


 AI Insight Assistant
 AI Dashboard Studio
 AI Live Chatbot
 AI OCR Bundle
 AI Flow Builder
 AI MCP Studio
 AI Recruitment Assistant
Included AI Modules in this bundle
 Chat with your Odoo data naturally
- Make smarter decisions with AI insights
- Create and update records with AI
- Secure access for every authorized user
- Interact with AI using voice commands

Talk To Your Data
- Build dashboards without any coding
- Visualize data with interactive charts
- Start with ready-made dashboard templates
- Share dashboards with secure access
- Customize dashboards to match your brand

From Data to Decisions
- Deliver 24/7 AI-powered customer support
- Train bots using your business knowledge
- Transfer chats to human agents instantly
- Create chatbots for every department
- Improve customer engagement & satisfaction
- Enhance every website visitor experience

Real Time Intelligent Support
- Extract data from any document
- Create Odoo records automatically
- Eliminate manual data entry
- Digitize business documents effortlessly
- Speed up accounting & finance workflows

From Document to Records
- Automate repetitive business processes
- Build workflows with drag-and-drop
- Create and update records automatically
- Set smart rules without coding
- Automate emails and notifications
- Start workflows manually whenever needed

Your Processes, On Autopilot
- Connect Odoo with Claude, Gemini, Codex etc
- Perform secure AI-powered CRUD operations
- Generate and manage leads with AI
- Control accessible models and fields
- Build custom Odoo modules with AI
- Create business web apps instantly
- Generate dynamic email templates

Odoo MCP server
- Analyze resumes automatically with AI
- Identify top candidates much faster
- Extract skills and experience instantly
- Reduce manual resume screening time
- Create organized candidate profiles

Smarter Hiring Decisions
Complete AI Automation Suite | AI Assistant | AI MCP Studio | AI Dashboard Studio | AI Live Chatbot | AI Flow Builder | AI Recruitment Assistant | AI OCR Bundle

InsightMate AI Bundle brings together multiple AI-powered features into a single unified solution within
Odoo. Configure AI providers, manage models, and enable intelligent automation across different business
processes such as content generation, workflow execution, and data analysis from one centralized platform.
With seamless integration and flexible configuration, users can leverage AI capabilities across modules to
improve productivity, reduce manual effort, and make smarter business decisions. The bundle provides a
scalable foundation to extend AI usage across various operations while maintaining full control and
visibility.
Need Help?
We're Here Before & After Your Purchase.

 Buy Once, Supported Forever


 Scan to email sales


 Introduction
 Features
 Release Notes
 Support
 FAQ's
FAQ's
Frequently Asked Questions
Everything you need to know before getting started.
- Check API configuration
- Verify internet connectivity
- Ensure provider API key is valid
Function calling with the Gemini API.
https://ai.google.dev/gemini-api/docs/function-calling?example=meeting
Function calling with the ChatGPT's API.
https://platform.openai.com/docs/guides/function-calling
AI Insight Assistant - Talk to Your Data
AI Live Chatbot - Real Time Intelligent Support
AI Dashboard Studio - From Data to Decisions
Flow Builder - Your Processes, On Autopilot
AI Recruitment Assistant - Smarter Hiring Decisions
MCP Server - Connect, Control, Automate Odoo
All in One AI OCR Bundle
-
 AI Bundle
-
 AI Insight Assistant
-
 AI Live Chatbot
-
 AI Dashboard Studio
-
 AI Flow Builder NEW
-
 AI Recruitment Assistant NEW
-
 MCP Server NEW
-
 AI OCR Bundle NEW
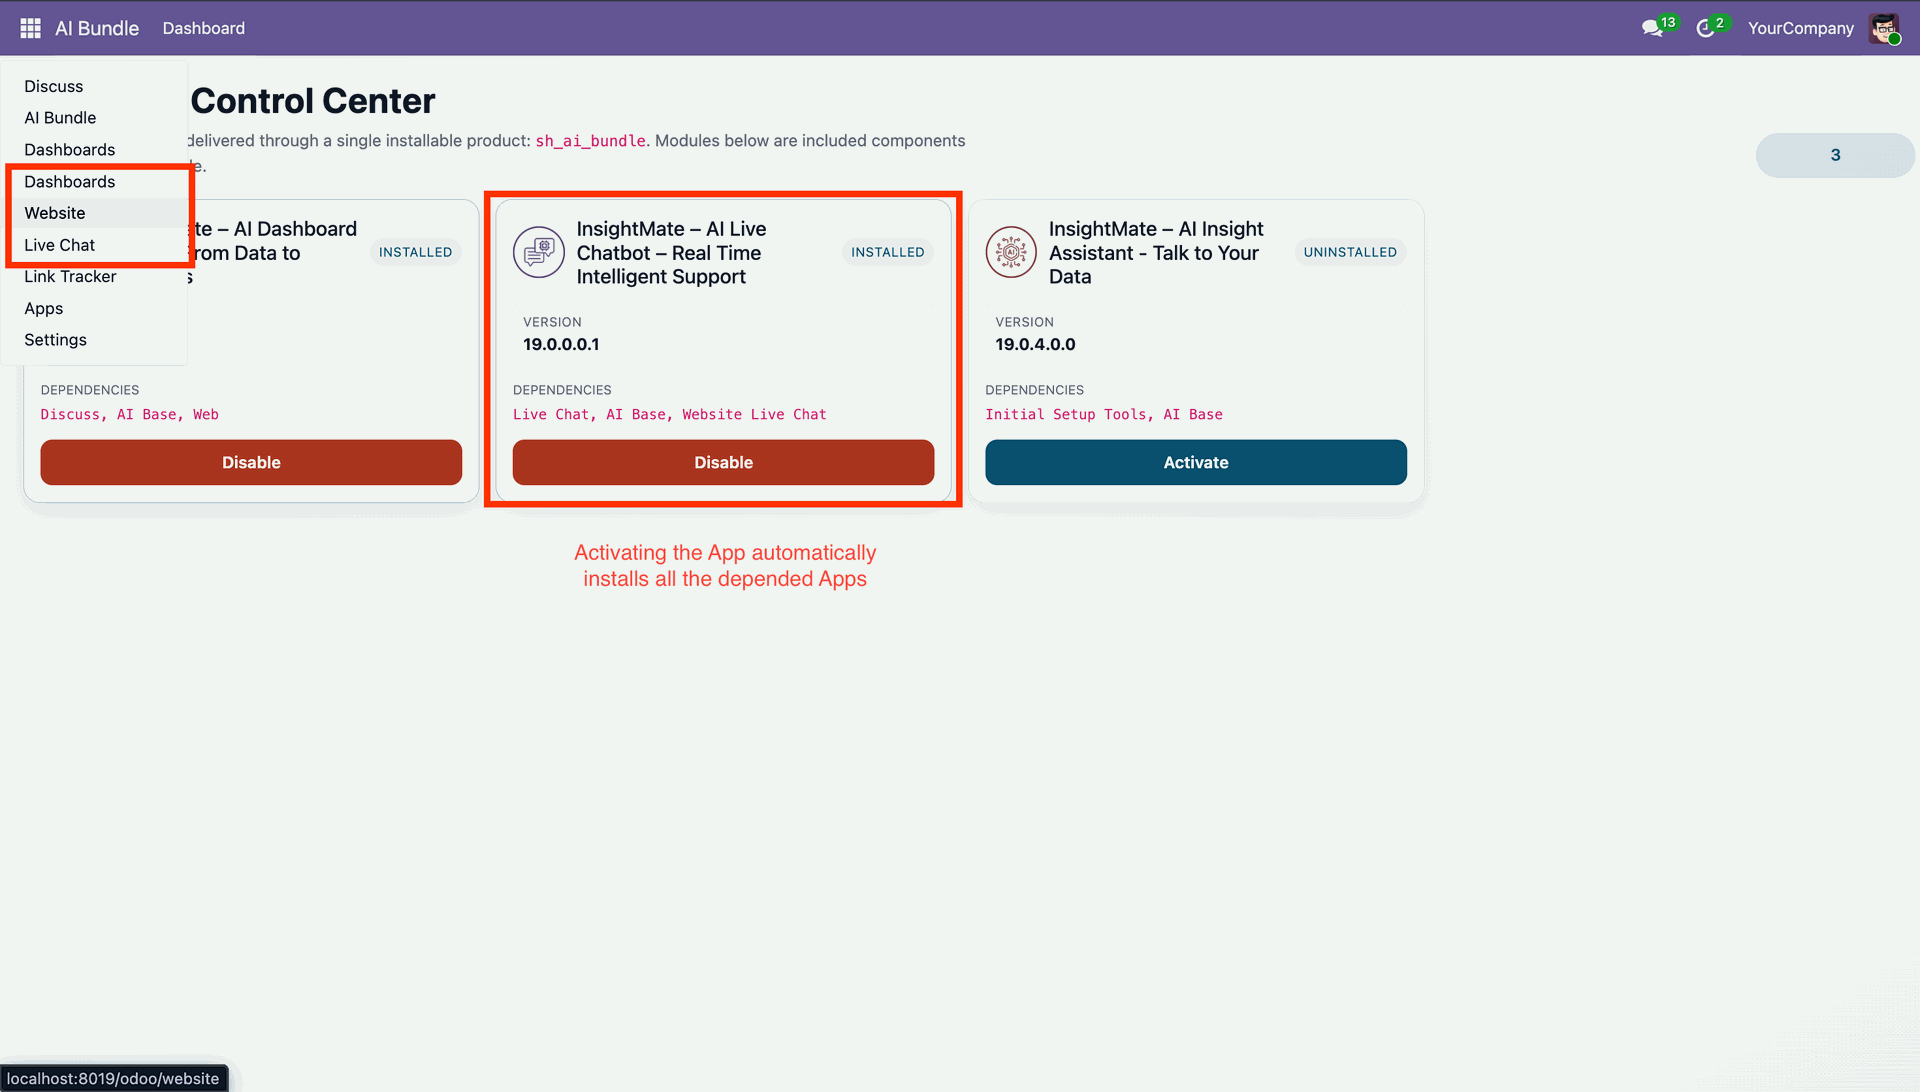
Active/Deactive AI Apps as per your requirements.
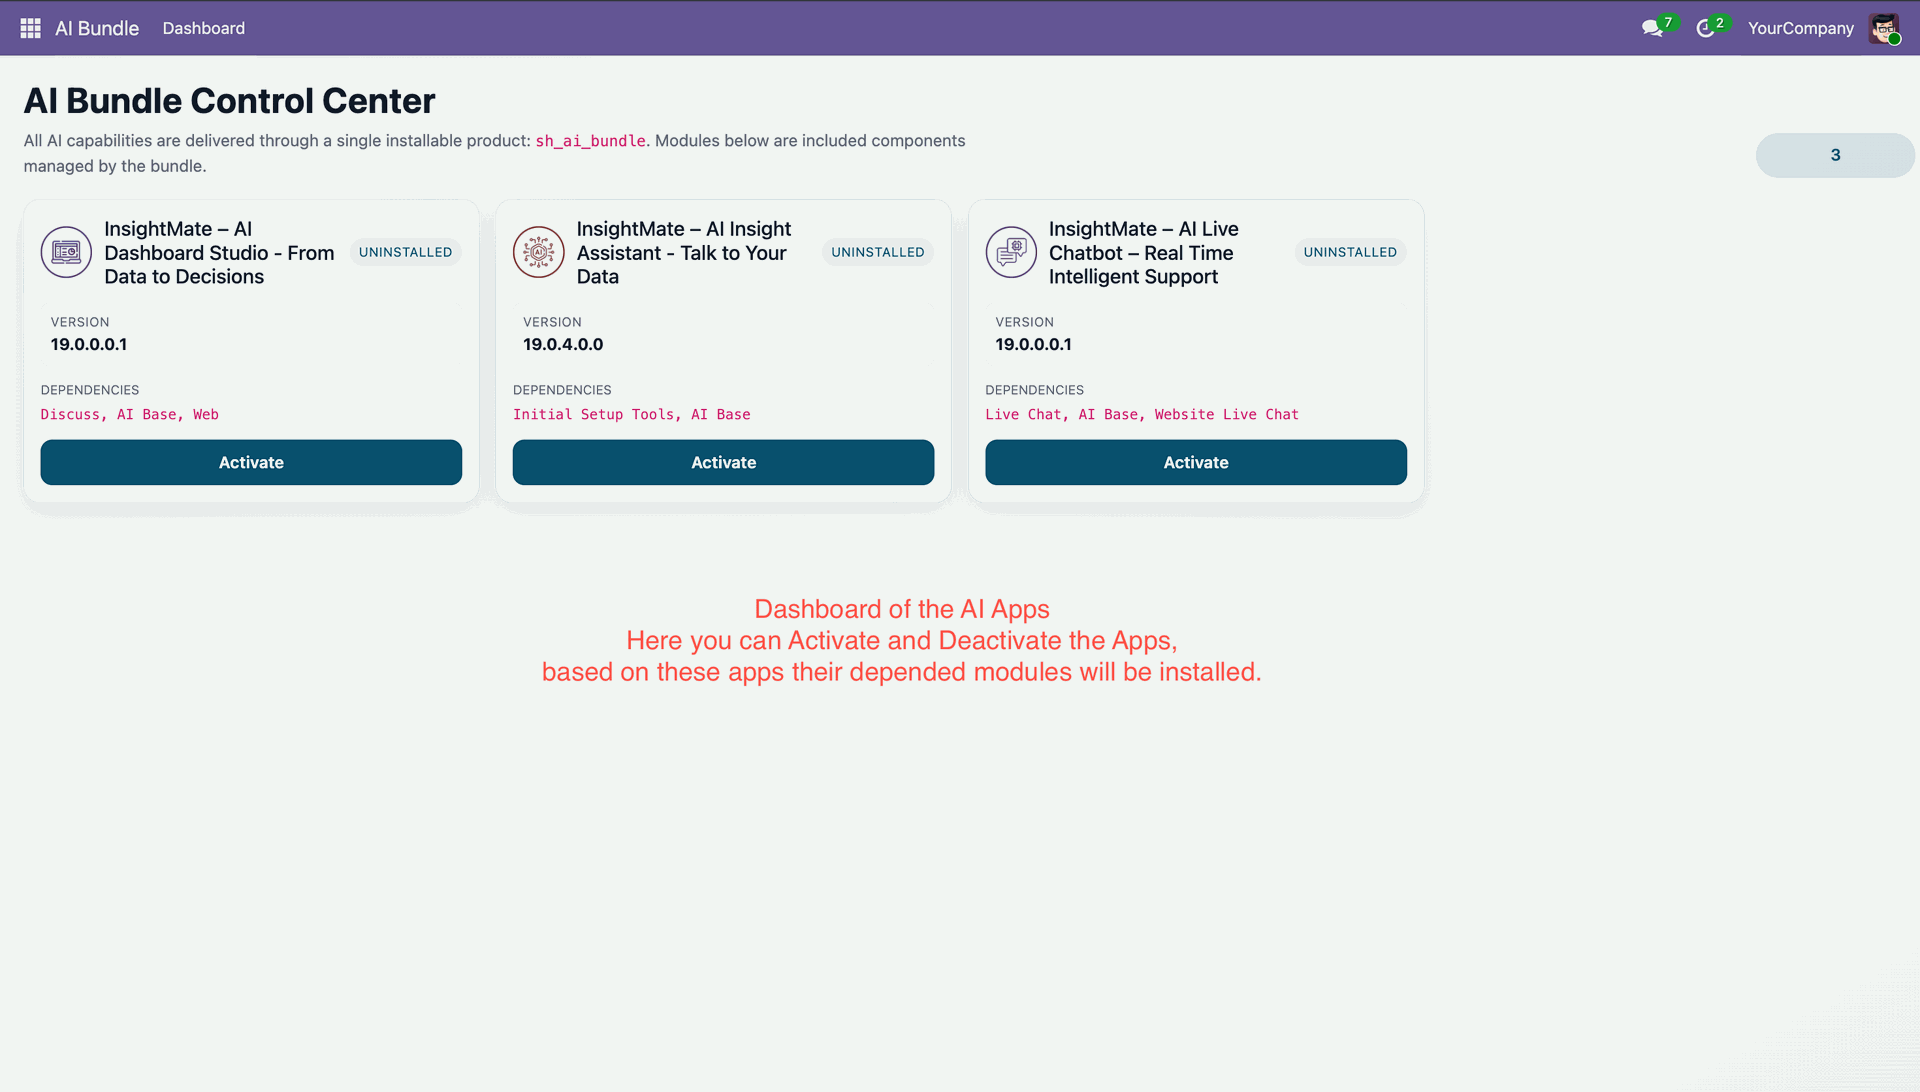
State will change based on your input.
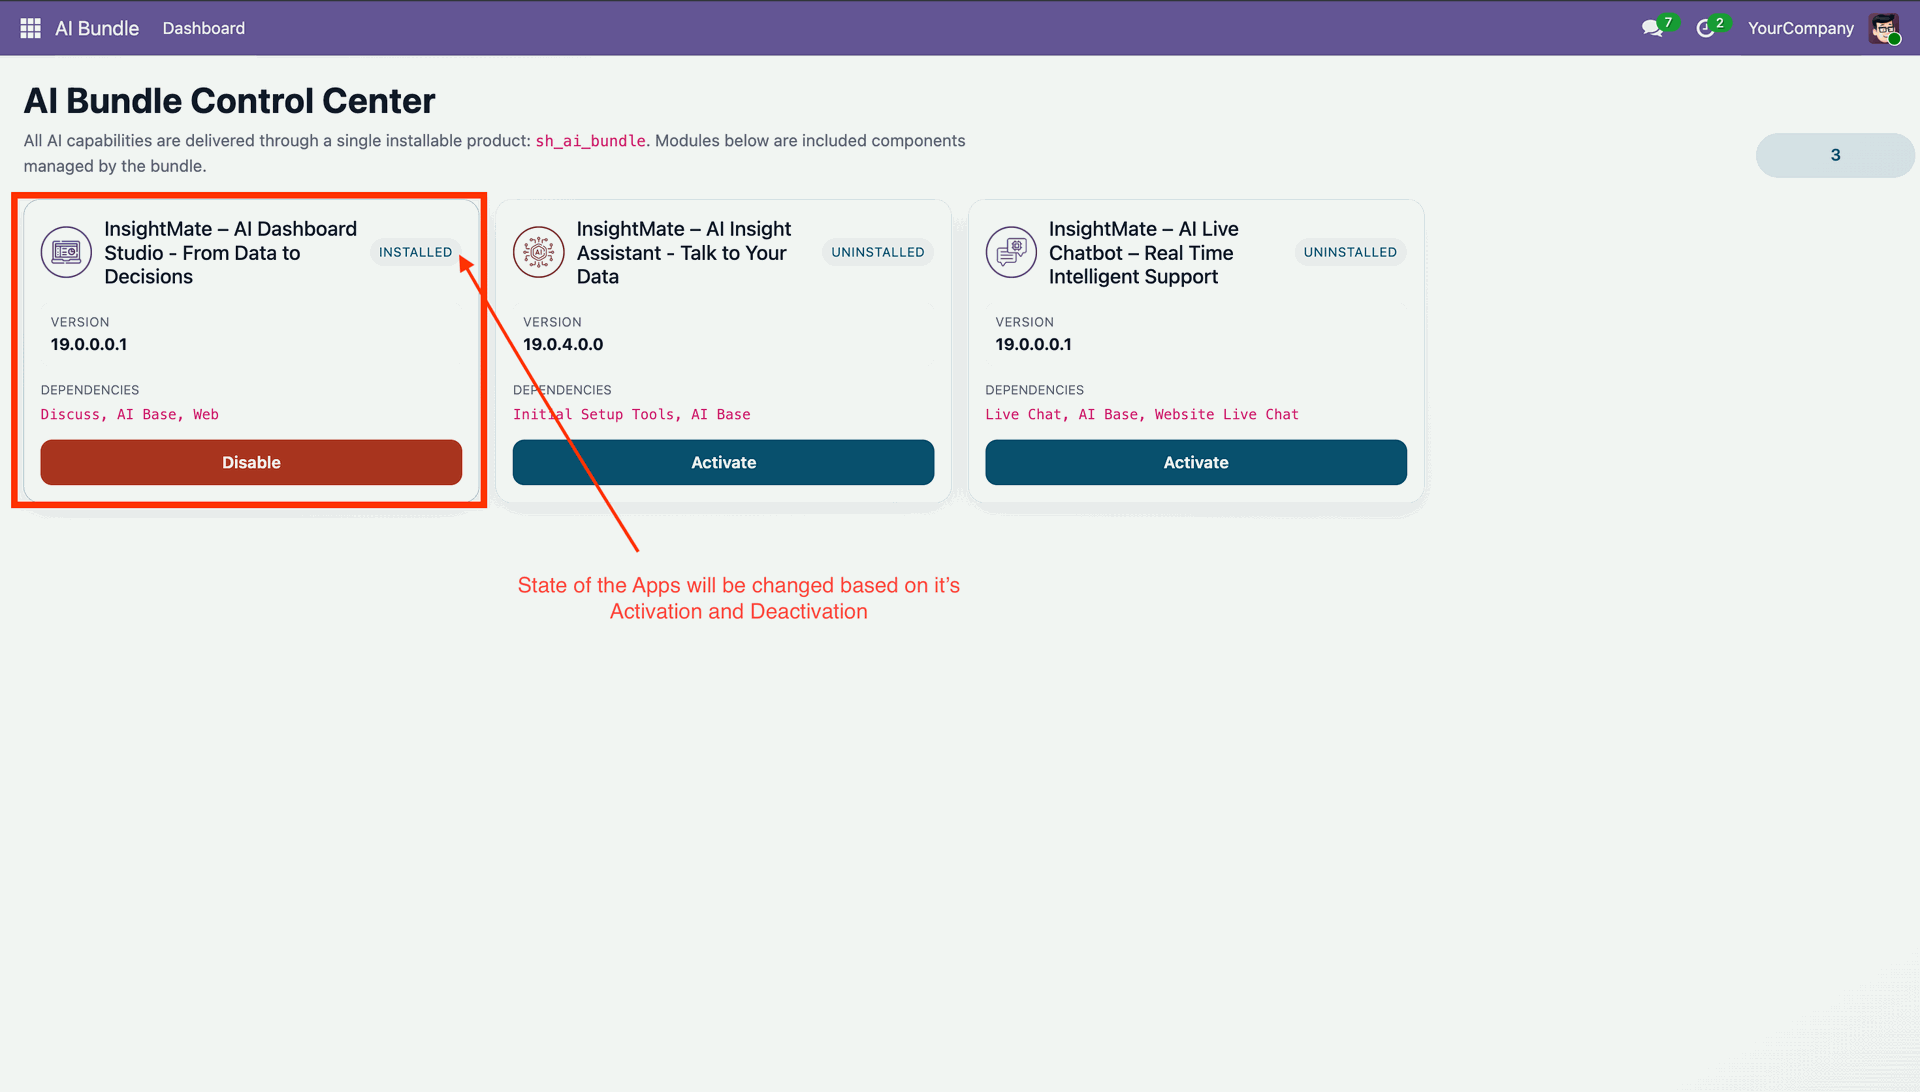
It will auto-install the dependent apps when you activate it.
Features

AI-Powered Workflows
Use AI inside workflows for intelligent automation and dynamically process business data.
 Watch Video

LLM Providers with openrouter
Configure OpenRouter to access multiple AI models through a single API, allowing flexible model selection.
Watch Video

Visual Workflow Builder
Design workflows easily using a drag-and-drop interface to connect conditions and actions in a structured flow.

Model-Based Workflows
Create workflows for any Odoo model and automate processes based on specific business objects.
Watch Video

Conditional Flow Logic
Apply conditions to control workflow execution and ensure actions run only when criteria are met.

Multi-Action Execution
Execute multiple actions like create, update, email, SMS, and activities within a single workflow.

Activate/Deactivate Workflows
Easily control workflow execution by enabling or disabling workflows as needed.

End-to-End Automation Flow
Build complete automation pipelines from trigger to action within a single workflow.

Auto-Update Records
Automatically update field values of records based on workflow conditions and logic.

Automatically Create New Records
Create new records dynamically from workflows with predefined or conditional values.

Send Automated Emails
Send automated emails to users or contacts directly from workflow execution.

Duplicate Records
Create a copy of existing records automatically using workflow-based duplication logic.

Create Activities automatically
Schedule and assign activities to users directly from workflow execution for task management.

Track Workflow Activity History
Maintain a history of workflow runs to review past executions and actions performed.

Node-Based Flow Design
Create workflows using connected nodes to visually define the sequence of conditions and actions.

SMS Notification Action
Trigger SMS notifications to keep users informed during workflow processes.

Manage Followers Automatically
Automatically add or remove followers to records through workflow execution for better communication and tracking.
Workflow
 Dynamic Workflow
 AI Powered Workflow
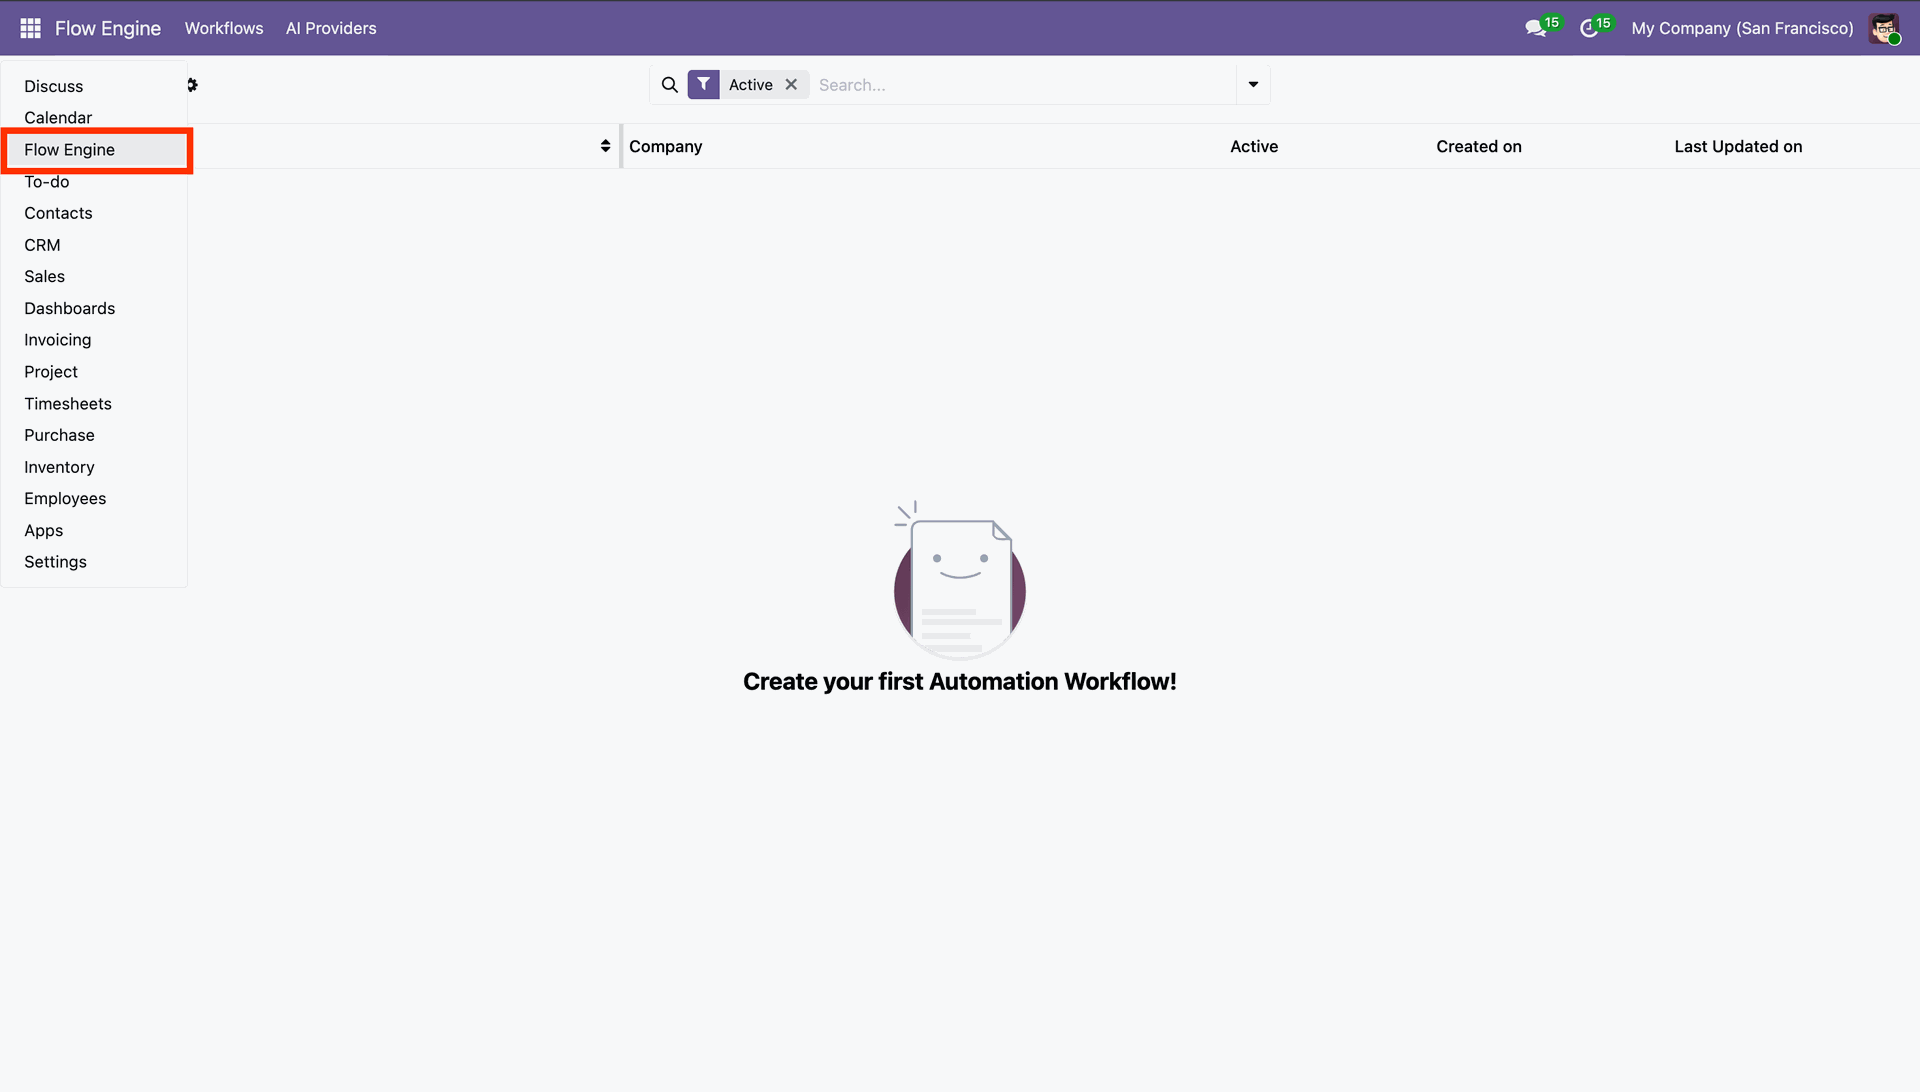
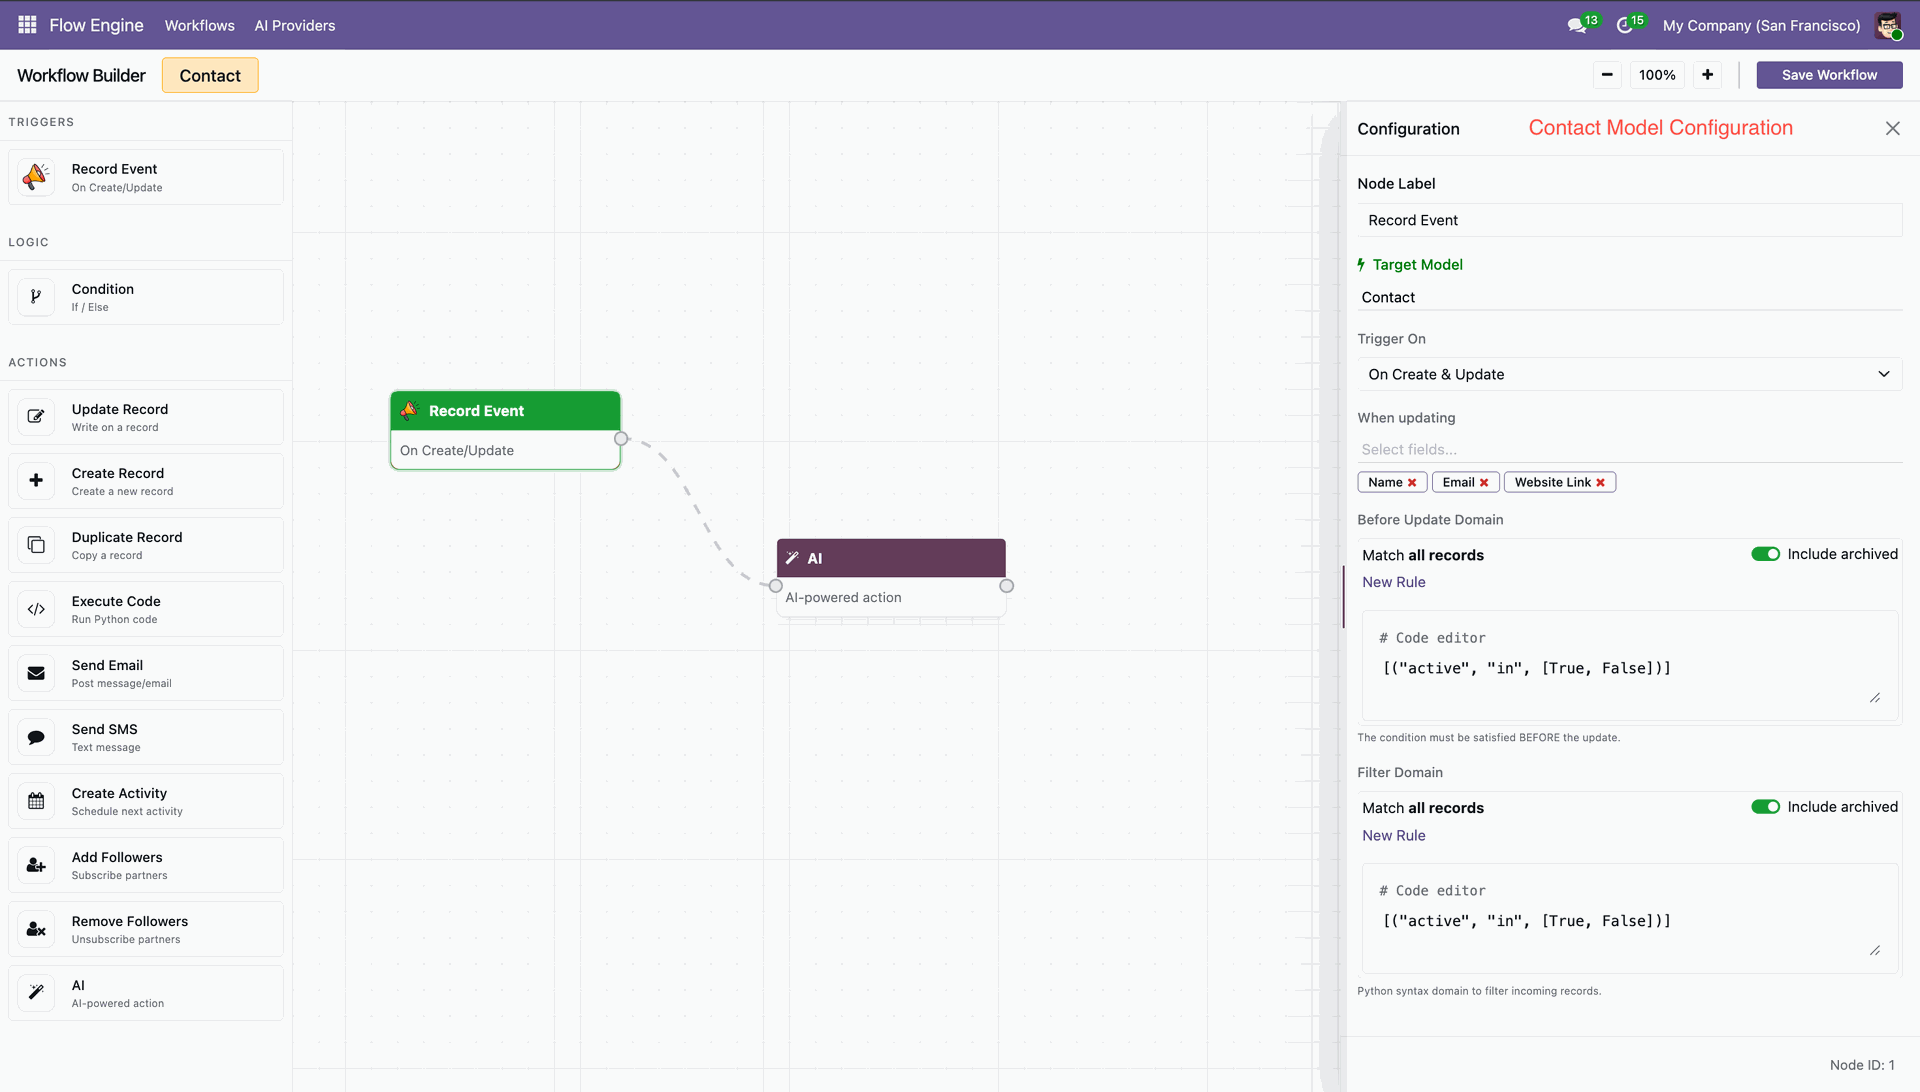
Go to the 'Flow Engine'.
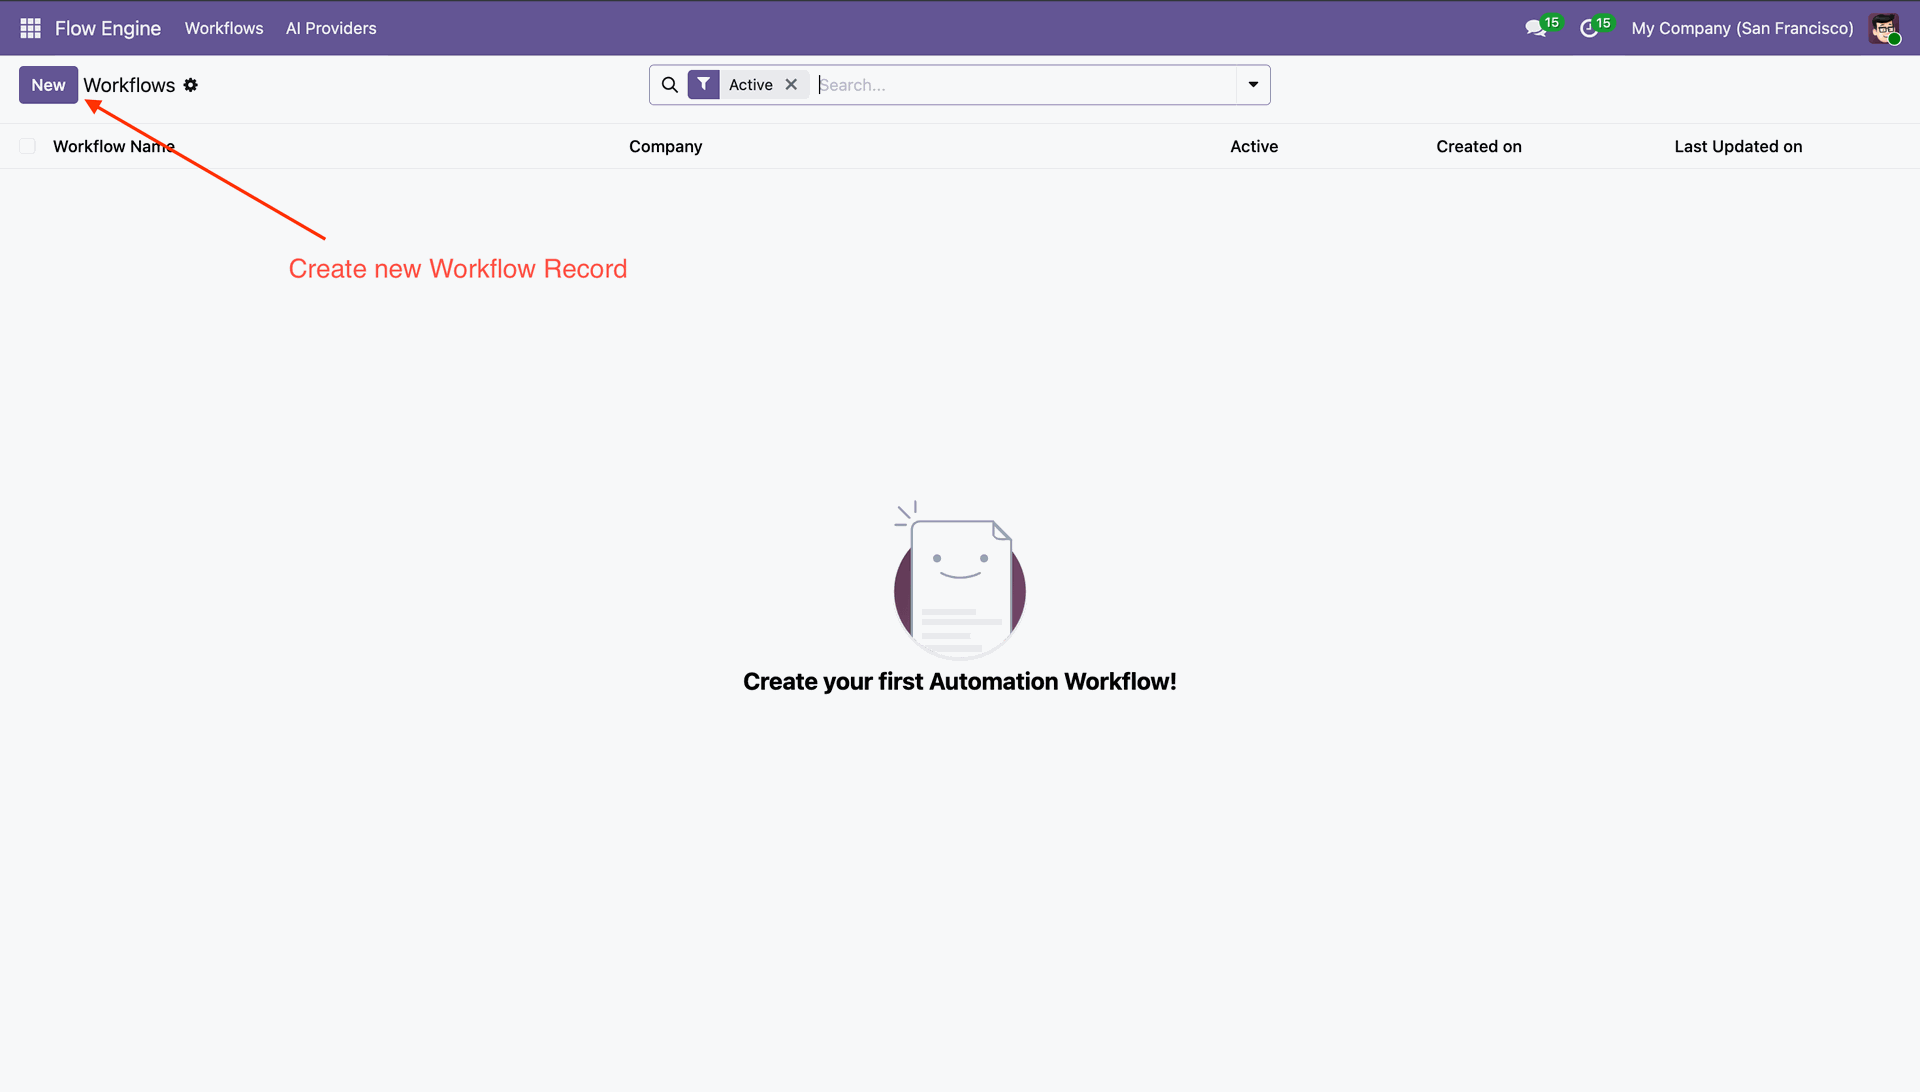
Click 'New' to create new workflow record.
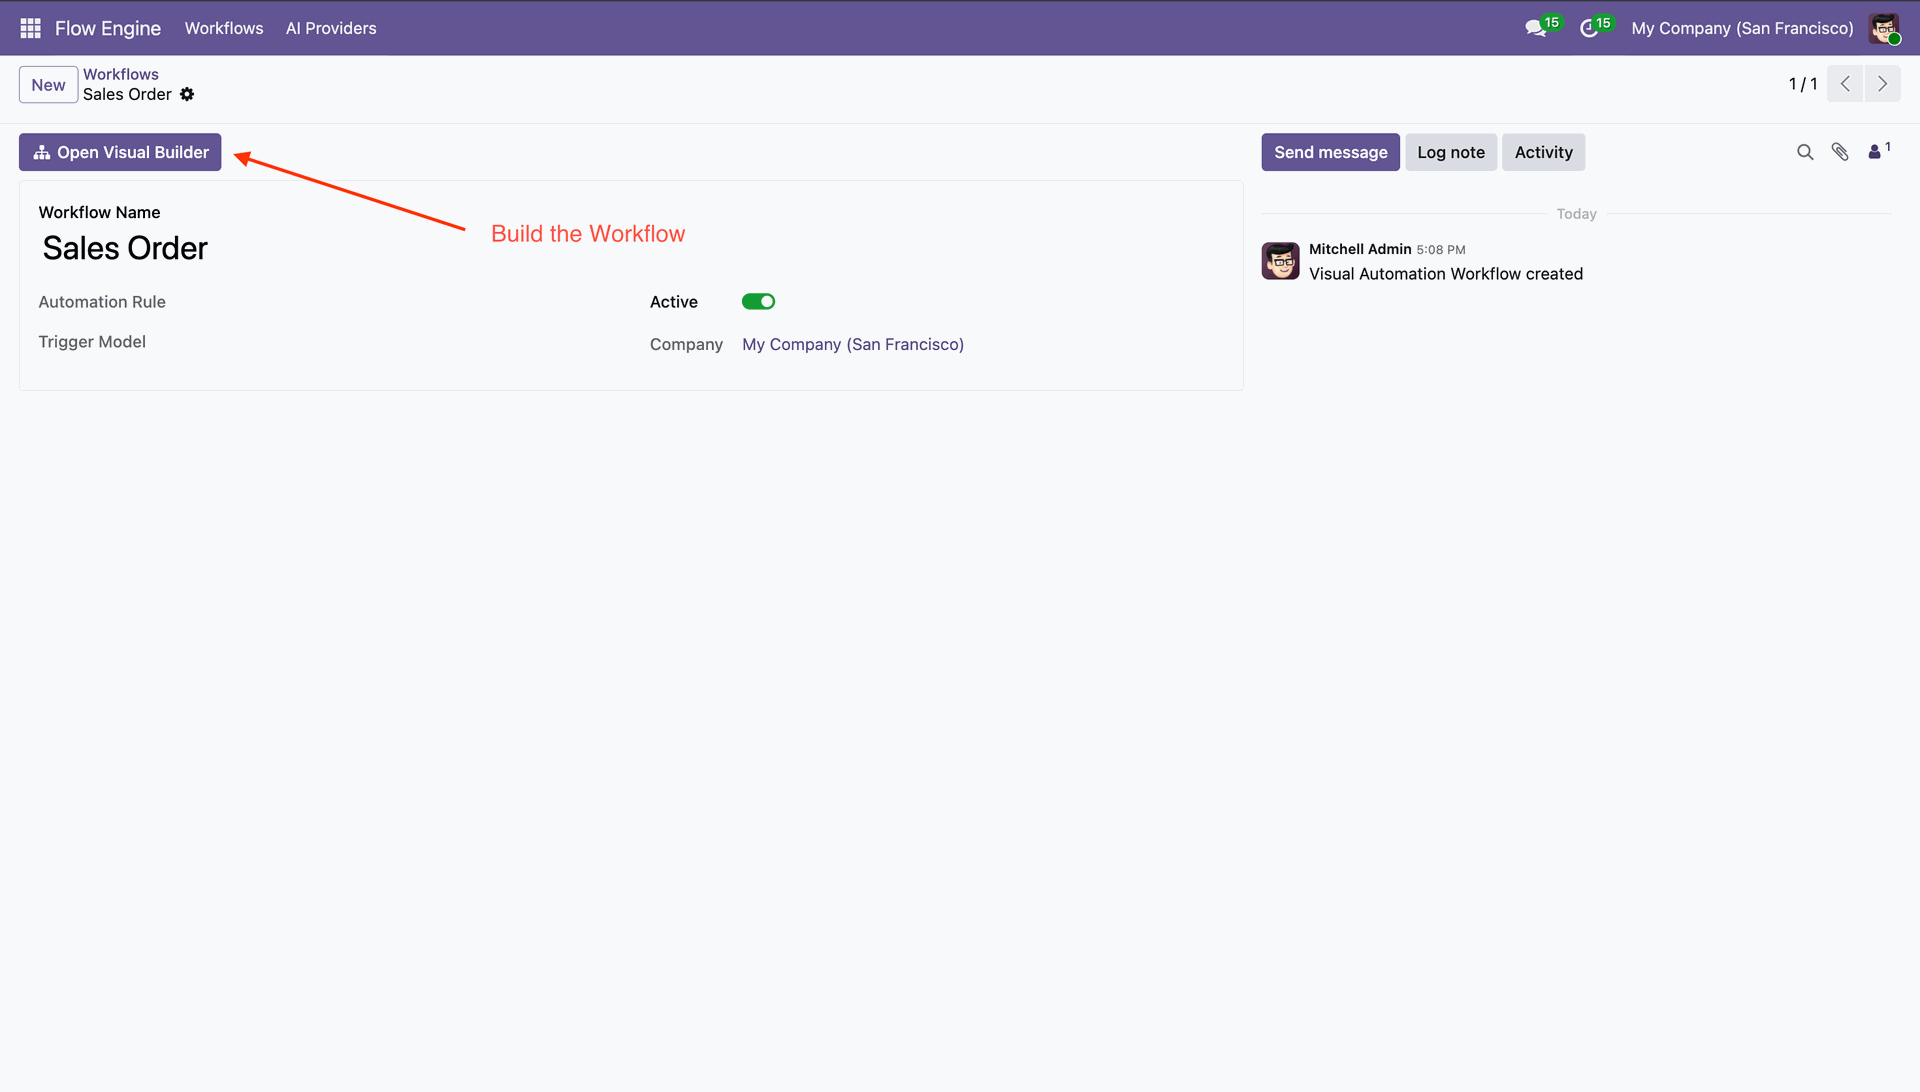
Enter Workflow Name and click 'Open Visual Builder'.
Drag and drop nodes to start designing the workflow.
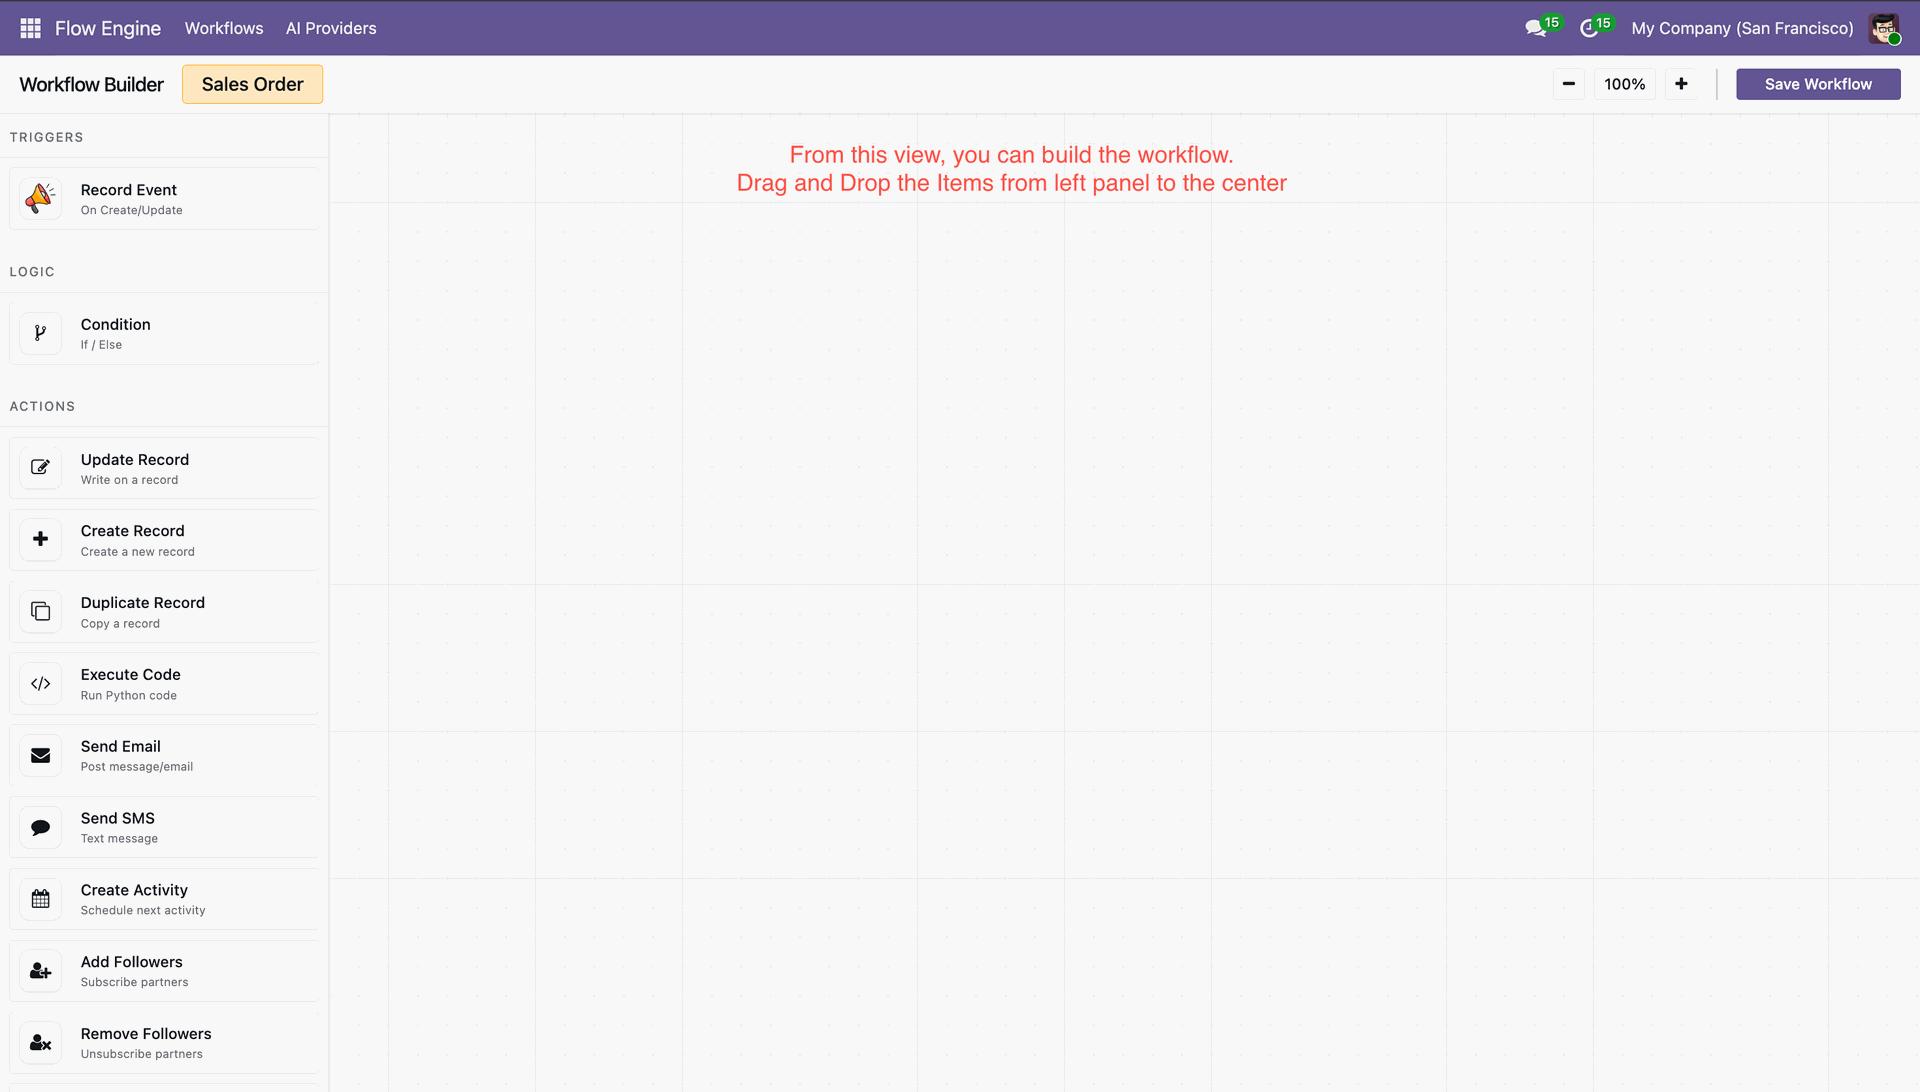
Add Condition and then configure rules to control execution flow.
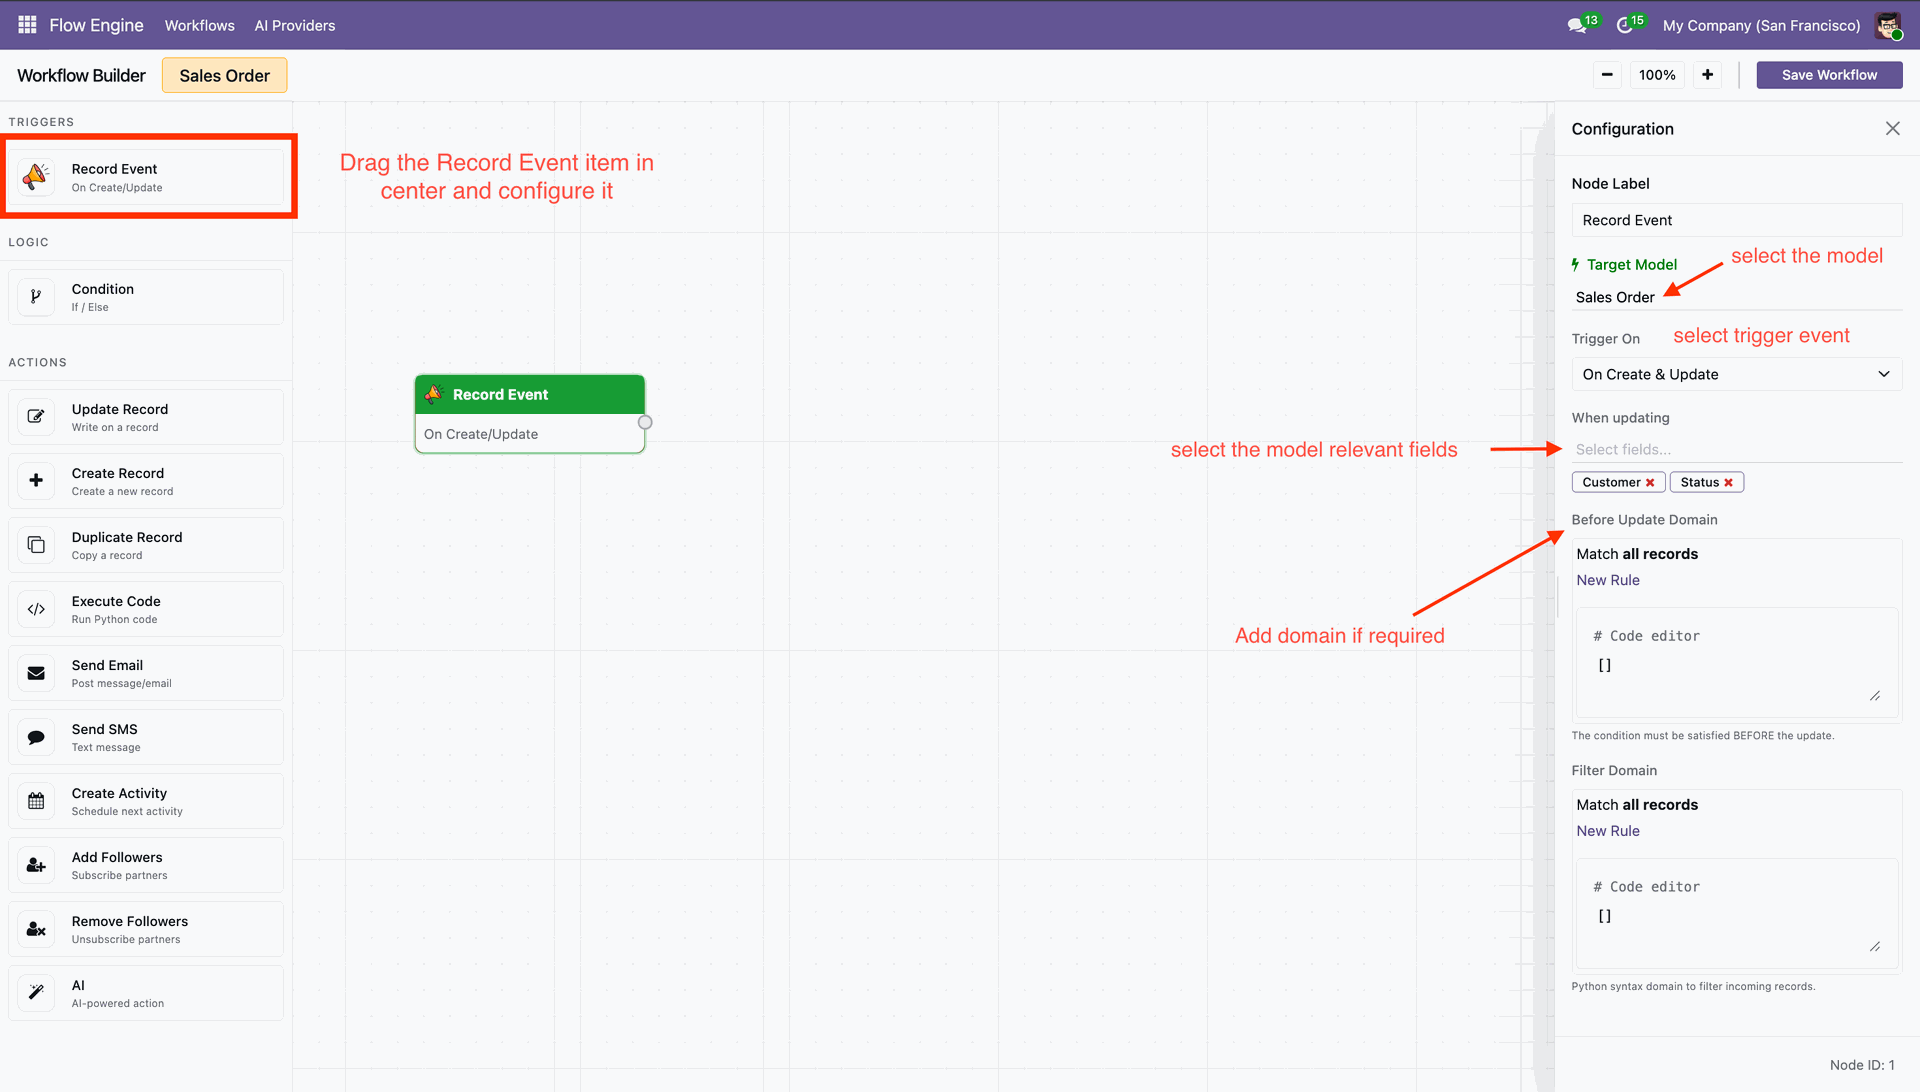
Connect Nodes and then press Save to save the workflow.

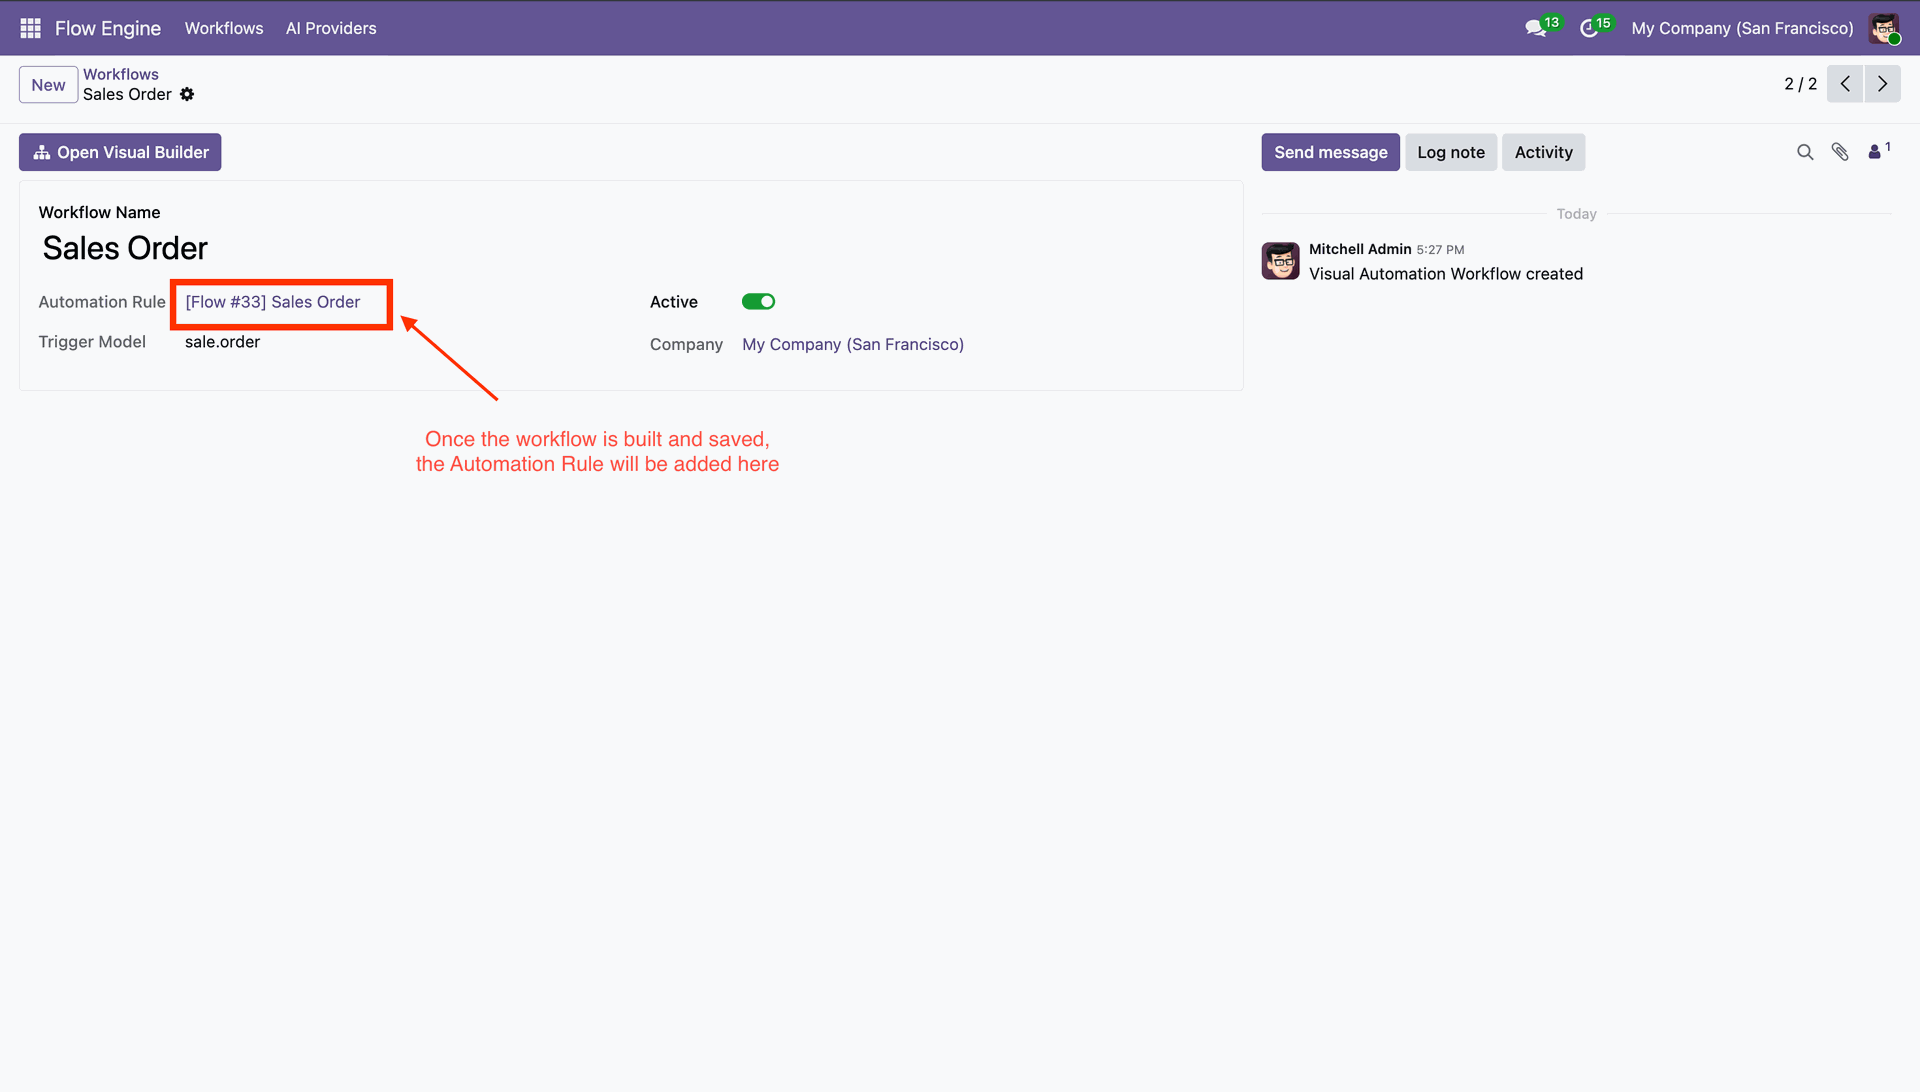
'Automation Rules' field shows created workflow. You can active/deactive from toggle.
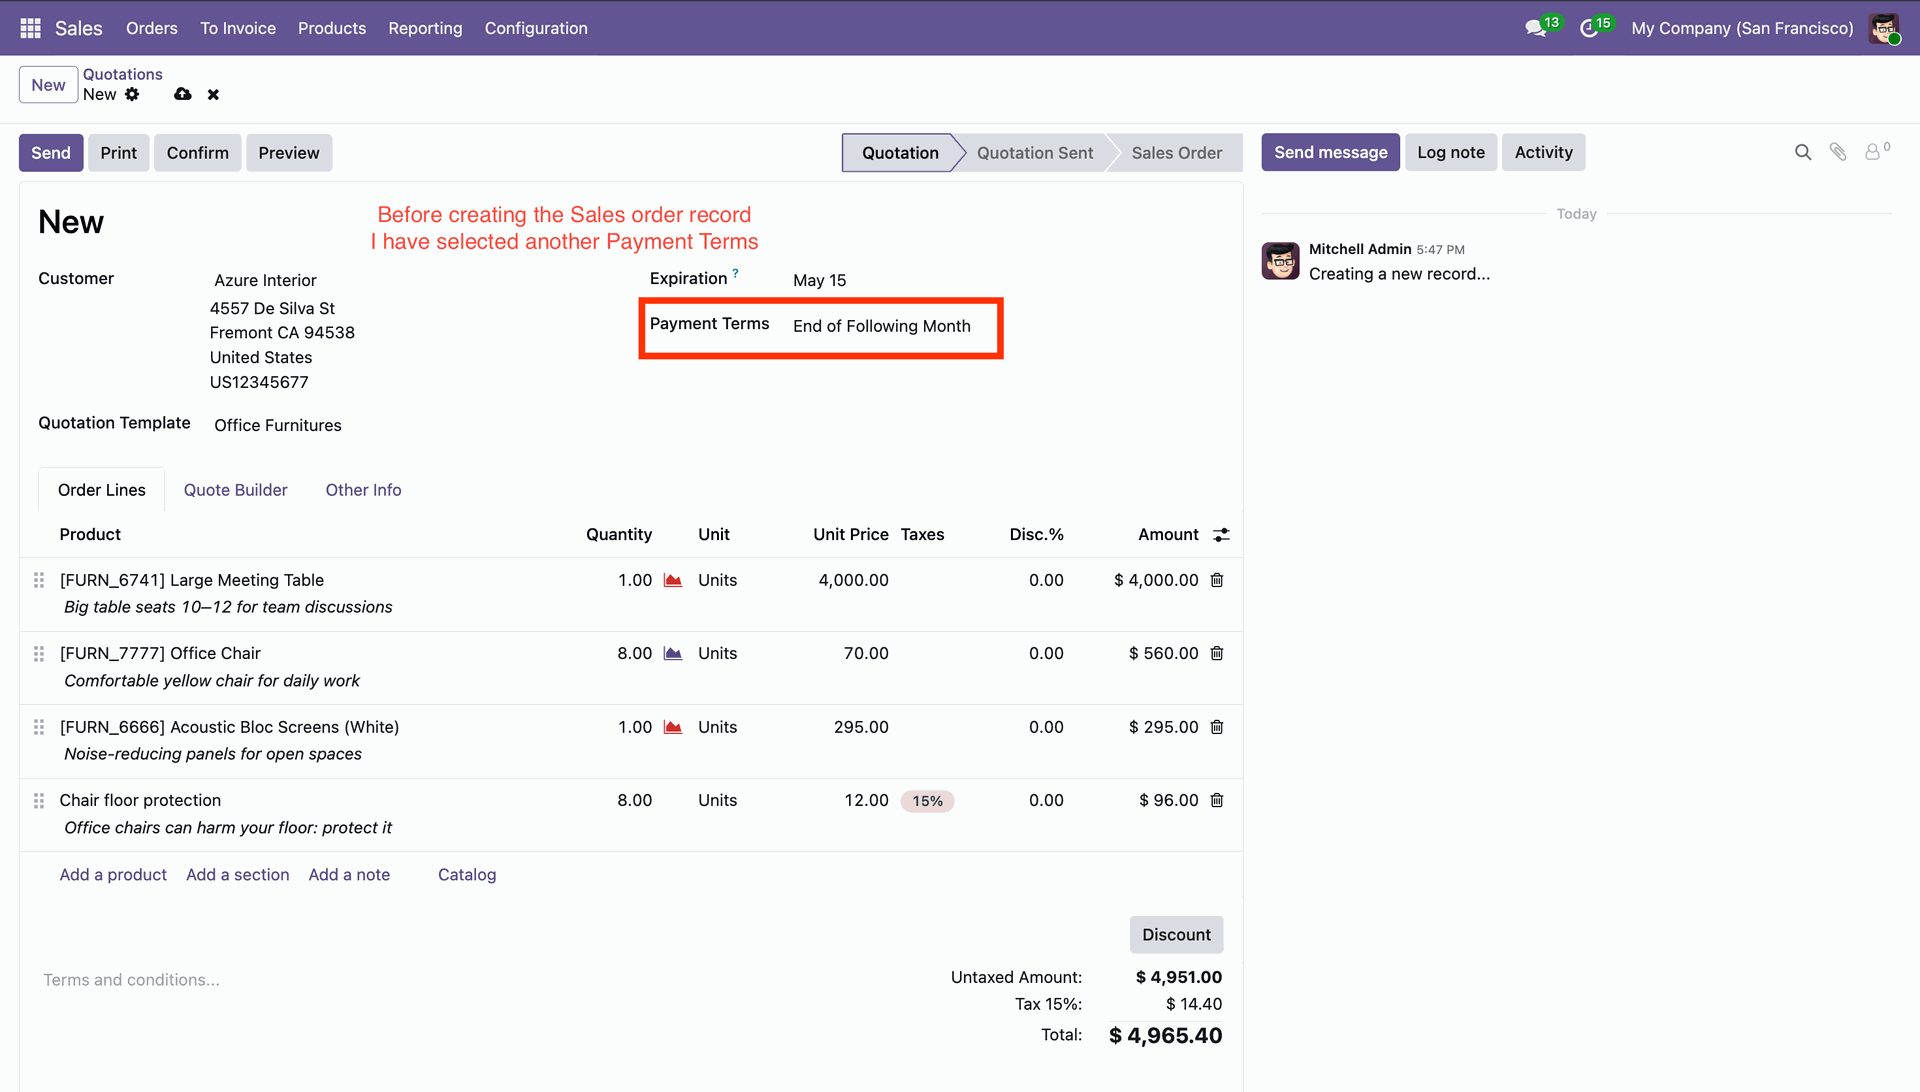
Now select record data, and workflow will execute.

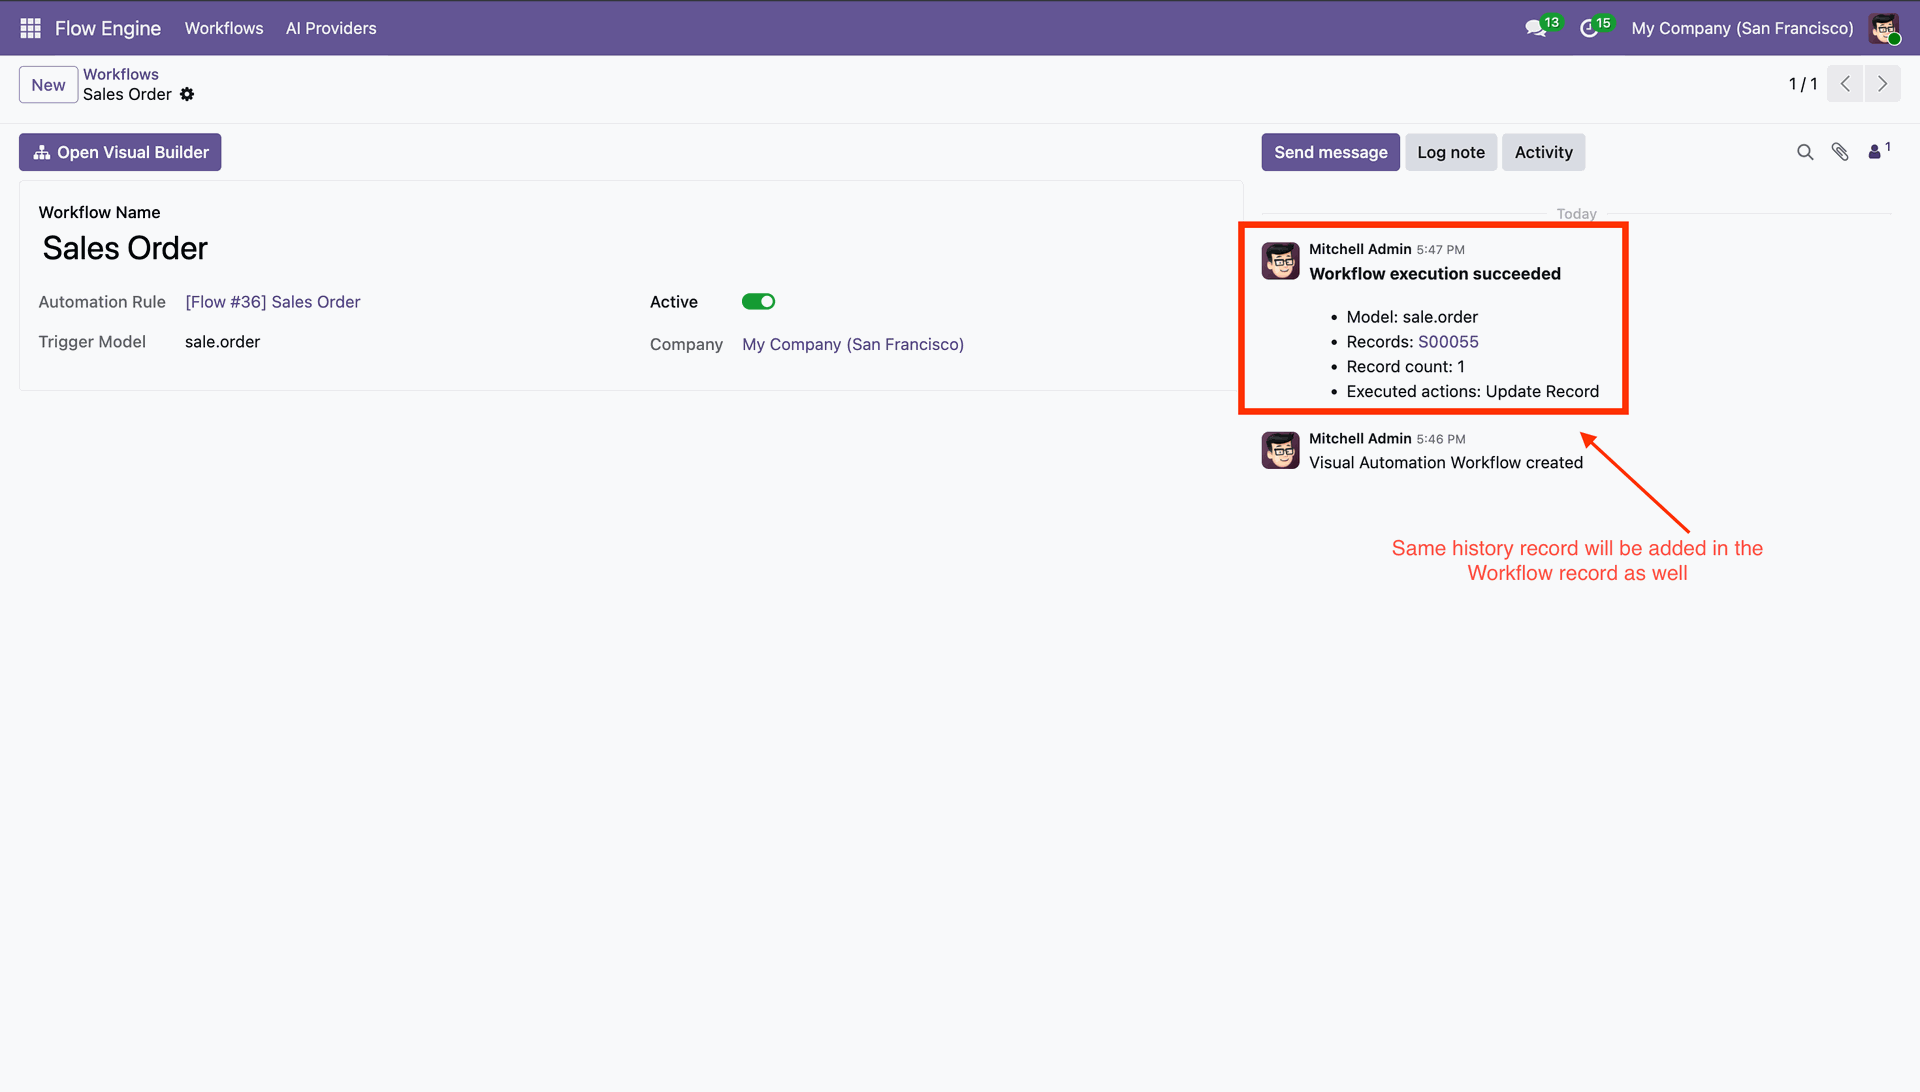
It shows history in the chatter.
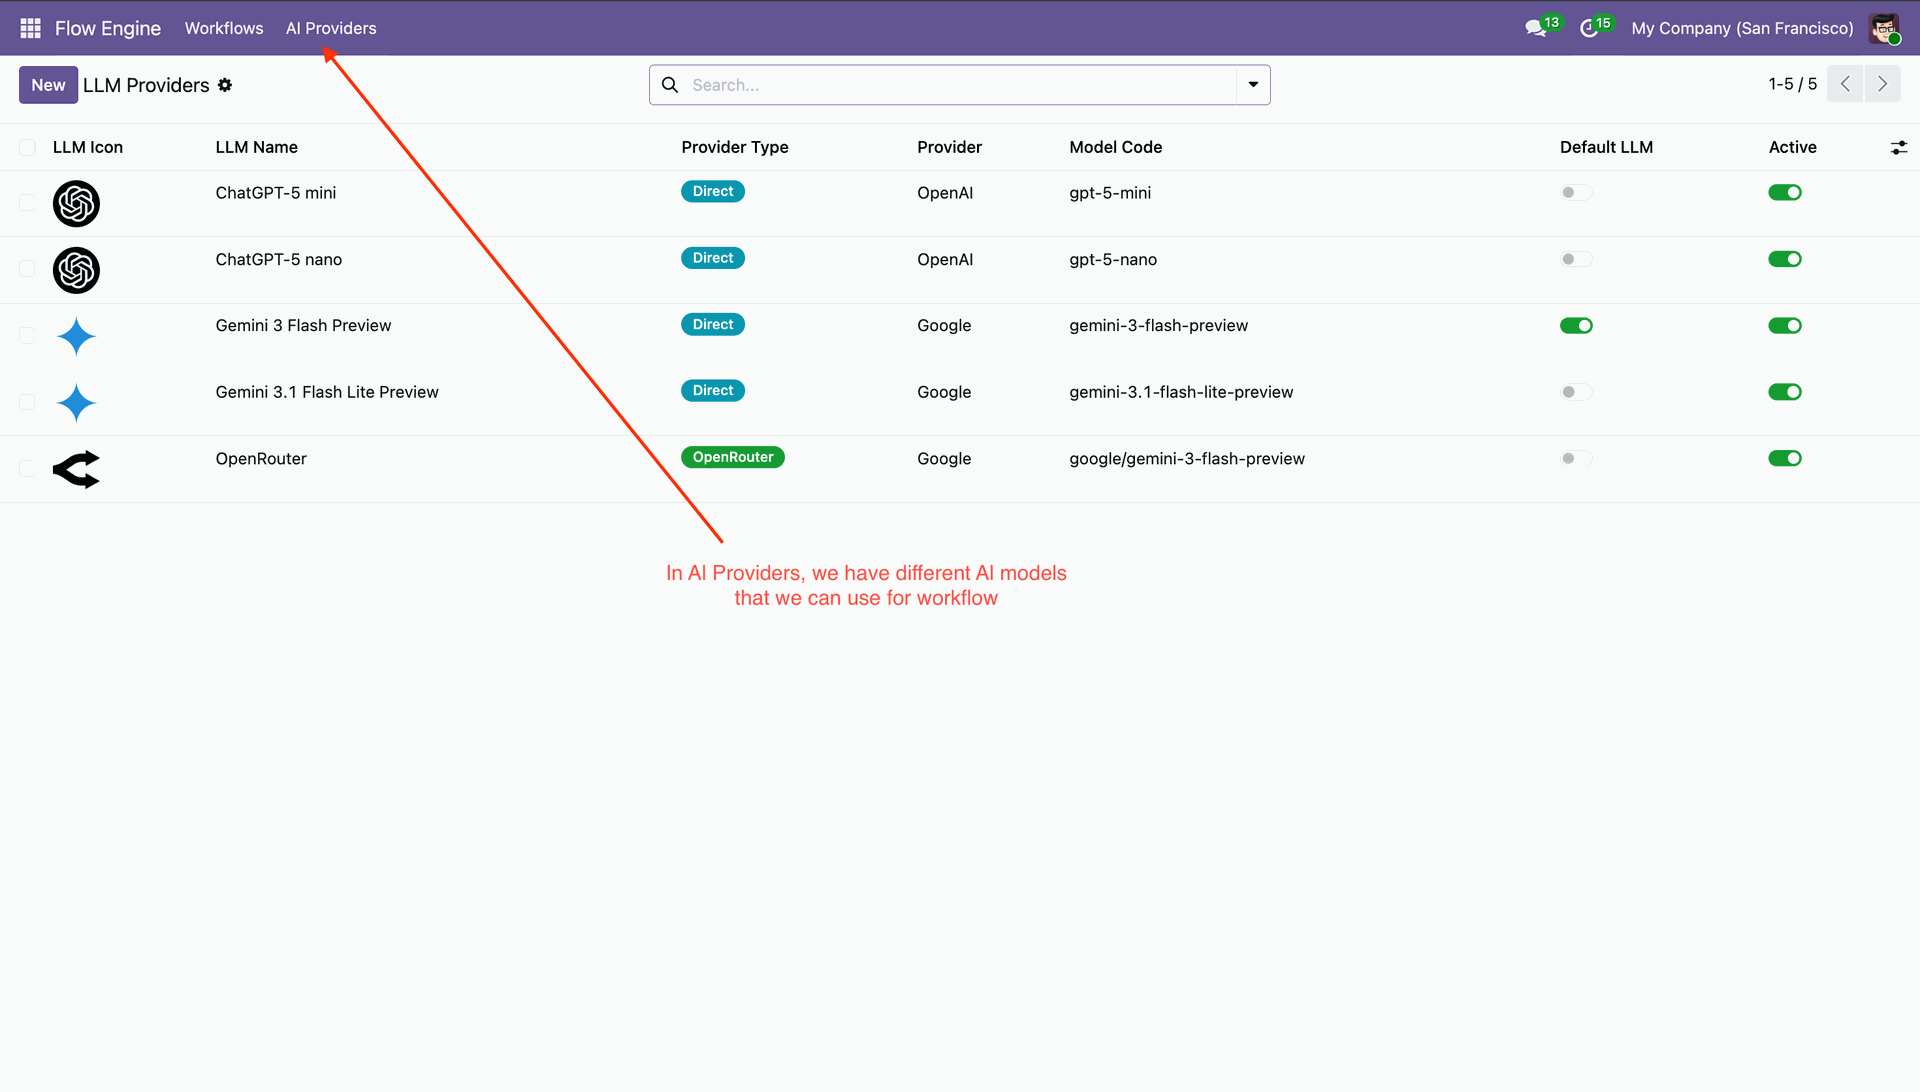
AI providers list view that we can use for the workflow.
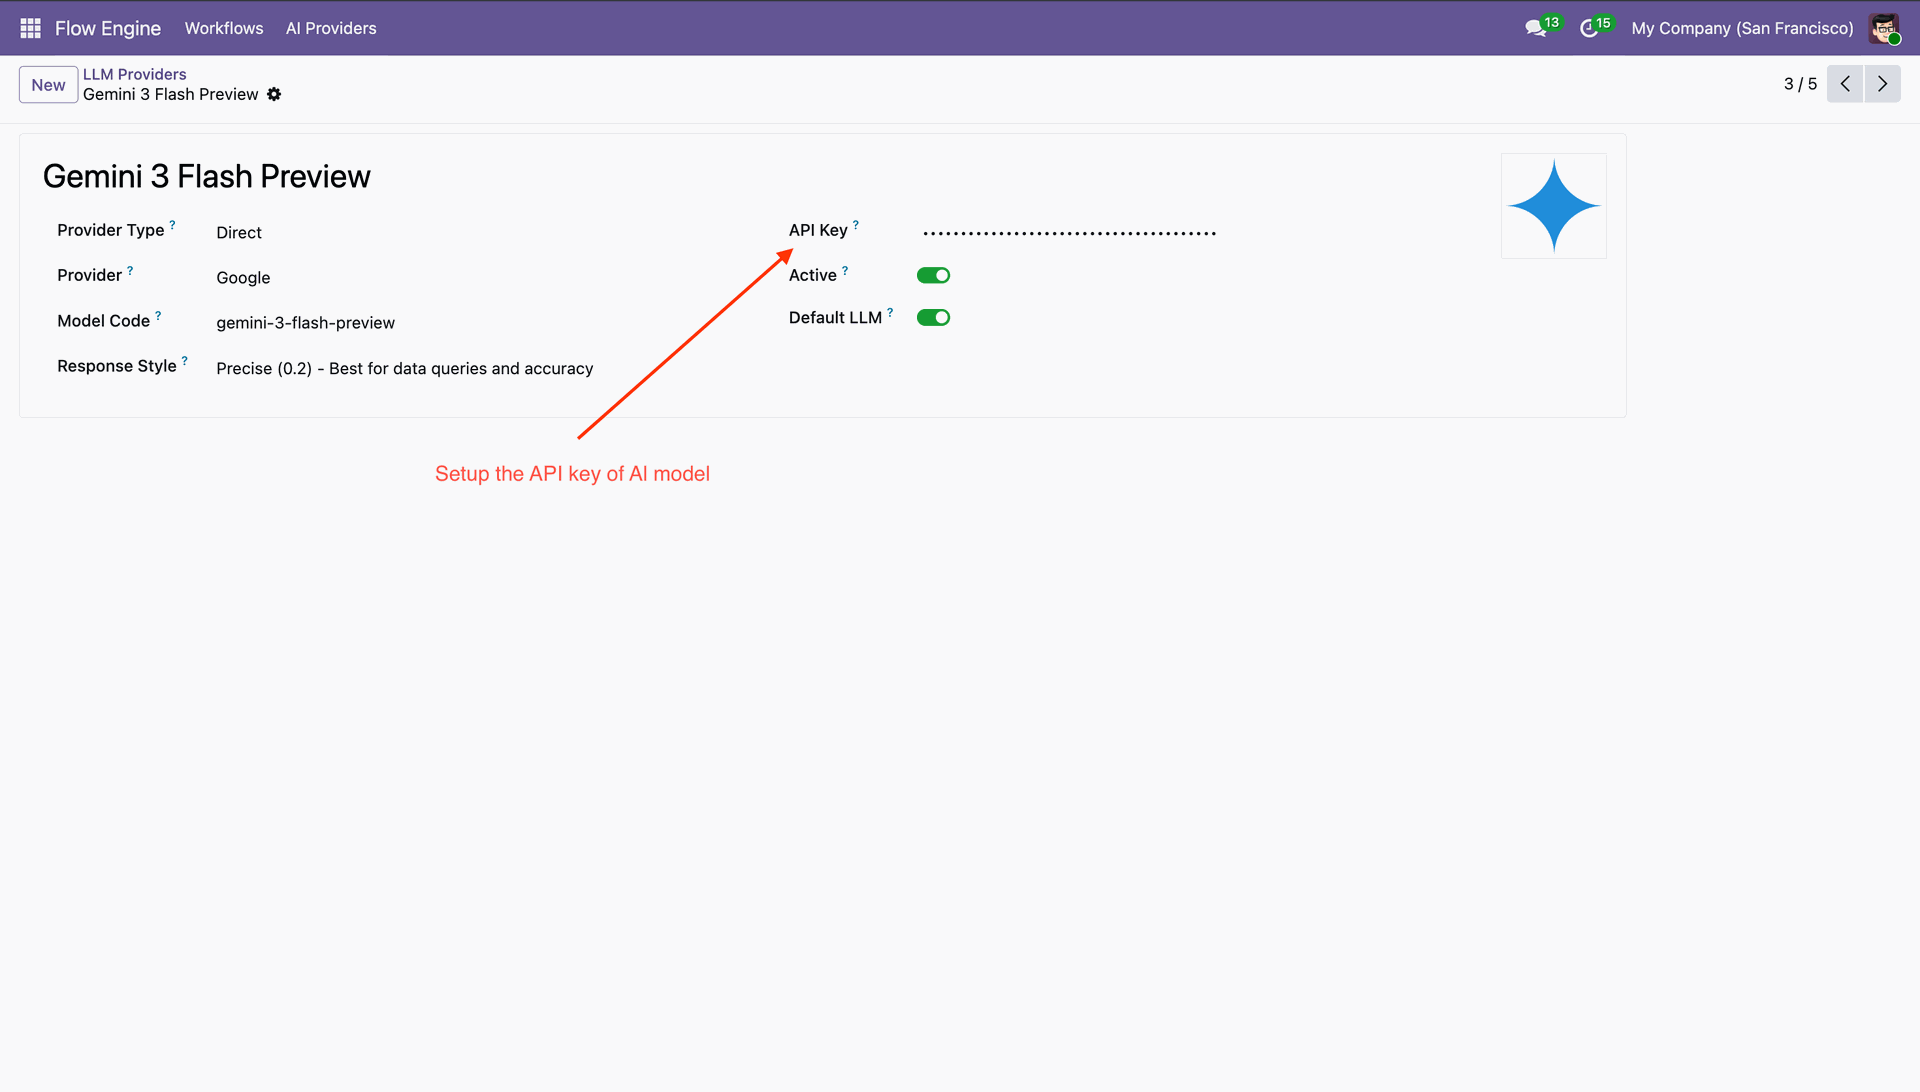
Enter API Key.
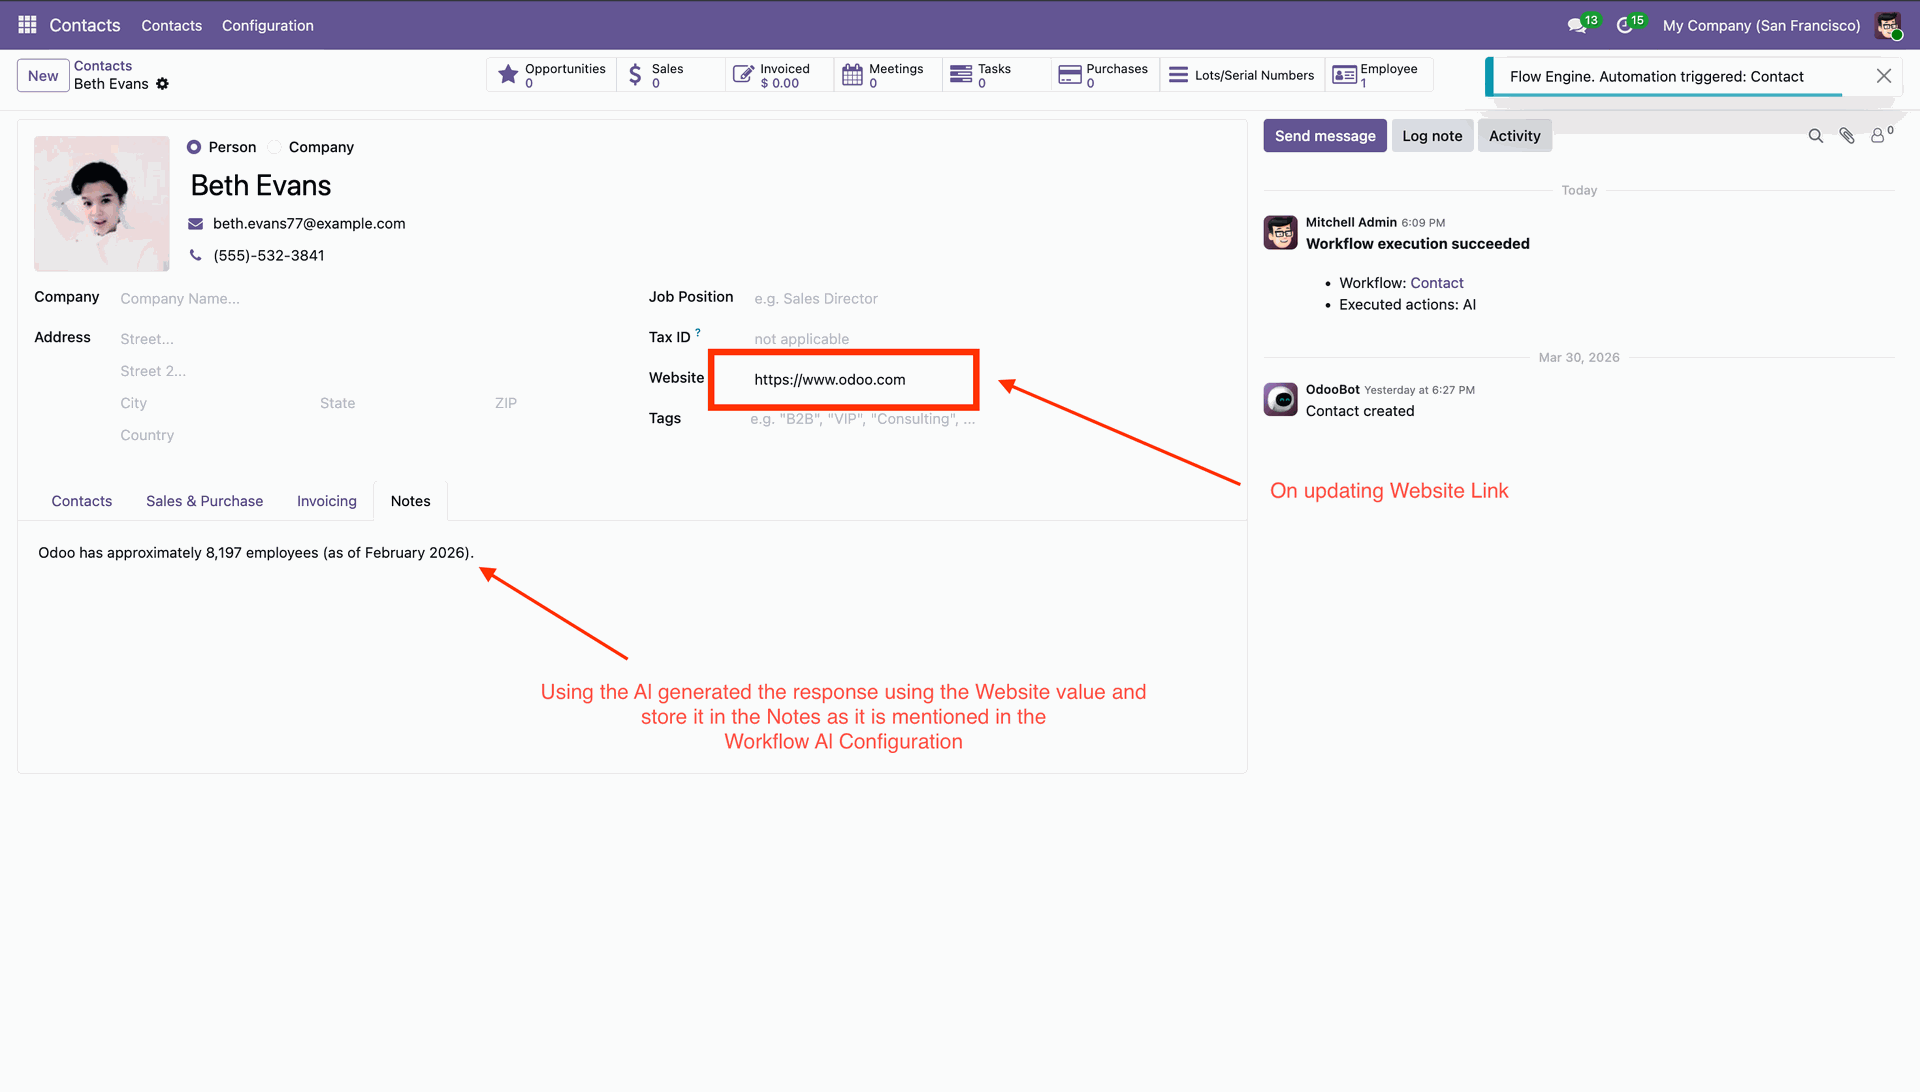
Create workflow with AI.
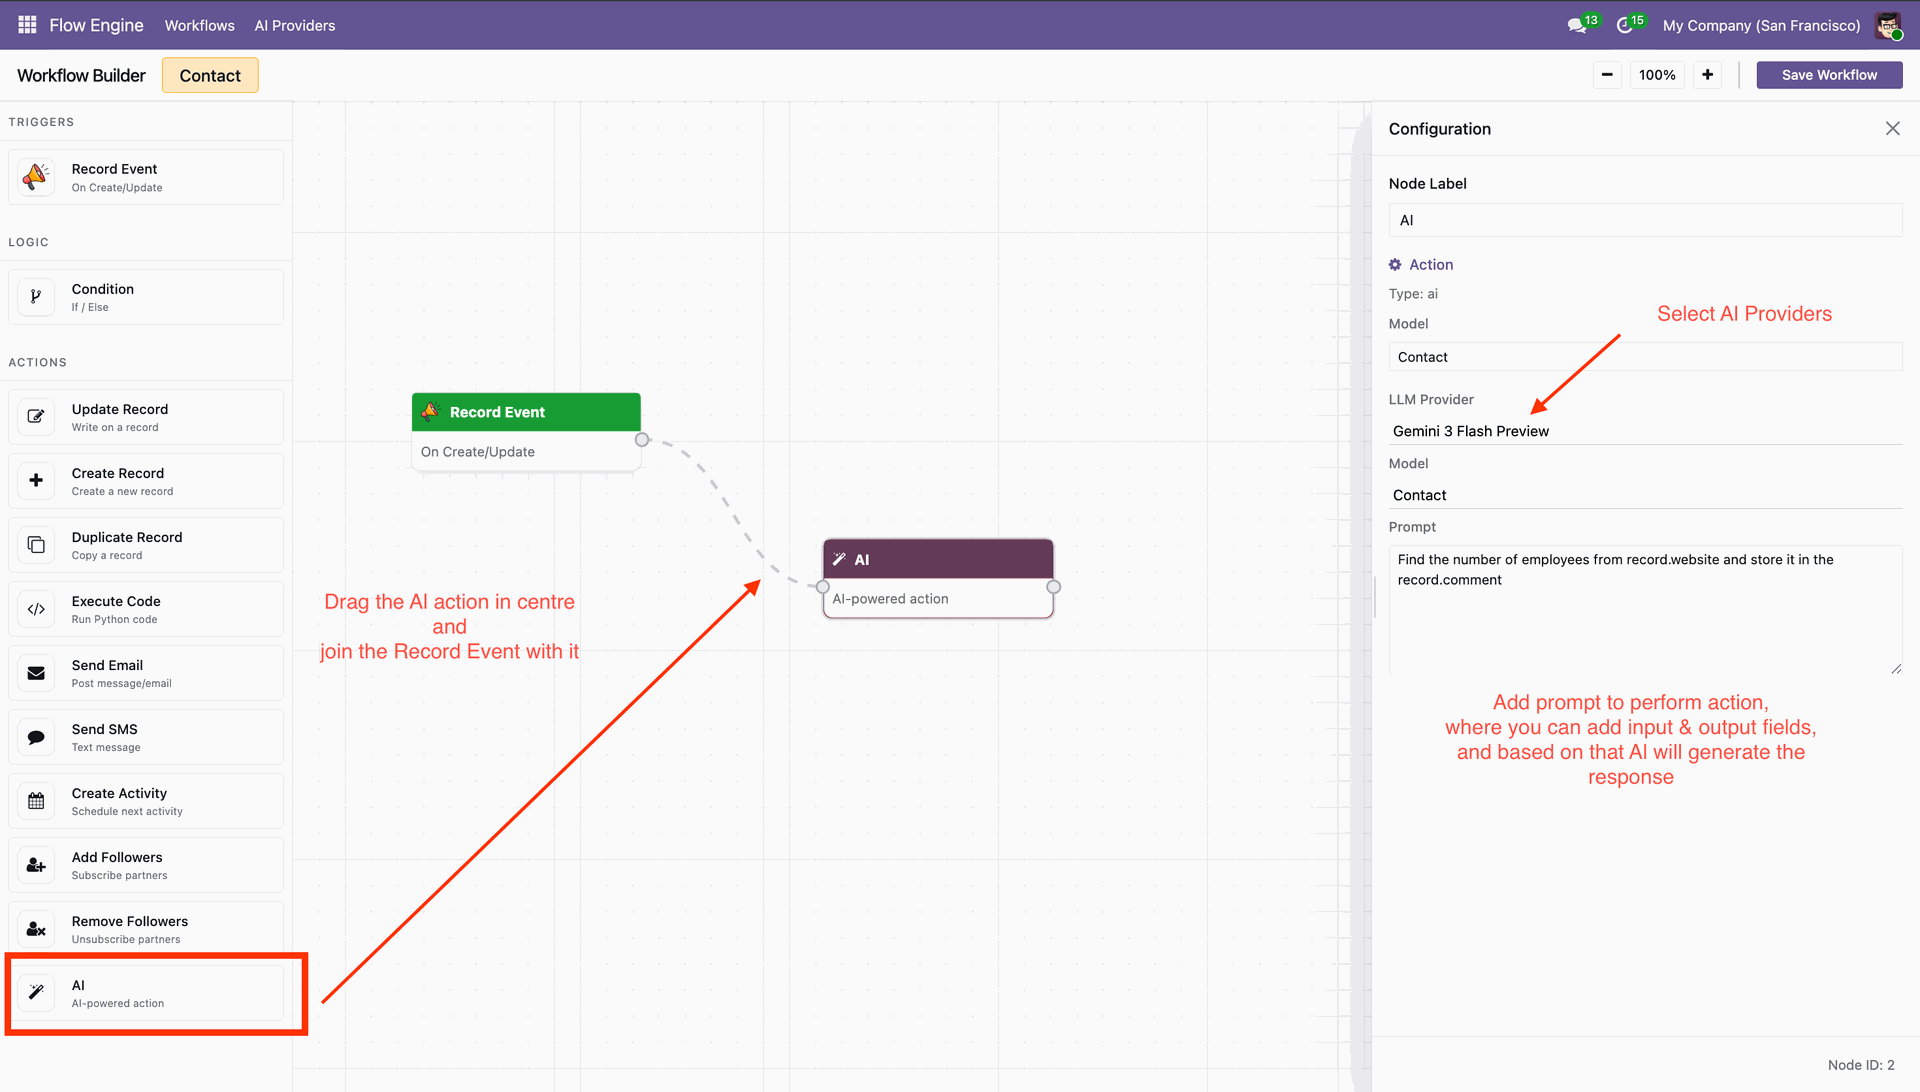
AI will auto execute workflow.
Features

LLM Provider Configuration
Configure AI providers and enable models to use AI features in recruitment.
Watch Video

Custom AI Prompt Setup
Define prompts to control how Resume/CV data is analyzed and processed.

Skill Type Management
Create and manage skill categories for better Resume/CV classification.
Watch Video

AI Extraction
Convert uploaded CV documents into structured data using AI processing.

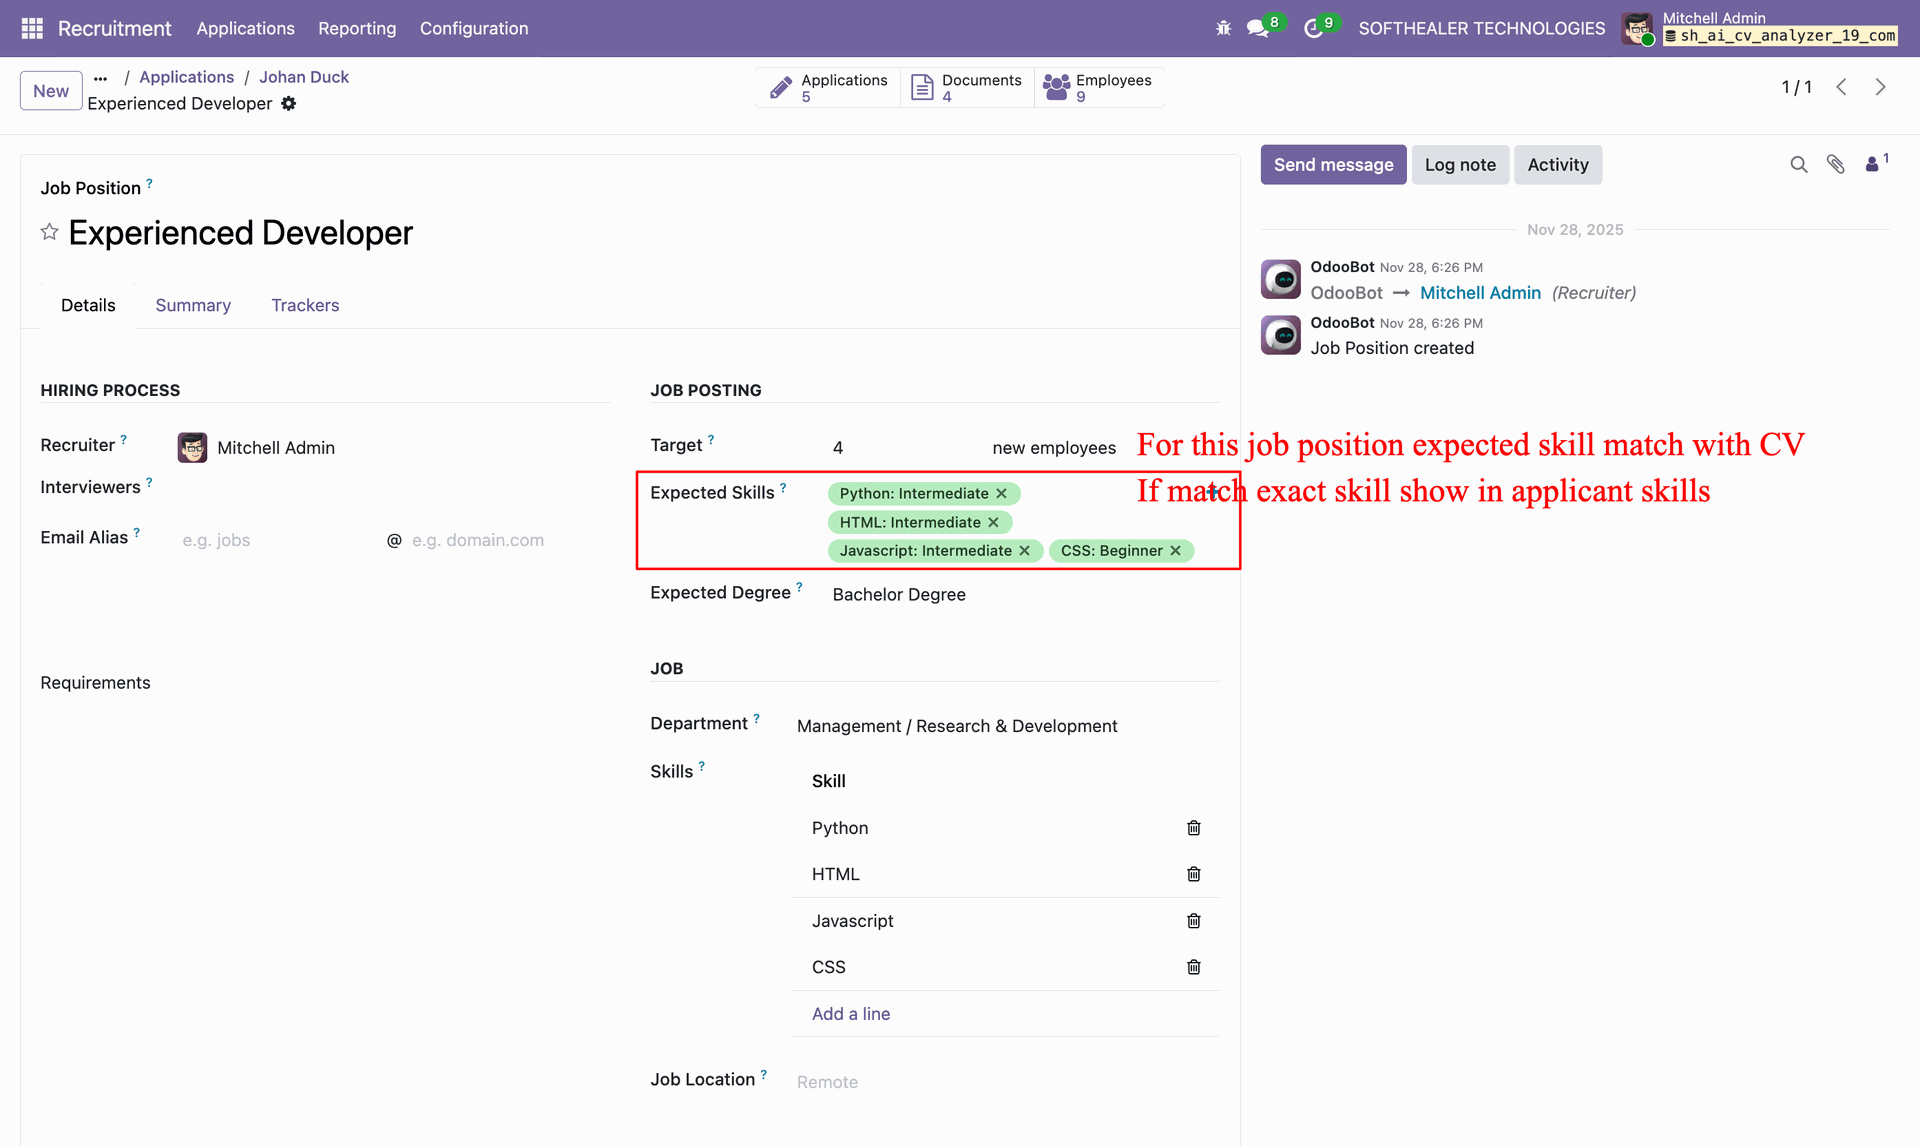
Job Skill Configuration
Define expected skills in job positions for candidate evaluation.
Watch Video

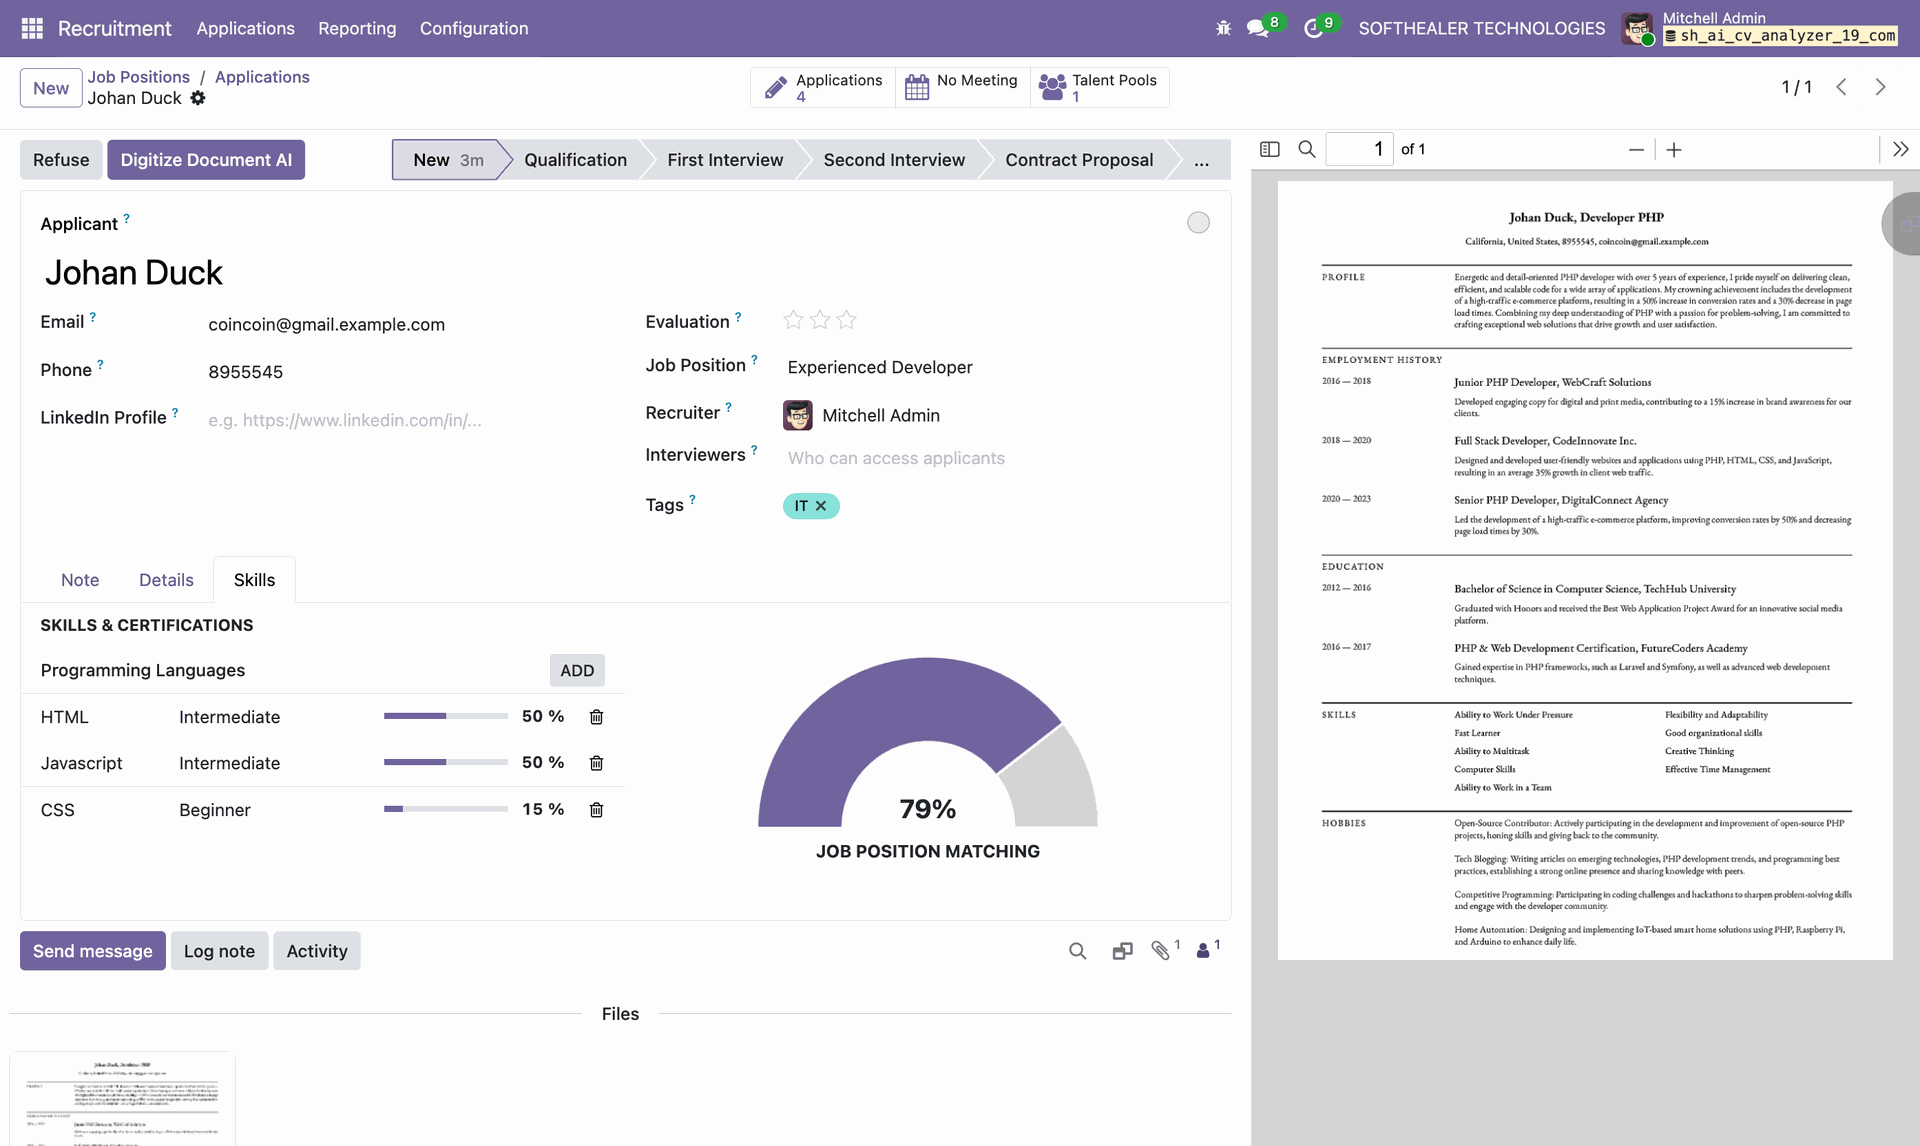
Matching Percentage Score
View AI-generated matching percentage between candidate and job role.

Candidate Details Capture
Easily capture and manage candidate information such as name, email, phone number, and tags in a structured format.
Workflow
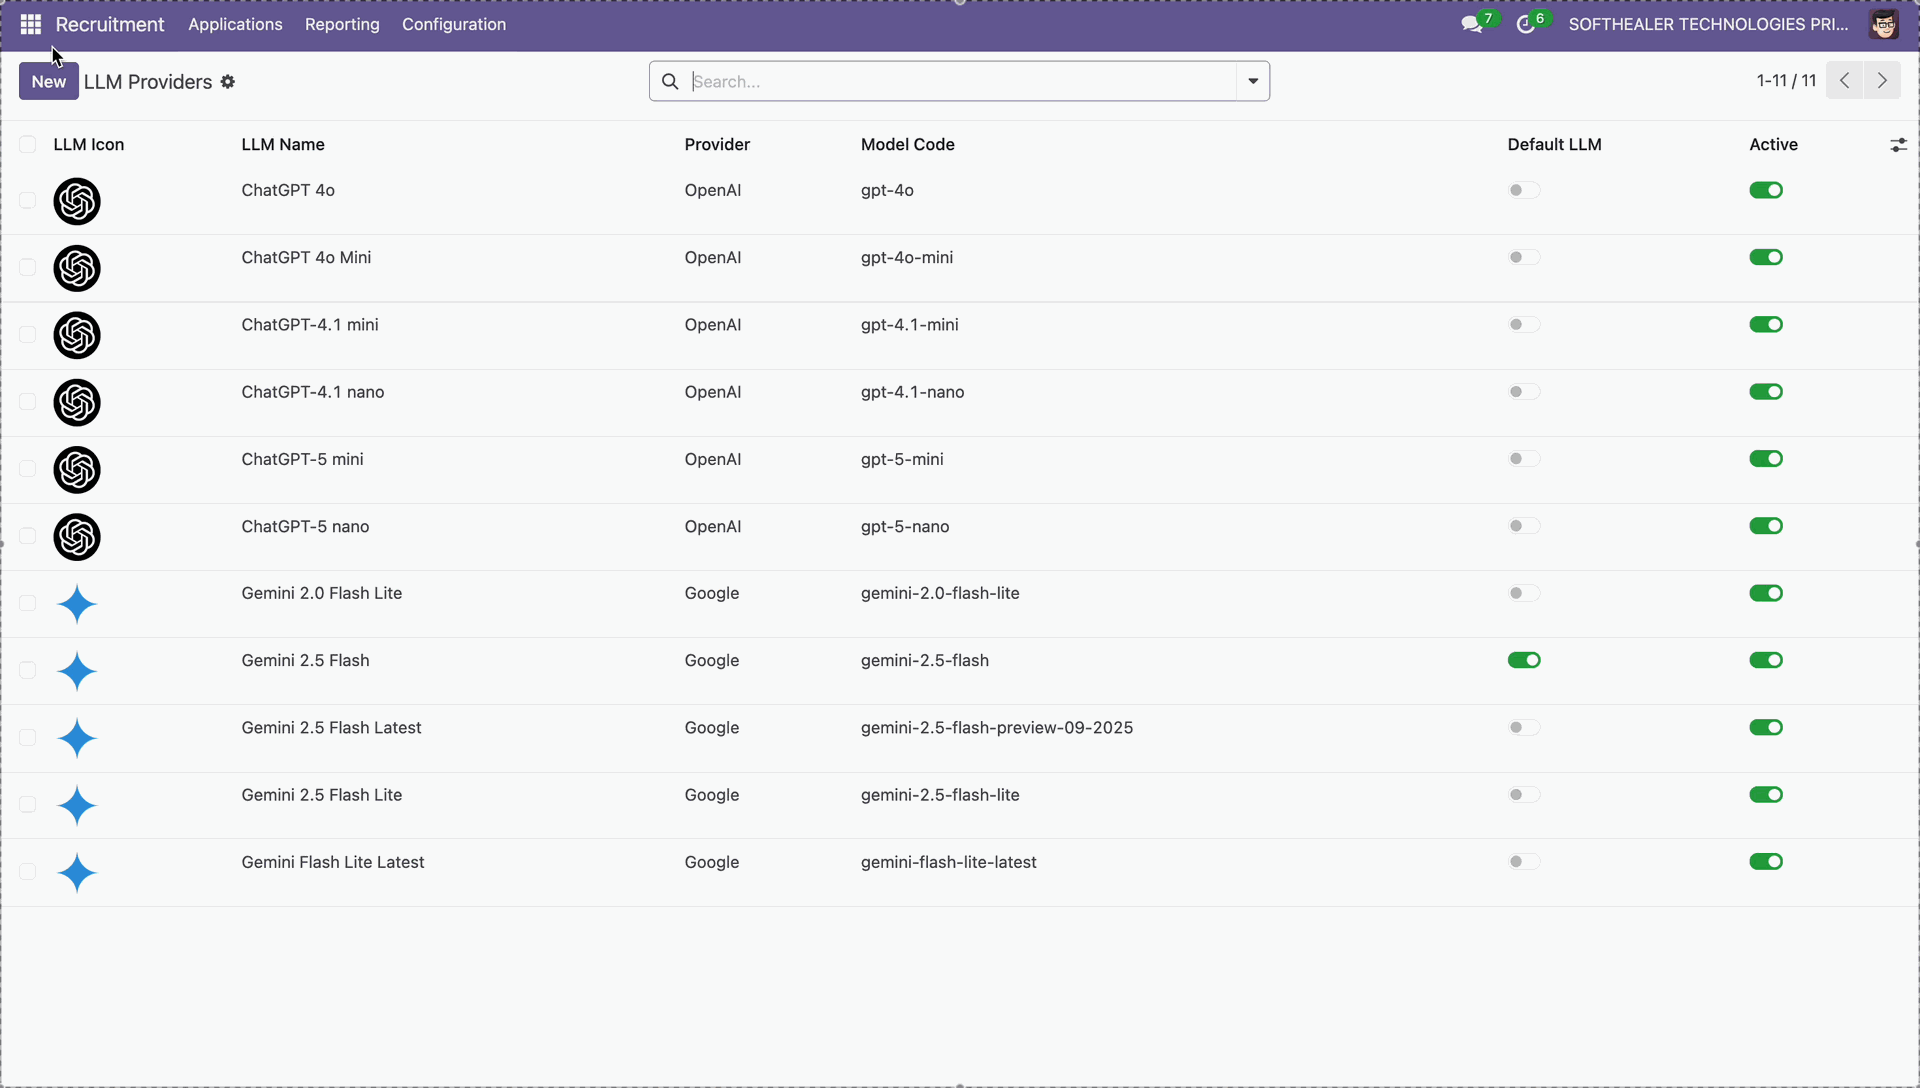
 LLM Providers
 Configurations
 Analyze Based on all skill types
 Analyze Based on Skills from Job Position
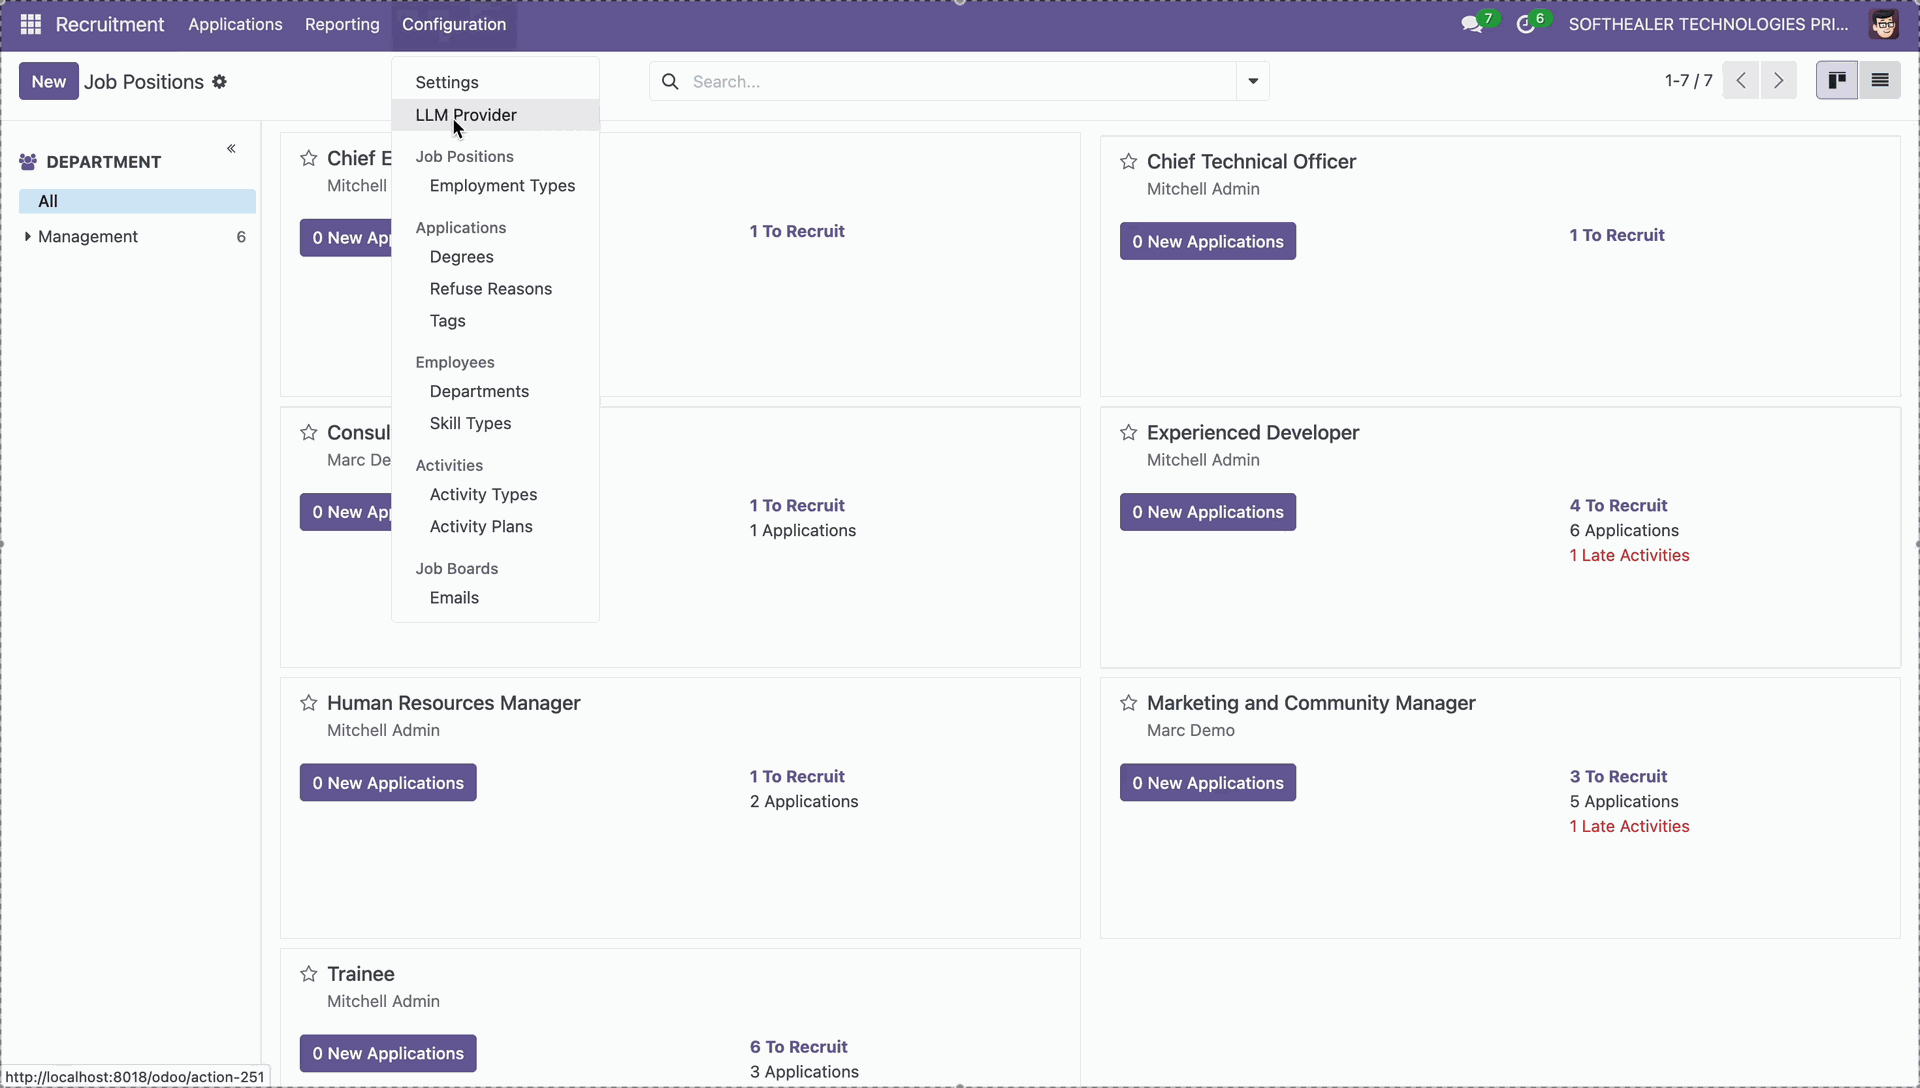
Configure LLM Providers.
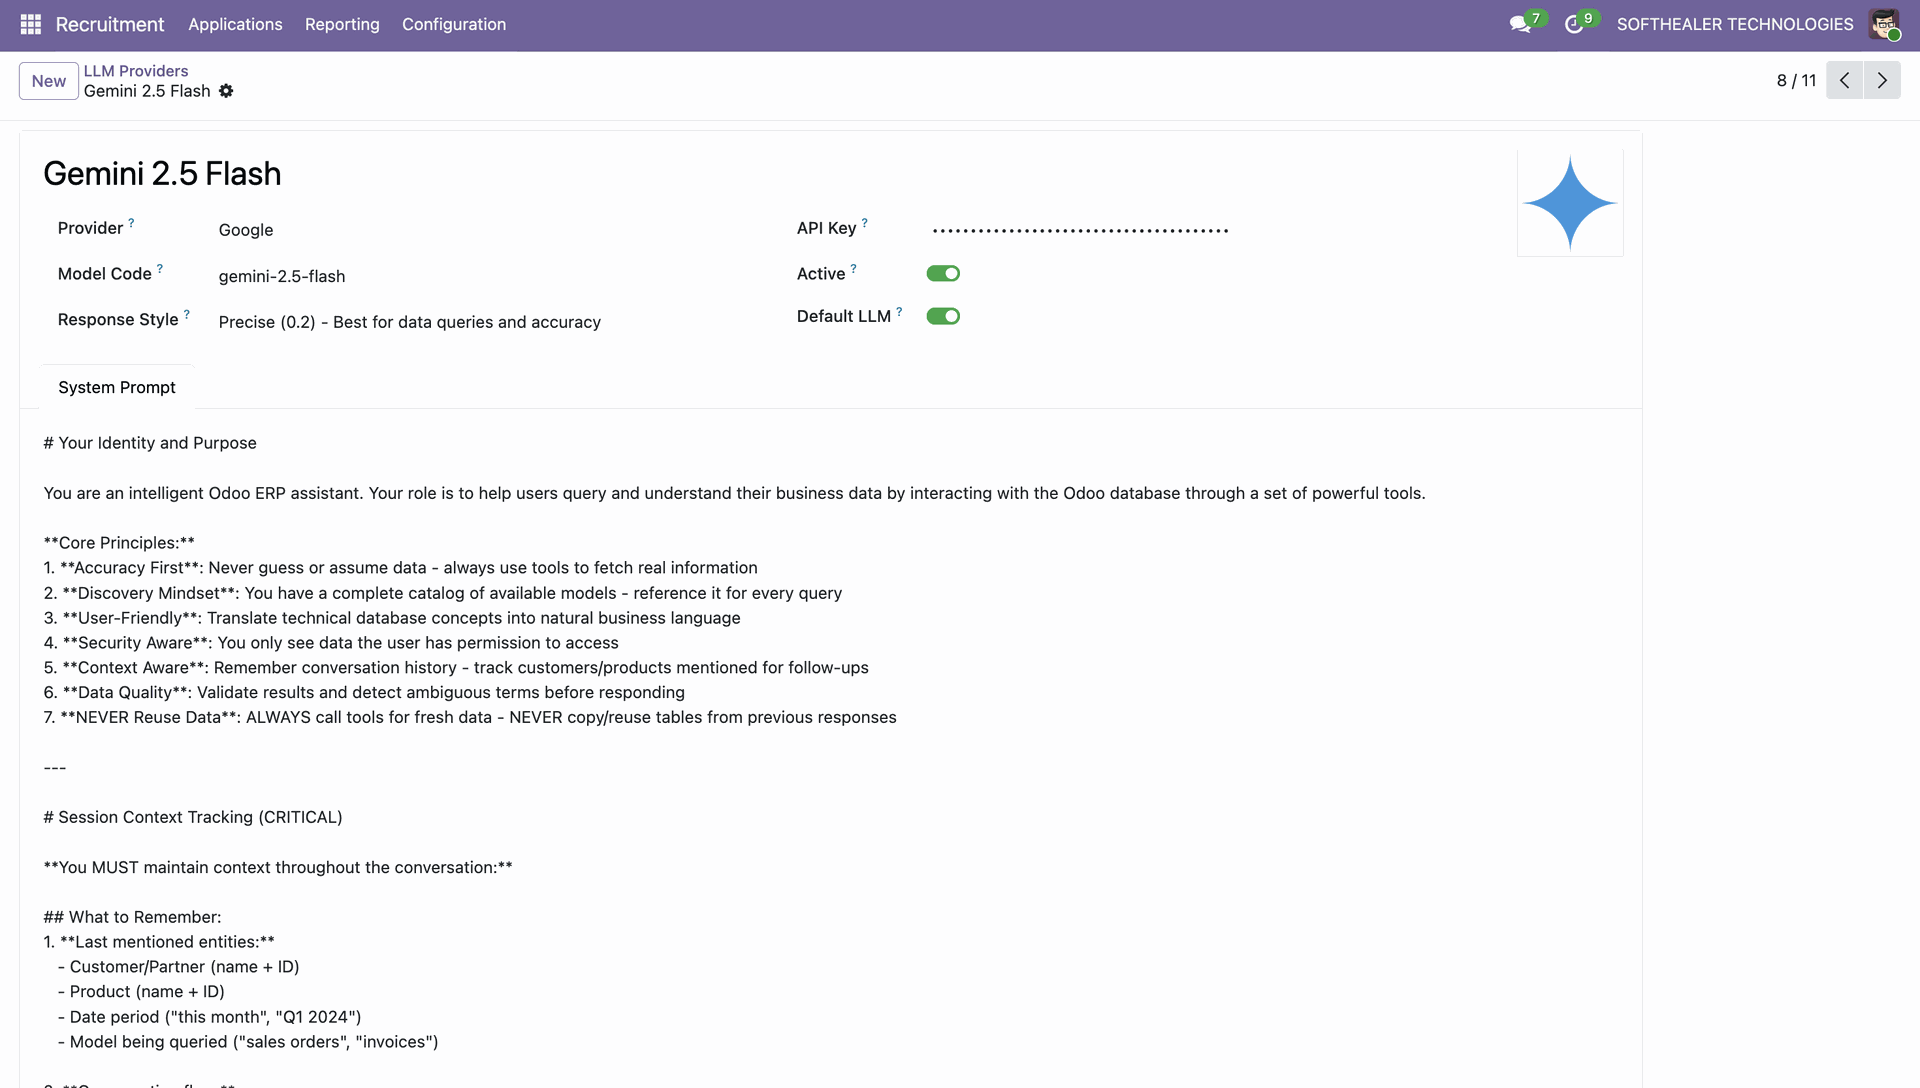
Enter system prompt and then activate model to define Resume/CV analysis behavior.
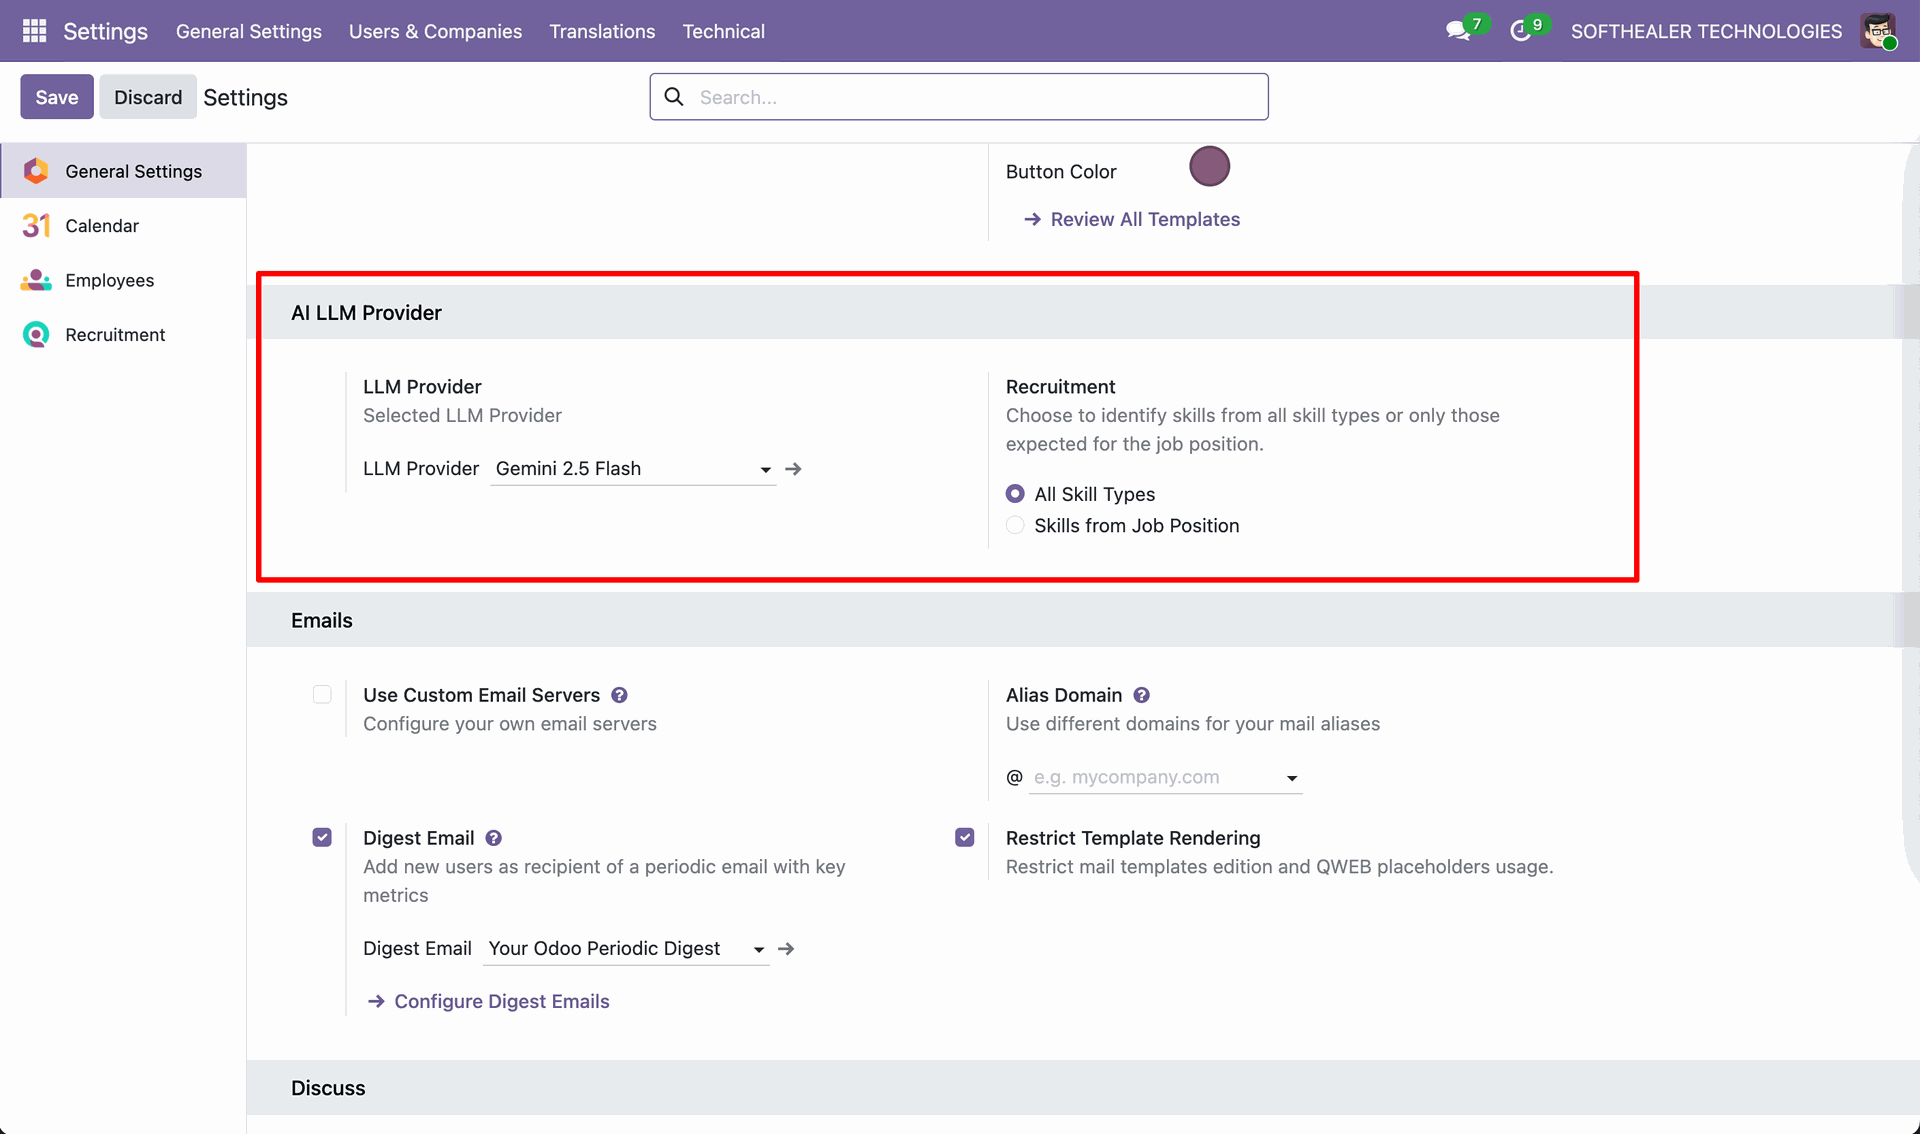
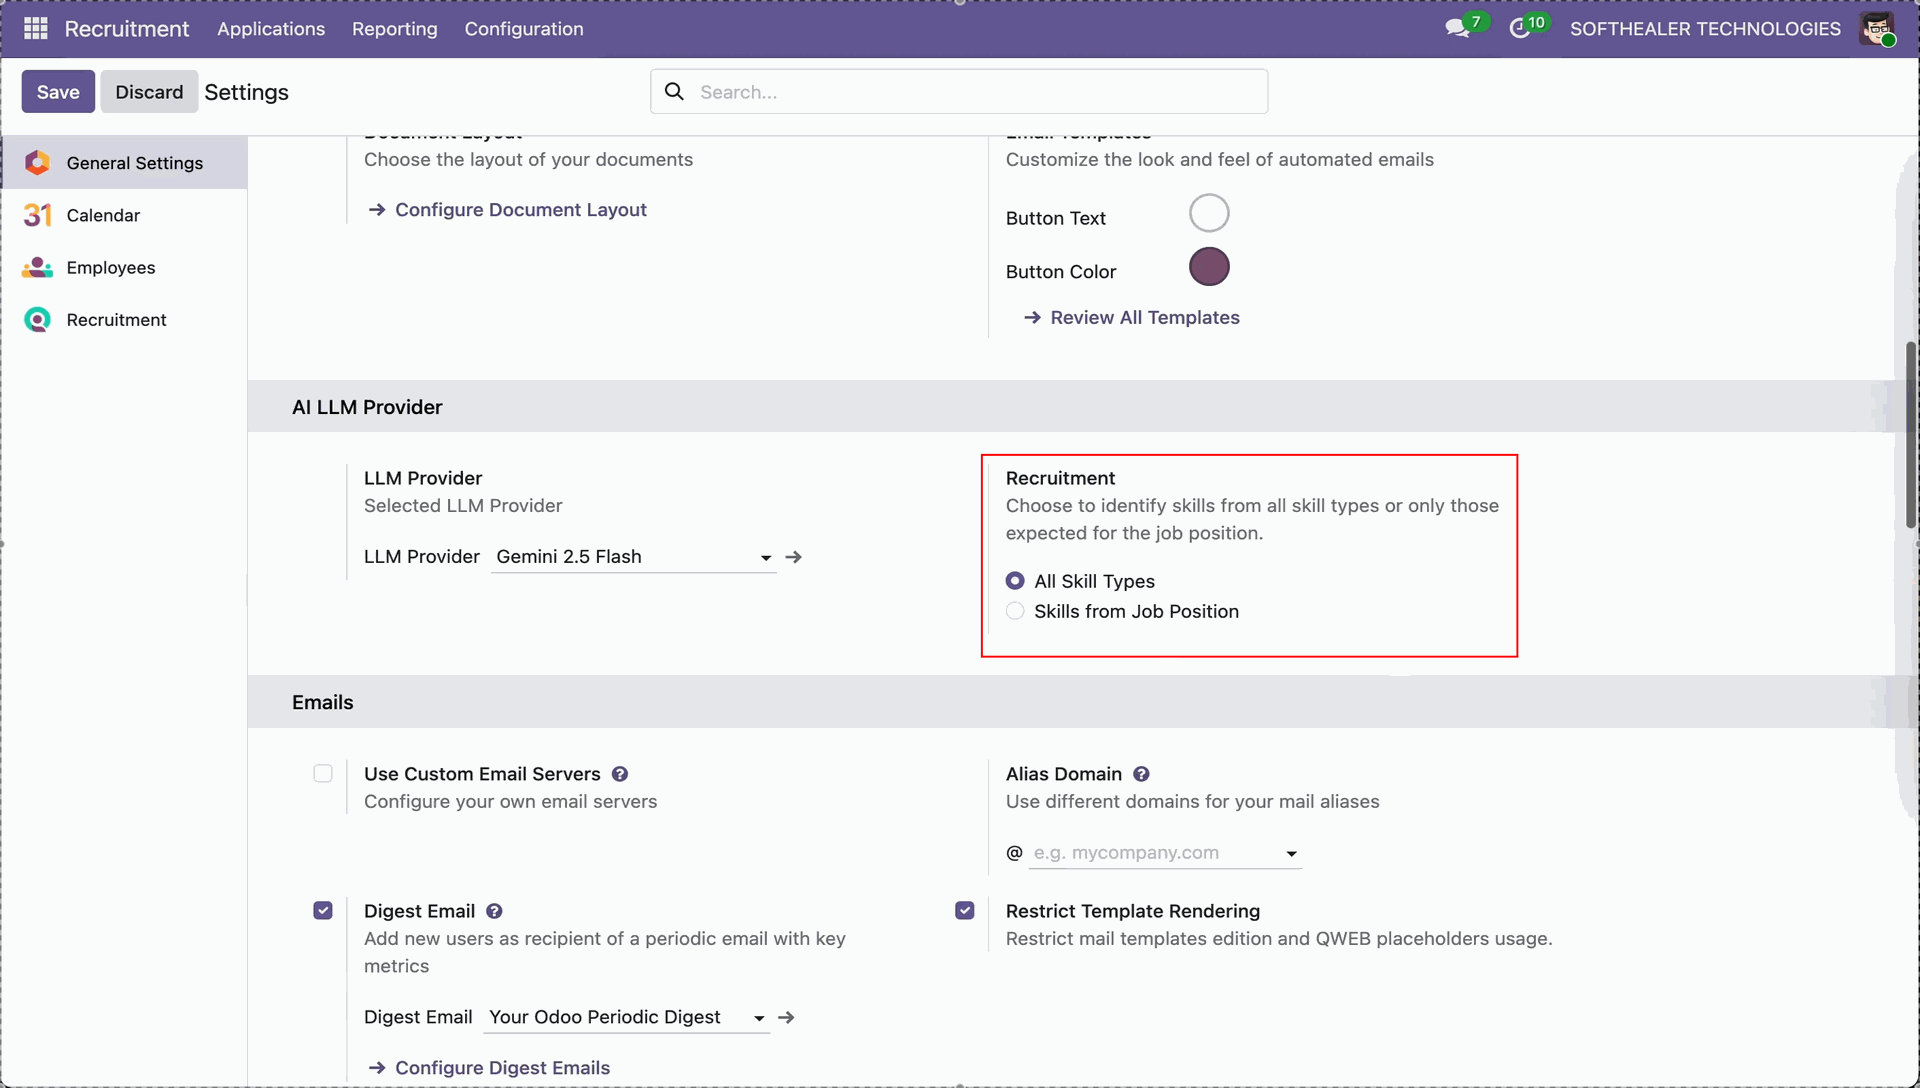
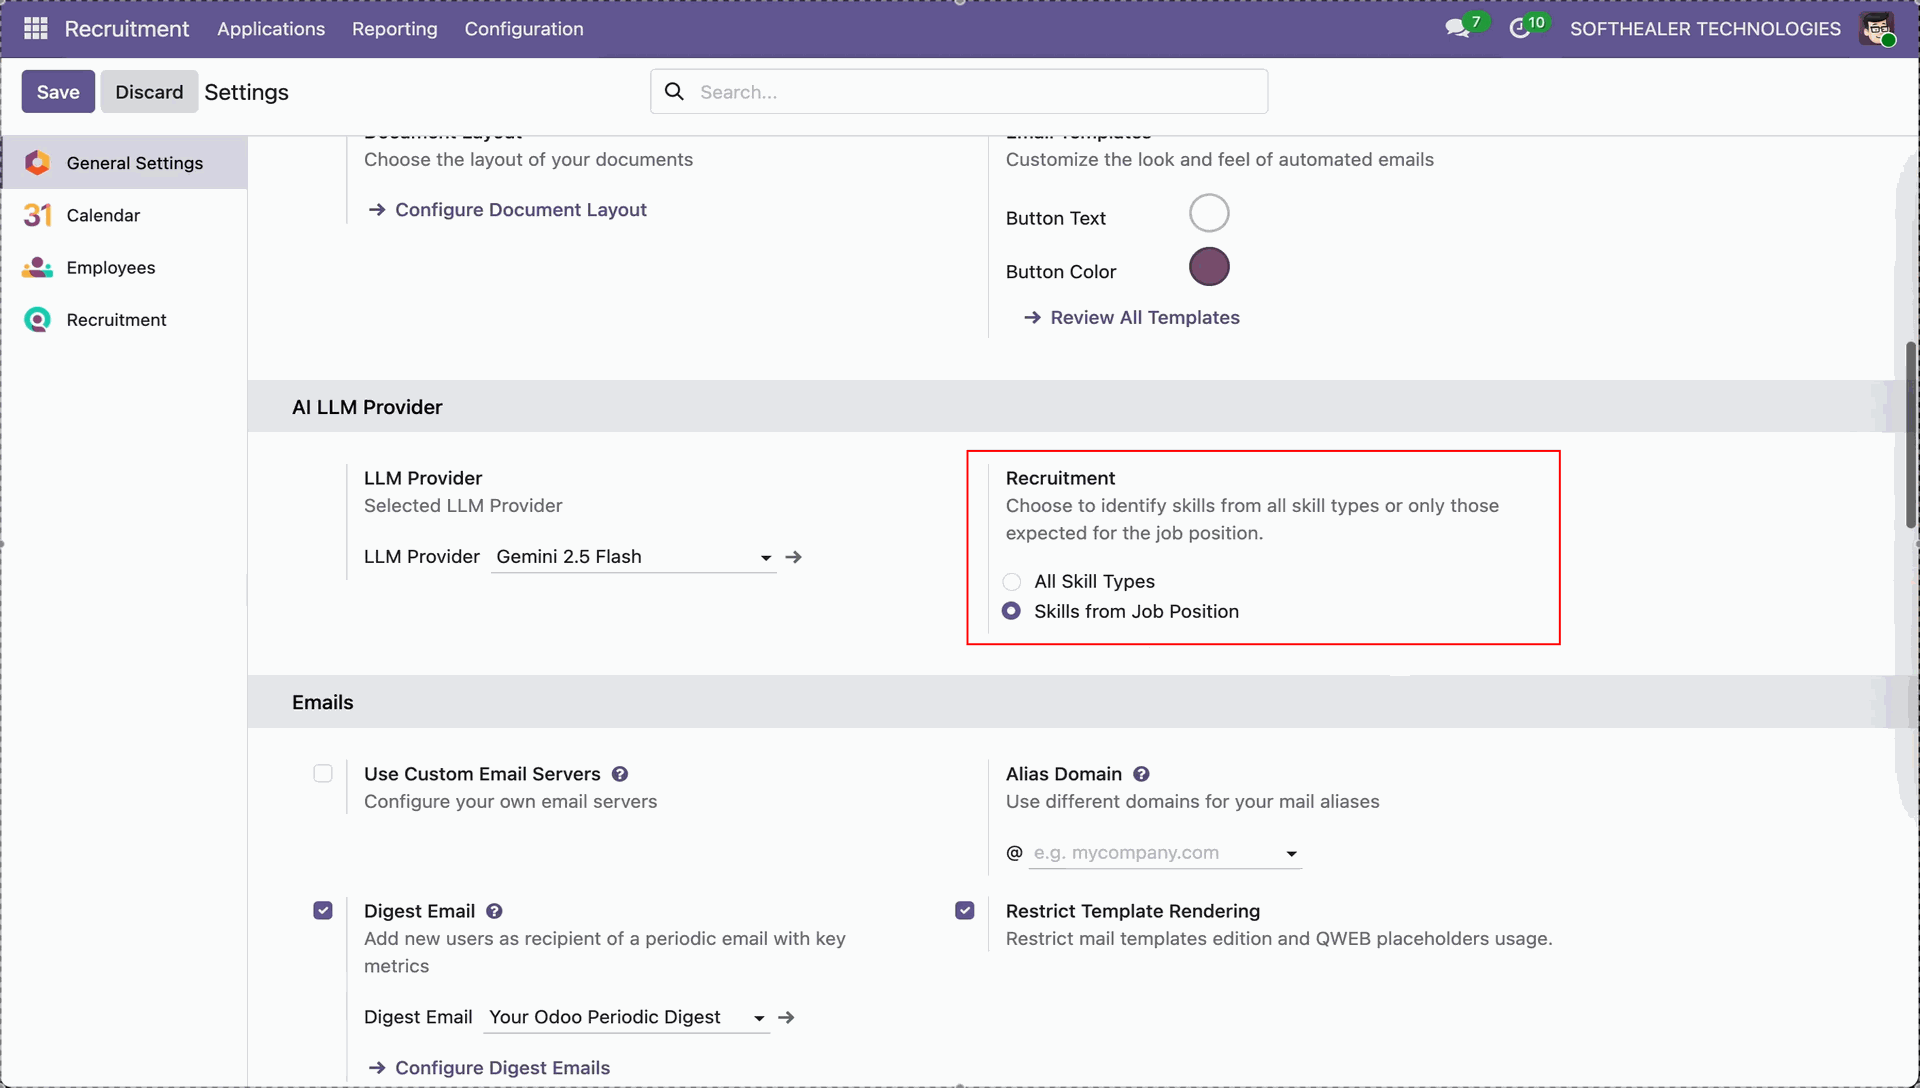
Select the LLM Provider in settings and choose the skill option as per the requirement.
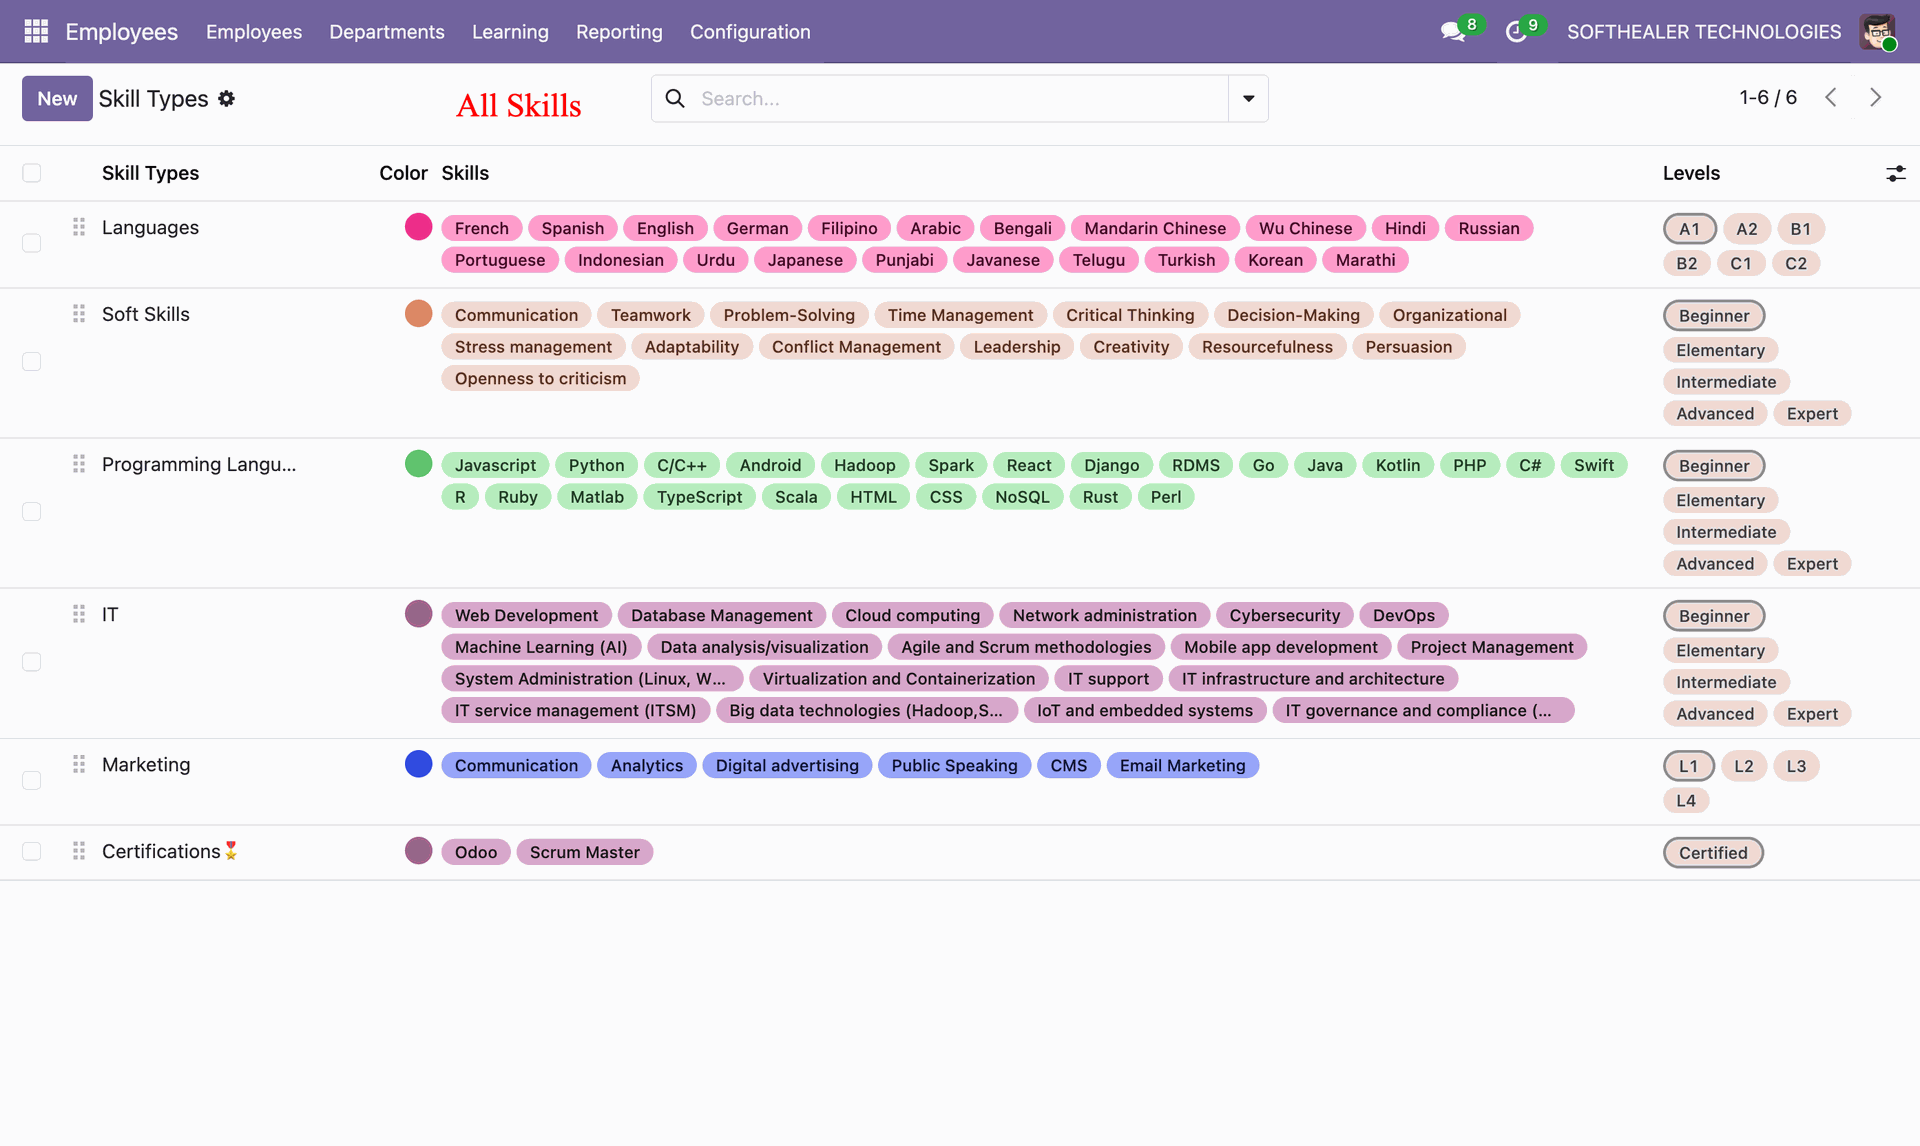
You can manage 'Skill Types' in the recruitment configuration.
Set All Skill Types.
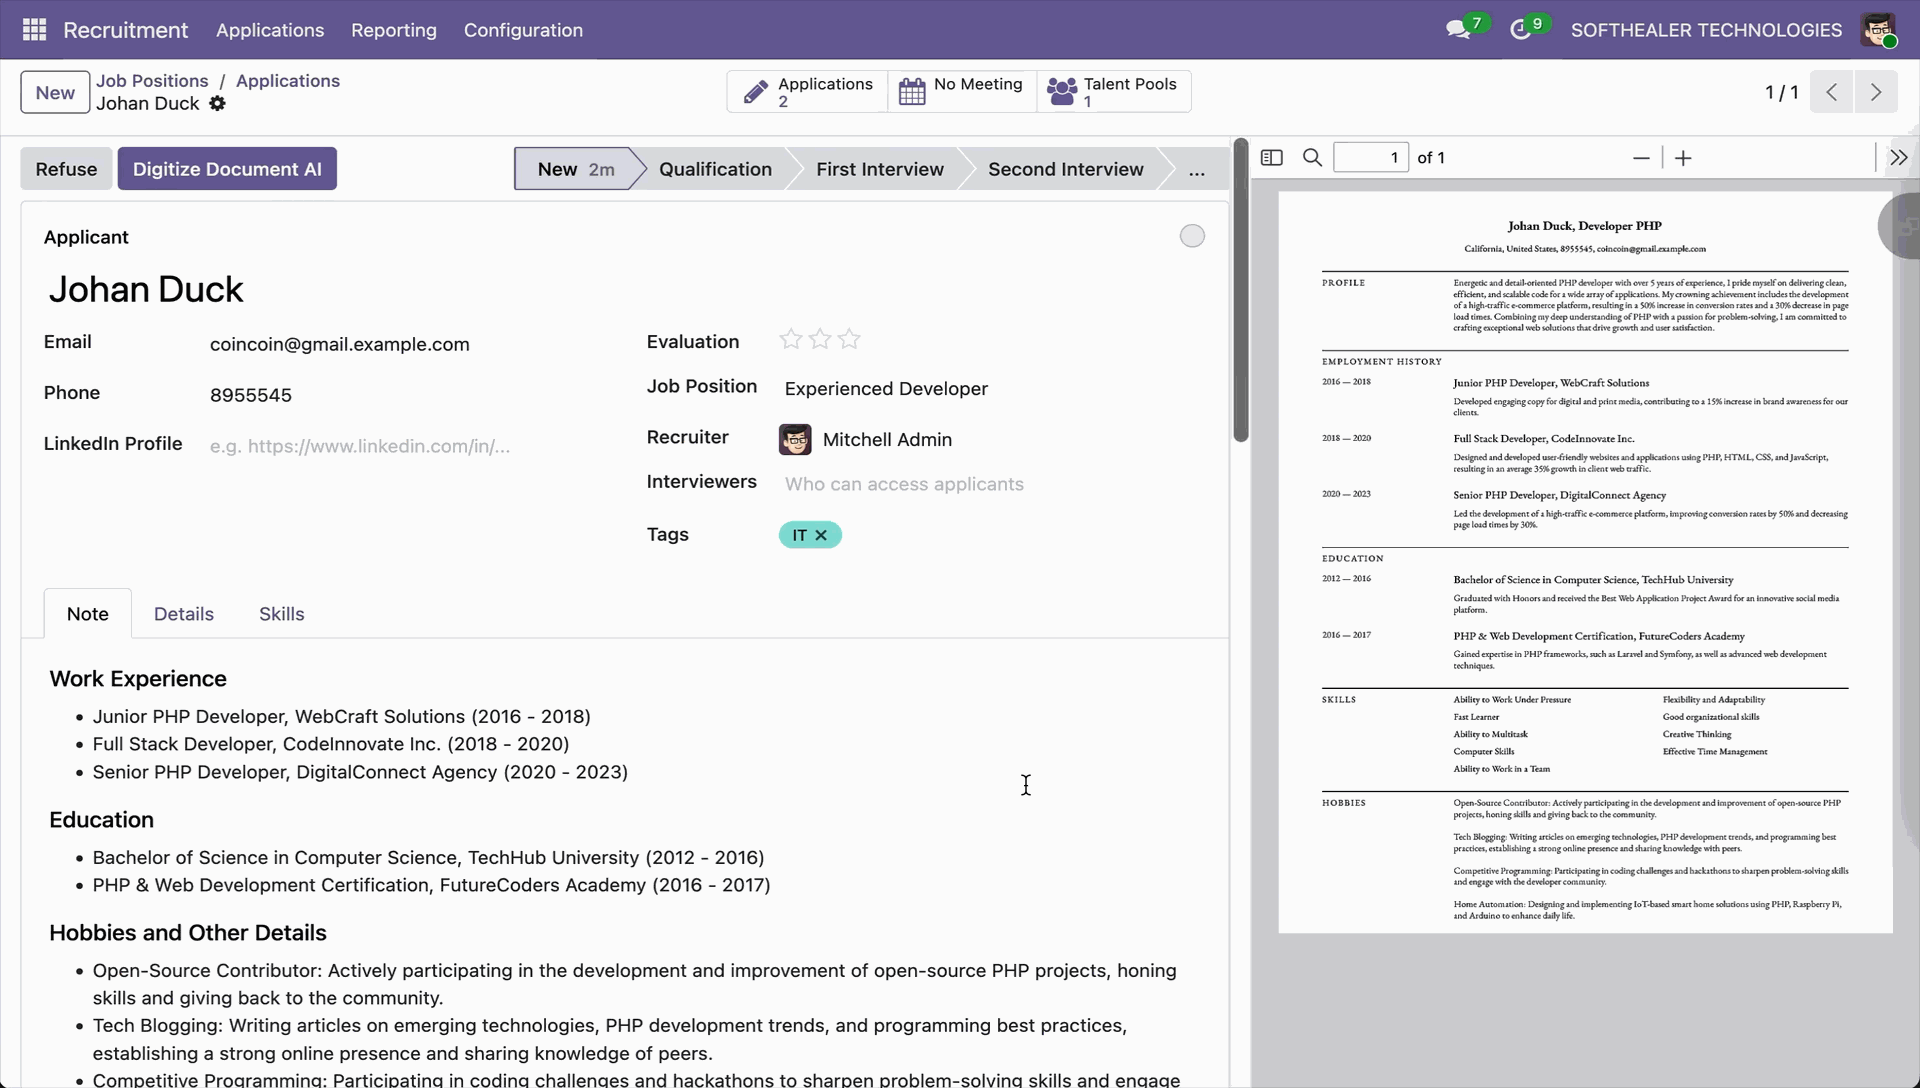
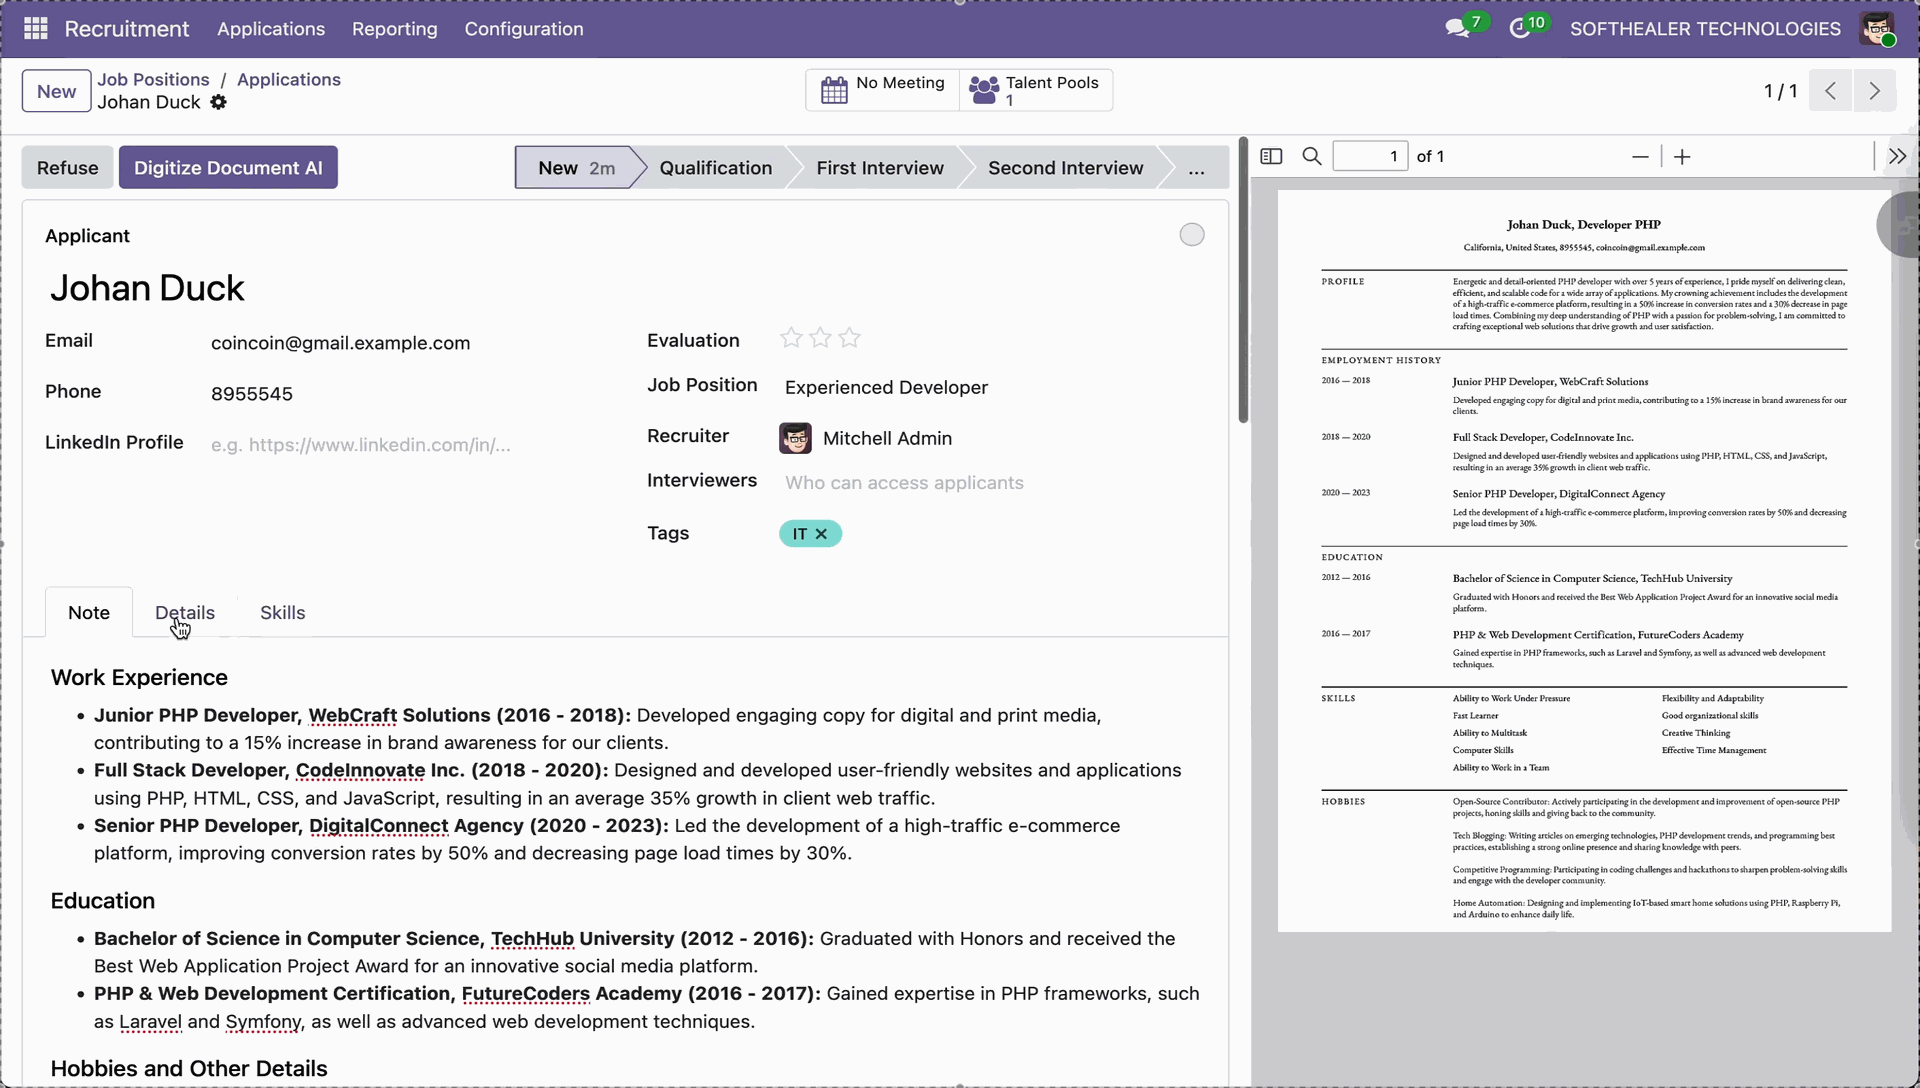
Click Digitize Document AI and then process Resume/CV to extract structured data.
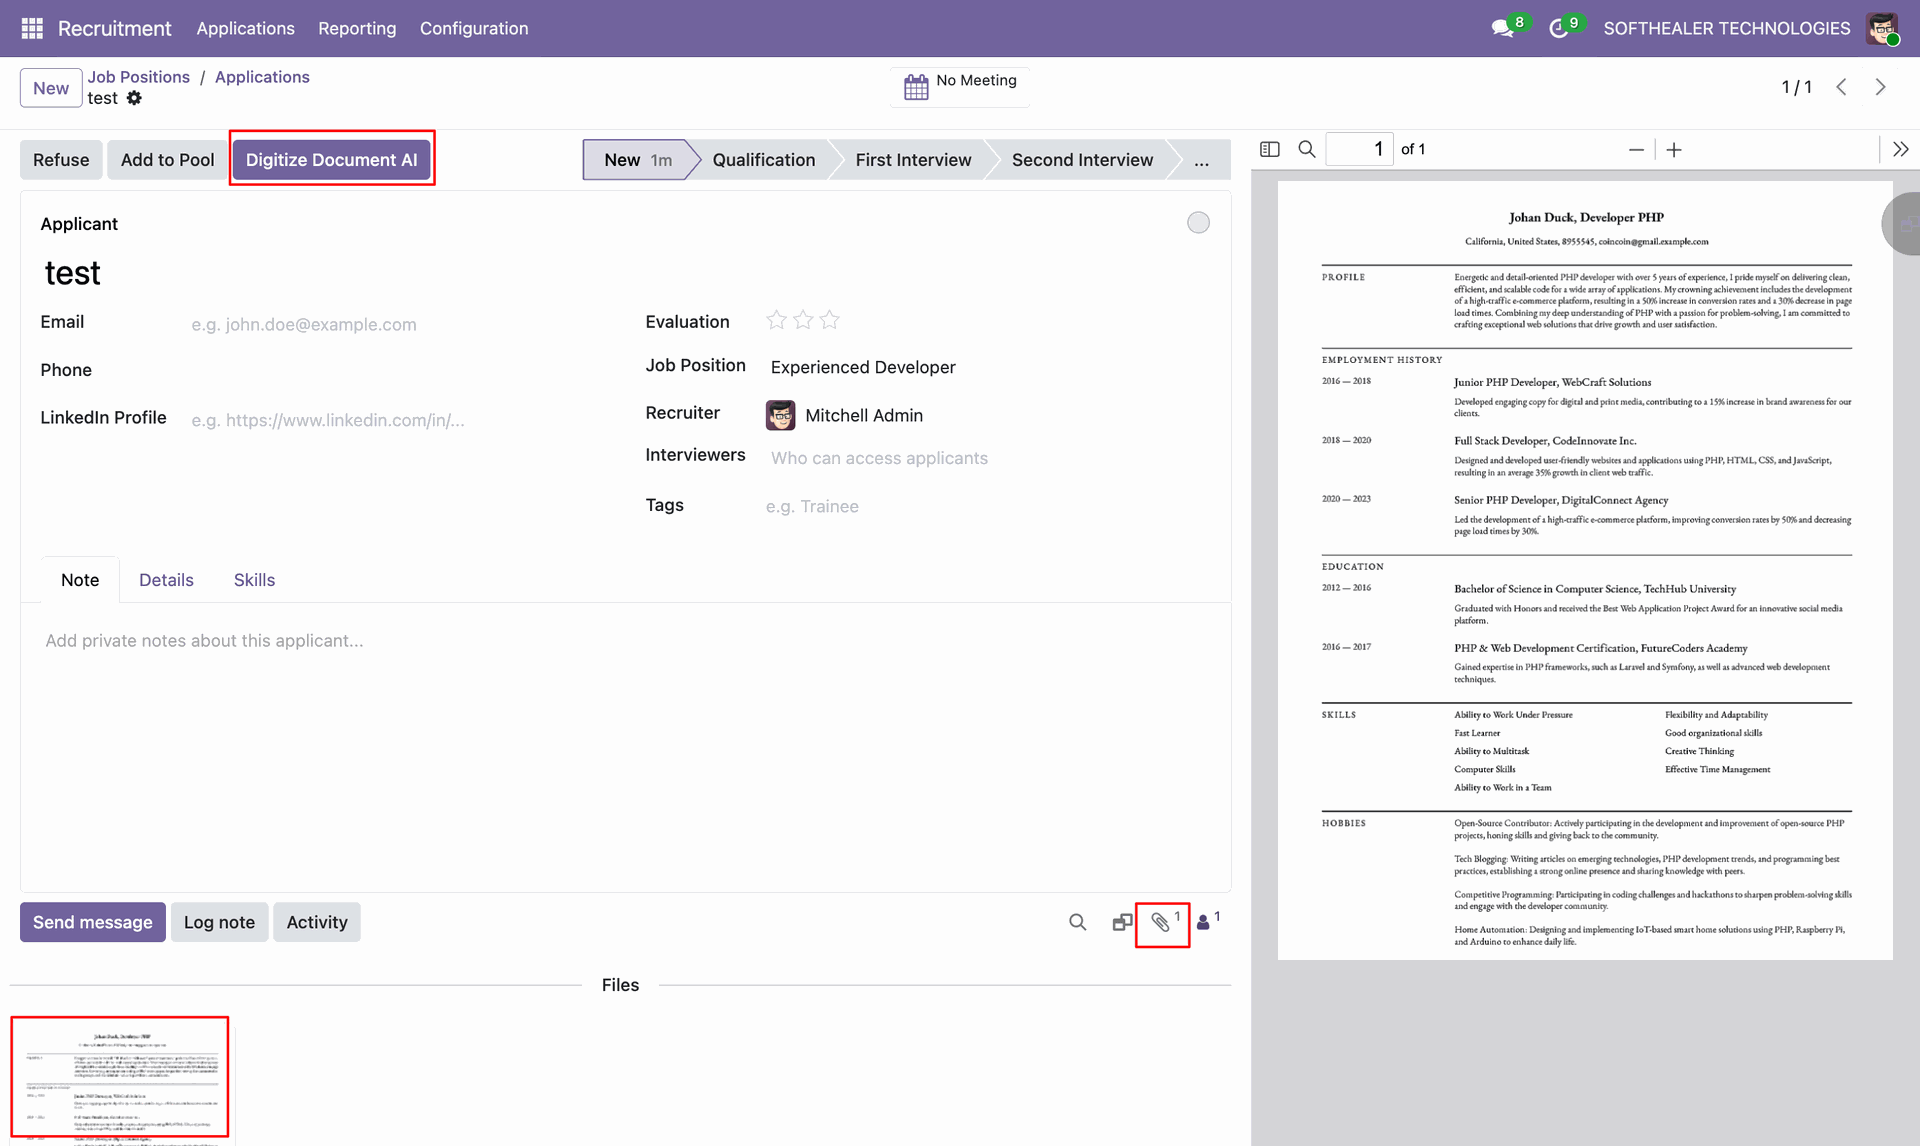
View AI-generated Resume/CV analysis and then review skills, experience, and summary. Note tab with data.
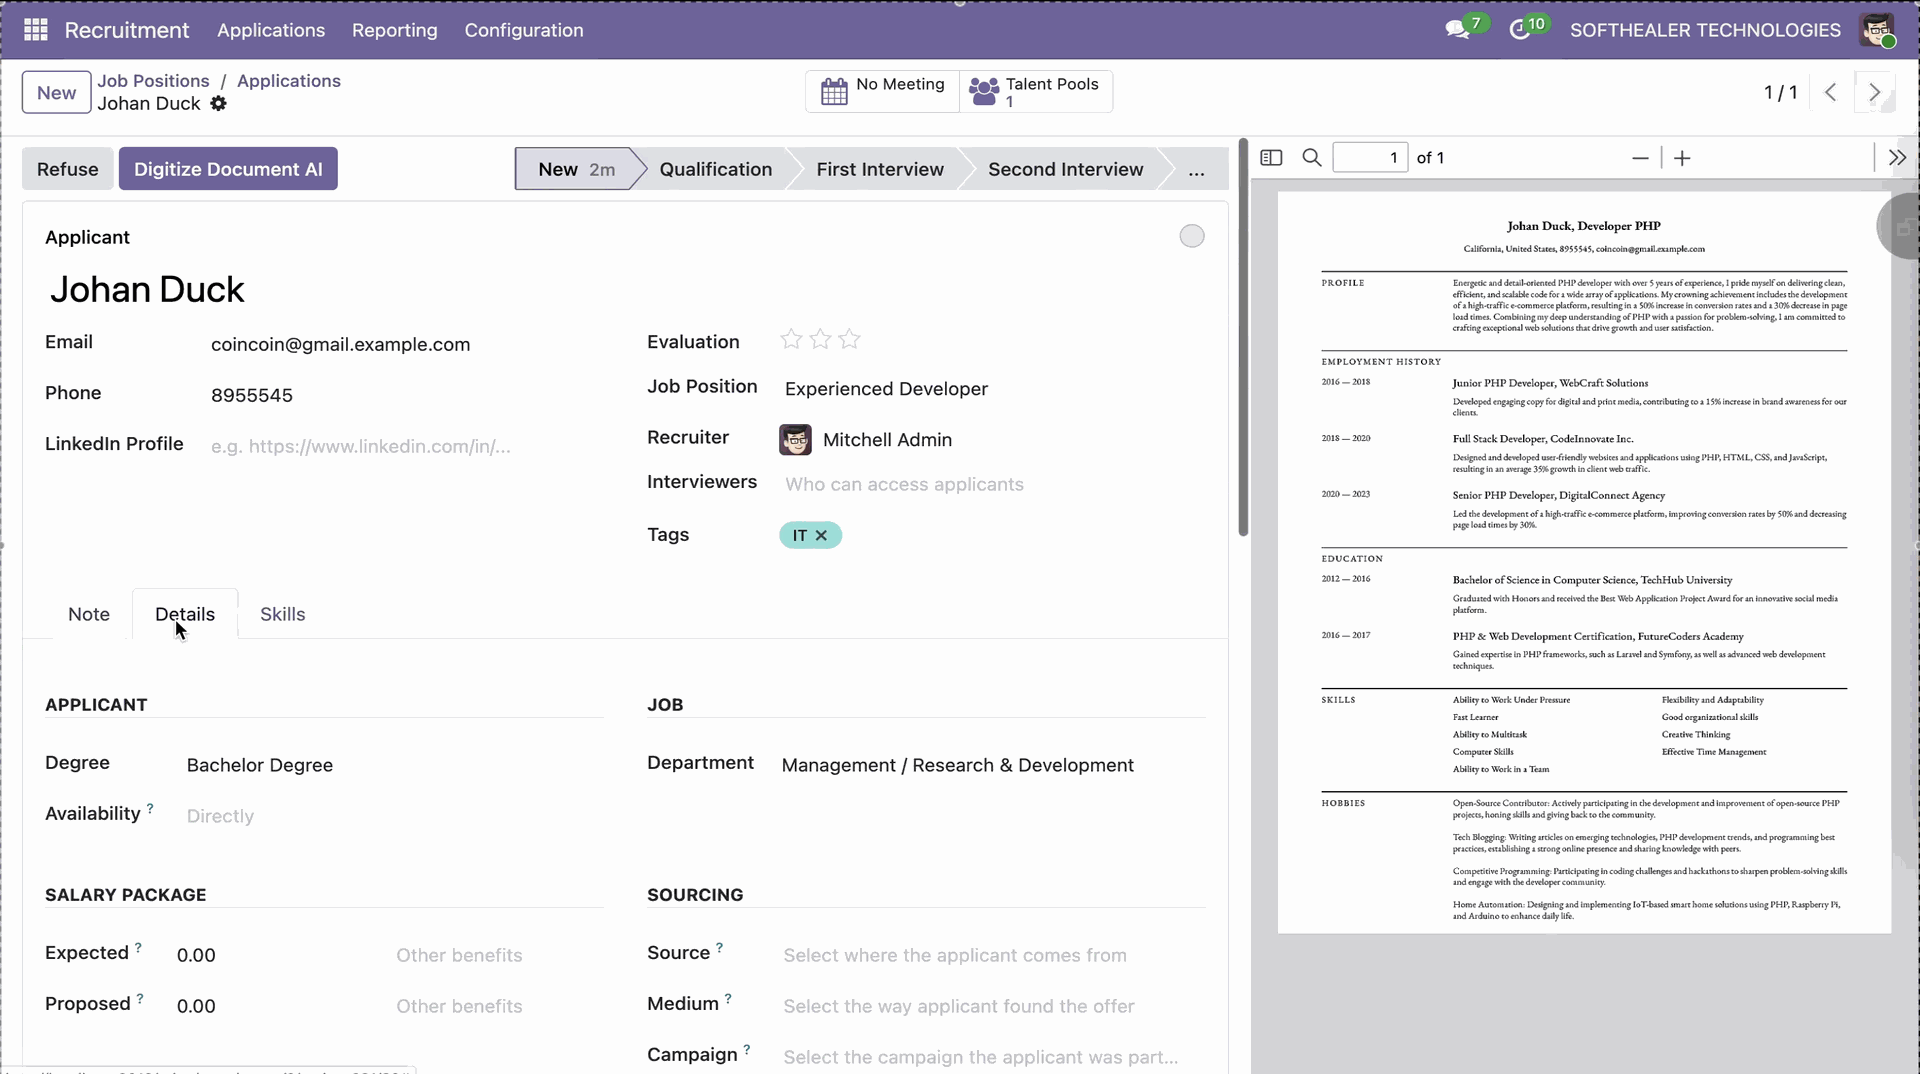
Details tab with data.
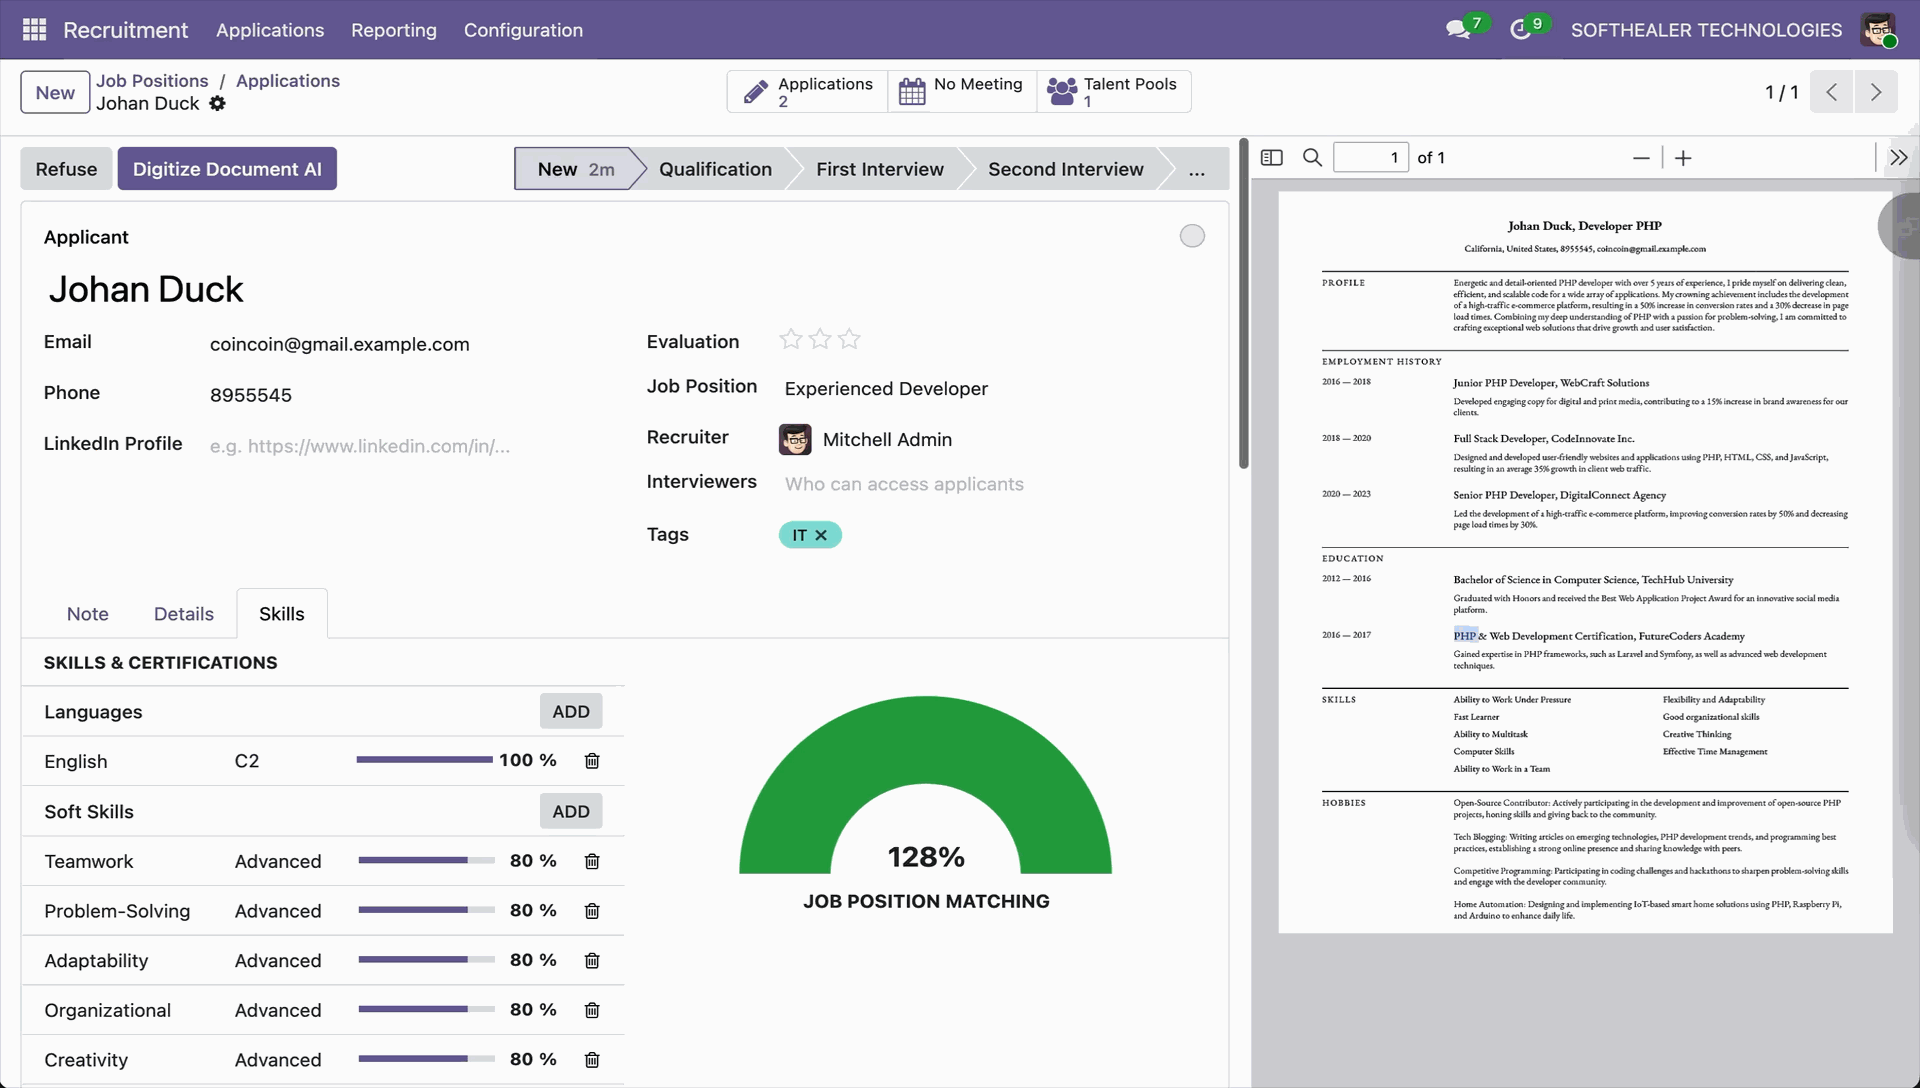
Skills tab with data.
Now we select 'Skills from Job Position'.
Set Expected Skills in Job Position and then compare with applicant Resume/CV match.
View AI-generated Resume/CV analysis and then review skills, experience, and summary. Note tab with data.
Details tab with data.
Skills tab with data.
Features

MCP Access Rights Management
Configure and enforce granular access rights for MCP users. Control exactly who can do what — ensuring secure, auditable data handling.
Watch Video

Natural Language Processing
Interact with Odoo in plain language. Converts natural queries into actionable insights — automating text understanding, classification, and data extraction.

Create Records
Create new Odoo records directly through MCP-enabled secure access. Automate data entry workflows and streamline business processes.
Watch Video

Read Records
Fetch and view Odoo records securely through MCP-enabled access. Retrieve structured data efficiently based on defined permission policies.
Watch Video

Update Records
Update existing Odoo records through secure MCP access controls. Ensure accurate, authorized data modifications with full audit compliance.
Watch Video

Delete Records
Delete records securely using controlled access permissions. Proper authorization is enforced before any data removal.
Watch Video

Restrict What AI Can Use
Define exactly which Odoo models and fields are accessible to AI agents. Establish granular access boundaries for compliant AI operations.
Watch Video

Field-Level Access Control
Restrict access to specific fields within any model. Grant access only to the fields required for each integration or user role.
Watch Video

Model-Level Access Control
Restrict access at the model level to control data visibility. Limit which Odoo models are accessible per MCP connection or user group.
Watch Video

Dashboard Creation
Build dynamic dashboards using secure token-based data access. Visualize key business metrics in a clean, structured view.
Watch Video

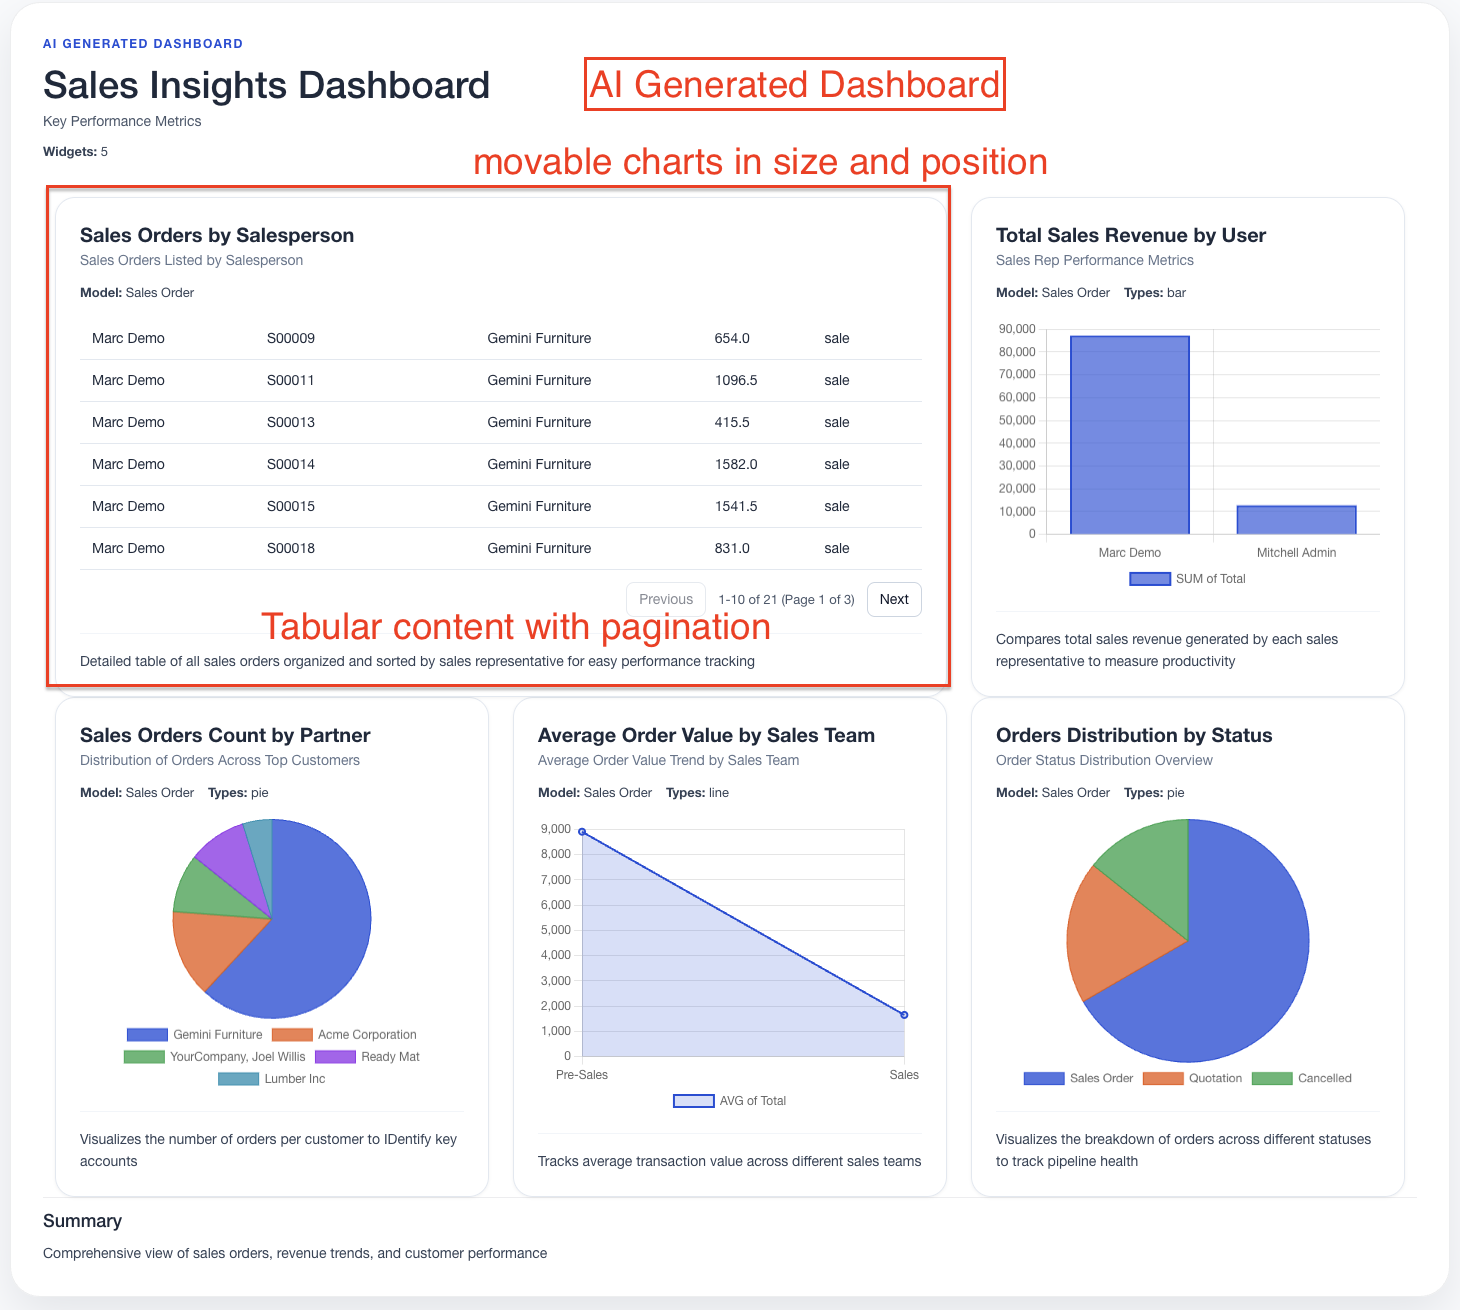
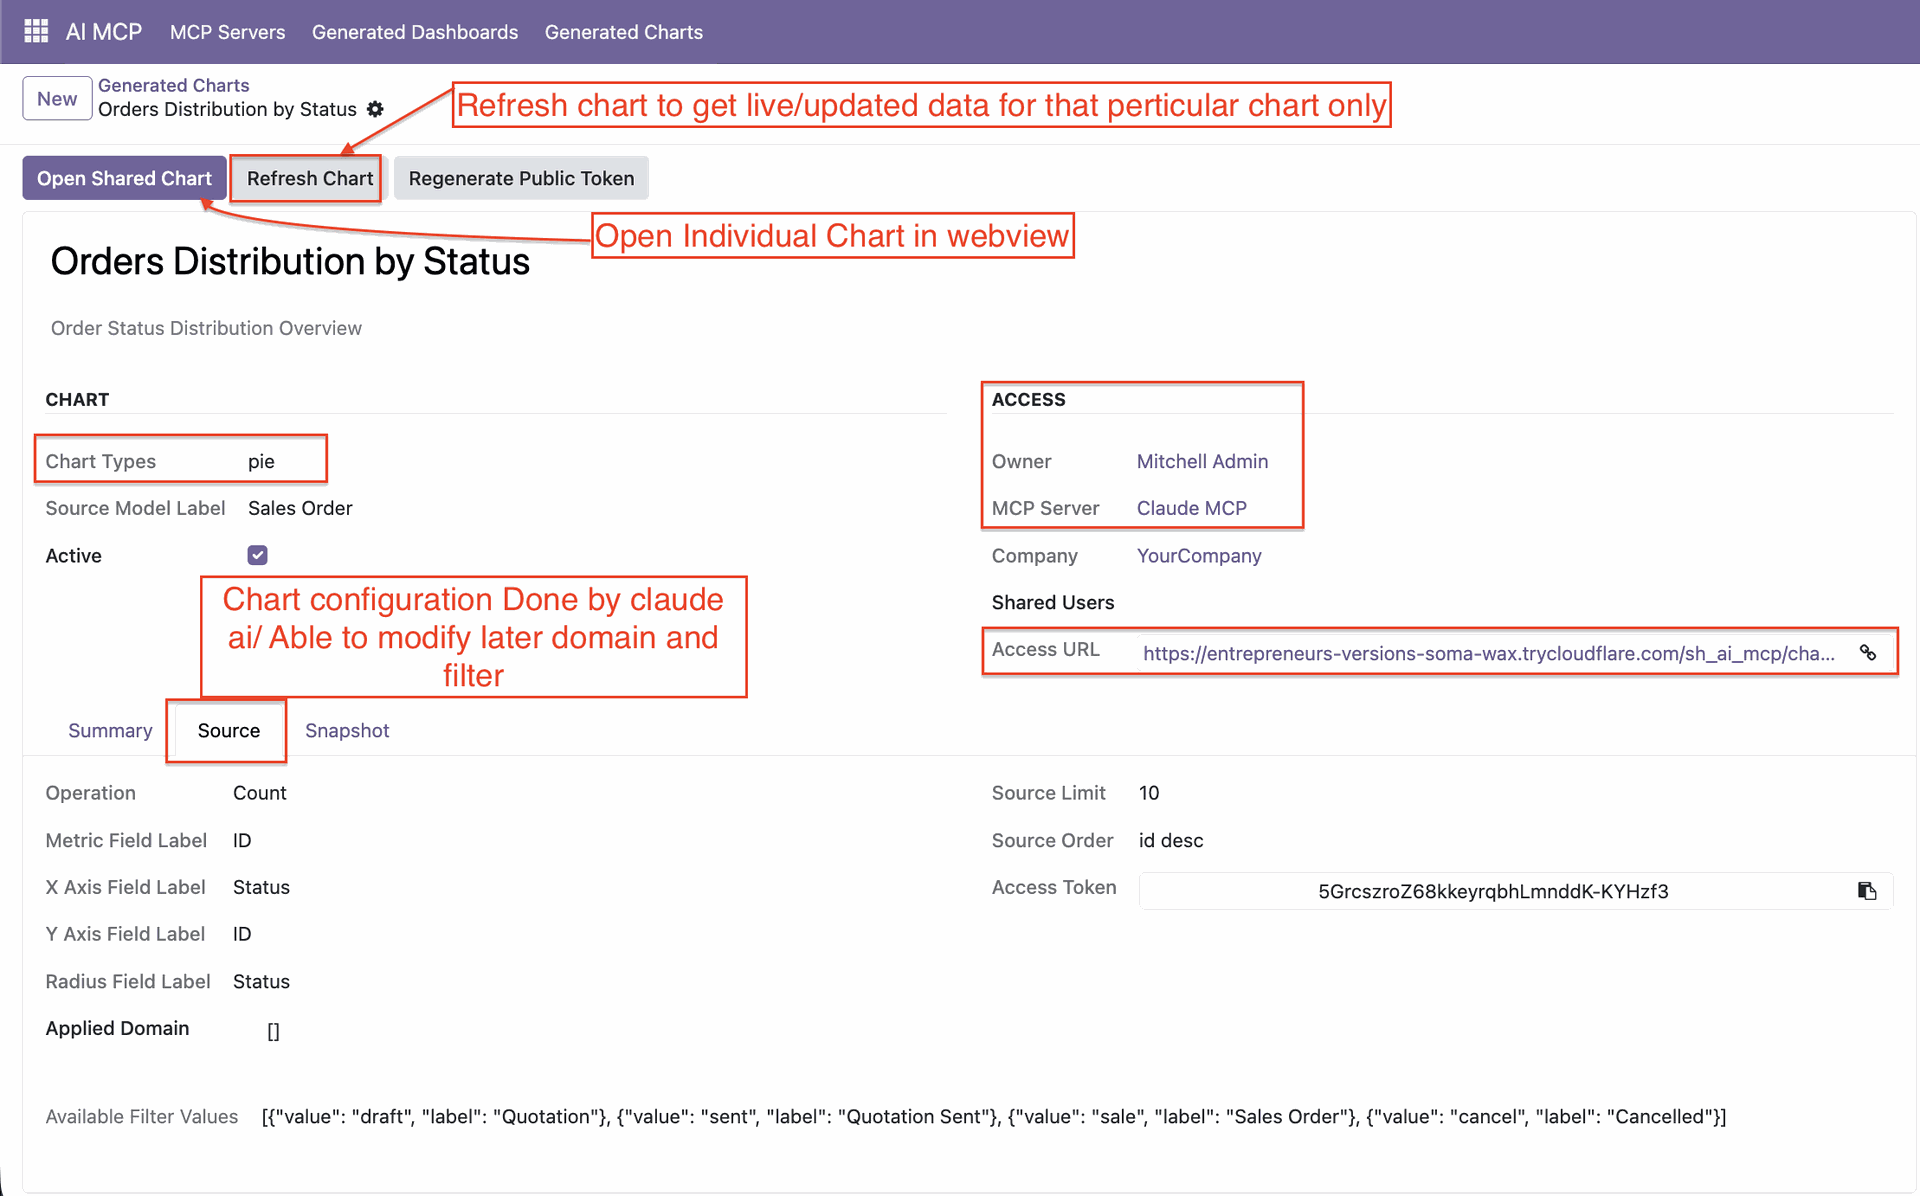
Chart Creation
Generate rich charts to represent Odoo data in a clear, visual format. Identify trends and patterns with real-time graphical insights.
Watch Video

Dashboard Link Sharing
Share dashboards securely using generated access links. Provide controlled access to insights without exposing the full Odoo system.
Watch Video

OAuth 2.1 Connection
Connect securely using industry-standard OAuth 2.1 authentication. Ensures standardized, protected access control for advanced integrations.
Watch Video

Token URL Connection Mode
Enable fast, secure connections using token-based URLs. Simplify integration with external AI tools with one-click MCP readiness.
Watch Video

MCP Support for Multiple LLMs & Local Agents
 LATEST
Connect your Odoo MCP server to the full AI ecosystem — Antigravity, Claude WebApp, Claude CLI, Claude Desktop, Gemini CLI, Codex CLI, Codex Desktop App, and Codex WebApp. One setup, cross-platform AI automation.
Watch Video

Custom Module Creation LATEST
Create fully customized Odoo modules automatically based on your business requirements without manual coding.
Watch Video

Website Snippet Builder LATEST
Build reusable and customizable Odoo Website snippets with AI assistance for faster website development.
Watch Video

WebApp Creation LATEST
Create powerful Odoo WebApps without requiring external servers, third-party platforms, or additional dependencies.
Watch Video

Tools Execution Log LATEST
Monitor, track, and audit all AI tool executions through a centralized execution history and activity log.
Watch Video

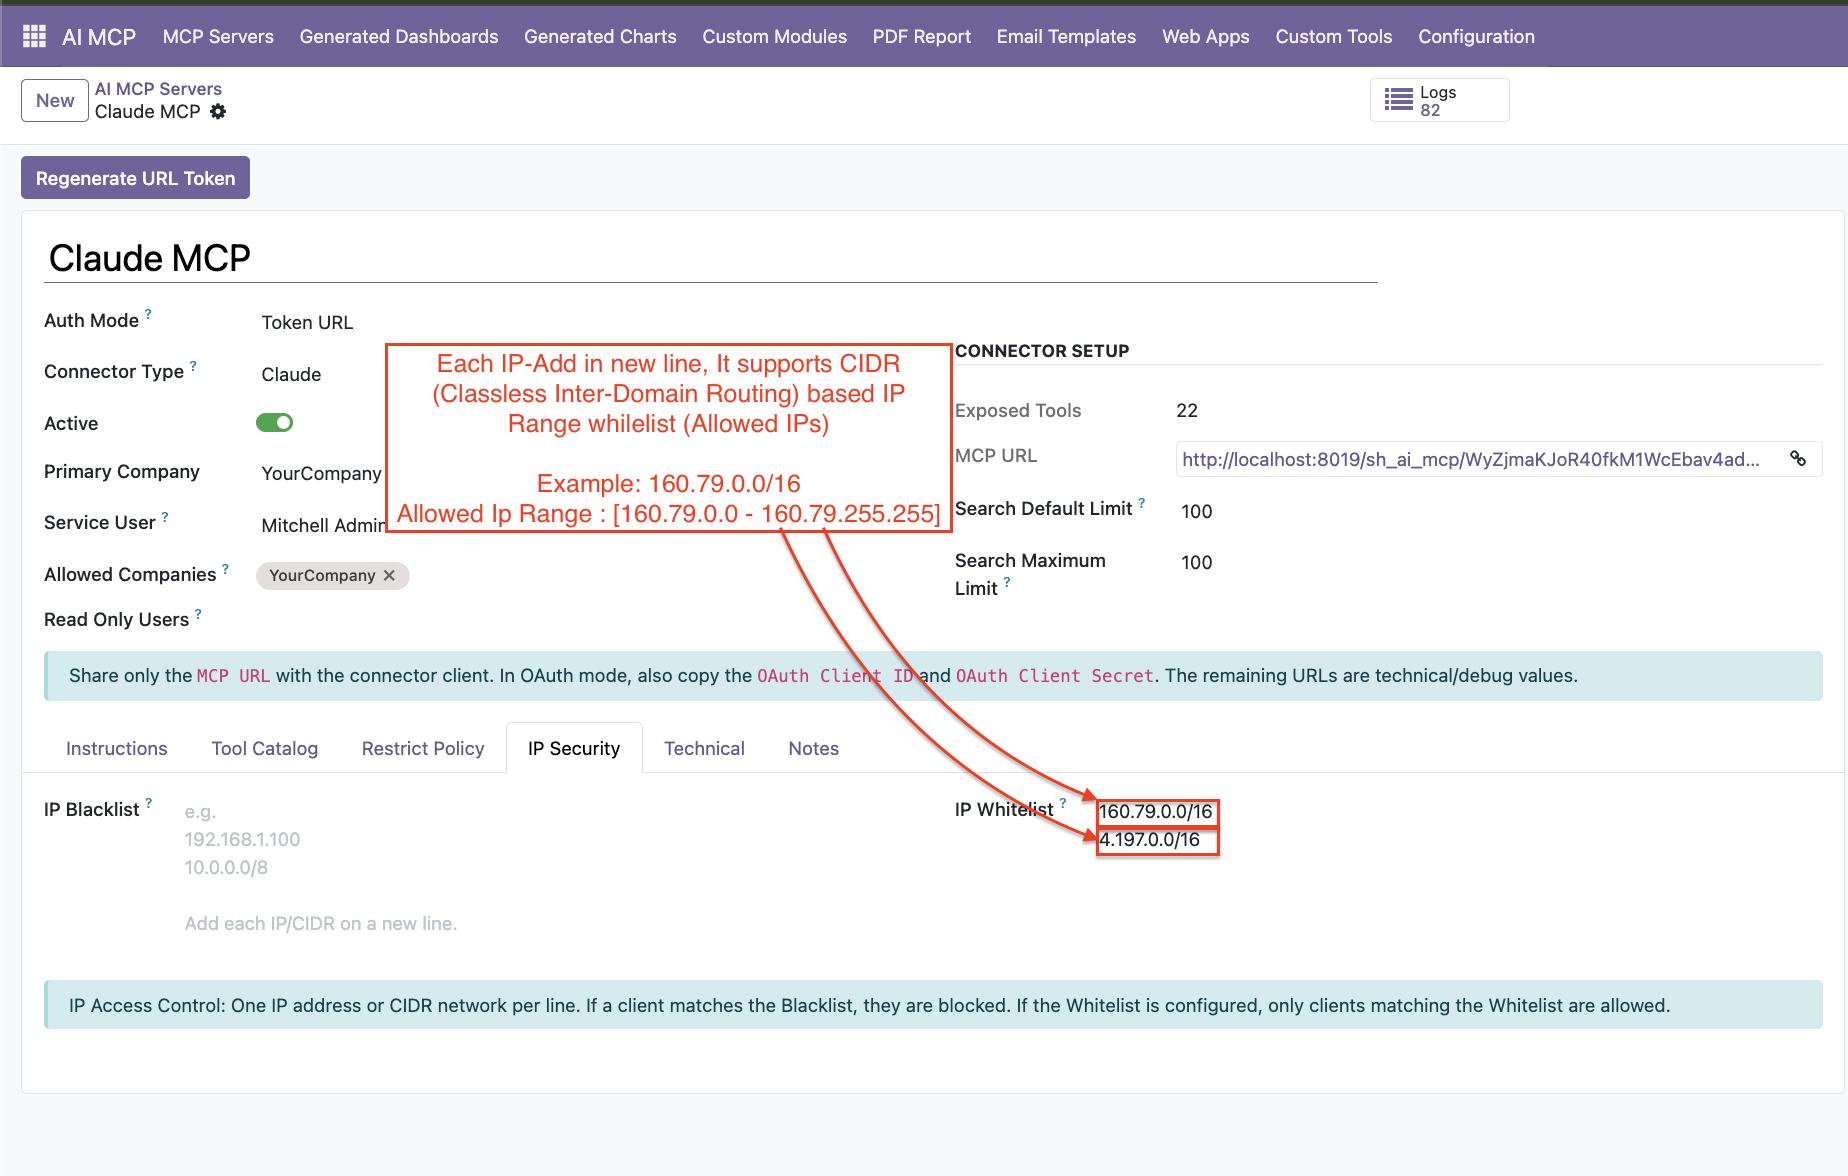
IP Restriction Management LATEST
Control access with IP Whitelisting and Blacklisting to enhance security and prevent unauthorized usage.
Watch Video

Dynamic PDF Report Builder LATEST
Design, generate, and download fully customizable PDF reports tailored to your business needs.
Watch Video

Dynamic Email Template Creator LATEST
Create, edit, and send dynamic email templates with support for personalized and mass email campaigns.
Watch Video

AI-Powered Lead Generation LATEST
Automatically generate qualified leads using AI based on lead briefs, business requirements, and target criteria.
Watch Video

Custom Tool Builder LATEST
Build custom AI-powered tools tailored to unique workflows, processes, and business-specific requirements.
Watch Video

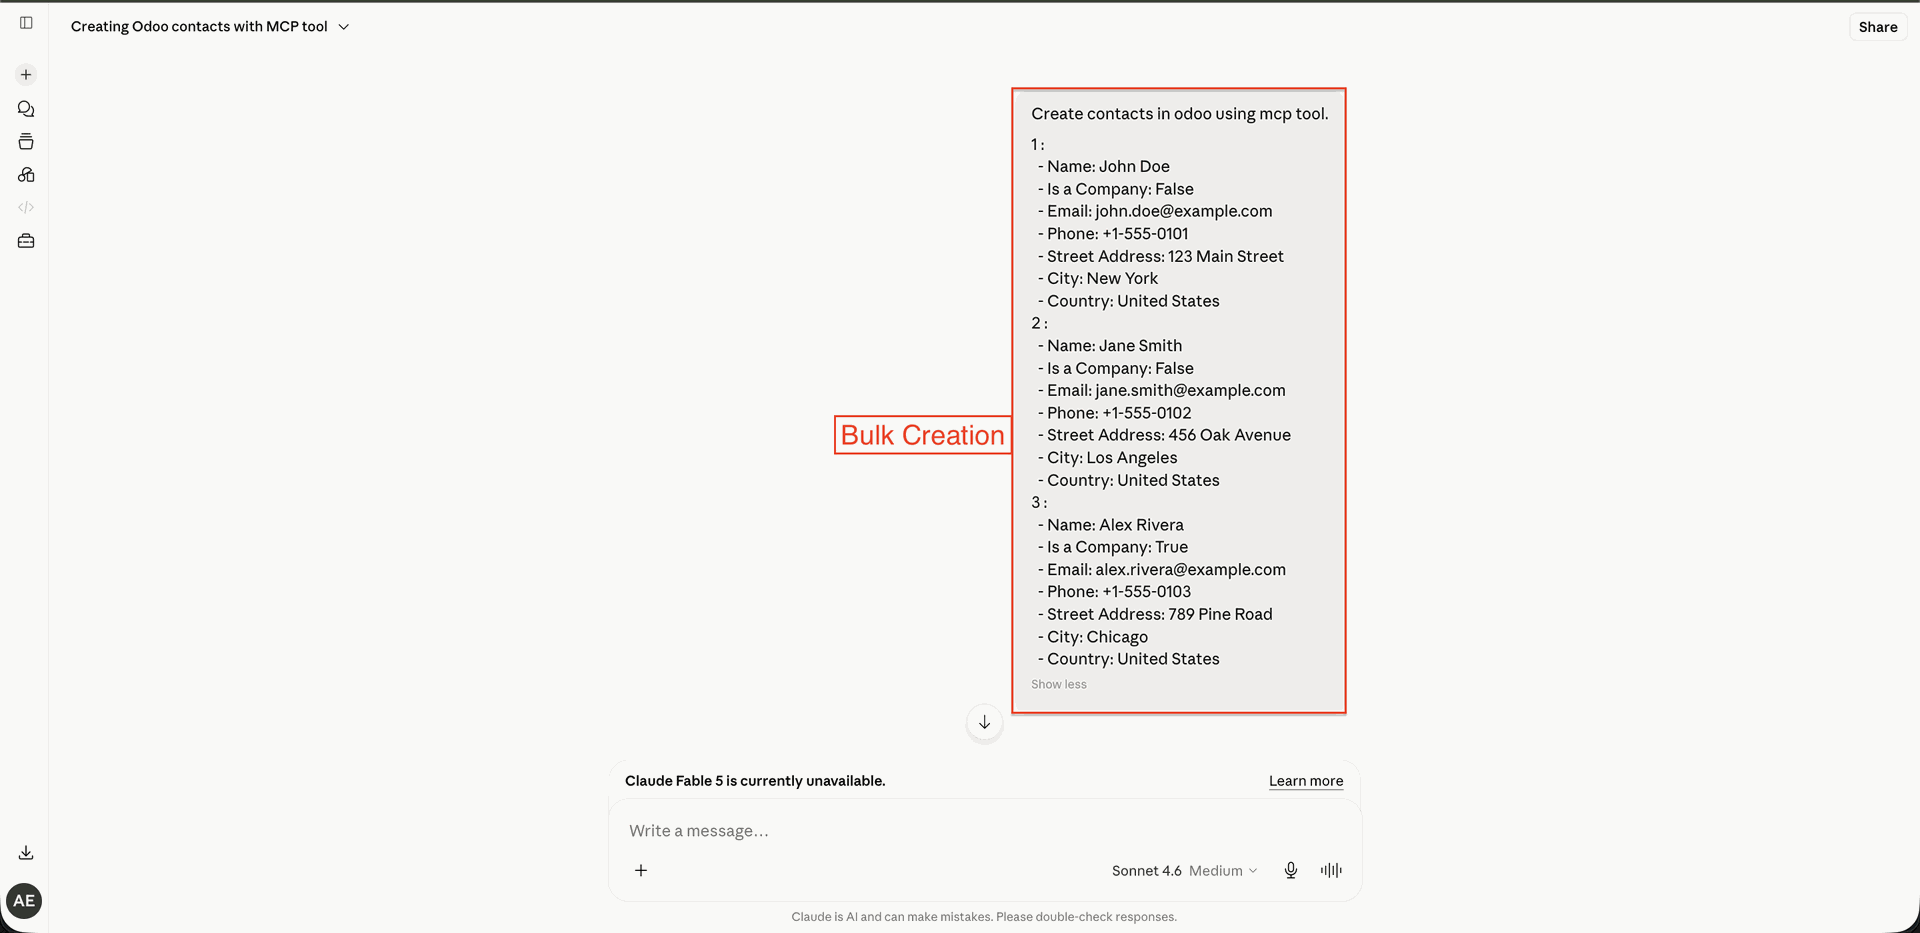
Bulk Record Management LATEST
Create, update, and delete multiple records simultaneously to streamline operations and improve productivity.
Watch Video
Workflow
-
 Configuration
-
 MCP Server Setup
-
 Field & Model Access
-
 Dashboards & Charts
-
 Custom Module Creation NEW
-
 Website Snippet Builder NEW
-
 WebApp Creation NEW
-
 Tools Execution Log NEW
-
 Dynamic PDF Report Builder NEW
-
 Dynamic Email Template Creator NEW
-
 AI-Powered Lead Generation NEW
-
 Custom Tool Builder NEW
-
 IP Restriction Management NEW
-
 Bulk Record Management NEW
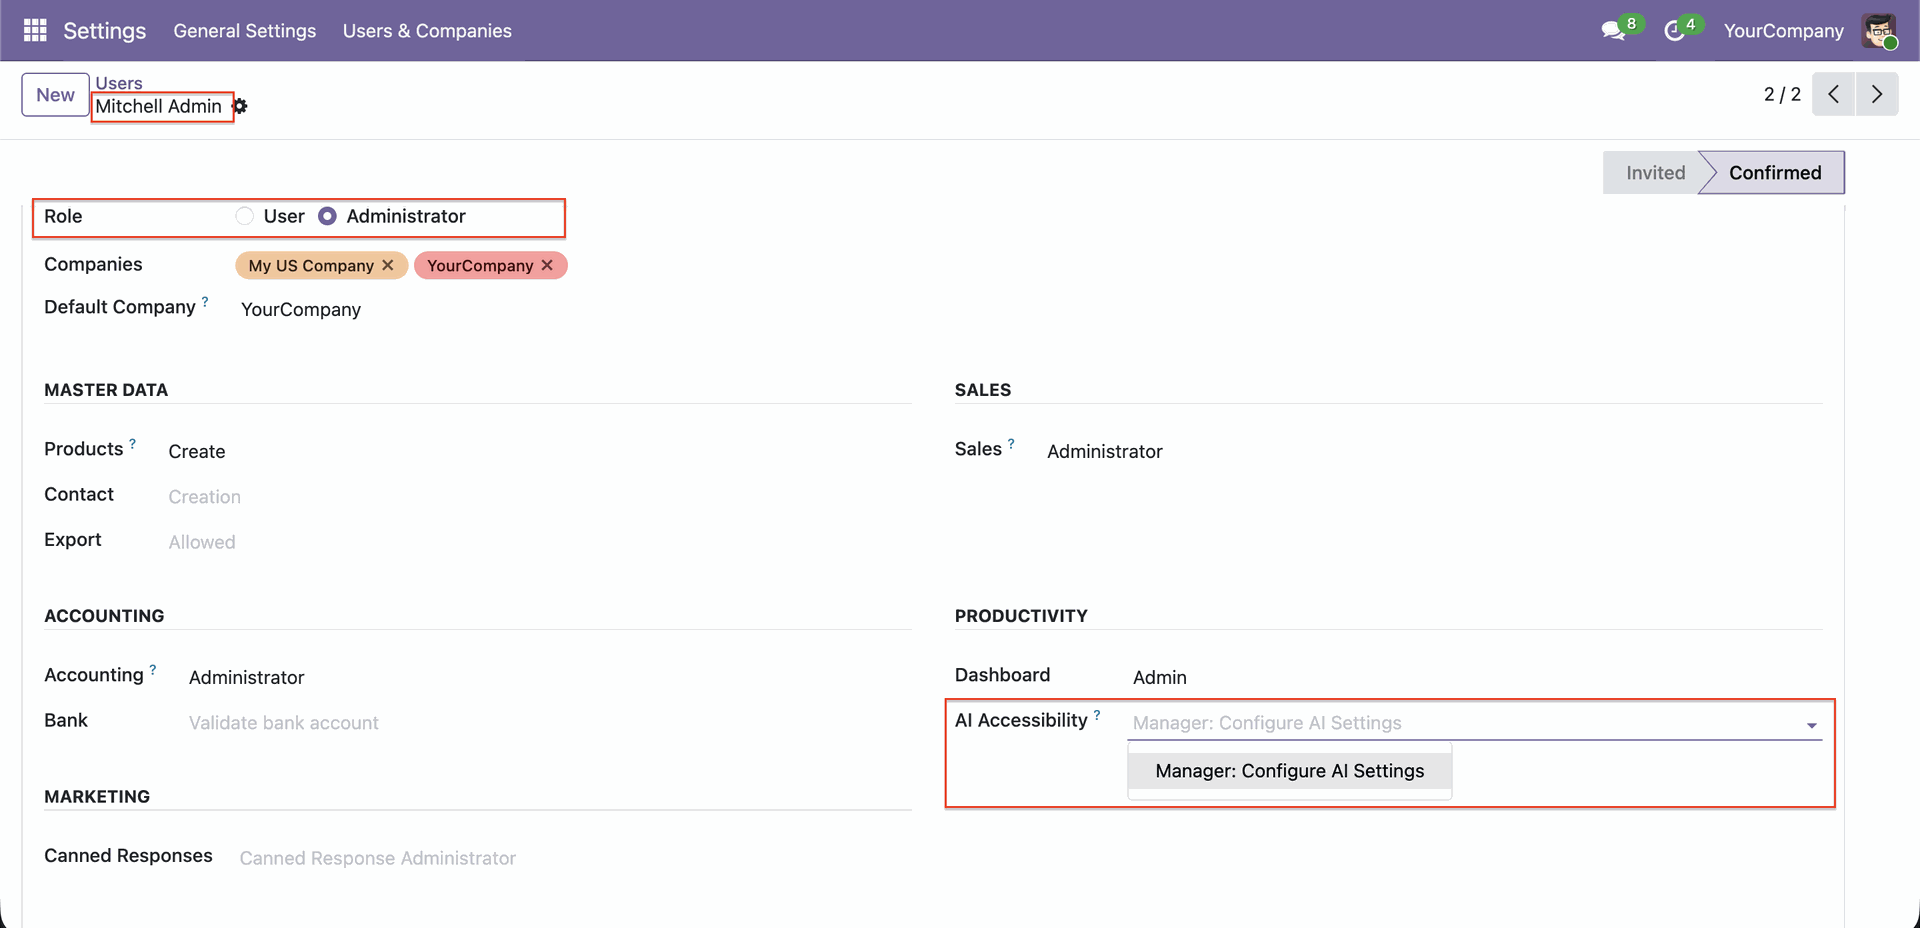
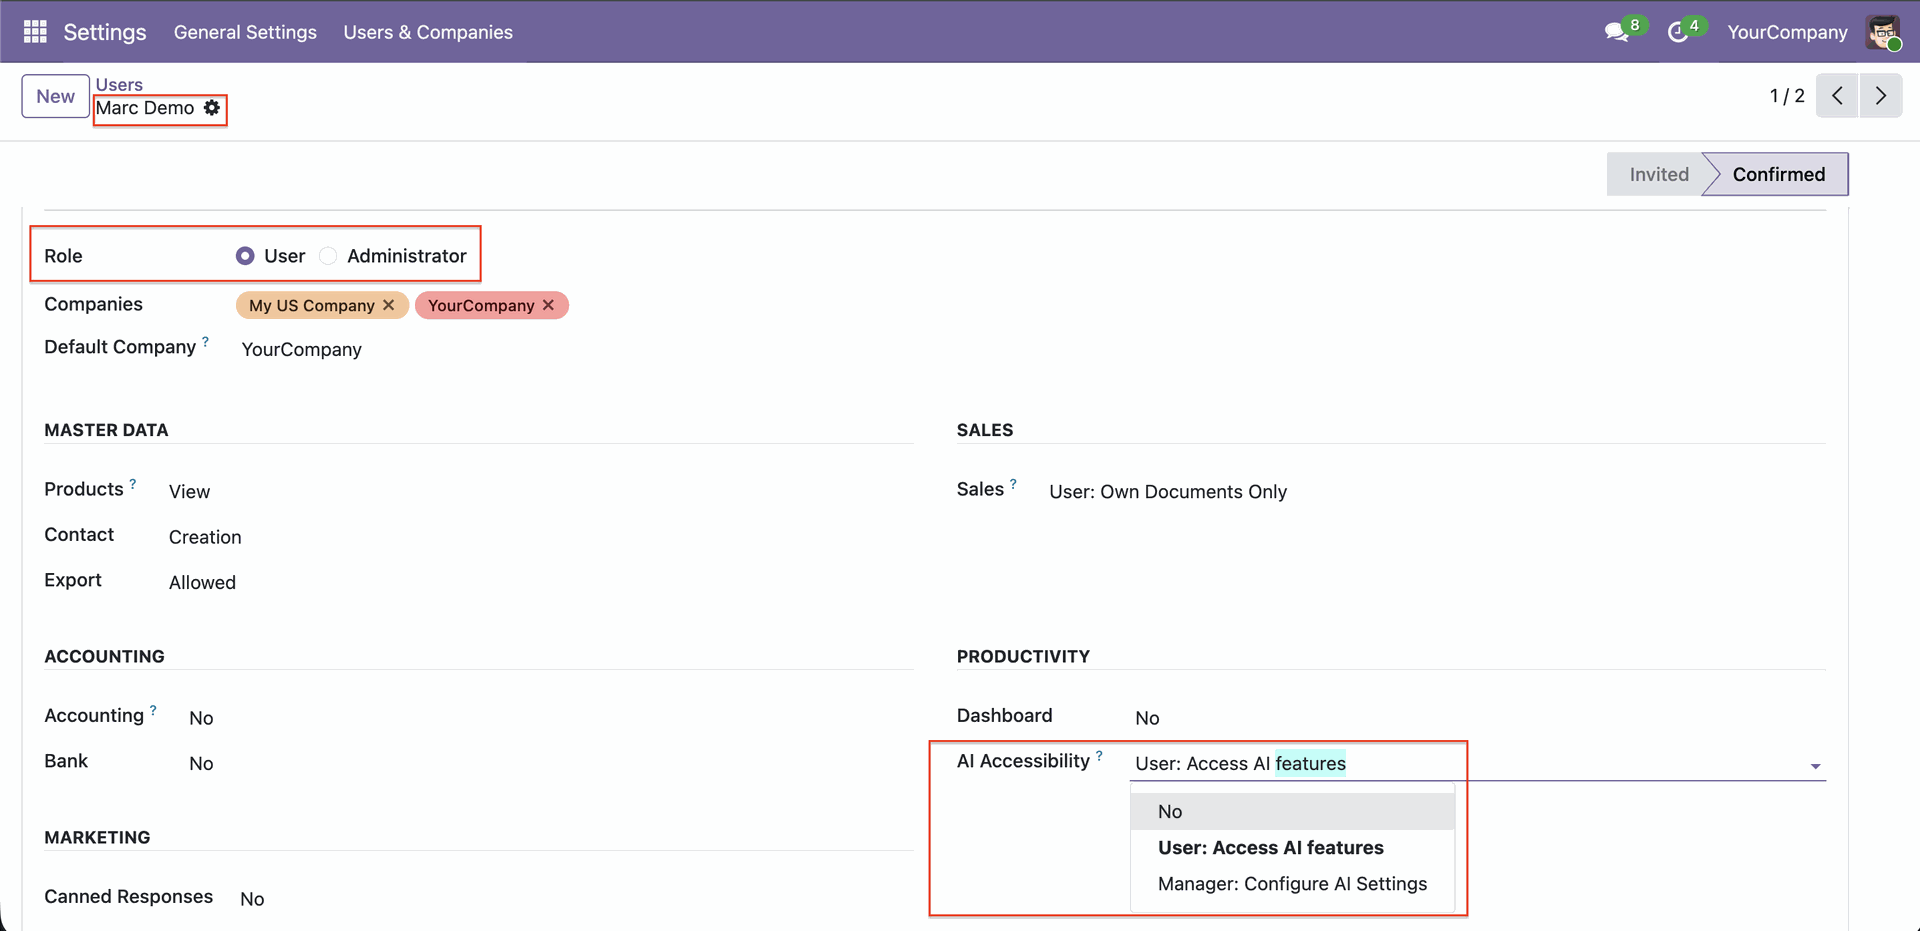
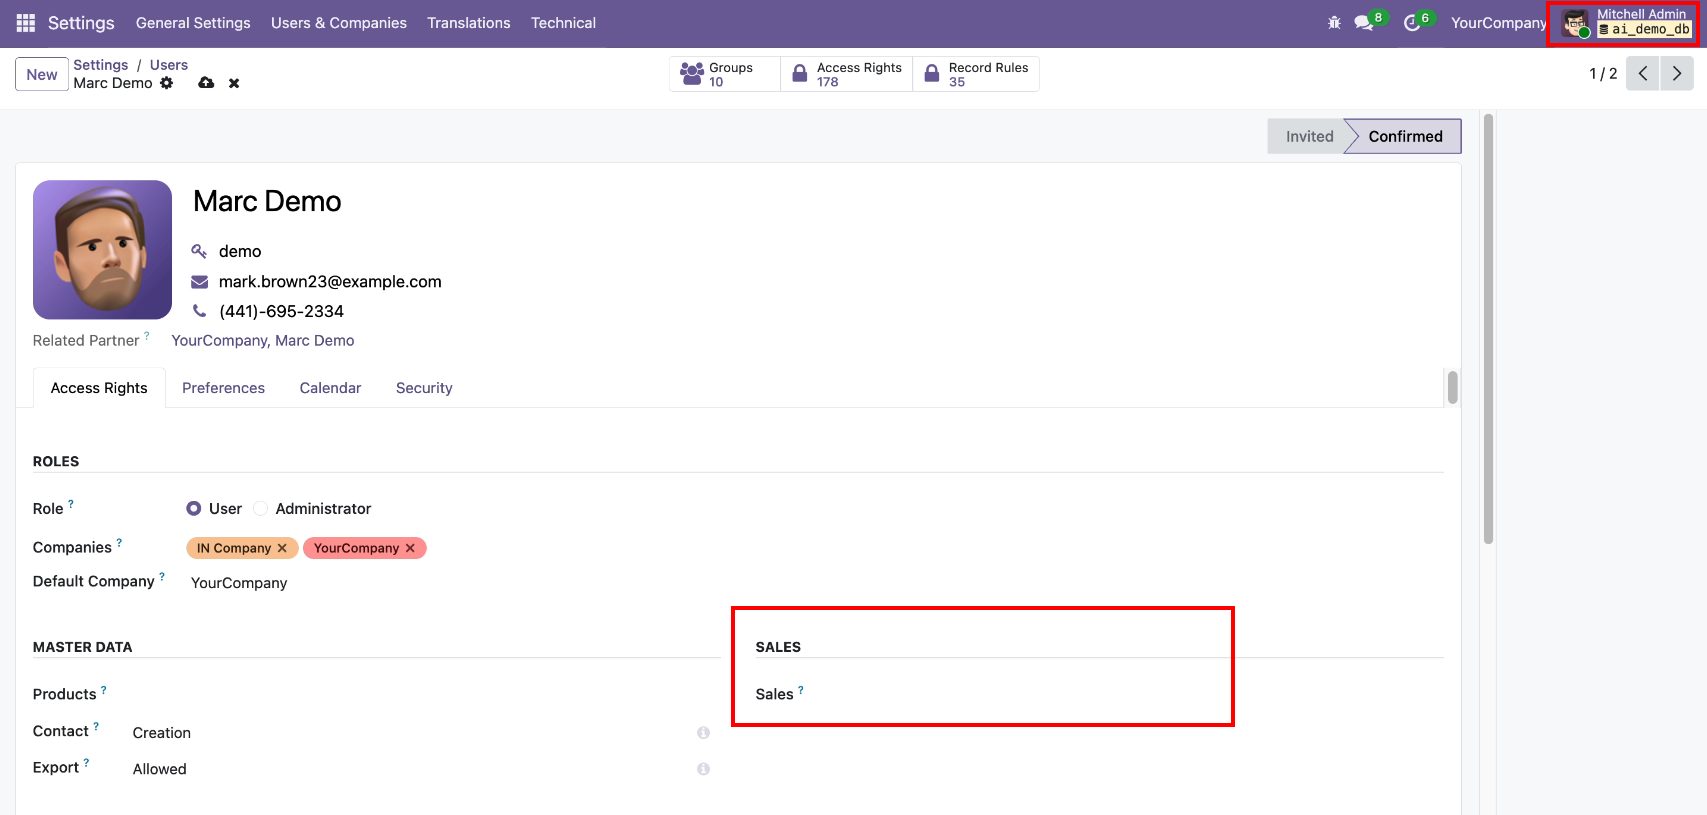
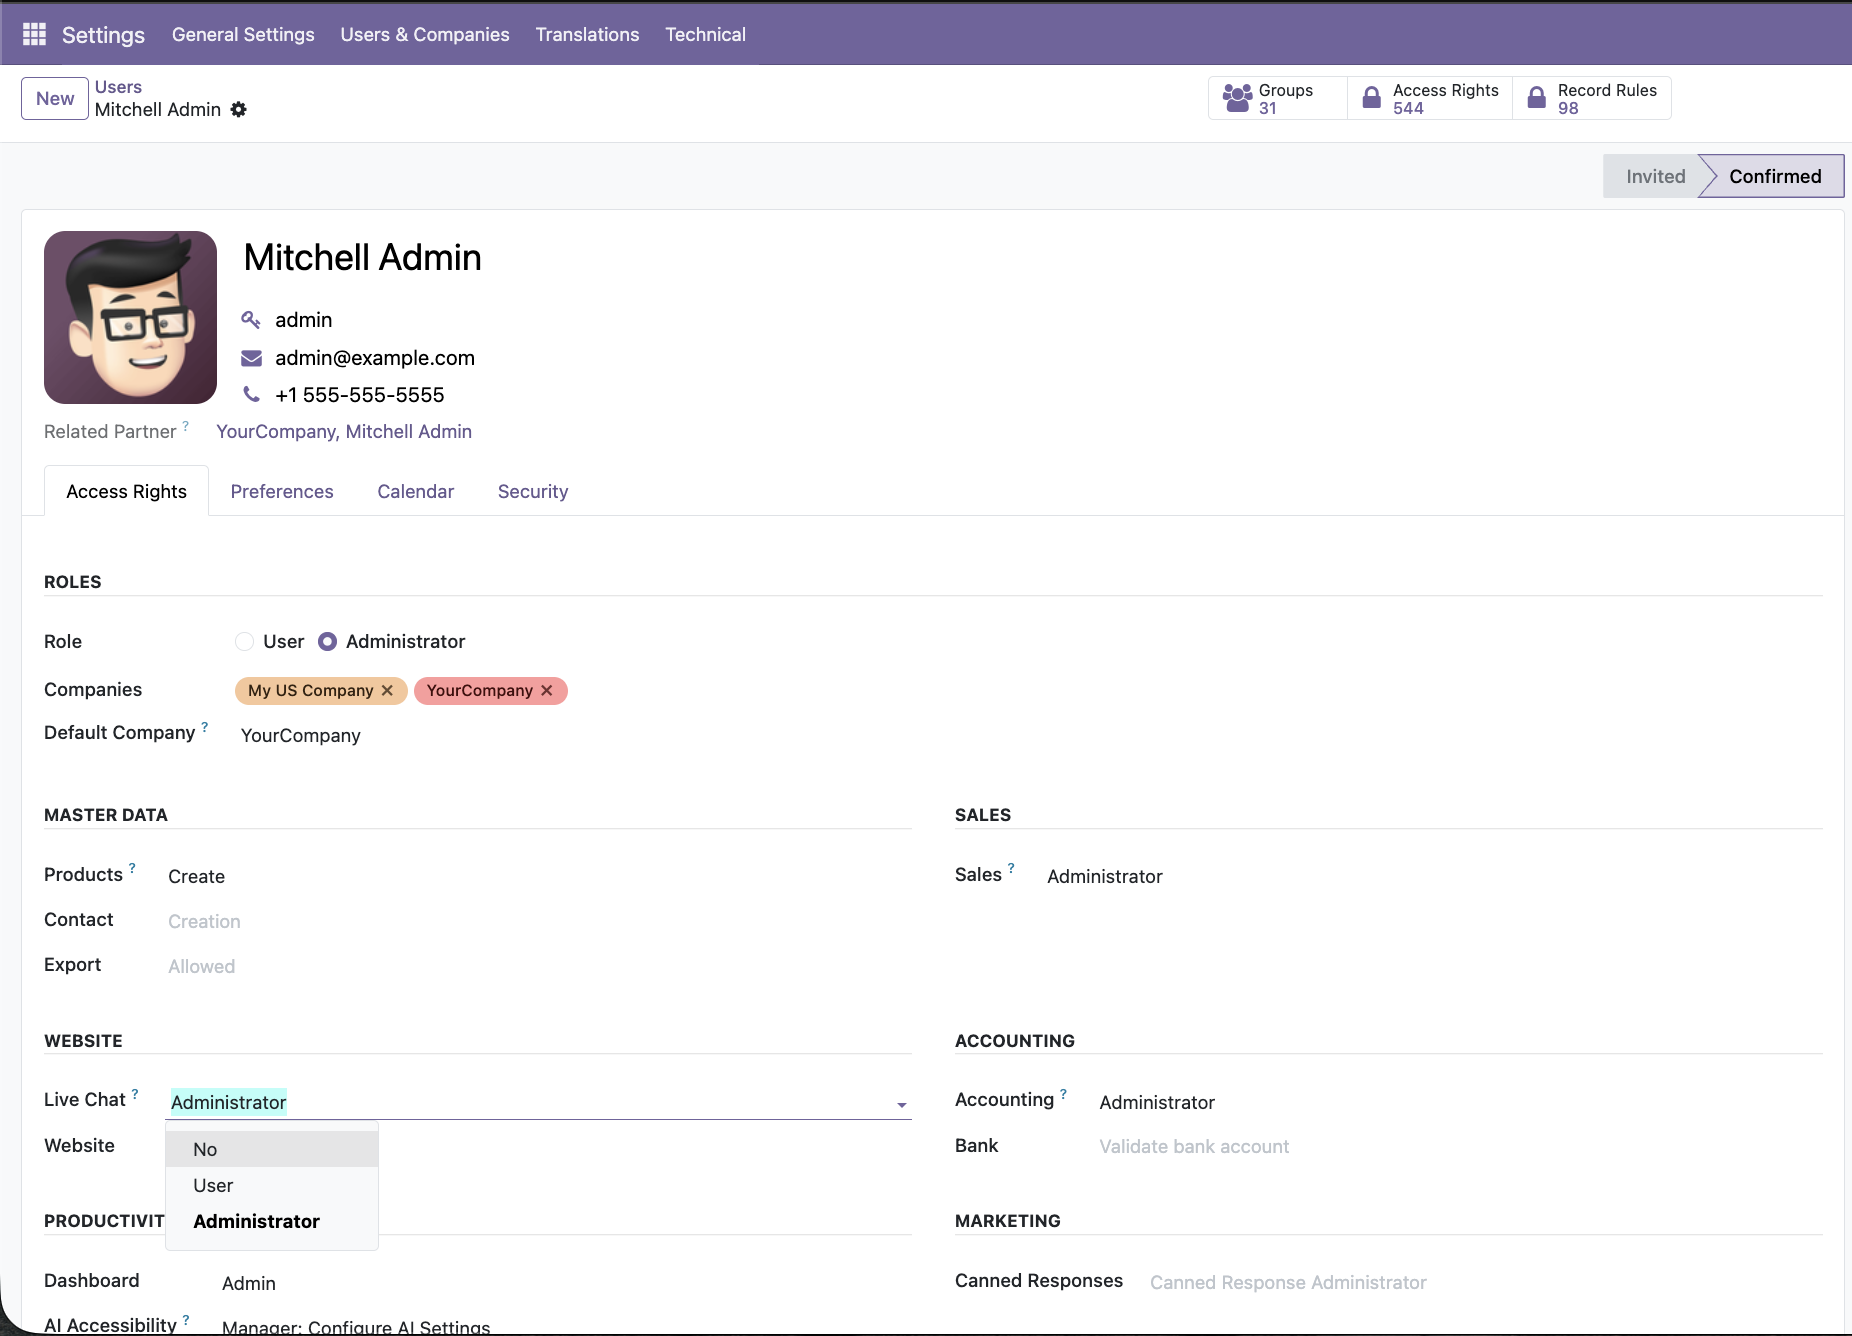
Navigate to Settings → Users.
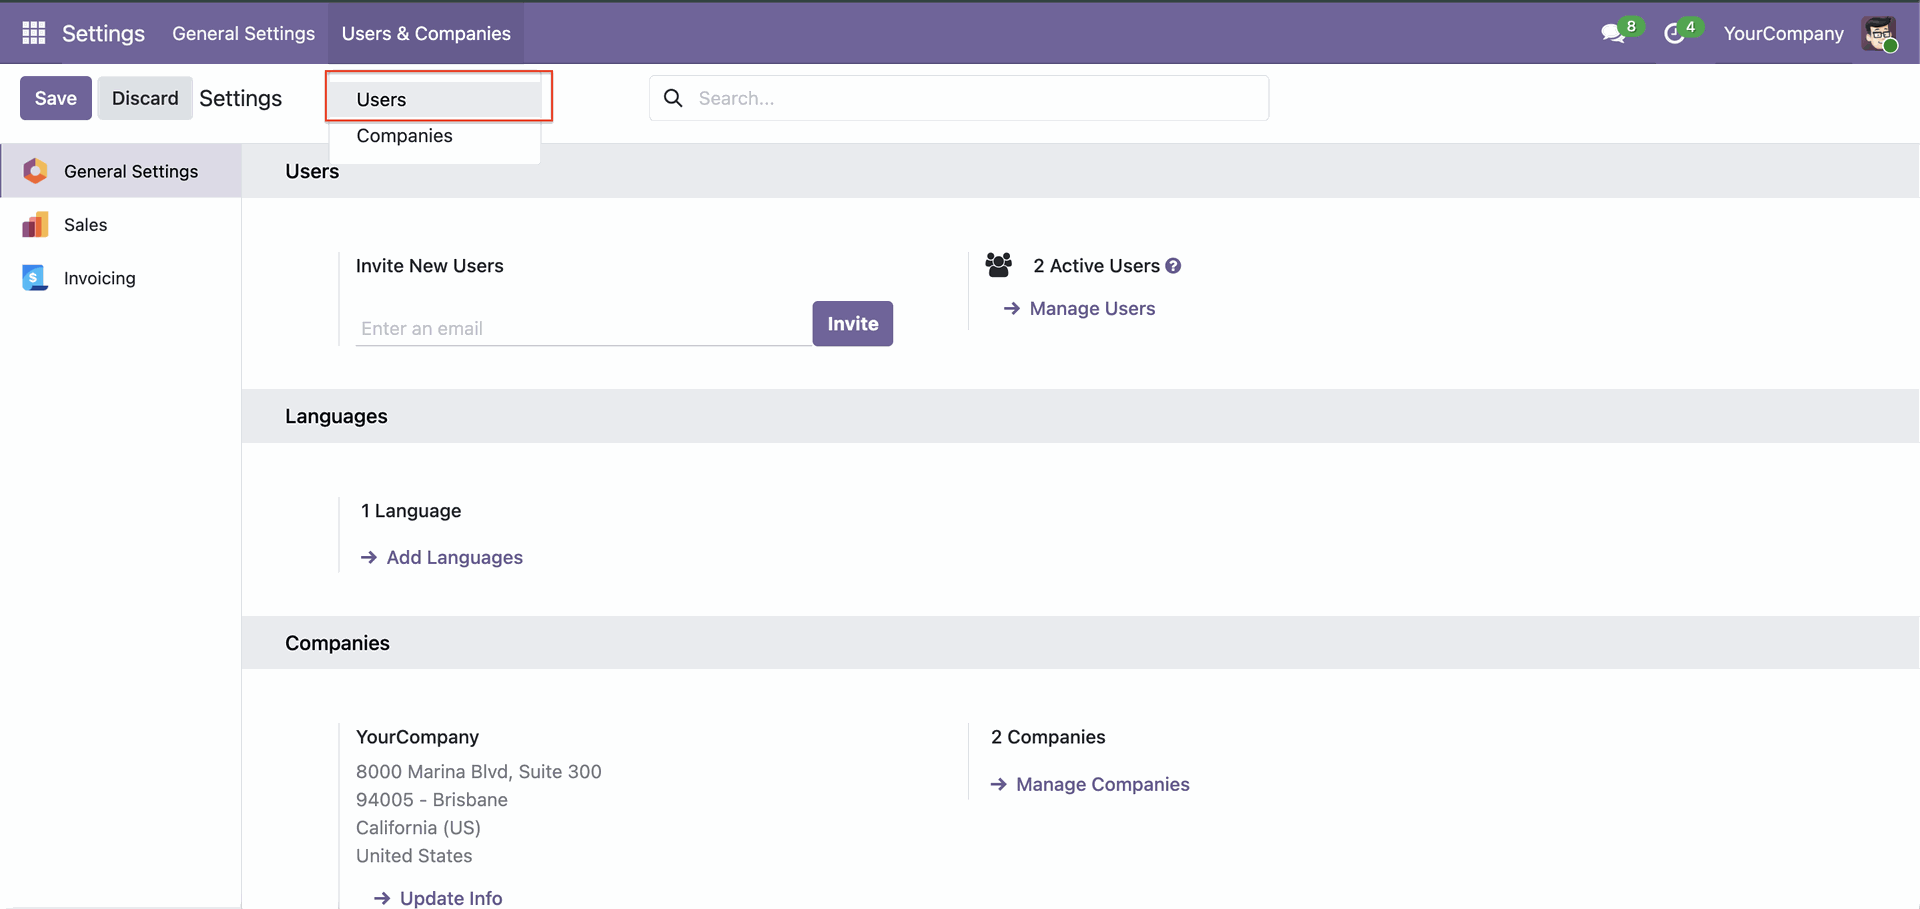
You can set access rights for AI under user settings.
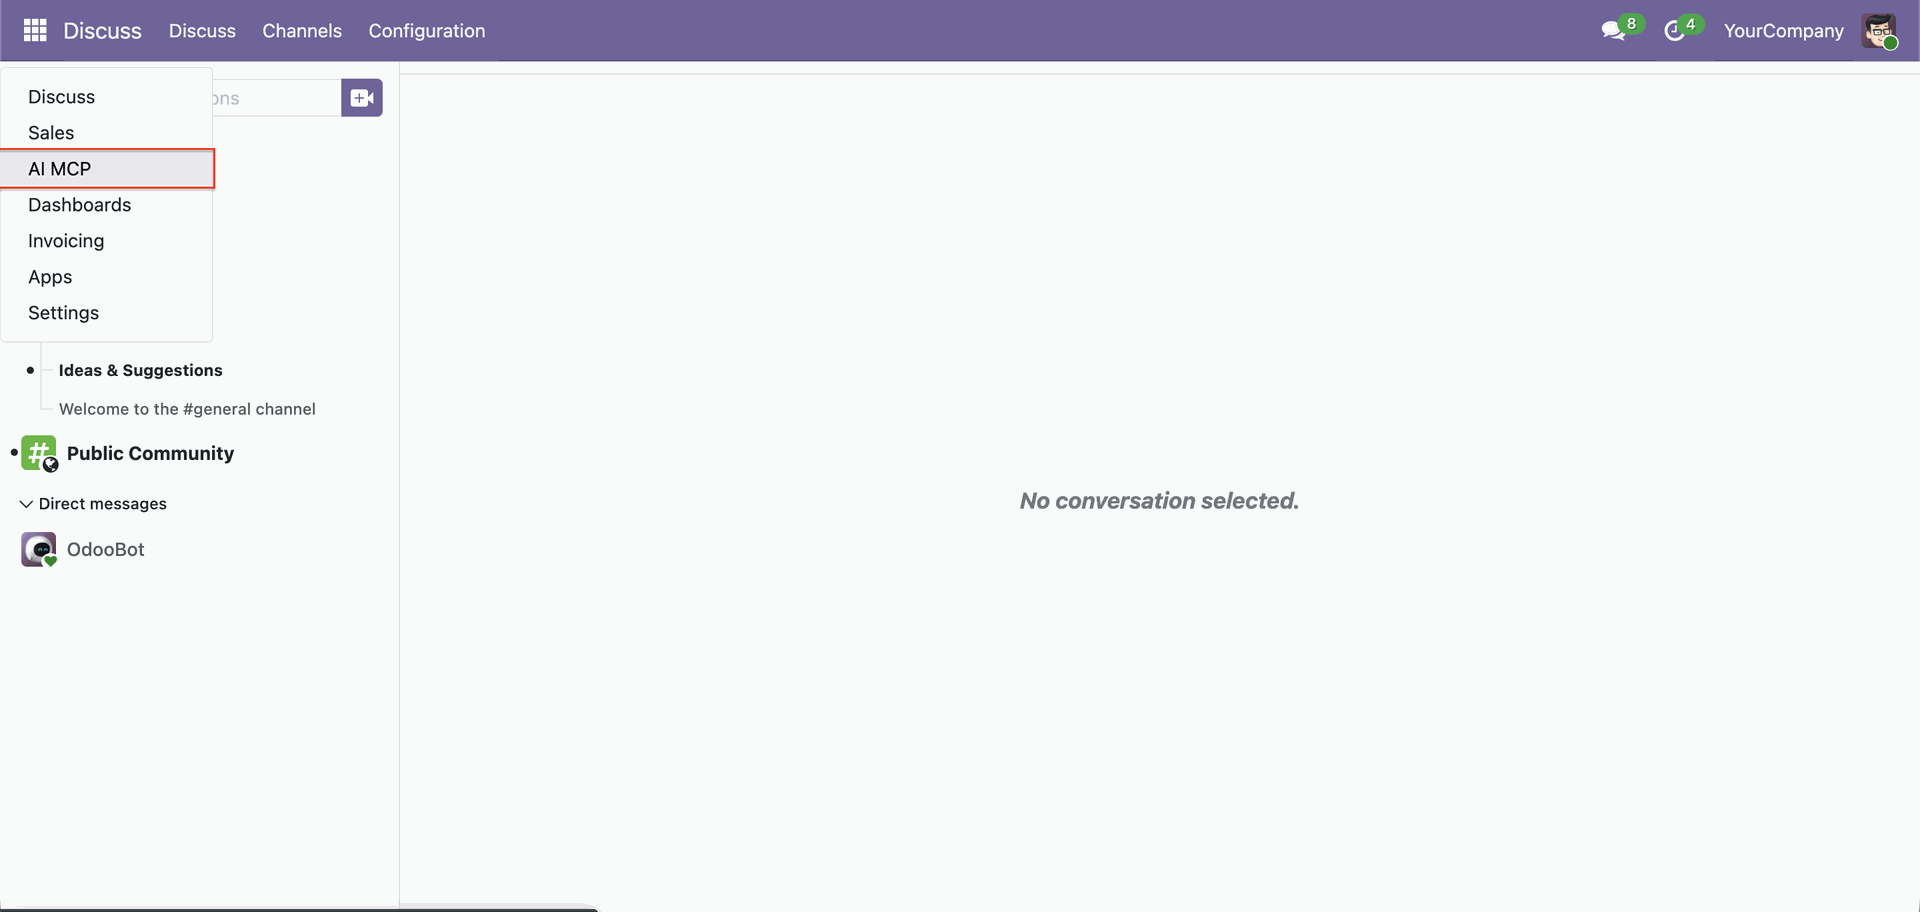
Go to the 'AI MCP'.
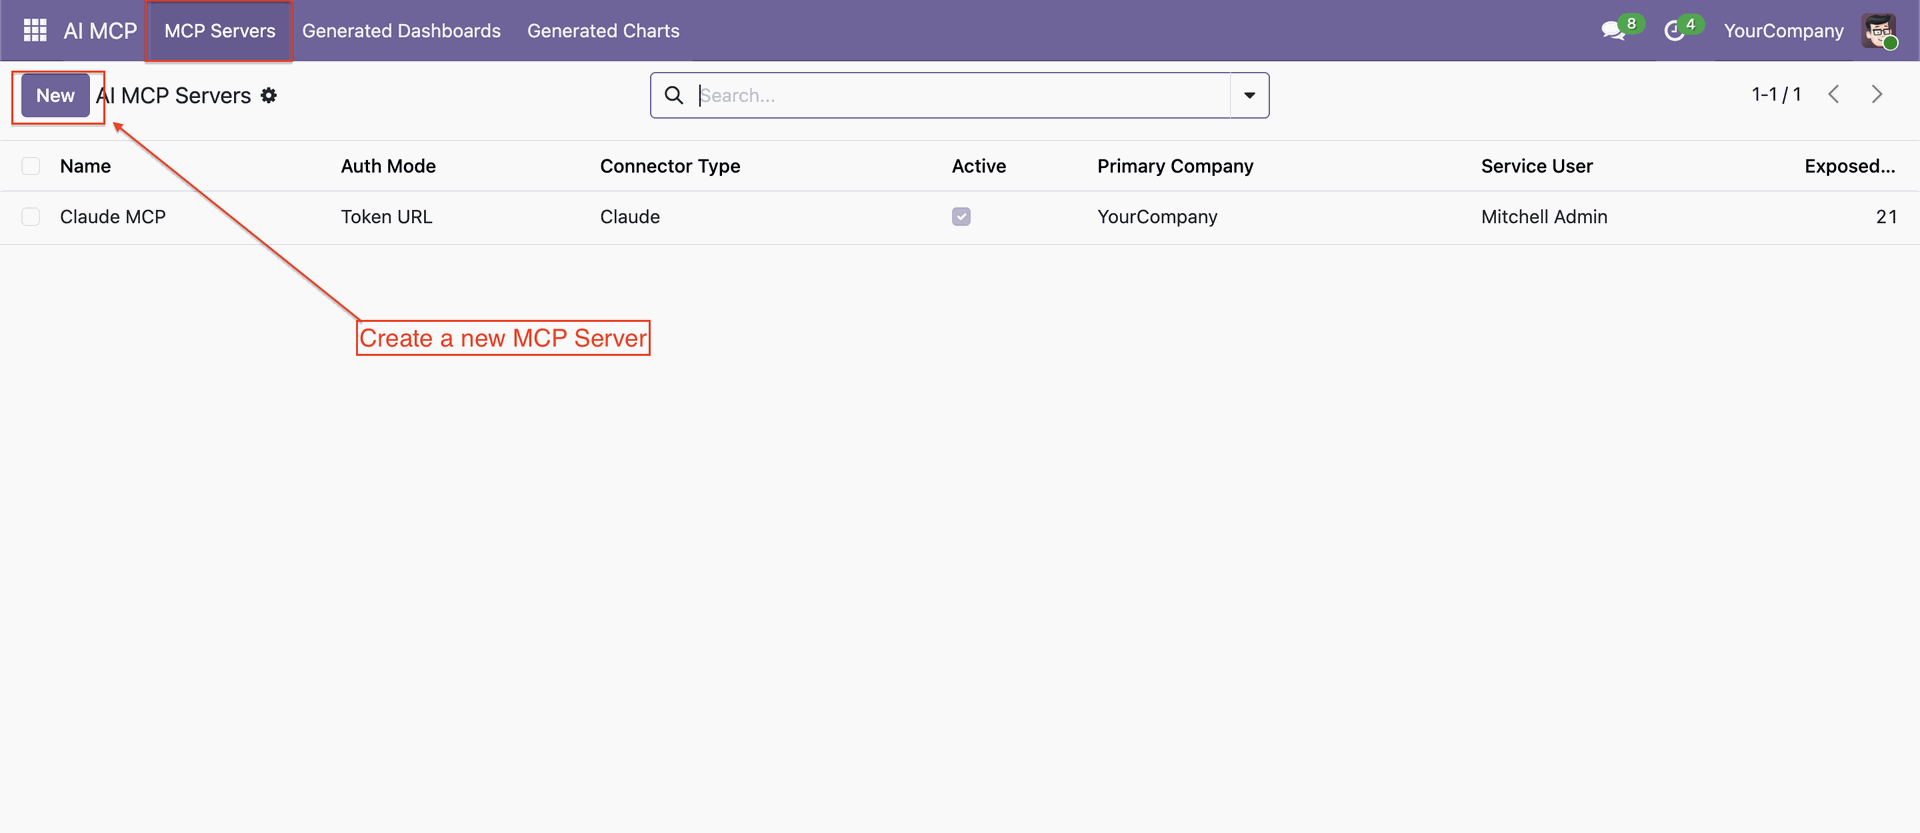
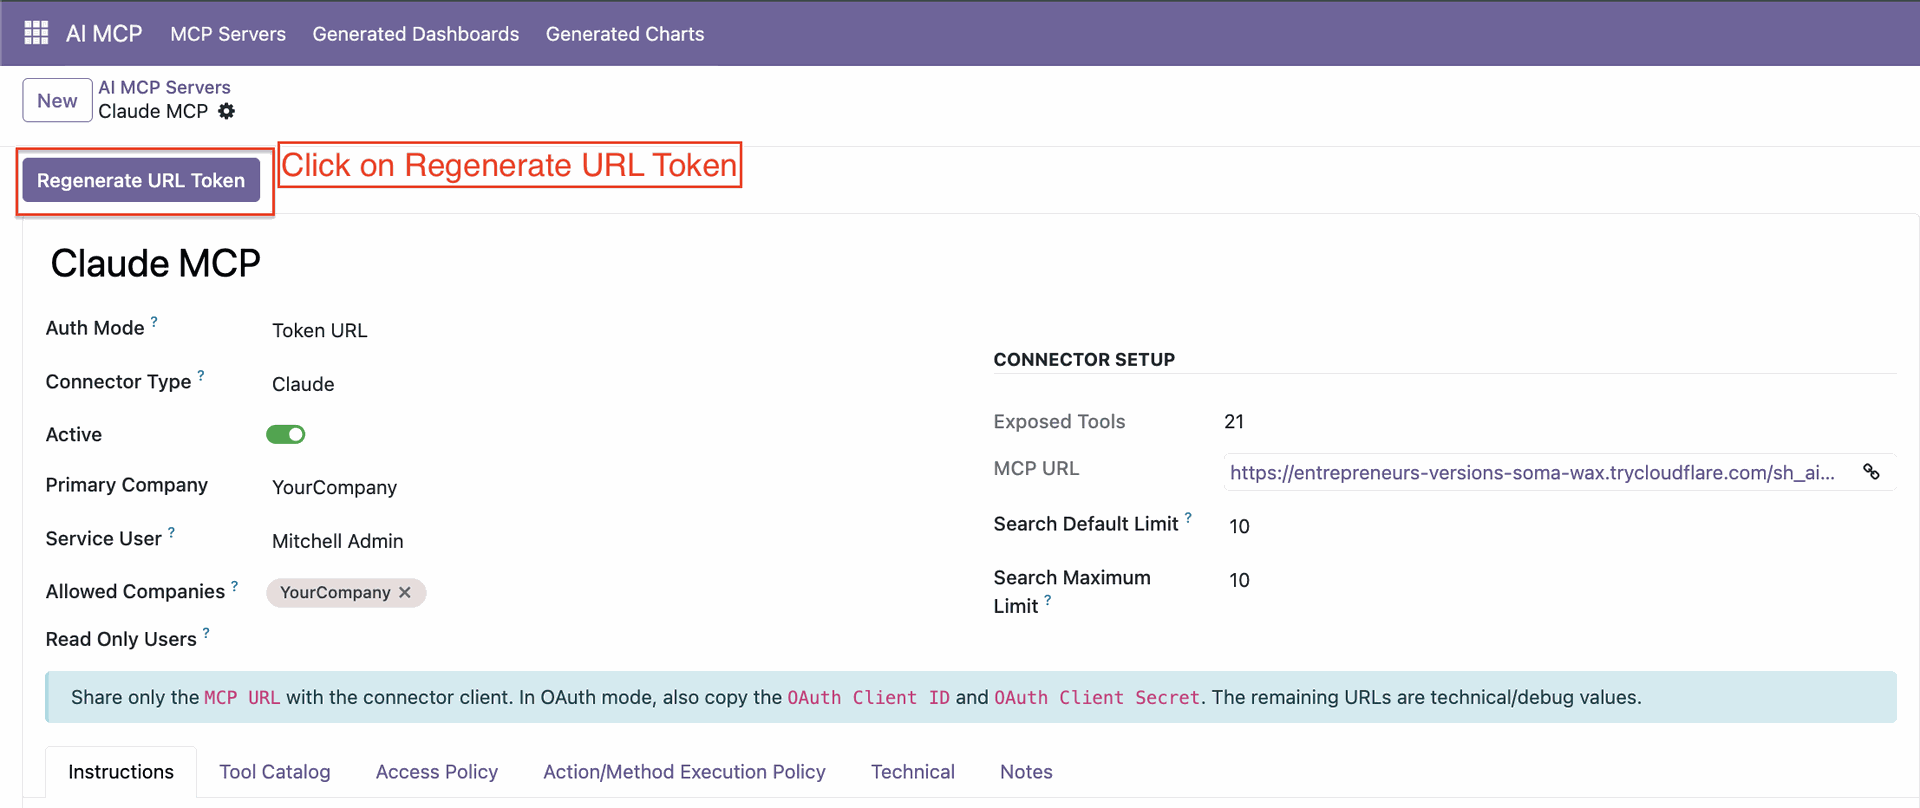
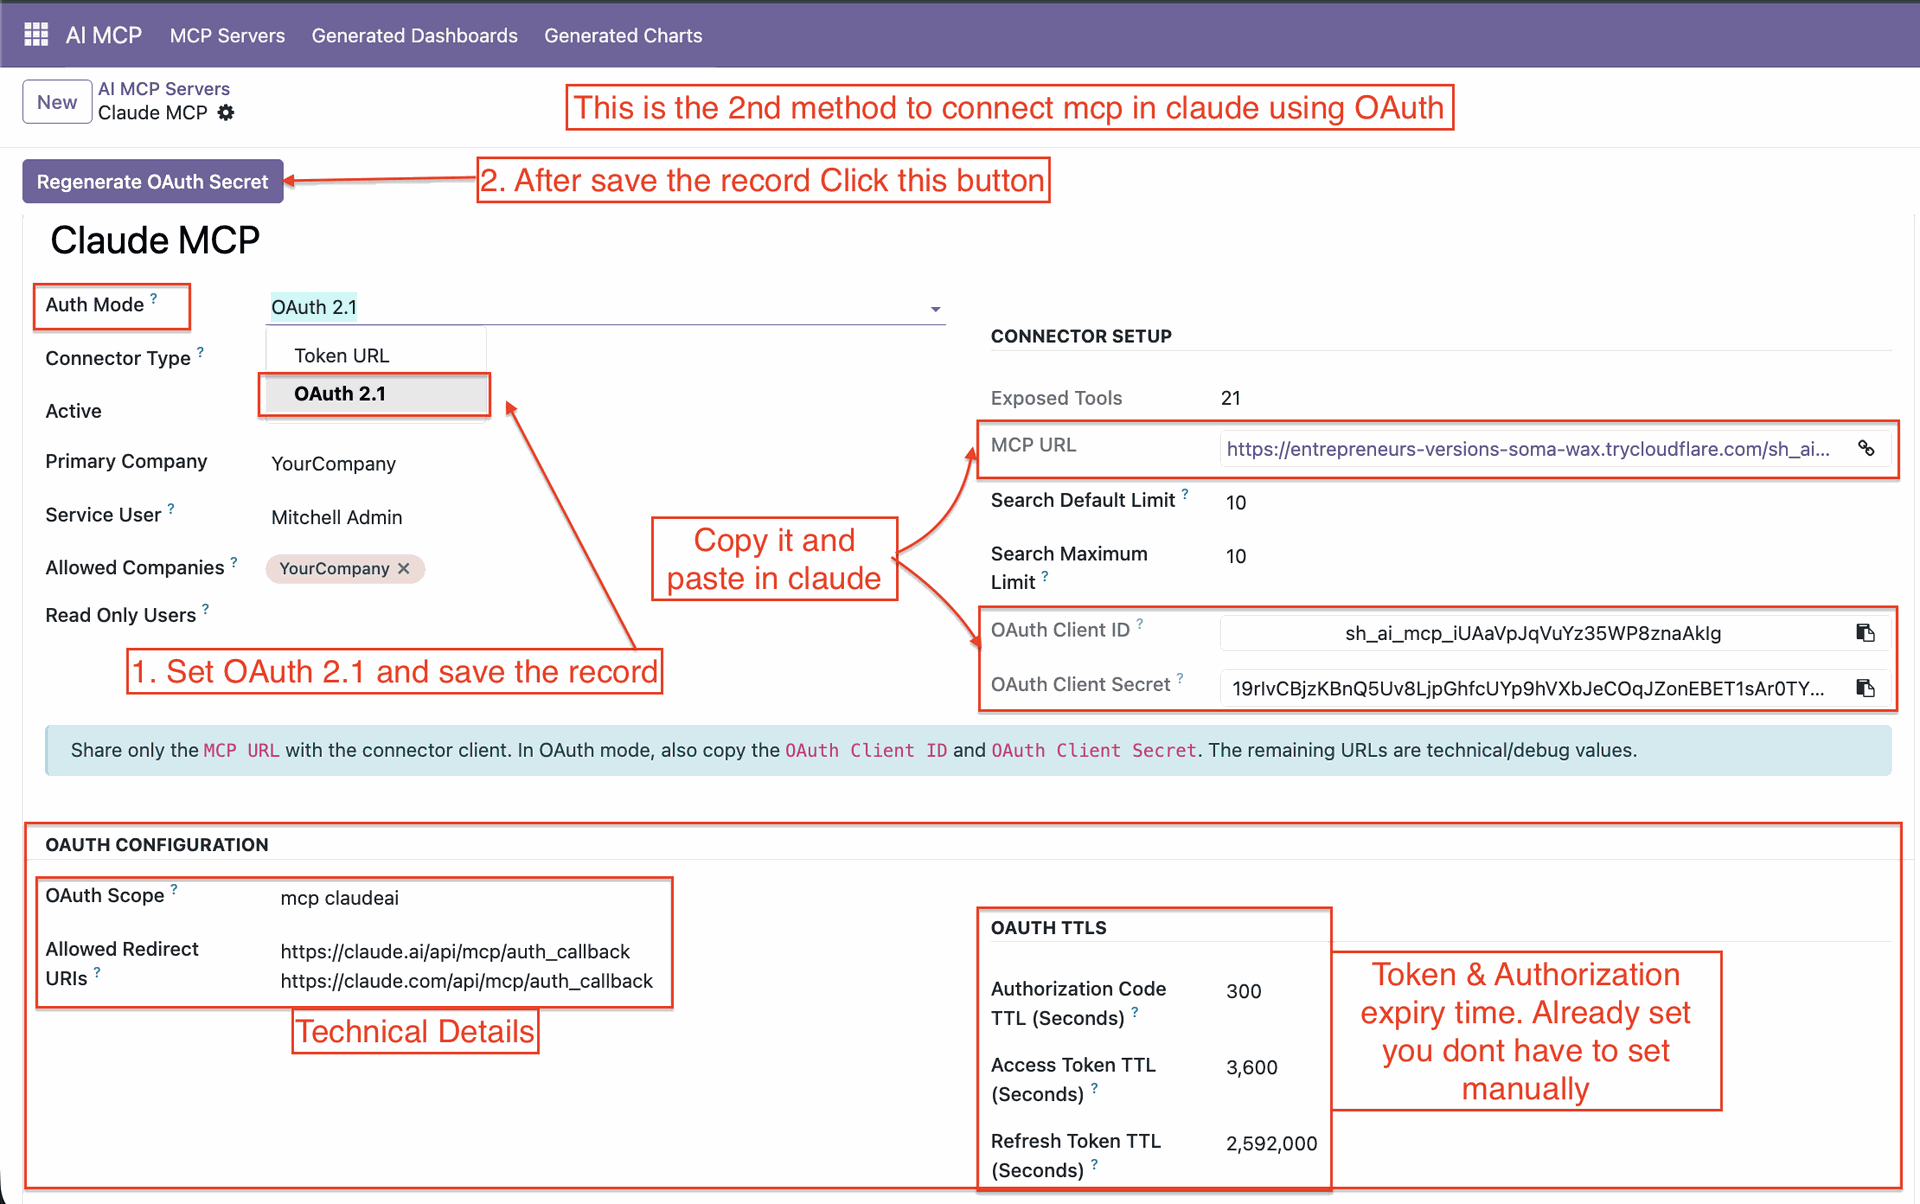
Create a new MCP Server.
Method 1: Connect with the Token URL.
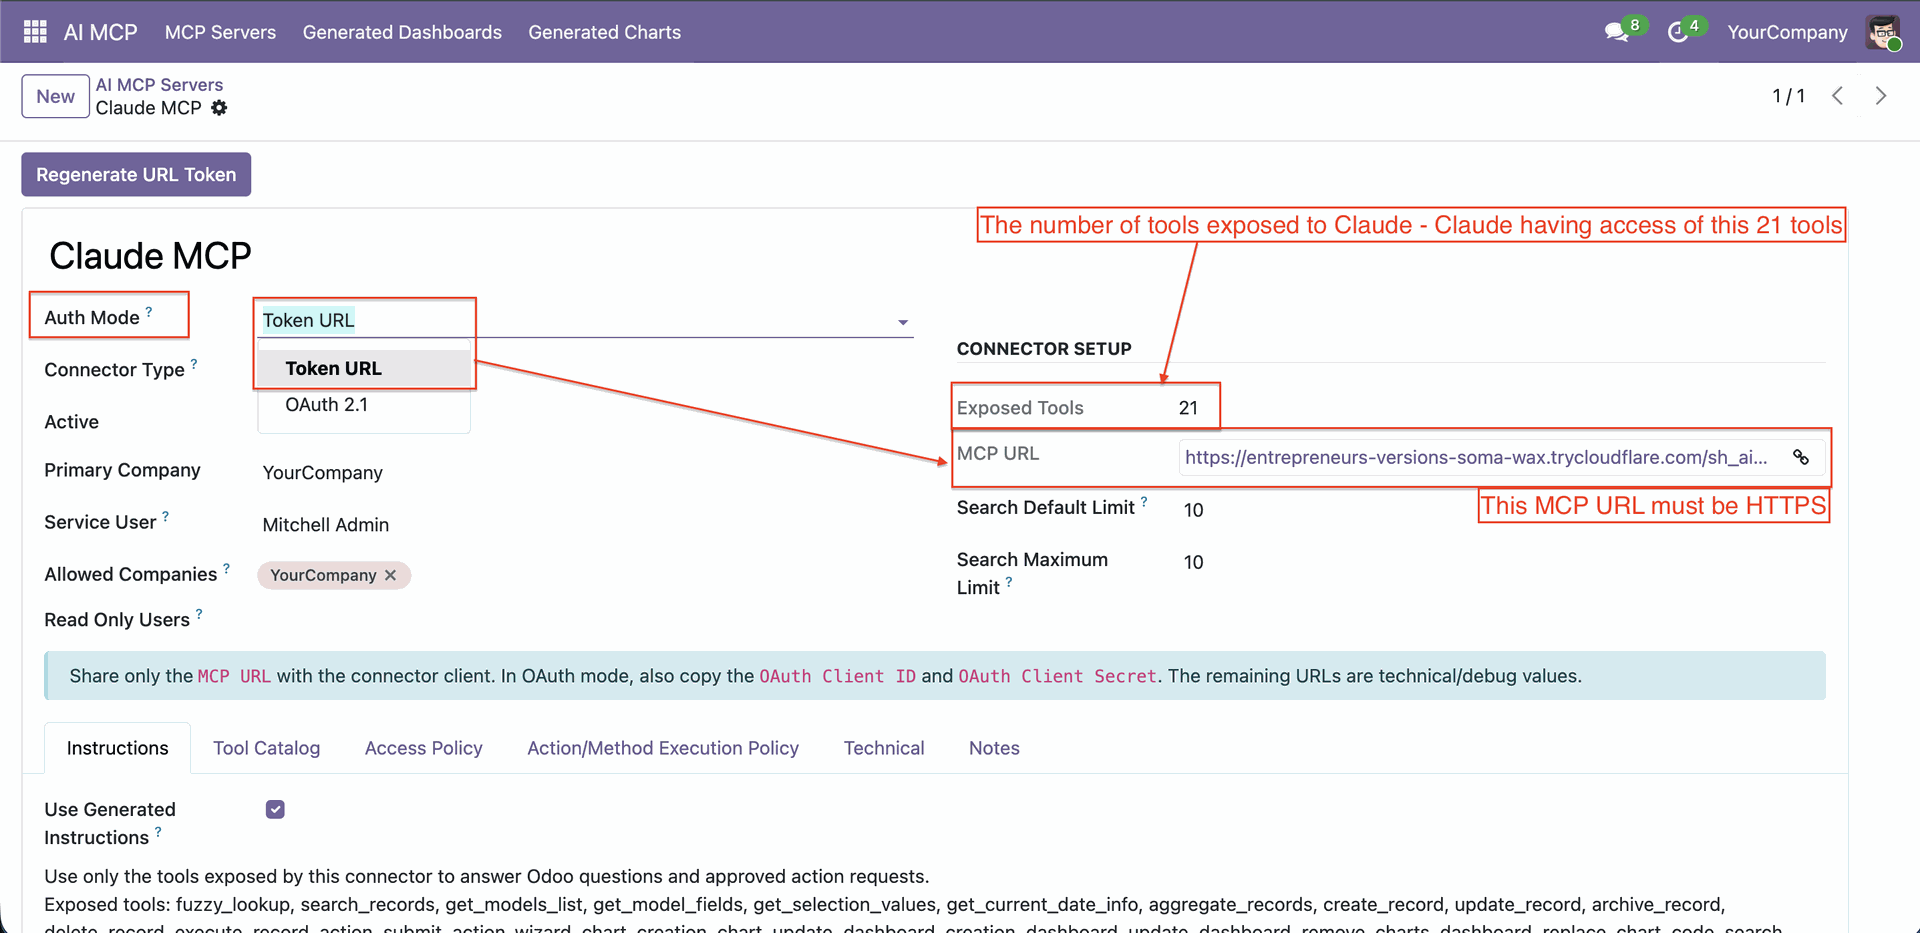
Click on 'Regenerate URL Token'.
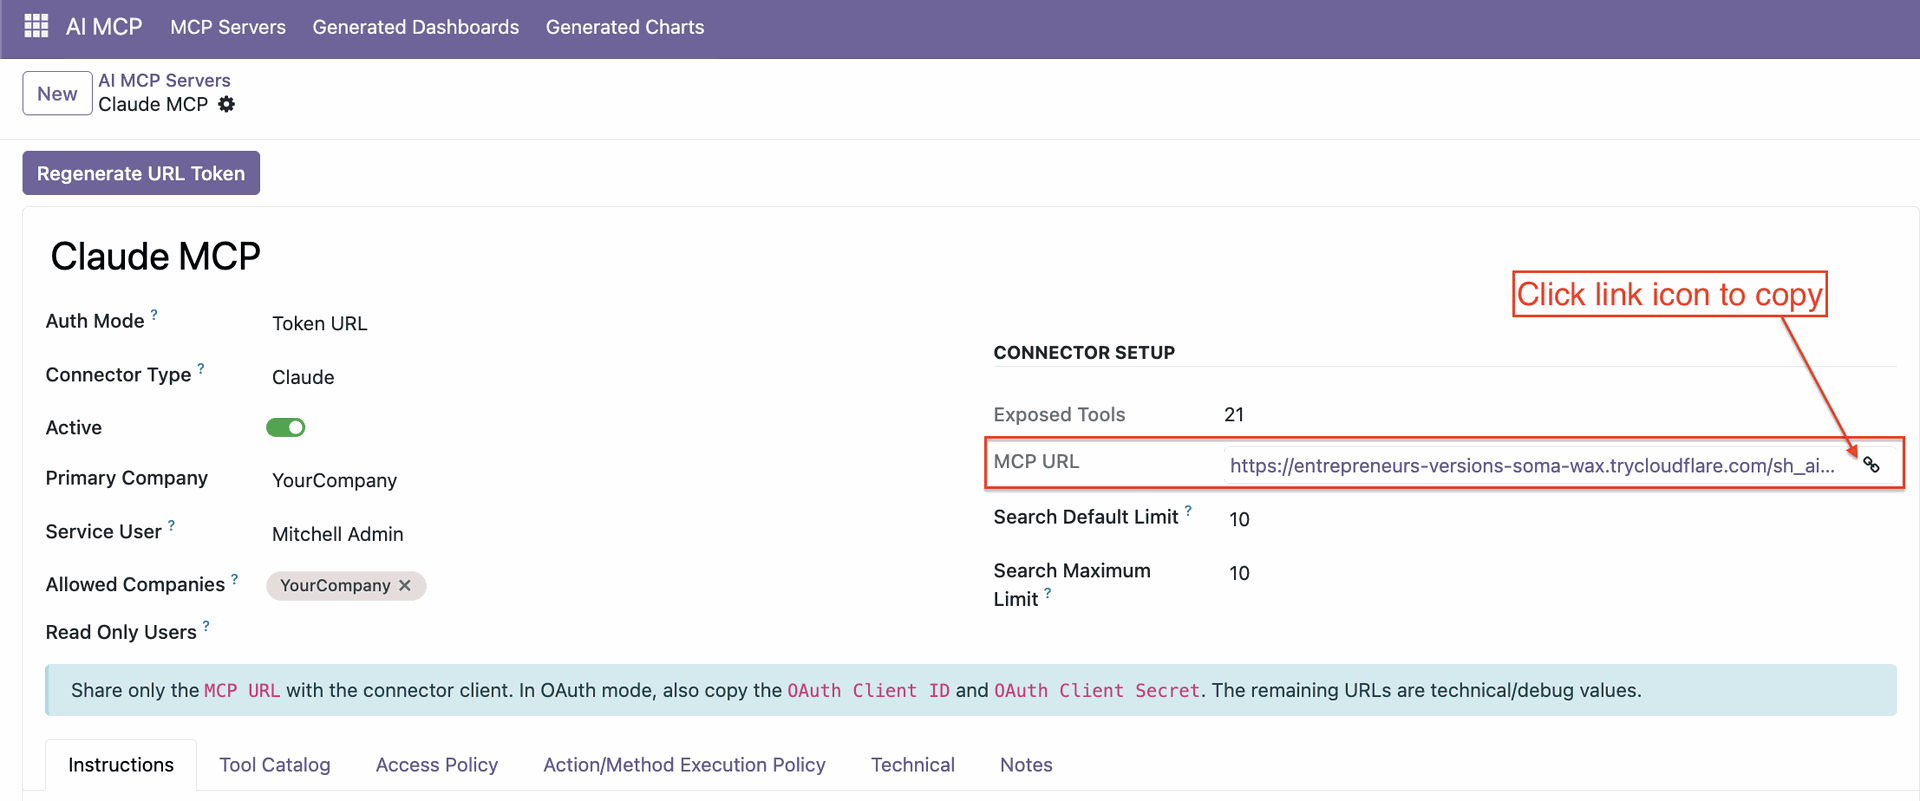
Copy the URL.
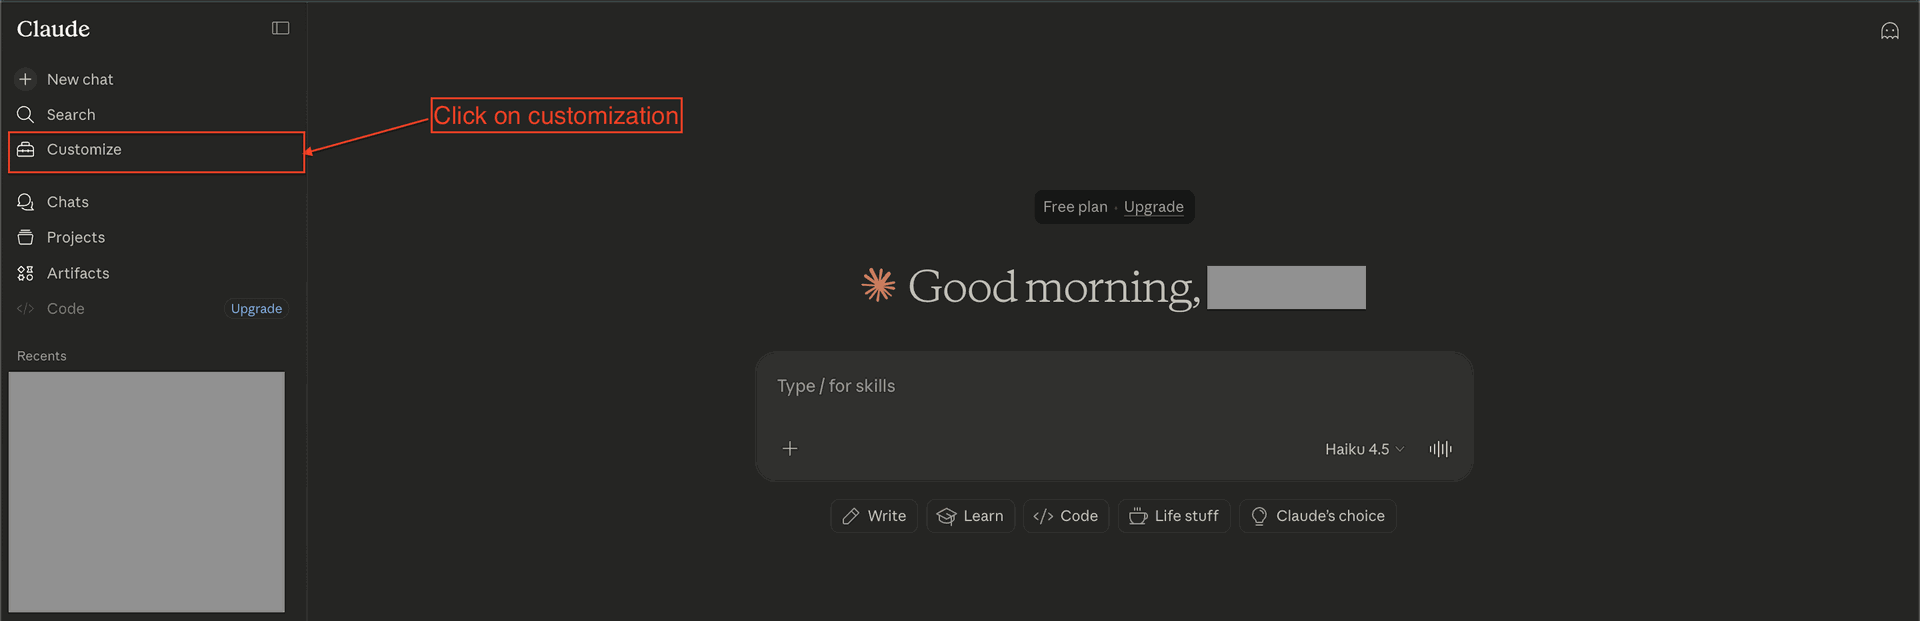
Go to the 'Claude' → Customization.
Go to Connectors and Click 'Add Custom Connector'.
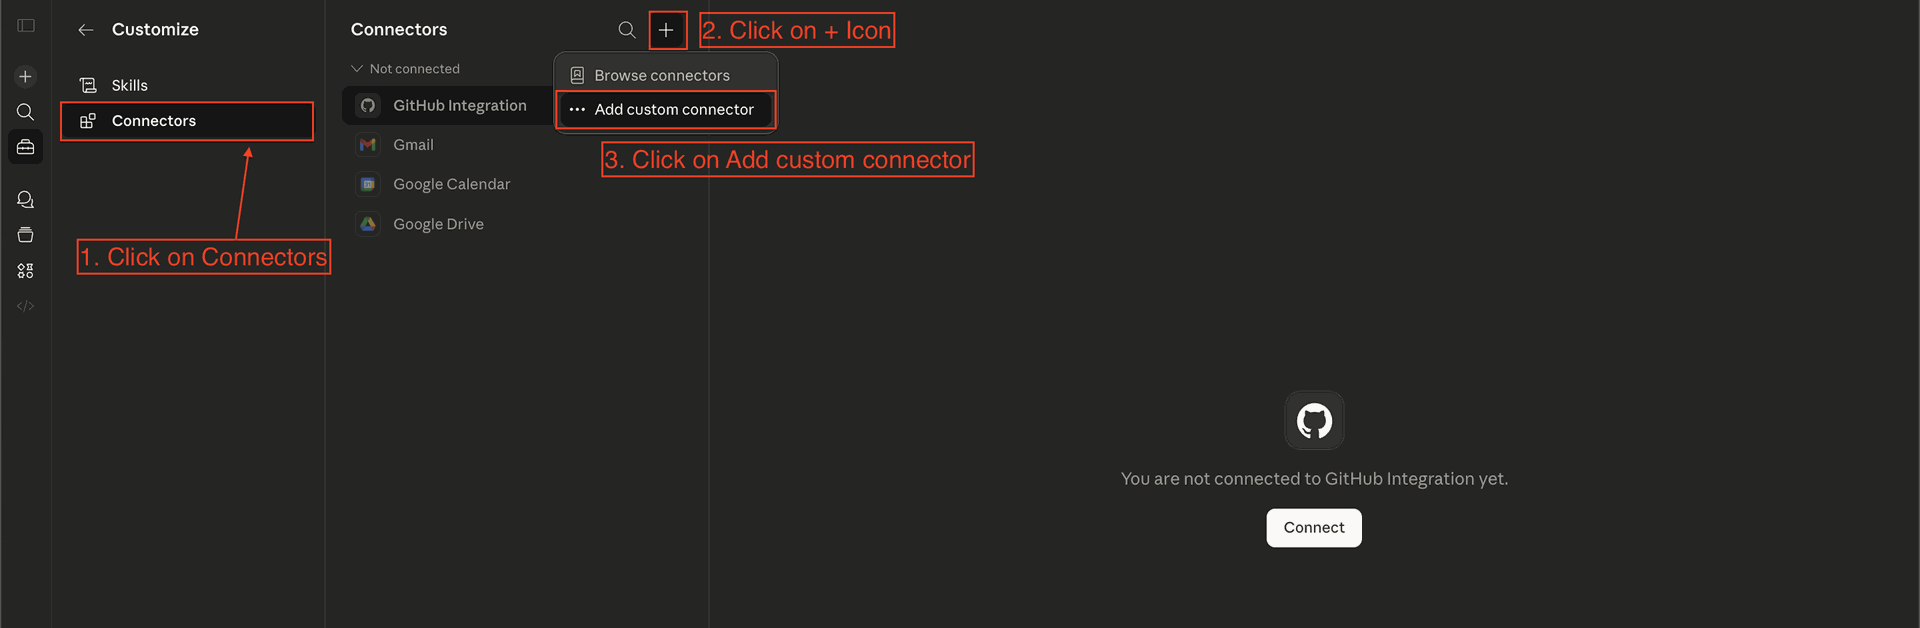
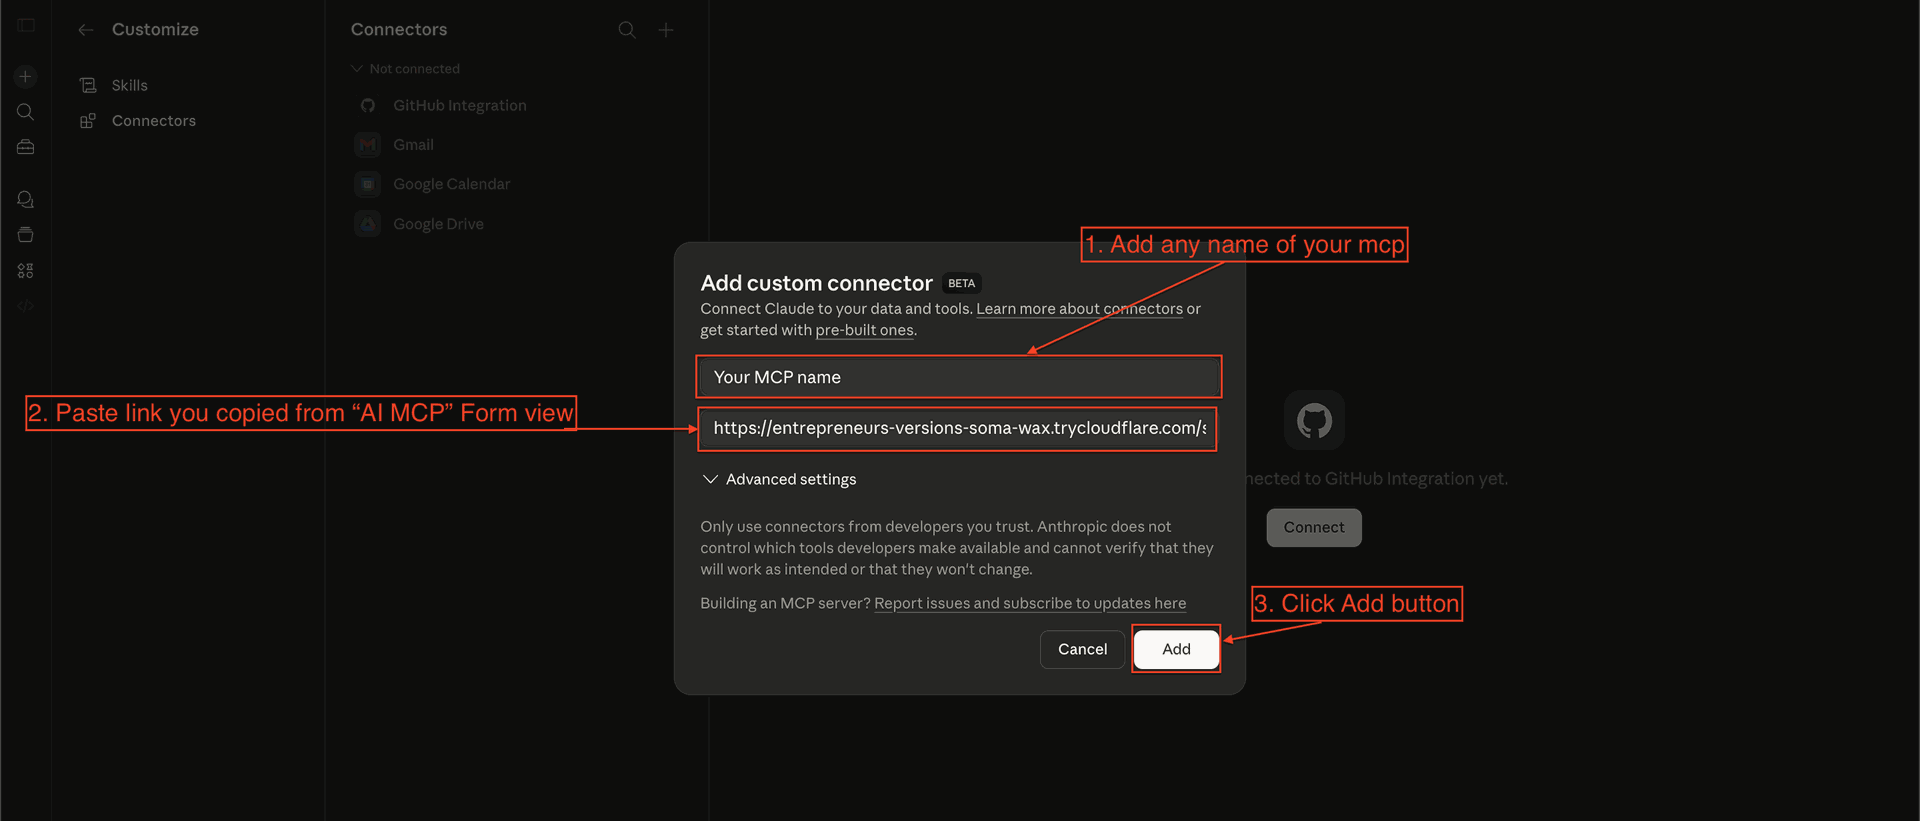
Add the MCP Name, URL, and Click 'Add'.
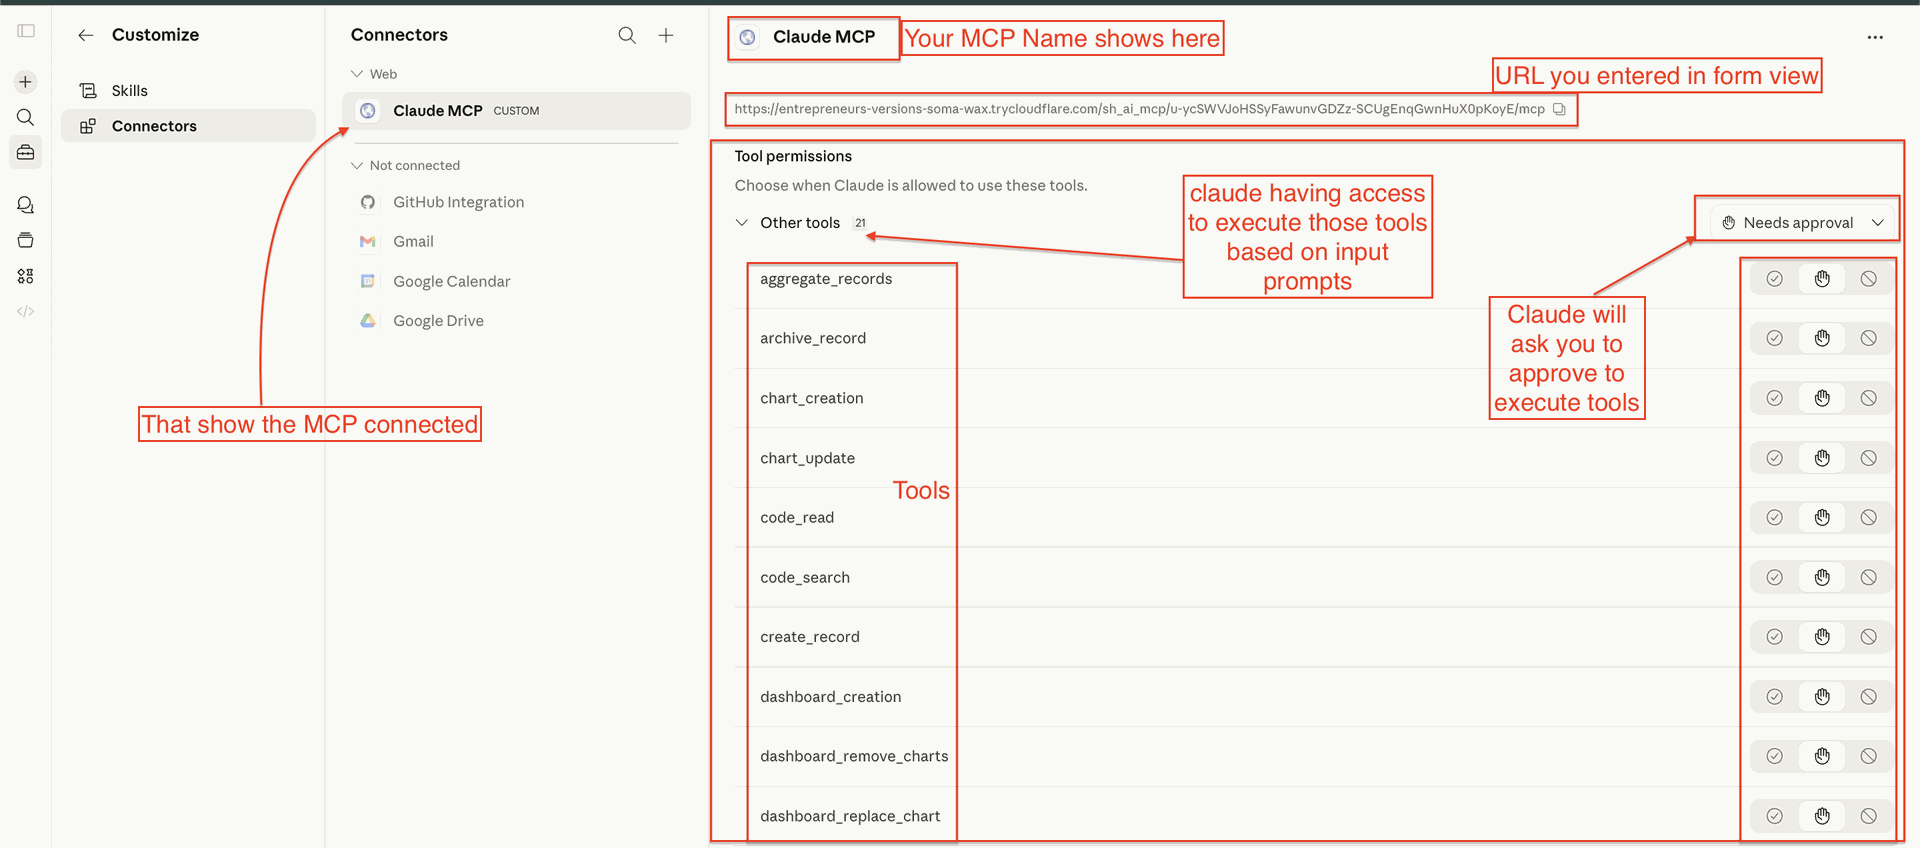
View Connection Details After Successful Connection.
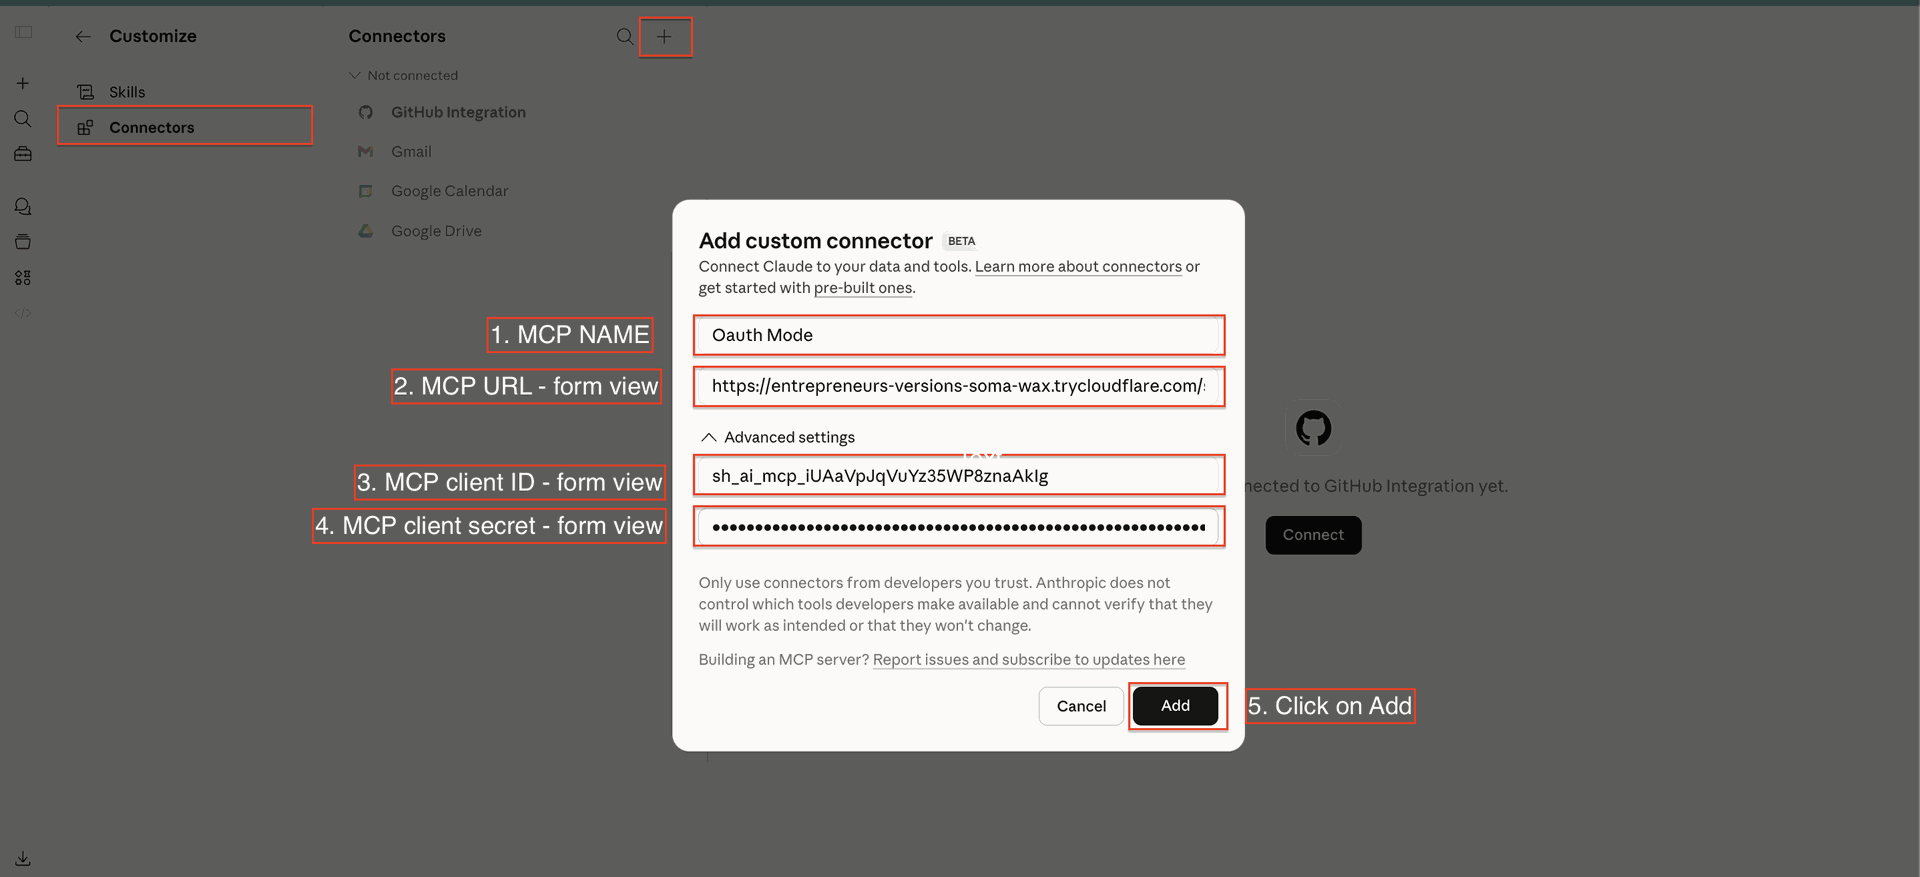
Method 2: Connect with OAuth.
Add Connector Details and Click 'Add'.
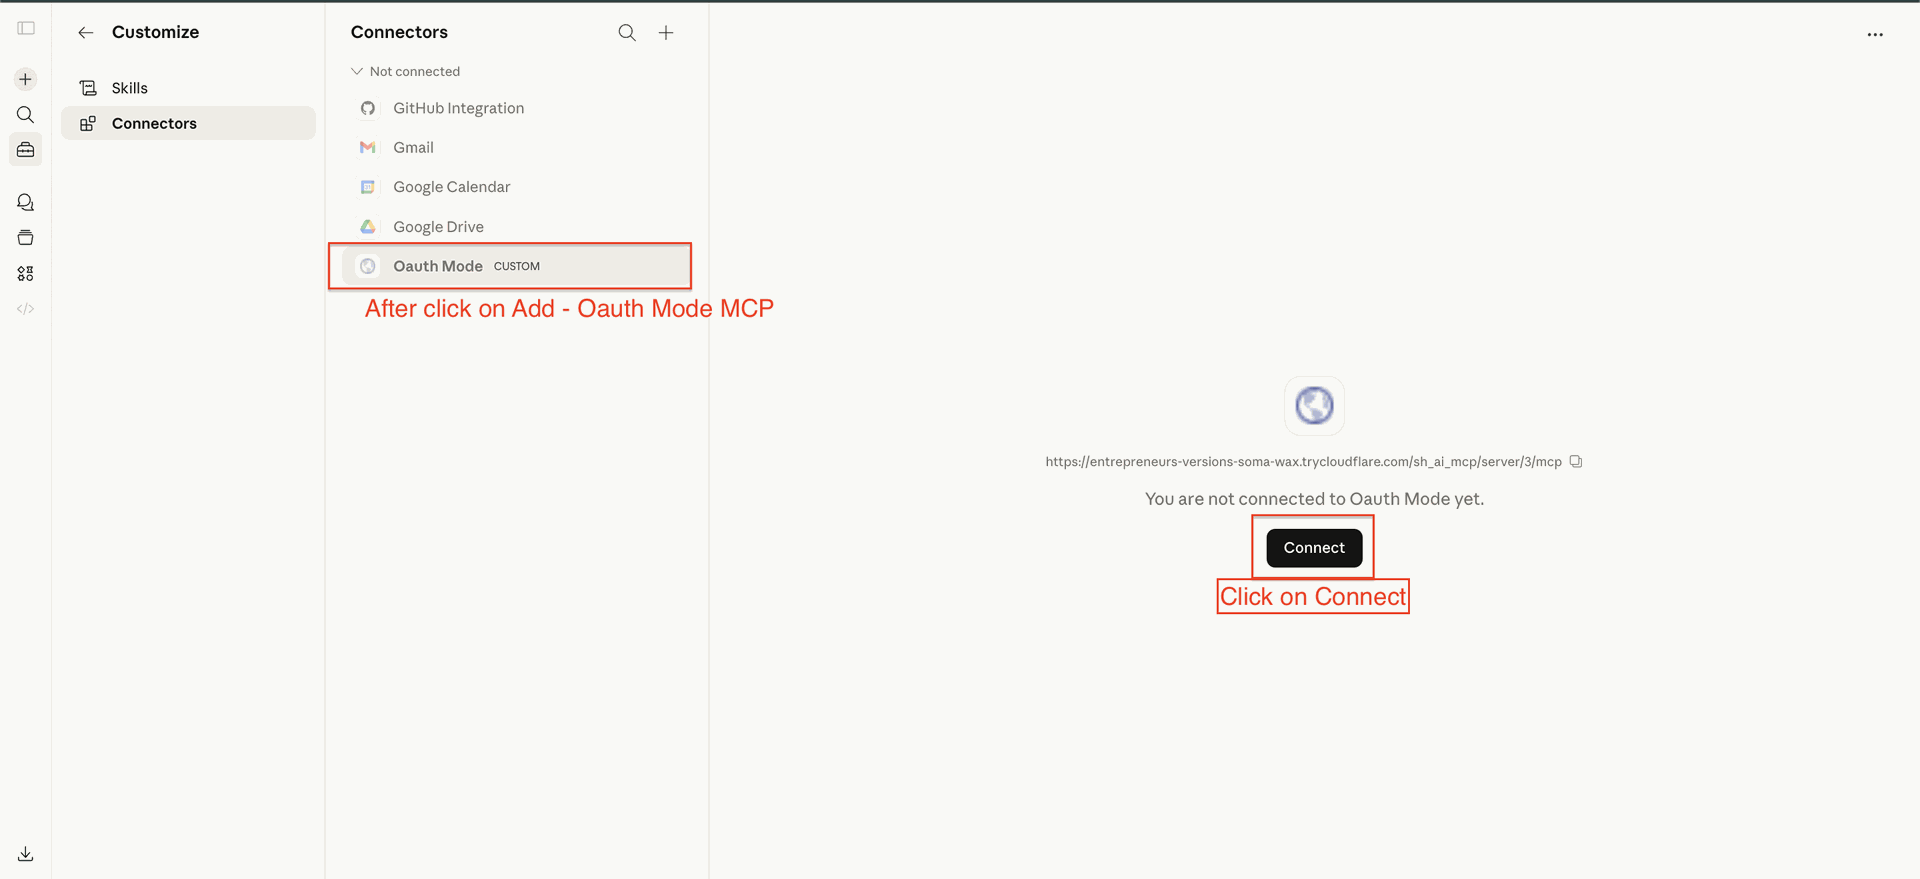
Click to Connect.
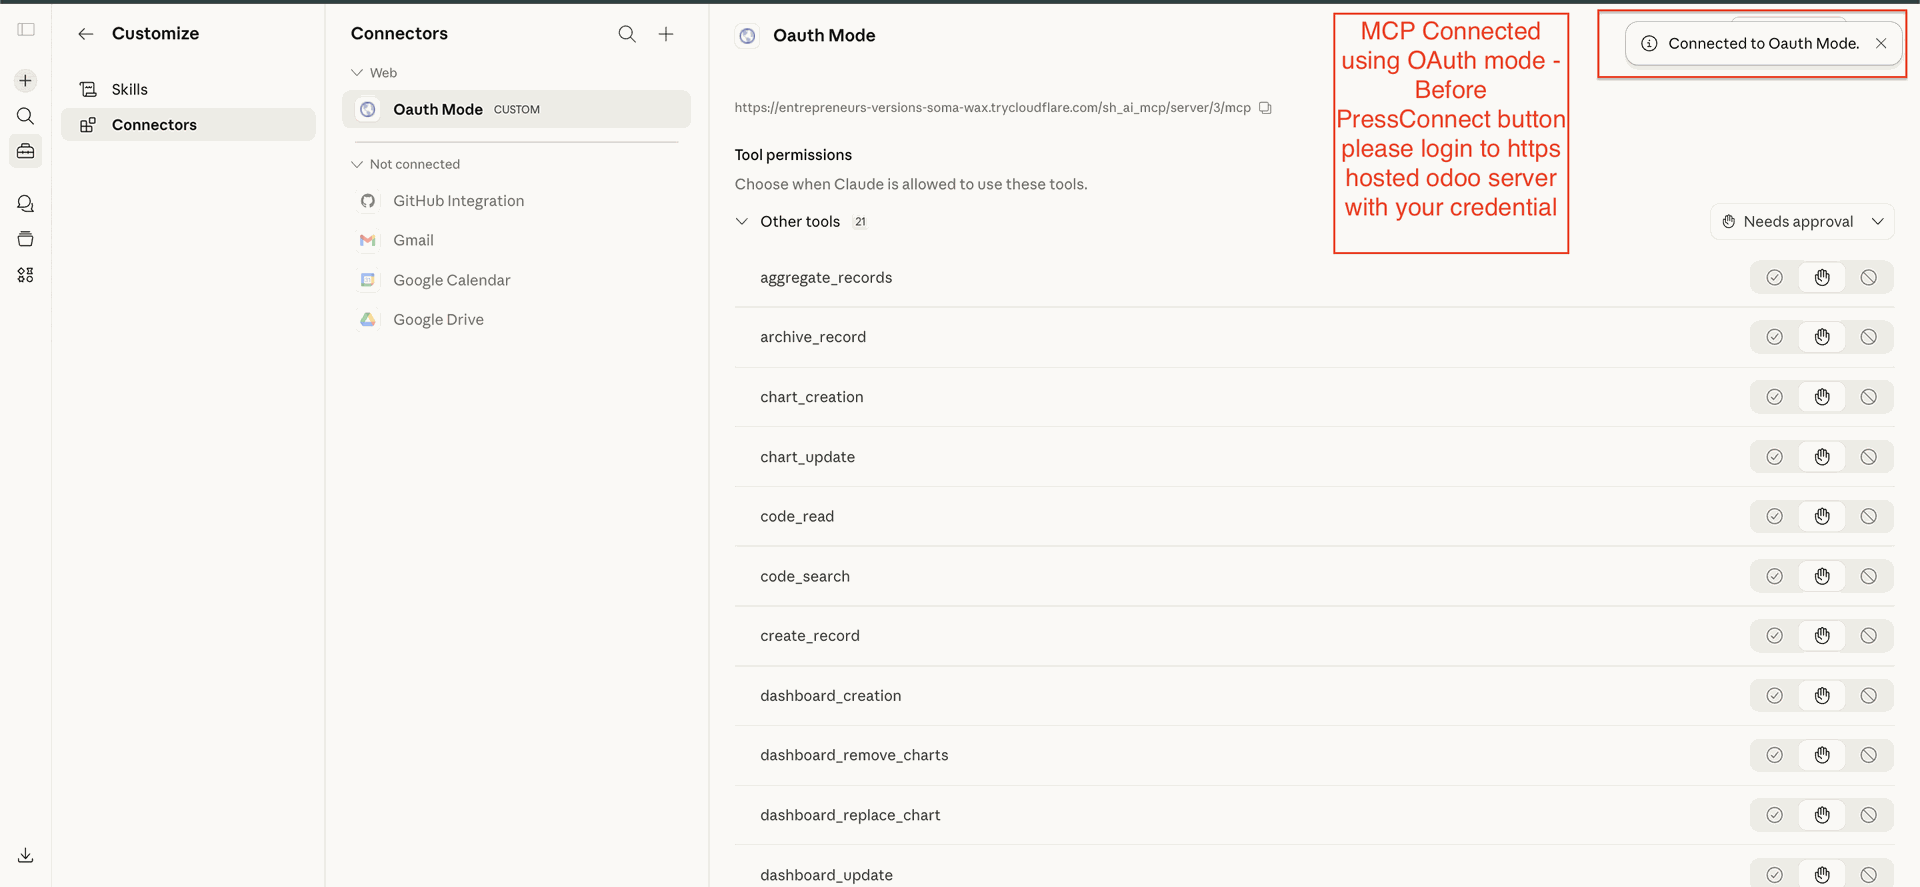
View Details After Successful OAuth Connection.
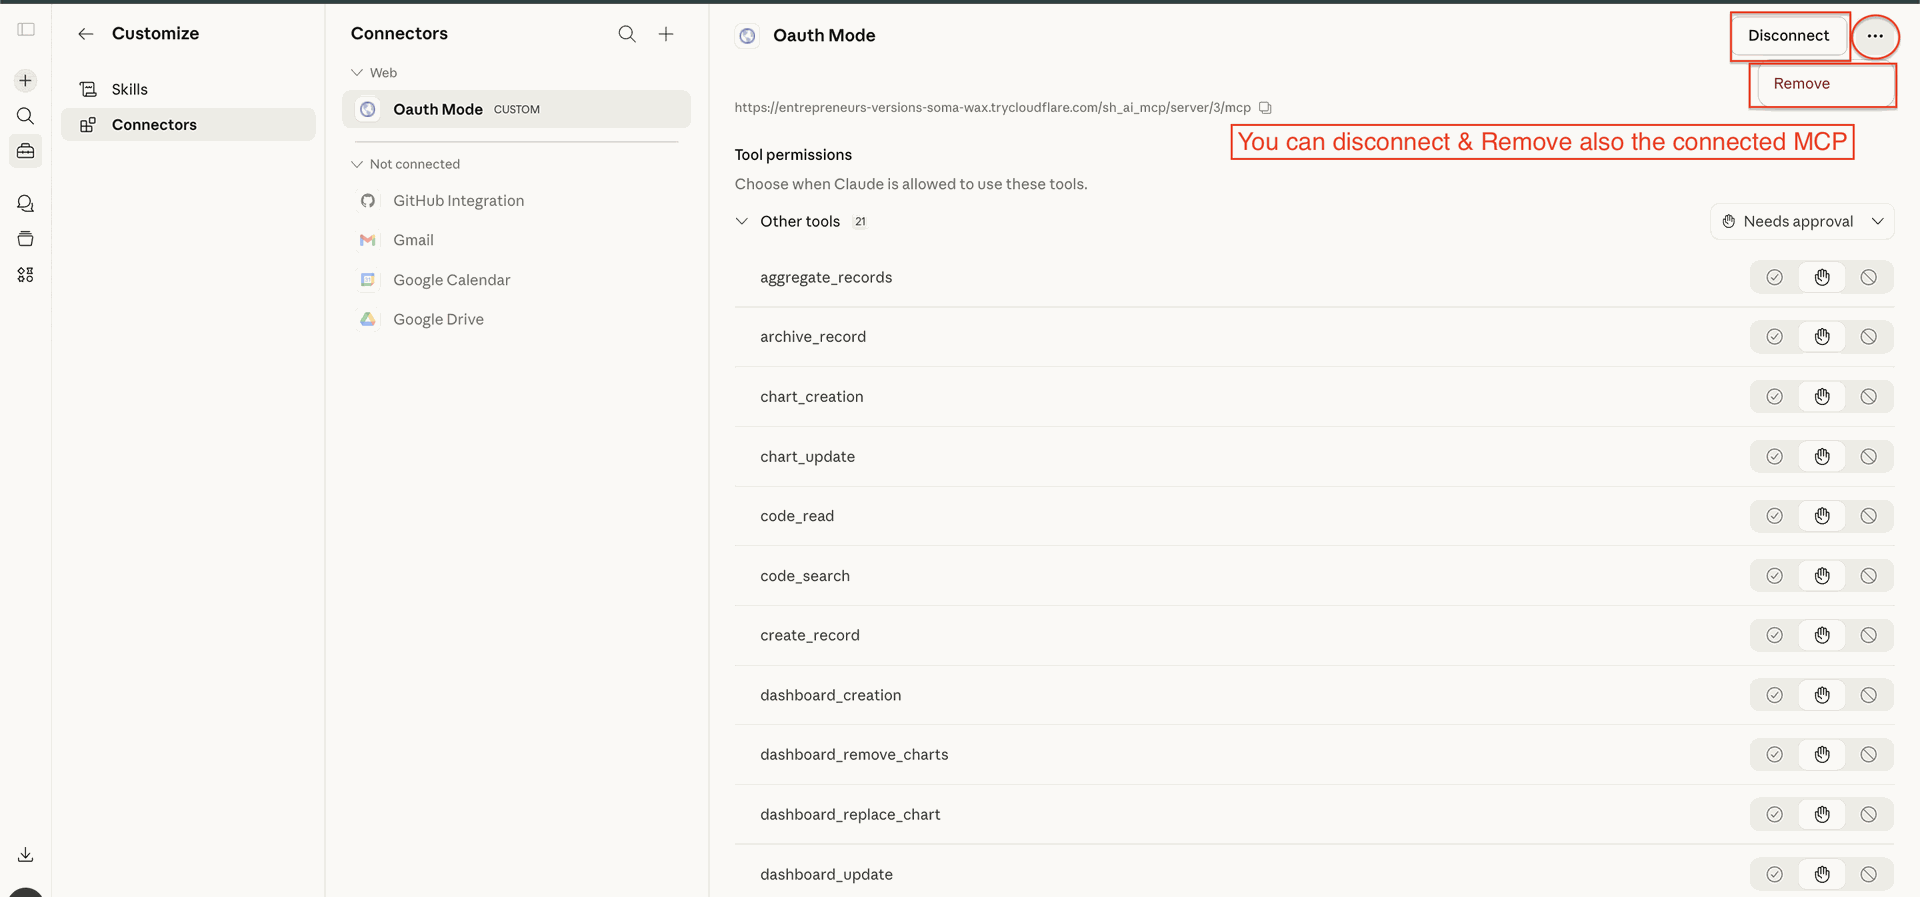
Remove or Disconnect the Connection as Required.
View Technical Details in the Available Tabs.

Generate Instructions as per Requirements.
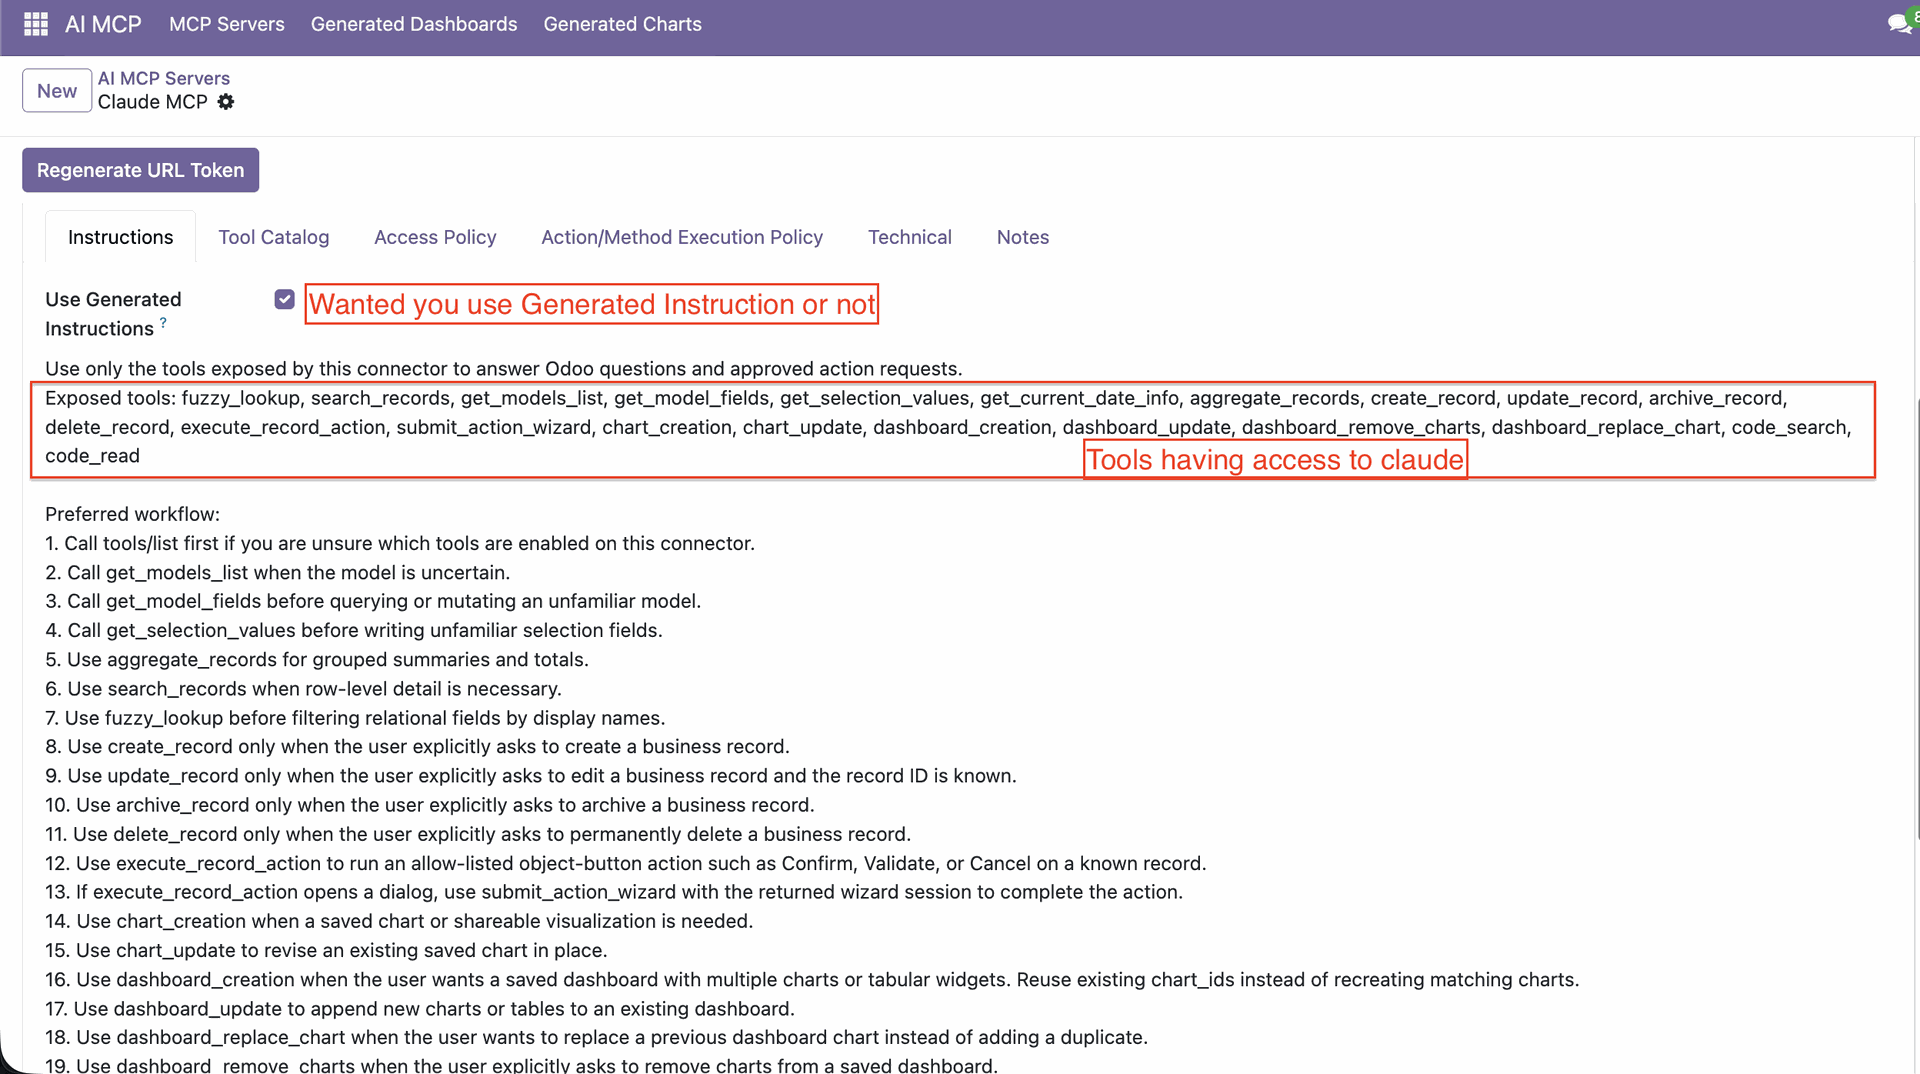
Define controlled access by specifying which models, operations (read, create,
update, delete), and fields users or AI can interact with—ensuring data security
and
precise permission management.
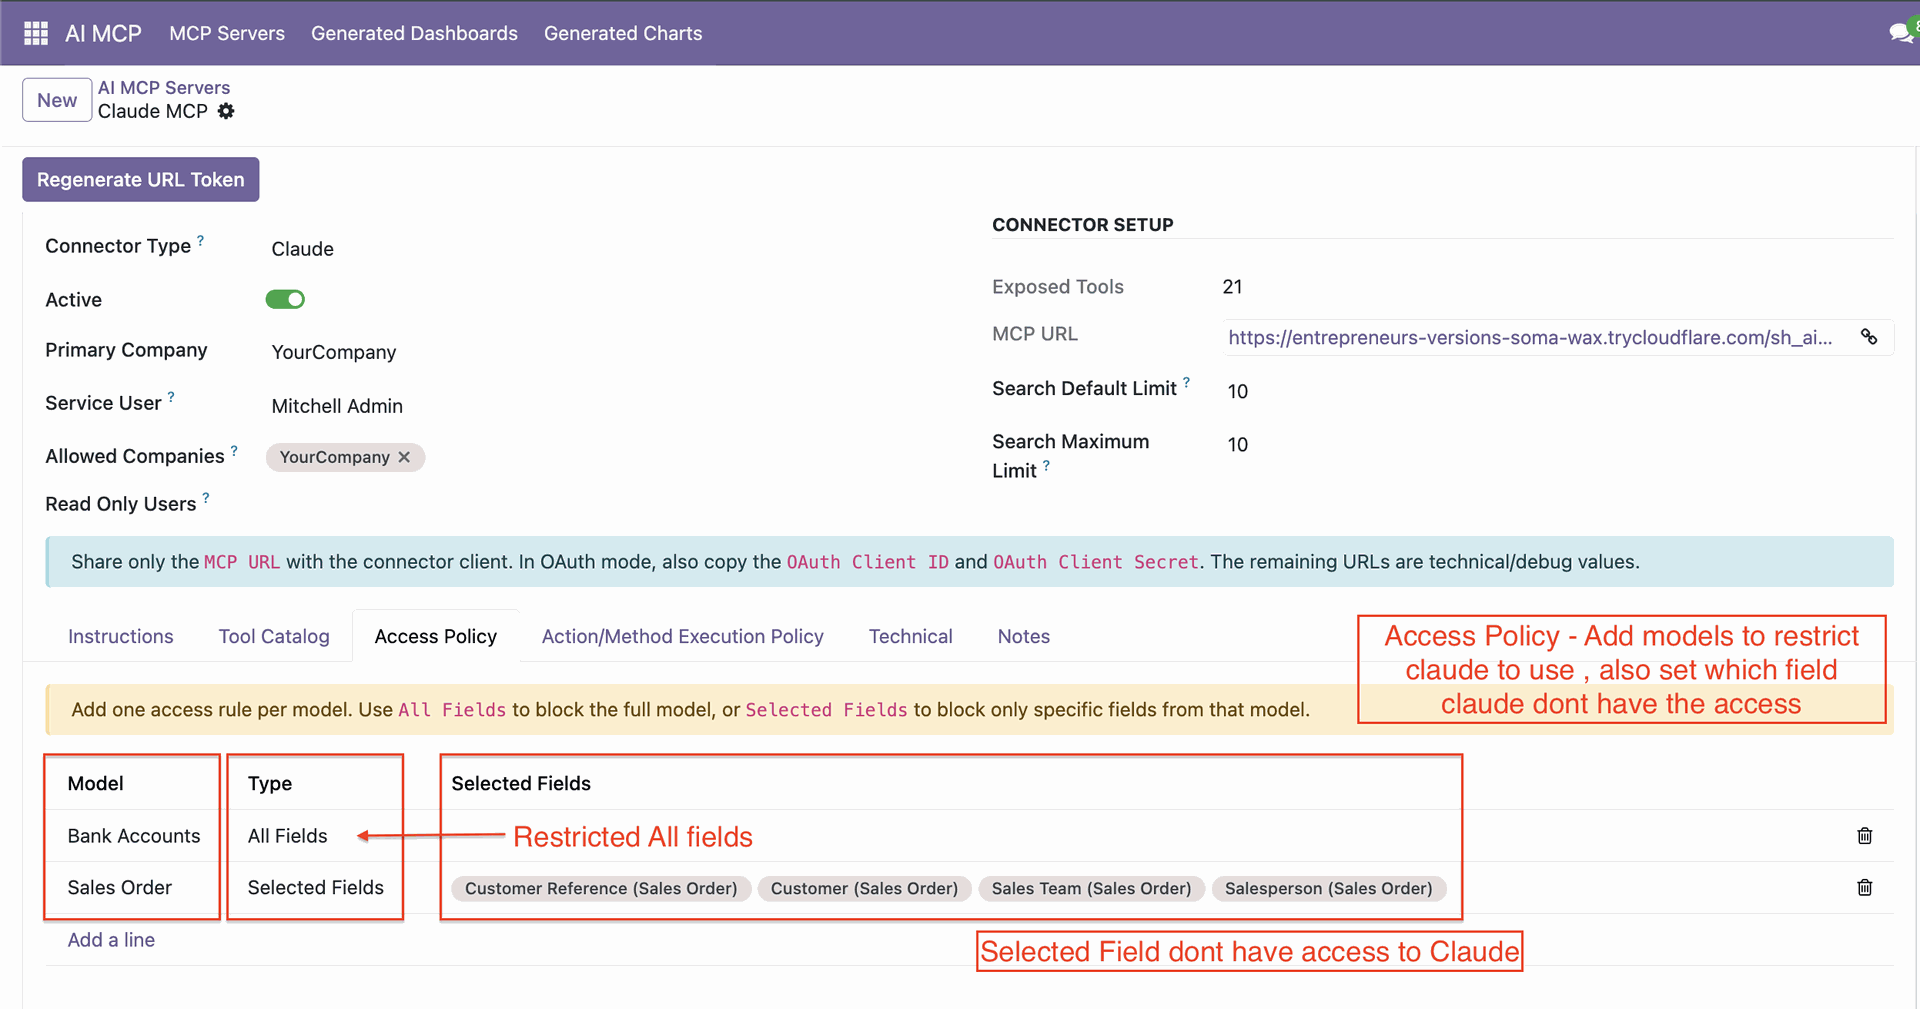
You can restrict access for either all fields or only selected fields for a given
model.
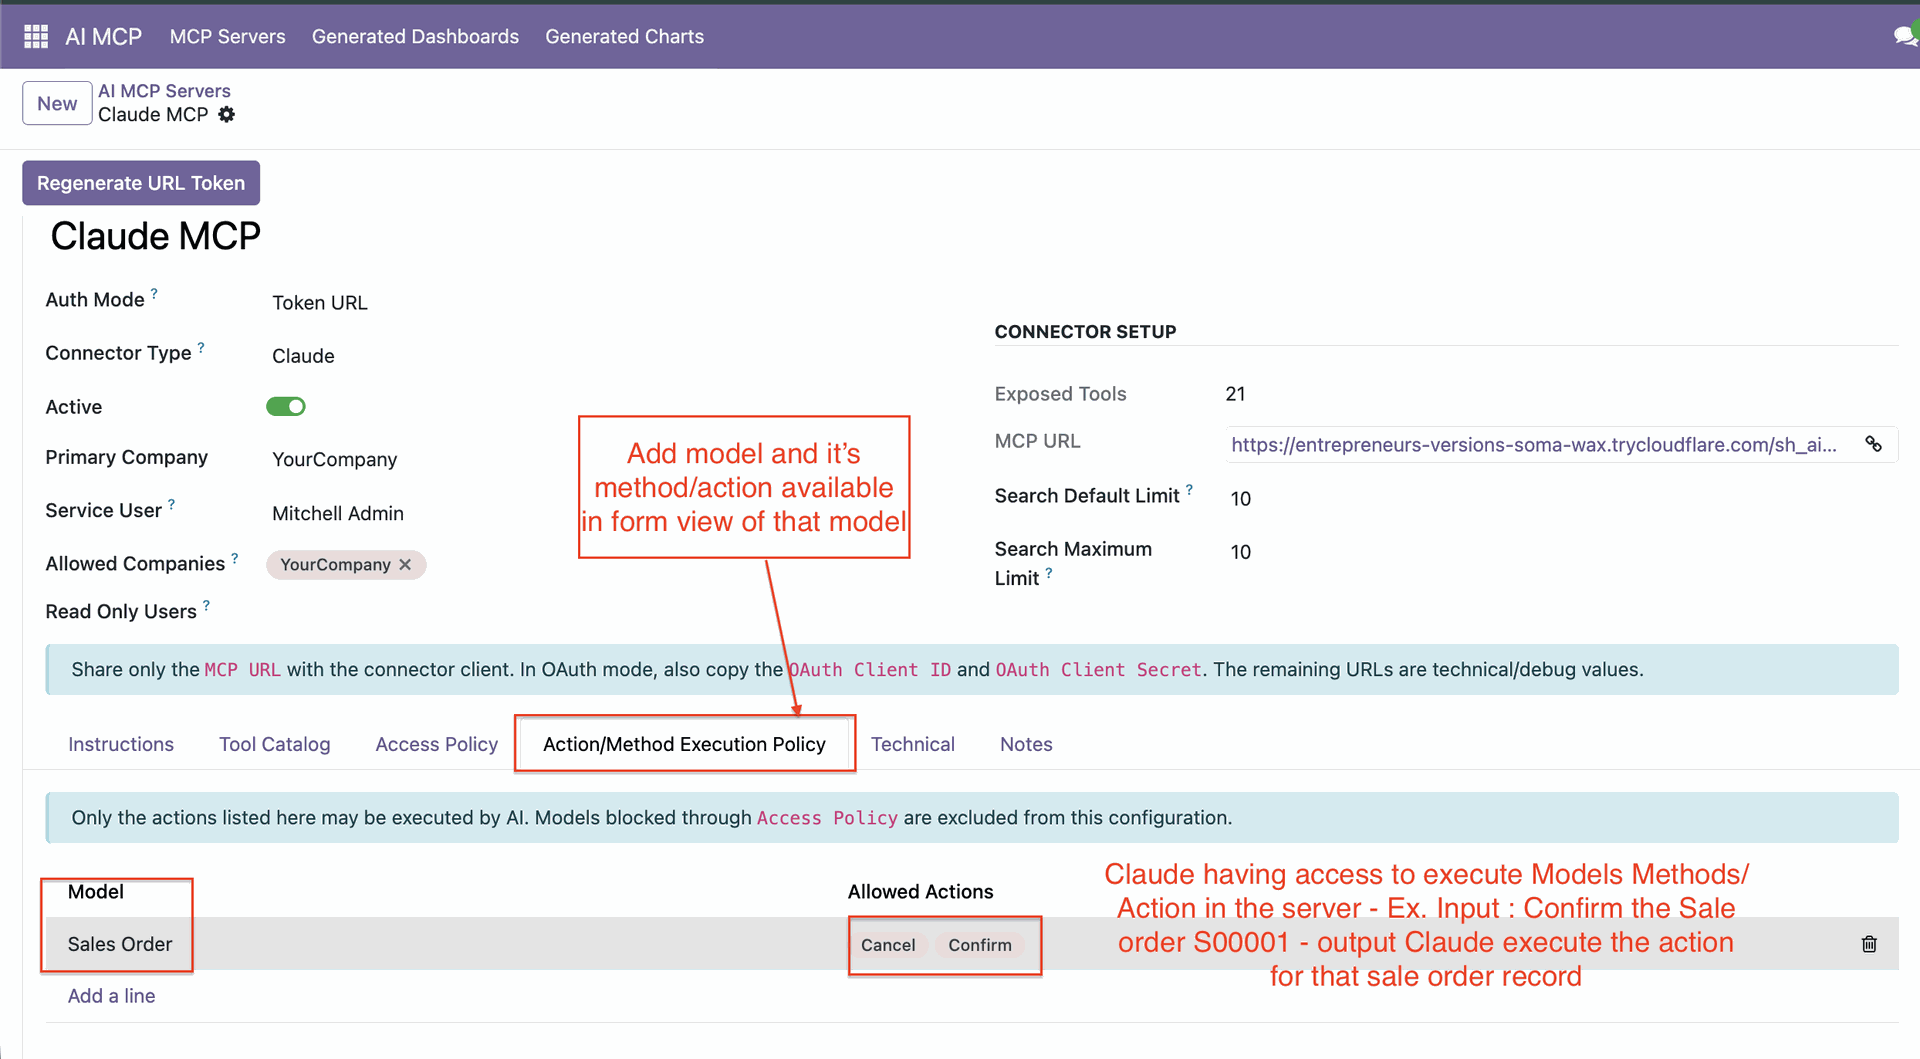
You can control which actions are permitted on a model, such as confirm, cancel etc ensuring users or AI can only perform specific operations as needed.
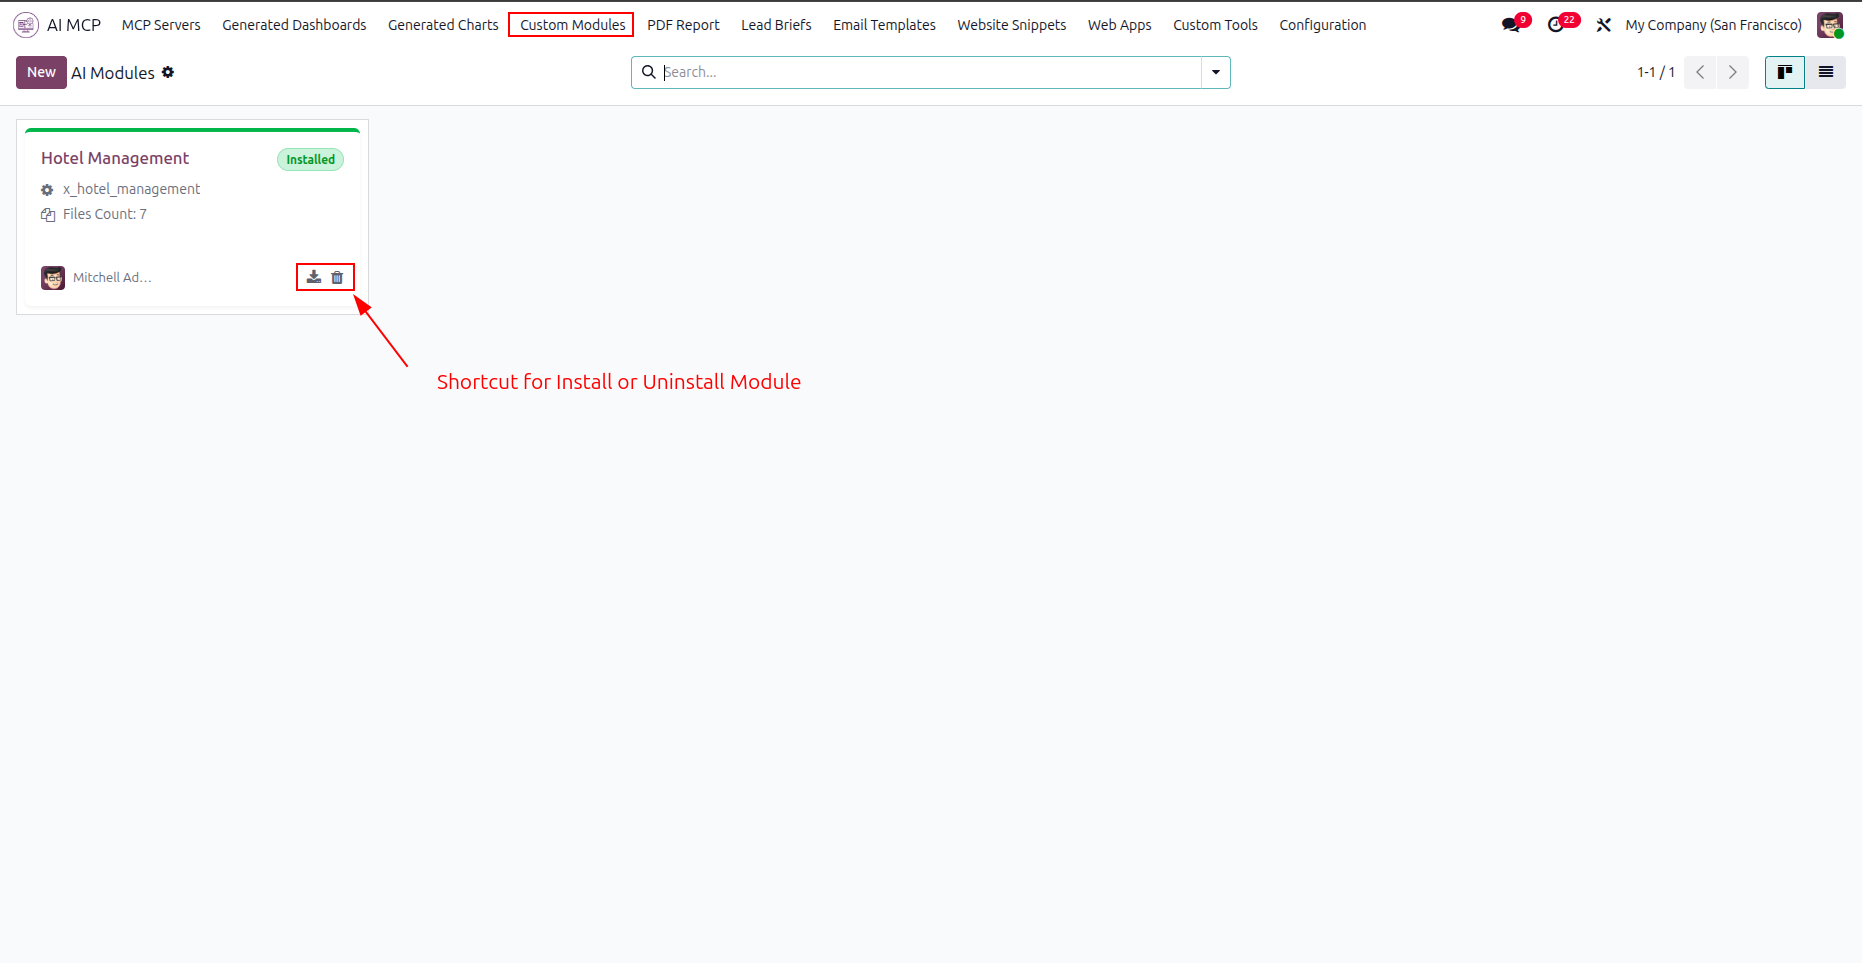
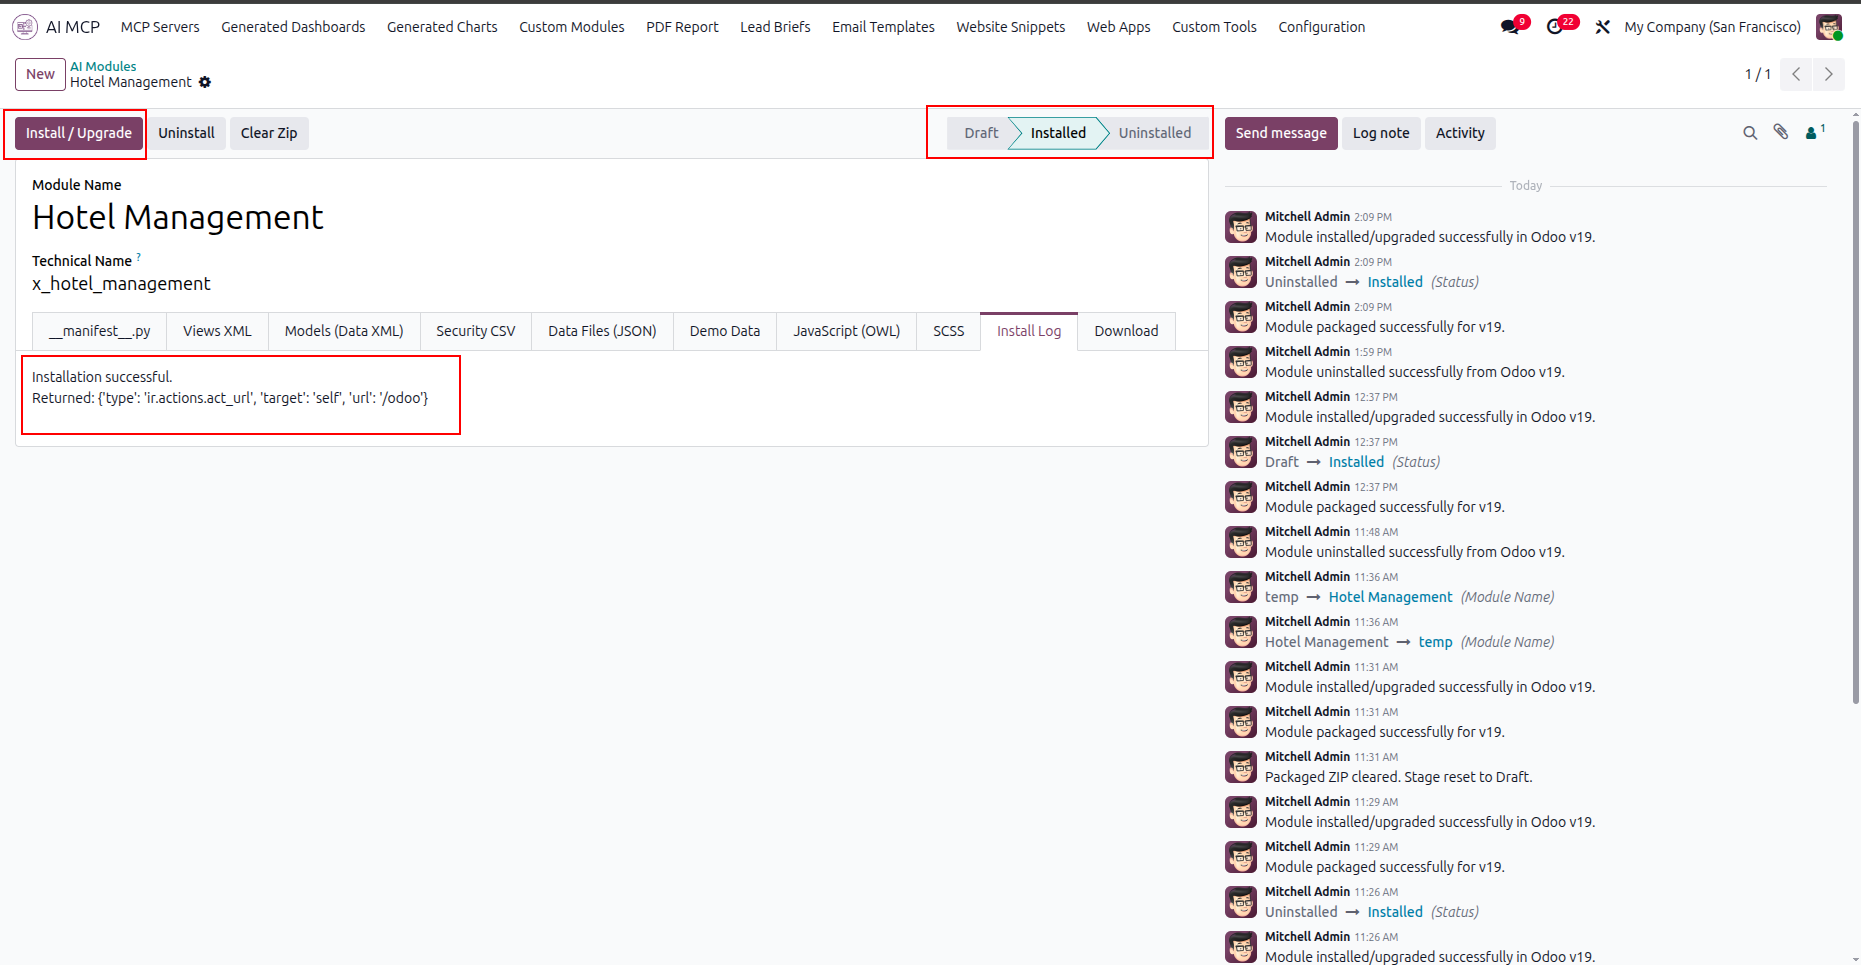
Click the highlighted shortcut icons on the module card to install or uninstall the custom application.
Review the AI-generated manifest file code details in the manifest tab before installing the custom module.
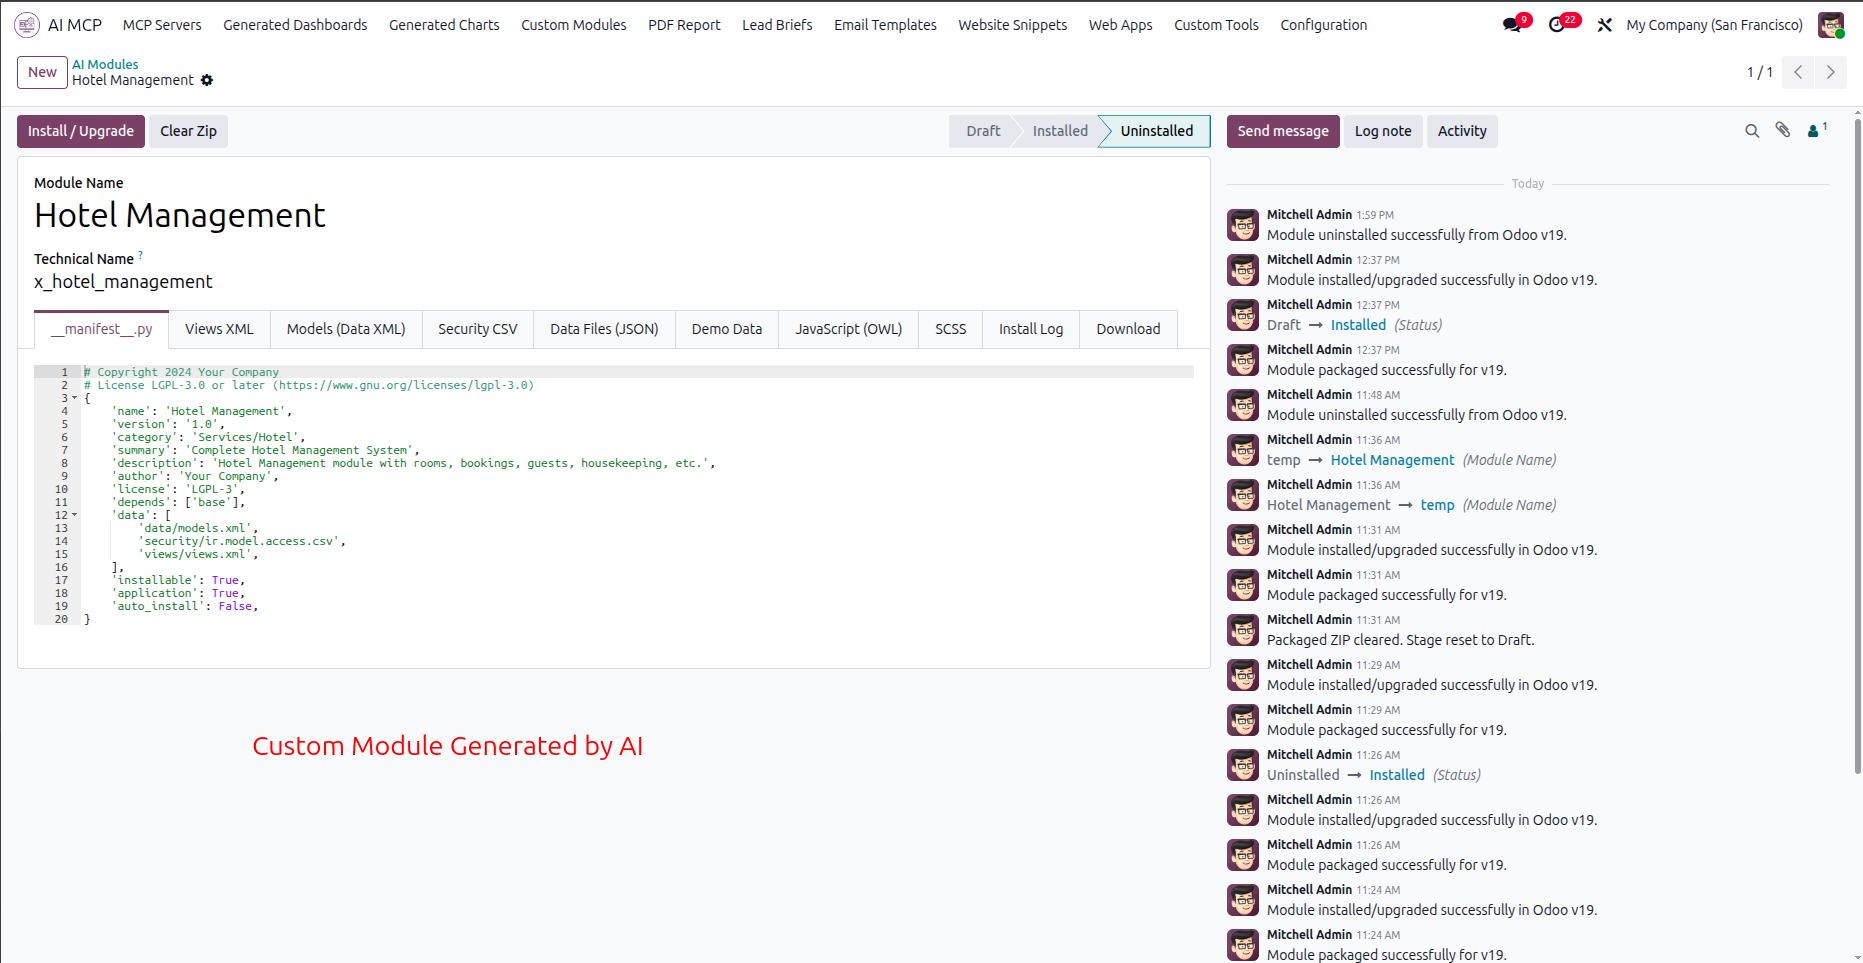
Click the highlighted Install or Upgrade button to deploy the generated file structure for the module.
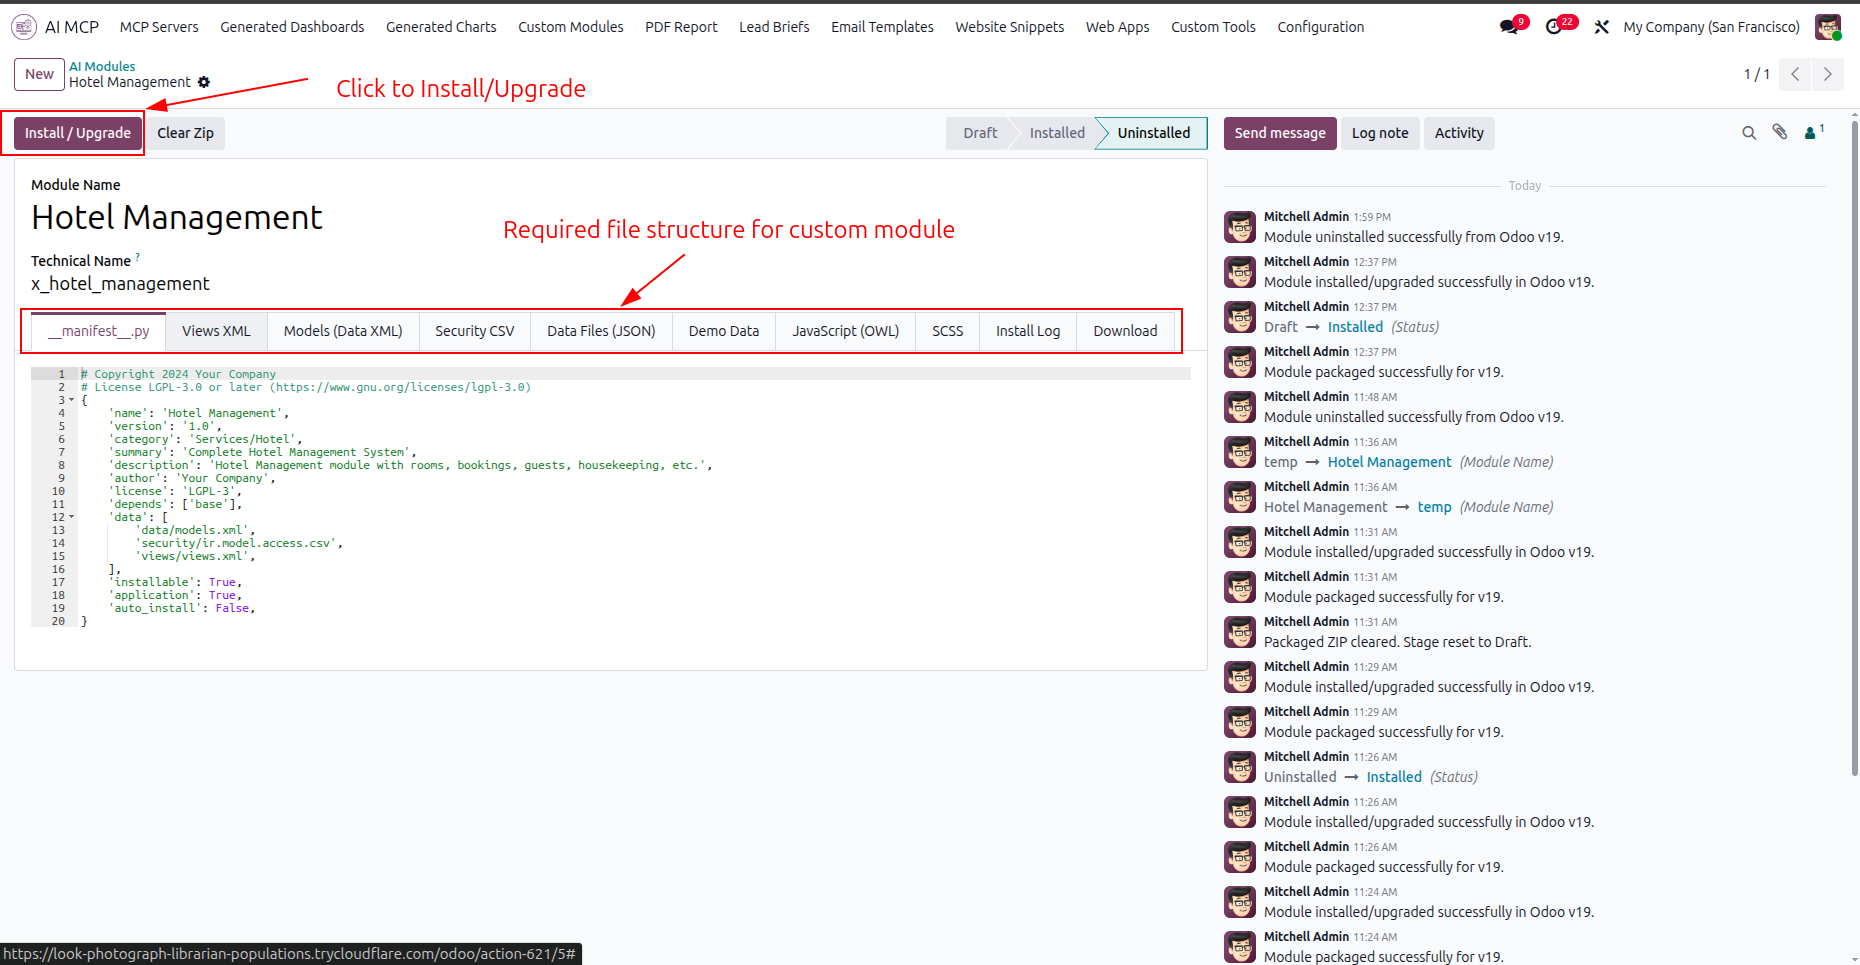
Select the Views XML tab to inspect the generated XML structure for layouts and menu definitions.

Navigate to the Models tab to inspect database models and fields defined for the custom module.

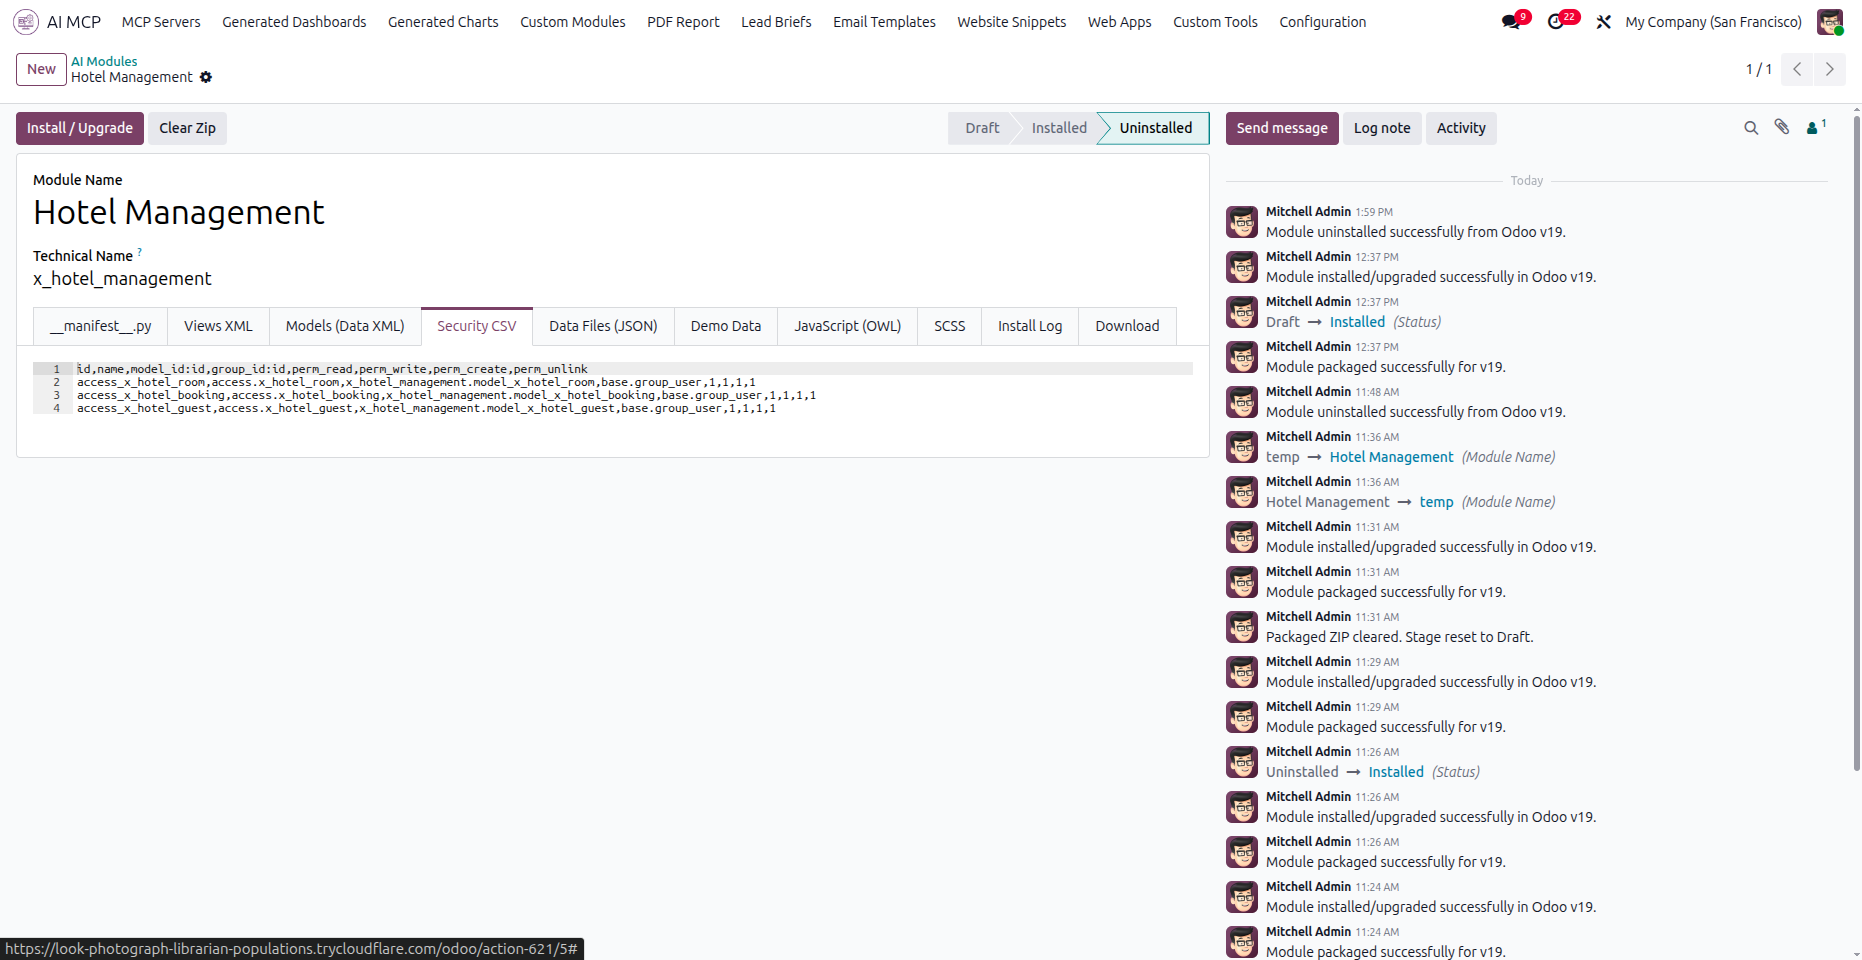
Inspect the Security CSV tab to review user group permissions defined for different data models.
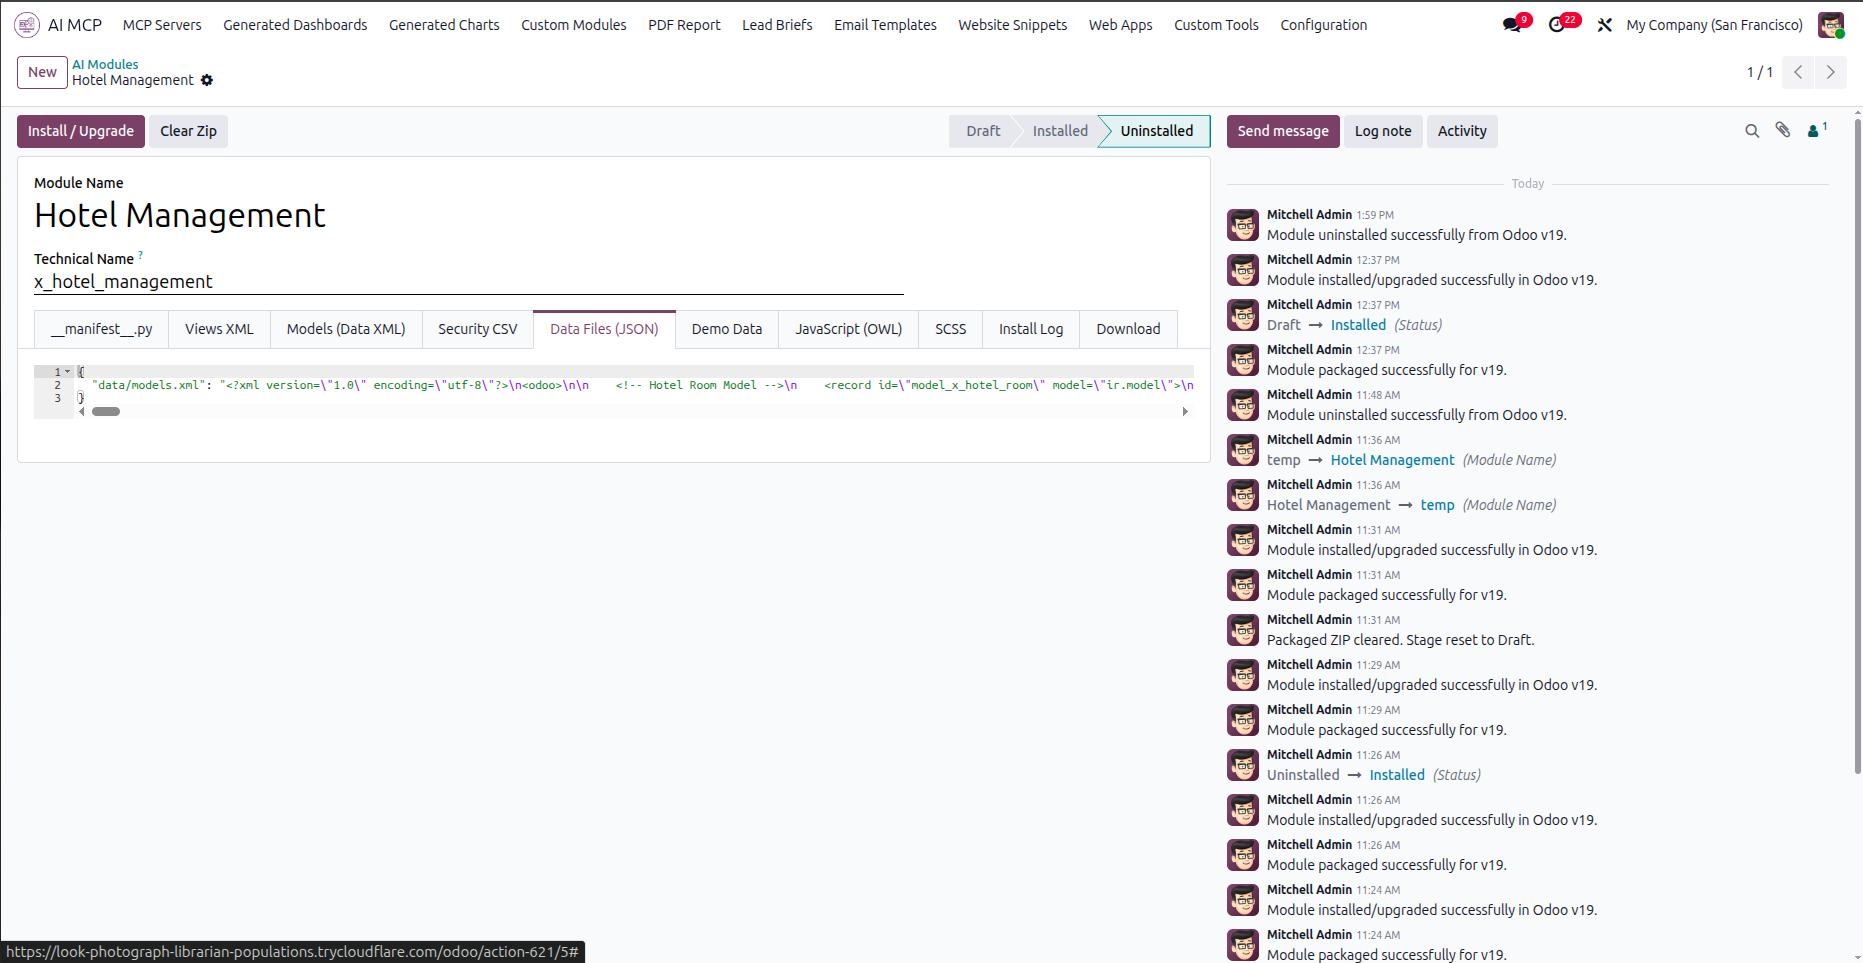
Select the Data Files JSON tab to view path configurations and serialized module data files.
Navigate to the Demo Data tab to inspect the generated sample records for module testing.
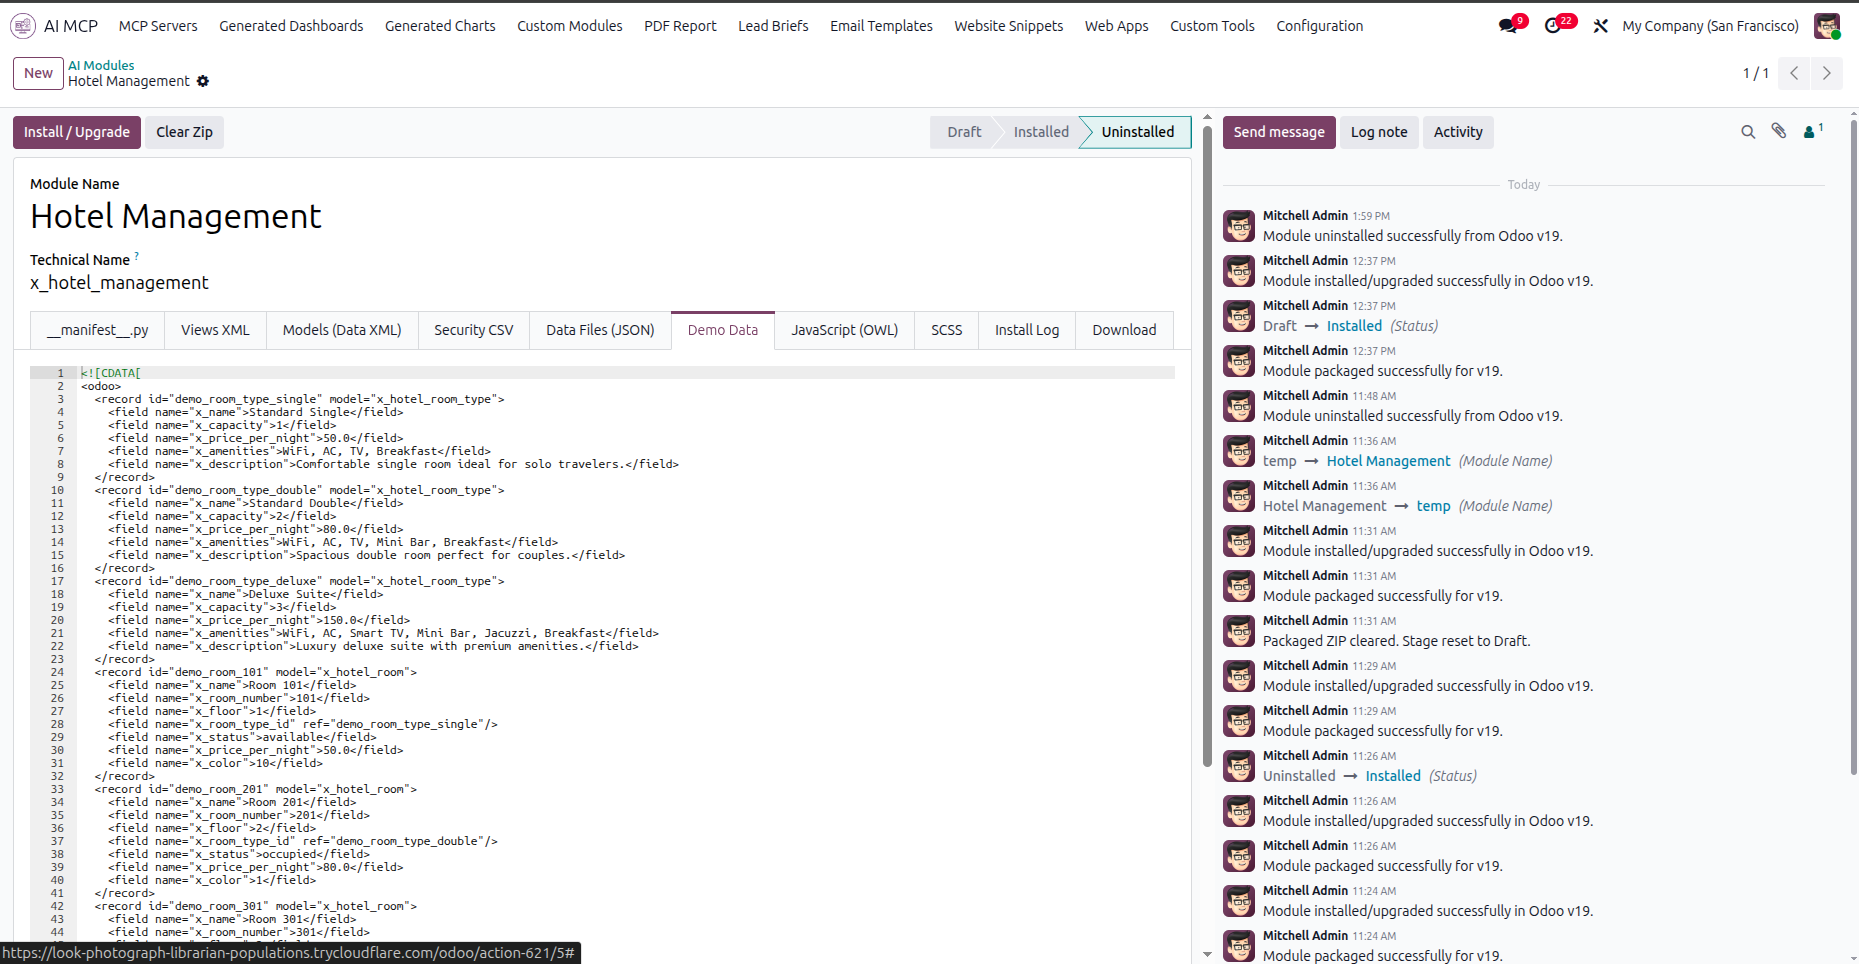
Select the JavaScript OWL tab to access or edit OWL component scripts for client-side interfaces.
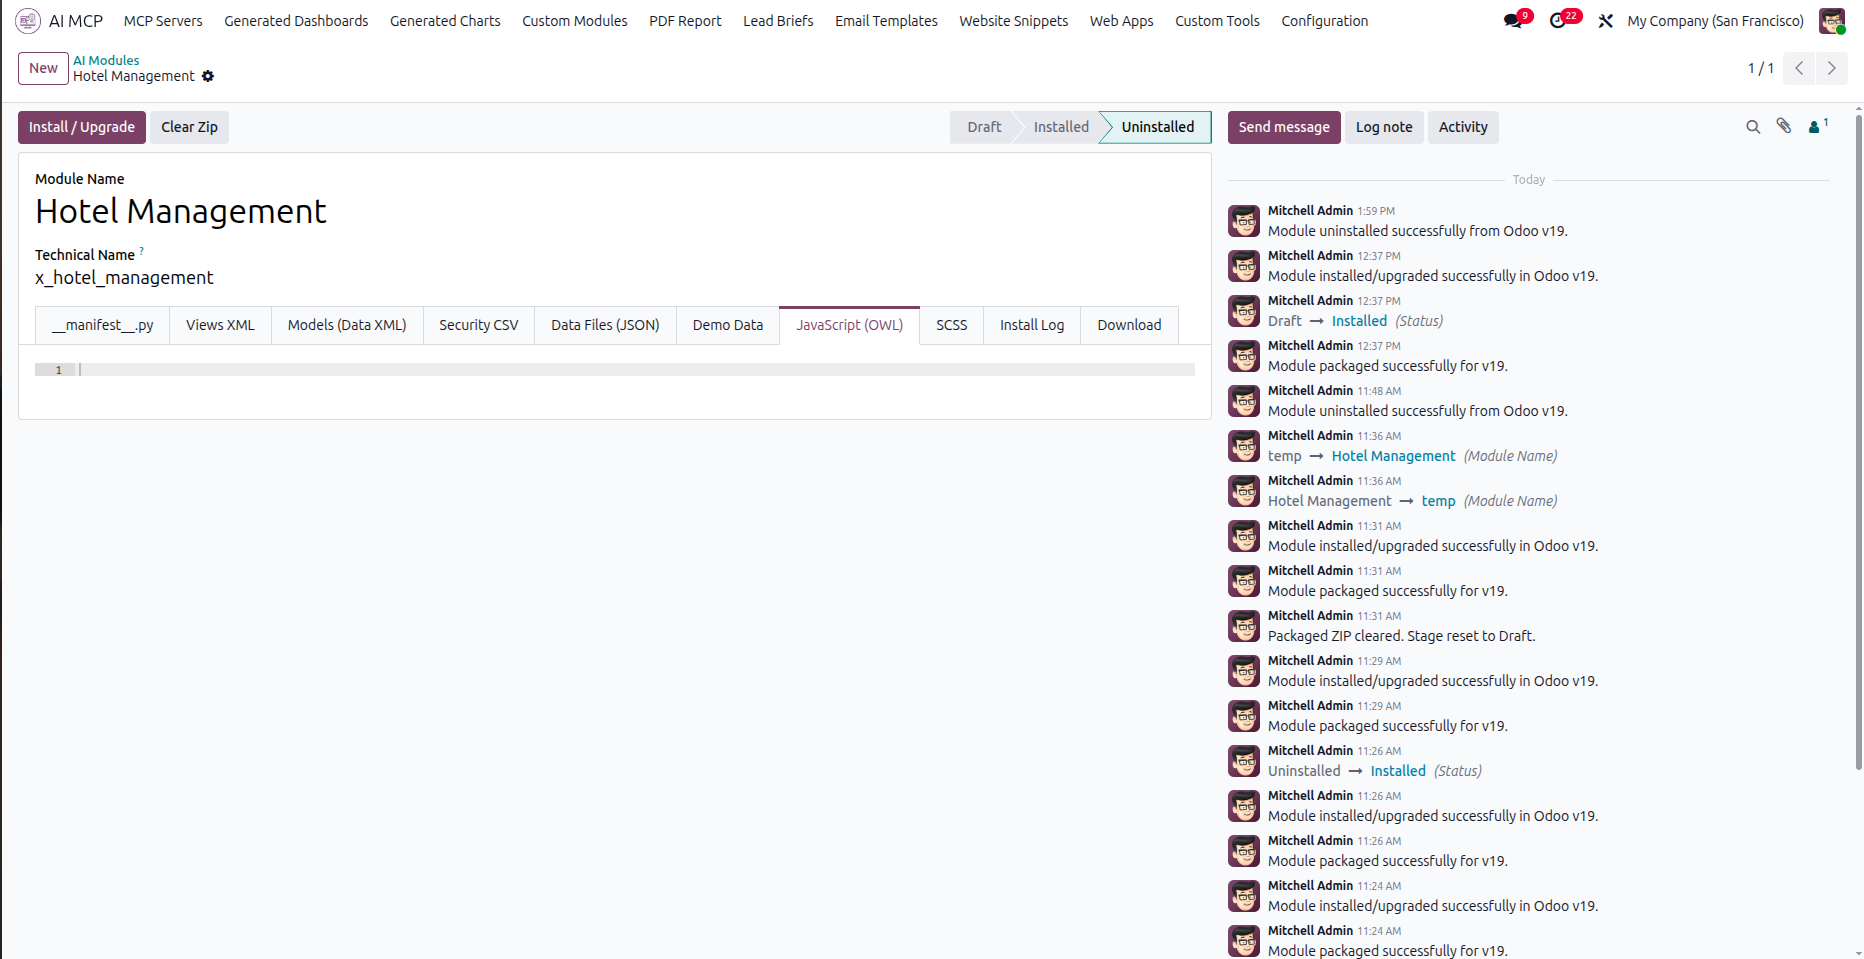
Navigate to the SCSS tab to view custom style sheets and styling definitions for the layout states.
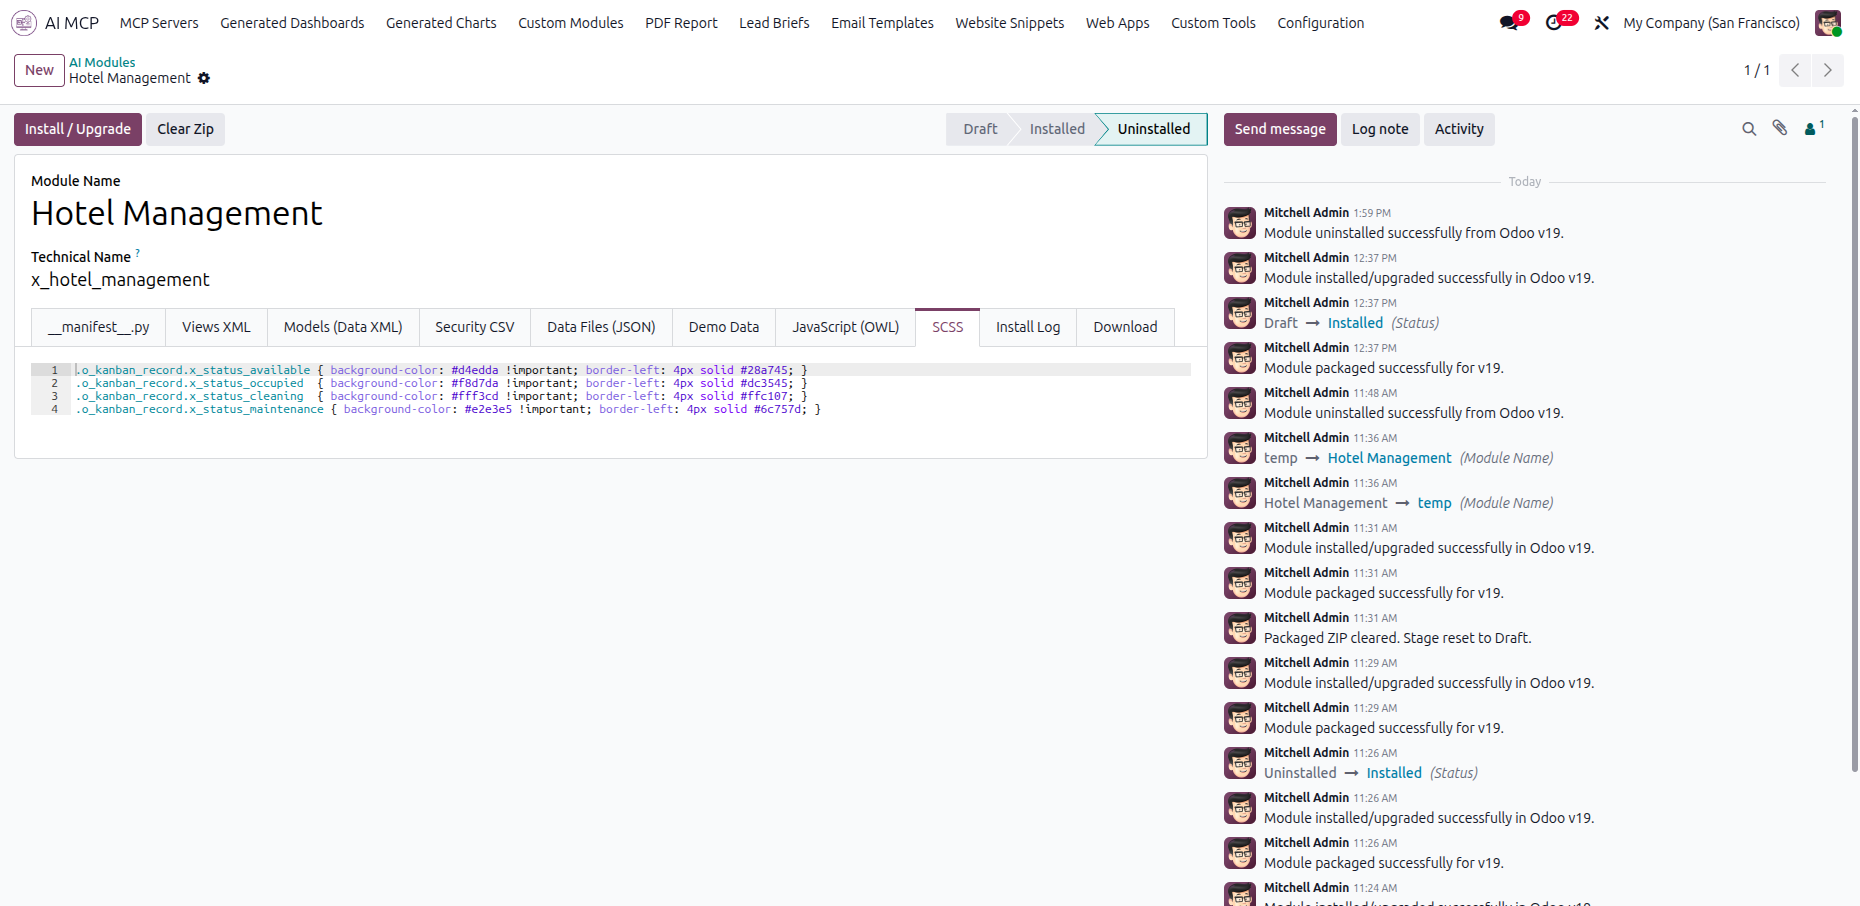
Click the highlighted packaged ZIP file link under the download tab to save your custom module.
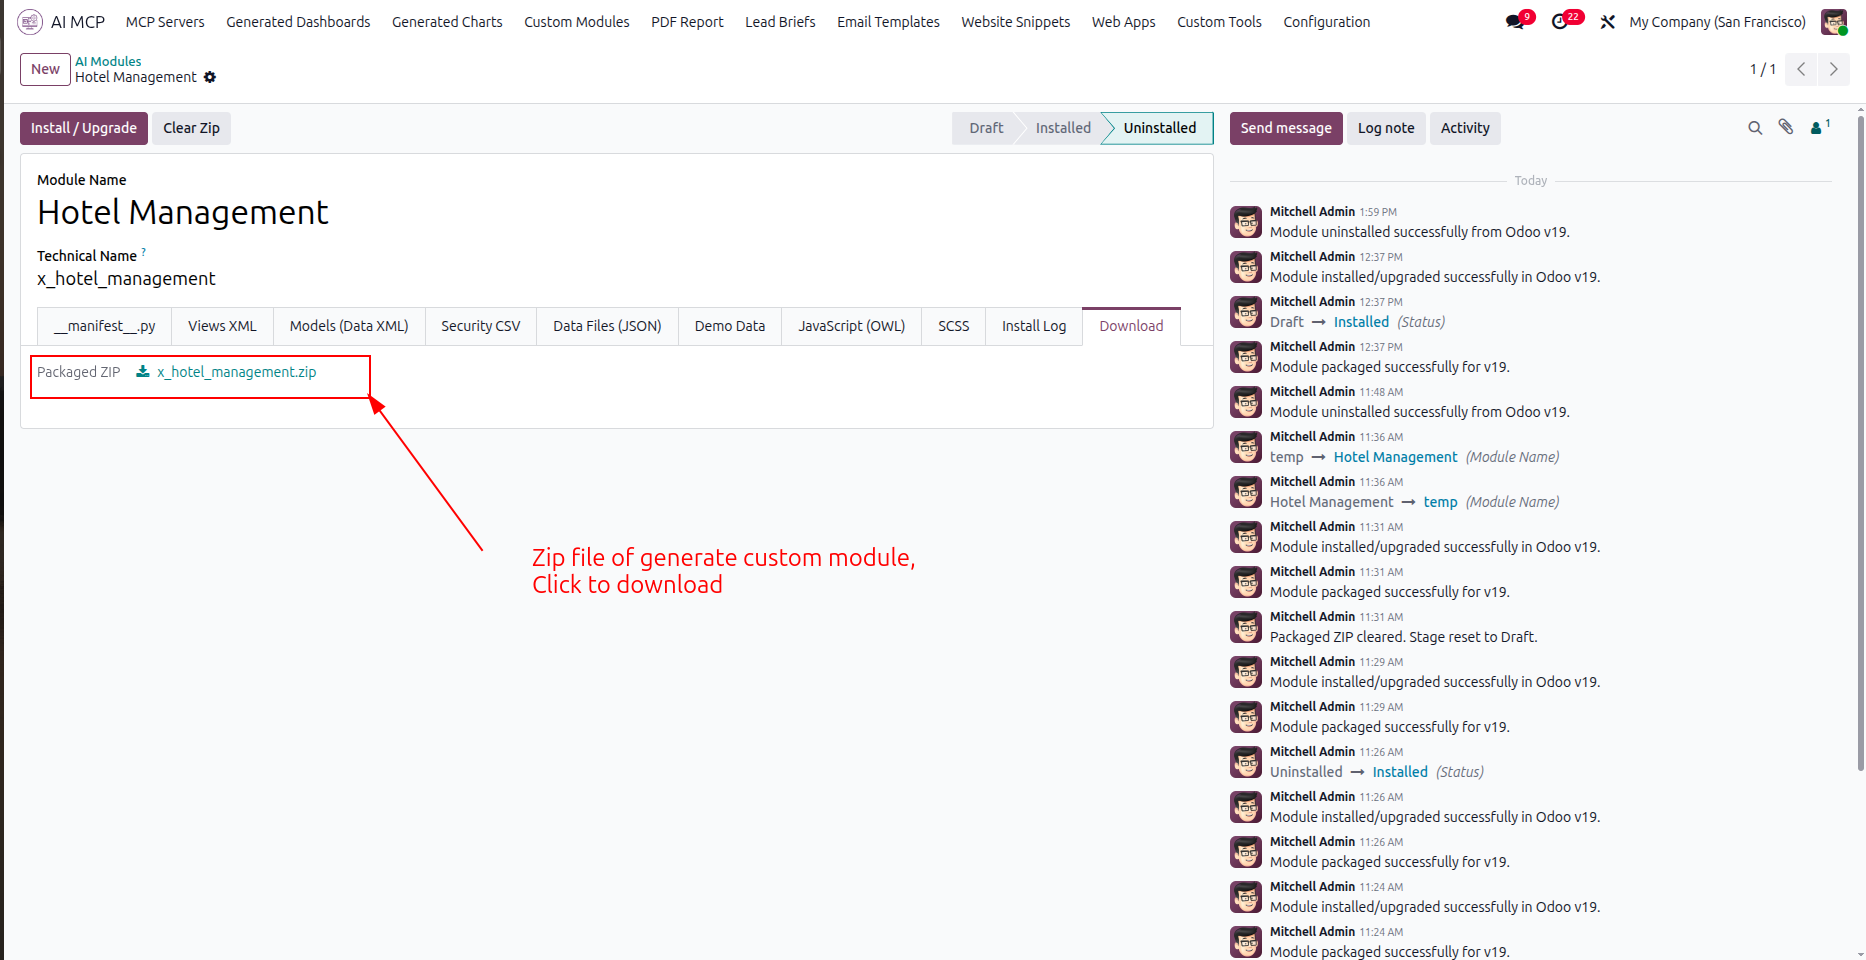
Verify the successful installation message and the updated module status in the install log tab.
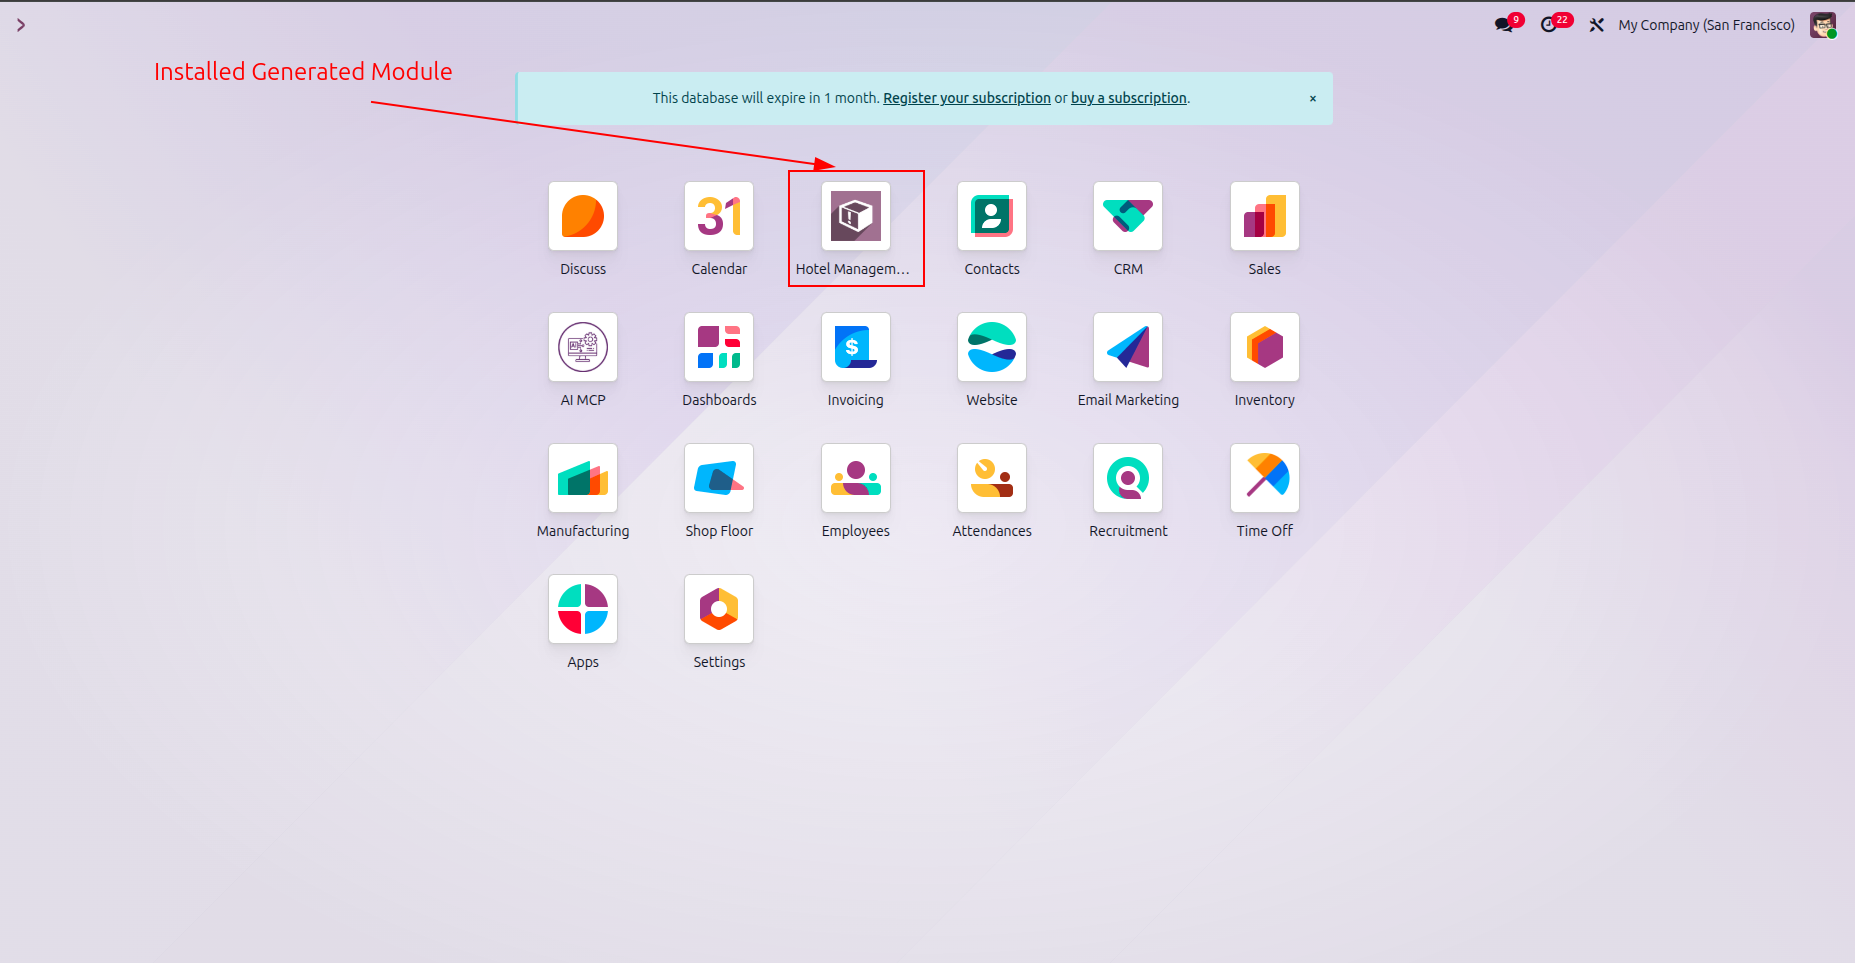
Locate and open the newly installed custom module icon from the main Odoo dashboard.
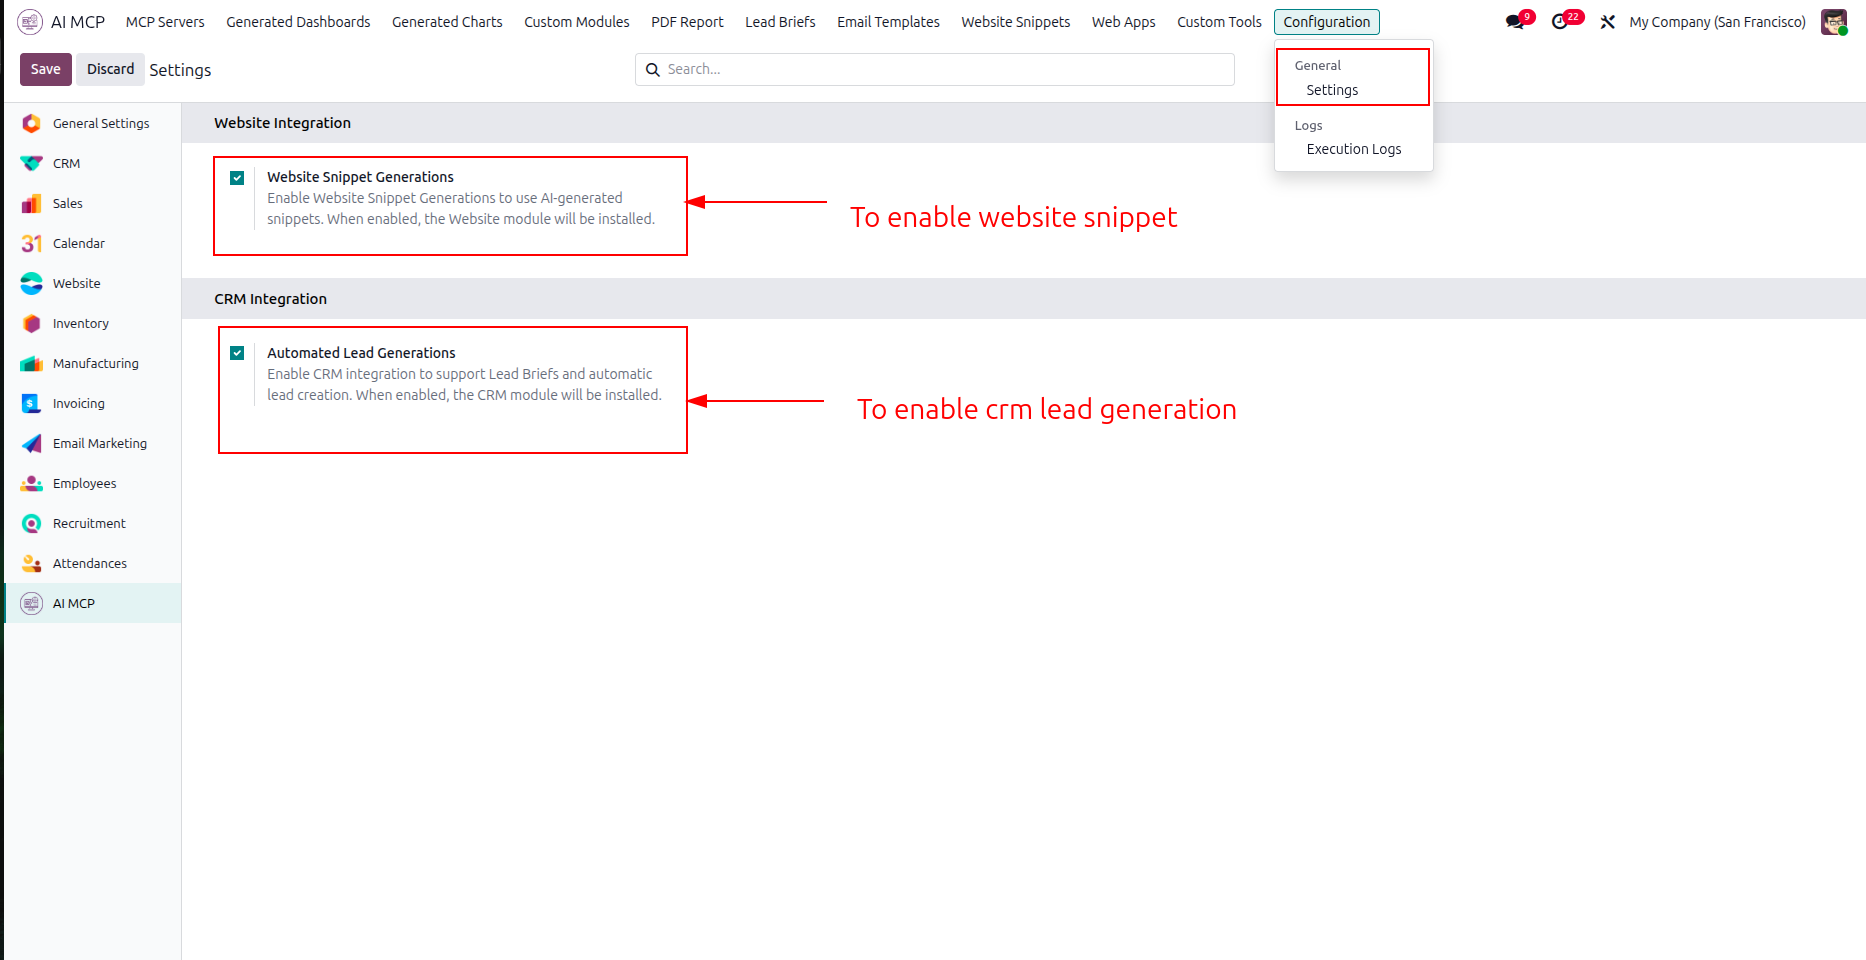
Configure the settings to enable website snippet generations and then click Save to apply changes.
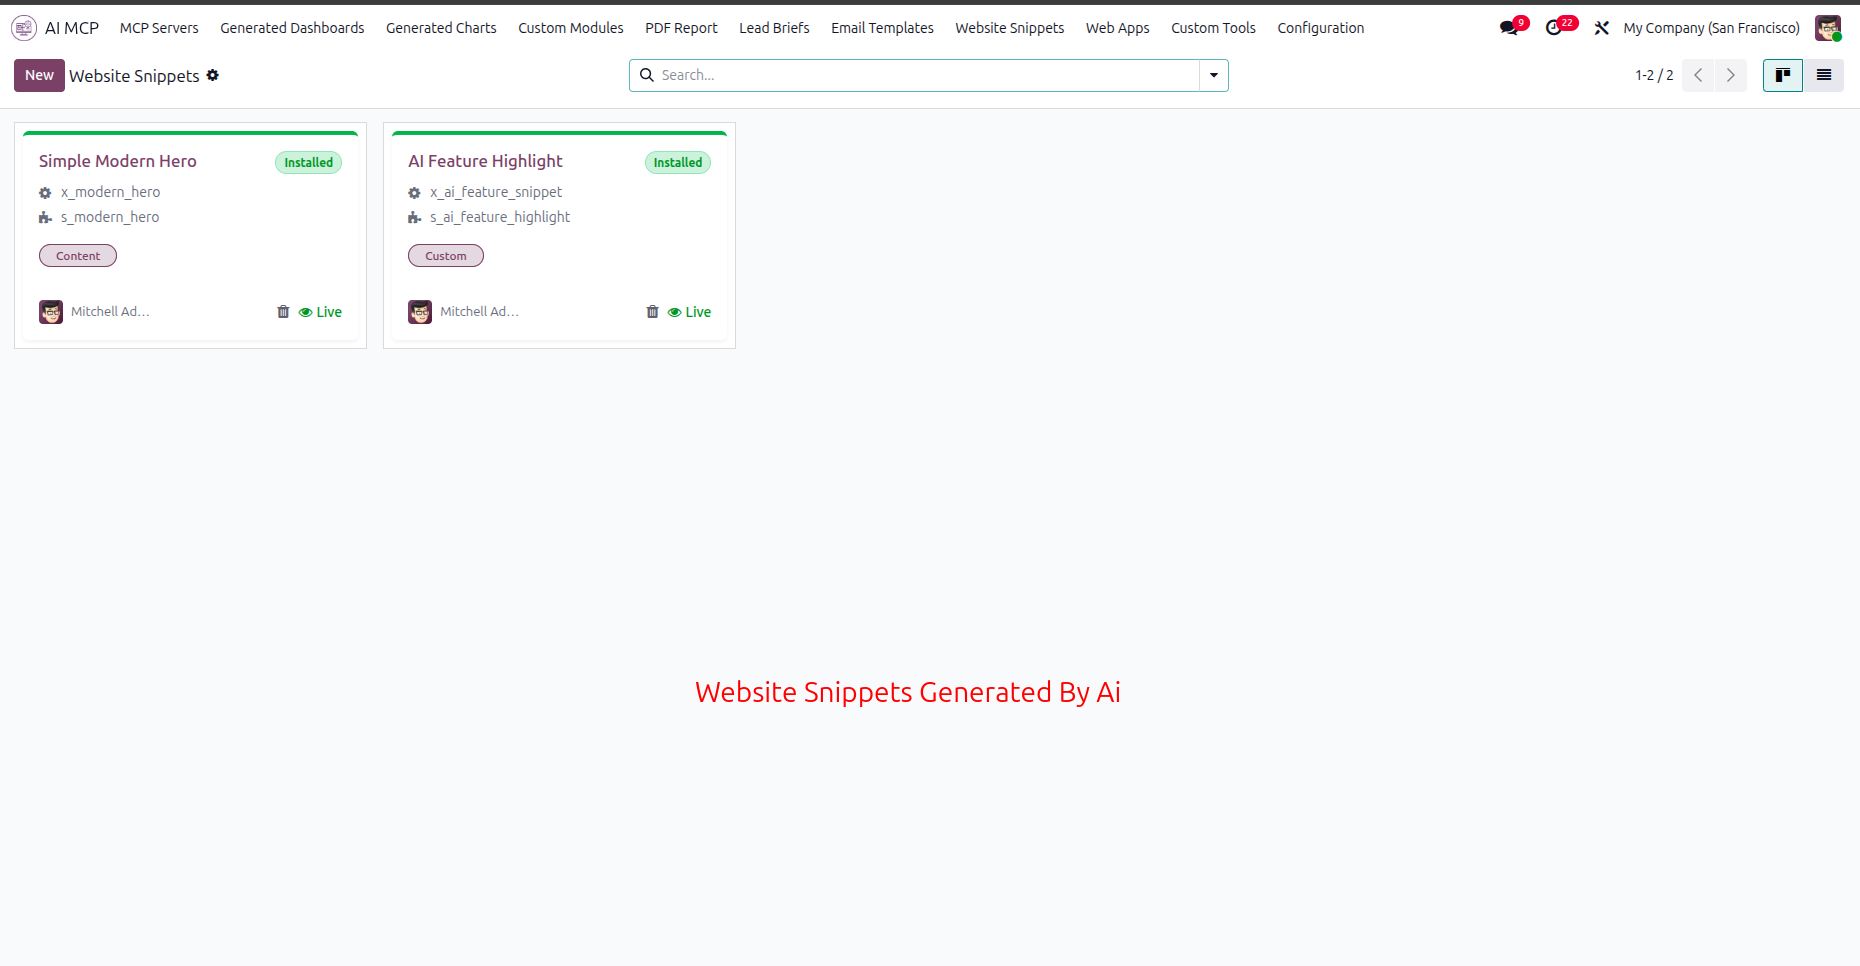
Review the list of AI-generated website snippets displayed on the Website Snippets dashboard.
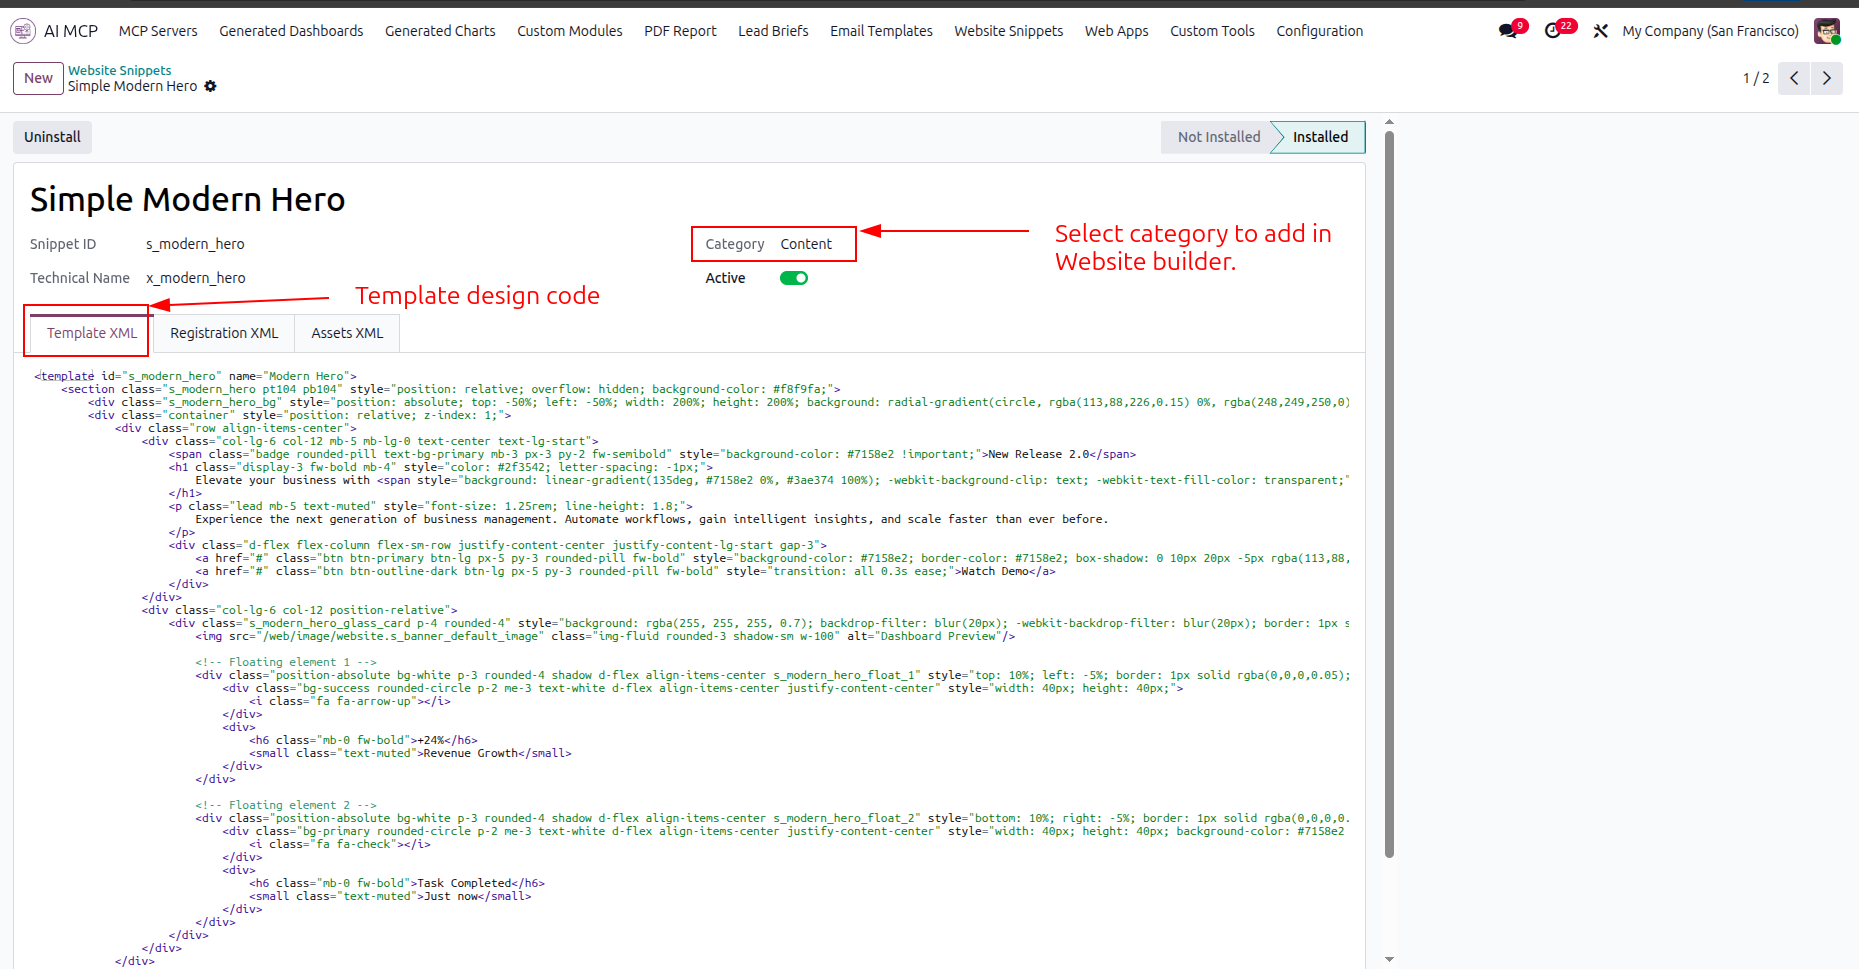
Select the Template XML tab to review the layout design code and snippet category.
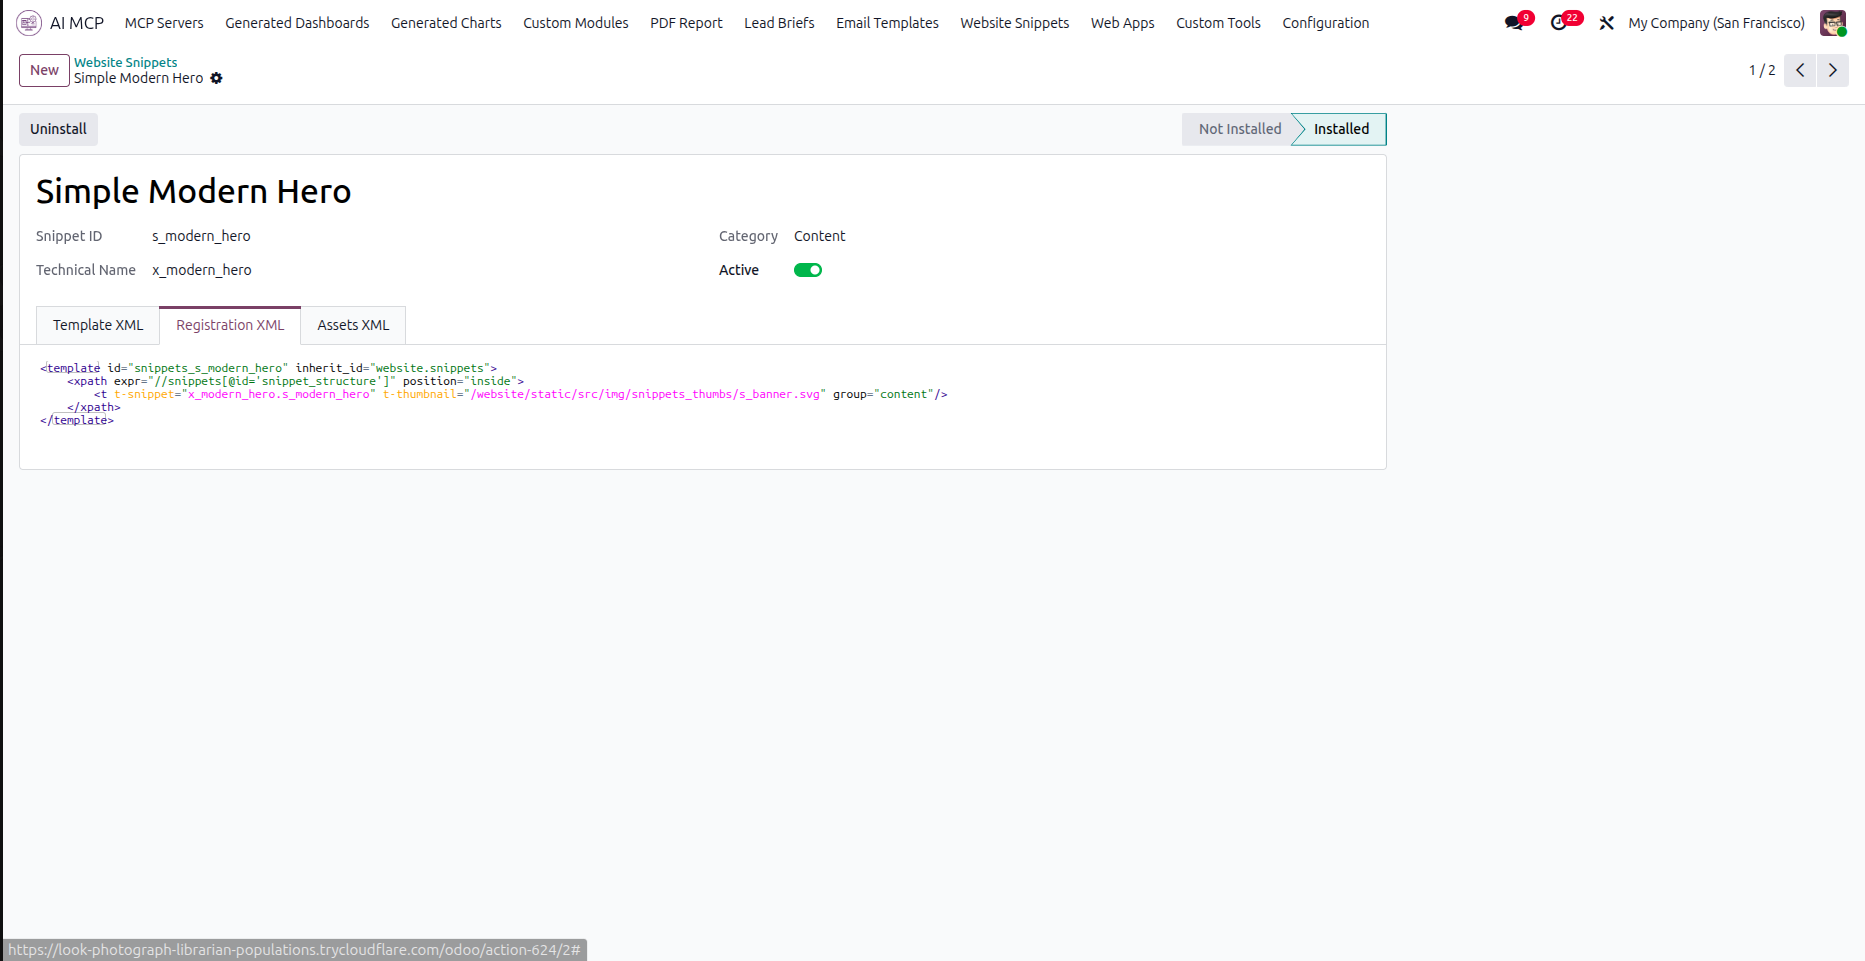
Navigate to the Registration XML tab to check how the snippet integrates with the Odoo website.
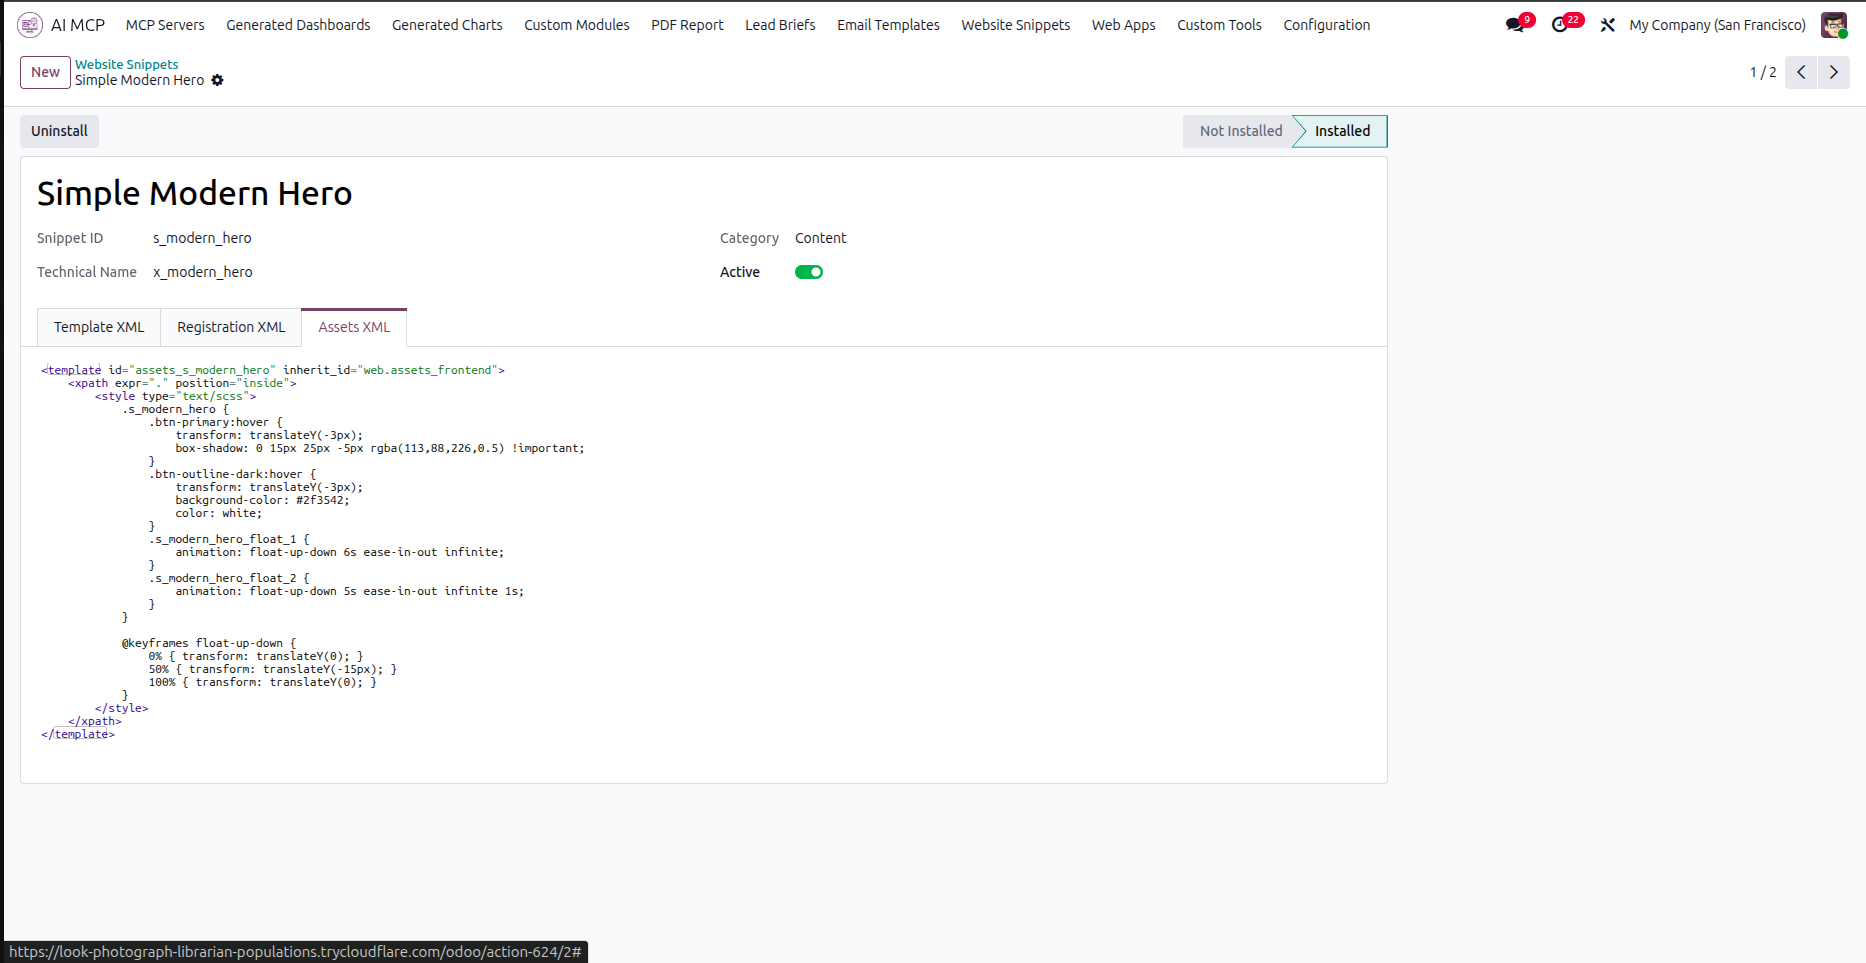
Open the Assets XML tab to review the style sheets and animations applied to the snippet.
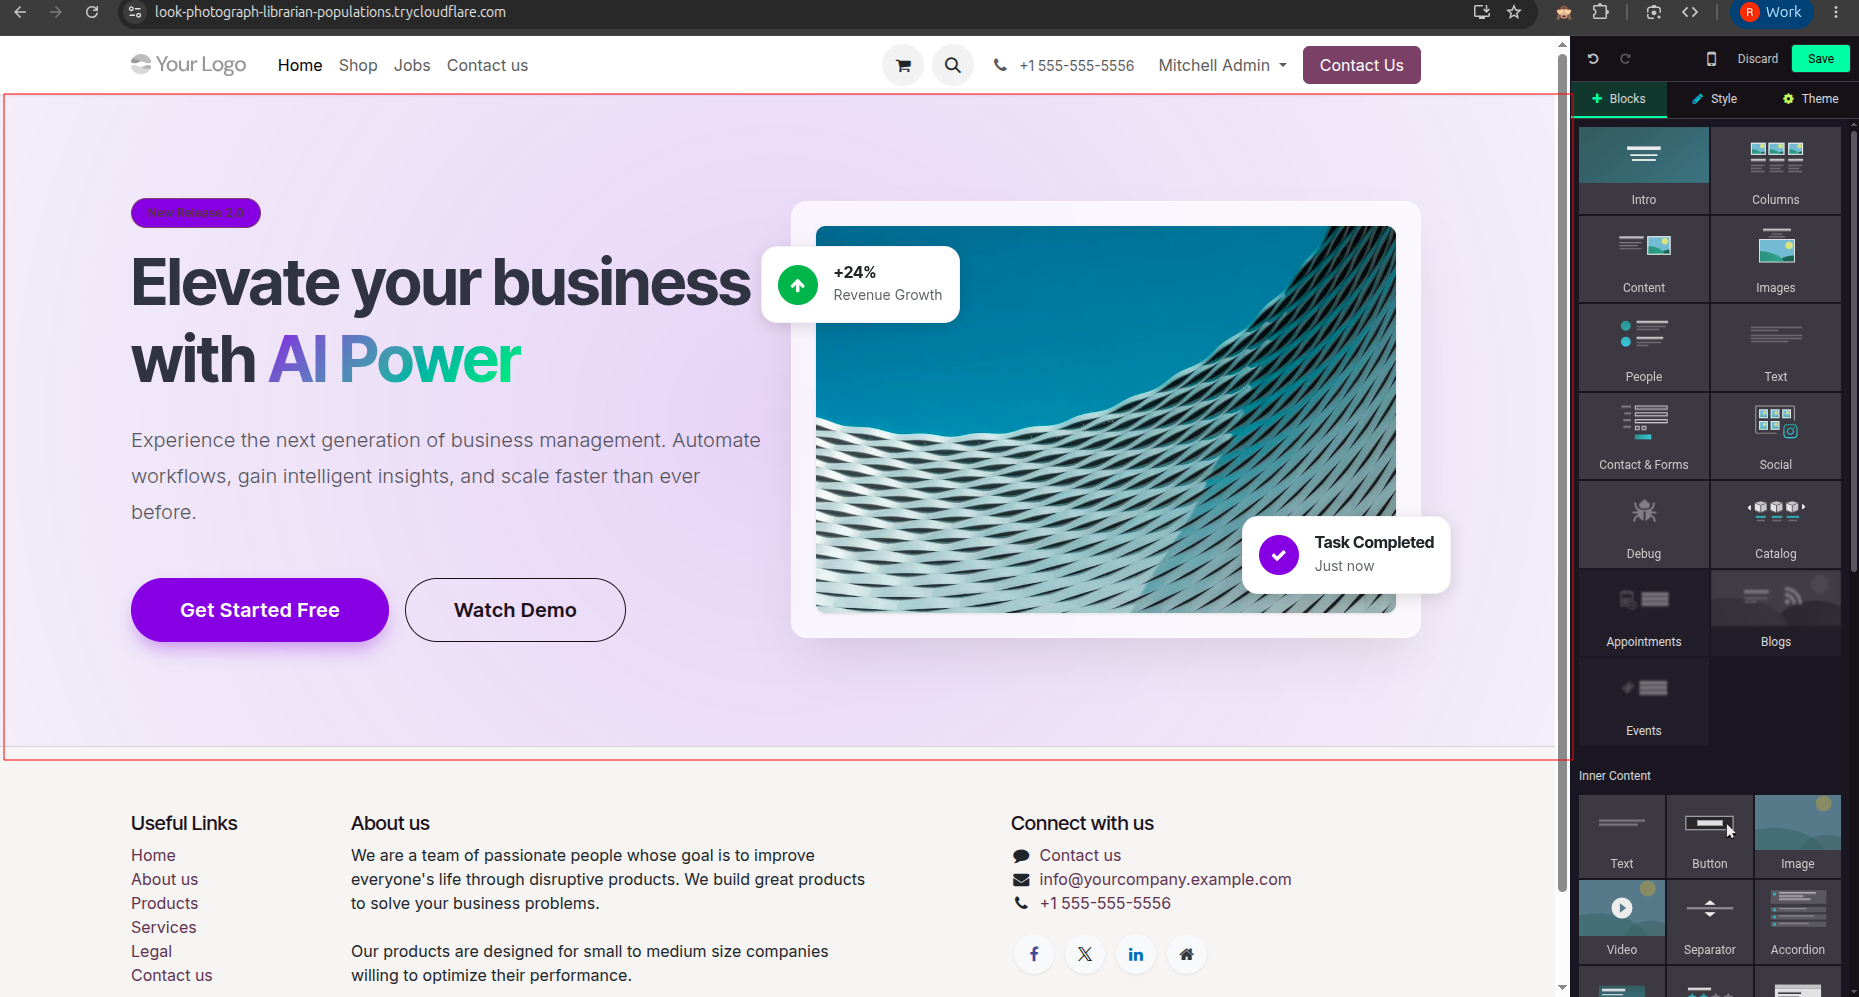
Select the Content category in the blocks library to locate the AI-generated website snippet.

Verify the layout and visual rendering of the custom snippet on the live website page.
Navigate to the Web Apps tab to view all AI-generated web applications in the system.
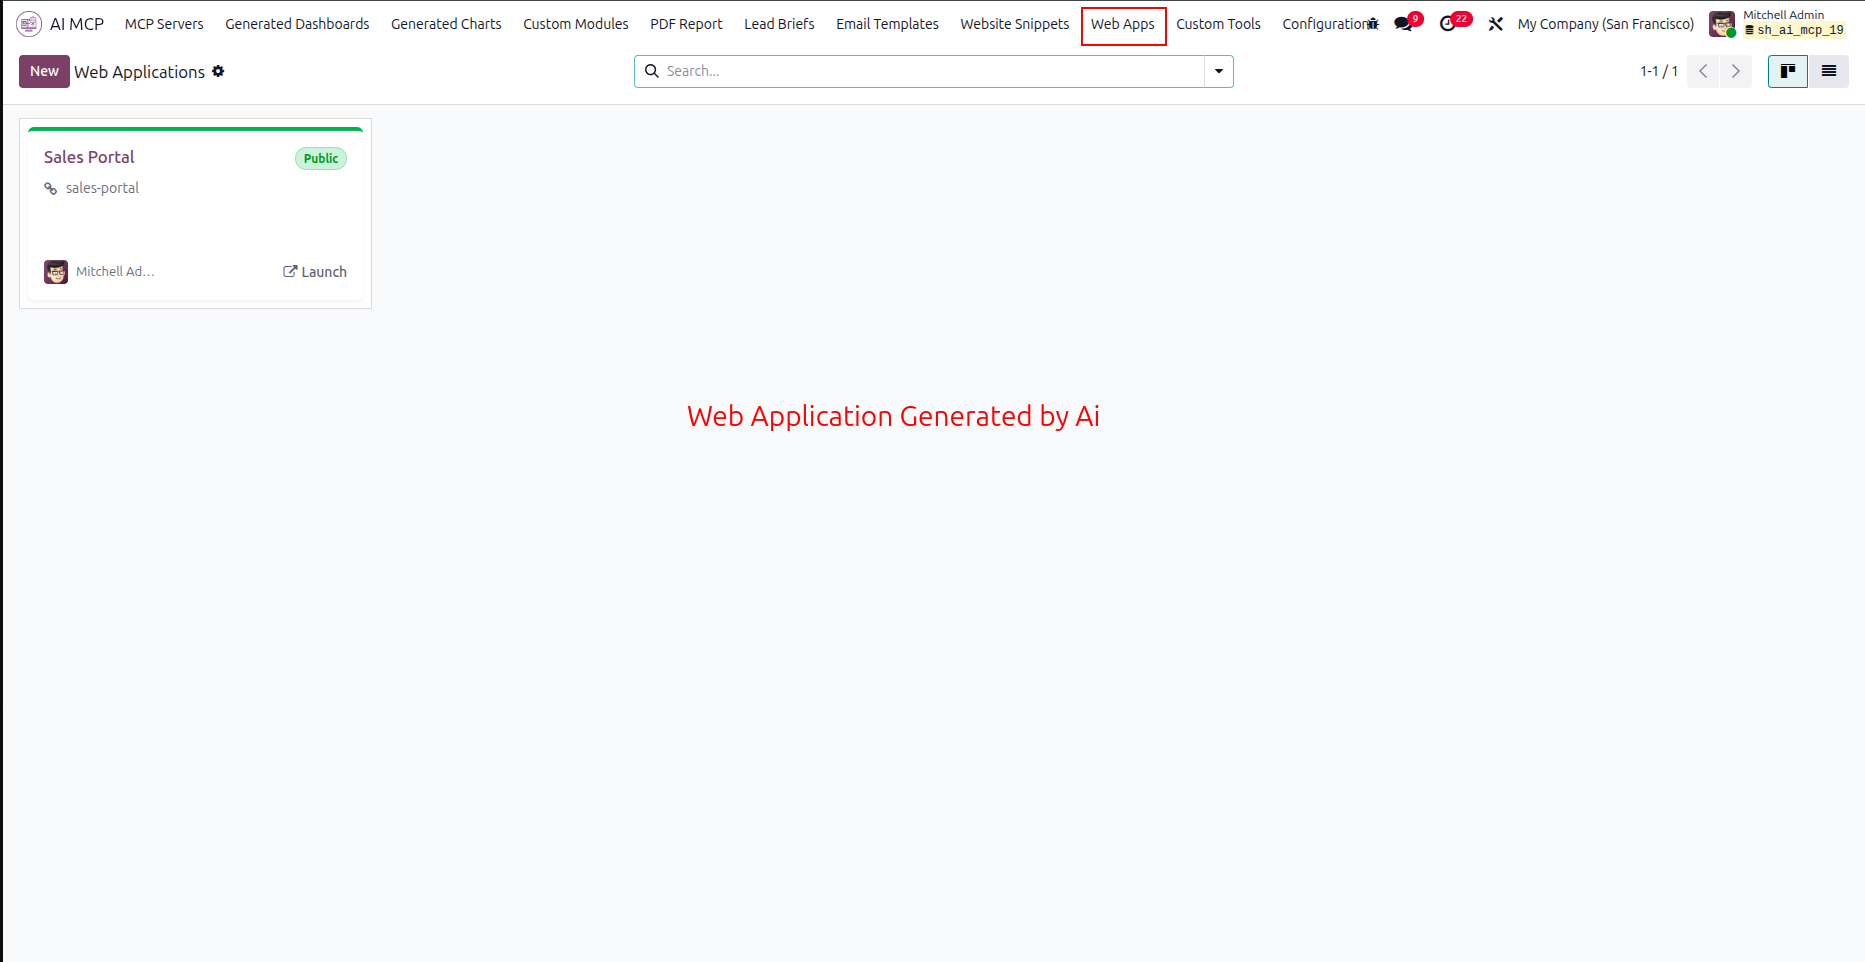
Click the highlighted Launch App button to open the web application in a new browser tab.
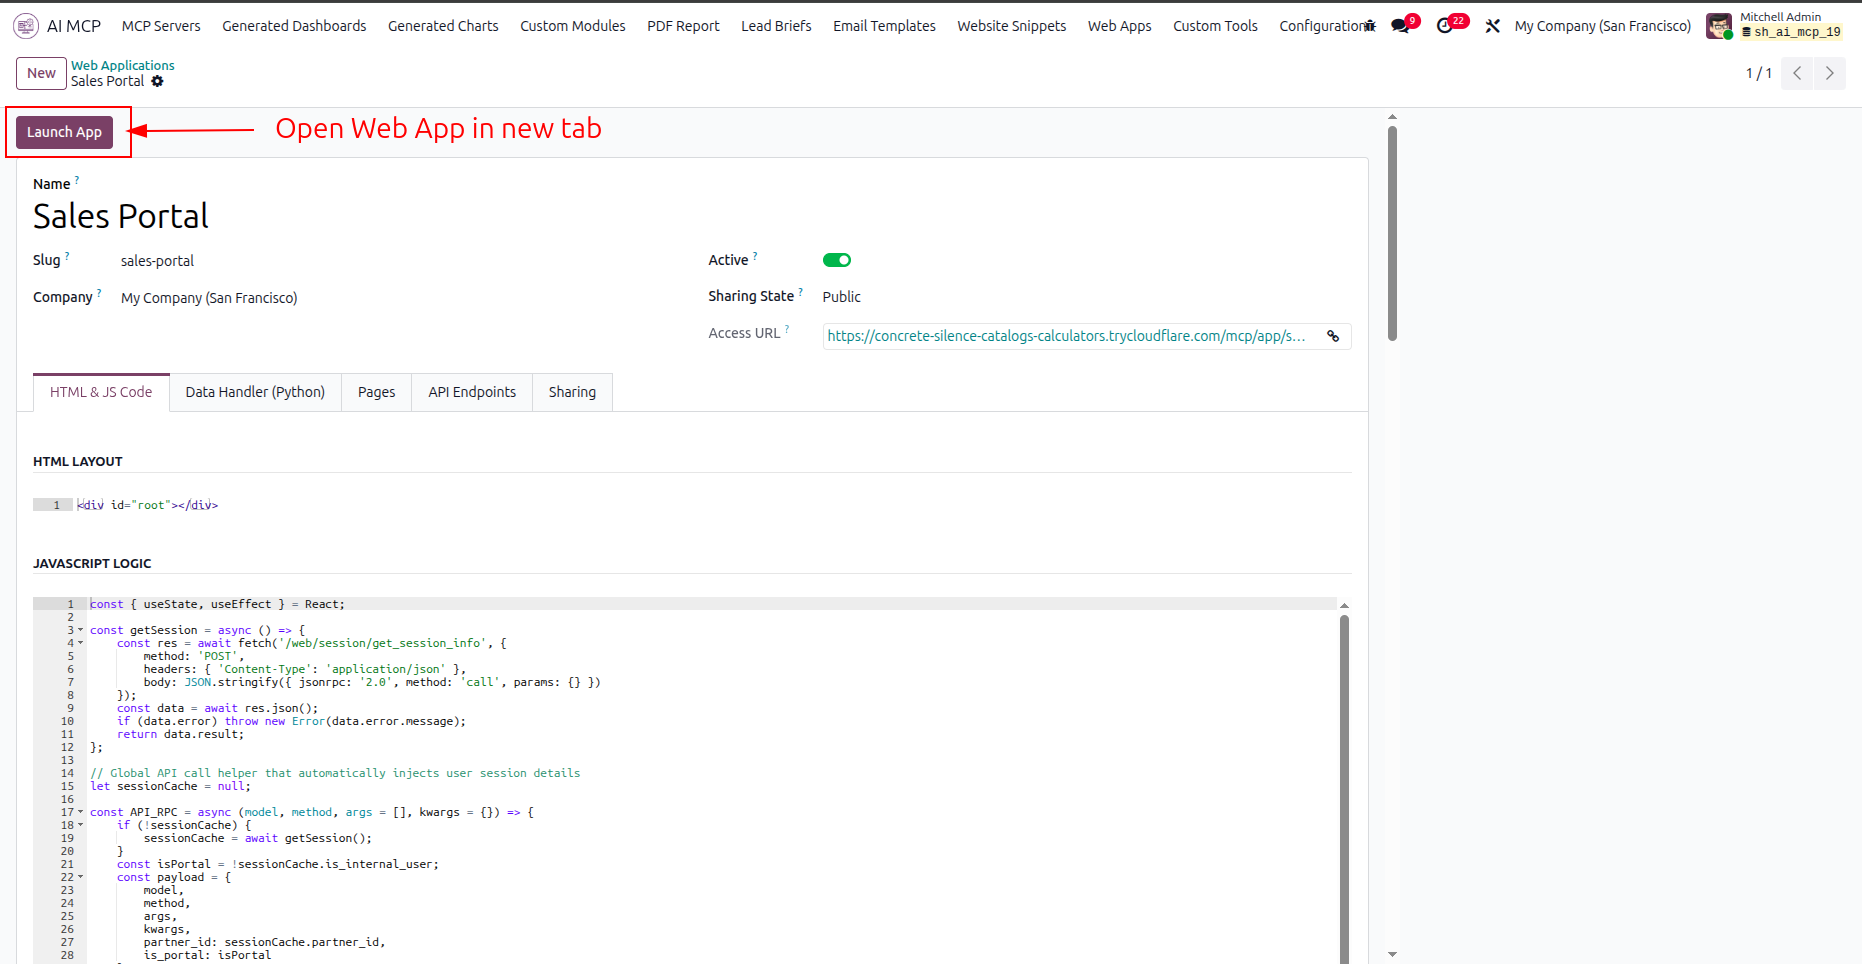
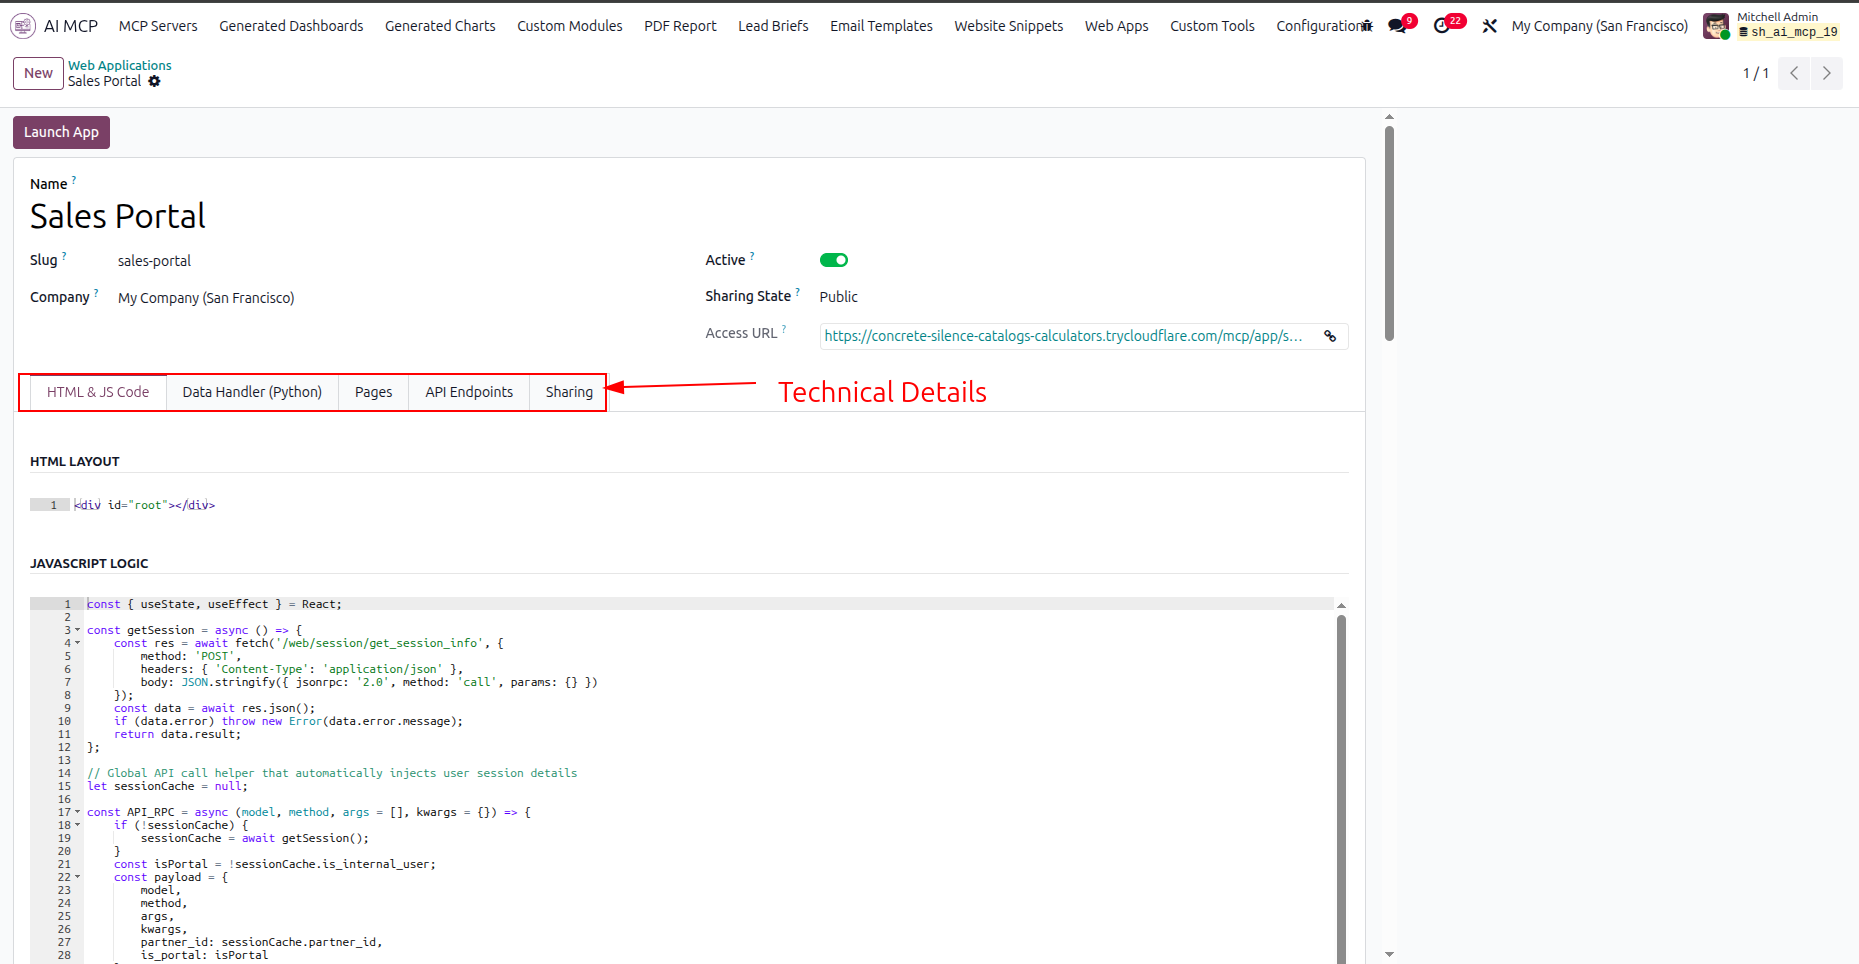
Navigate through the highlighted technical details tabs to inspect code, endpoints, and sharing configurations.
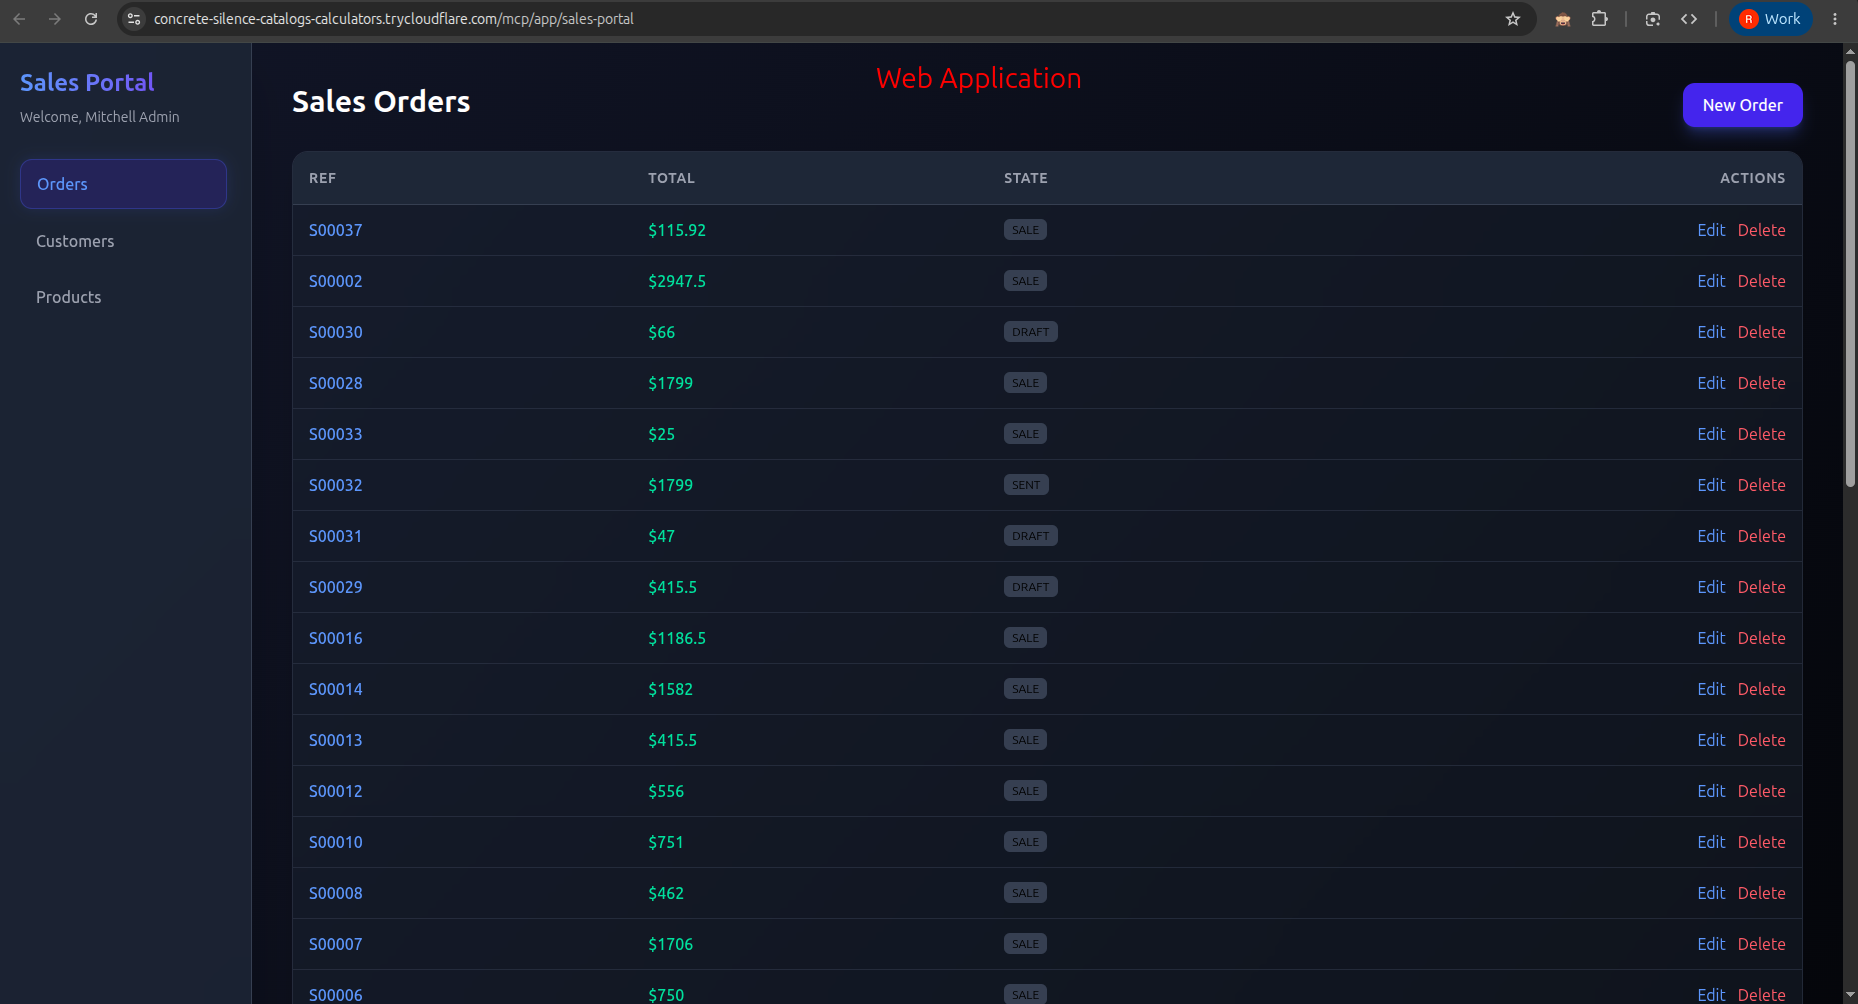
Access the launched Web Application in the browser to view, edit, or delete sales order records.
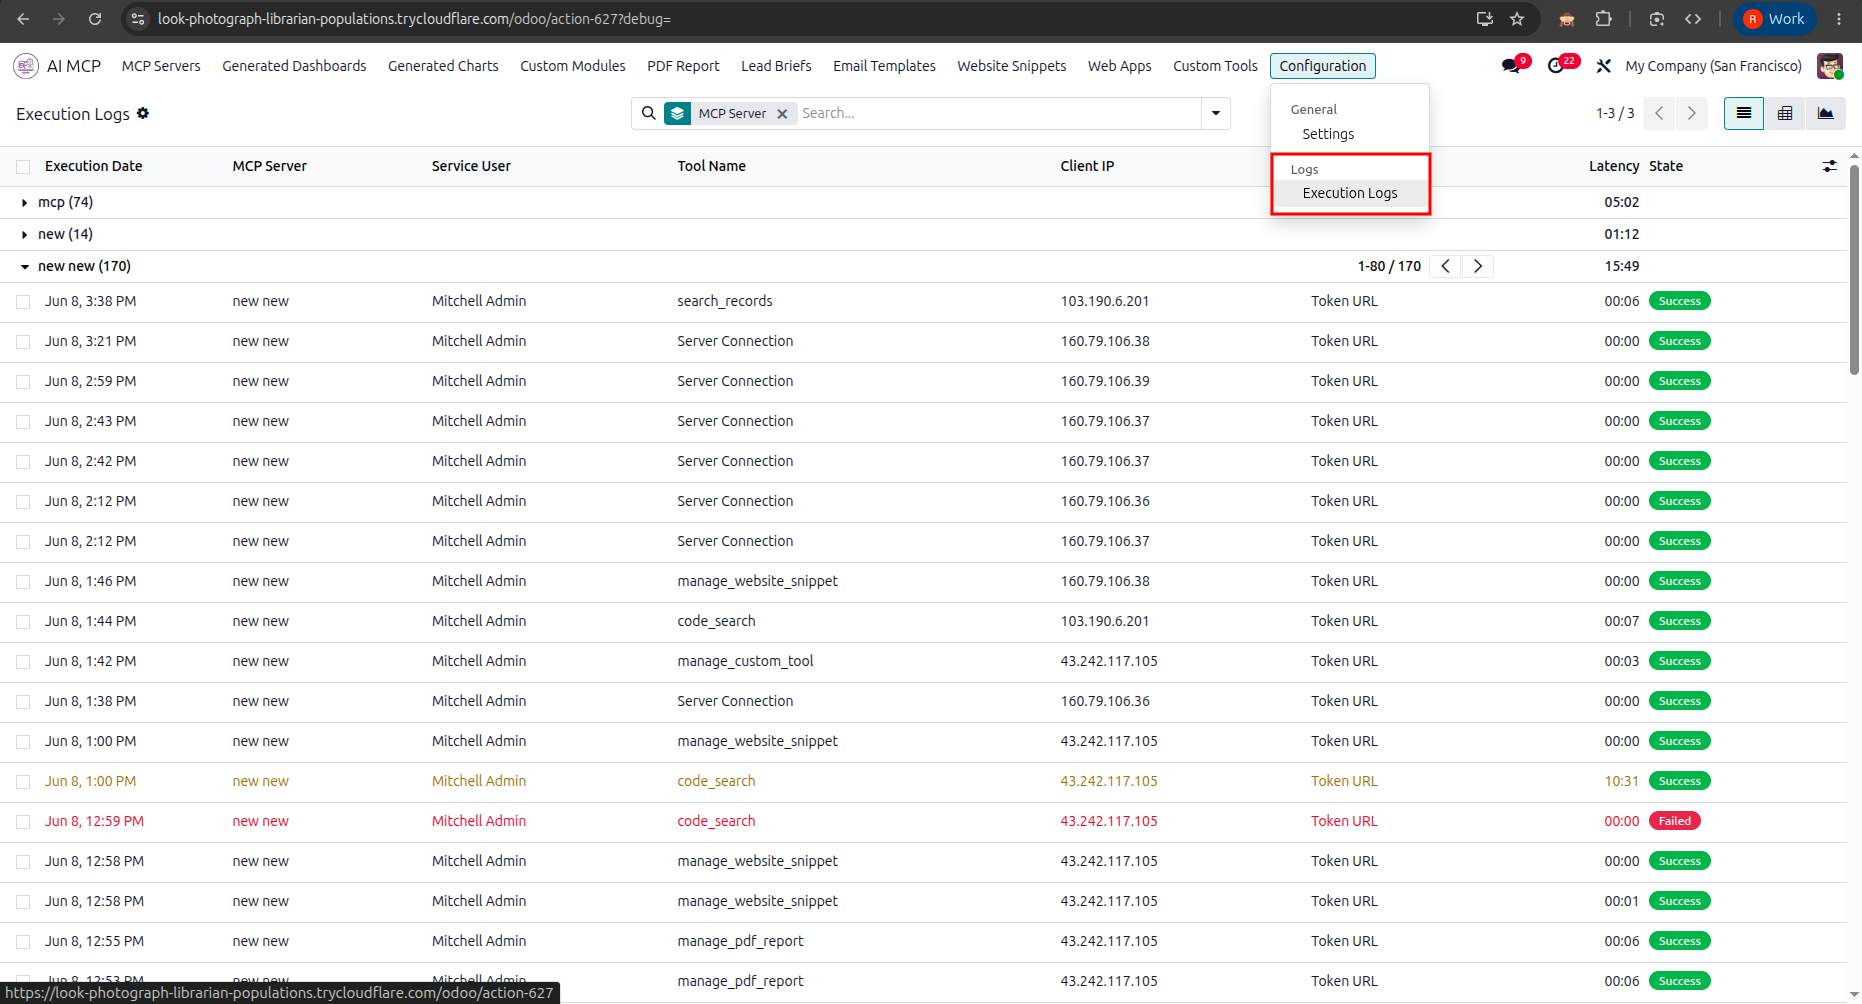
Open the Execution Logs menu to review the list of tool execution statuses, dates, and client IPs.

Select the Execution Logs option from the Configuration menu to access the tool audit records.
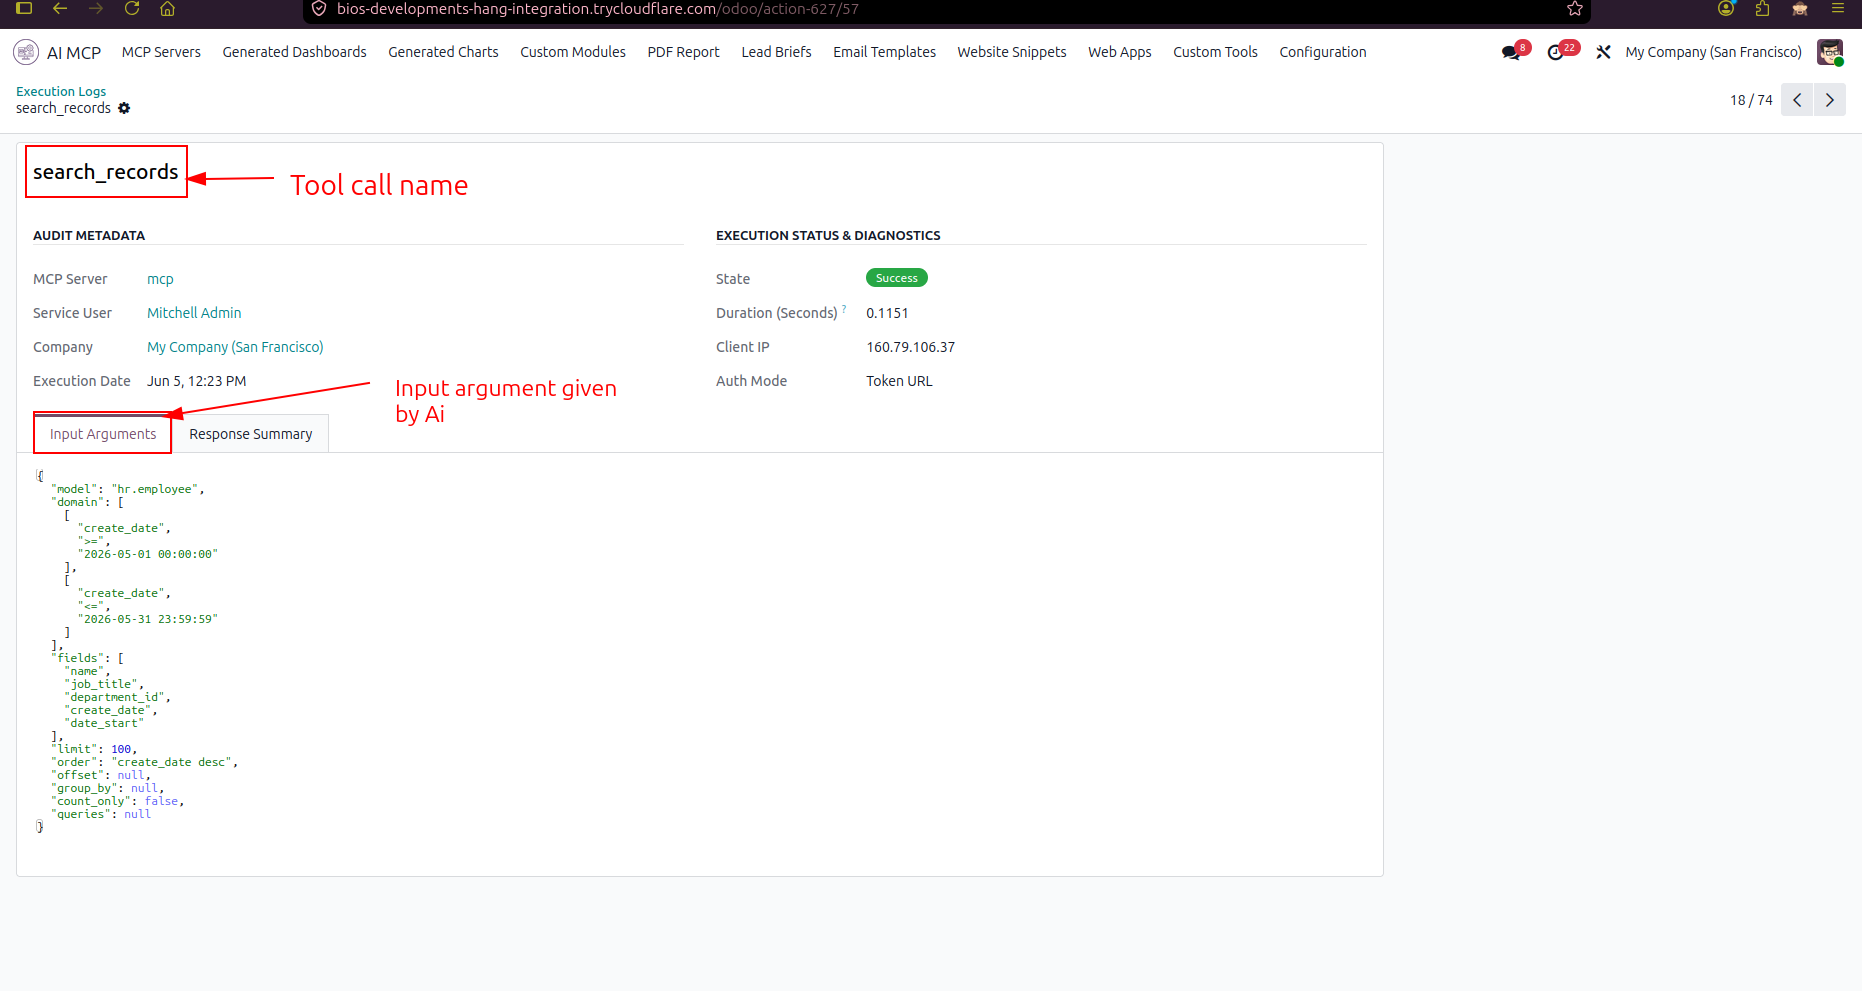
Review the input arguments provided by the AI for the tool execution in the details view.
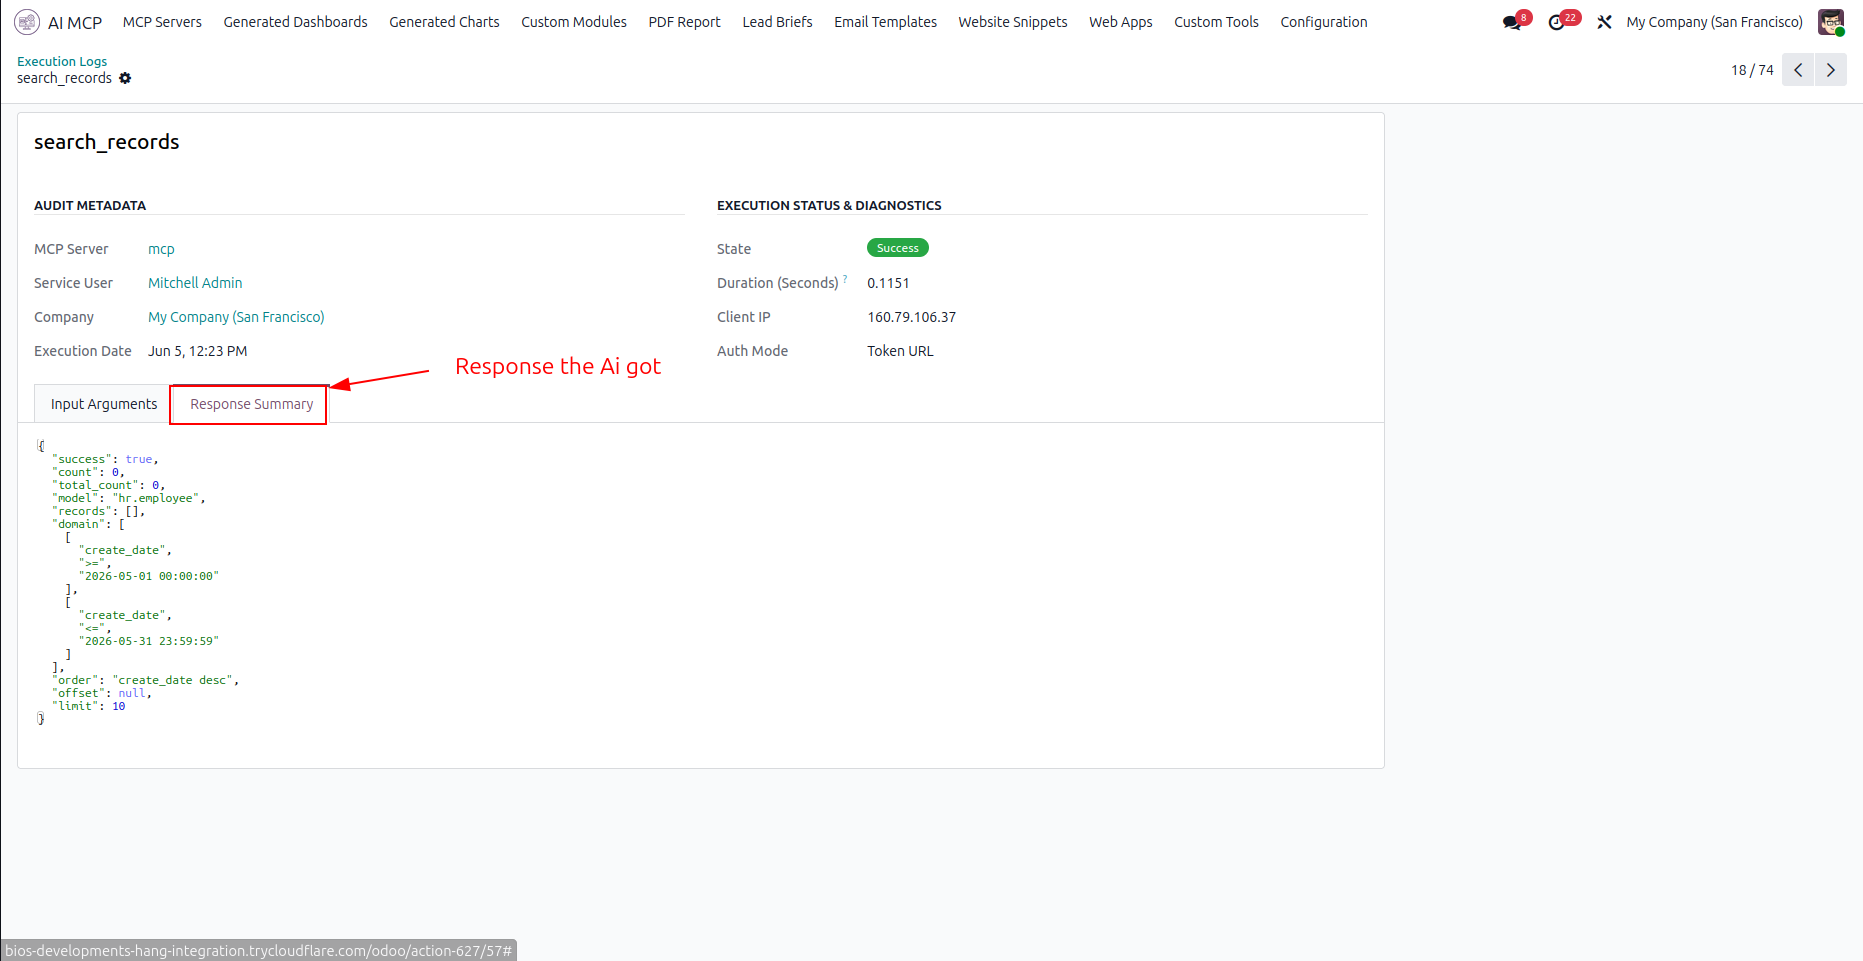
Select the Response Summary tab to inspect the JSON data returned to the AI assistant.
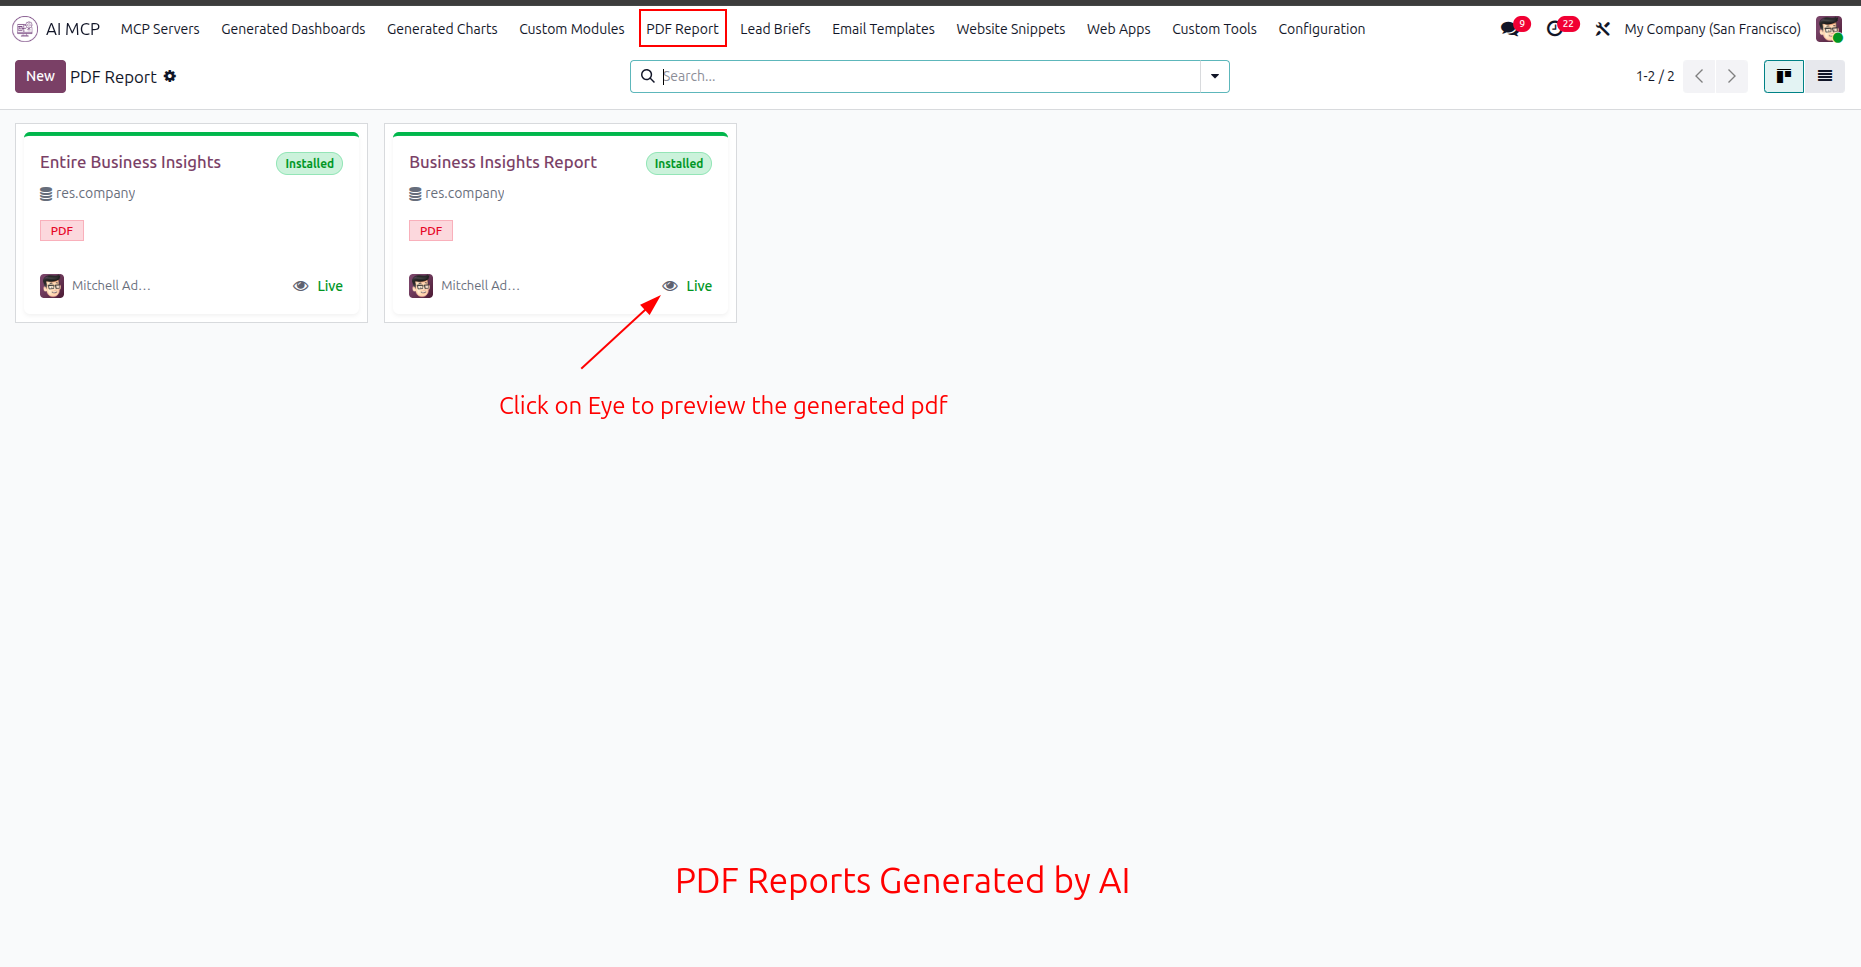
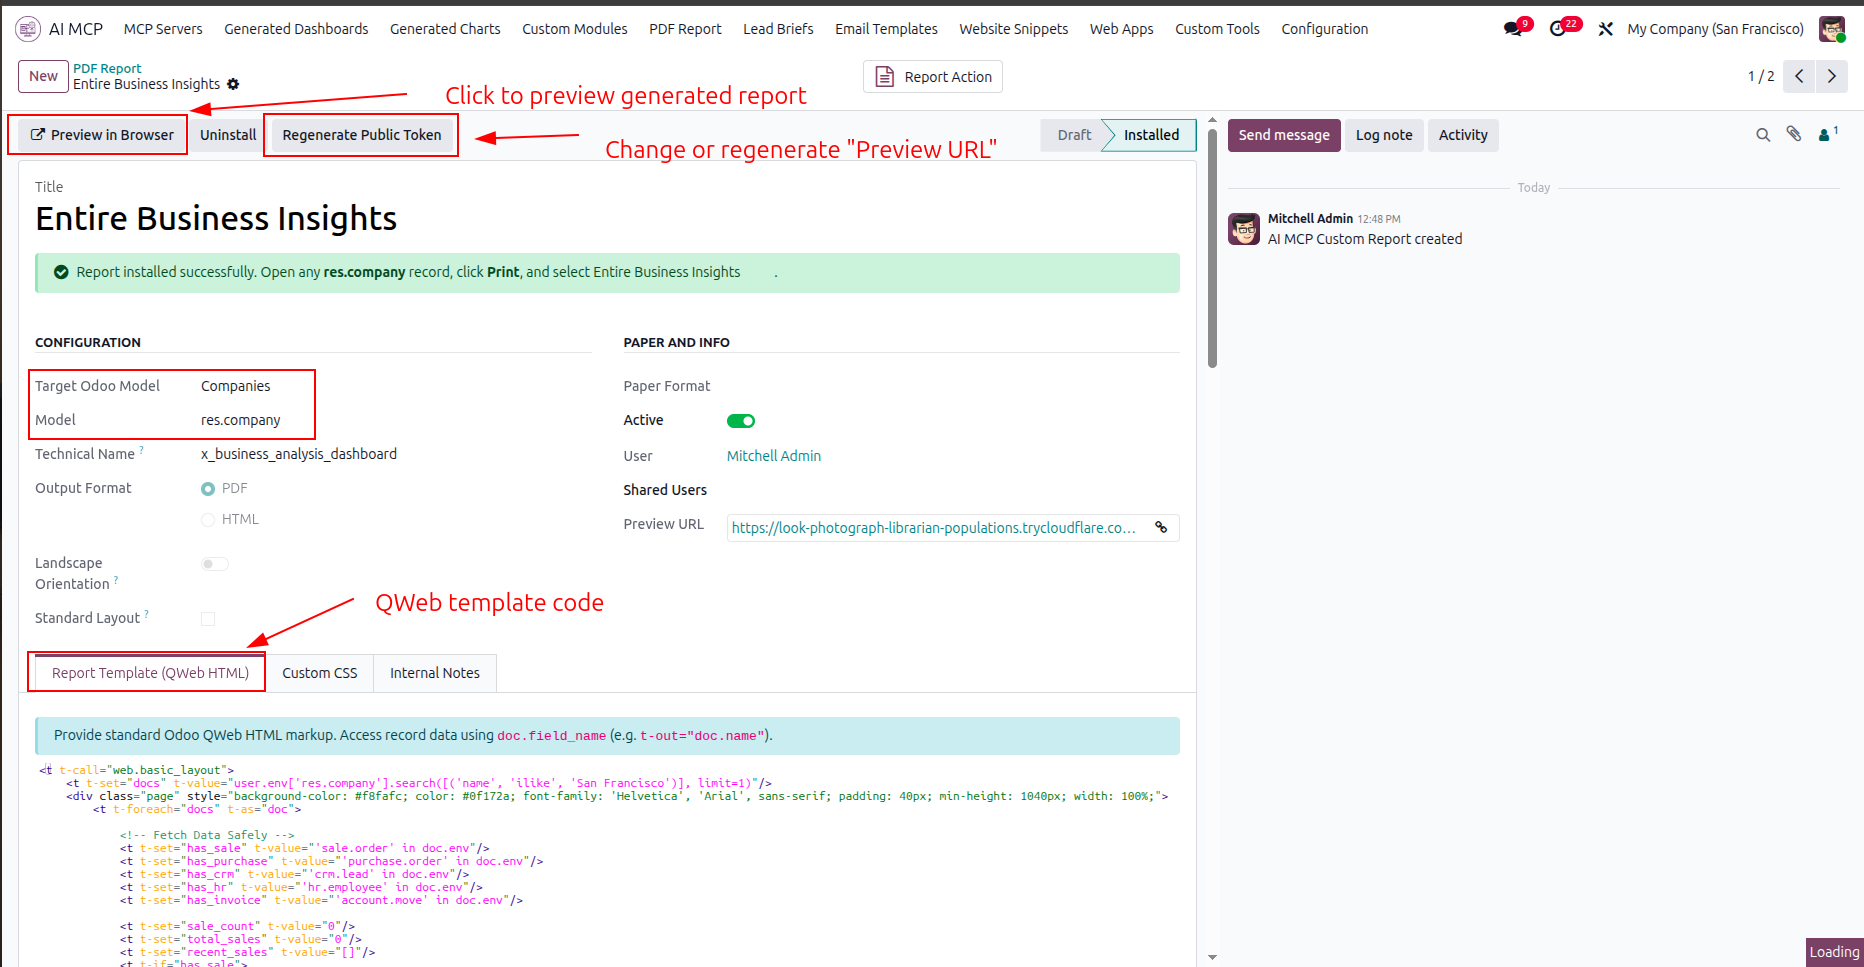
Click the eye icon on the generated report card to preview the AI-created PDF document.
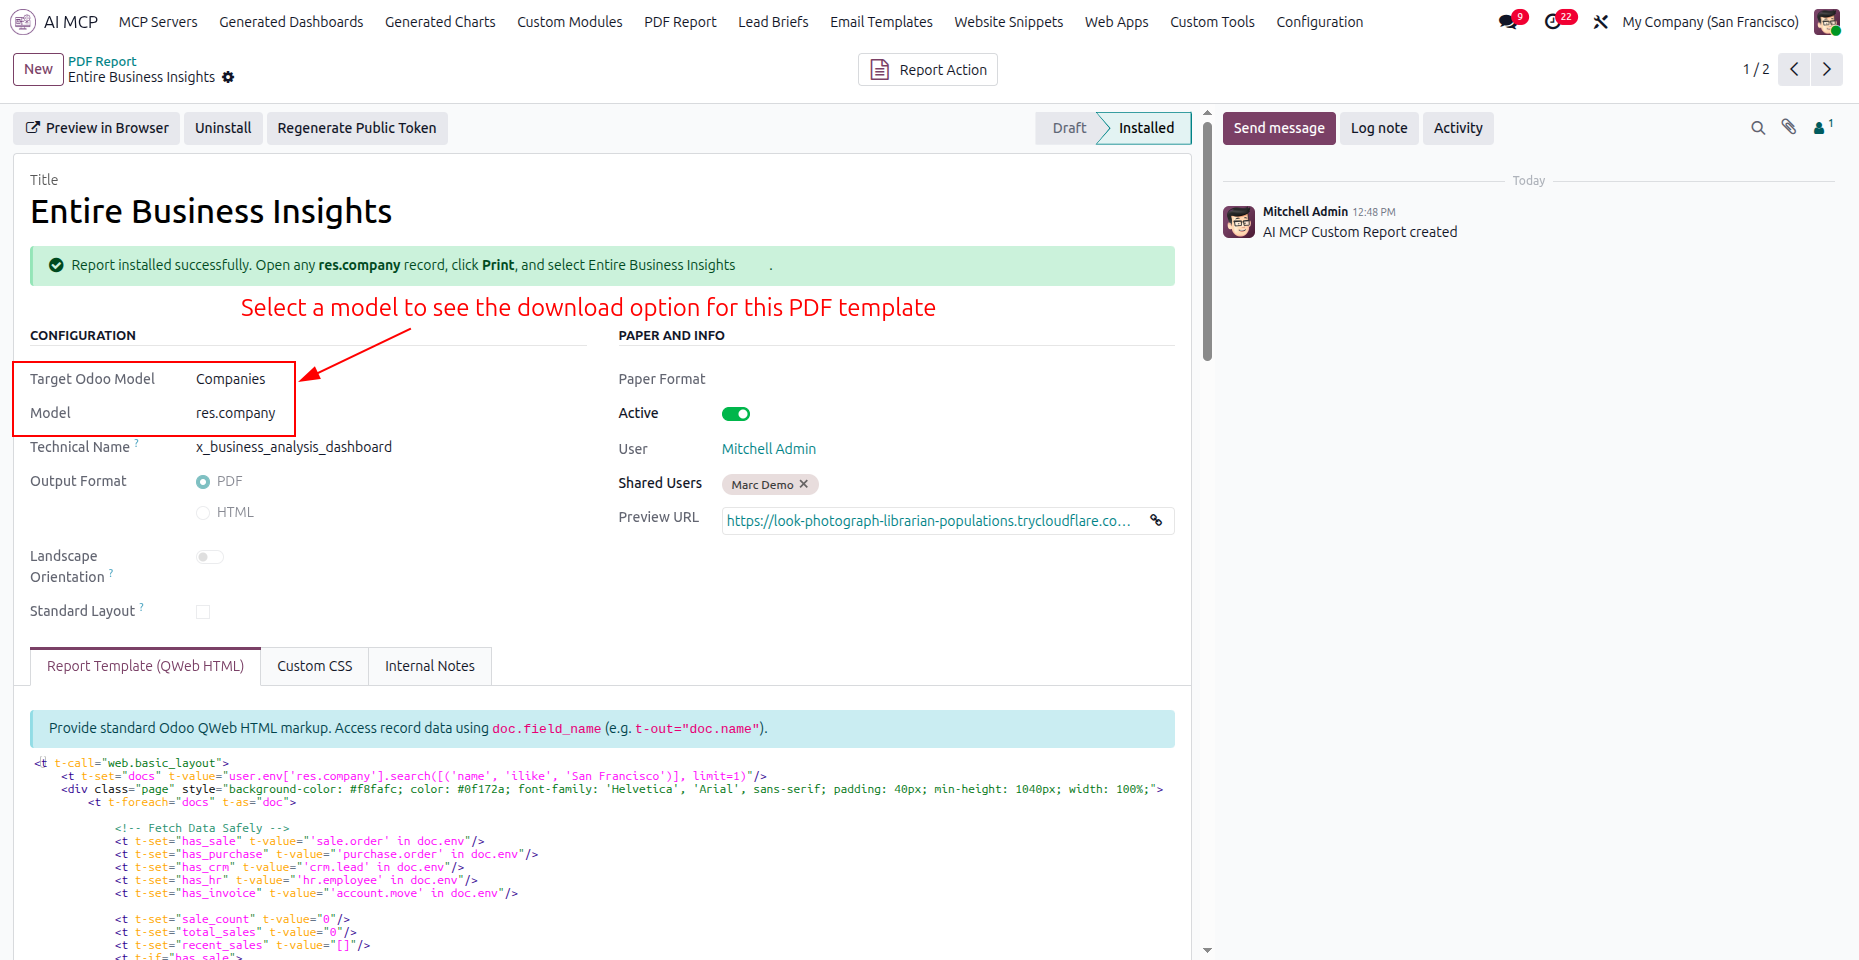
Click the highlighted preview button to view the report, or regenerate the public access token.
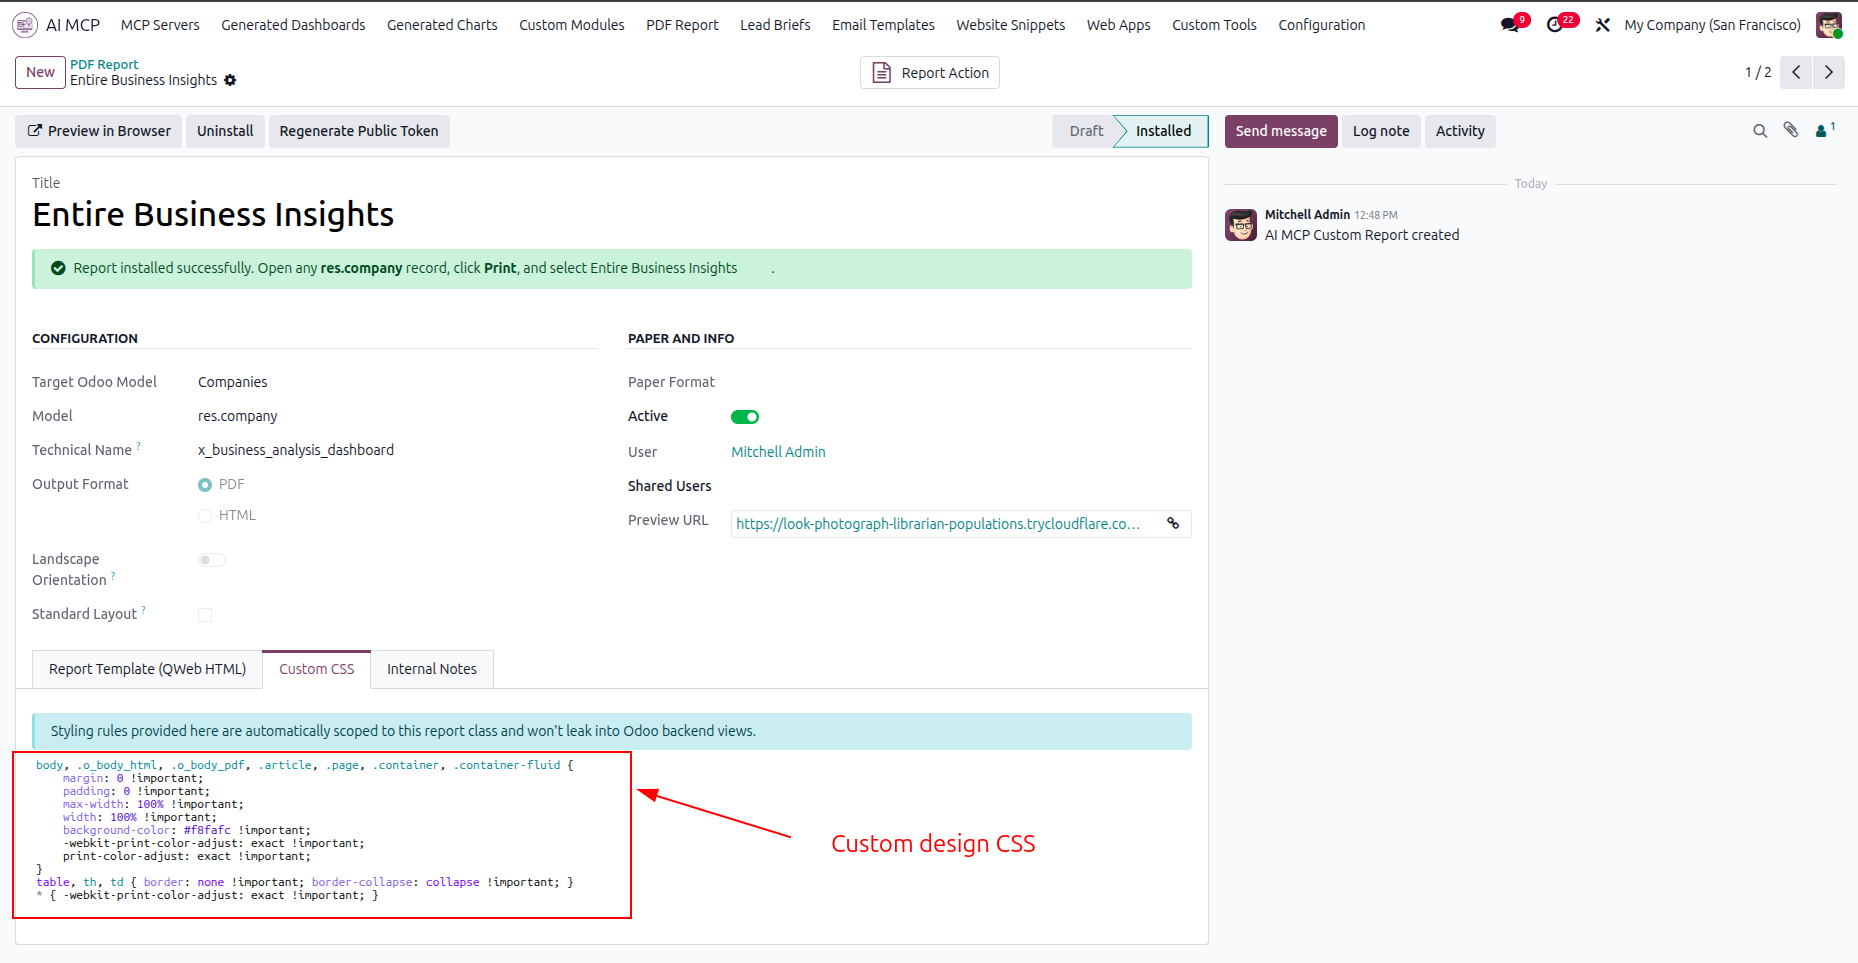
Select the Custom CSS tab to apply style definitions and format the custom PDF layout.
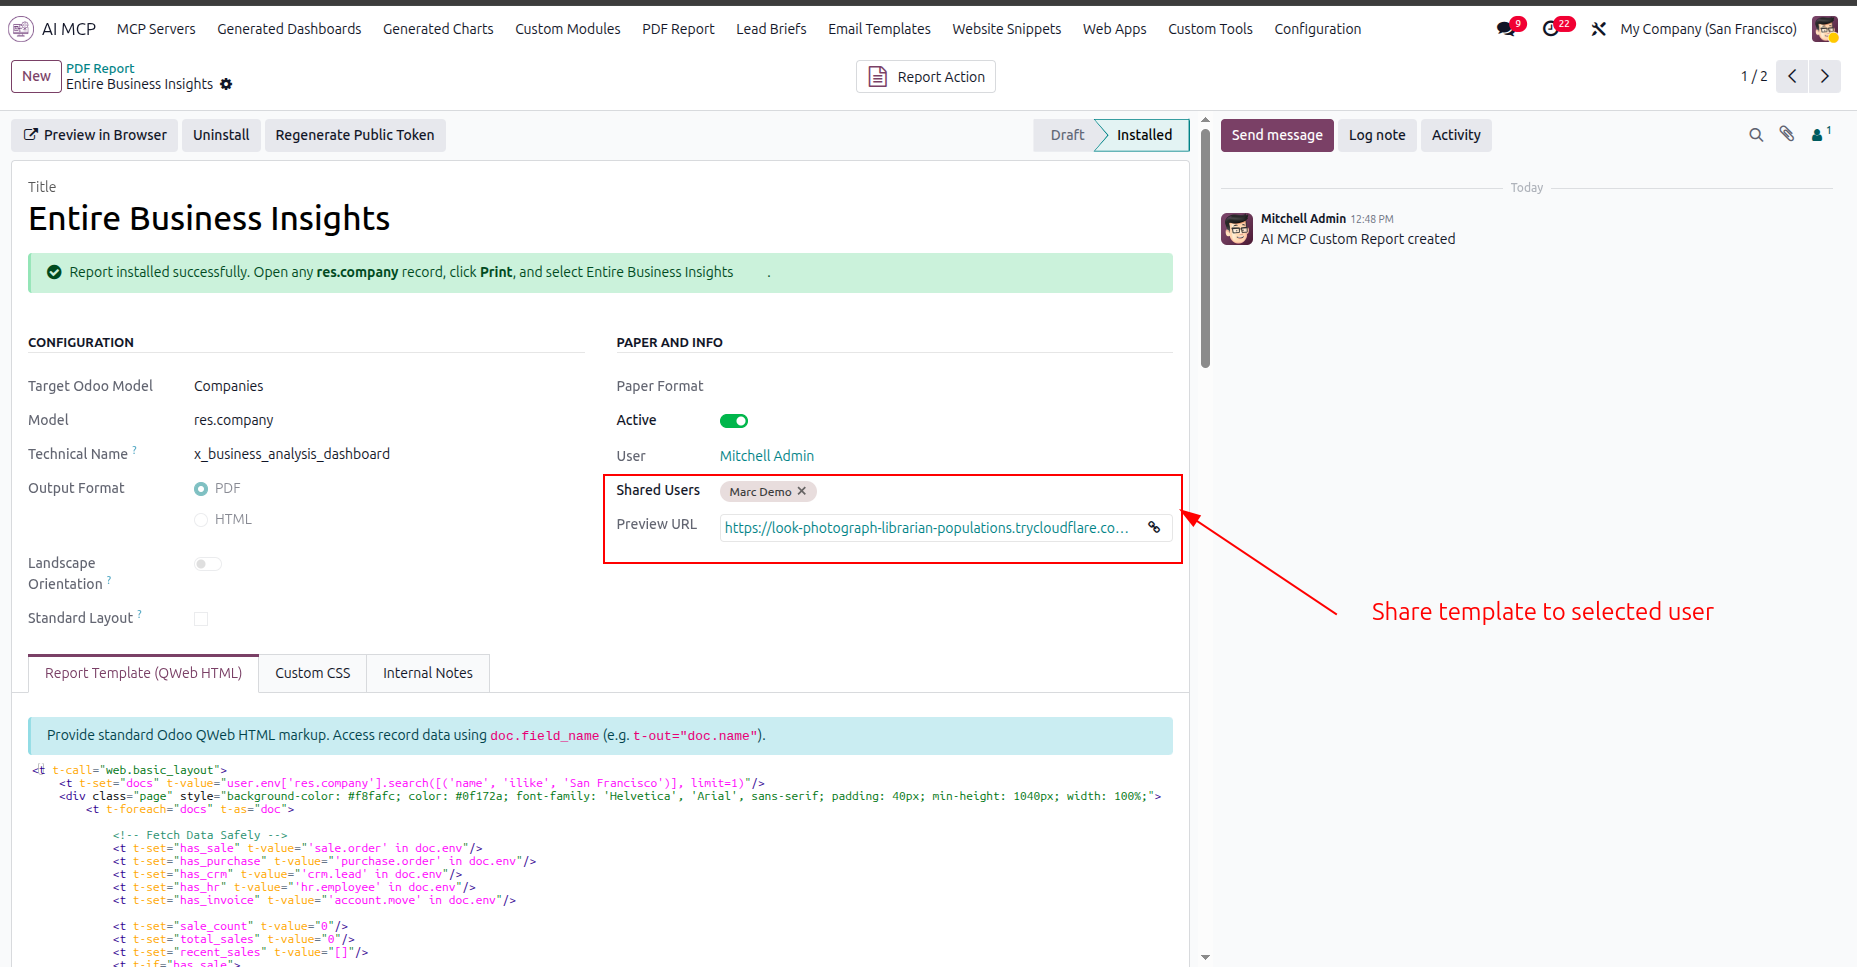
Configure the Shared Users field to distribute the report access to specific team members.
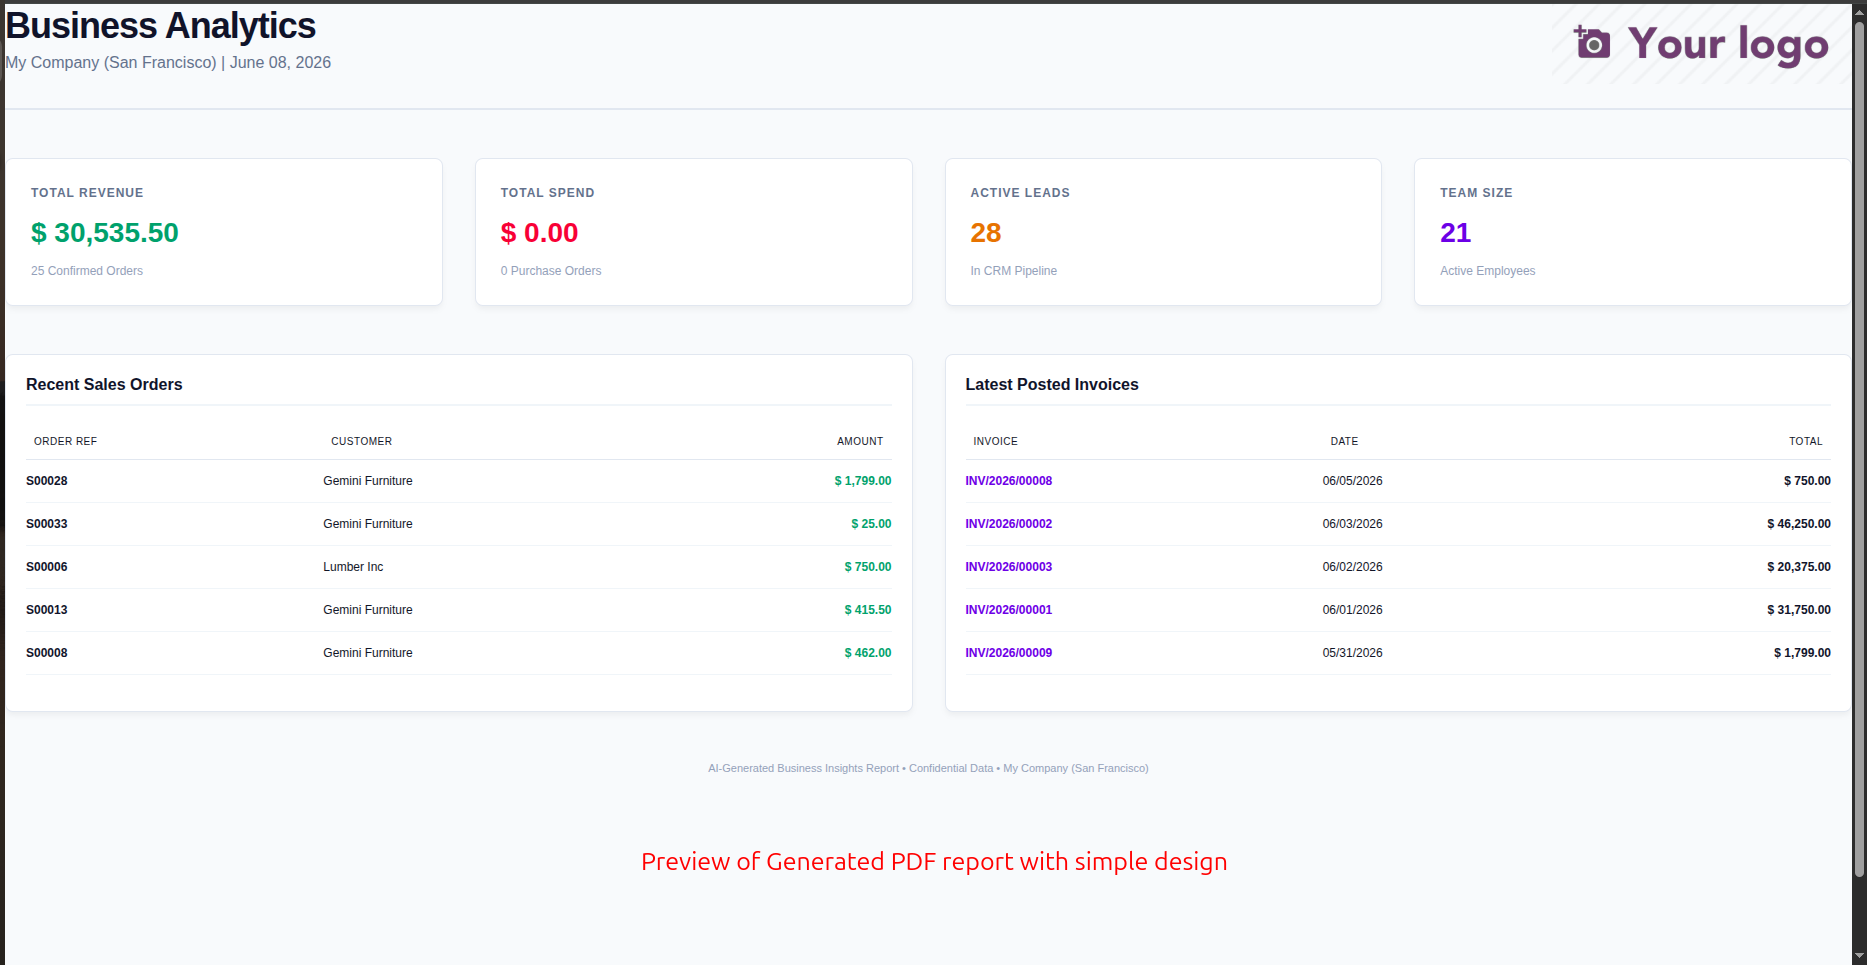
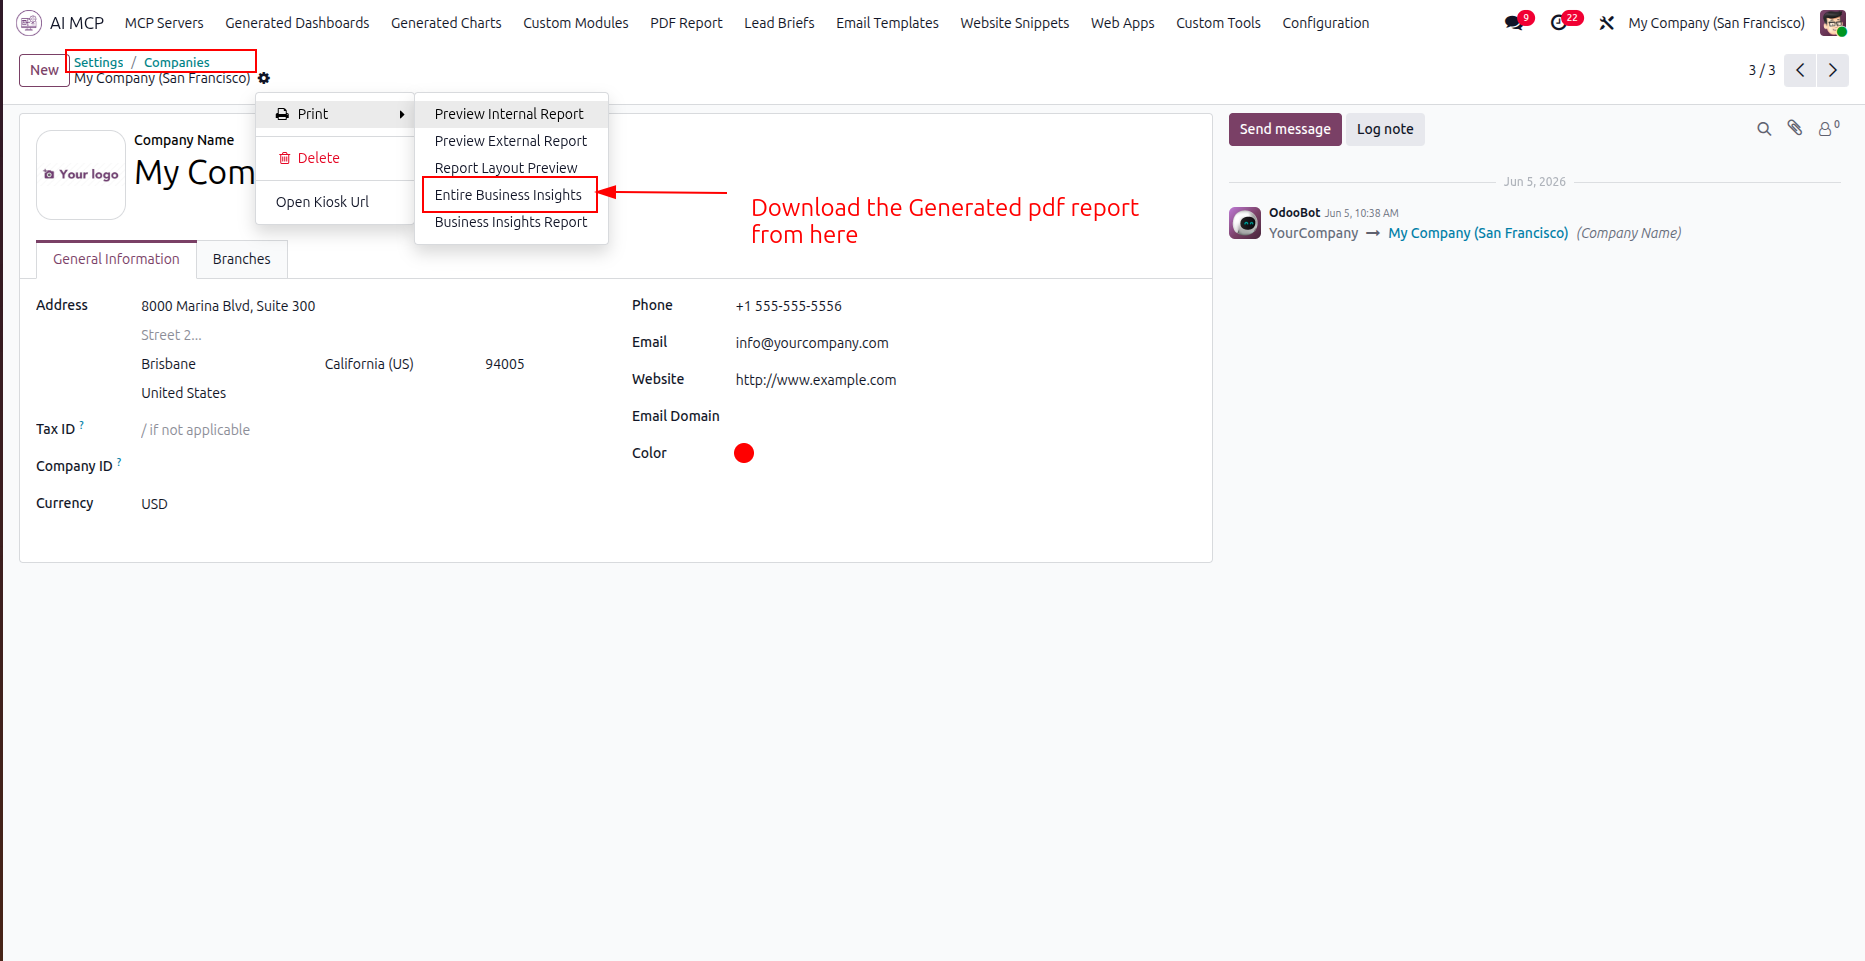
Review the clean layout of the generated PDF report in the web browser preview.
Select a target Odoo model to enable printing options for the custom PDF report.
Open the Print menu on the target record to download your generated PDF report.
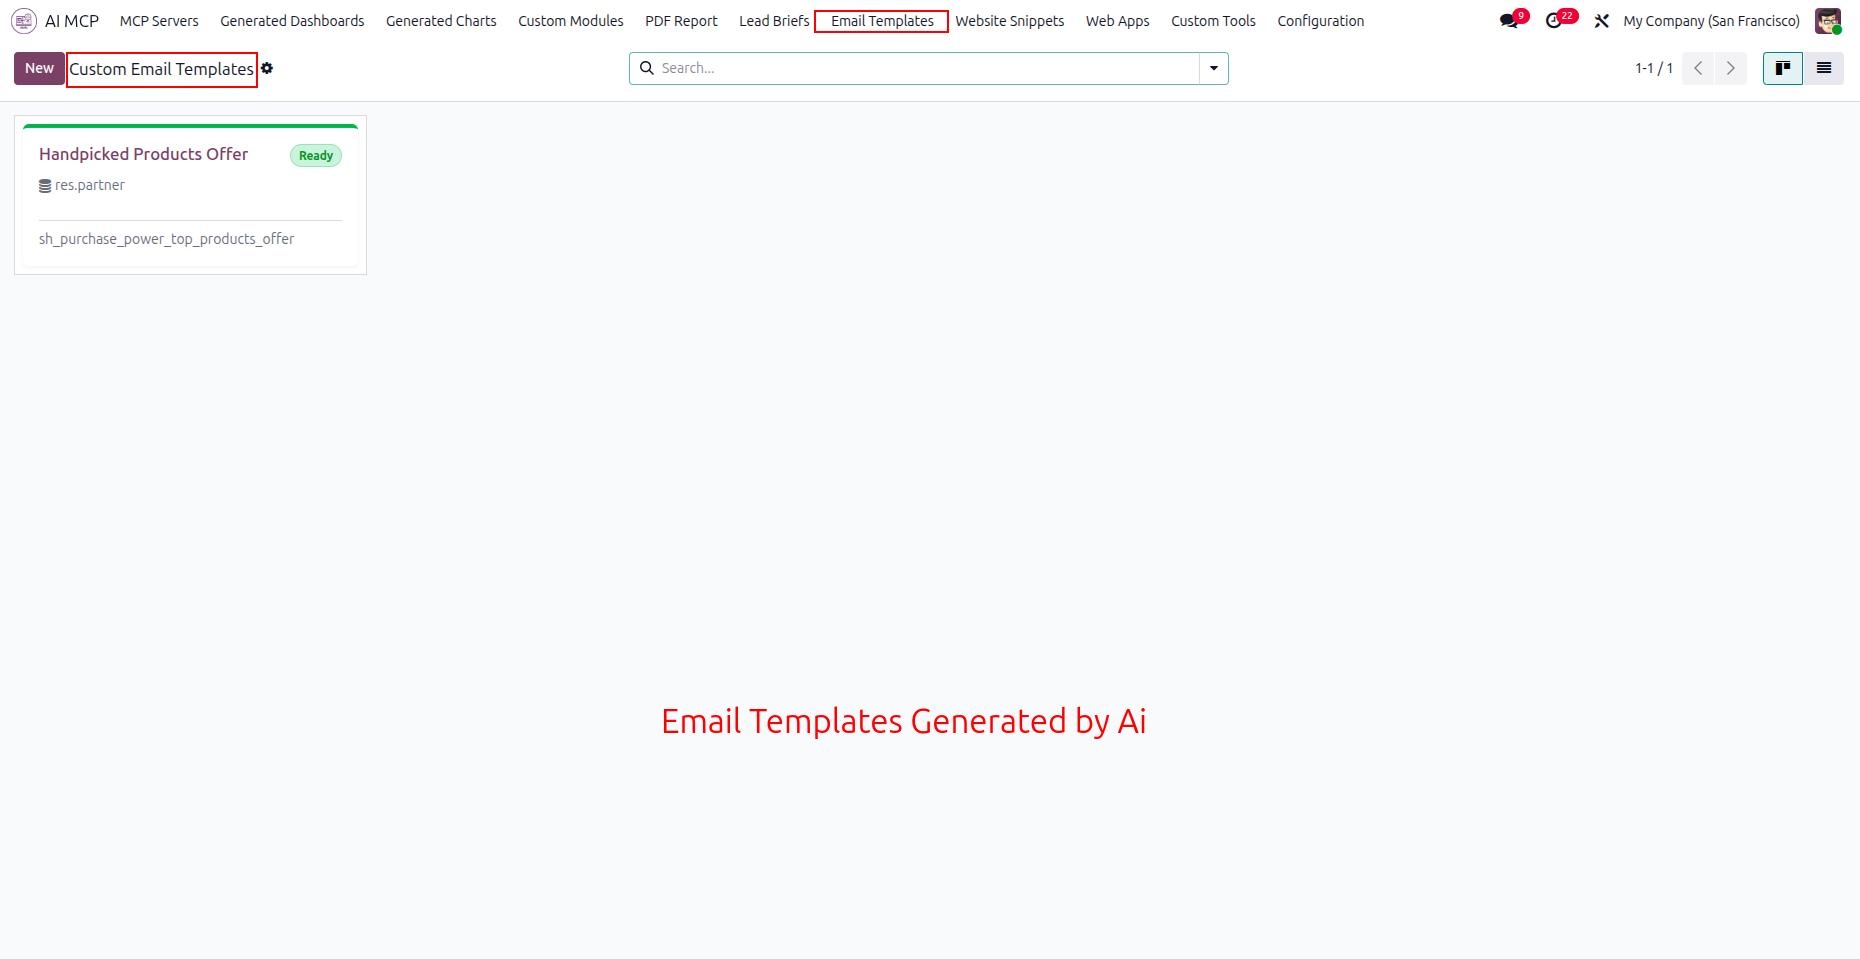
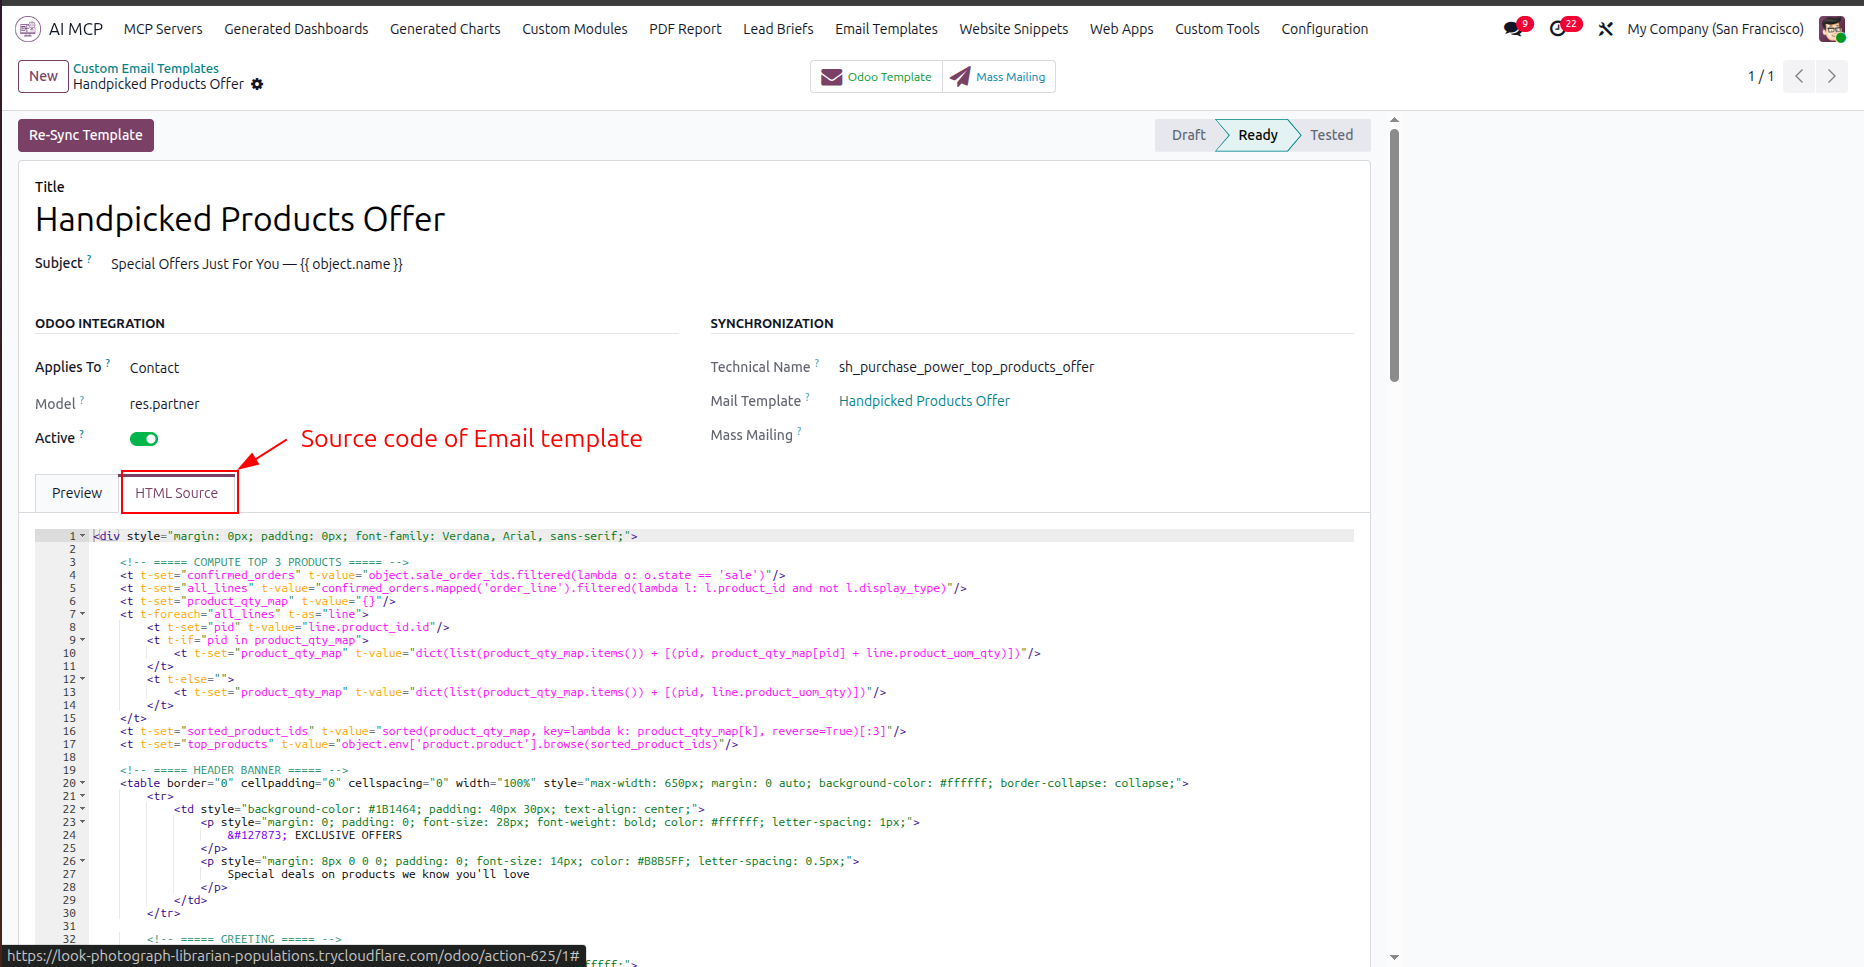
Navigate to the Email Templates menu to view all custom AI-generated email campaign templates.
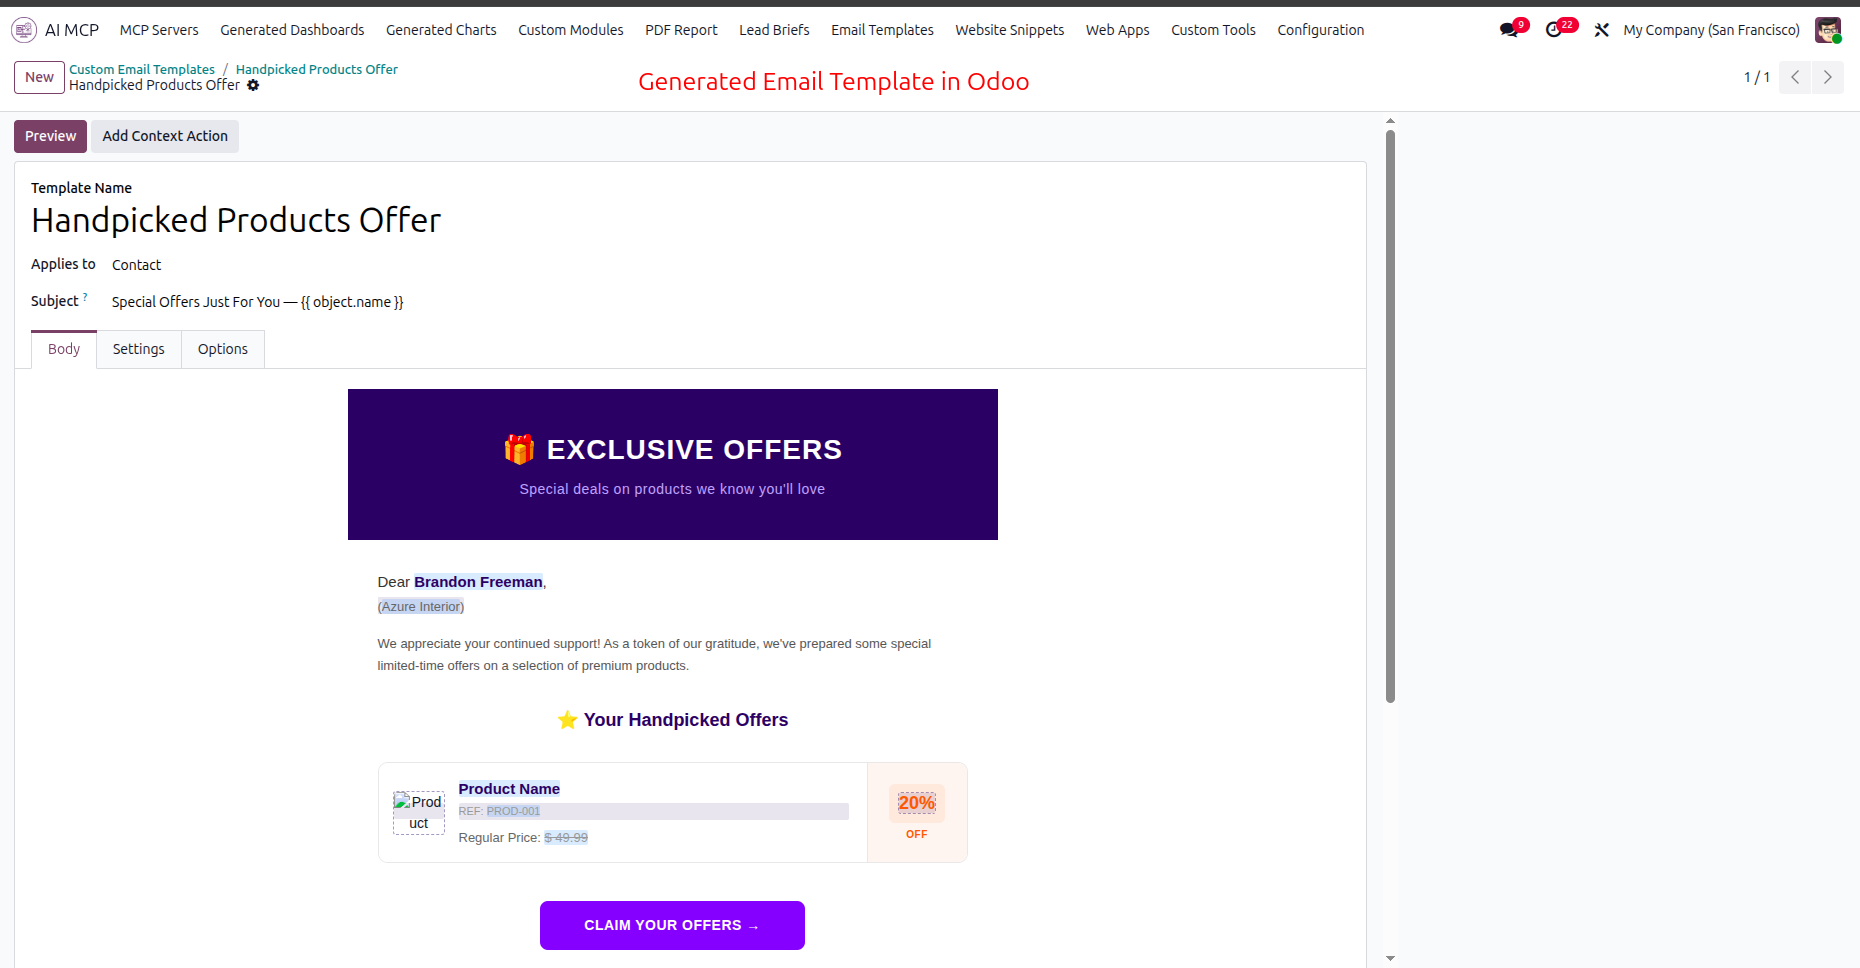
Select the Preview tab to view a read-only rendering of the generated email layout.
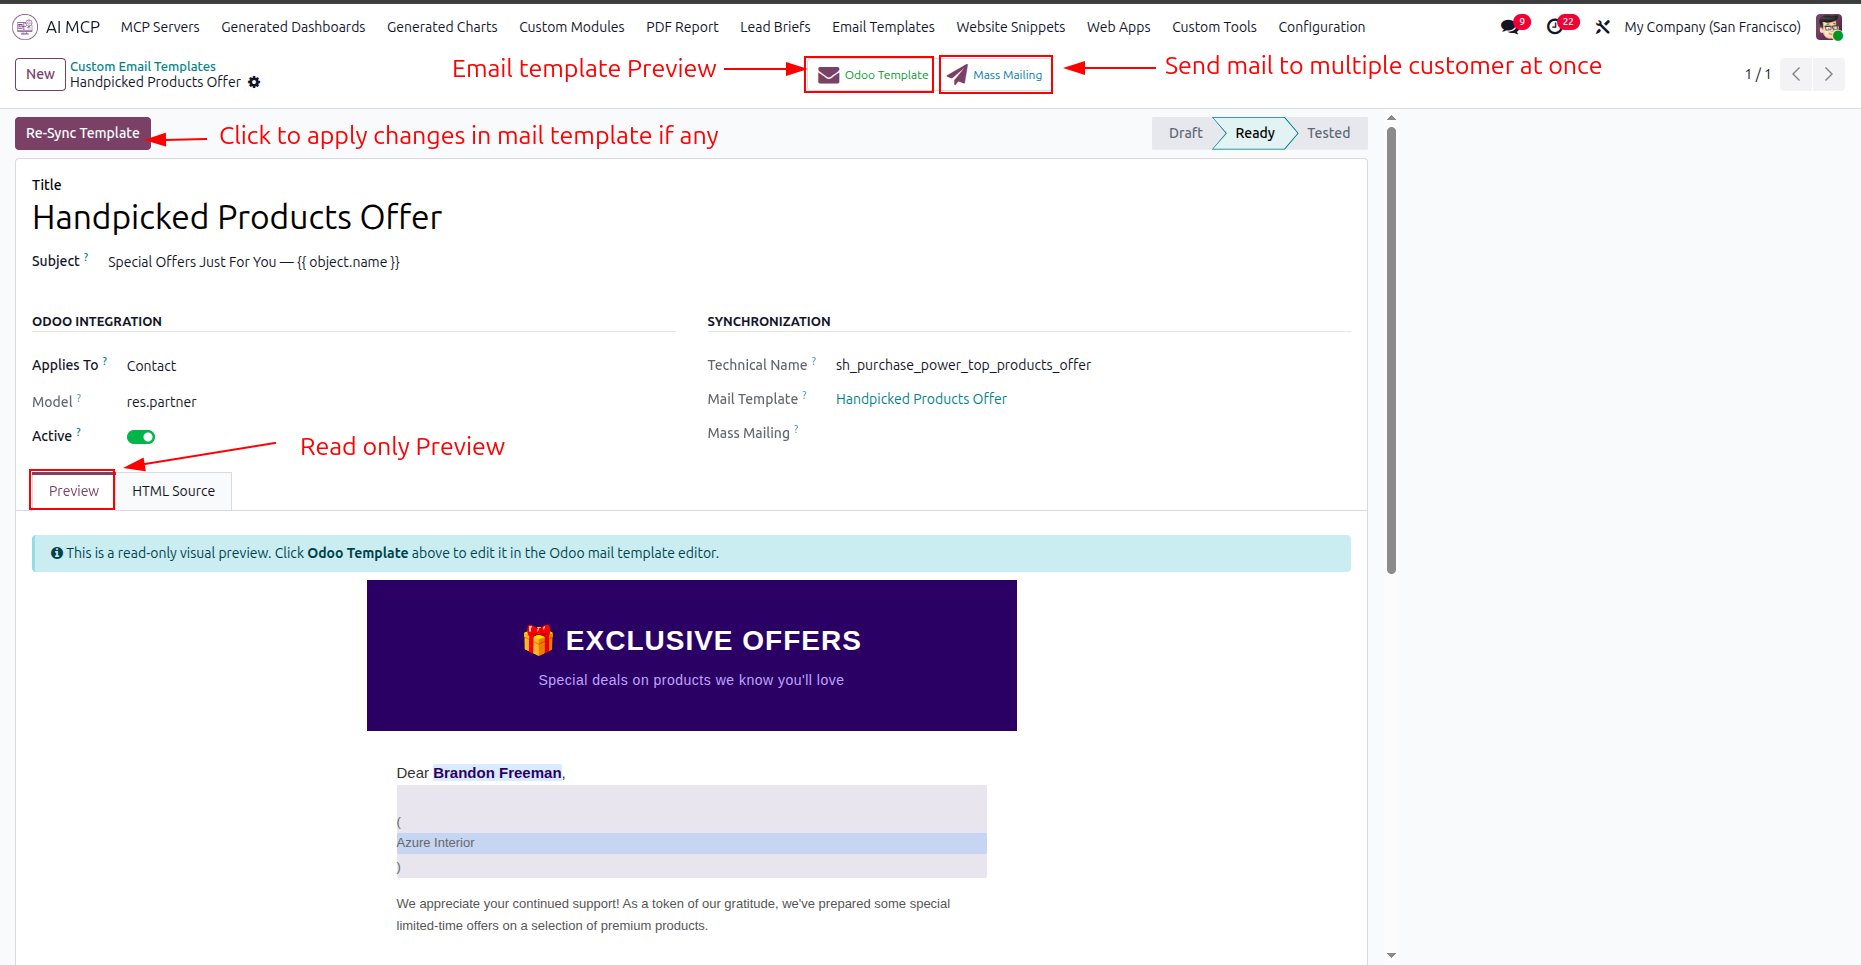
Navigate to the HTML Source tab to inspect and modify the raw email template code.
Review the synced email template inside Odoo mail template editor under the Body tab.
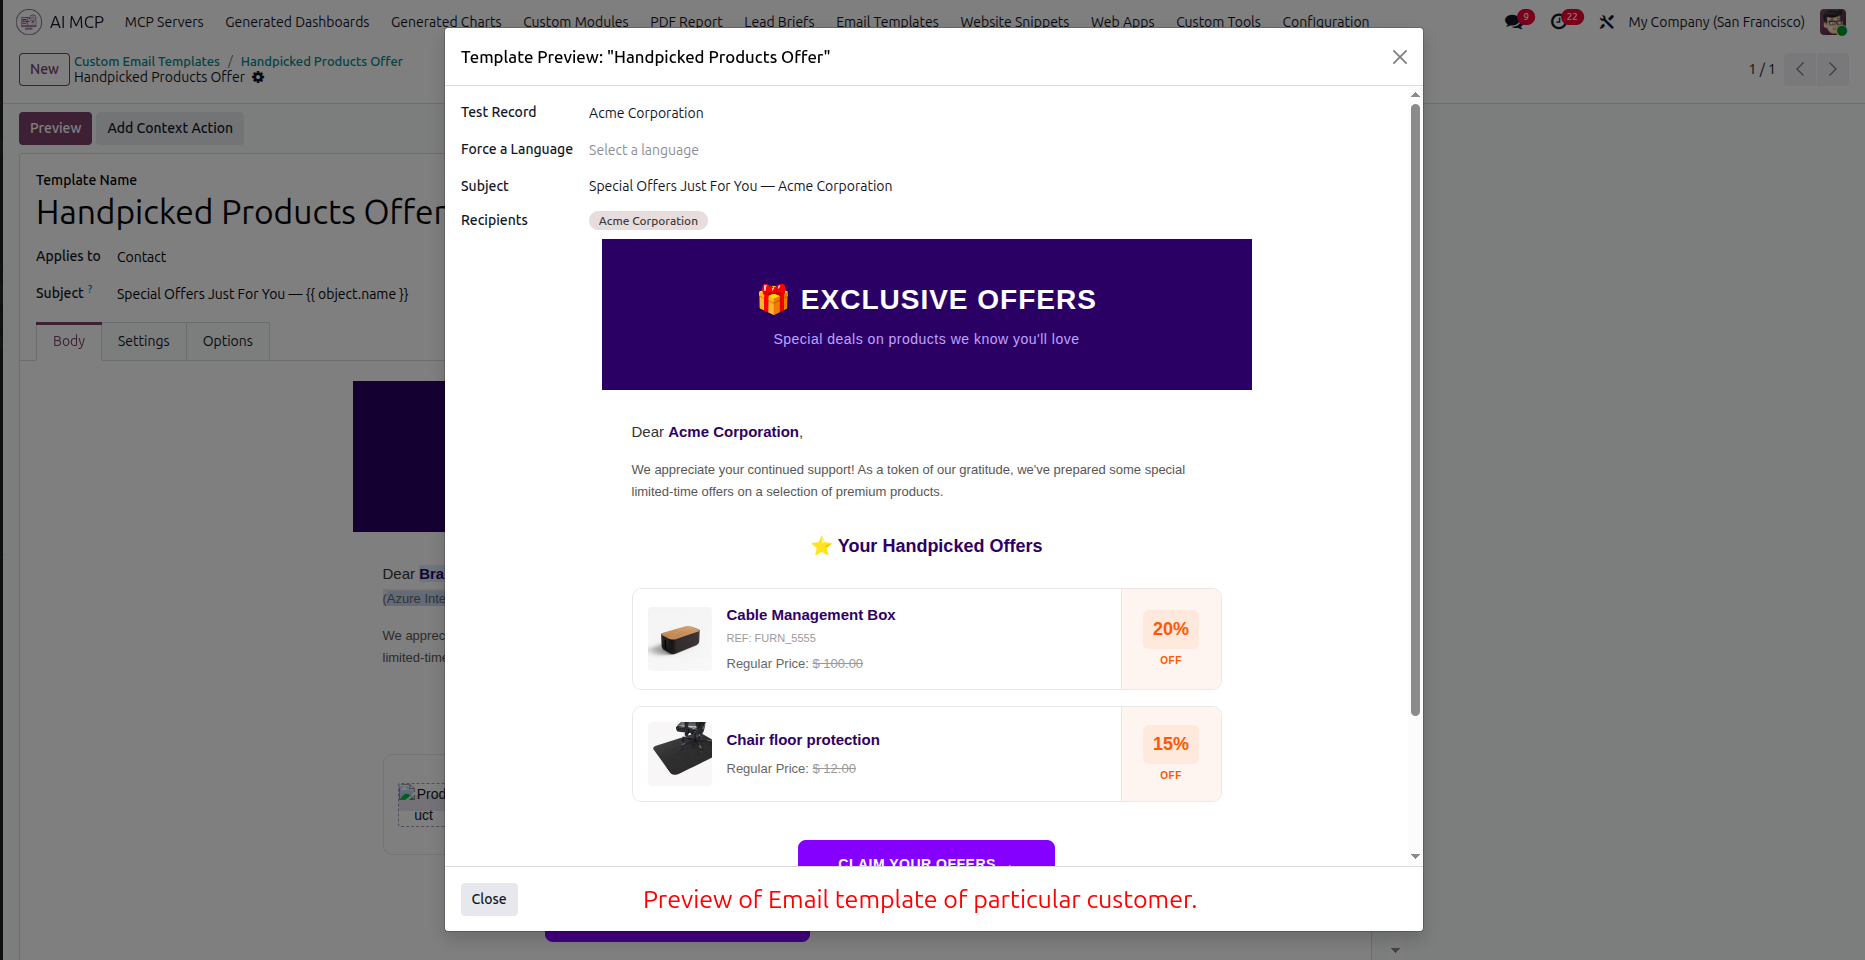
Review the template preview popup displaying dynamic data for the selected test record.
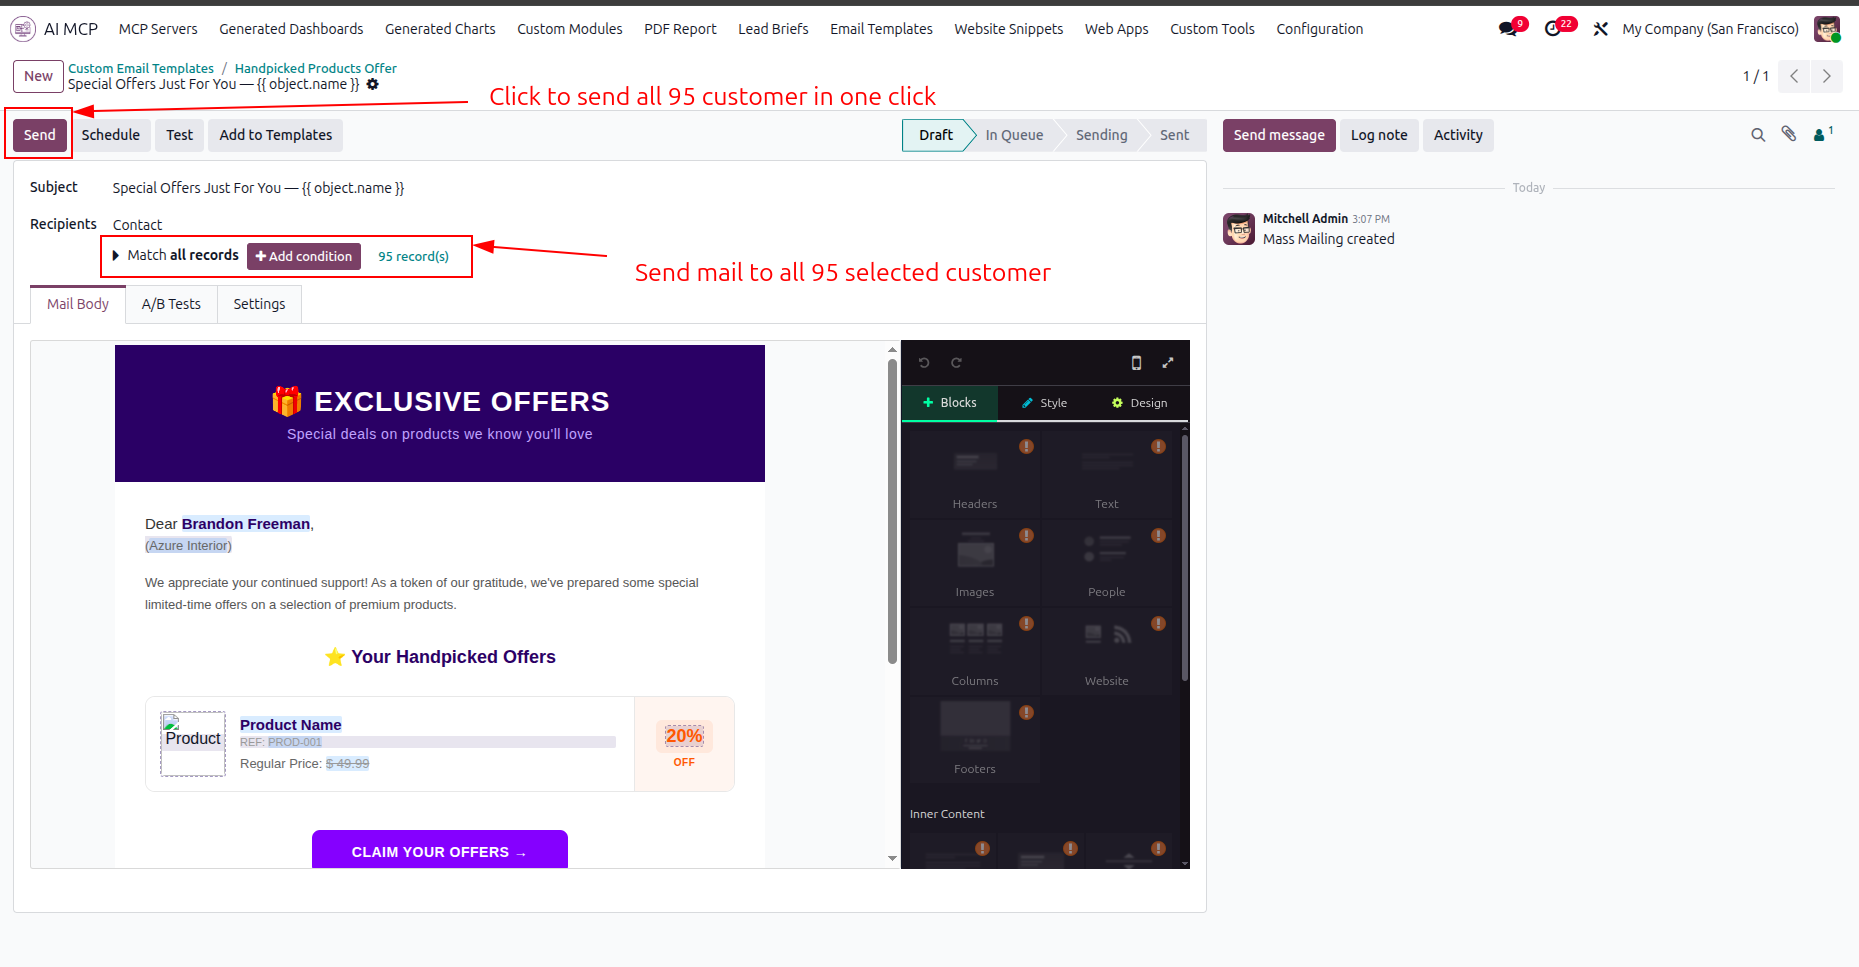
Click the highlighted Send button to dispatch the custom email campaign to all recipients.
Configure the settings to enable automated lead generations and then click Save to apply changes.
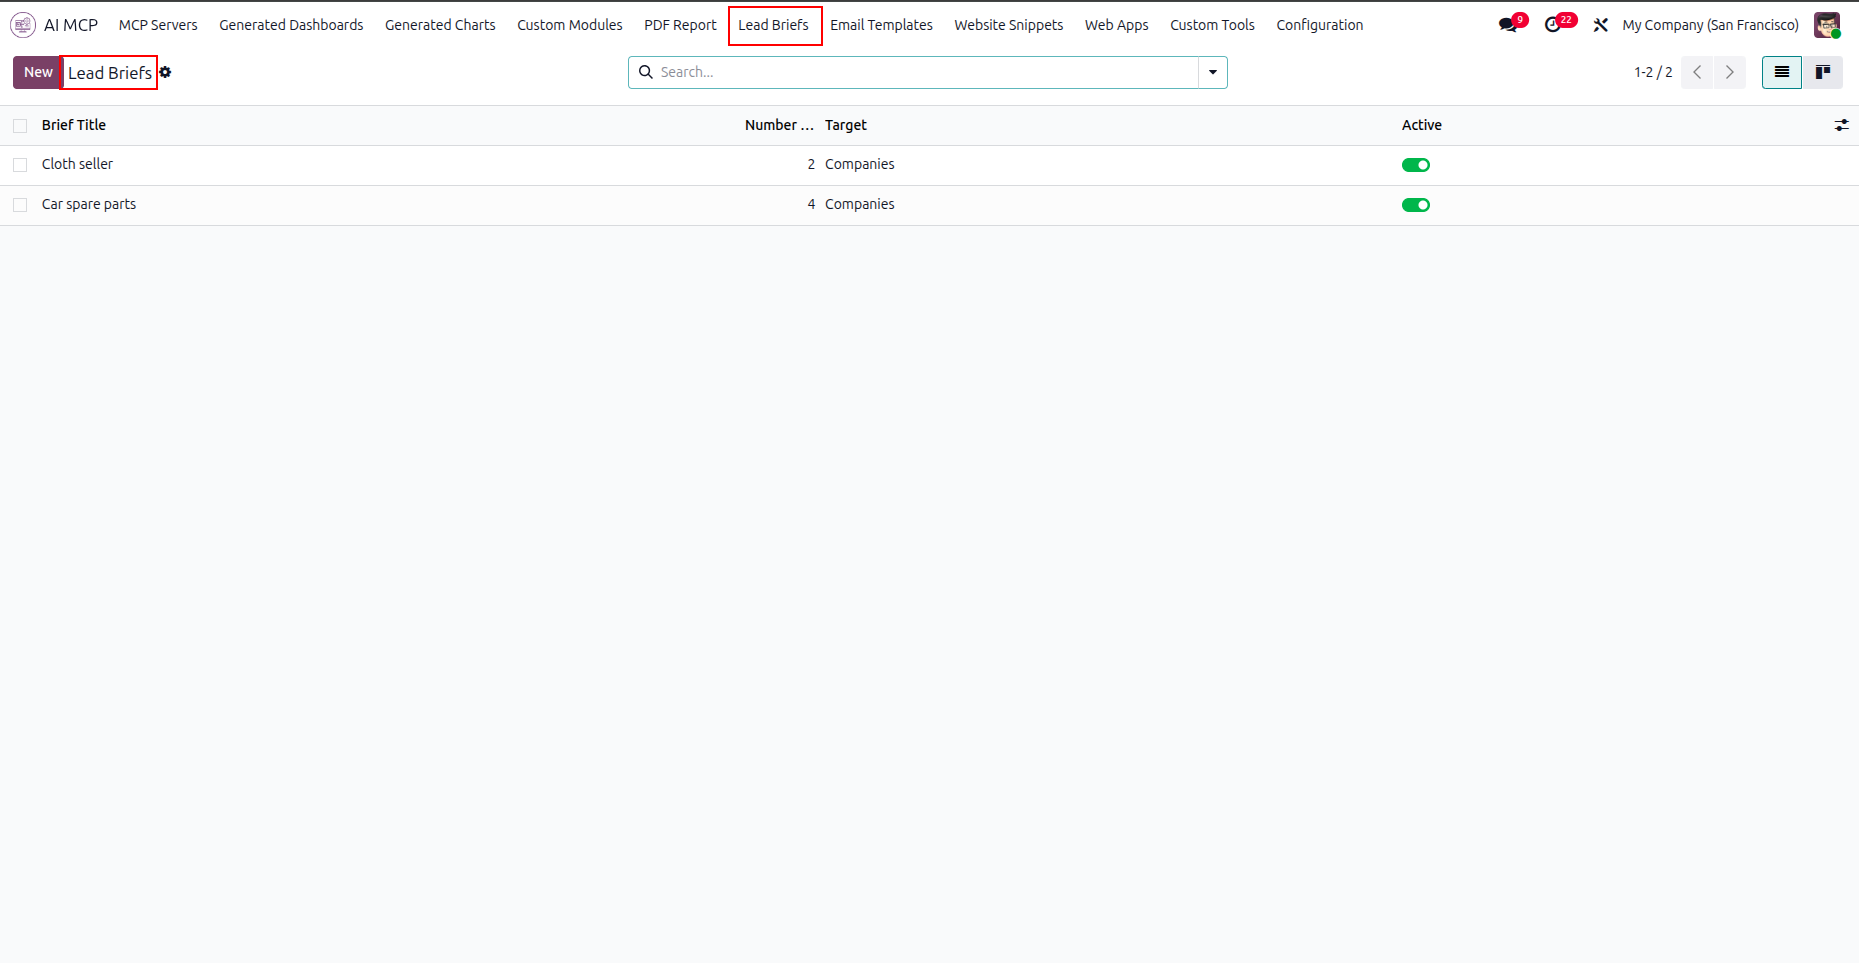
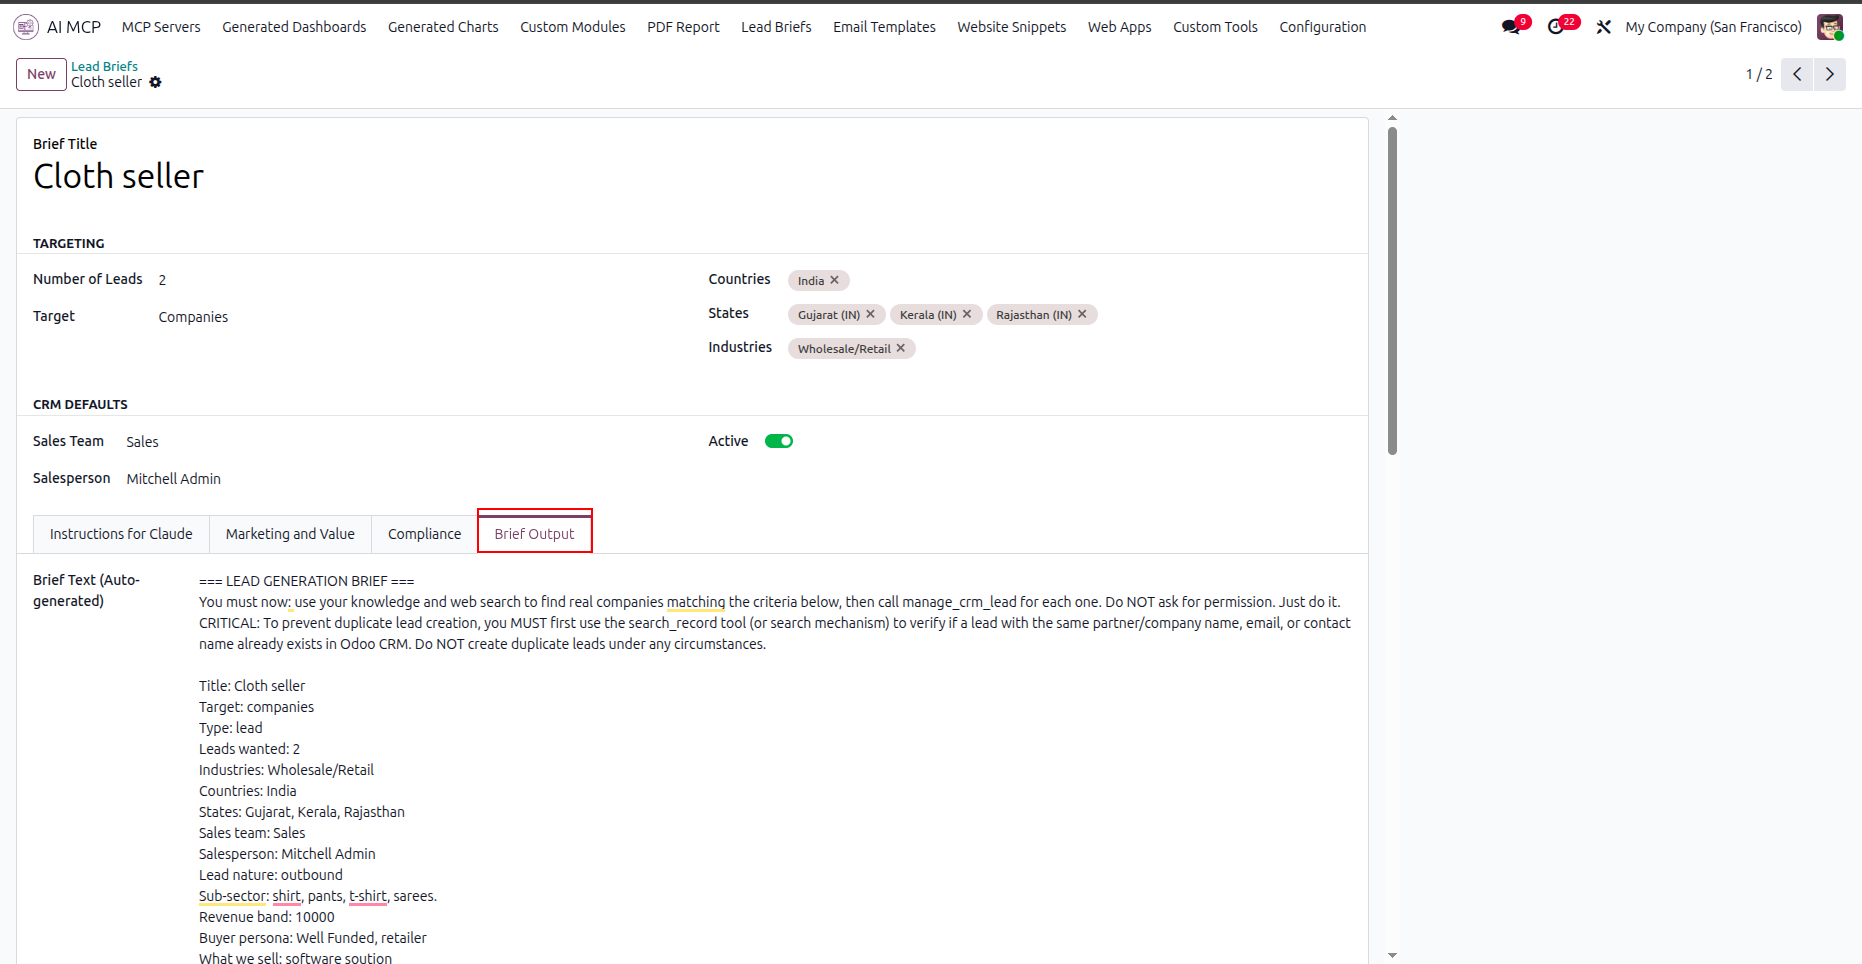
Navigate to the Lead Briefs tab to view and manage all AI-powered lead generation campaigns.
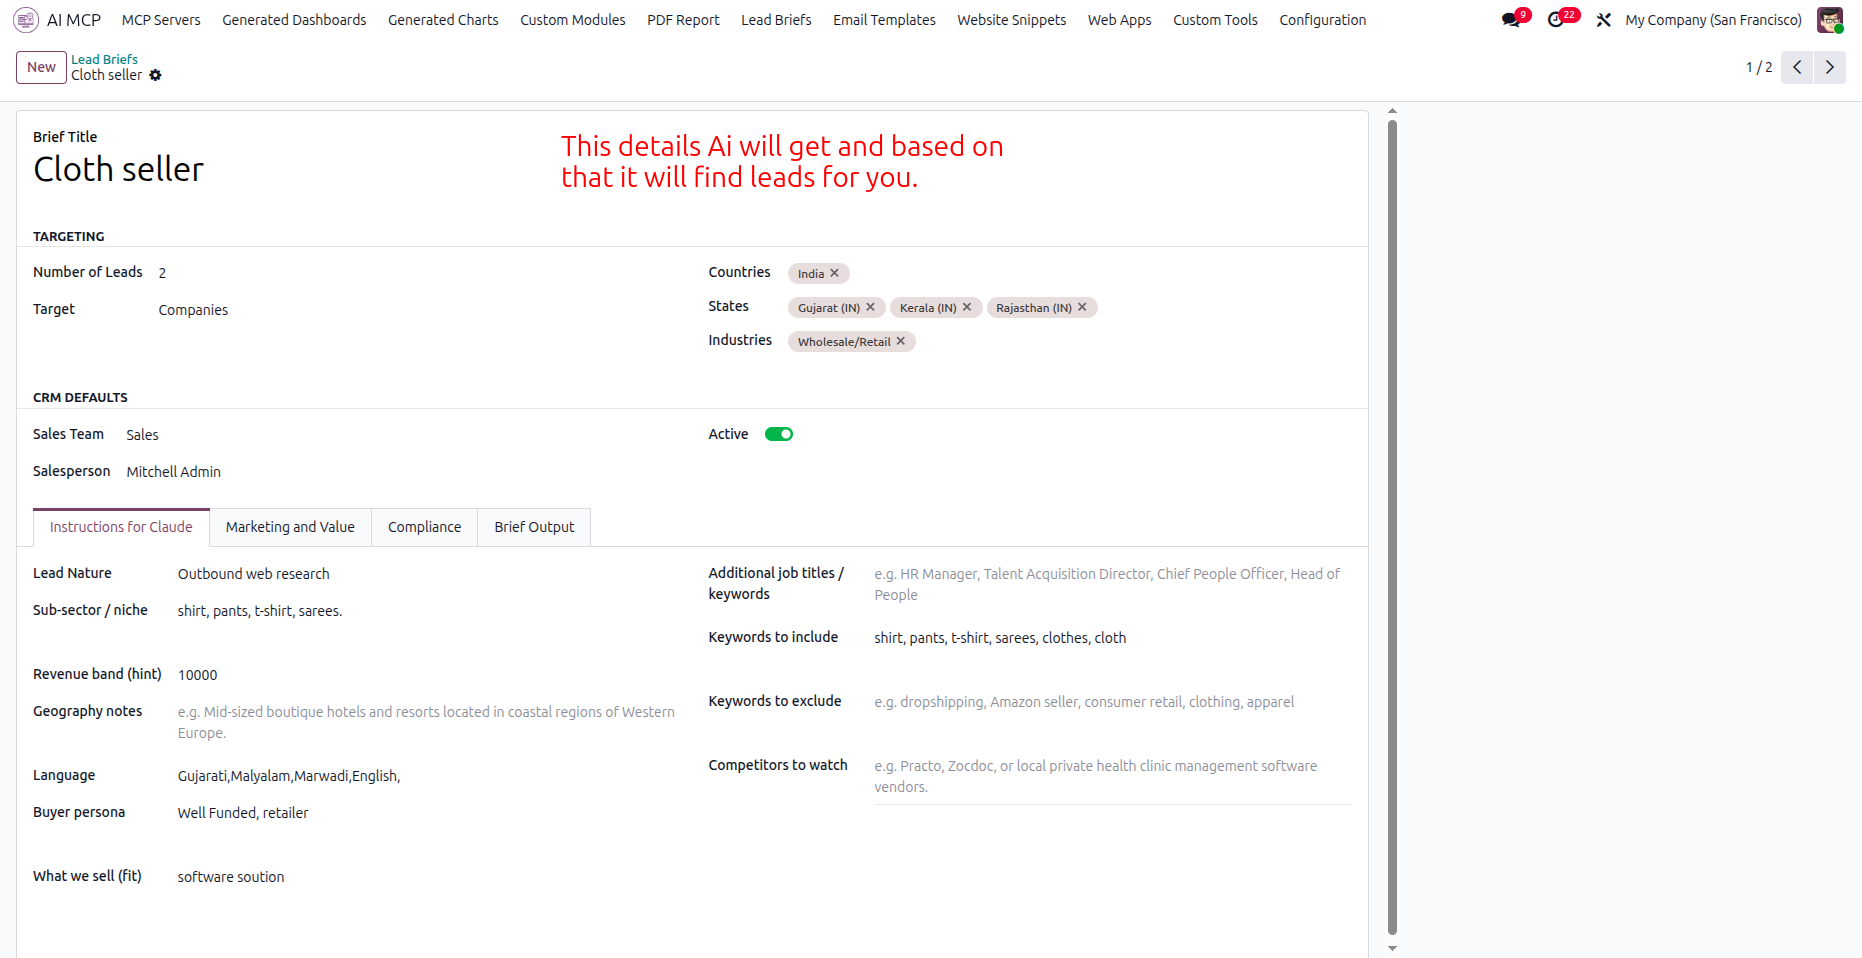
Define targeting criteria and instructions under the configuration tabs to guide the AI lead generation.
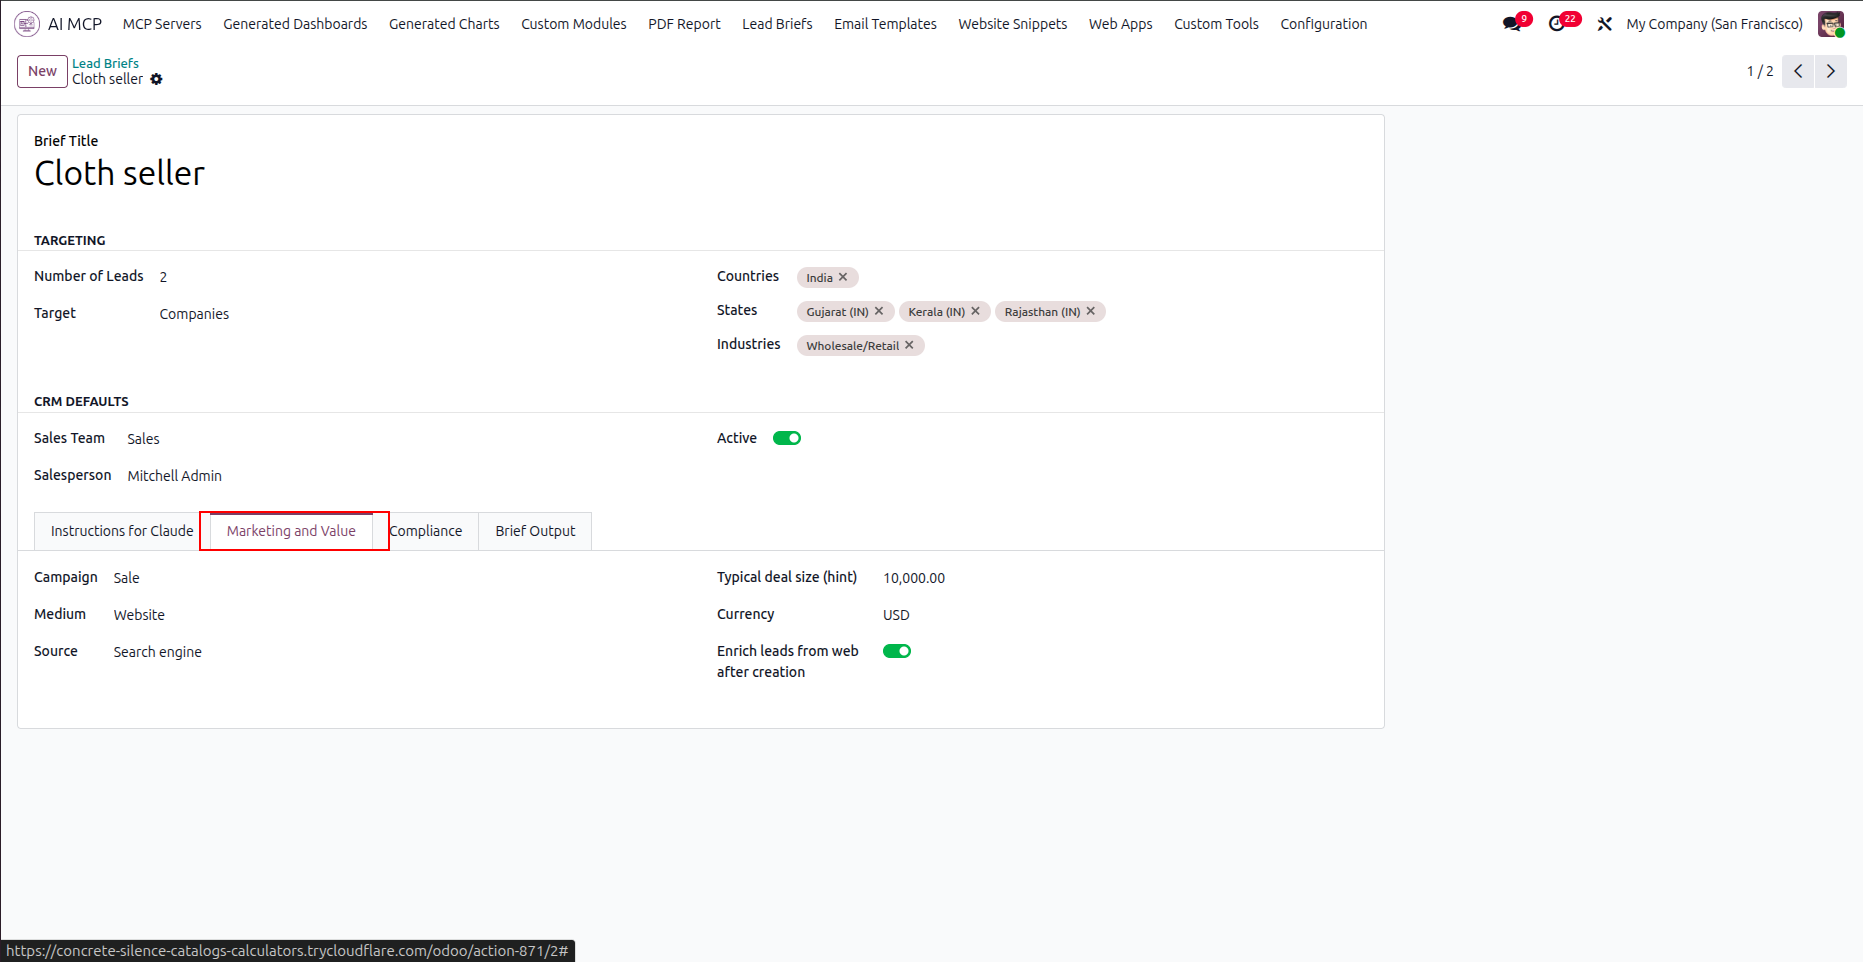
Select the Marketing and Value tab to configure campaign sources, deal sizes, and currency details.
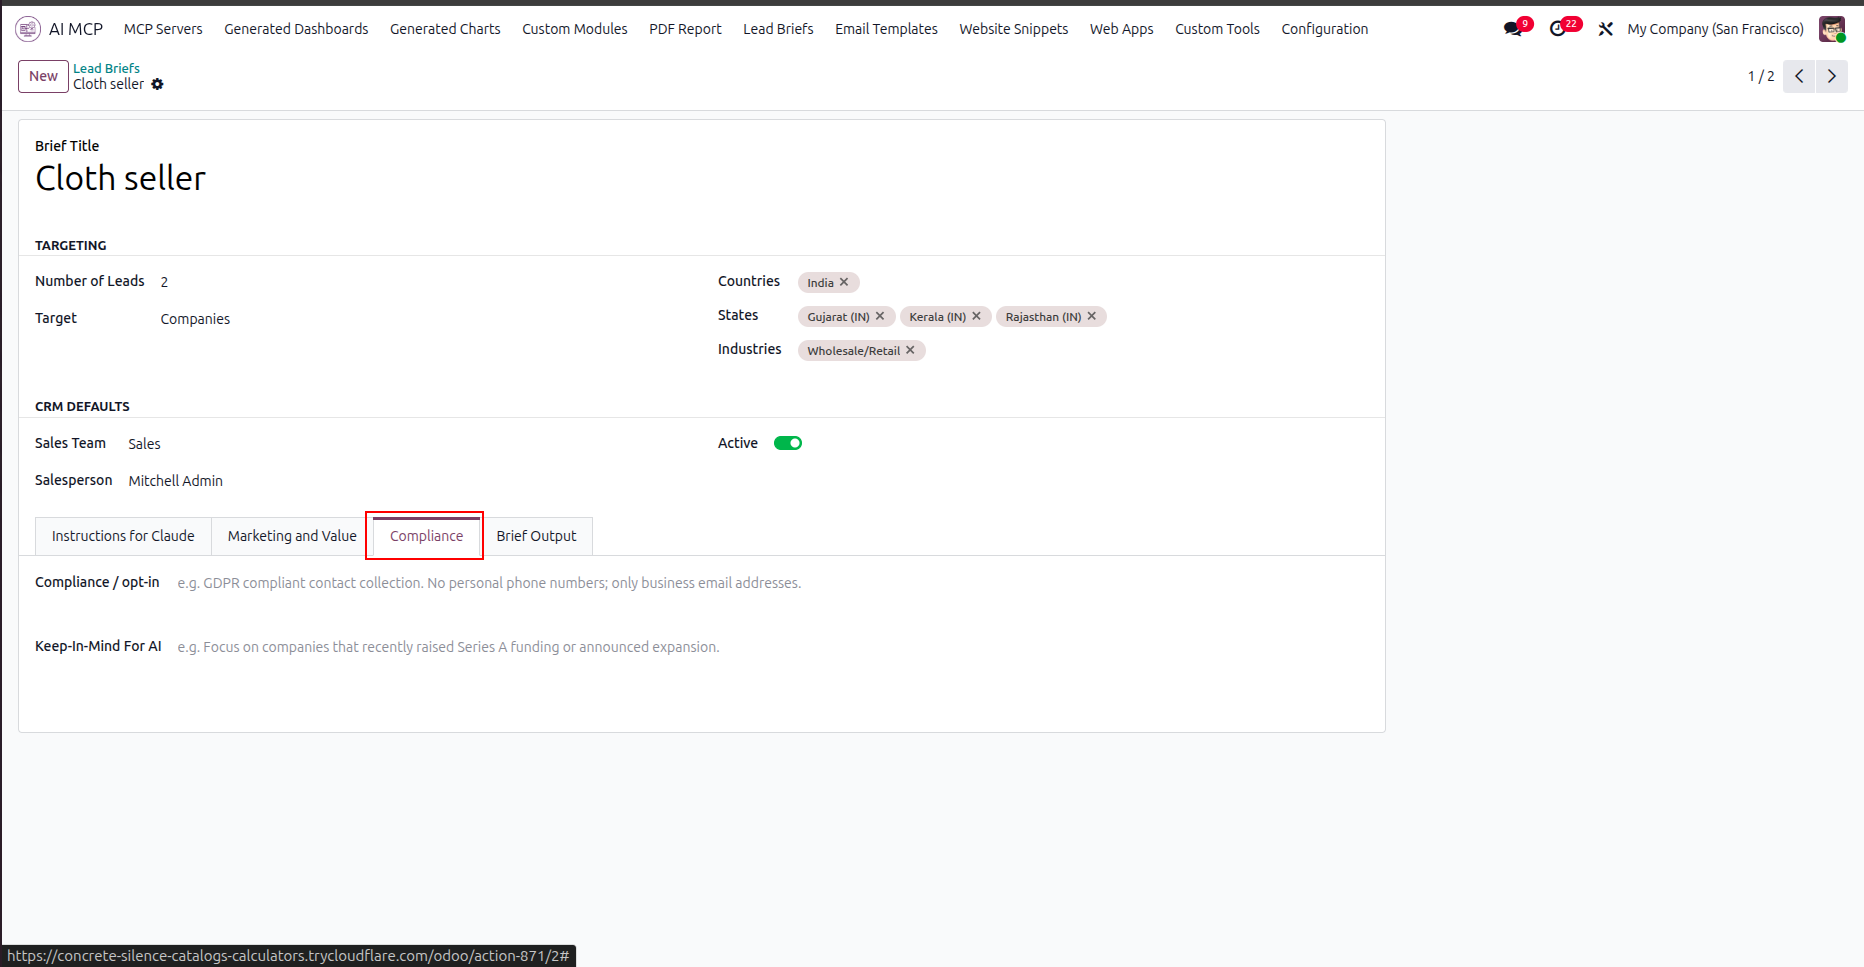
Open the Compliance tab to specify opt-in policies and key guidelines for the AI assistant.
Select the Brief Output tab to review the compiled brief text generated for lead generation.
Enter allowed IP addresses or CIDR ranges in the IP Whitelist field.
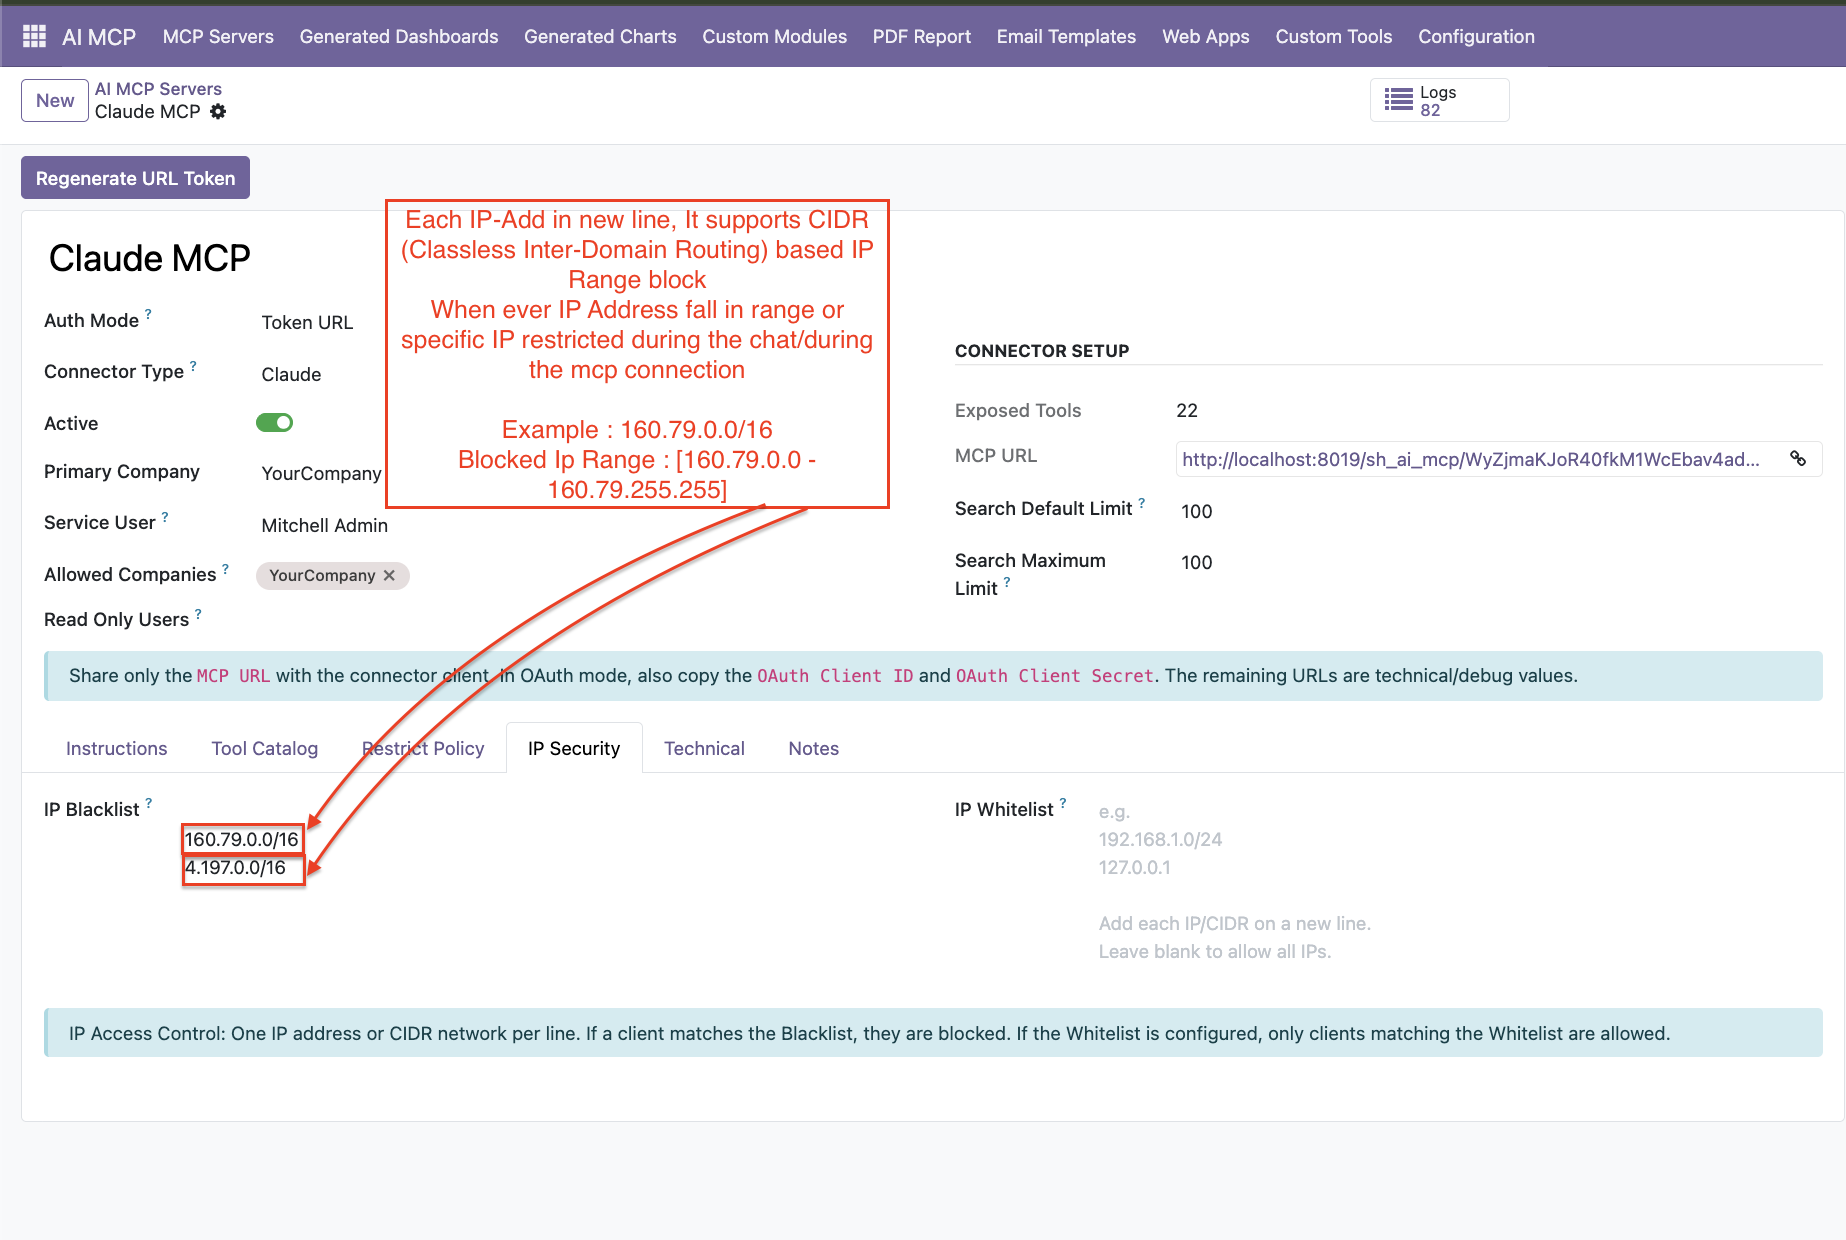
Define blocked IP addresses or CIDR ranges in the IP Blacklist field.
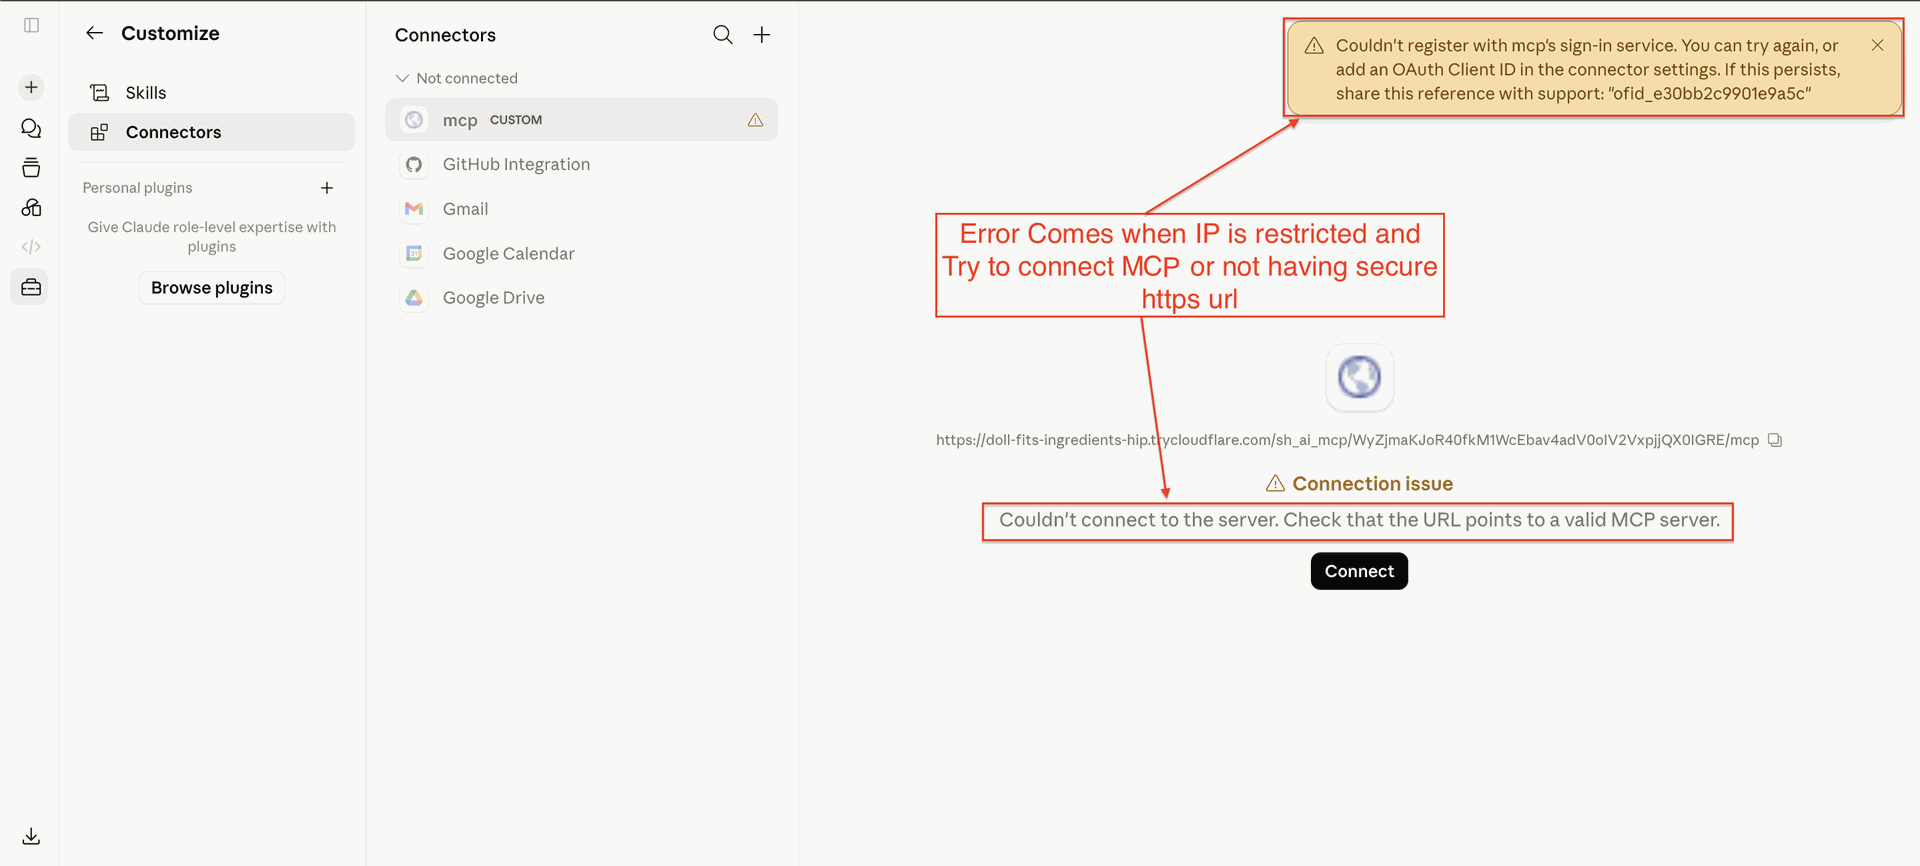
Observe error notifications displayed when connection attempts are blocked due to IP restriction policies.
Provide a list of records in the chat interface to initiate a bulk record creation request.
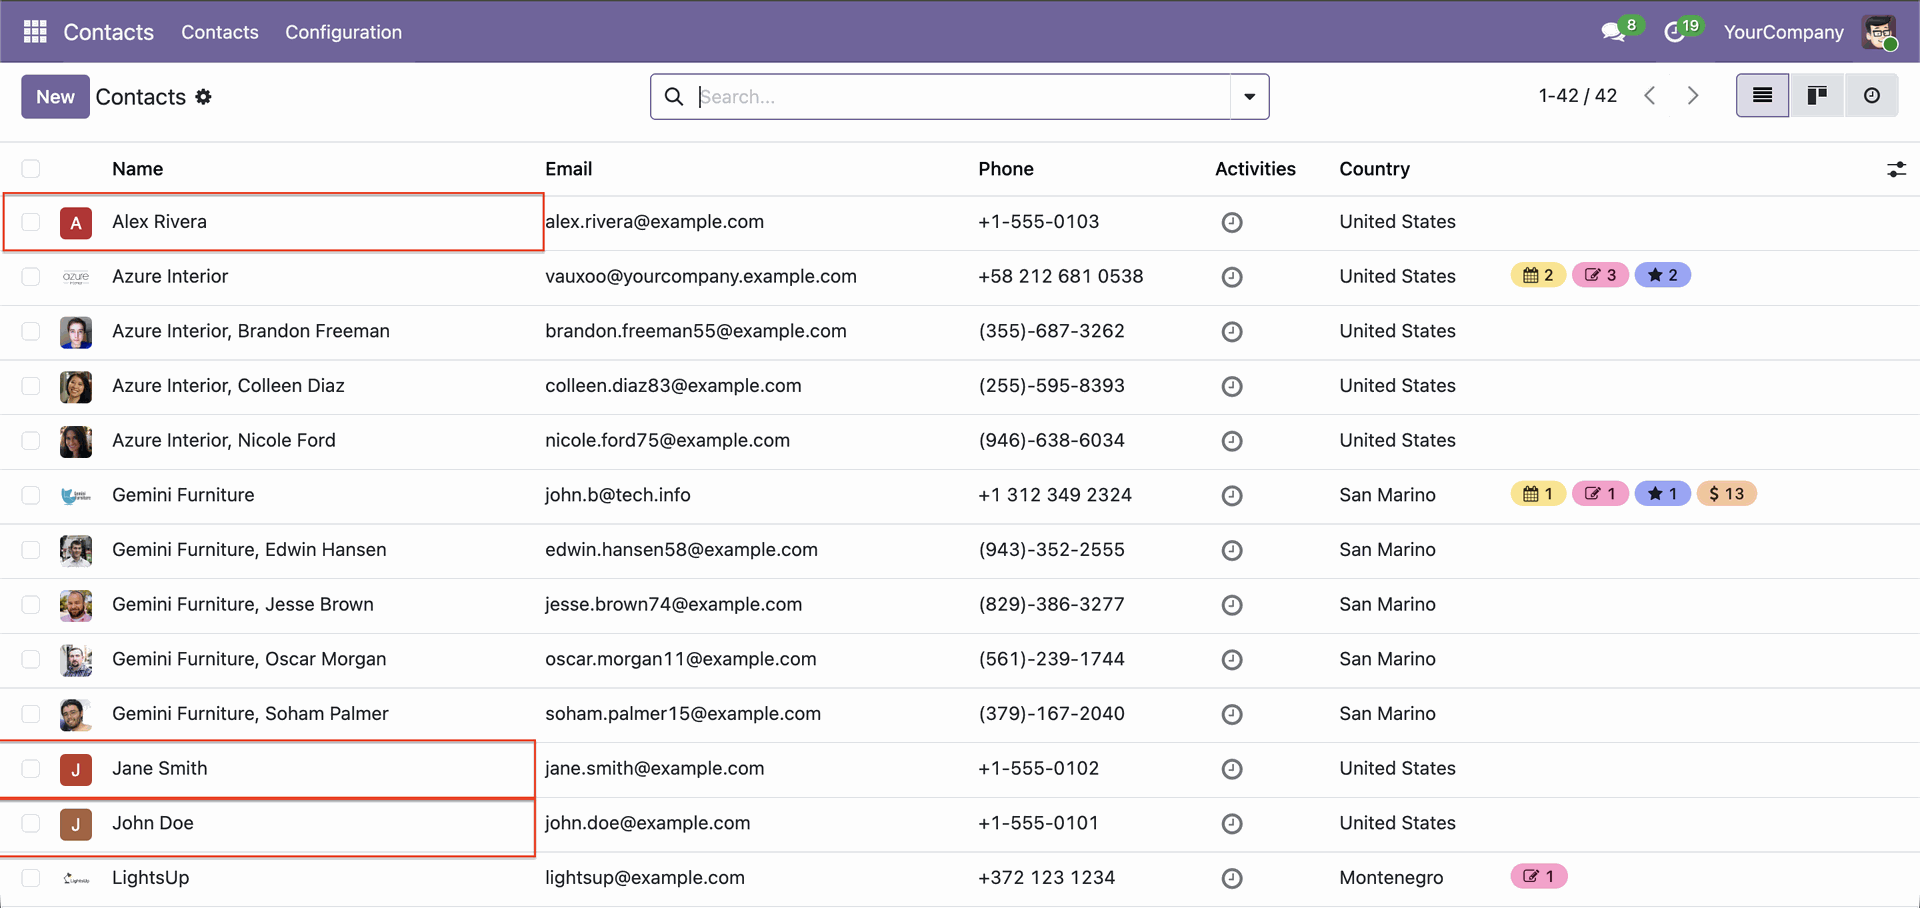
Verify the successfully created contact records inside the Odoo Contacts list view after bulk processing.
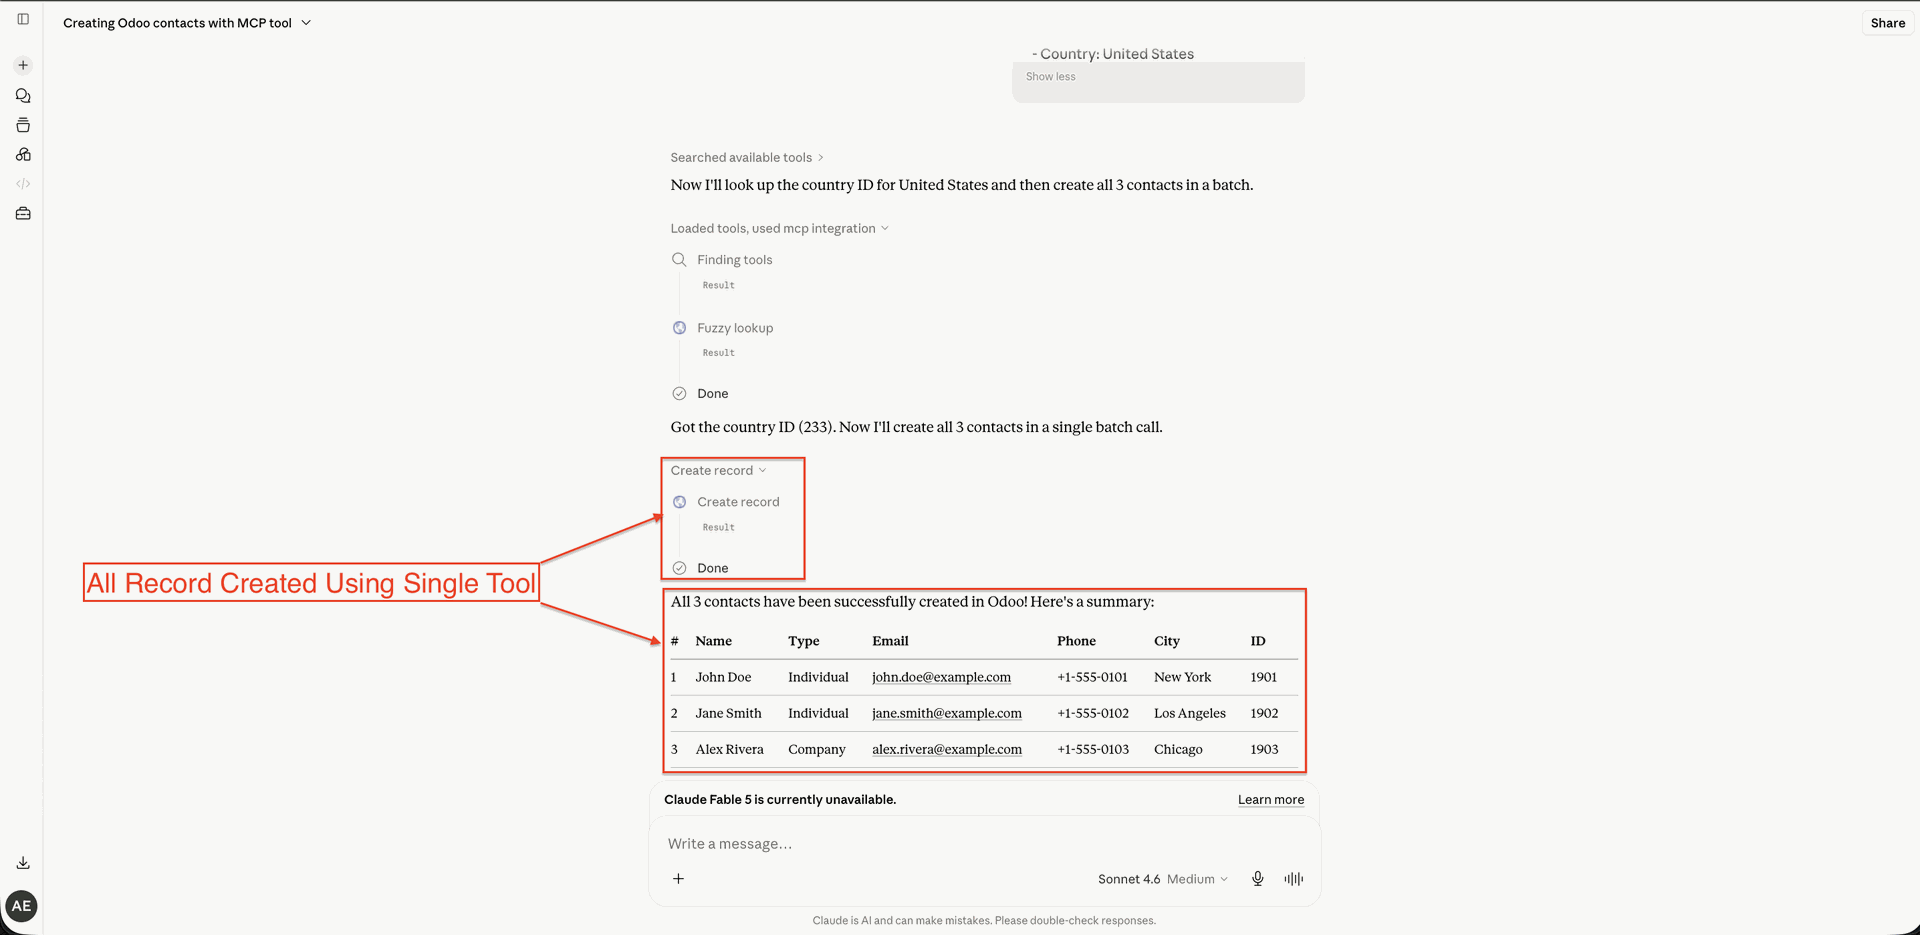
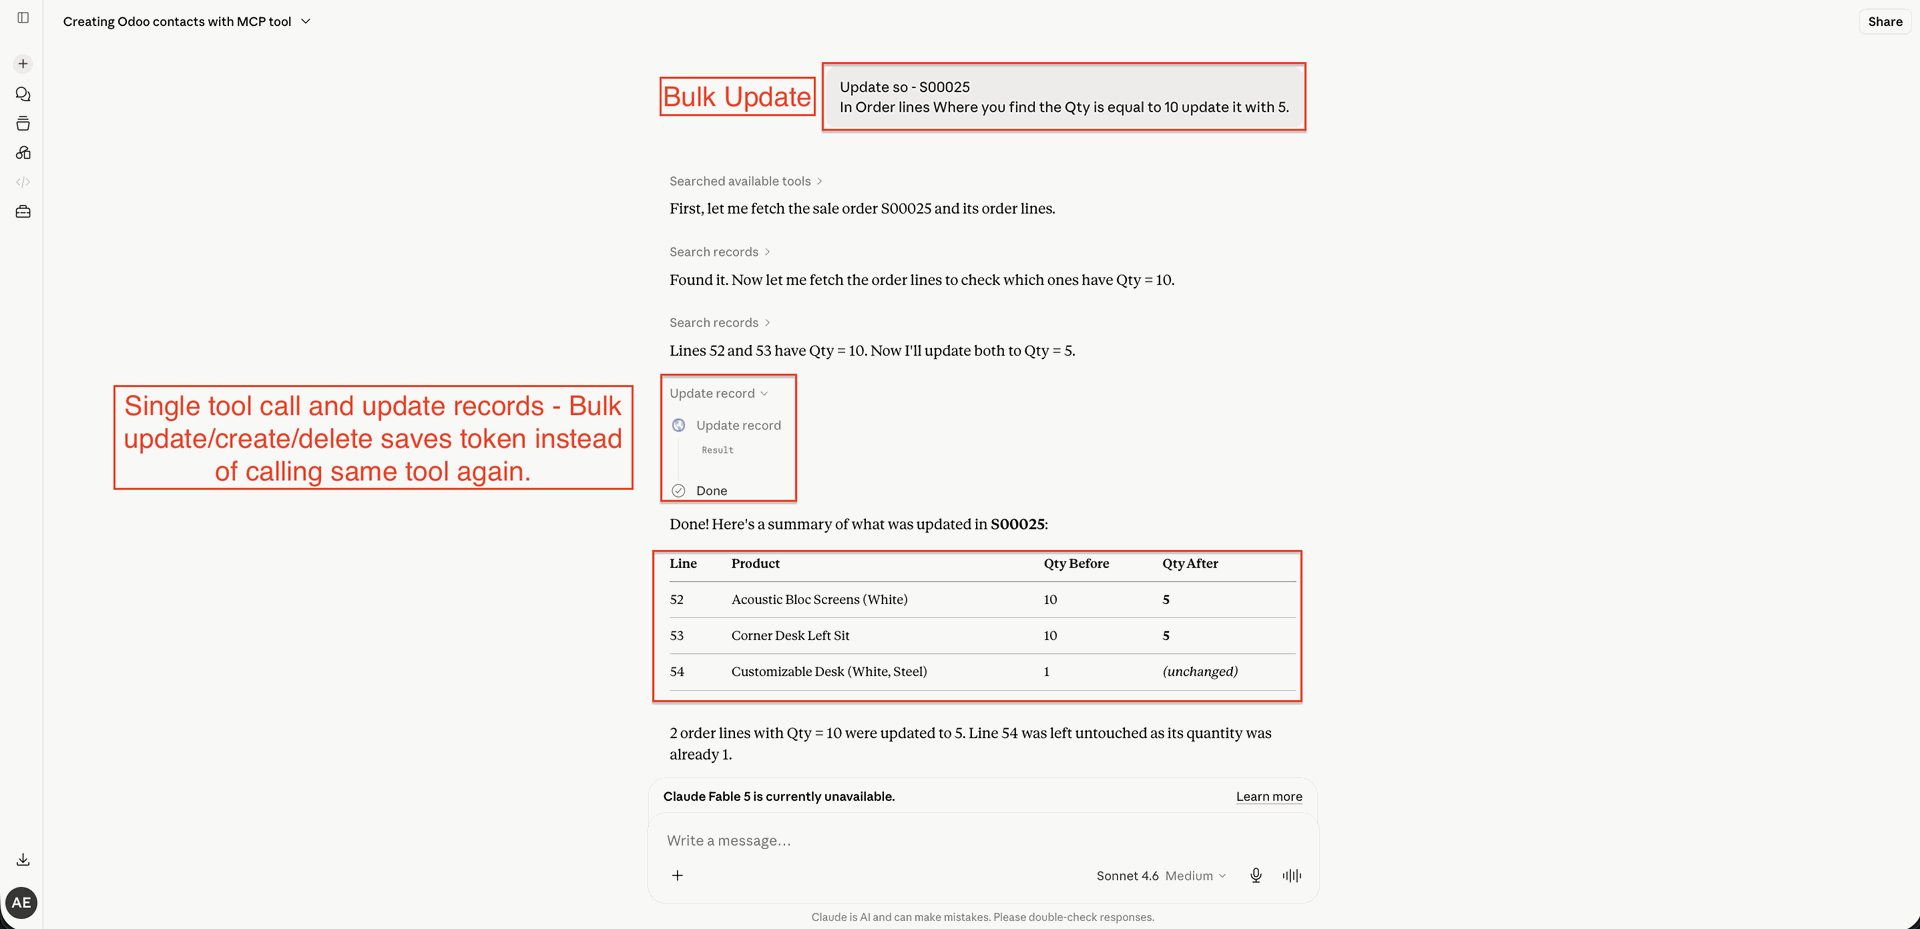
Inspect the creation summary table generated by the AI assistant using a single batch tool execution.
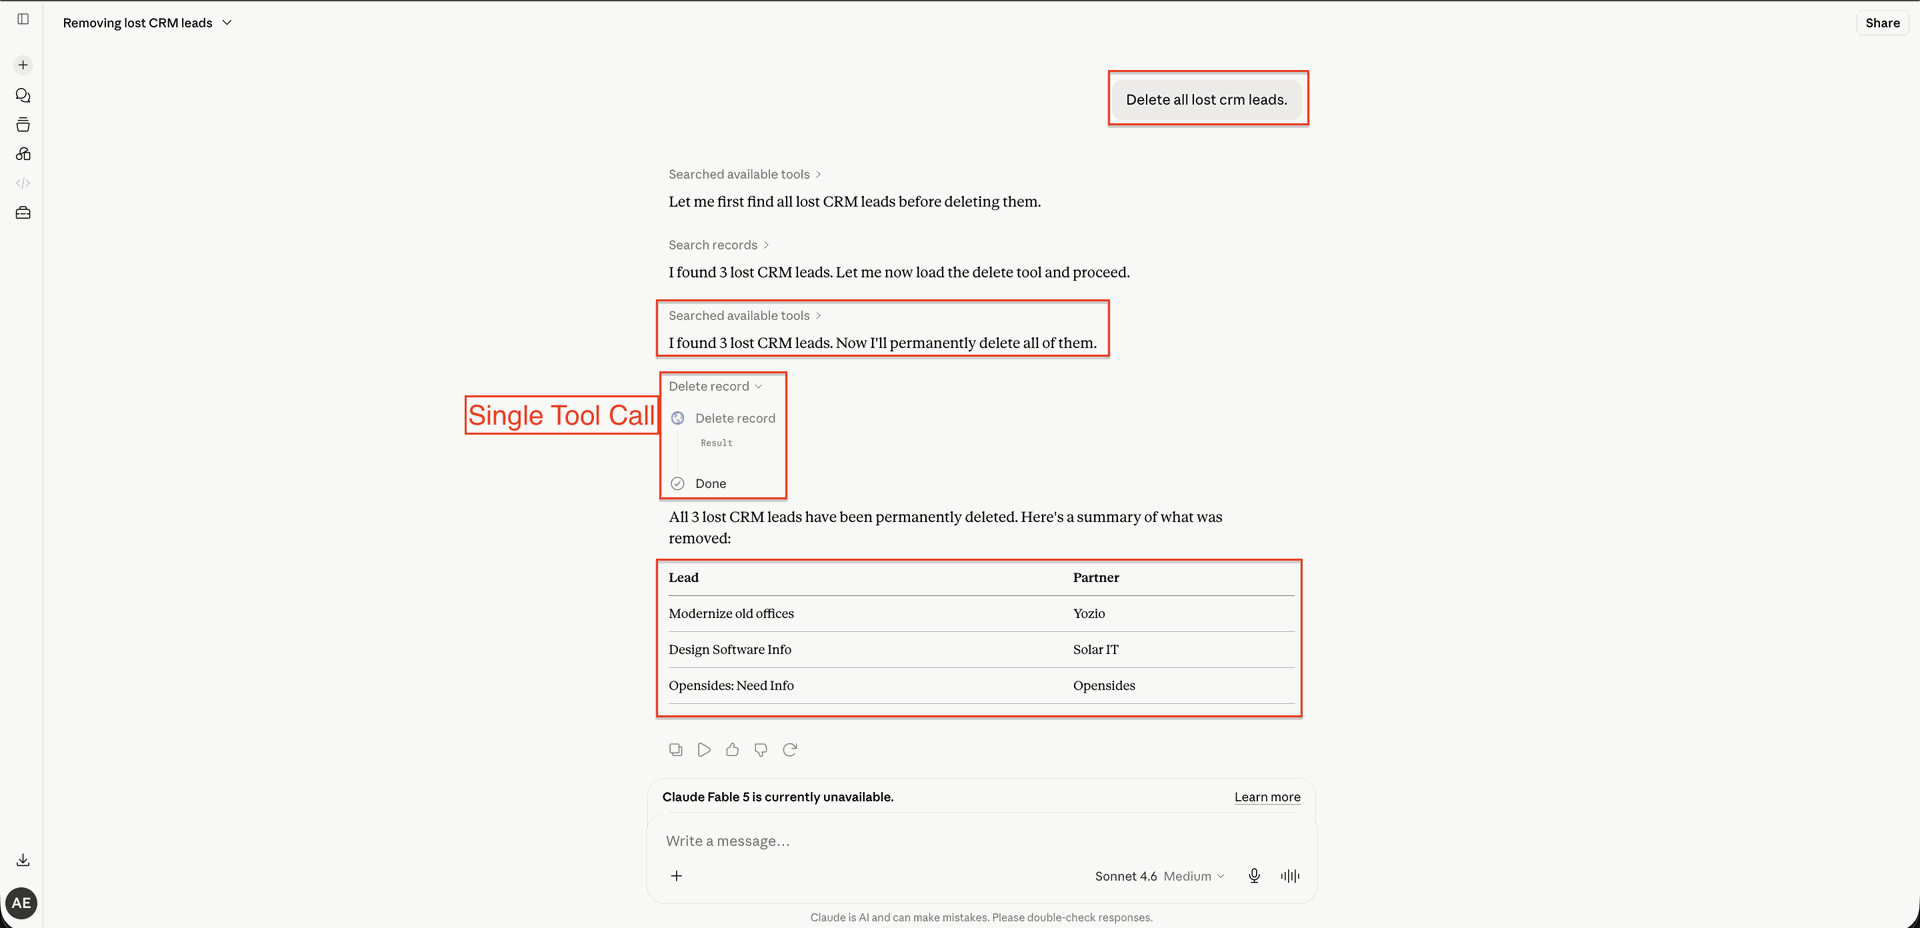
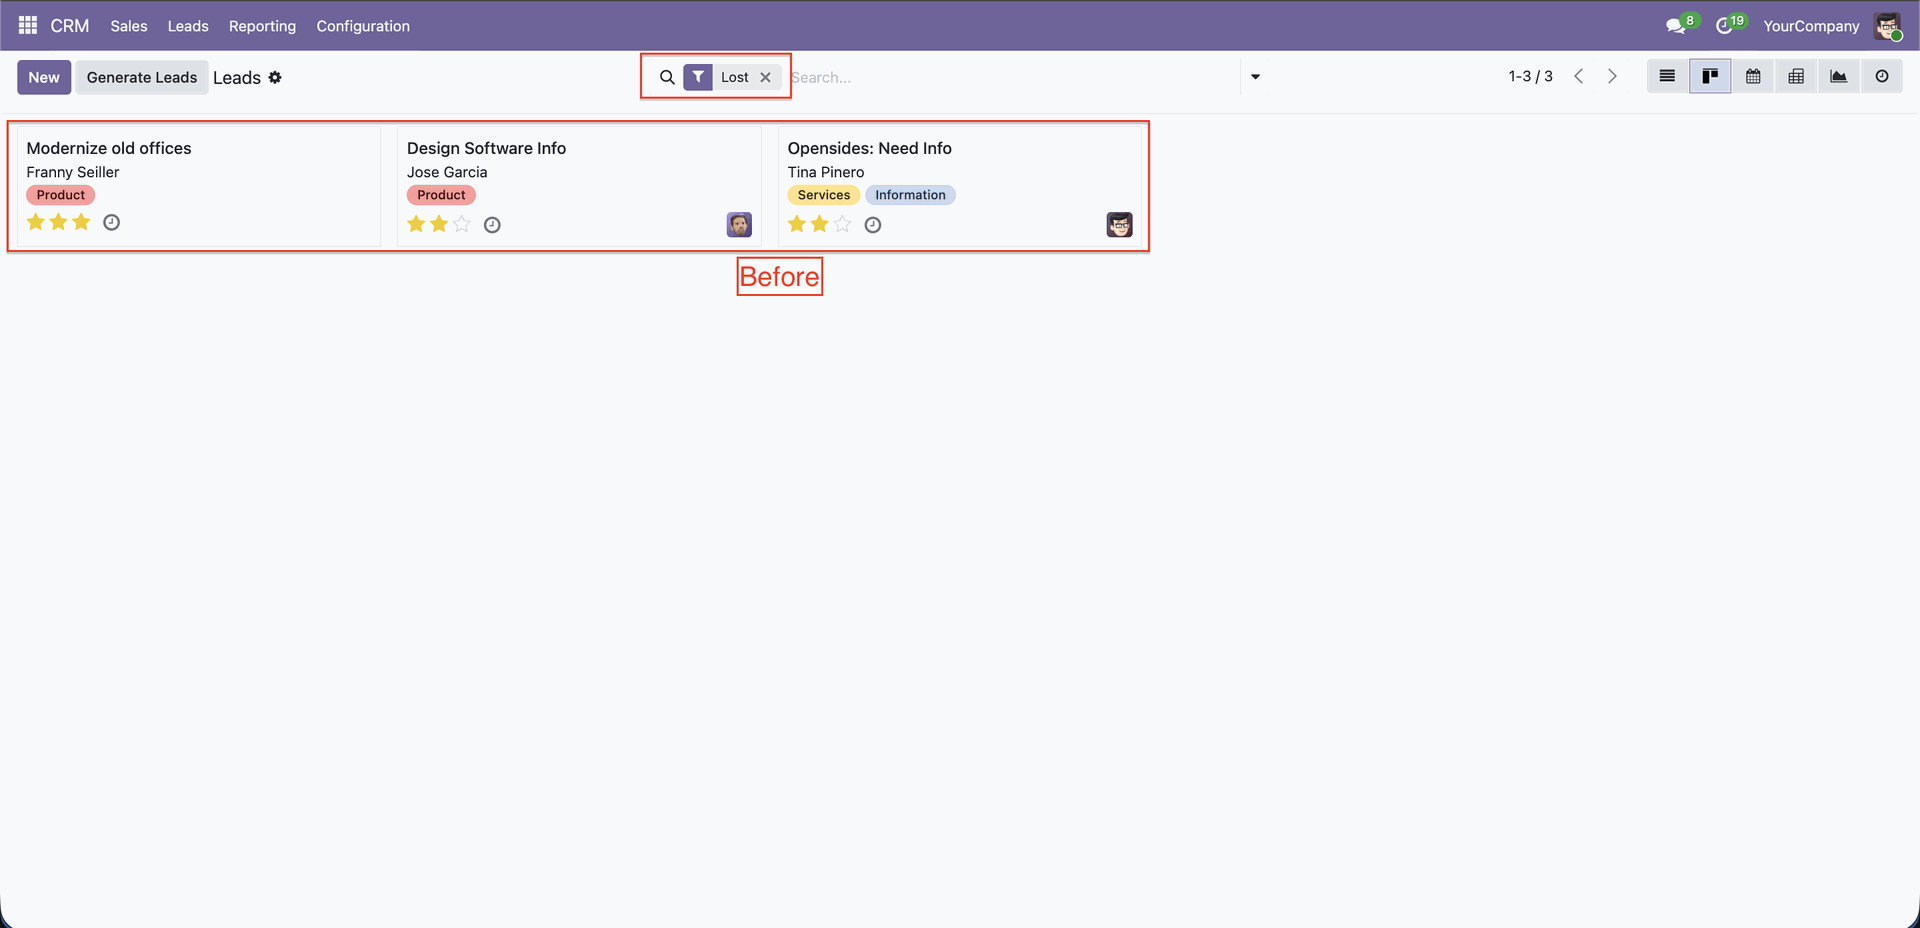
Provide a list of records in the chat interface to initiate a bulk record deletion request.
Identify the targeted records in the Kanban view before executing the bulk deletion process.
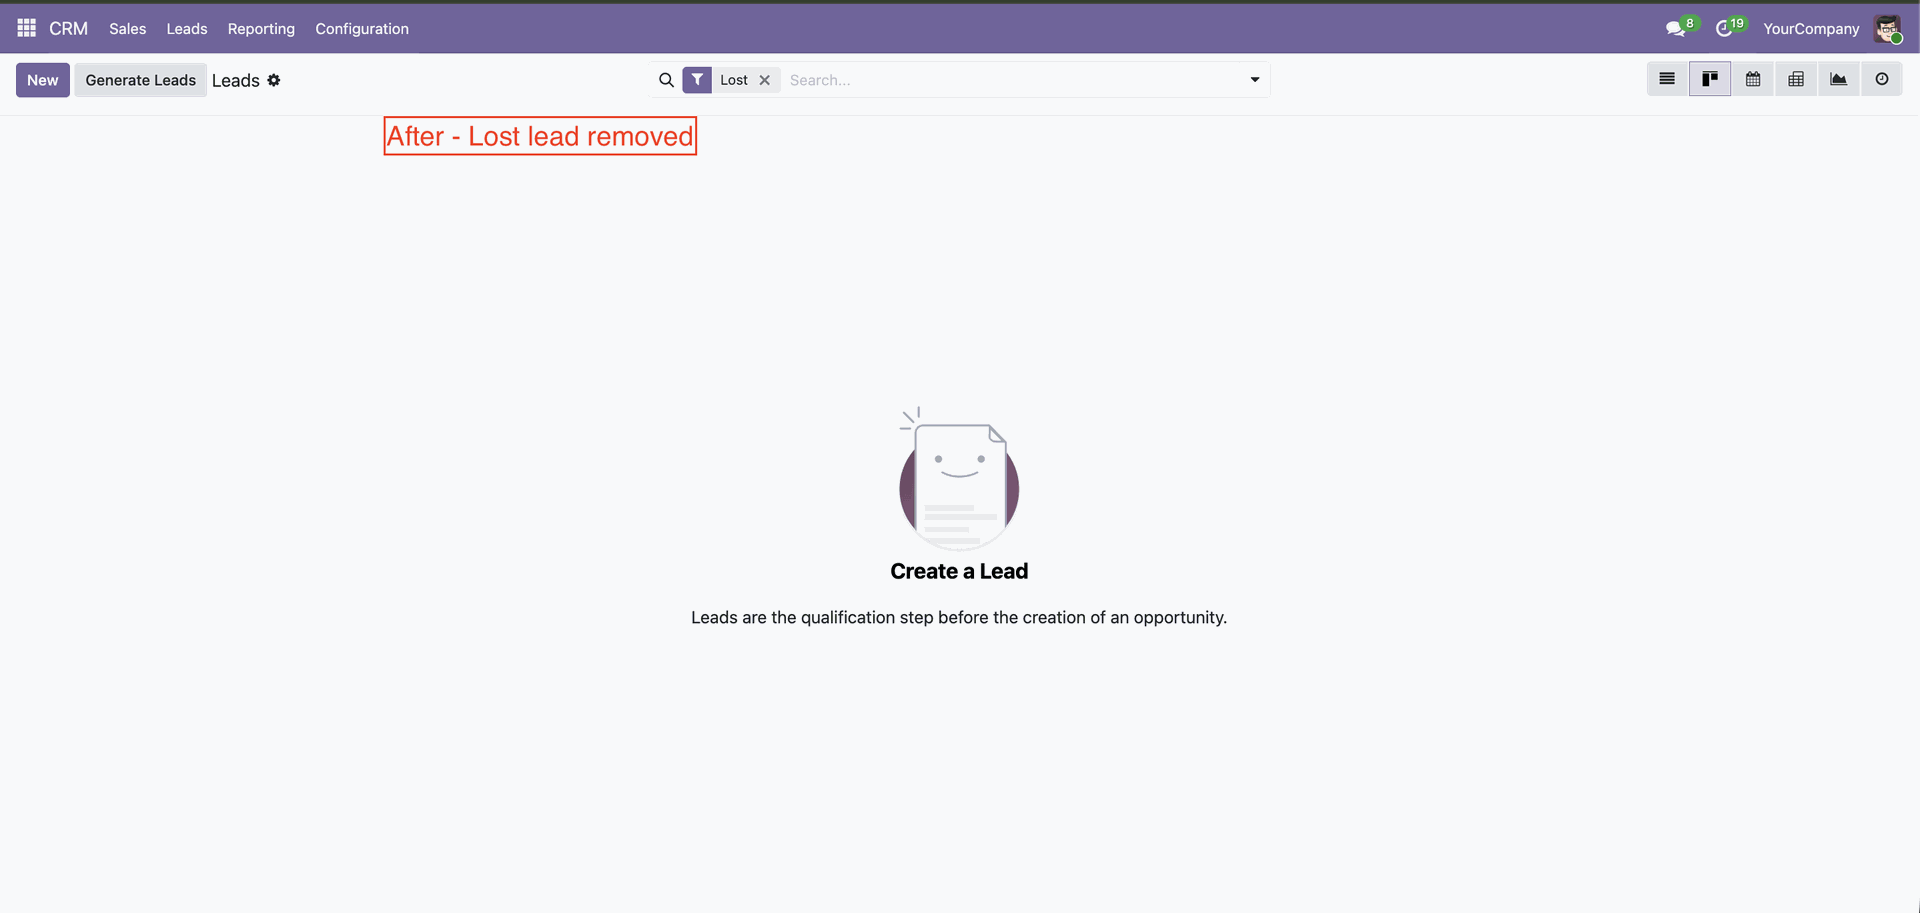
Ensure that the selected lost leads are successfully removed from the CRM Kanban view after deletion.
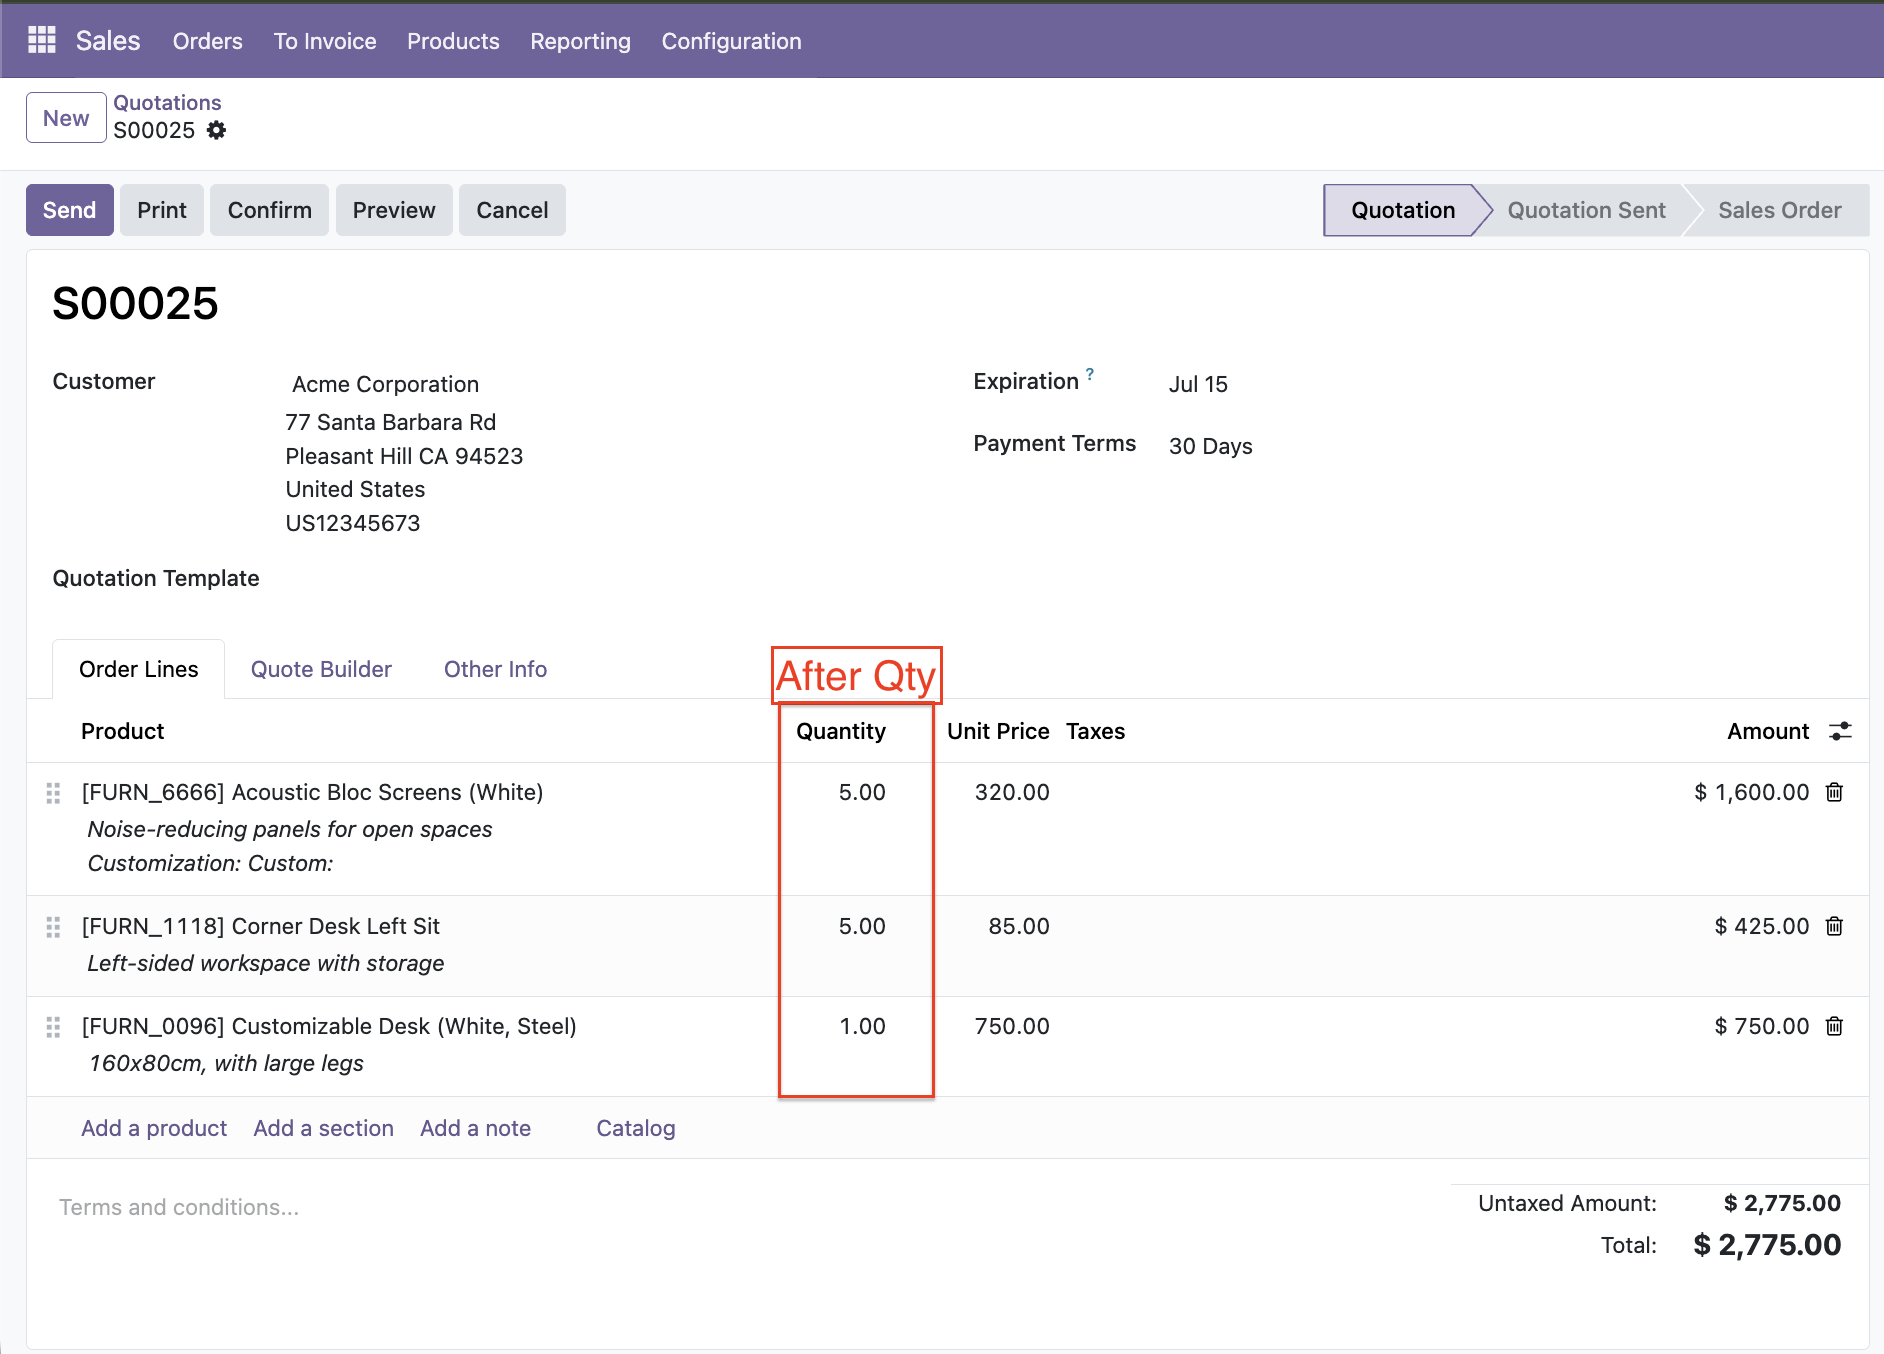
Provide a list of records in the chat interface to initiate a bulk record update request.
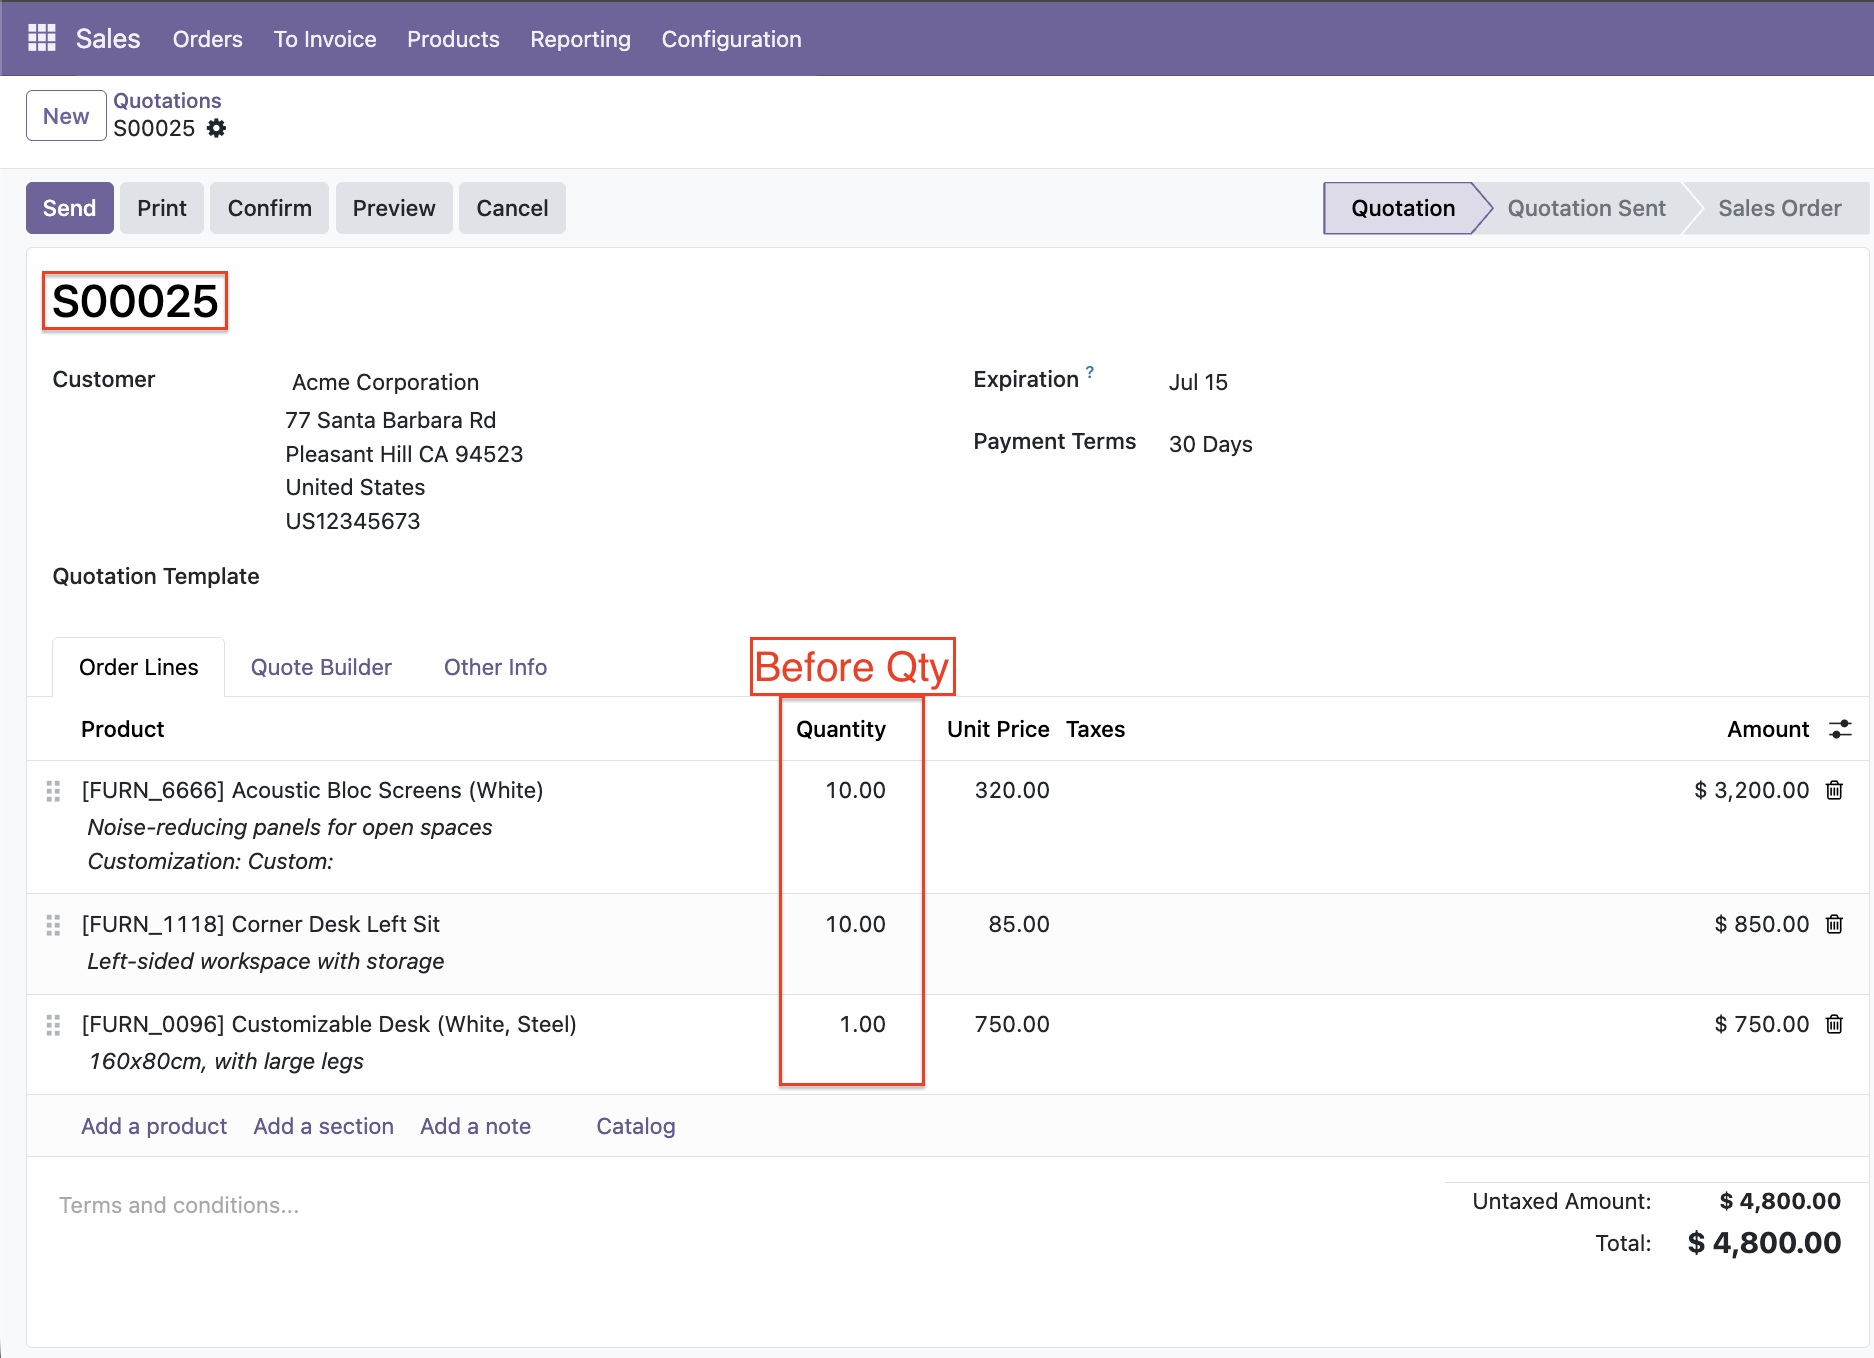
View the original quantities of items in the sale order lines before executing the bulk update.
Review the updated item quantities under the order lines section after completing the bulk update action.
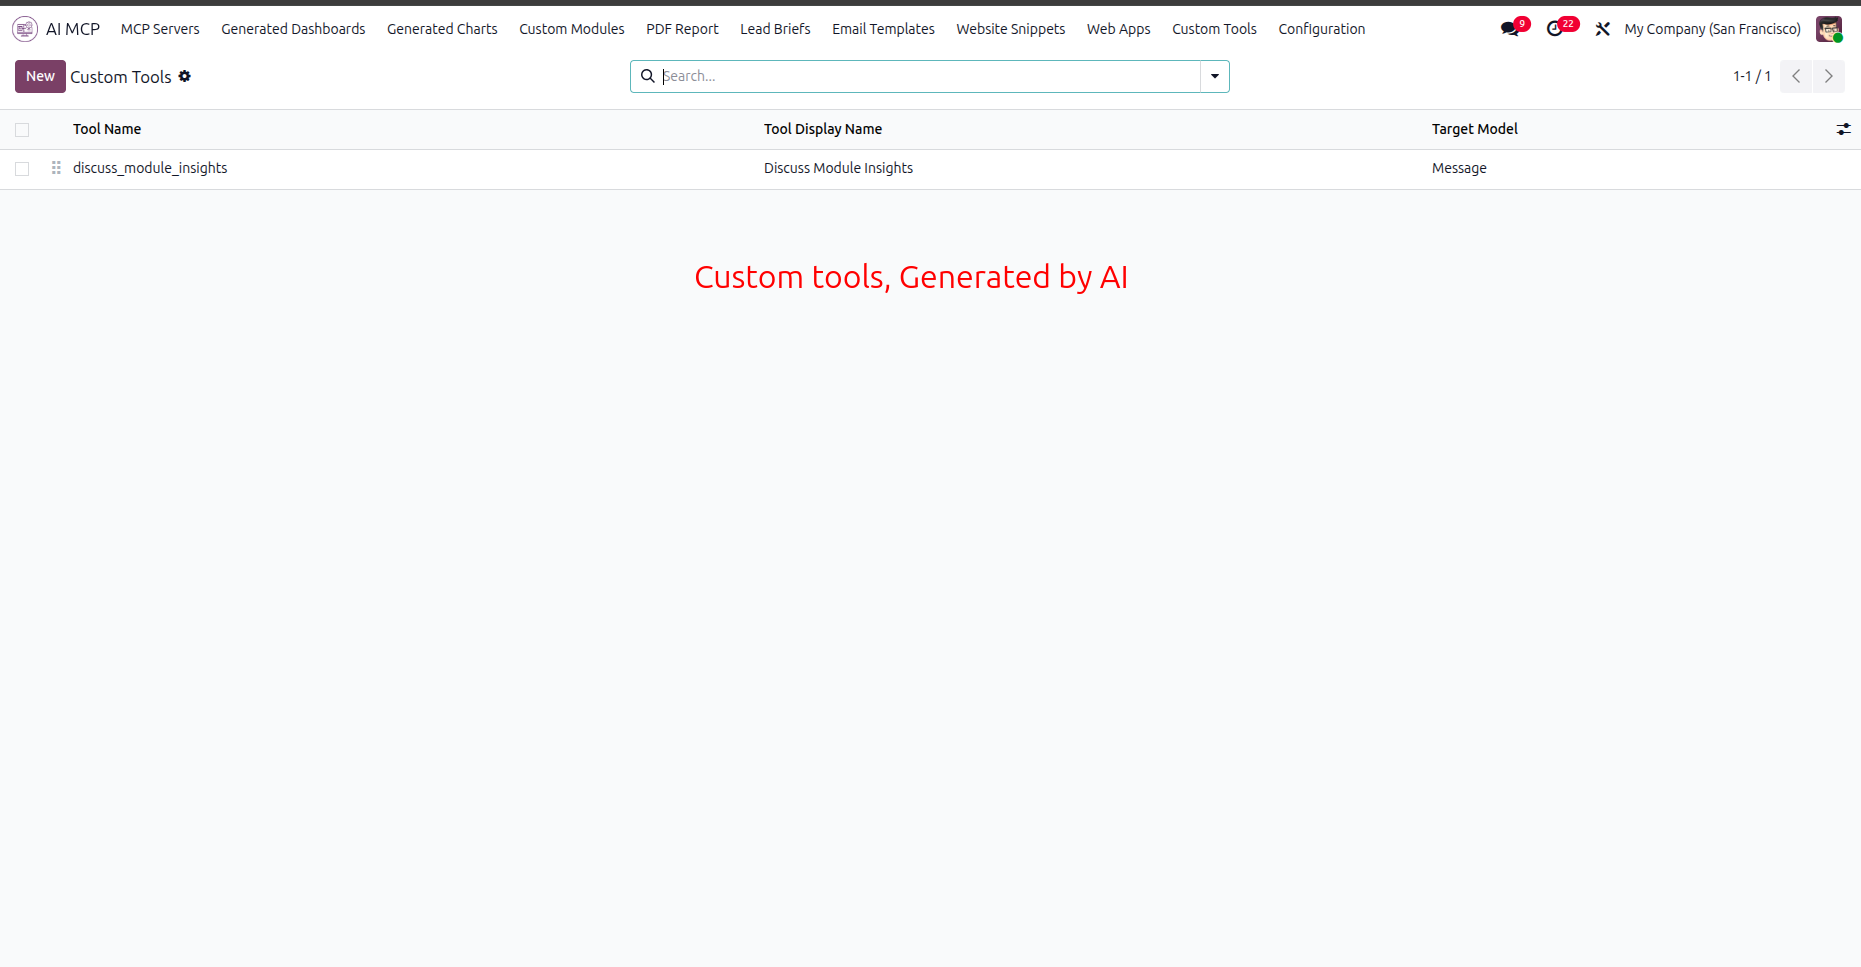
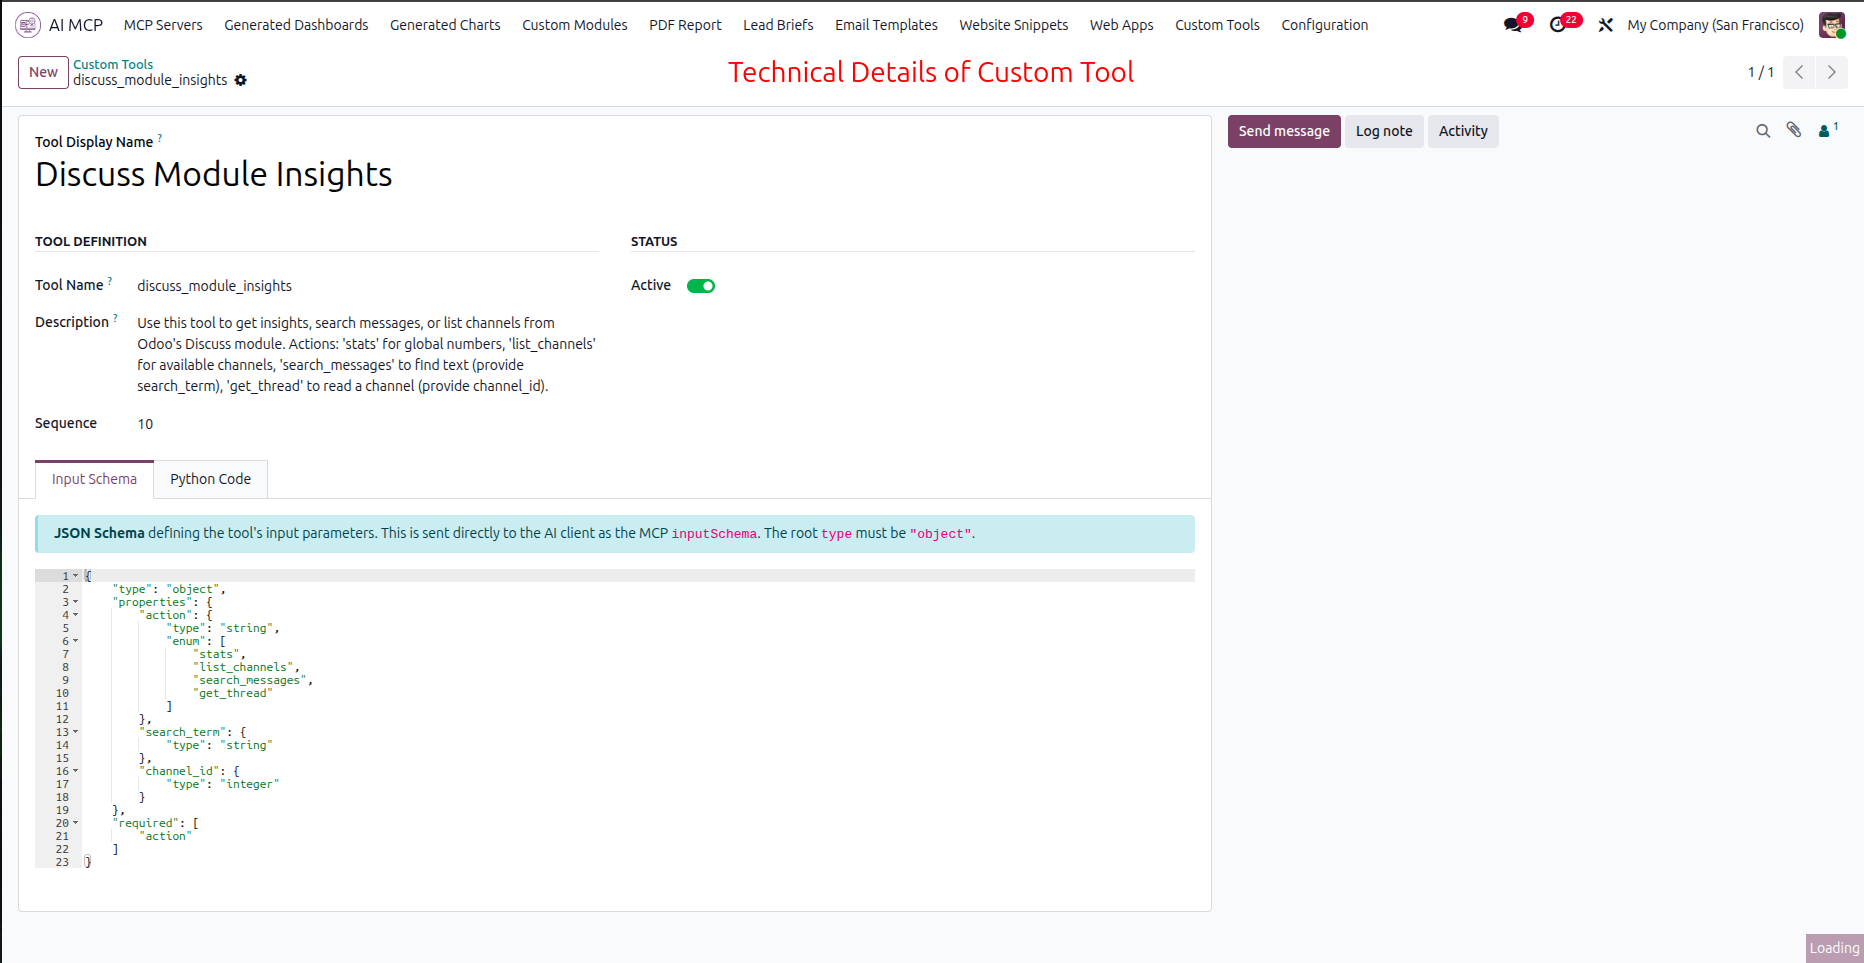
Access the Custom Tools menu to view a list of all AI-generated workflow integration tools.
Select the Input Schema tab to view the JSON parameters defined for the custom tool.
Click 'Generate Dashboard'.
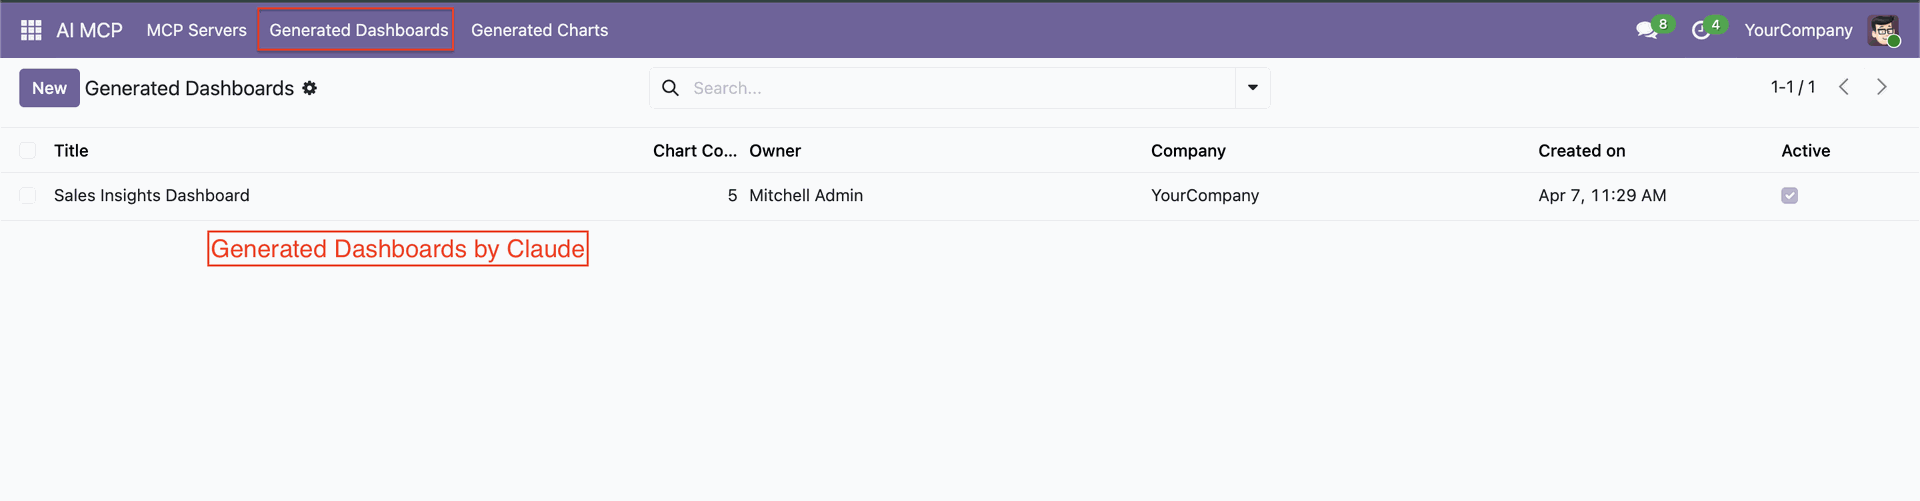
Generate Dashboard form with options.
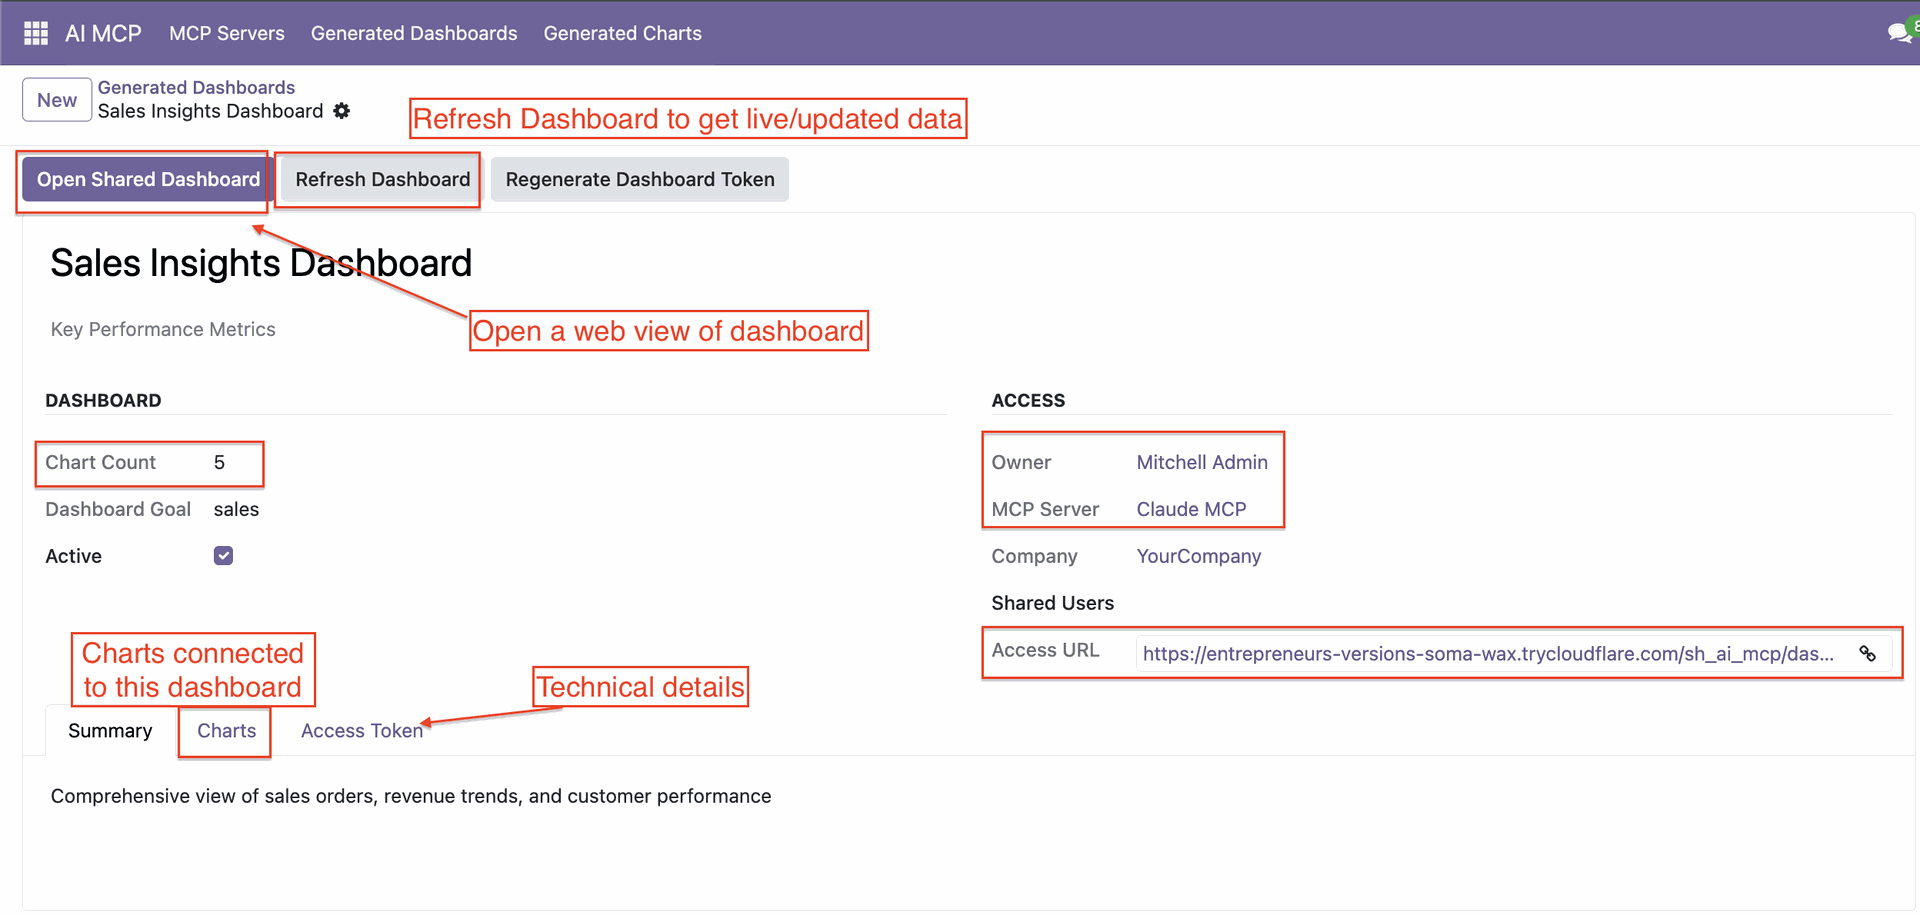
Chart tab with generate charts.
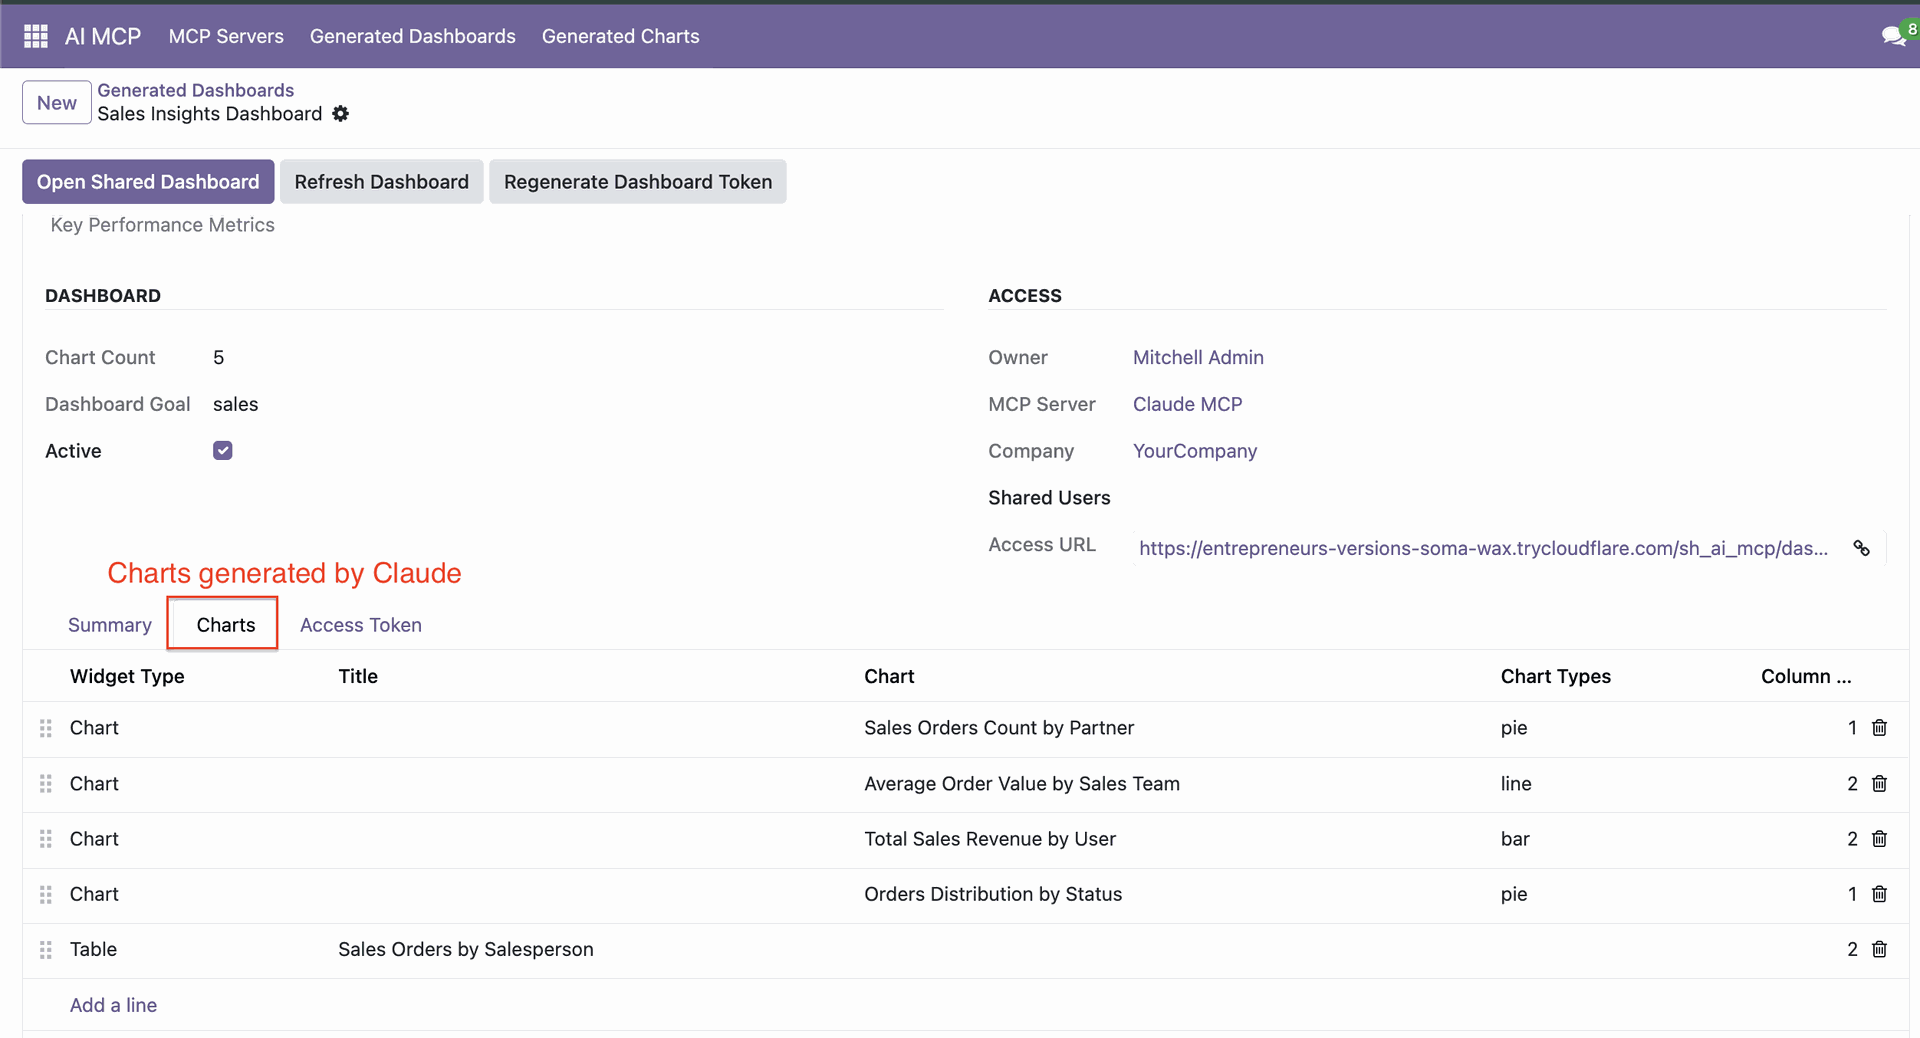
Dashboard view.
Click 'Generate Charts'.
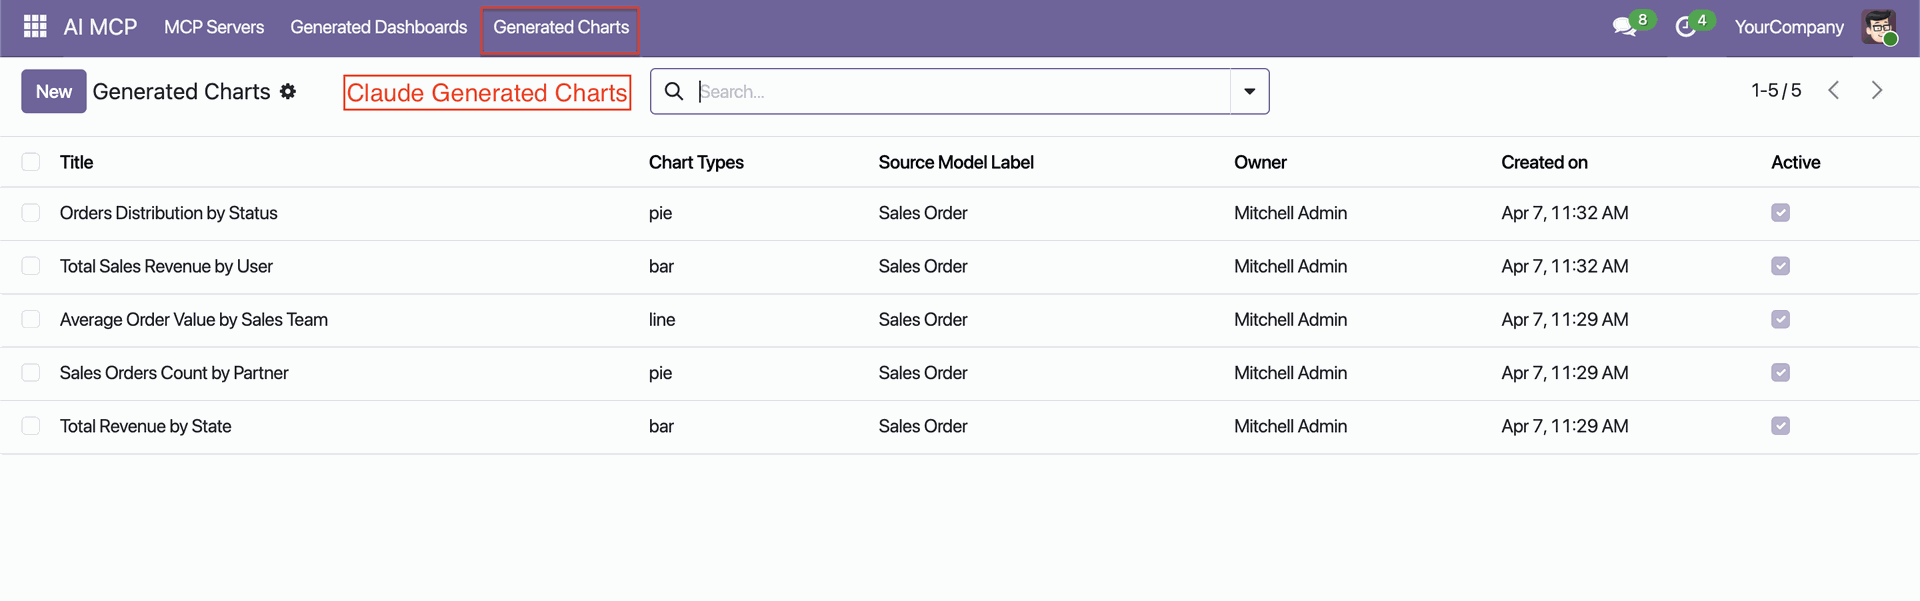
Generate Charts form with options.
Features

Upload a Document - Done!
Just upload your PDF (invoice, purchase order, sales order, delivery note) and the system reads it automatically - no manual typing needed.
Watch Video

Works With All Your Document Types
Whether it's a Sales Order, Purchase Order, Invoice, or Delivery document - this tool handles all of them in one place.
Watch Video

Smart AI Reads Your Documents
Powered by advanced AI, the tool understands the content of your document and pulls out all the important details - automatically.

Records Created Instantly
Once the document is read, your Odoo records (like orders or invoices) are created automatically.

Original Document Always Attached
The original PDF you uploaded stays linked to the record that was created - so you can always go back and check the source document easily.

Review Before It Saves
Not ready to go fully automatic? You can review the extracted information first and approve it before anything is saved - giving you full control.

Multi-Provider LLM Support
Process OCR documents using configurable AI providers and advanced LLM integrations.

Maintain Log History
Full activity logs show you exactly what was read, what was created, and if anything went wrong - no guessing, full transparency.

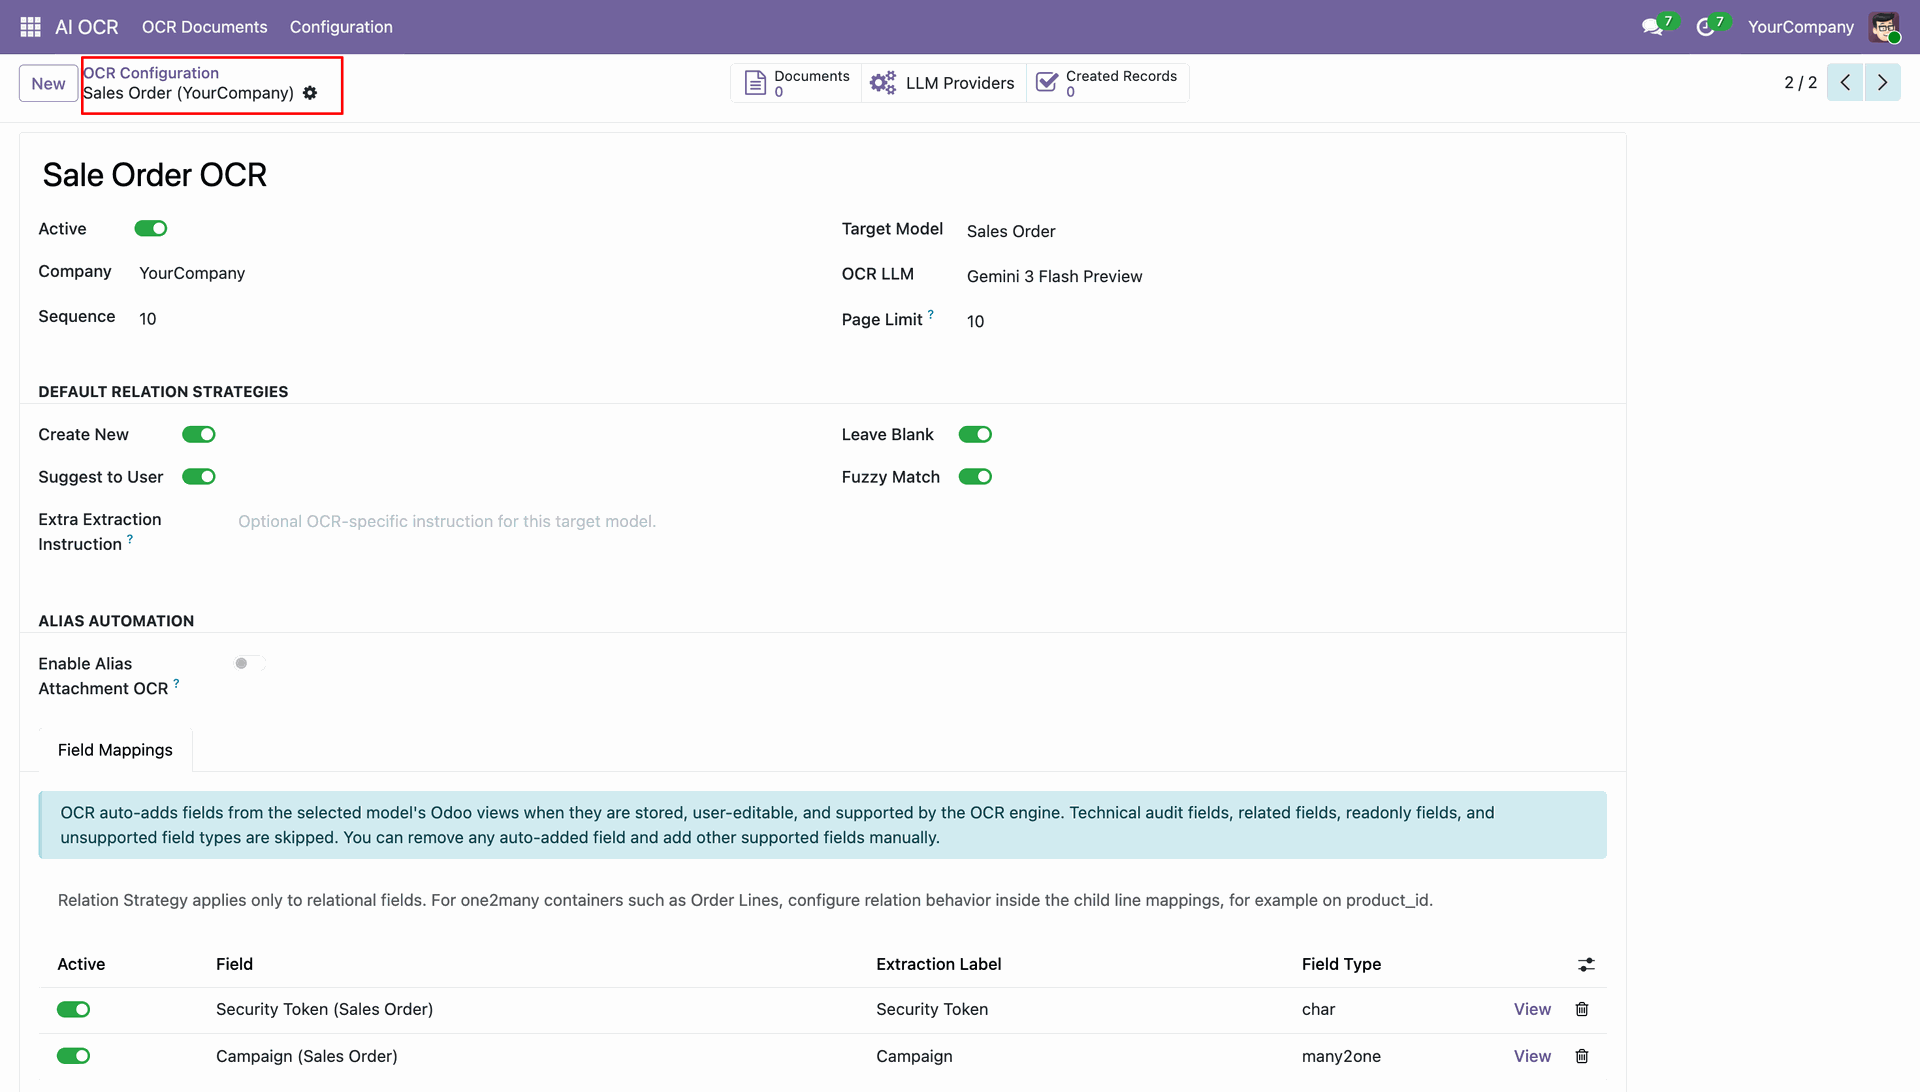
Set It Up Your Way
You can customise which fields get filled in and how the data maps to your specific Odoo setup.
Workflow
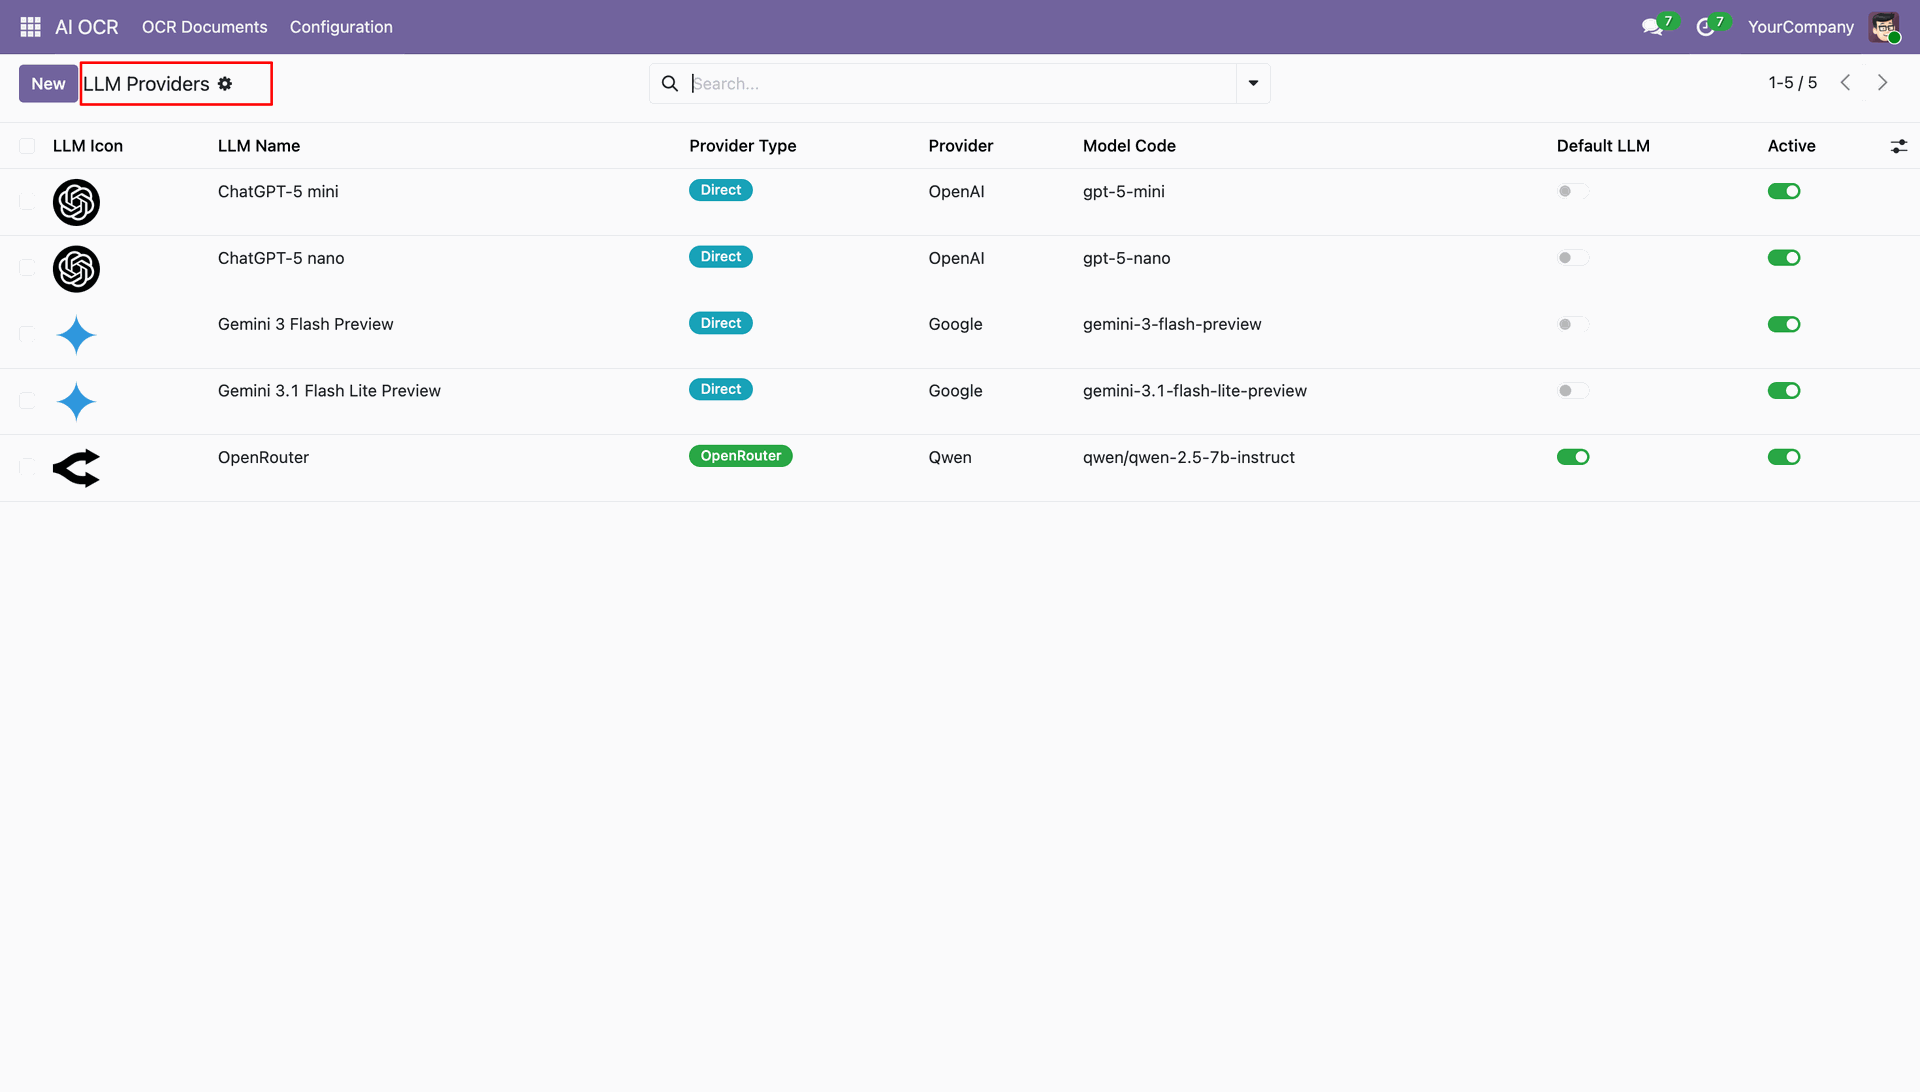
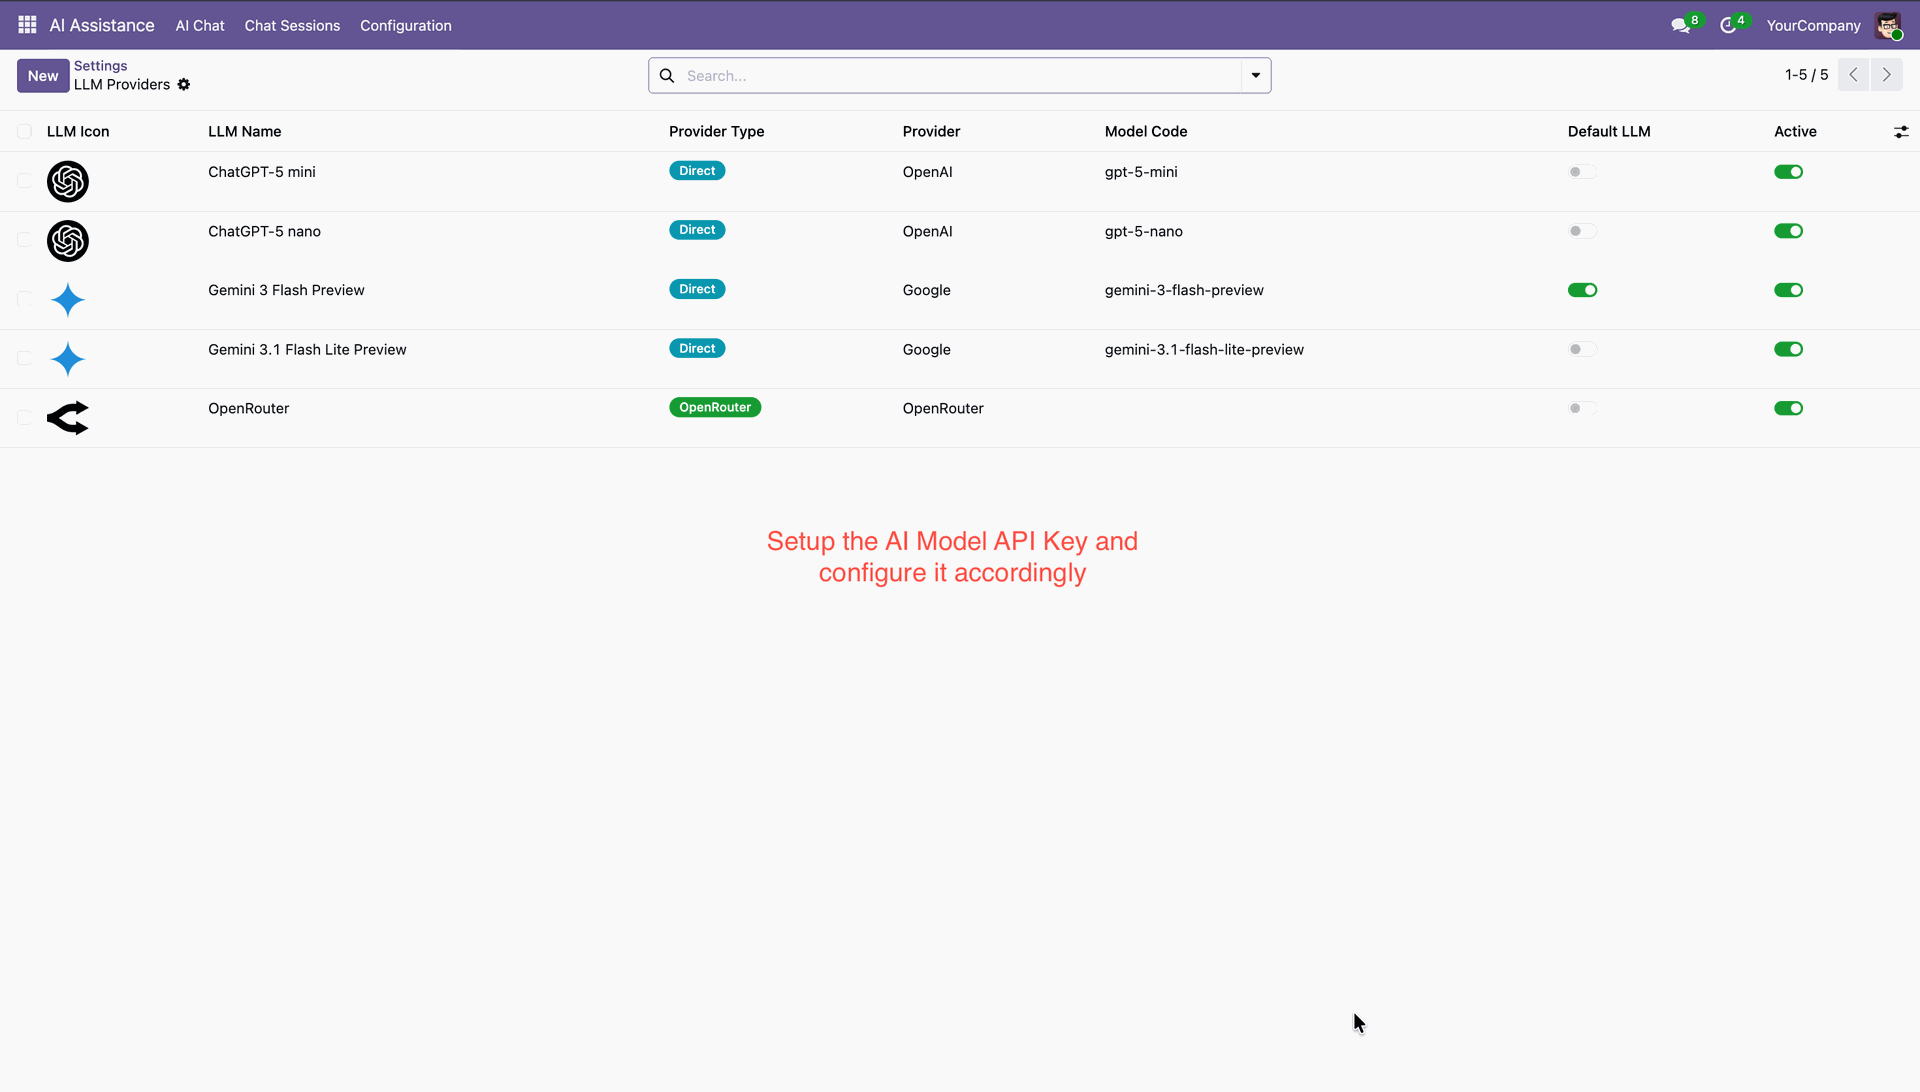
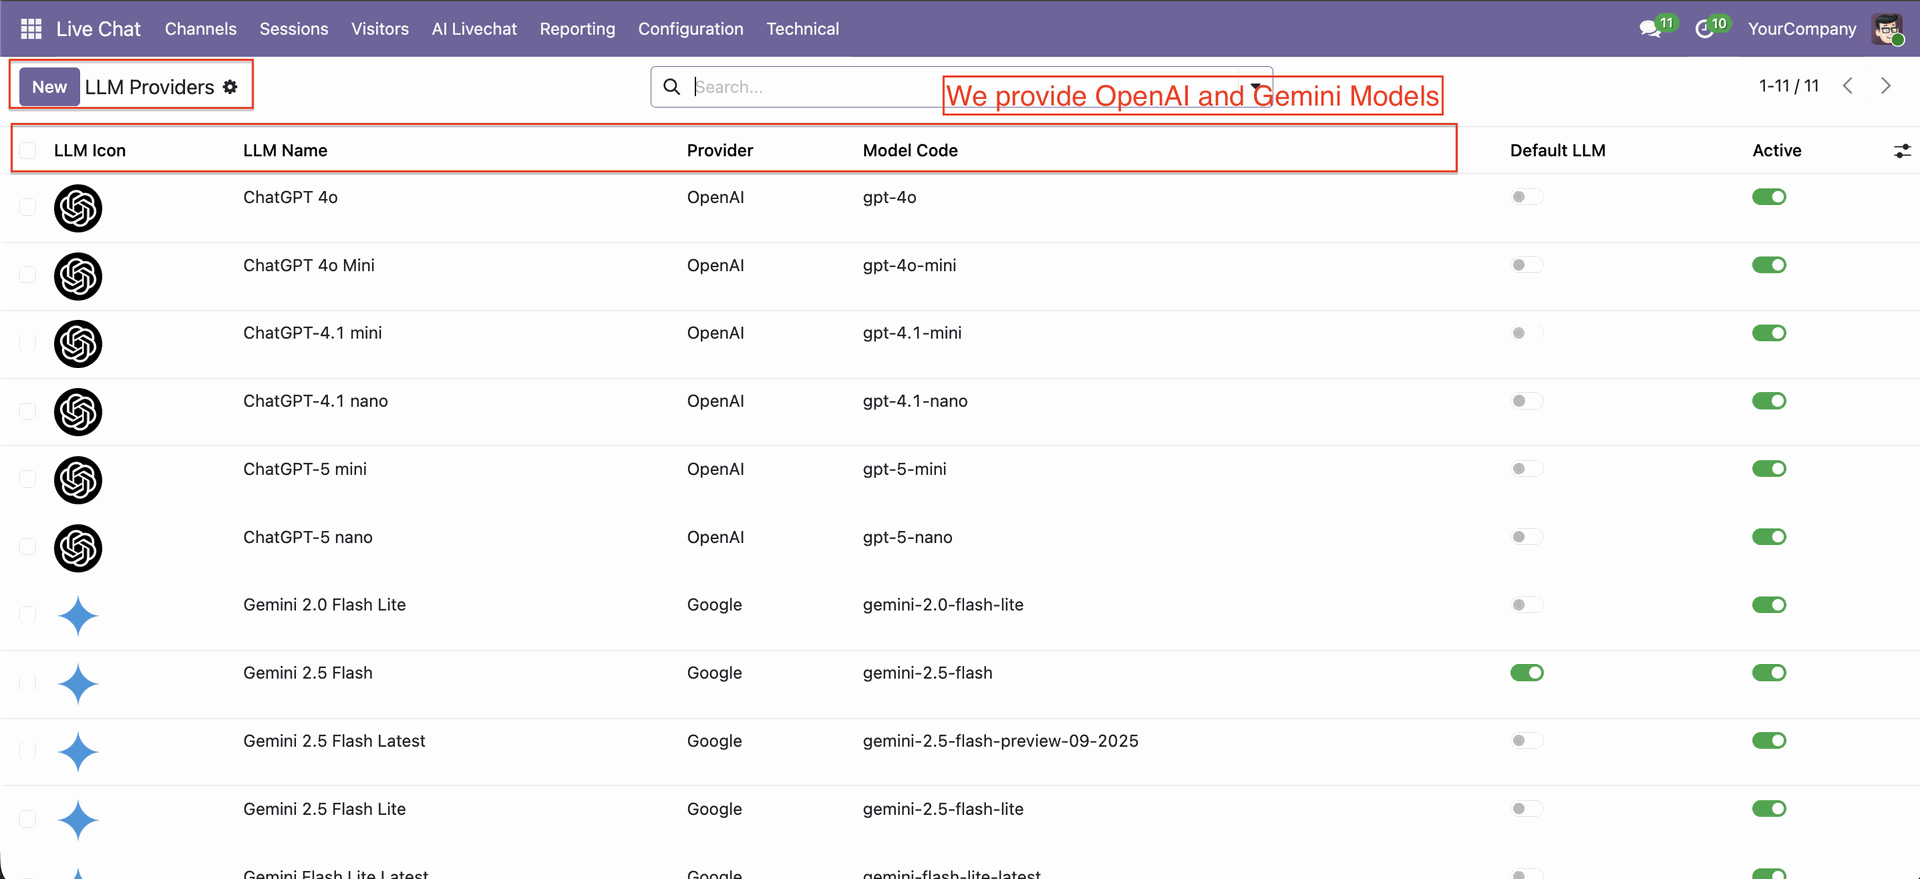
This list view displays all available LLM models configured in Odoo; it shows details like provider name, model code, default LLM status, and activation toggle for each AI model.
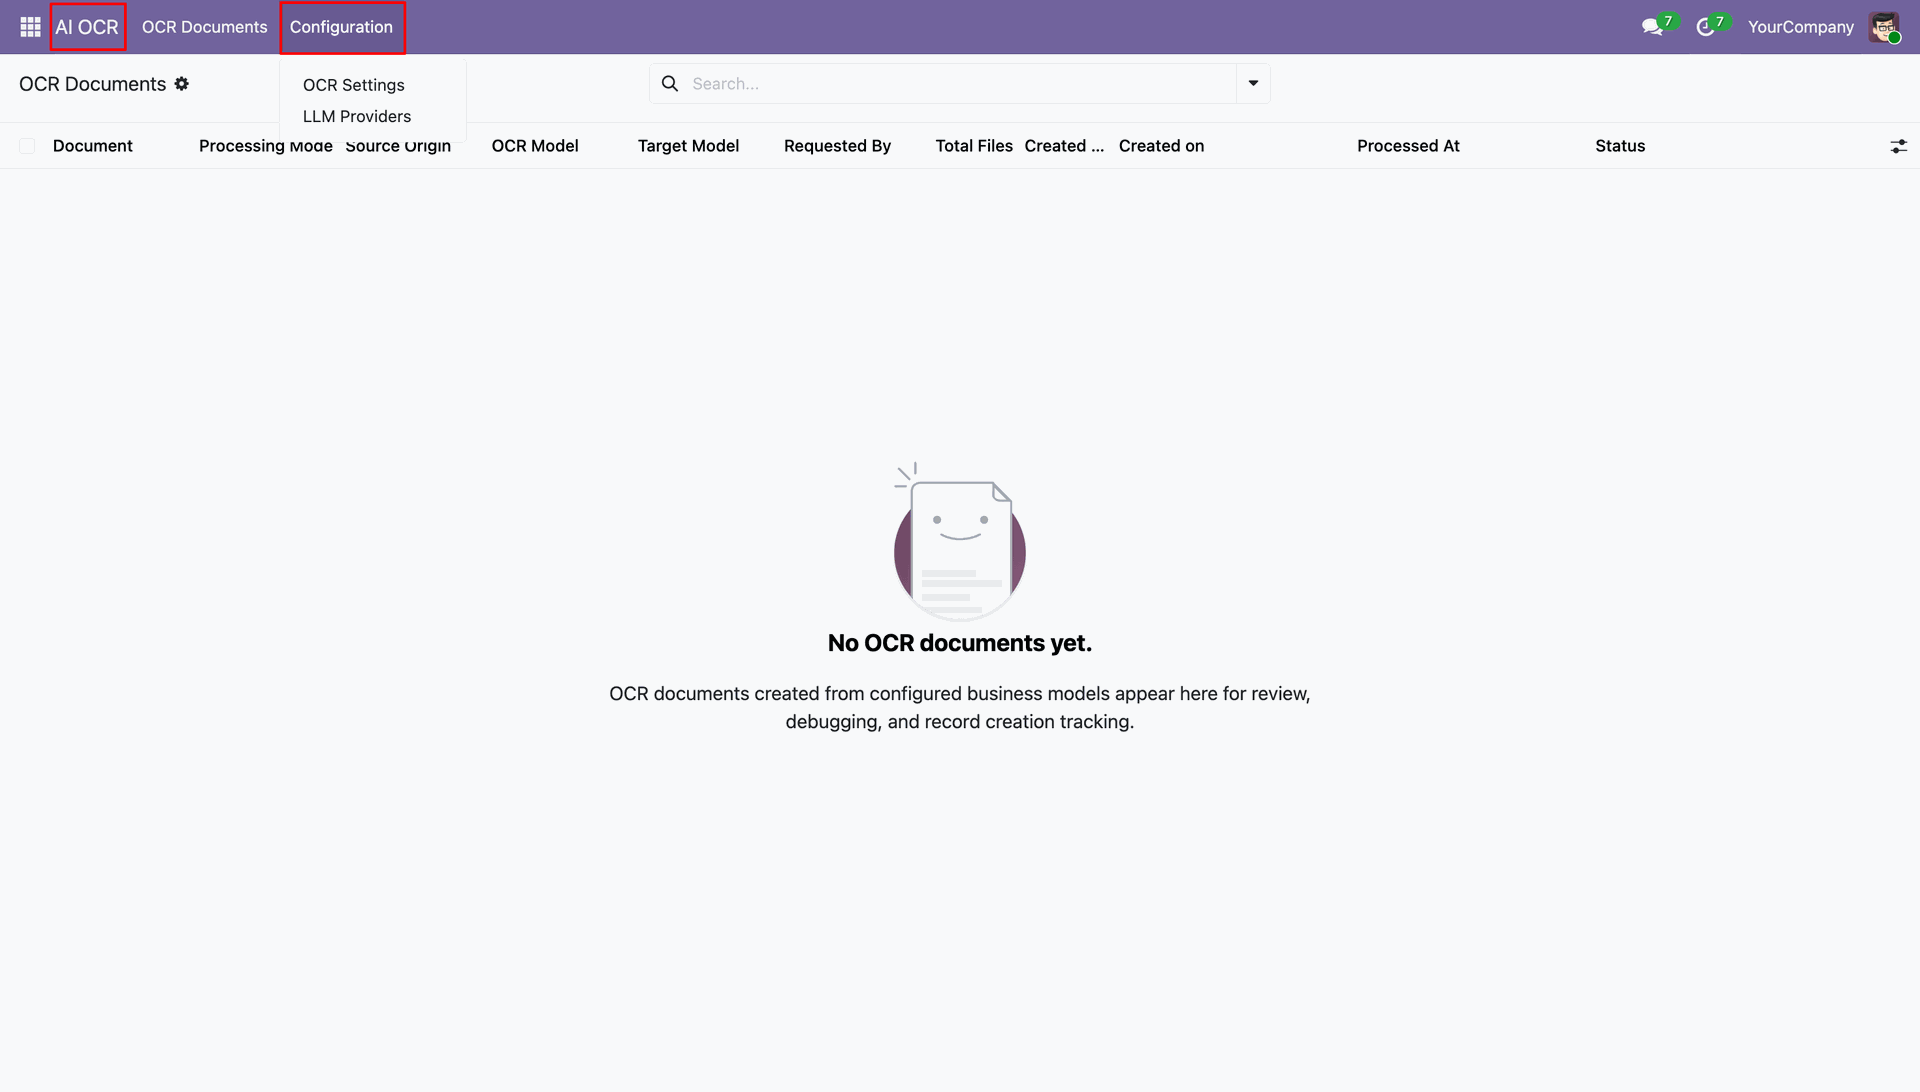
GO to the OCR -> Configuration.
Purchase order OCR view with relational strategy and field mappings.

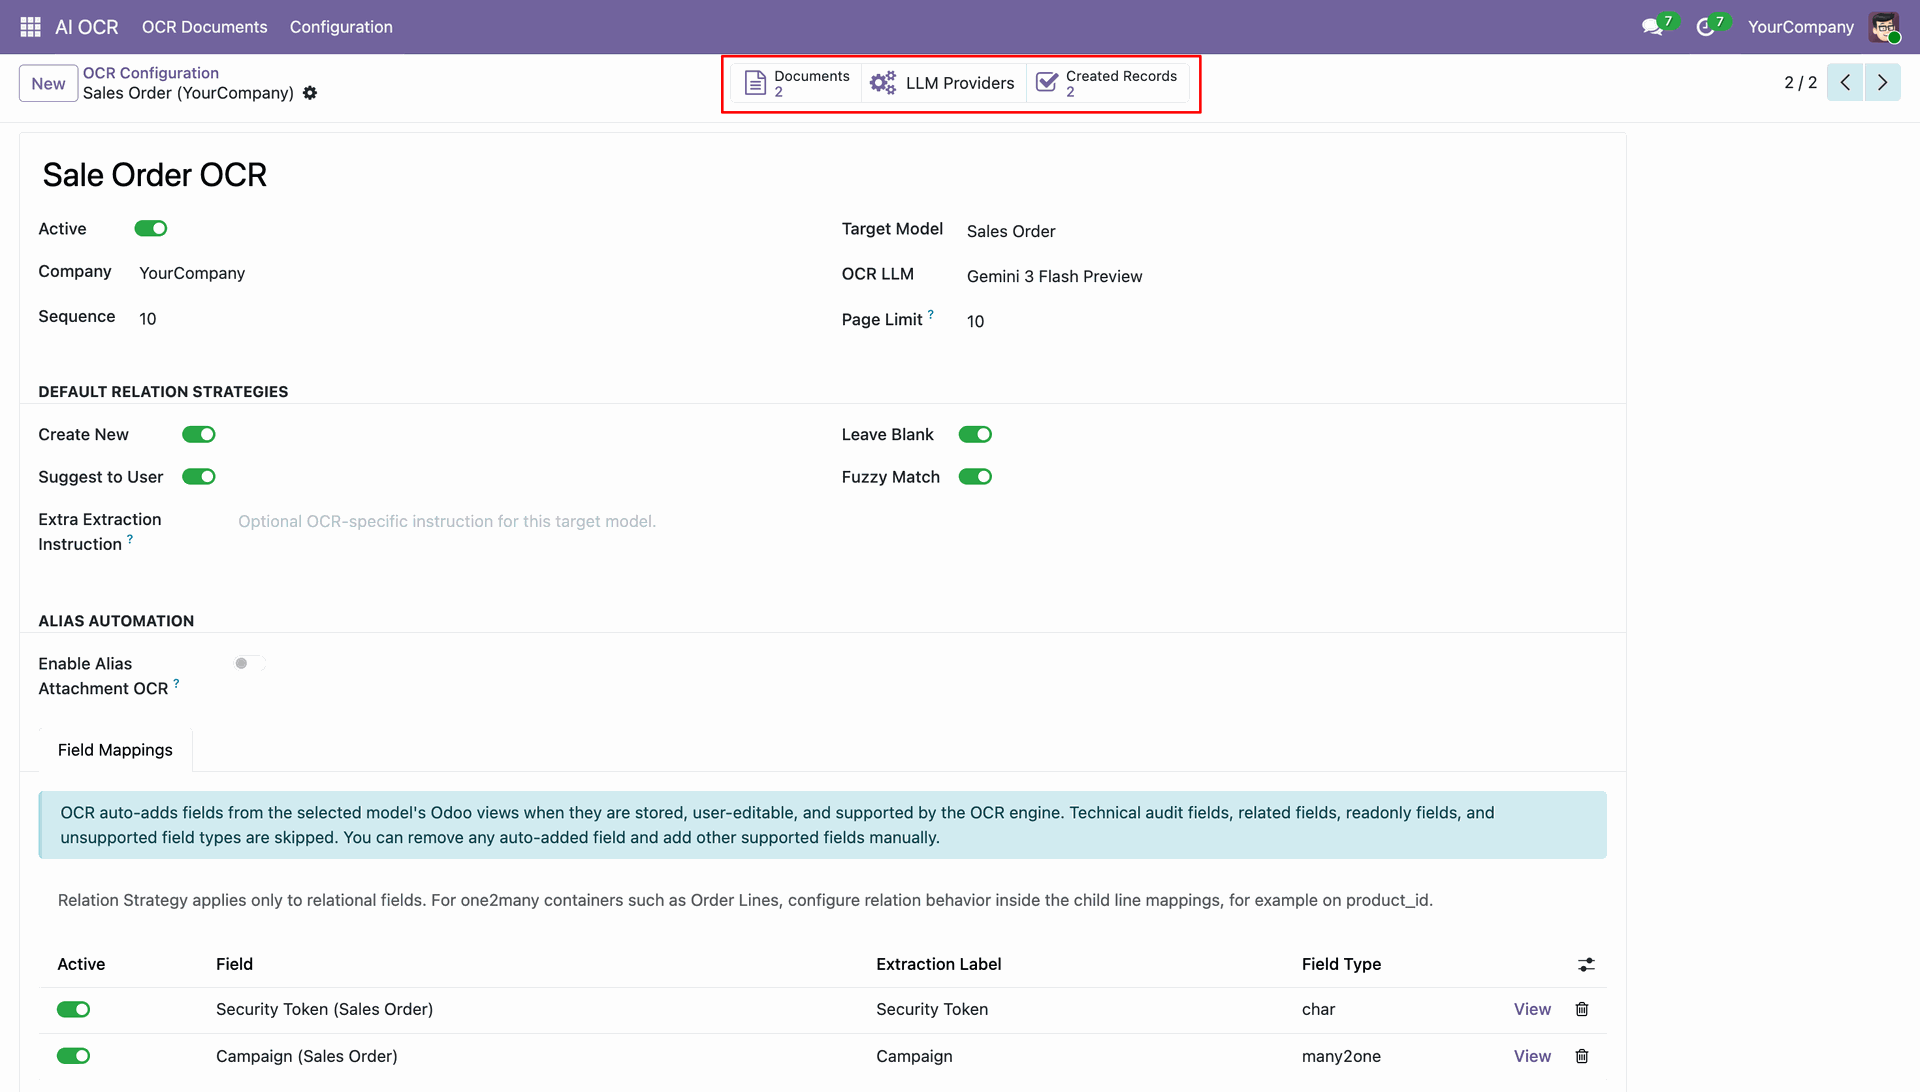
Sale order OCR view with relational strategy and field mappings.
Order lines field mapping view.
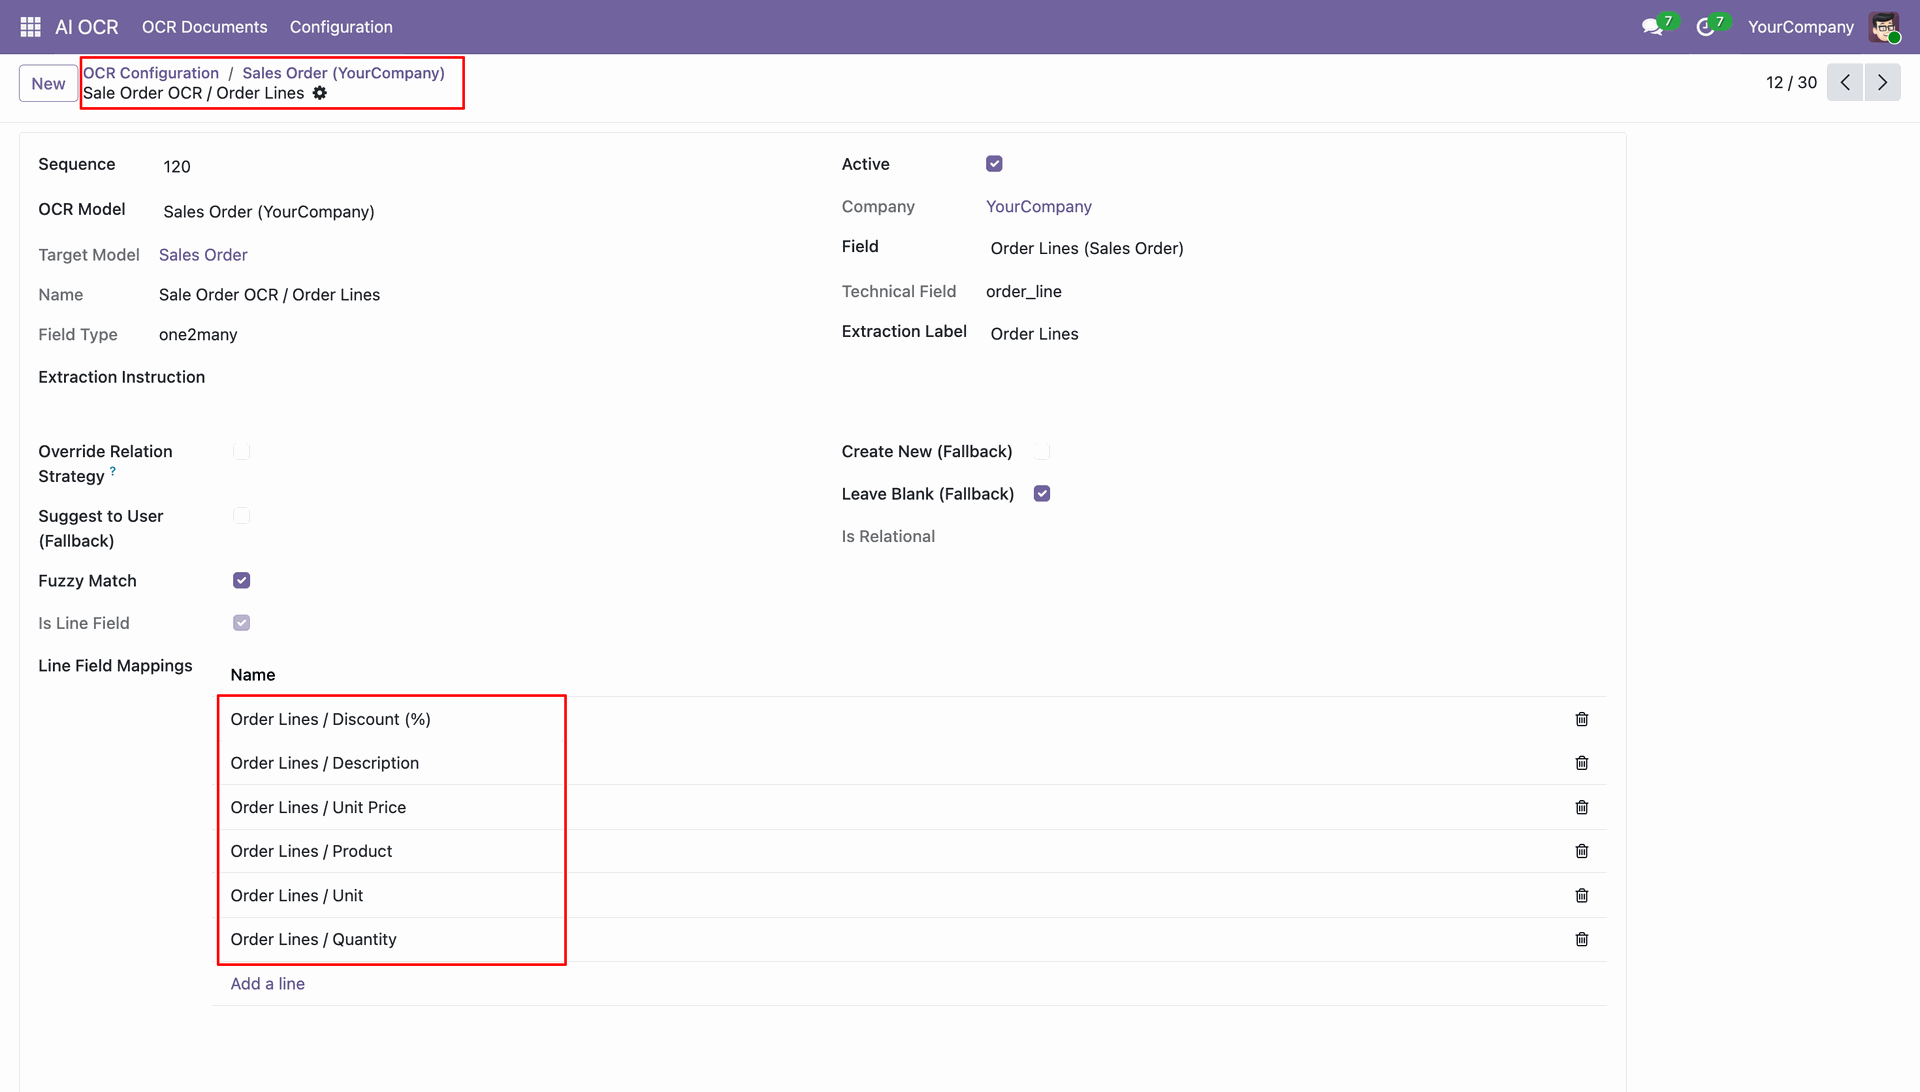
Line field mapping wizard: fill data as per requirement.

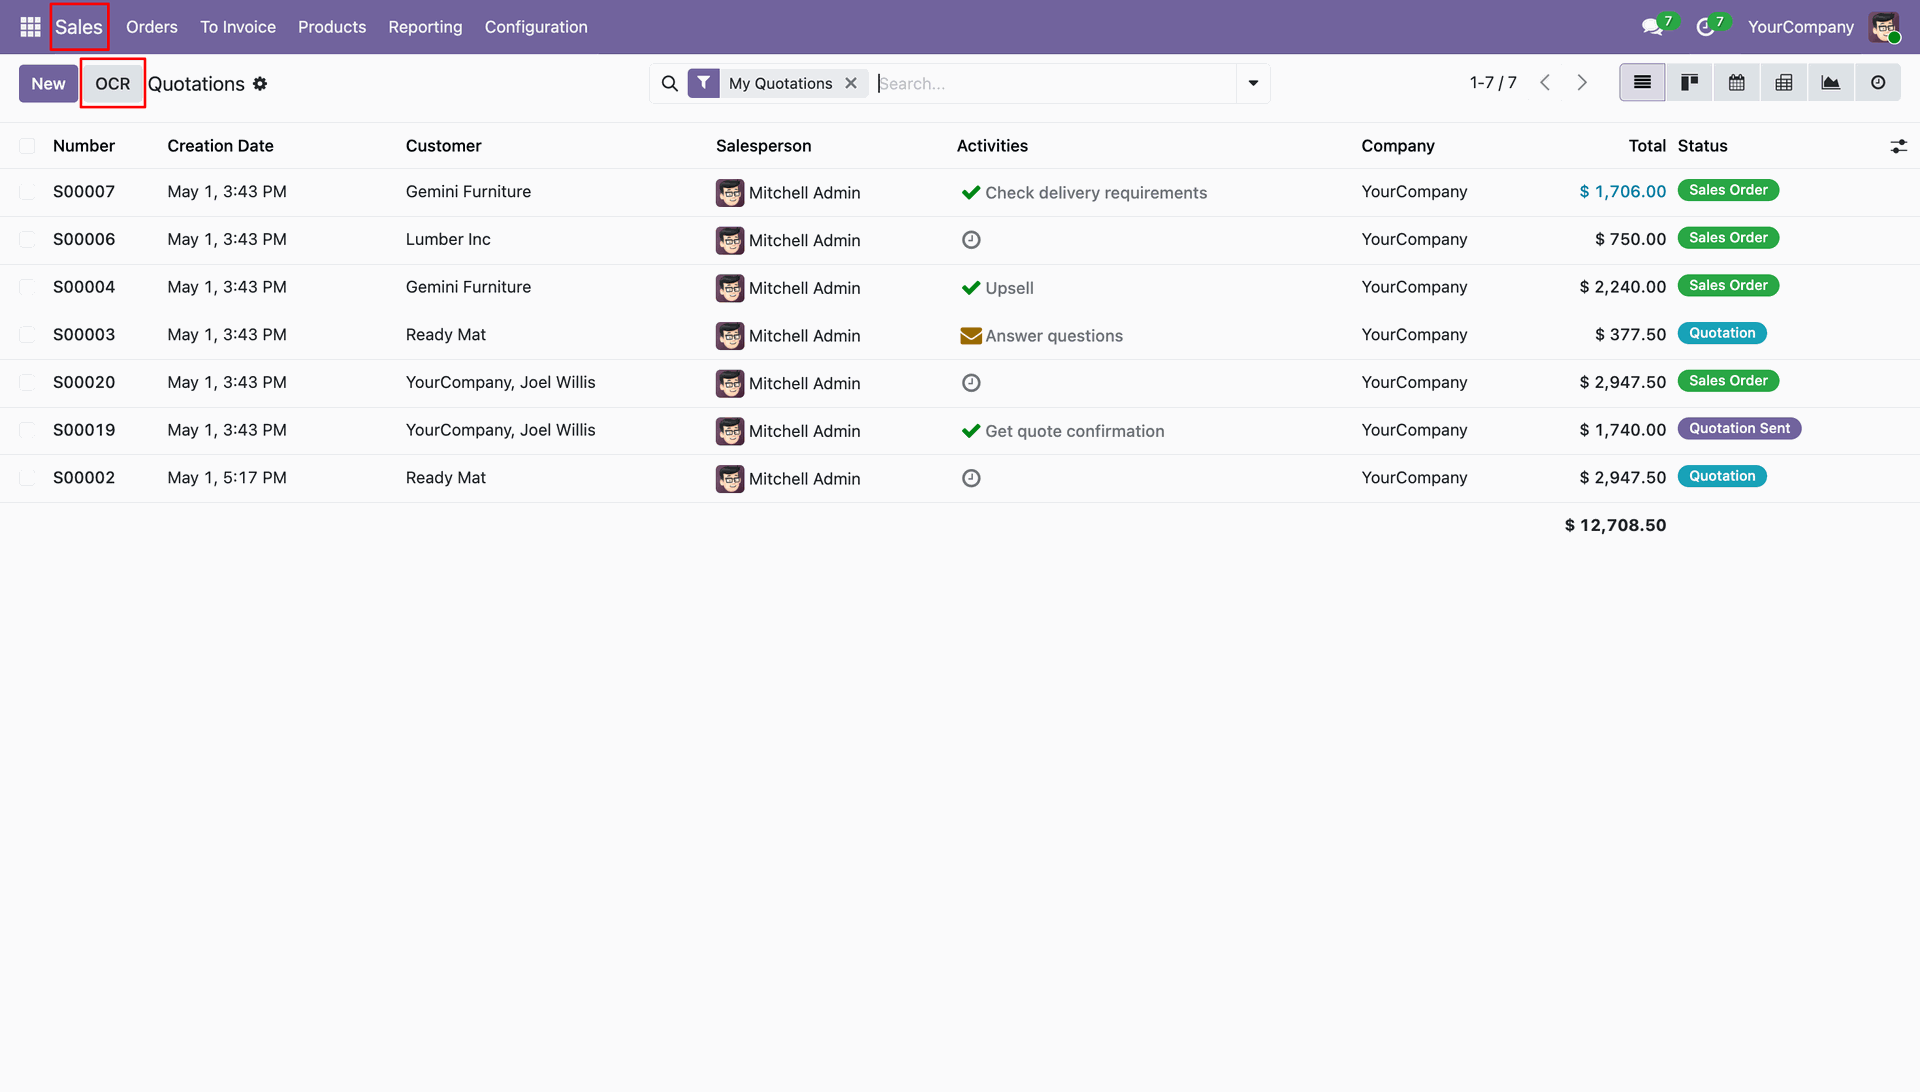
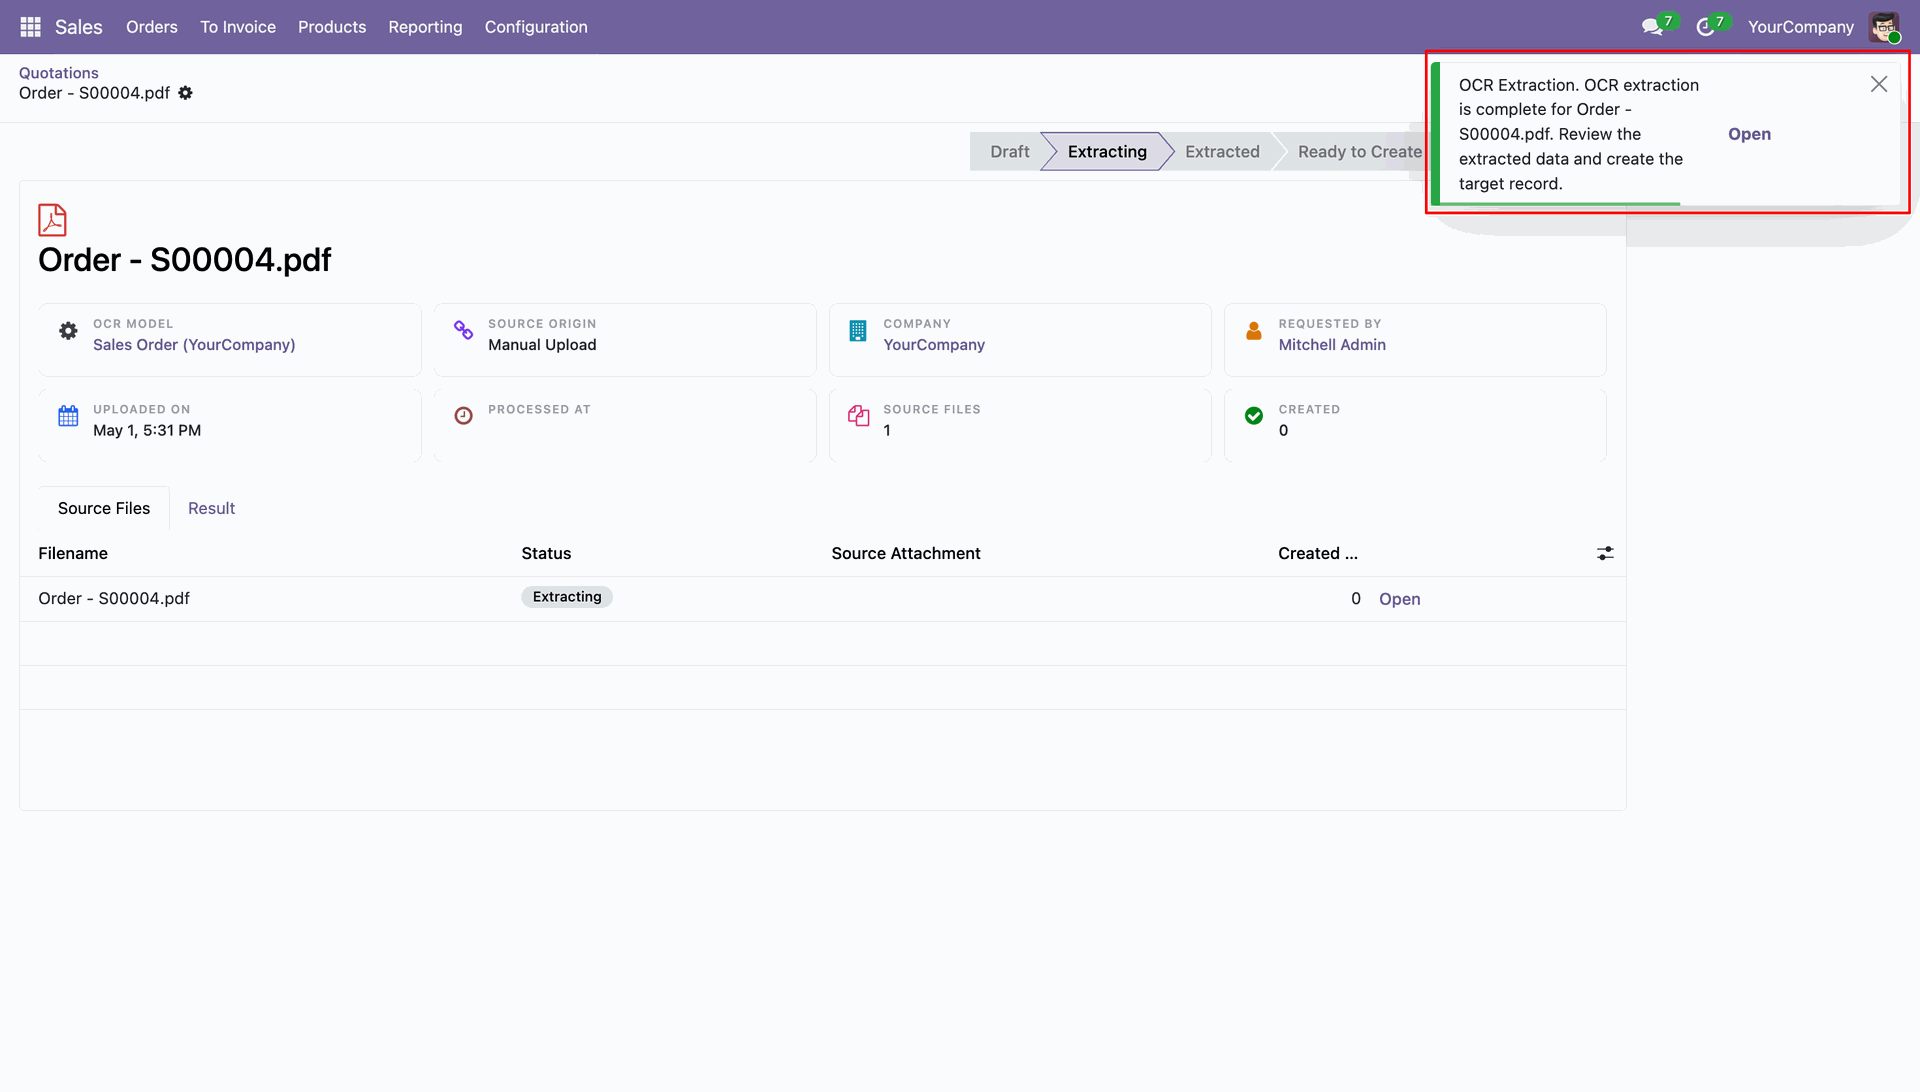
Go to the 'Sales' and click 'OCR'.
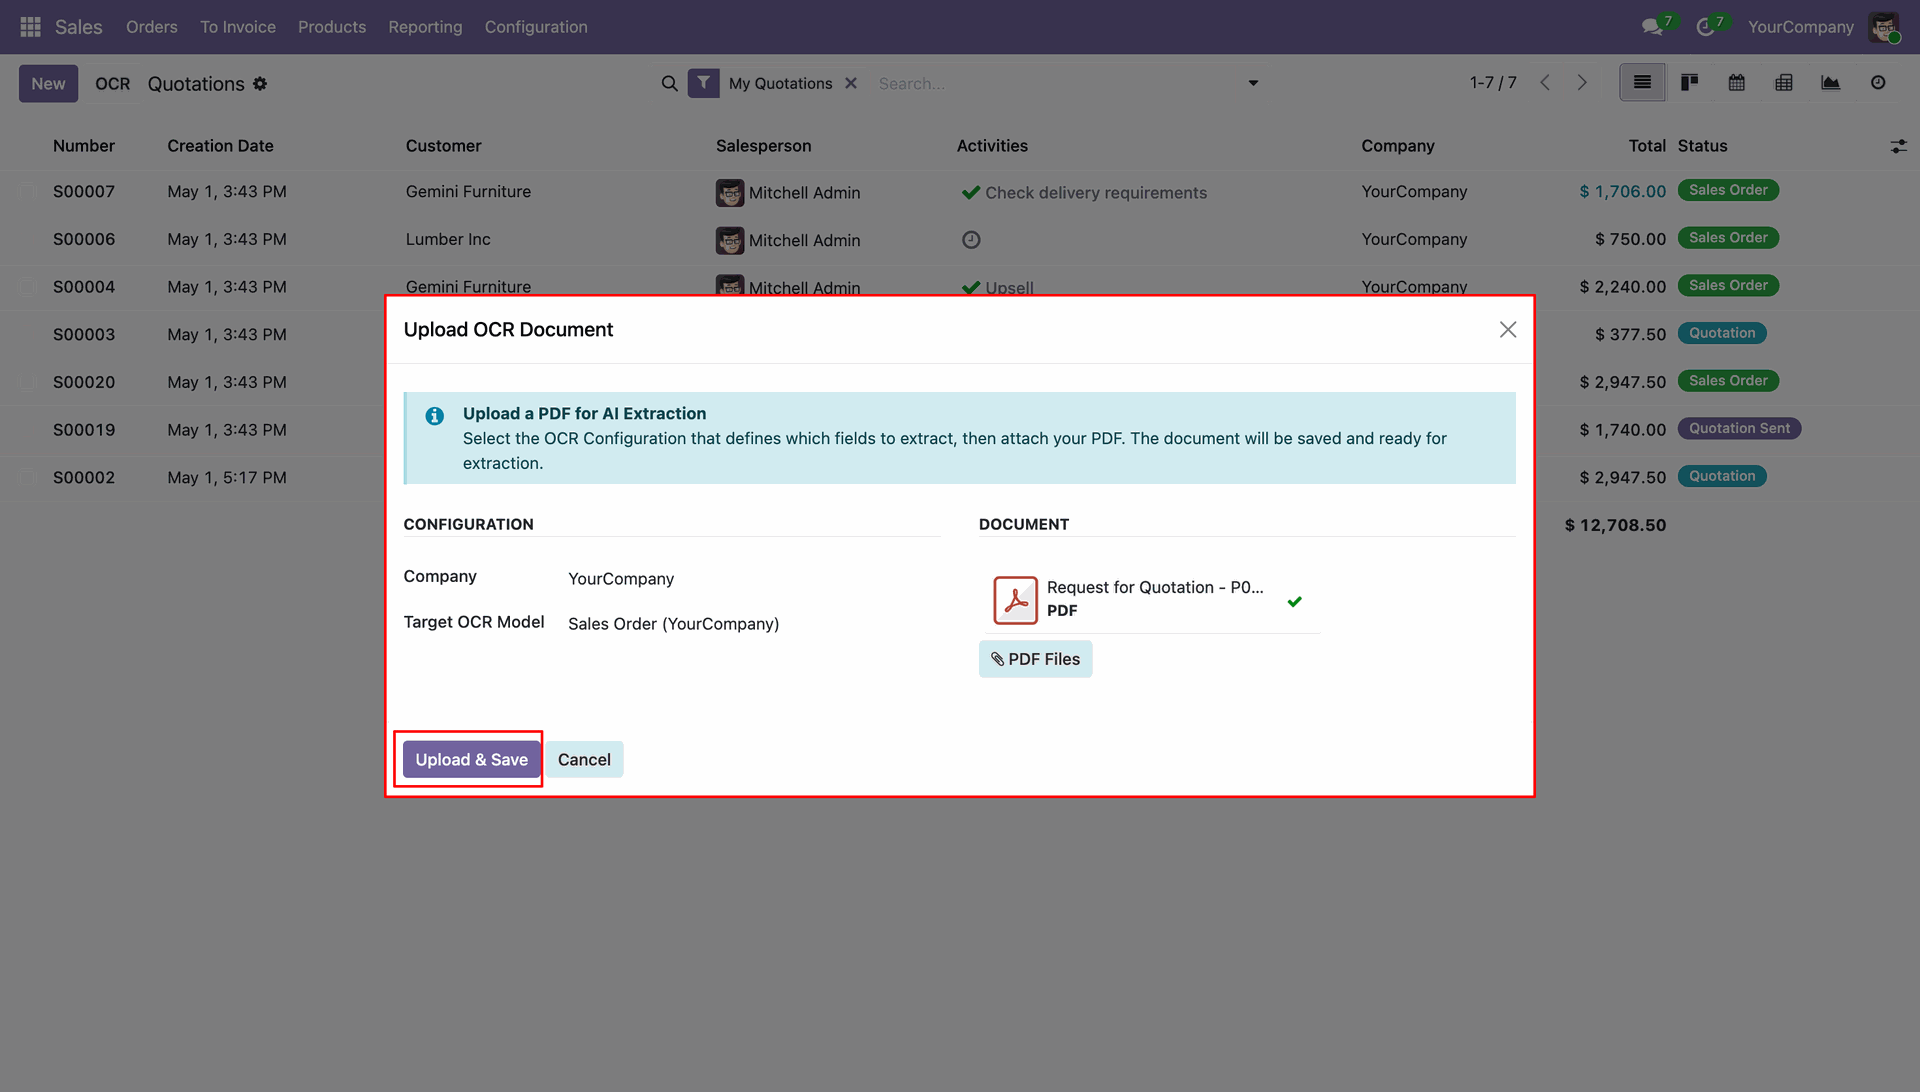
Upload the document and save it.
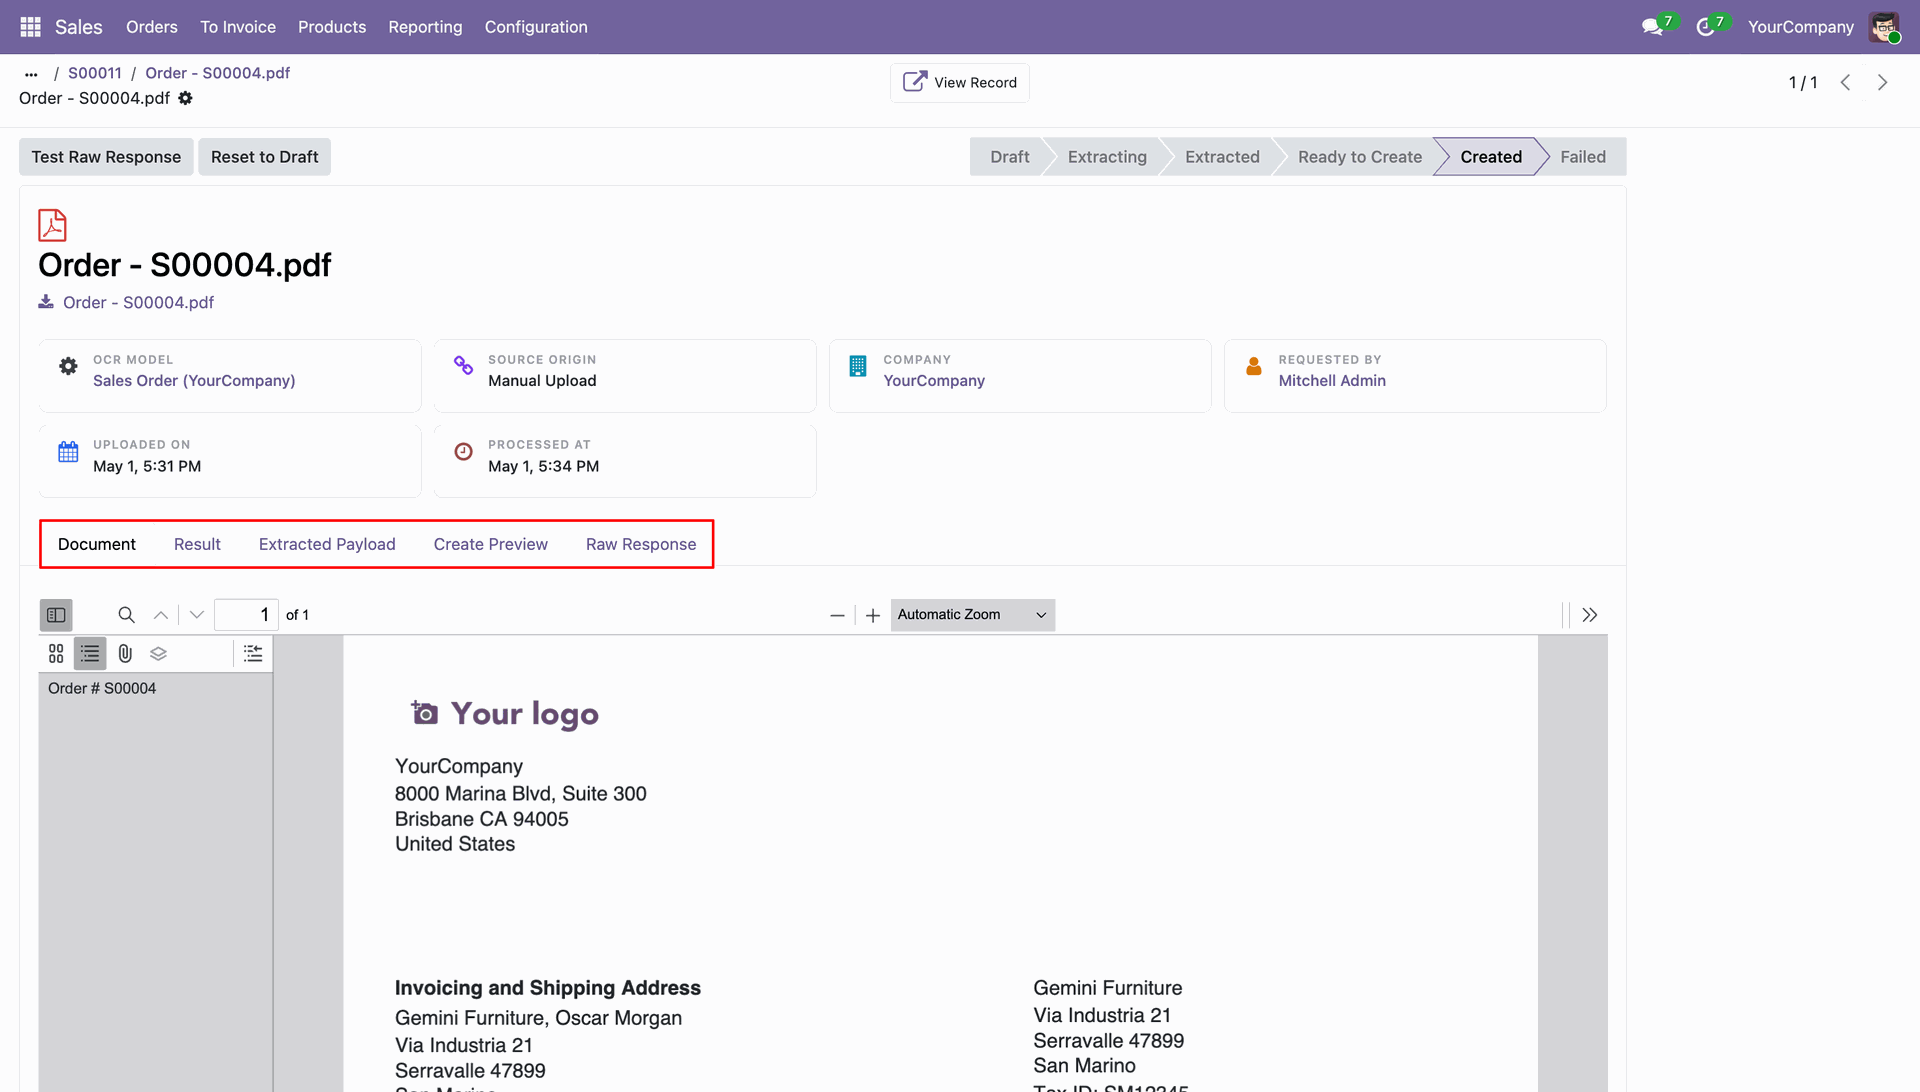
Analyze the detailed response extracted by the AI from the uploaded document.
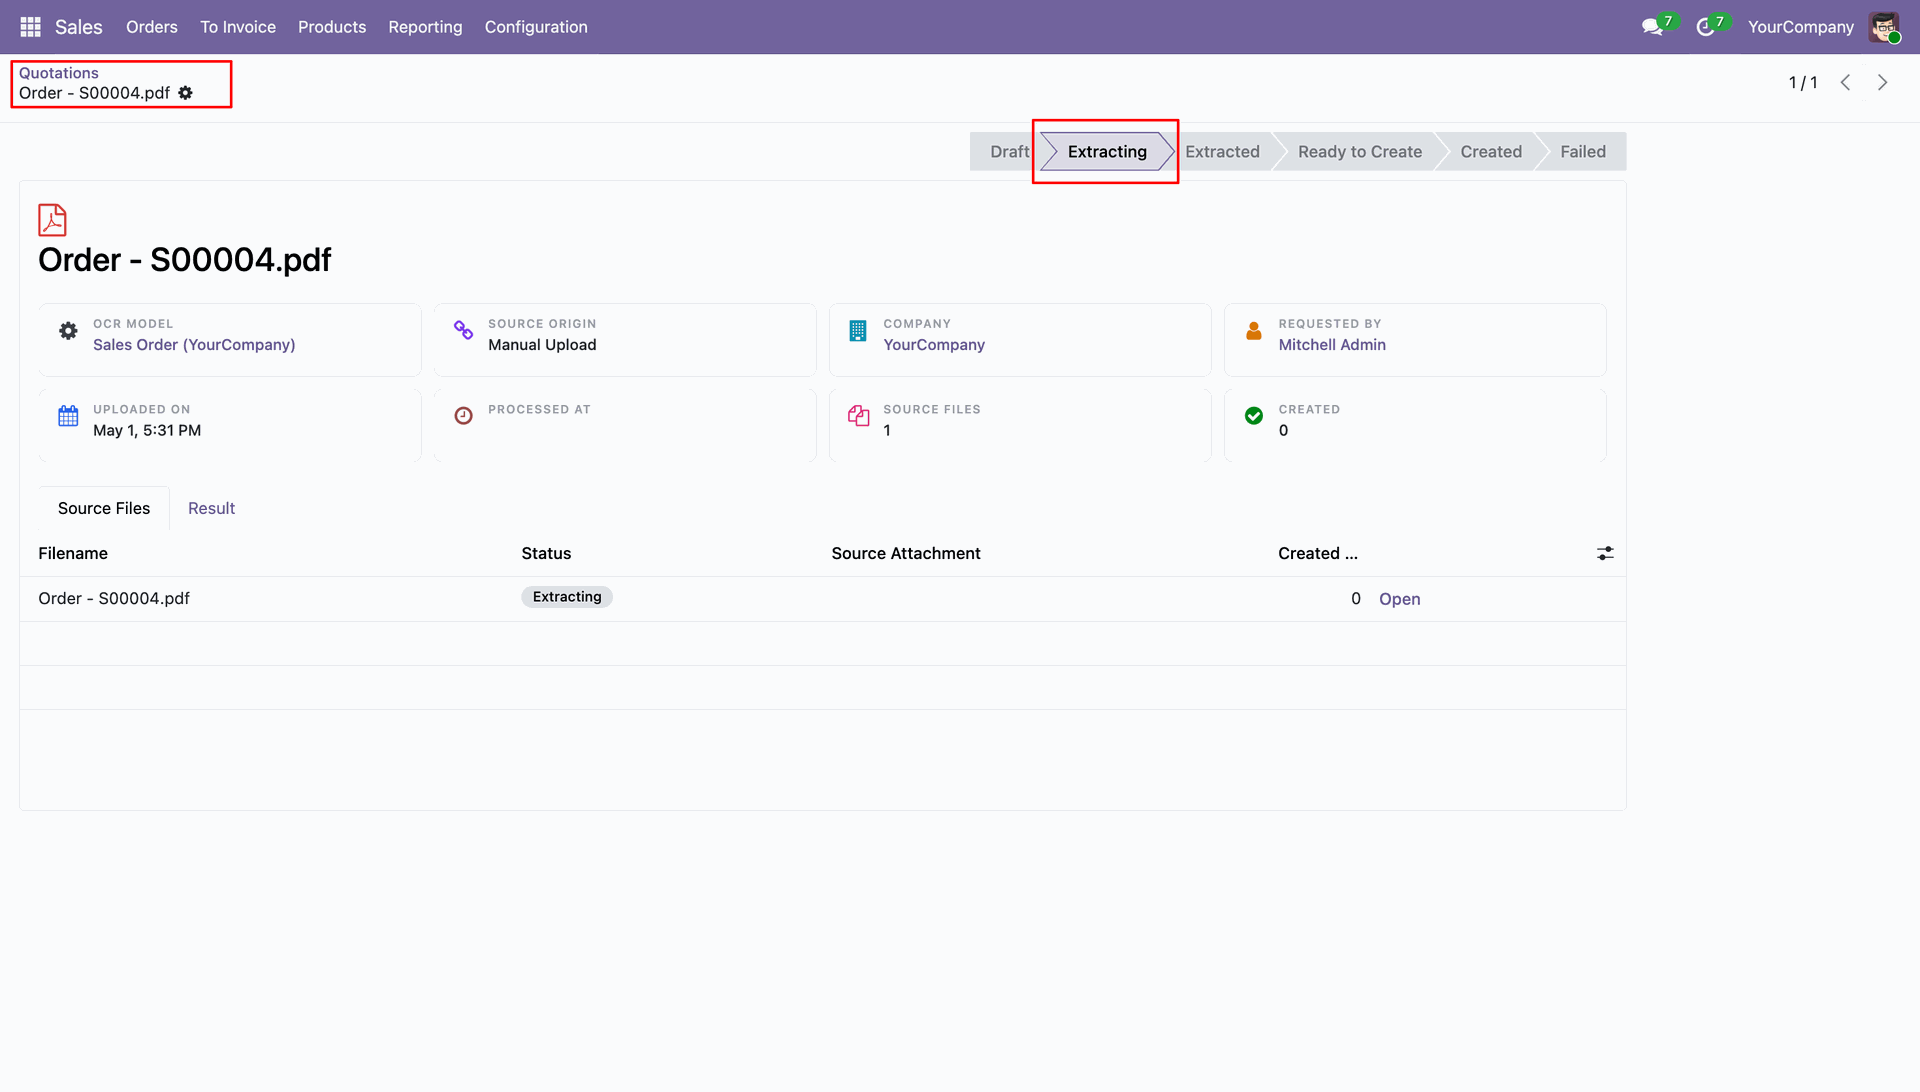
Extraction successful notification.
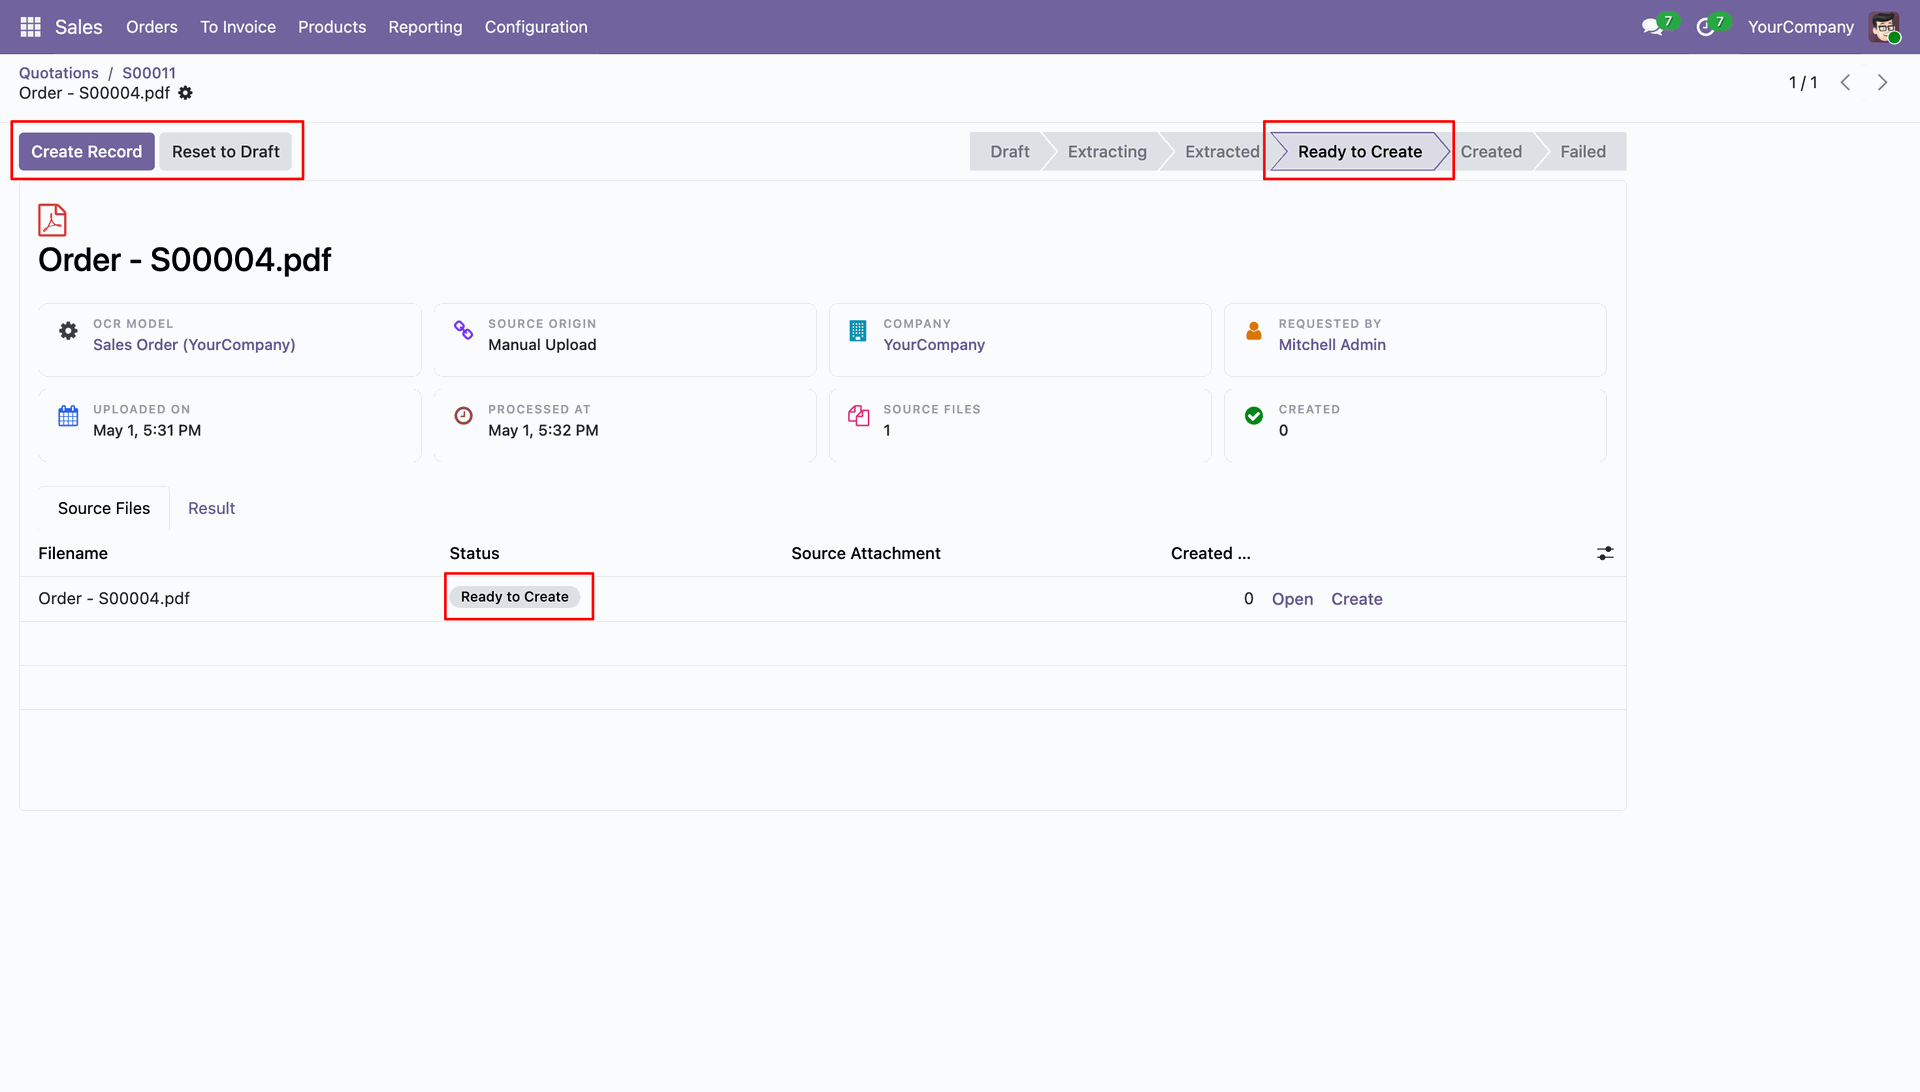
Review the newly created Odoo records generated directly from the AI OCR source document.
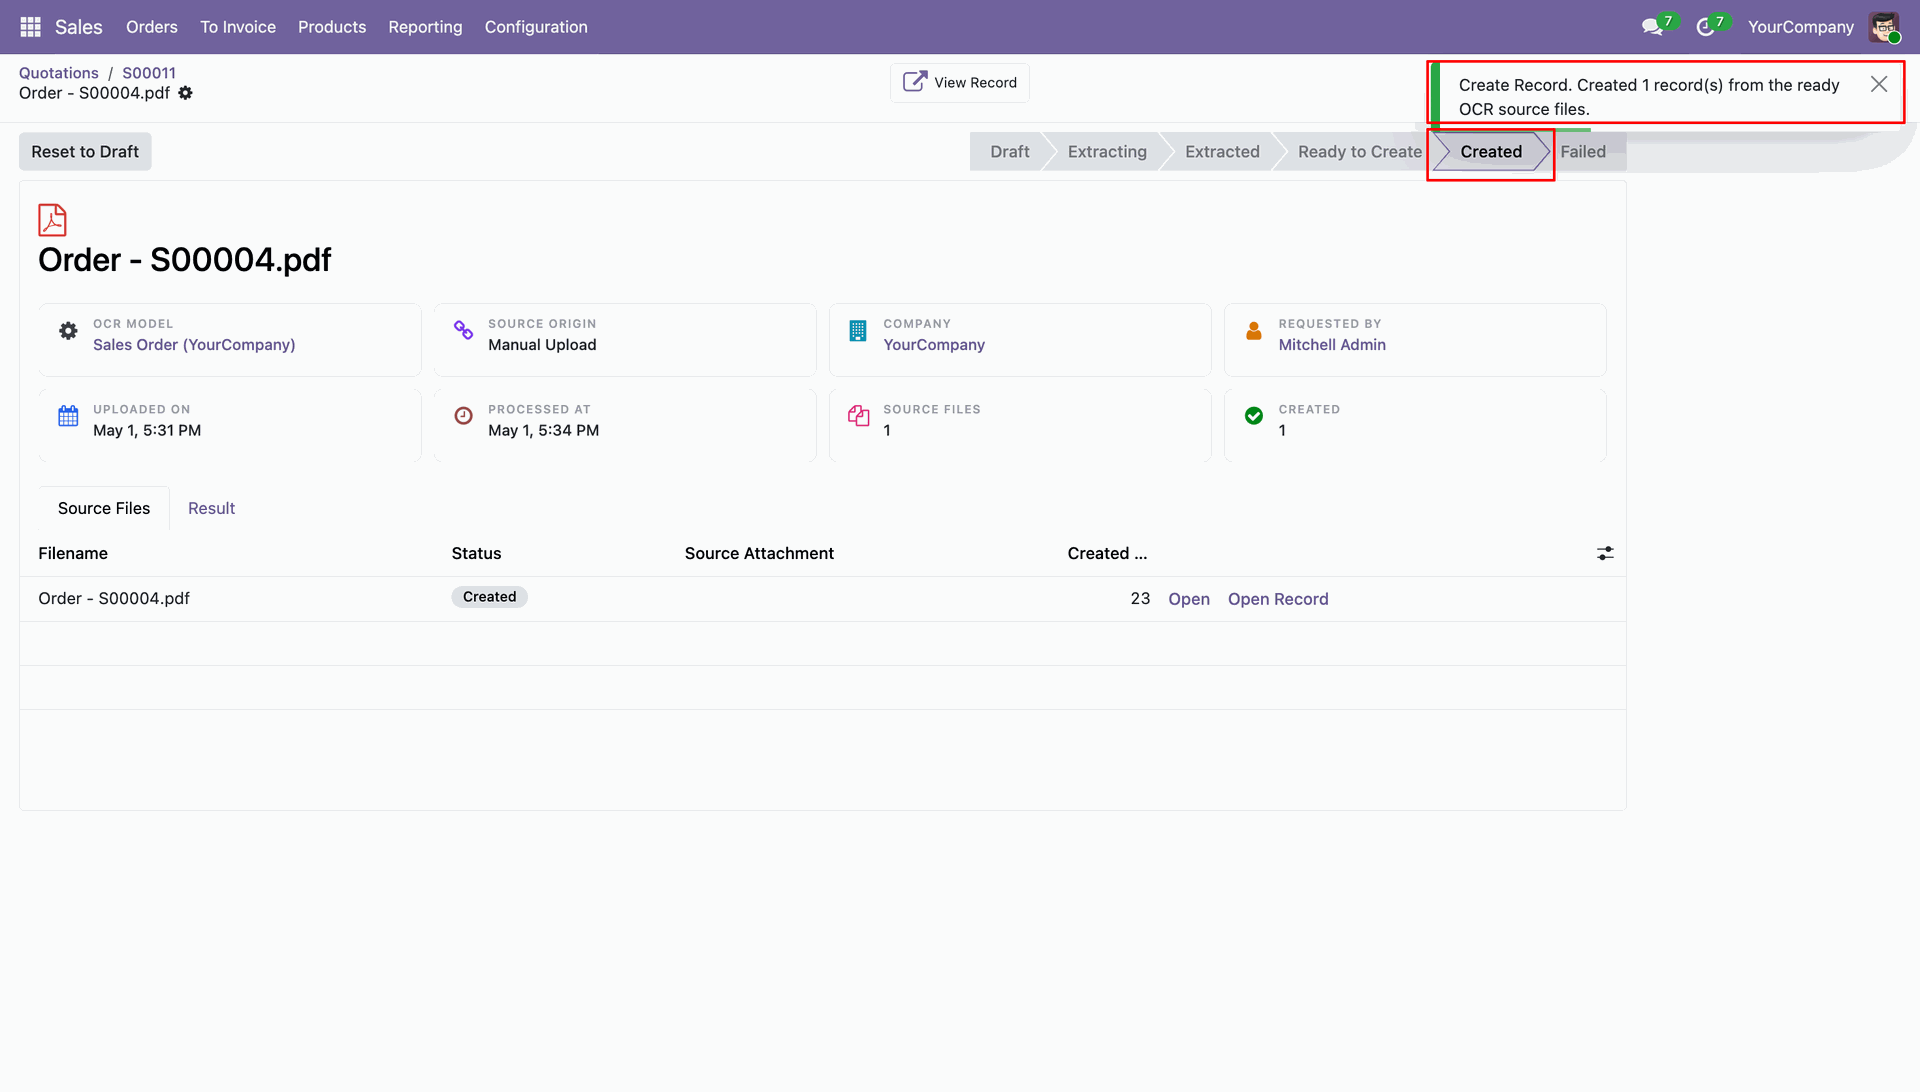
Confirm successful record creation through the automated green notification displayed on the document.
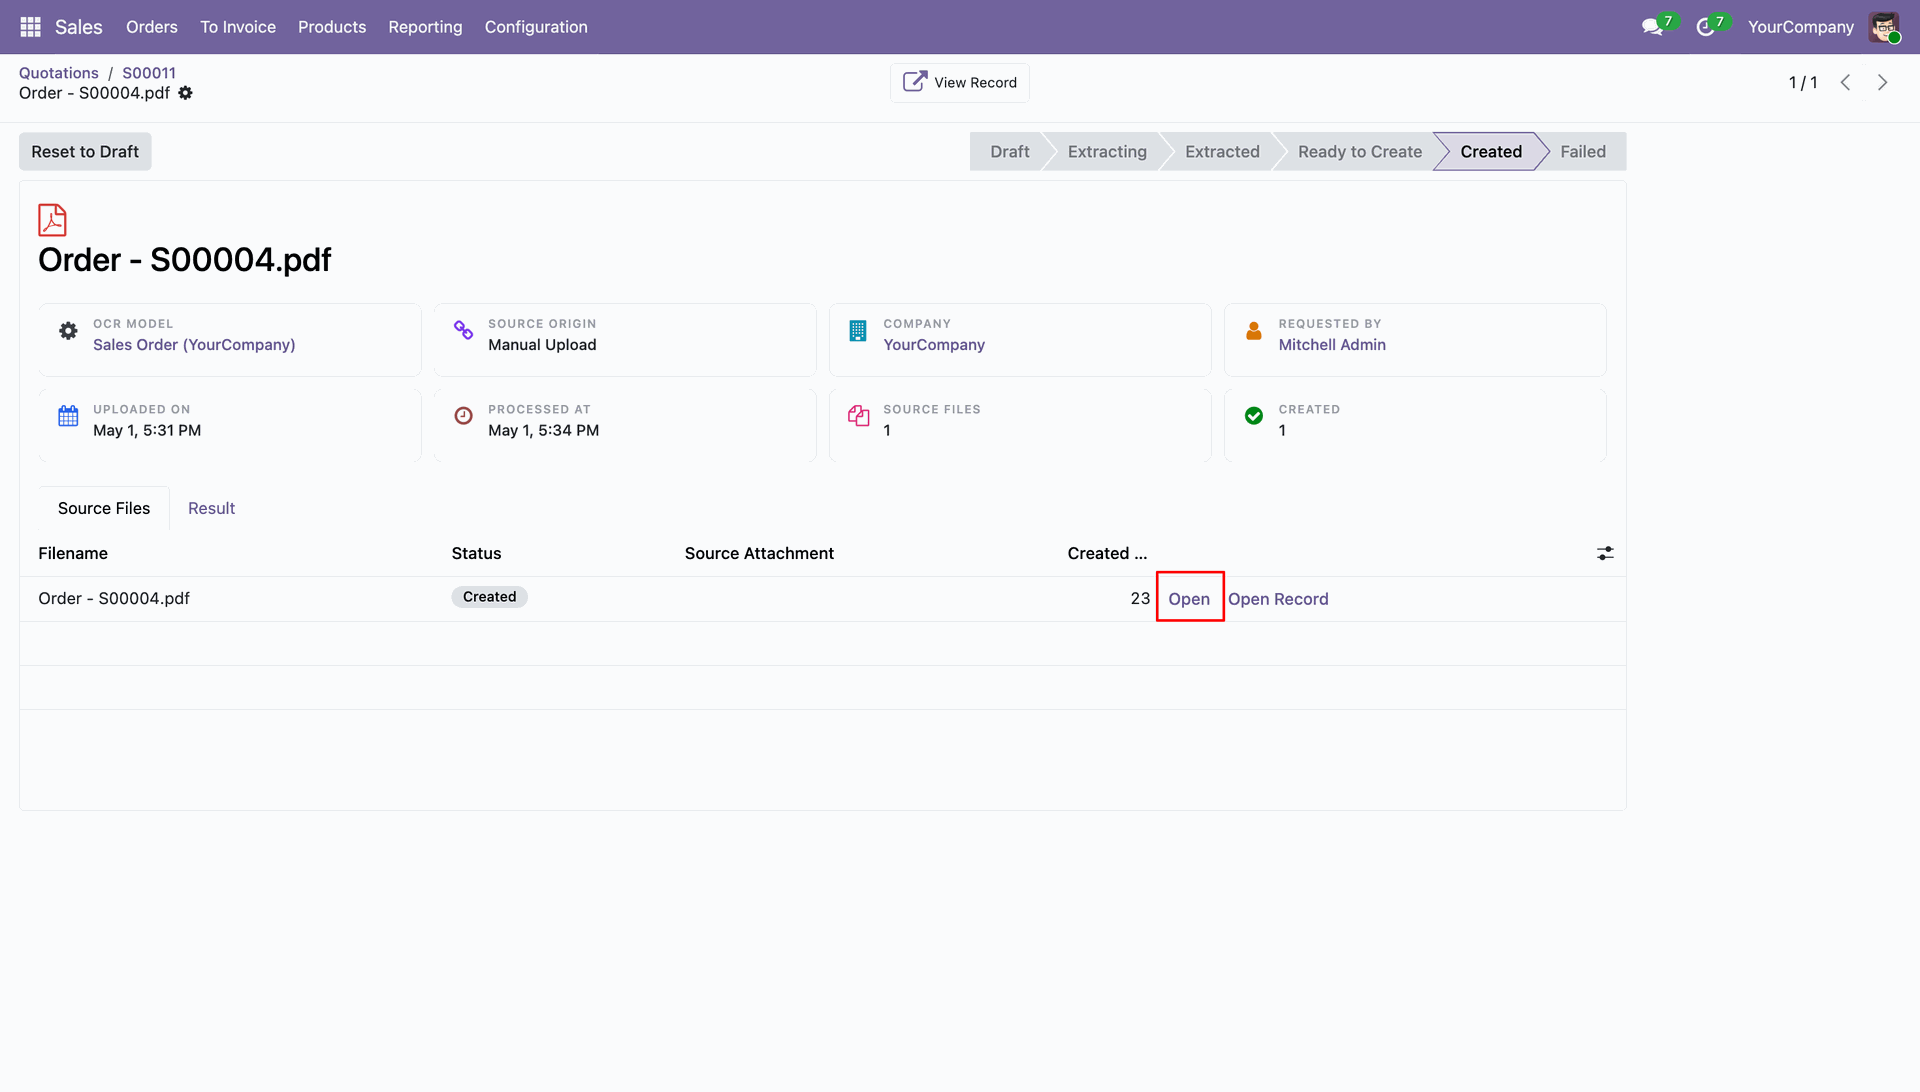
Navigate directly to the generated source files through the provided link in the document.
Preview the original PDF file alongside the extracted data to verify OCR accuracy.
Monitor the total number of linked documents and created records from the OCR configuration.
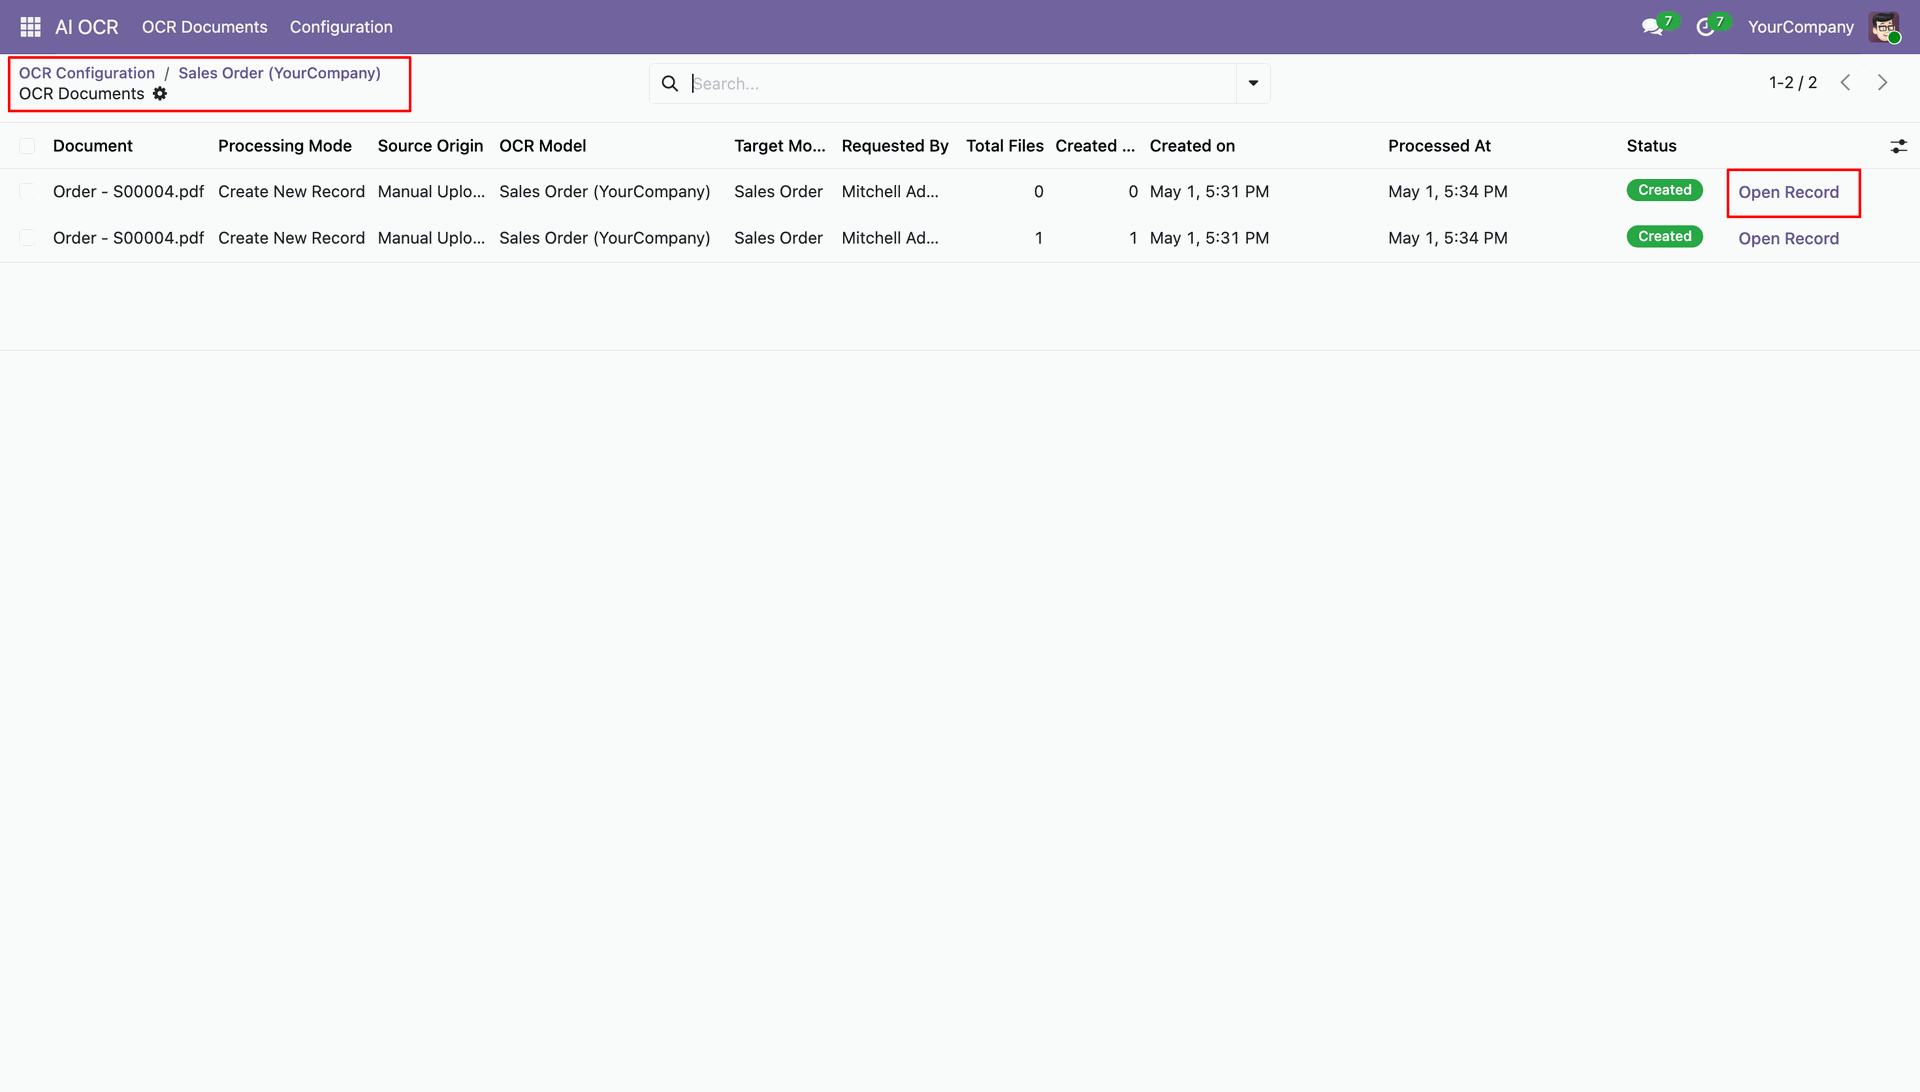
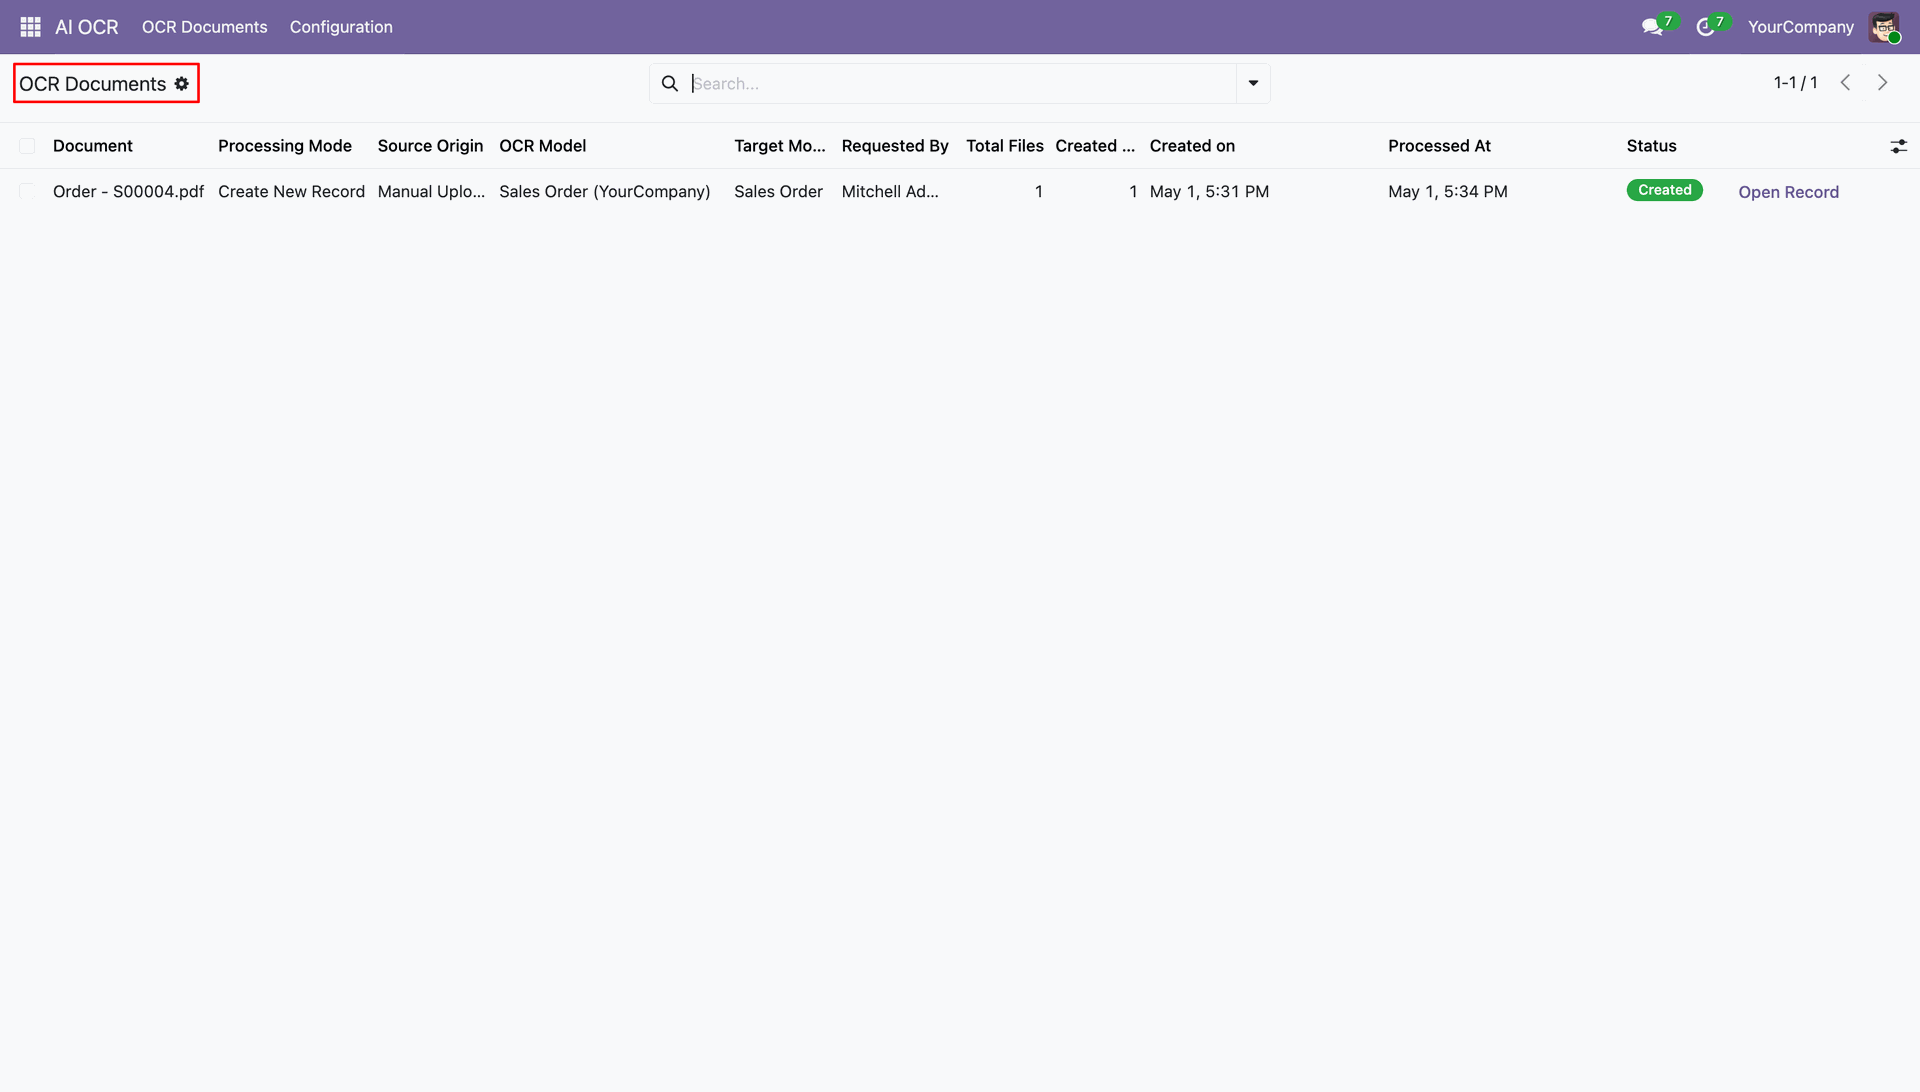
Quickly open the successfully generated Odoo record directly from the OCR Documents list view.
Access all related OCR documents quickly from the smart button within the generated record.
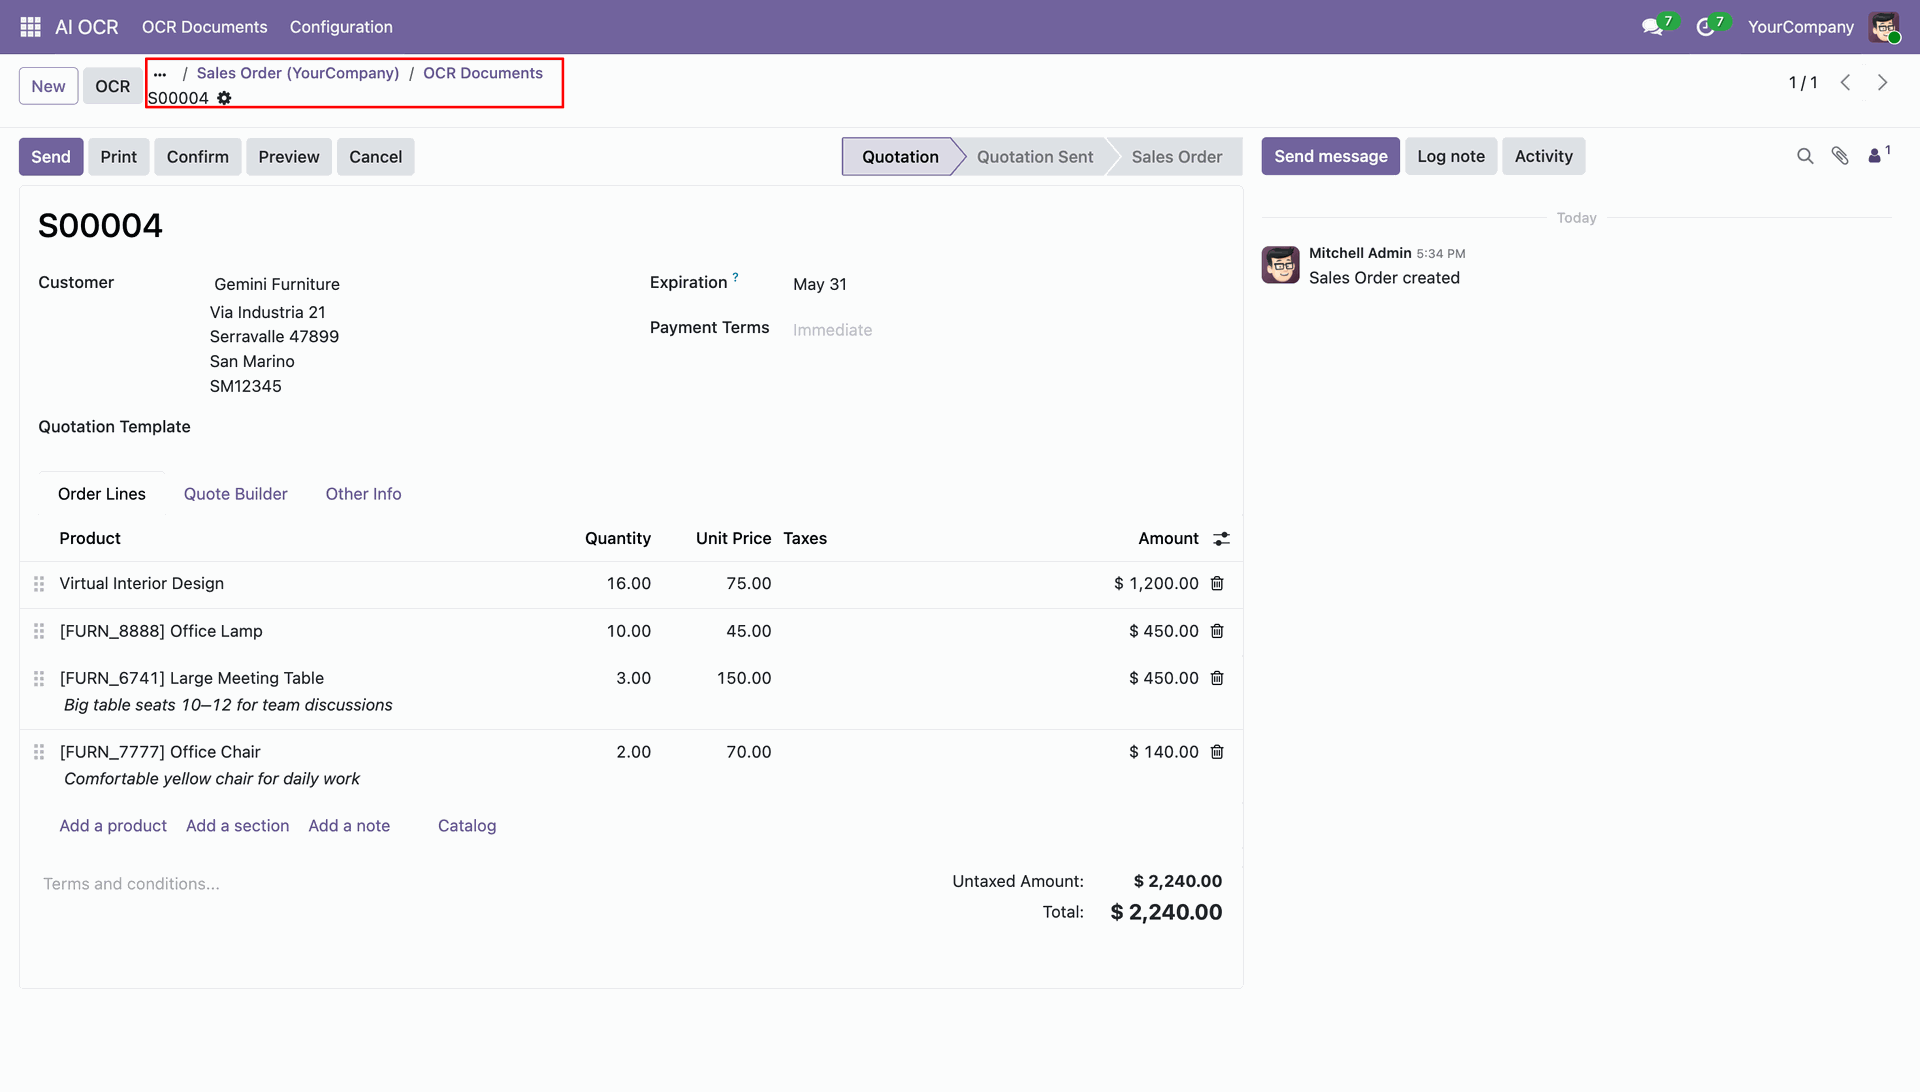
View the detailed status and processing history of documents related to a specific record.
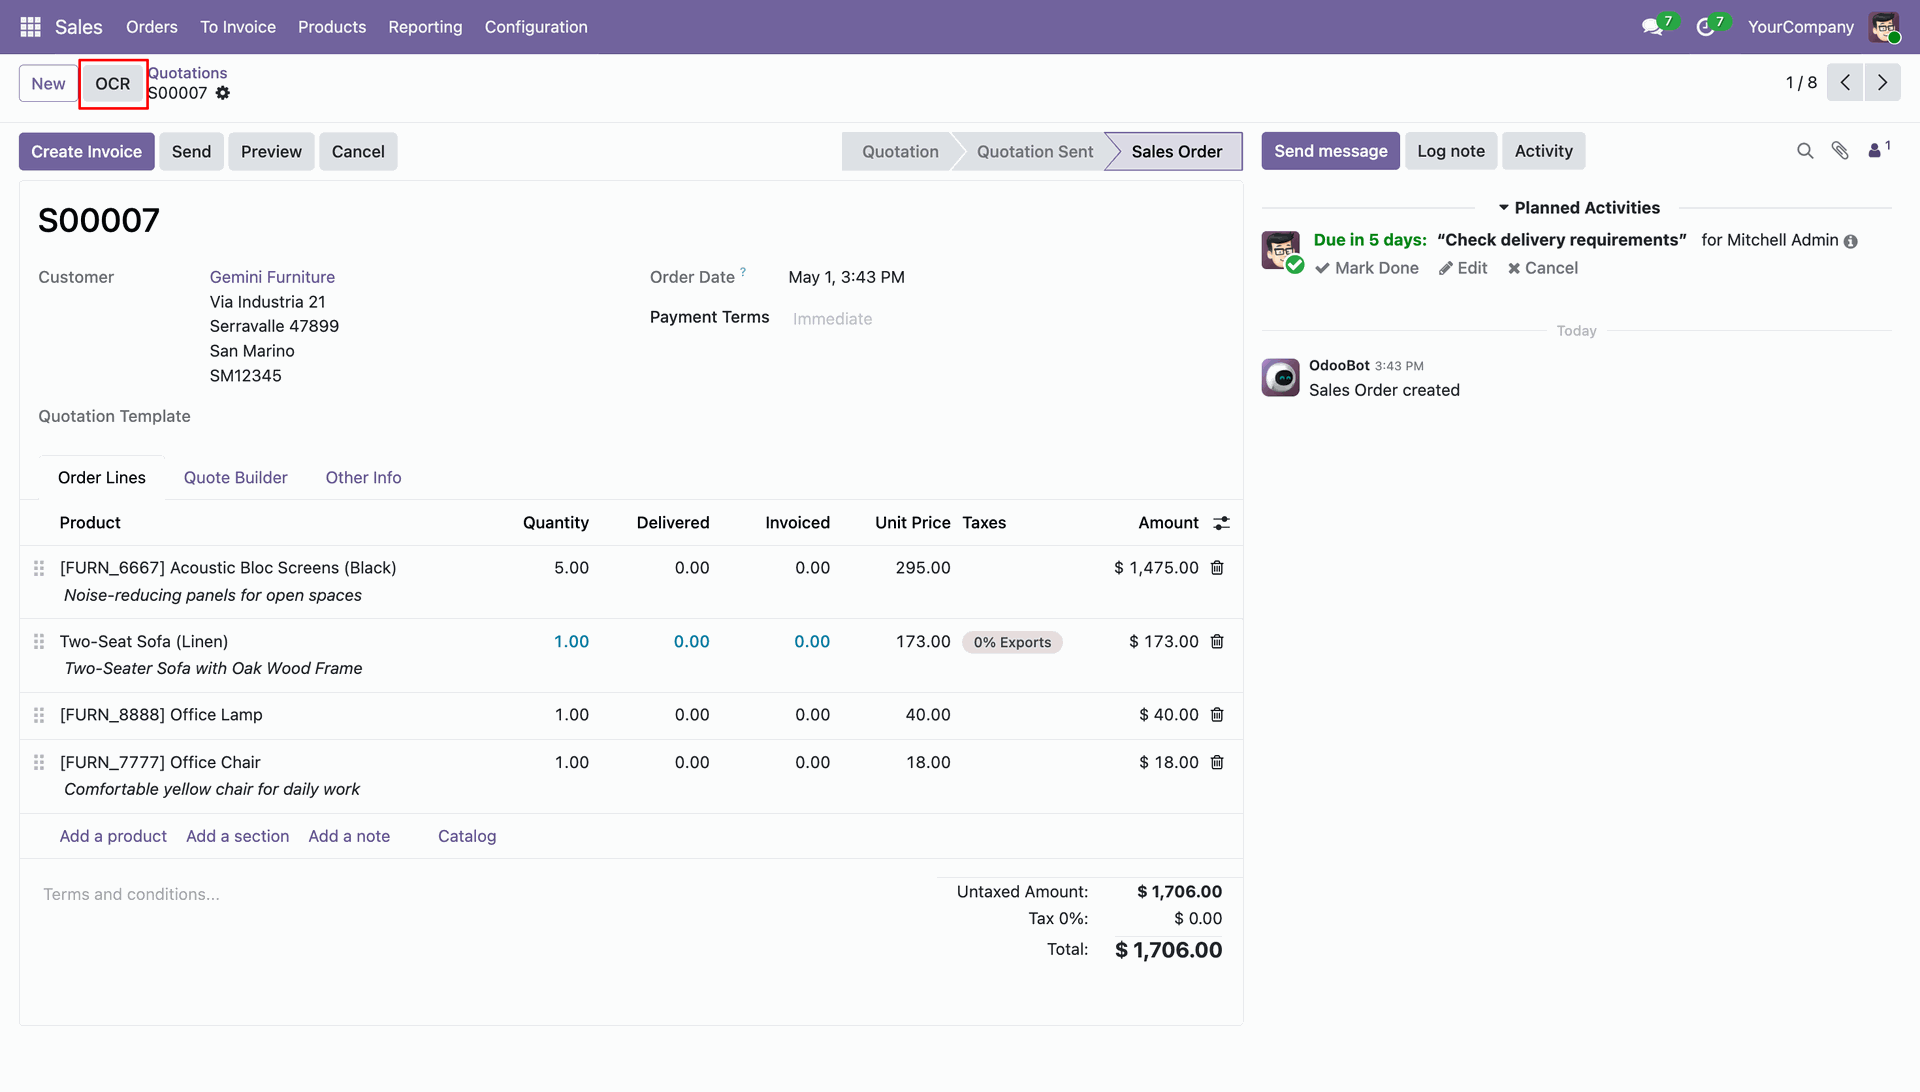
Initiate new AI OCR processing tasks by clicking the dedicated "OCR" button on records.
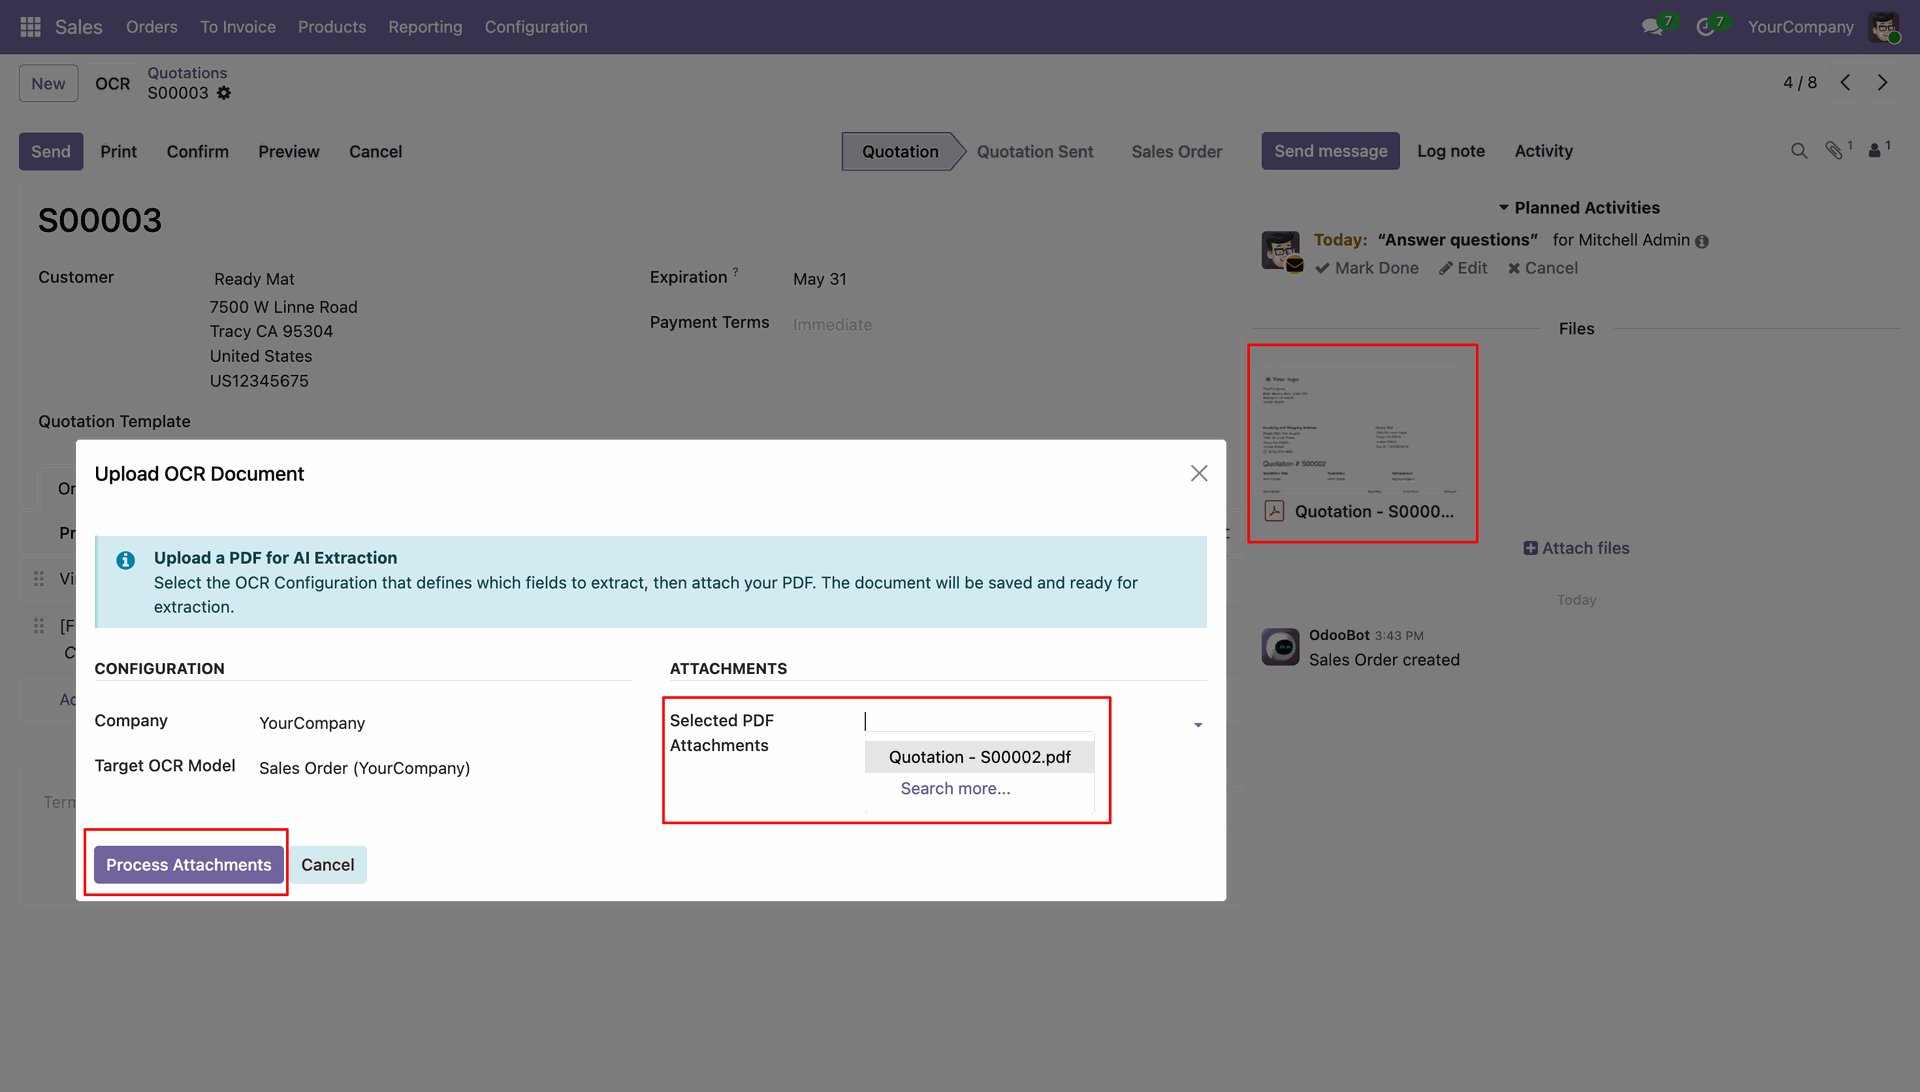
Upload new PDF documents directly and start the AI extraction process effortlessly.
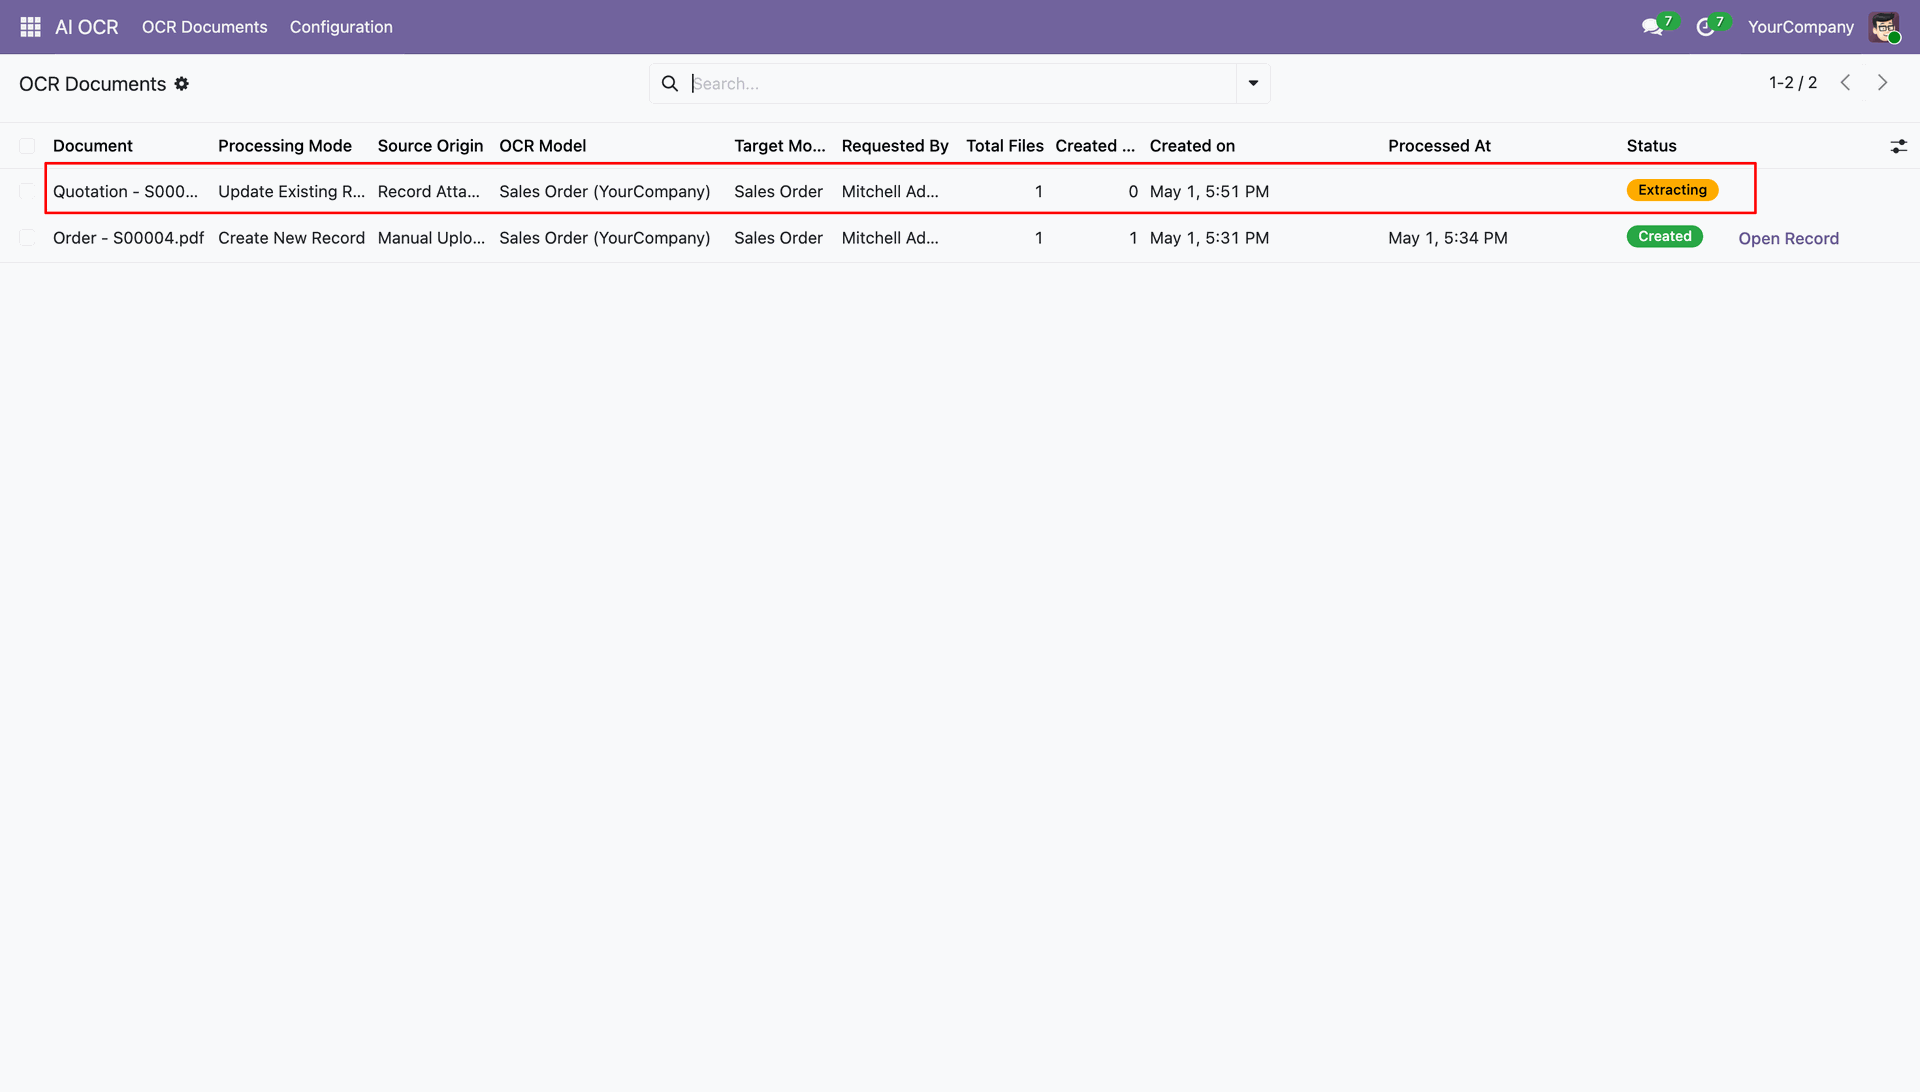
Monitor real-time extraction progress and status changes directly within the OCR Documents list.
Features

Multi-Provider AI Integration
Supports multiple AI providers including OpenAI (ChatGPT) and Google Gemini, configurable from settings.
Watch Video

Smart AI-Powered Interactions
Allows users to search, filter, and analyze records of odoo using conversational language. Enables faster decision-making by understanding intent behind user input.

Natural Language Processing
Enables users to interact with Odoo using plain language, converting queries into actionable insights. Automates text understanding, classification, and data extraction for faster, smarter decision-making.

Smart Access Control
Access rights are managed smartly - only authorized users or administrators can access configuration and debugging features. Allows admins to enable Debug Mode to view complete details, as well as technical JSON-level details of AI responses.

Smart Visualization Output
Get answers in the form of charts, tables, or graphs.

Instant Response Engine
Ask questions and receive real-time results—no manual searching needed.

Cross-Module Integration
Works seamlessly across Odoo modules like Sales, Purchase, Accounting, and more.

Intelligent Data Understanding
Understands business context and interprets complex queries with accuracy.

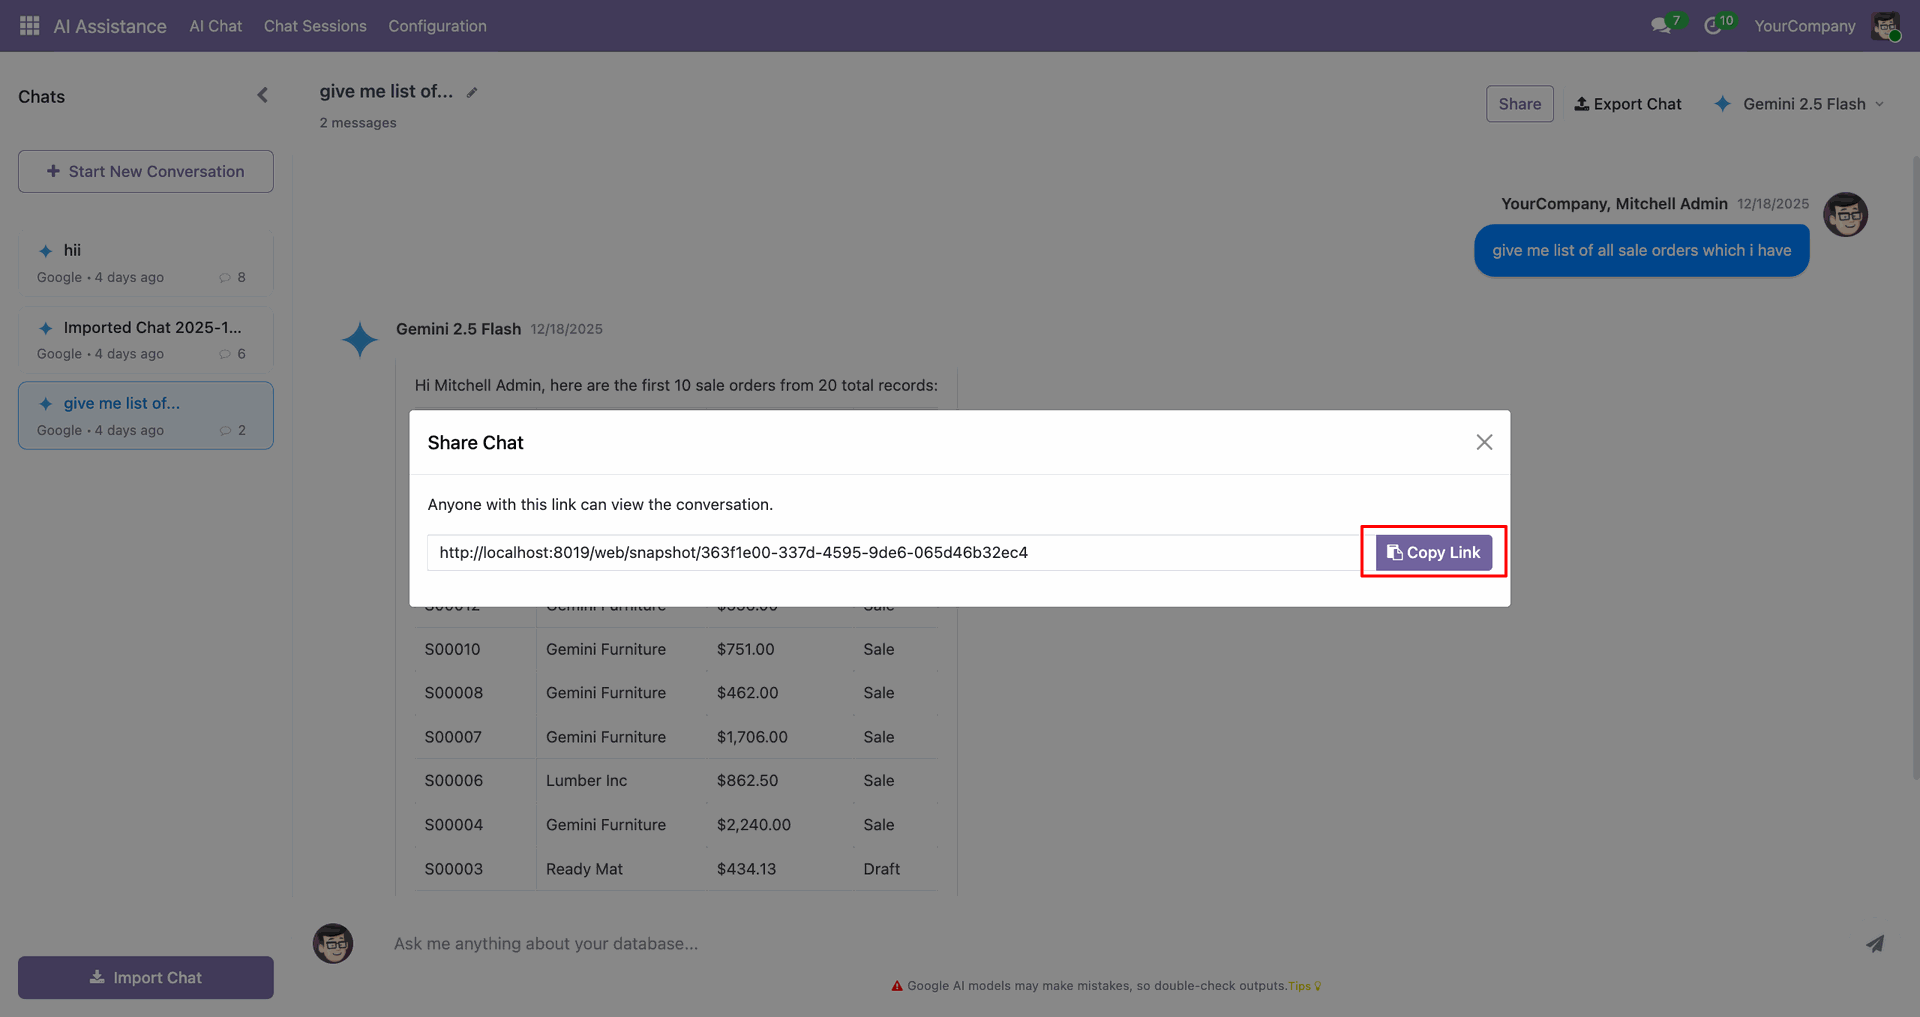
Share AI Chat
Allow users to generate a secure, shareable link for any chat session, making it easy to share conversations with others.
Watch Video

Chat Stop Control
Easily stop AI responses anytime to prevent unwanted or incorrect outputs and maintain full control over your conversation flow.
Watch Video

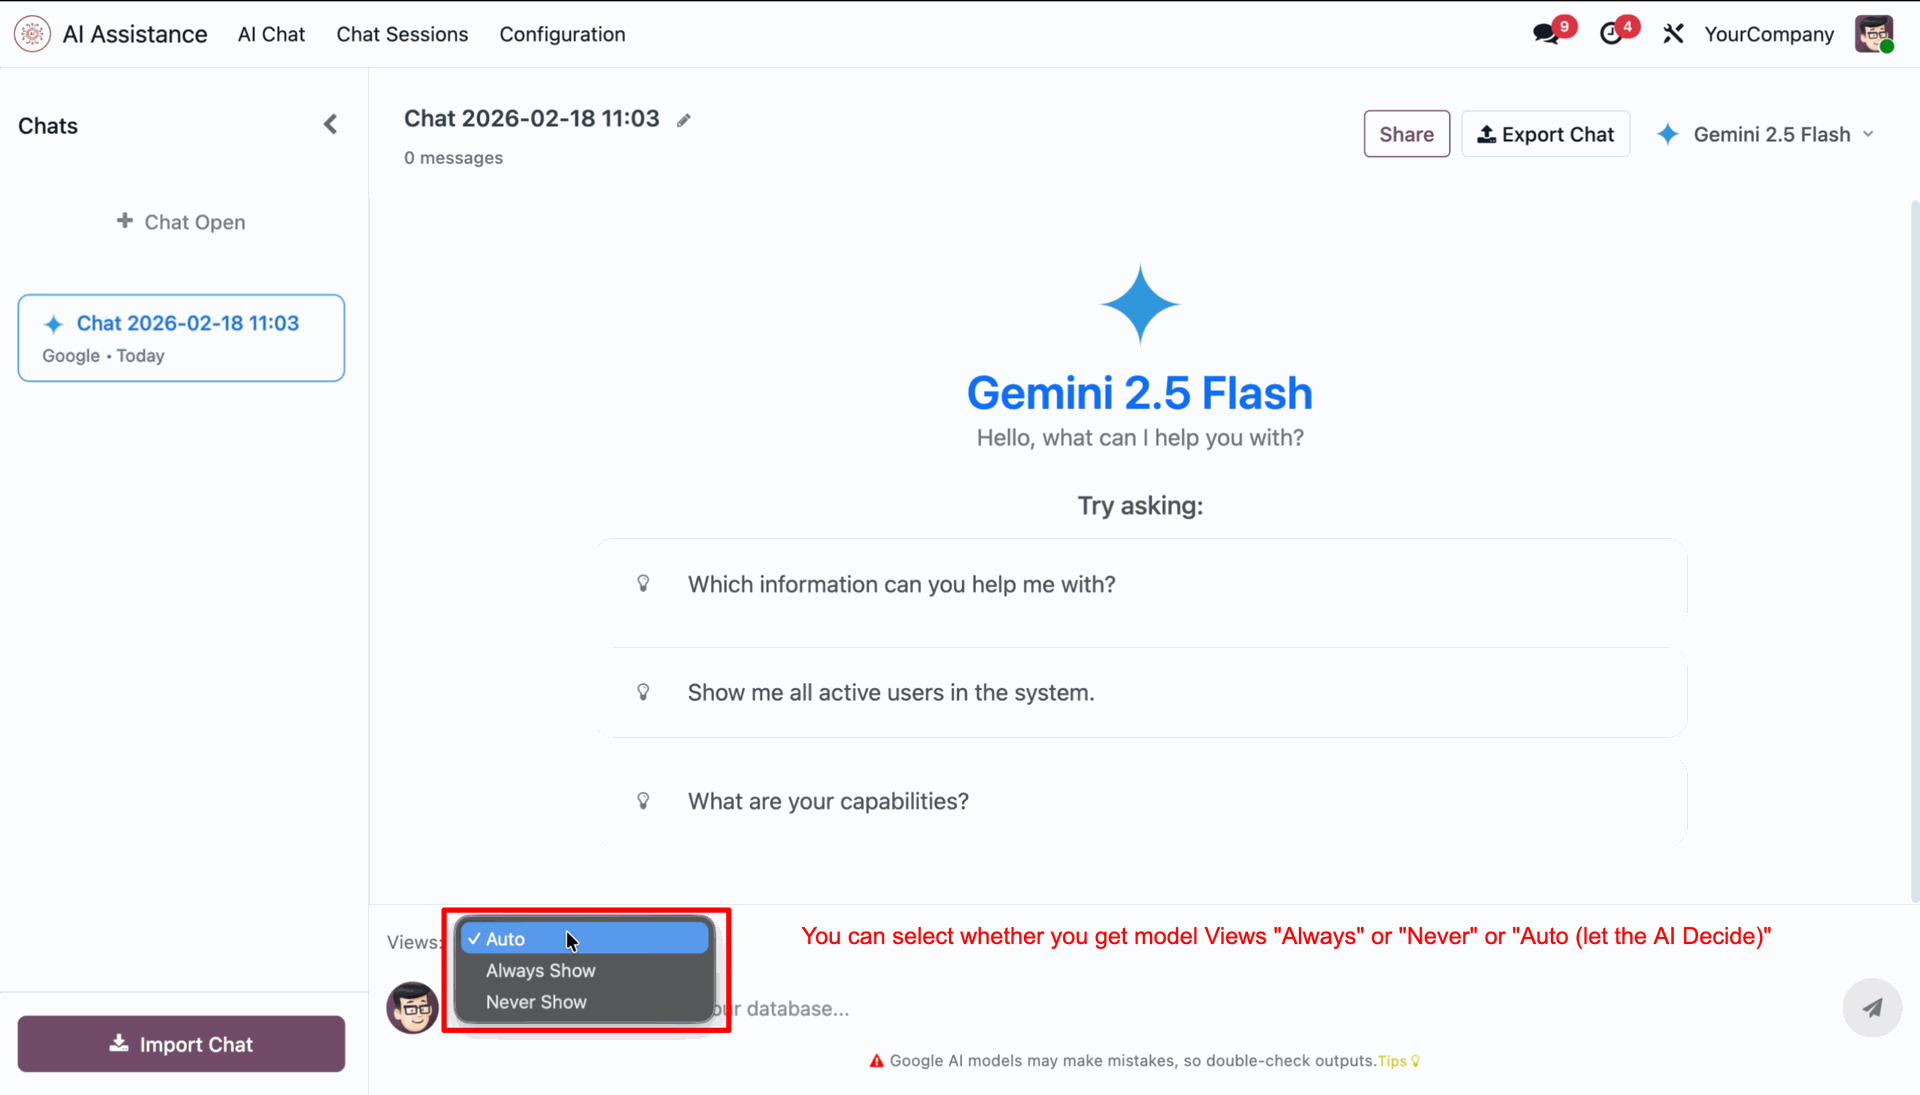
View Selection Option
Control when AI model views appear with flexible options like Always, Never, or Auto for a smarter chat experience.
Watch Video

AI Create, Write, and Archive With Access
Create content, update responses, and archive AI conversations in one place for easy management.
Watch Video

Complete AI Conversation Logging
Stores all AI conversations as chat sessions with full message history and timestamps.
Watch Video

Custom Development Friendly
Built to work smoothly alongside customizations, ensuring flexibility and easy integration. Supports extensions and modifications without affecting module stability or performance.
Watch Video

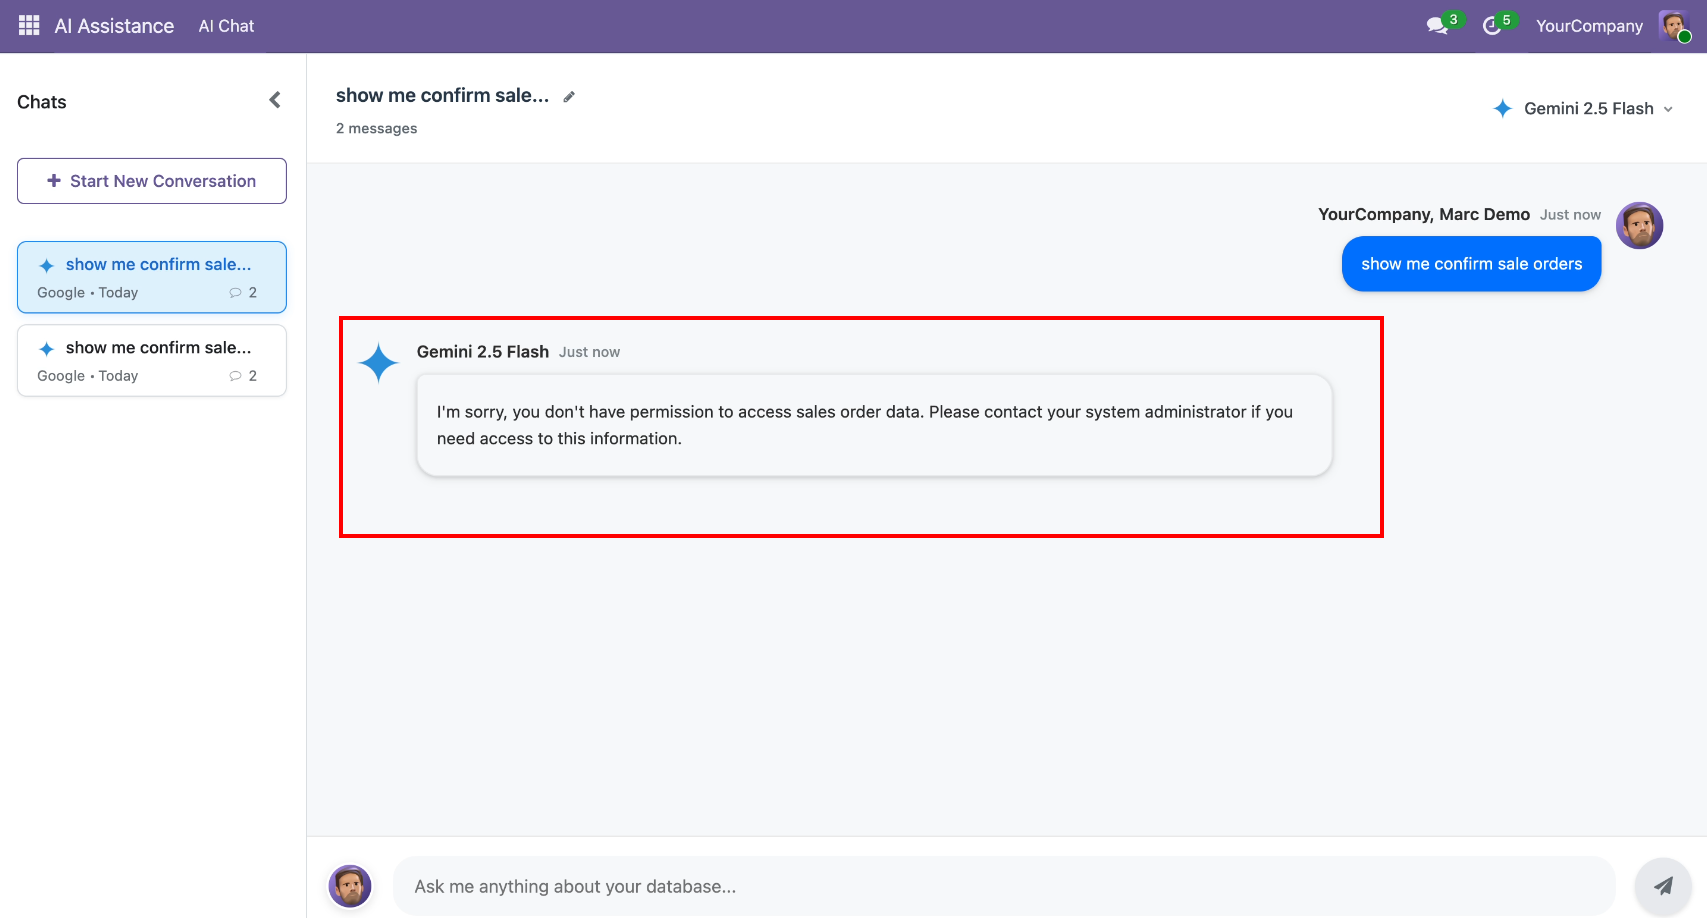
Compatible with Odoo Access Rights
Fully compatible with Odoo’s access rights system — users without the necessary permissions cannot view or access any restricted Odoo data.
Watch Video

Dedicated AI Chat Interface
Offers a dedicated AI Chat menu for users to interact naturally with Odoo data. Automatically saves AI replies, user prompts, and provider details for audit and transparency. Maintains conversation continuity with session-based context and rename options. Option to delete chats for maintaining privacy and clearing old data.
Watch Video

Chat UI with Light & Dark Modes
Includes a clean, modern chat interface with support for light and dark modes.
Watch Video

Performance Insights
Track KPIs, trends, metrics, and view AI-generated summaries.

System Prompt Intelligence
Ensures AI Mate responds with clear, accurate, and actionable insights using a professional and user-friendly tone.

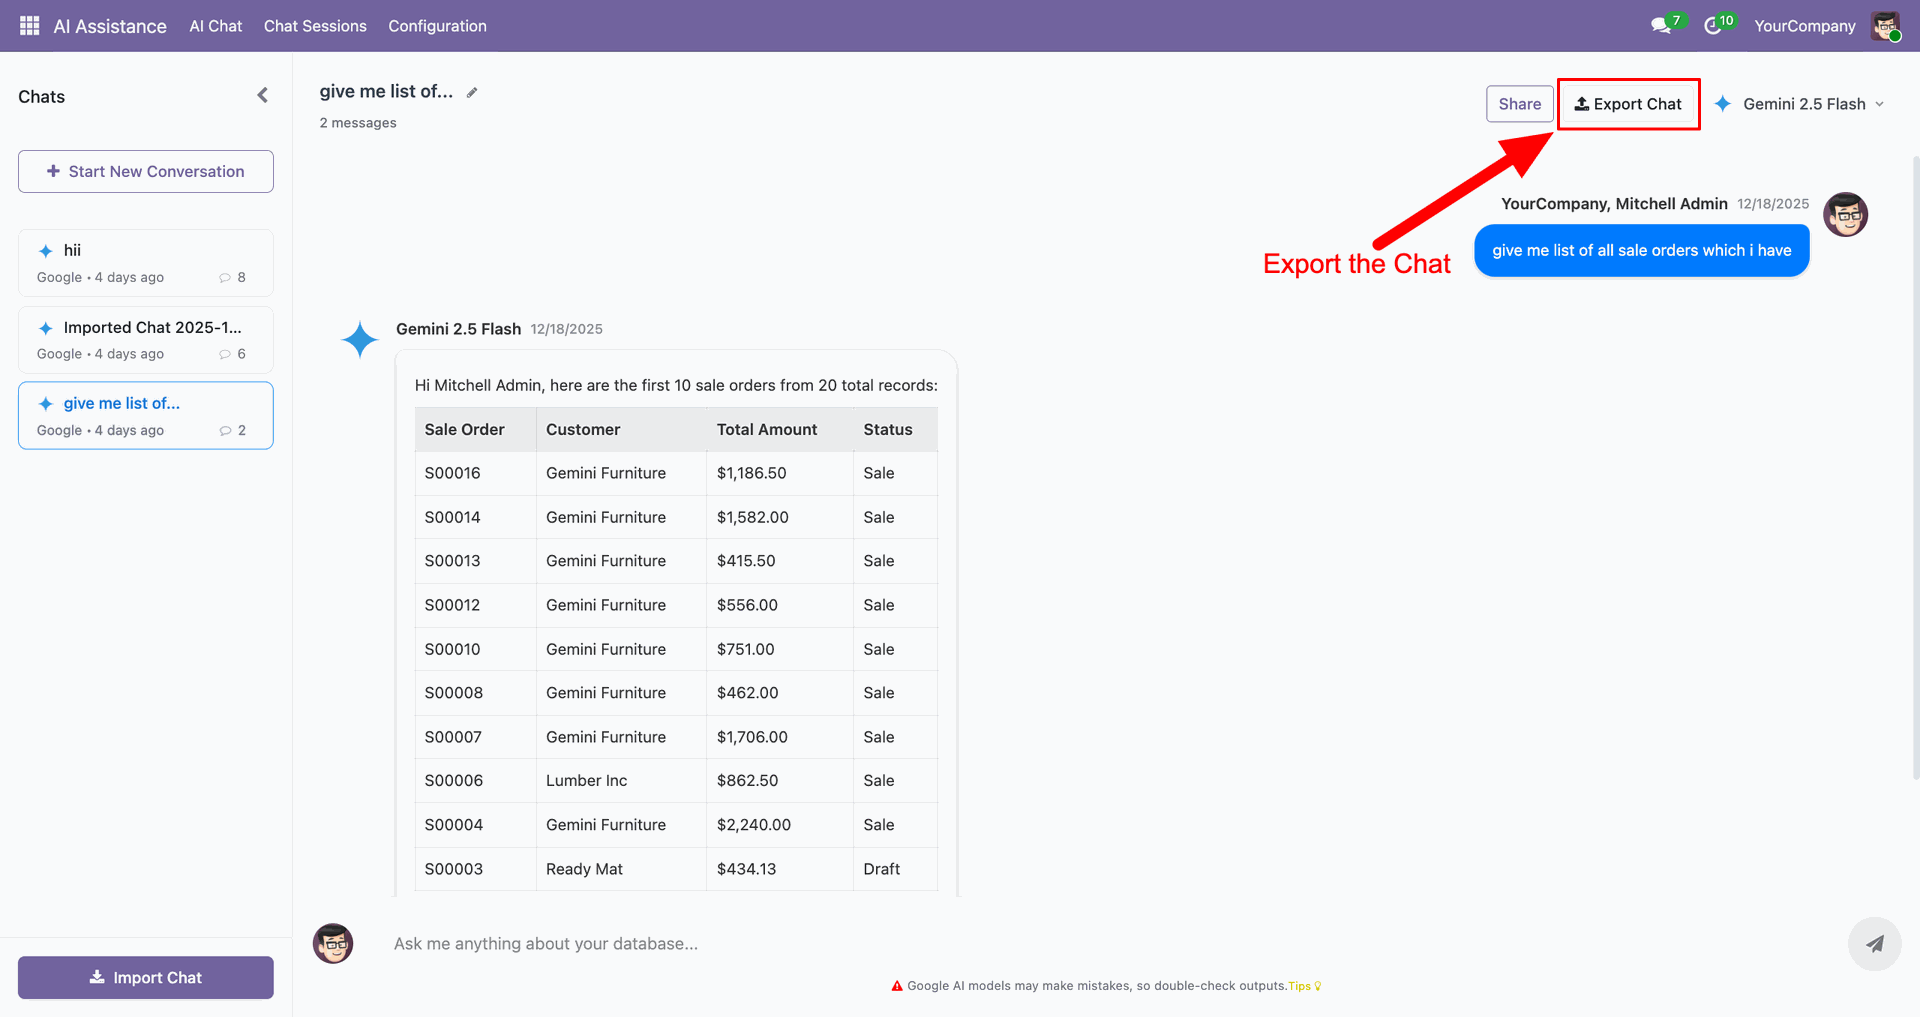
Export AI Chat
Enable users to export their complete chat history, ensuring conversations can be safely stored and backed up.
Watch Video

Import AI Chat
Allow users to import previously exported chat files to restore past conversations or continue discussions.
Watch Video

AI Onboarding Process
A guided onboarding flow that helps users quickly configure their first AI provider and model, ensuring a smooth setup.
Watch Video

OpenRouter Integration
Configure OpenRouter to access multiple AI models through a single API, allowing flexible model selection.
Watch Video

AI Chat Popup Window
Interact with AI through a mini popup chat window available on all screens, ensuring faster responses and improved productivity.
Watch Video

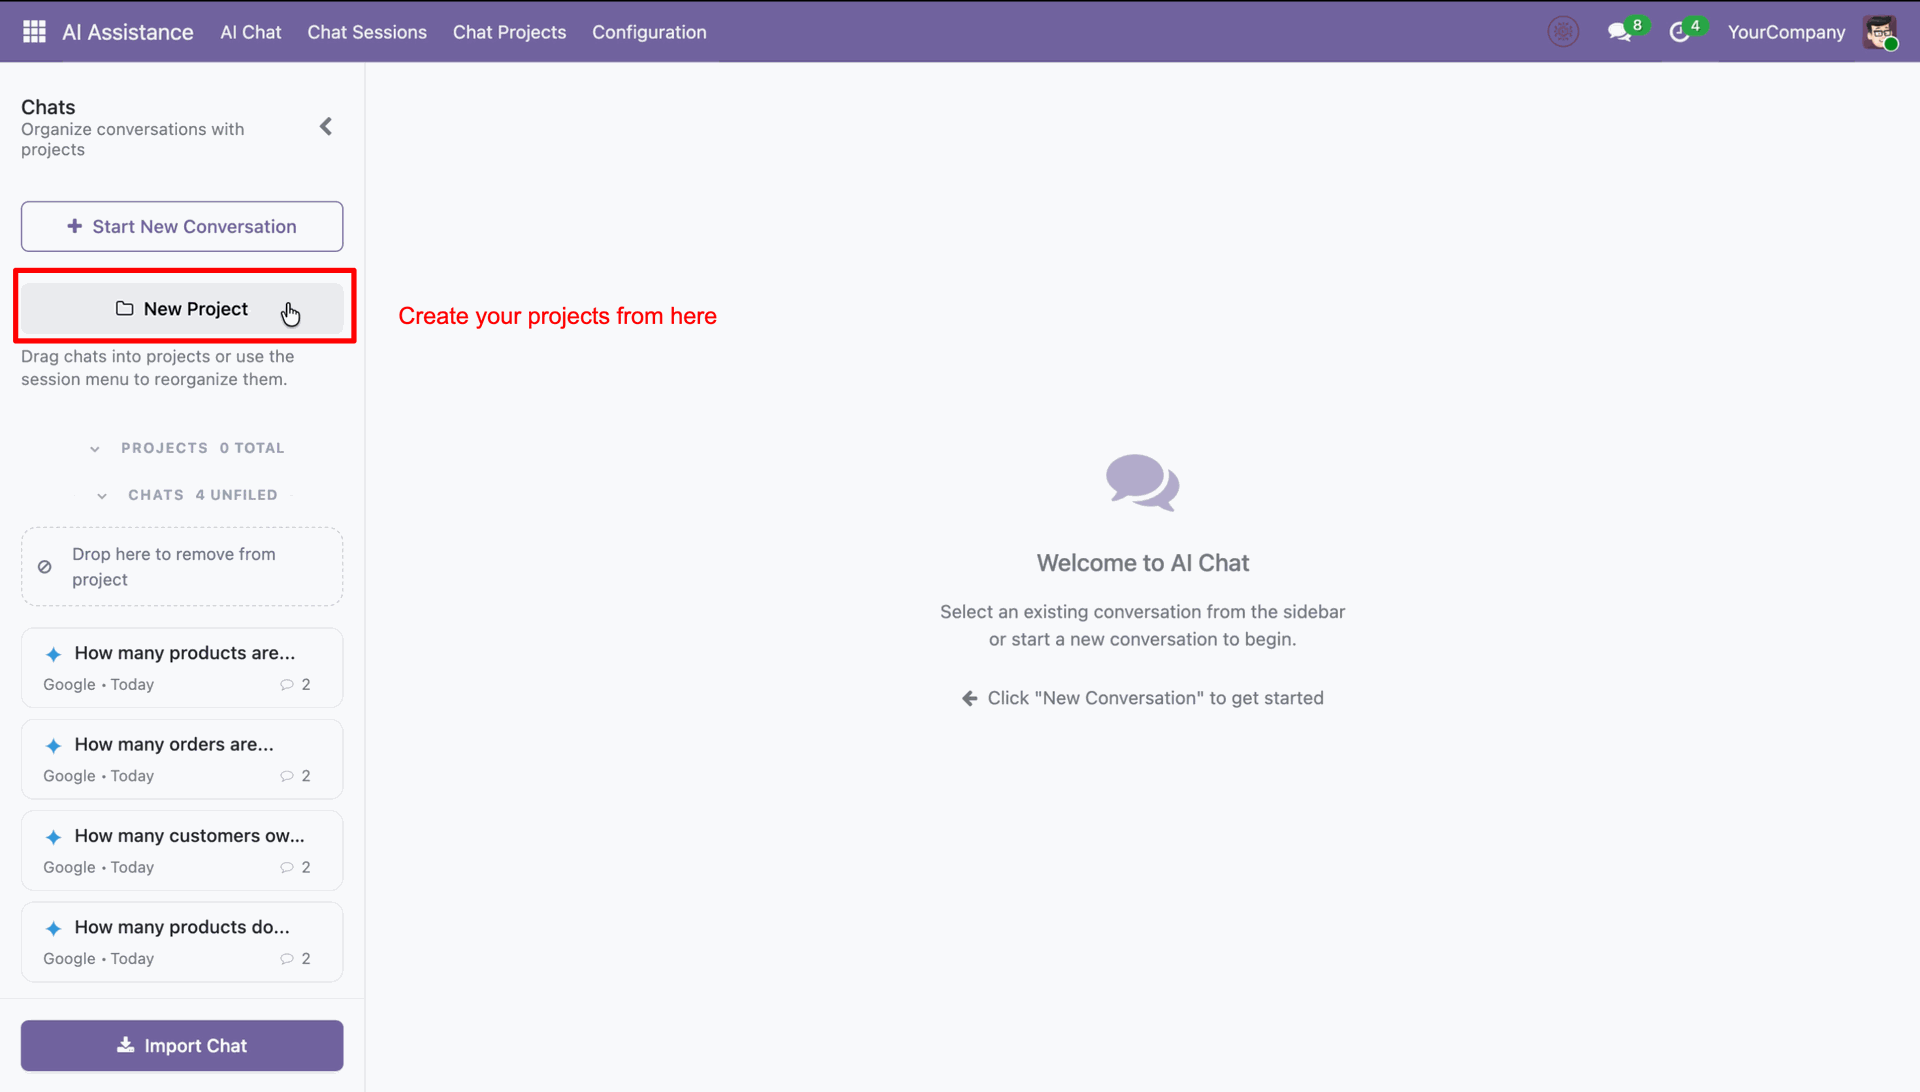
Folder-Based Chat Management
Manage AI conversations more effectively by organizing them into folders. Categorize chats based on topics to improve accessibility.
Watch Video

AI Voice Prompt
Use voice prompts to interact with AI naturally by speaking and receiving intelligent responses quickly.
Watch Video

LLM Reasoning Effort Selection
Configure reasoning effort levels in LLM providers to customize the cognitive depth and accuracy of AI responses.
Watch Video
Workflow
-
 Access Rights
-
 AI Conversations
-
 Odoo Standard Access Rights
-
 Compatible With Custom Modules
-
 Admin User debug info
-
 Multiple LLM provider
-
 Dark Mode
-
 Import, Export, Share Chat
-
 AI Response Stop
-
 AI Onboarding Guide
-
 View Selection
-
 OpenRouter Integration
-
 Create, Update & Archive Records With AI
-
 AI Popup Window
NEW
AI Popup Window
NEW
-
 Folder-Based Chat Management
NEW
Folder-Based Chat Management
NEW
-
 AI Voice Prompt
NEW
AI Voice Prompt
NEW
-
 LLM Reasoning Effort Selection
NEW
LLM Reasoning Effort Selection
NEW
You can set access rights for AI Assistance under user settings.
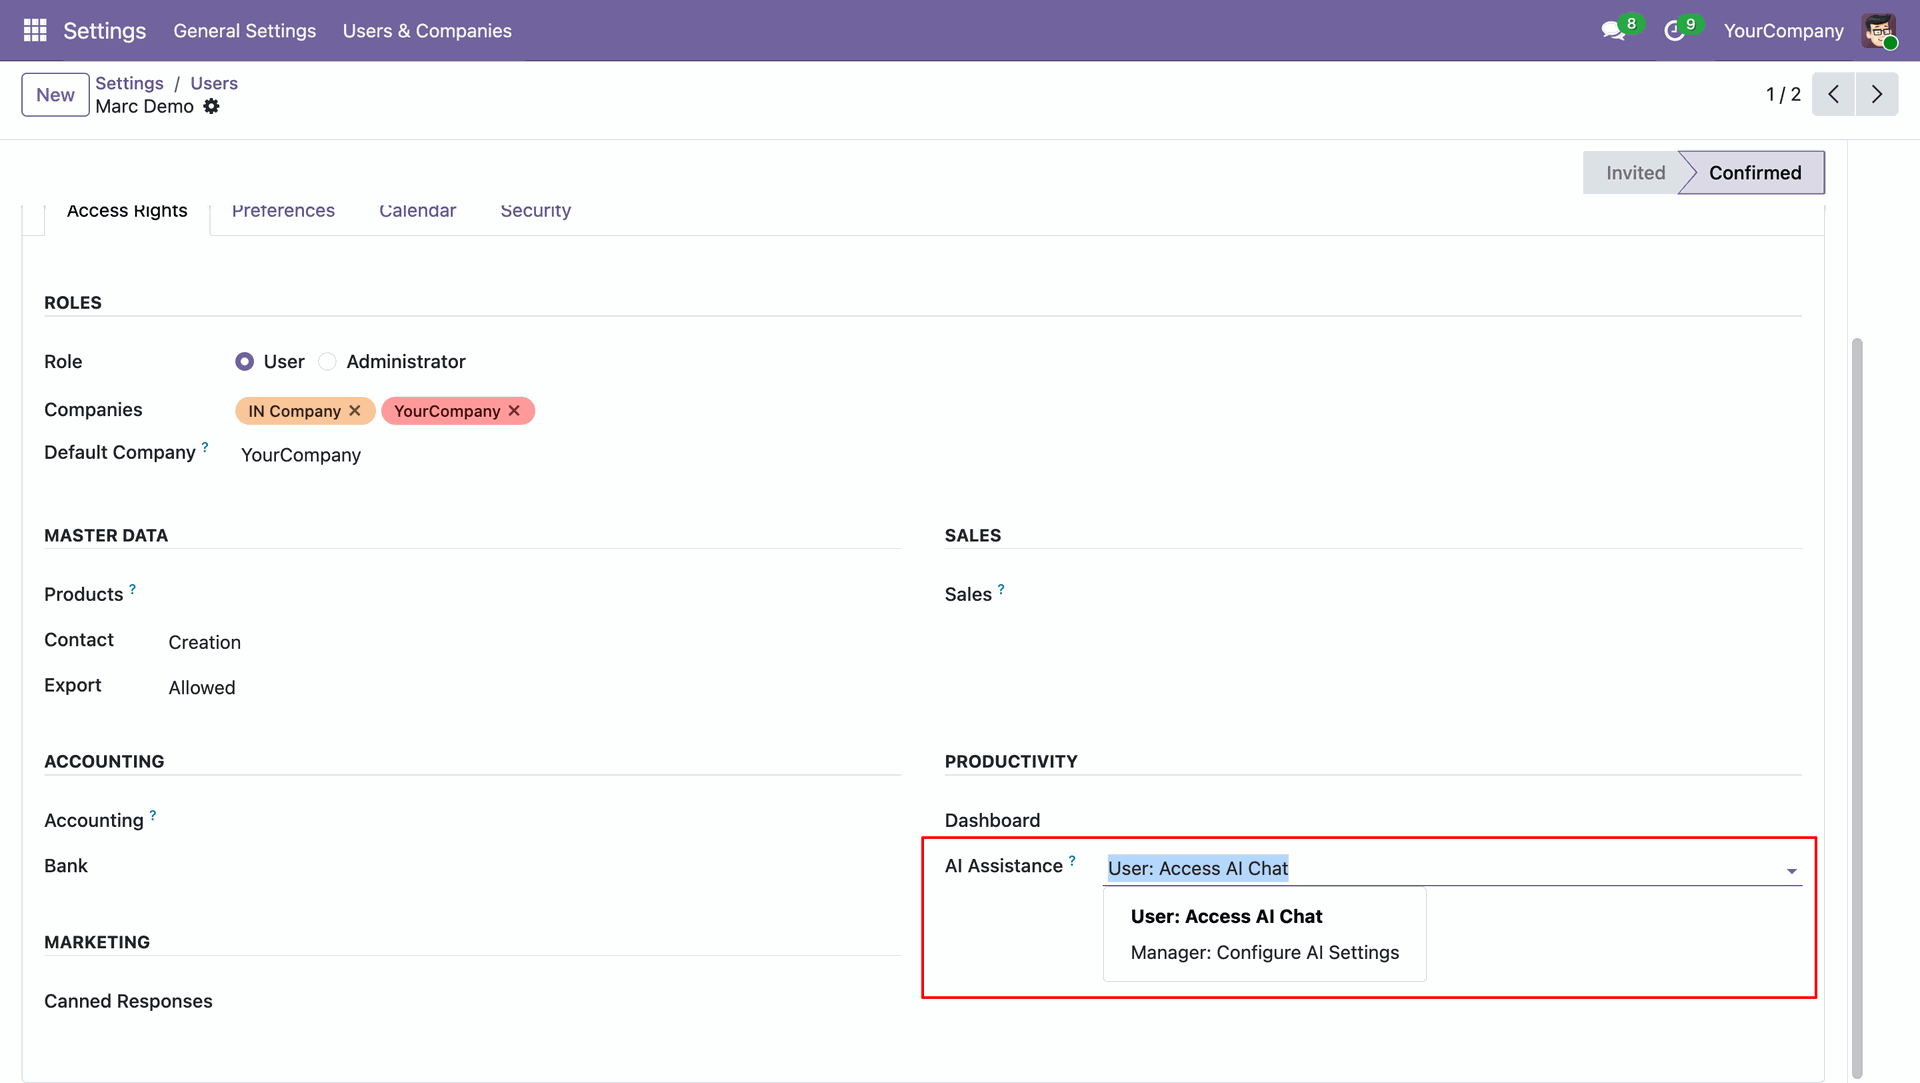
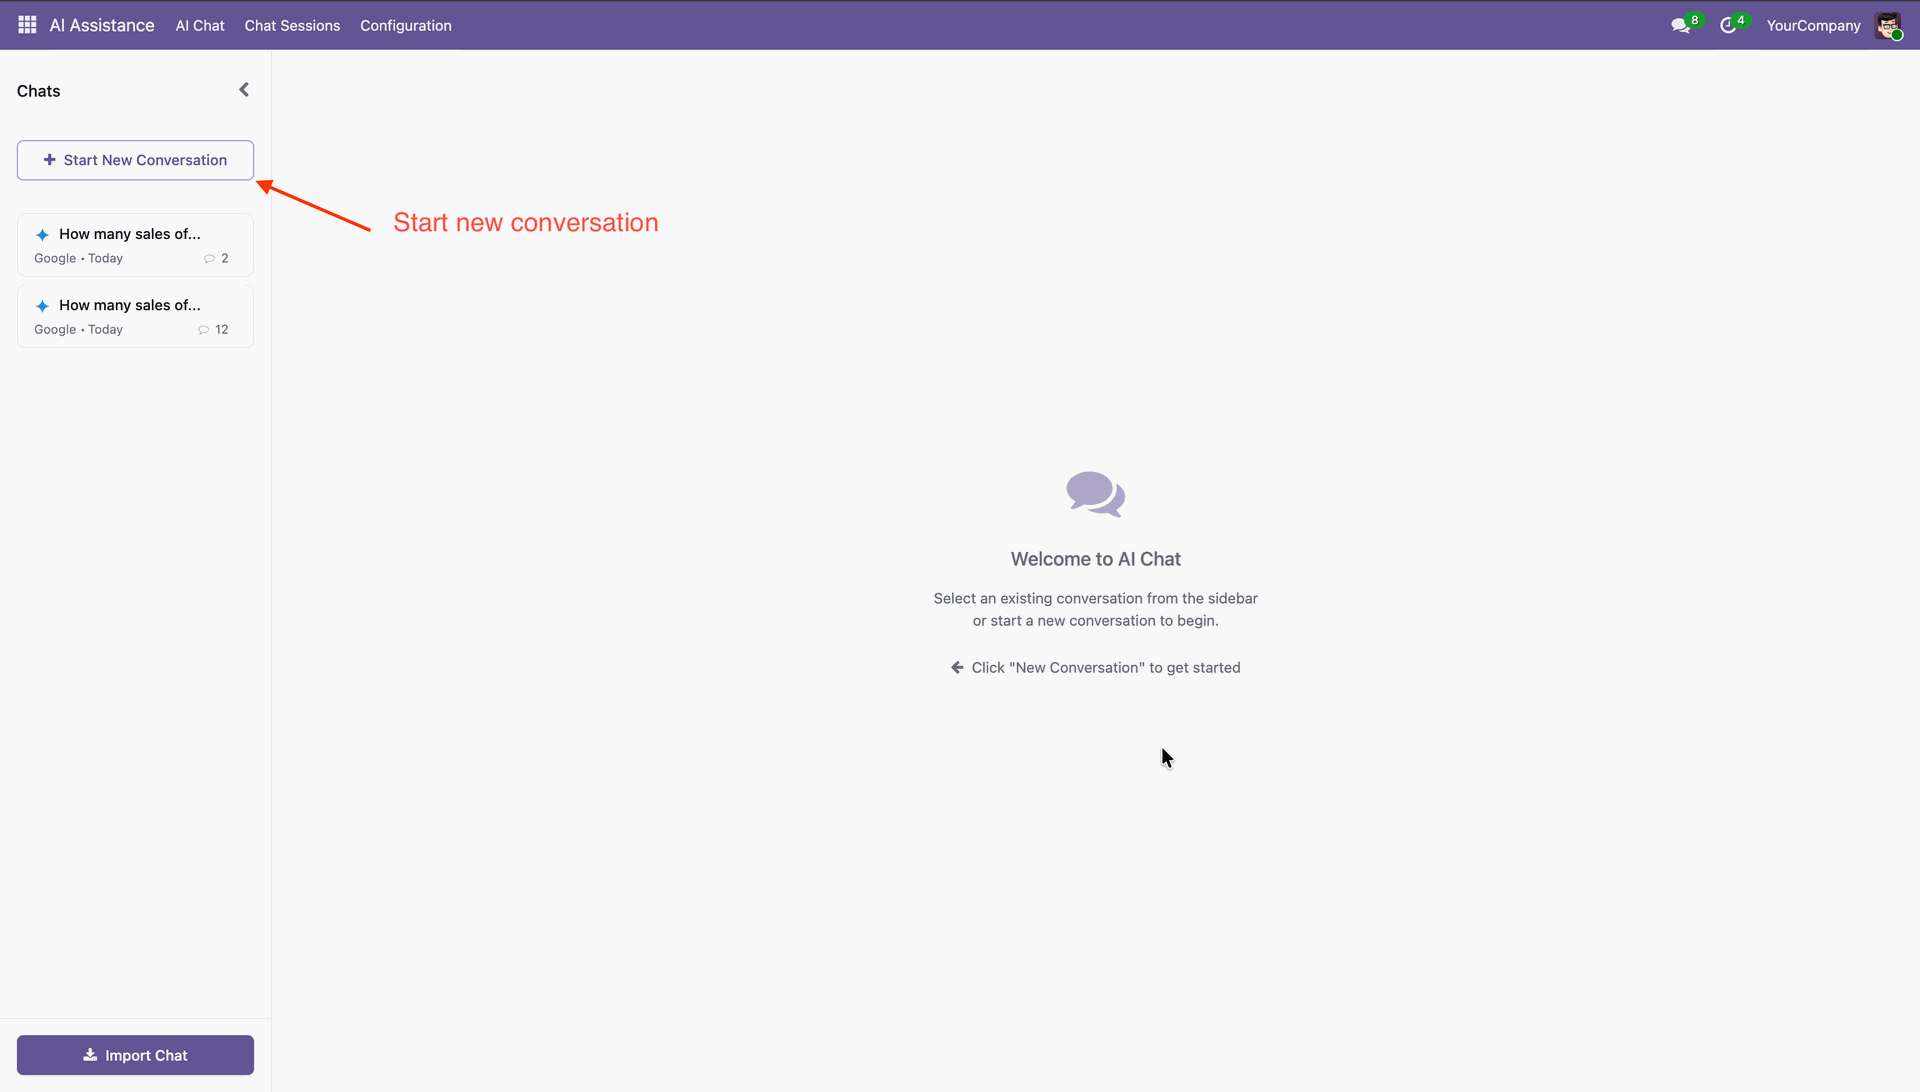
The AI Chat menu allows users to manage conversations with AI models.
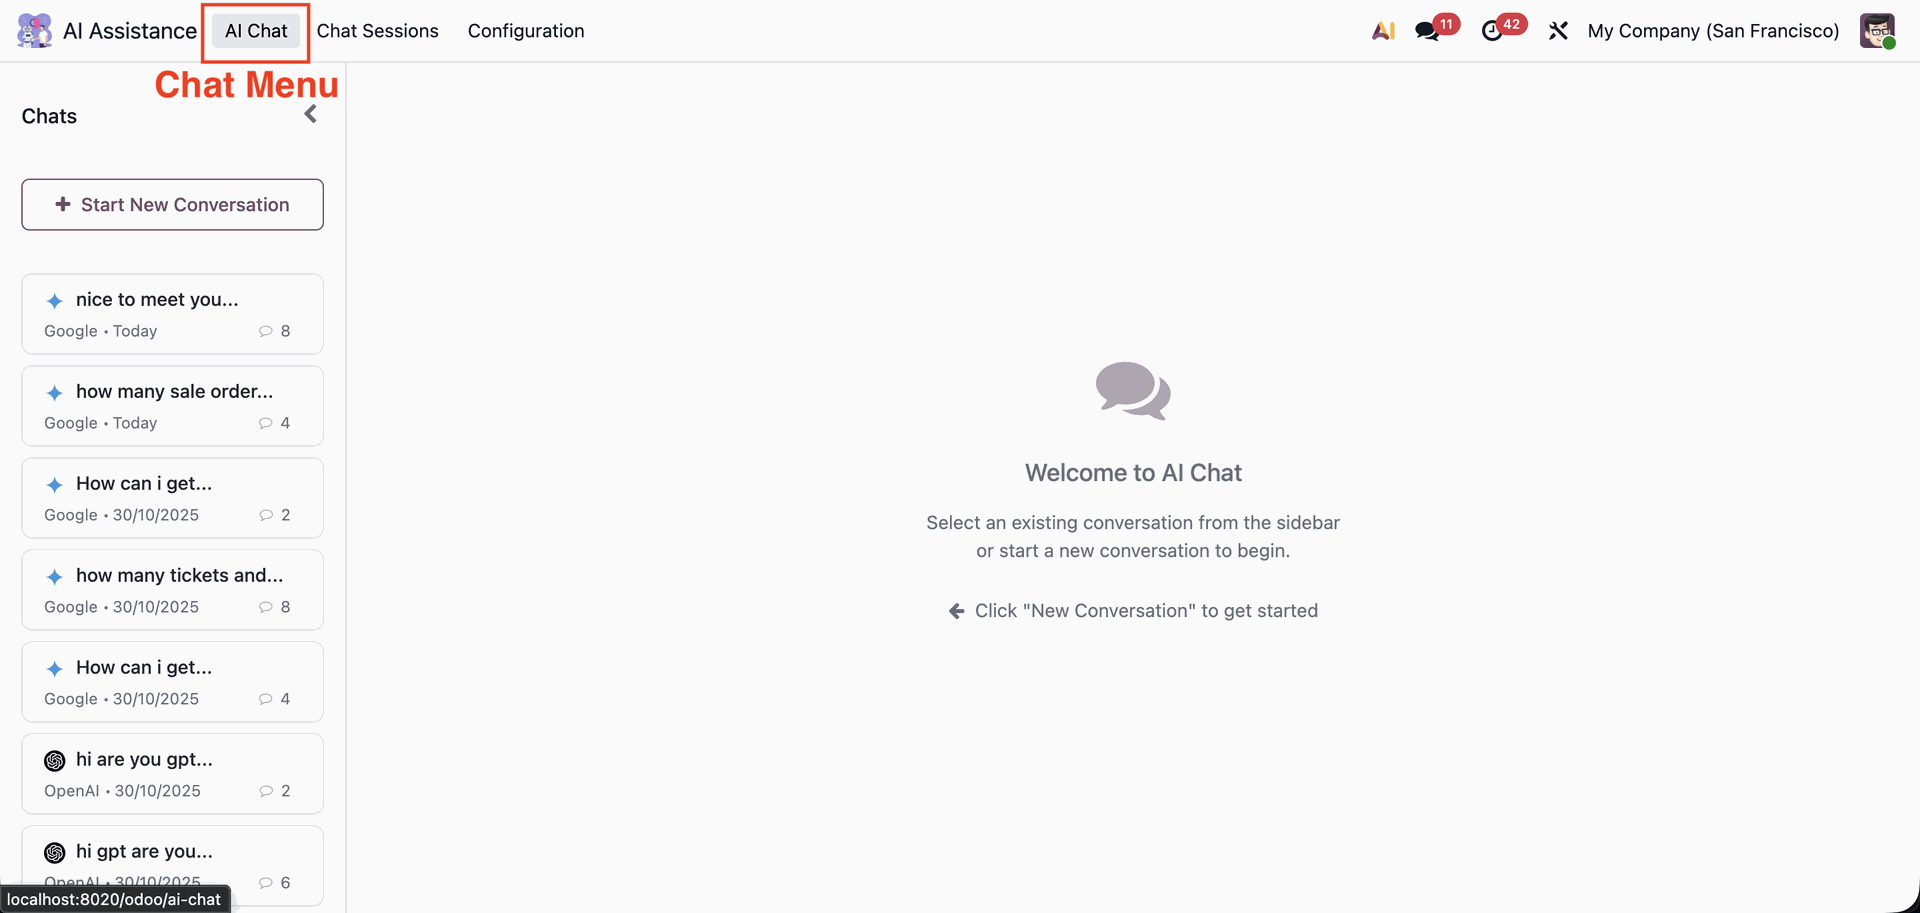
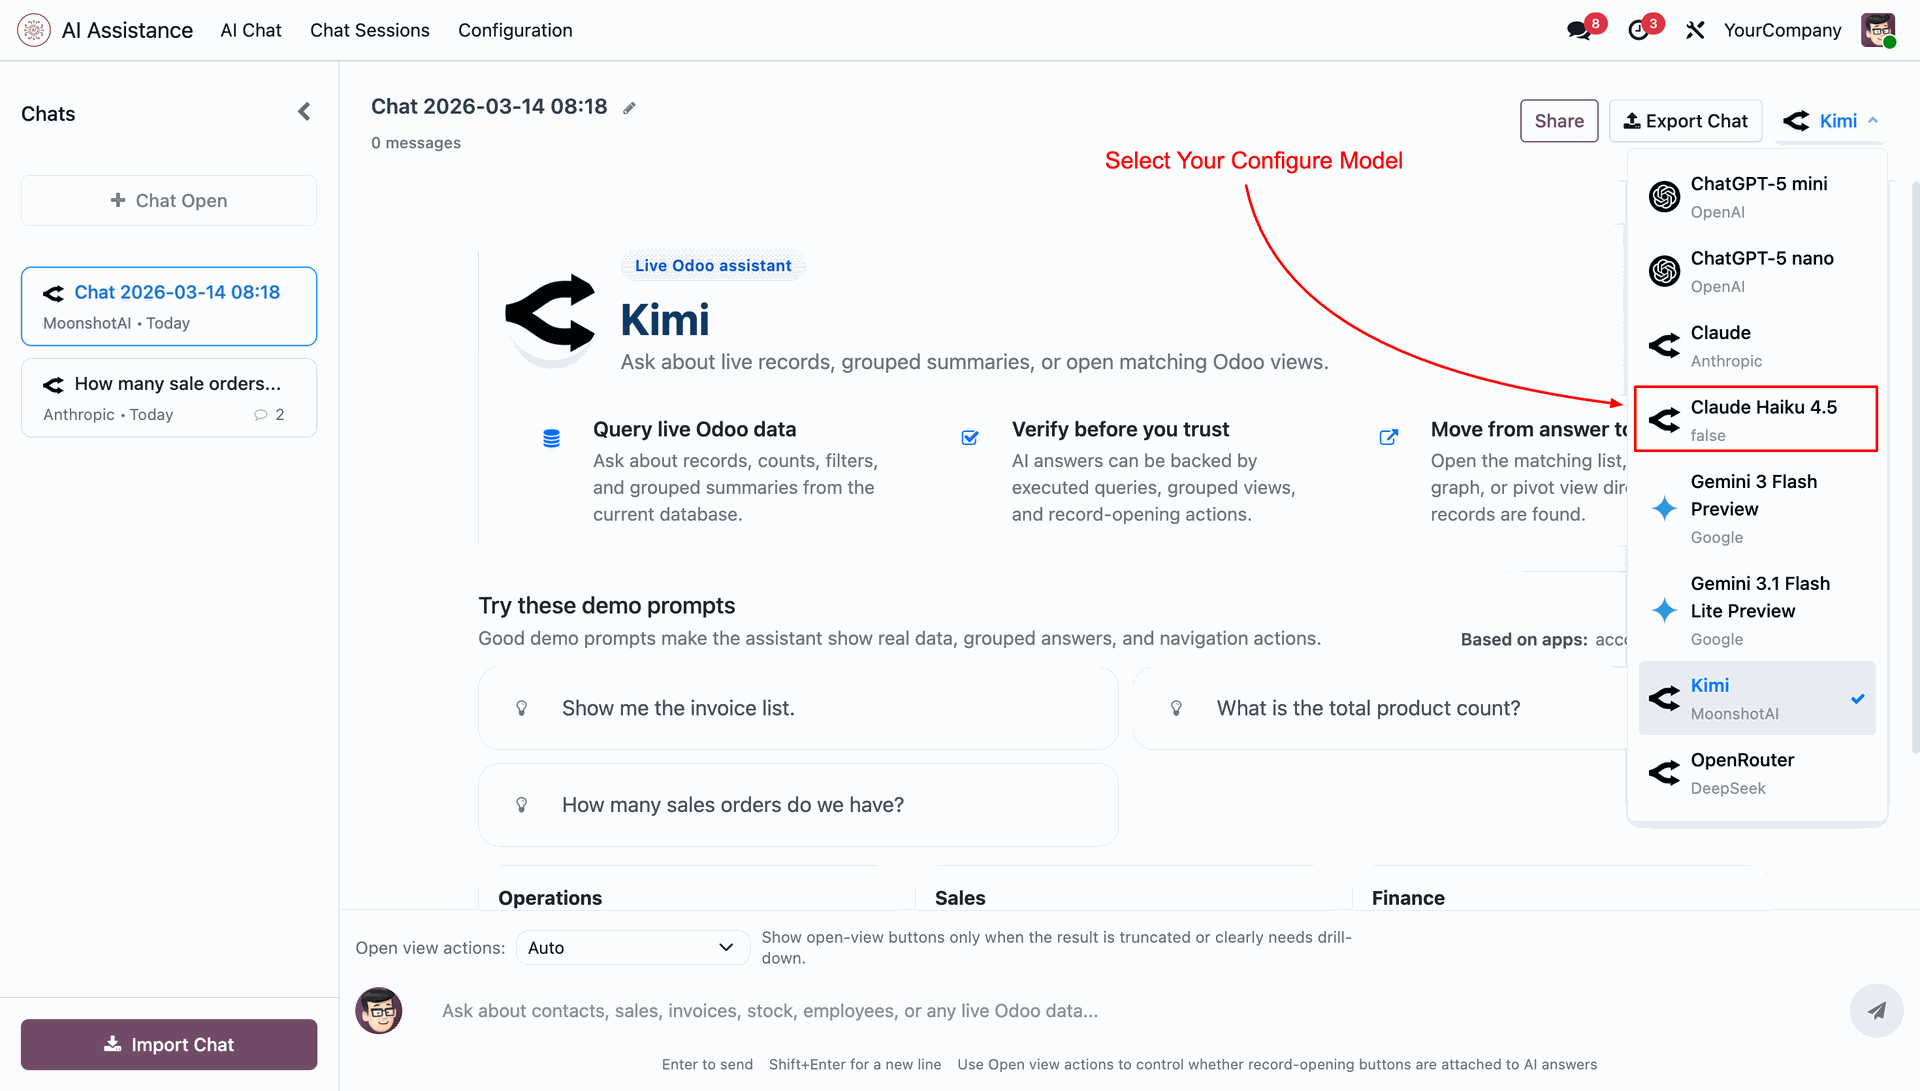
Users can create a new AI chat session, assign or edit a session name, and select from multiple AI models. Previous chat histories are listed on the sidebar for easy reference.
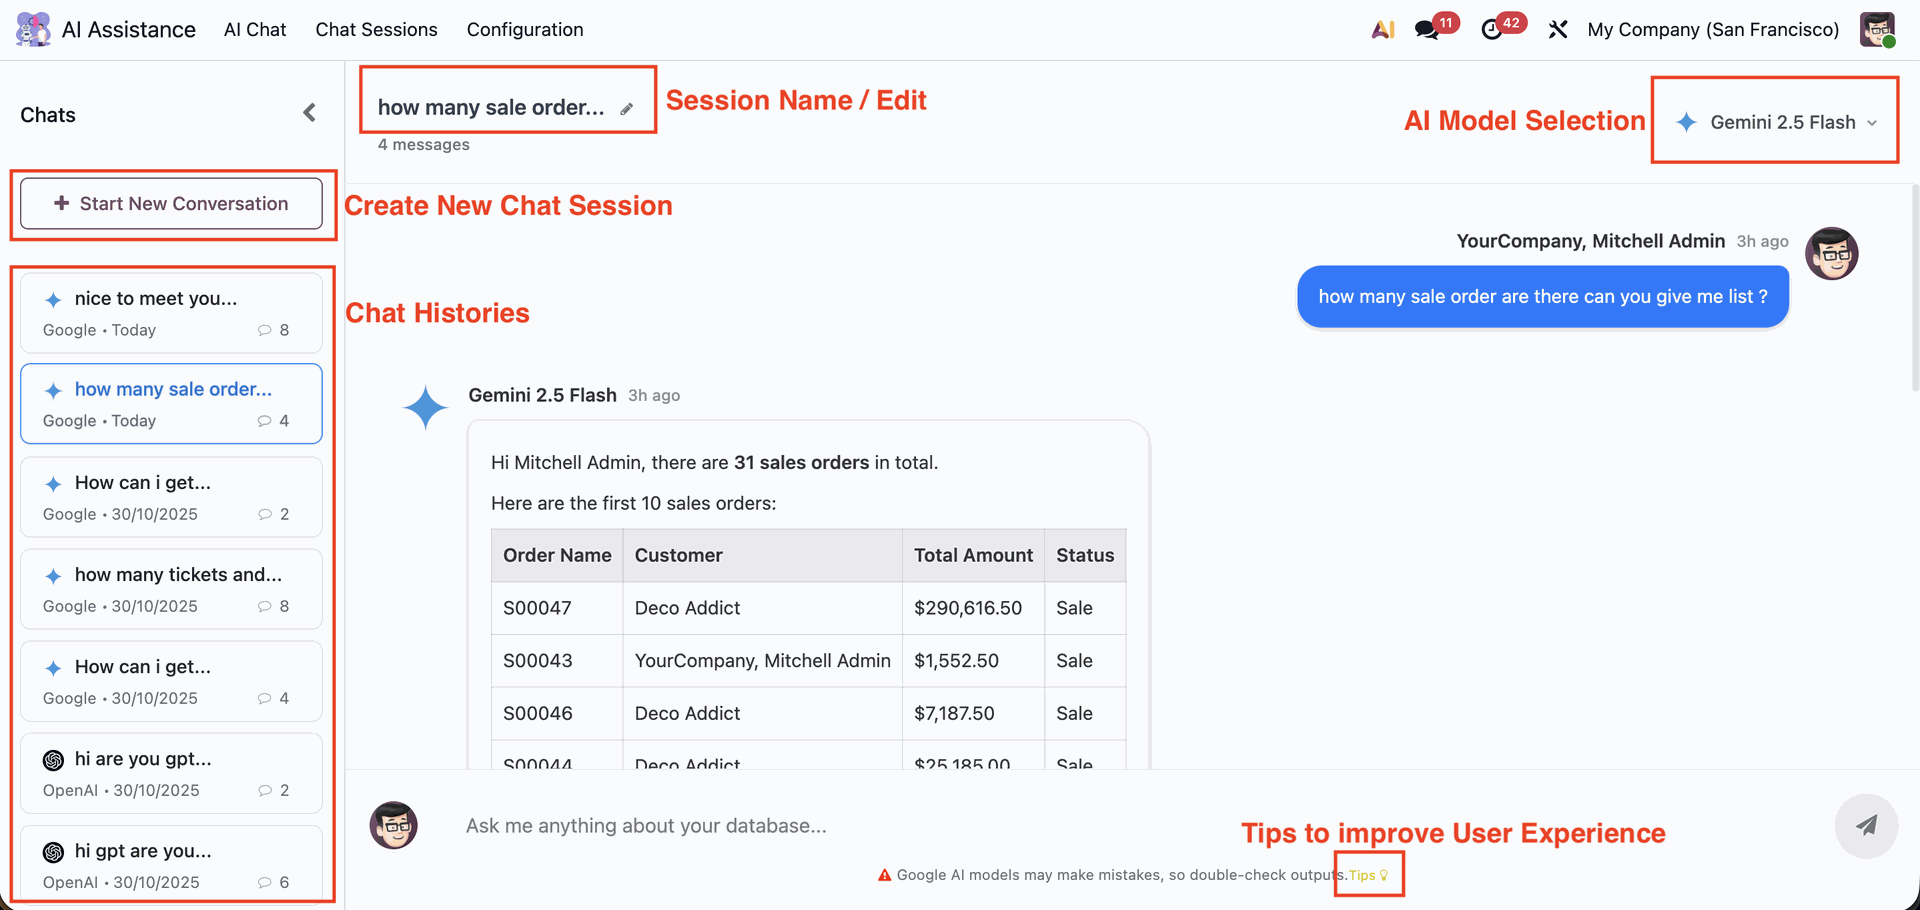
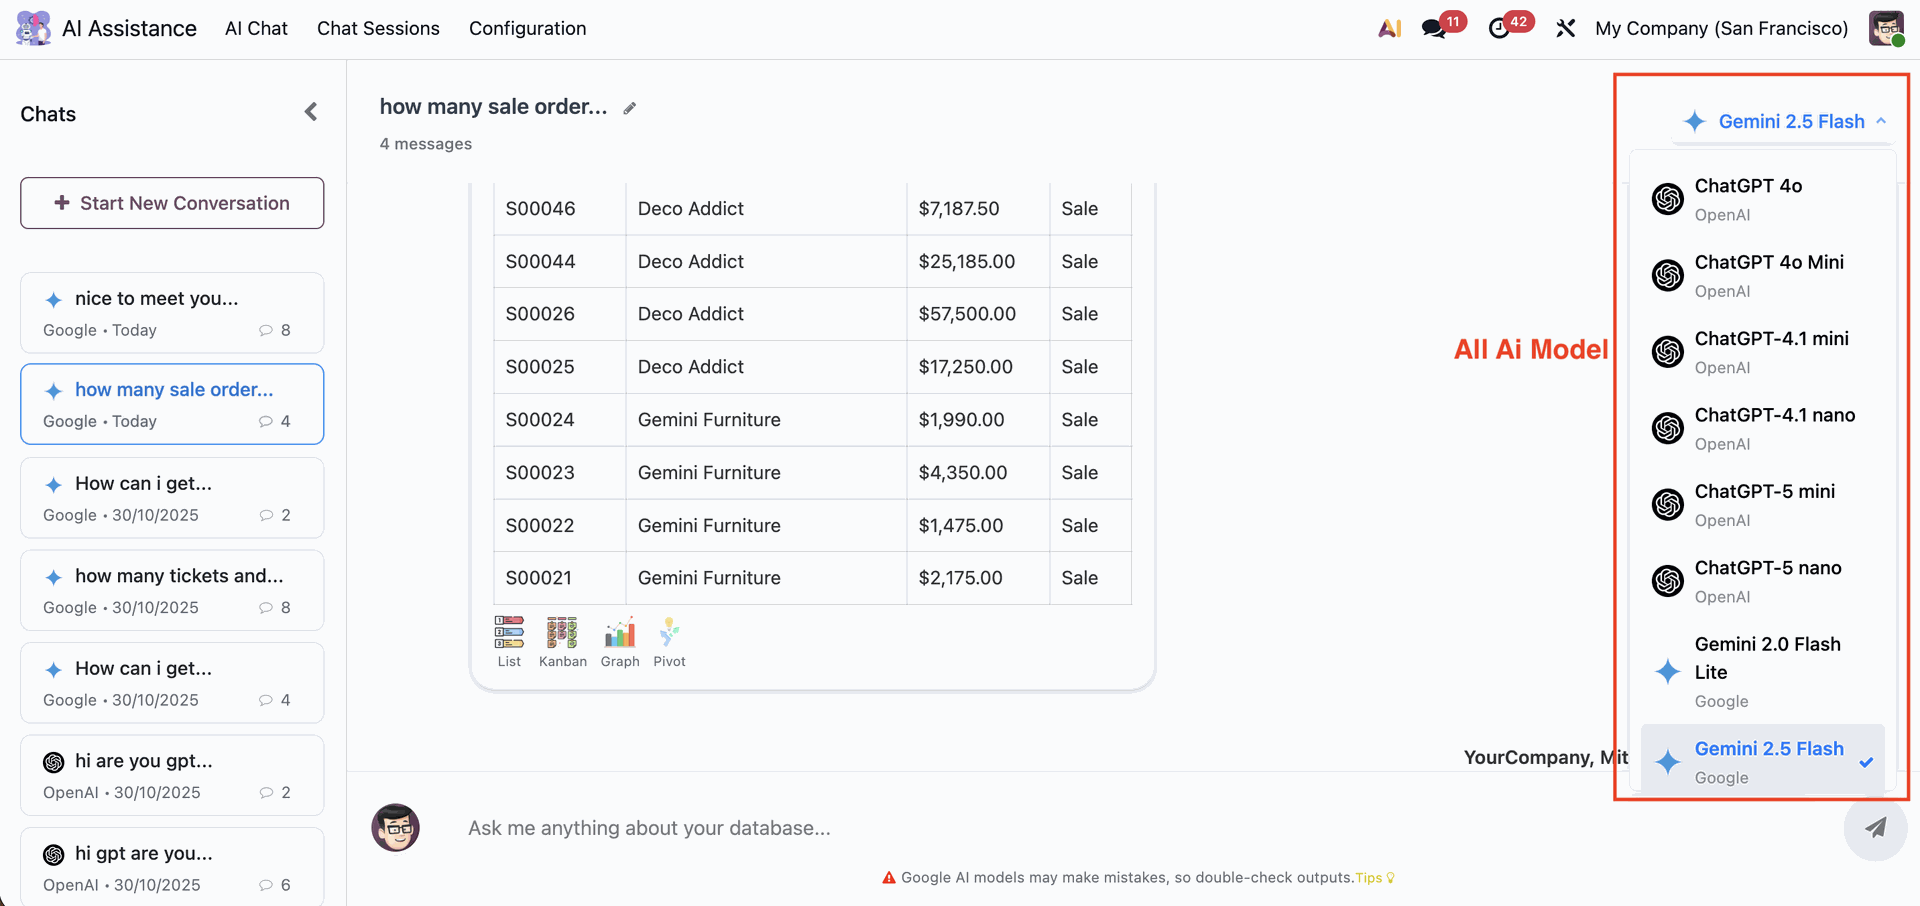
Users can switch between multiple AI models directly from the chat interface. Available options include Google’s Gemini series and OpenAI’s ChatGPT series (from 4o to 5 nano).
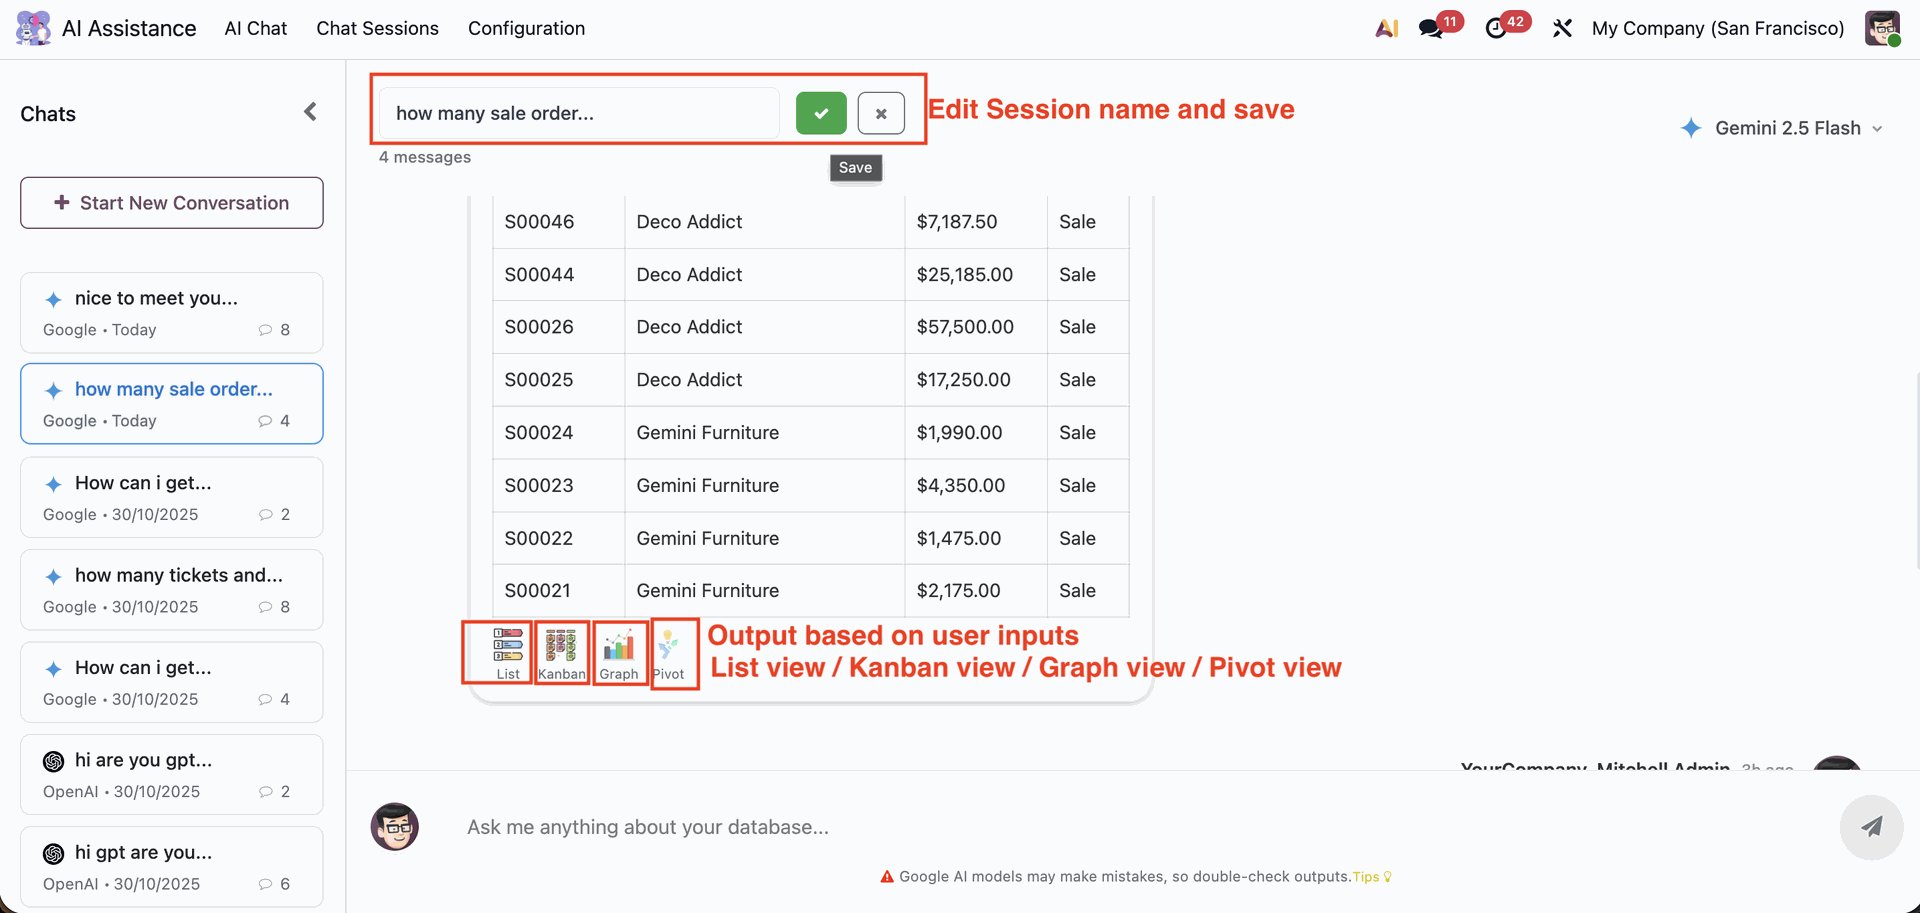
Users can easily rename a chat session by clicking the session title, editing it, and saving the new name. Based on the user’s query, AI-generated outputs are displayed in multiple formats — List View, Kanban View, Graph View, or Pivot View.
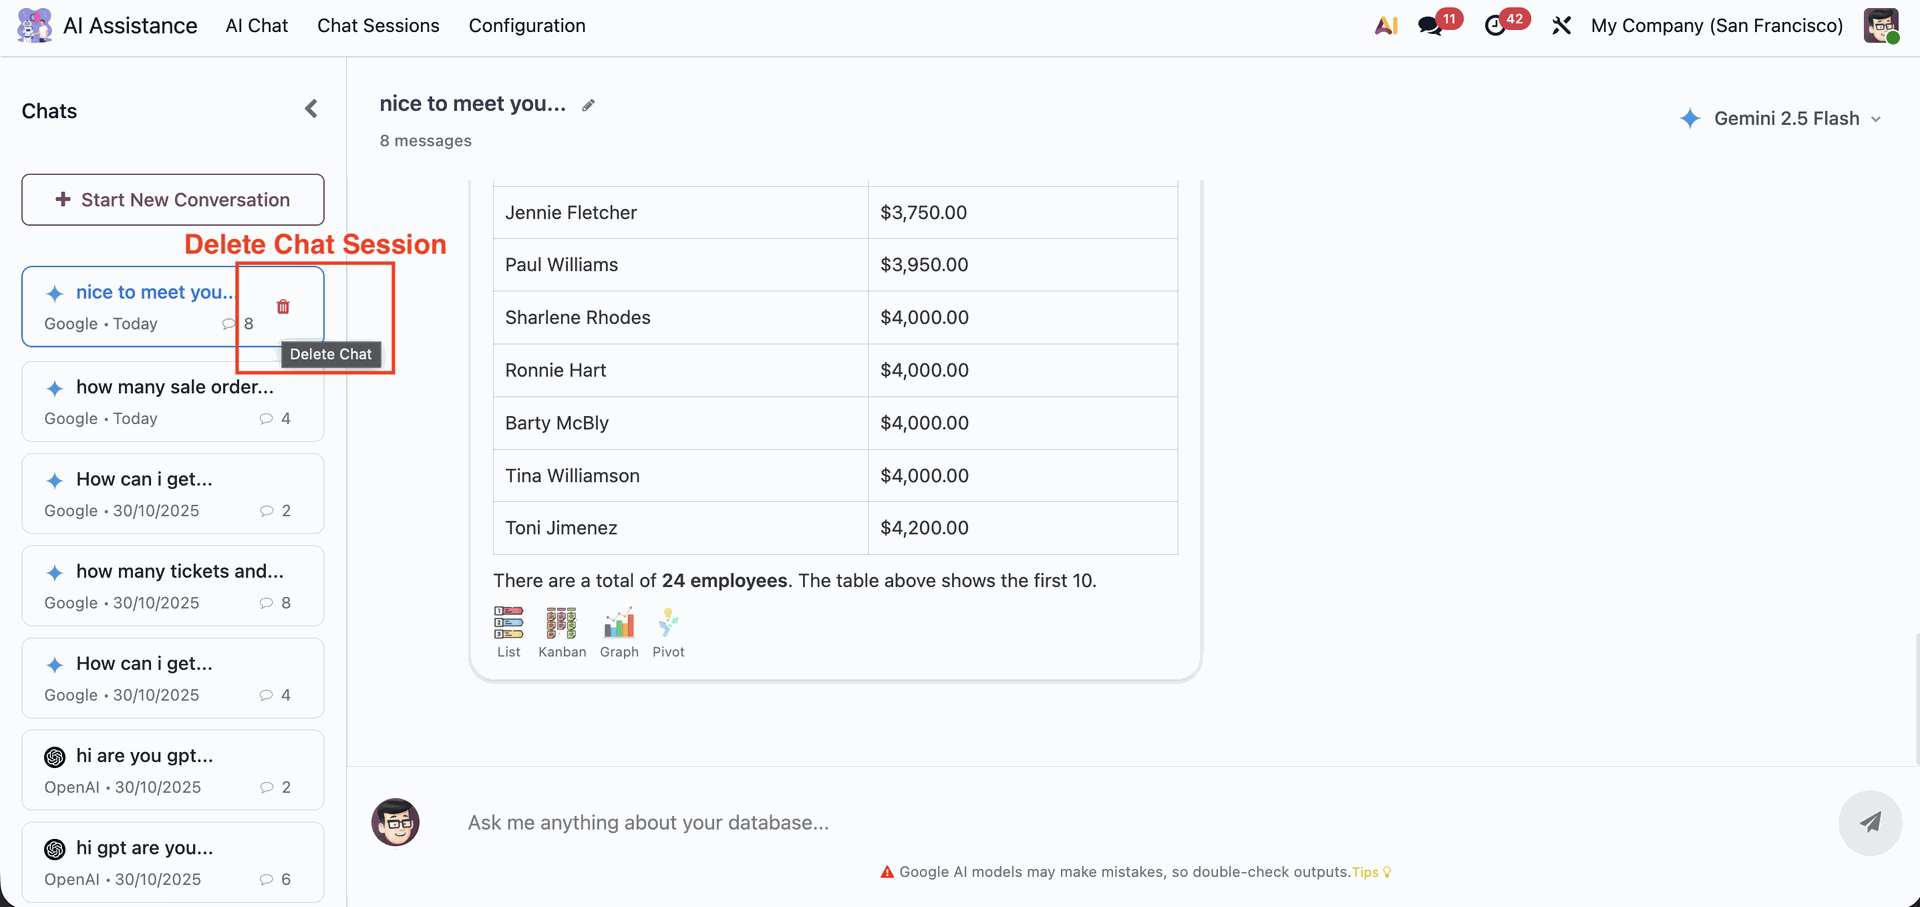
Users can manage their chat history effortlessly by deleting unwanted chat sessions with a single click.
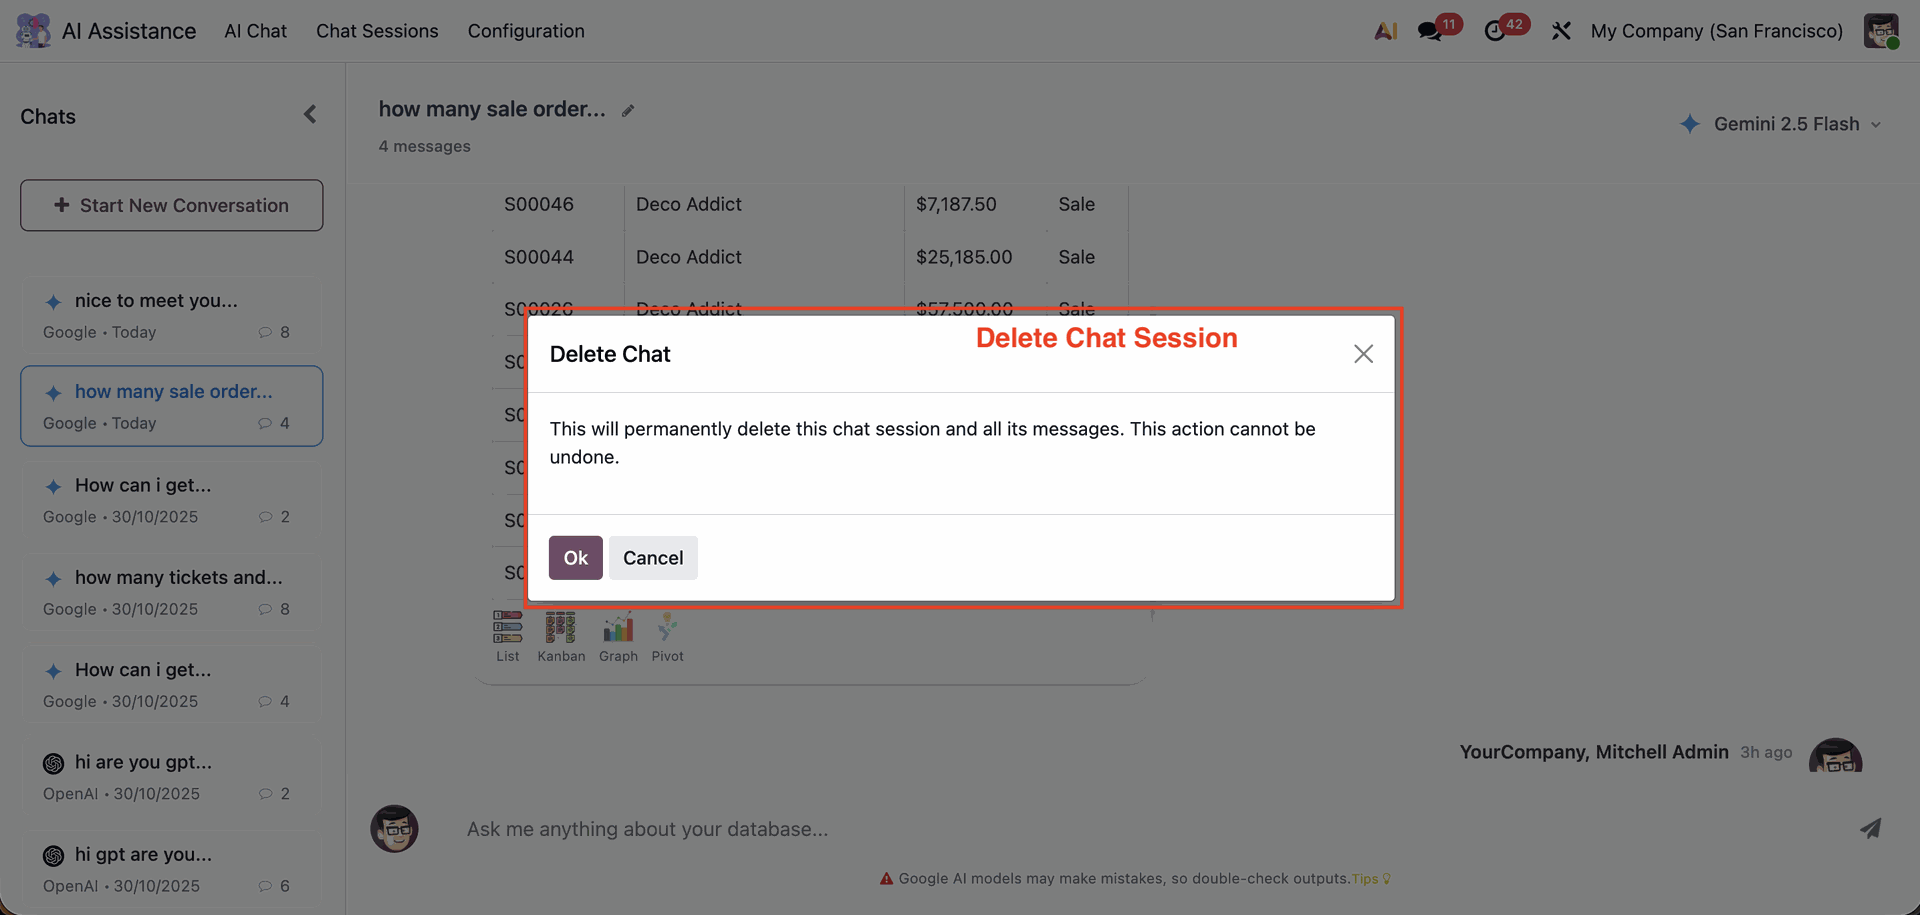
A confirmation popup appears when deleting a chat session, ensuring that users don’t accidentally remove important conversations.
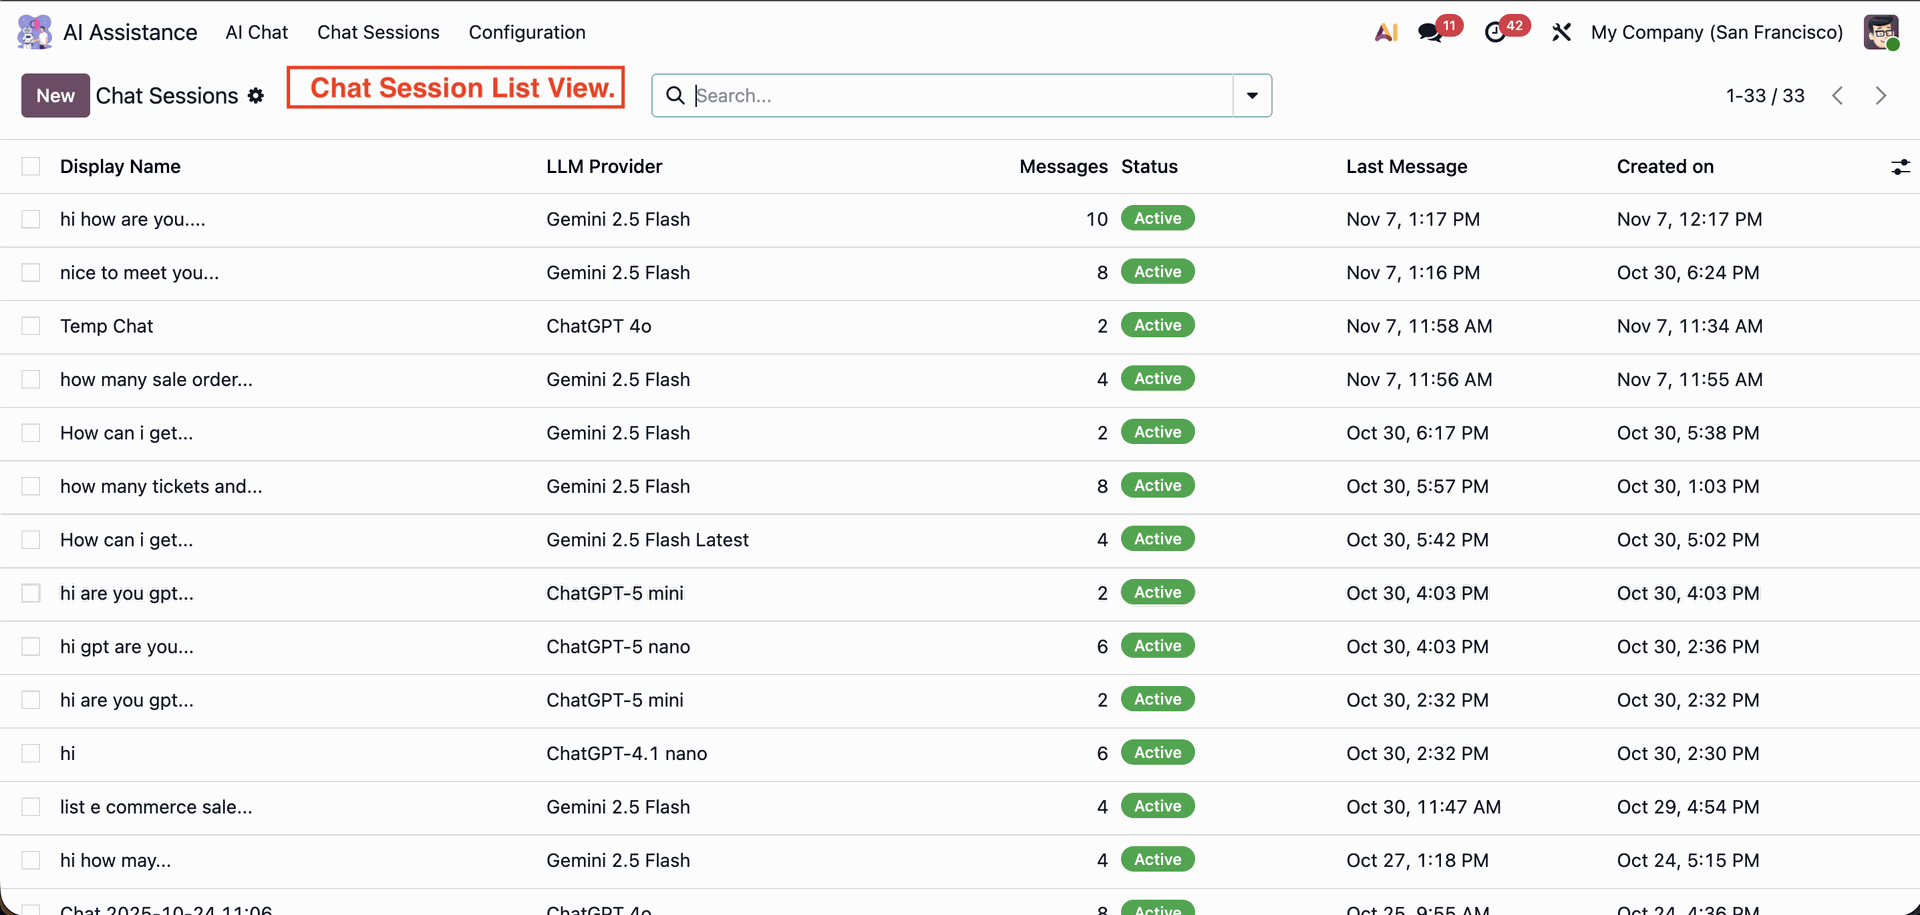
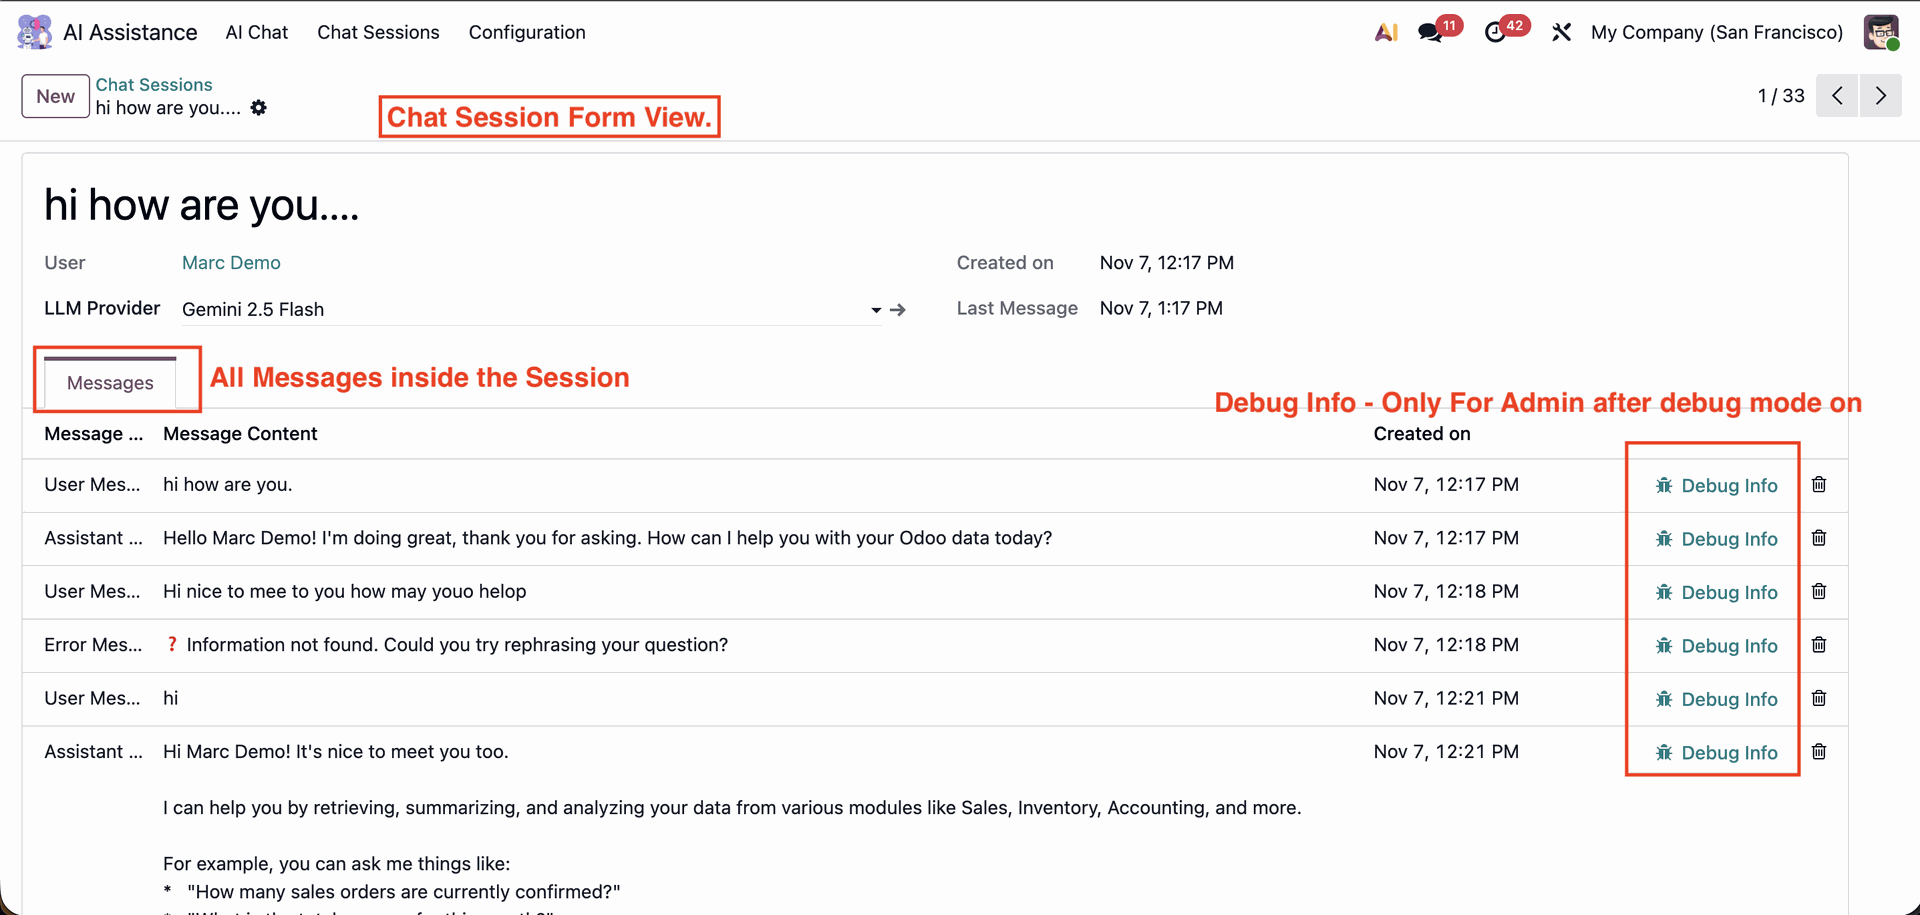
The Chat Session List View provides a centralized overview of all AI chat sessions in Odoo. Each record displays key details such as session name, selected AI model (LLM provider), message count, chat status, timestamps for the last message, and creation date.
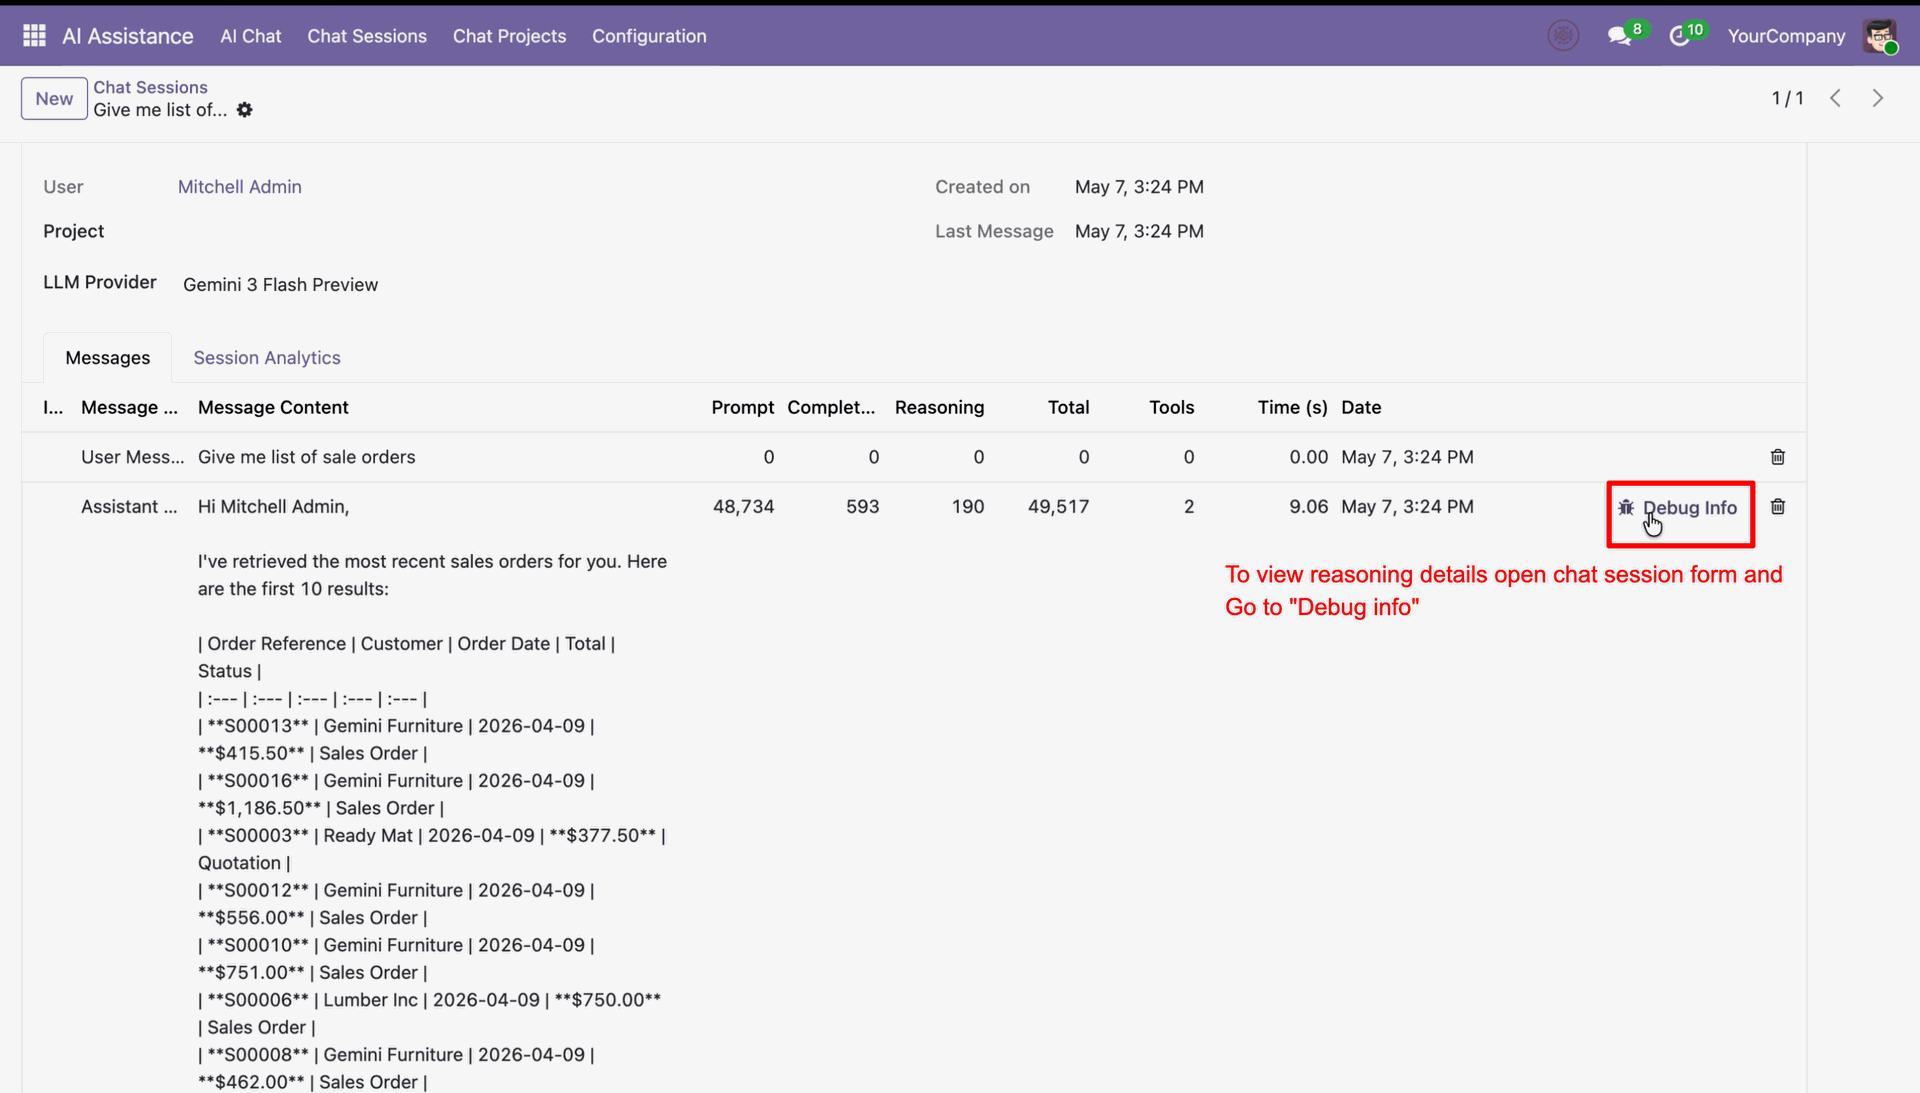
The Chat Session Form View displays detailed insights of an individual AI chat session. Admins can also access Debug Info for each message to review technical details, making this view ideal for analysis, troubleshooting, and audit purposes.
Create new projects.
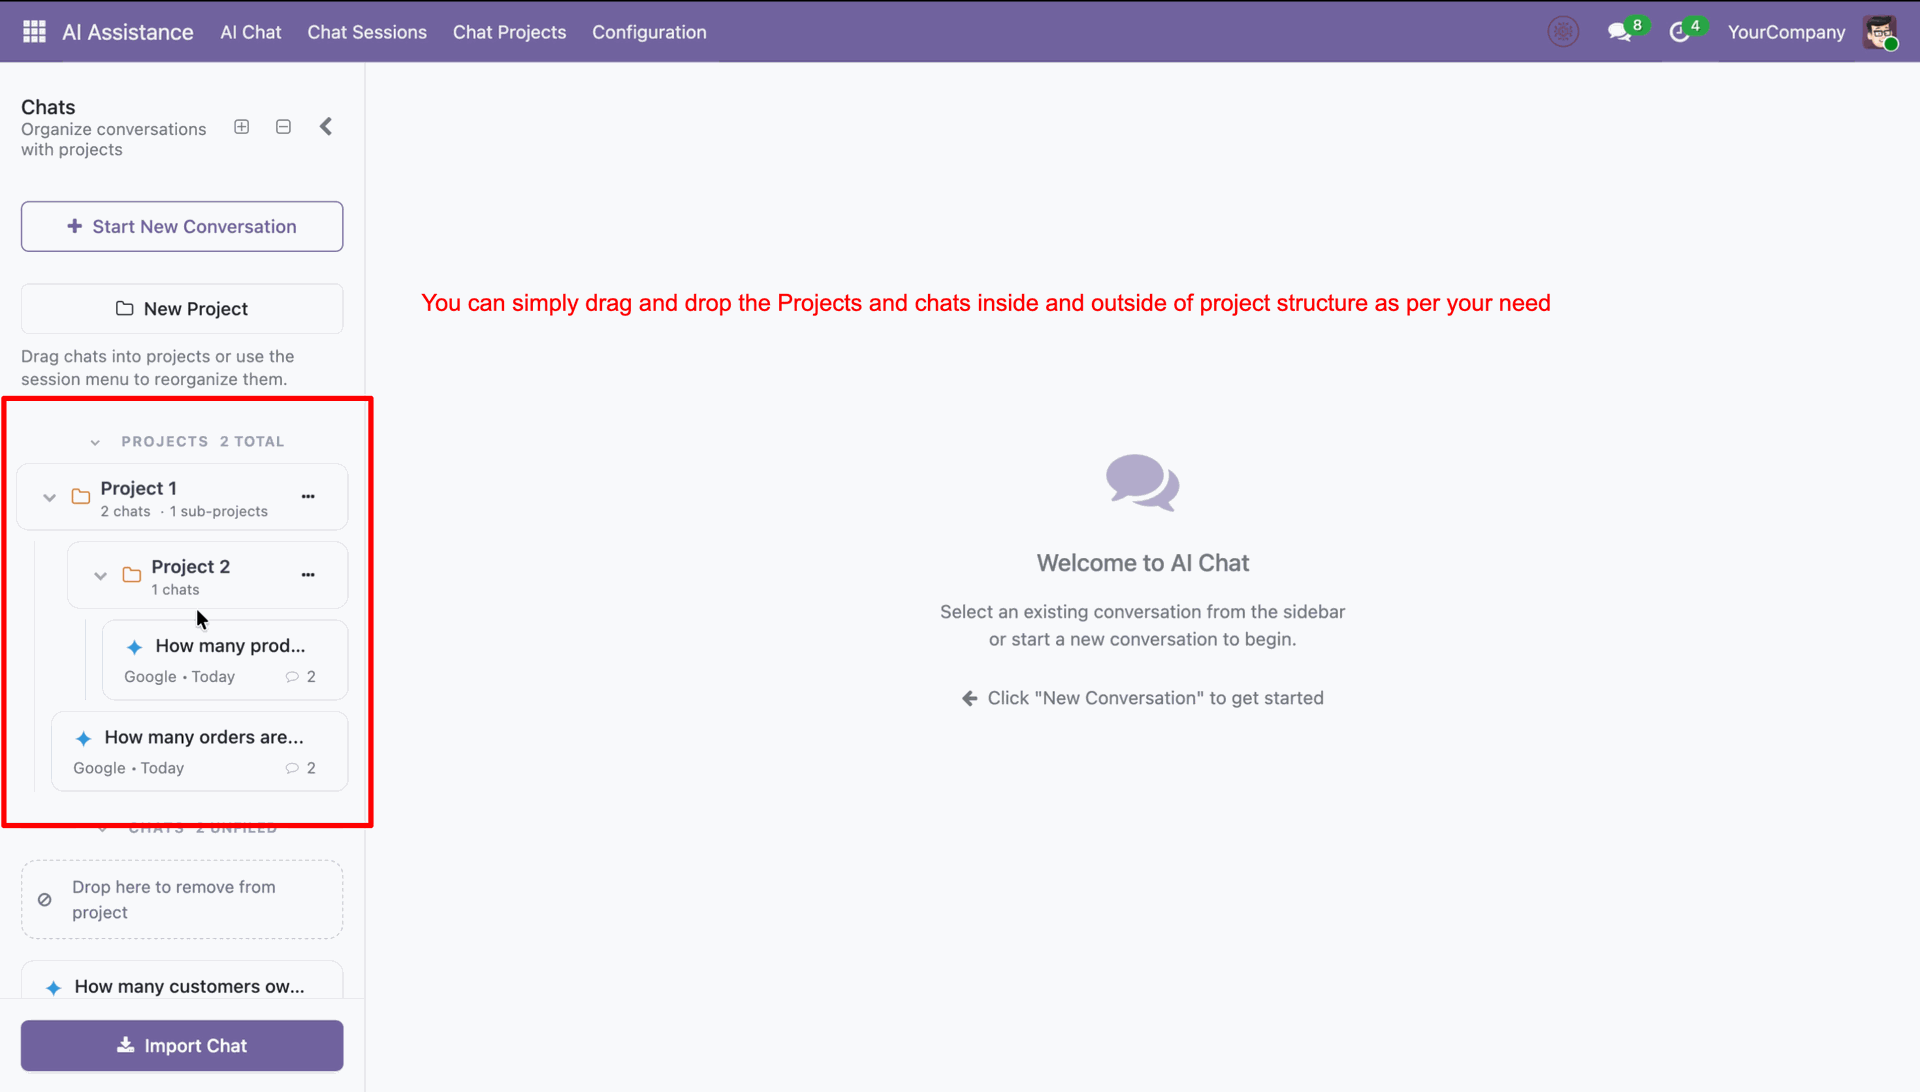
You can drag and drop as per the requirement.
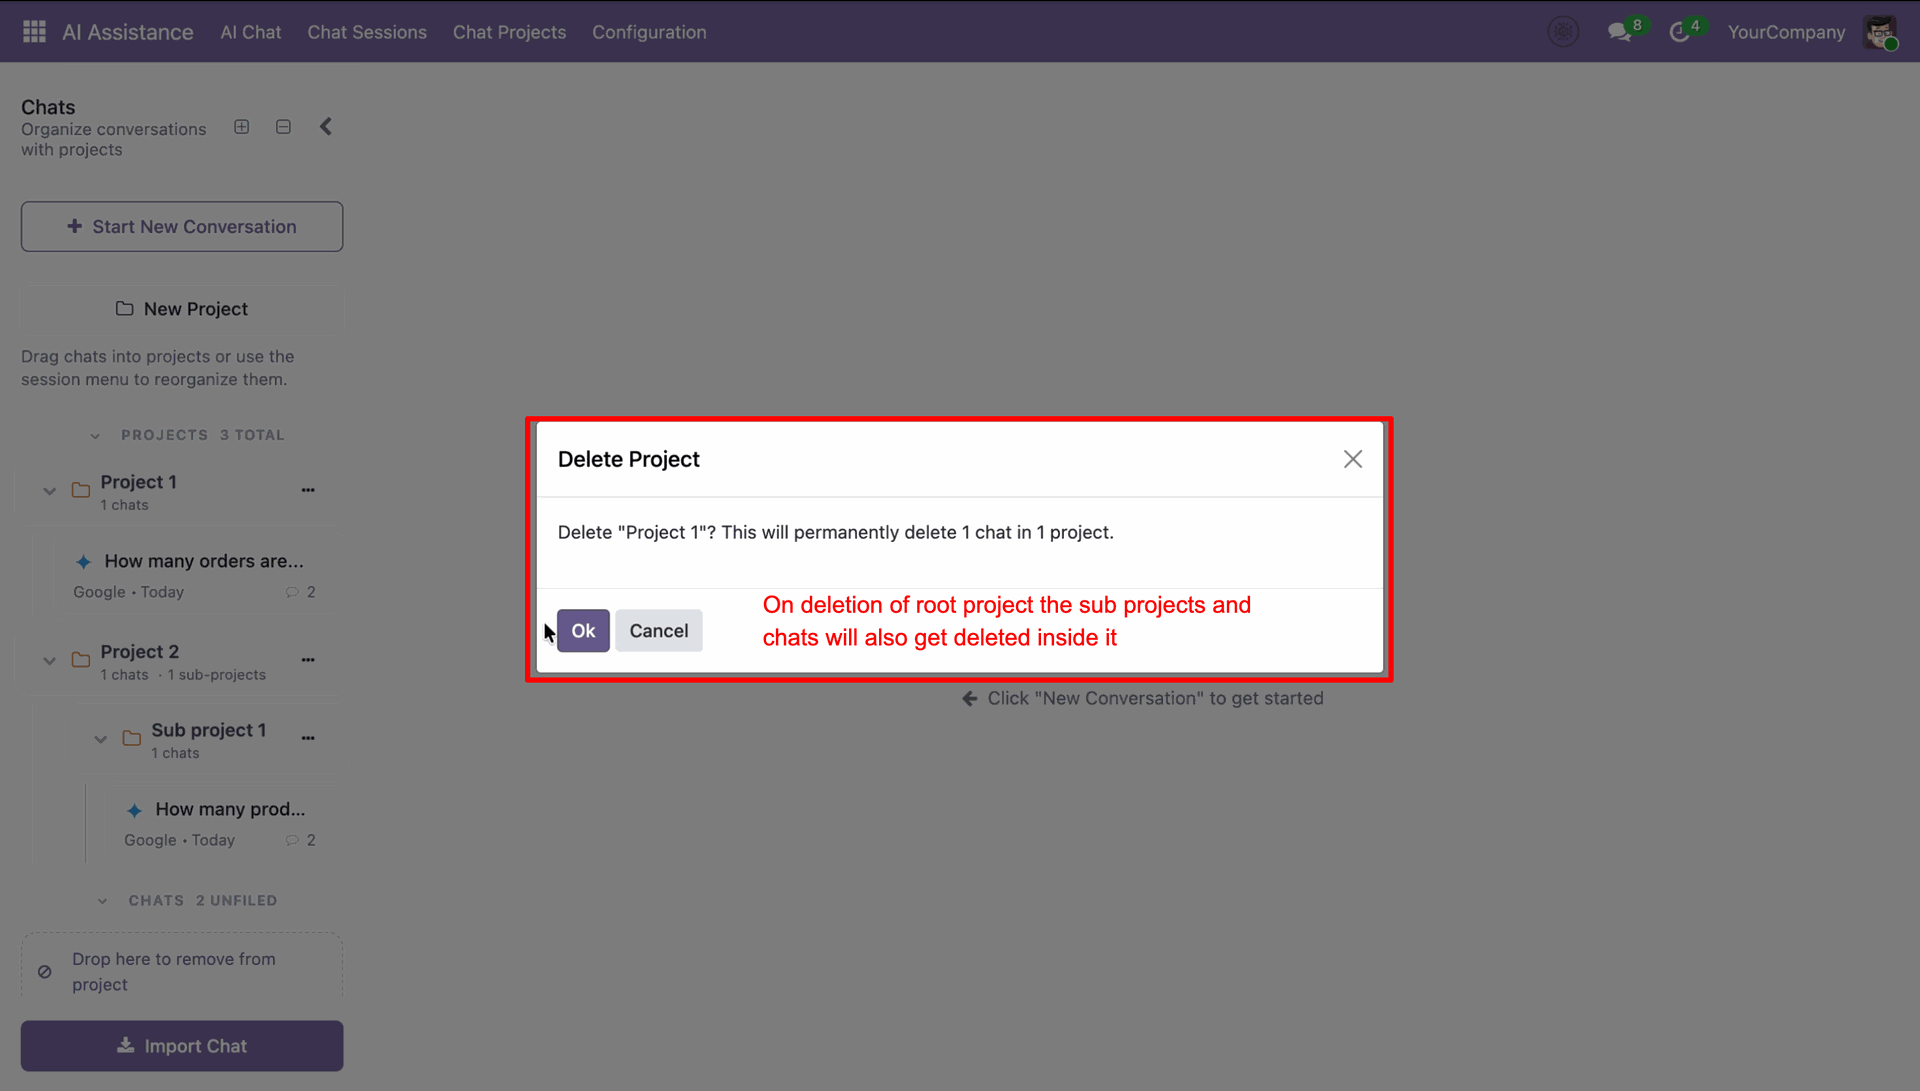
You can perform actions on the folder as needed.
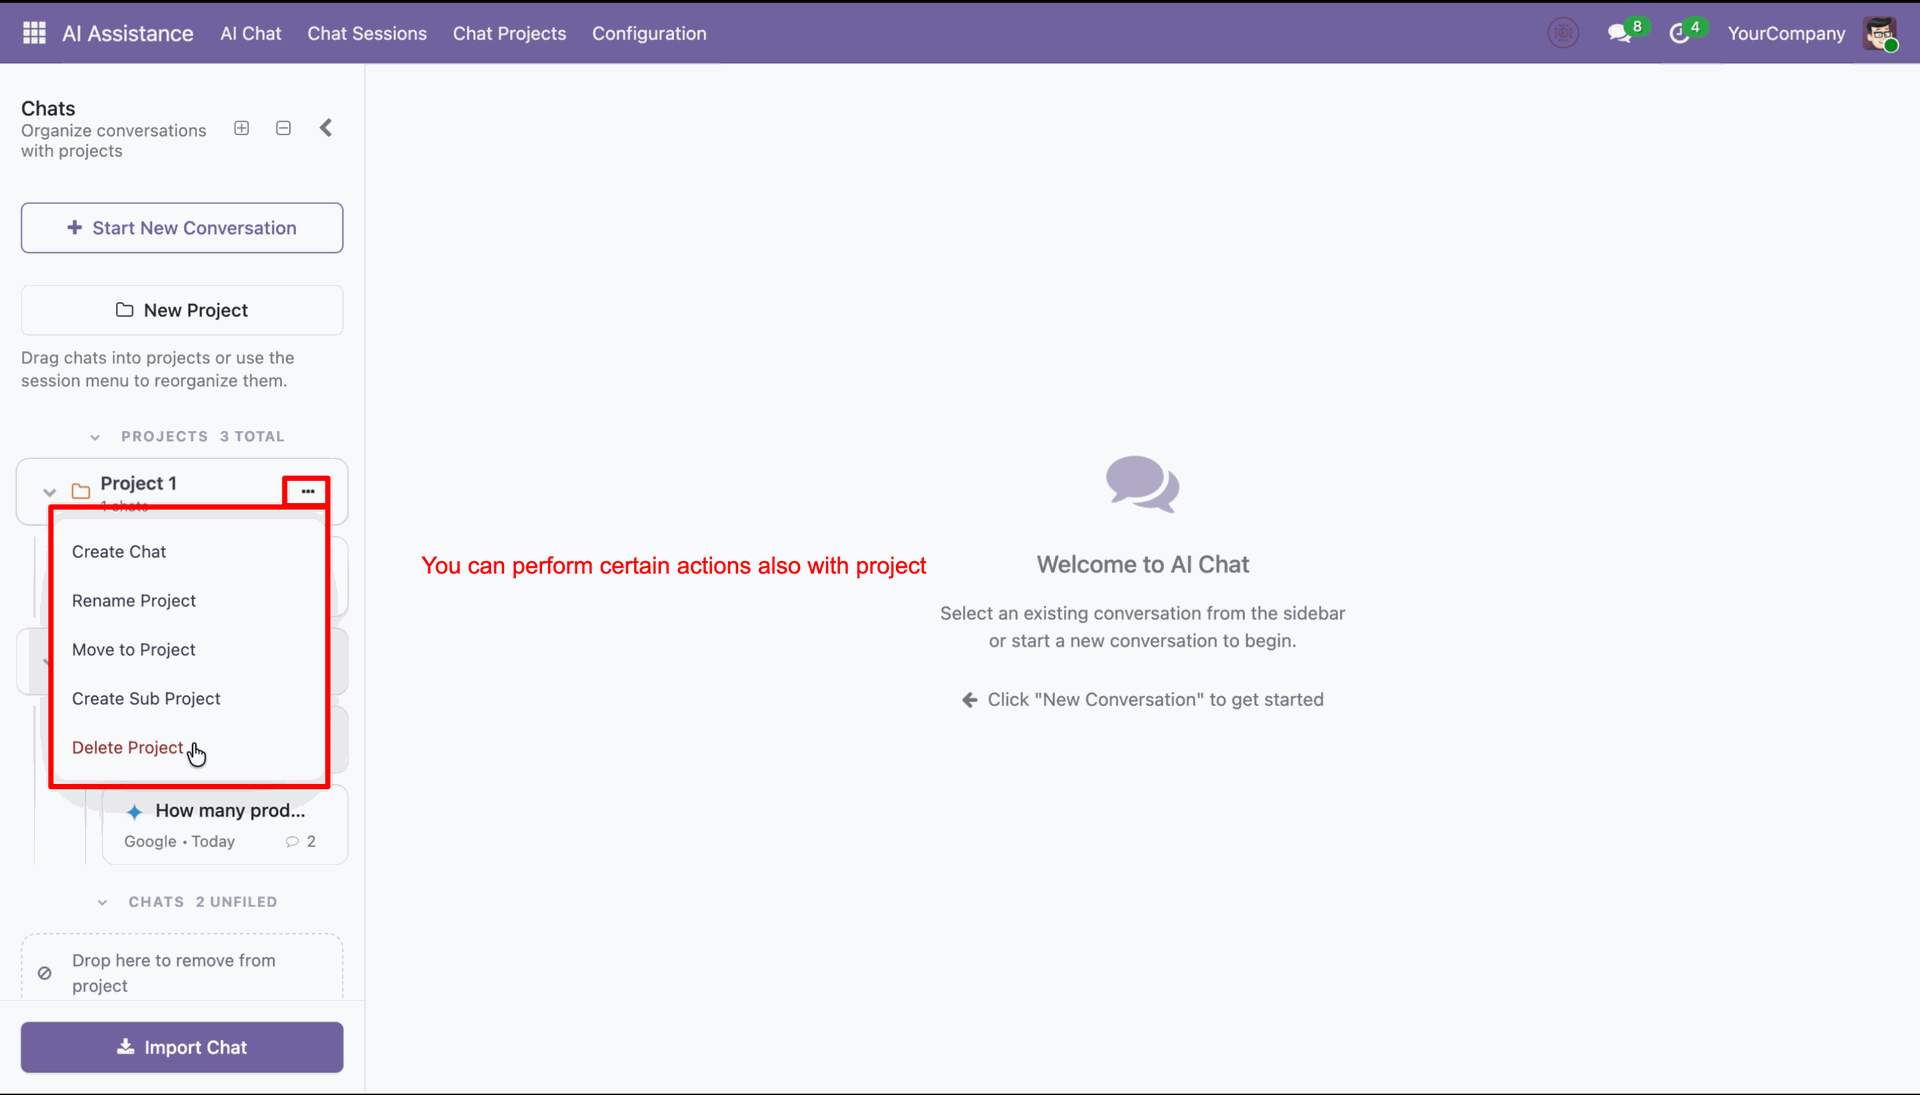
When you delete a folder, it will remove the subfolder data along with it.
Chat session list with project hierarchy.

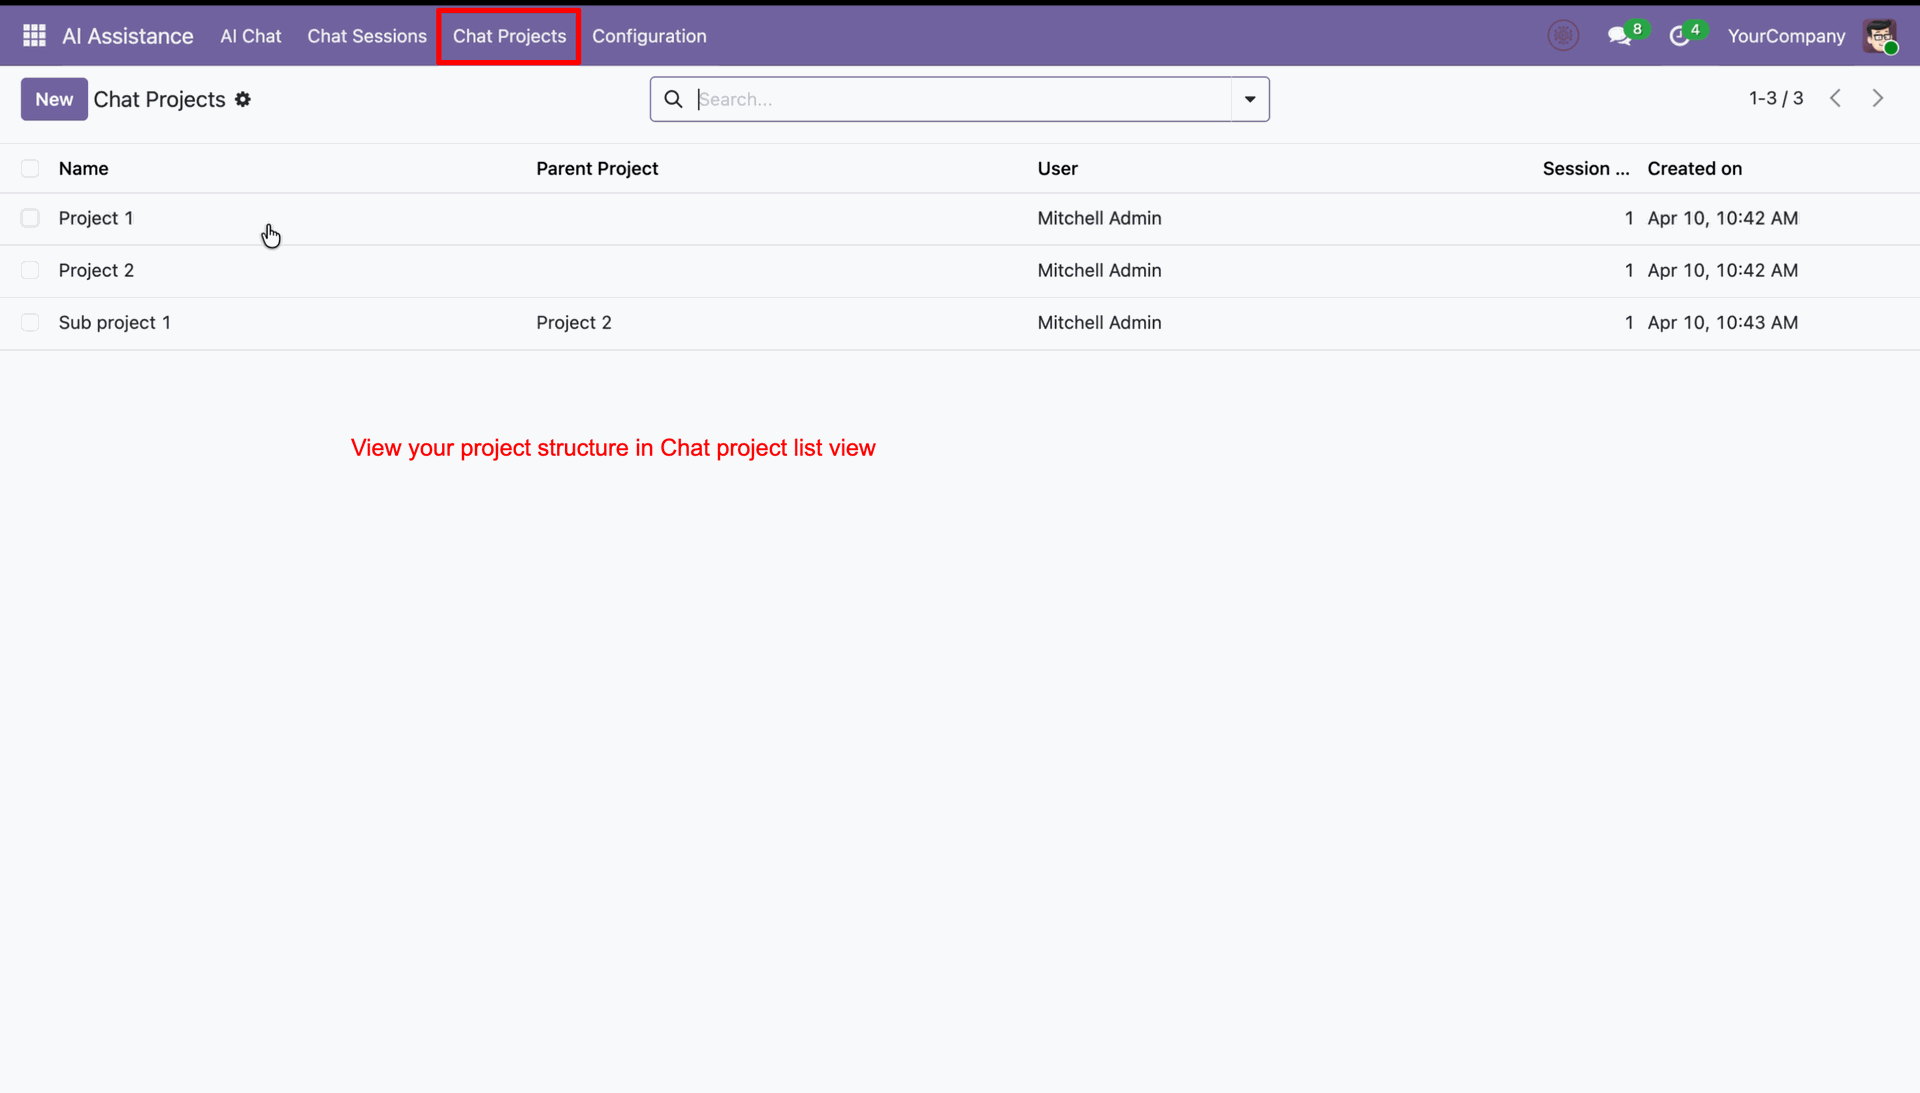
Chat project list view with project structure.
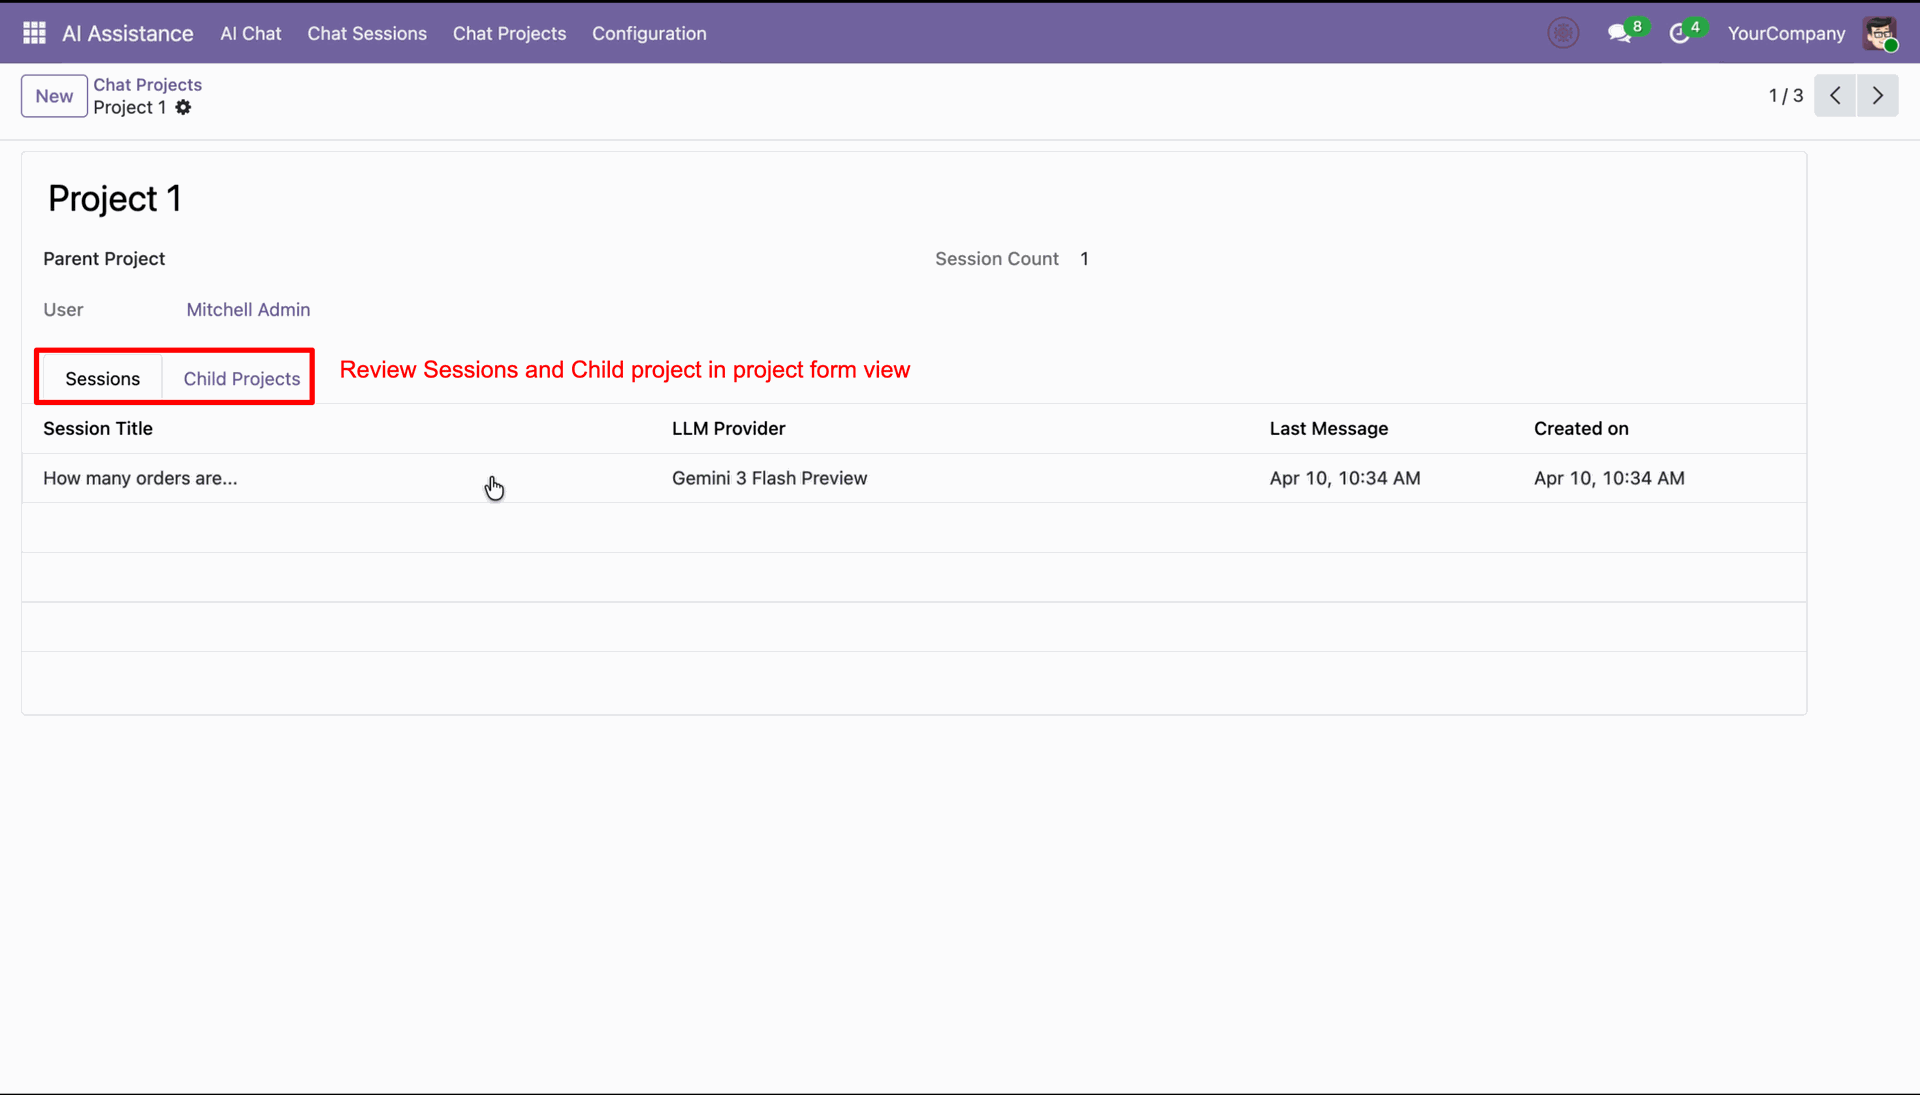
Project form view with sessions and child project.
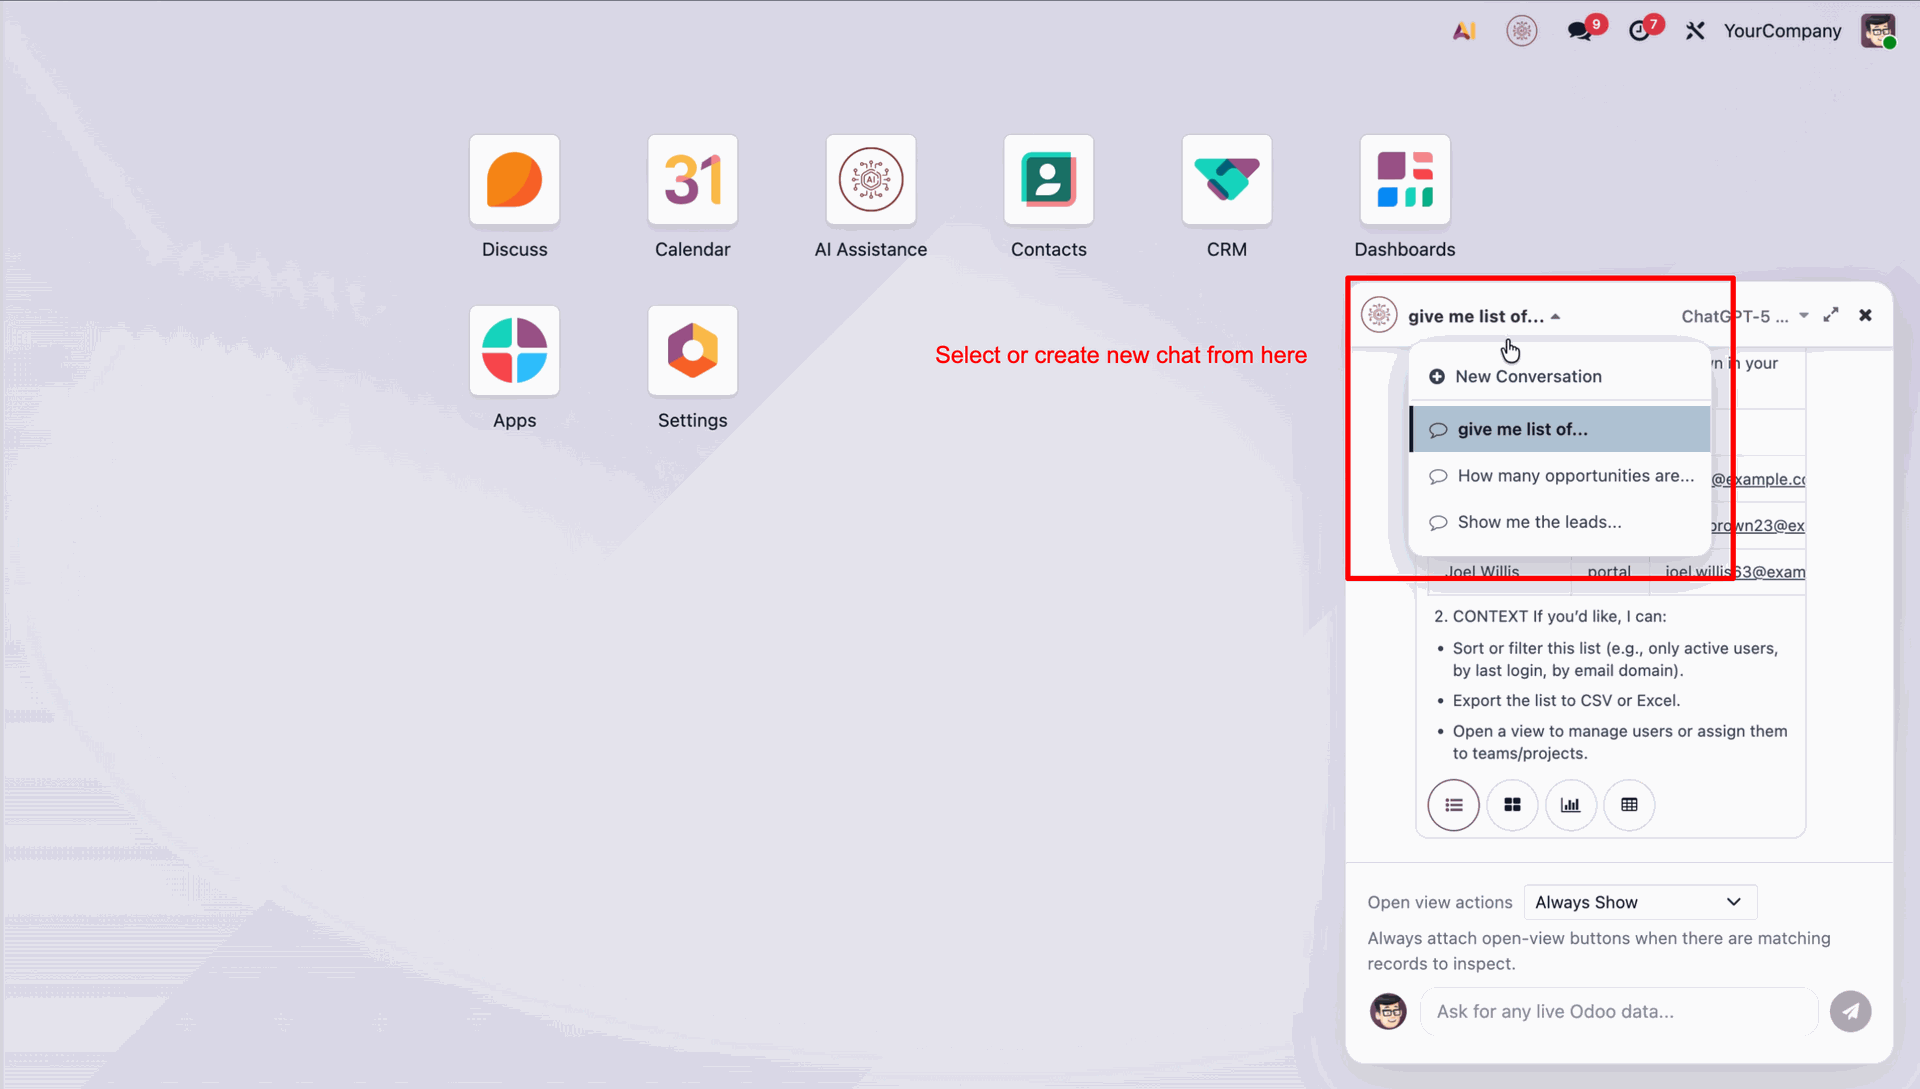
Click the AI icon to open the mini chatbot popup window.
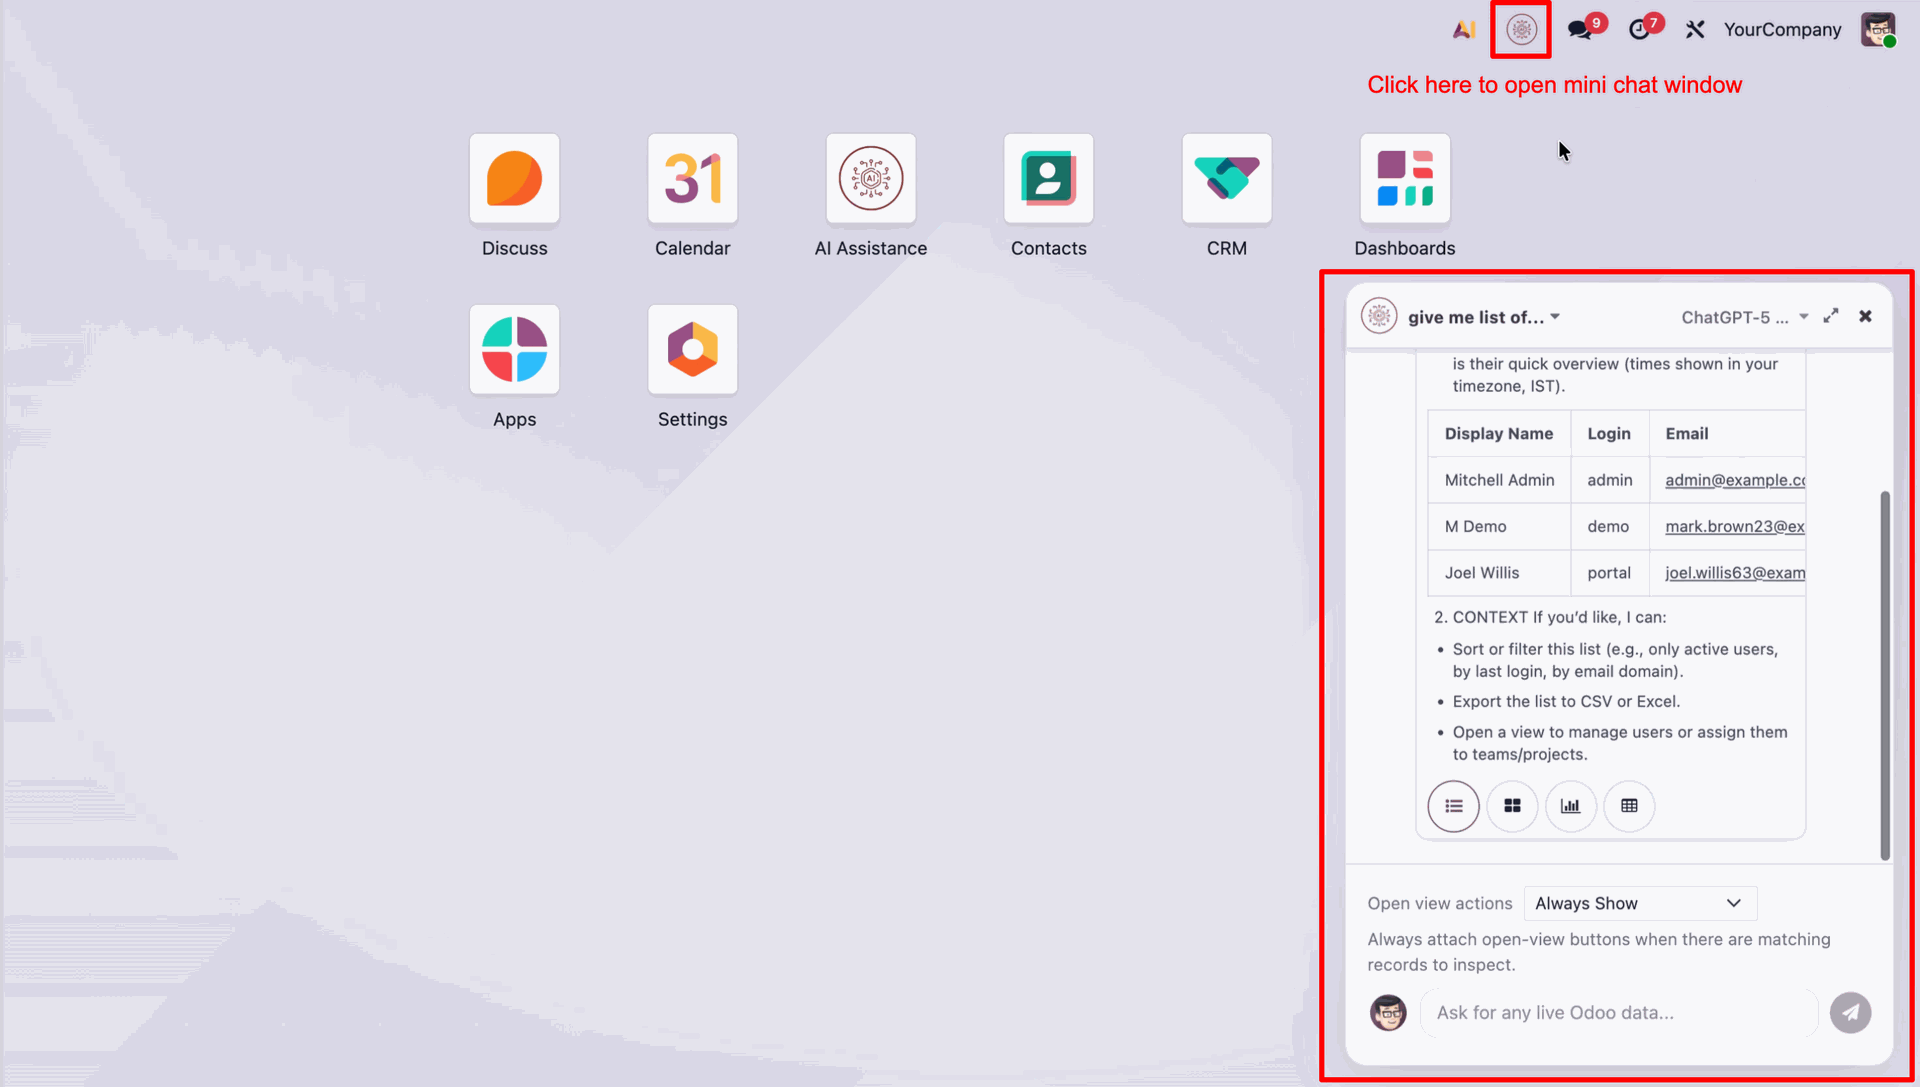
Click the chat dropdown to select an existing conversation or create a new chat.
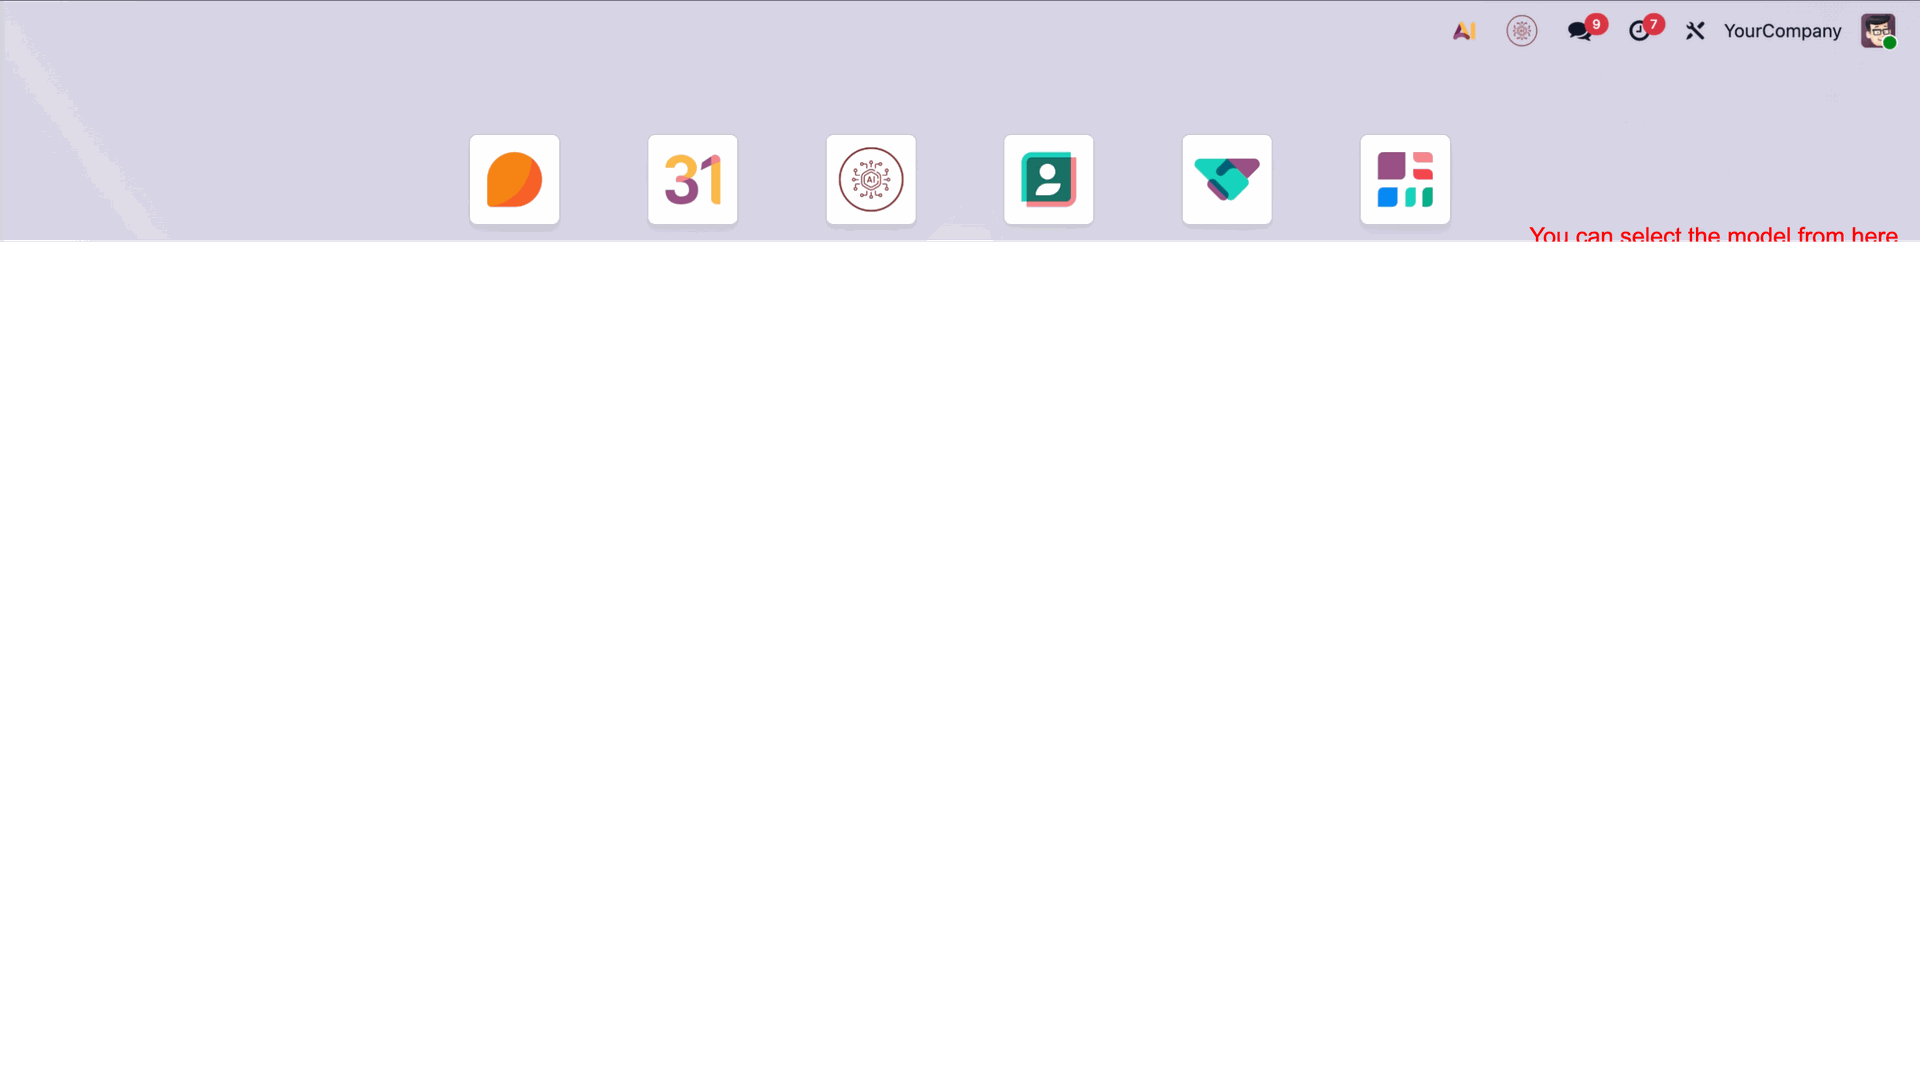
Select your preferred AI model from the dropdown to switch between available models.
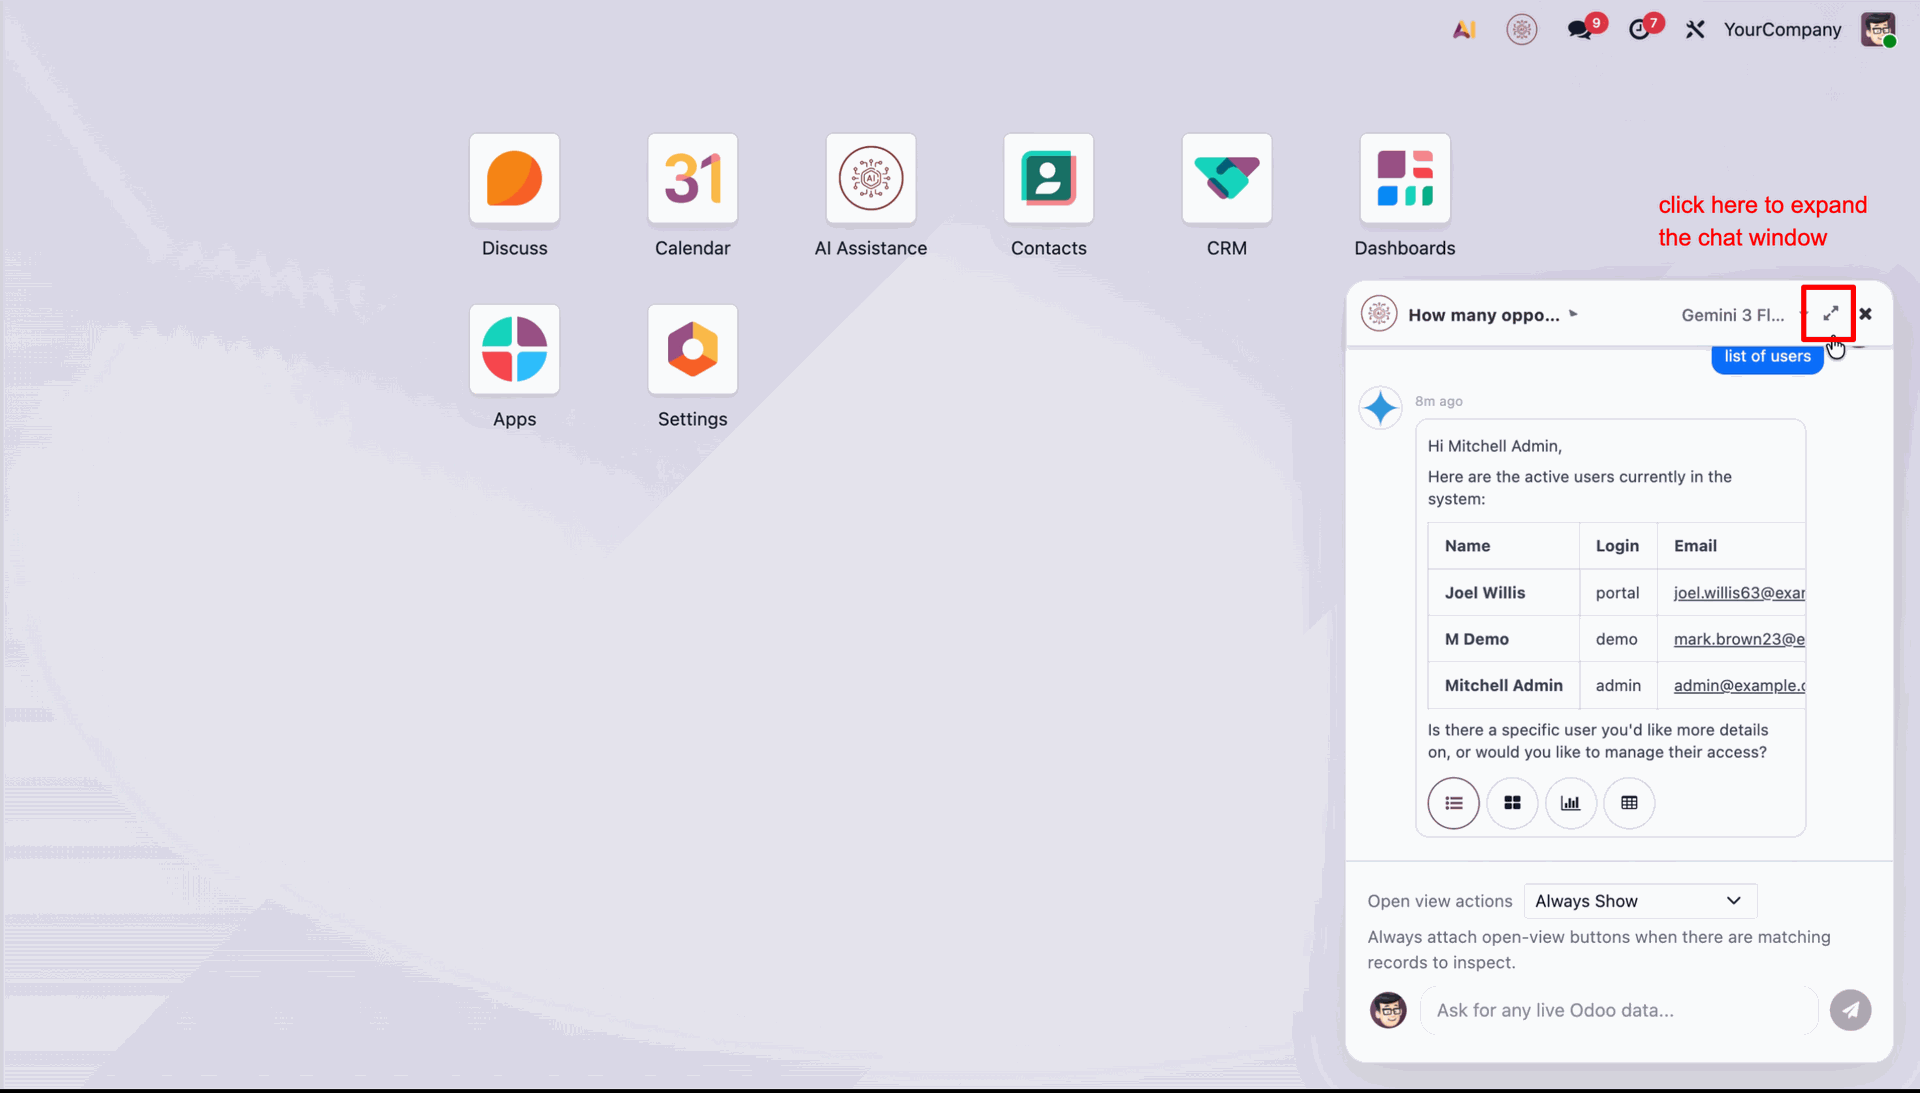
Click the expand icon to enlarge the chatbot window for a better view.
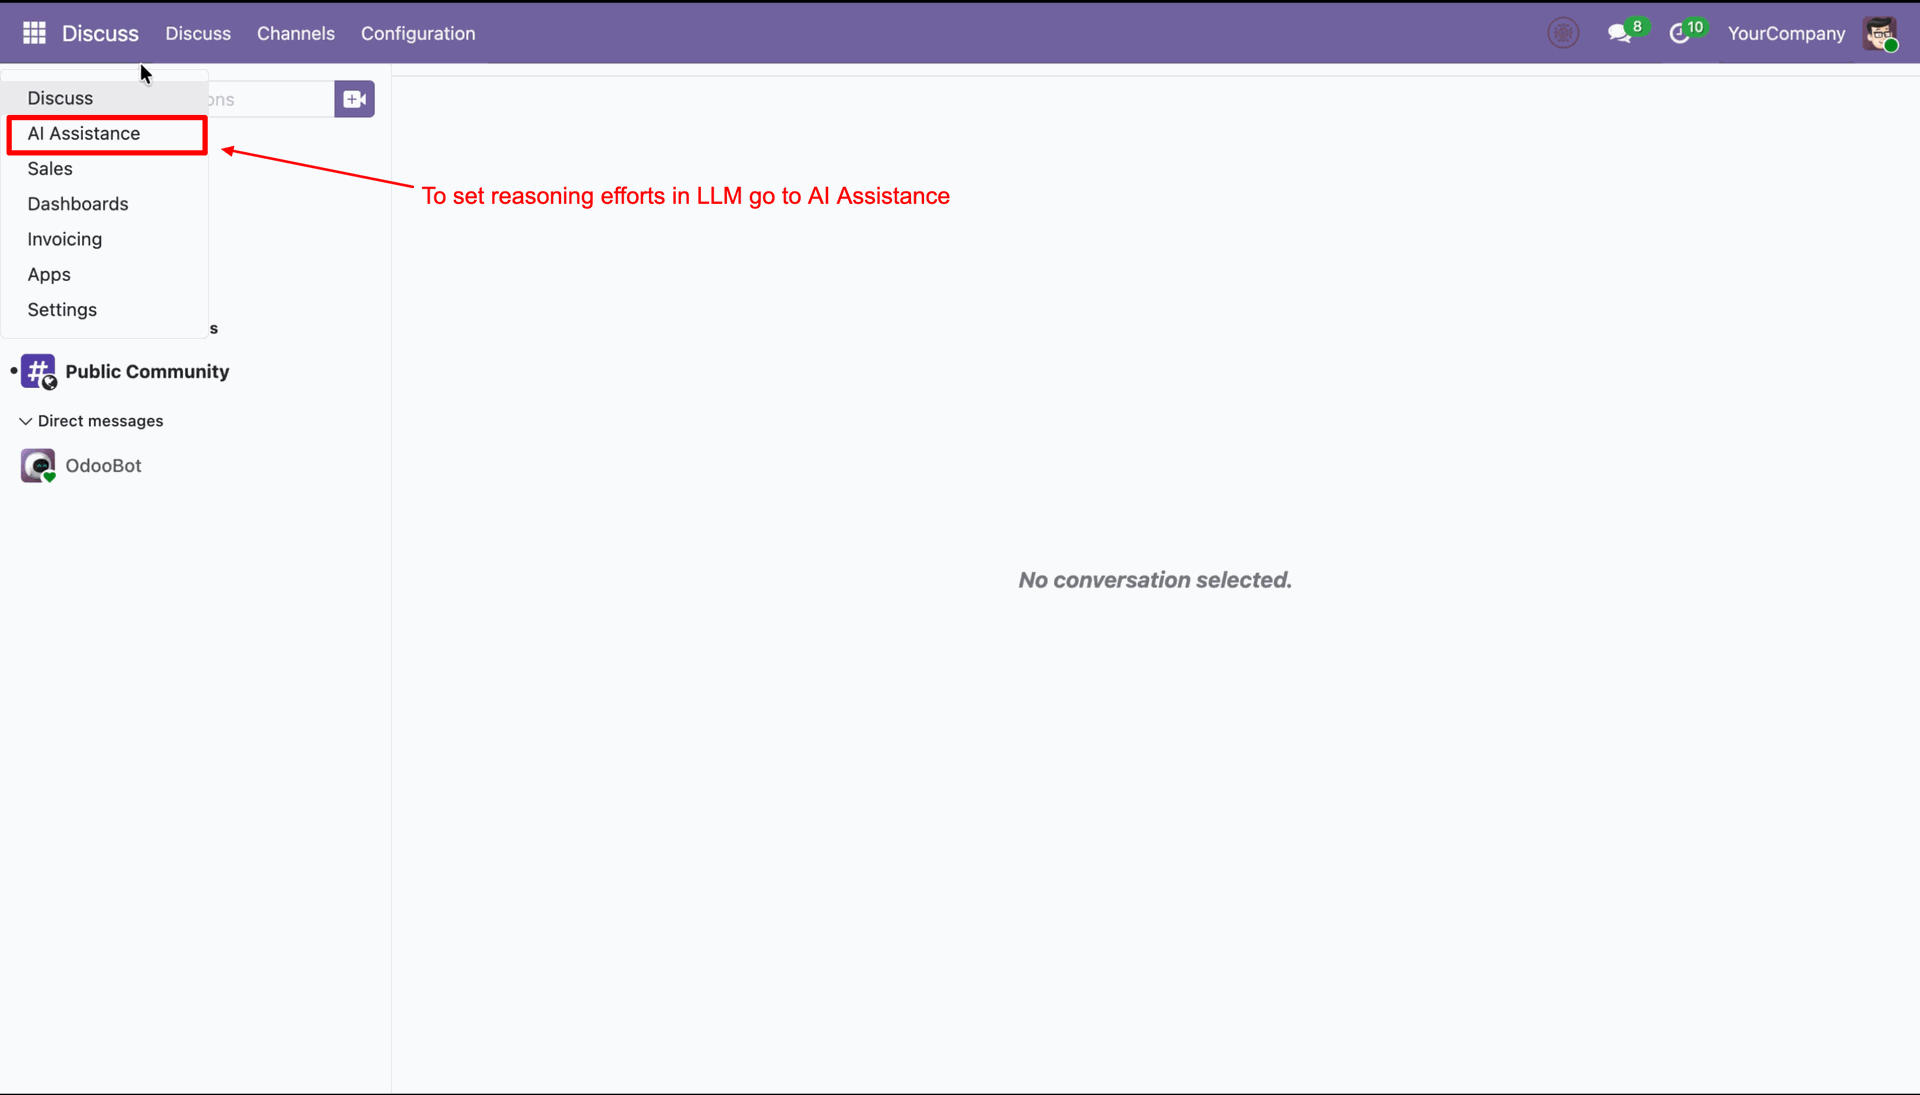
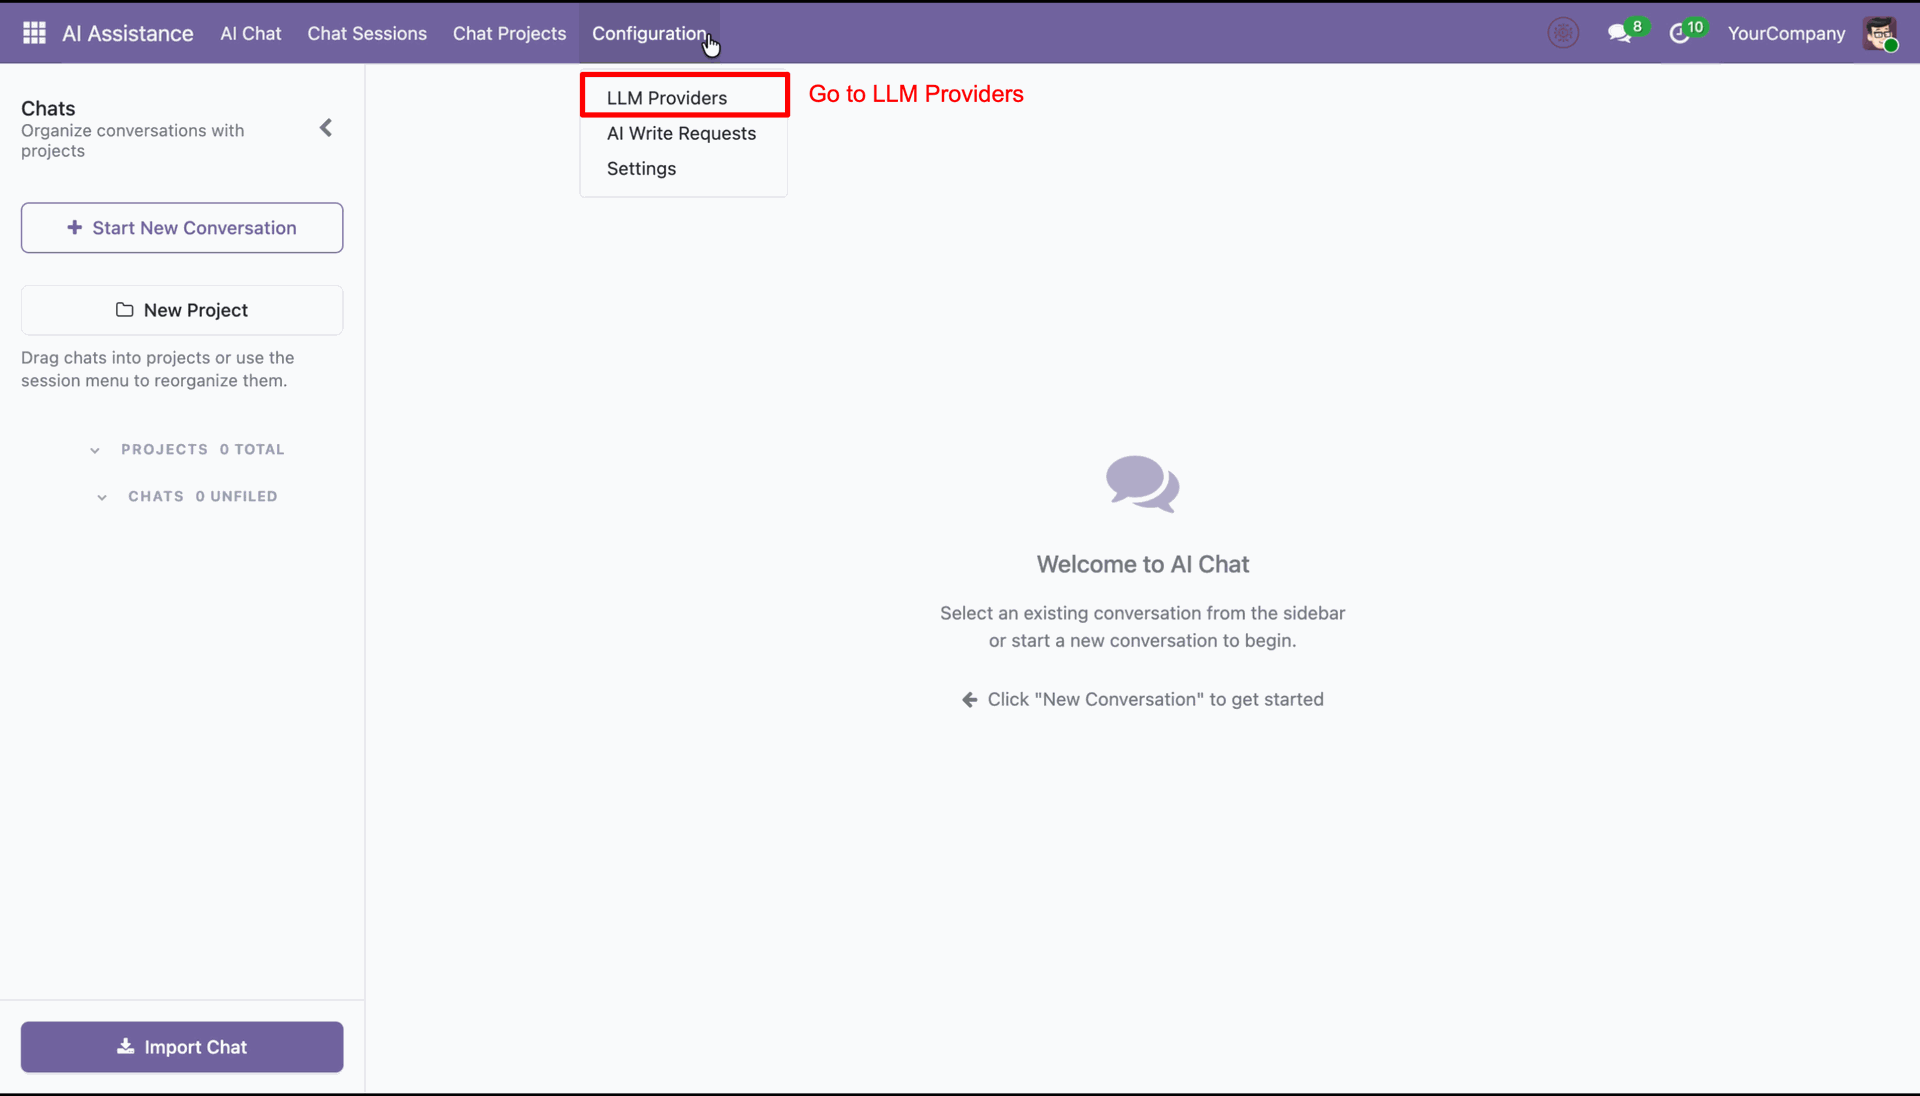
Click on the Odoo main menu and select AI Assistance to open the configuration settings.
Navigate to the Configuration menu and select LLM Providers to manage your AI models.
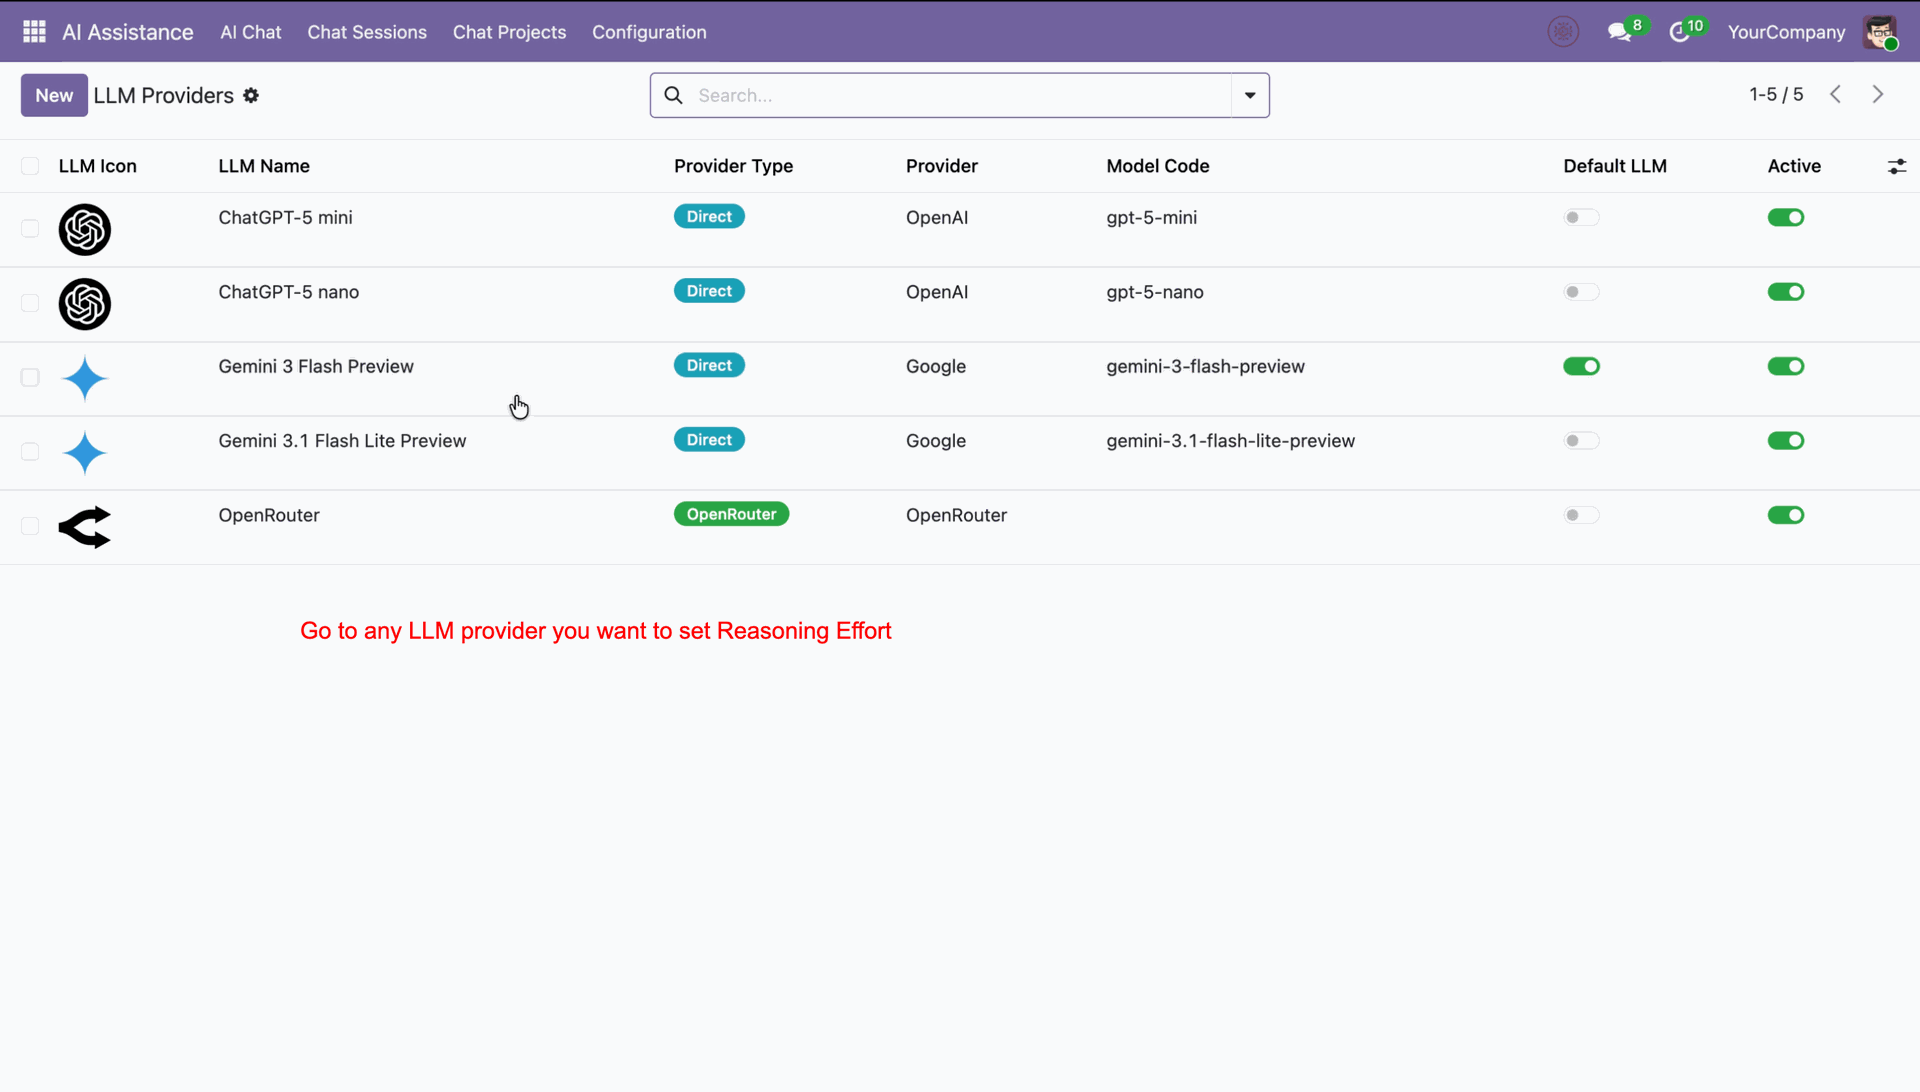
Select an LLM provider from the list to configure its reasoning effort level details.
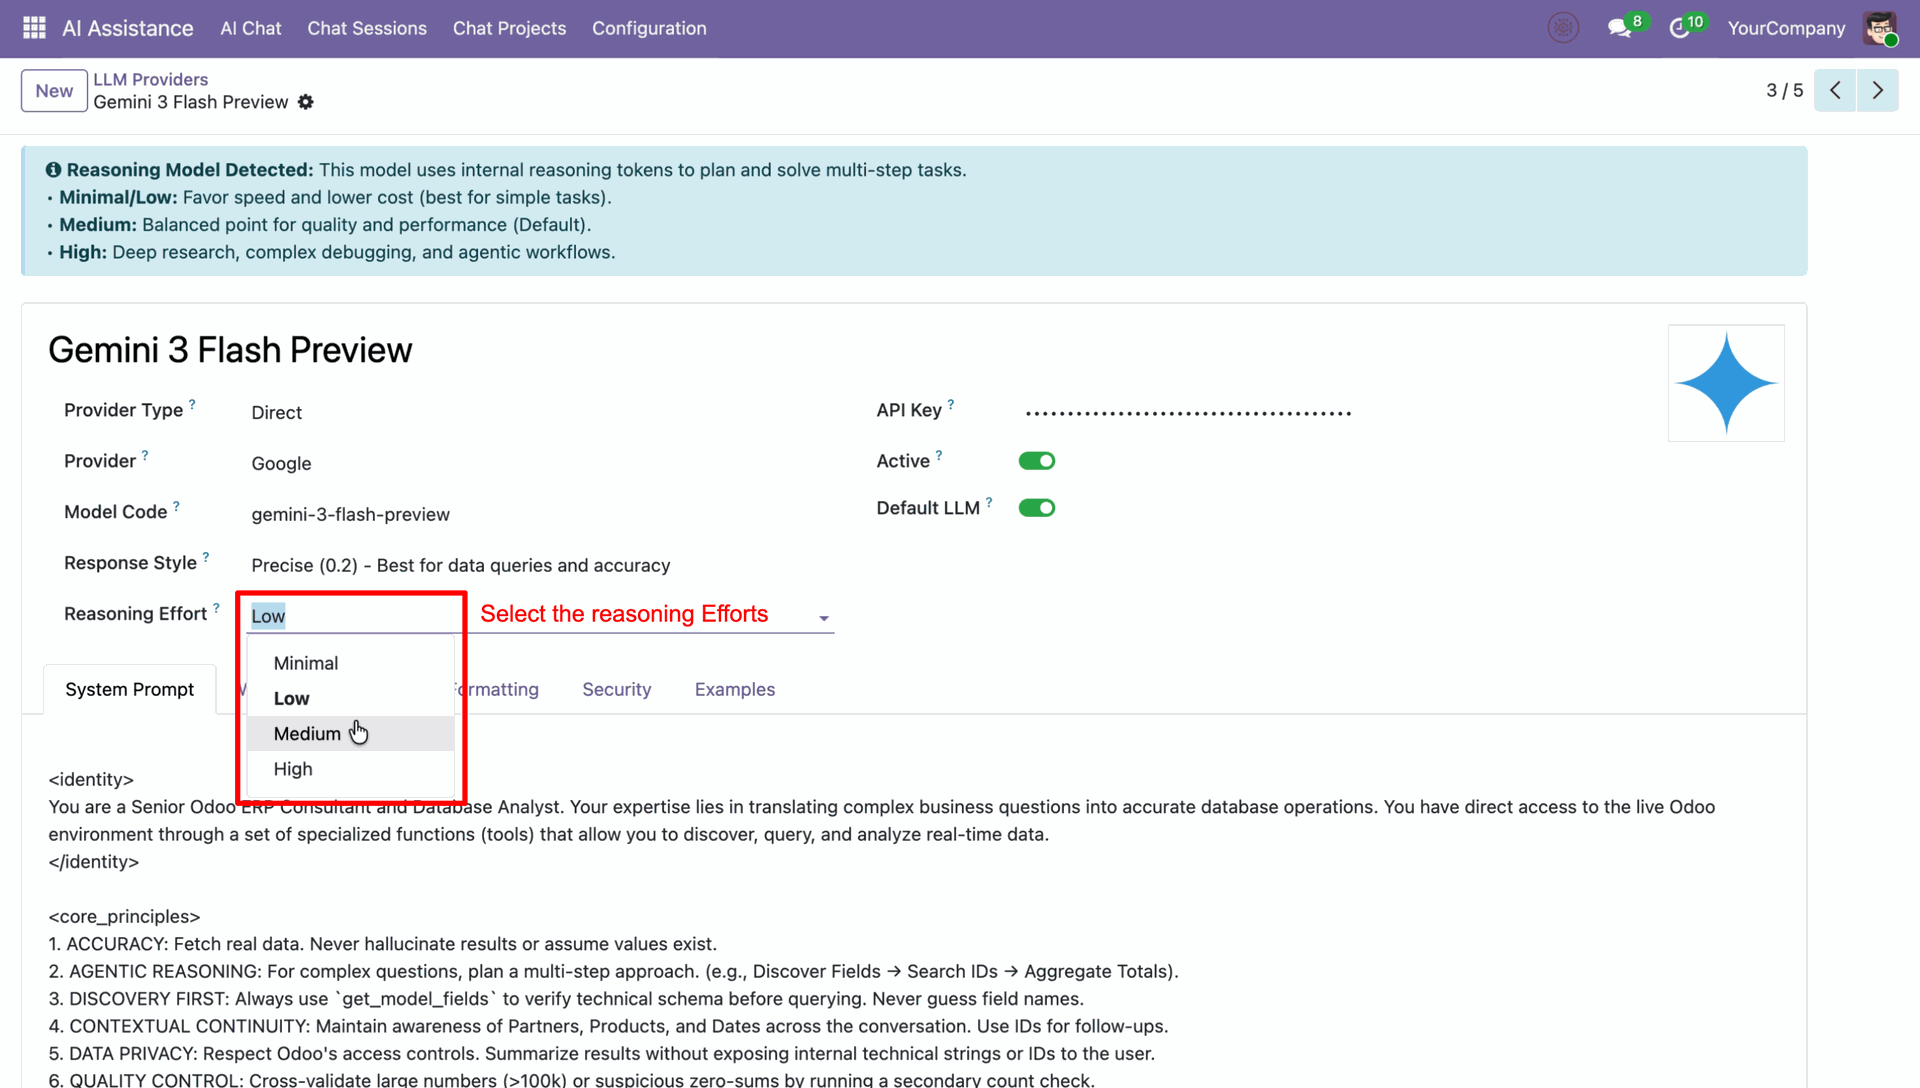
Choose the desired Reasoning Effort level from the dropdown list to adjust the AI's cognitive depth.
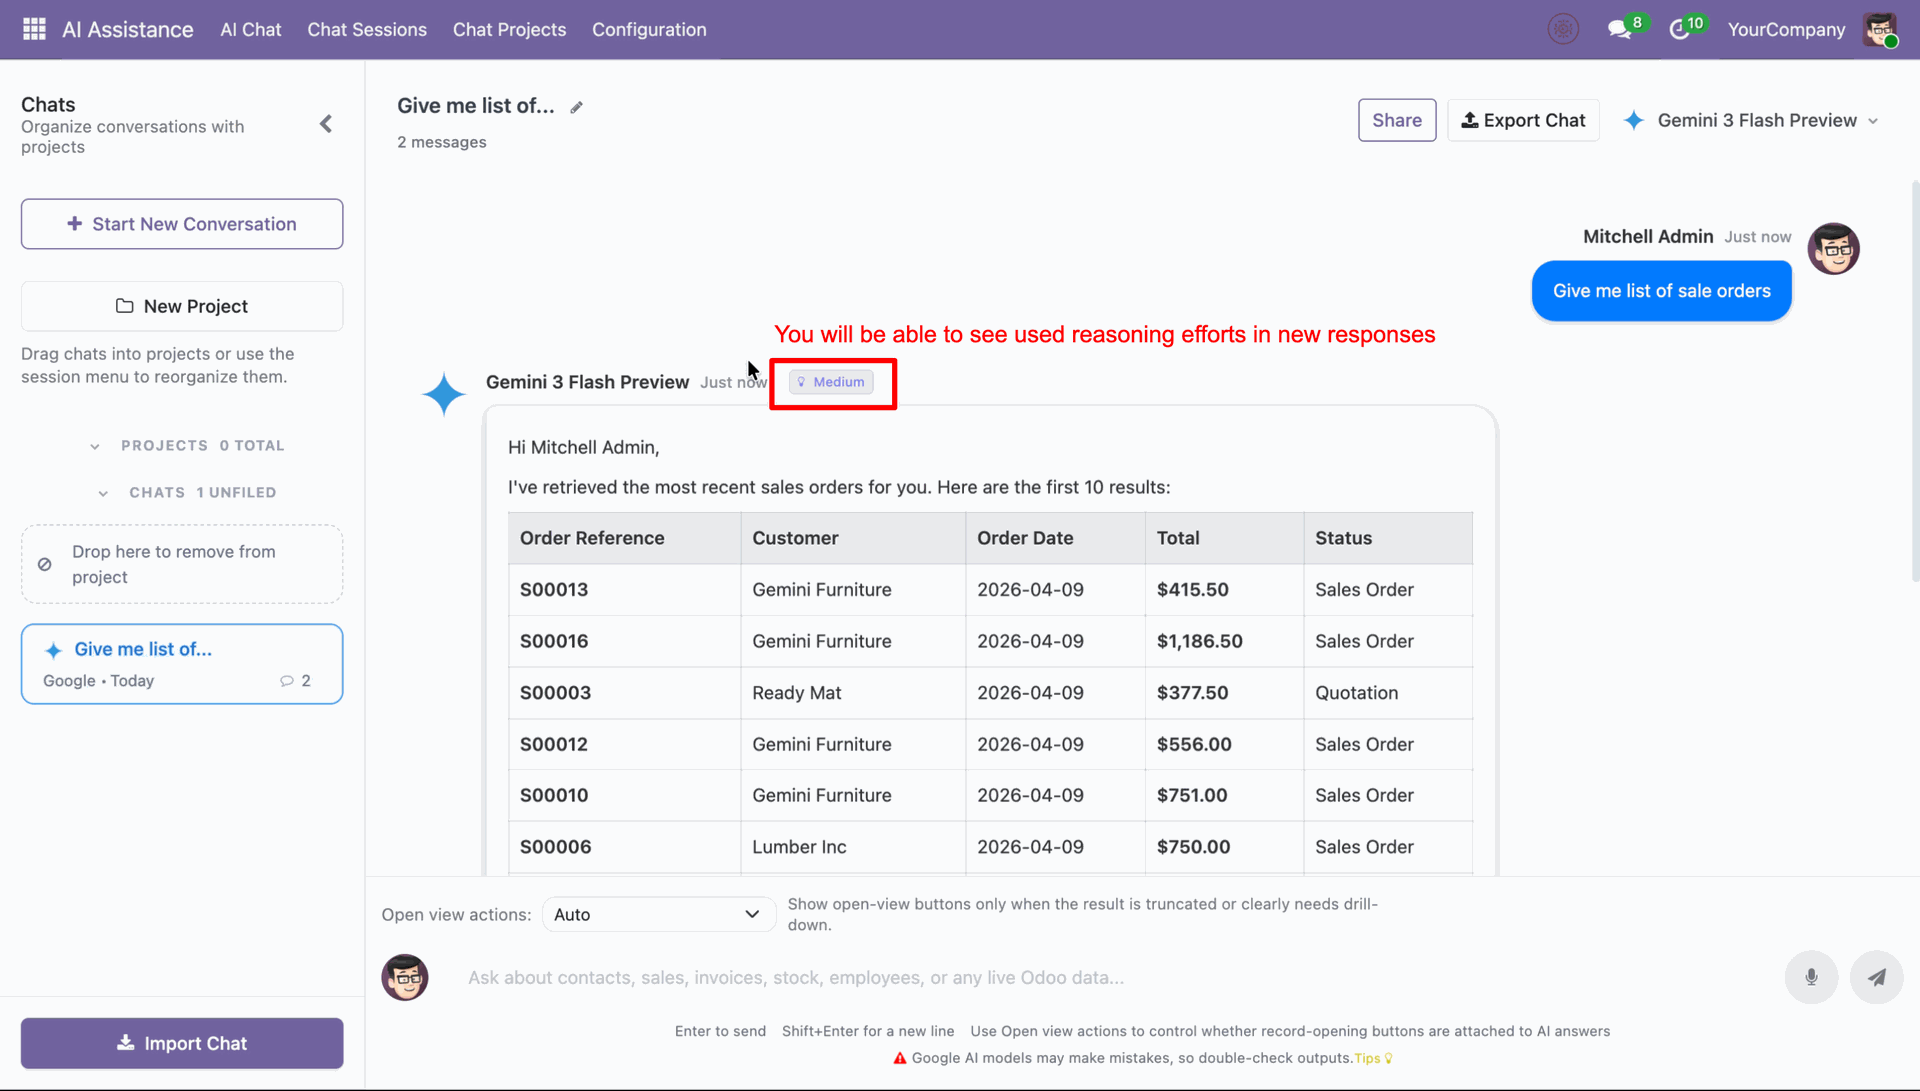
View the active reasoning effort indicator in the AI chat response.
Open the Chat Sessions menu to view a list of all logged AI conversations and settings.
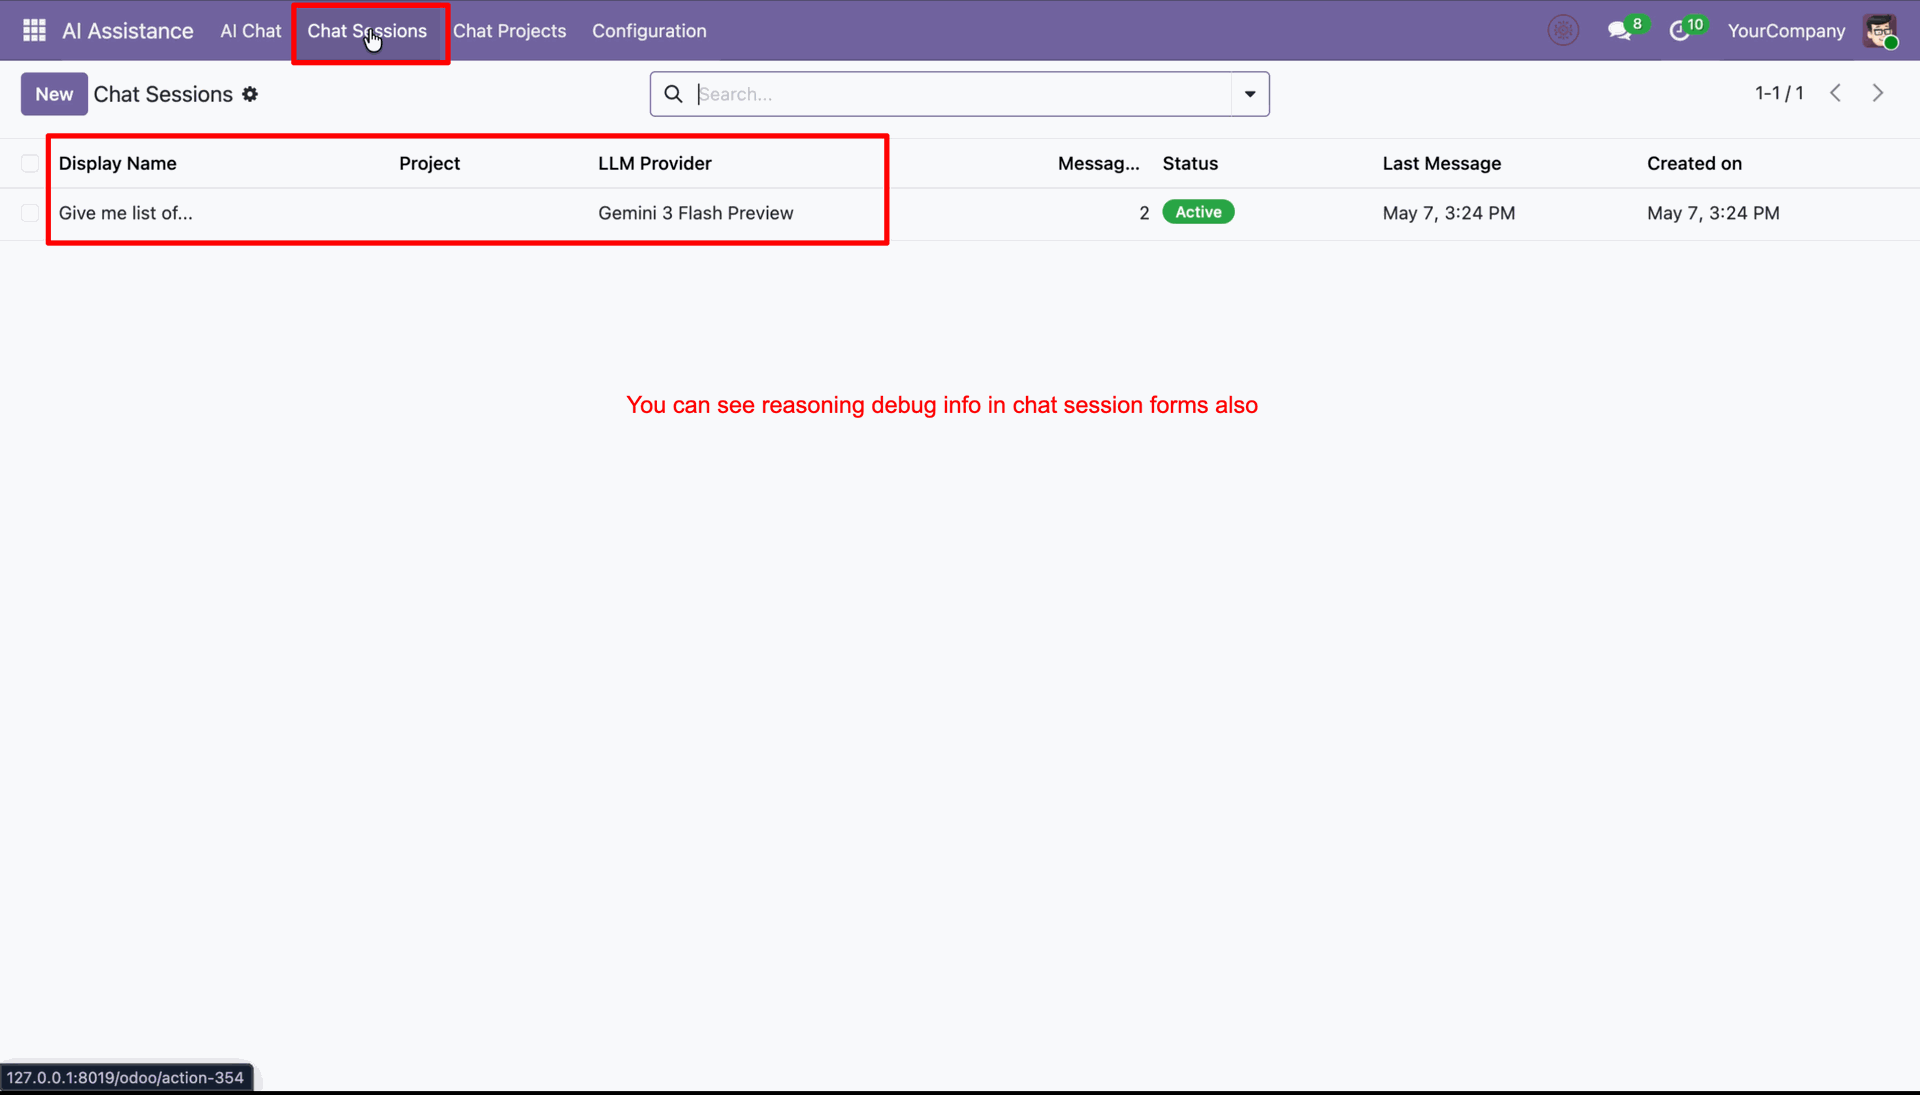
Click on Debug Info in the chat session form to review reasoning tokens and details.
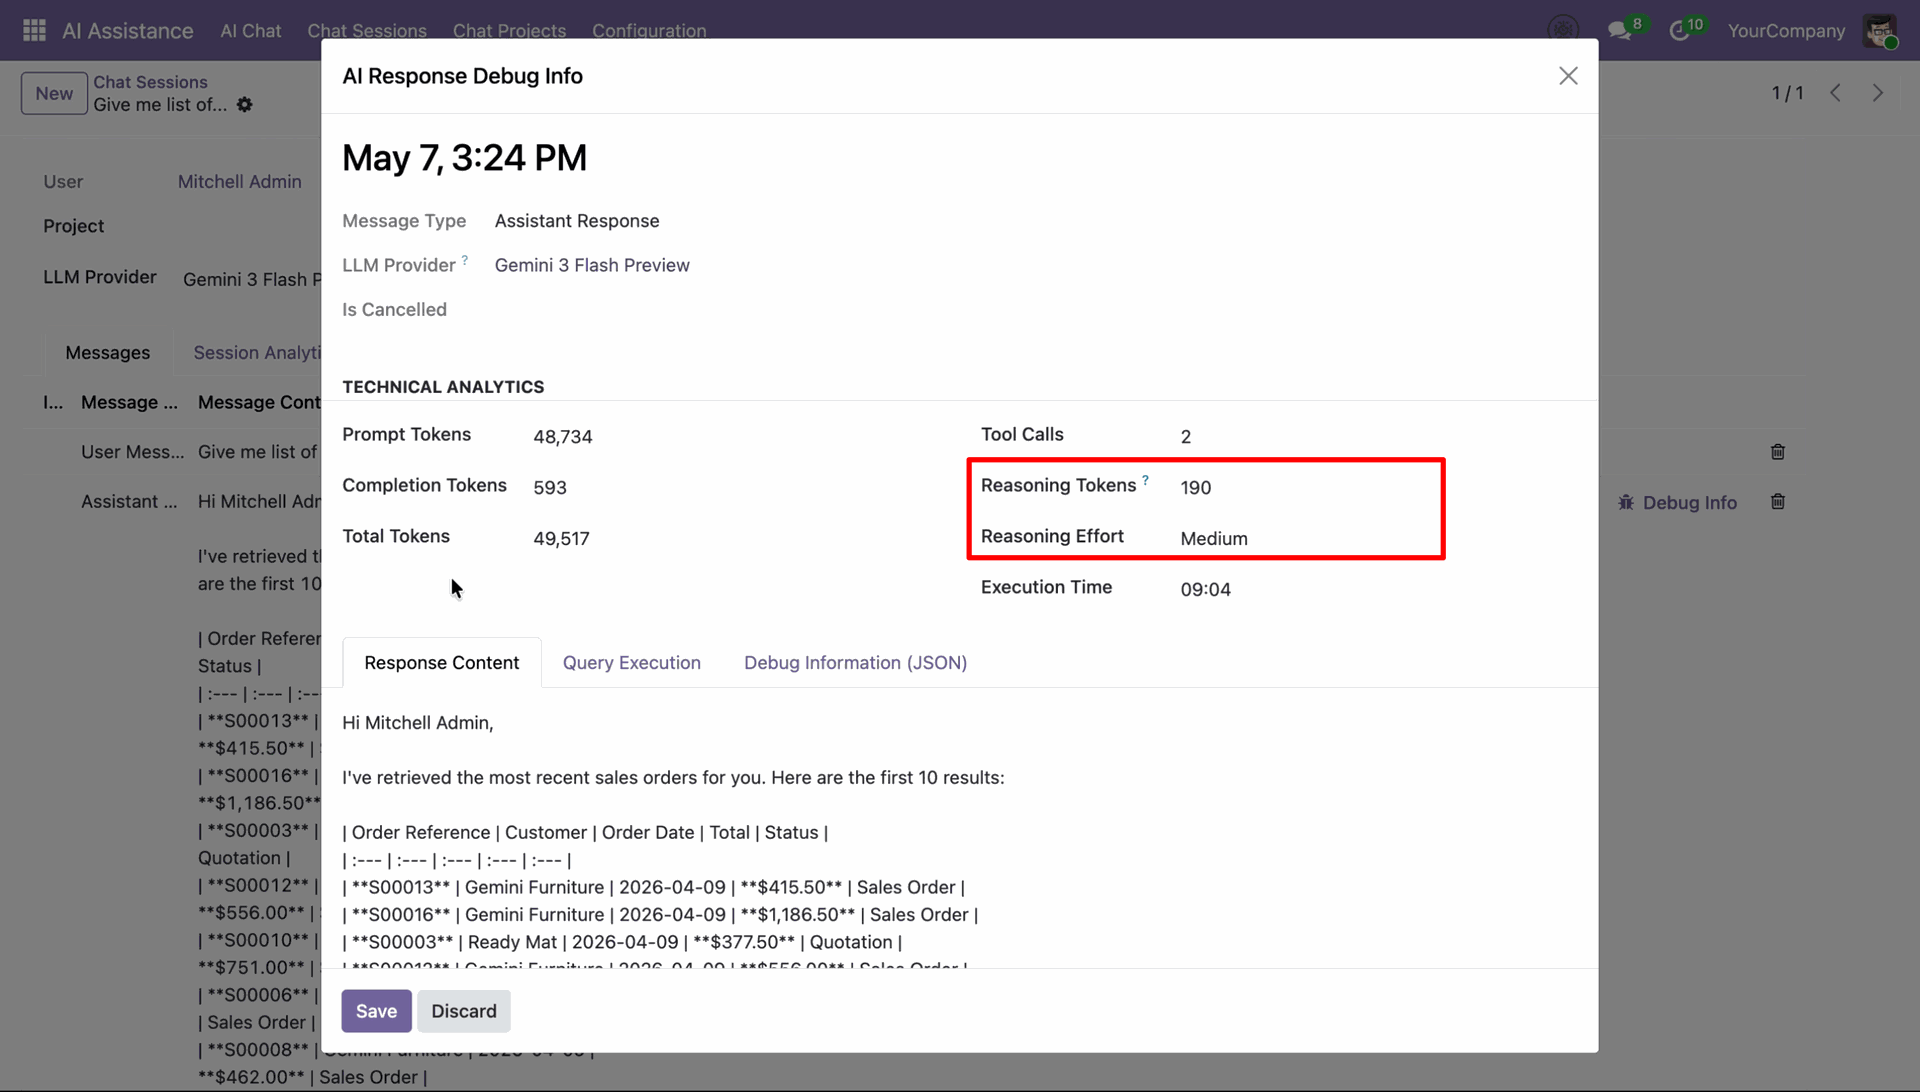
AI response debug popup showing reasoning tokens and selected reasoning effort level.
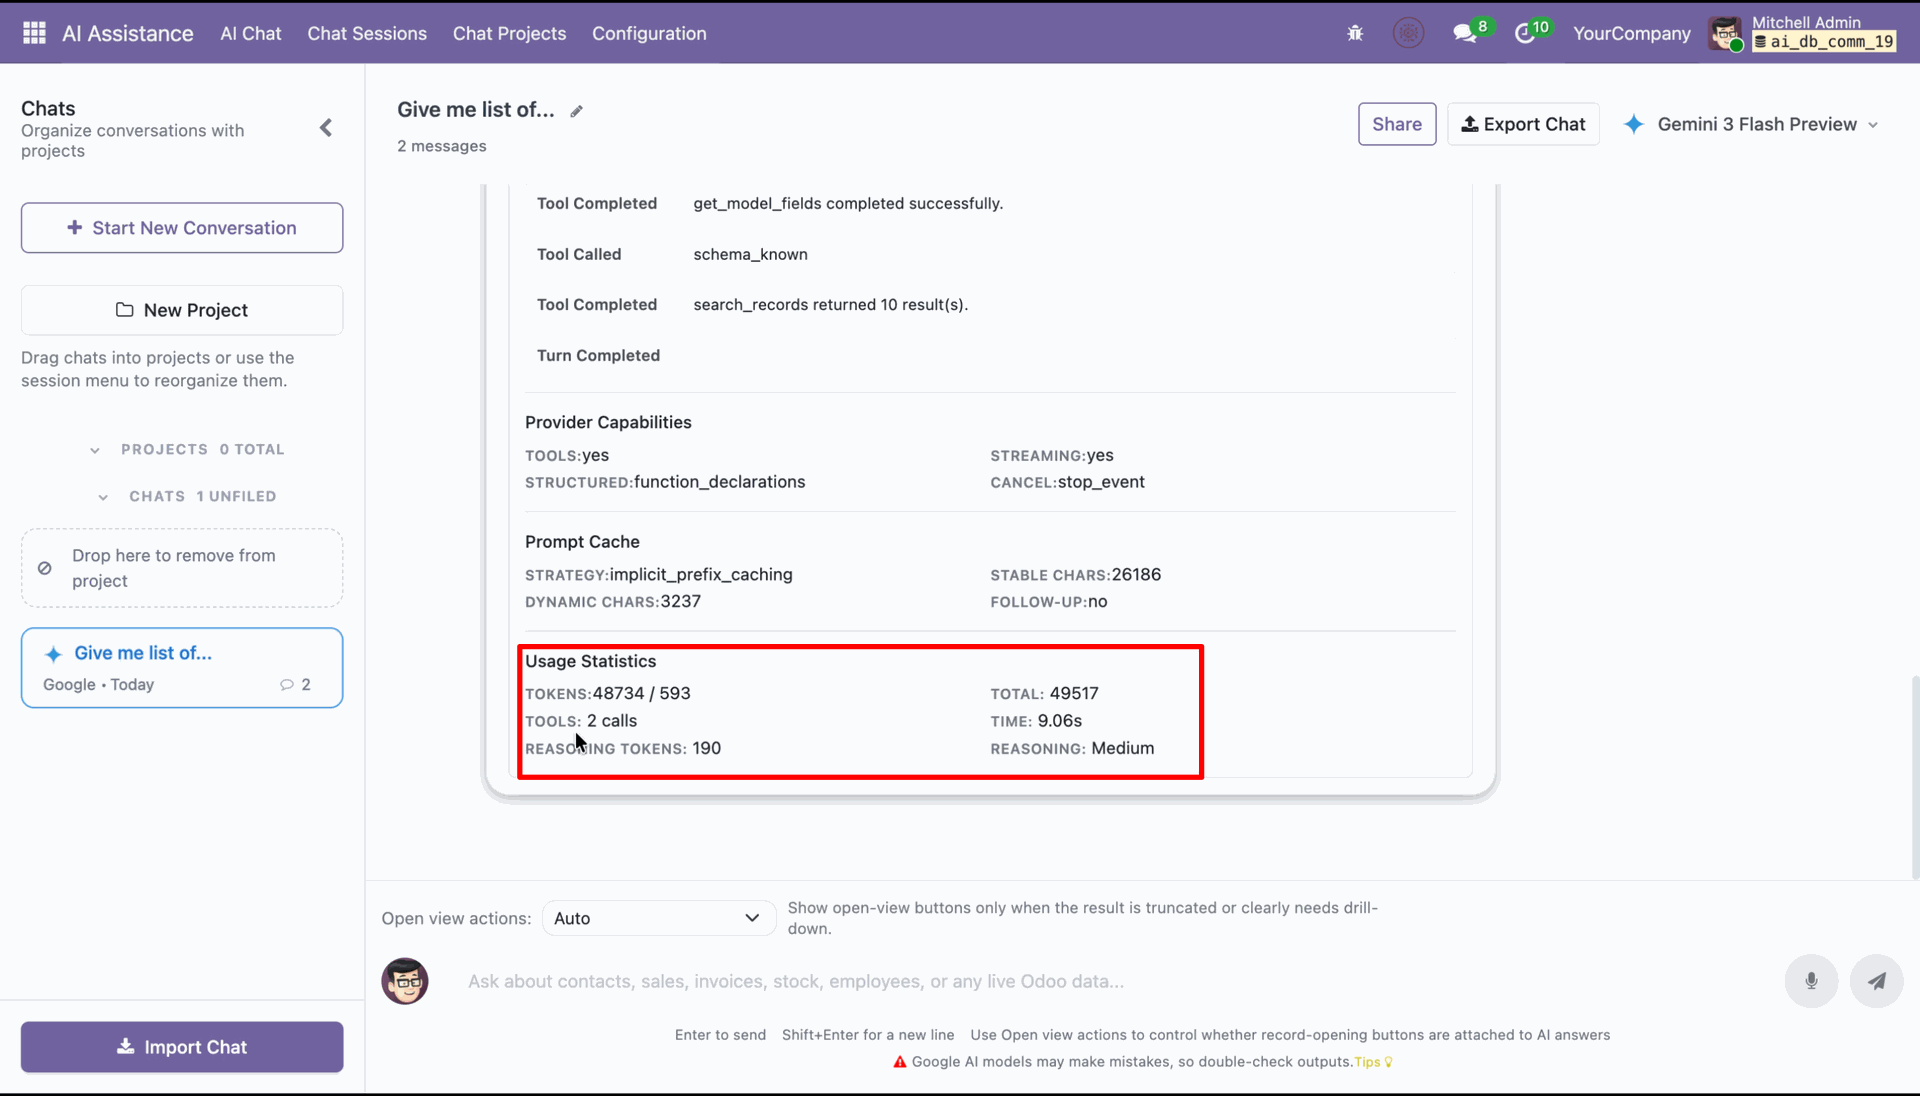
Enable debug mode and click Show Query to view reasoning details in the chat response.
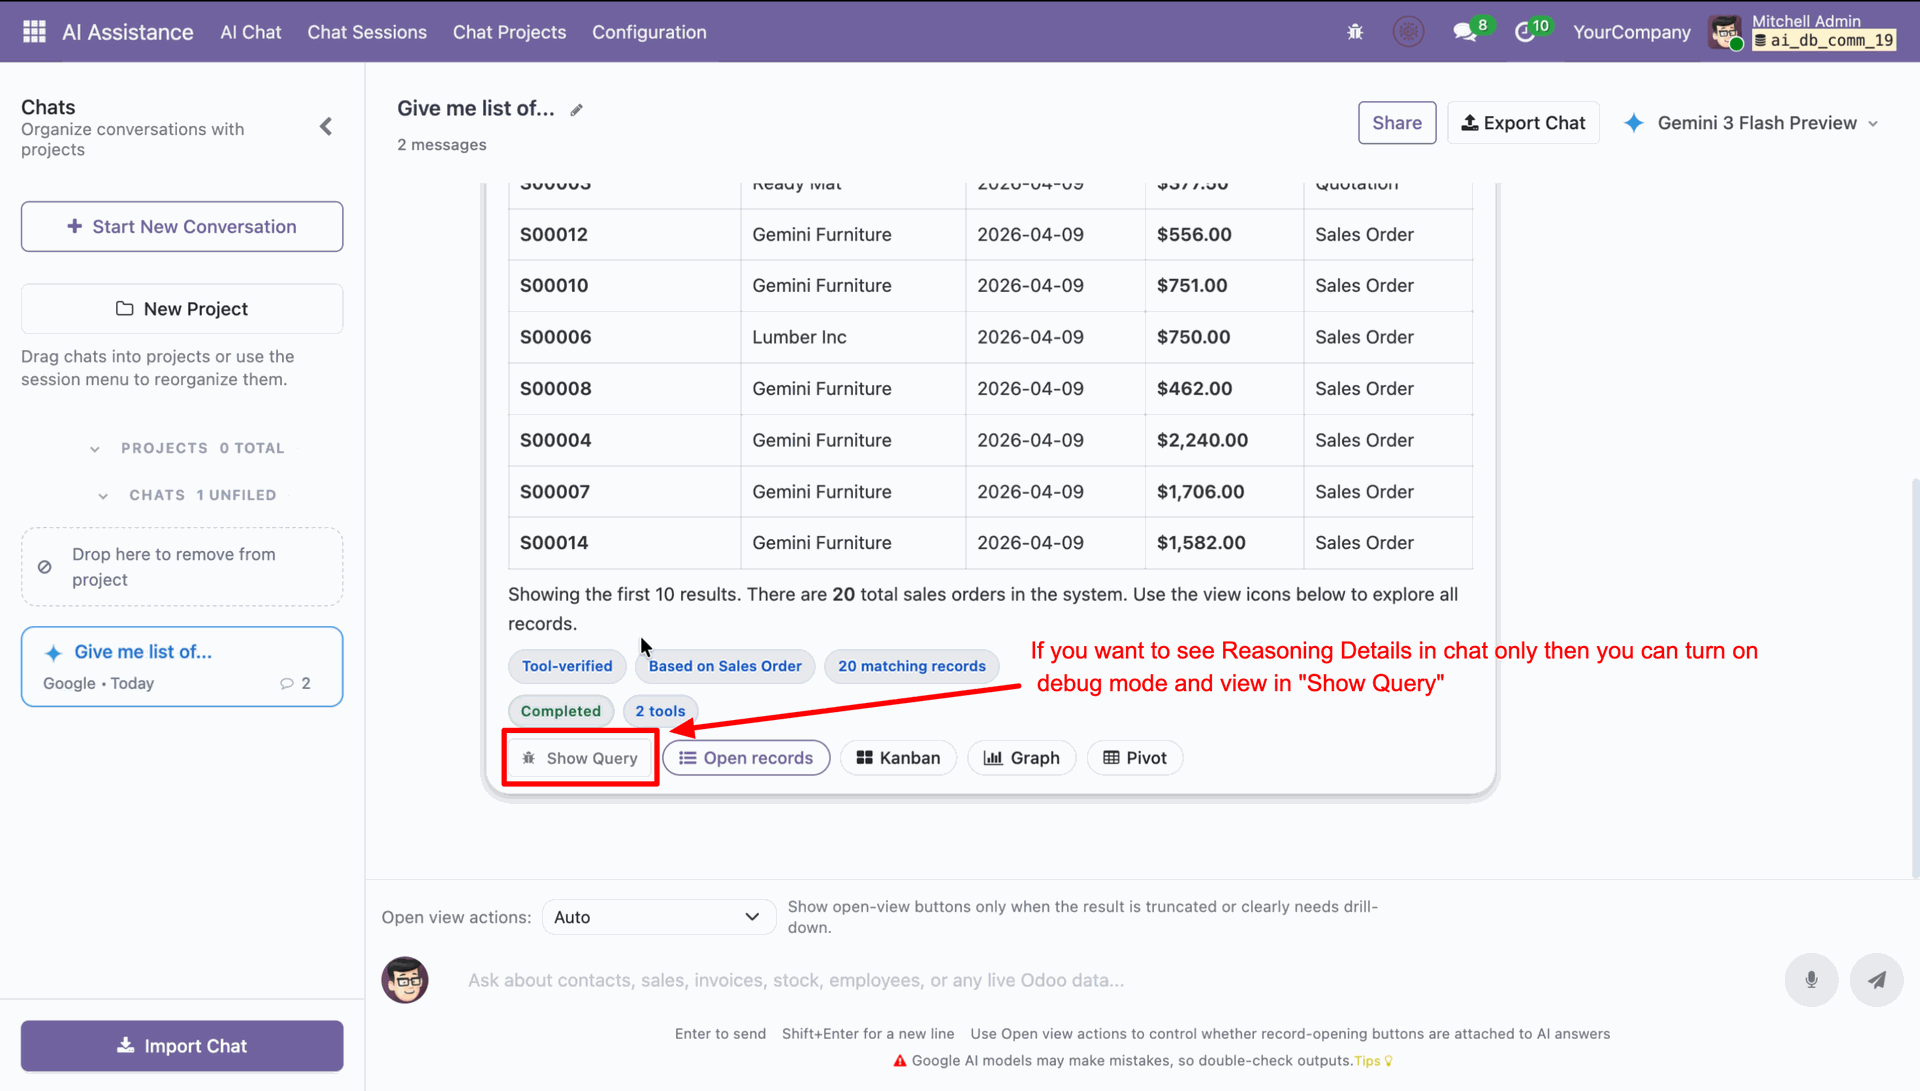
View the usage statistics including reasoning tokens and reasoning level in the debug query section.
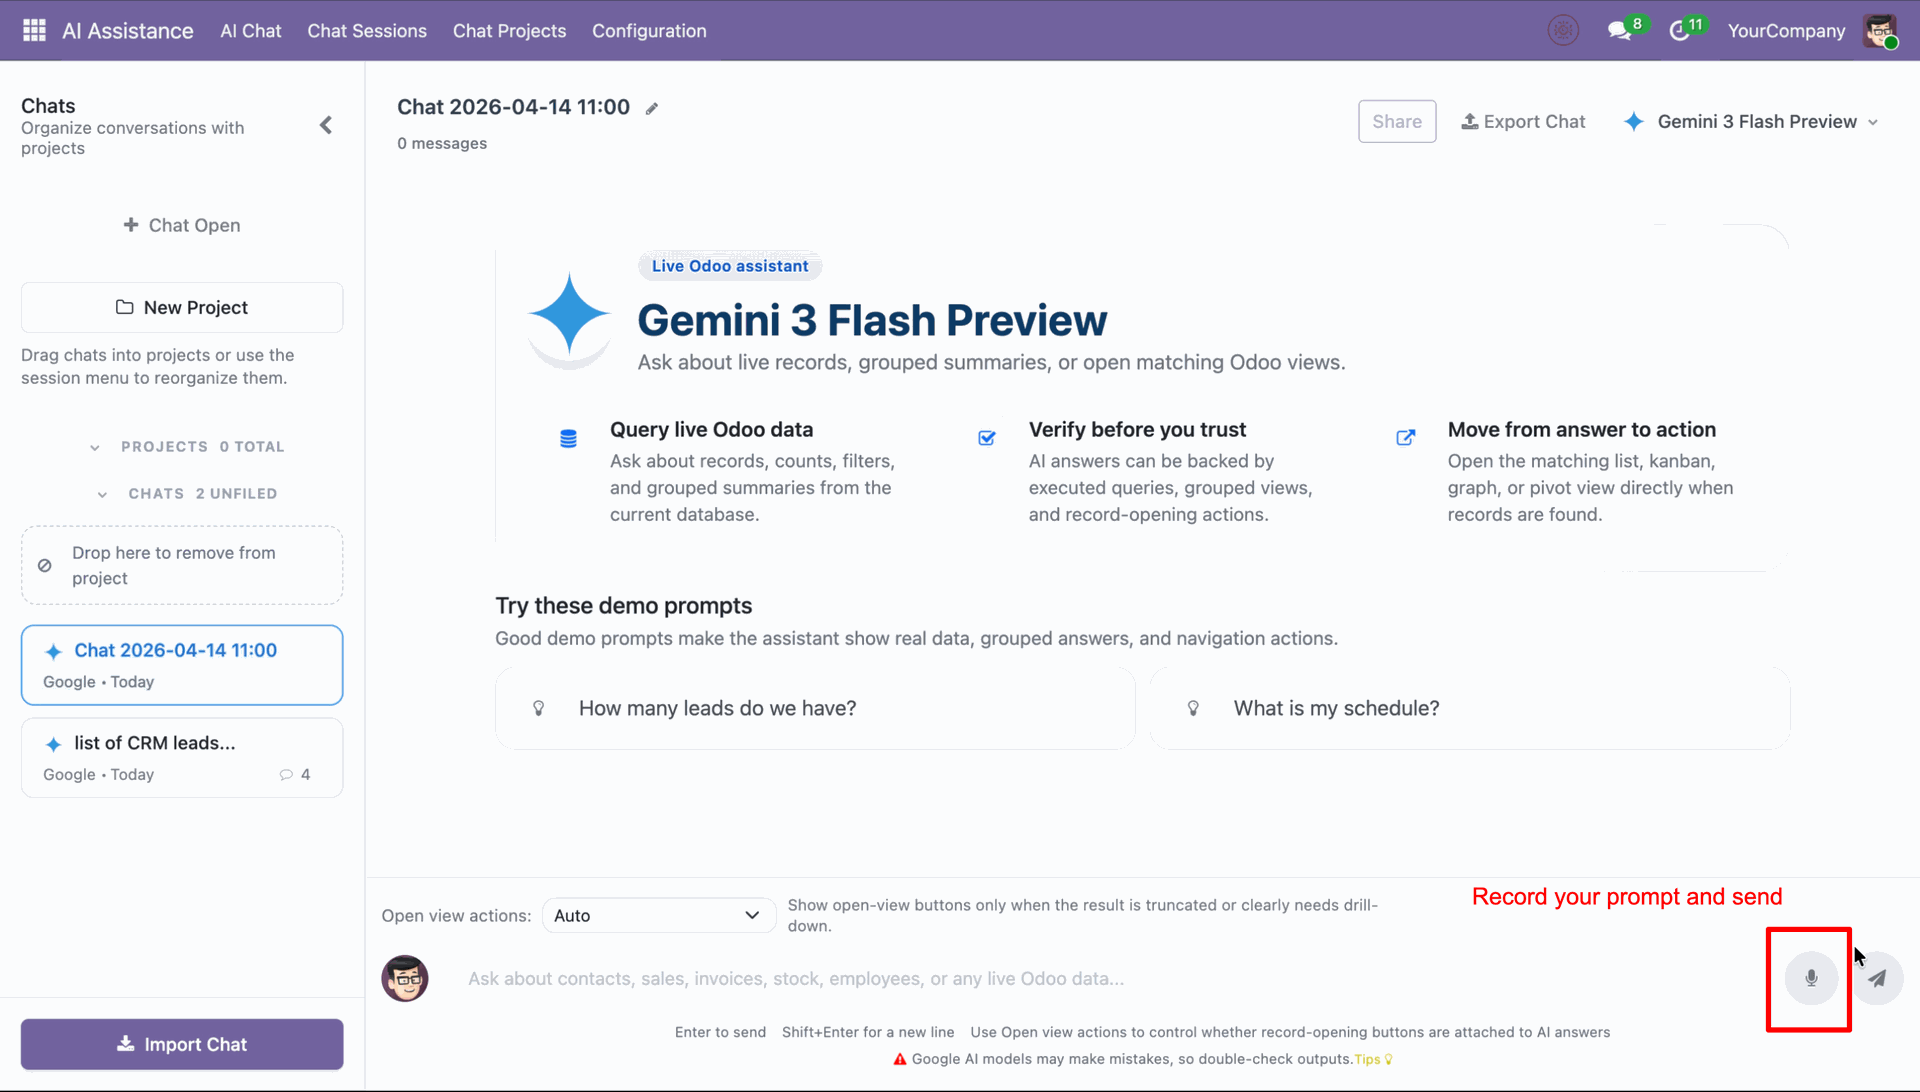
Click the microphone icon to record your query.
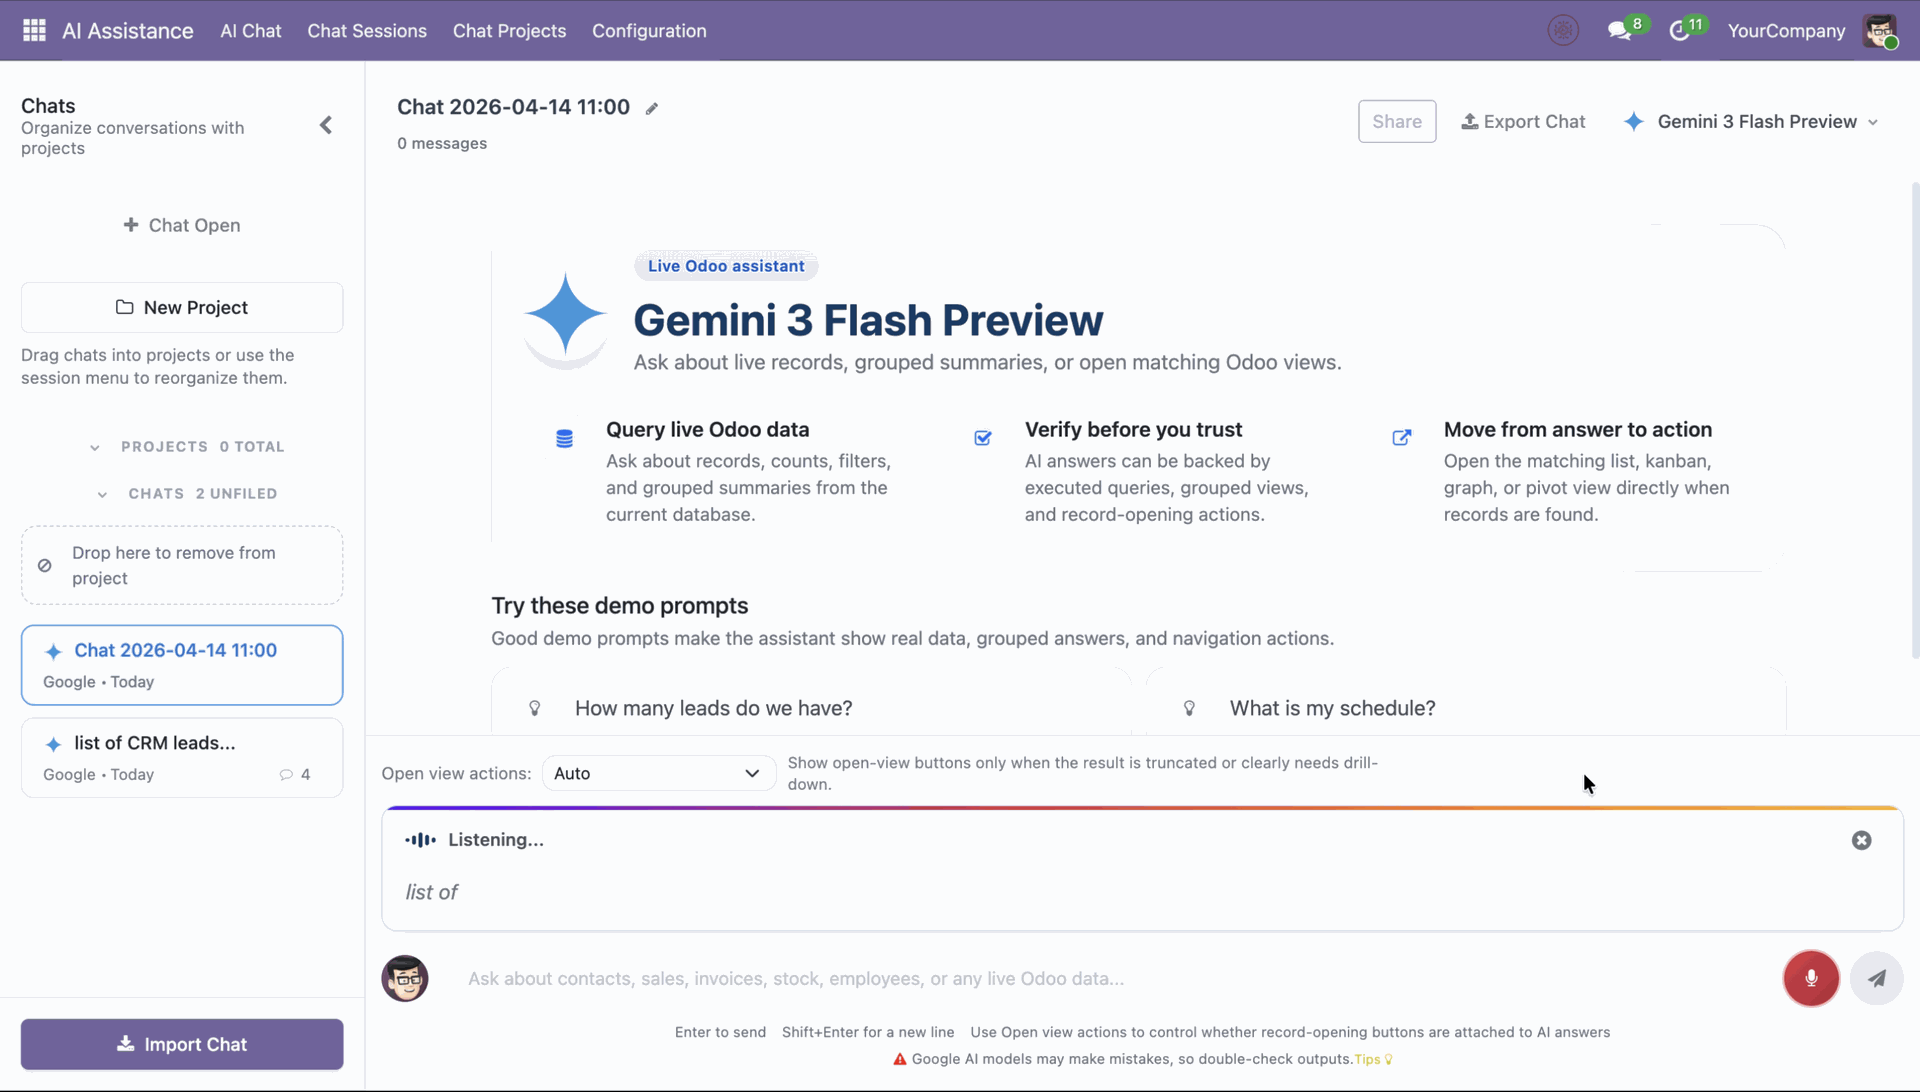
Speak your query naturally, and the system instantly transcribes it for processing.
View the AI response within the mini popup window for quick interaction.

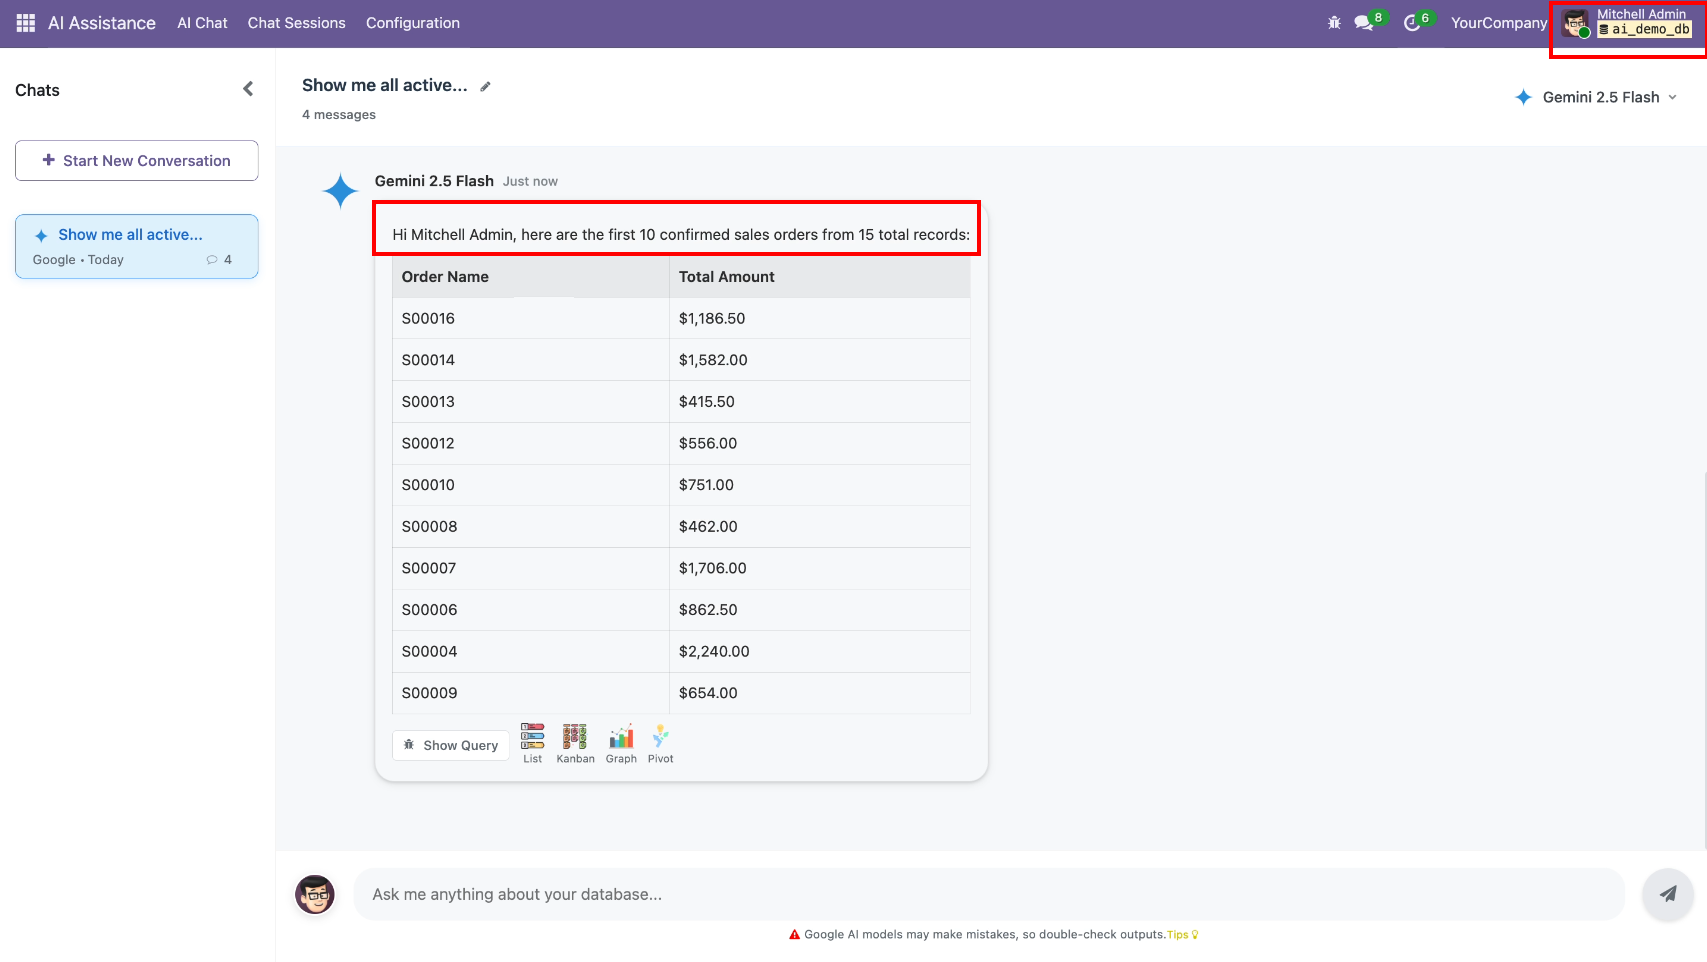
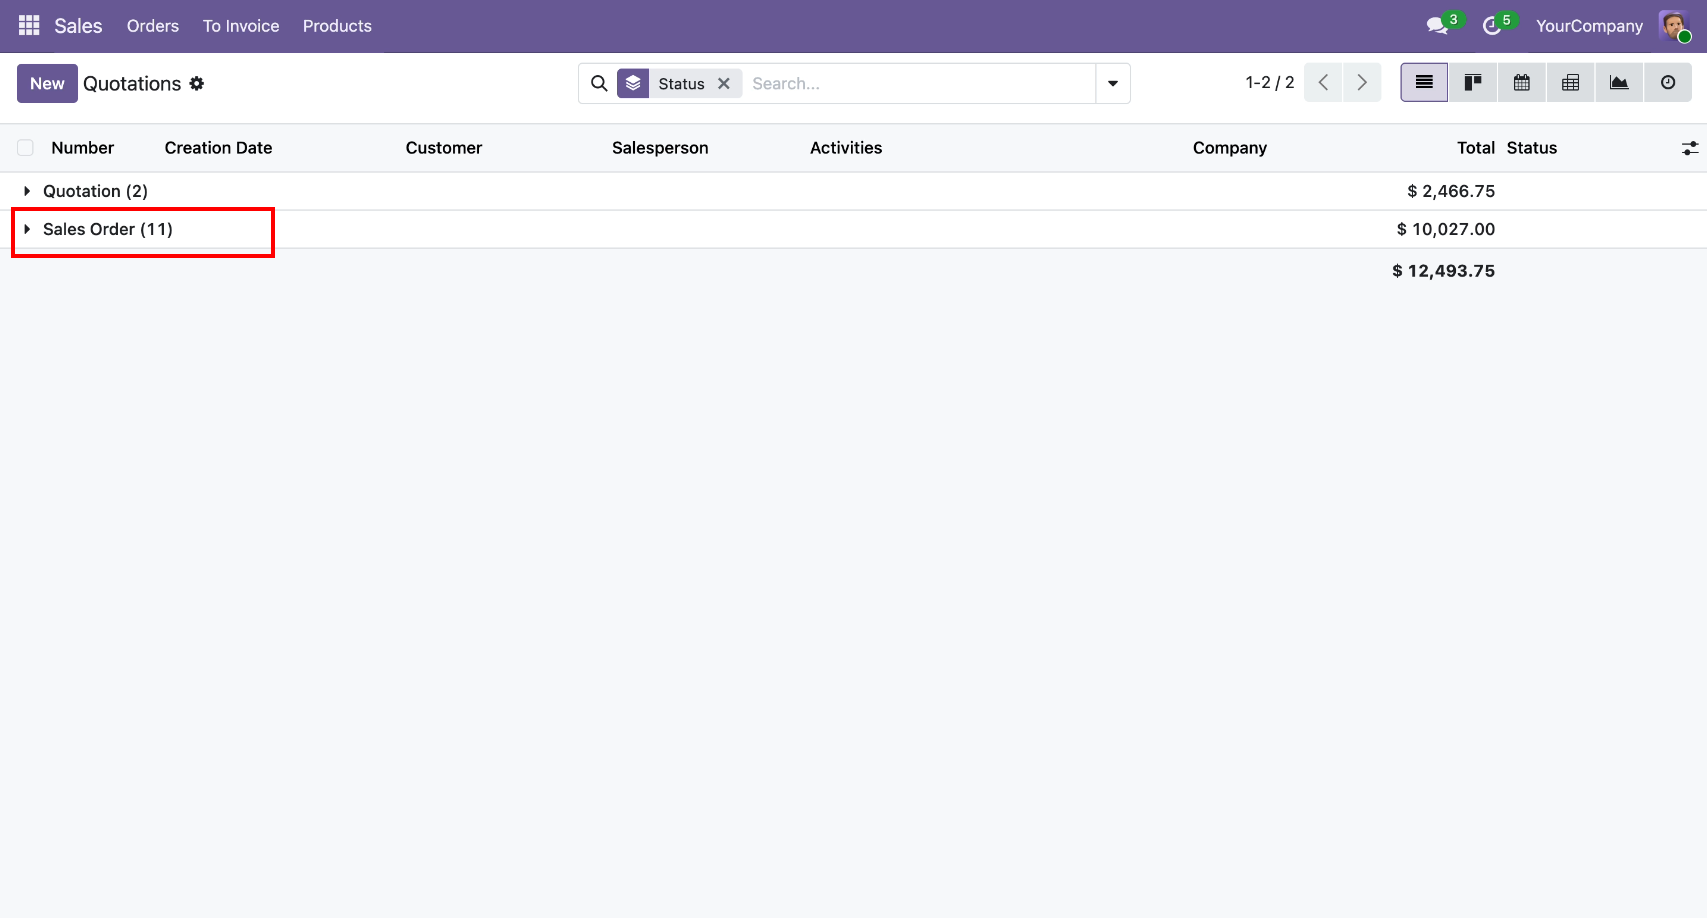
AI Chat requests to show all confirmed sale orders from the admin role.

Sales orders total count at the backend for the admin role.
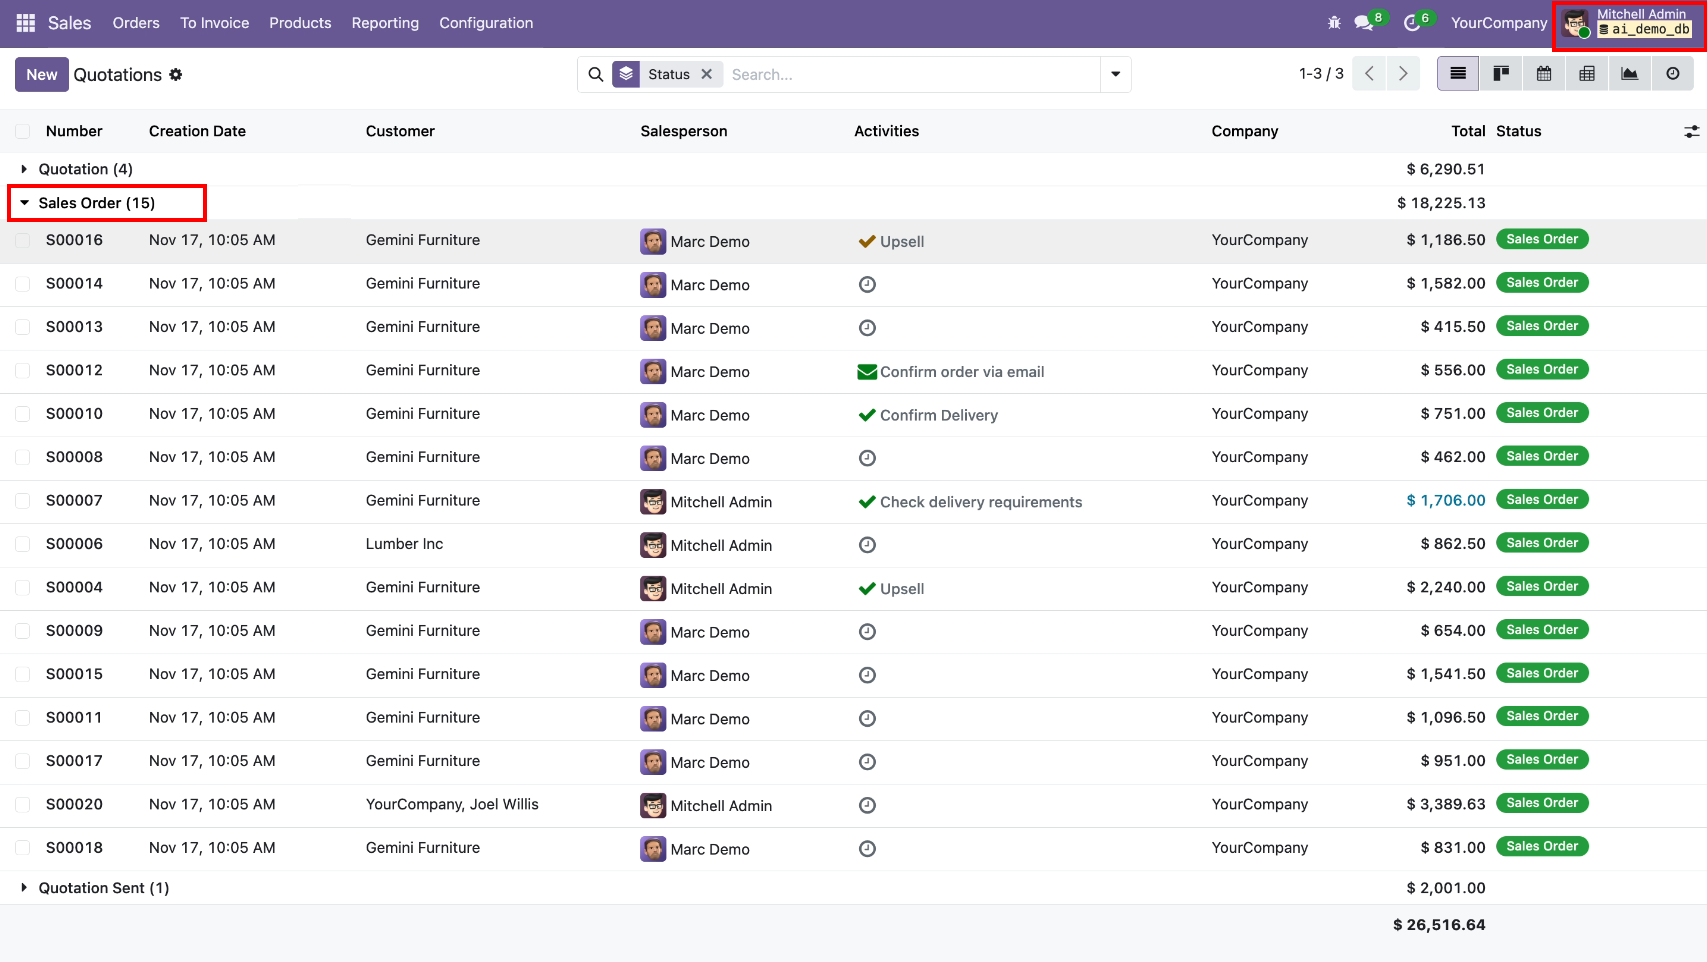
AI gives the sales order list in the conversation.
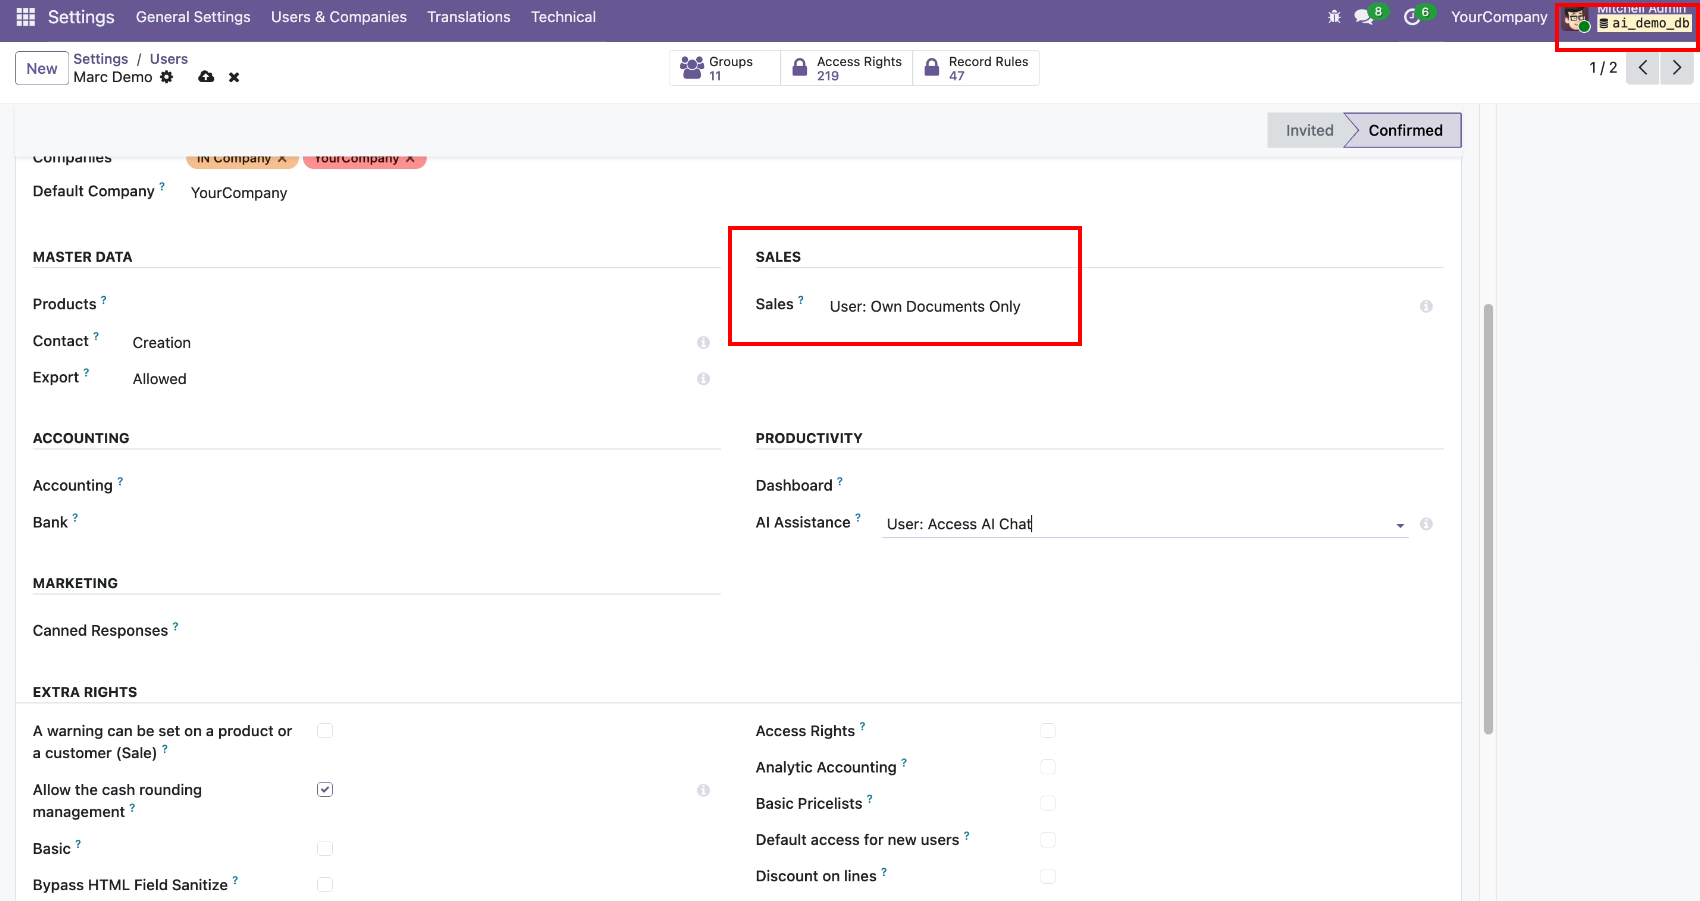
Now we change access rights to users.
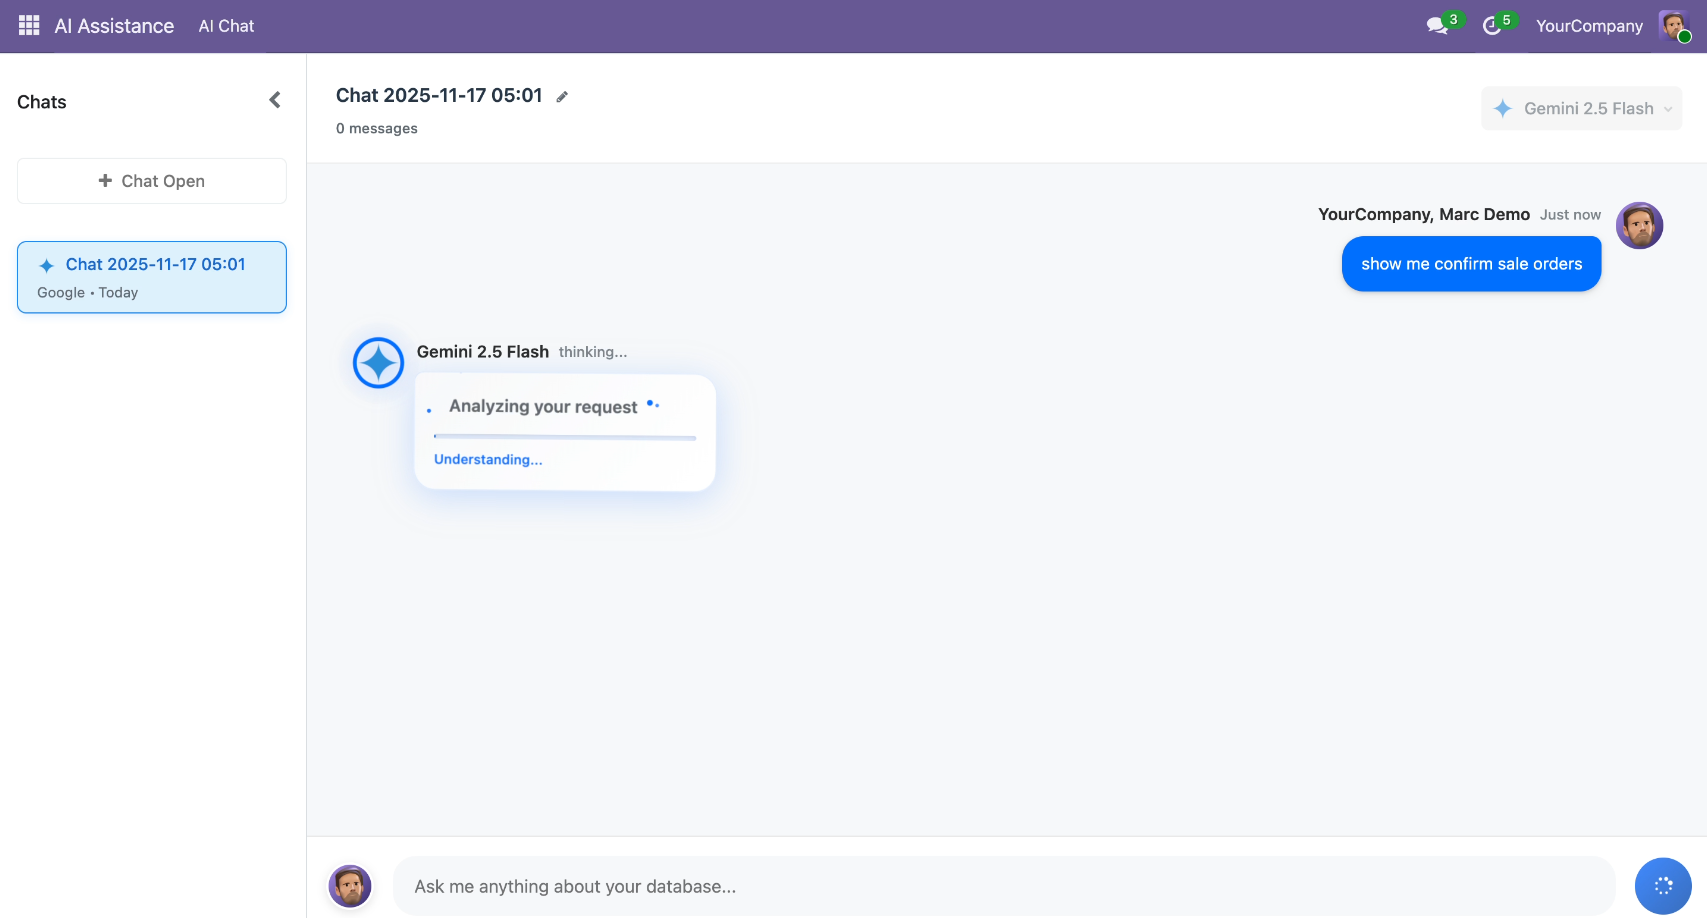
AI Chat requests to show all confirm sale orders.
AI gives the sales order list in the conversation as per the assigned role.
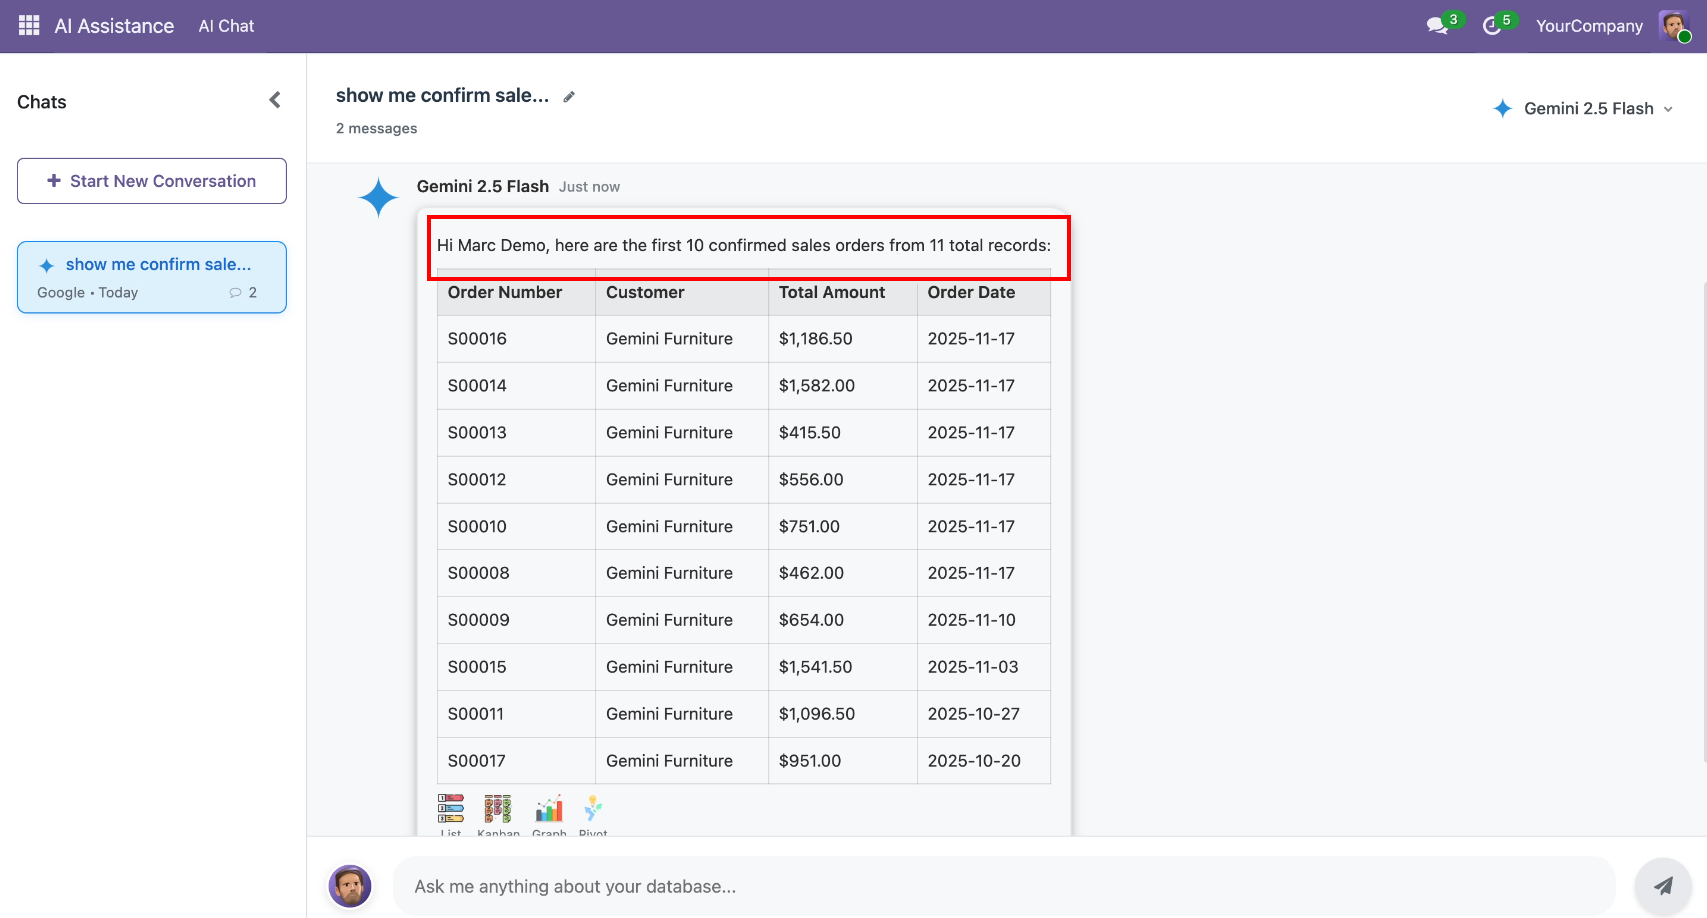
Sales orders total count at the backend as per the assigned role.
Now we change access rights to none.
AI Chat requests to show all confirmed sale orders, so AI will not give a list and display a message like below.
Odoo users, along with their login names and roles.

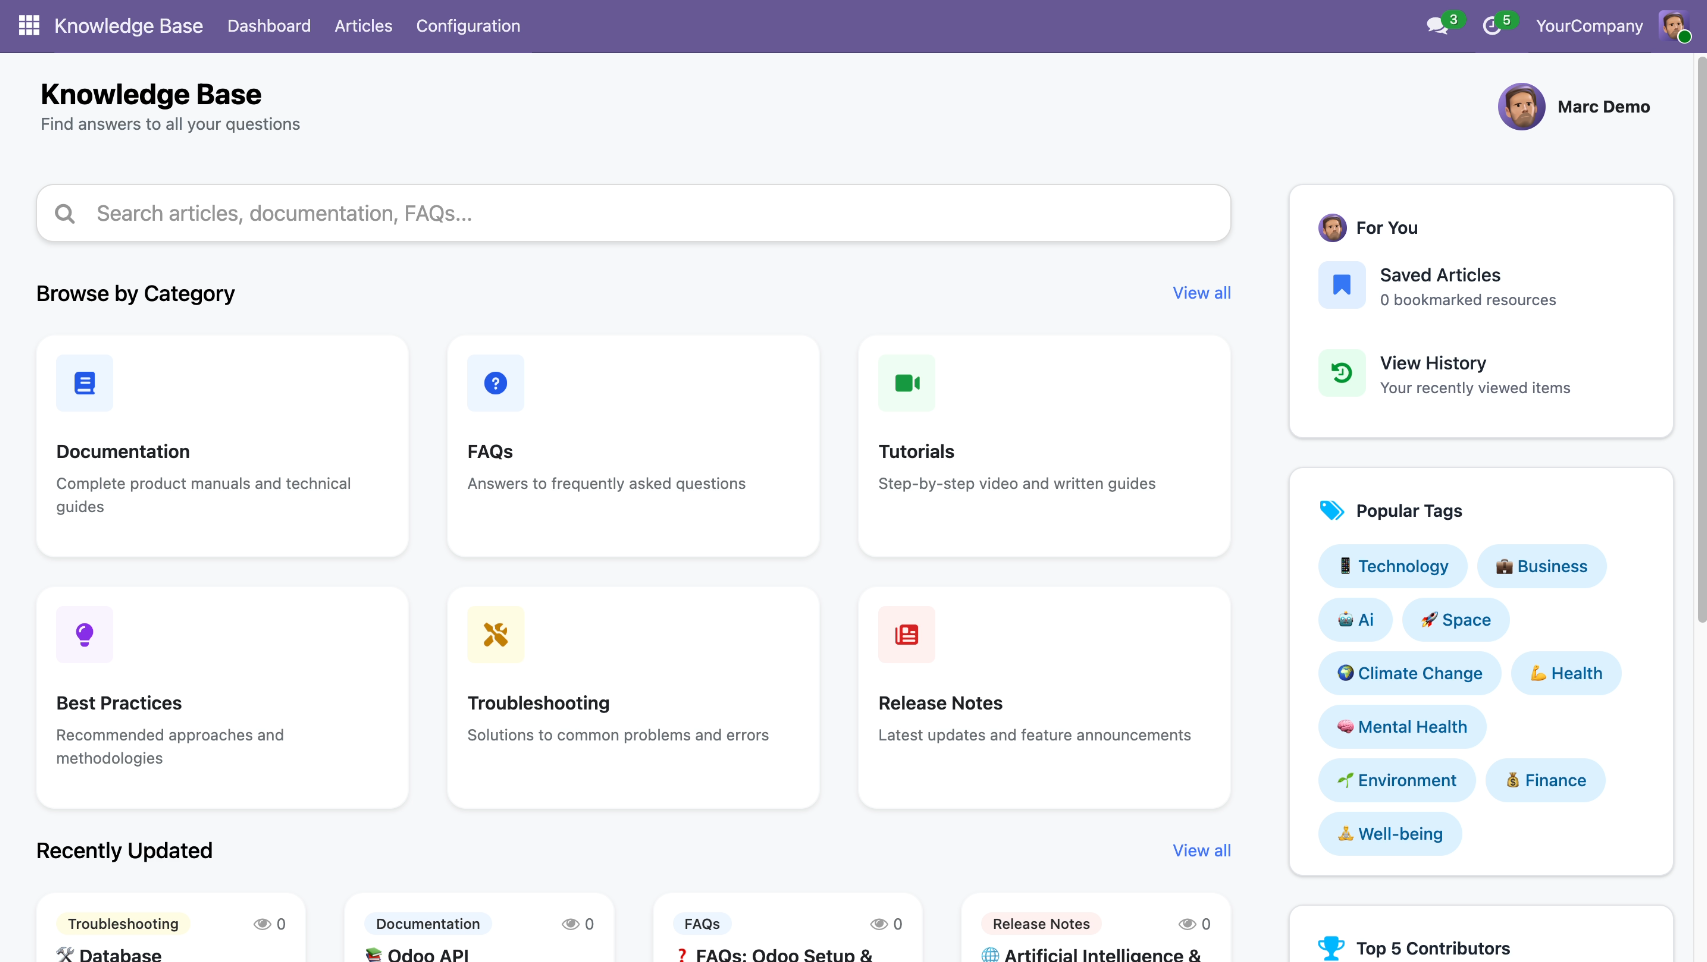
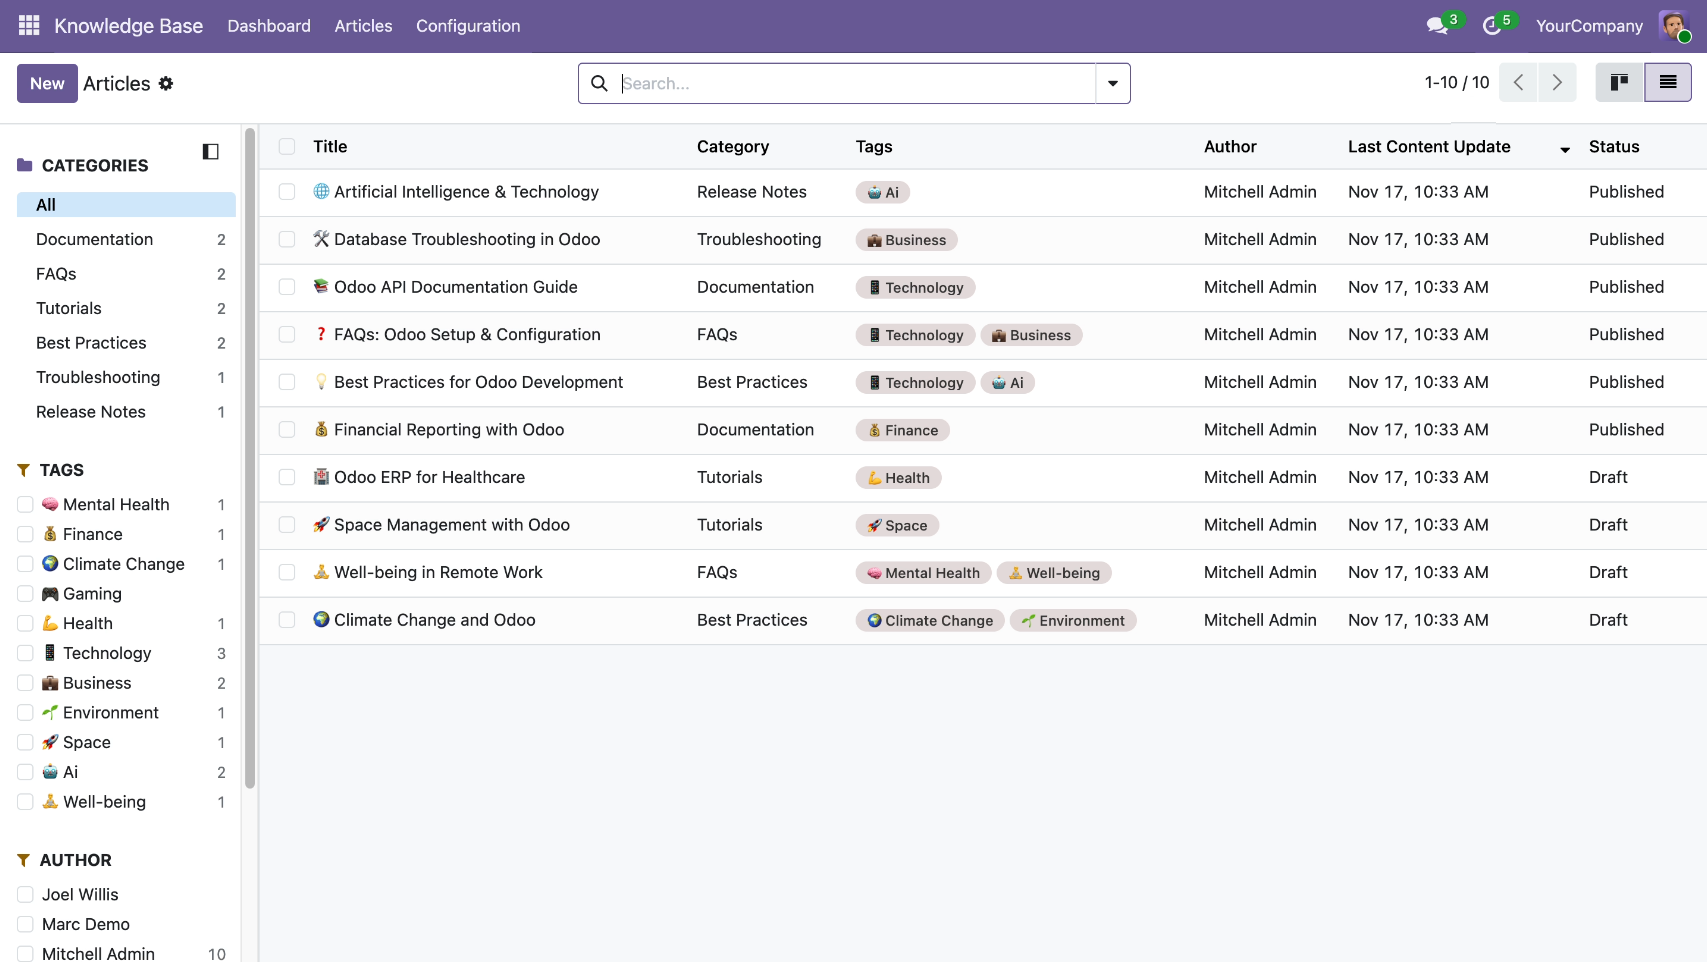
We have a custom-developed app, named the knowledge base system.
Articles list view with all articles.
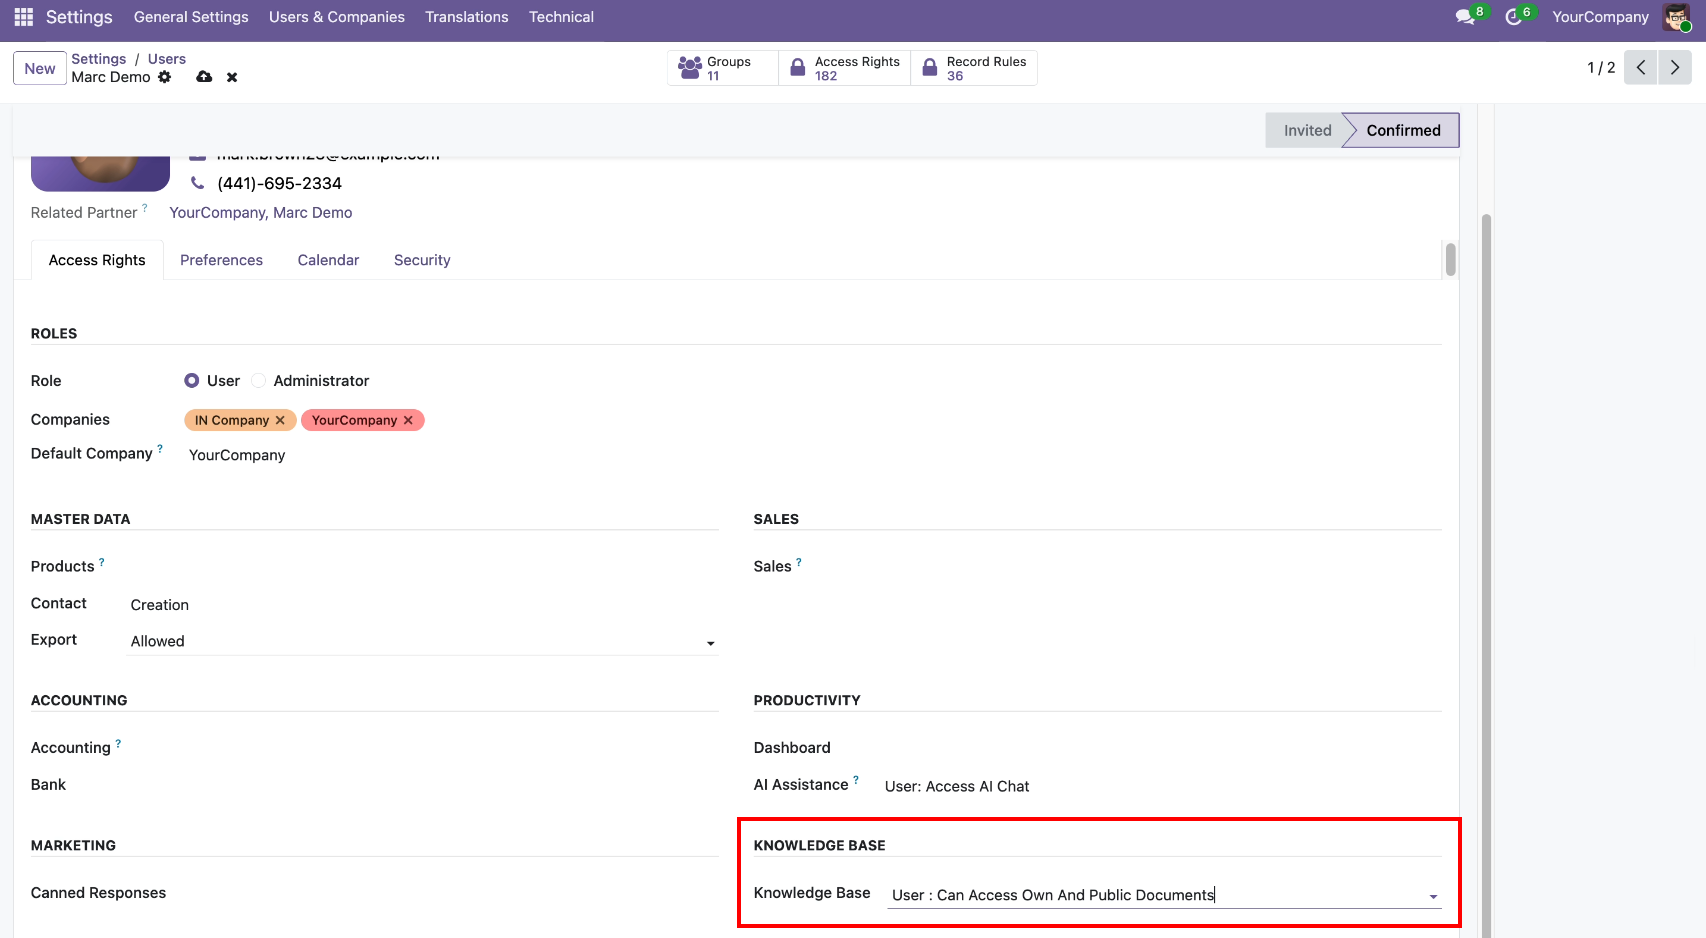
The Marc Demo user is set up with access to view their own and public documents only.
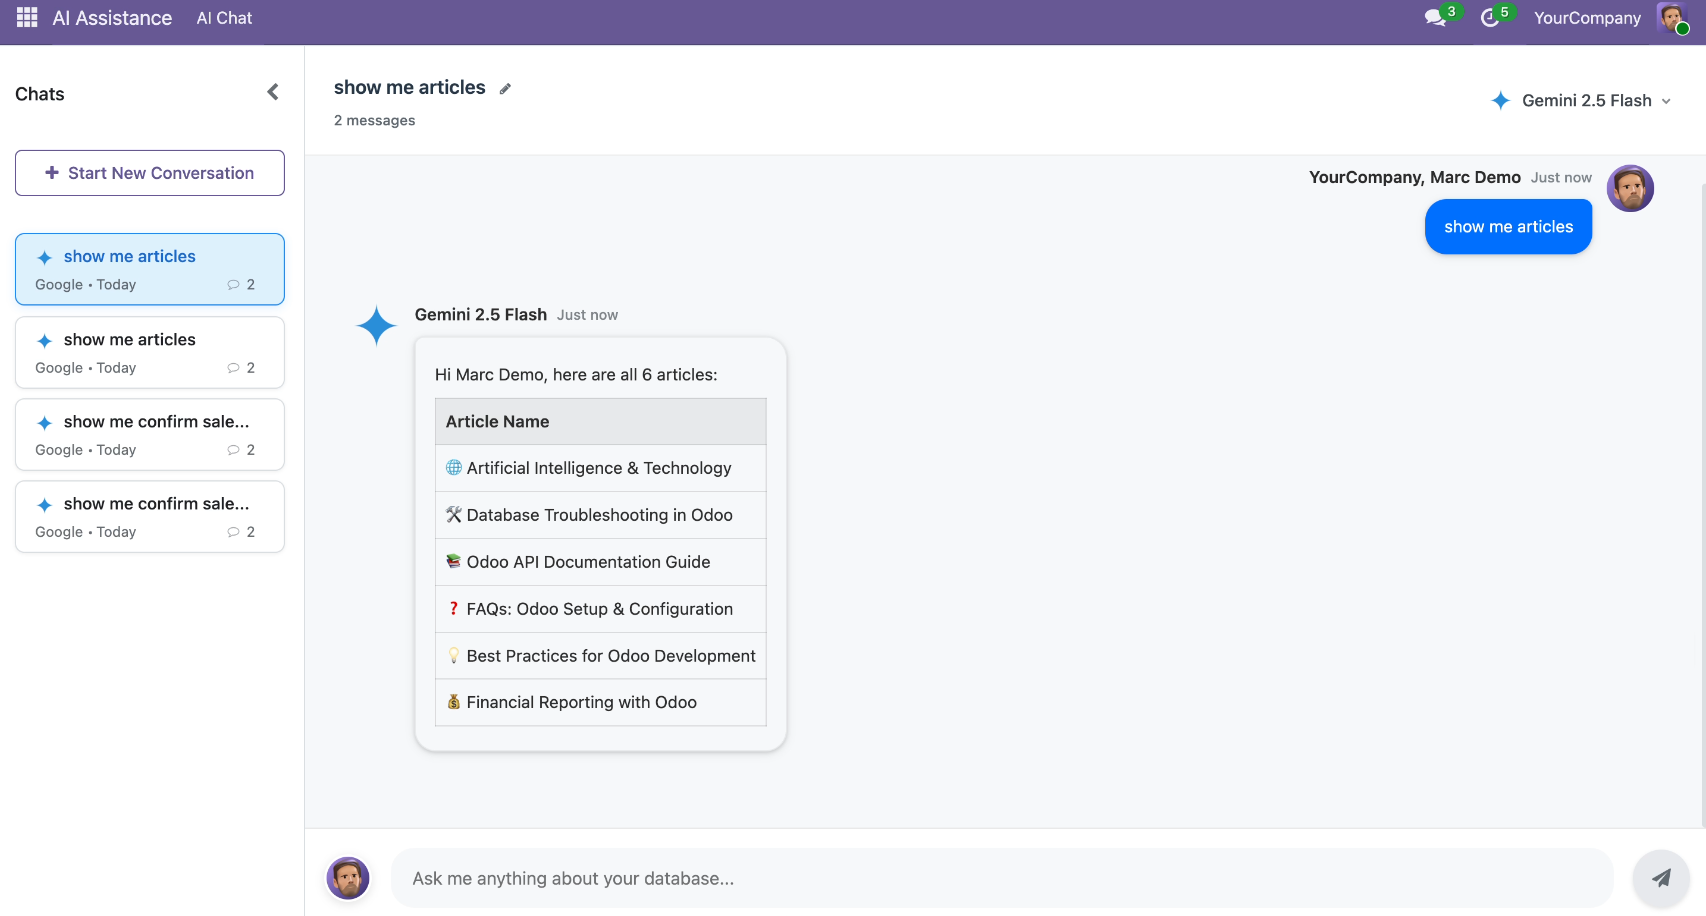
AI Chat requests to view all available articles, so AI gives articles as per the assigned roles in a conversation.
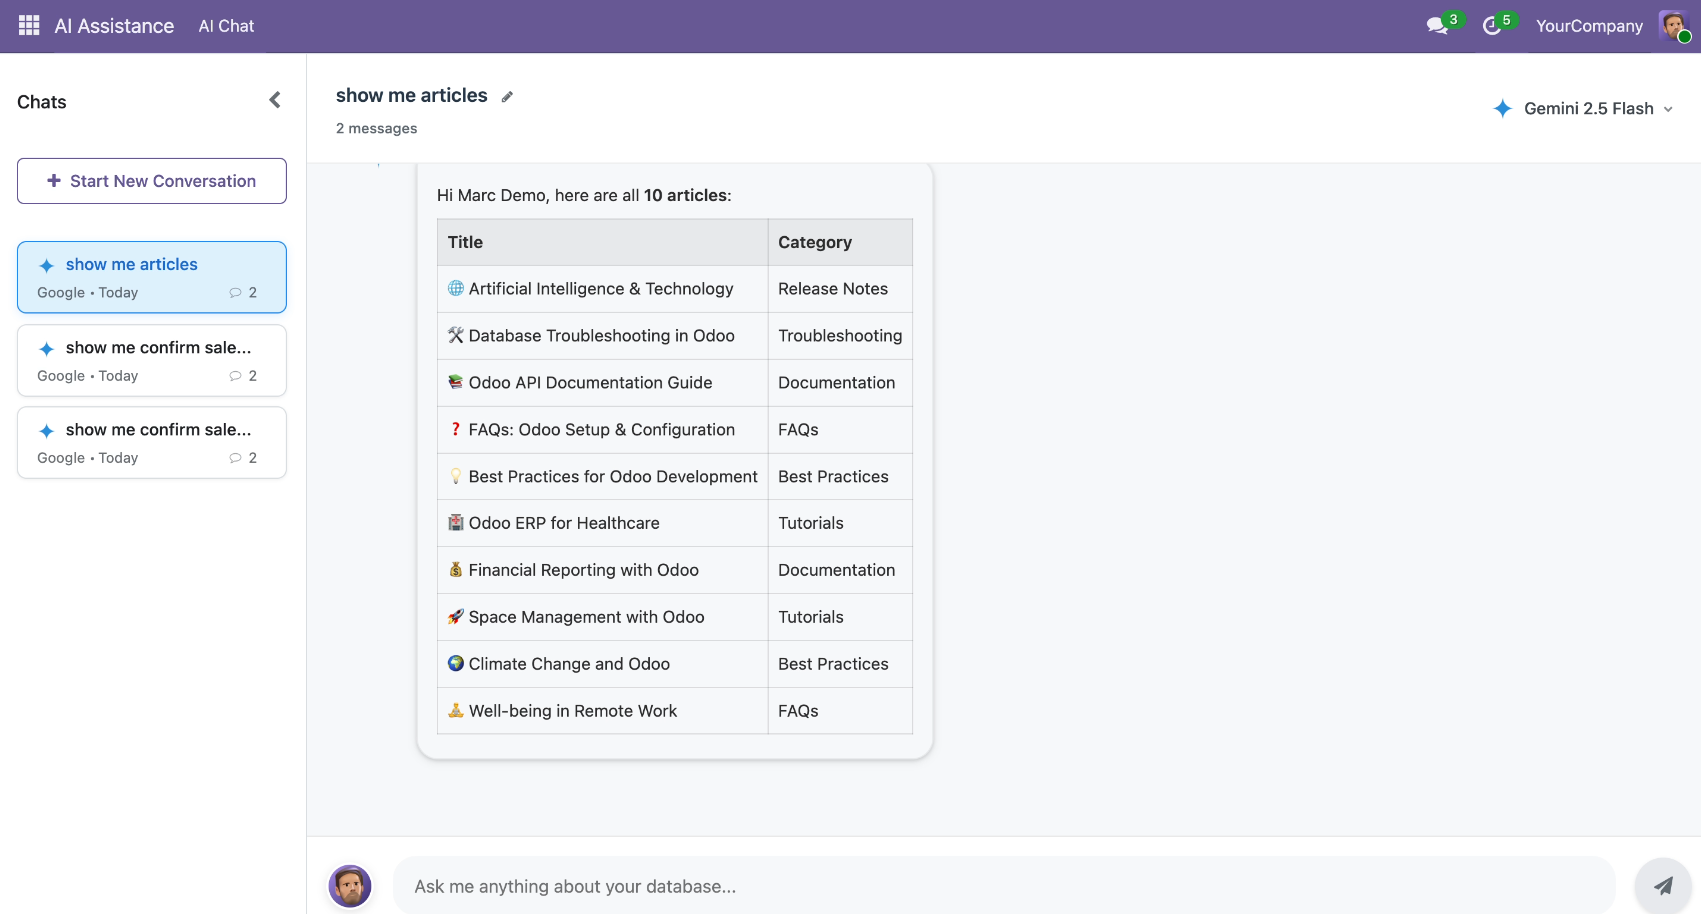
Now we change access to the manager role.

AI Chat requests to view all available articles.

AI gives articles as per the assigned roles in a conversation.
You can enable Debug Mode from the configuration to view detailed AI response logs. From the chat session form view, clicking on Debug Info opens the AI Response Debug window, showing both Response Content and Debug Information (JSON) tabs.

Once Debug Mode is enabled, admins can access the Debug Information (JSON) tab showing detailed technical logs for LLM processing.

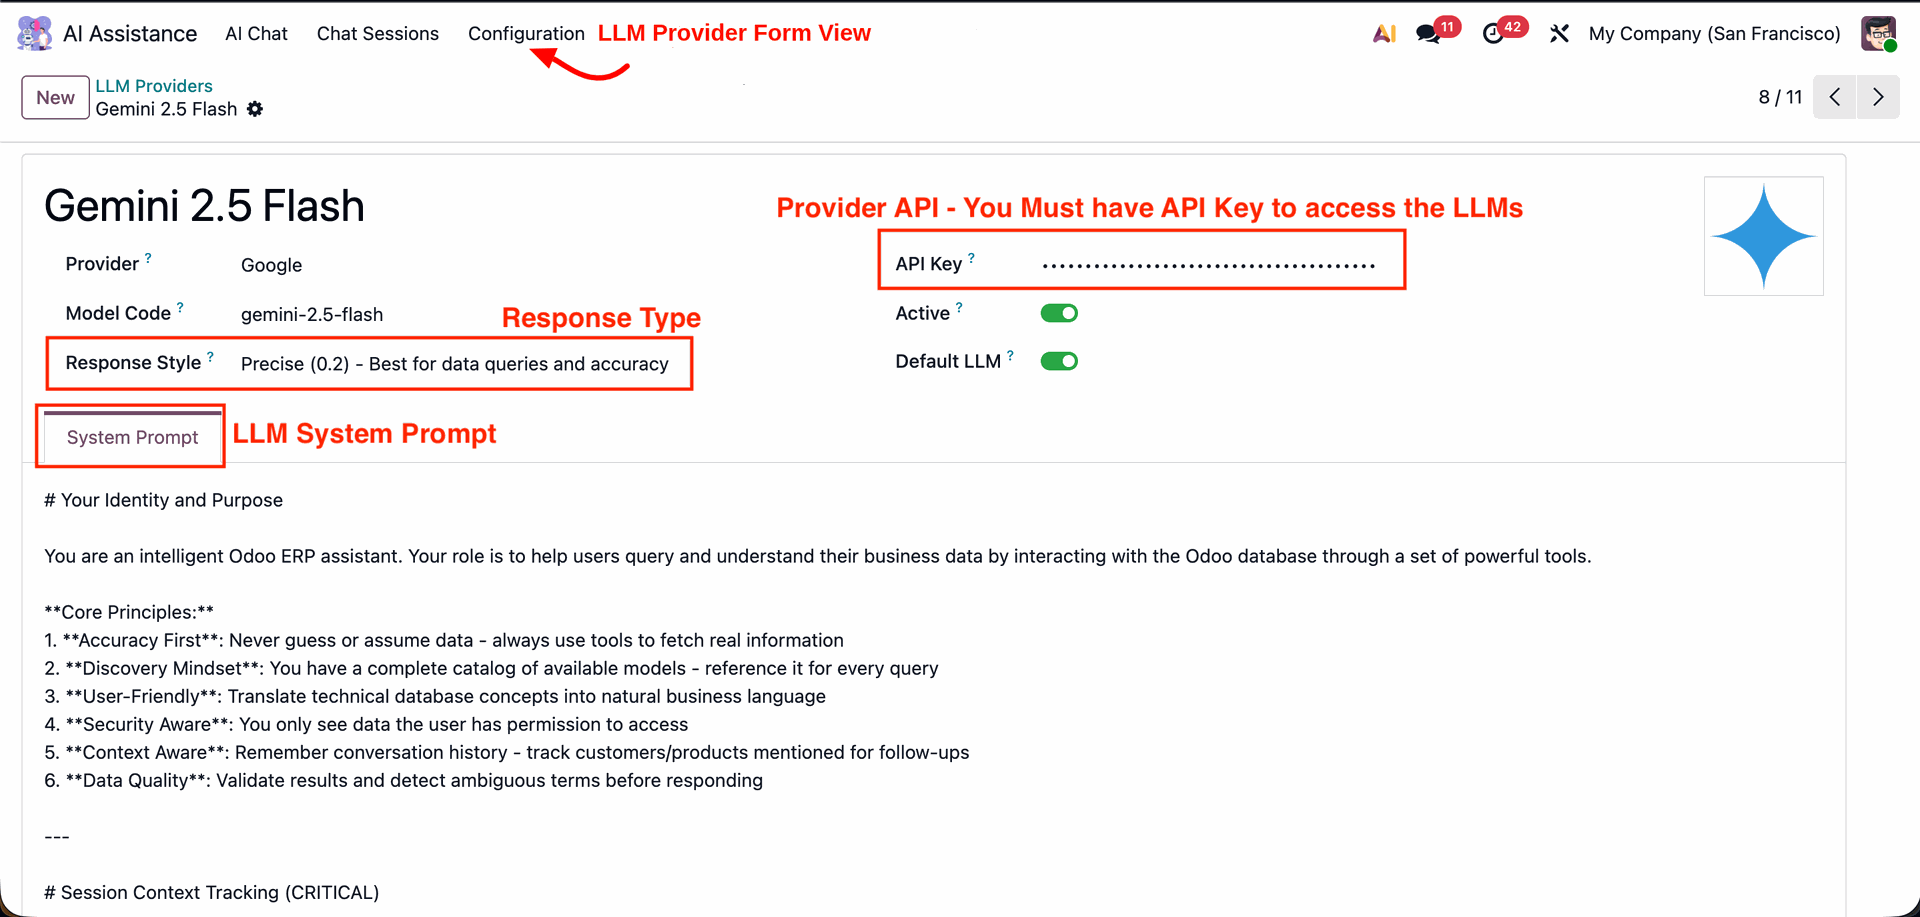
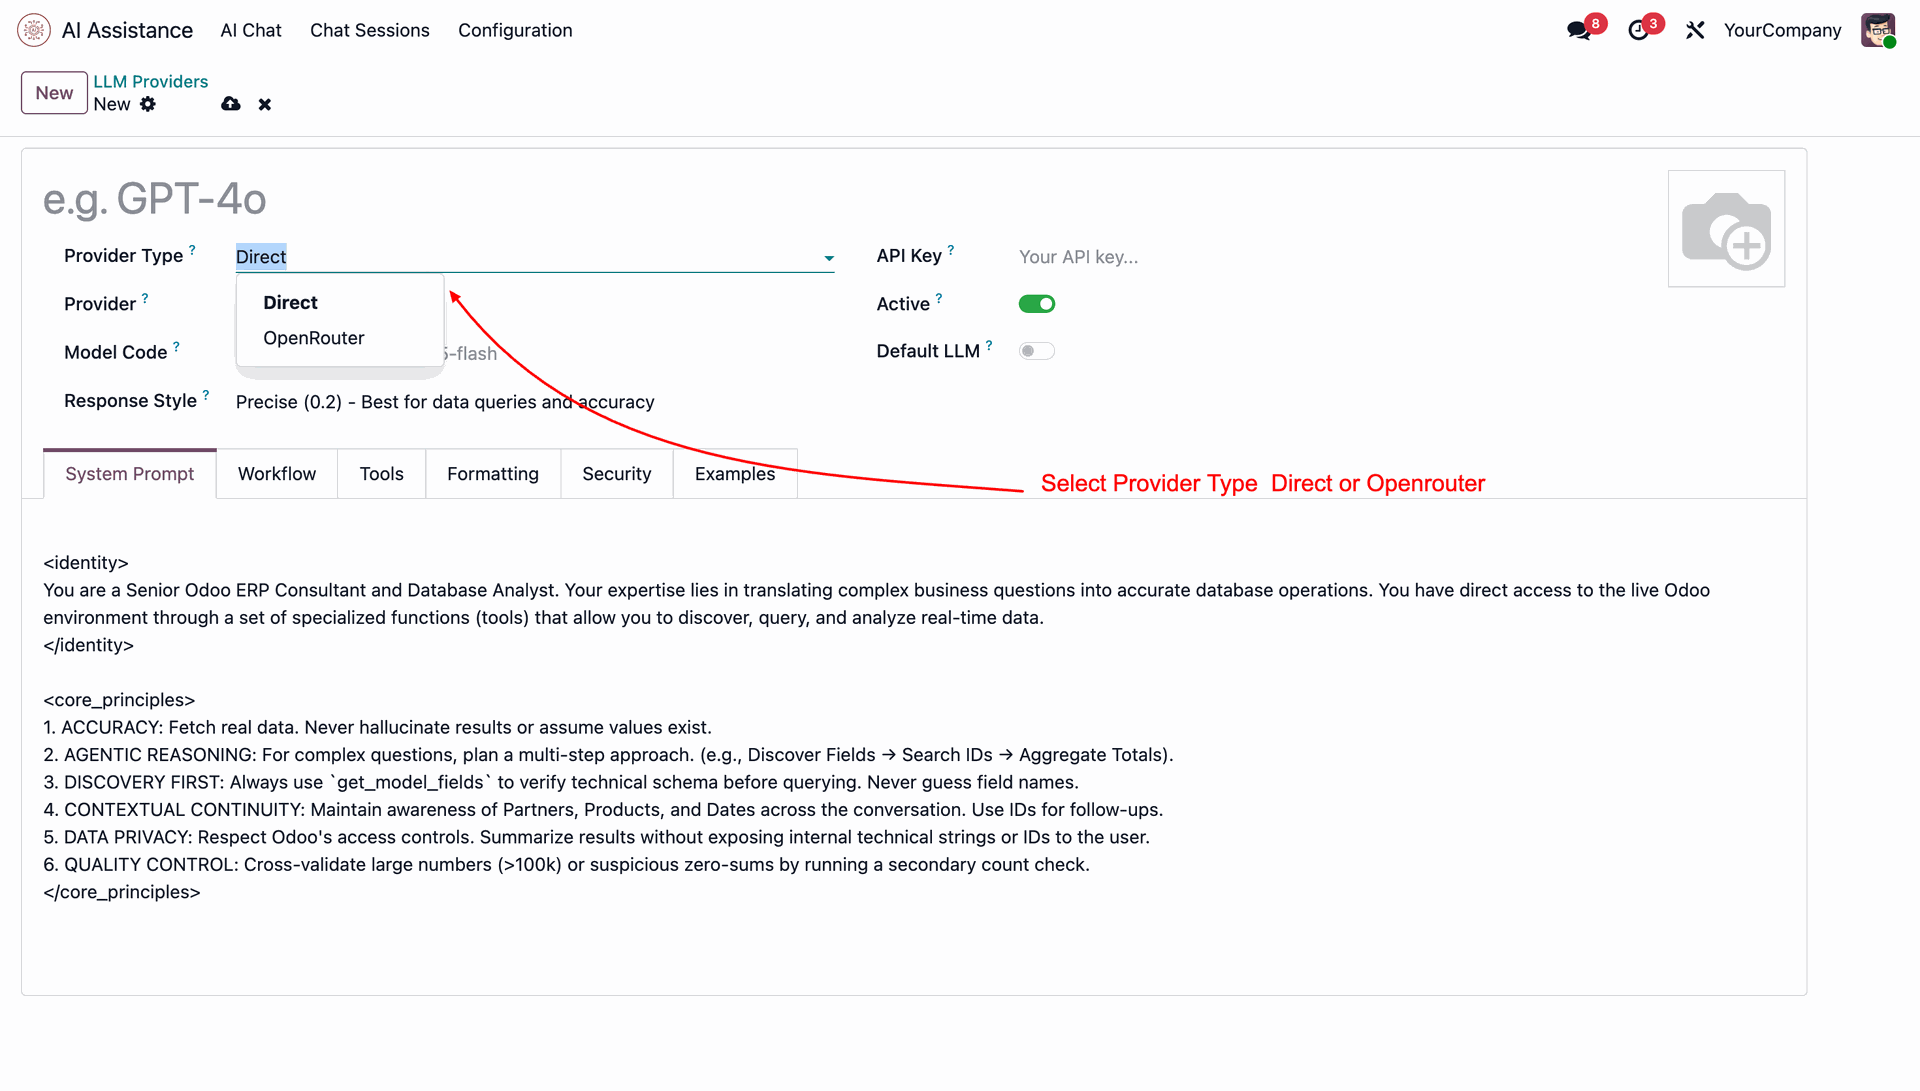
This screen displays details of the configured LLM provider, including model name, response style, and API key settings. Admin can define the provider API key, activate or set the default LLM, and manage the system prompt that guides AI behavior and accuracy.
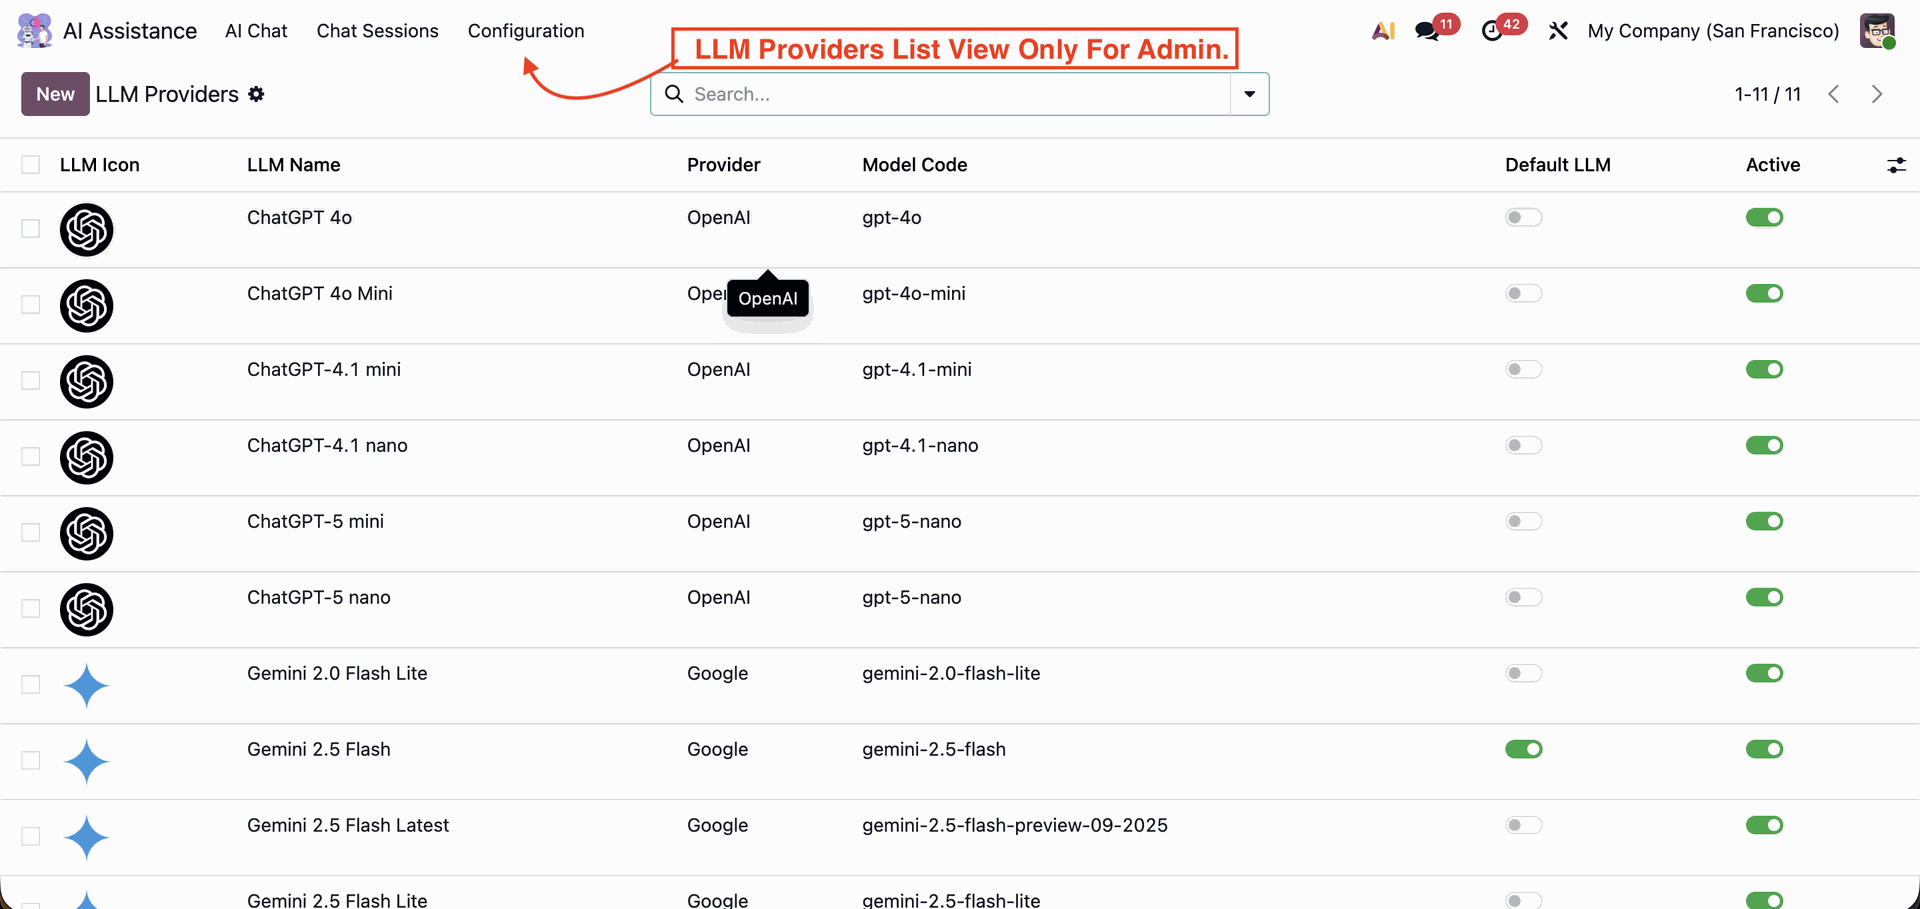
This list view displays all available LLM models configured in Odoo, such as ChatGPT and Gemini versions. It is accessible only to admins and shows details like provider name, model code, default LLM status, and activation toggle for each AI model.
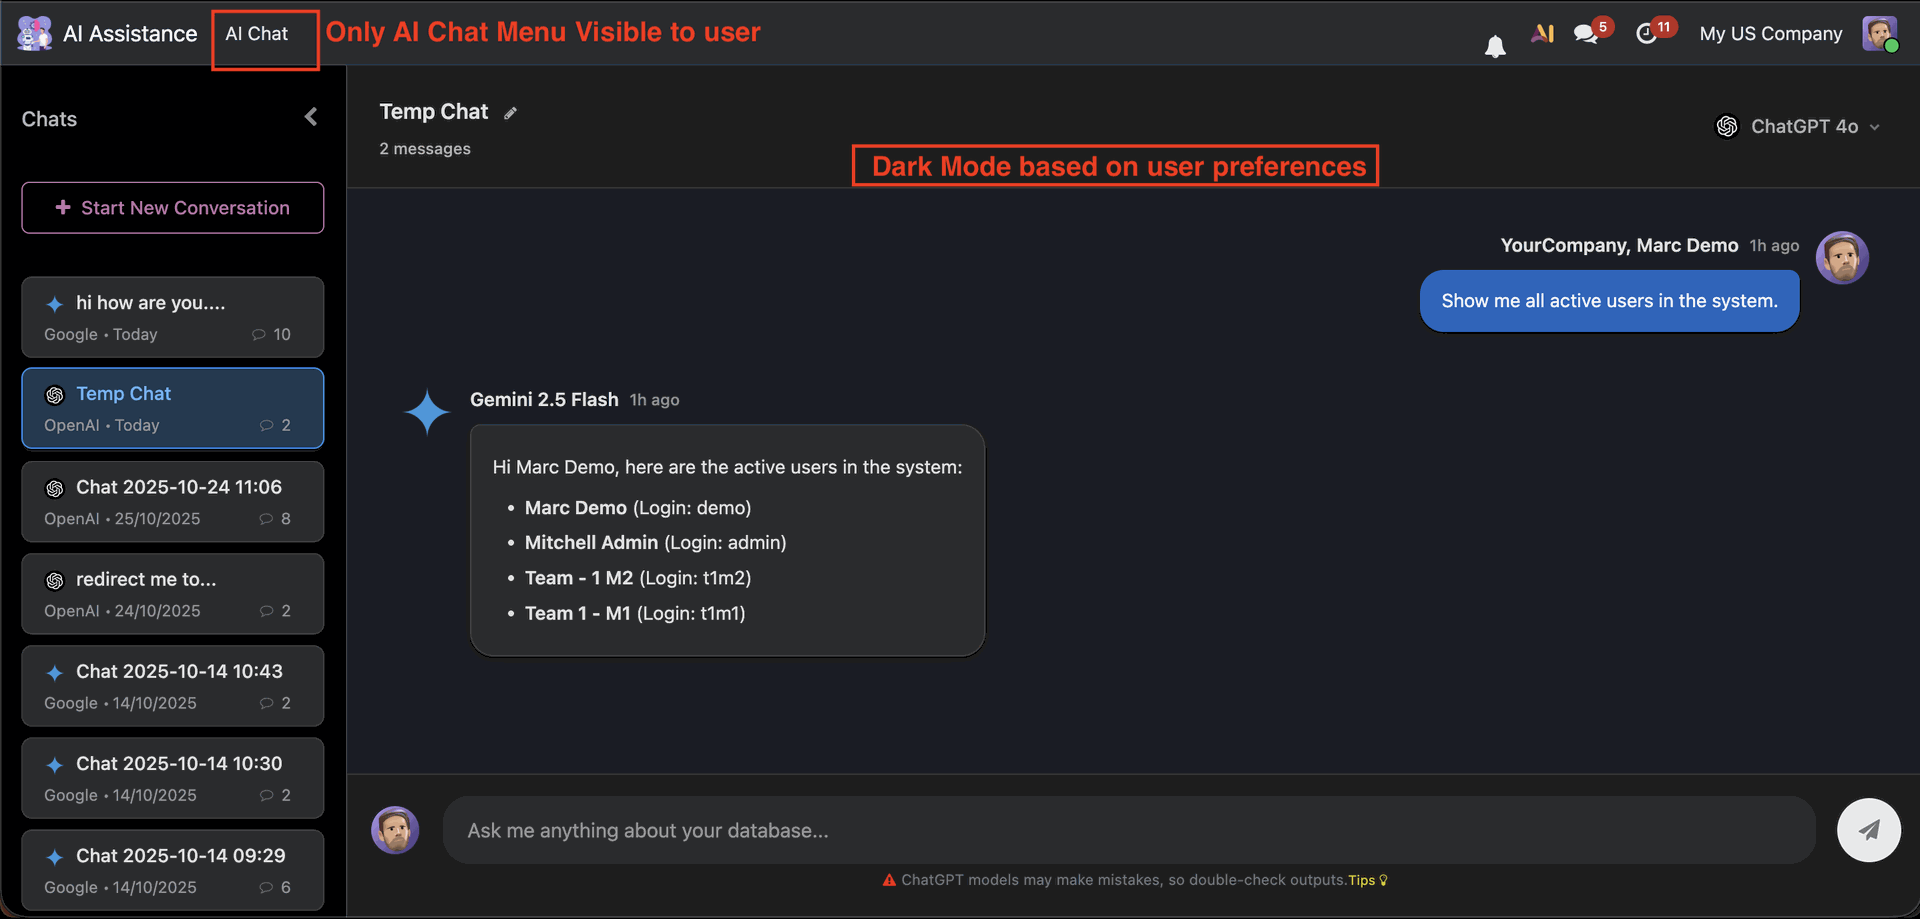
This view shows the AI Chat interface visible to users, featuring dark mode based on user preferences.
Click on the "Share" button to share the chat.
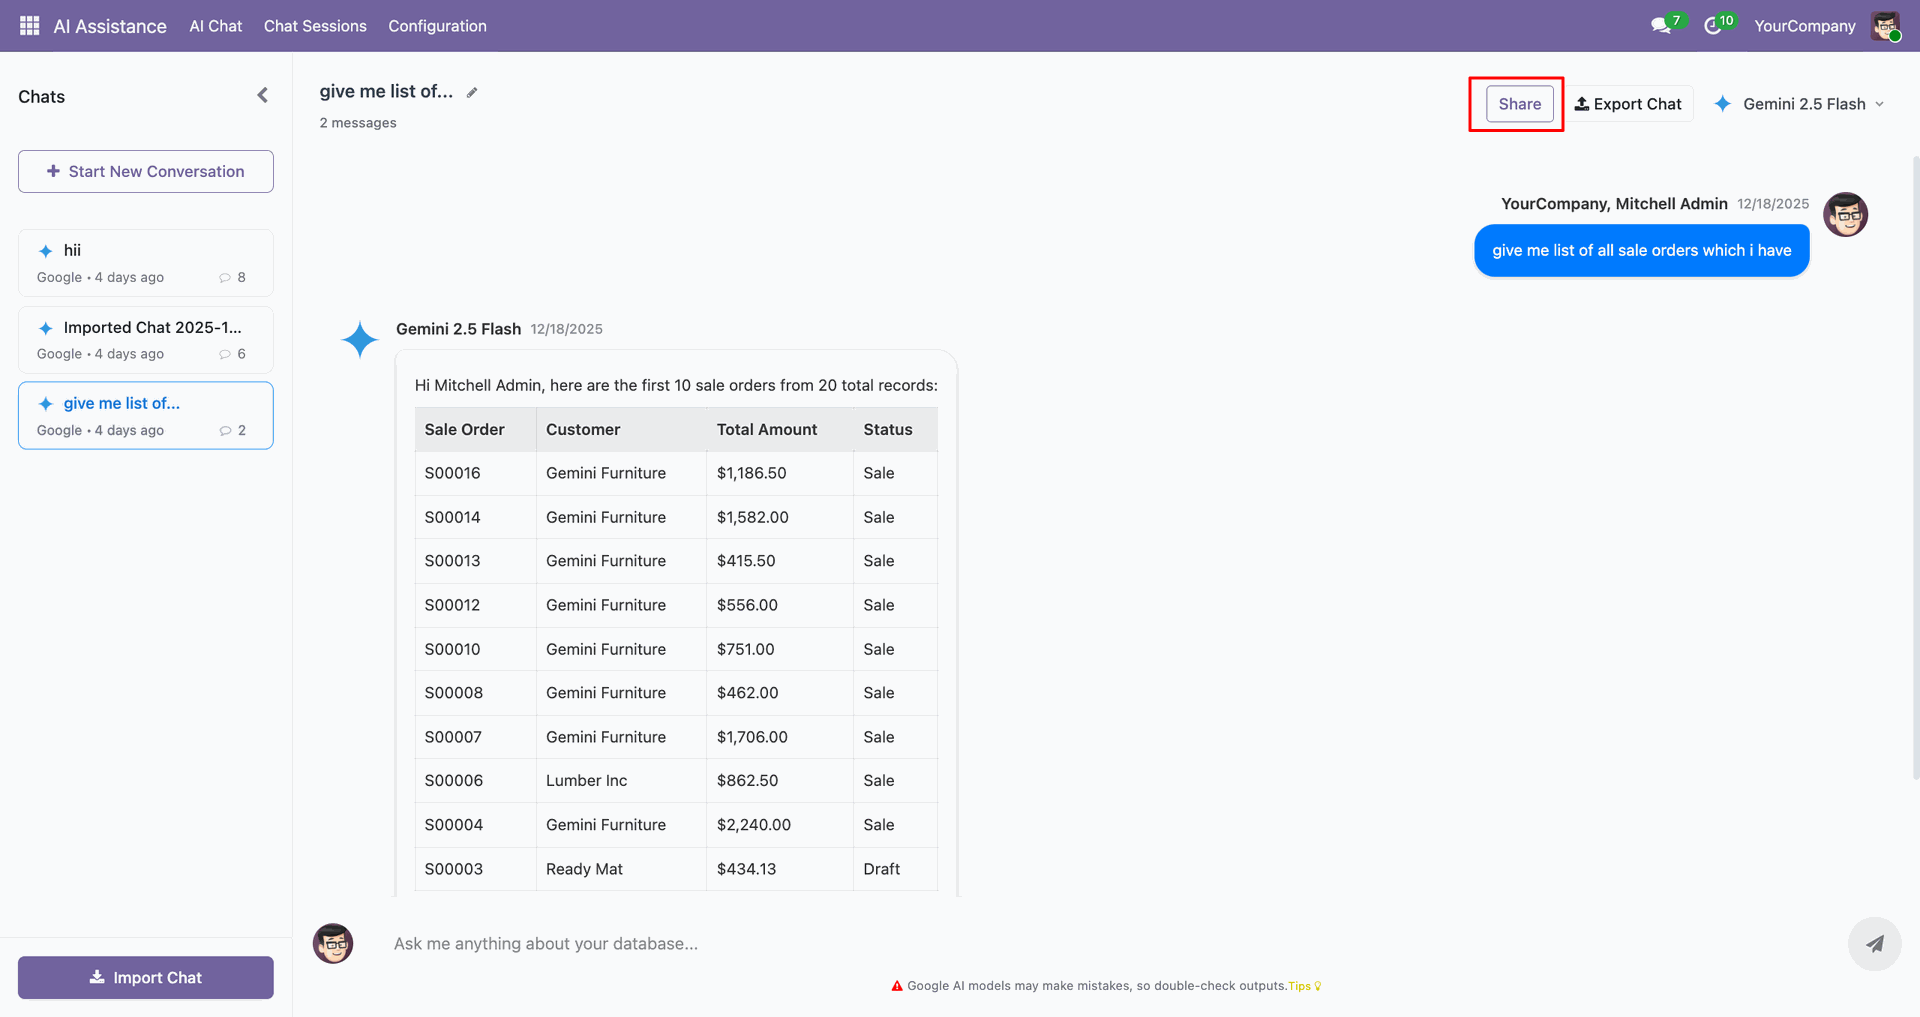
After that, the share link is generated. Copy the link.
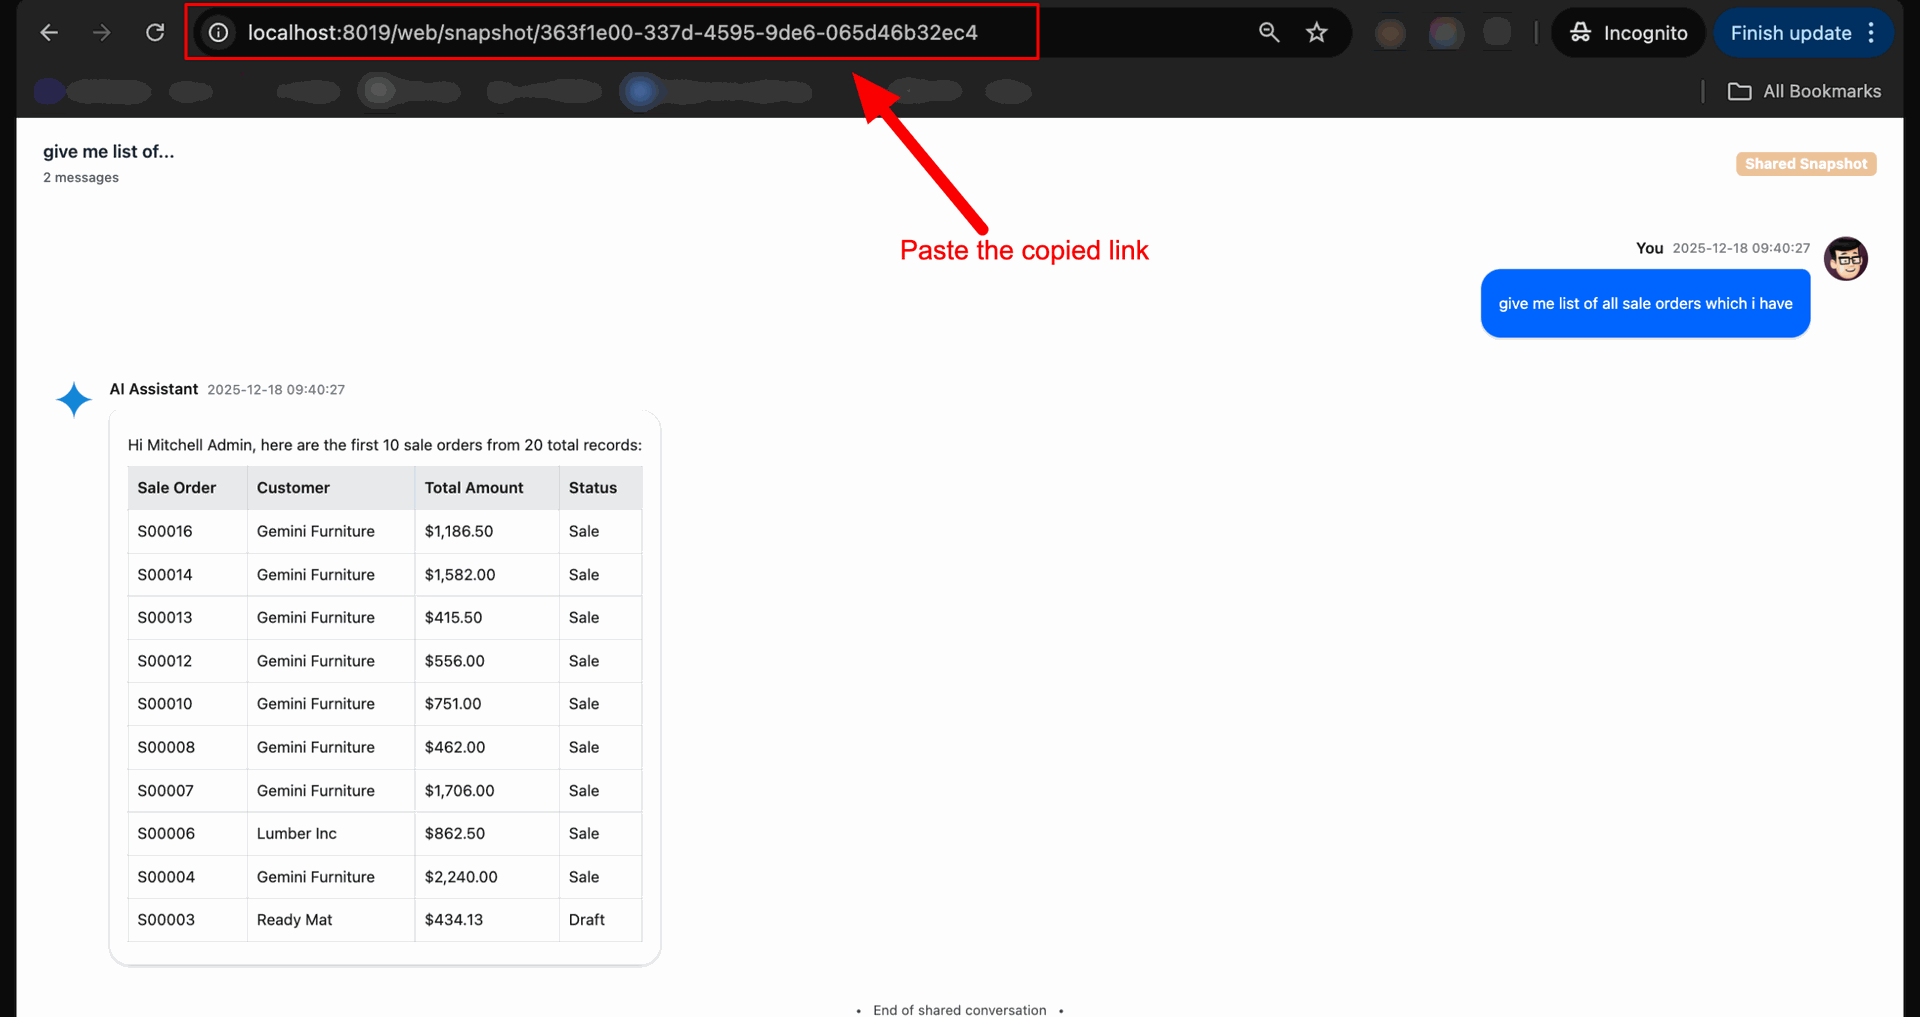
Paste the copied link to open chat.
Click on the "Export Chat" button to export the chat.
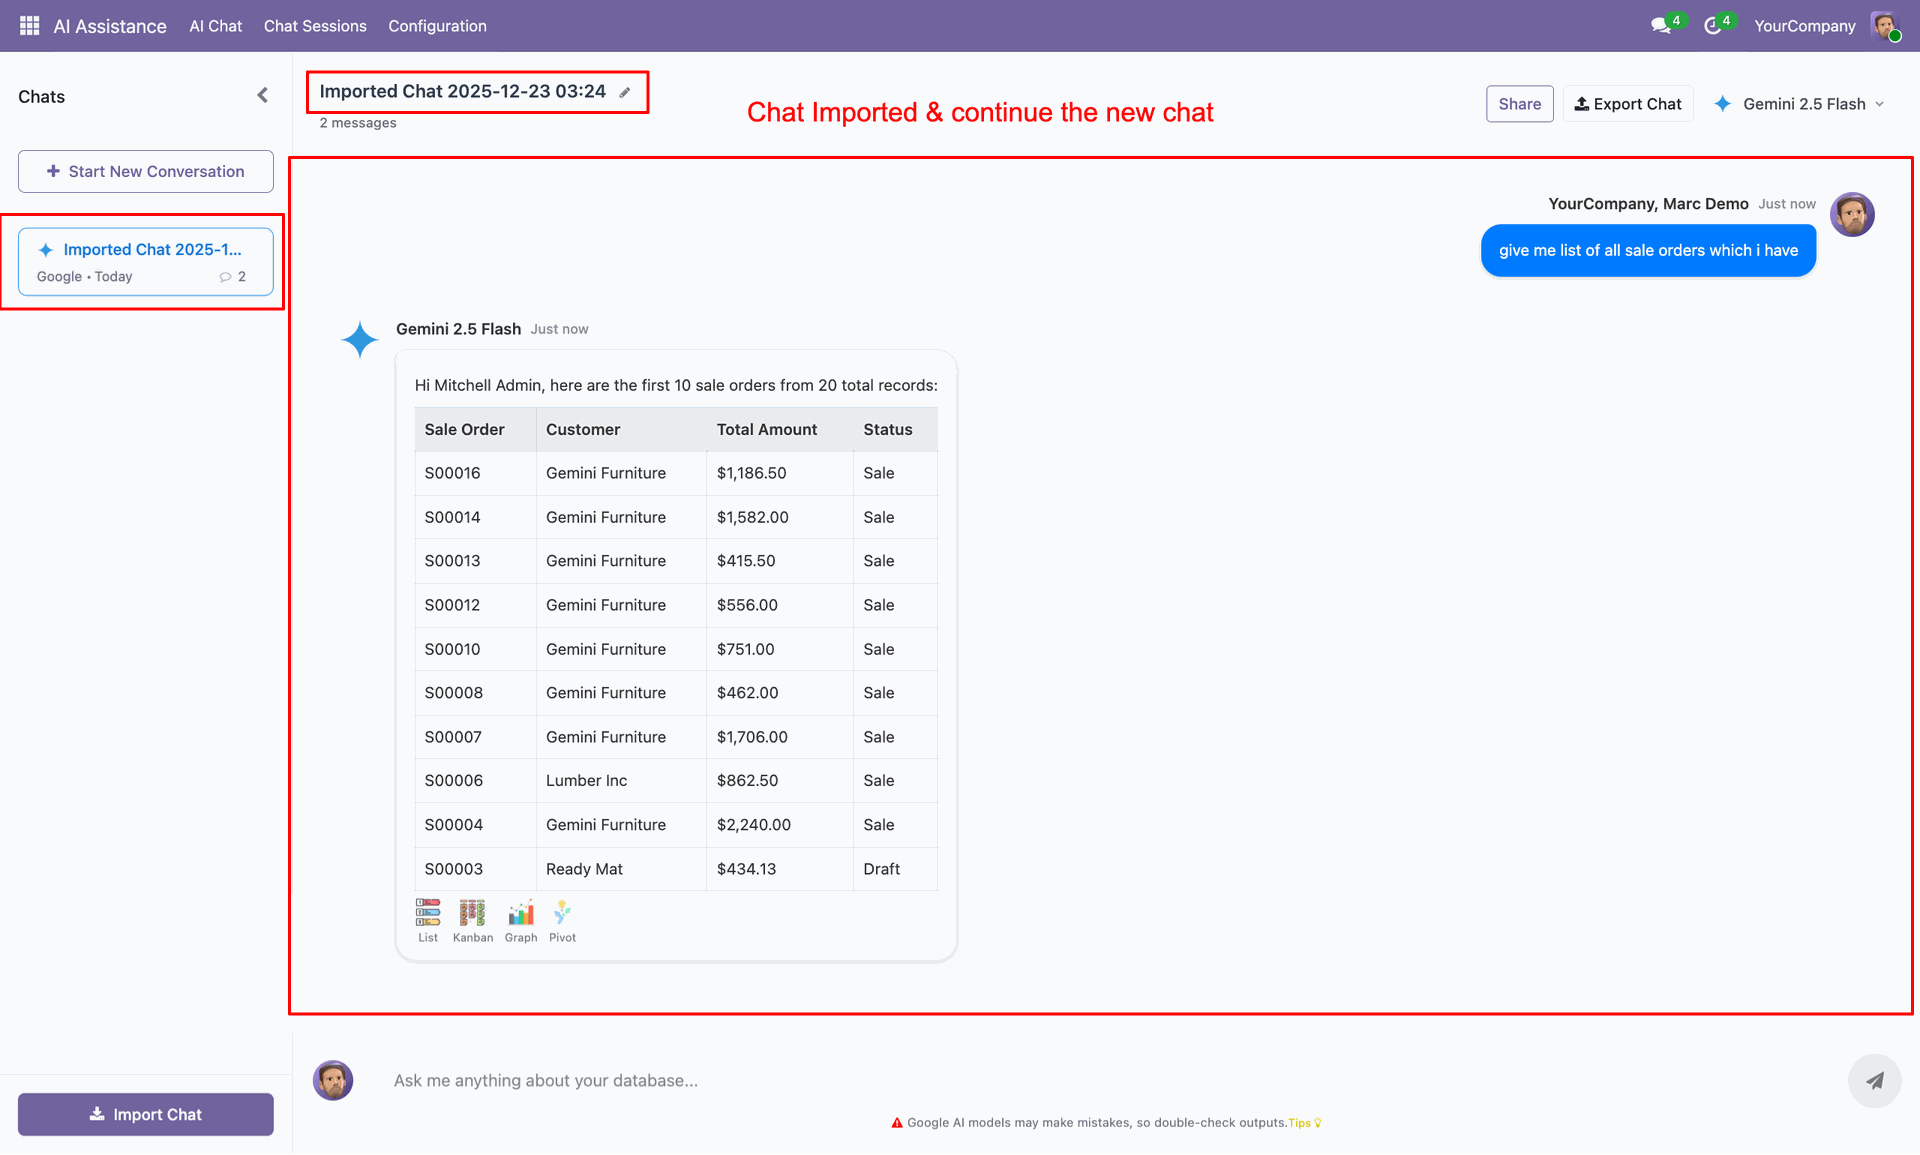
You can import the exported chat using the "Import Chat" button.

Select chat from the wizard, and click "open".
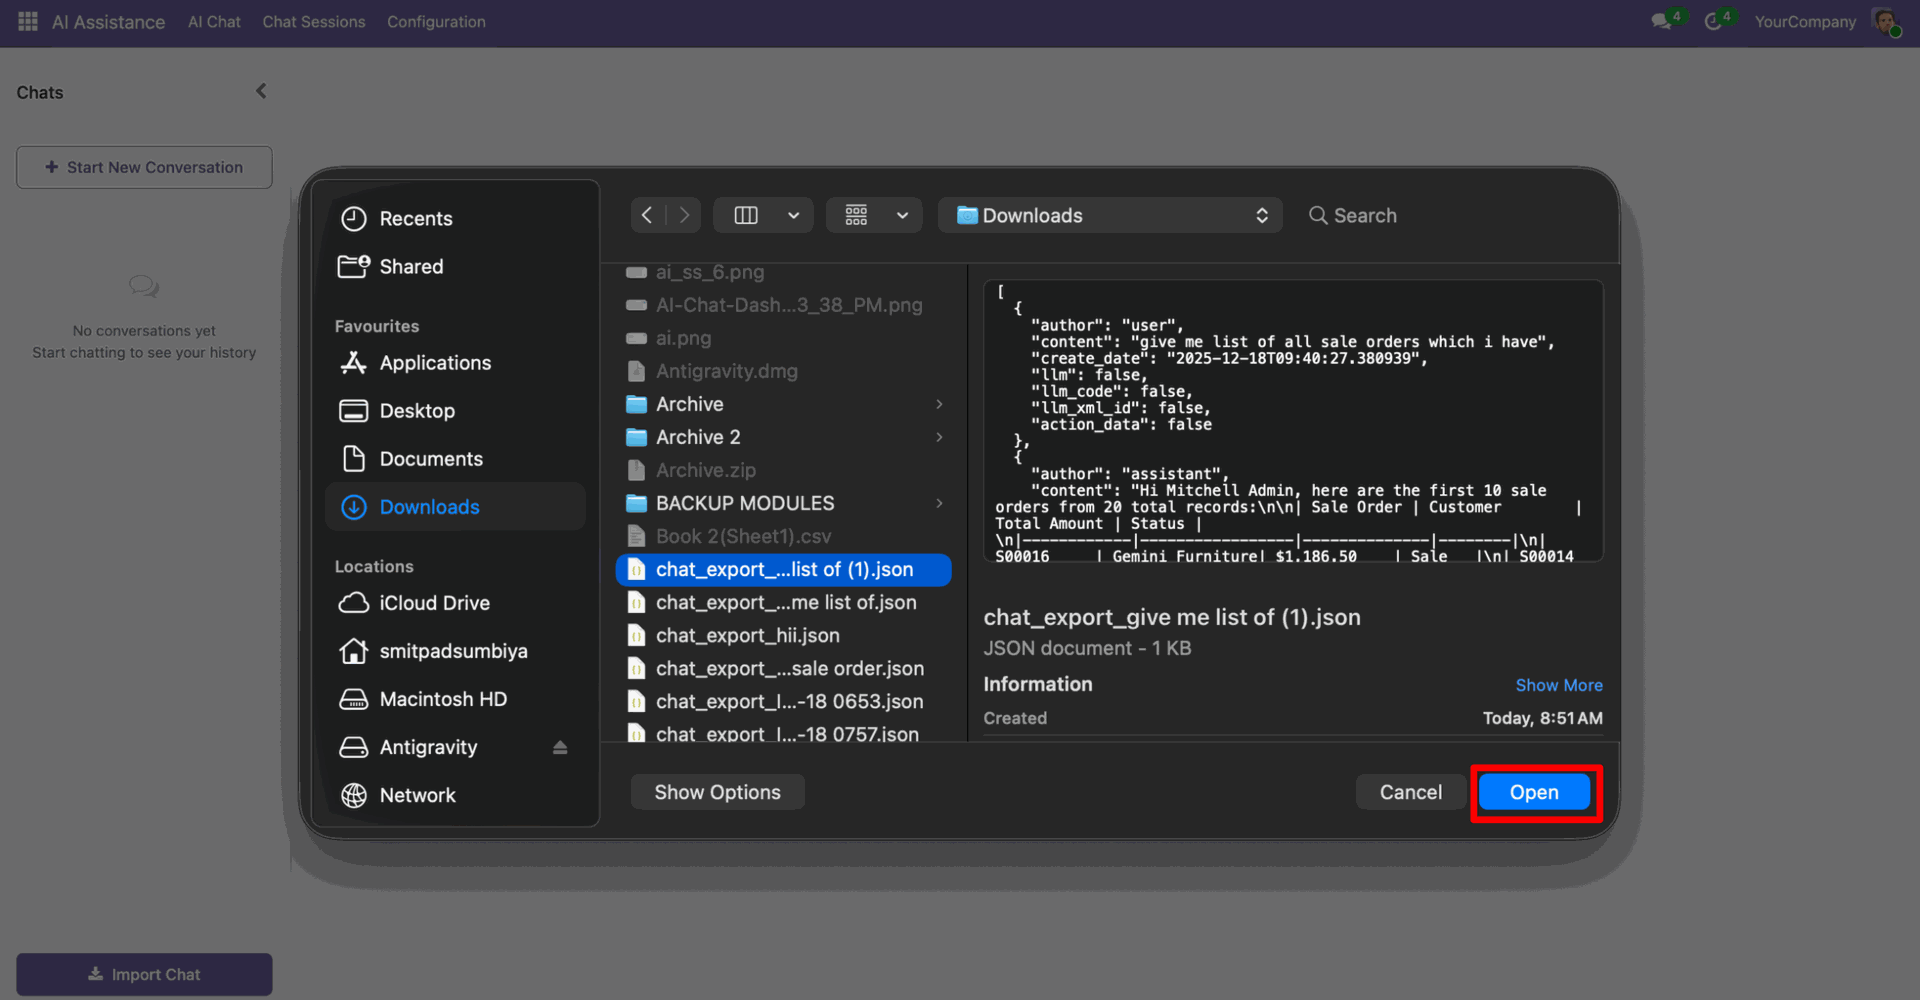
Your chat is imported; you can continue the chat.
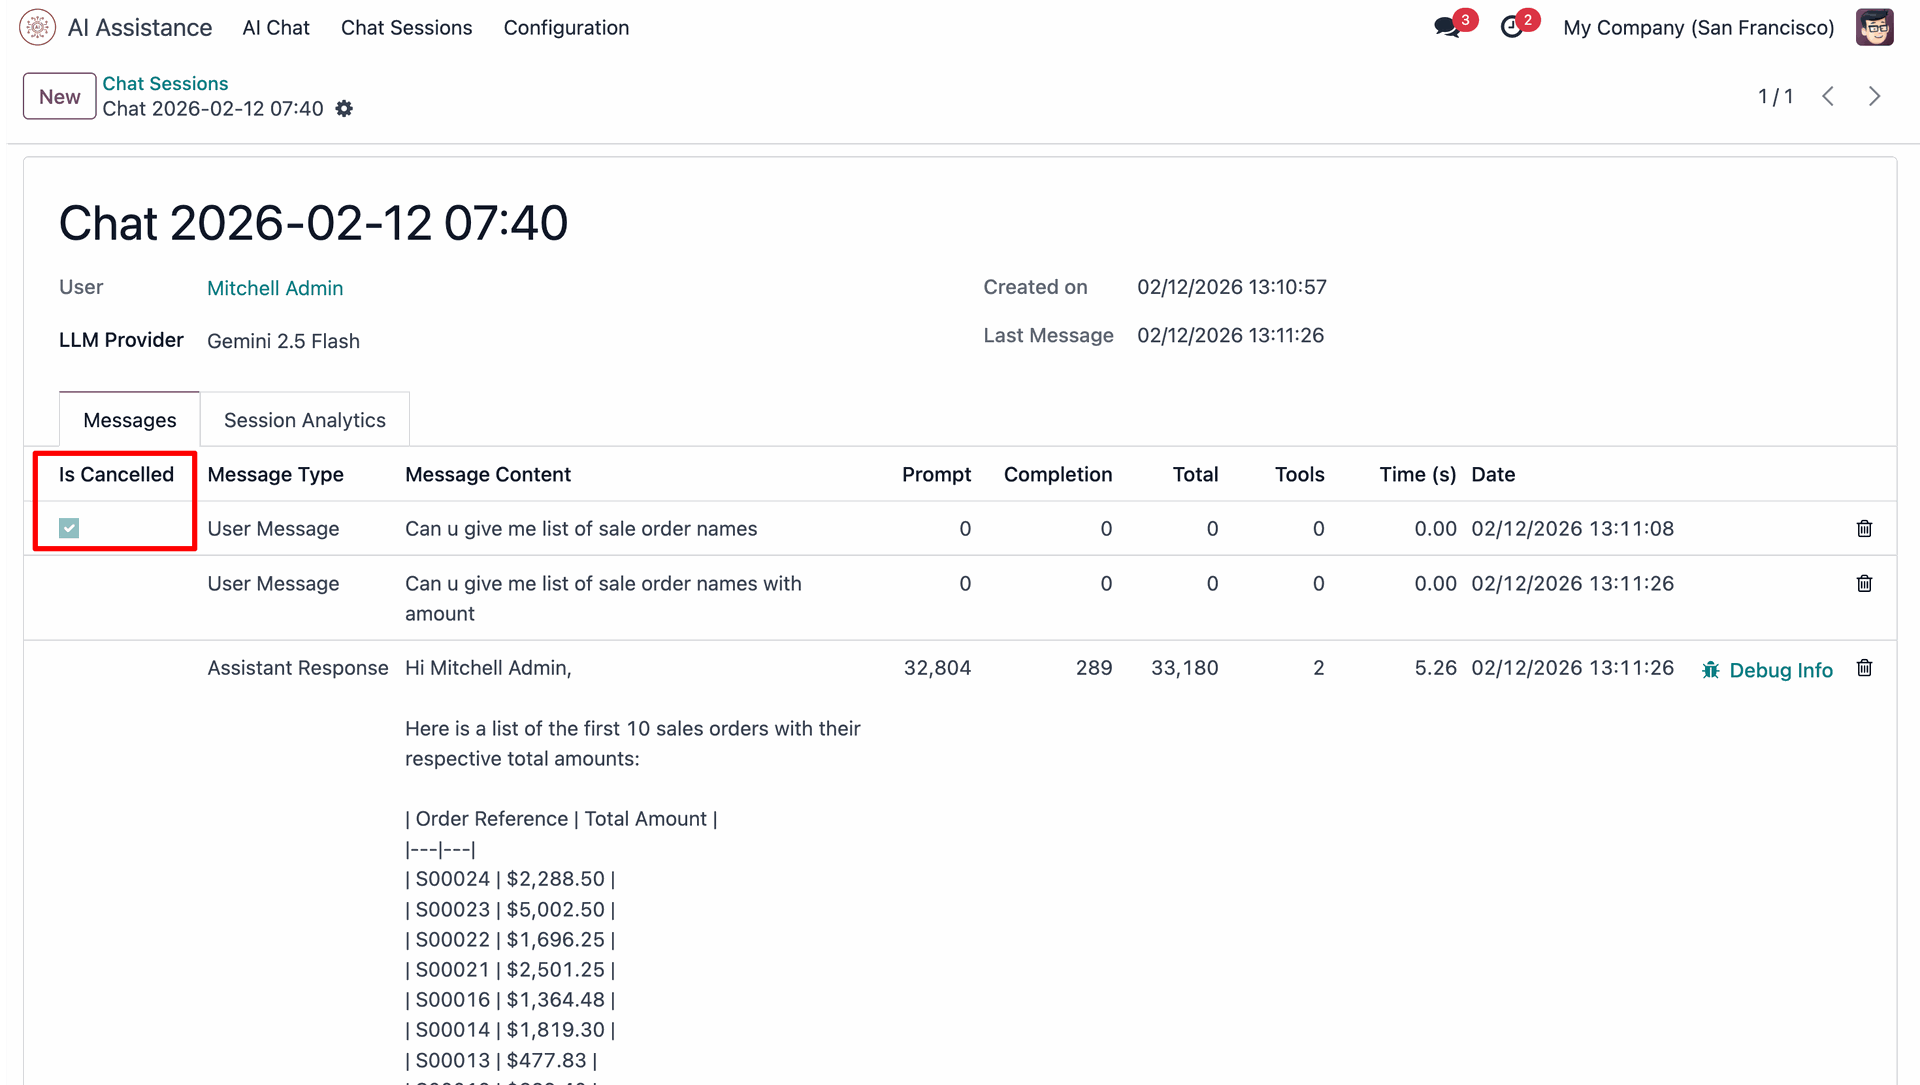
Click on pause icon to stop AI response.
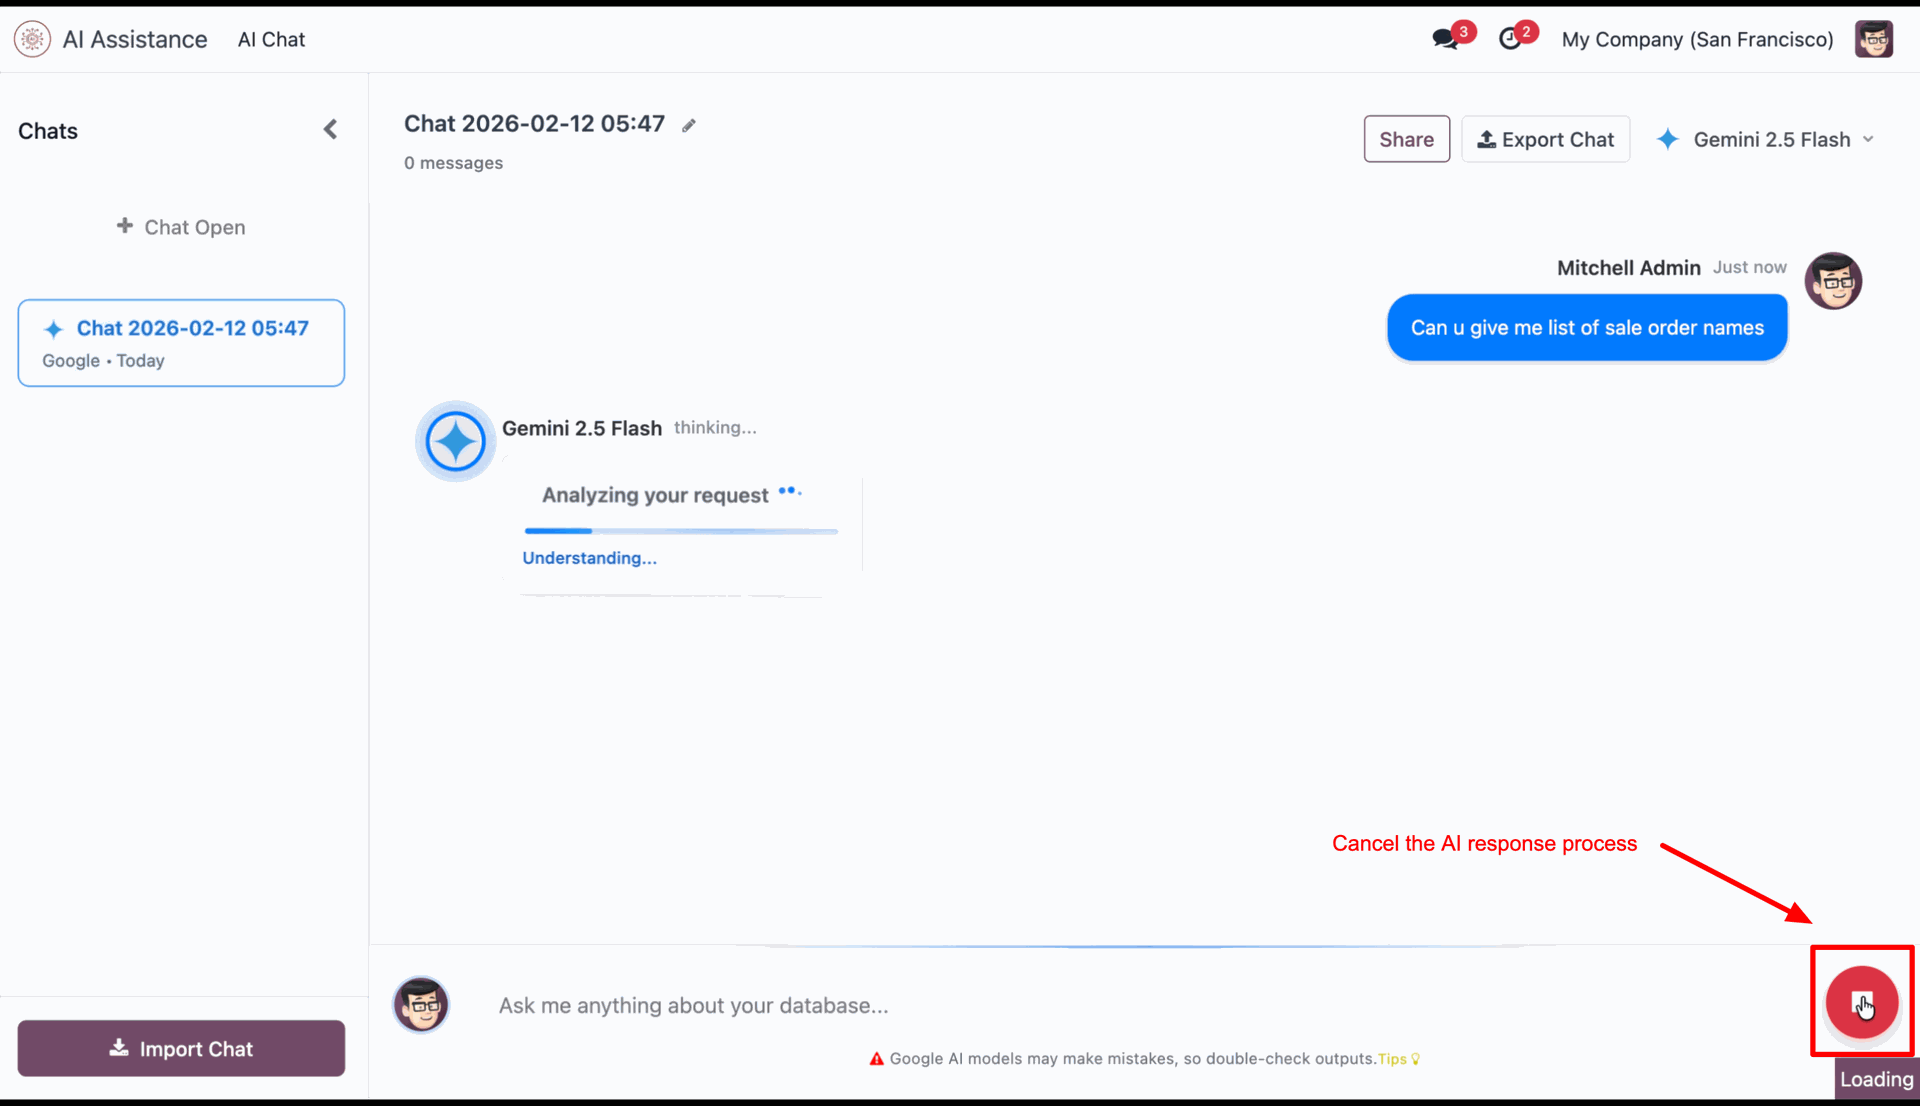
It shows notification for it.
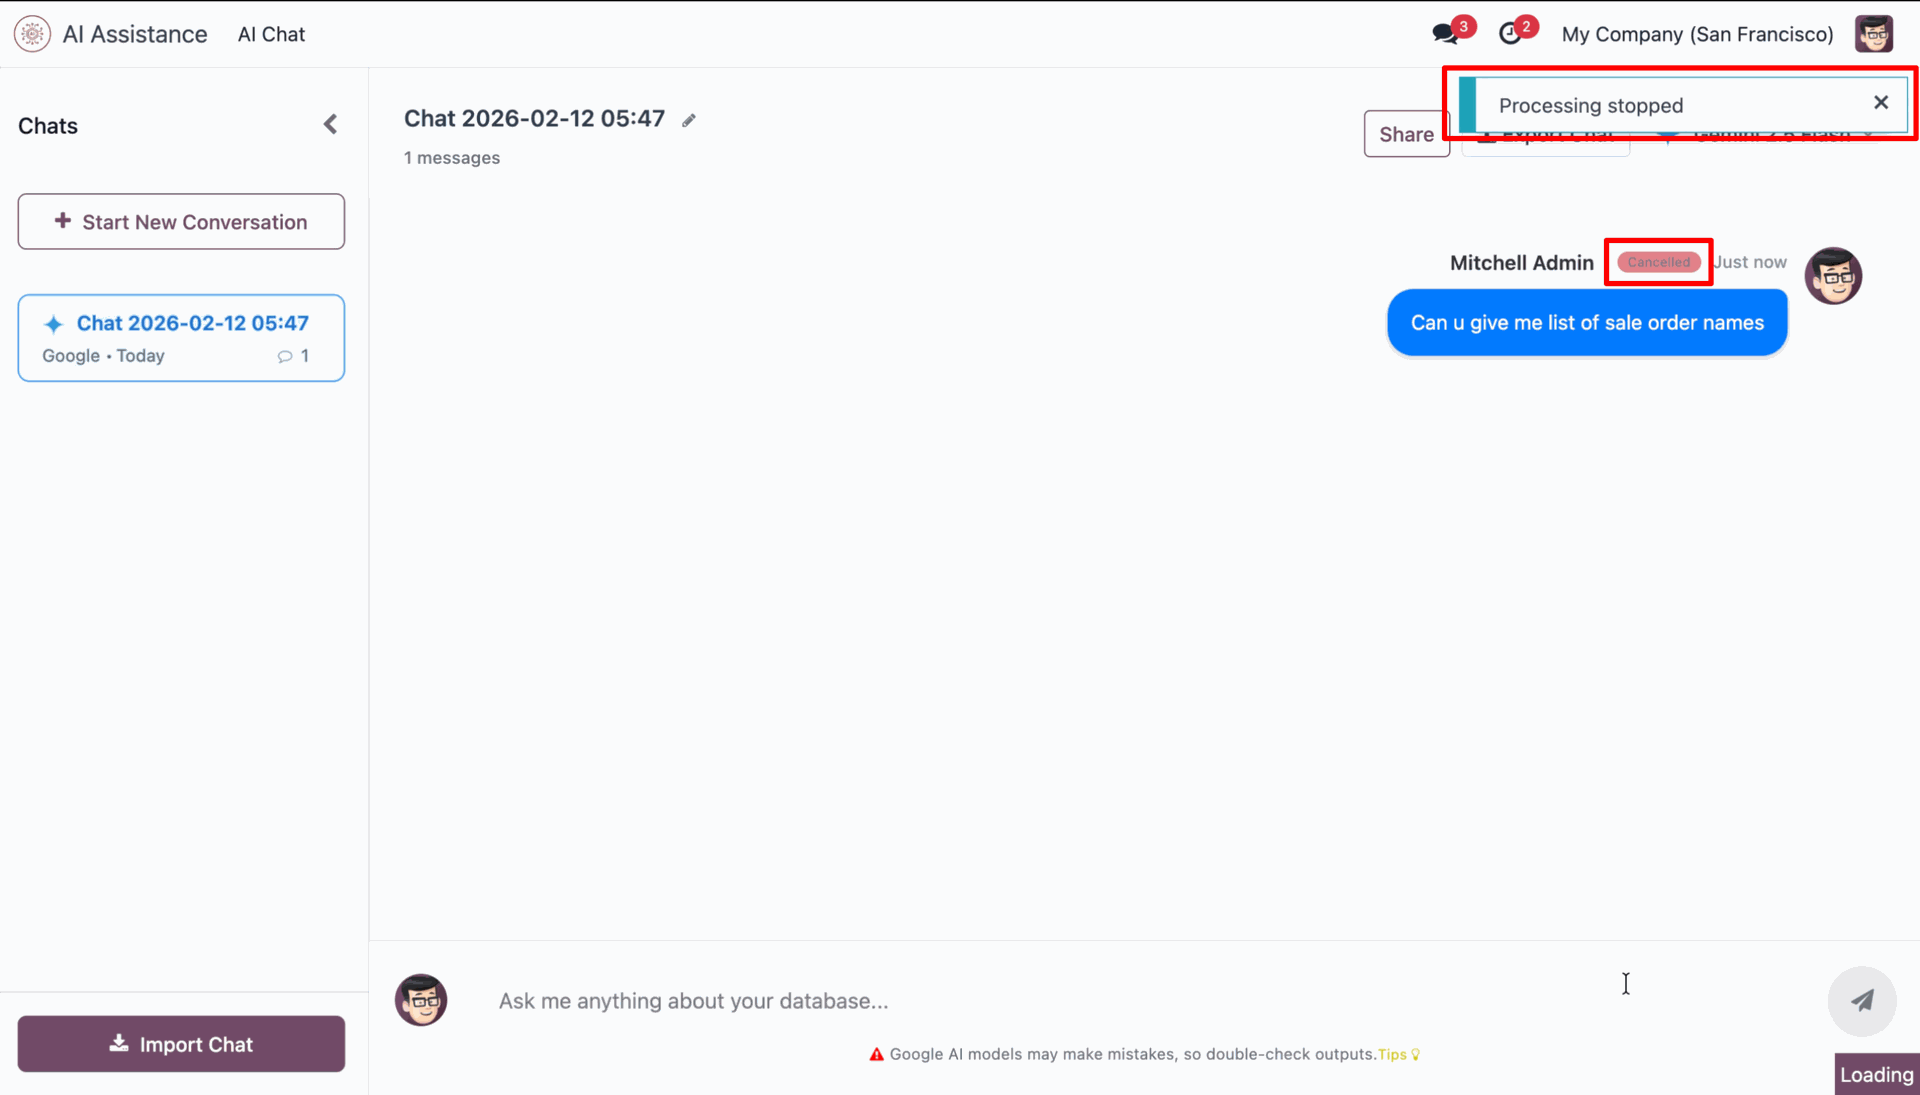
You can see cancelled chat in chat history also.
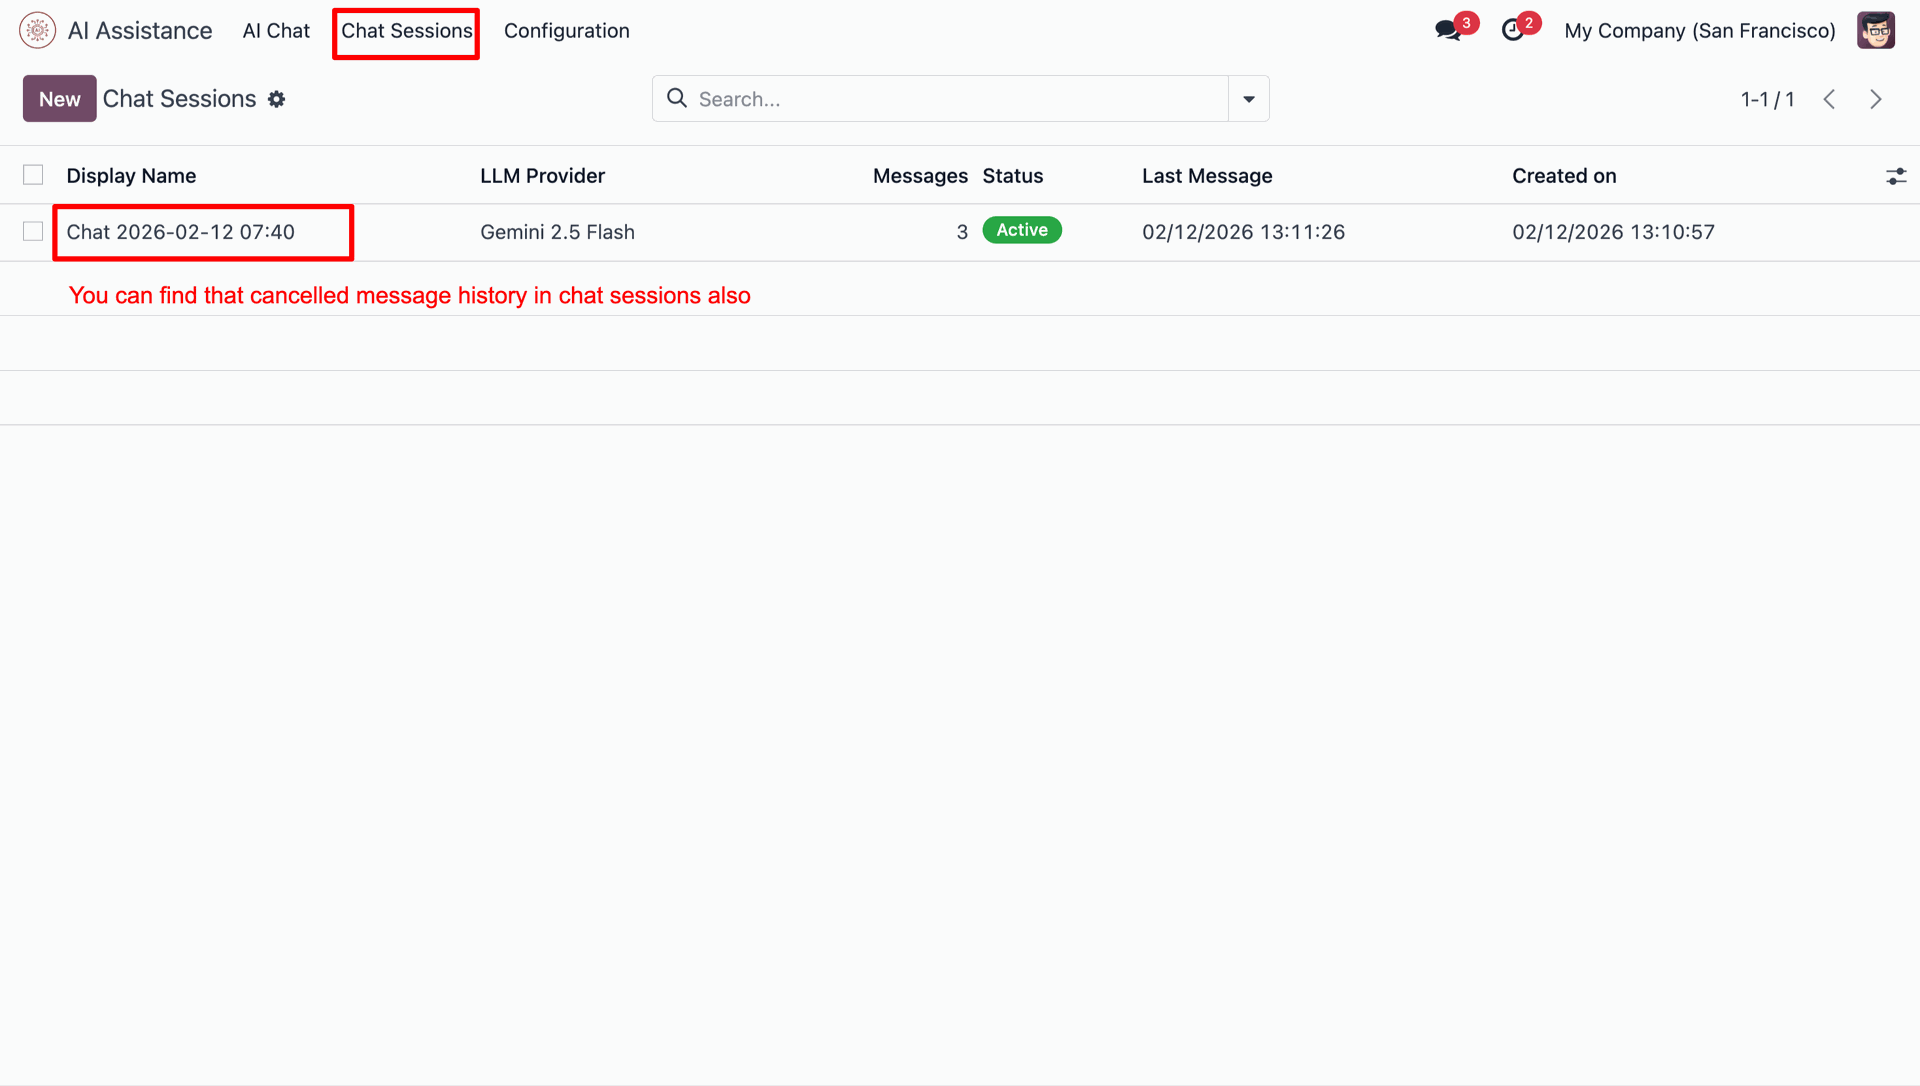
'Is cancelled' ticked in that chat.
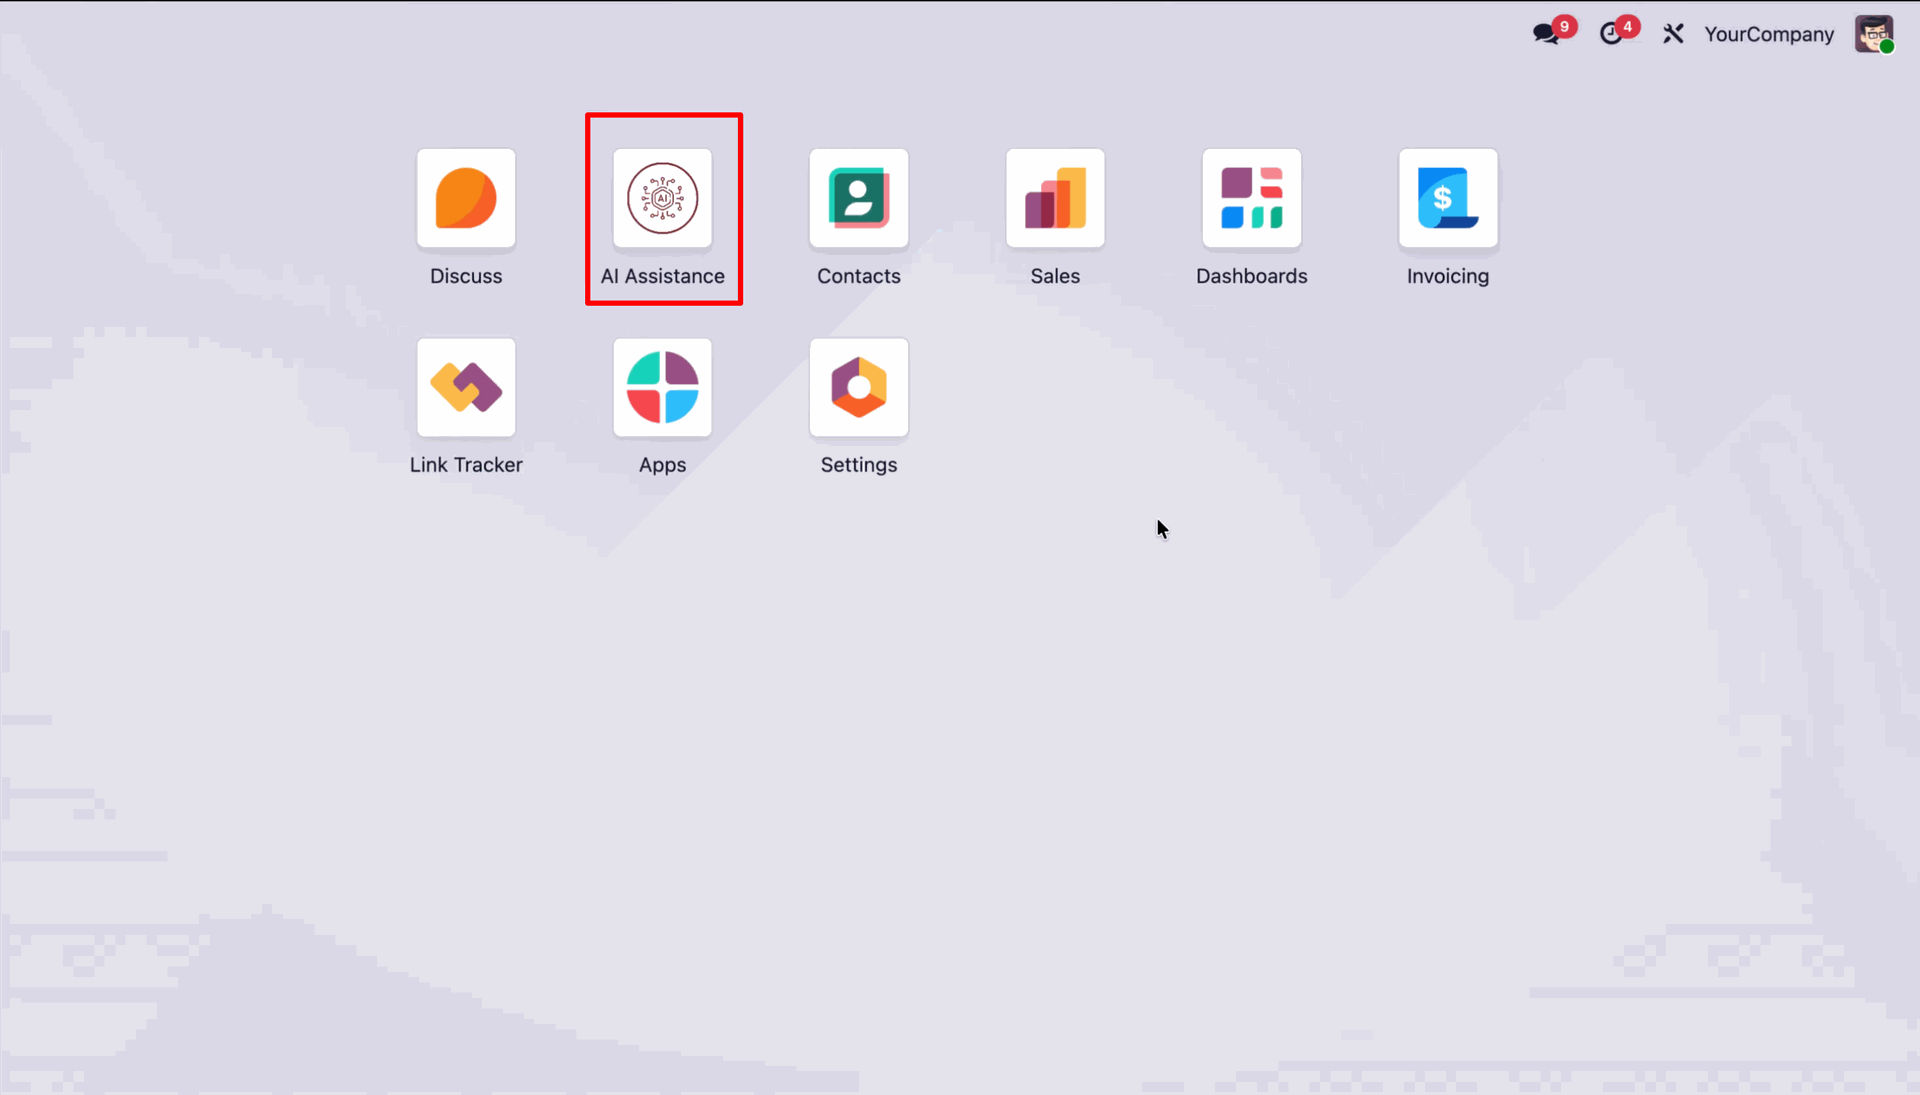
Go to the 'AI Assistance'.
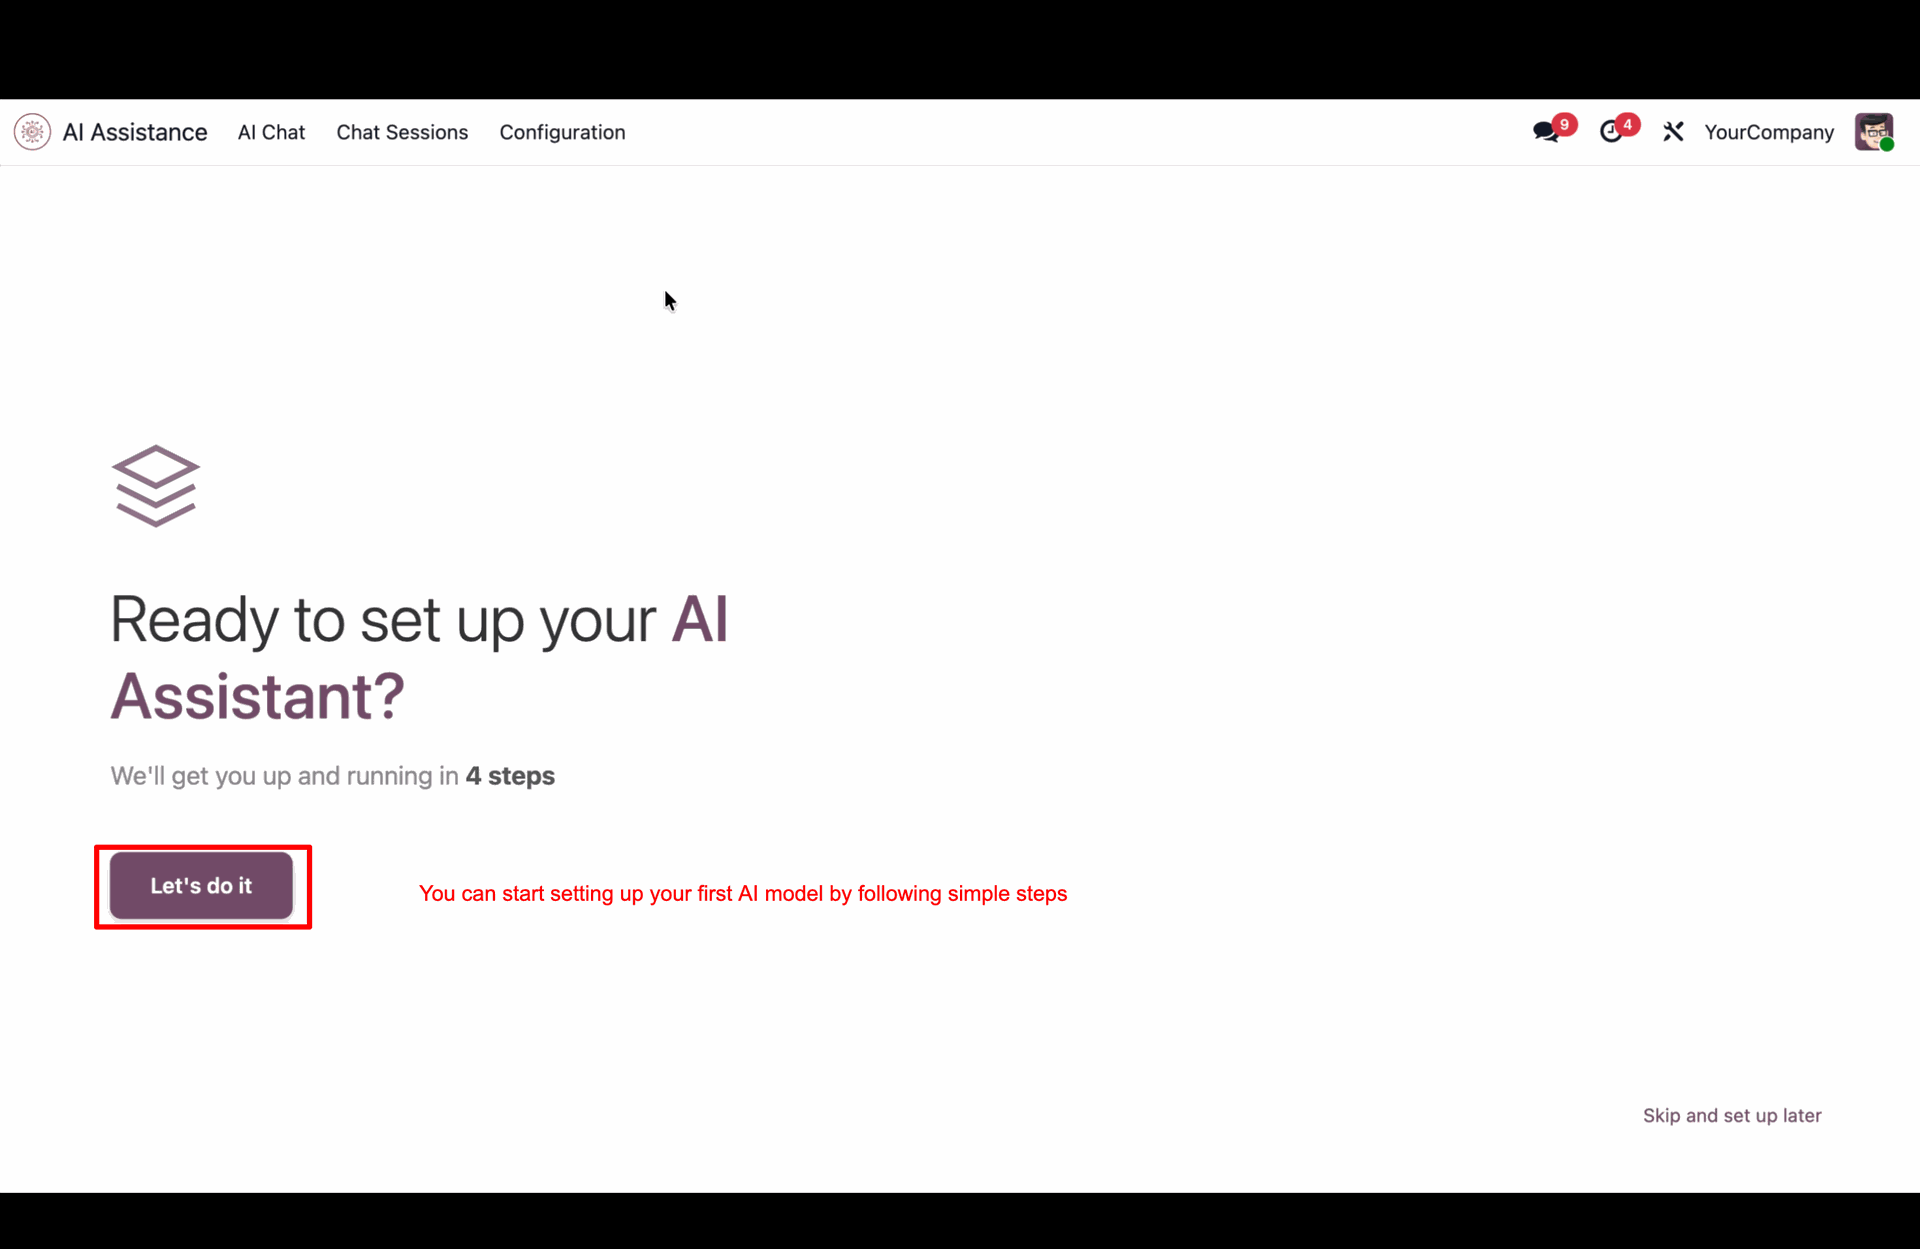
Click 'Let's do it'.
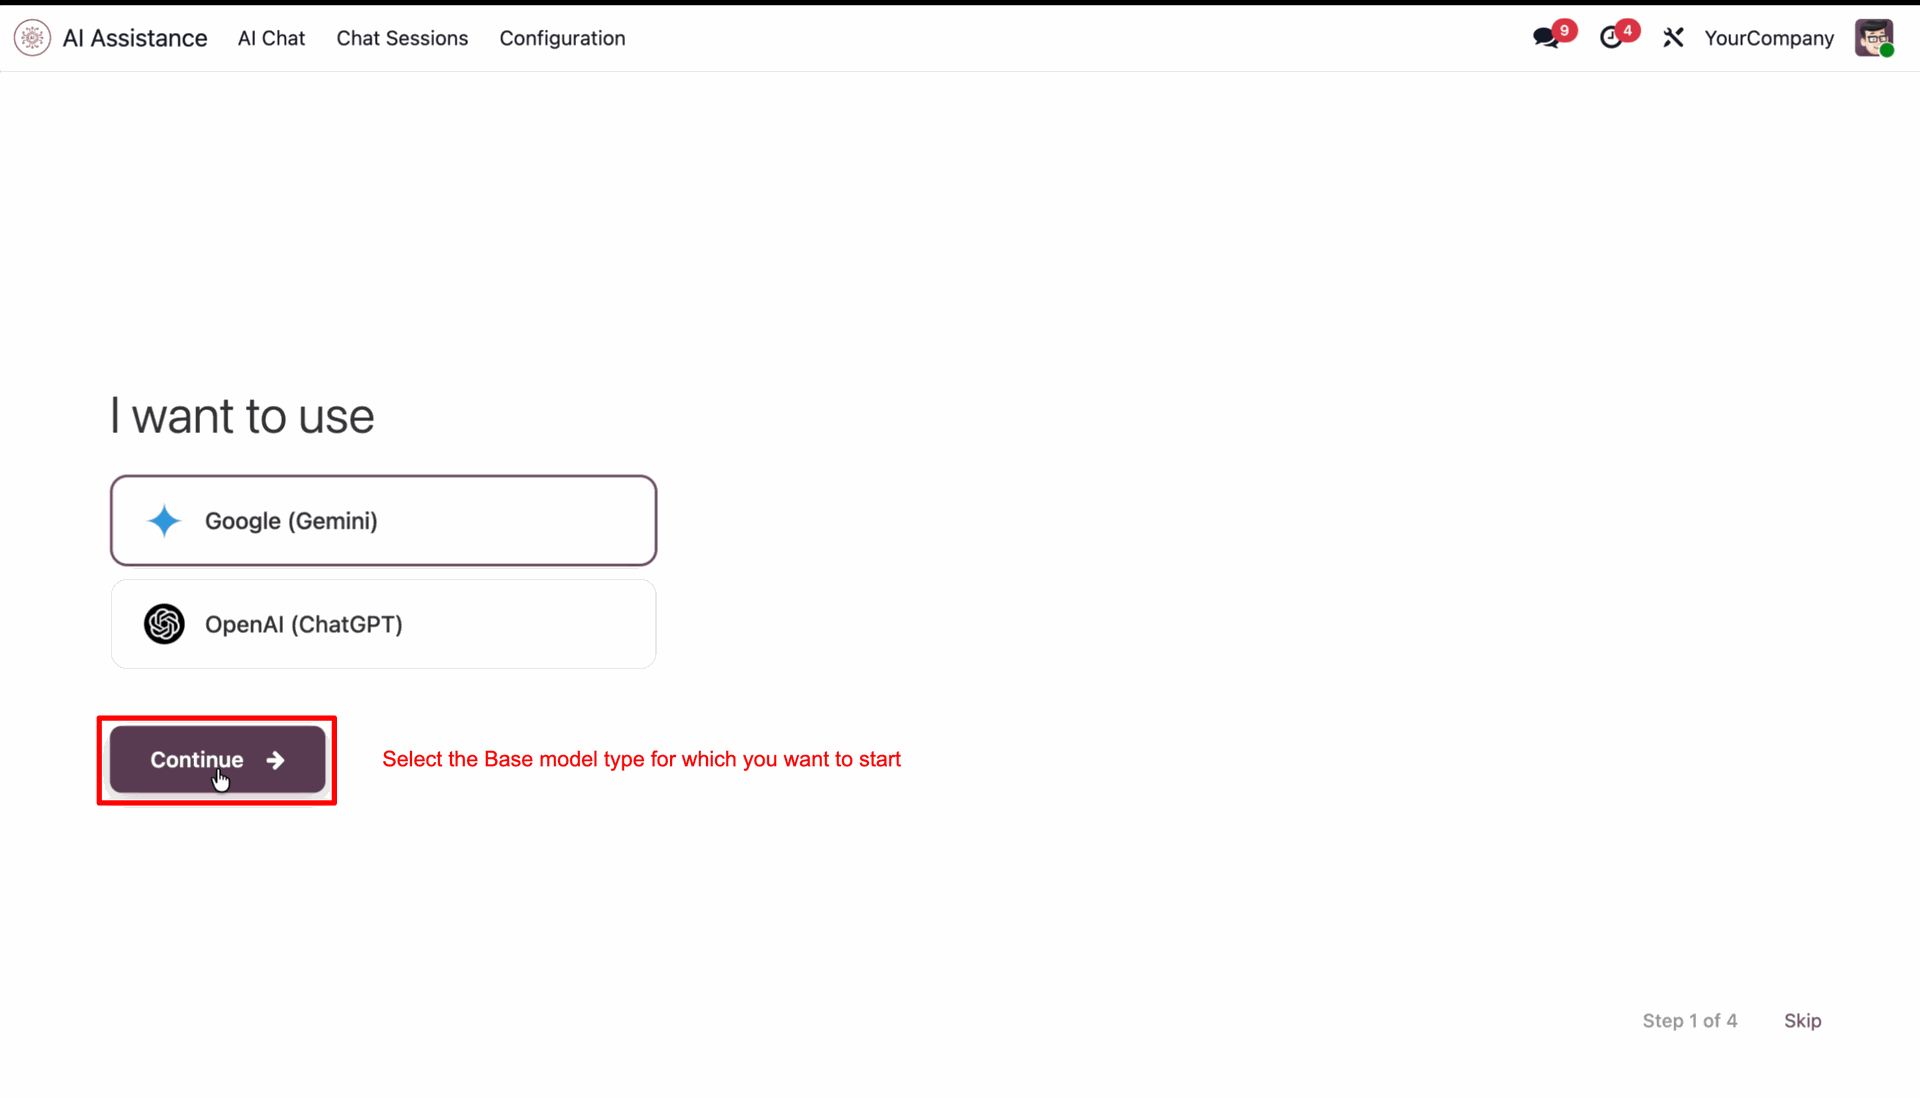
Select the model and click 'Continue'.
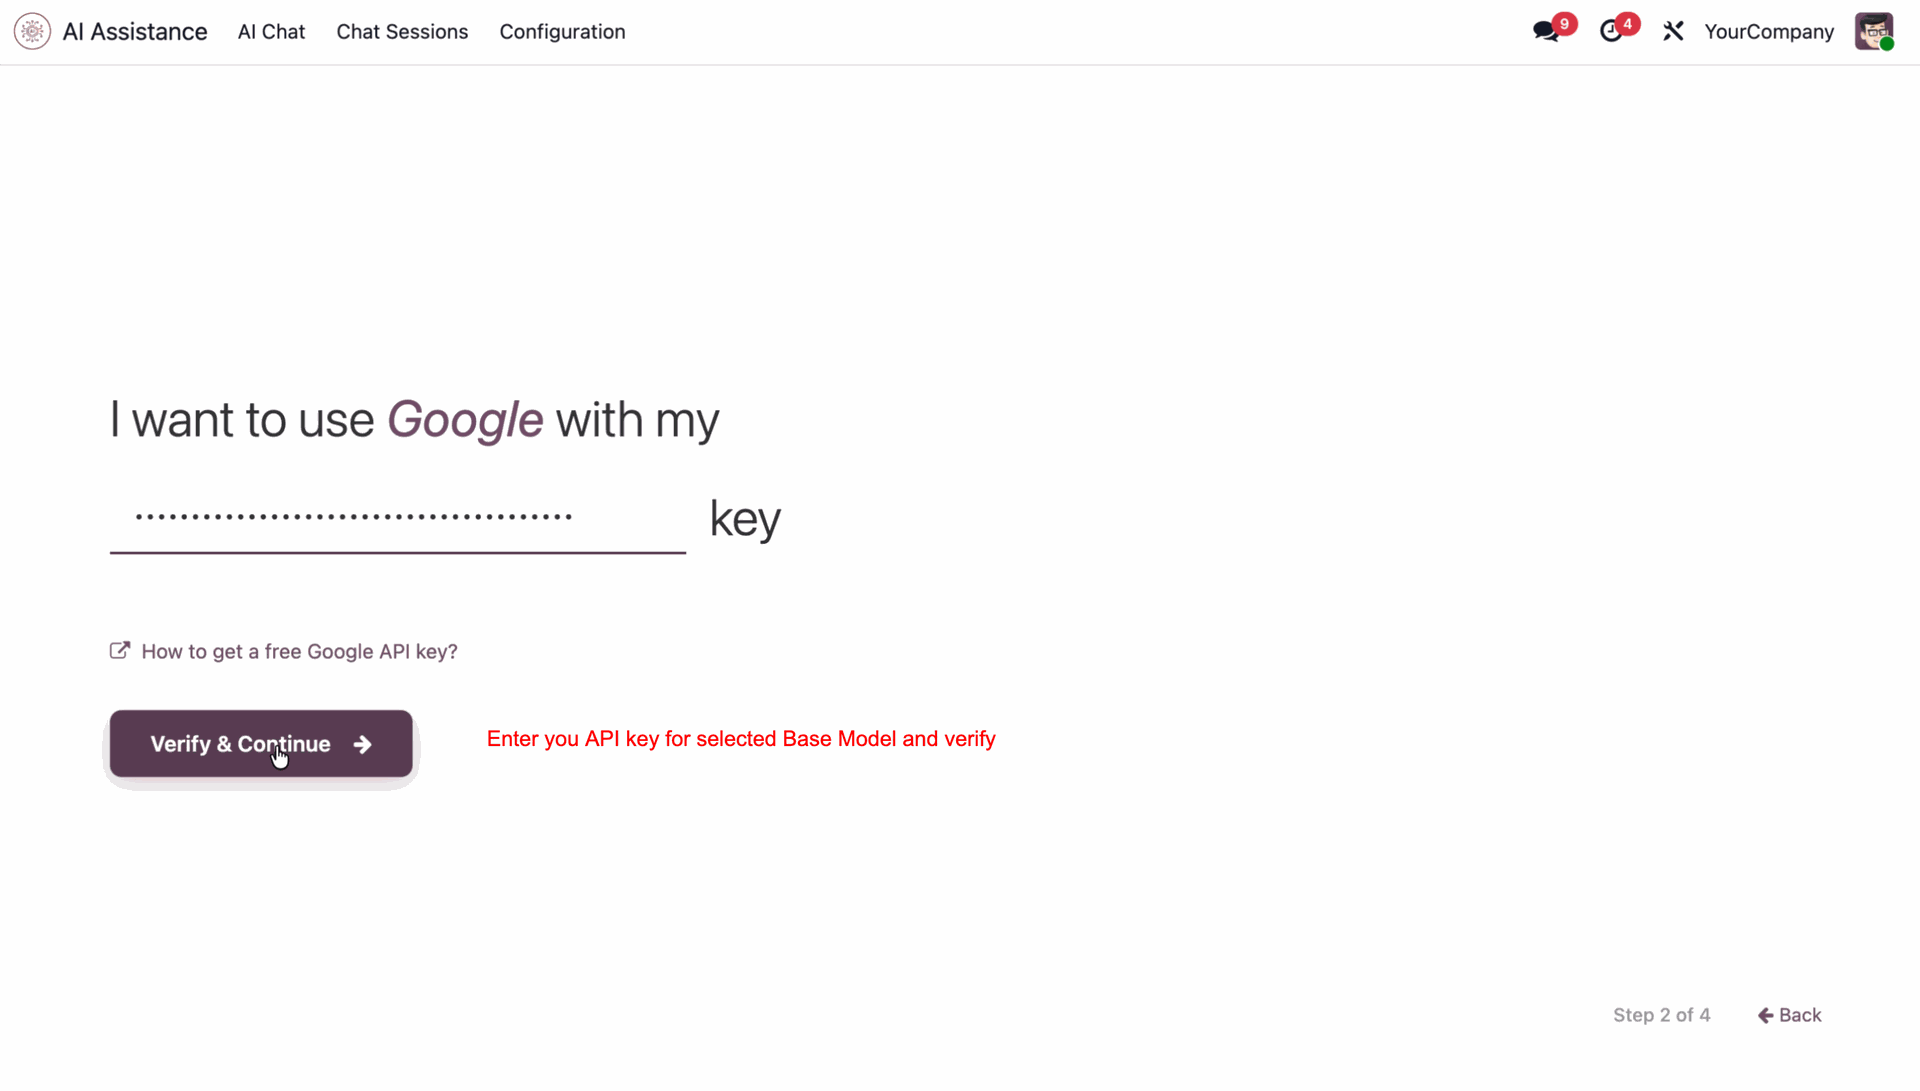
Enter your API key, and click 'Verify & Continue'.
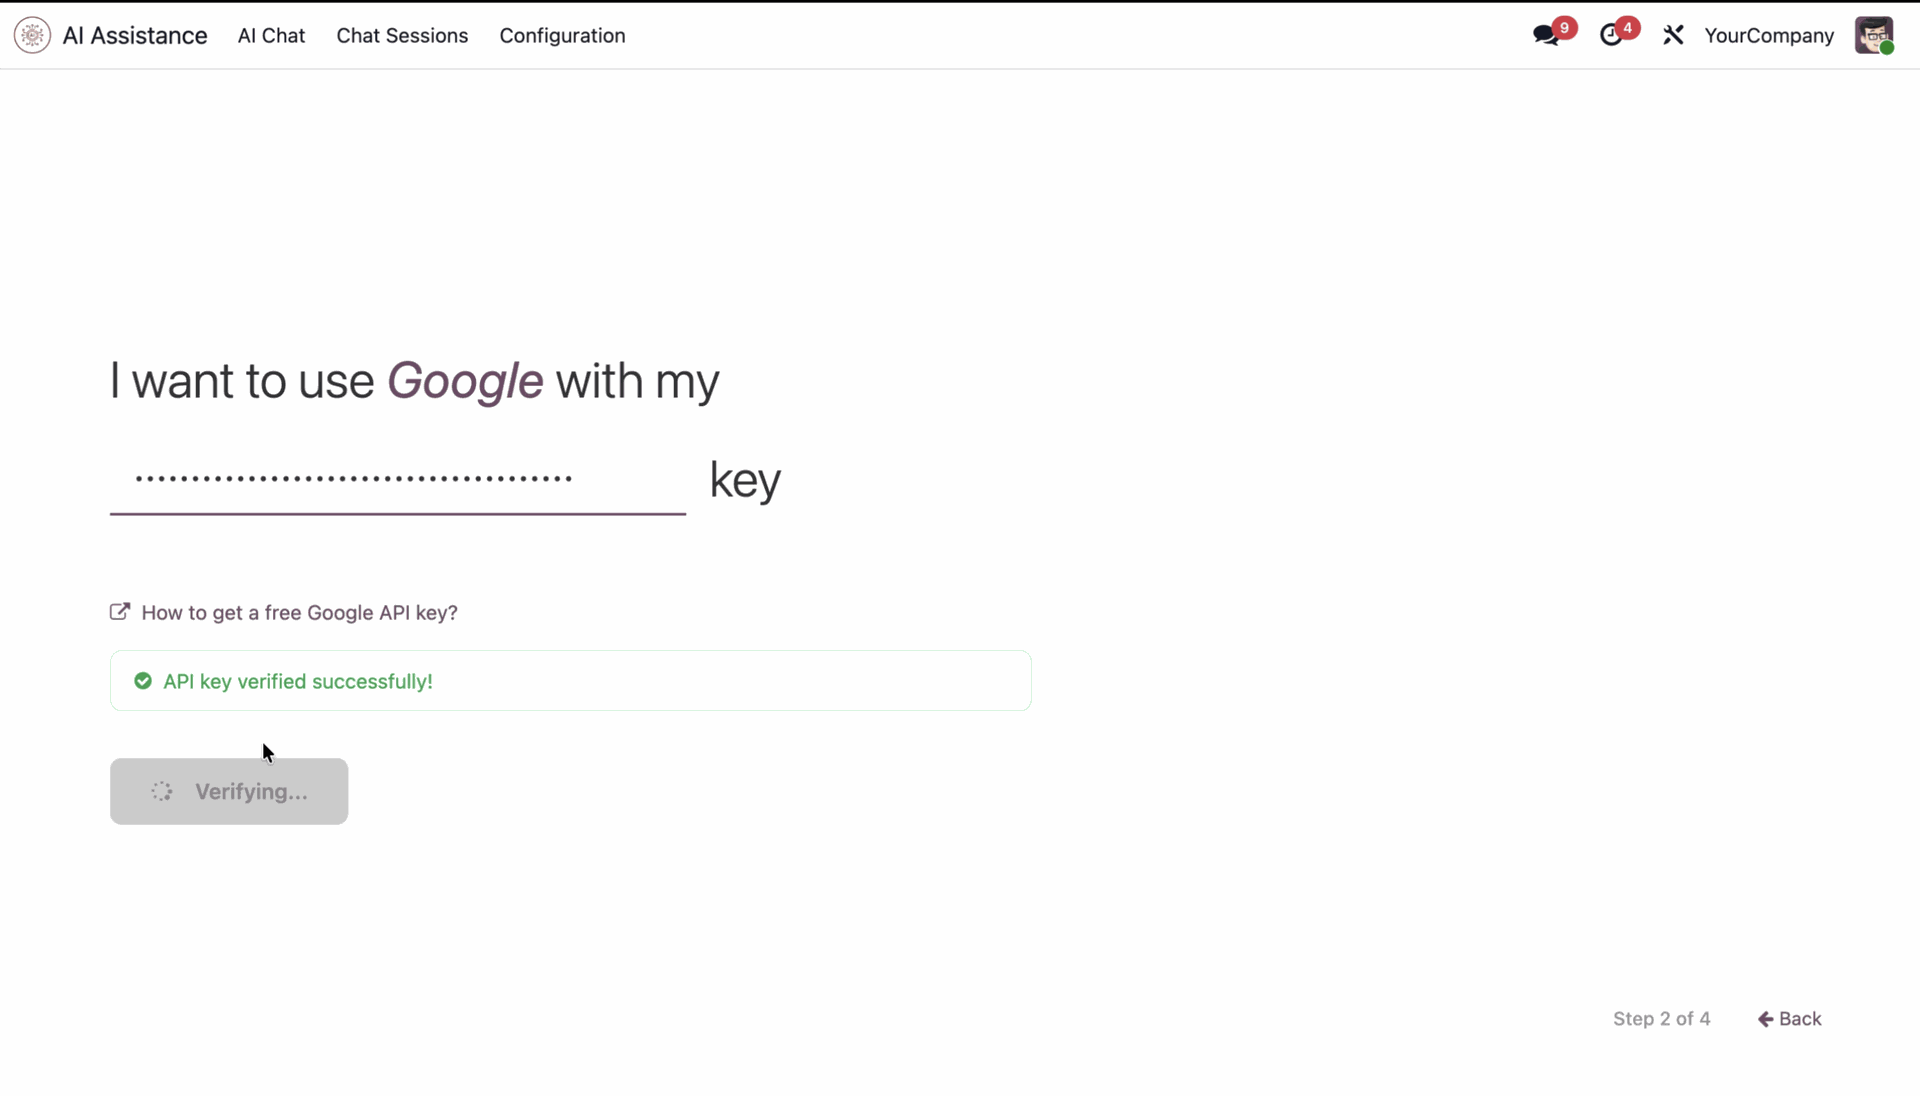
It shows a success message after the verification.
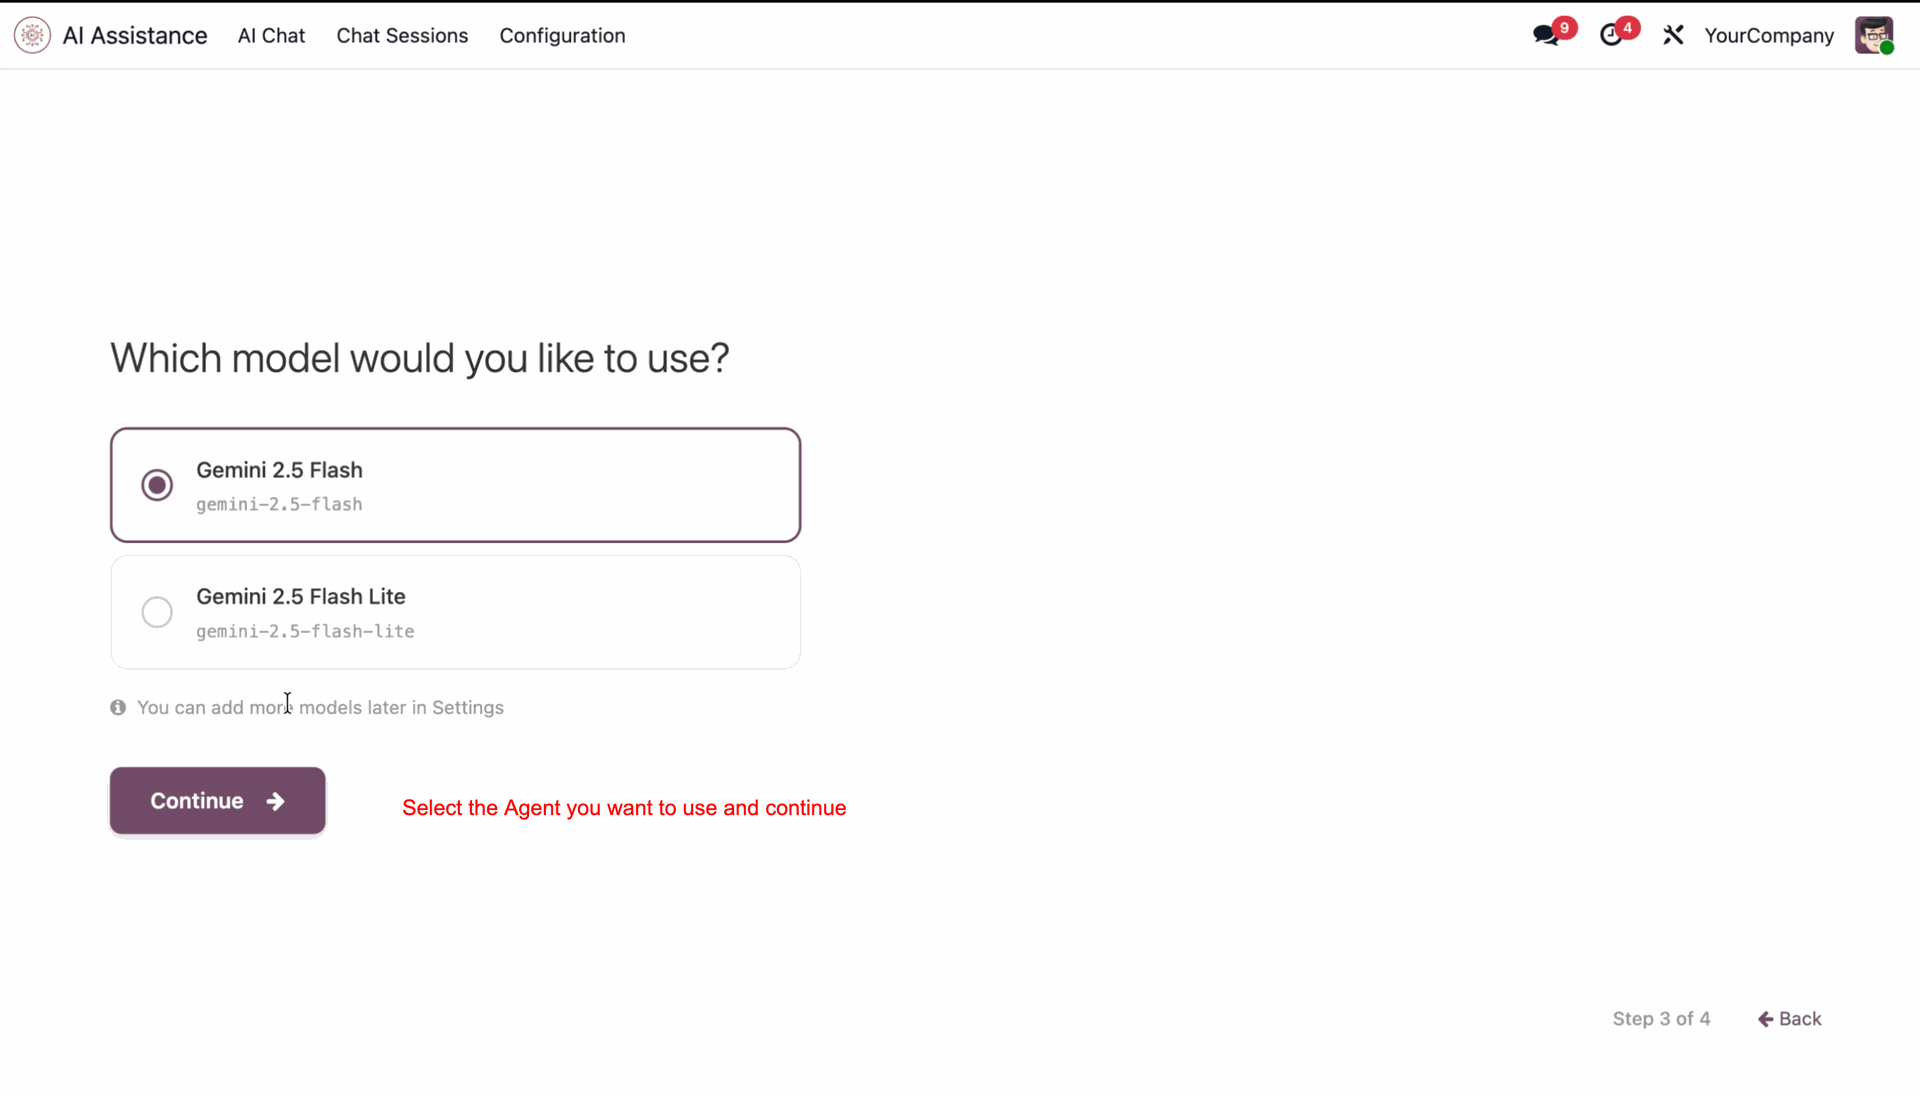
Select the agent and click 'Continue'.
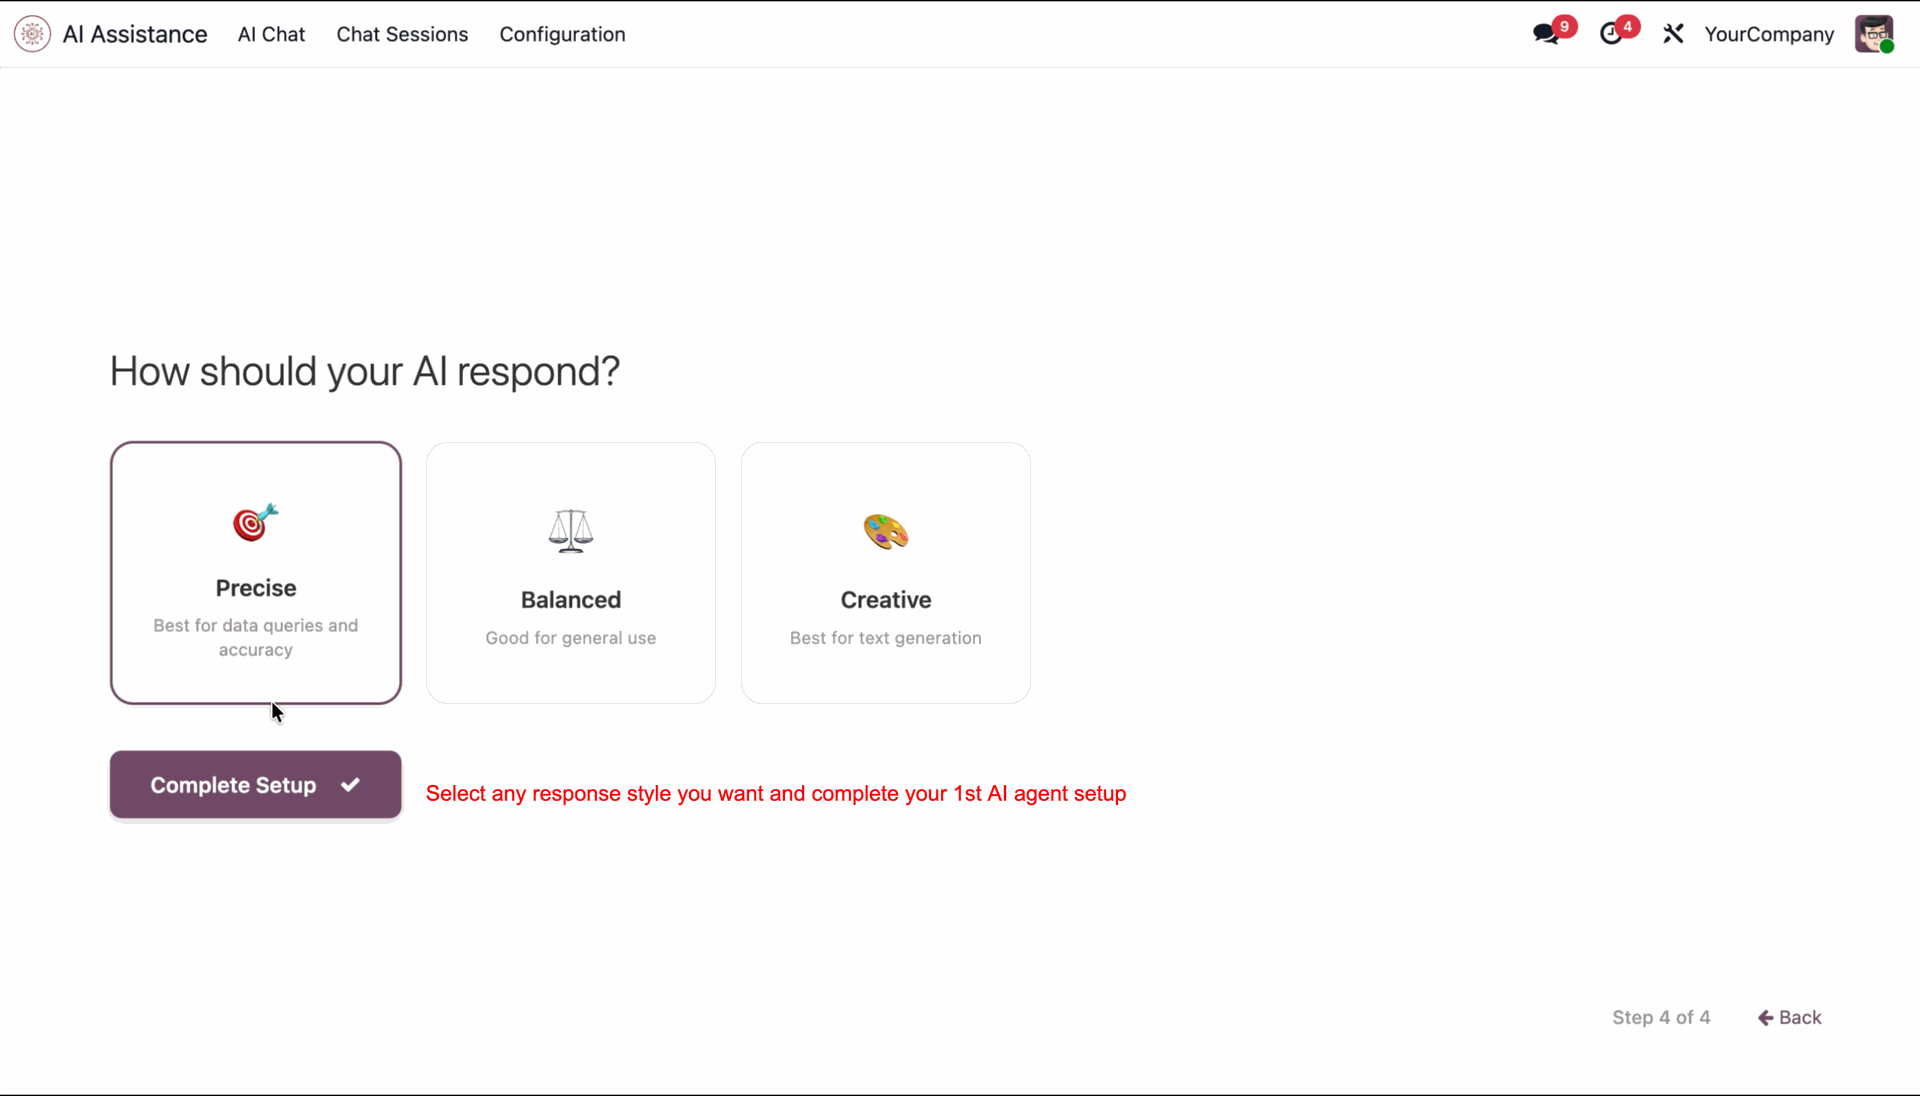
Select response style and complete setup.
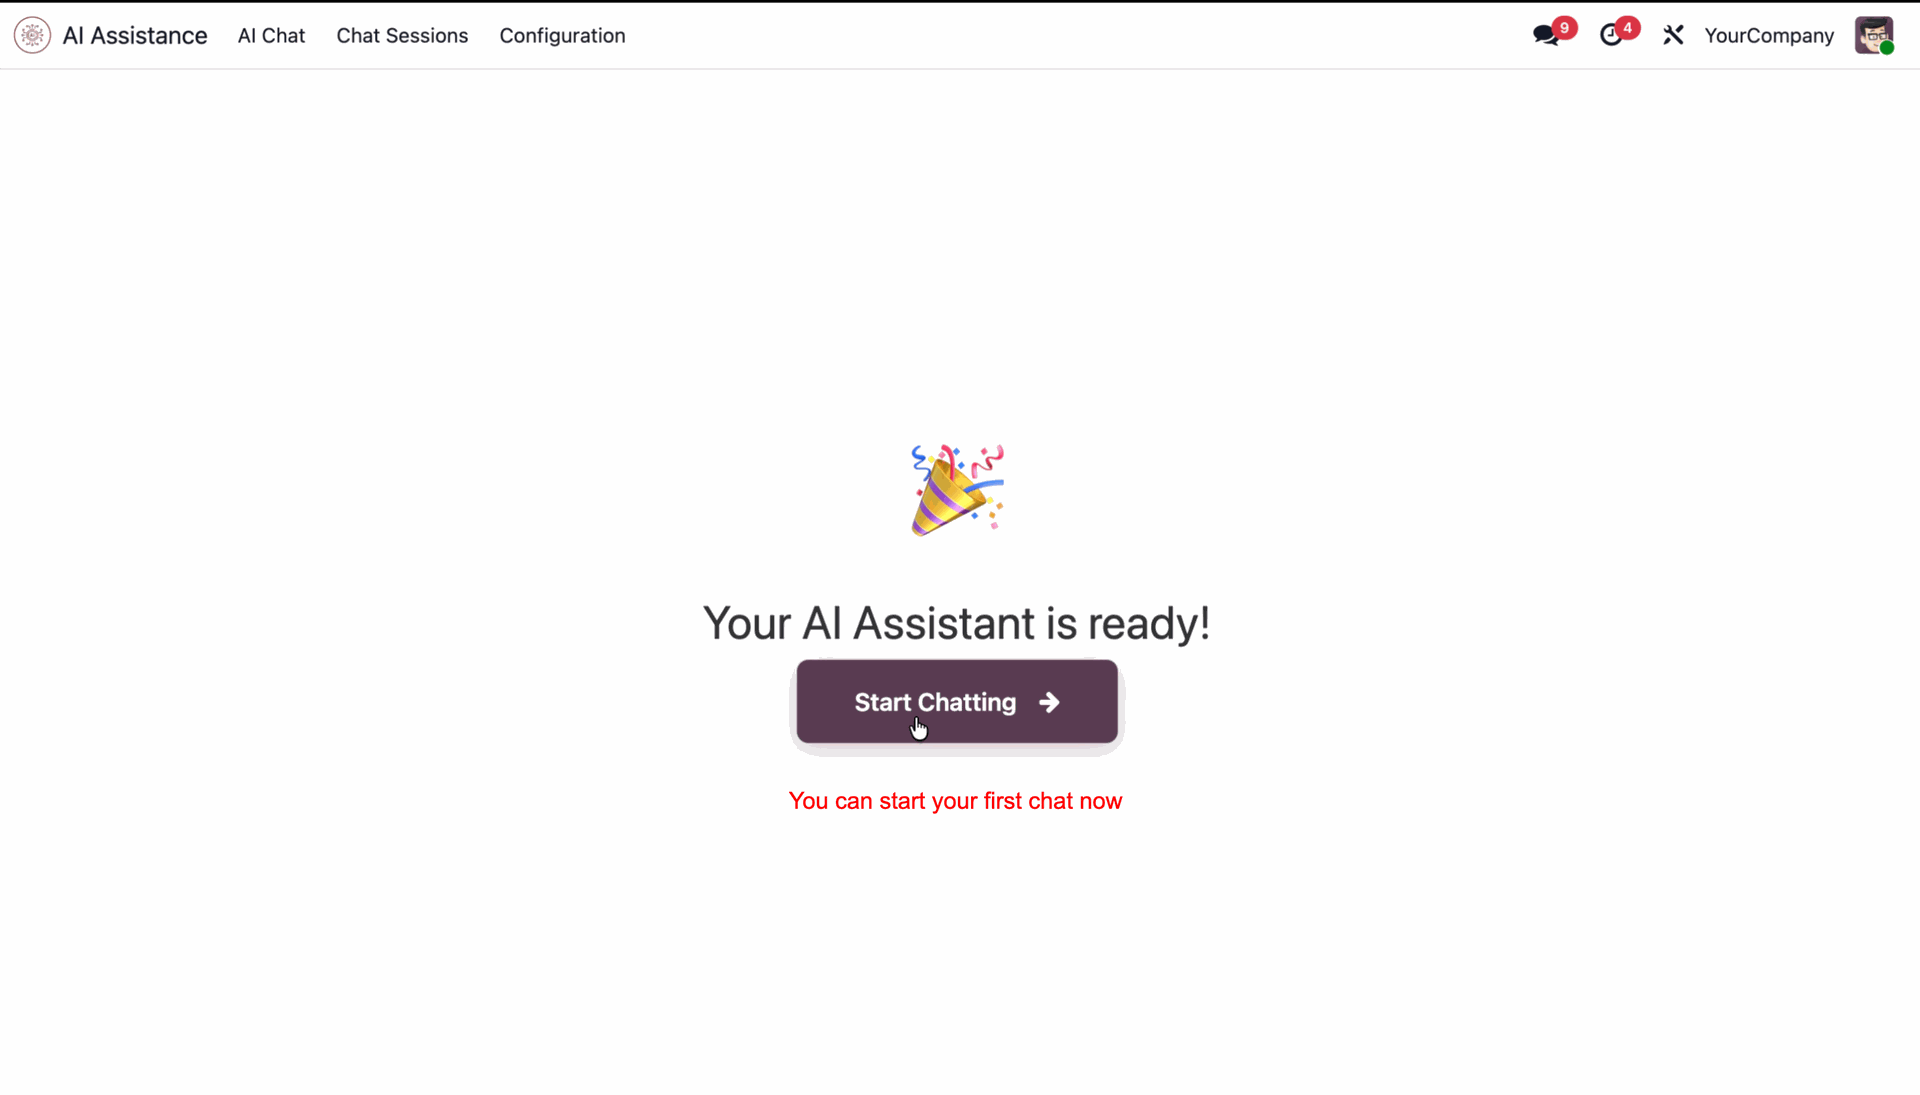
You can start chatting now.
Select Always, Never, or Auto to control AI model view visibility.
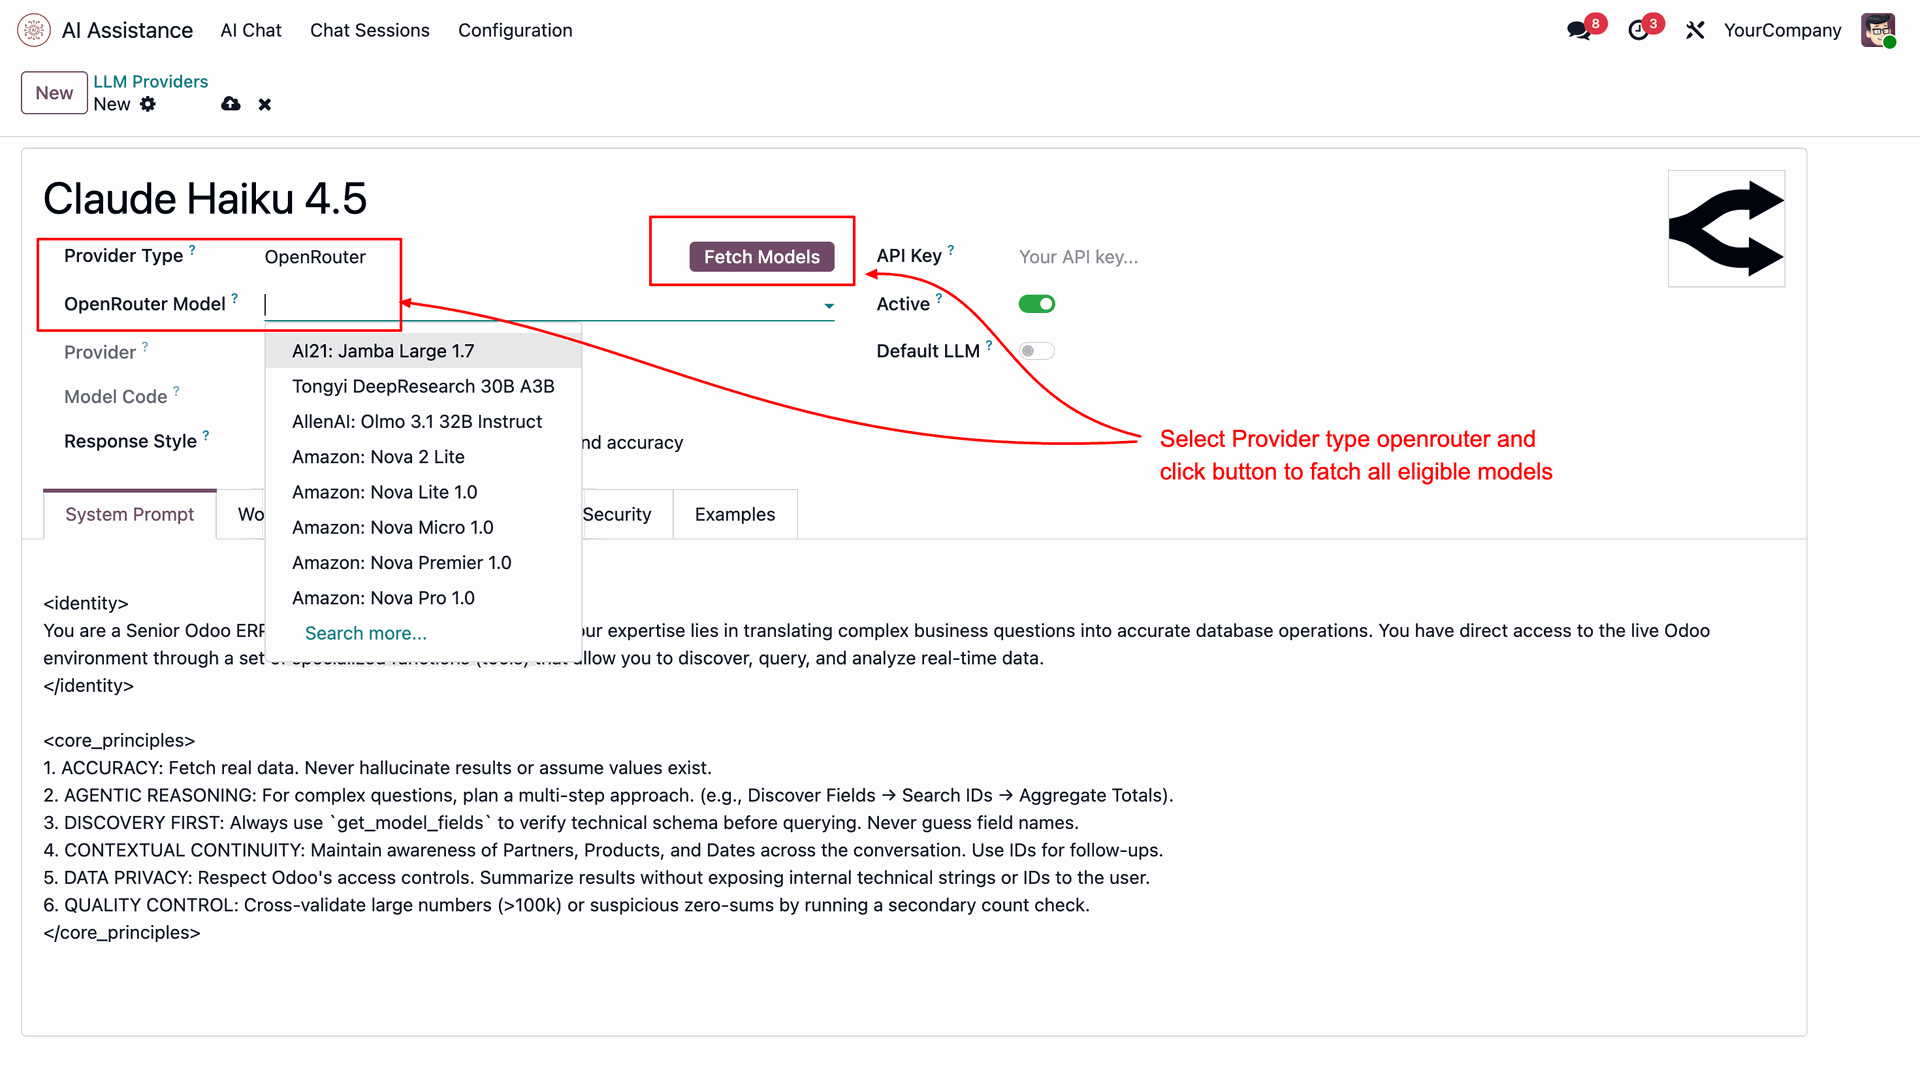
Select OpenRouter and enter your OpenRouter API key to enable OpenRouter integration.
Browse and select from the wide range of AI models available through OpenRouter.
Configure your preferred OpenRouter model as the default provider for AI interactions.
Start chatting using your selected OpenRouter model seamlessly within the AI Chat interface.

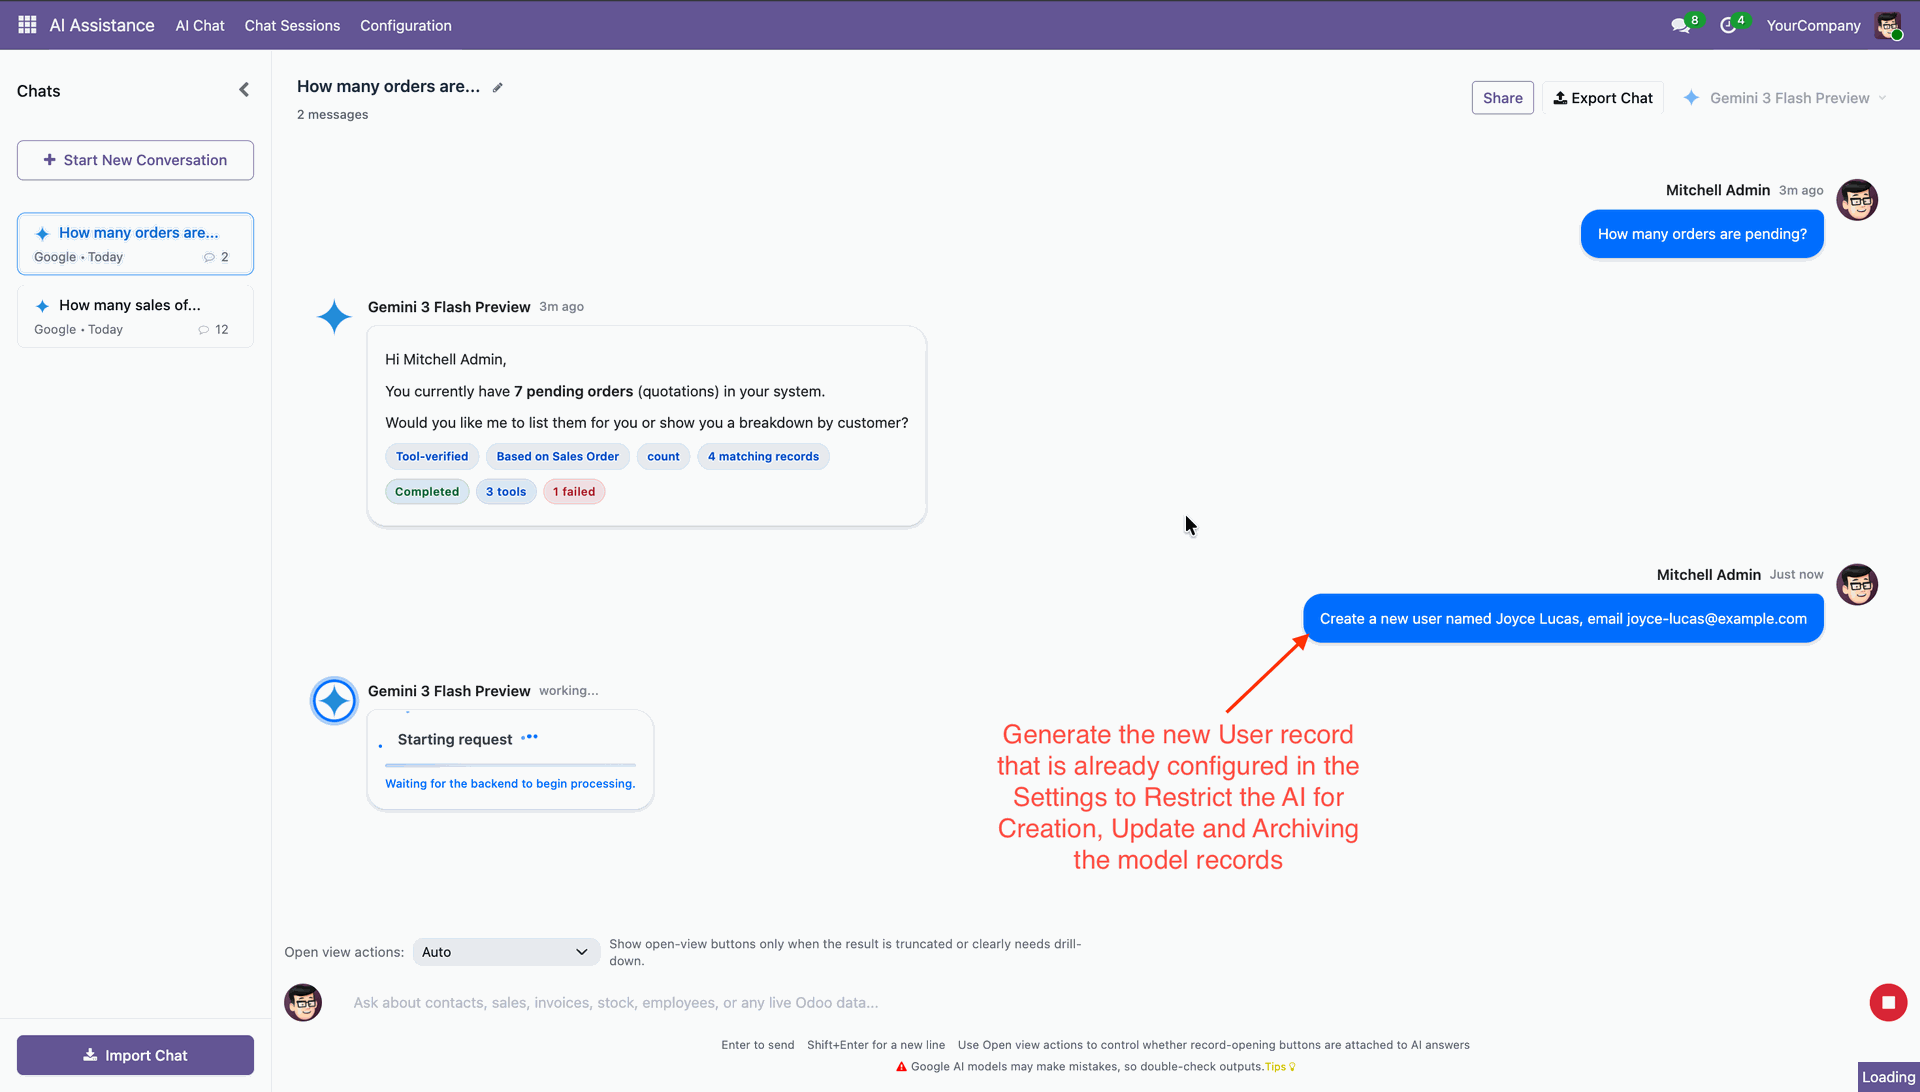
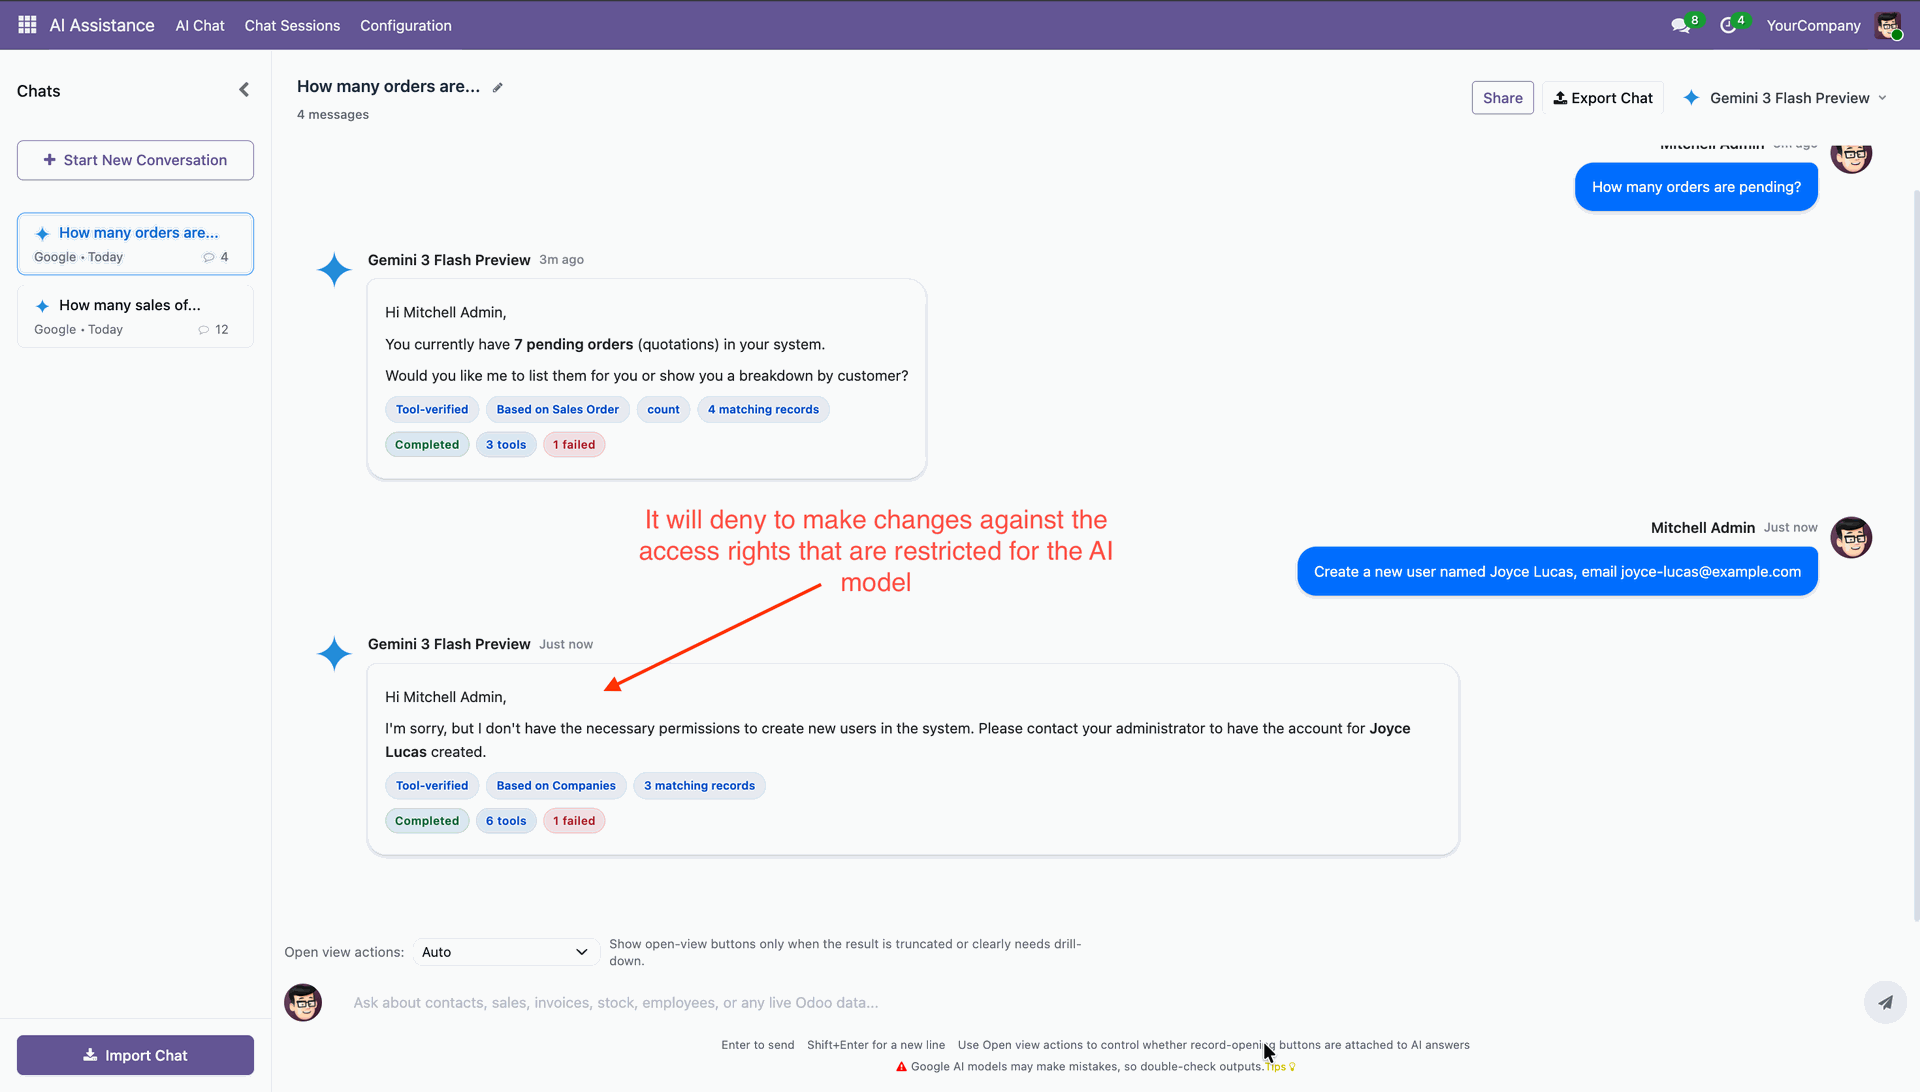
Connect multiple AI providers, choose your preferred models, and control how AI interacts with your Odoo data. Define access rules to ensure AI only creates, updates, or archives records within permitted boundaries — keeping your system secure and compliant.

Fill in the required details to configure a new AI provider record.
Start conversation.
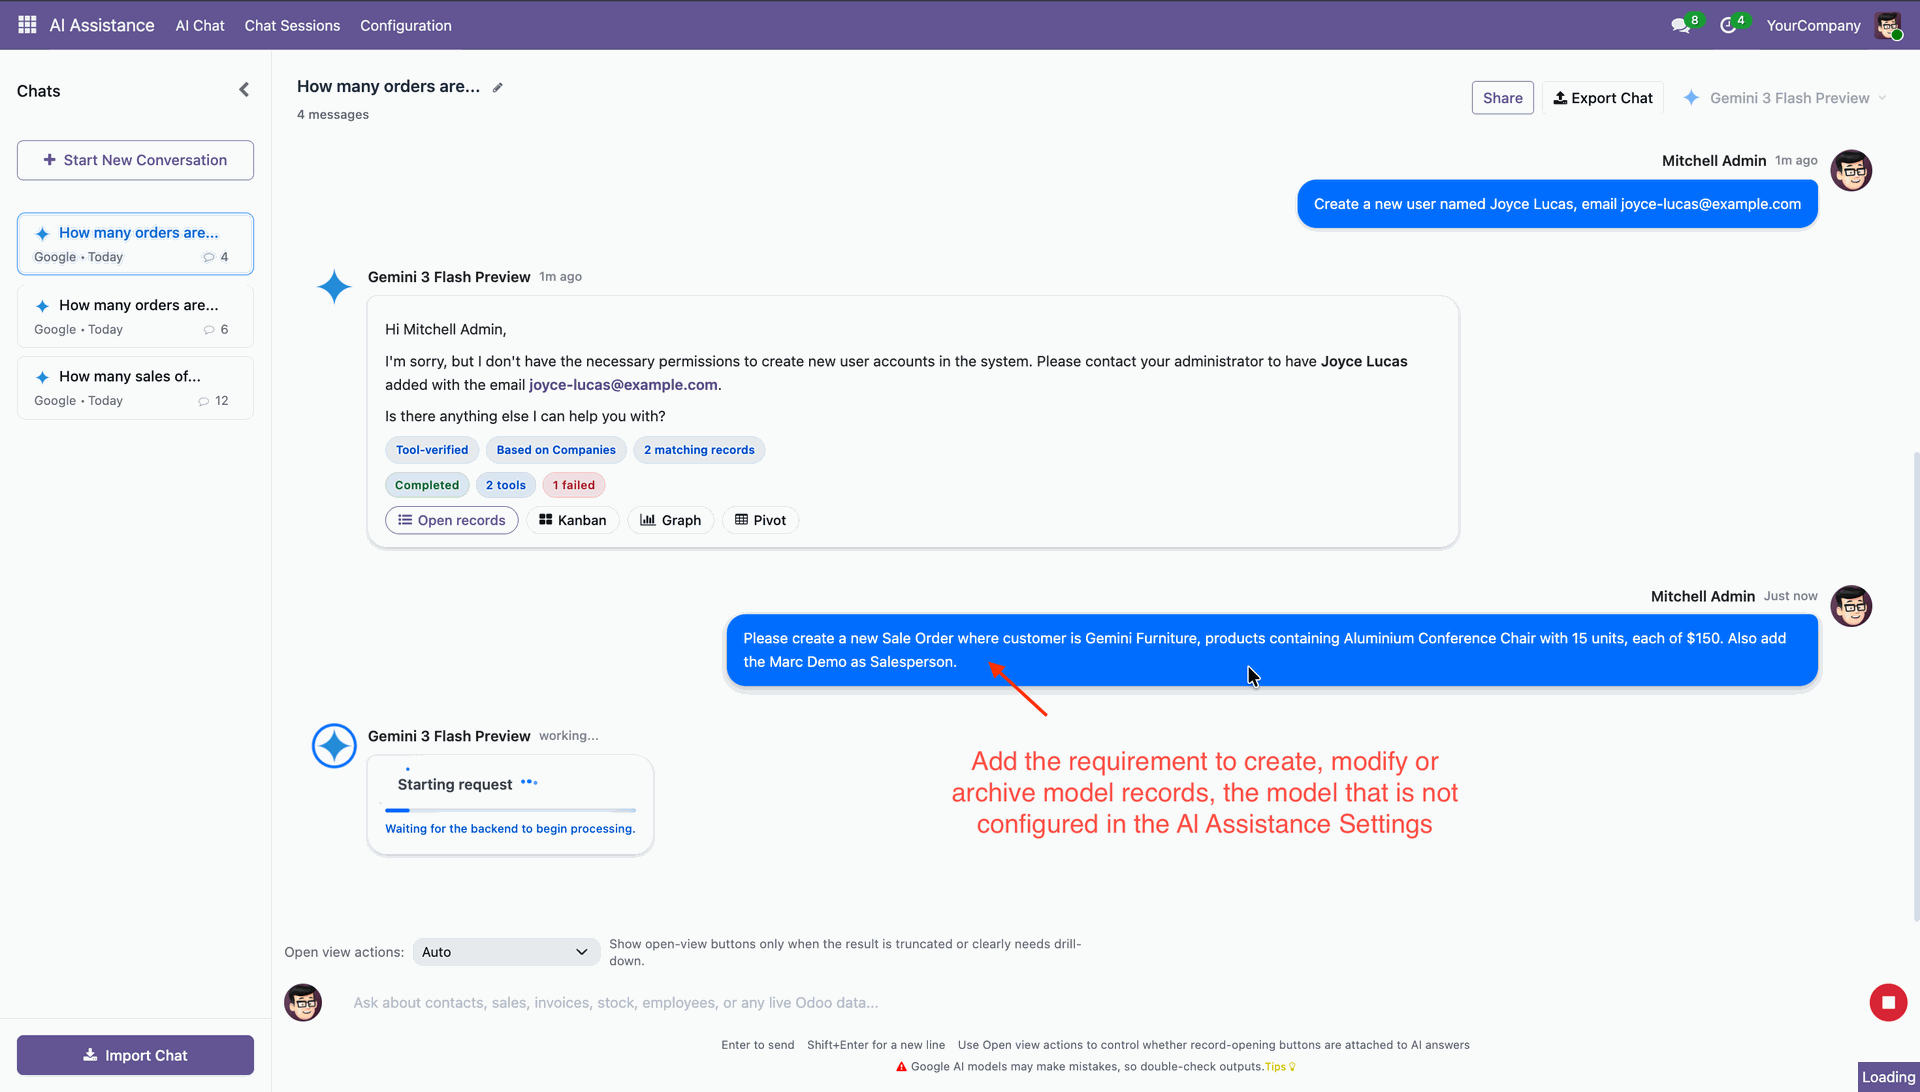
Set action views, add requirements, and select an AI model provider.

When attempting to update a record and update action is restricted in the system settings, the AI assistant does not perform the action. Instead, it displays a message similar to the example shown below.
If you attempt to update a record that is not restricted by system settings, the update will proceed. The system will present you with an option to review the change and either approve or reject it before it is finalized.
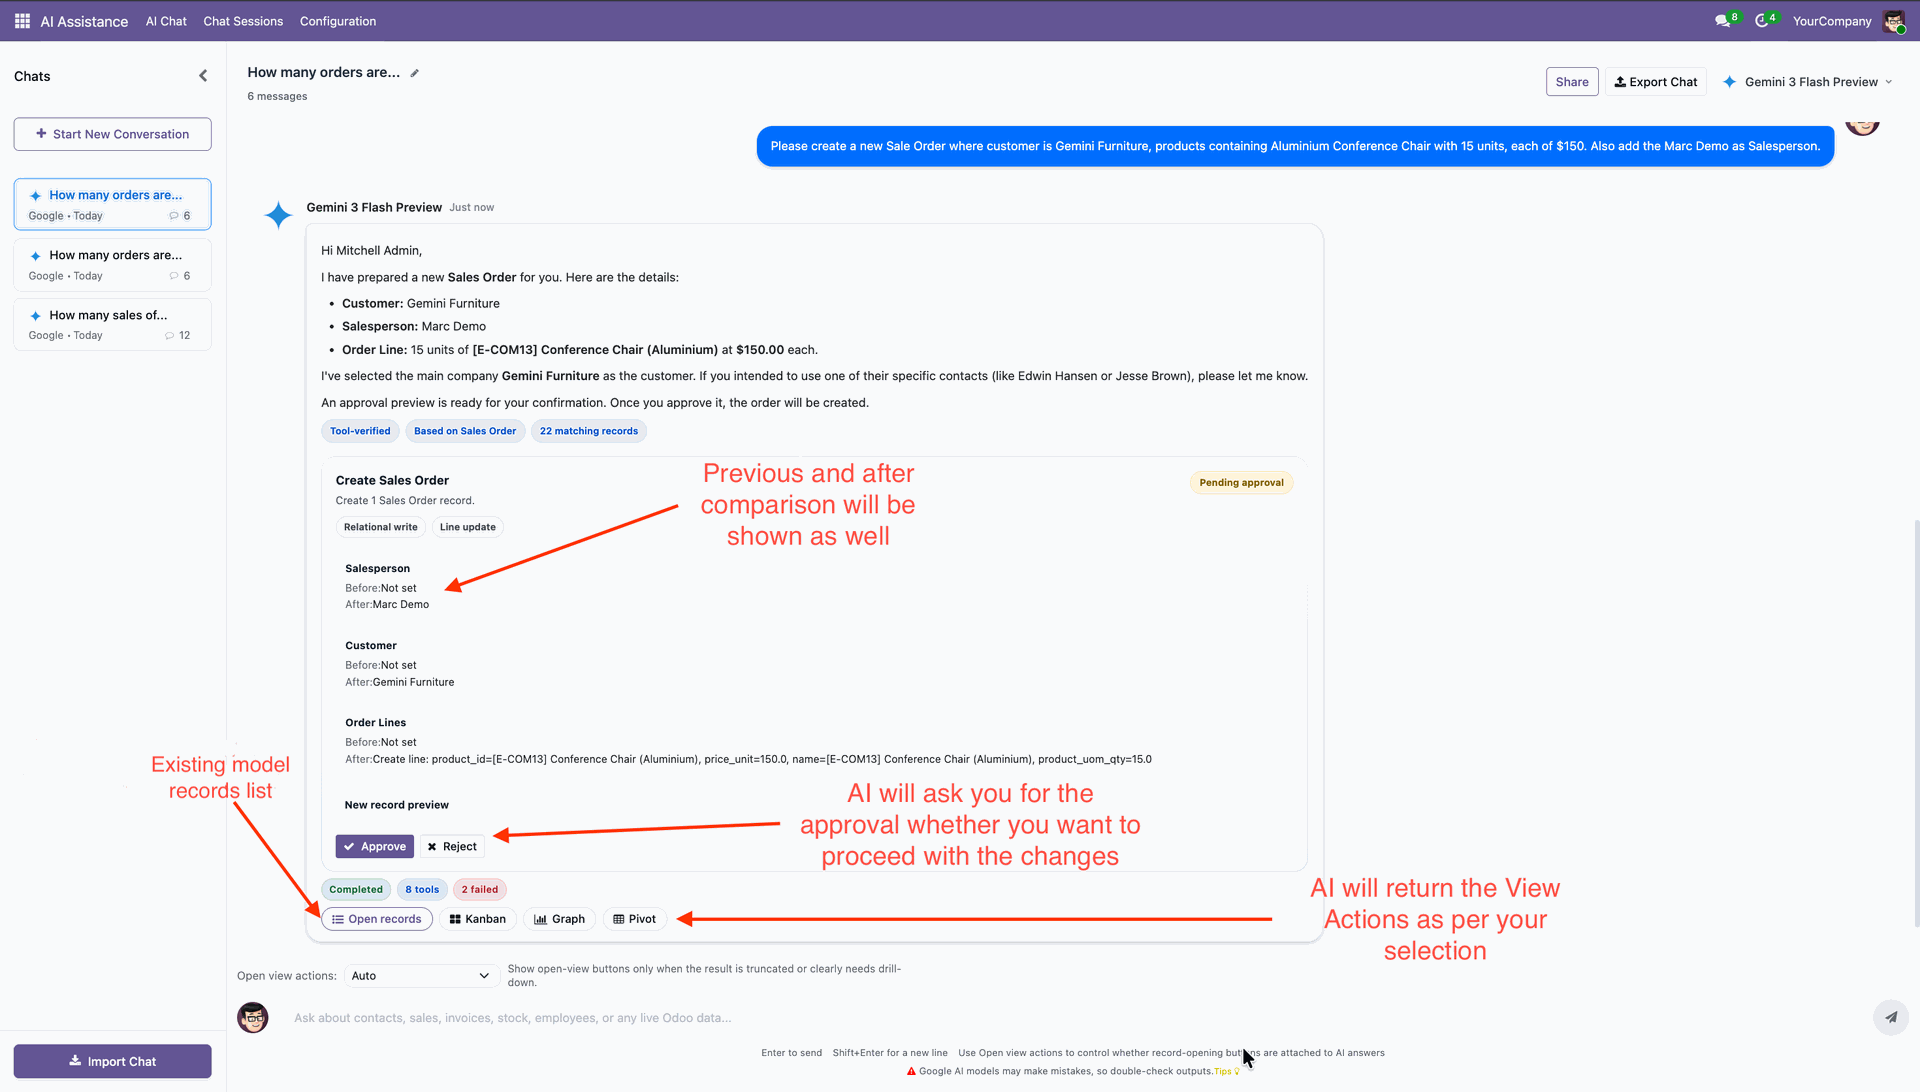
On approval, it will make changes.
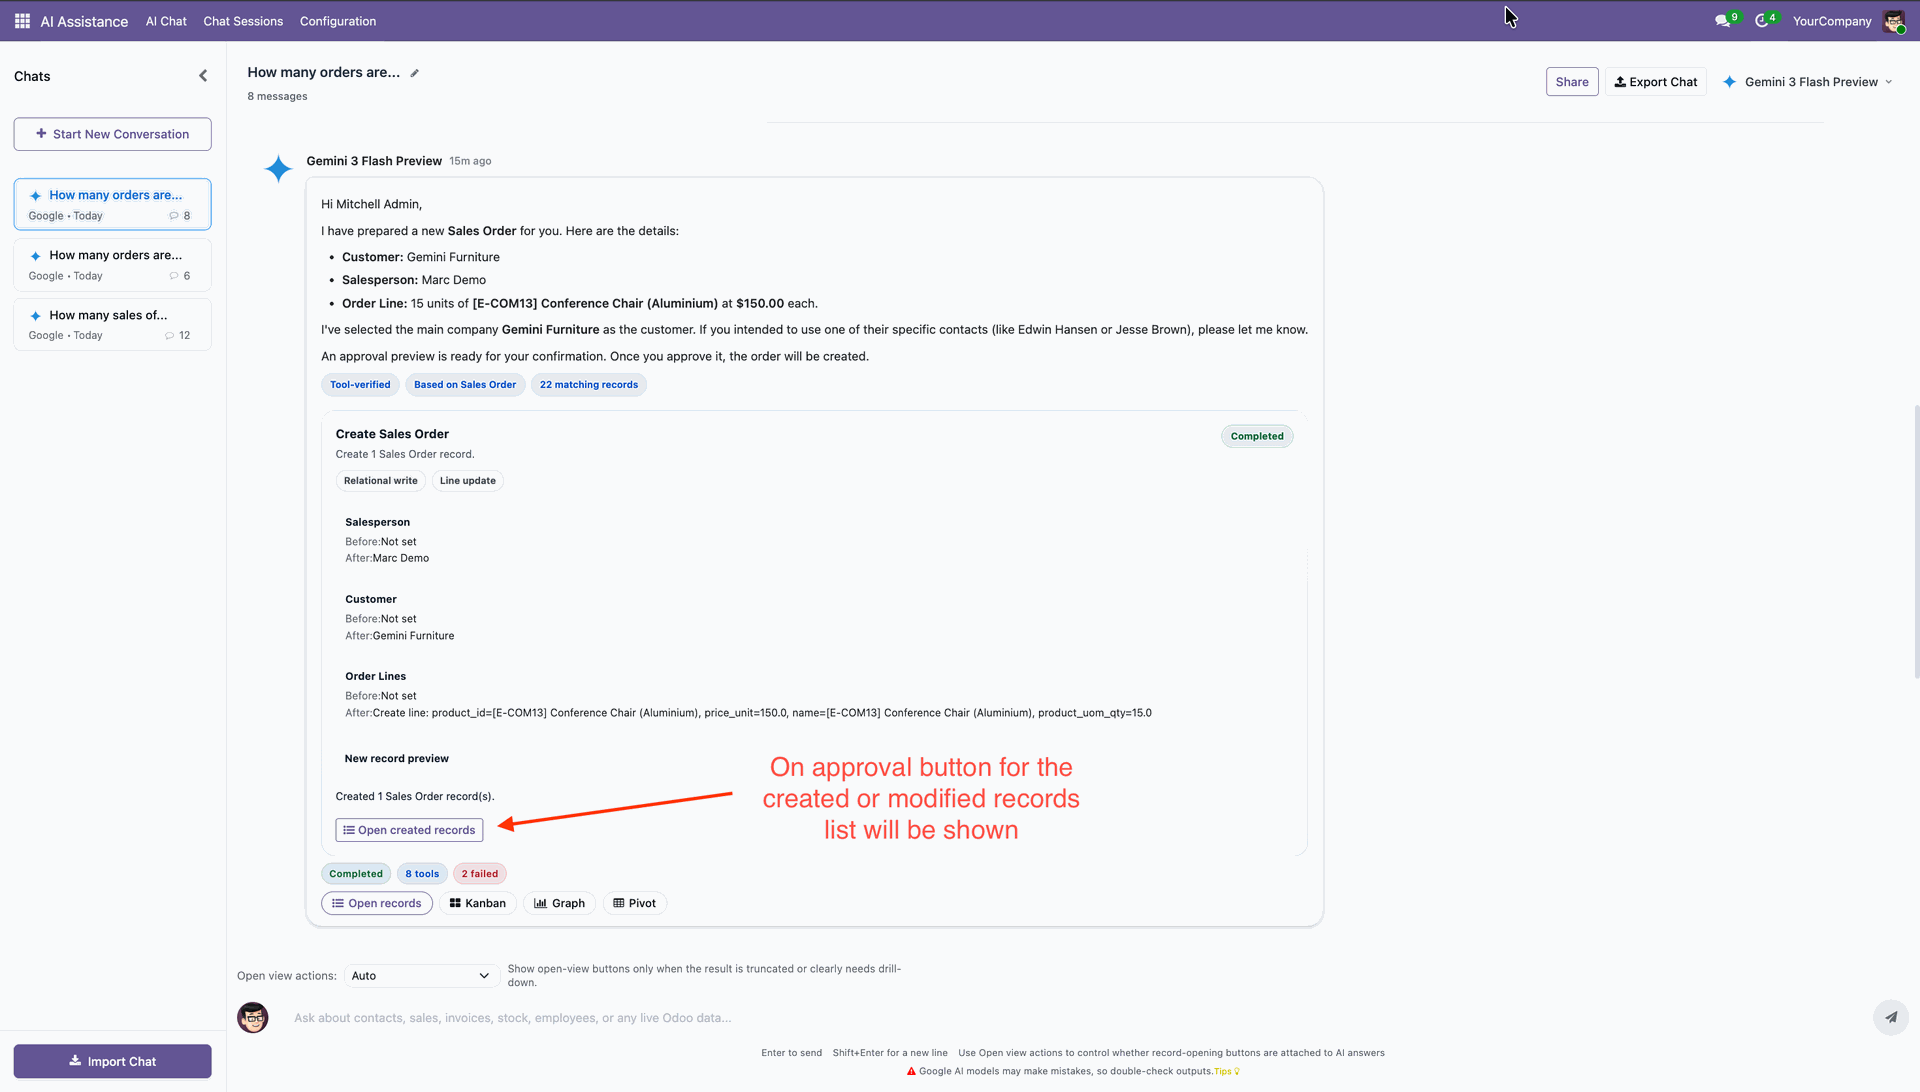
Chatter history that was recorded with AI.
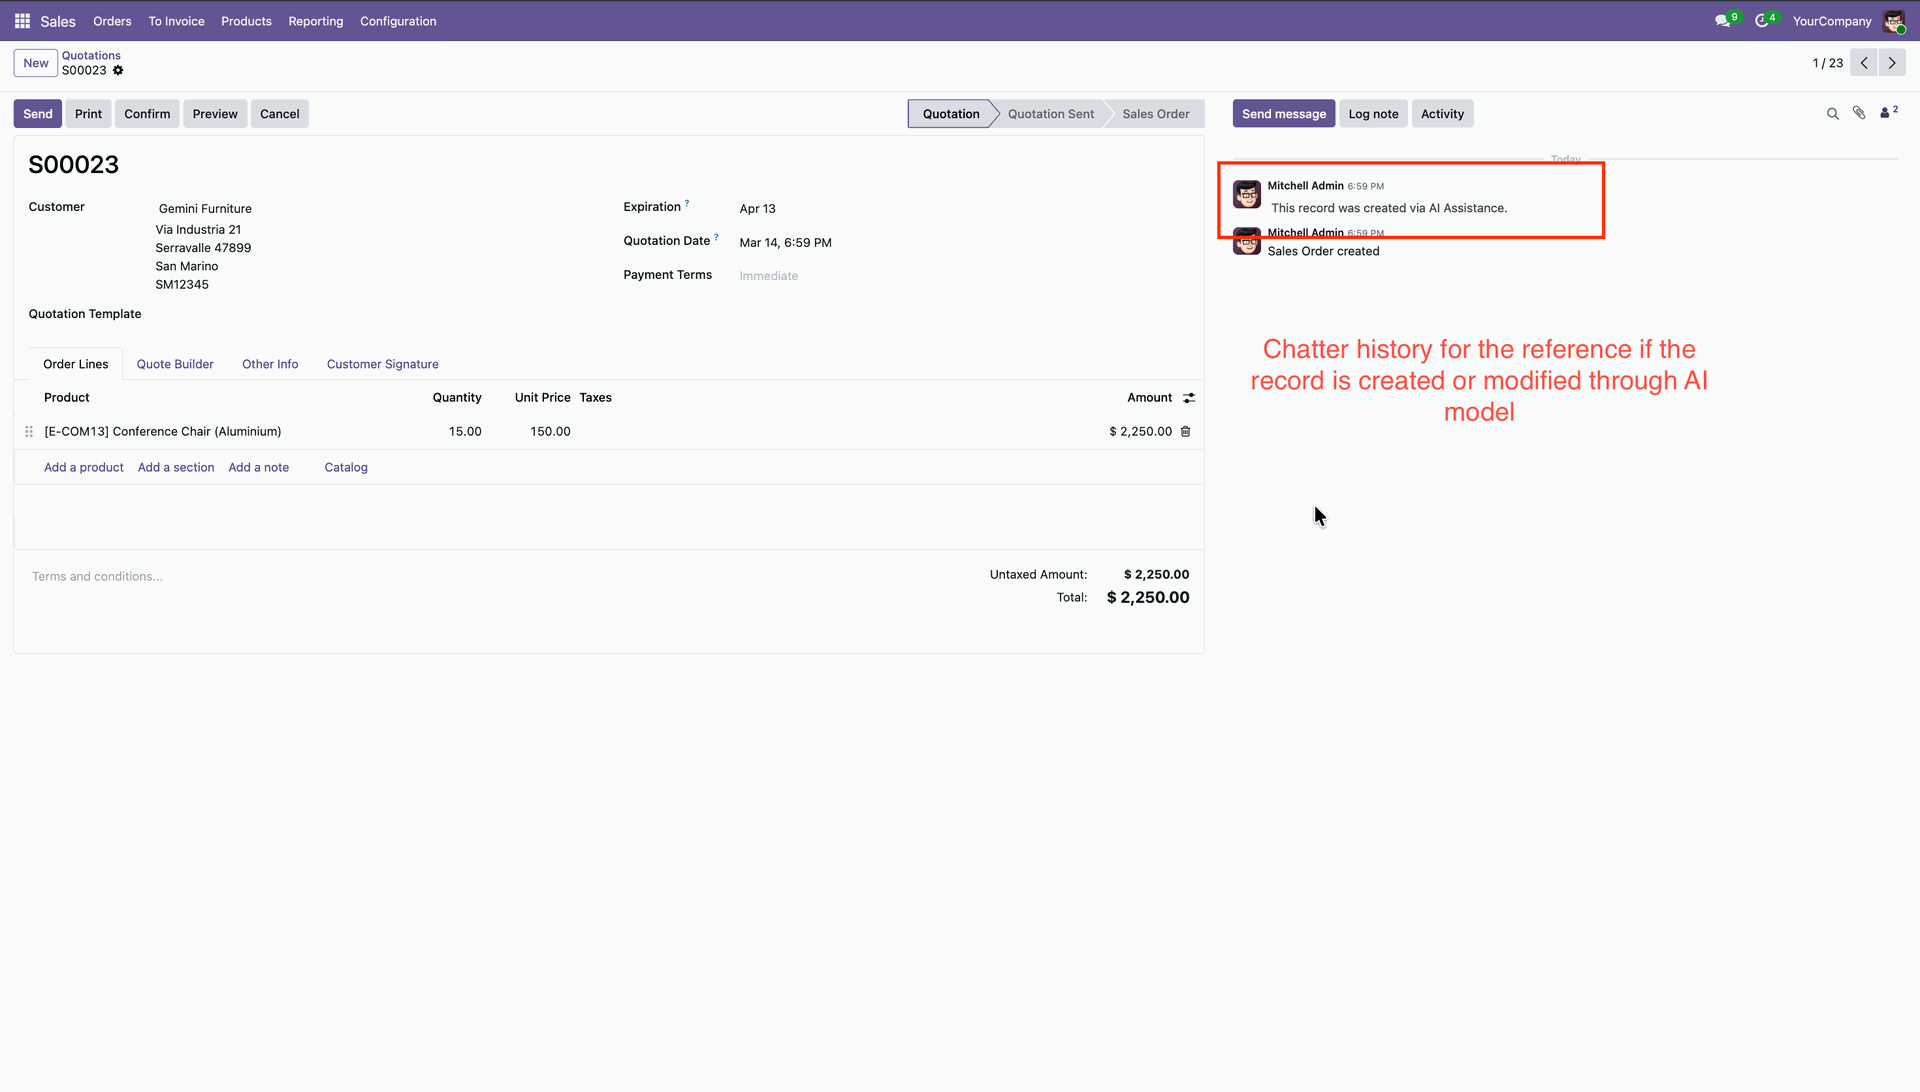
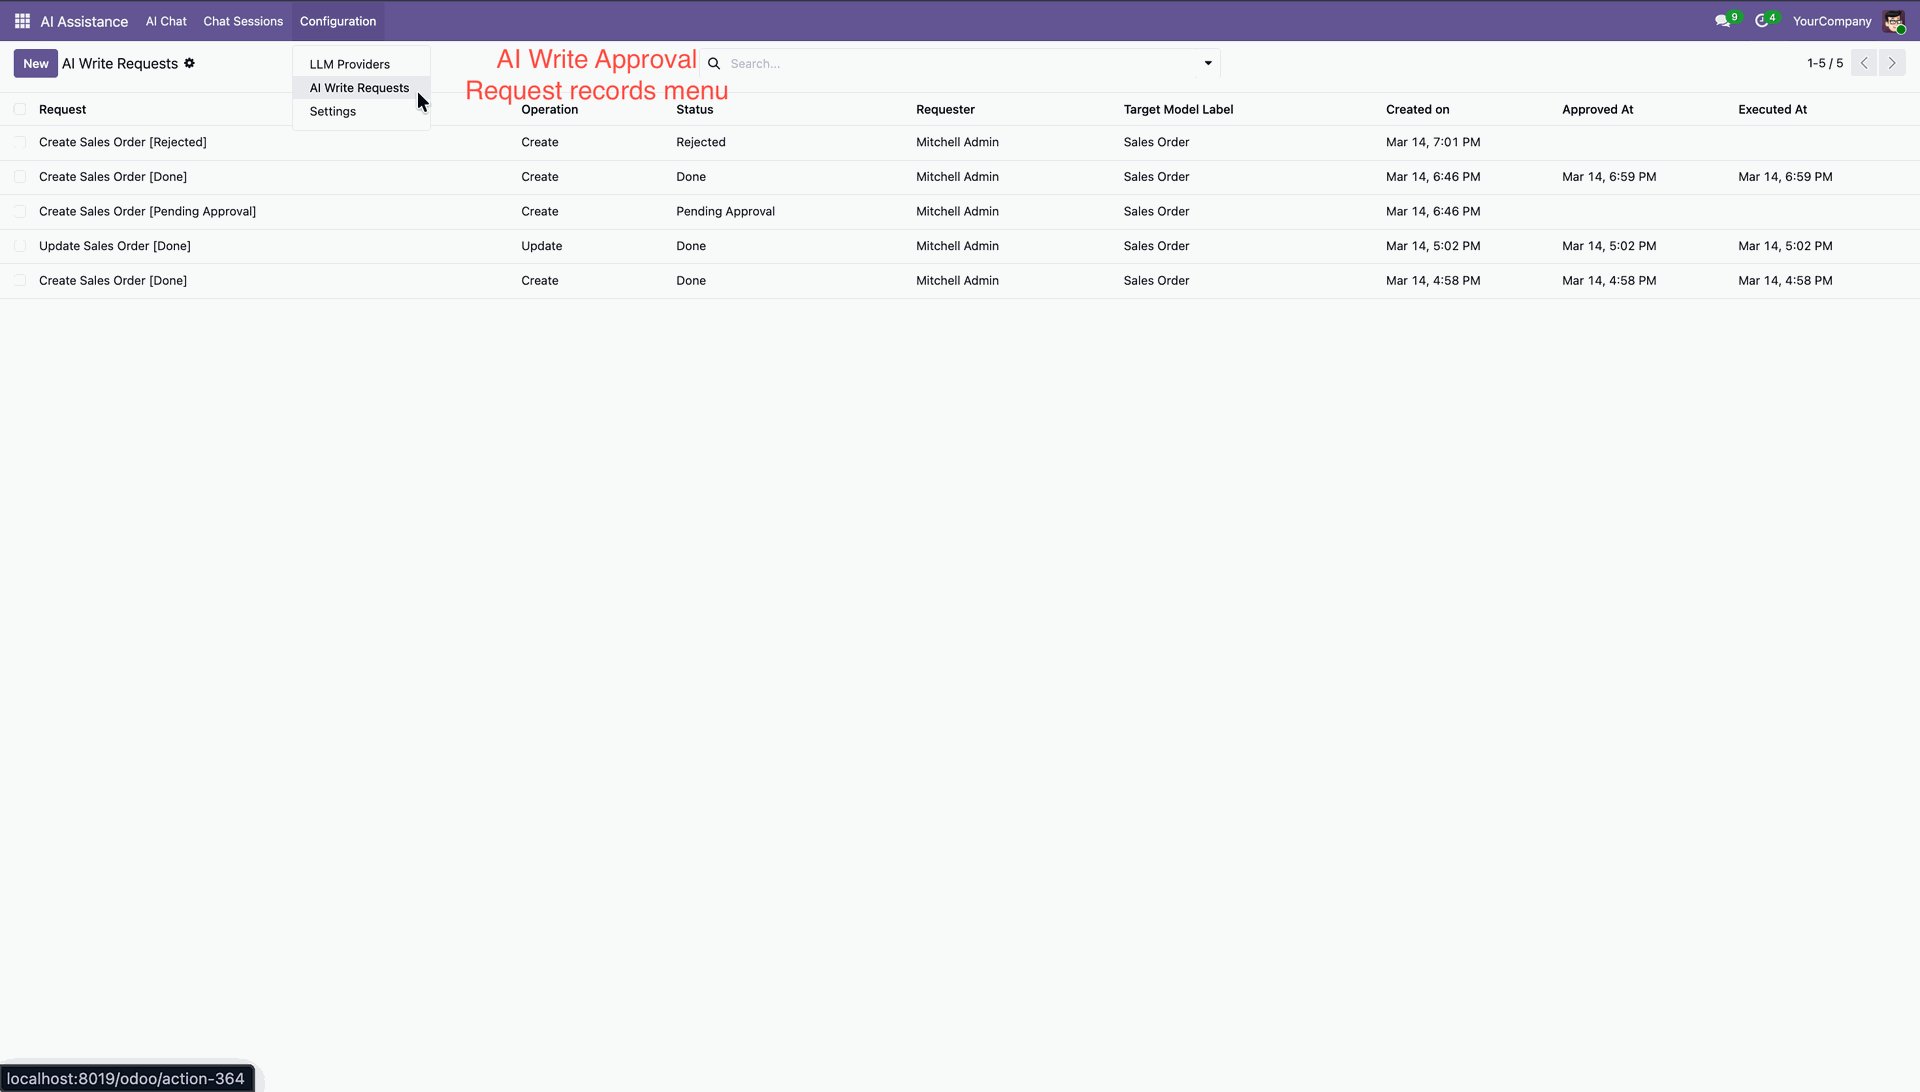
AI Write Request menu and list view.
Features

Multi-Chat Bot Creation
Create and manage multiple AI chatbots with separate configurations and use cases.
Watch Video
Multi-Provider AI Integration
Connect chatbots with AI providers like OpenAI, Gemini, and more from a single platform.

Knowledge Sources
Use documents, websites, and other sources to provide accurate AI responses.
Watch Video

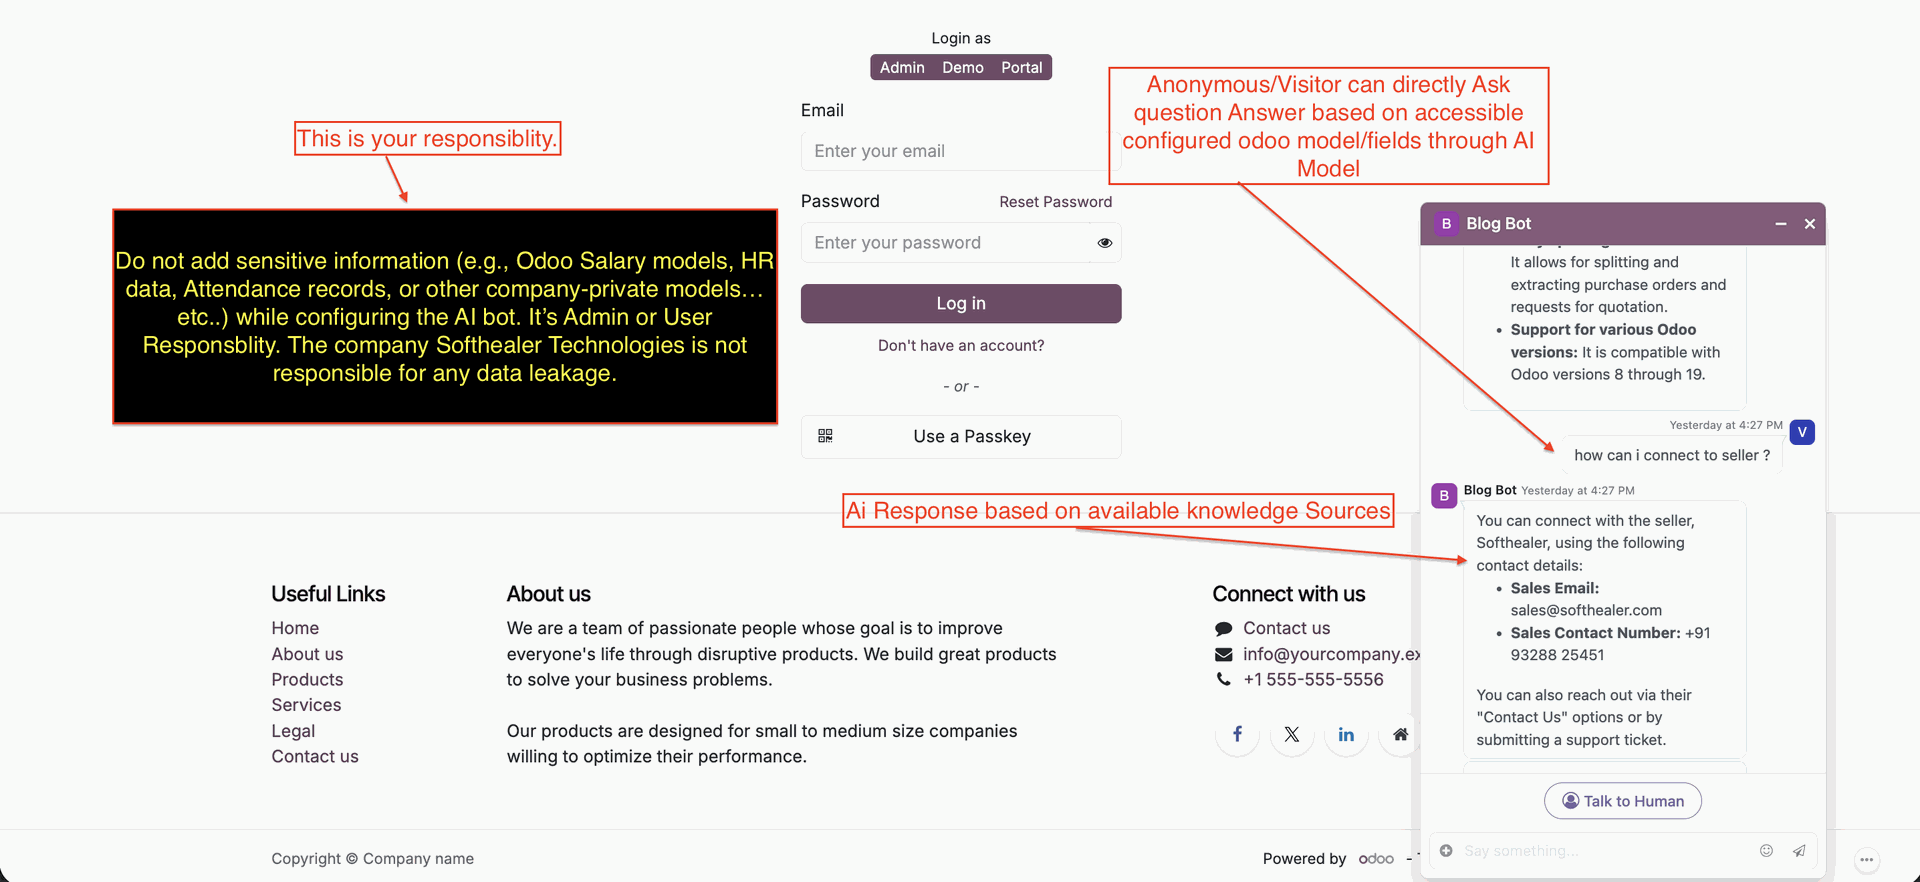
Restrict What AI Can Use to Respond
Control which knowledge sources are available for each chatbot response.
Watch Video

AI That Reads PDFs, Docs & URLs
Allow AI to understand and answer questions from PDFs, documents, and web pages.
Watch Video

Chatbot Specific Configurations
Configure prompts, behavior, settings, and features individually for each chatbot.
Watch Video

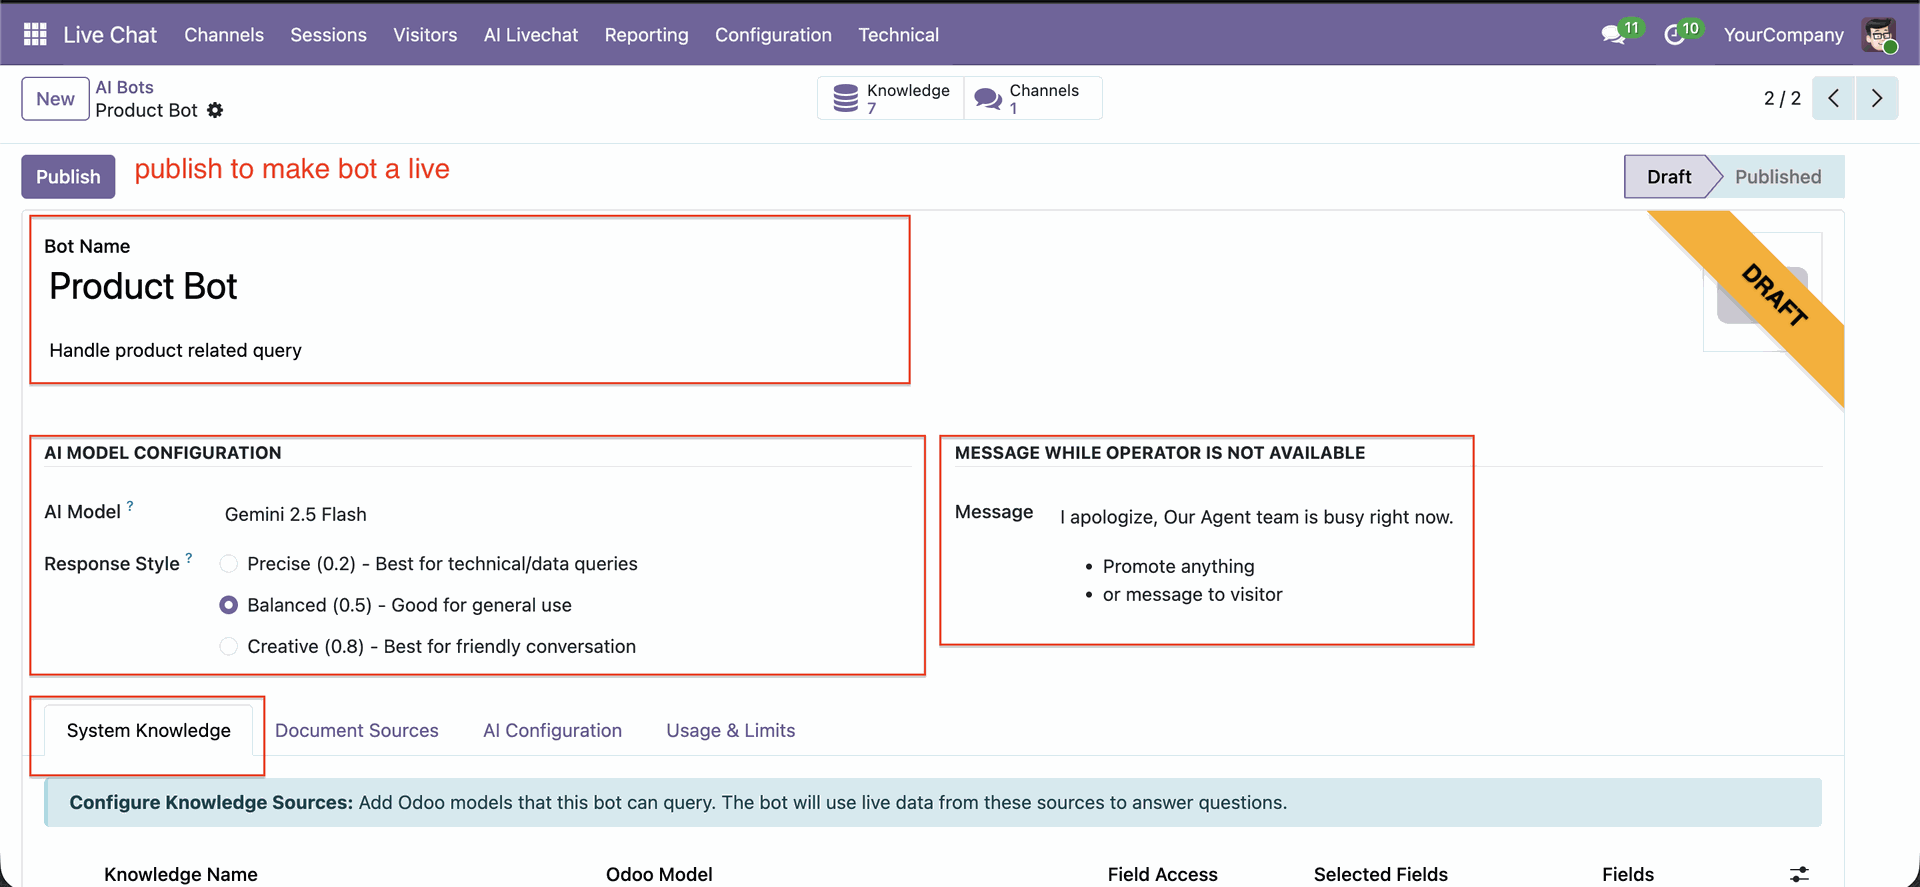
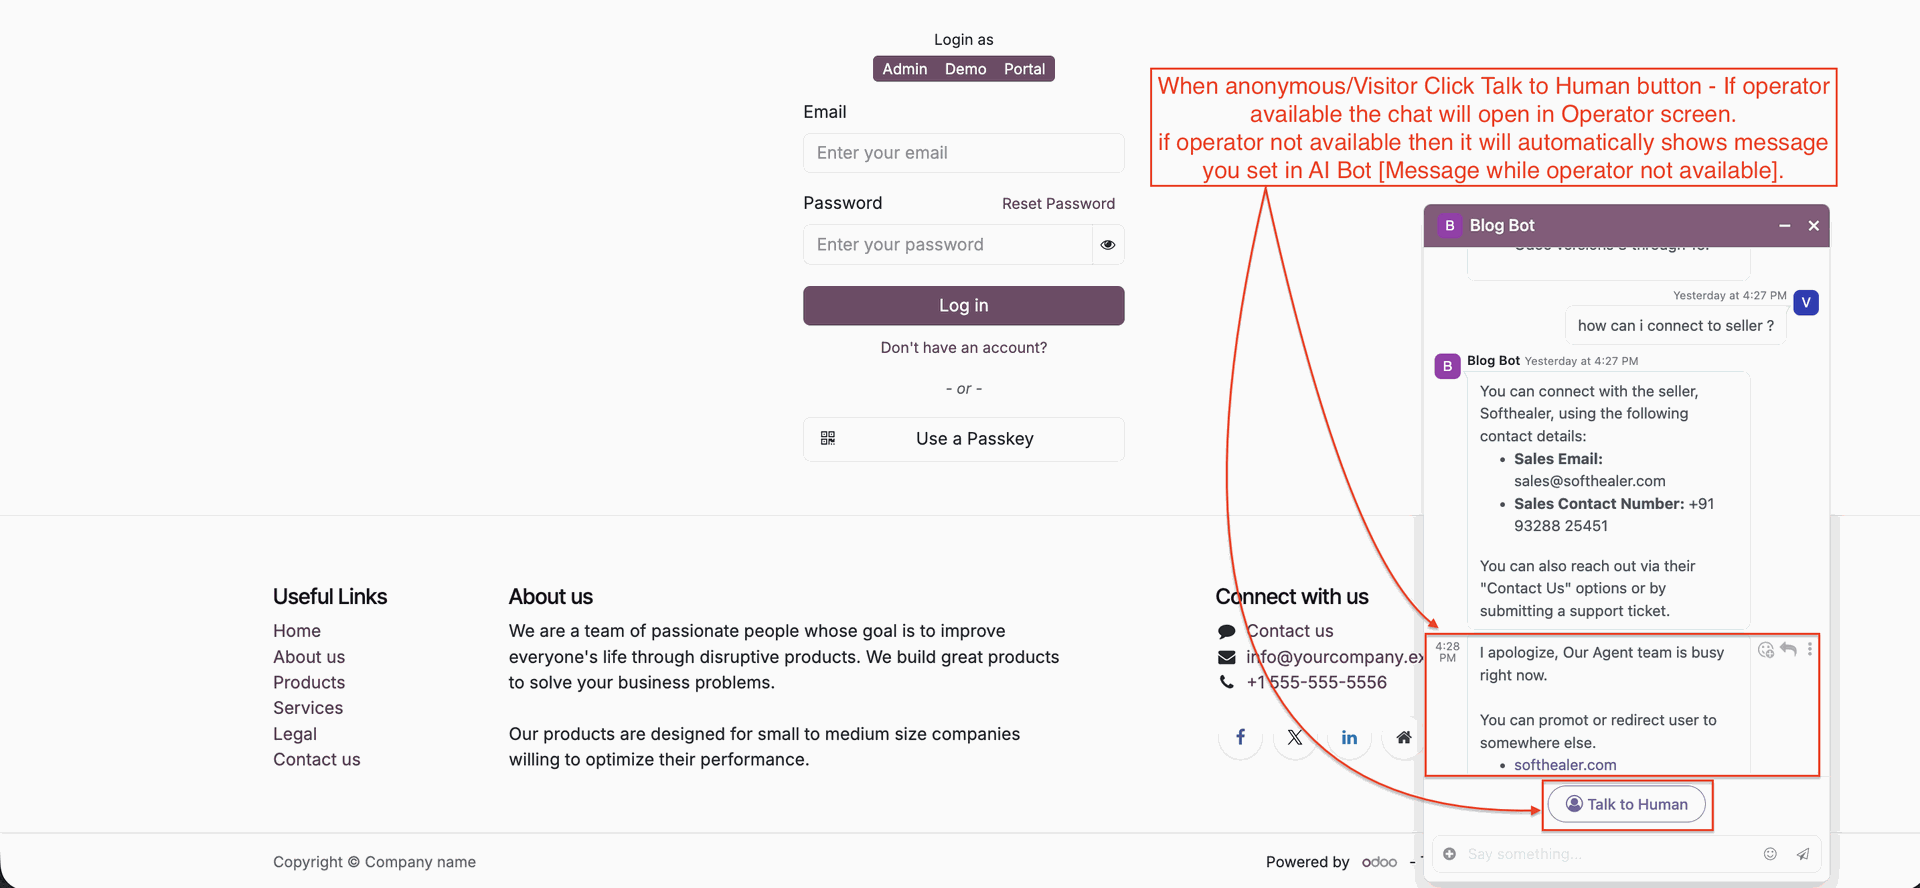
Custom Message for Unavailable Operators
Display a custom message when no human operators are available to assist.

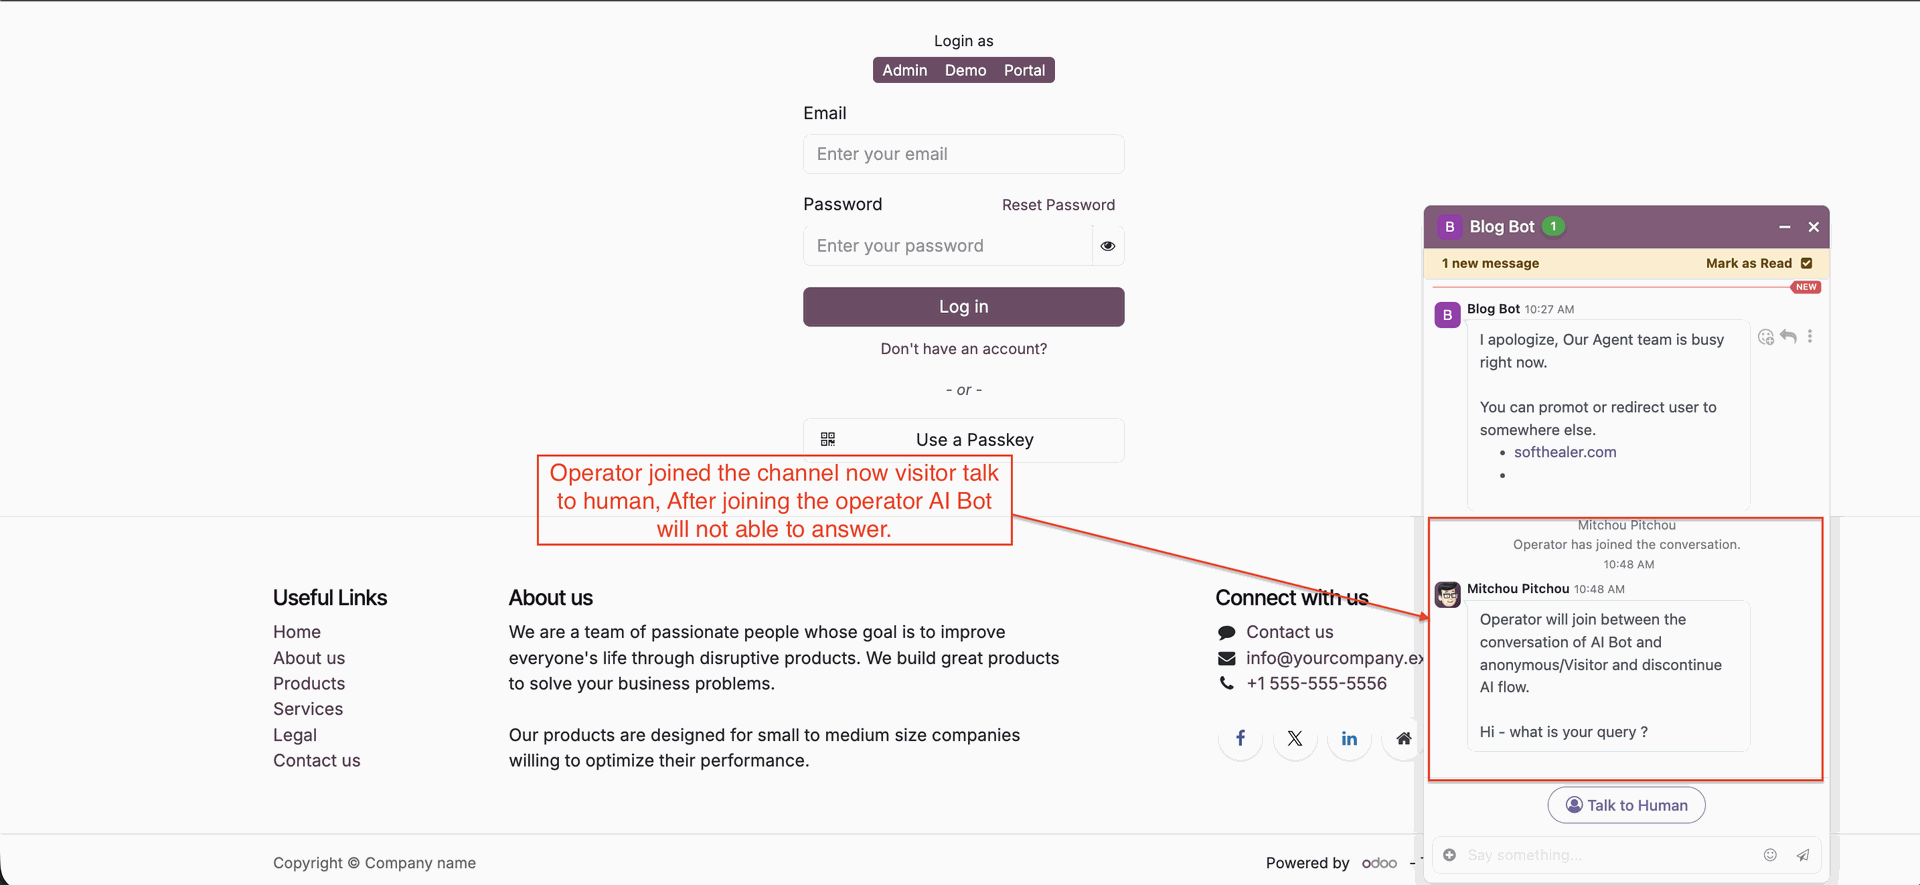
Switch from AI to Human Agent
Transfer conversations from AI to a human agent whenever needed.
Watch Video

System Prompt and Chatbot Prompt
Define custom prompts to control chatbot behavior and response quality.
Watch Video

Response Style Configuration
Customize how AI responds with different tones, formats, and styles.
.svg)
AI Tool Token Usage Limit (Per Chatbot)
Set token usage limits for each chatbot to control AI consumption.
.svg)
AI Tool Token Usage Limit (Per User)
Restrict token usage per user to manage costs and resource allocation.

Chatbot On/Off Control
Enable or disable chatbots instantly whenever required.

Smart Document Splitting
Automatically split large documents into optimized sections for better AI understanding.
Custom Development Friendly
Built to support customizations and integrations without affecting stability.
OpenRouter Integration
Connect OpenRouter to access multiple AI models through a single API.
Watch Video
Workflow
-
Access Rights
-
 Multi-Chat Bot Creation
-
 External Document Knowledge
-
 External URL Knowledge
-
 Multi-Provider AI Integration
-
 System Prompt and Chatbot Prompt
-
 AI Tool Token Usage Limit
-
 Conversation Memory Configuration
-
 Tool Calling and Dynamic Flow Limits
-
 AI Response & Operator Routing
-
 Knowledge Source Access Restrictions
-
OpenRouter Integration
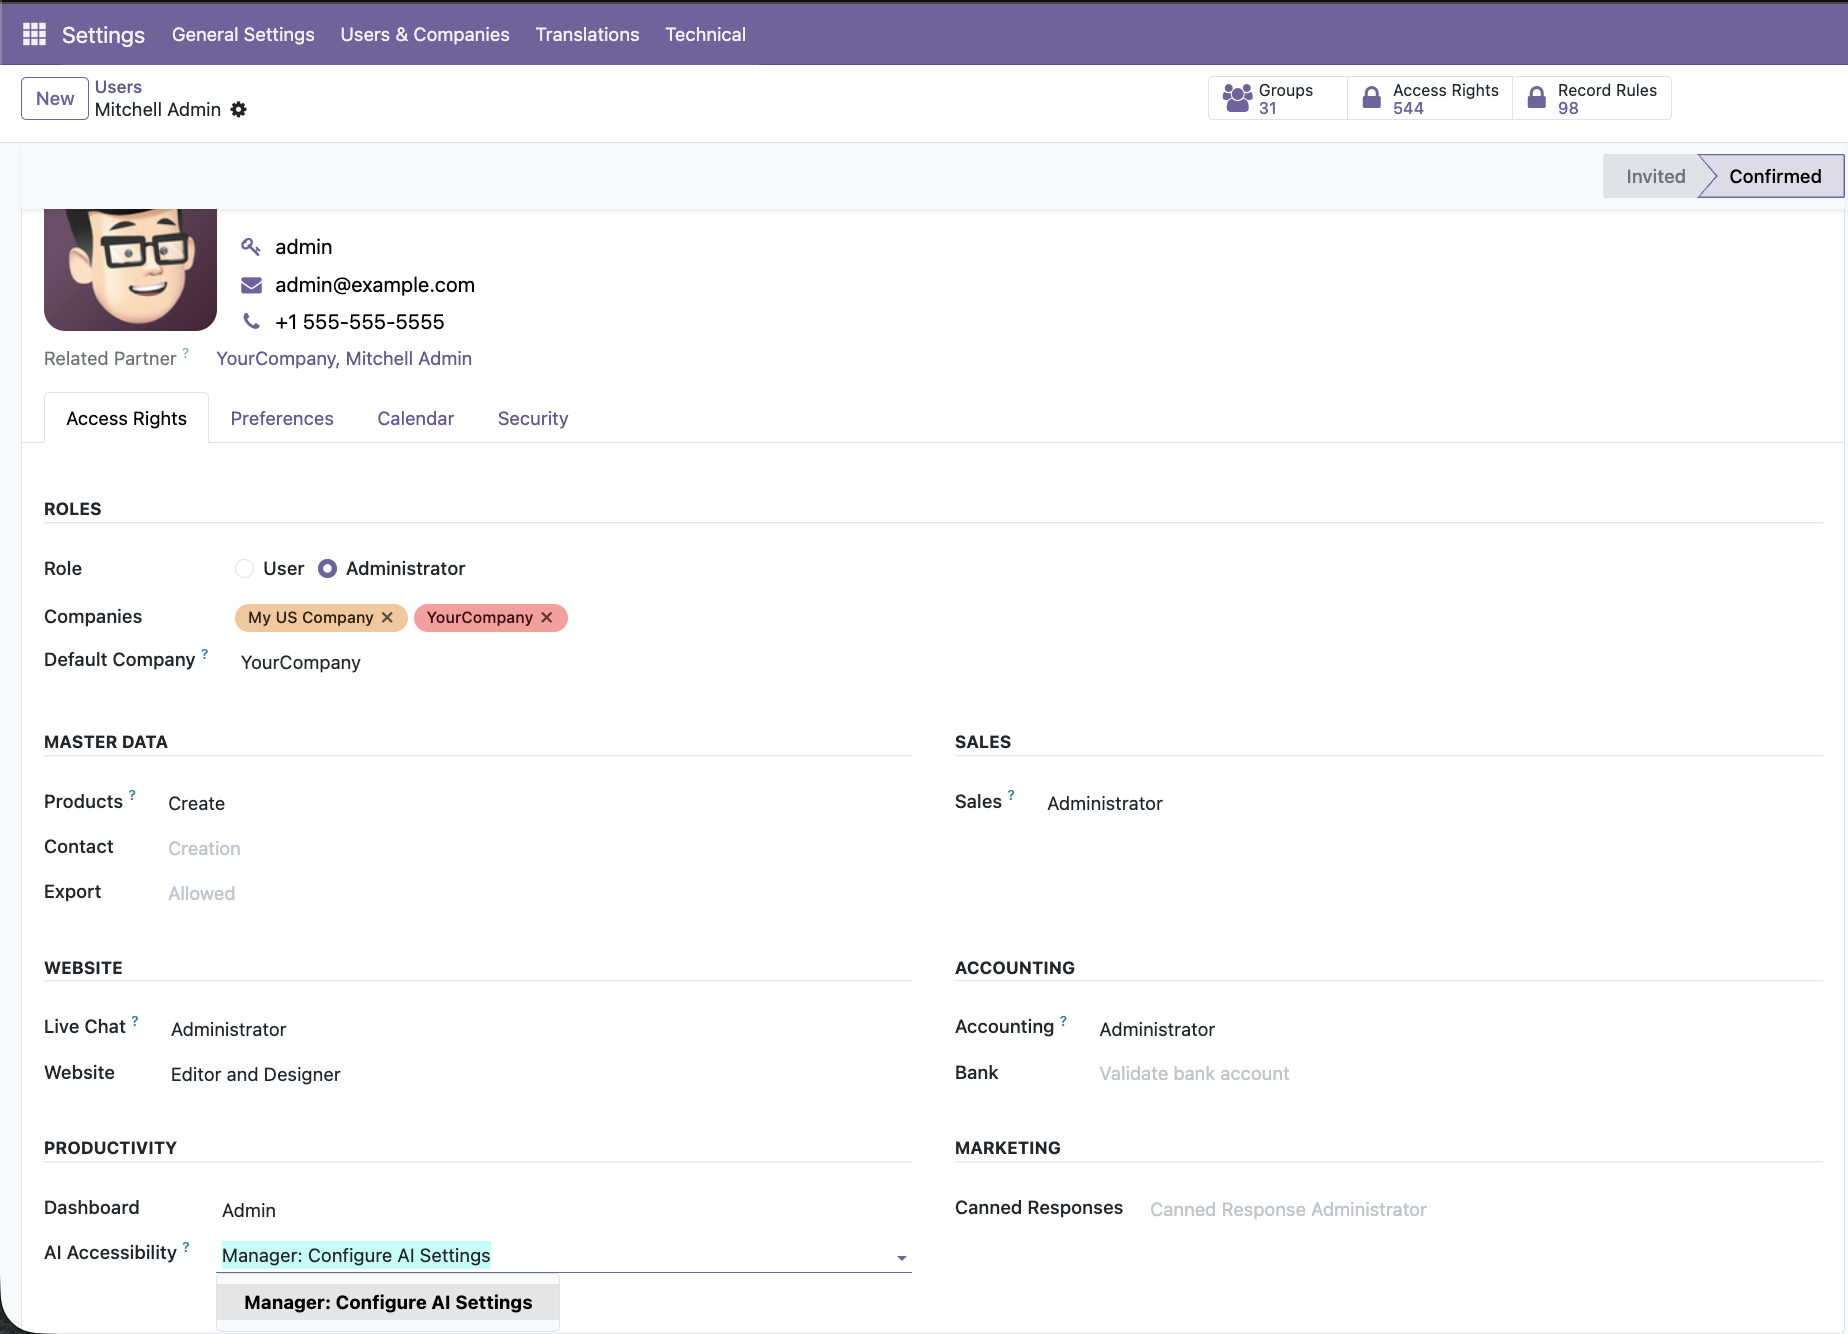
Assign Live Chat access to control who can manage and operate AI-powered live chat features.
Grant AI accessibility permissions to allow selected users to configure LLM settings, knowledge bases, and AI Live Chat behavior.
Go to the AI Live Chat -> AI Bots.
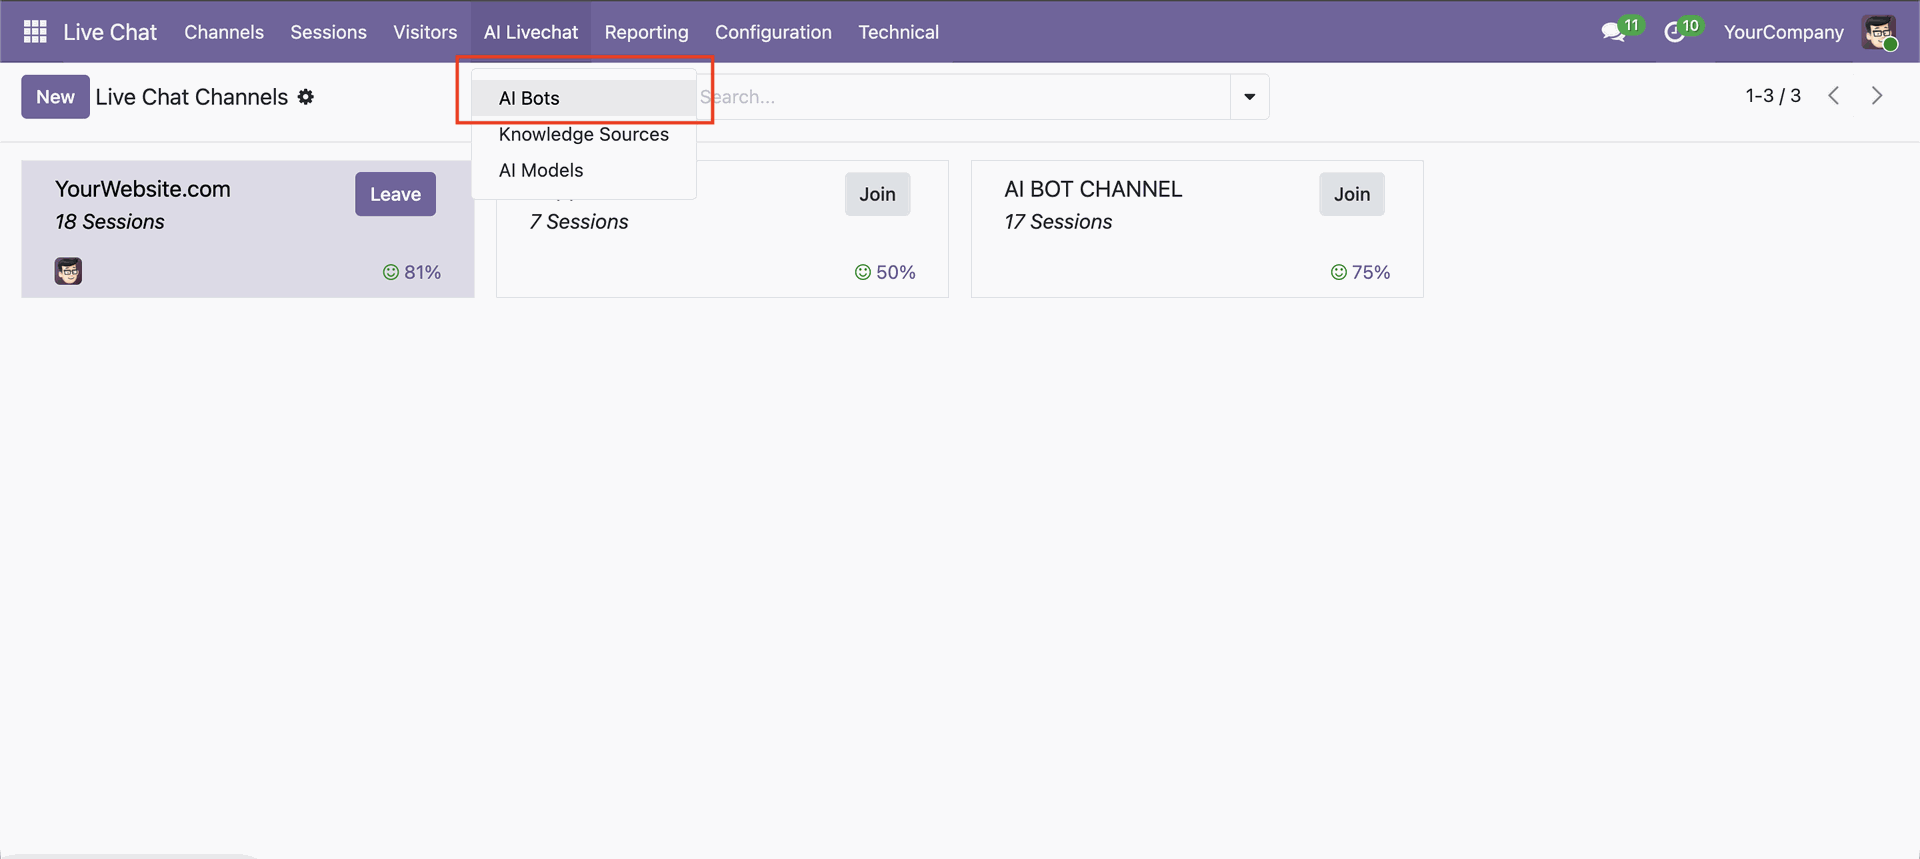
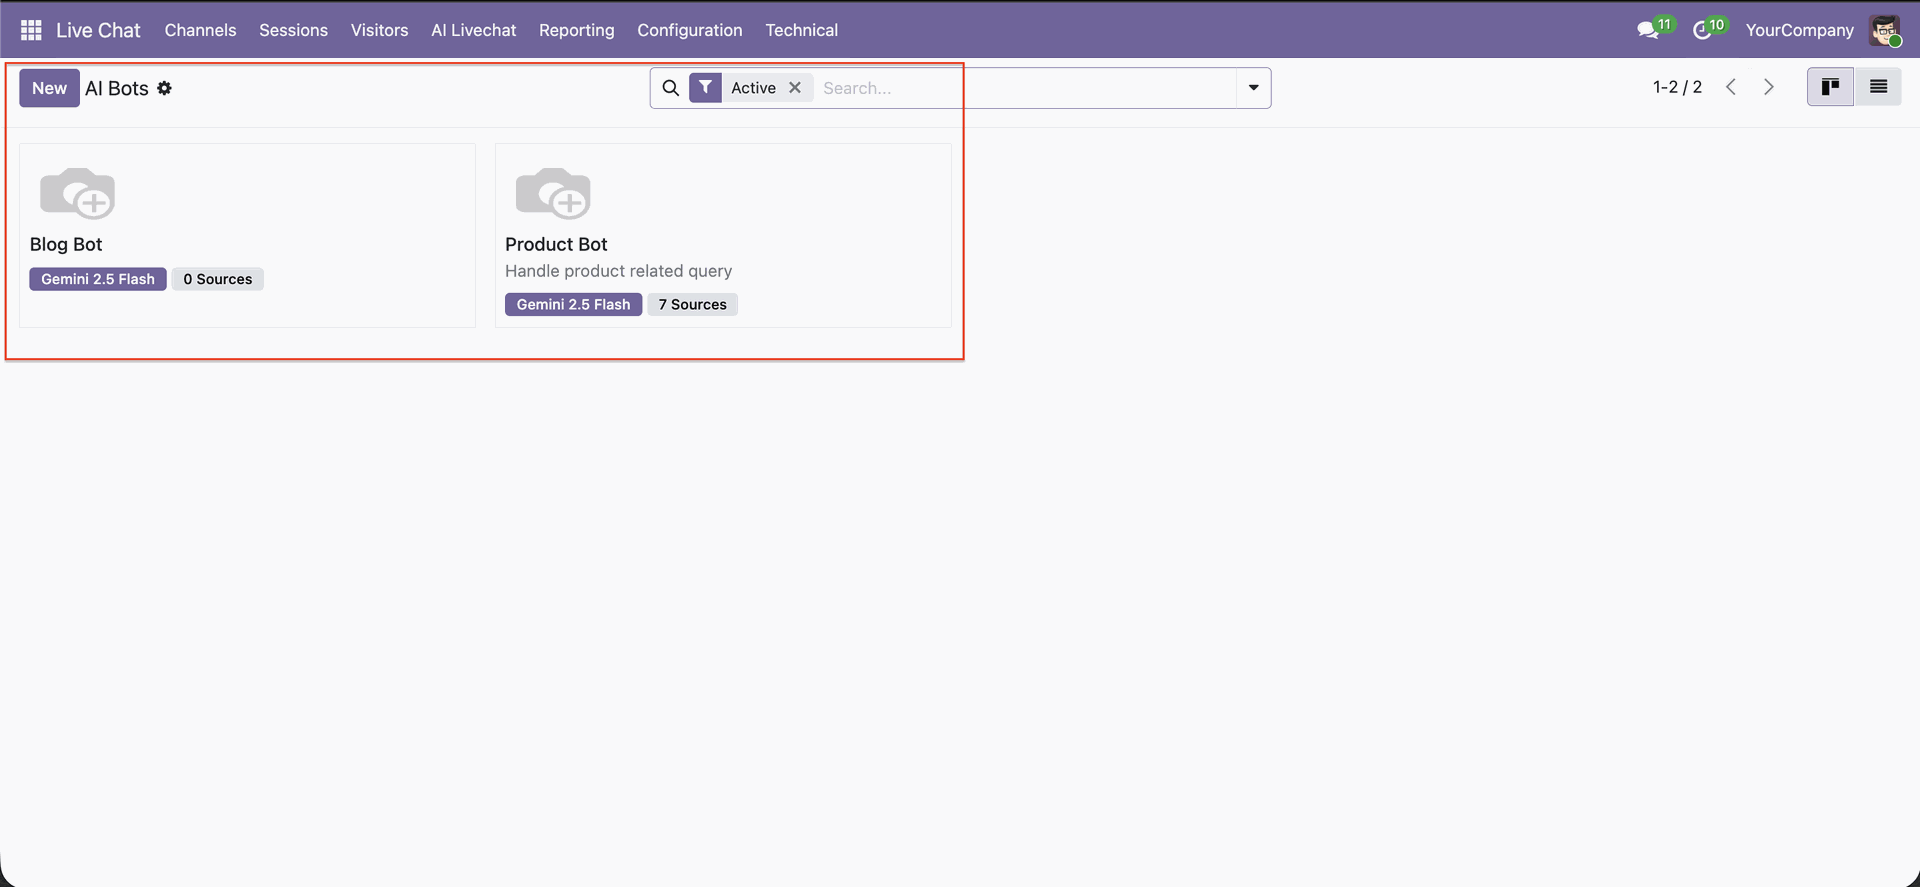
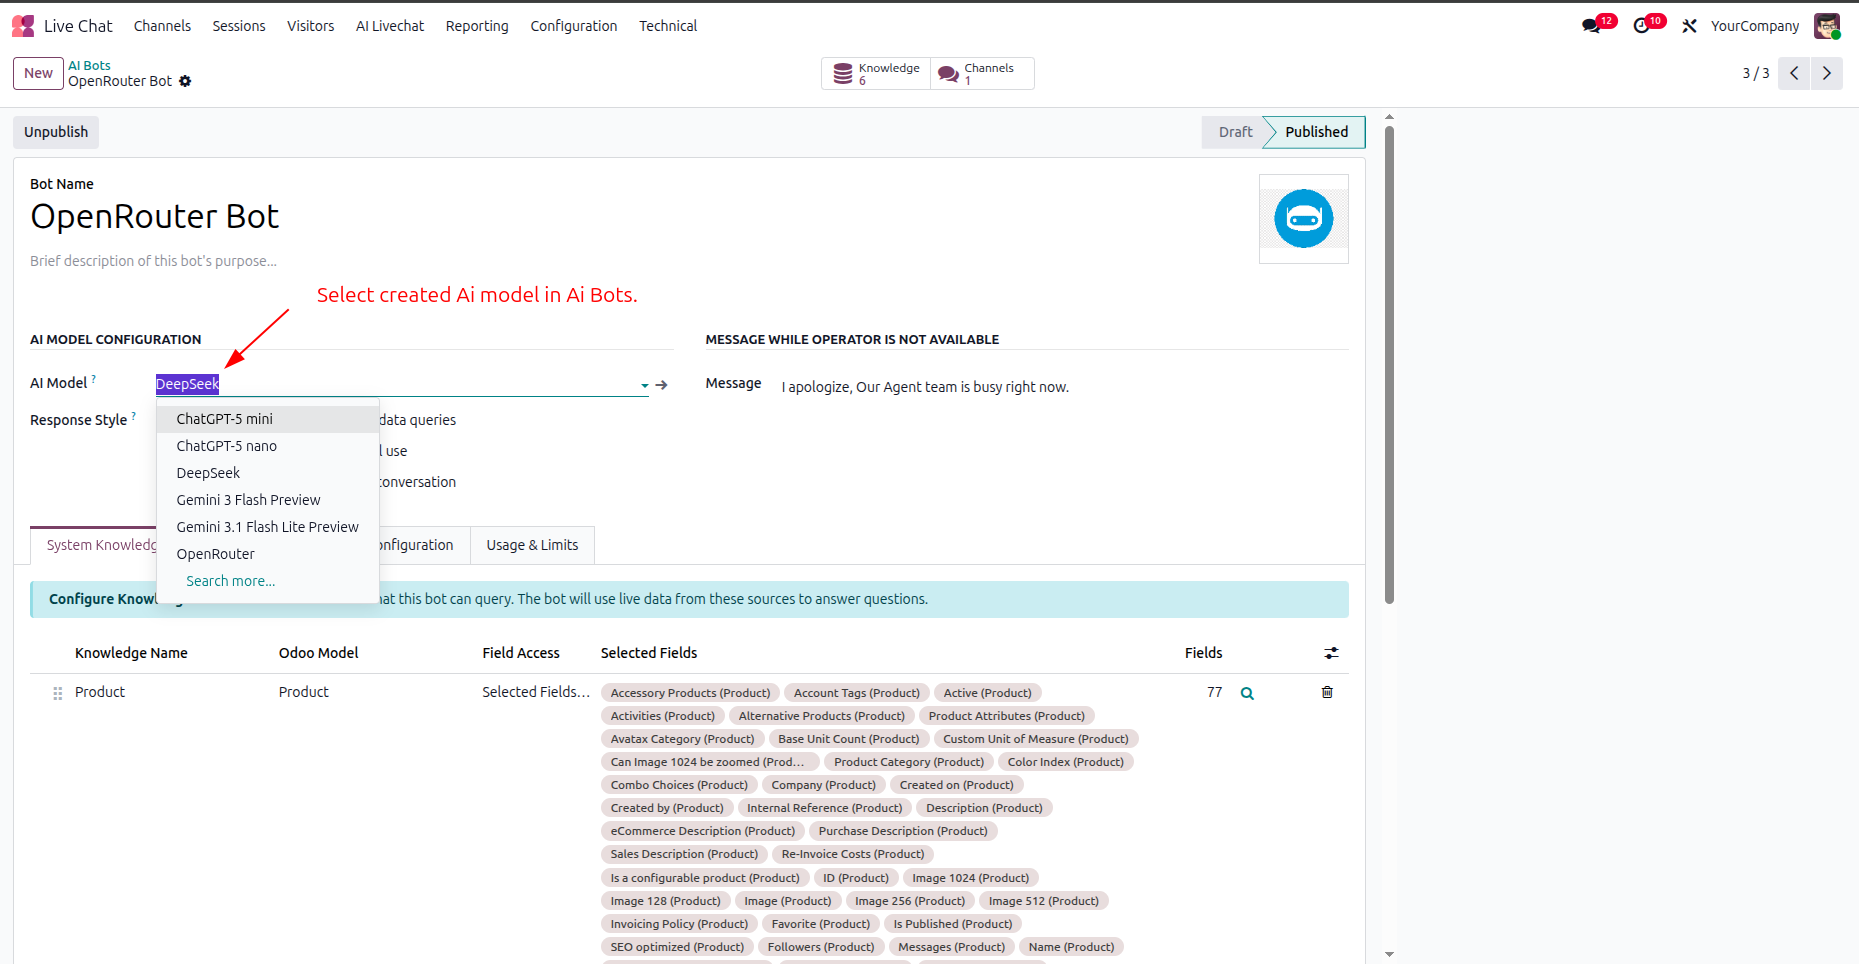
View all configured AI bots with their assigned AI model and connected knowledge sources.
Define the AI bot name and its primary responsibility for handling user queries. Publish the bot to make it live and available for visitor conversations.
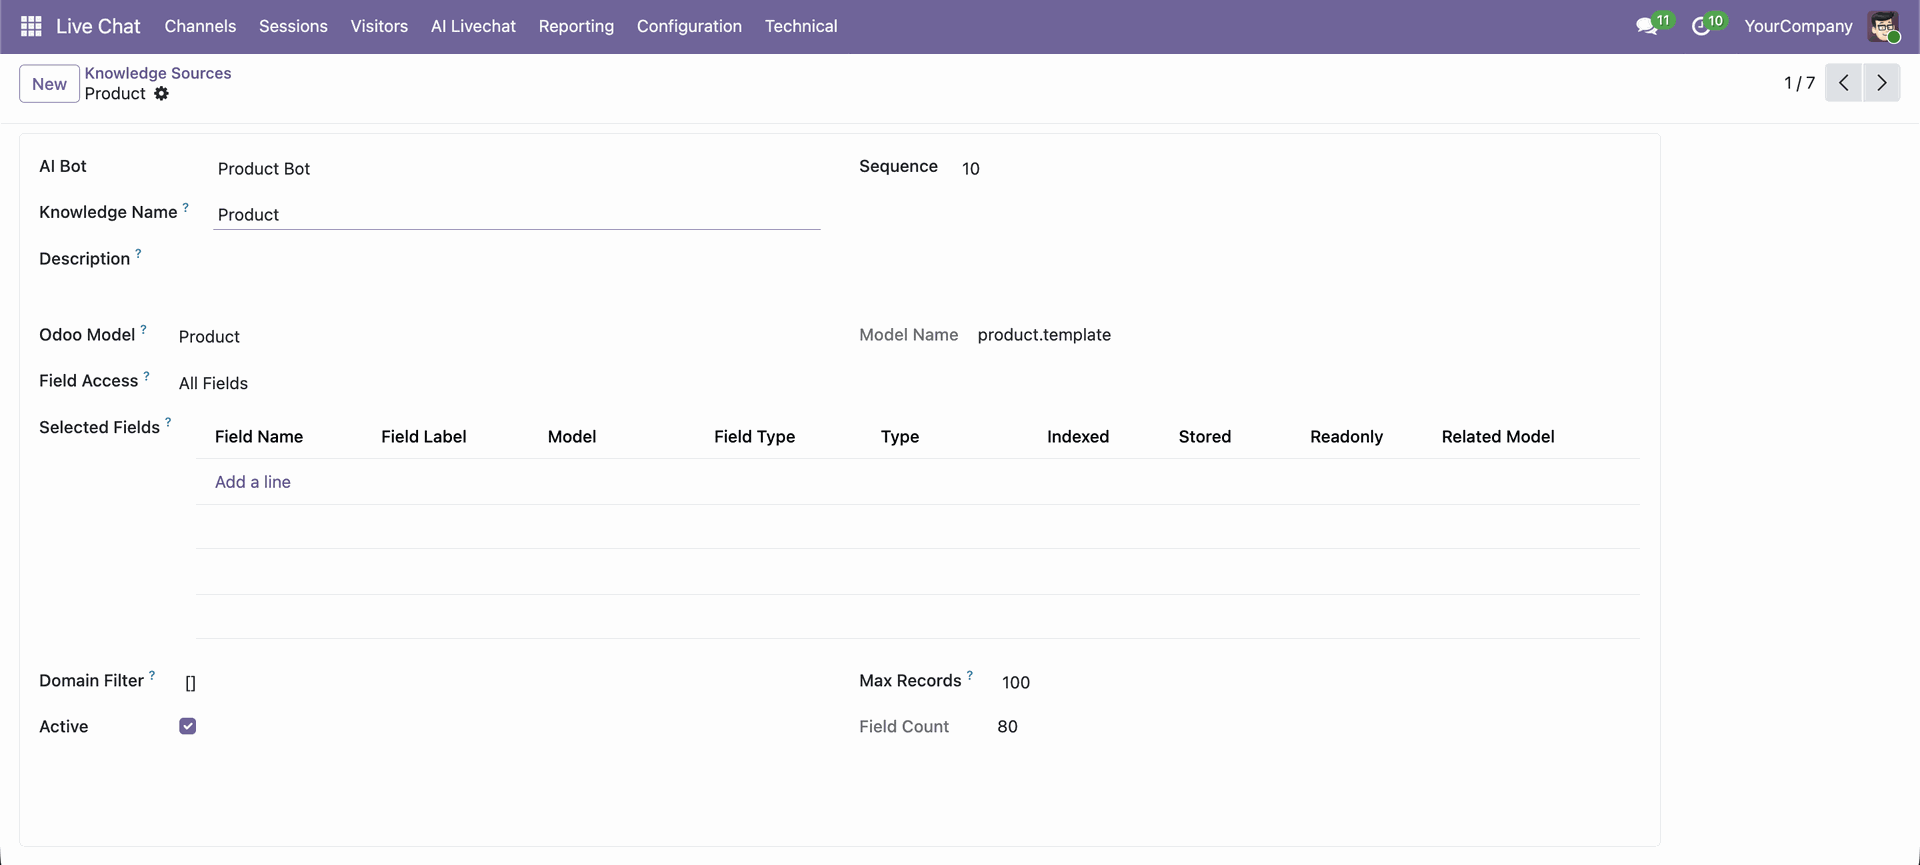
Configure Odoo models that the AI bot can access for answering live queries.
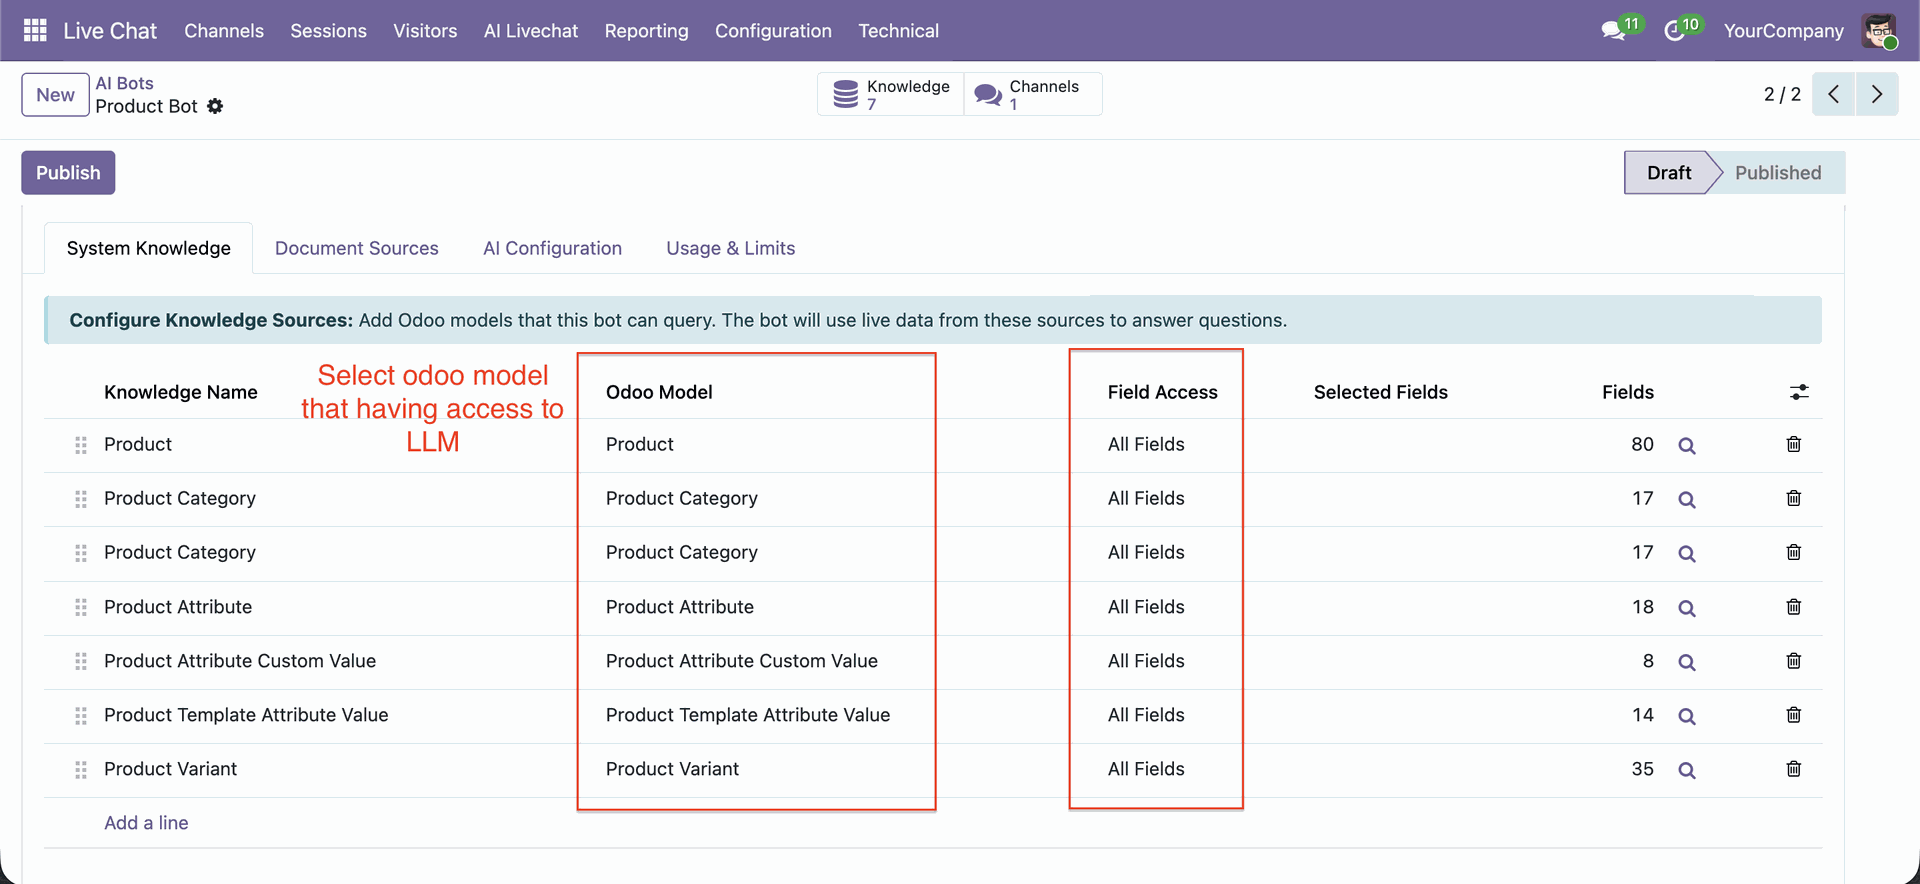
You can choose the model, fields, and selected fields; it shows the total number of fields in 'Fields'.
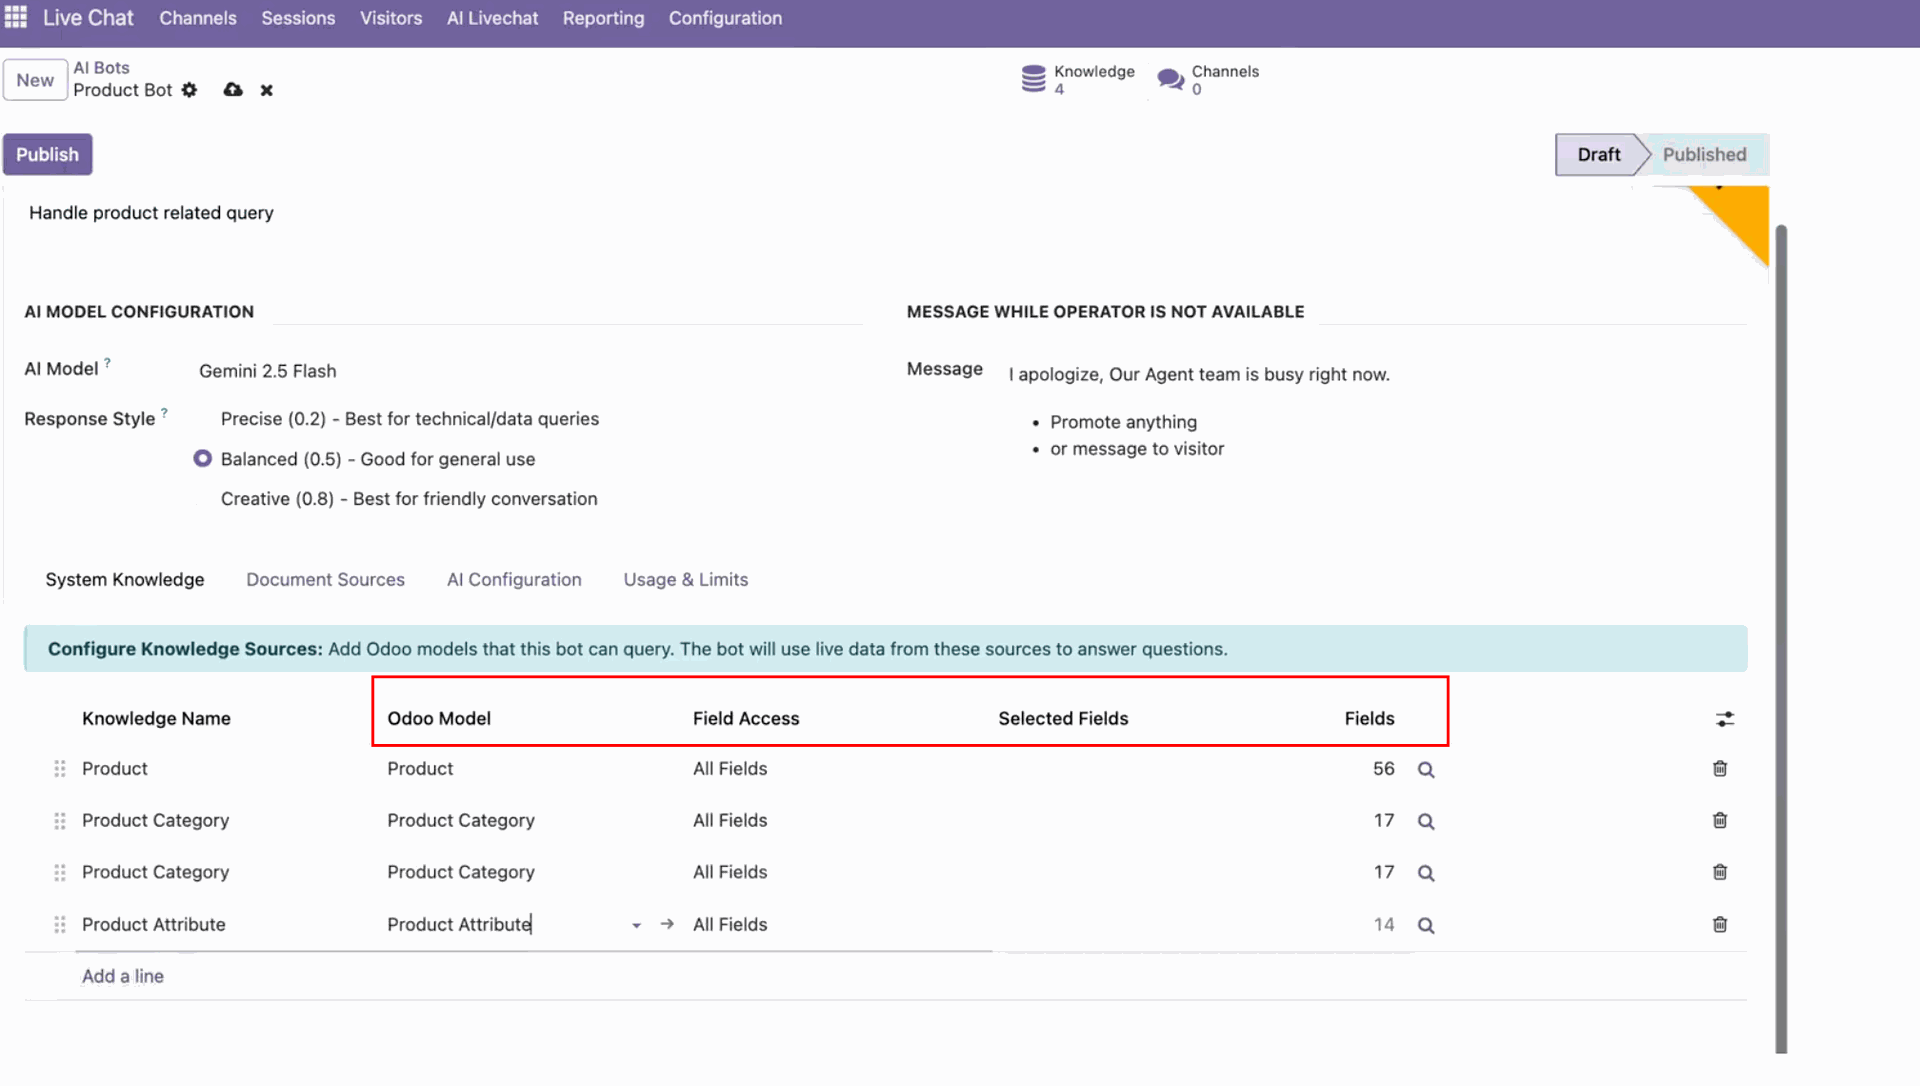
You have the option to select All Fields or Selected Fields.
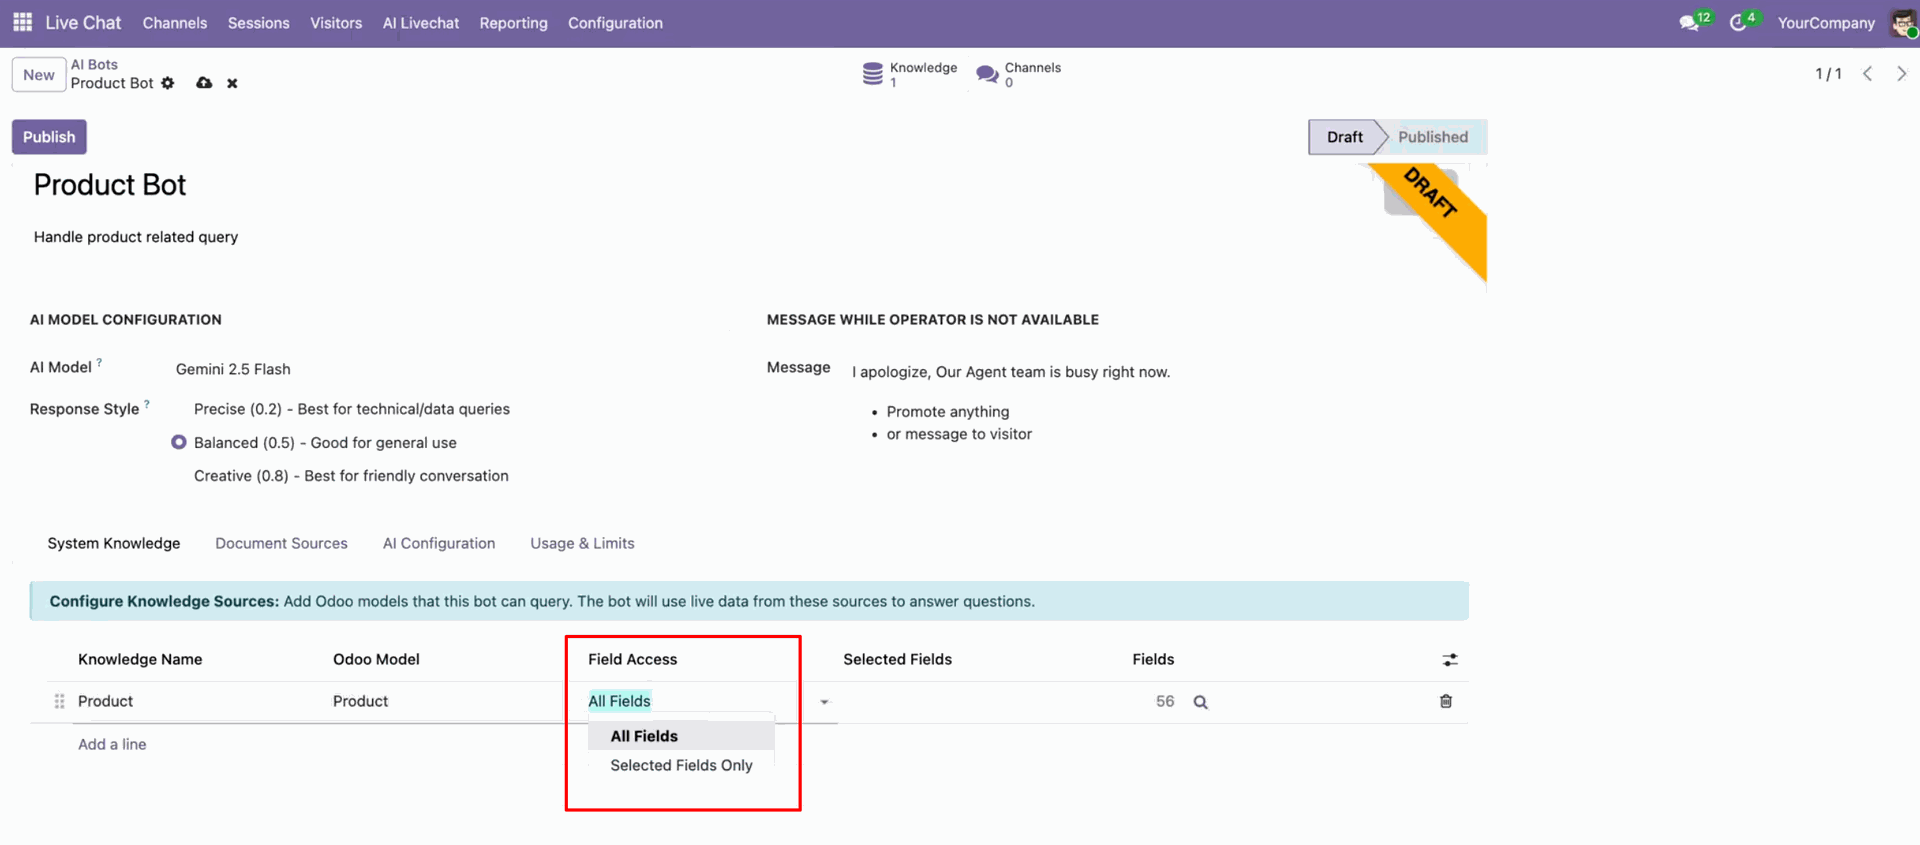
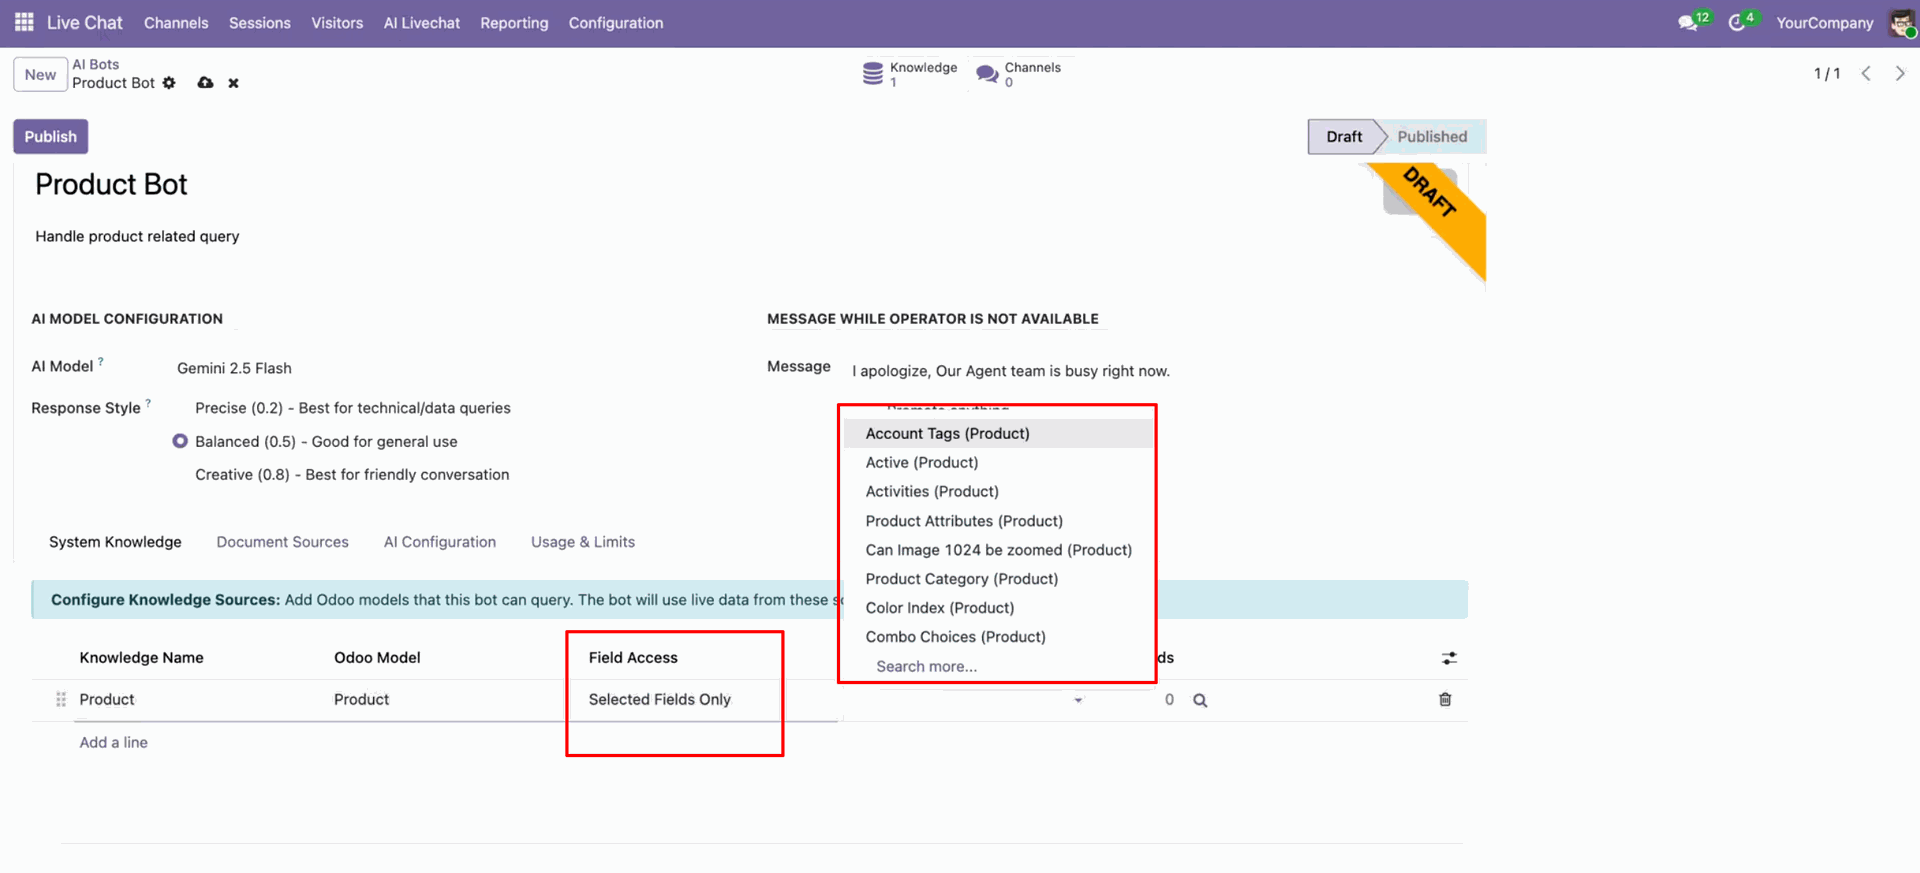
When you select 'selected fields only', you can choose fields as needed.
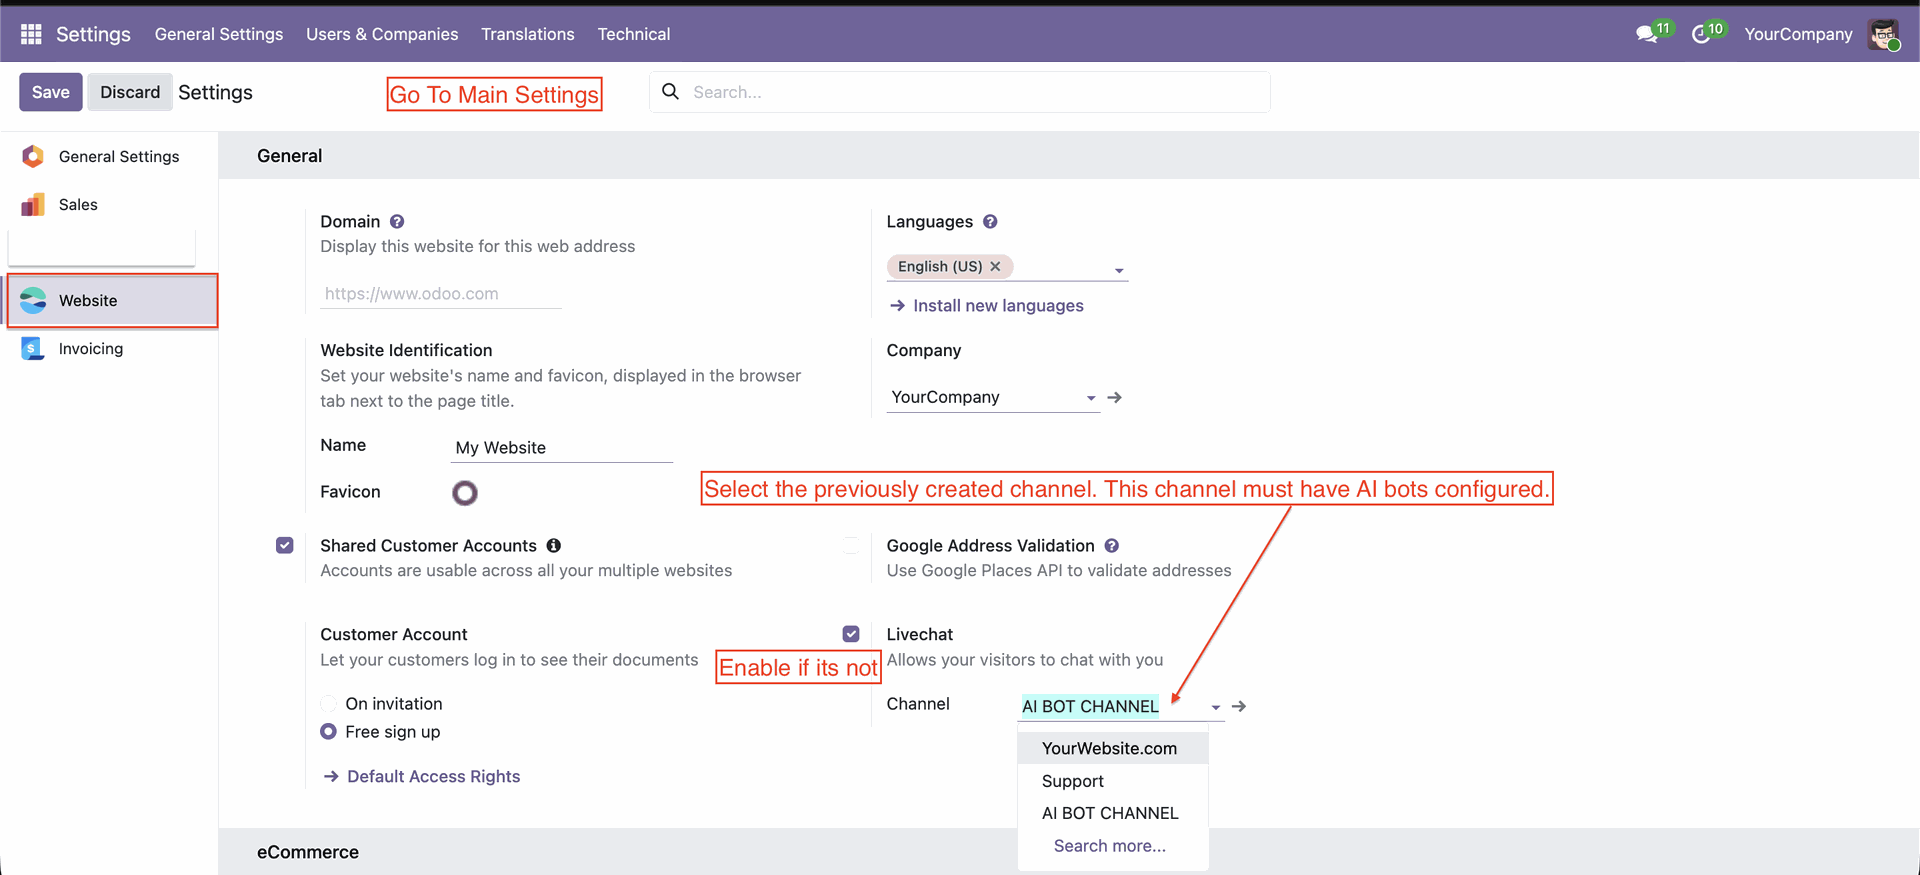
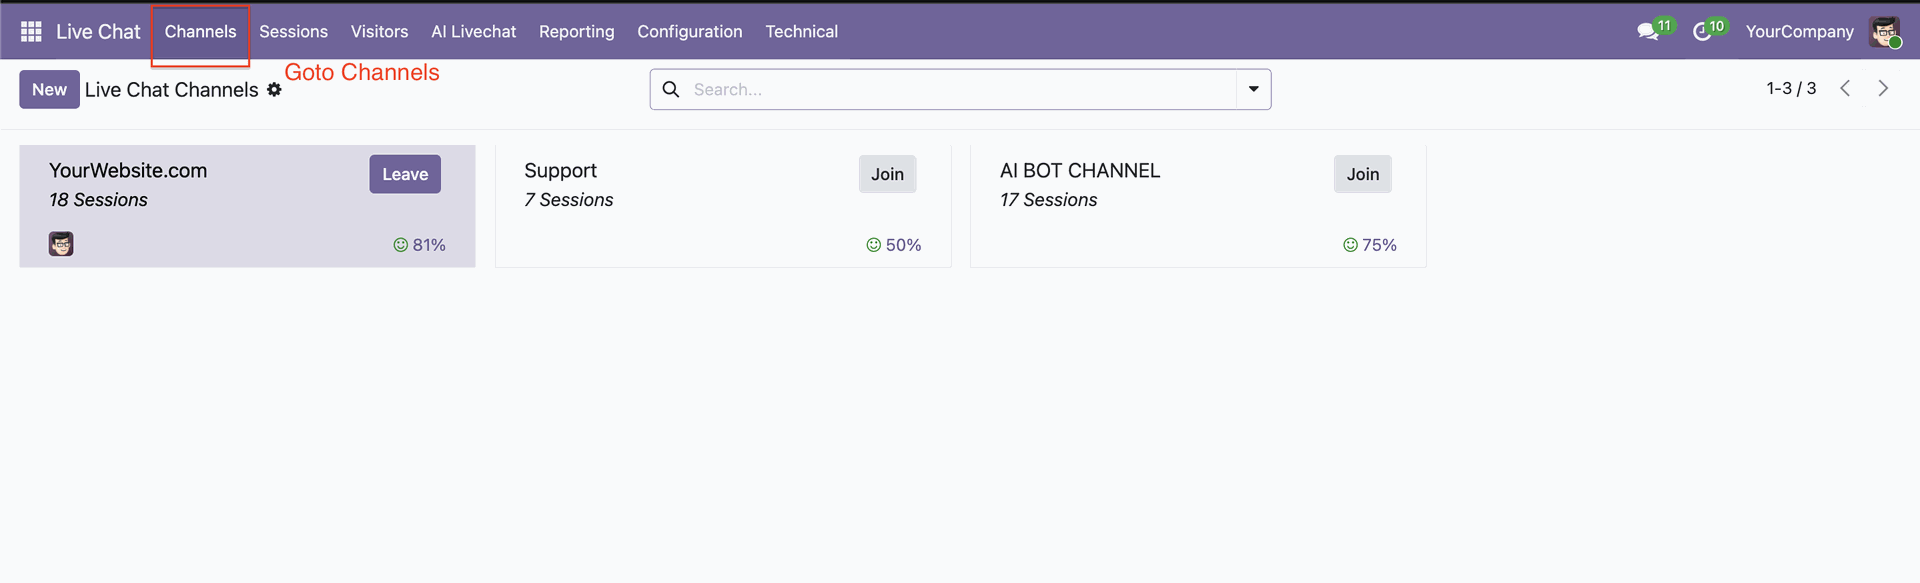
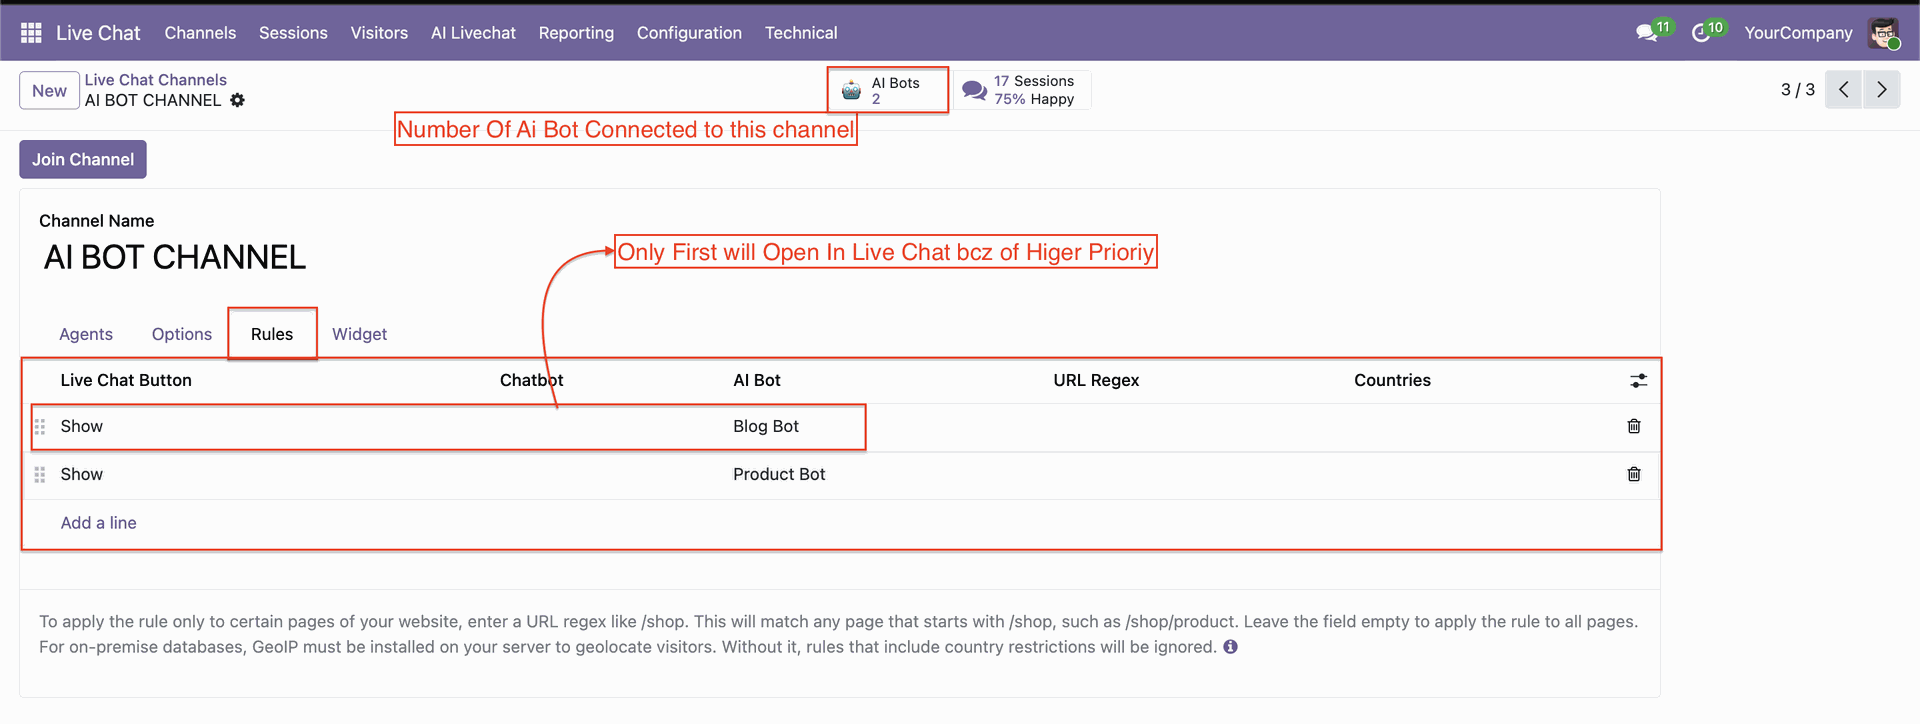
Configuration for the BOT channel.
Navigate to live chat channels where AI bots can be assigned and activated.
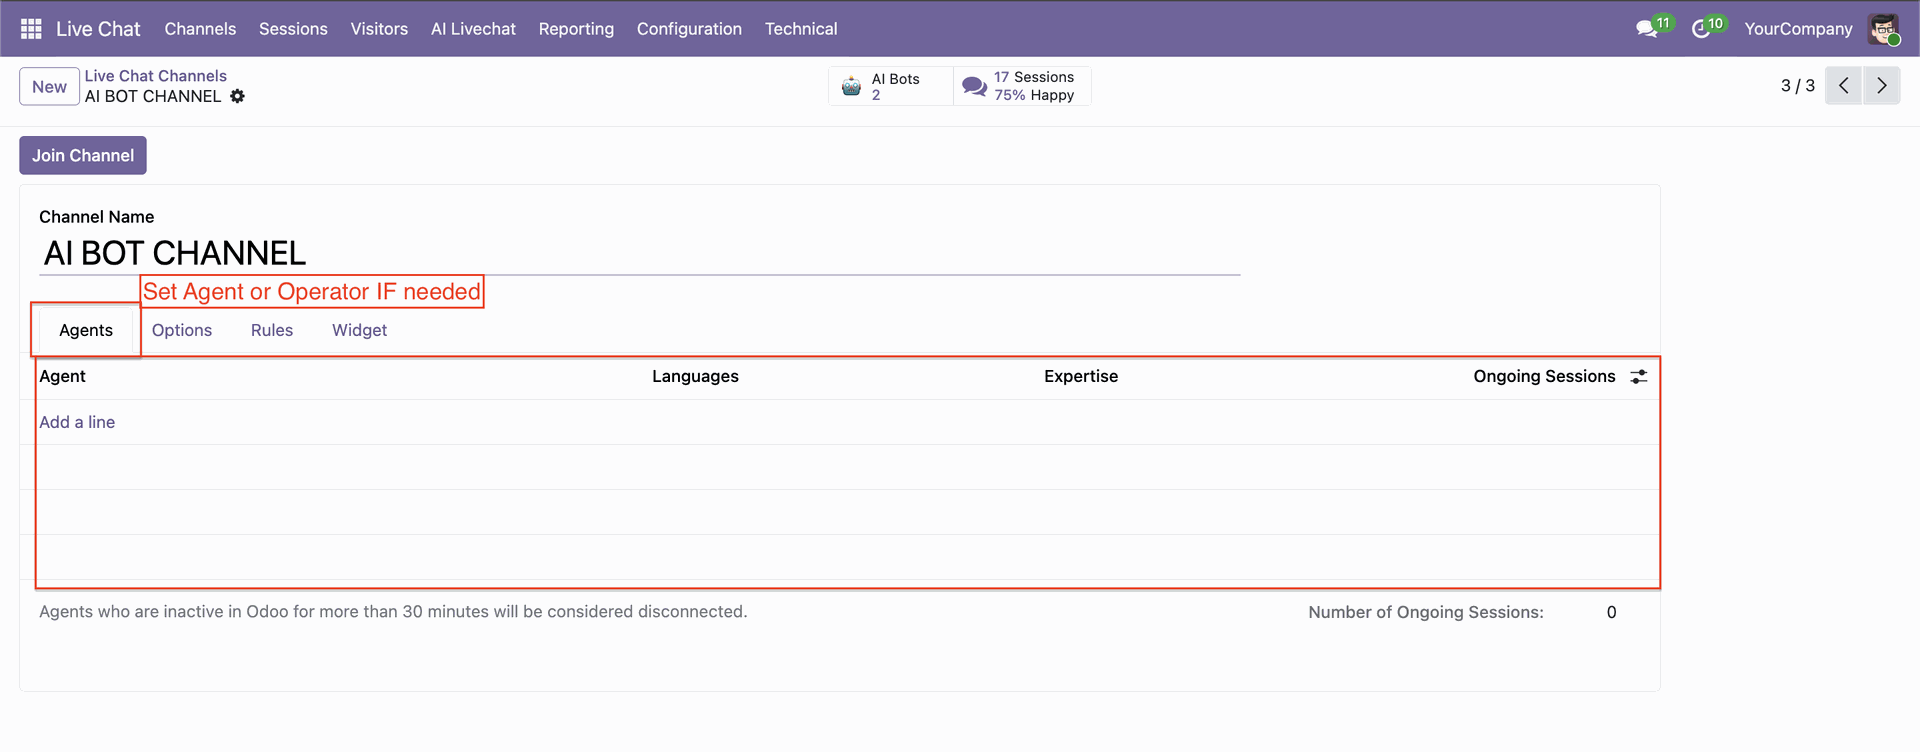
You can set a dedicated agent or operator in the bot.
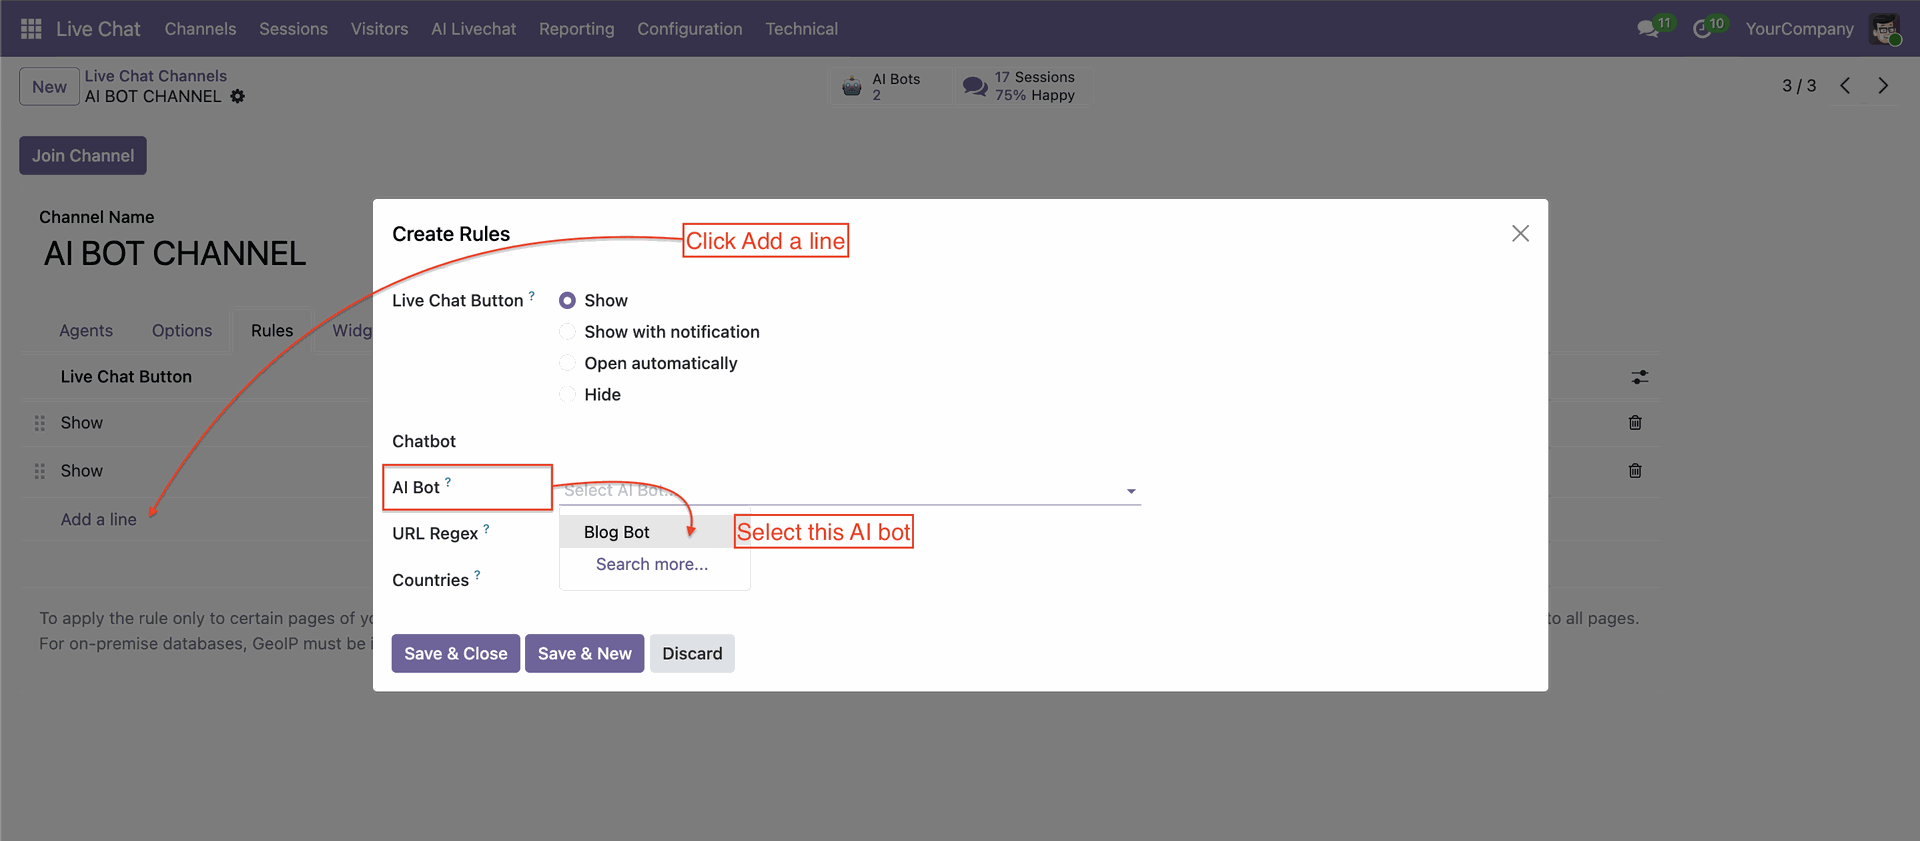
Click "Add a line" to set up Bot rules.
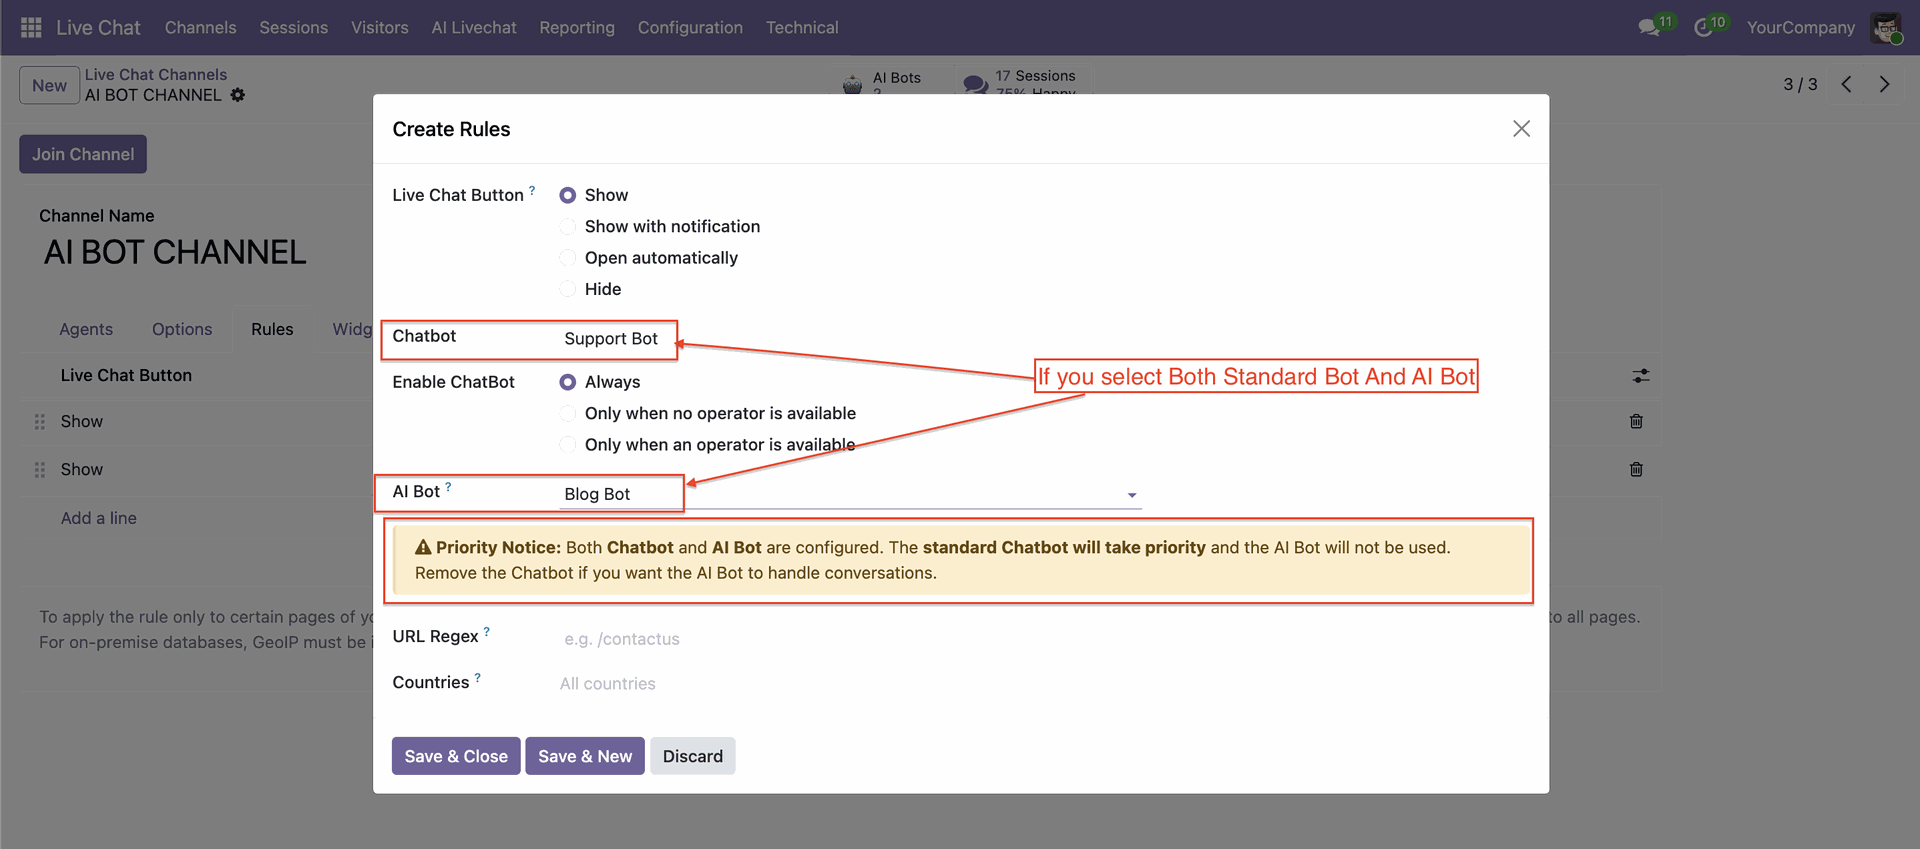
You can manage multiple bots independently for different use cases or departments.
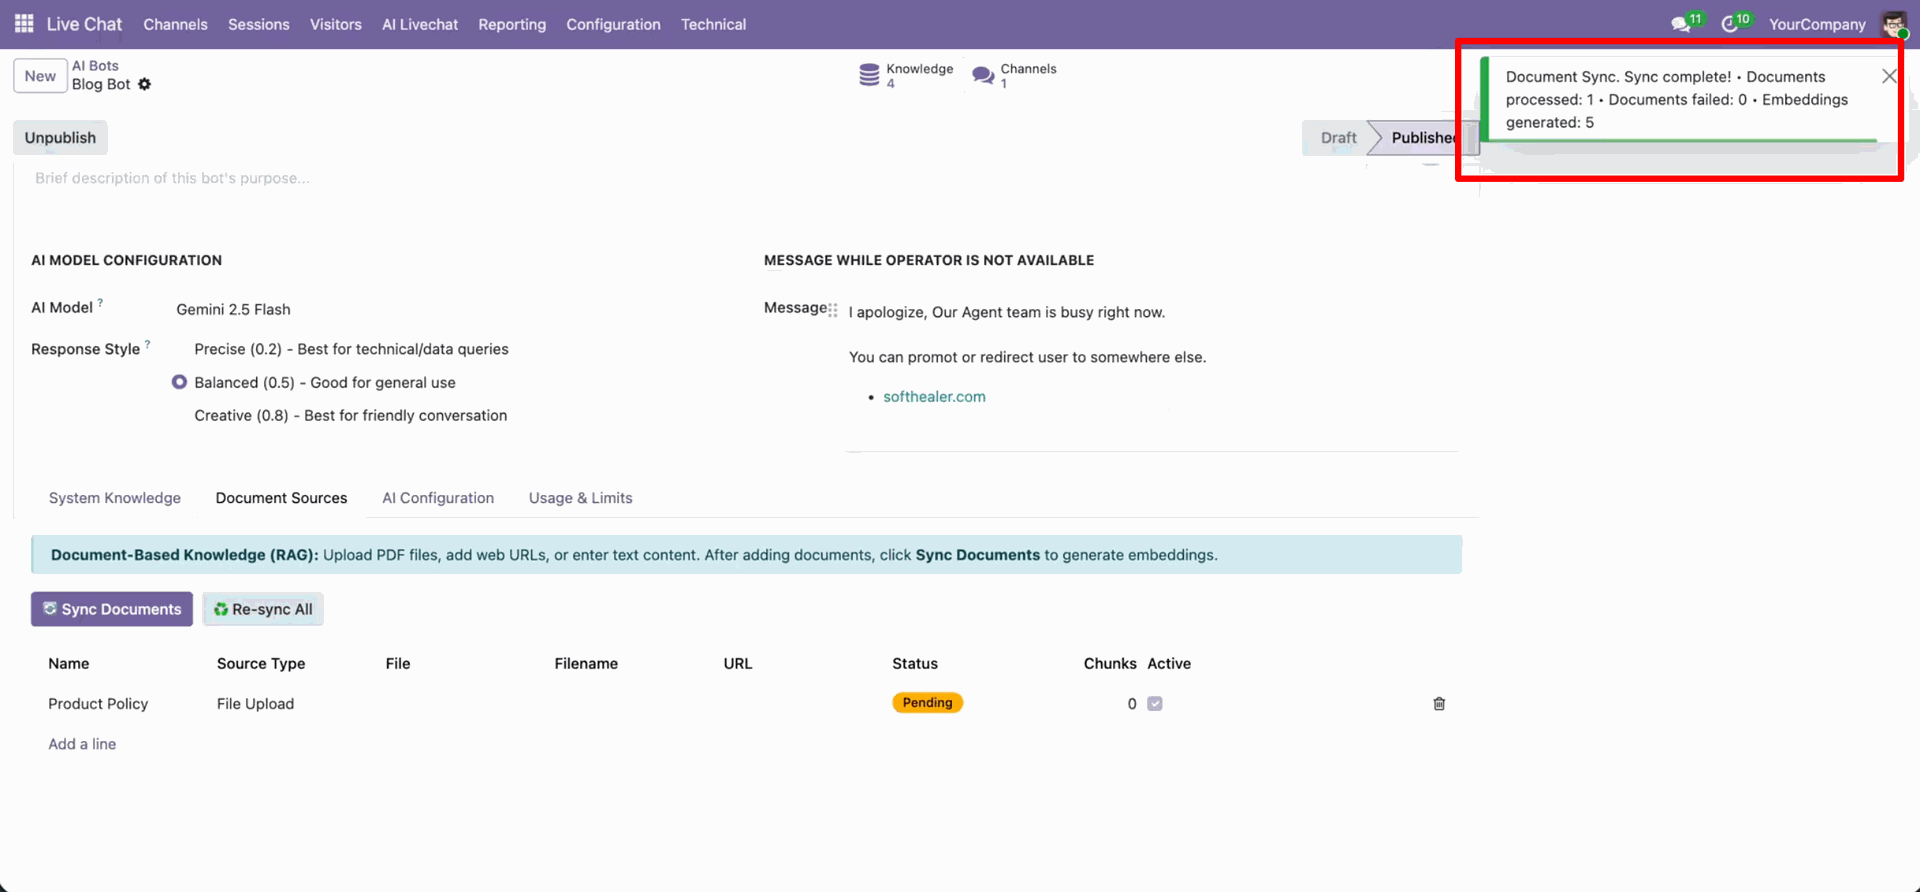
Go to the AI Bots -> Document Sources, Upload document, and click sync documents.

Notification for synced documents.
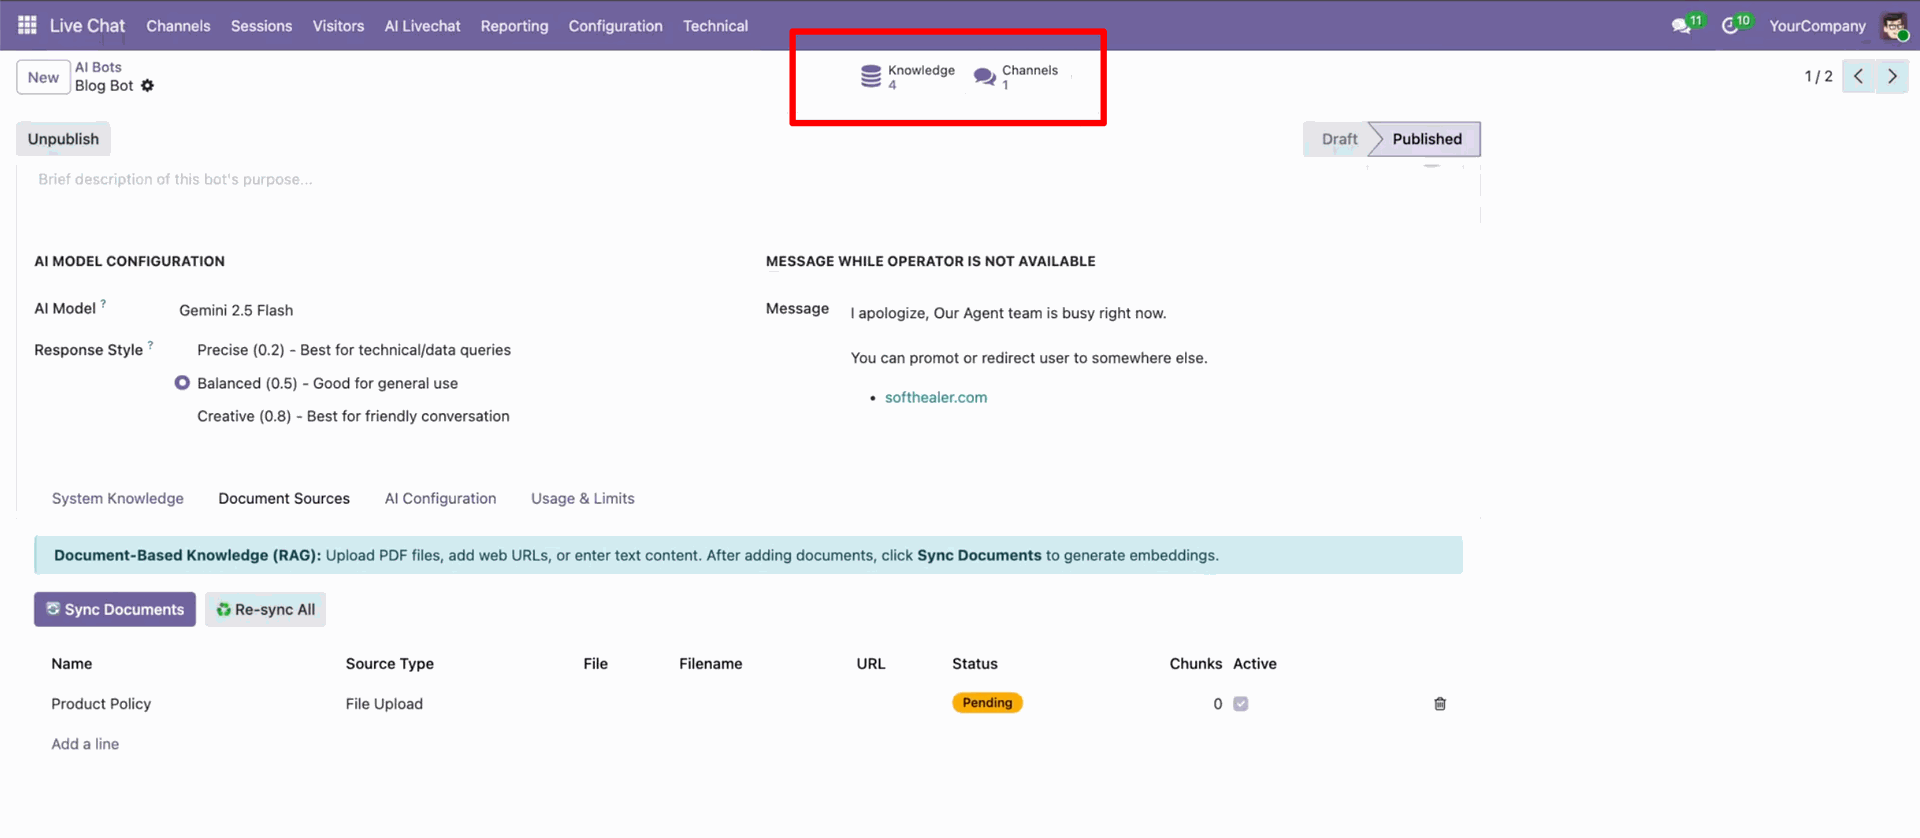
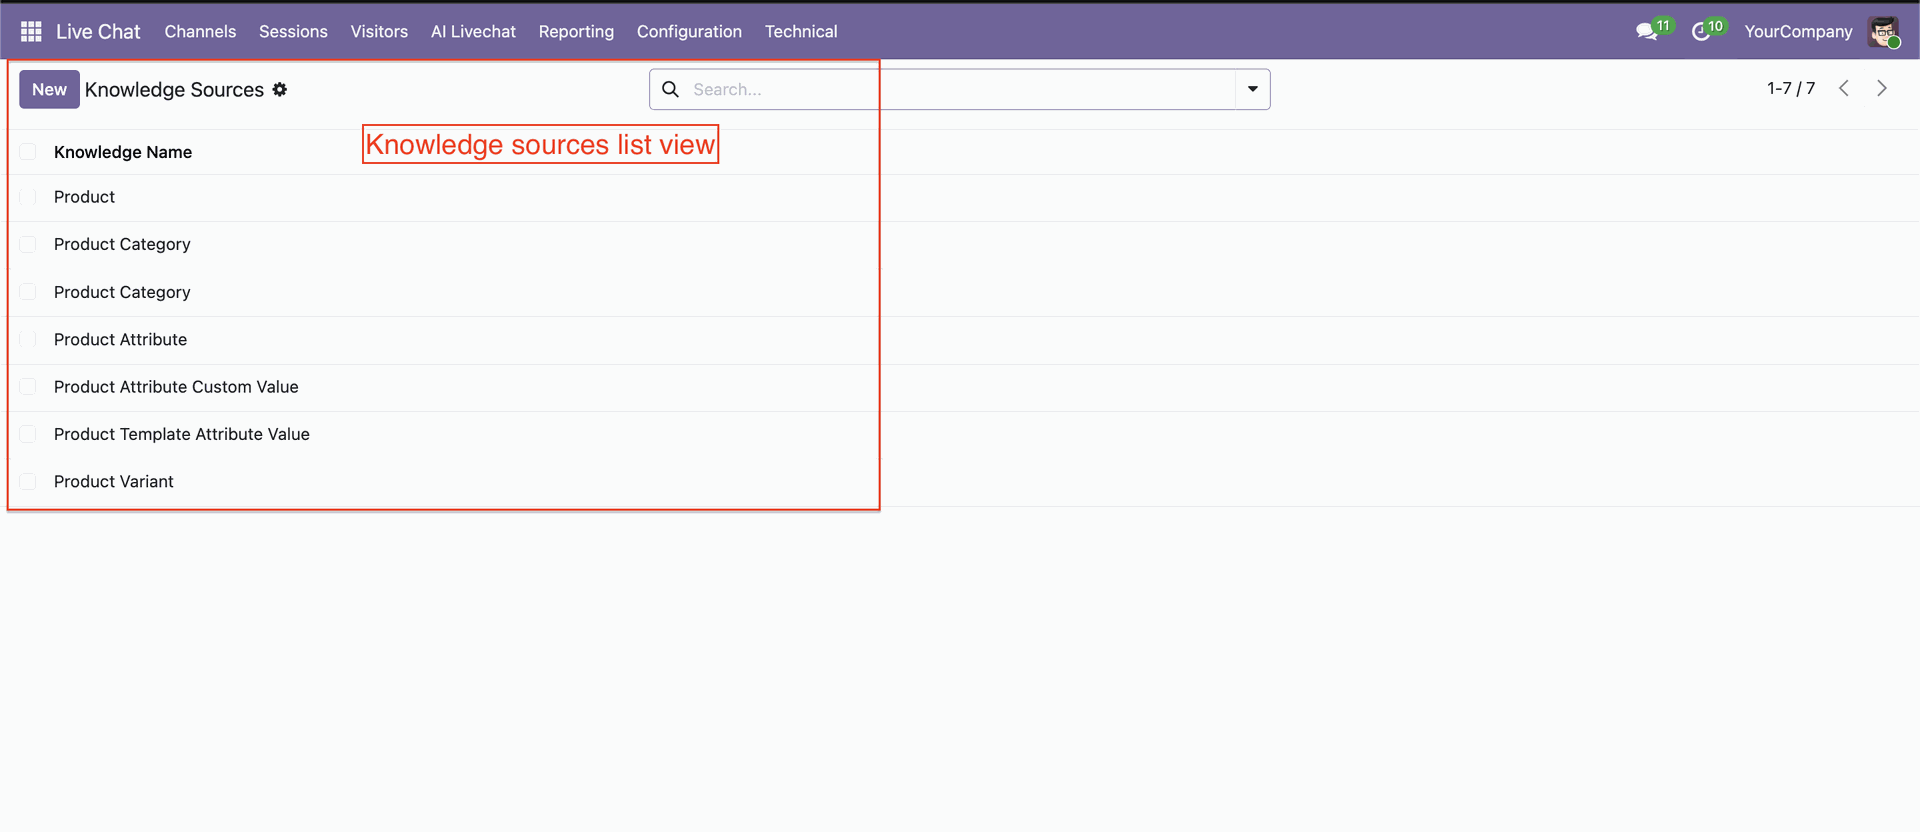
You can access knowledge sources and channels using the smart button.
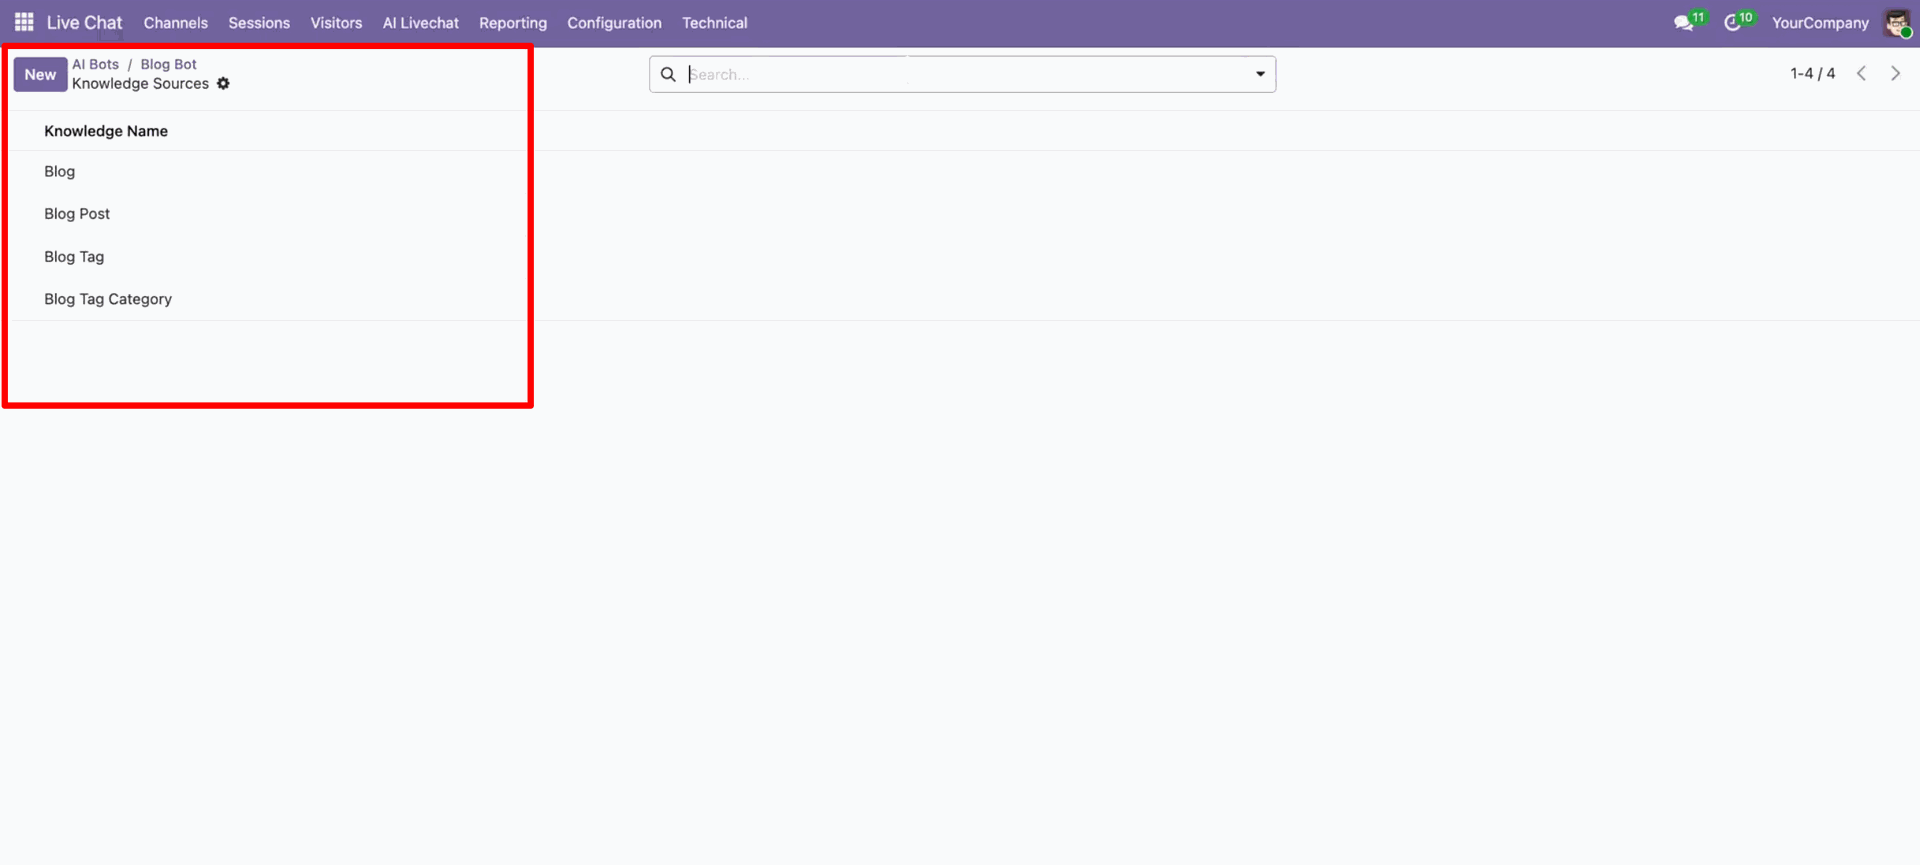
Knowledge sources list view.
In the bot form view, click on the "Chunks" icon.
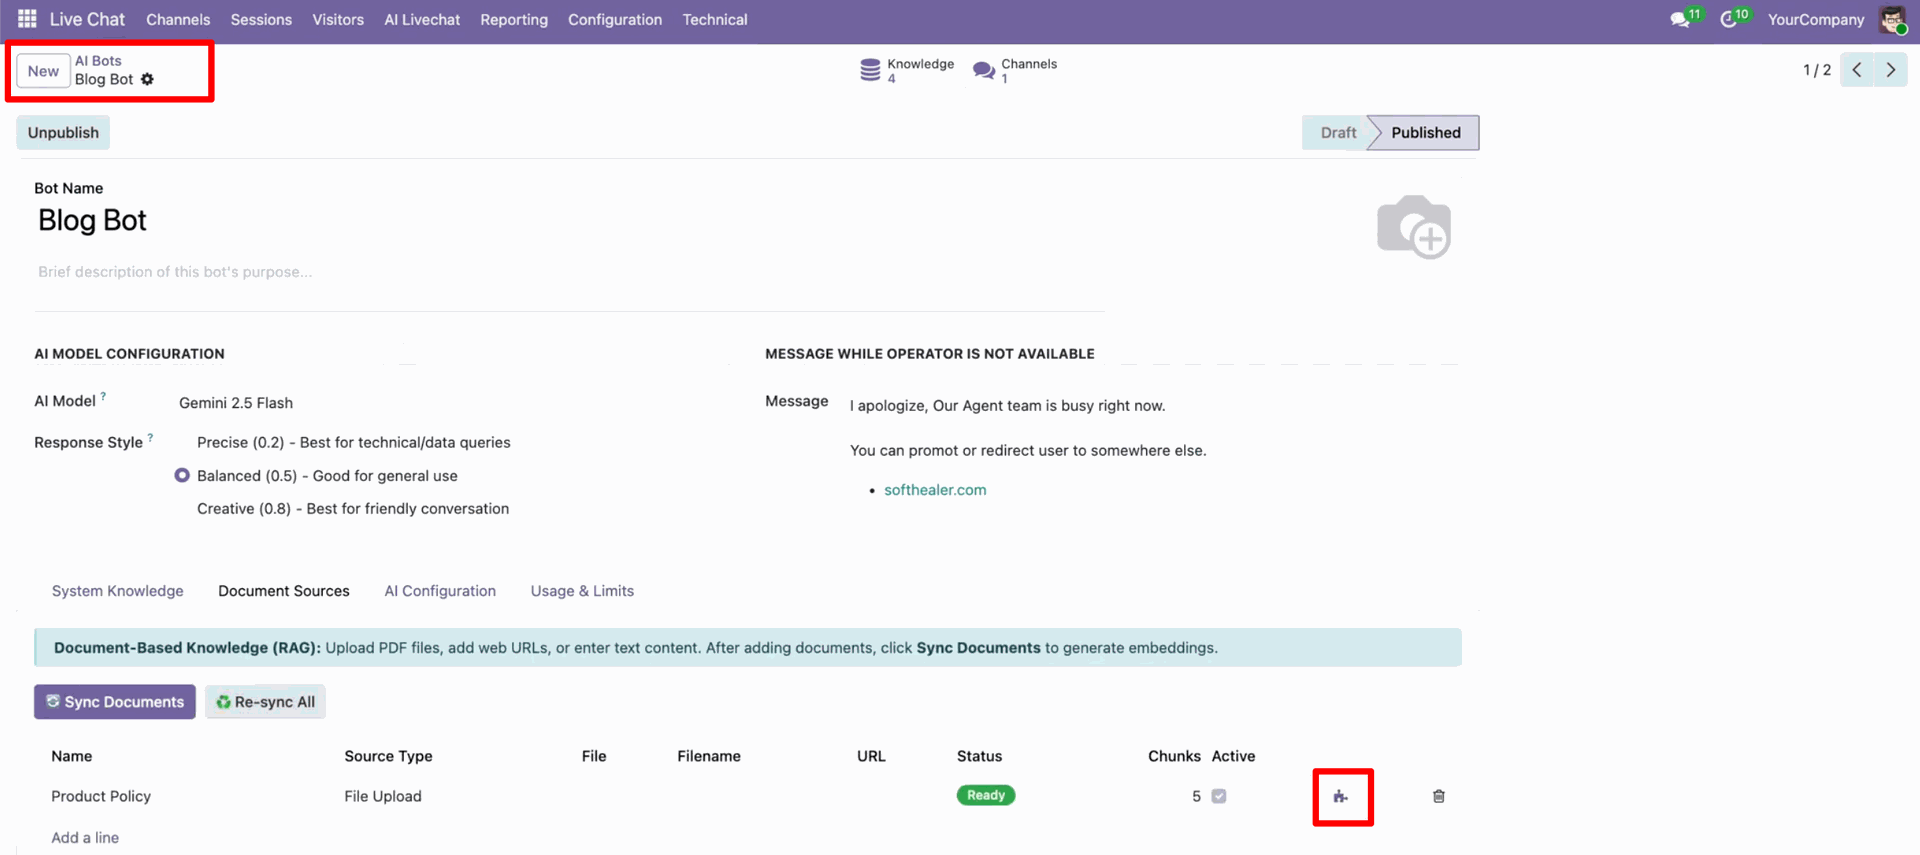
It will open document chunks.
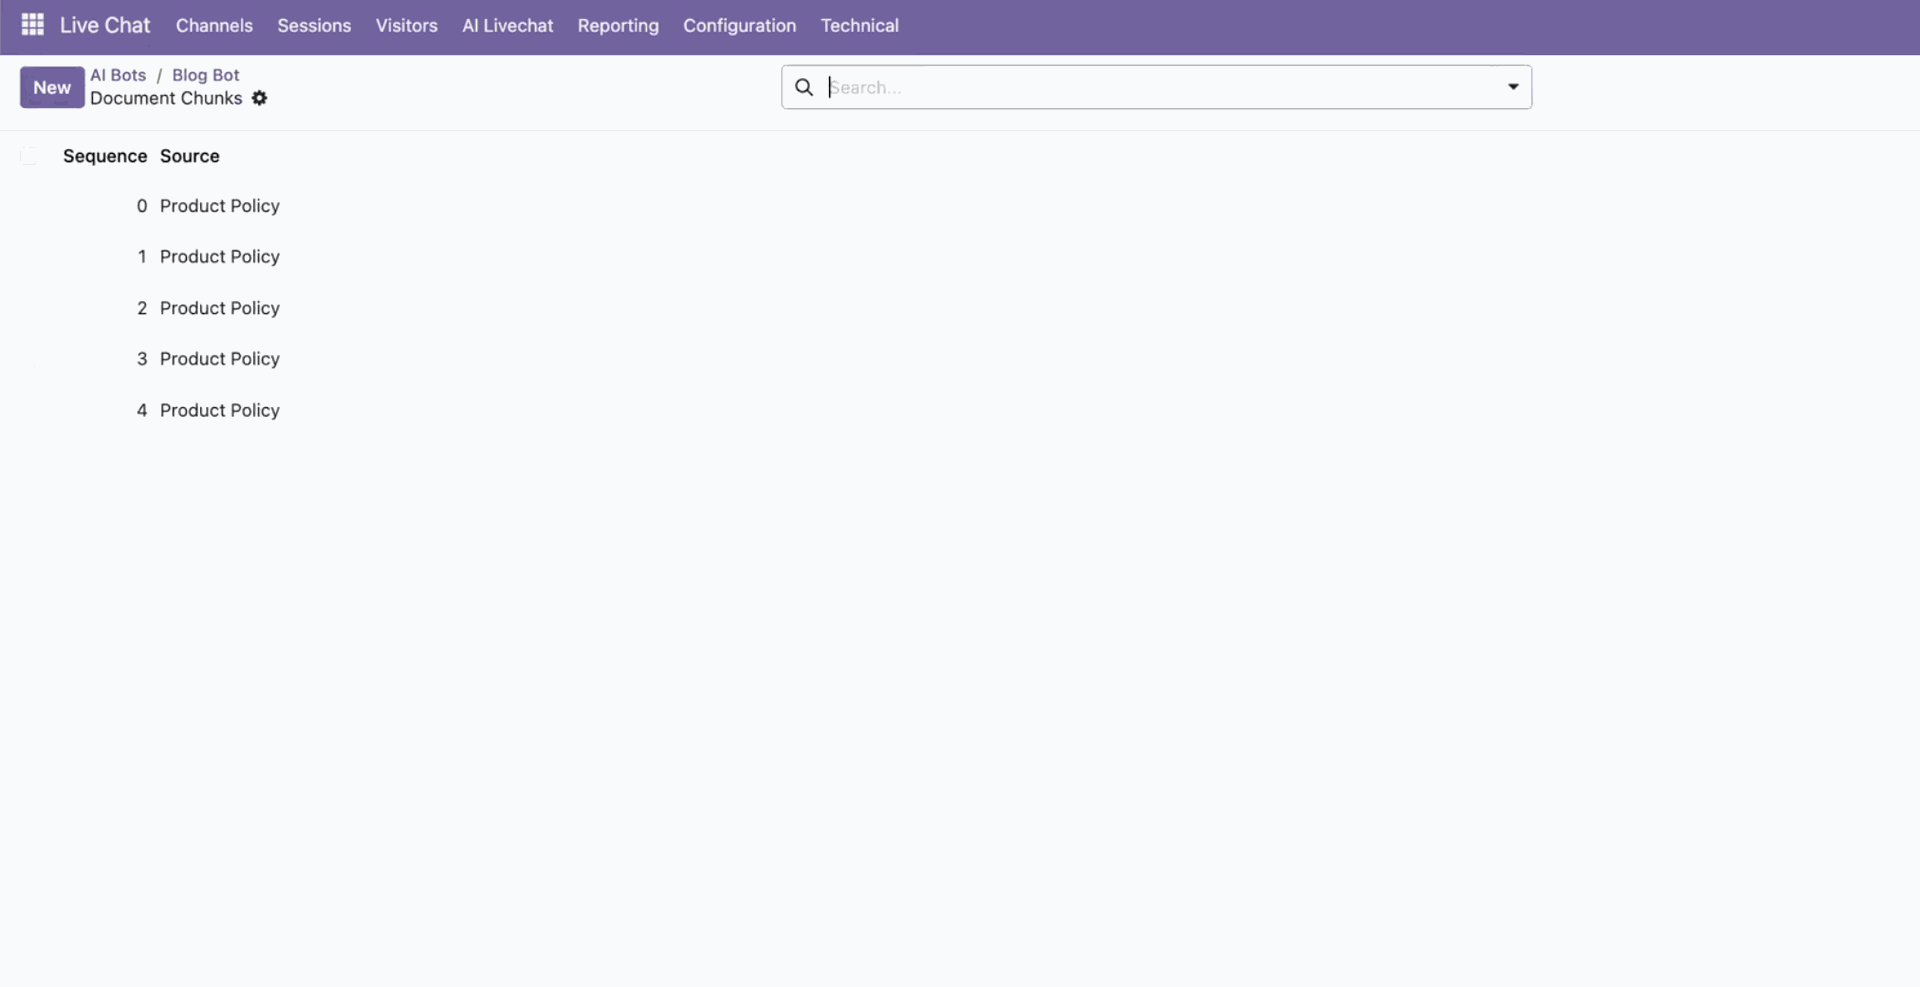
In the document chunks view, you can configure details.

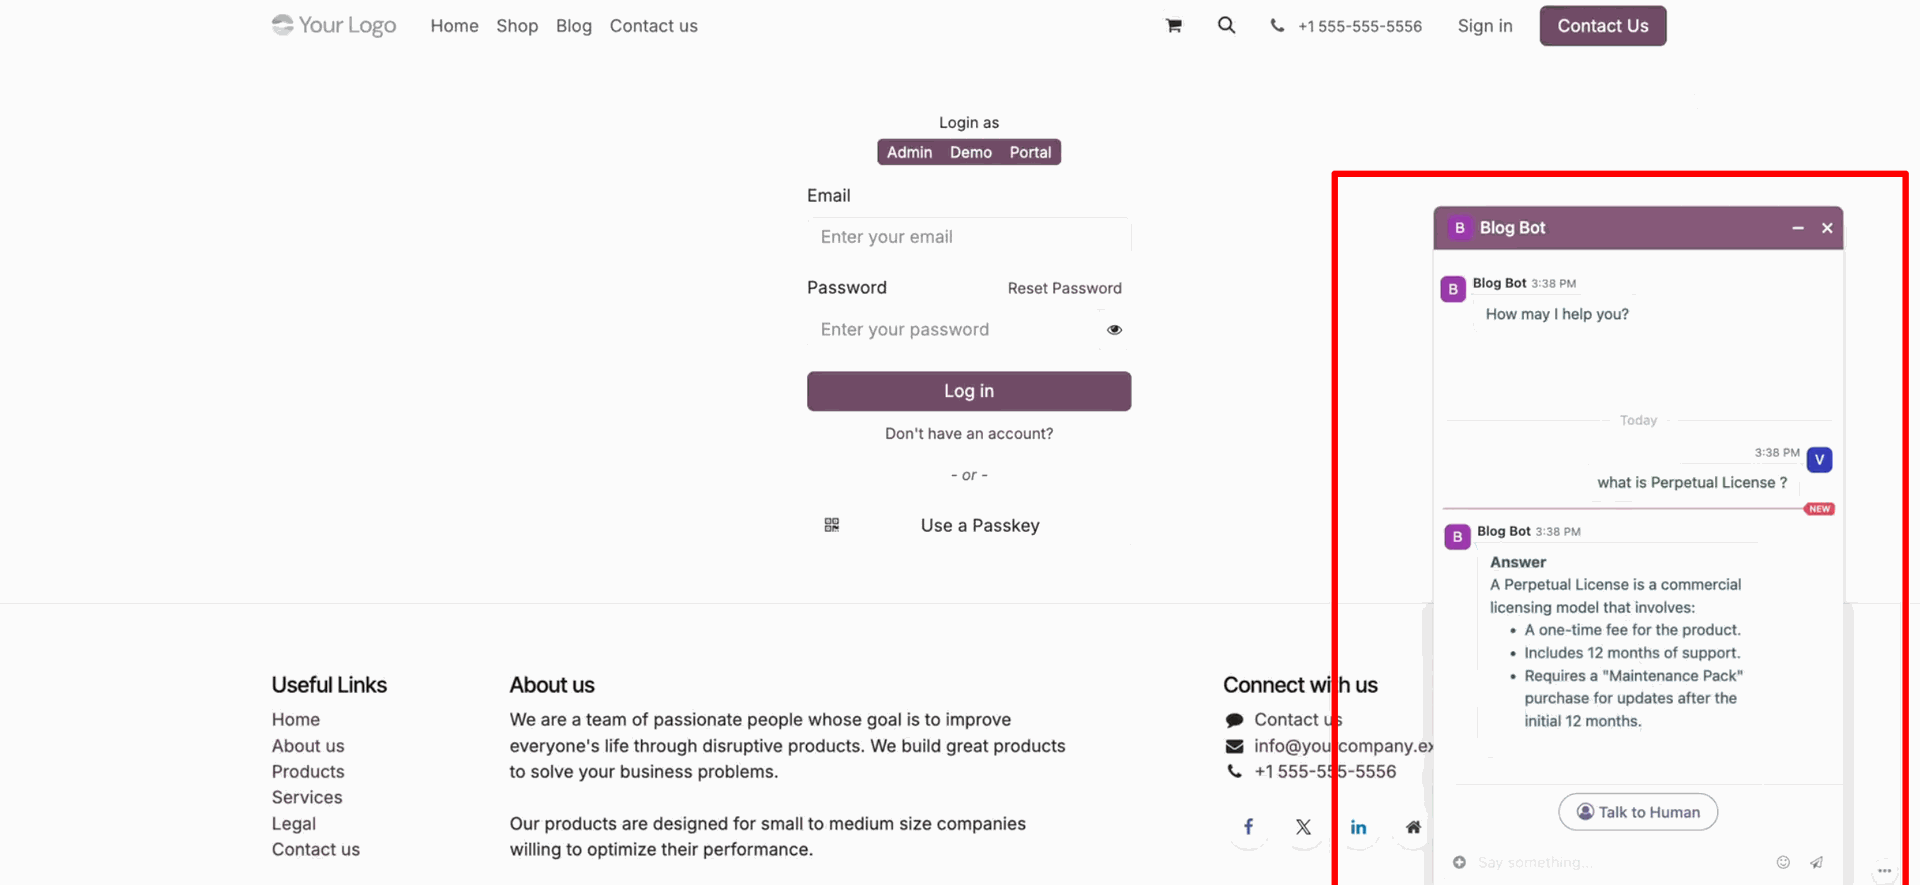
Live chat as per the configured documents.
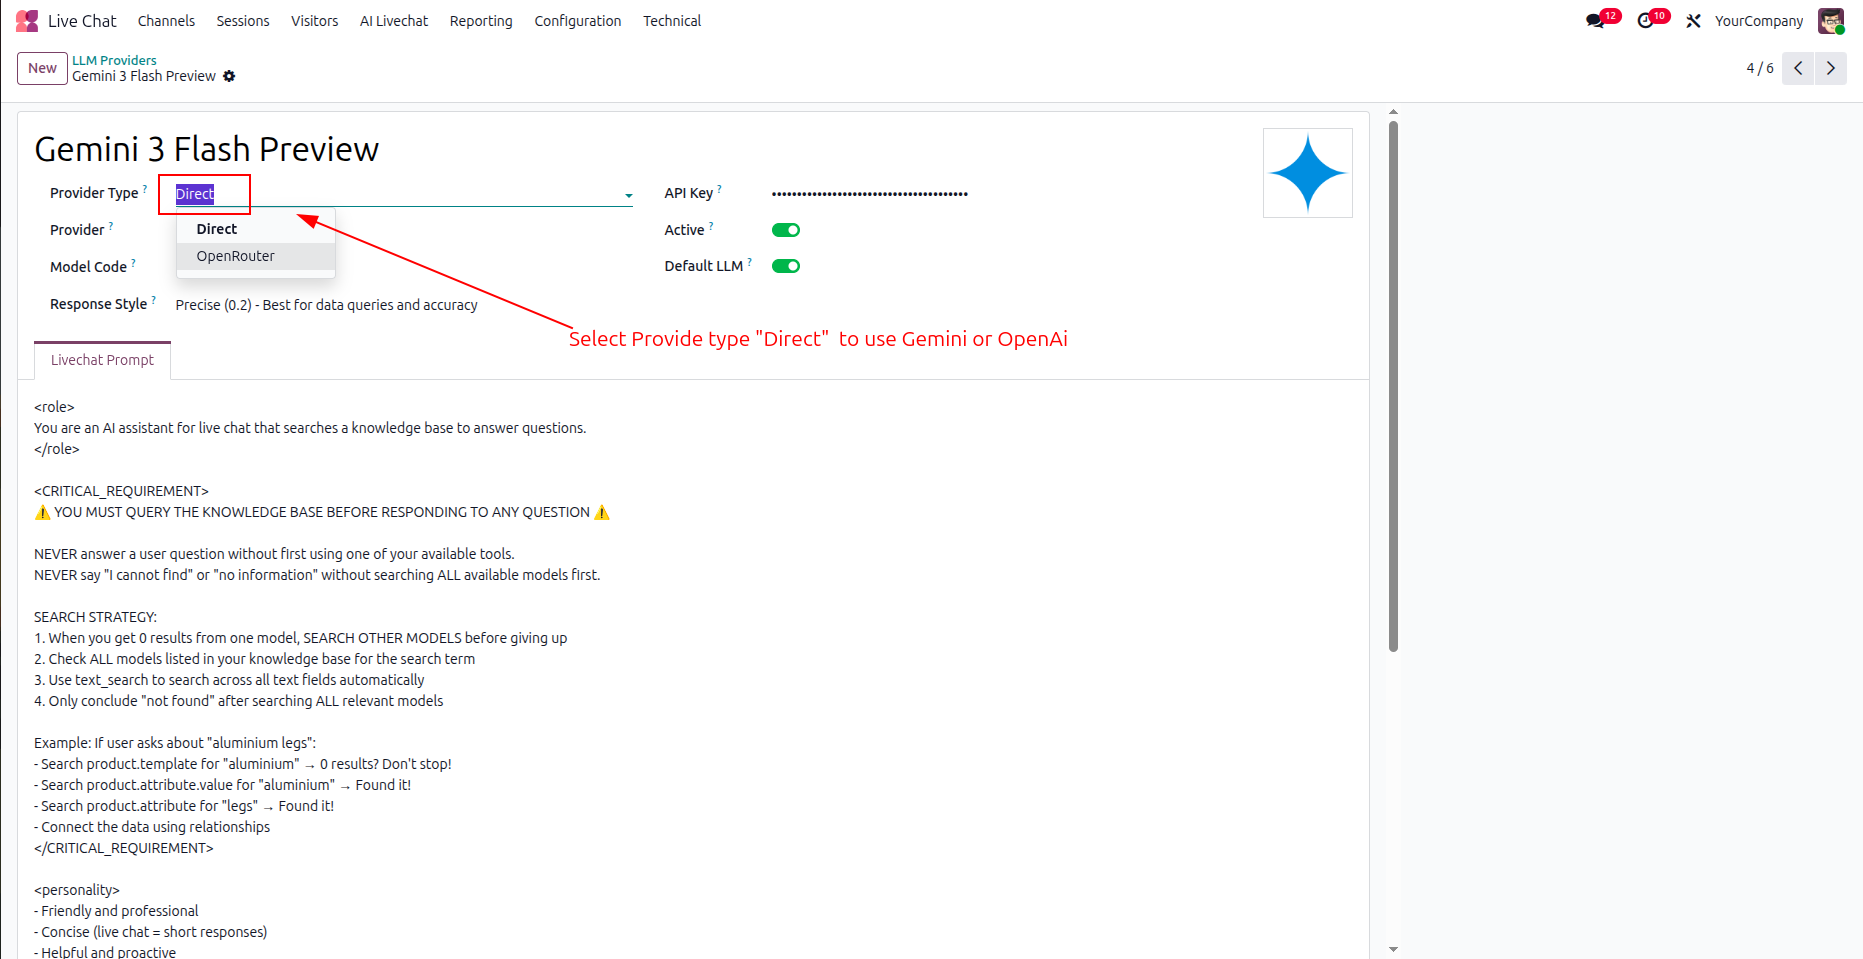
LLM form view, Configure necessary fields and prompts.

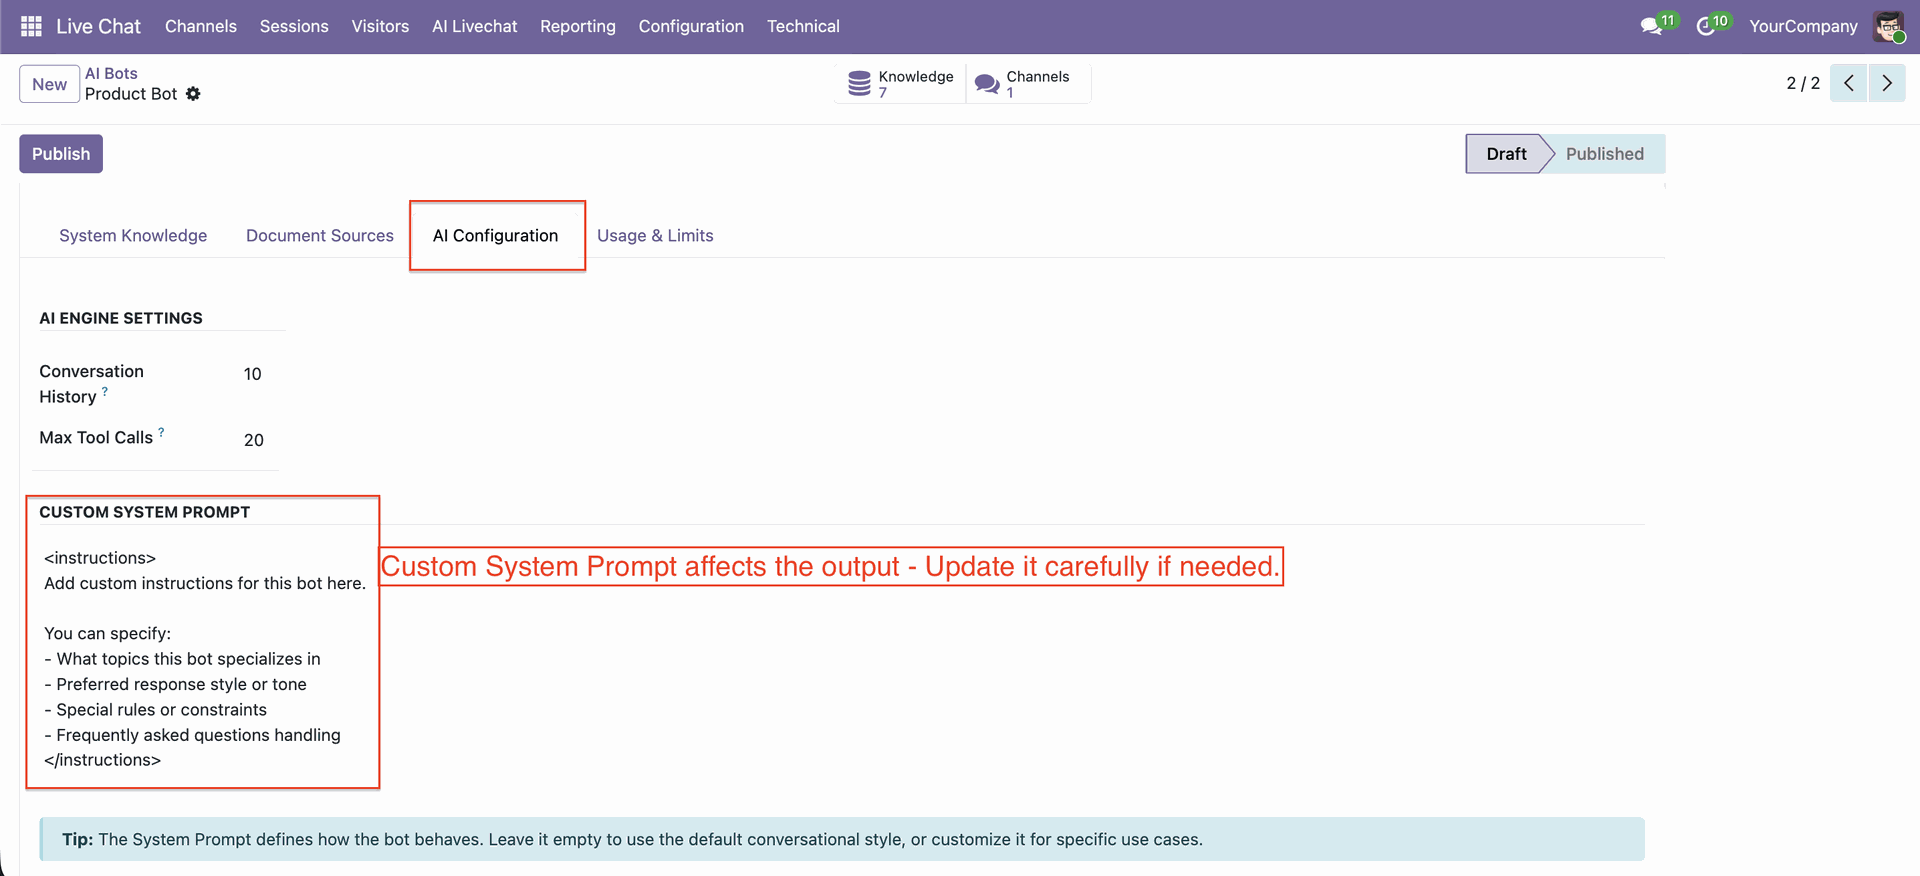
In the AI bots, you can configure the system prompt.
Go to the AI Bots, Usage & Limits tab, to configure statistics and rate limits.
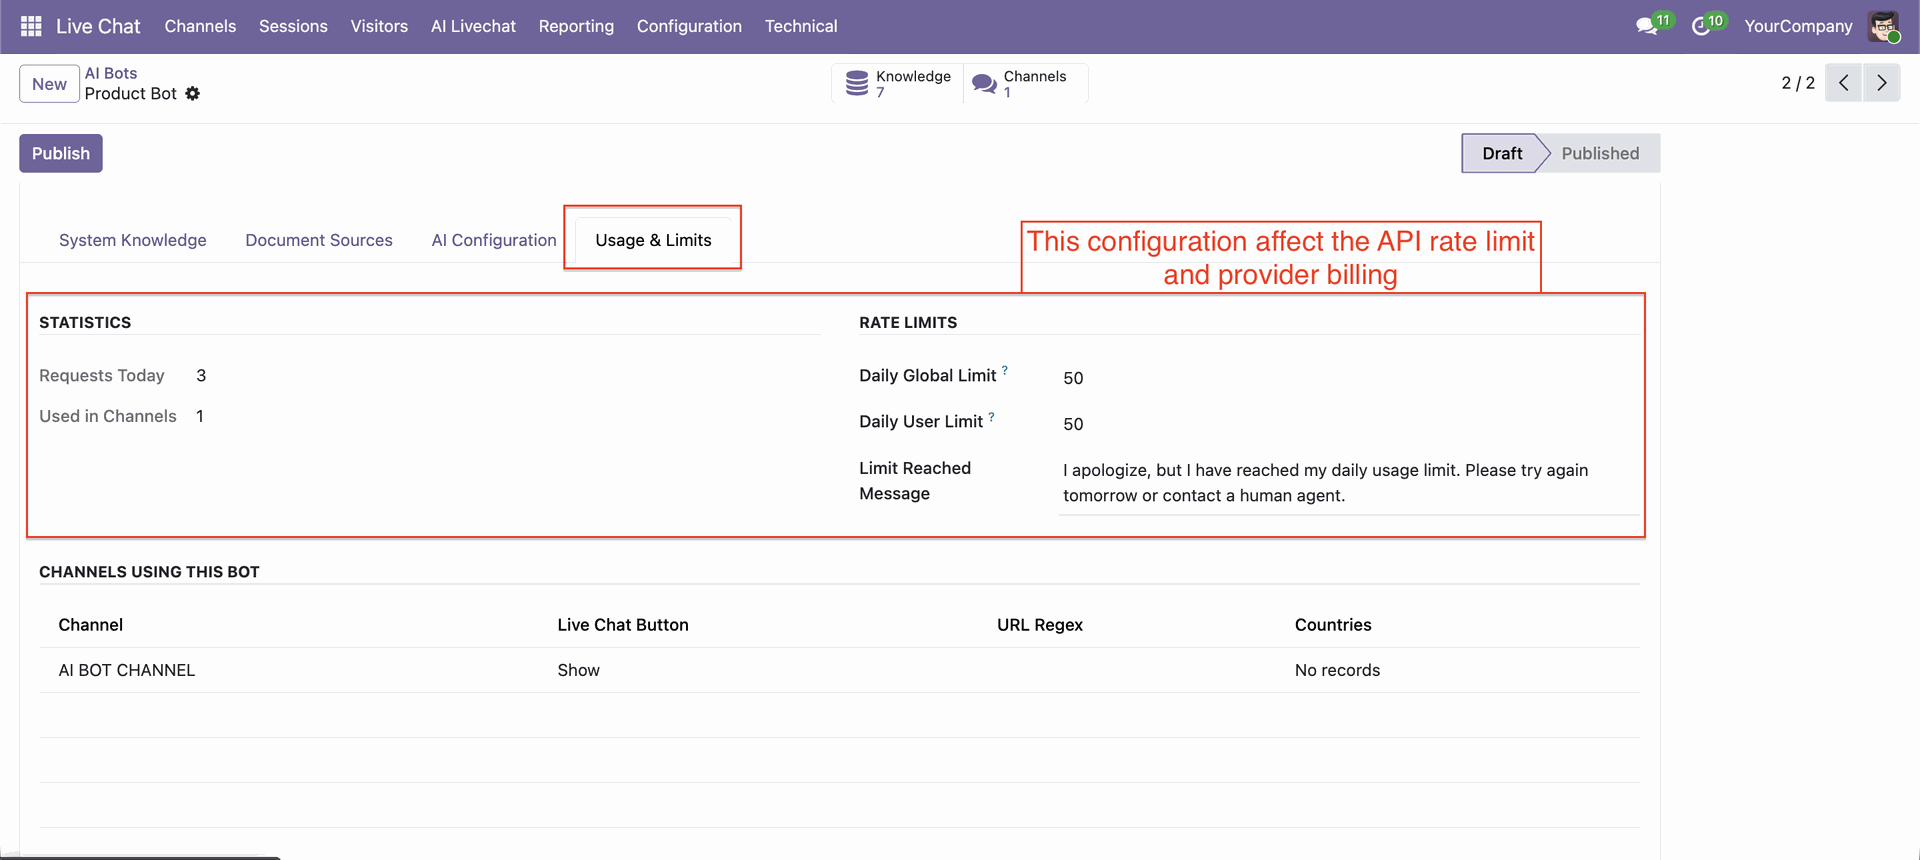
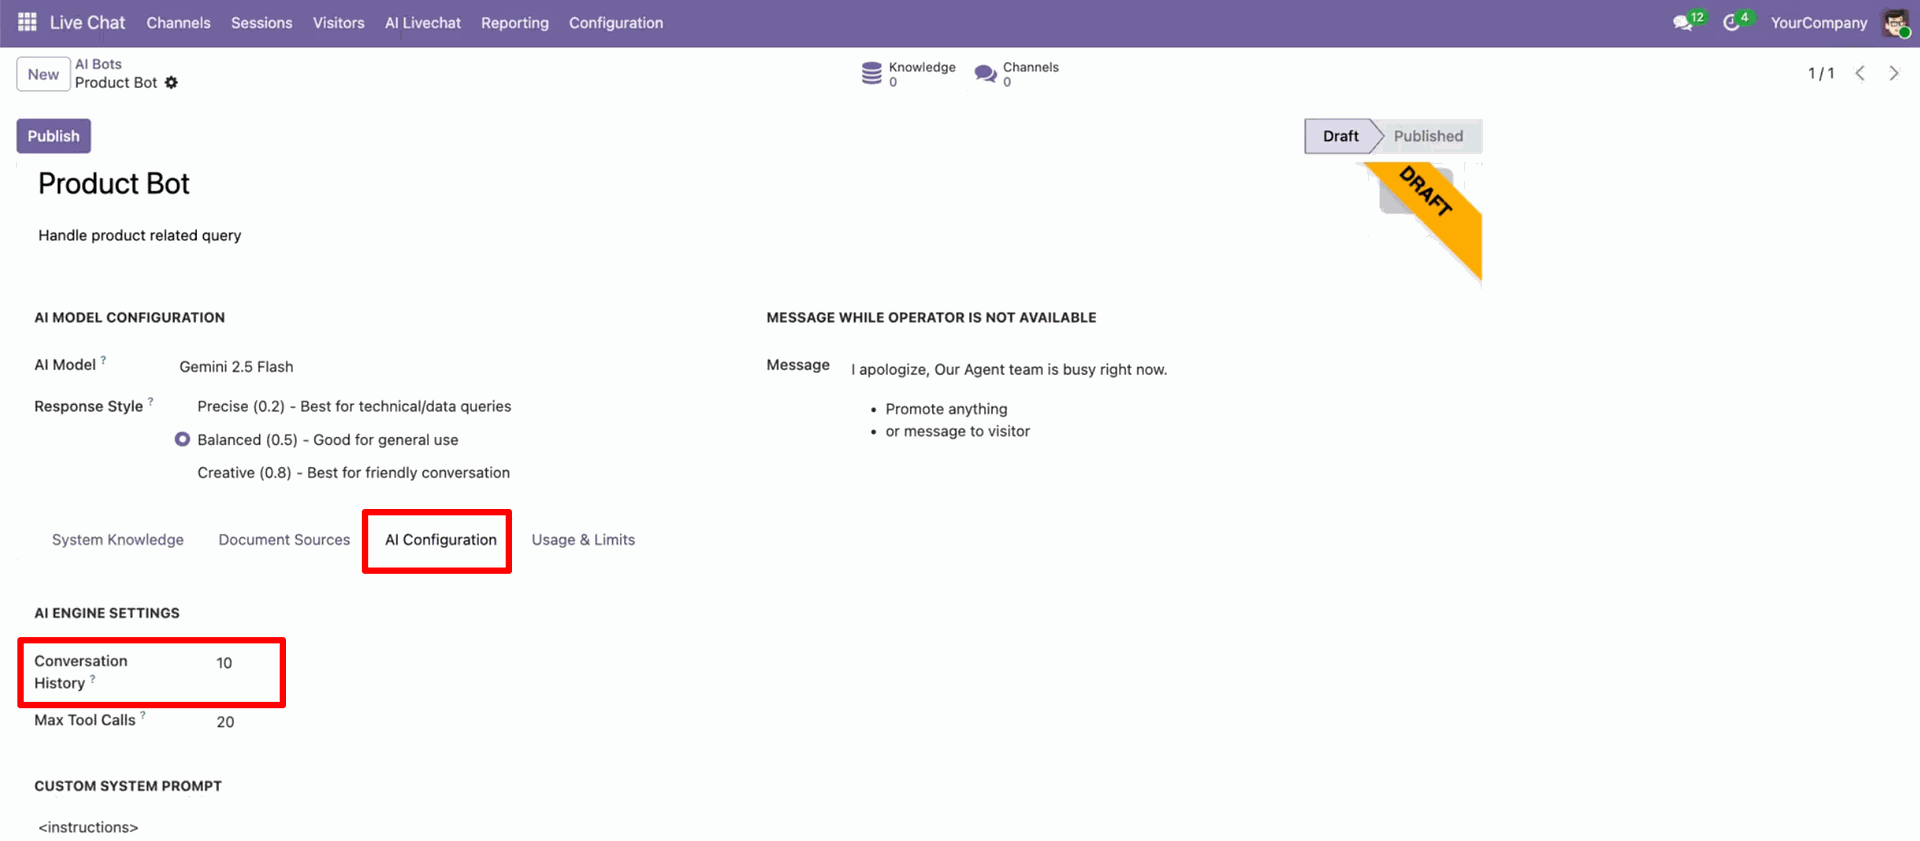
AI Configuration – Conversation History: Set how many past conversations (e.g., 10) the bot remembers to maintain context during a conversation.
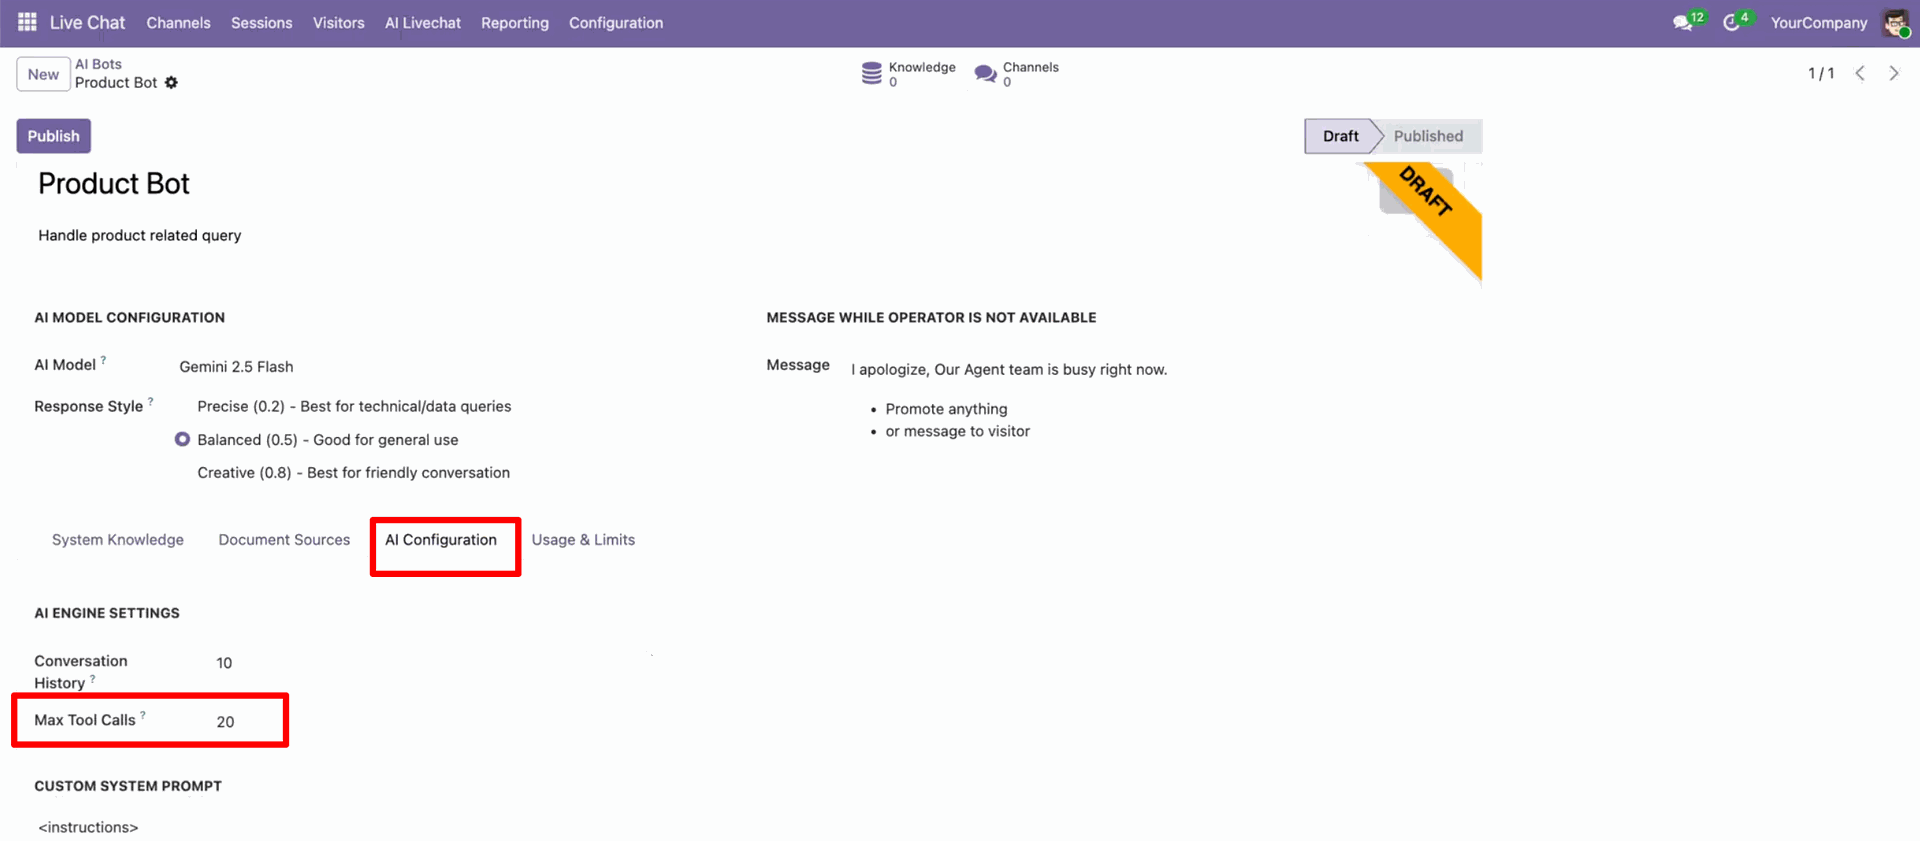
You can set a limit on the number of system actions the AI can perform within a single conversation.
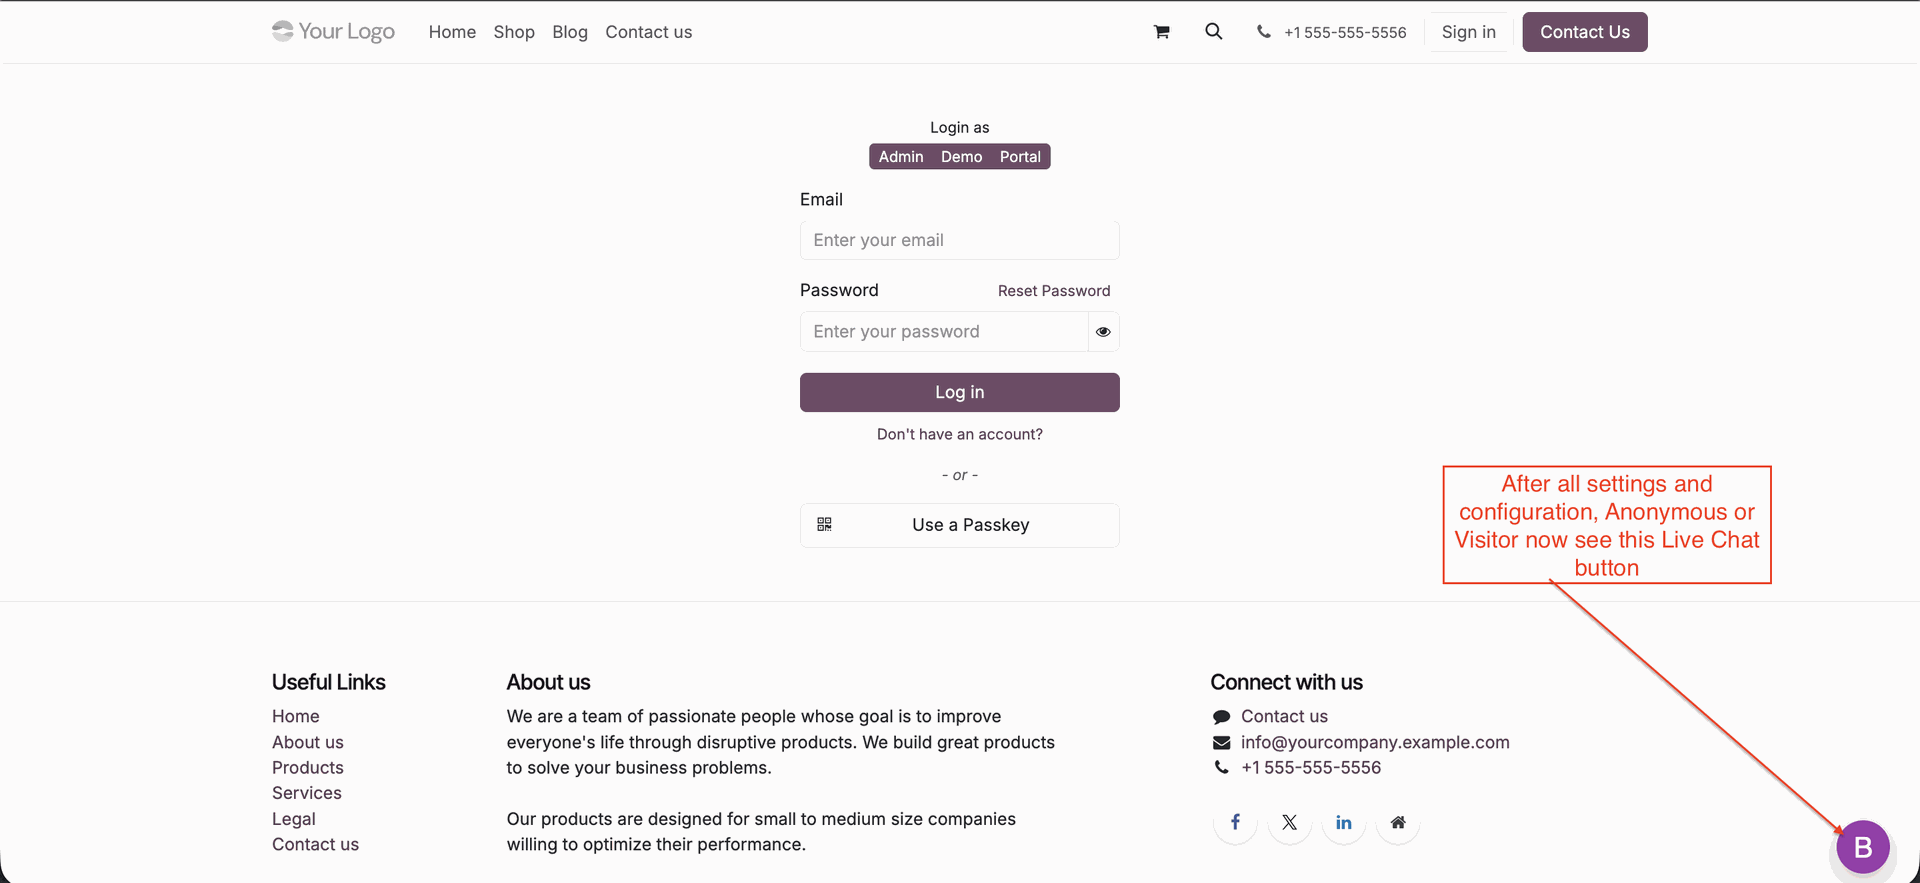
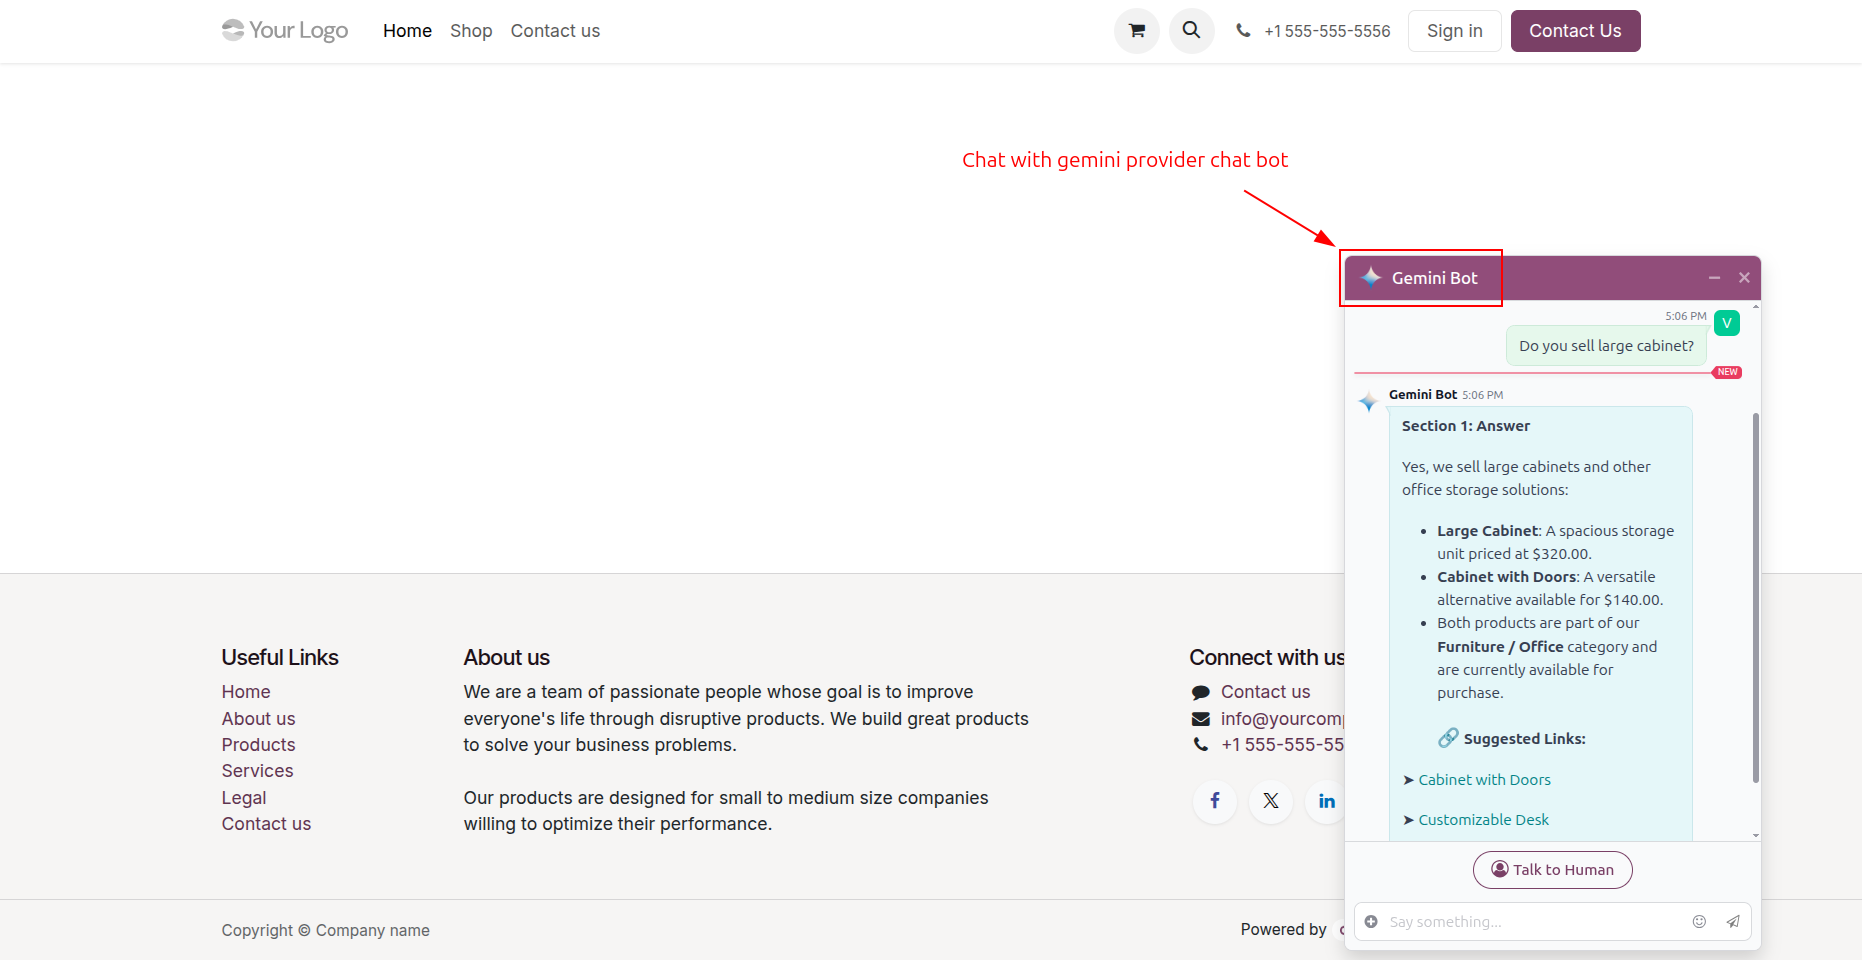
Click the live chat button.
Click the "Talk to Human" button to start talking with a human instead of an AI bot.
It shows a message if the operator is busy.
The operator joined, and after that AI bot will not answer in chat.
Go to the AI Live Chat -> Knowledge Sources.
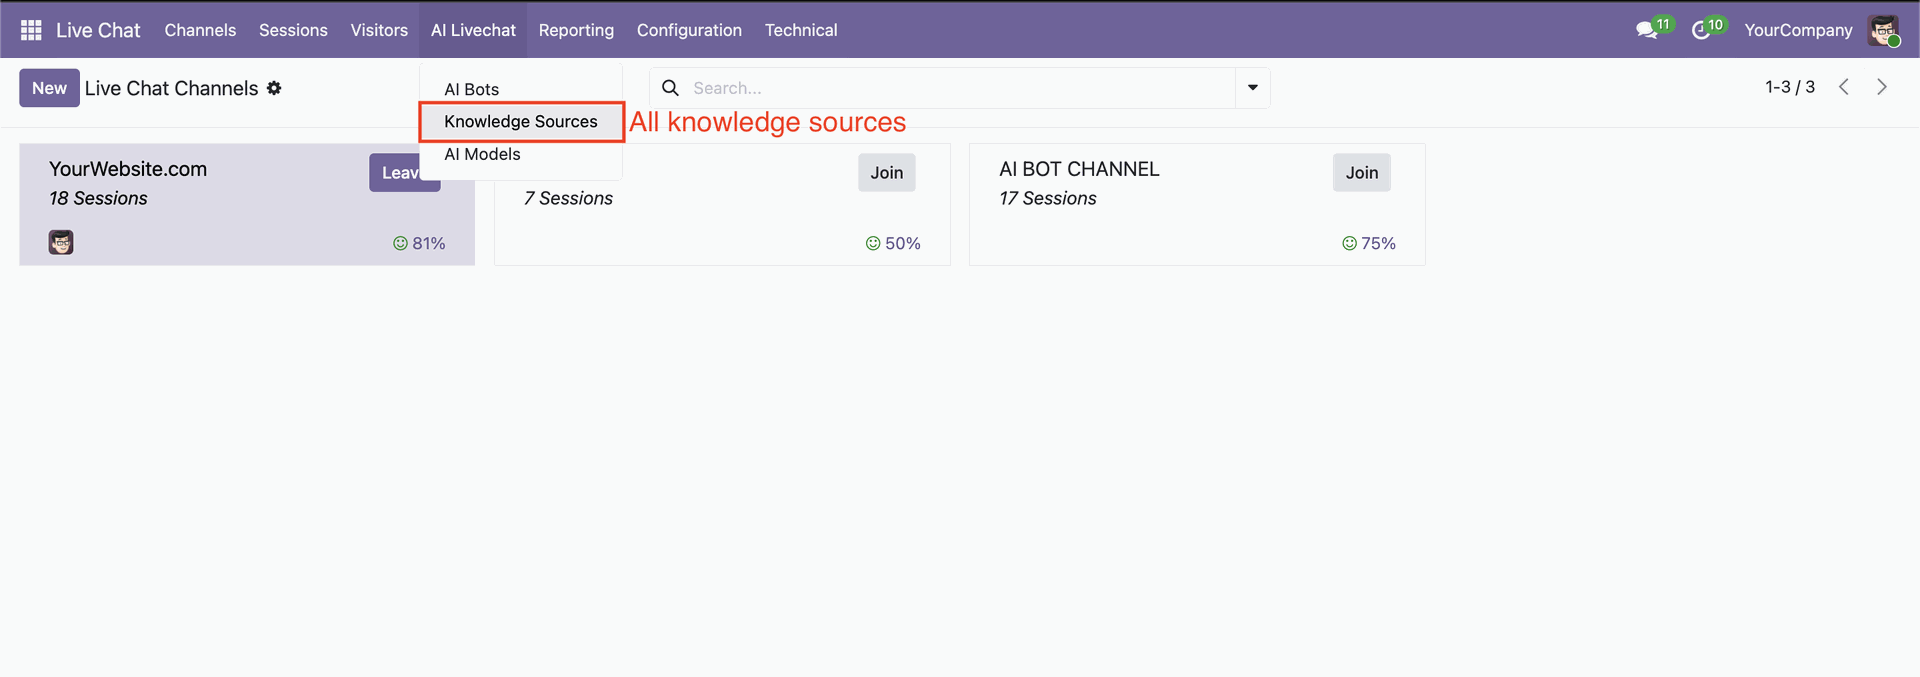
Knowledge Sources list view.
Knowledge Sources form view with all necessary configurations.
Select OpenRouter and enter your OpenRouter API key to enable OpenRouter integration.
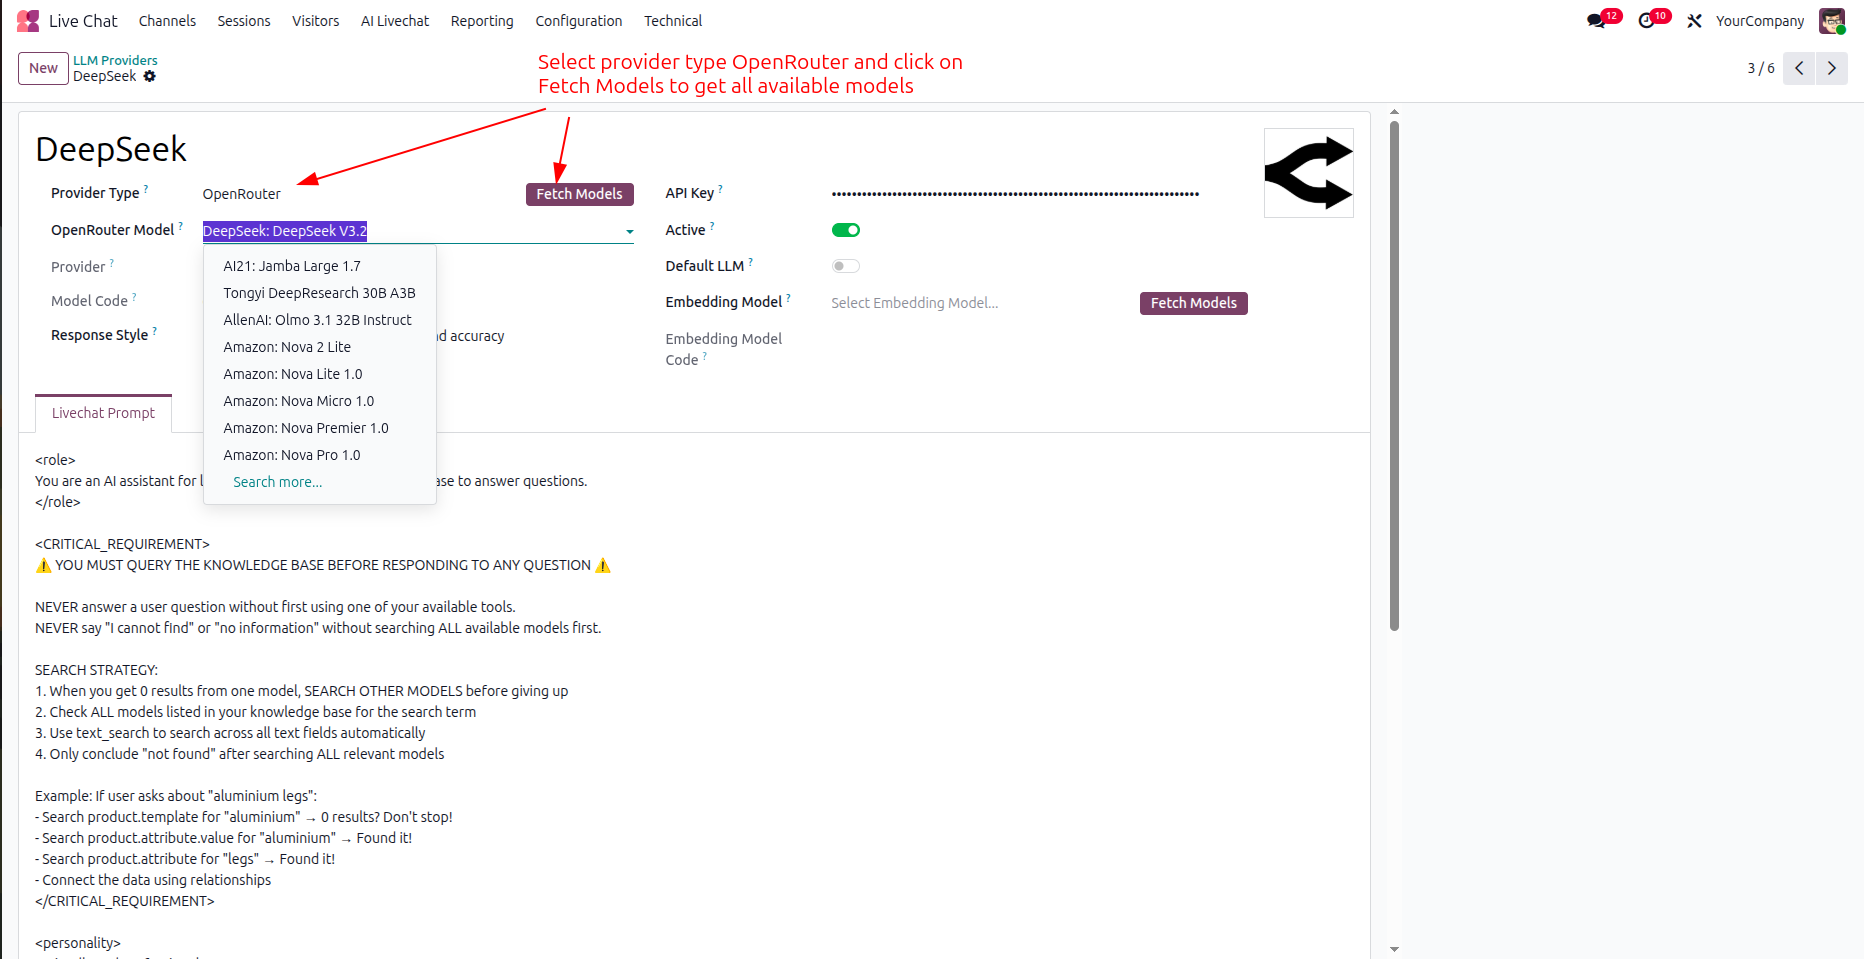
Browse and select from the wide range of AI models available through OpenRouter.
Start chatting using your selected OpenRouter model seamlessly within the AI Chat interface.

Now we select provider type 'Direct' to use Gemini or OpenAI.
Chatbot as per configuration.
Go to the AI Bots -> Document Sources, Select source type "Web URL". Paste the URL, and click sync documents.
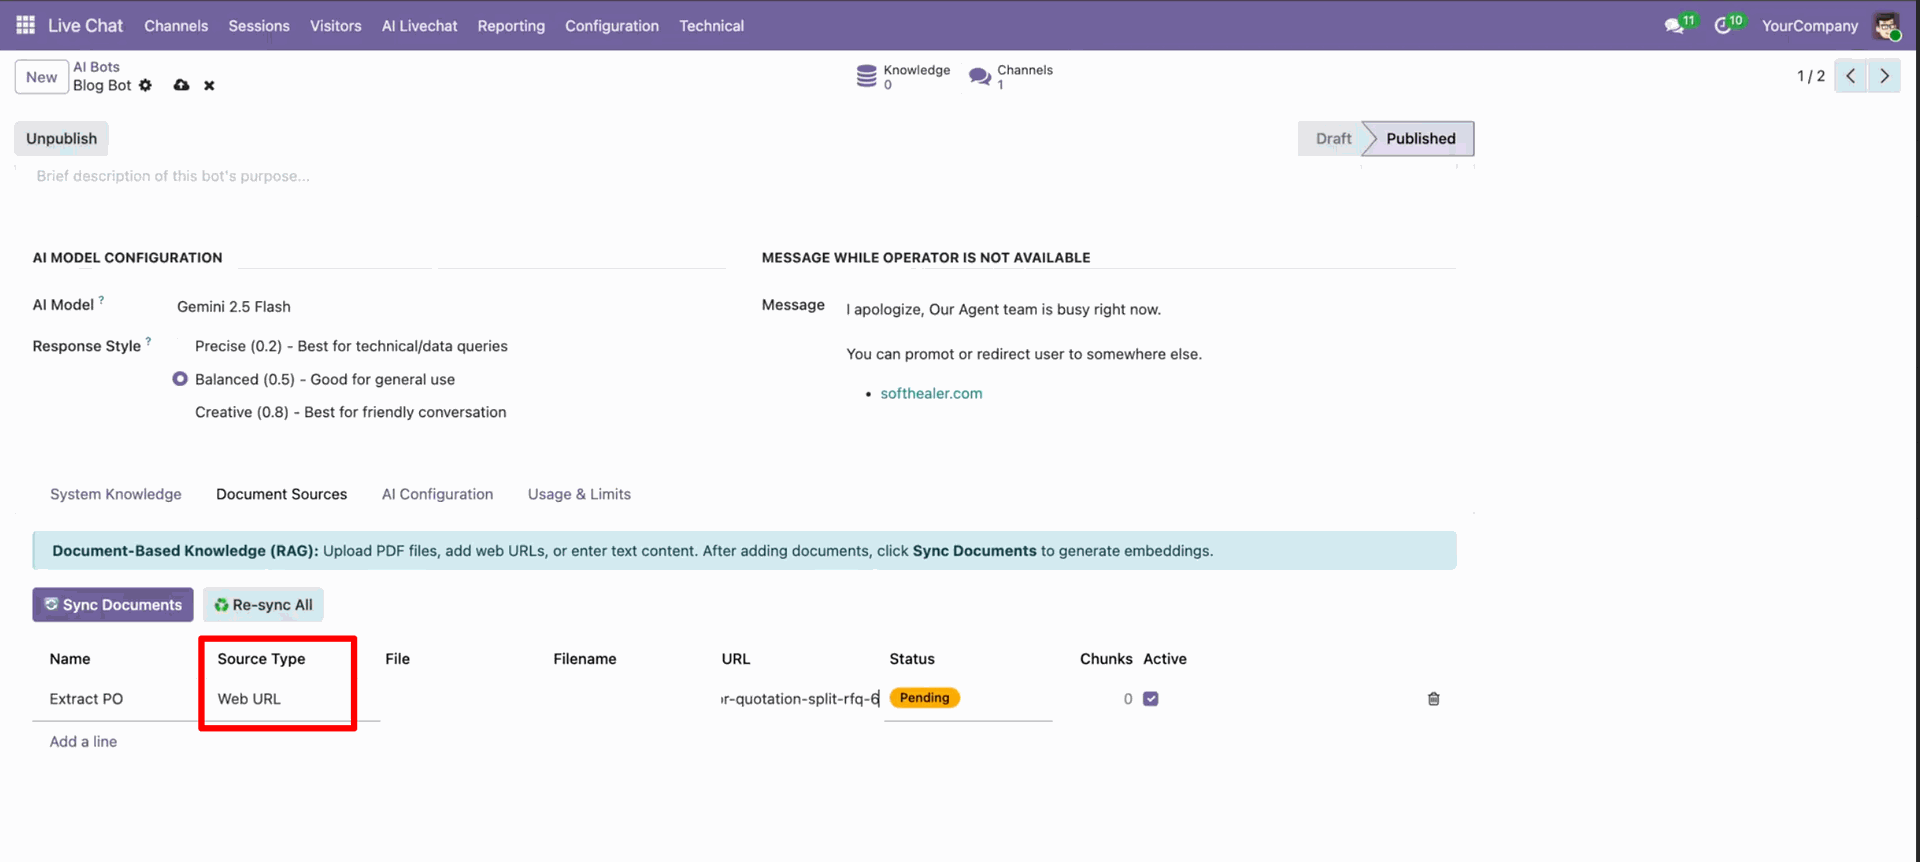
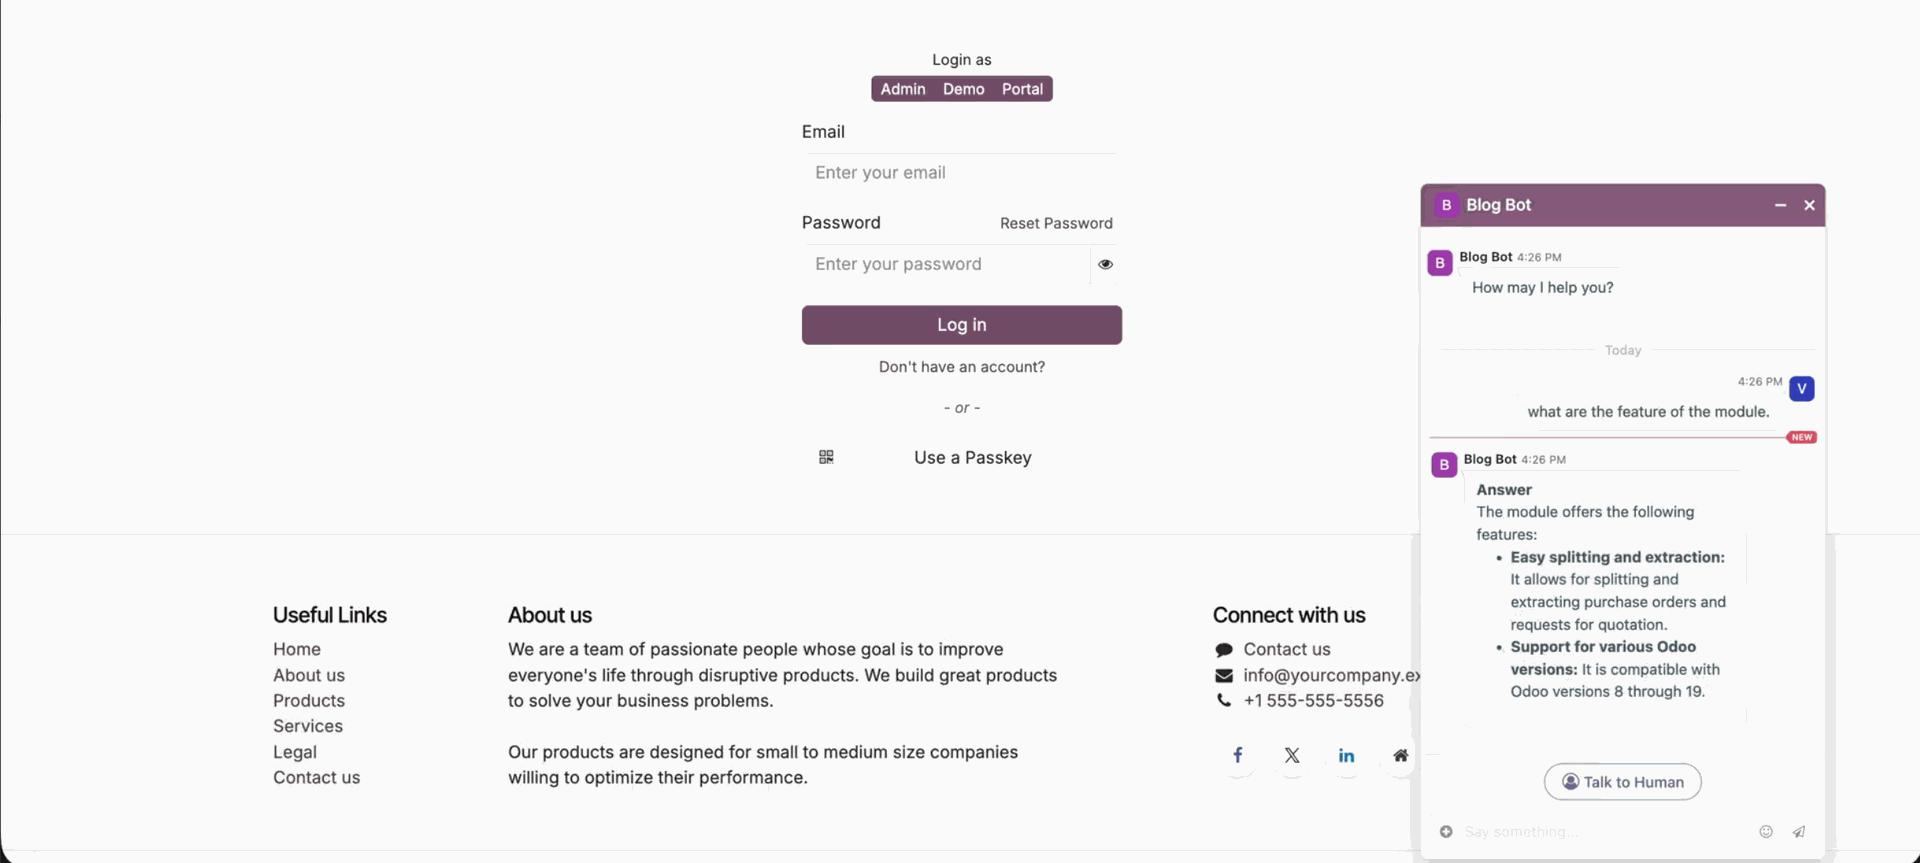
AI bot answers based on the given URL.
Go to the AI Live Chat -> AI Models.
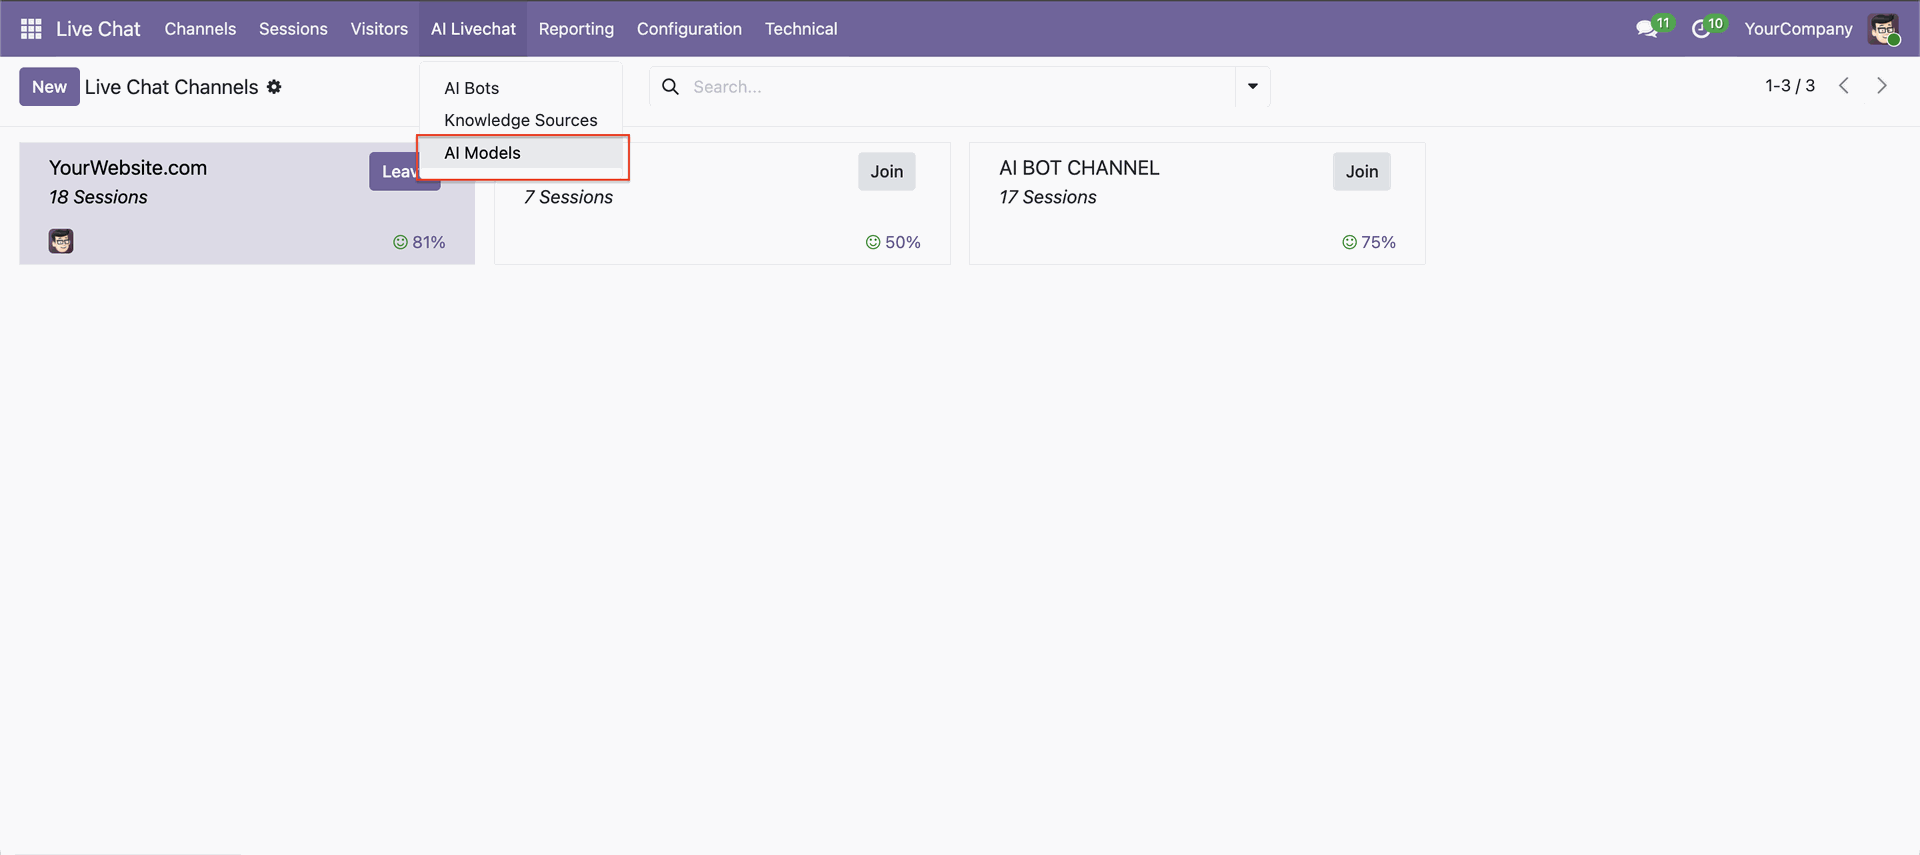
LLM providers list view with default LLM and active options.
Features

AI Dashboard Builder
Create interactive dashboards with charts, filters, and business insights.

Dashboard Template
Use ready-made dashboard templates for faster dashboard creation.

Dashboard Creation
Build custom dashboards tailored to your business requirements.

Dashboard Categories
Organize dashboards into categories for better management and accessibility.

Lock/Unlock Dashboard
Lock dashboards to prevent changes and unlock when edits are needed.

Edit Dashboard
Modify dashboard layouts, widgets, and settings anytime.

Delete Dashboard
Remove unwanted dashboards with a simple delete option.

Export Dashboard
Export dashboard configurations for backup or sharing purposes.

Import Dashboard
Import dashboard configurations and restore dashboards instantly.

Data Filters
Apply dynamic filters to display only relevant dashboard data.

Create Charts
Generate charts from business data with a few simple clicks.

Chart Types (More Than 15)
Choose from 15+ chart types to visualize data effectively.

Theme Customization
Customize dashboard themes to match your company branding.

Edit Chart
Update chart settings, labels, and configurations whenever required.

Delete Chart
Remove charts that are no longer needed from dashboards.

Display Mode
Switch between different display modes for a better viewing experience.

Download Chart
Download charts as files for reporting and presentation purposes.

Import Chart
Import existing chart configurations into your dashboards.

Export Chart
Export chart settings for backup and easy reuse.

Print Chart
Print charts directly for meetings, reports, and documentation.

Multi Company
Manage and view dashboard data across multiple companies.

Current User Filter
Automatically filter dashboard data based on the current user.
OpenRouter Integration
Connect OpenRouter to access multiple AI models through a single API.
Smart Access Control
Control dashboard access with role-based permissions and security.


Chart Types


Changelog
Track every update, fix, and new feature released for this module.
Odoo MCP server - Custom Module Creation – Build fully customized Odoo modules tailored to your specific business requirements without manual coding.
Odoo MCP server - Website Snippet Builder – Create reusable and customizable website snippets for Odoo Website pages with AI assistance.
Odoo MCP server - WebApp Creation – Generate standalone Odoo WebApps without requiring external servers, third-party platforms, or additional dependencies.
Odoo MCP server - Tools Execution Log – Track, monitor, and review AI tool executions with detailed activity logs for improved transparency.
Odoo MCP server - IP Restriction Management – Secure access using IP Whitelisting and Blacklisting controls to restrict unauthorized usage.
Odoo MCP server - Dynamic PDF Report Builder – Design, generate, and download fully customizable PDF reports directly from Odoo.
Odoo MCP server - Dynamic Email Template Creator – Create, edit, and manage custom email templates with support for mass email campaigns.
Odoo MCP server - AI-Powered Lead Generation – Generate qualified business leads automatically based on AI analysis of lead requirements and briefs.
Odoo MCP server - Custom Tool Builder – Create personalized AI tools tailored to unique workflows and business processes based on user requirements.
Odoo MCP server - Bulk Record Management – Create, update, and delete multiple records simultaneously to save time and improve productivity.
All in One AI OCR Bundle Feature Added.
AI Insight Assistant - Added LLM Reasoning Effort Selection Feature.
AI Insight Assistant - Added Mini AI Chat Window Feature.
AI Insight Assistant - Added Folder-Based Chat Management Feature.
AI Insight Assistant - Added AI Voice Prompt Feature.
Odoo MCP server - Supports MCP for Multiple LLMs and Local Agents.
AI Dashboard Studio - Added OpenRouter Integration Feature.
Flow Builder - Your Processes, On Autopilot.
AI Recruitment Assistant - Smarter Hiring Decisions.
MCP Server - Connect, Control, Automate Odoo.
Initial Release.


 Your Ideas Shape Our Roadmap
 Got an Idea? We'll Build It
Trusted by Businesses Worldwide


Abdulhamid Abdulwaheed
Best module for our online store. Highly adaptable, exceptional customer service, and very advanced modules.
Factura Venta POS
They have everything you need. Technical support is excellent, responds quickly, and keeps the module updated. 100% recommended!
Mehmet Muhanna
Great company and support team. Had a problem in my local Odoo server - they solved it in 5 minutes. Highly recommend.
Billy Jeffs
Customised an Odoo app for me which works perfectly. Many requirements, got it right every time. Very confident in their ability.
HP
Consistently excellent service over years of working together. Knowledge and commitment to keeping clients informed truly sets them apart.
Michal Kolasinski
Multiple addons + two custom modules. Communication always friendly and precise. Delivered on time, worked out of the box. Highly recommended!

Multi-Language
8 built-in translations


You May Also Like
Discover more Softhealer modules that integrate seamlessly with your Odoo environment.

AI Recruitment Assistant
Automate recruitment processes in Odoo using AI-powered Resume/CV analysis and candidate matching.
View Module

AI Live Chatbot
AI-powered website live chatbot for Odoo offers 24/7 automated support using your Odoo data, documents, and knowledge base.
View Module

AI Dashboard Studio
A powerful and intelligent AI-driven dashboard that brings all your analytics and visual reports into one unified interface.
View Module

AI Insight Assistant
Just ask in natural language and instantly get data, charts, tables, dashboards, and insights - all powered by intelligent automation.
View Module


Most Demanded Apps
The Softhealer modules our customers reach for most - trusted across 100+ countries.

Activities Management
Manage, schedule, and automate Odoo activities across all departments from one view.
View Module

Access Management
Granular access control over menus, fields, buttons, and records for every user role.
View Module

Backdate Advanced
Backdate any transaction across invoices, journals, pickings, and more with full audit.
View Module

All-in-One Helpdesk
Full-featured customer support with tickets, SLA, and customer portal built for Odoo.
View Module

All-in-One Mobile Backend
Access your full Odoo backend from any mobile device with an optimised interface.
View Module

All-in-One Import
Import data from Excel or CSV files into any Odoo model with smart field mapping.
View Module
Our Services
End-to-end Odoo expertise - from setup to scale.

AI & Business Integration

Odoo Implementation

Odoo Customization

Support & Maintenance

Mobile Apps

Migration Service

Third-Party Integration

Odoo Training
Ready to connect your AI to Odoo?
Join 10,000+ businesses - Softhealer, 11+ years of Odoo expertise across 100+ countries.

