


Website Table Booking for POS

Streamline table reservation and enhance guest satisfaction with a unified module that connects your Odoo Website directly to Odoo Point of Sale. Customers can check live availability, select their preferred tables from an interactive floor grid, and make secure deposit payments. The Odoo POS register integrates these bookings instantly, providing real-time cashier notifications, a dedicated daily reservation sidebar, and check-in/checkout status updates. Upon checkout, the system automates post-visit email review requests, syncing star ratings and guest feedback back to the POS order.

Features

Table Reservation Settings
Configure table reservation directly from Odoo Website Settings for easy reservation management.

Interactive Table Booking Page
Let customers check table availability by date, time, and guest count via a dedicated page linked directly from the navigation bar.

Interactive Visual Floor Selection
Guests select tables from a visual floor plan layout, with built-in guest capacity checks and table selection validation.

Reservation Hold Timeout
Auto-Release Automatically release and cancel draft reservations that remain unpaid or unconfirmed within the configured hold period.
Advance Lead Time Reservation
Prevent bookings that violate the advance lead time threshold and show a validation error prompting guests to select a valid slot.

Guest Detail Summaries & Email Confirmations
Collect contact details alongside a booking summary panel, and automatically trigger confirmation emails upon booking.

POS Live Sync & Reservations Panel
Notify POS cashiers instantly of new bookings and display daily reservations, time slots, and status badges in a dedicated sidebar.

Visual Status Badges & Late Alerts
Update POS table colors and display eye-catching status badges (e.g. Late, Checked In) to notify staff of reservation updates.

Automated Check-In & Customer Locking
Open pre-assigned POS orders on check-in and lock the ticket to the reservation customer to maintain strict data integrity.

Linked Orders & Printed Receipts
Link reservation references directly inside the POS register view and automatically print details on the guest receipt.

Dynamic Guest Capacity Validation
Prevent bookings and outline fields in red if the guest count exceeds the maximum seating capacity of selected tables.

One-Click Checkout & Table Release
Checkout guests directly from the sidebar, automatically releasing tables back to available on the map and clearing the panel.

Mandatory Advance Booking Deposits
Configure a mandatory advance booking and add advance payment amounts in the backend settings.

Automated POS Deposit Deductions
Automatically apply pre-paid website deposits as negative line items on POS register orders to adjust the final bill.

Post-Visit Feedback & Review
Send automated post-checkout feedback request emails to sync 5-star customer ratings and comments directly to POS orders.
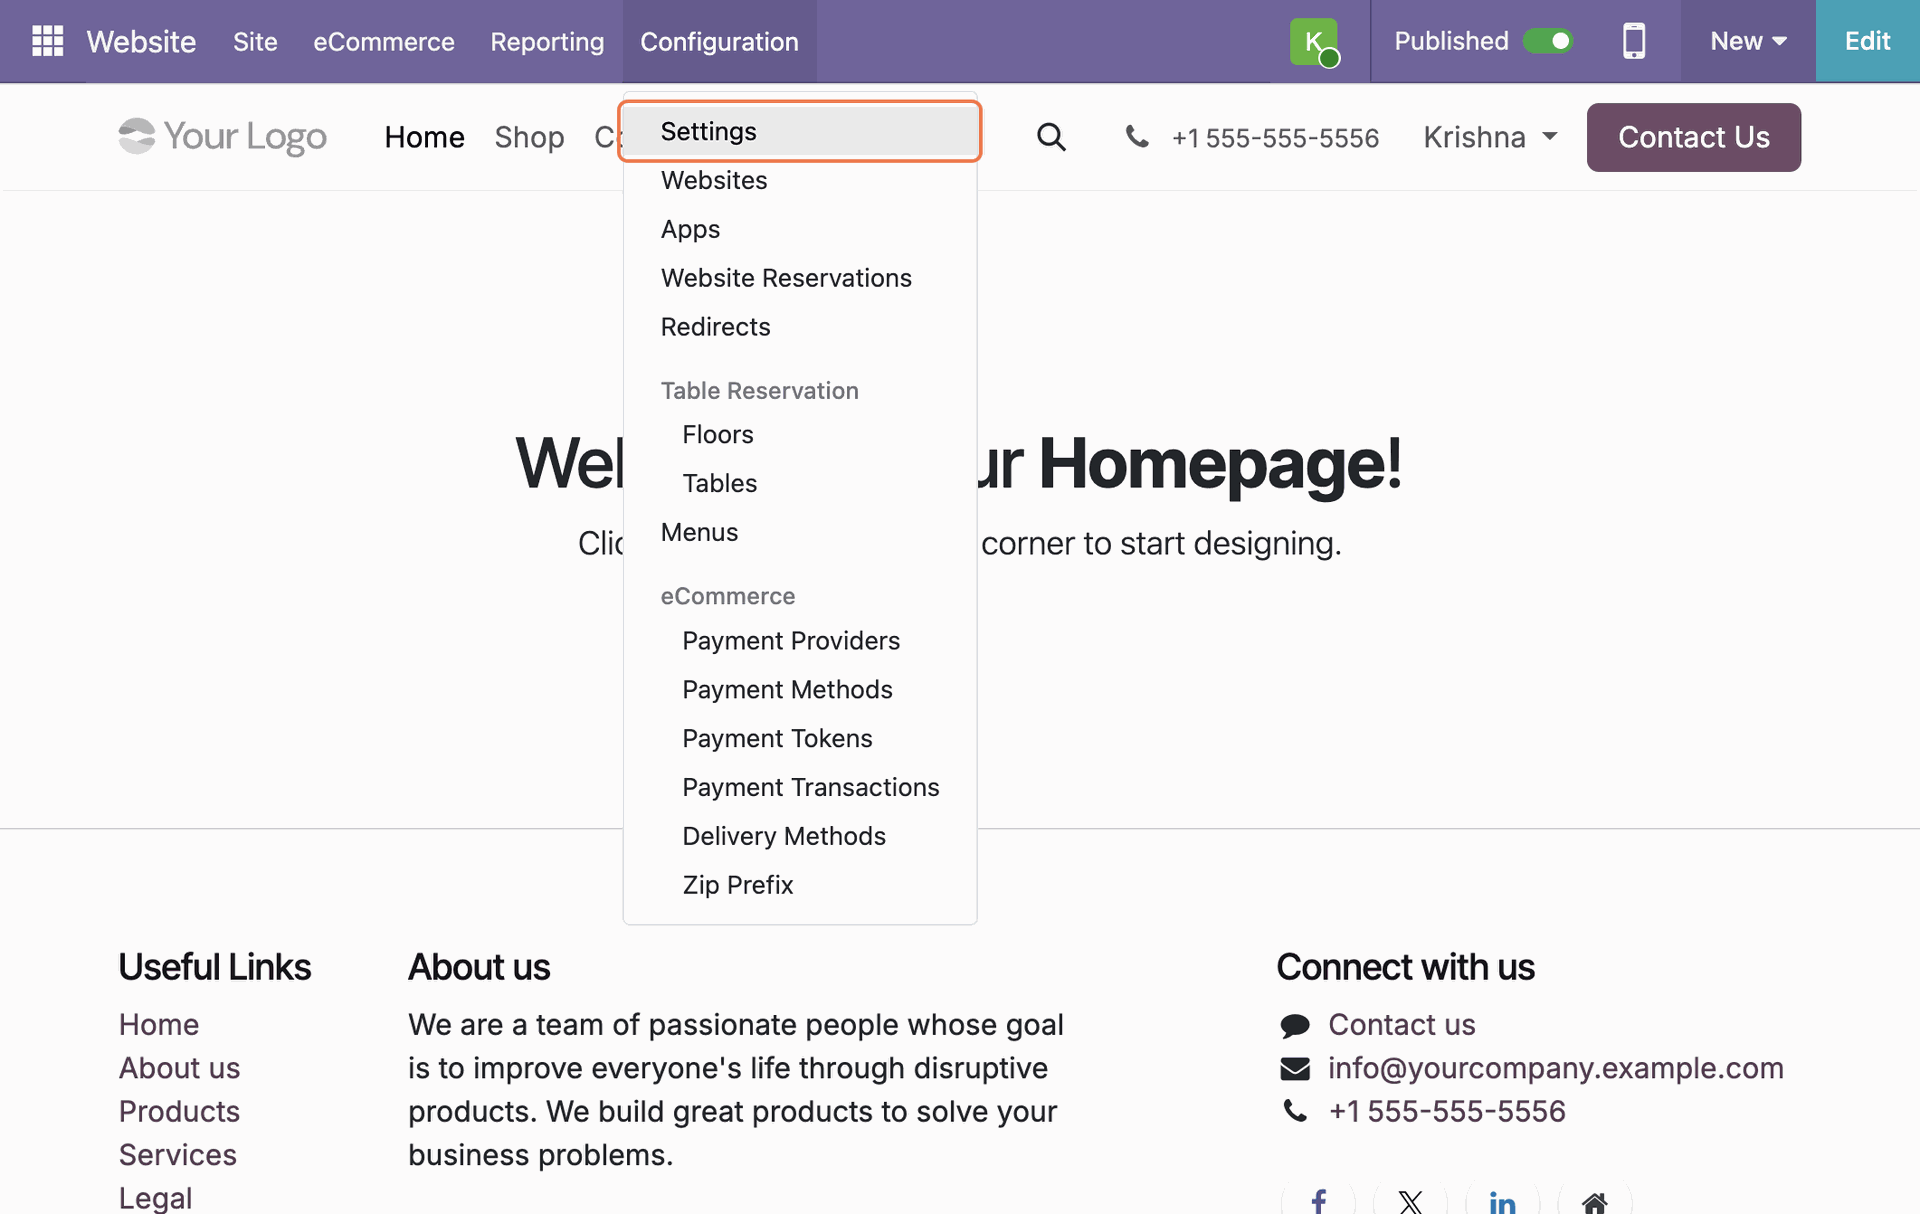
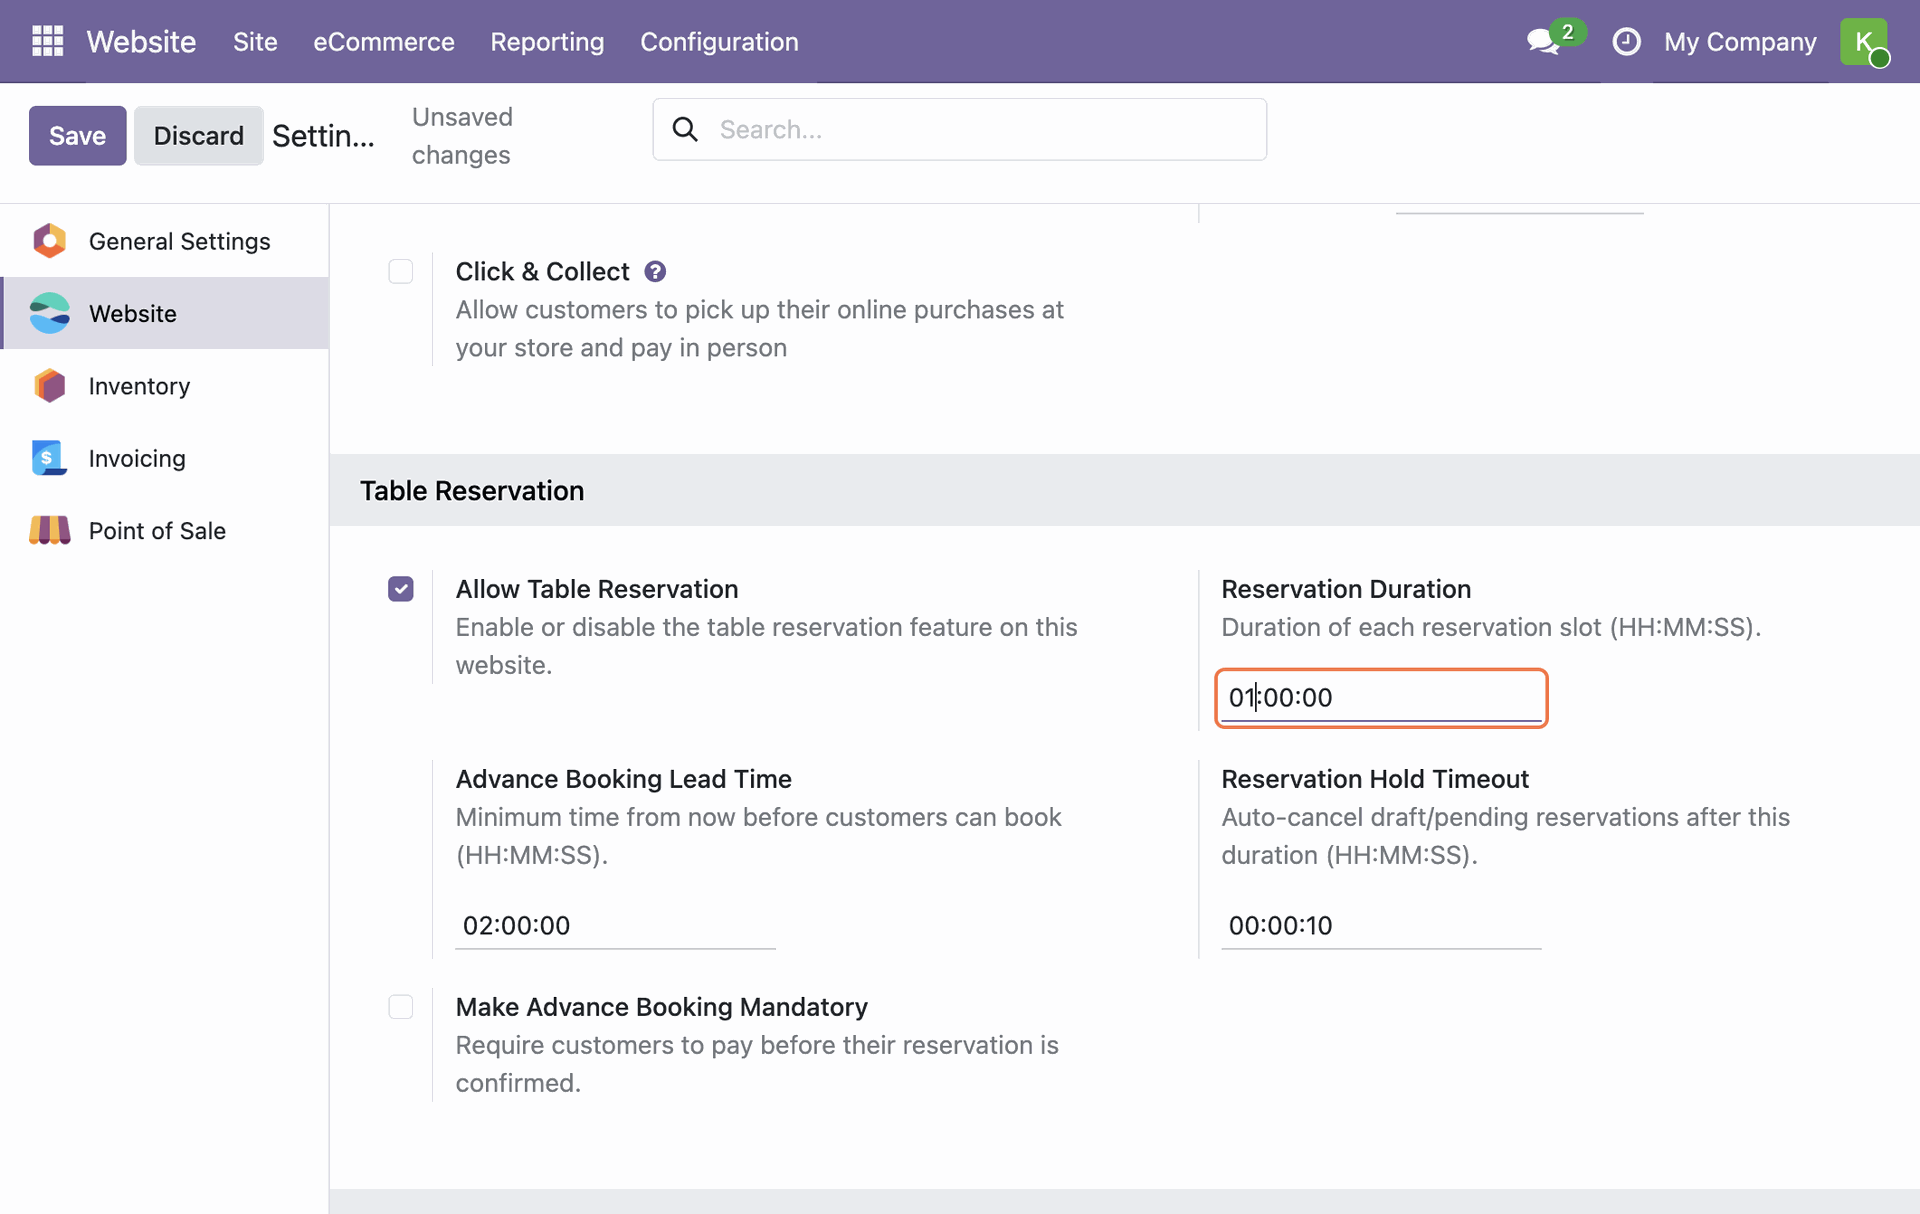
Navigate to Website > Configuration > Settings.
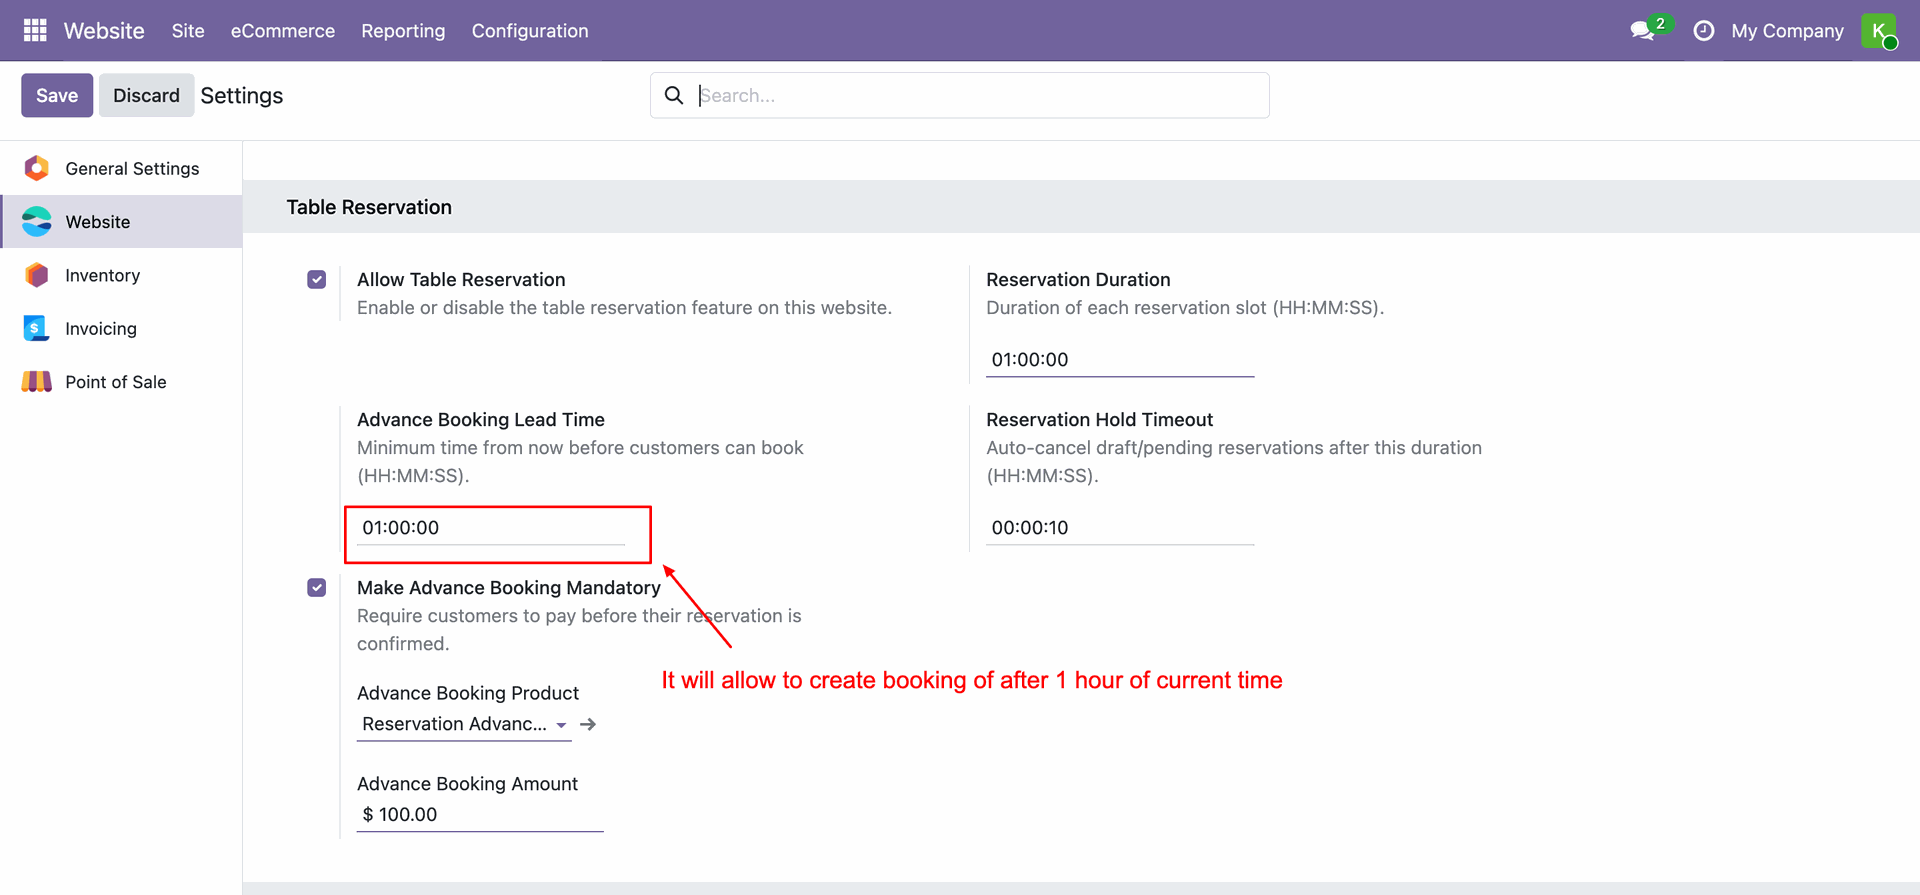
Under the Table Reservation section you will find dedicated settings to manage all reservation-related options for your site. Enable the Allow Table Reservation checkbox to activate the feature on your website. Set the Reservation Duration, Advance Booking Lead Time, and Reservation Hold Timeout as needed.
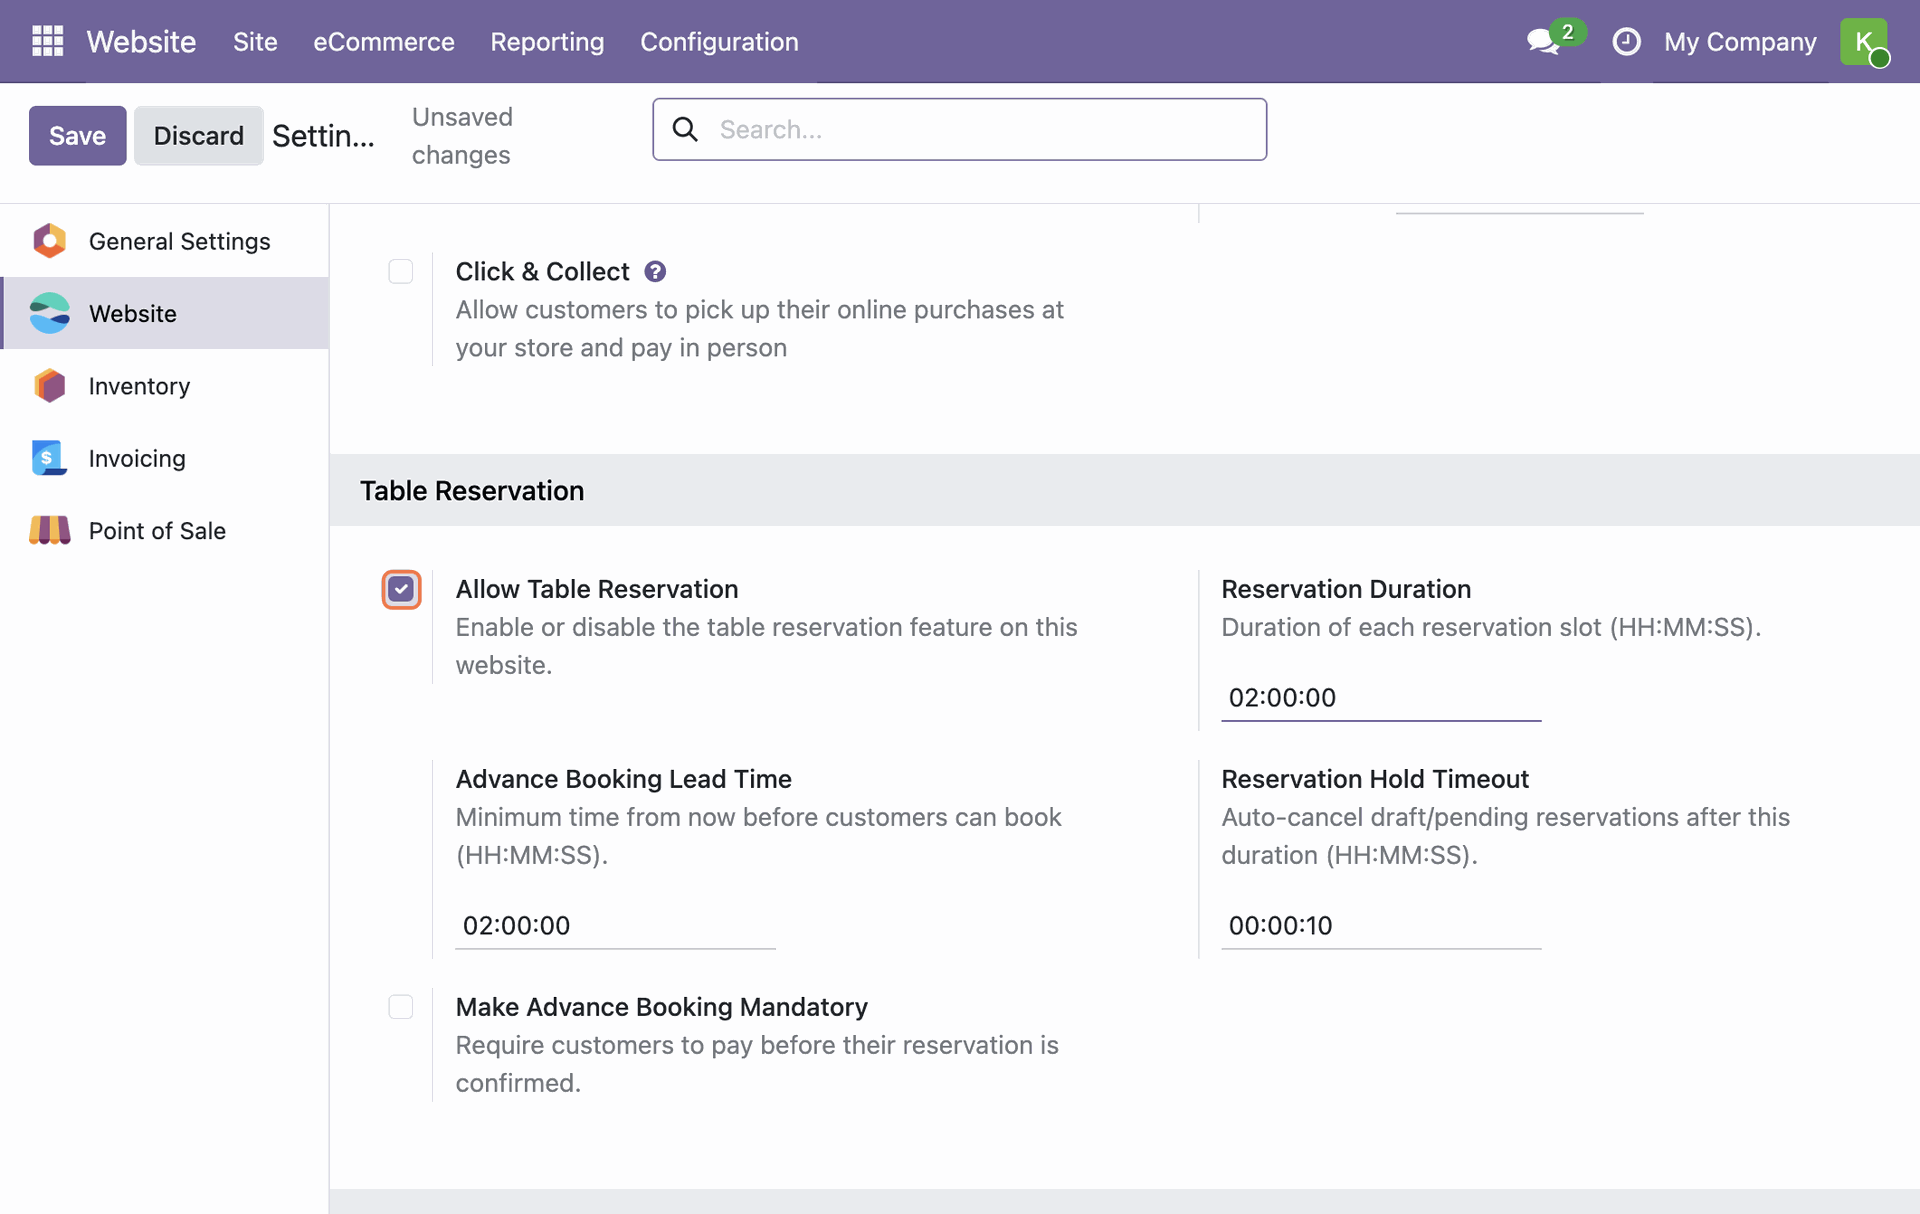
Set the Reservation Duration (slot length) as needed. For example, configure it to 1 hour to define the default duration for each booking slot.
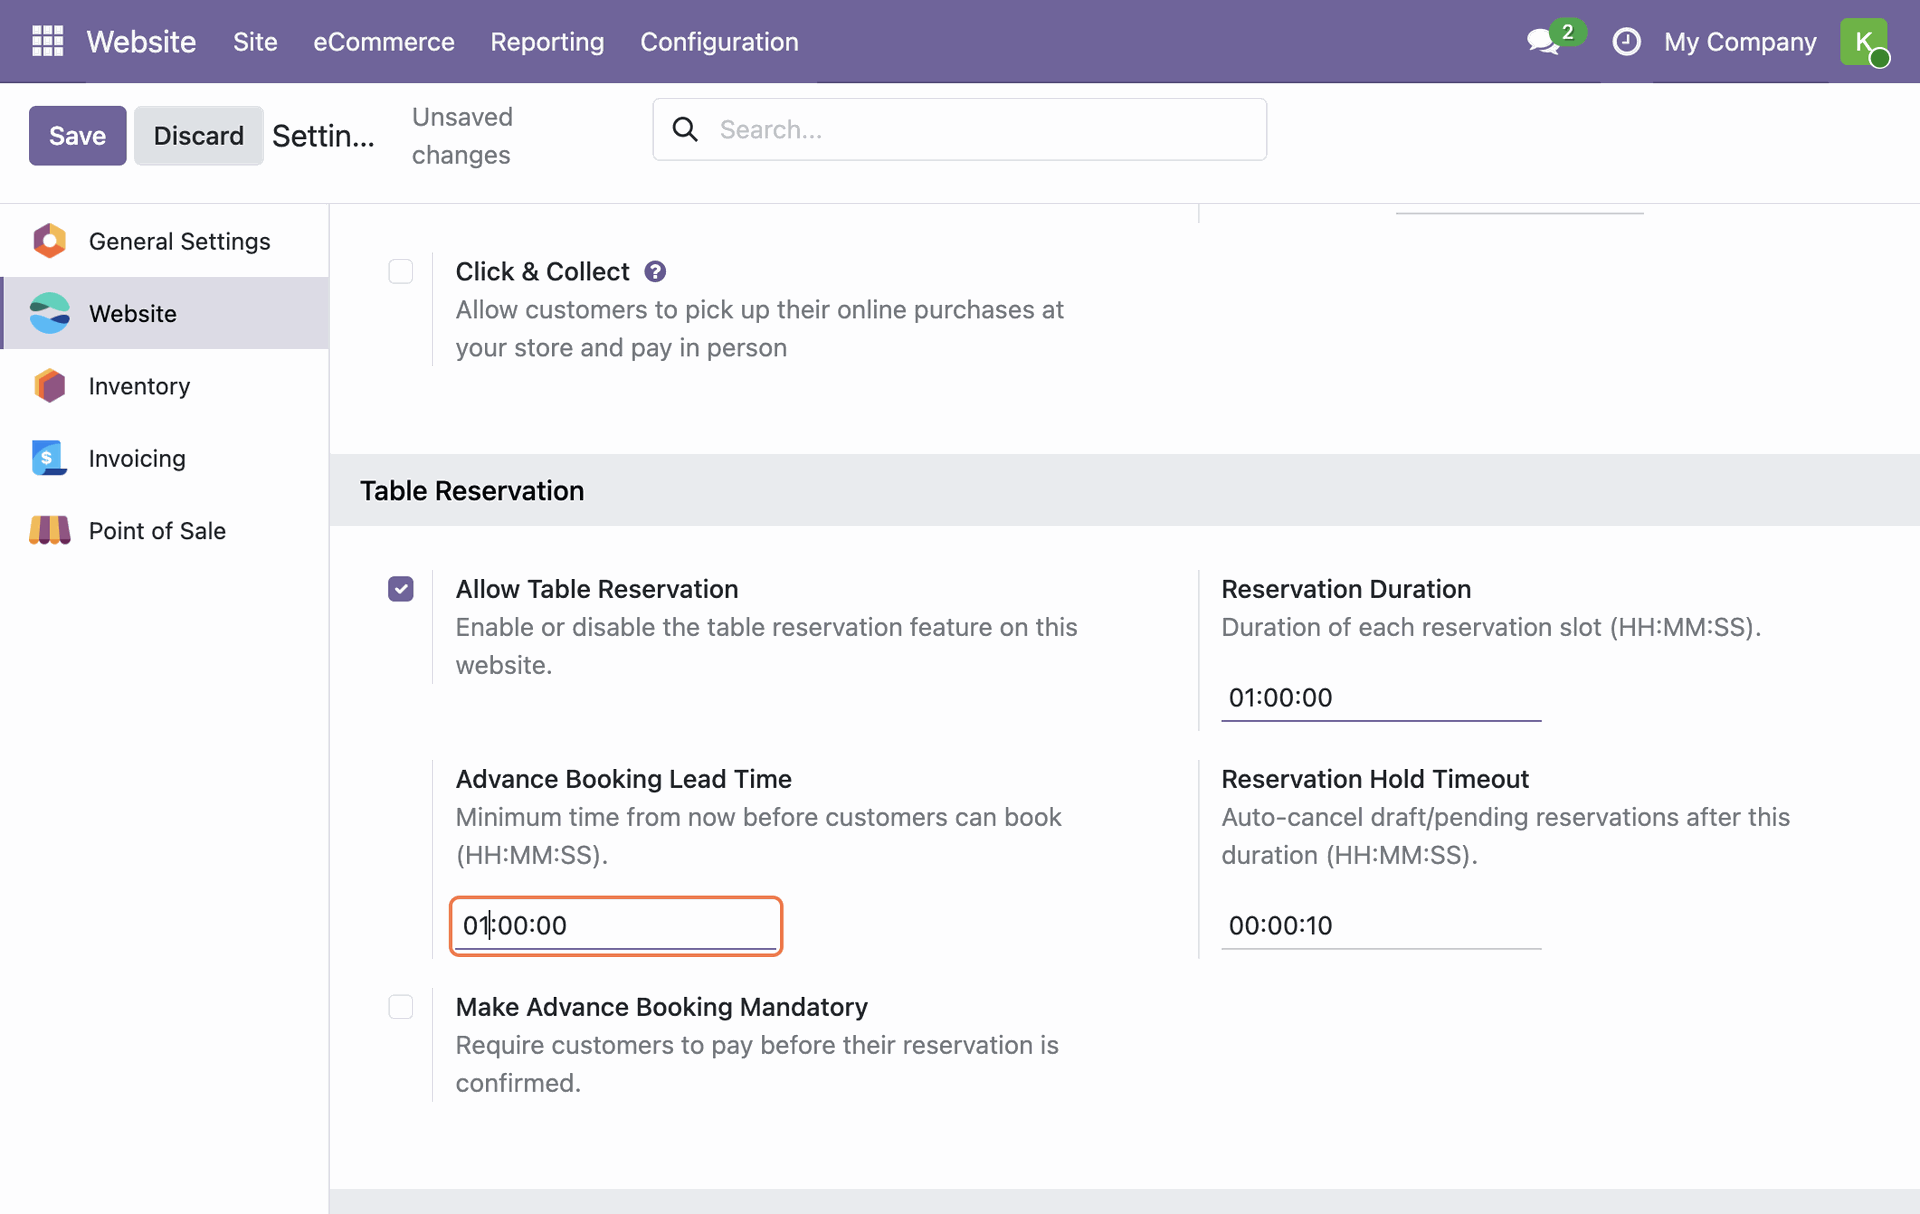
Set the Advance Booking Lead Time to control how far in advance customers must book. For example, configure it to 1 hour to prevent last-minute reservations that staff cannot accommodate.
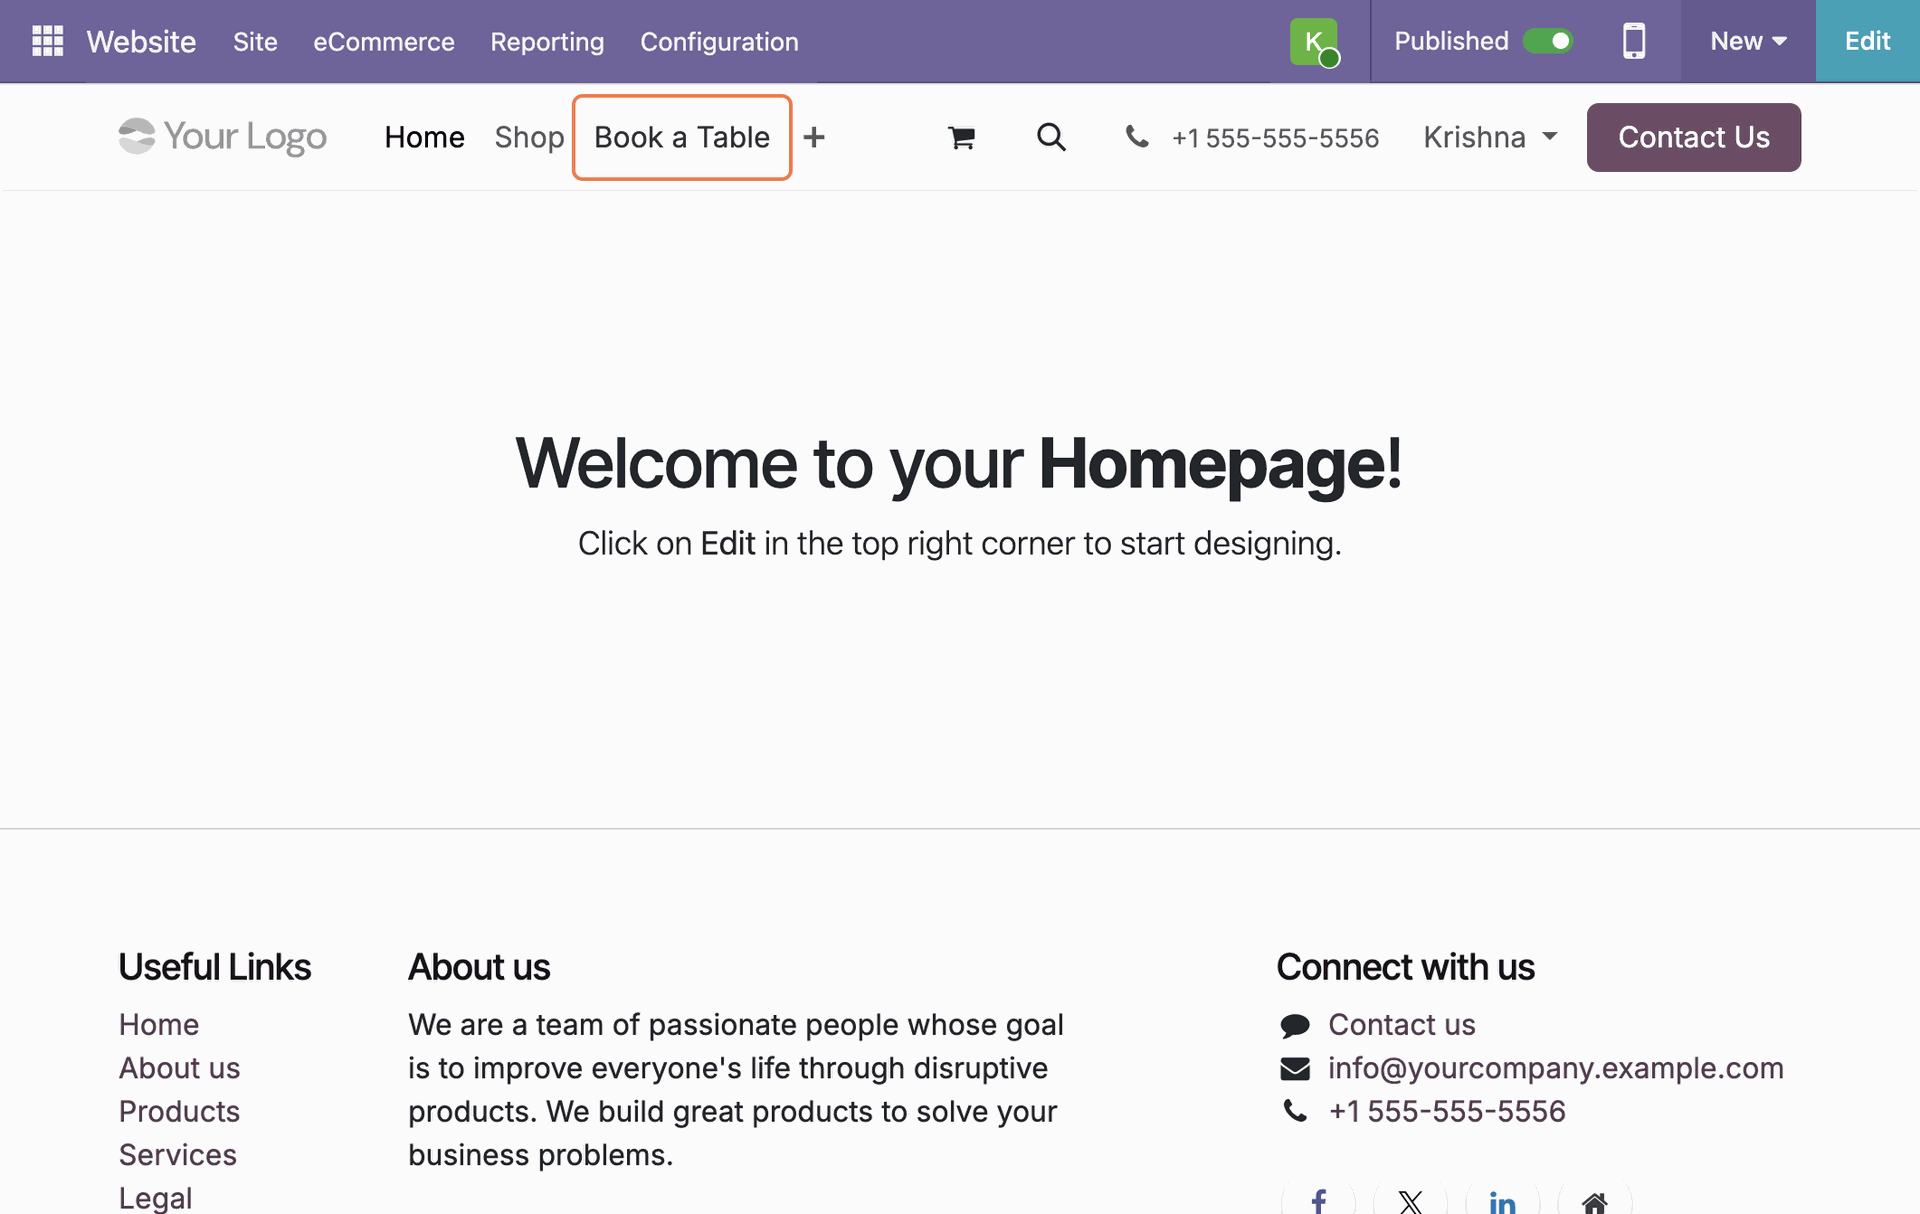
The Book a Table link is automatically added to the website navigation bar, making it easy for visitors to discover and use the reservation feature.
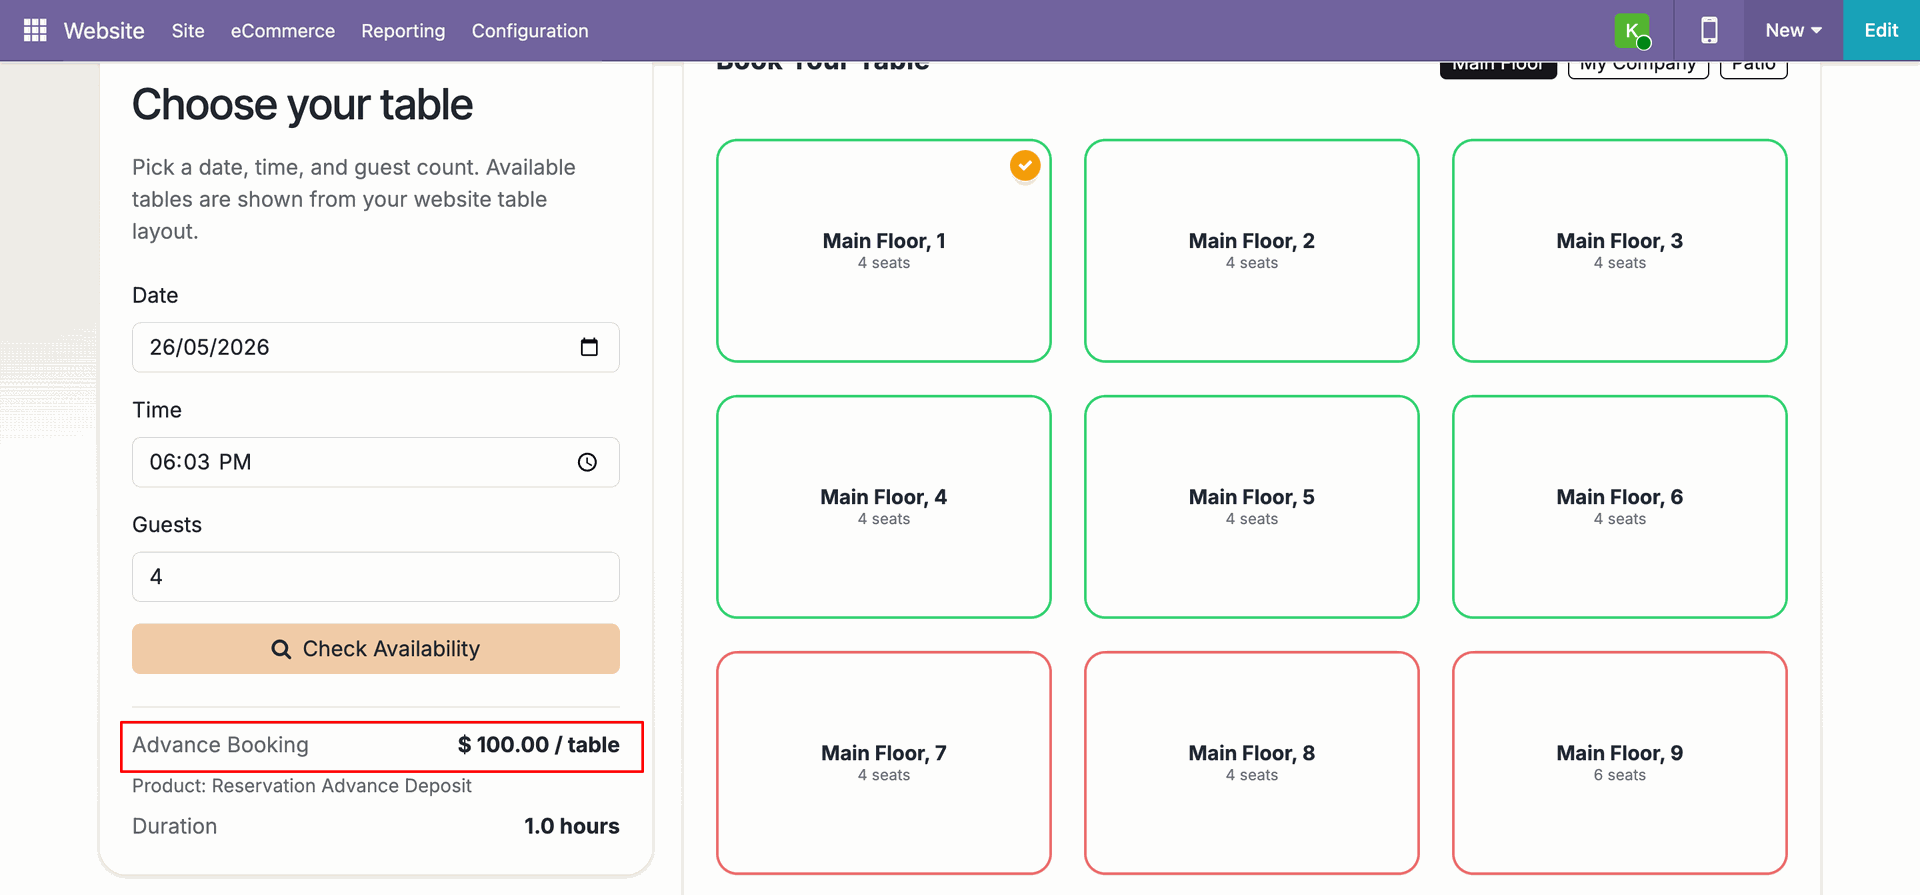
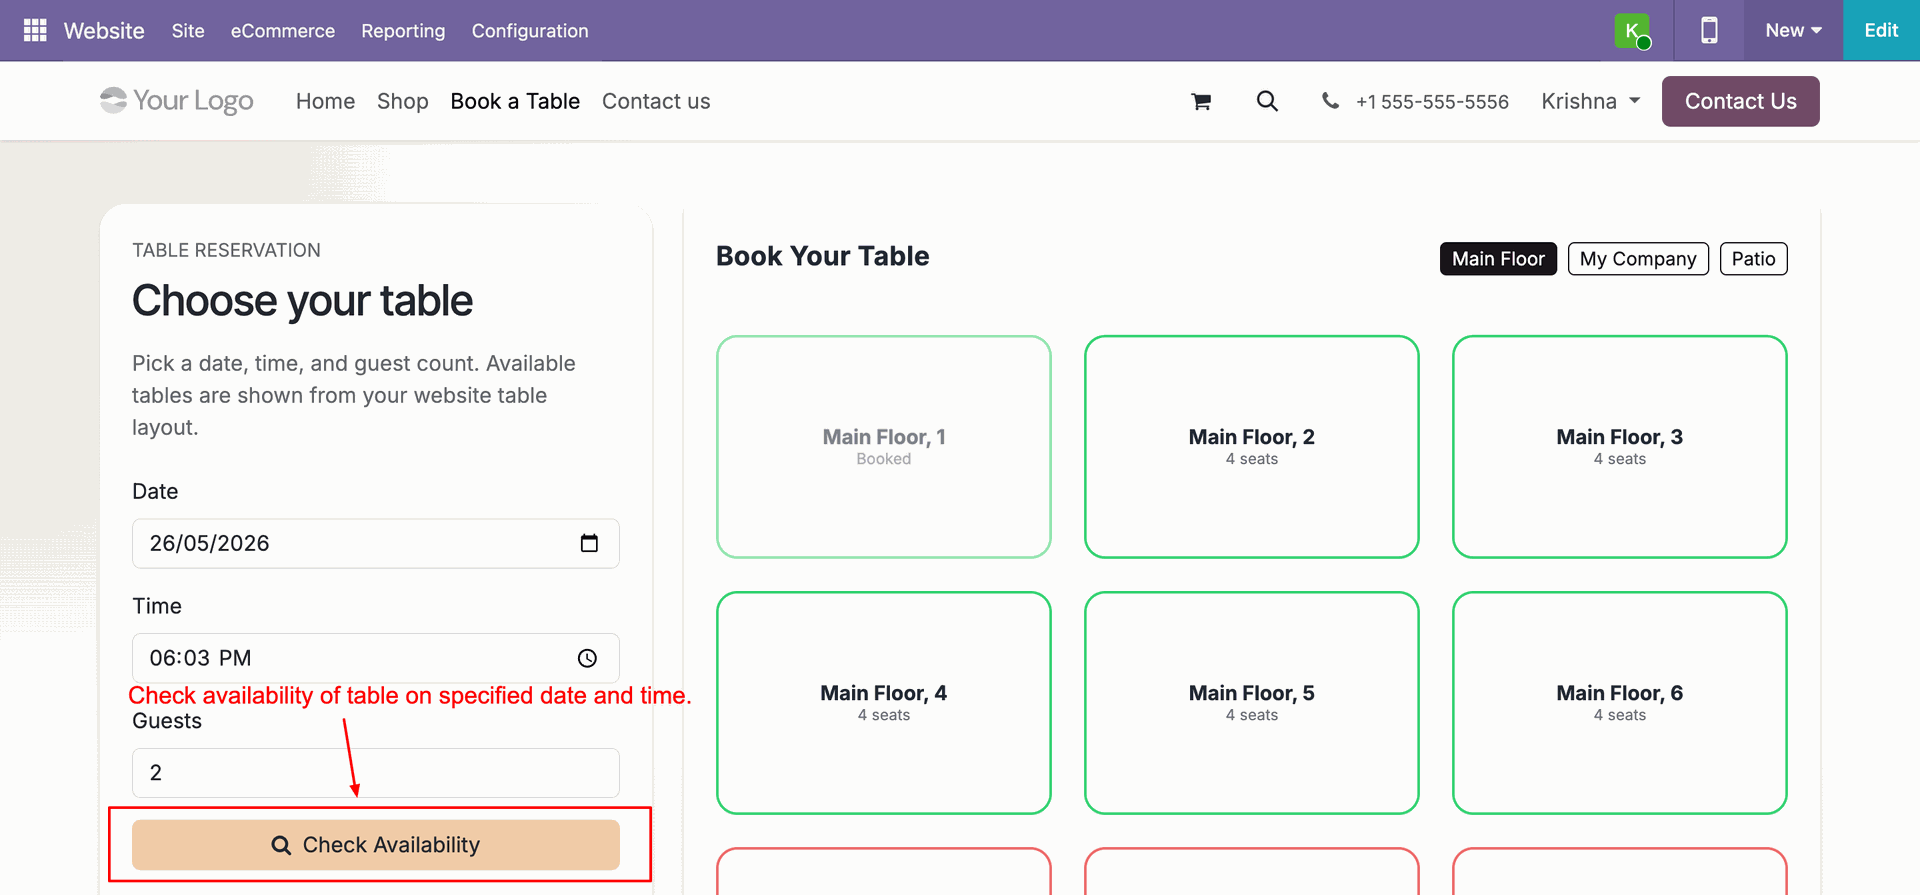
On the website's Book a Table page, customers select a date, time, and number of guests, then click Check Availability to see the available tables.
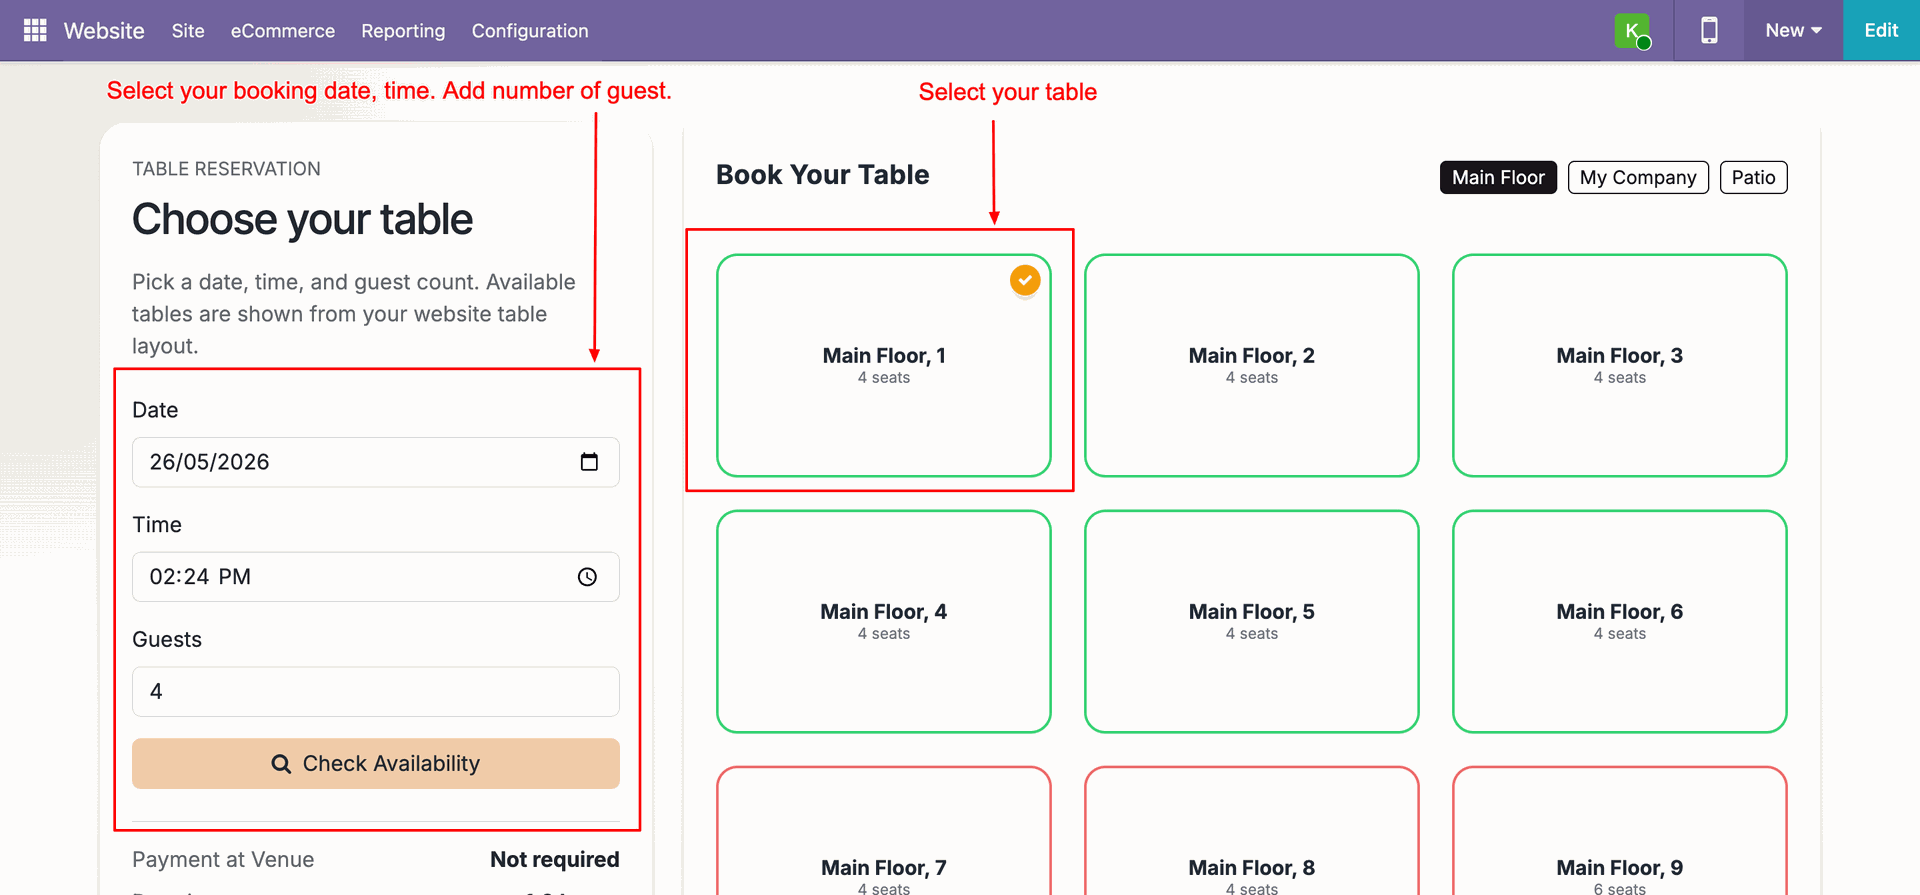
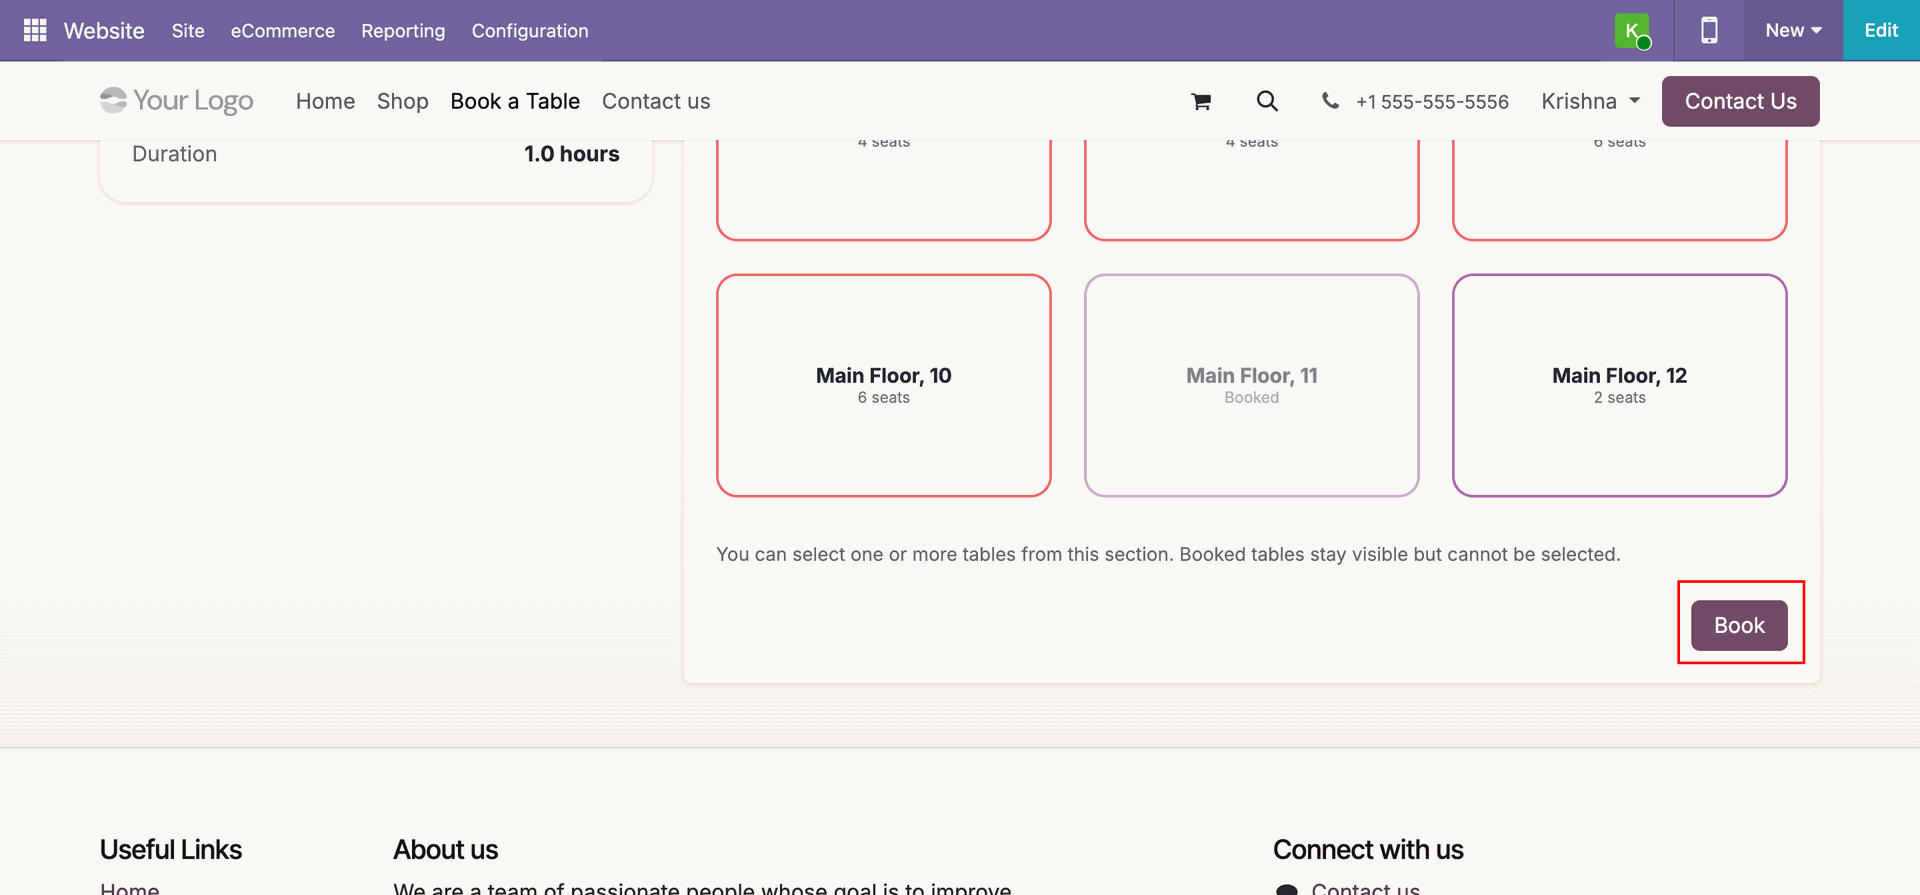
Customers can choose one or more tables from the grid. Selected tables are highlighted with a checkmark. Booked tables remain visible but cannot be selected. Click the Book button to proceed to the next step.
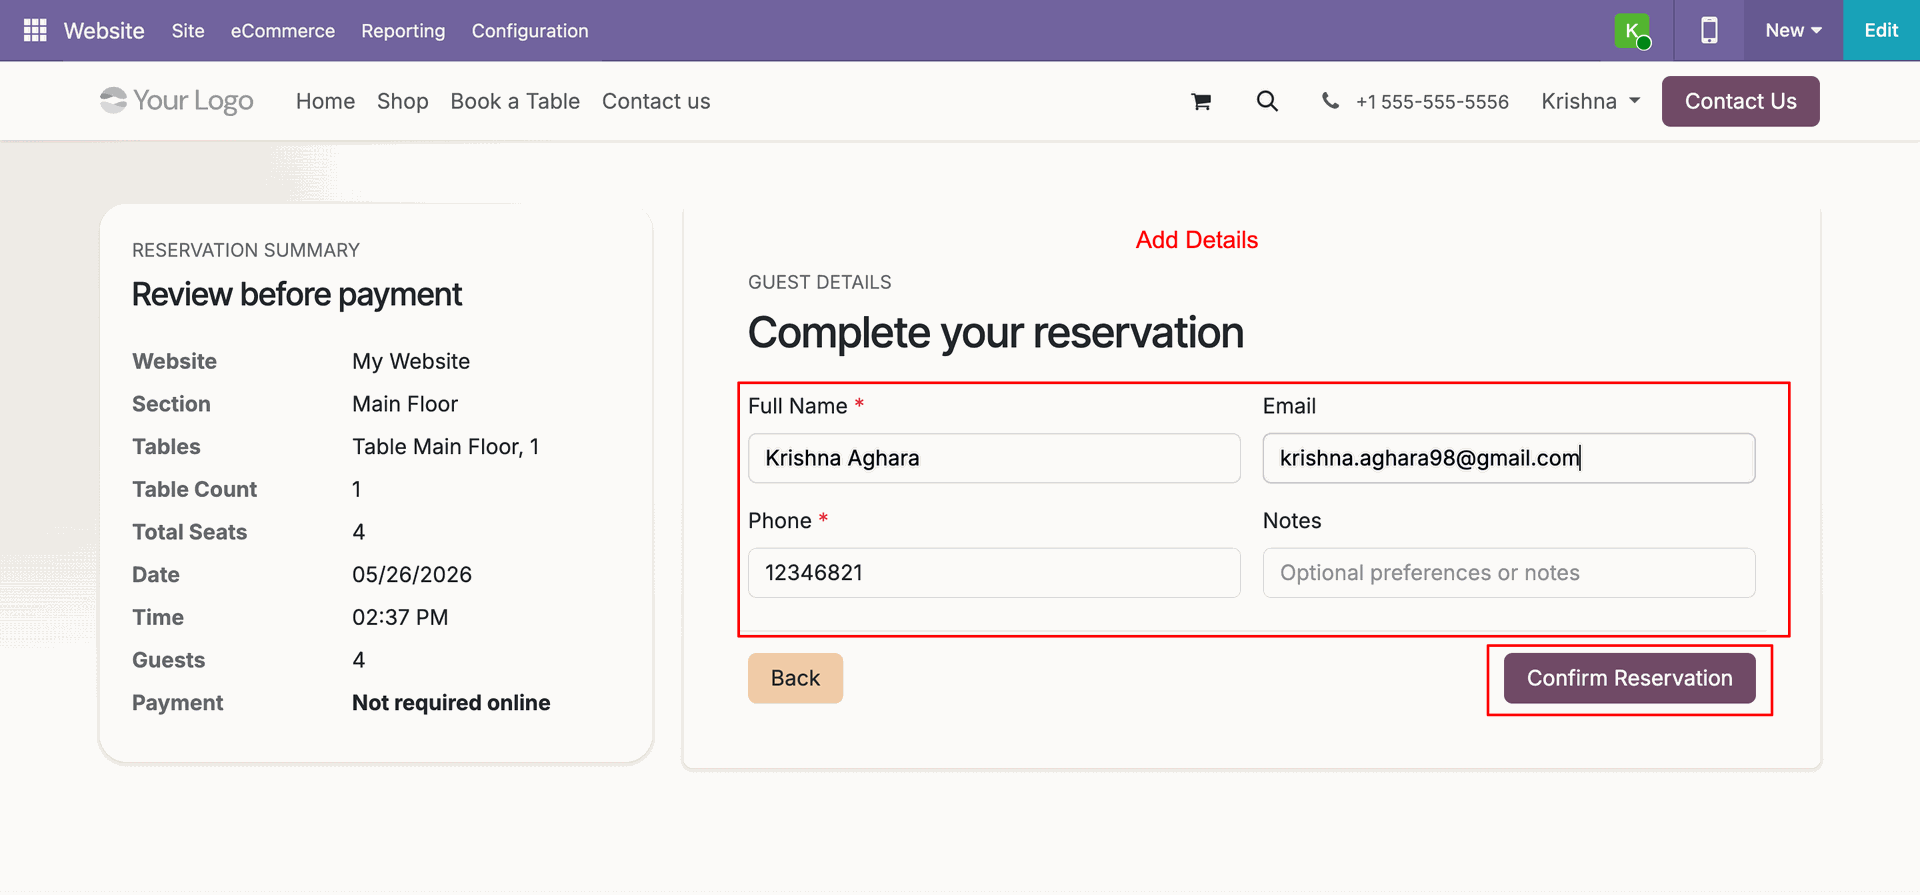
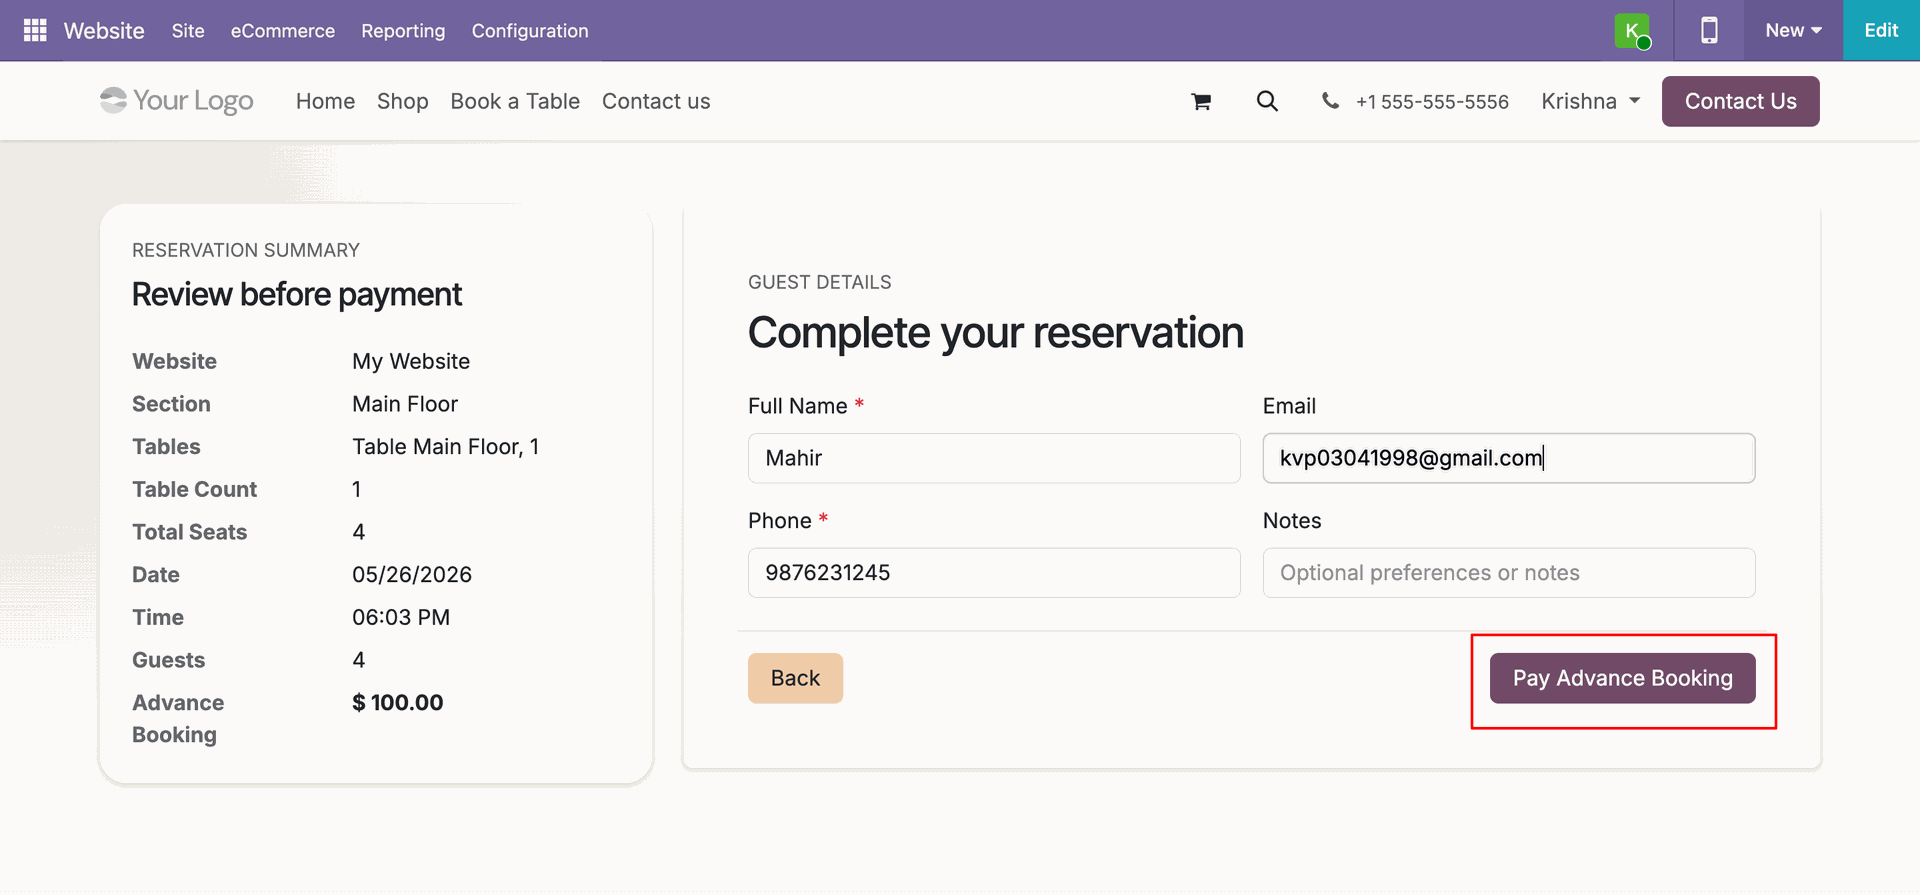
After selecting a table, a Reservation Summary panel is shown alongside the guest details form. Customers fill in their full name, email, phone, and optional notes, then click Confirm Reservation.
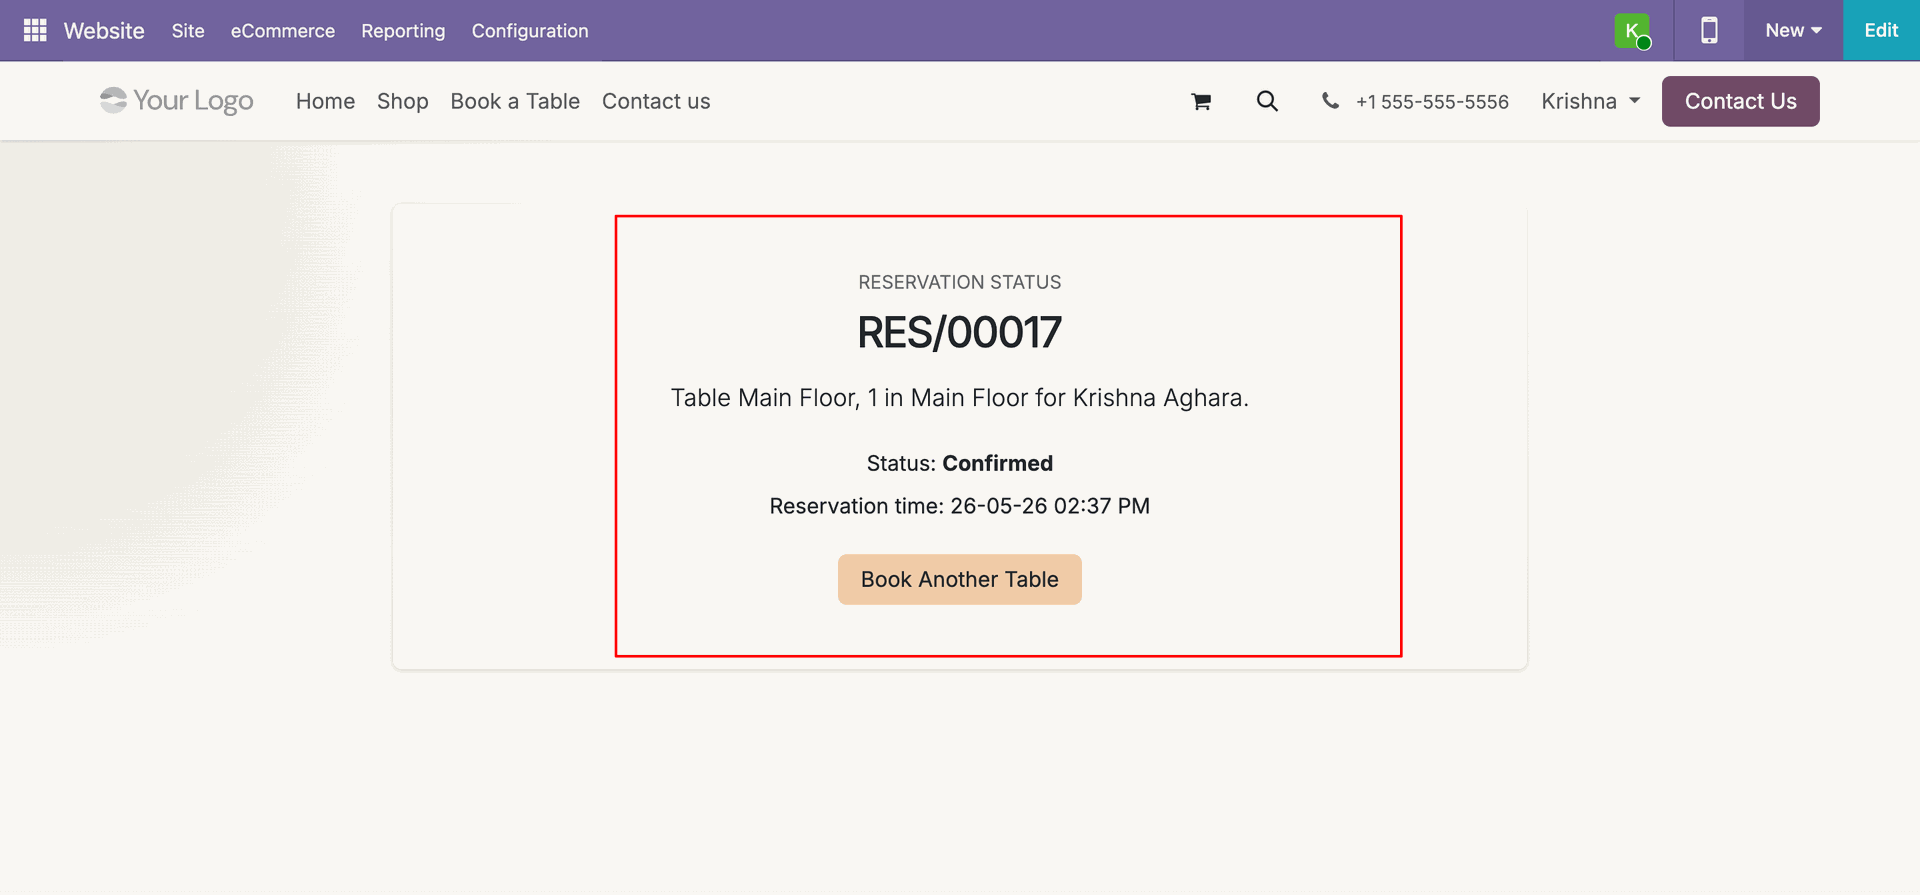
A Reservation Confirmation page is displayed showing the reservation number, table details, customer name, status (Confirmed), and booking time. Customers can also book another table from this page.
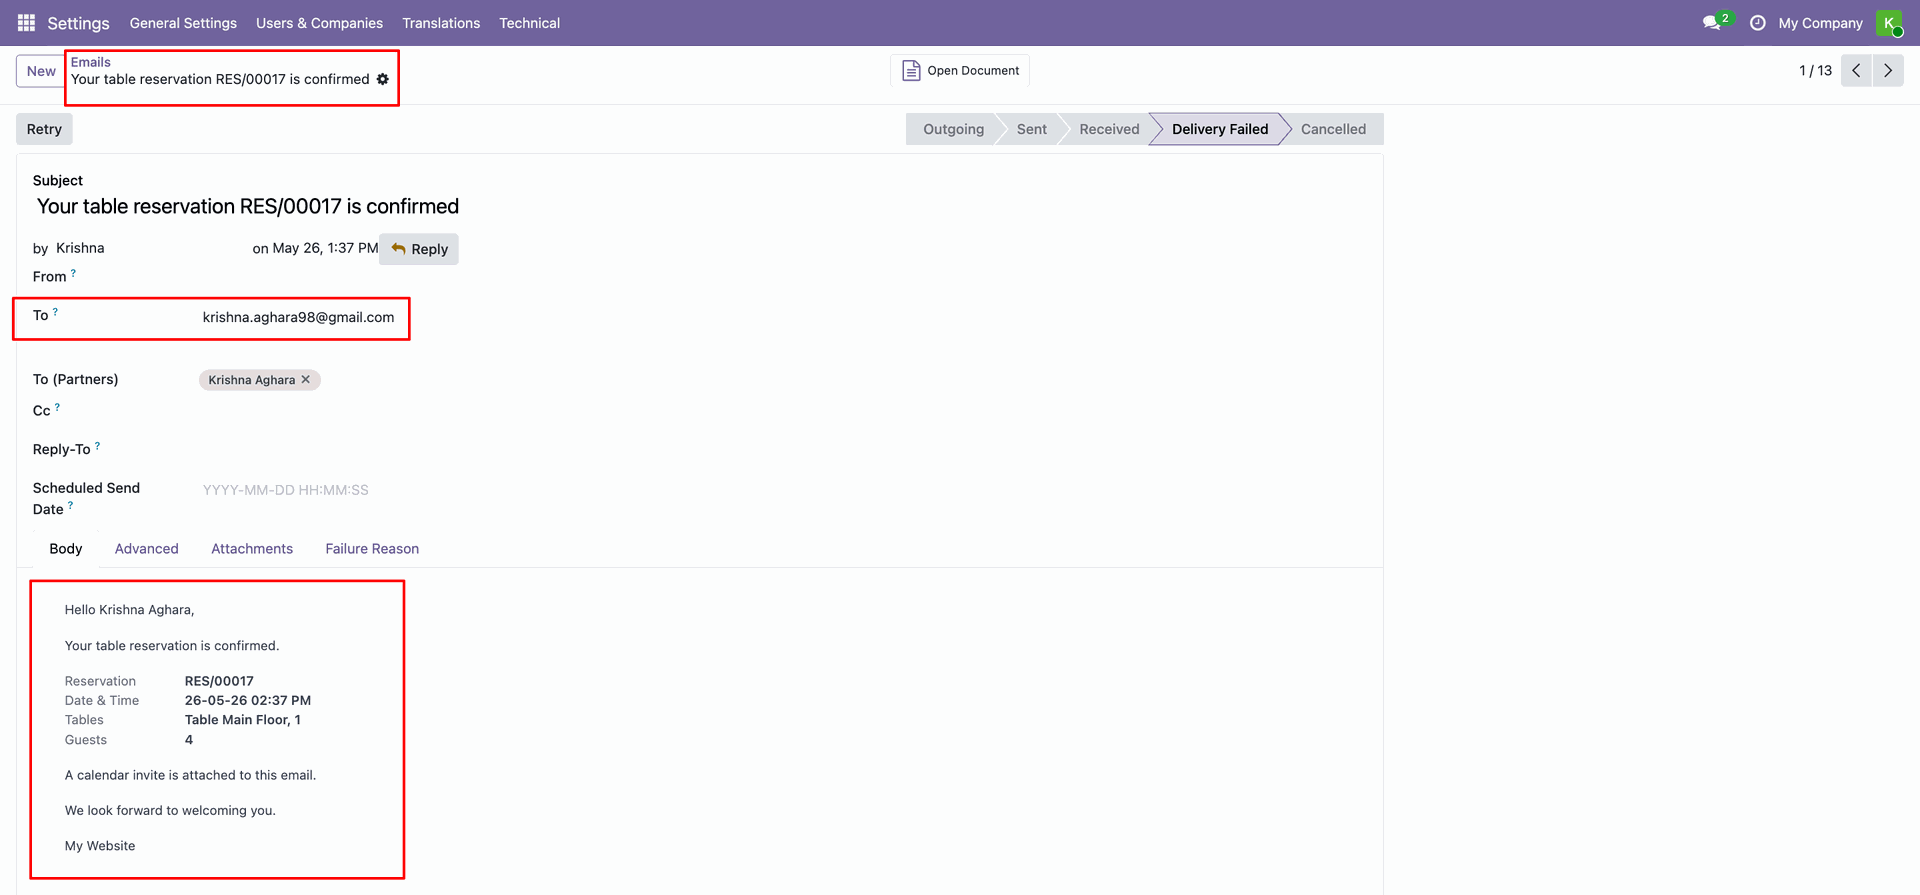
Once the reservation is confirmed, the customer automatically receives a confirmation email containing all details of their booked table and slot.
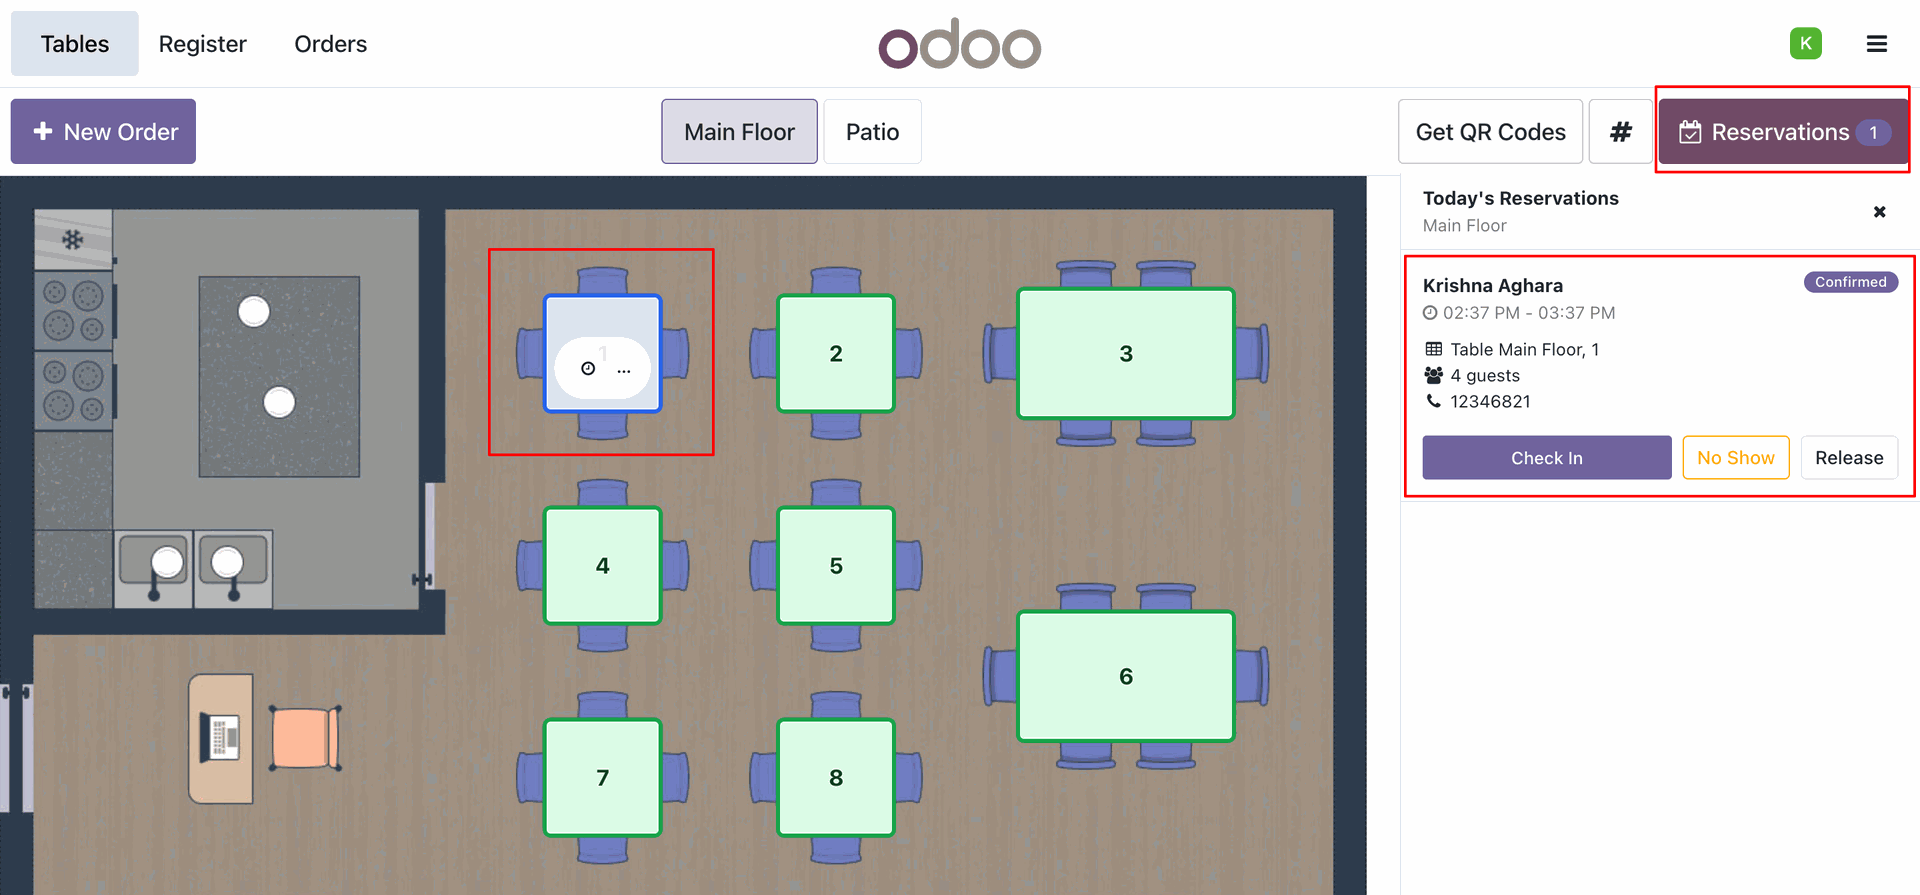
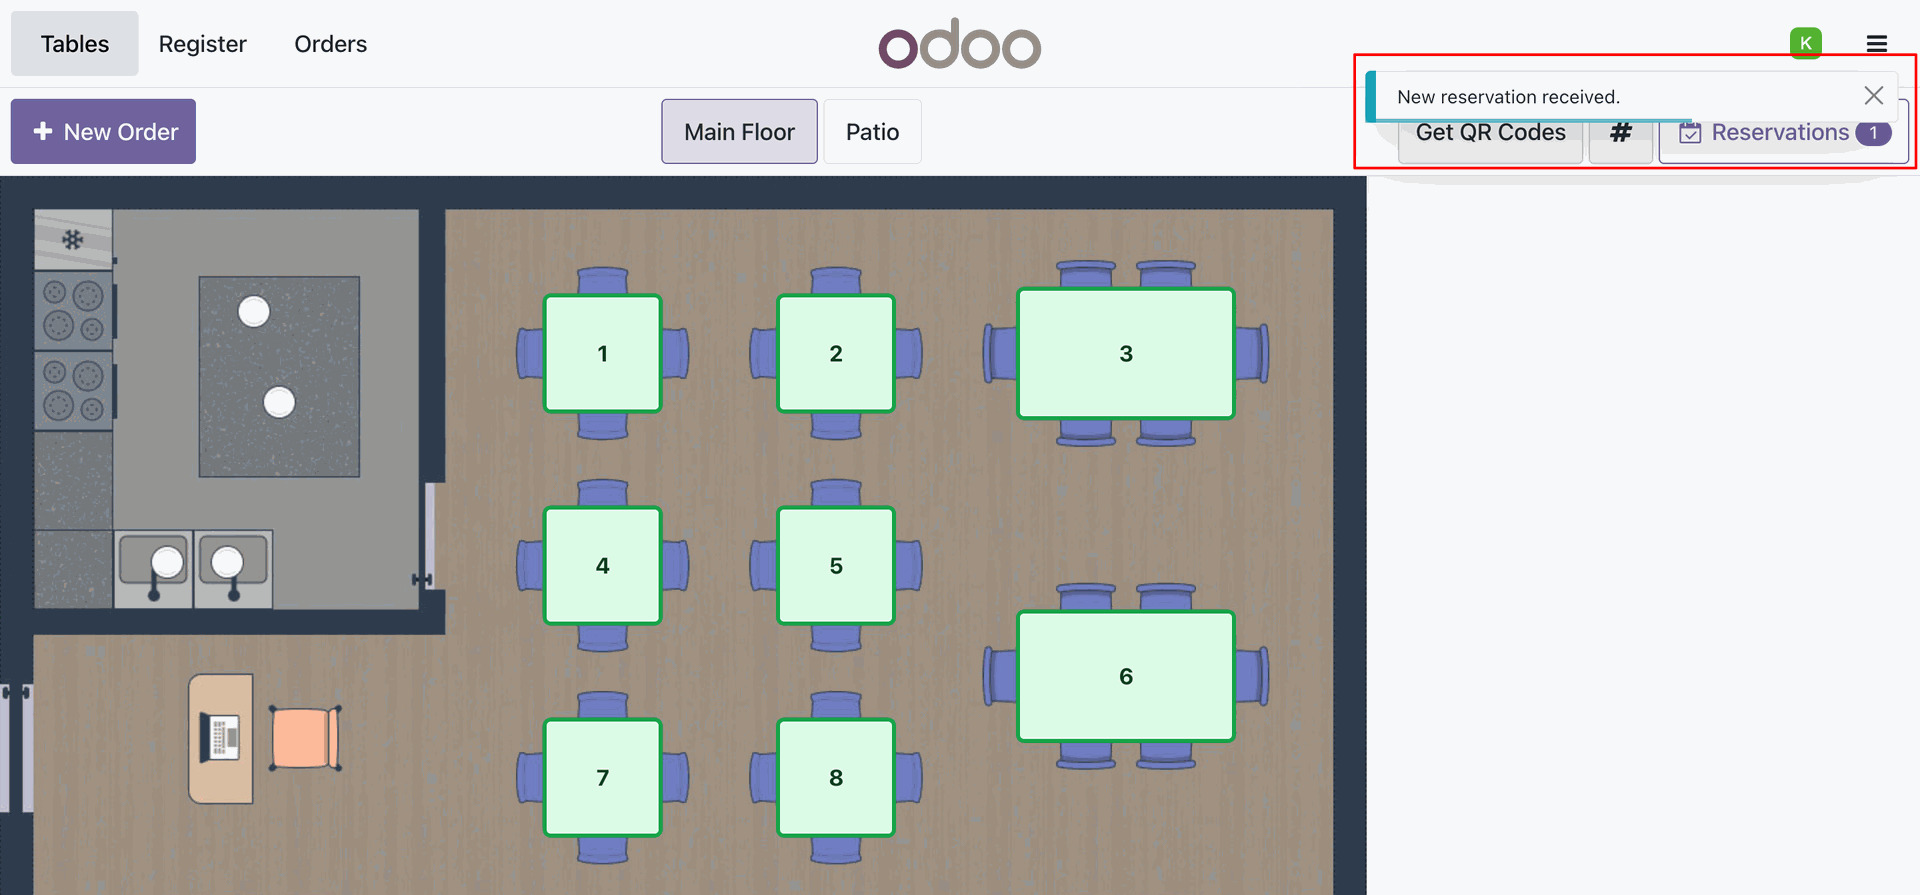
In the POS Tables view, a Reservations button appears in the top-right corner showing today's confirmed bookings. When a new reservation arrives, a real-time pop-up notification alerts the cashier immediately.

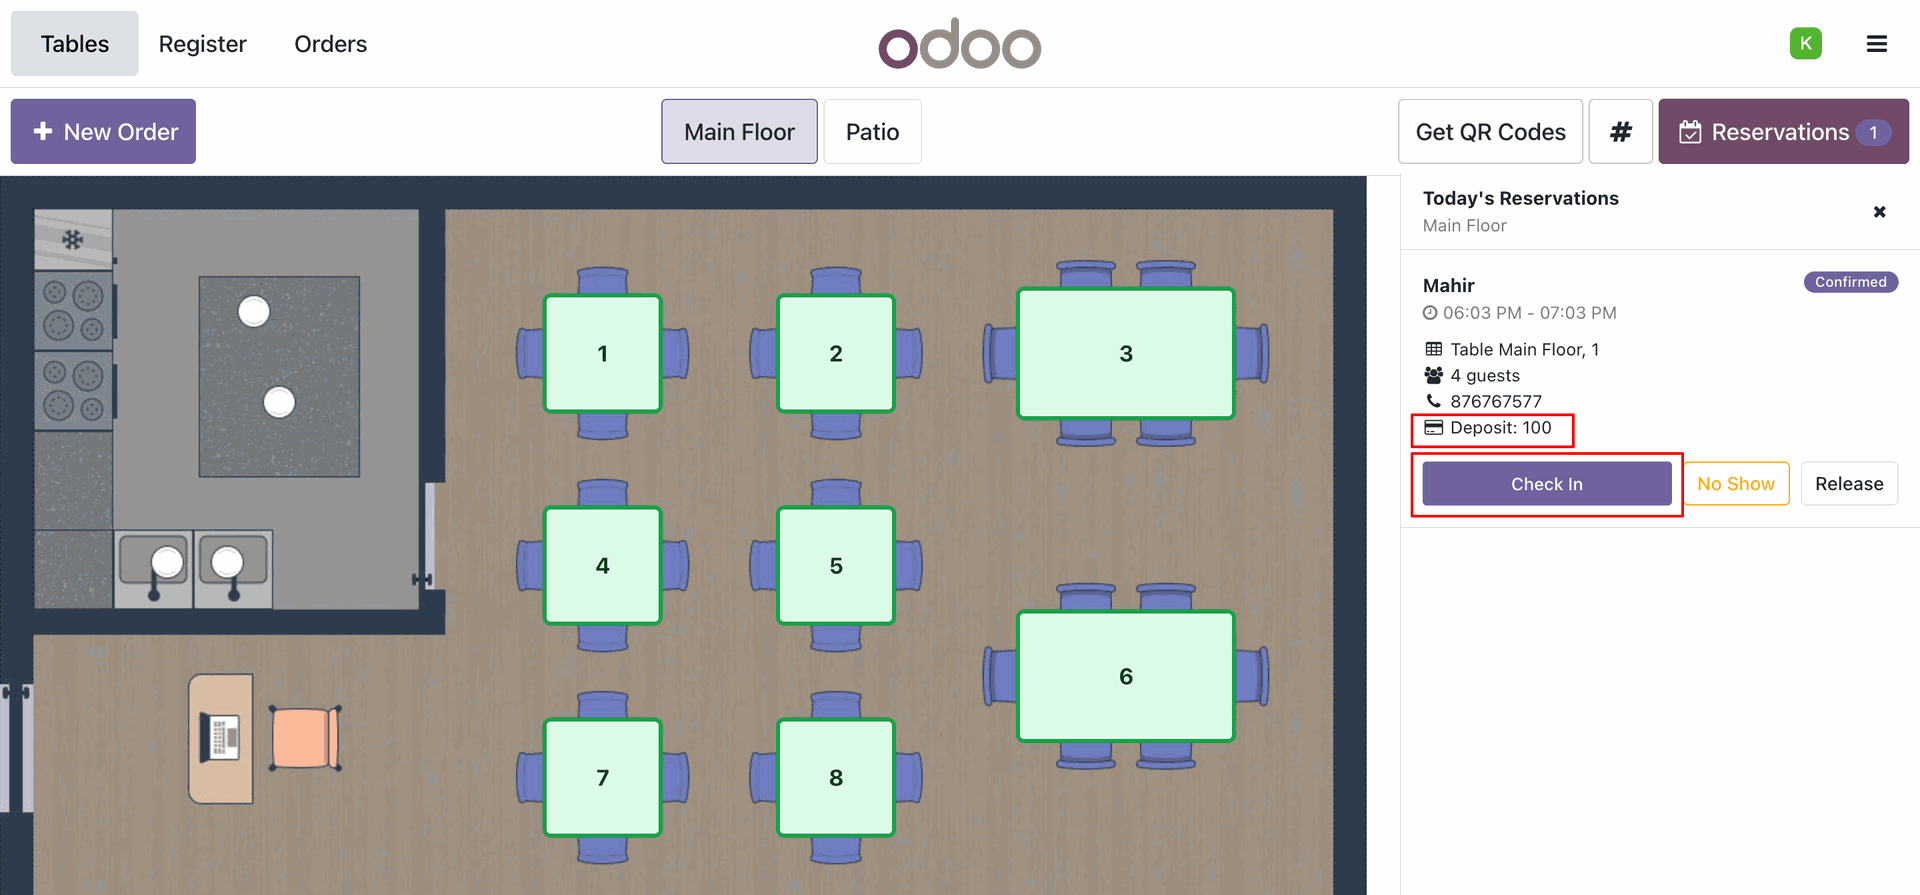
The Today's Reservations panel in POS displays each booking with the customer name, reservation time slot, table, guest count, and contact number. The status badge shows whether the reservation is Confirmed, Checked In, or another state.
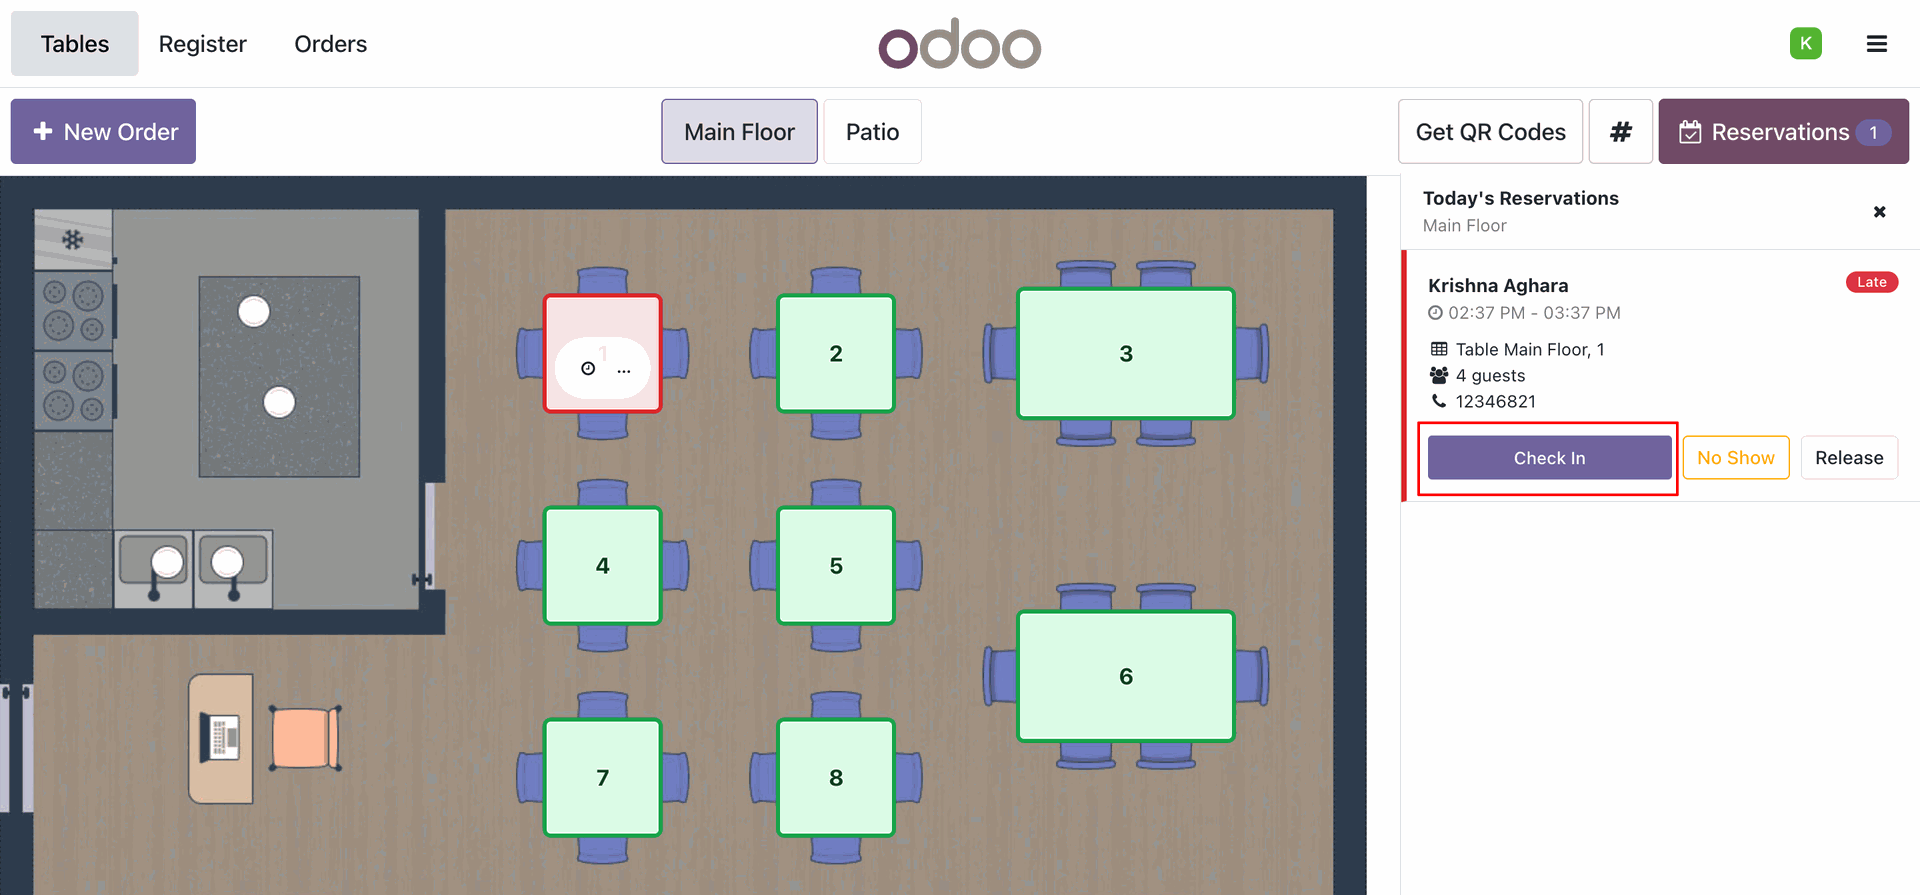
If guests are delayed past their time, their booking status changes to Late (red badge) in the sidebar, and the table on the map updates visually. Cashiers can select the table and click the Check In button.
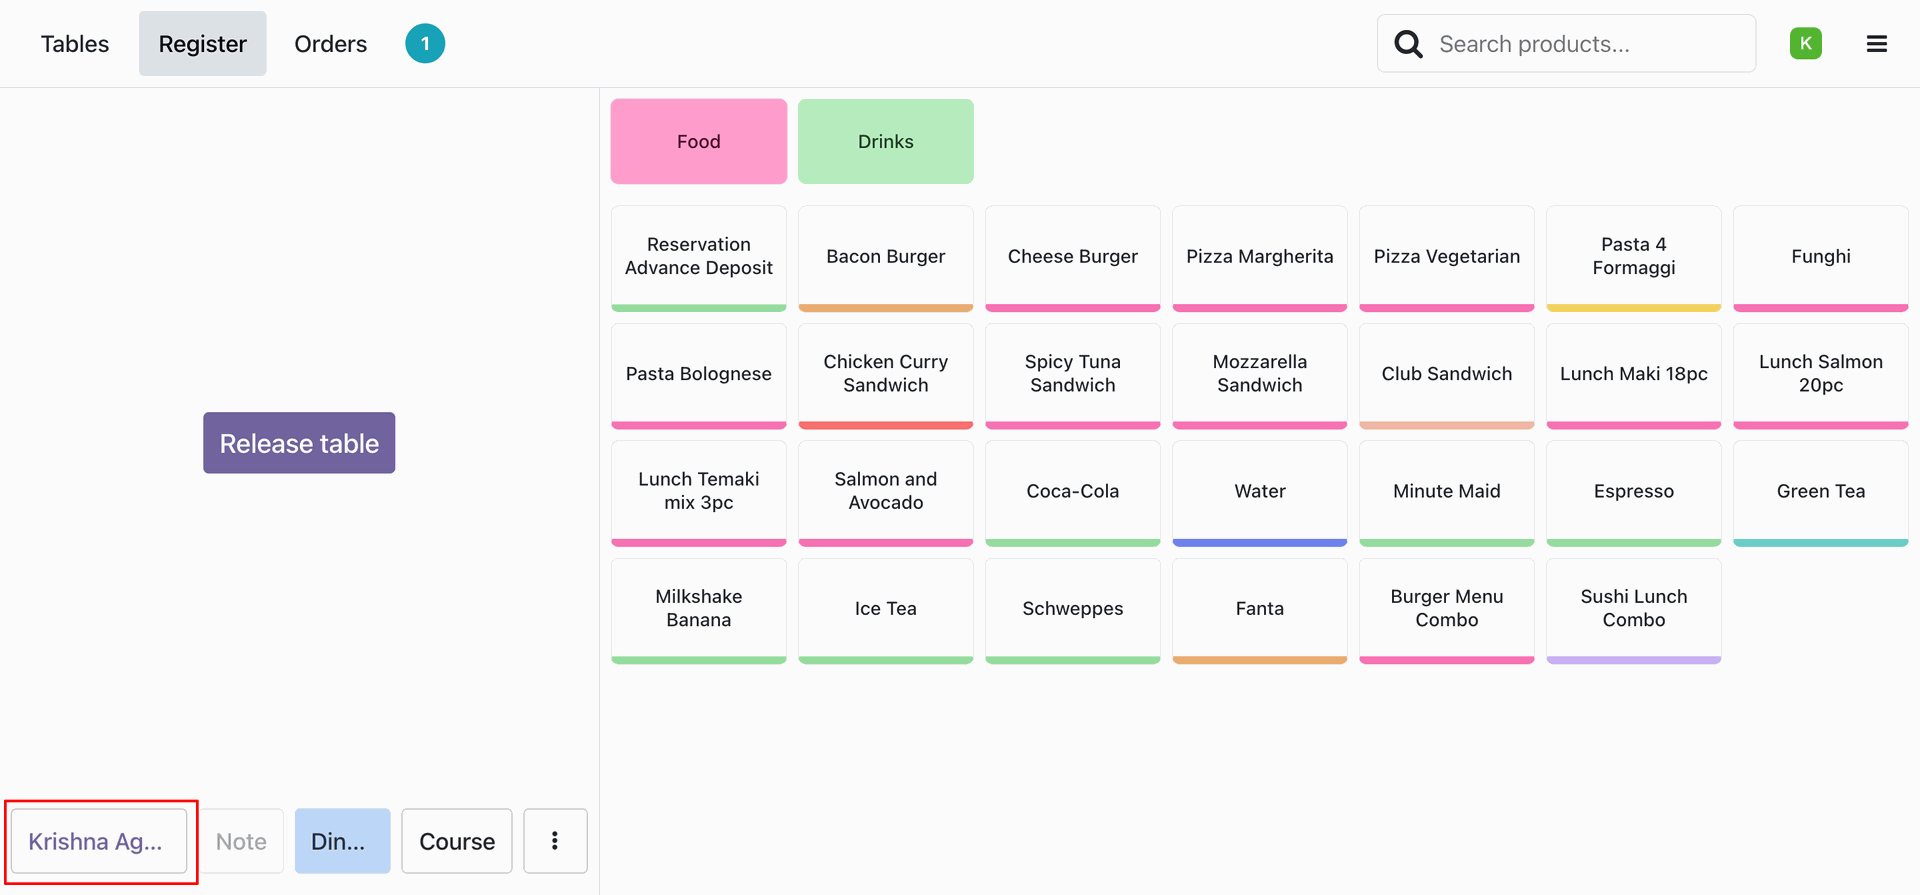
Upon clicking Check In, a new order is opened in the POS register interface, and the reservation customer's name is automatically set on the order.
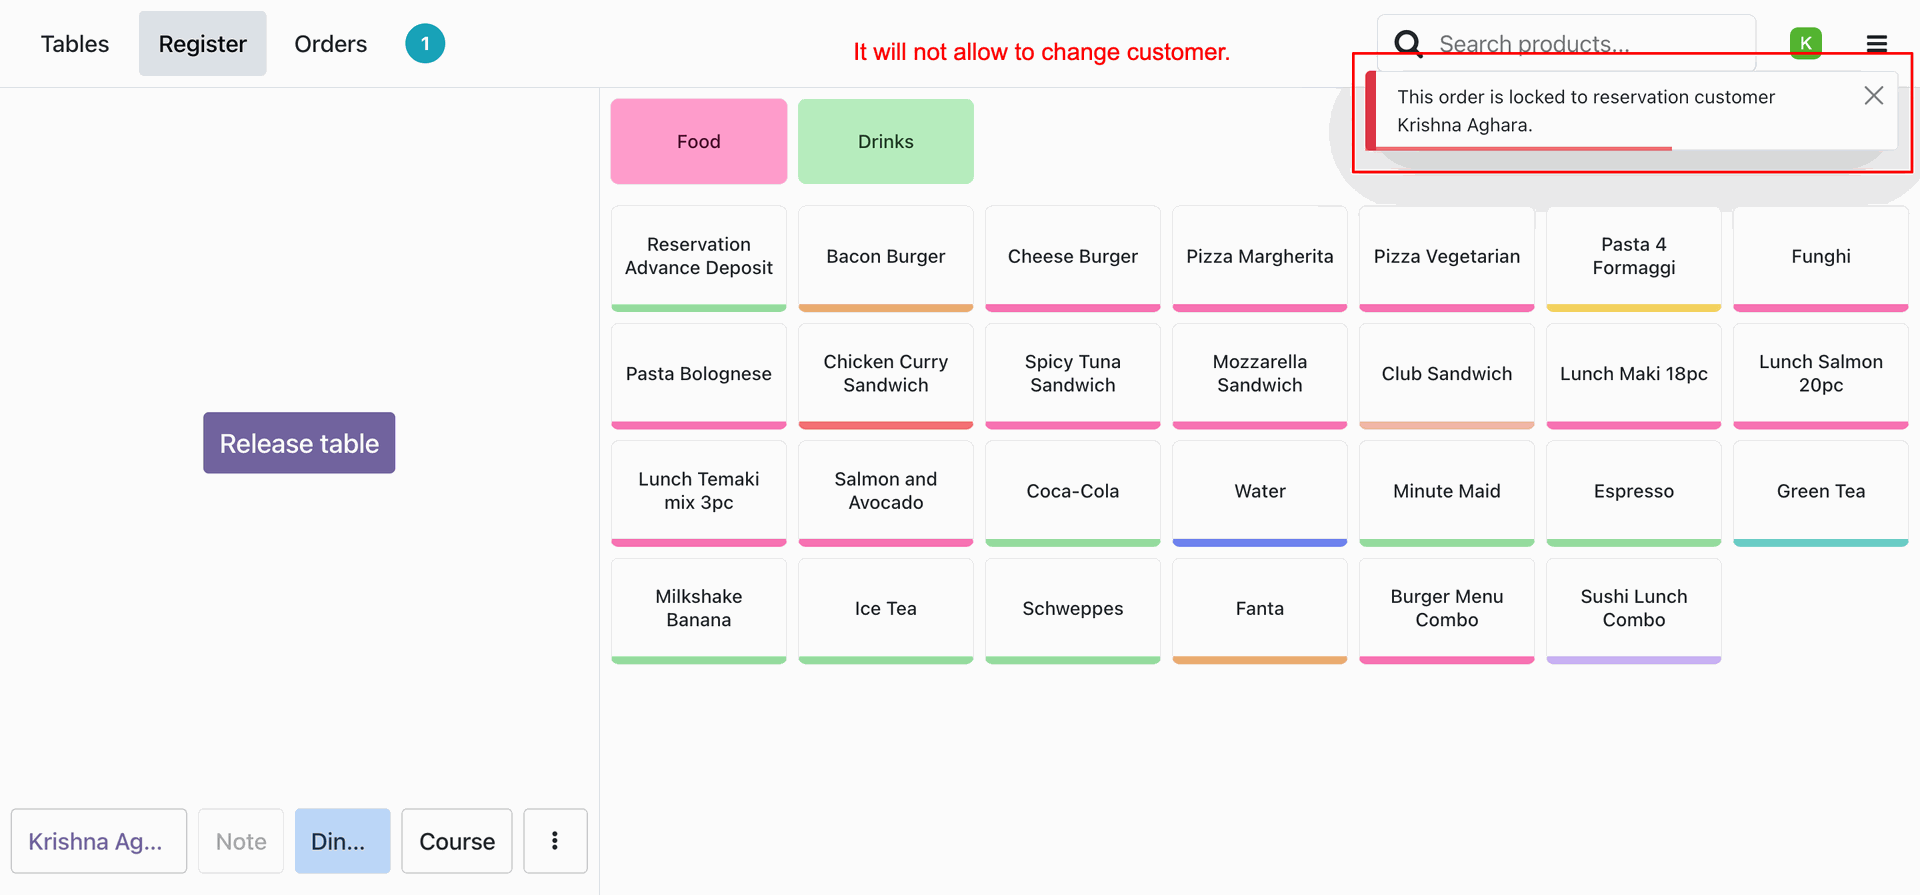
To maintain data integrity, the order is locked to the reservation customer. Any attempt to change the customer triggers a warning: "This order is locked to reservation customer Krishna Aghara. It will not allow to change customer."
In the POS Register view, the reservation ID (RES/00017) and guest name are clearly linked and displayed under the list of ordered food and beverage items.
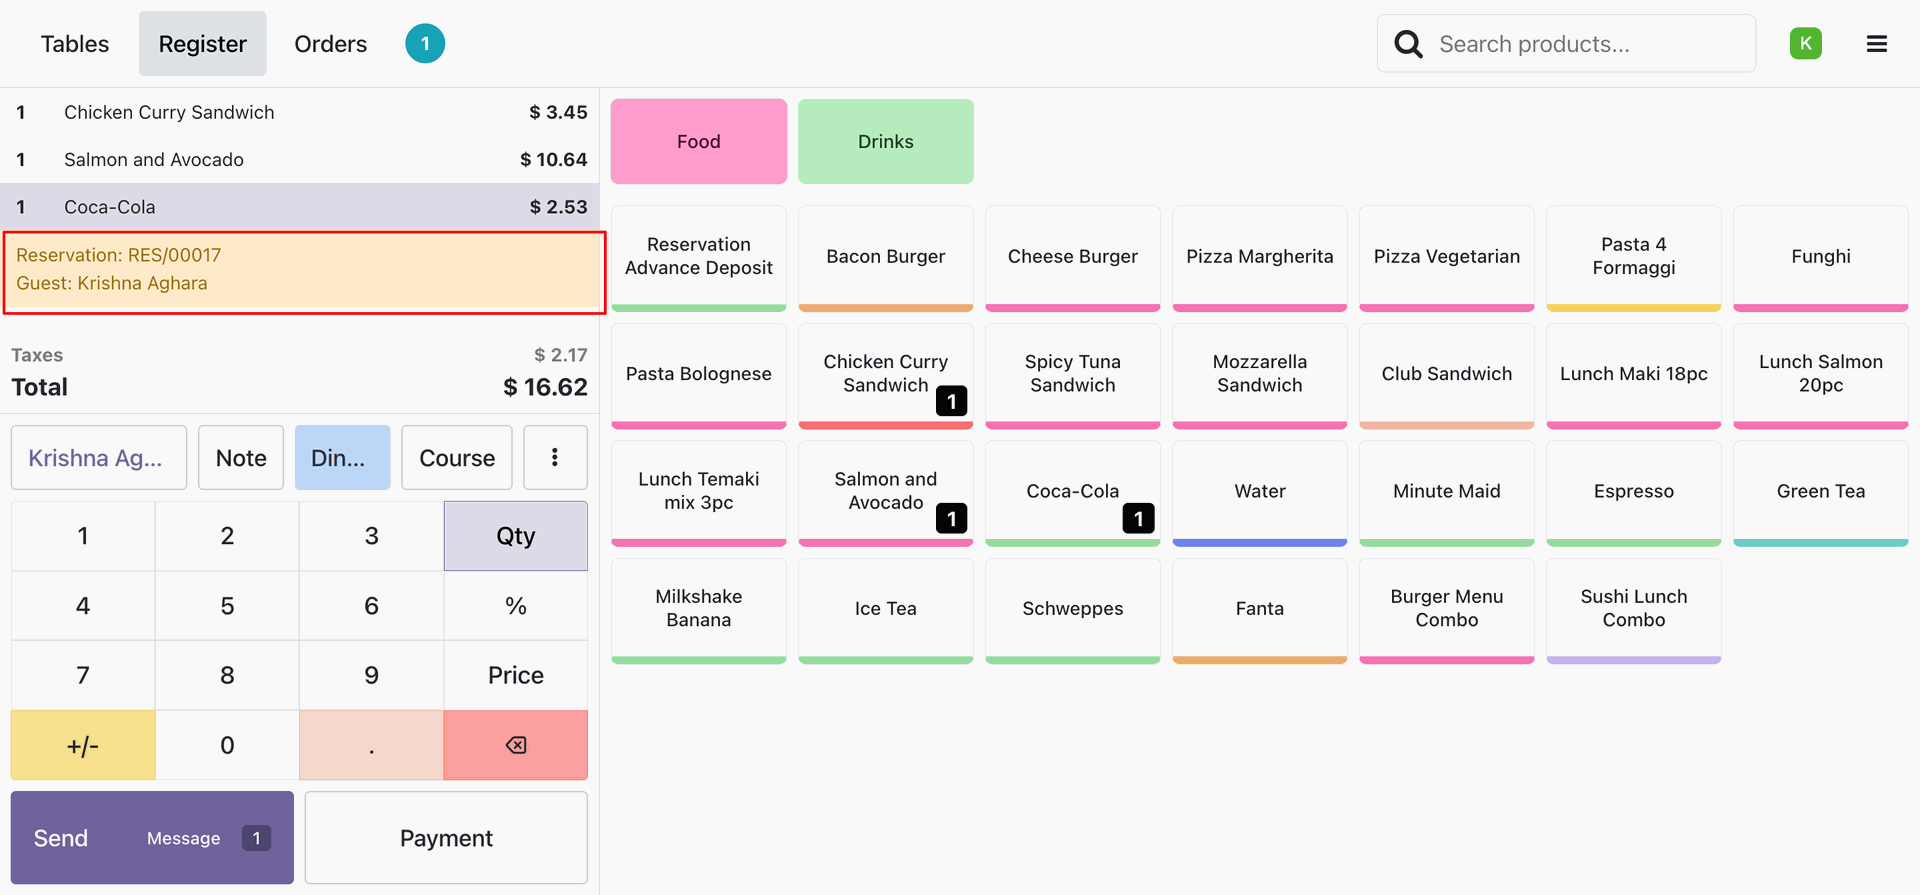
Upon payment completion, the printed POS receipt automatically prints the Reservation reference and guest name, helping keep track of completed bookings.

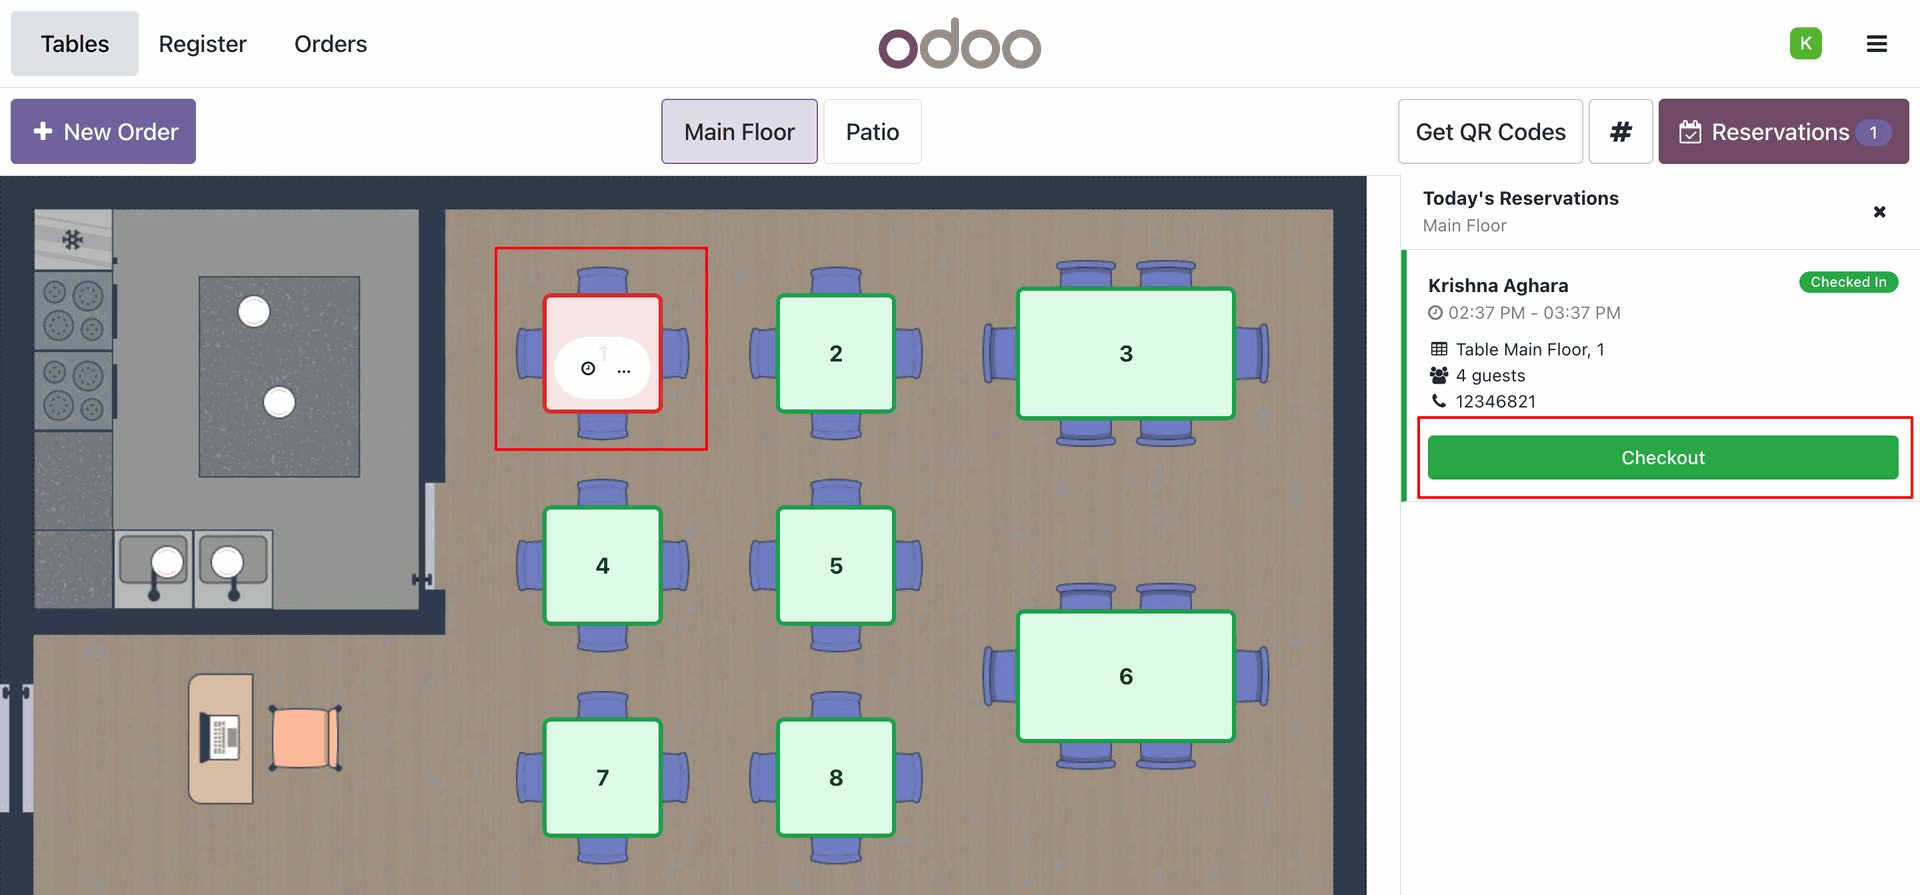
After check-in, the reservation status in the panel becomes Checked In (green badge). The green Checkout button is highlighted in the sidebar, which the staff can click when the guest decides to pay and leave.
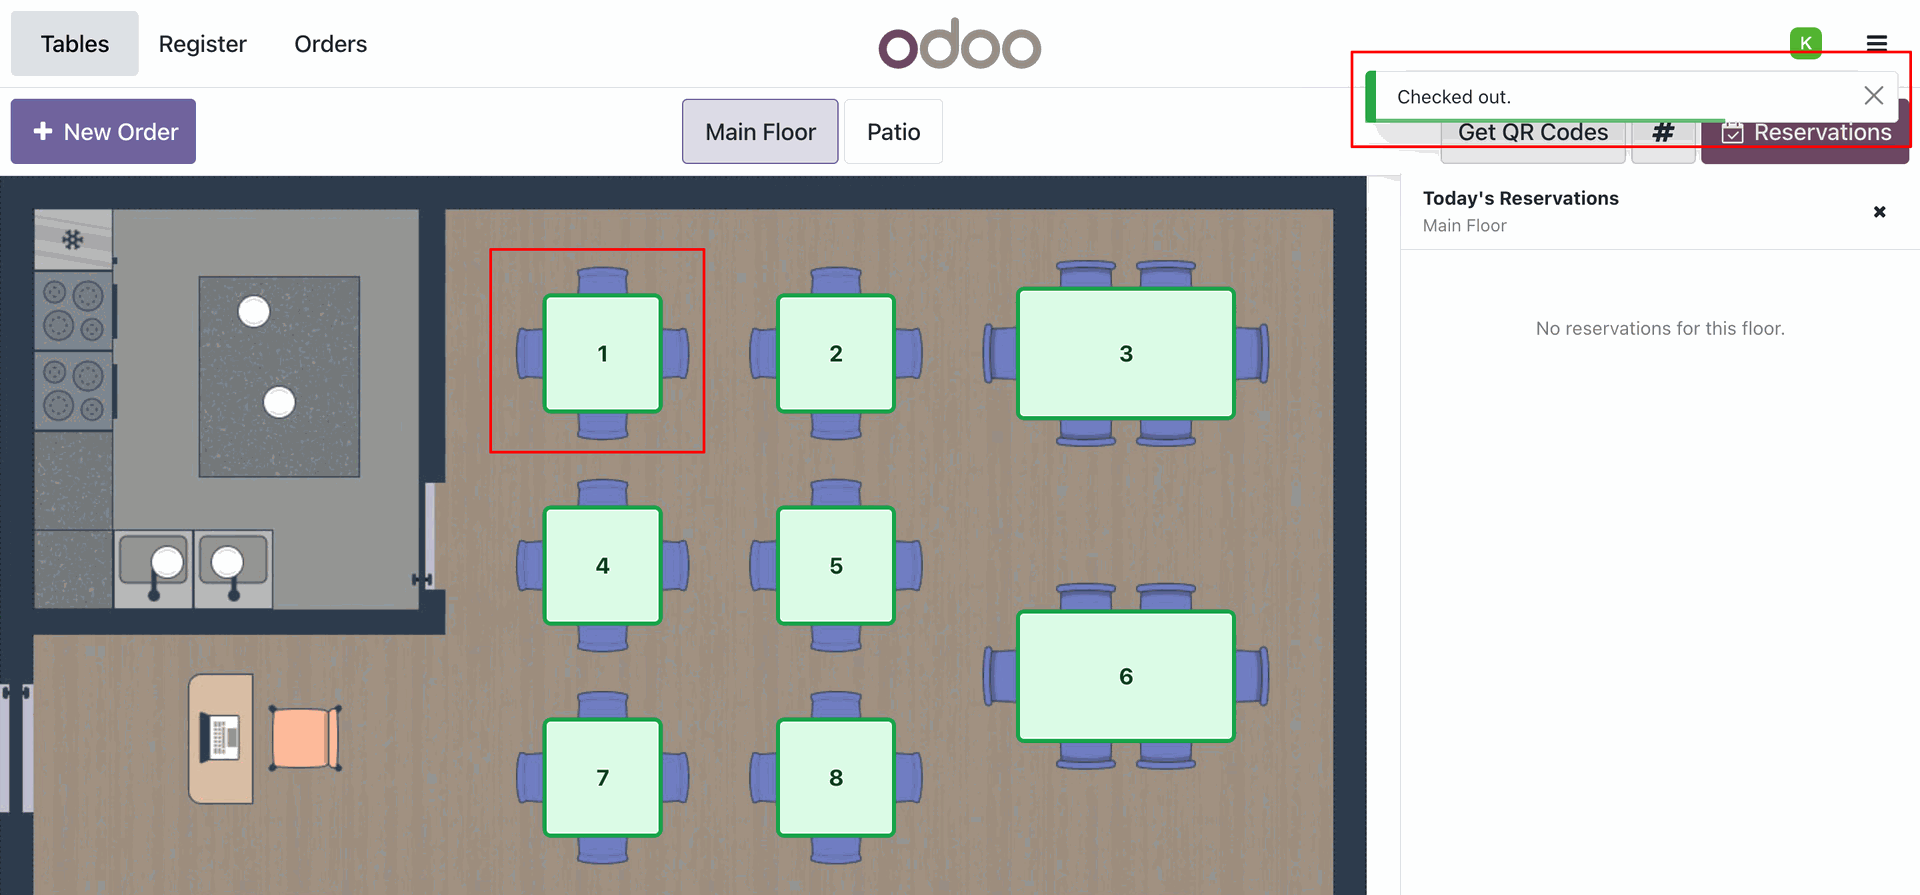
Once checked out, the POS cashier receives a green Checked out. pop-up confirmation, the table is released to green (available) on the map, and the sidebar is updated to show no active reservations.
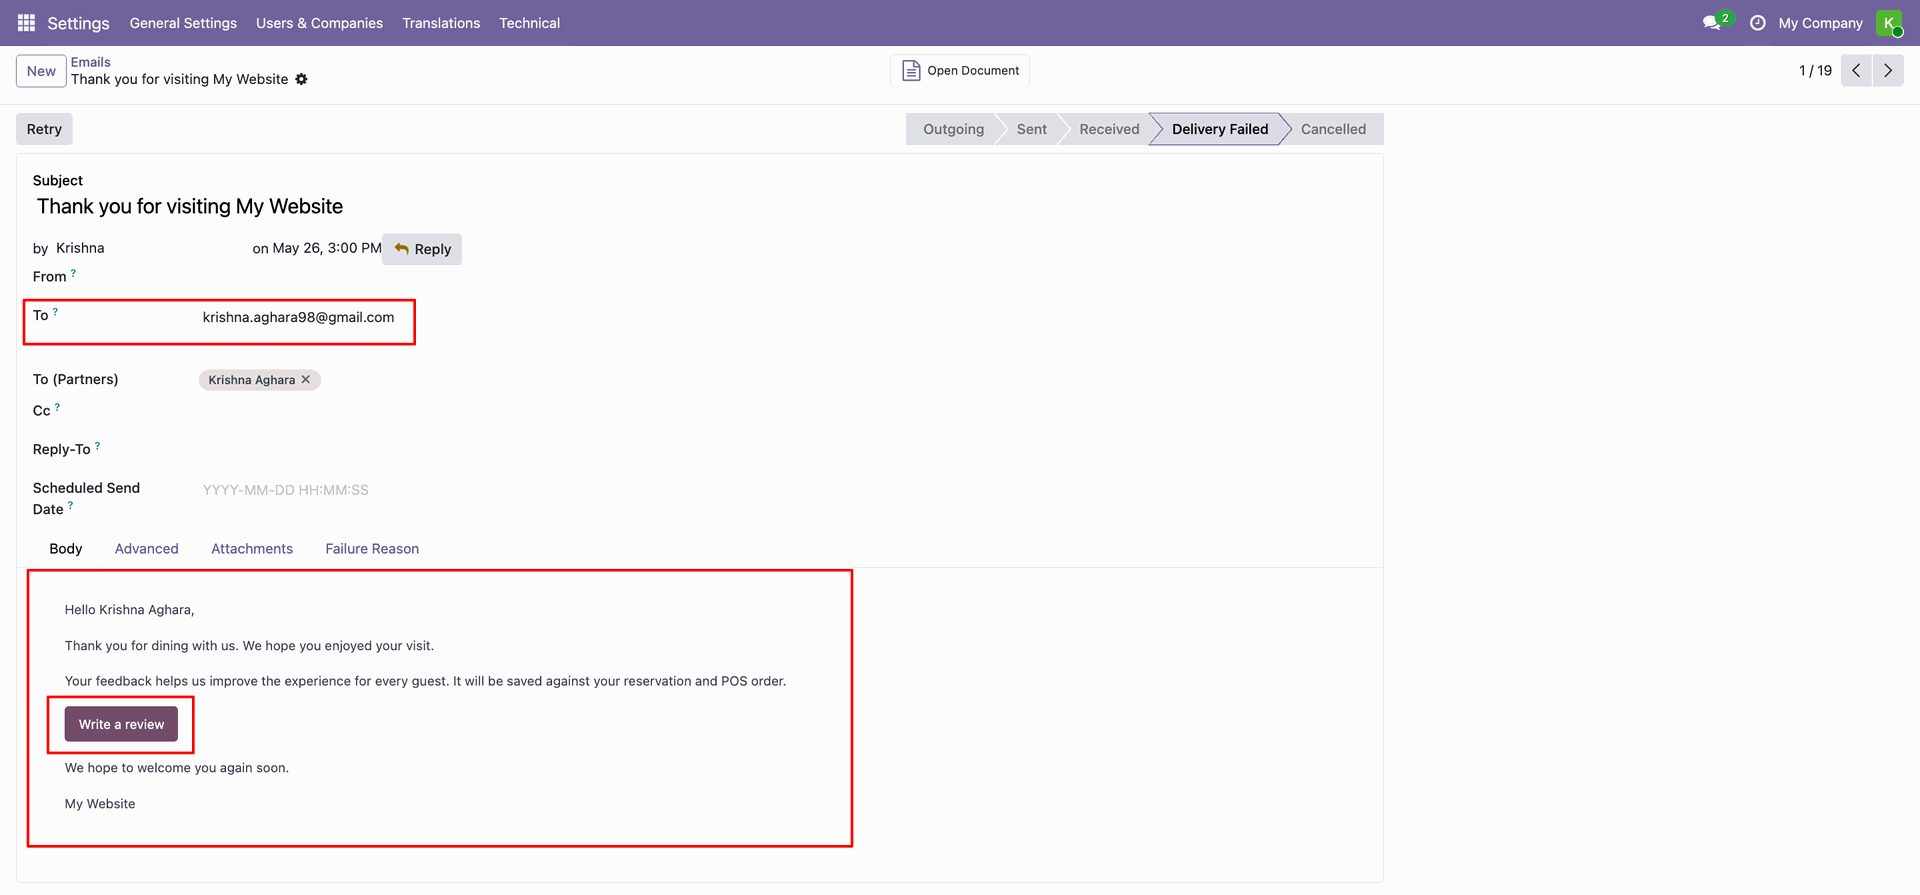
A post-visit feedback request email is automatically generated and sent to the customer's email address, containing a Write a review link.
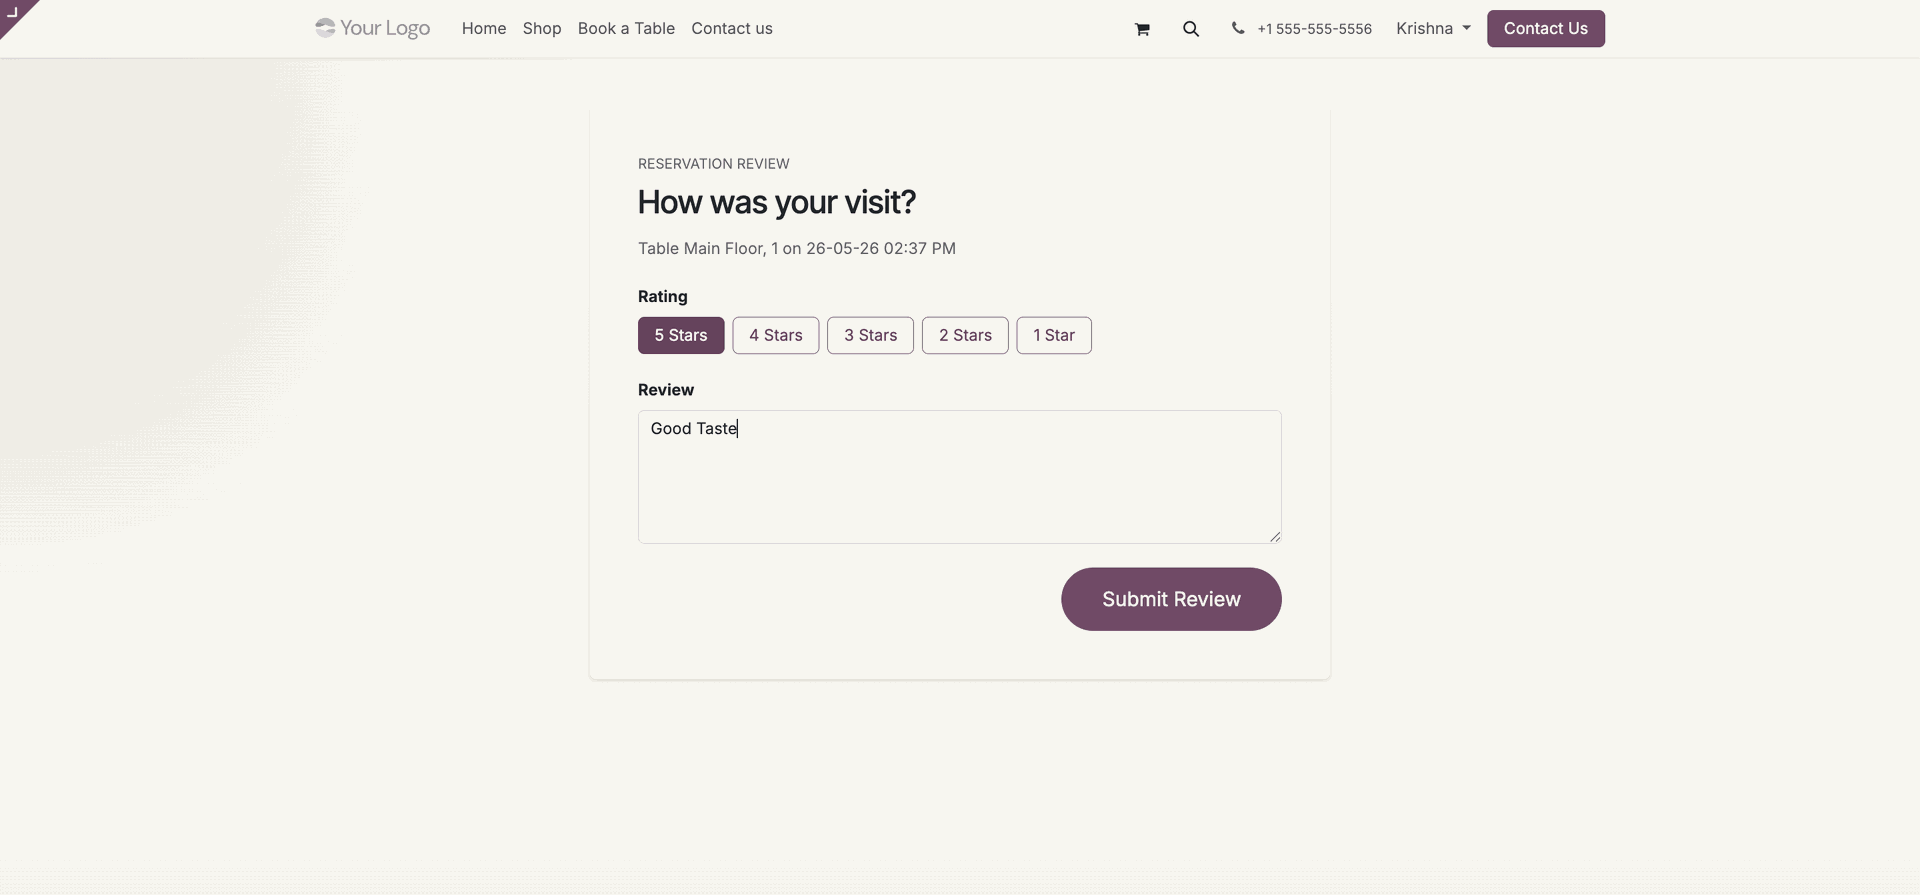
The link directs customers to the website review page where they can rate their visit (1 to 5 stars) and write comments.
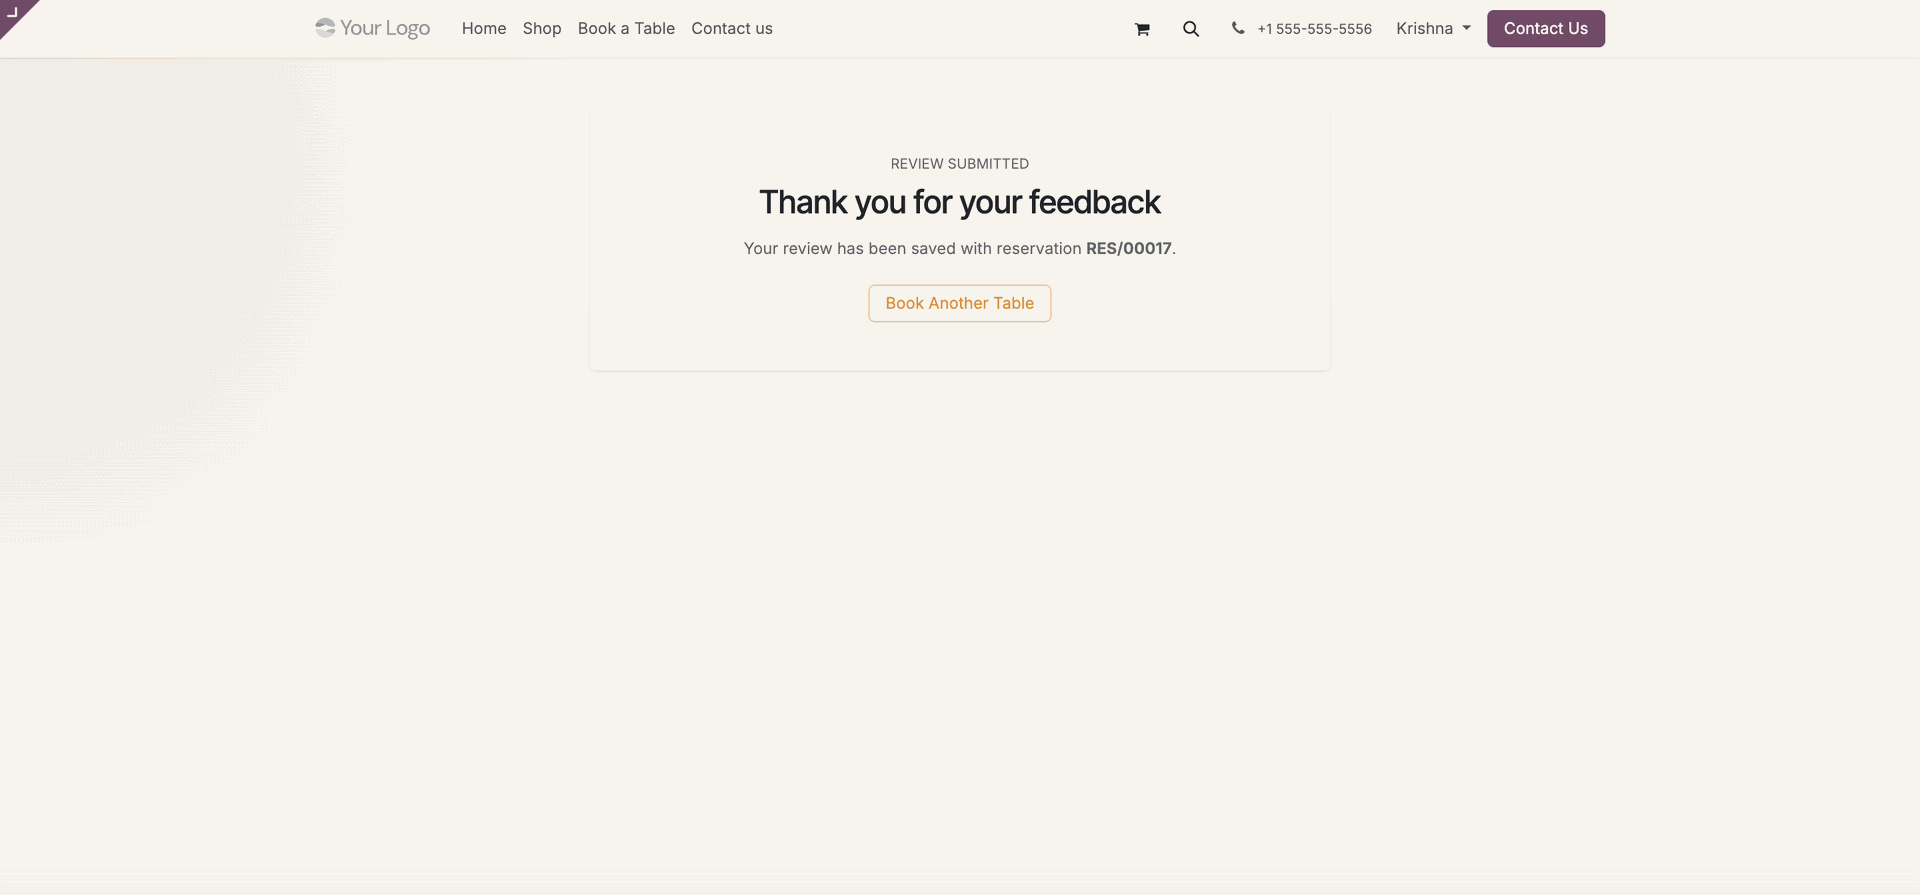
Upon submitting their feedback, customers see a Thank you for your feedback confirmation page linked to their reservation ID (RES/00017).
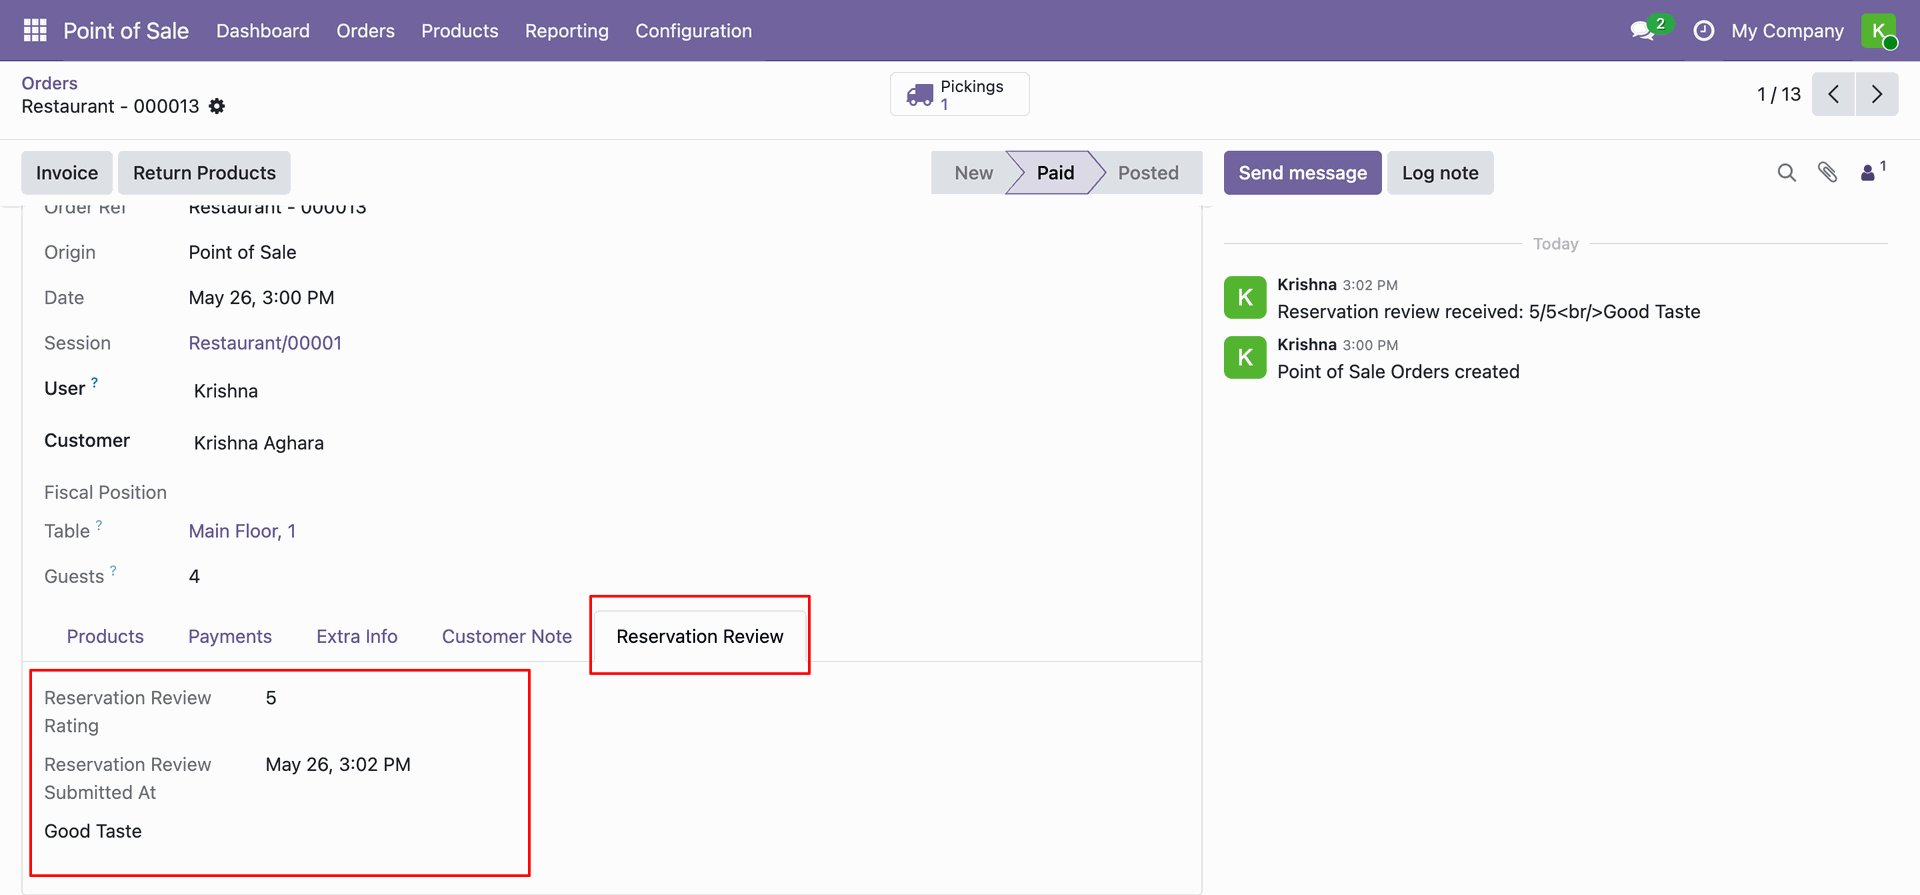
The review rating, submission date, and comments are synced to the backend under the Reservation Review tab on the POS order, and are also logged in the chatter feed.
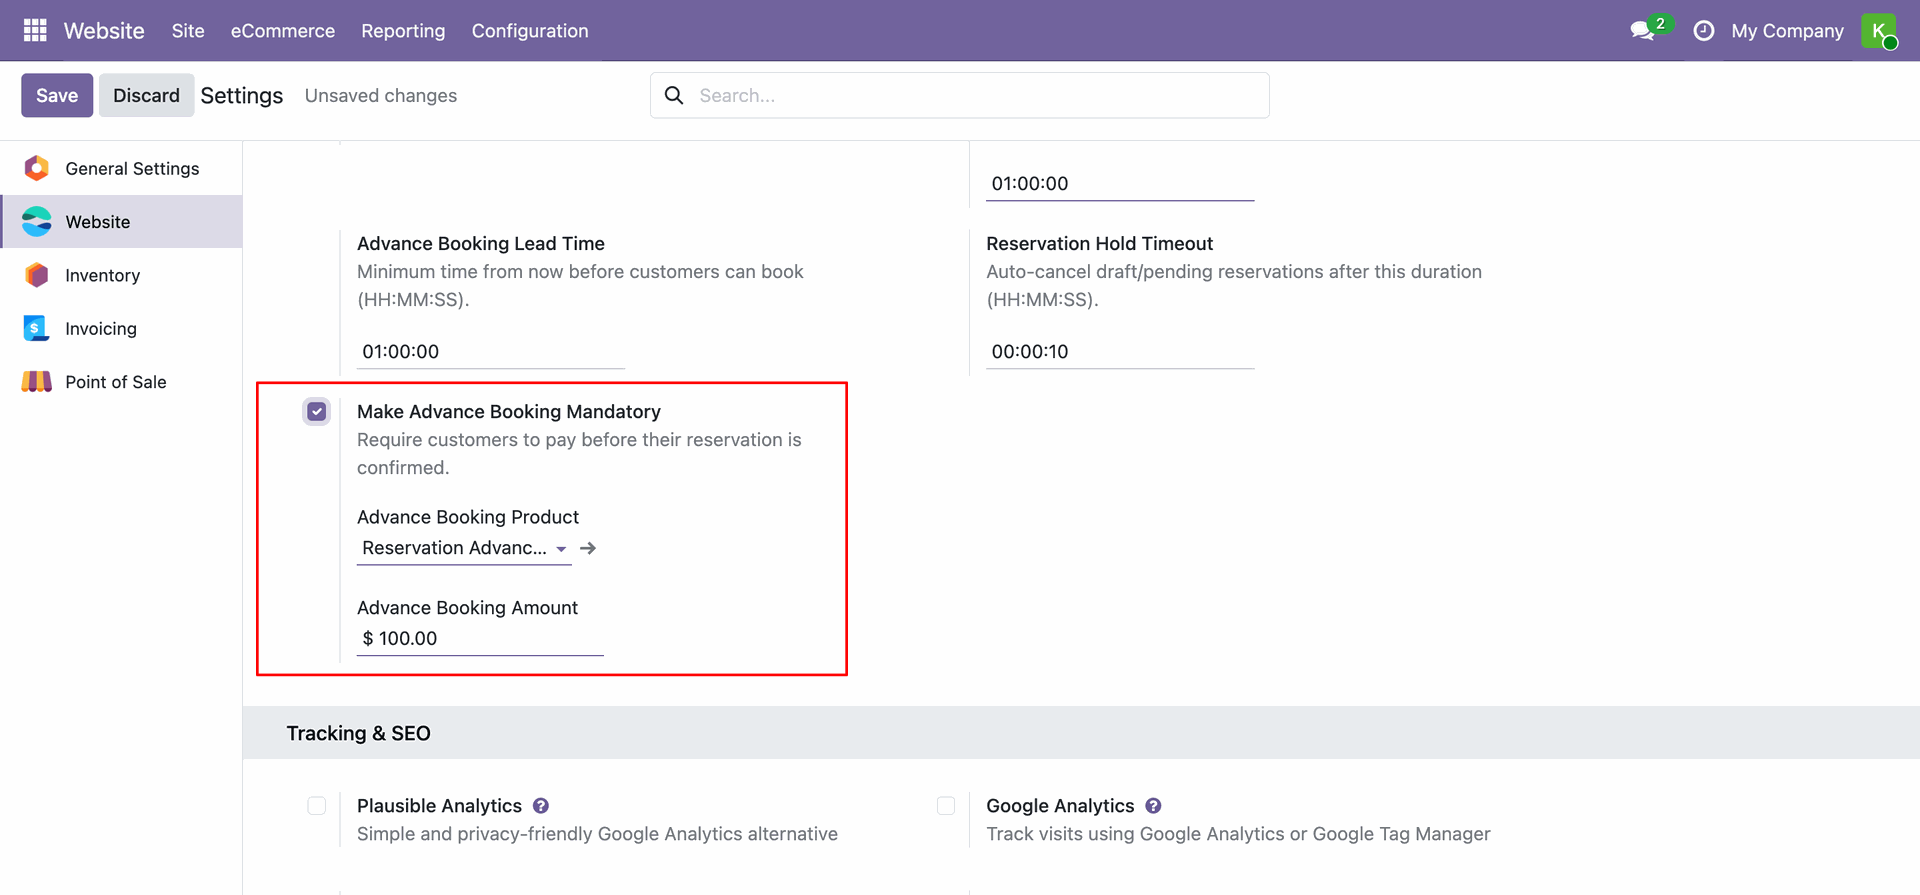
To enable advance payment, activate Make Advance Booking Mandatory in Website Settings. Set the Advance Booking Product (used to generate the online invoice) and the Advance Booking Amount per table.
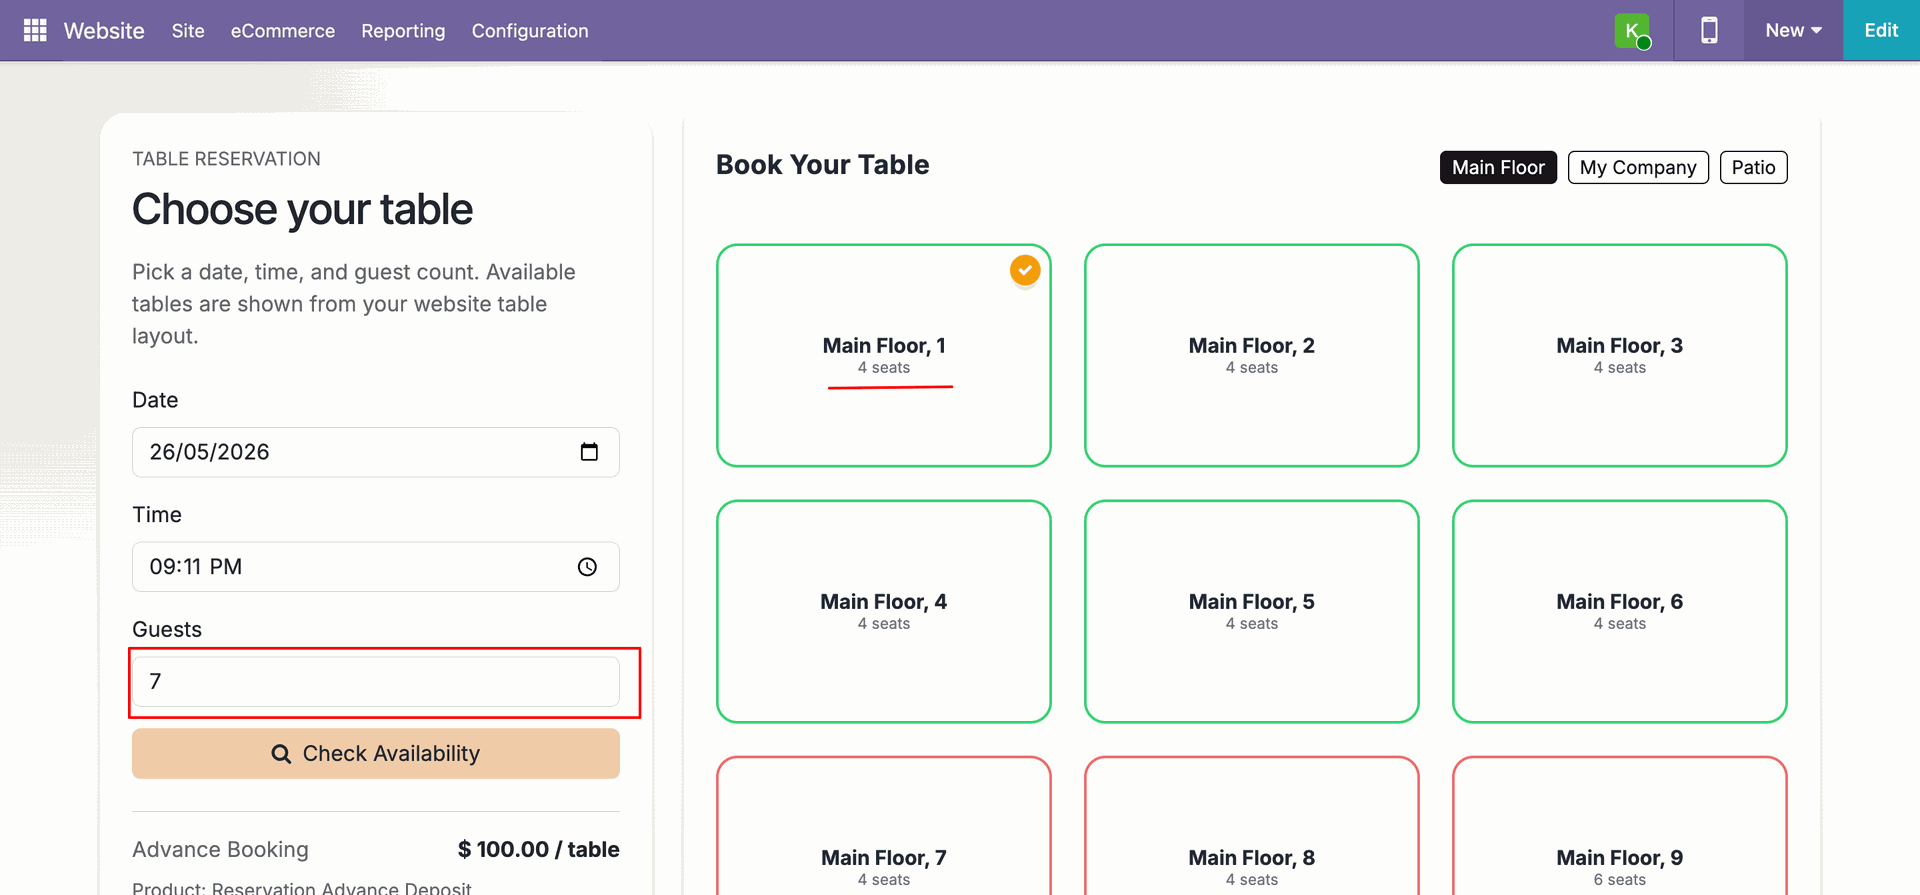
With advance payment enabled, customers can see the Advance Booking amount per table prominently displayed on the Book a Table page while selecting a table, so they know upfront what deposit is required.
On the Review before payment page, the system displays the complete reservation details and guest form. The Advance Booking amount ($100.00) is clearly shown. Customers must click the Pay Advance Booking button to proceed.
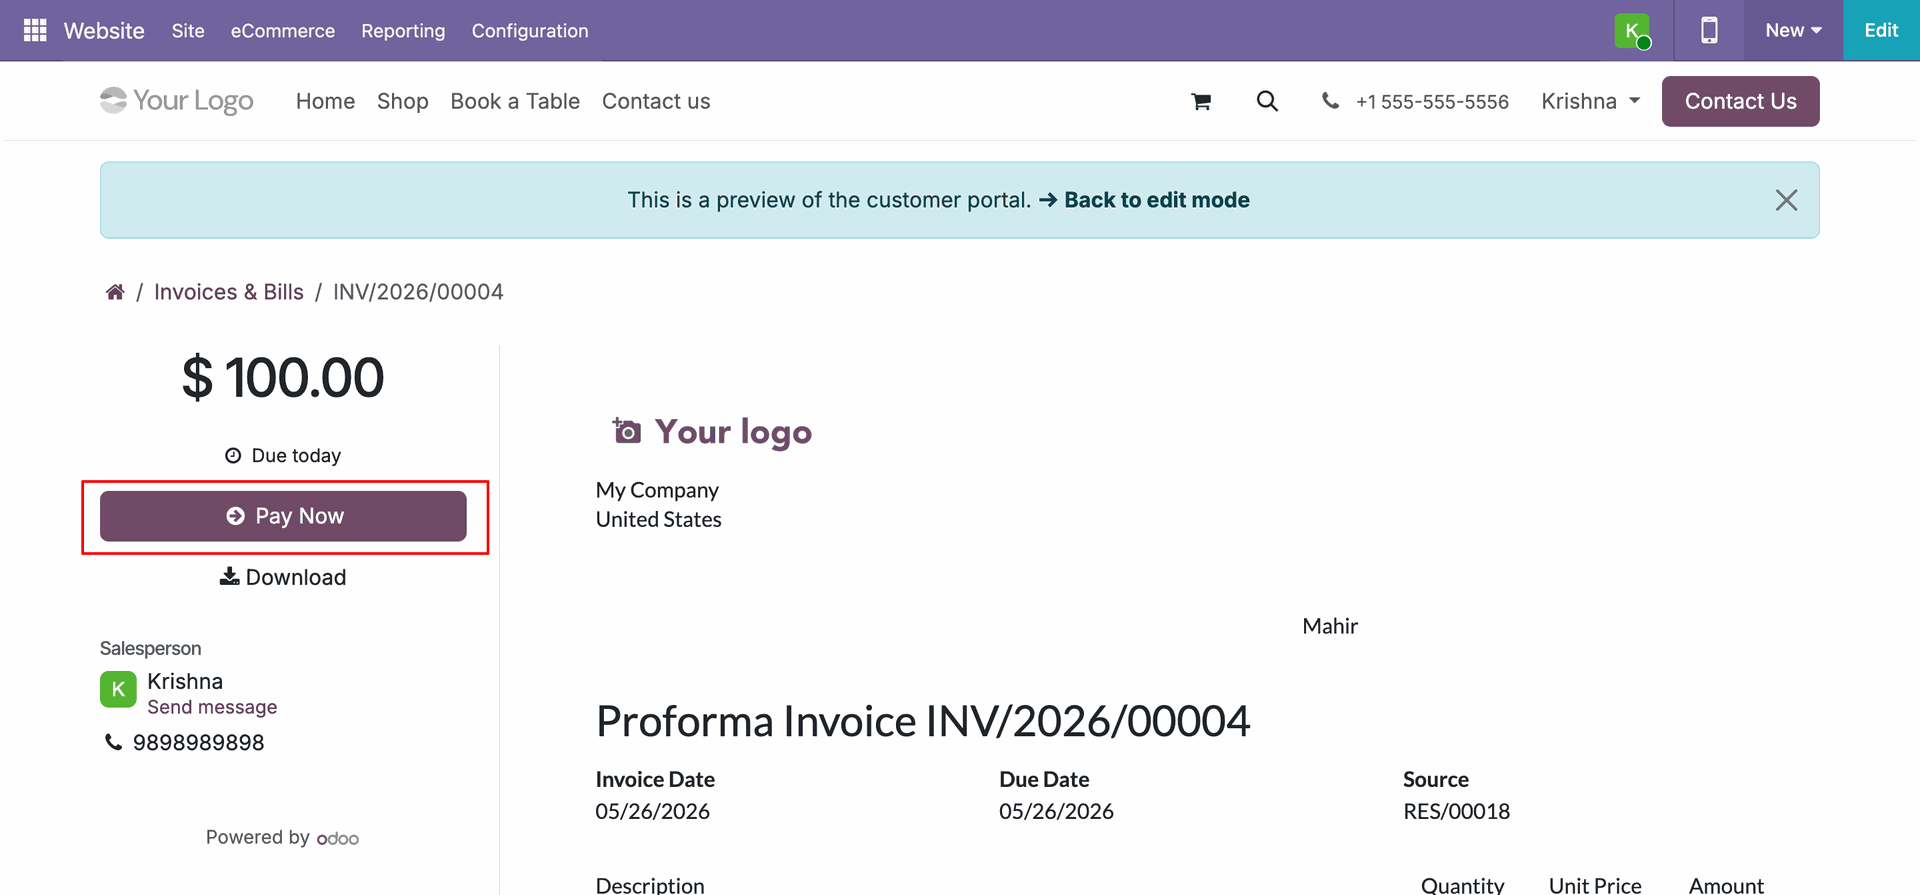
Customers are redirected to the portal to view the generated Proforma Invoice for their deposit and click the Pay Now button to complete the secure online payment.
In the POS interface, cashiers instantly receive a New reservation received. pop-up notification upon successful completion of the booking and payment on the website.
Under the Today's Reservations sidebar in POS, the confirmed booking lists the paid deposit details with a Deposit: 100 badge, indicating that the mandatory advance payment has been successfully recorded.
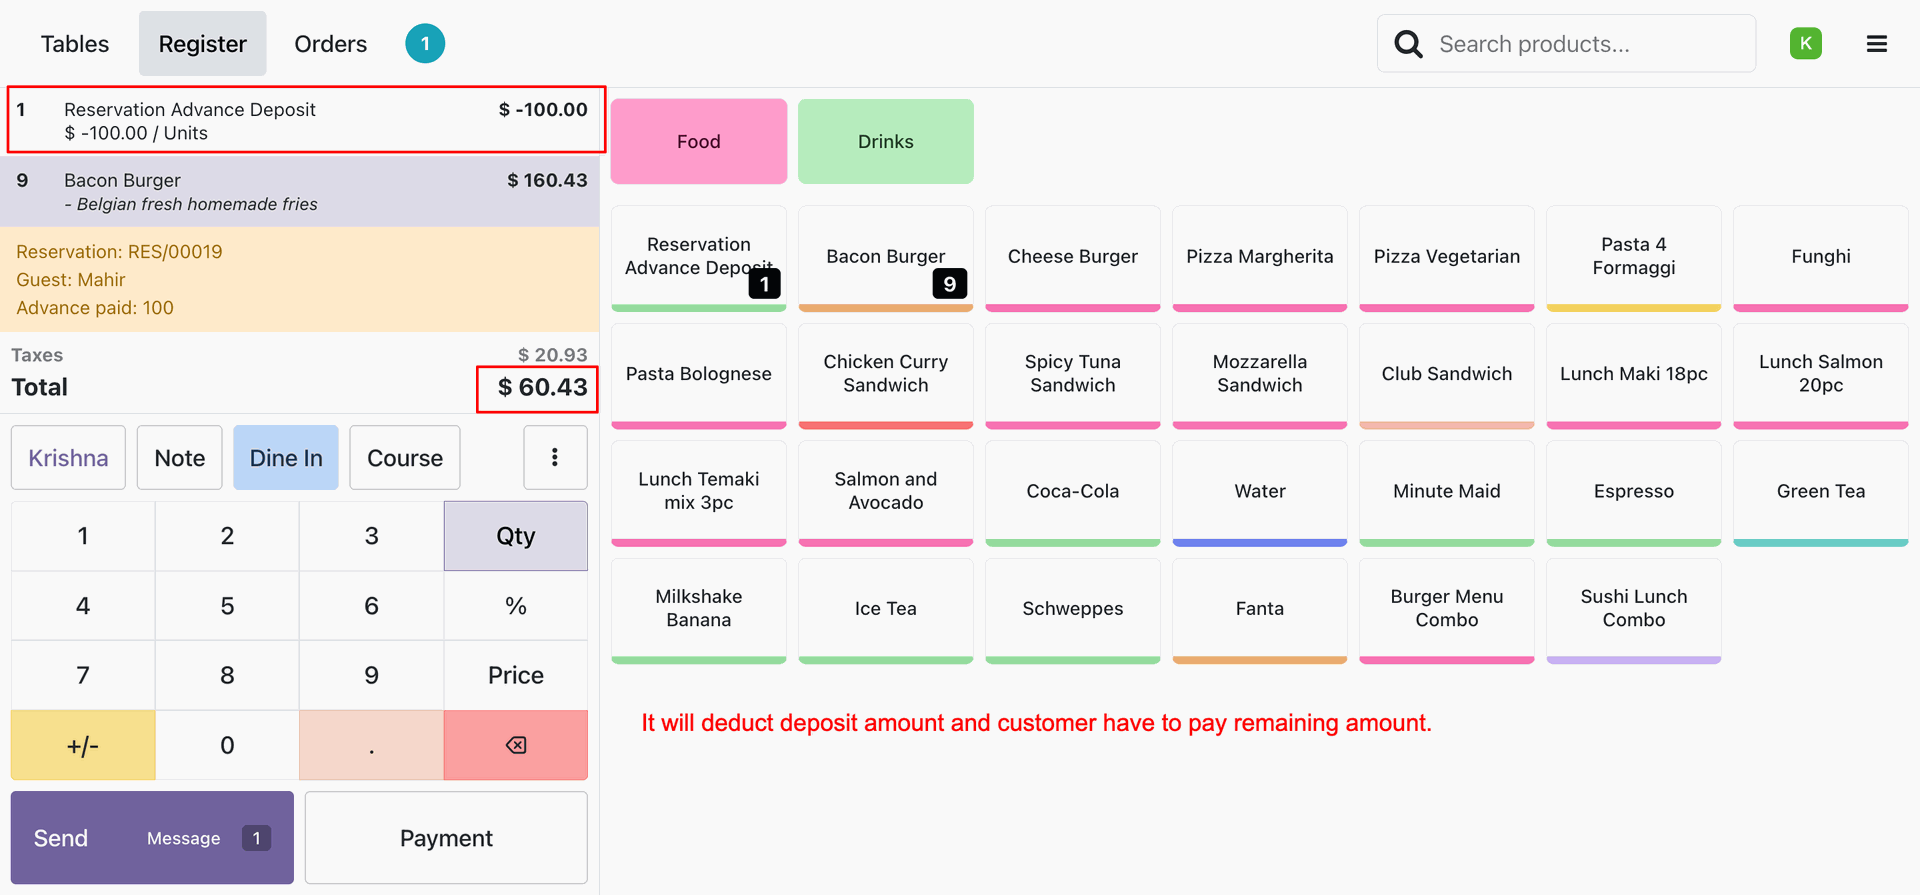
At checkout in POS, the pre-paid deposit is automatically added to the register order as a negative line item (Reservation Advance Deposit) of -$100.00, so the customer only pays the remaining balance.
The booking form validates selected table capacity against the guest count in real time. If the guest count exceeds the capacity of the selected table, the guest input field is outlined in red and the table's name is underlined in red.
The form prevents booking submissions when no table has been selected. Clicking the Book button without a table selection highlights the button with a red boundary to prompt the user.

A clear warning banner is displayed underneath the table availability check when the selected tables do not provide enough seats for the specified number of guests.

Configure the Advance Booking Lead Time in the backend settings to define the minimum time period required before customers can book a table on the website.
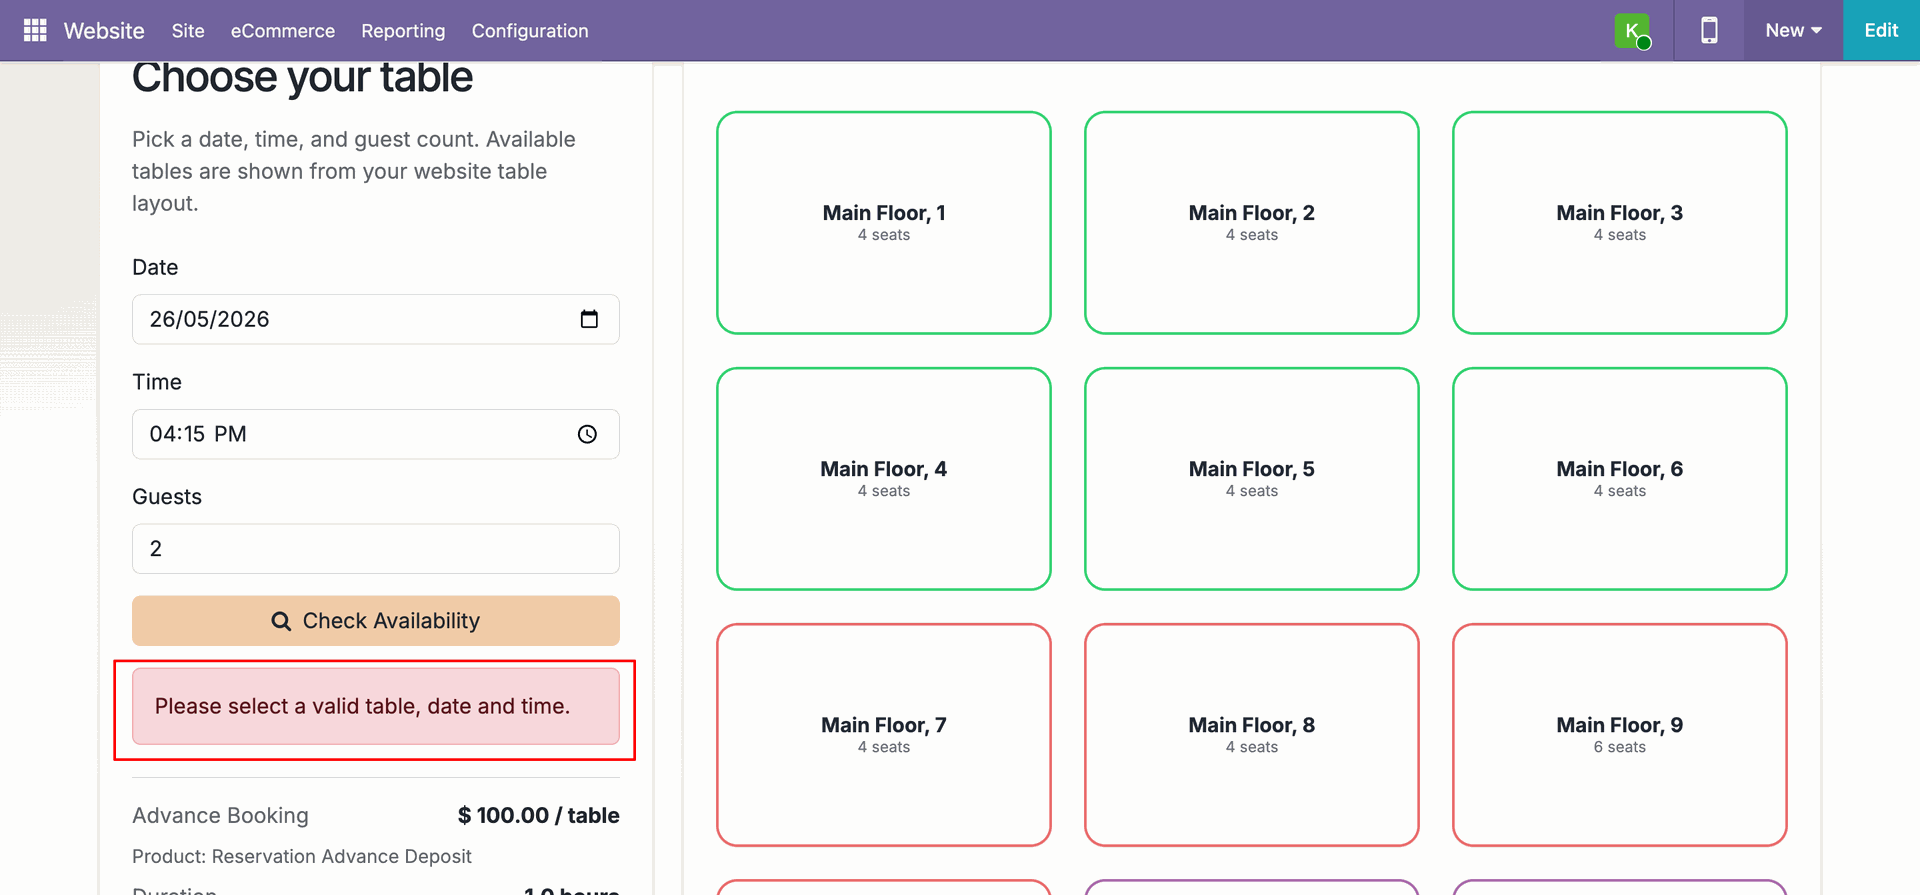
If a customer attempts to select a reservation slot that violates the configured Advance Booking Lead Time, the system displays a validation error message: "Please select a valid table, date and time."
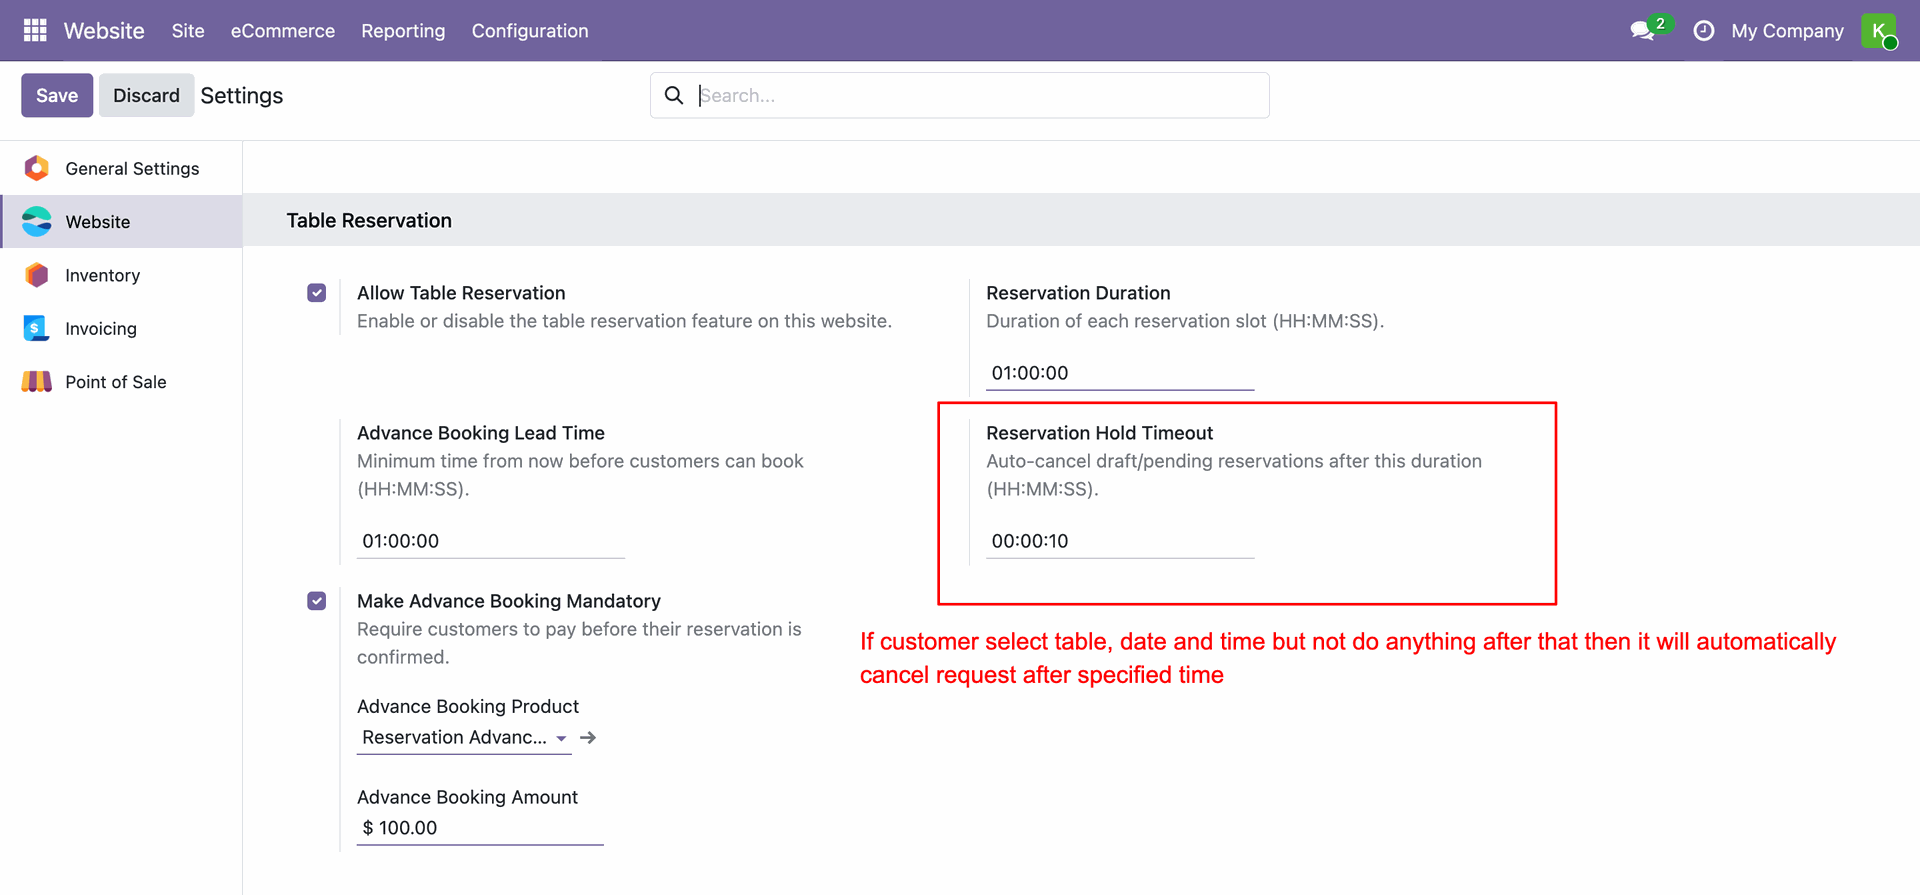
Configure the Reservation Hold Timeout in the backend settings. This automatically releases draft/pending table reservations if they are not completed within the specified duration.
If a user changes the date, time, or guest input fields on the booking form after having checked availability, the system prompts them to check table availability again before proceeding.
Version 19.0.1.0.0 | Released on : 01st July 2026
- Yes, this app works perfectly with Odoo Enterprise (Odoo.sh & Premise) as well as Community.
- No, this application is not compatible with odoo.com(odoo saas/Odoo Online)
- Yes, to test this module, please contact us at sales@softhealer.com.
- Please contact us at sales@softhealer.com to request customization.
- Yes, we provide free support for 365 days from the date of purchase.
- Yes, you will receive lifetime free updates for the version of the module you purchased.
- No, there is no need to install any additional libraries.
- Yes, for version 12 and above, you need to purchase the module separately for each version you intend to use.
- No, exchanges or refunds are not allowed. Please make sure to select the correct version before purchasing.
- You can contact us at support@softhealer.com for language translation support. We use Google Translator tools to provide translations in multiple languages, so the accuracy may vary. We welcome your suggestions to help improve translations.
Discover Our Latest Apps