












Shopify Odoo Connector

Platform Walkthrough
Explore the intuitive interface designed for maximum efficiency.

Import Products
 Description
- Images
- Categories
- Date
range filter
- Warehouse
assignment
- Tags
- Exclude
Products from Shopify Sync


Export Products
- Description
- Images
- Shopify
ID written back
- Exclude
Products from Shopify Sync

Import Contacts
- Email
- Phone
- Address
- Date
Range filter
- Tags

Export Contacts
- Email
- Phone
- Billing
address
- Tags

Queue Dashboard Framework
-
Track, monitor, and manage asynchronous data
synchronization payloads and execution state logs.

Import Orders
- Customer
details
- Shopify
order ref
- Option
to import confirm orders
- Order
status and Tracking
- Option
to select shipped and unshipped or all
- Taxes
- Import
Buy With Prime orders
- Payments
& transactions
- Cancel
Order from odoo
- Fraud
risk scores
- Draft
Order Management
Auto Workflow
- Auto-create
invoice
- Auto-validate
delivery
- Auto-register
payment
- Force
transfer
- Per-workflow
config
- Fully
automated

Import / Export Refunds
-
Seamlessly process and sync order refunds and return
records across systems.

Returns and Refund
- Full
returns with credit notes
- Partial
returns
- Restocking
- Multi-currency
refunds
Real Time Inventory Sync
-
Instantly map and update dynamic stock level quantities across connected
channels.

Payment Gateway Matrix
-
Route external payment provider transactions smoothly to customized Odoo
financial journals.

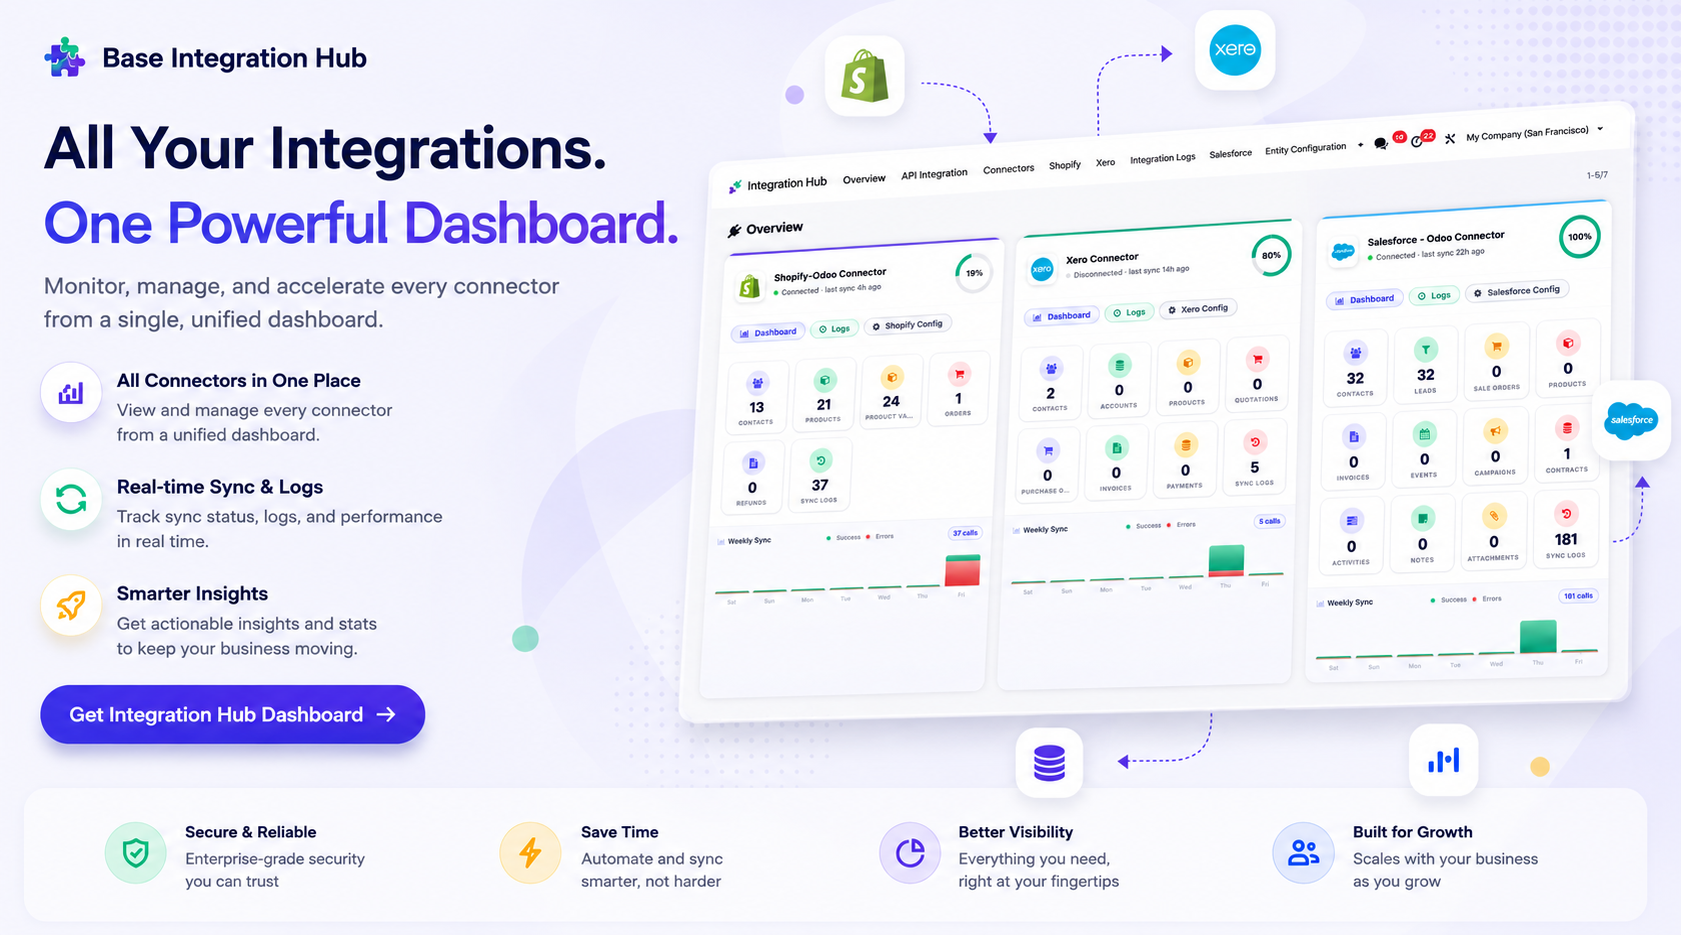
Integration Hub
-
A centralized view to track the status of all connectors, recent activities, and
synchronization stats.

Multi Store Support
-
Support for managing multiple Shopify store instances within a single Odoo
database.

Multi-Location Support
-
Connect specific Odoo warehouses seamlessly directly to designated Shopify
locations.

Multi Company Support
-
Each distinct Shopify instance can be linked to a specific Odoo multi-company
accounting record.

Access Rights
-
Granular security groups to control who can manage Shopify credentials, sync
data, or view system logs.

Product Recommendations
- Auto
Recommendation Sync
- Recommendation
Queue Processing
- Recommendation
Mapping Rules
- Alternative
Product Mapping
- Accessory
Product Recommendations
- Total
Count Recommendations

Abandoned Checkouts
- Import
Abandoned Checkouts
- Auto
Checkout Synchronization
- Checkout
Webhook Automation
- CRM
Recovery Routing
- Checkout
Recovery Lifecycle
- Checkout
Filter Configuration
Import/Export Gift Card
-
Import and export Shopify gift cards directly from Odoo.

Metafields/Custom FIelds Mapping
- Customer
Metafield Mapping
- Product
Metafield Mapping
- Order
Metafield Mapping
Shopify Integration Dashboard
-
Monitor synchronization status, statistics, and integration activities from a
centralized dashboard.

Product Publish/Unpublish via Sales Channel
- Odoo syncs product visibility to Shopify
by publishing to added channels and unpublishing from removed ones.
Export Orders
- Line
Items
-
Discounts
-
Tags
-
Custom Attributes: Odoo Sale Order Name, Odoo DB ID, and Customer Reference
-
Re-export failed or updated orders whenever required.

GraphQL API Integration
-
Connect and synchronize data efficiently using GraphQL APIs for faster and more flexible integrations.
-
Shopify Integration Dashboard

-
Queue Dashboard
-
Buy With Prime Order
-
Export Product Stock
-
Import/Export Refund Orders
-
Contacts Create/Update using Webhook
-
Products Create/Update using Webhook
-
Order Fulfillment status
-
Integration Hub Dashboard
-
Product Recommendation
-
Shopify Abandoned Card
-
Shopify Gift Card
-
Customer, Product & Order Metafield Mapping
-
Order Export & Re-Export
-
Automatic Product Synchronization
-
Product Exclusion from Sync
-
Product Metafield Mapping
-
Product Publish & Unpublish Control
-
Two-Way Product Synchronization

Workflow

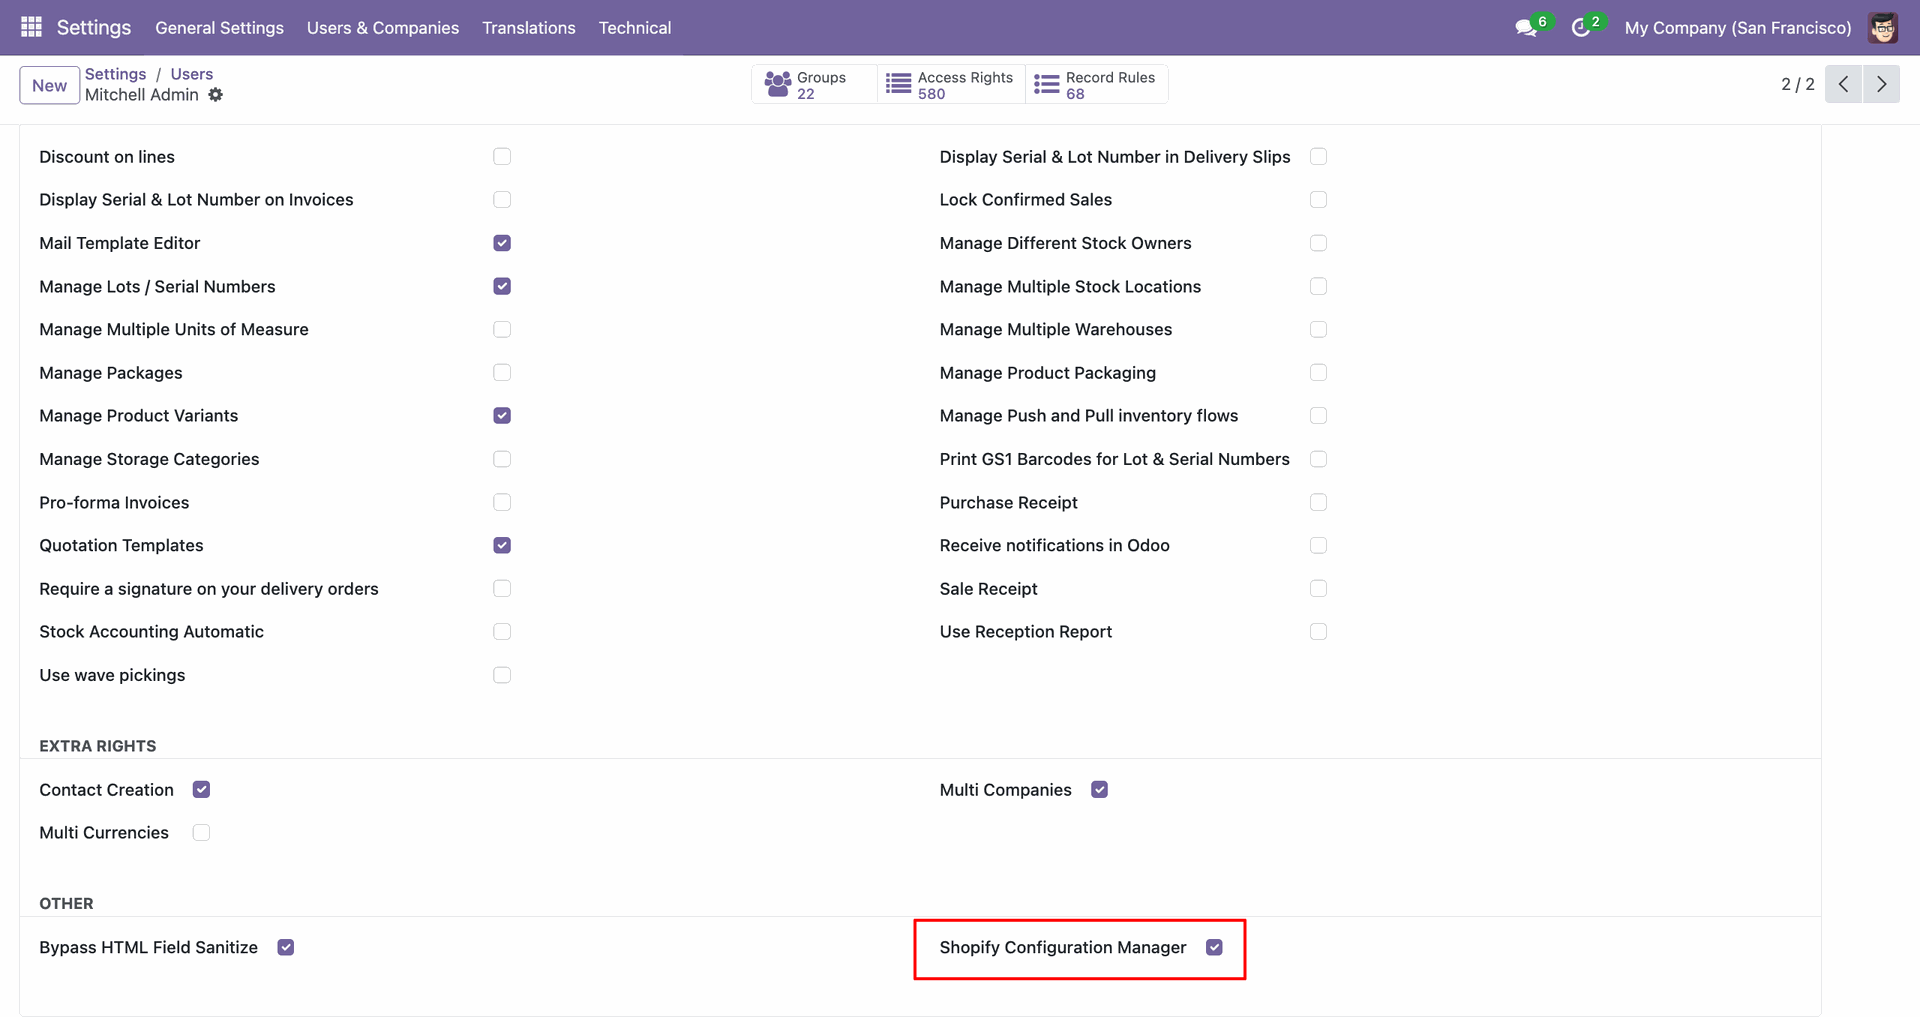
Enable the Shopify Configuration Manager access right to open connector settings and controls.
Open Settings in Shopify Admin to begin configuring the store for connector access.
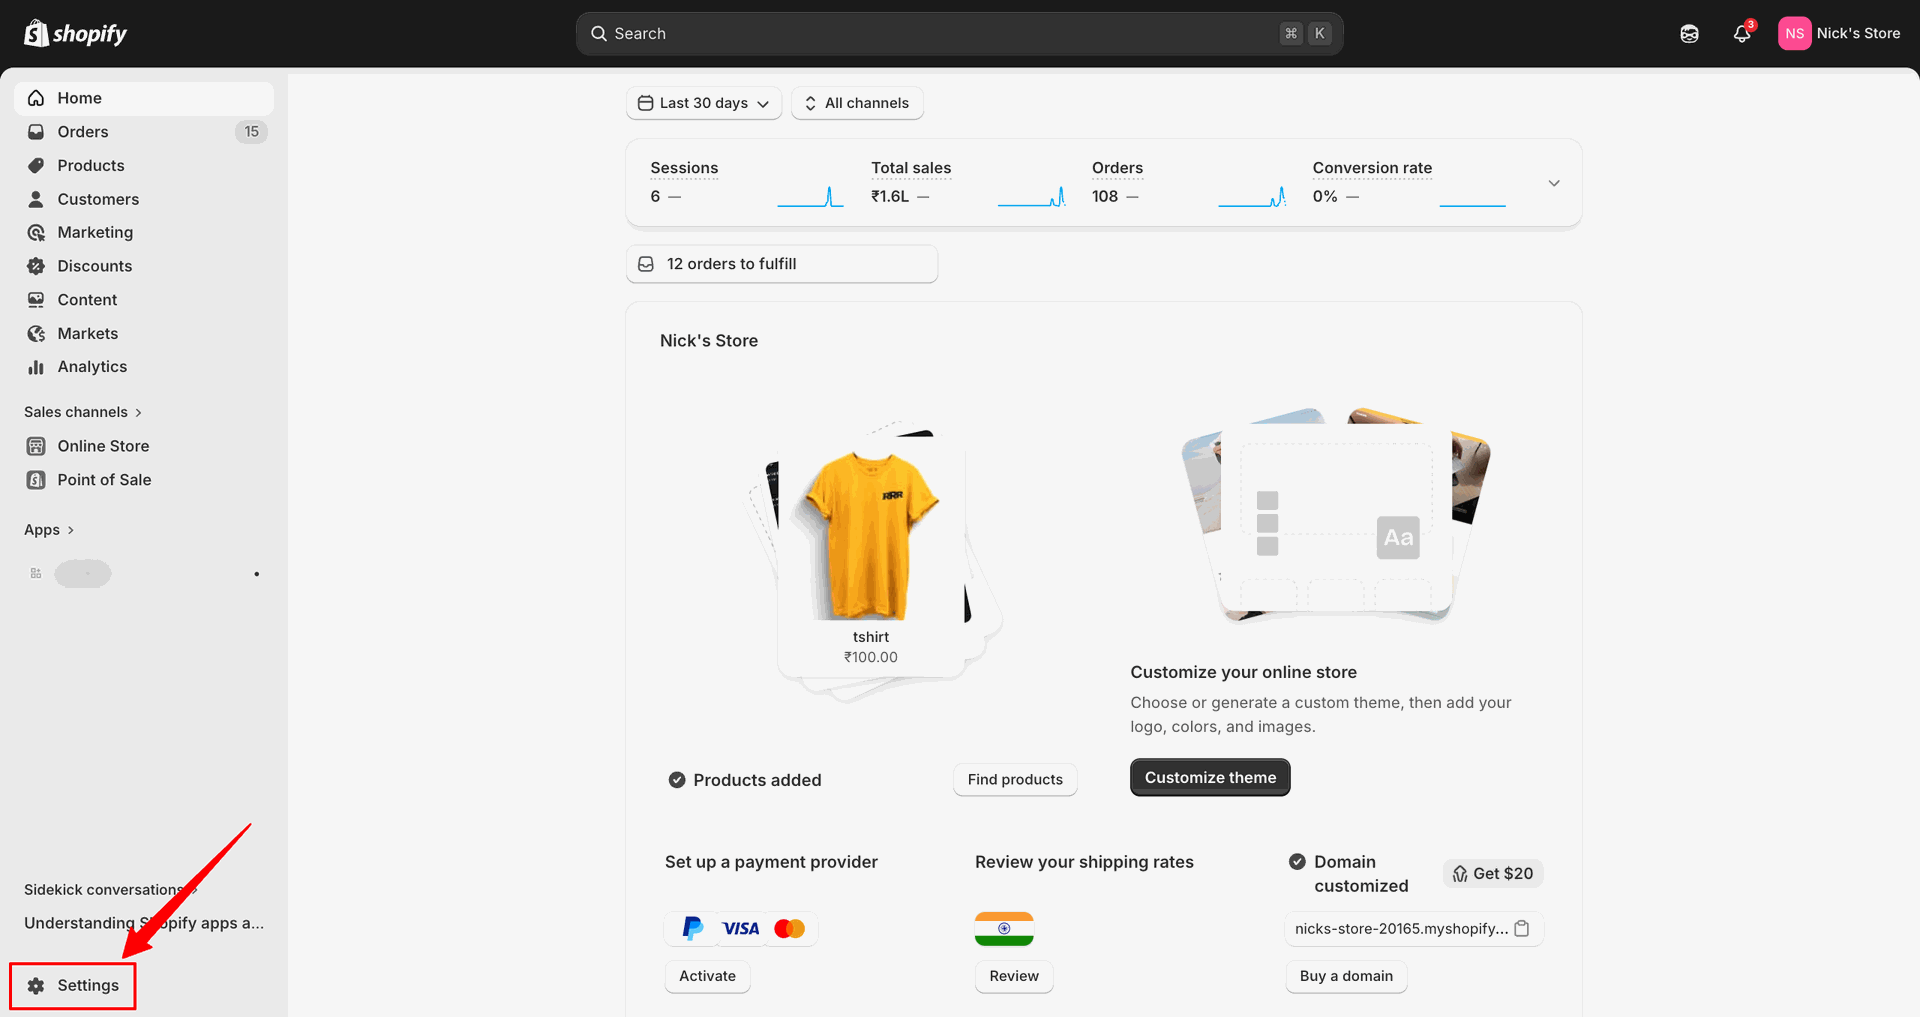
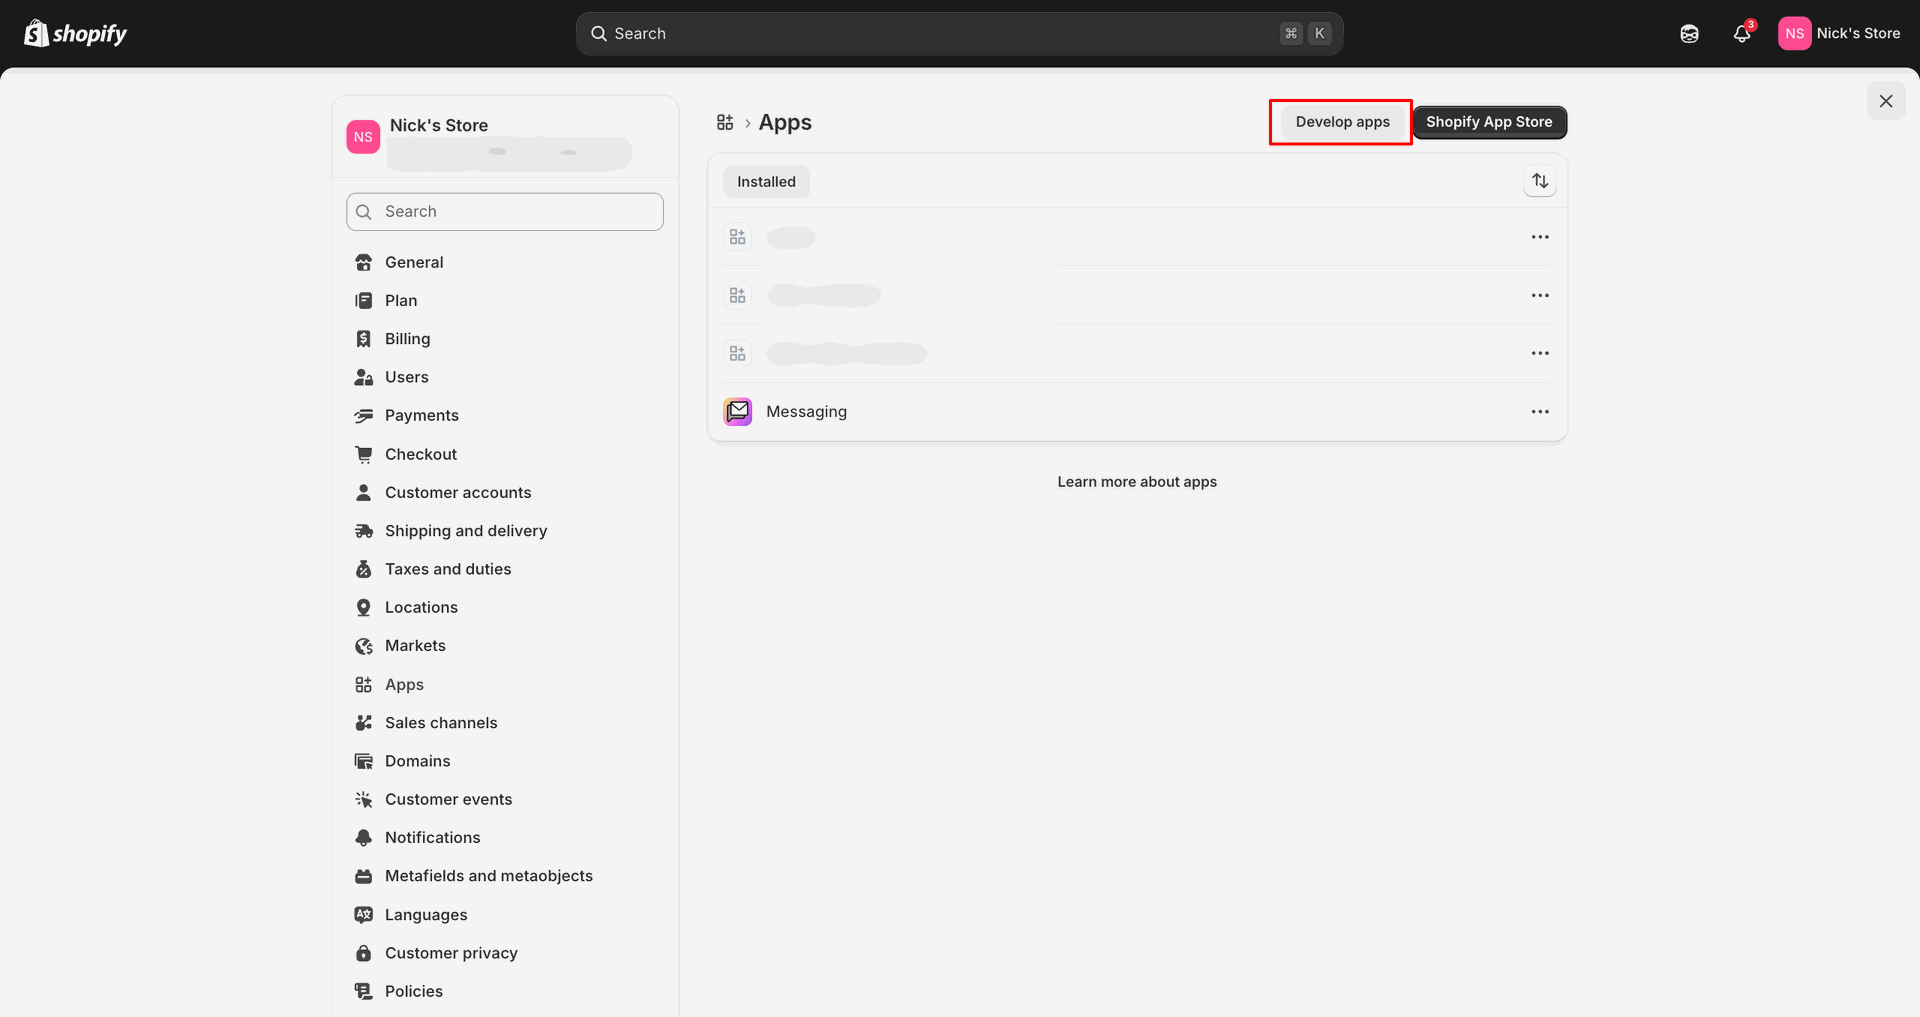
Click Develop apps from the Apps page to manage custom Shopify integrations.
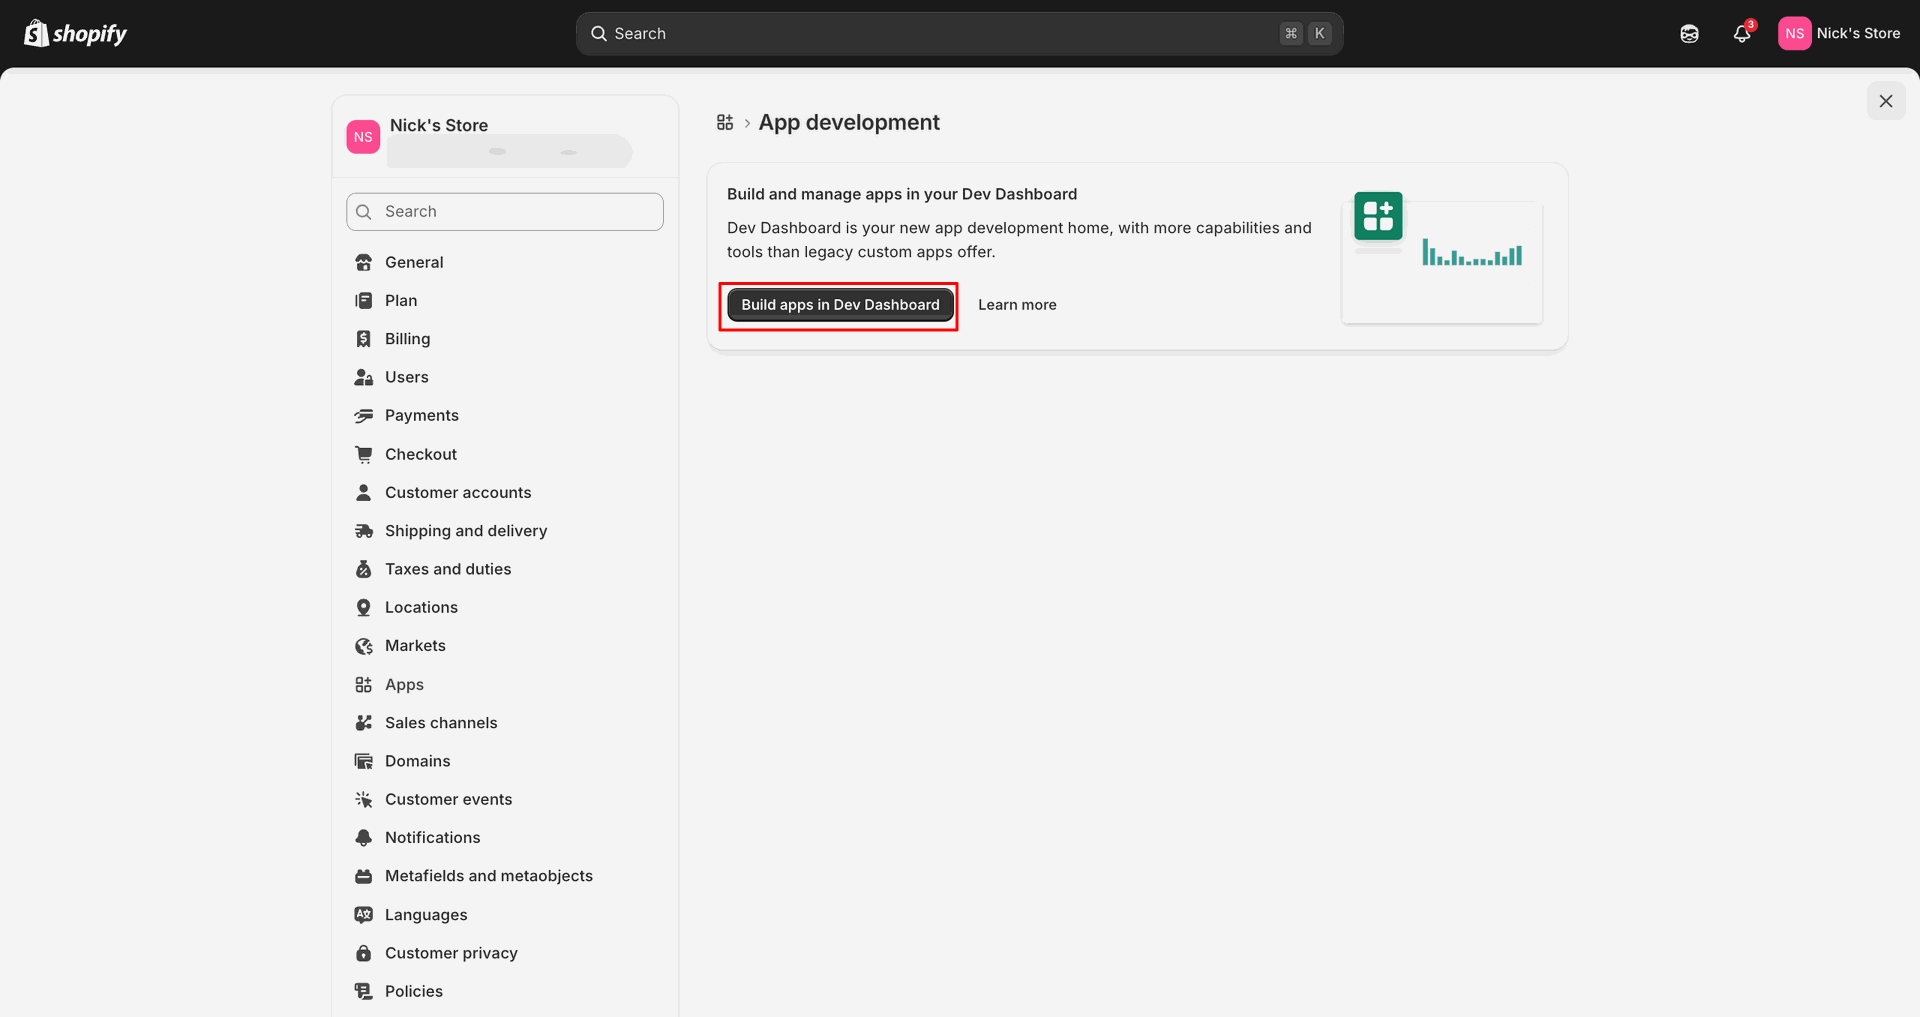
Select Build apps in Dev Dashboard to continue with app development.
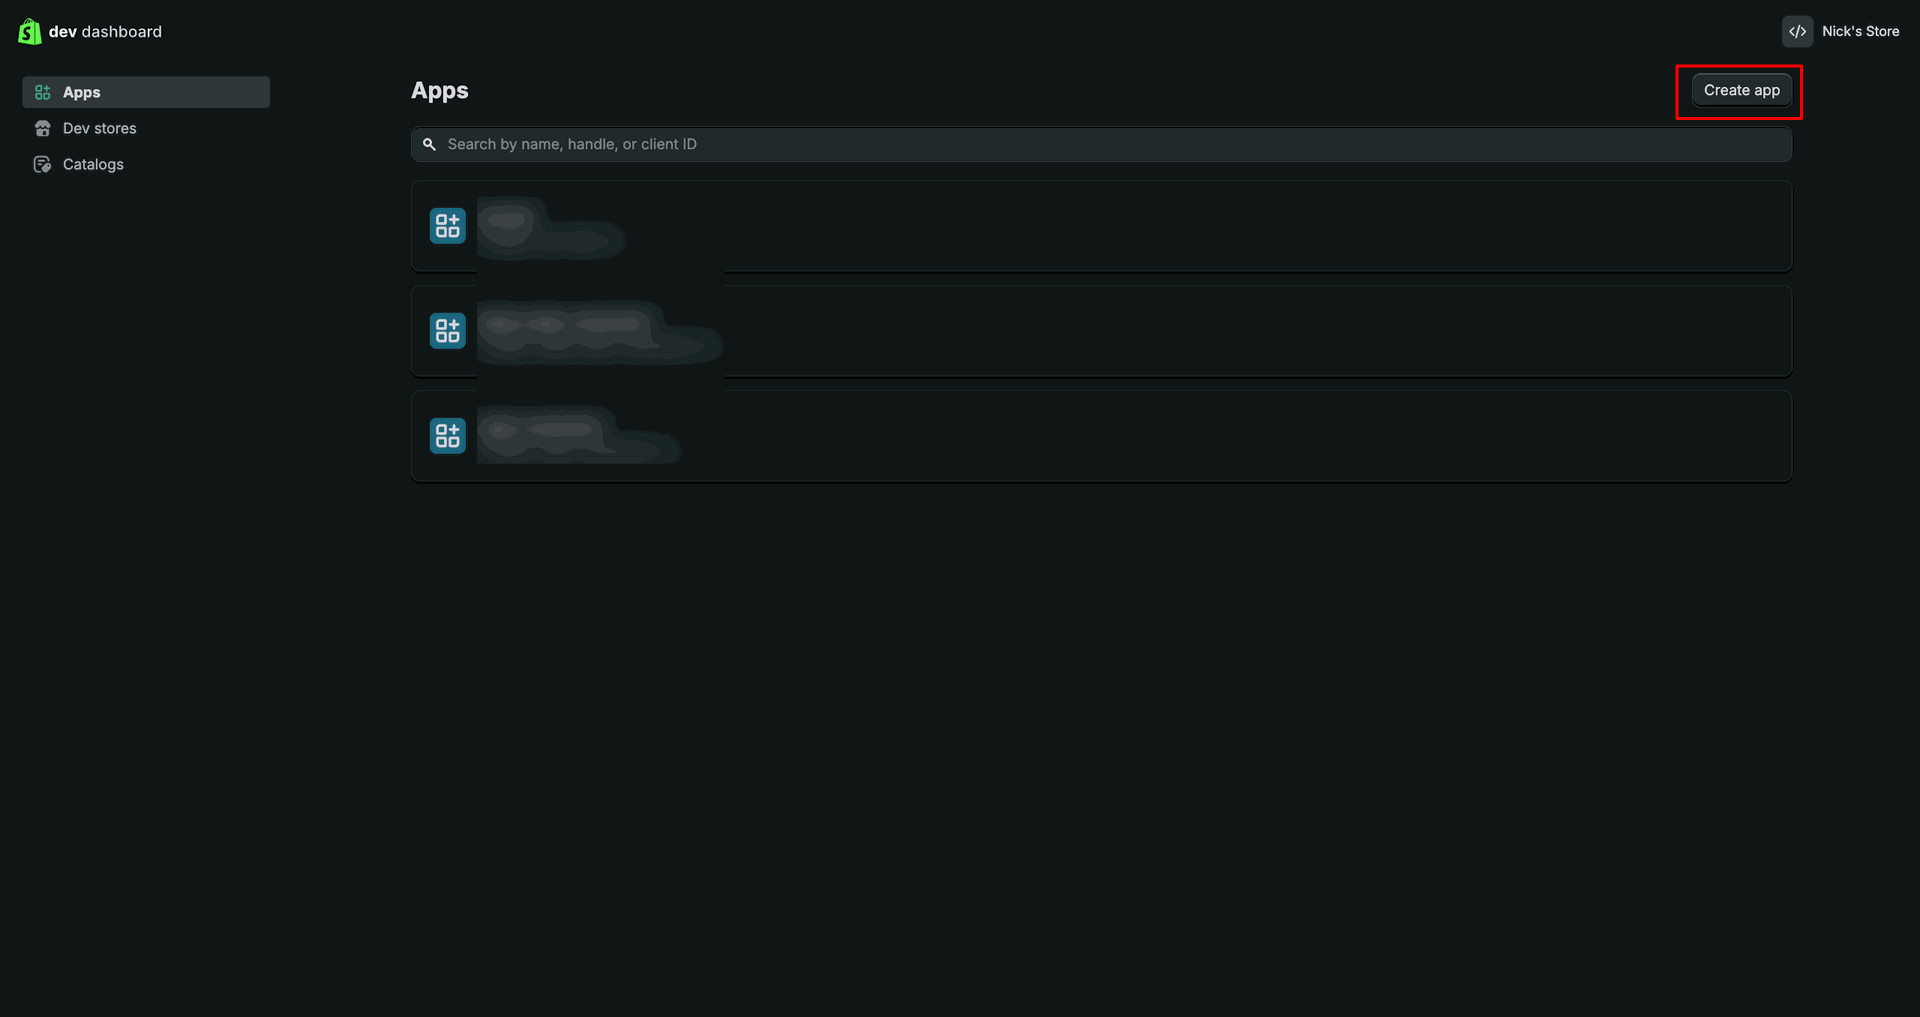
Press Create app in Dev Dashboard to create a new Shopify application.
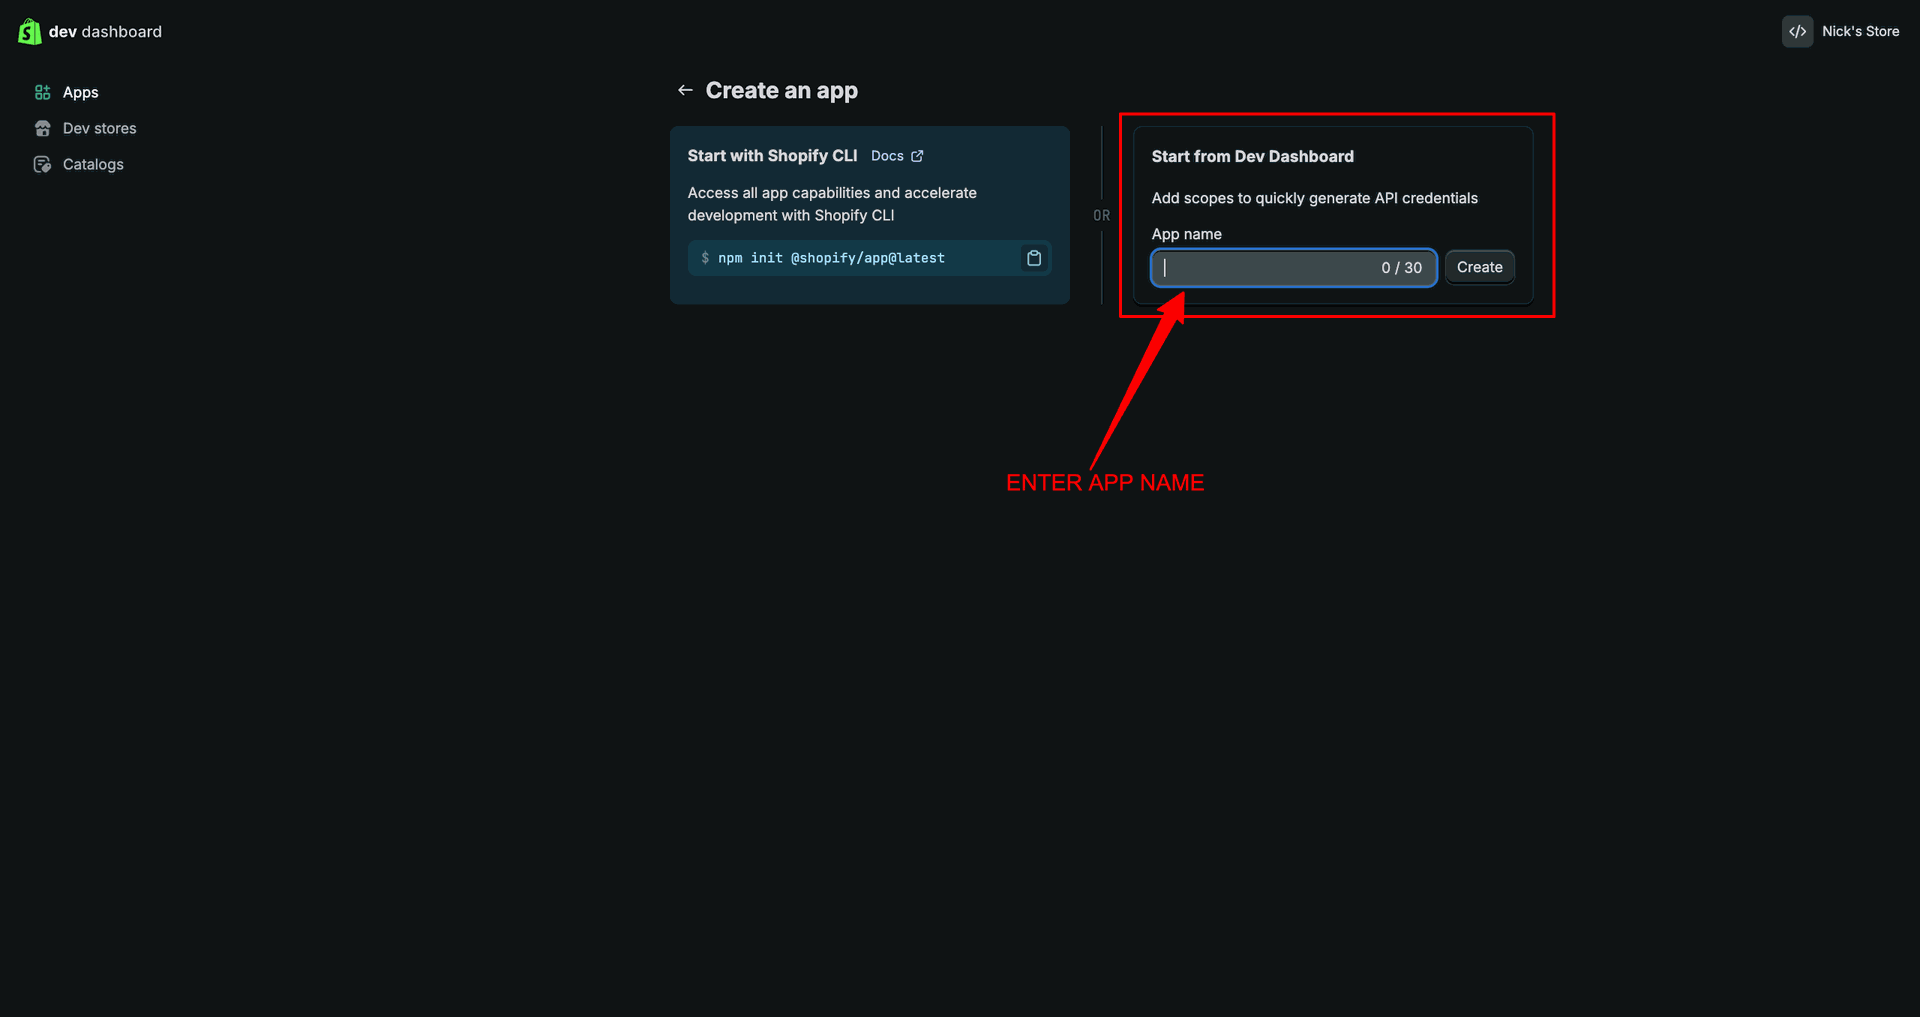
Enter the app name and click Create to generate the custom app.
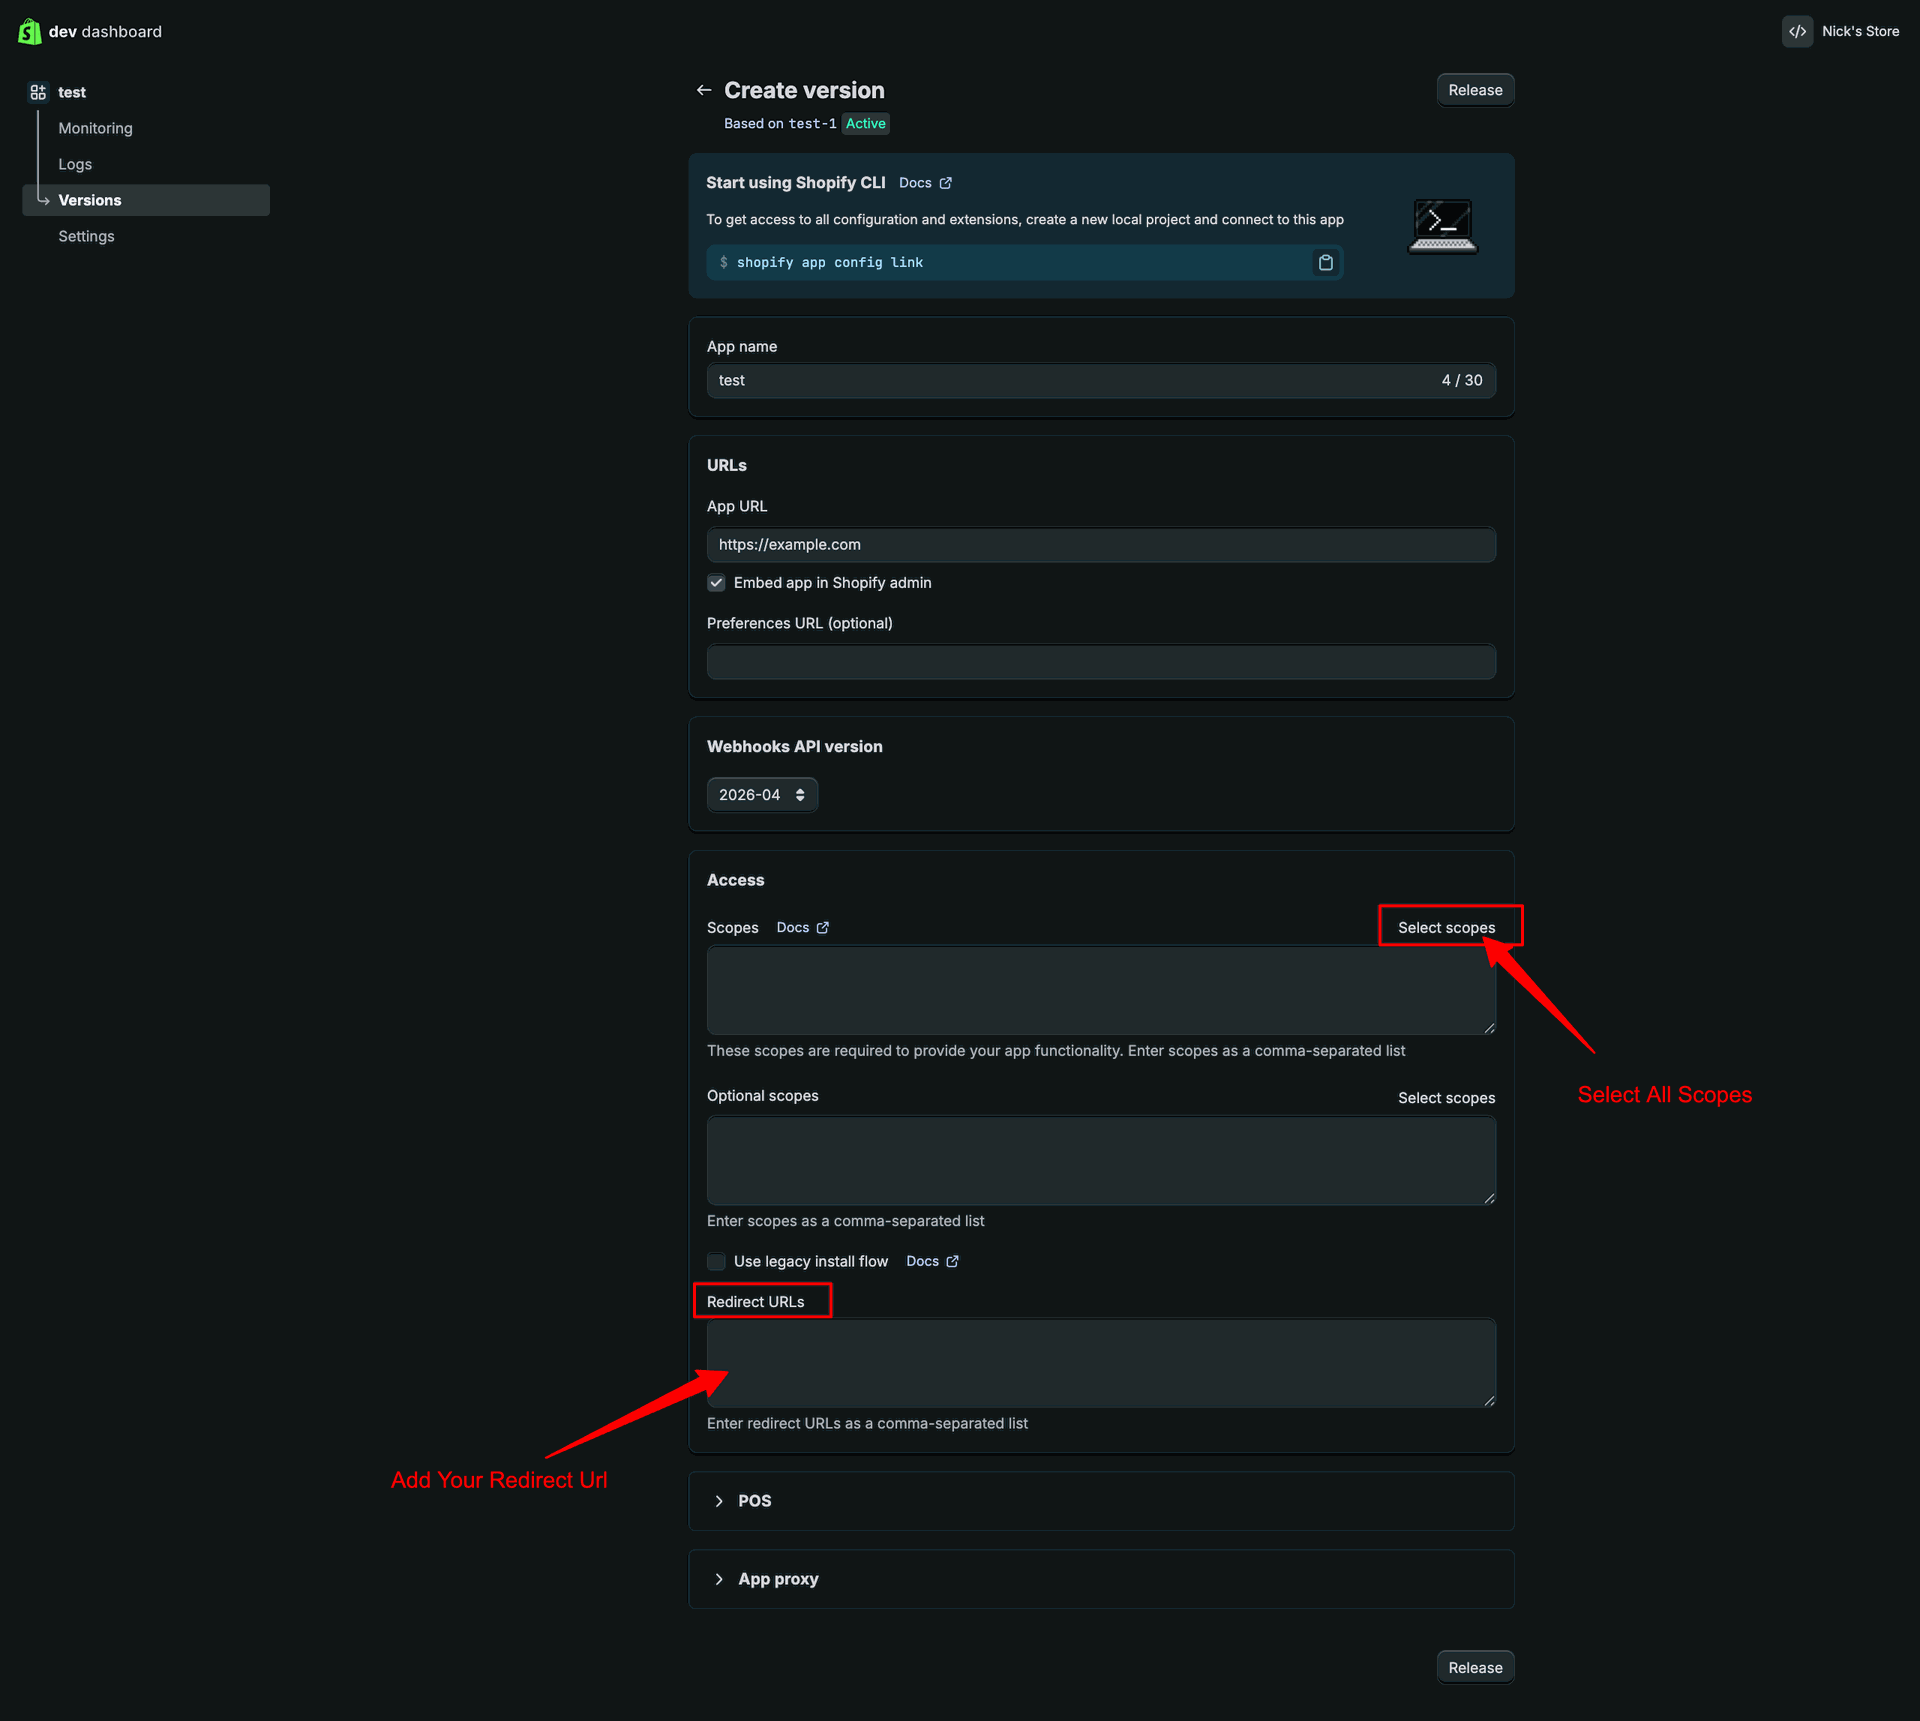
Add the redirect URL, choose required scopes, and click Release to continue.
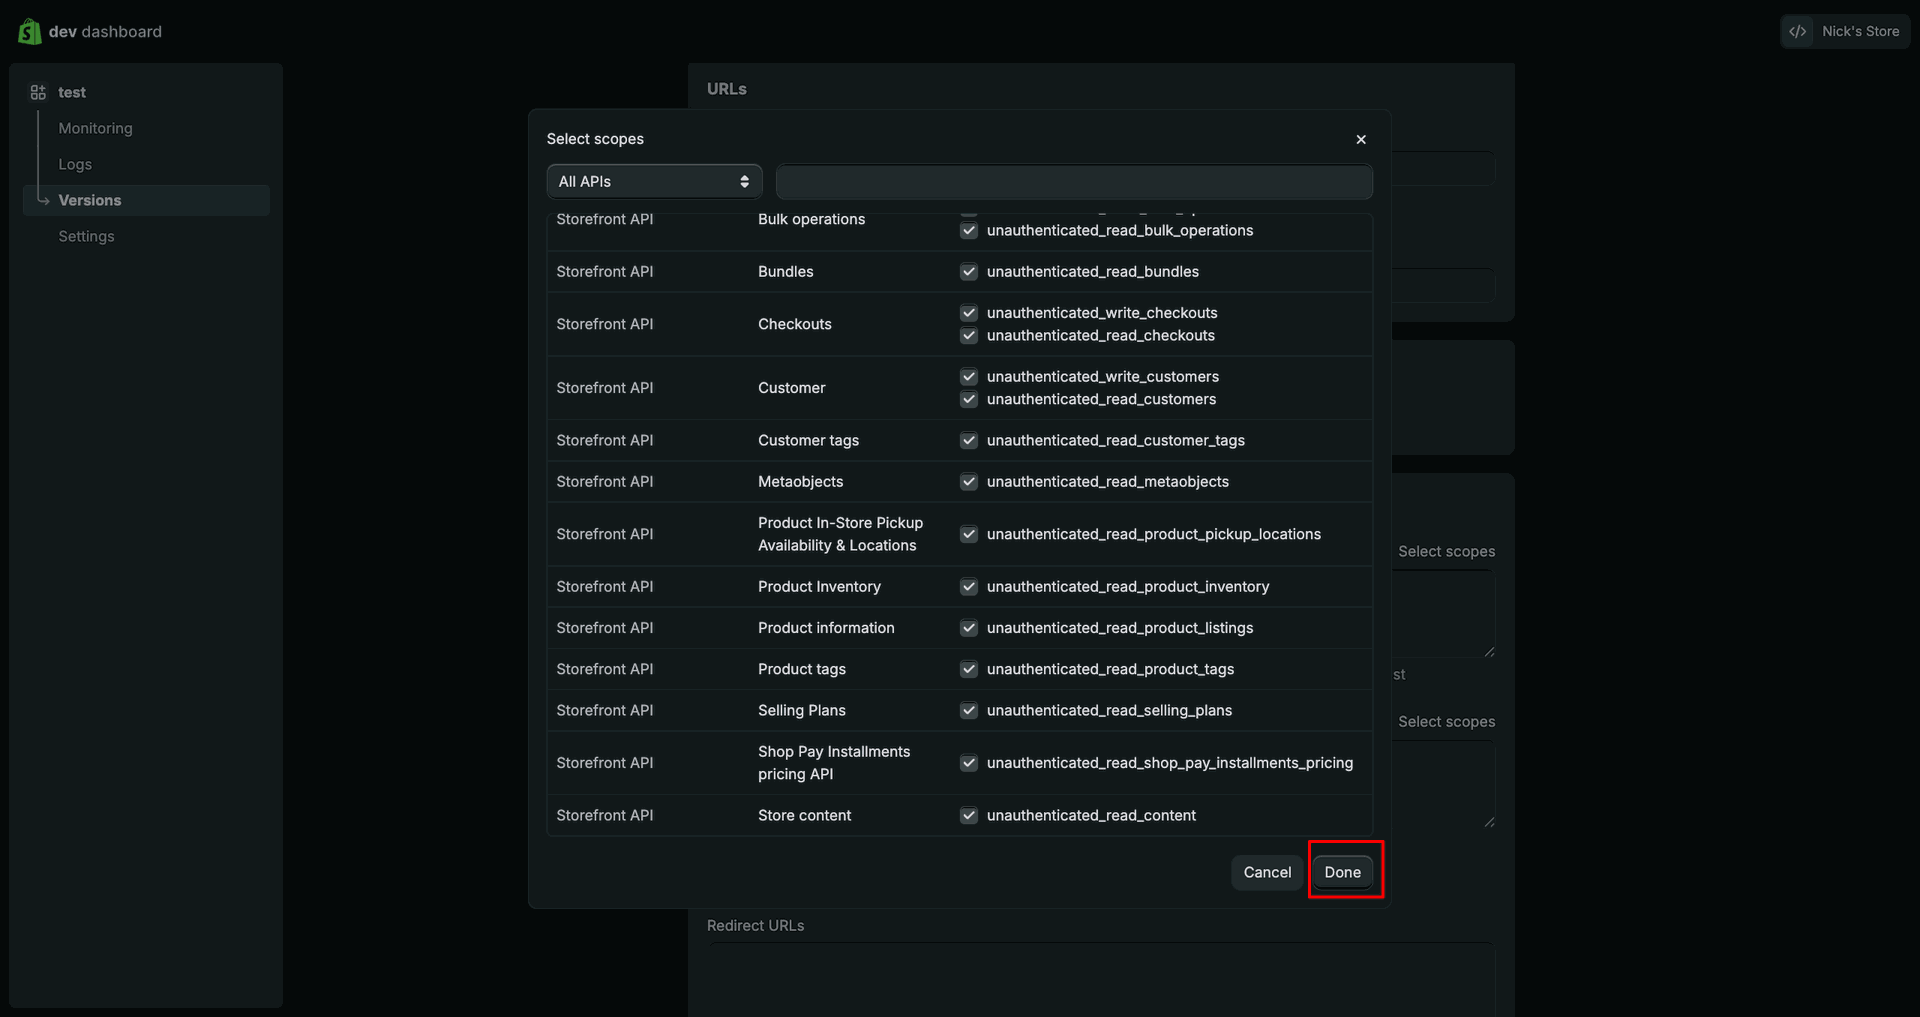
Select the required API scopes, then click Done to confirm the selection.
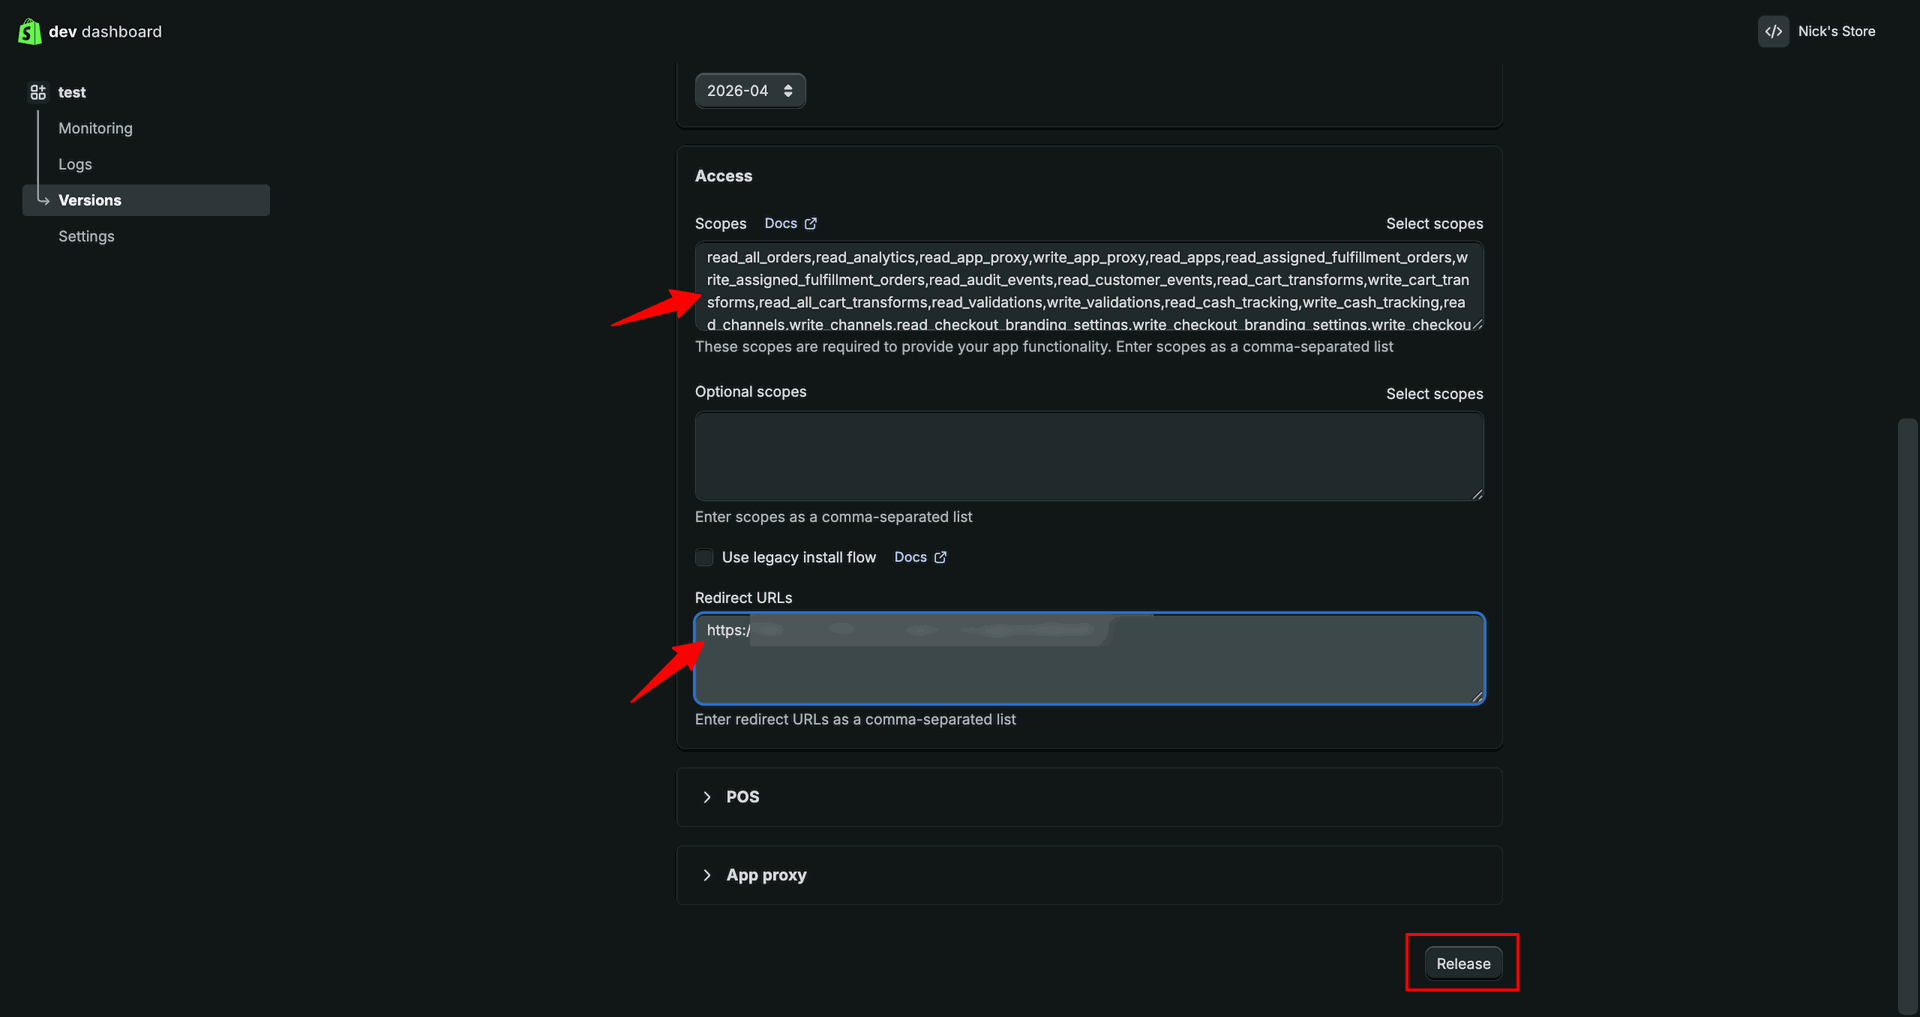
Review scopes and redirect URL, then click Release to publish the version.
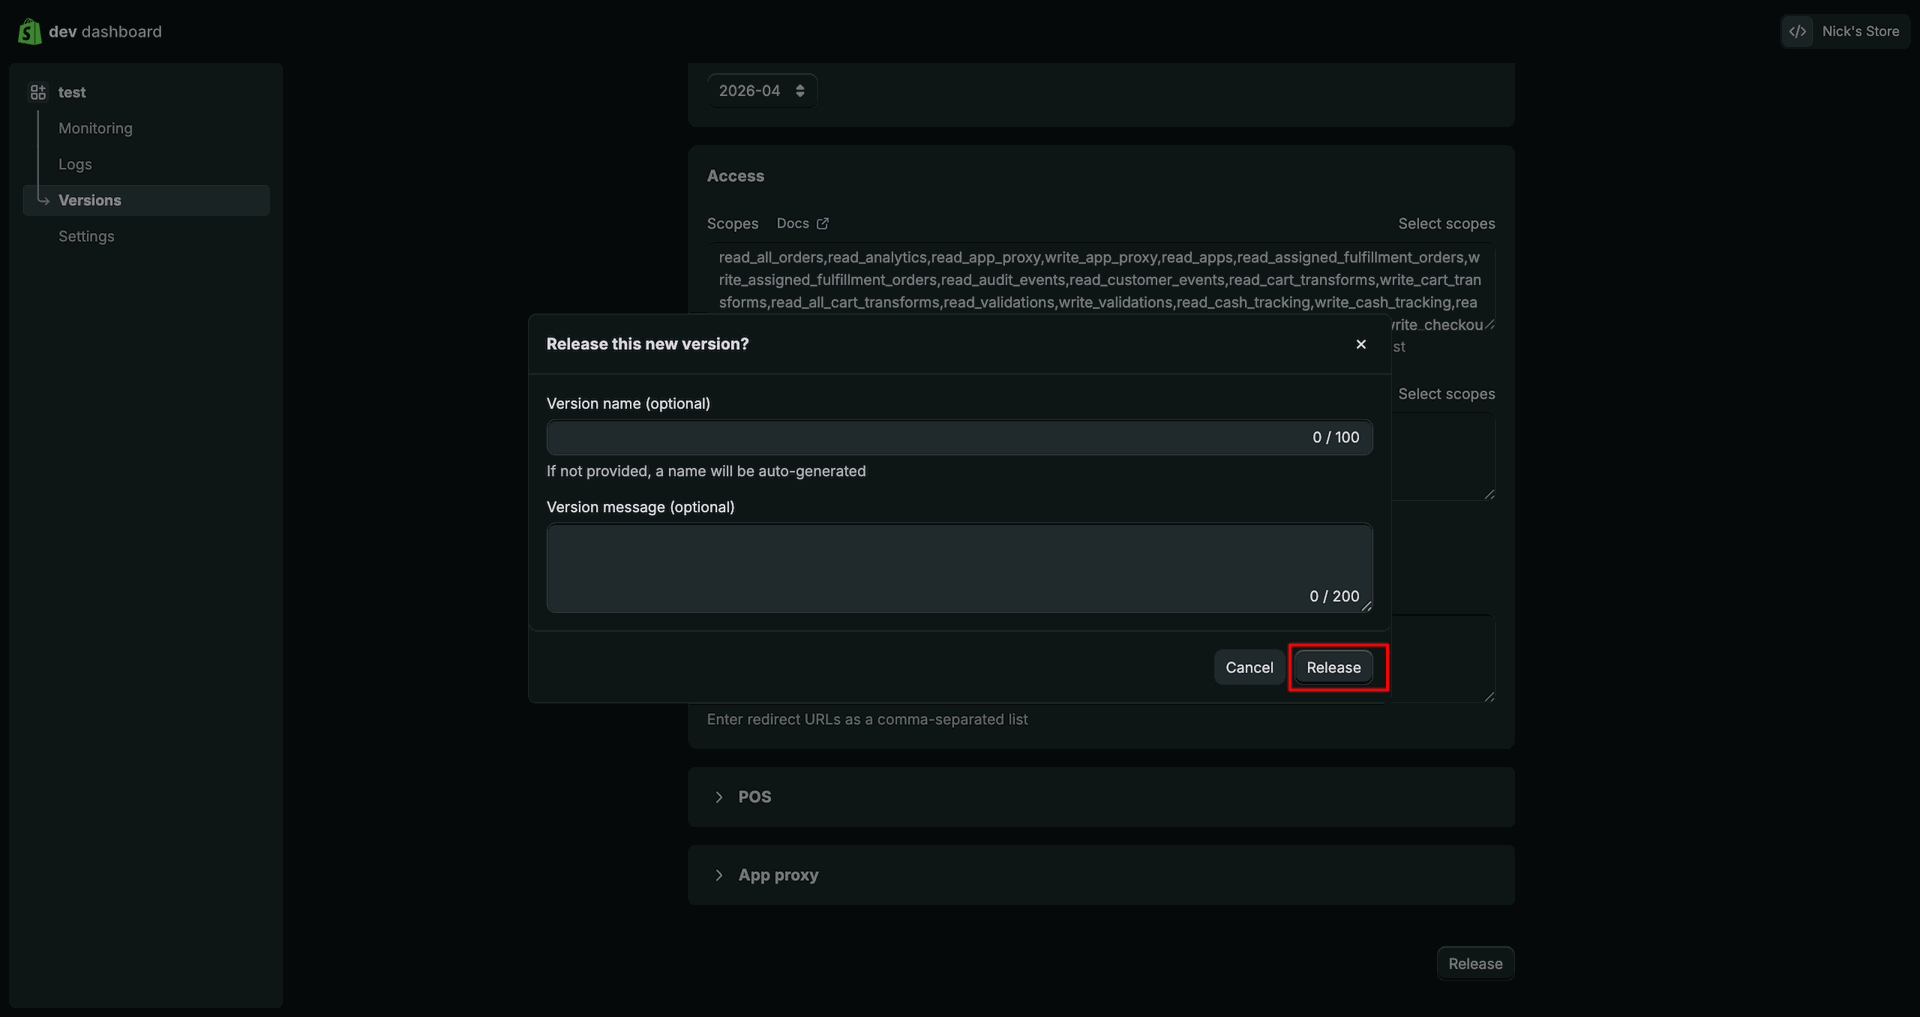
Confirm the version release popup by clicking Release to publish app changes.
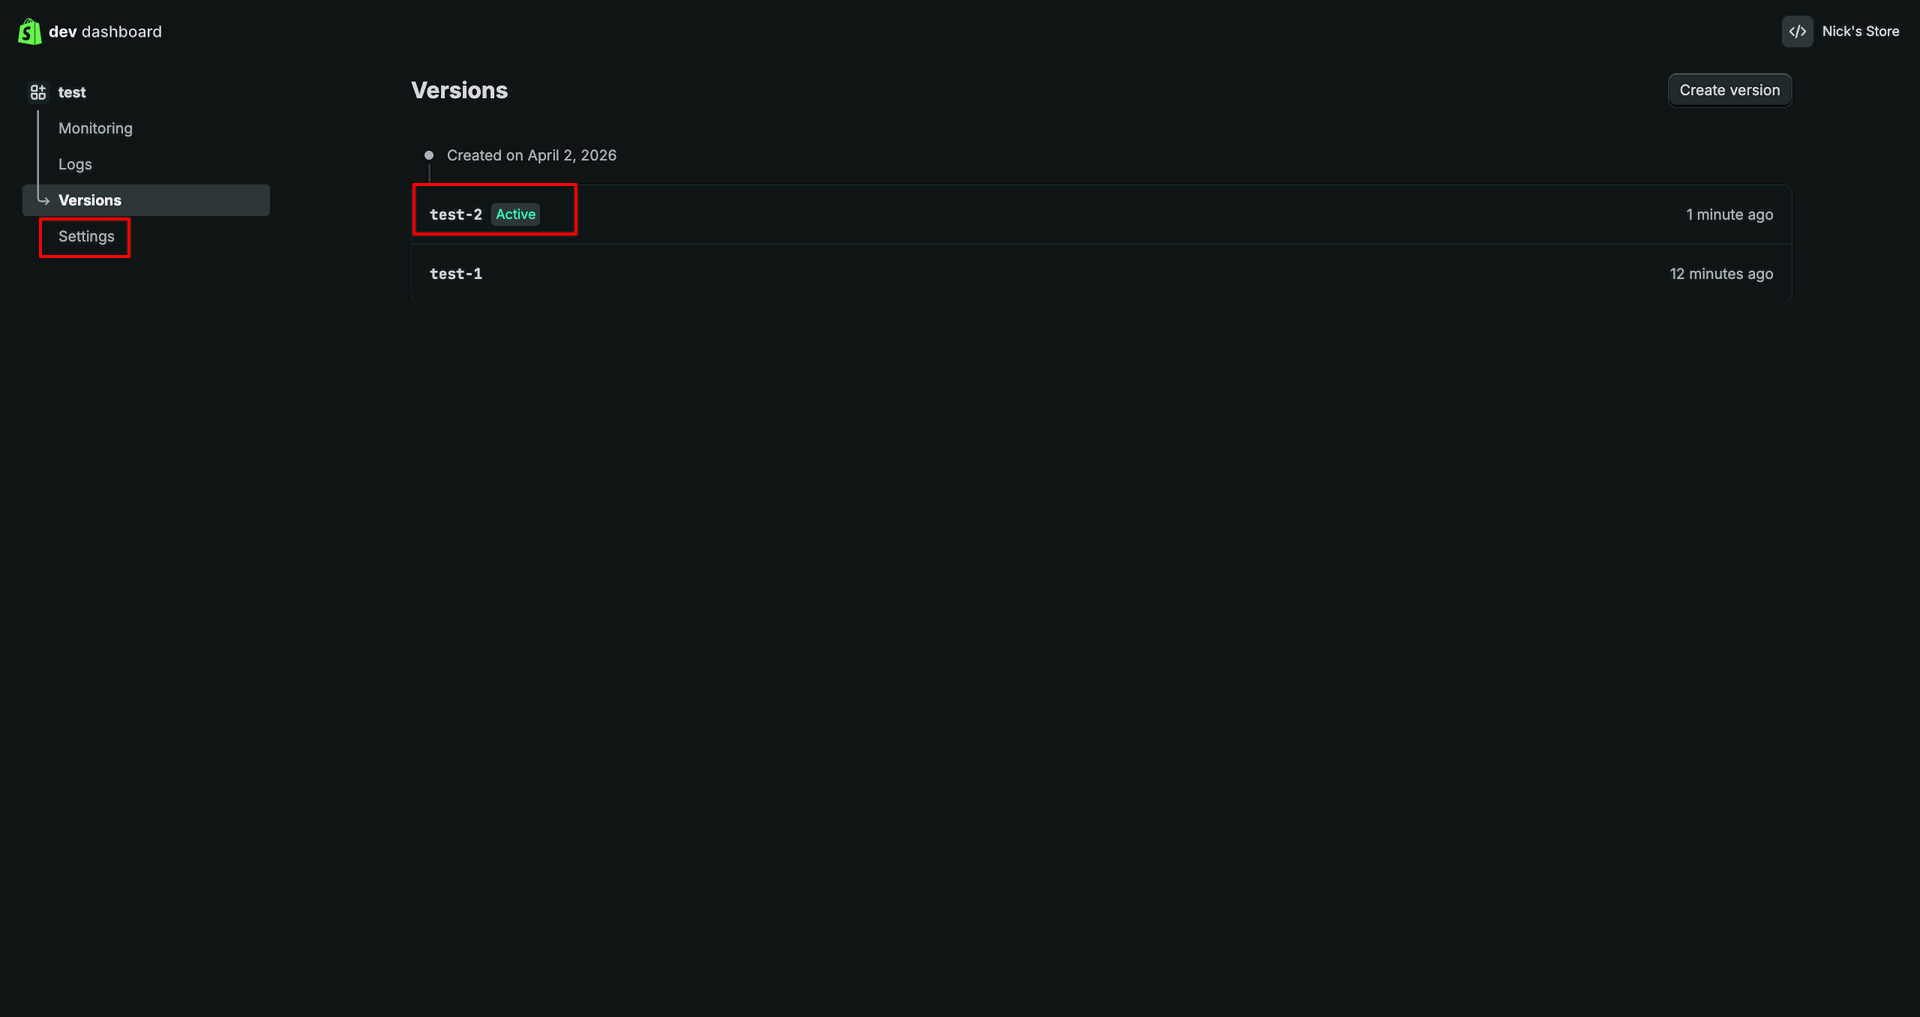
Open the created version from the Versions list to review published app details.
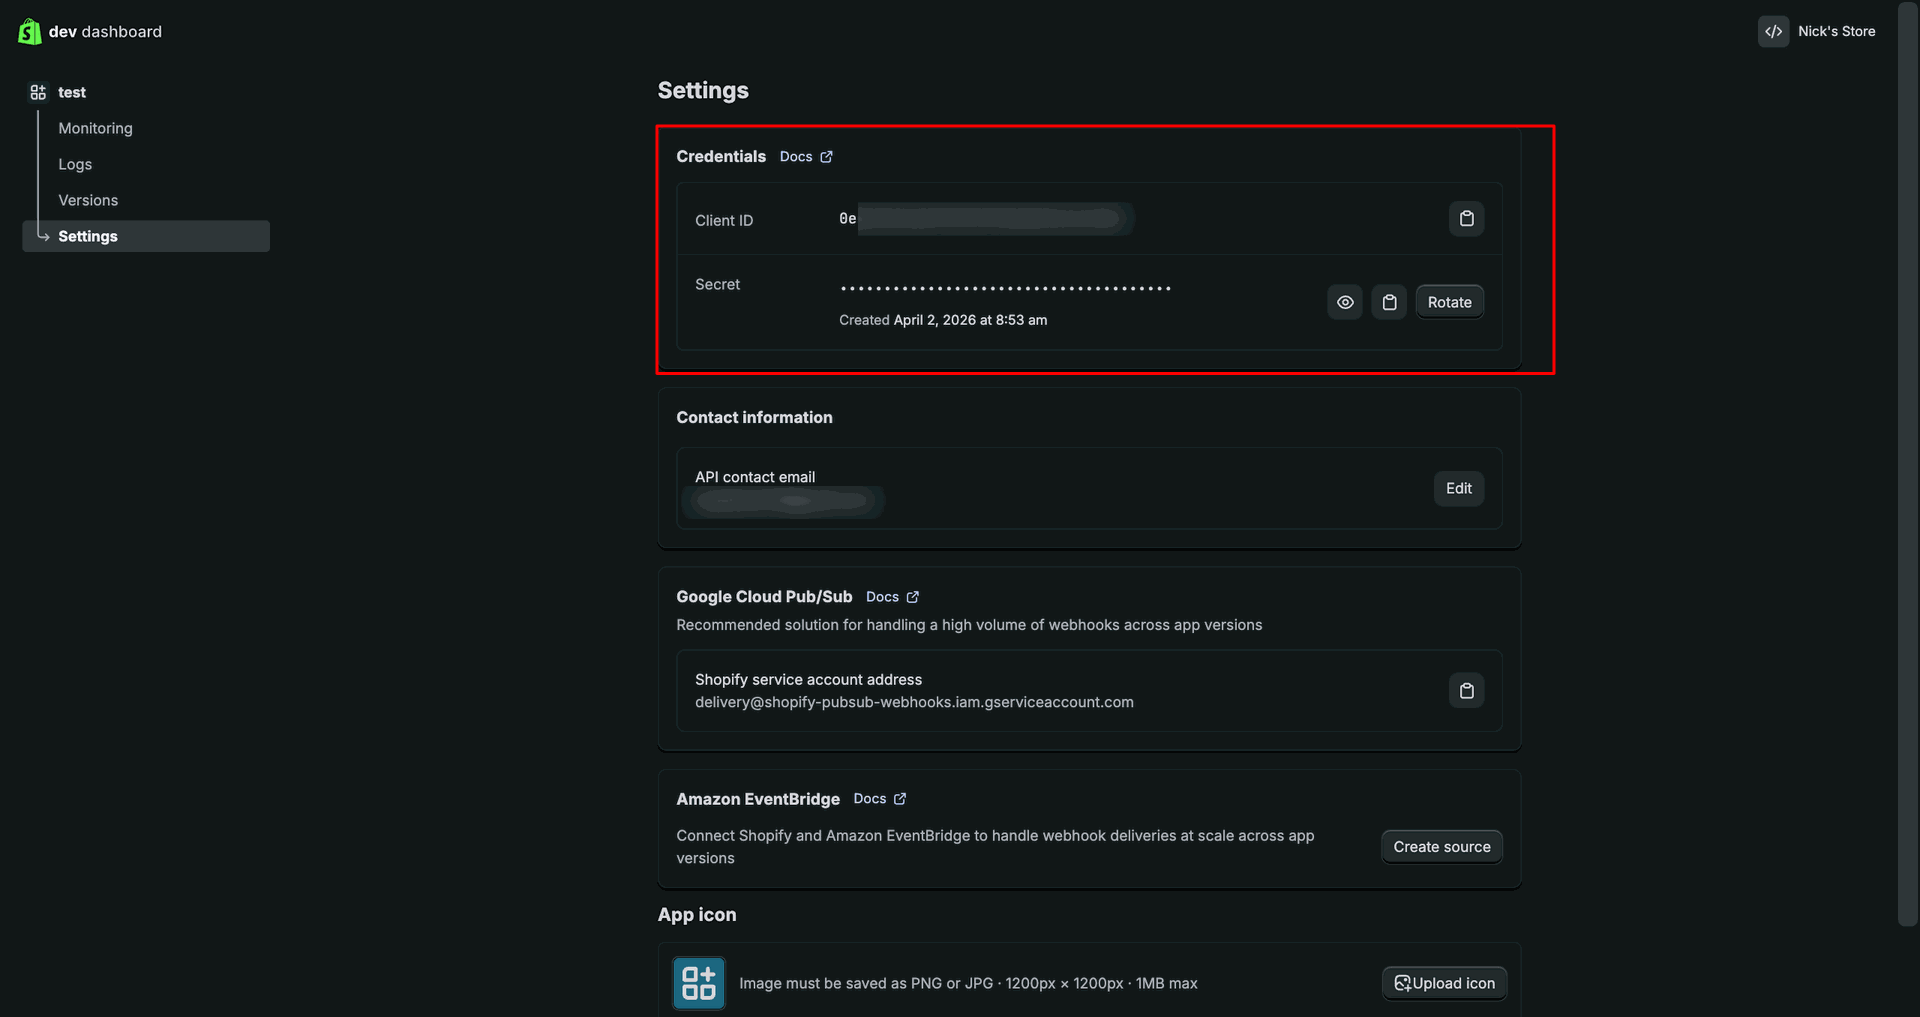
Review the generated client credentials from the Settings page before connecting Odoo.
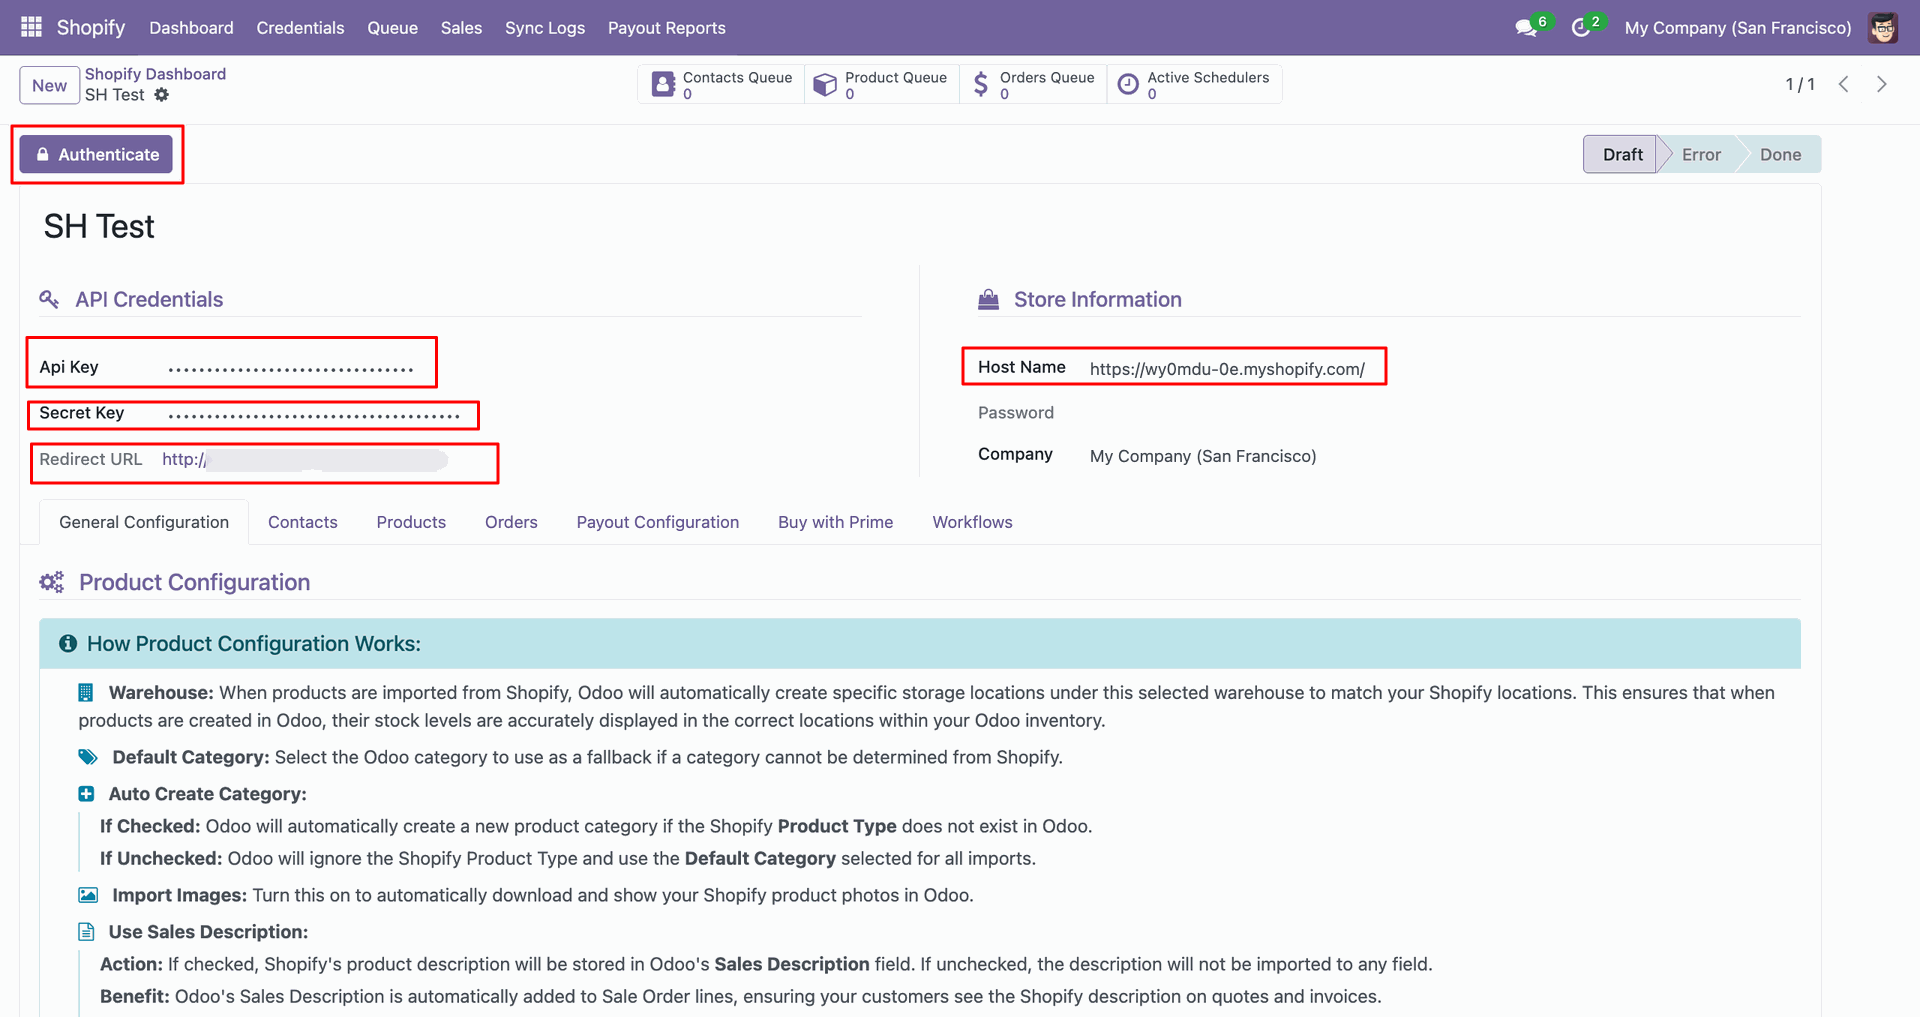
Paste the Shopify credentials into Odoo and click Authenticate to connect the store.
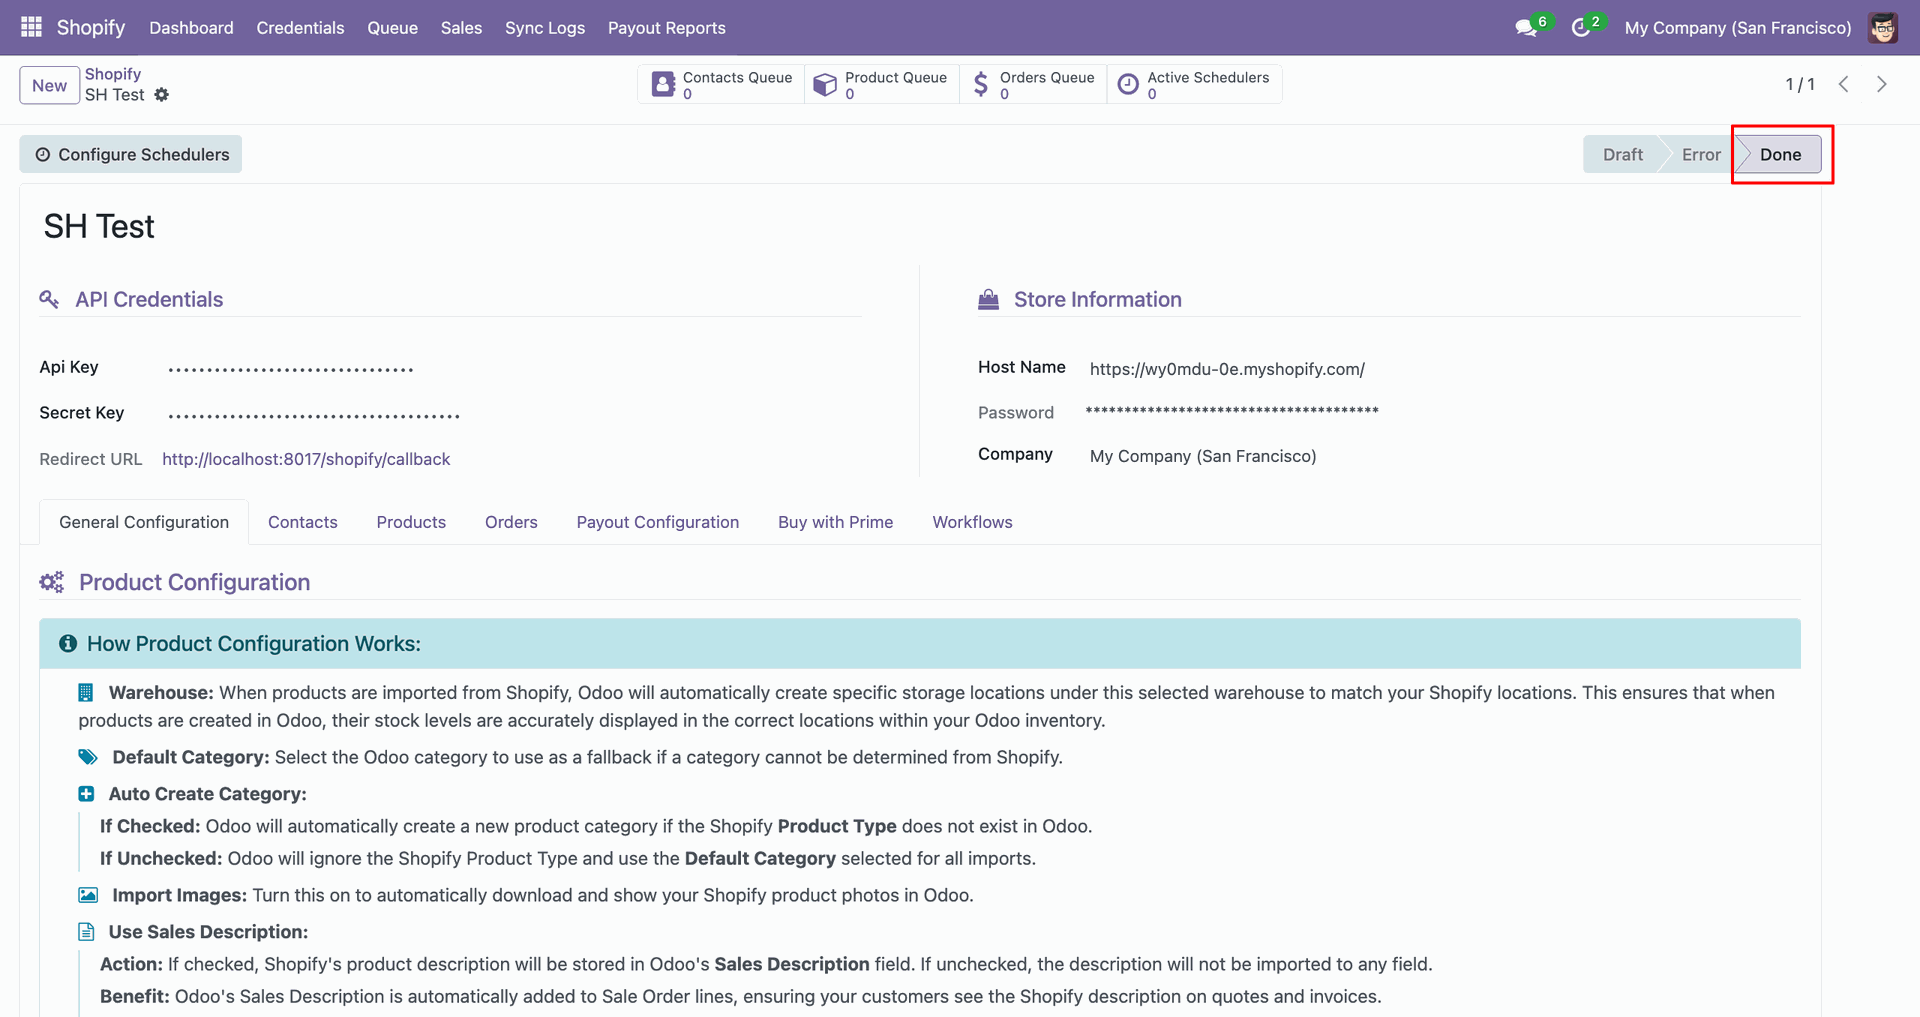
Verify the instance status changes to Done after successful Shopify authentication.
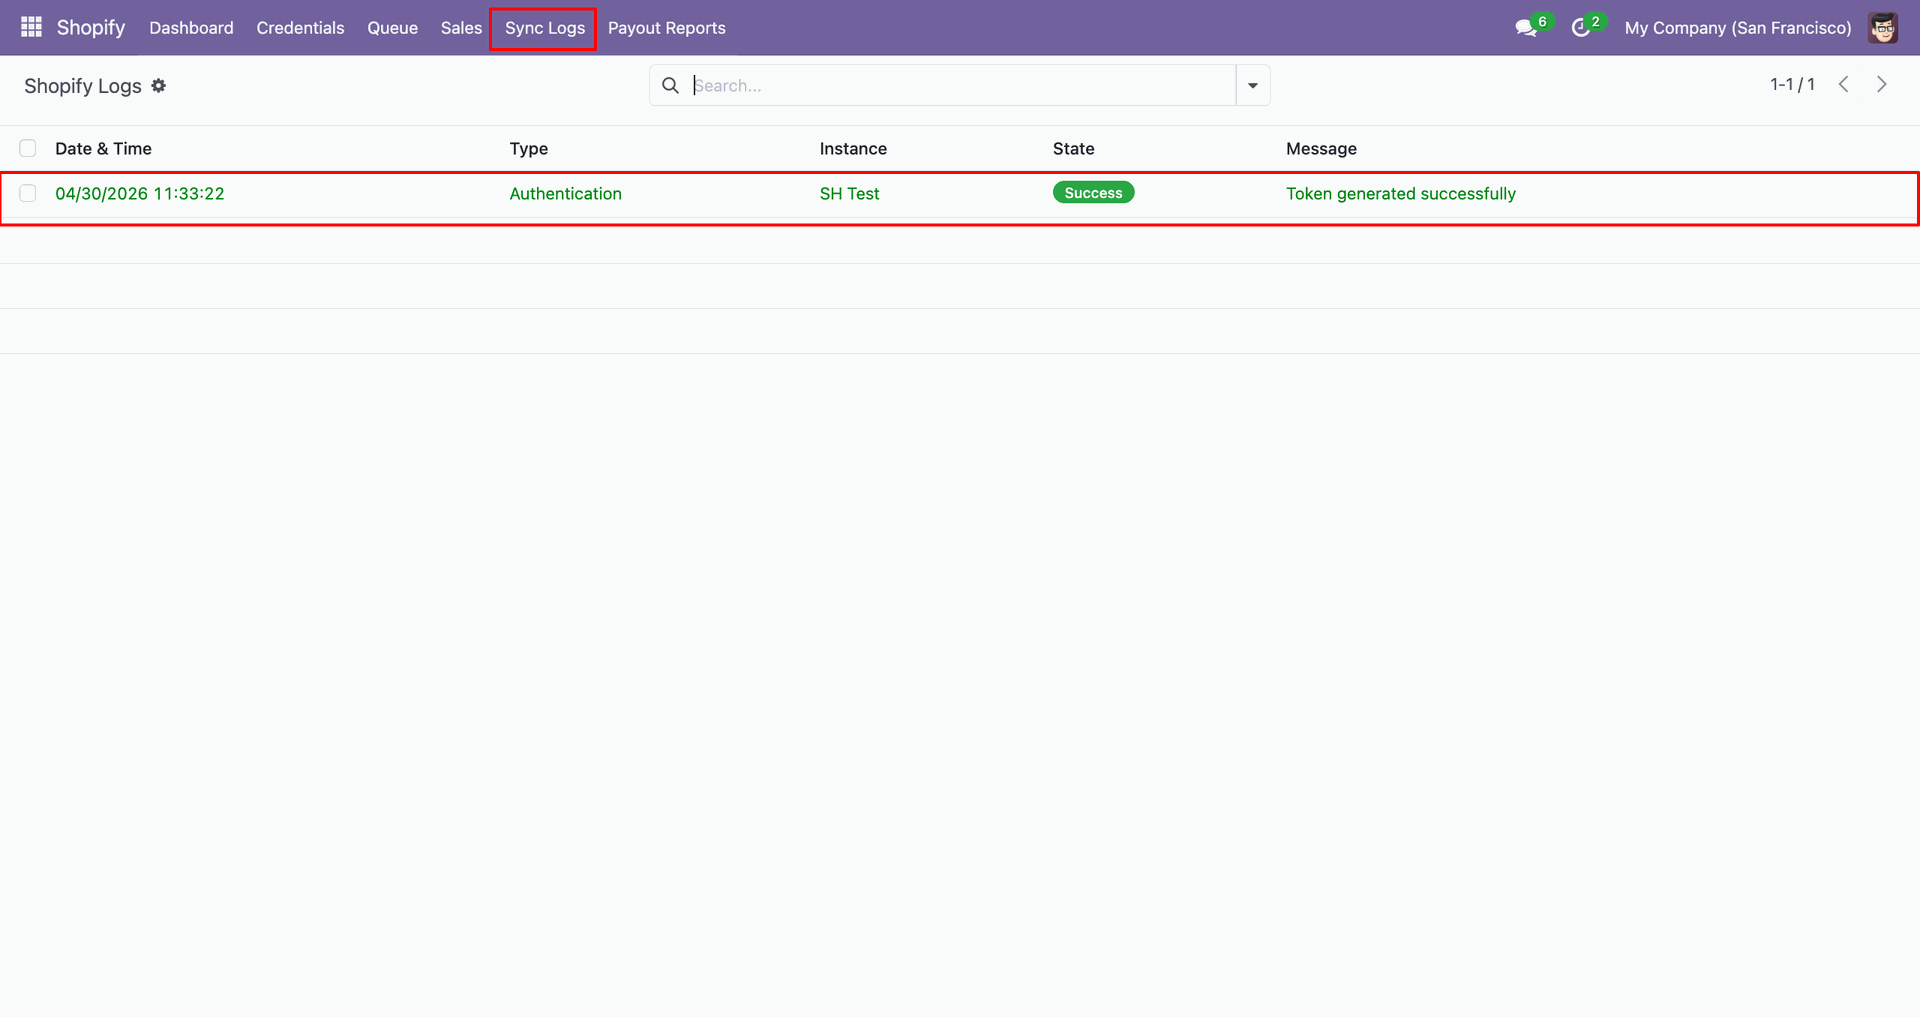
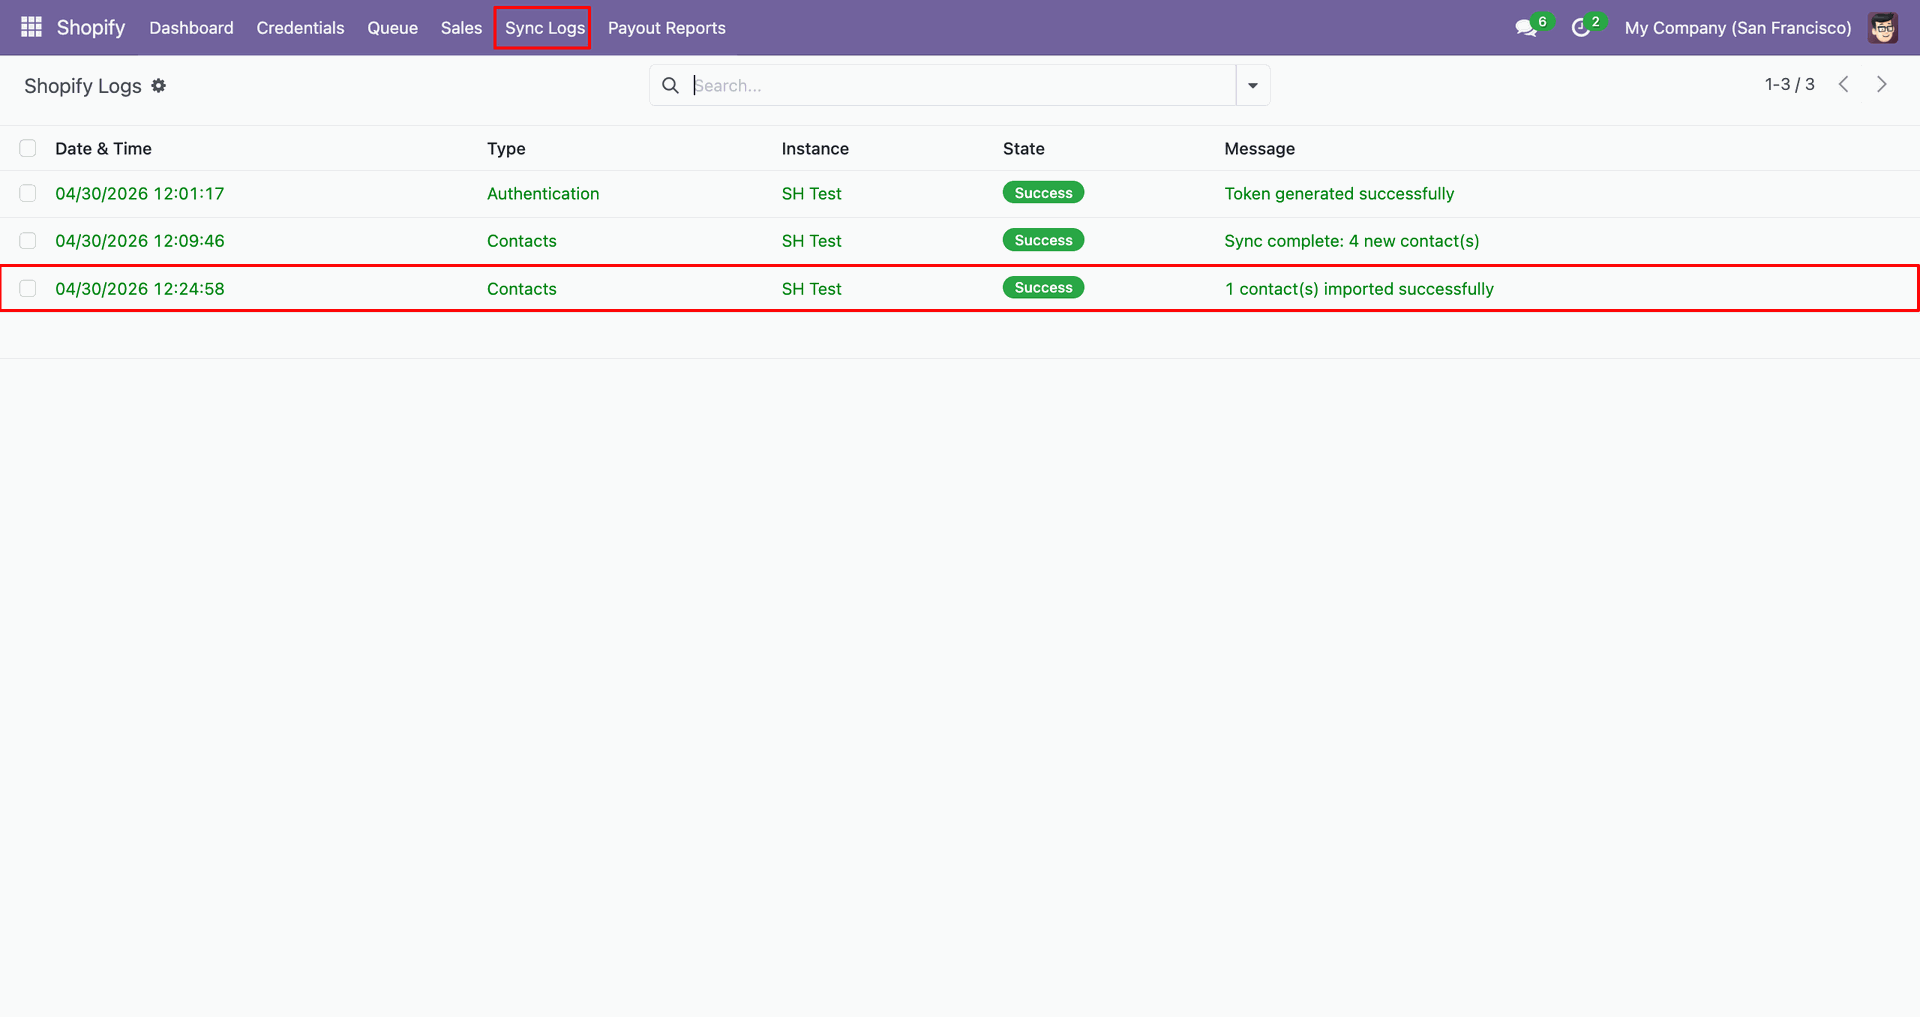
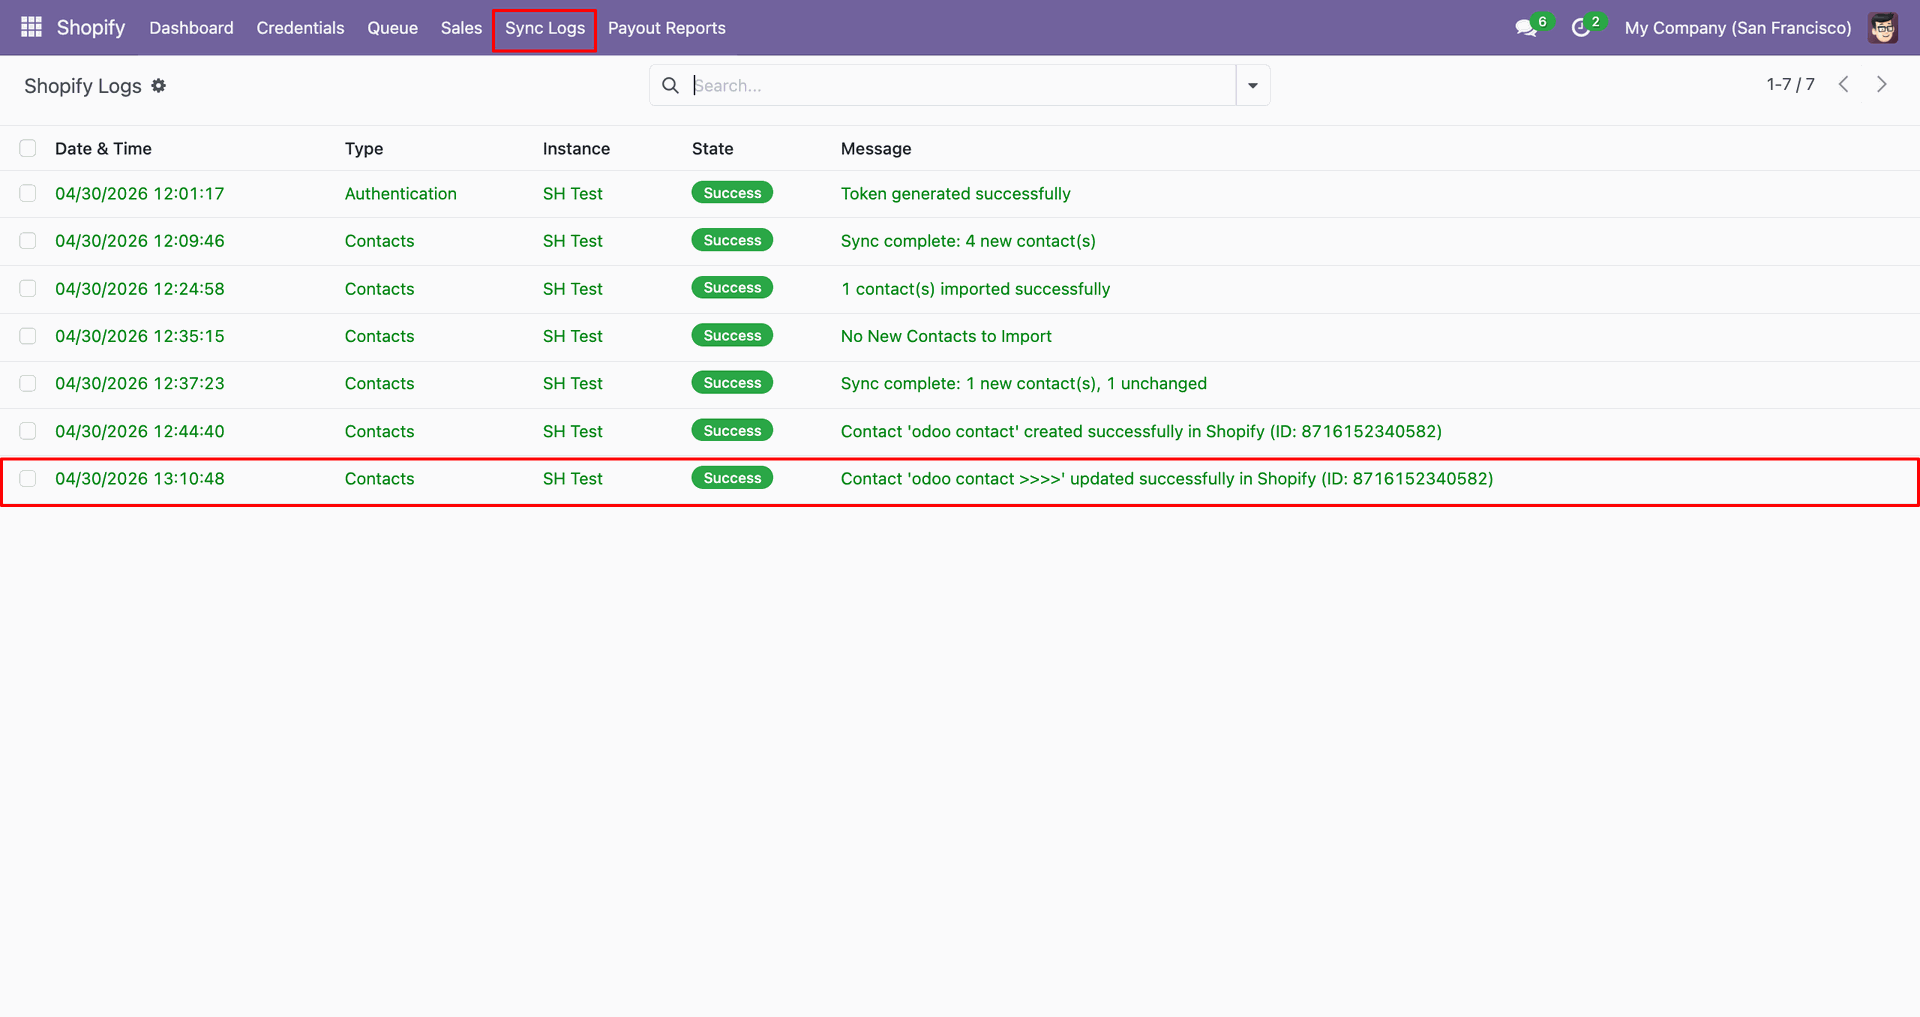
Check Sync Logs to confirm token generation completed successfully for the Shopify instance.
Workflow
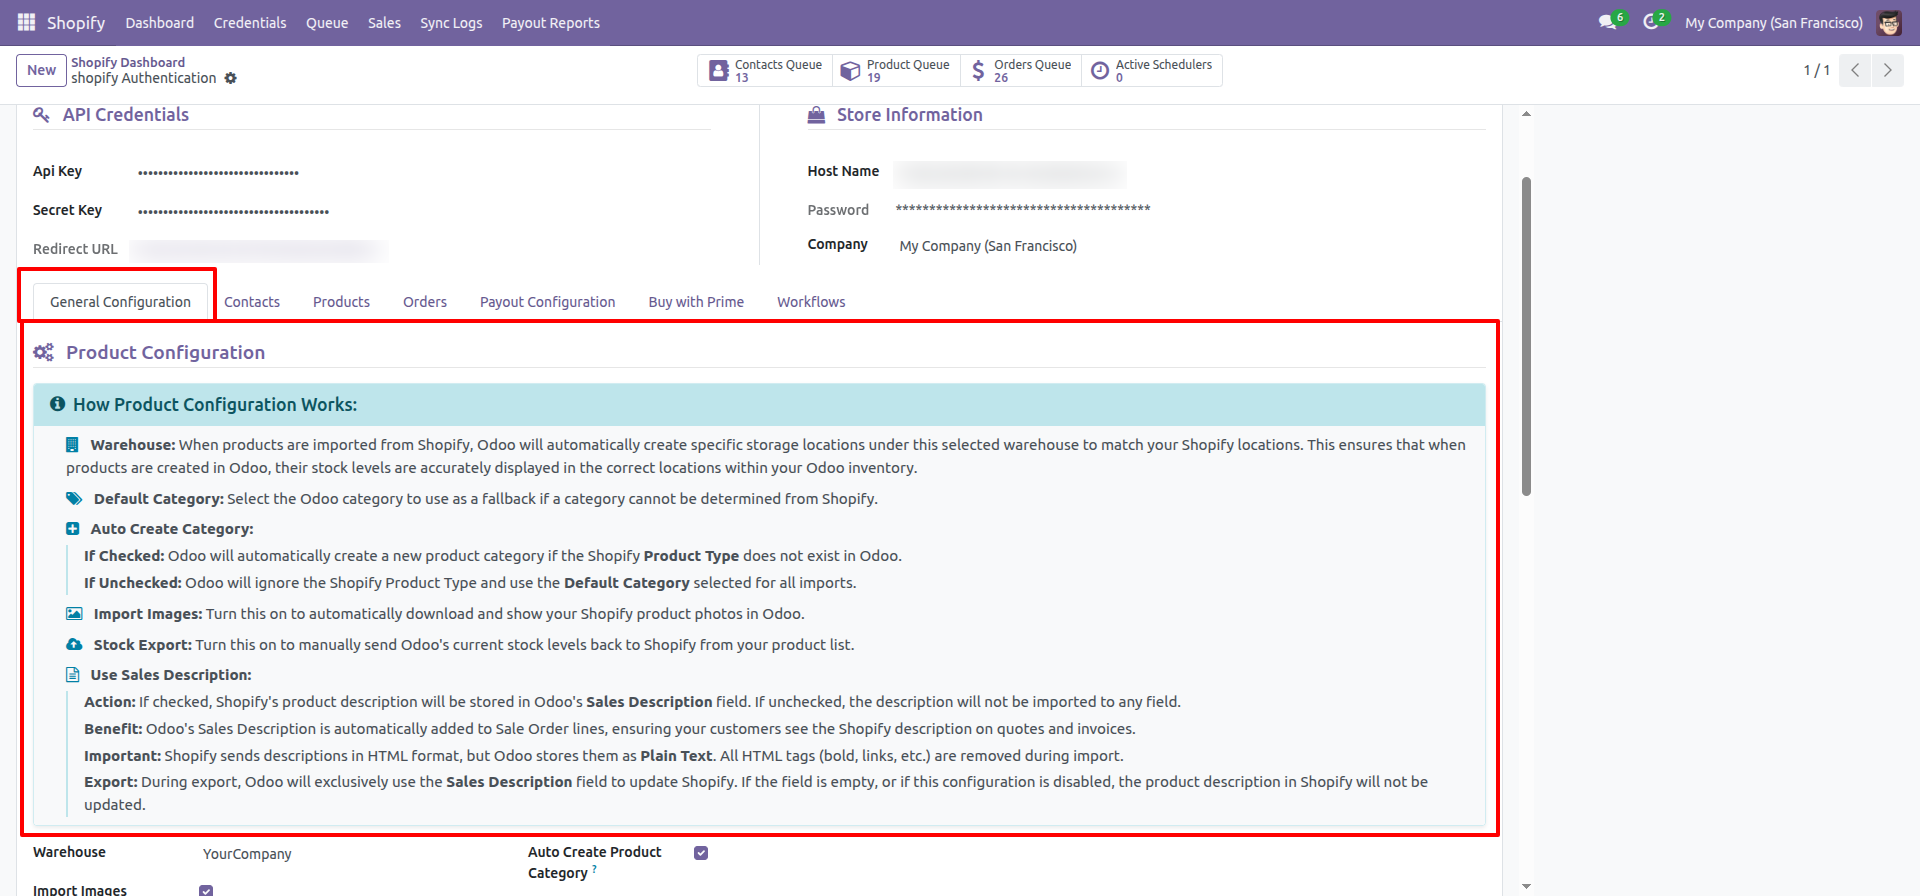
Open the Products tab to review product configuration before importing Shopify items.
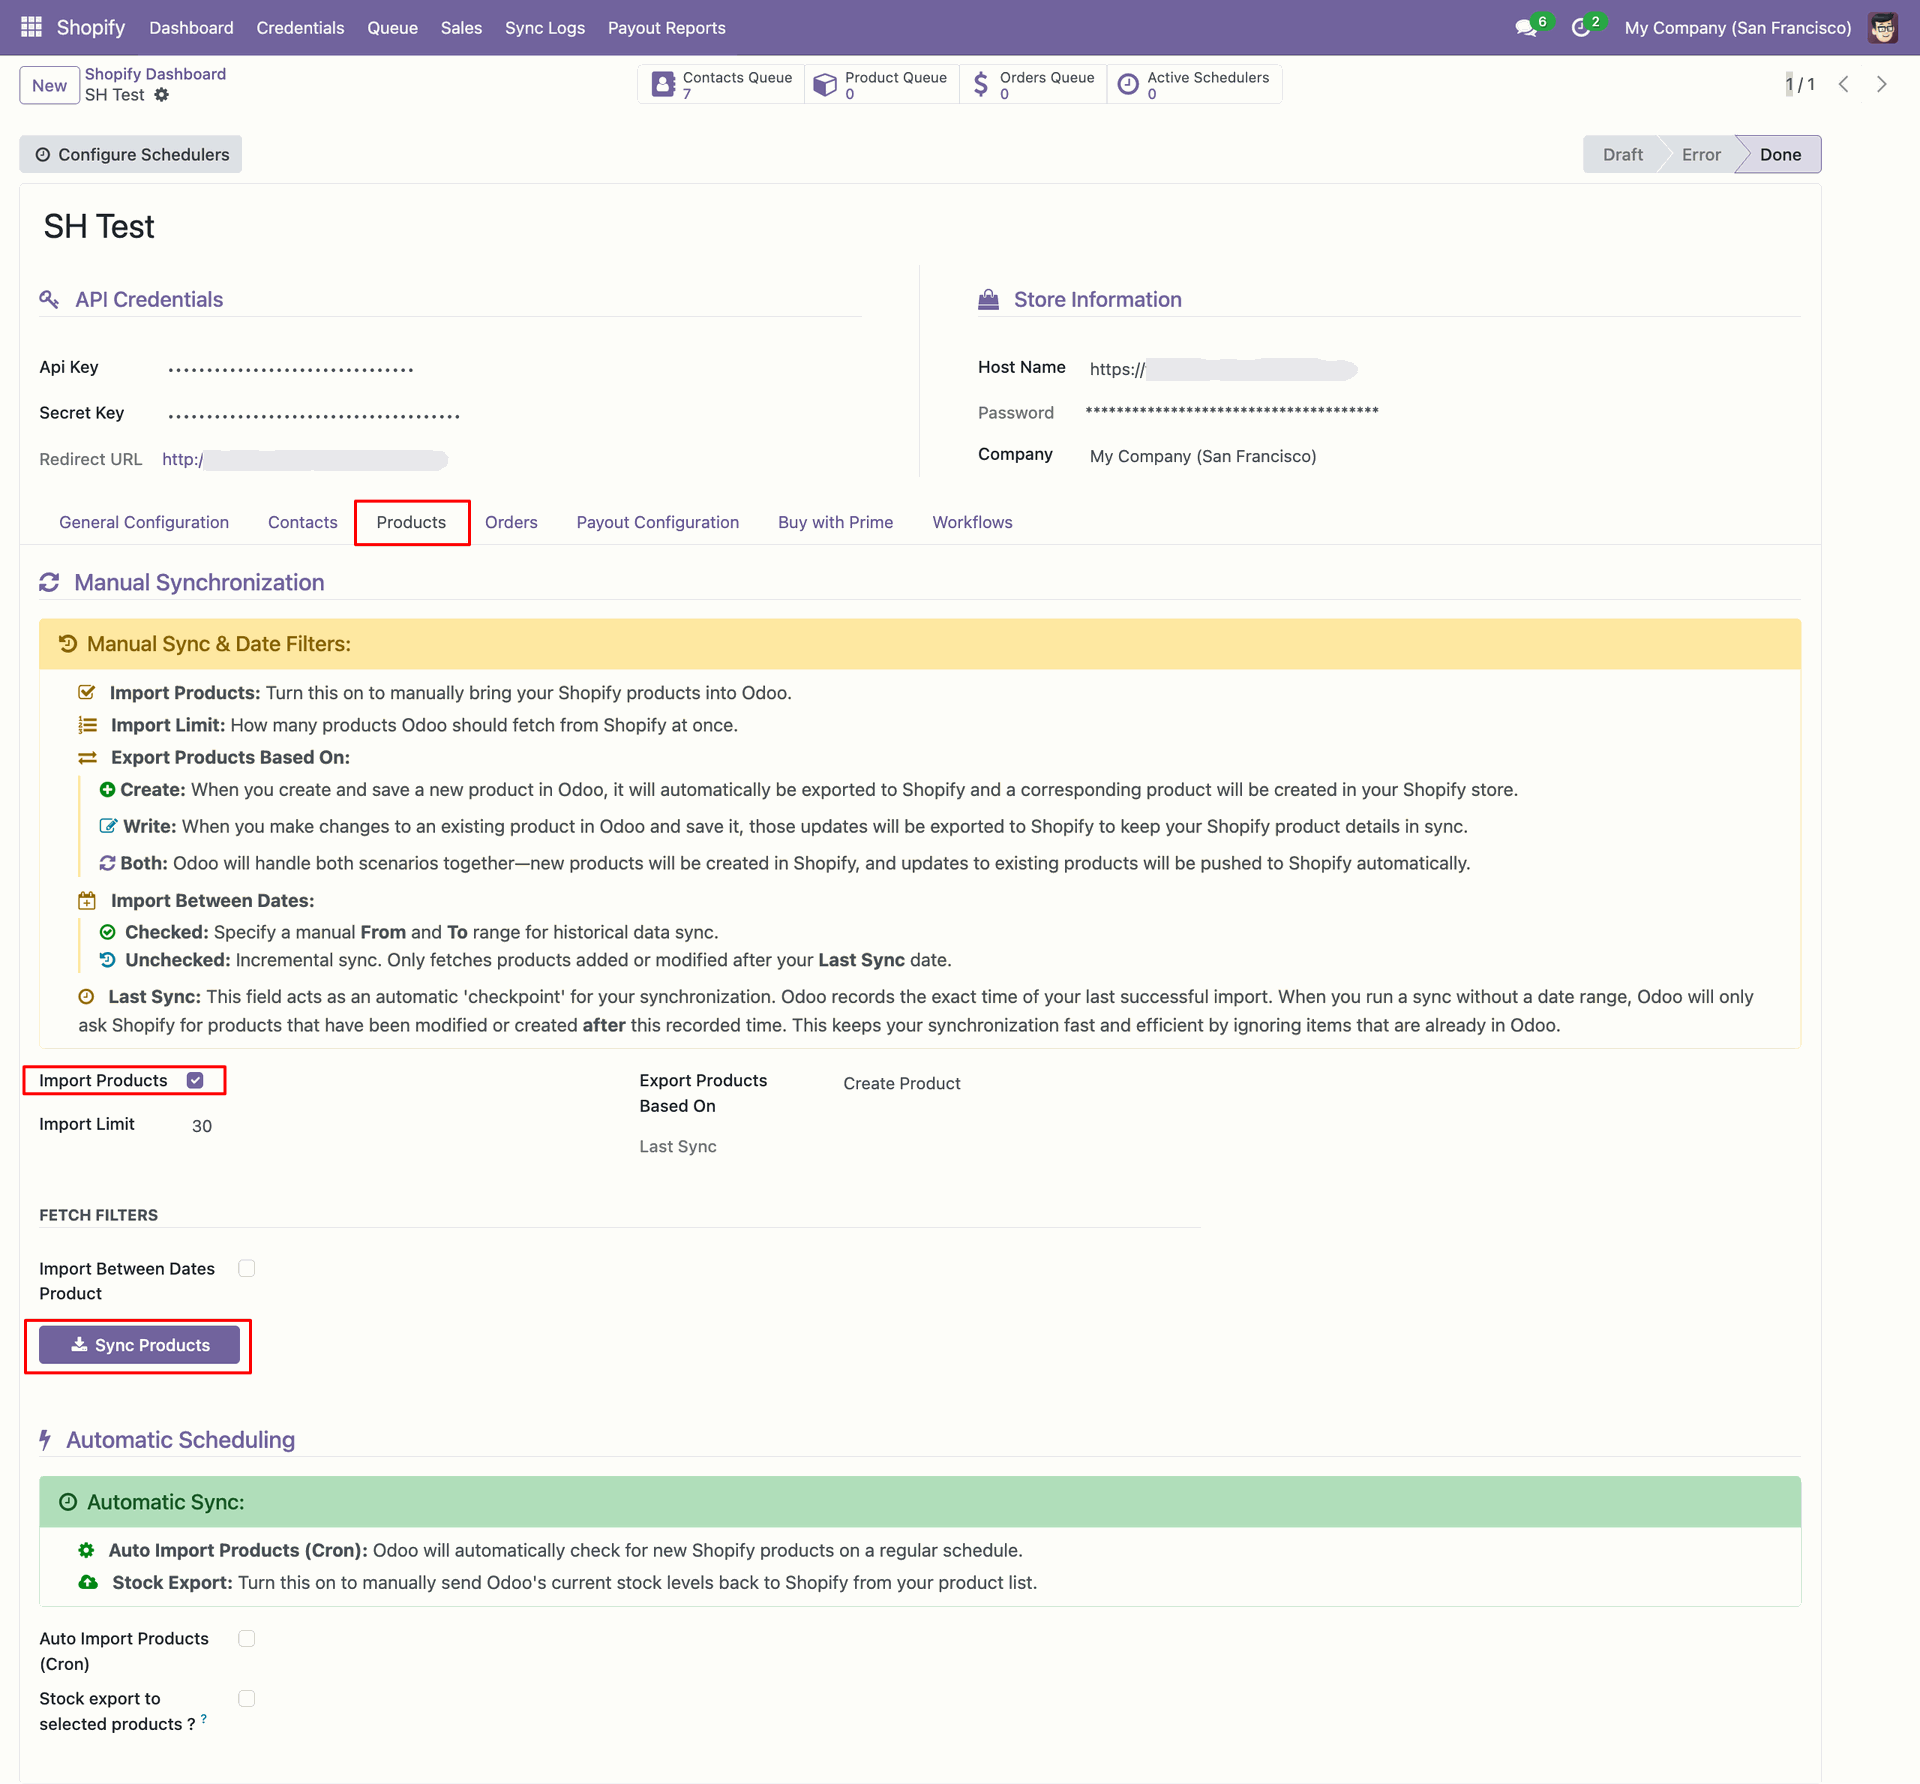
Enable Import Products and click Sync Products to fetch items manually.
Use the Product Queue shortcut to review staged product records after synchronization.
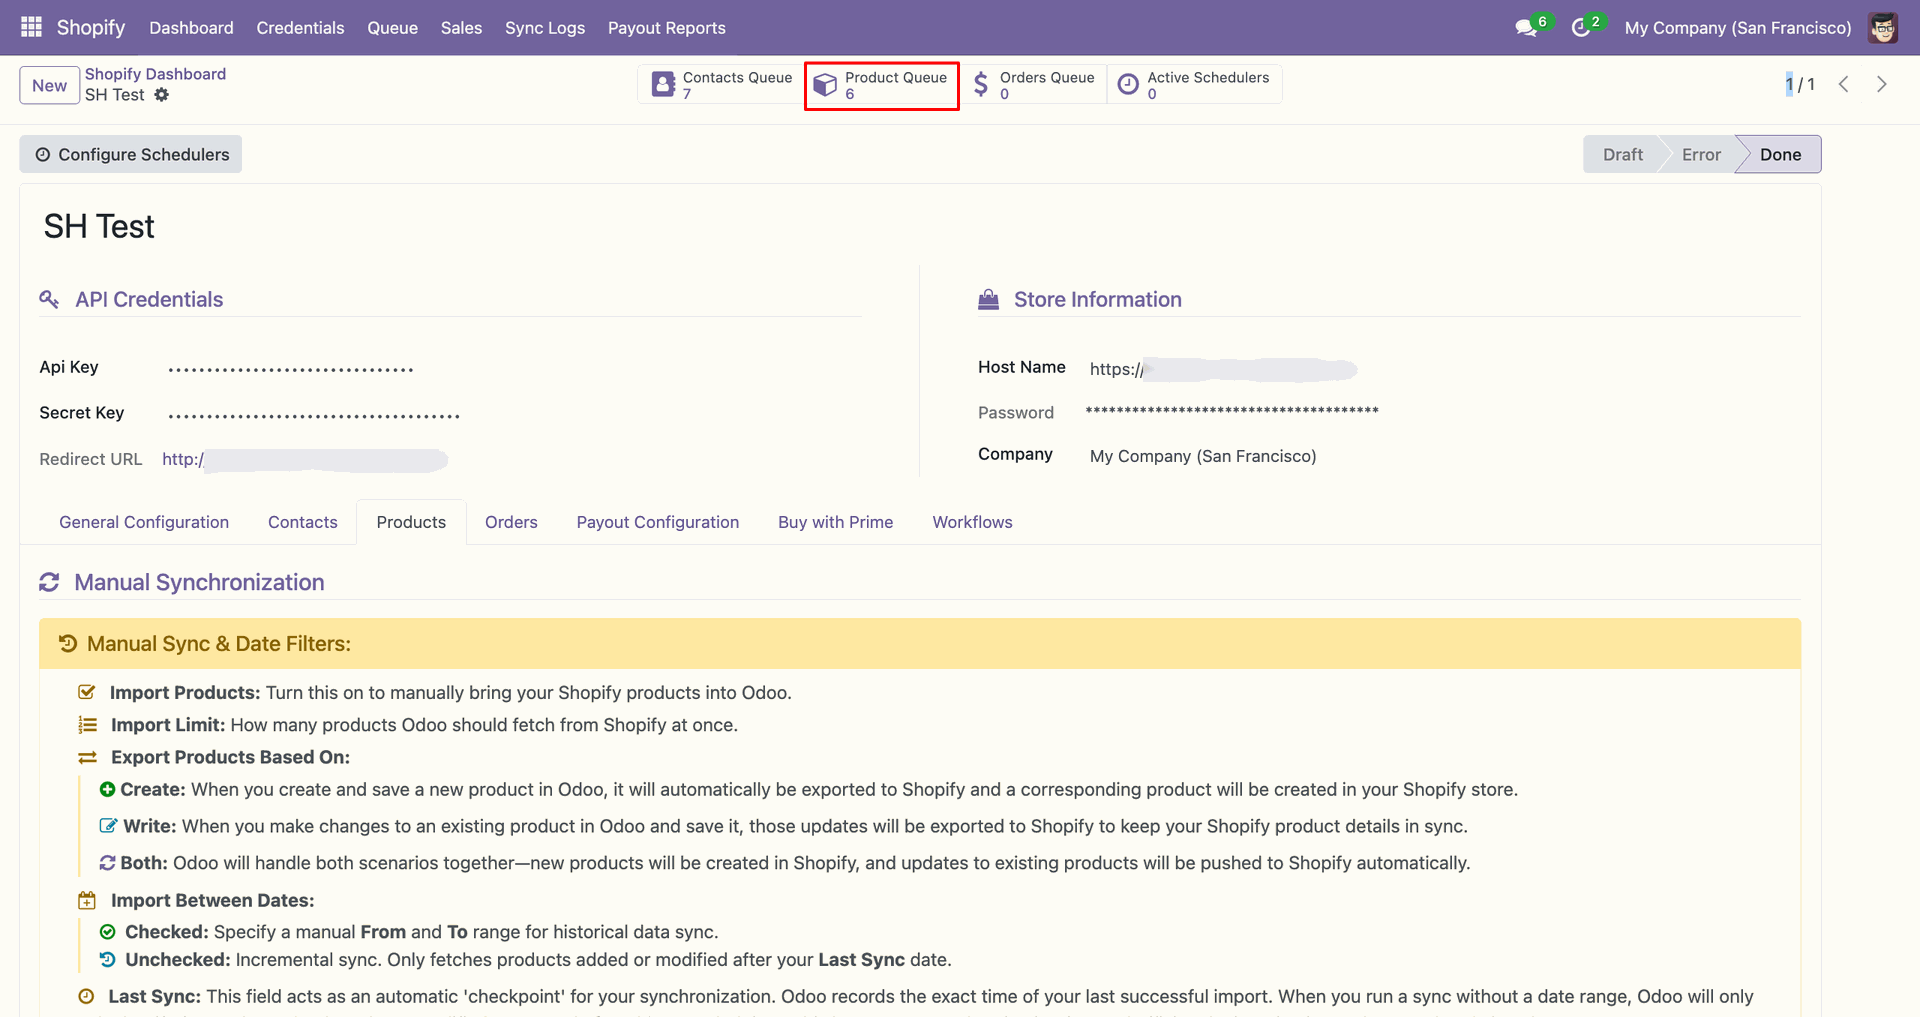
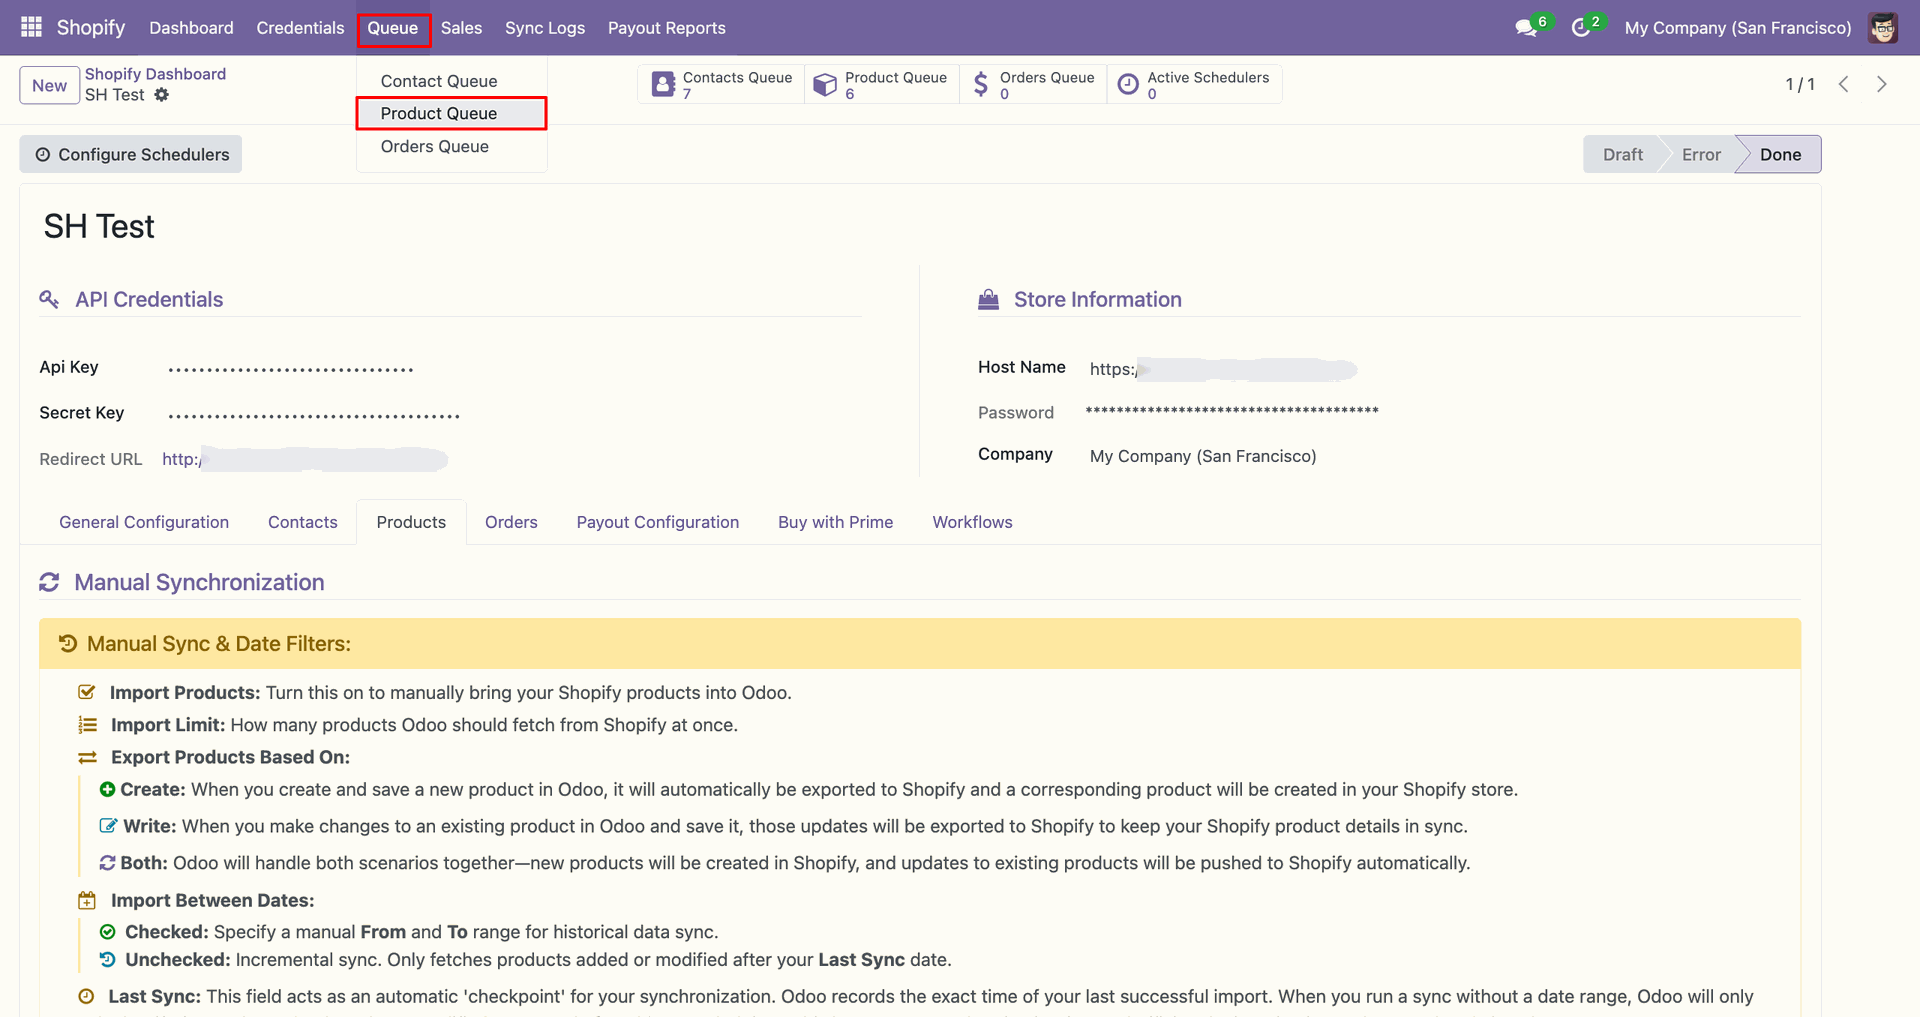
Open Product Queue from the Queue menu to inspect imported product entries.
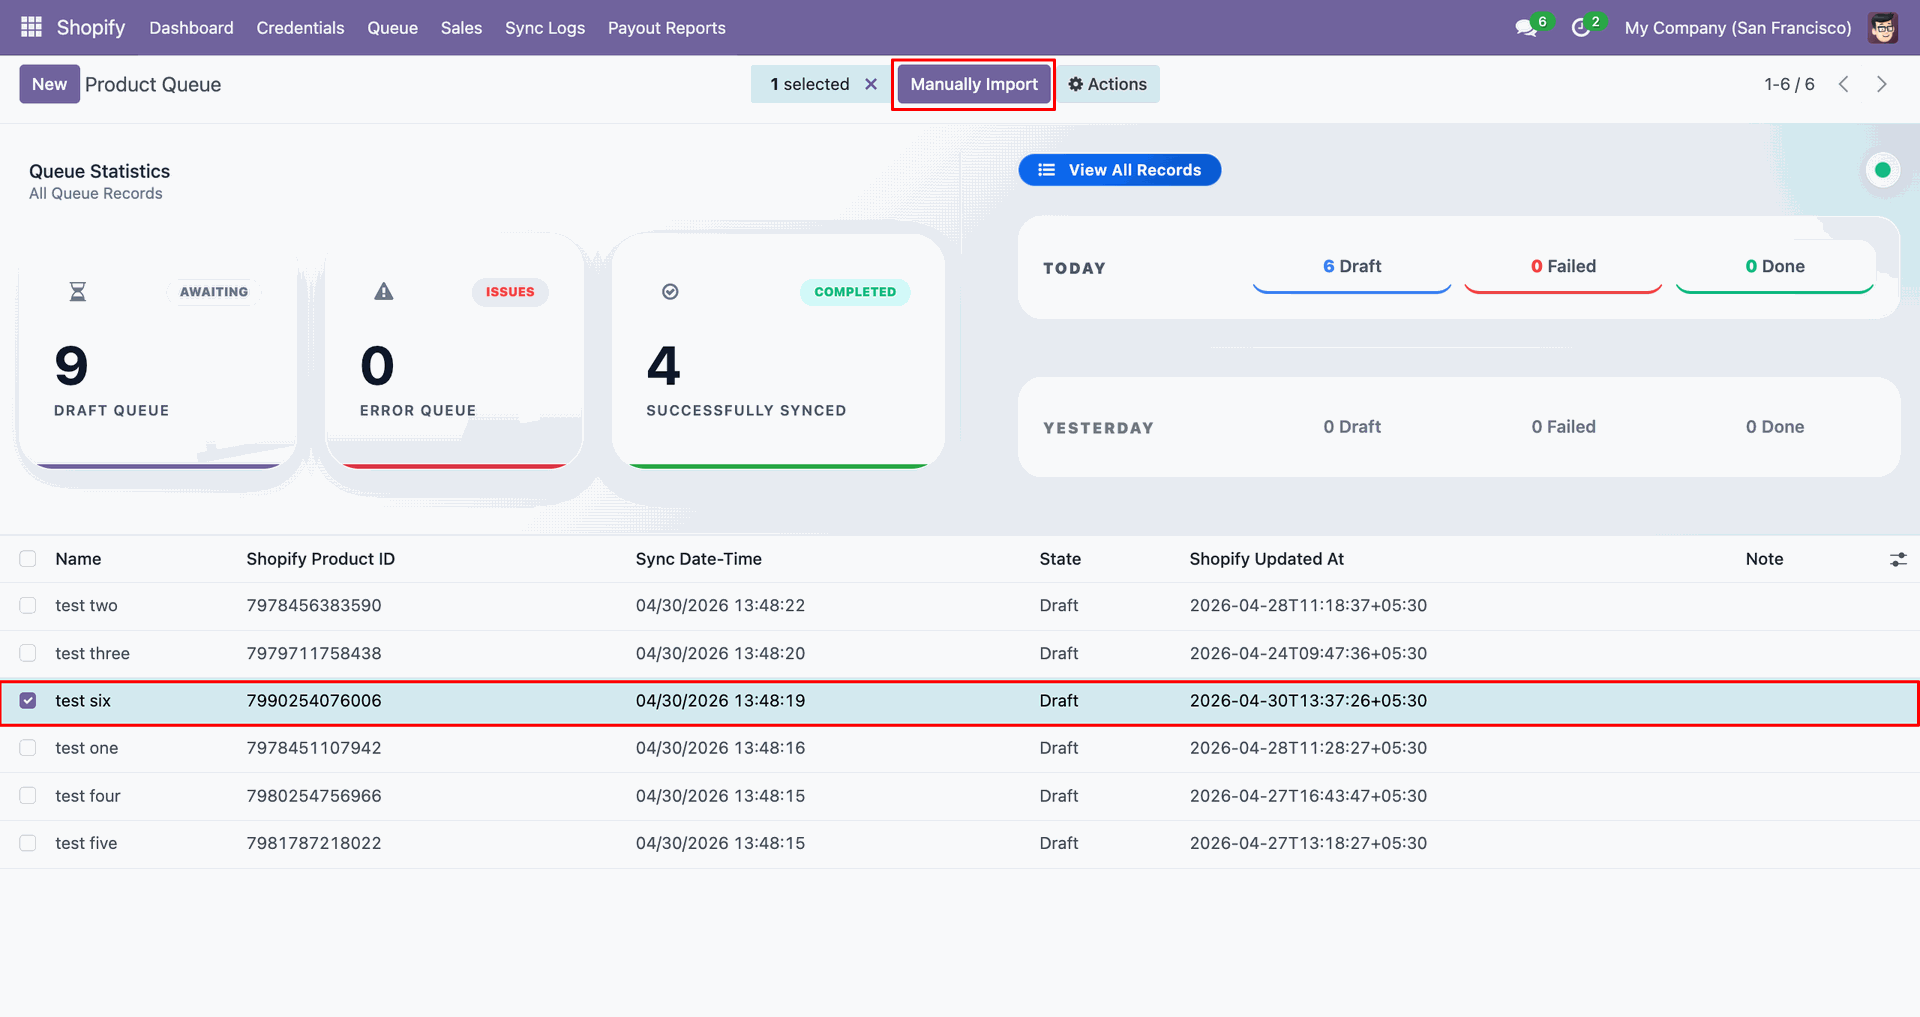
Select the queued product line and click Manually Import to process it.
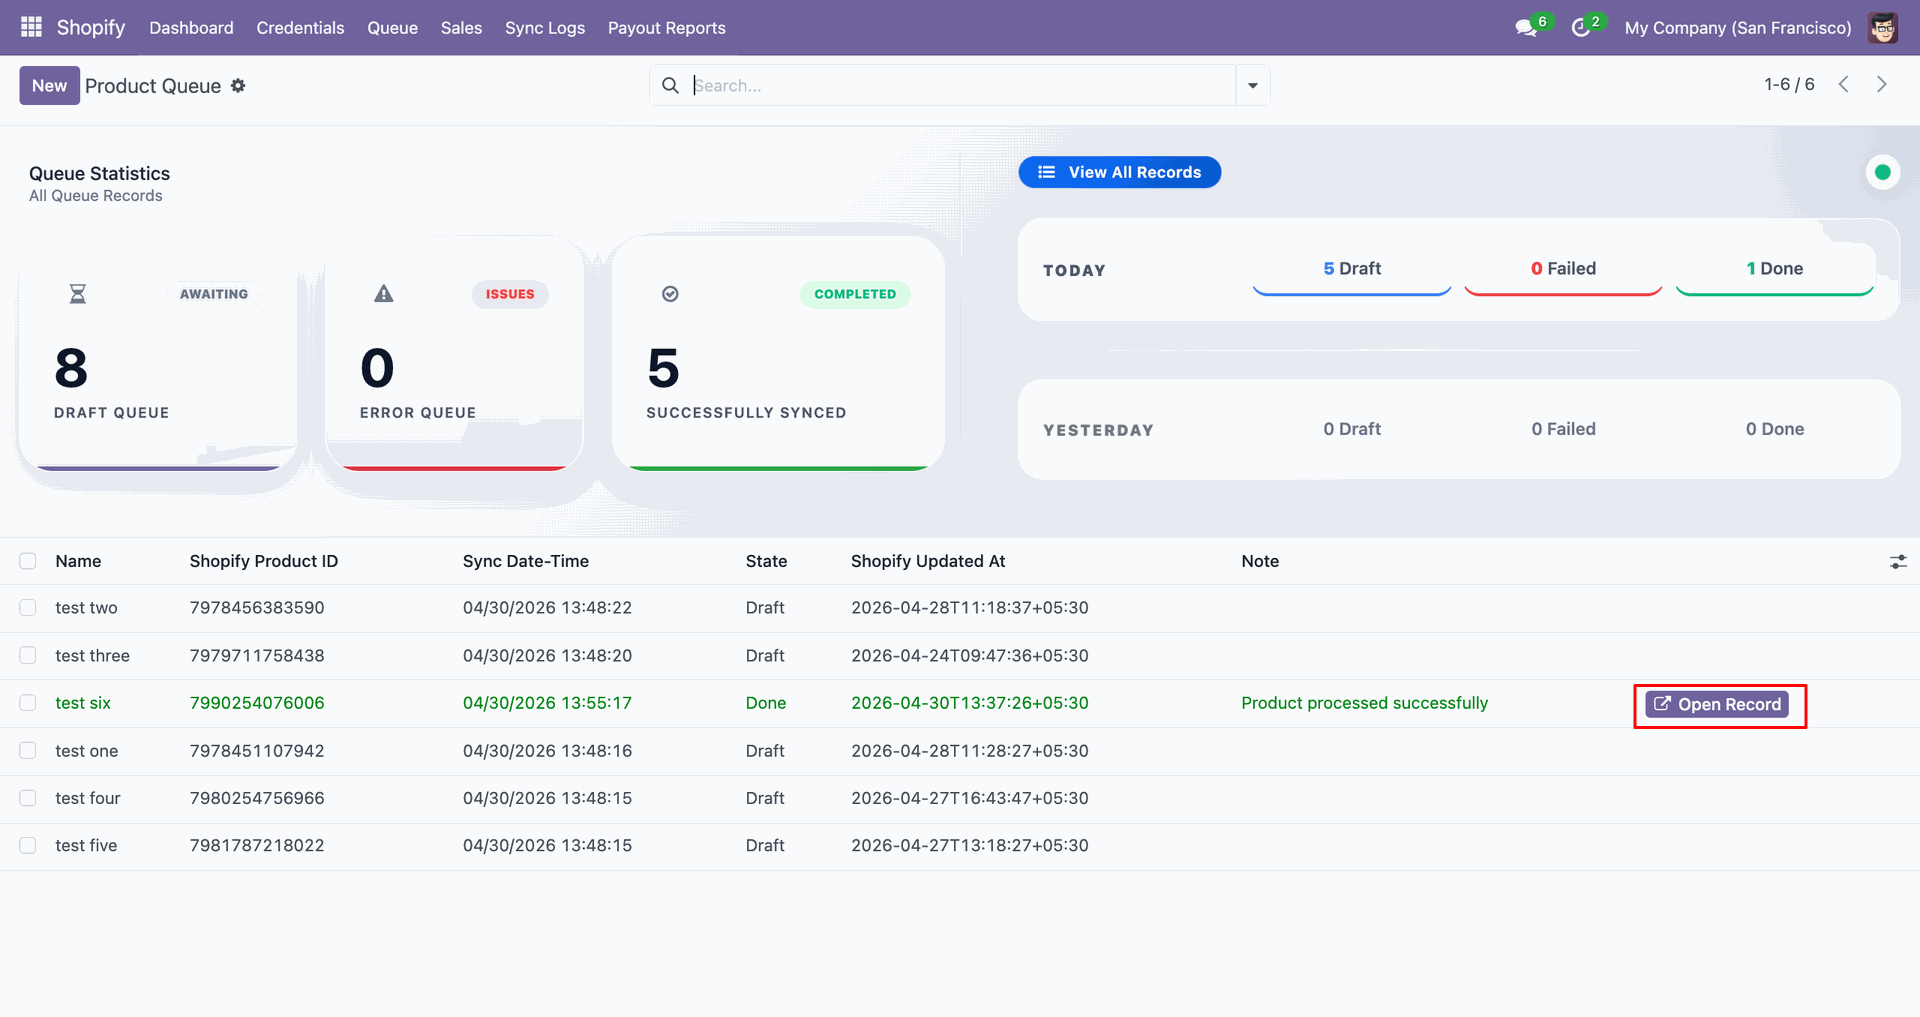
Click Open Record beside the completed queue line to view the Odoo product.
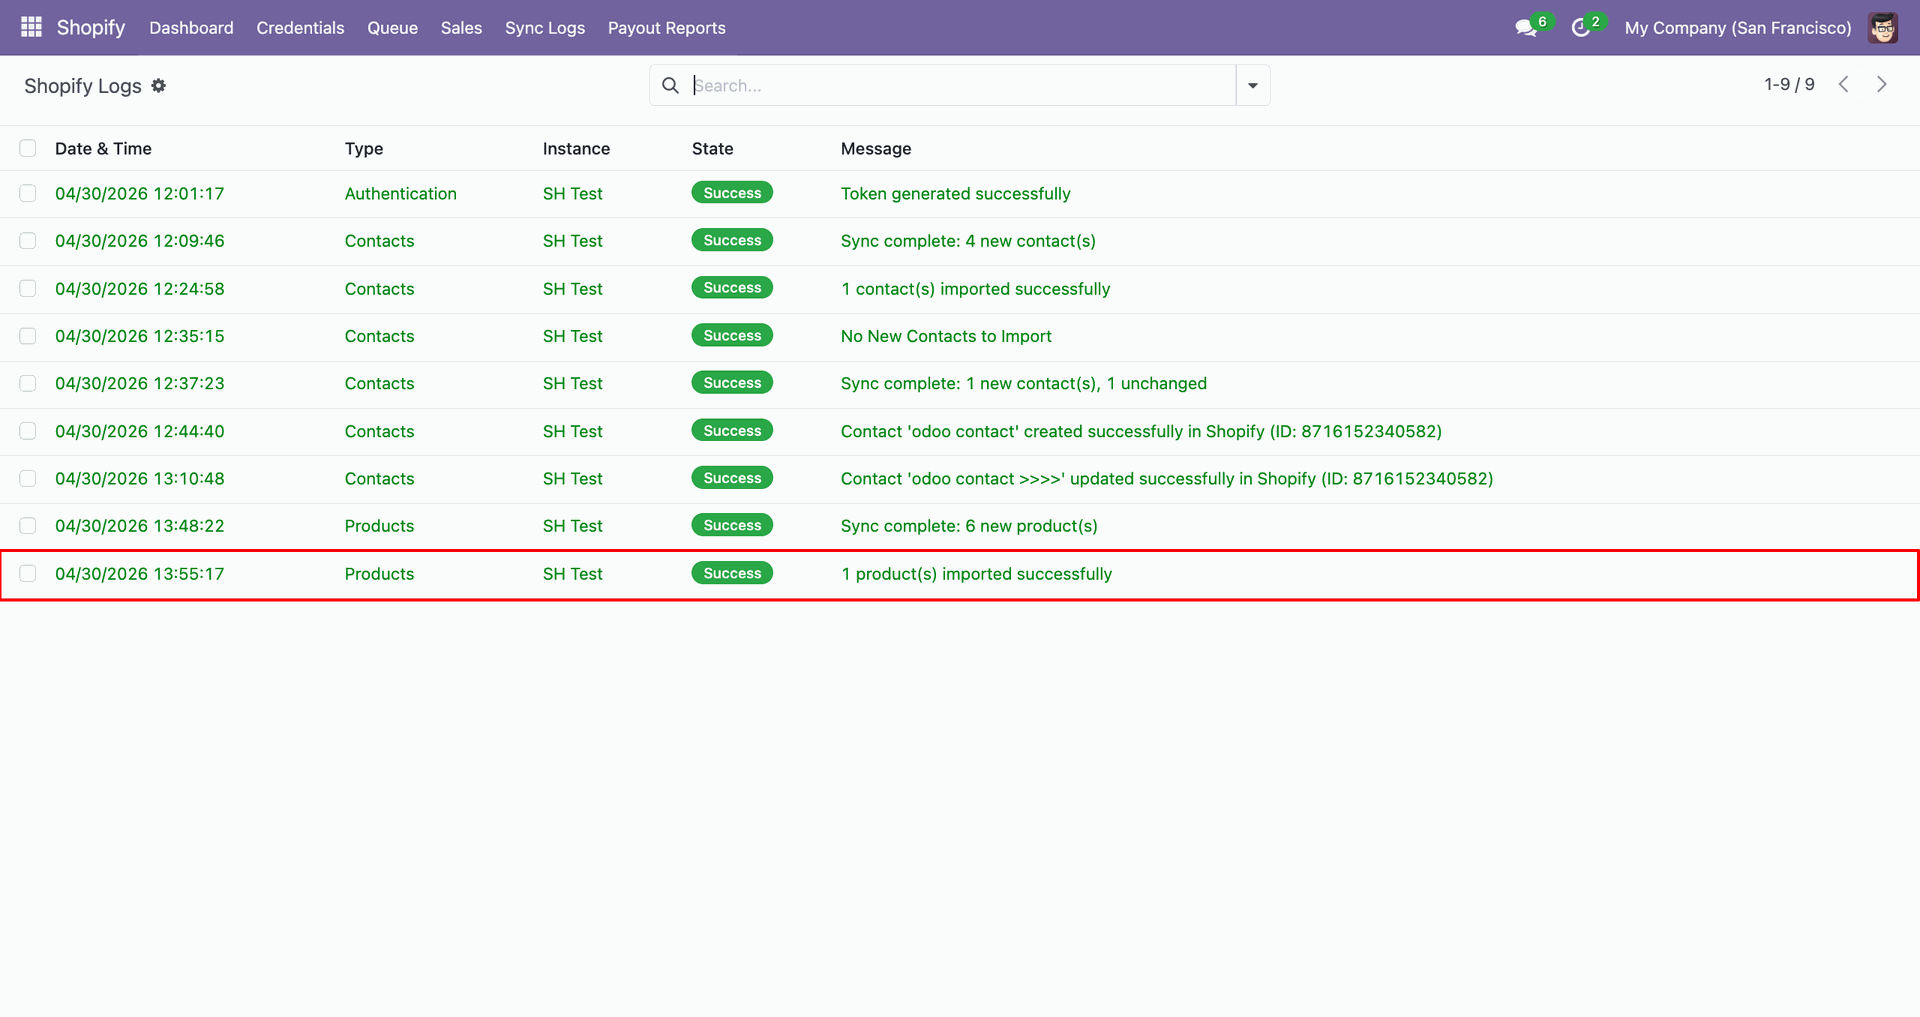
Review the Products log entry to confirm the product import finished successfully.
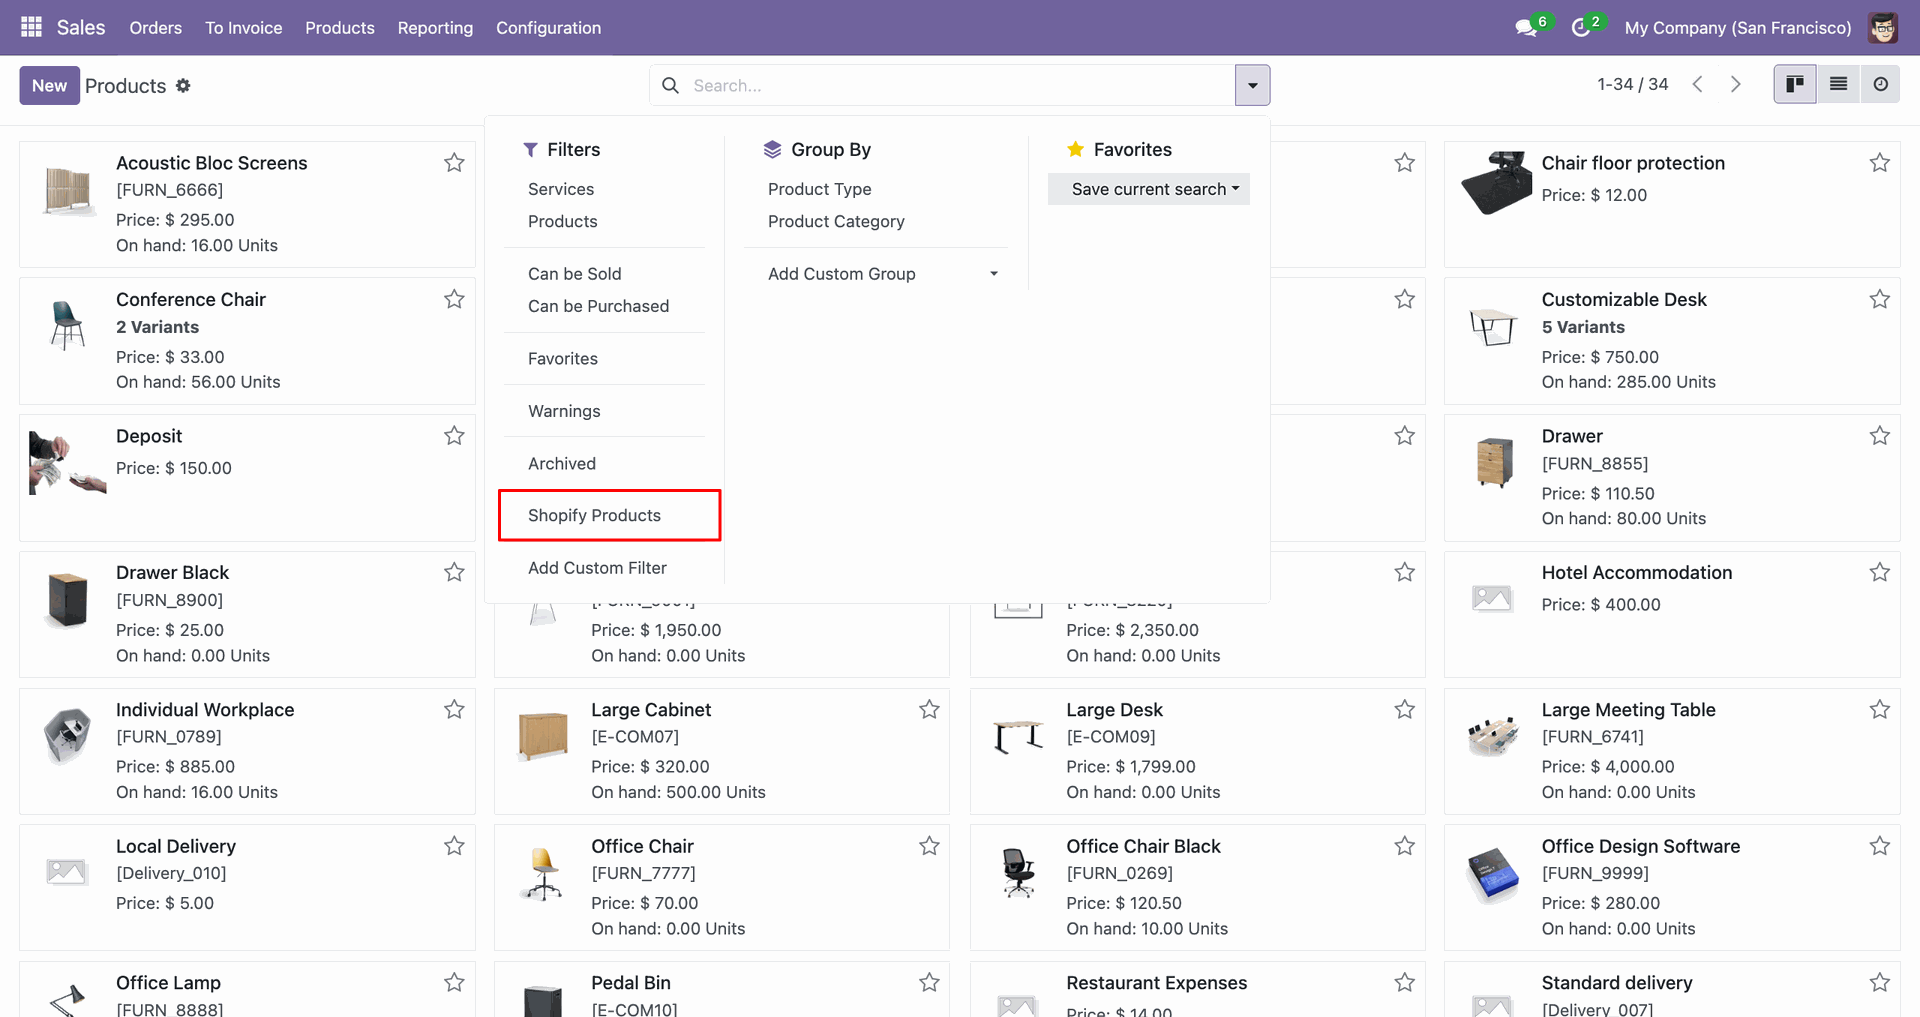
Apply the Shopify Products filter to display only synced products in Odoo.
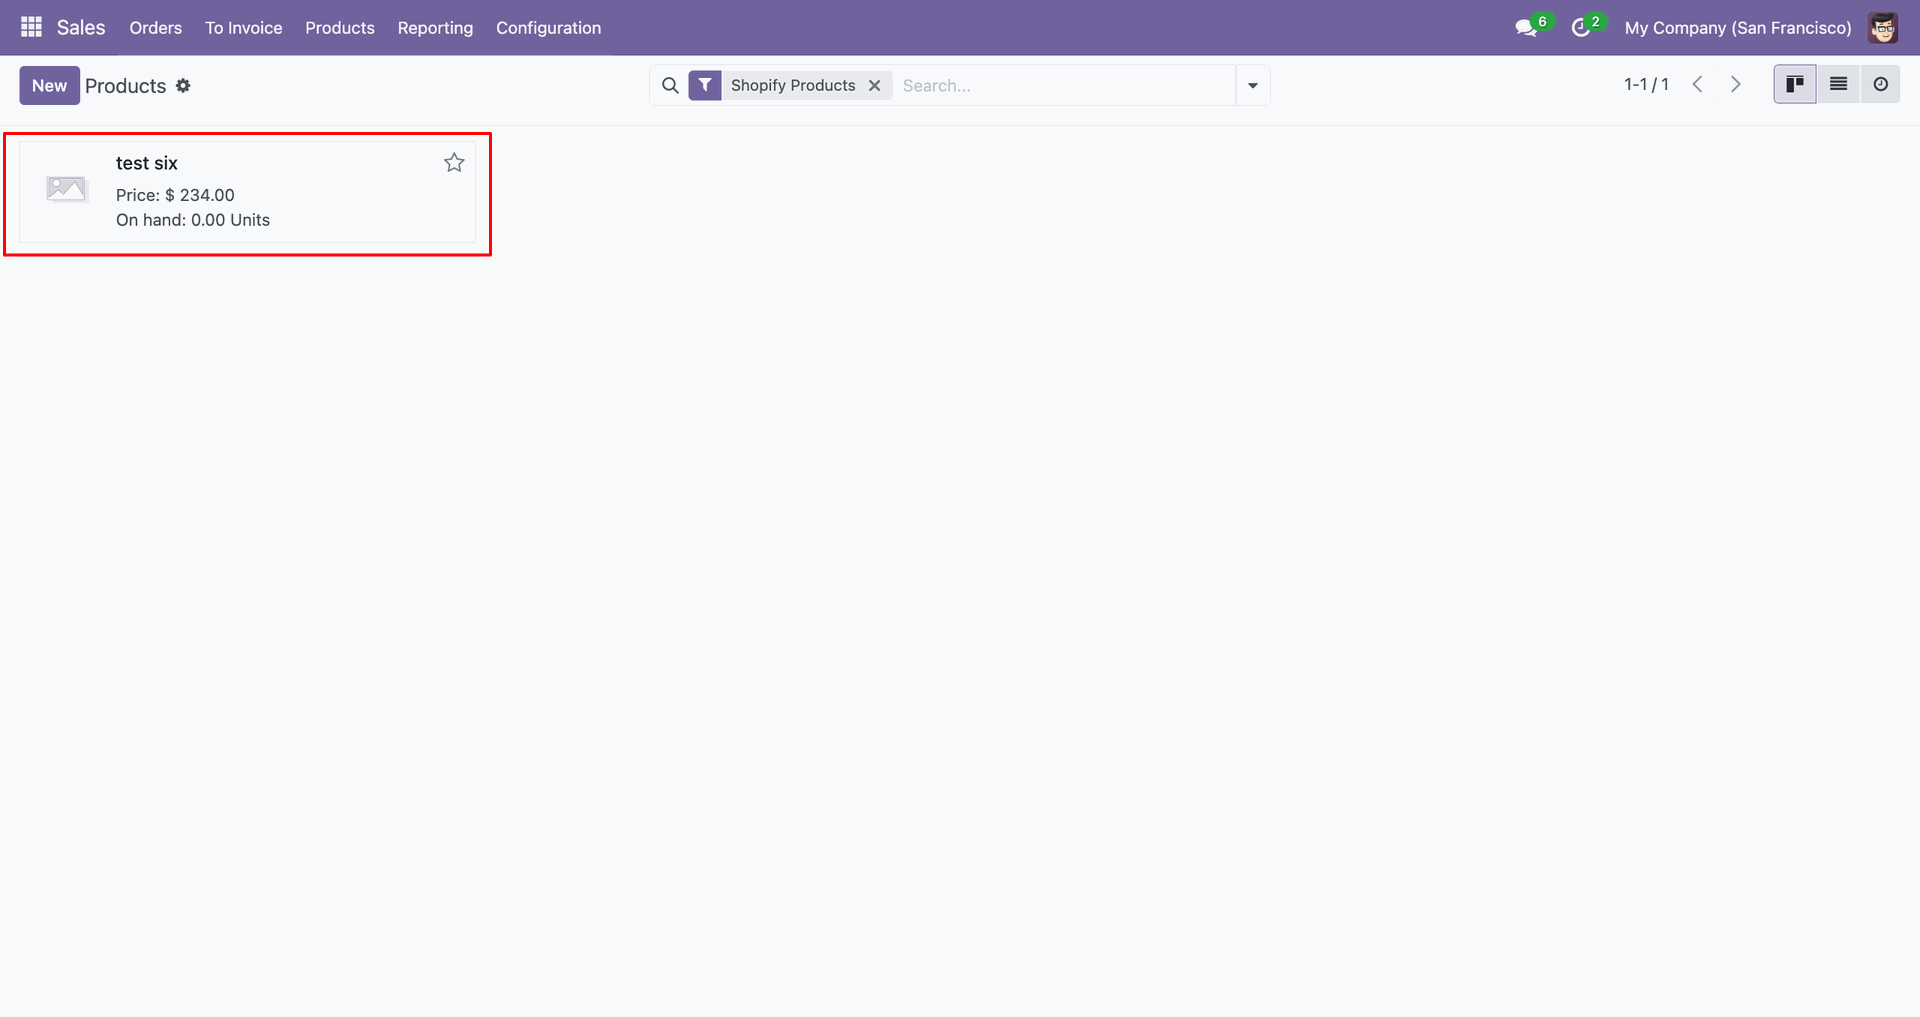
The imported product card displays the synced item with price and stock.
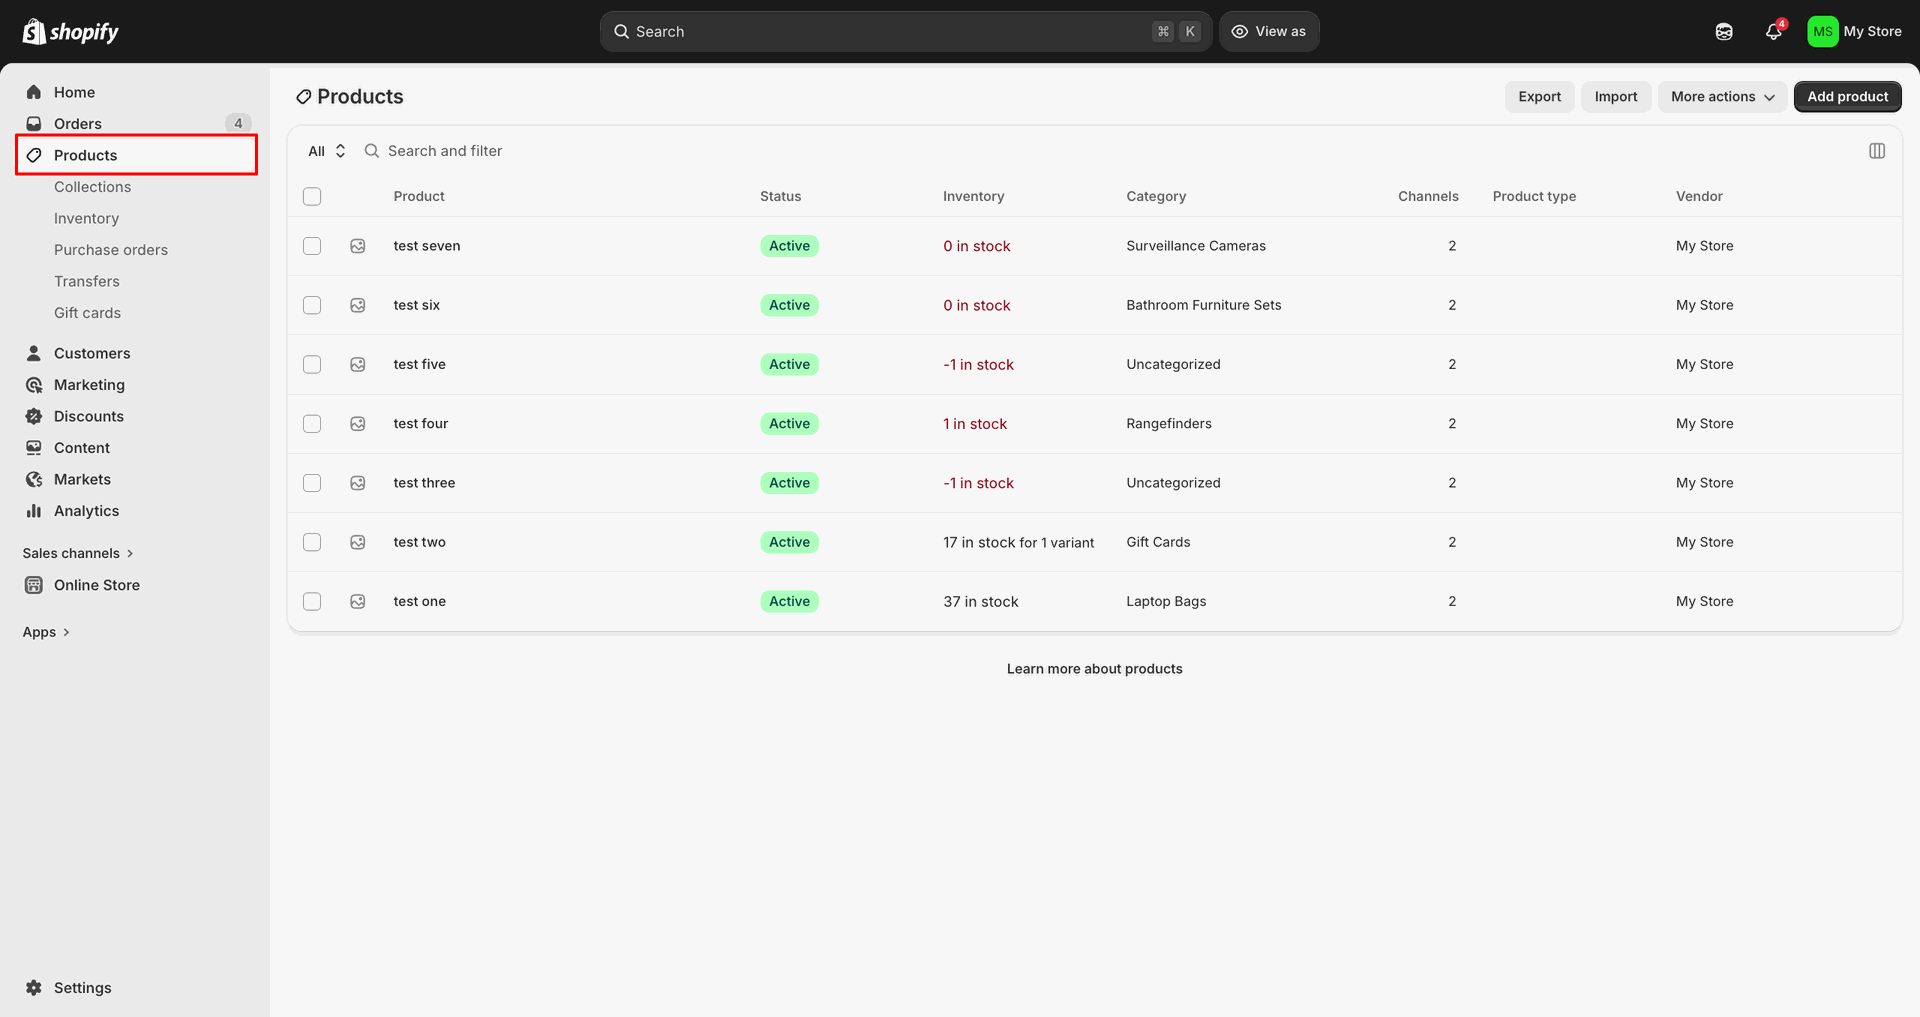
Open Products in Shopify Admin to verify the imported item appears correctly.
Set the product date range, then click Sync Products for dated imports.
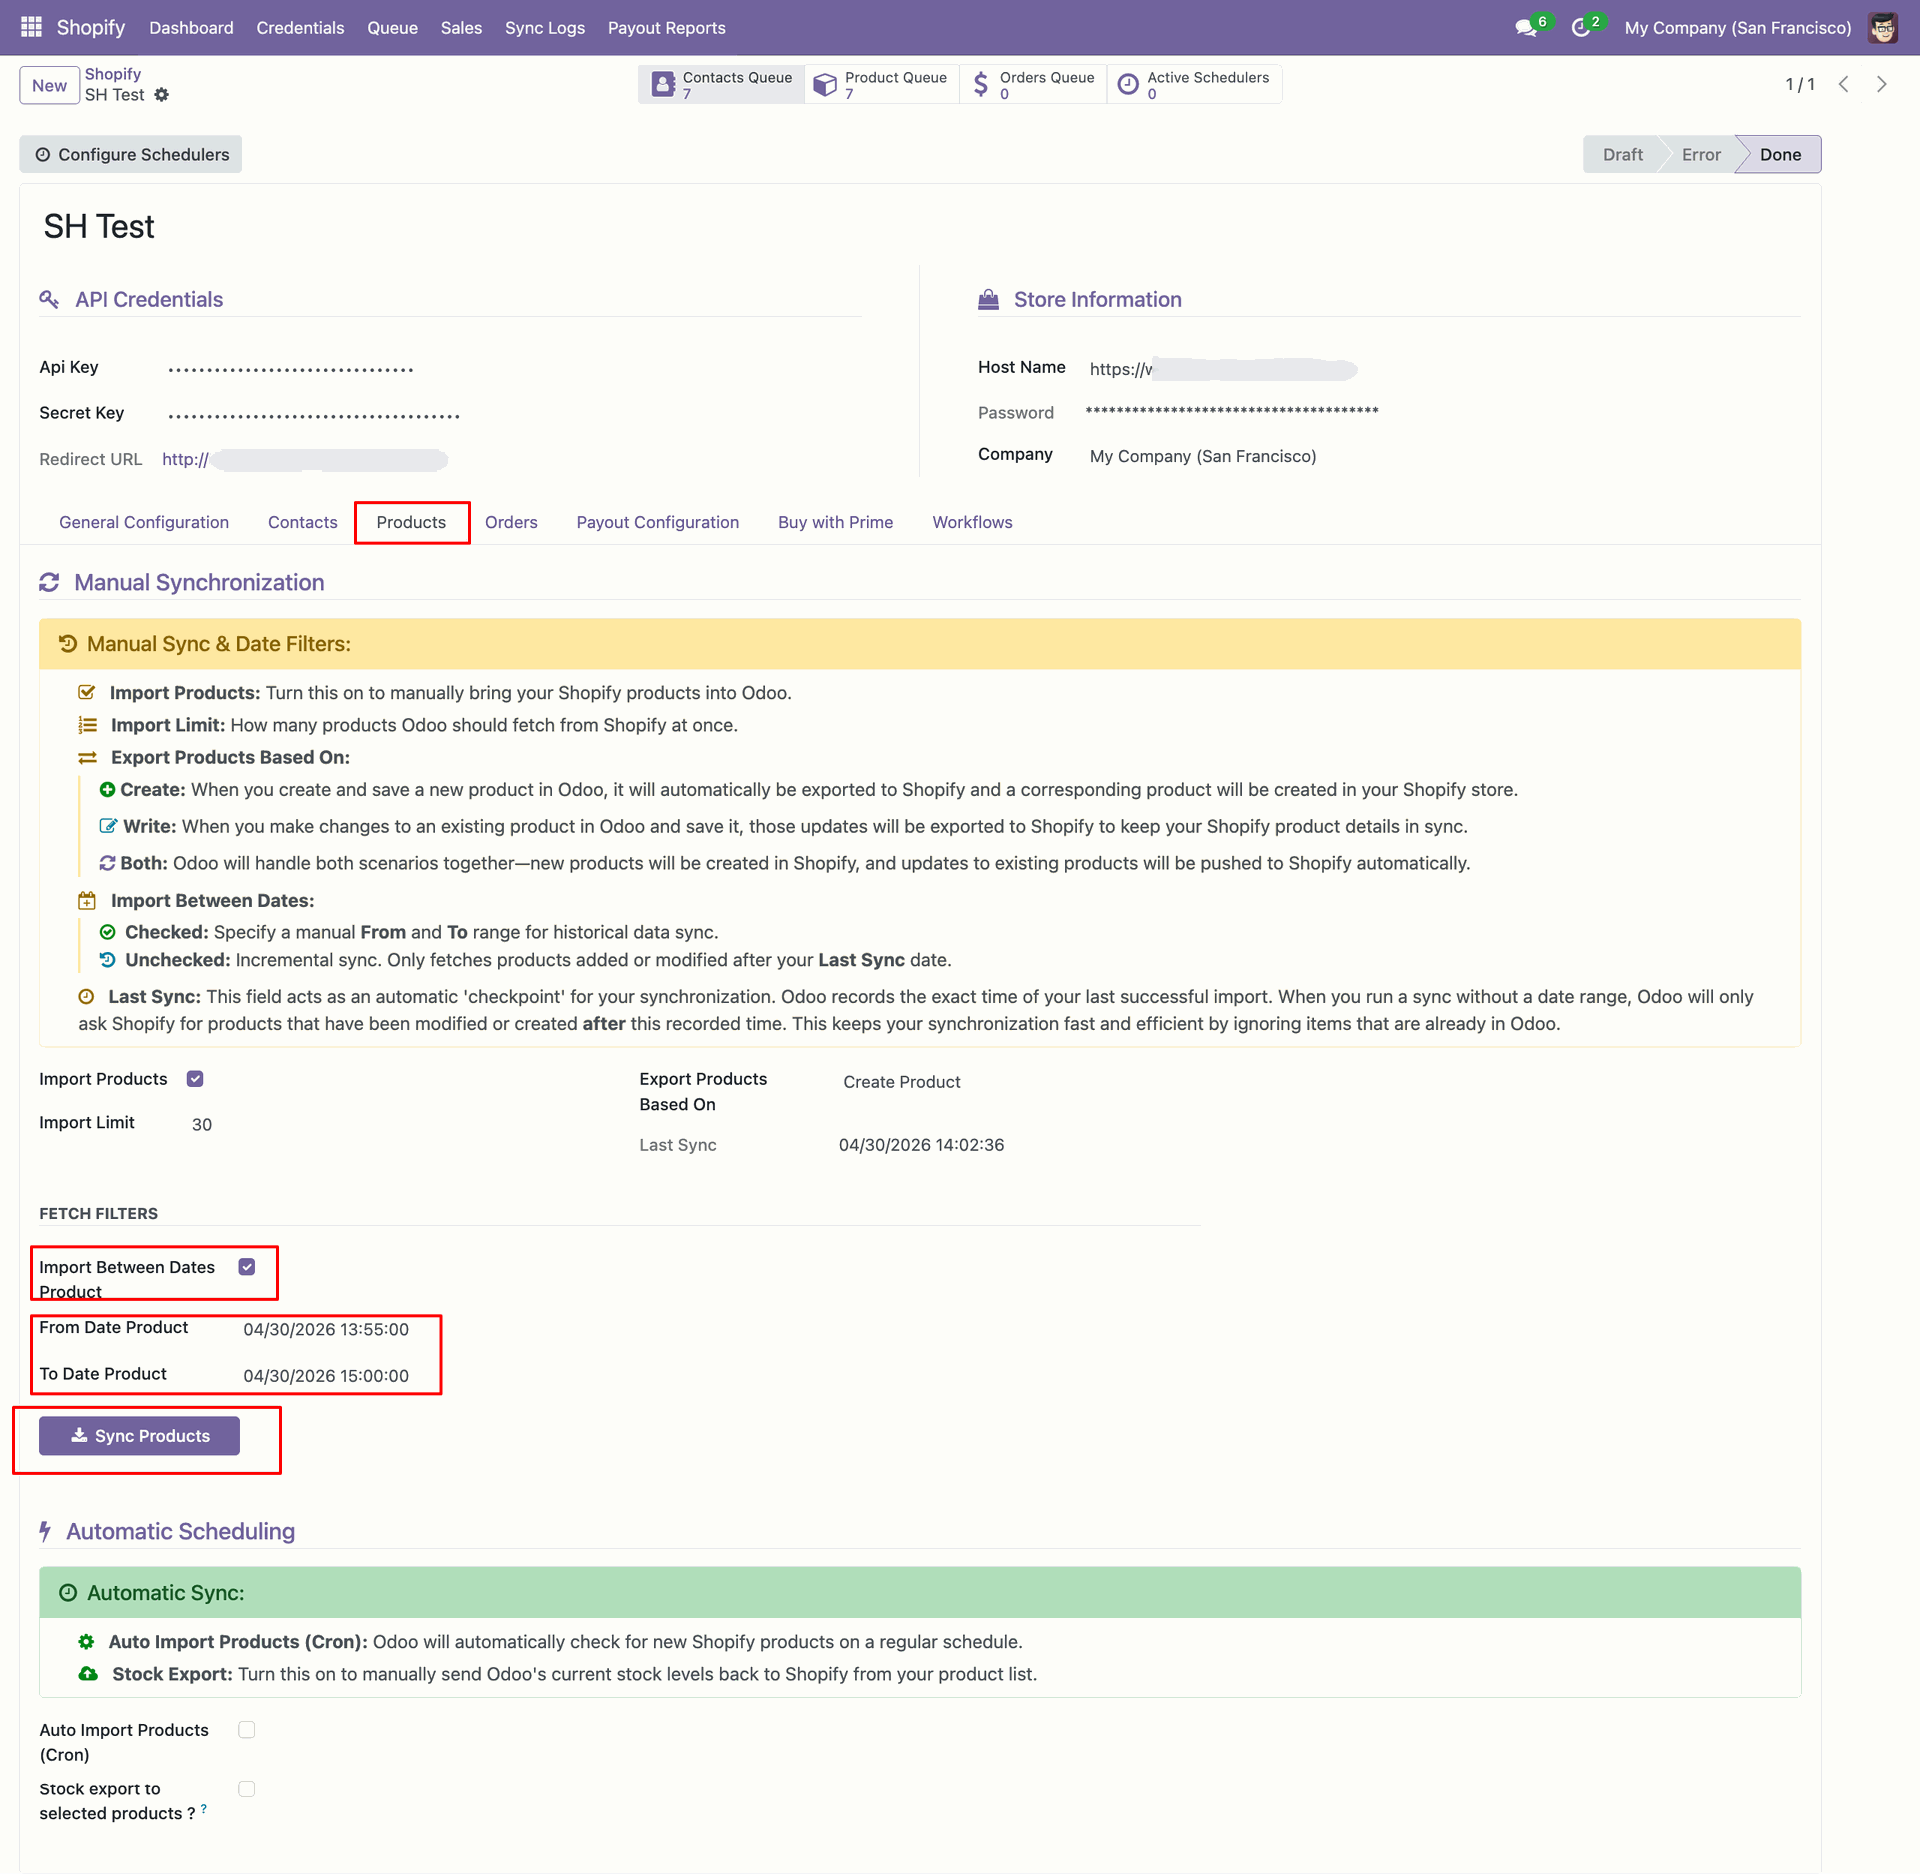
Review the updated Product Queue counter after fetching products within the selected dates.
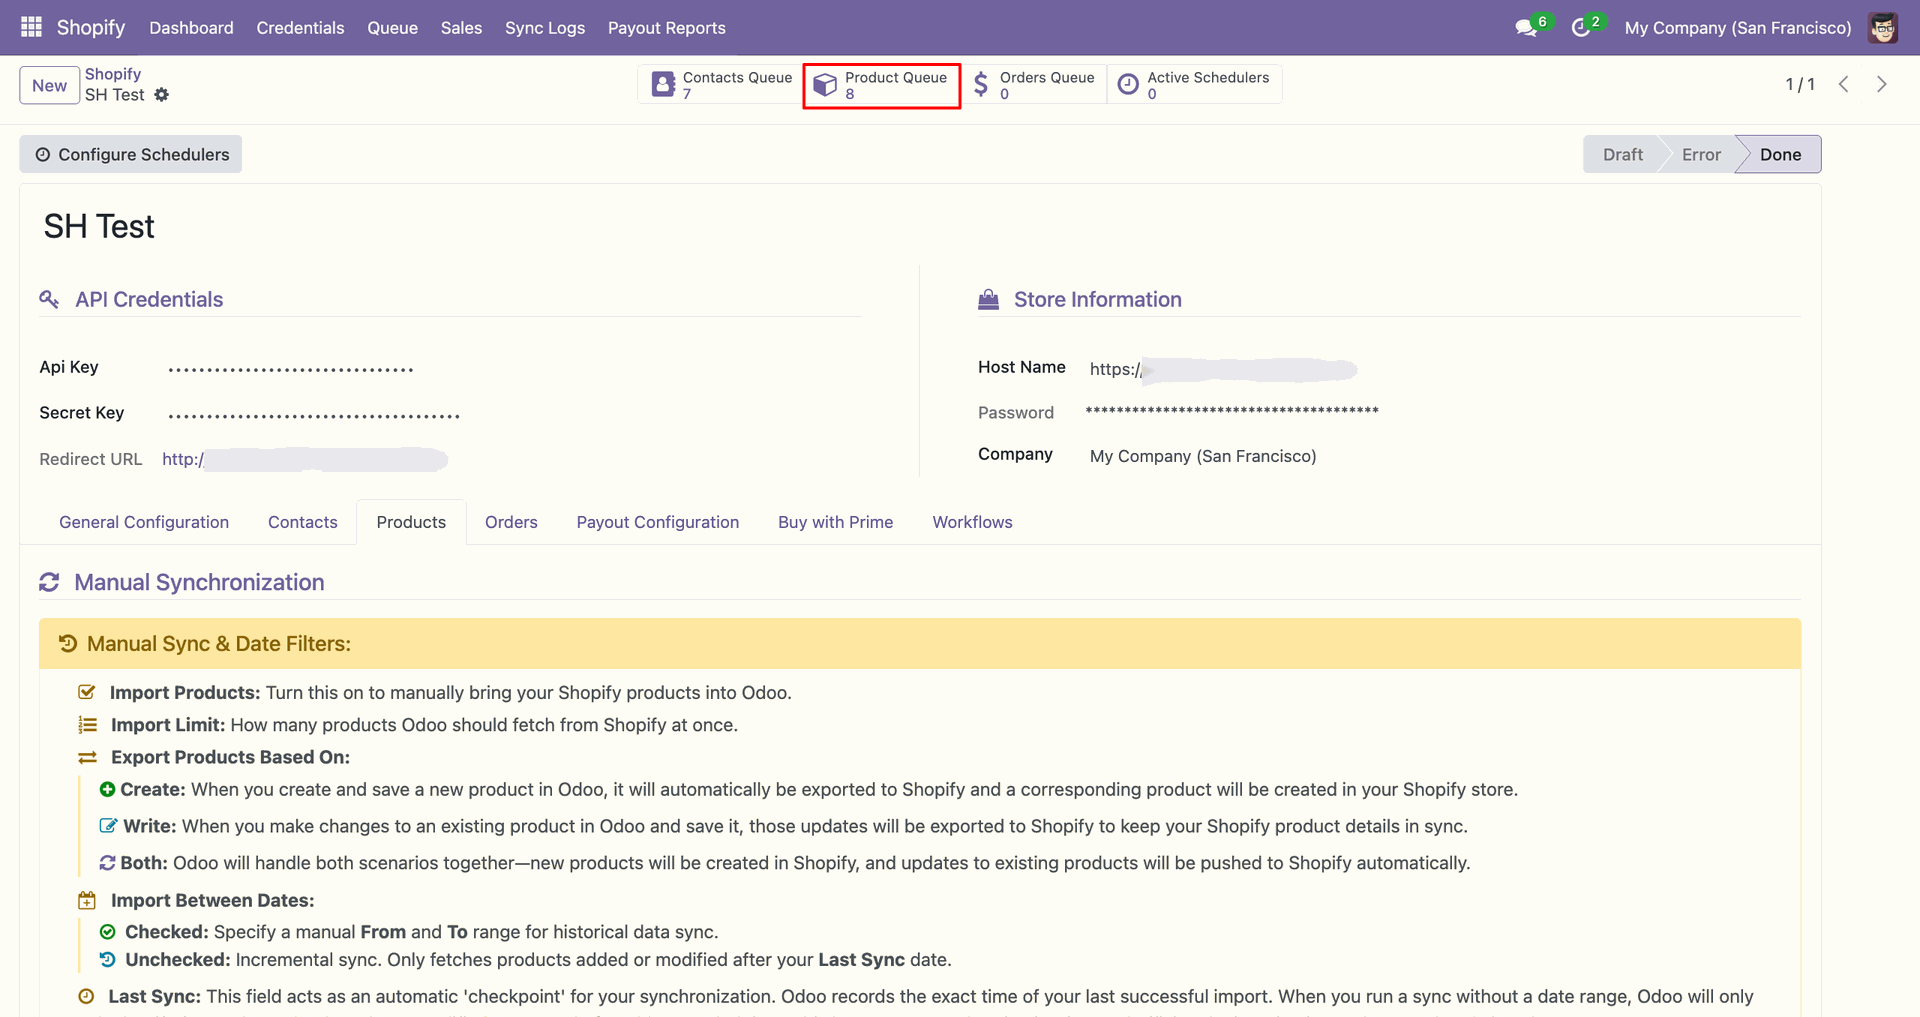
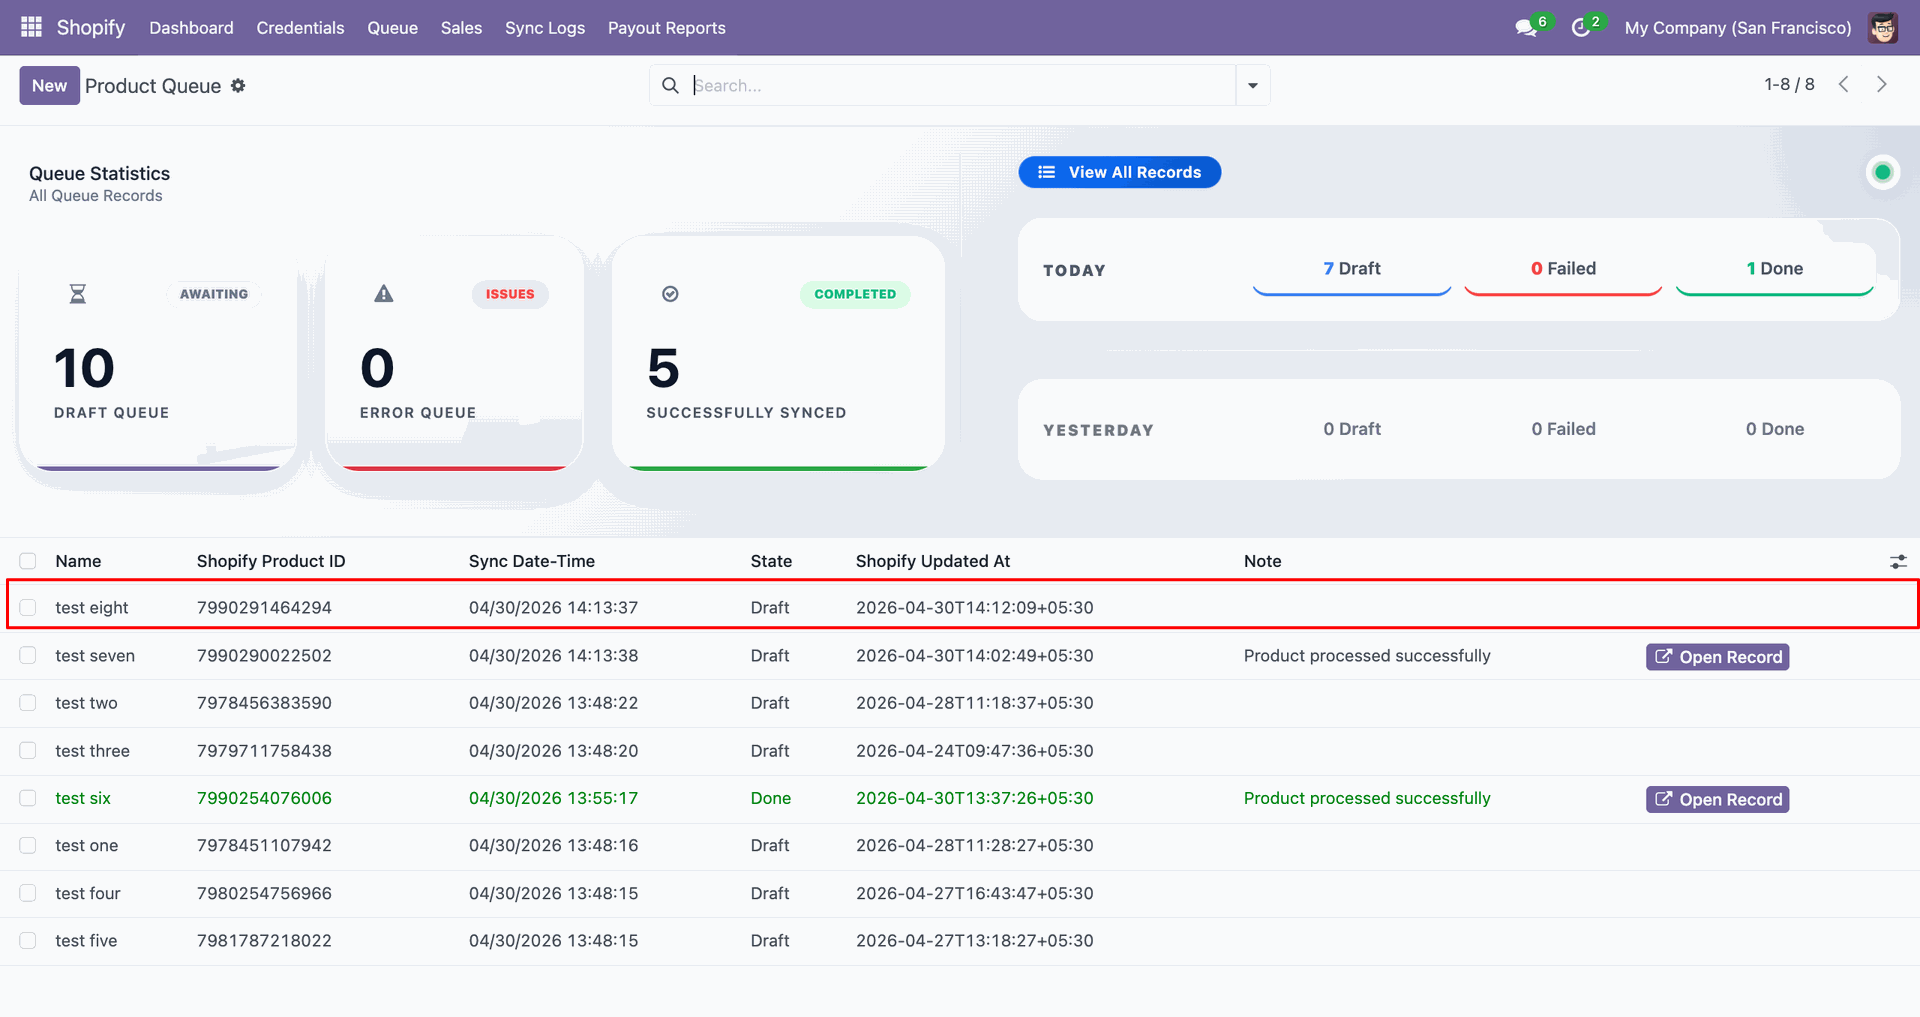
Inspect the new product queue row to verify the fetched record details.
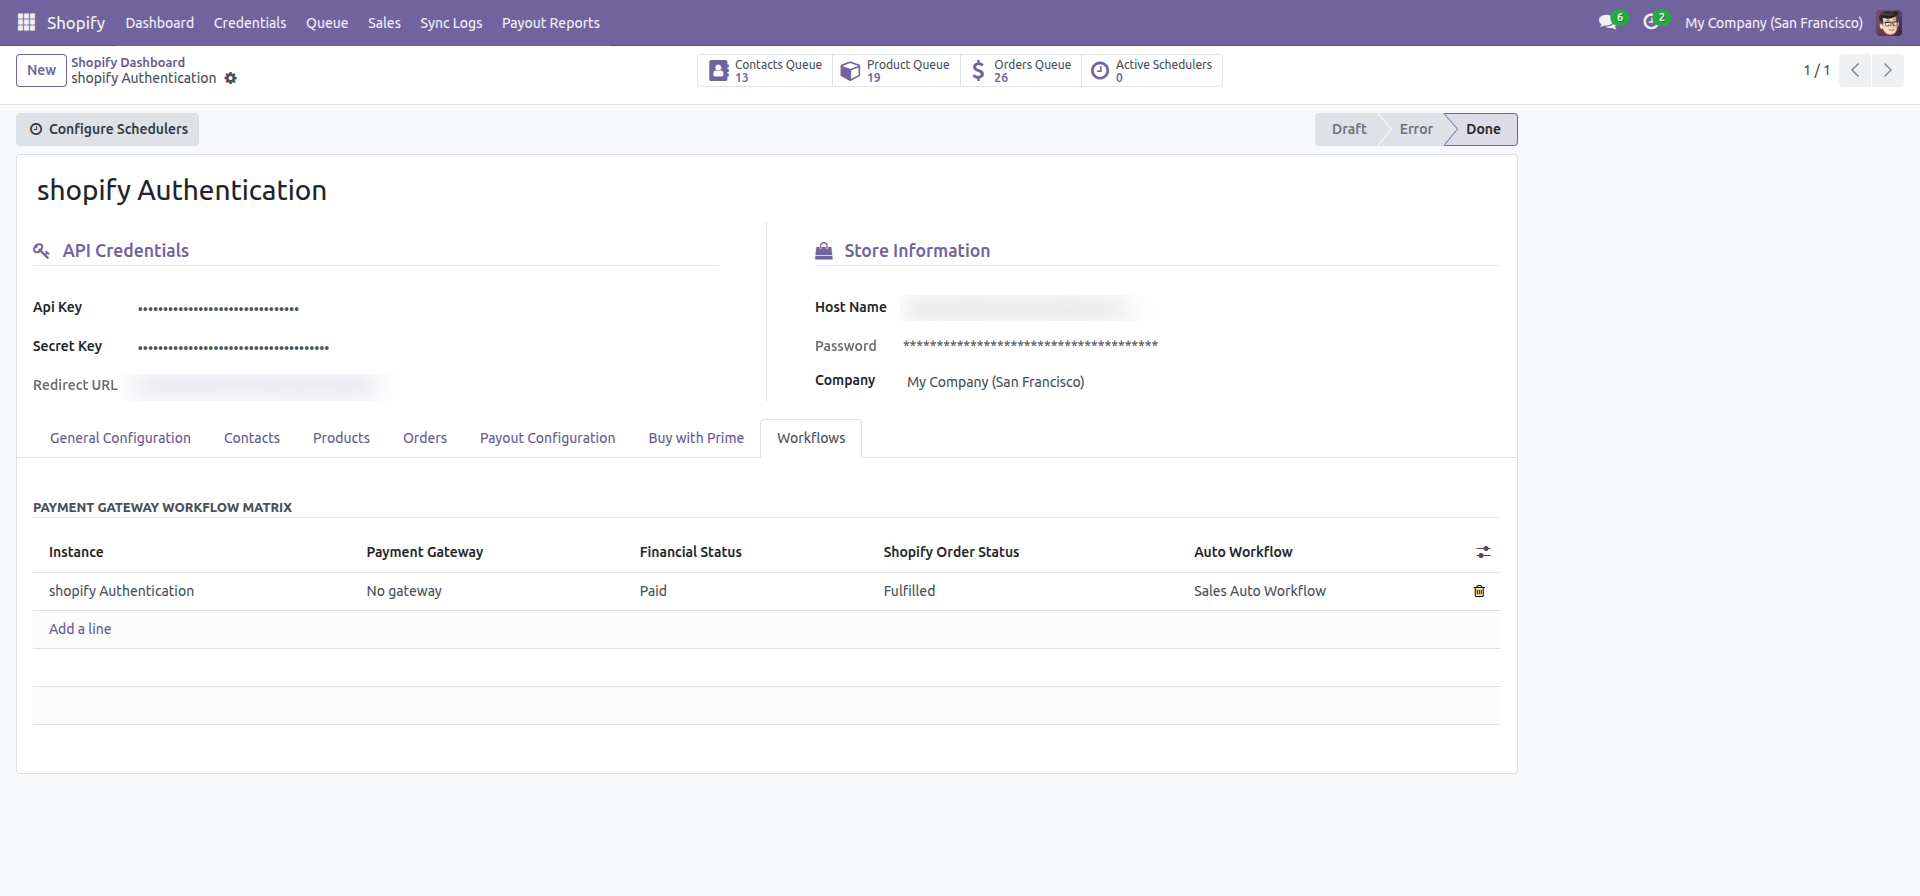
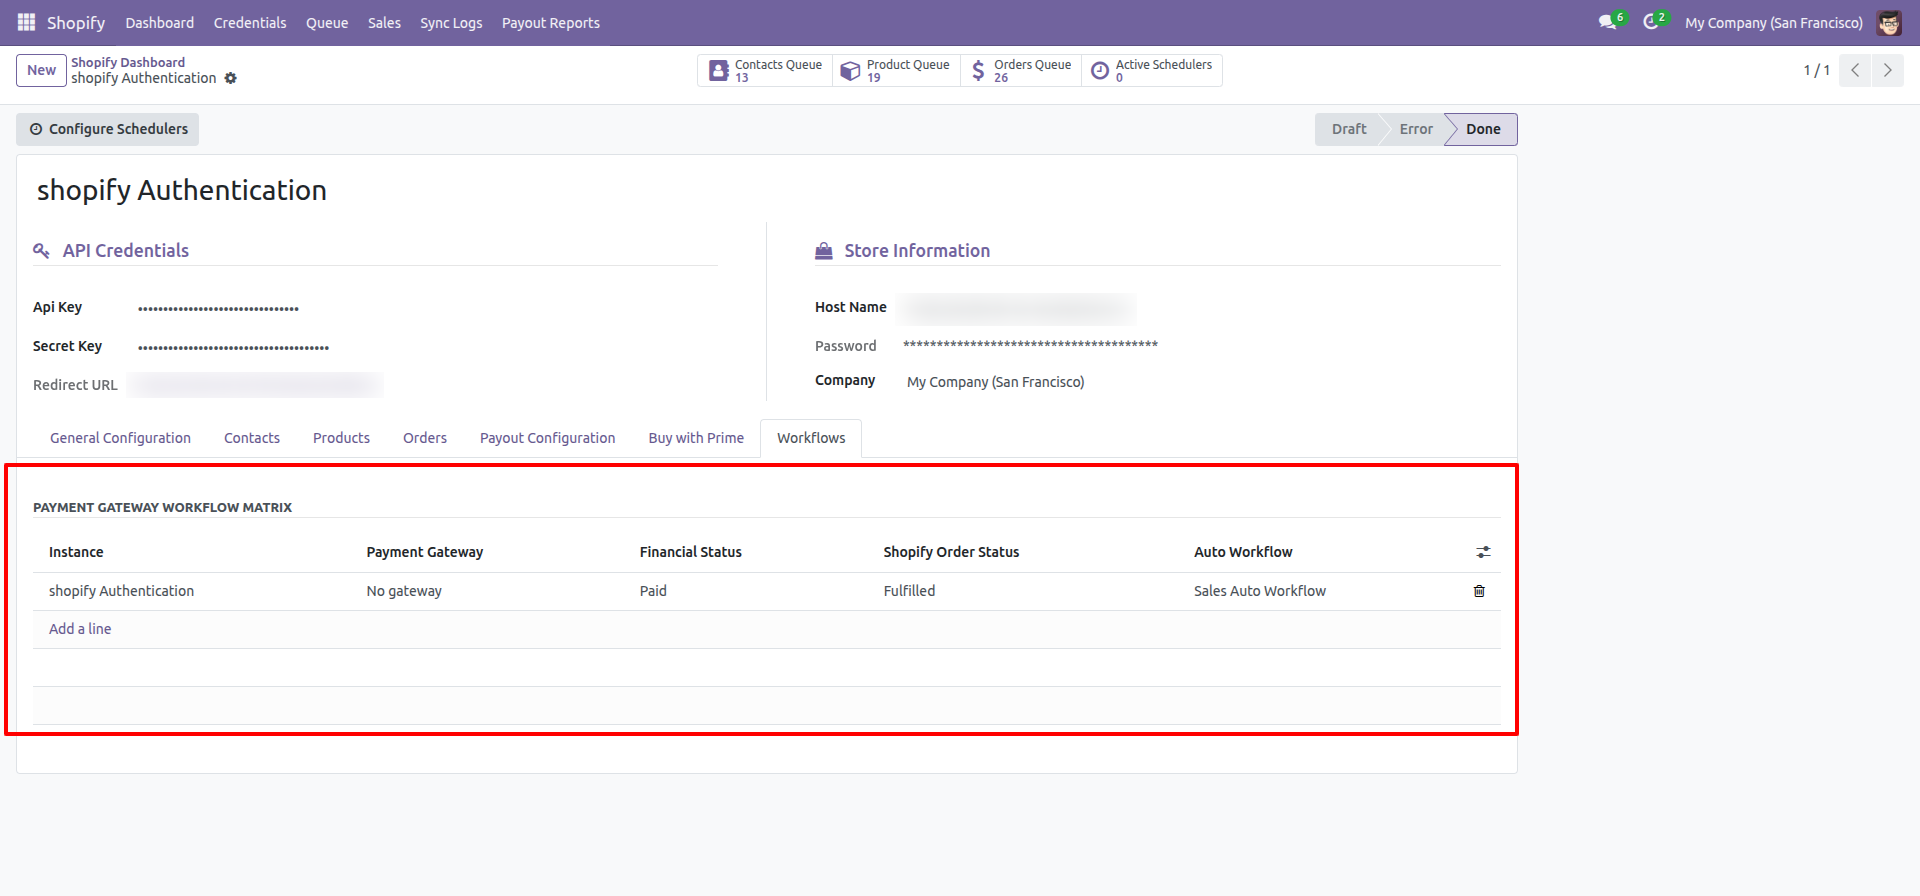
Review the Payment Gateway Workflow Matrix for rules applied during order processing.
Set Export Products Based On to Update Product before running product updates.
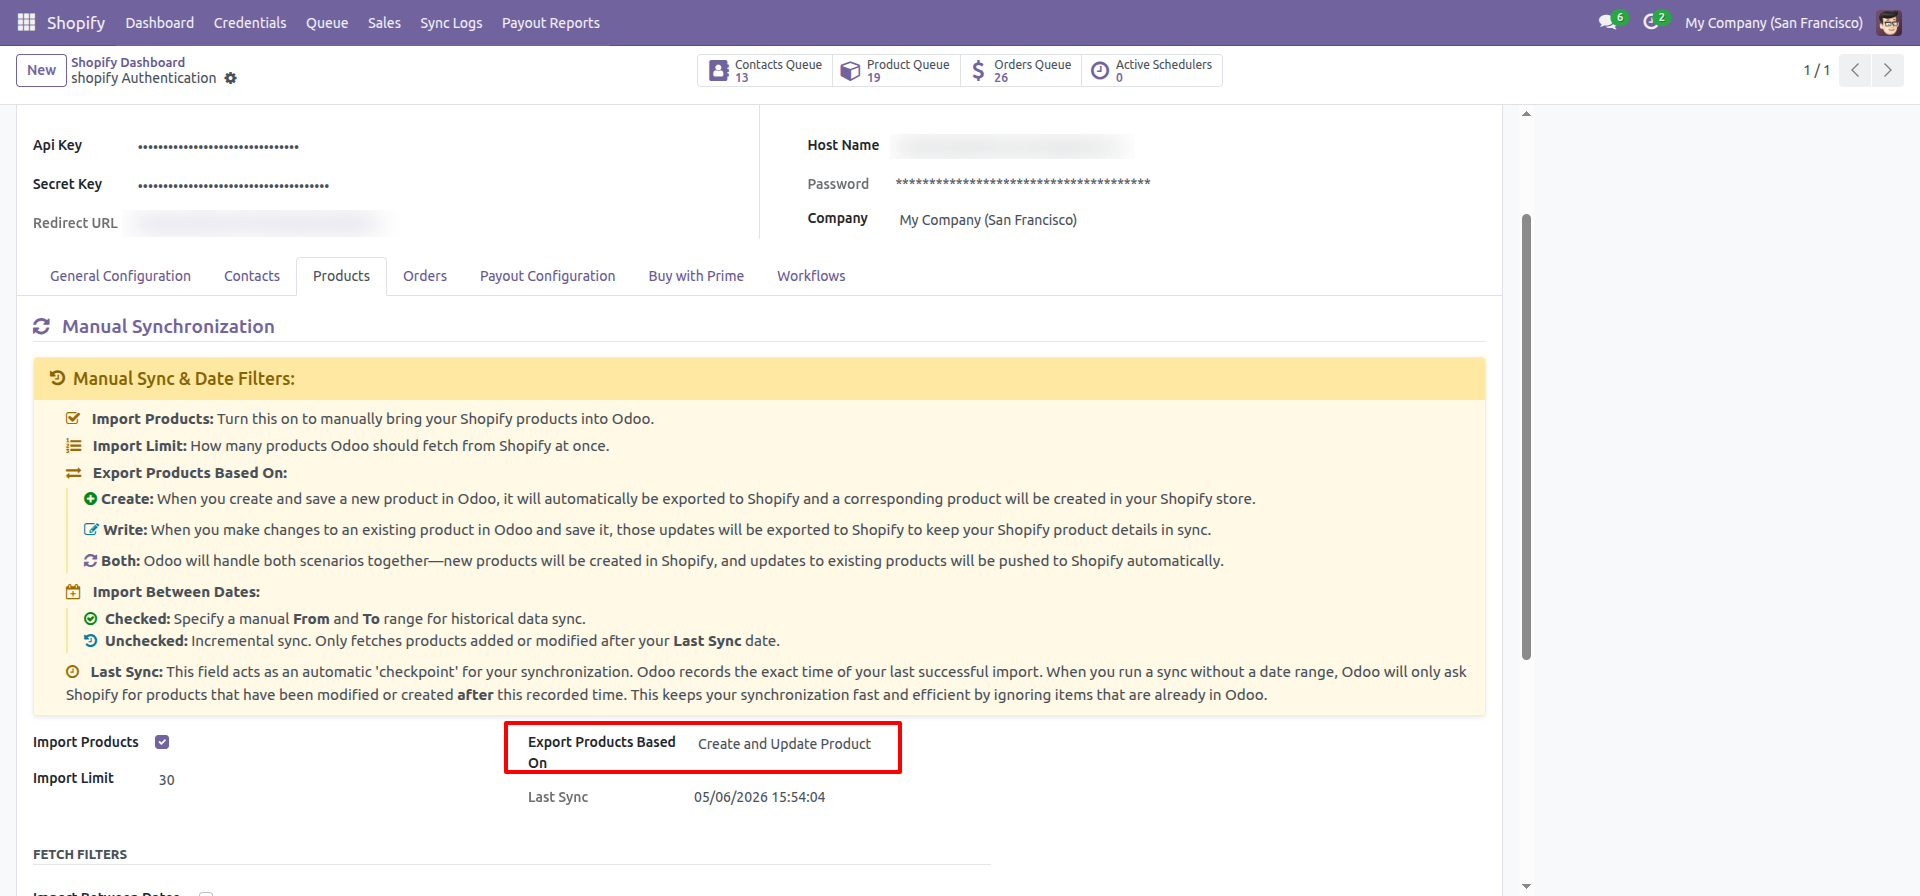
Click the export icon on the product form to send this item.
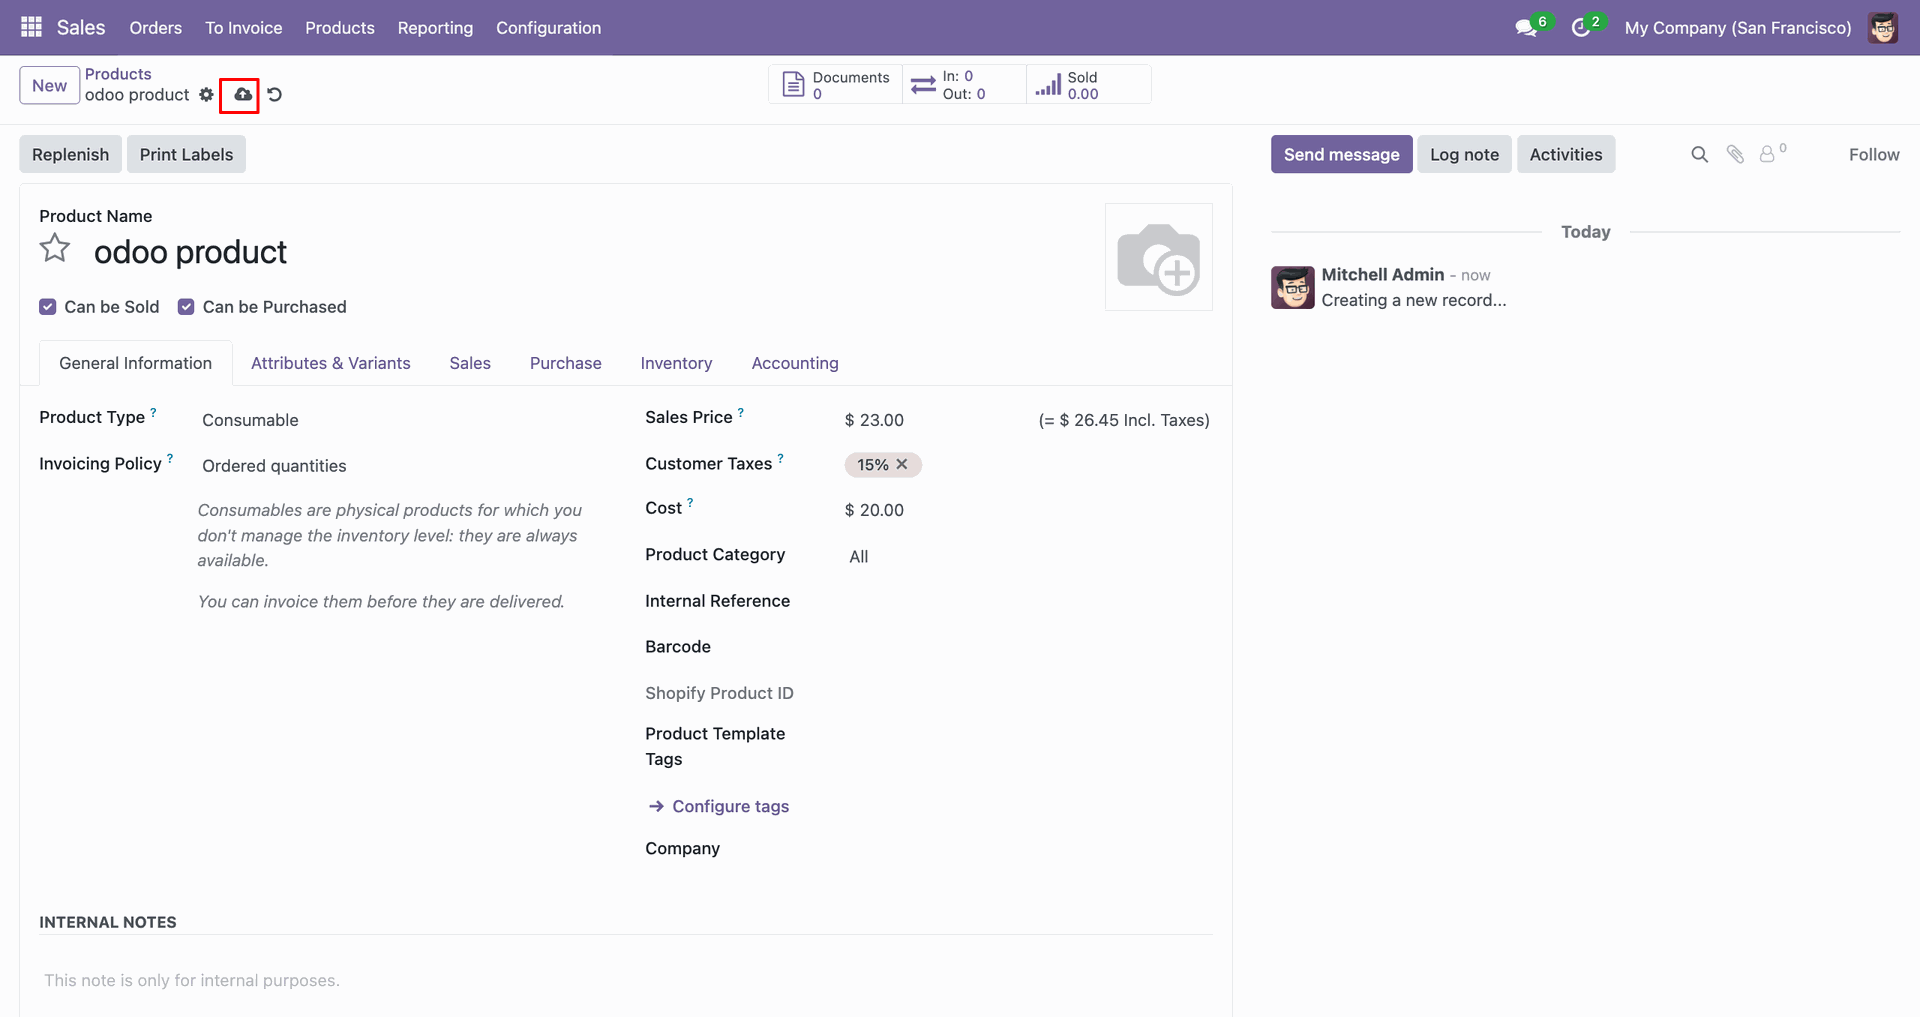
Review the Shopify Product ID field after exporting the product from Odoo.
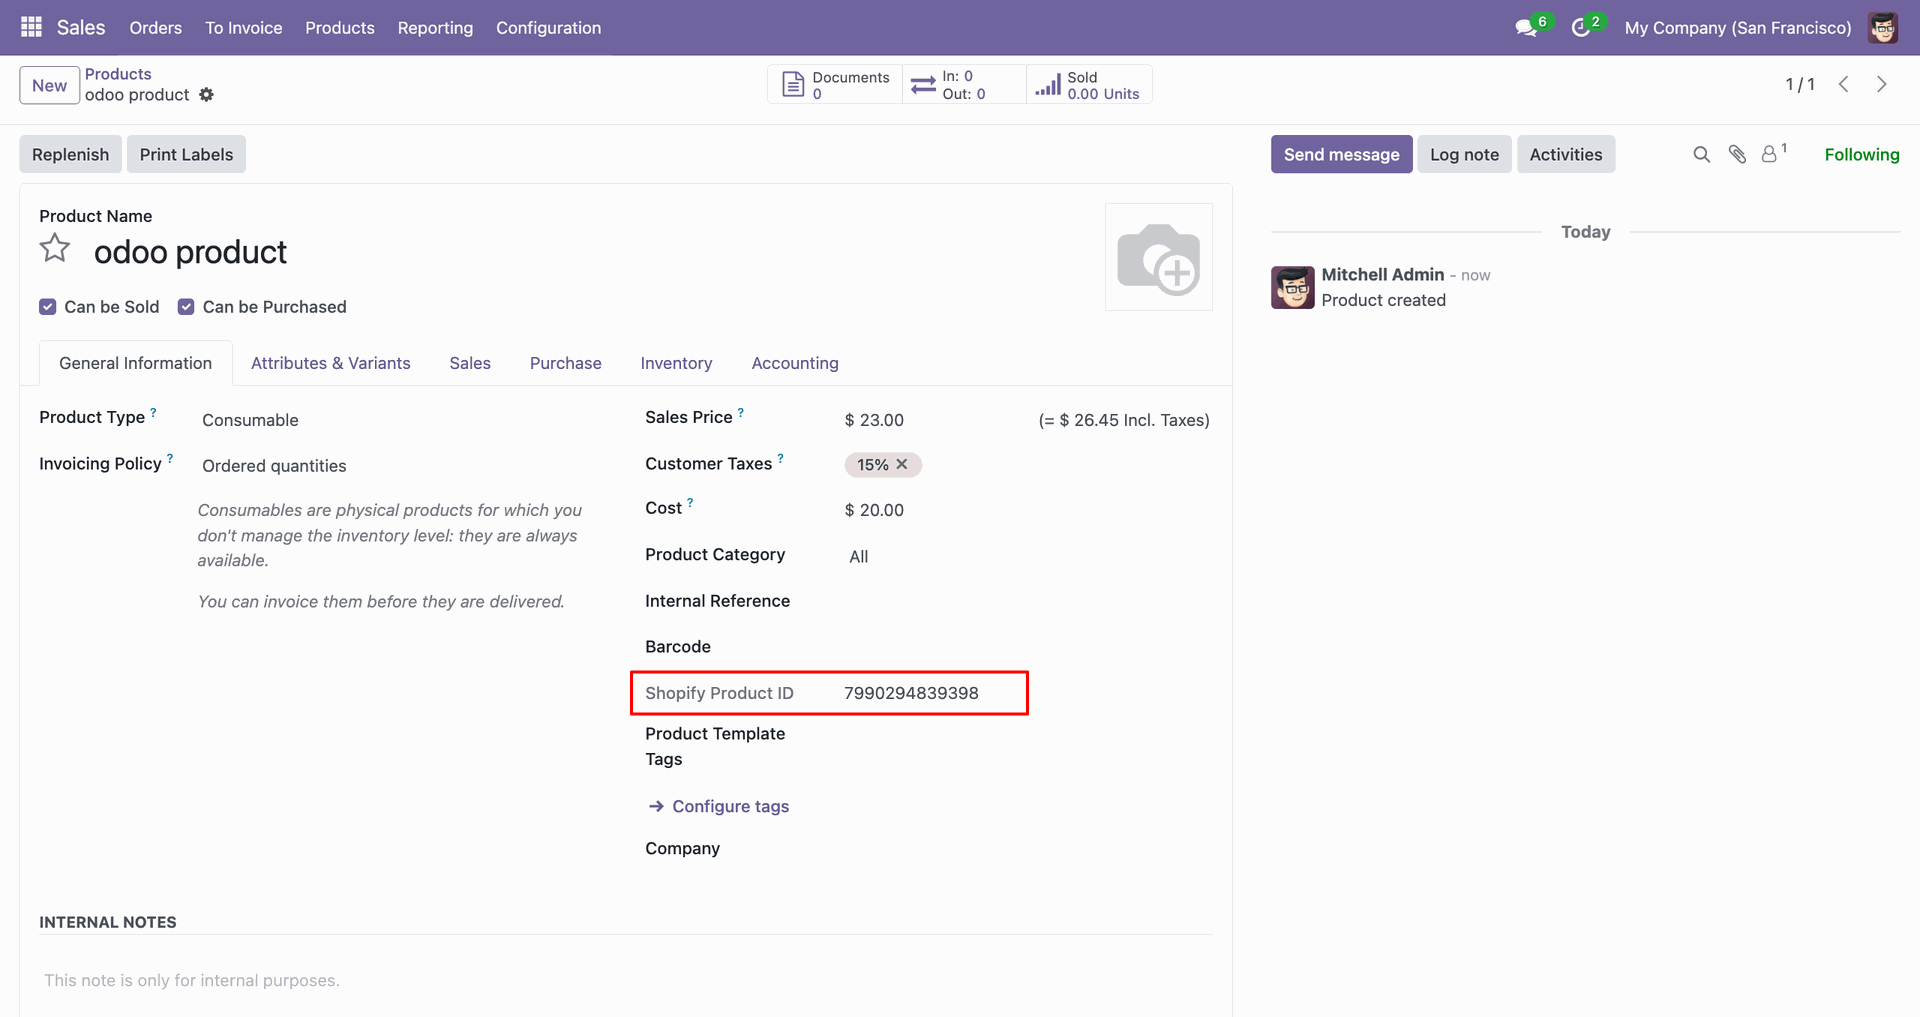
Check Sync Logs to confirm the product was created successfully in Shopify.
Verify the exported product row appears in Shopify with the expected details.
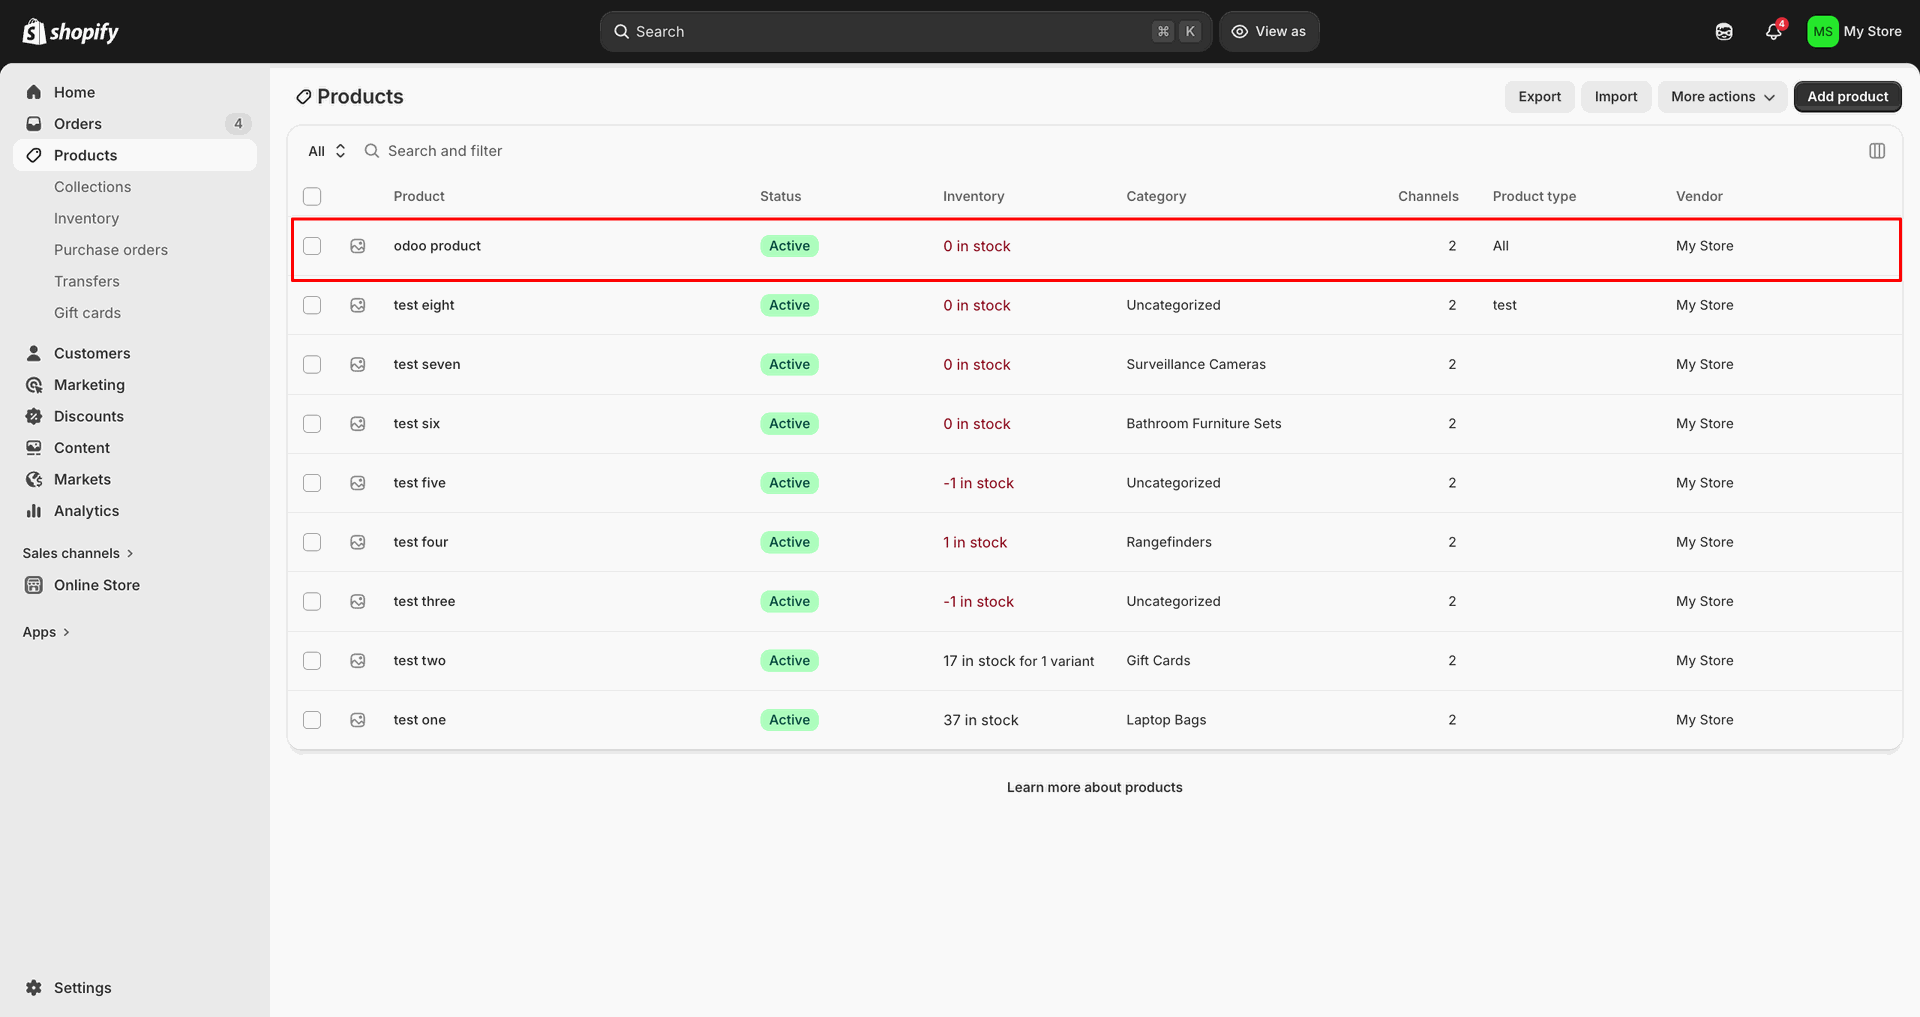
Confirm Export Products Based On is set to Update Product for changes.
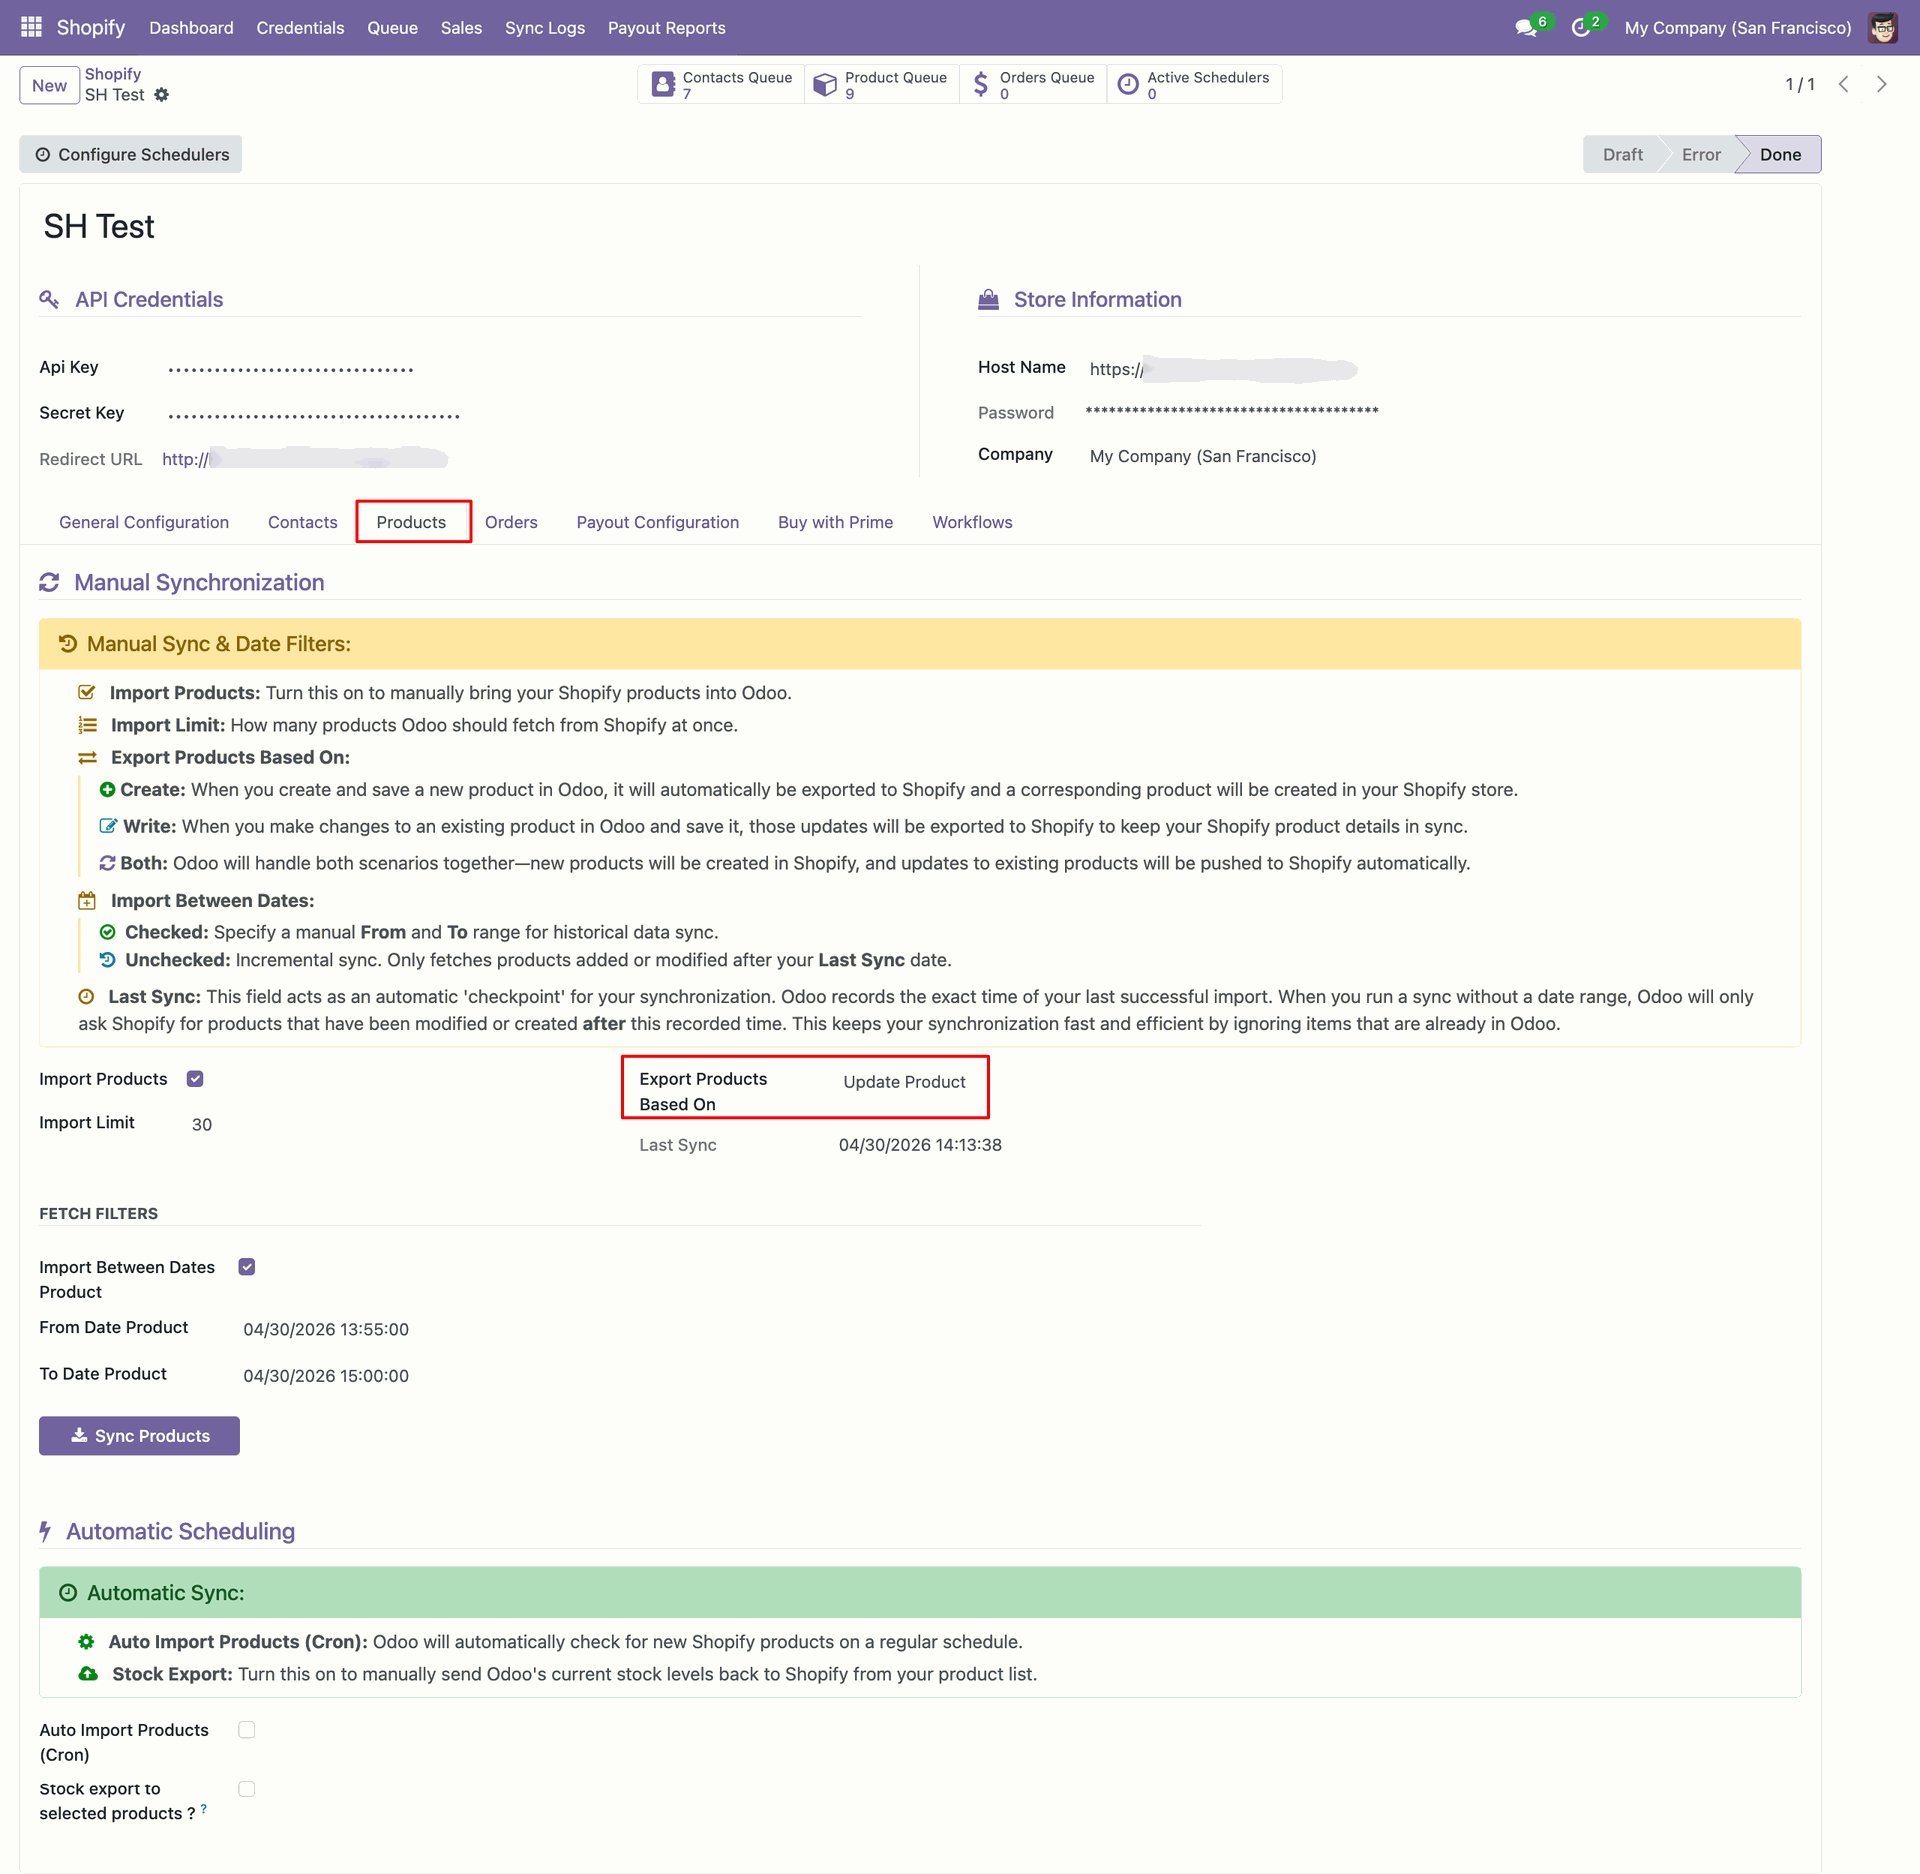
Update the Odoo product name before exporting the revised product information.
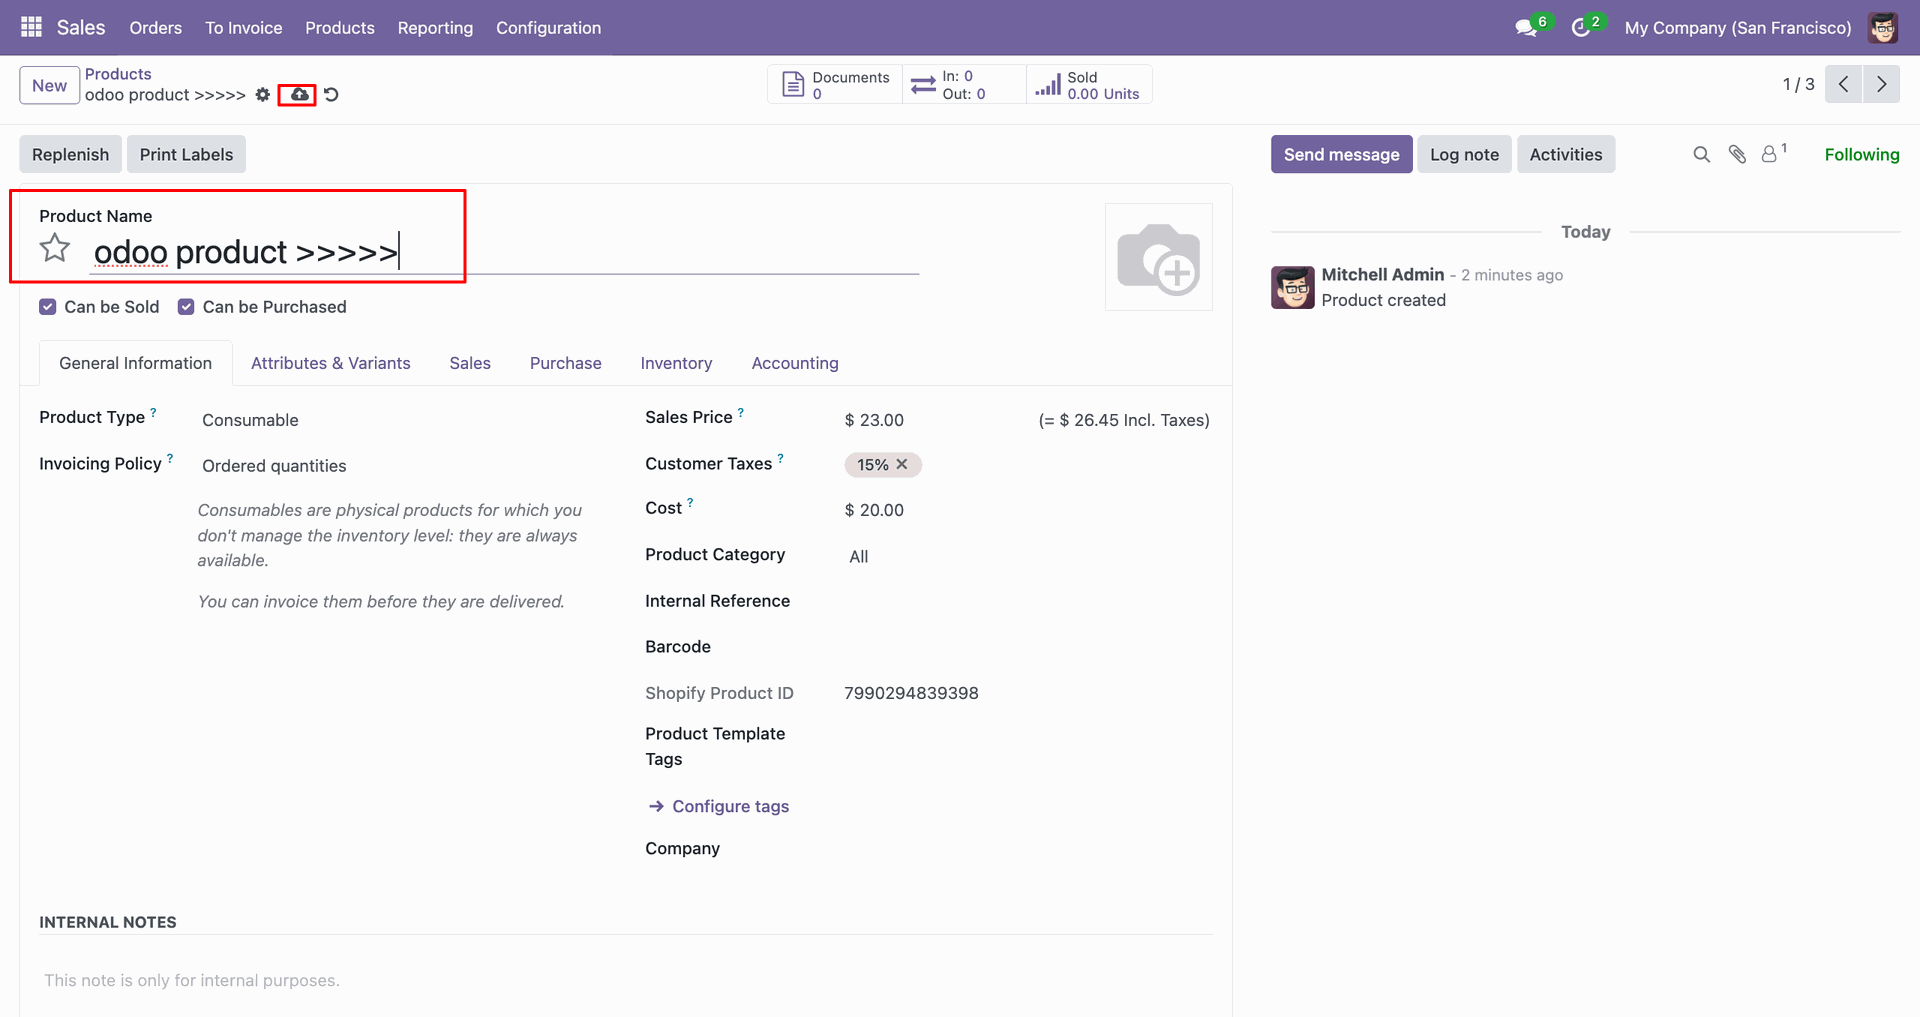
Review Sync Logs to confirm the product update was sent successfully.
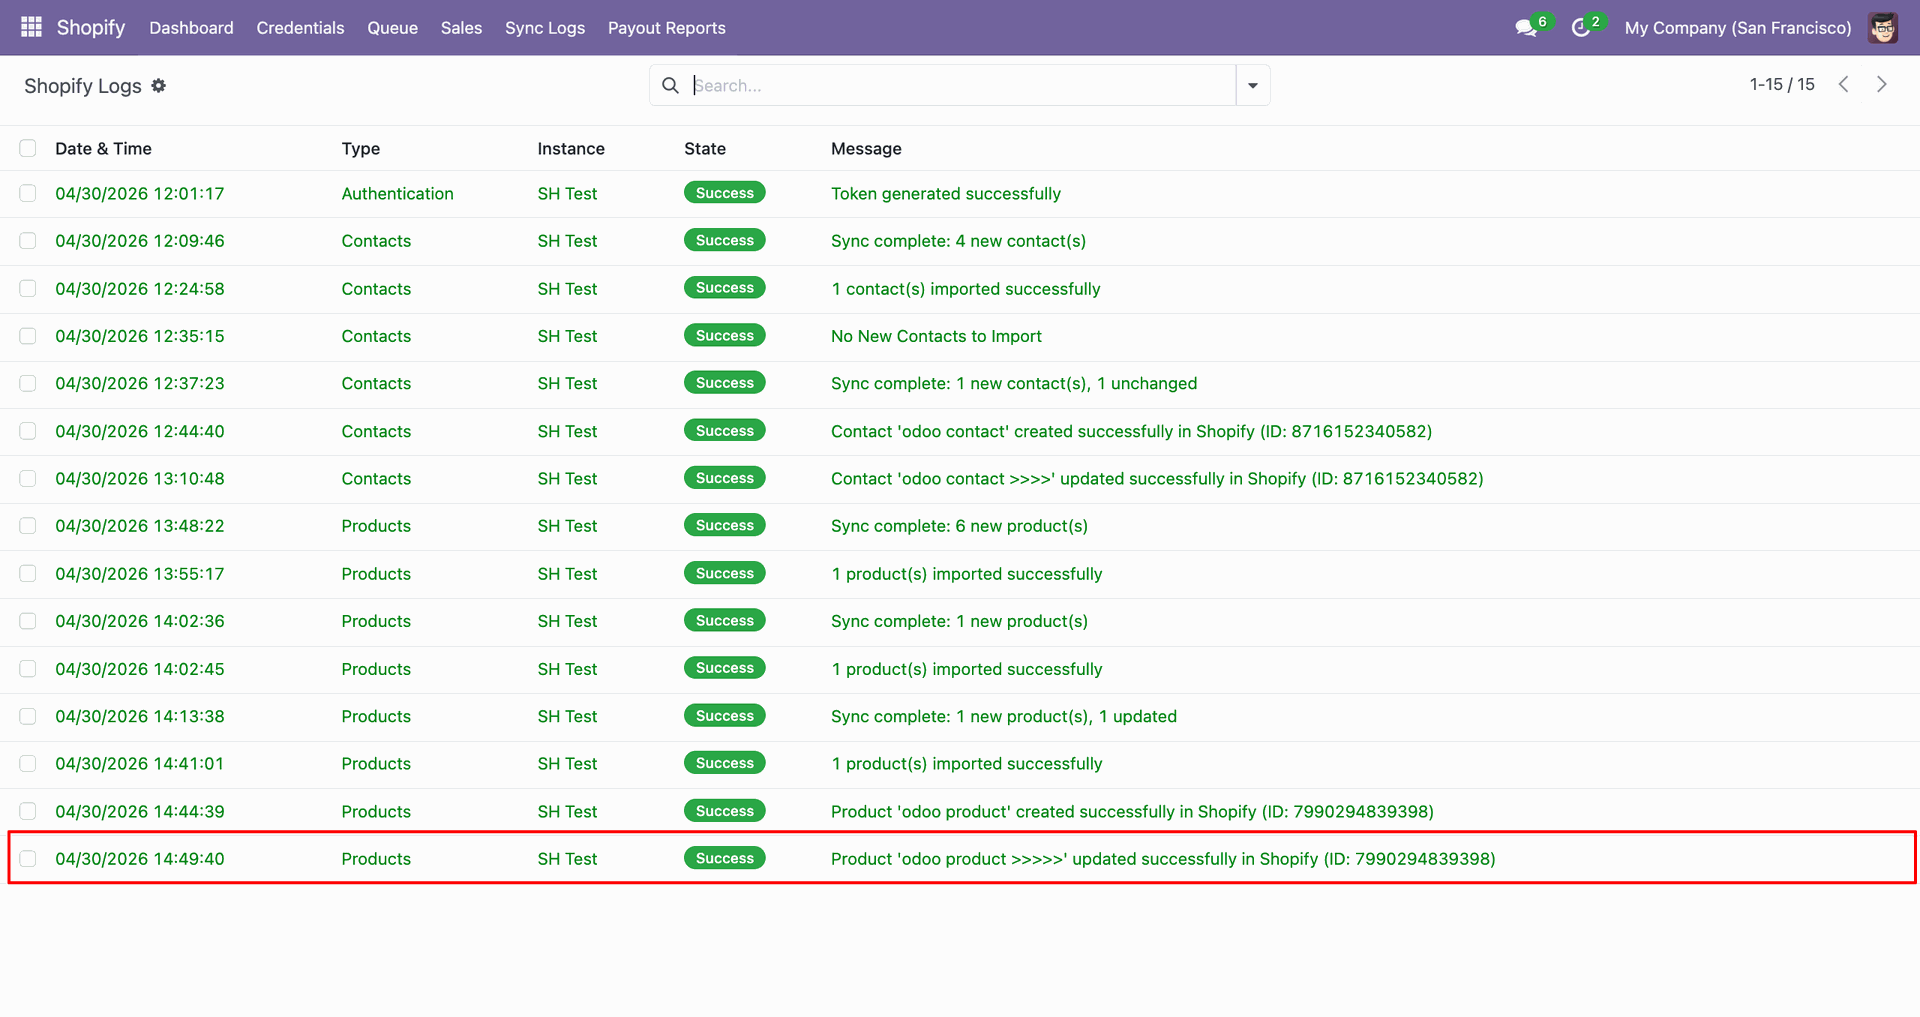
Verify the updated product row is visible in Shopify after export.
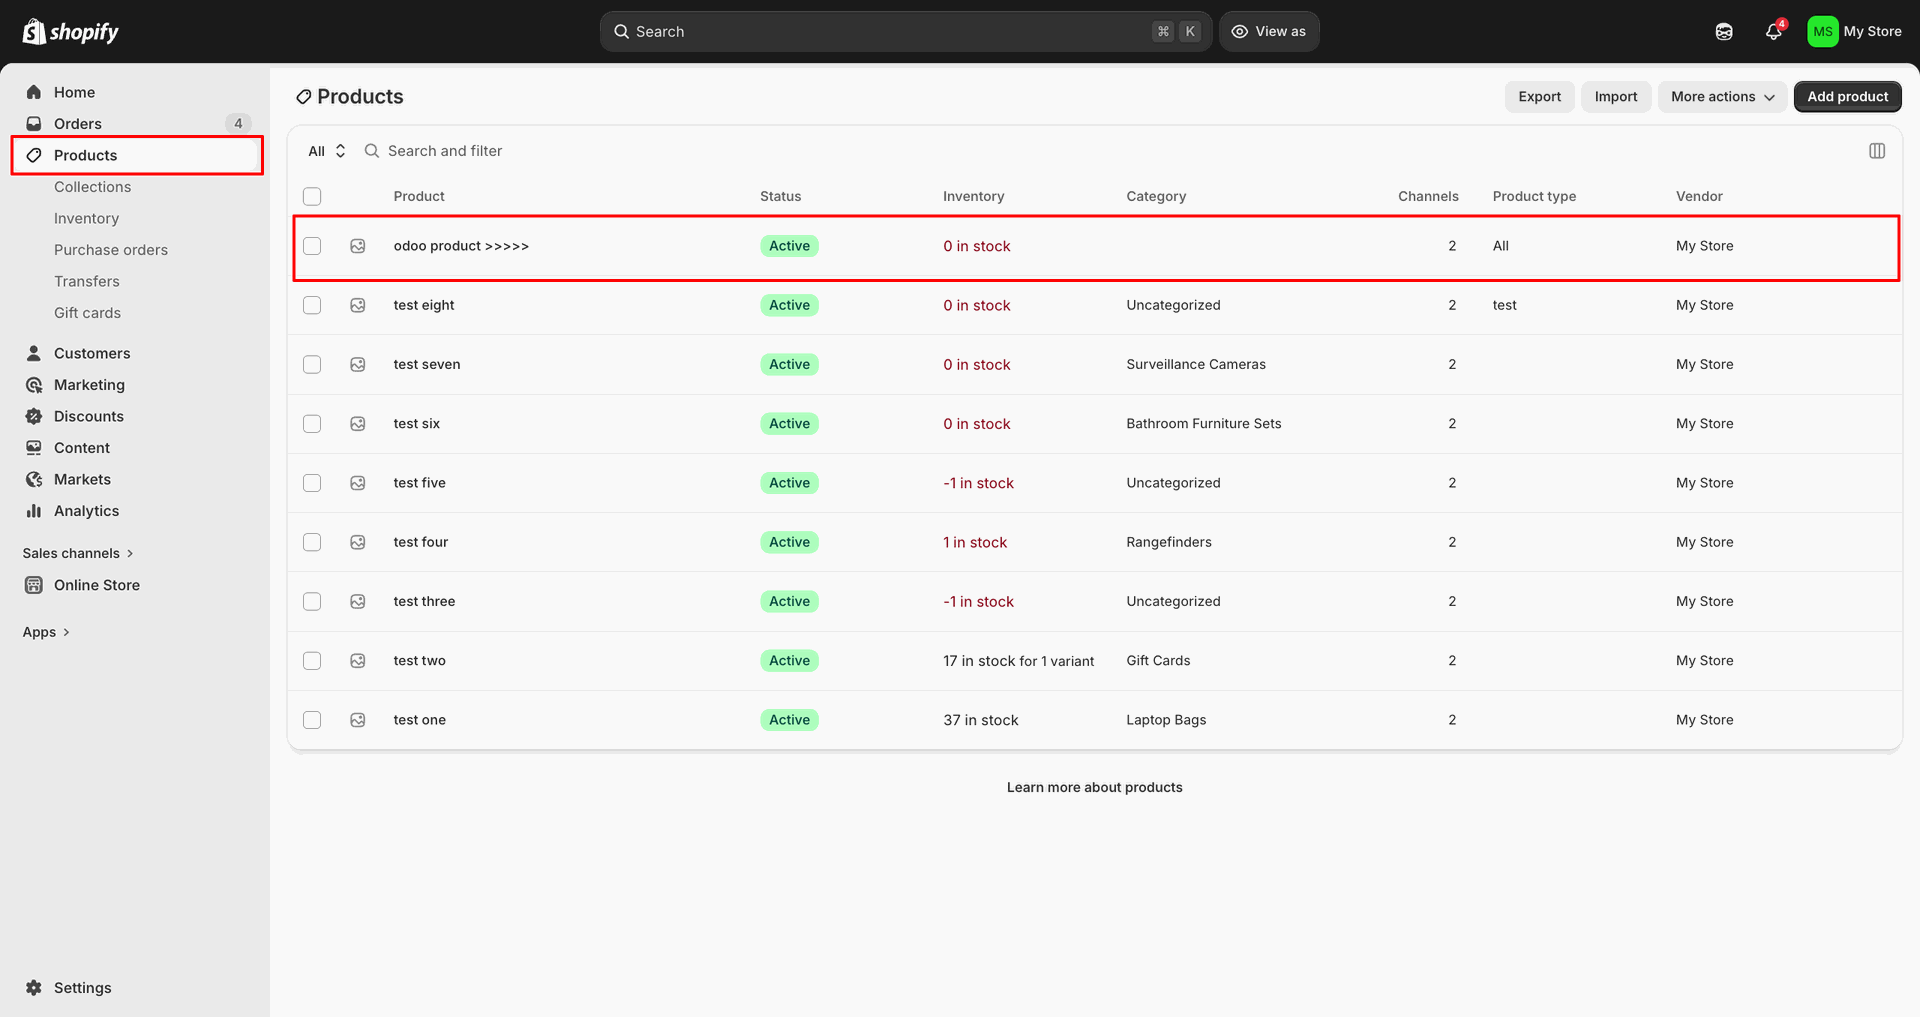
Workflow
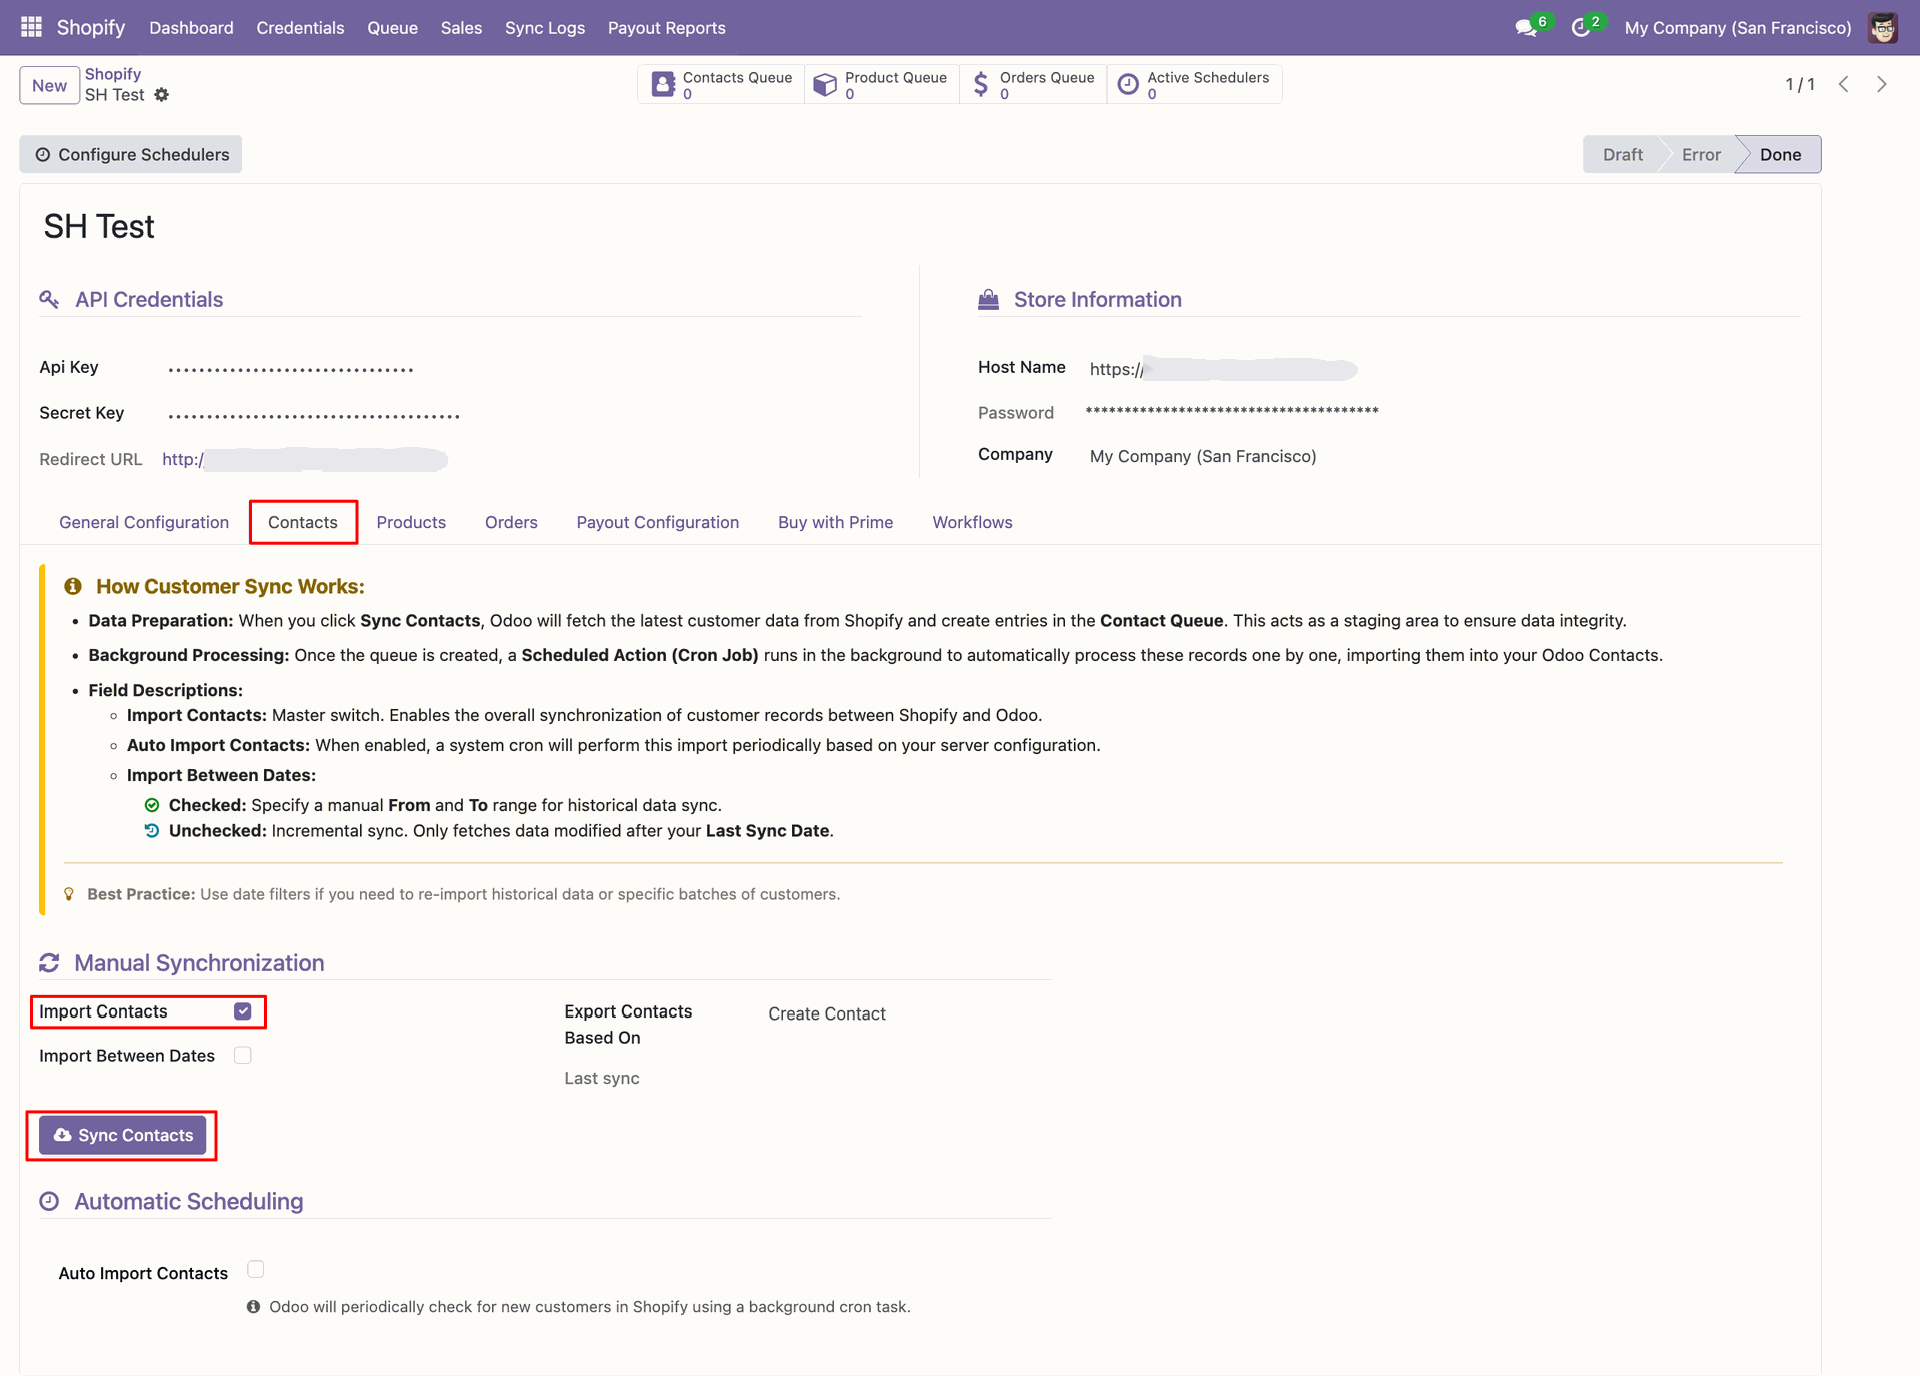
Open the Contacts tab, enable Import Contacts, and click Sync Contacts.
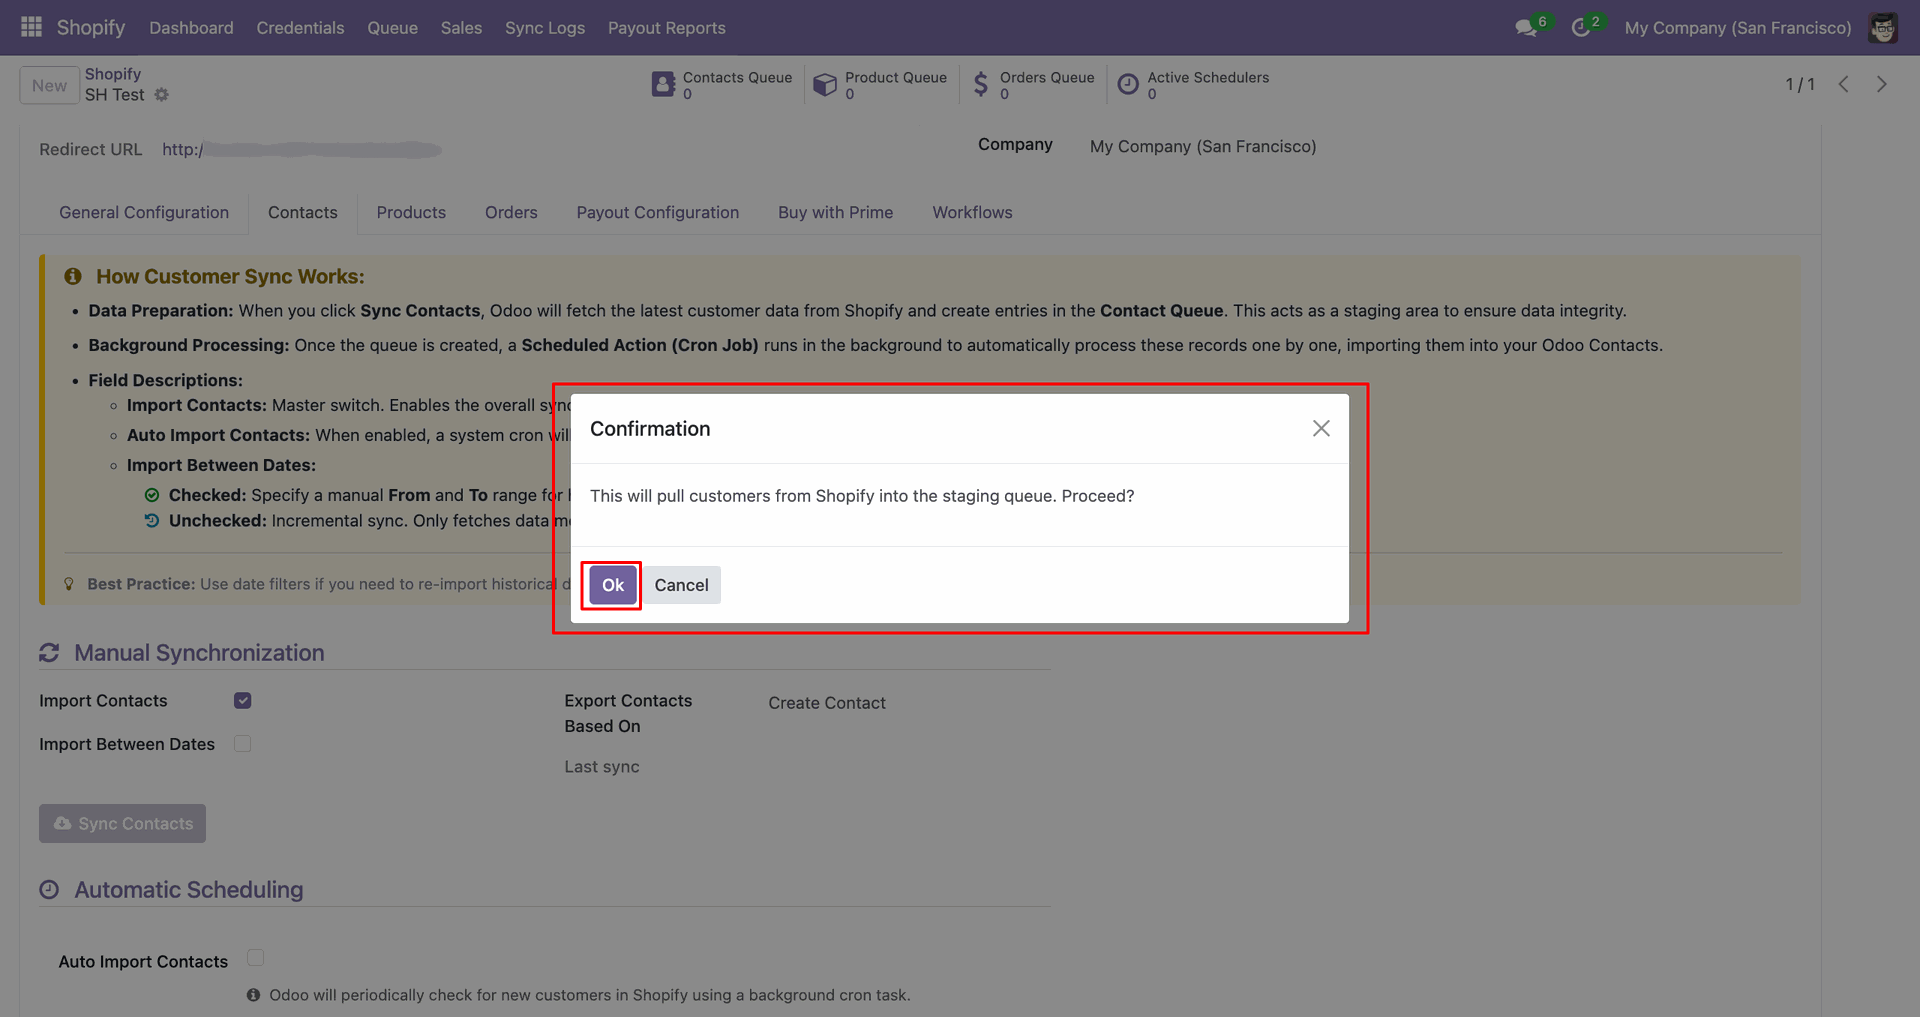
Confirm the staging queue popup by clicking OK to continue contact import.
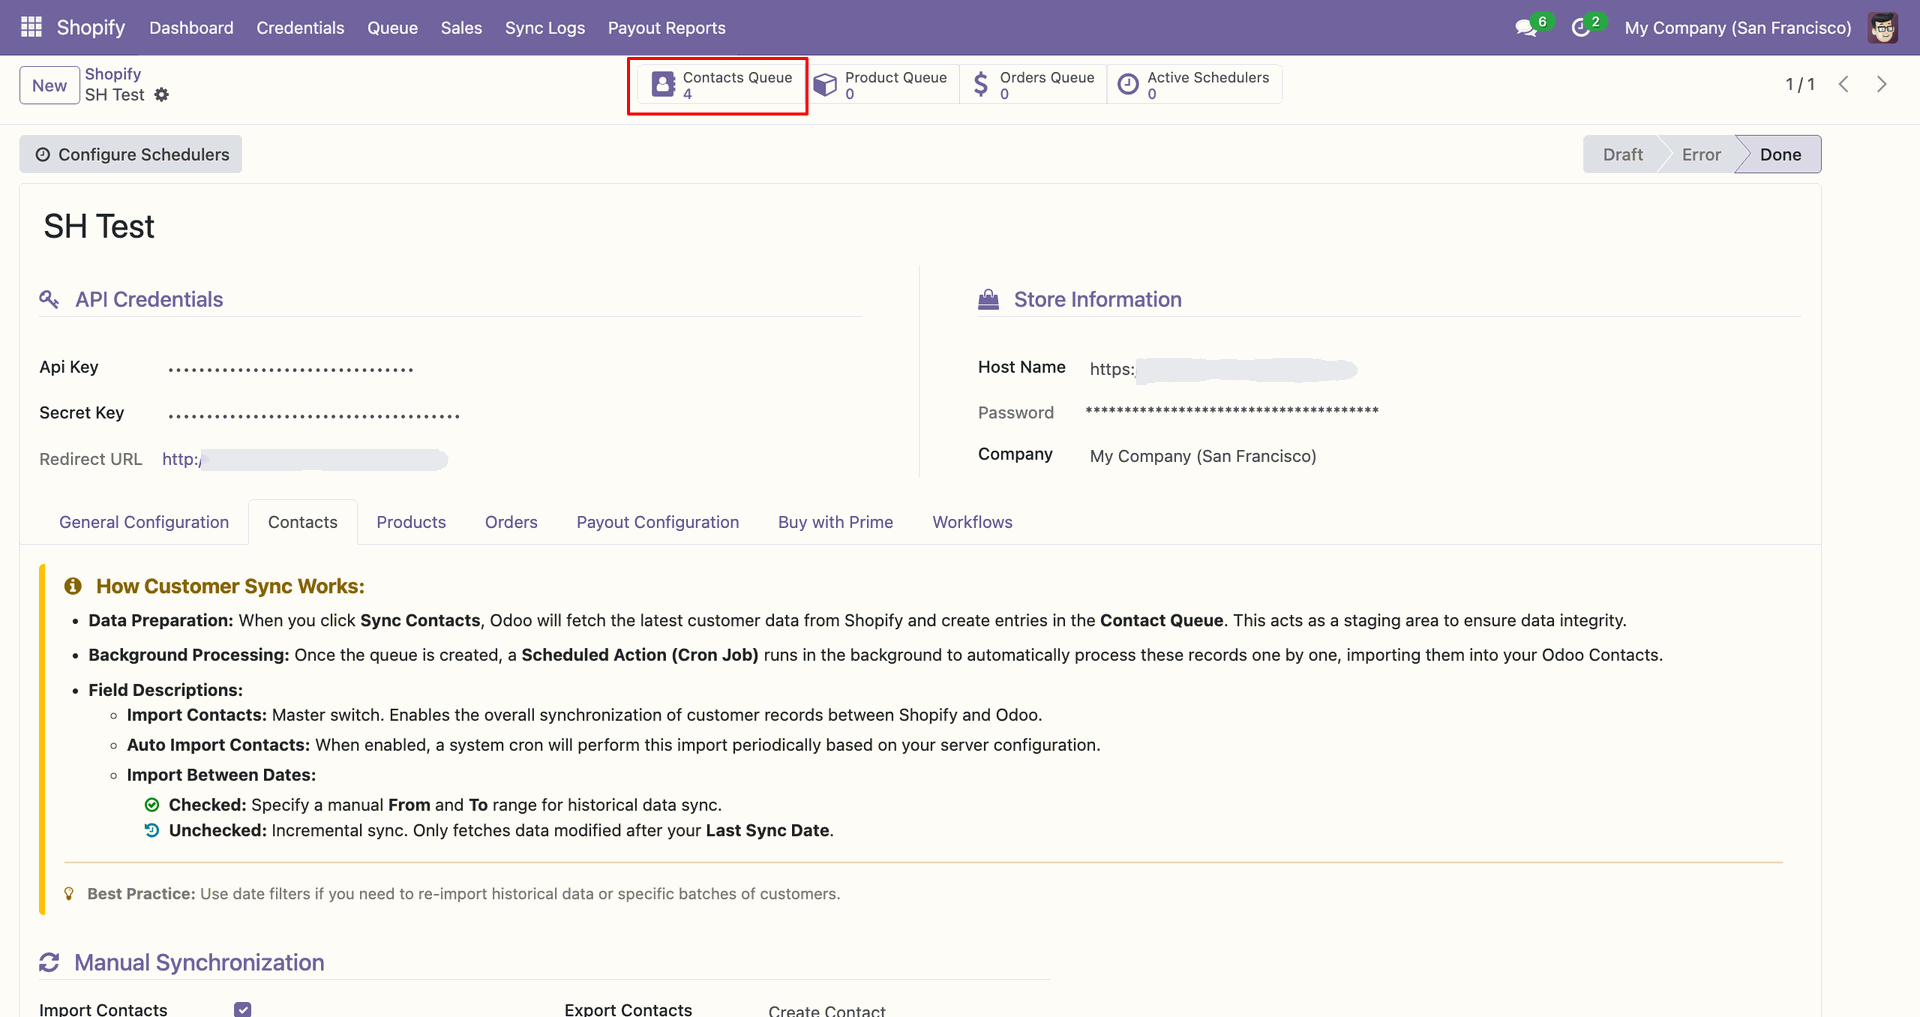
Use the Contacts Queue shortcut to review staged customer records after synchronization.
Check Sync Logs to verify the customer fetch completed and staged contacts.
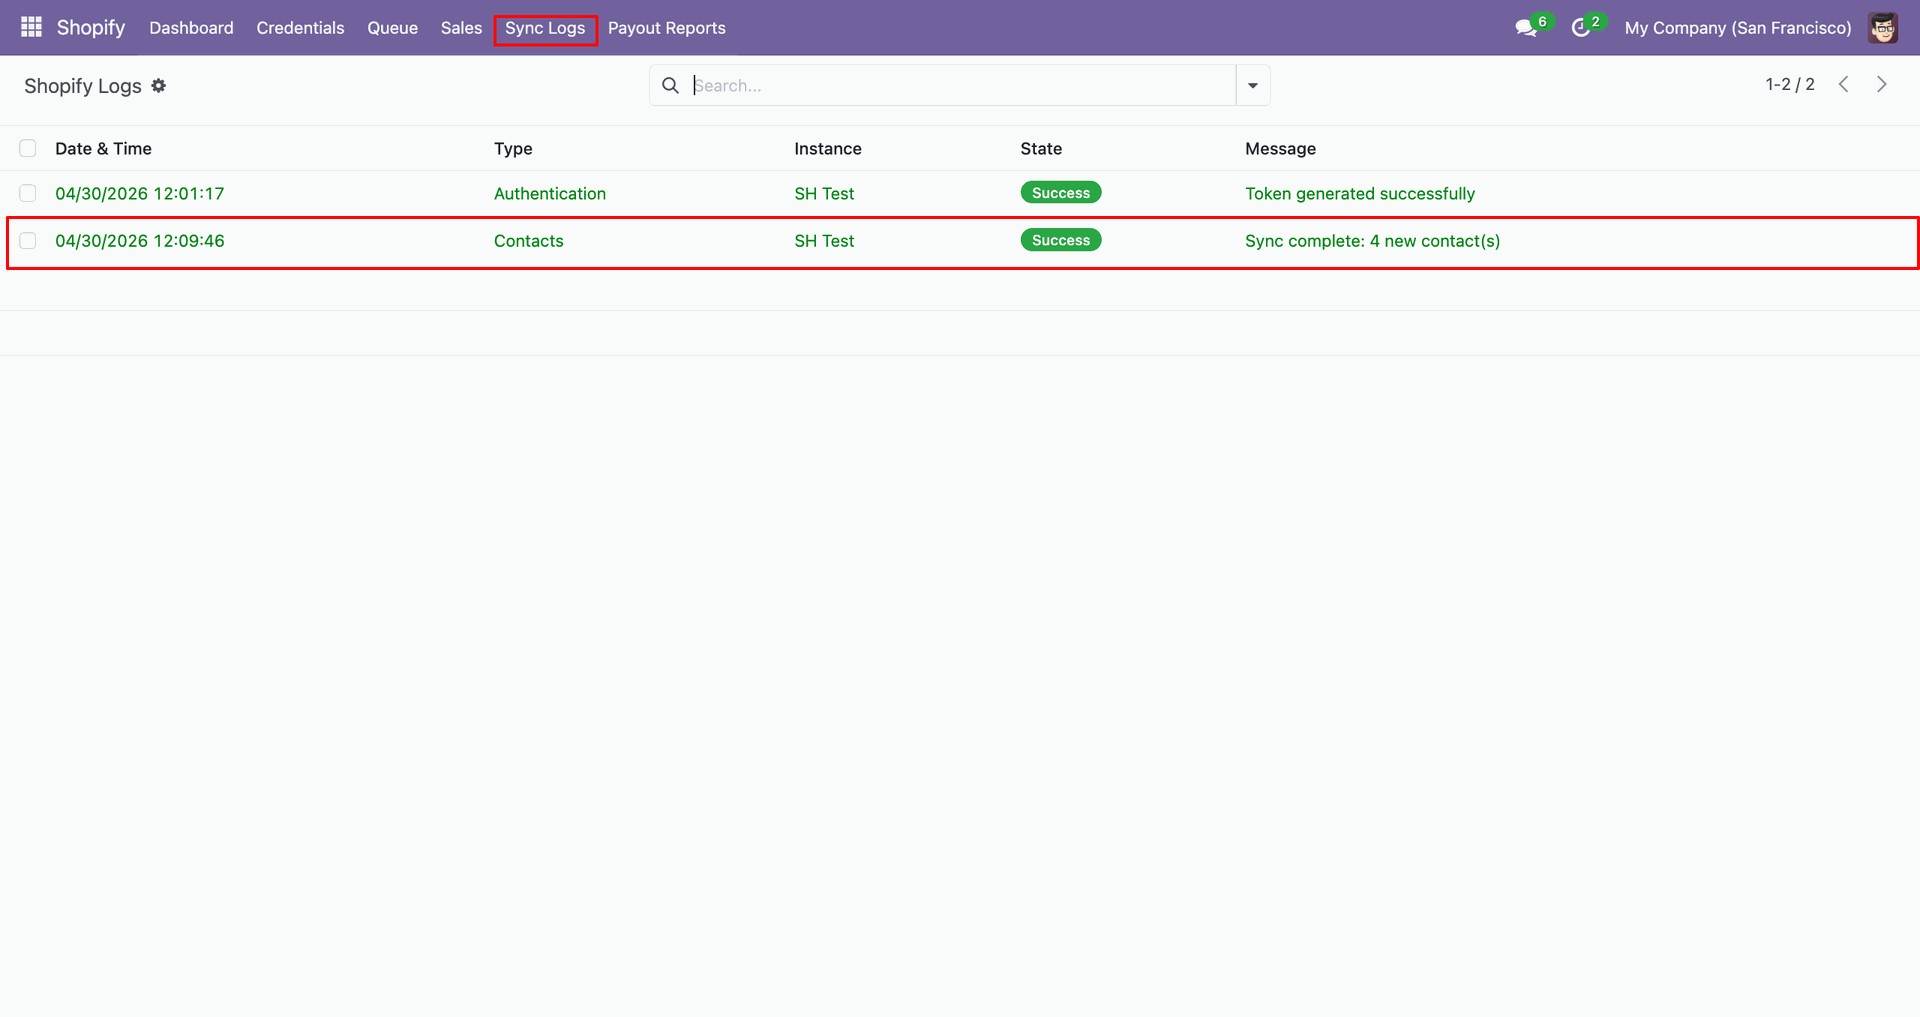
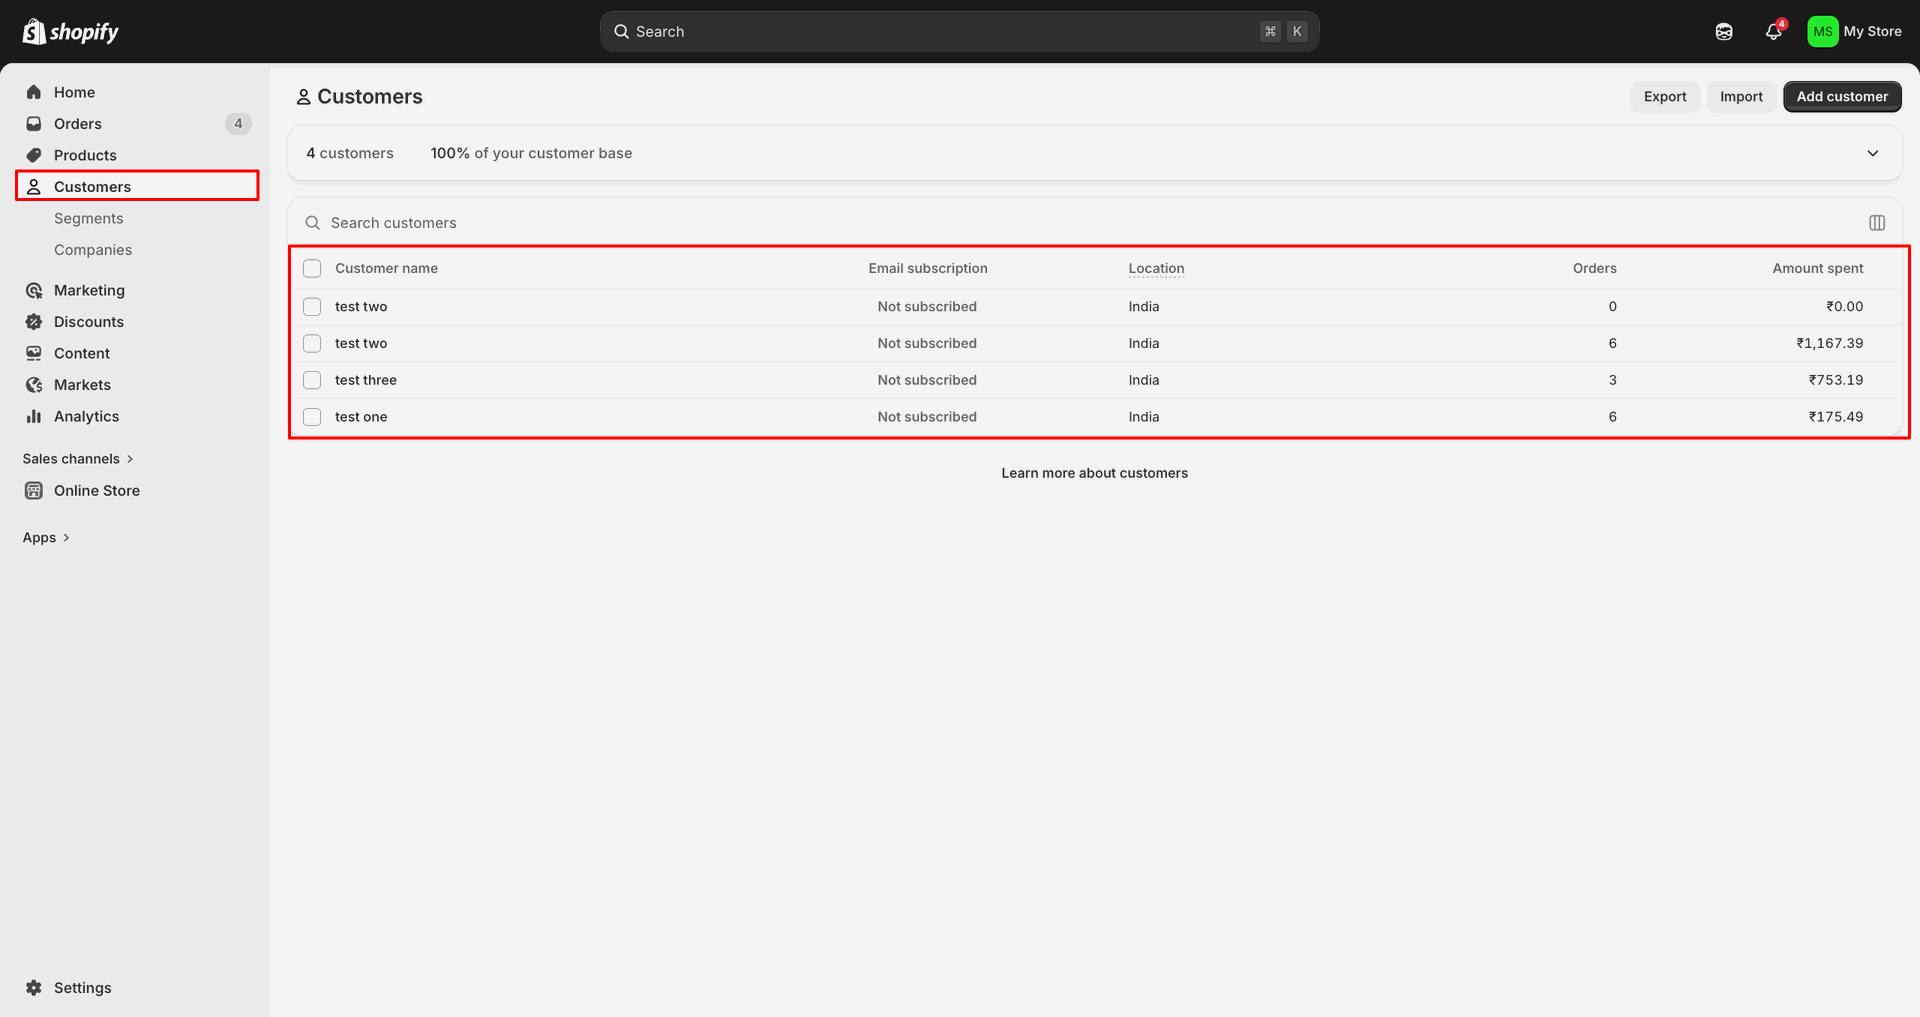
Open Customers in Shopify Admin to review the source customer records.
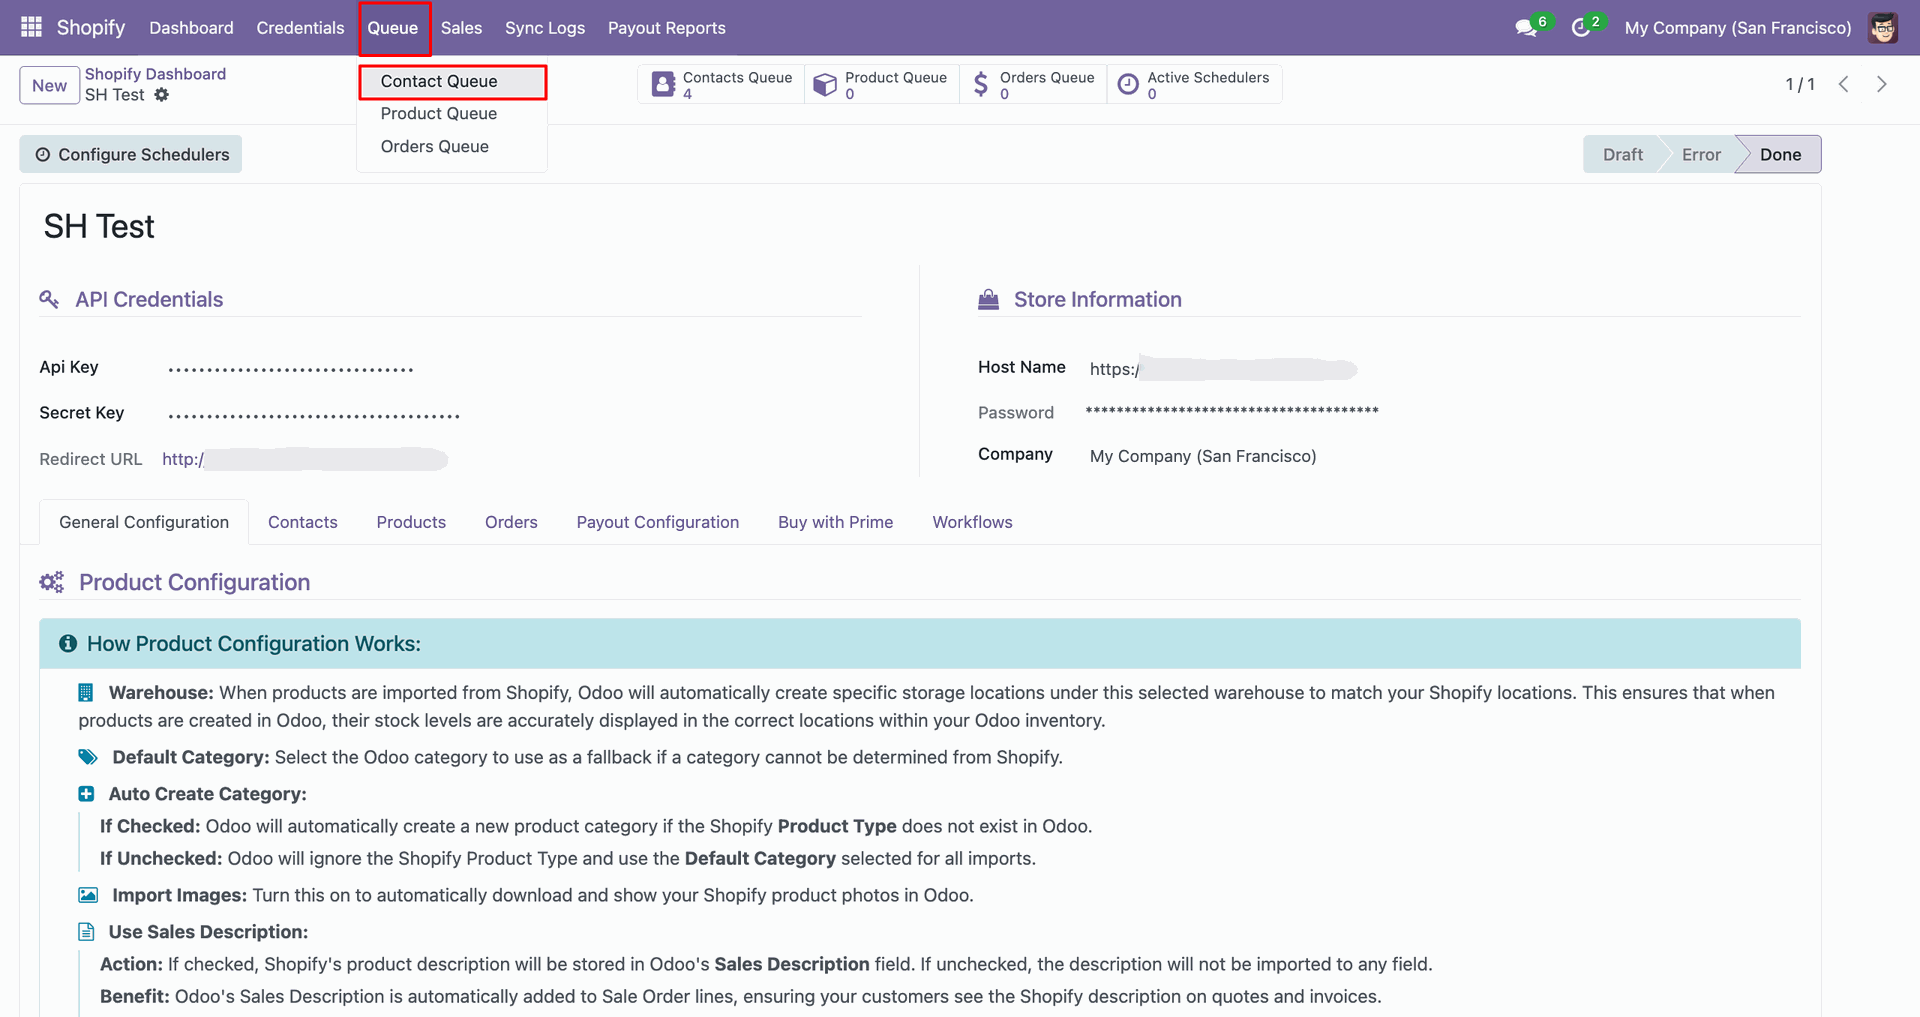
Open Contact Queue from the Queue menu to inspect imported customer entries.
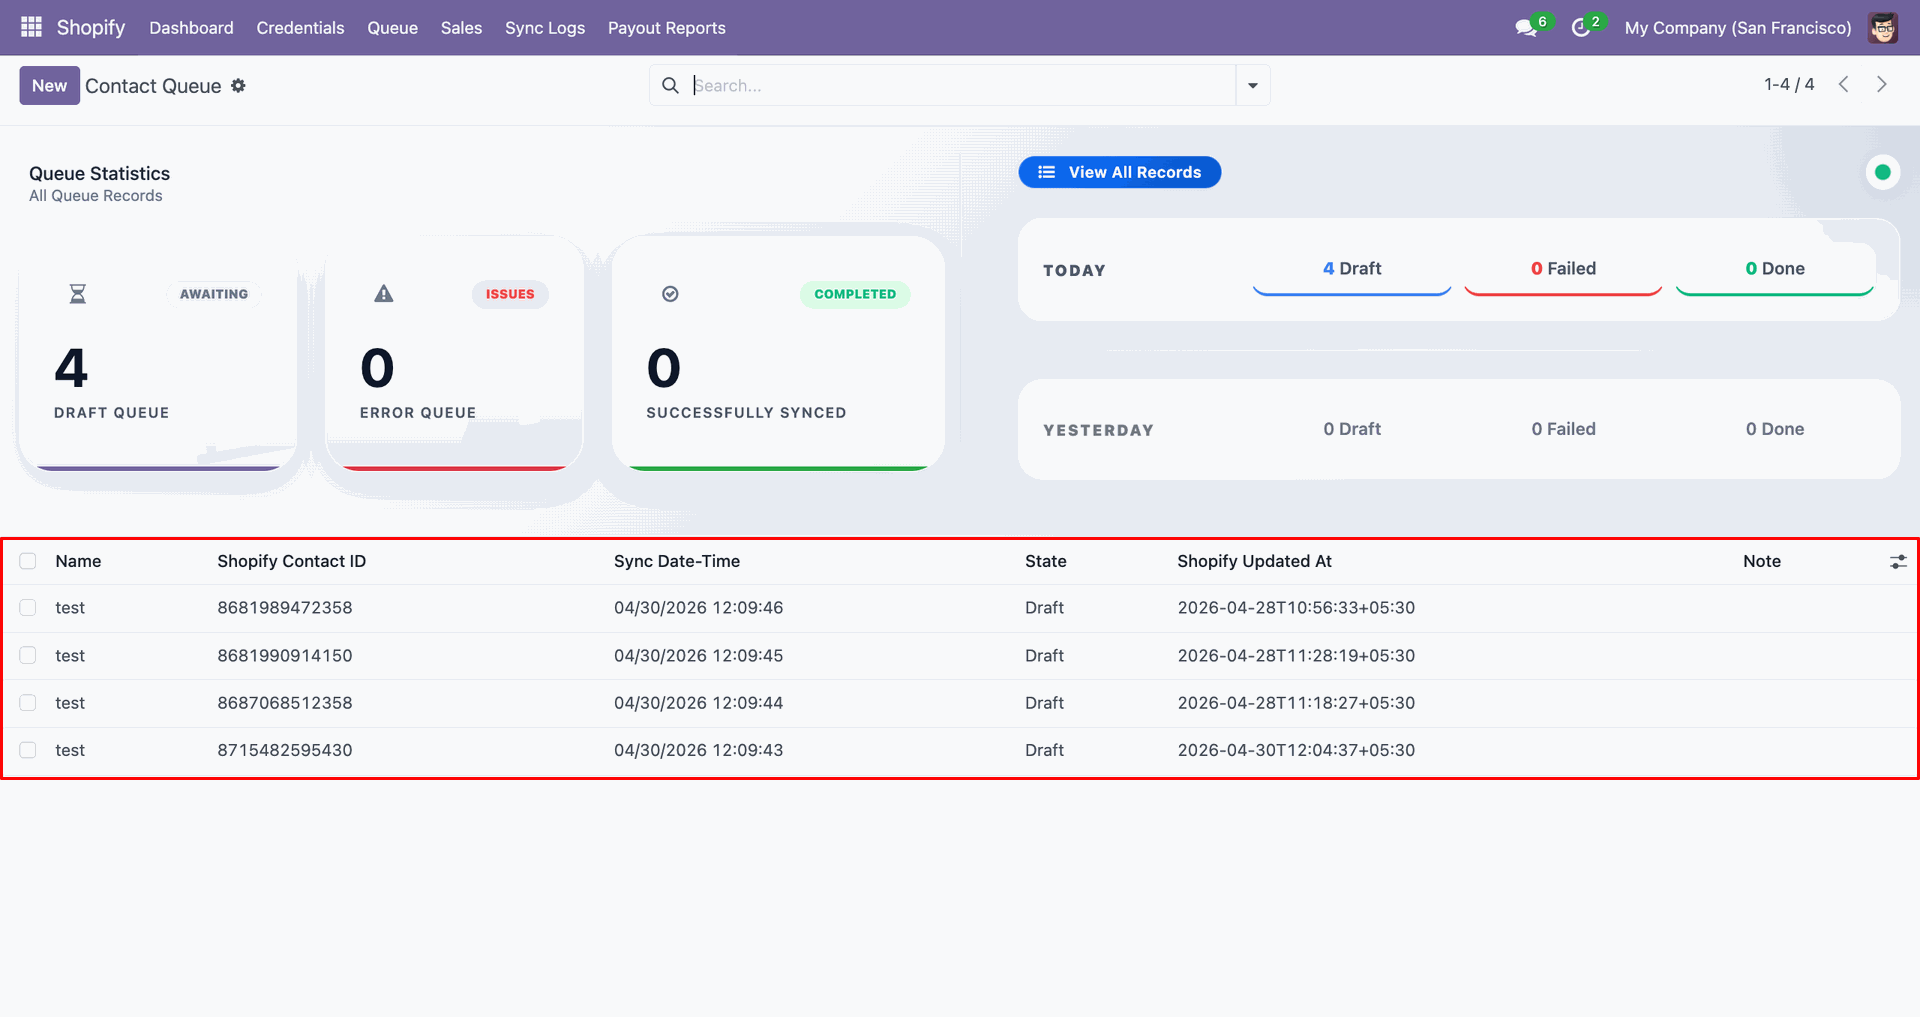
Review the Contact Queue list to compare staged customer IDs and timestamps.
Select the staged contact line and click Manually Import to process it.
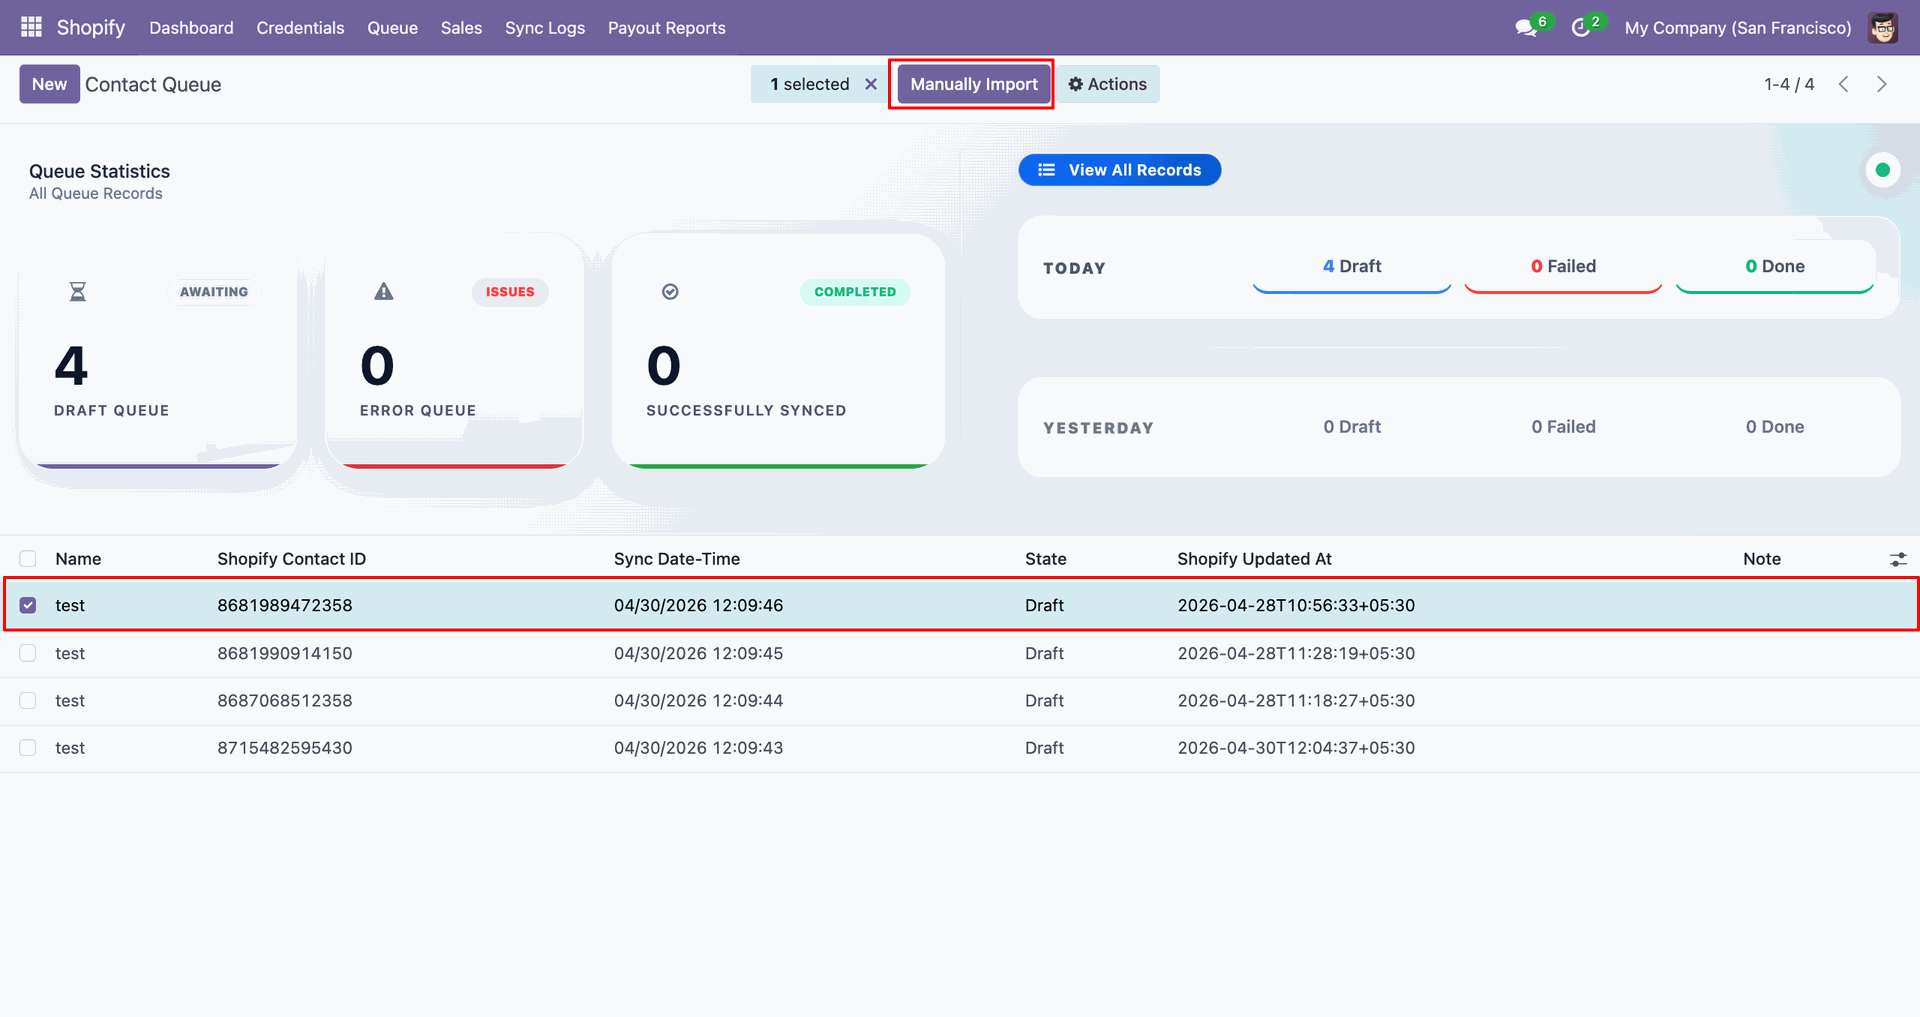
Click Process Queues Manually in the popup to import the selected customer.
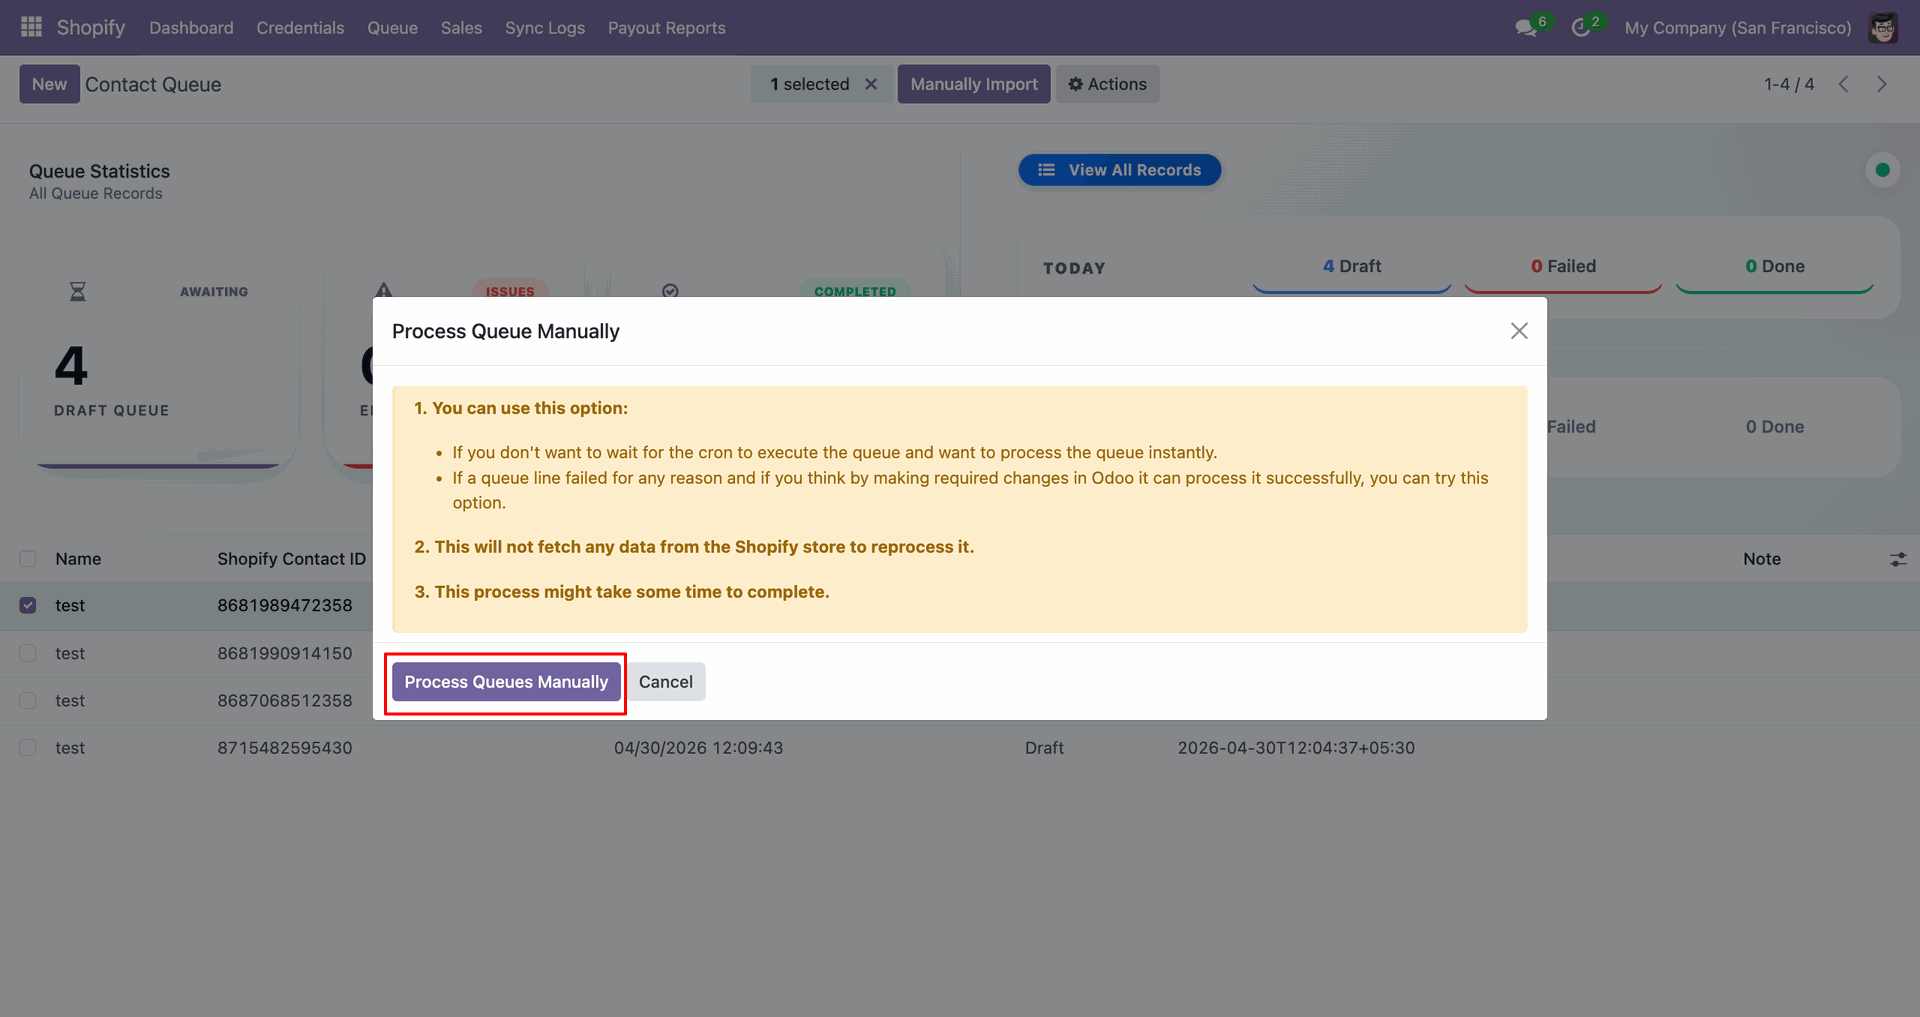
Use Open Record beside the completed queue line to open the Odoo contact.
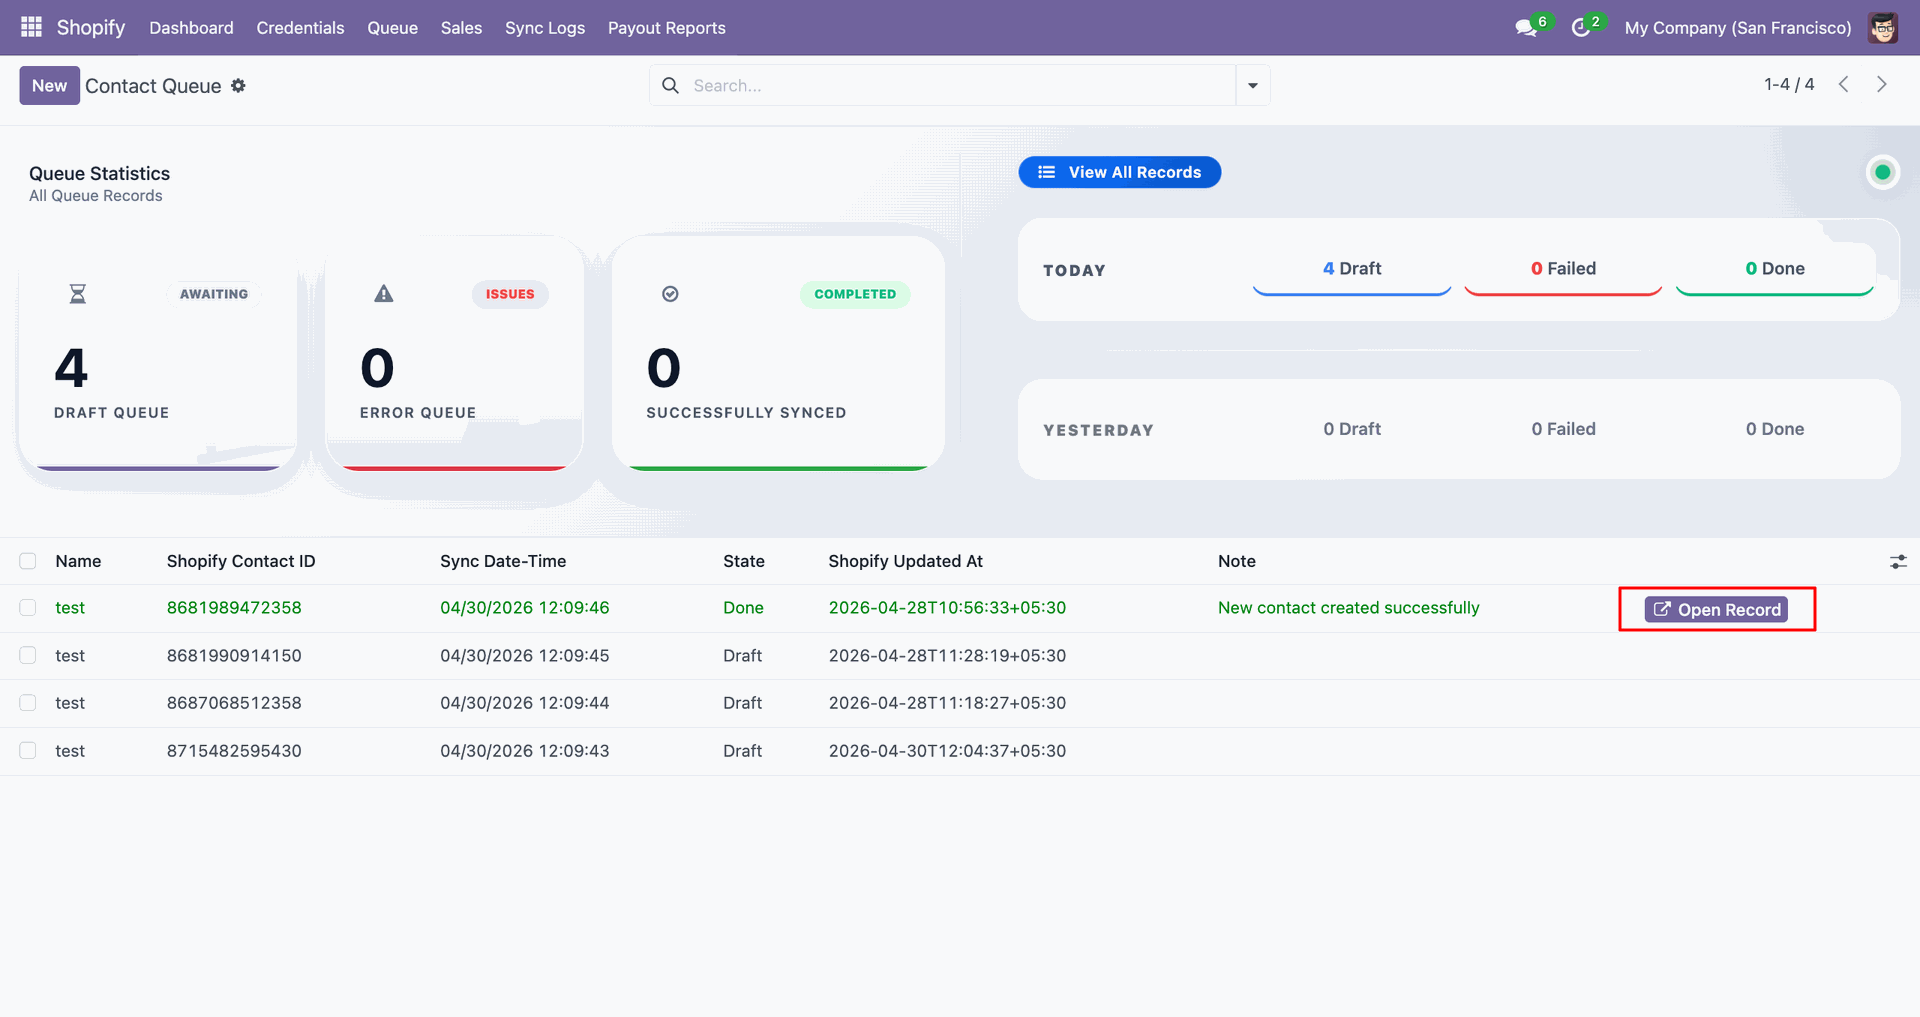
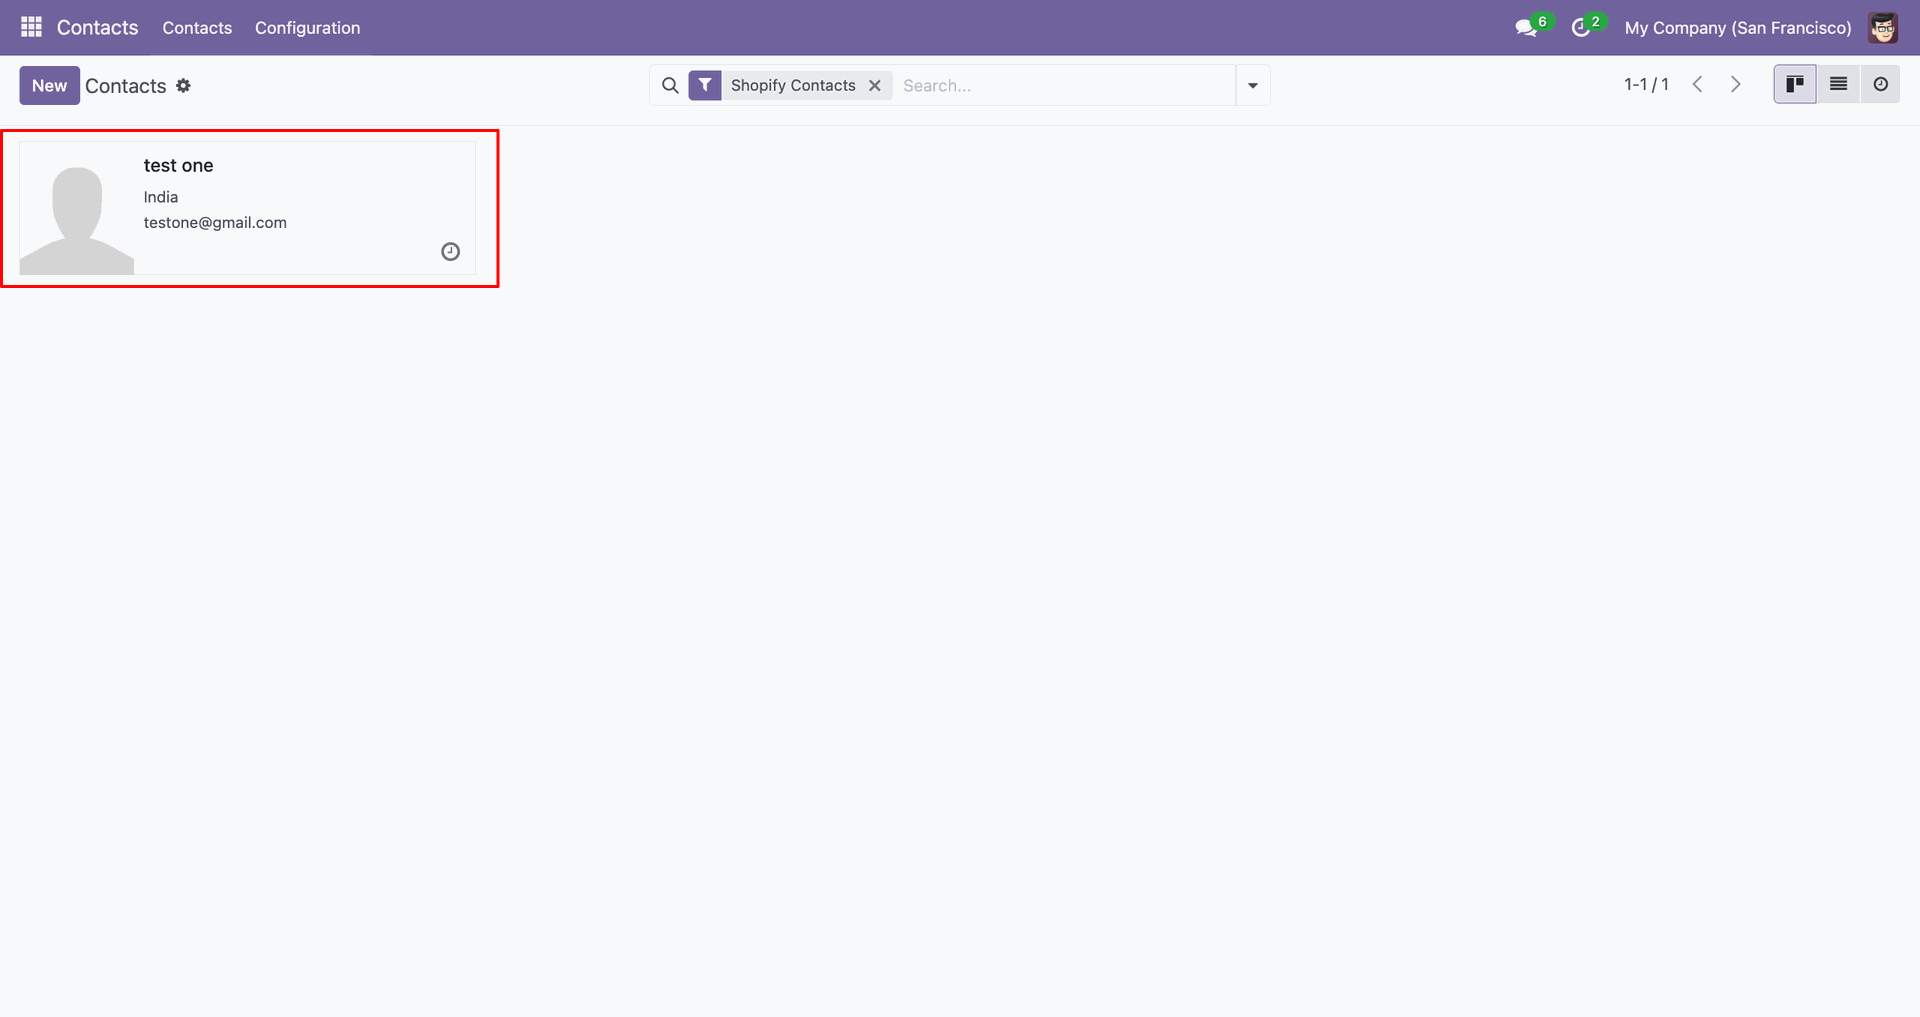
Apply the Shopify Contacts filter to display only imported customer records.
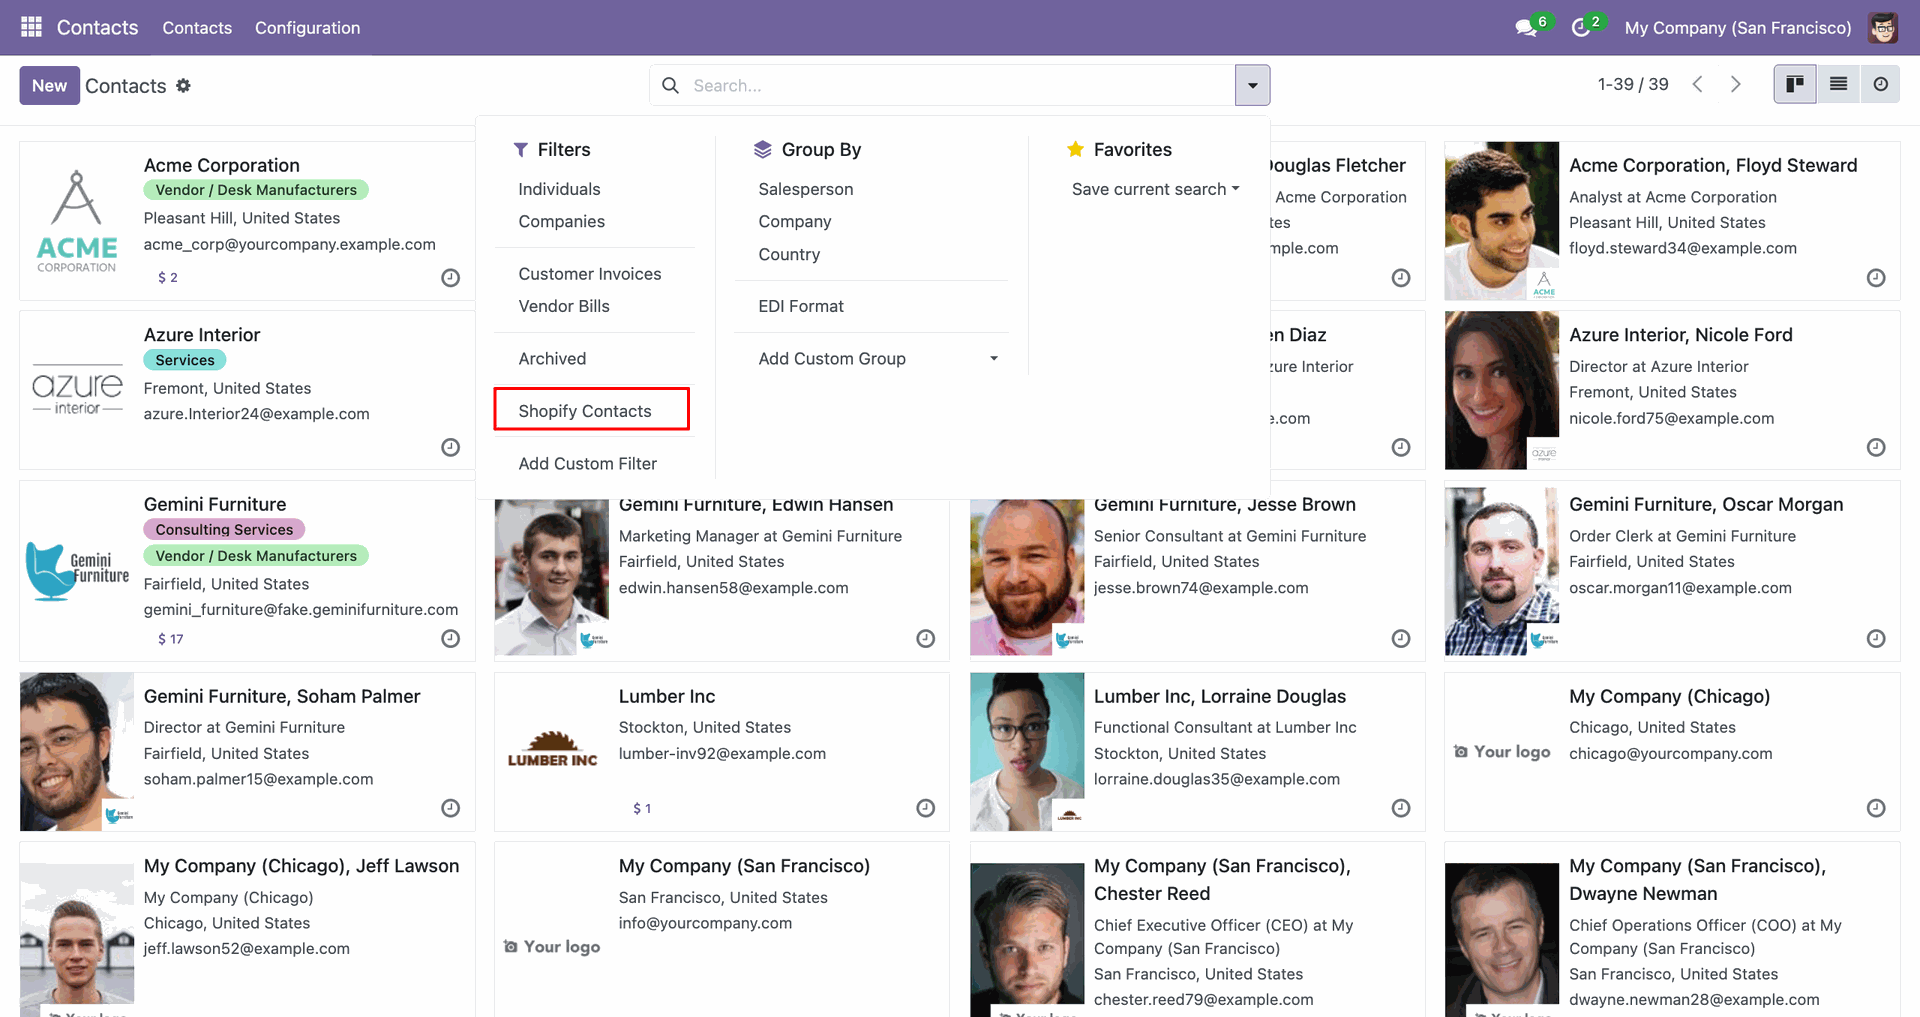
The imported contact card shows the synced customer name and email.
Review Sync Logs to confirm one staged contact imported successfully into Odoo.
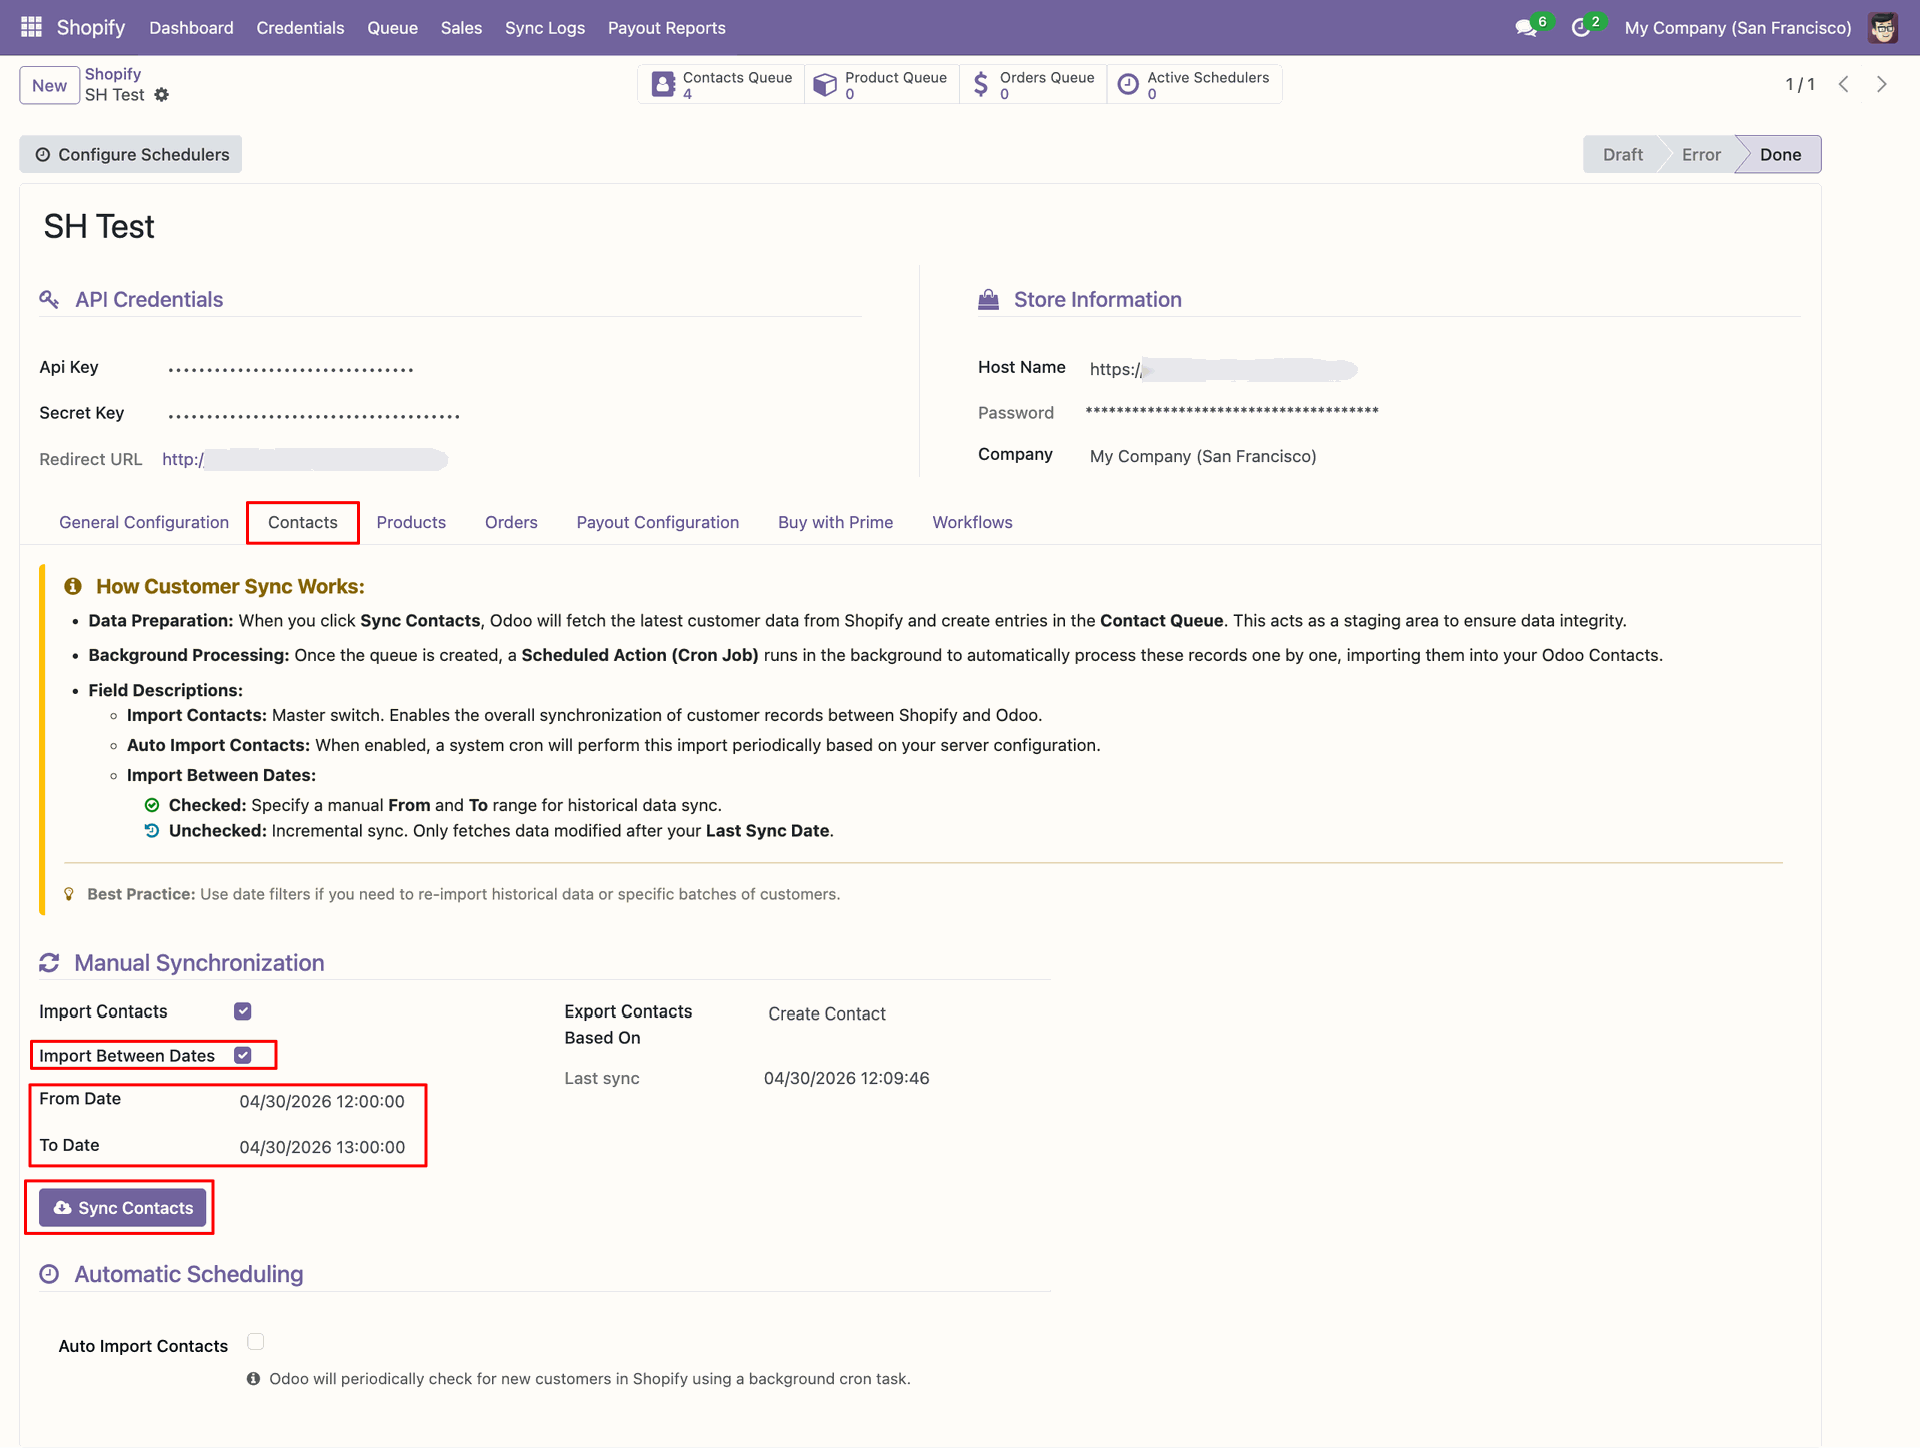
Set From and To dates, then click Sync Contacts for dated imports.
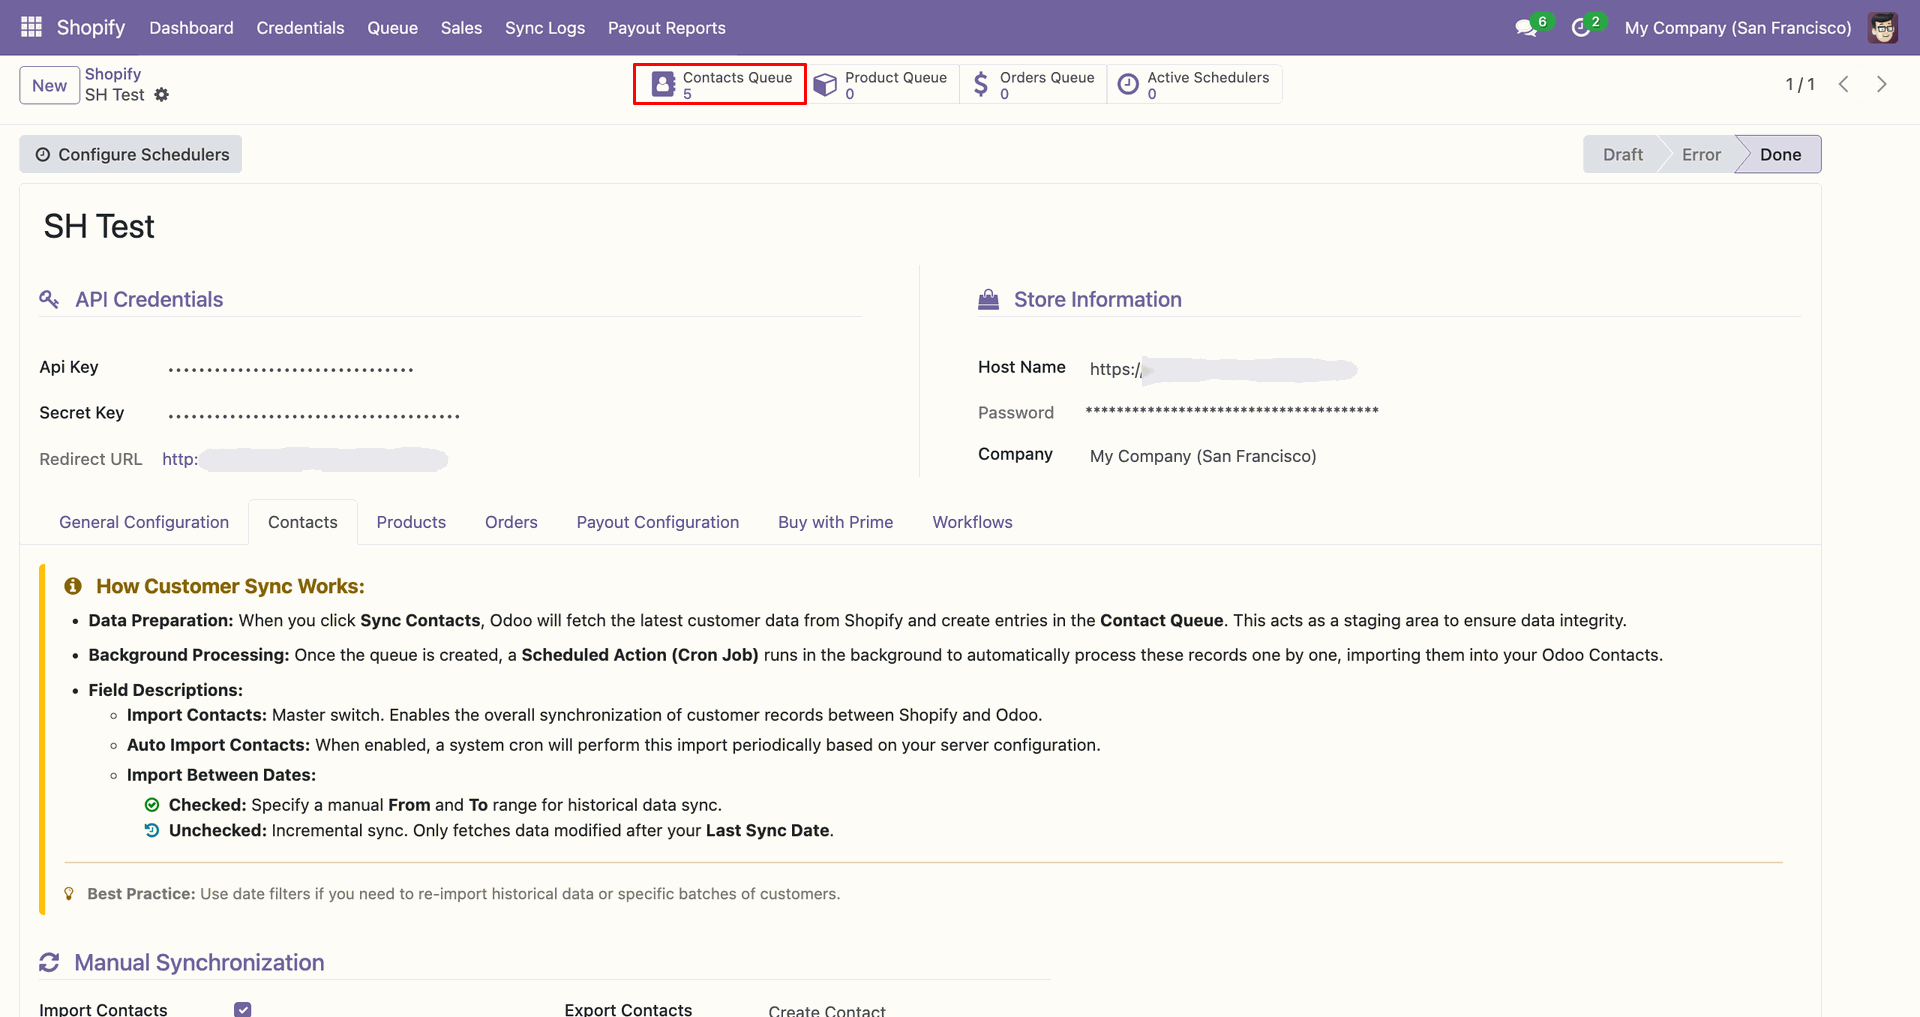
Review the Contacts Queue counter after fetching records within the selected dates.
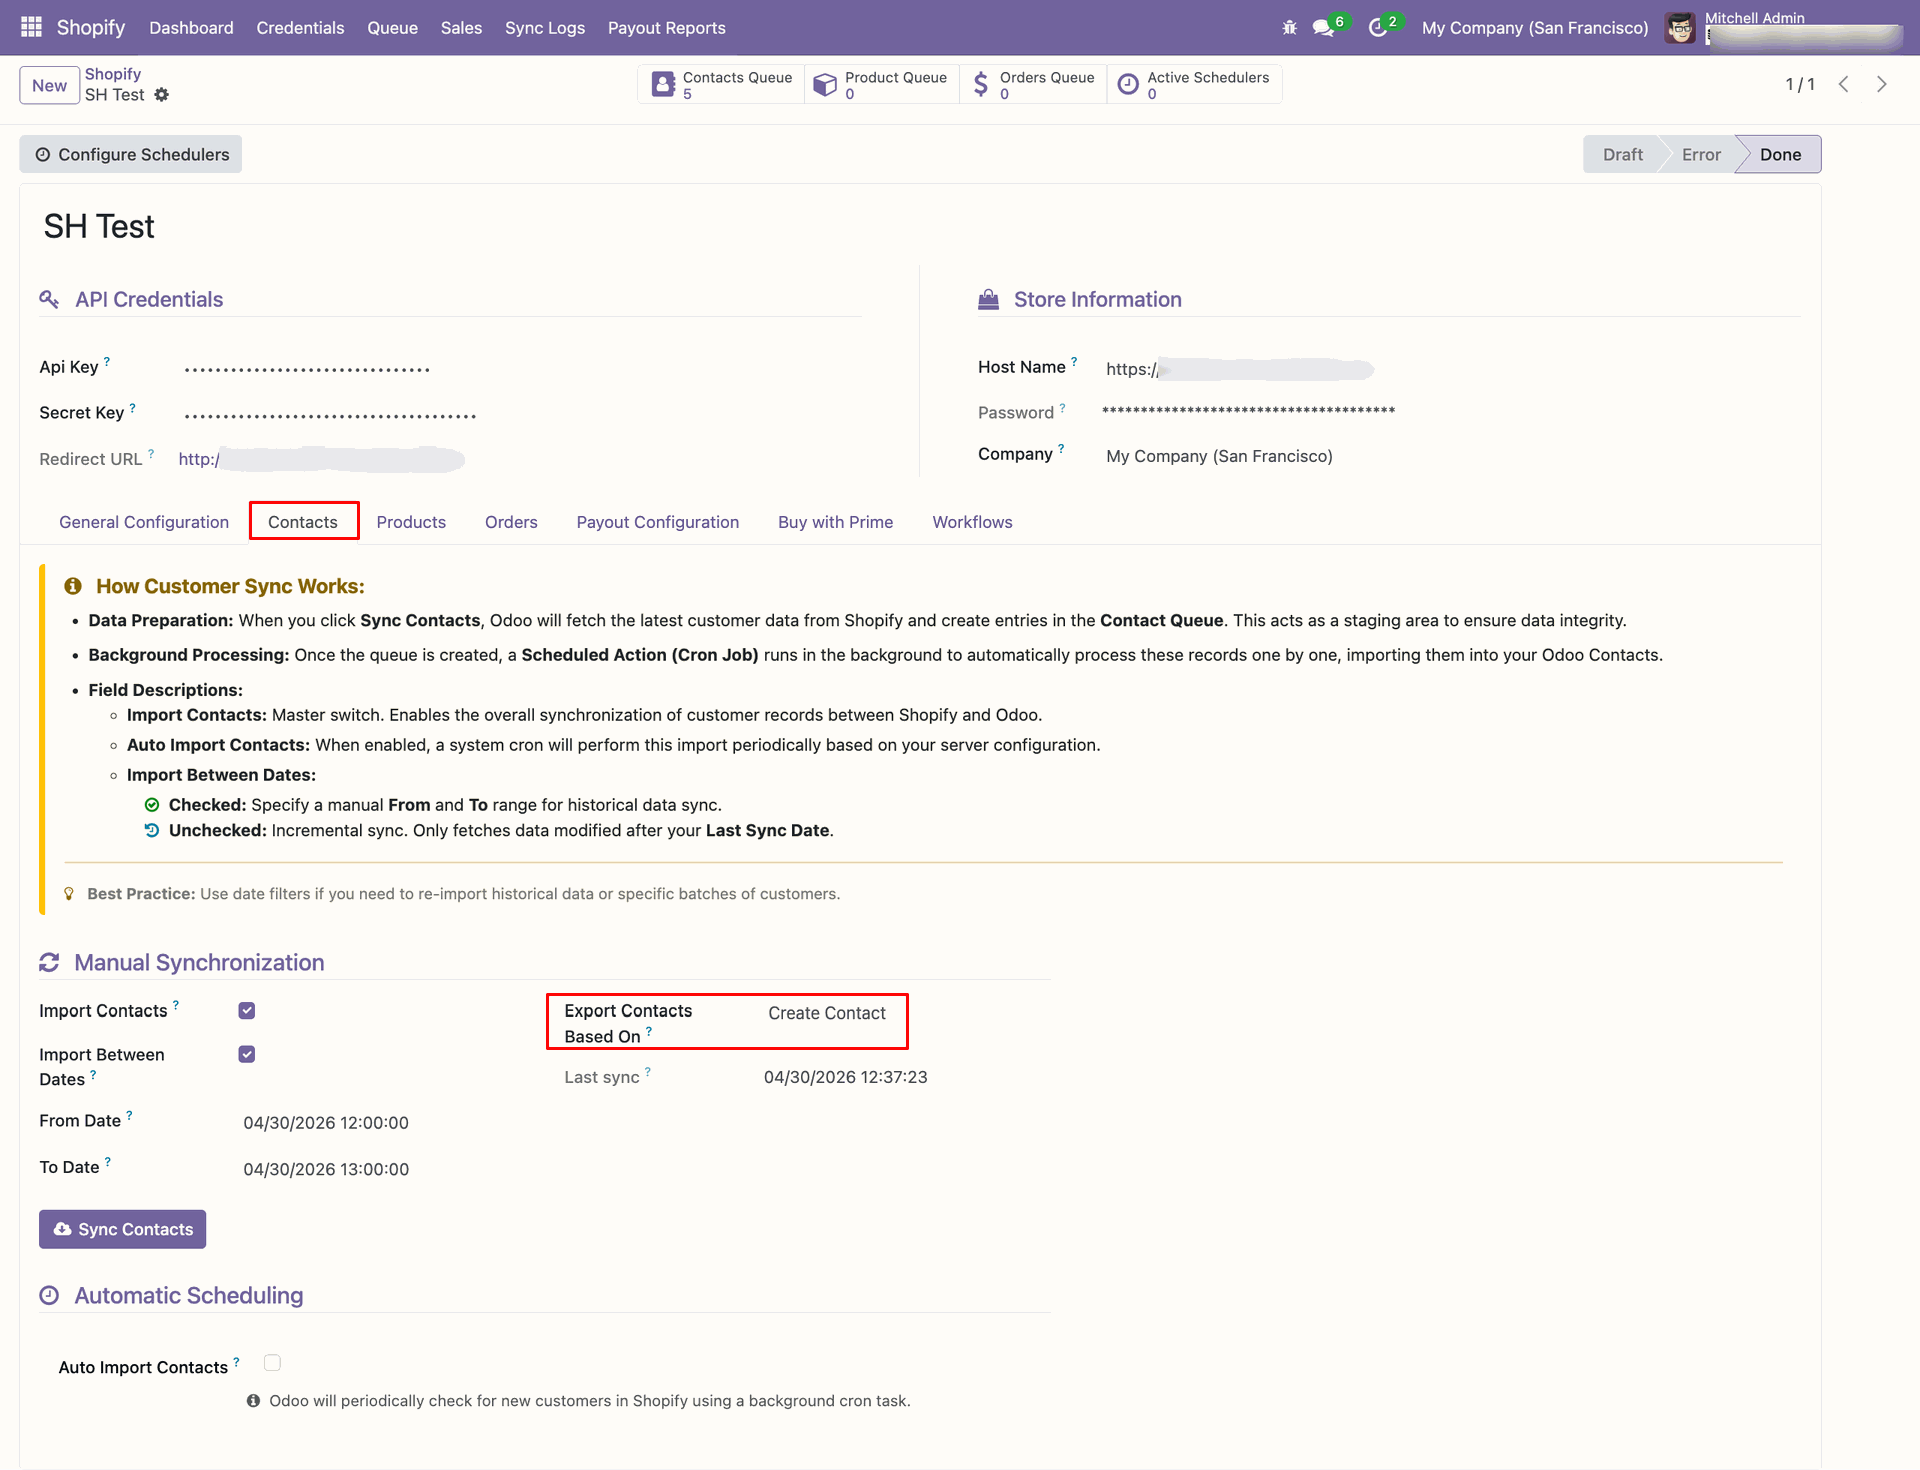
Set Export Contacts Based On to Create Contact before exporting new customers.
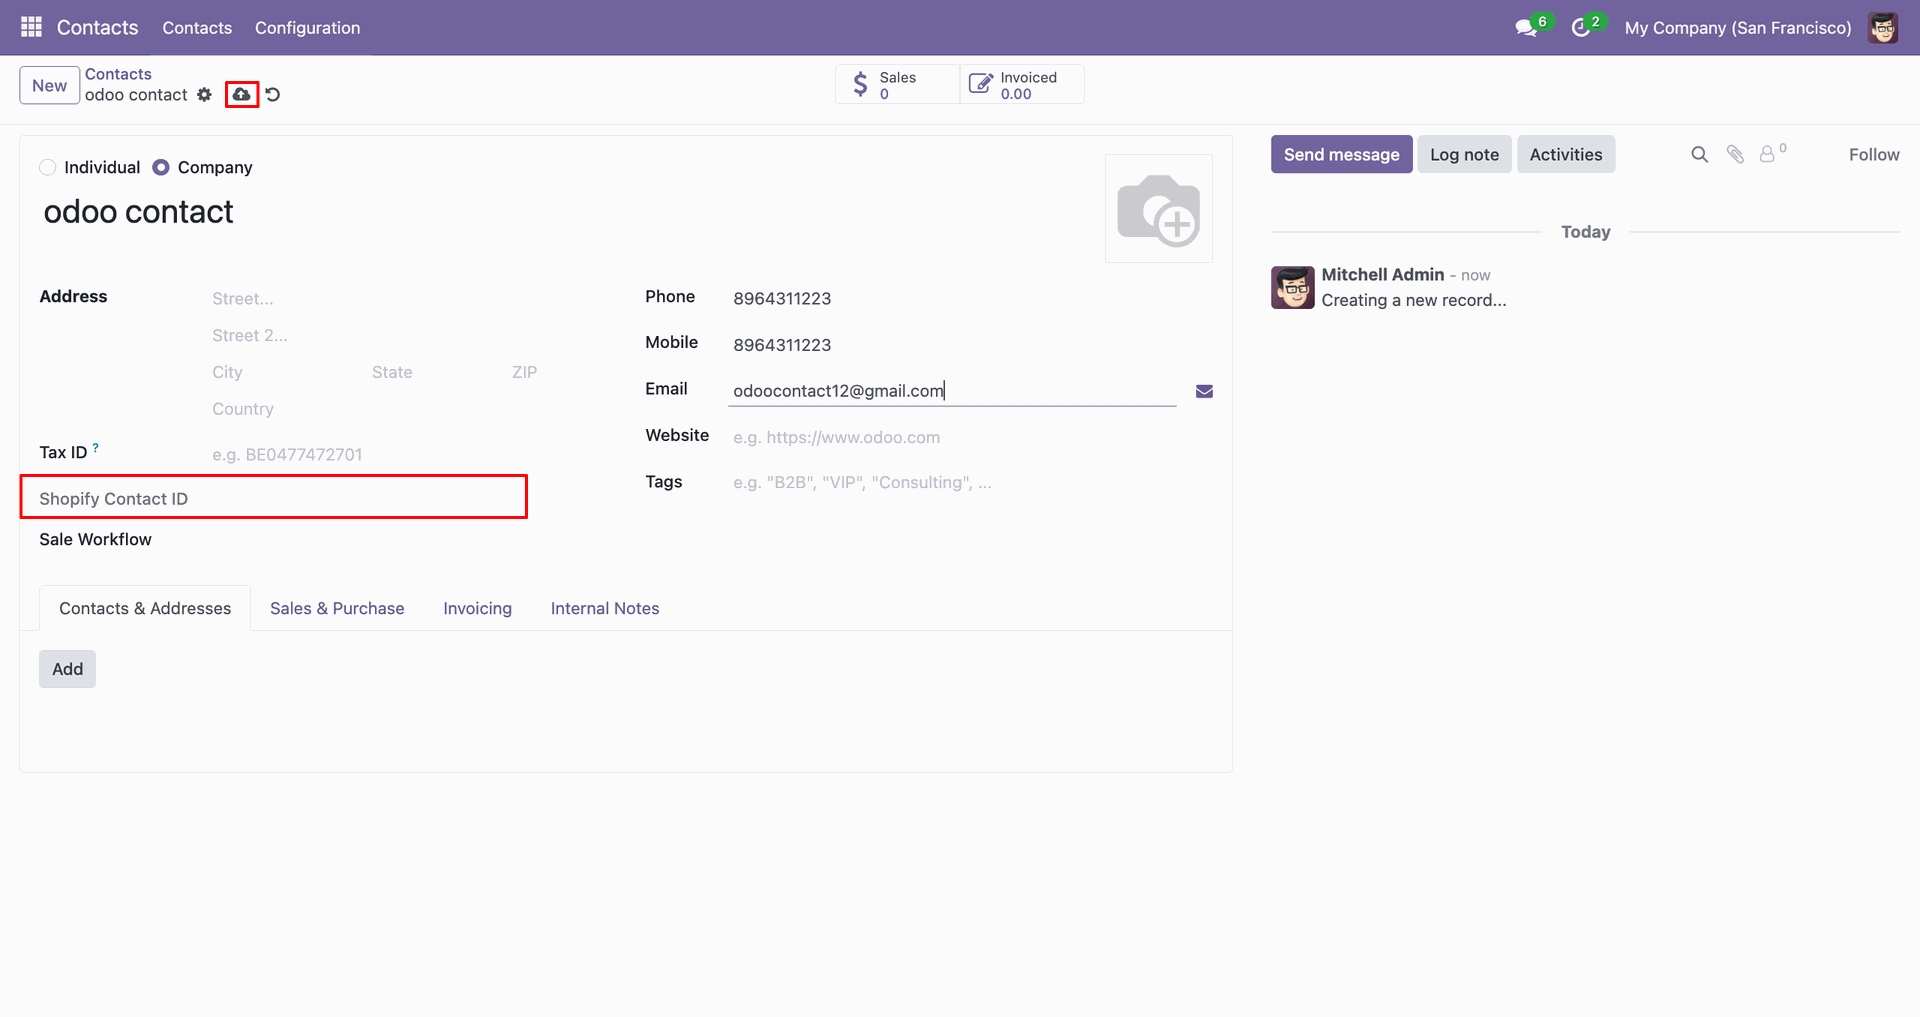
Use the export icon on the contact form to send this customer.
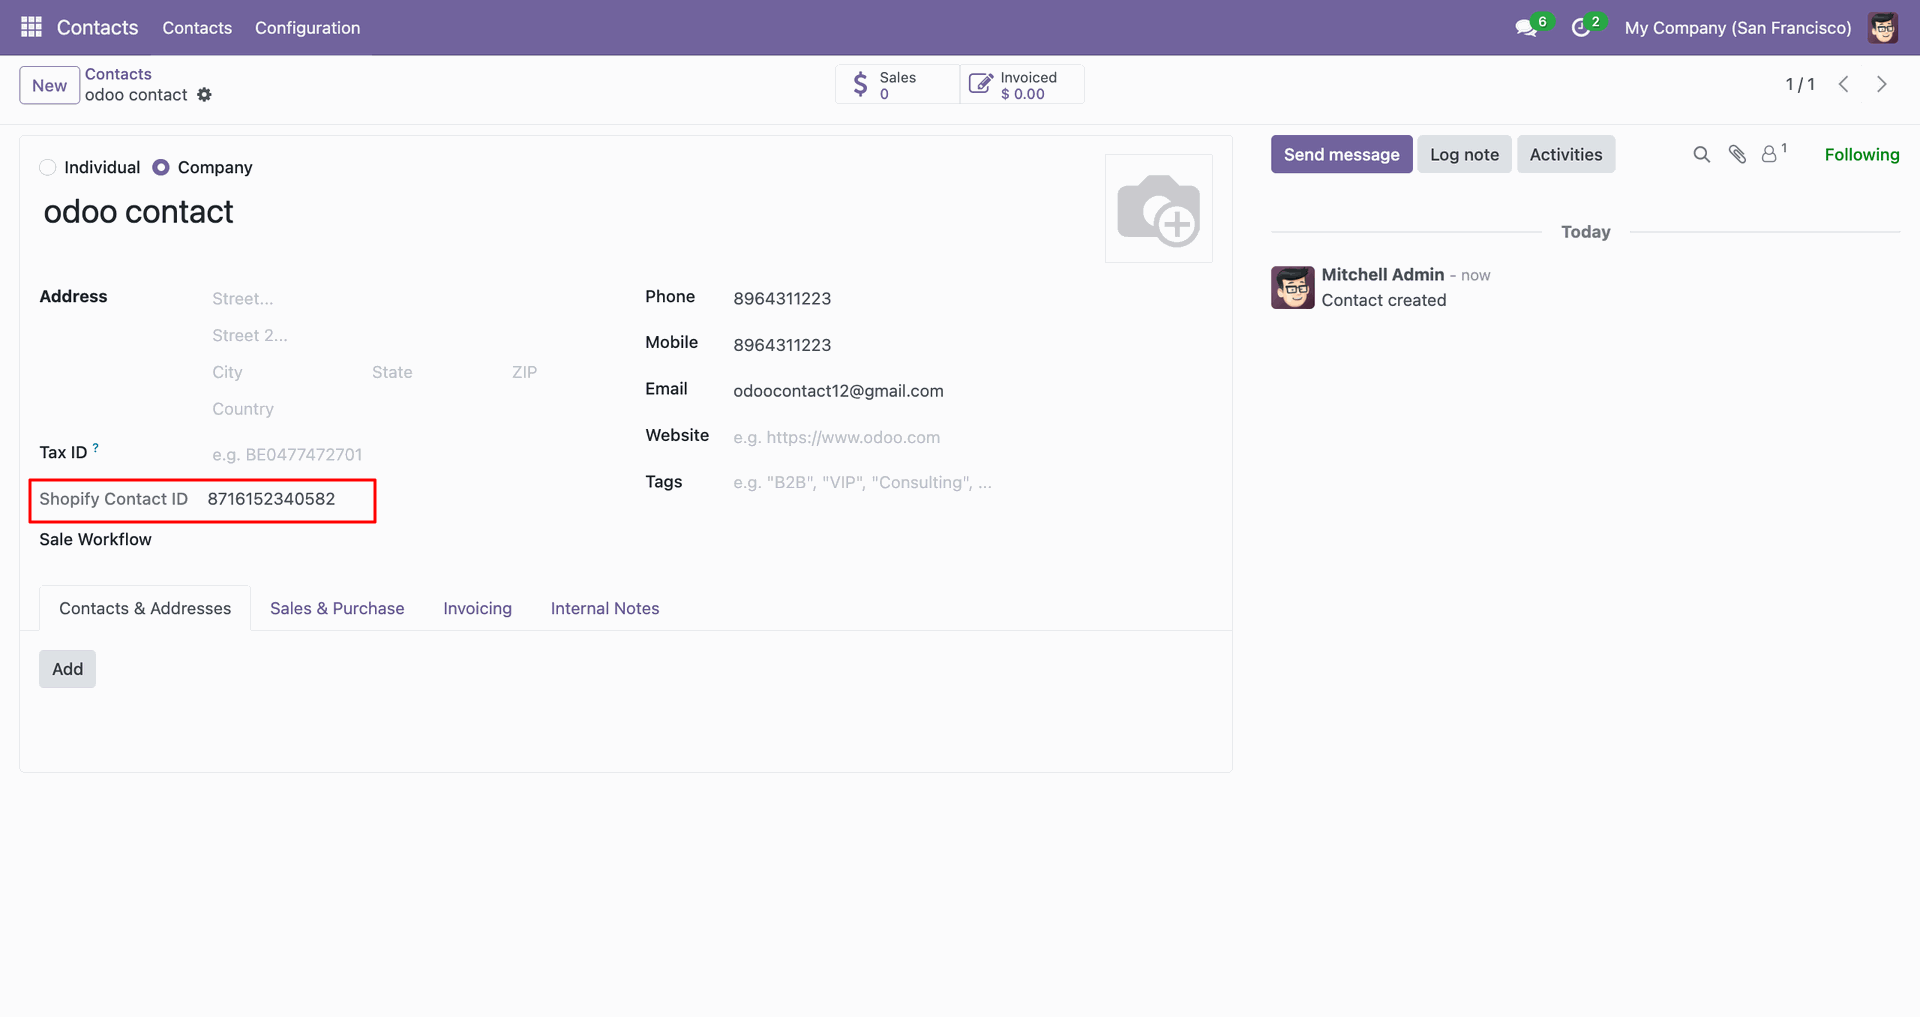
Review the Shopify Contact ID field after exporting the contact from Odoo.
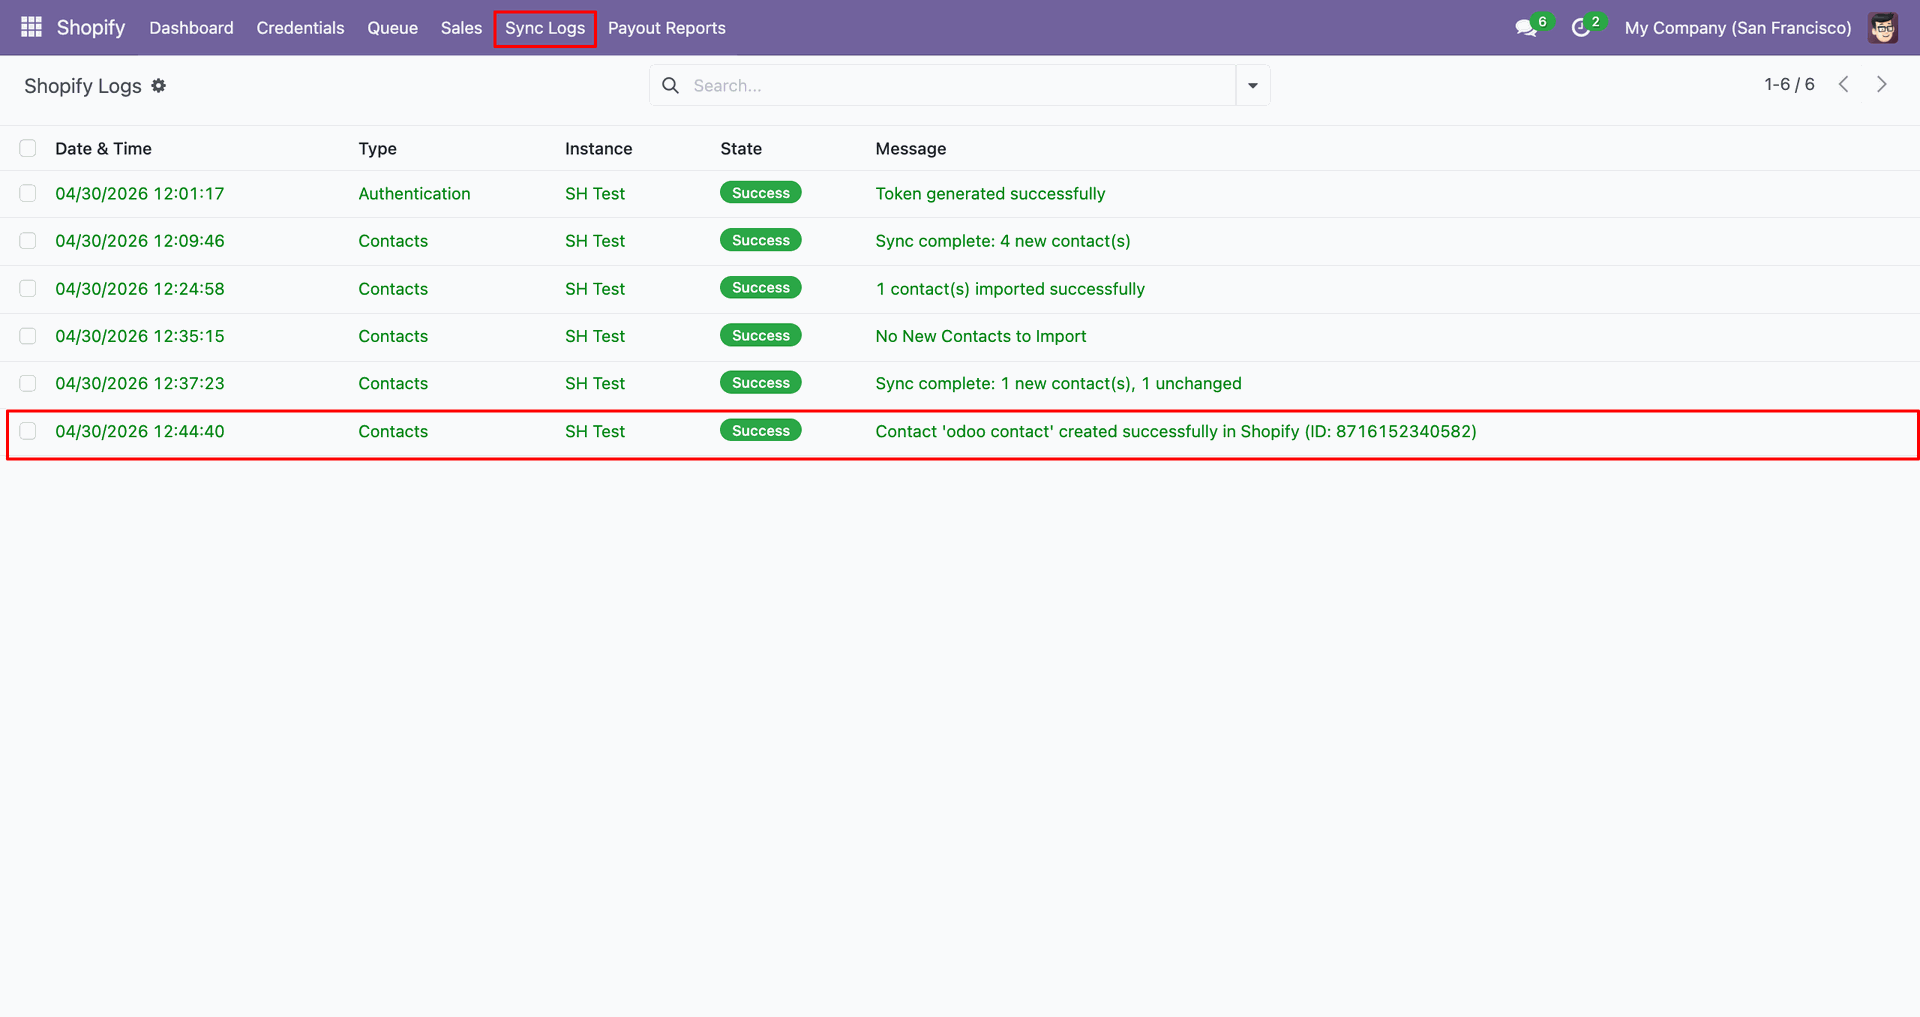
Check Sync Logs to confirm the customer was created successfully in Shopify.
Verify the exported customer row appears in Shopify with the expected details.
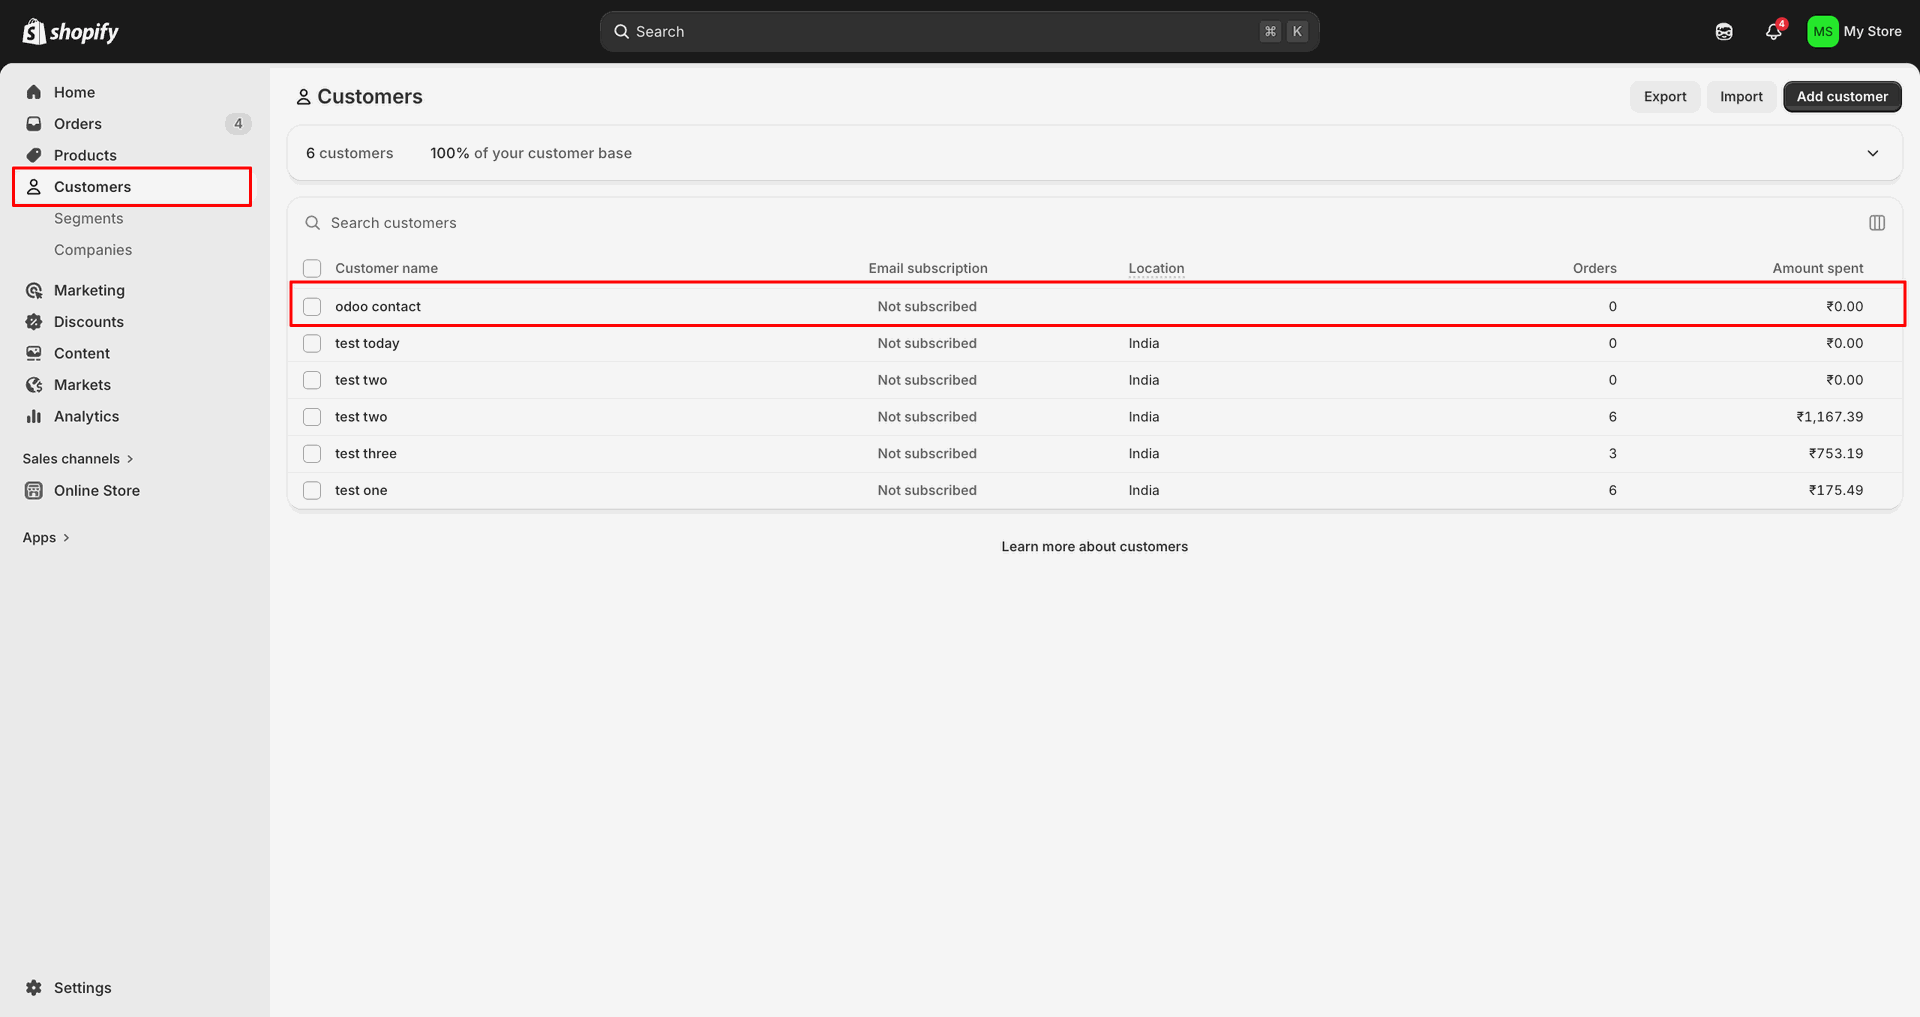
Set Export Contacts Based On to Update Contact before exporting customer changes.
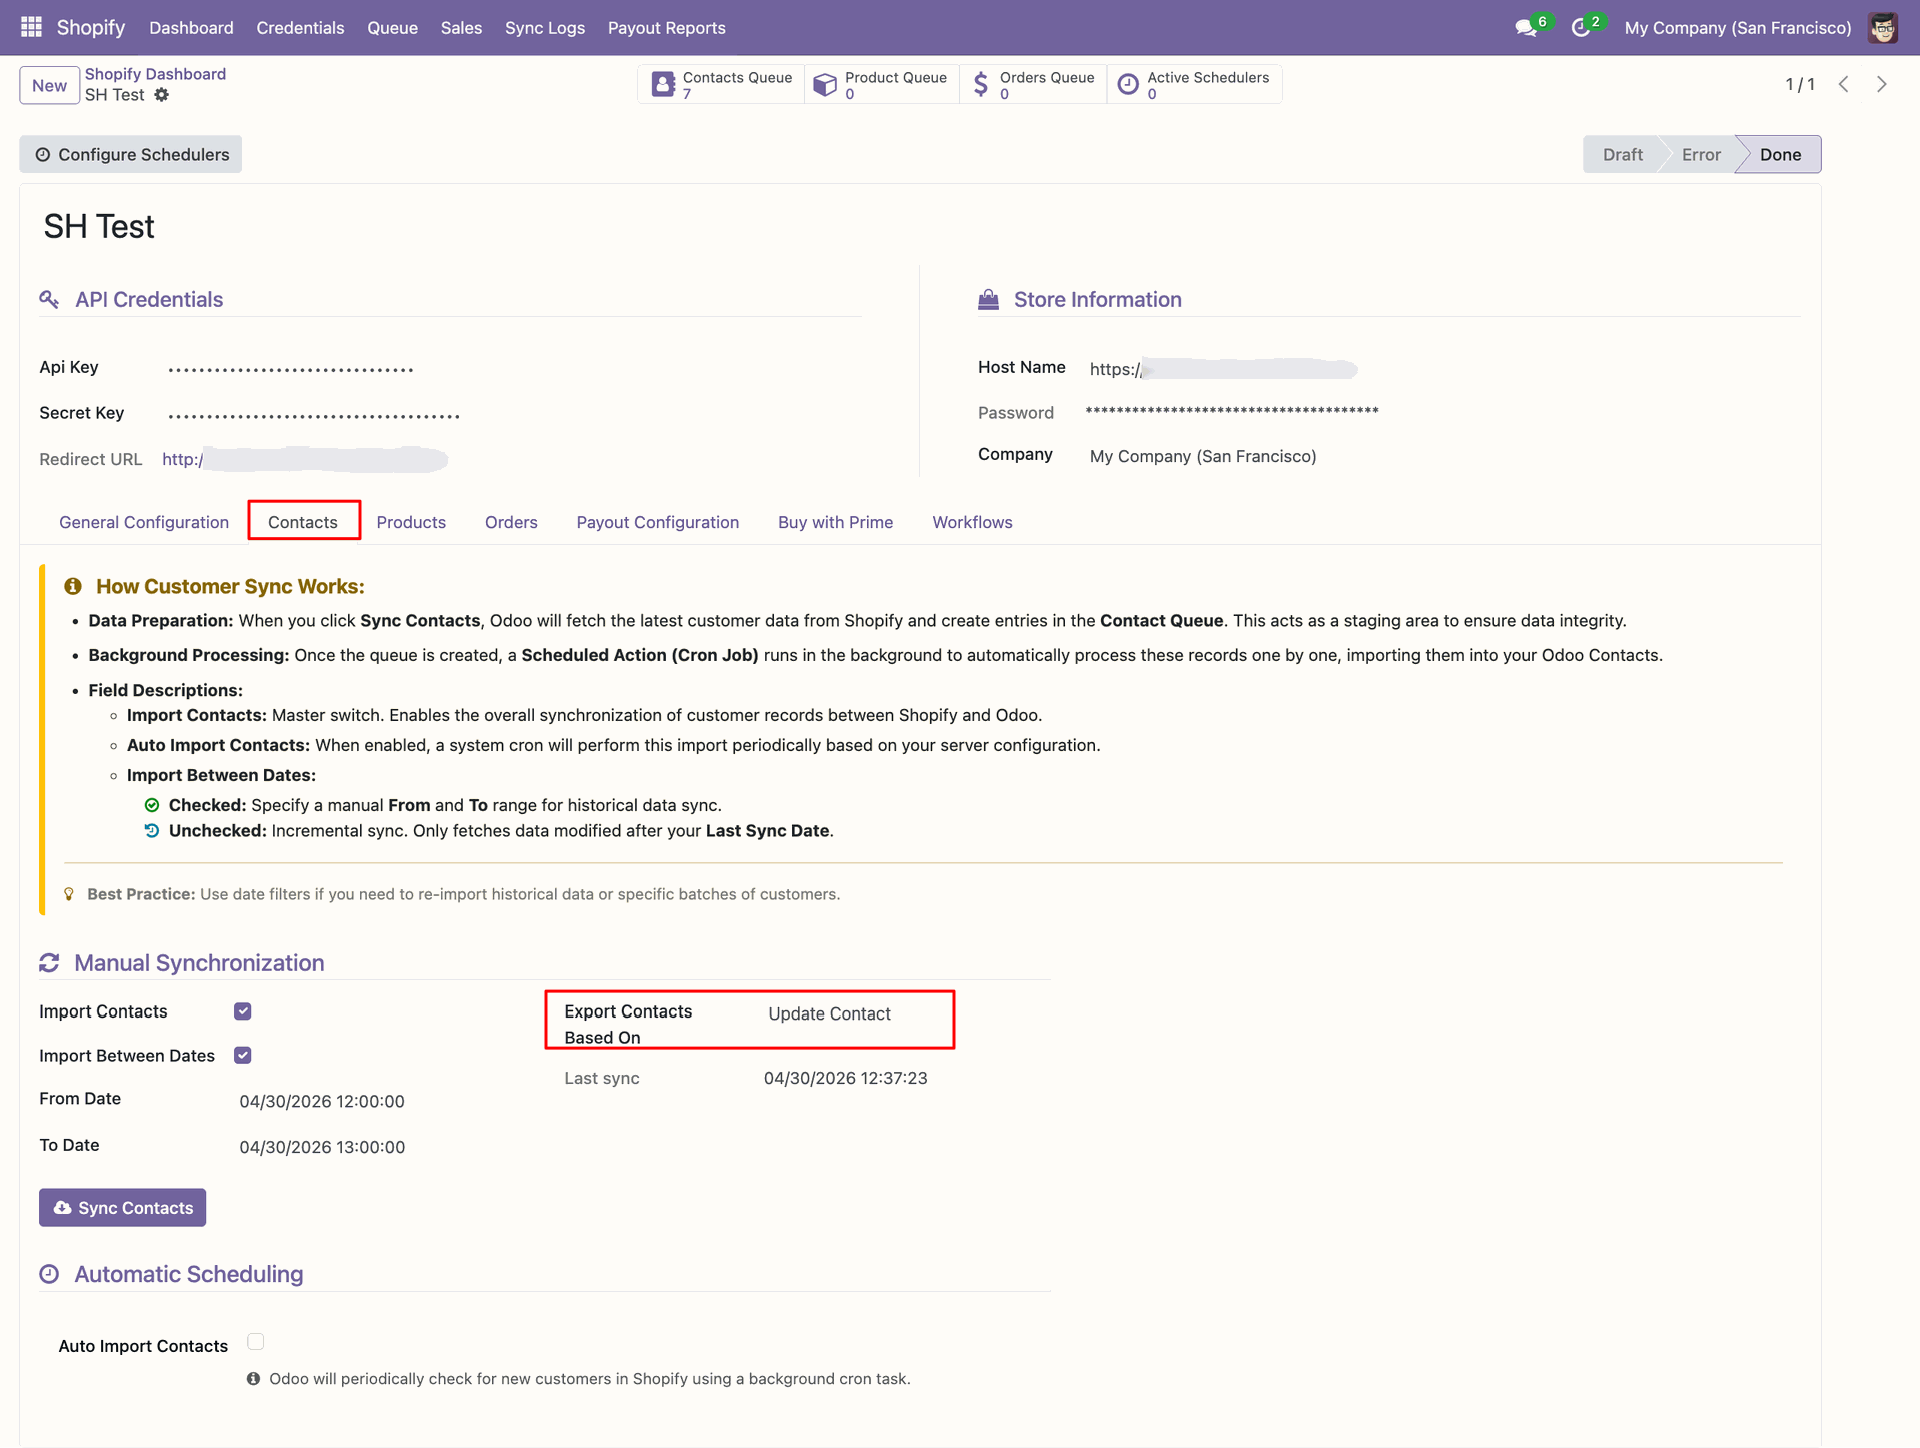
Update the Odoo contact name before exporting the revised customer information.
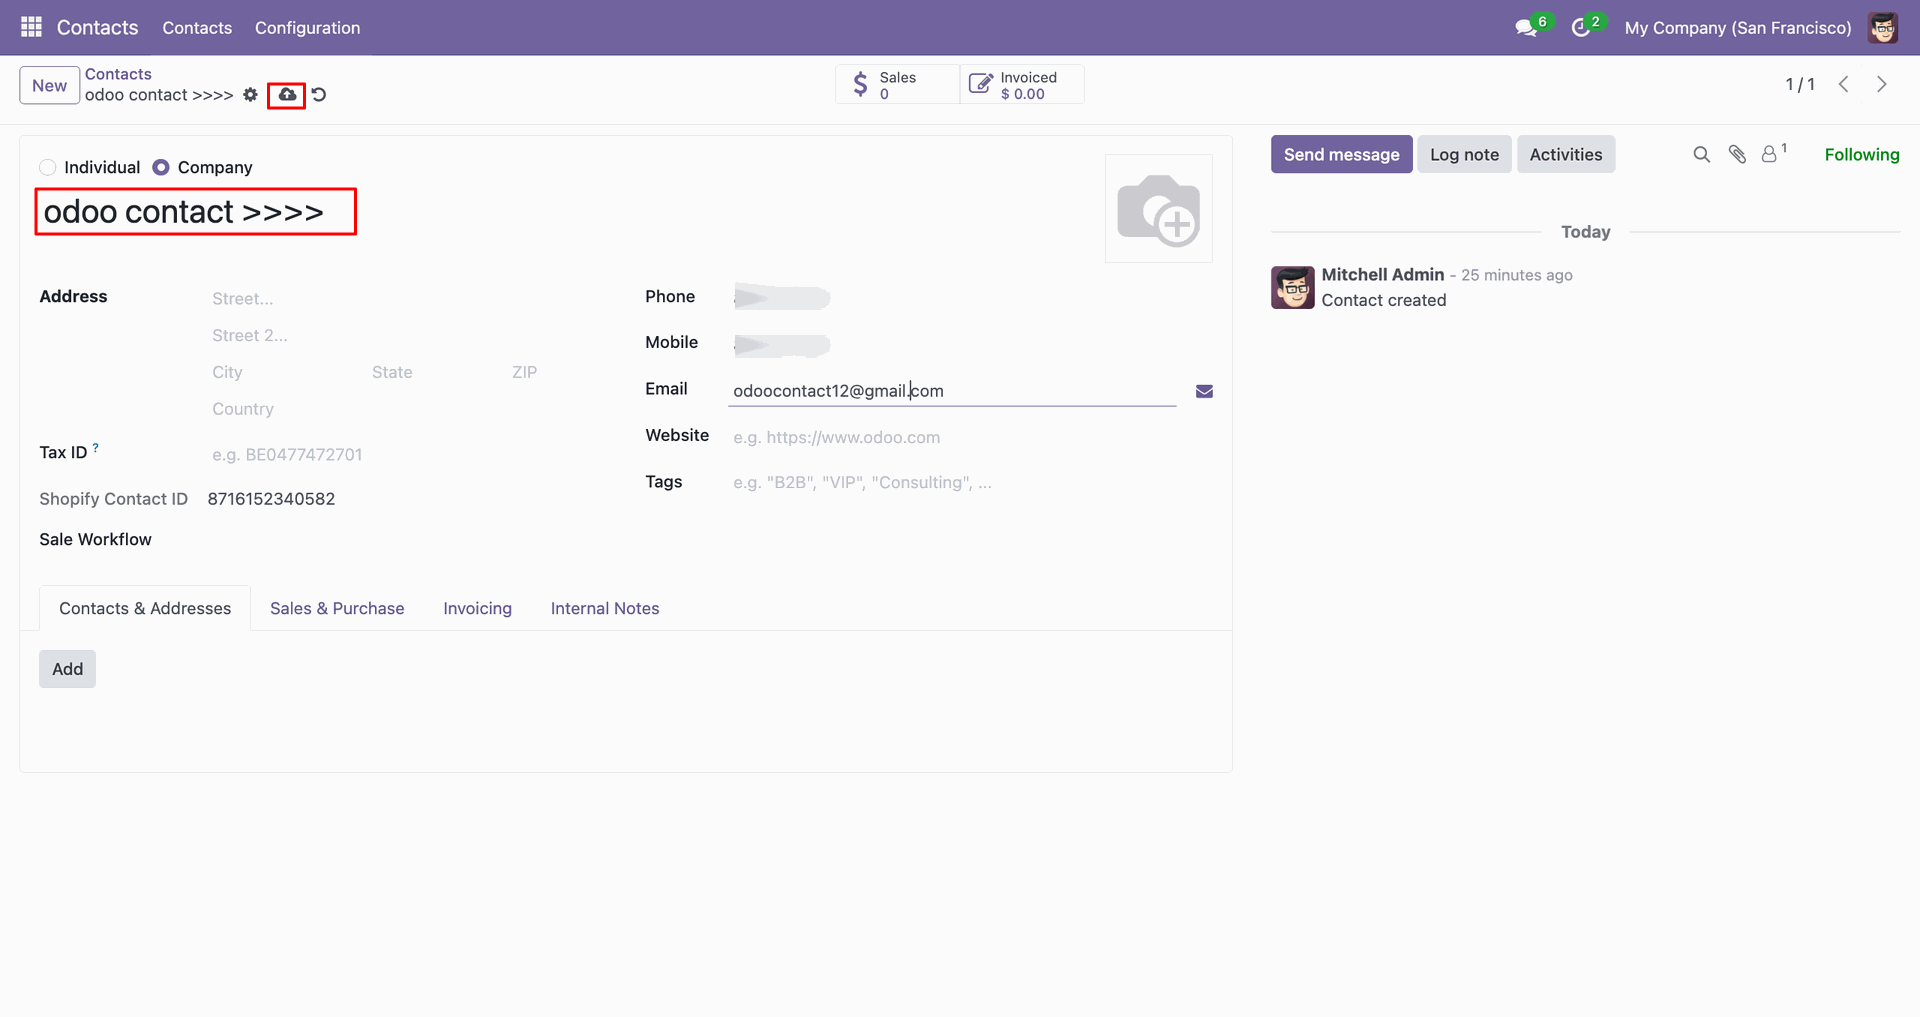
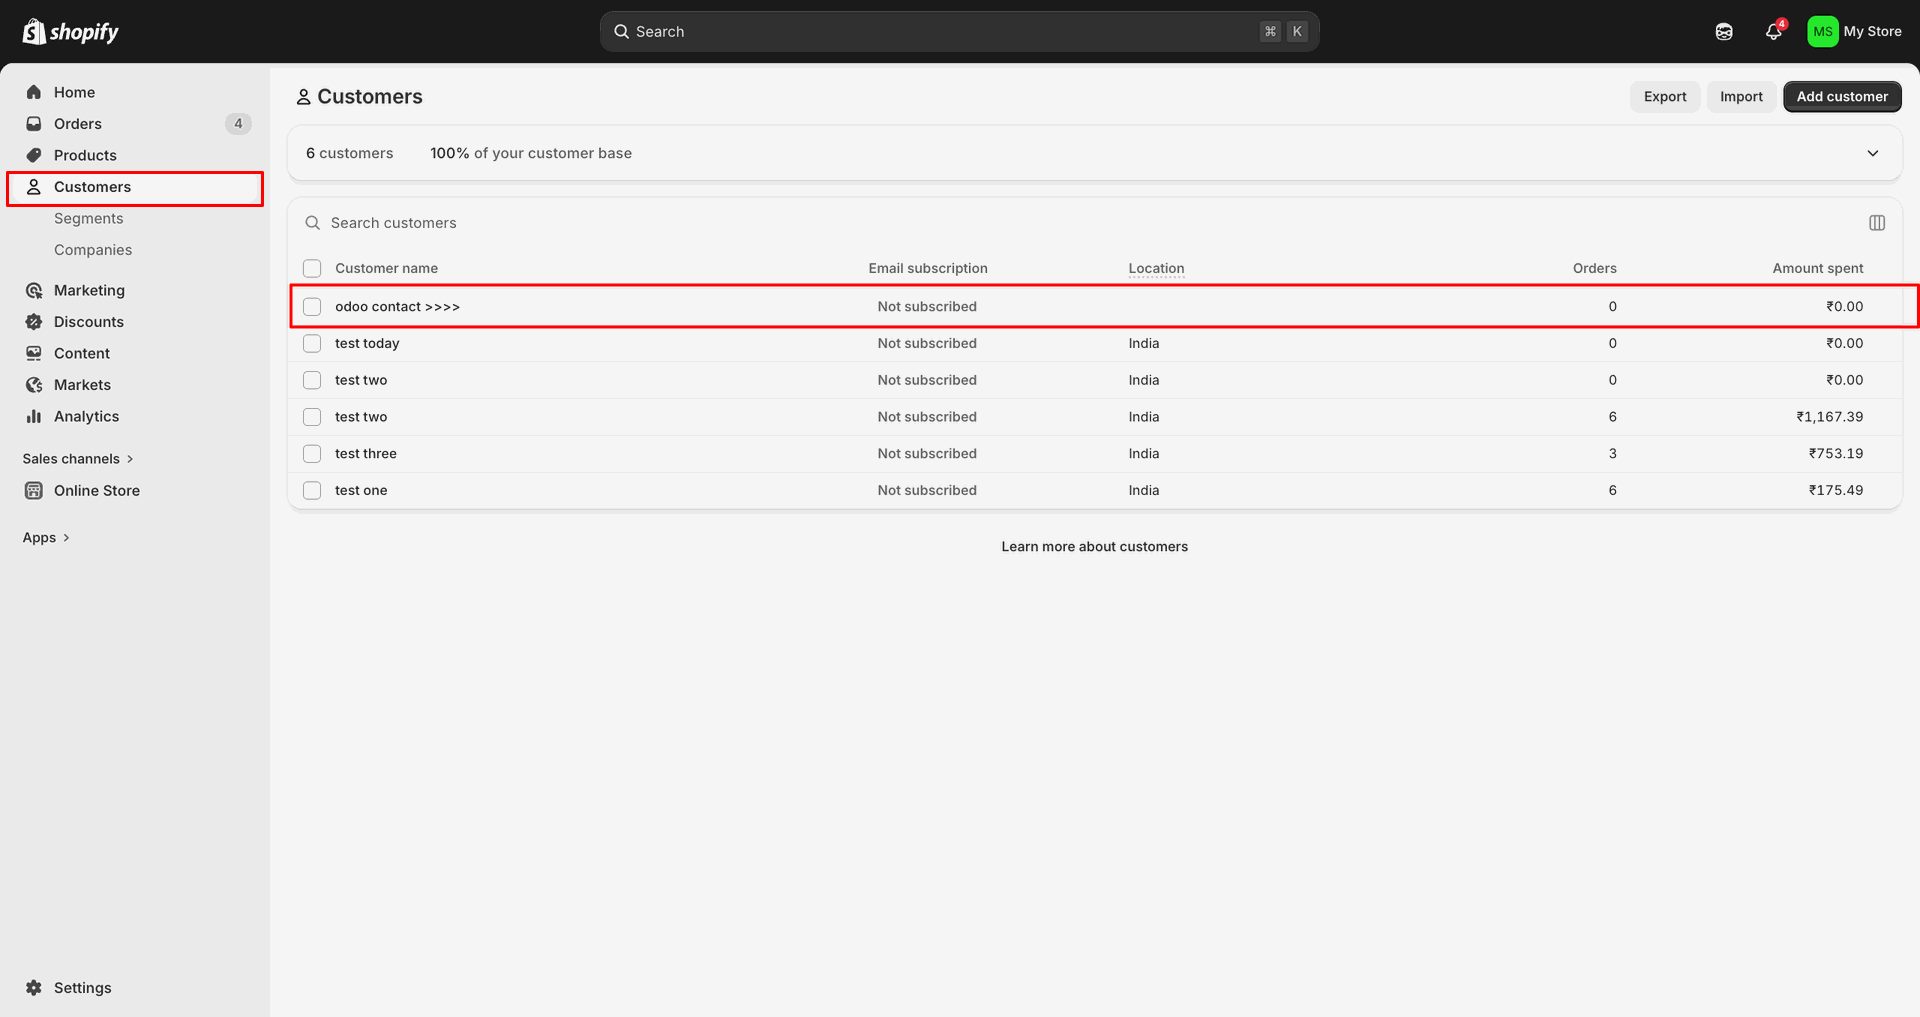
Verify the updated customer row appears in Shopify after the contact export.
Review Sync Logs to confirm the customer update was sent successfully.
Workflow
Review the Payment Gateway Workflow Matrix used to process imported Shopify orders.
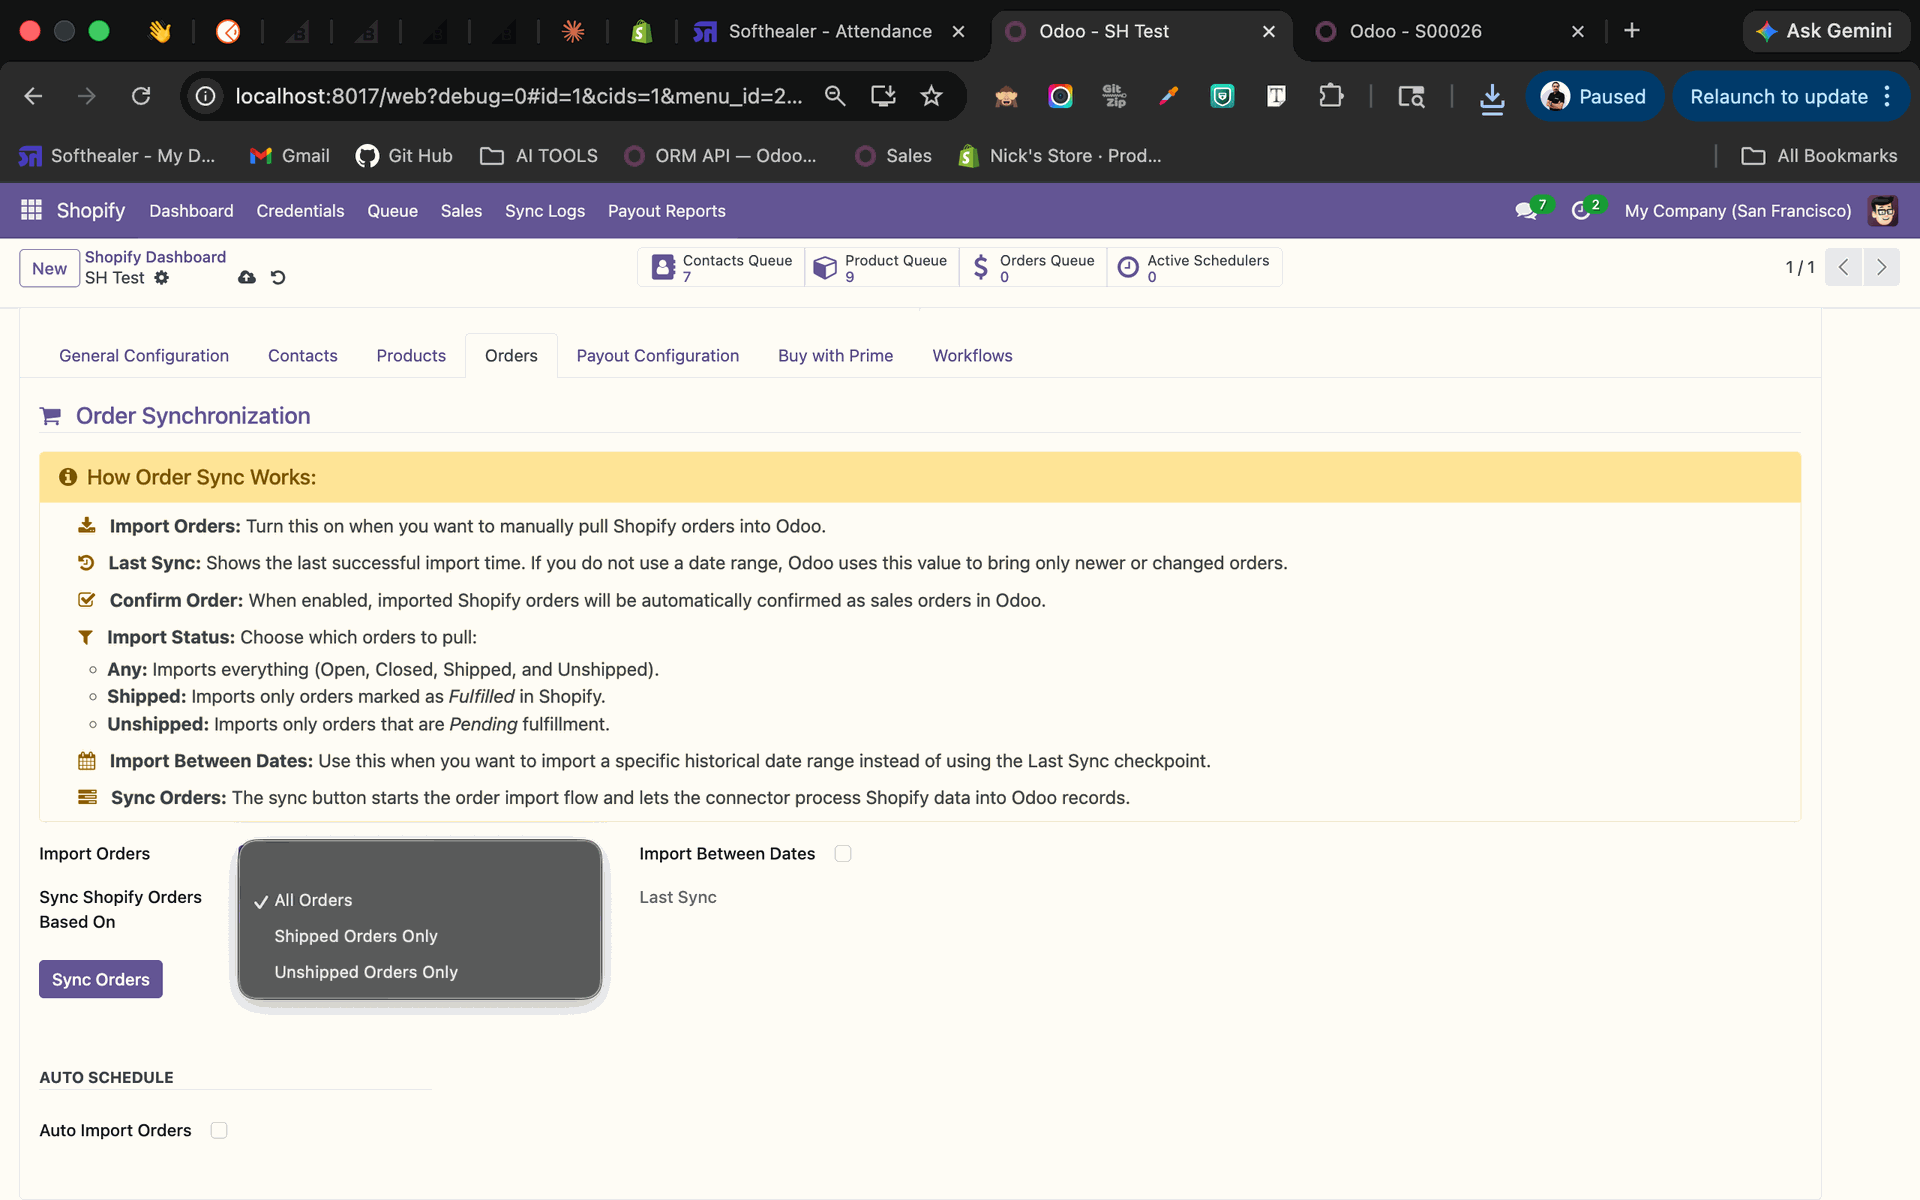
Choose which Shopify orders to fetch from the Sync Shopify Orders Based On list.
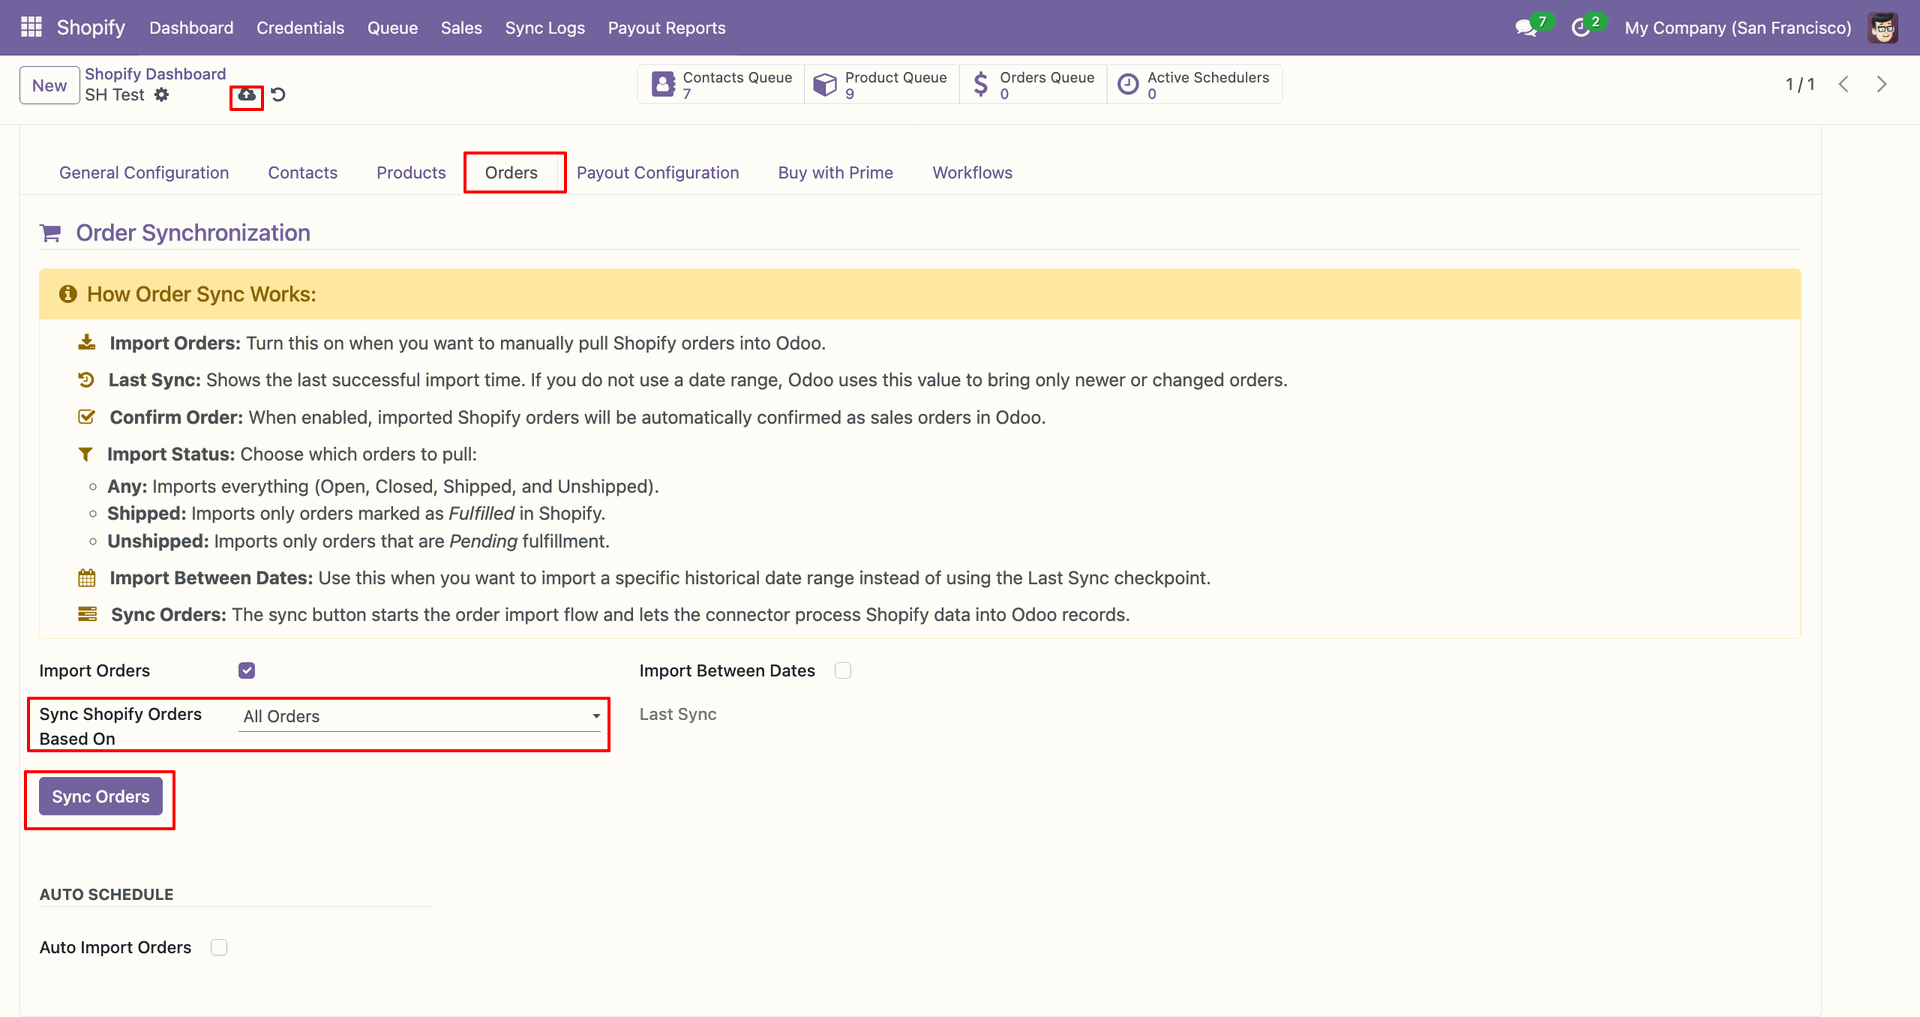
Select All Orders and click Sync Orders to fetch Shopify orders manually.
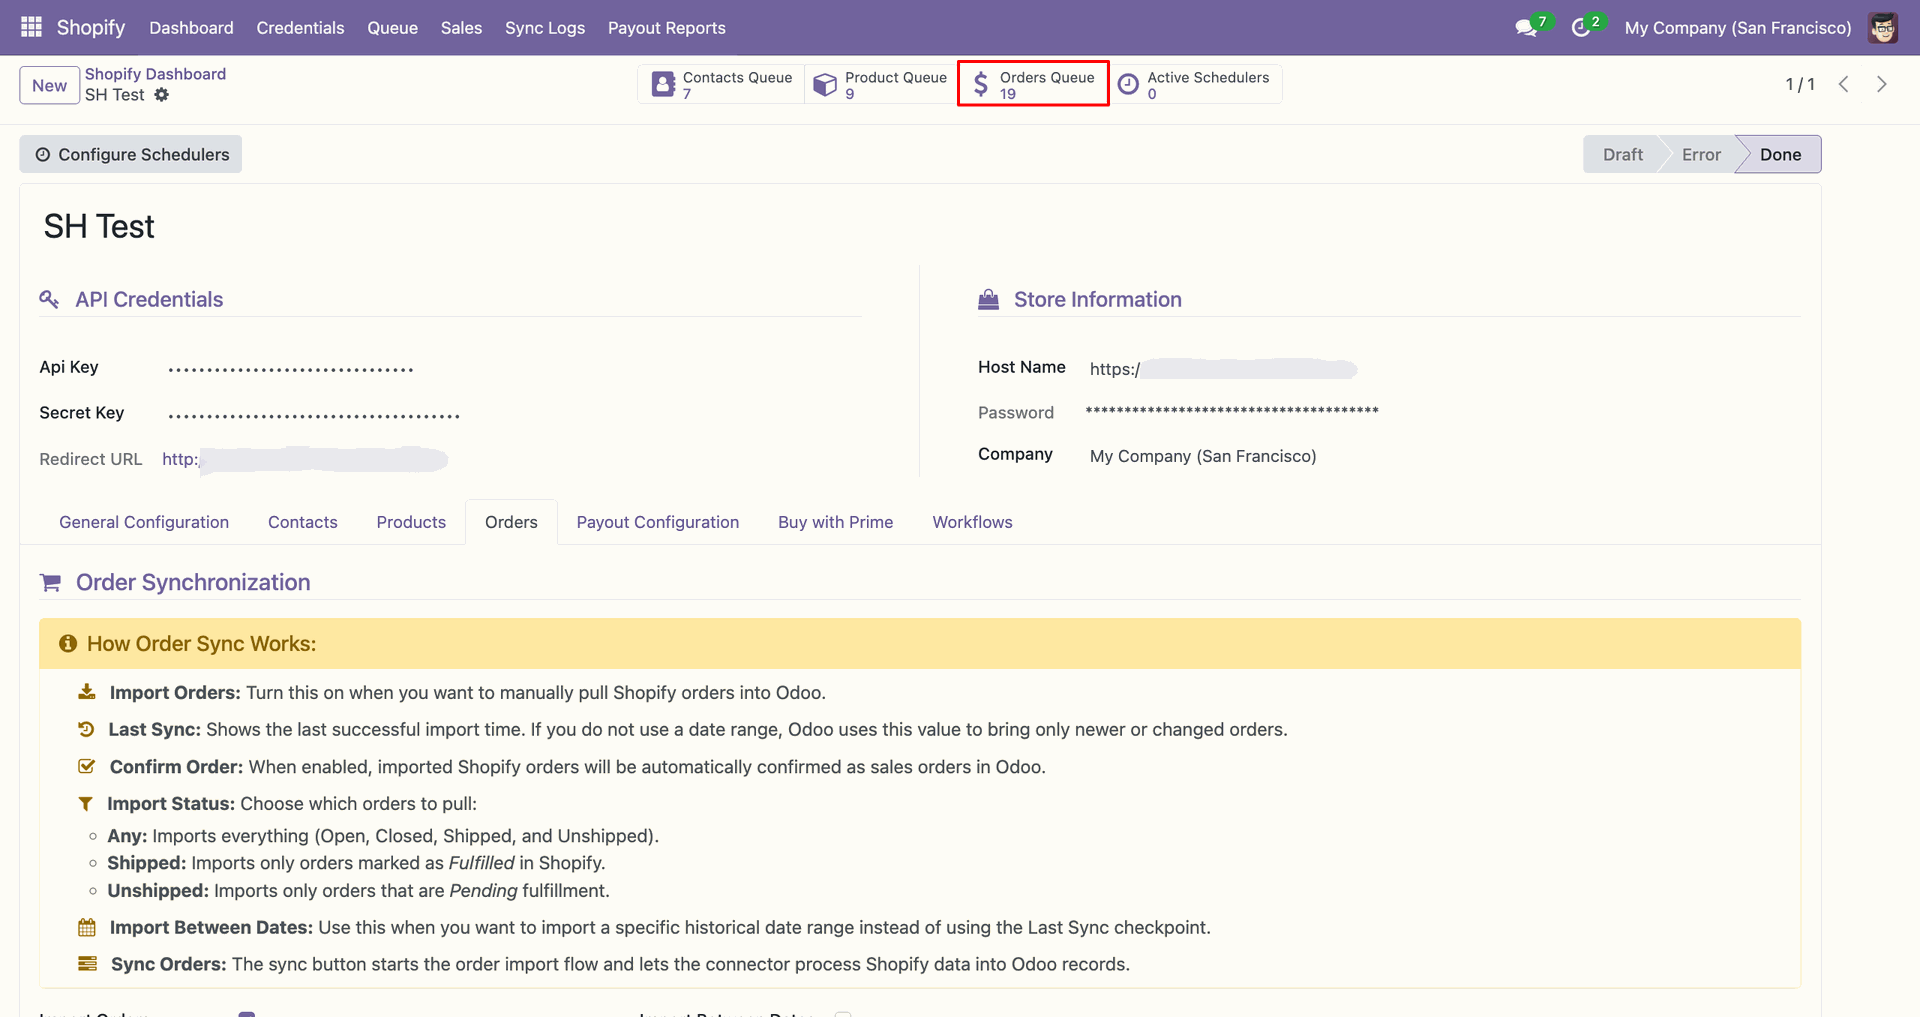
Use the Orders Queue shortcut to review staged order records after synchronization.
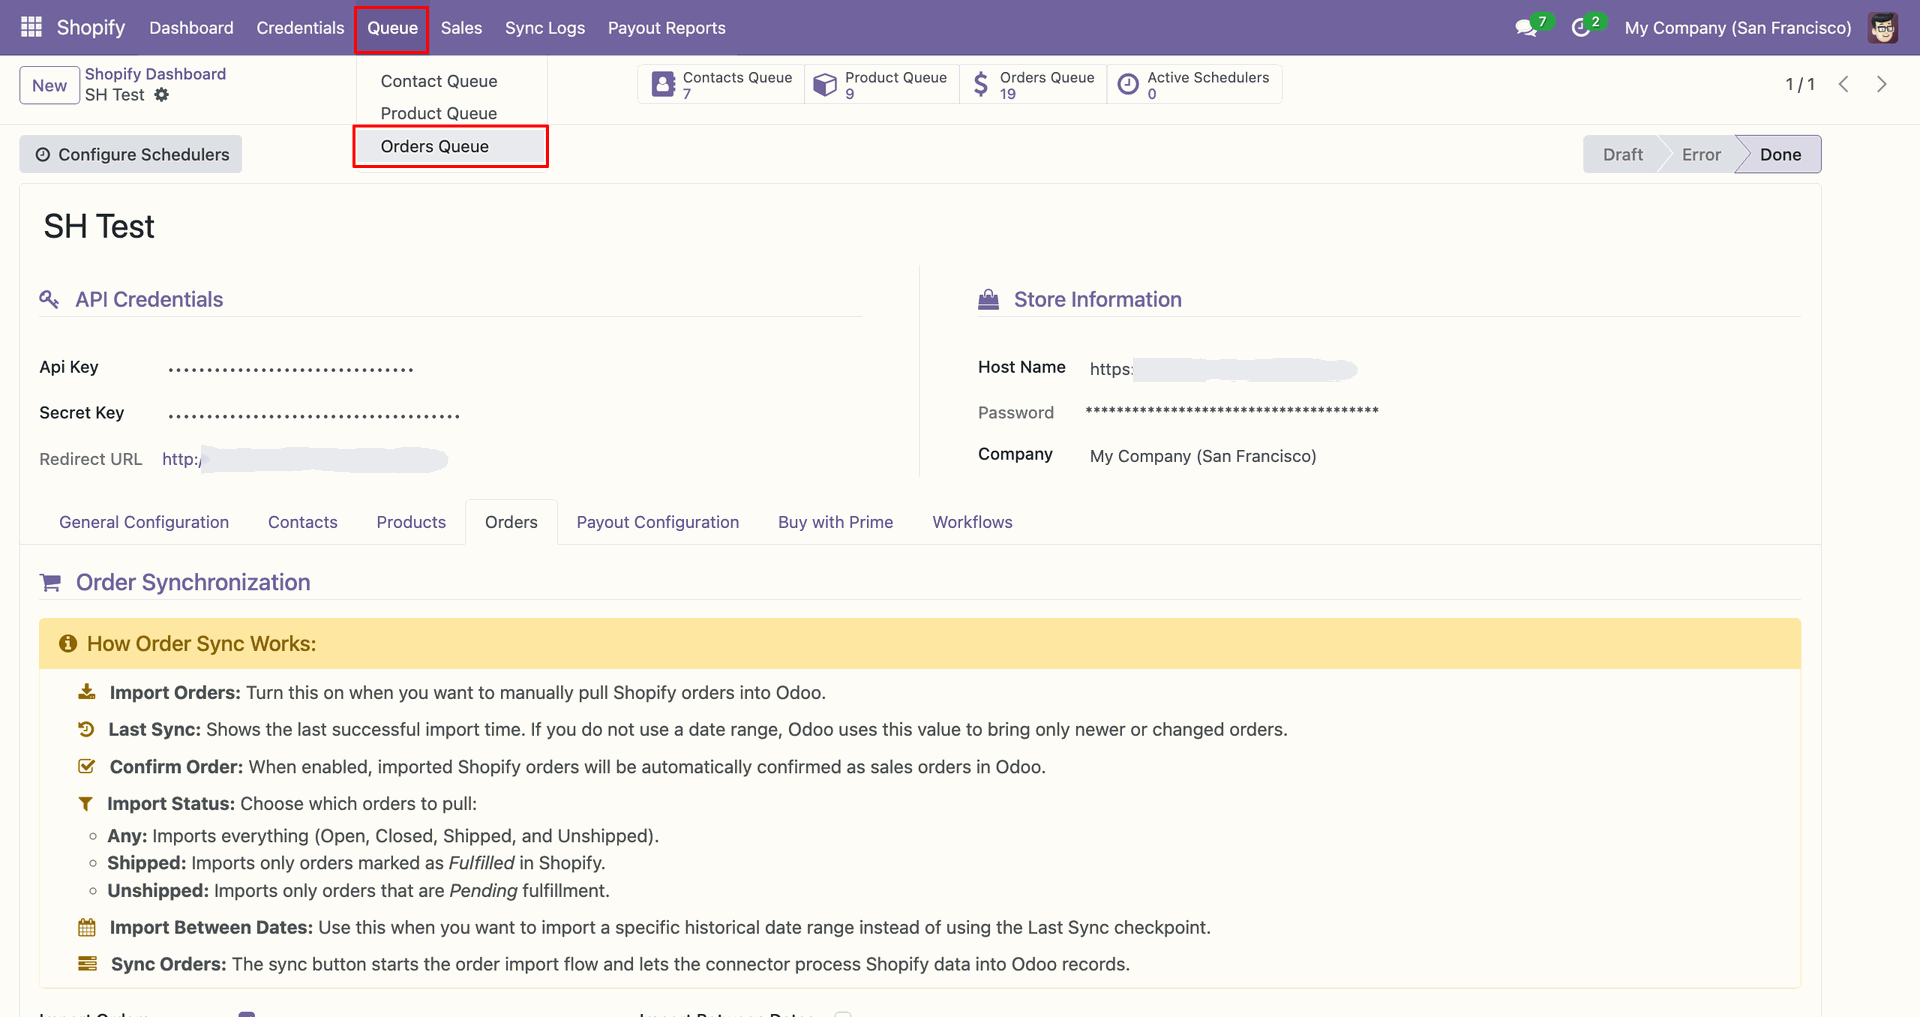
Open Orders Queue from the Queue menu to inspect imported order entries.
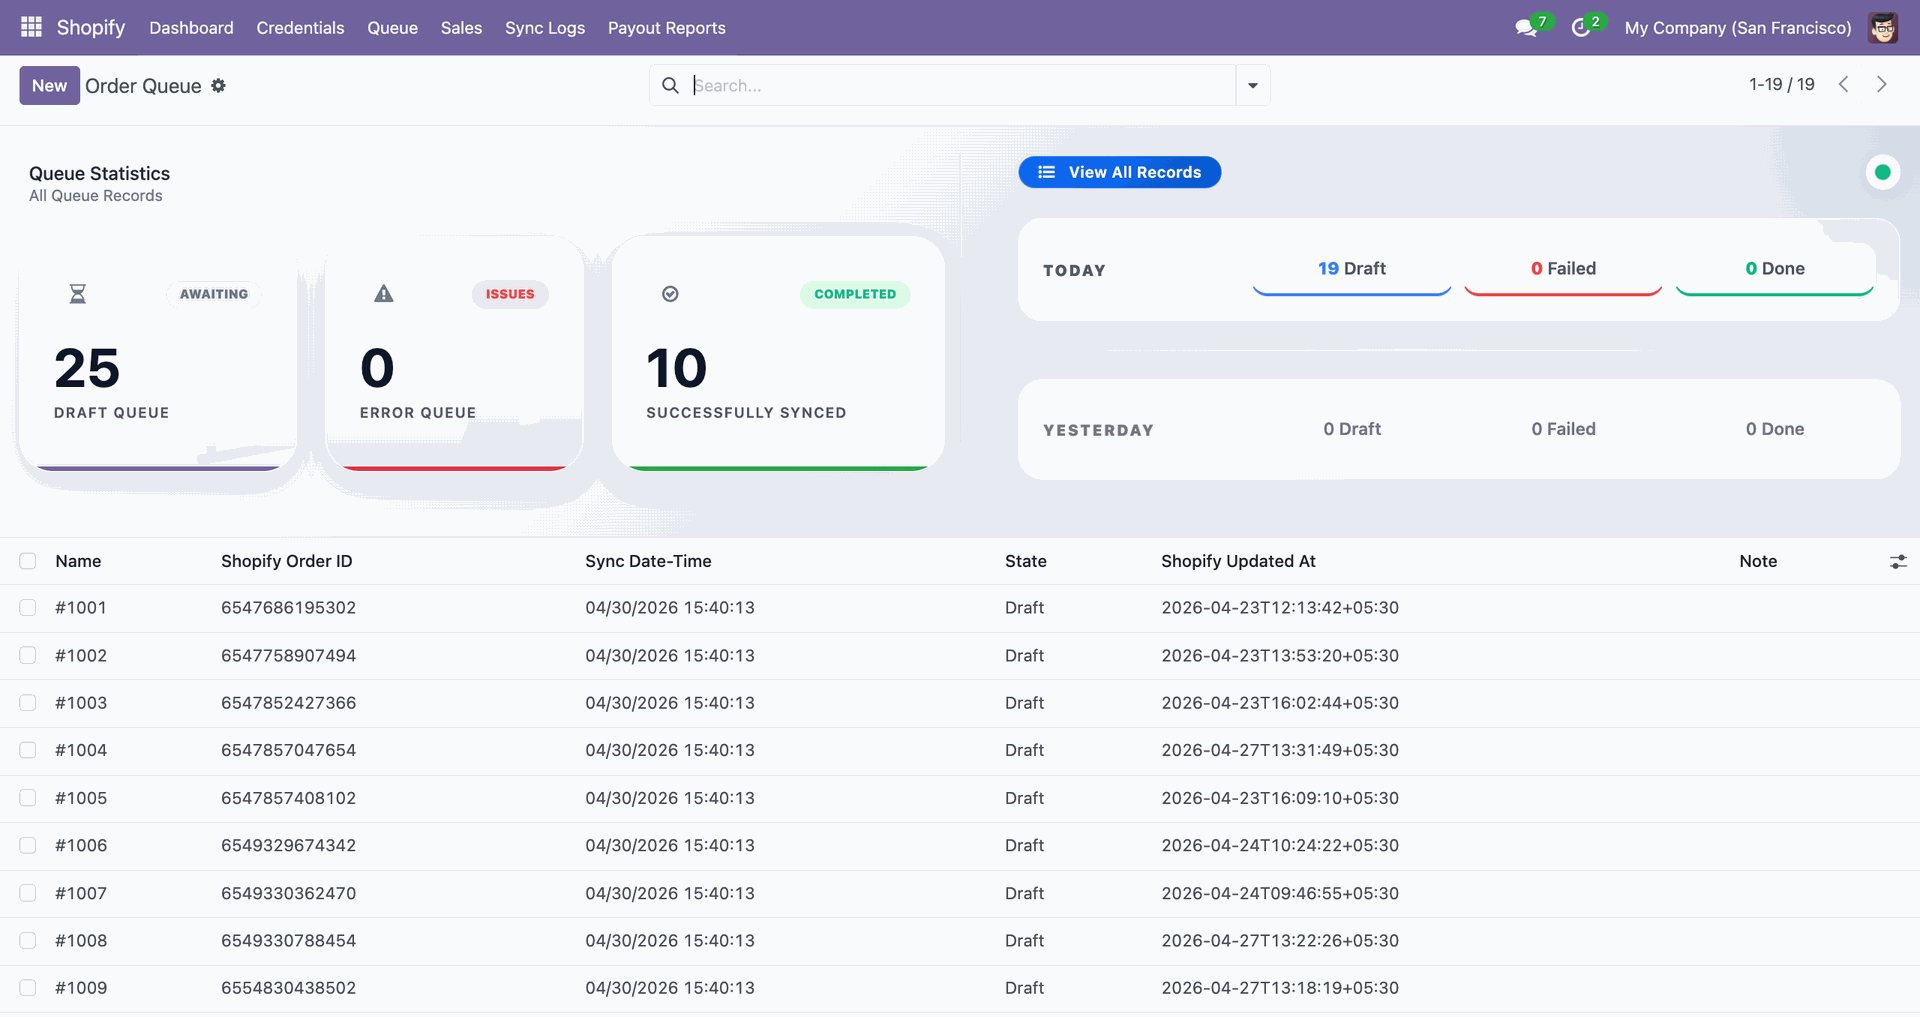
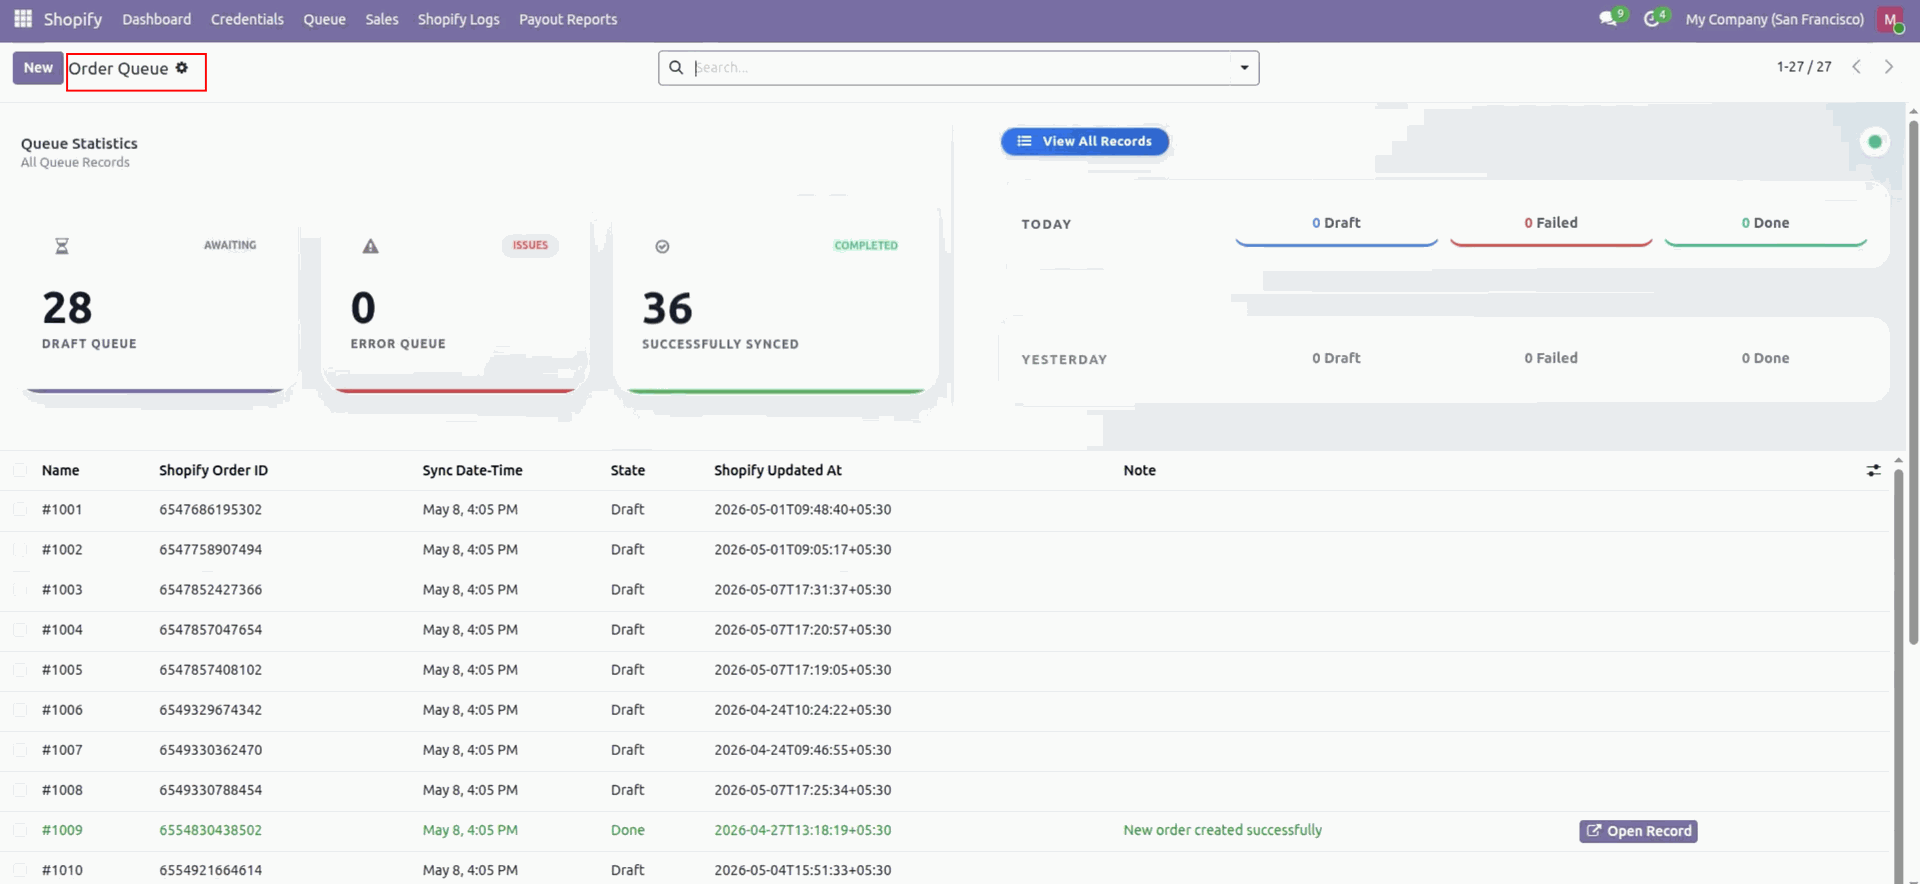
The Order Queue dashboard displays draft, completed, and failed order synchronization counts.
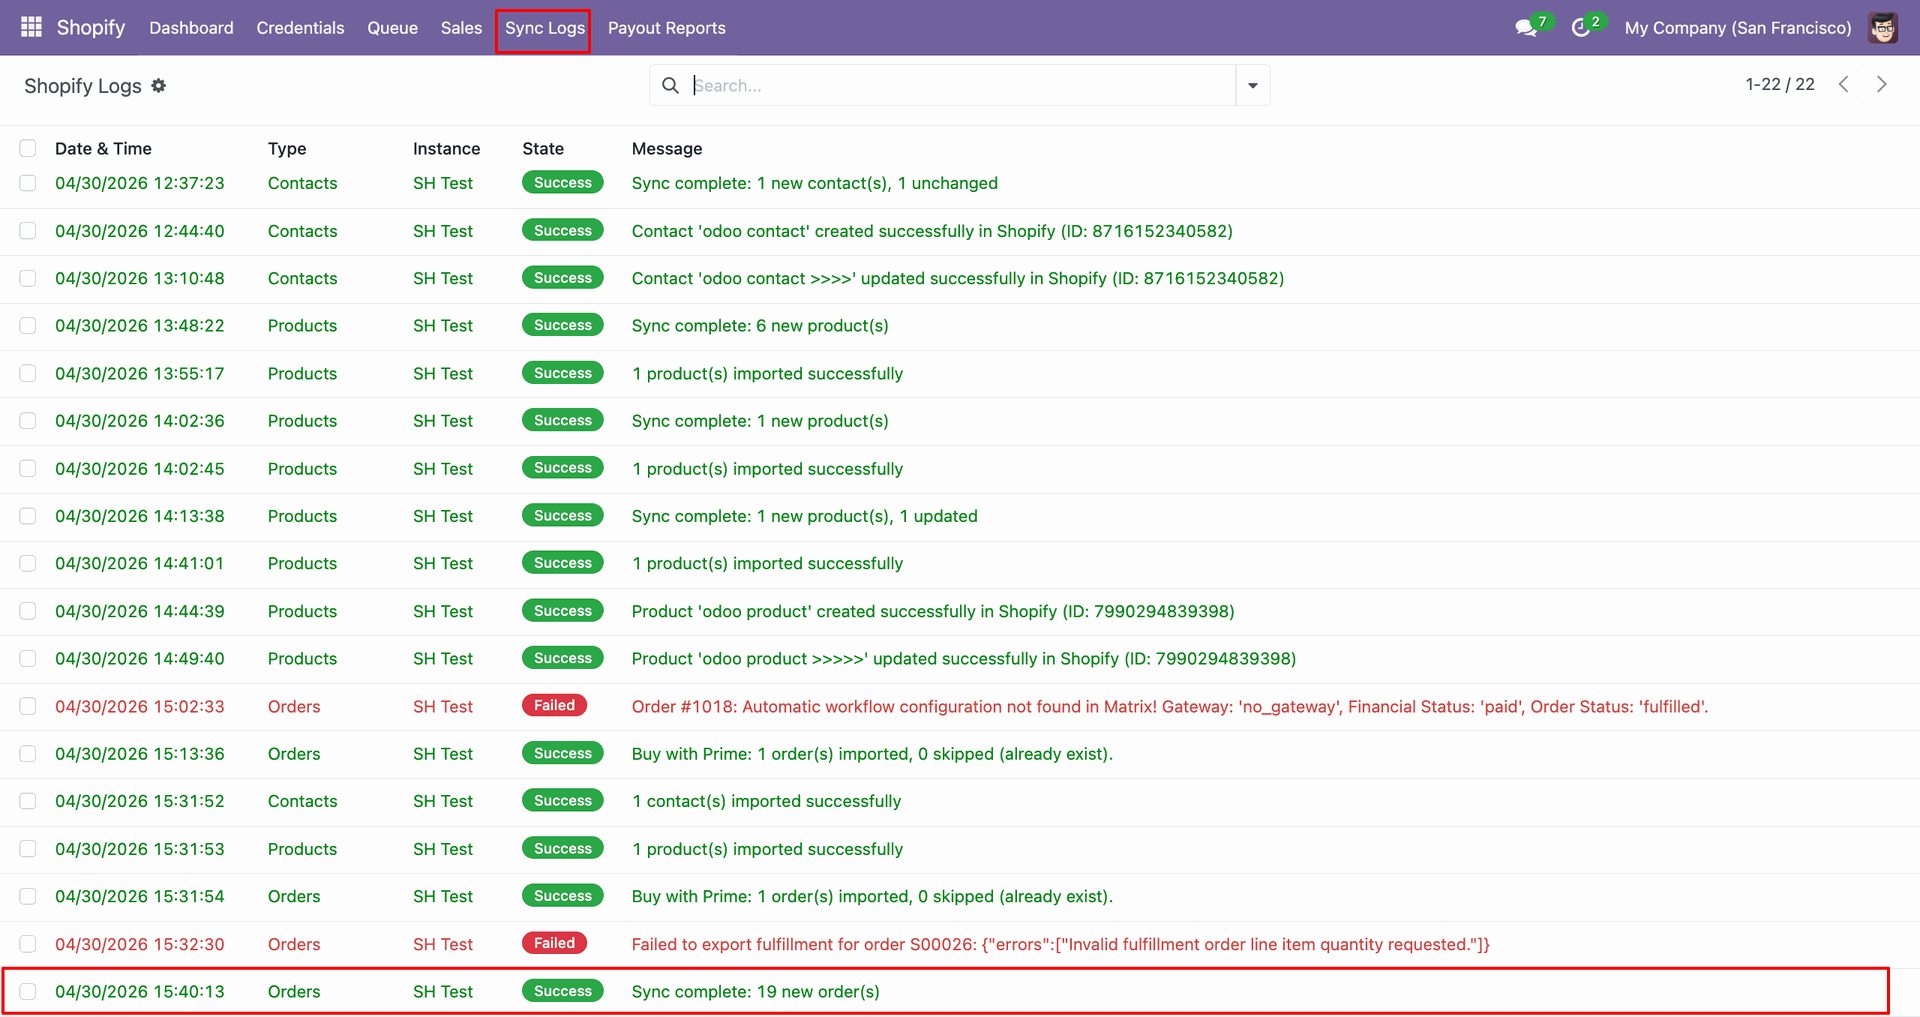
Check Sync Logs to confirm the order fetch completed with new records.
Select the queued order line and click Manually Import to process it.
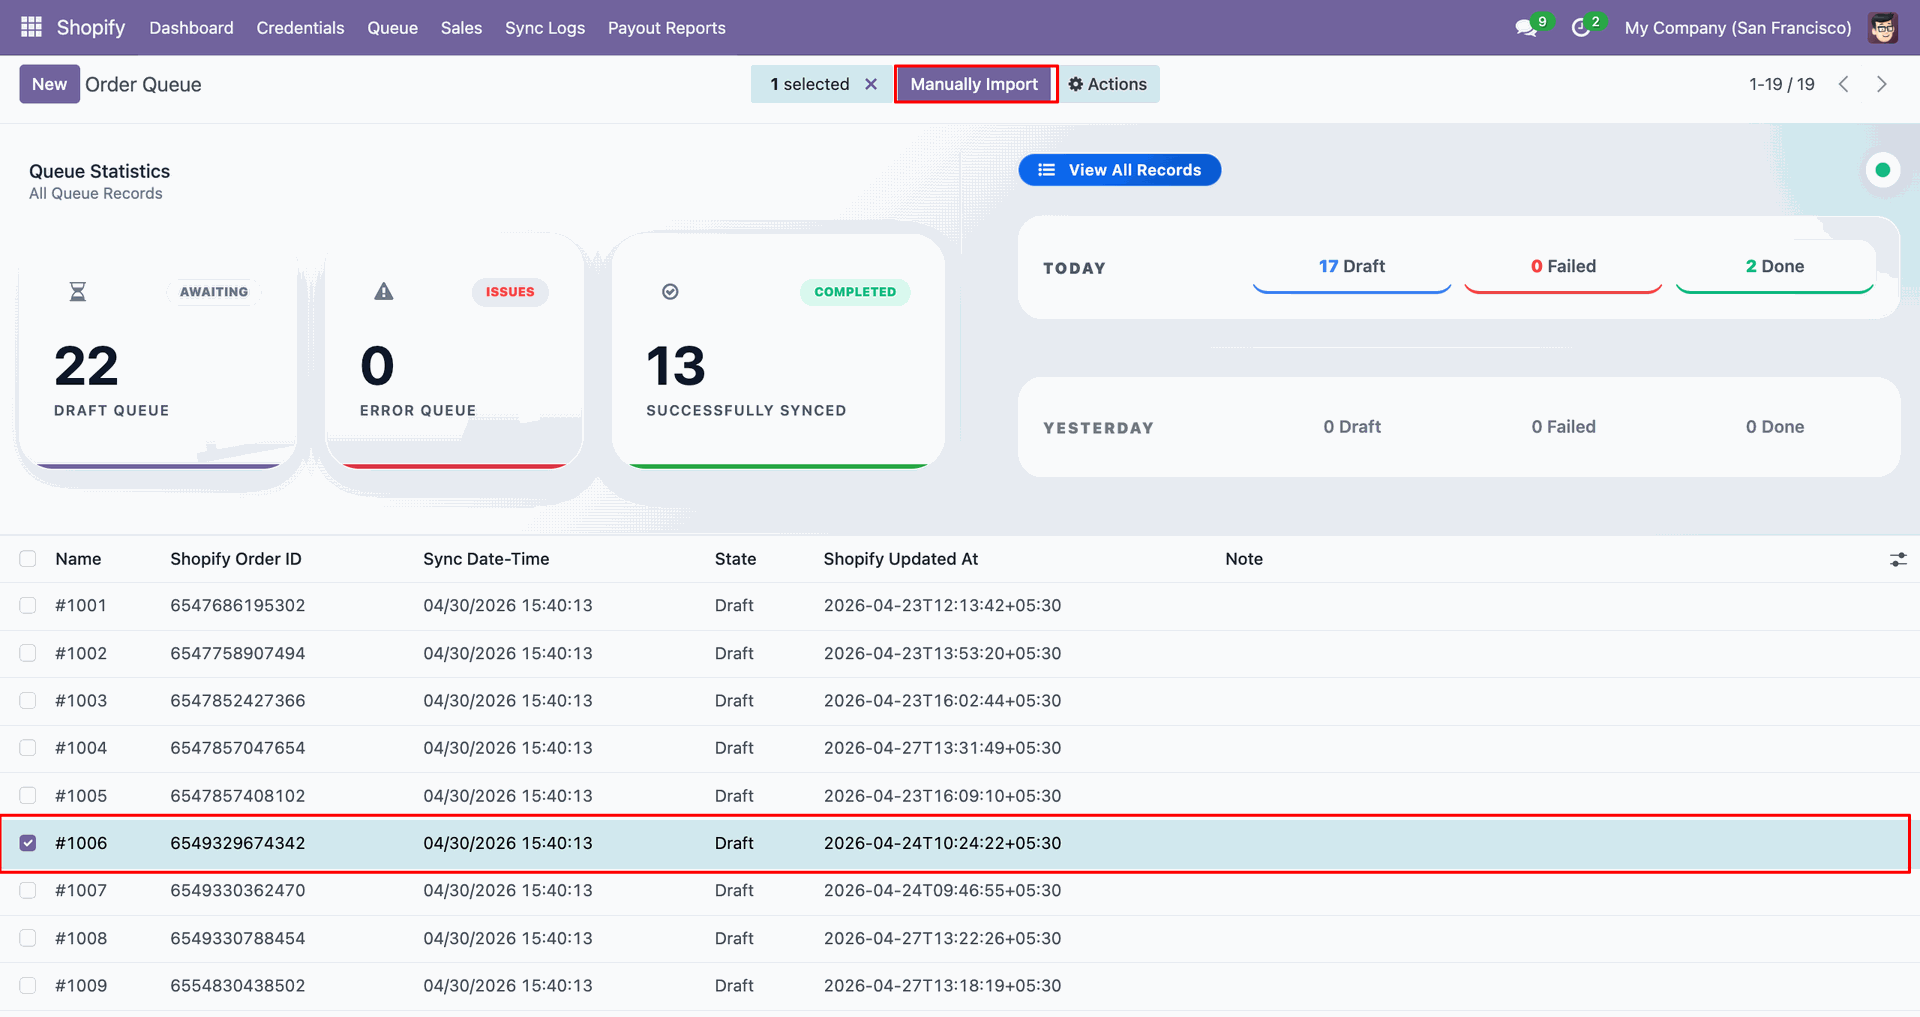
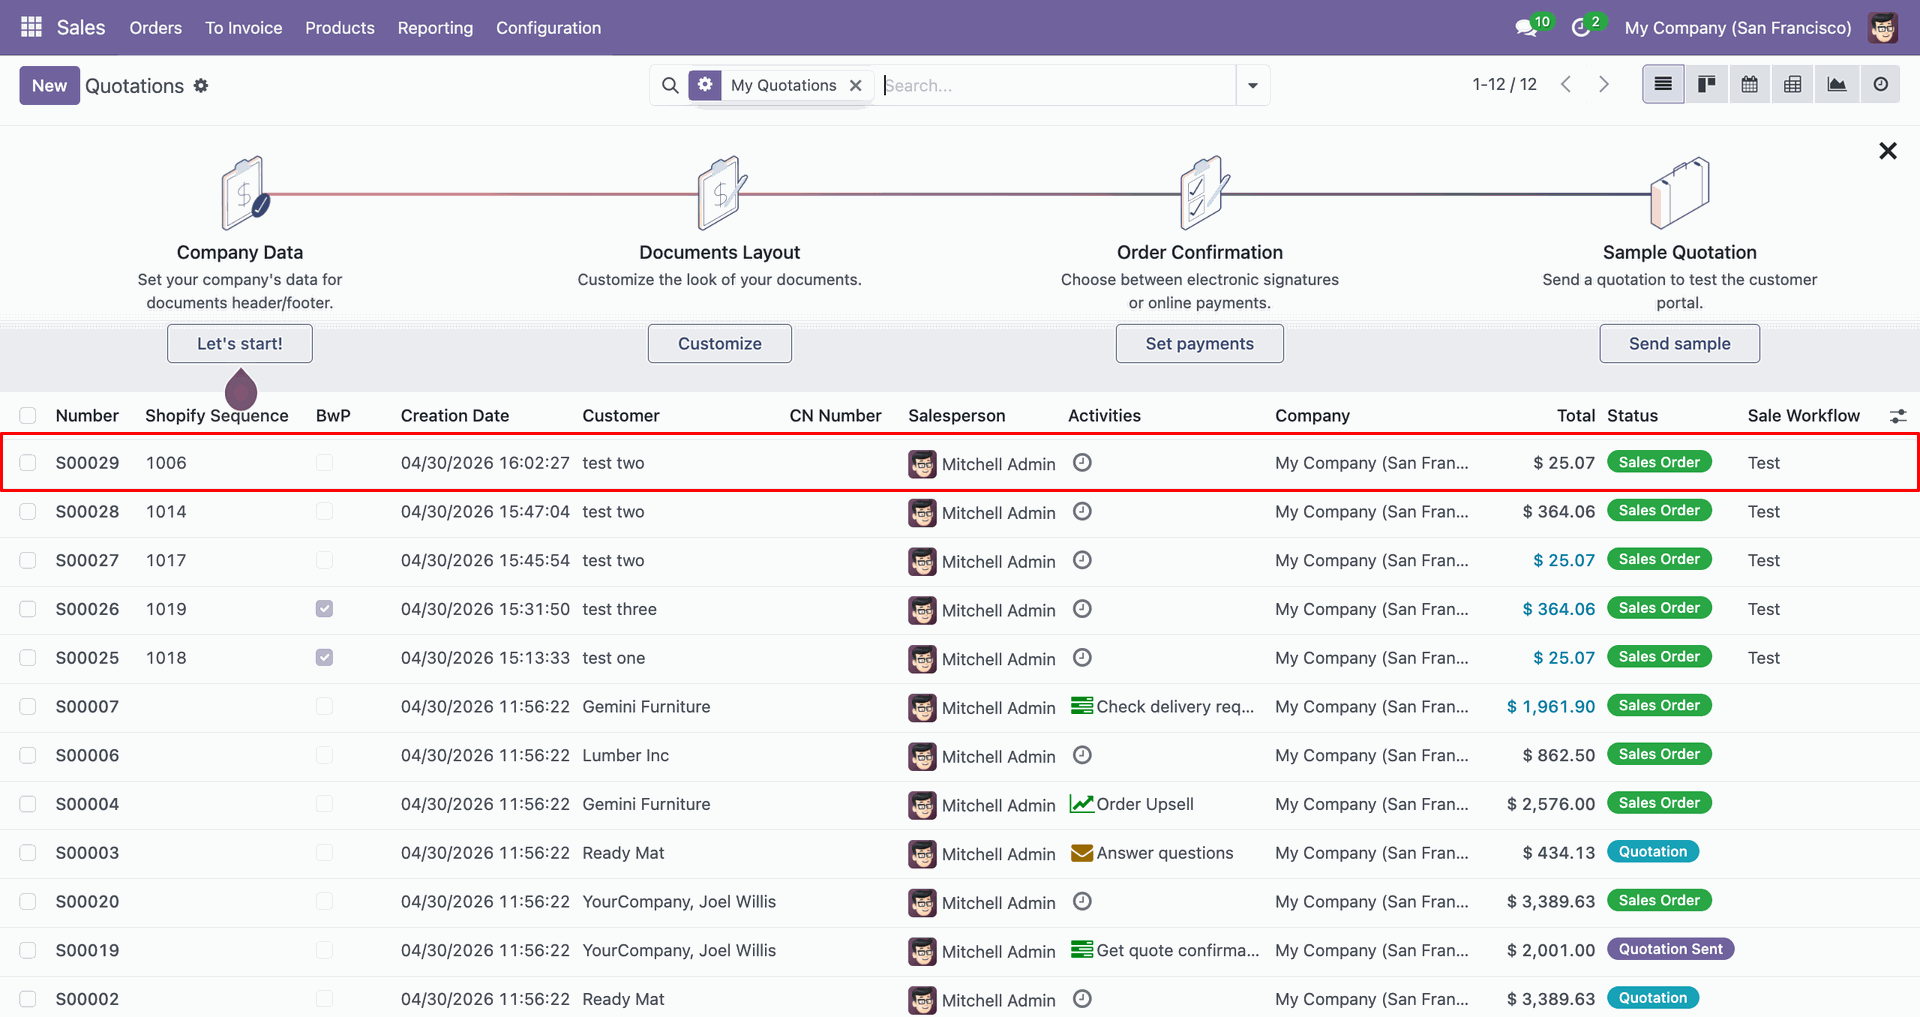
Review the imported sales order row in Odoo after queue processing completes.
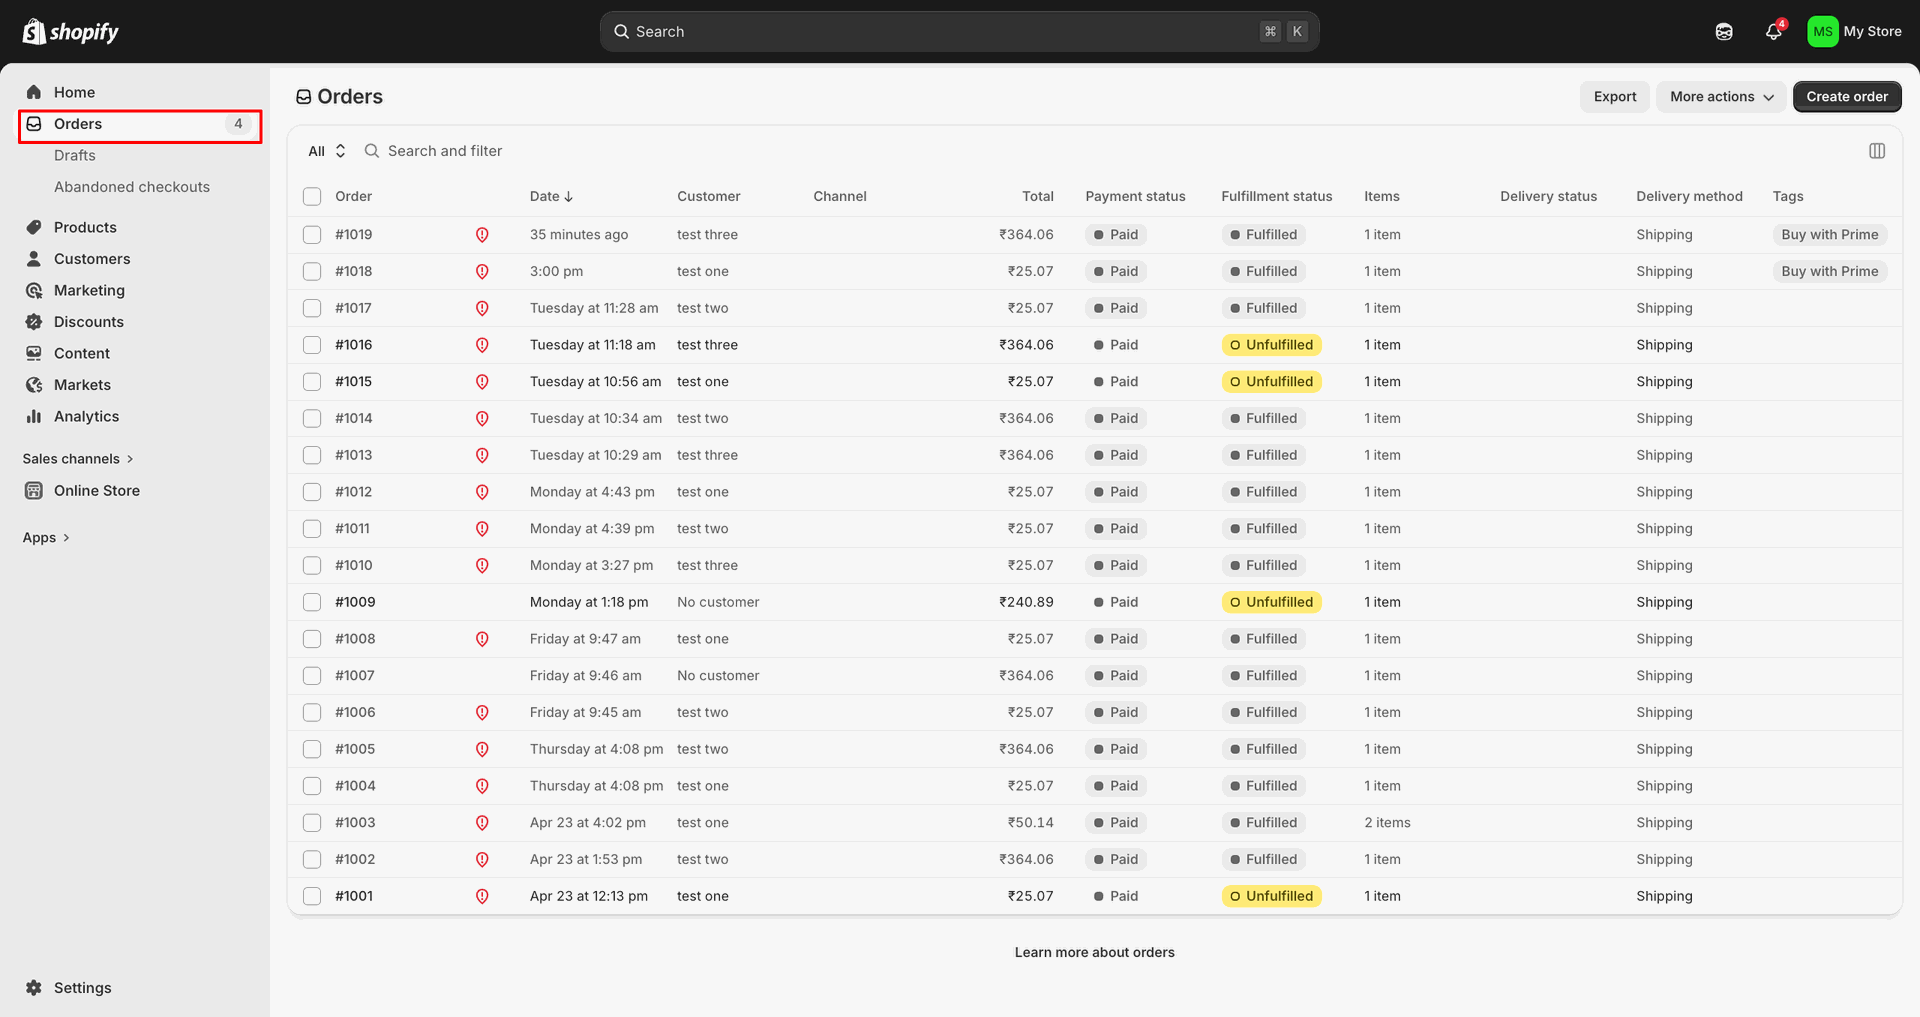
Open Orders in Shopify Admin to compare the source order records.
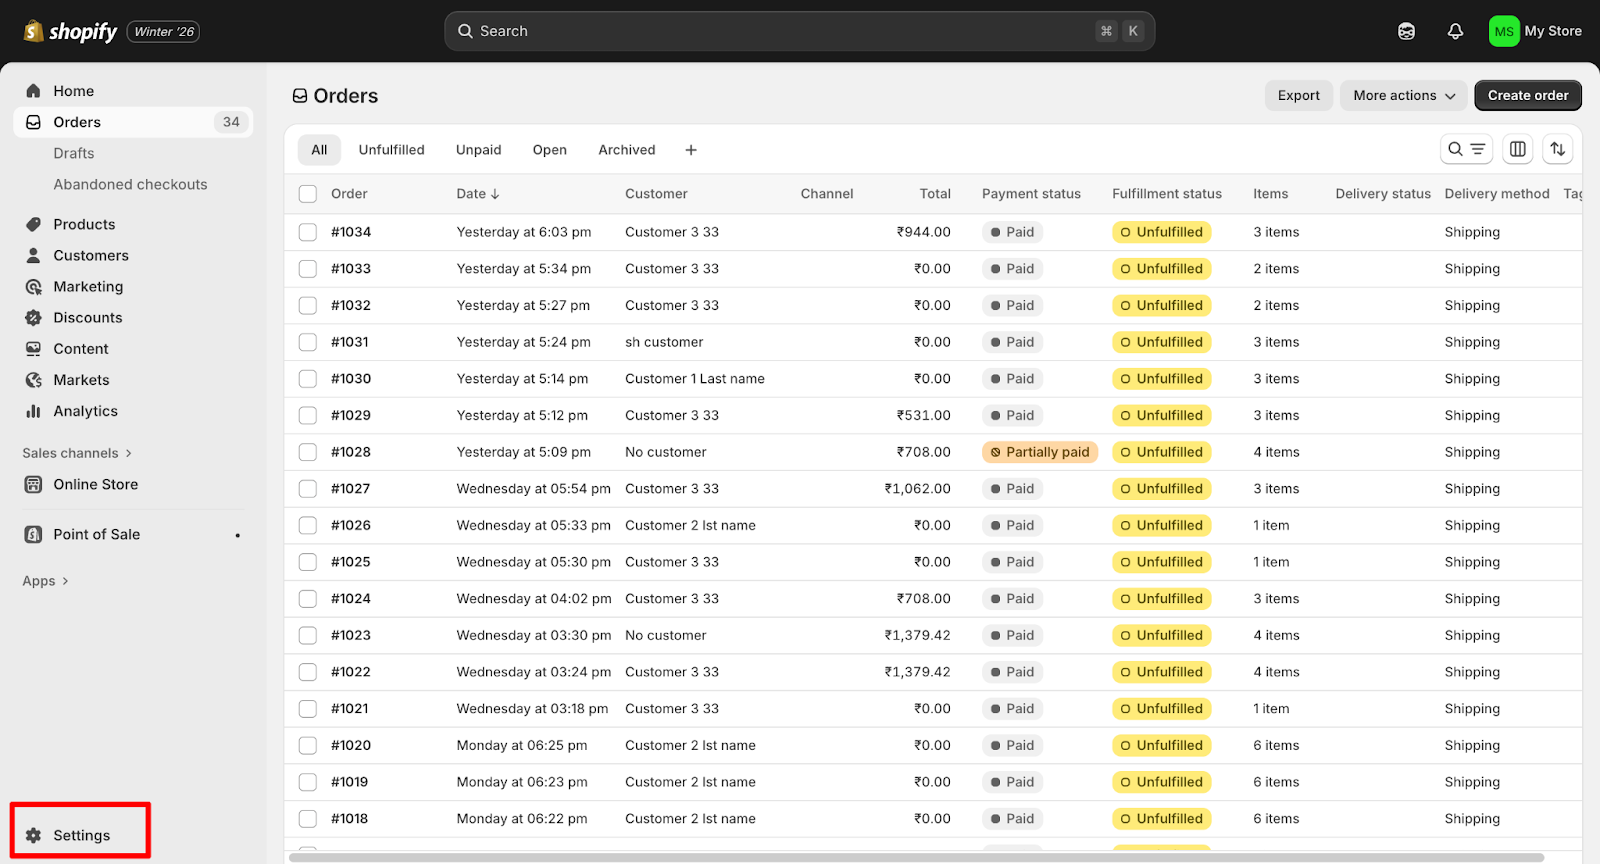
Open Settings in Shopify Admin to access webhook and notification options.
Open Notifications and select Webhooks to manage store event subscriptions.
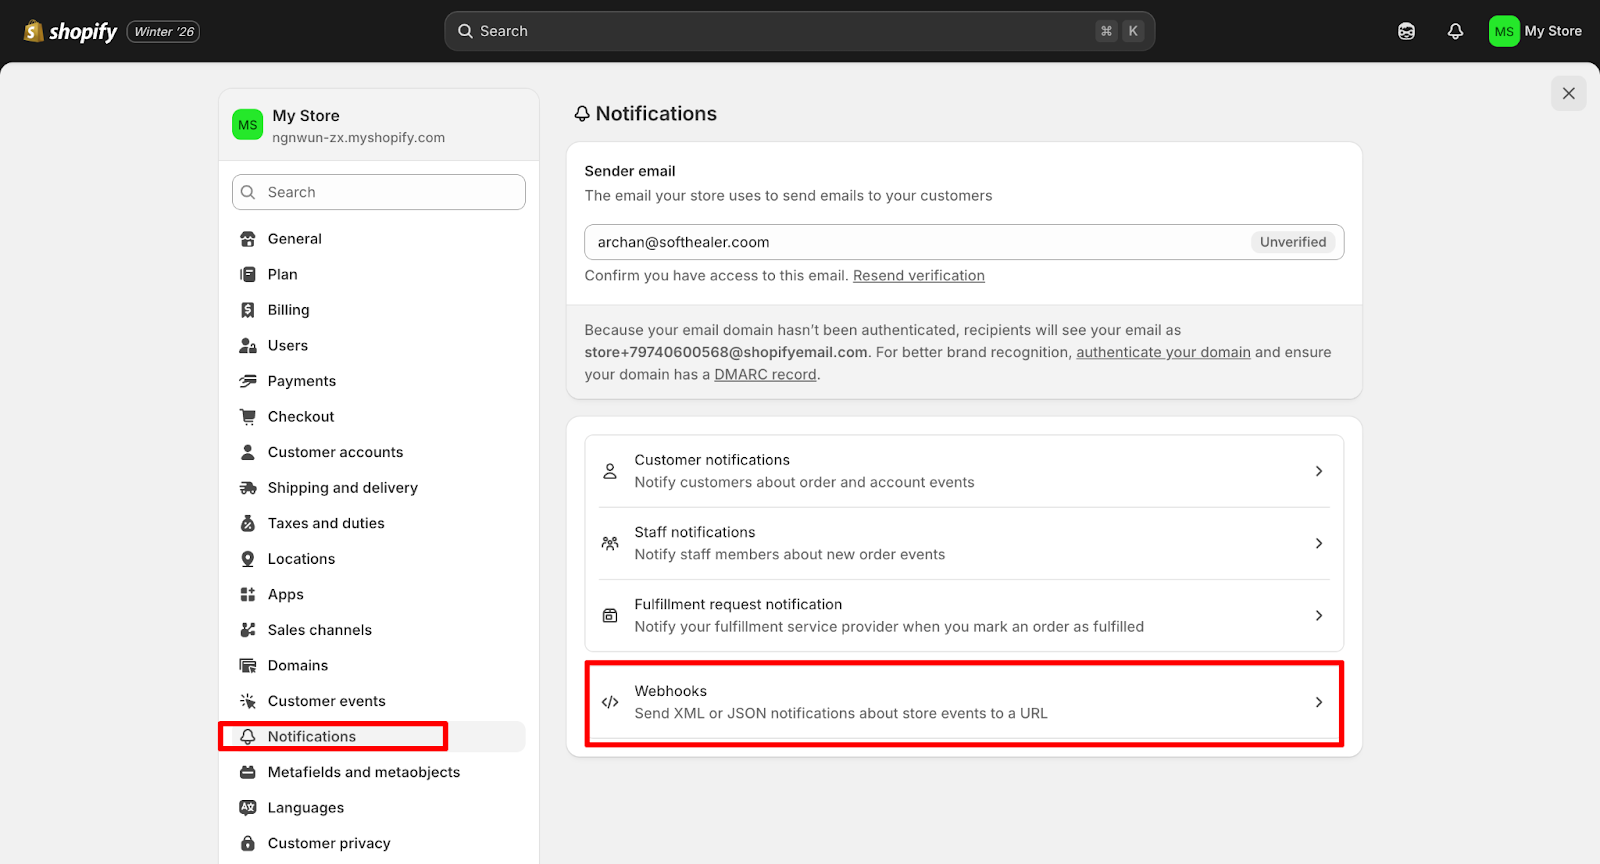
Click Create webhook to add a new event subscription endpoint.
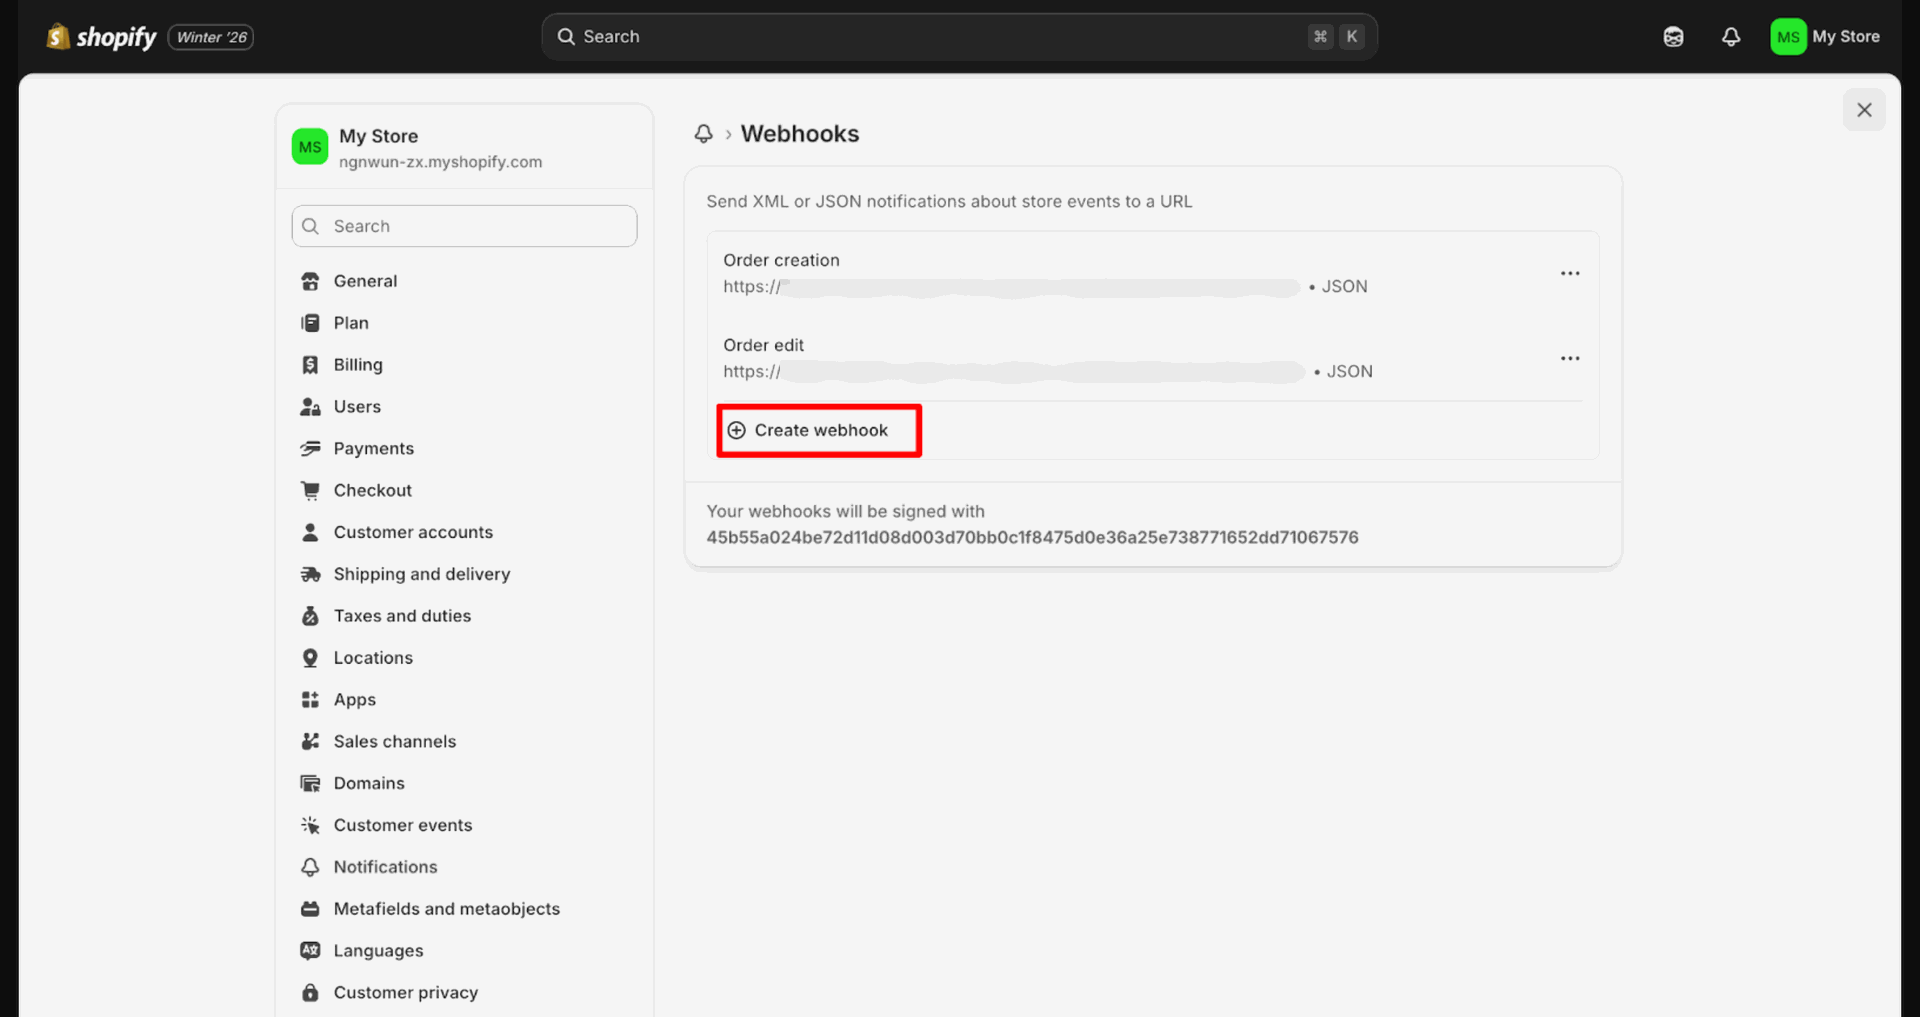
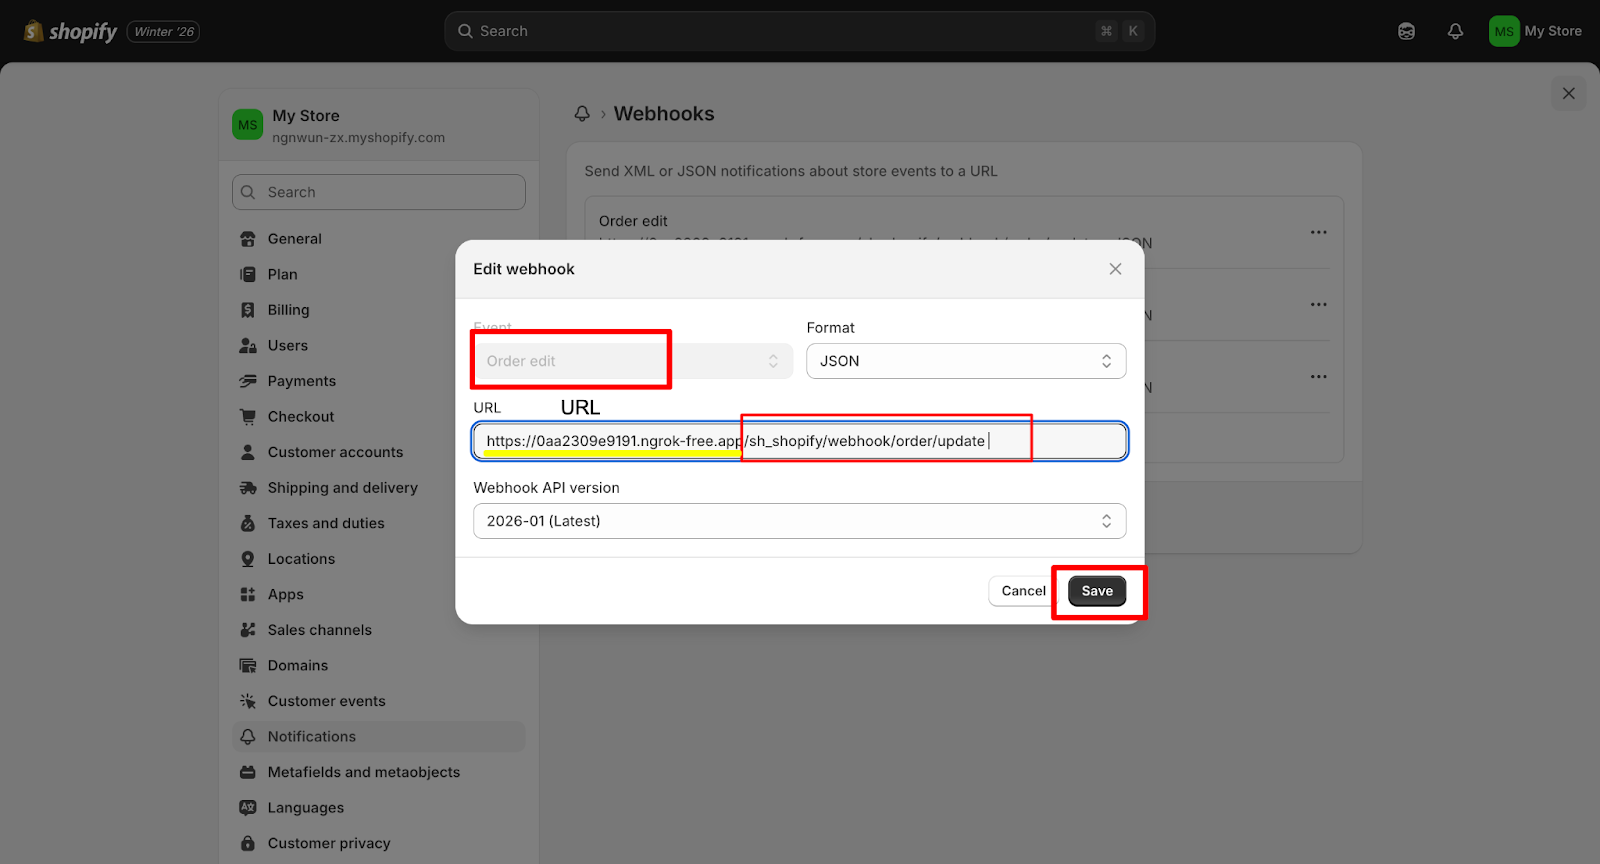
Select the event, enter the webhook URL, and click Save.
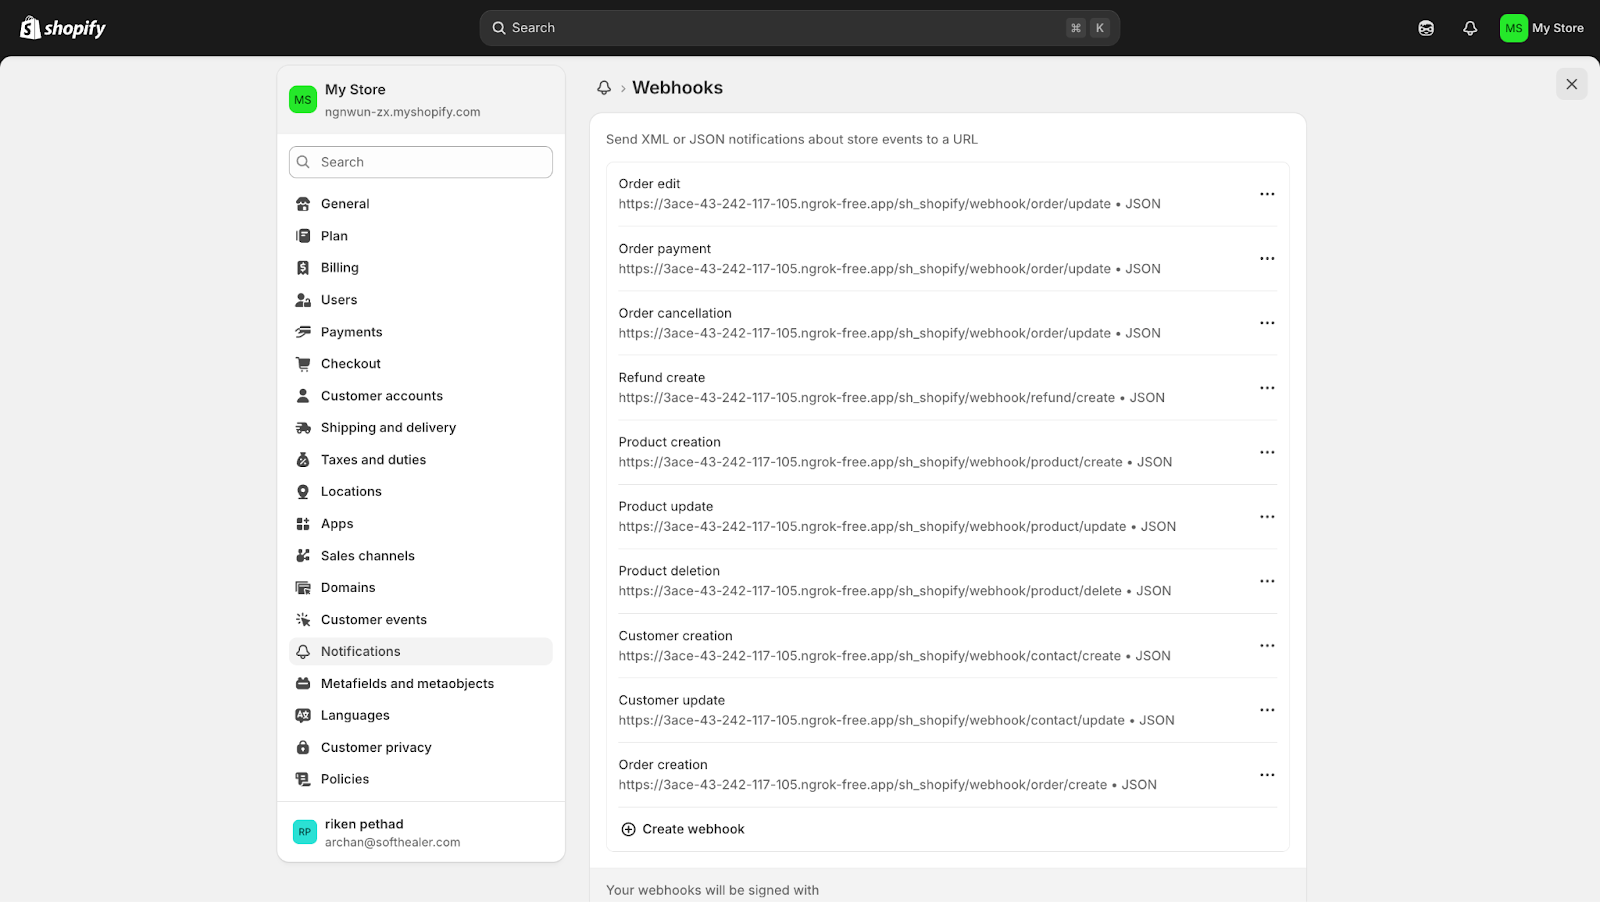
Review the Webhooks list to confirm each event URL is configured.
Workflow
Enable the Auto Sale Workflow access right for the required user.
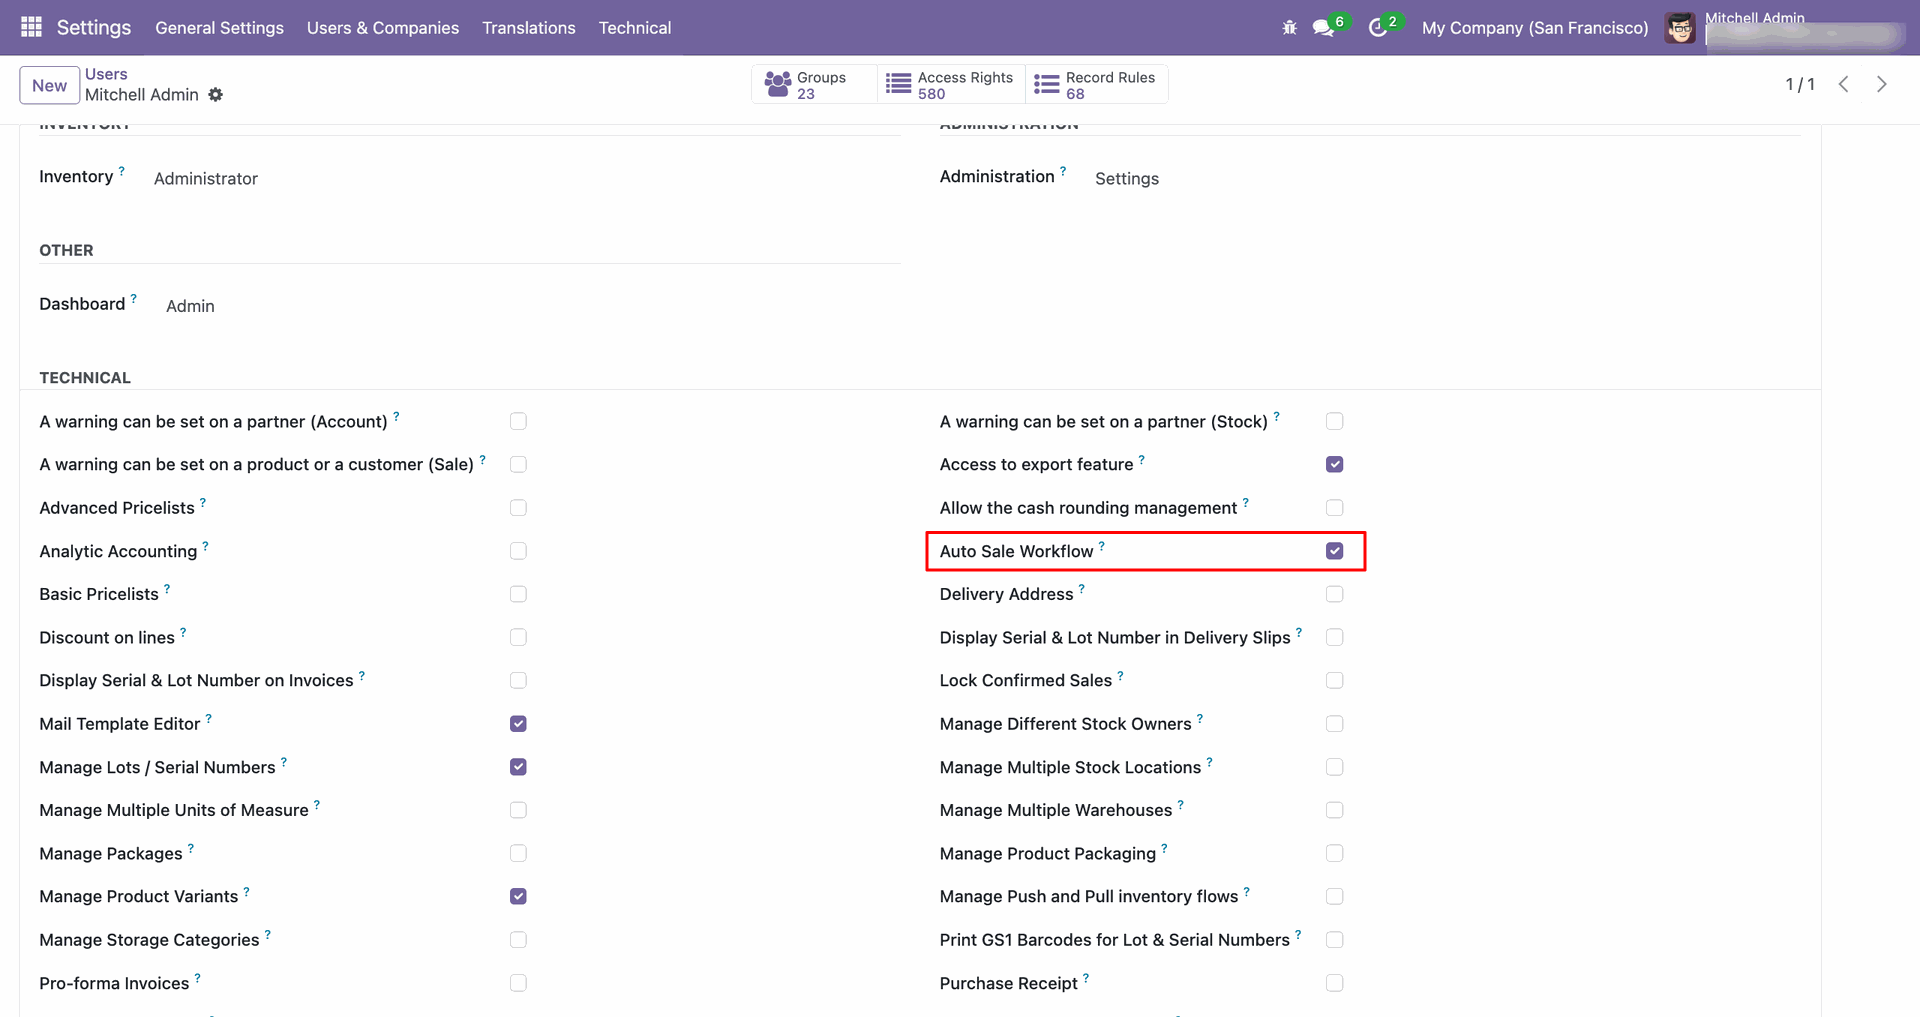
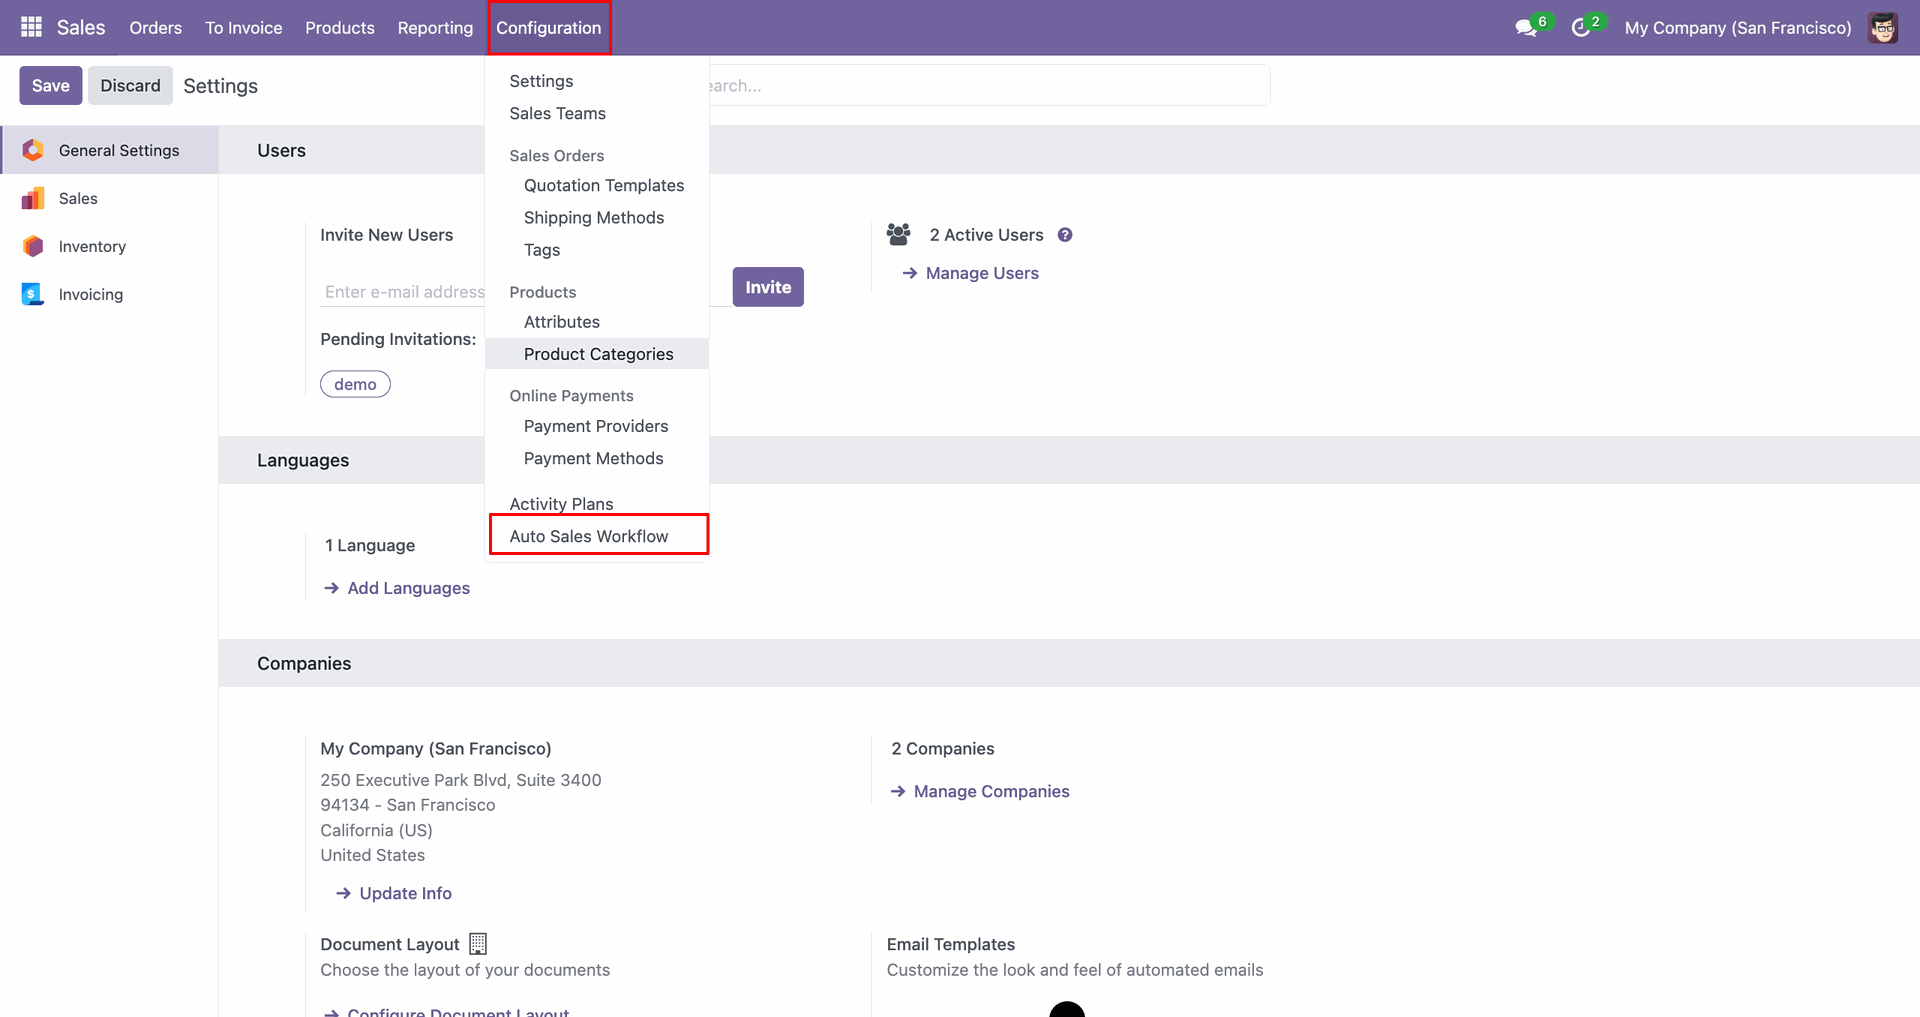
Open Auto Sales Workflow from Configuration to manage sales automation rules.
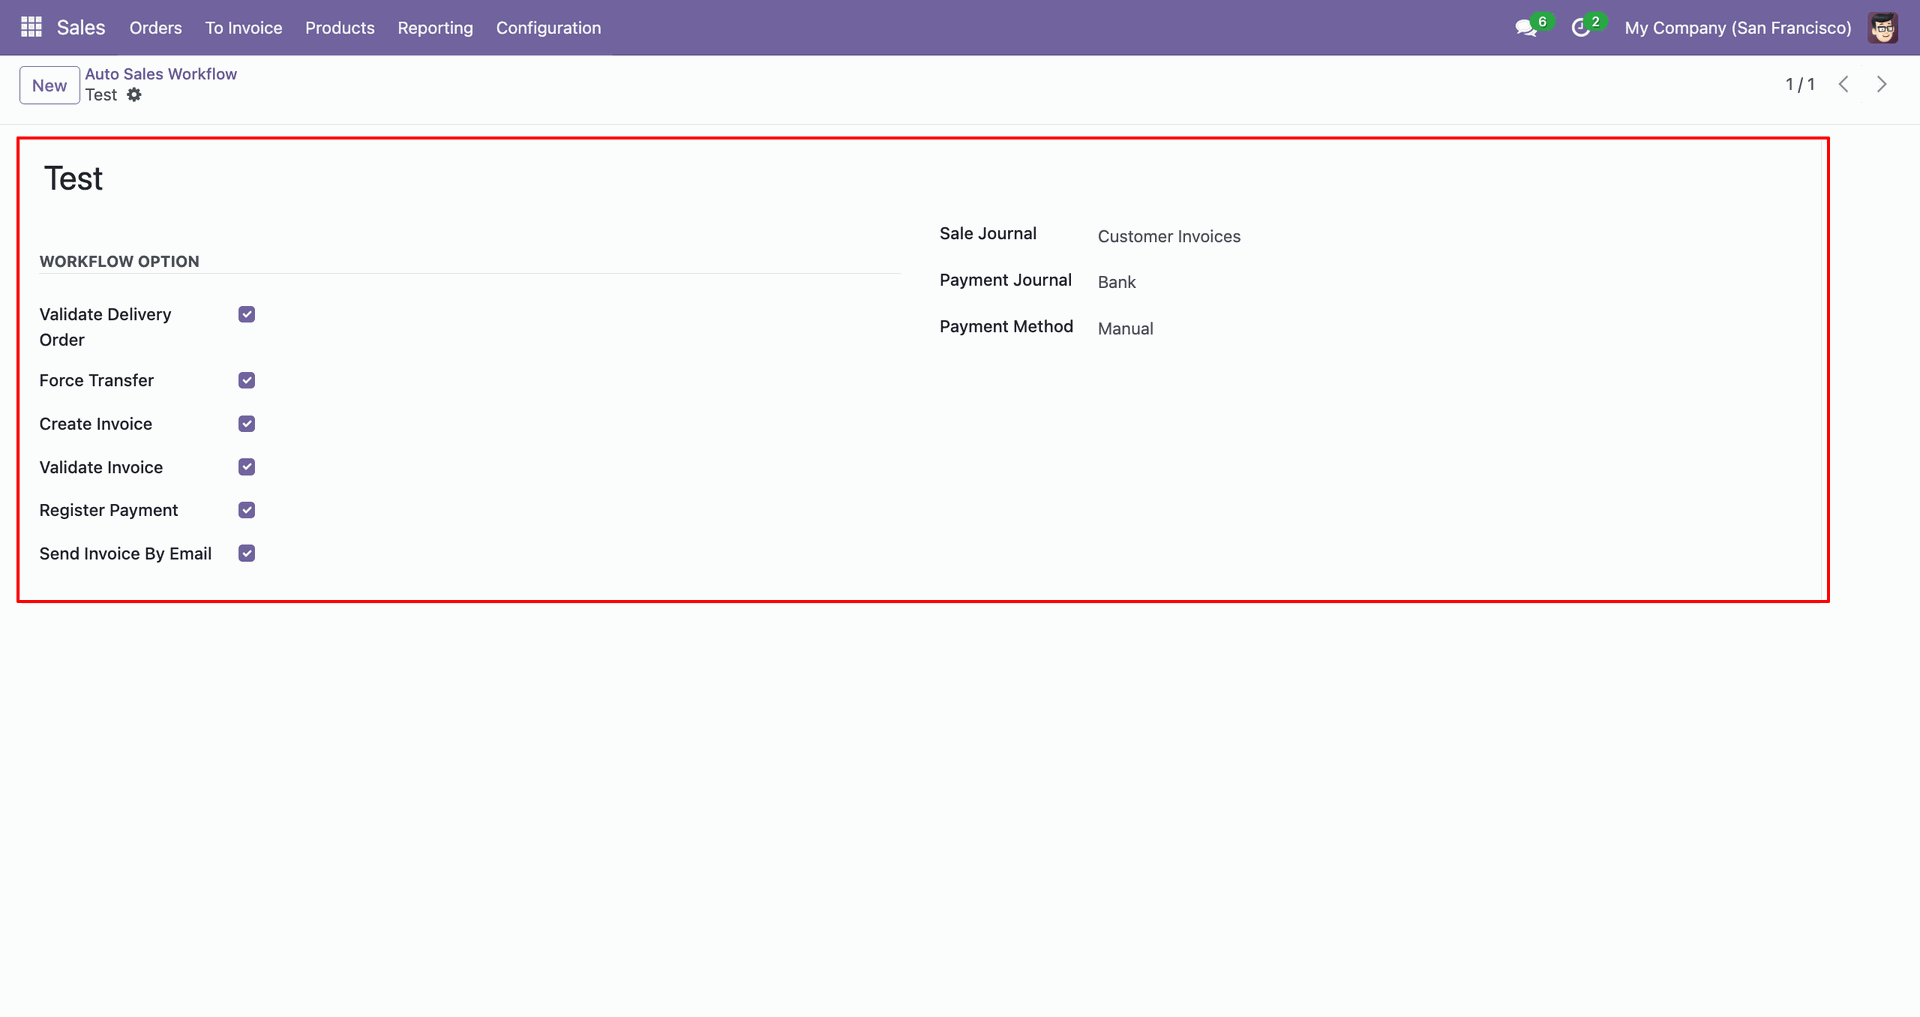
Review the Auto Sales Workflow settings and enabled actions for this rule.
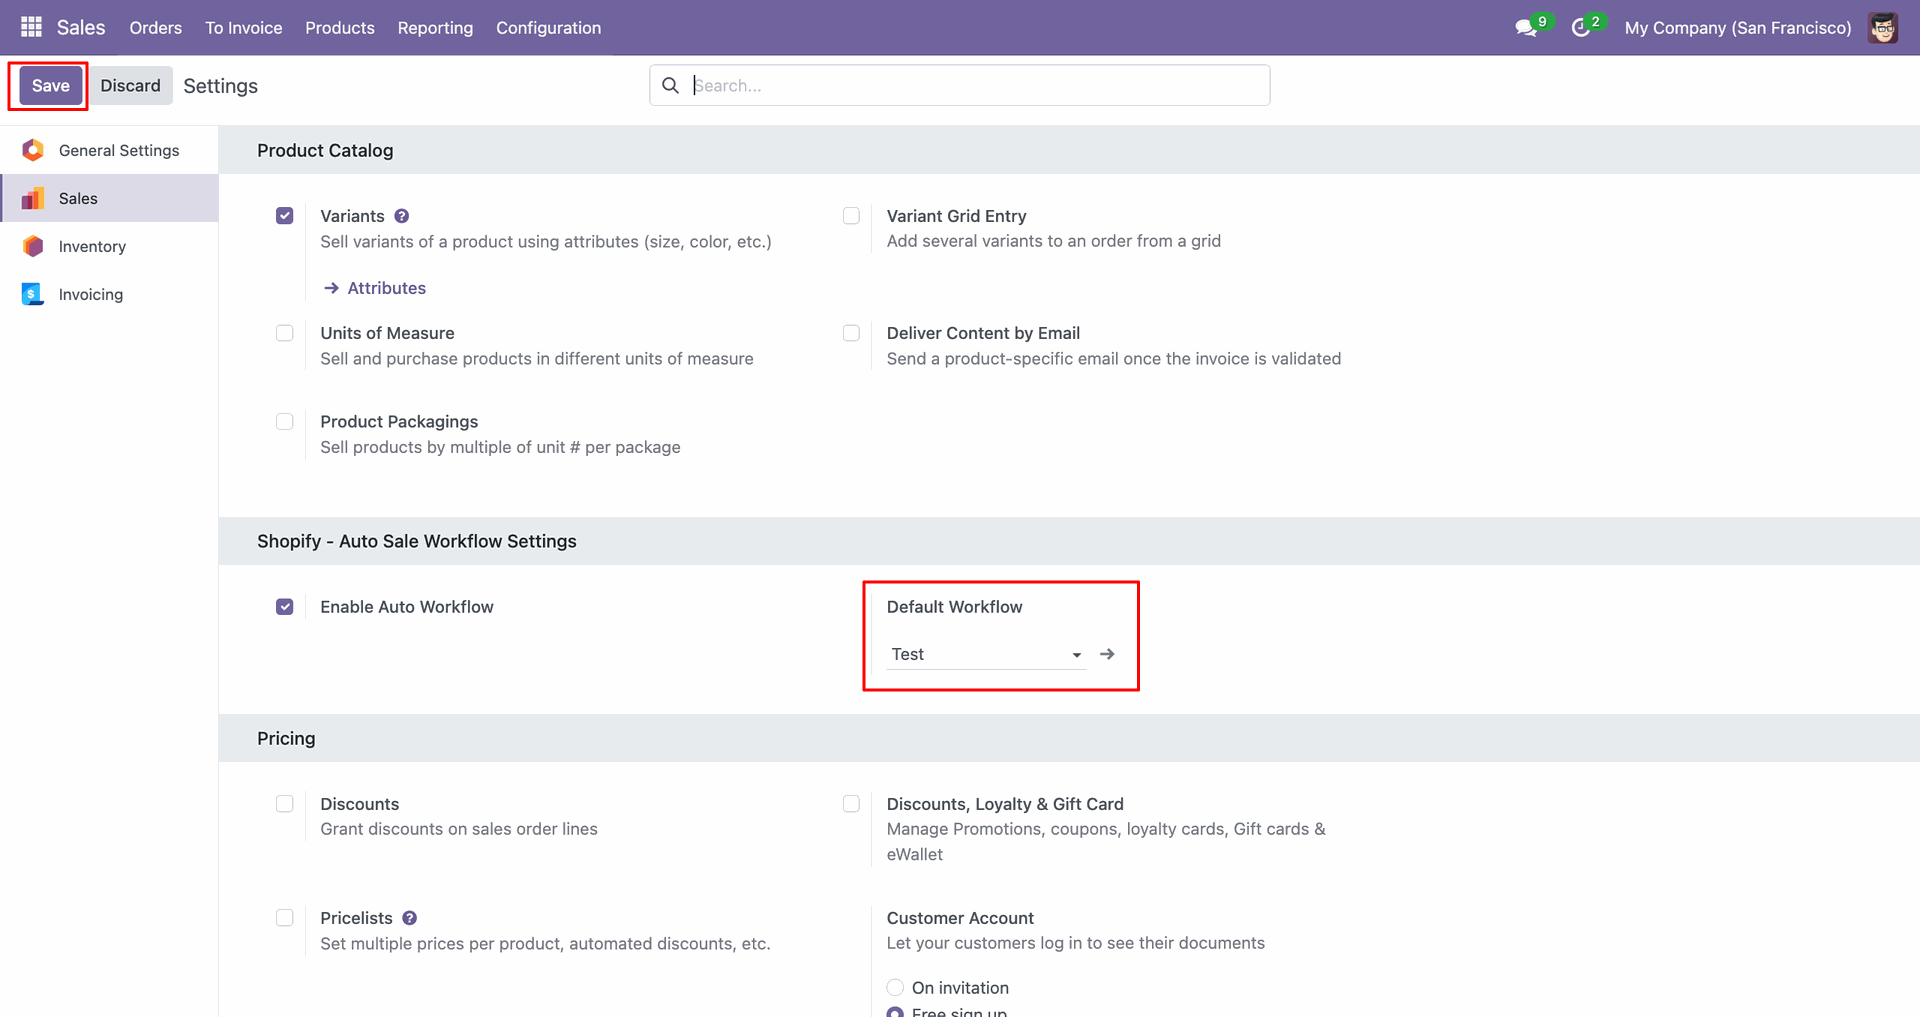
Set the Default Workflow in Settings to apply automatic sales processing.
Workflow
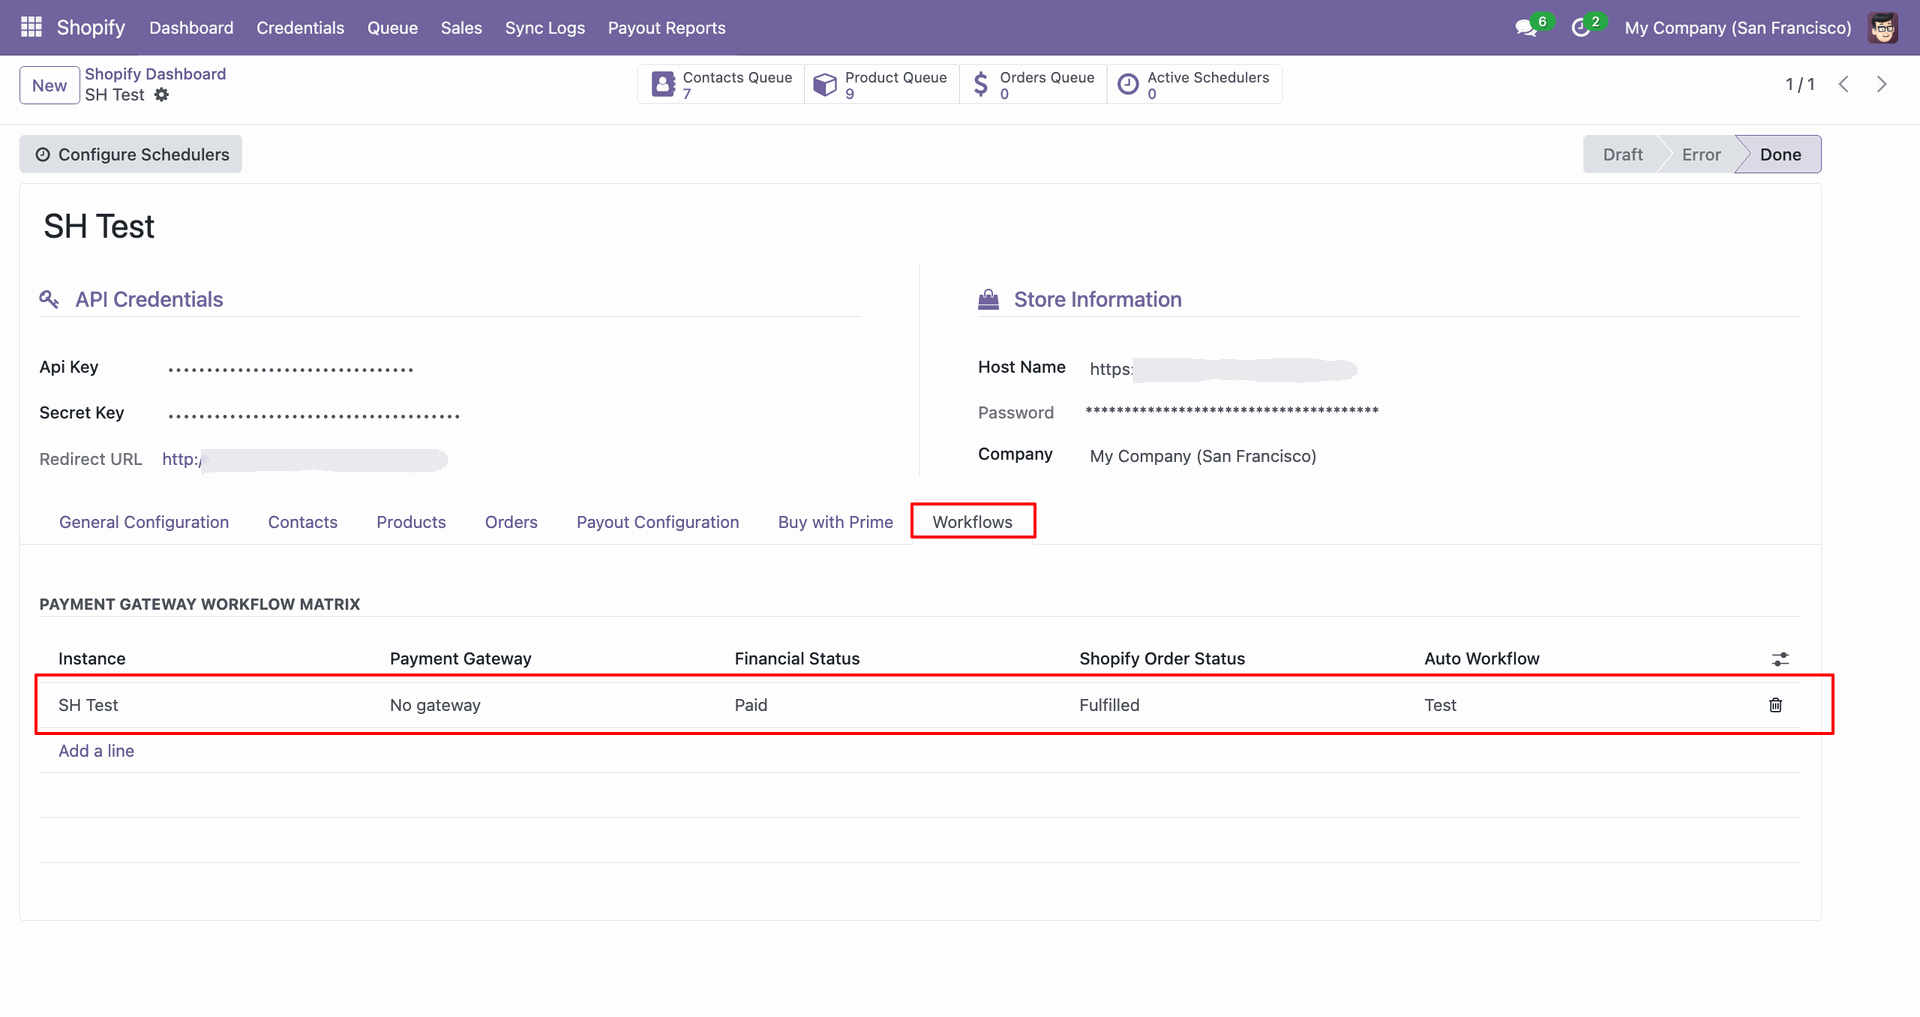
Review the workflow matrix row used for Buy with Prime order processing.
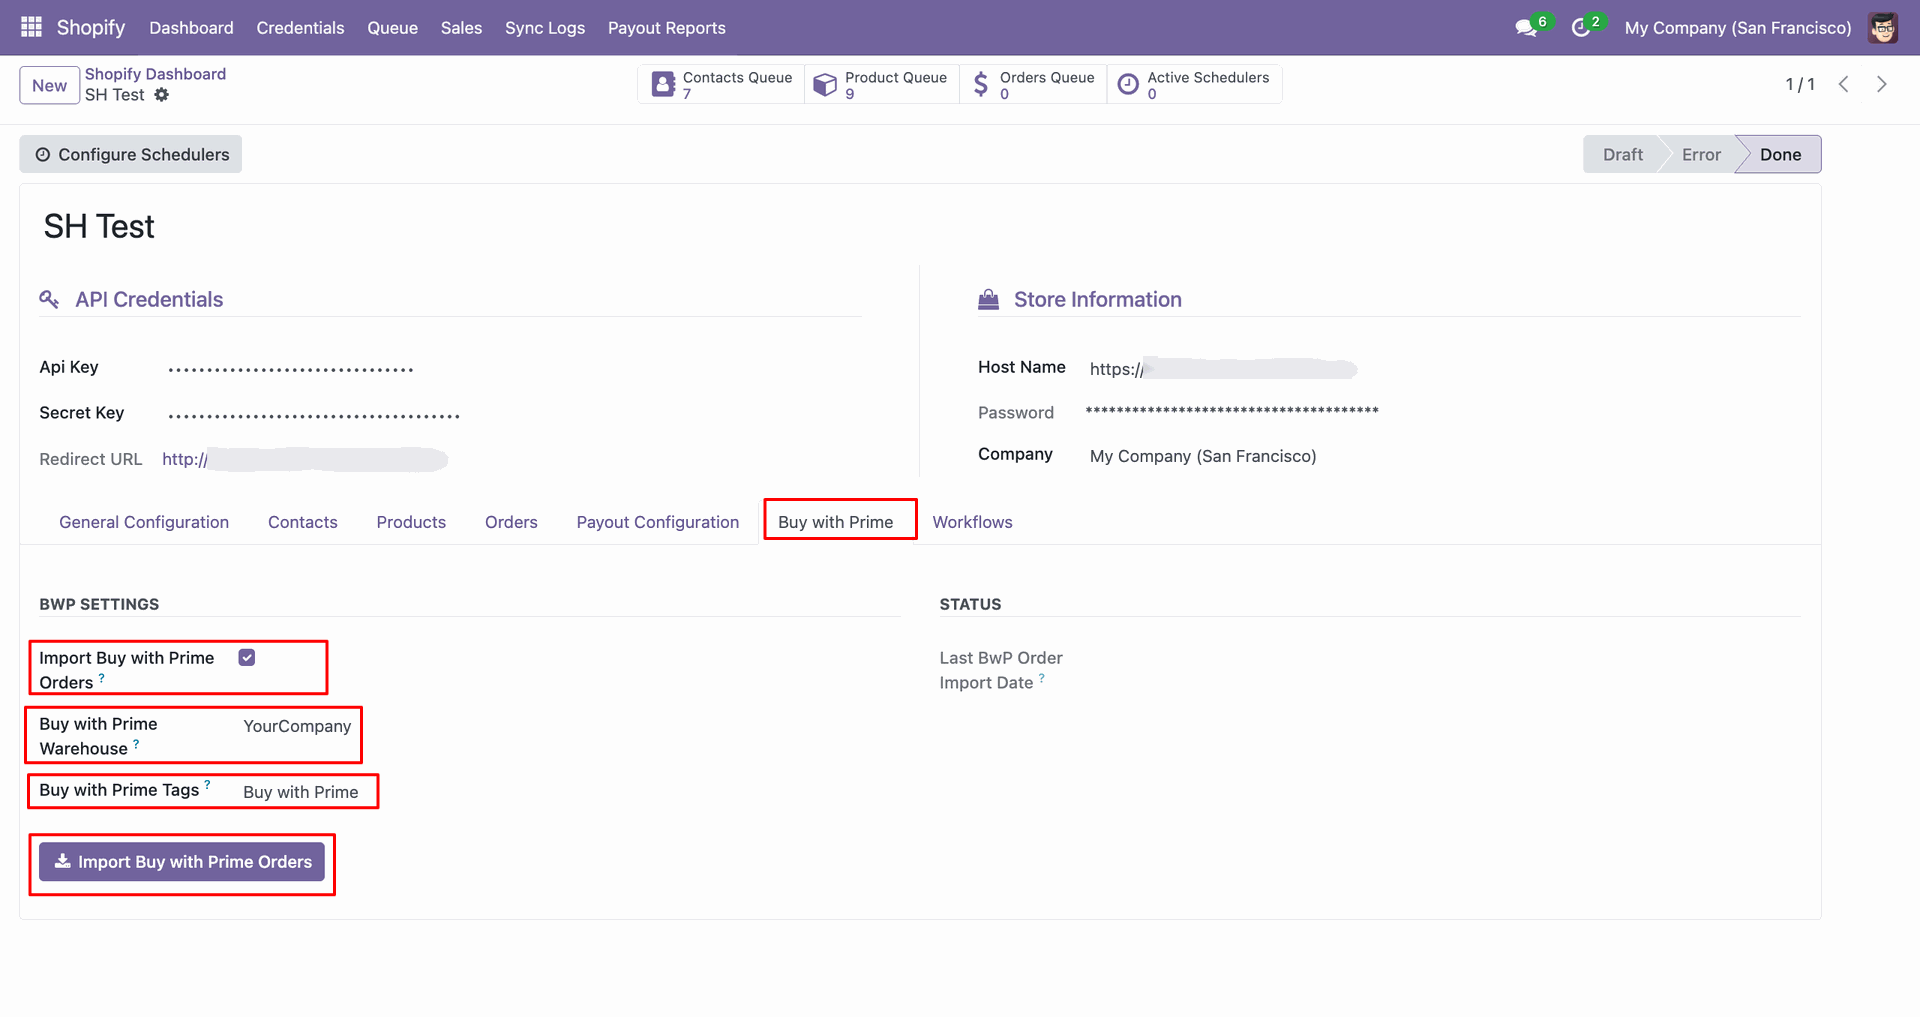
Open the Buy with Prime tab and click Import Buy with Prime Orders.
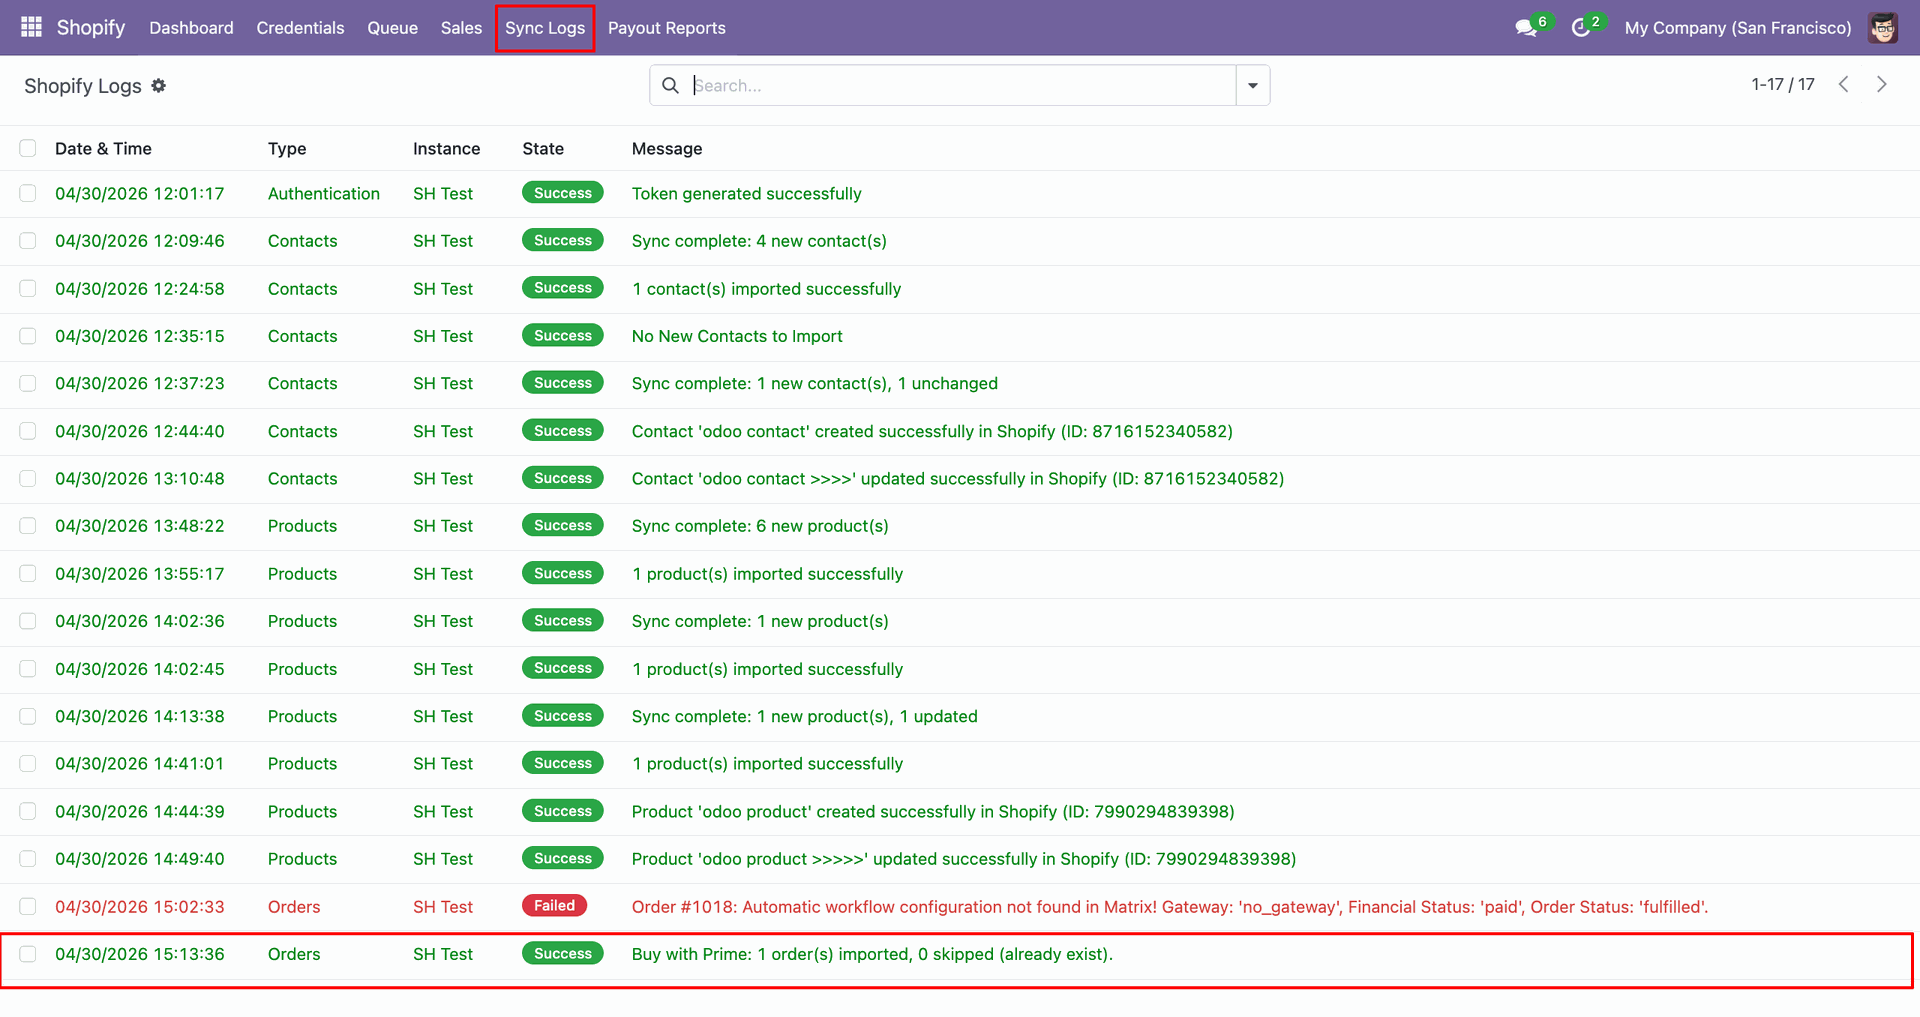
Check Sync Logs to confirm the Buy with Prime order import result.
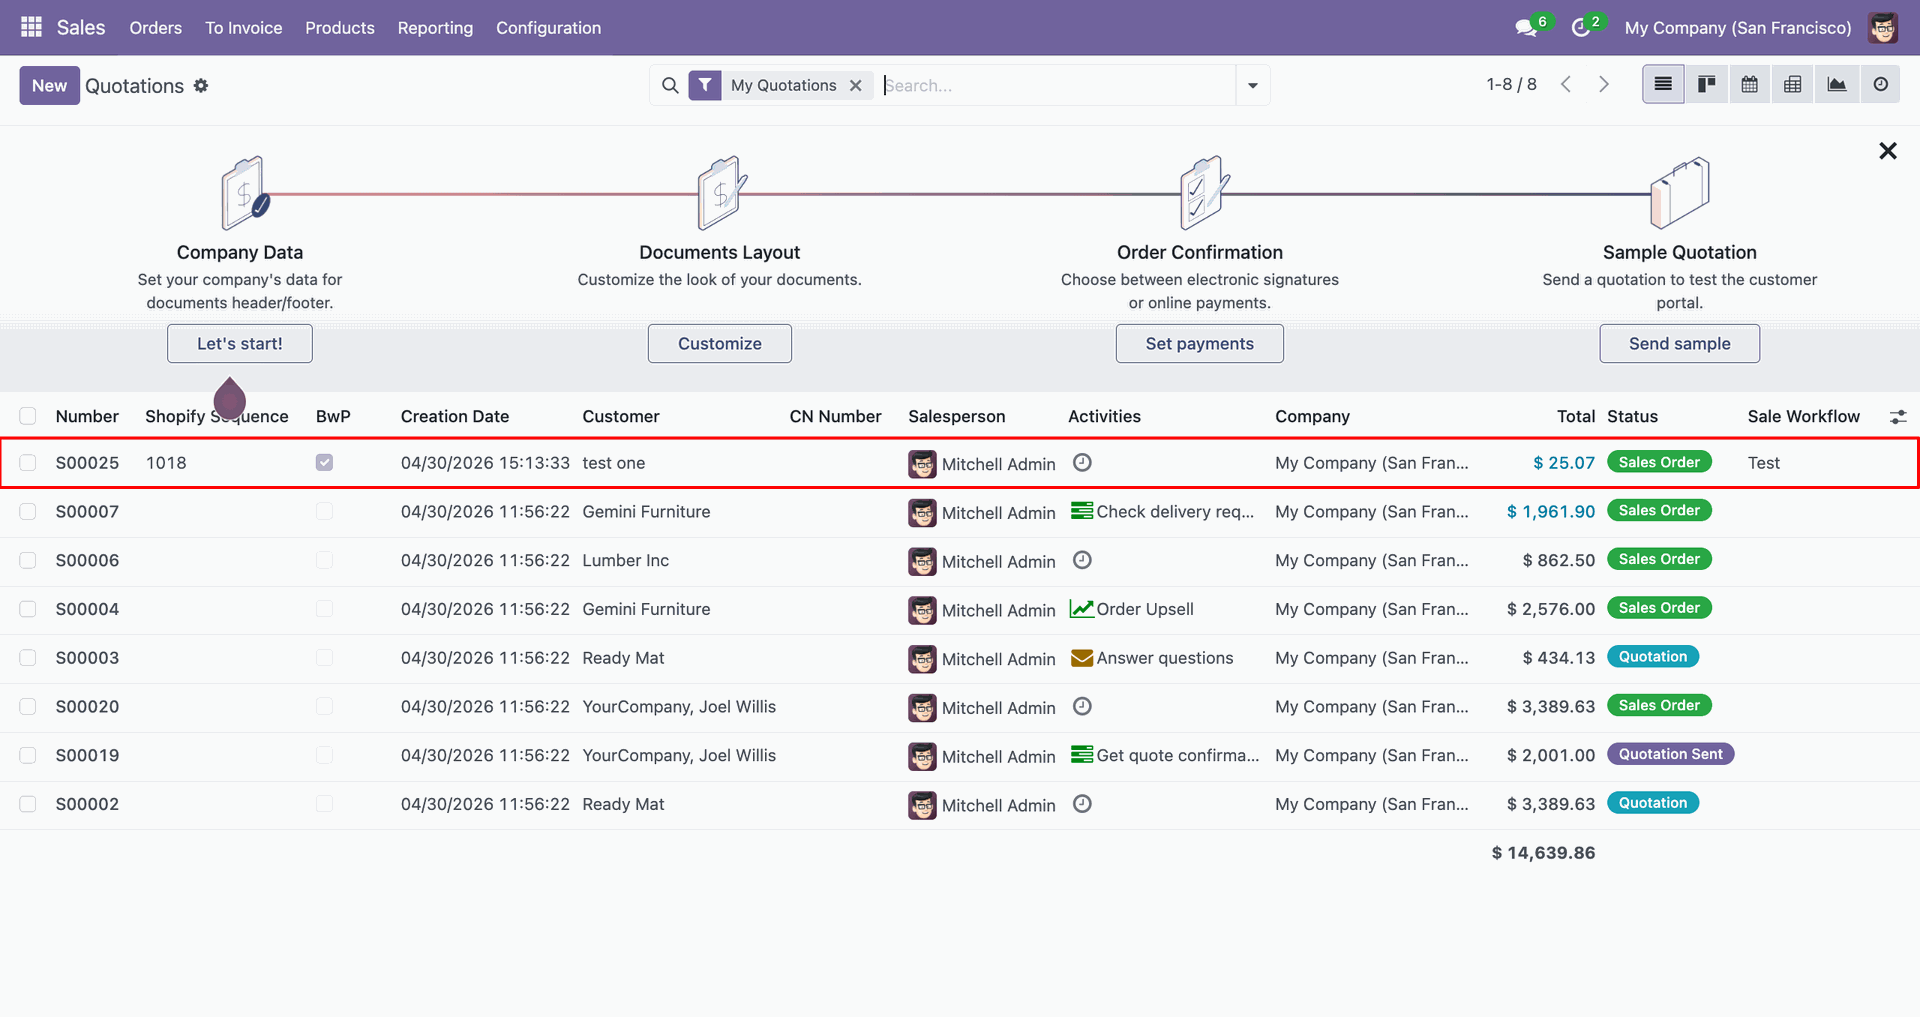
Review the imported Buy with Prime sales order row in Odoo.
Workflow
Enable Stock export to selected products from the Products configuration tab.
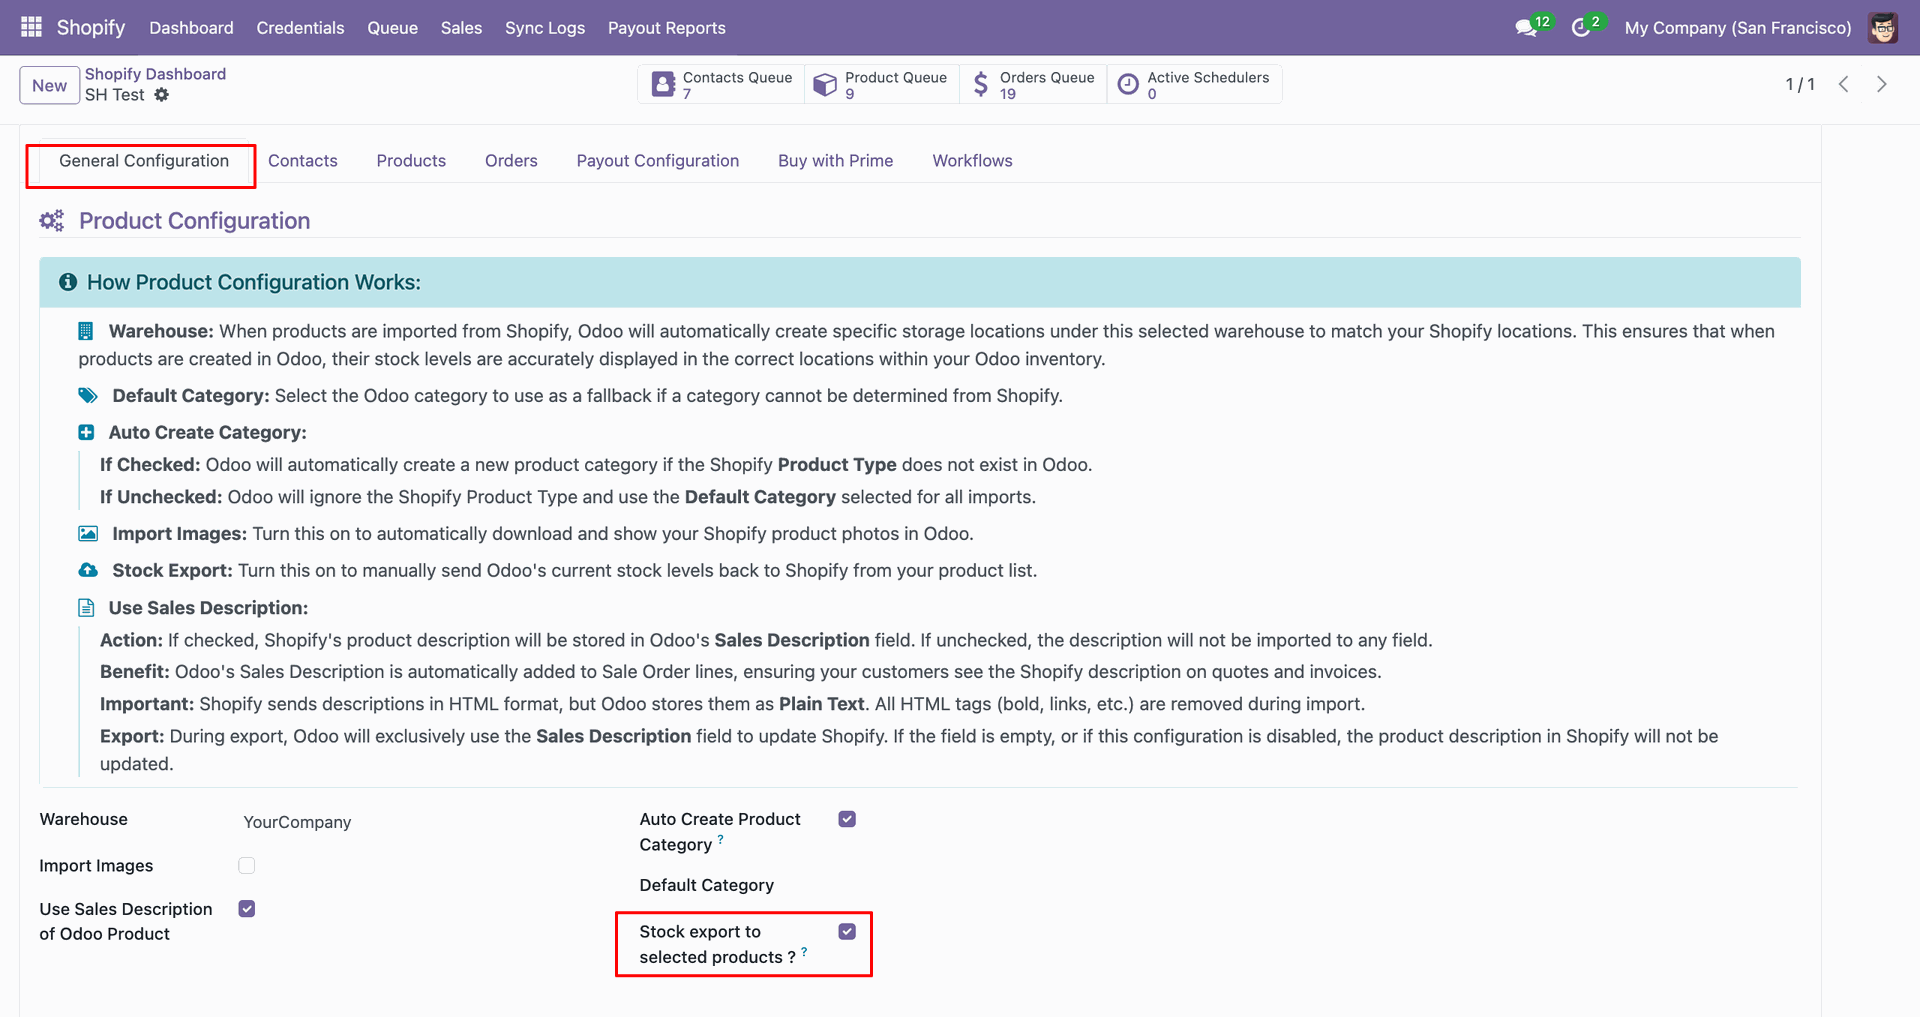
Open the Shopify product row to review its current inventory before export.
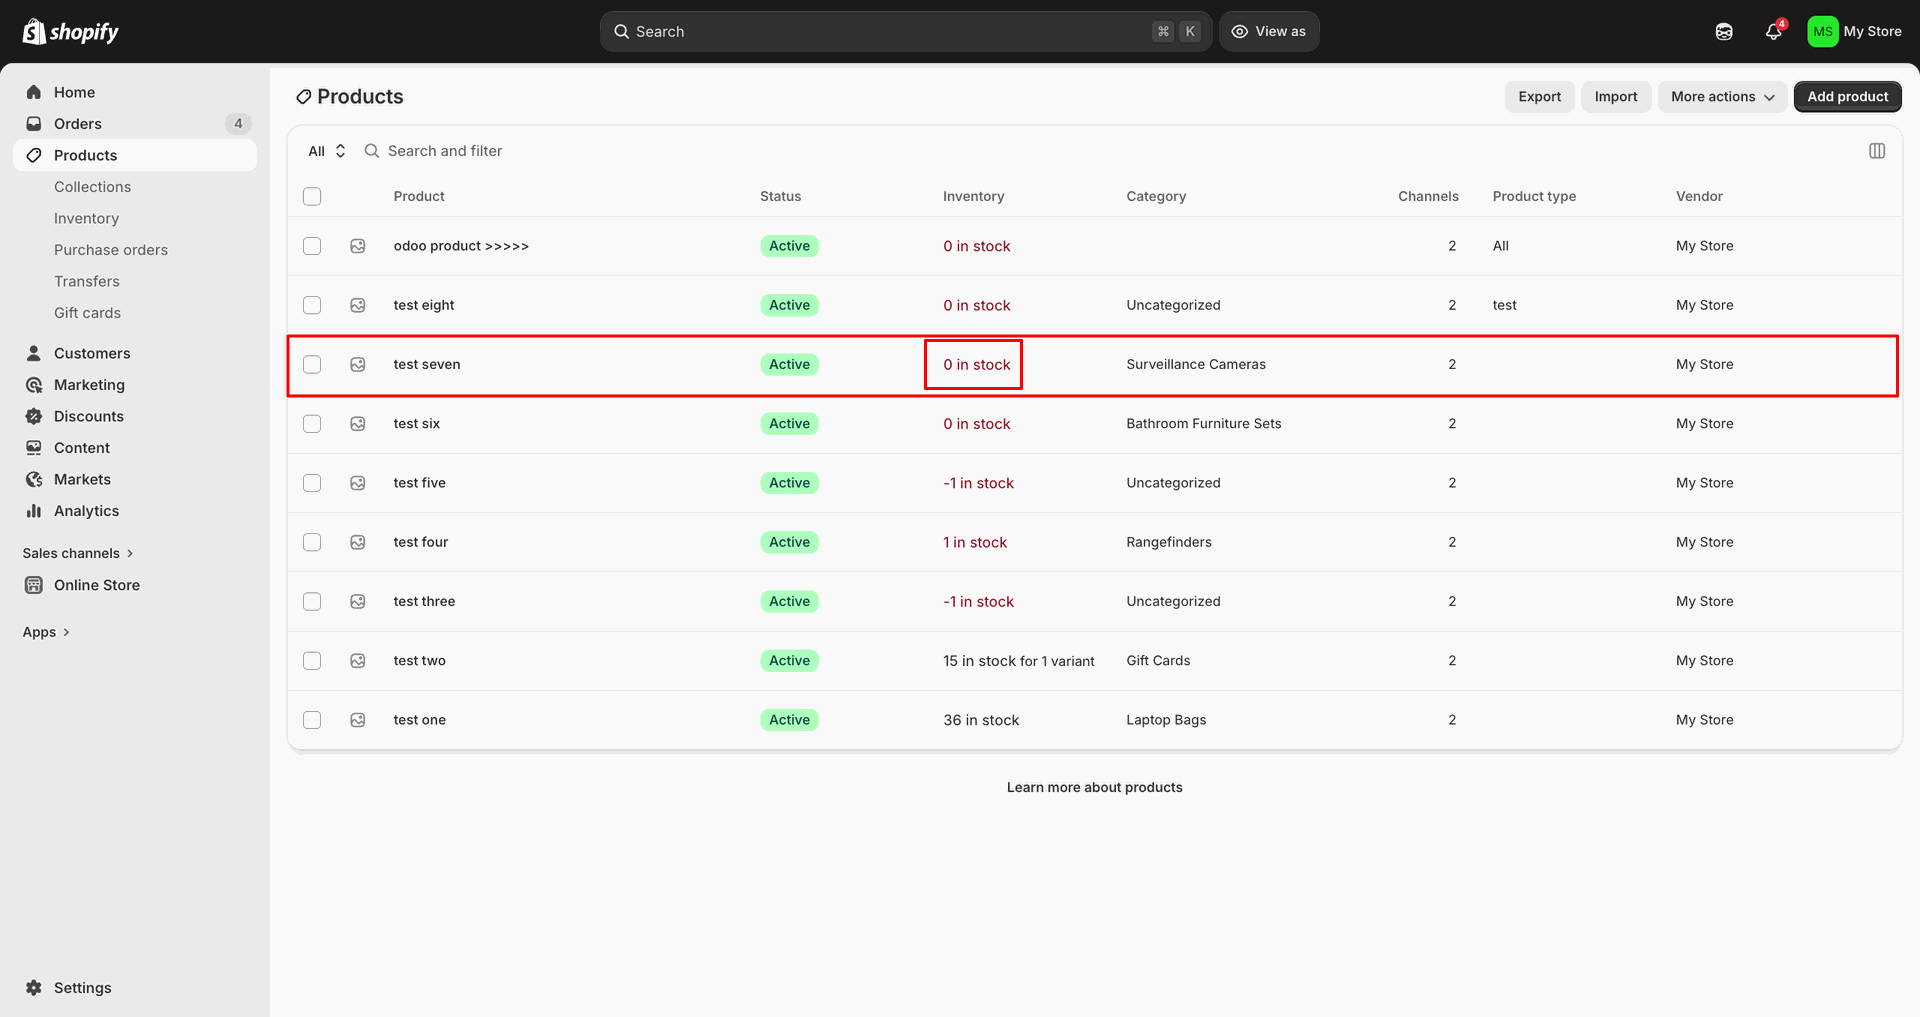
Select the variant line and choose Export Stock to Shopify from Actions.
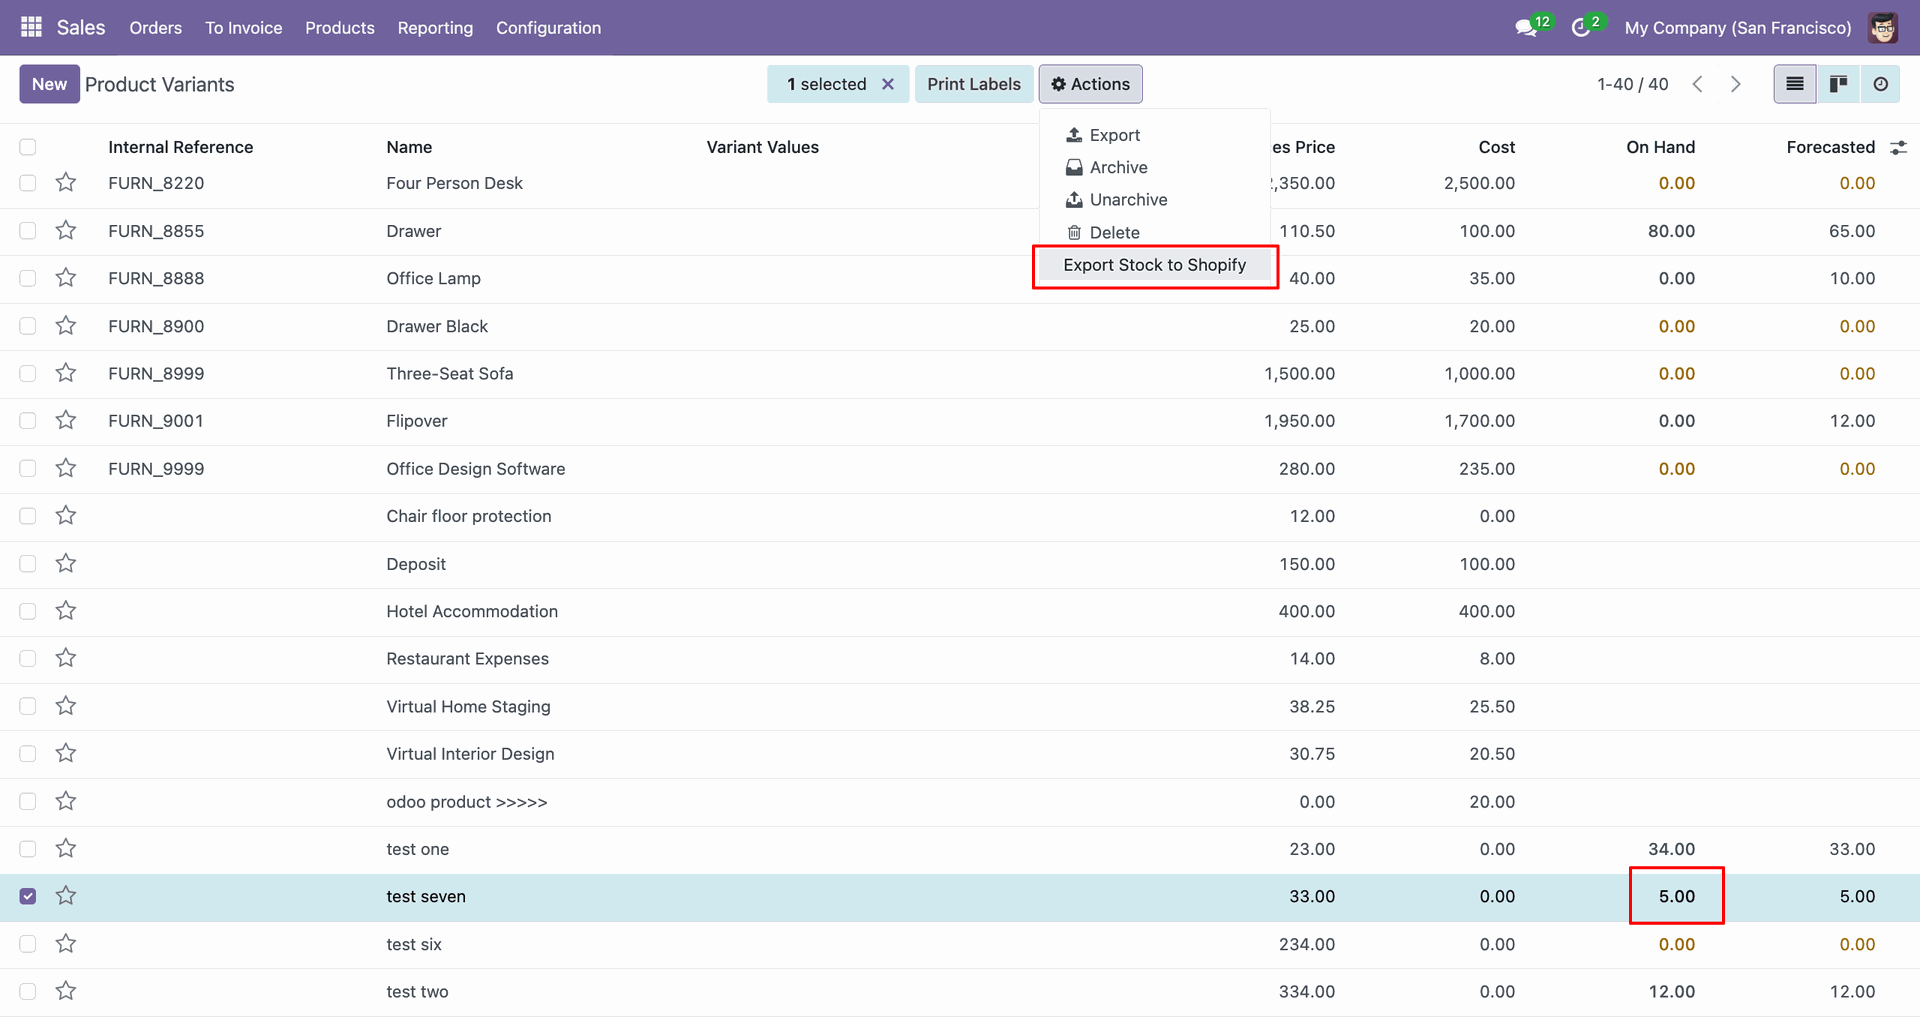
Check Sync Logs to confirm the stock export completed successfully for the product.
Verify the Shopify product row shows the updated stock after export.
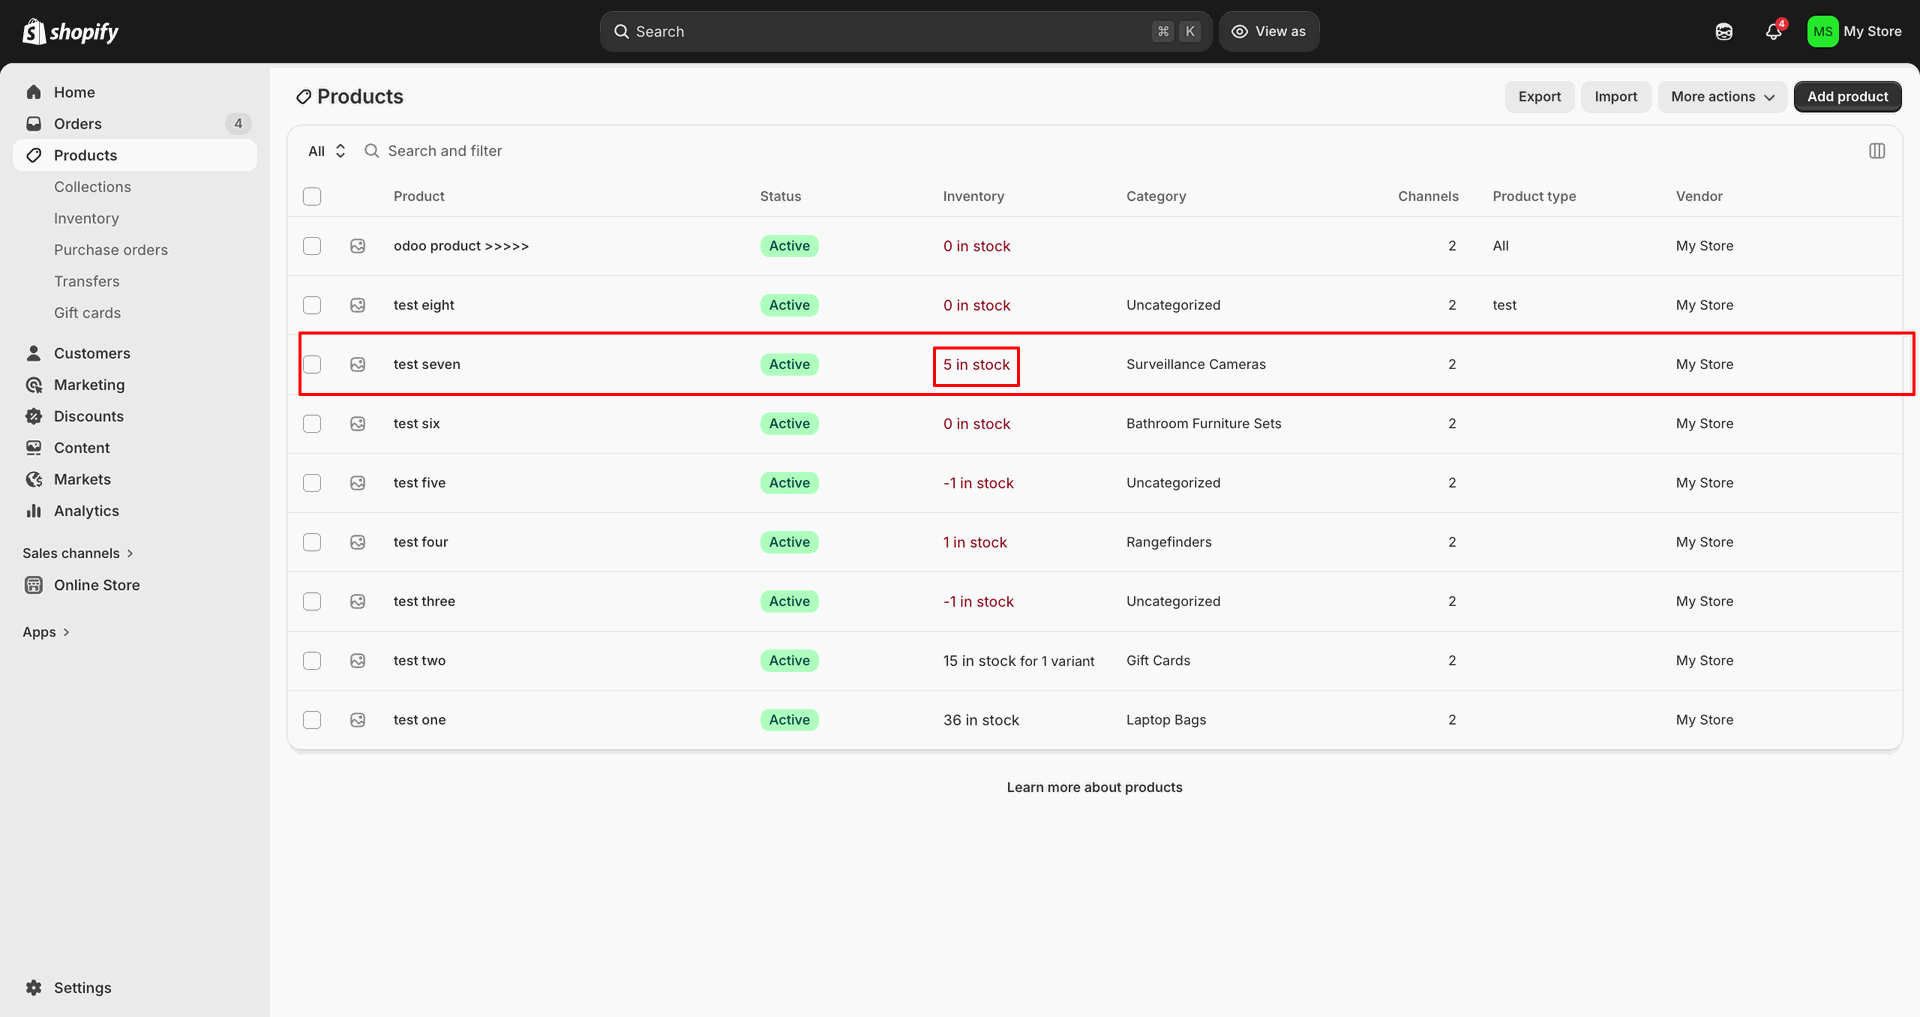
Workflow
Enable Import Refunds from Shopify in the Refunds section to receive returns.
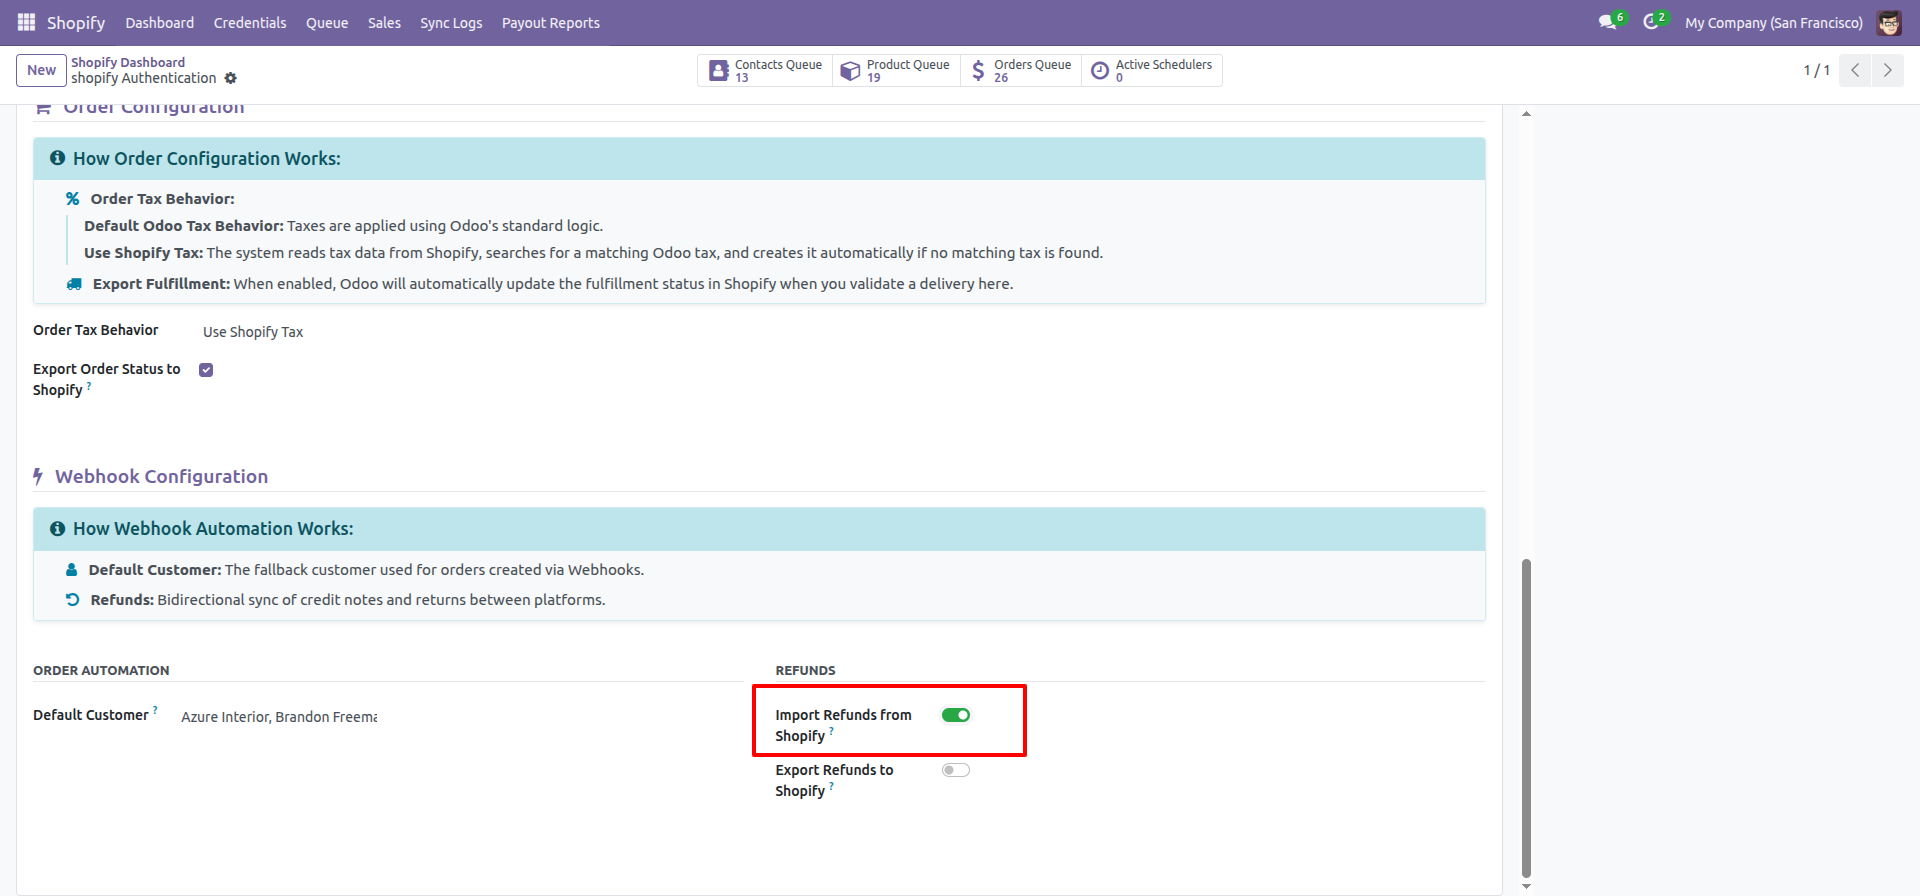
Open the refunded Shopify order to review its order number and status.
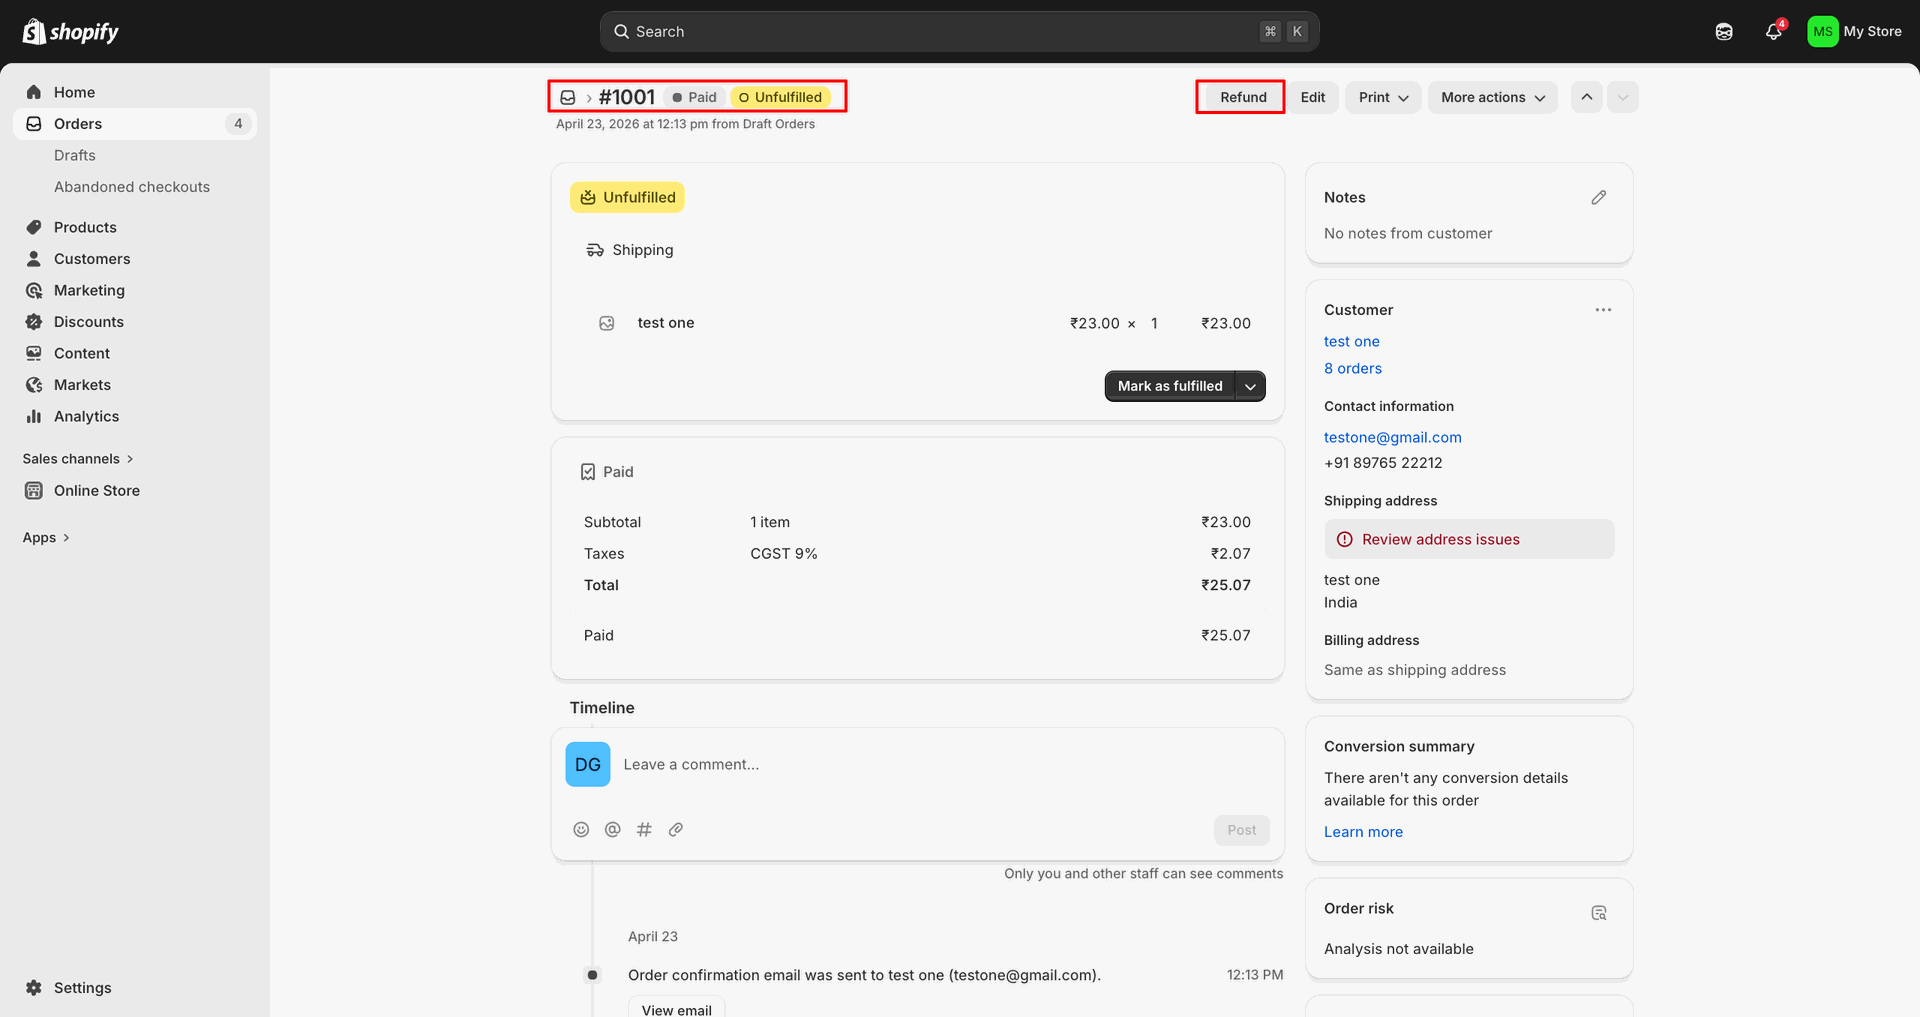
Enter the refund reason and click Refund to submit the Shopify return.
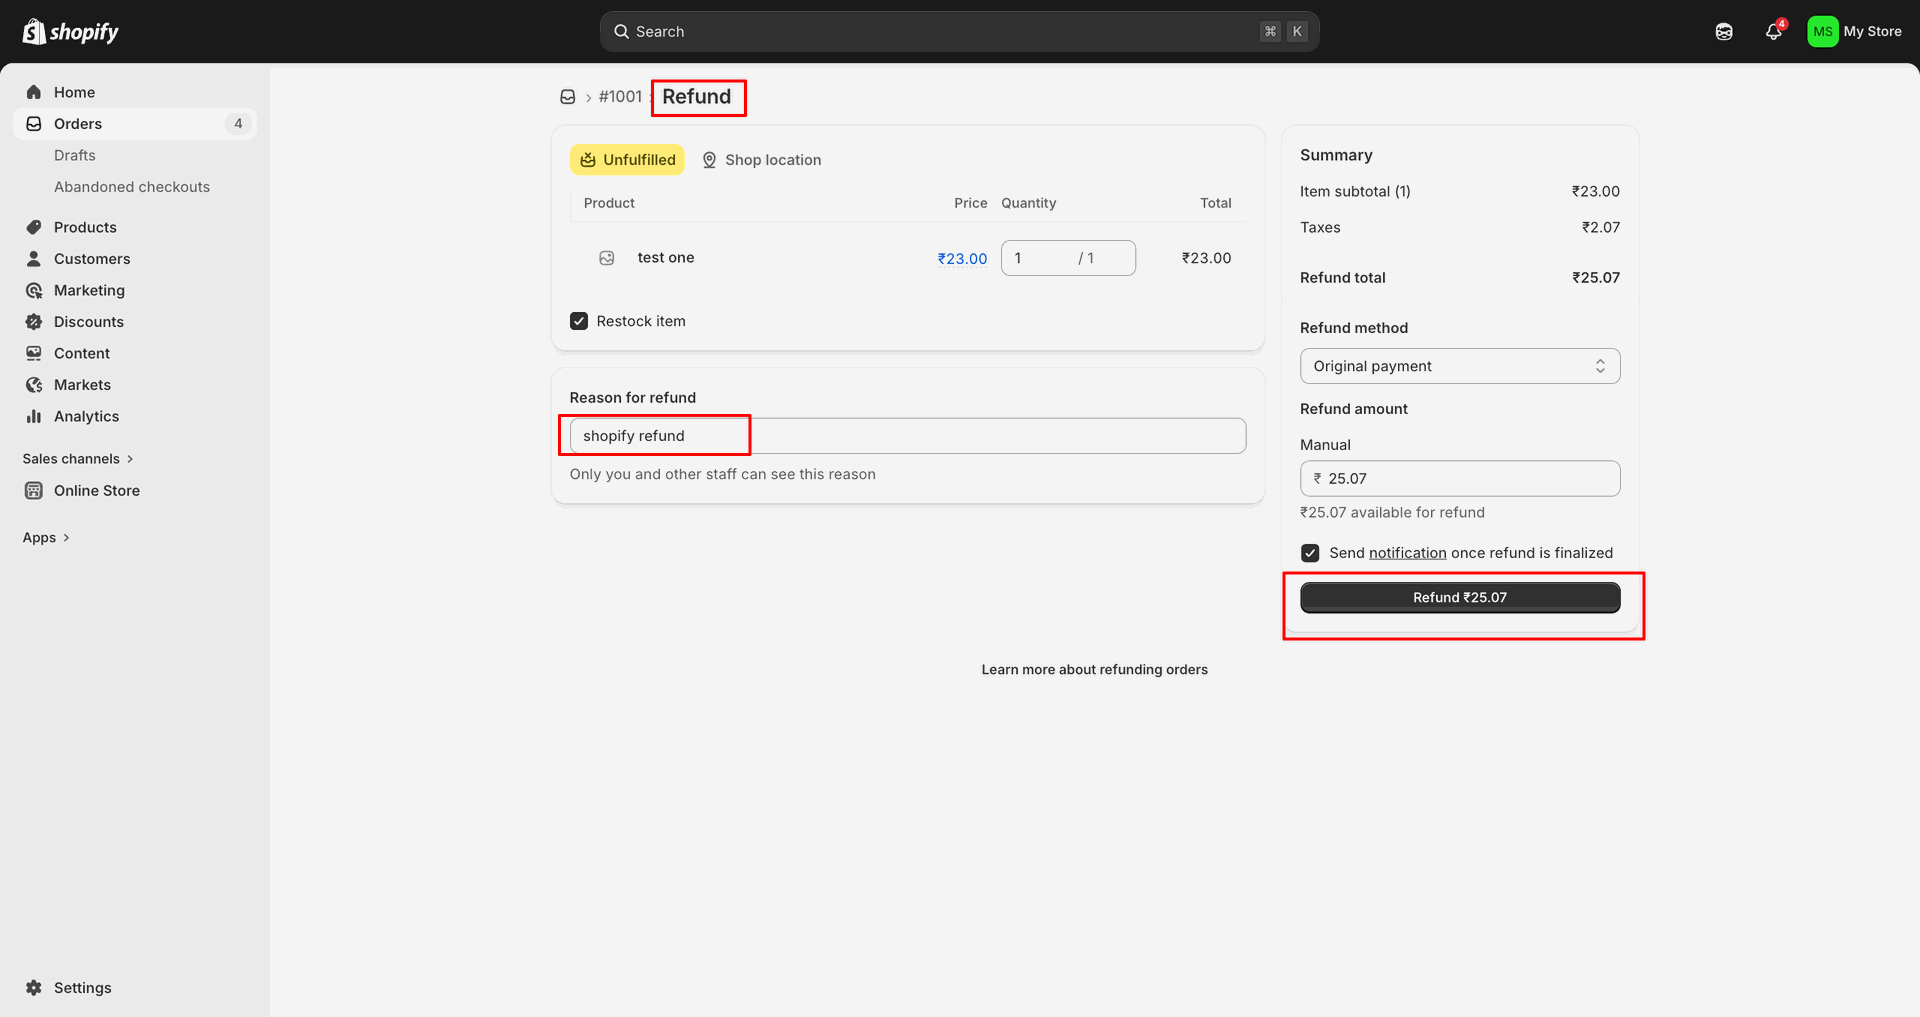
Check Sync Logs to confirm the refund was imported successfully for the order.
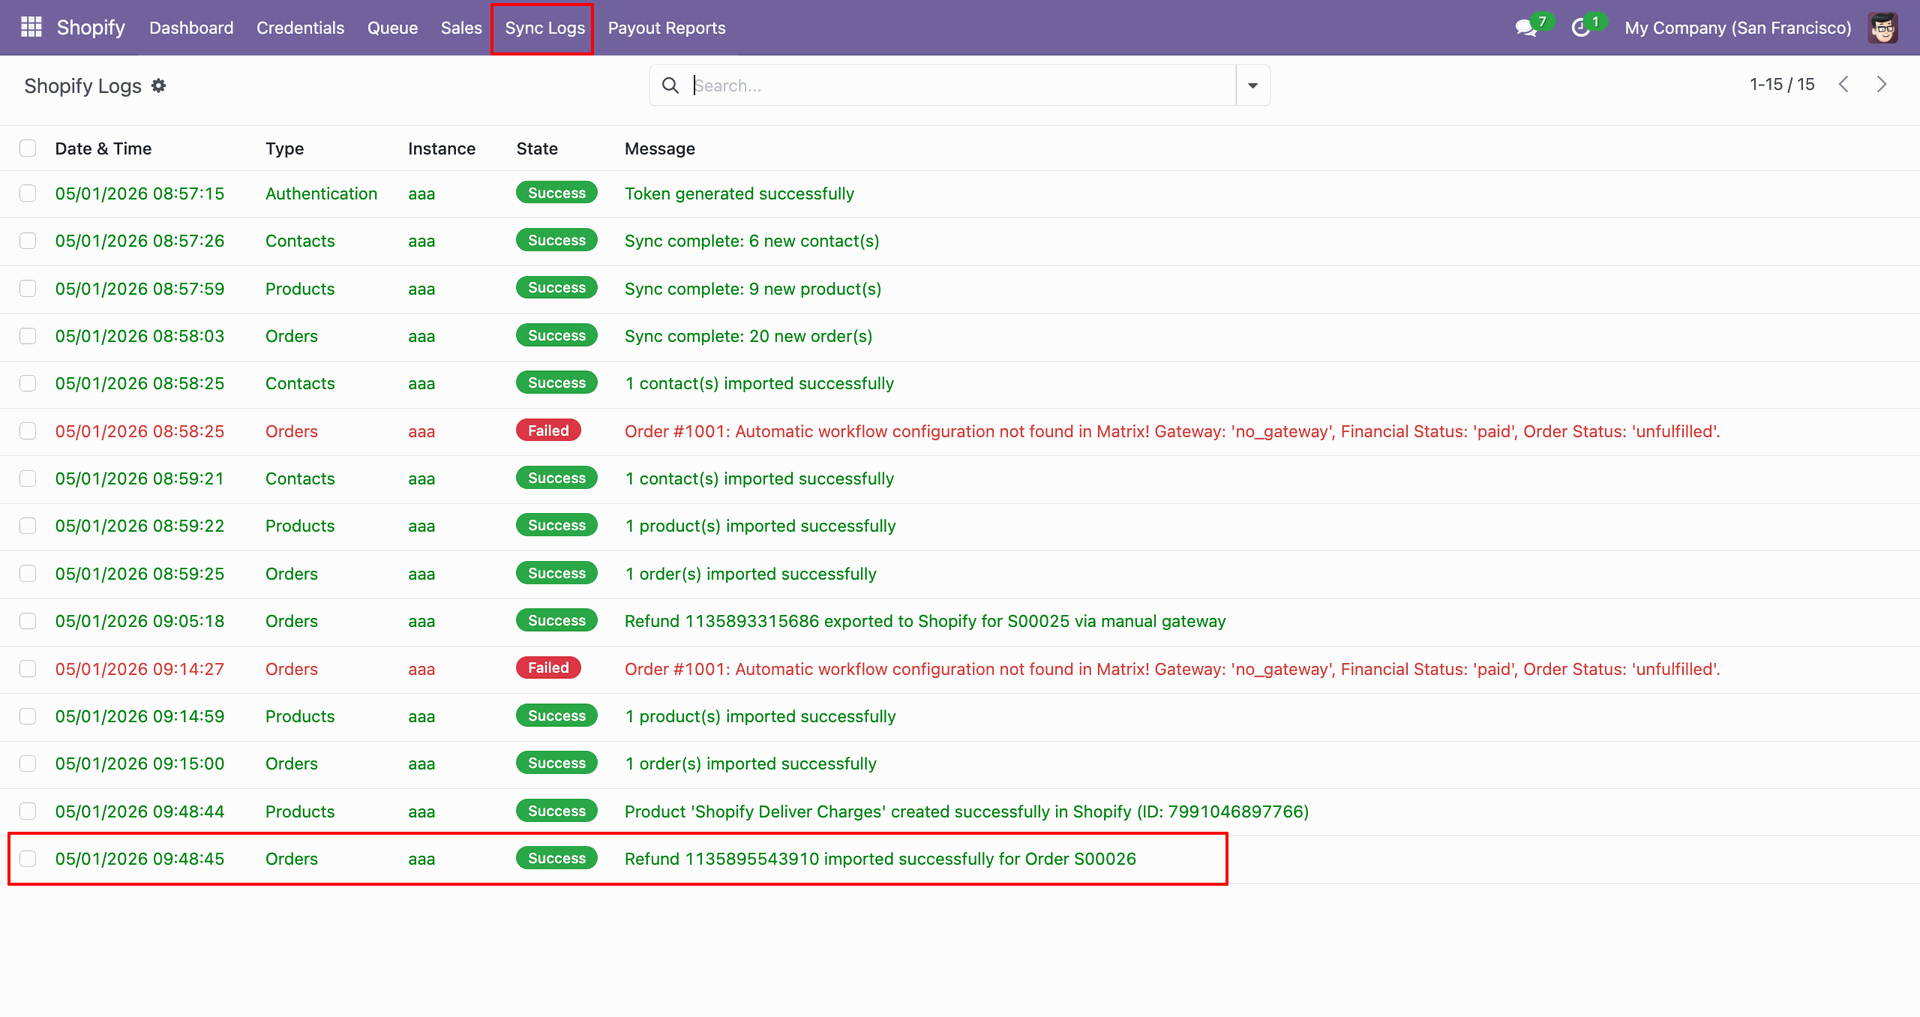
Review the imported sales order and Shopify Sequence created from the refund.
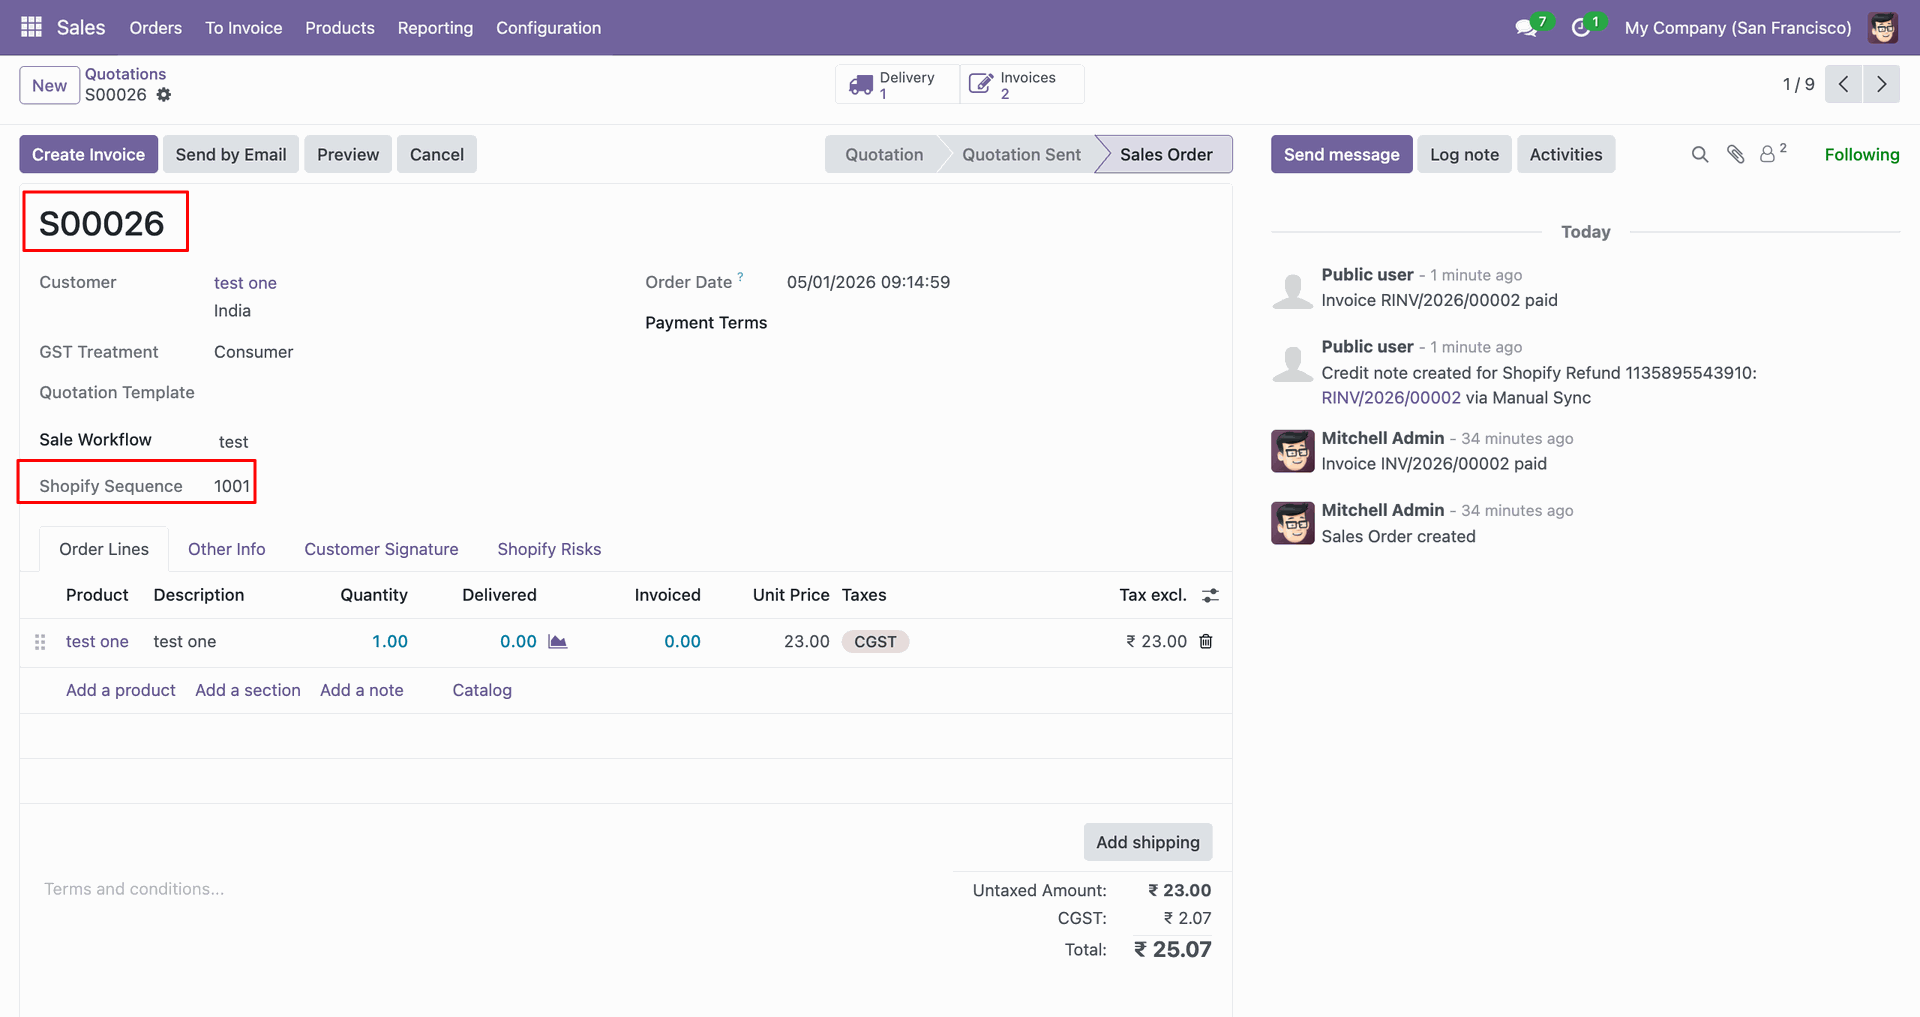
Review the credit note fields showing Shopify Refund ID and Refund in Shopify.
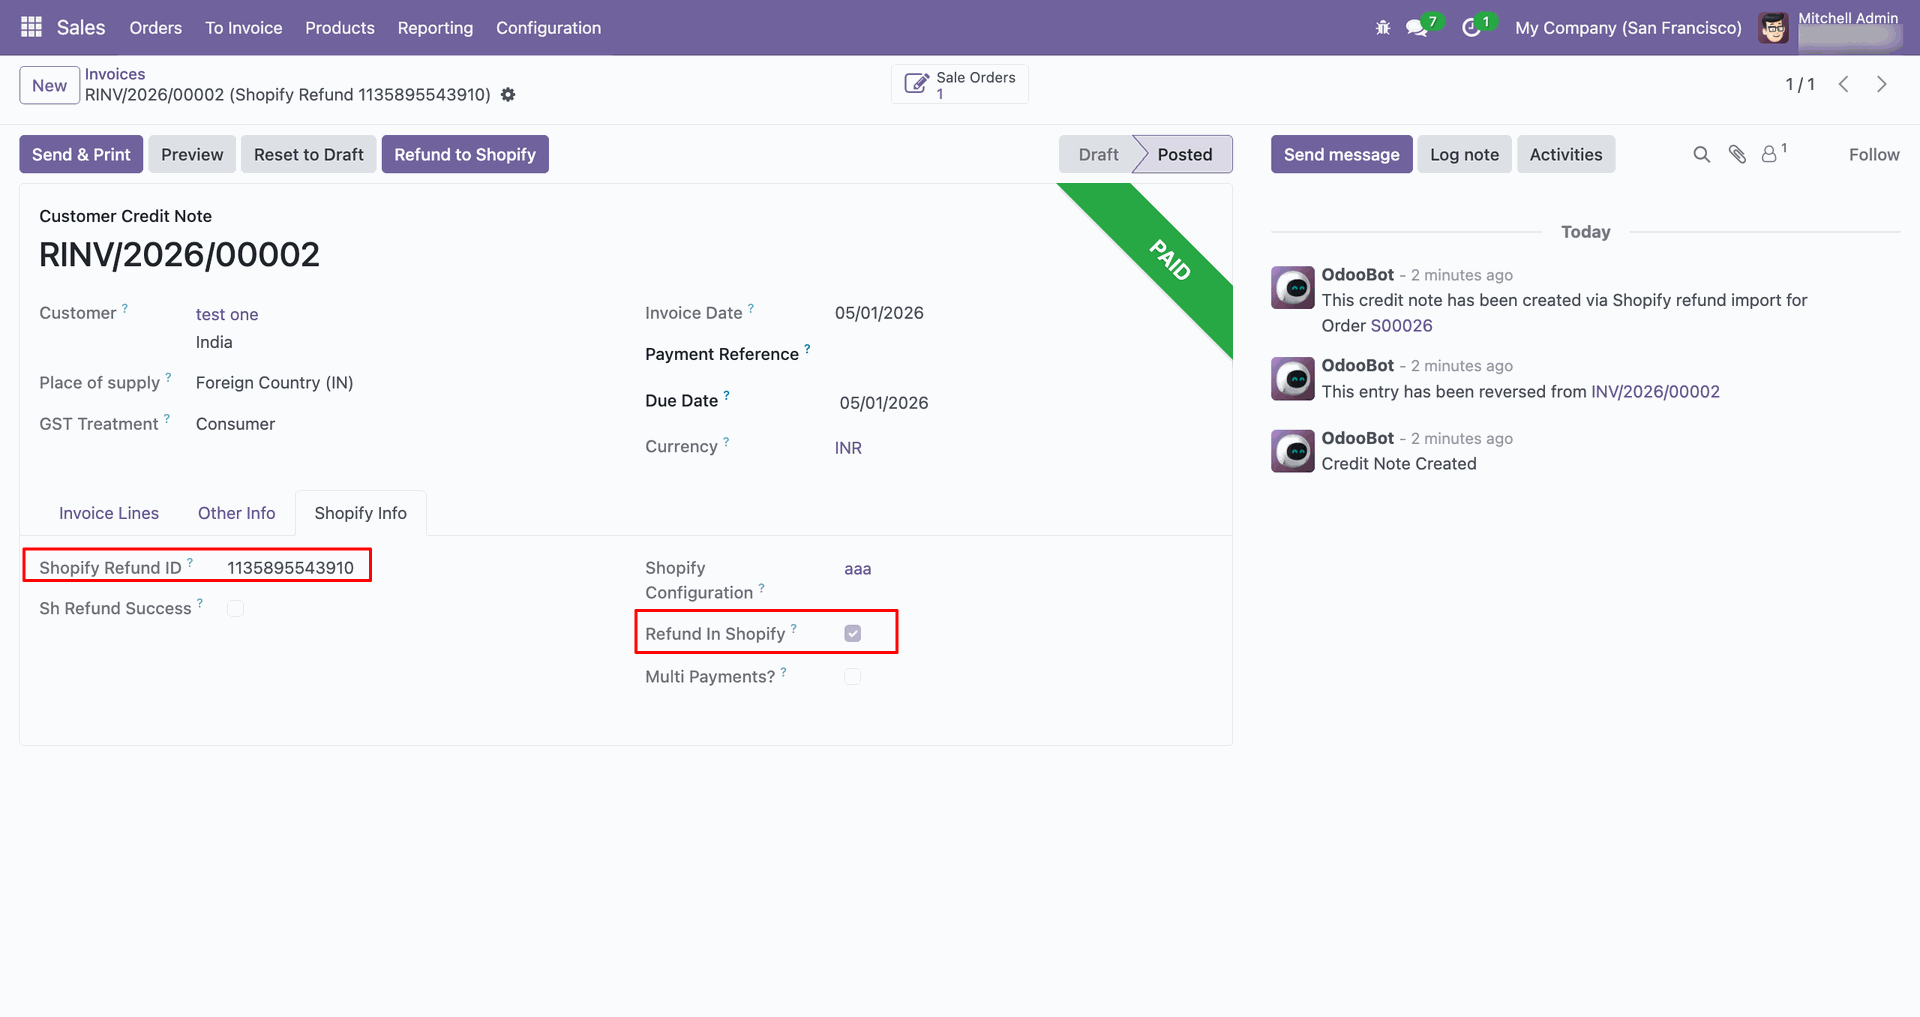
Enable Export Refunds to Shopify in the Refunds section before refund synchronization.
Open the Shopify order that will receive the exported refund details.
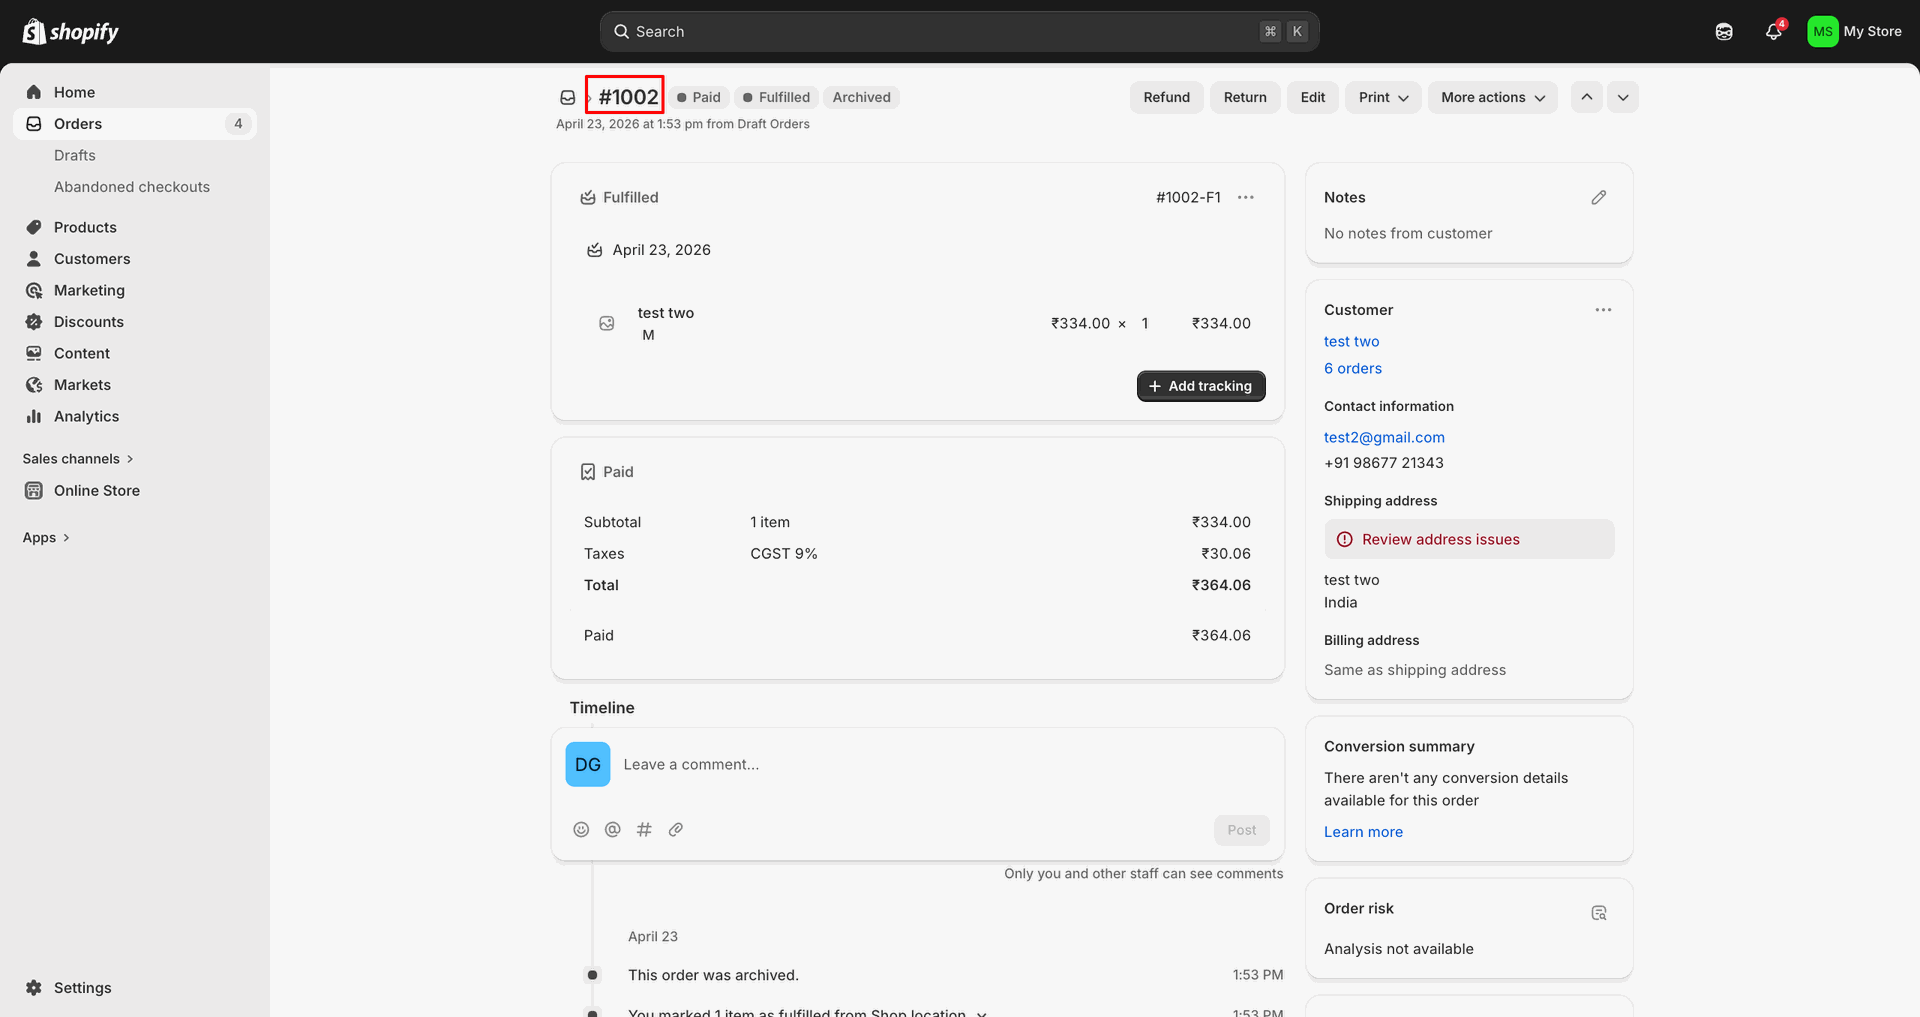
Open the Invoices smart button to create the refund from the sales order.
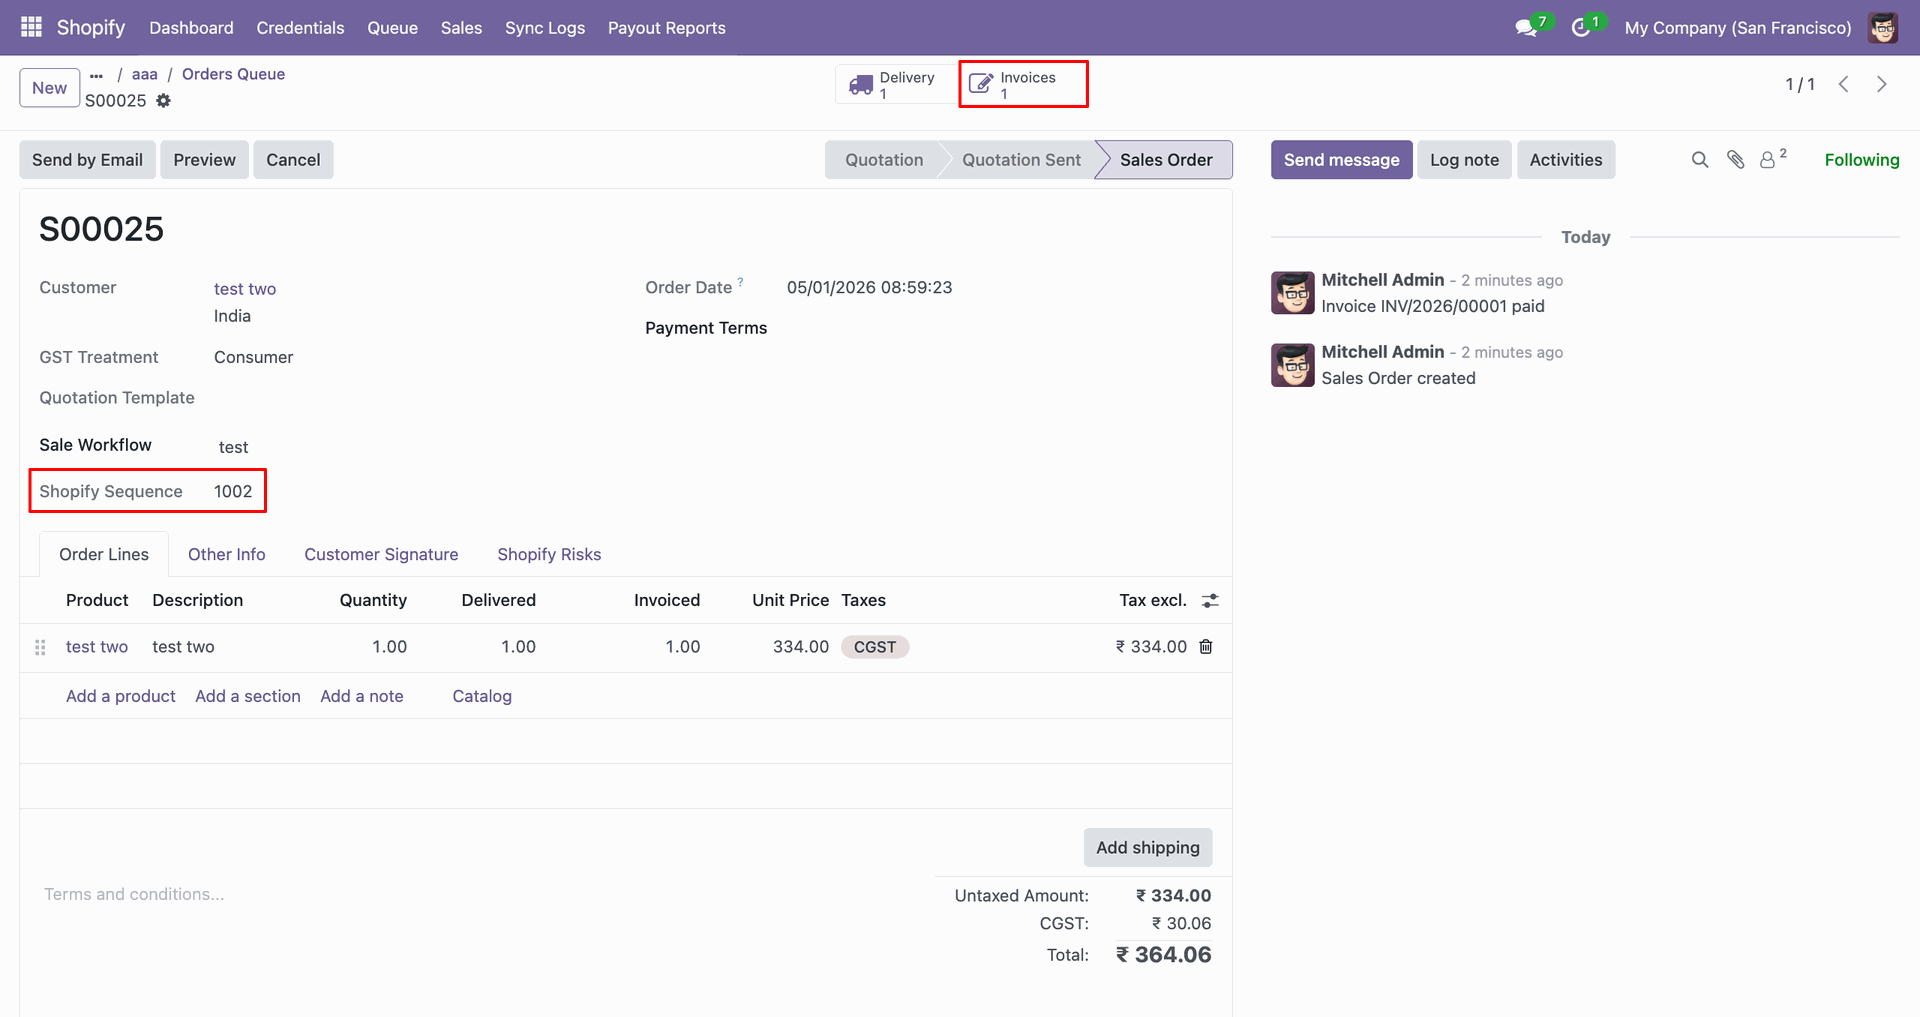
Click Create Note on the invoice to generate the customer credit note.
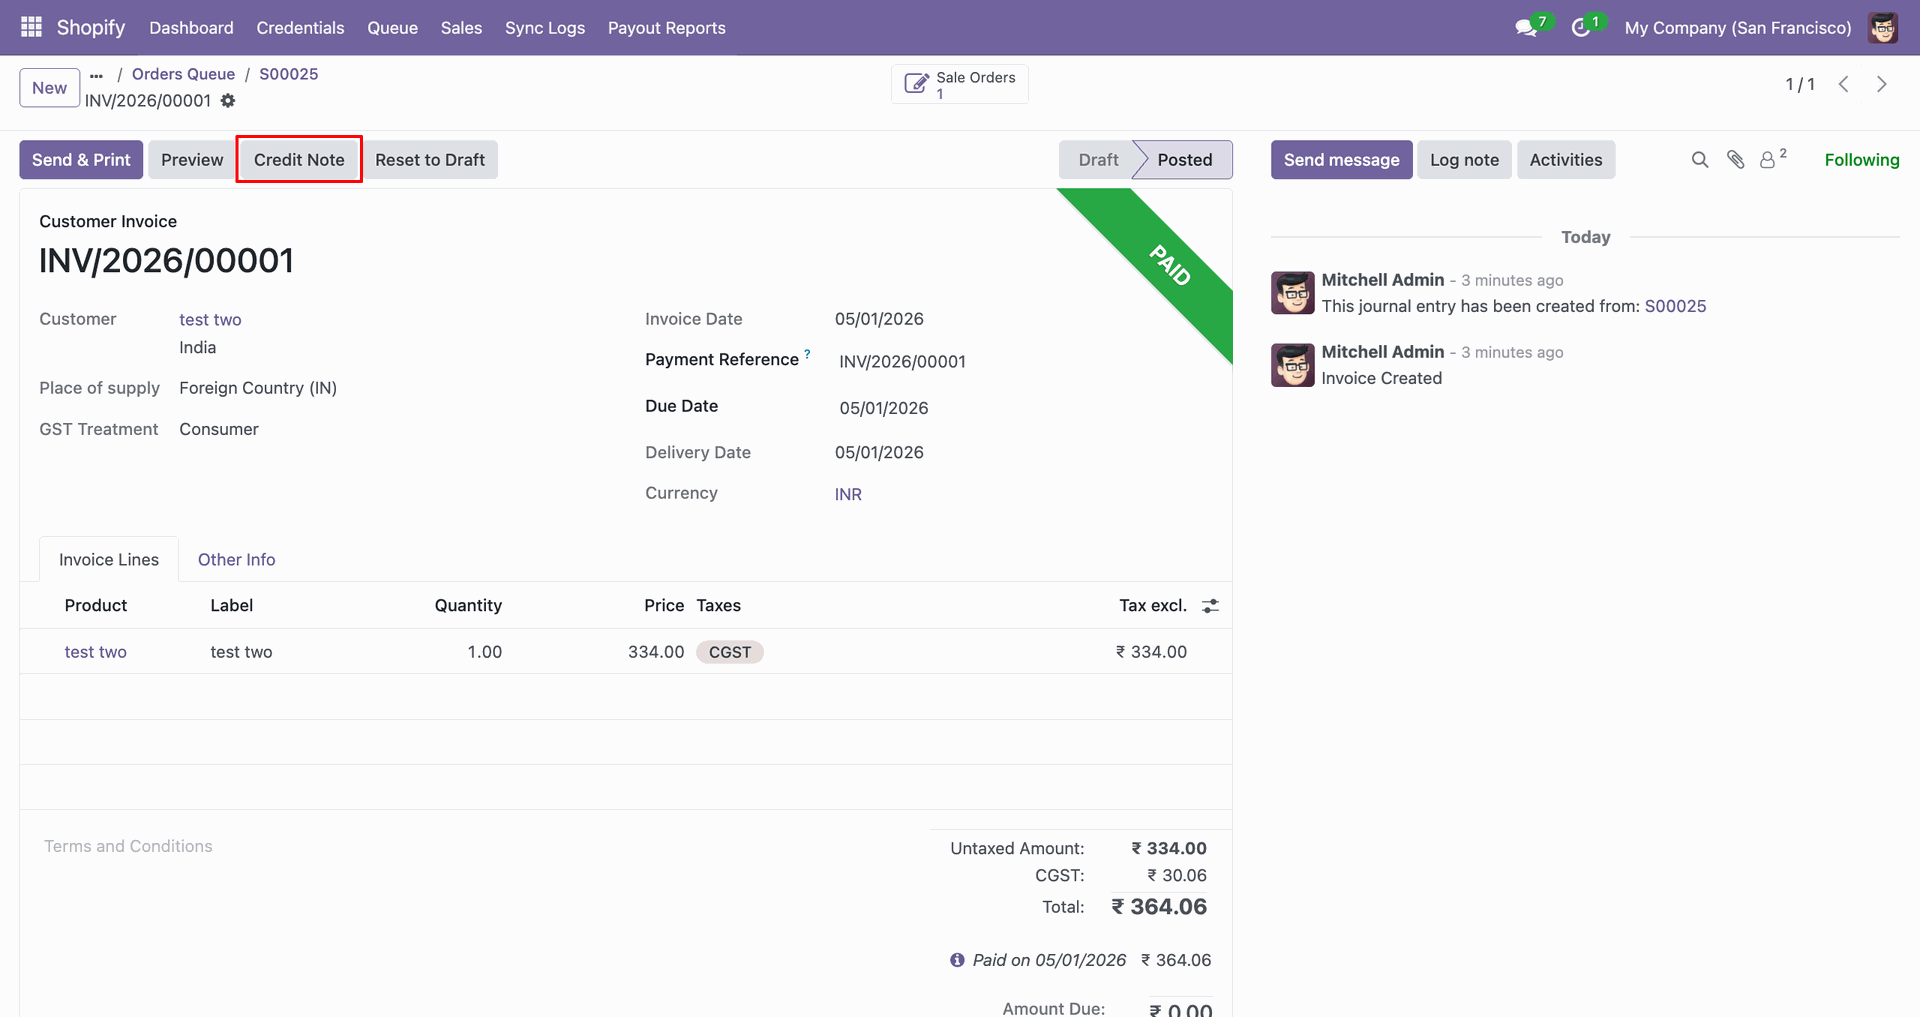
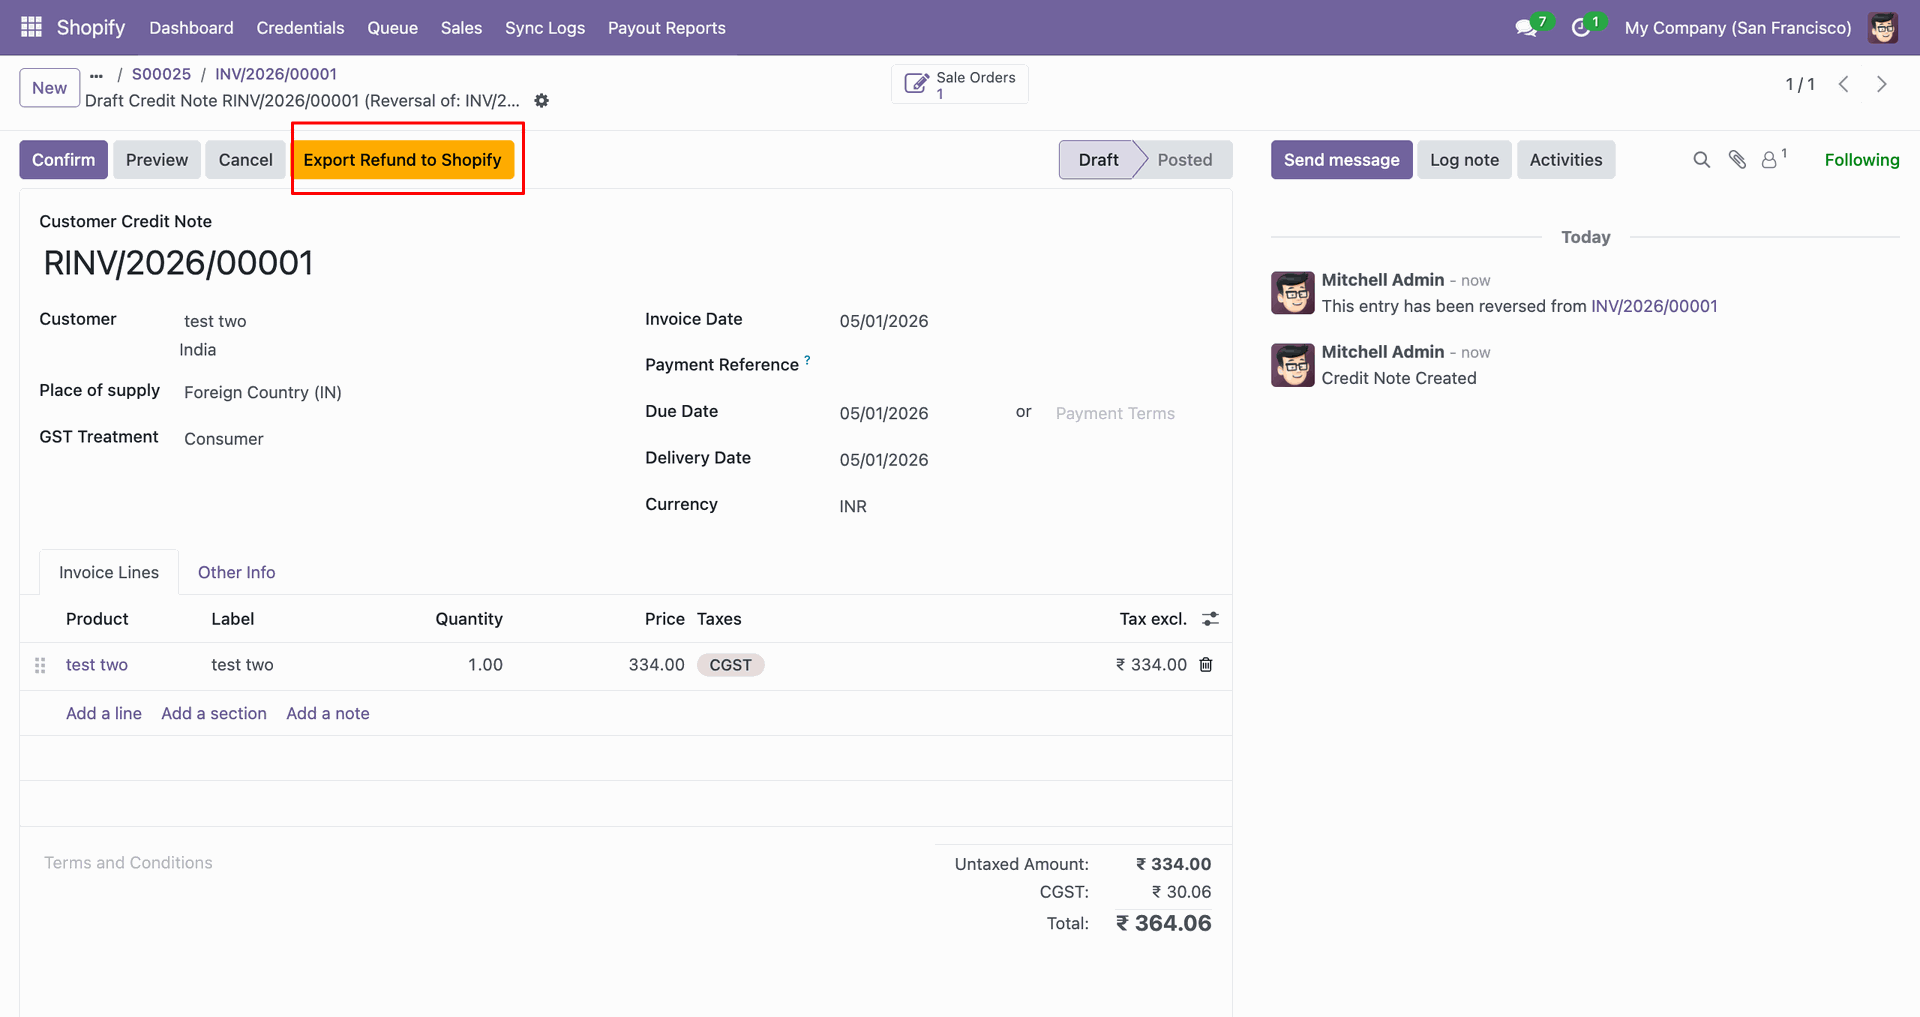
Click Export Refund to Shopify on the credit note to continue.
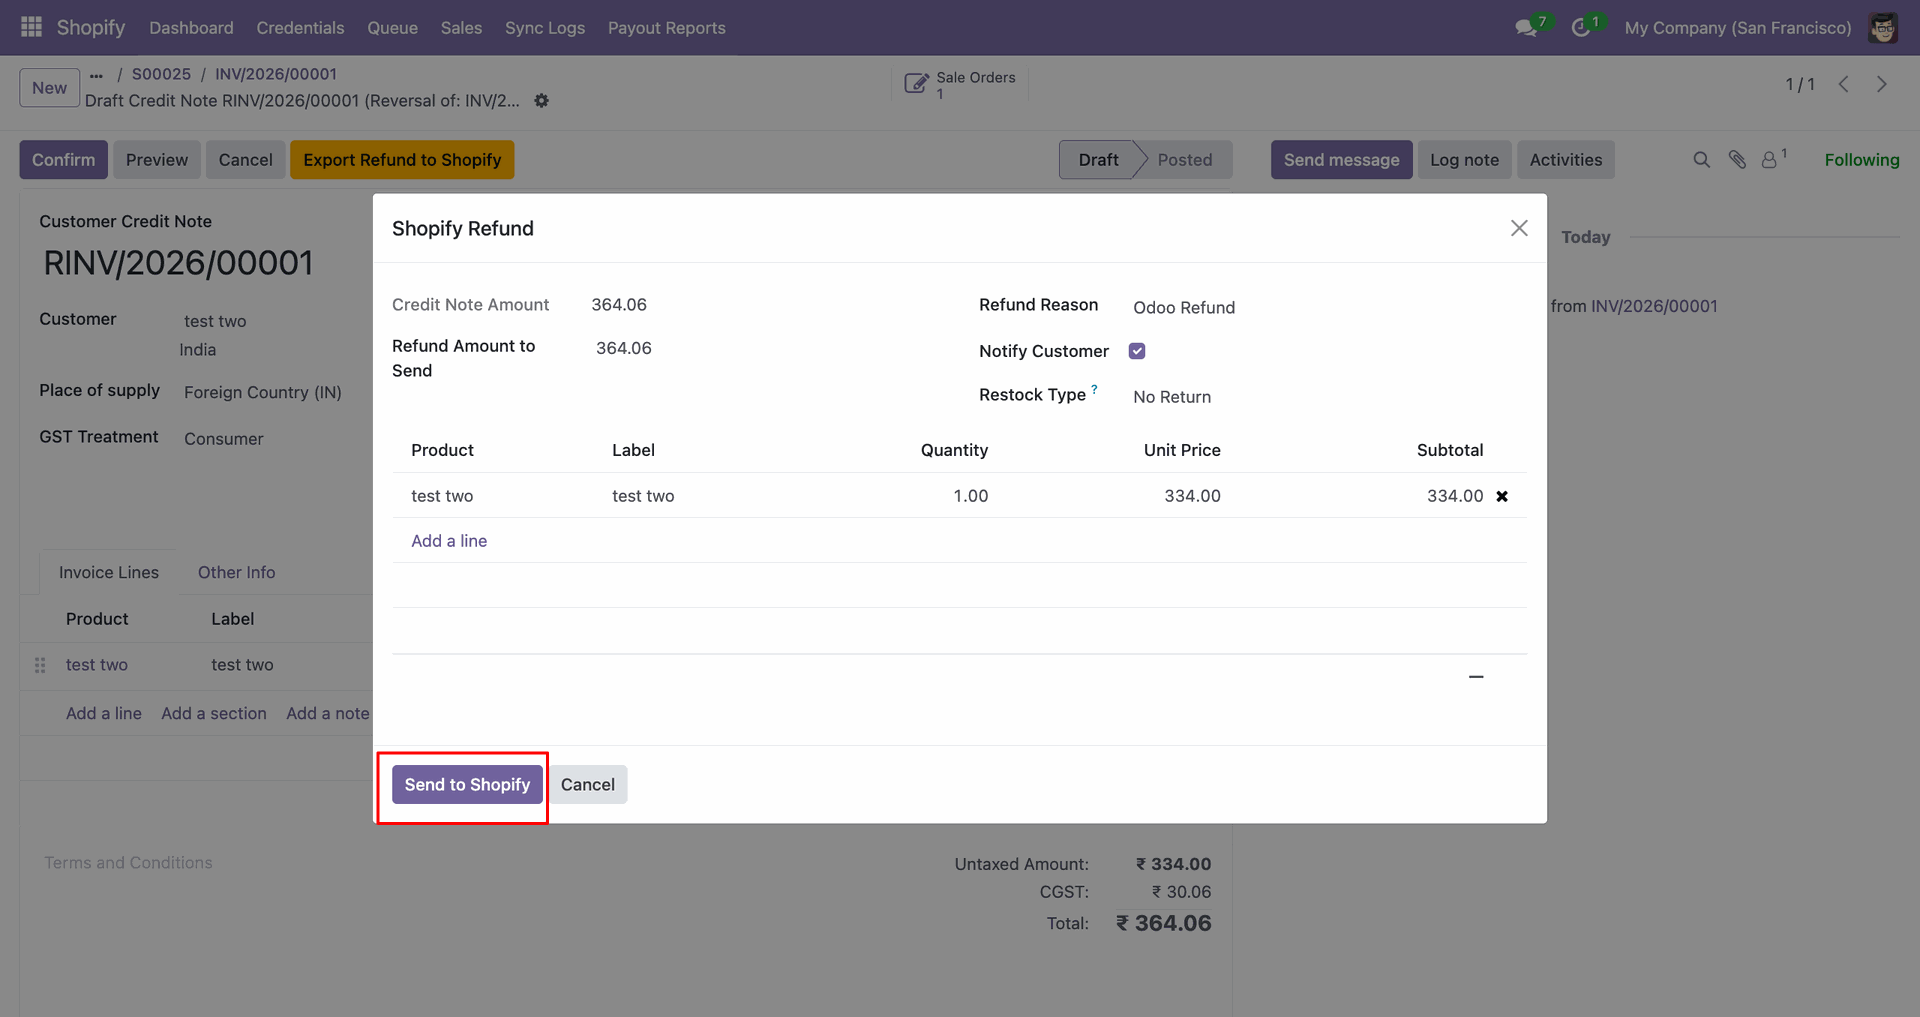
Review the Shopify Refund popup, then click Send to Shopify.
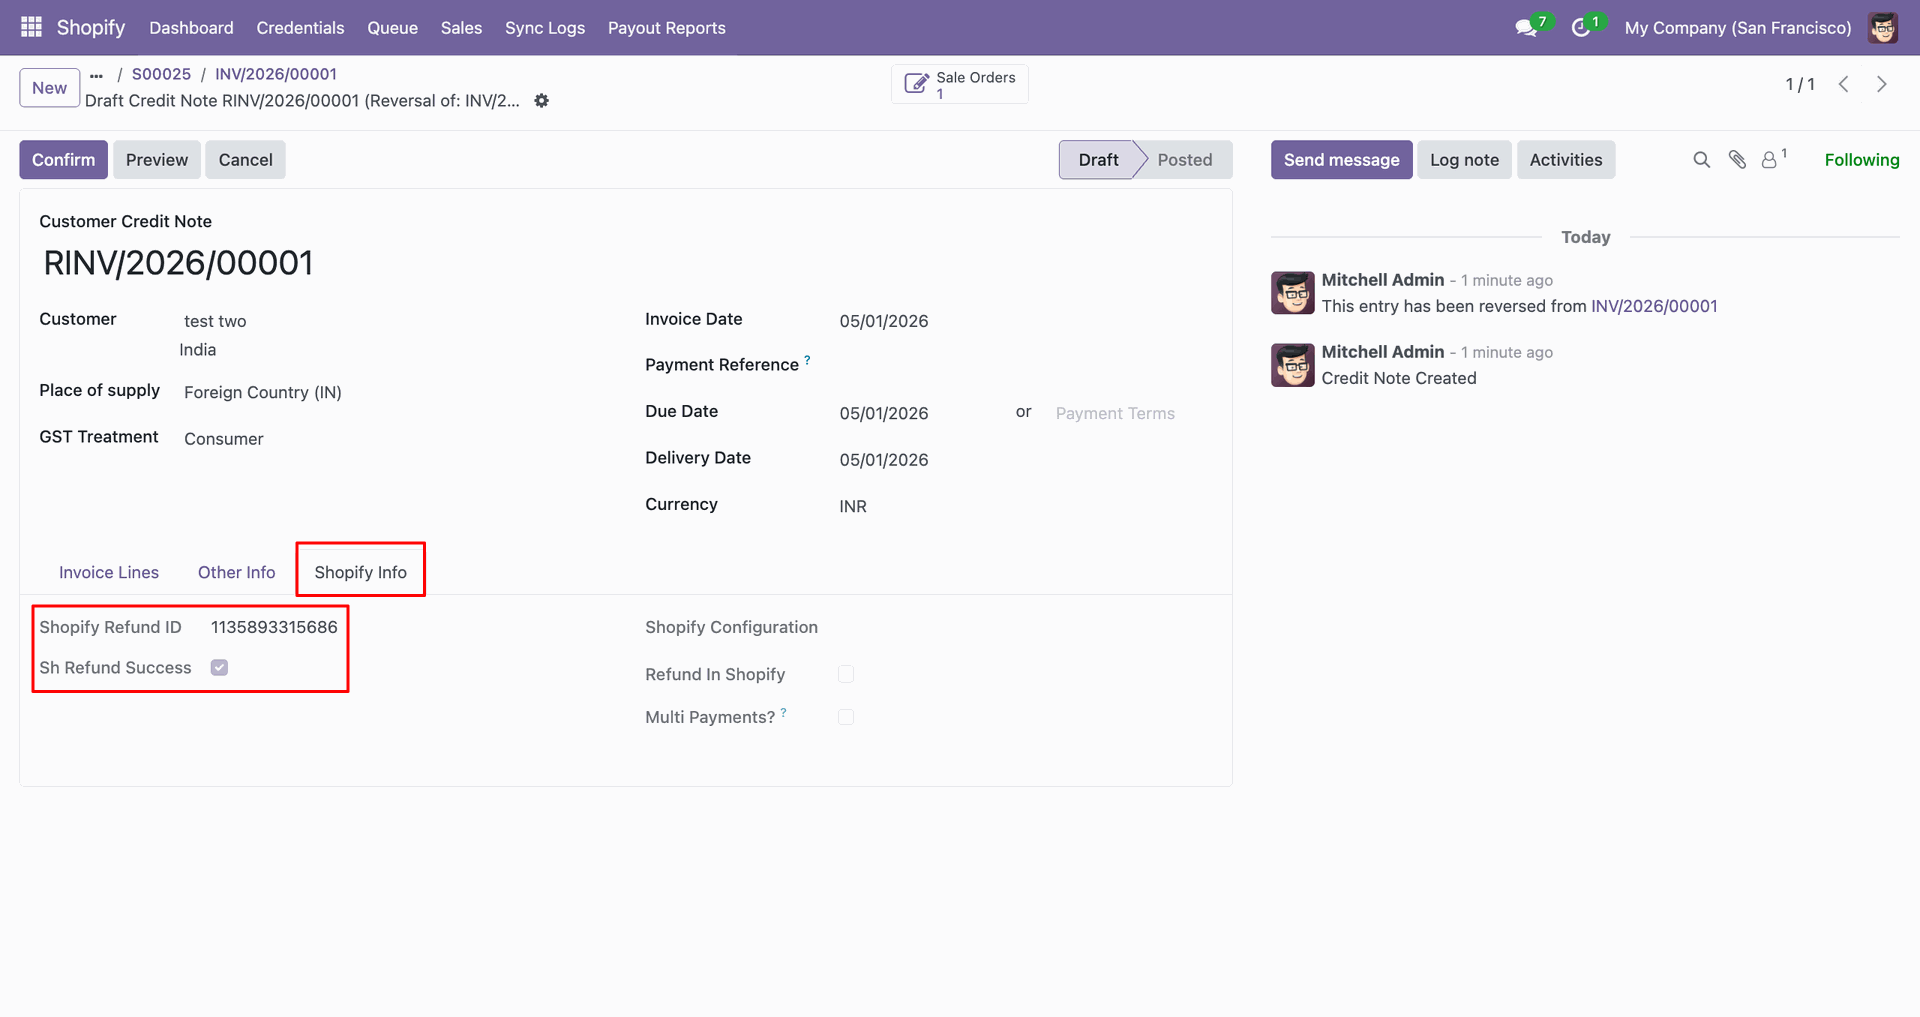
Review the Shopify Info tab to confirm refund IDs and status fields.
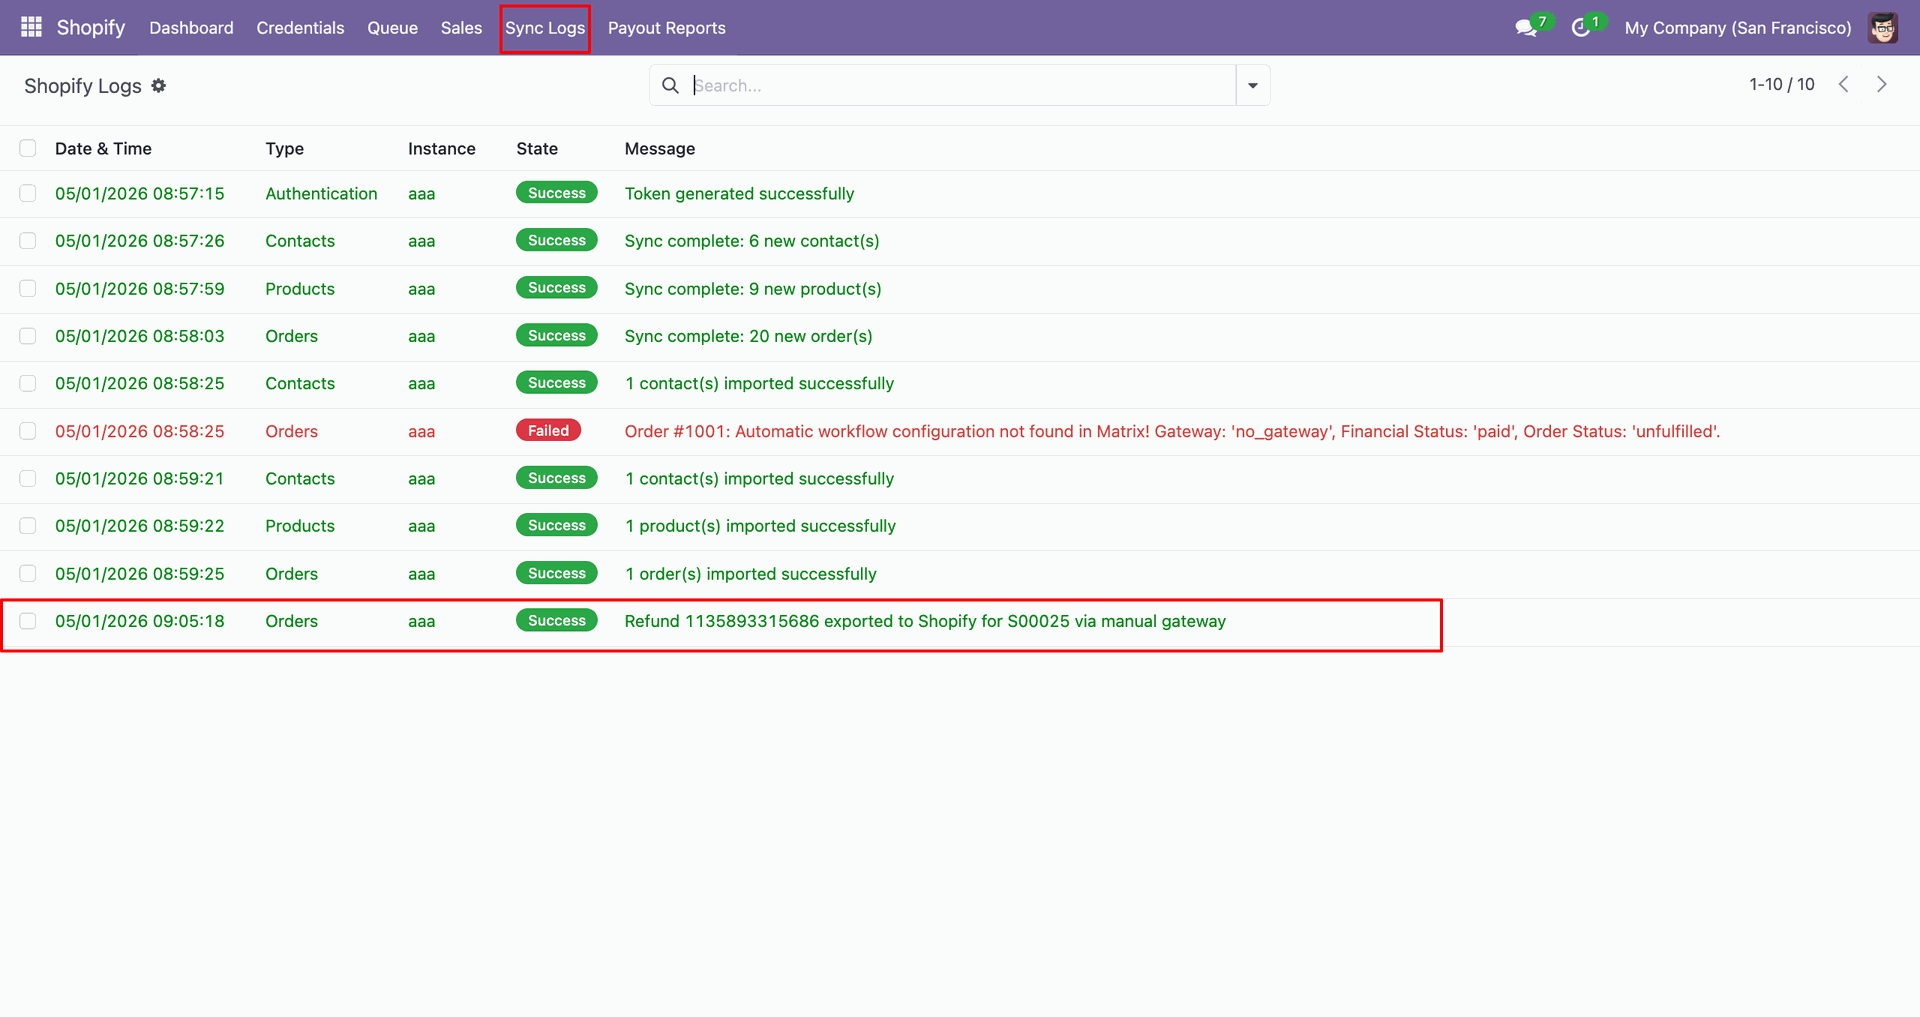
Check Sync Logs to confirm the refund was exported successfully to Shopify.
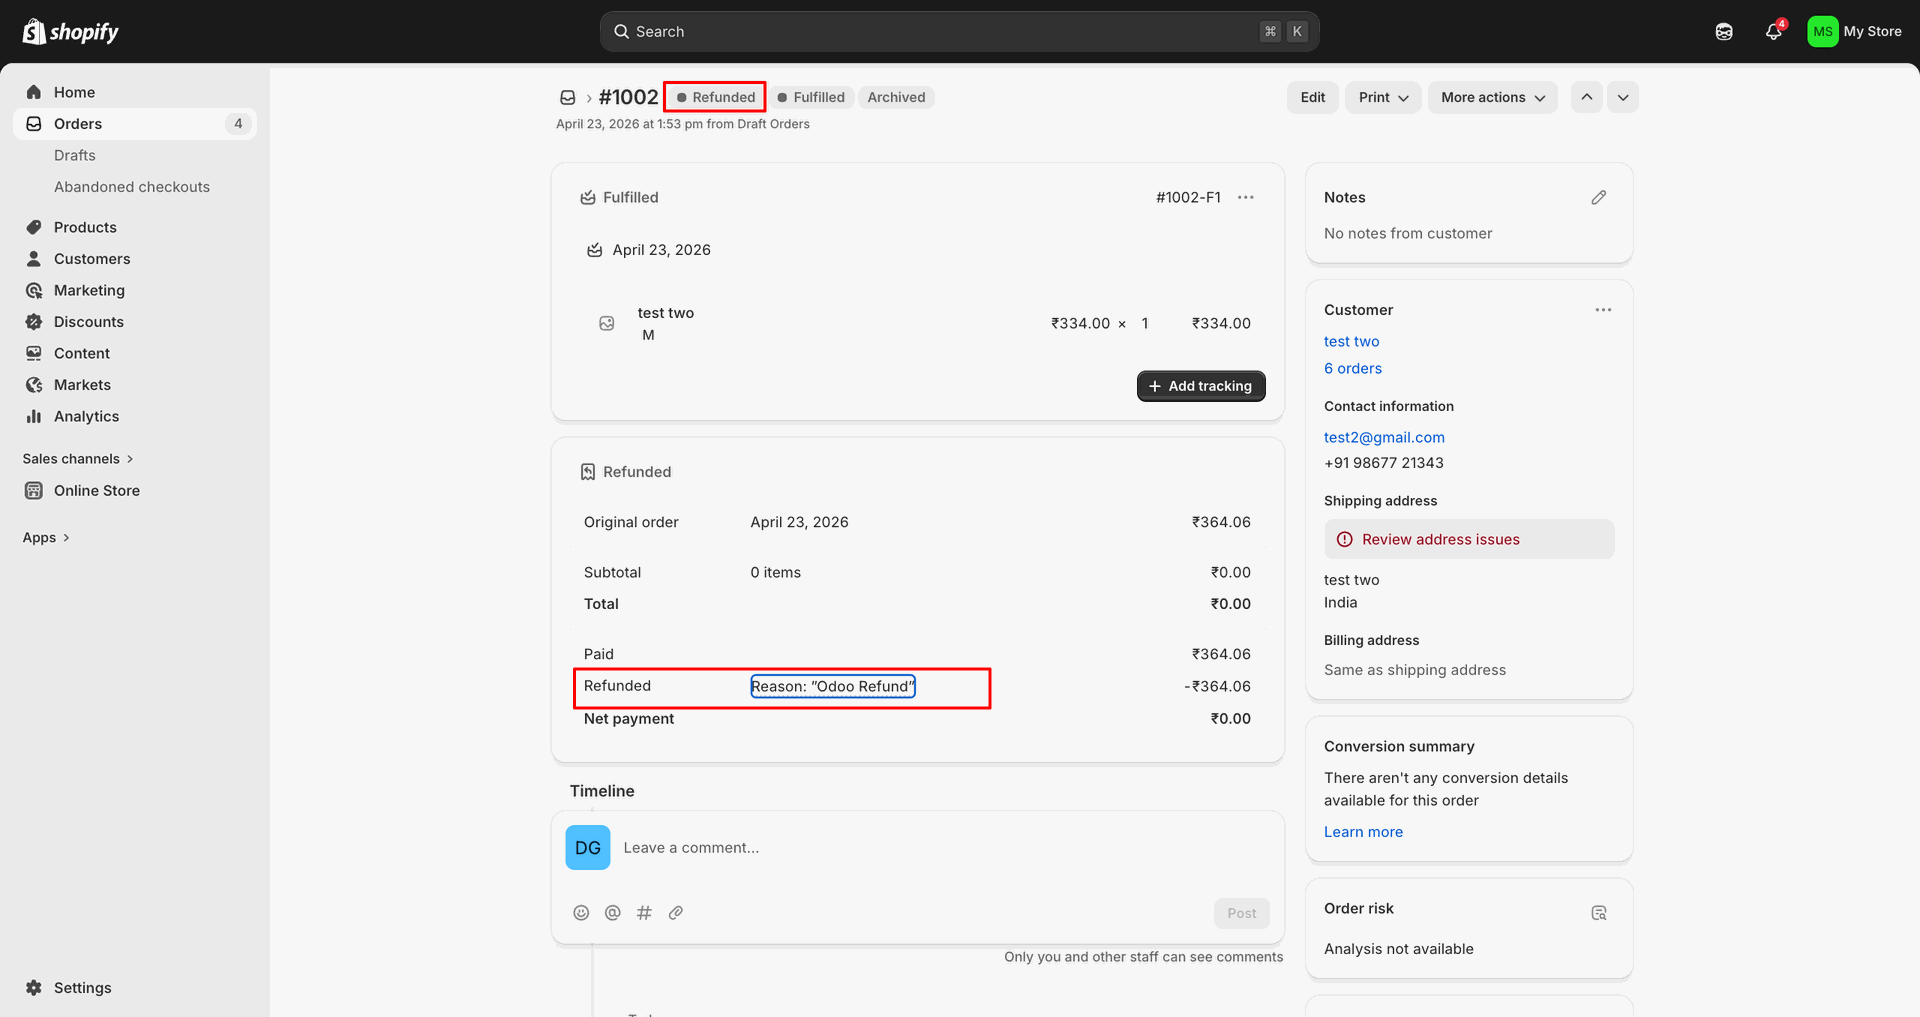
Verify the refunded Shopify order shows the refund reason and amount.
Workflow
Go to the 'Shopify Dashboard'.
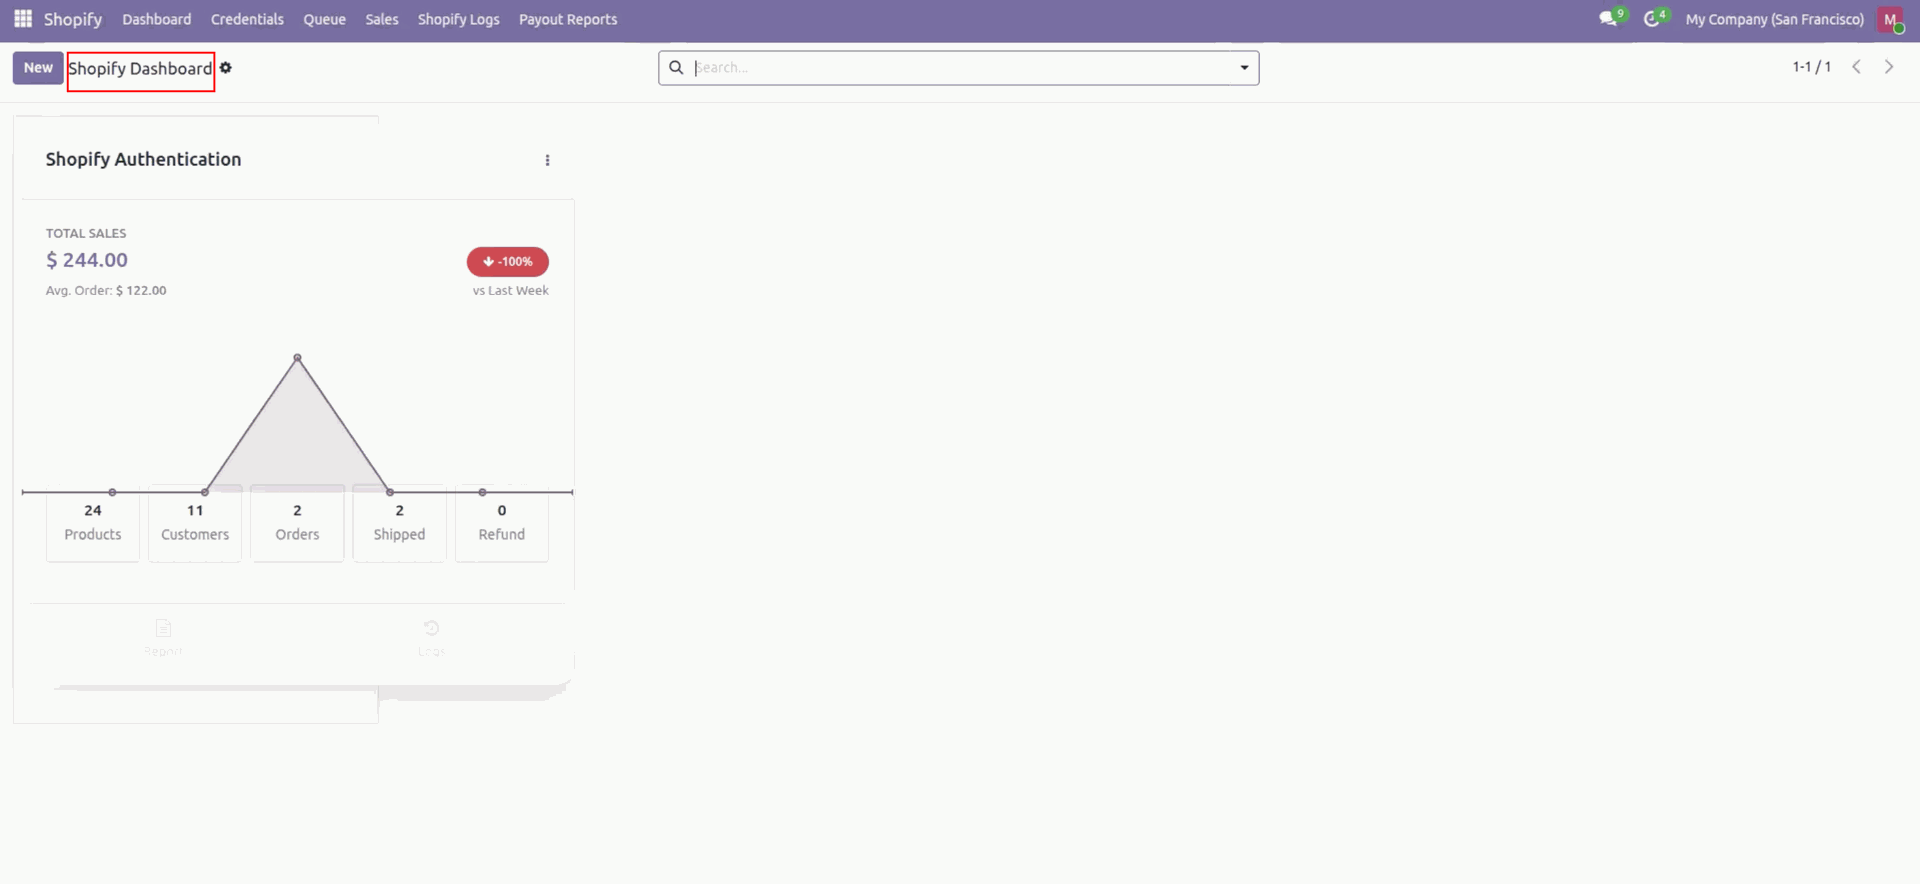
You can open a separate dashboard for contact, product, and order from the 'Queue' menu.
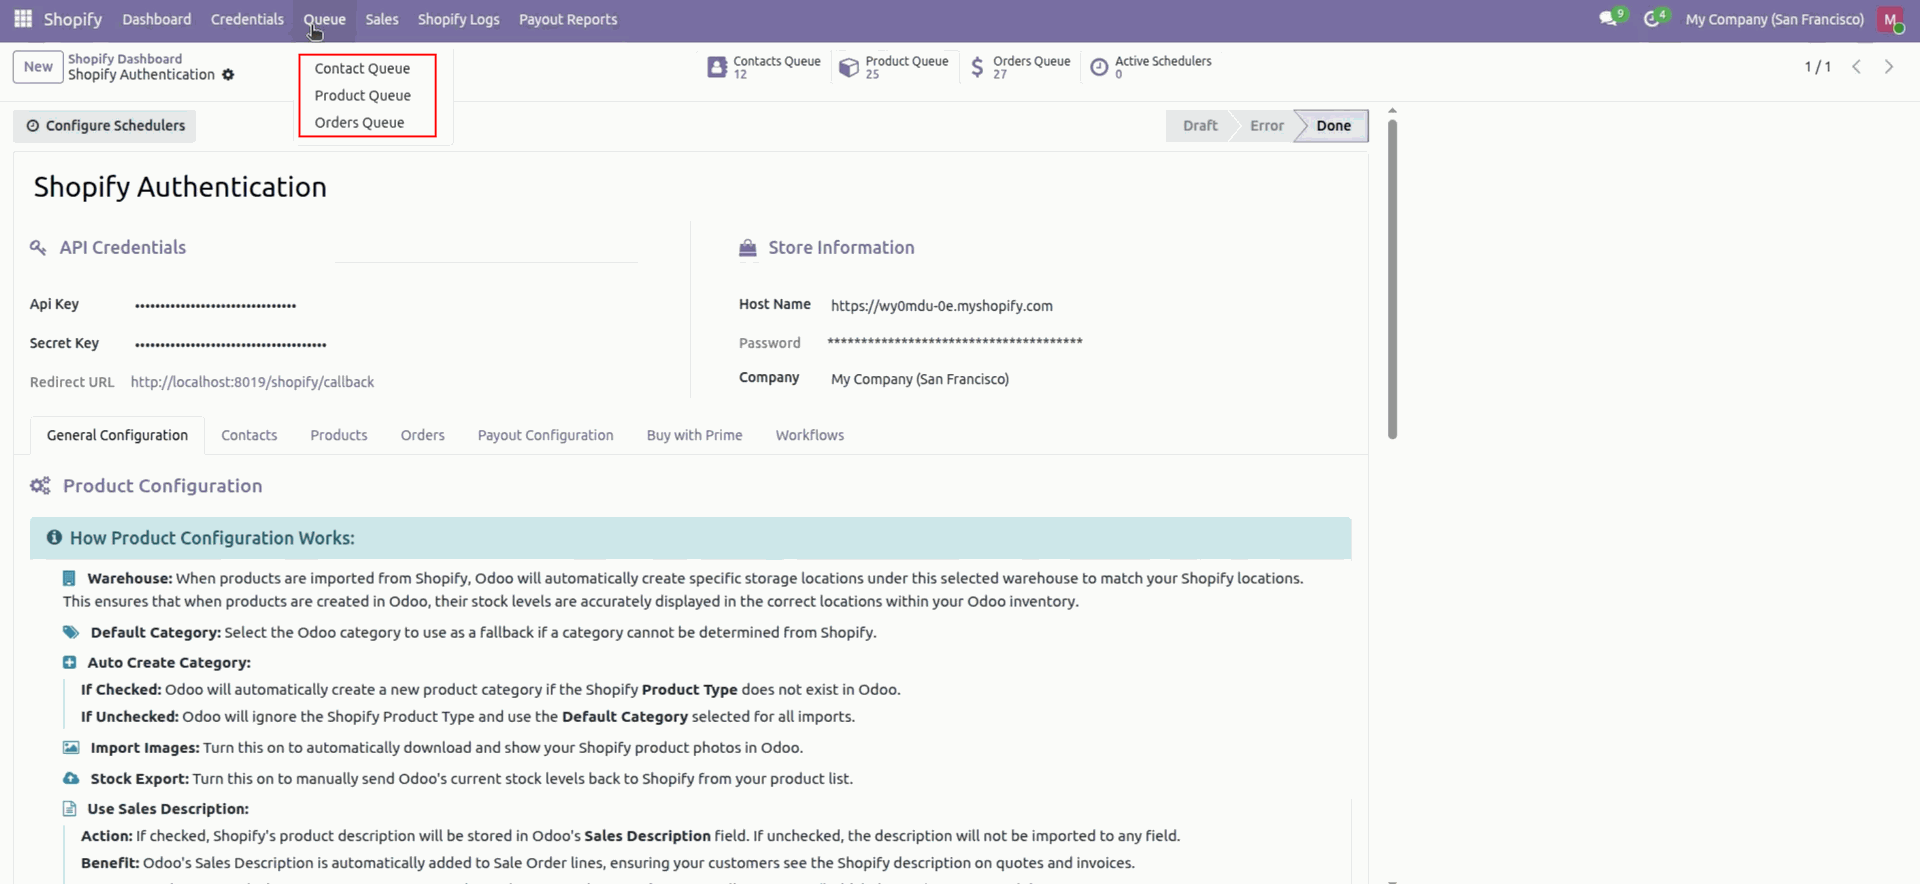
Contact queue looks like this. Click on the 'Successfully Synced' to open synced records.
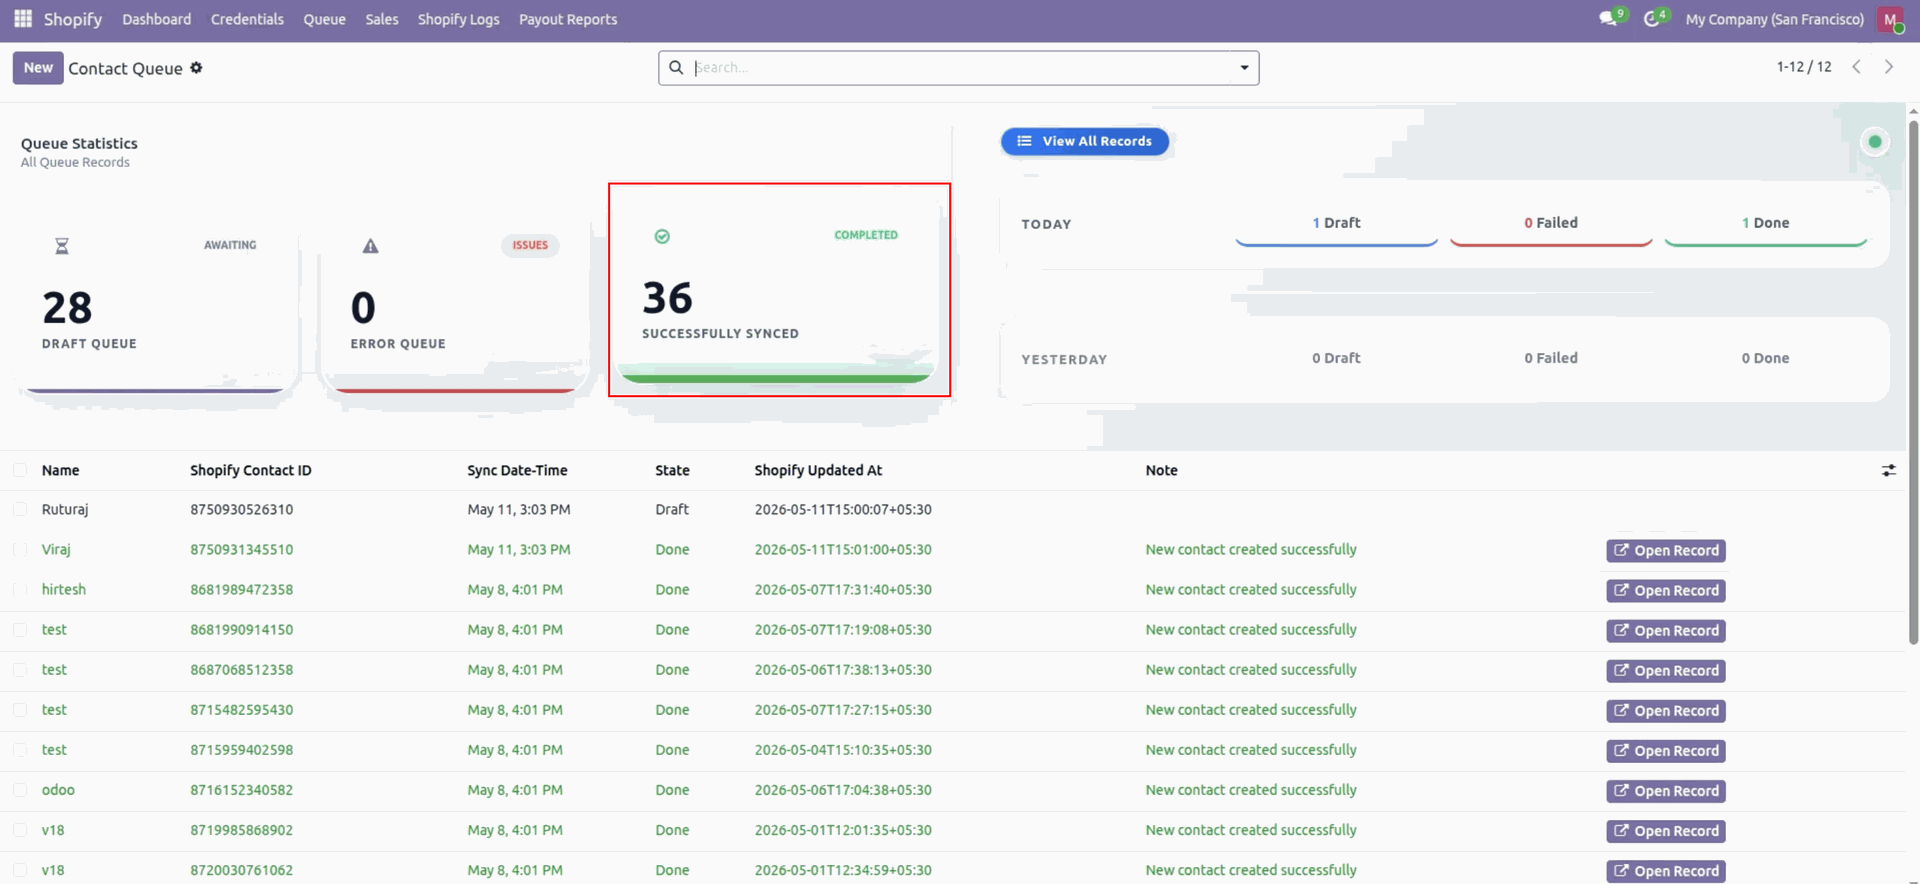
It will show synced records only in the dashboard.
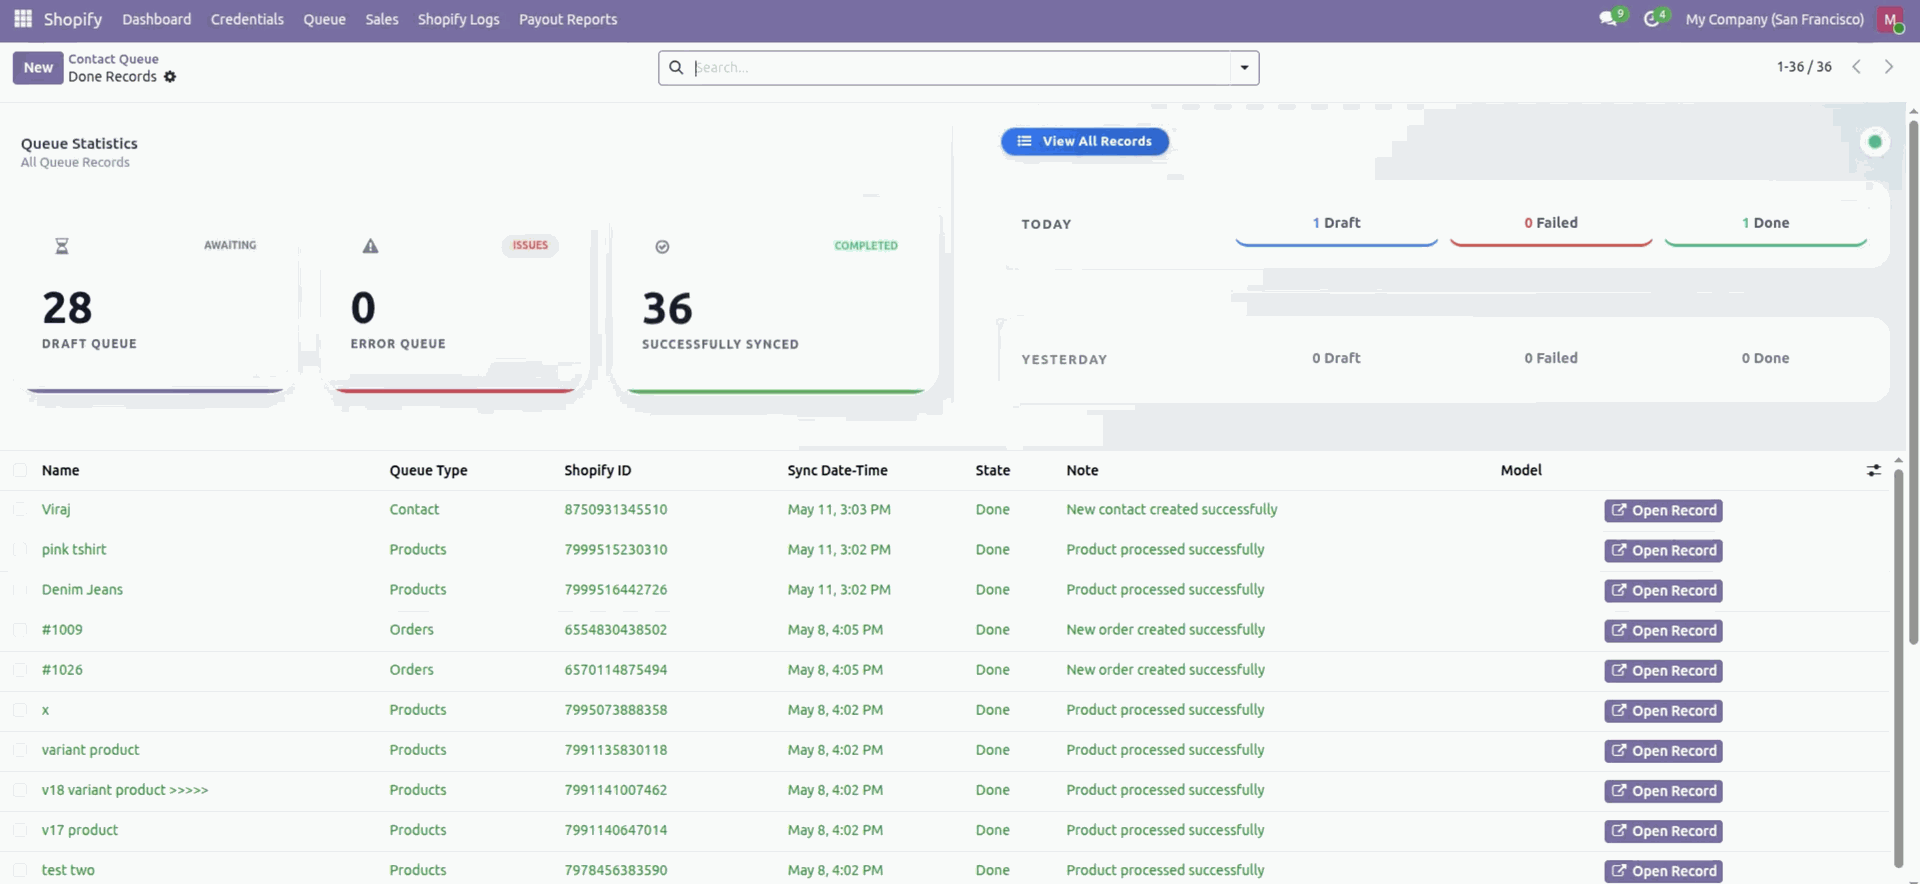
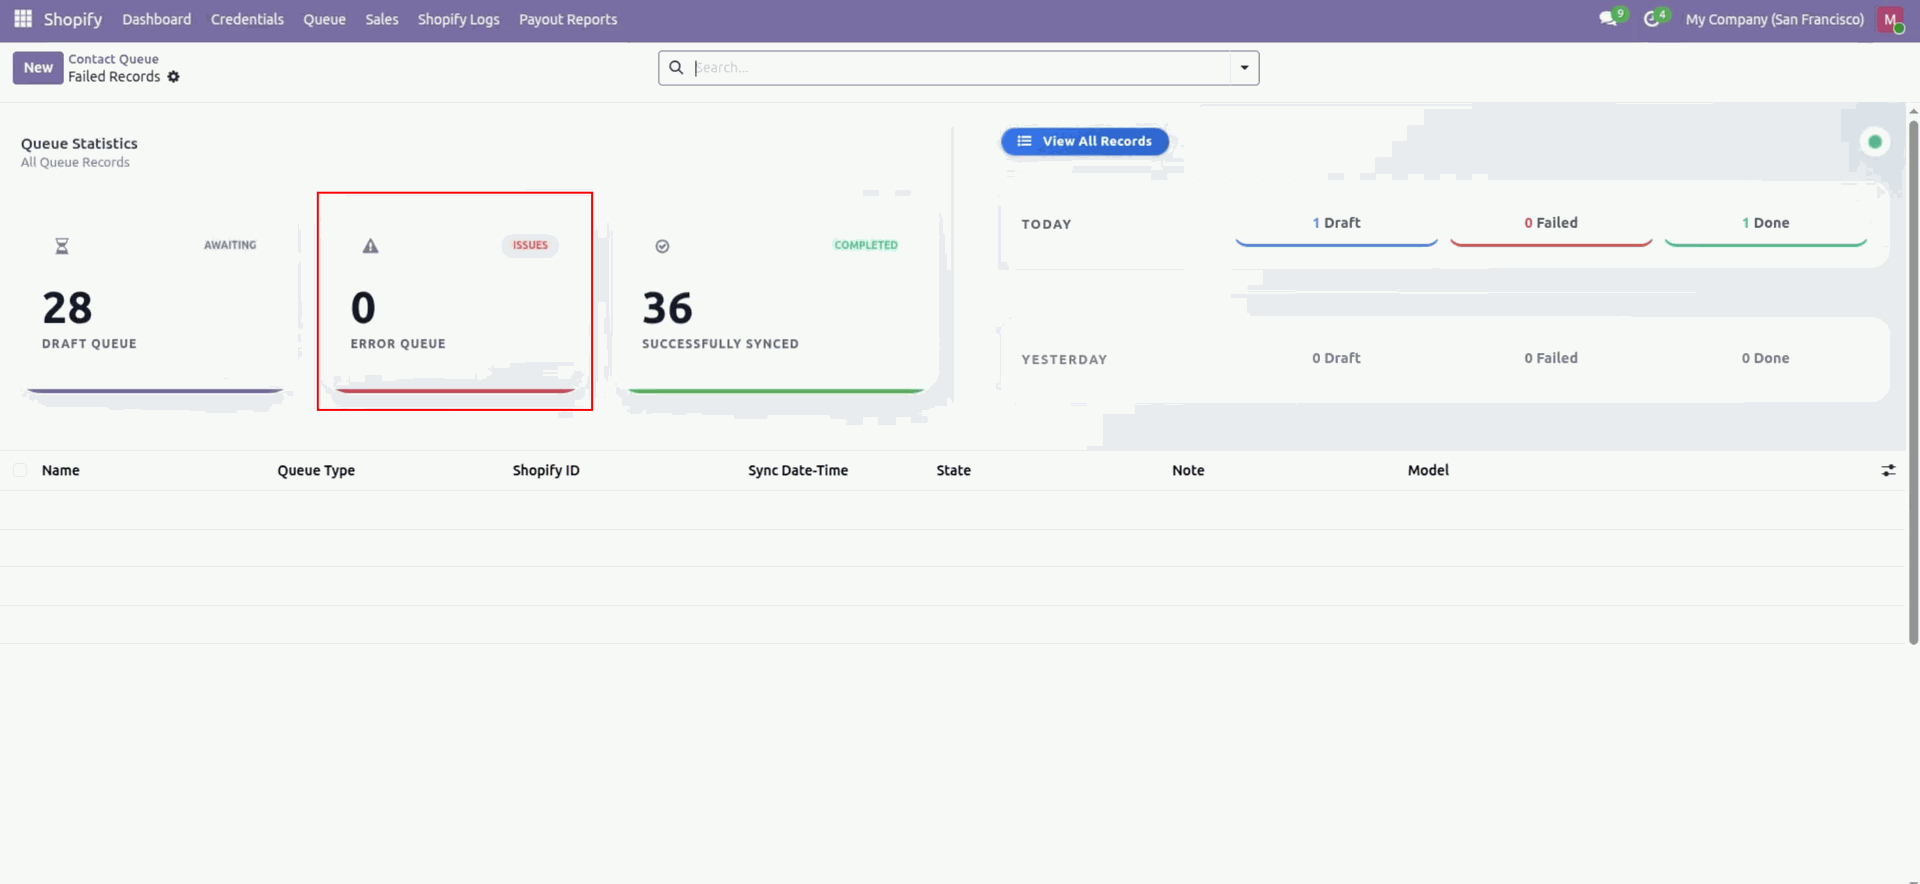
Click on the 'Error Queue' to open the error records. Currently, error records are 0, so it will show empty.
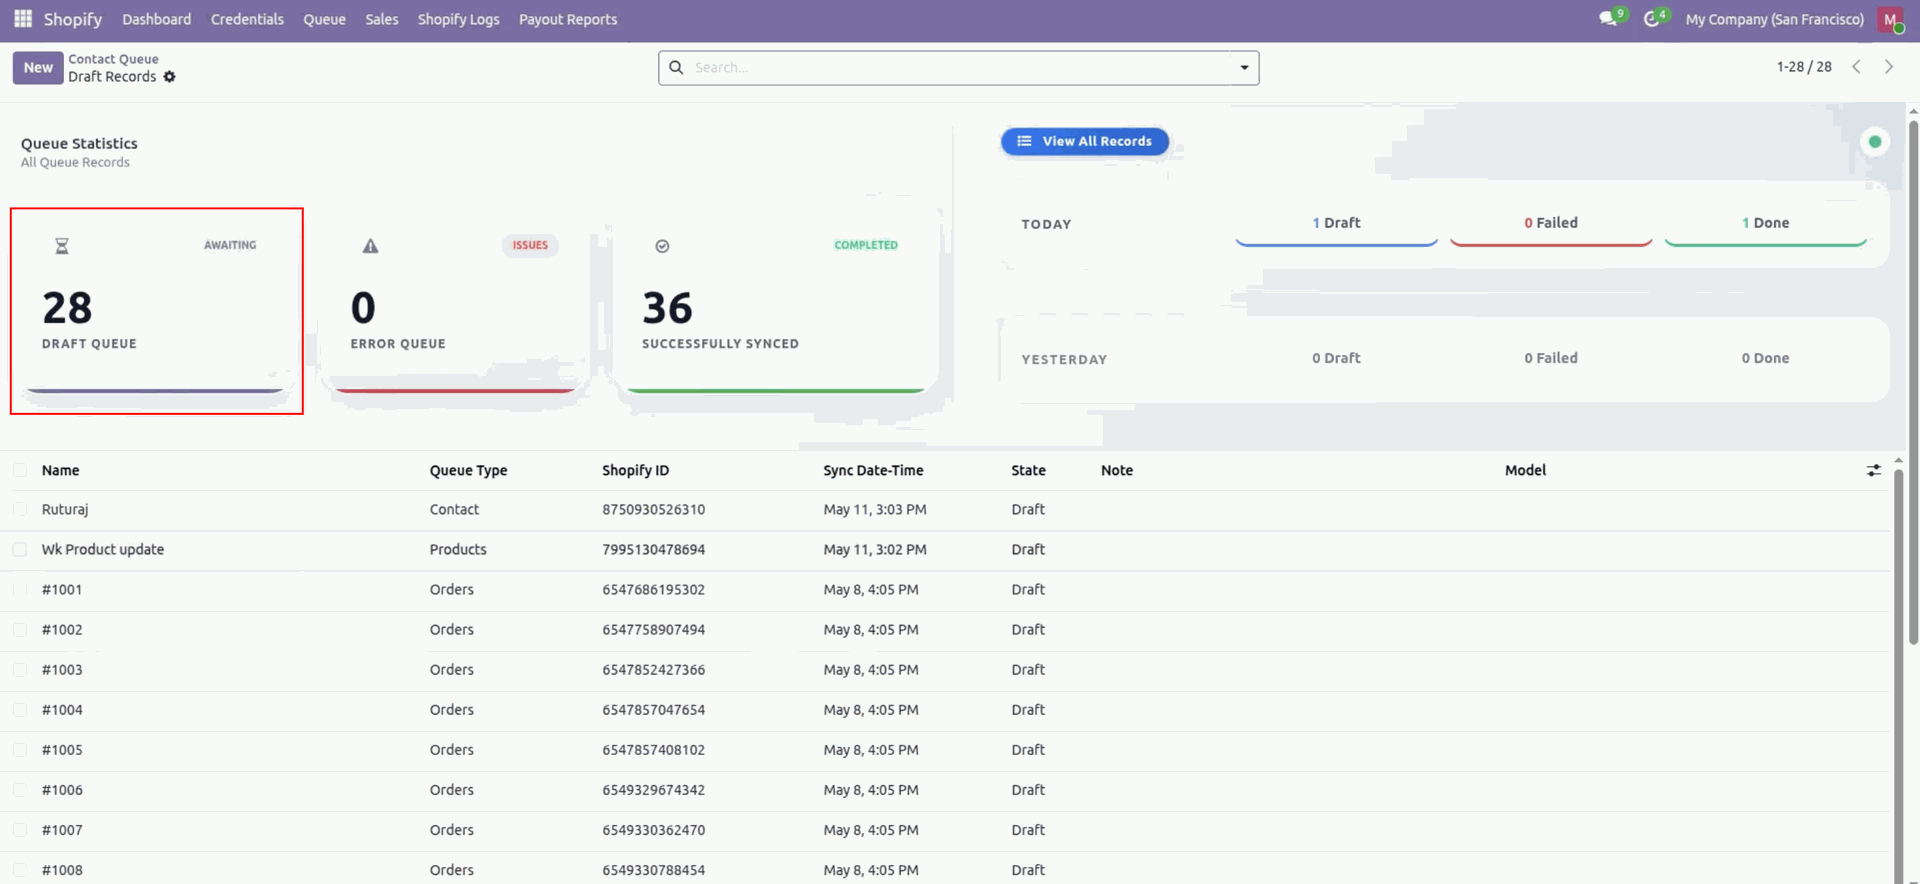
Click on the 'Draft Queue' to open the draft records; it will show draft records in the dashboard.
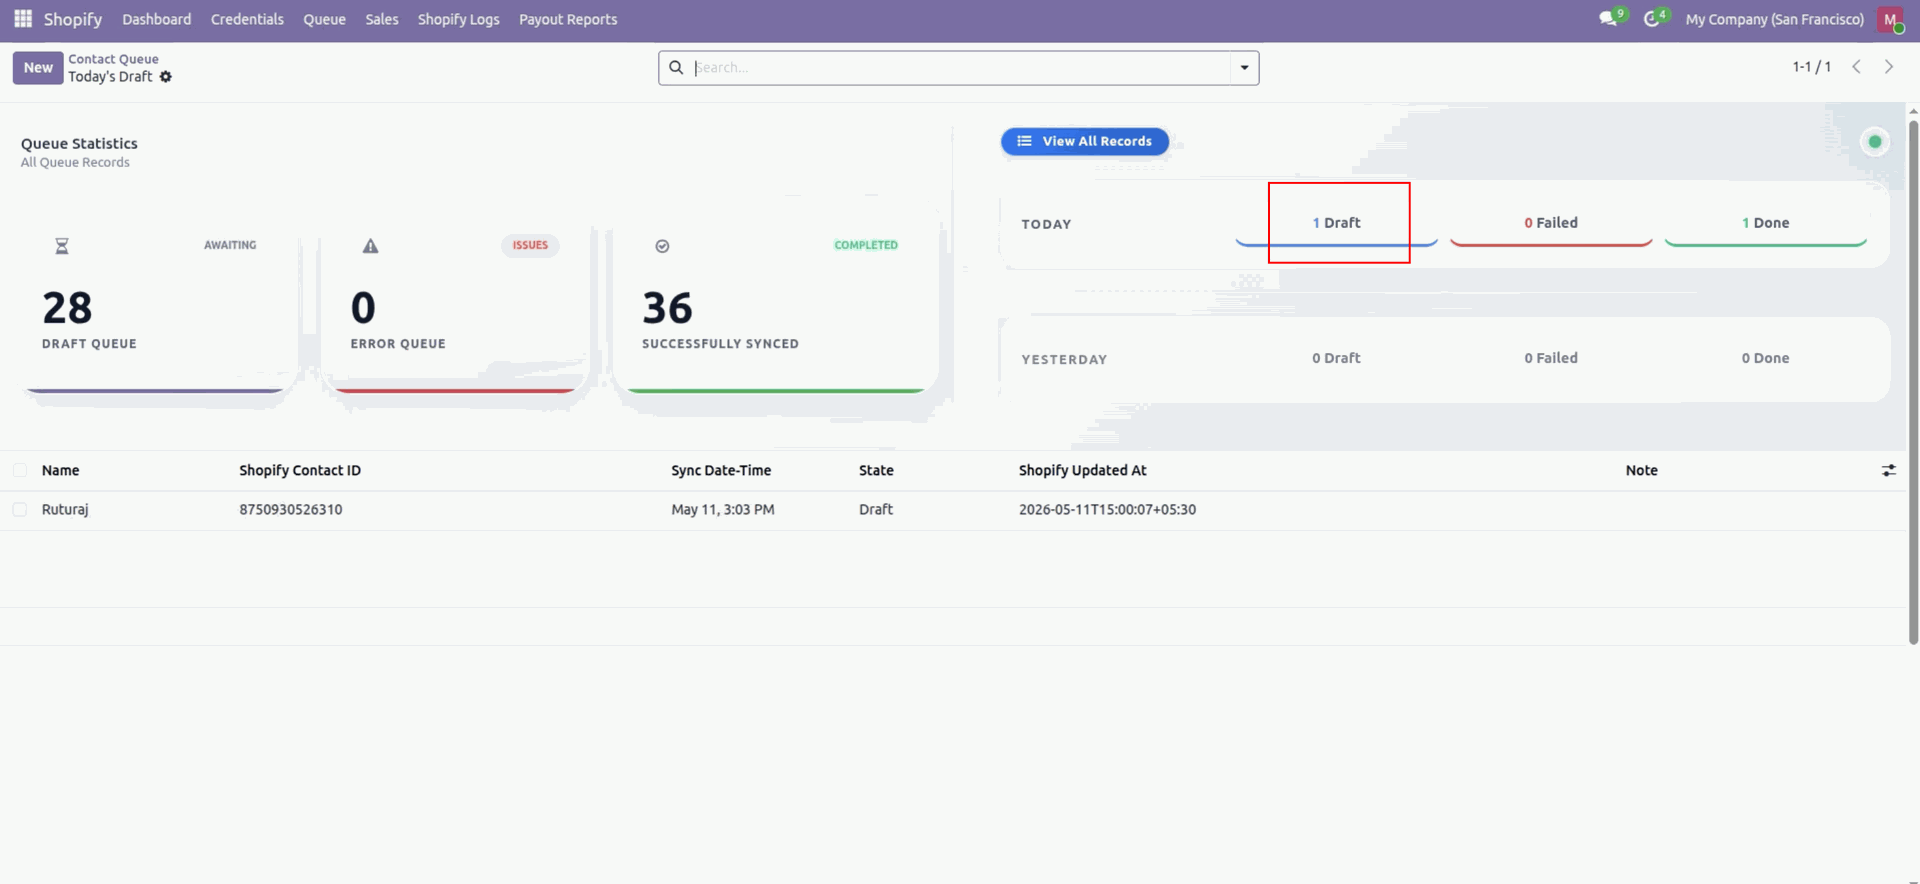
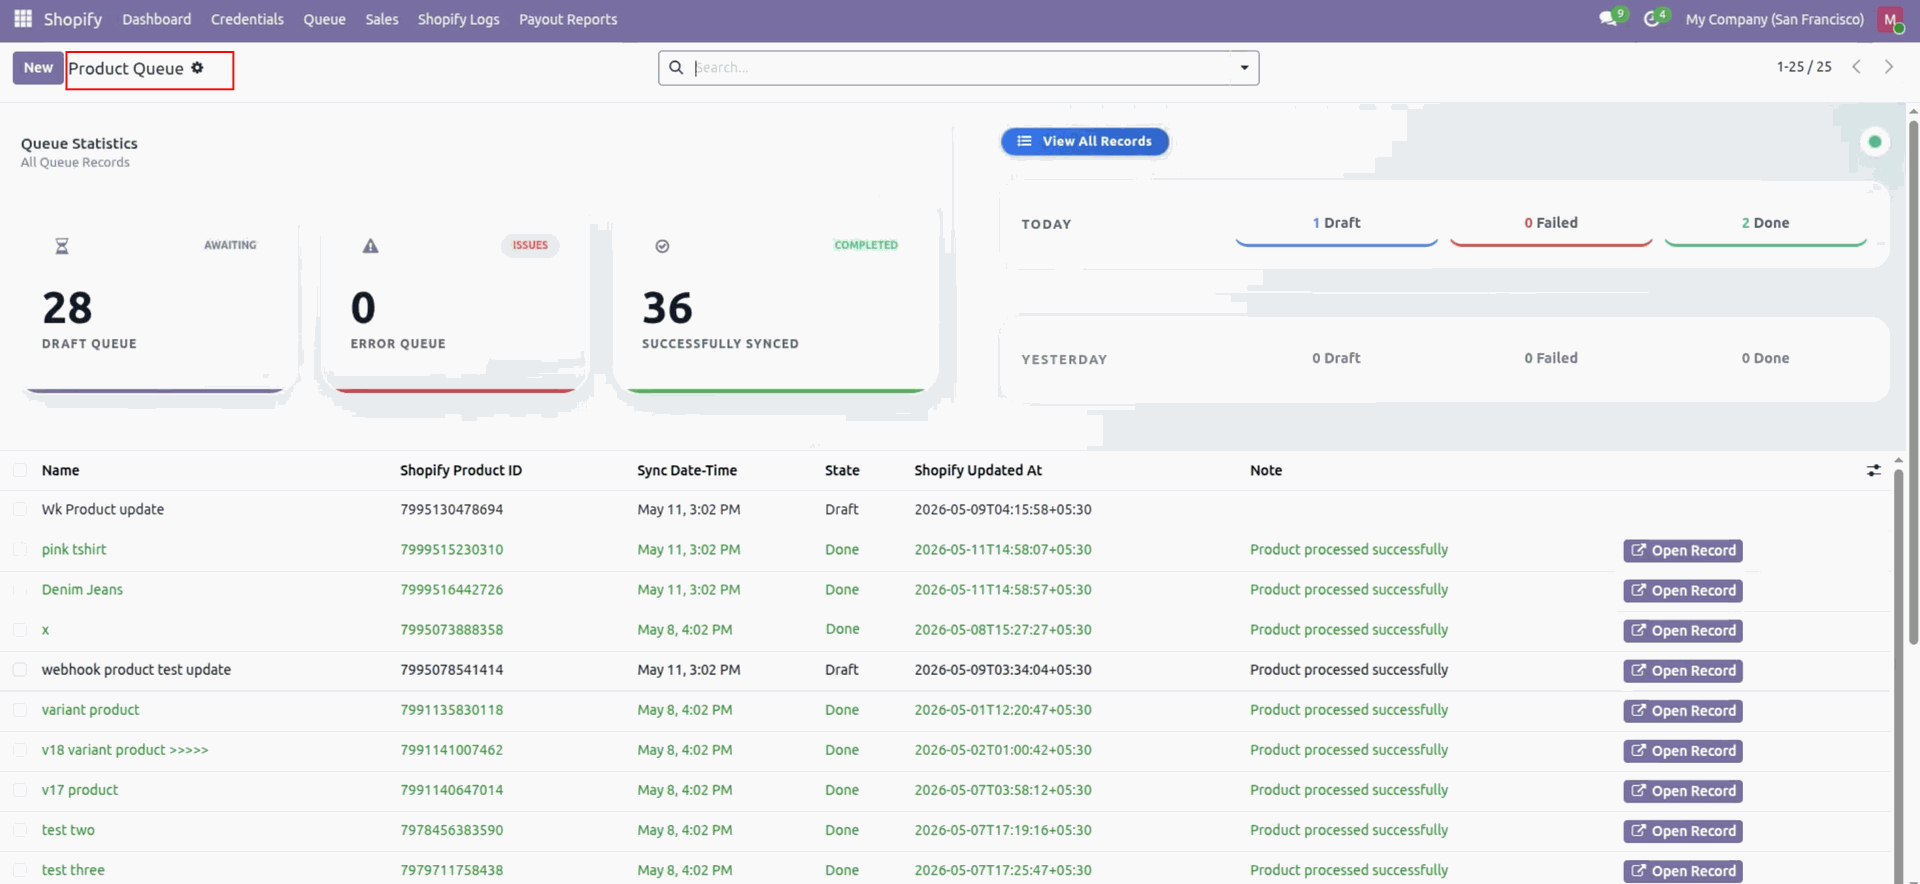
You can track daily queue activities with day-wise draft, failed, and done synchronization records for better monitoring and operational visibility.
You can open any records from the dashboard by using the 'Open Record' button.
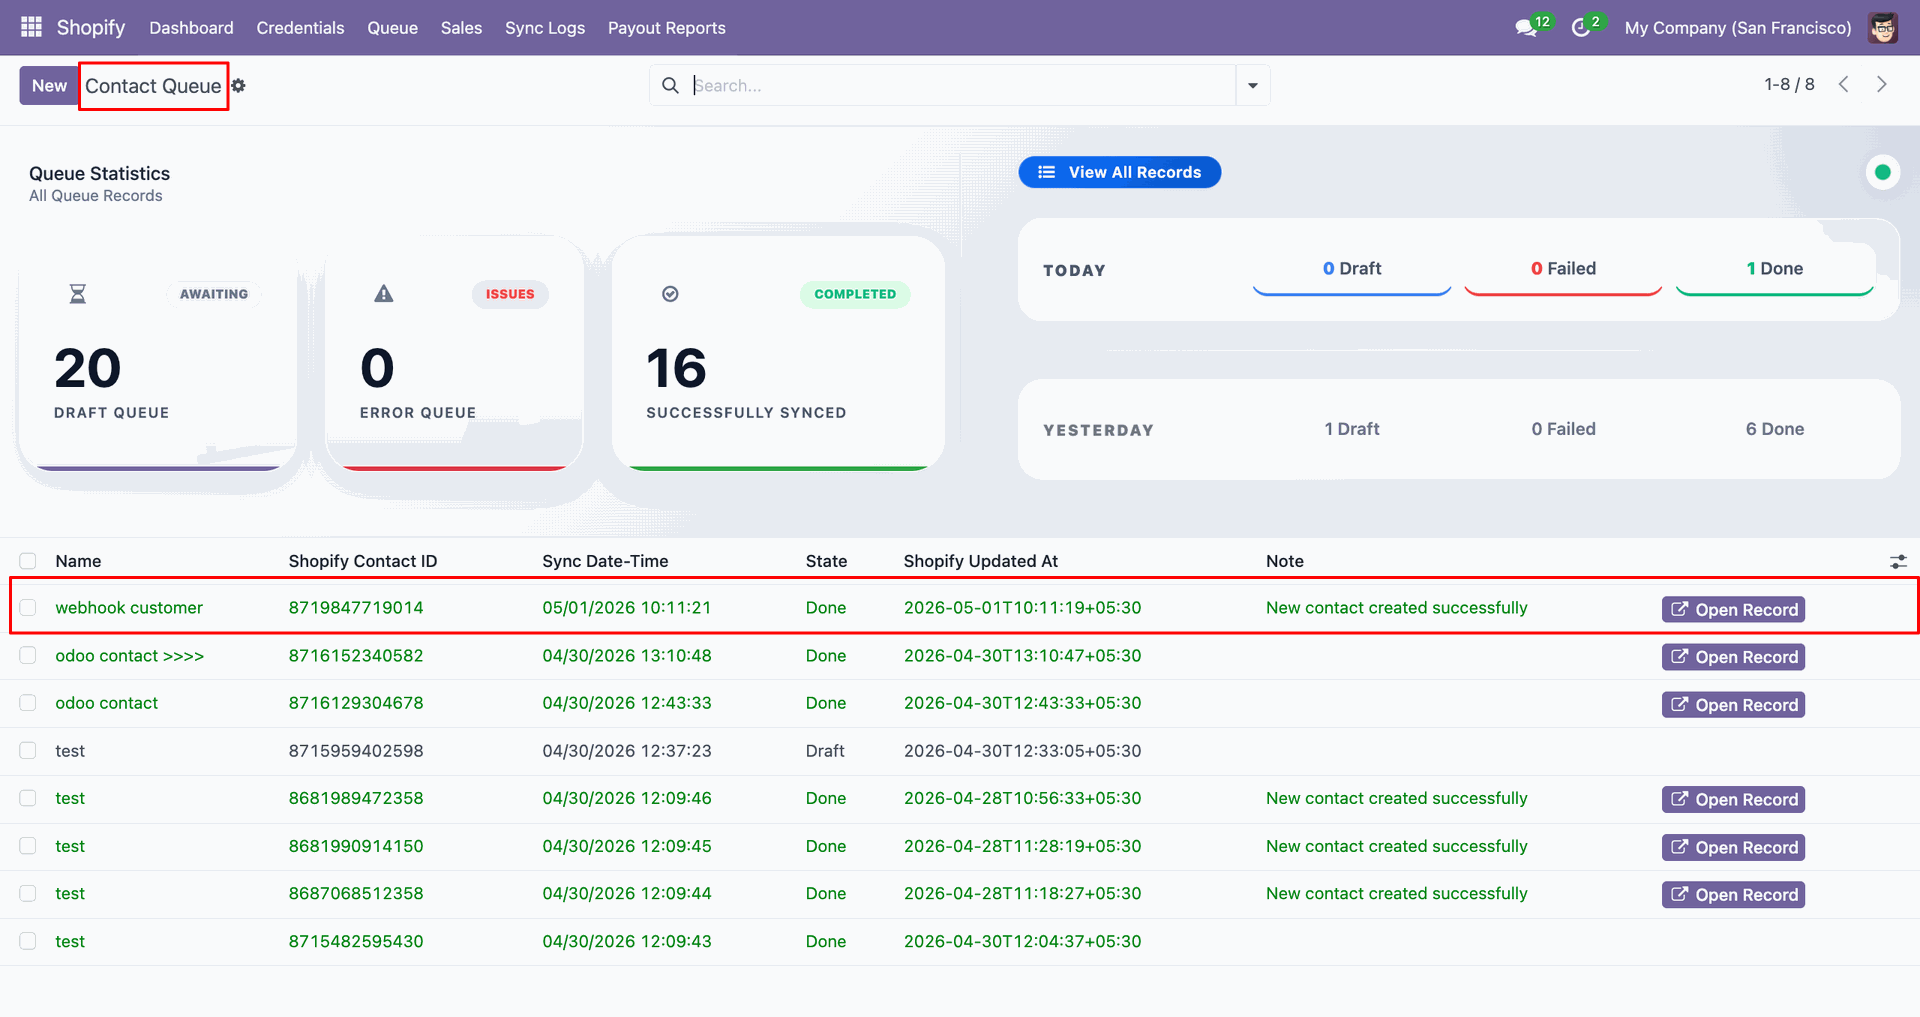
It will open the record.
Product queue looks like this.
The order queue looks like this.
Workflow
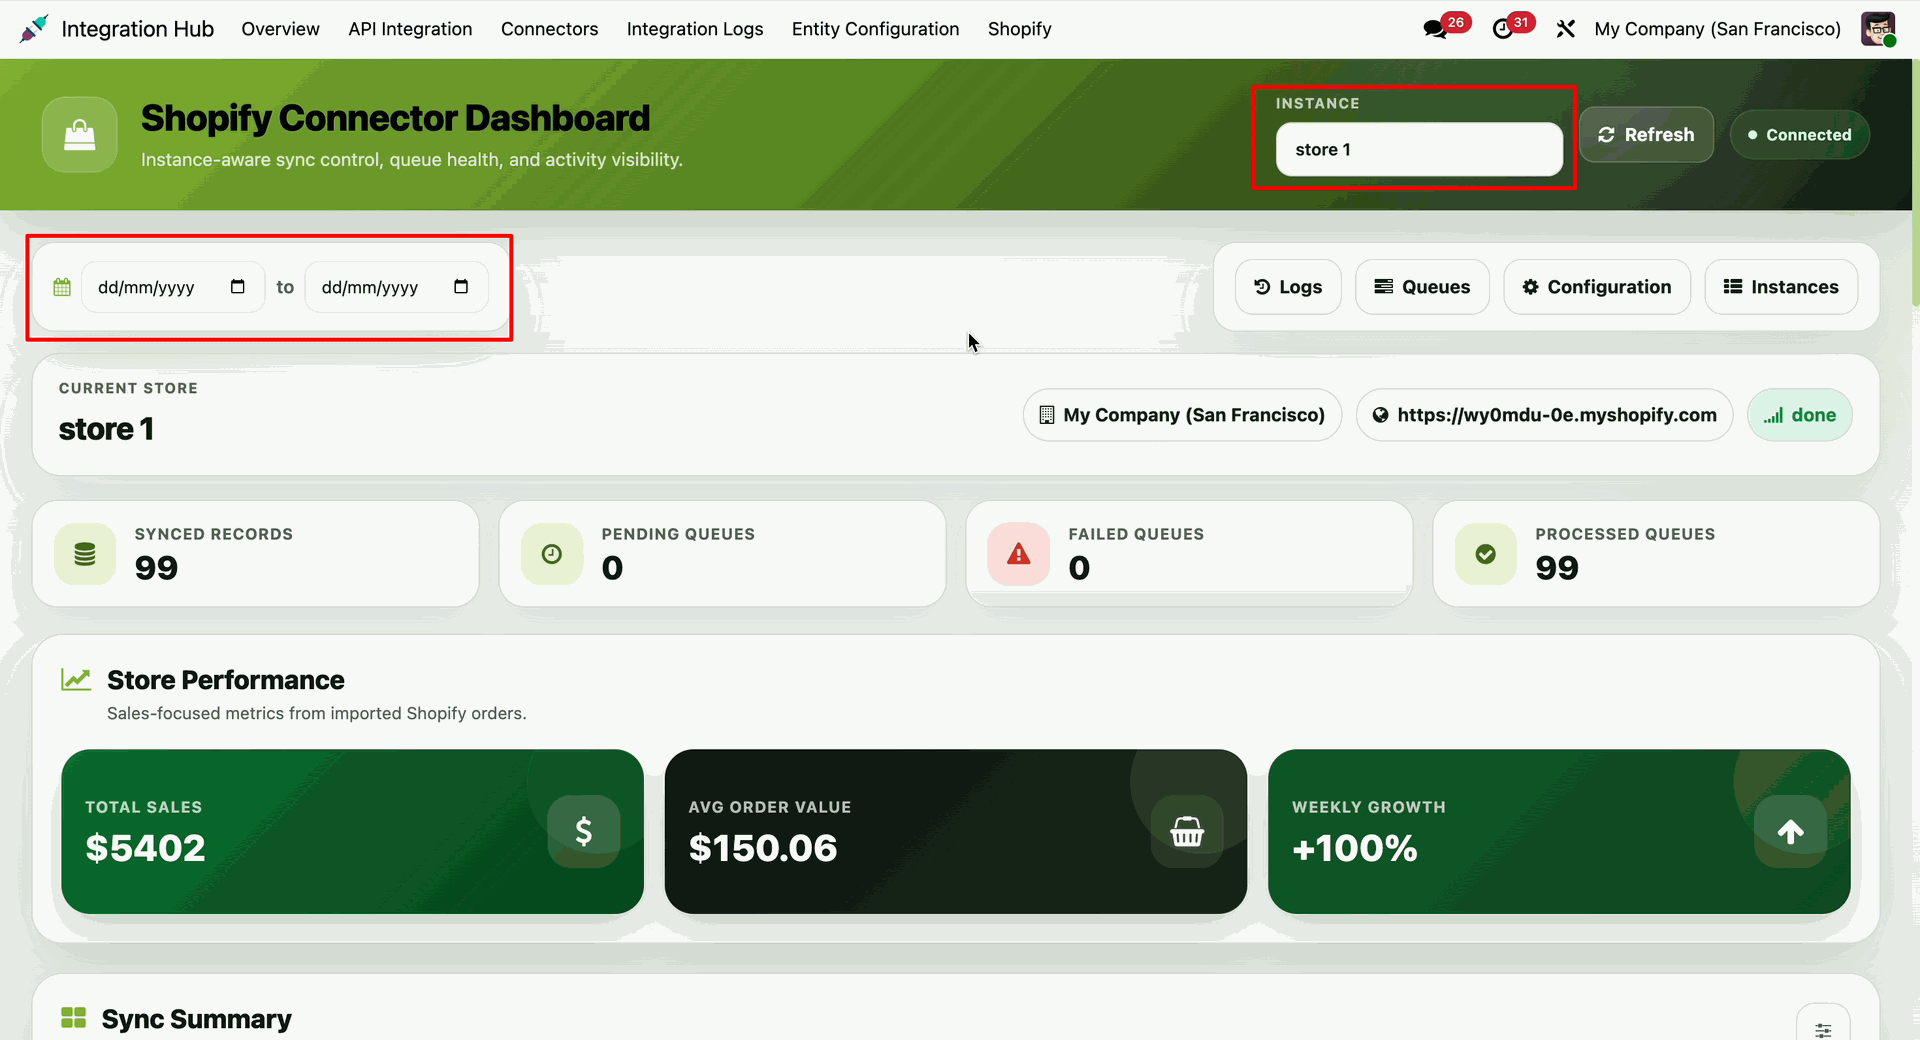
Access the centralised Integration Hub Overview, and select "Dashboard" from the Shopify menu dropdown.
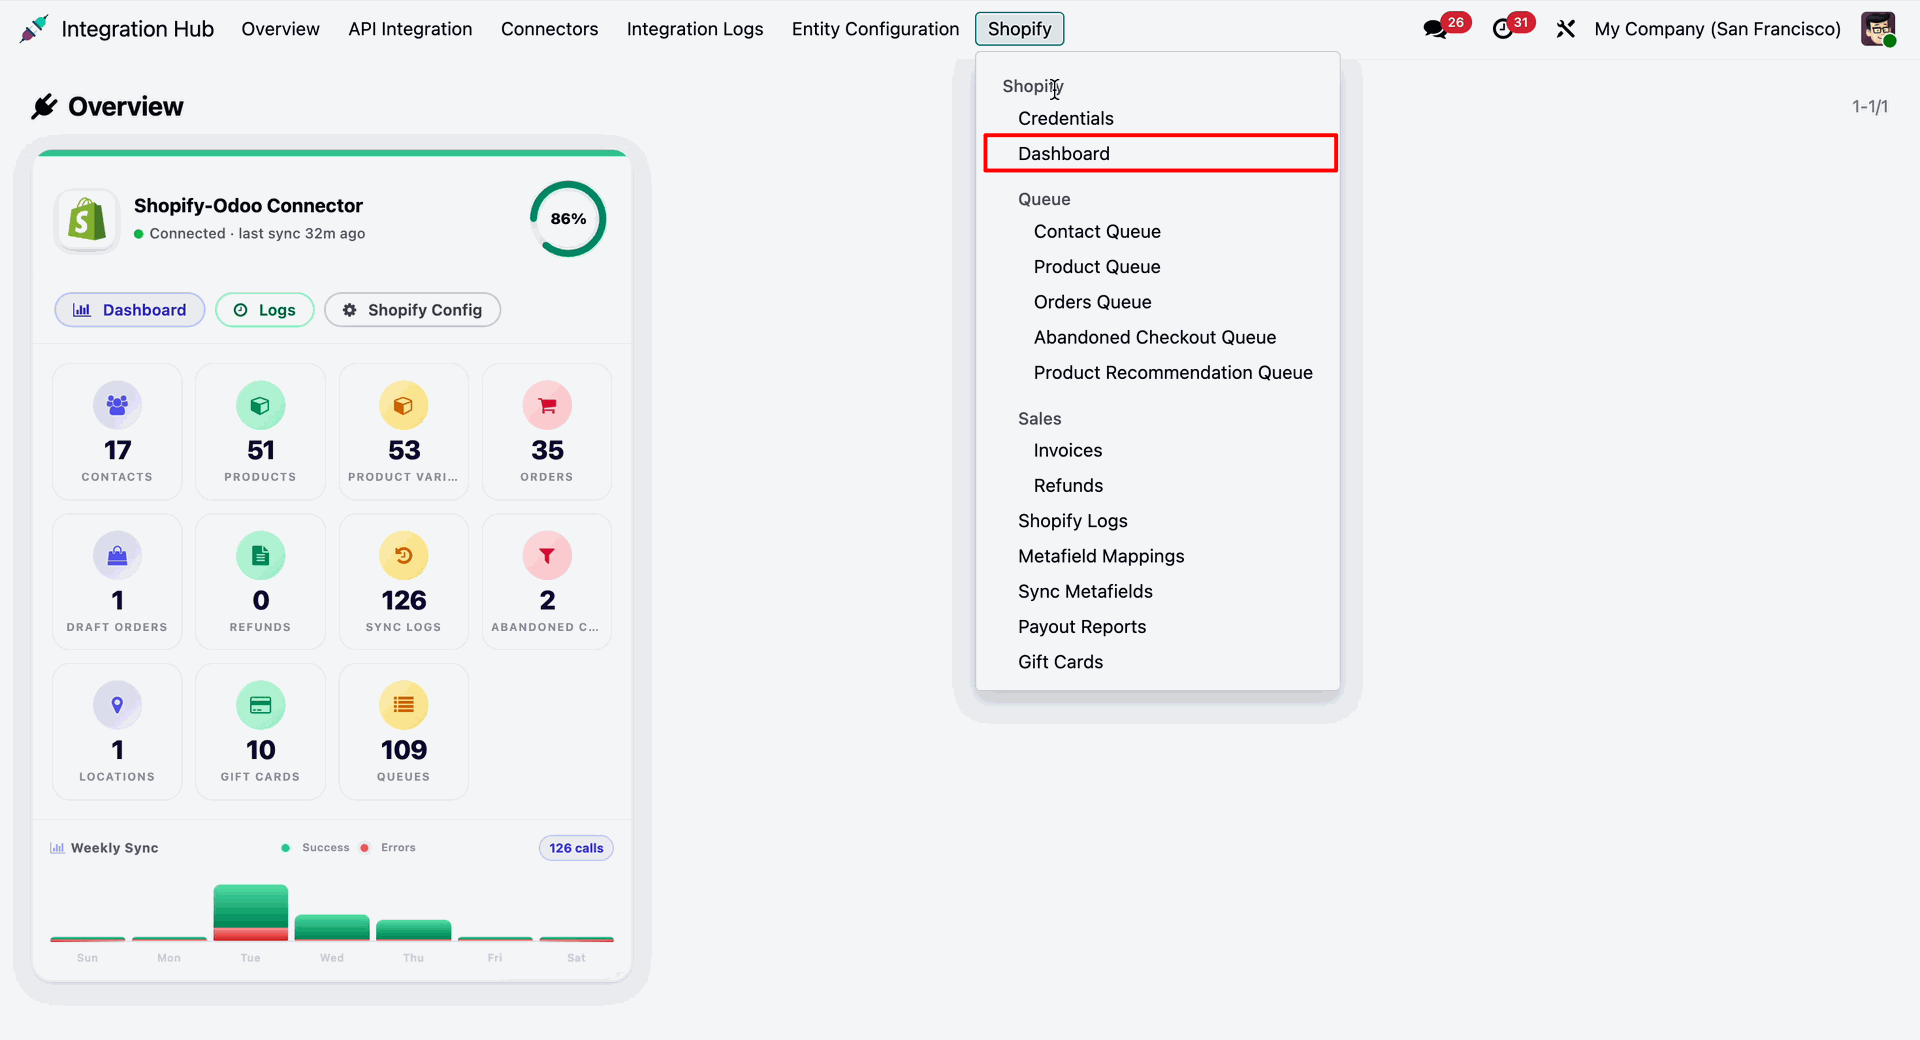
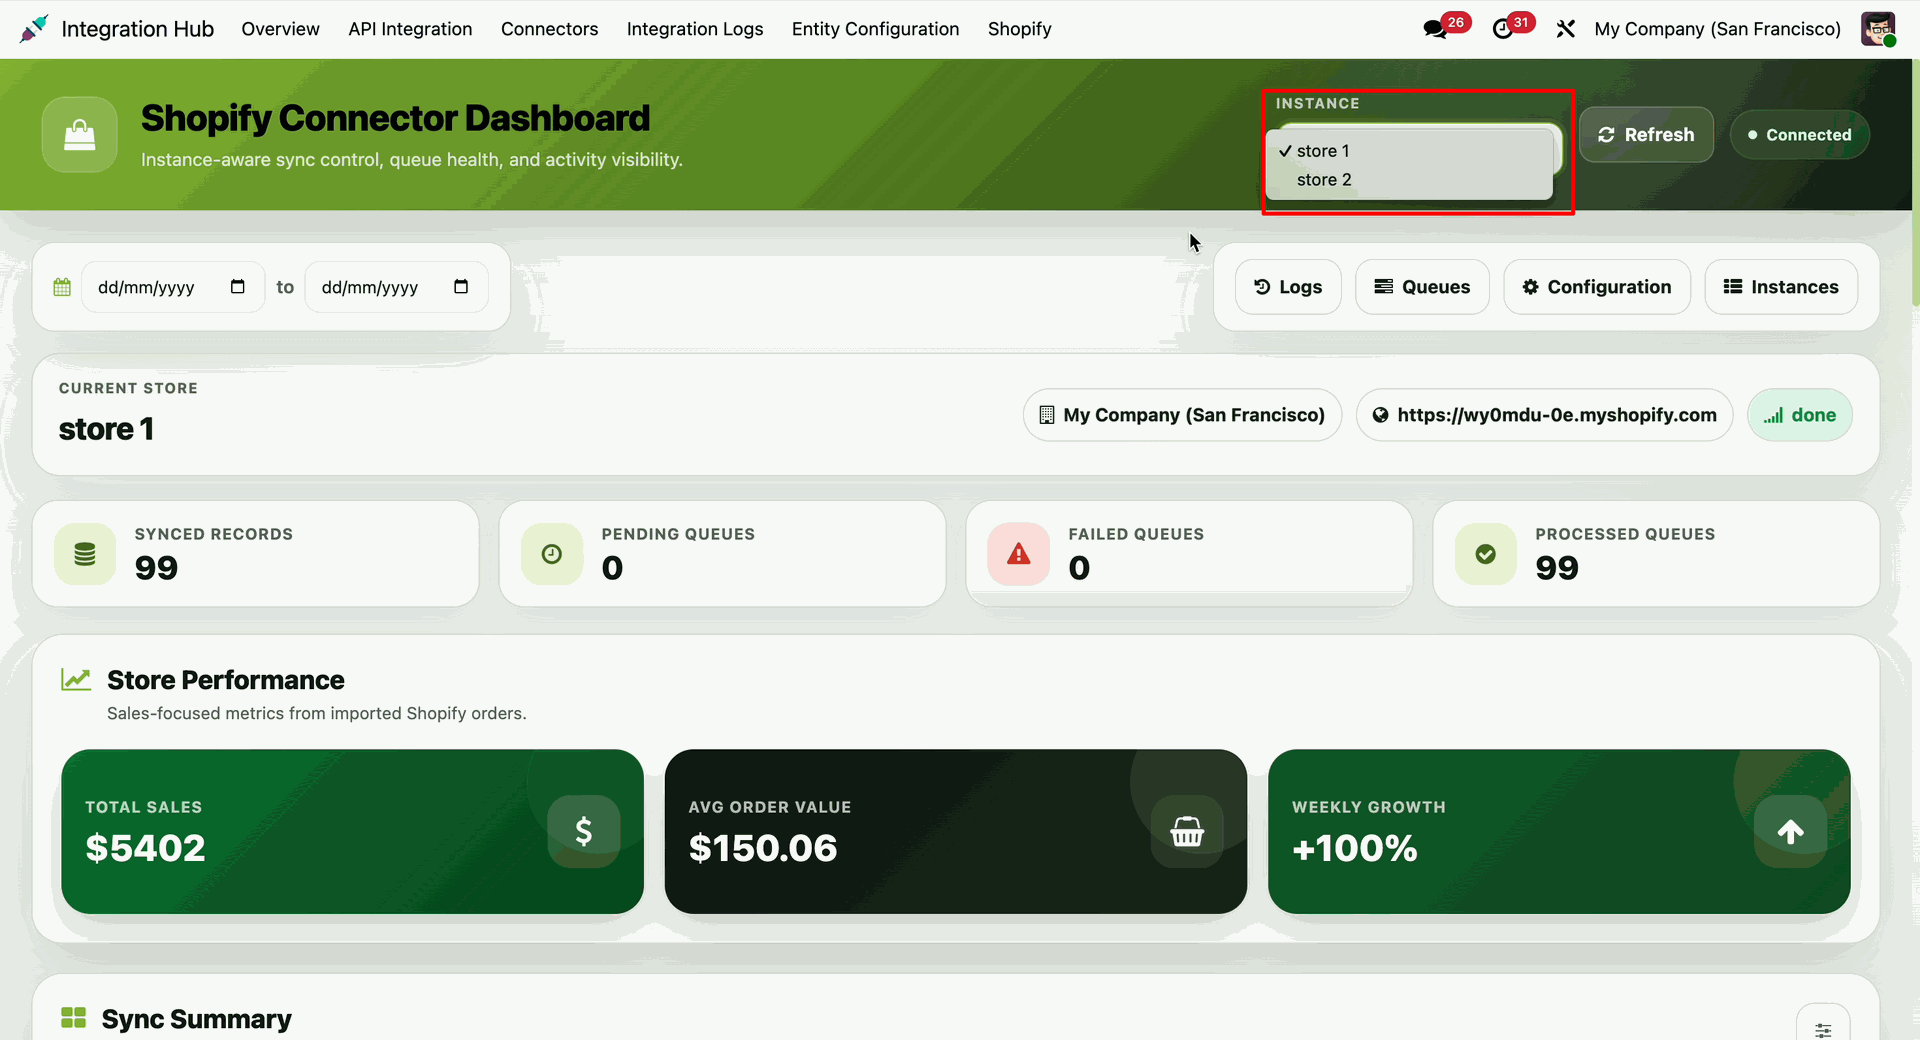
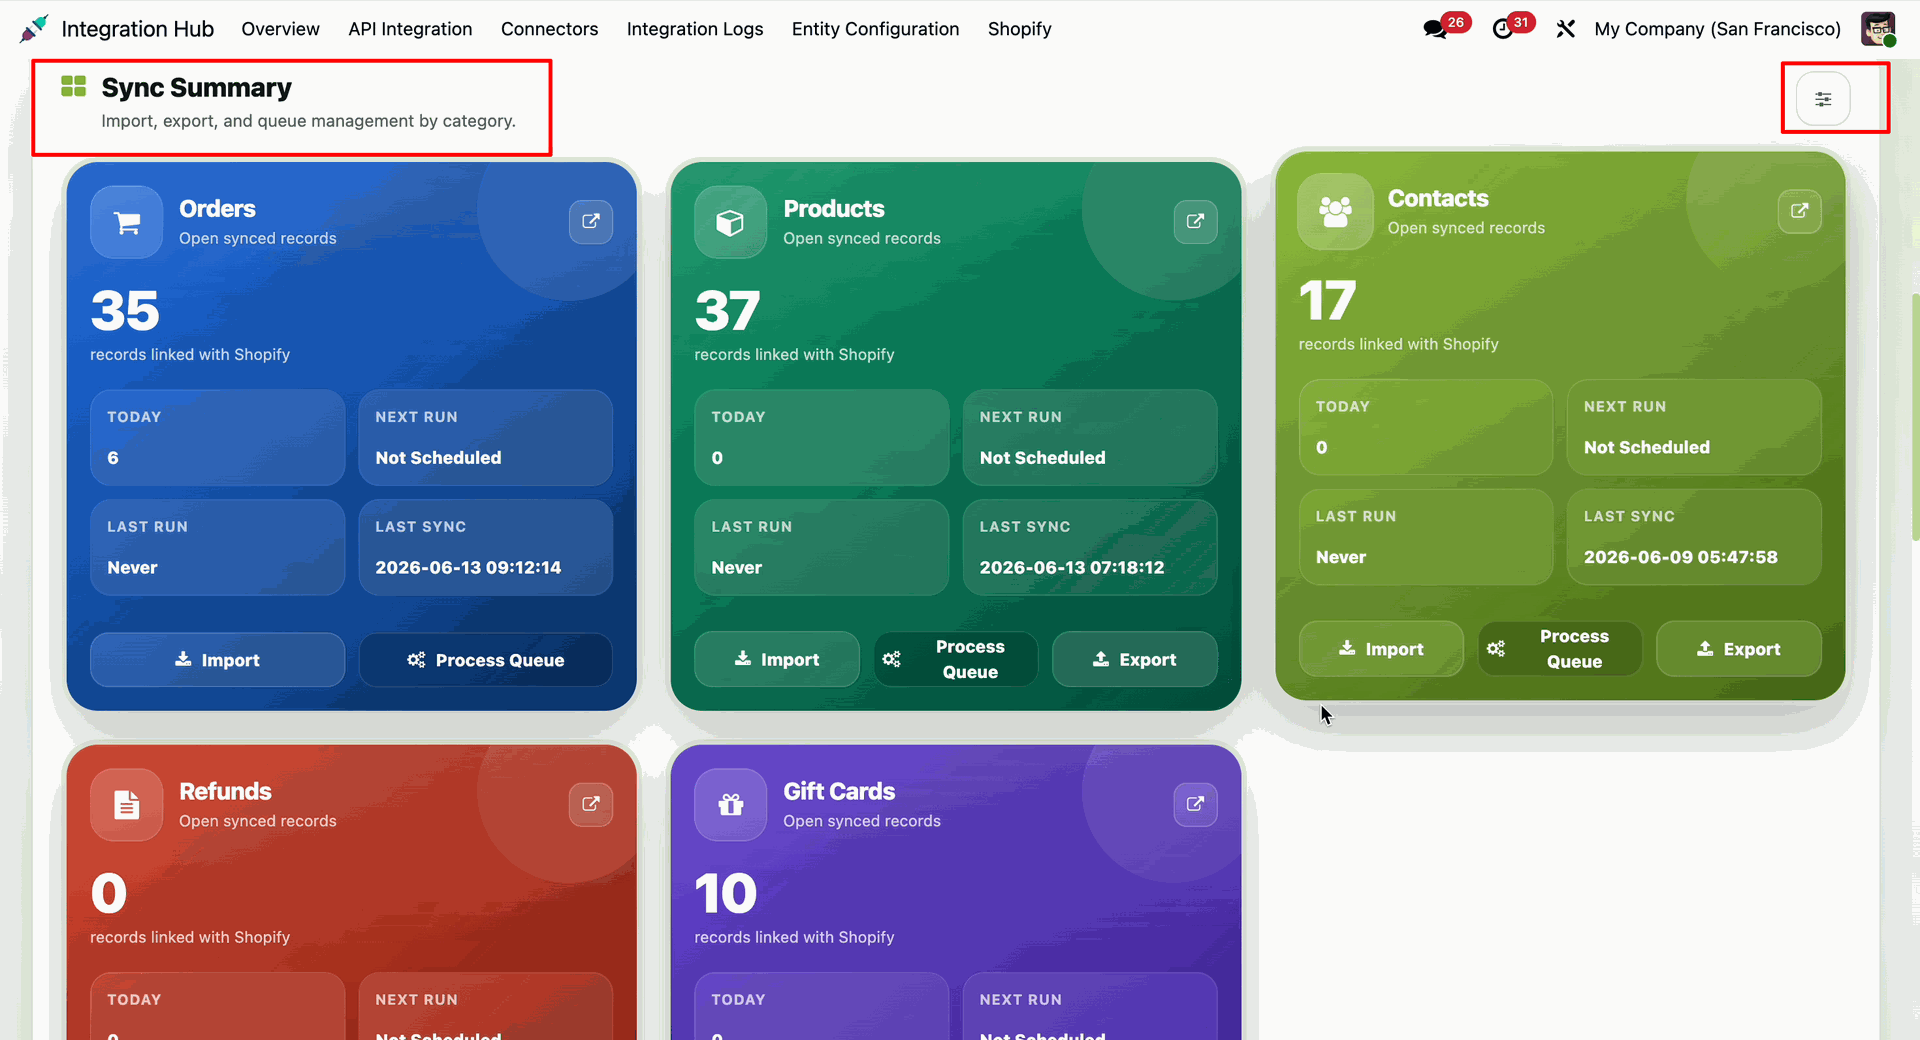
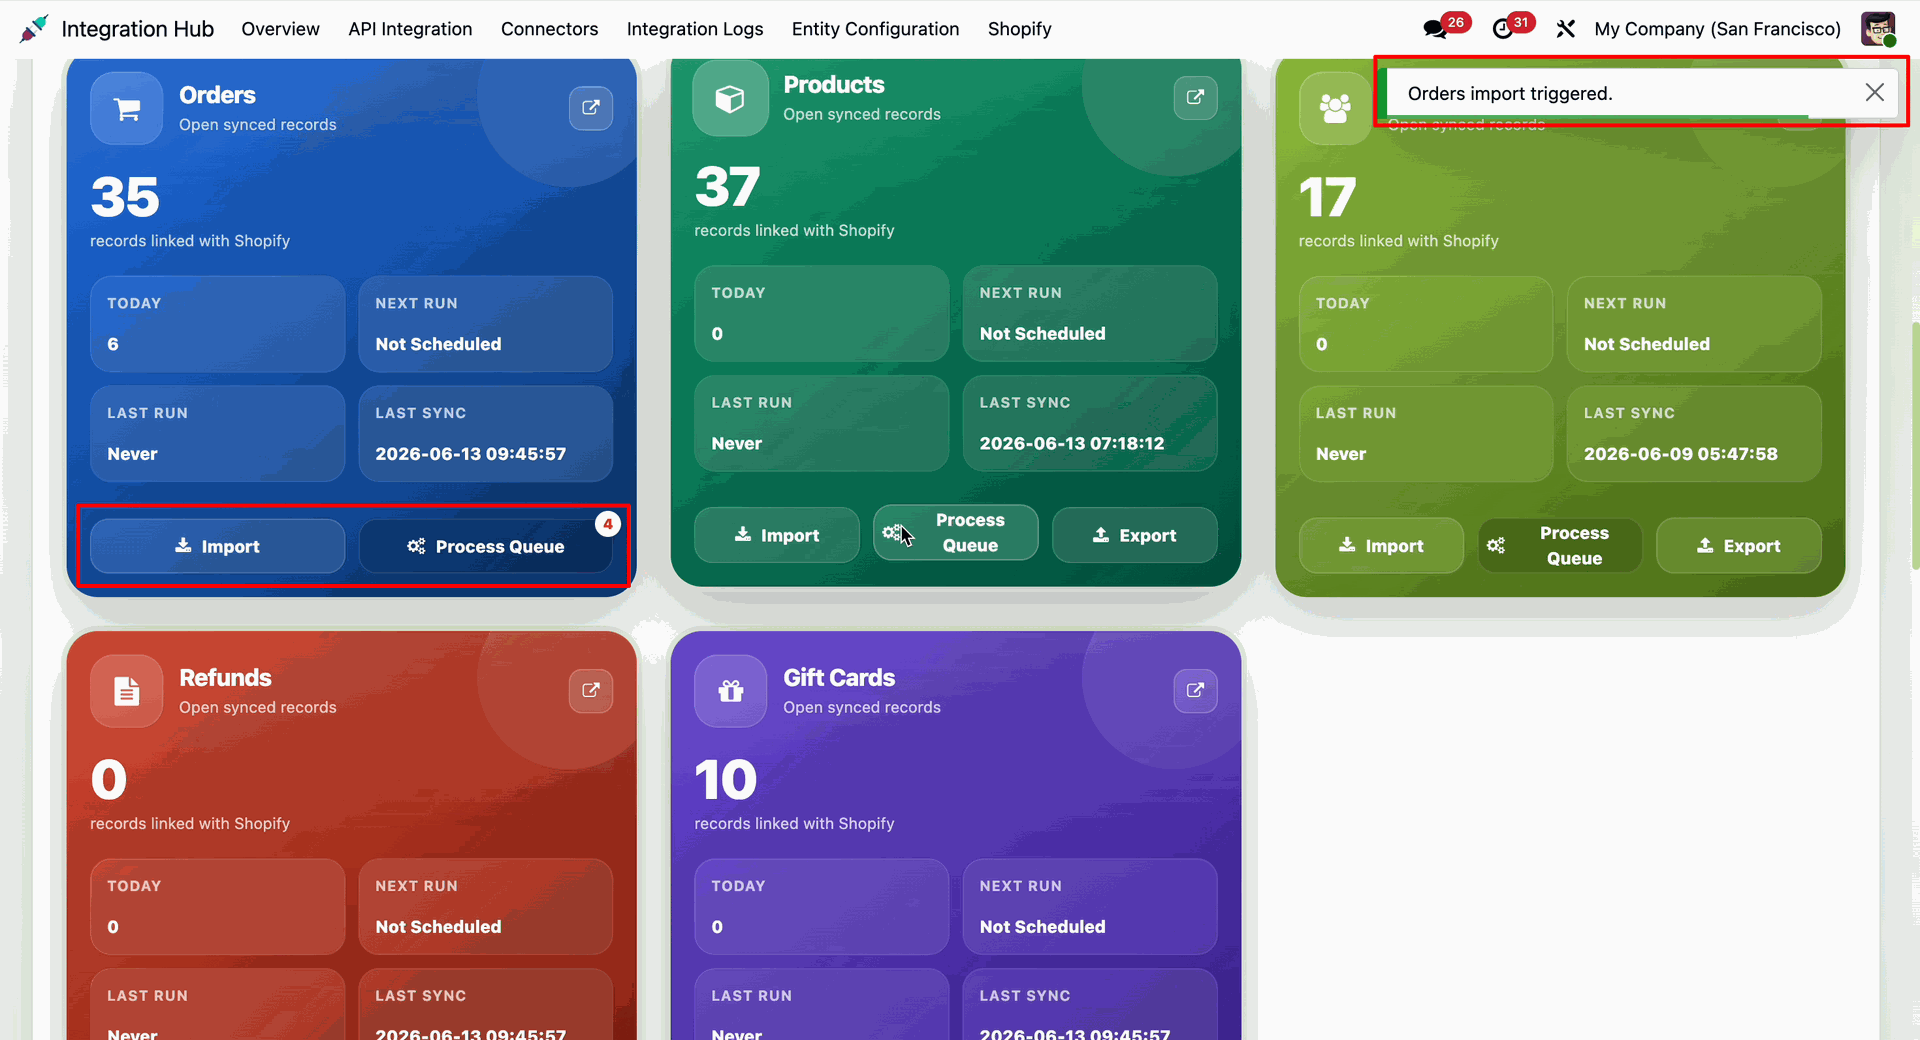
View the interactive Shopify Connector Dashboard showing instance-specific sync status, date range filter, queues health, processed vs pending queues counts, and sales performance indicators (Total Sales, Average Order Value, Weekly Growth).
Contact queue looks like this. Click on the 'Successfully Synced' to open synced records.
It will show synced records only in the dashboard.
Click on the 'Error Queue' to open the error records. Currently, error records are 0, so it will show empty.
Click on the 'Draft Queue' to open the draft records; it will show draft records in the dashboard.
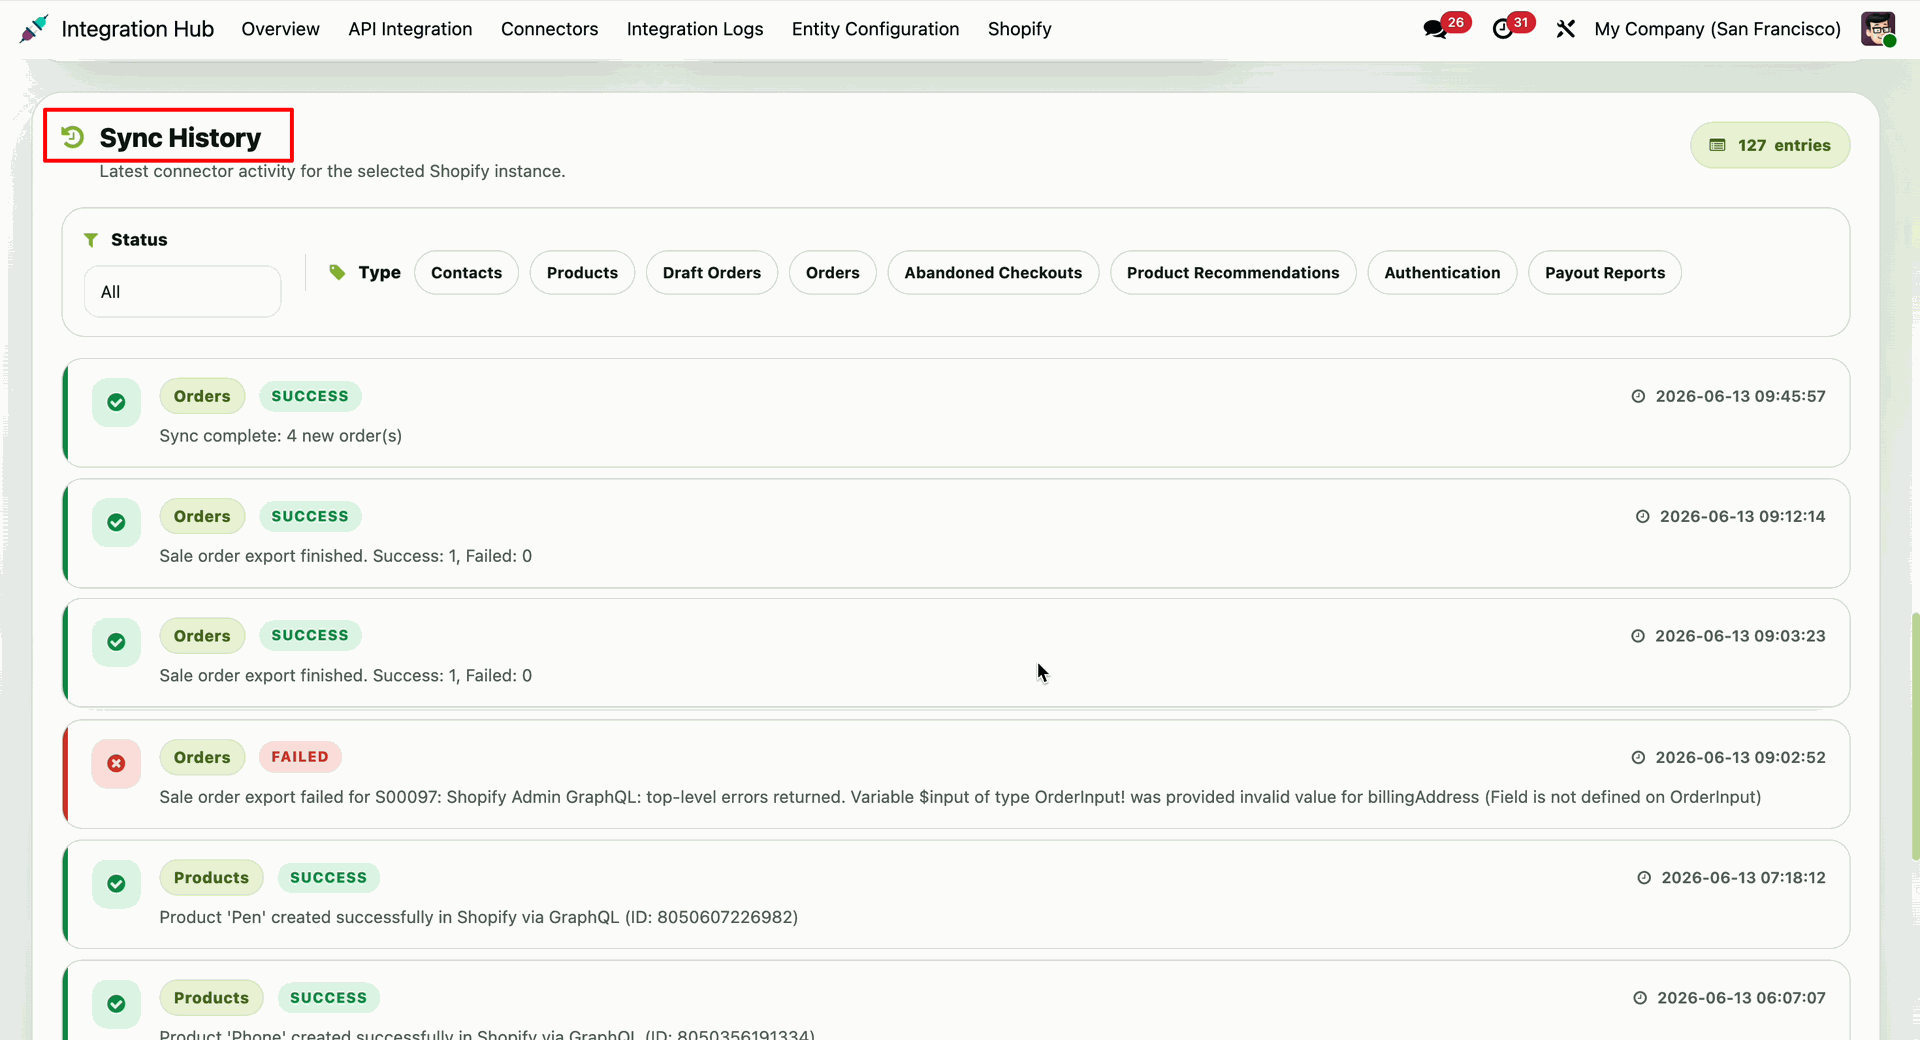
You can track daily queue activities with day-wise draft, failed, and done synchronization records for better monitoring and operational visibility.
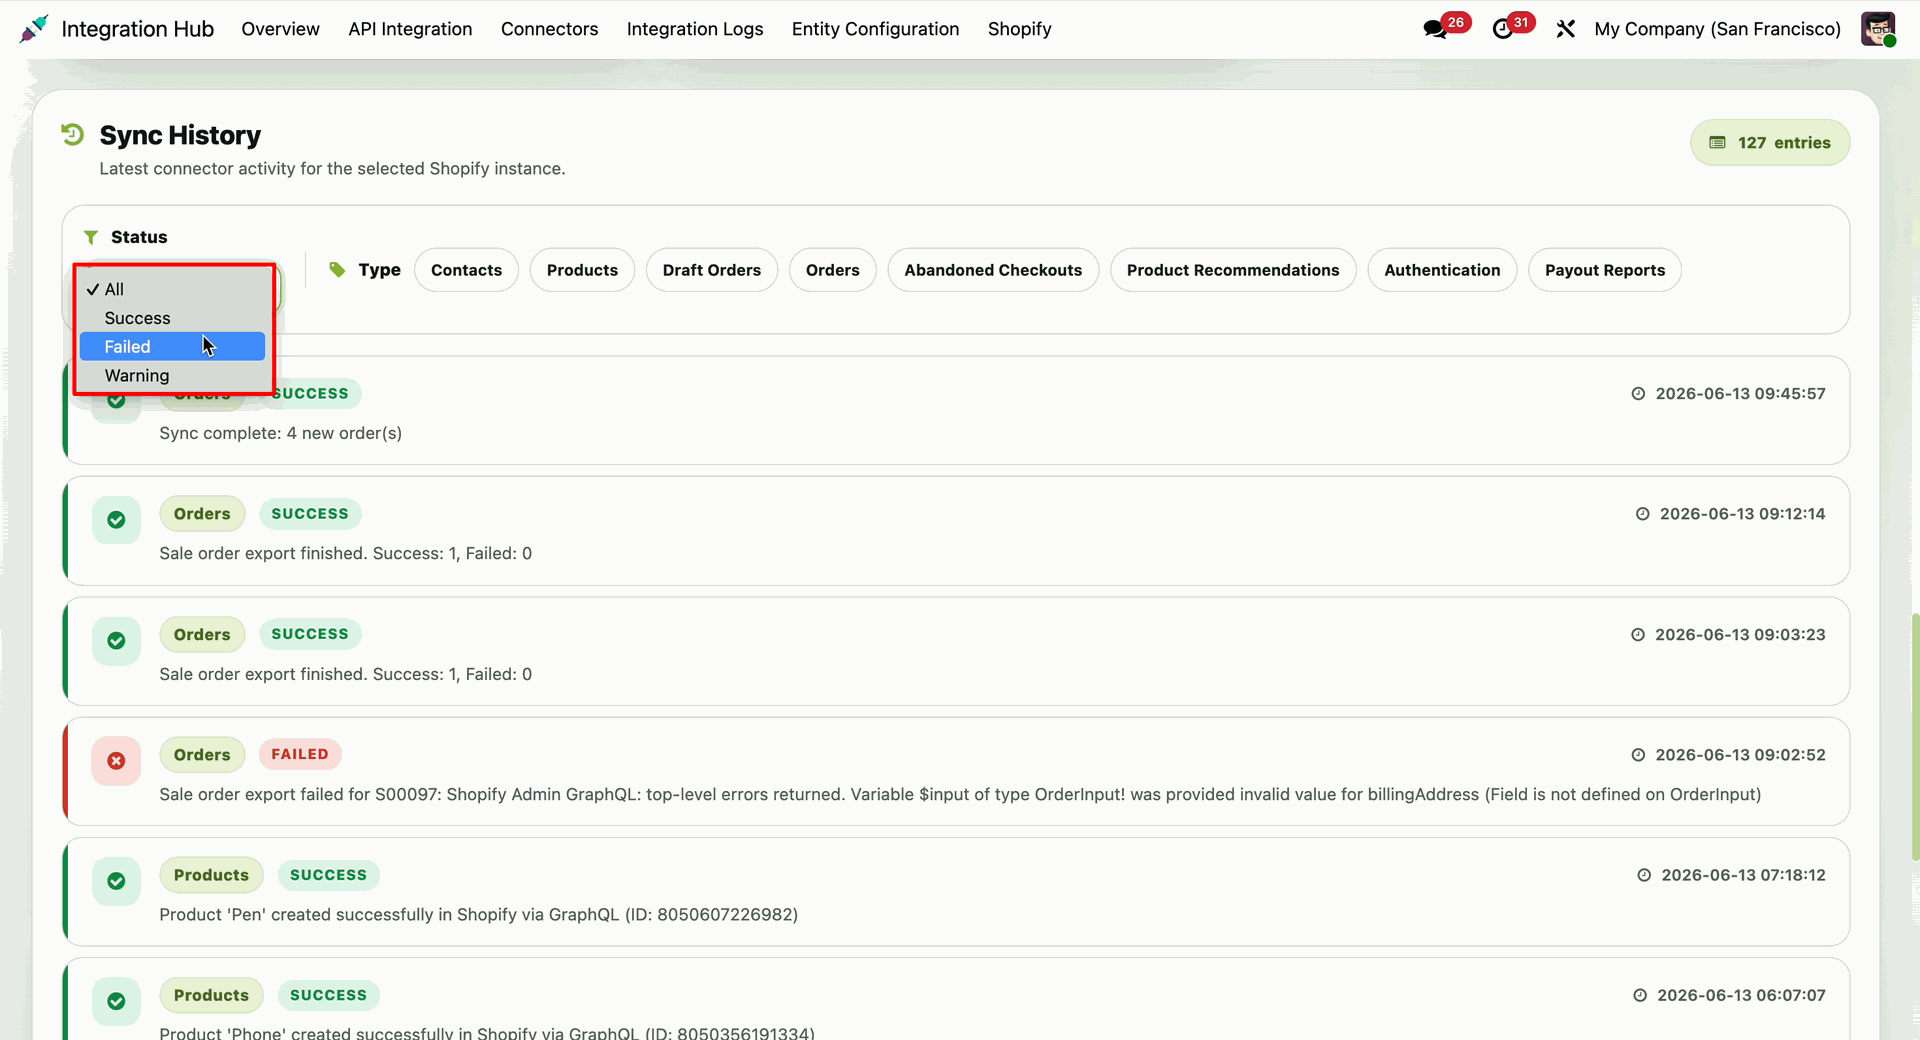
Workflow
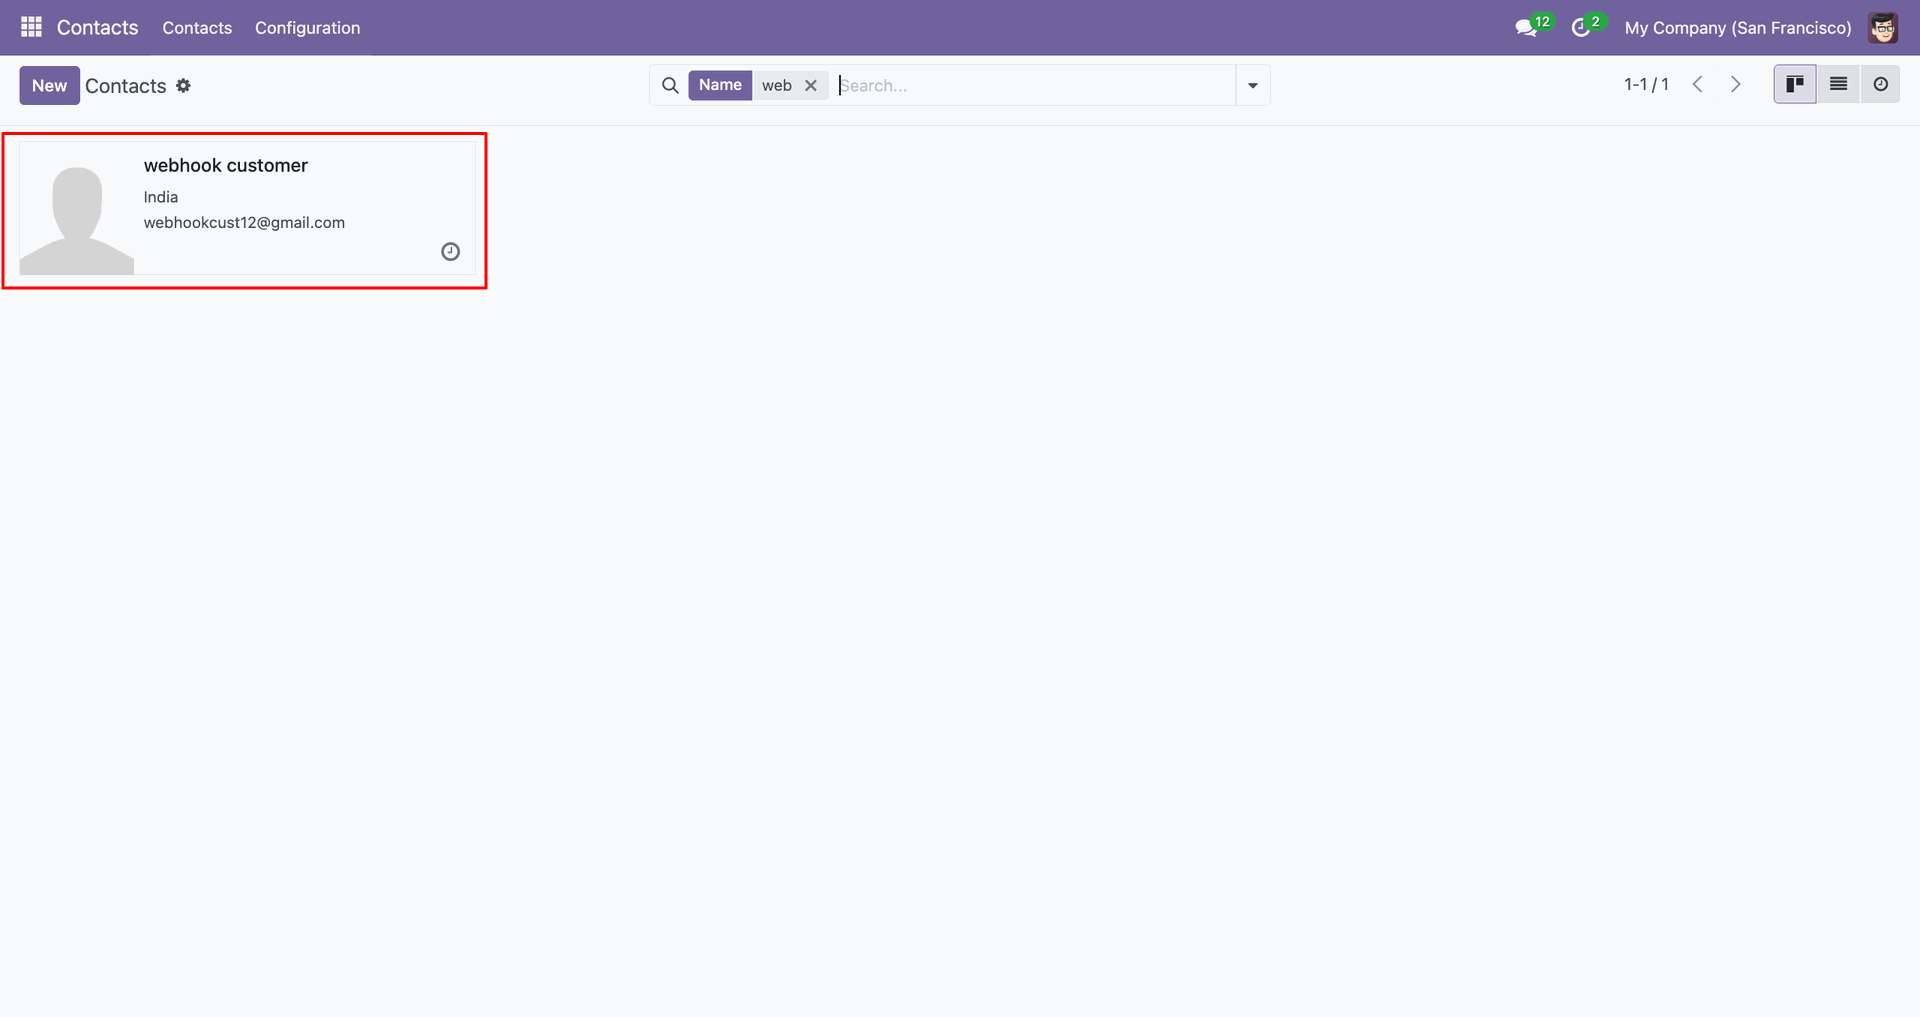
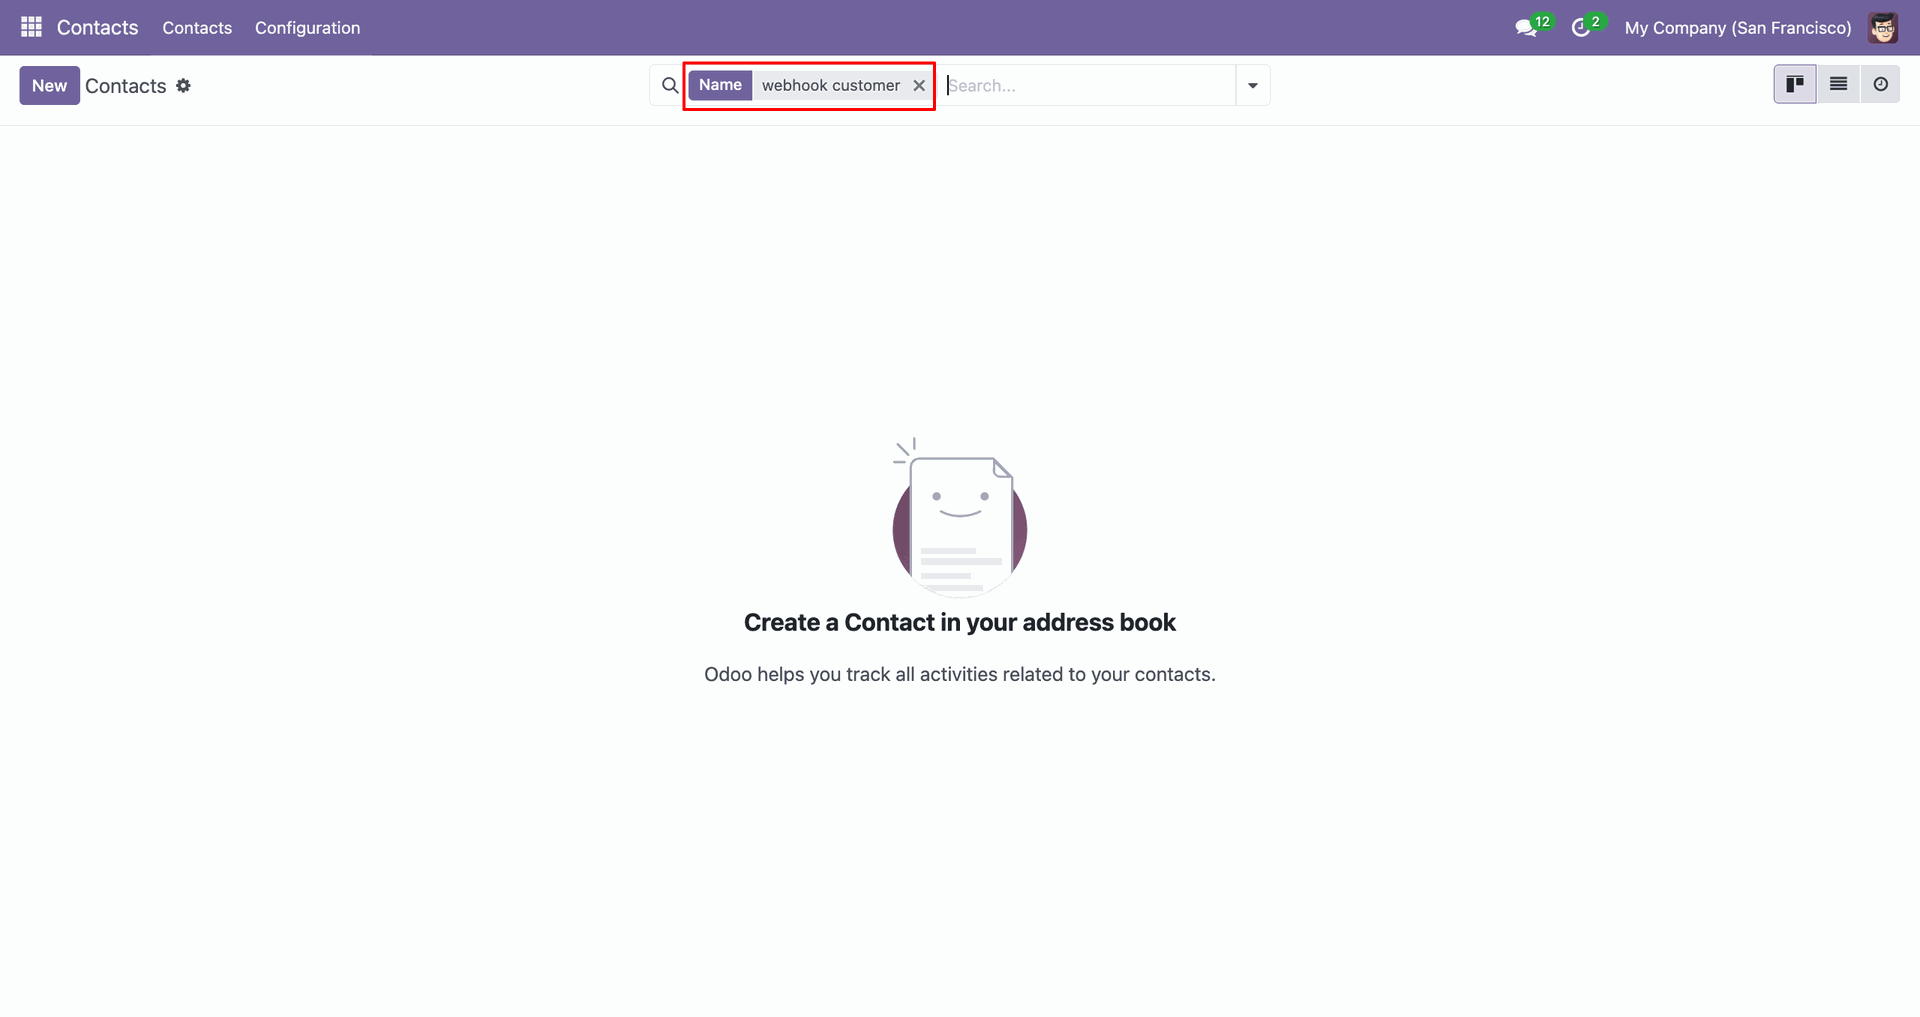
Use the Name search filter to find the webhook customer contact.
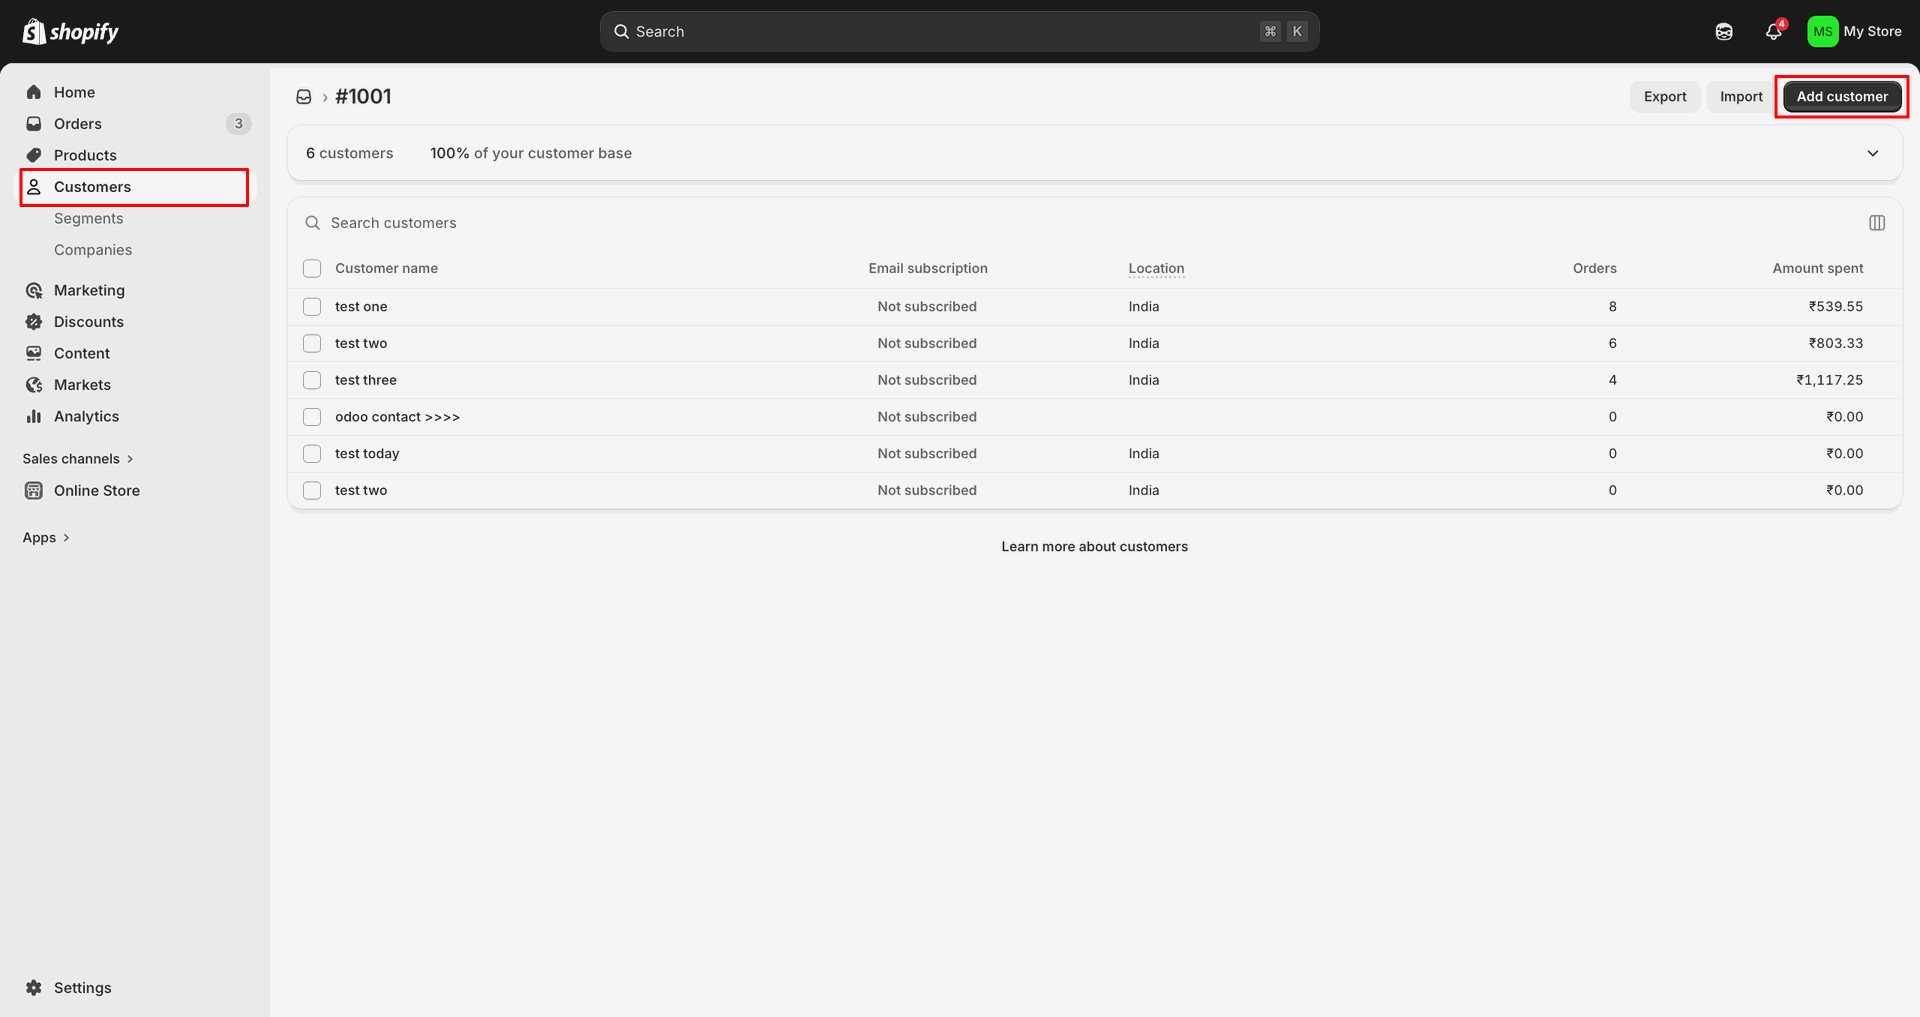
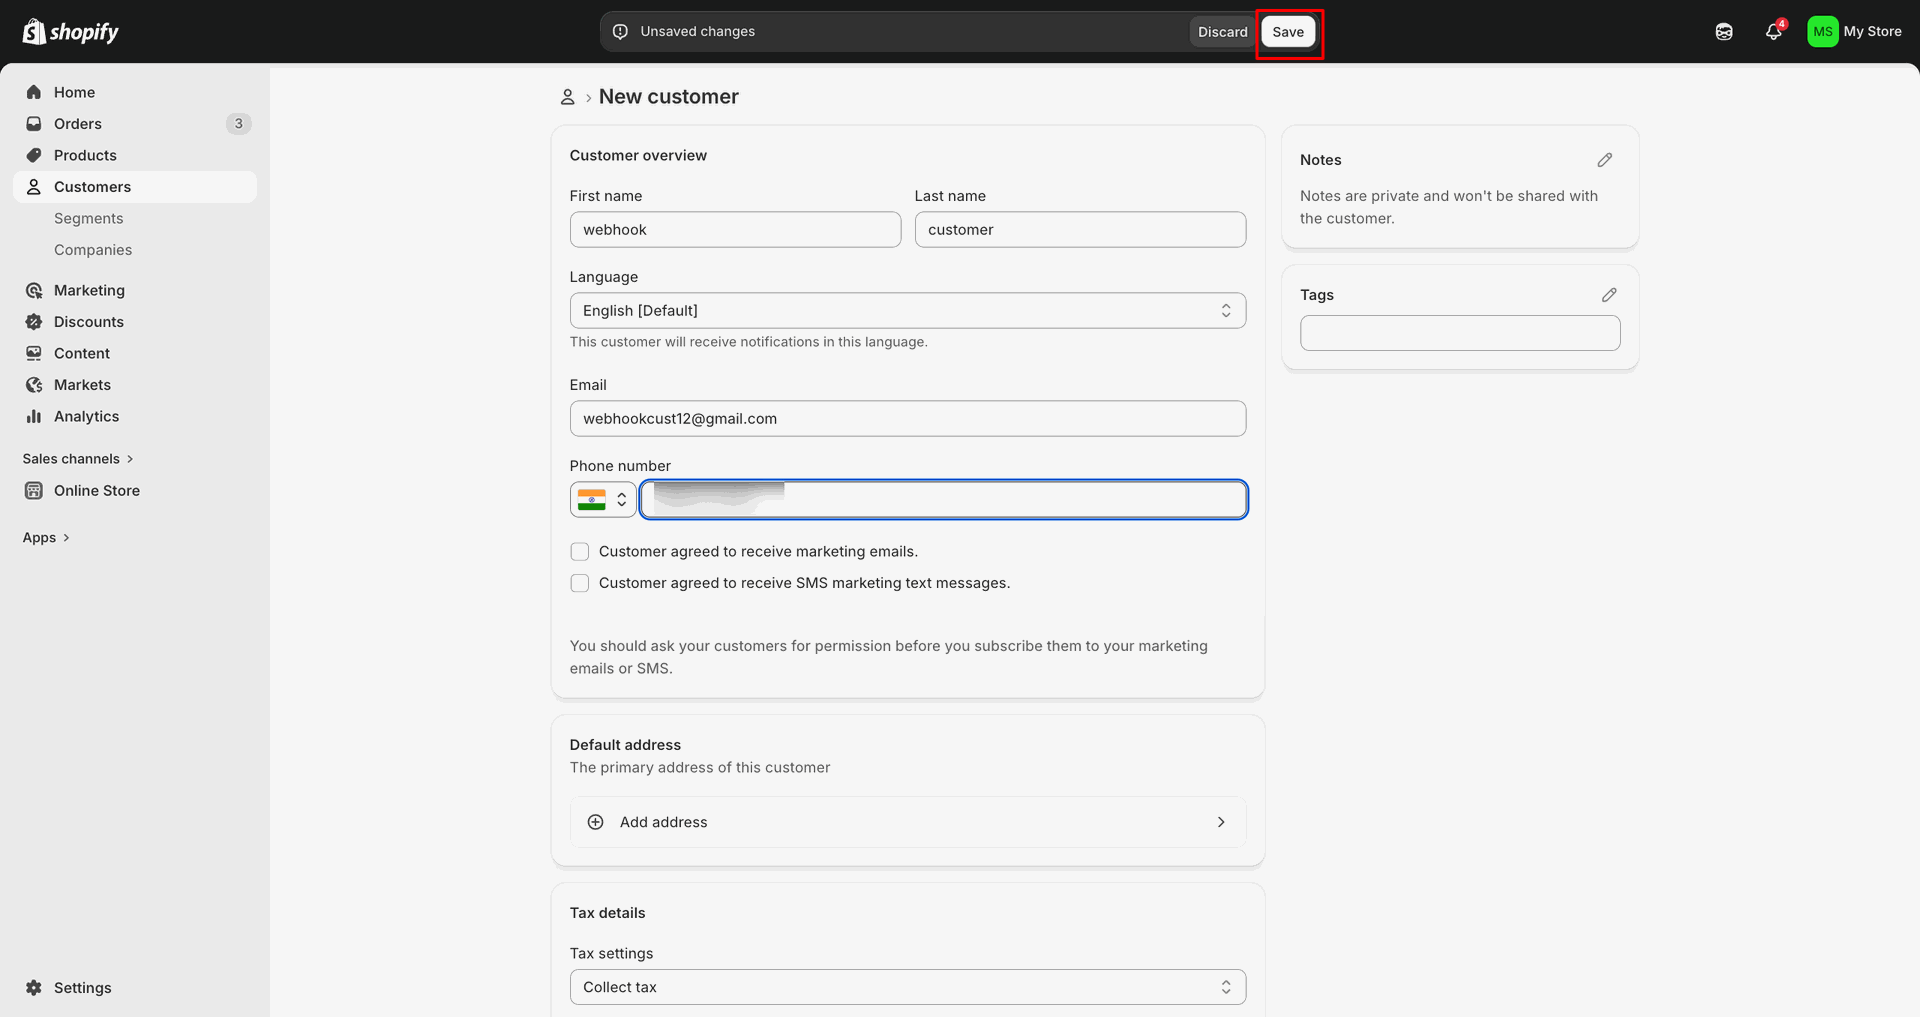
Click Add customer in Shopify to create a new customer record.
Enter customer details, update the phone number, and click Save.
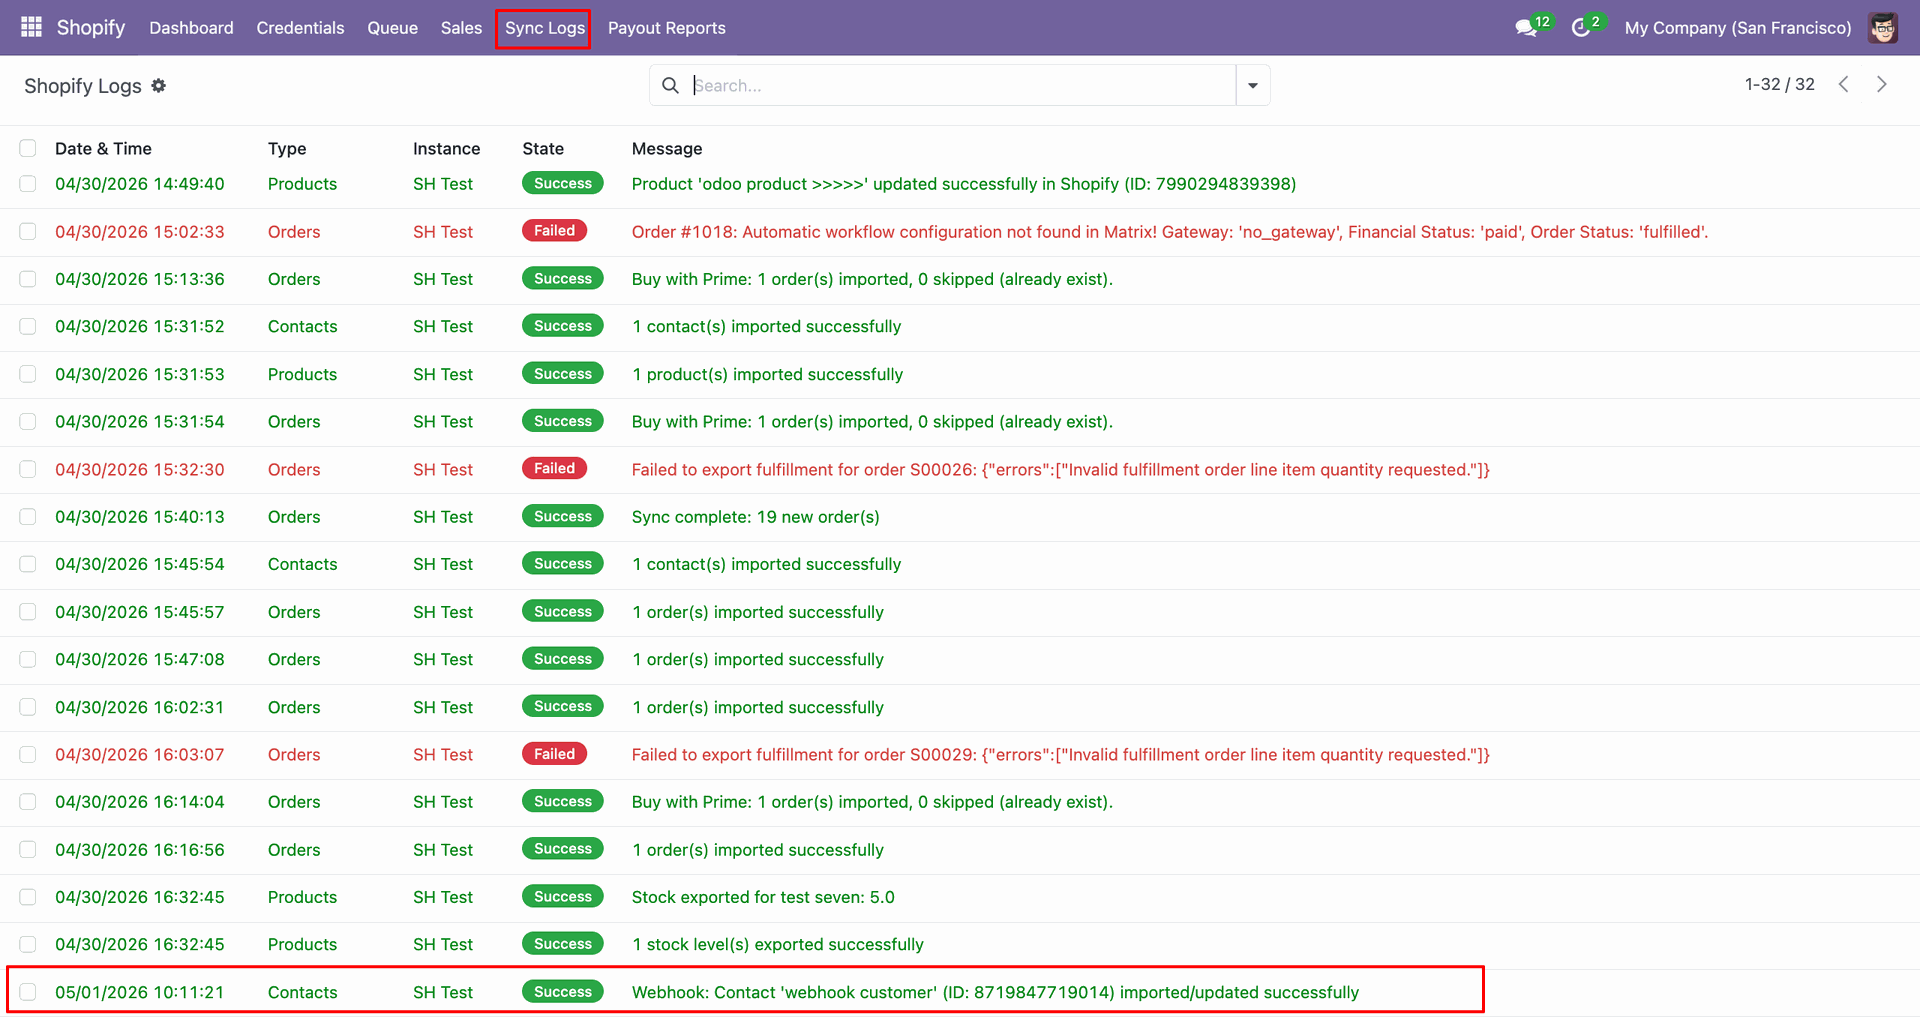
Check Sync Logs to confirm the webhook customer imported or updated successfully.
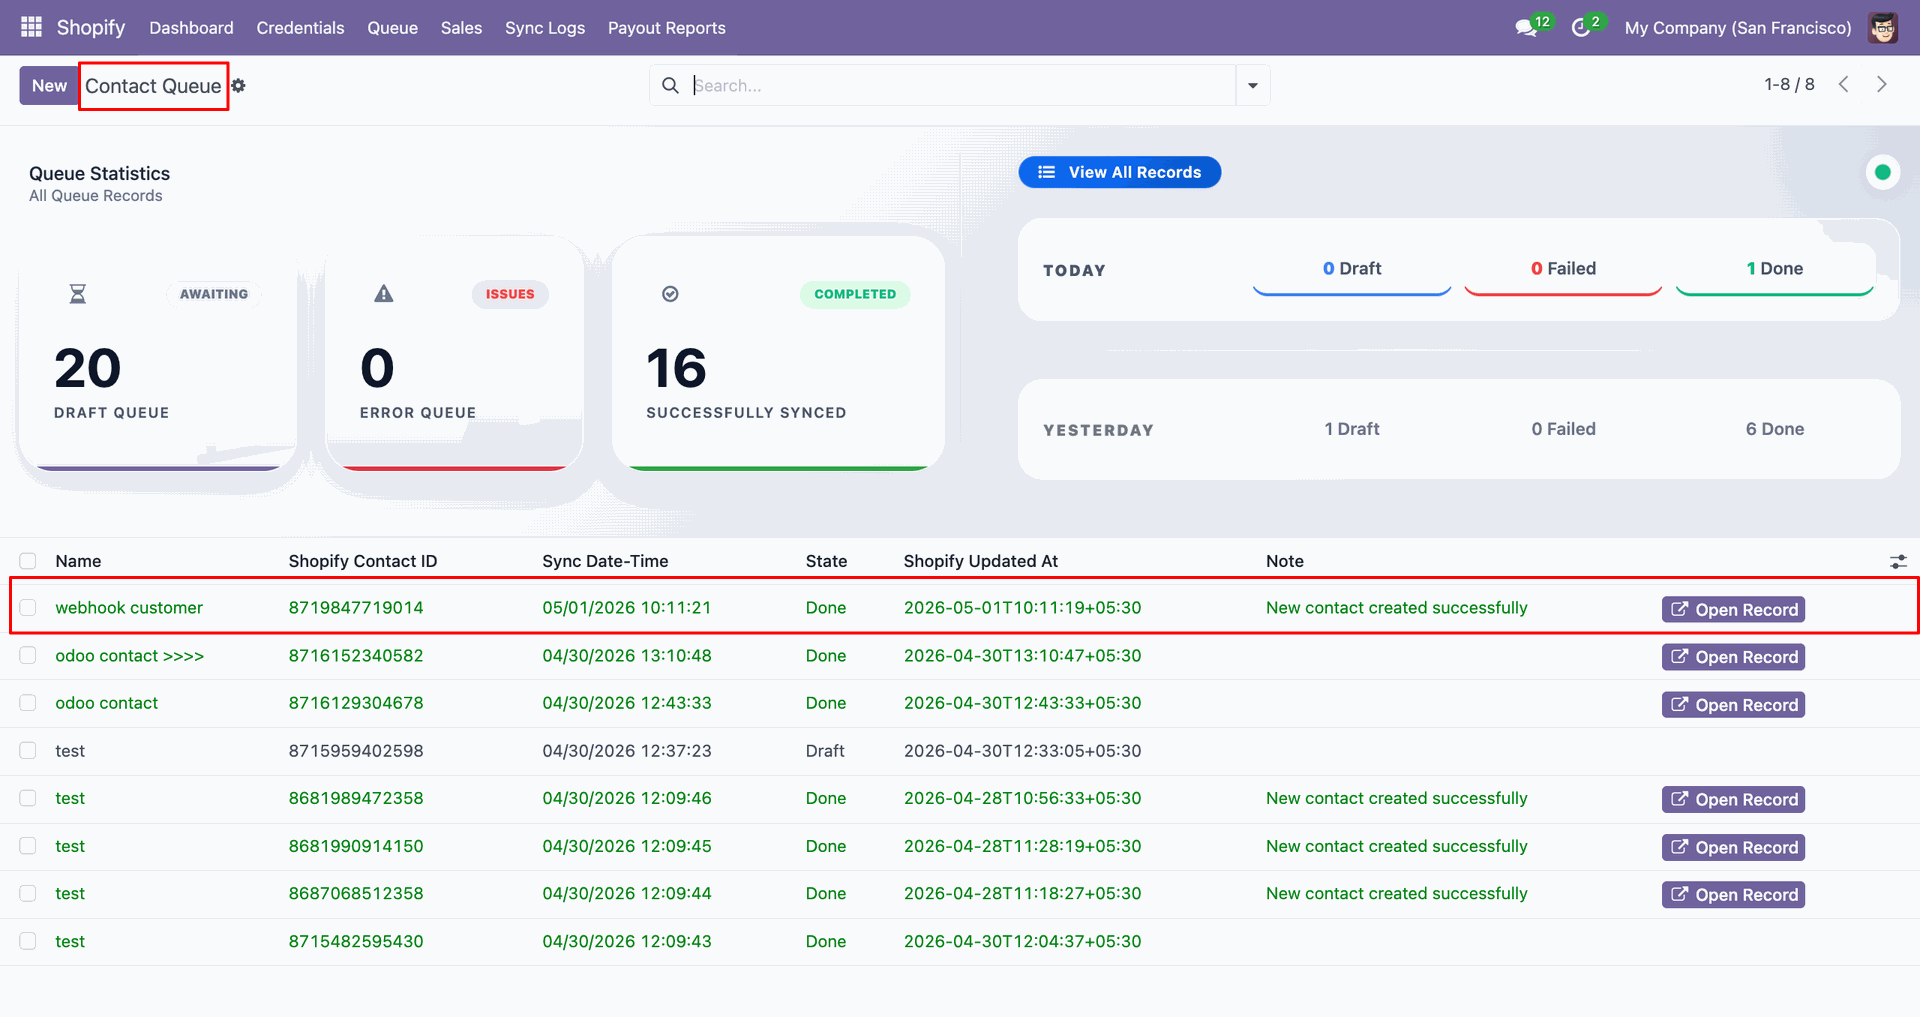
Open Contact Queue to review the webhook customer record and queue status.
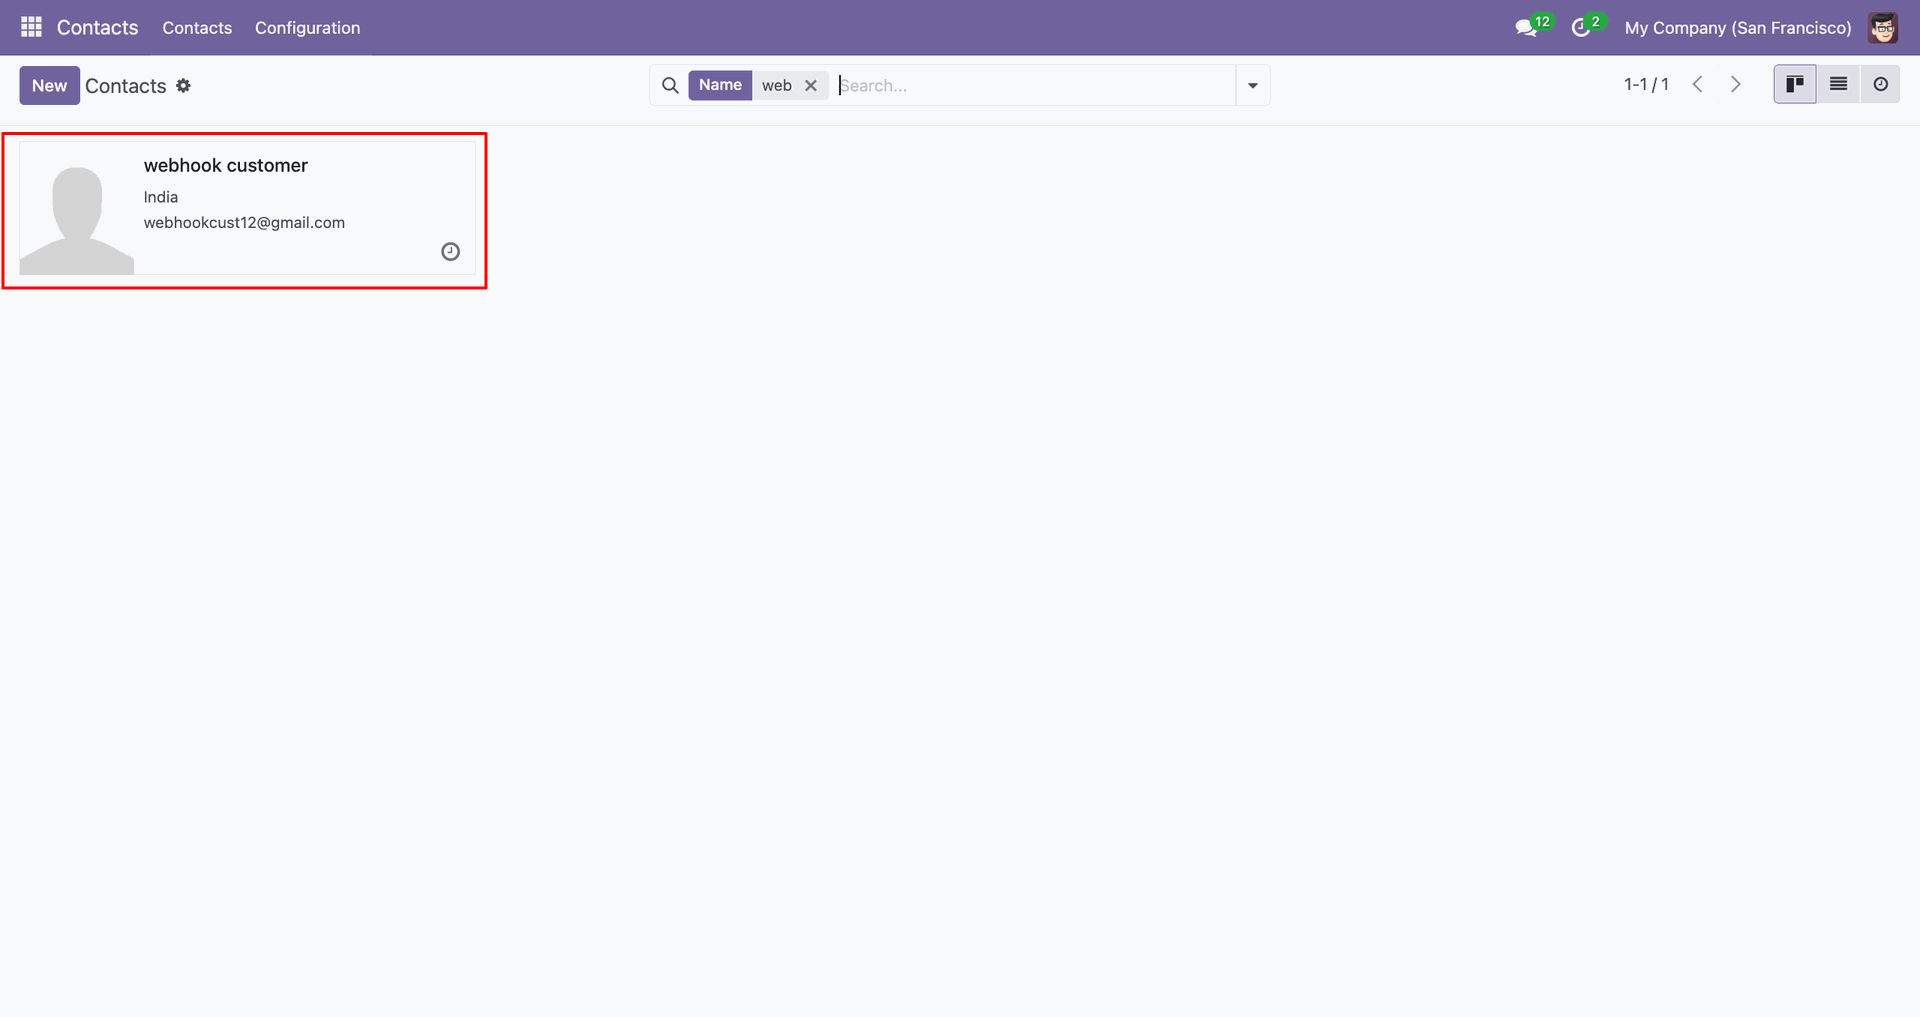
Open the webhook customer contact card to review the created Odoo record.
Choose Edit customer from Shopify to update the existing webhook customer.
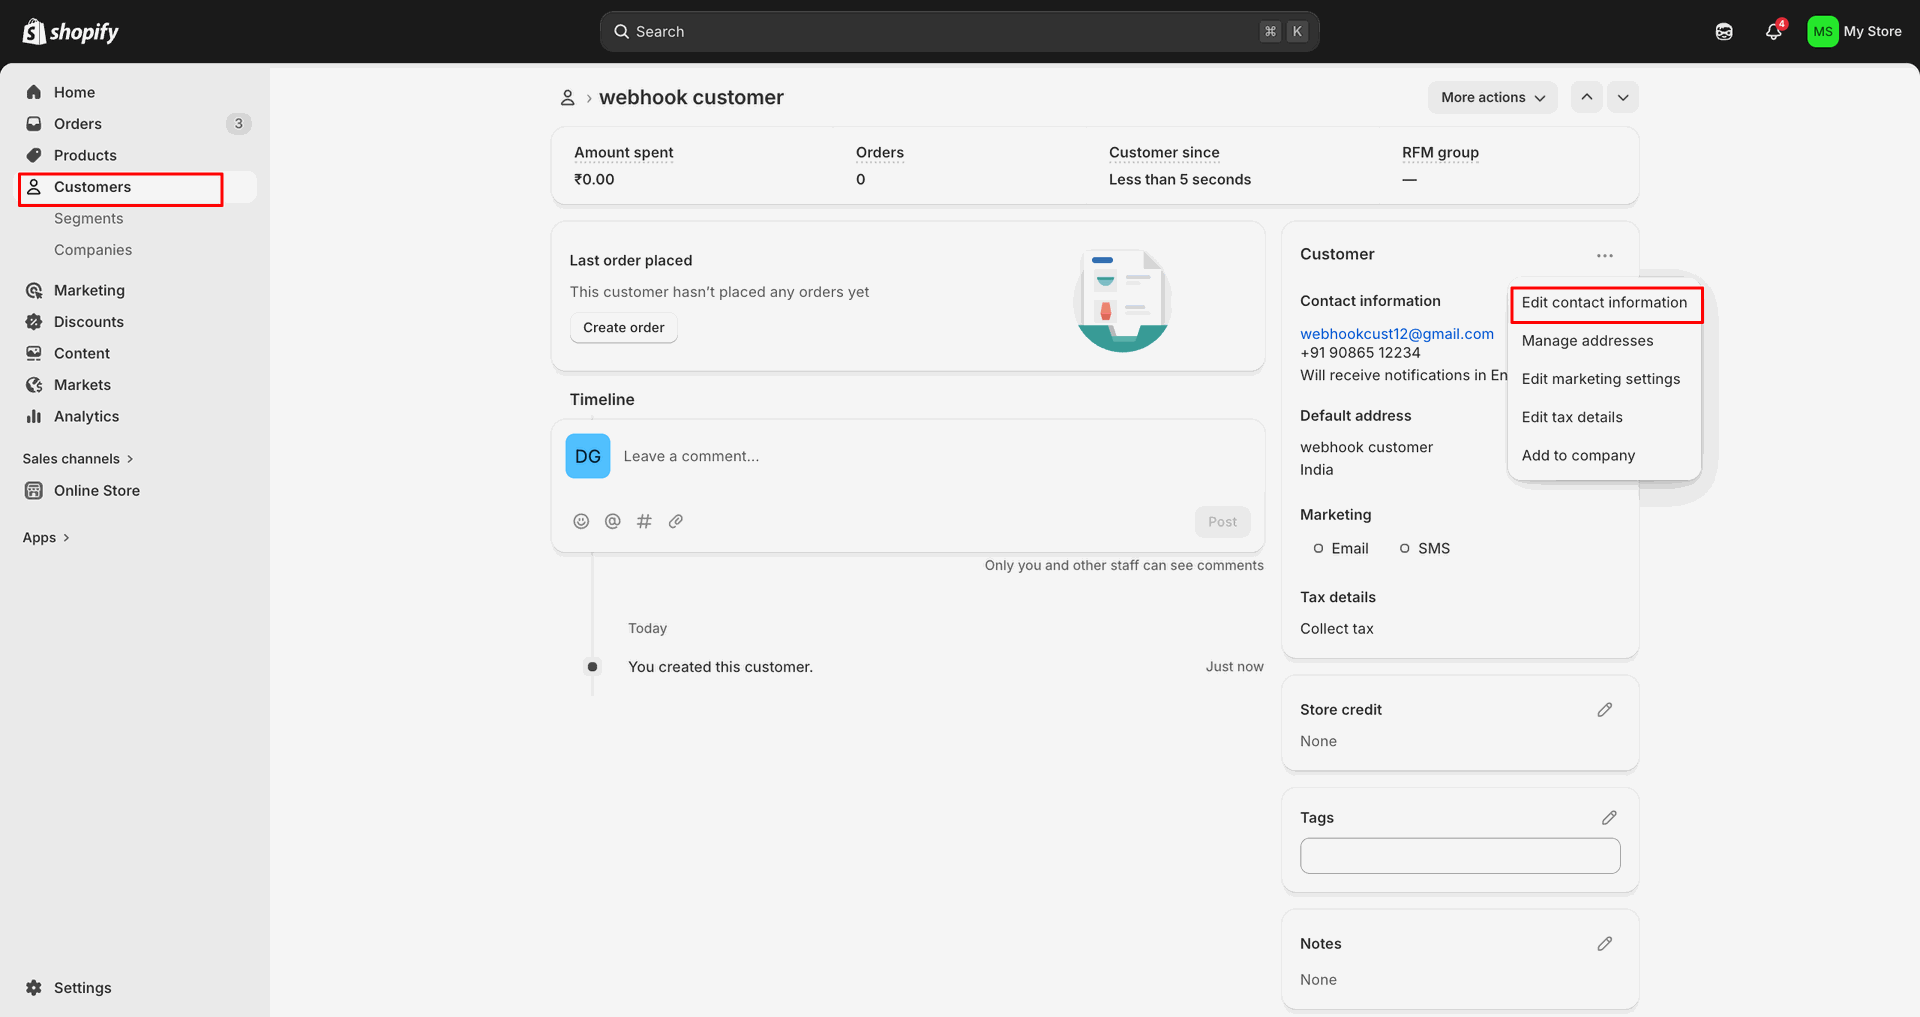
Change customer fields in the popup, then click Save to apply.
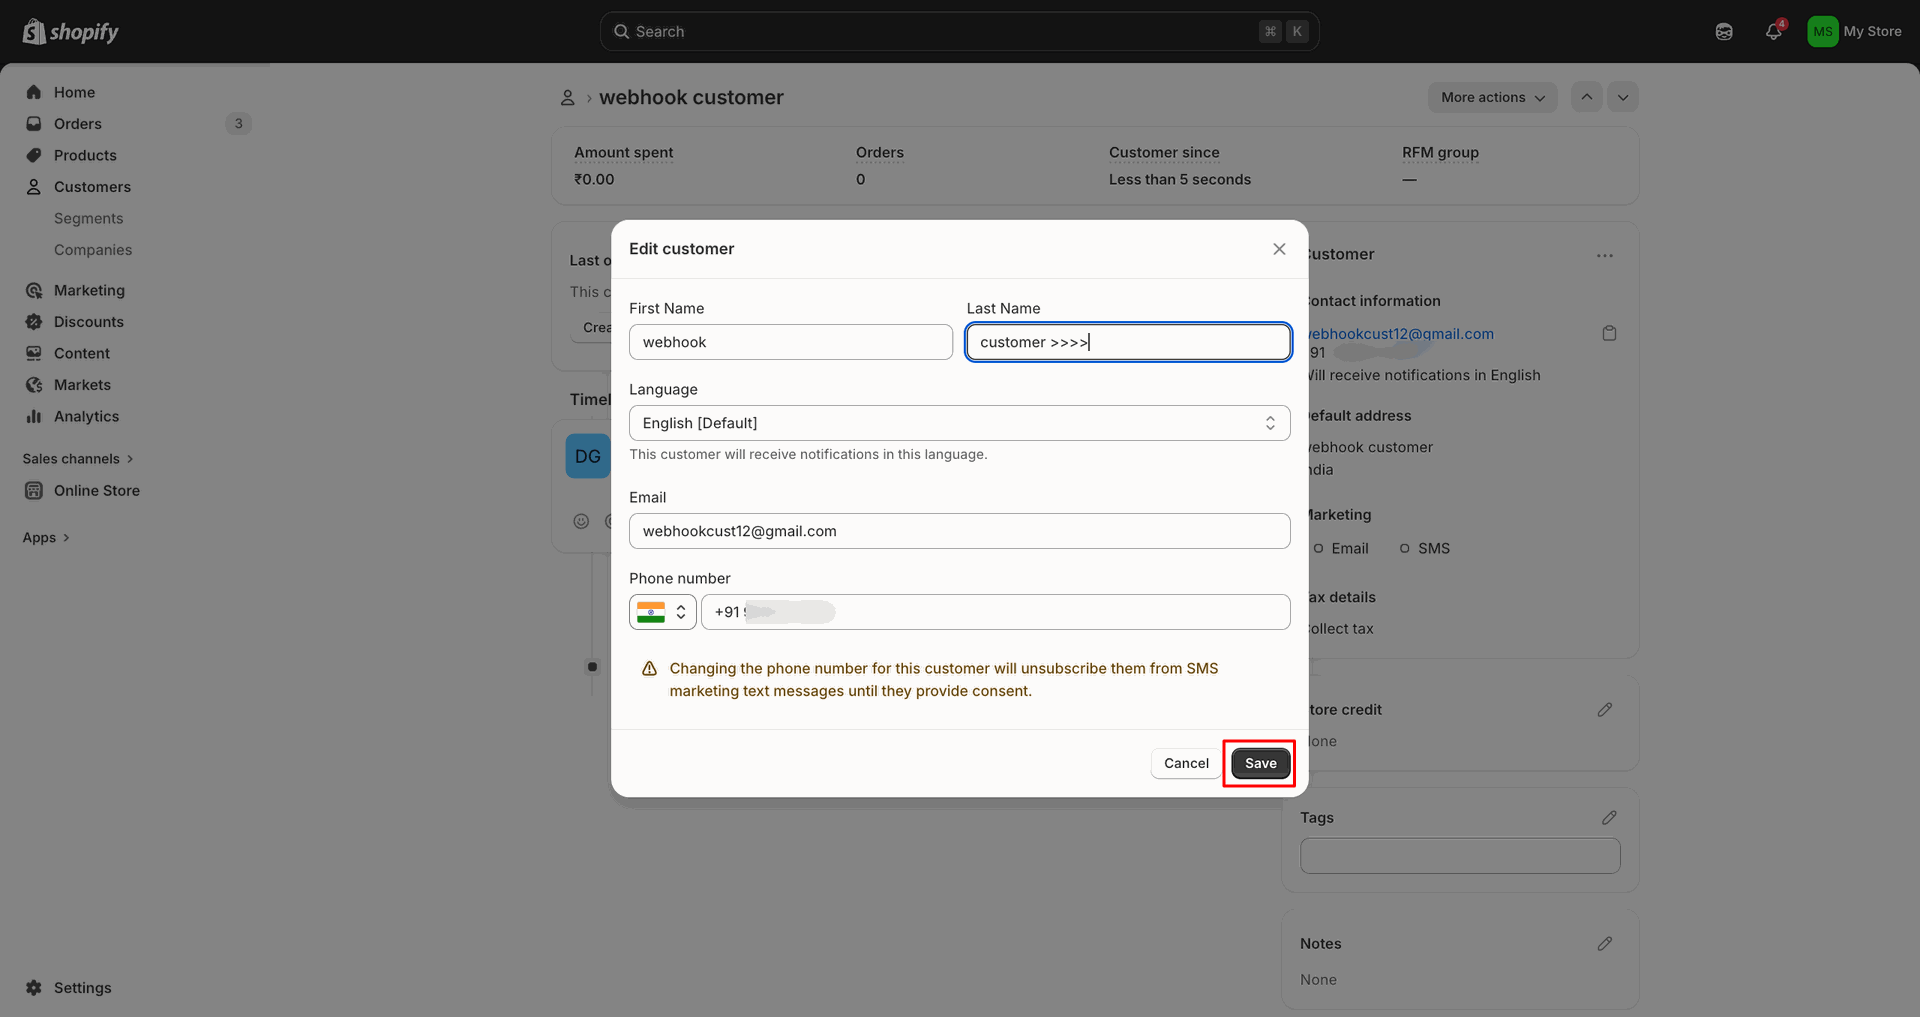
Review Sync Logs to confirm the webhook customer update processed successfully.
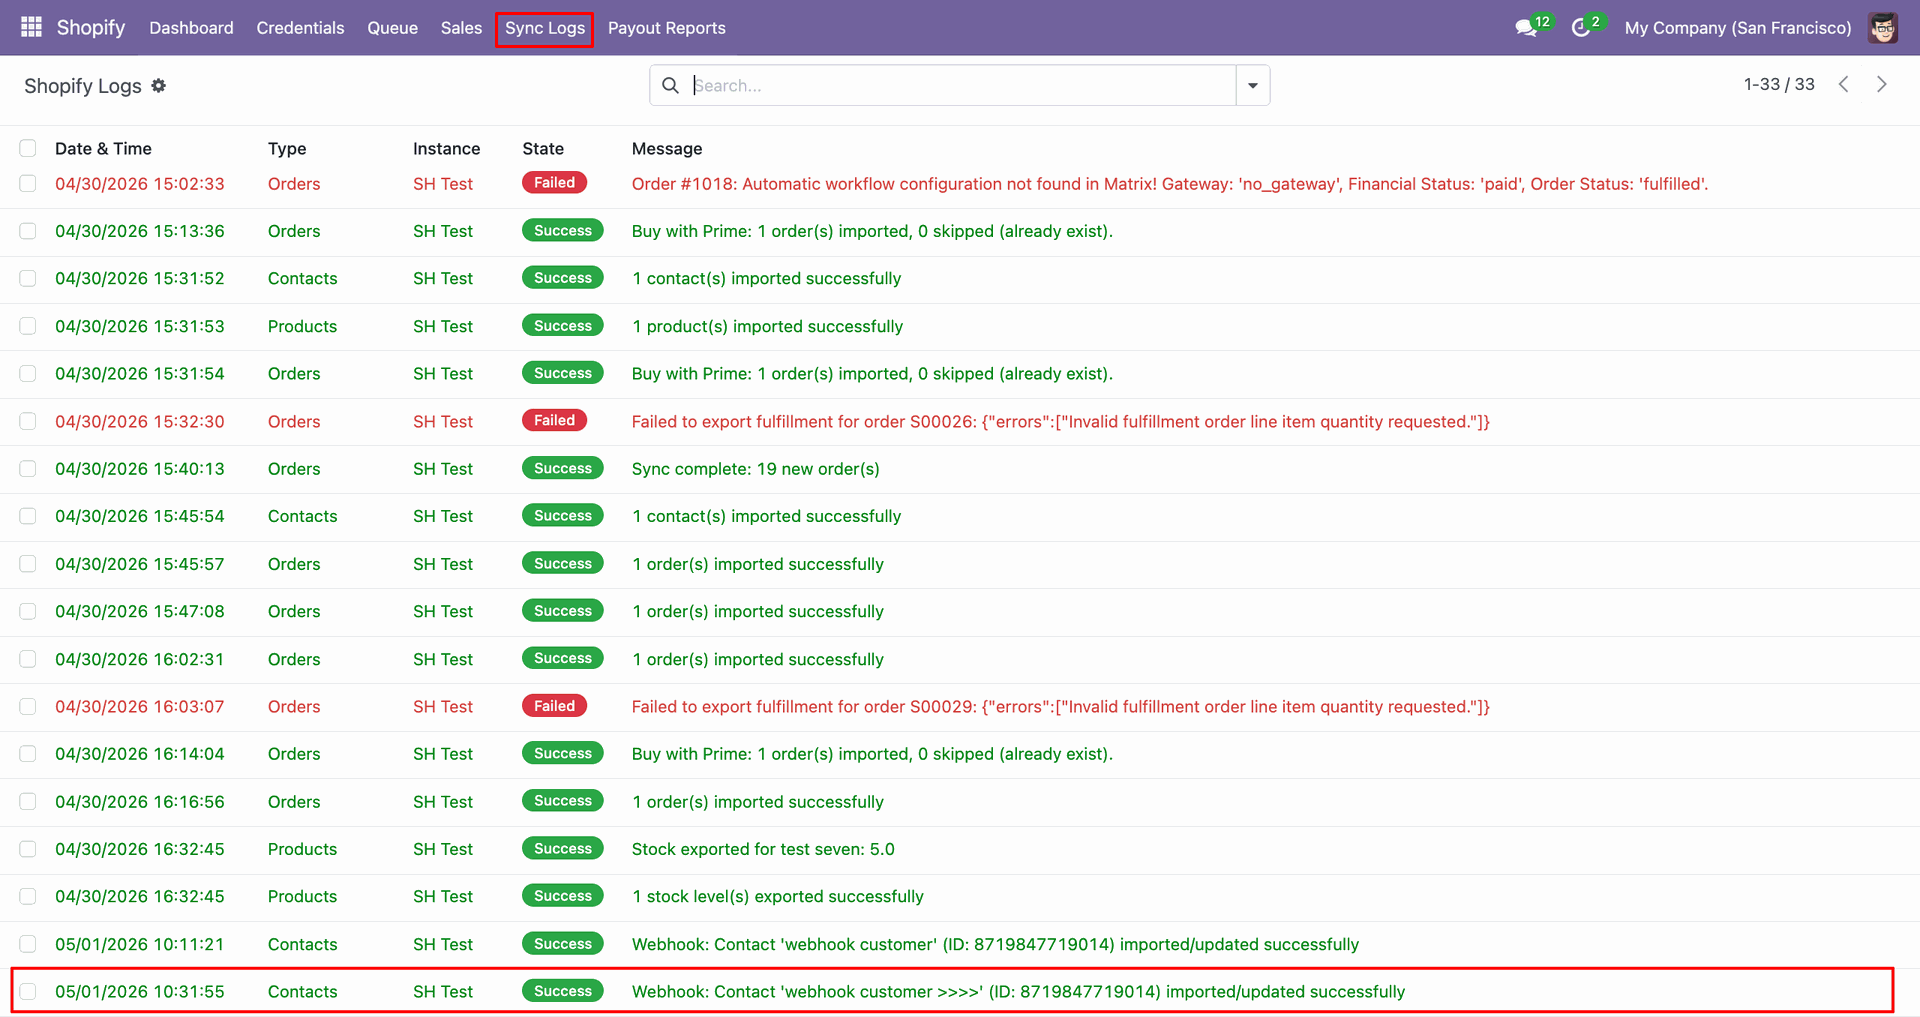
Inspect Contact Queue to verify the existing contact was updated successfully.
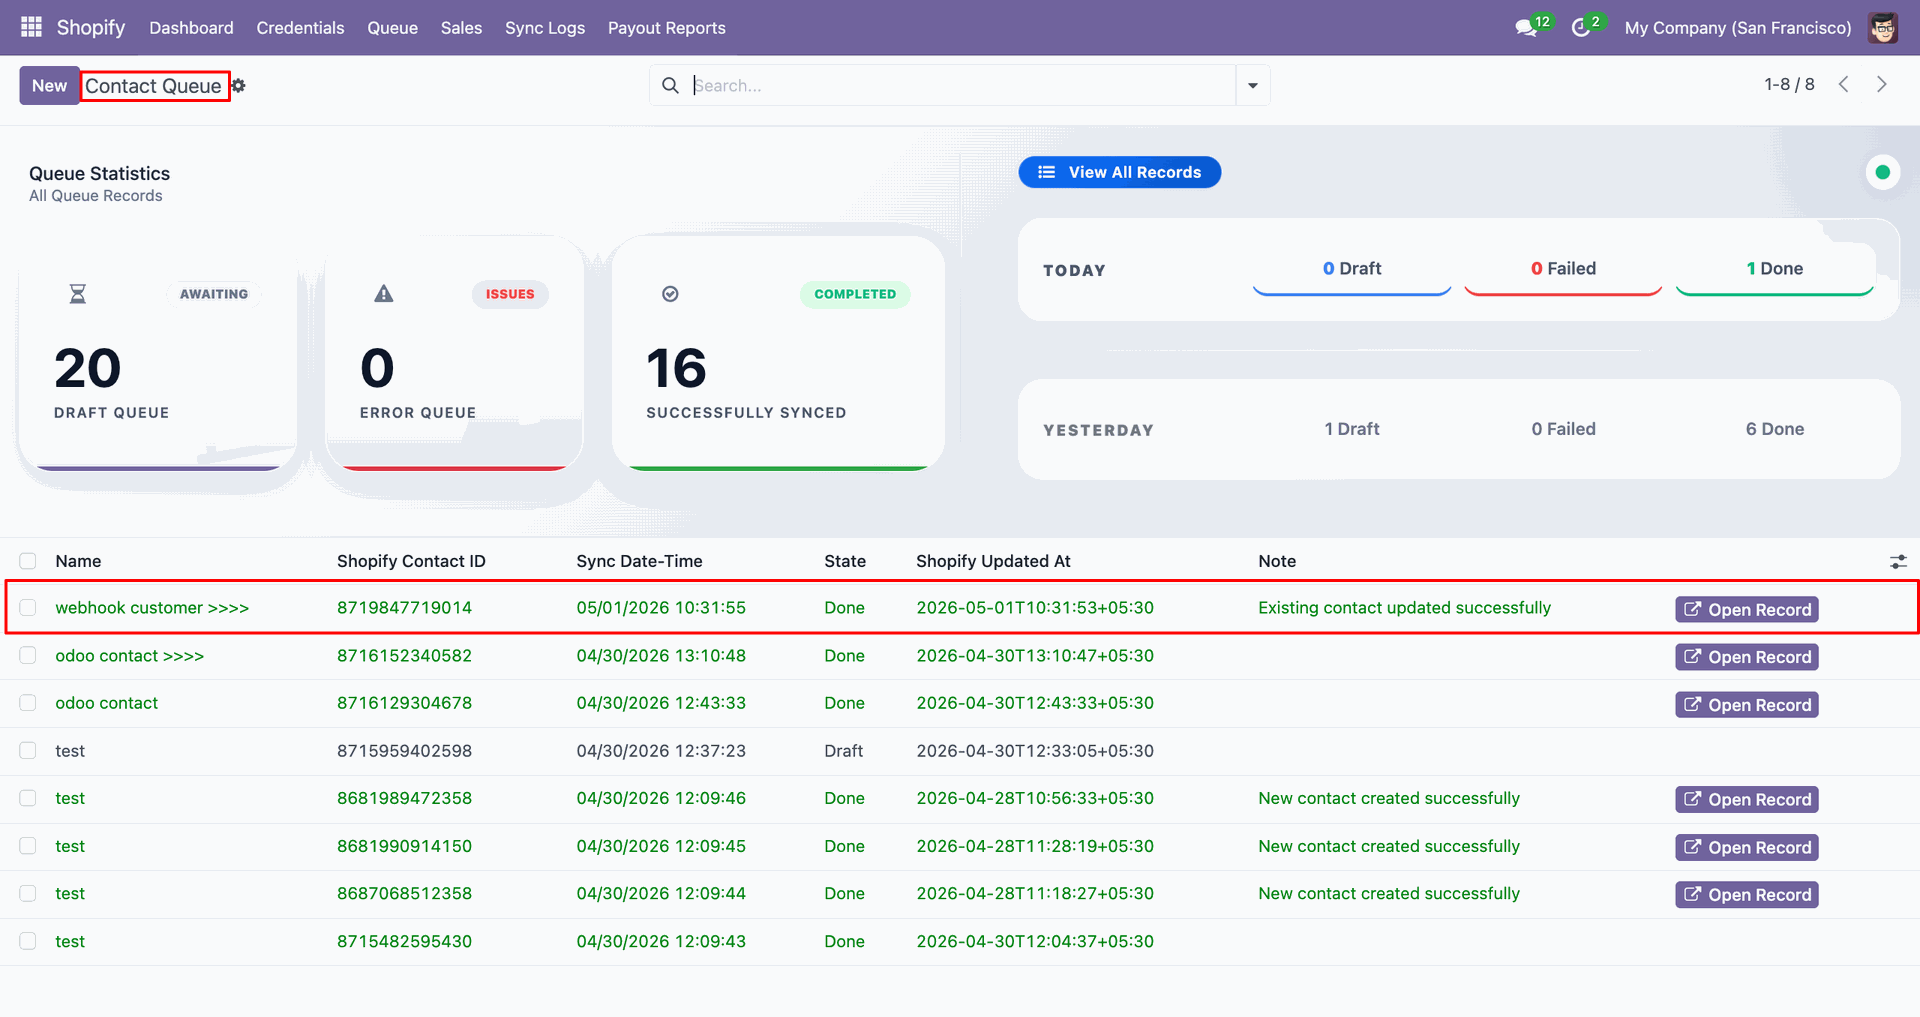
Open the updated webhook customer contact to review the changed name.
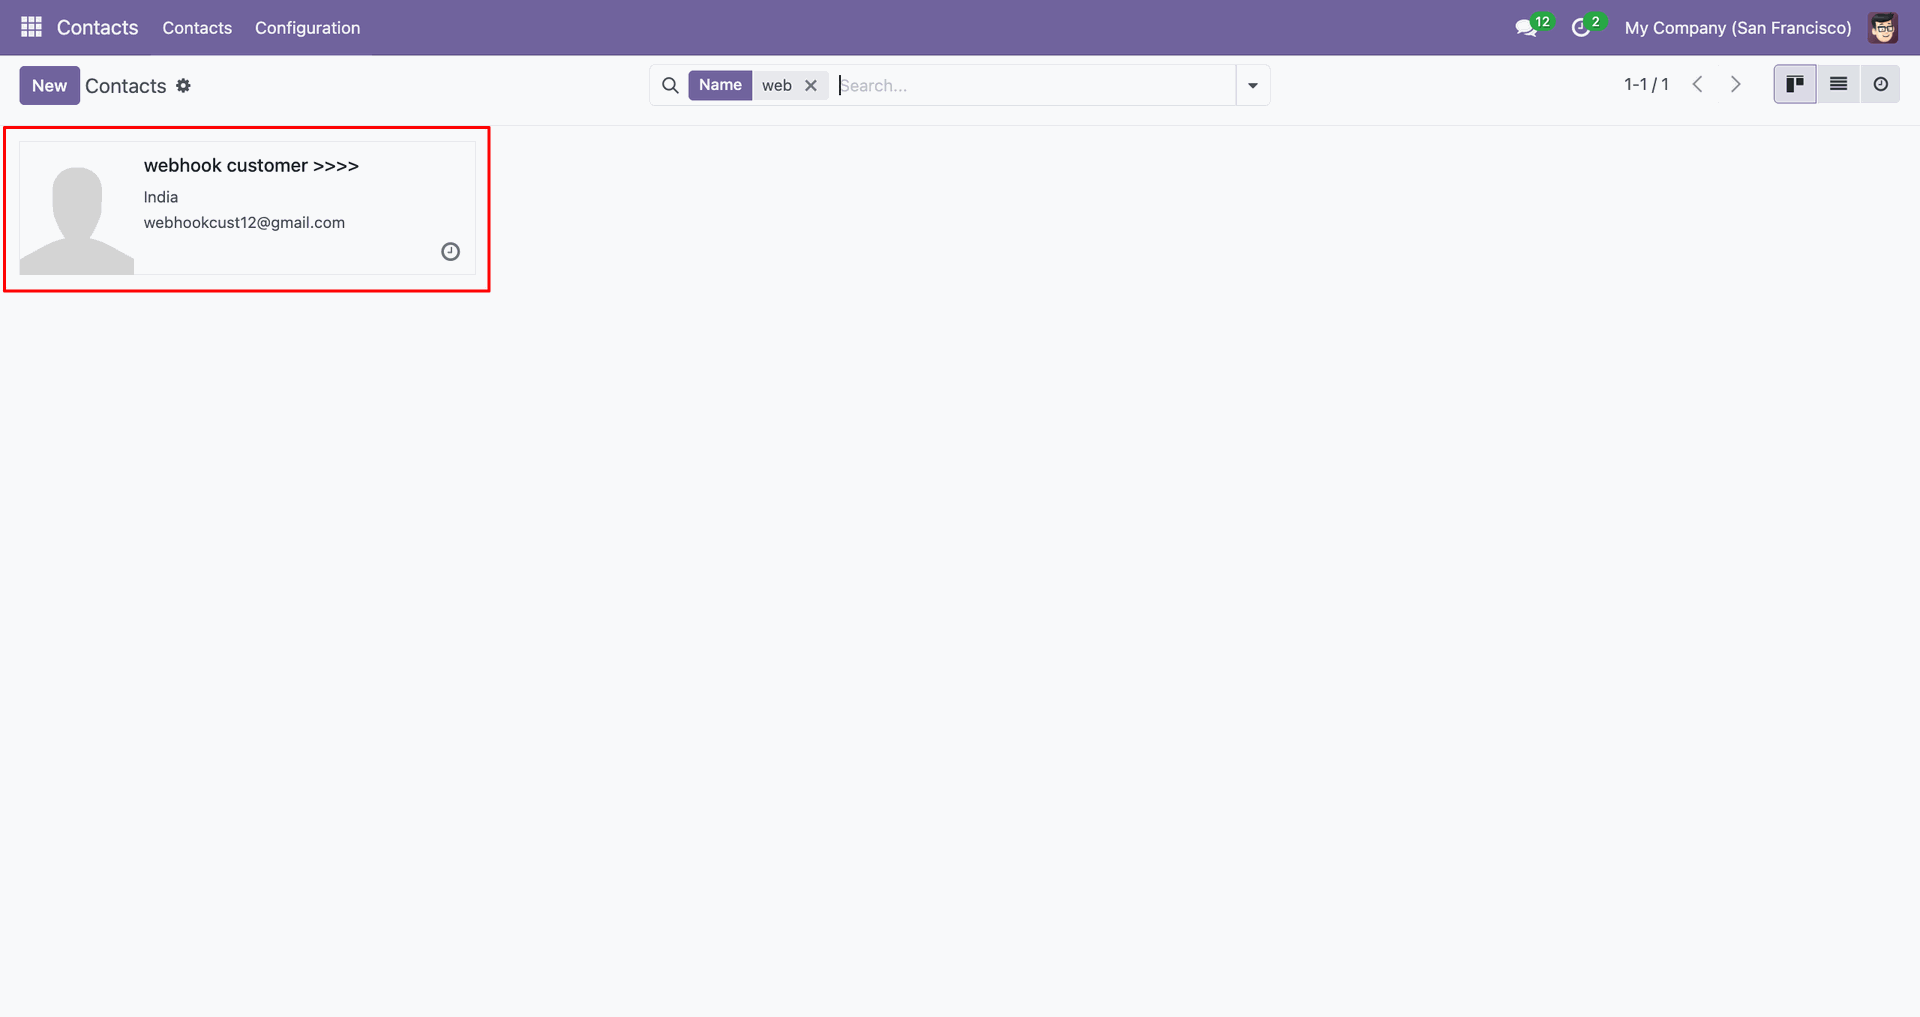
Workflow
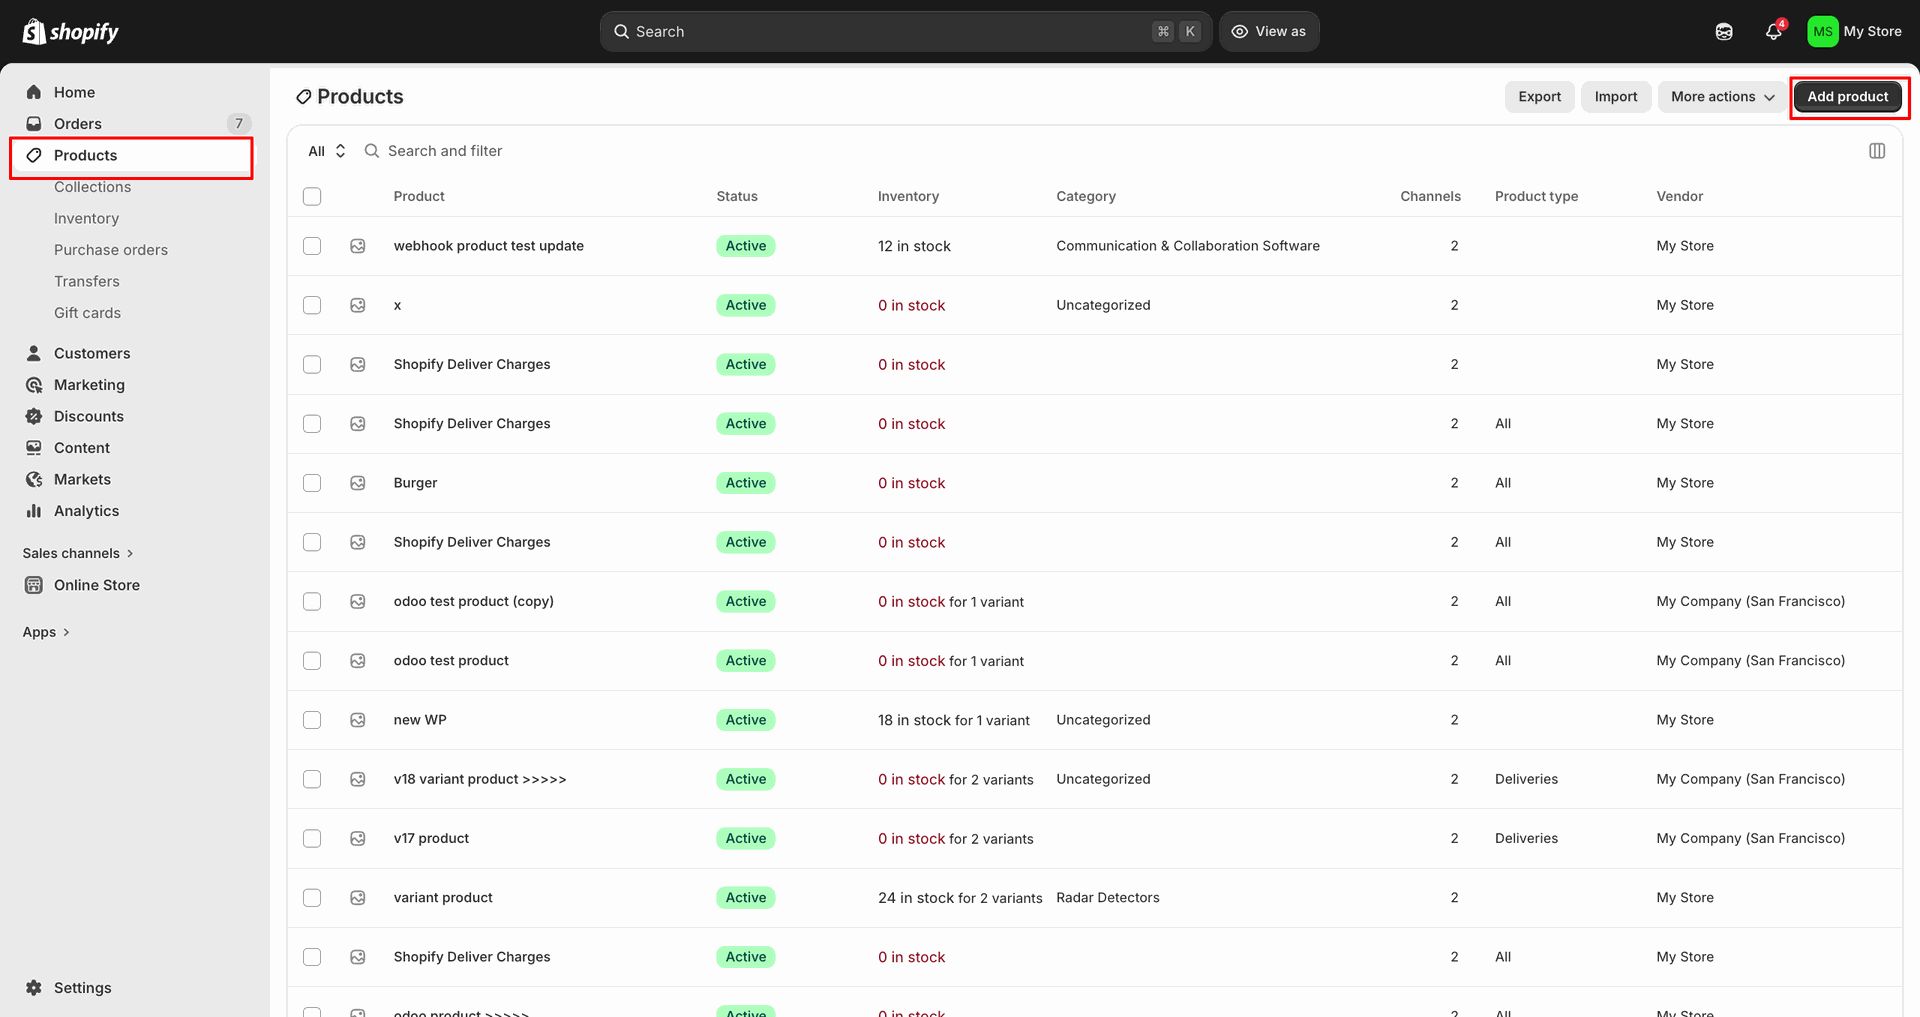
Click Add product in Shopify to create a new product record.
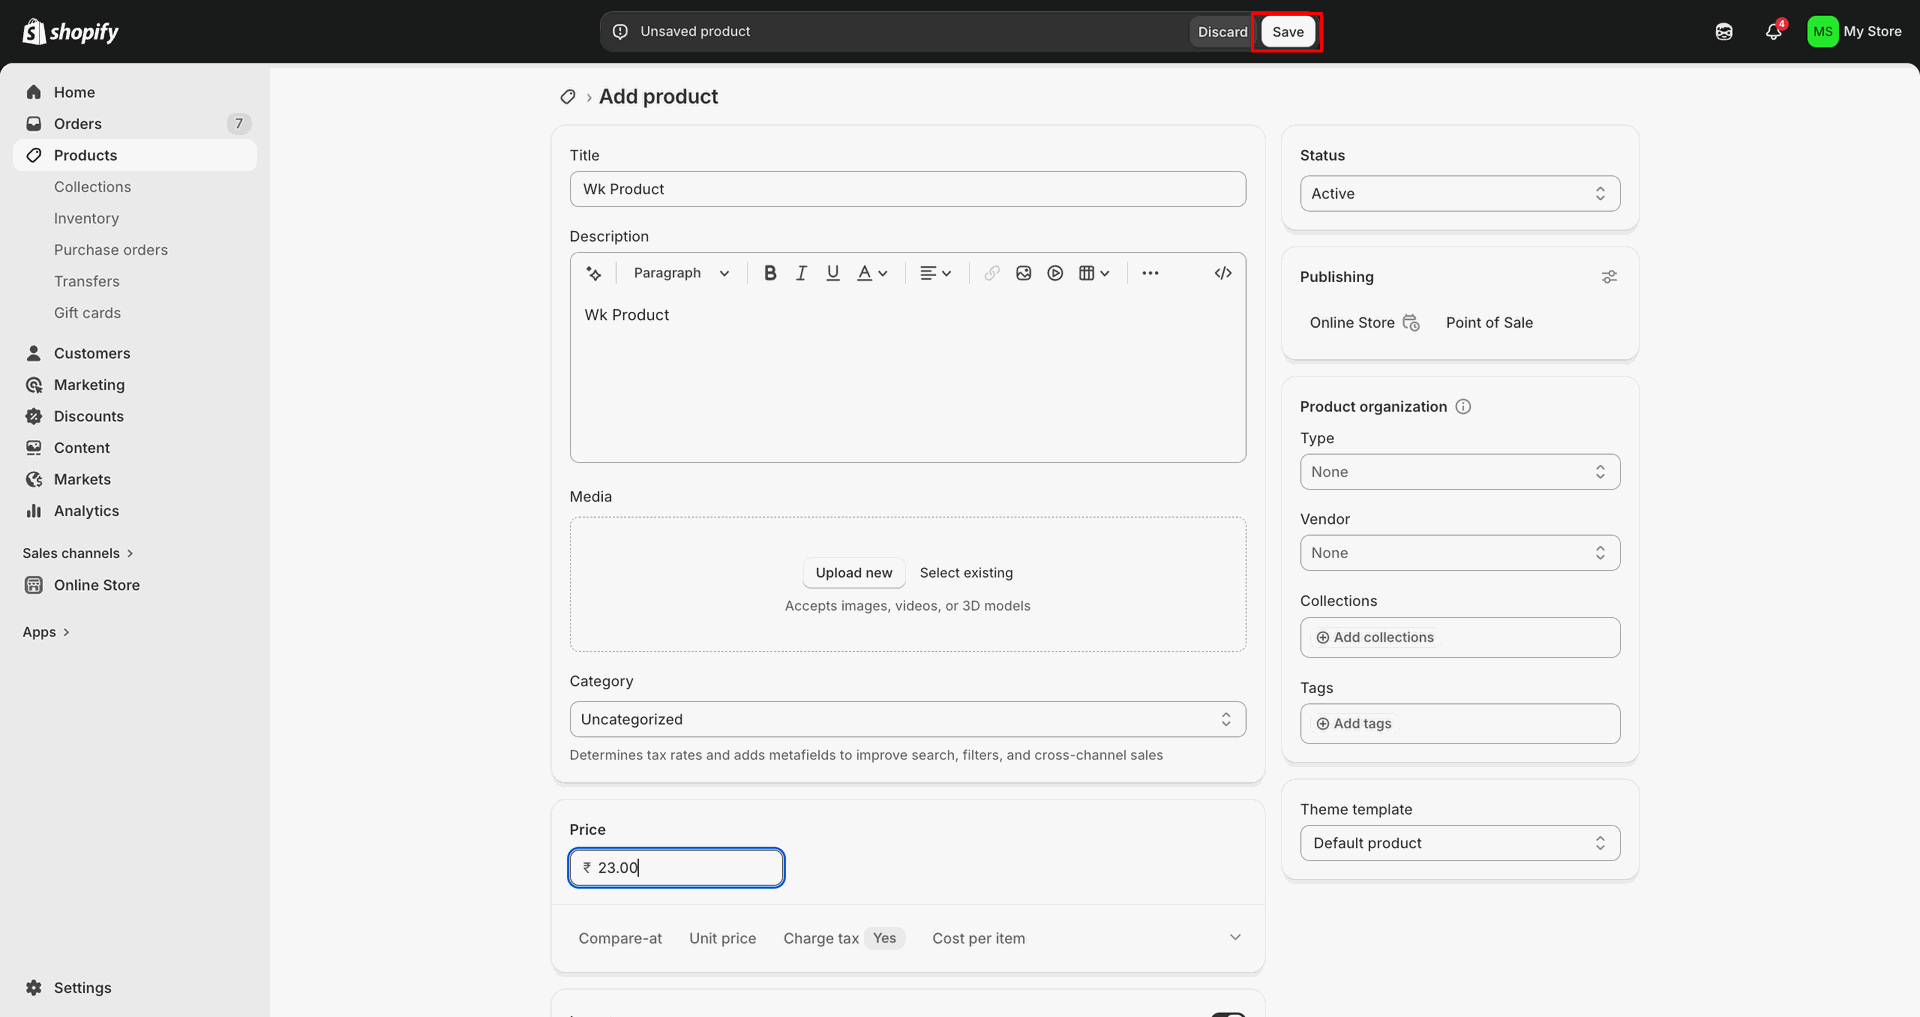
Enter product details and click Save.
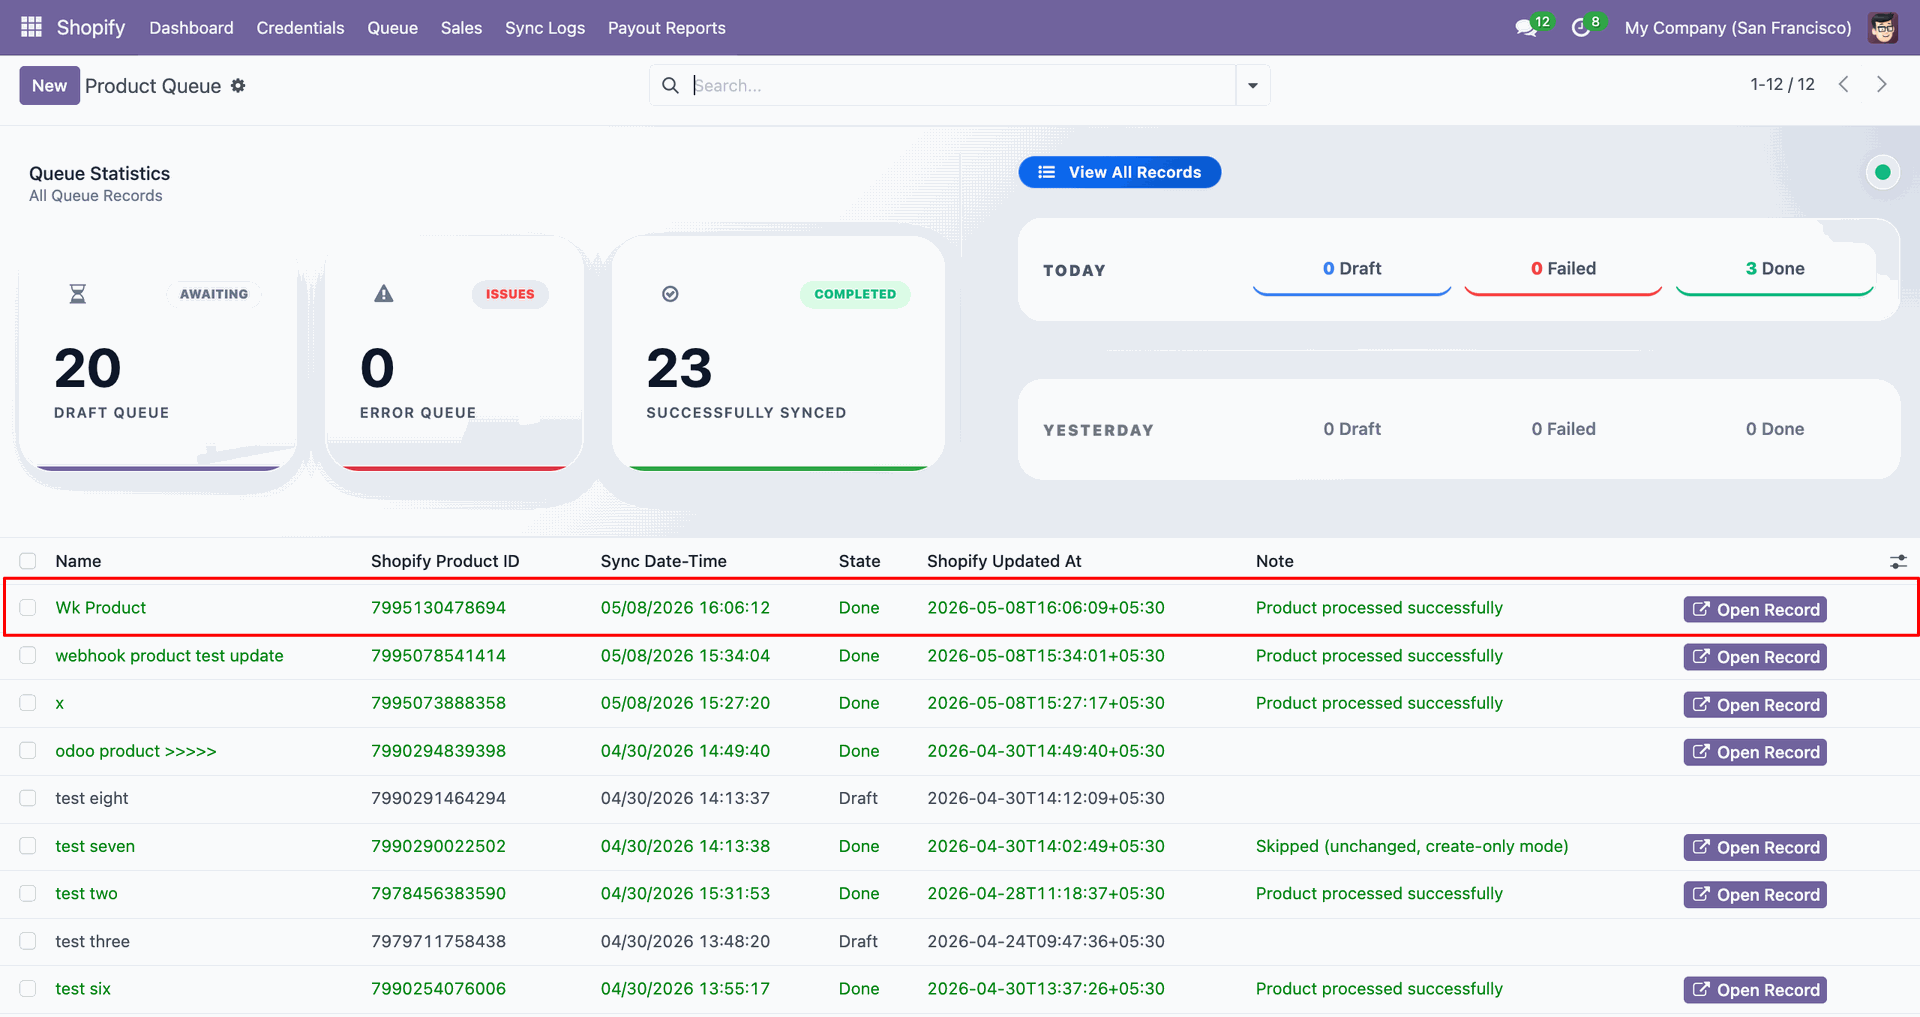
Check Sync Logs to confirm the webhook product imported or updated successfully.
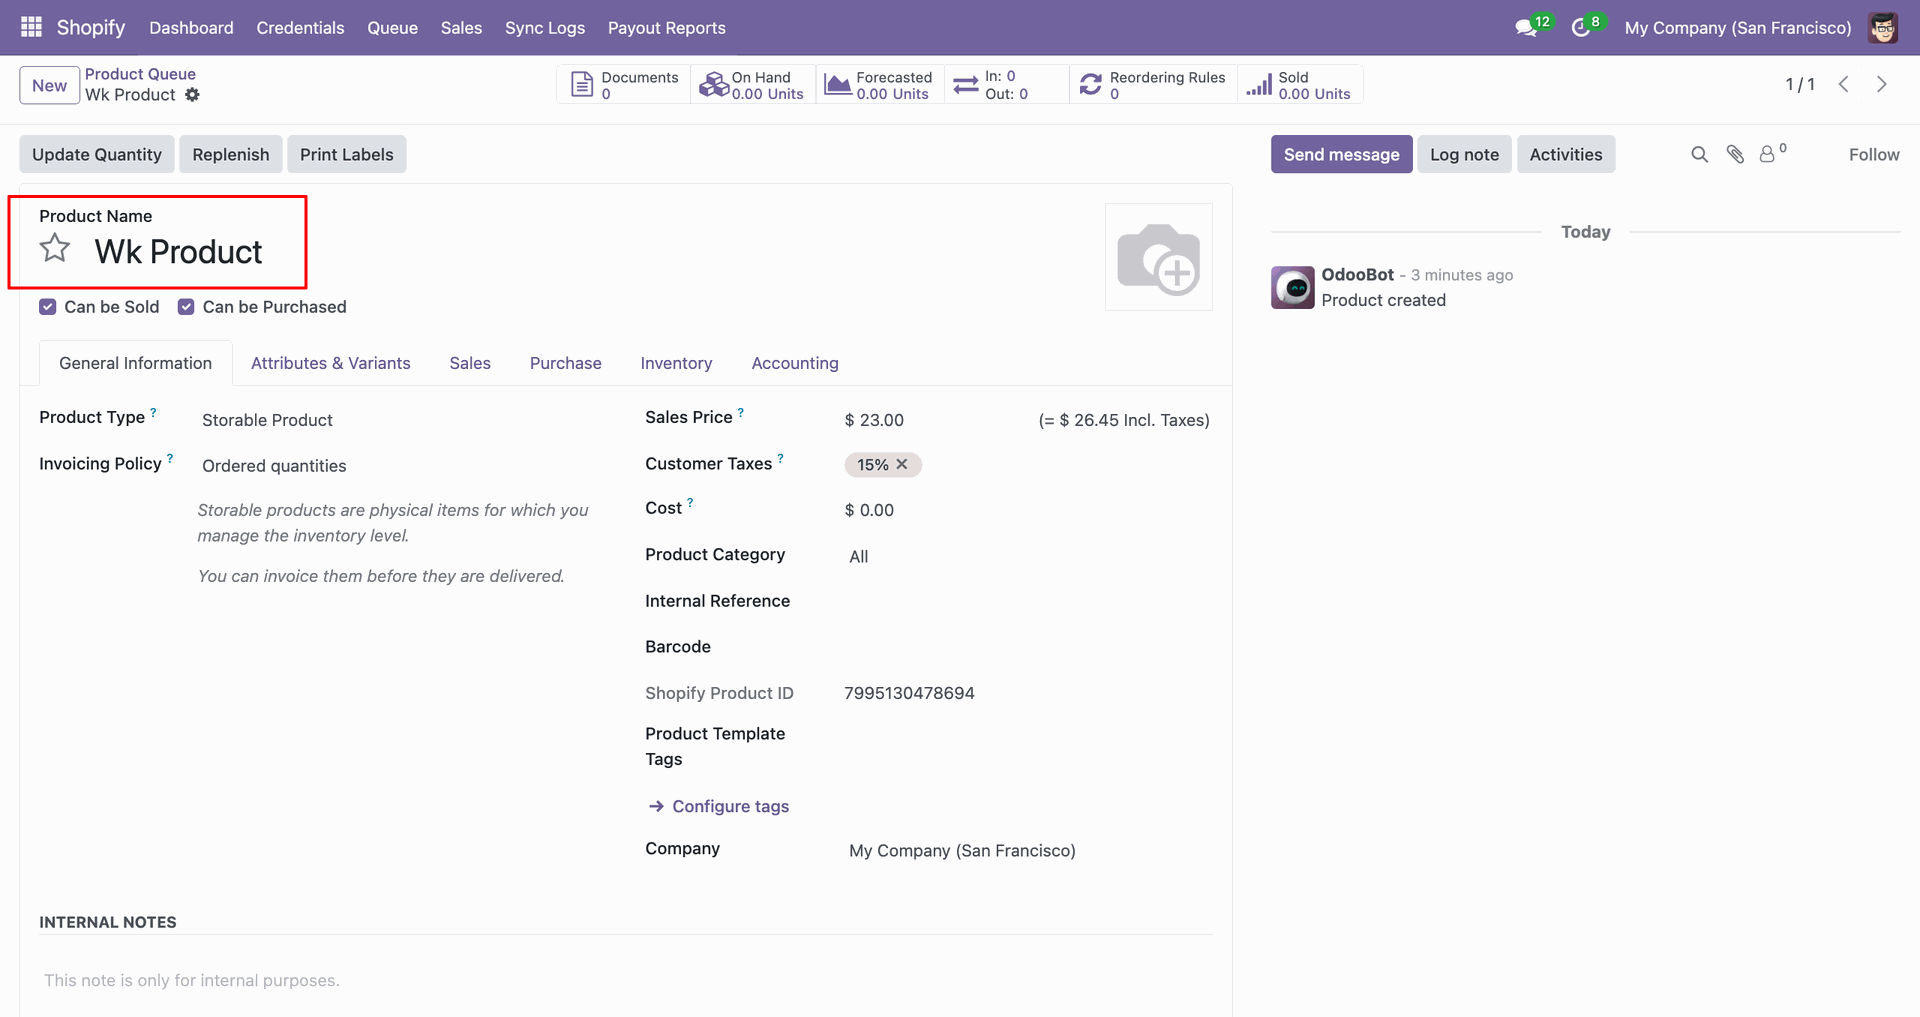
Open the webhook product contact card to review the created Odoo record.
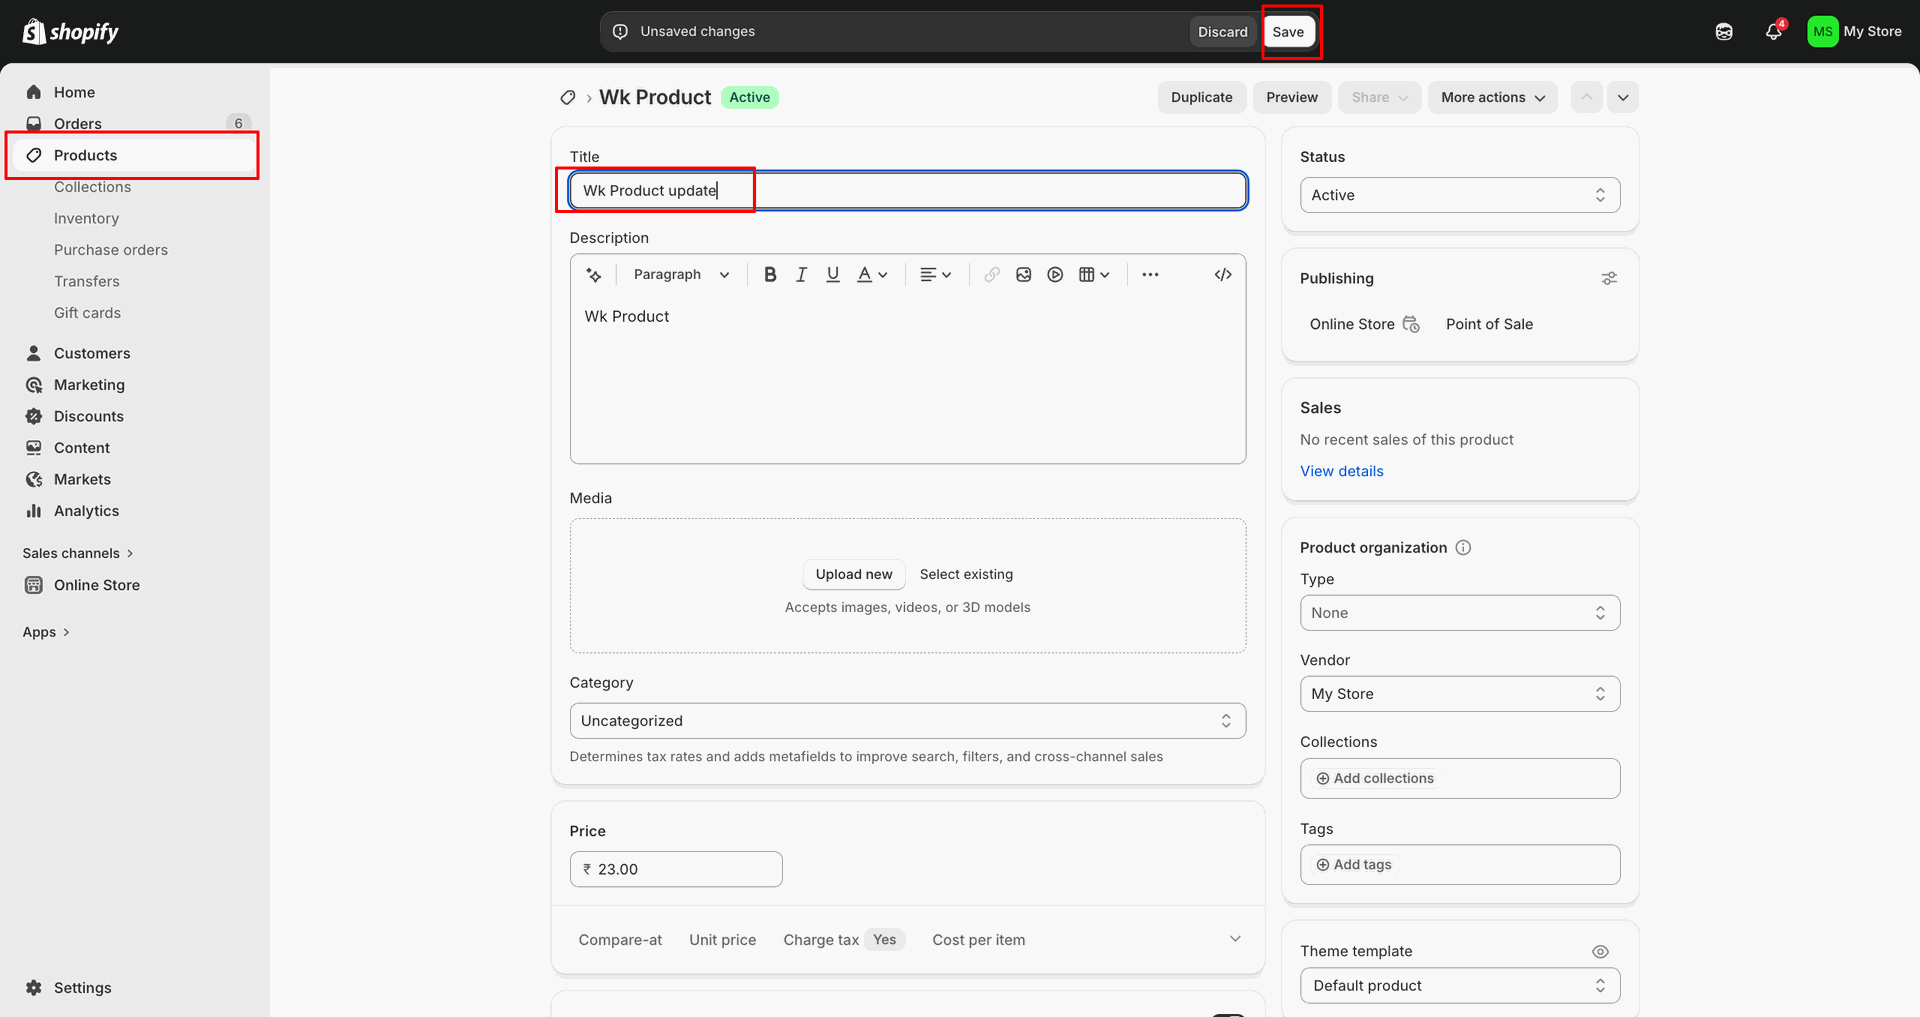
Change product name, then click Save to apply.
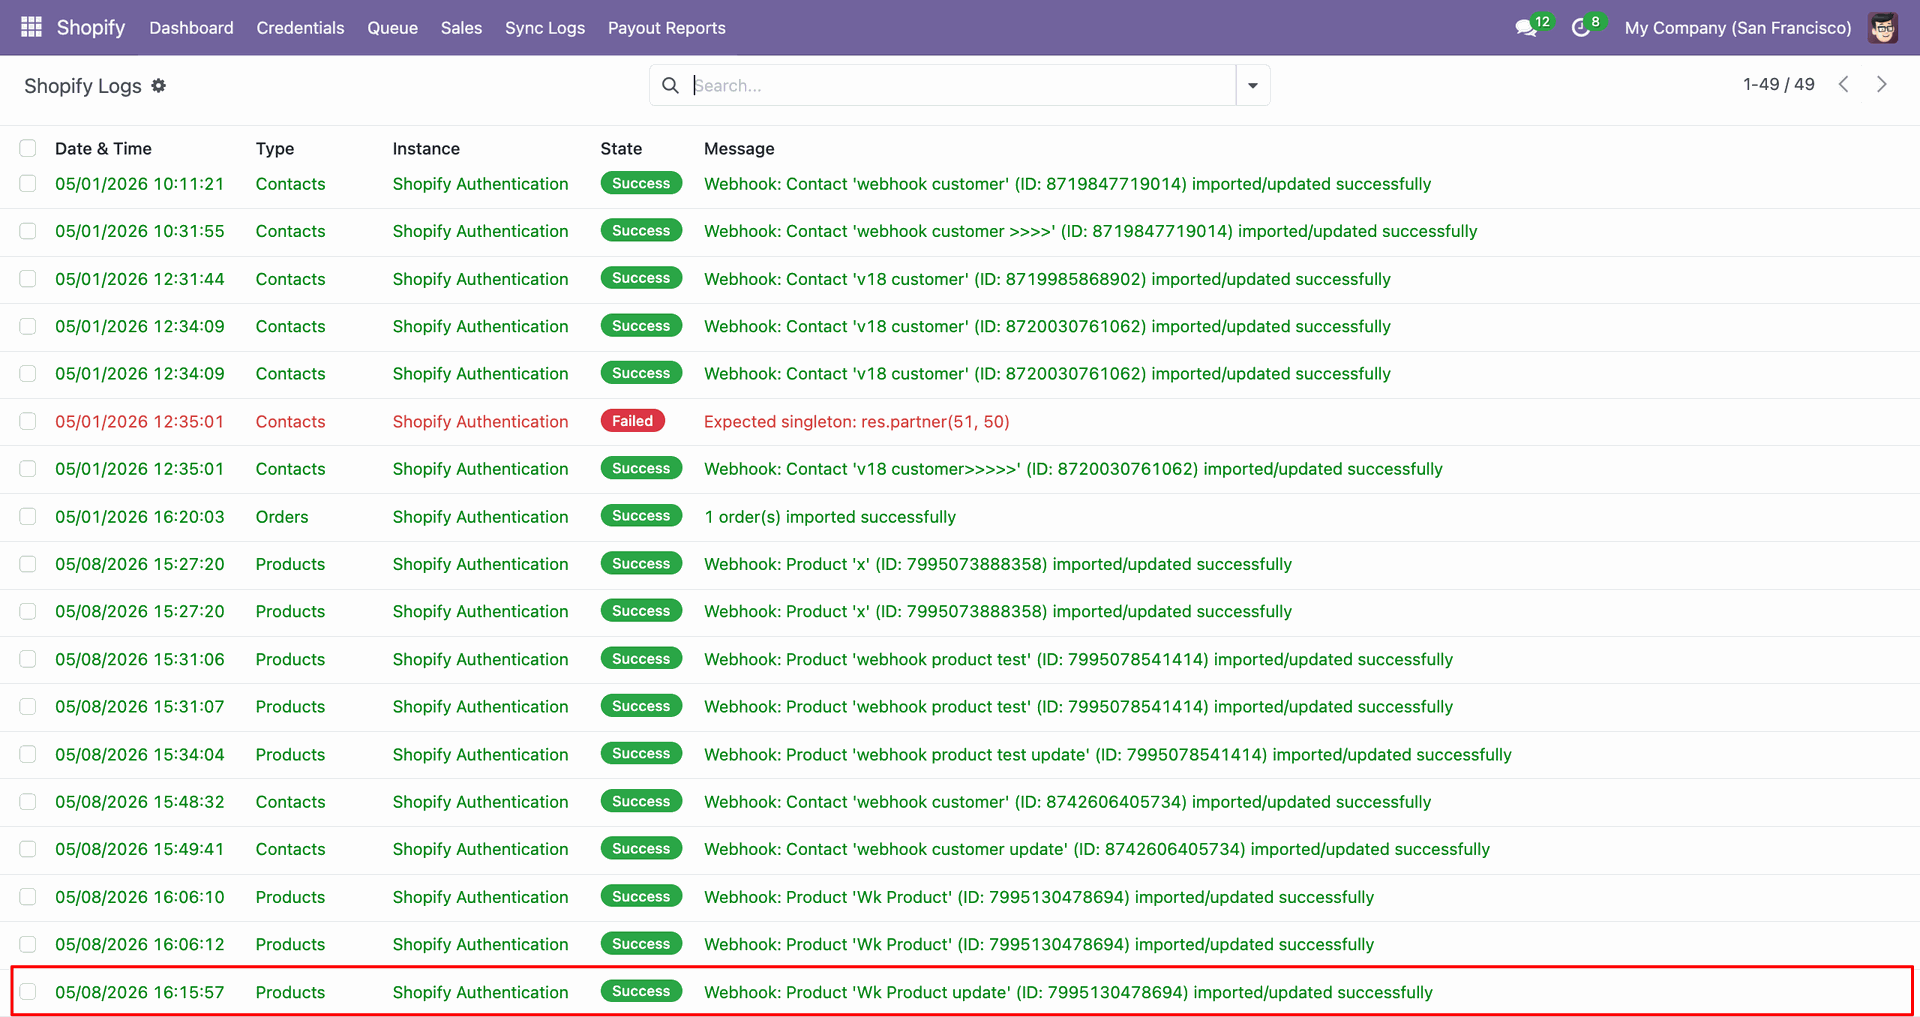
Review Sync Logs to confirm the webhook product update processed successfully.
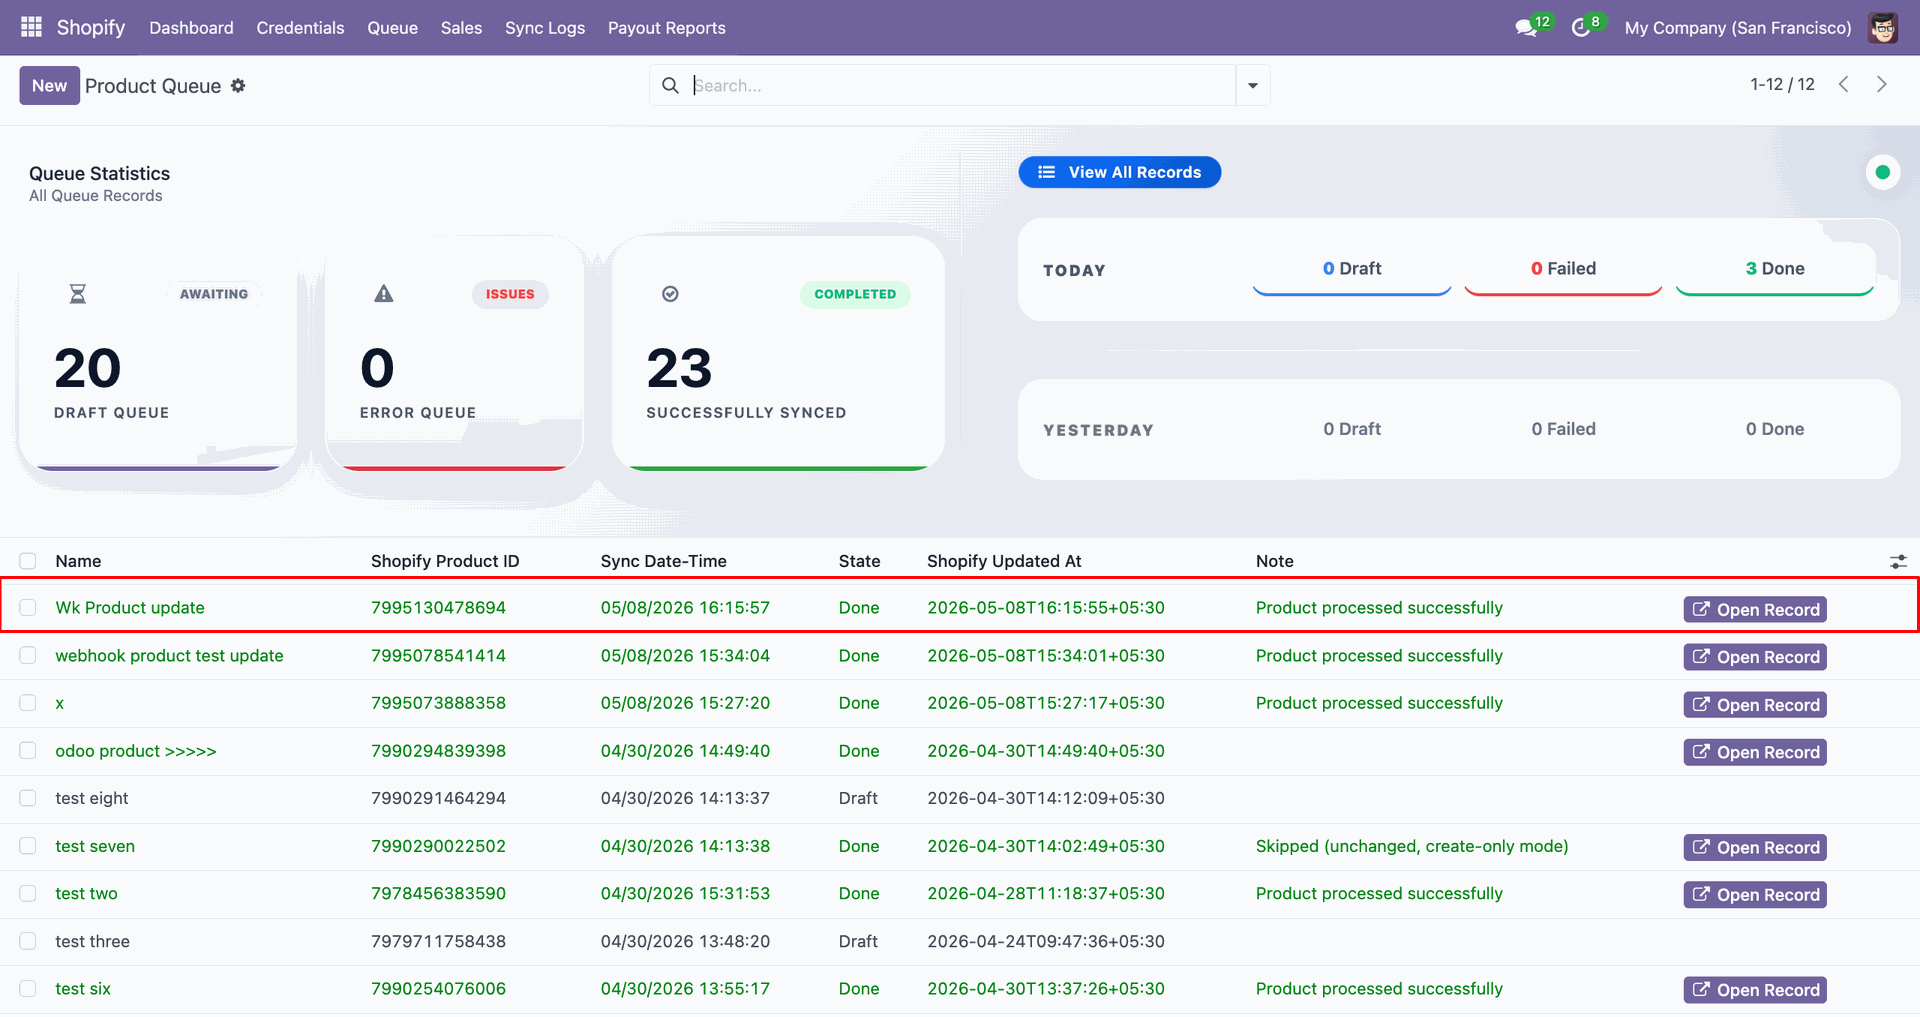
Inspect product Queue to verify the existing product was updated successfully.
Centralized dashboard to manage and monitor all connectors from one place. Quickly access sync summary, activity logs, and configuration controls with improved visibility.
Workflow
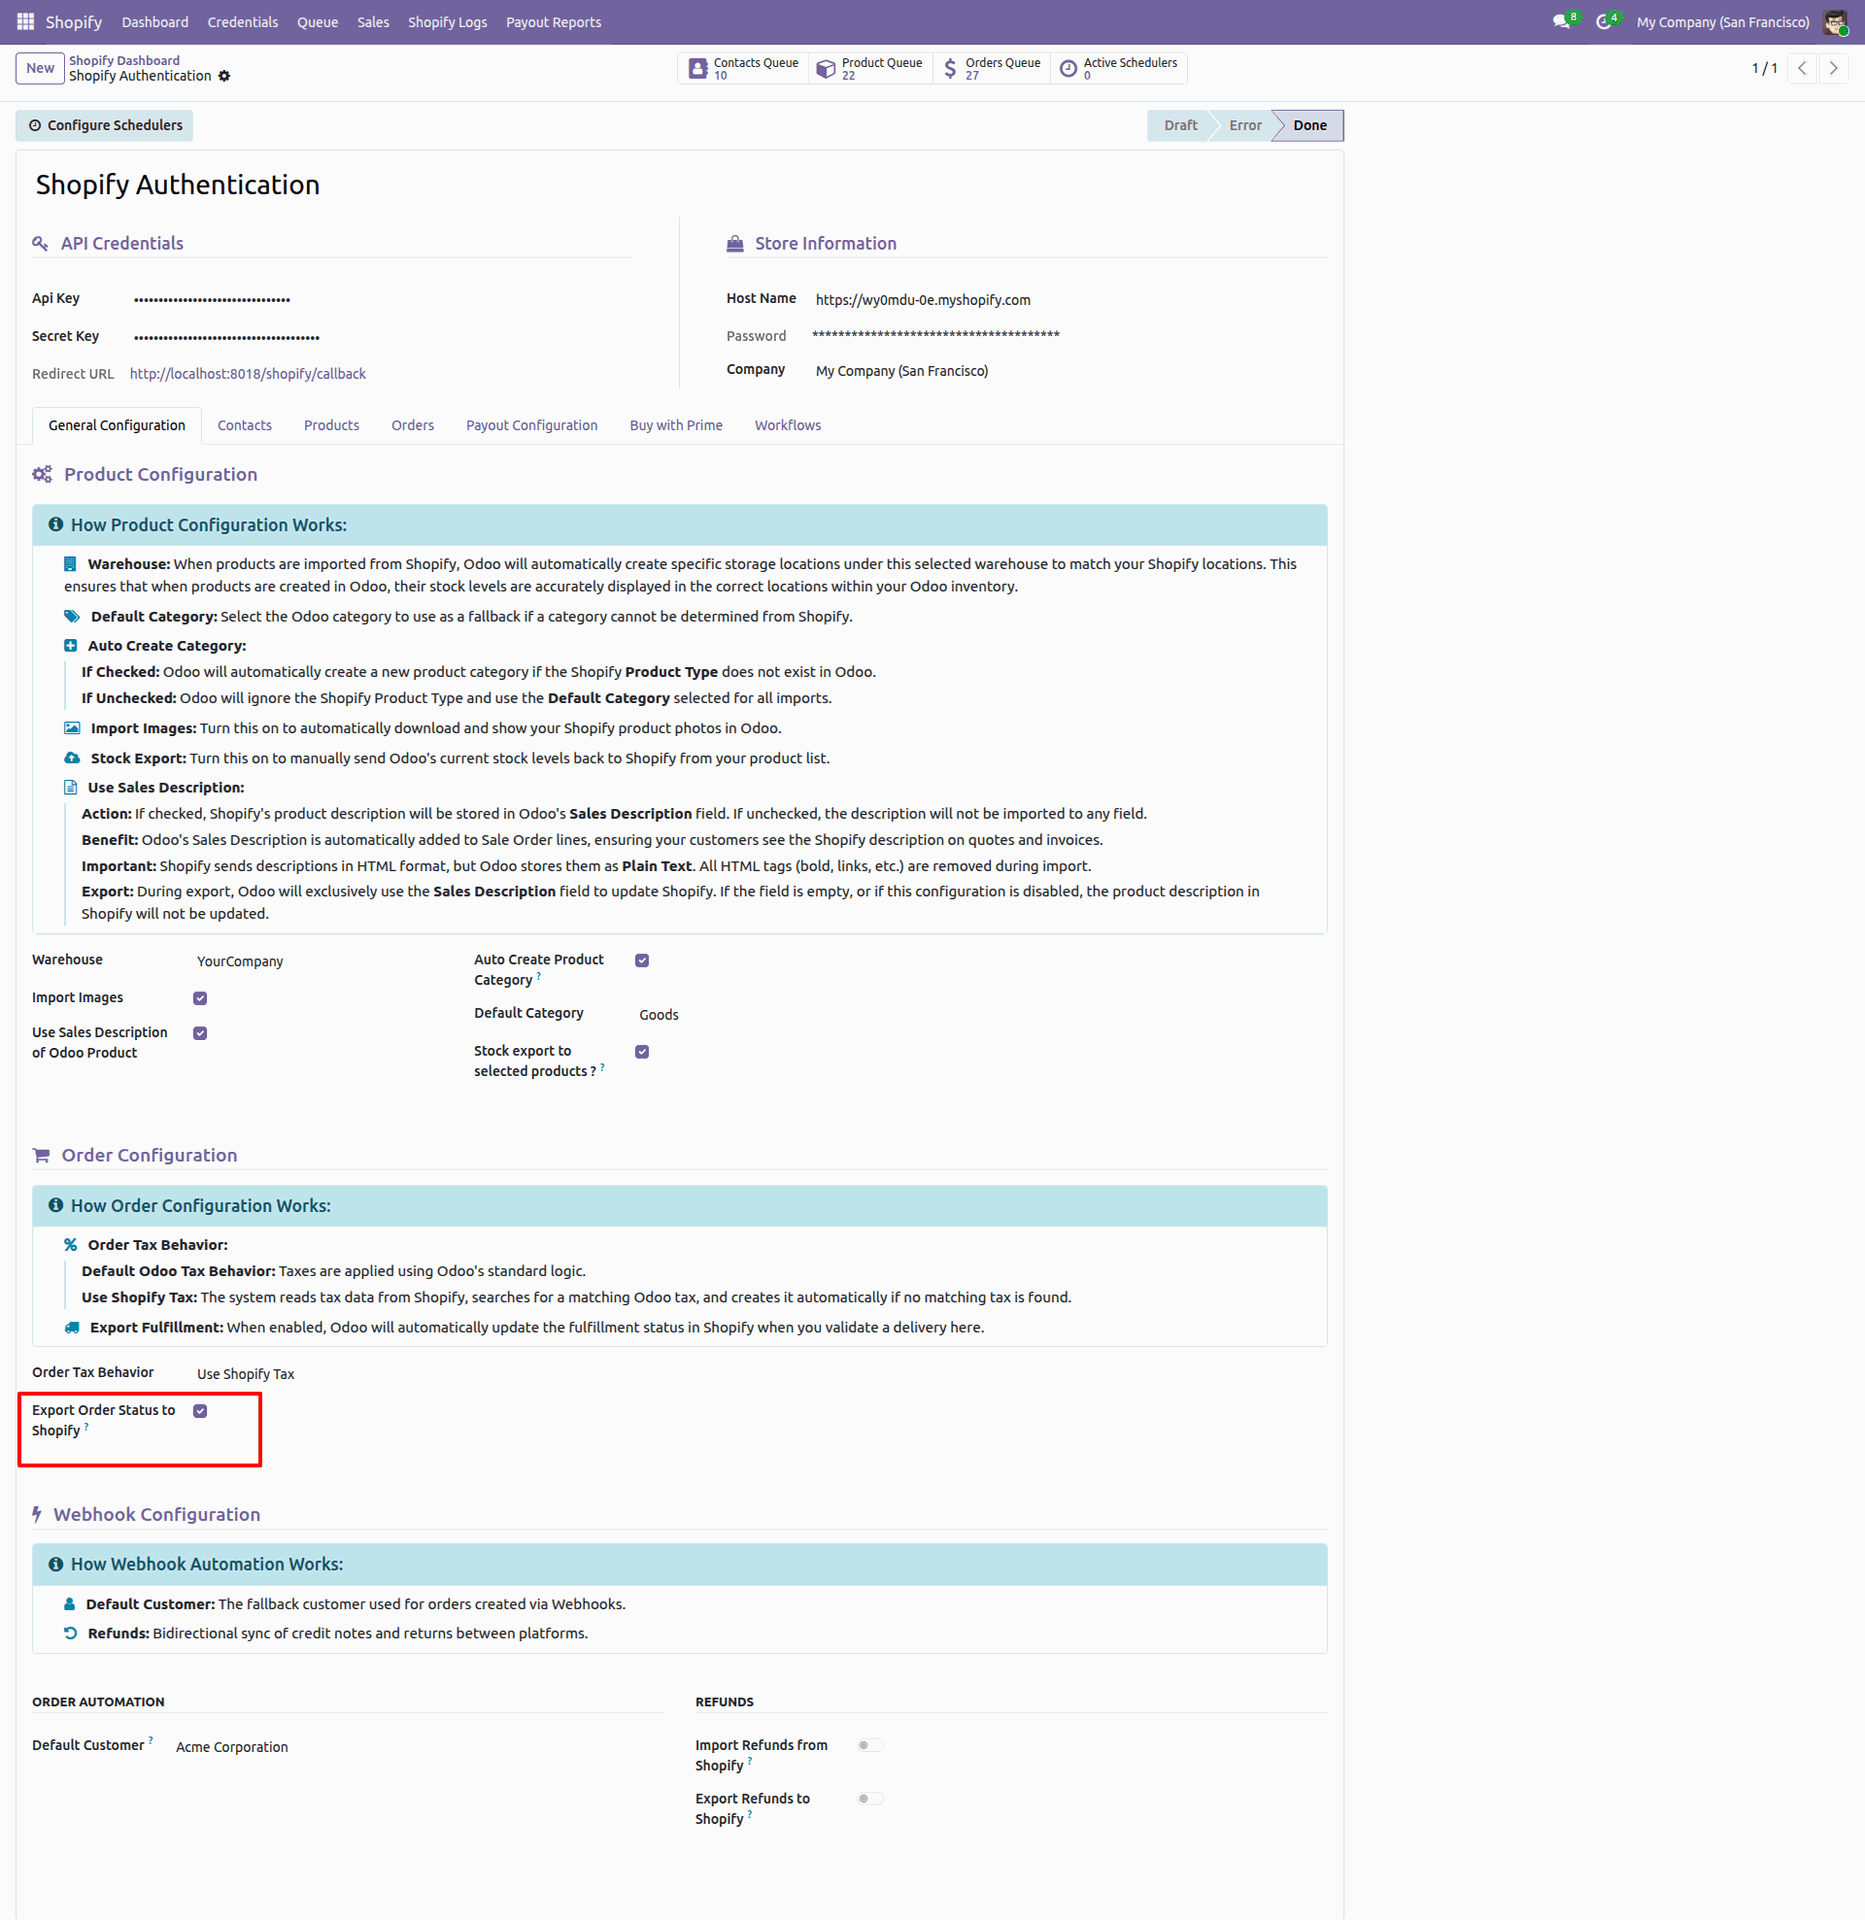
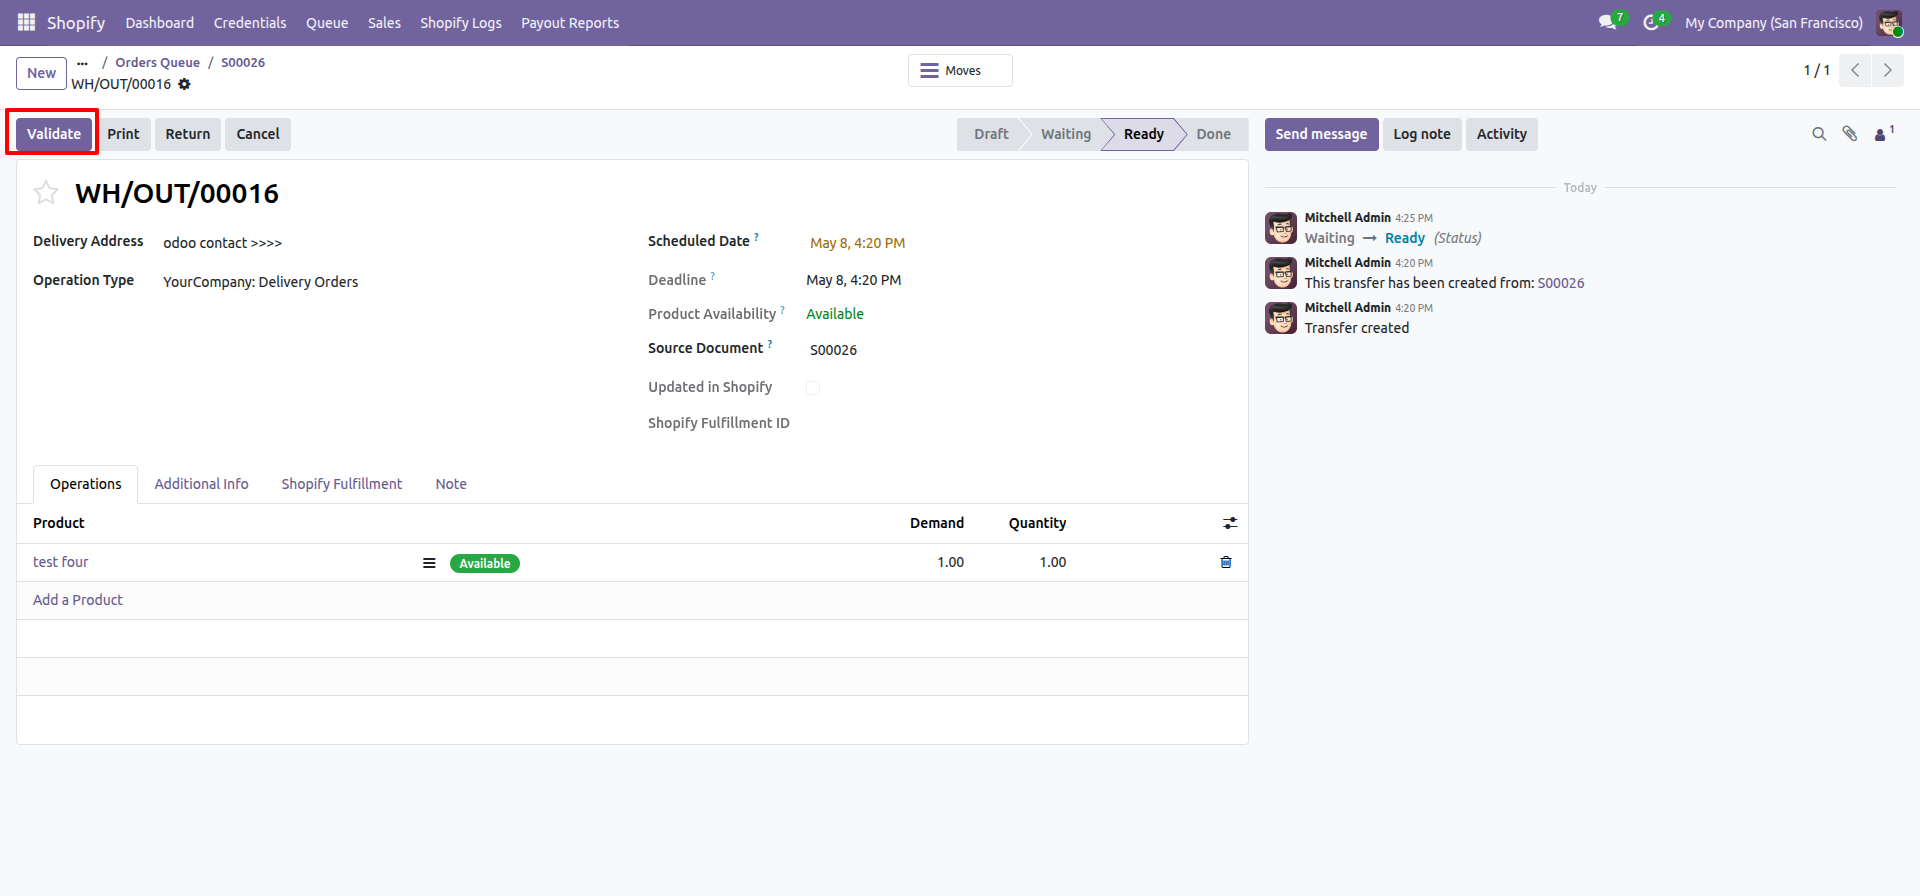
Enable 'Export Order Status to Shopify'.
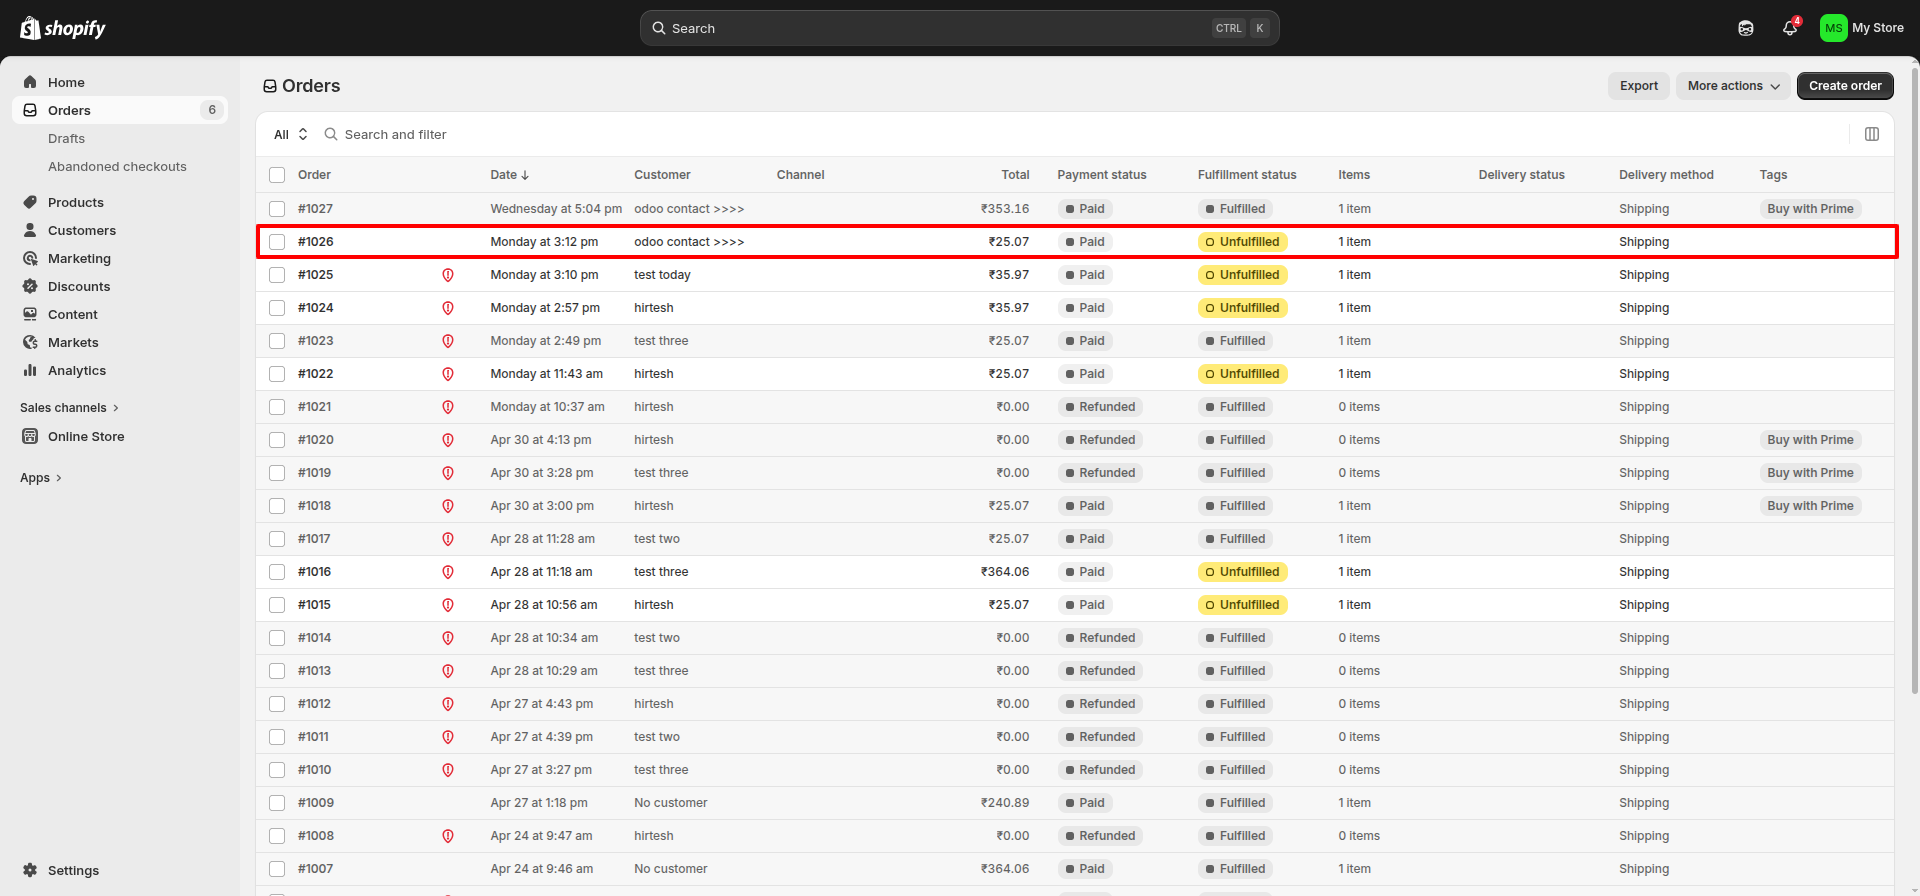
Current status is 'Unfulfilled'.
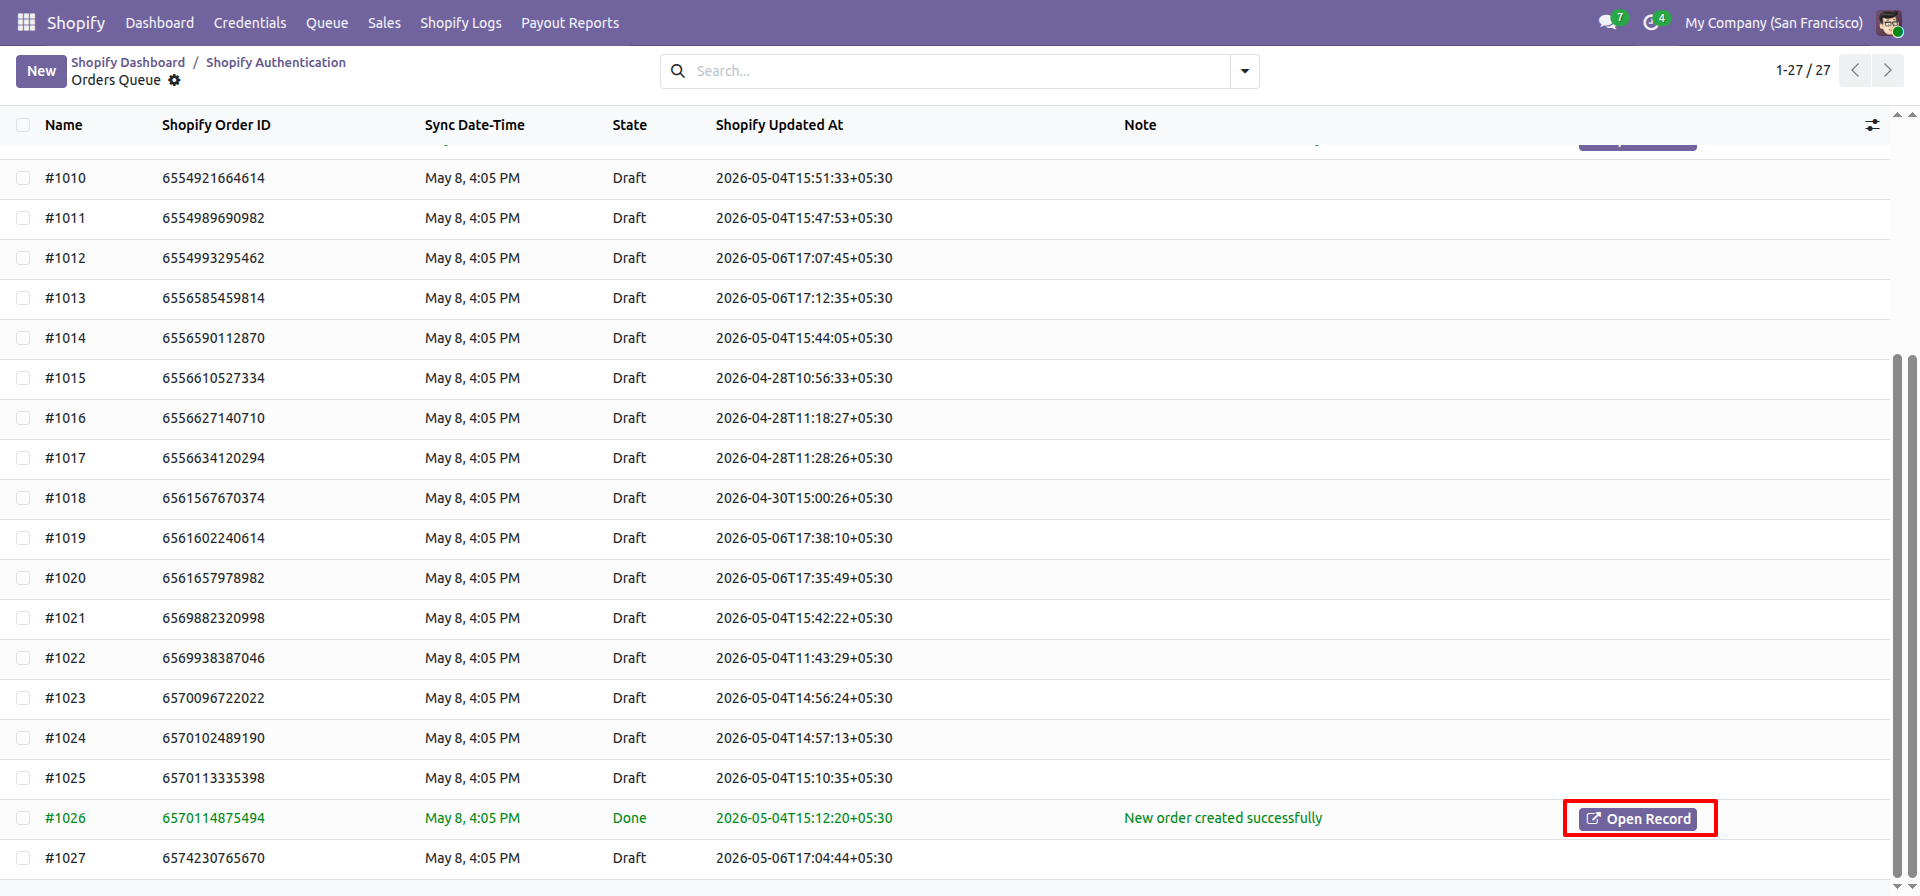
Click 'Open Record'.
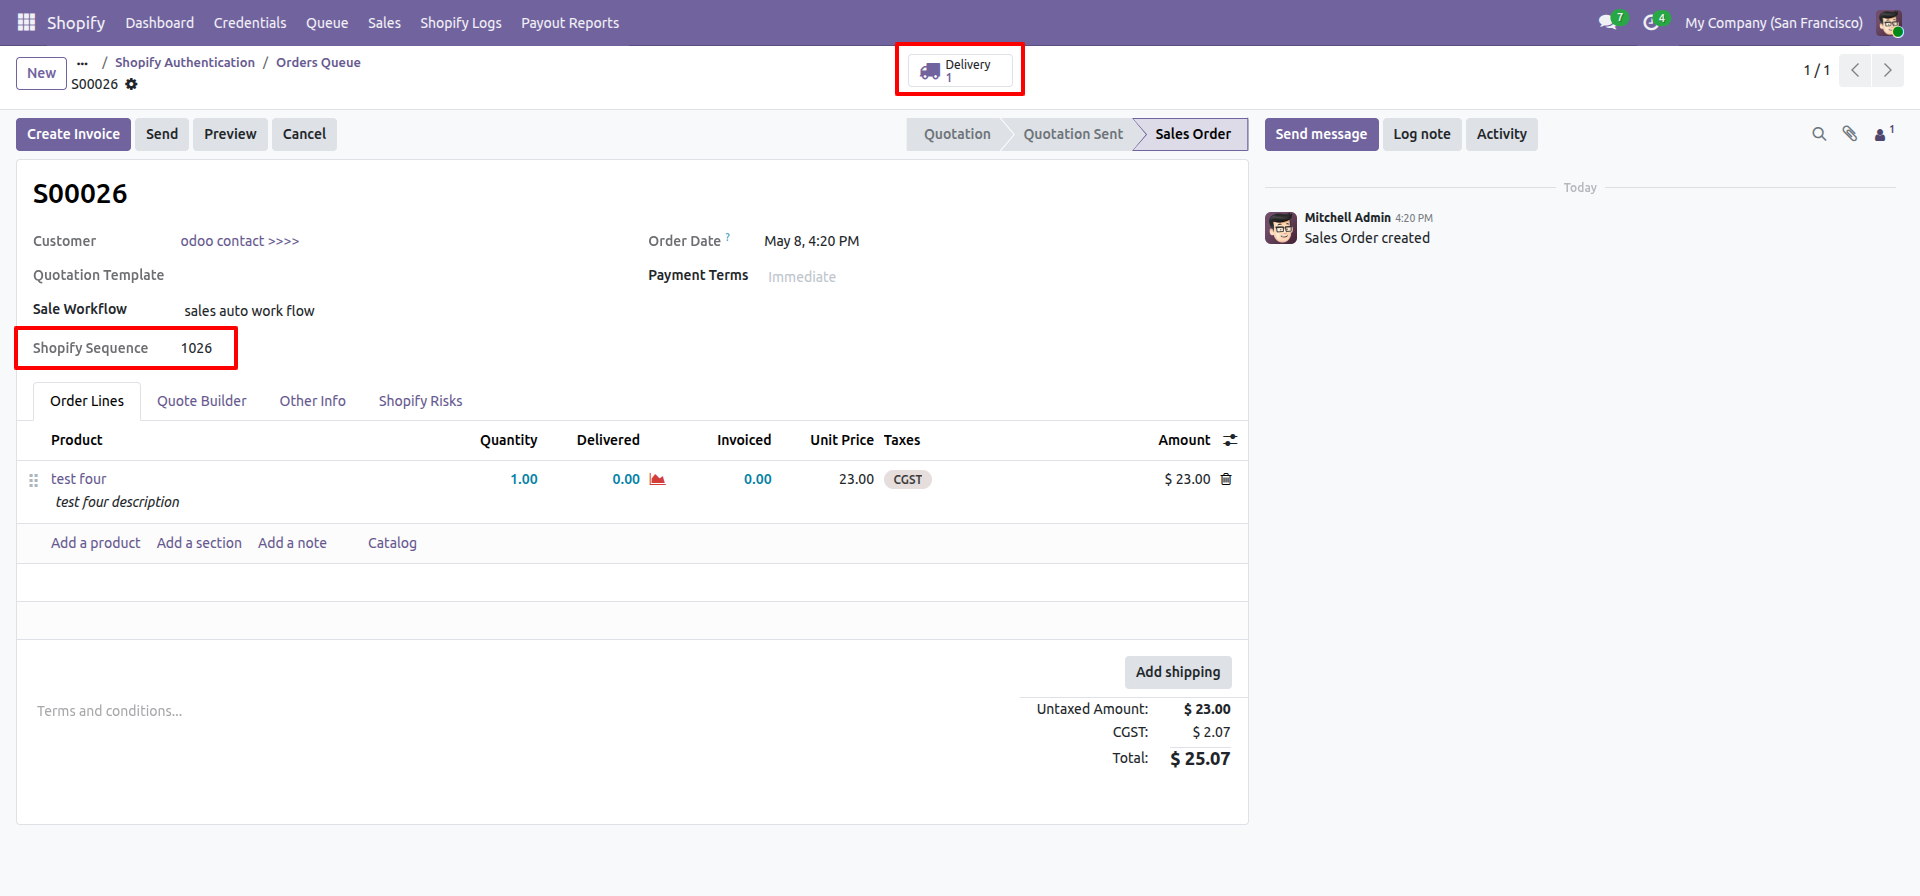
Order queue with Shopify sequence, Click ' Delivery'.
Click 'Validate'.
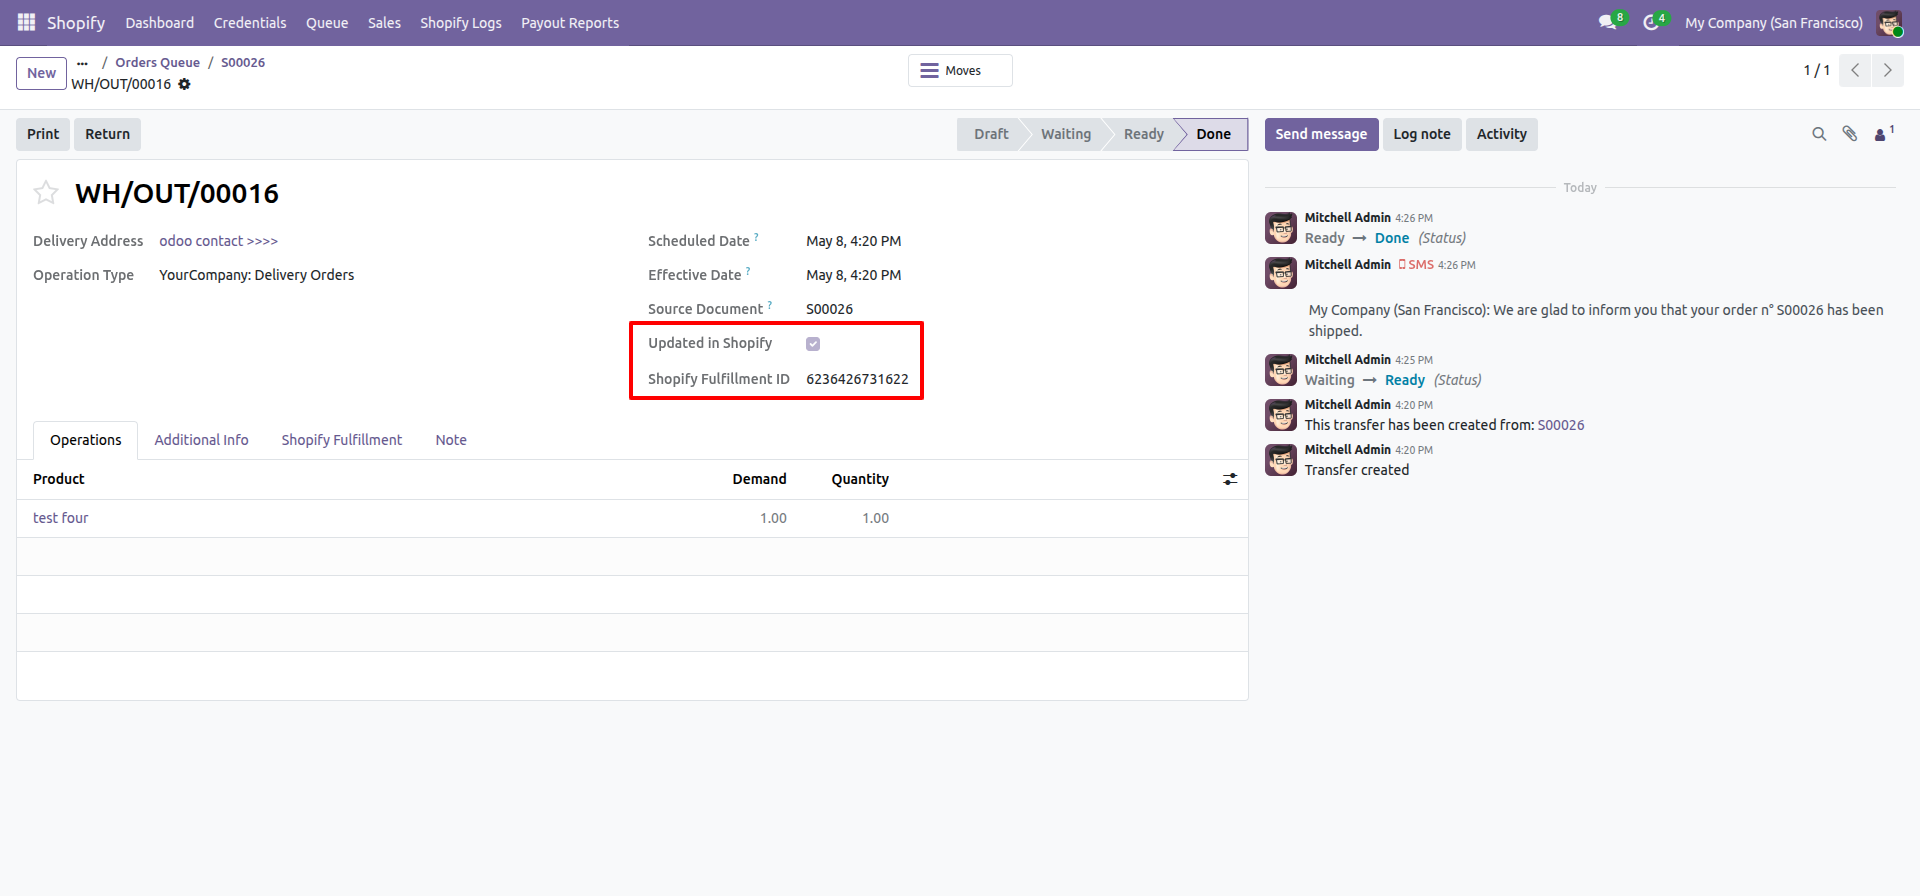
Stage moved to done with fulfillment ID.
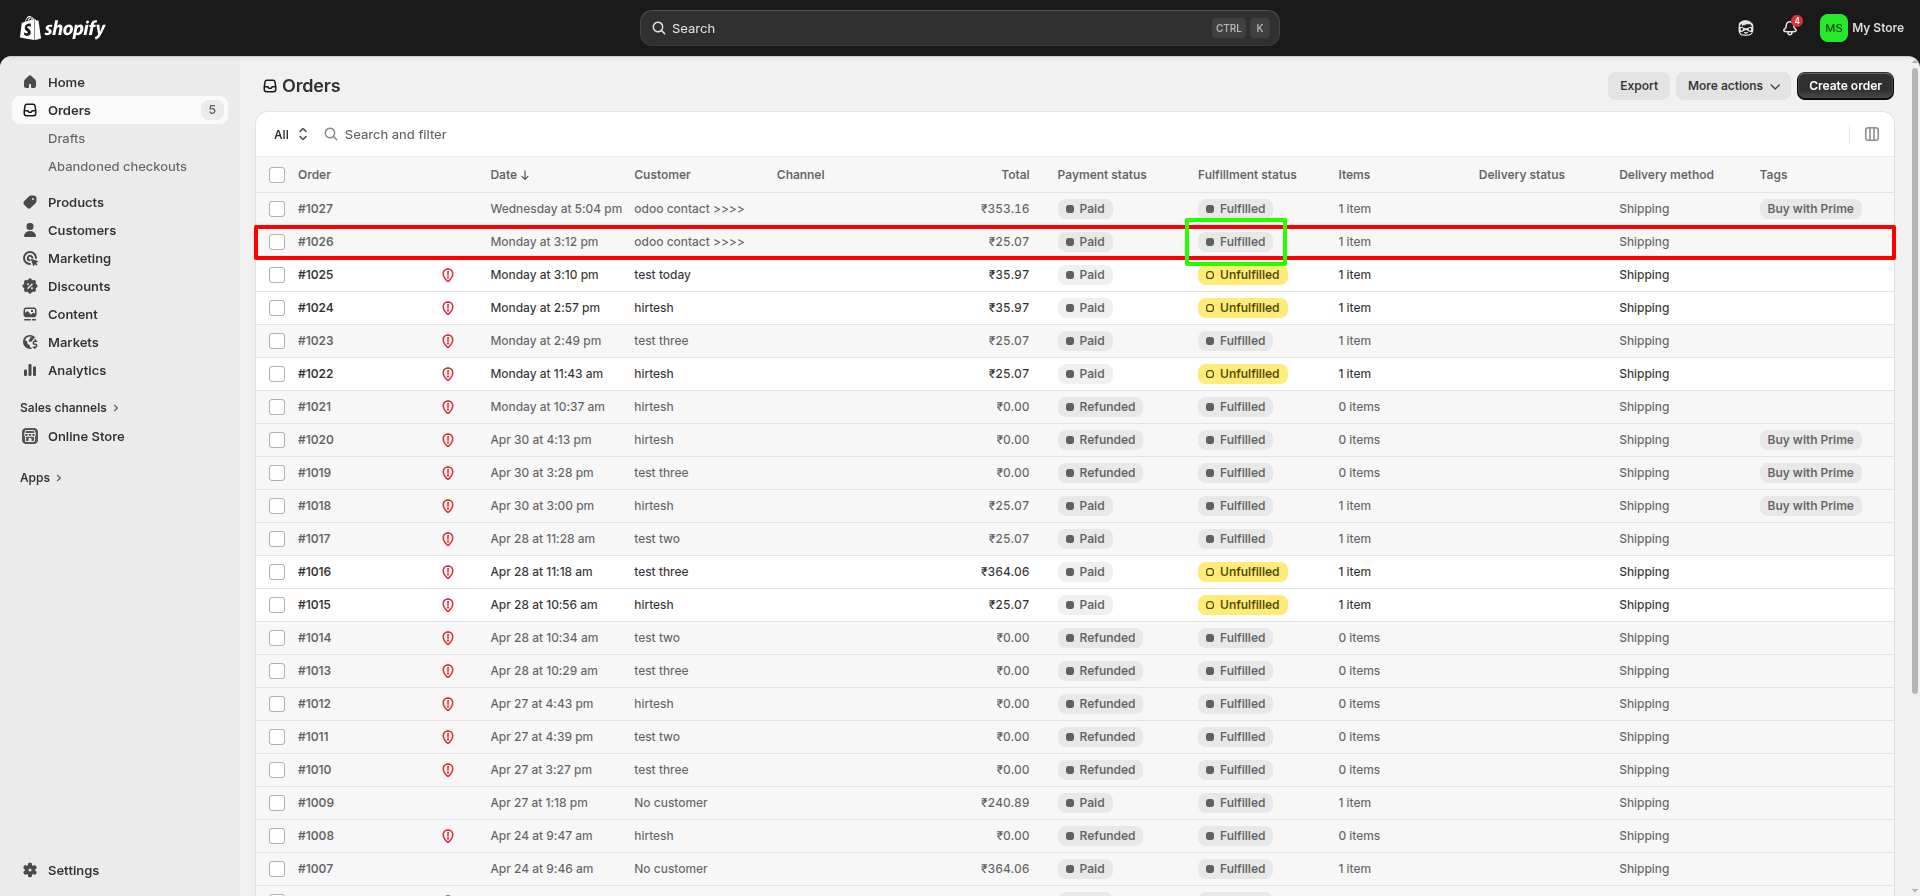
Shopify order with fulfillment status.
Workflow
Open the Product Recommendations tab to read the synchronization guidelines for alternative and accessory products. Recommendation sync uses Shopify Admin GraphQL, and the module’s core customer, product, order, draft-order, and fulfillment sync paths now use the same GraphQL service layer. Refunds, risks, payouts, abandoned checkout, and inventory quantity synchronization remain on their deferred API paths.
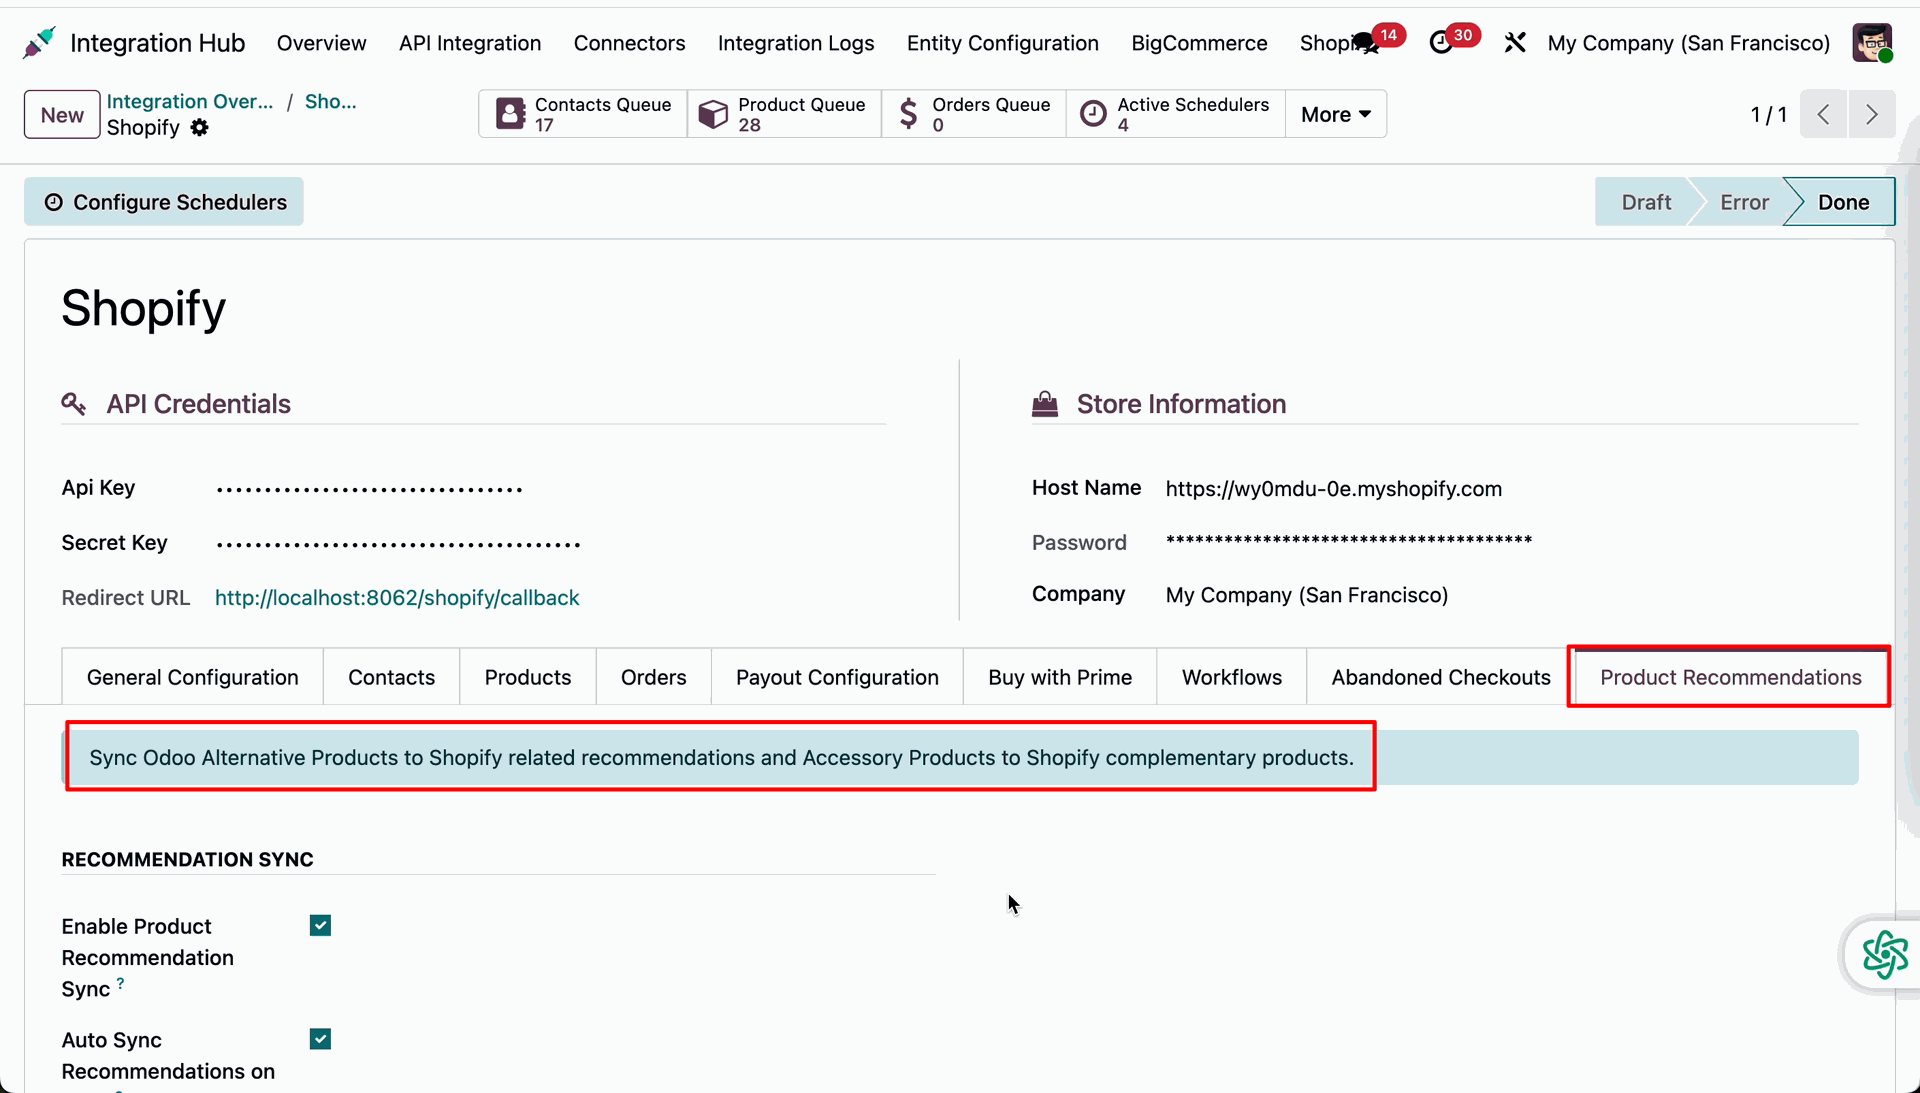
Configure recommendation sync options and batch size parameters under the Product Recommendations settings section, including the GraphQL-based recommendation queue settings shared with the module’s core entity synchronization.
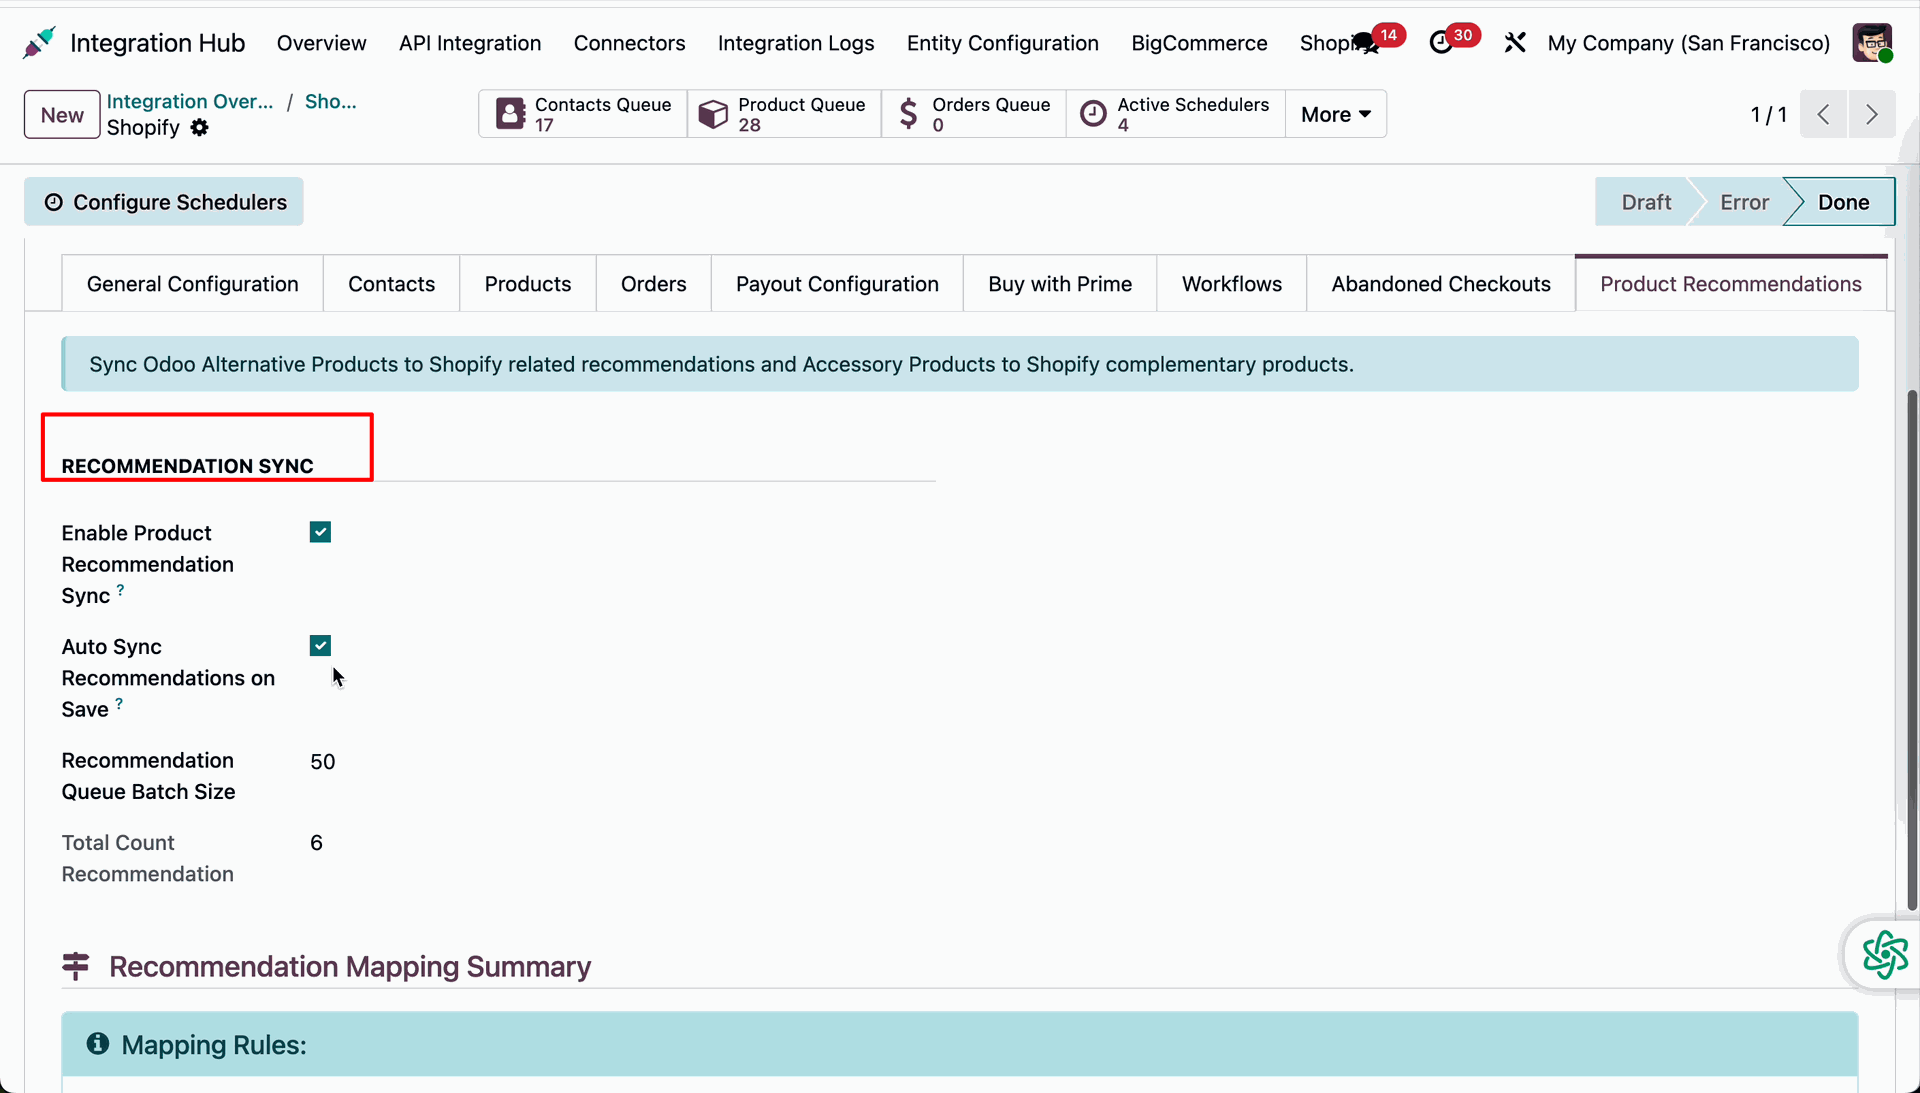
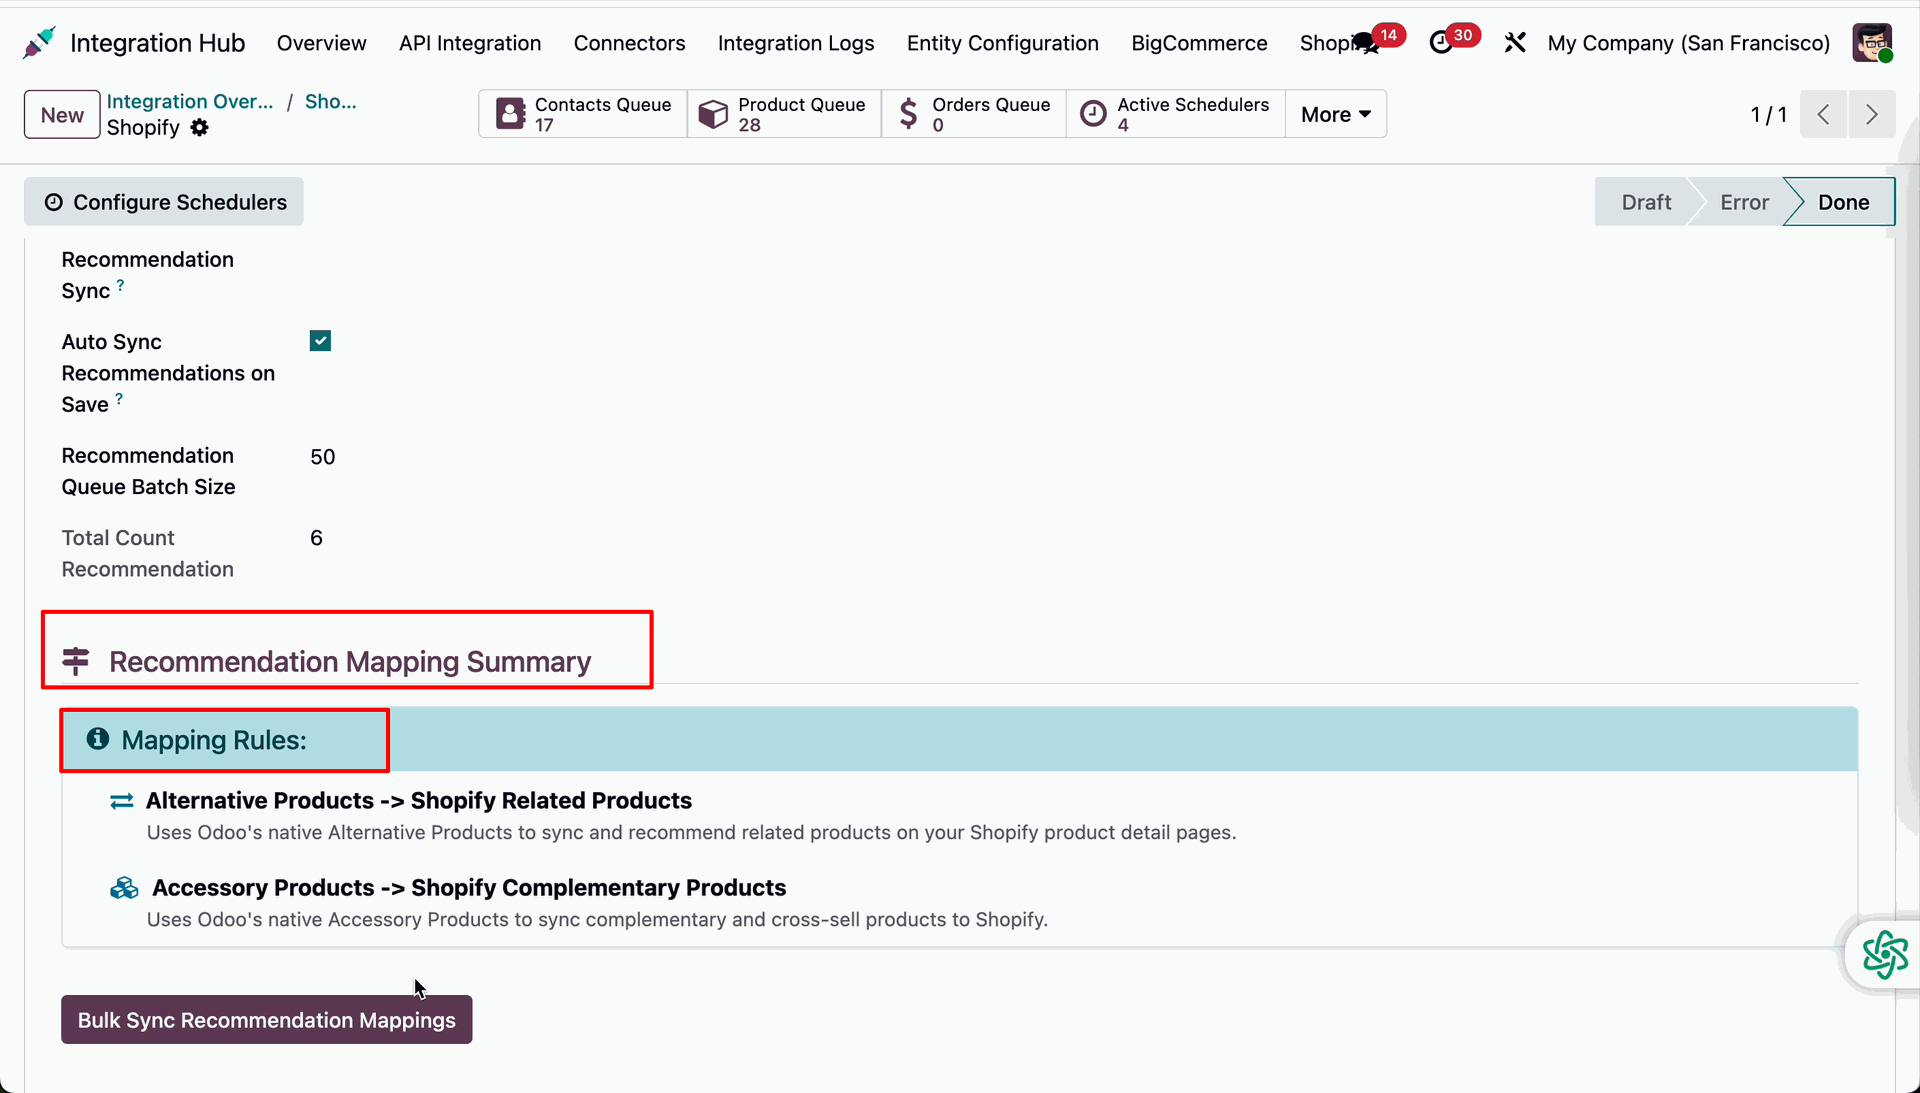
Review the recommendation mapping summary and active GraphQL mapping rules for alternative and accessory products.
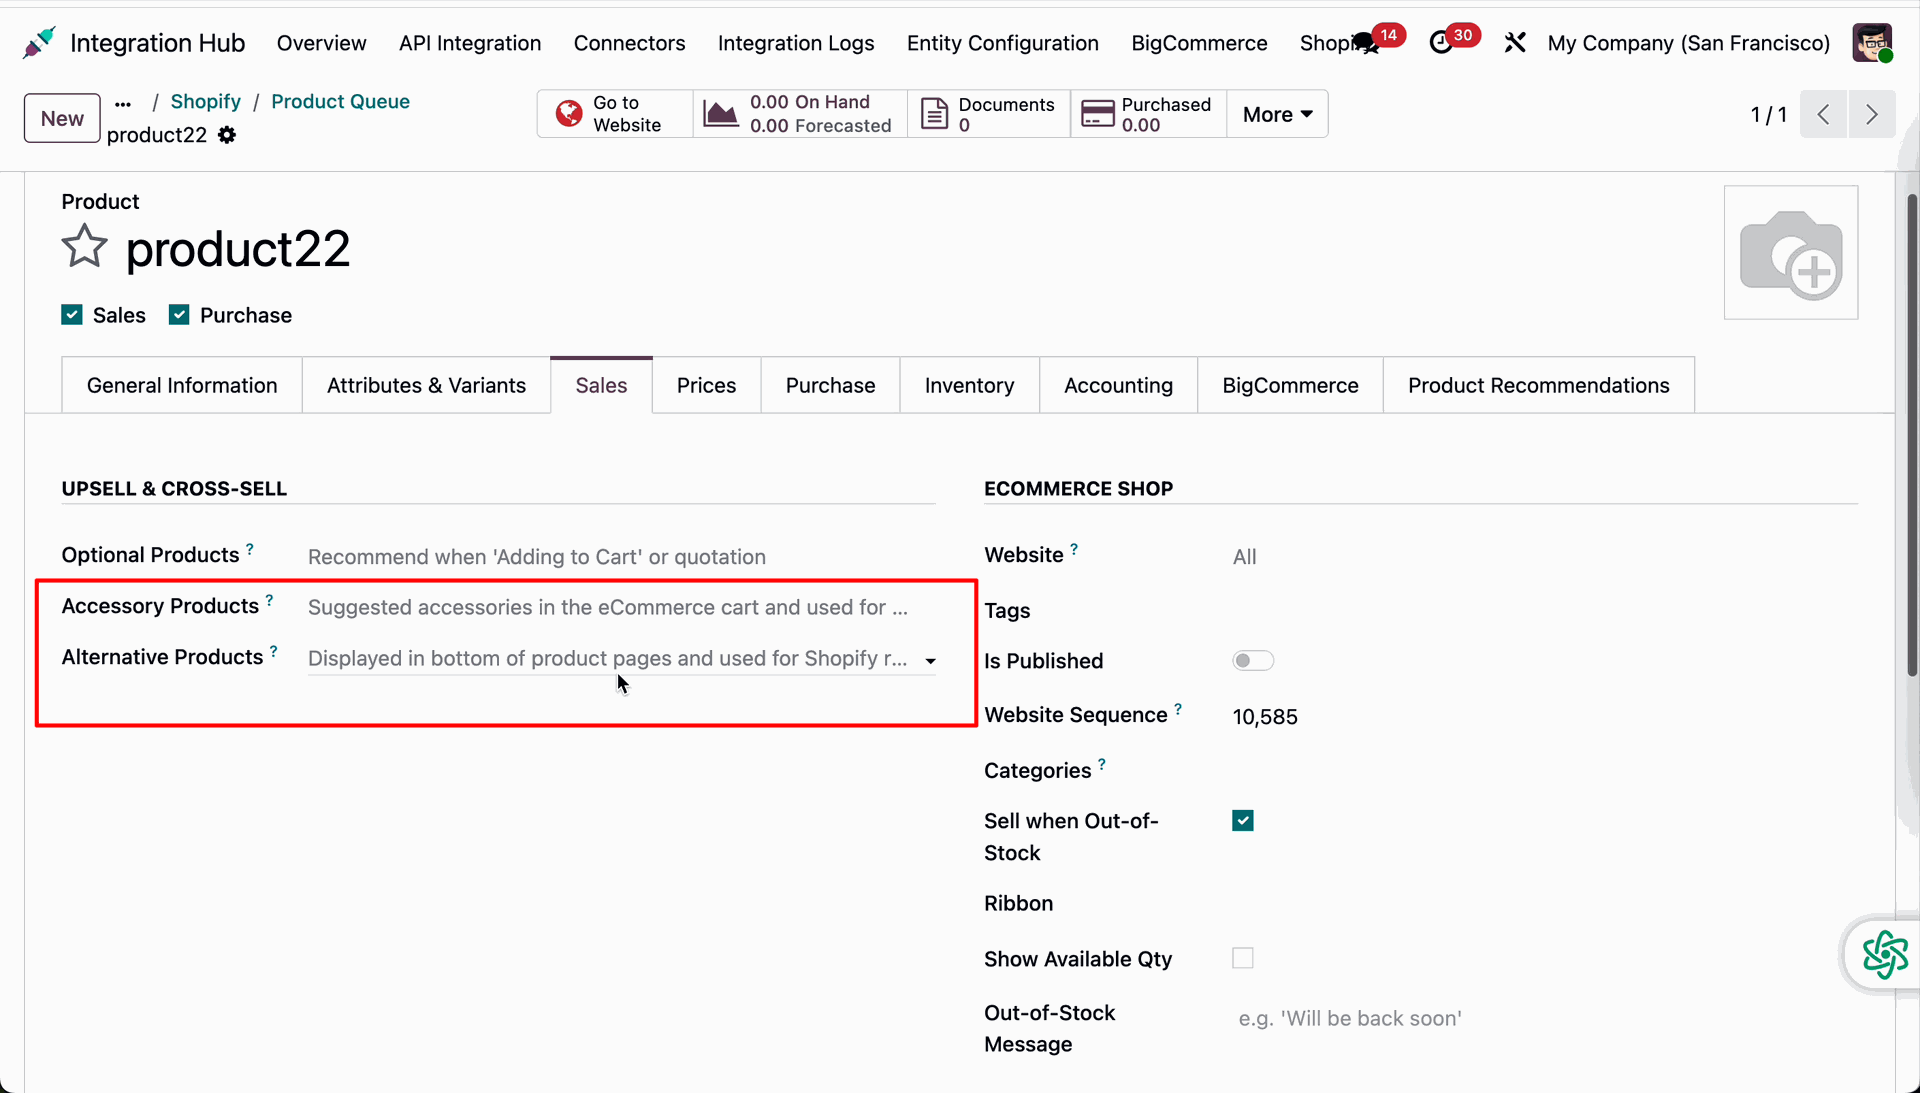
Locate the Accessory Products and Alternative Products fields under the Sales tab of a product.
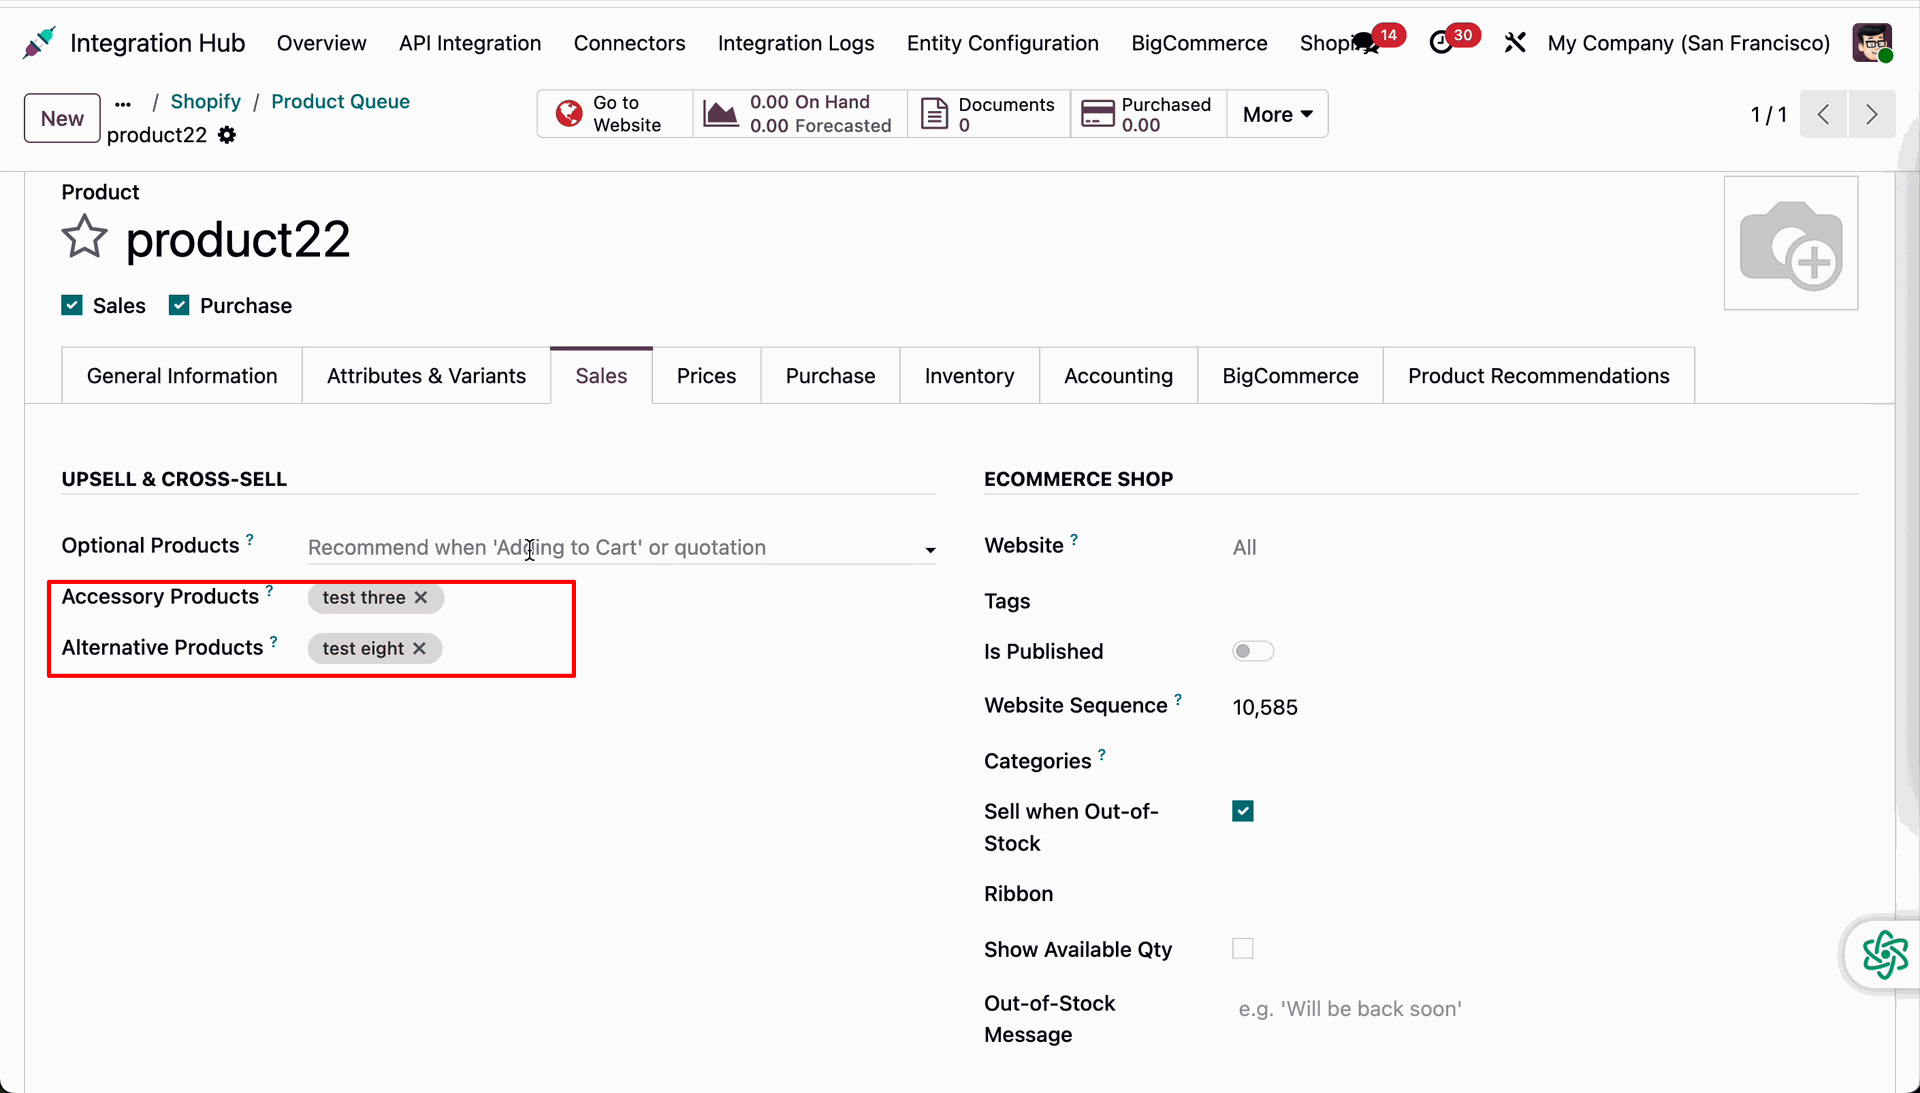
Select target items in the Accessory Products and Alternative Products fields on the product form.
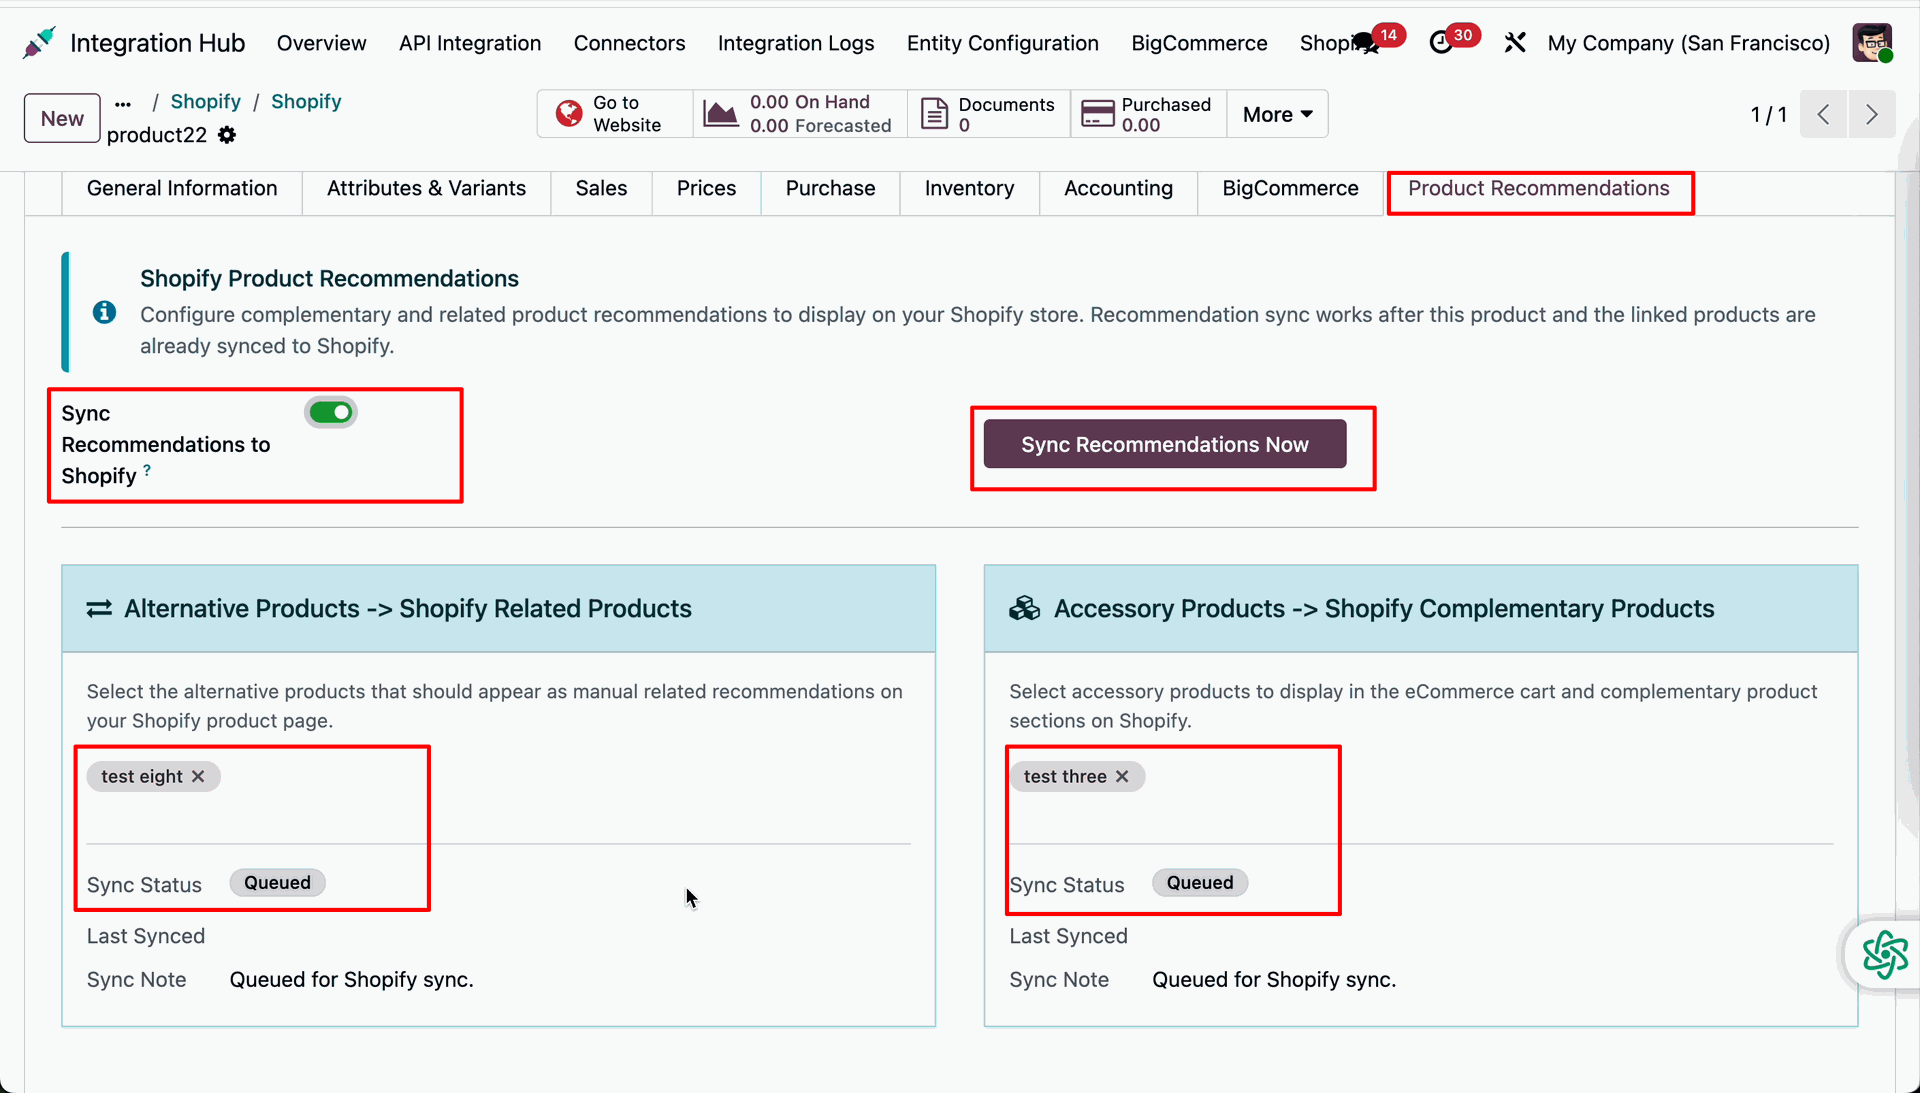
Enable the sync toggle and click Sync Recommendations Now to queue related and complementary products through Shopify Admin GraphQL.
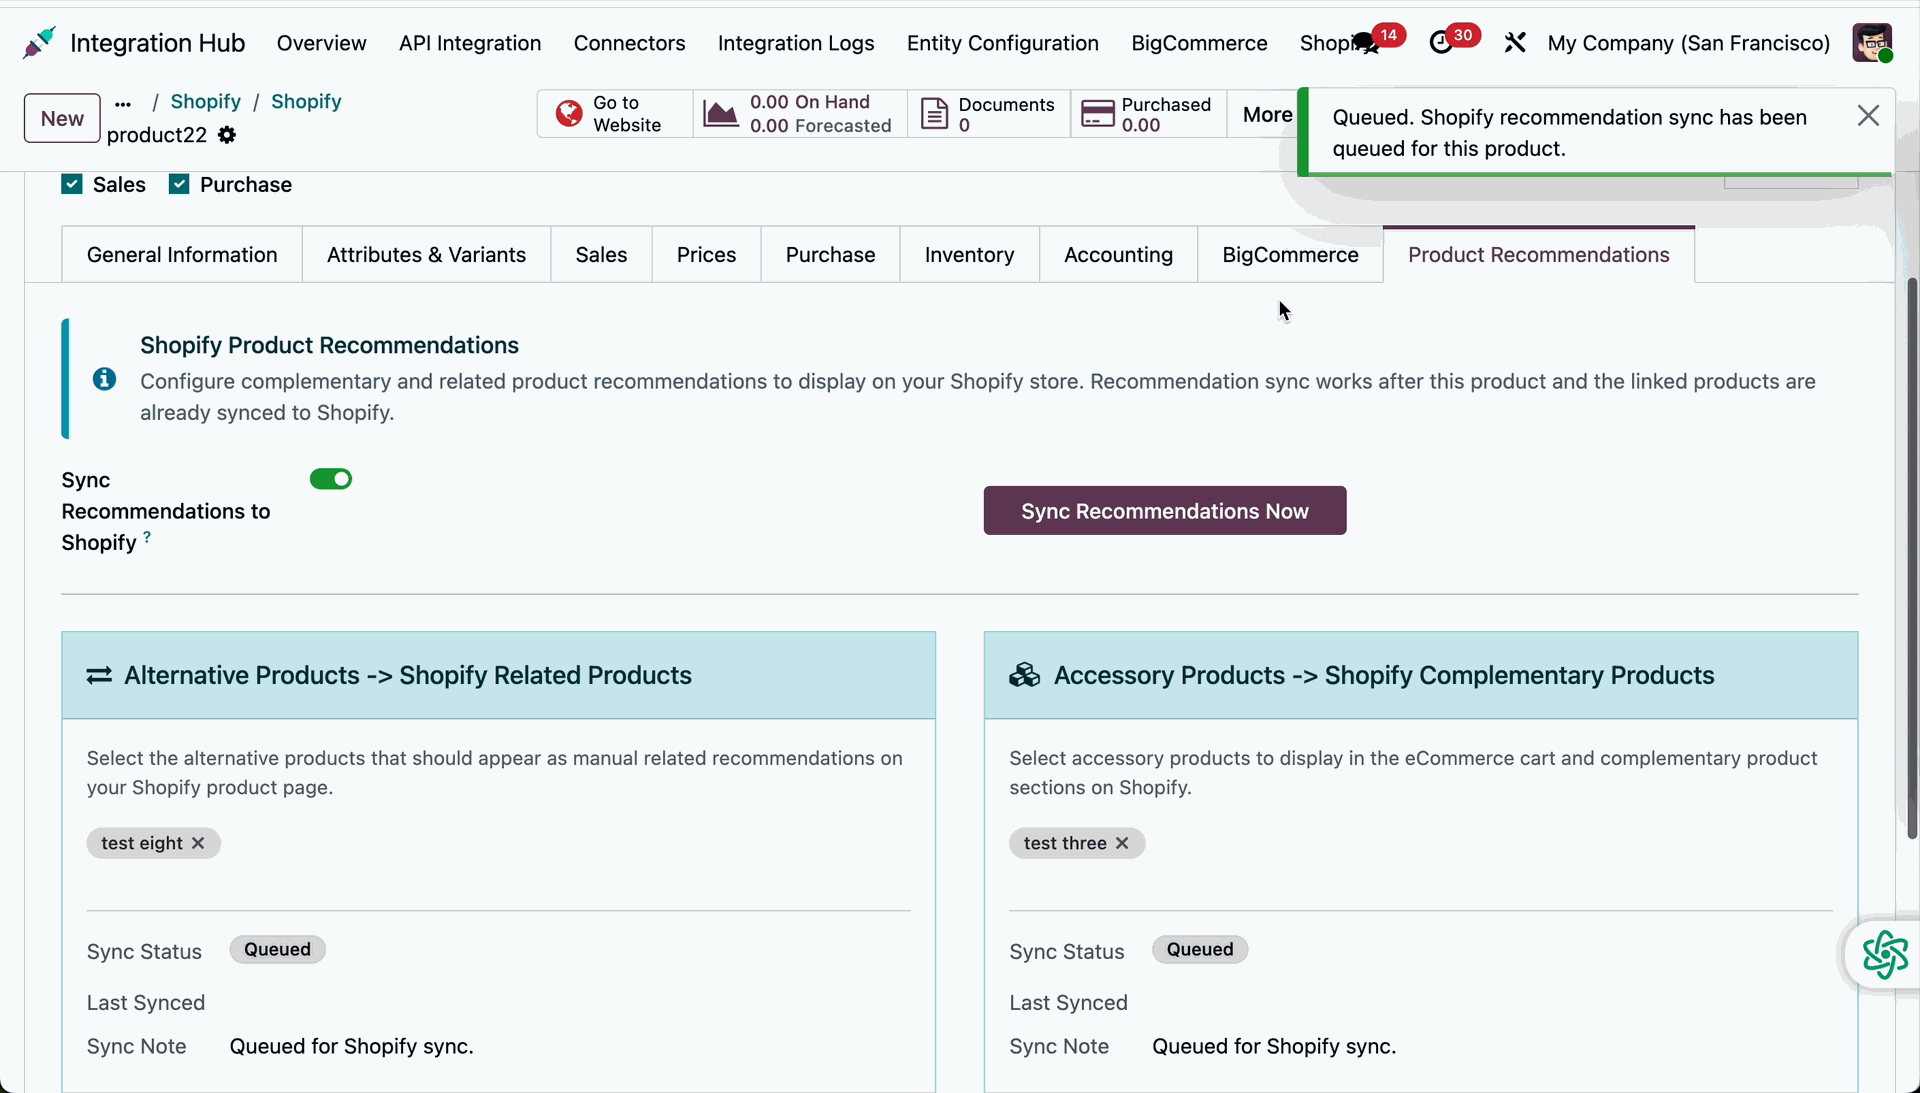
Displays a confirmation toast message when the product recommendation synchronization job is successfully queued.
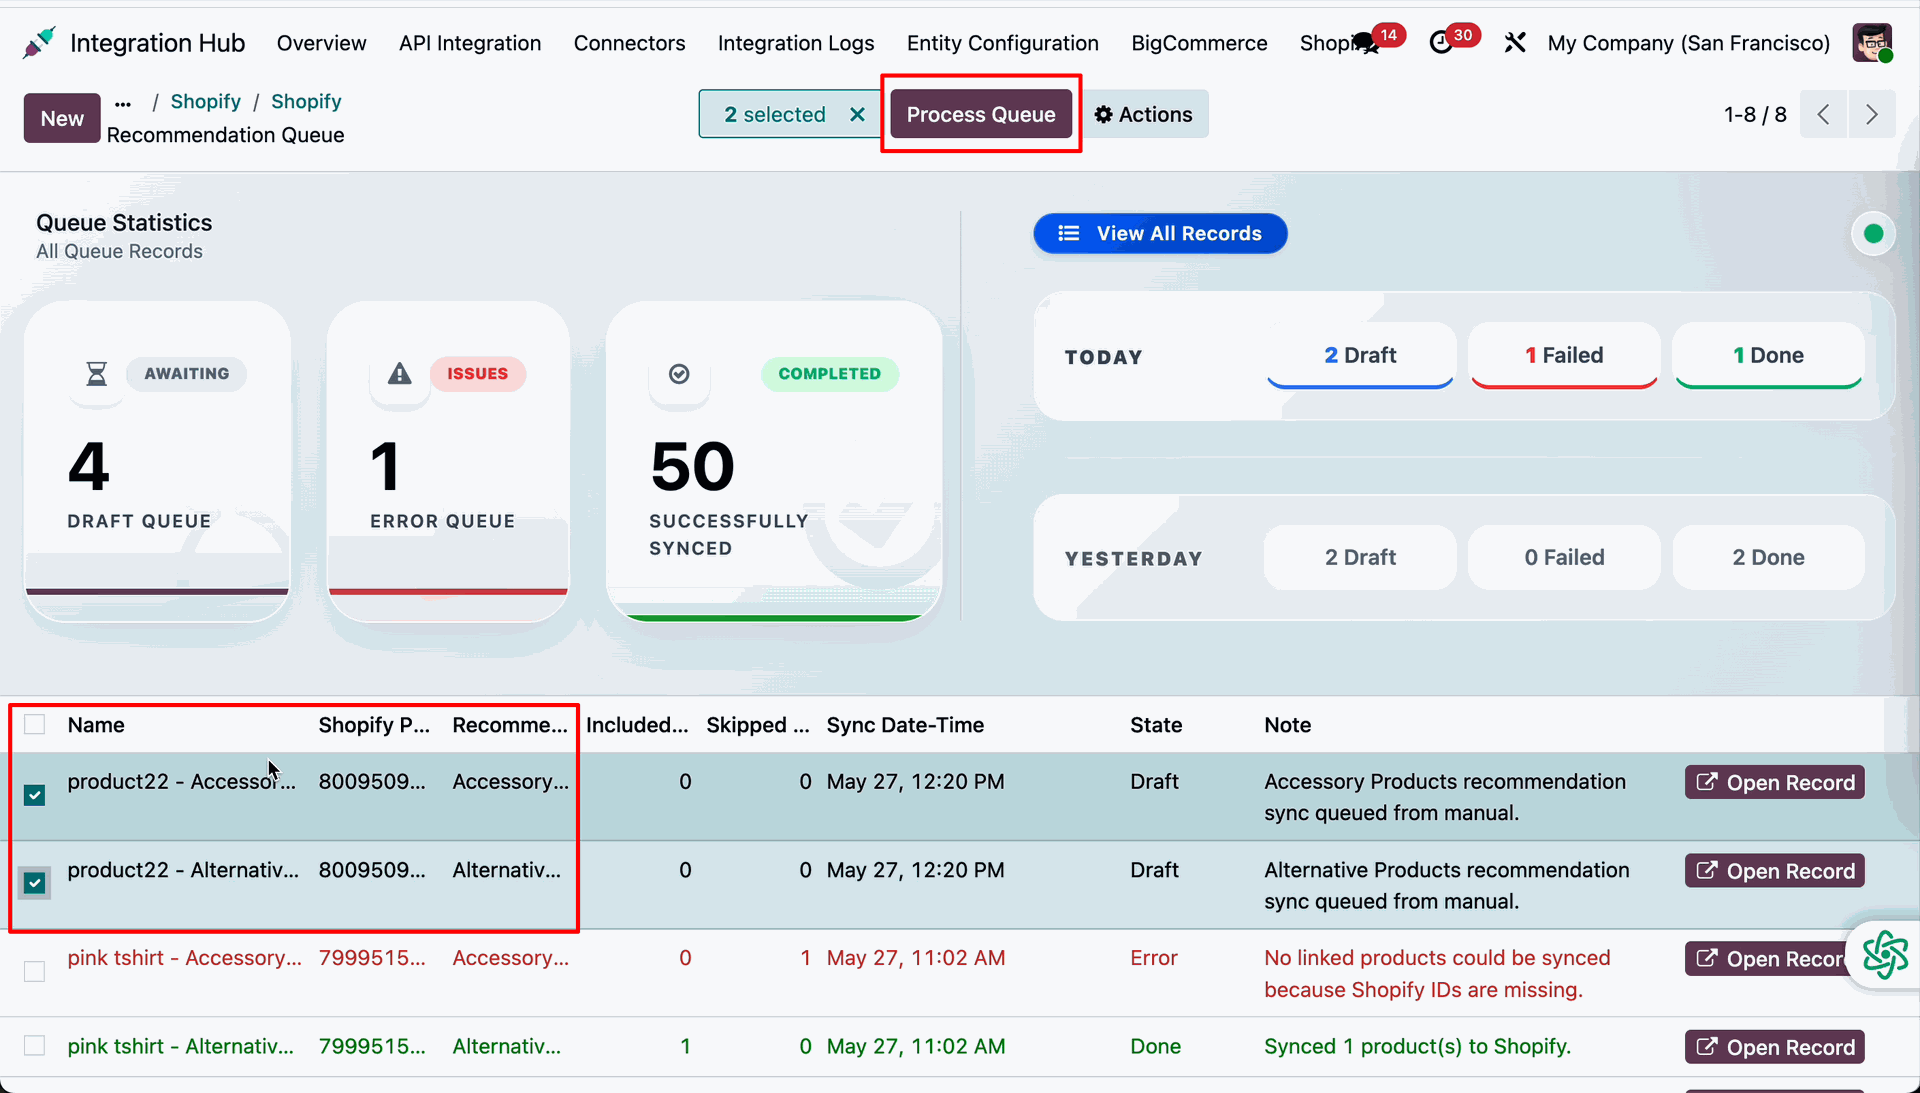
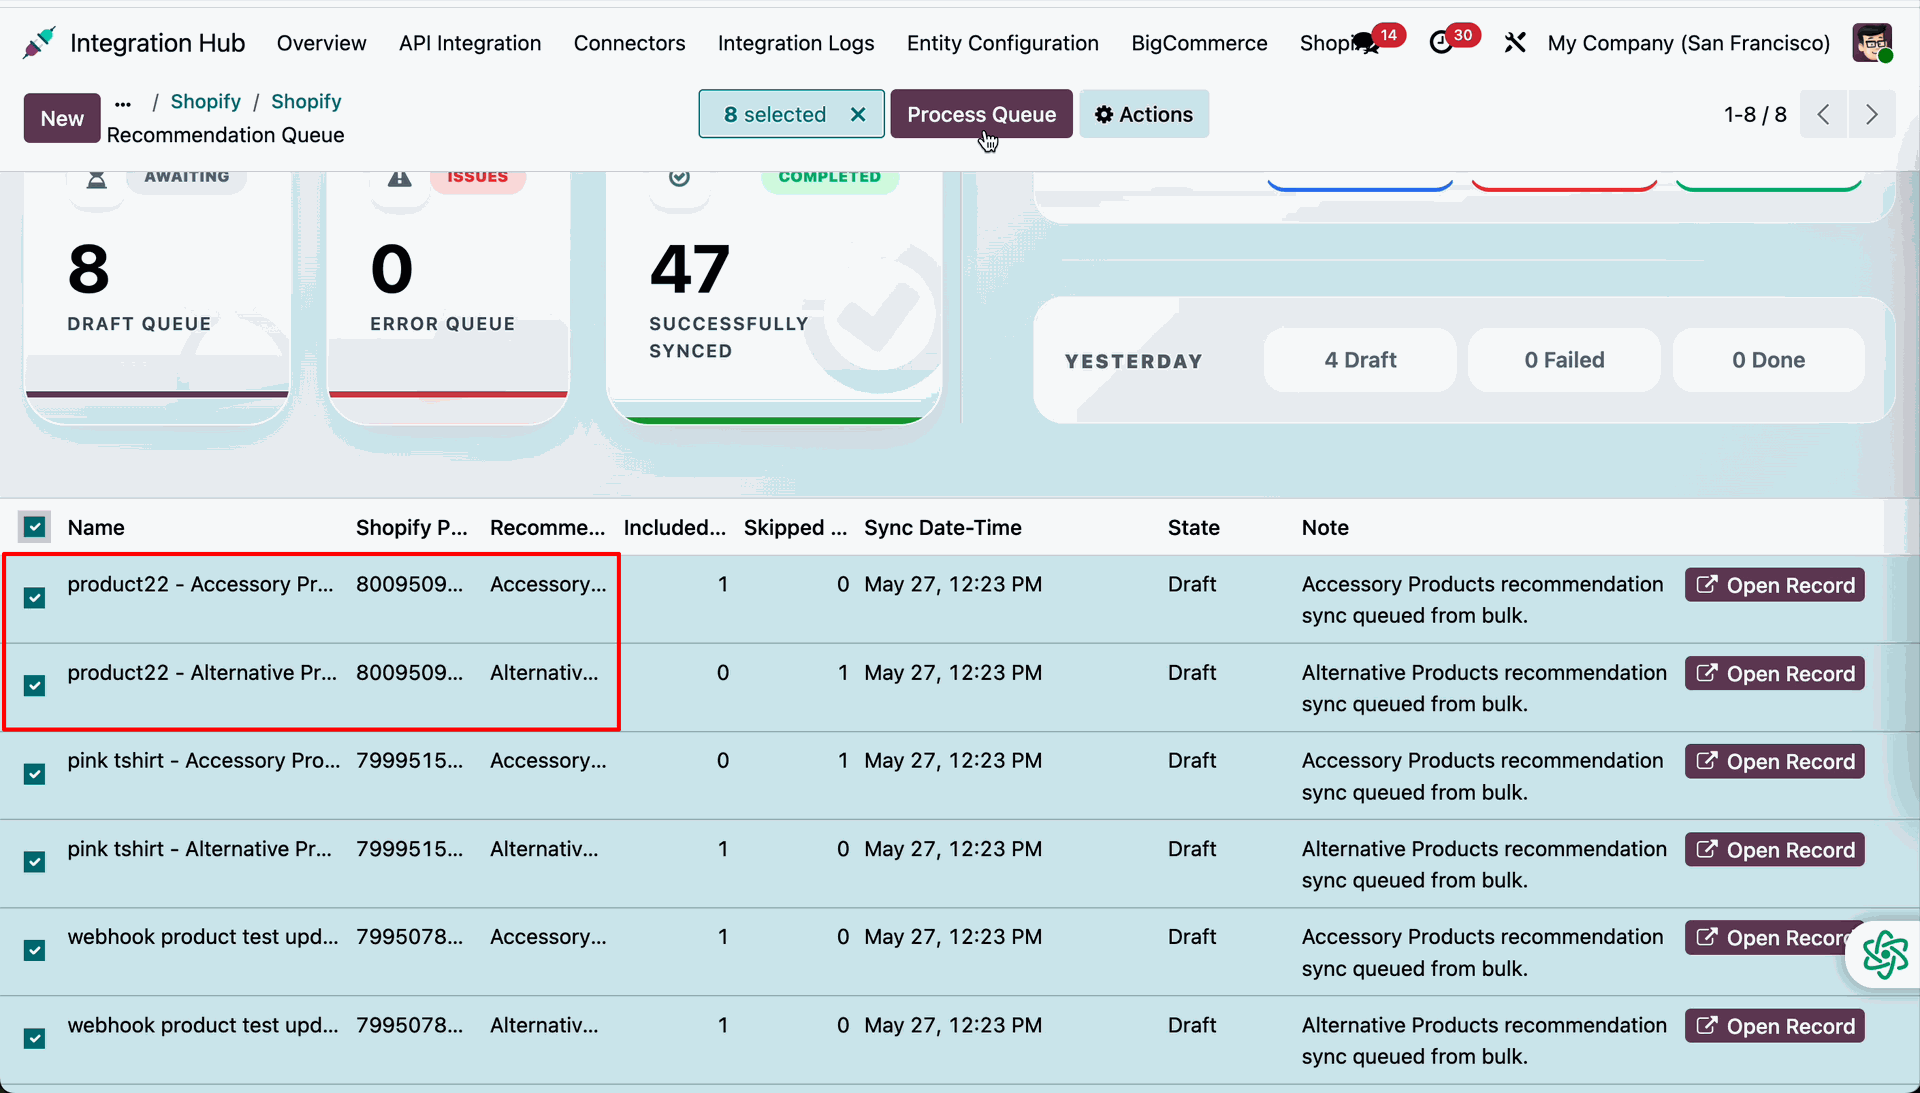
Select draft queue lines and then click Process Queue to execute the recommendation synchronization.
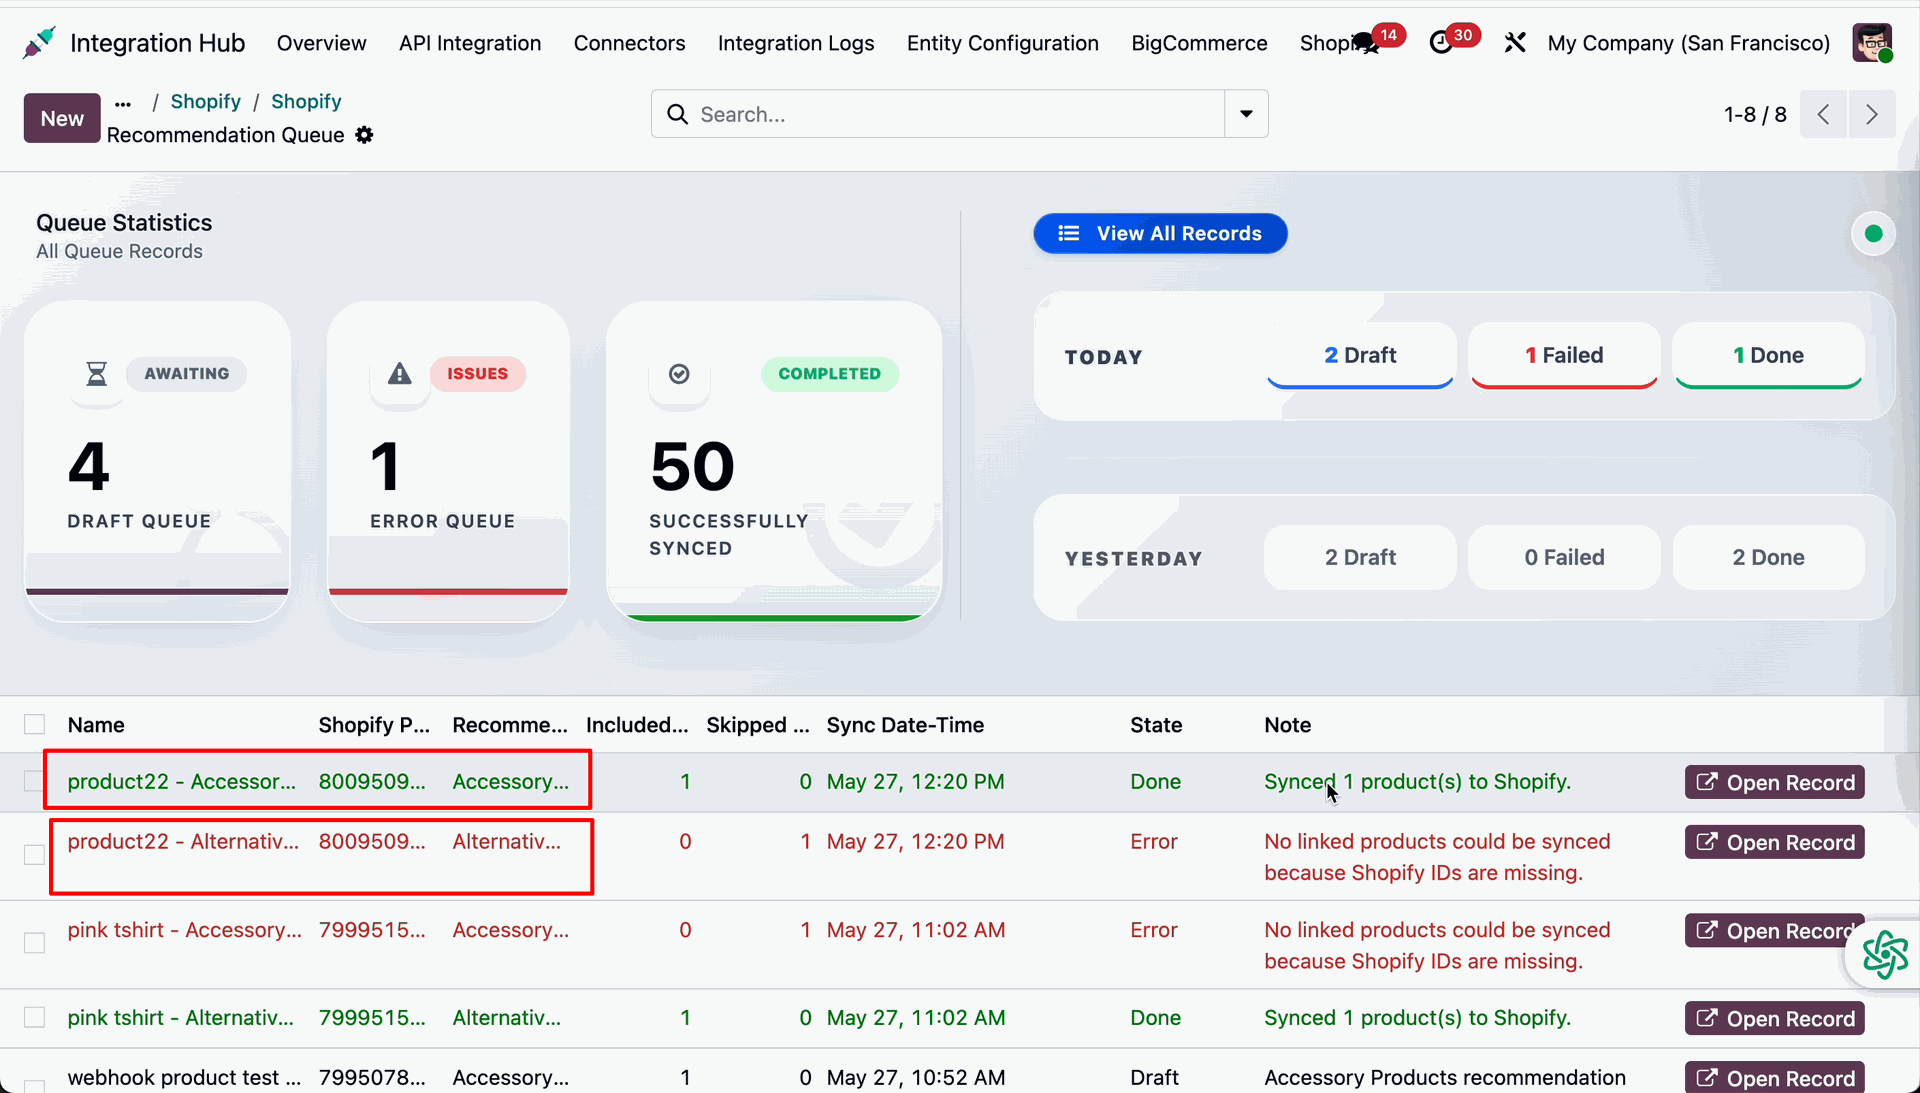
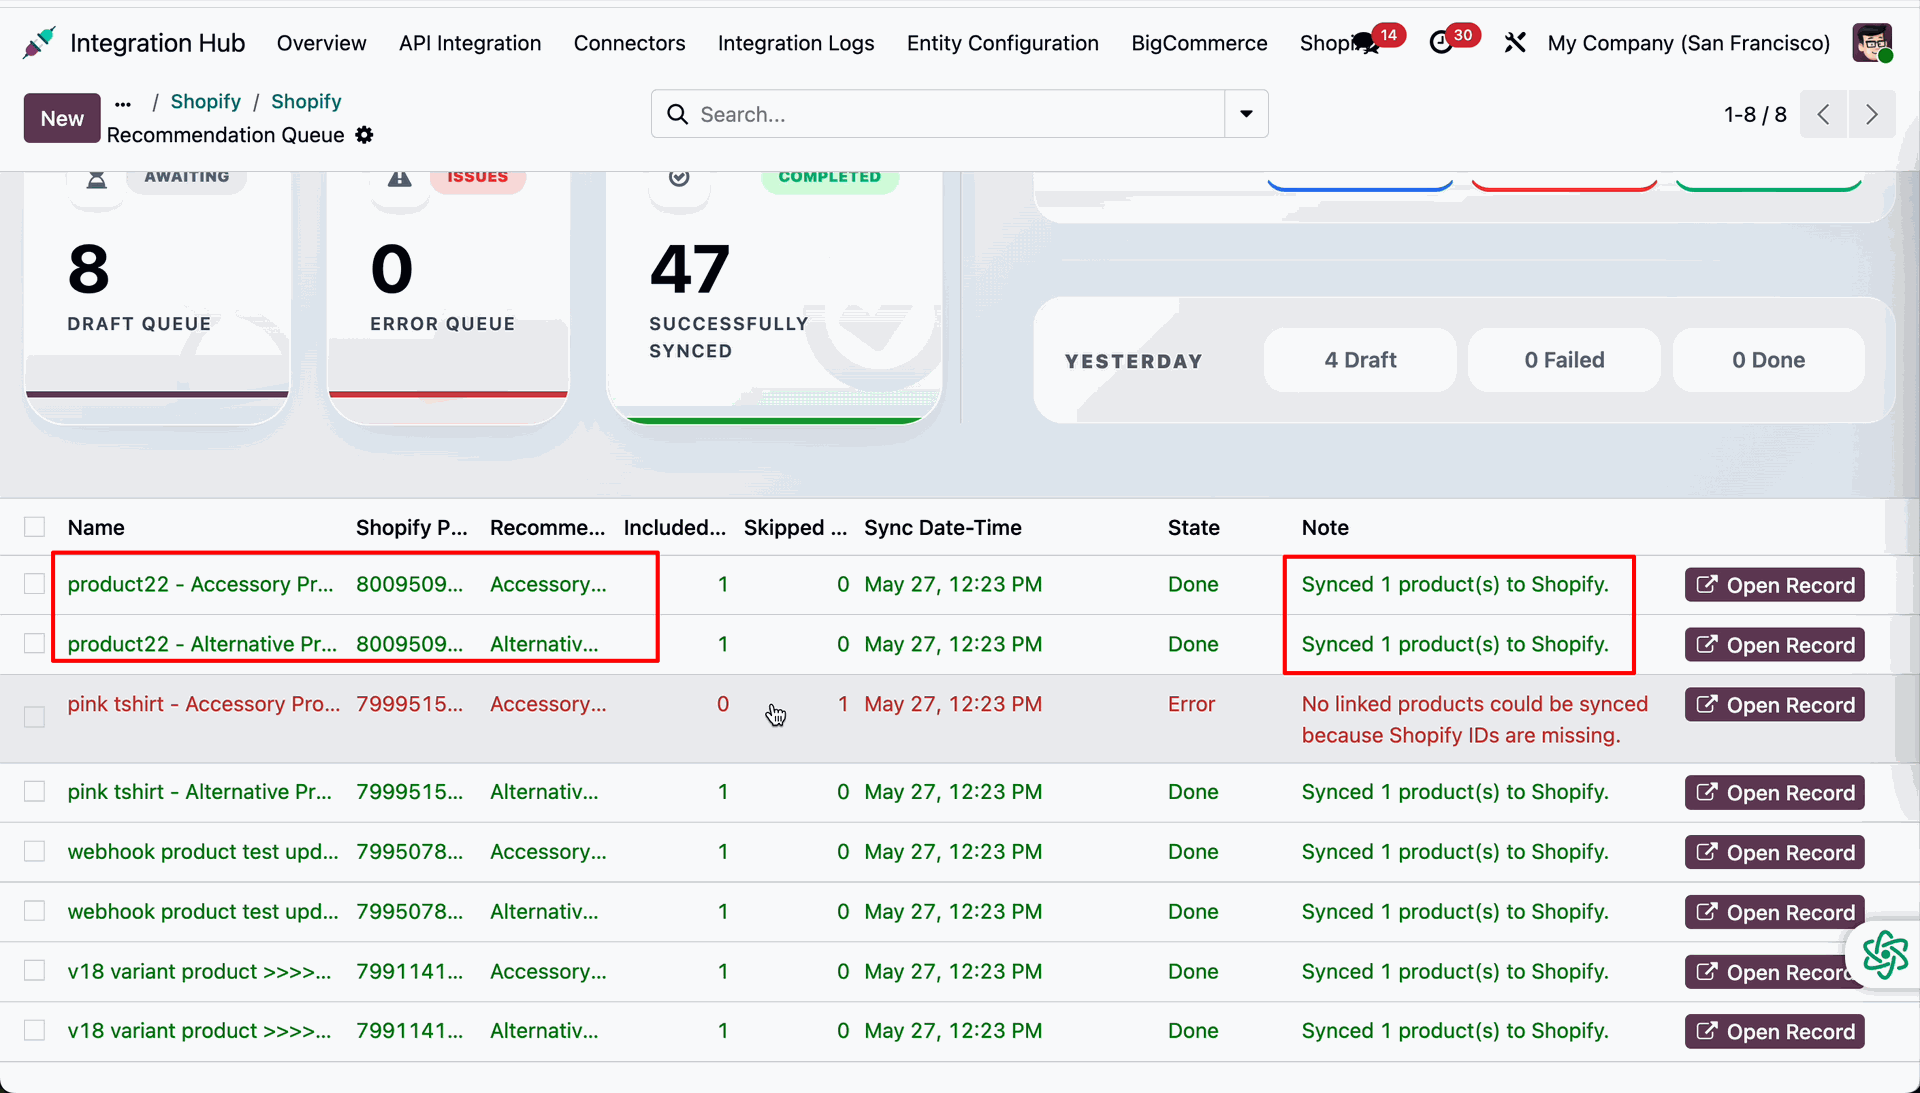
Verify synchronization queue results to identify completed updates and failed records with sync notes.
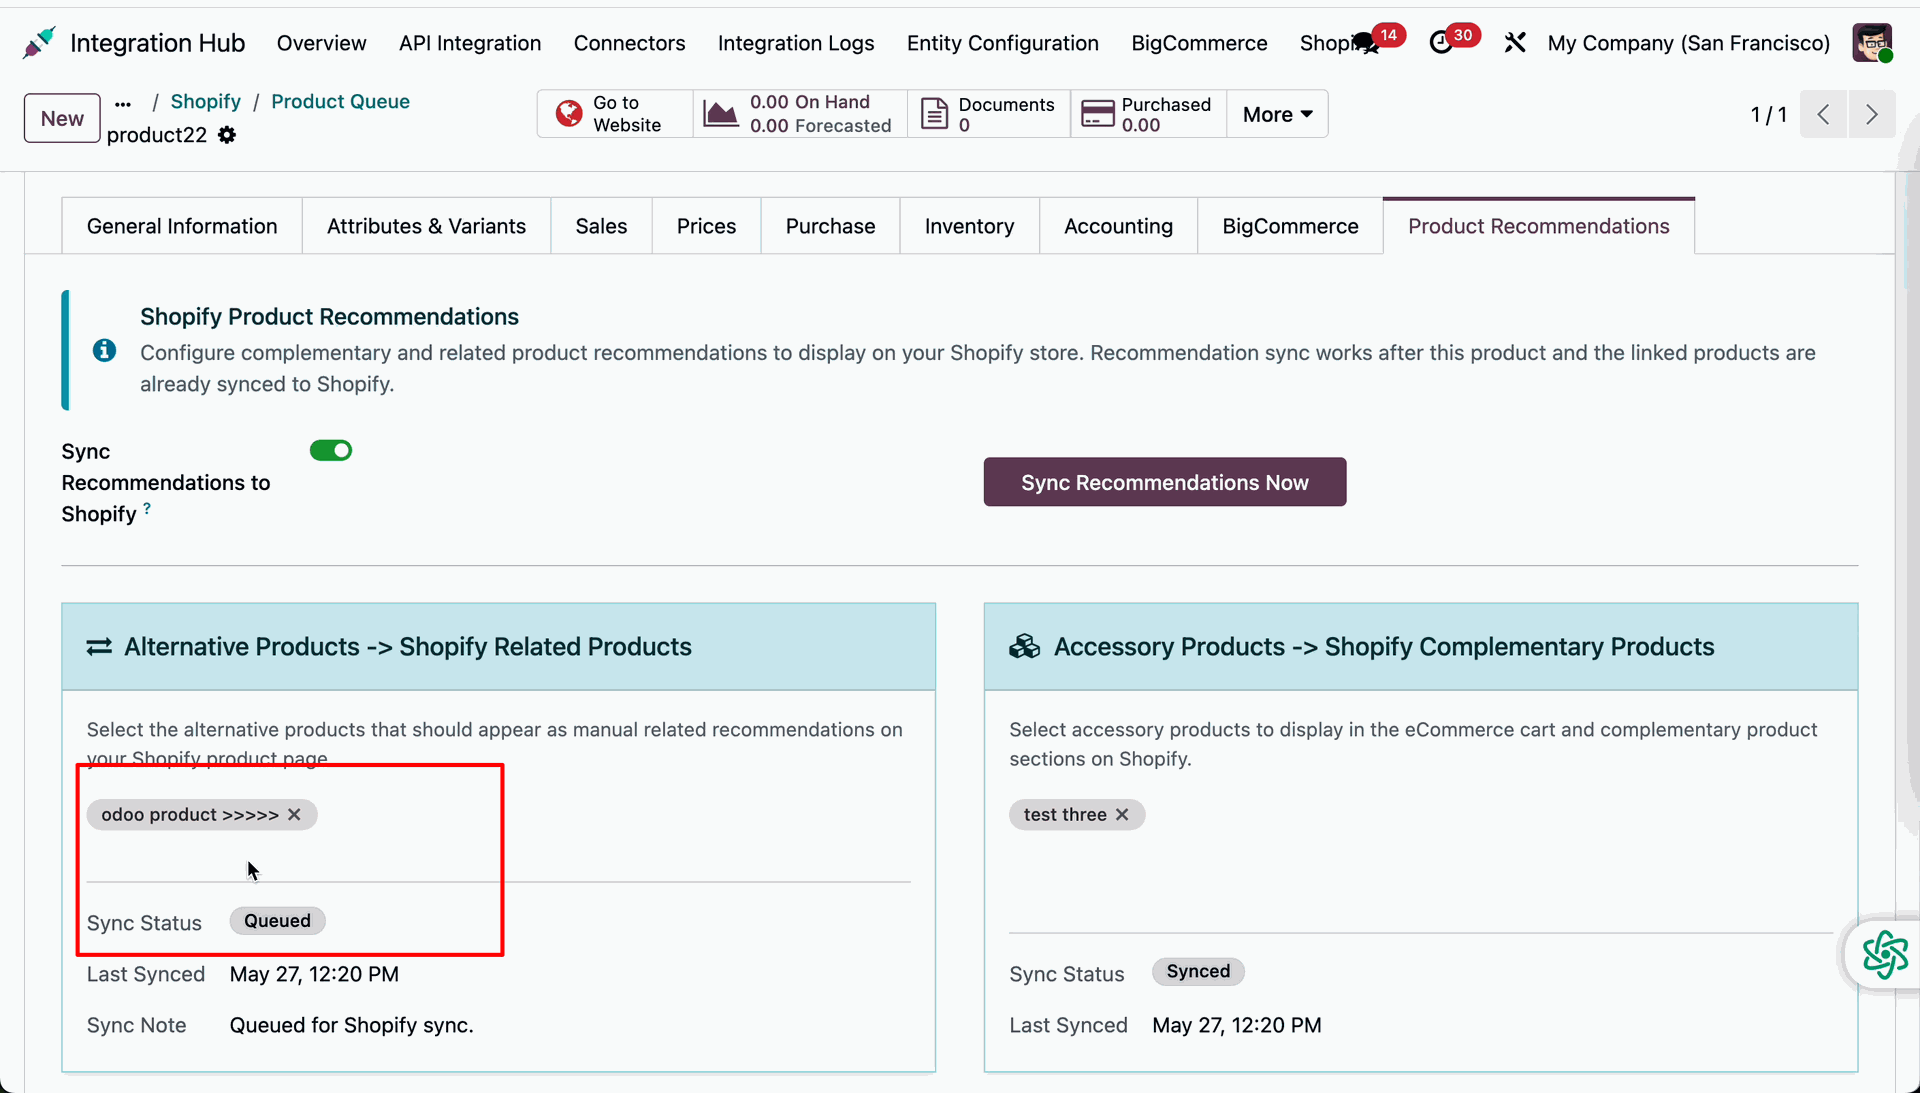
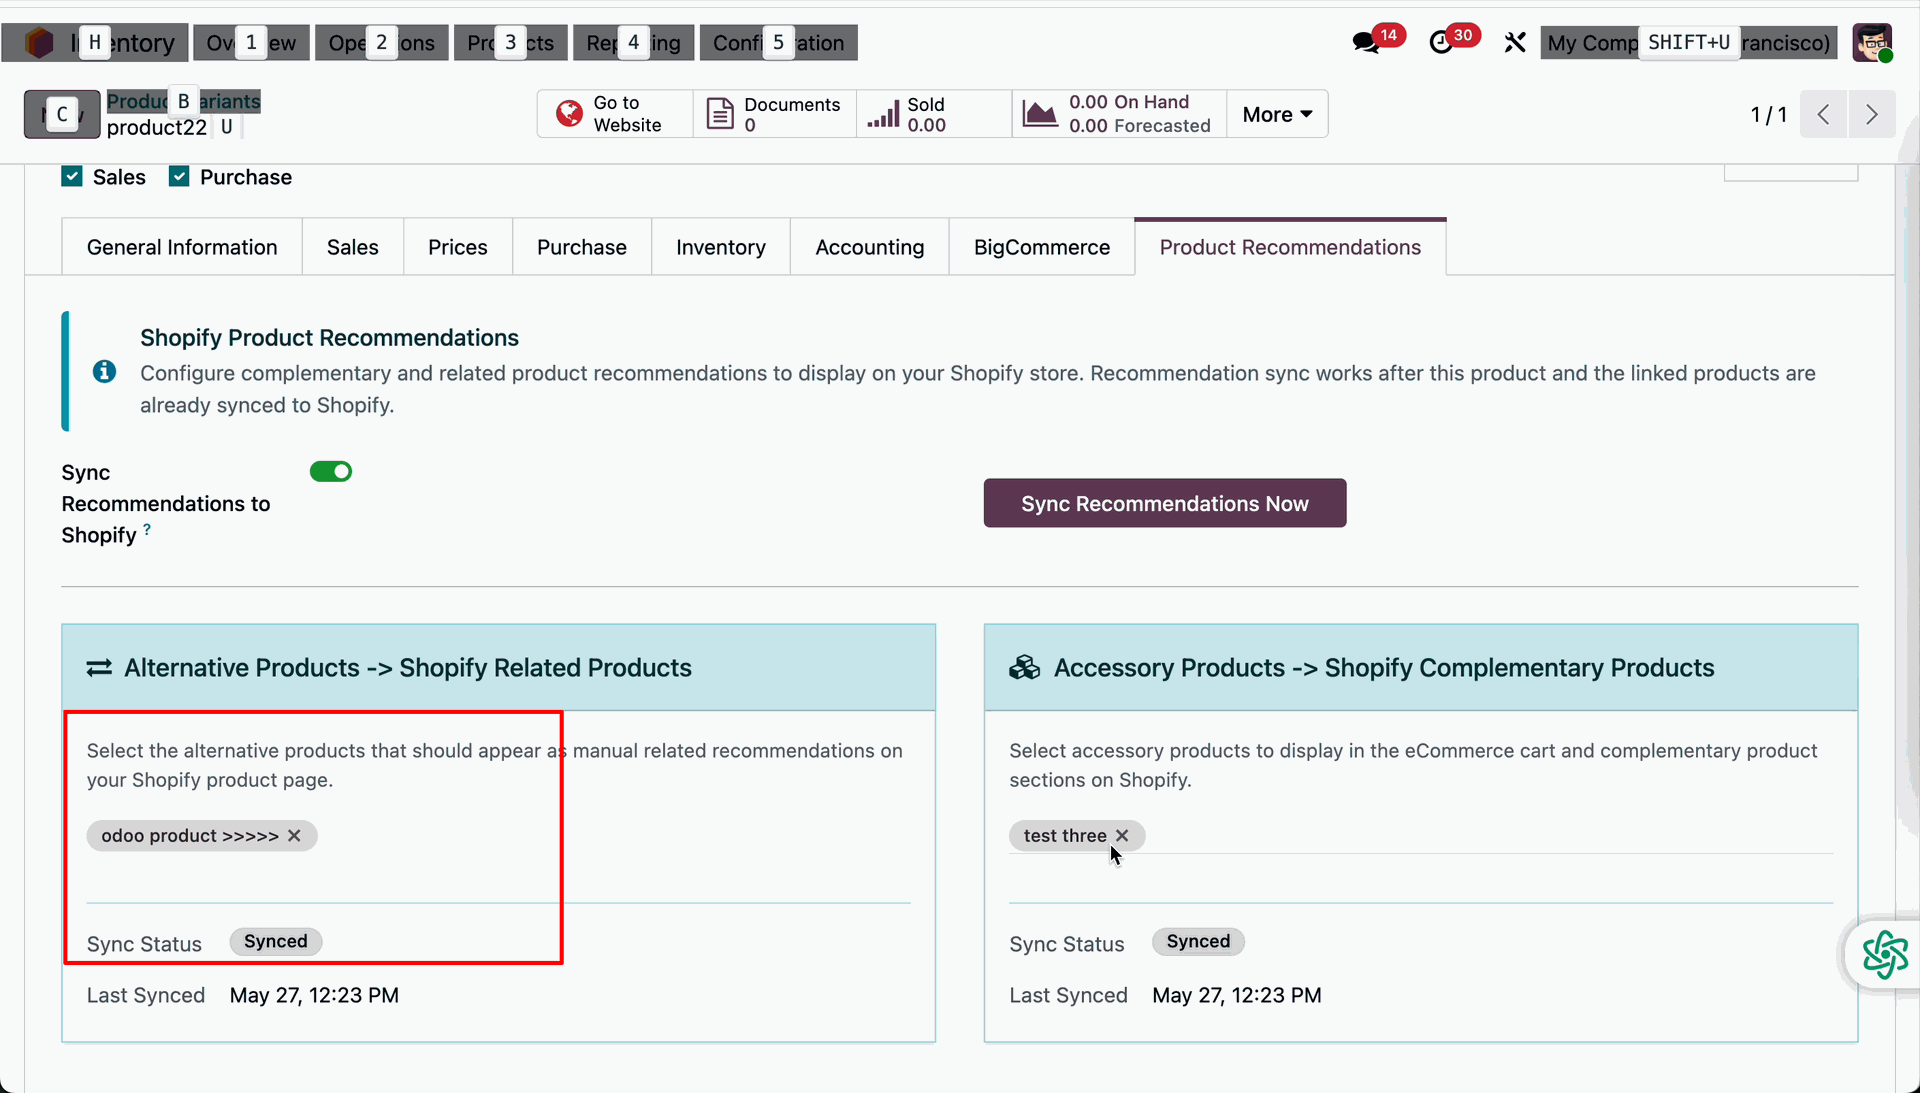
Verify that the alternative product synchronization status is updated to queued on the product card.
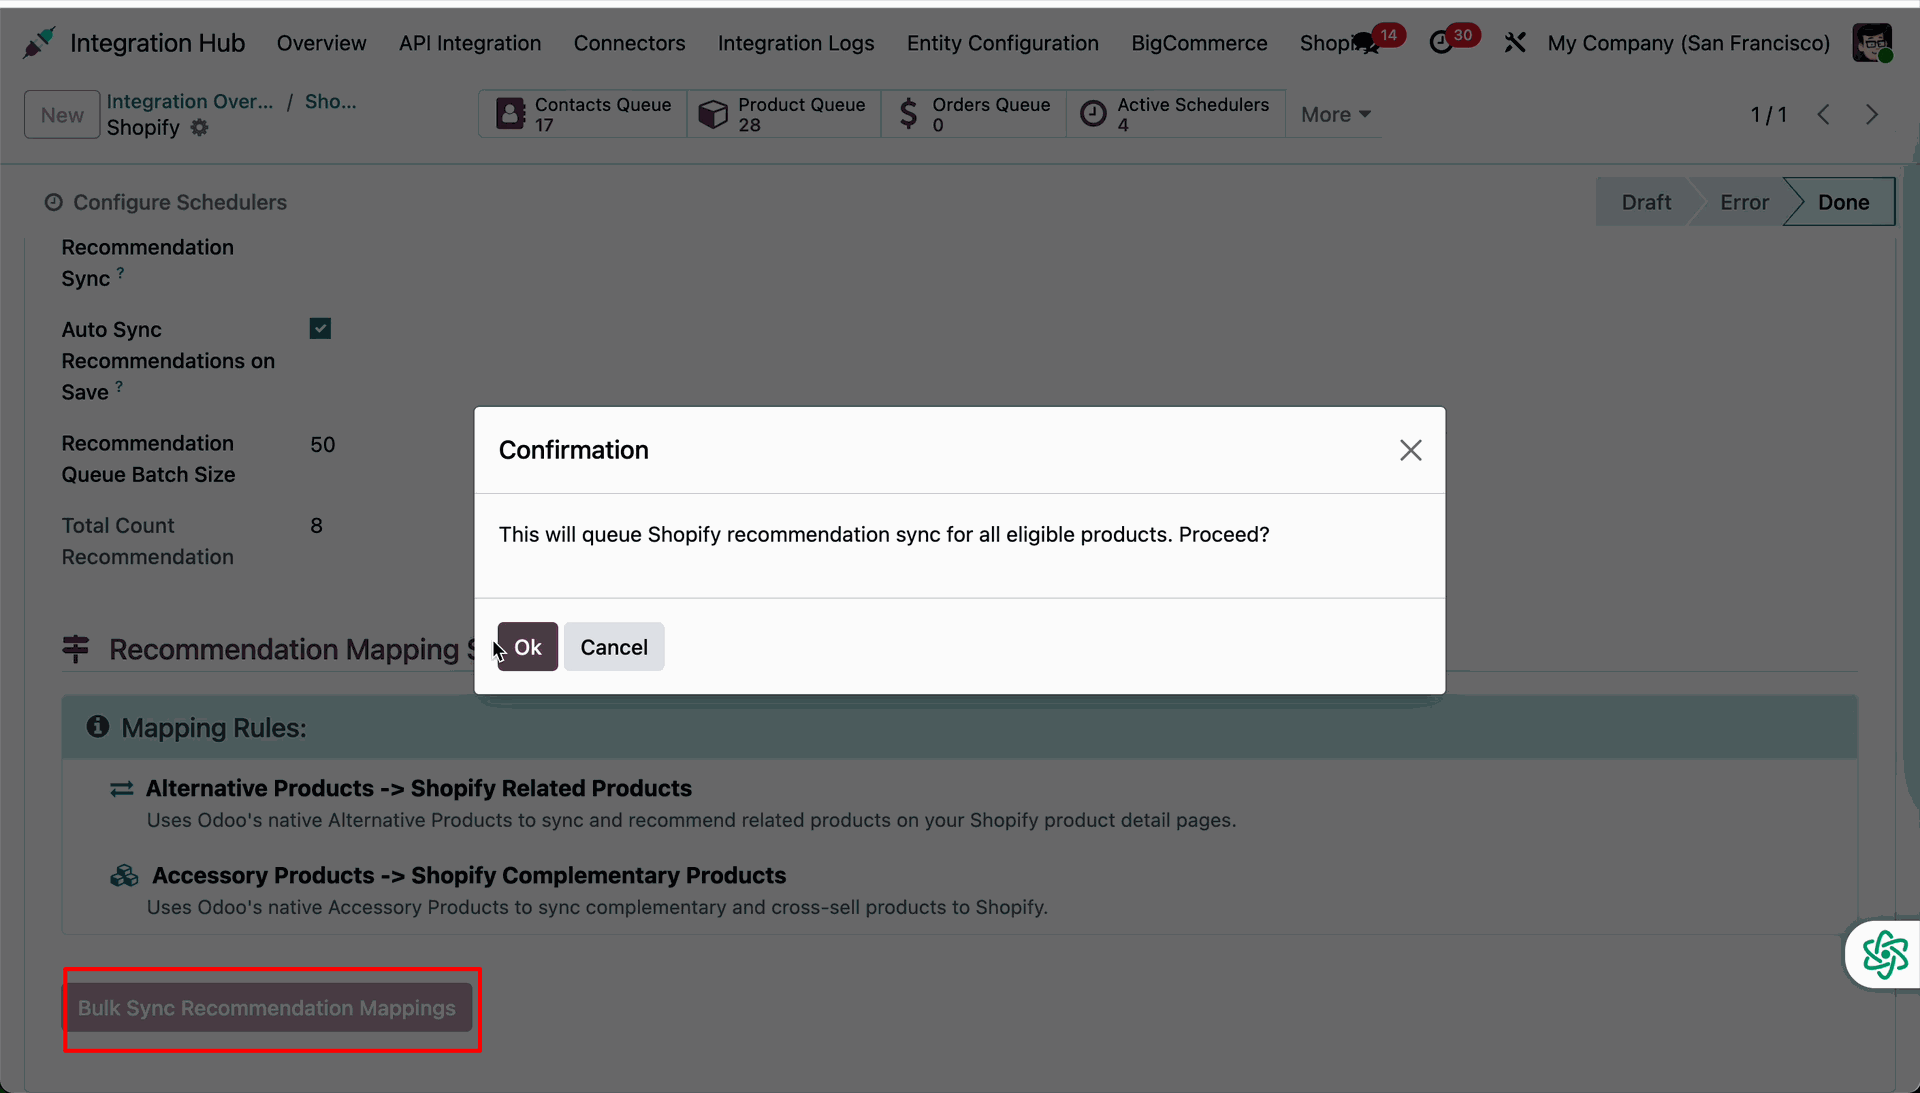
Click the Bulk Sync Recommendation Mappings button and click Ok on the confirmation popup.
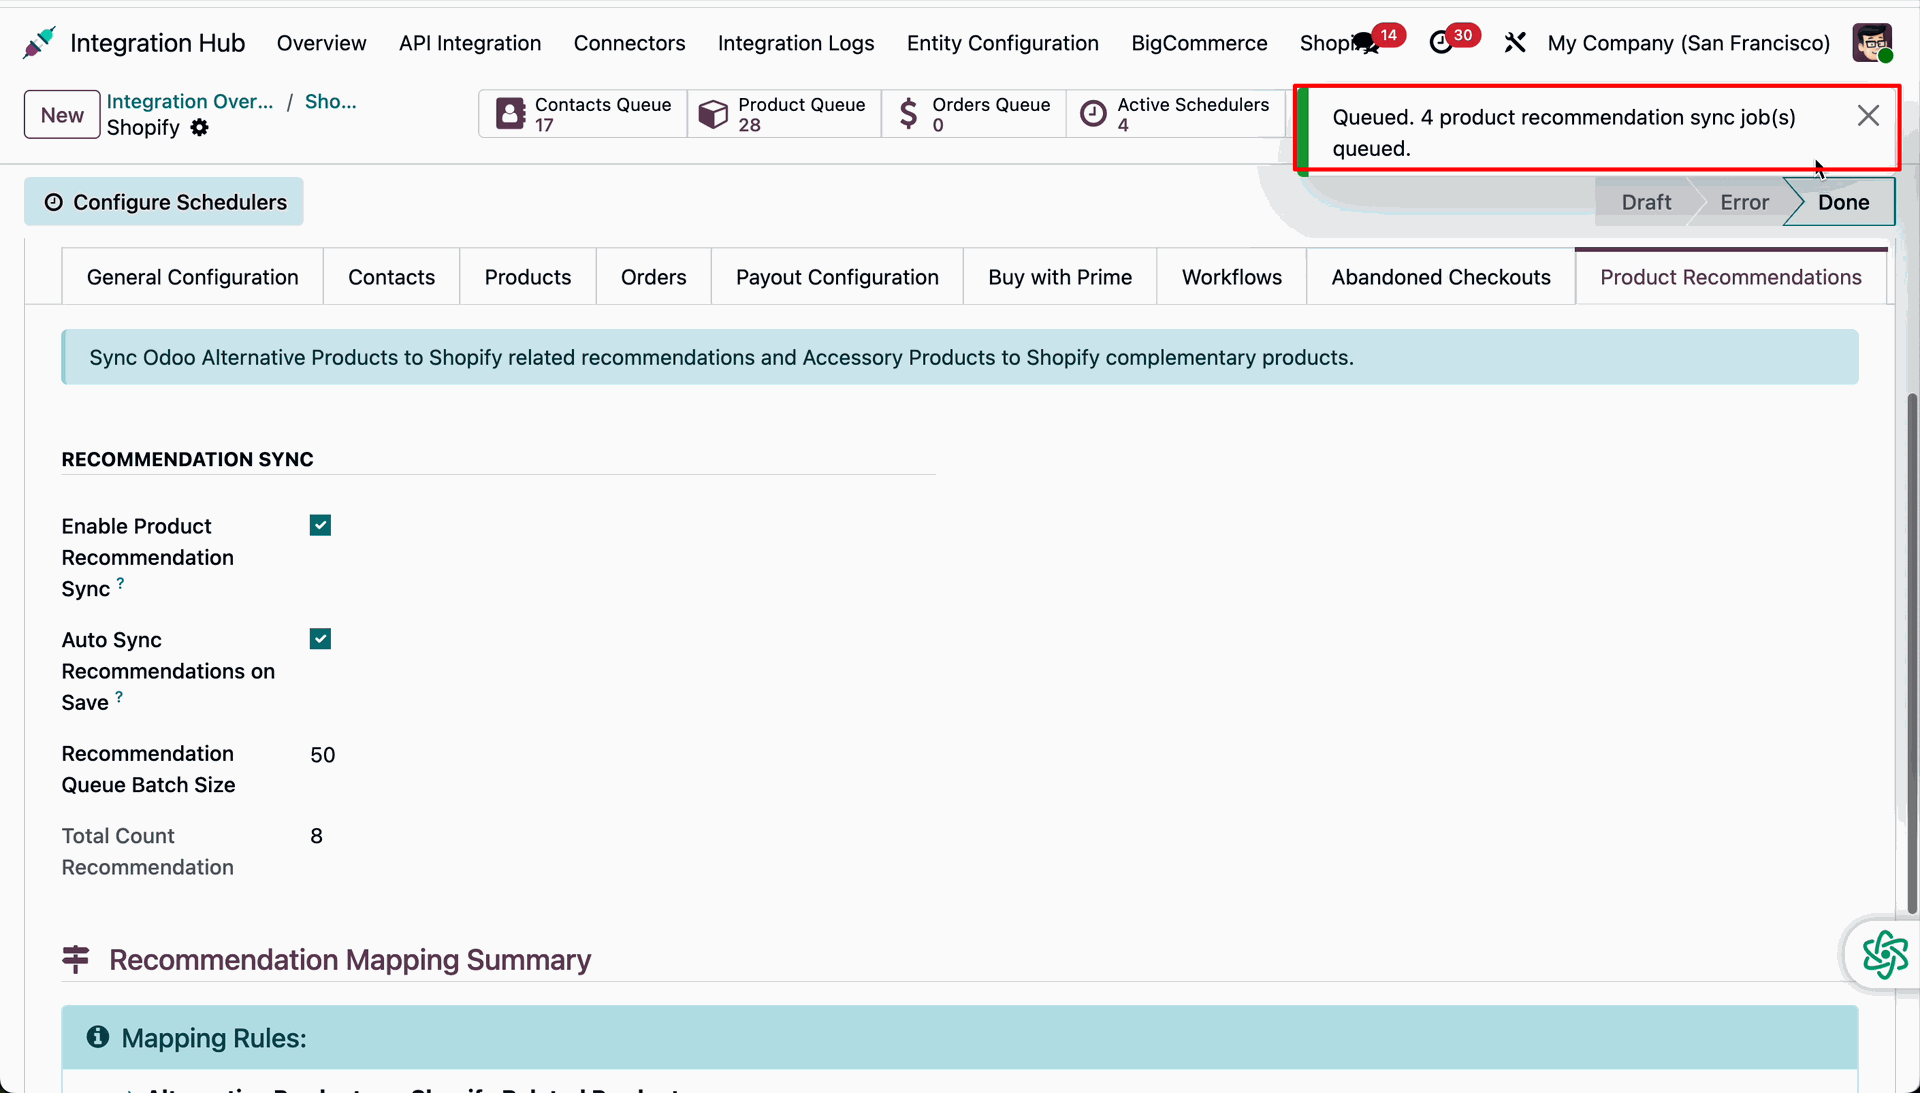
Displays a toast notification indicating the total count of queued product recommendation sync jobs.
Inspect the recommendation queue list to check draft jobs created by the bulk sync action.
Verify that the processed bulk queue lines successfully change state to done with confirmation notes.
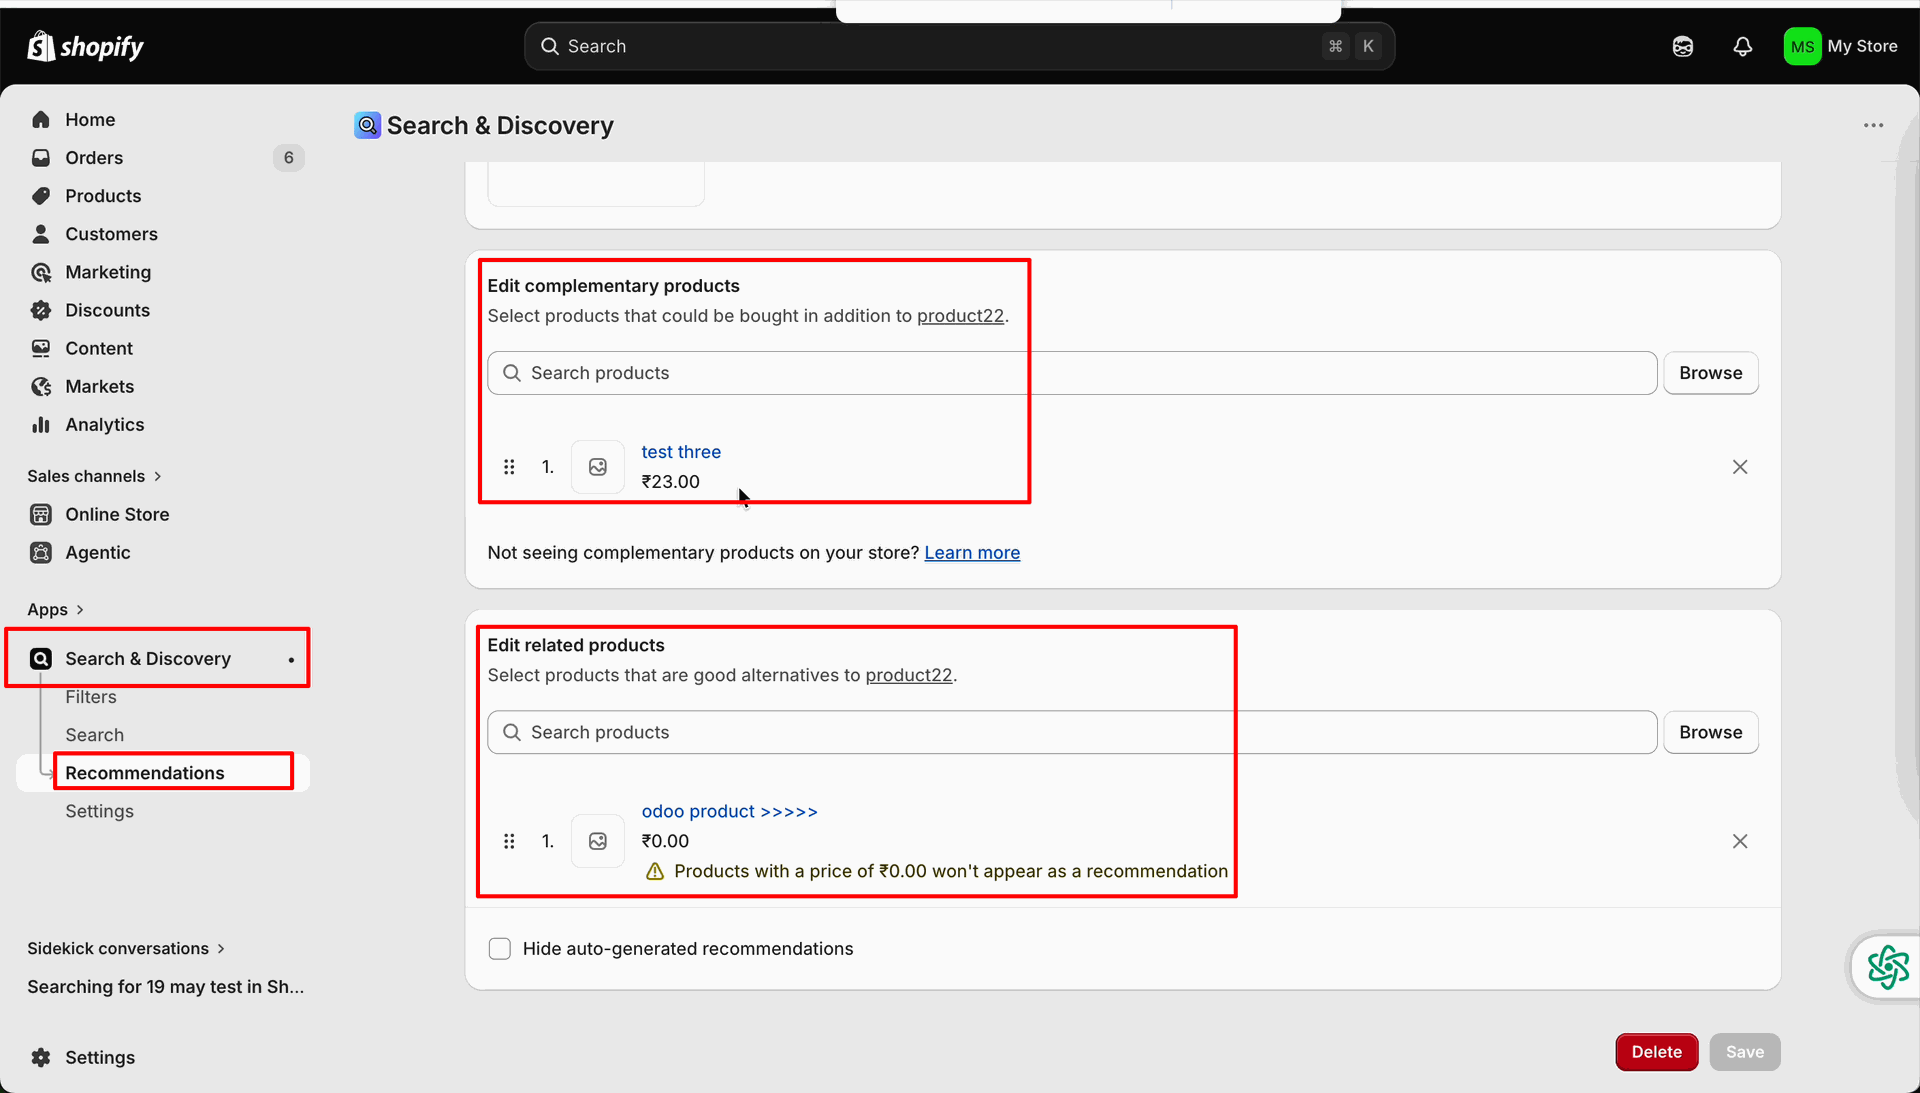
Open the Search & Discovery menu in Shopify to review complementary and related product configurations.
Verify that the alternative product synchronization status updates to synced on the product template.
Workflow
Open the Abandoned Checkouts tab to read about importing checkout records into CRM leads.
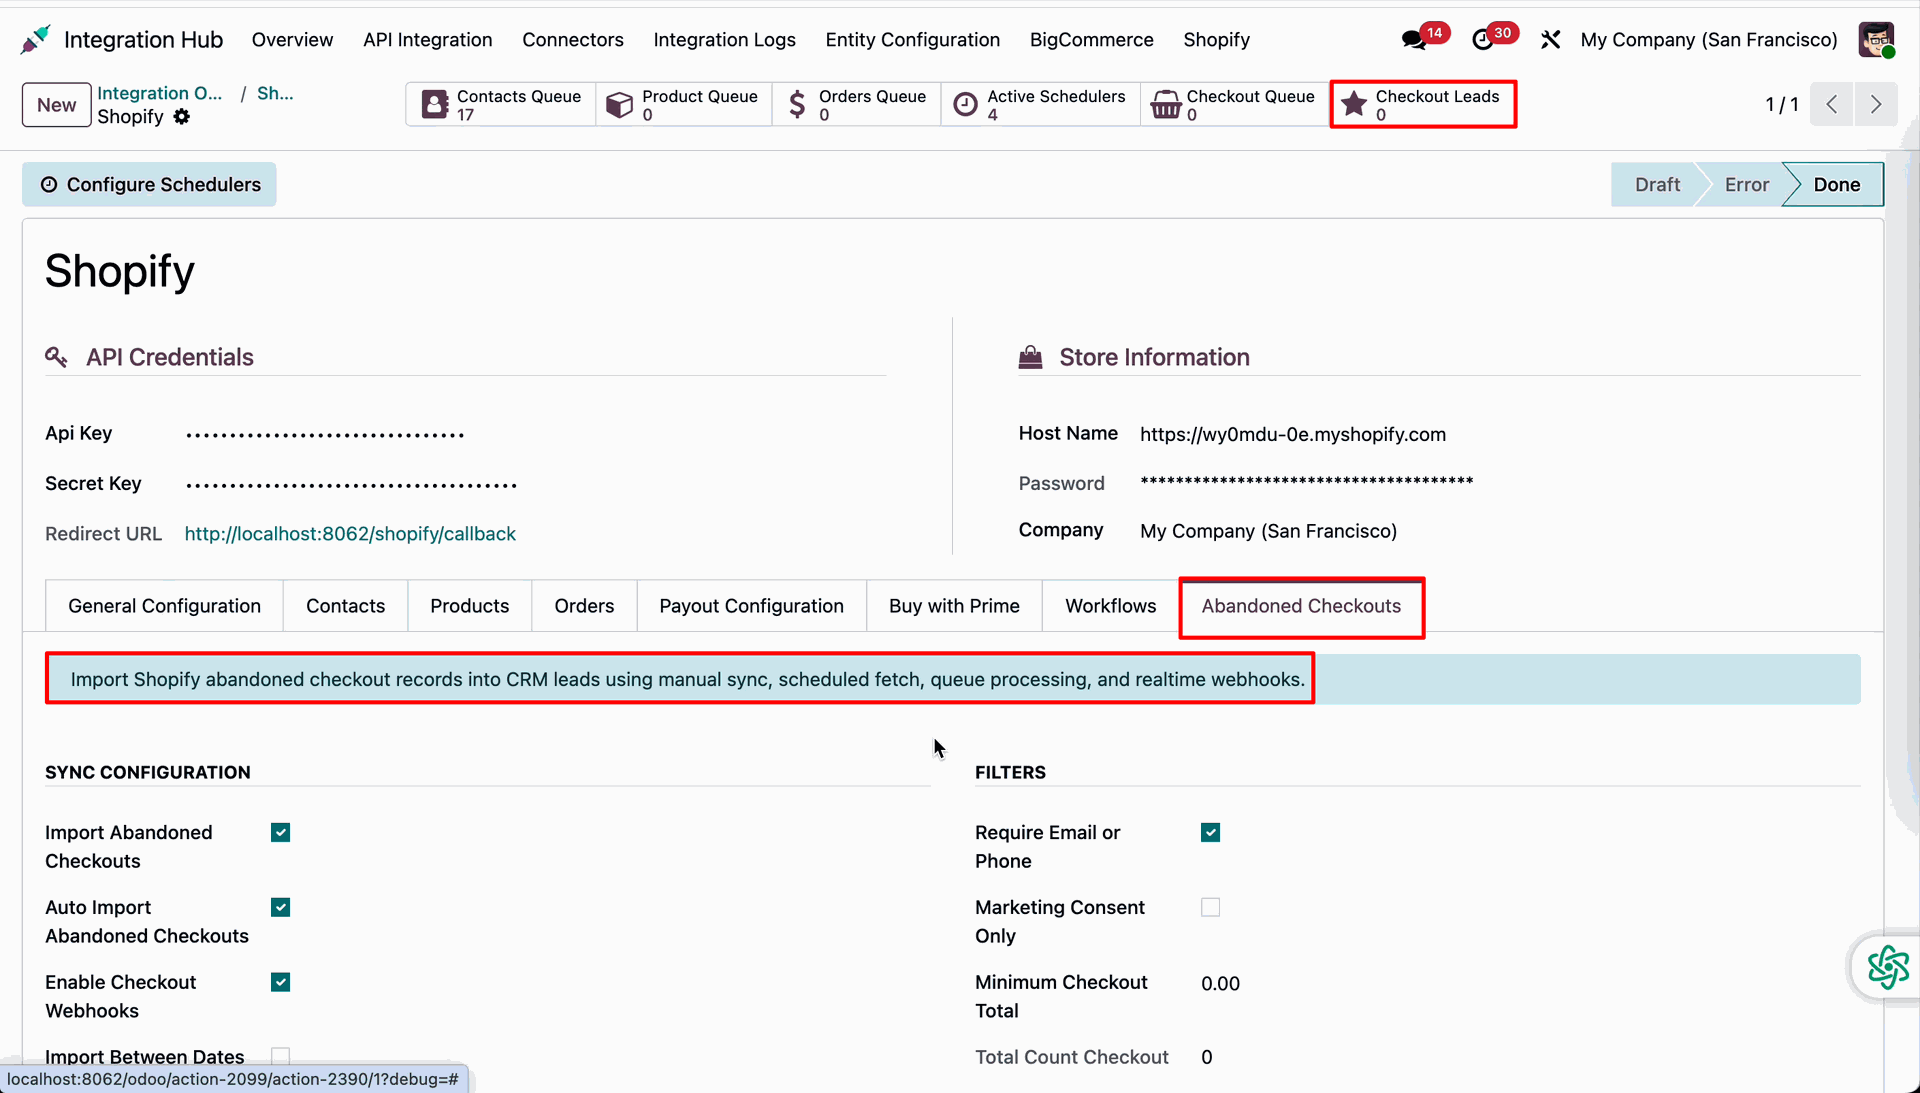
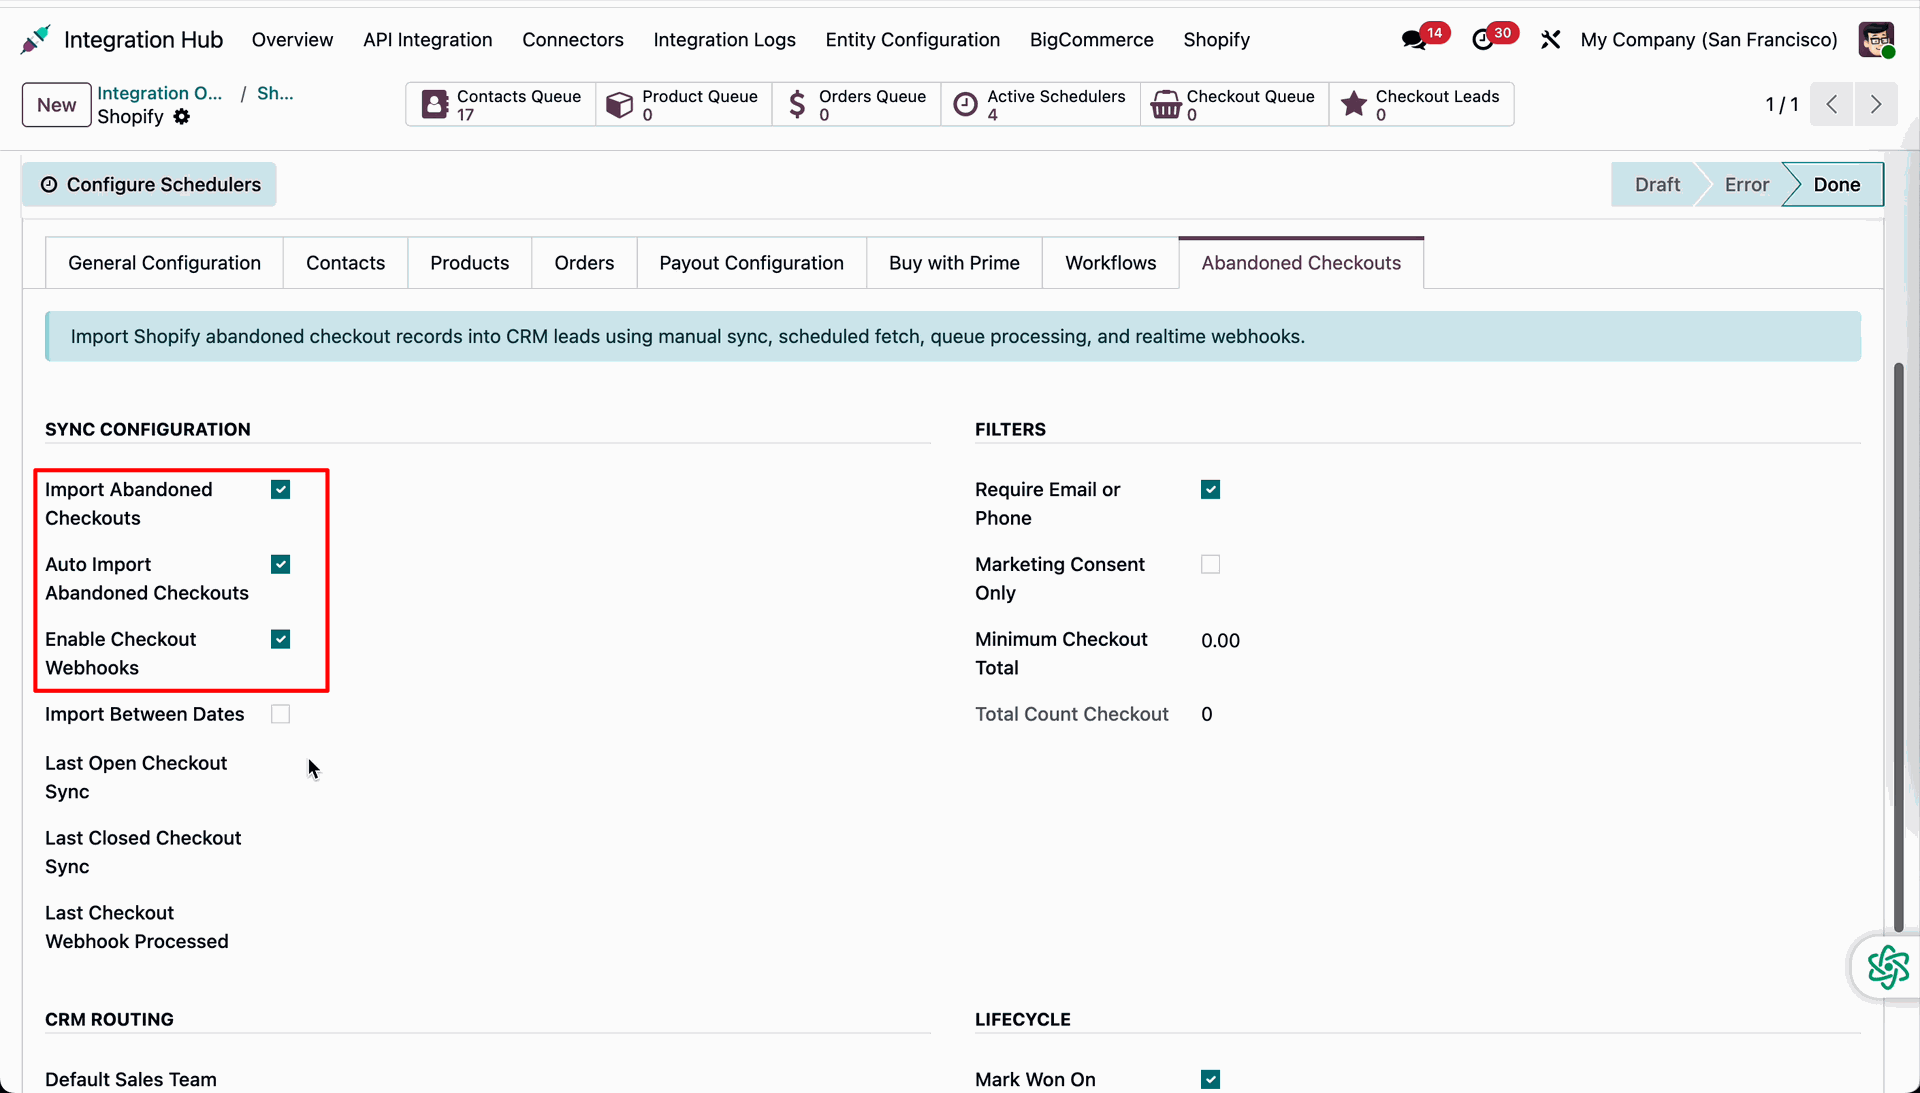
Configure abandoned checkouts sync parameters, auto-import settings, and webhook activation checkboxes.
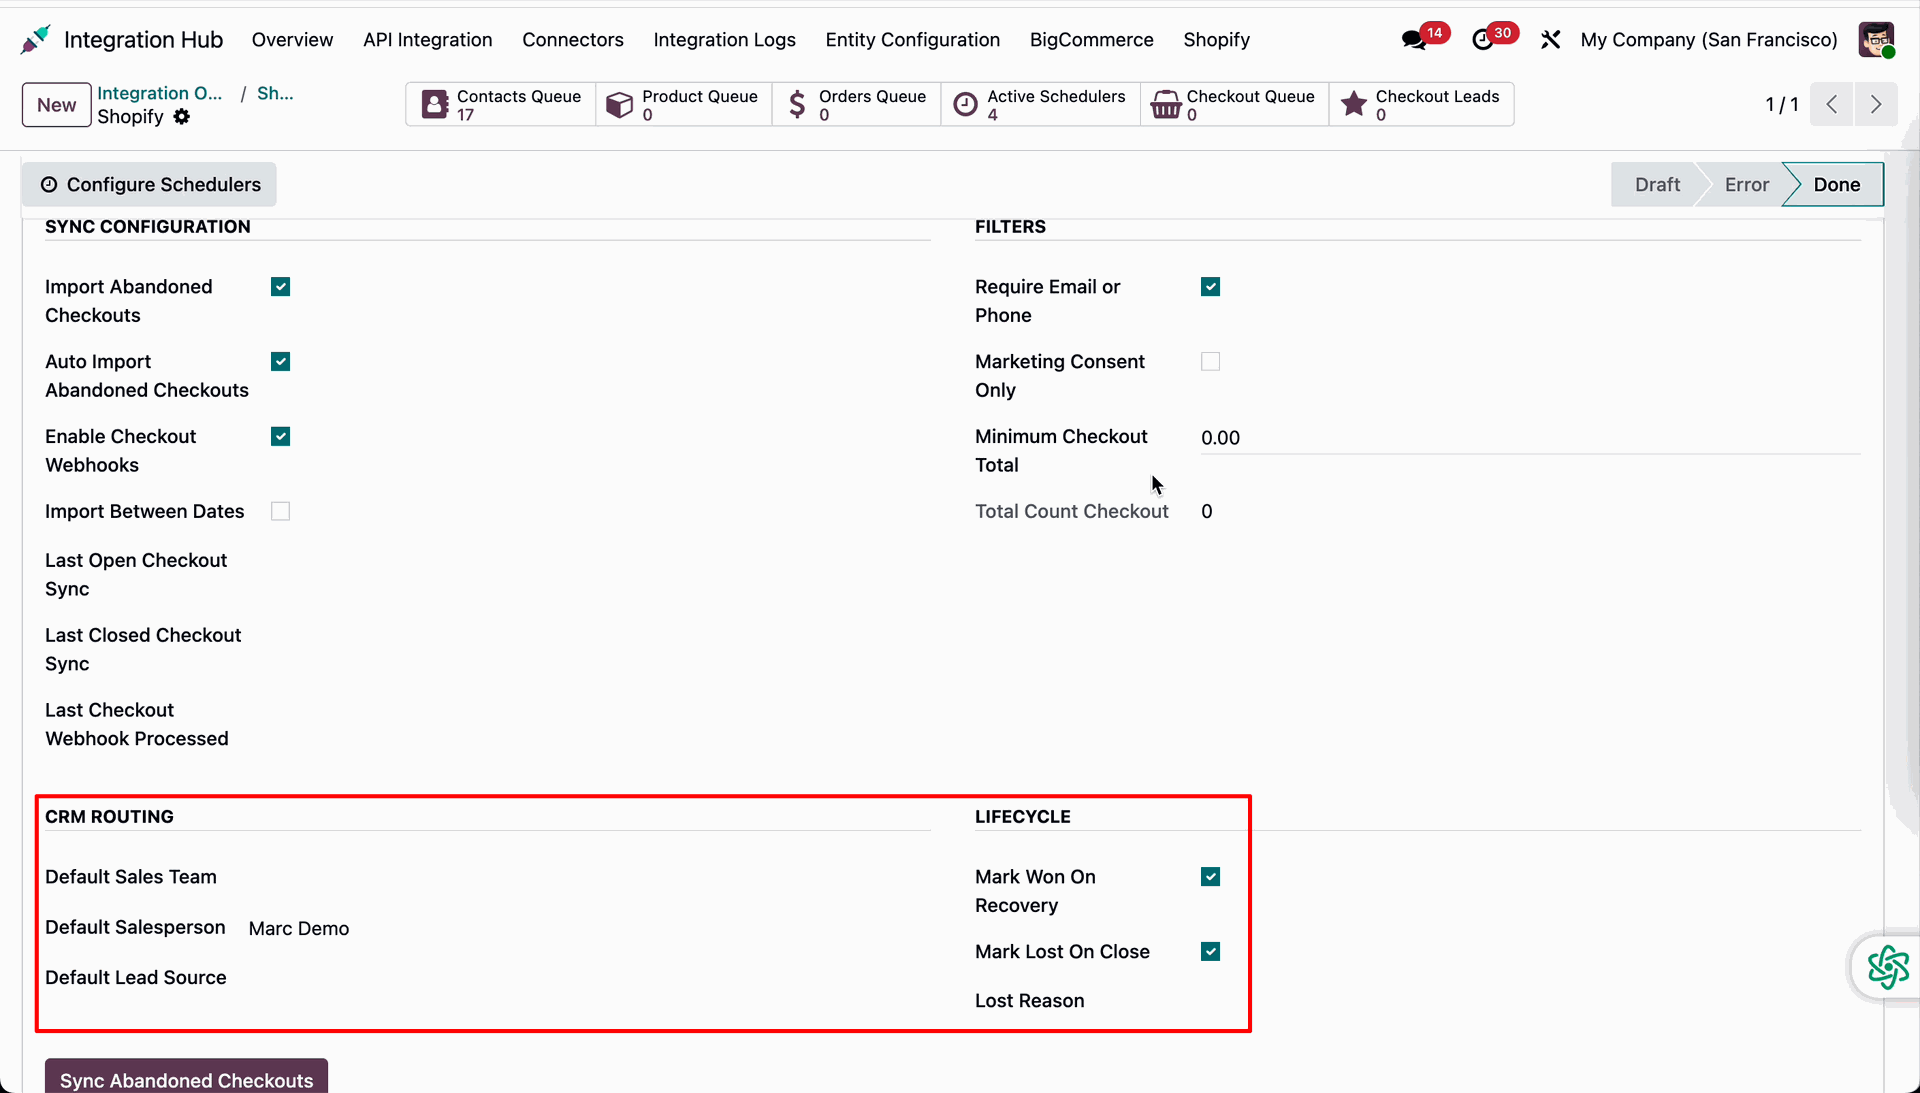
Set the CRM routing rules and lead lifecycle parameters for imported checkout records.
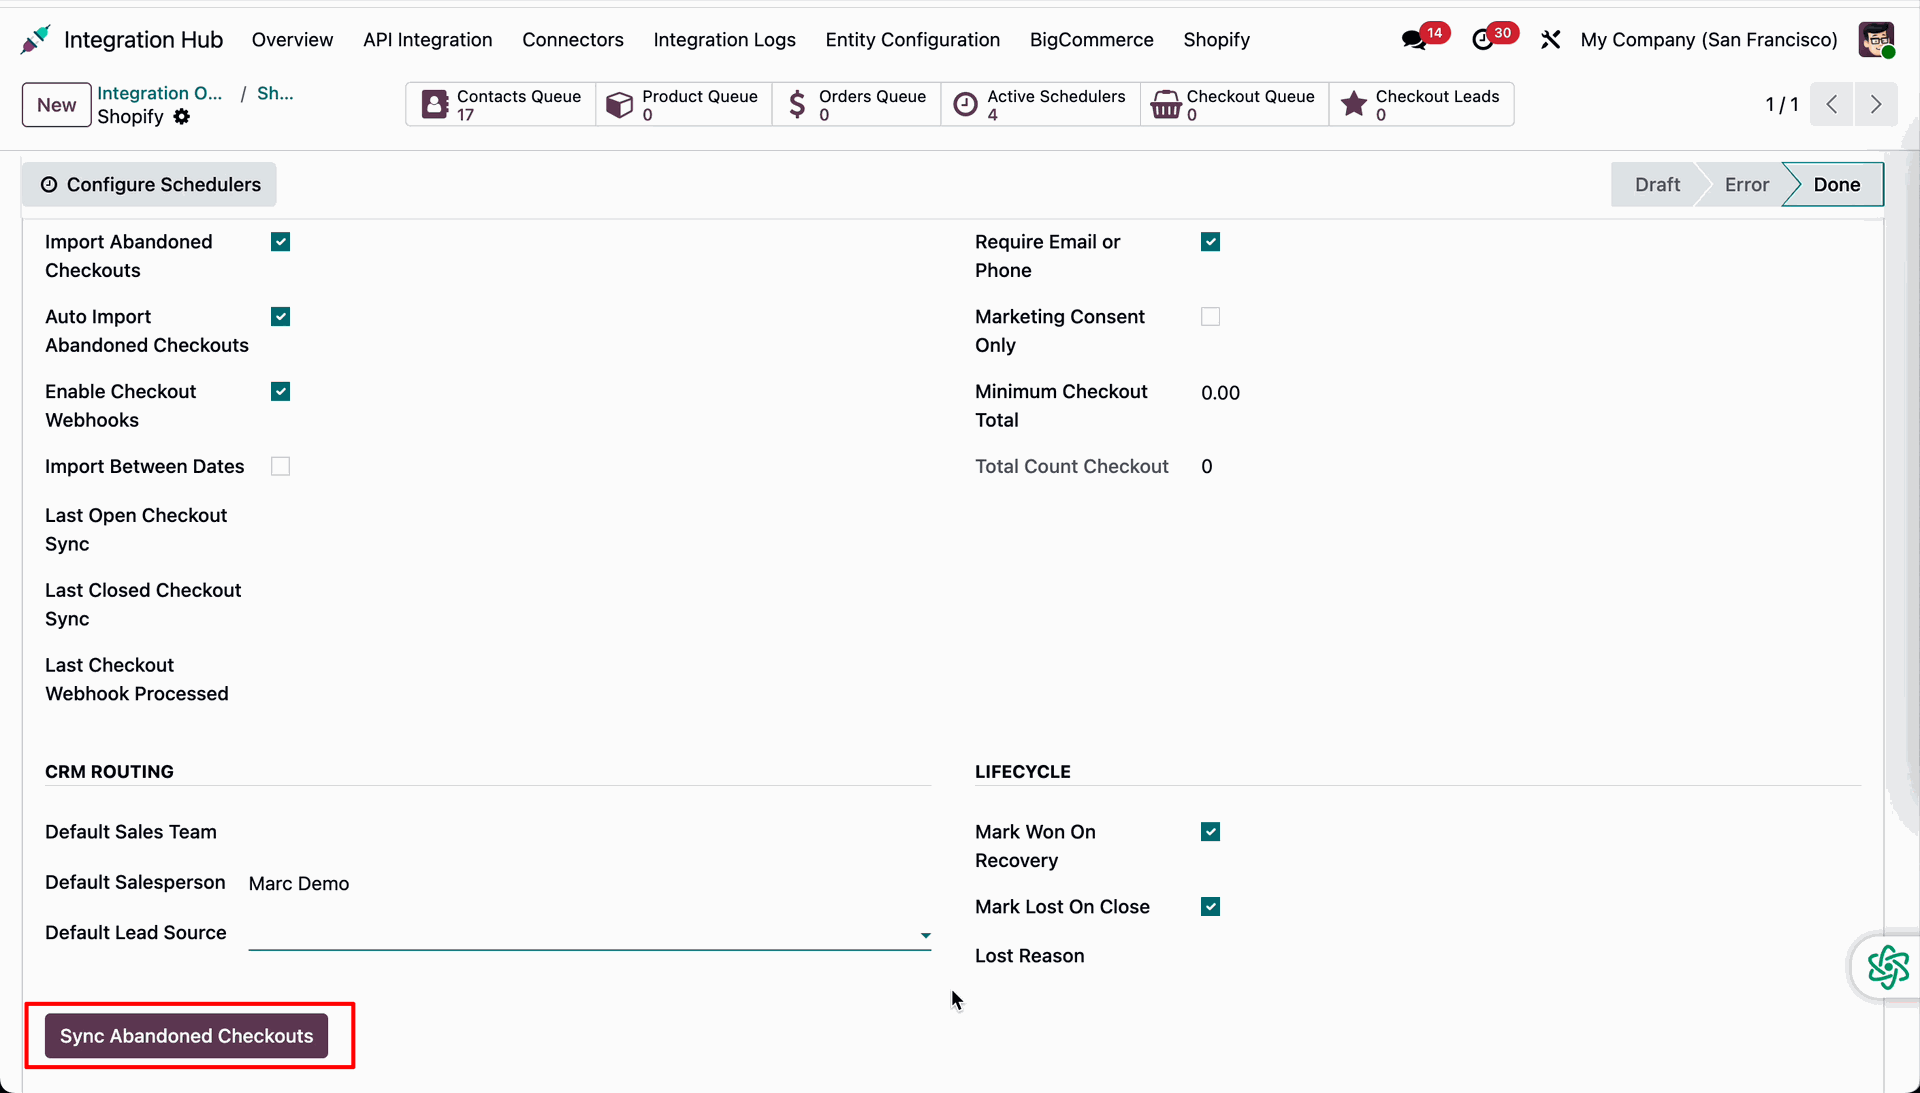
Click the Sync Abandoned Checkouts button to trigger manual import of abandoned checkouts.
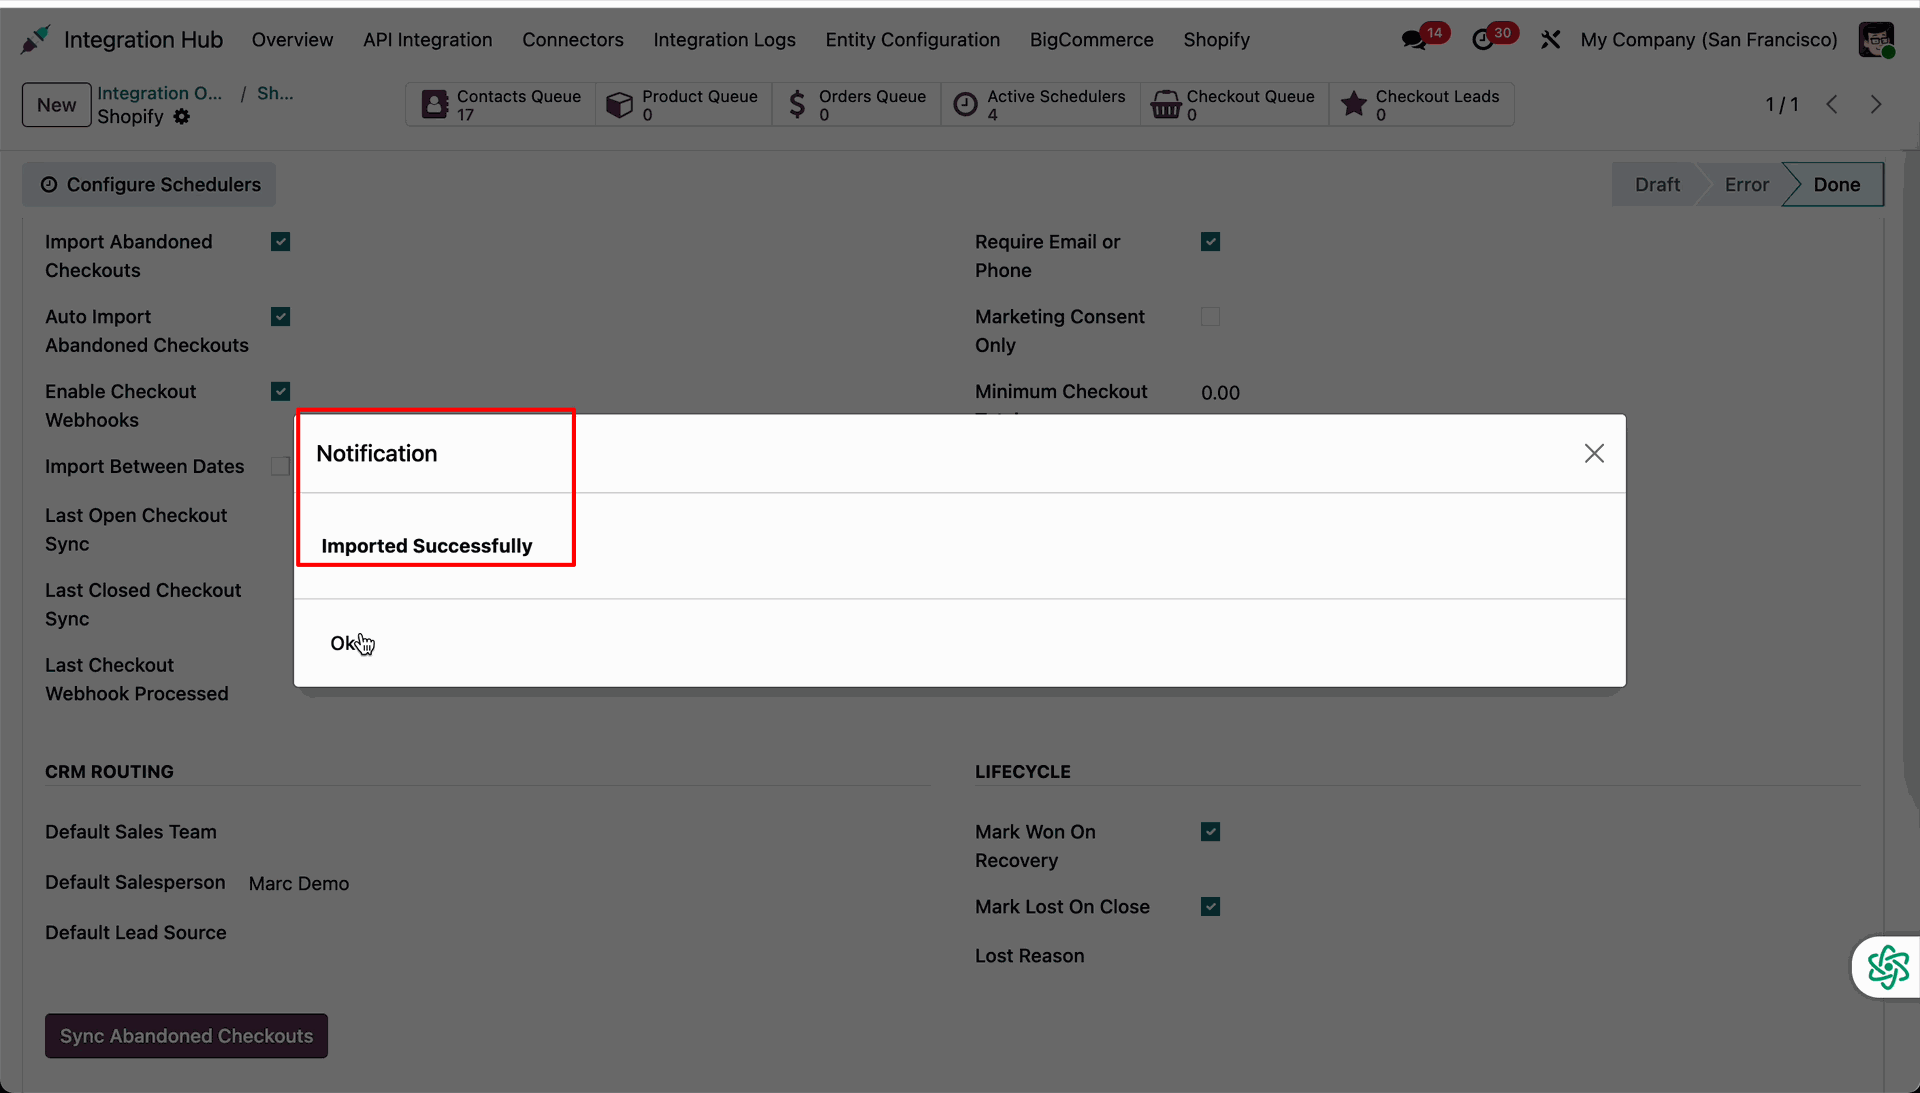
Review the notification dialog showing that abandoned checkouts have been imported successfully.
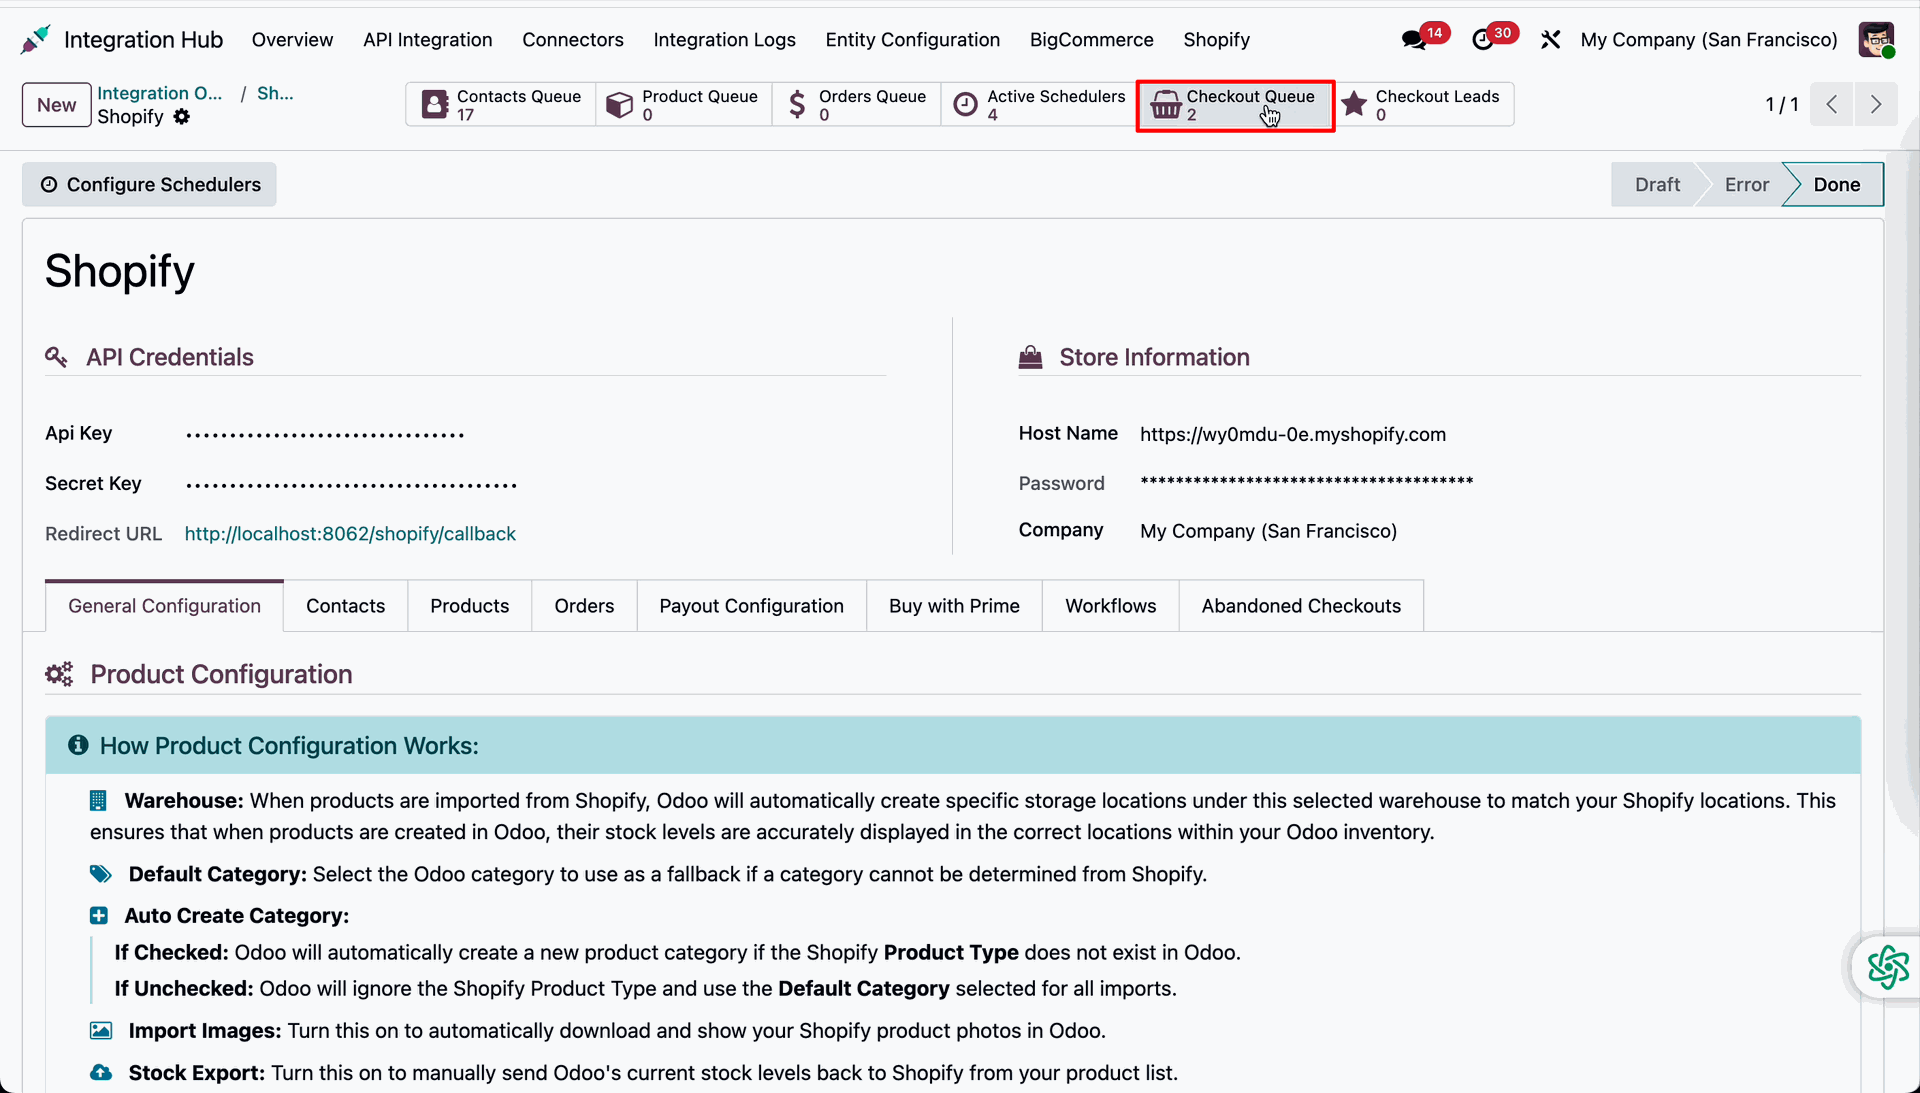
Click the Checkout Queue stat button to access the queue of imported checkouts.
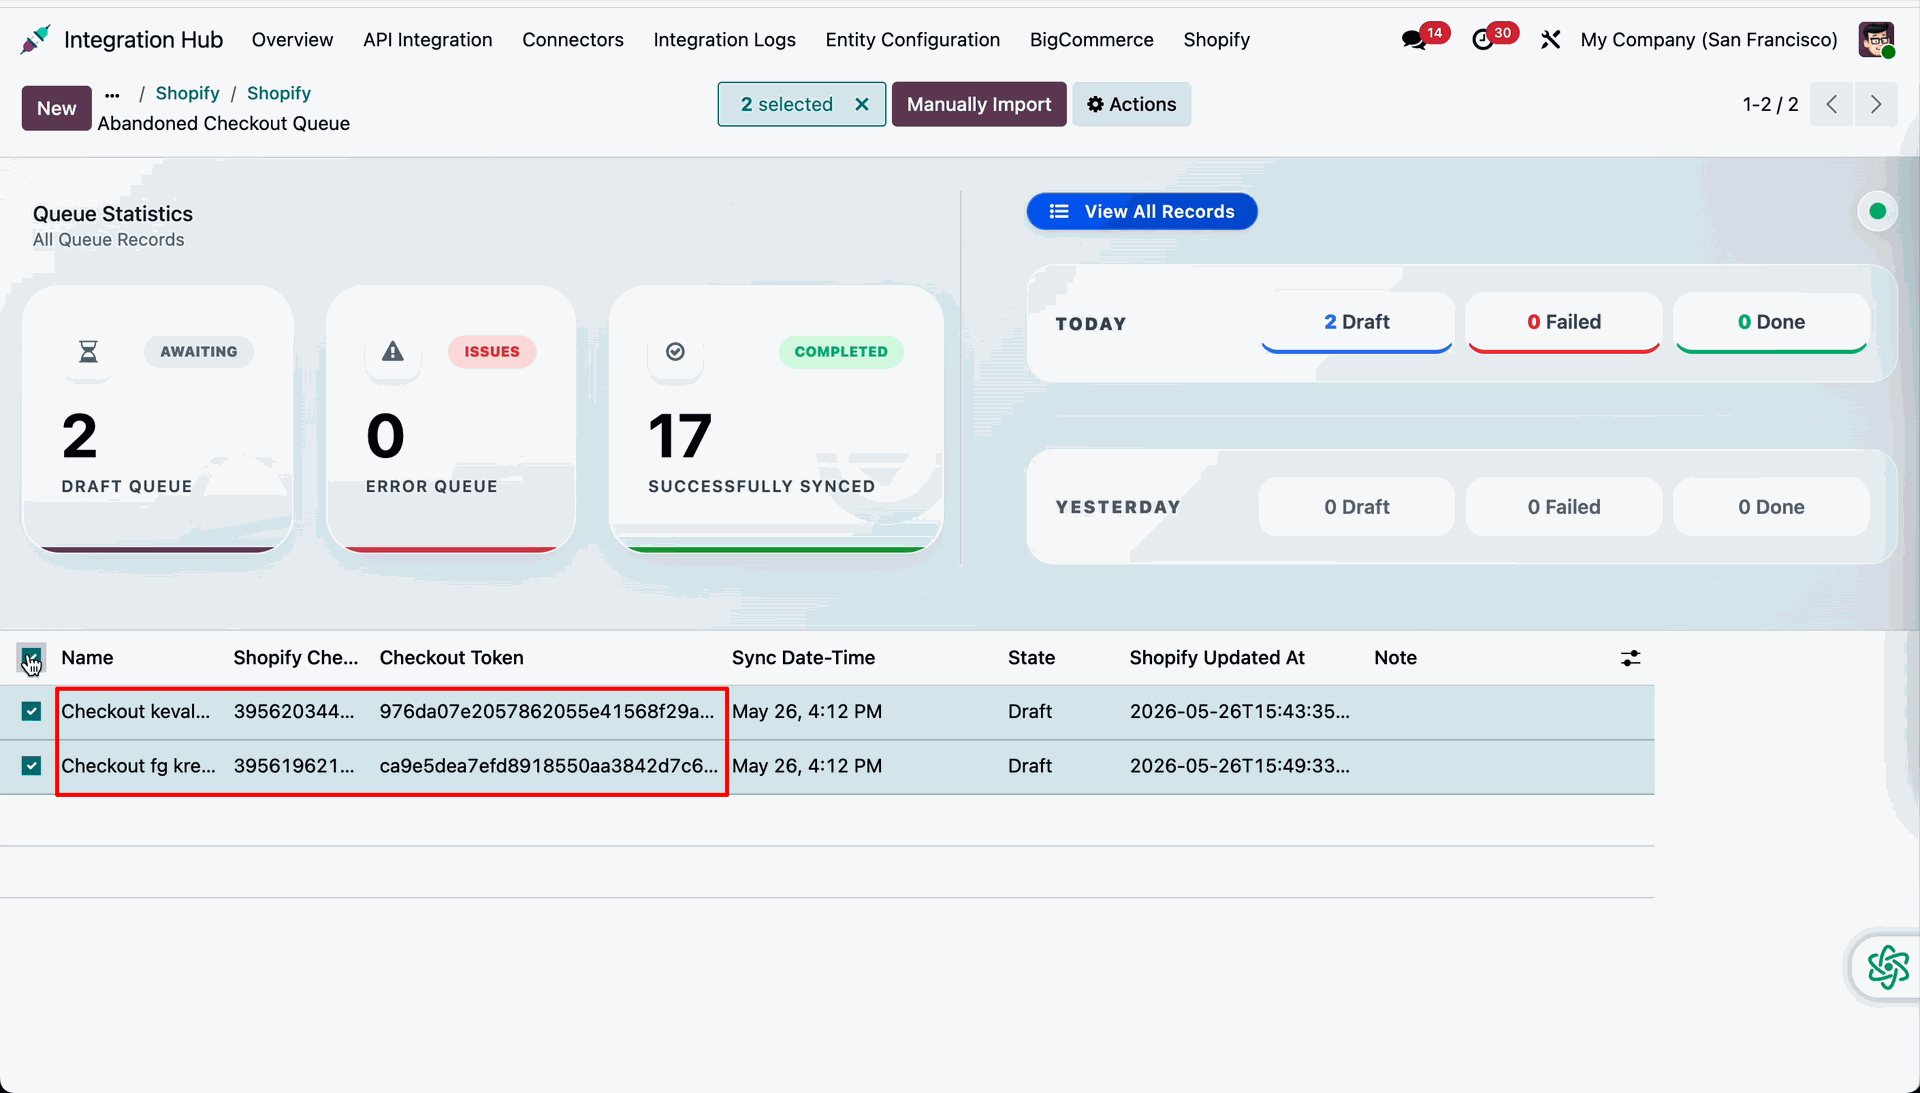
Select draft checkout queue lines and then press Manually Import to process them.
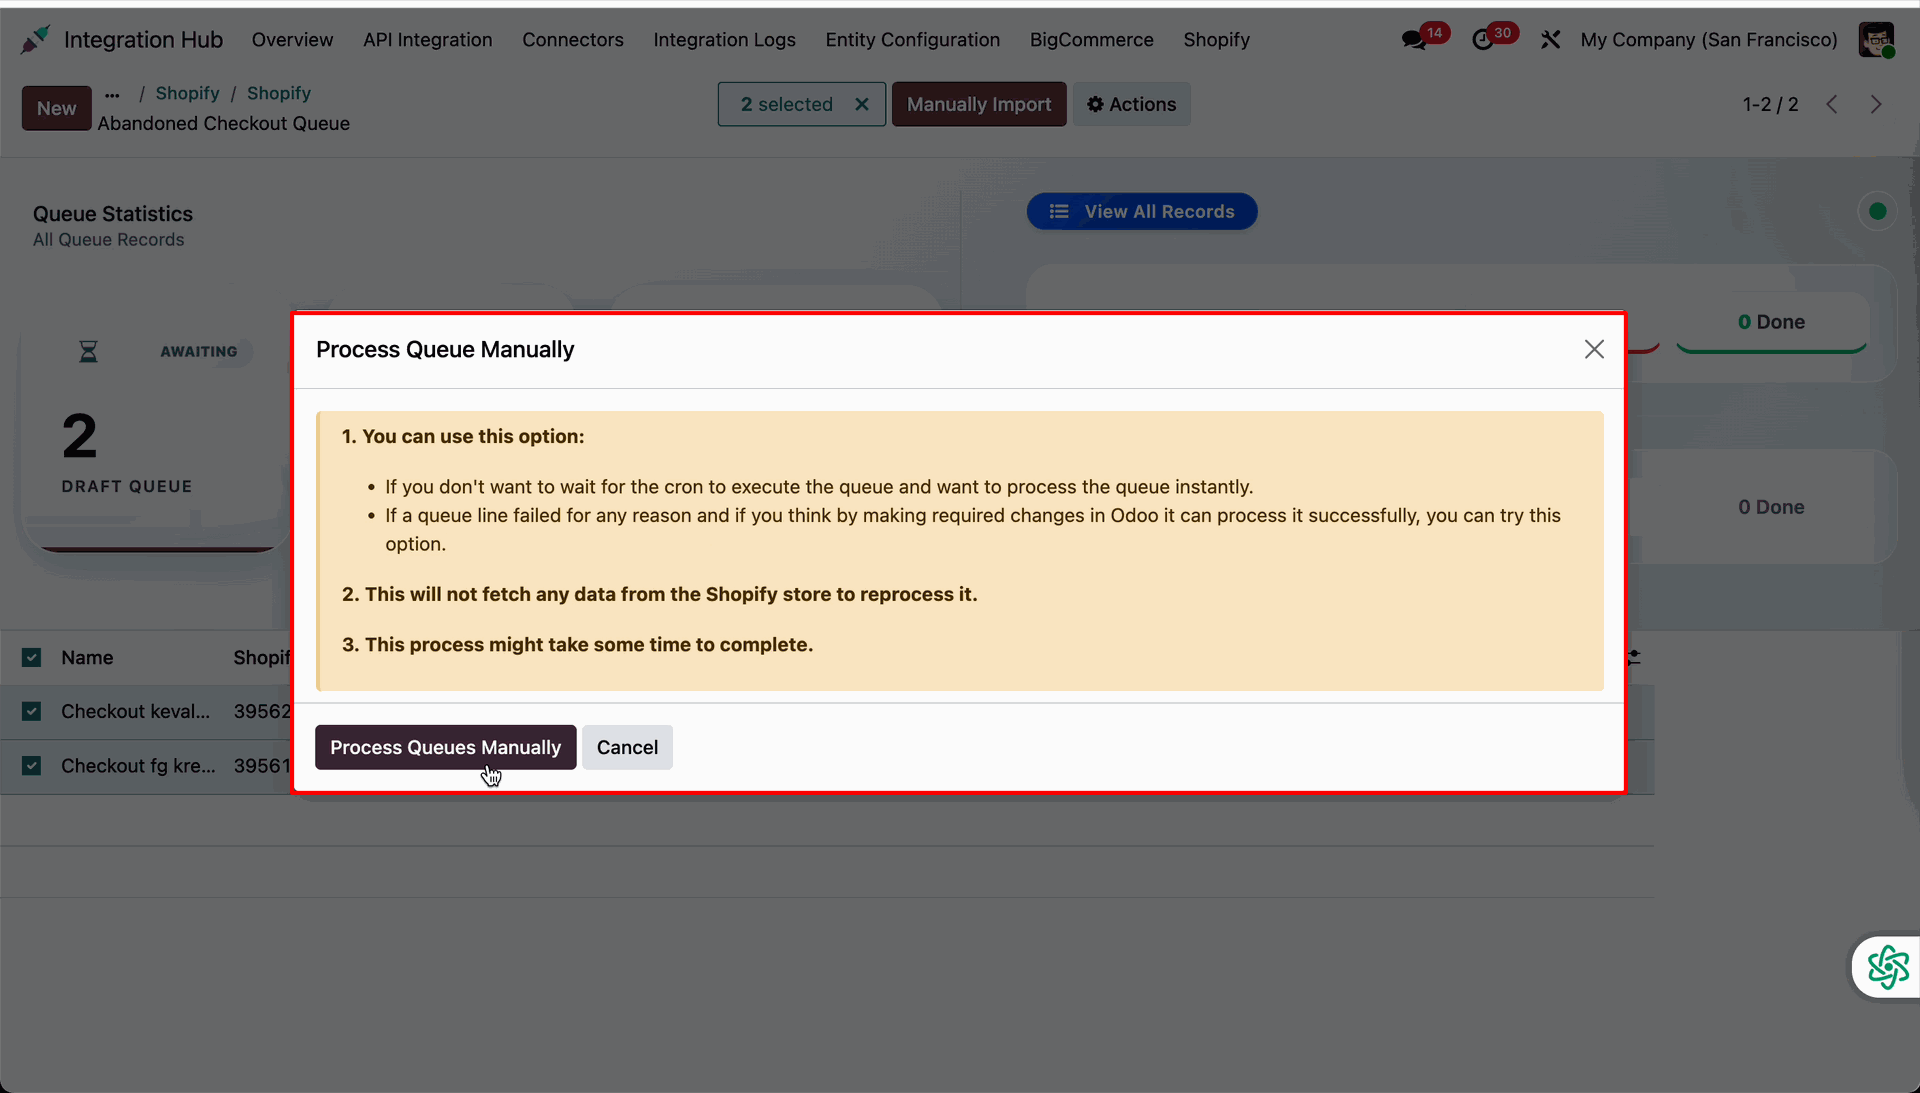
Review the active wizard and then click Process Queues Manually to process the selected records.
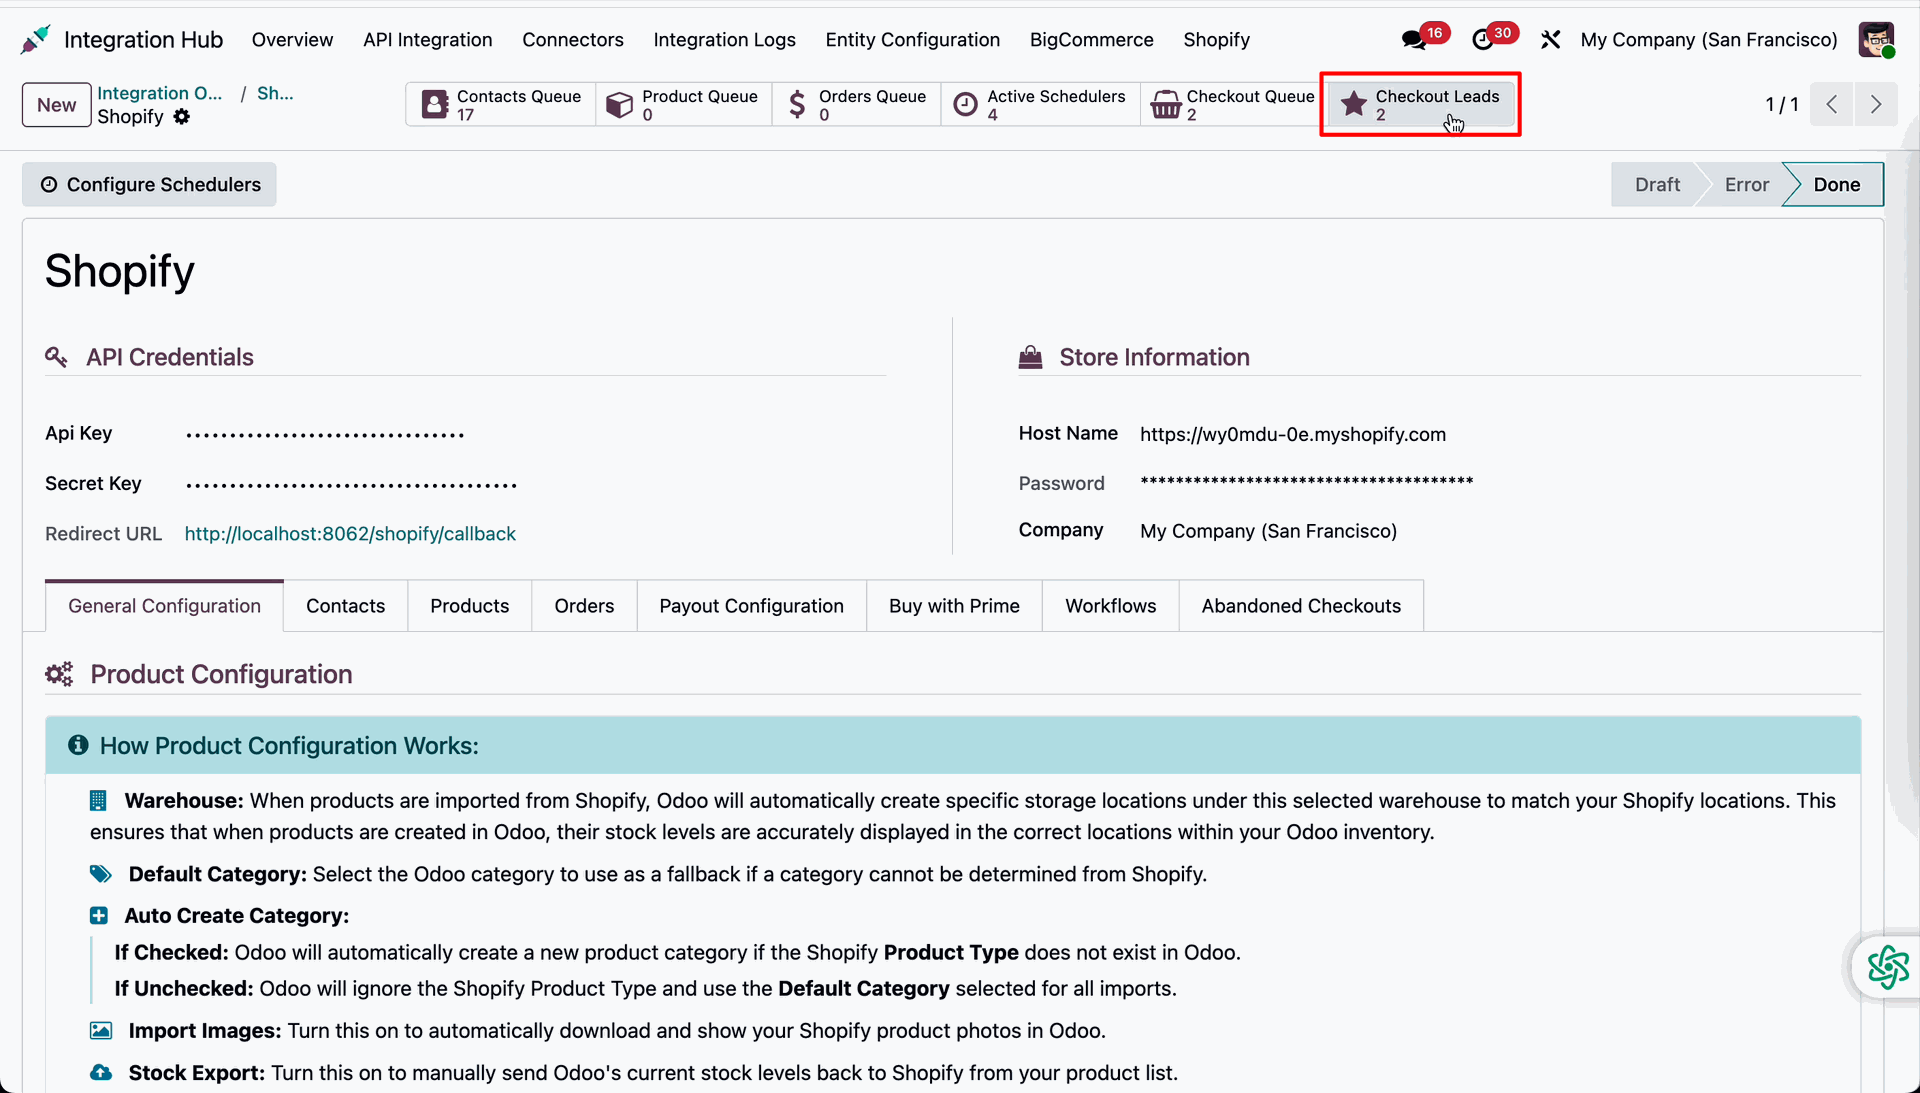
Click the Checkout Leads stat button to review the imported checkout lead records.
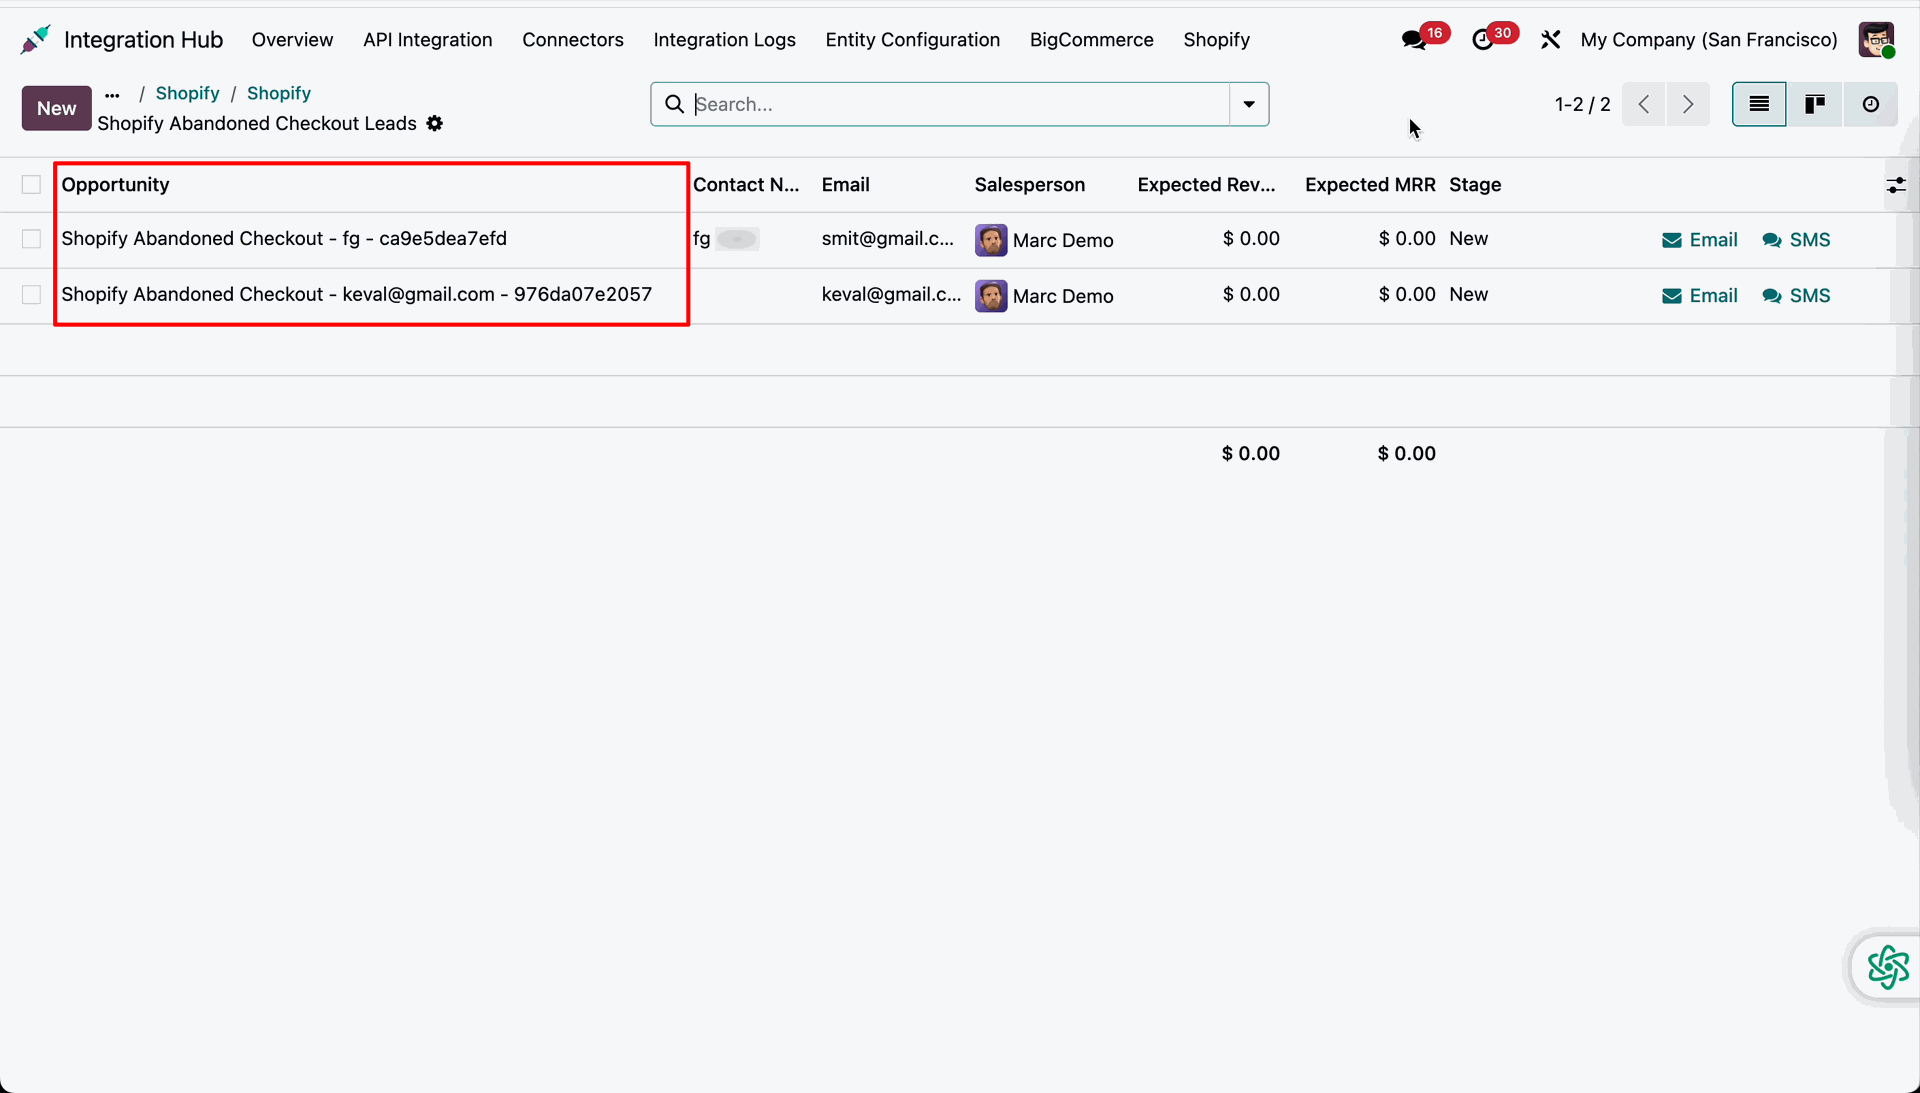
Review the generated opportunities list under the Shopify Abandoned Checkout Leads view.
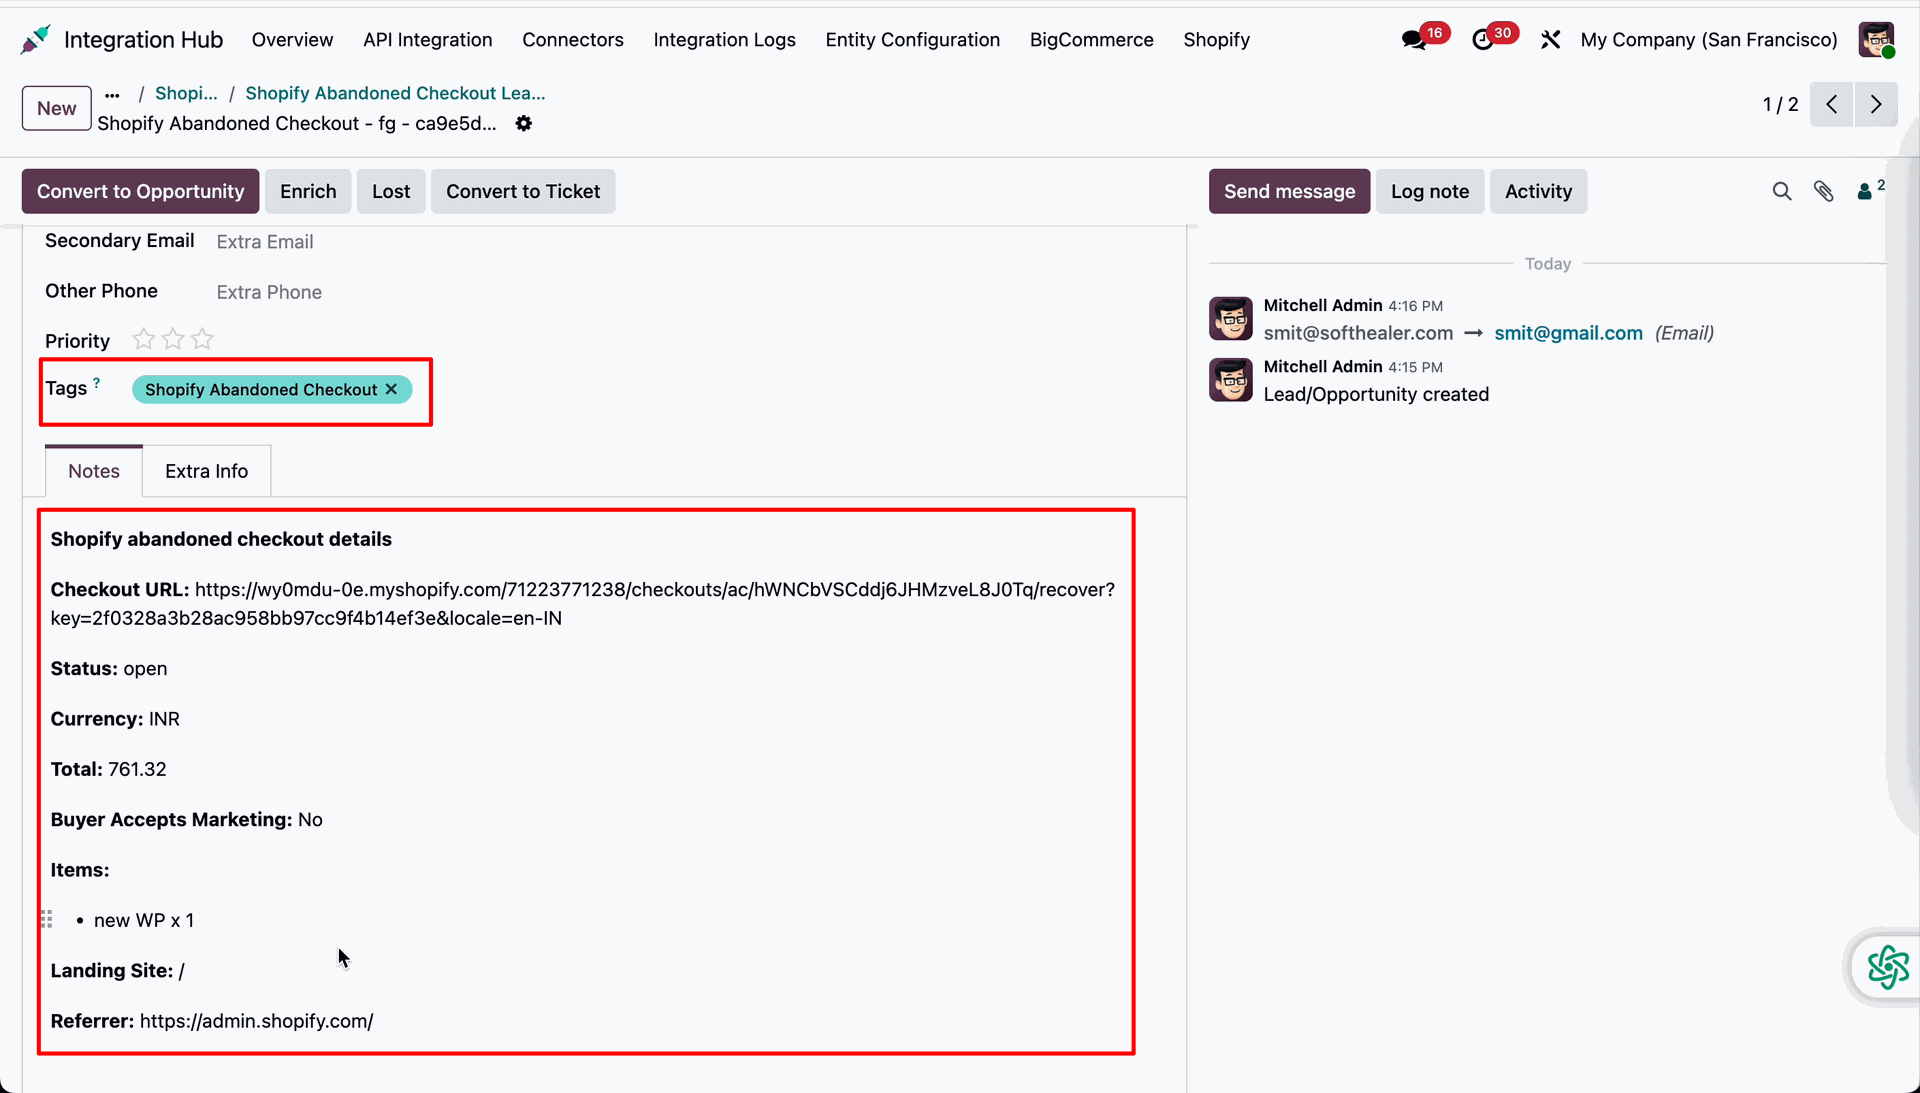
Verify the mapped customer information and cart details under the Shopify abandoned checkout details section.
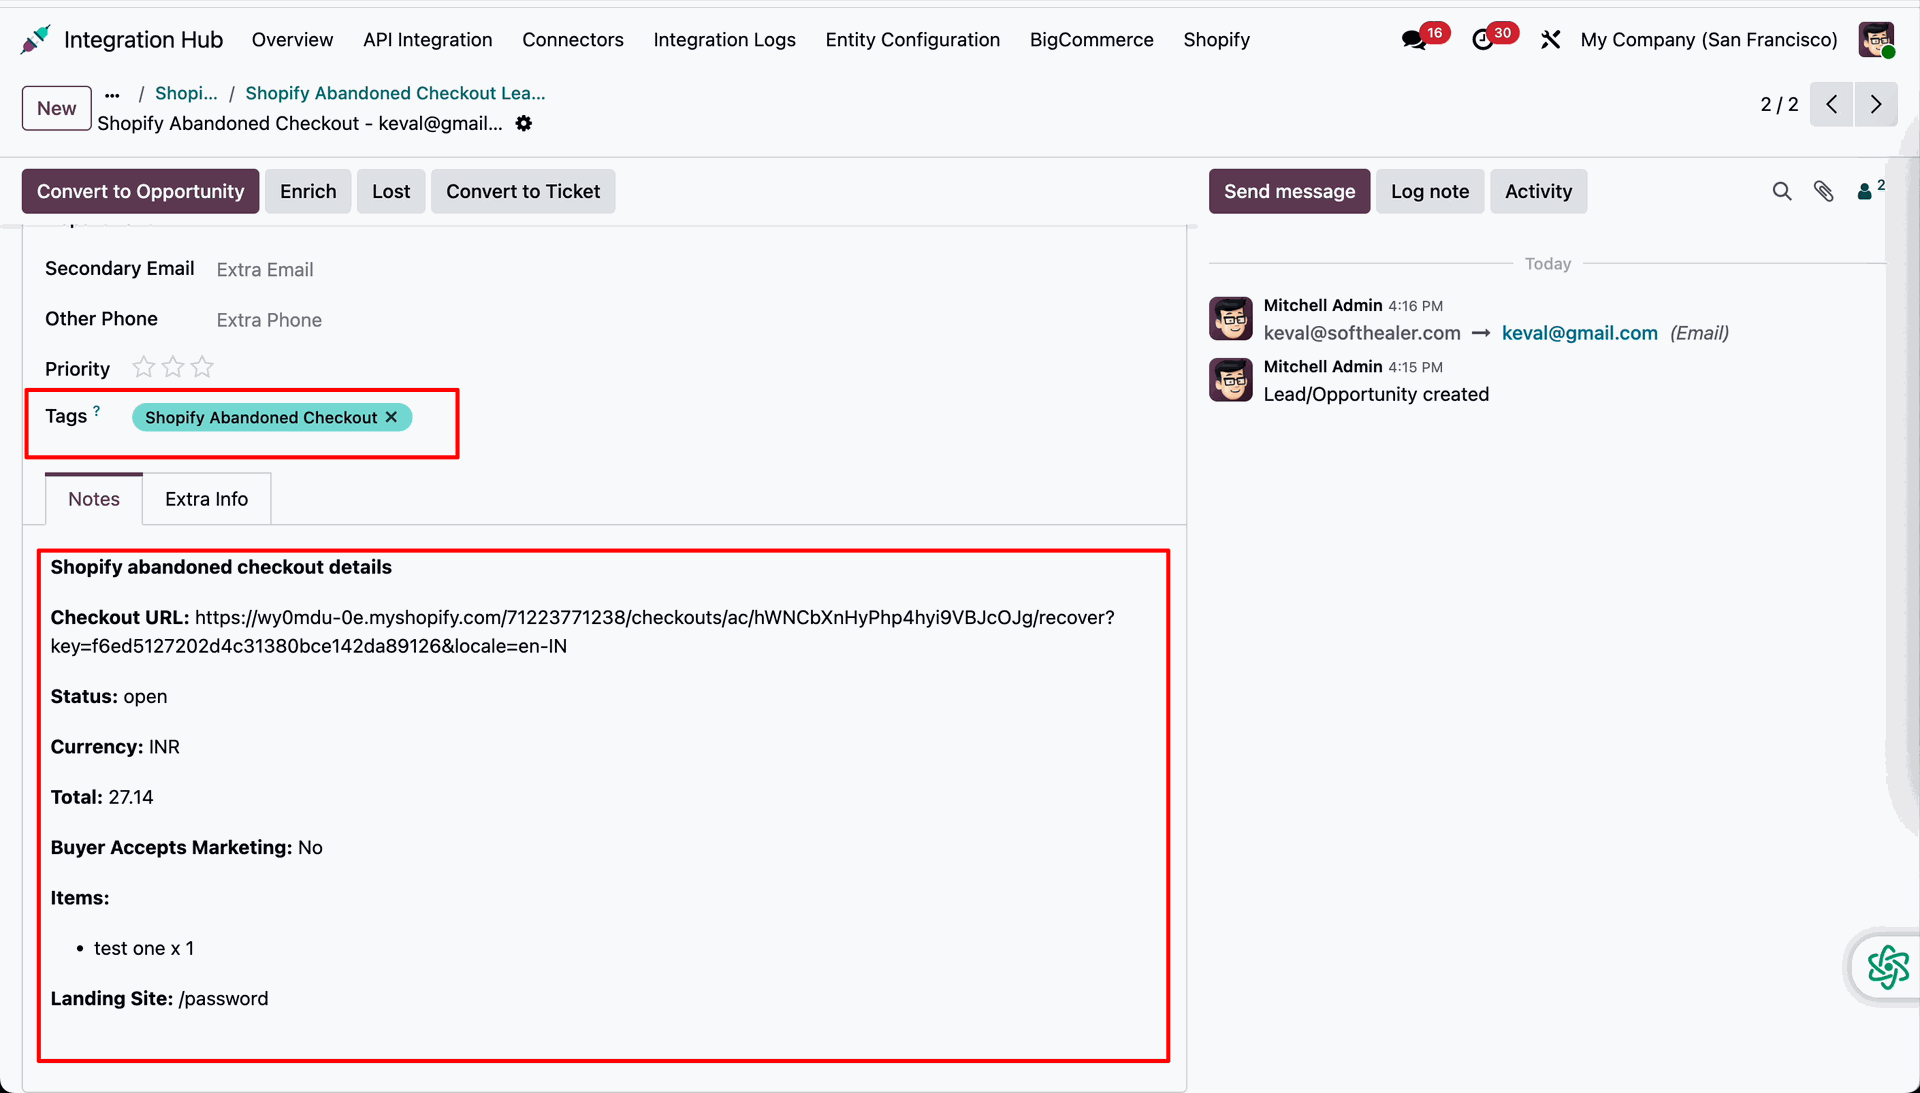
Review the detailed item lines and recover URL on the Shopify abandoned checkout details sheet.
Workflow
Navigate to the Gift Cards tab in the Shopify Configuration to configure gift card settings.
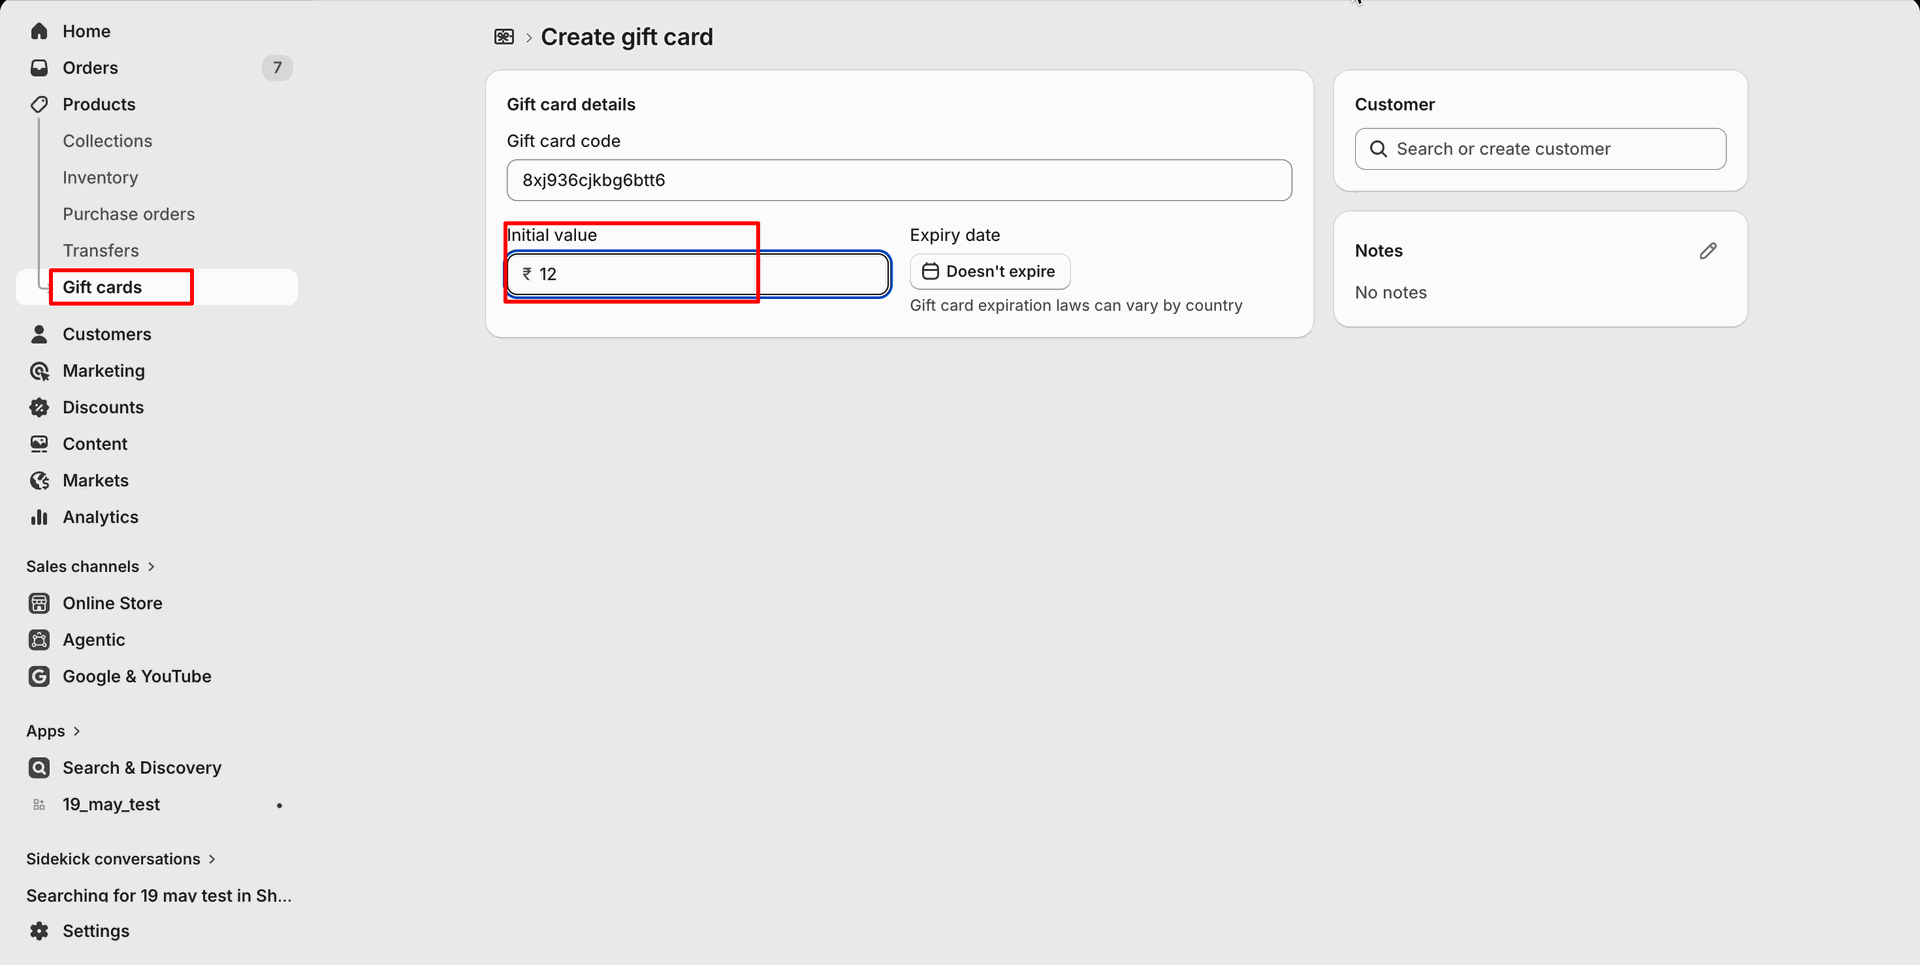
Configured Gift Card in Shopify with the desired Gift Card Code.
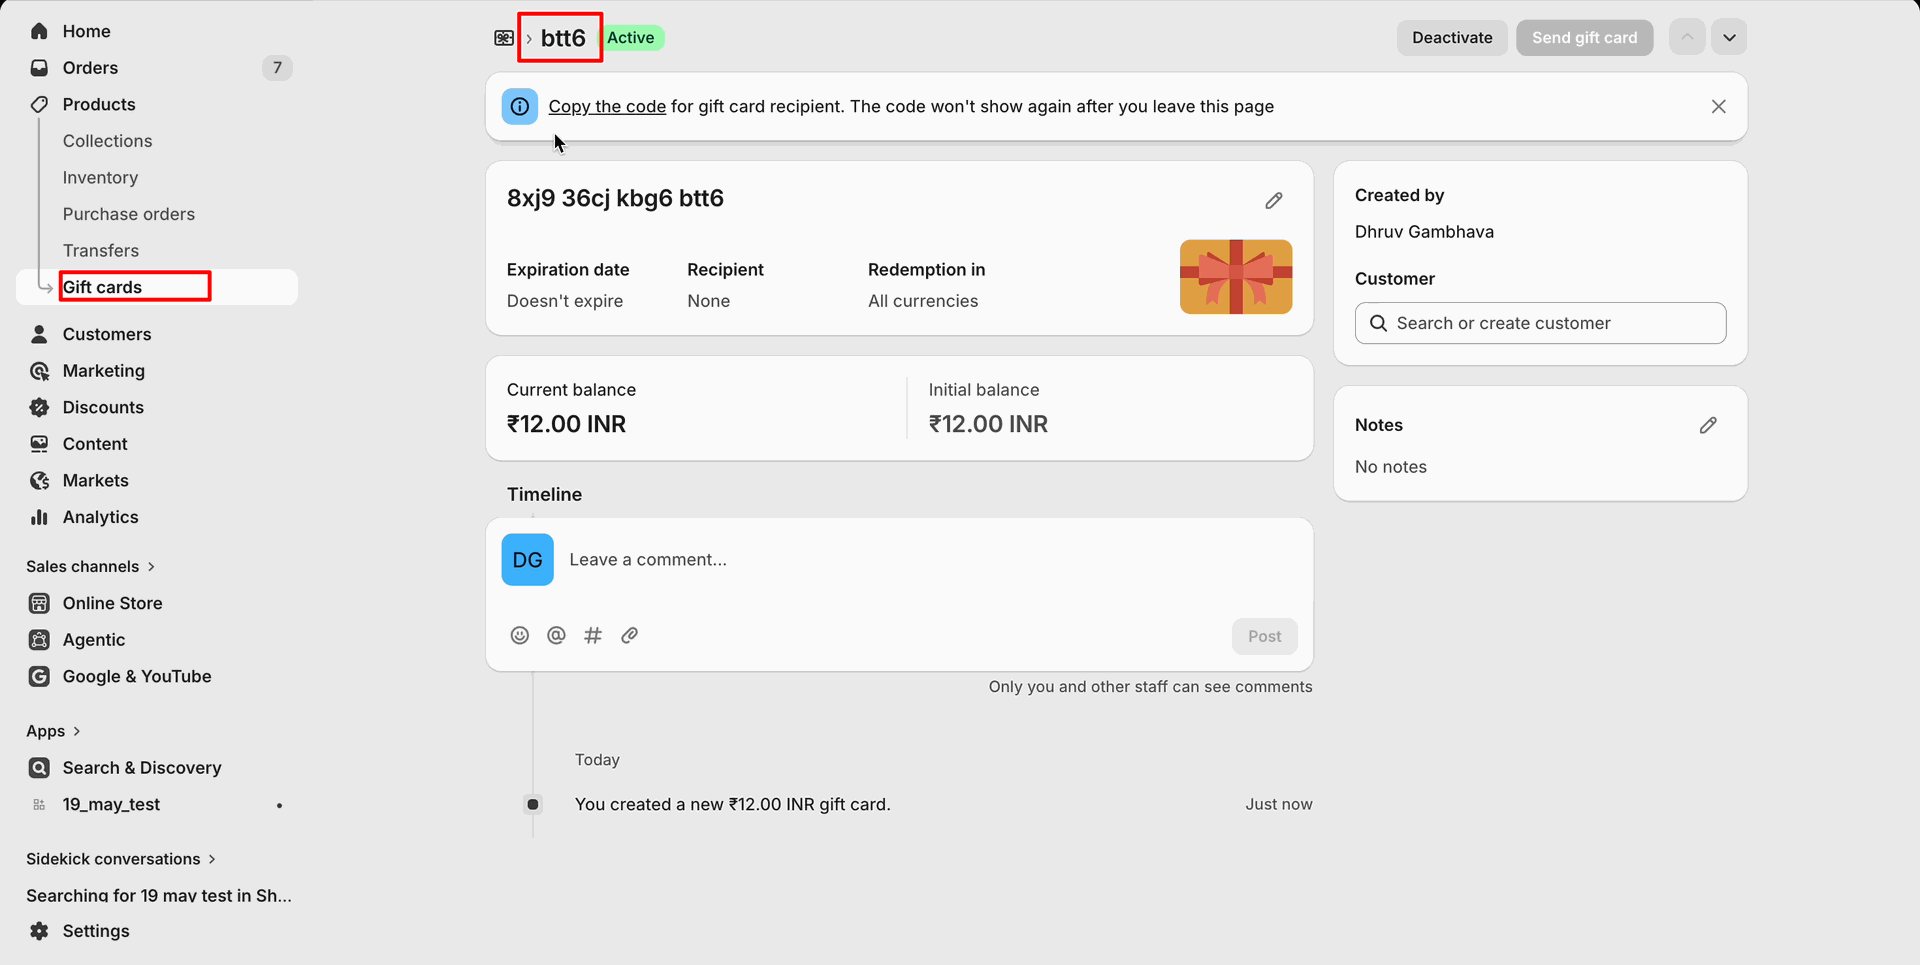
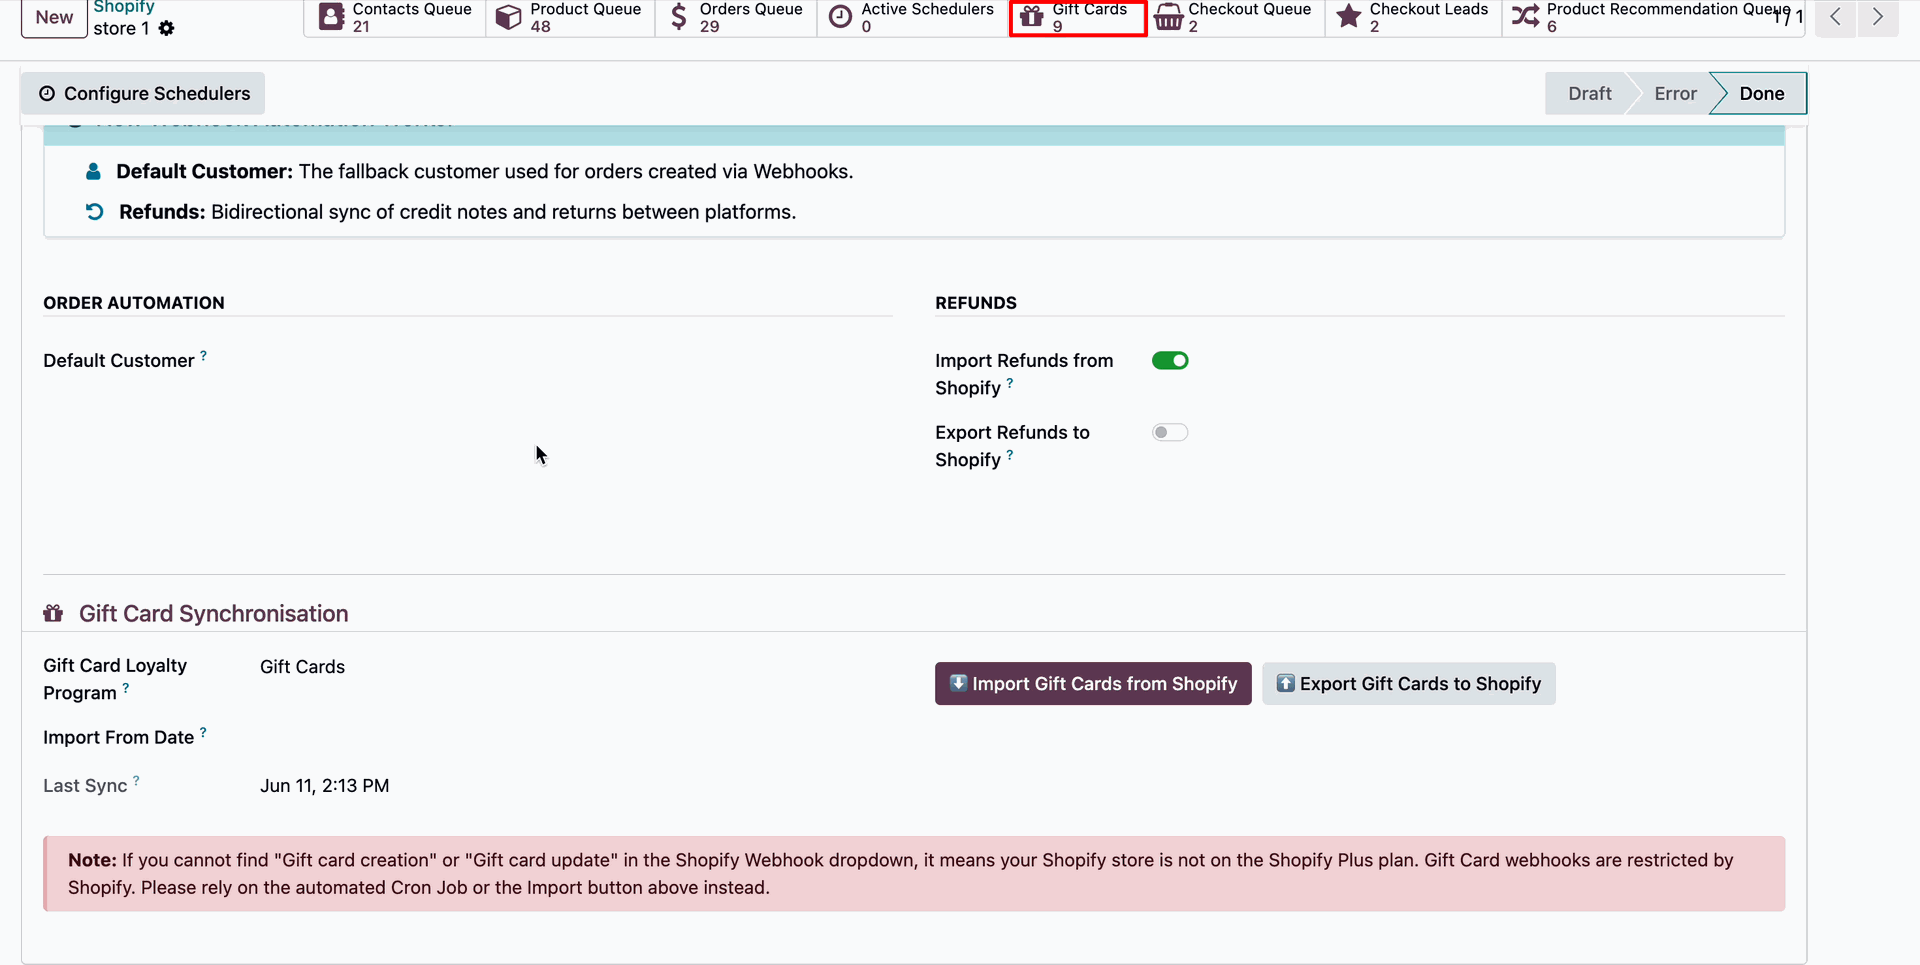
Click the Import Gift Cards from Shopify button to start importing gift cards manually.
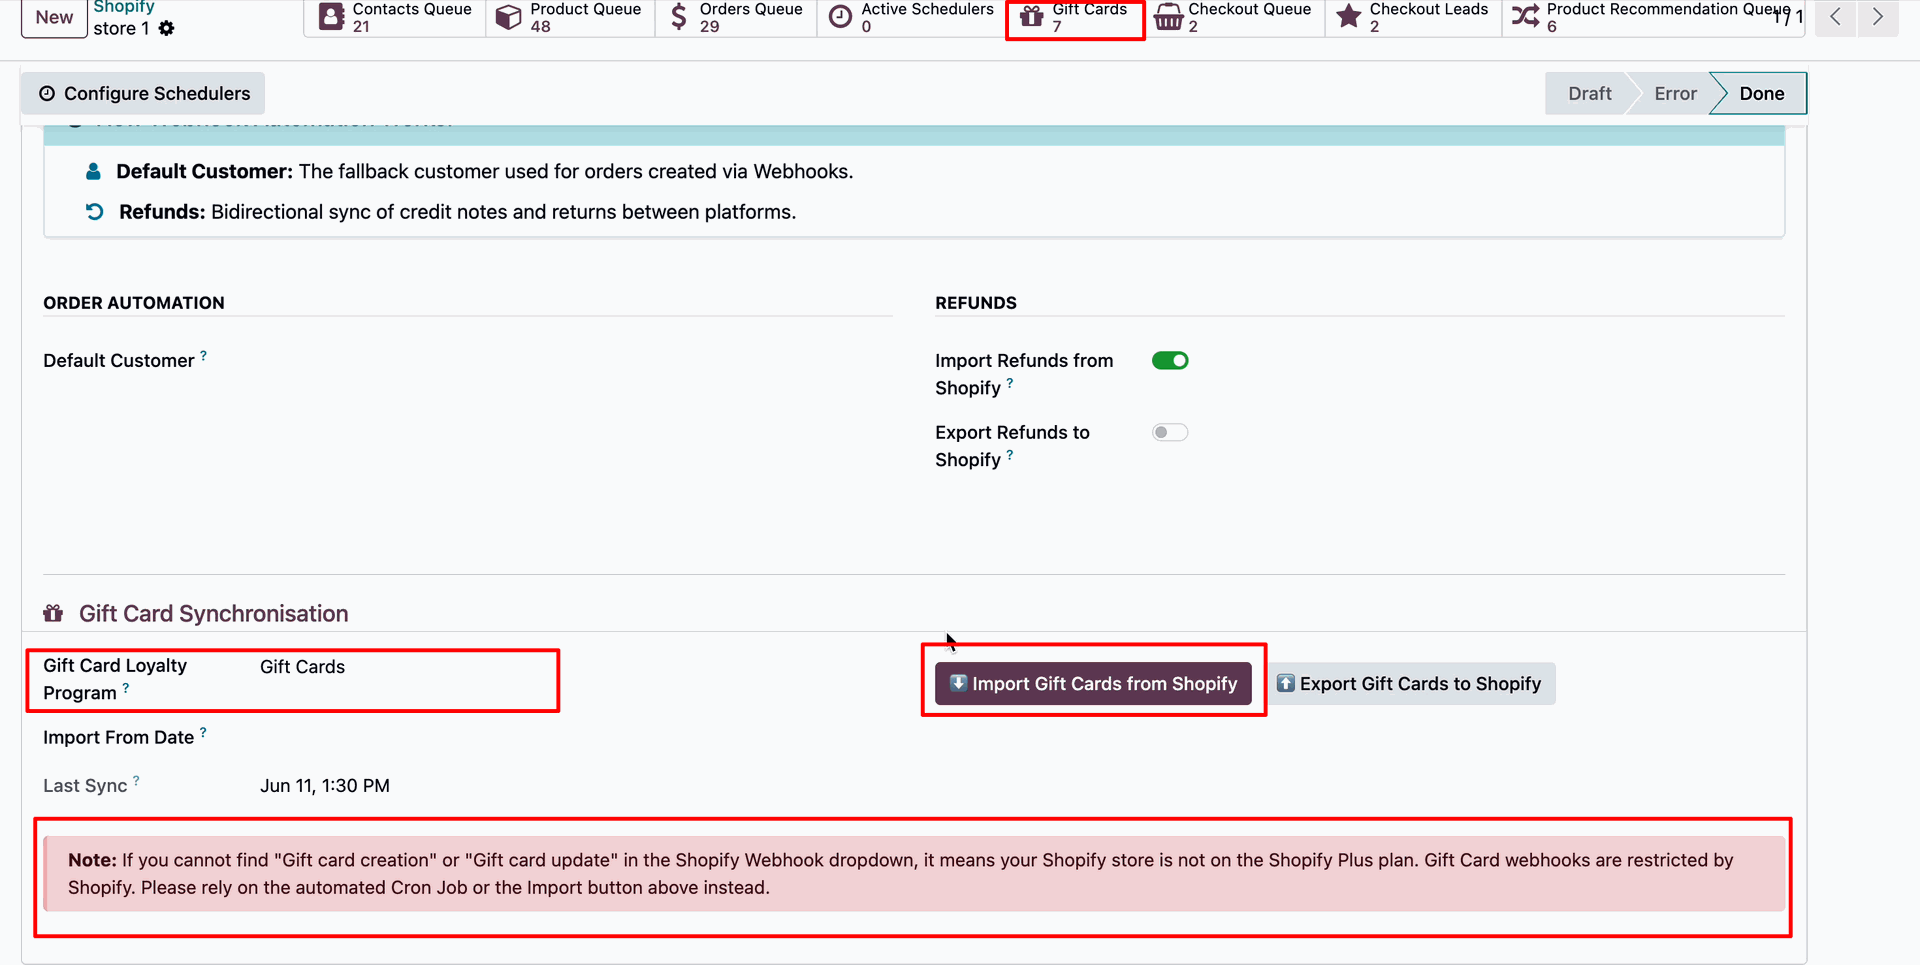
Open the Odoo Shopify configuration, and view the Last Sync
timestamp.
Click the Gift Card smart button to view and manage the gift cards
associated with the selected record.
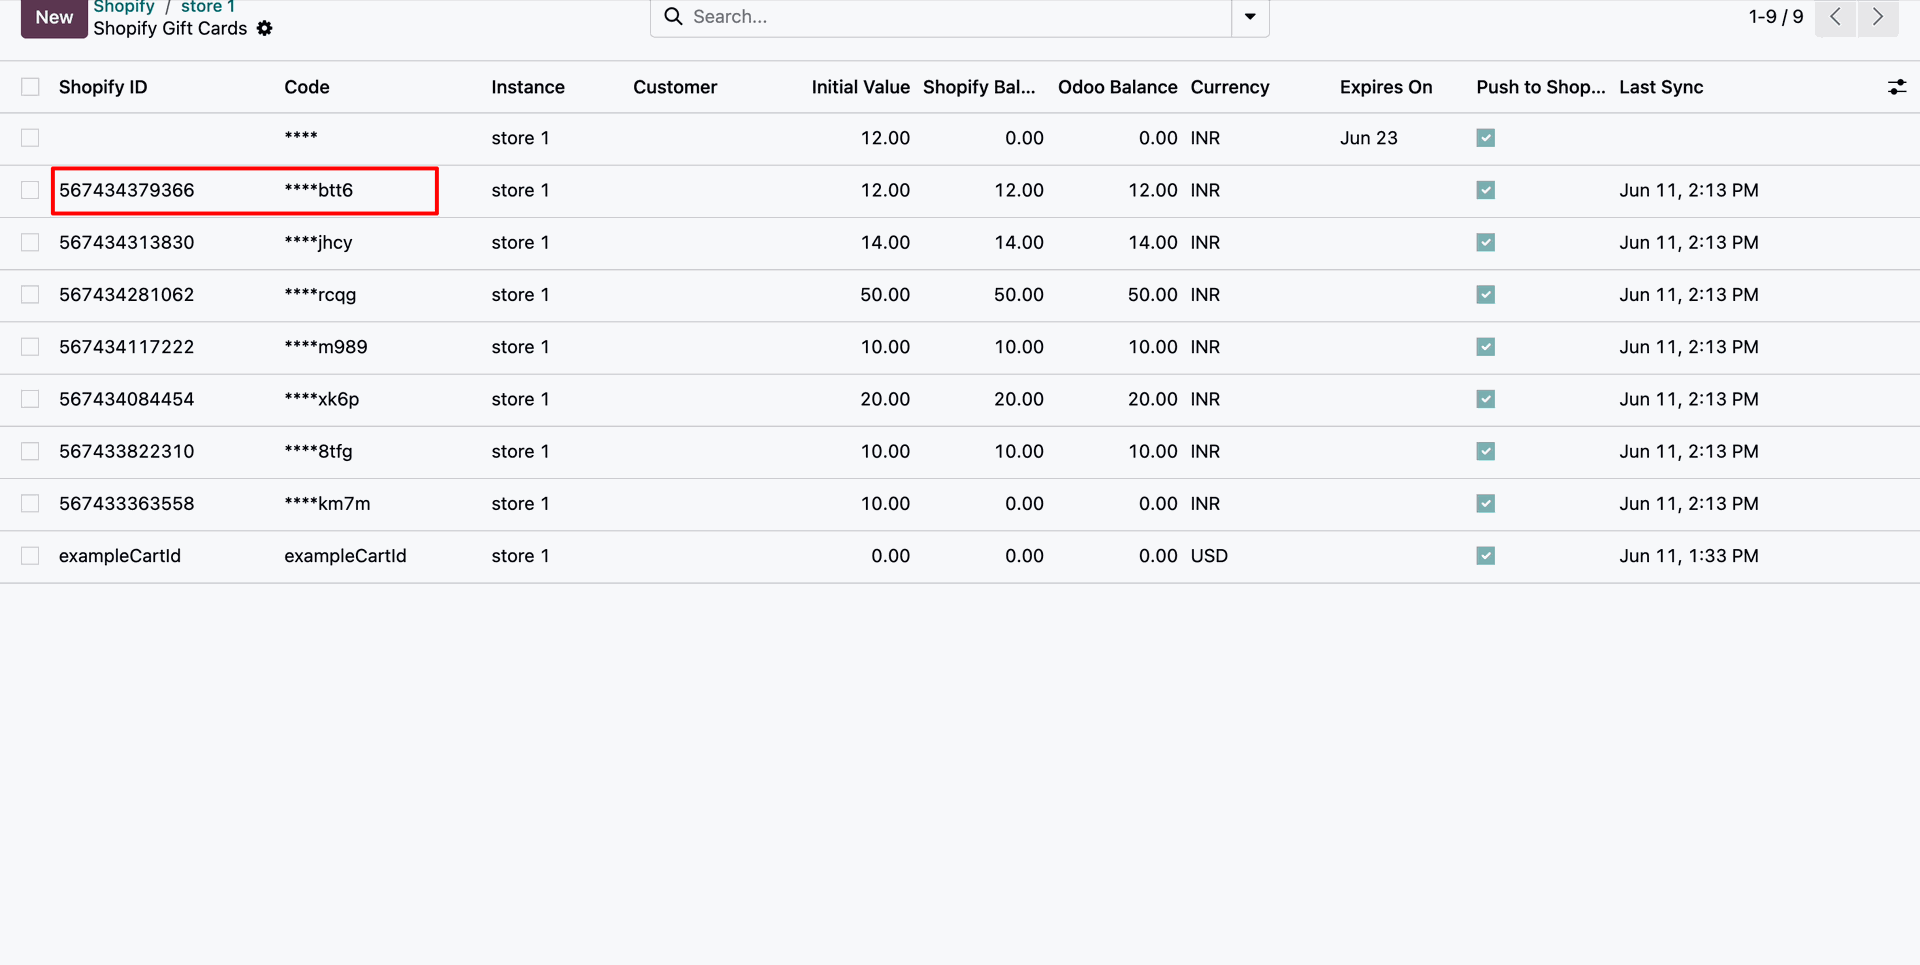
Access the list of imported gift cards in Odoo under the Gift Cards configuration menu.
Click the Export Gift Cards to Shopify button to export Odoo gift cards marked for push to Shopify.
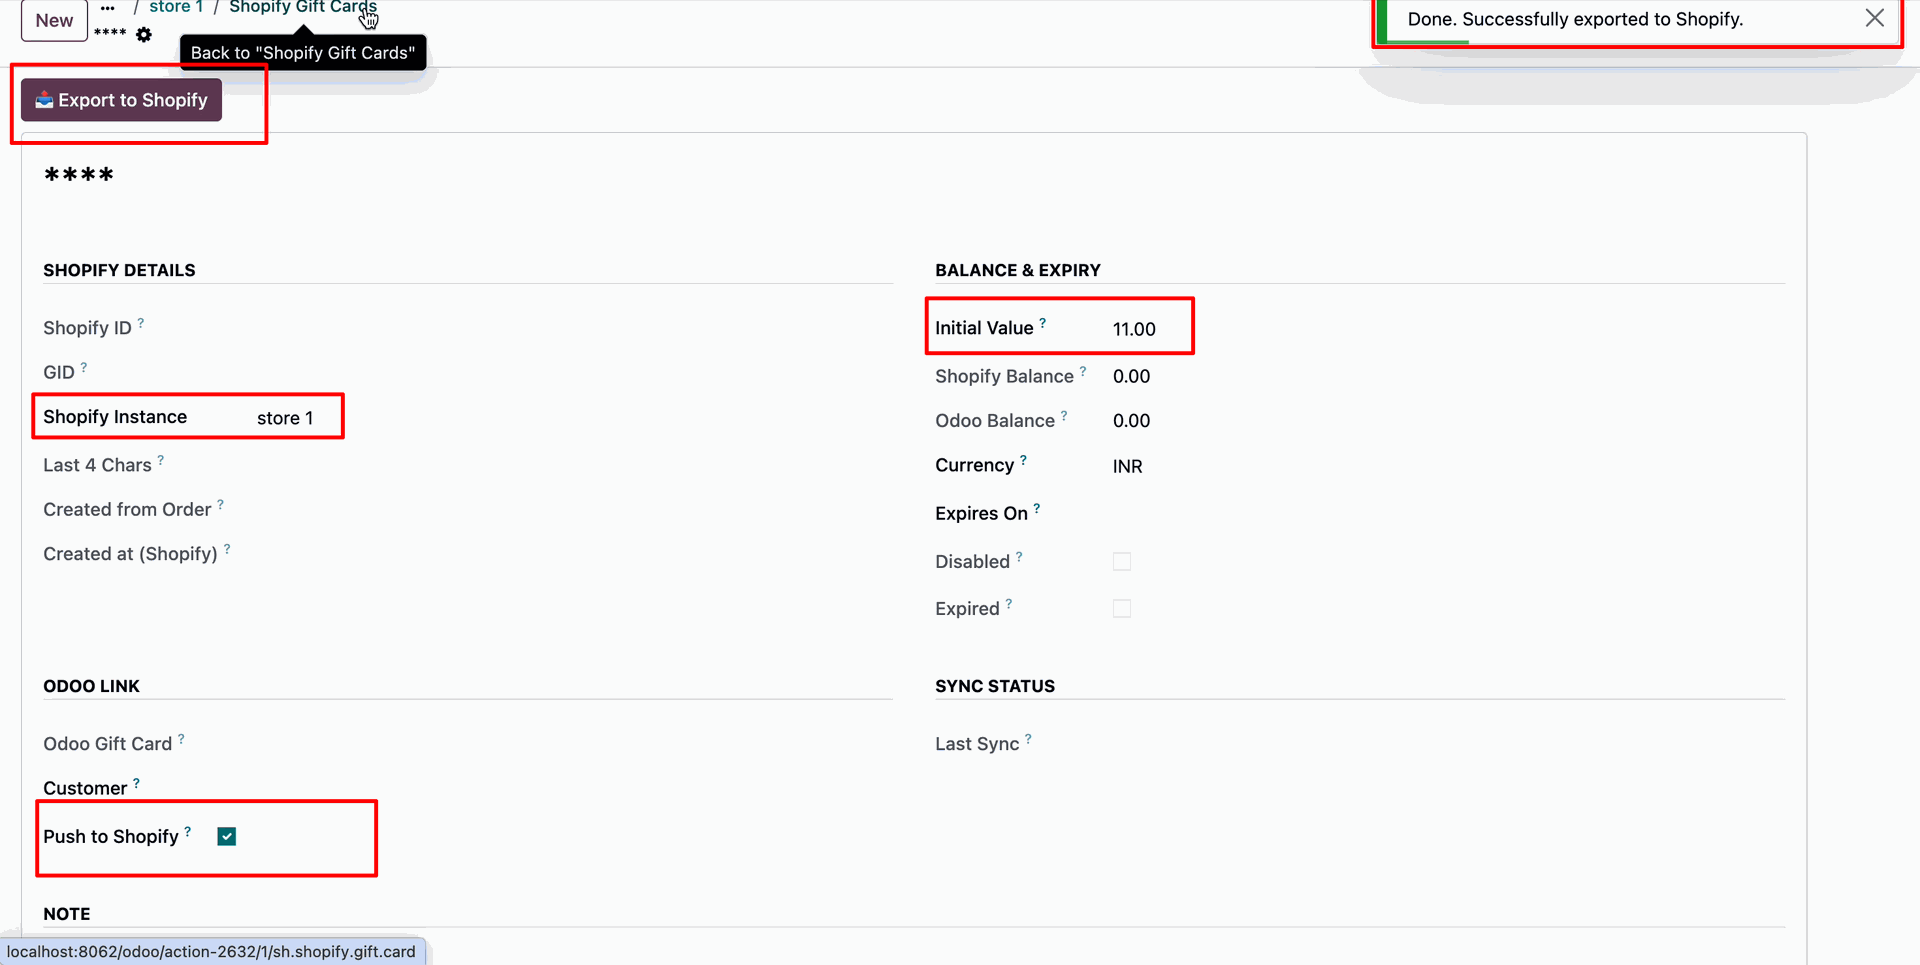
Open the Gift Card record to view the Odoo Gift Card link.
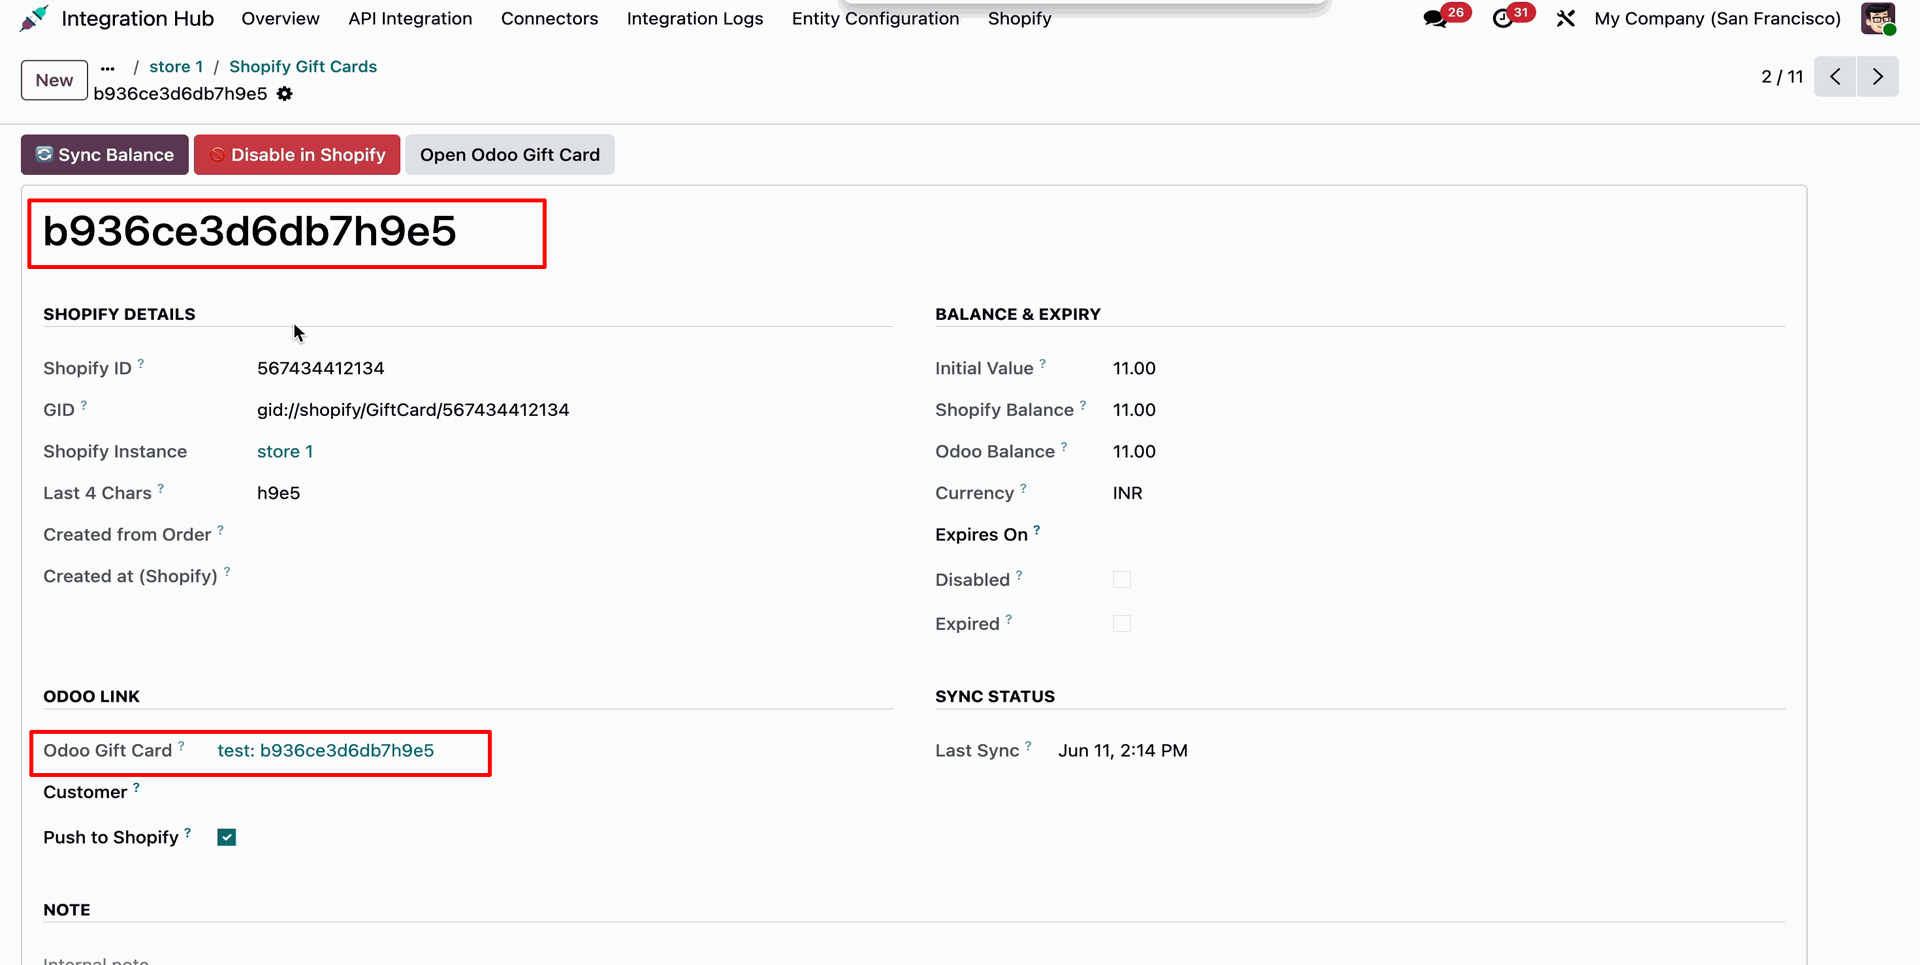
Open a Shopify Gift Card record to see mapped details, including Shopify ID, Masked Code, initial value, Shopify balance, Odoo balance, currency, expiry date, and sync status.
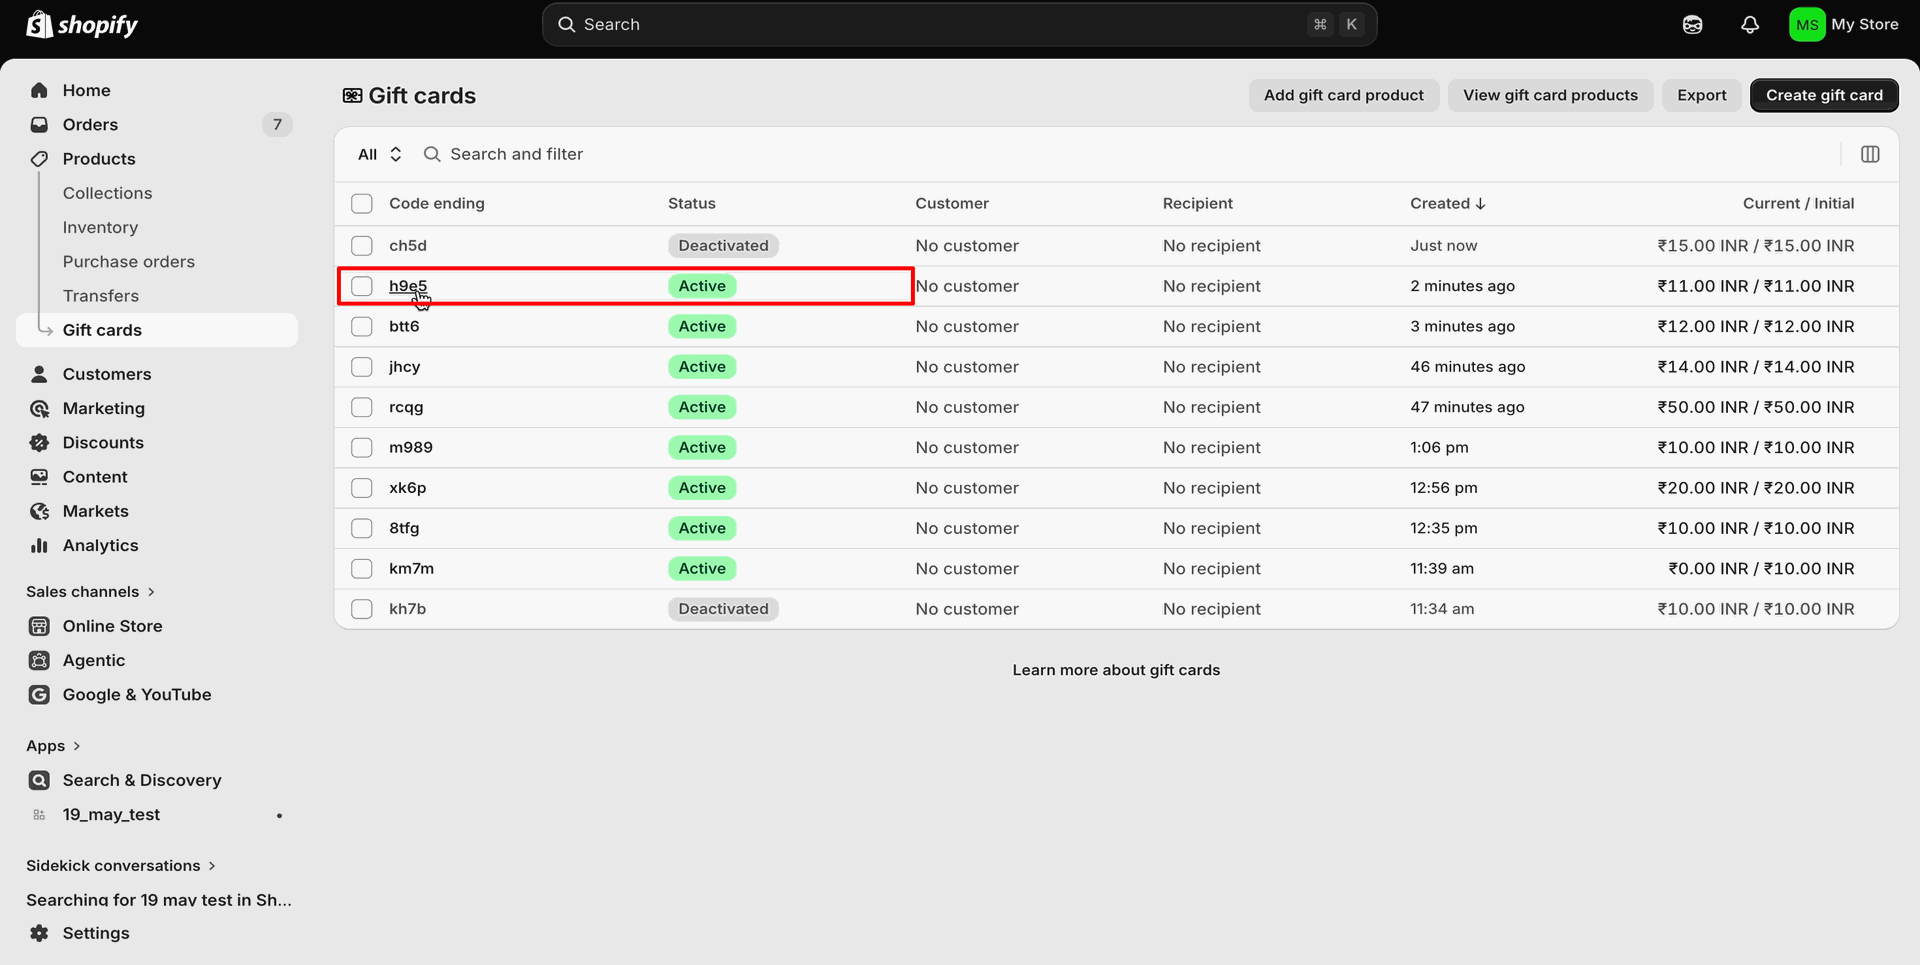
Go to the Odoo Gift Card record and click the Disable in Shopify button to
deactivate the corresponding gift card in Shopify.
A Confirmation Wizard will open when you click the Disable in Shopify
button. Click OK to proceed with disabling the gift card in Shopify, or Cancel to
abort the action.
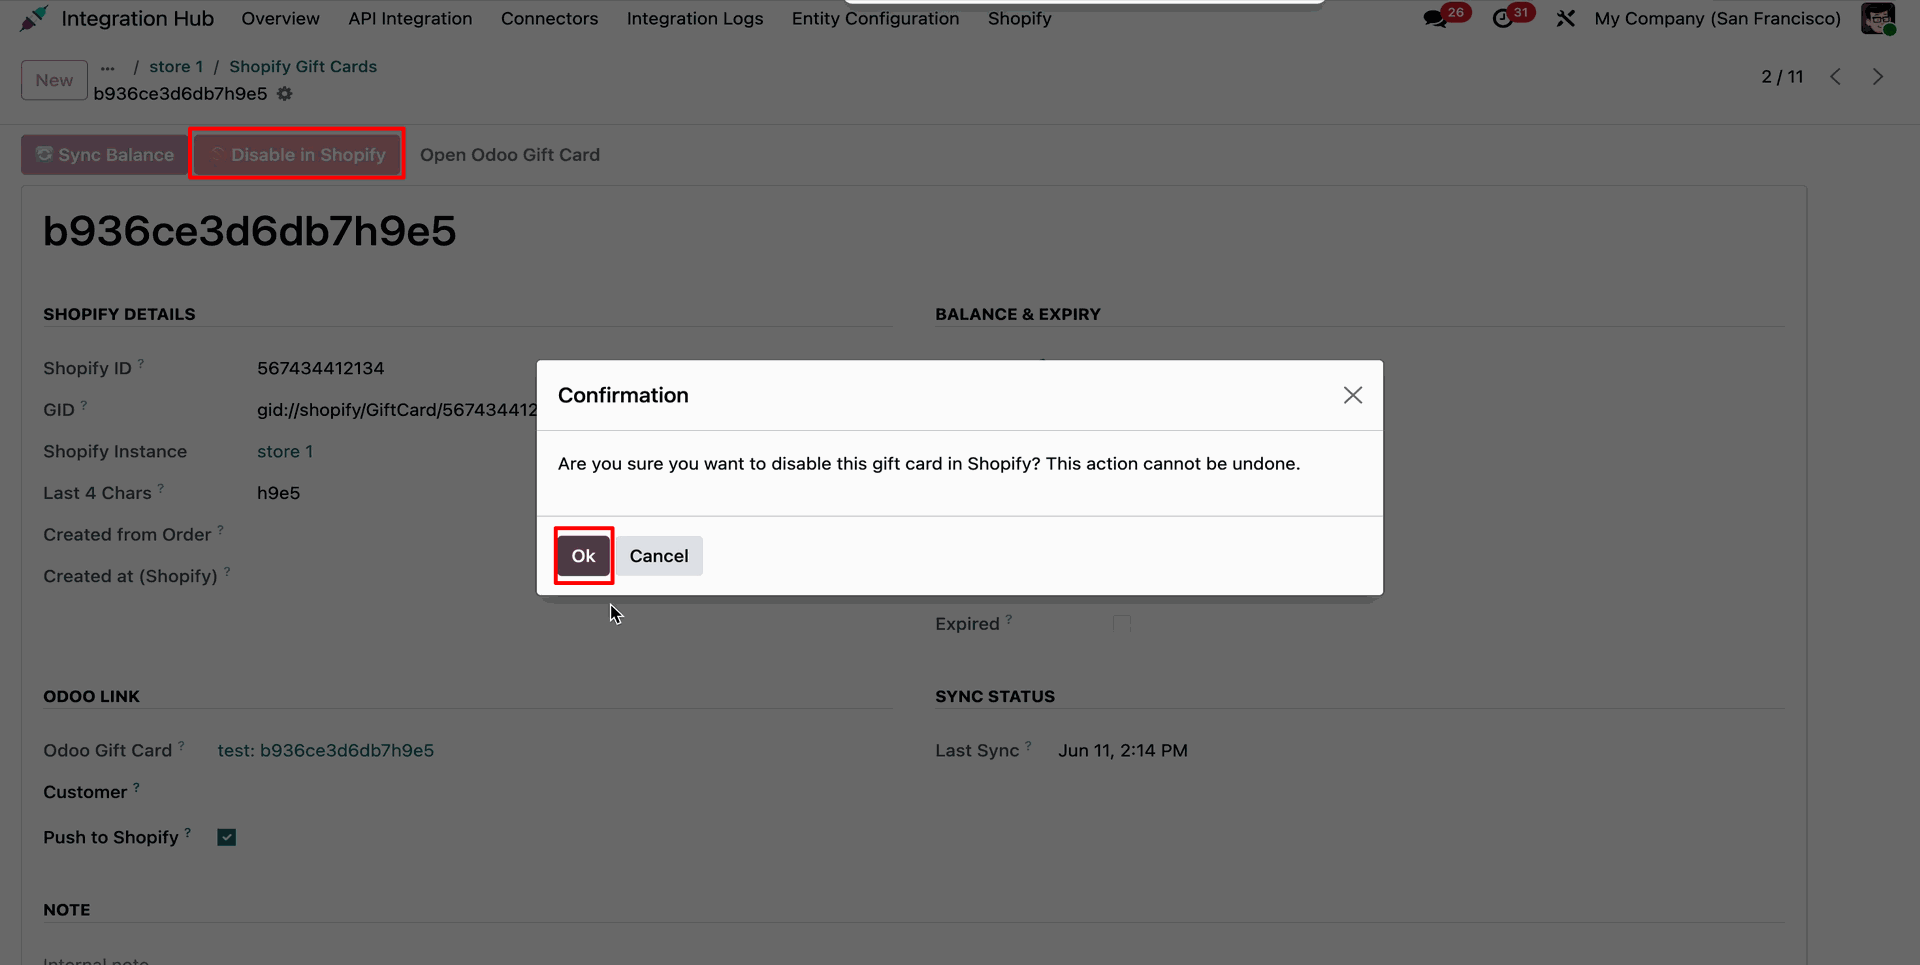
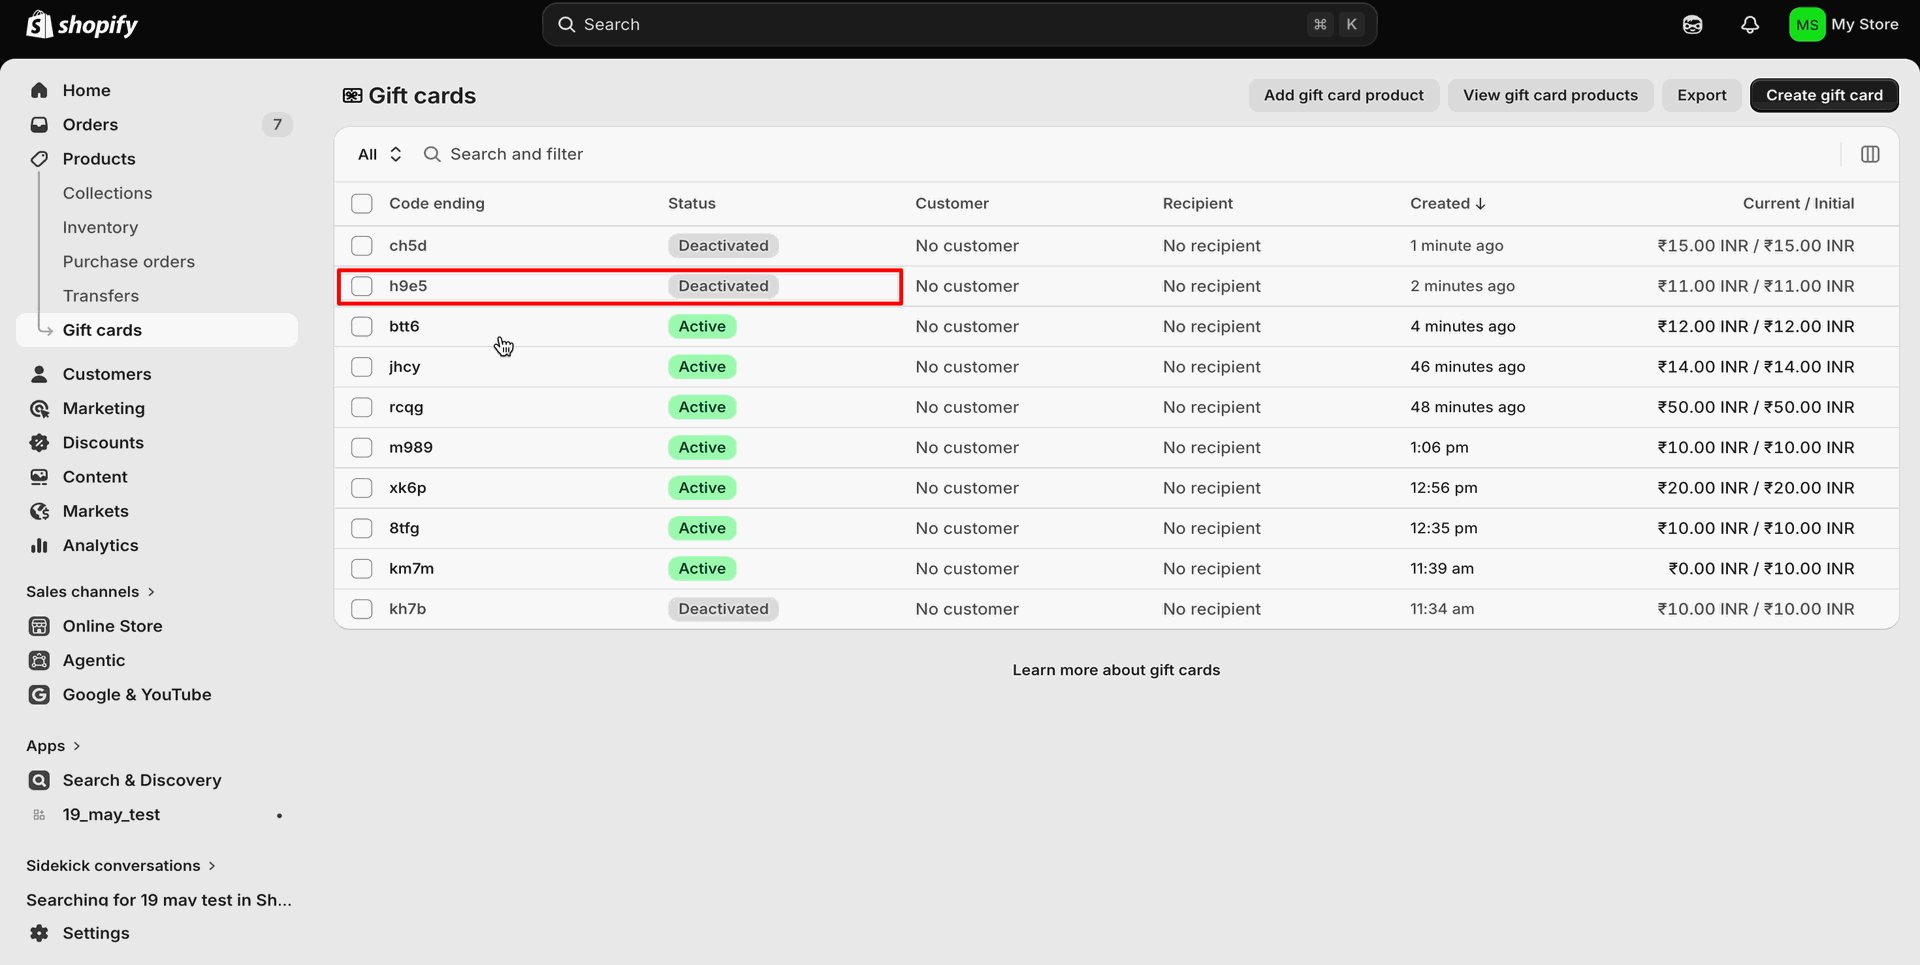
When you click the OK button in the confirmation wizard, the gift card will be disabled in Shopify, and a success notification will be displayed confirming that the gift card has been successfully disabled.
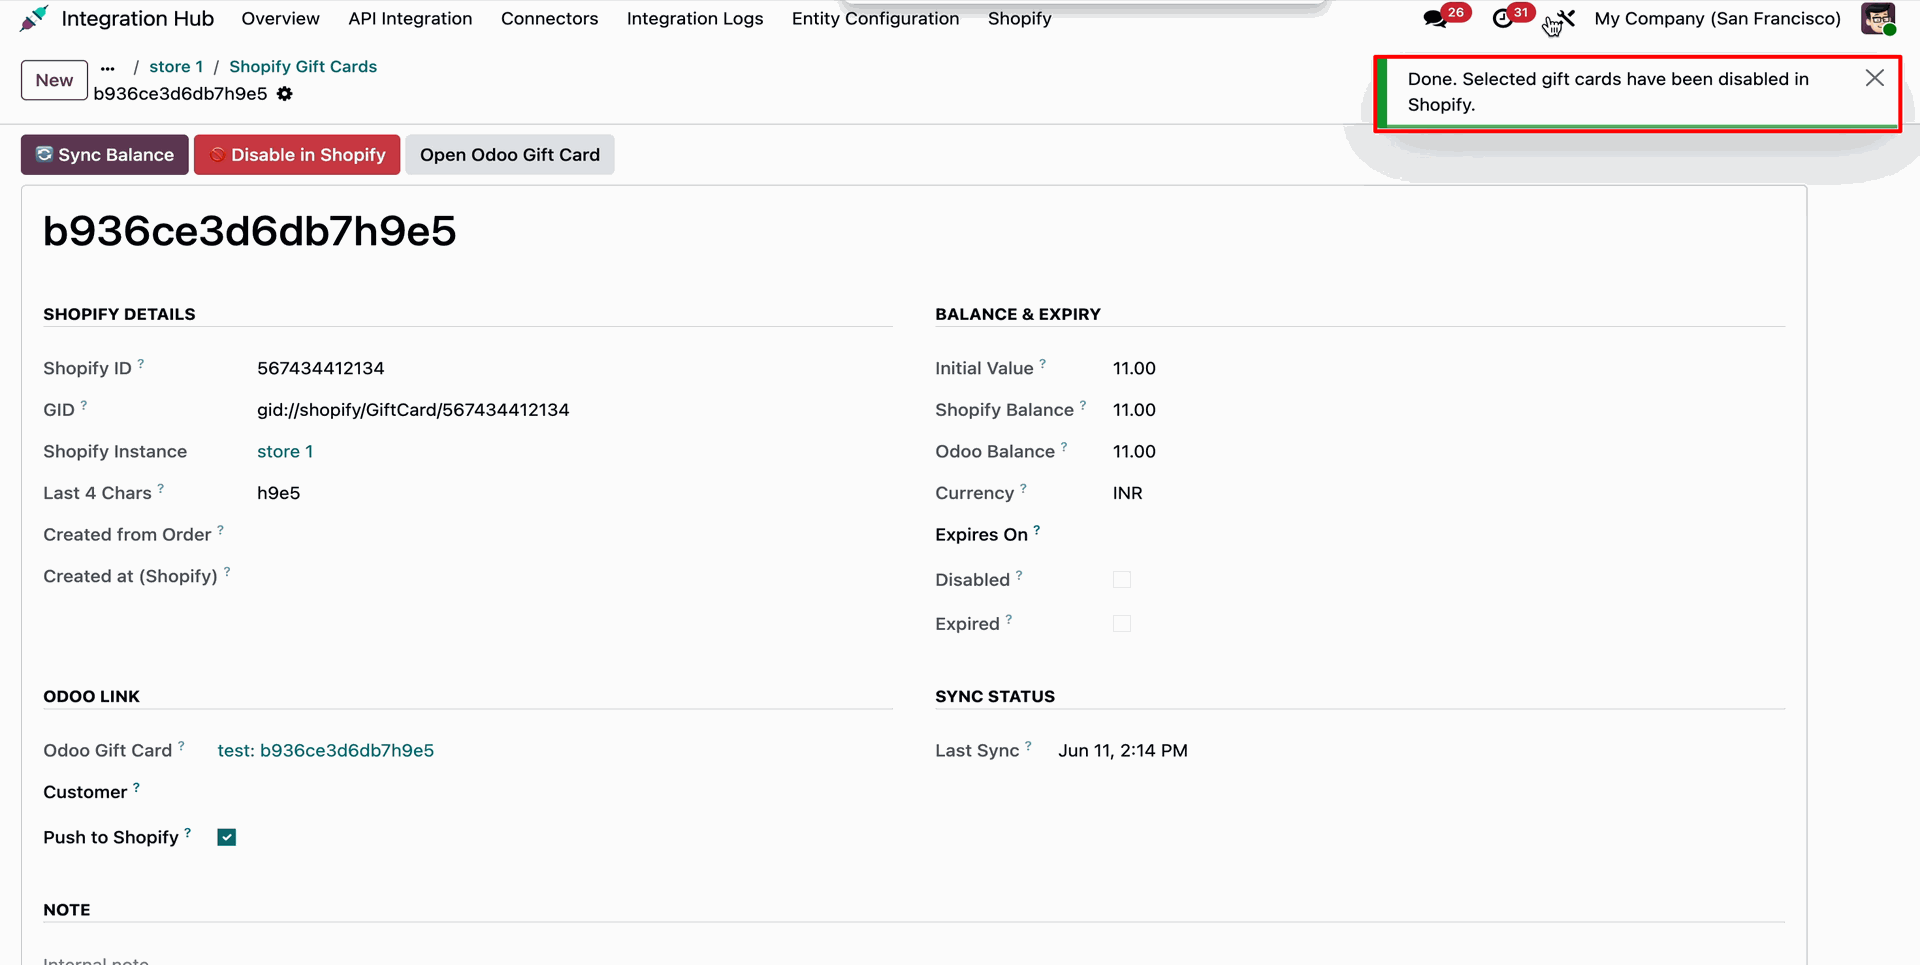
The gift card has been successfully deactivated in Shopify, and its status has been updated accordingly.
Workflow
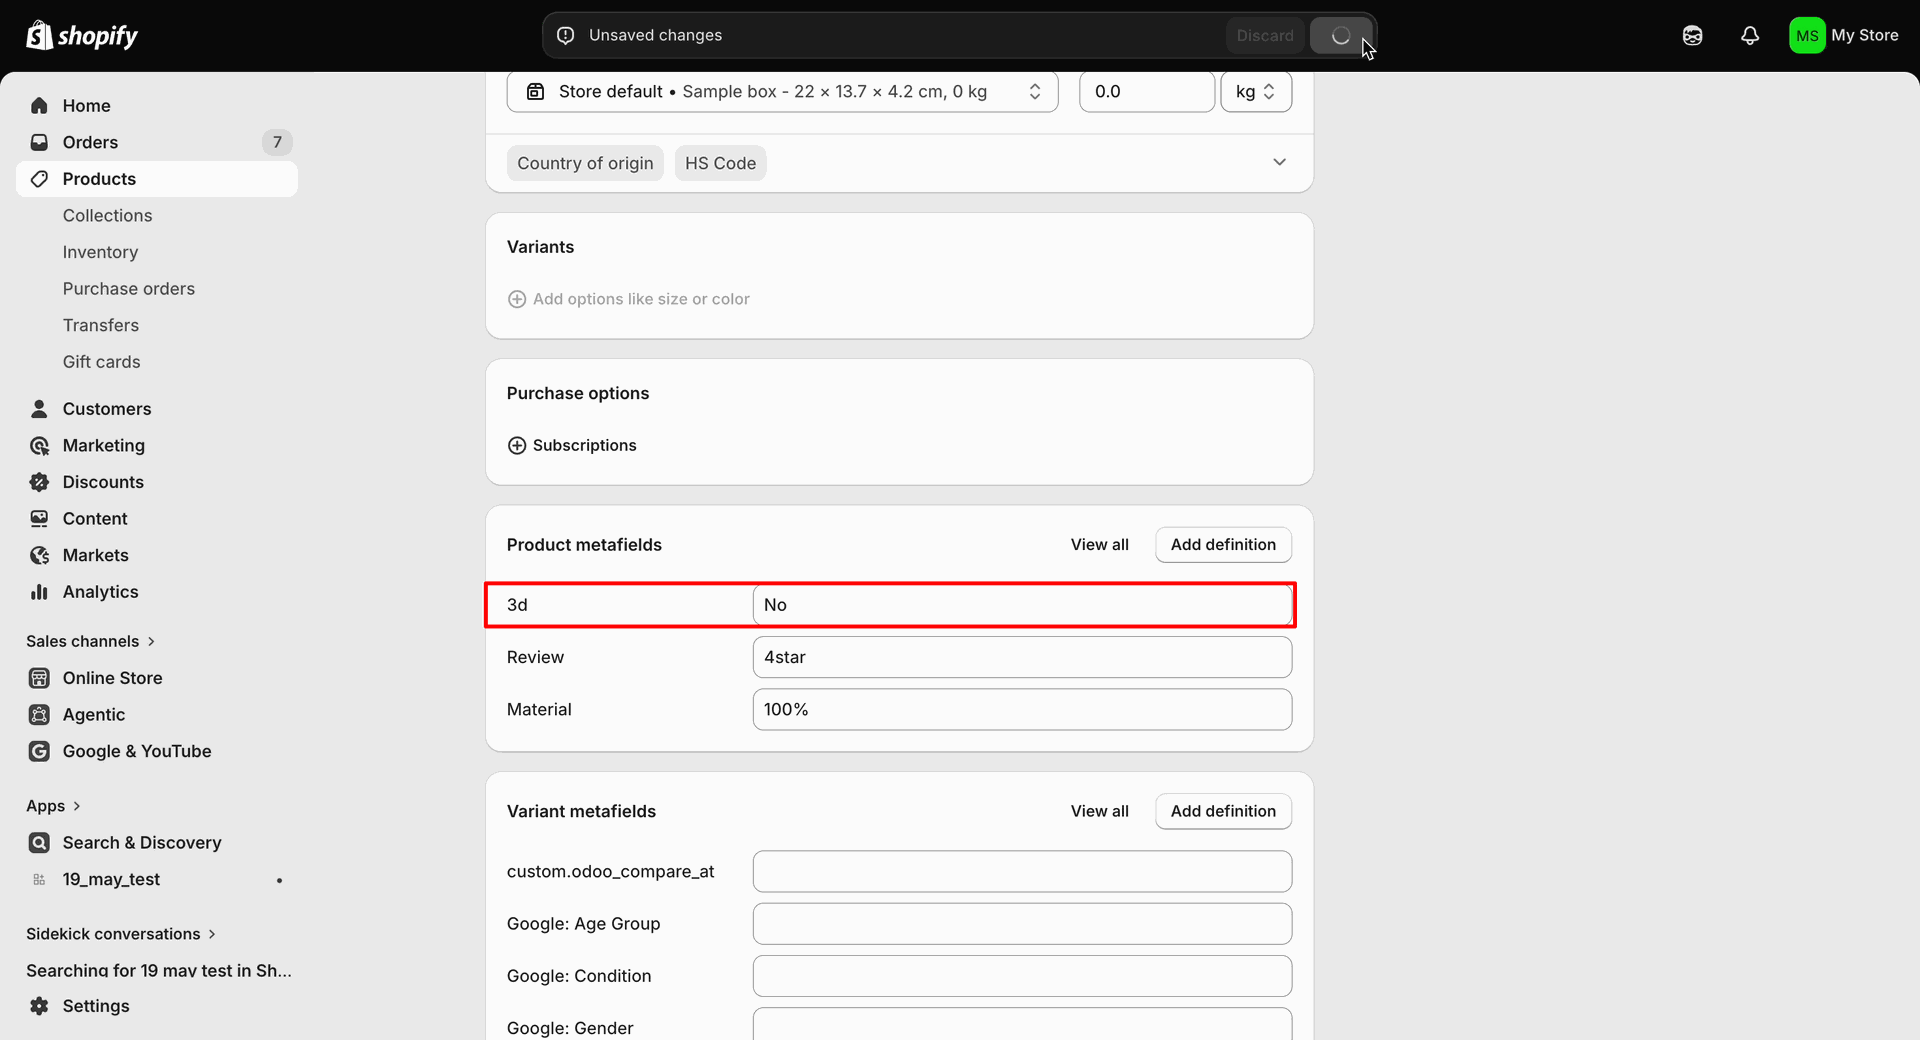
Open the Metafield Mappings menu in Shopify and add the required Product Metafield Definitions to configure custom field information.
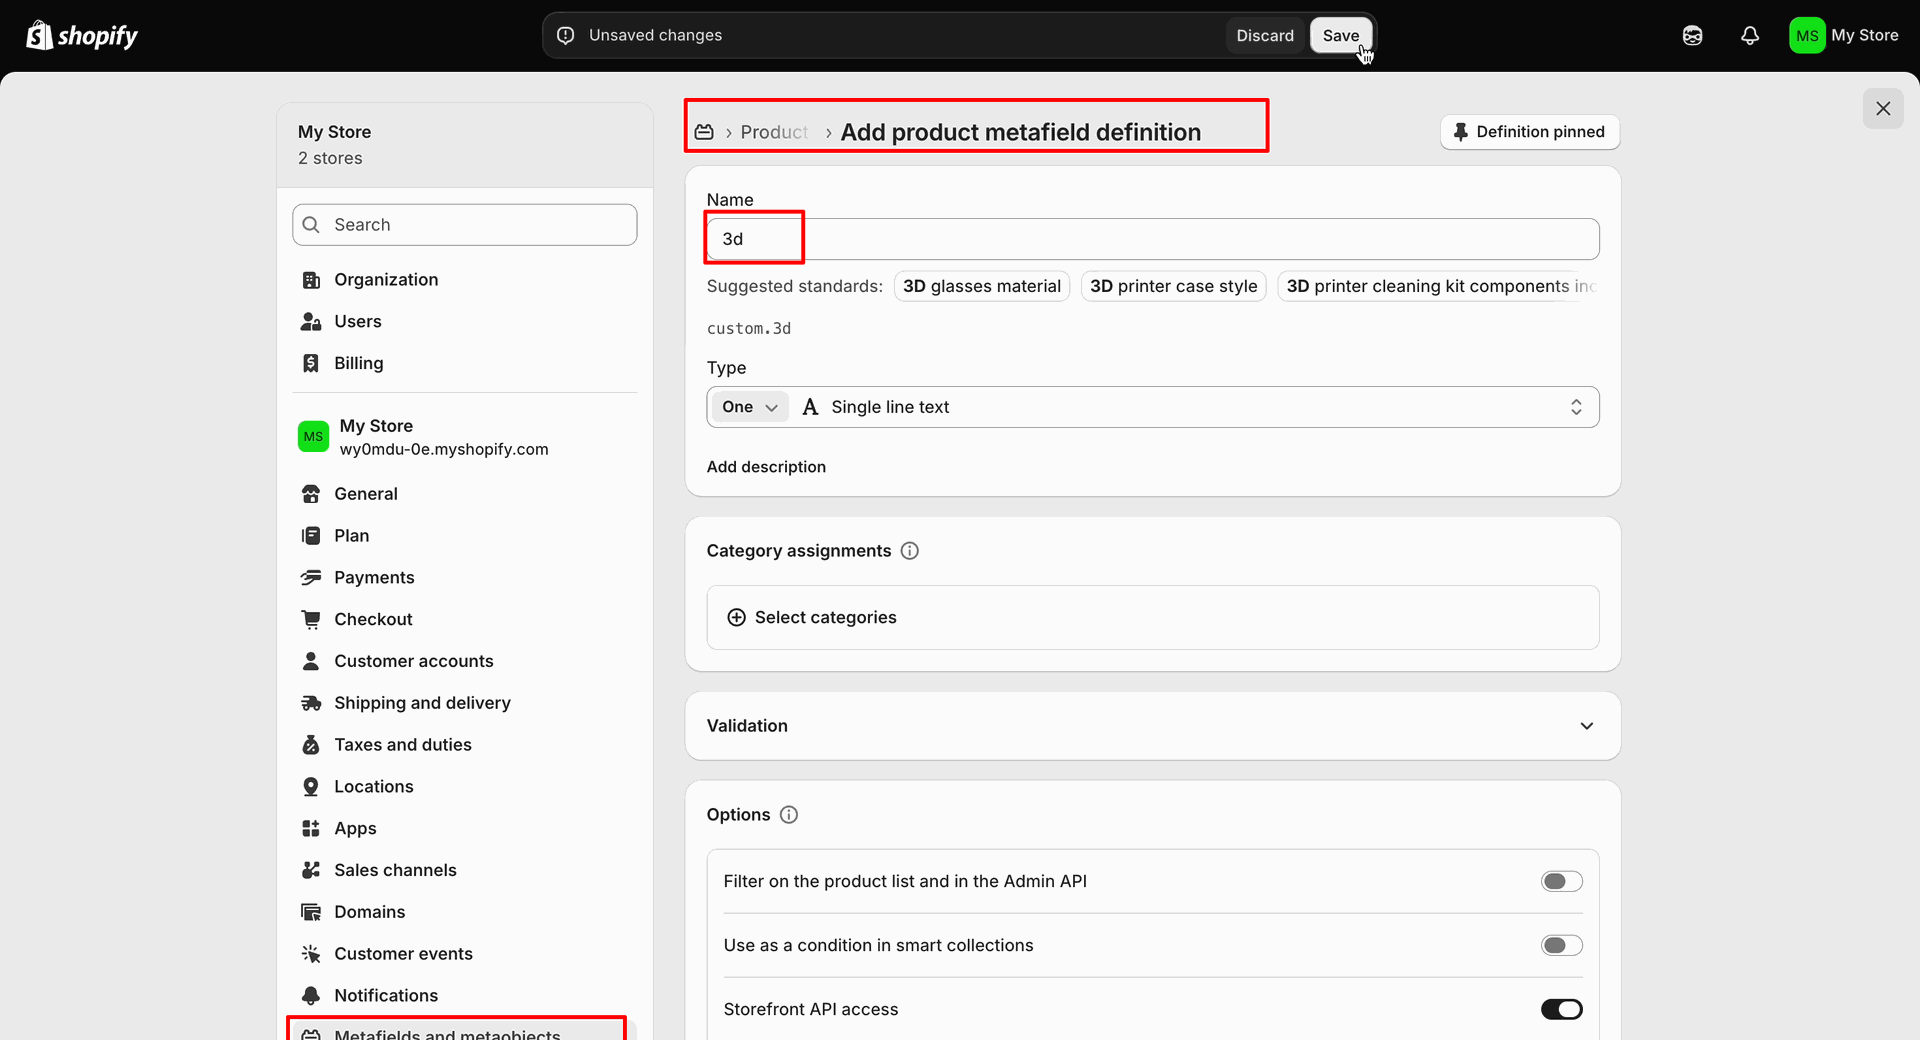
The Product Metafield Definitions List View displays all configured product metafield definitions, allowing users to review, manage, custom fields to the product.
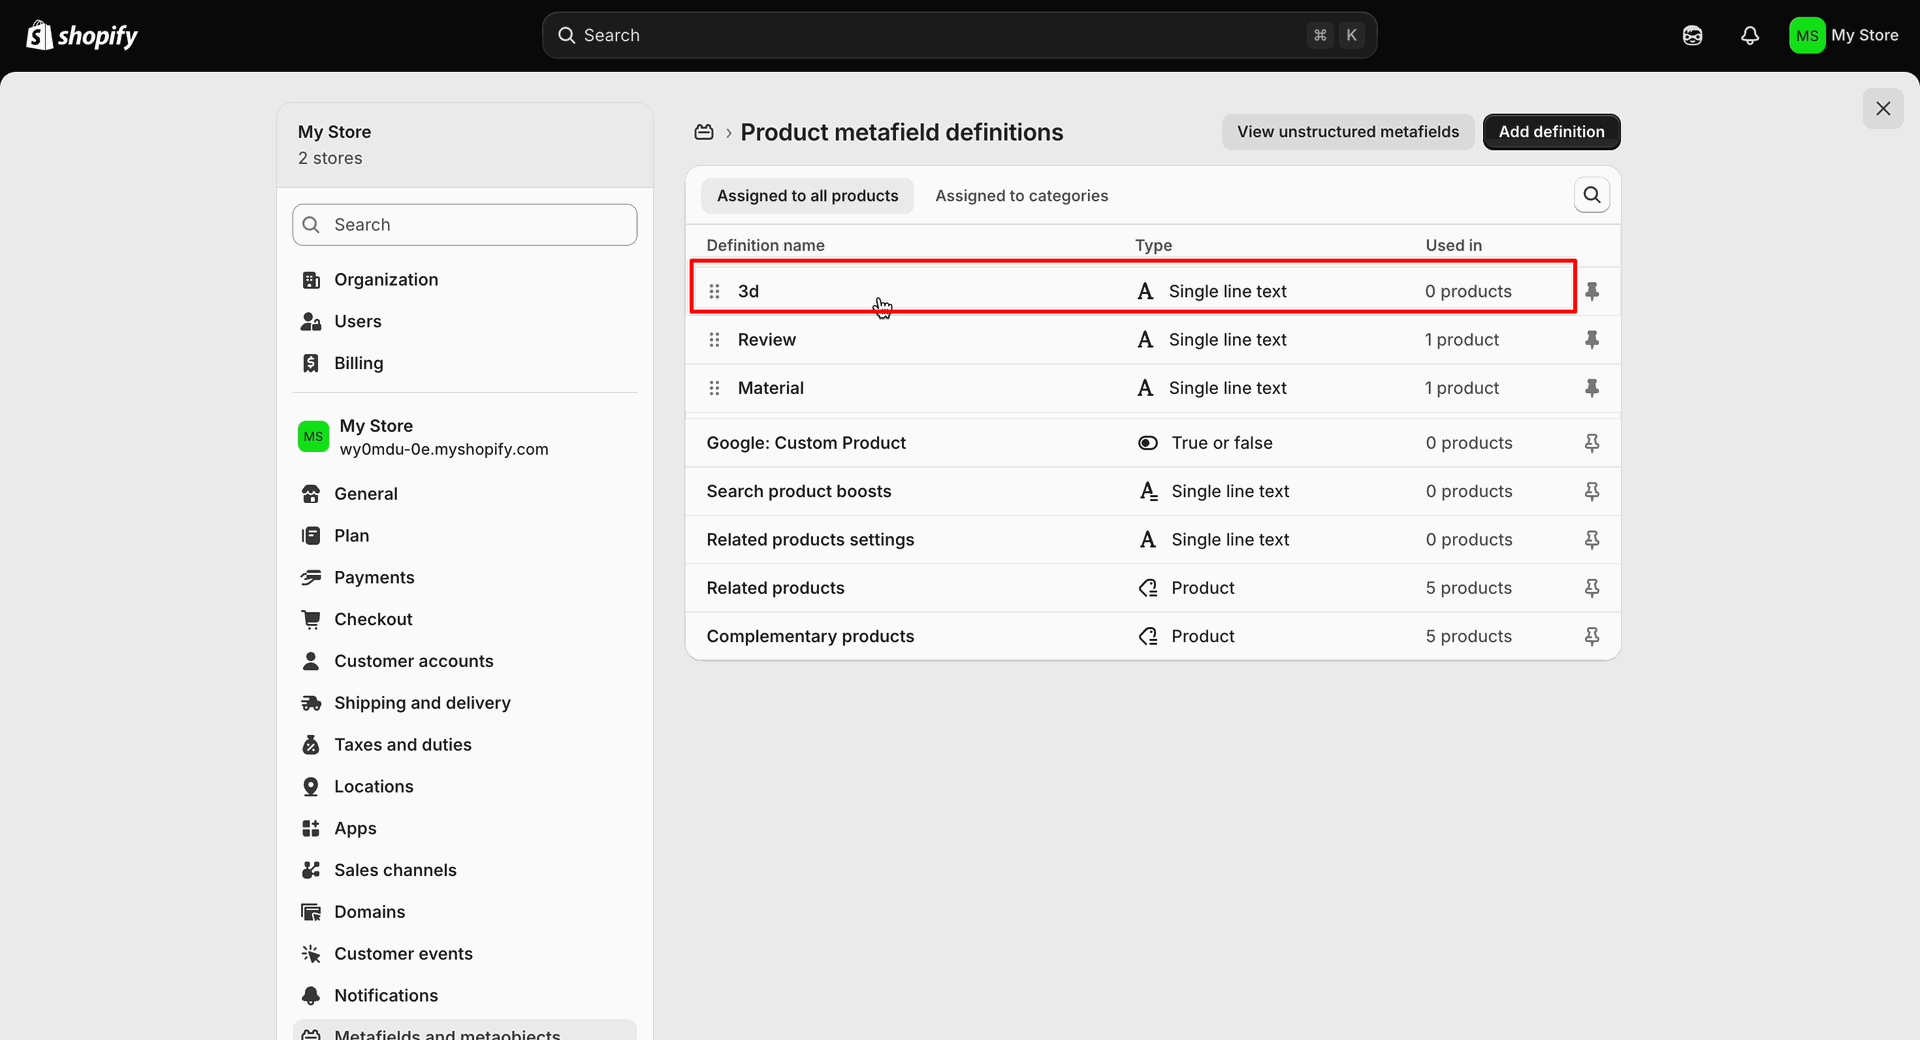
Open the Product Metafield Definitions in Shopify and add a Custom Field.
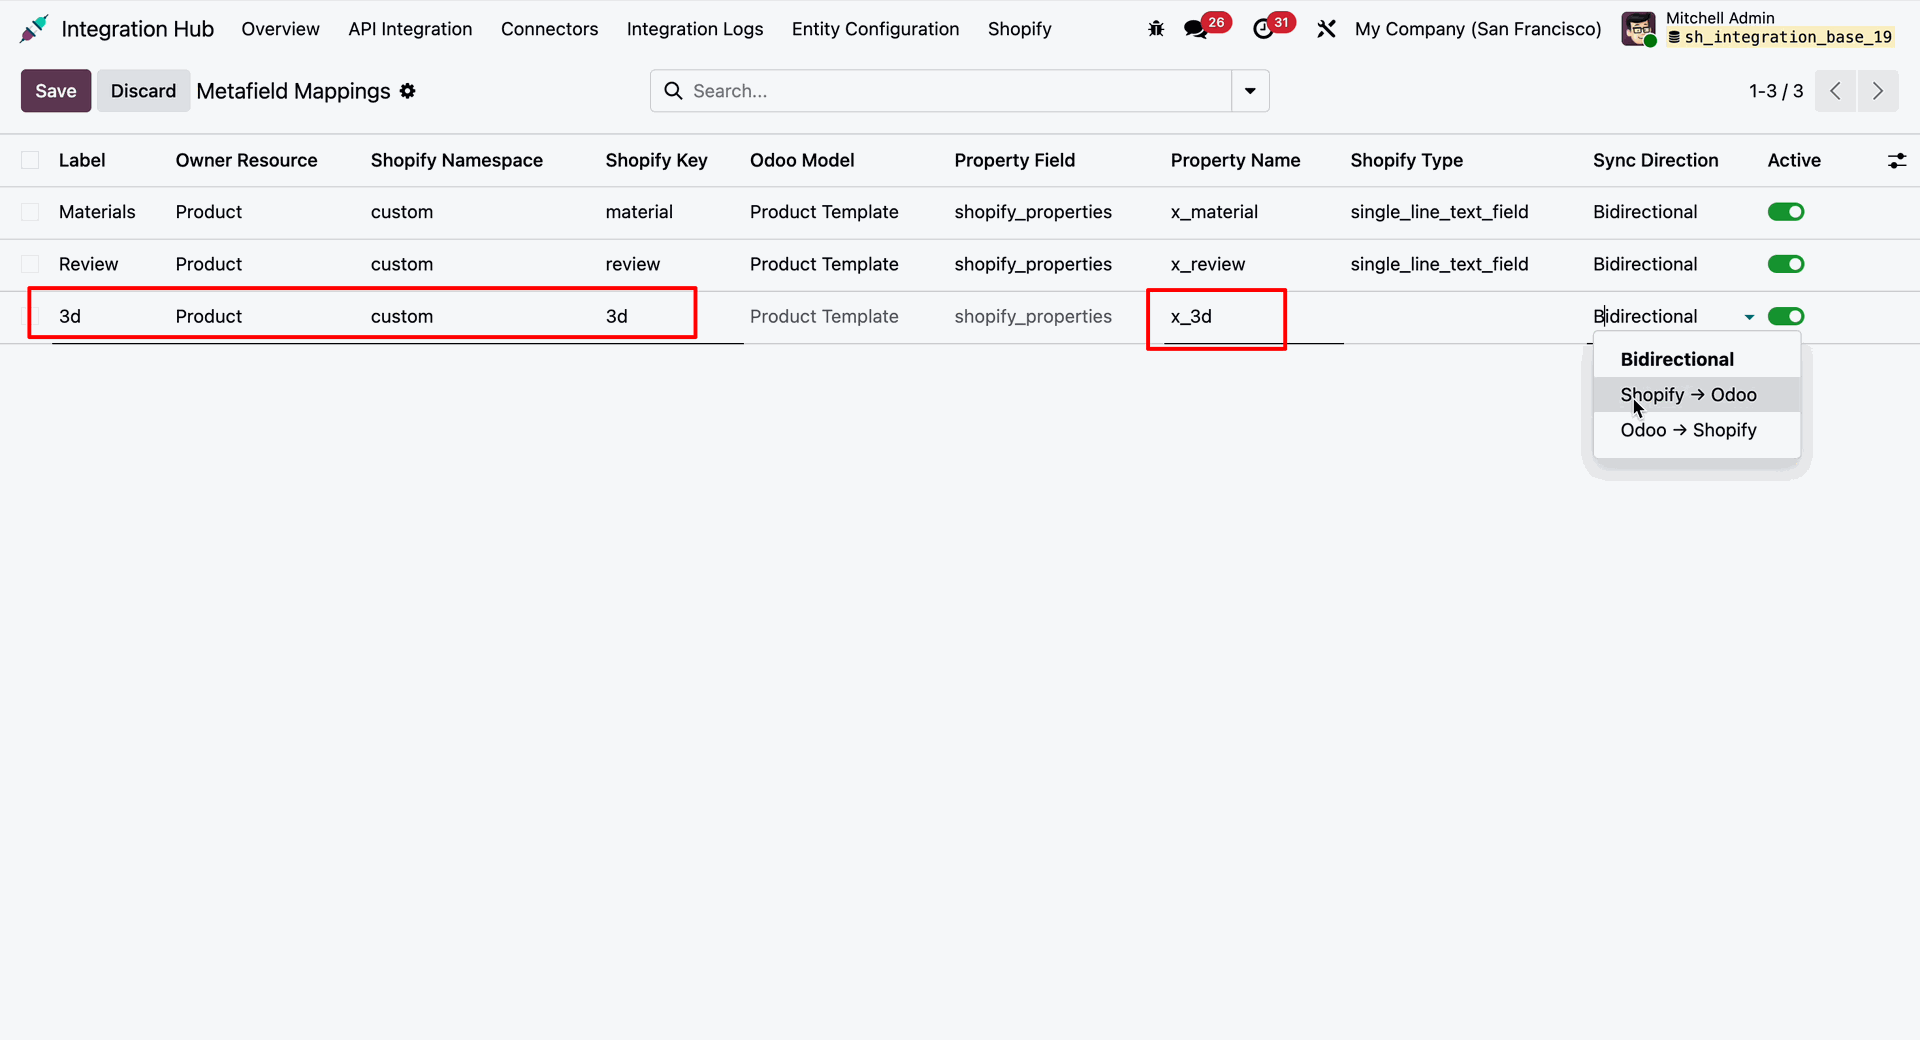
Go to Odoo -> Shopify -> Metafield Mappings and select the custom field created in Shopify to map and select the desired Sync Direction for the metafield mapping and click Save to apply the configuration and enable synchronization.
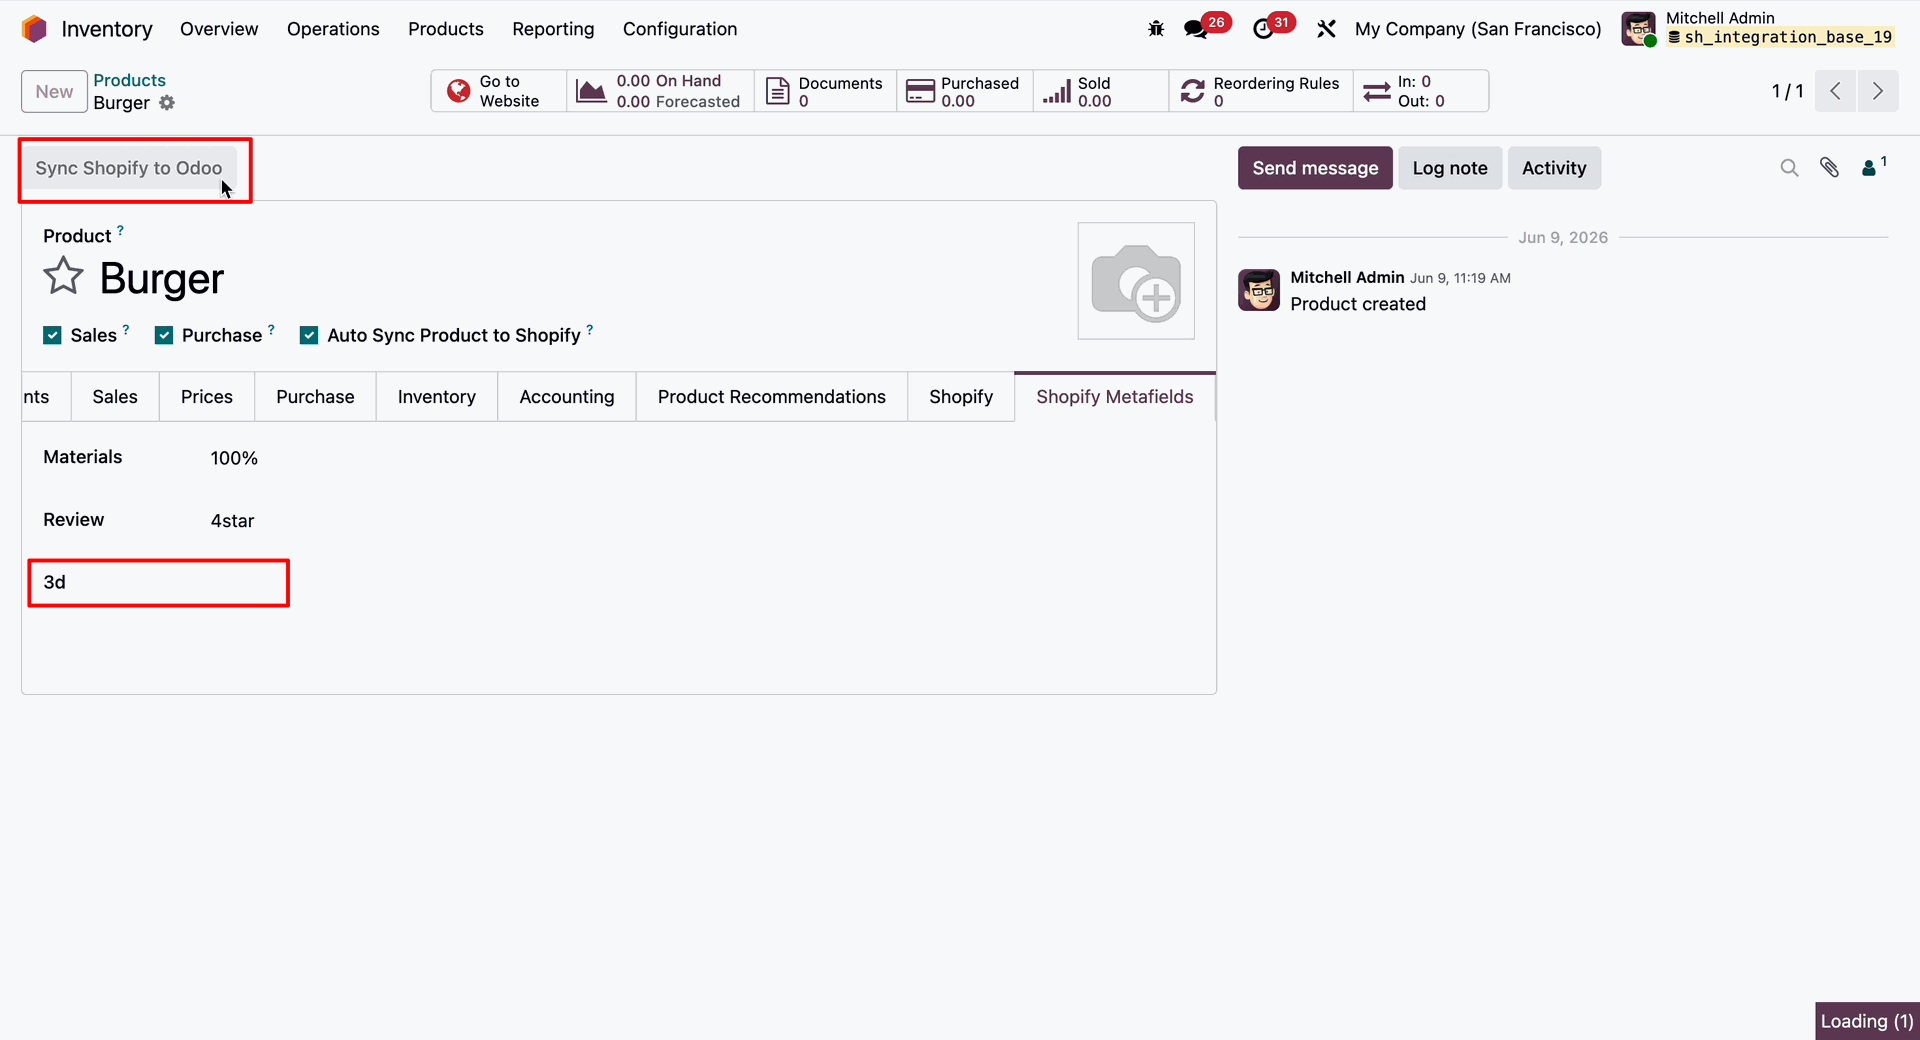
Go to the Shopify Metafields tab under the Product Template Form View and click the Sync Shopify to Odoo button to import and update the product data, including mapped metafield values, from Shopify to Odoo.
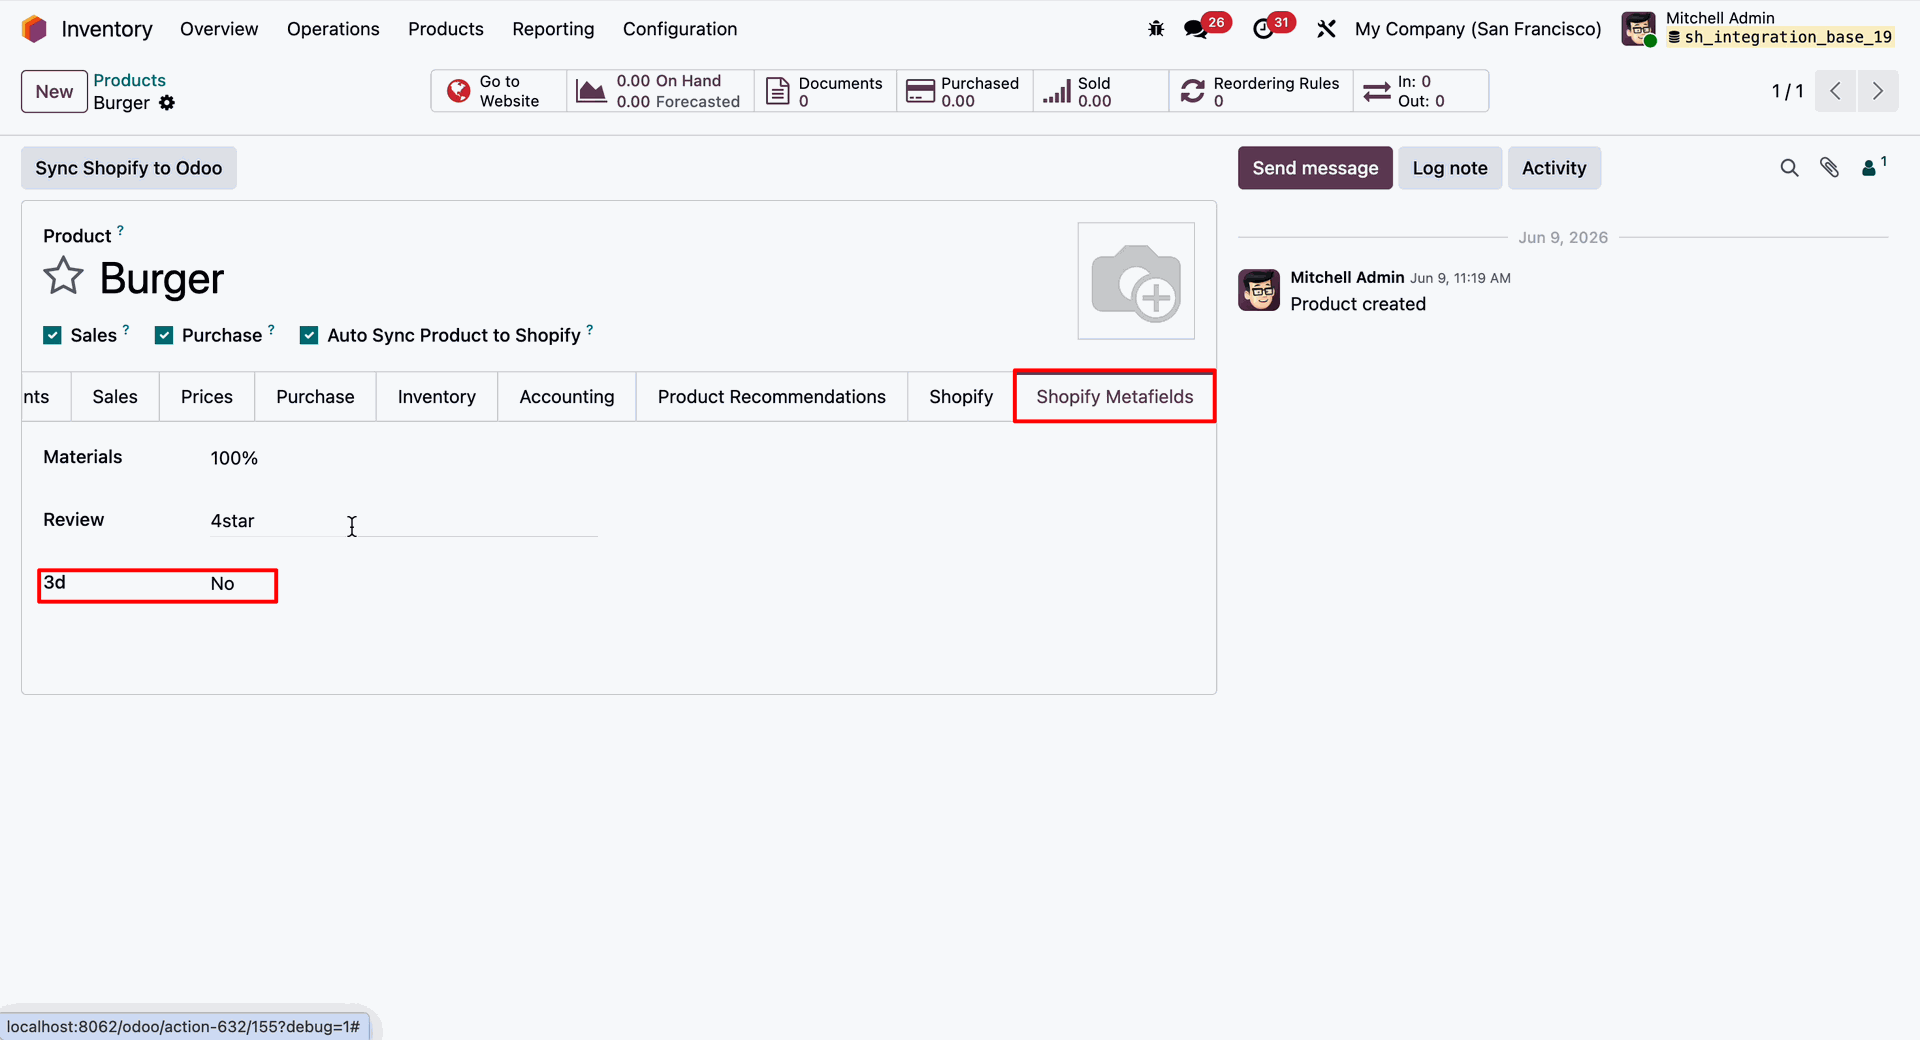
The Shopify Metafield Values associated with the product have been successfully synchronized and are now available in Odoo according to the configured metafield mappings.
Update the Review value from the Shopify Metafields tab under the Product Template Form View and click Save to store the changes in Odoo.
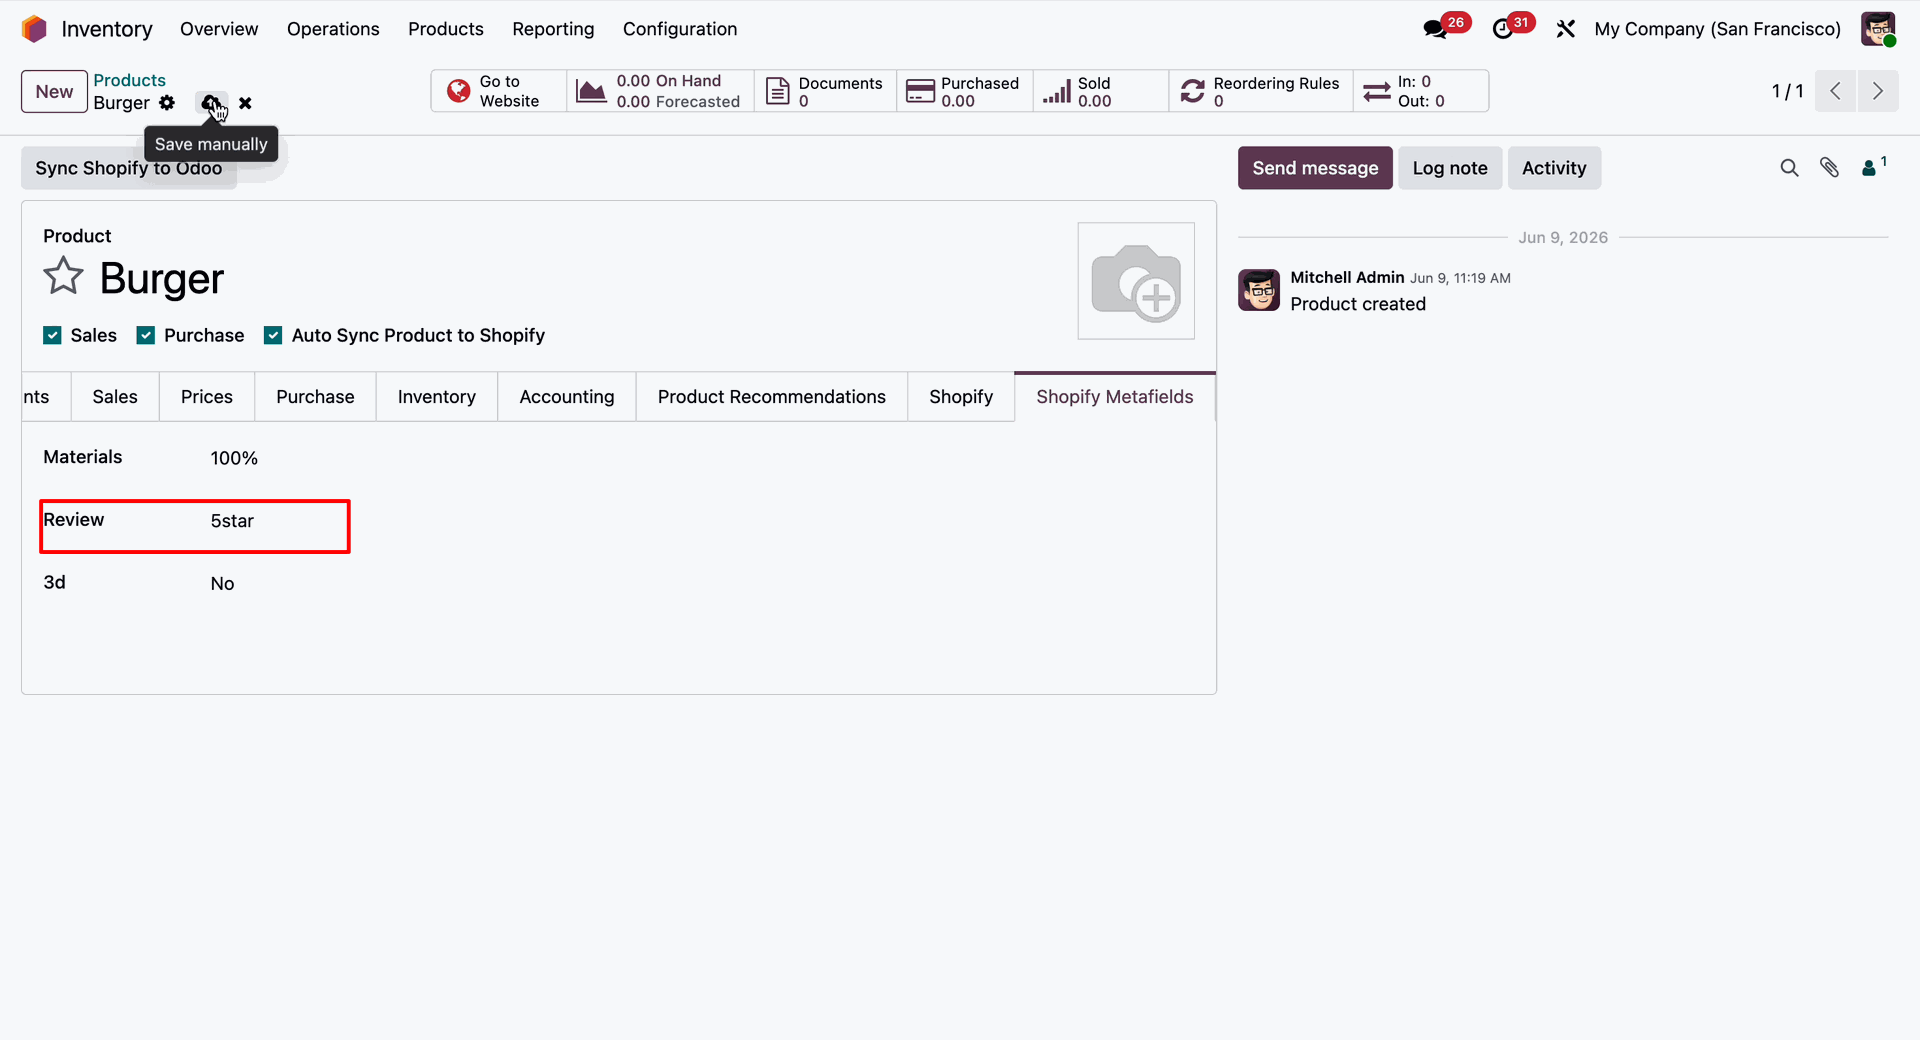
The Review value has been successfully updated in Shopify.
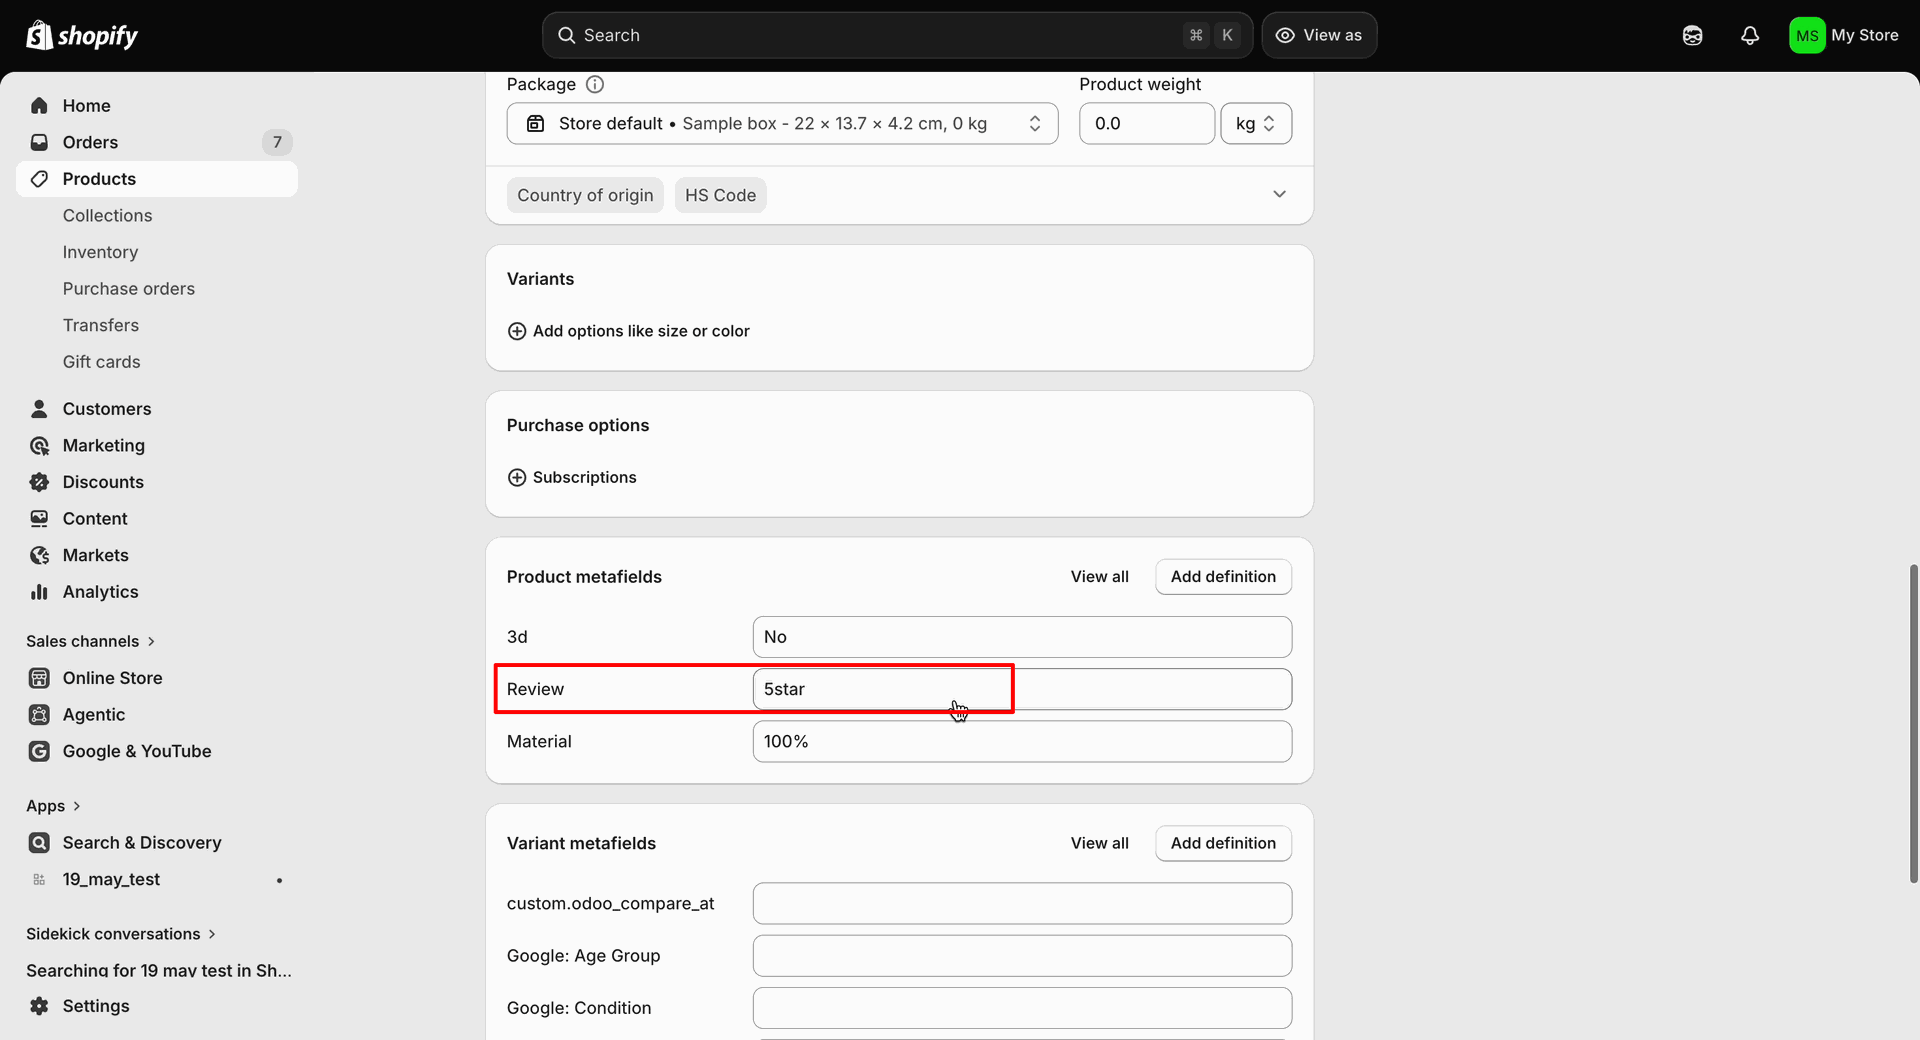
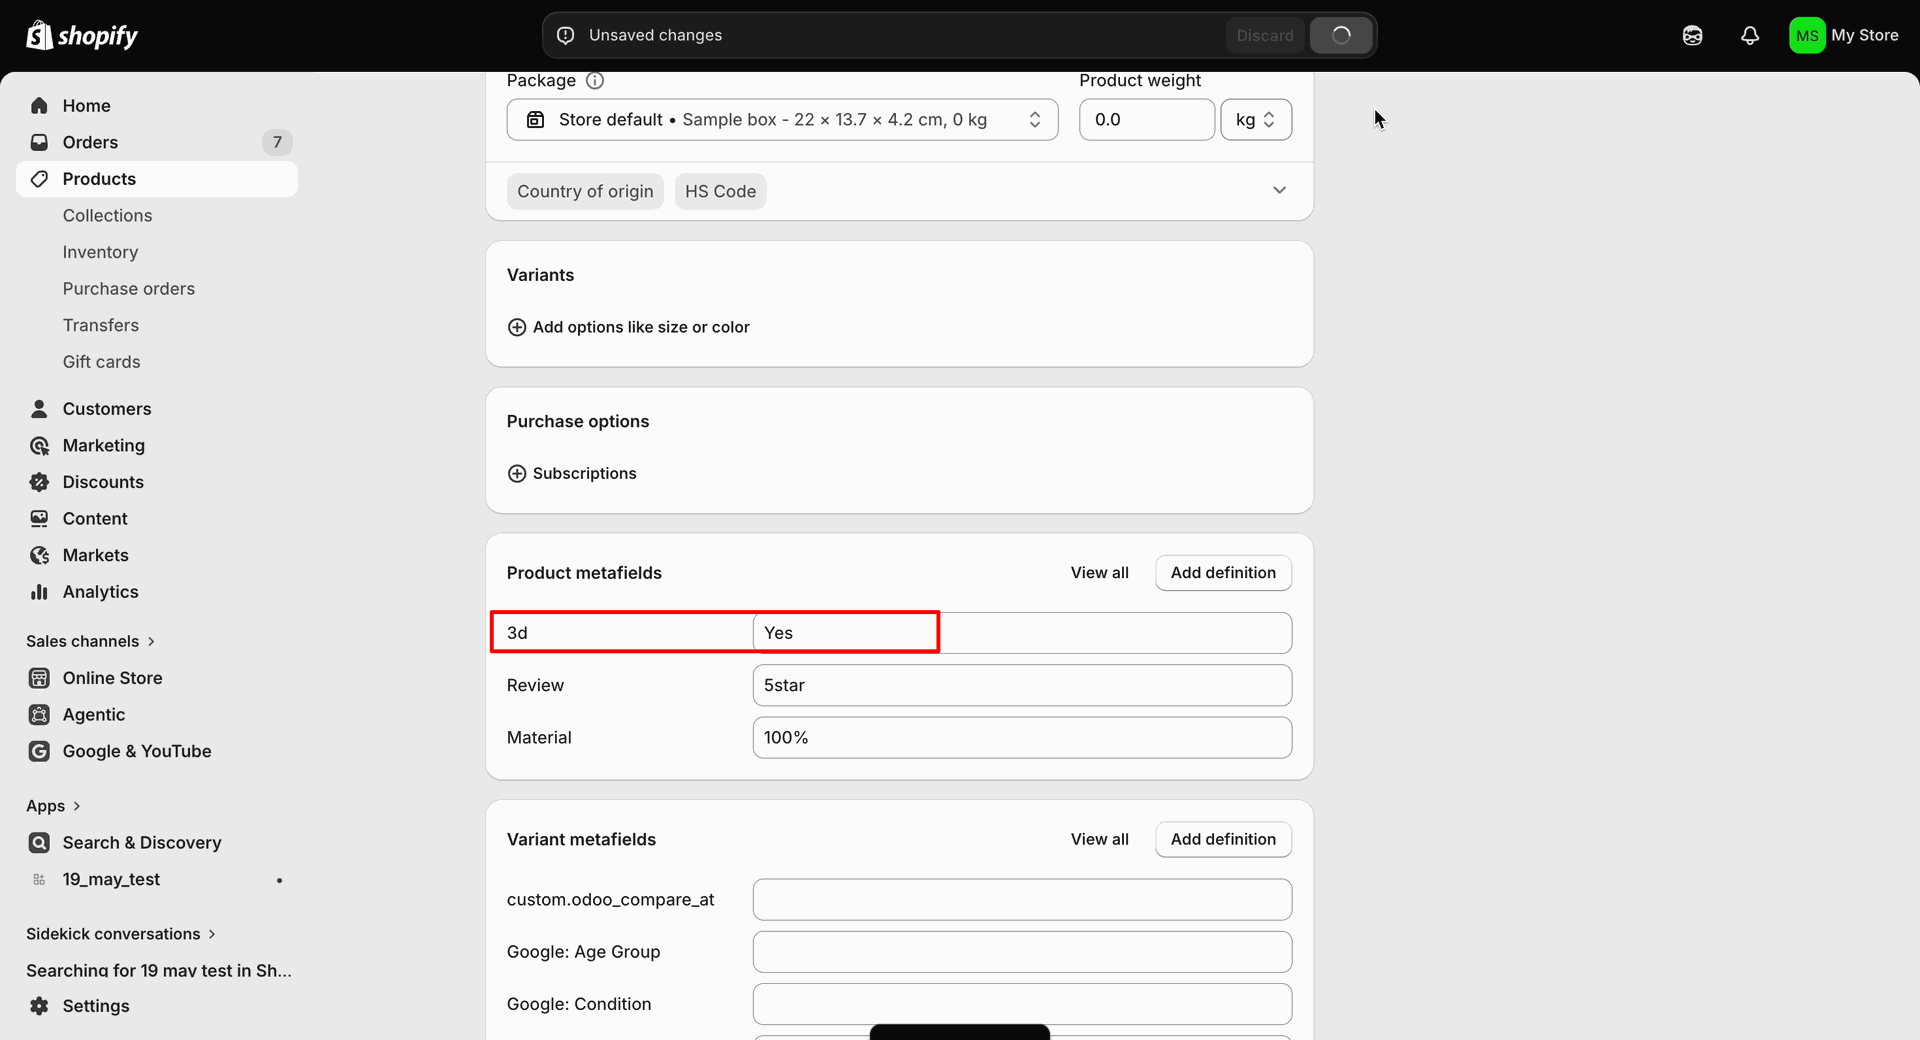
Update the Metafield Definition in Shopify.
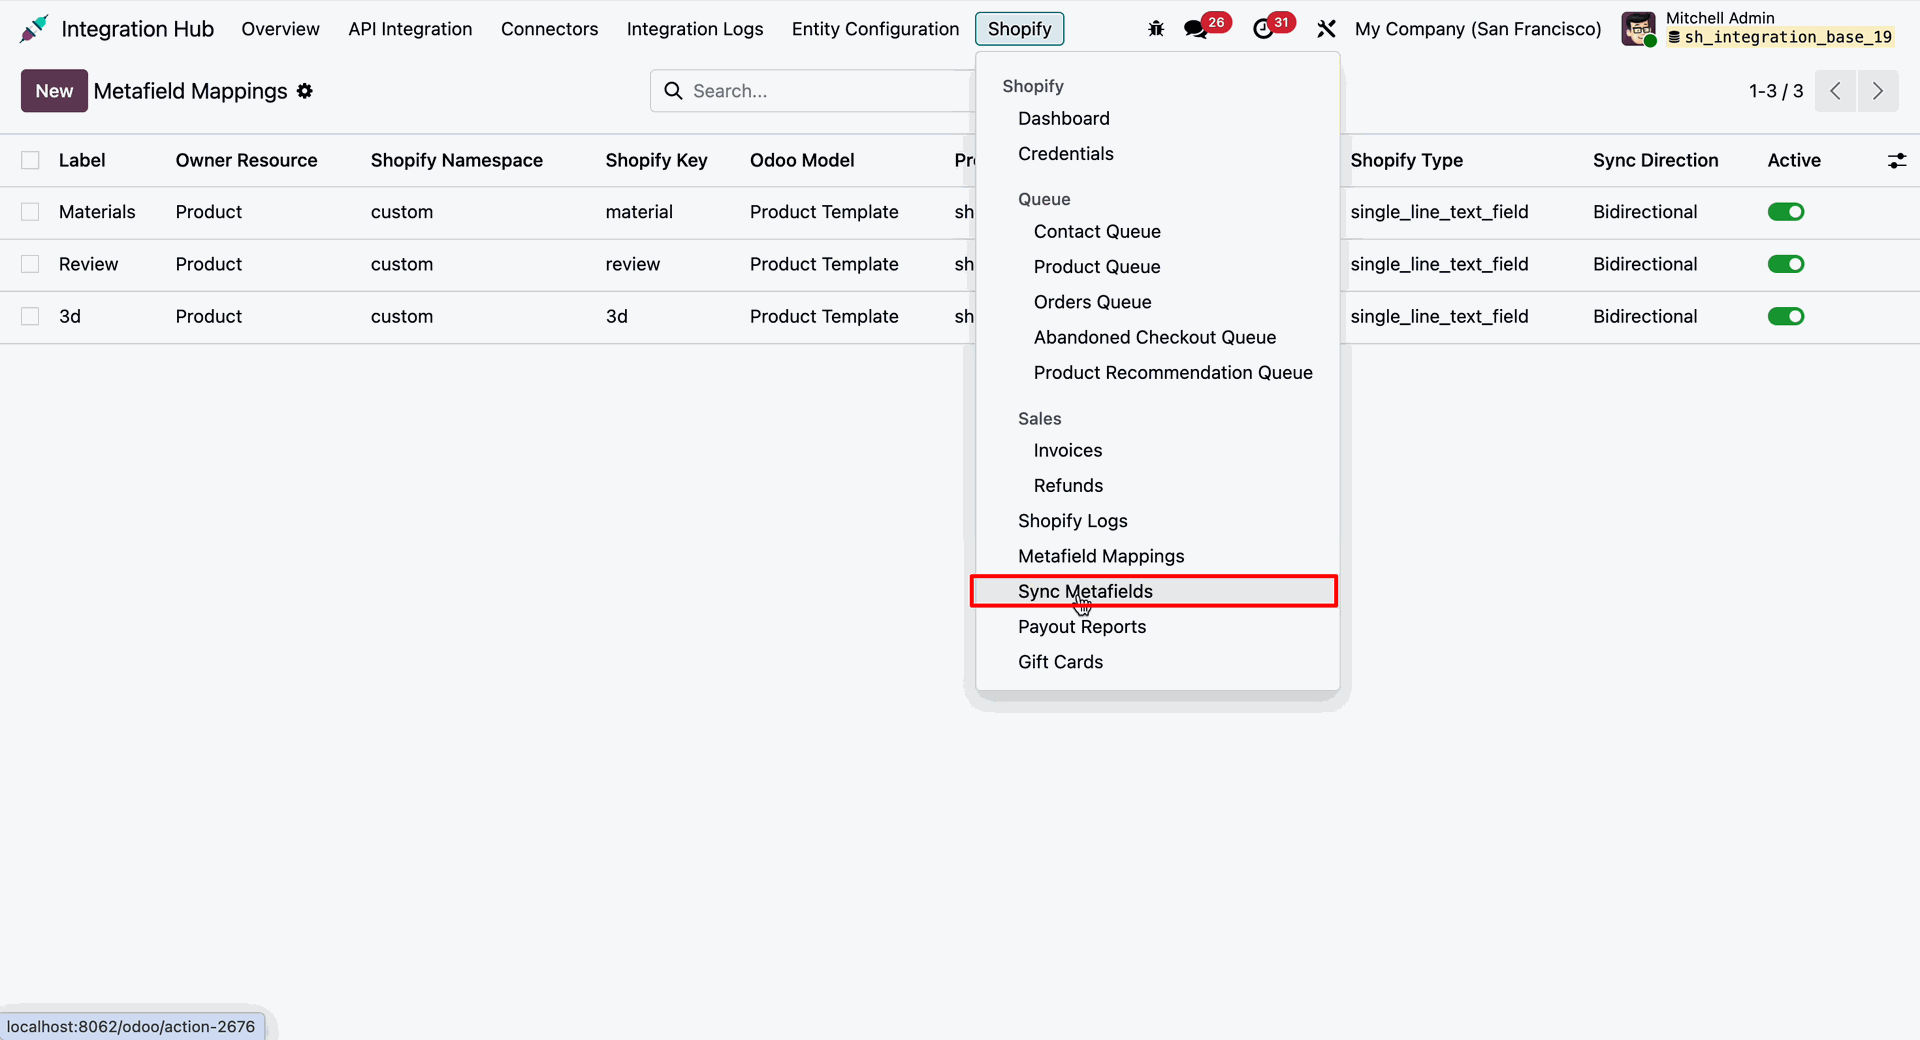
Go to the Shopify menu in Odoo and select the Sync Metafields submenu to synchronize the latest metafield definitions and values from Shopify.
The Sync Metafields wizard will open. Enter the required details and click the Sync Metafields button to synchronize metafield definitions and values between Shopify and Odoo.
After the synchronization is completed, a notification message will be displayed showing the number of records successfully synchronized.
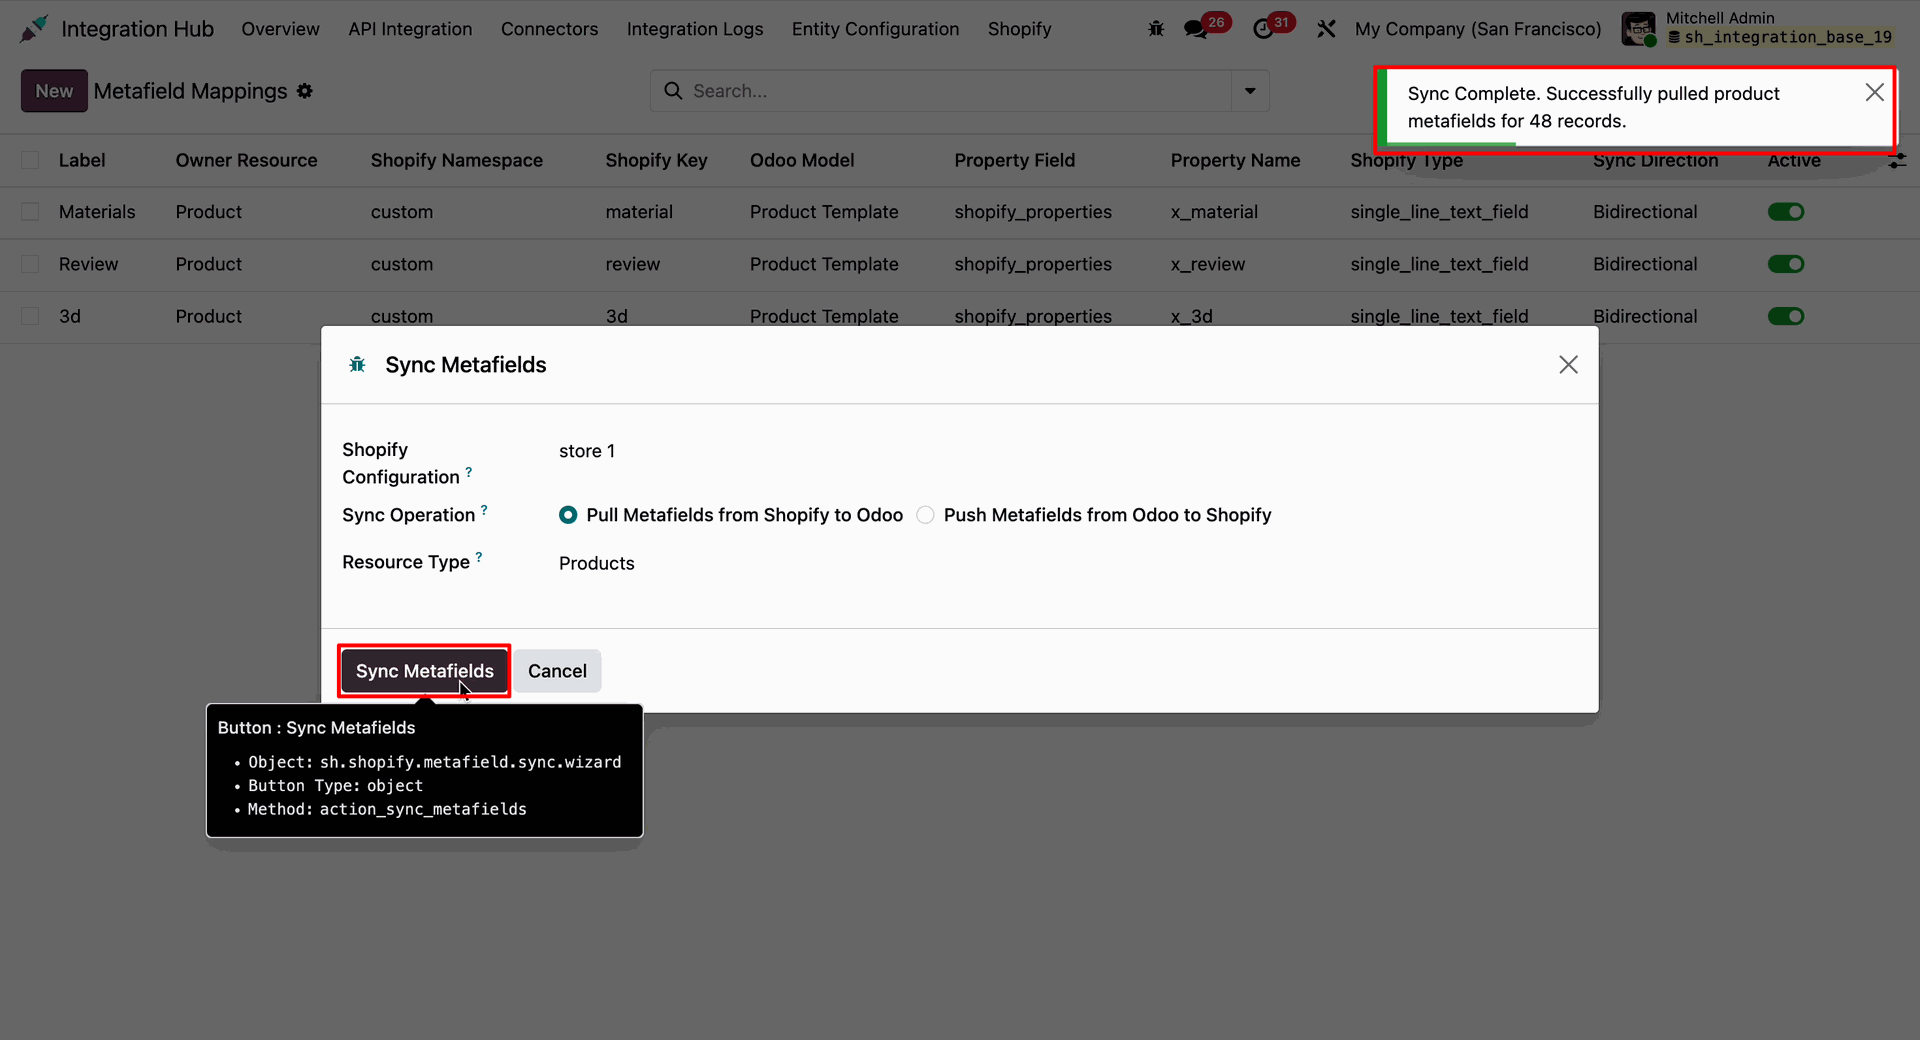
Users can also synchronize metafields in bulk by selecting multiple records from the Metafield Mappings List View and using the Sync Metafields option from the Action menu.
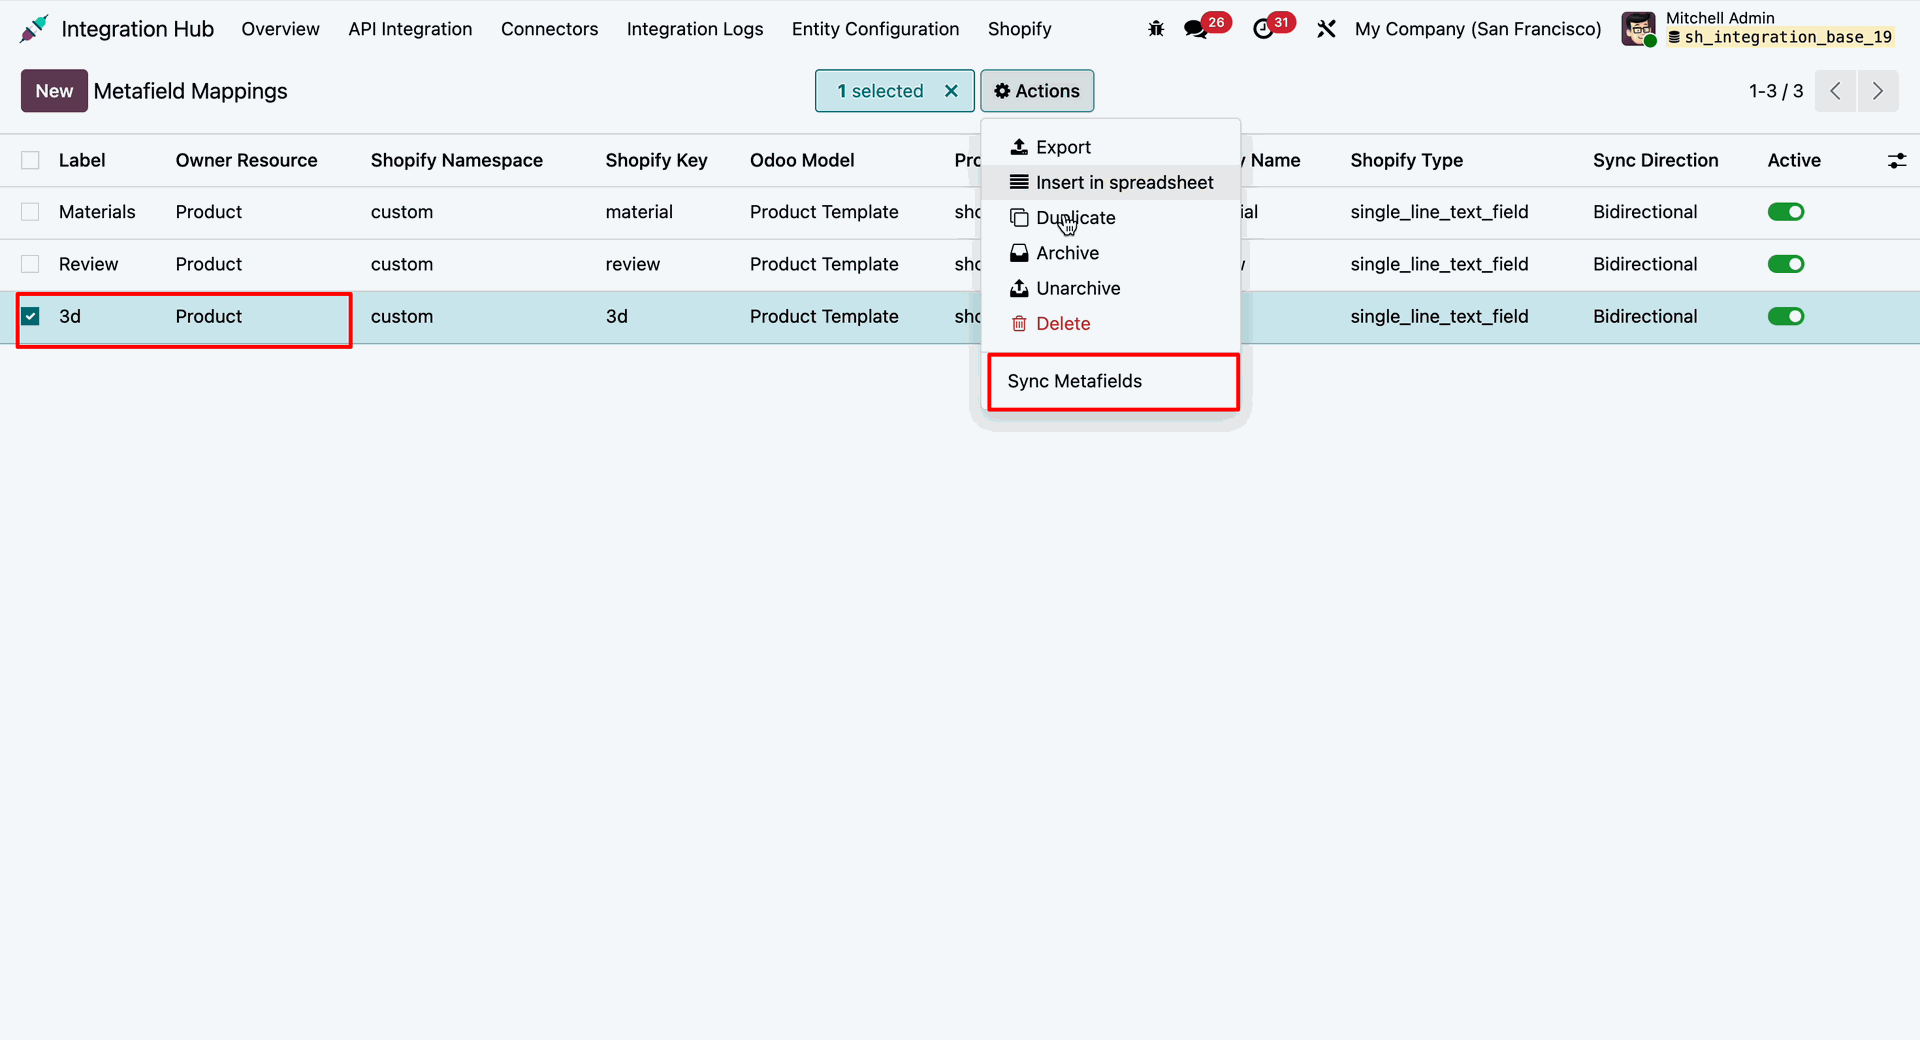
The Sync Metafields wizard will open. Enter the required details and click the Sync Metafields button to synchronize metafield definitions and values between Shopify and Odoo.
After the synchronization is completed, a notification message will be displayed showing the number of records successfully synchronized.
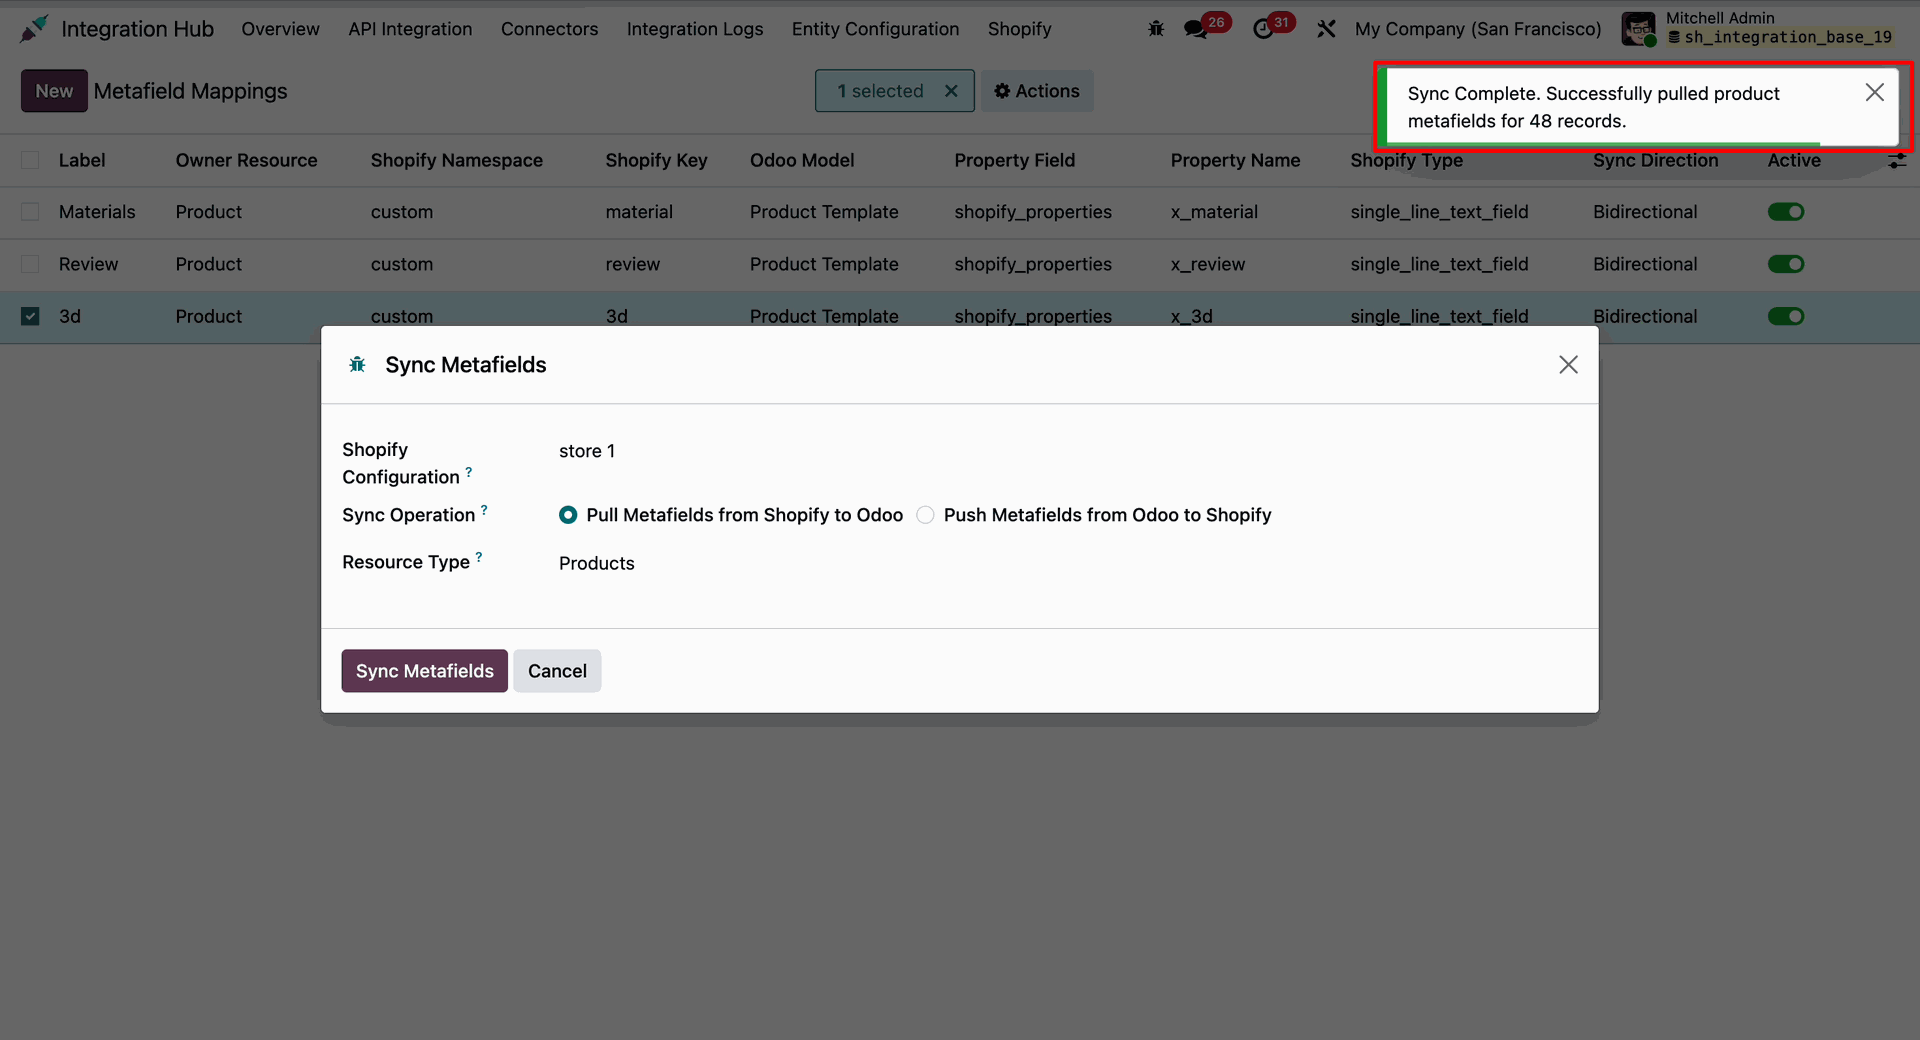
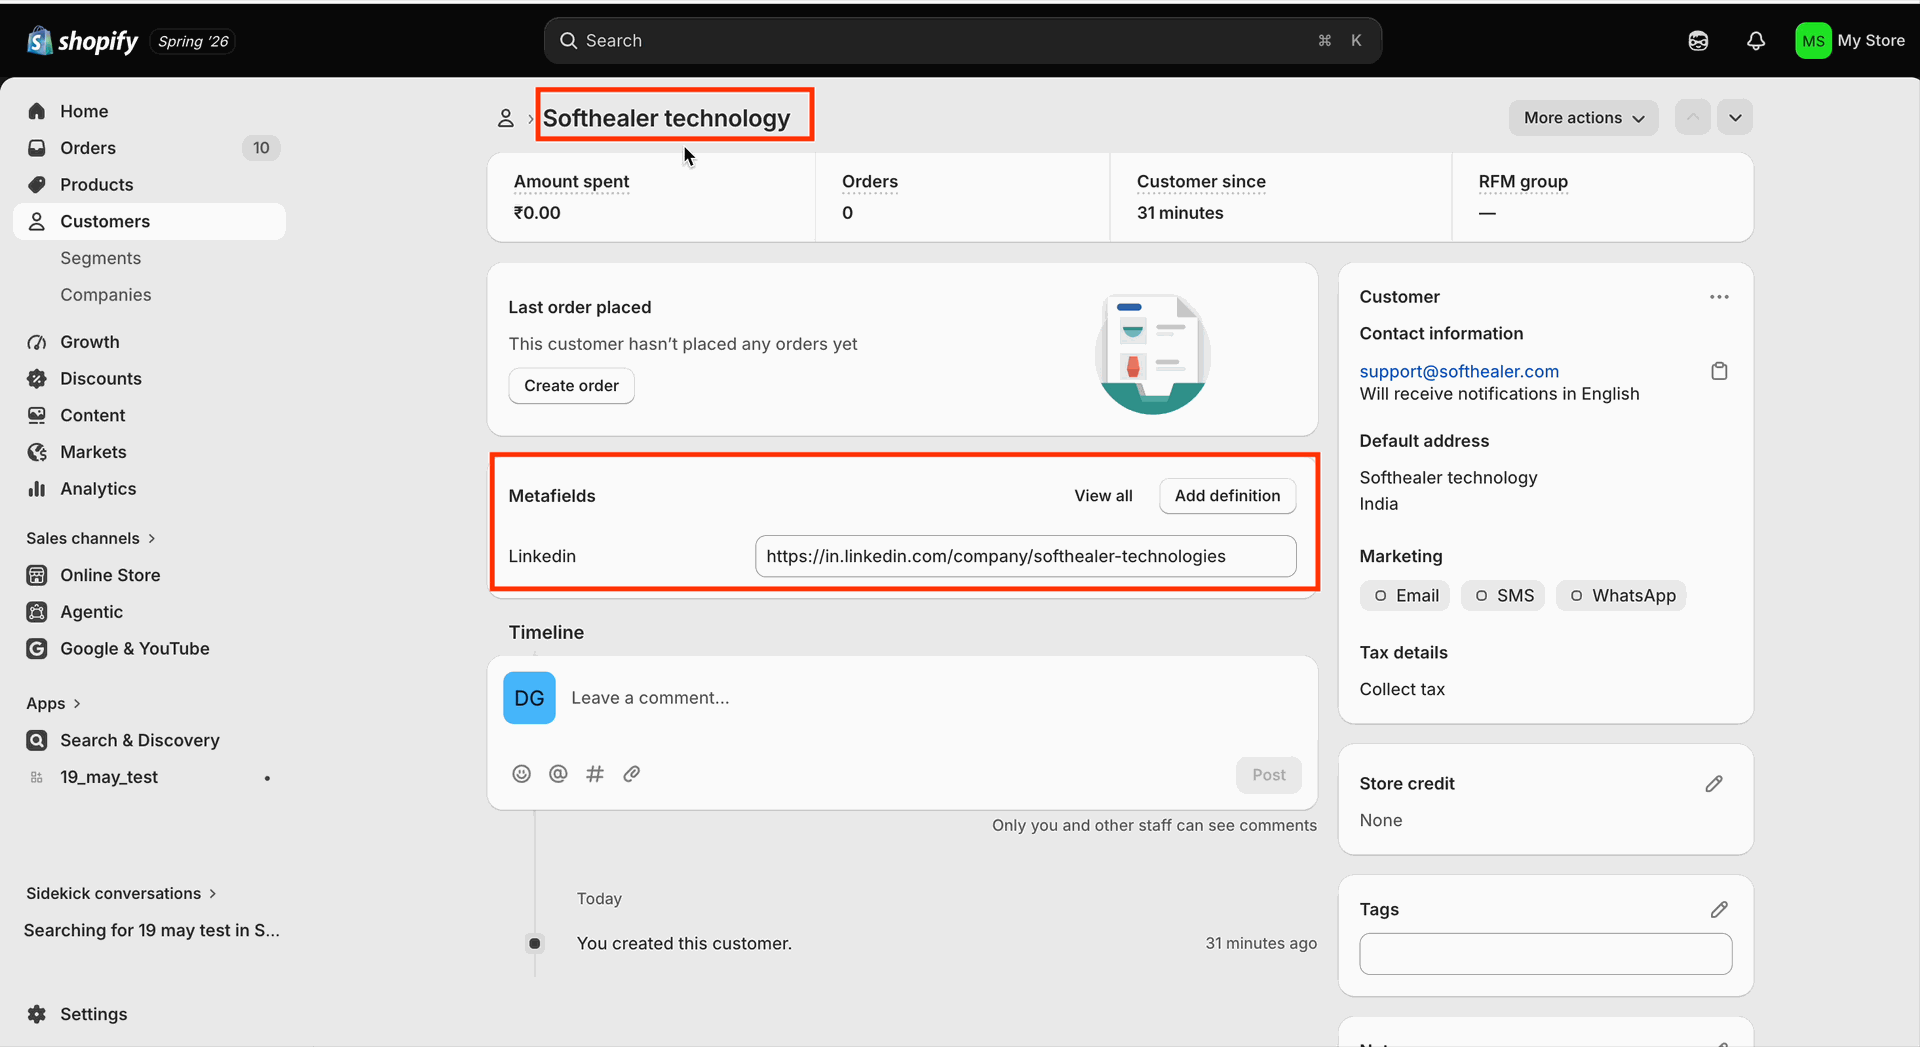
Open the Metafield Mappings menu in Shopify and add the required Customer Metafield Definitions to configure custom field information.
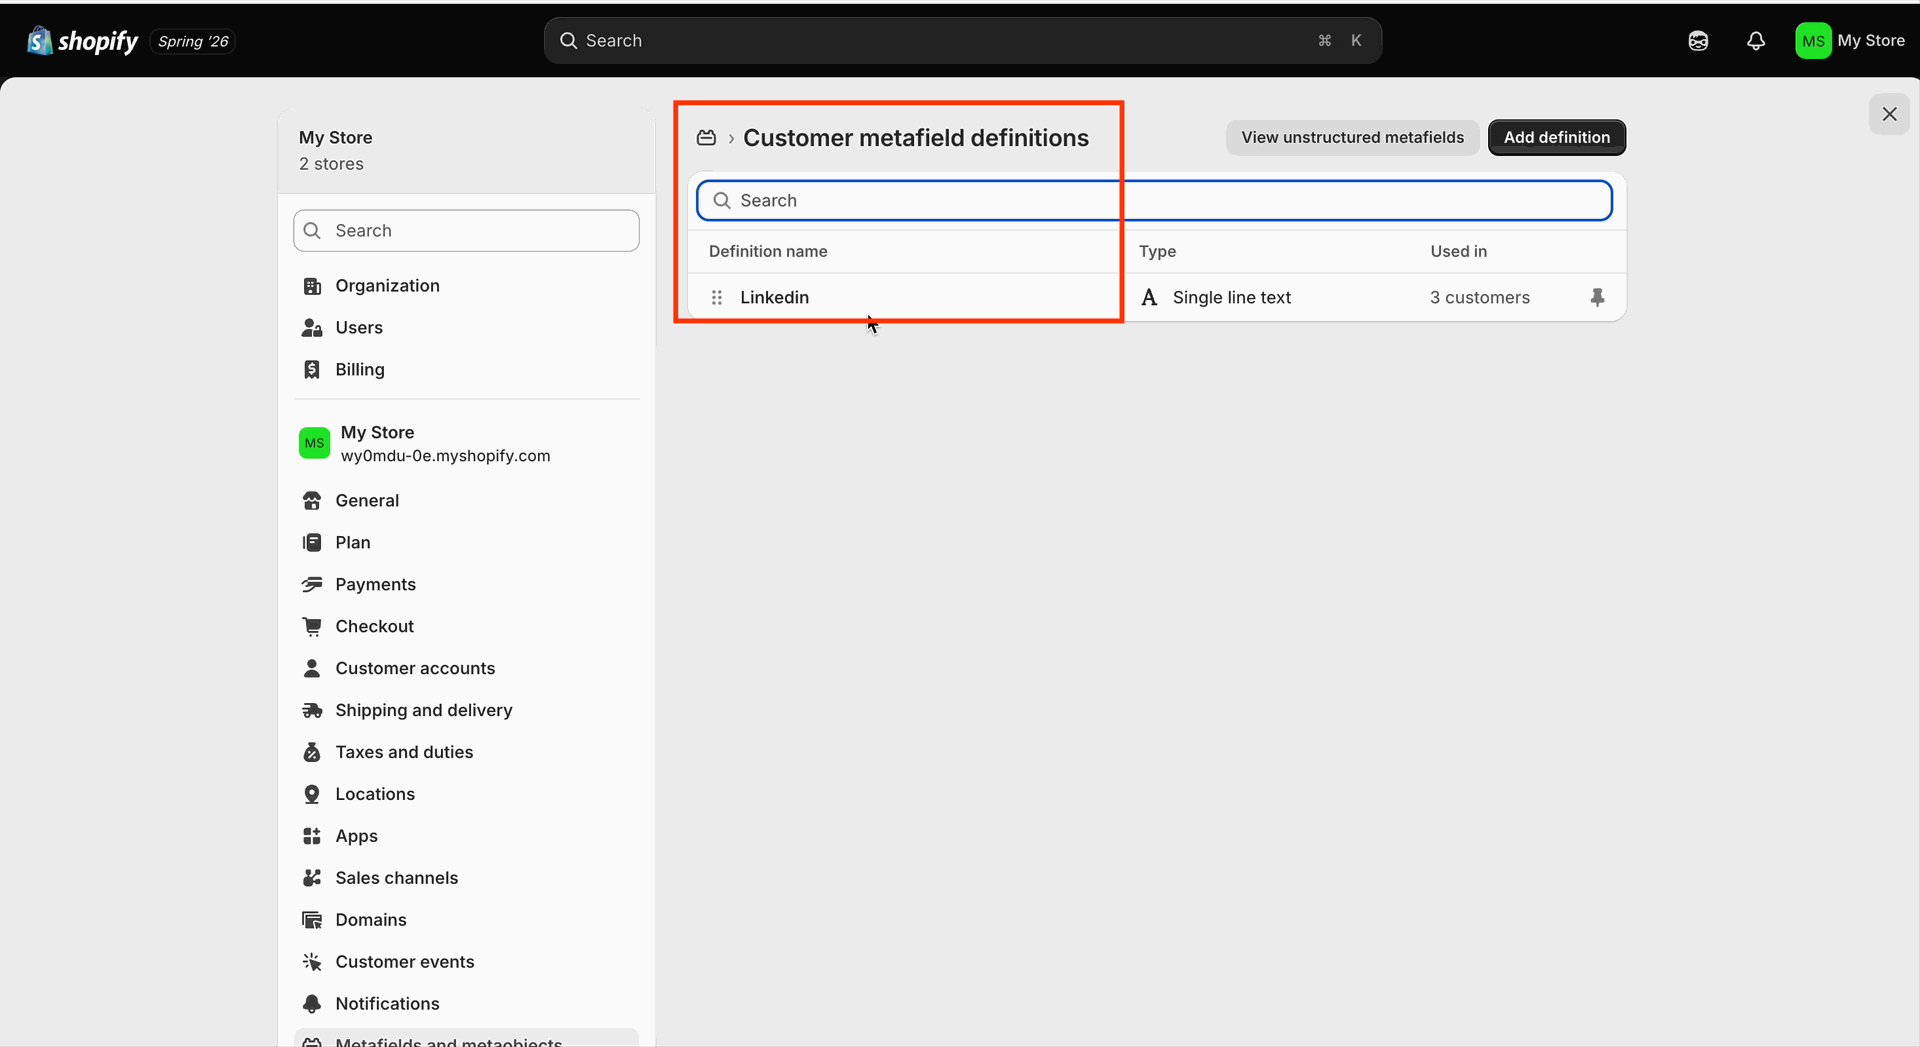
Open the Customer Metafield Definitions in Shopify and add a Custom Field.
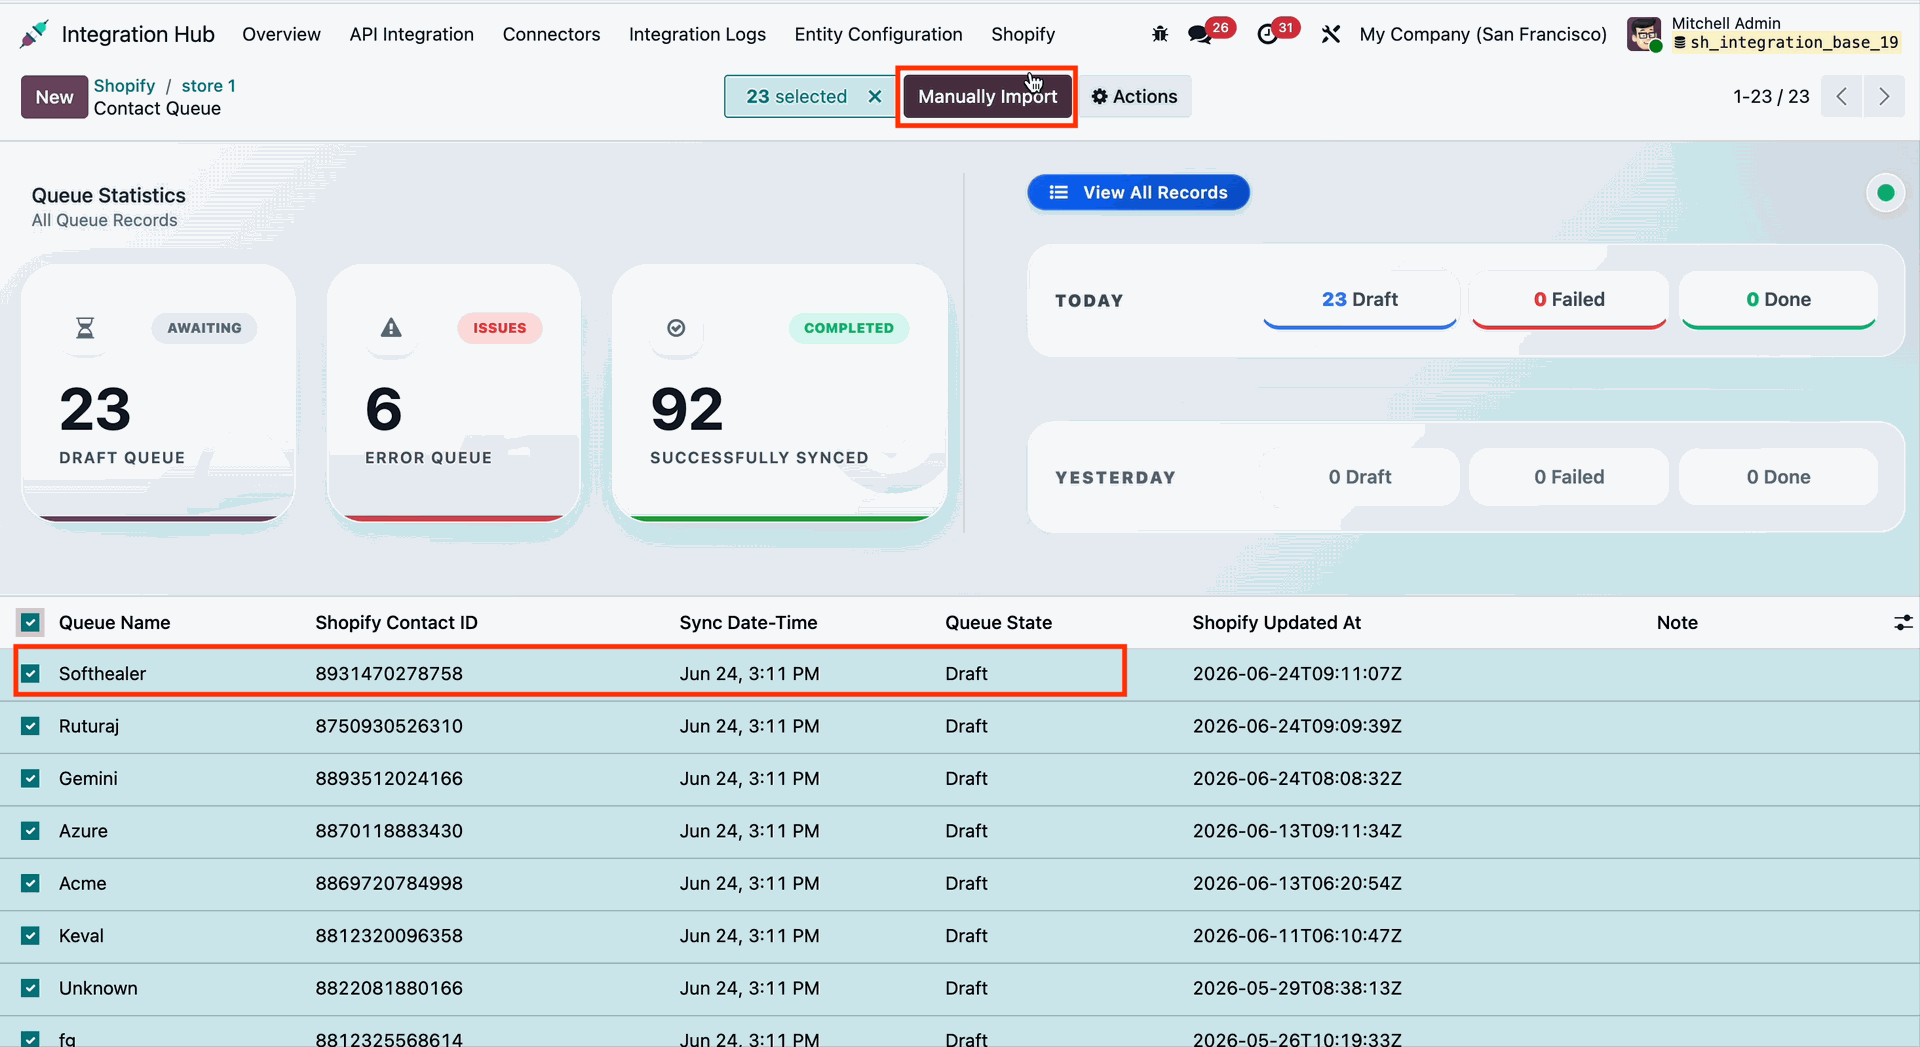
Go to Shopify -> Configuration -> Contact Queue in Odoo, select multiple contacts from the List View, and click the Manual Import button to import the selected contacts into Odoo.
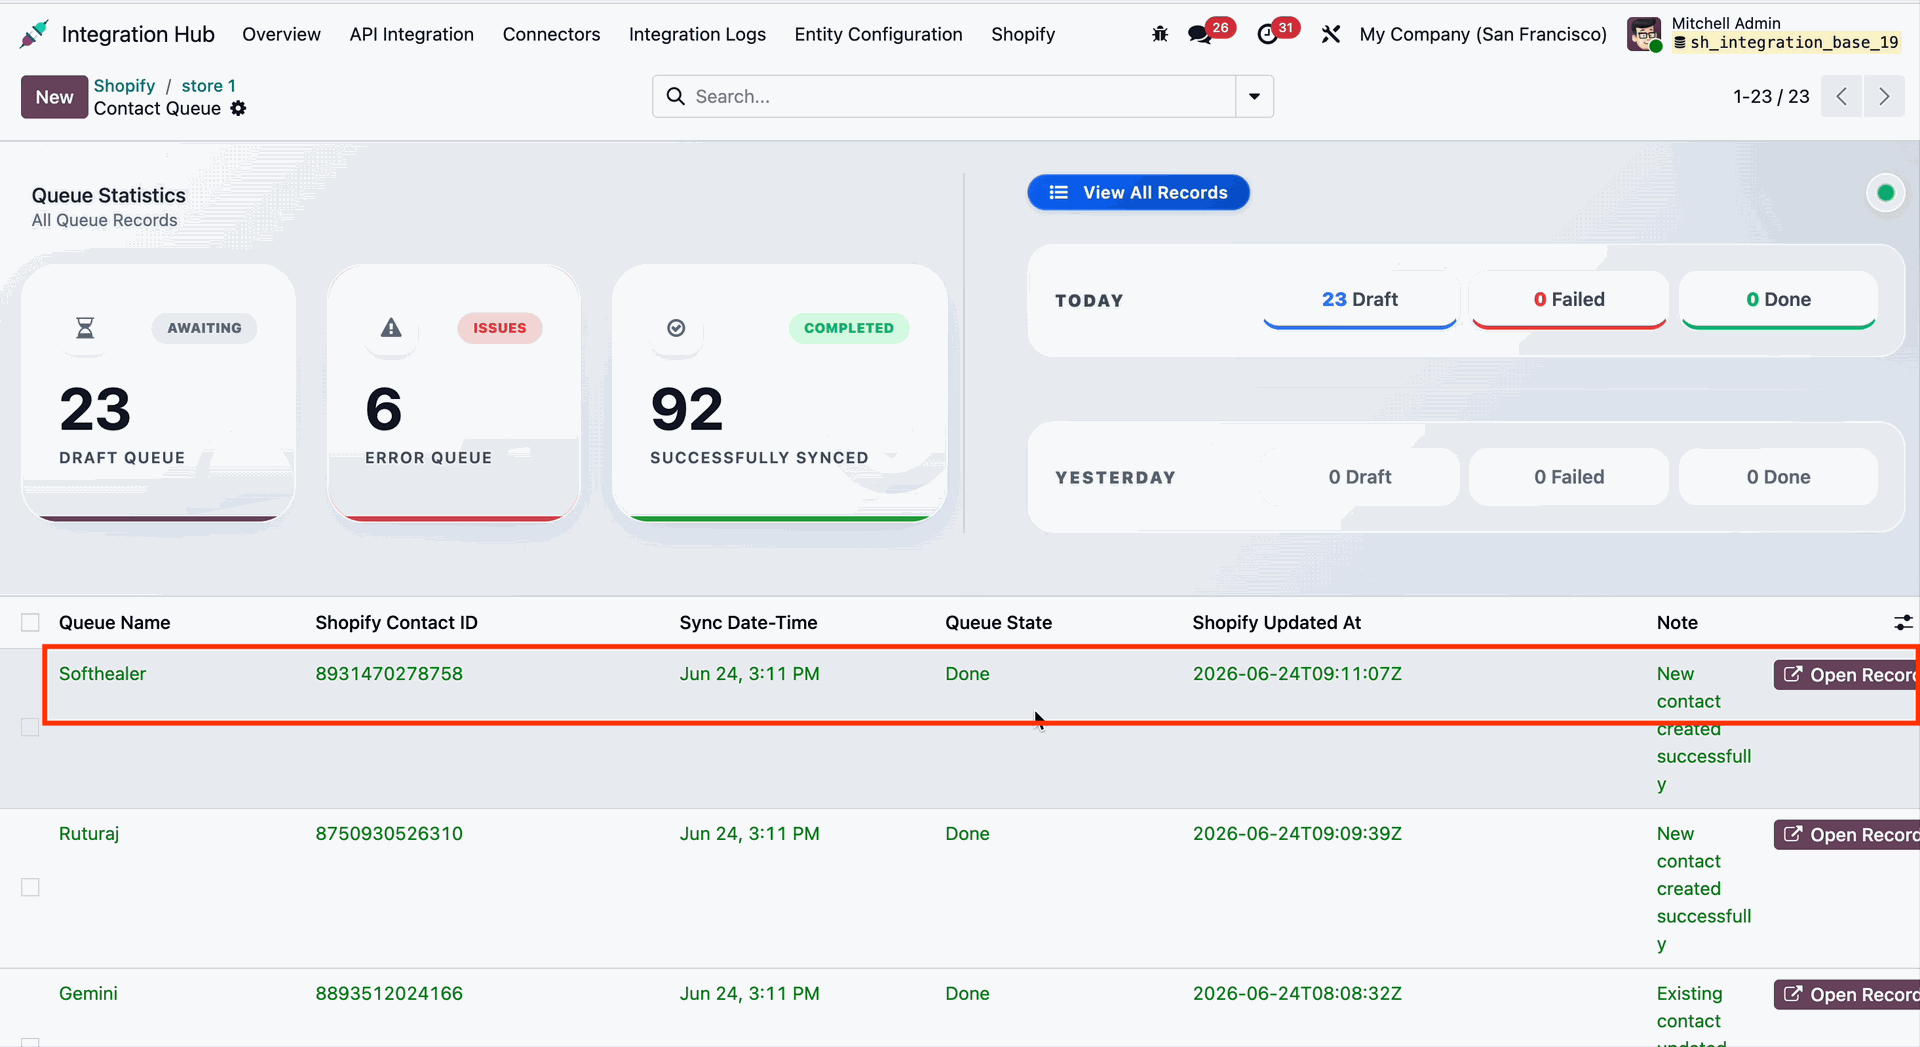
The newly imported contacts are successfully created in Odoo and can be viewed from the Contact Queue Dashboard, where users can track and manage imported contact records.
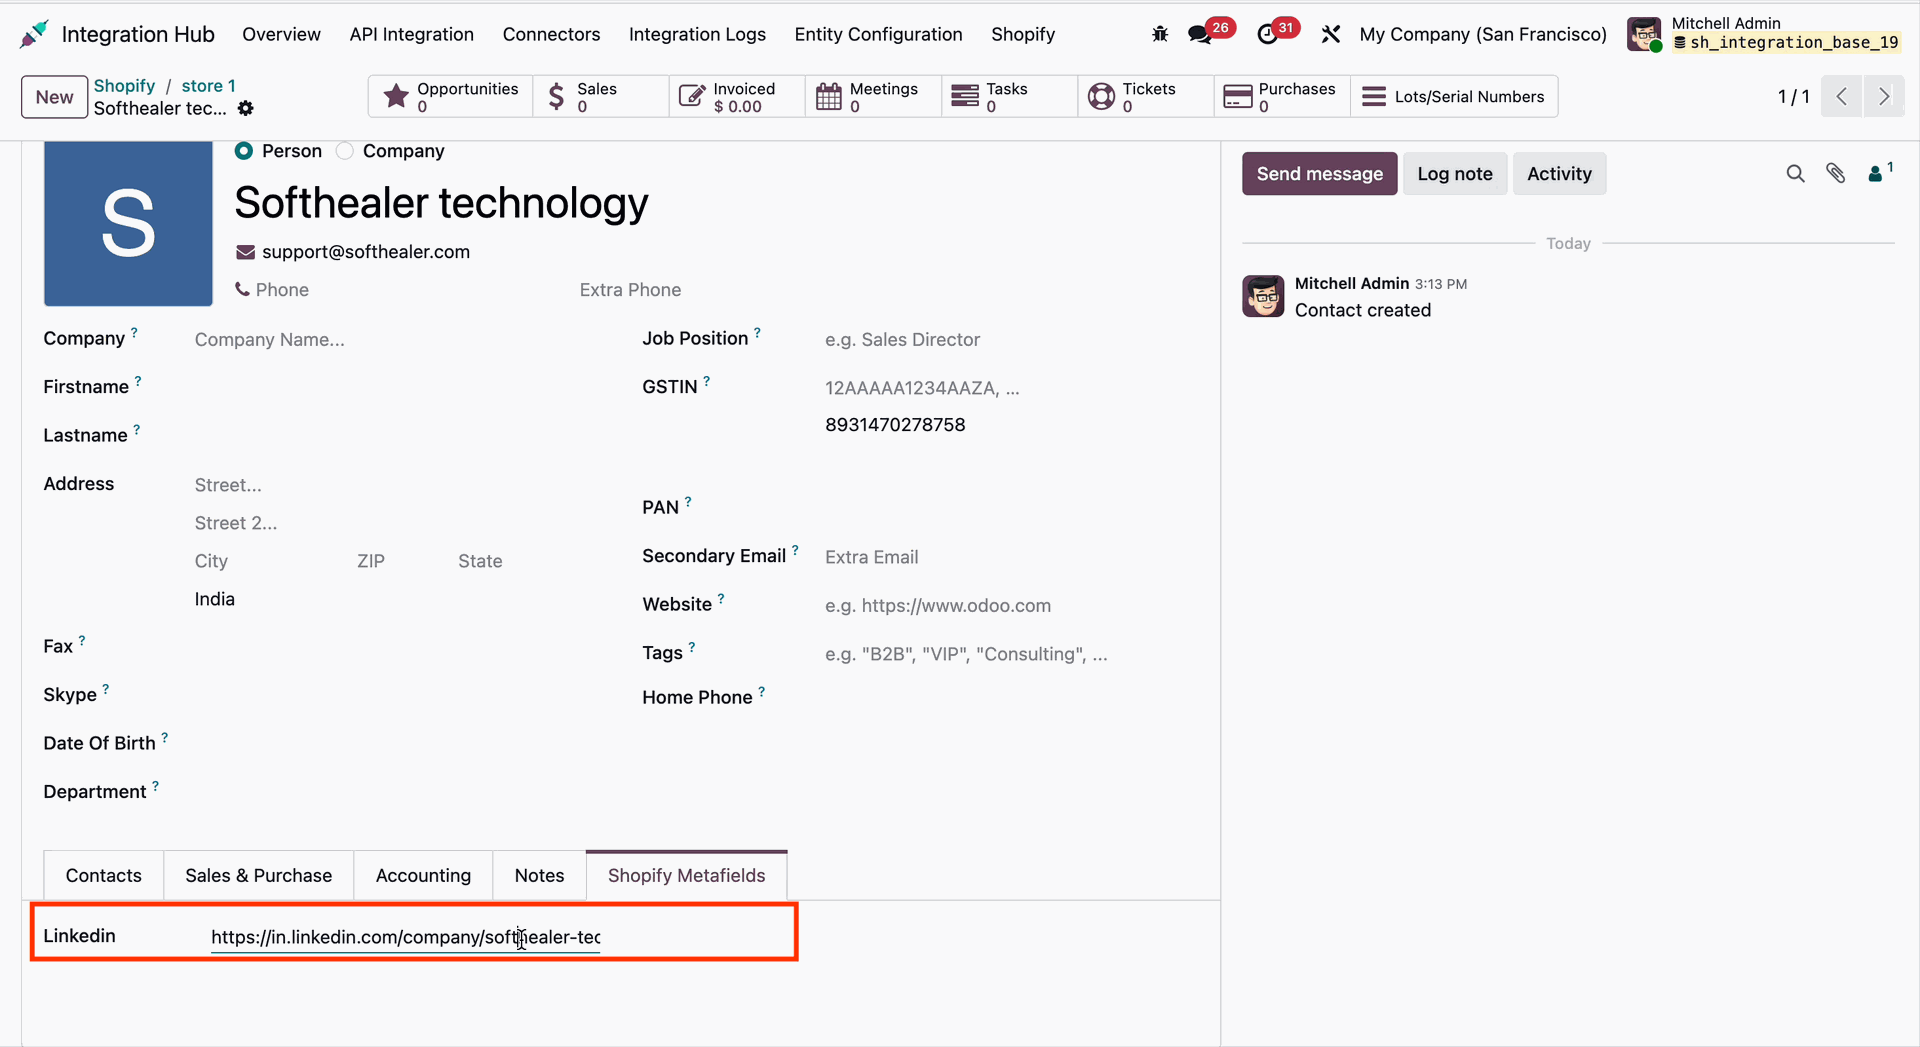
The Shopify Metafield Values associated with the customer have been successfully synchronized and are now available in Odoo according to the configured metafield mappings.
Open the Metafield Mappings menu in Shopify and add the required Order Metafield Definitions to configure custom field information.
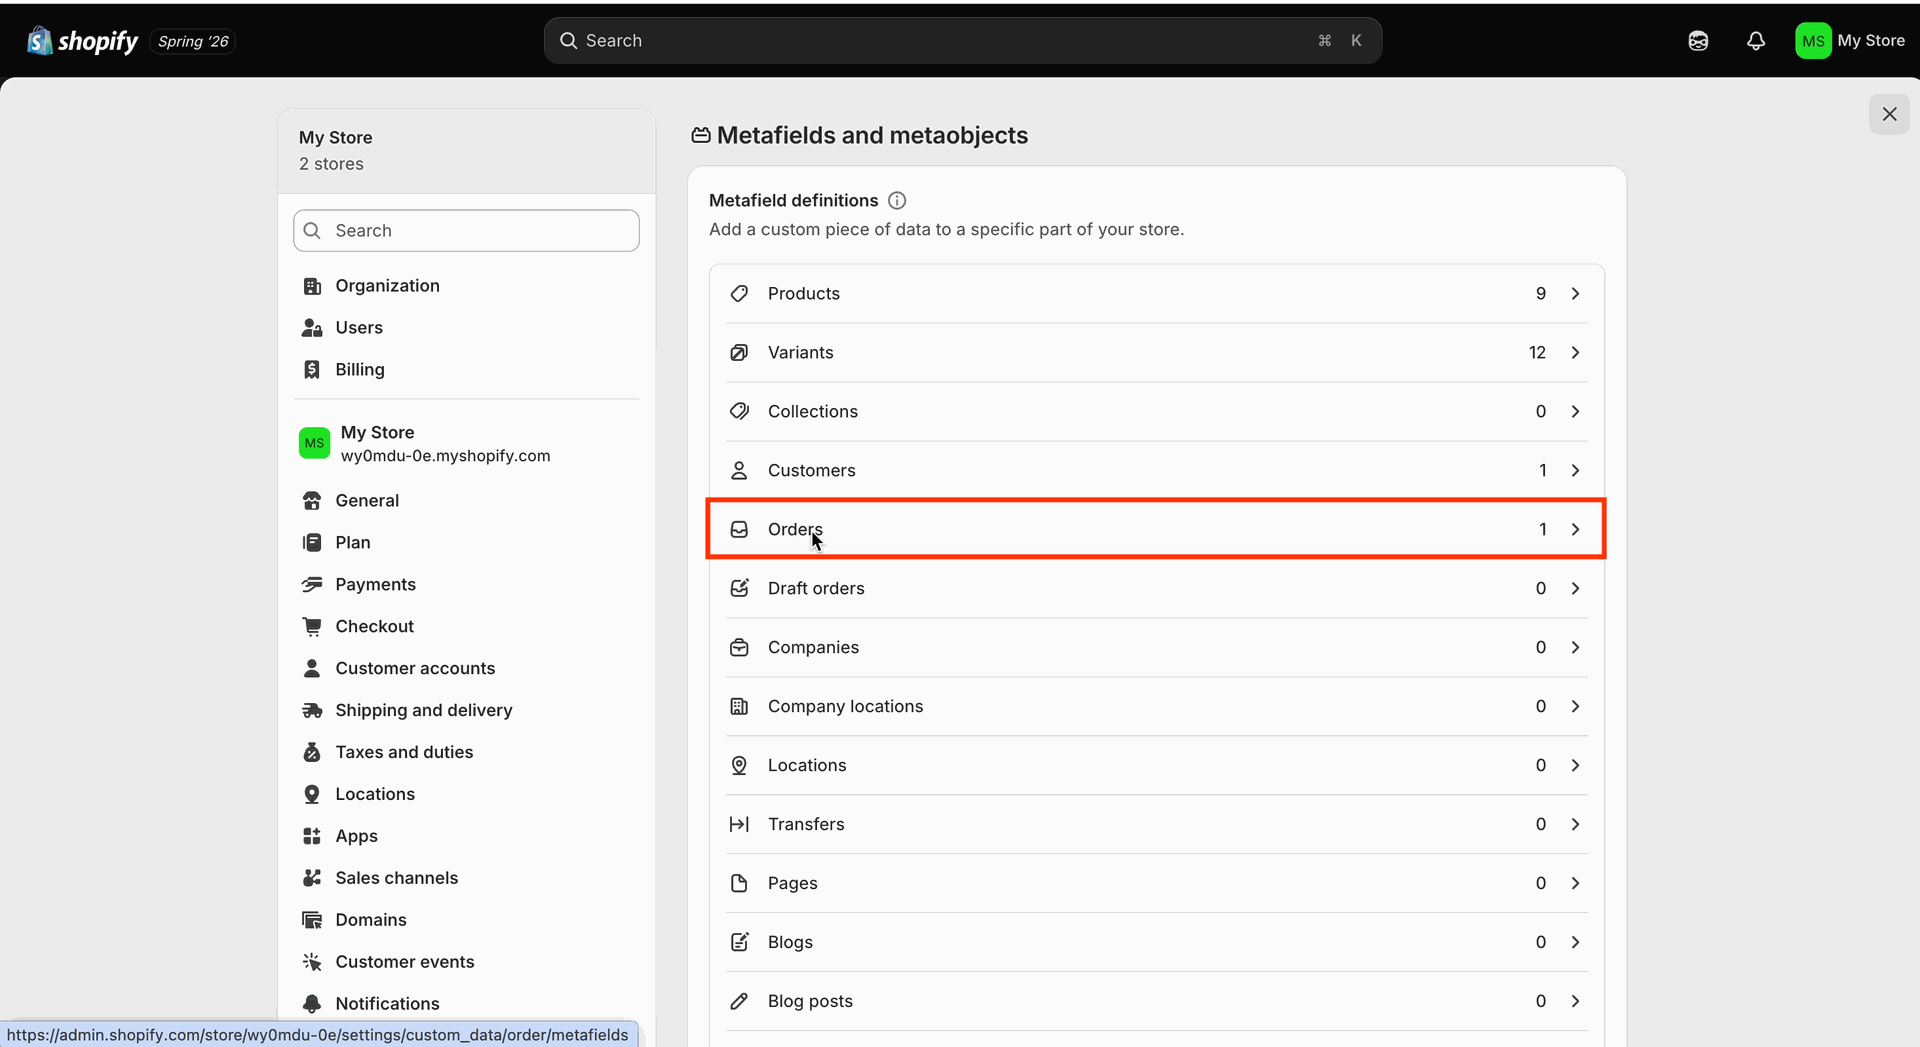
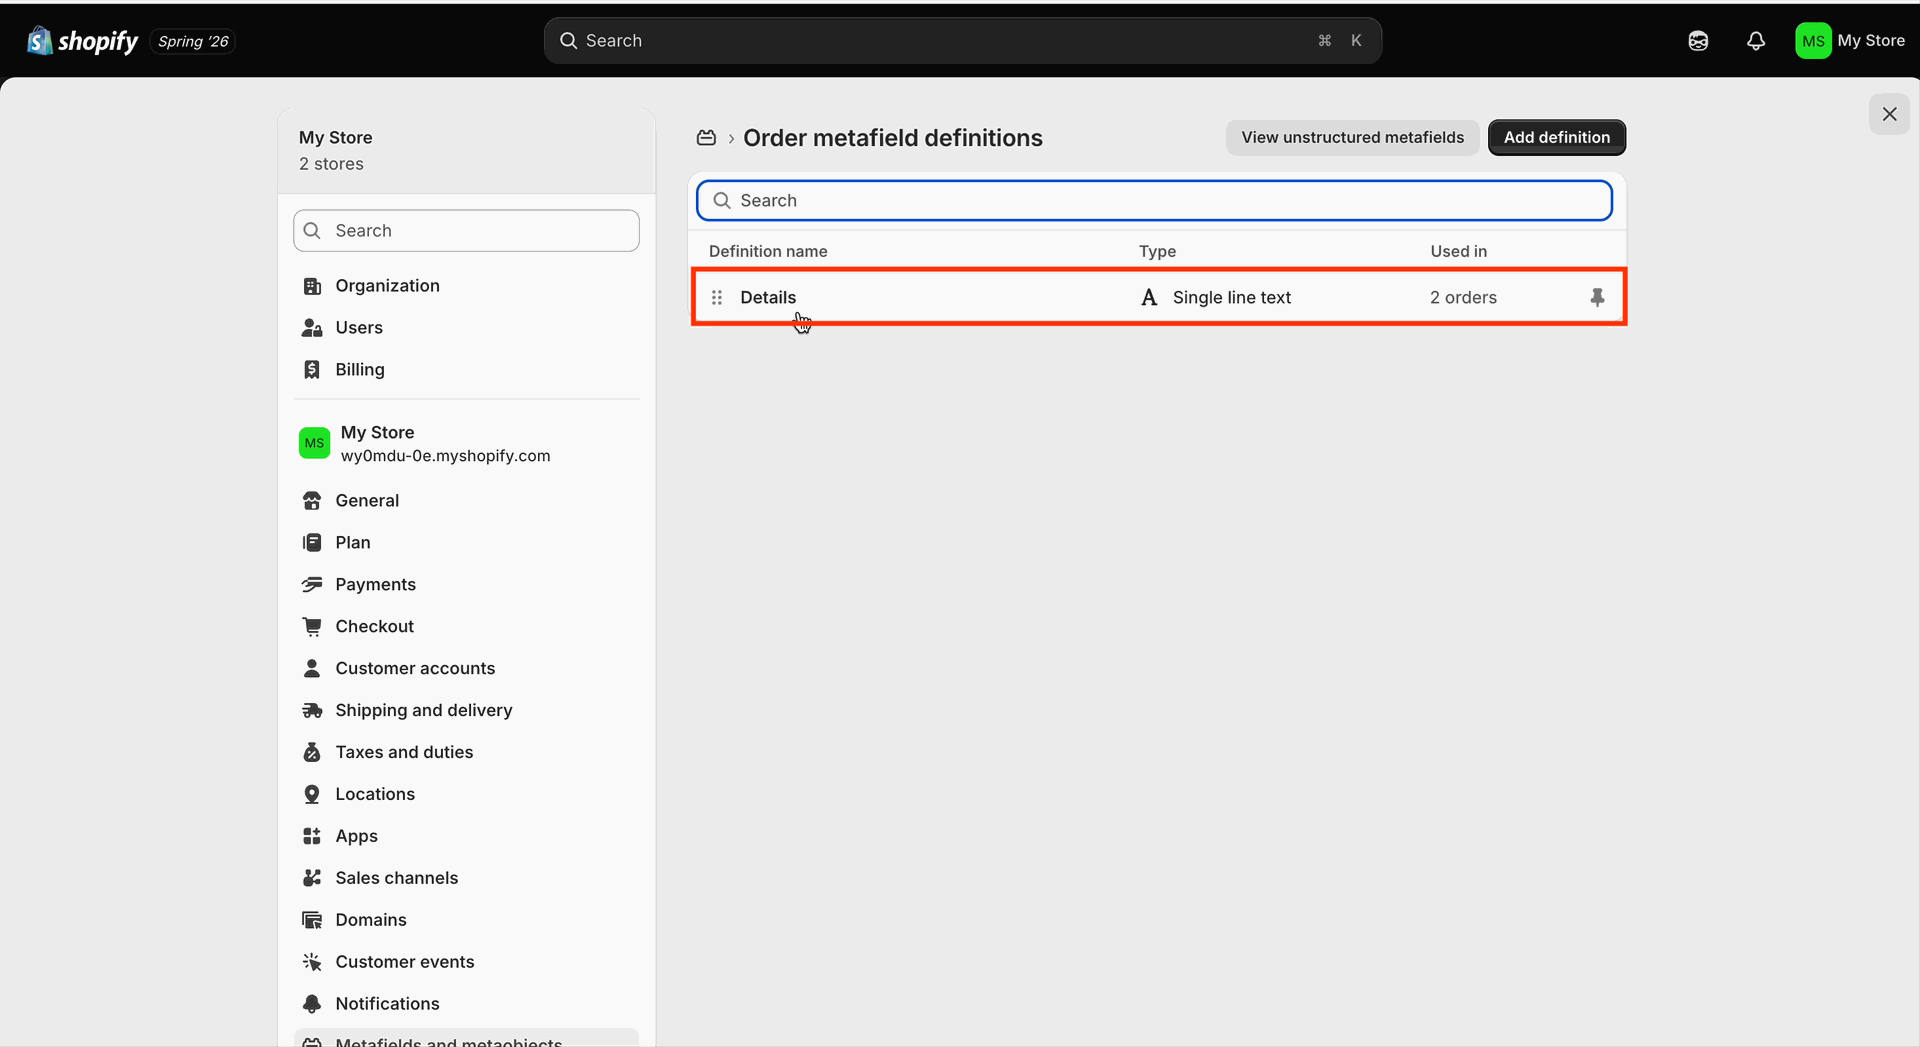
The Order Metafield Definitions List View displays all configured order metafield definitions, allowing users to review, manage, custom fields to the orders. Add a Custom Field.
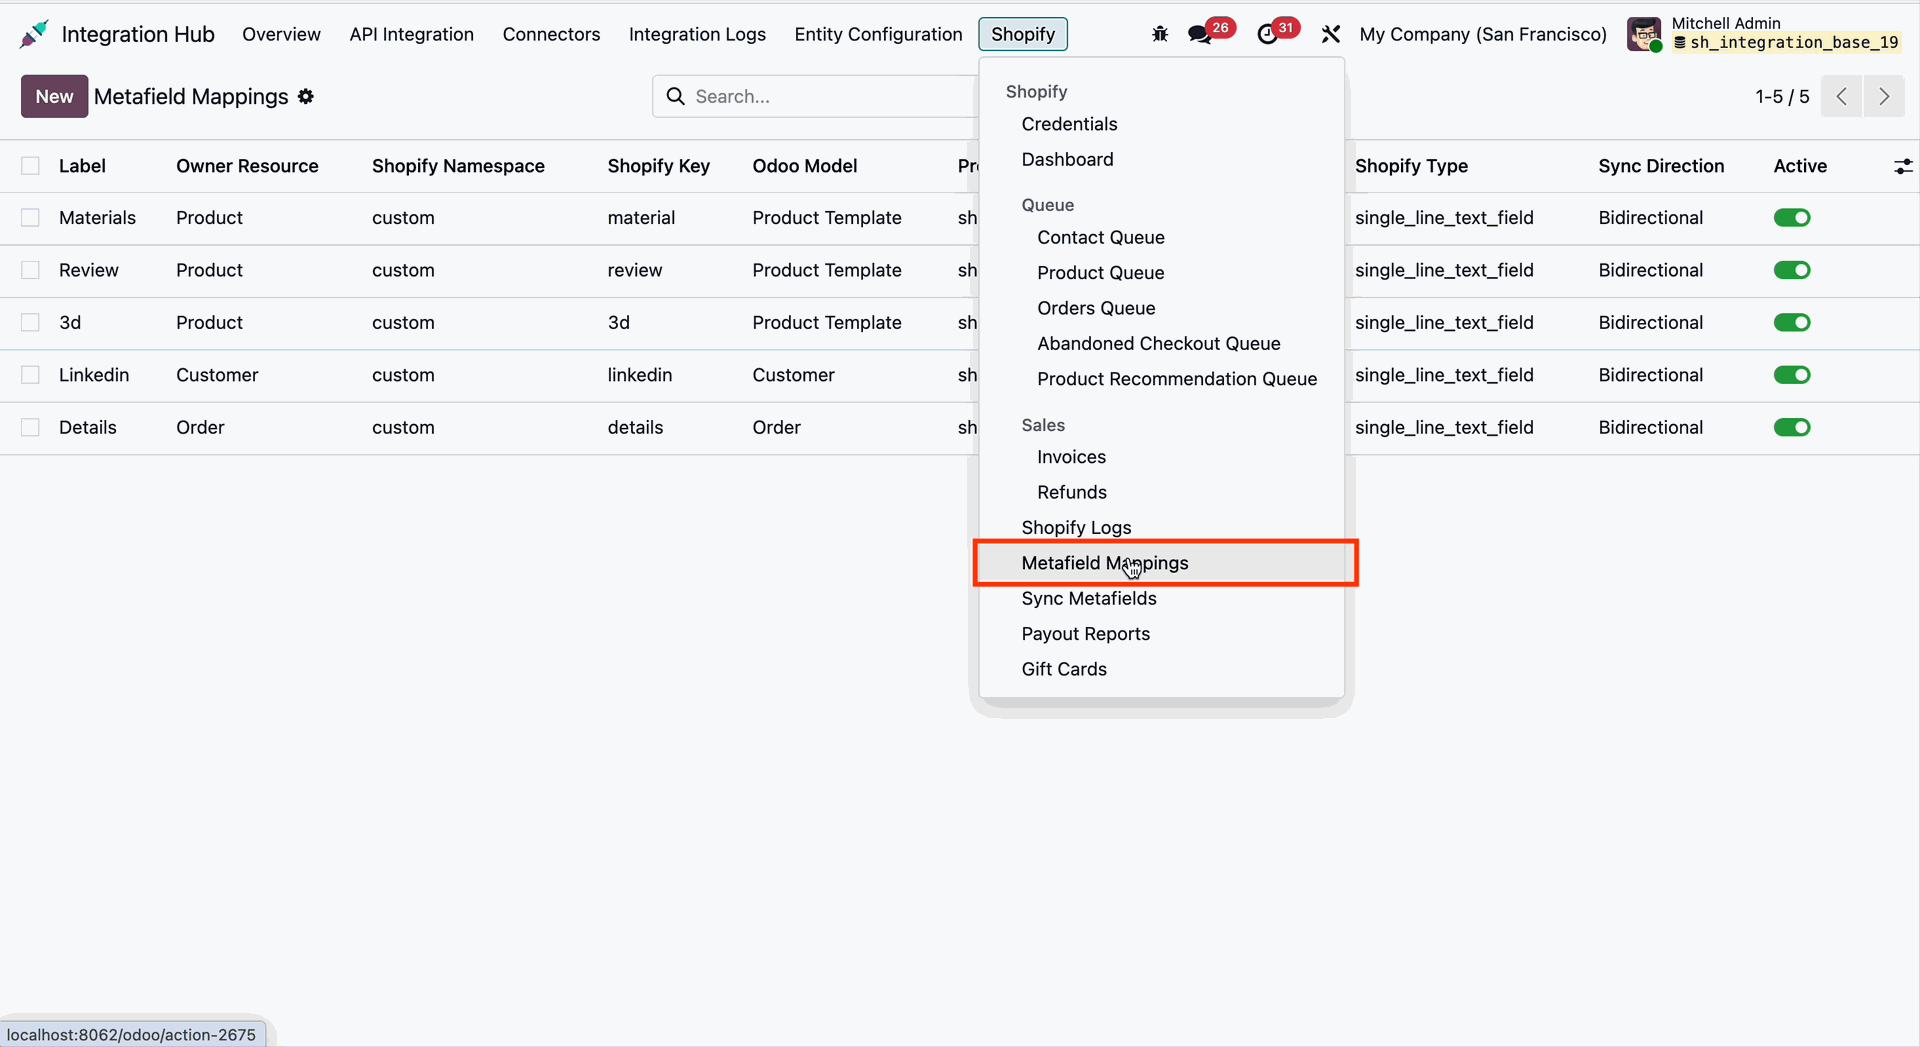
Go to the Shopify menu in Odoo and select the Metafield Mappings submenu.
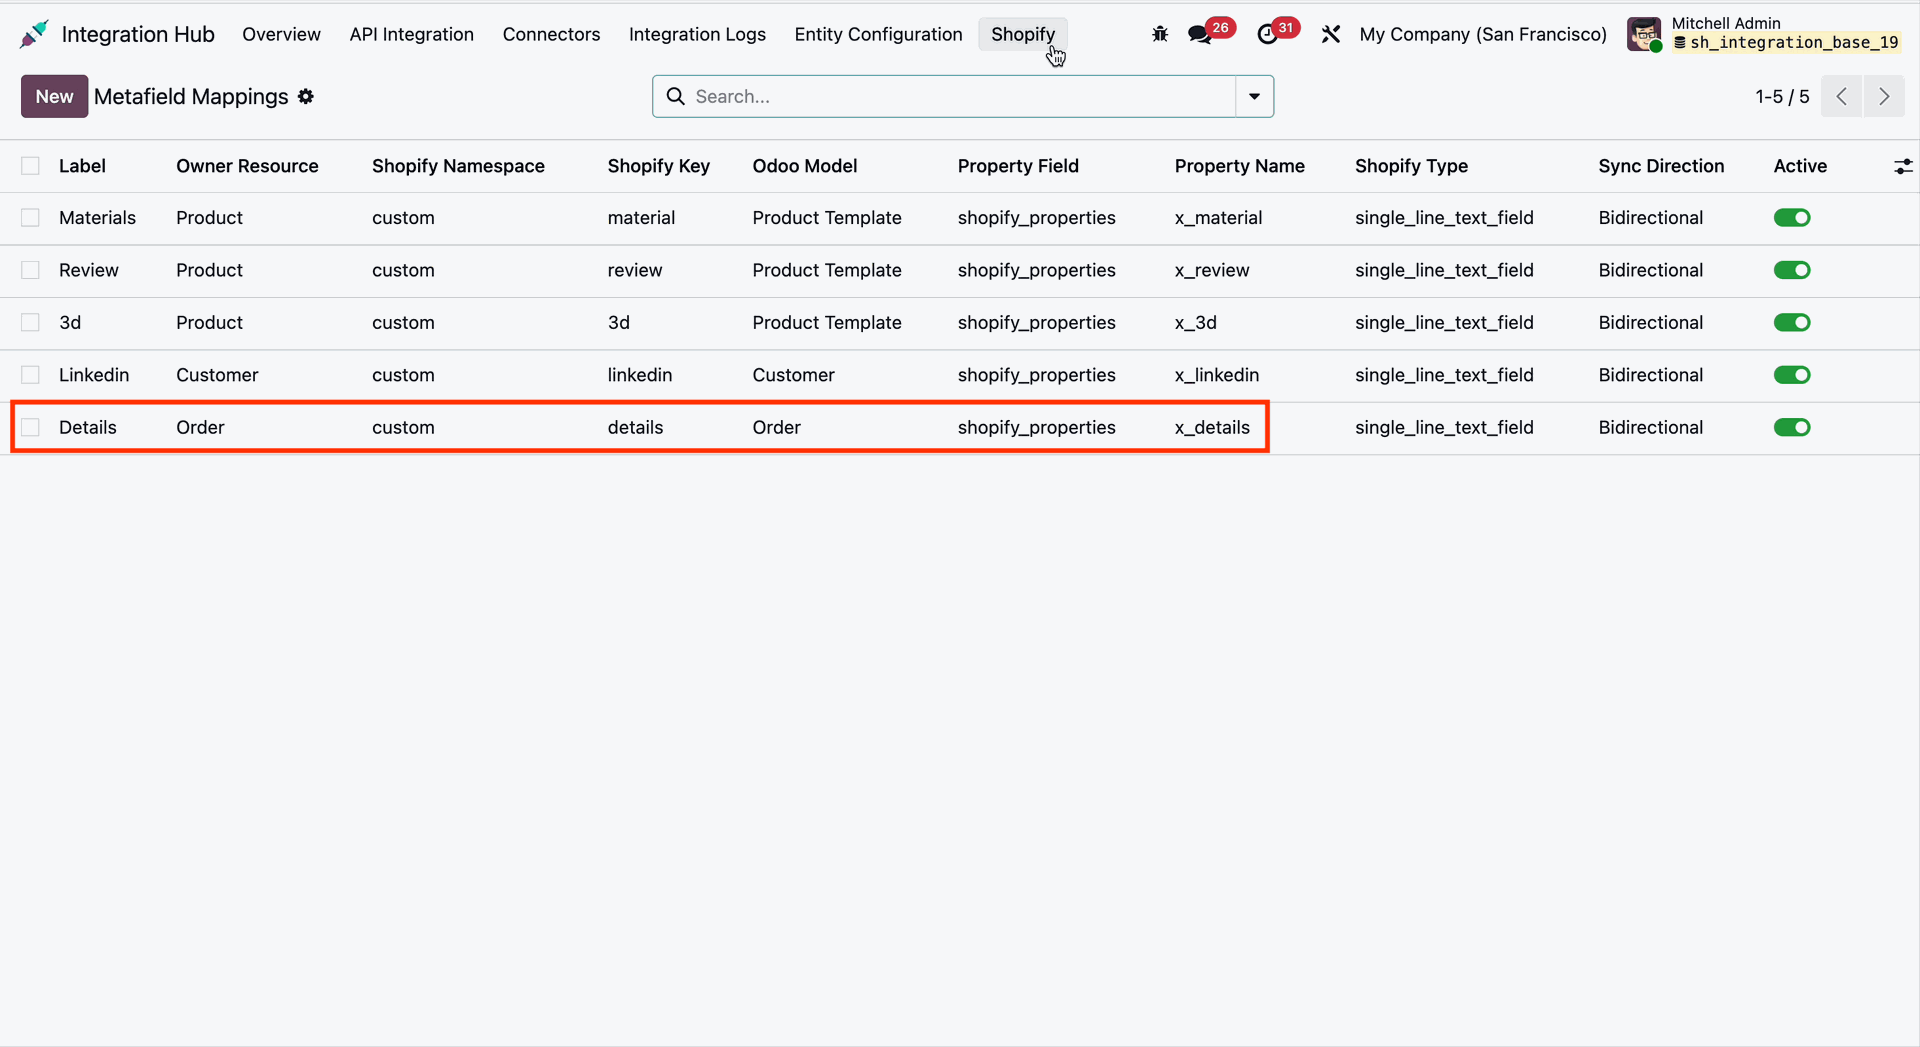
The Metafield Mappings List View displays all configured custom fields, allowing users to review, manage, and synchronize metafield mappings between Odoo and Shopify.
Go to the Shopify Metafields tab under the Sales Order Form View. The Metafield Values associated with the Sales Order are successfully synchronized and available in Odoo according to the configured metafield mappings.
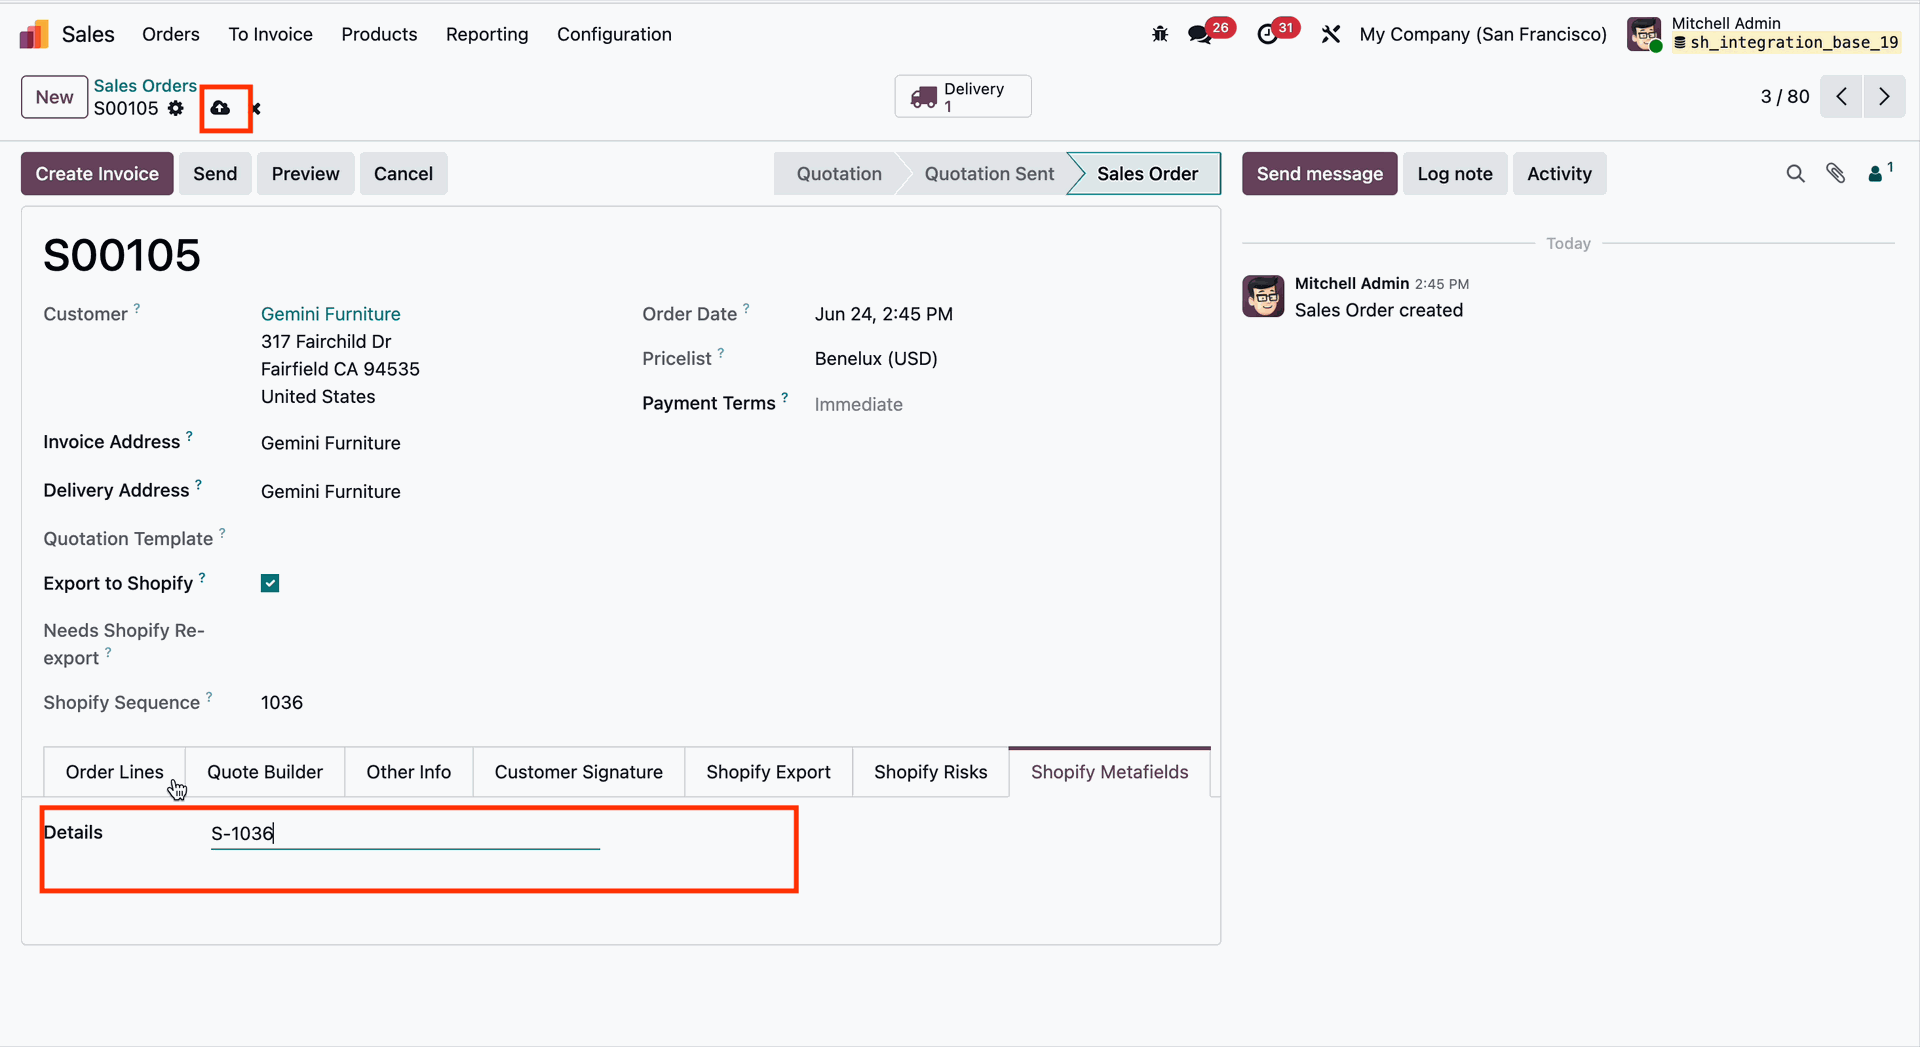
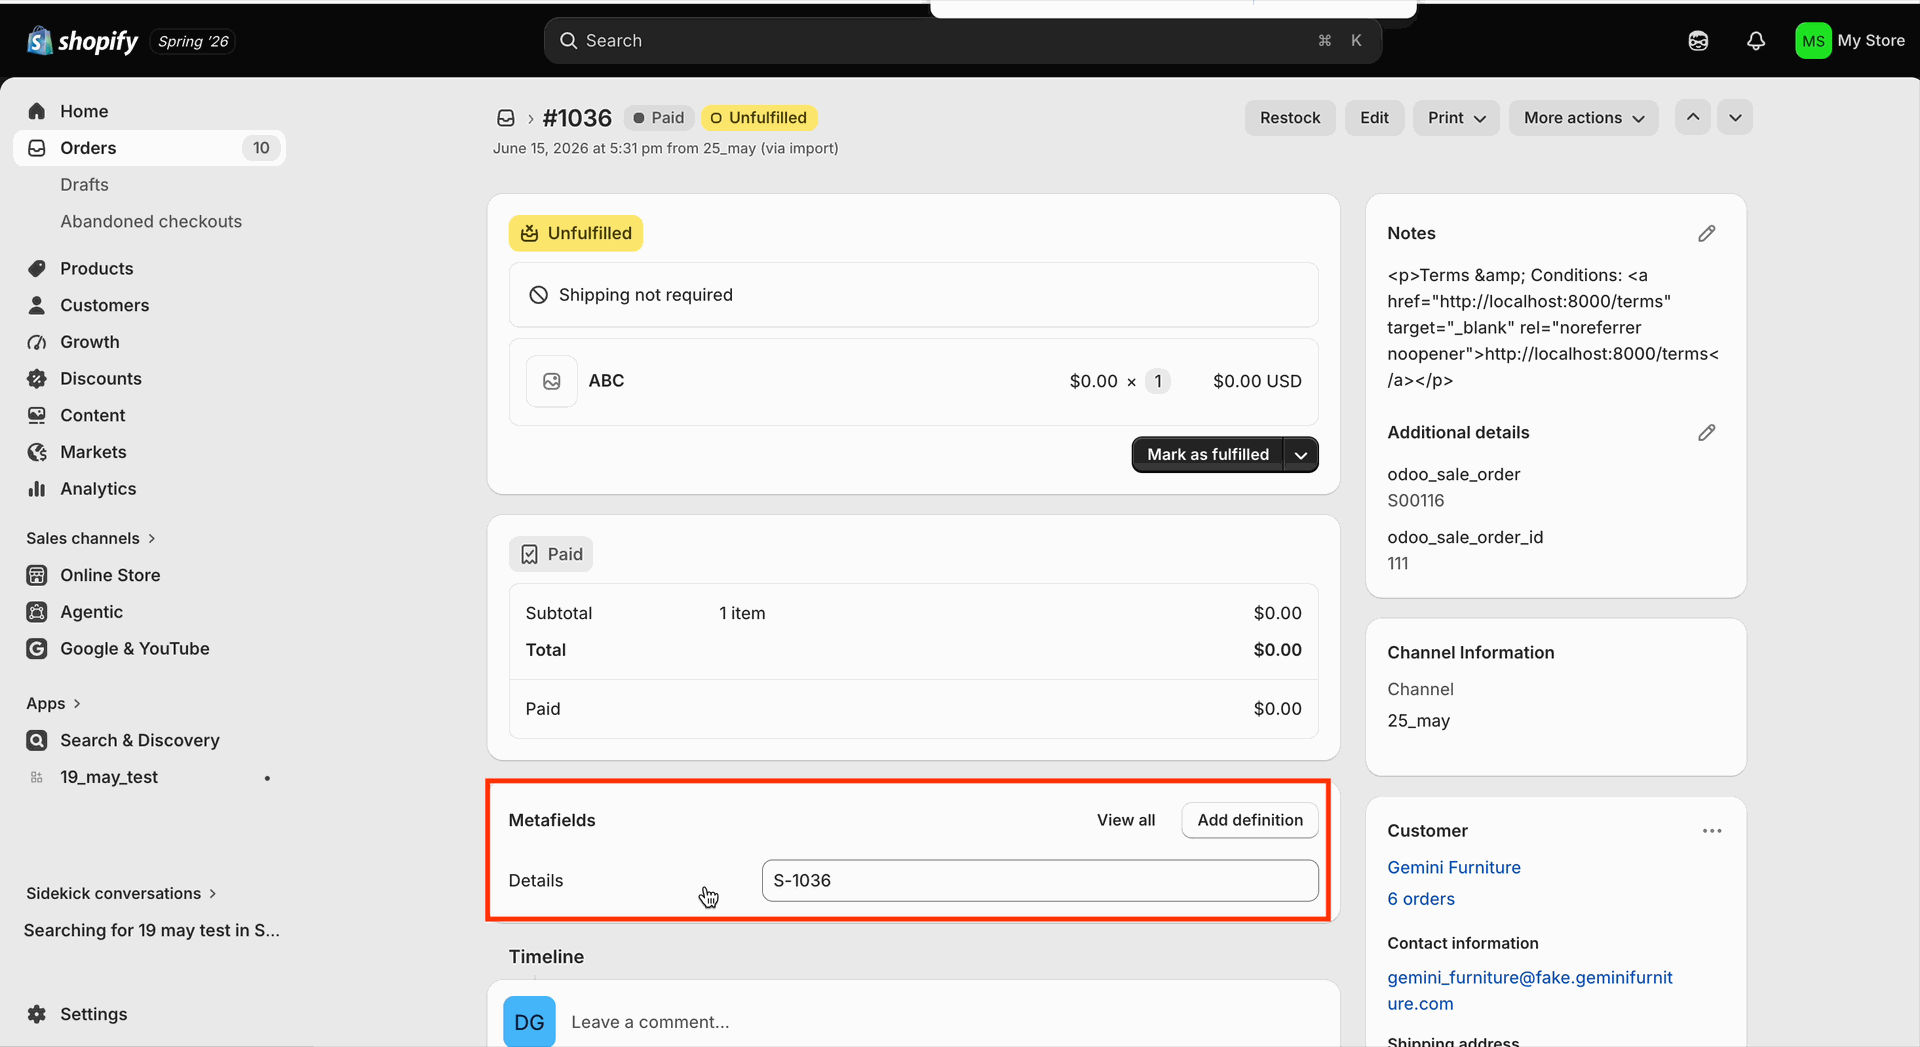
Enable the Export to Shopify option on the Sales Order. This will export the Shopify Sequence value to the configured Shopify custom metafield during the next synchronization process.
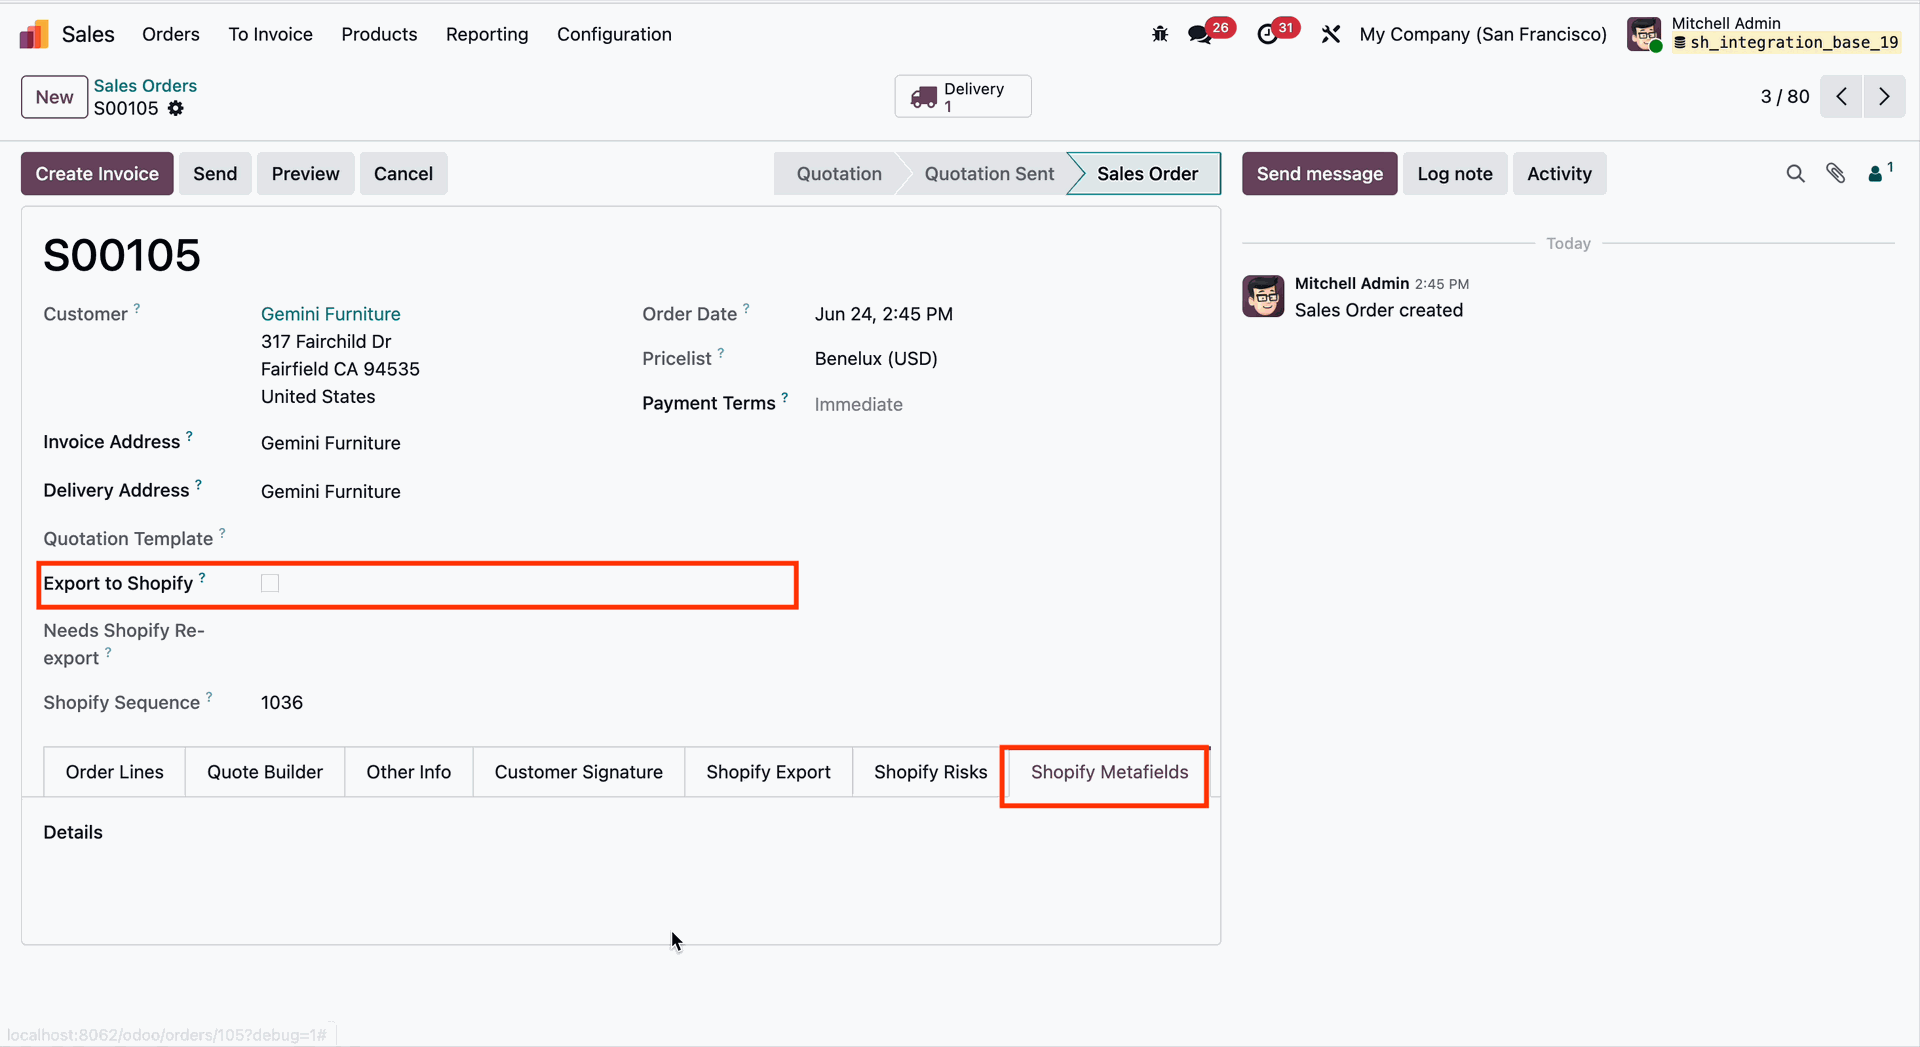
The Sync Metafields wizard will open. Enter the required details and click the Sync Metafields button to synchronize metafield definitions and values between Shopify and Odoo.
After the synchronization is completed, a notification message will be displayed showing the number of records successfully synchronized.
Update the Metafield Definition in Shopify.
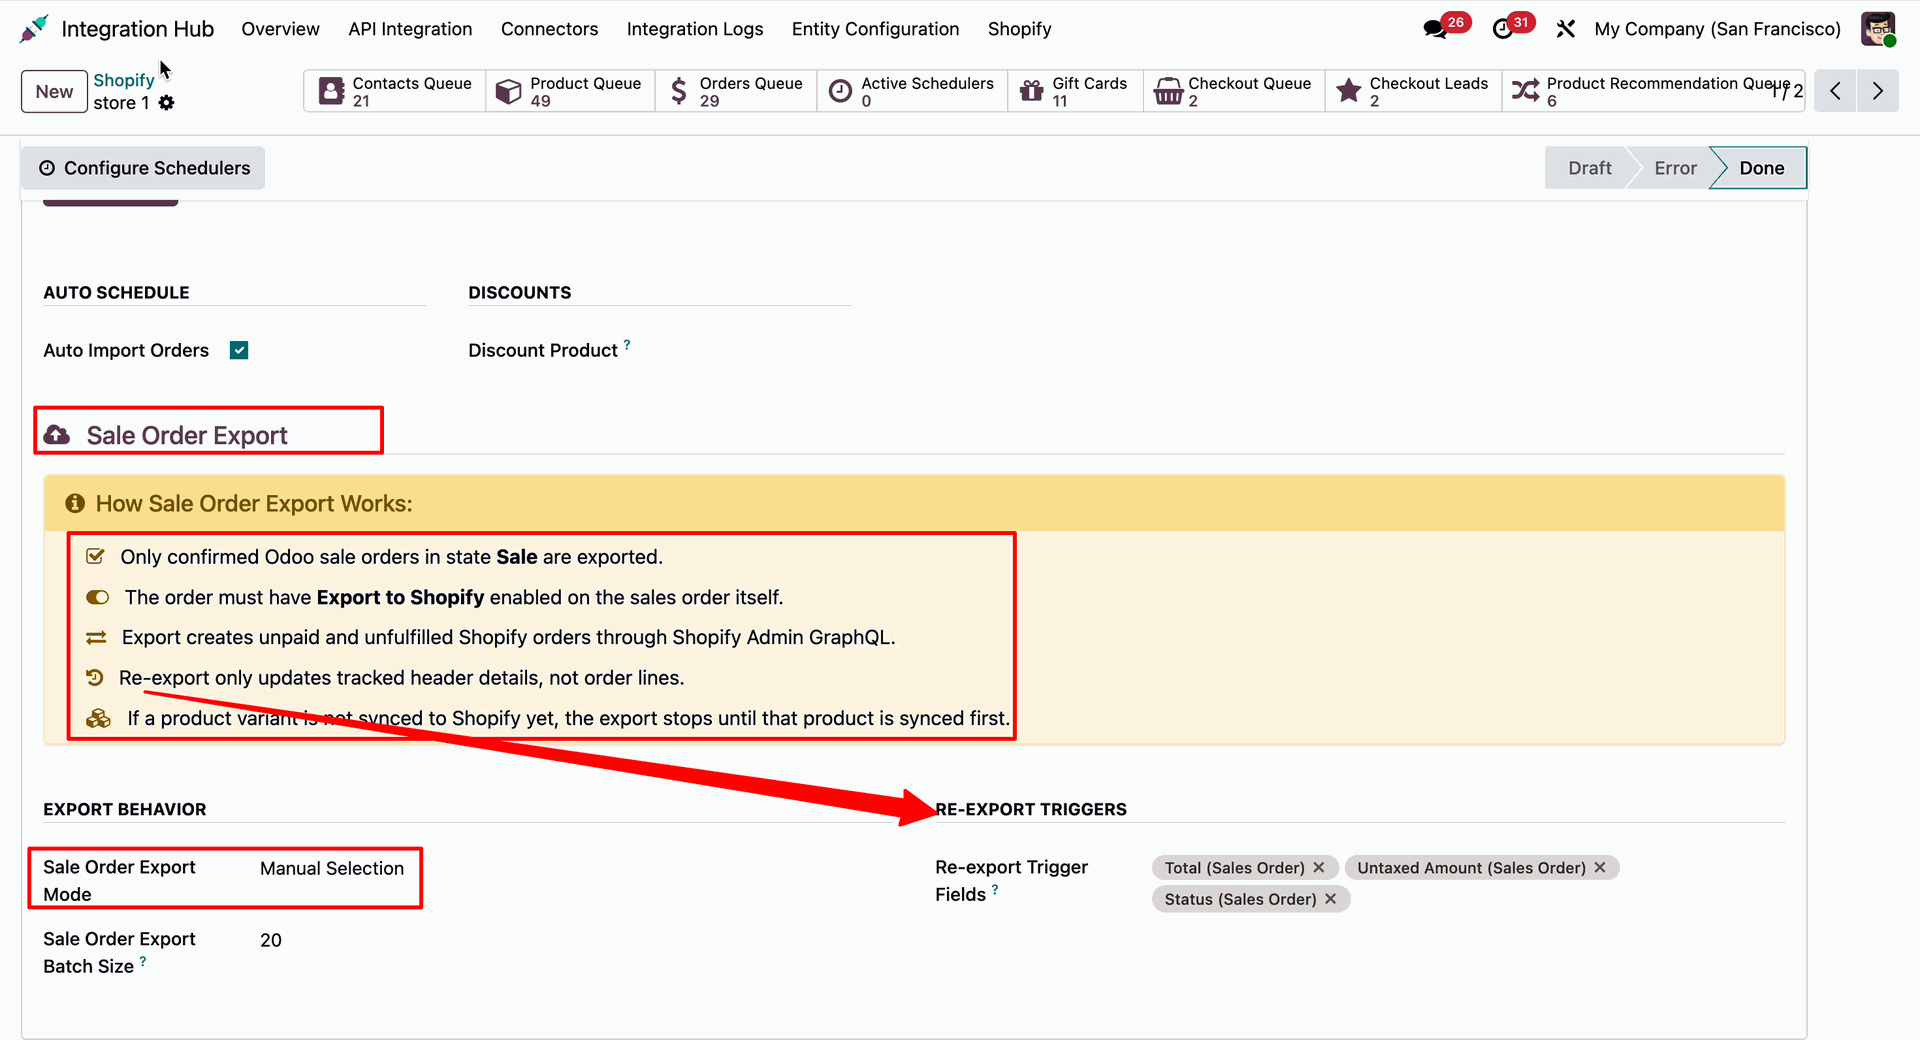
Workflow
Open the Shopify Configuration Settings and navigate to the Sales Order Export Options. Choose the desired Sale Order Export Mode (Manual Selection or Automatic Processing), configure the required Re-export Trigger Fields, and specify the Export Batch Size to control the export process.
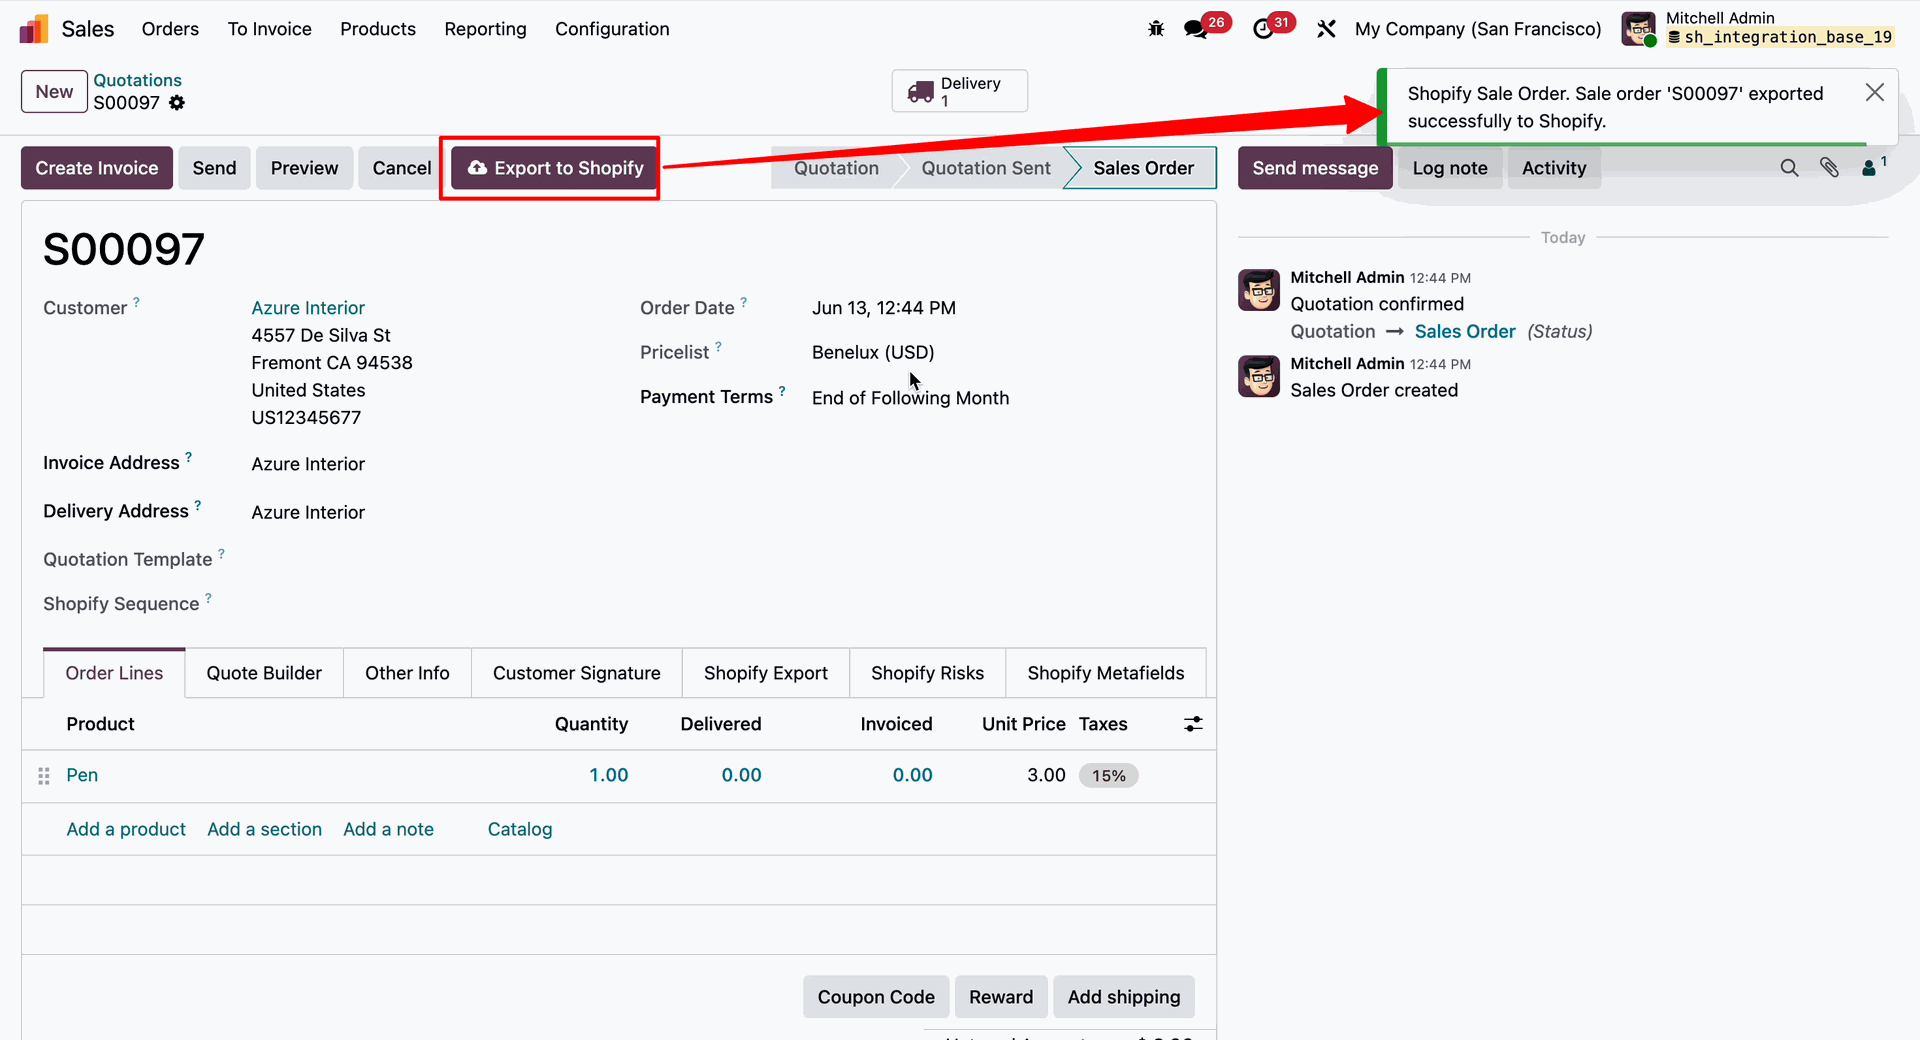
Open the Shopify Export tab from the Quotation Form View. The Export to Shopify button will be displayed in a disabled.
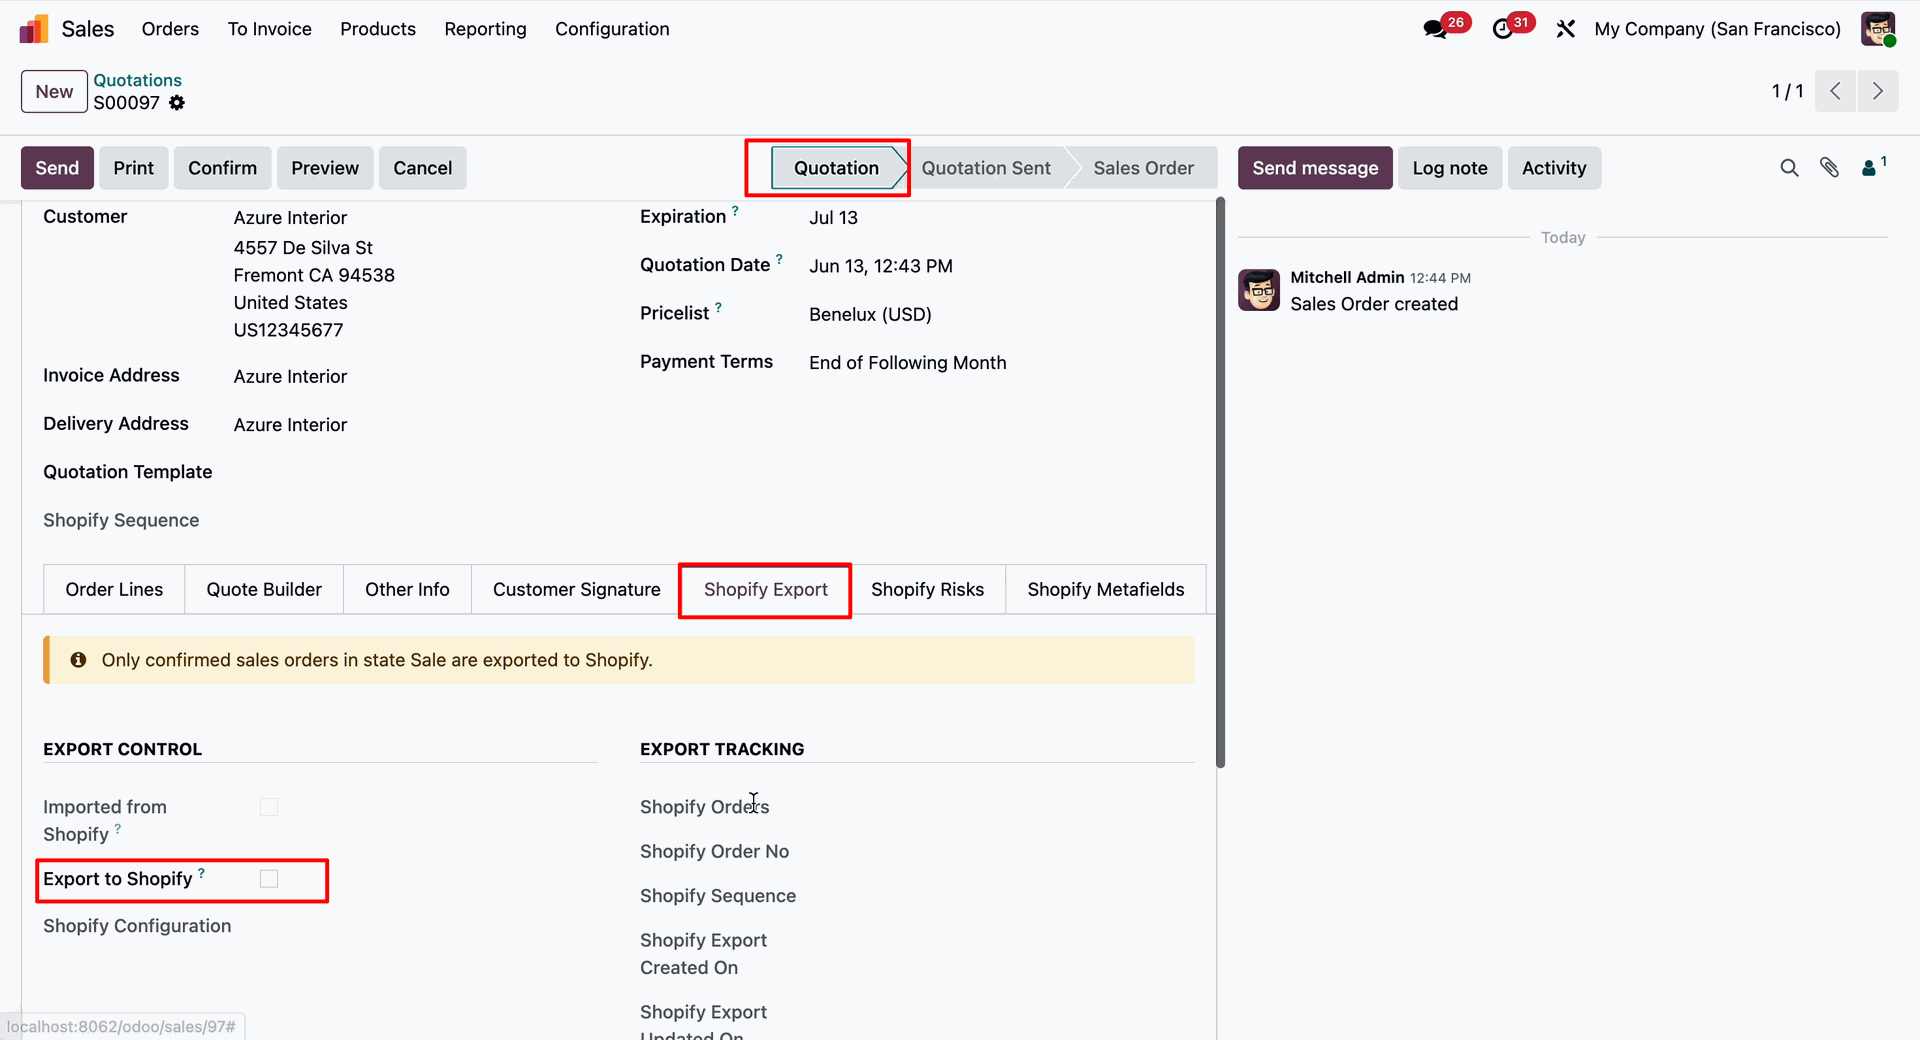
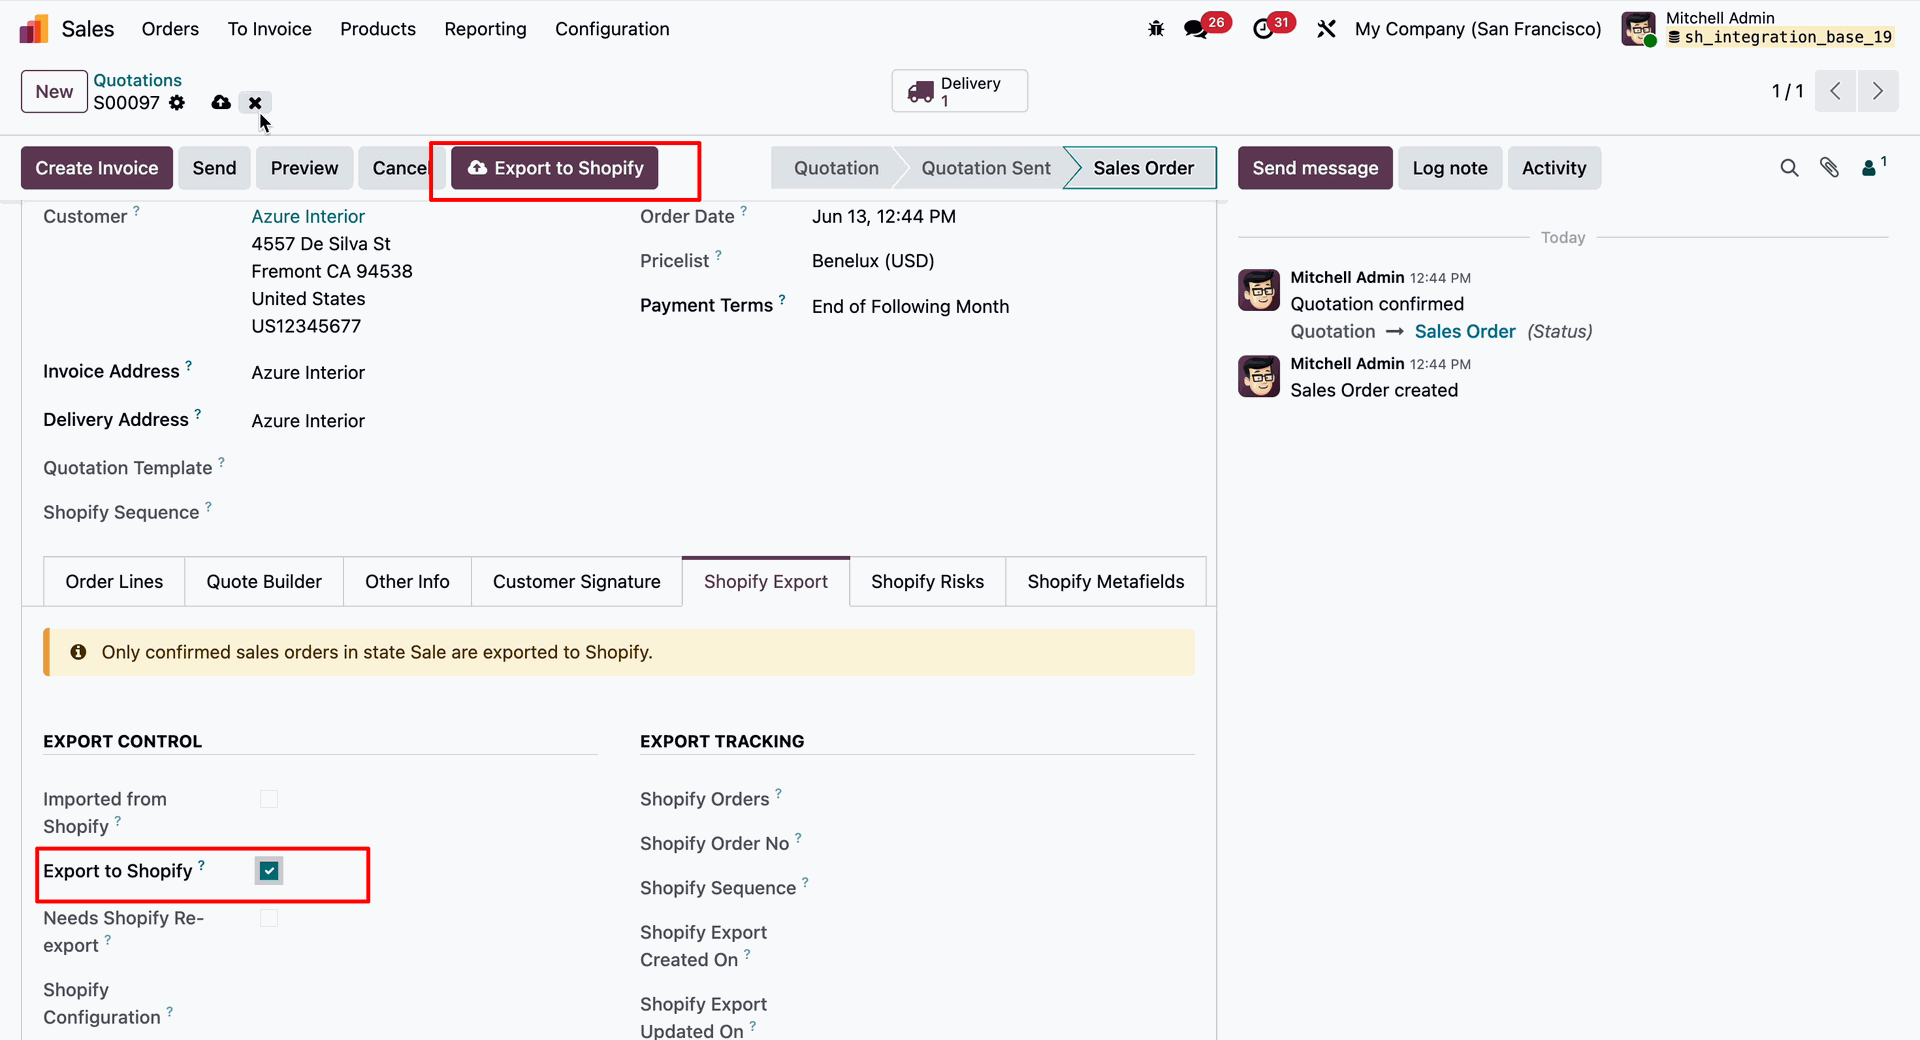
Select a confirmed sales order in Odoo that is eligible for export (with the Export to Shopify option enabled). Then, click the Export to Shopify button to synchronize the sales order with Shopify.
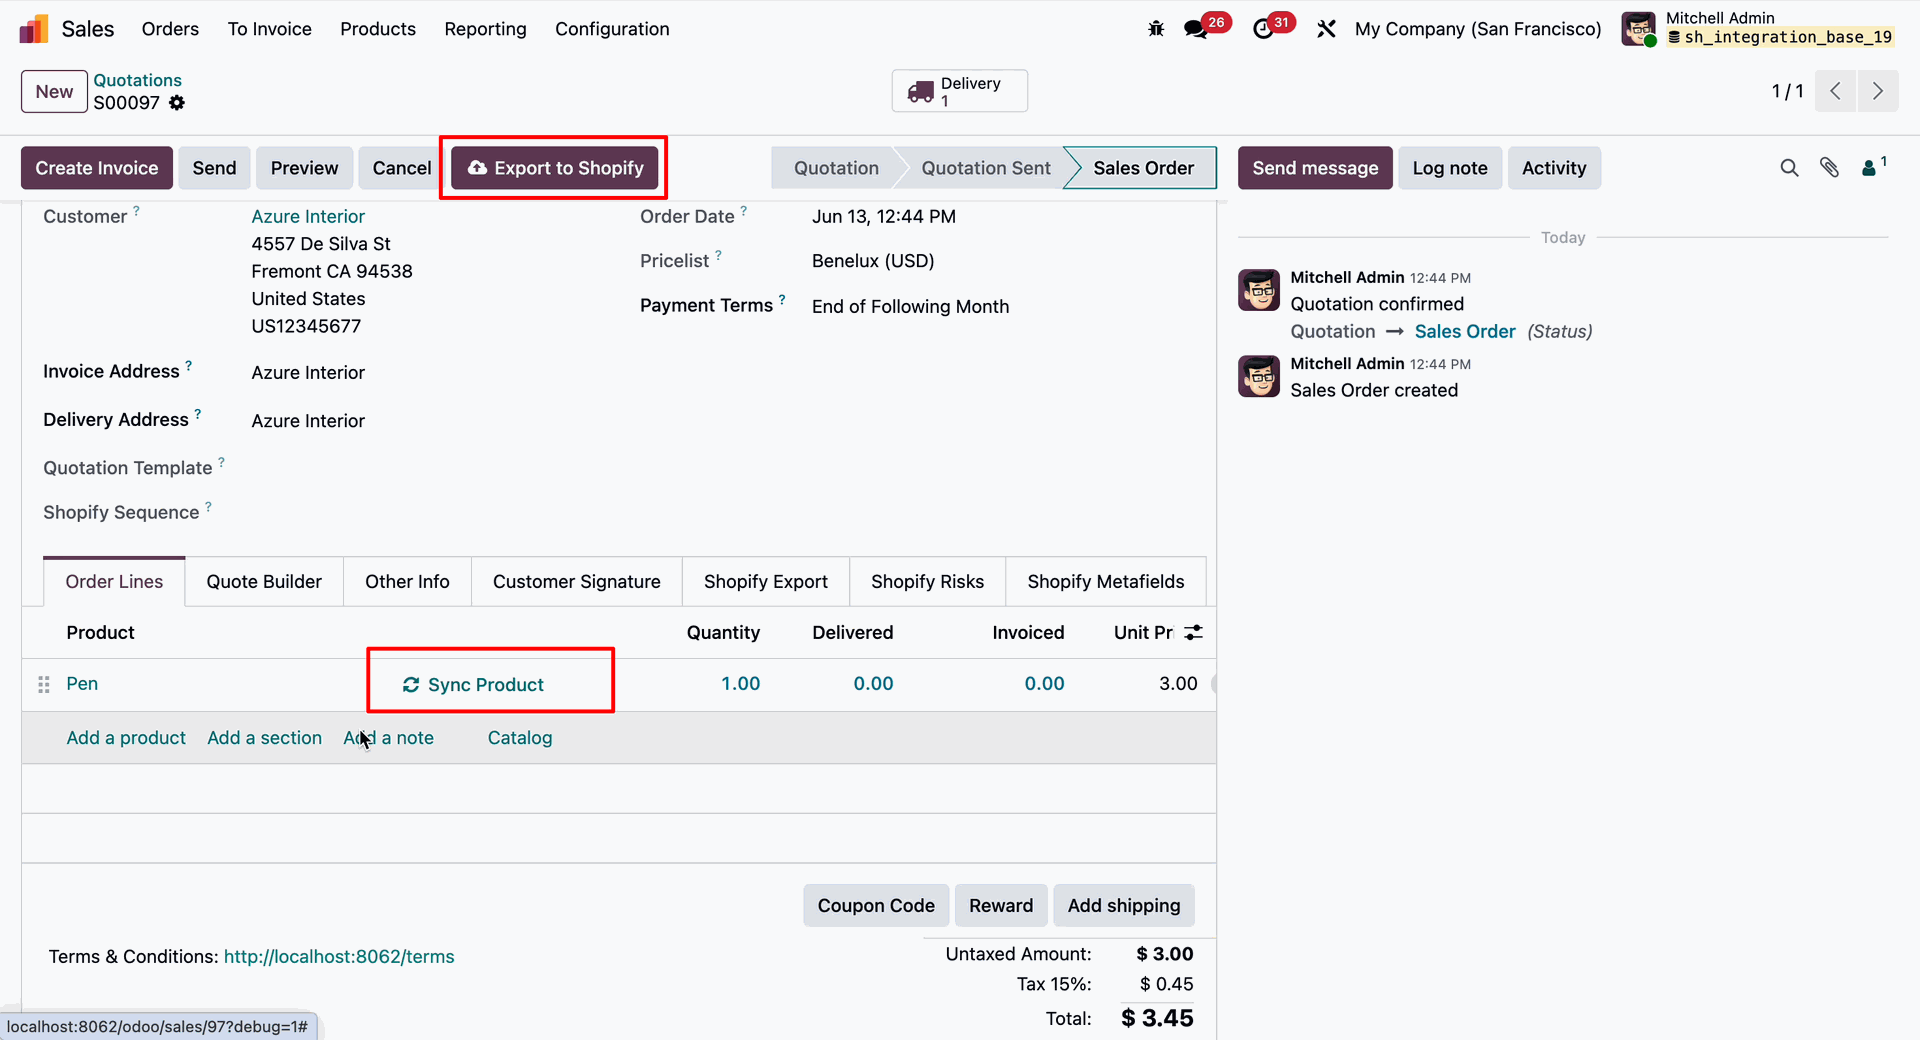
Click the Sync Product button from the Sales Order Order Lines to synchronize the selected product information between Odoo and Shopify.
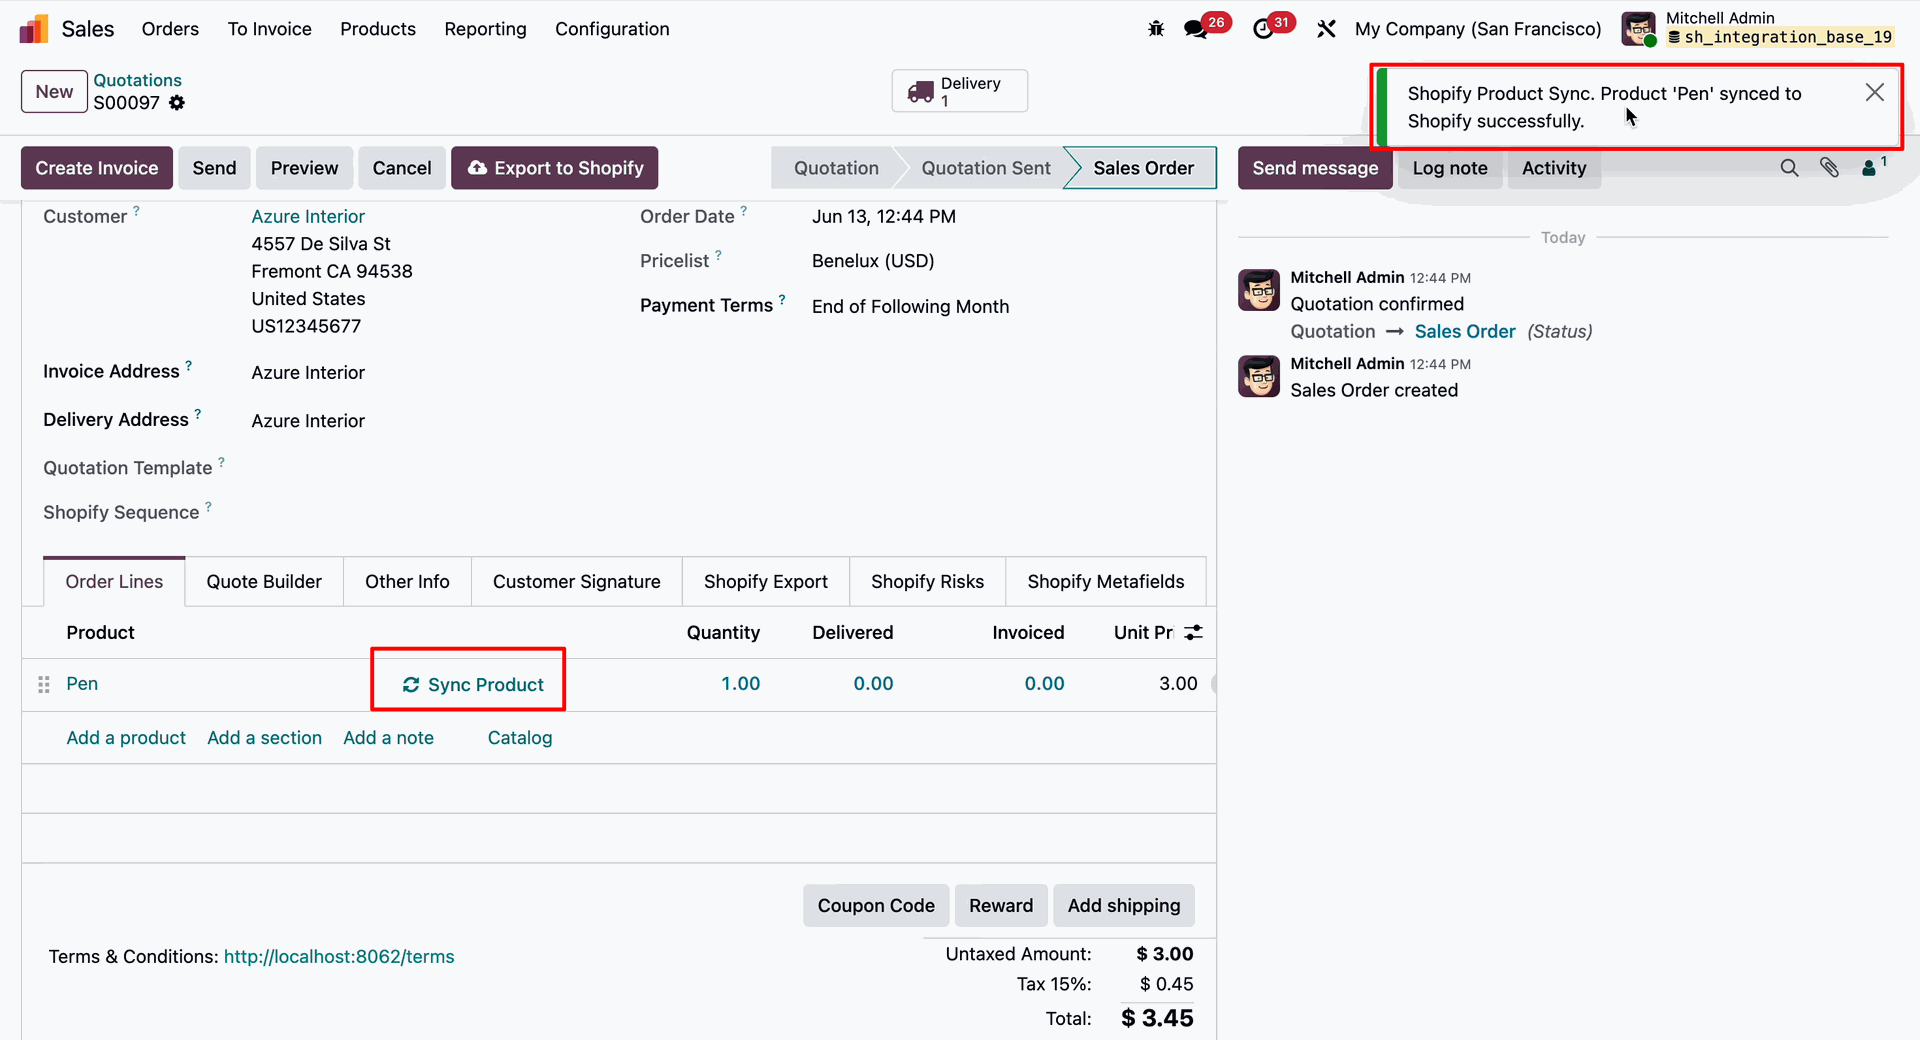
Once the synchronization is completed successfully, a success notification will be displayed, confirming that the product has been synchronized with Shopify.
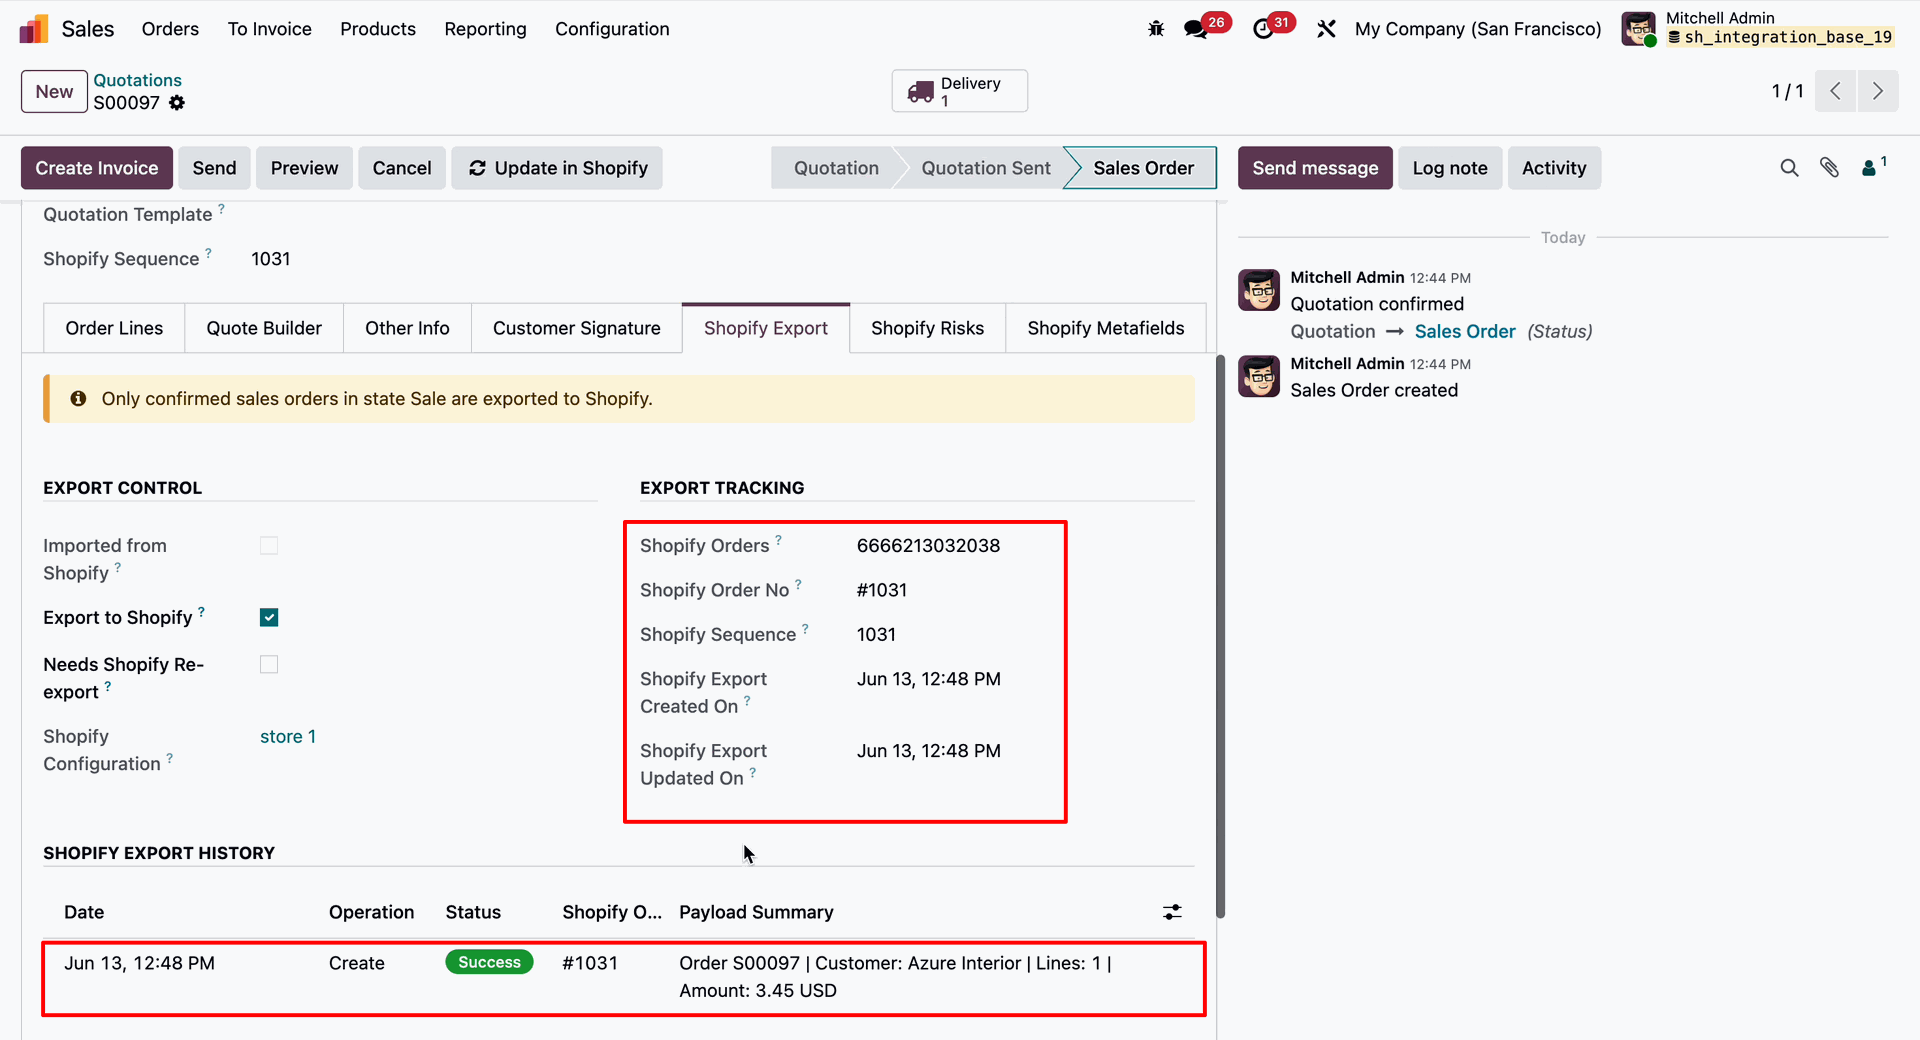
Once the sales order is exported, Odoo retrieves the Shopify Order ID, Shopify Order Name, and Shopify Sequence Number, and automatically updates the corresponding fields under the Shopify Export tab.
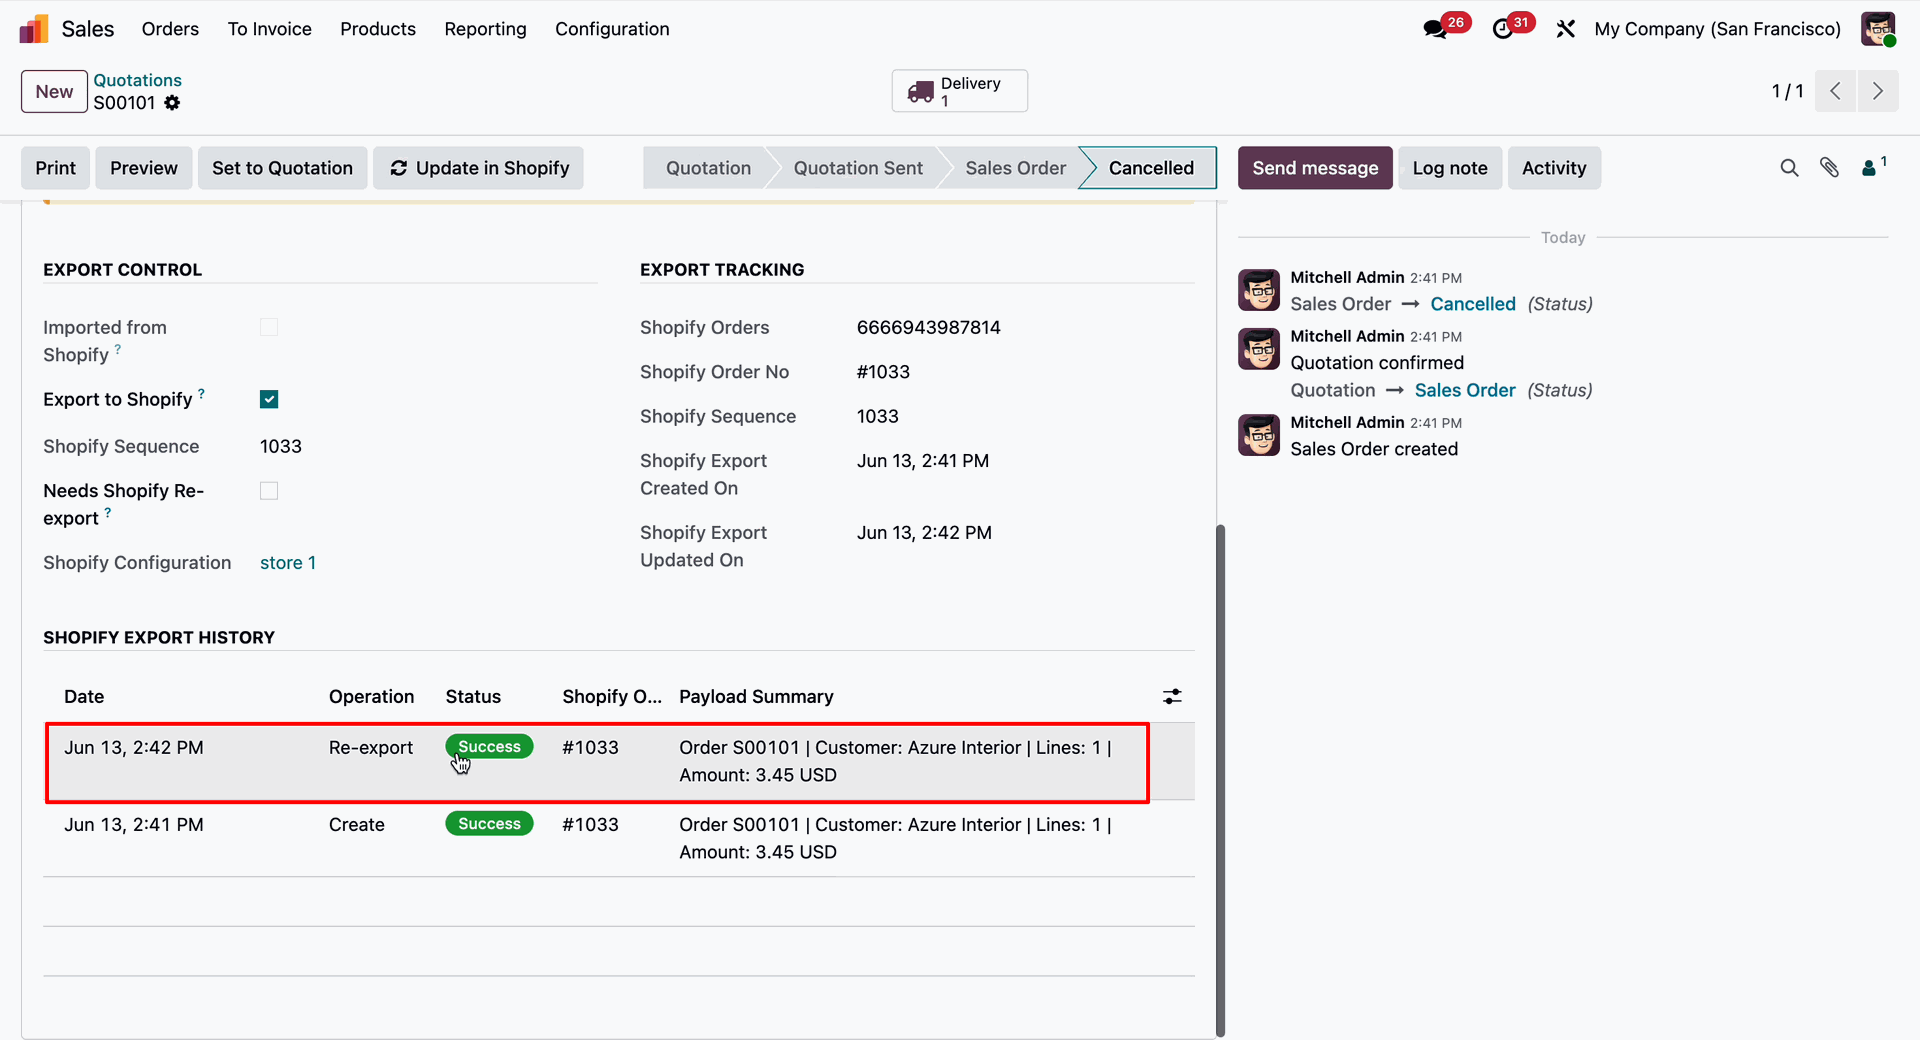
The Shopify Export Log History is also available under the Shopify tab of the Sales Order, allowing users to review export activities, statuses, timestamps, and synchronization details.
Cancel the exported Sales Order in Odoo. Once cancelled, the Re-Export to Shopify option will become available on the Sales Order, allowing you to synchronize the updated order status with Shopify.
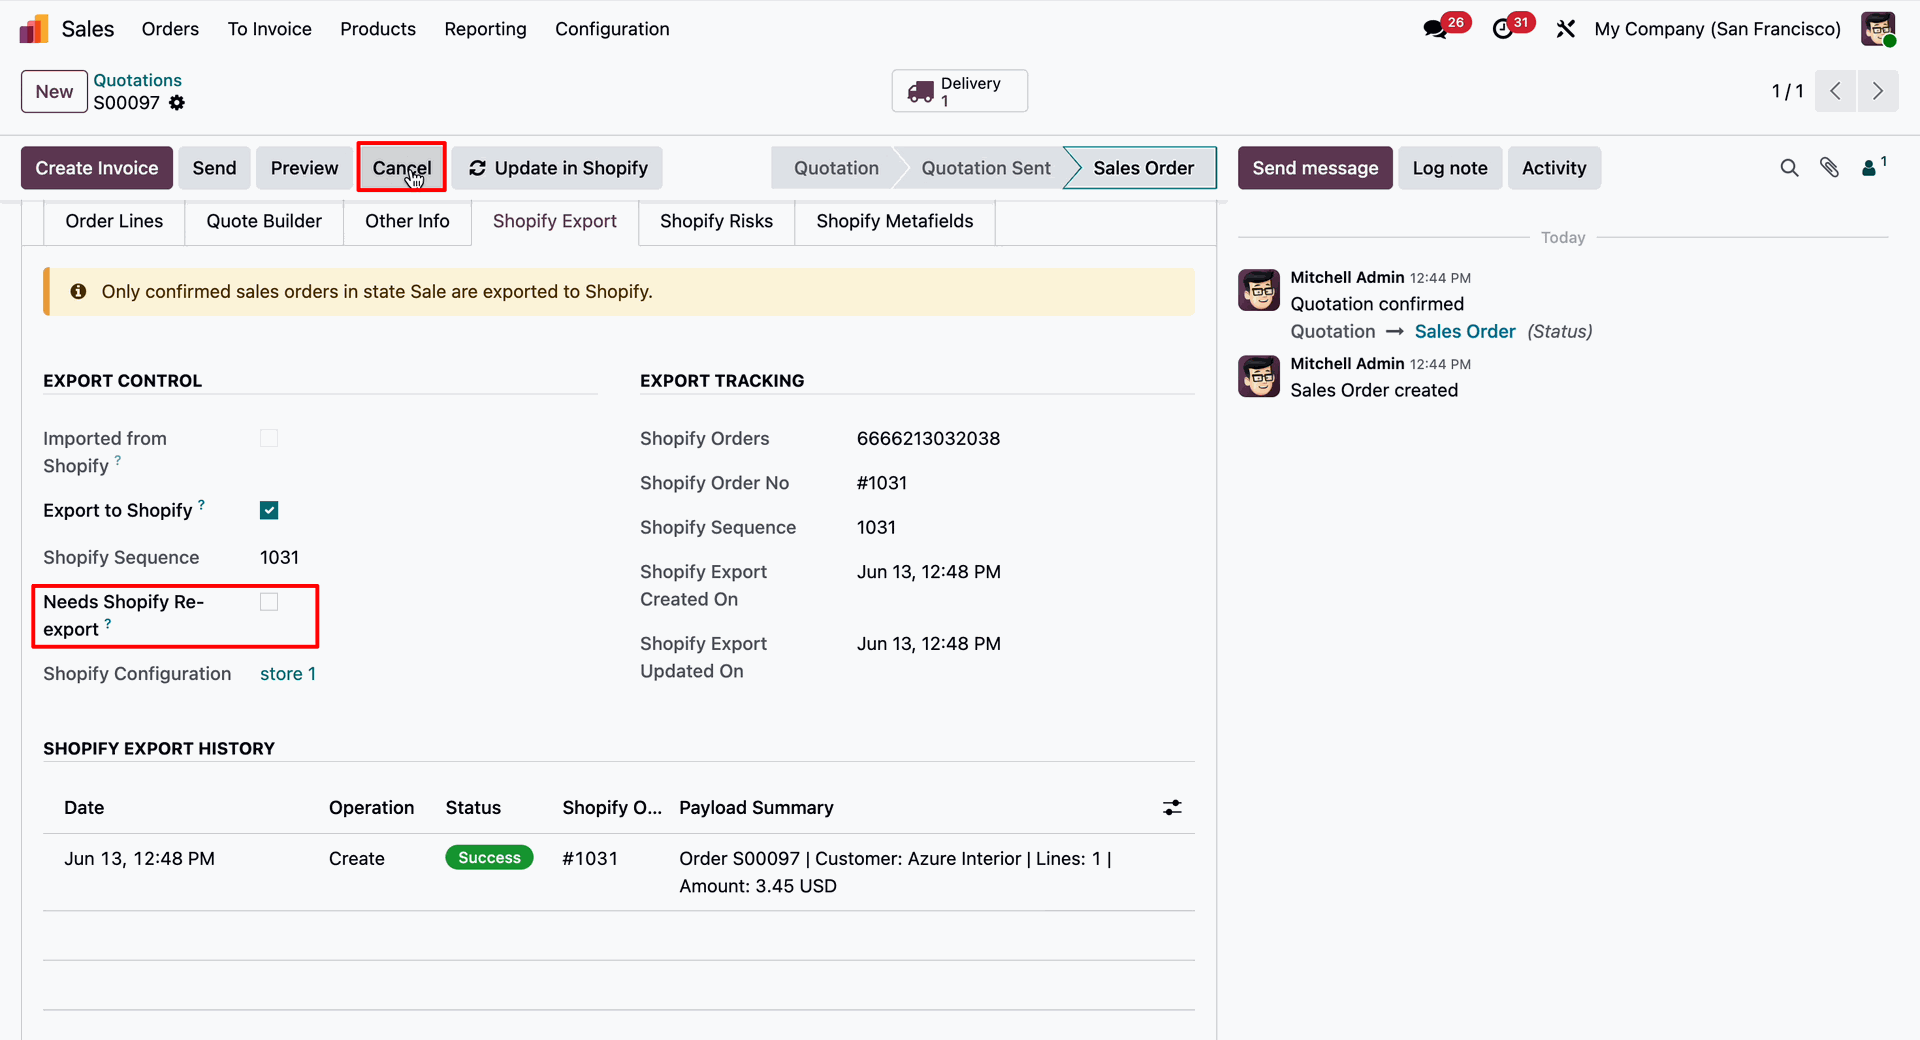
Enable the Needs Shopify Re-Export option on the cancelled Sales Order.
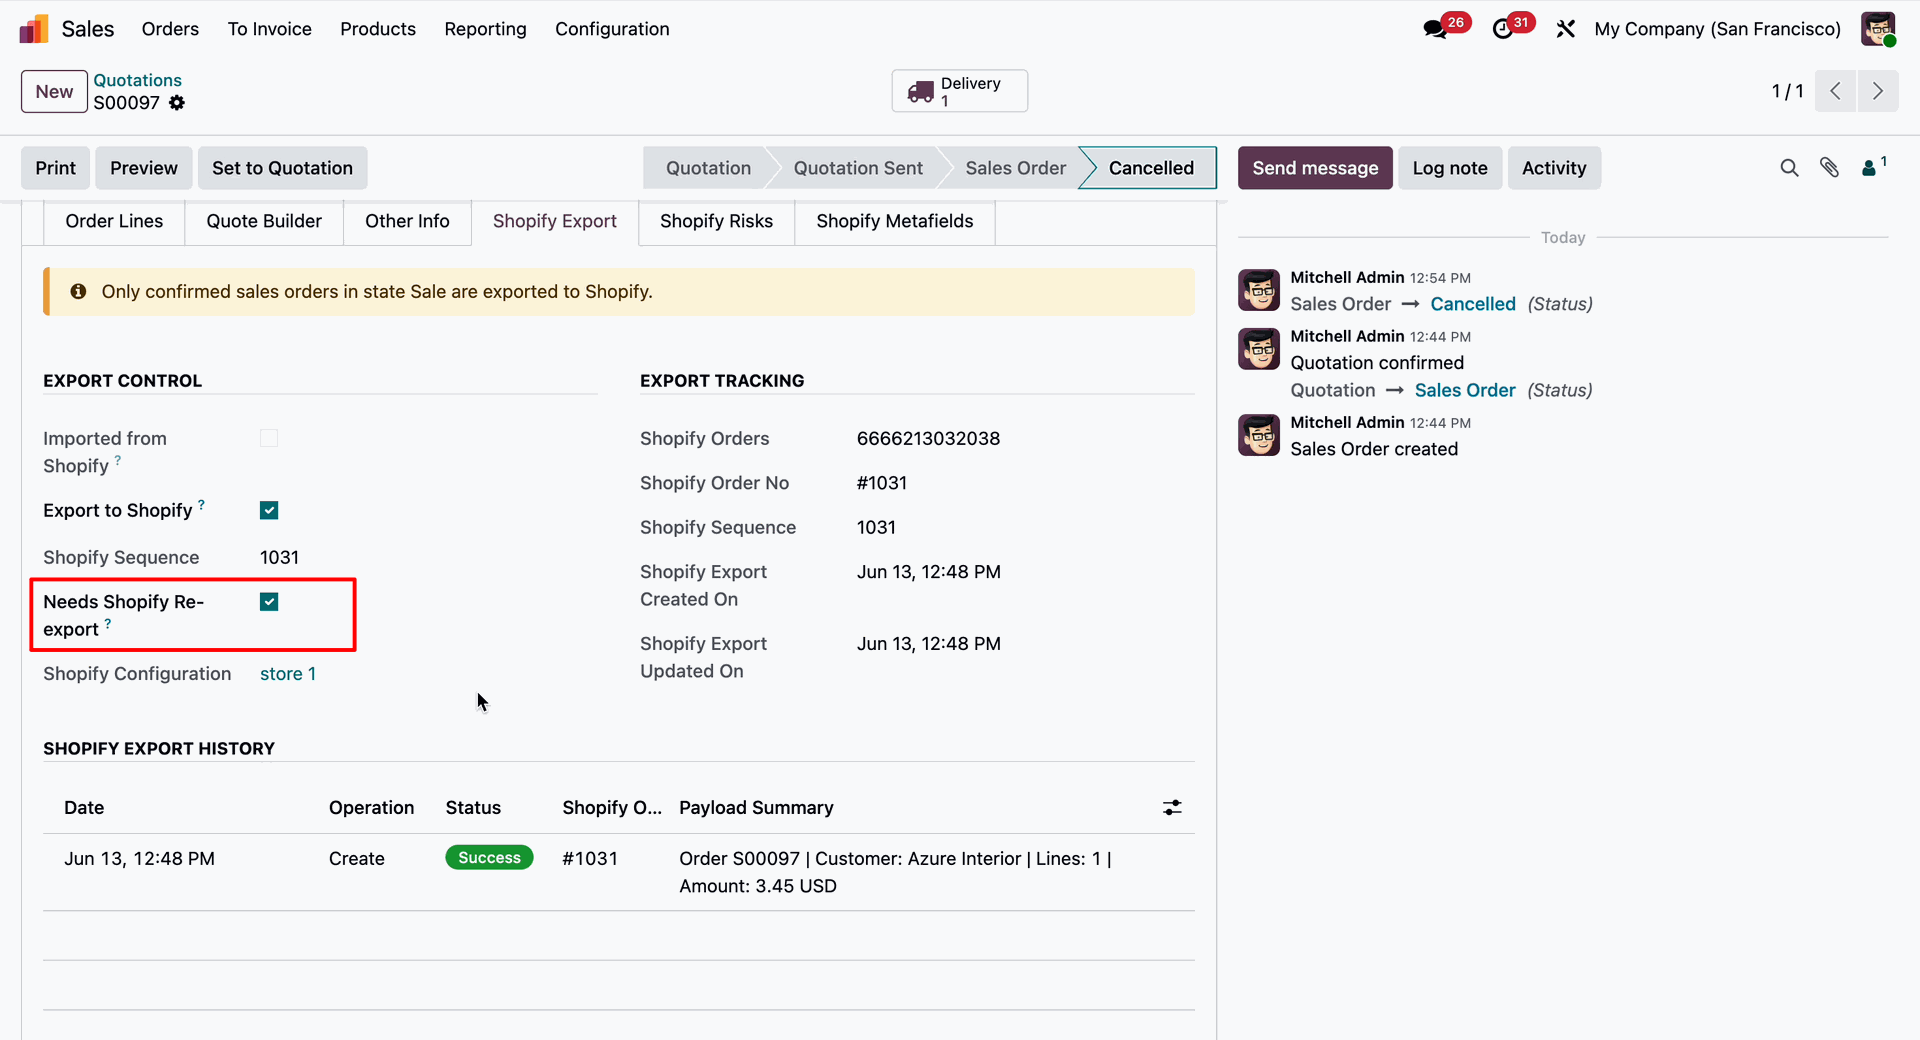
Click the internal link available next to the Needs Shopify Re-Export option on the Sales Order.
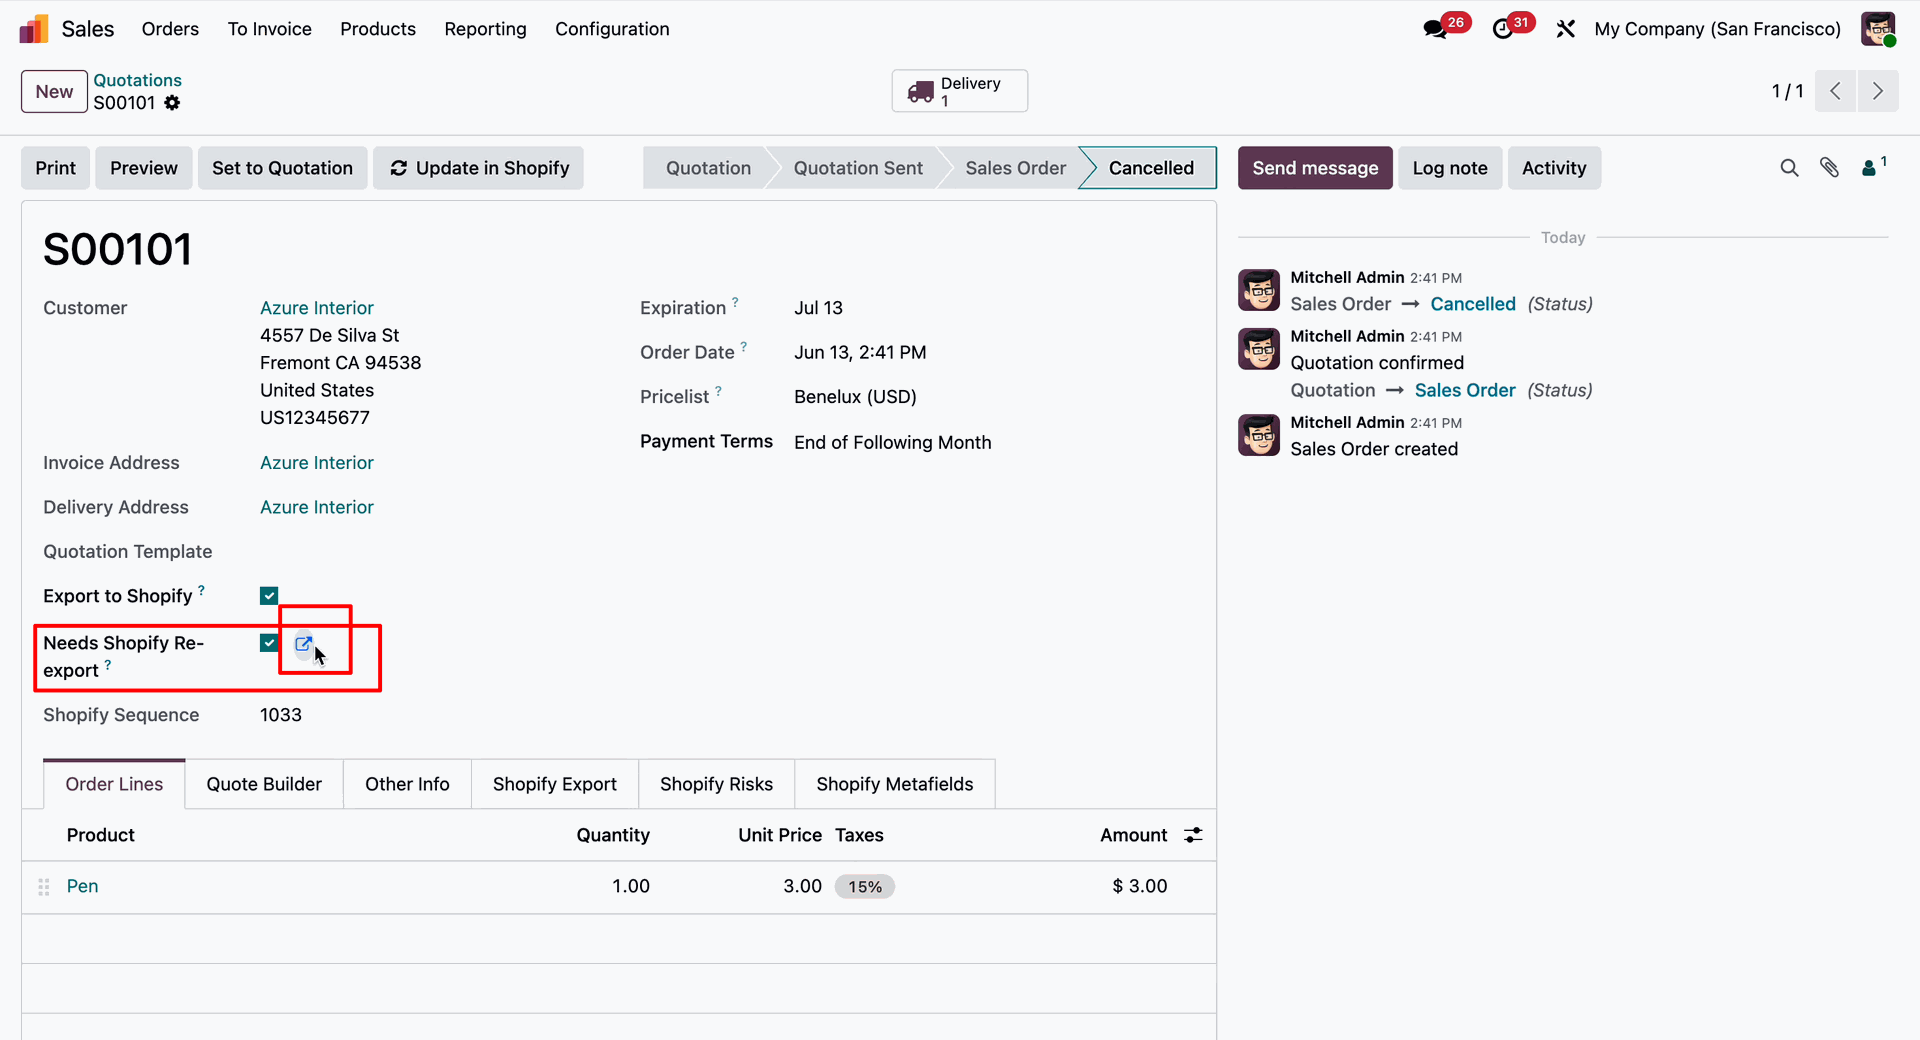
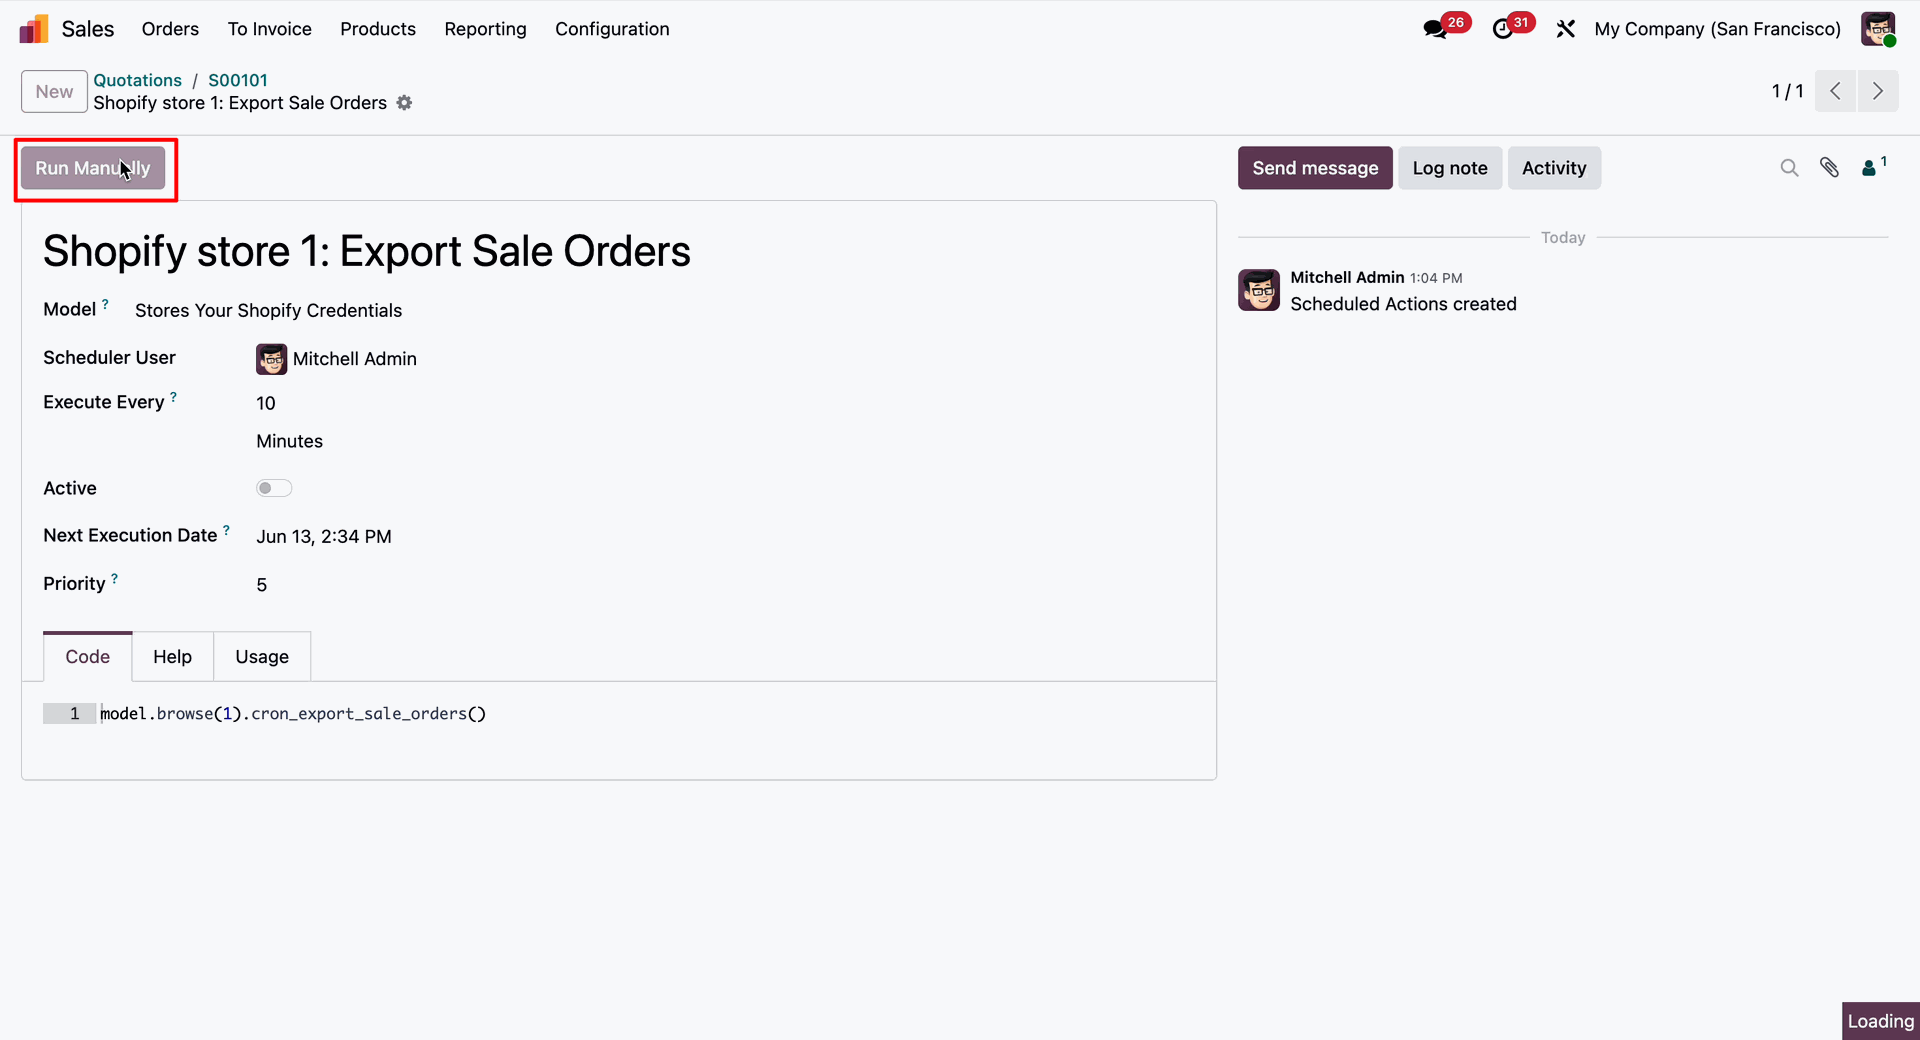
Clicking the link will open the scheduled action responsible for exporting Sales Orders to Shopify. Click the Run Manually button to immediately process and synchronize the Sales Order with Shopify.
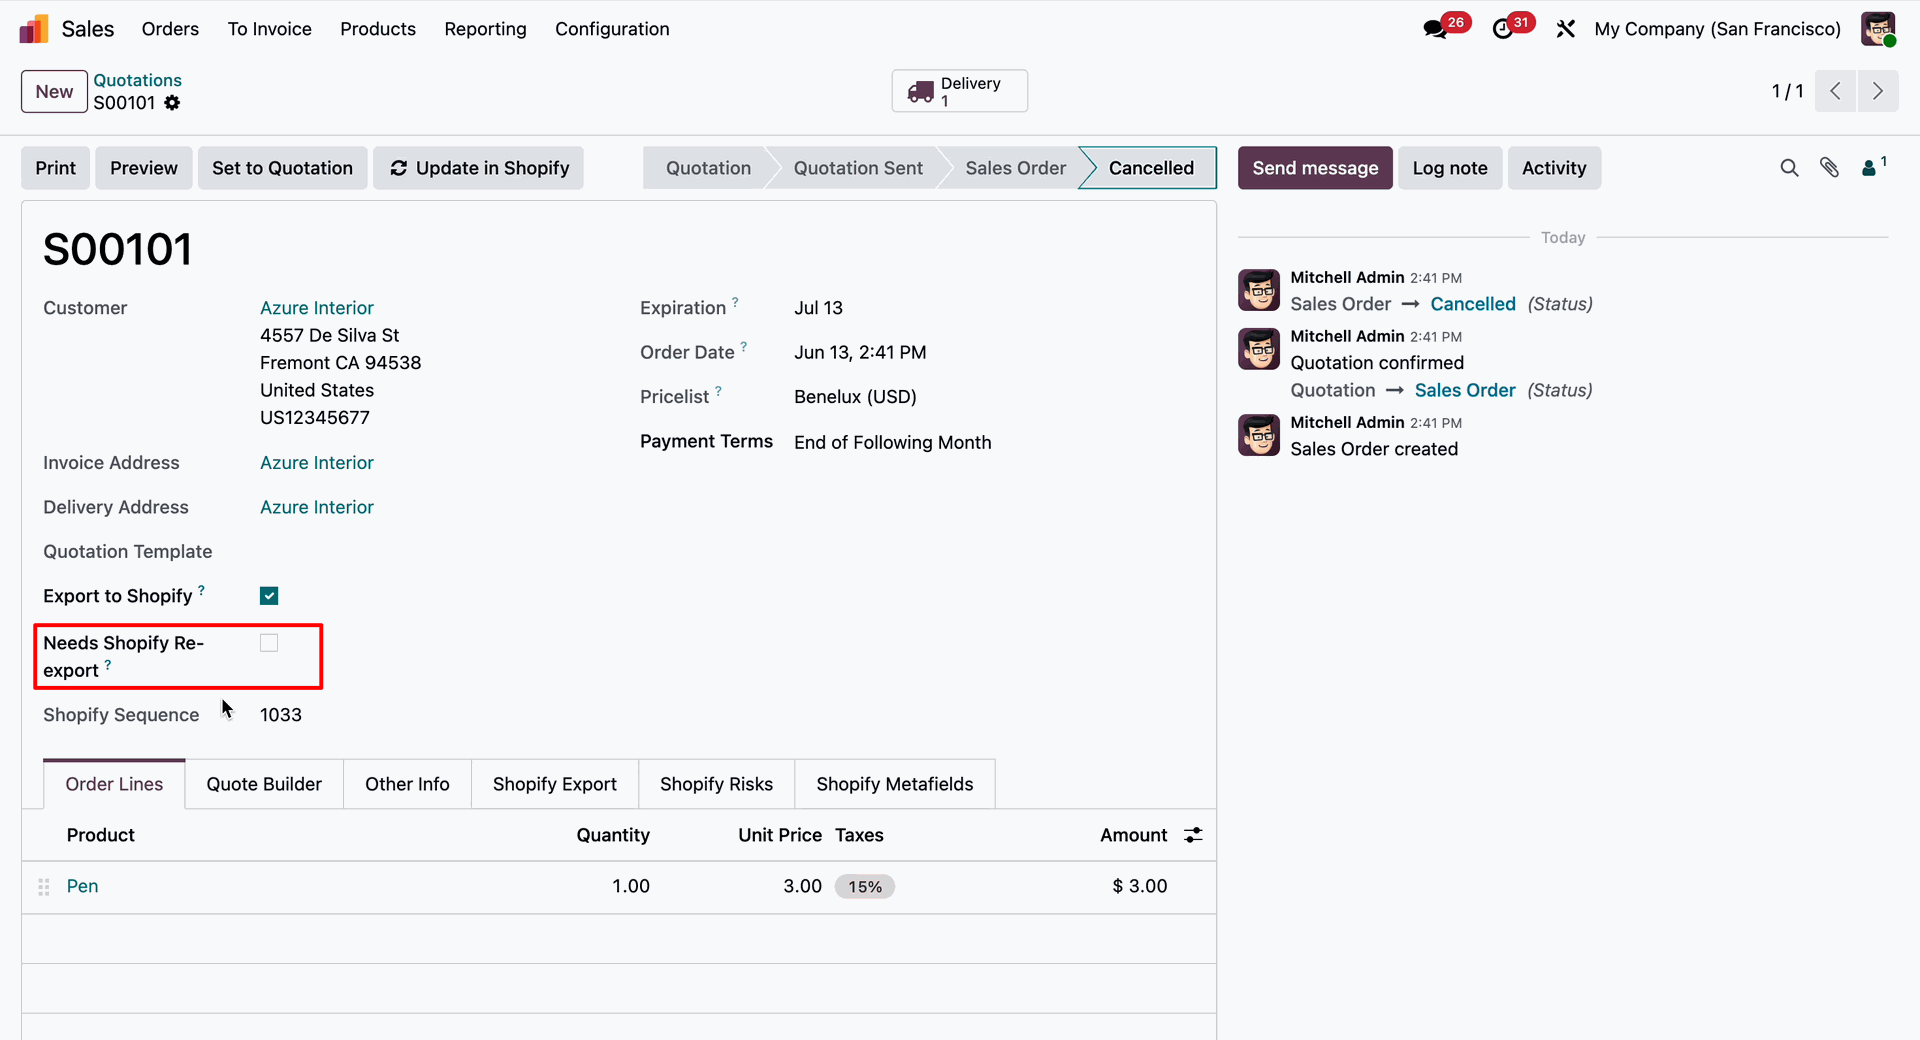
Once the scheduled action runs successfully and the Sales Order is synchronized with Shopify, the Needs Shopify Re-Export option is automatically disabled.
The Shopify Export Log History is available under the Shopify tab of the Sales Order with synchronization details.
Workflow
Create a Product in Odoo and enable the Auto Sync to Shopify option from the Product Form View to automatically synchronize the product with Shopify.
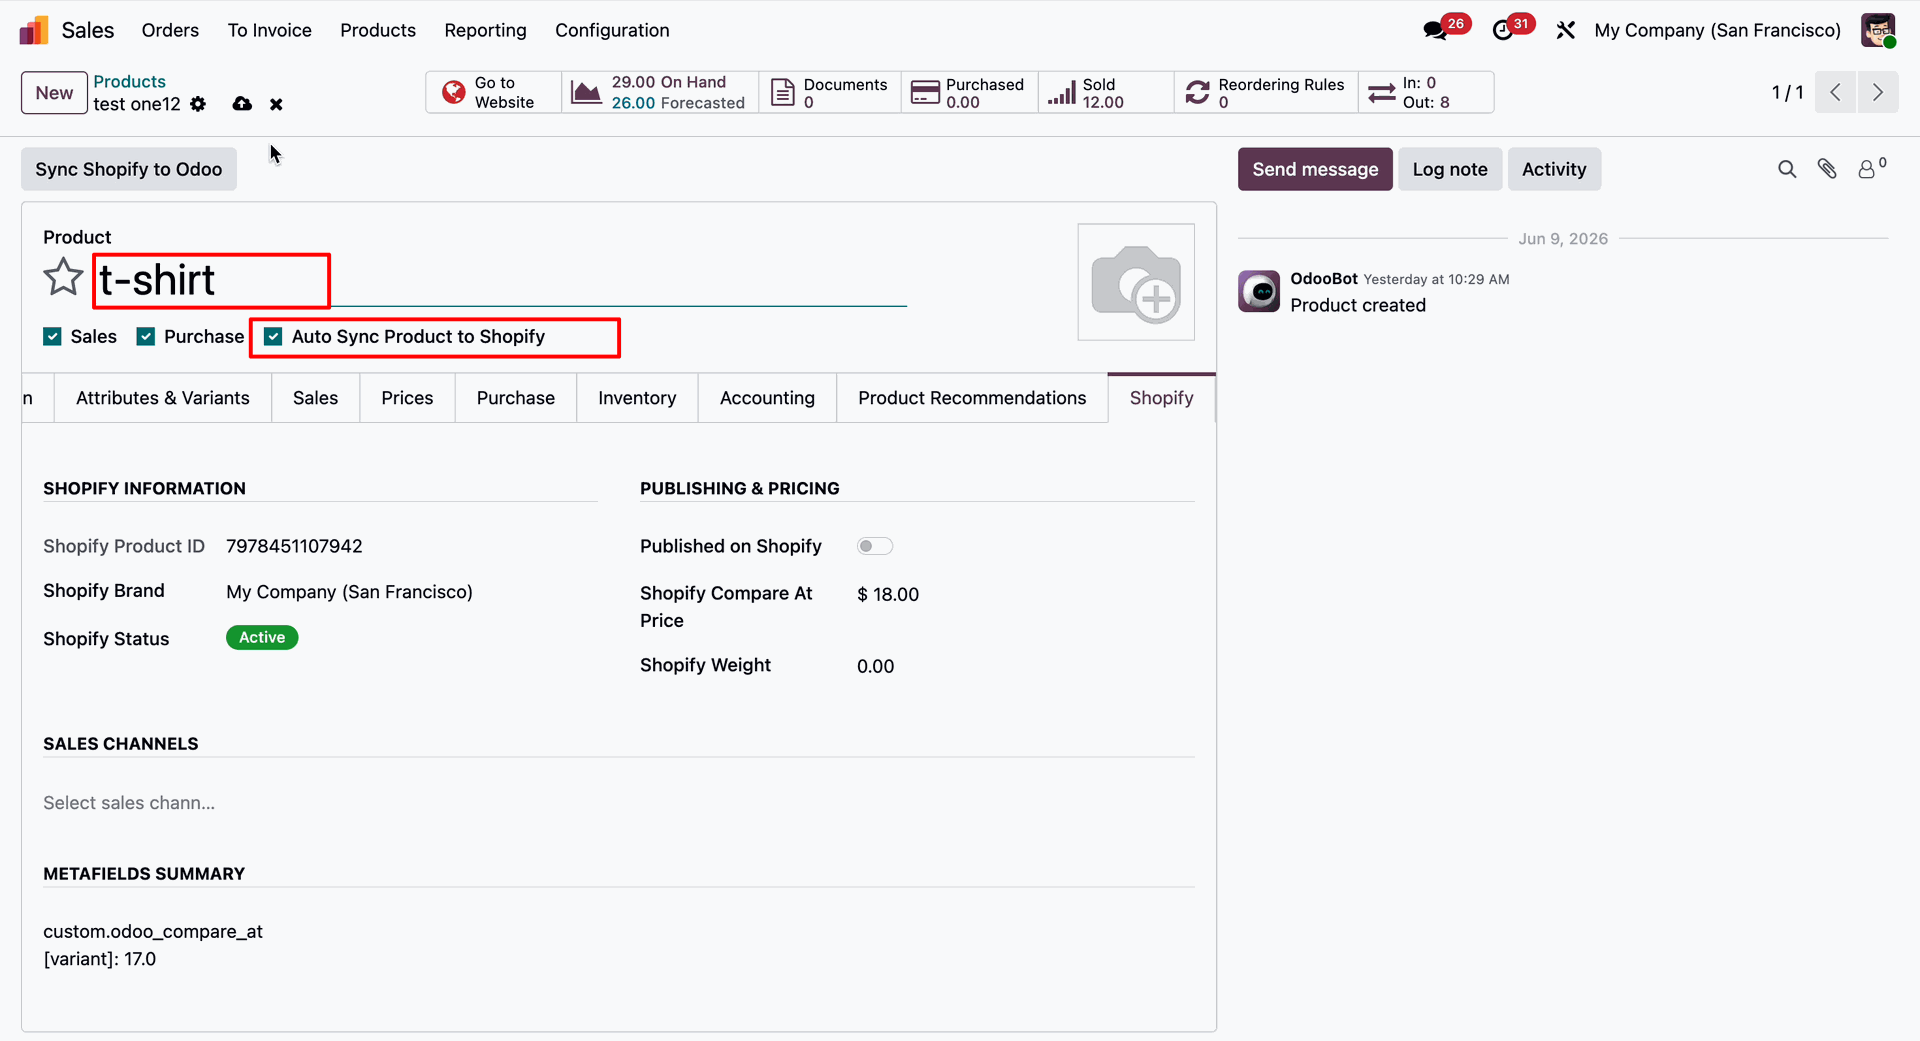
The Shopify Information will be visible under the Shopify tab of the Product Form View, allowing users to view synchronization details, Shopify IDs, statuses, and other related information.
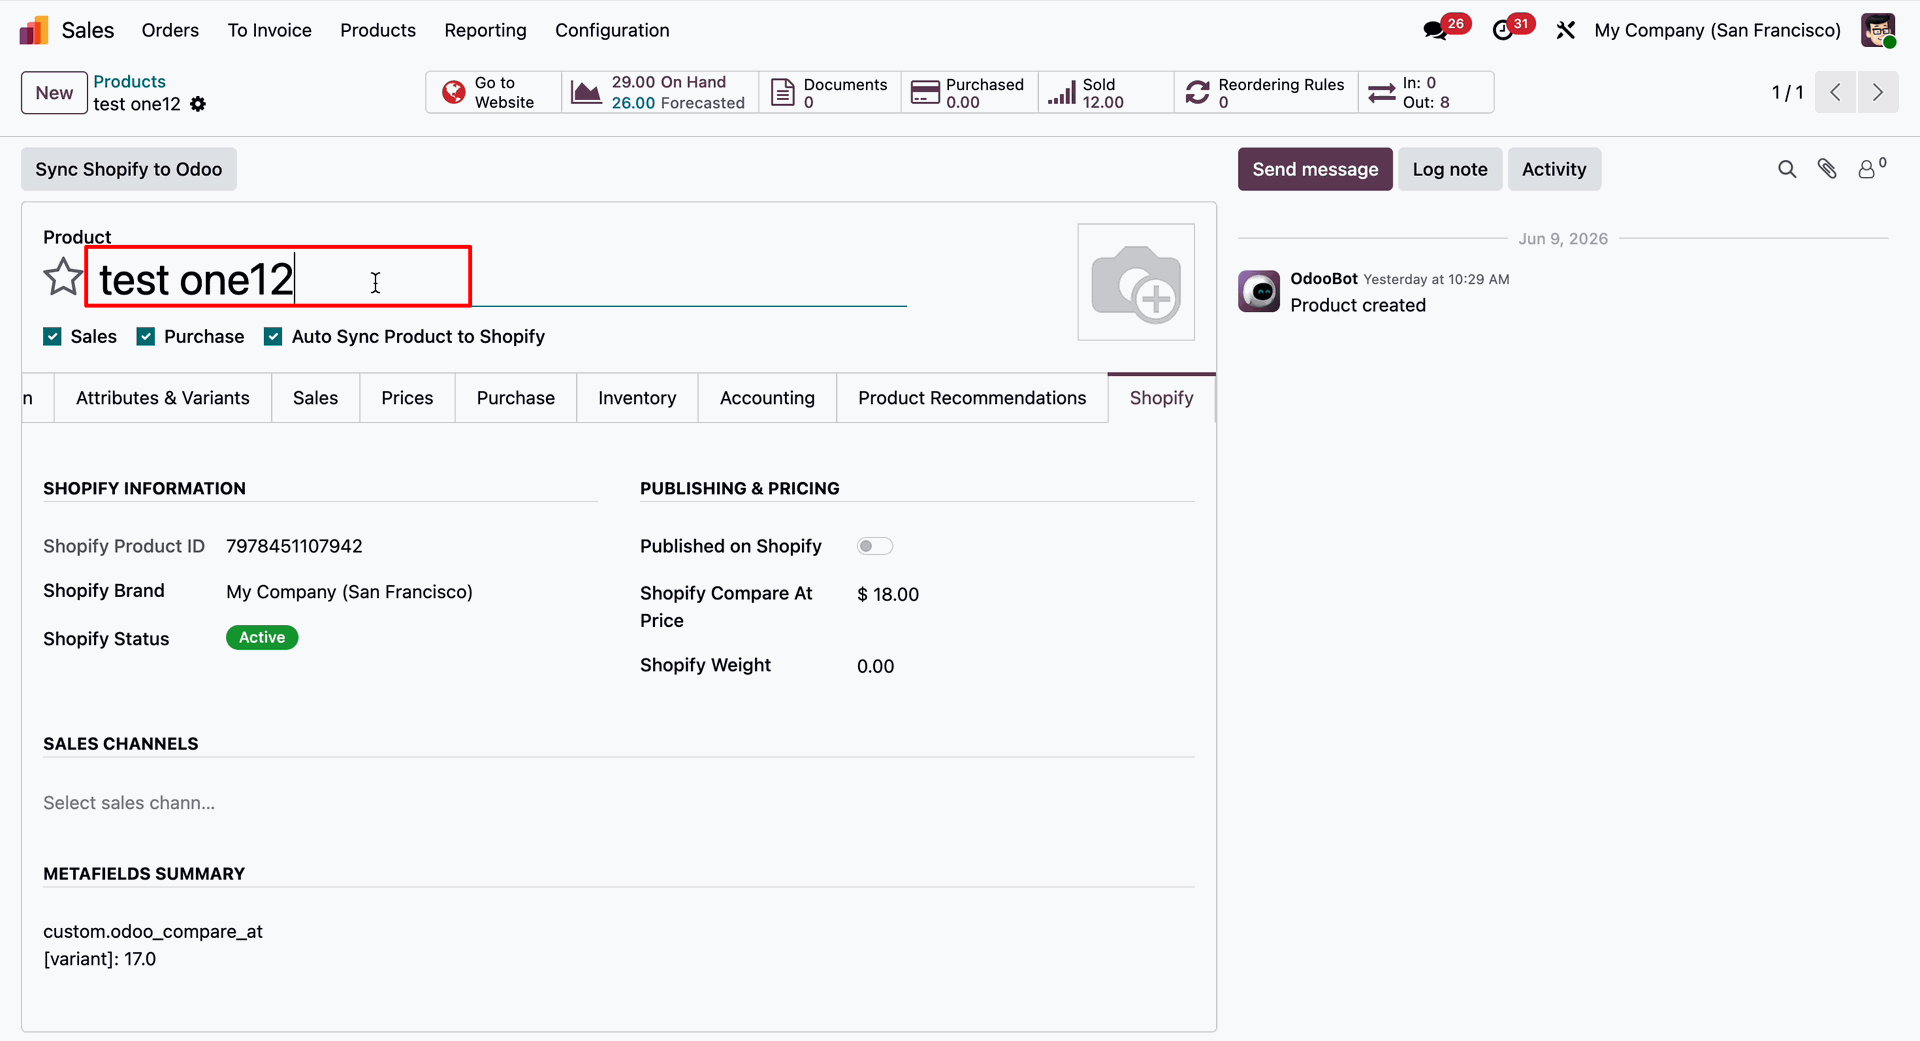
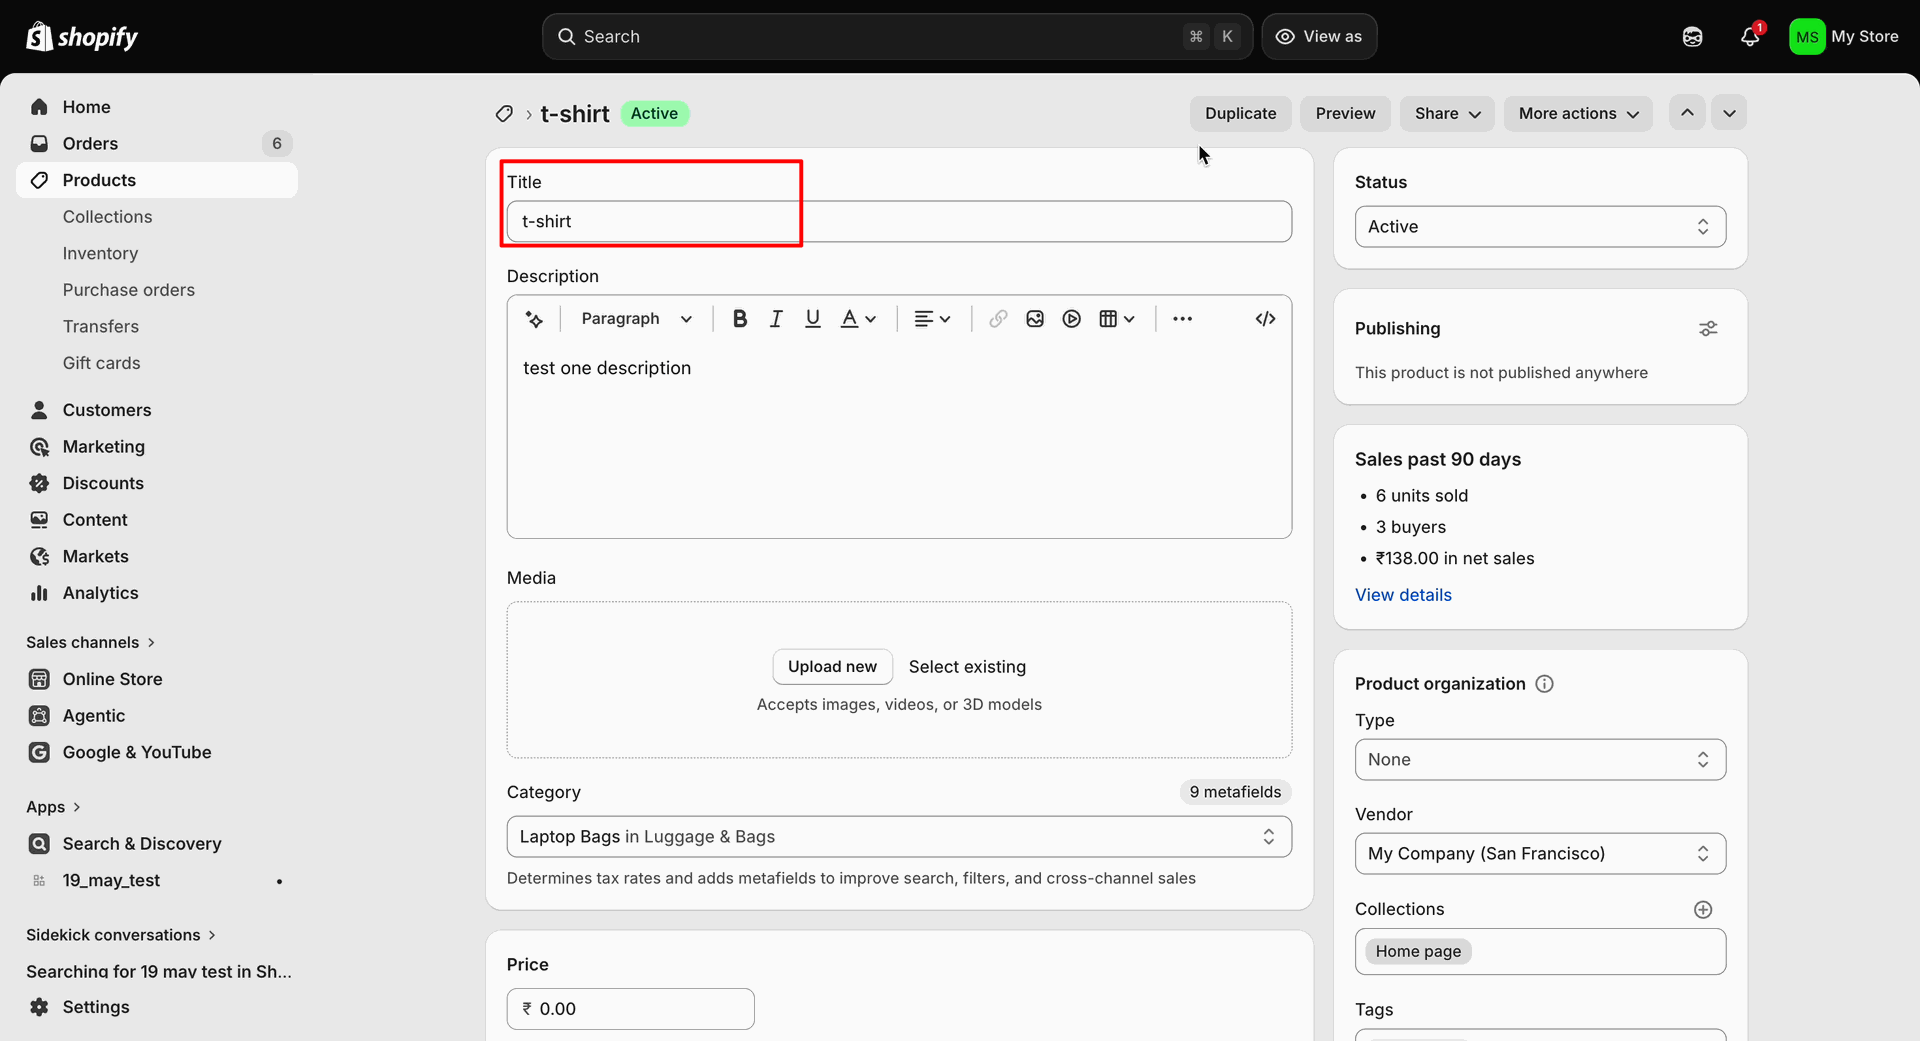
Go to Shopify and open the product that was synchronized from Odoo.
Disable the Auto Sync to Shopify option from the Product Form View, update the Shopify Compare-at Price field as required, and save the changes. The updated value will remain in Odoo until a manual synchronization is performed.
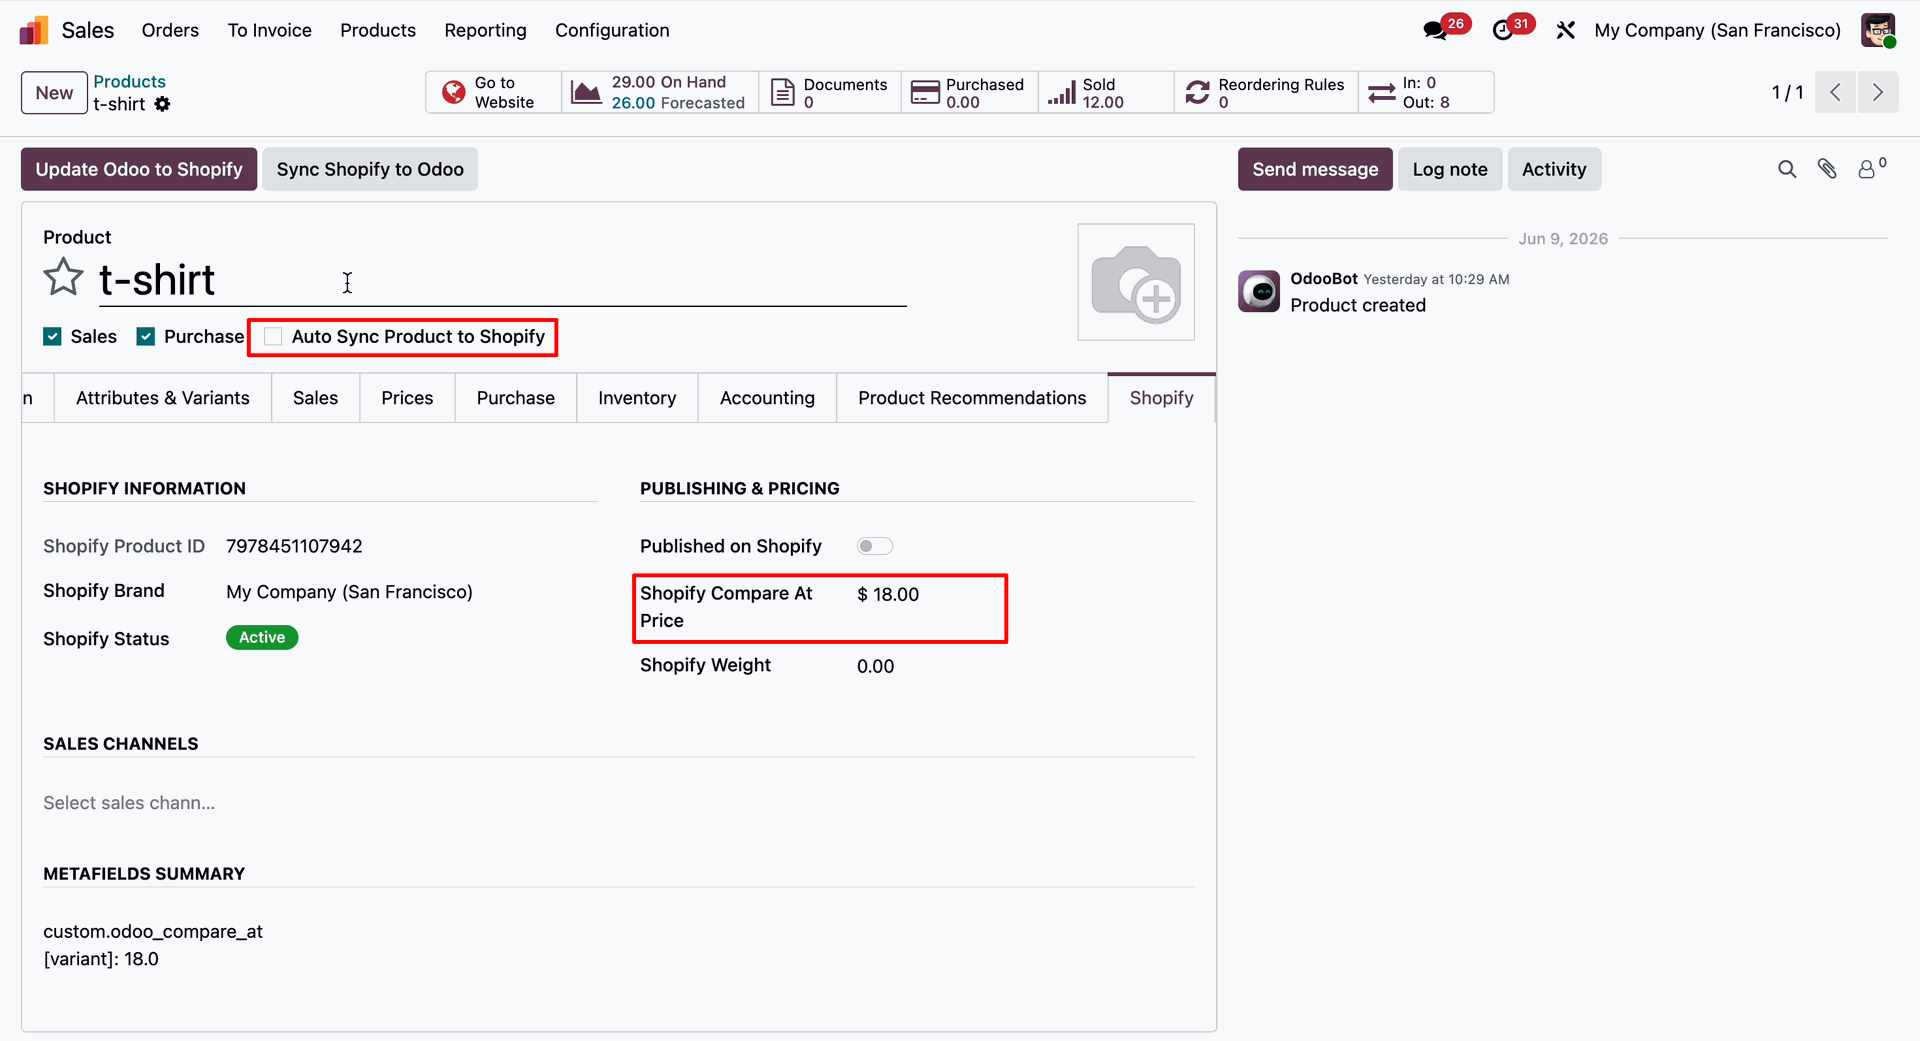
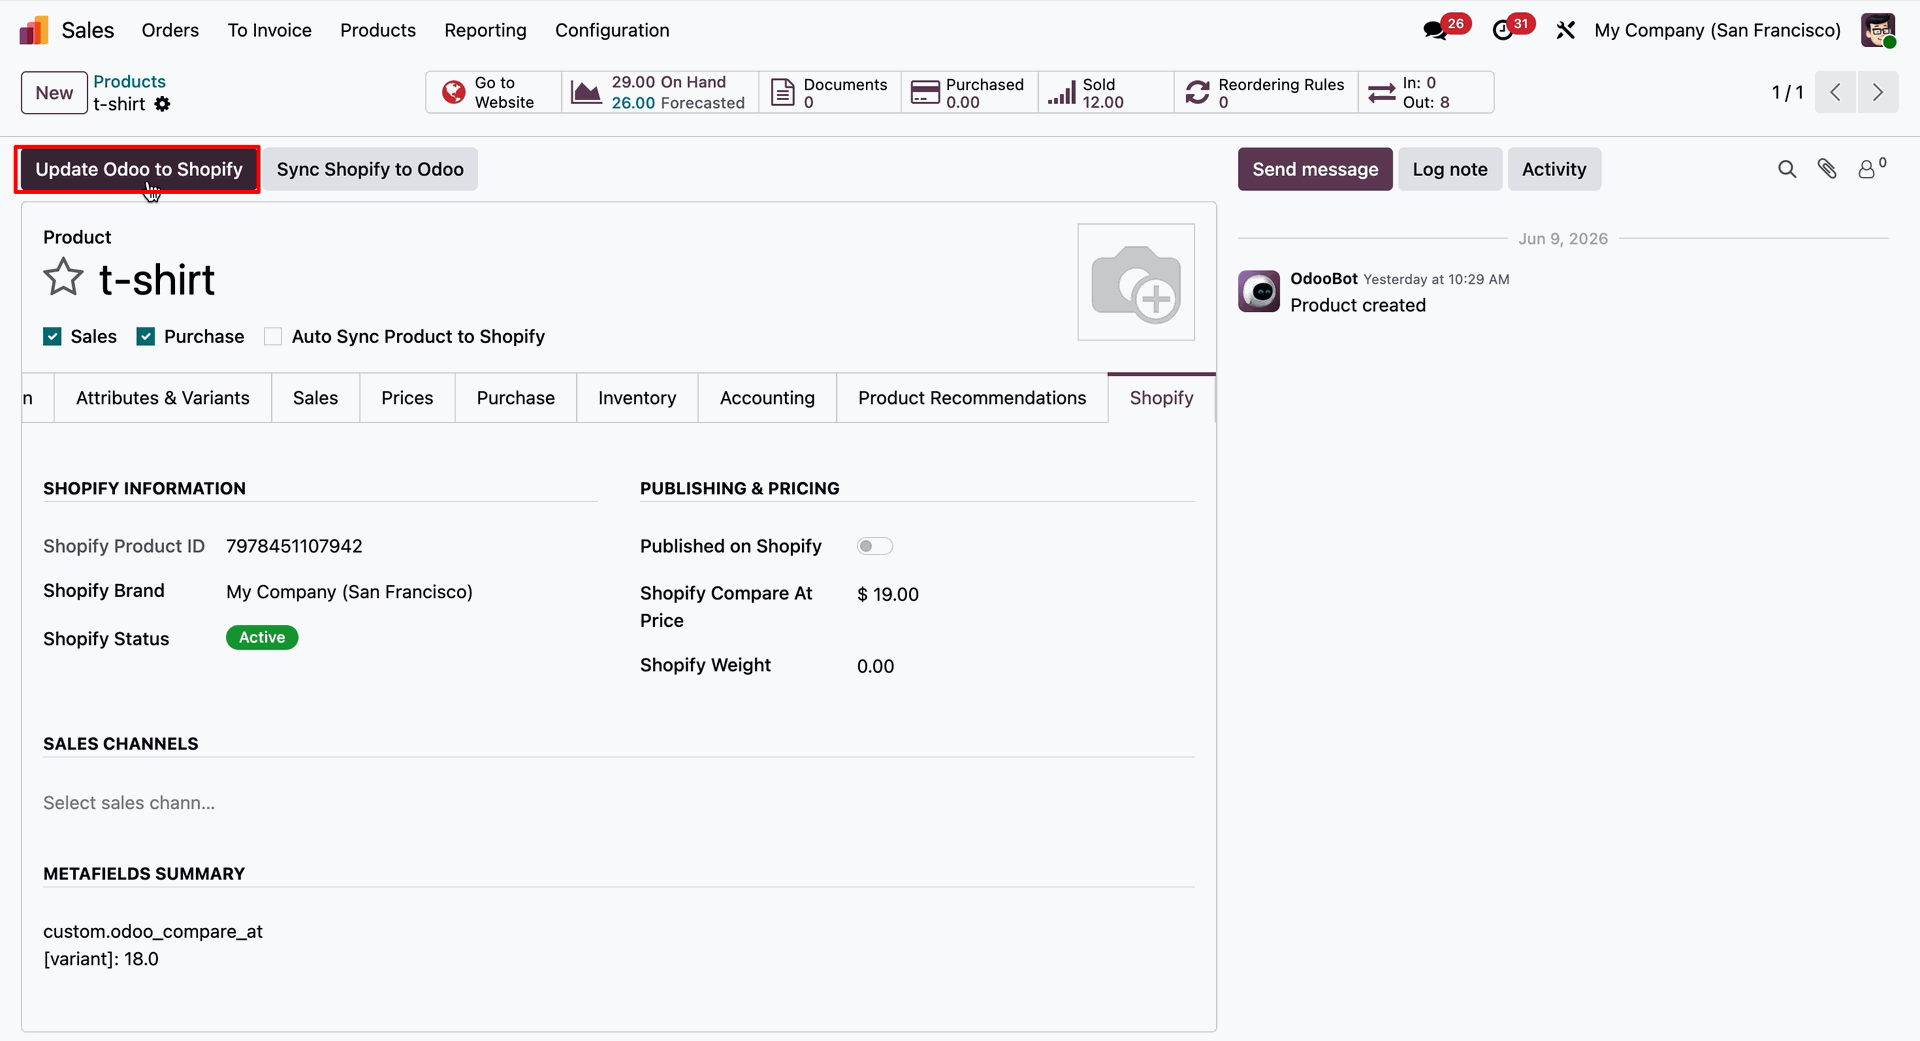
Click the Update Odoo to Shopify button from the Product Form View to manually synchronize the latest product information and updates from Odoo to Shopify.
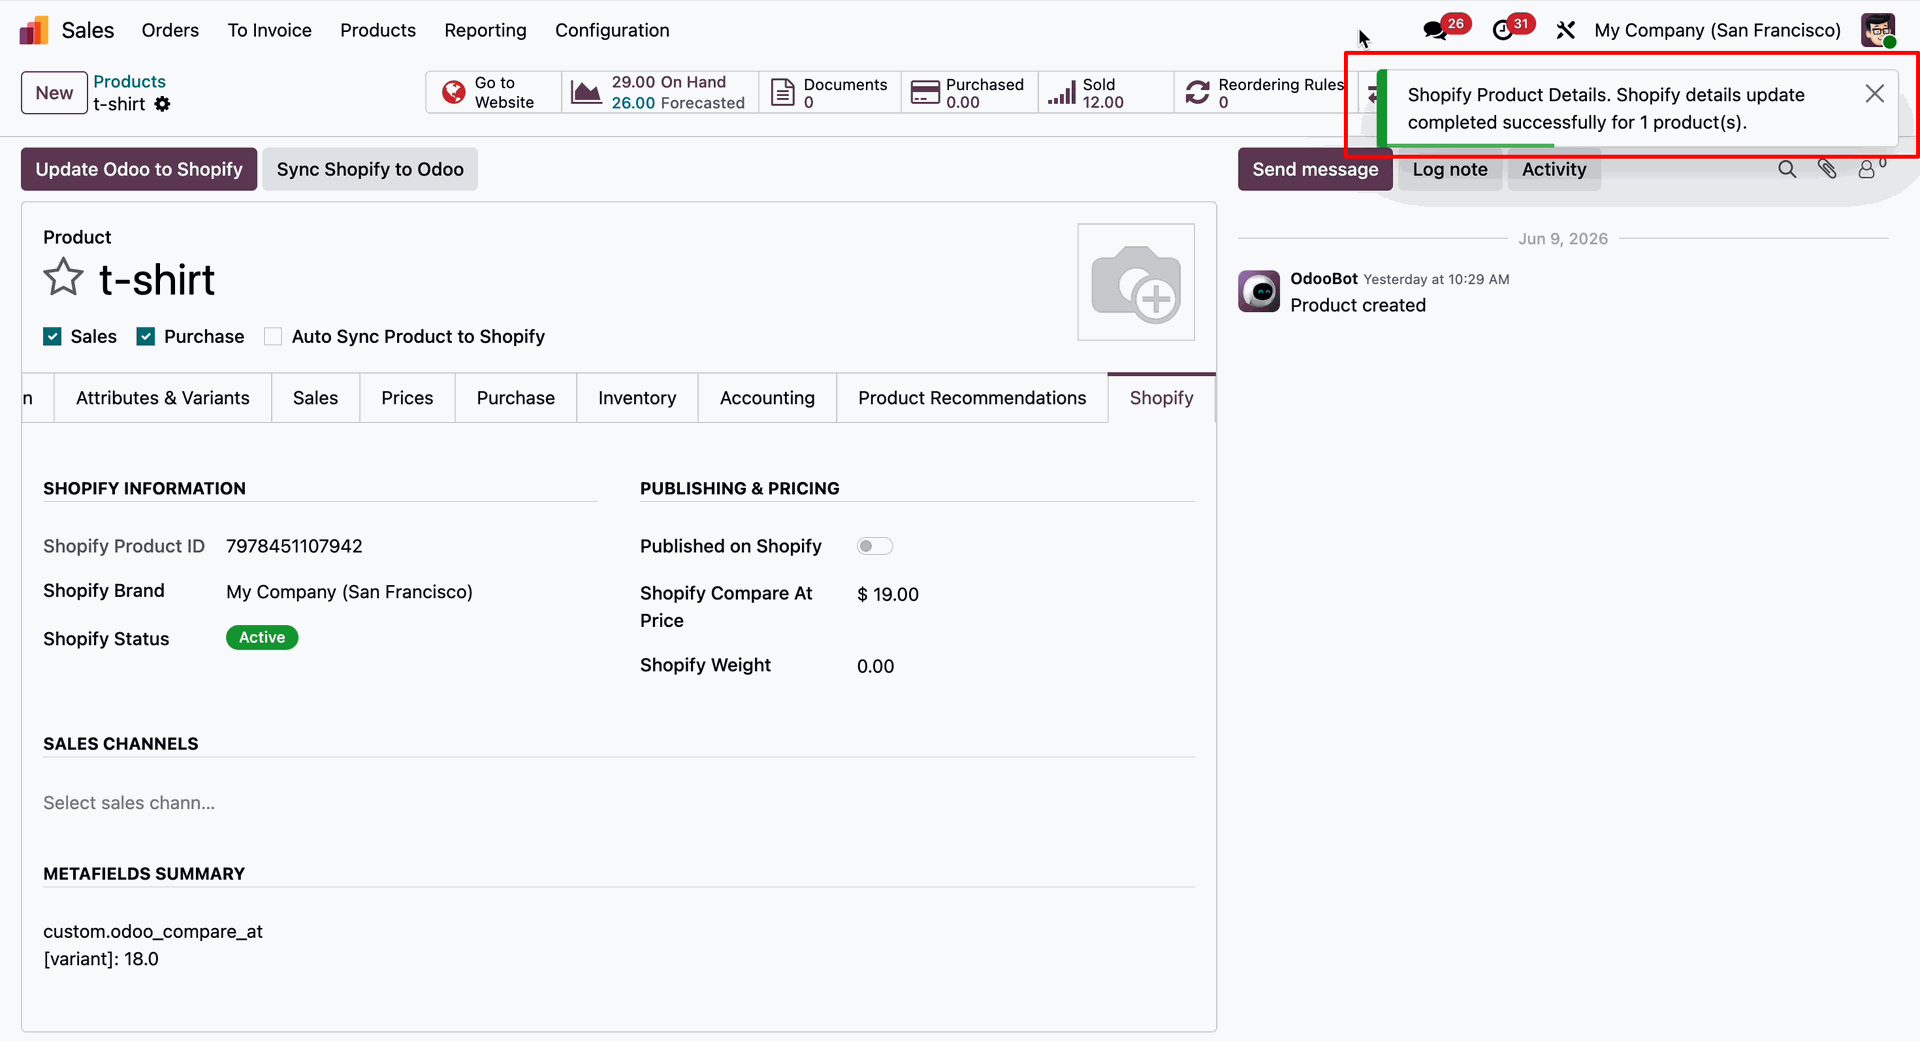
Once the synchronization is completed successfully, a success notification will be displayed, confirming that the product information has been successfully updated in Shopify.
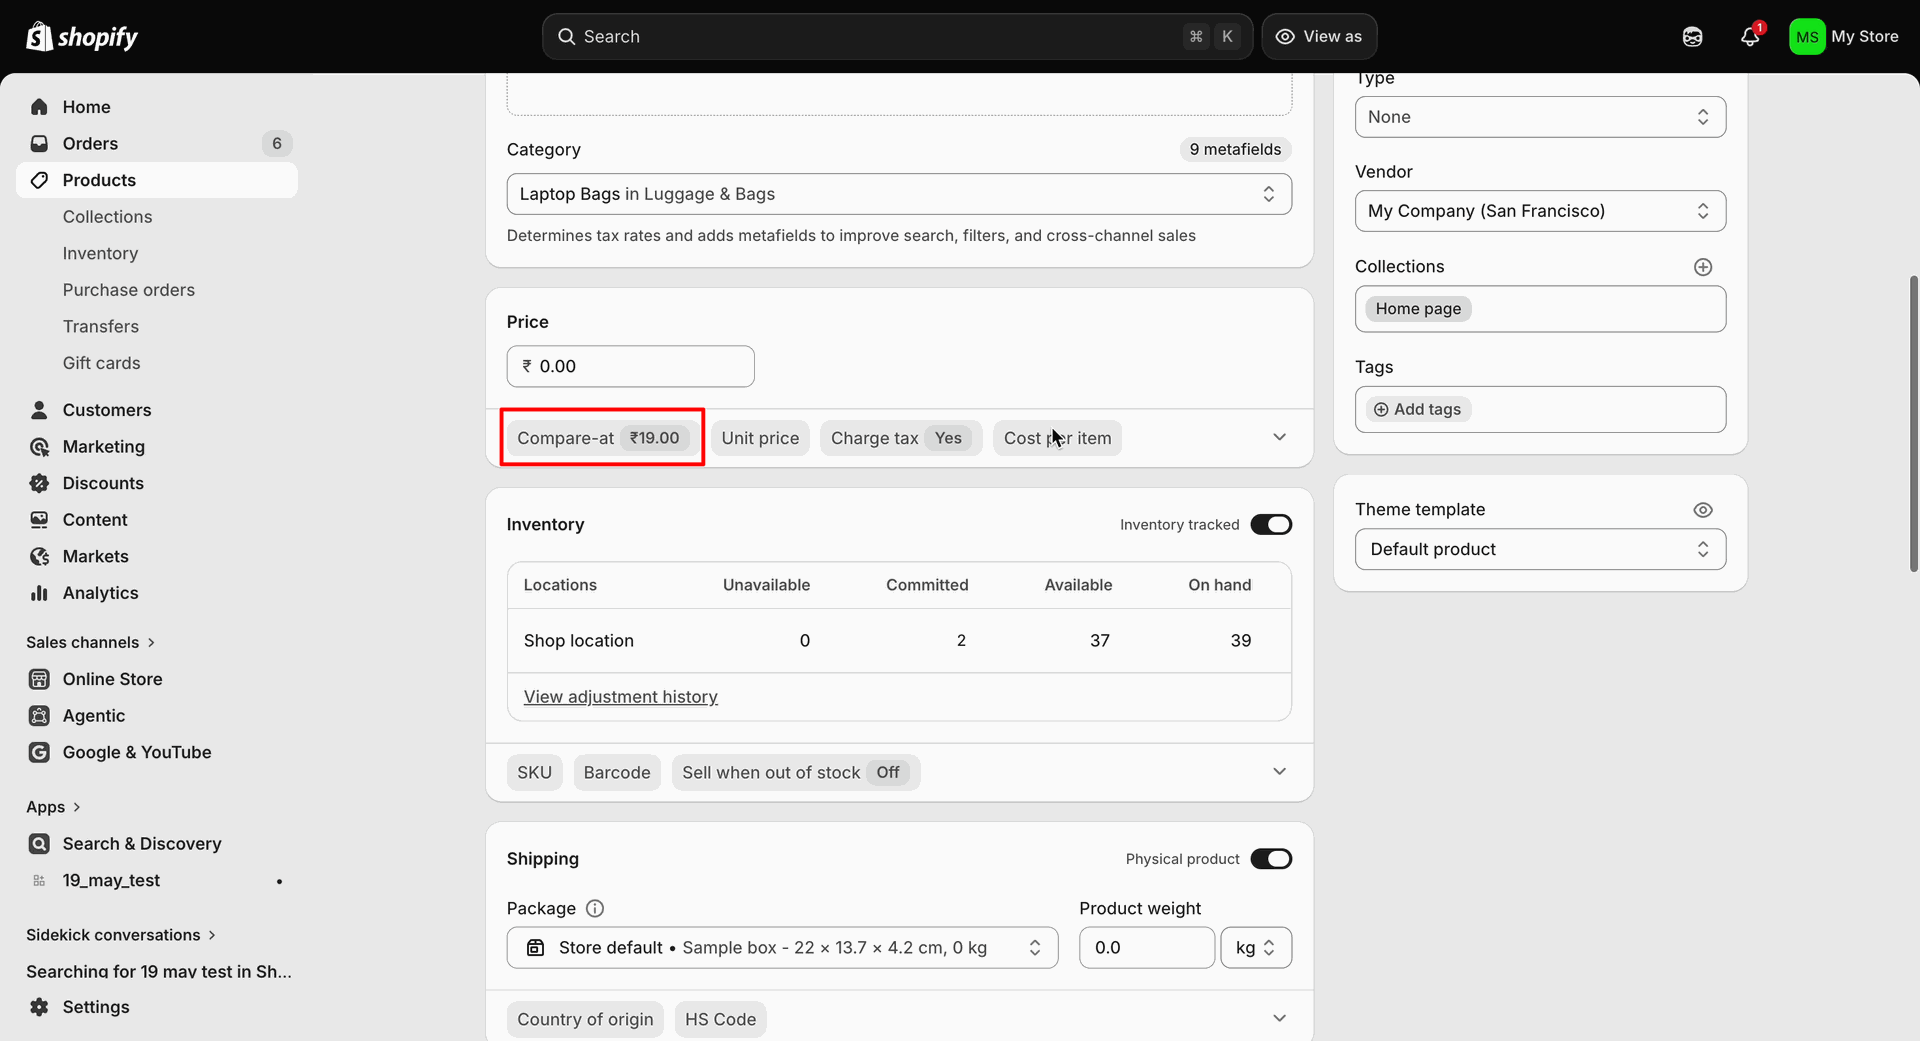
Go to the Shopify Product and open the synchronized product record. You will see that the Compare-at Price has been updated successfully based on the changes synchronized from Odoo.
Workflow
Open the Product Template Form View in Odoo and enable the Exclude Product from Shopify Sync option to prevent the product from being synchronized with Shopify.
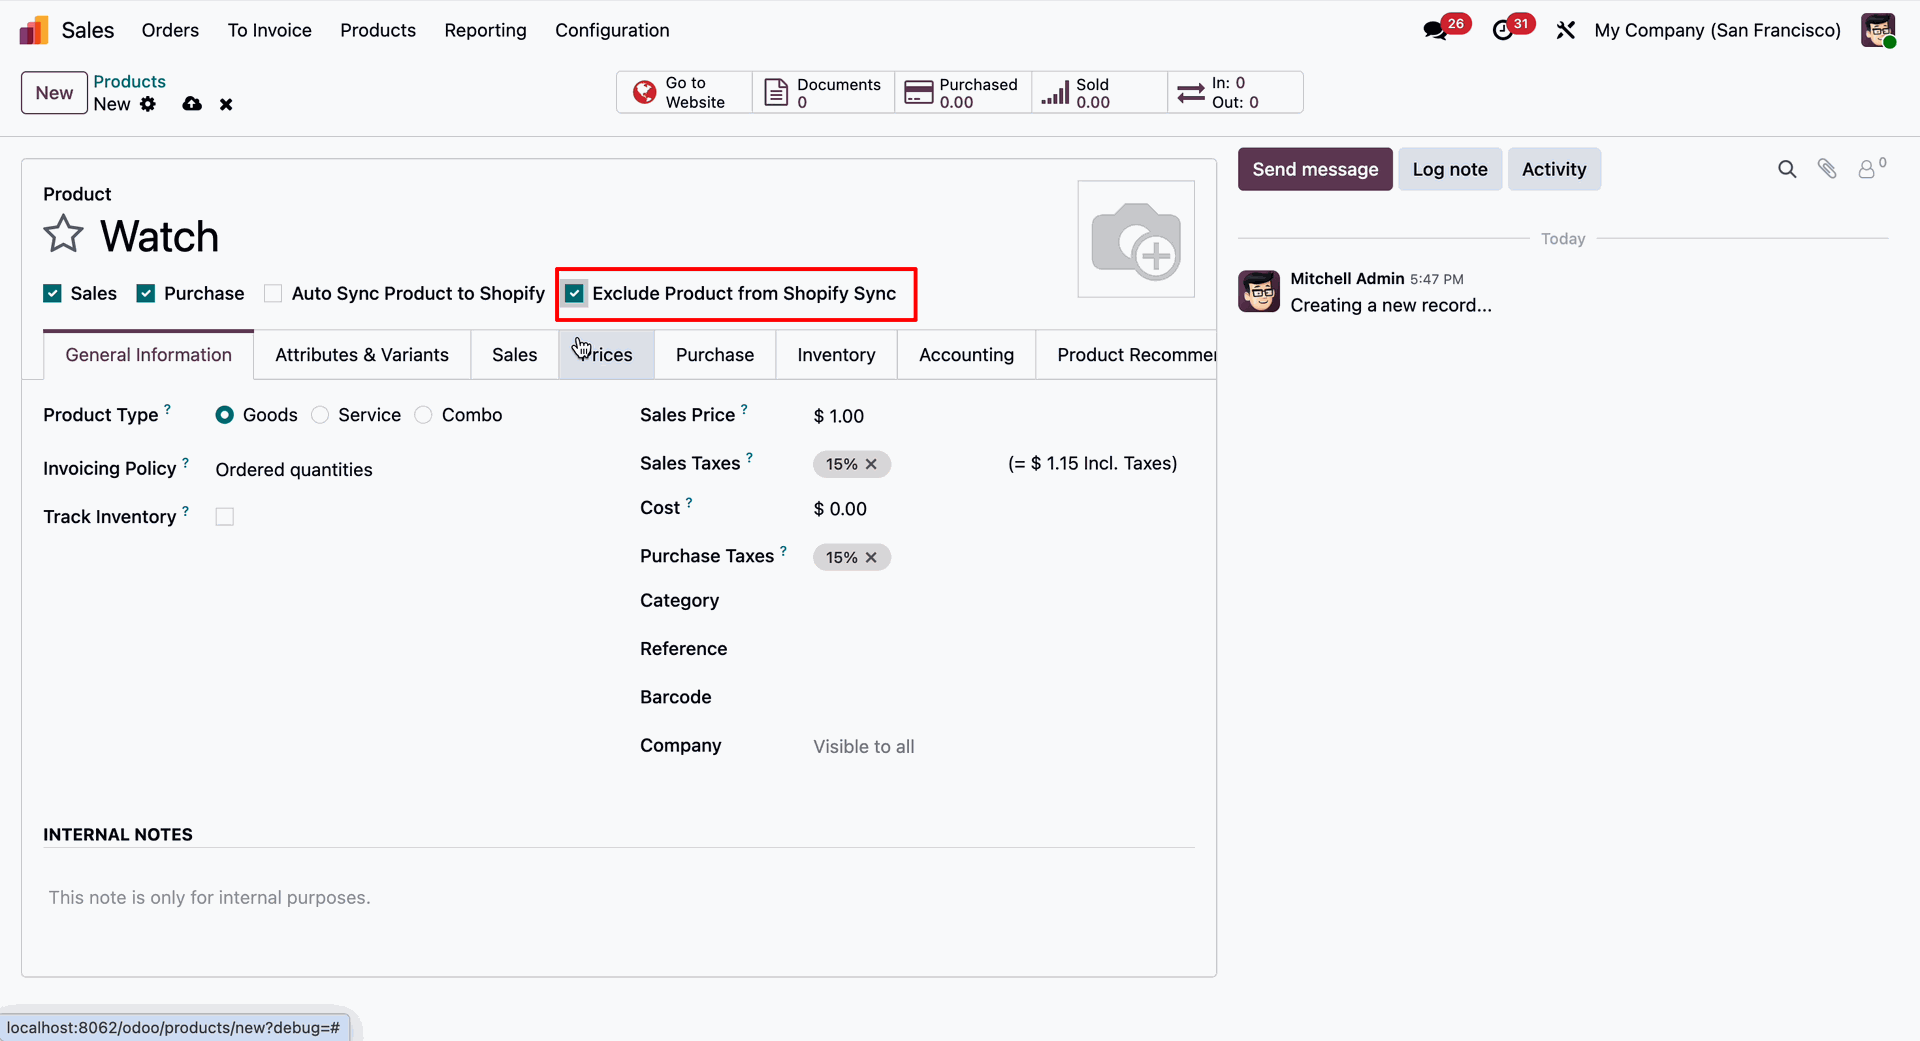
Open a Product Template Form View in Odoo and disable the Exclude Product from Shopify Sync option. The Export to Shopify button will become visible.
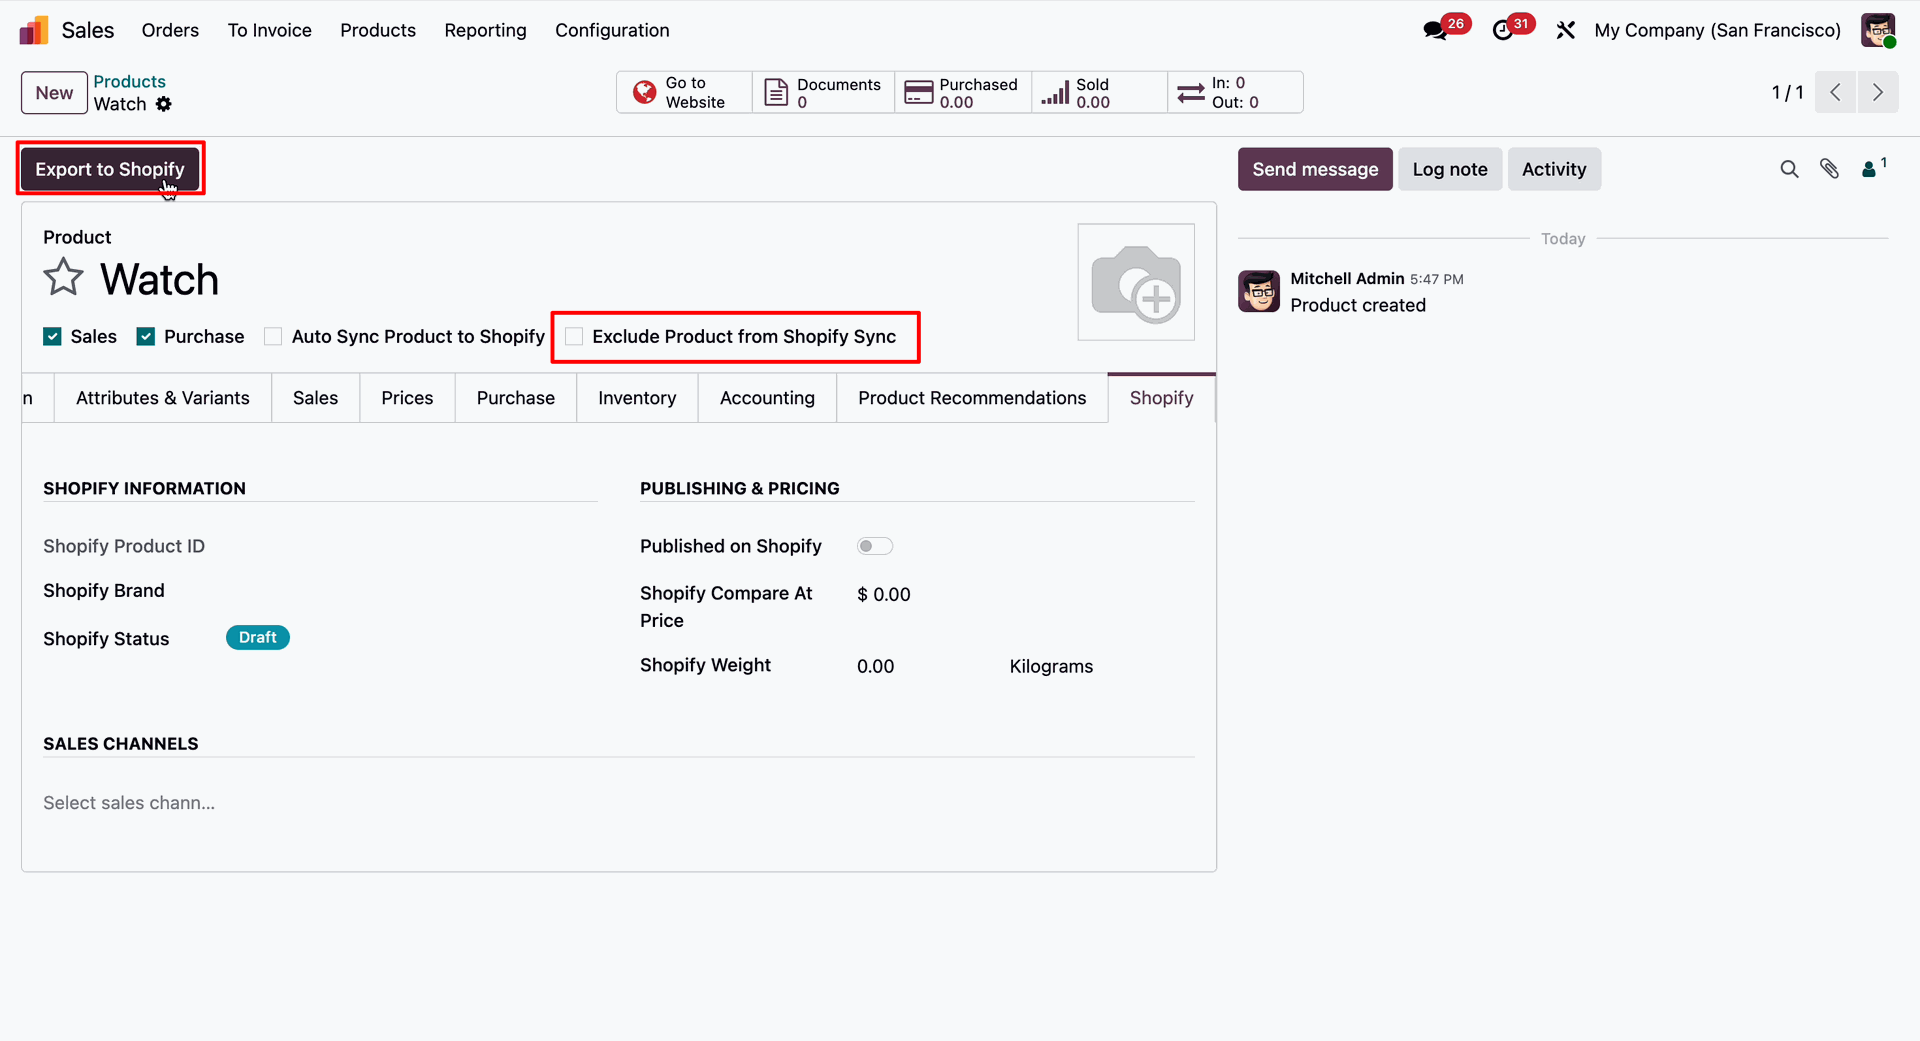
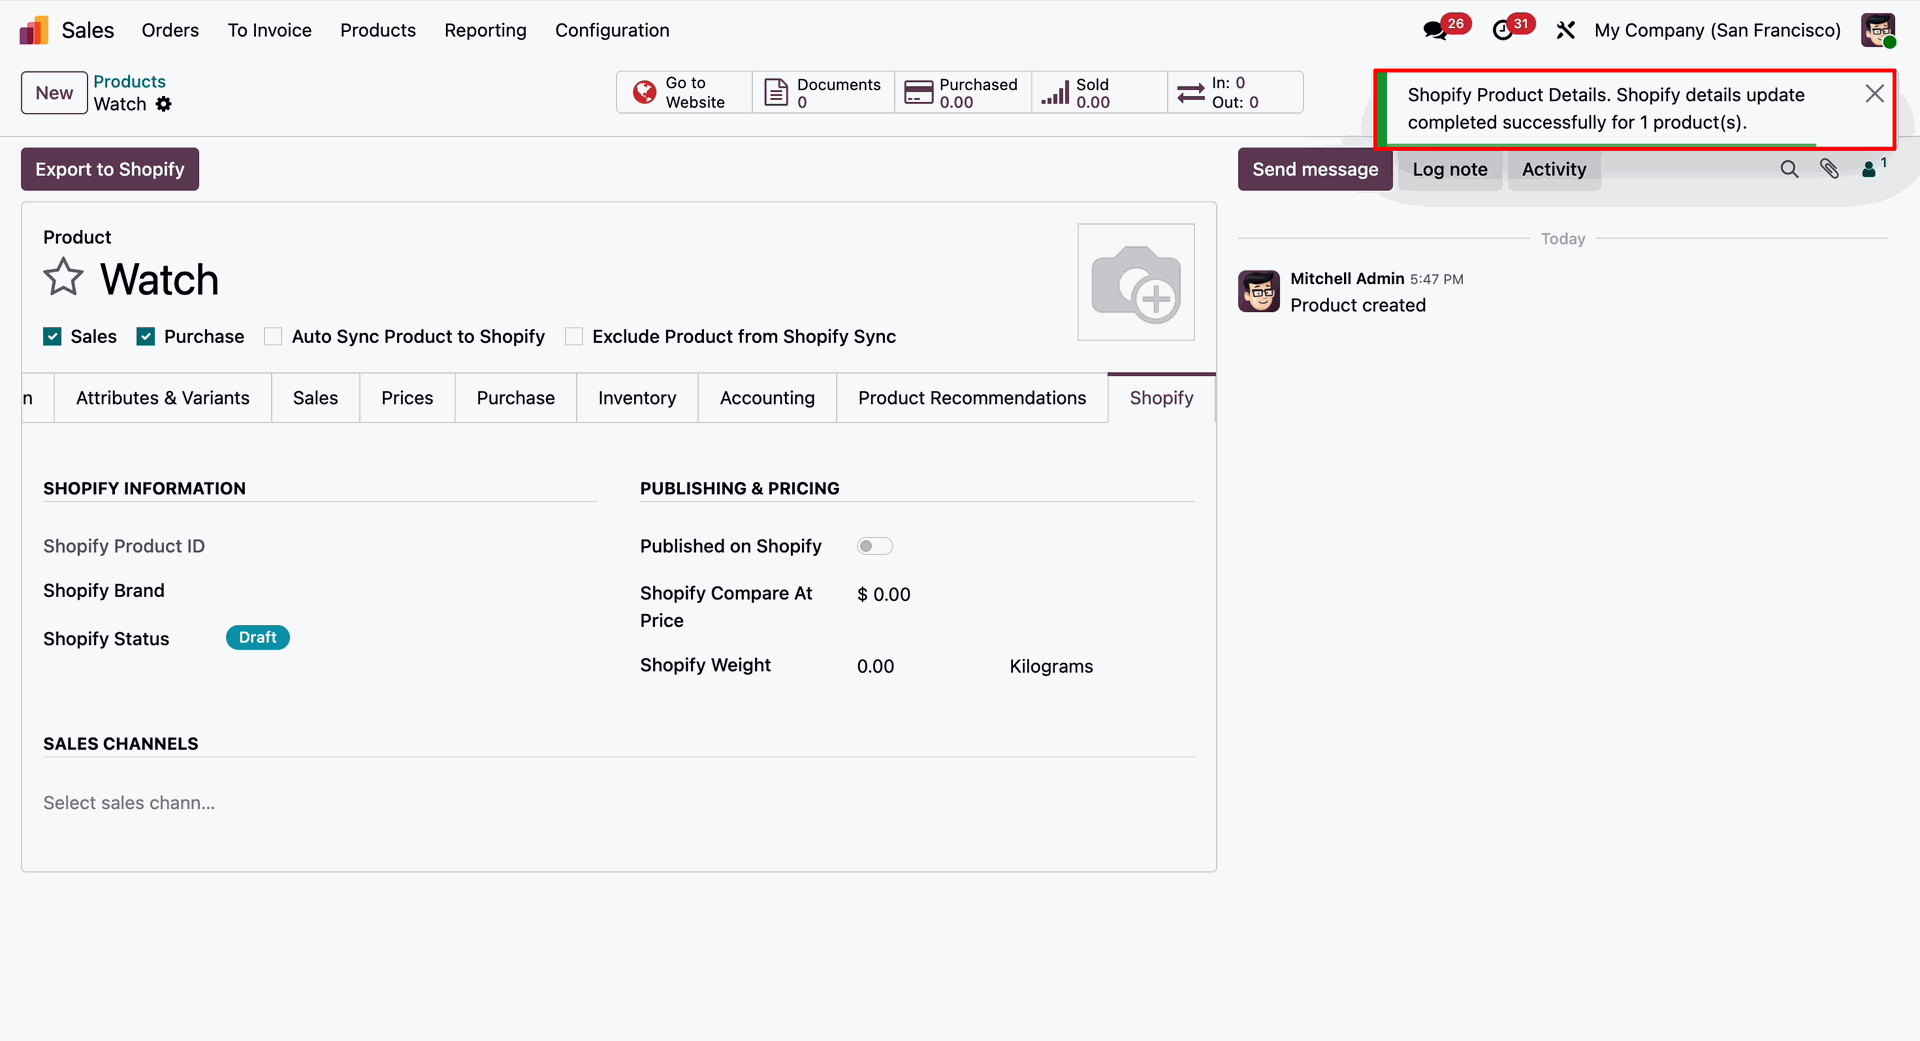
By clicking the Export to Shopify button from the Product Form View, the product details will be exported to Shopify. Upon successful completion, a success notification will be displayed confirming that the product has been exported successfully.
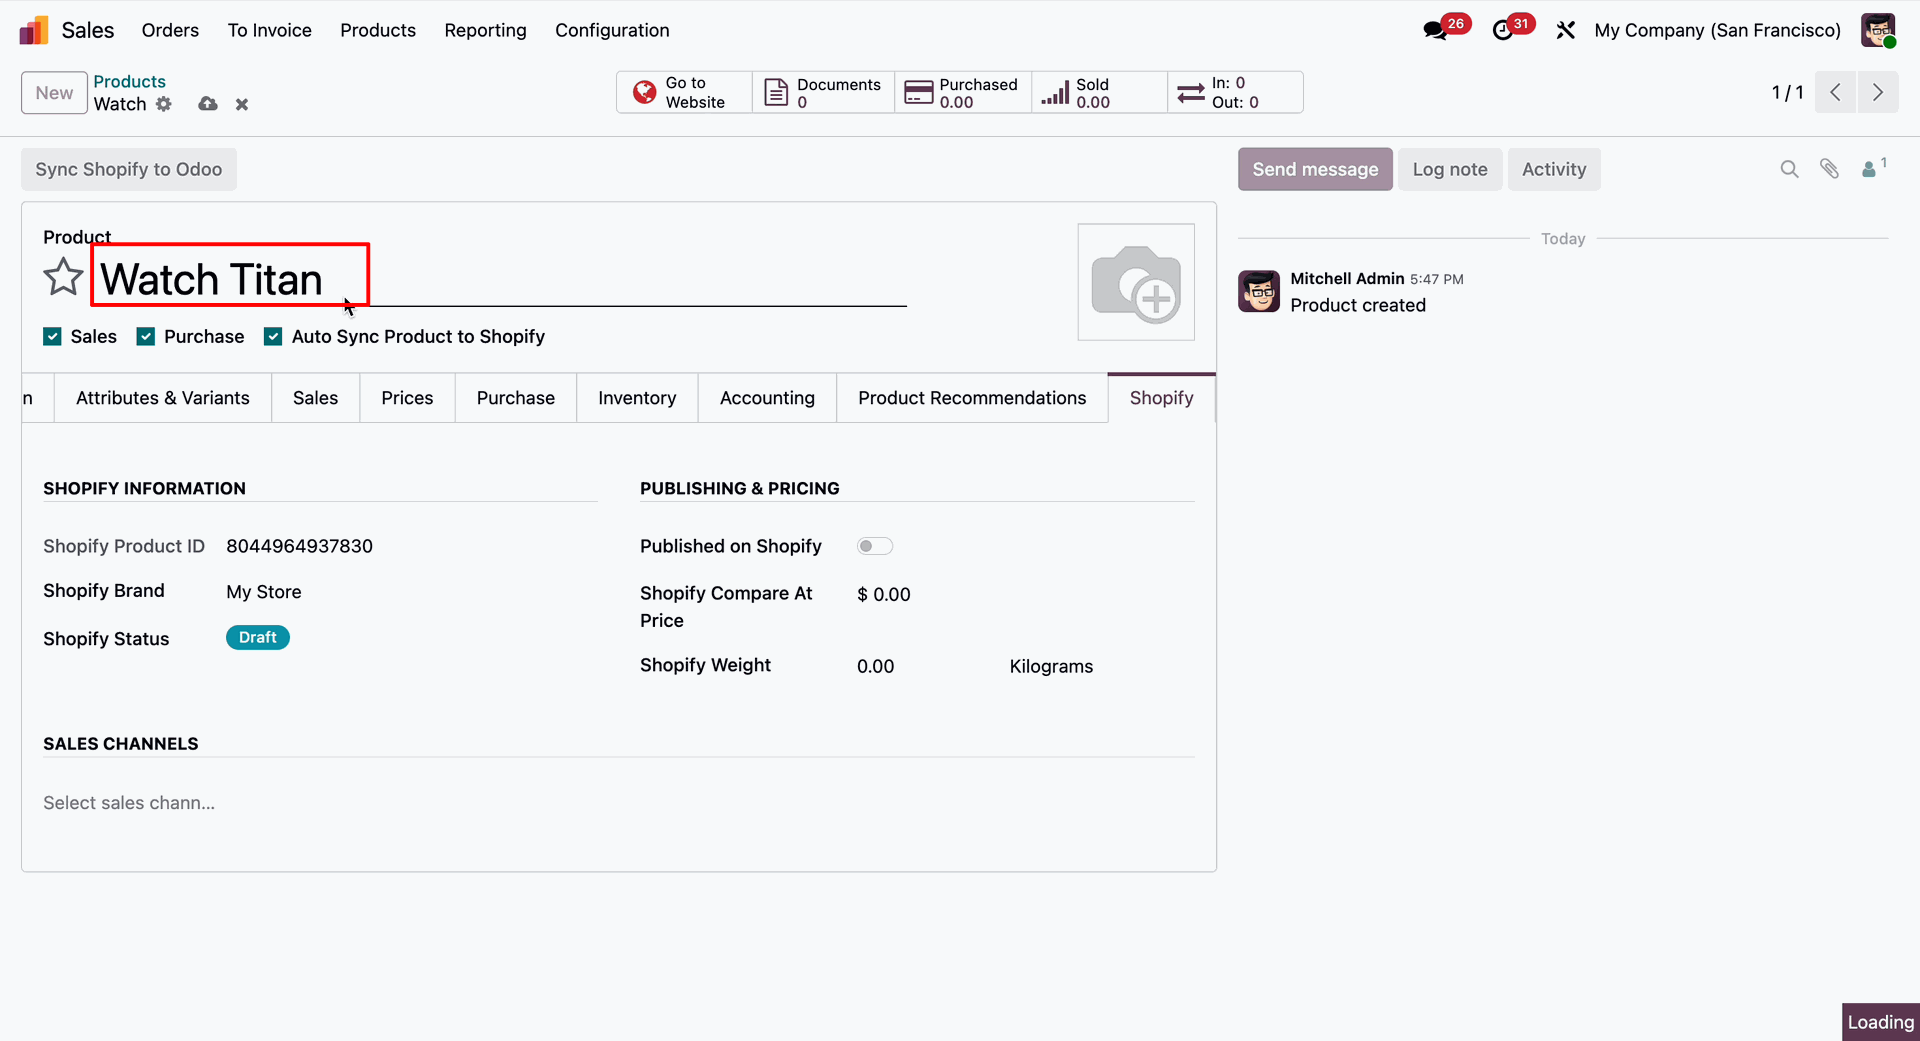
Update the product details in Odoo. If the Auto Sync Product to Shopify option is enabled, the changes will be automatically synchronized with Shopify.
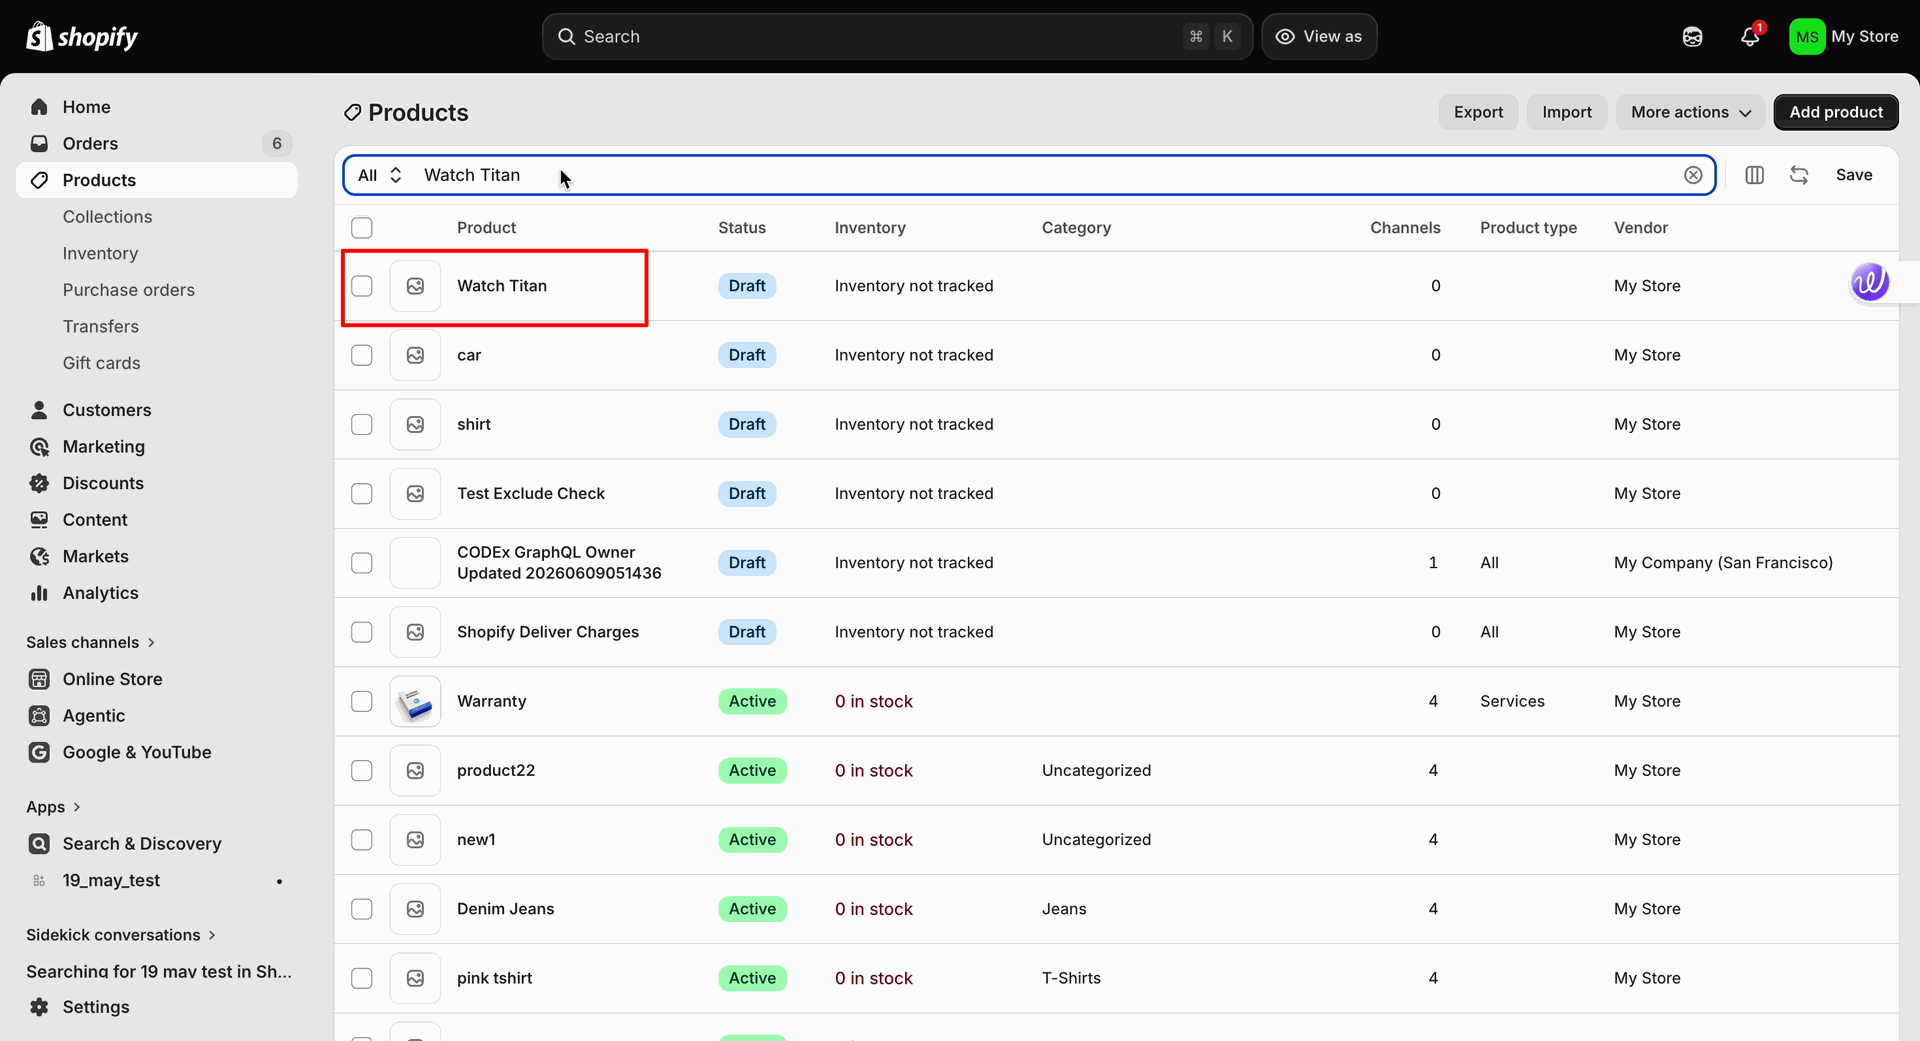
The updated product details have been successfully synchronized and are now visible in Shopify, reflecting the latest changes made in Odoo.
Update the product details in Odoo.
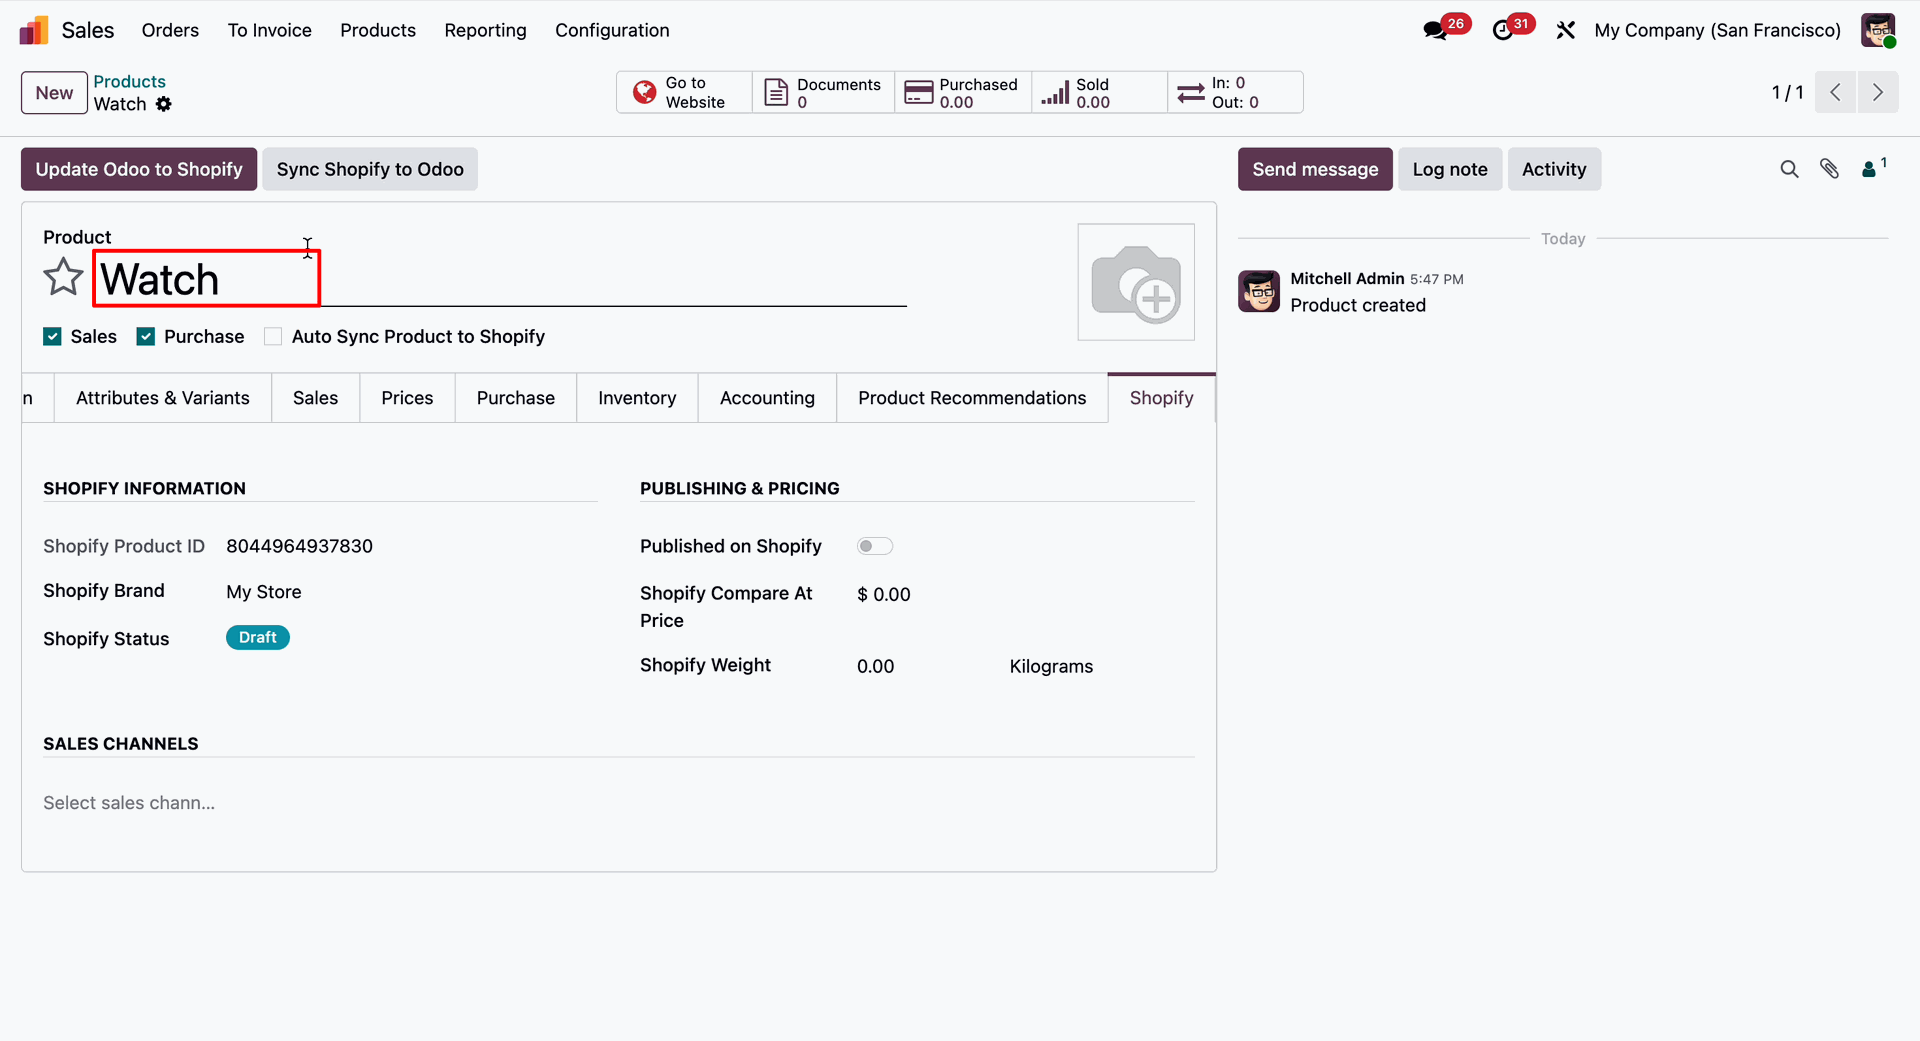
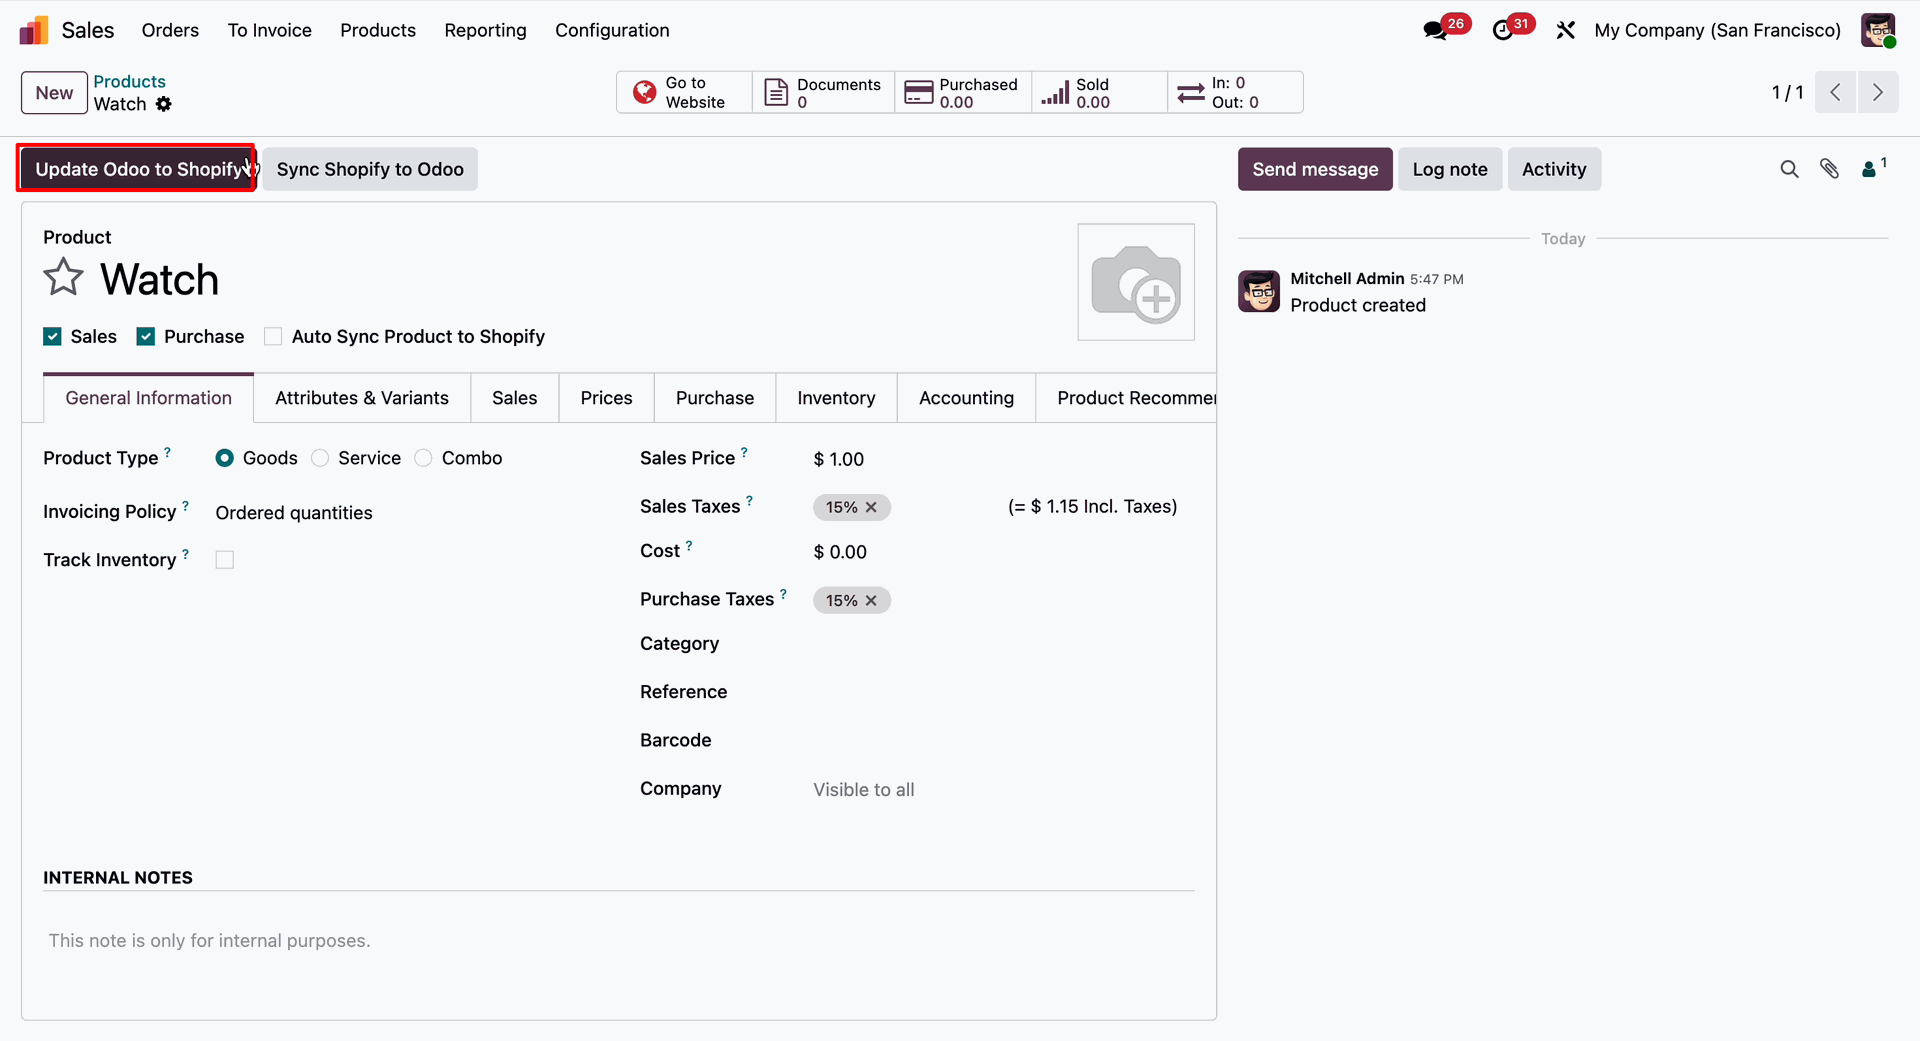
If the Auto Sync Product to Shopify option is disabled, the Update Odoo to Shopify button will be visible, allowing users to manually synchronize the updated product information with Shopify.
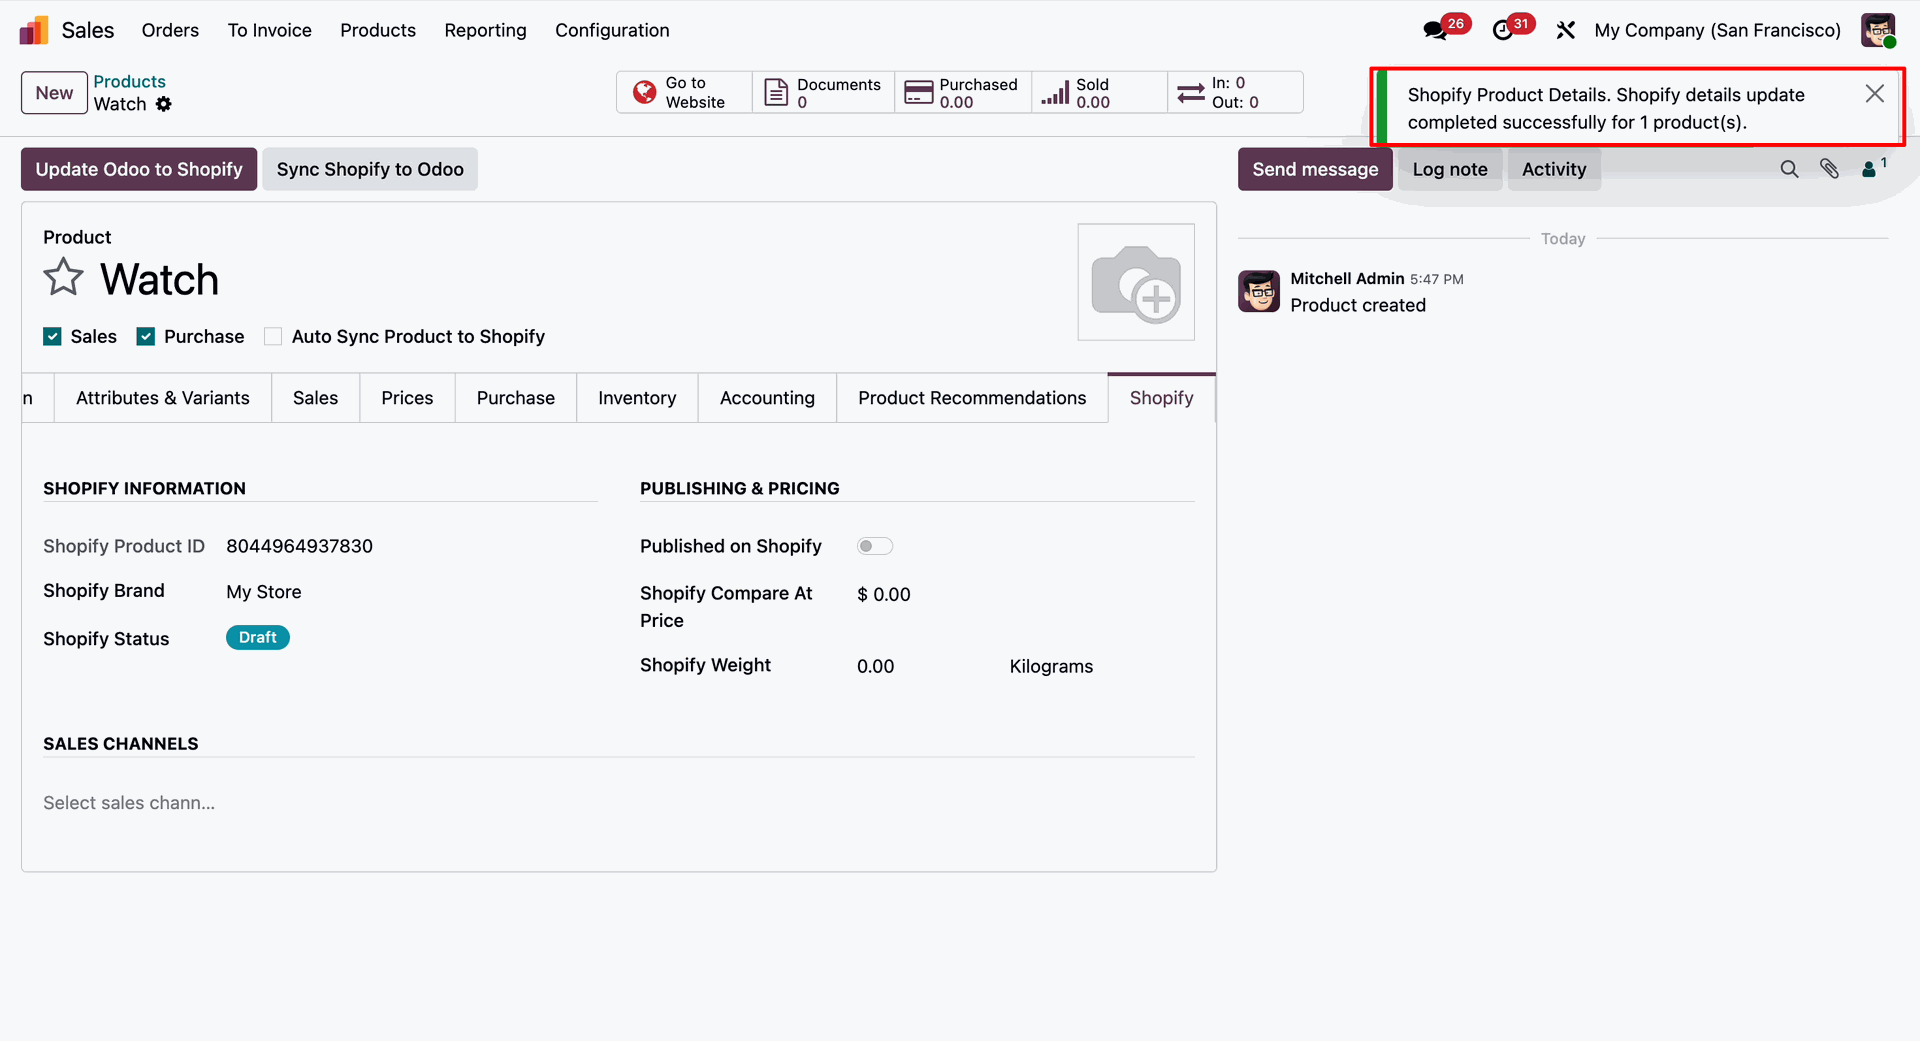
A success notification will be displayed once the synchronization is completed successfully, confirming that the product details have been updated in Shopify.
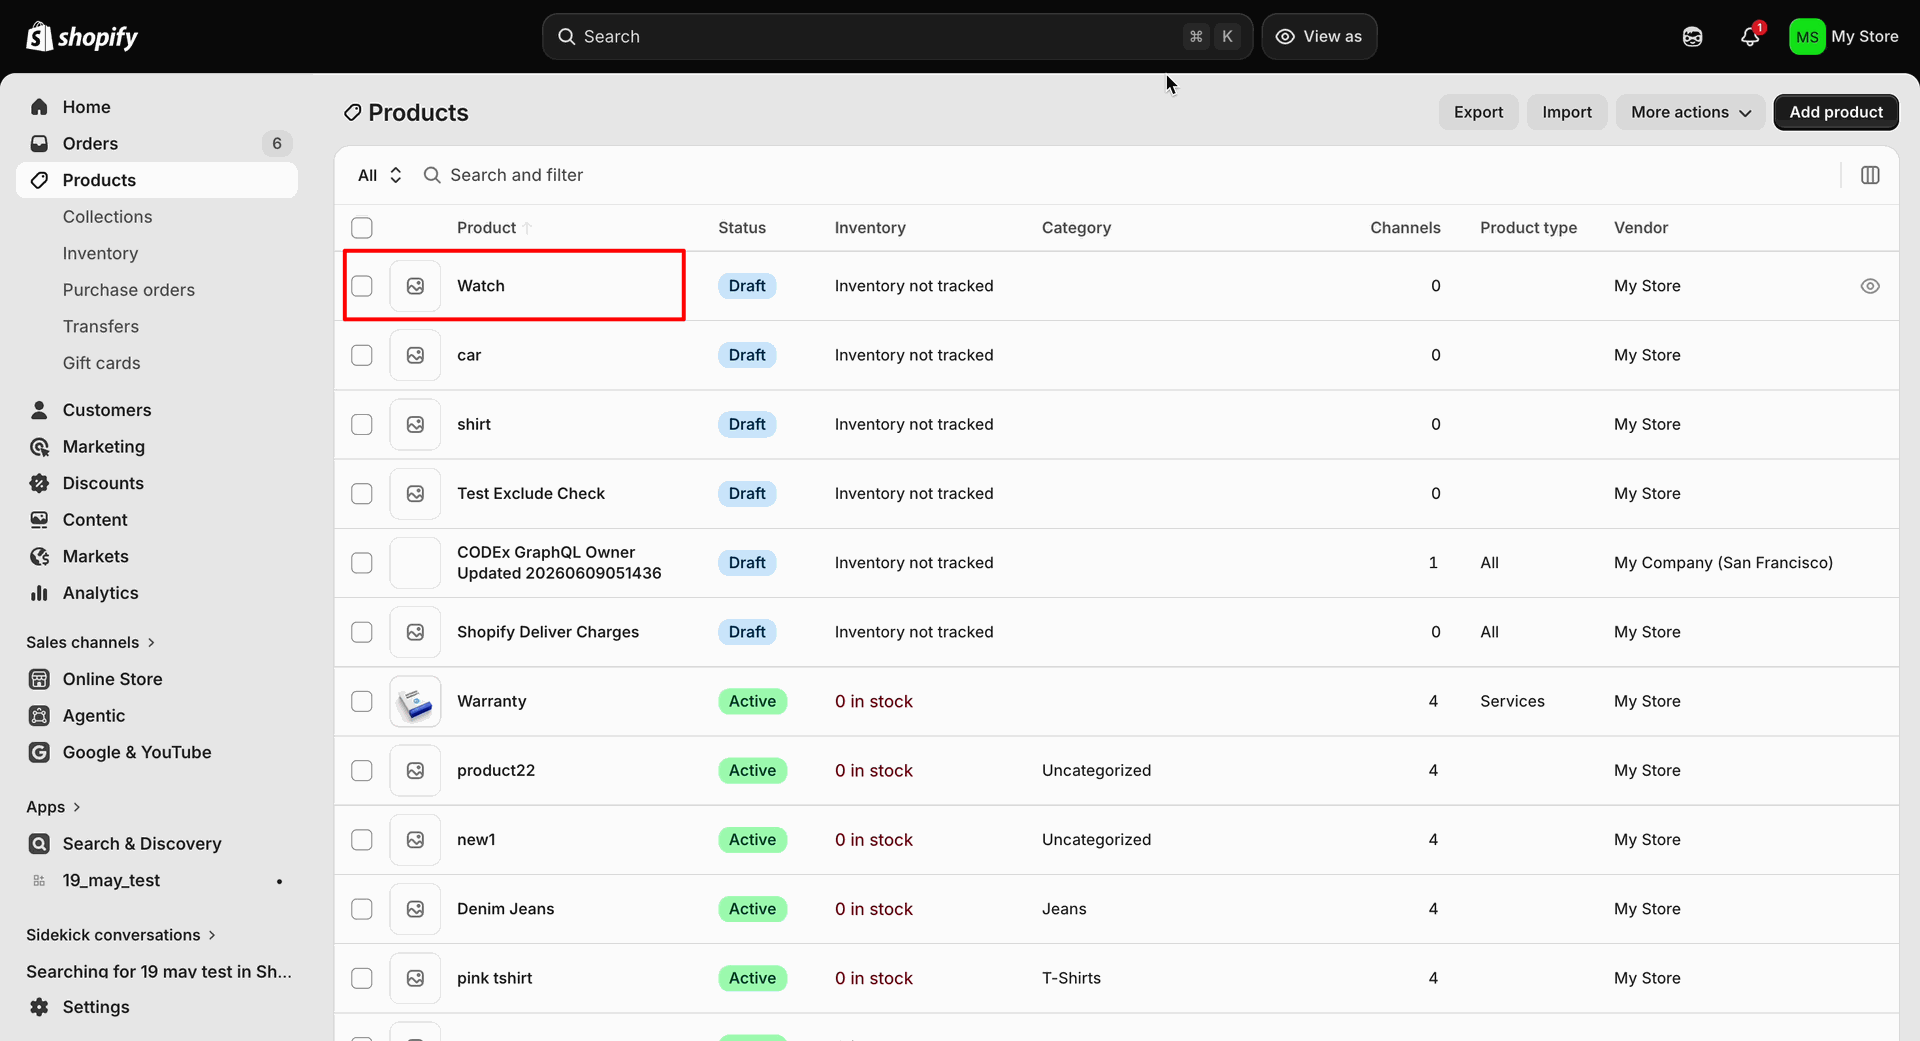
The updated product details have been successfully synchronized and are now visible in Shopify, reflecting the latest changes made in Odoo.
Workflow
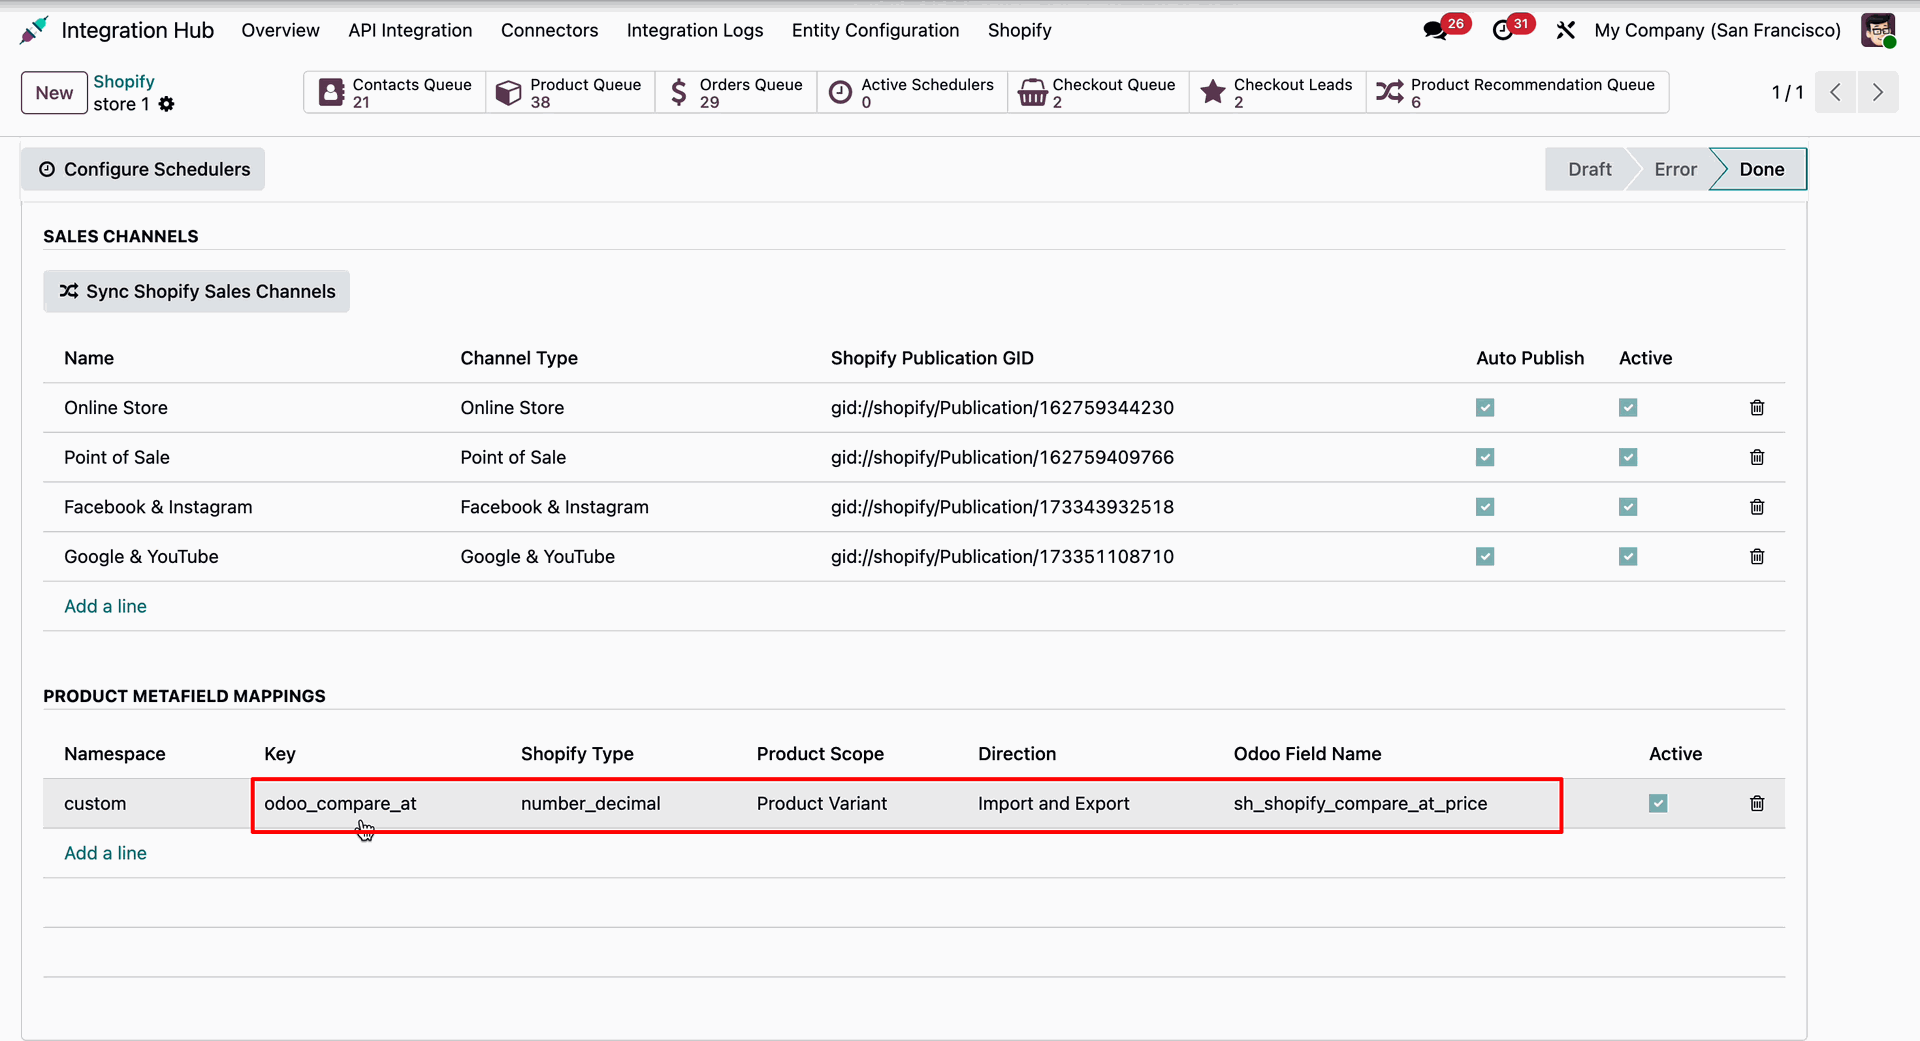
Go to Shopify -> Configuration -> Metafield Mappings andcreate a new Product Metafield Mapping by configuring the Custom Field Key, Type, Sync Direction, Scope, and the corresponding Odoo Field Name to define how product metafield data is synchronized between Odoo and Shopify.
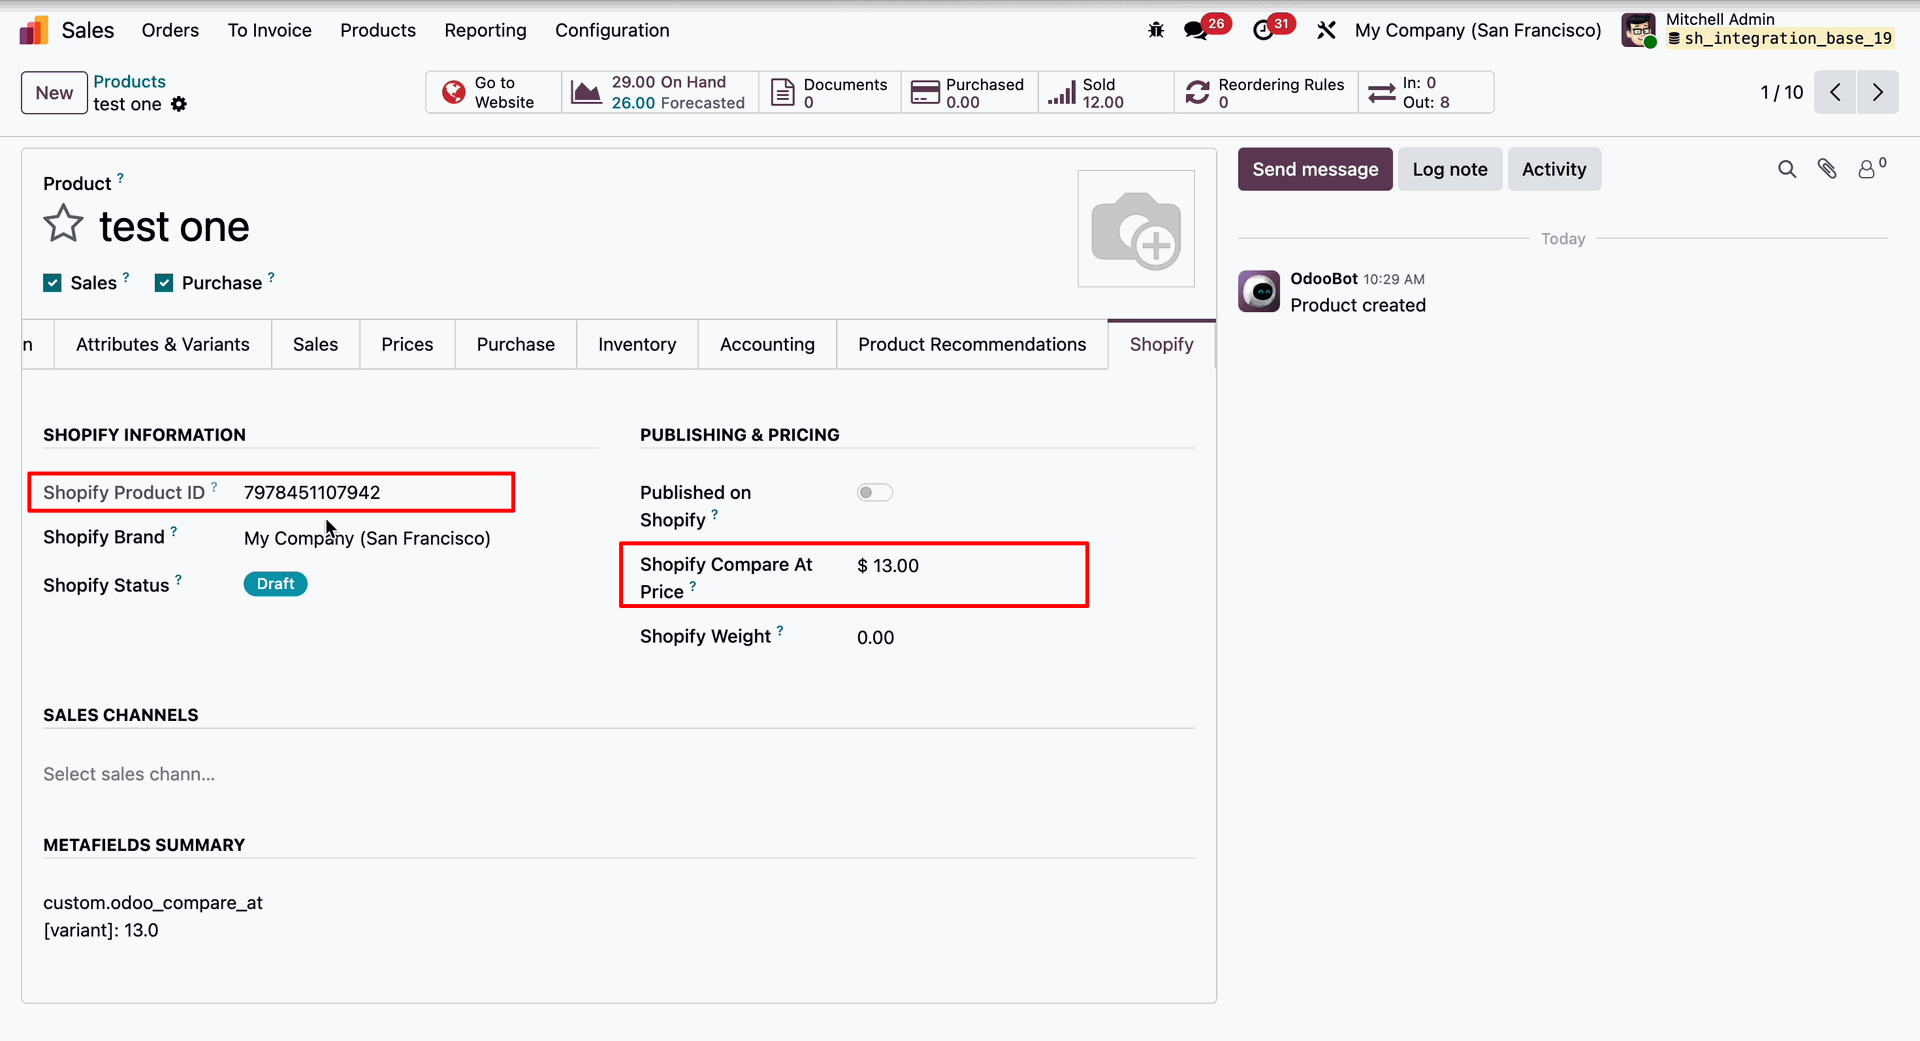
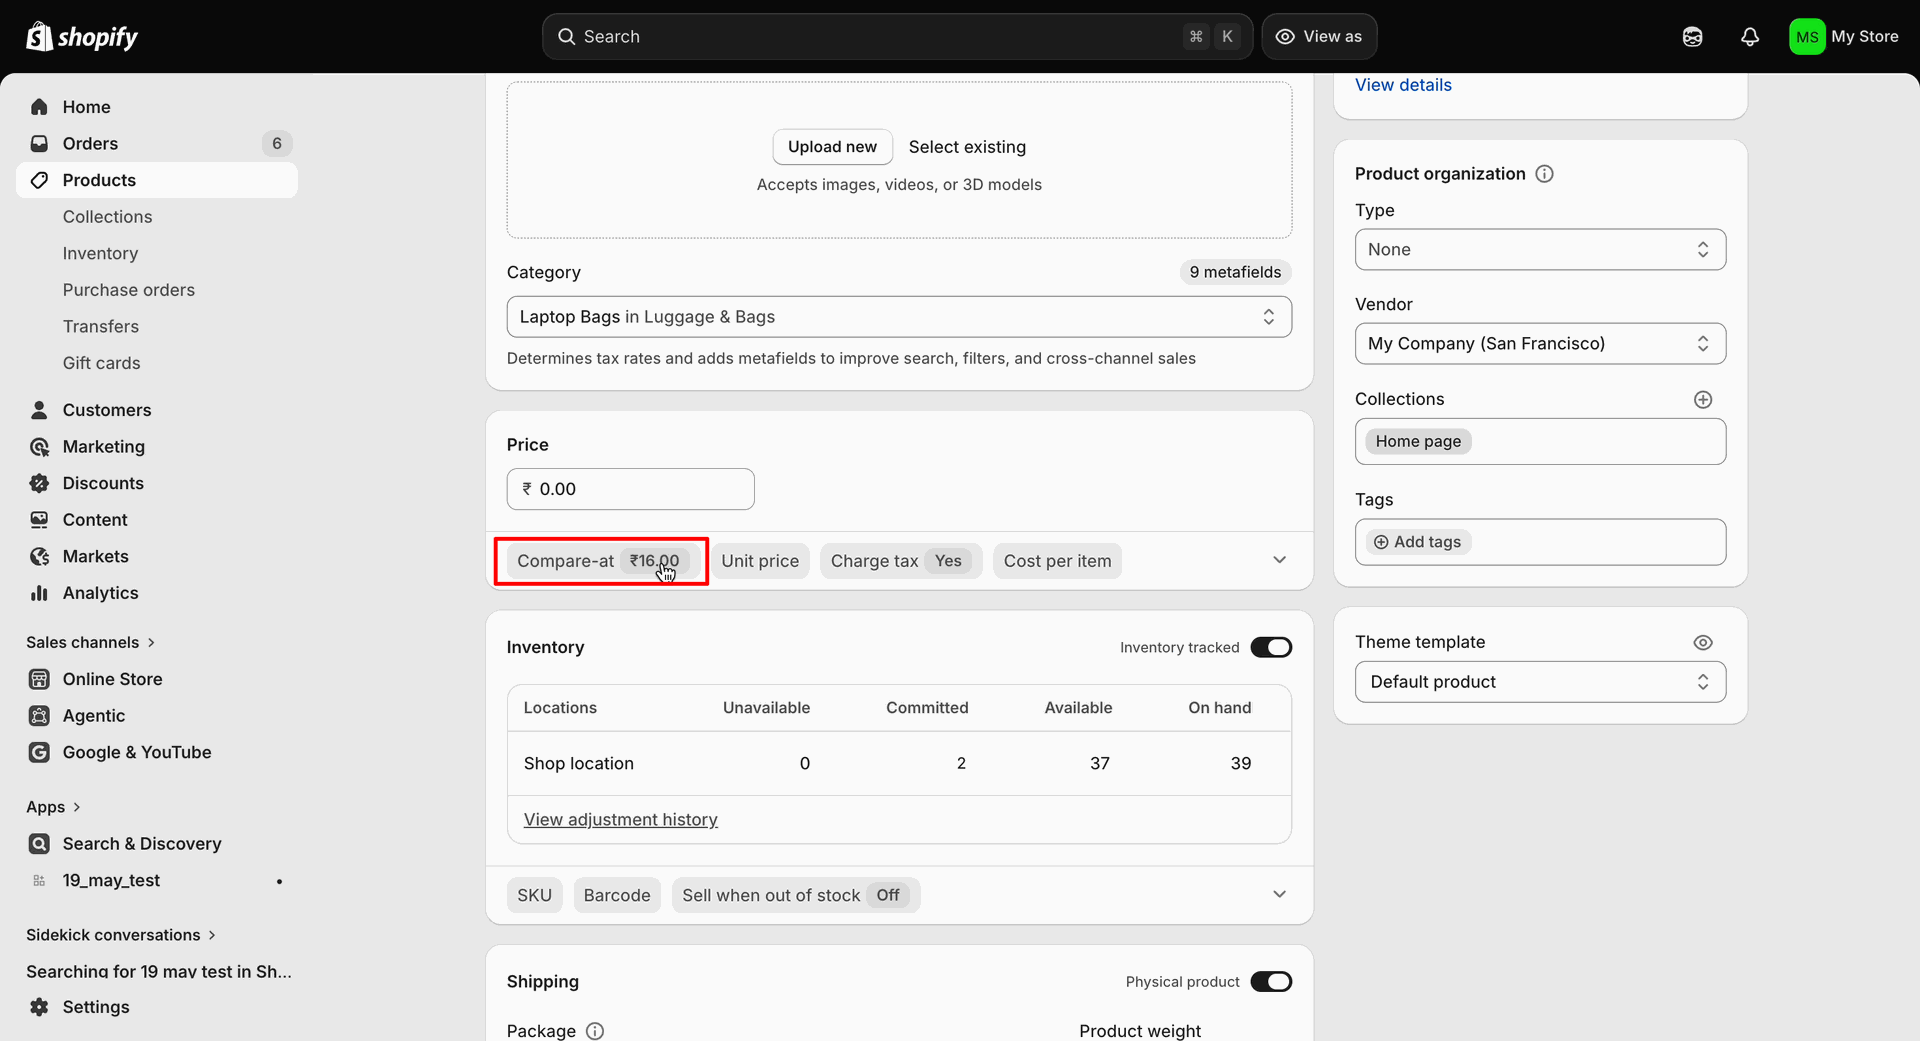
Go to the Product Form View and navigate to the Shopify tab. Here, you can view the Shopify Product ID, Compare-at Price, and other Shopify-related synchronization details associated with the product.
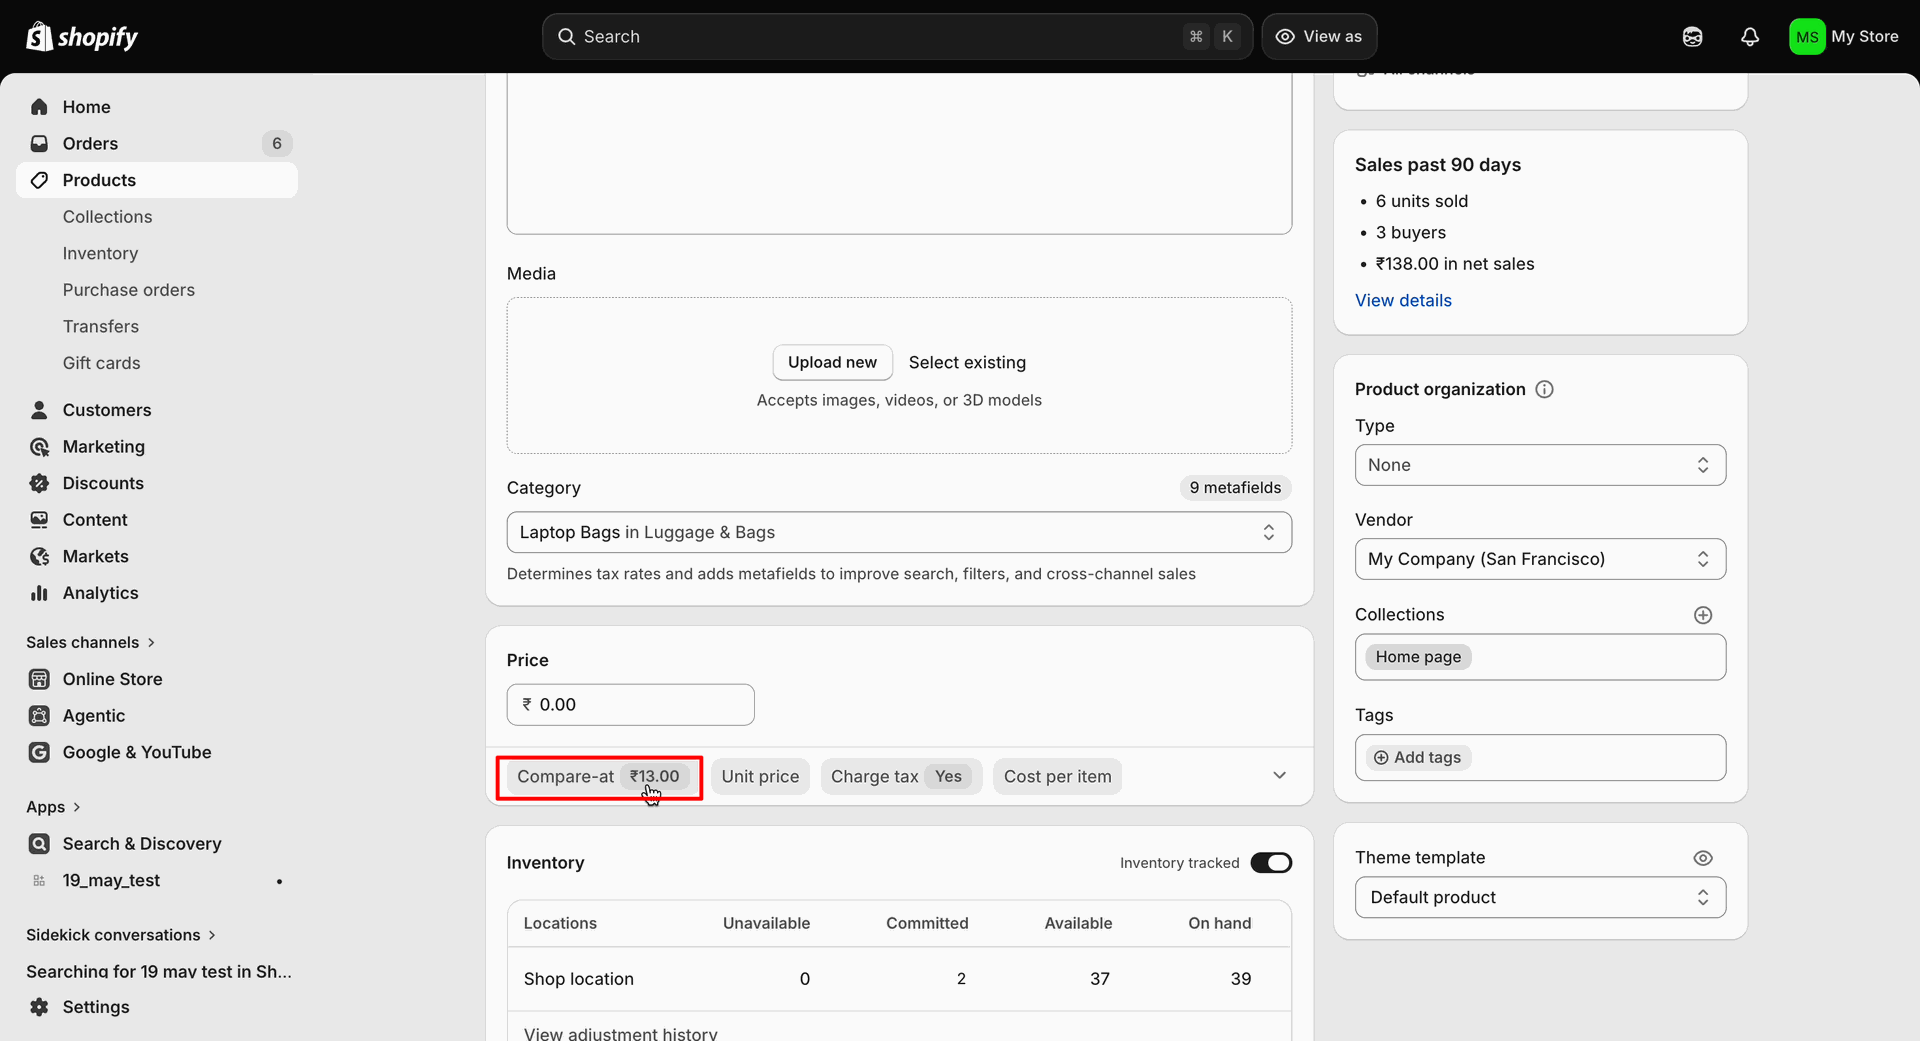
Open the selected product in Shopify and verify that the Compare-at Price.
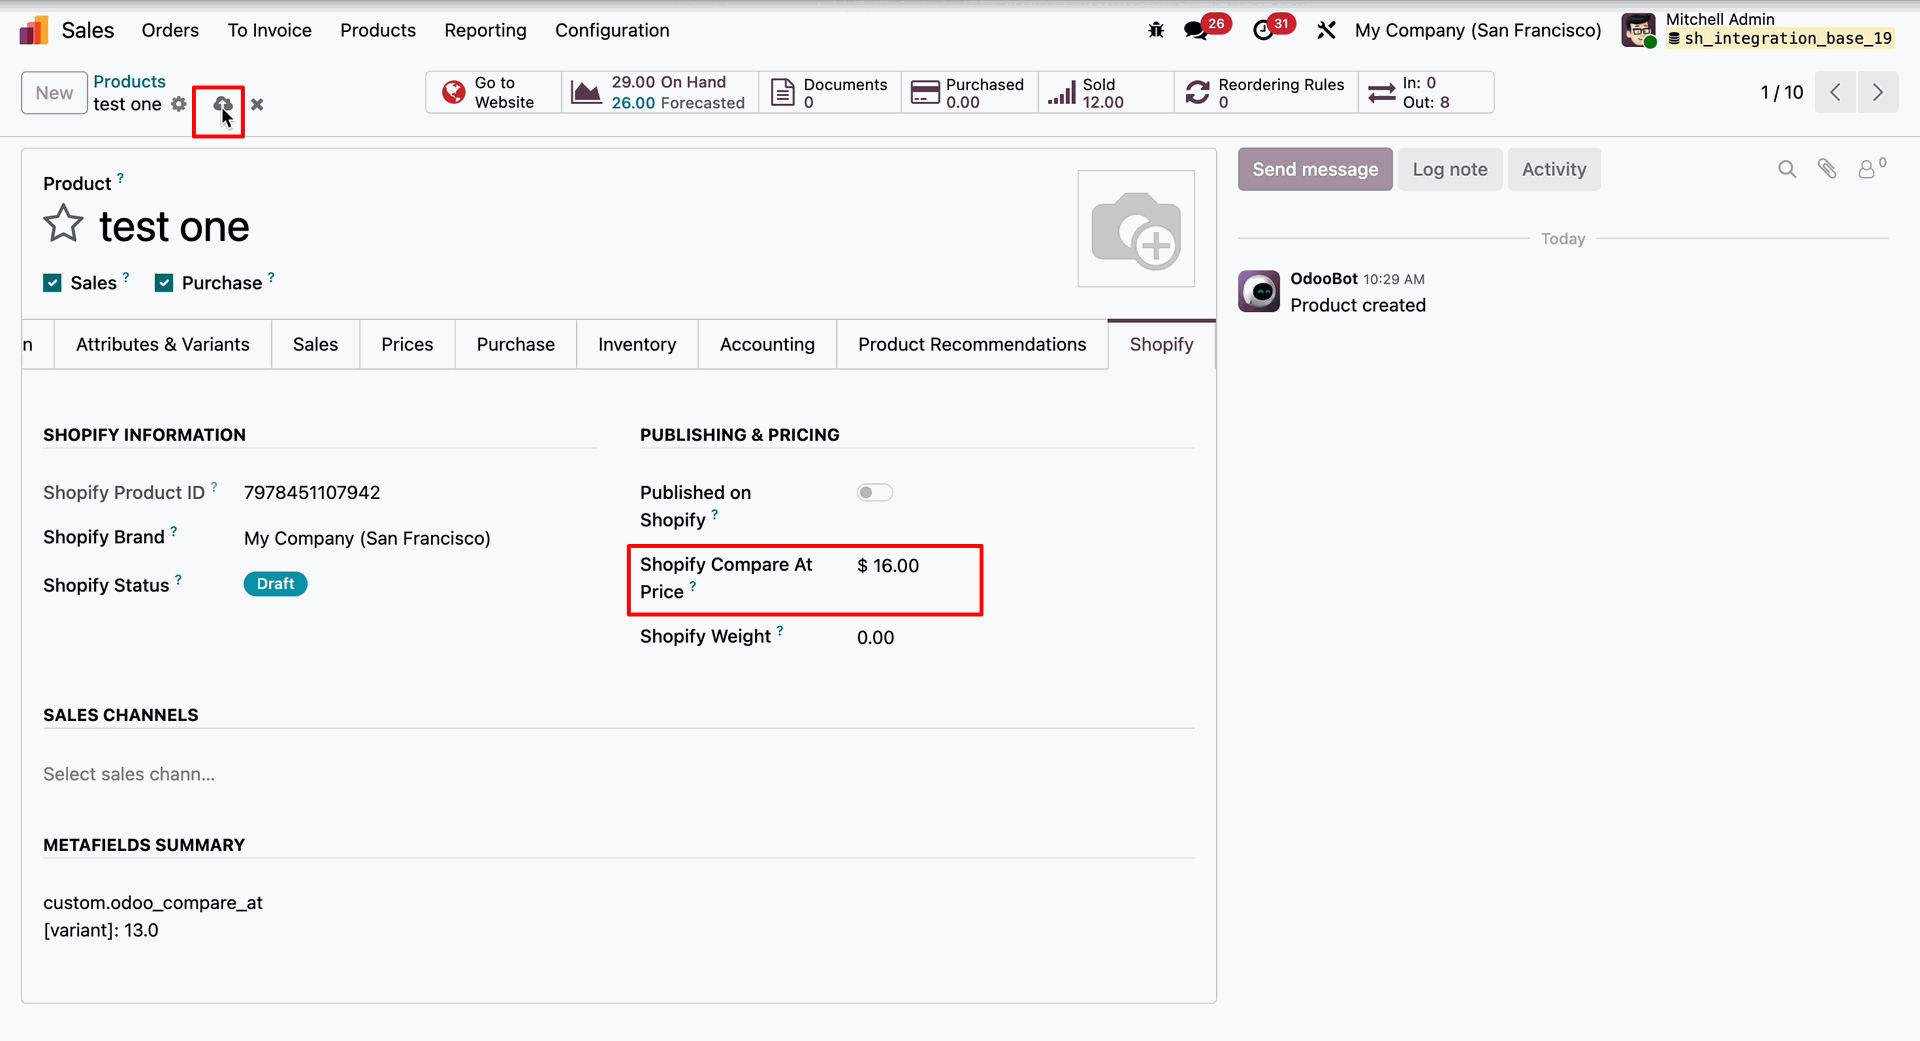
Update the Compare-at Price in the Shopify tab of the Product Form View and click Save to store the changes in Odoo.
Open the selected product in Shopify and verify that the Compare-at Price has been updated successfully and matches the value configured in Odoo.
Workflow
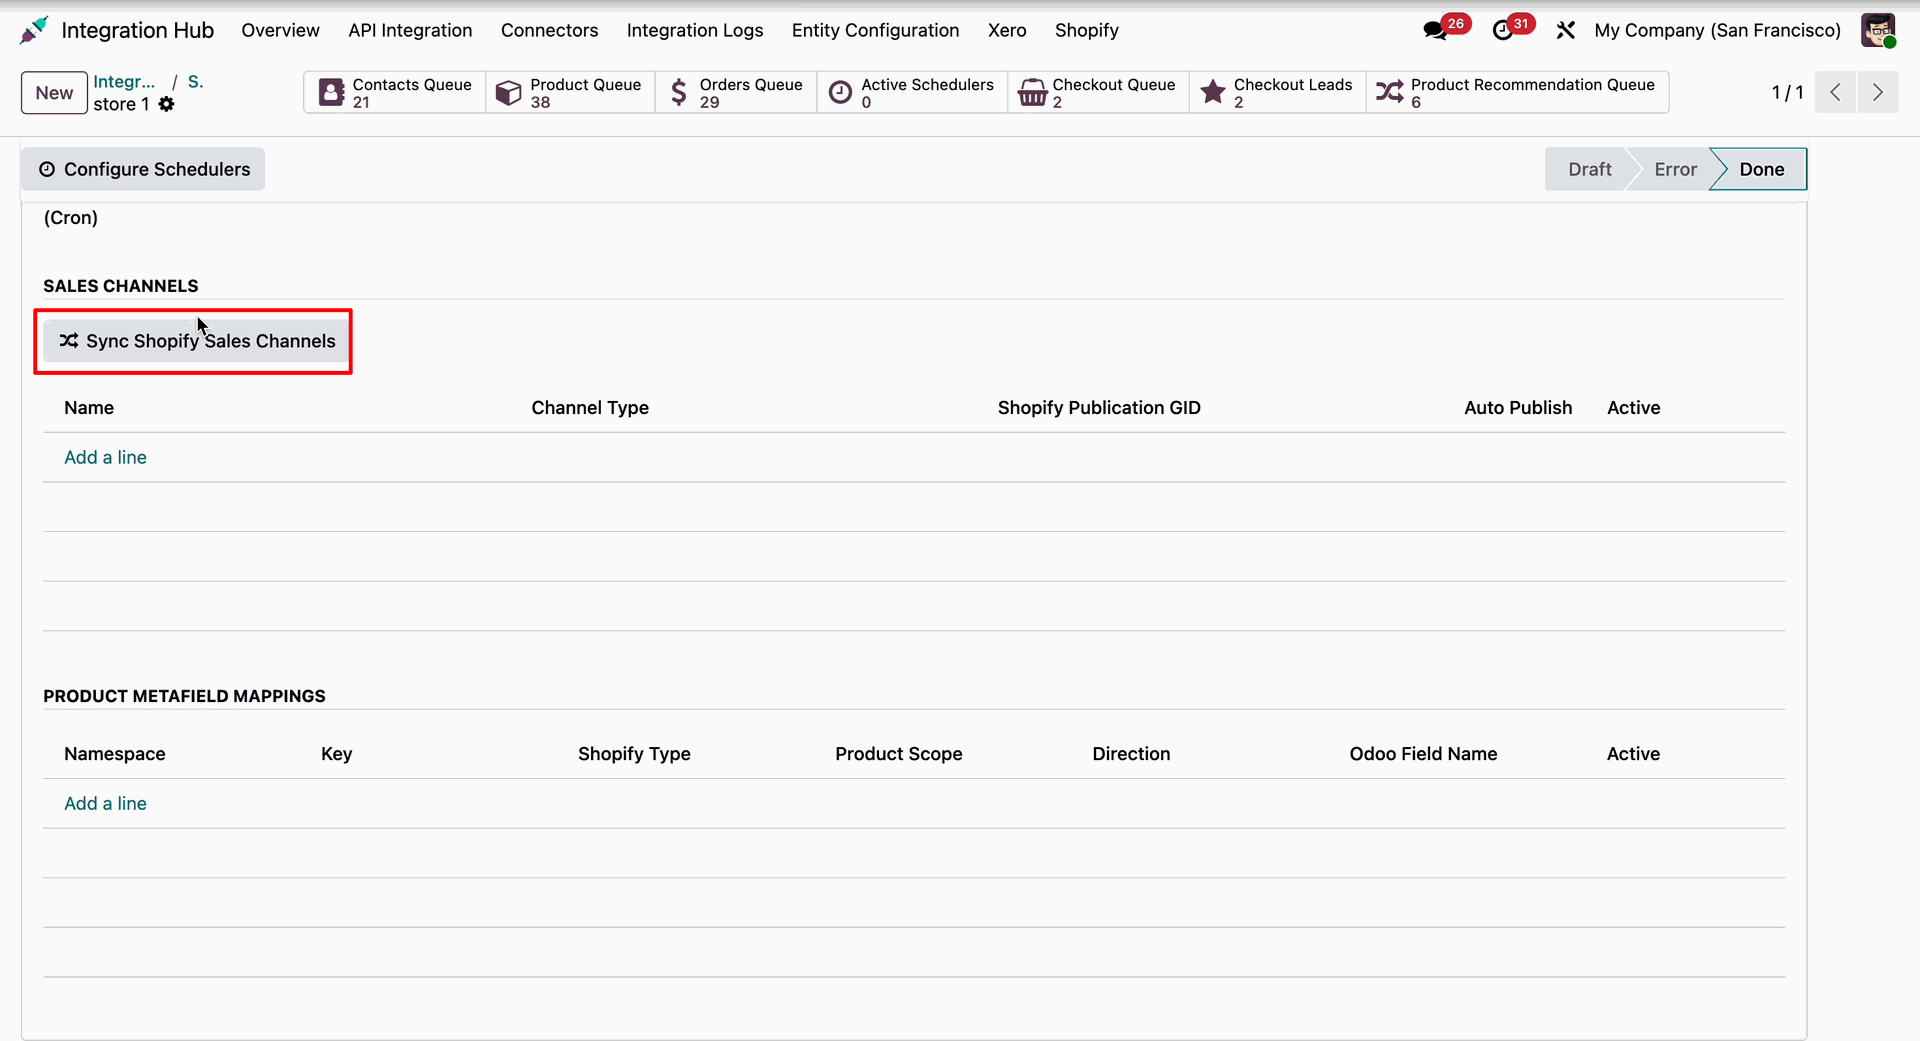
Go to Shopify -> Configuration and click the Sync Shopify Sales Channels button to import and synchronize the available sales channels from Shopify into Odoo.
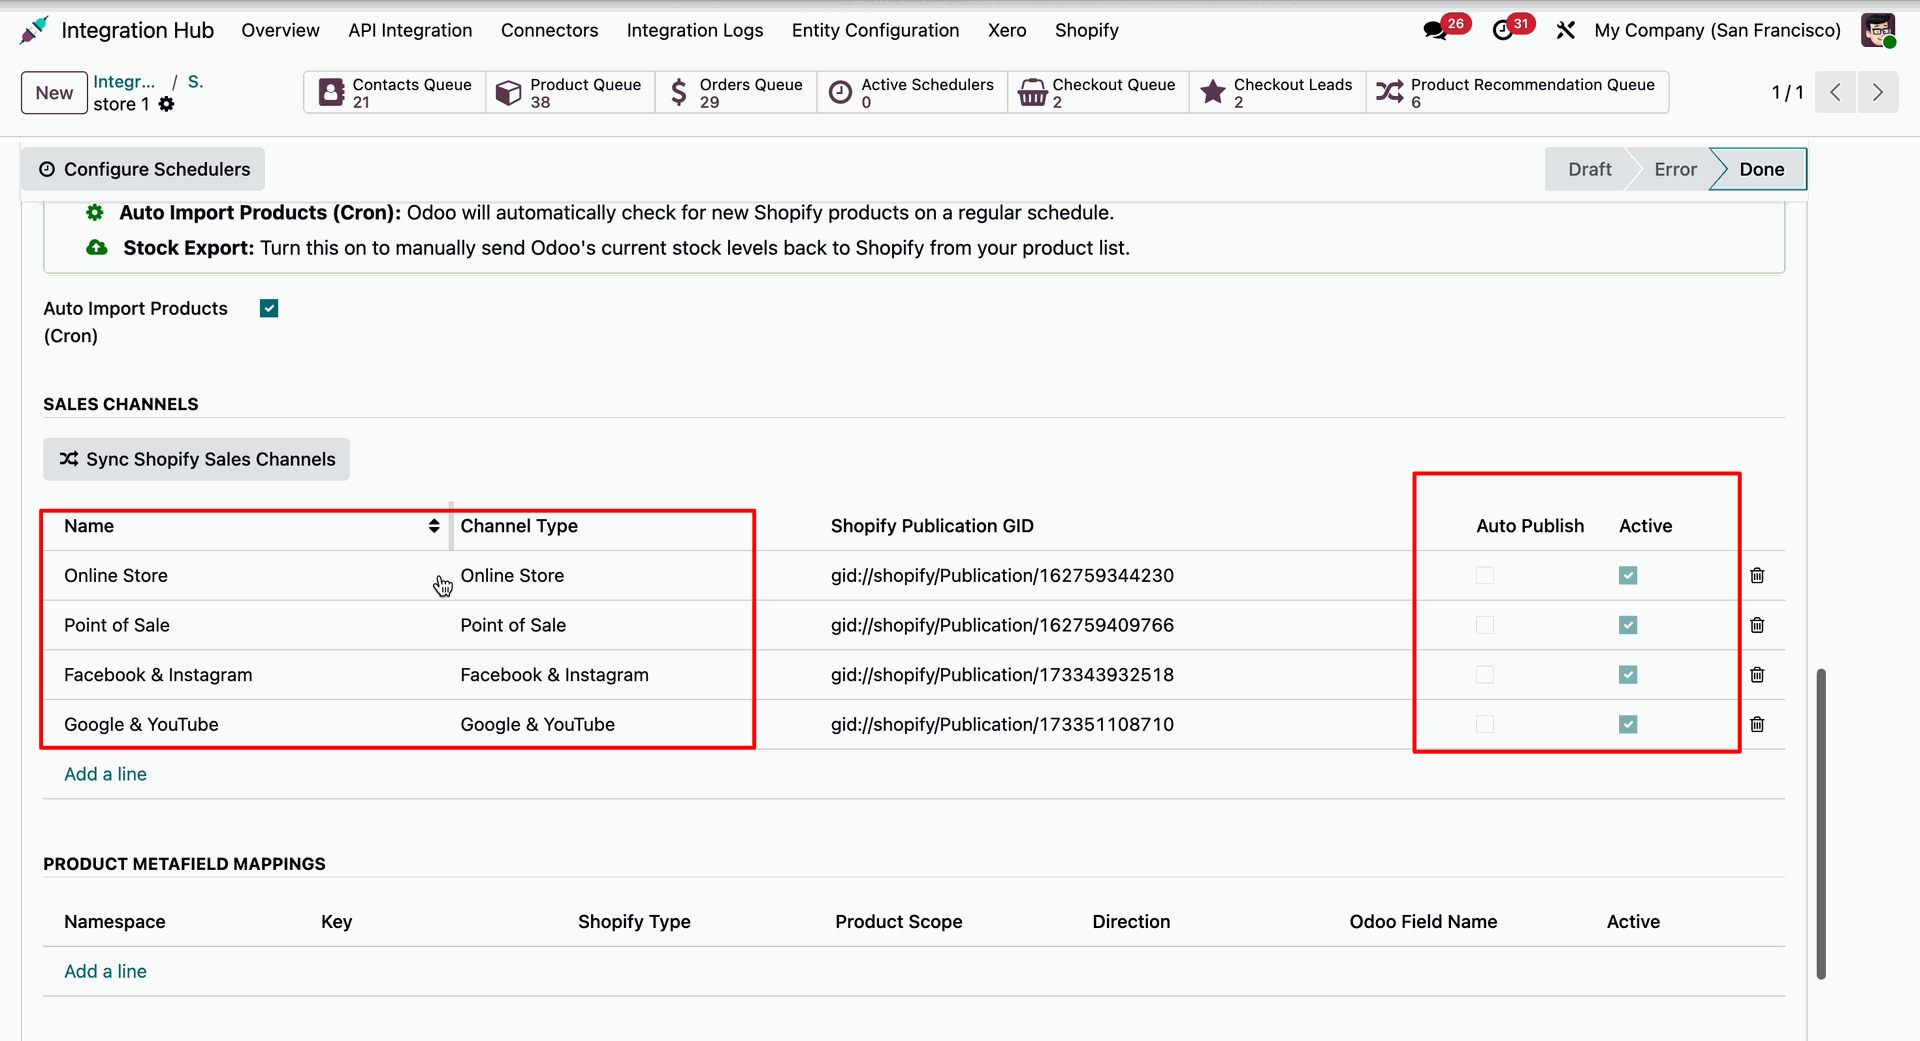
By clicking on Sales Channels, the list of available Shopify Sales Channels will be displayed.
Publish to Specific Sales Channels: To publish a product to a specific Shopify sales channel, add the desired channel (for example, Online Store) in the Sales Channels field. When the product is exported, Odoo will automatically publish it only to the selected Shopify sales channel(s).
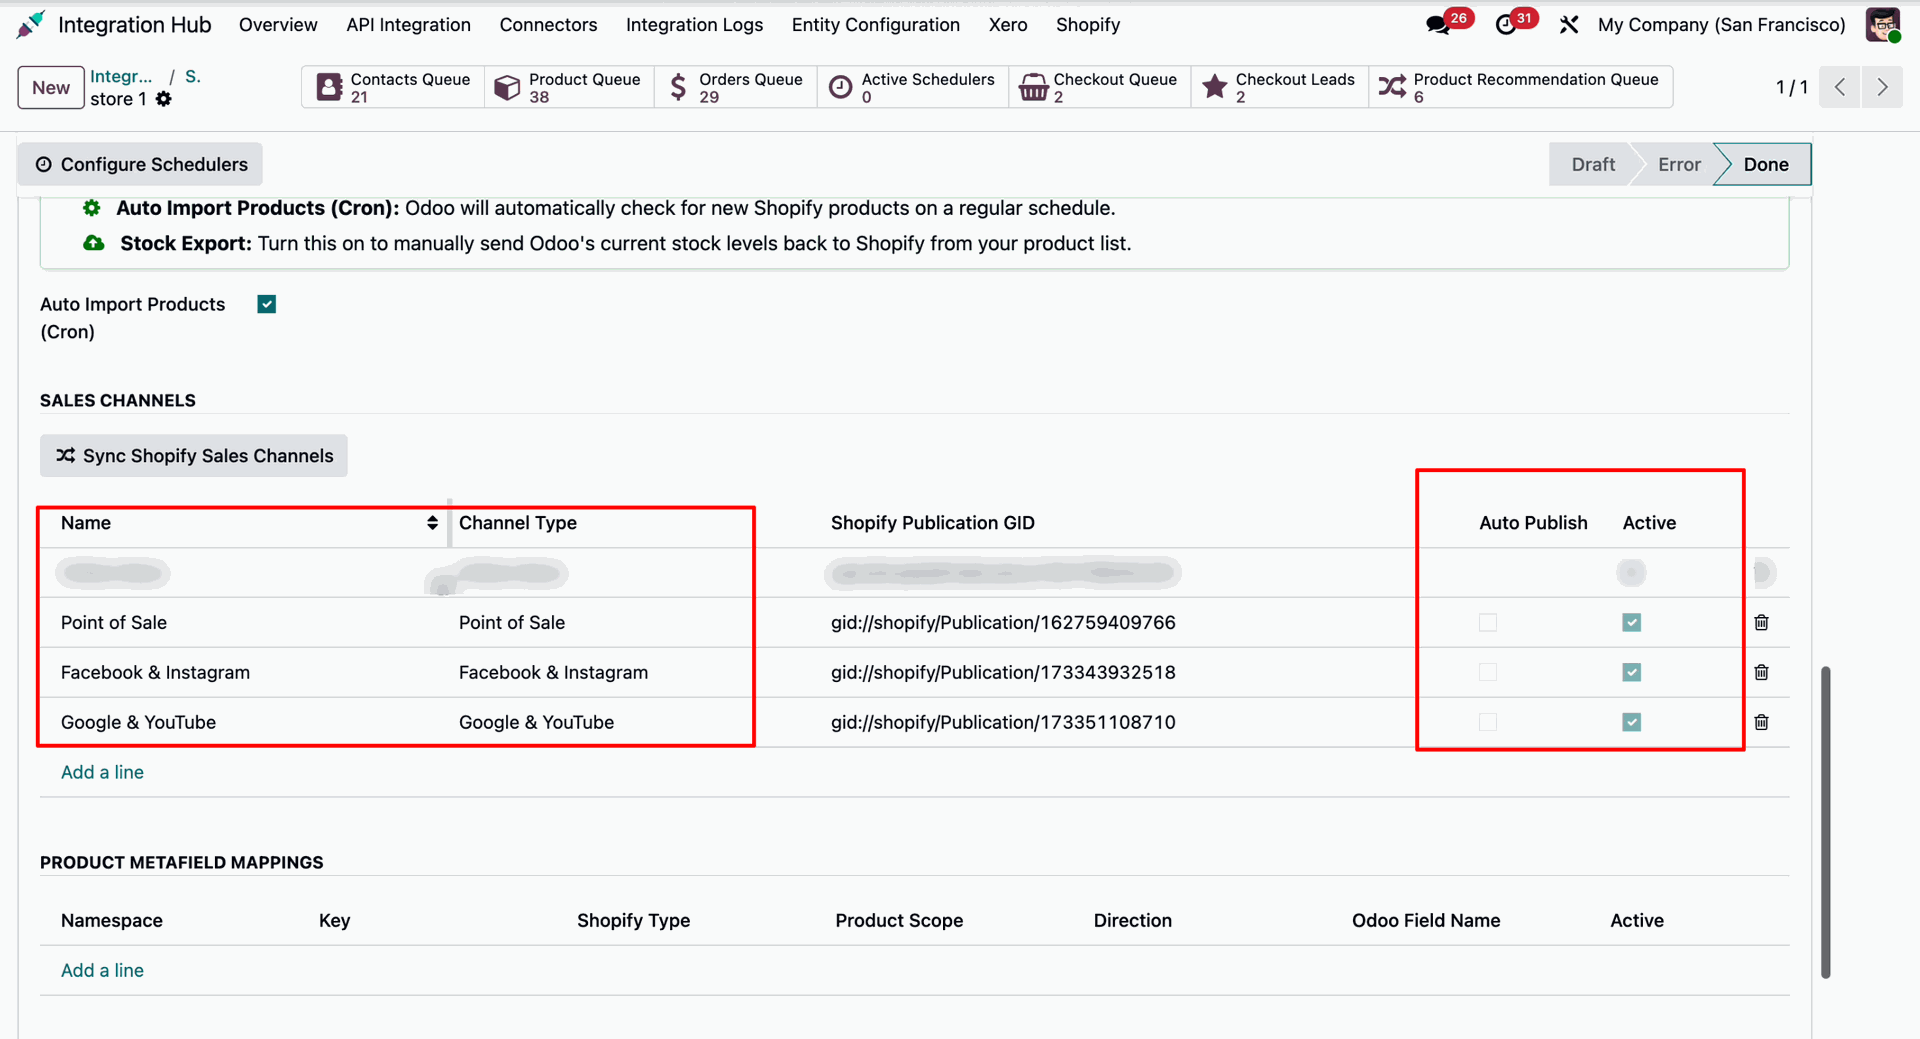
Unpublish from Specific Sales Channels: To unpublish a product from a specific Shopify sales channel, remove the desired channel from the Sales Channels field in Odoo while keeping any other channels selected. When the product is exported, Odoo detects the change and automatically unpublishes the product from the removed channel while keeping it published on the remaining selected channels.
Workflow
Open the Odoo Product Template form and navigate to the Shopify tab to check the Shopify status.
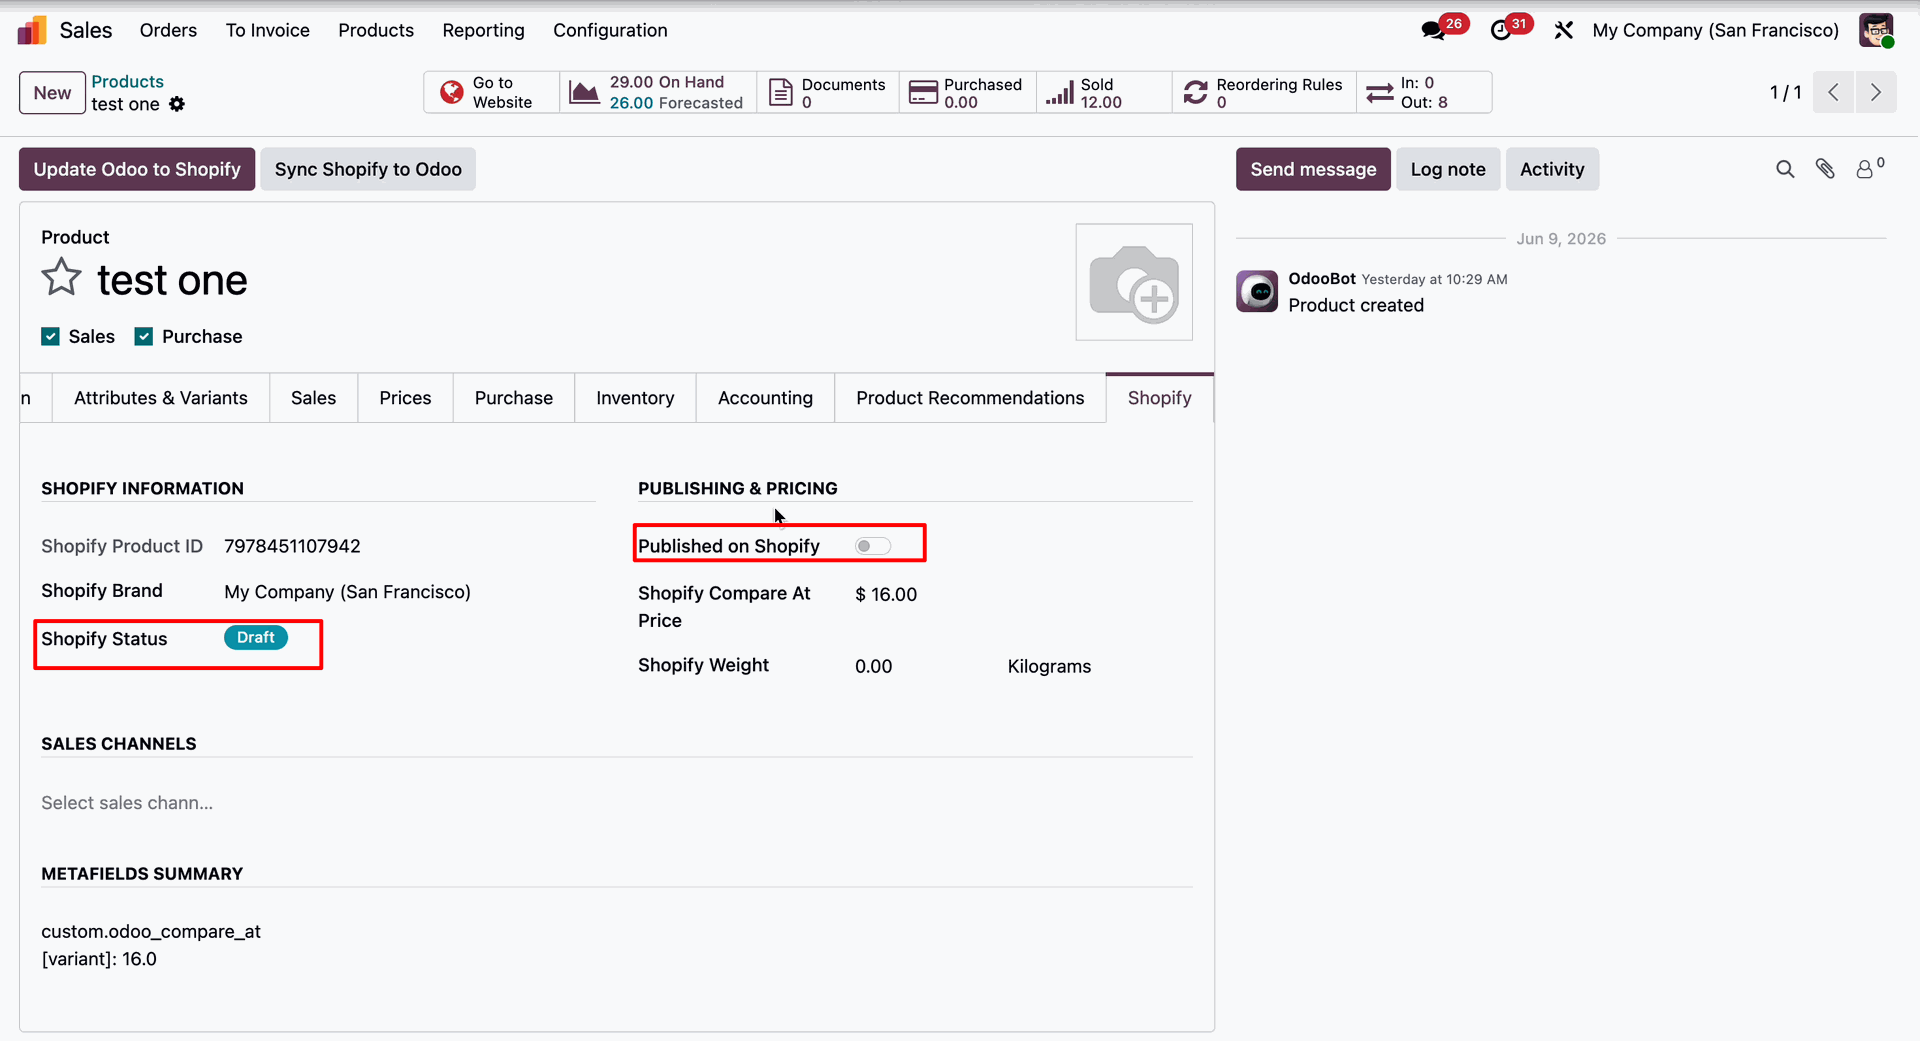
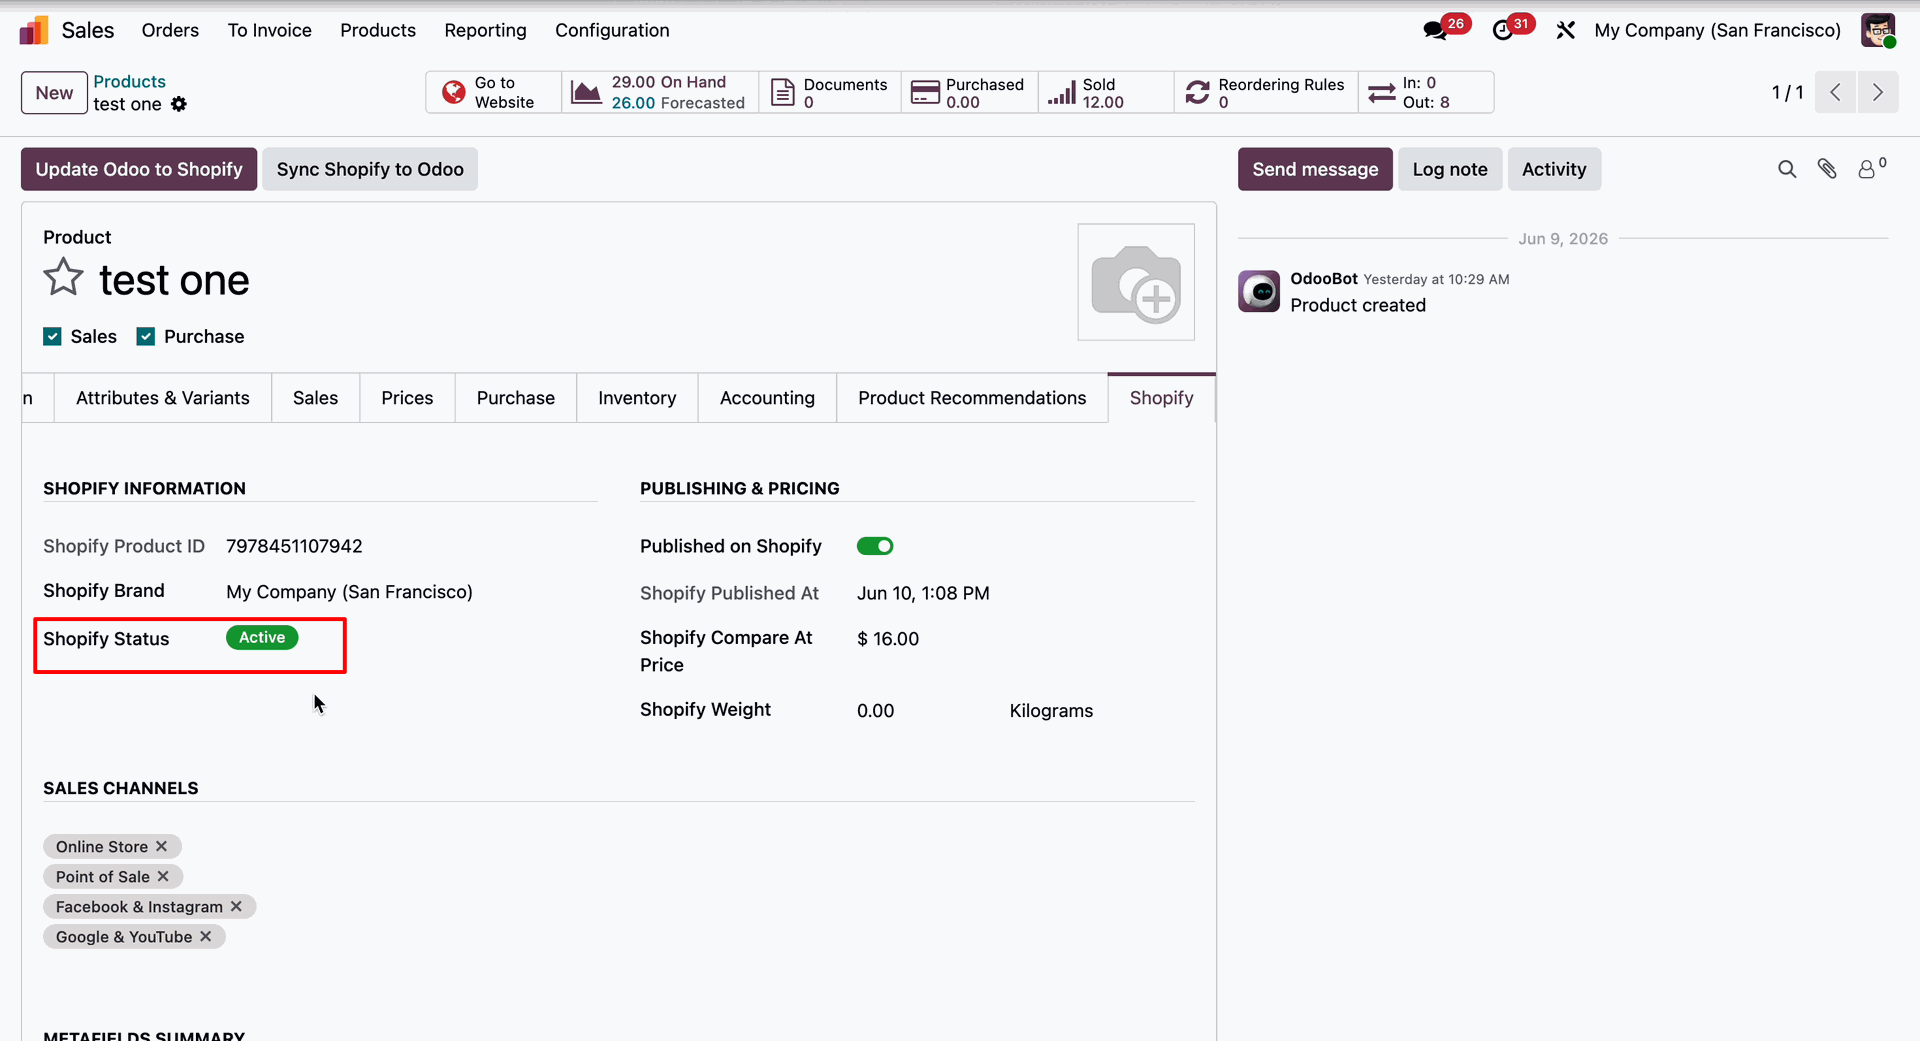
The Shopify status in Odoo matches the status of the product in Shopify.
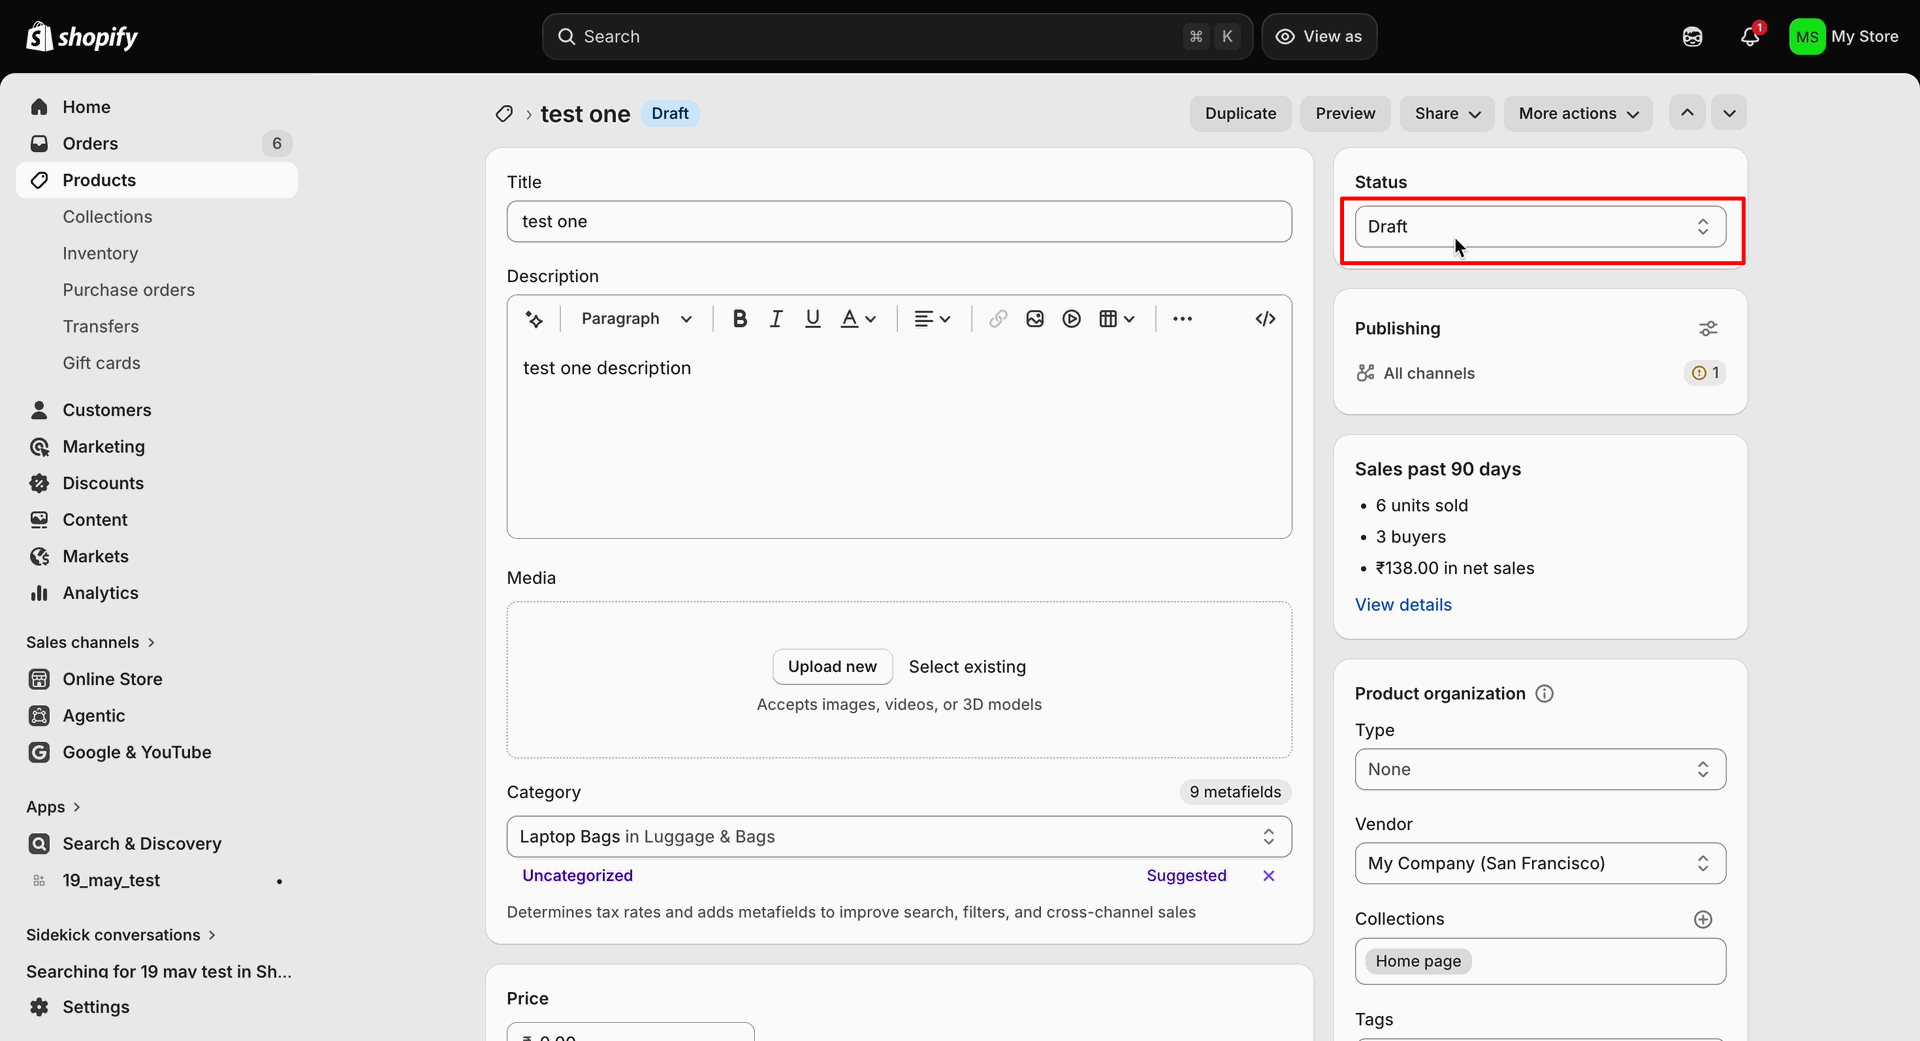
Update the product status in Shopify from Draft to Active.
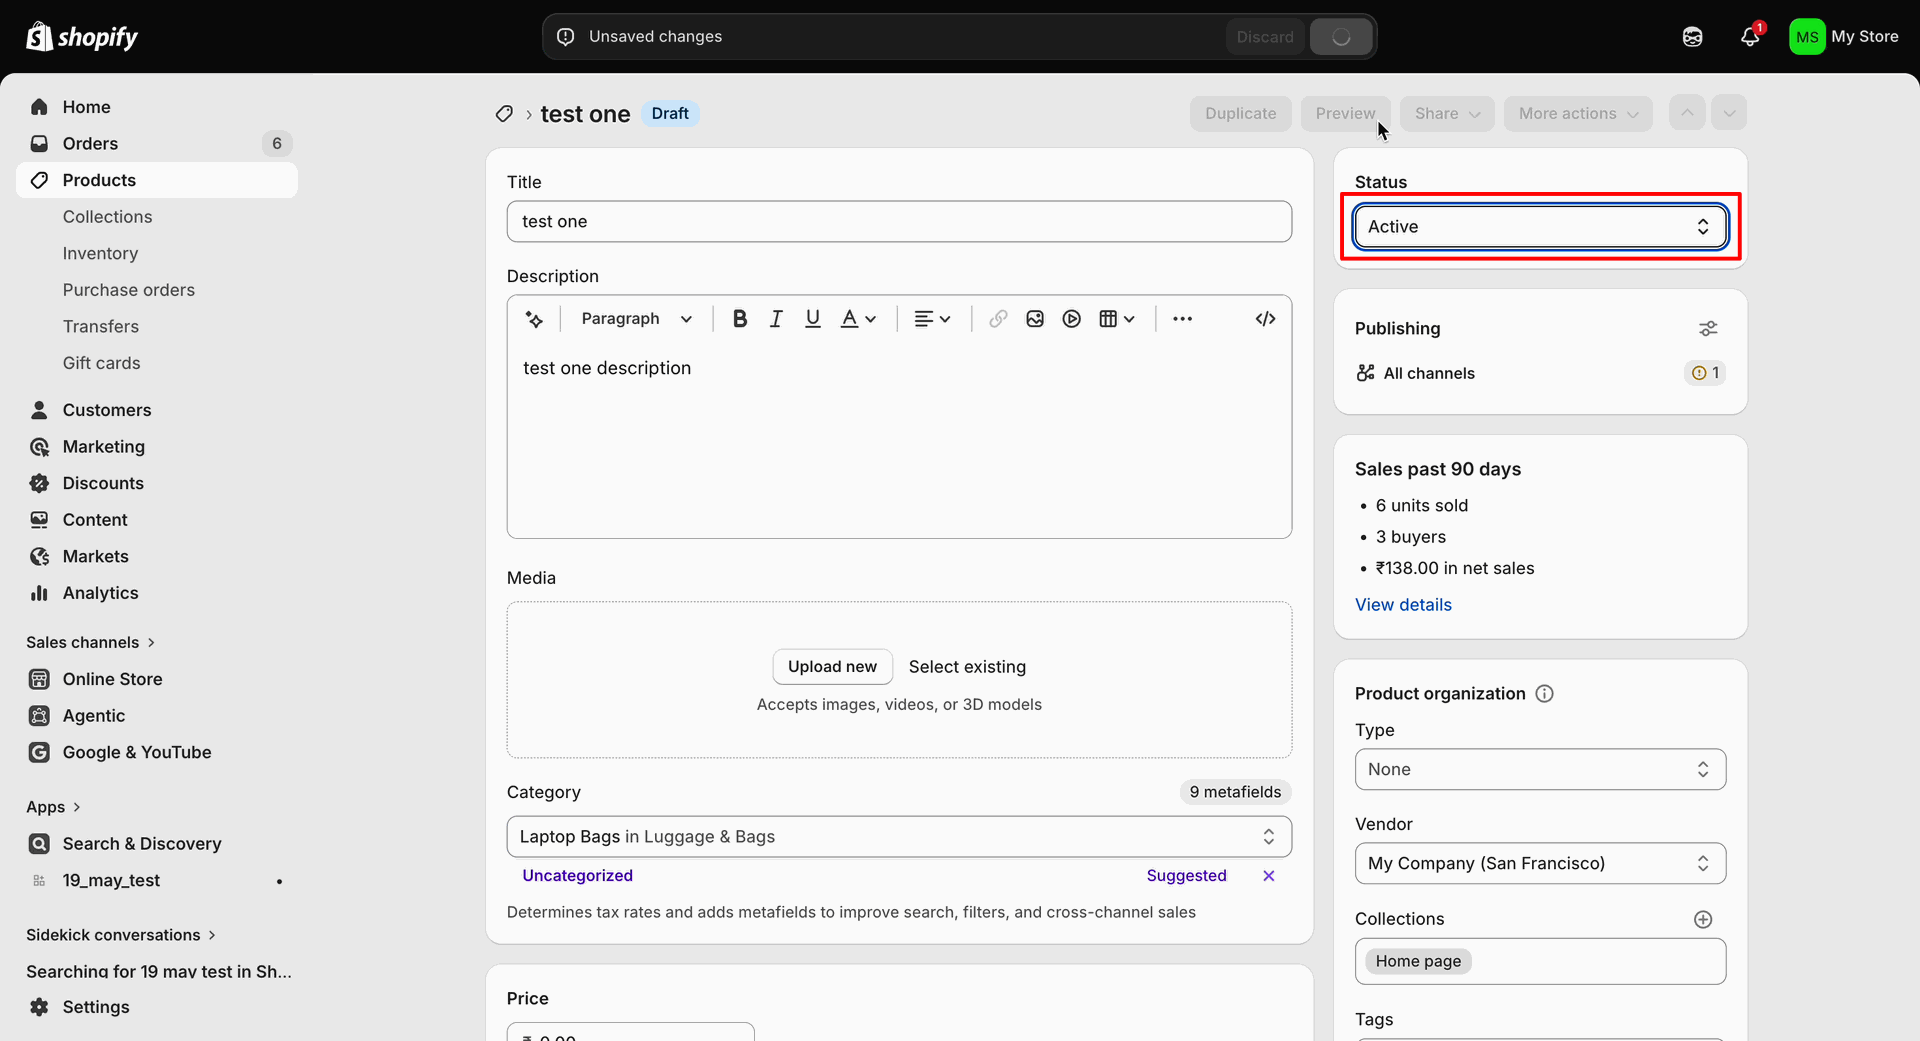
Go to the Product Form view in Odoo and click on Sync Shopify to Odoo.
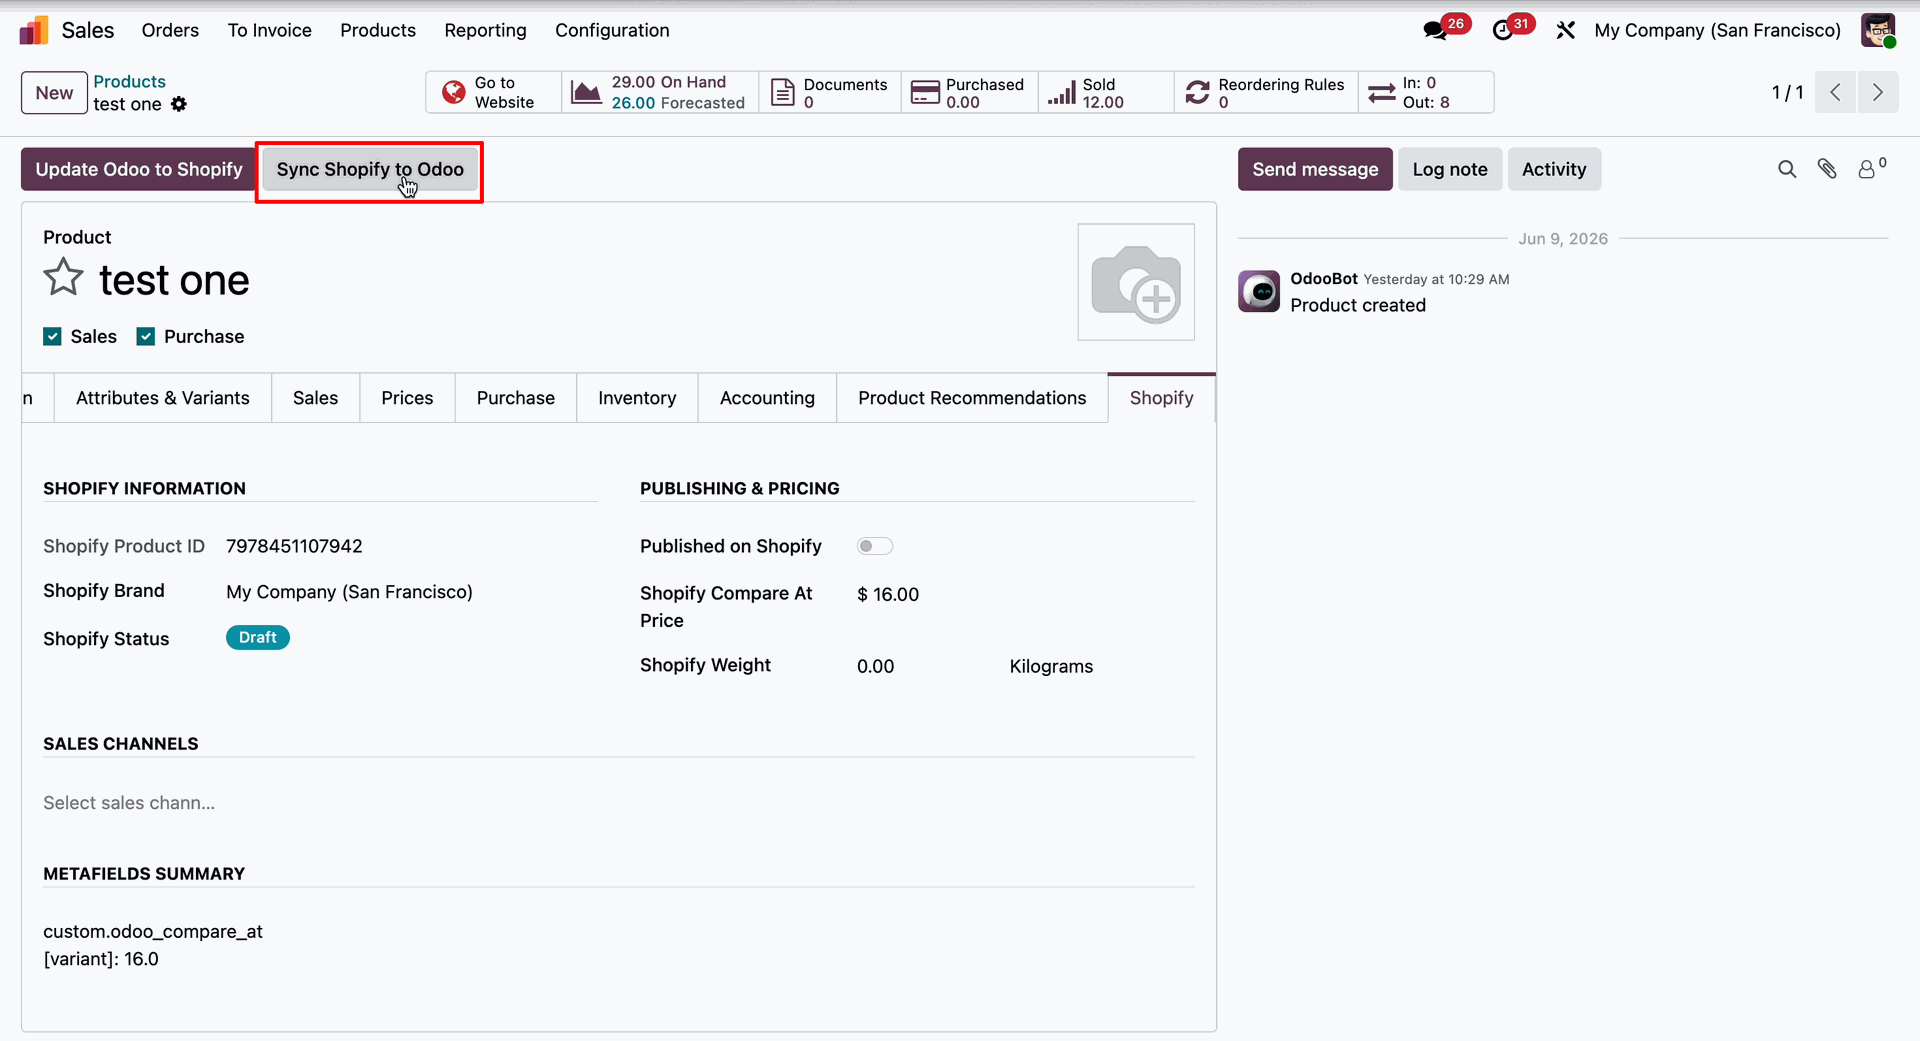
After syncing the data successfully, a success message will be displayed.
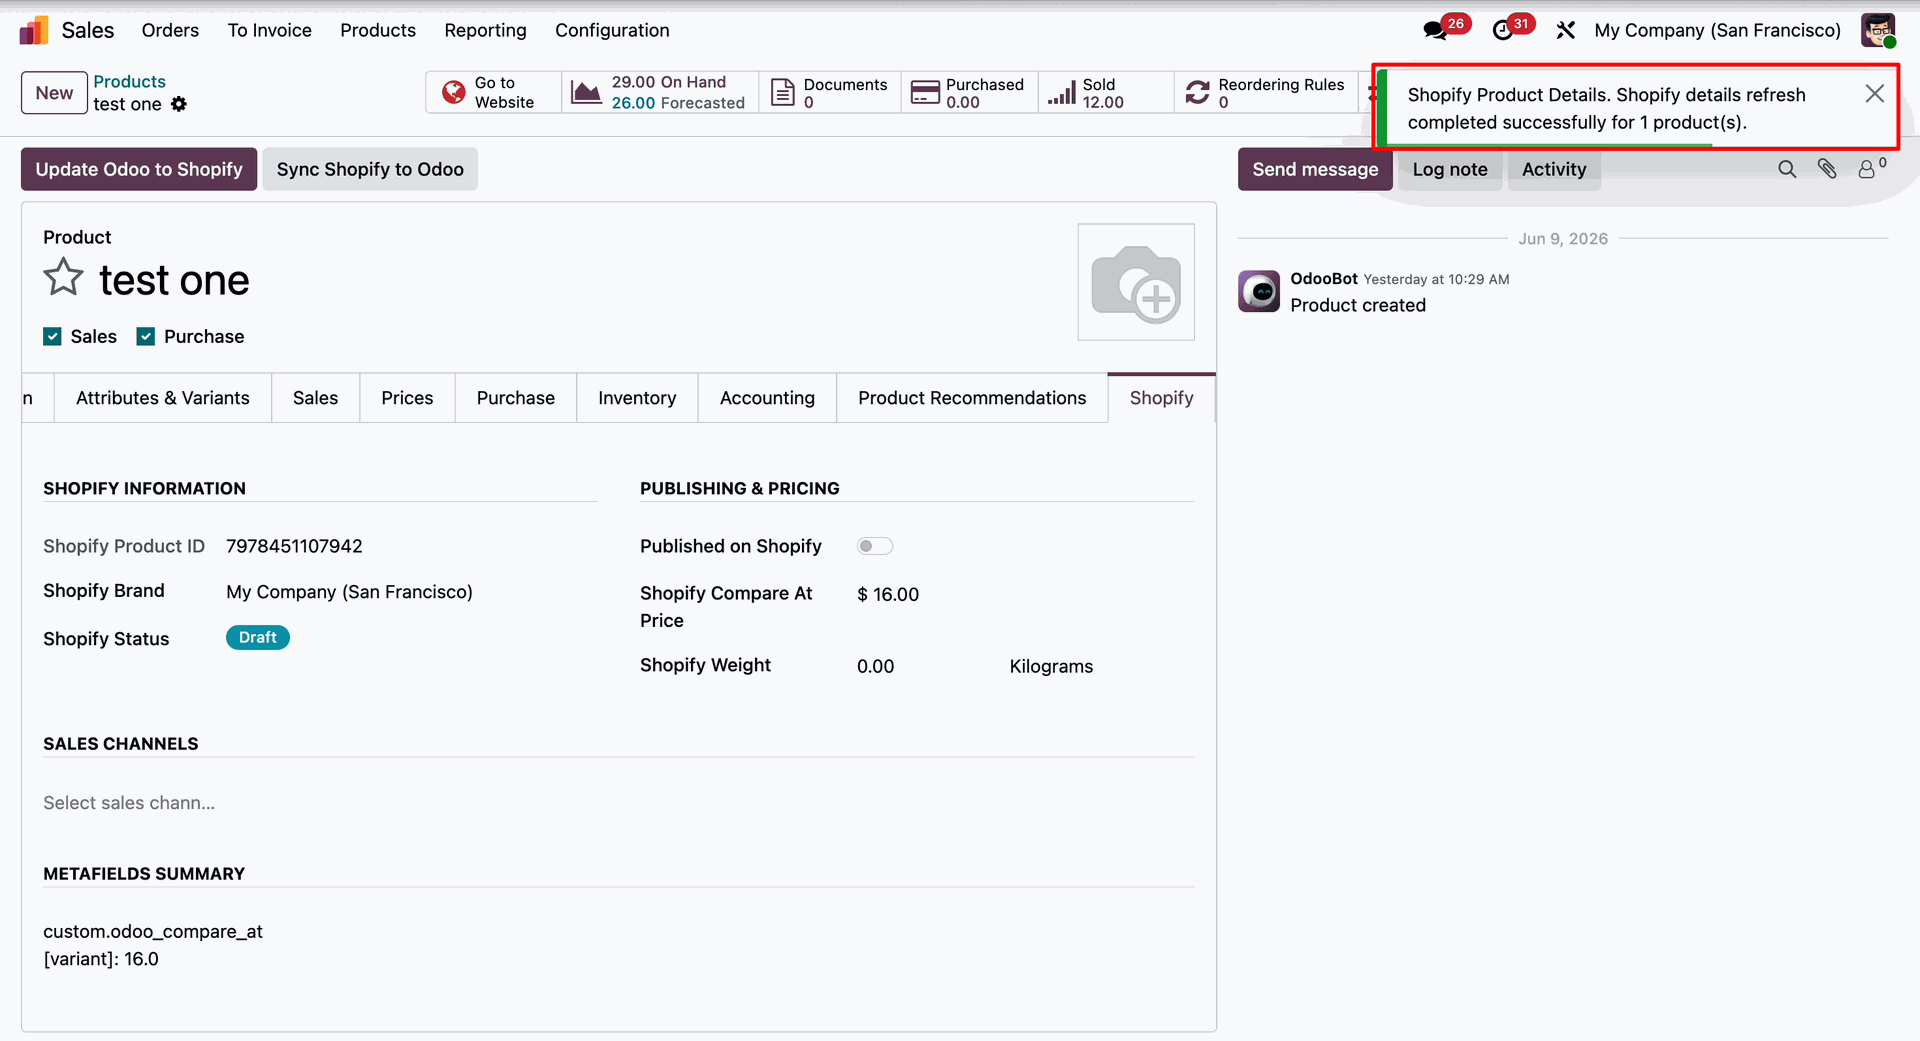
Updated the Shopify status in Odoo and enabled the Publish option in Odoo.
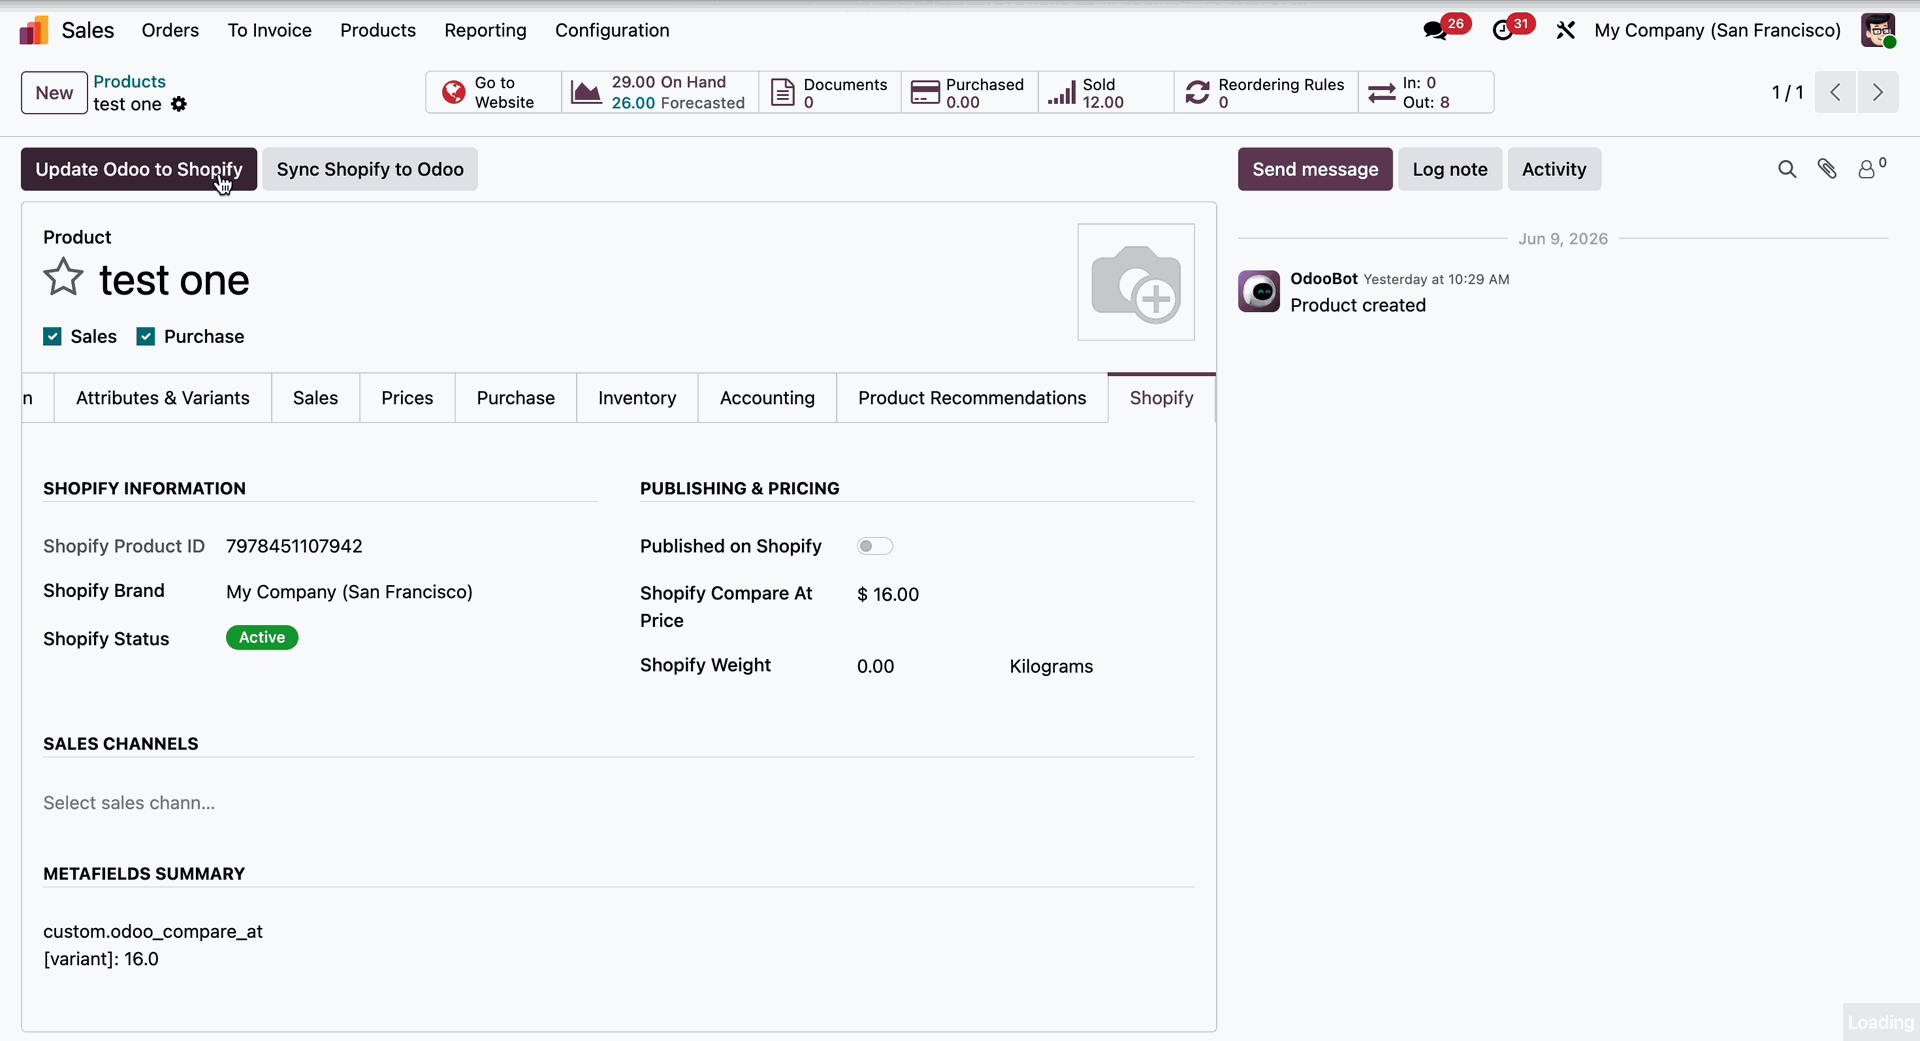
Disable the Published on Shopify option from Odoo and click on Update Odoo to Shopify to synchronize the changes.
Version 19.0.4.0.0 | Released on : 25th June 2026
Version 19.0.3.0.0 | Released on : 29th May 2026
Version 19.0.2.0.0 | Released on : 12th May 2026
Version 19.0.1.0.0 | Released on : 23rd February 2026
- Yes, this app works perfectly with Odoo Enterprise (Odoo.sh & Premise) as well as Community.
- No, this application is not compatible with odoo.com(odoo saas/Odoo Online)
- Yes, to test this module, please contact us at sales@softhealer.com.
- Please contact us at sales@softhealer.comto request customization.
- Yes, we provide free lifetime support for the version you purchased.
- Yes, you will receive lifetime free updates for the version of the module you purchased.
- No, there is no need to install any additional libraries.
- Yes, for version 12 and above, you need to purchase the module separately for each version you intend to use.
- No, exchanges or refunds are not allowed. Please make sure to select the correct version before purchasing.
- You can contact us at support@softhealer.com for language translation support. We use Google Translator tools to provide translations in multiple languages, so the accuracy may vary. We welcome your suggestions to help improve translations.
Premium Support - Every Step
We stand behind every purchase with hands-on, expert support from day one - and for life.

|
|
Free 1-Hr Pre-Sales Demo
|
|
See the module live before you commit. Our team walks you through every feature, answers your questions, and confirms the fit. |
 sales@softhealer.com
|

|
|
Free 2-Hr Post-Purchase Setup
|
|
After purchase, get up to 1 hour of free hands-on configuration support - instance connected, authentication configured, and fully verified. |
|
support@softhealer.com
|

|
|
Lifetime Free Support & Updates
|
|
Every purchase includes lifetime free support and updates for your version - no subscriptions, no hidden fees. Just email us anytime. |
 support@softhealer.com
|
Discover Our Latest Apps