








Complete AI Automation Suite
FLAT 30% OFF
AI Insight Assistant
Talk to your data. Get instant answers
AI Live Chatbot
24/7 customer support, always on
AI Dashboard Studio
 Beautiful dashboards, zero effort
MCP Integration
Seamless multi-channel connections
And Many More Features
Complete AI Automation Suite — FLAT 30% OFF

pos label pos cash control pos cash in out pos cash out pos logo pos receipt all pos in one all pos in one retail sneha neha odoo v15

  • Home
  • Blogs
  • pos label pos cash control pos cash in out pos cash out pos logo pos receipt all pos in one all pos in one retail sneha neha odoo v15
logo
Free Support
Life Time
Counter box img
Custom Apps
1500+
counter box img
top seller of odoo marketplace
counter box img
Happy Customer
10K+
counter box img
Year Of Experience
11+
counter box img
countries
100+
counter box img
Talented healers
150+
counter box img
Industries Served
45+
counter box img
Odoo Community Implementation
350+
counter box img
Odoo Enterprise Implementation
150+
counter box img
Best partner Nominee
2024
counter box img
Global Presence
counter box img

Free Demo
Email: sales@softhealer.com
Lifetime Free Support
Contact: support@softhealer.com
Customization
Sales: sales@softhealer.com
Odoo Community Odoo Enterprise Odoo.sh
Premium Connector

Shopify Odoo Connector

Seamlessly integrate your Shopify store with Odoo. Automate products, orders, inventory, and customer synchronization in real-time.

Powerful Sync Features

Everything you need to run your e-commerce operations seamlessly.
Products

Product Sync

  • Manual & automatic sync
  • Import/export product details
  • Date range filtering support
  • Works for variants & image
Orders

Order Management

  • Cron-based automatic import
  • Import as confirmed orders
  • Status & tracking sync
  • Buy With Prime orders
Stock

Inventory Control

  • Real-time stock qty export
  • Multi-location warehouse
  • Automated fulfillment sync
  • No manual work
Webhooks

Smart Automation

  • Real-time webhook triggers
  • Auto-create invoices
  • Auto-register payments
  • Instant customer updates
Refunds

Financial Sync

  • Import refund records accurately
  • Export refunds to Shopify
  • Payment gateway matrix
  • Complete financial reconciliation
Queue

Queue Dashboard

  • Centralized processing monitor
  • Track sync activities & status
  • Failure logs & retry mechanisms
  • Complete visibility

Customer Benefits

Practical gains for commerce, finance, warehouse, and support teams.

Less manual re-entry

Reduce time spent copying orders, products, and customer data between systems.

Faster exception handling

Resolve failed syncs through queues and logs instead of guessing what broke.

Cleaner fulfillment flow

Push delivery progress back to Shopify from Odoo to improve post-purchase accuracy.

Better stock confidence

Keep storefront inventory aligned with Odoo availability through exportable stock updates.

Refund visibility

Manage return flows with clear mappings between Shopify refunds and Odoo credit notes.

Scalable automation

Combine scheduled imports with webhook triggers to support higher order volume gracefully.

Multi-store readiness

Operate multiple Shopify instances from one Odoo environment with distinct controls.

Operational clarity

Give each team clearer ownership of sync status, queue management, and data accuracy.

Platform Walkthrough

Explore the intuitive interface designed for maximum efficiency.

Access Rights
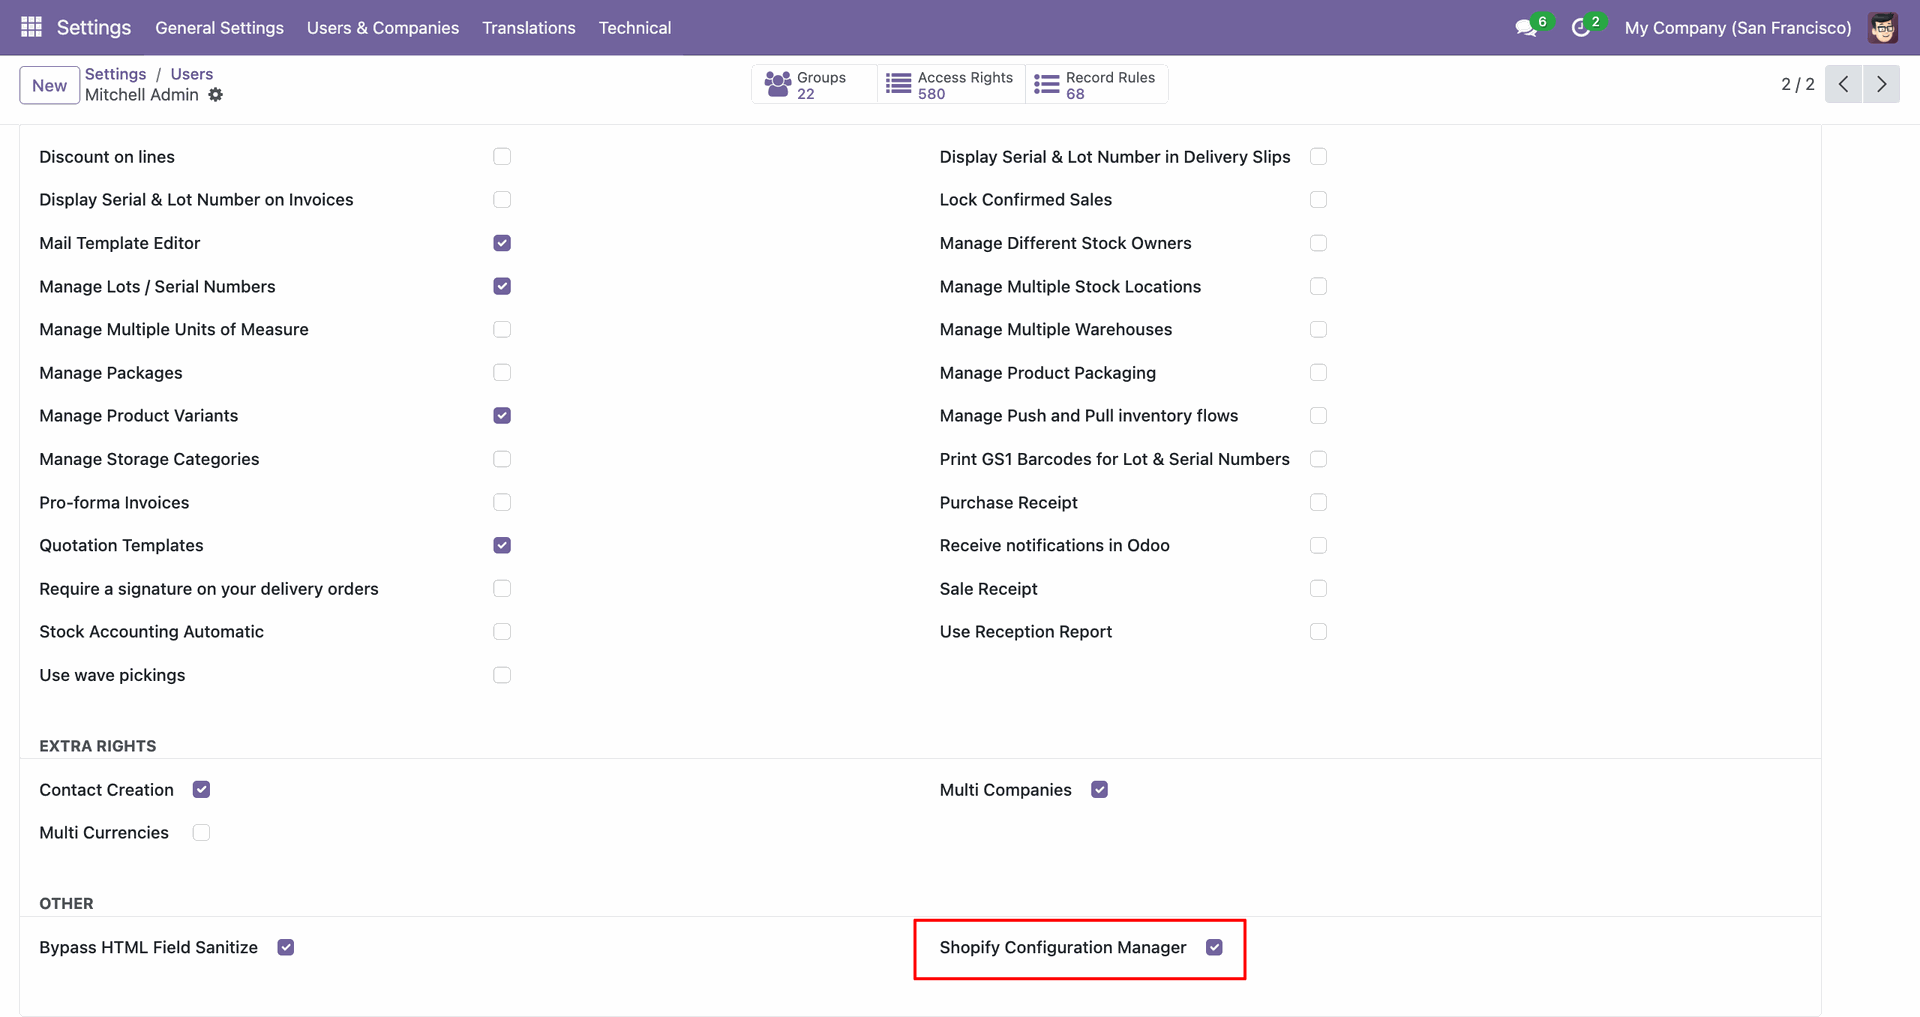
Enable the Shopify Configuration Manager access right to open connector settings and controls.
Access Rights interface screenshot

Shopify Credential

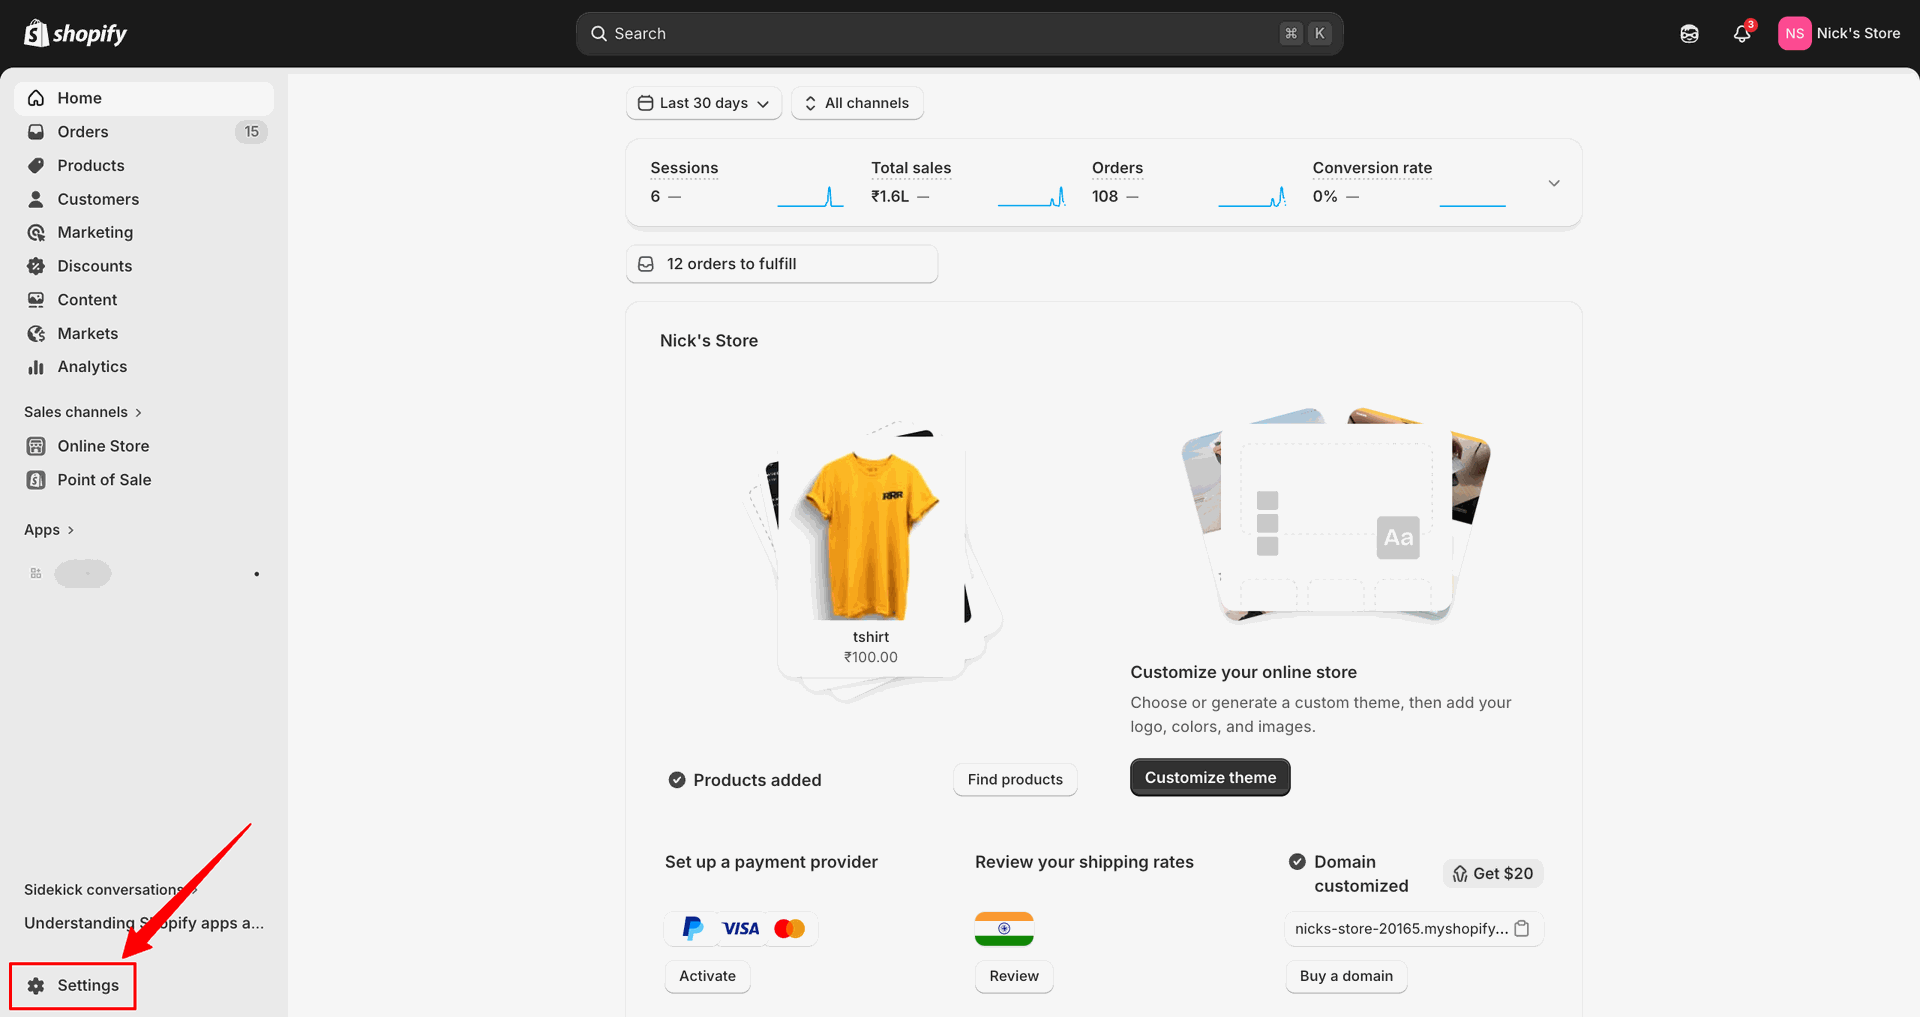
Open Settings in Shopify Admin to begin configuring the store for connector access.
Shopify Credential interface screenshot
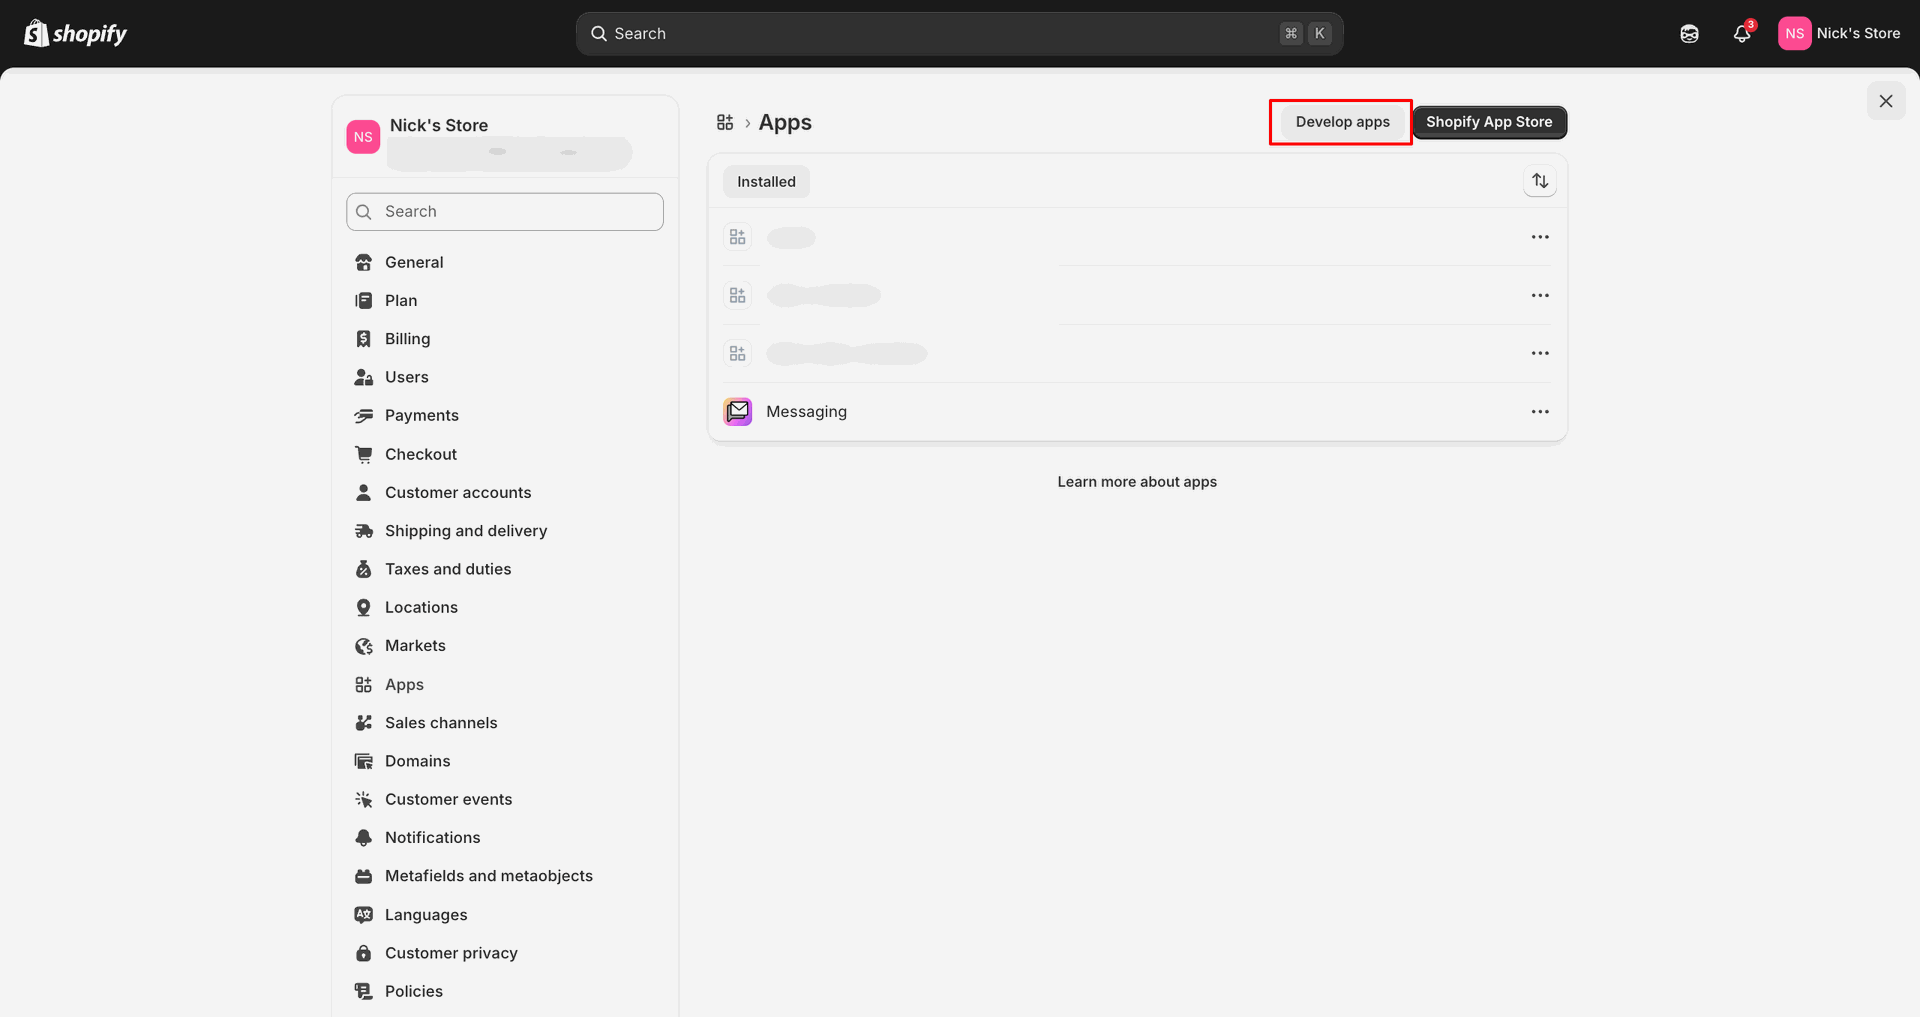
Click Develop apps from the Apps page to manage custom Shopify integrations.
Shopify Credential interface screenshot
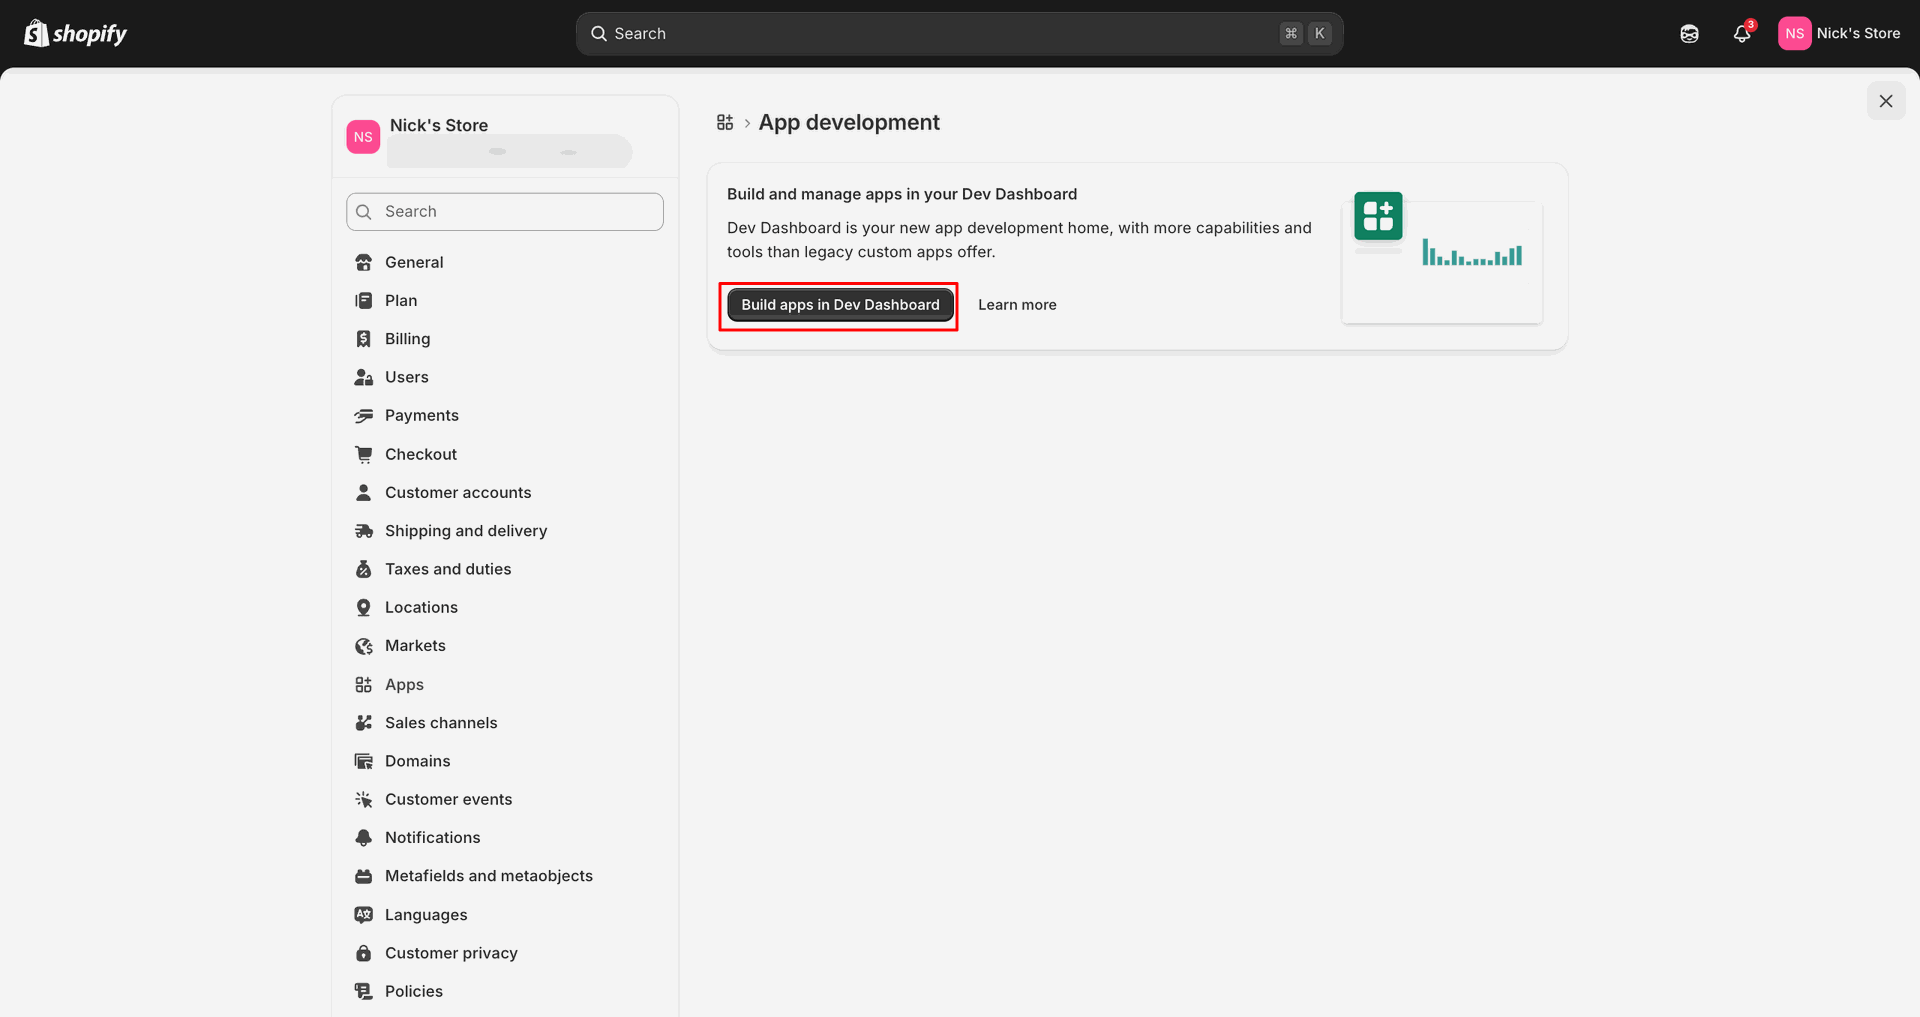
Select Build apps in Dev Dashboard to continue with app development.
Shopify Credential interface screenshot
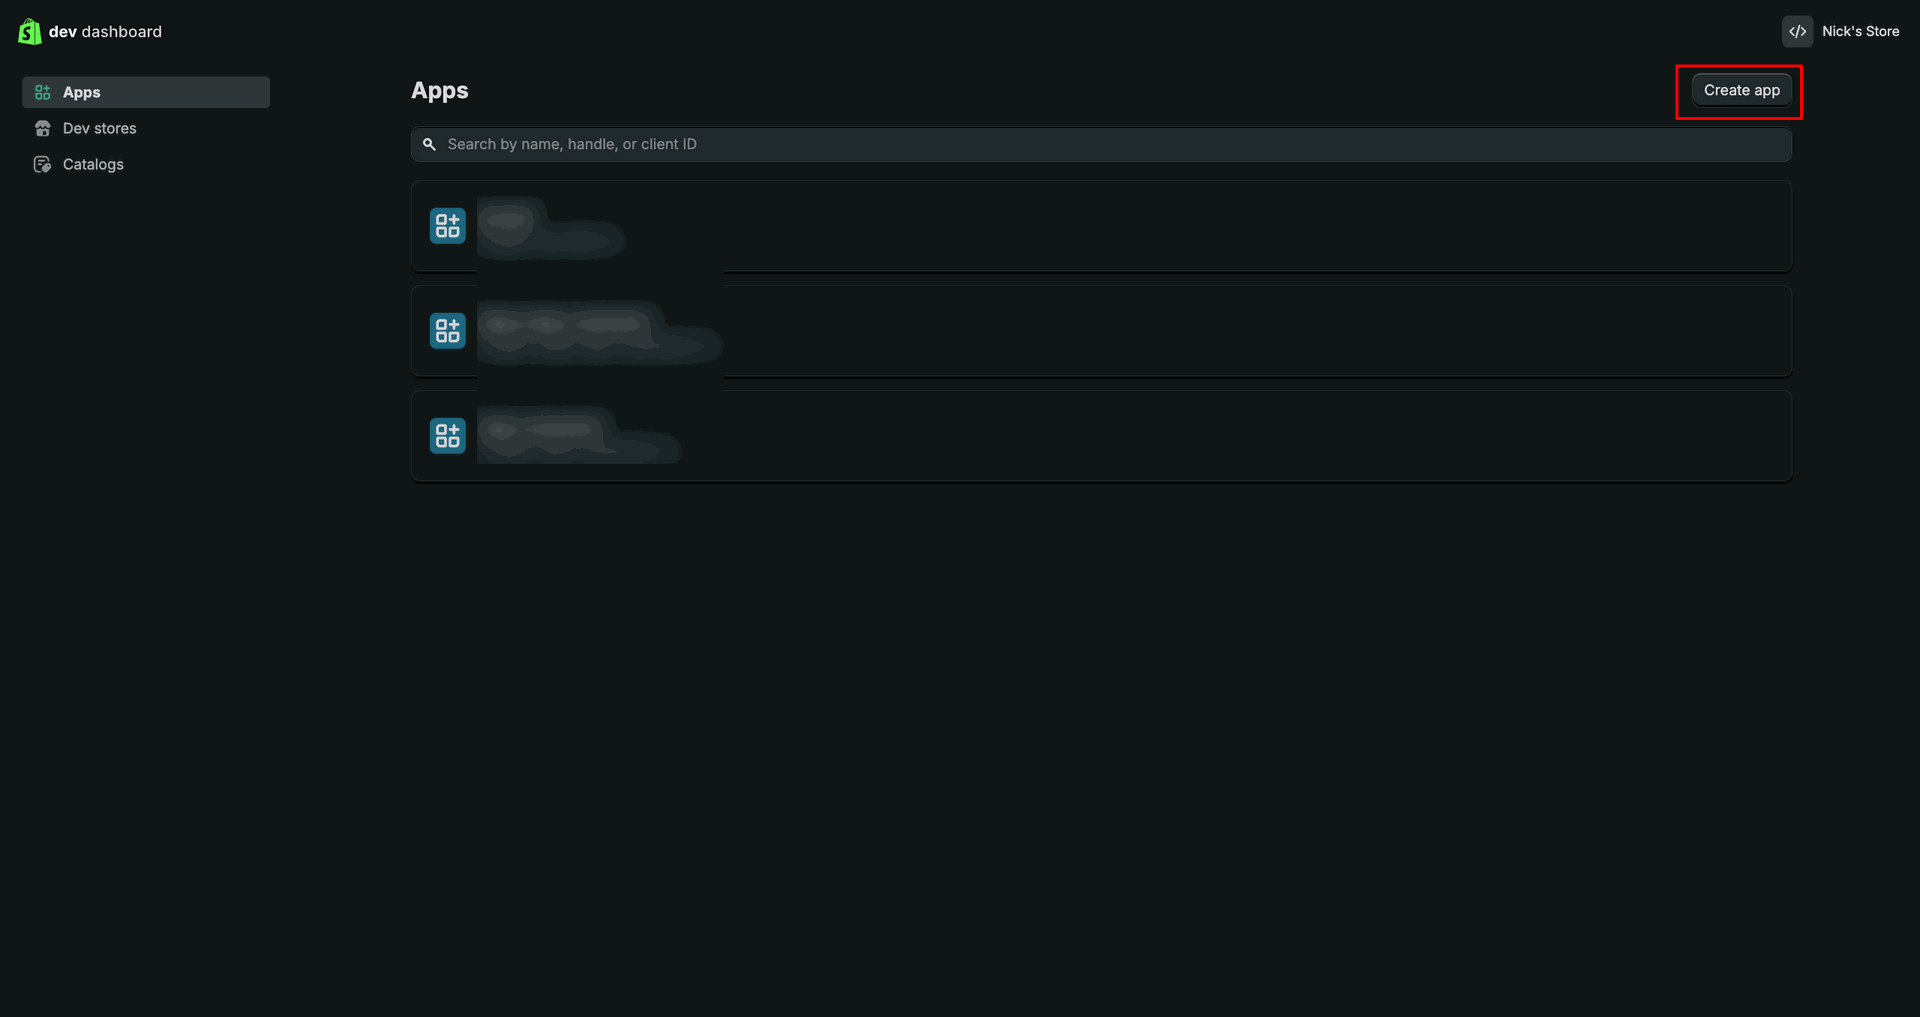
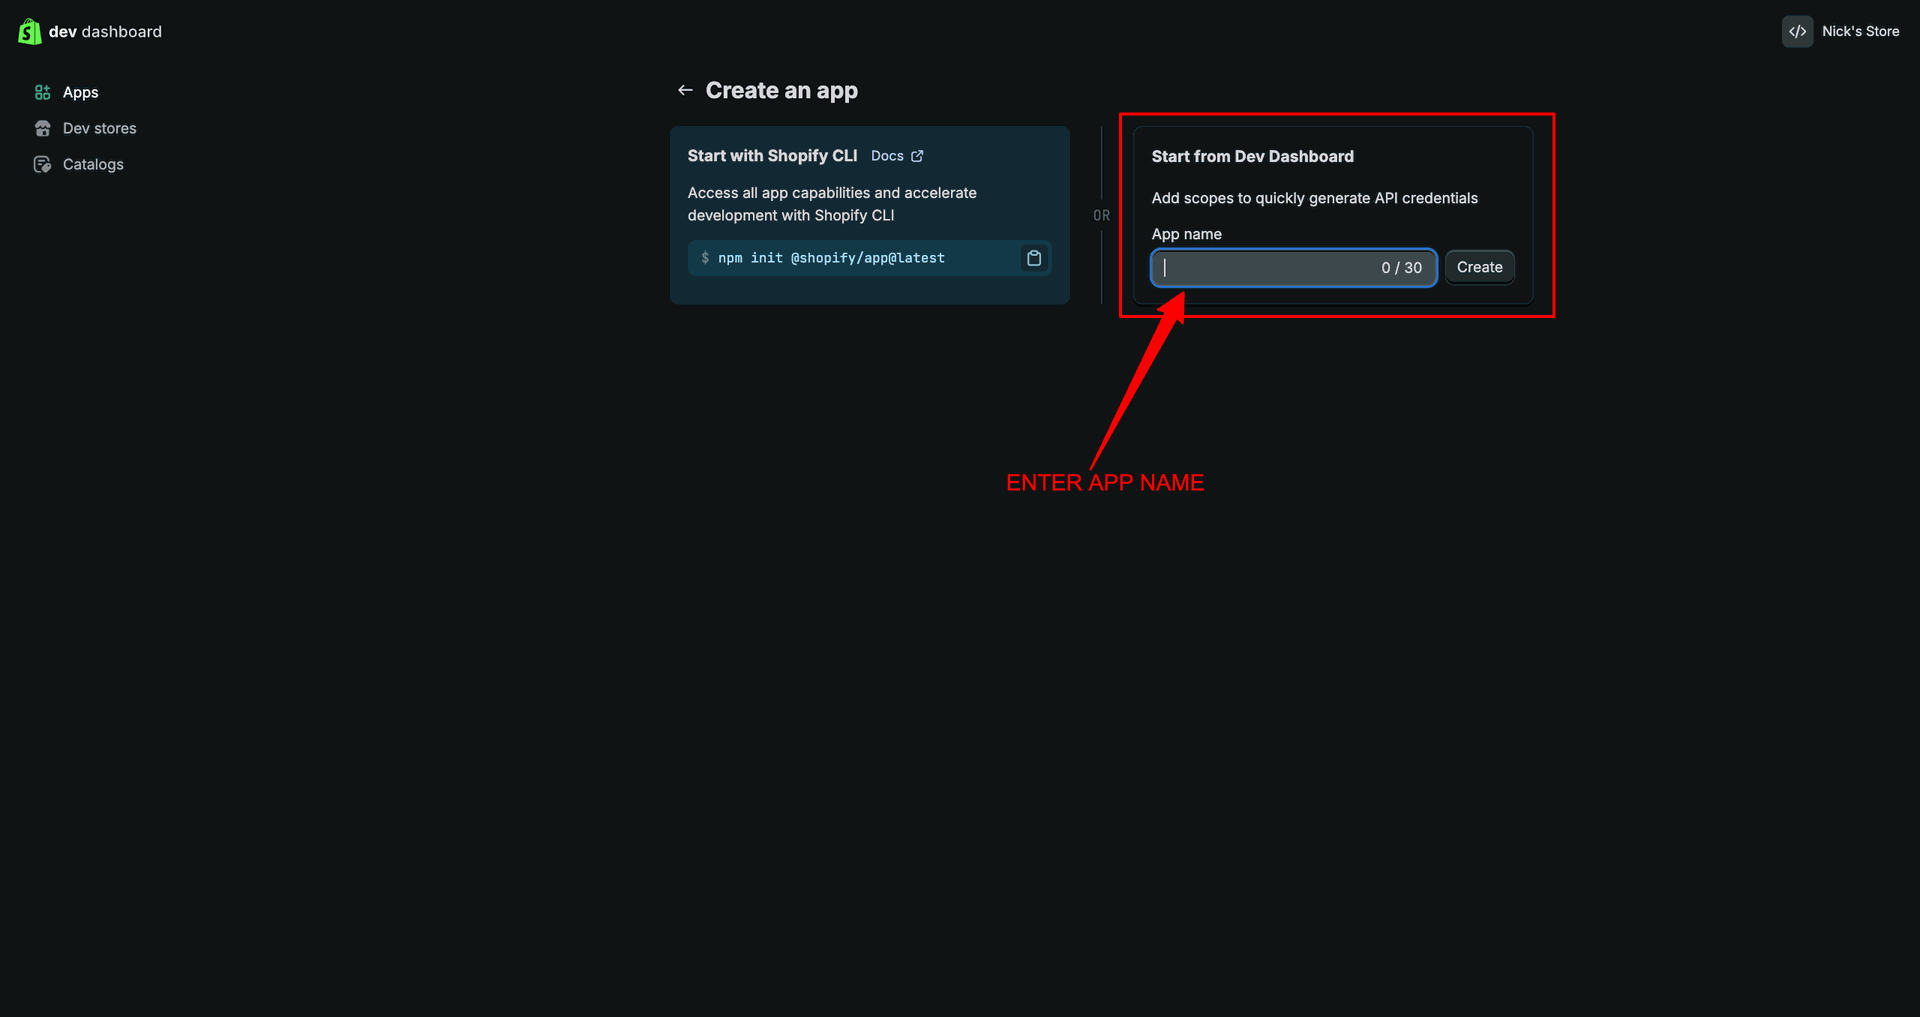
Press Create app in Dev Dashboard to create a new Shopify application.
Shopify Credential interface screenshot
Enter the app name and click Create to generate the custom app.
Shopify Credential interface screenshot
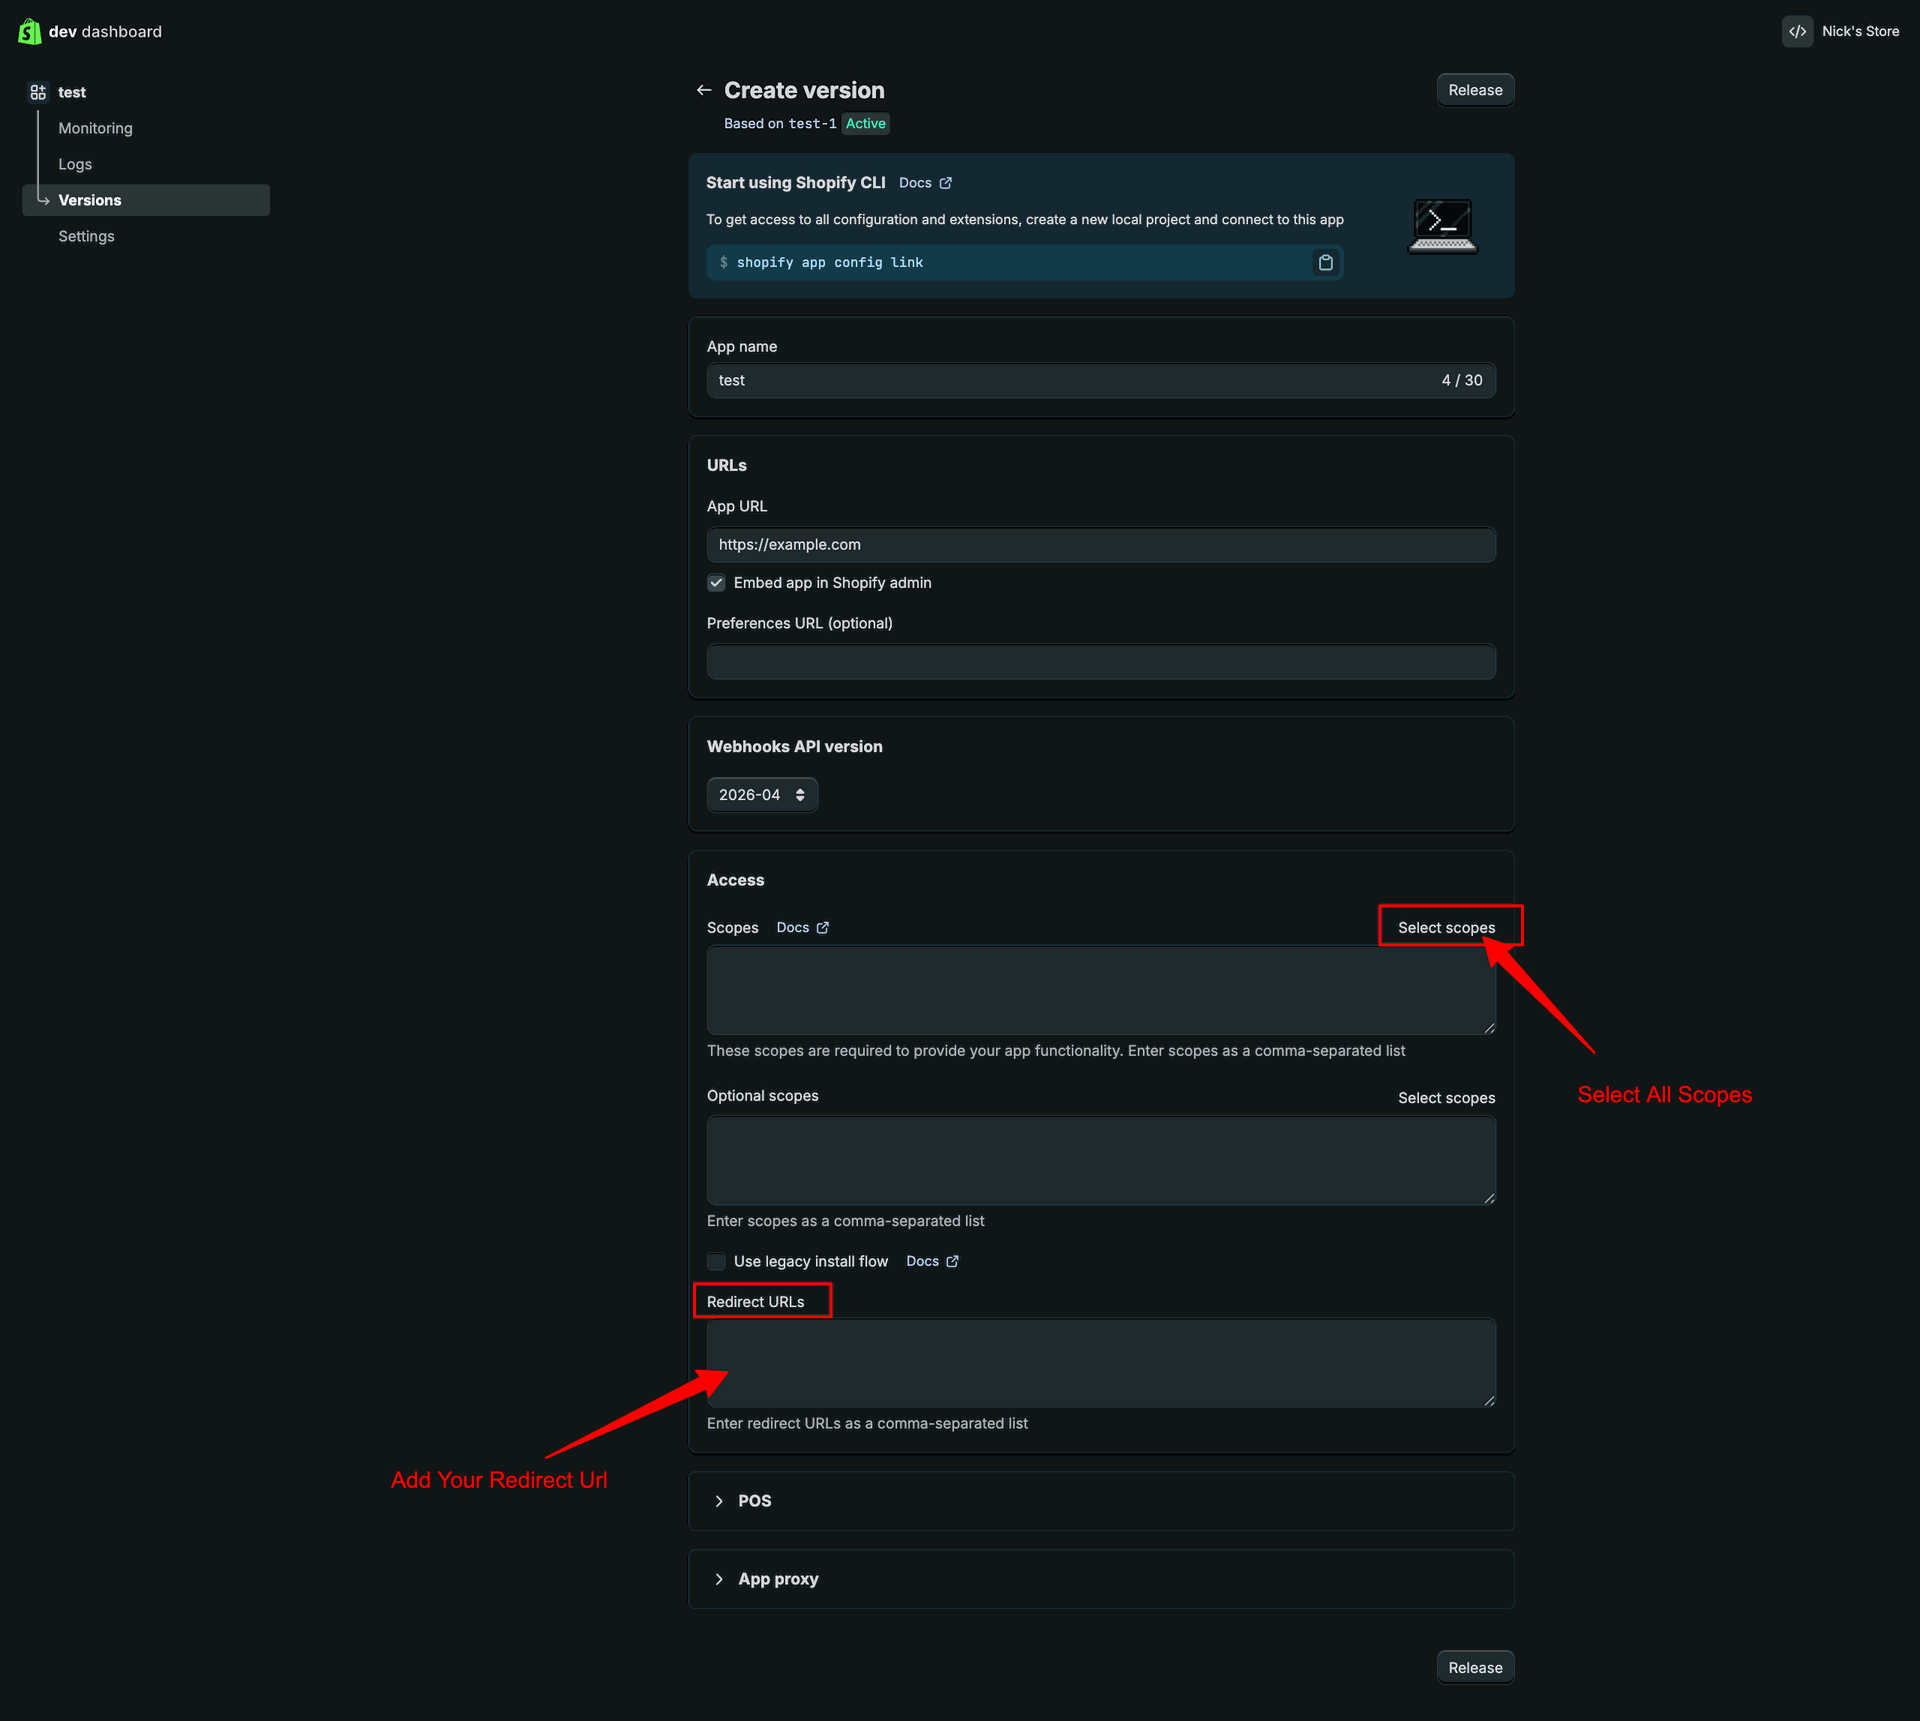
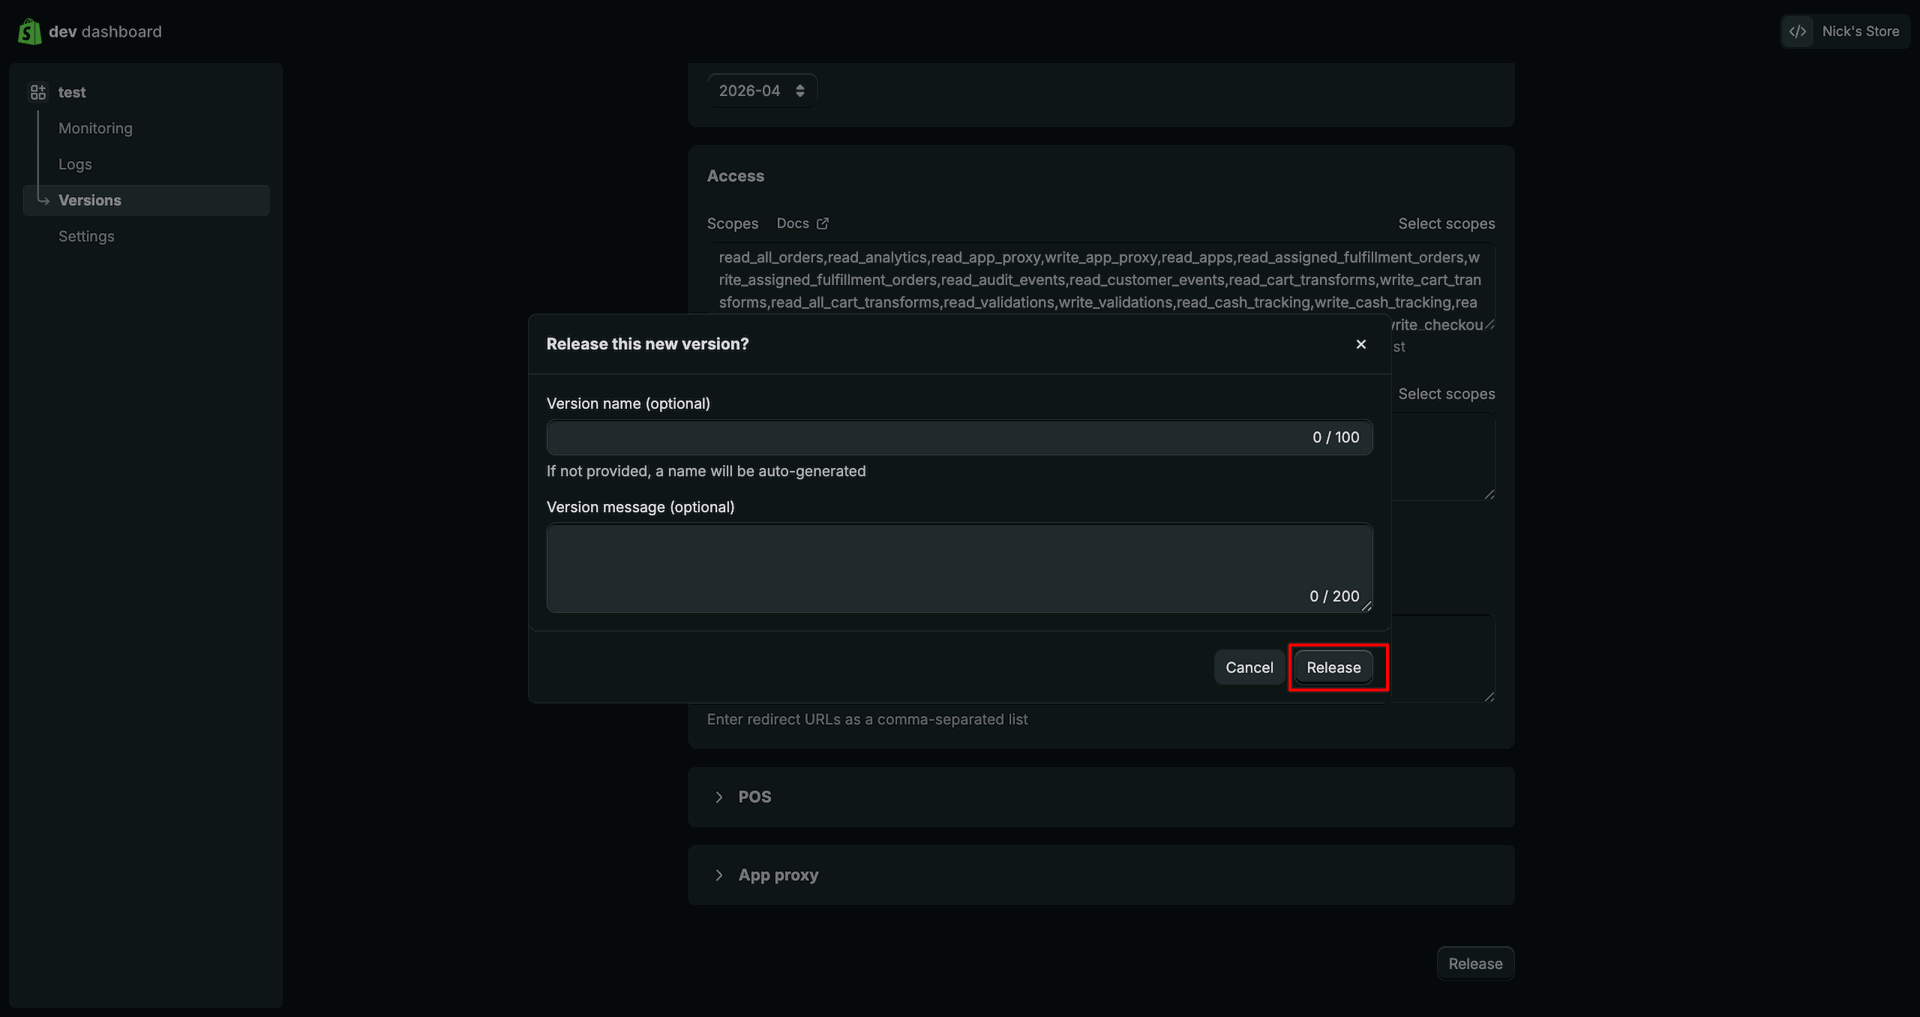
Add the redirect URL, choose required scopes, and click Release to continue.
Shopify Credential interface screenshot
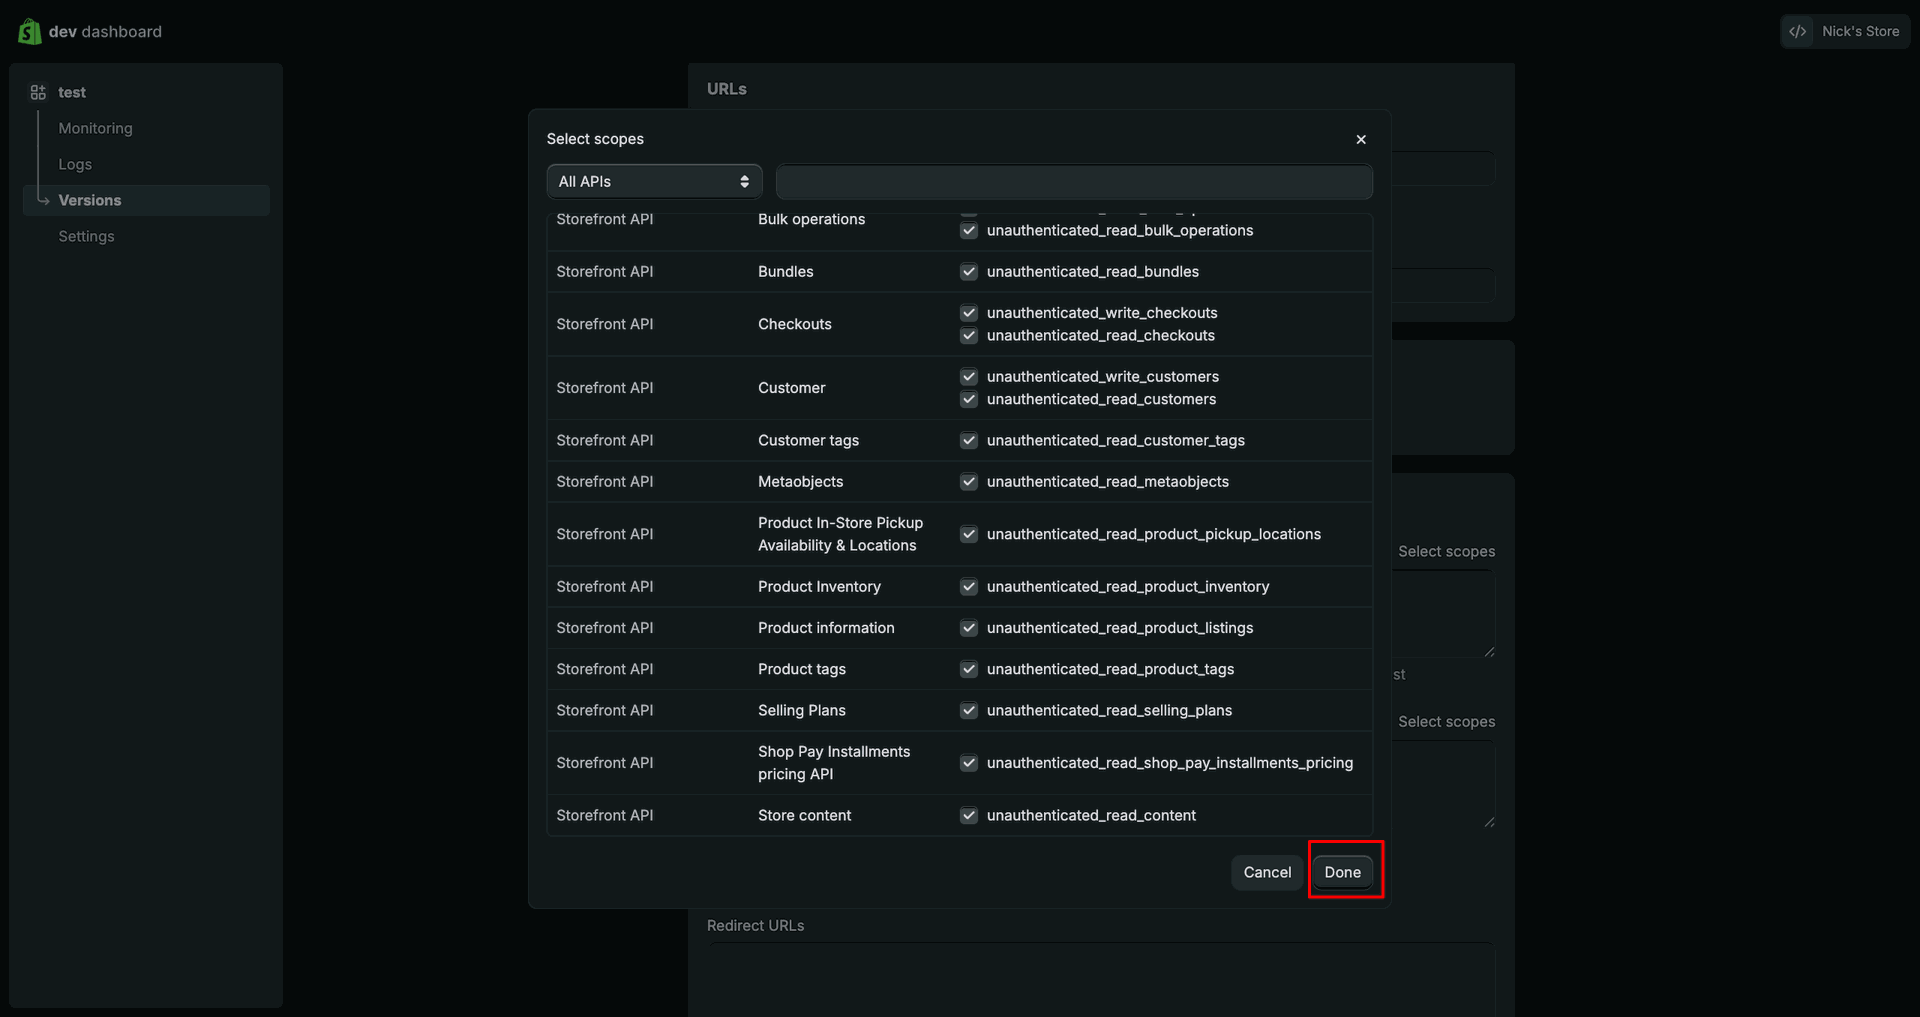
Select the required API scopes, then click Done to confirm the selection.
Shopify Credential interface screenshot
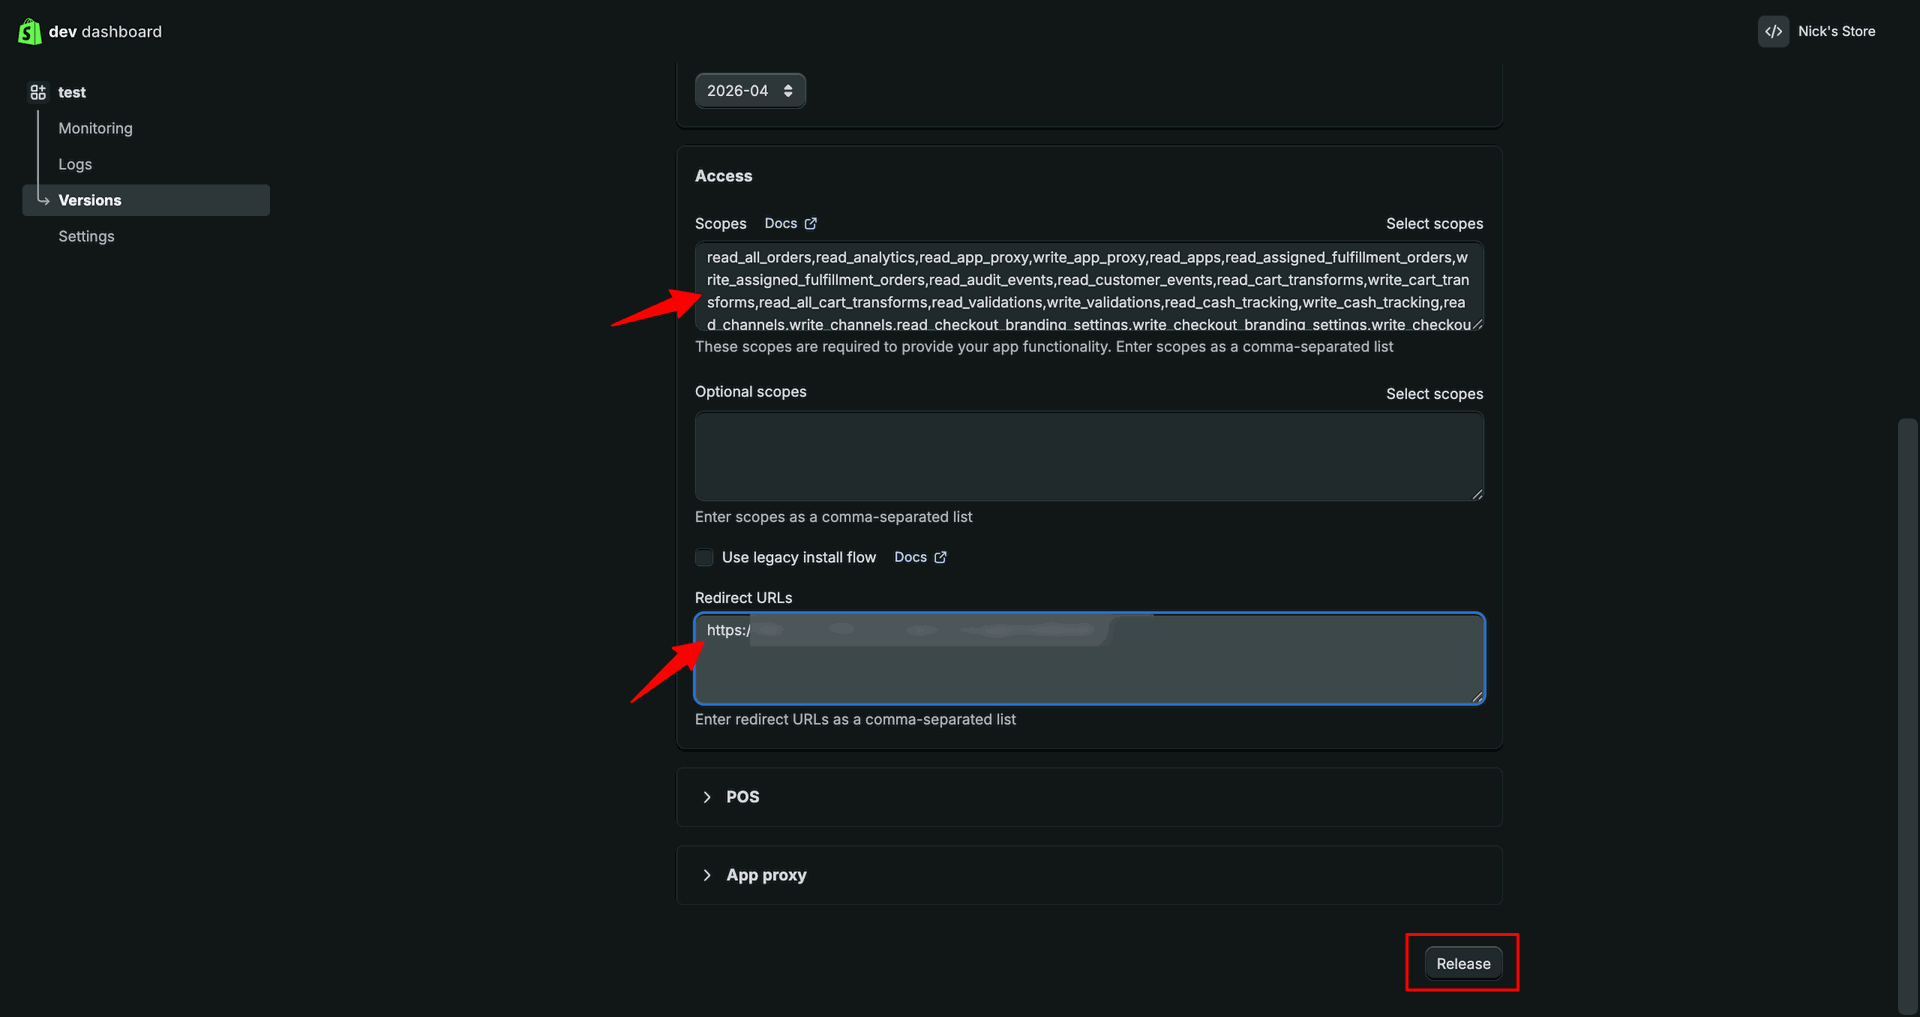
Review scopes and redirect URL, then click Release to publish the version.
Shopify Credential interface screenshot
Confirm the version release popup by clicking Release to publish app changes.
Shopify Credential interface screenshot
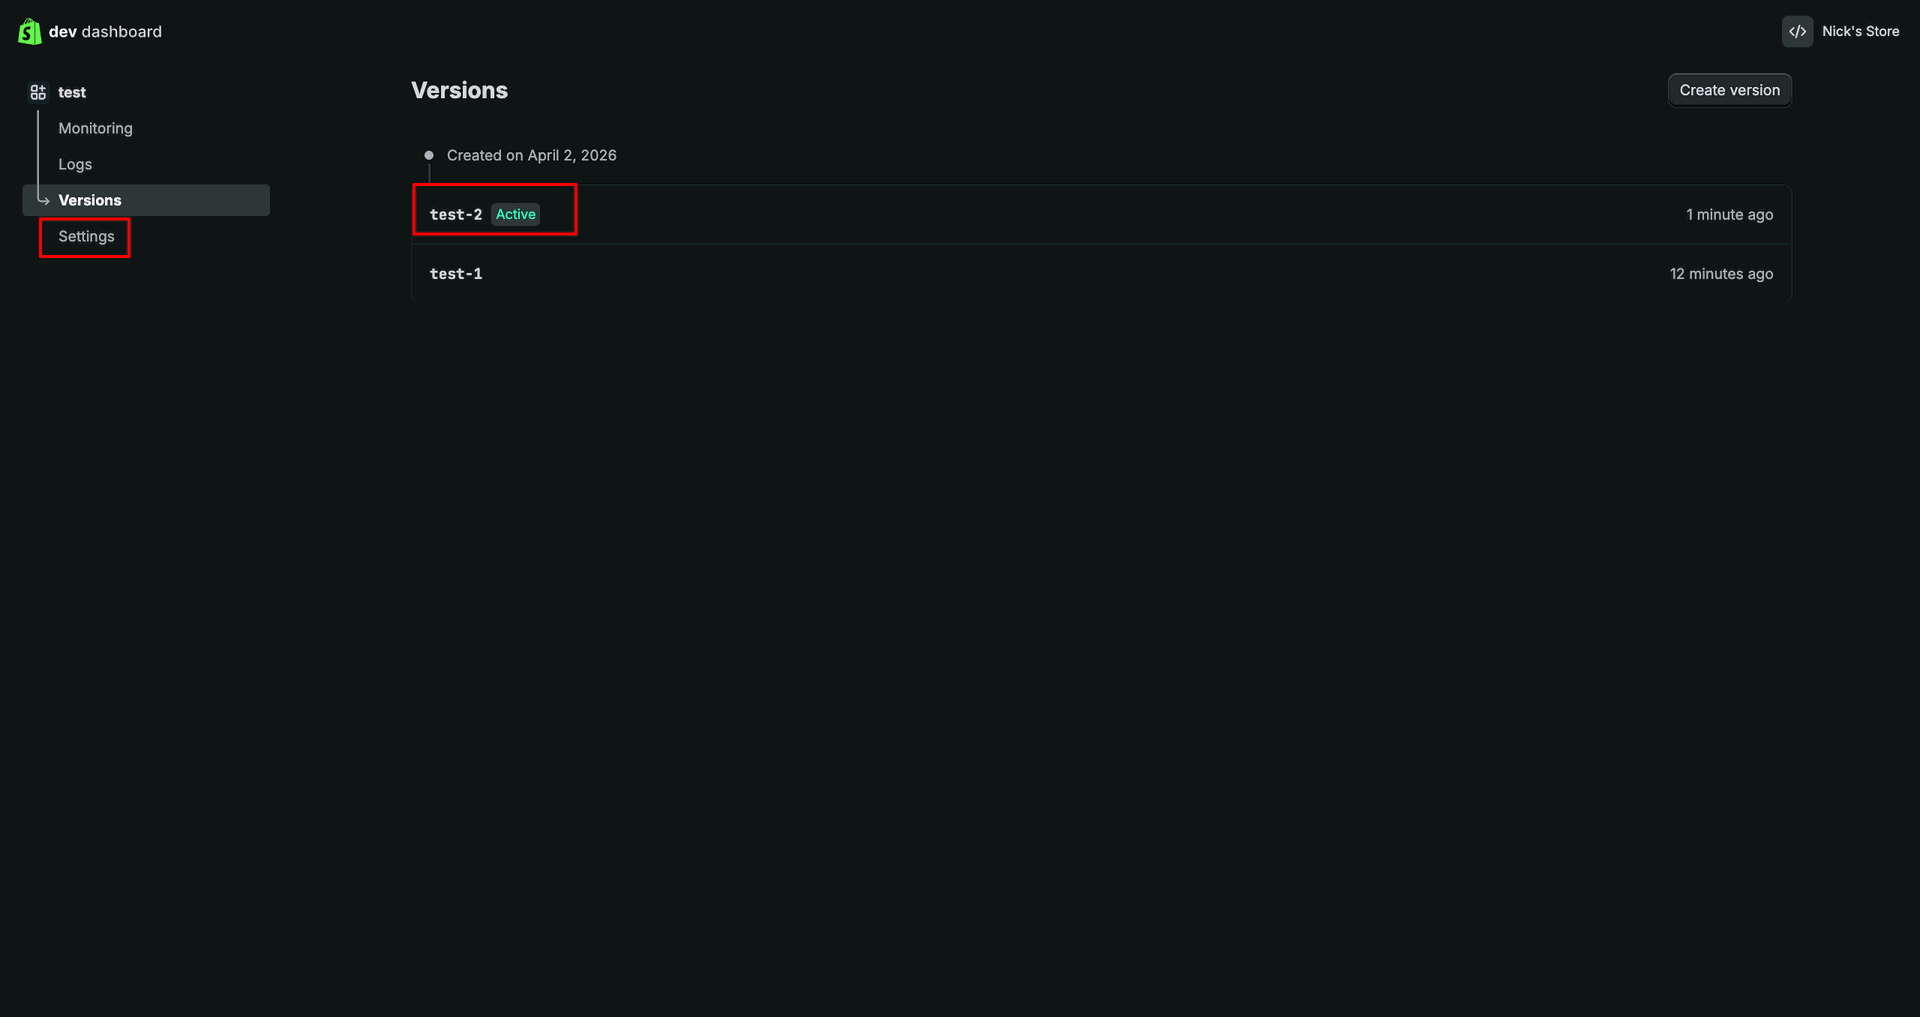
Open the created version from the Versions list to review published app details.
Shopify Credential interface screenshot
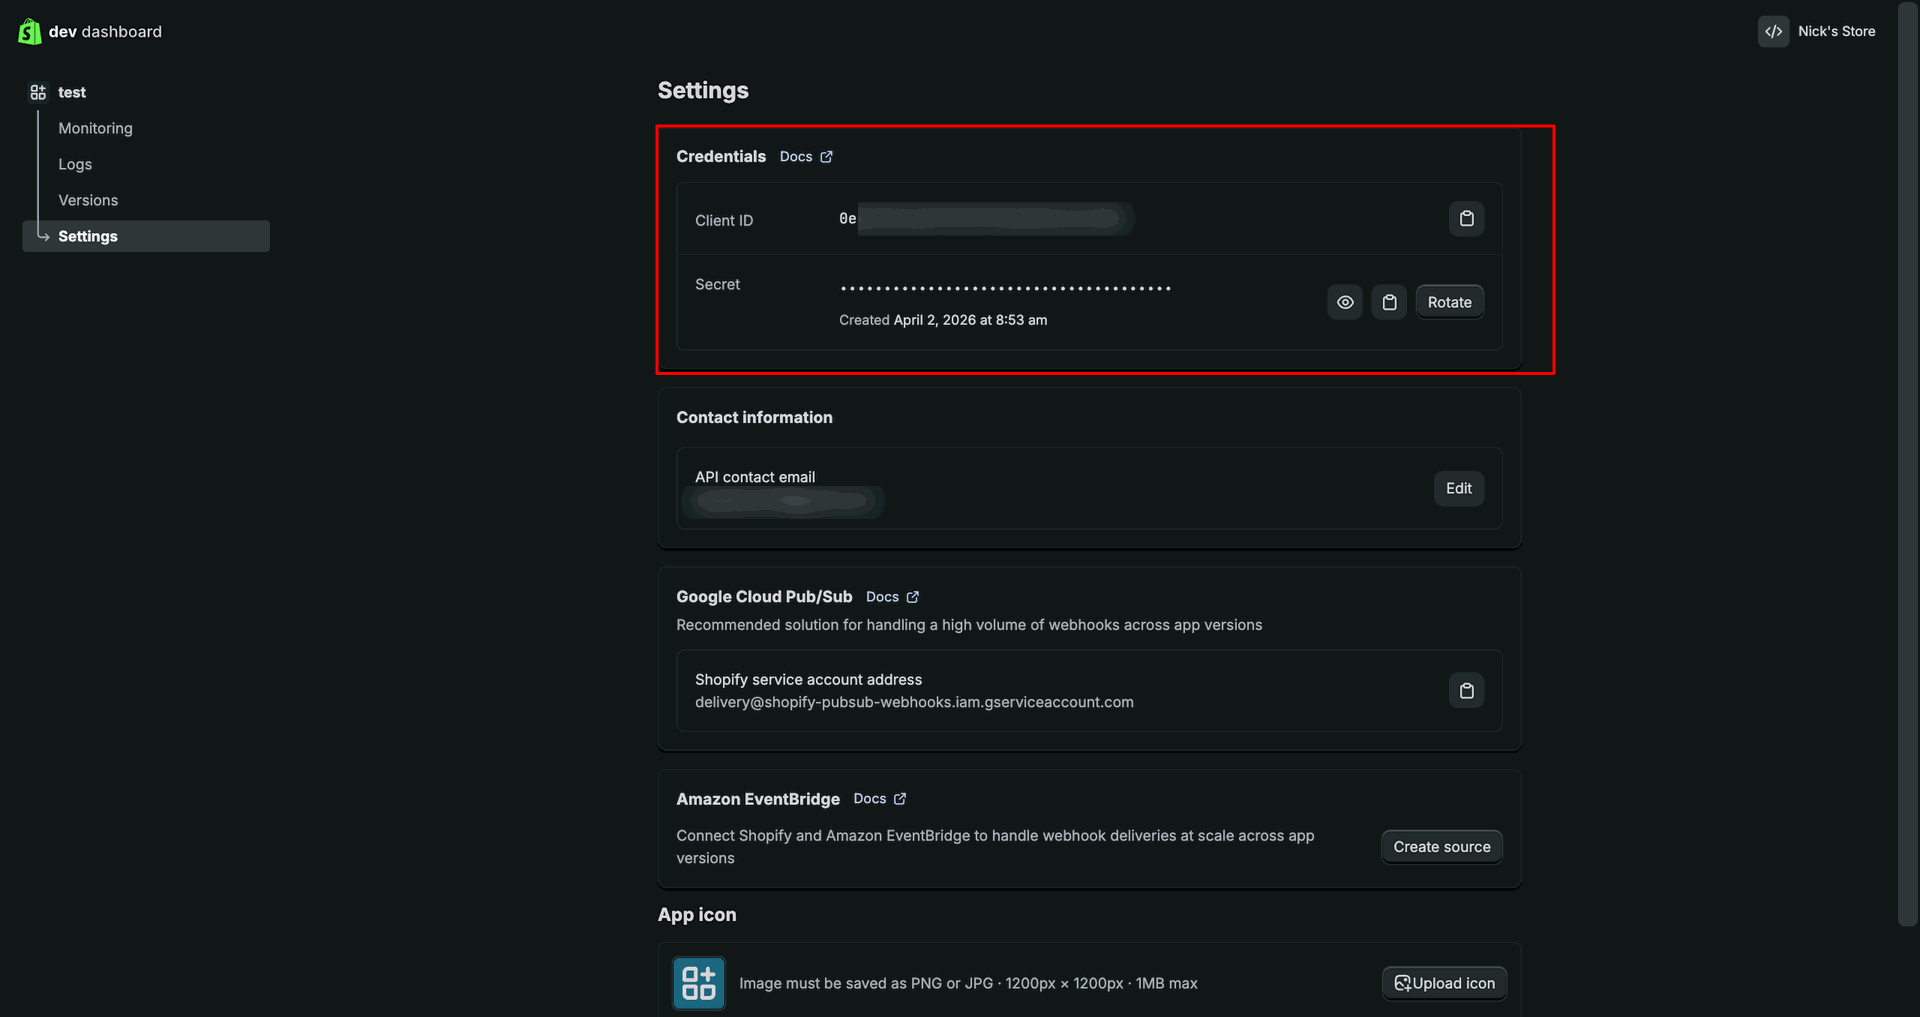
Review the generated client credentials from the Settings page before connecting Odoo.
Shopify Credential interface screenshot
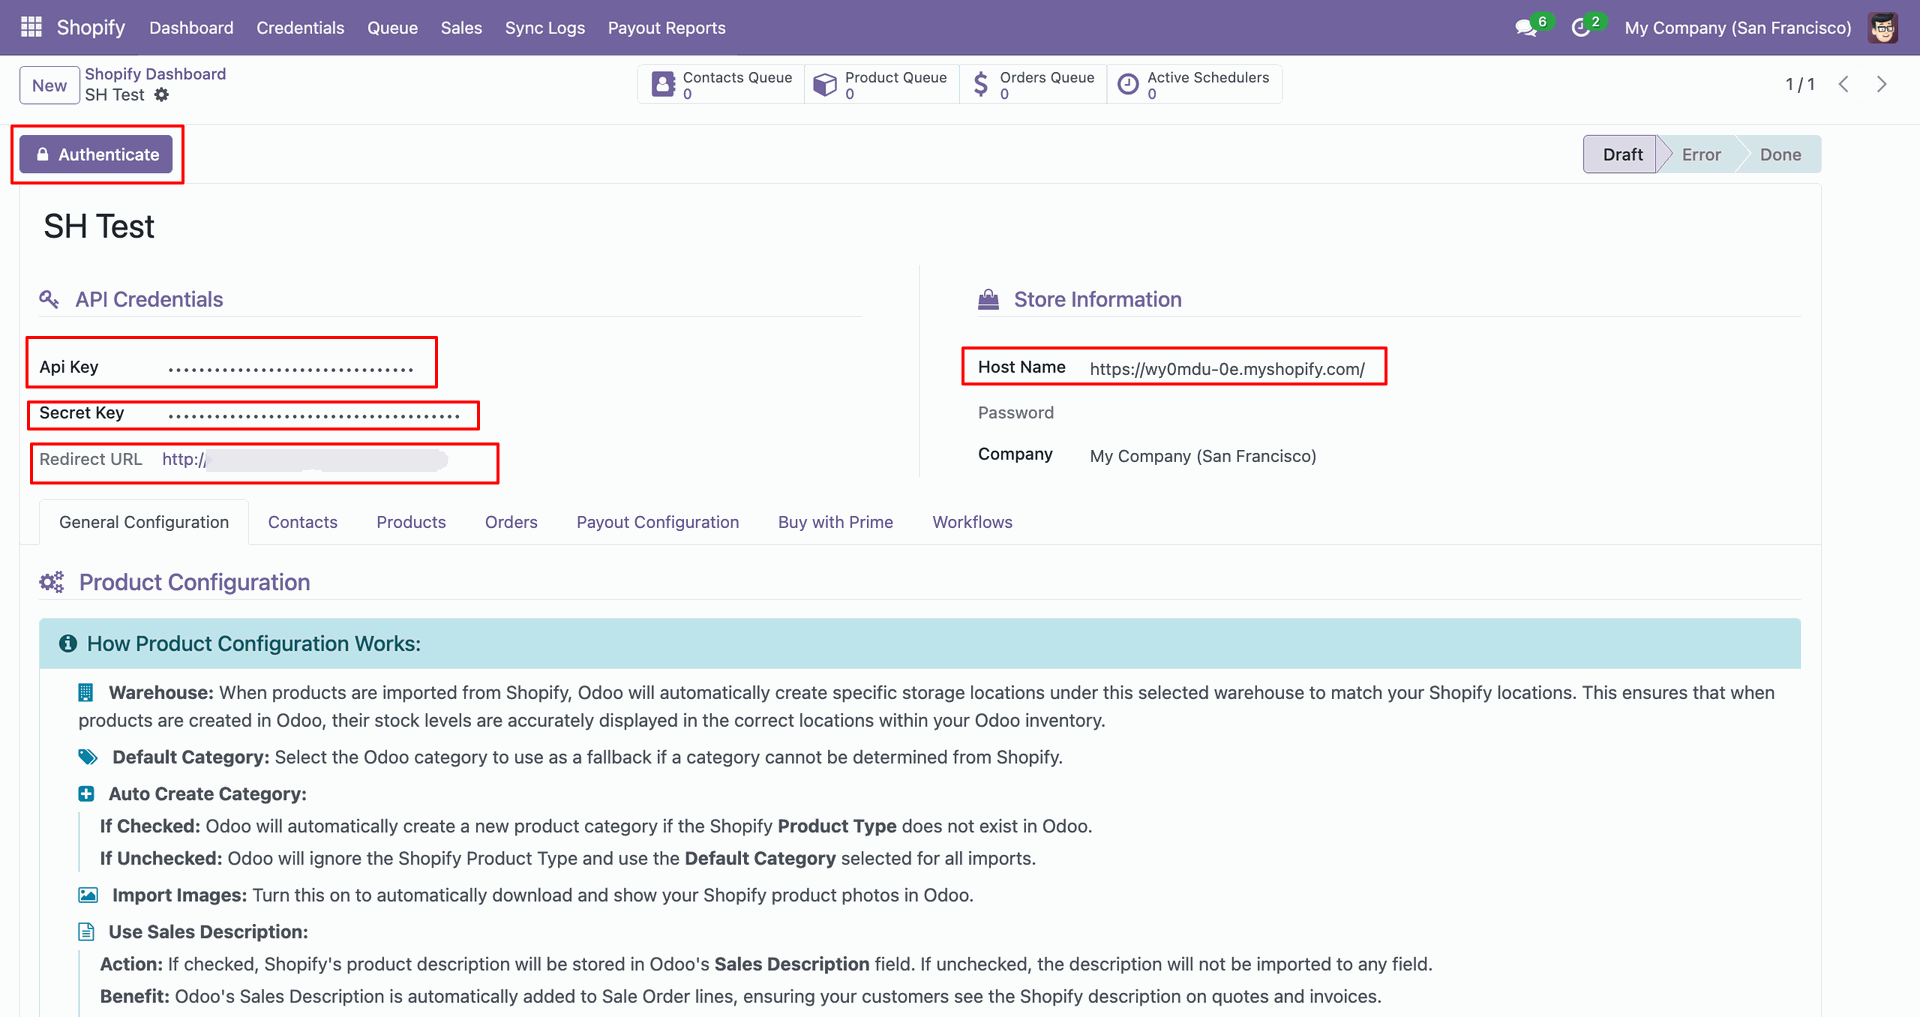
Paste the Shopify credentials into Odoo and click Authenticate to connect the store.
Shopify Credential interface screenshot
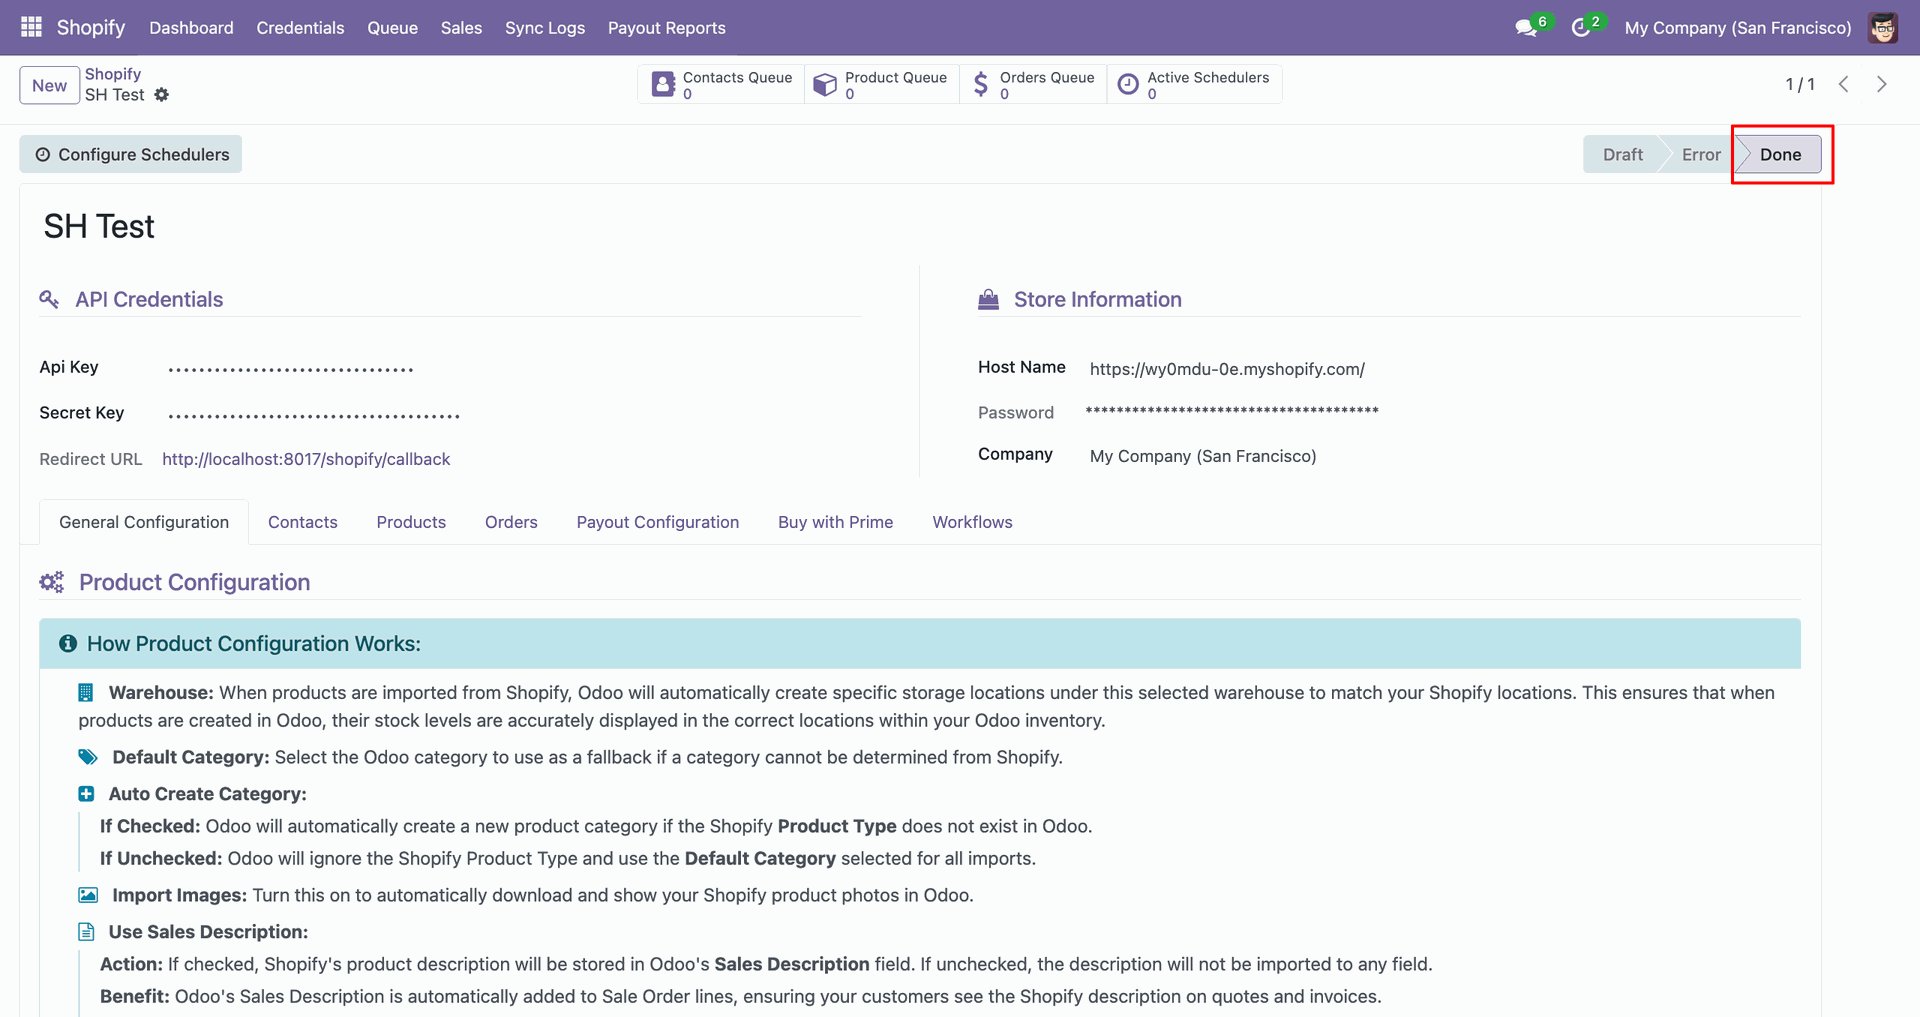
Verify the instance status changes to Done after successful Shopify authentication.
Shopify Credential interface screenshot
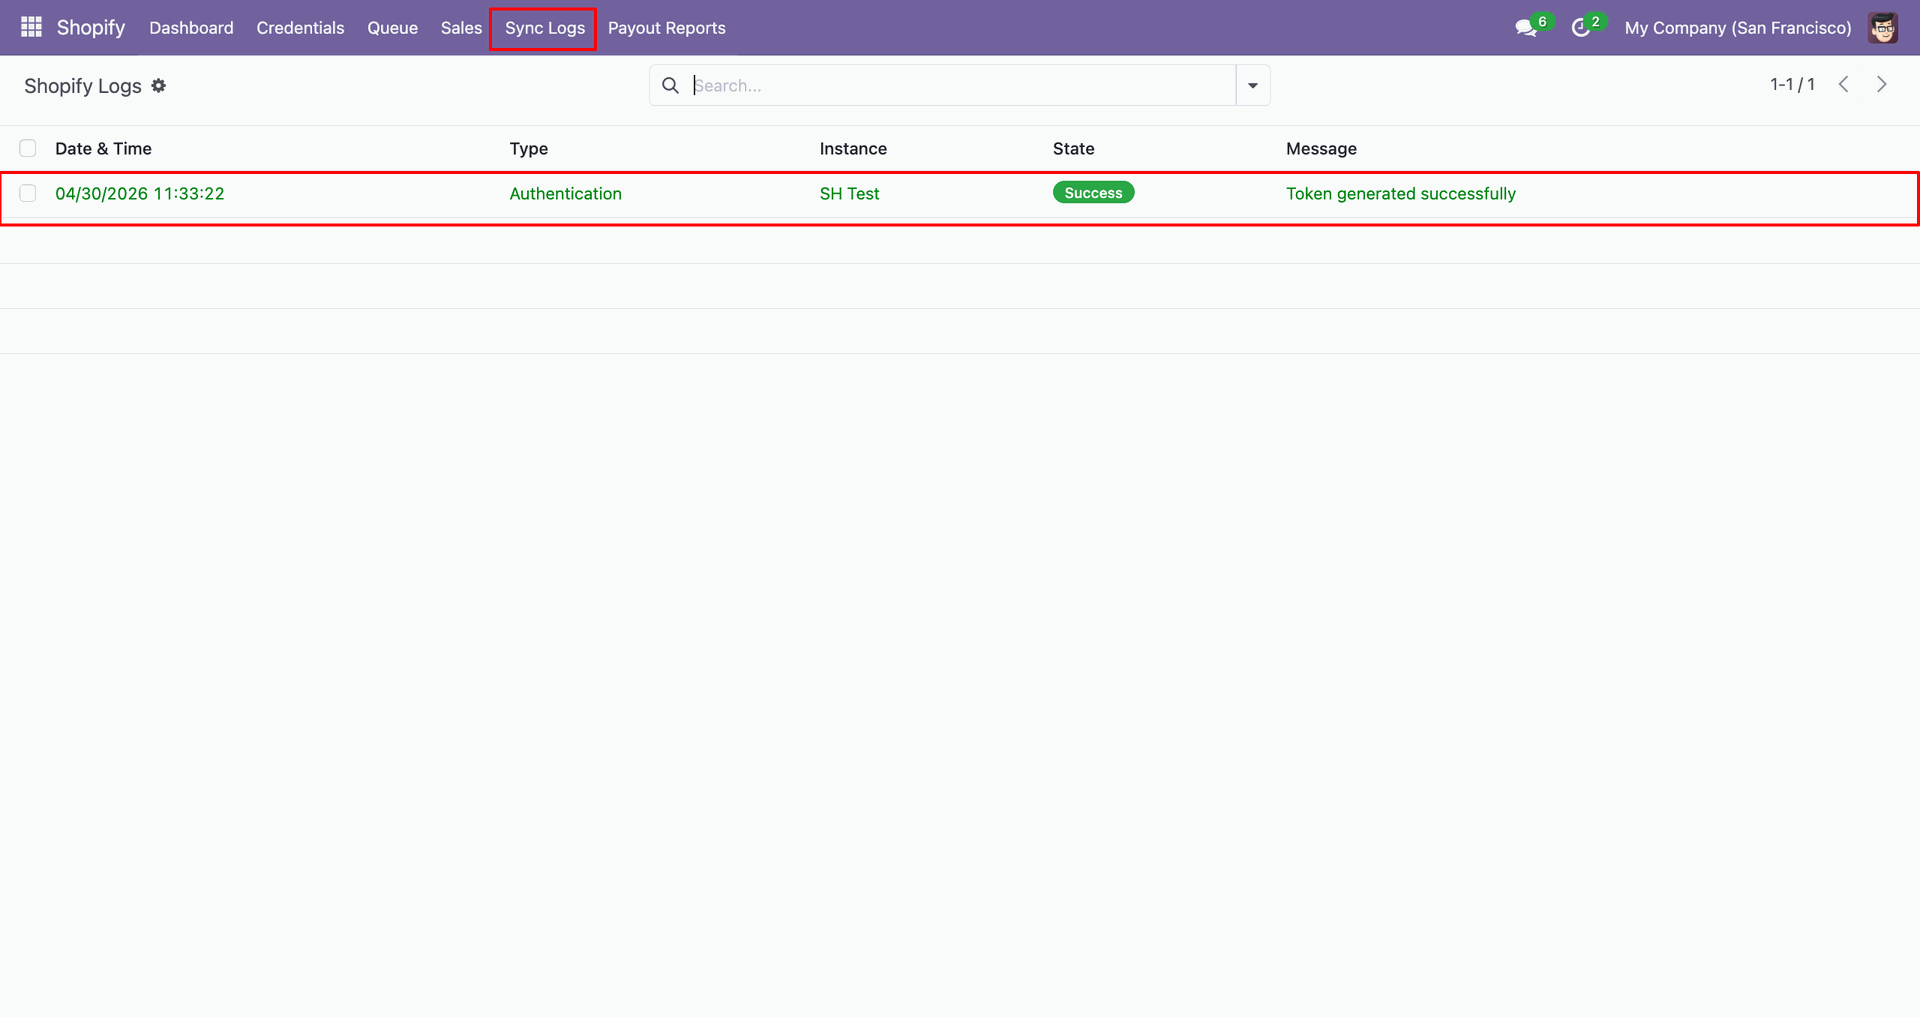
Check Sync Logs to confirm token generation completed successfully for the Shopify instance.
Shopify Credential interface screenshot

Import Products
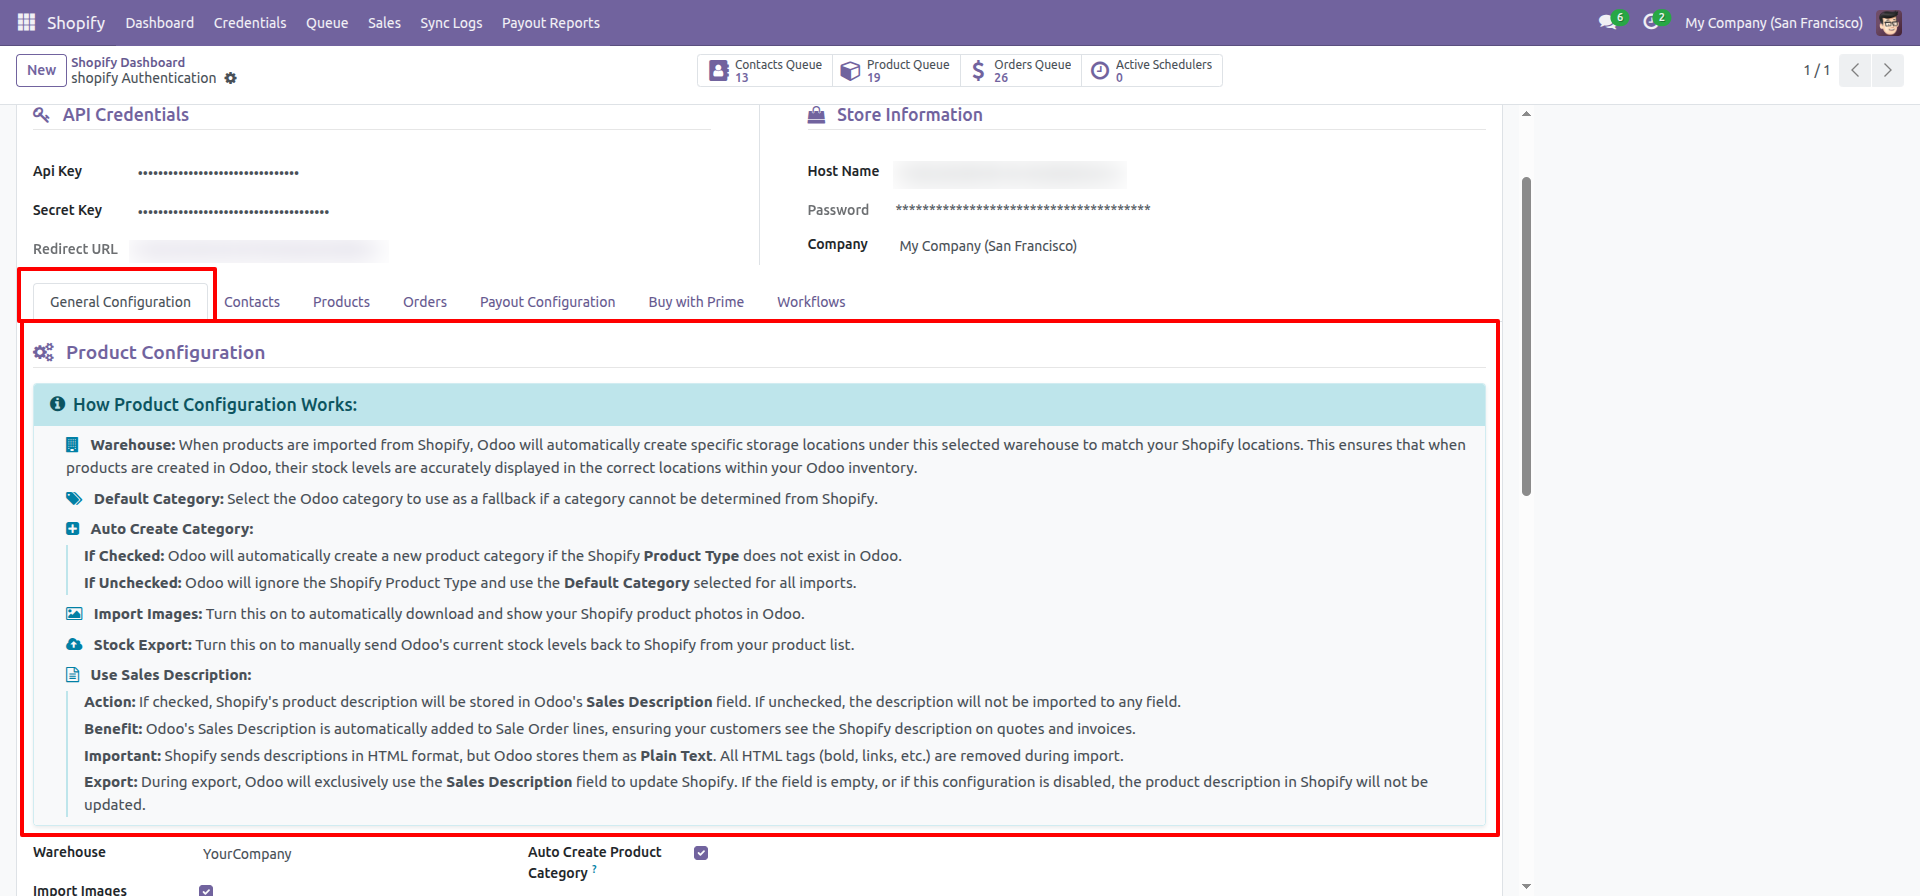
Open the Products tab to review product configuration before importing Shopify items.
Import Products interface screenshot
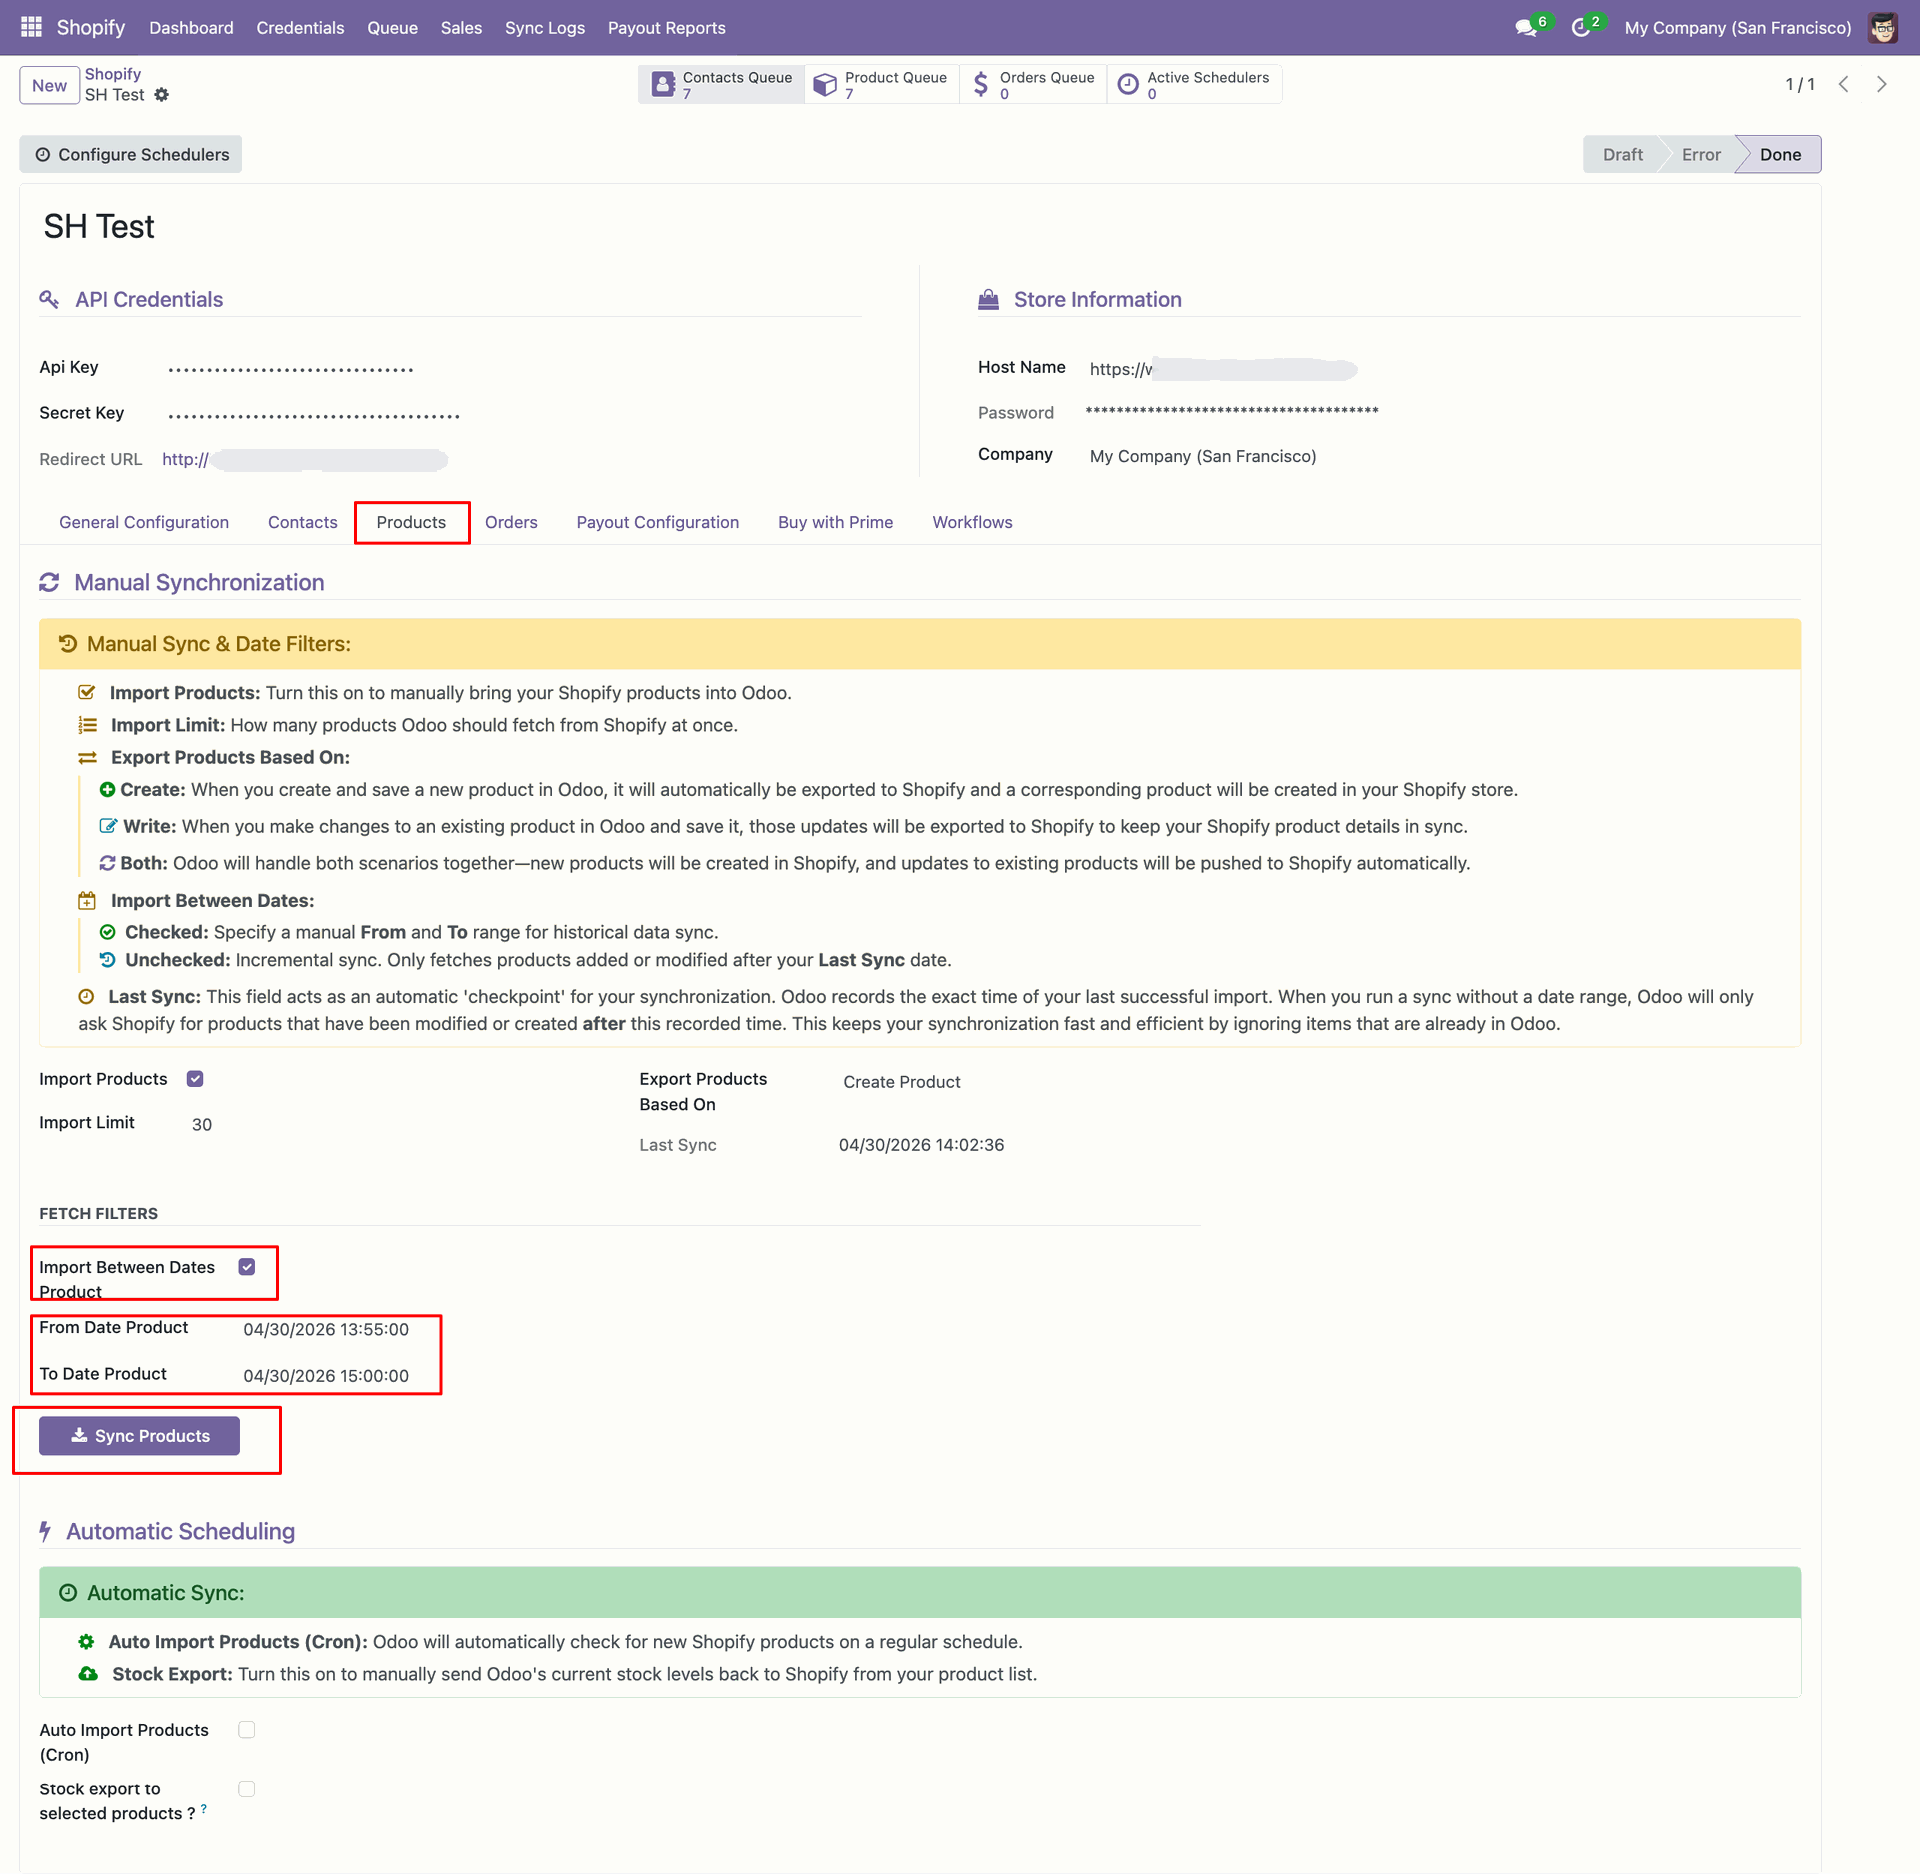
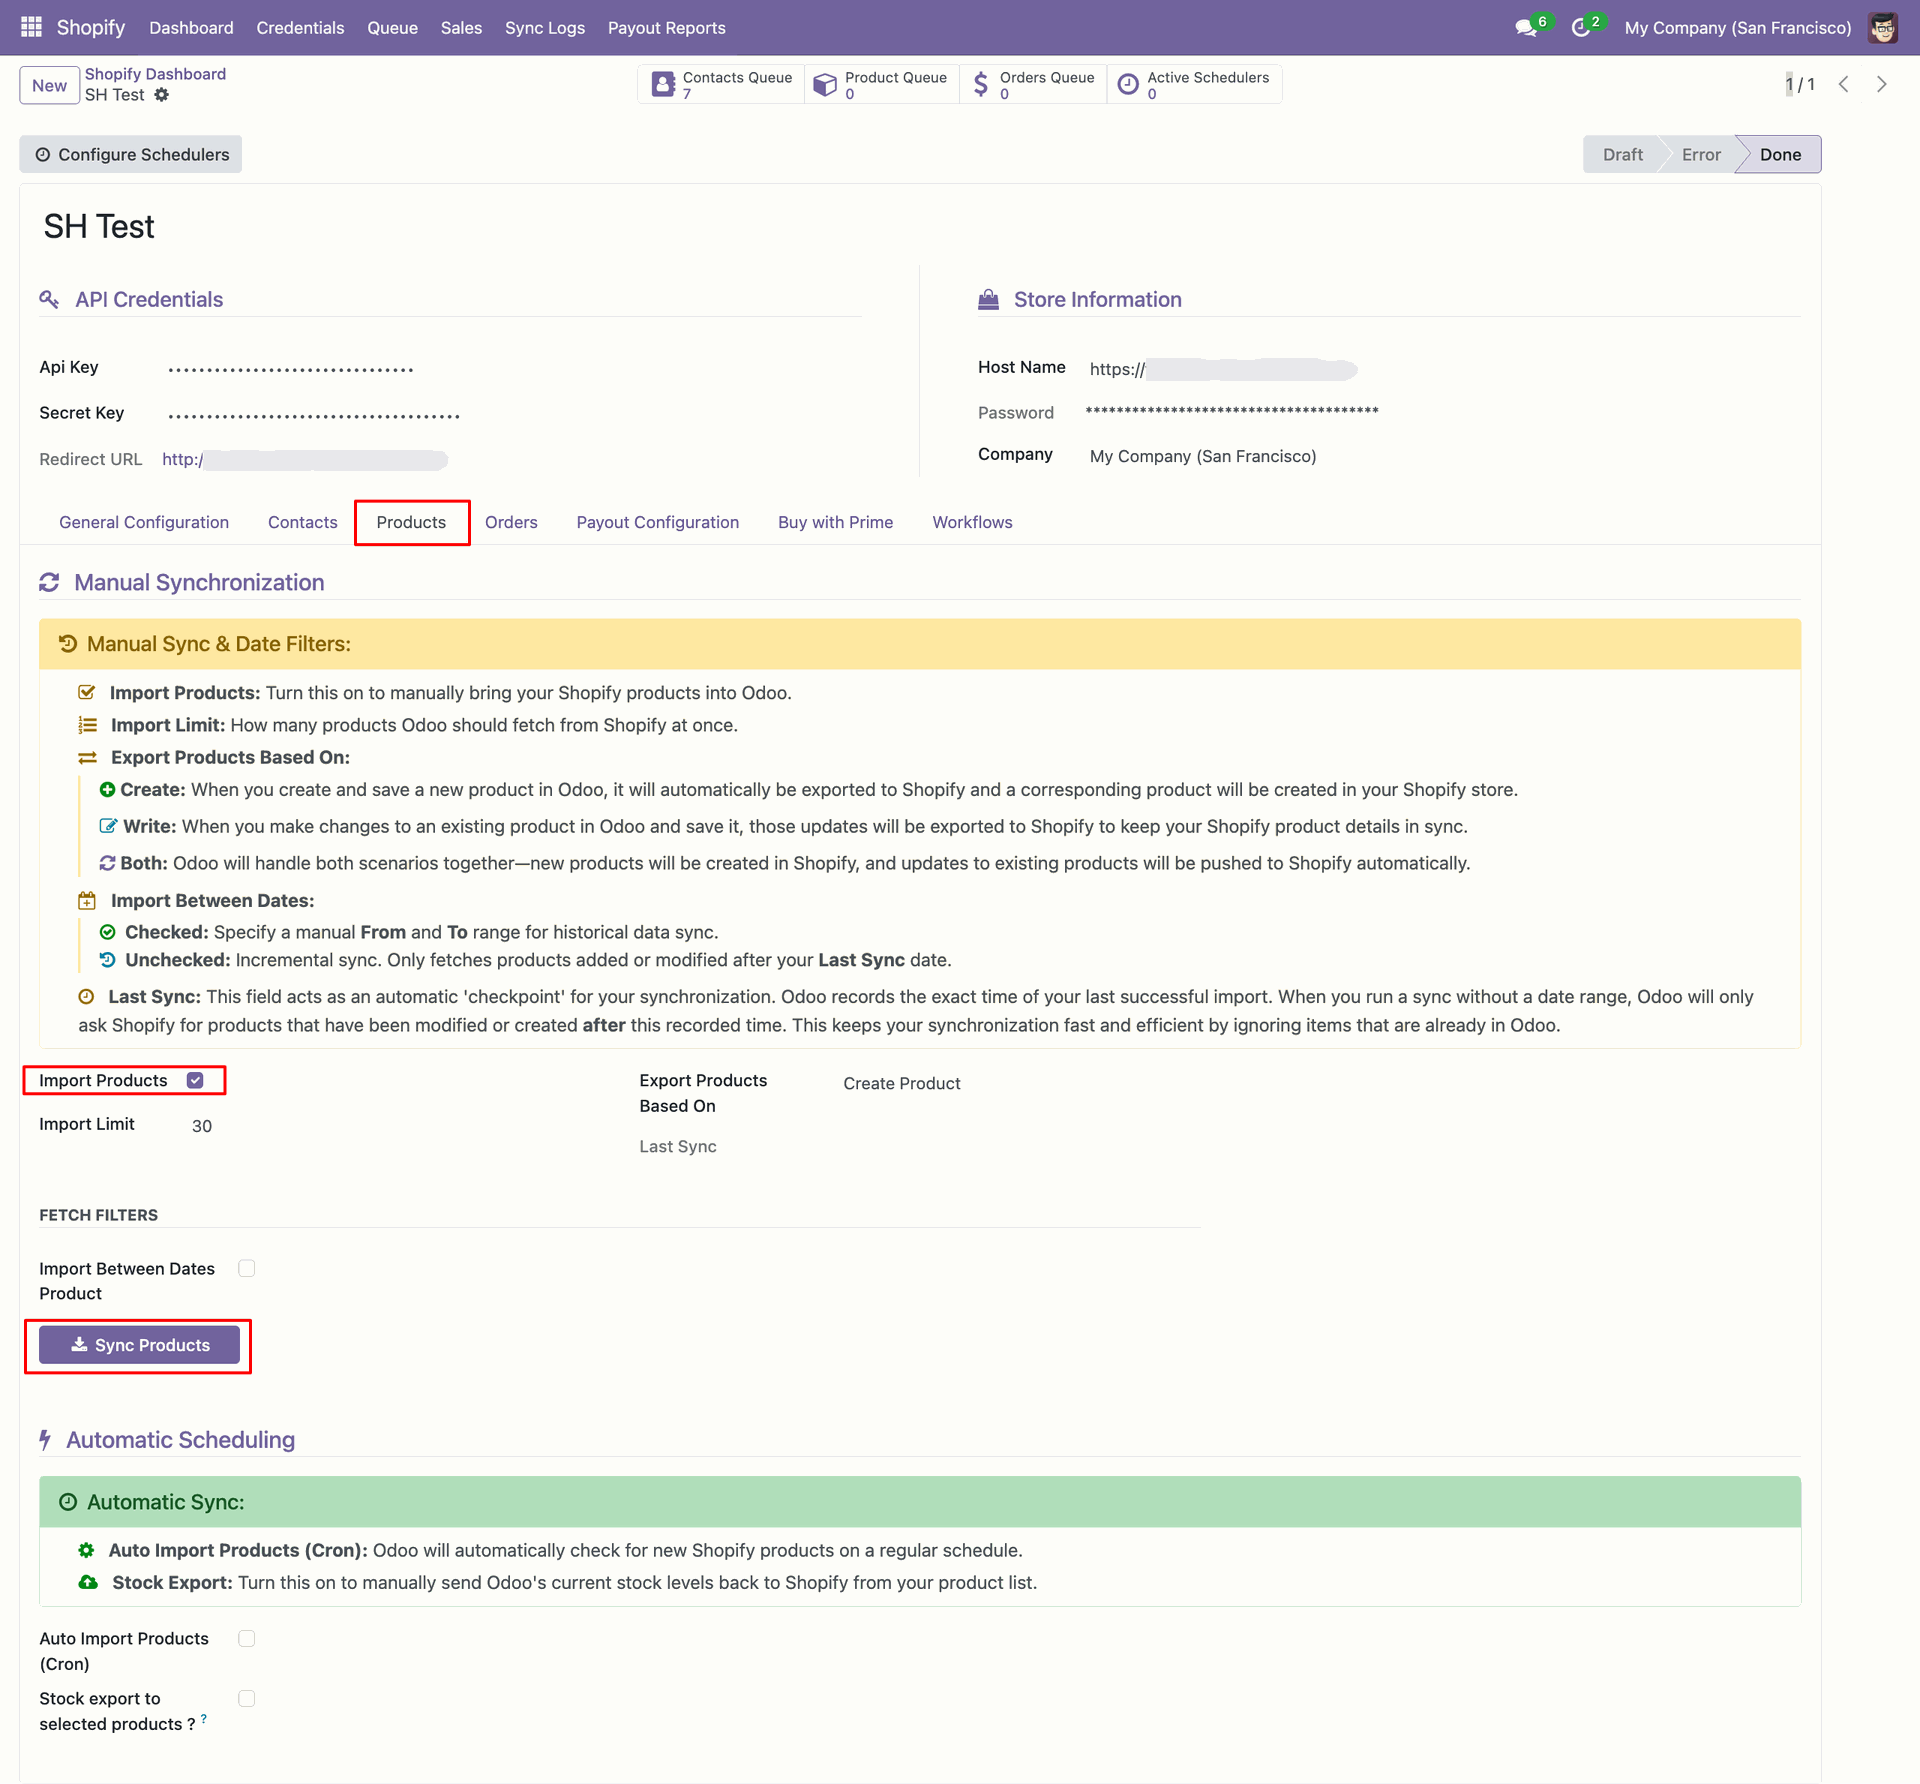
Enable Import Products and click Sync Products to fetch items manually.
Import Products interface screenshot
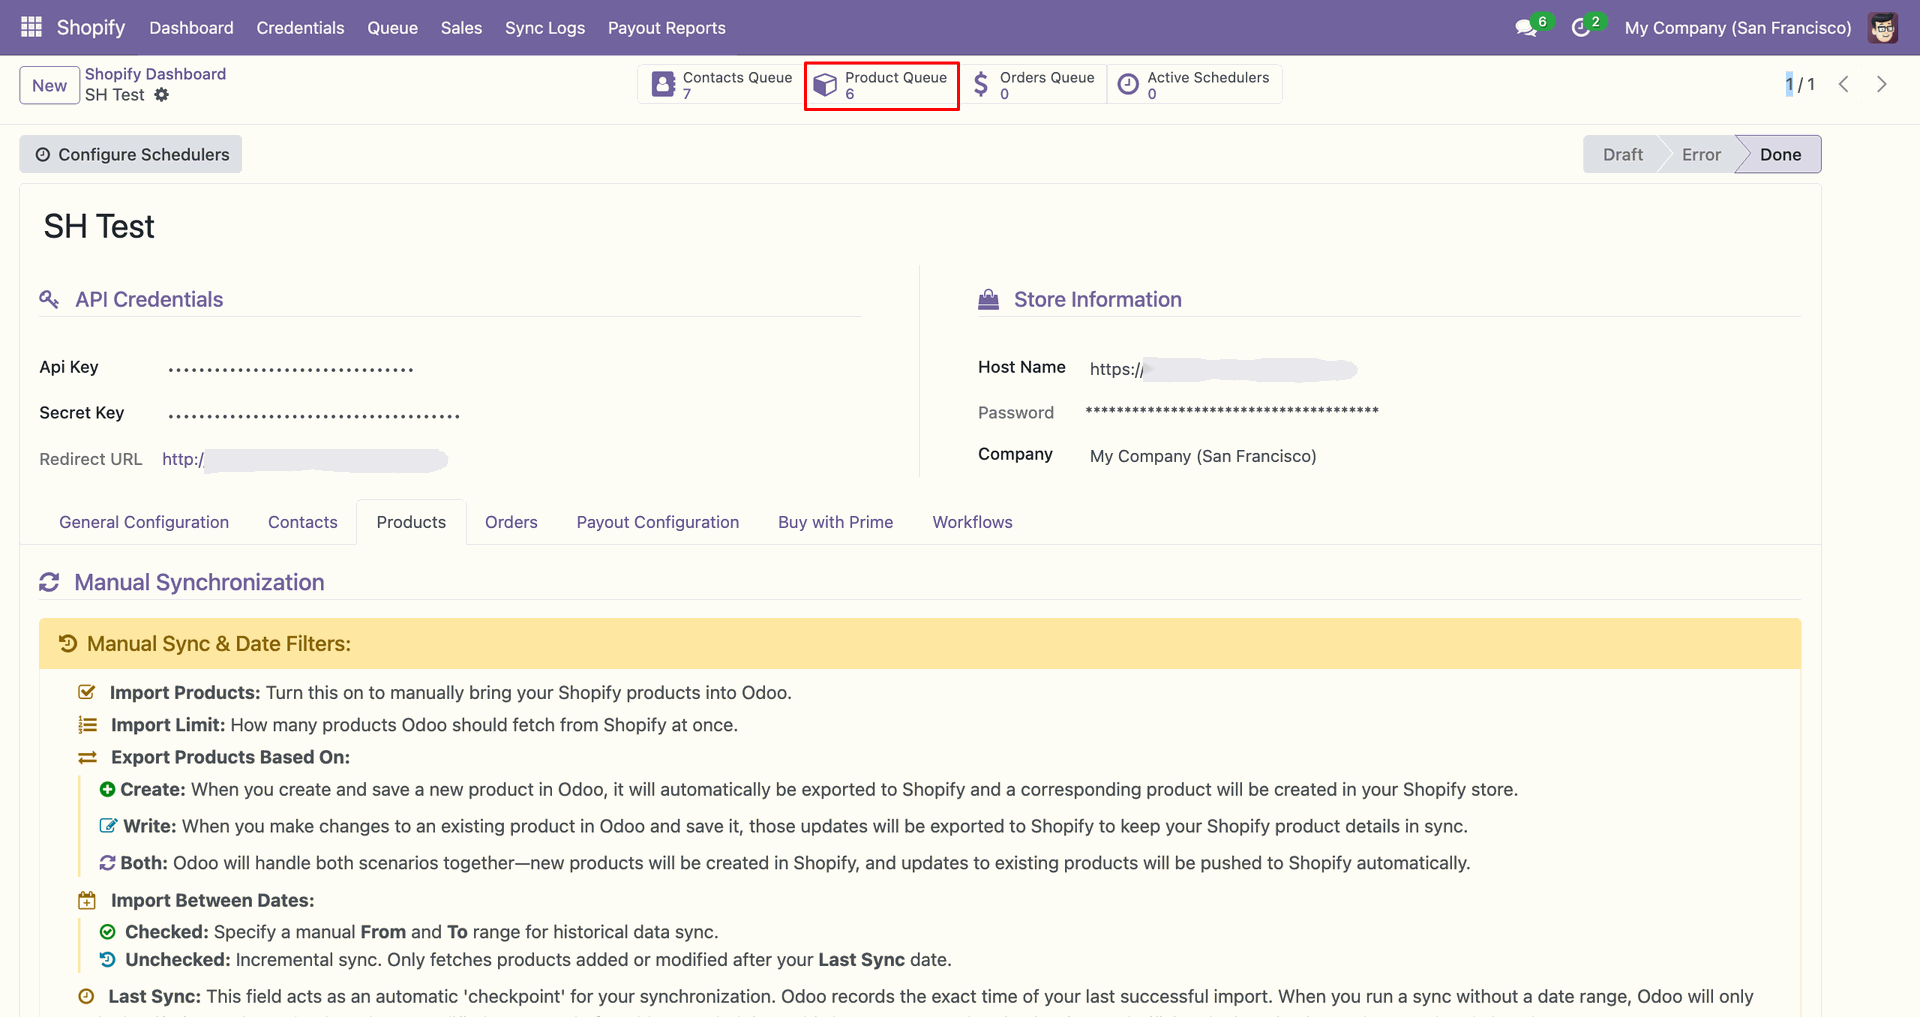
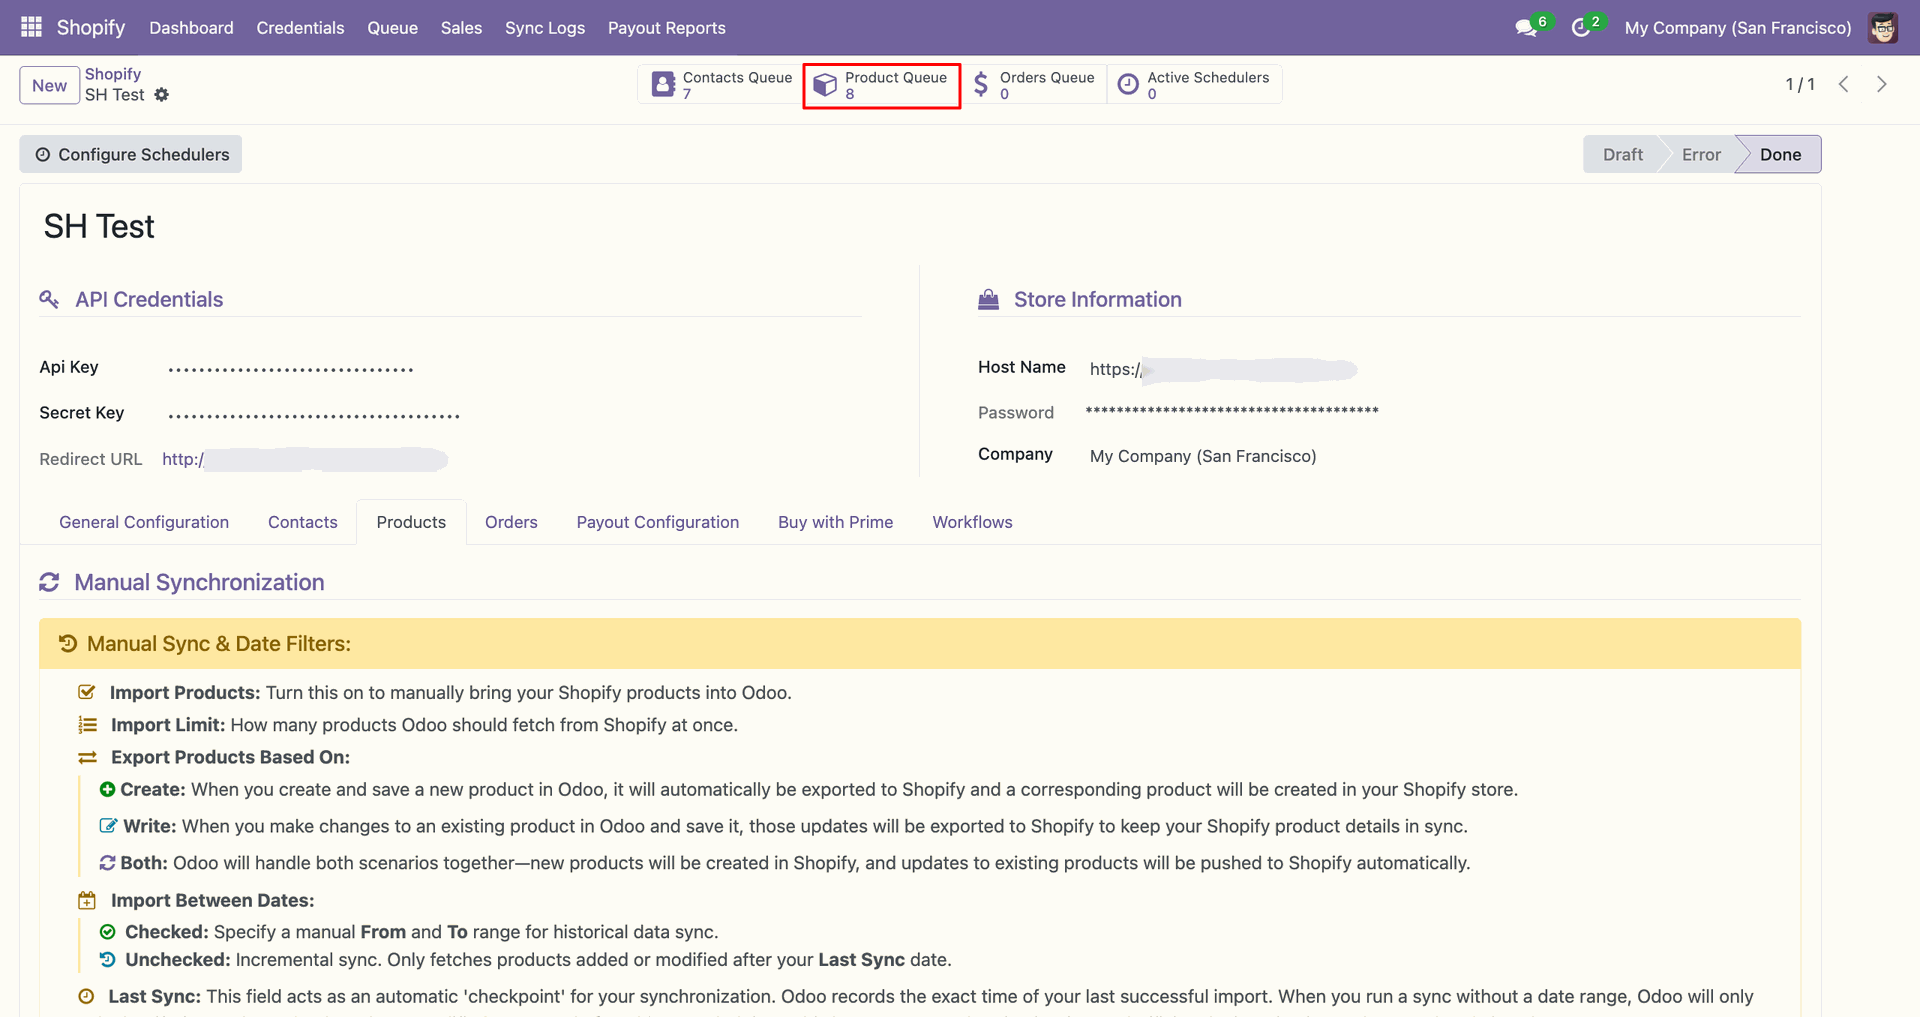
Use the Product Queue shortcut to review staged product records after synchronization.
Import Products interface screenshot
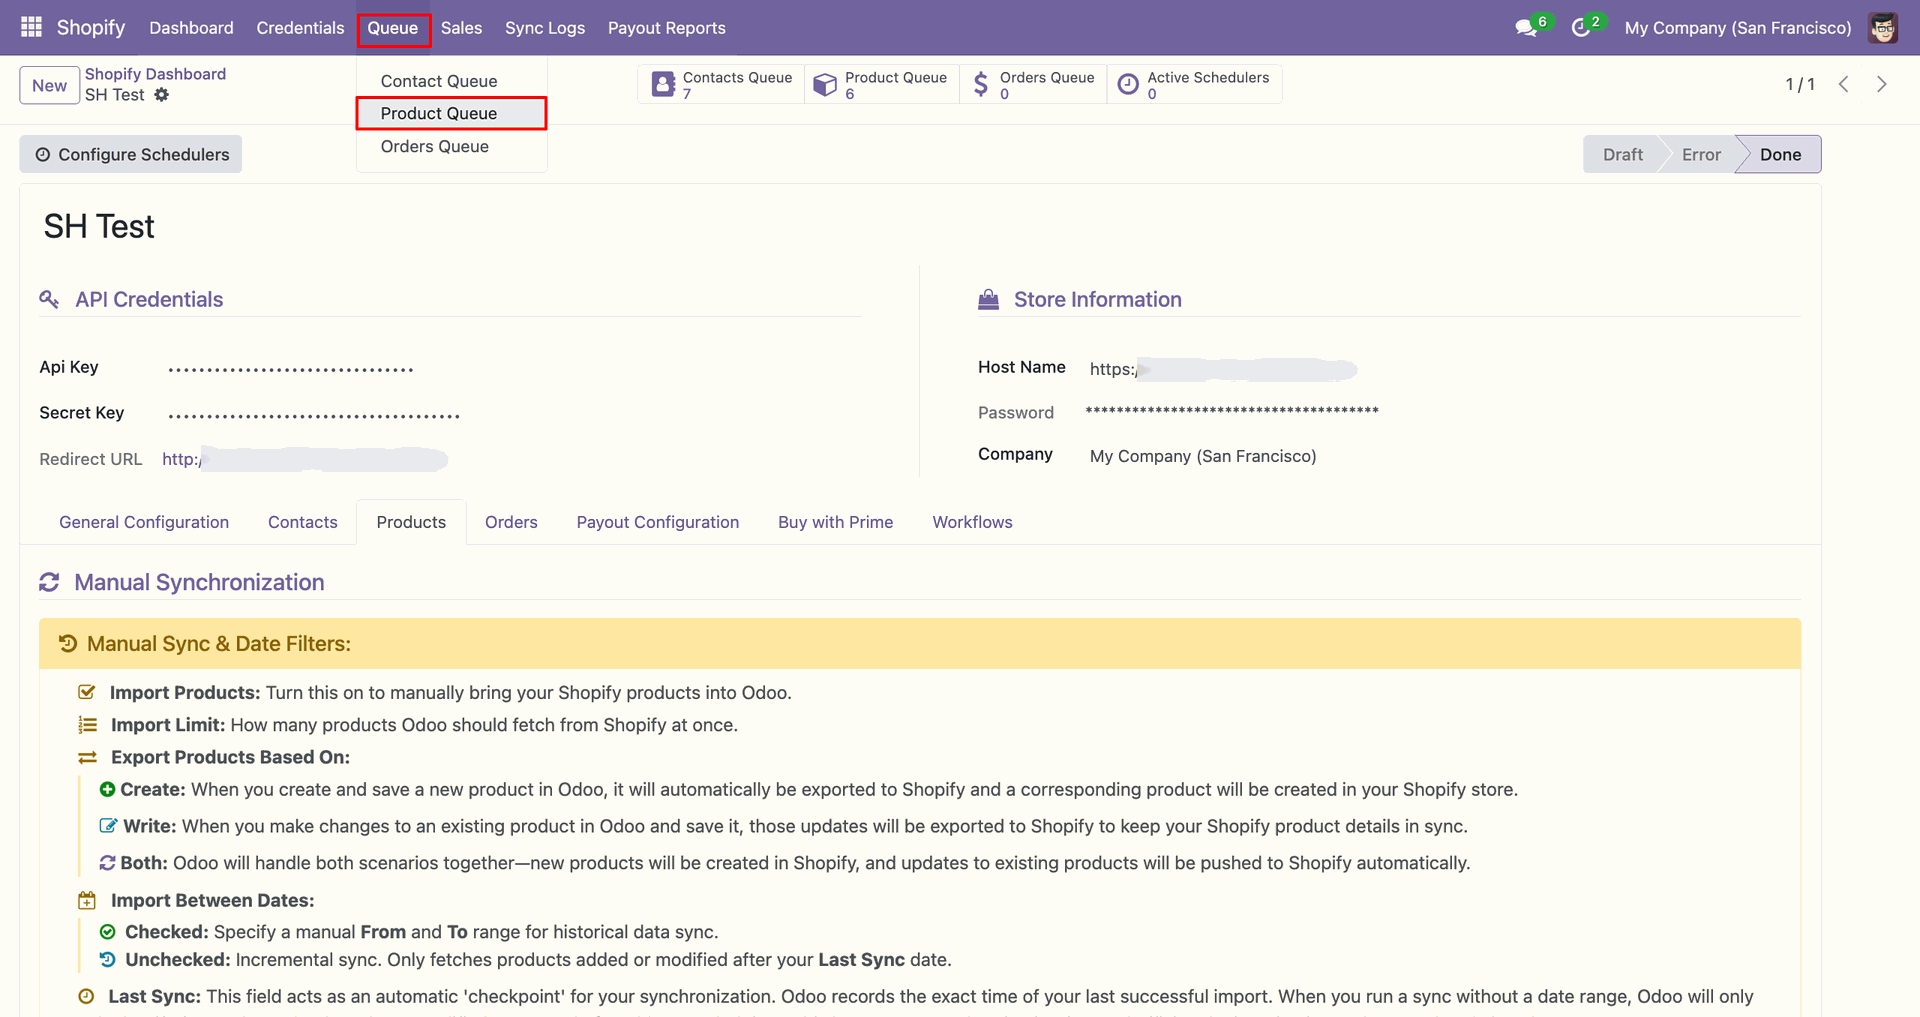
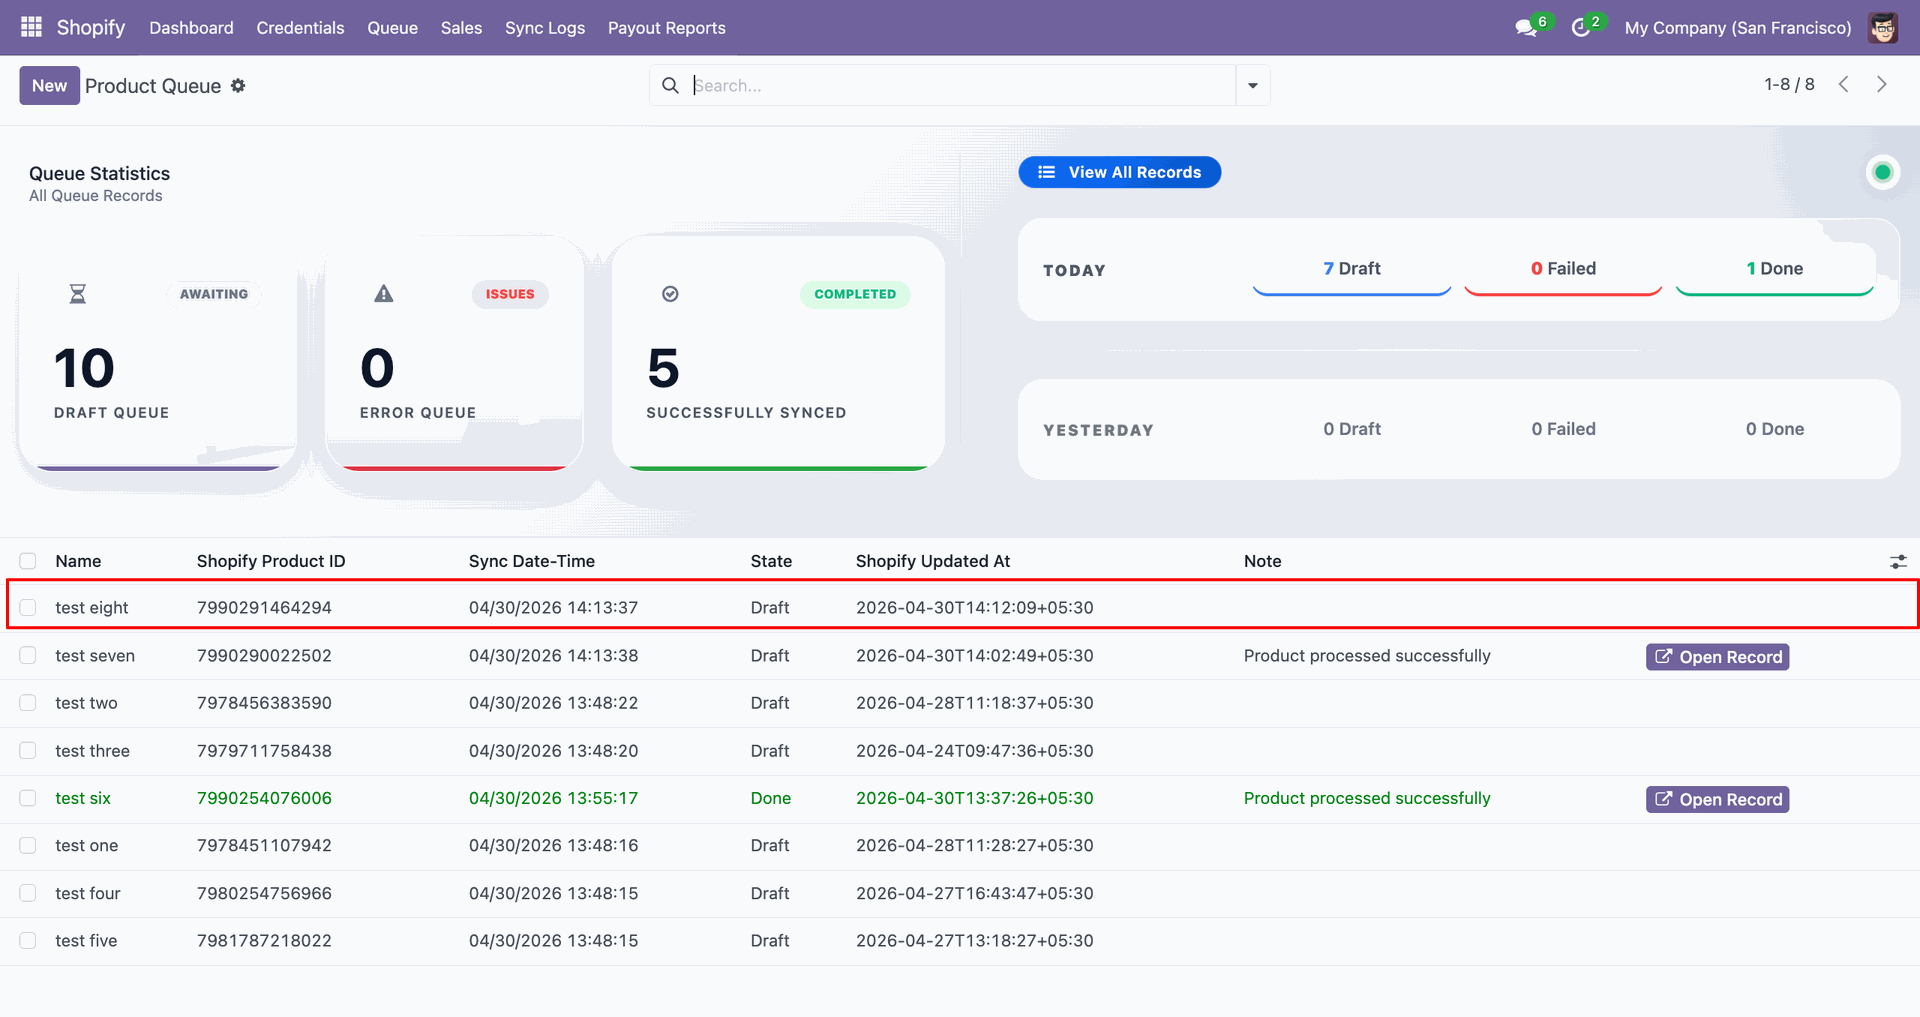
Open Product Queue from the Queue menu to inspect imported product entries.
Import Products interface screenshot
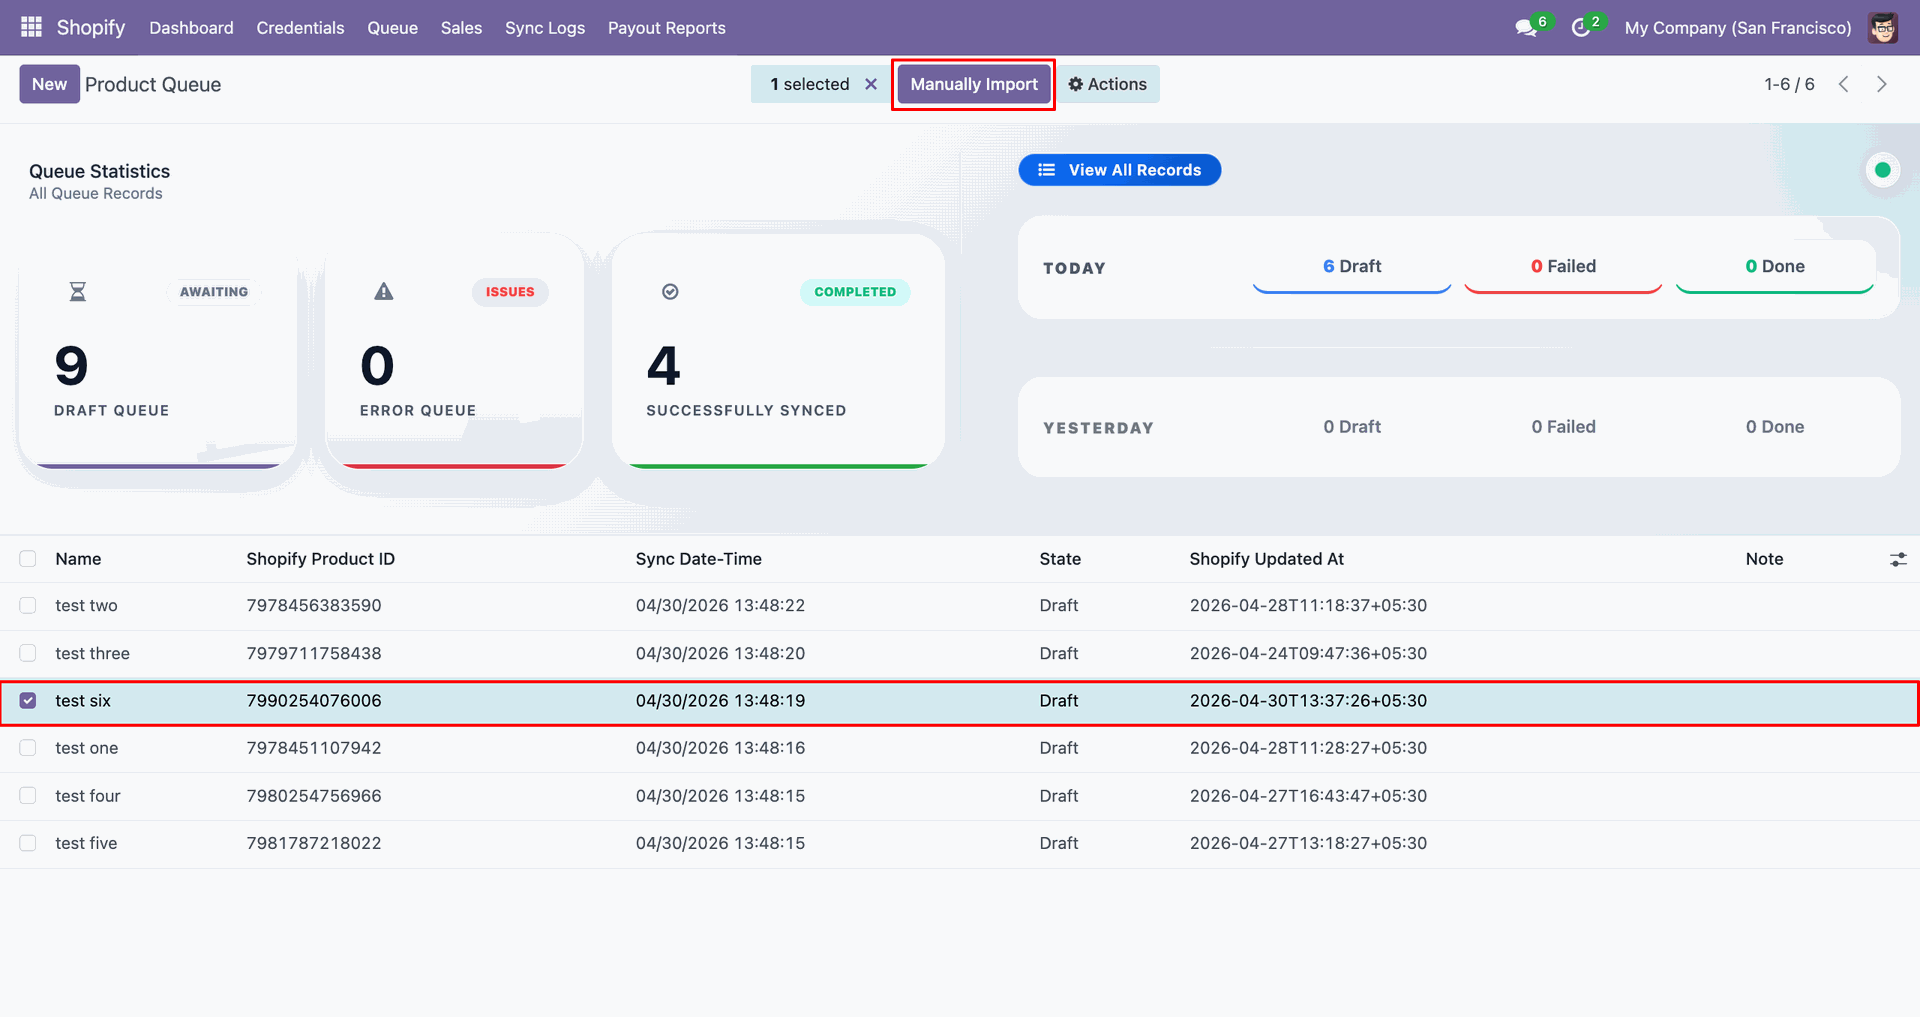
Select the queued product line and click Manually Import to process it.
Import Products interface screenshot
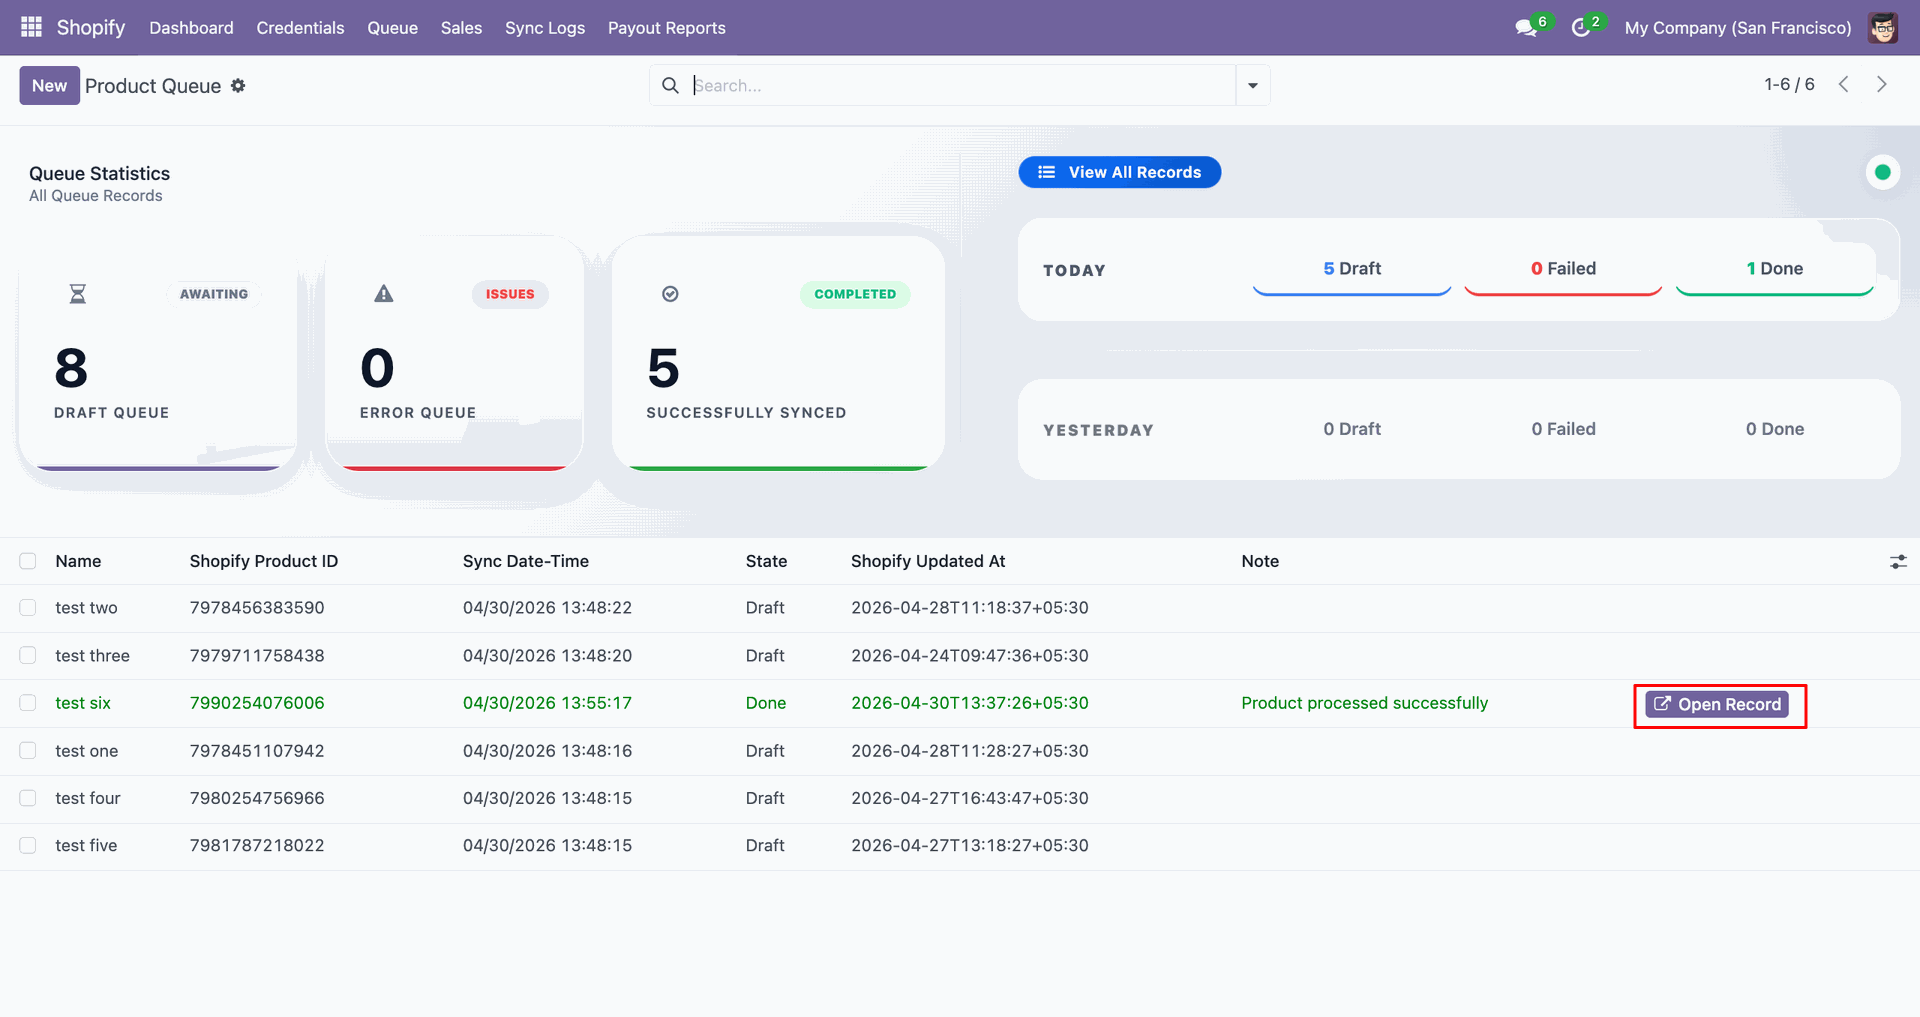
Click Open Record beside the completed queue line to view the Odoo product.
Import Products interface screenshot
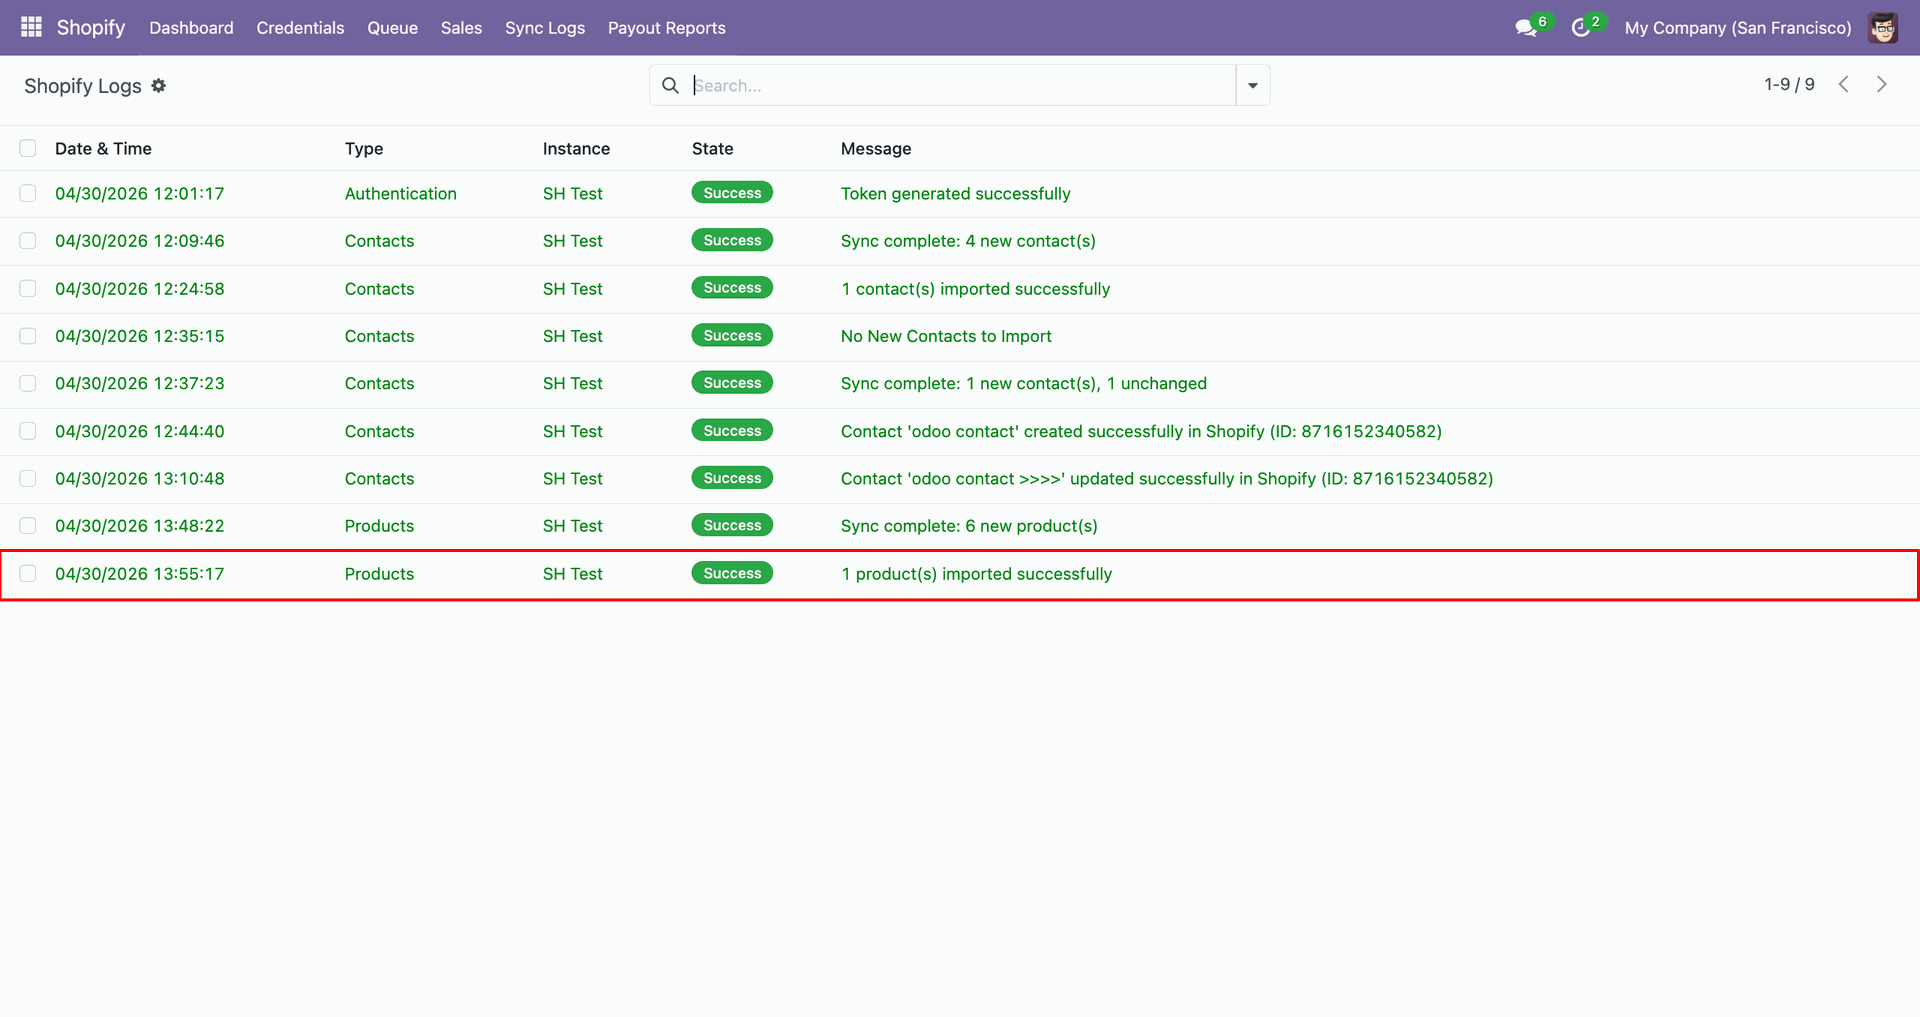
Review the Products log entry to confirm the product import finished successfully.
Import Products interface screenshot
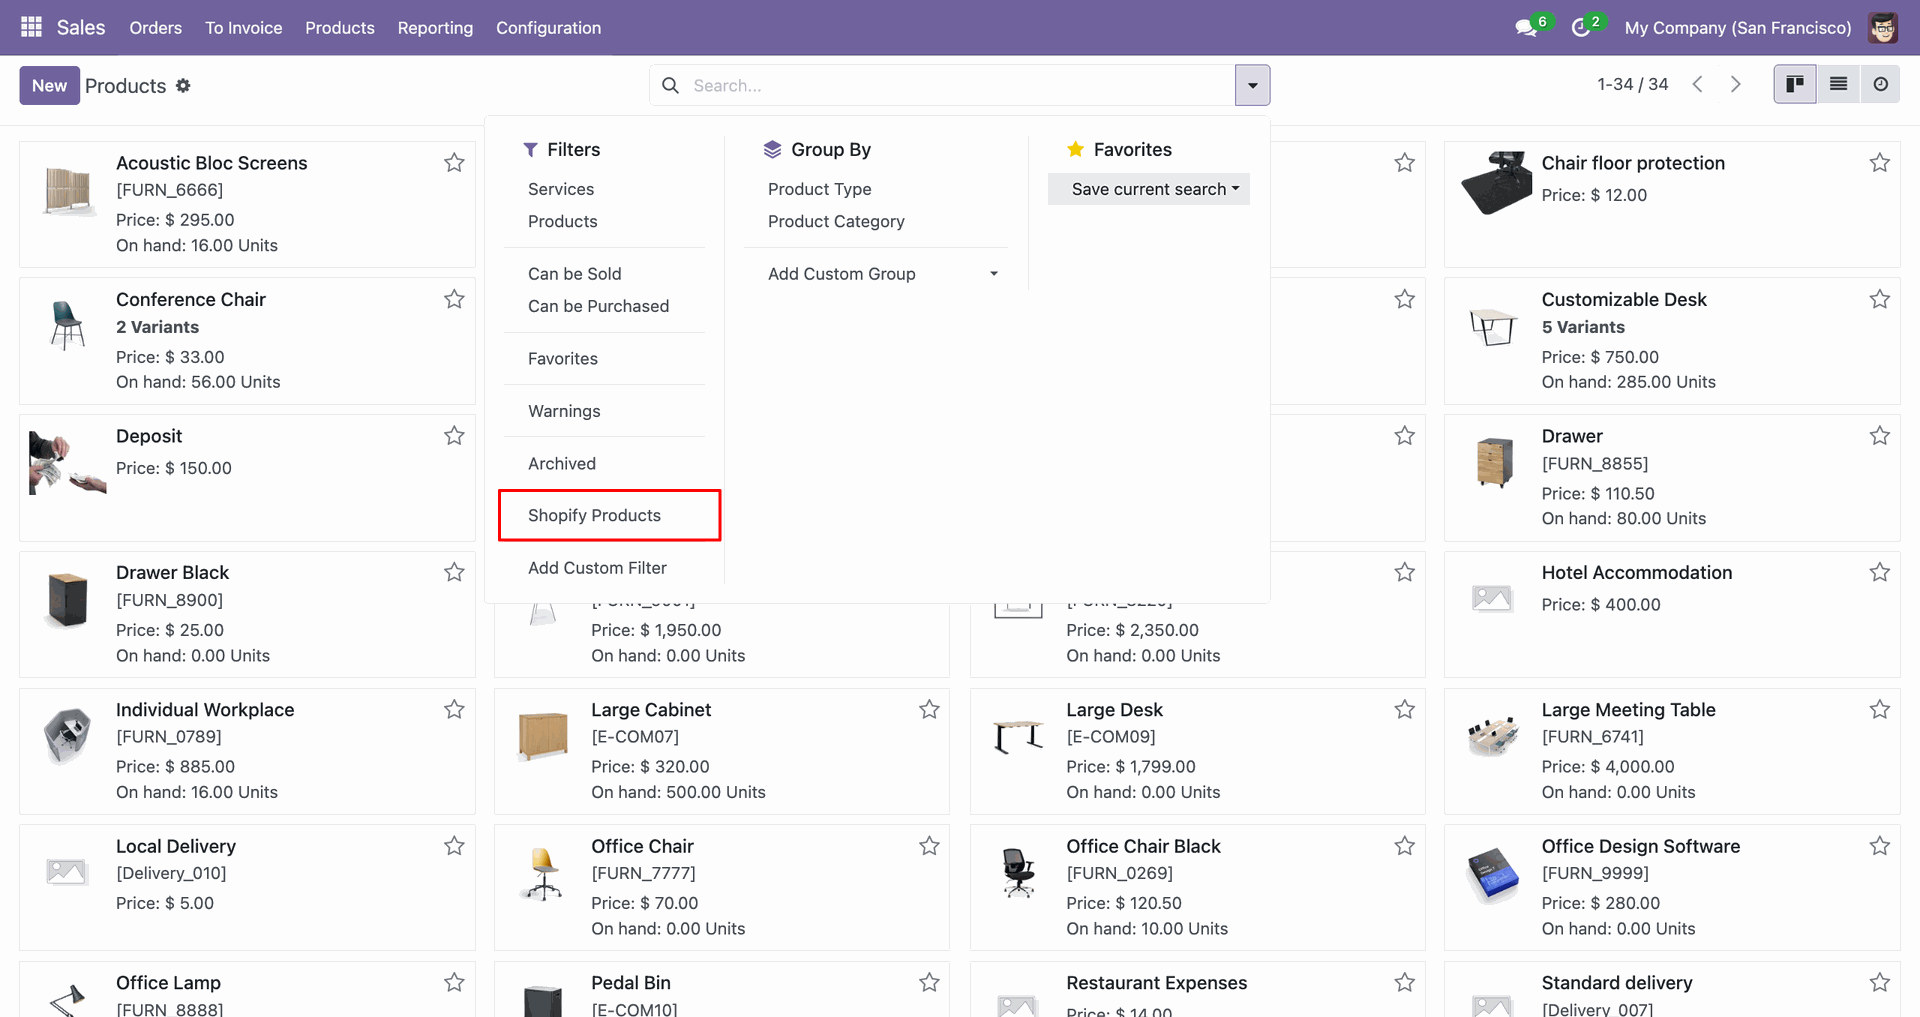
Apply the Shopify Products filter to display only synced products in Odoo.
Import Products interface screenshot
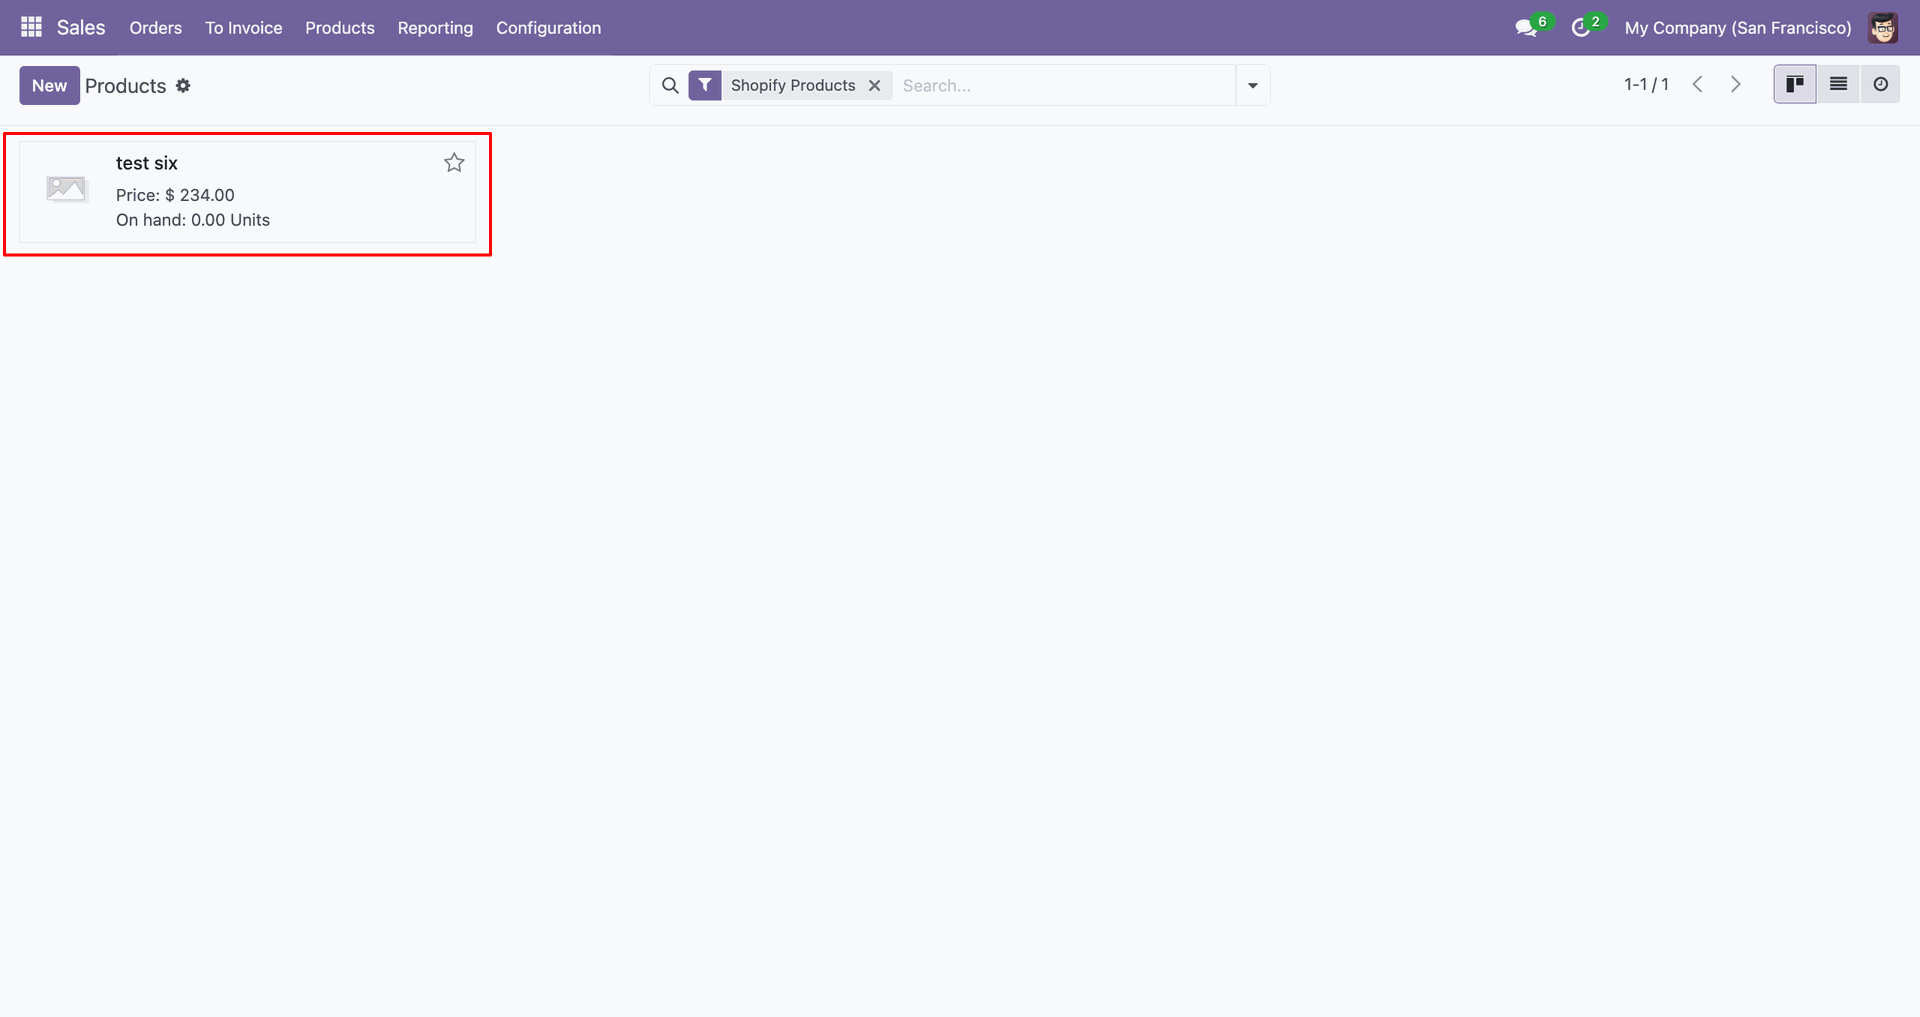
The imported product card displays the synced item with price and stock.
Import Products interface screenshot
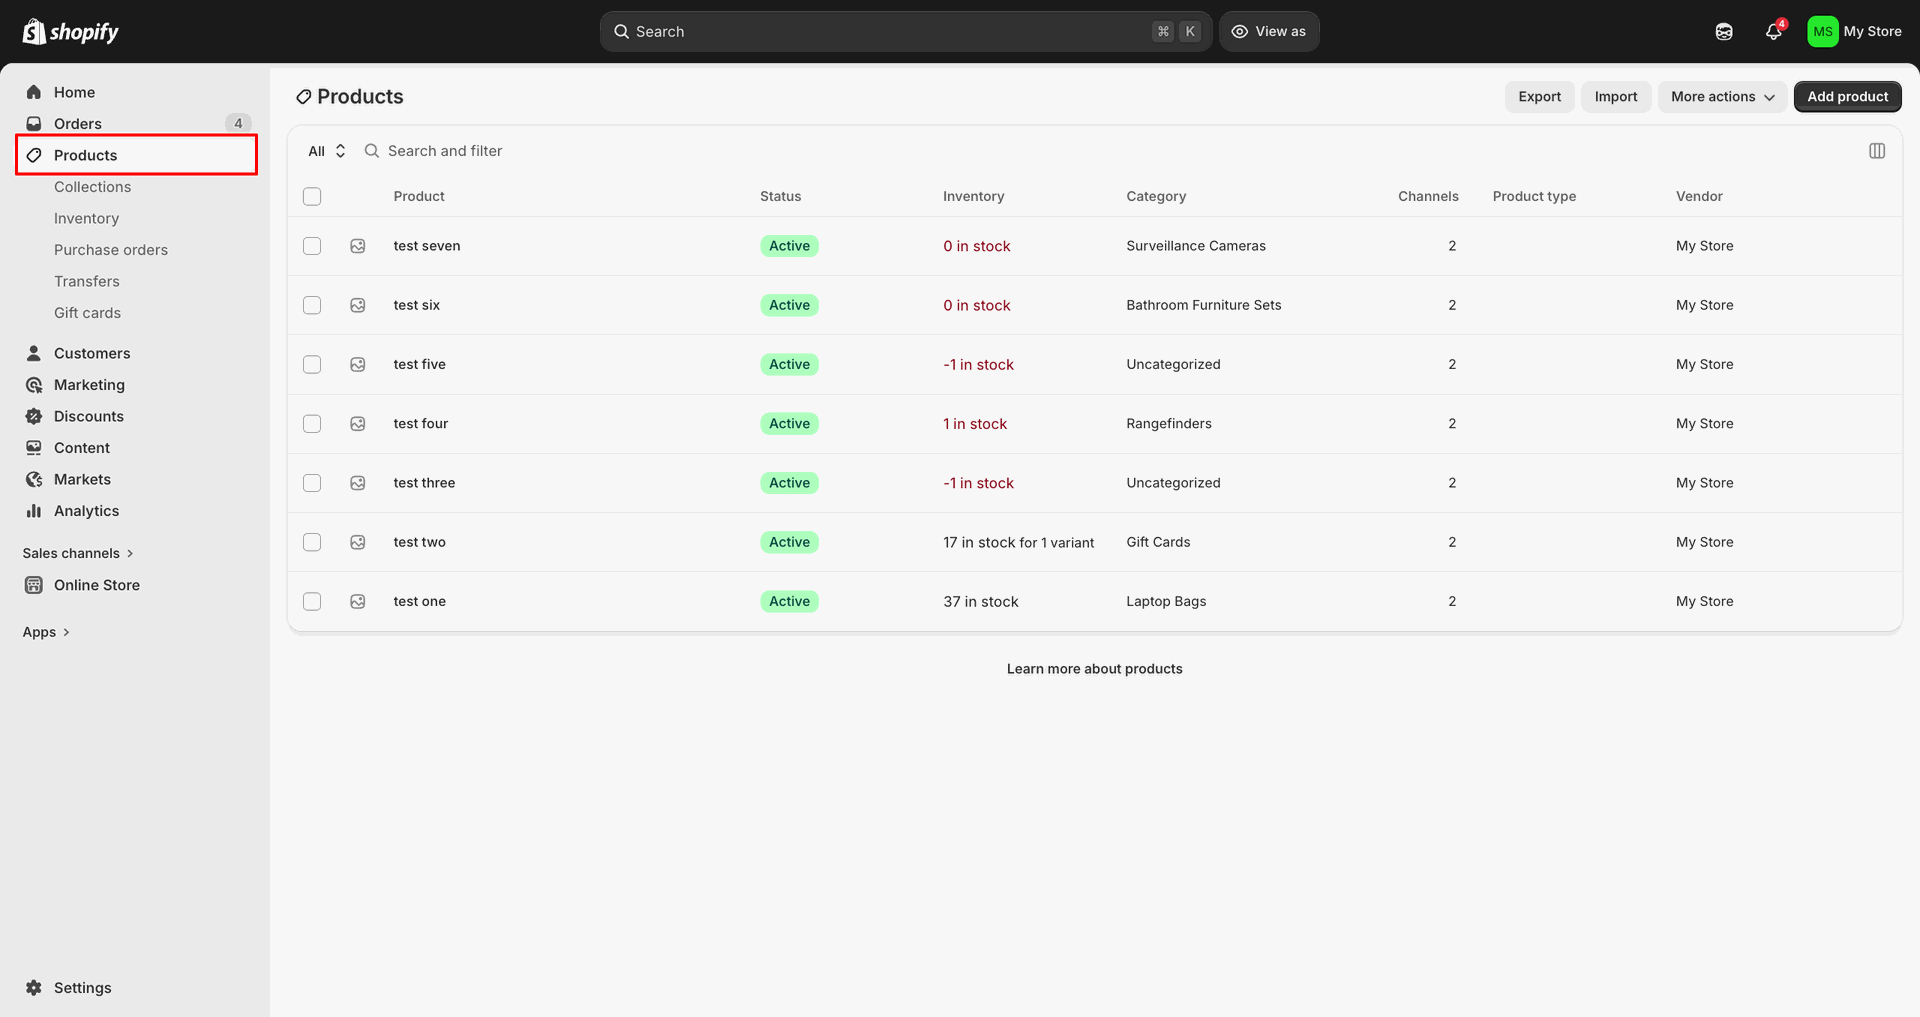
Open Products in Shopify Admin to verify the imported item appears correctly.
Import Products interface screenshot
Set the product date range, then click Sync Products for dated imports.
Import Products interface screenshot
Review the updated Product Queue counter after fetching products within the selected dates.
Import Products interface screenshot
Inspect the new product queue row to verify the fetched record details.
Import Products interface screenshot
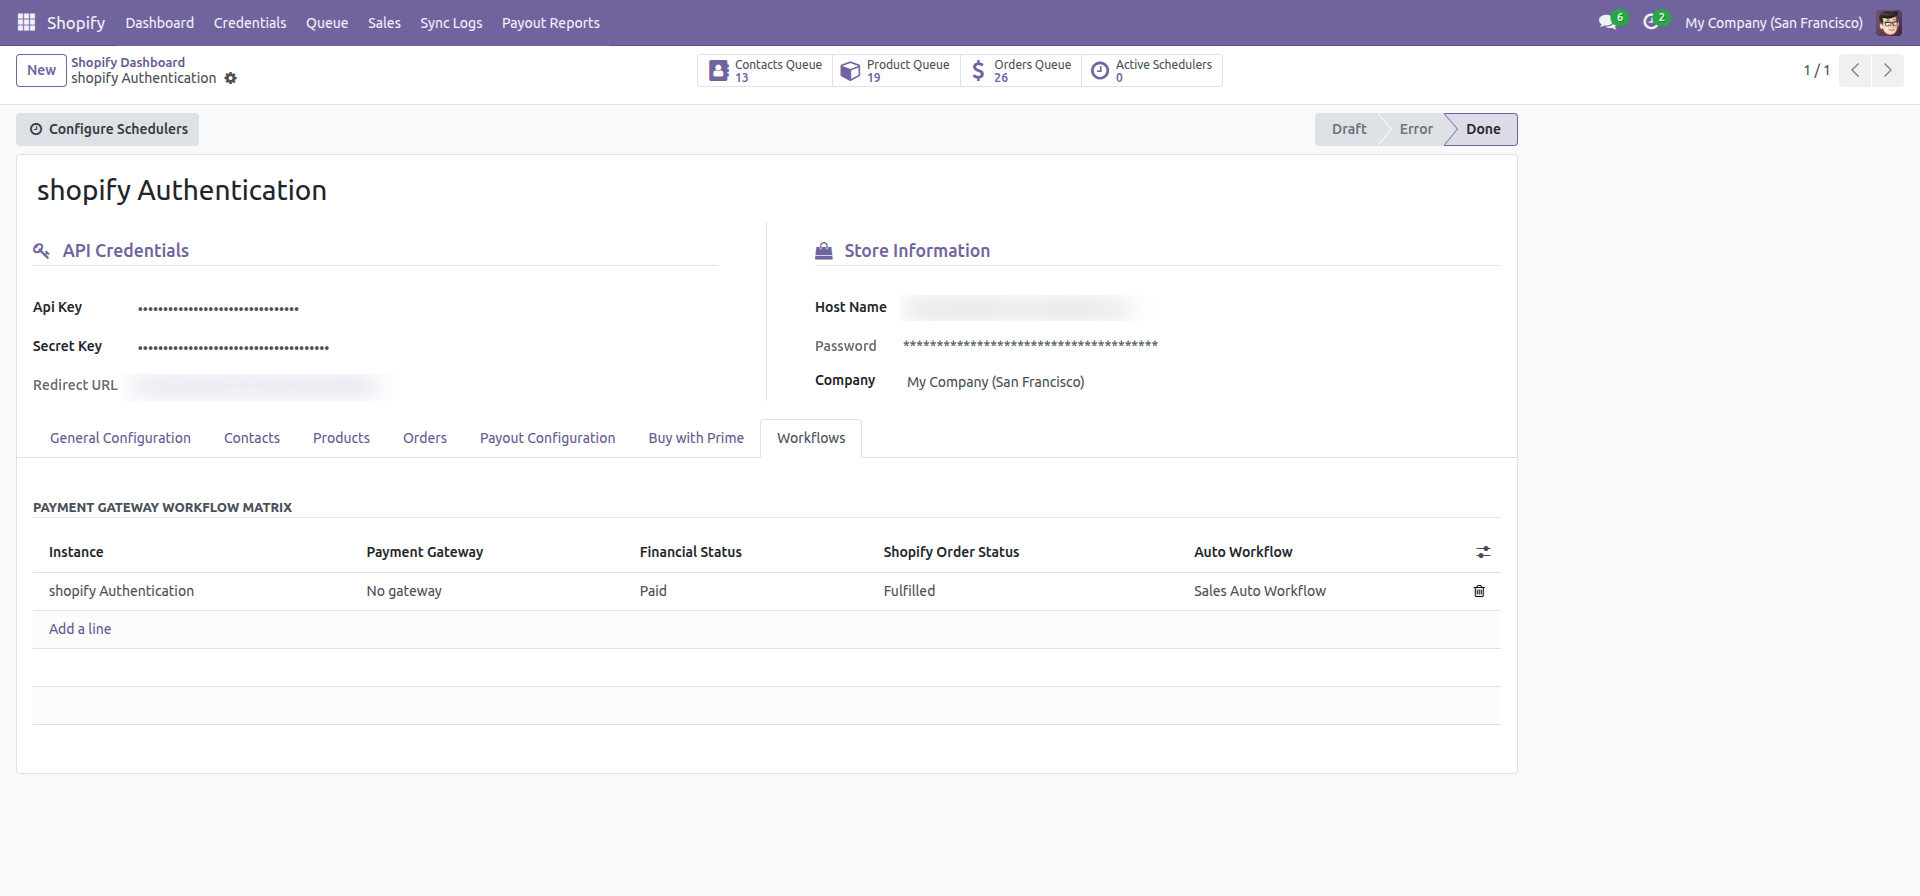
Review the Payment Gateway Workflow Matrix for rules applied during order processing.
Import Products interface screenshot

Export Products

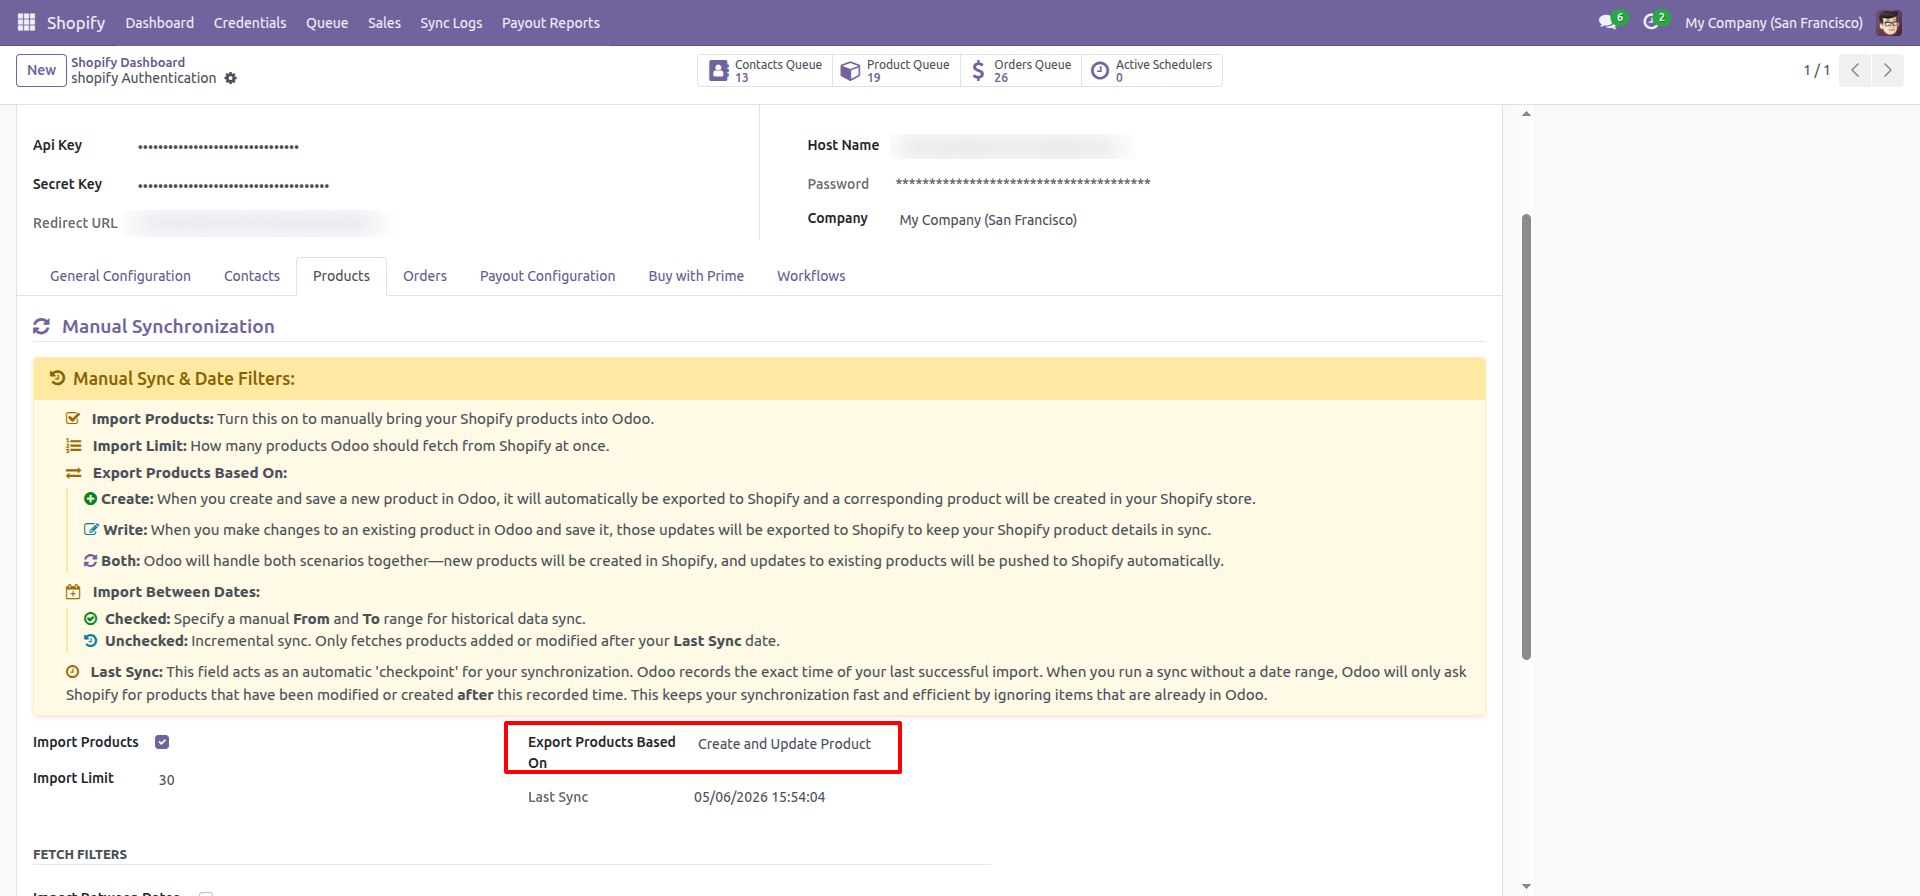
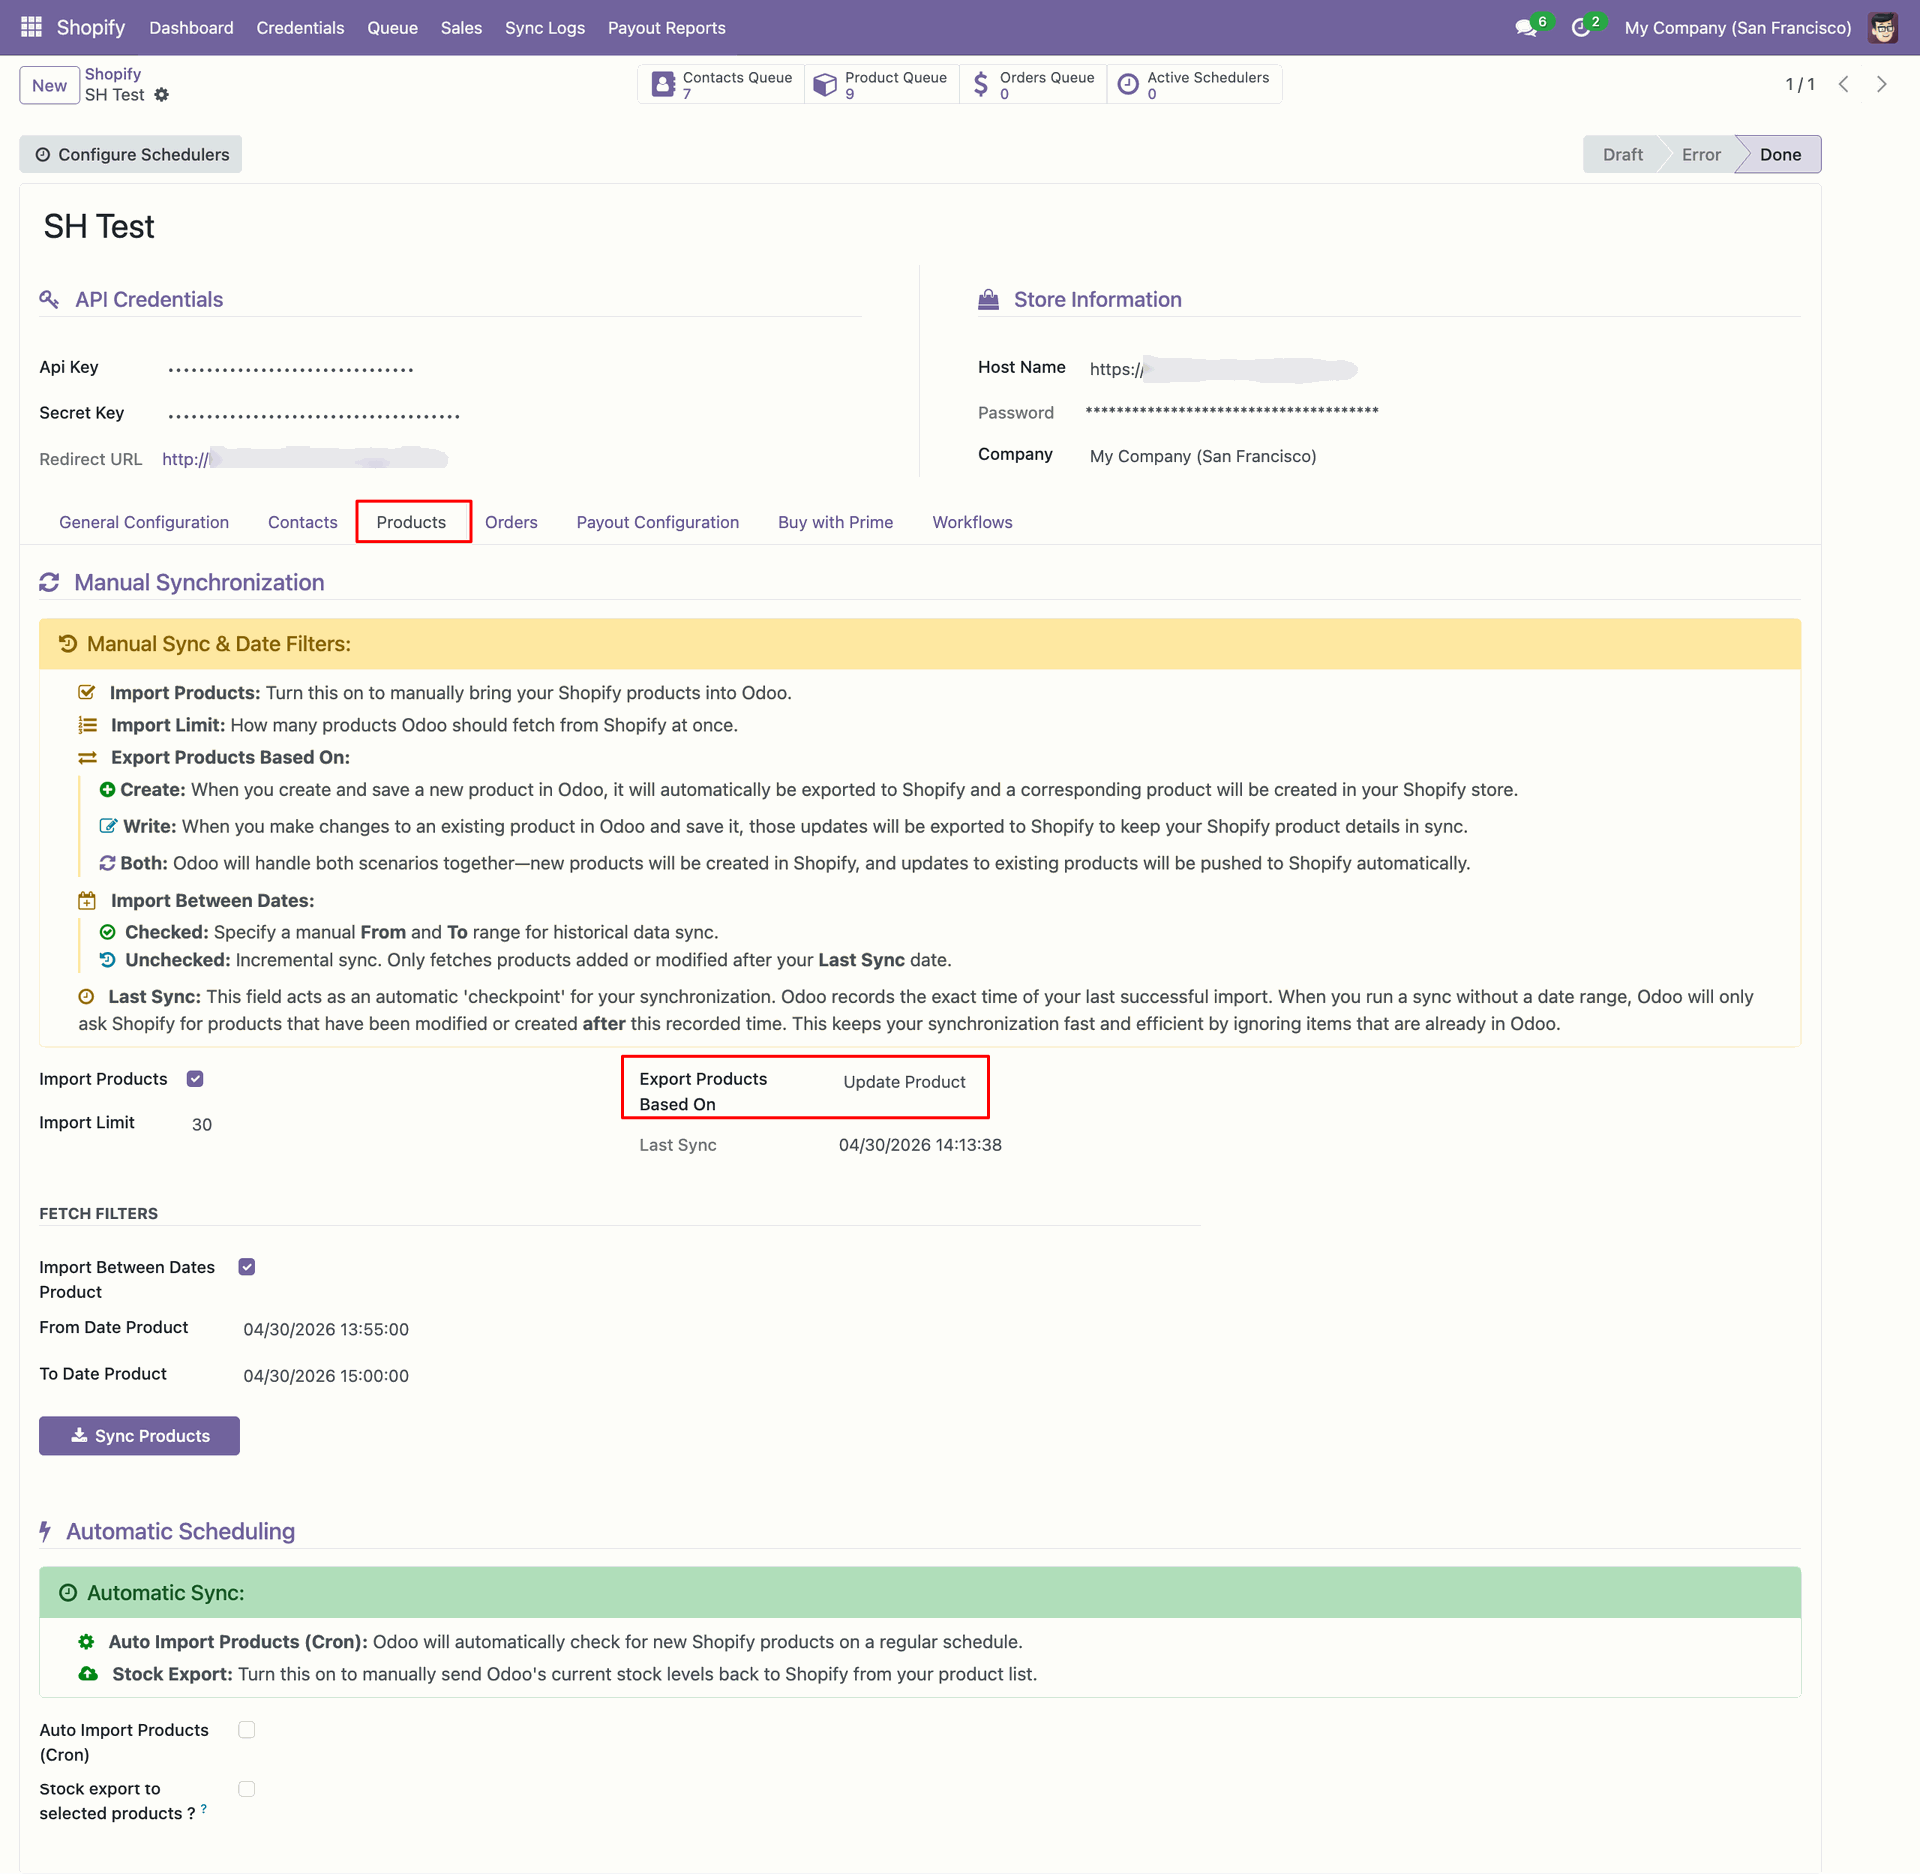
Set Export Products Based On to Update Product before running product updates.
Export Products interface screenshot
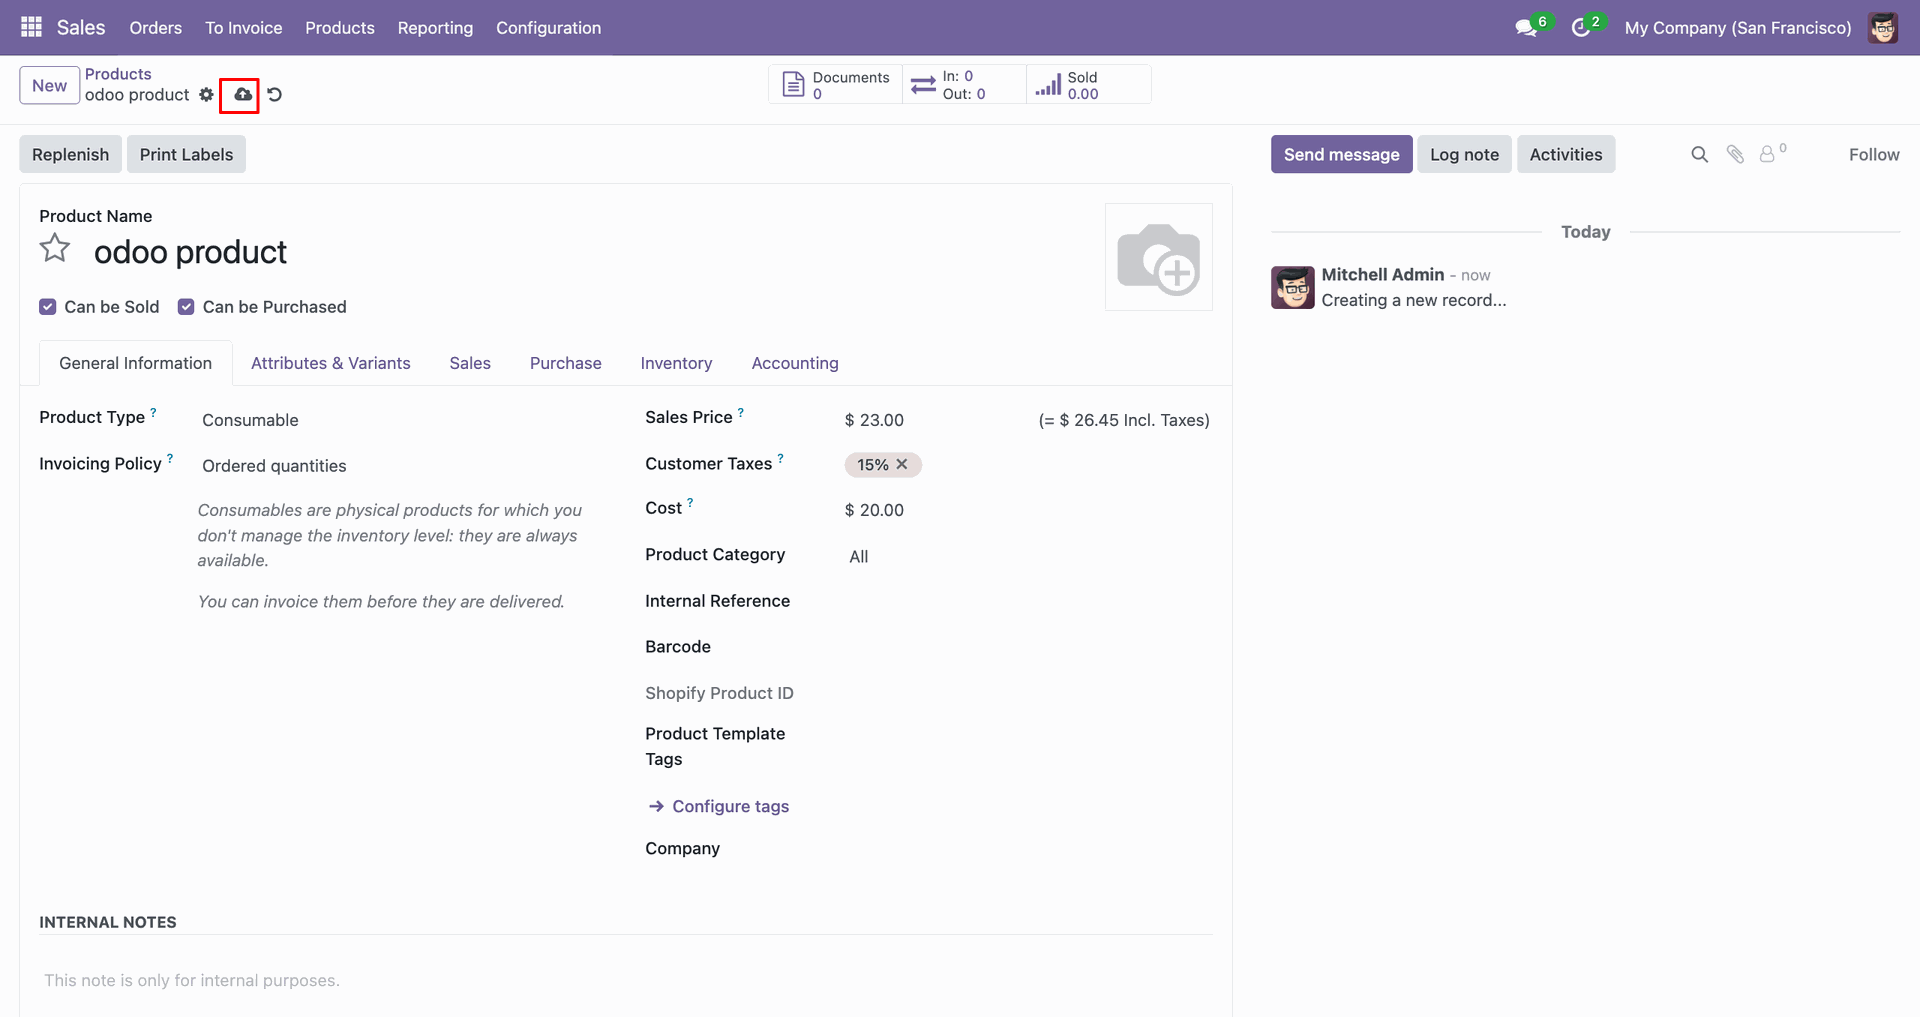
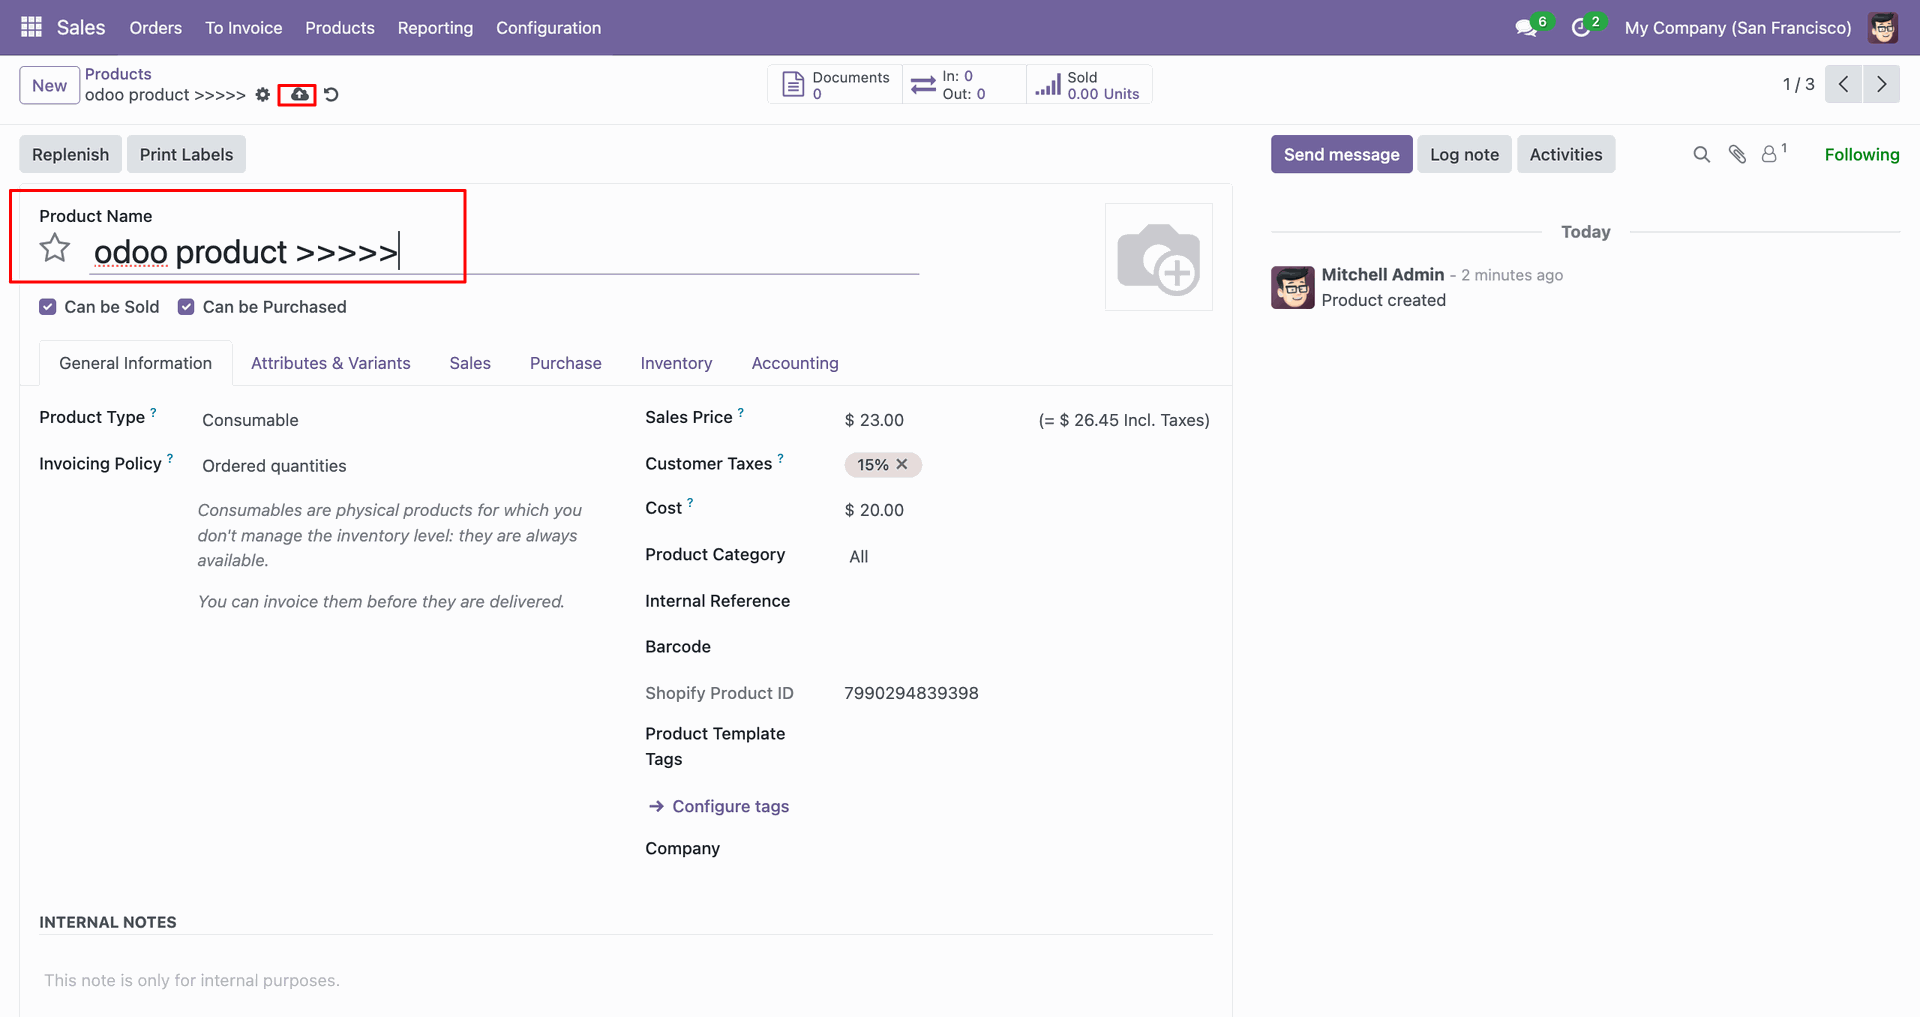
Click the export icon on the product form to send this item.
Export Products interface screenshot
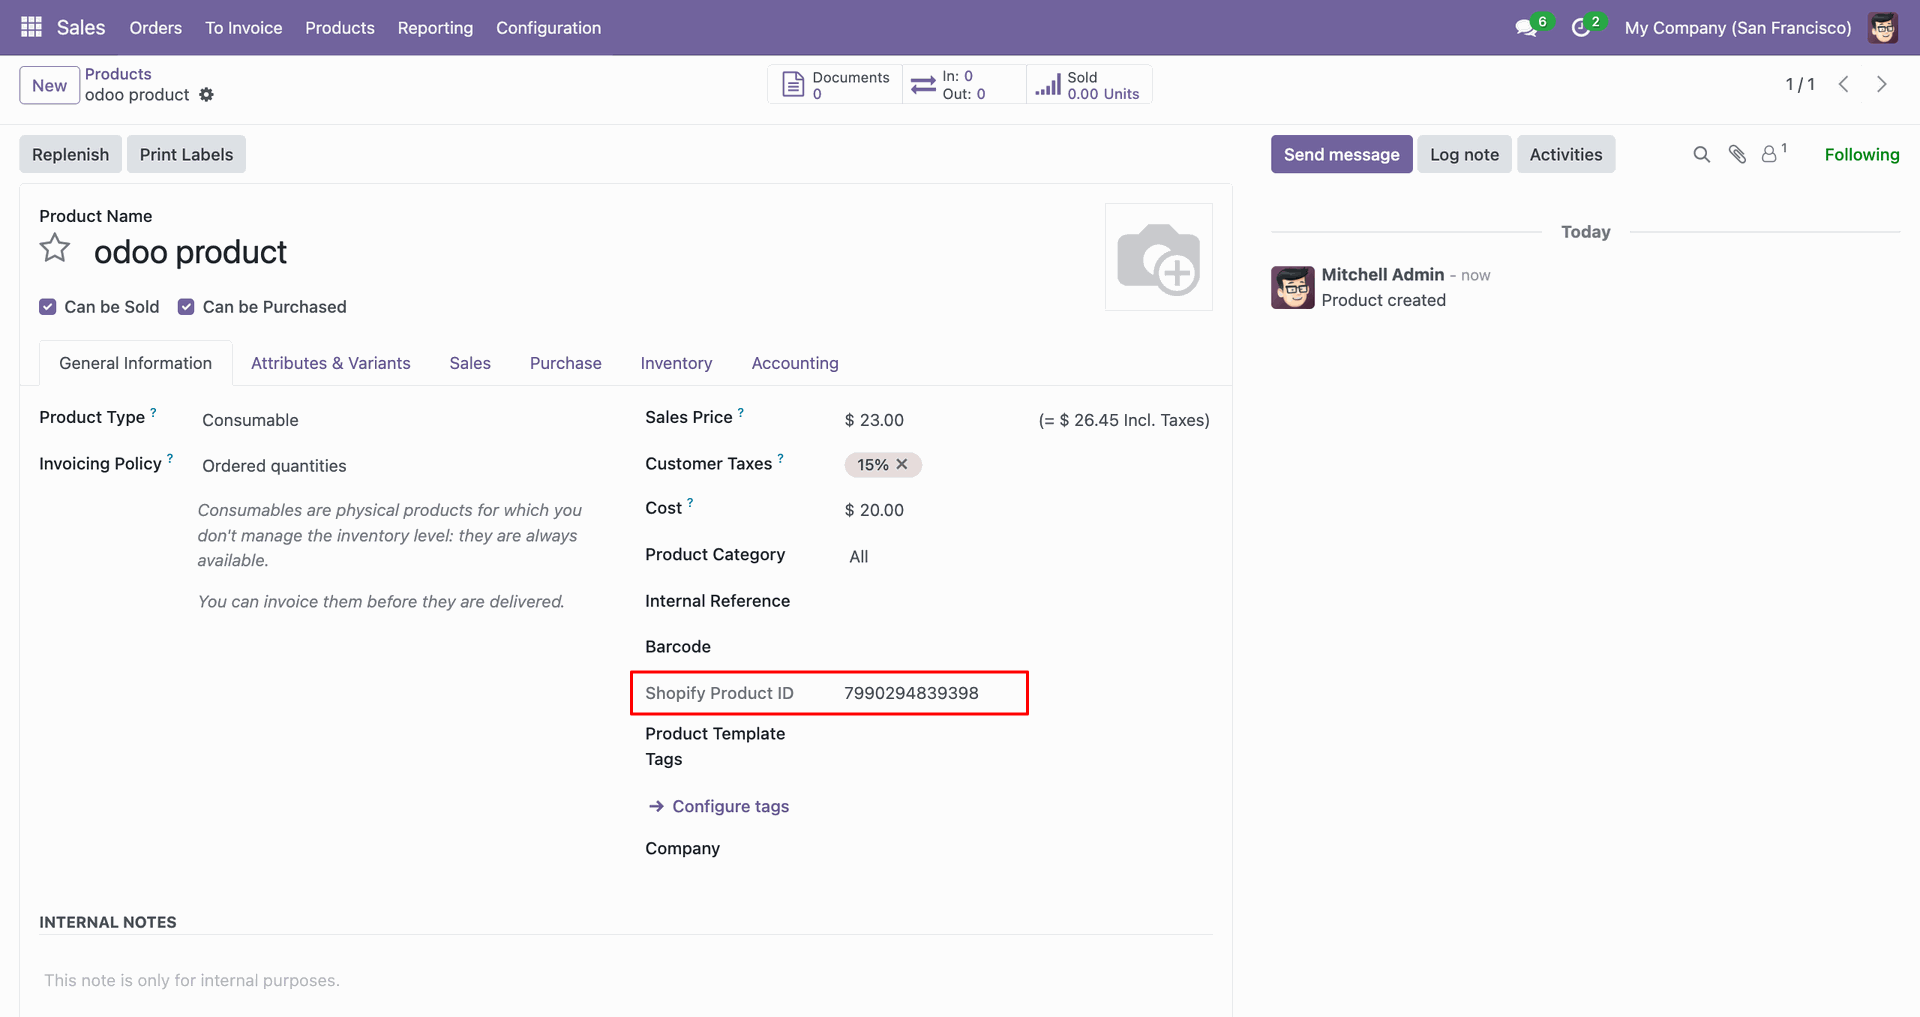
Review the Shopify Product ID field after exporting the product from Odoo.
Export Products interface screenshot
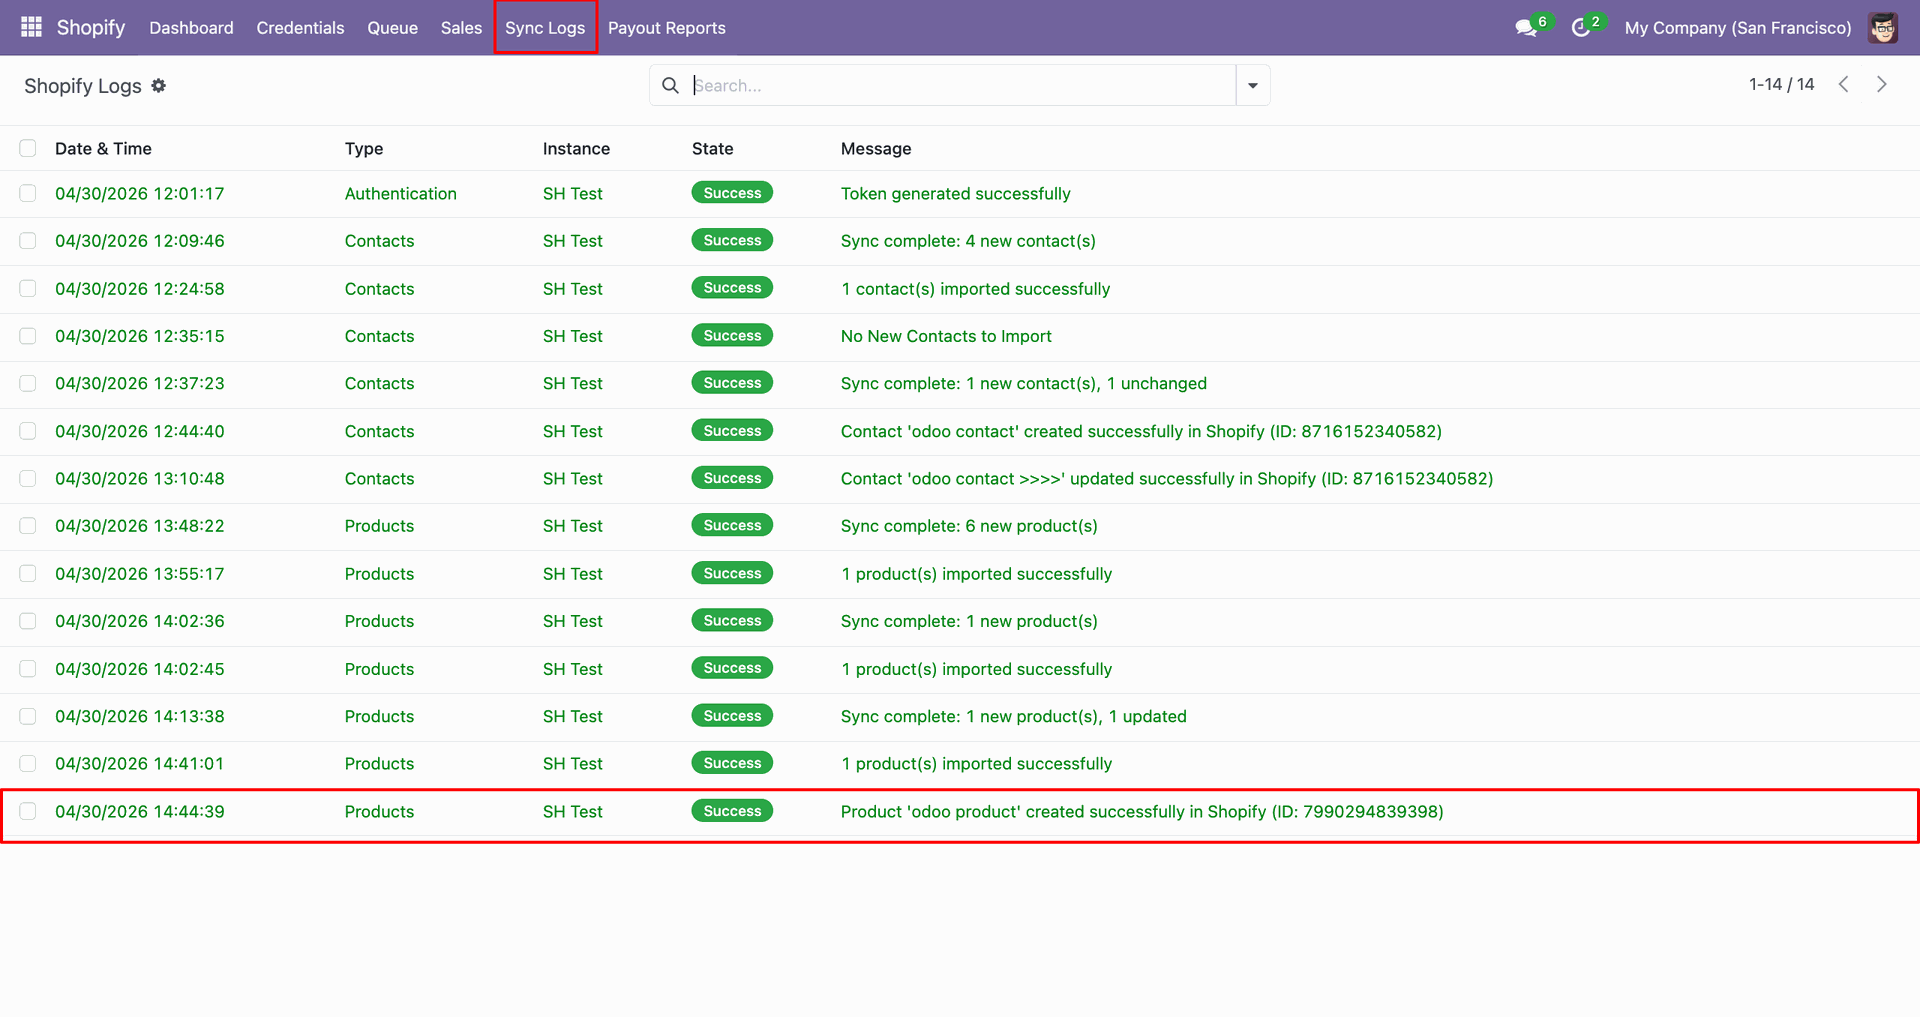
Check Sync Logs to confirm the product was created successfully in Shopify.
Export Products interface screenshot
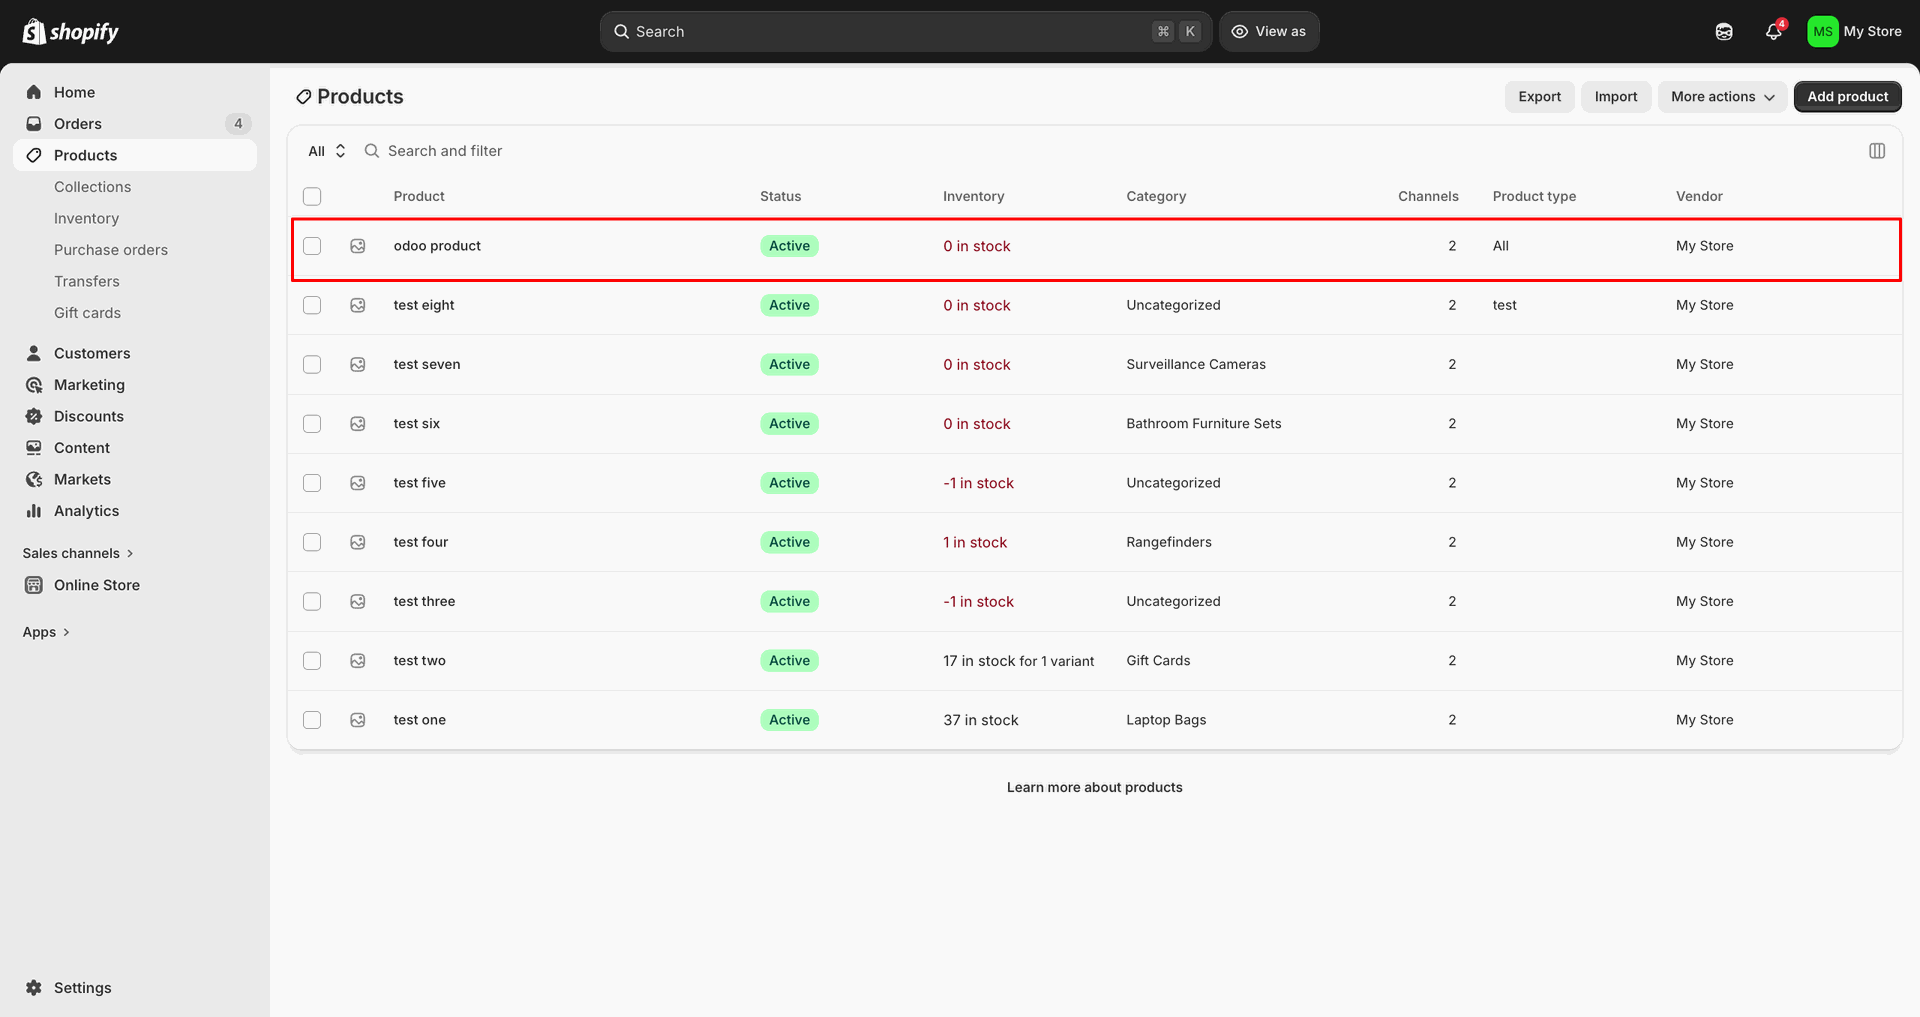
Verify the exported product row appears in Shopify with the expected details.
Export Products interface screenshot
Confirm Export Products Based On is set to Update Product for changes.
Export Products interface screenshot
Update the Odoo product name before exporting the revised product information.
Export Products interface screenshot
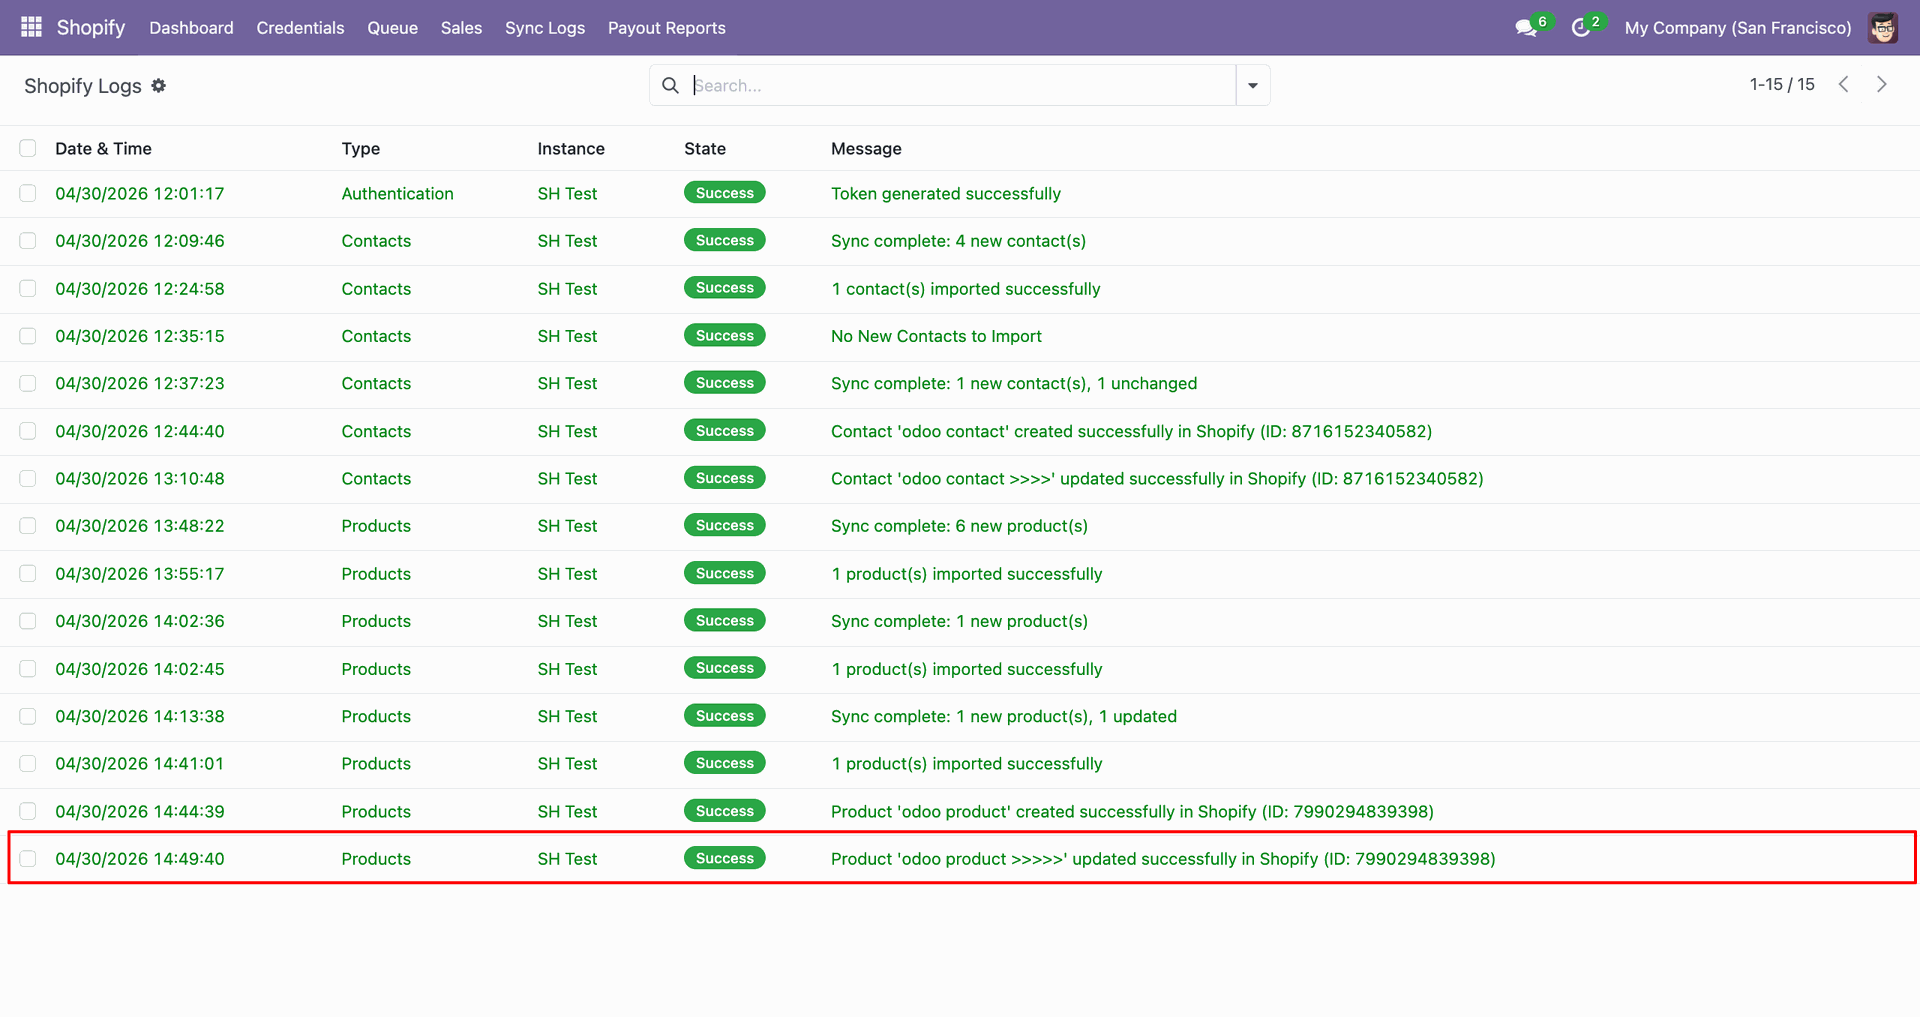
Review Sync Logs to confirm the product update was sent successfully.
Export Products interface screenshot
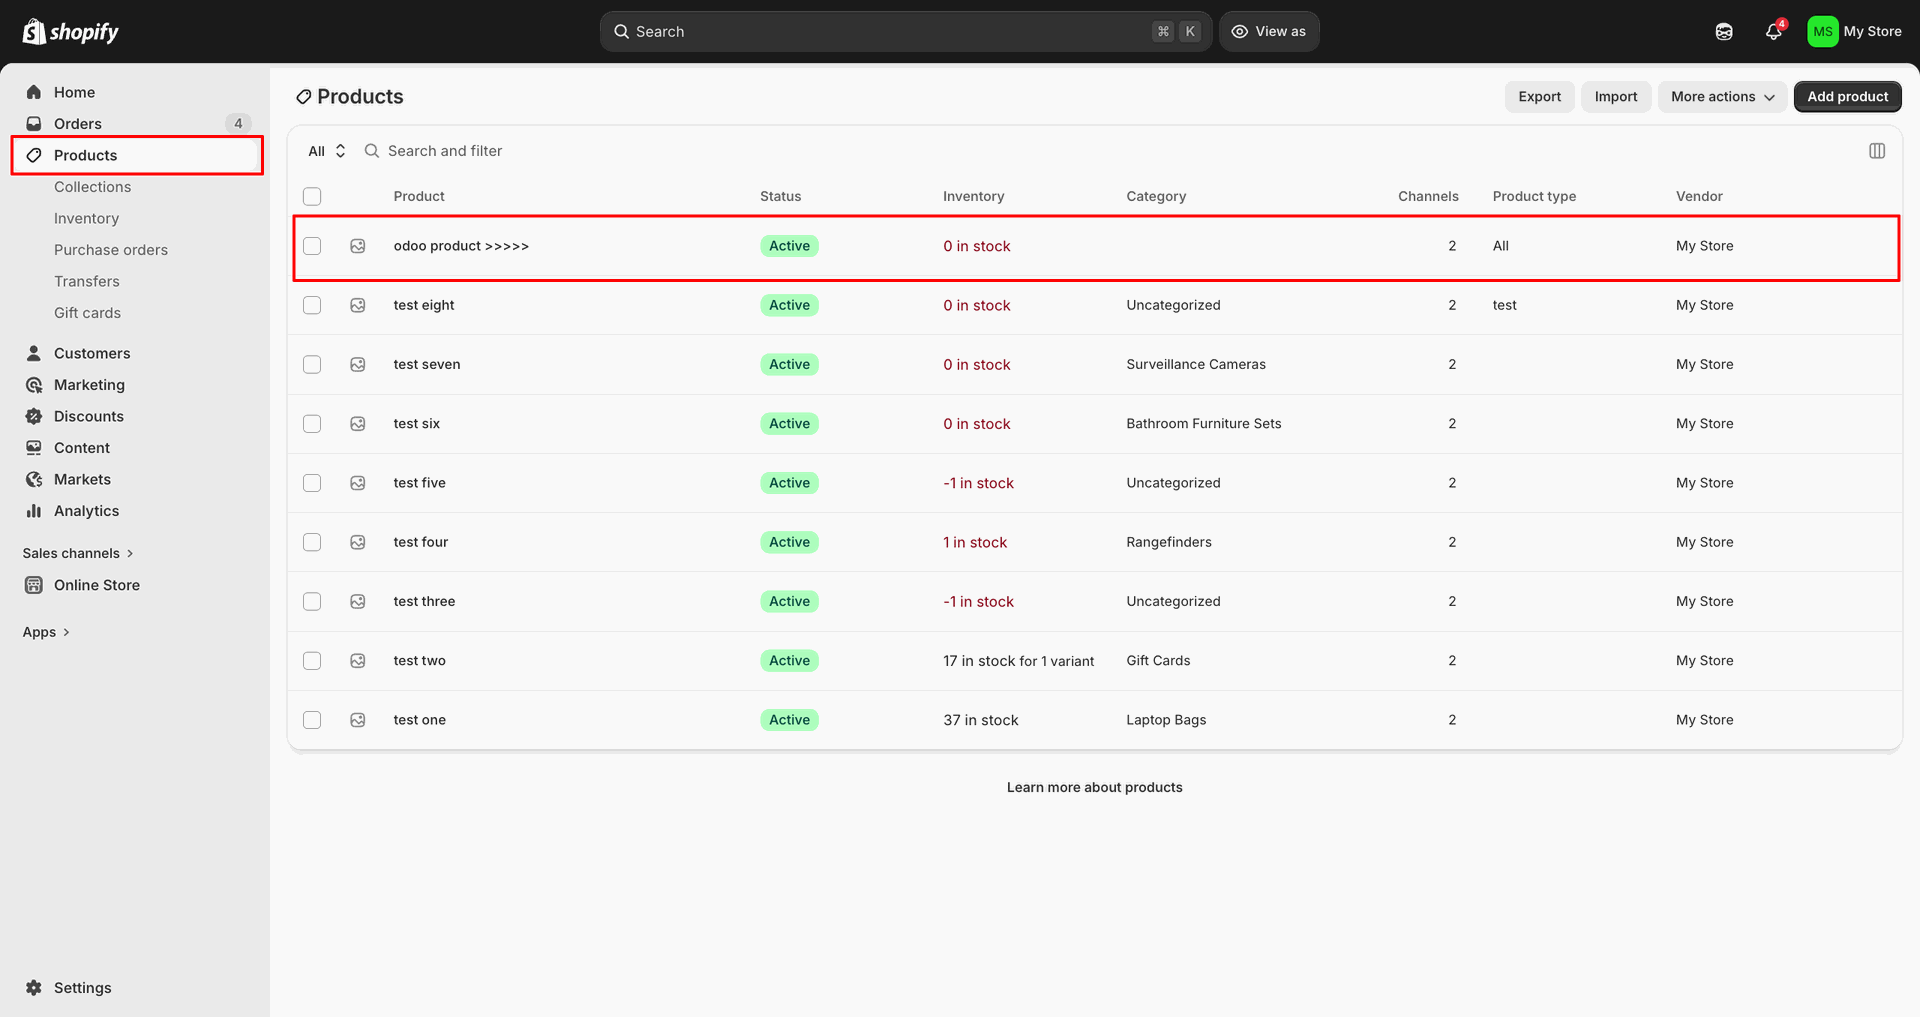
Verify the updated product row is visible in Shopify after export.
Export Products interface screenshot

Import Contacts
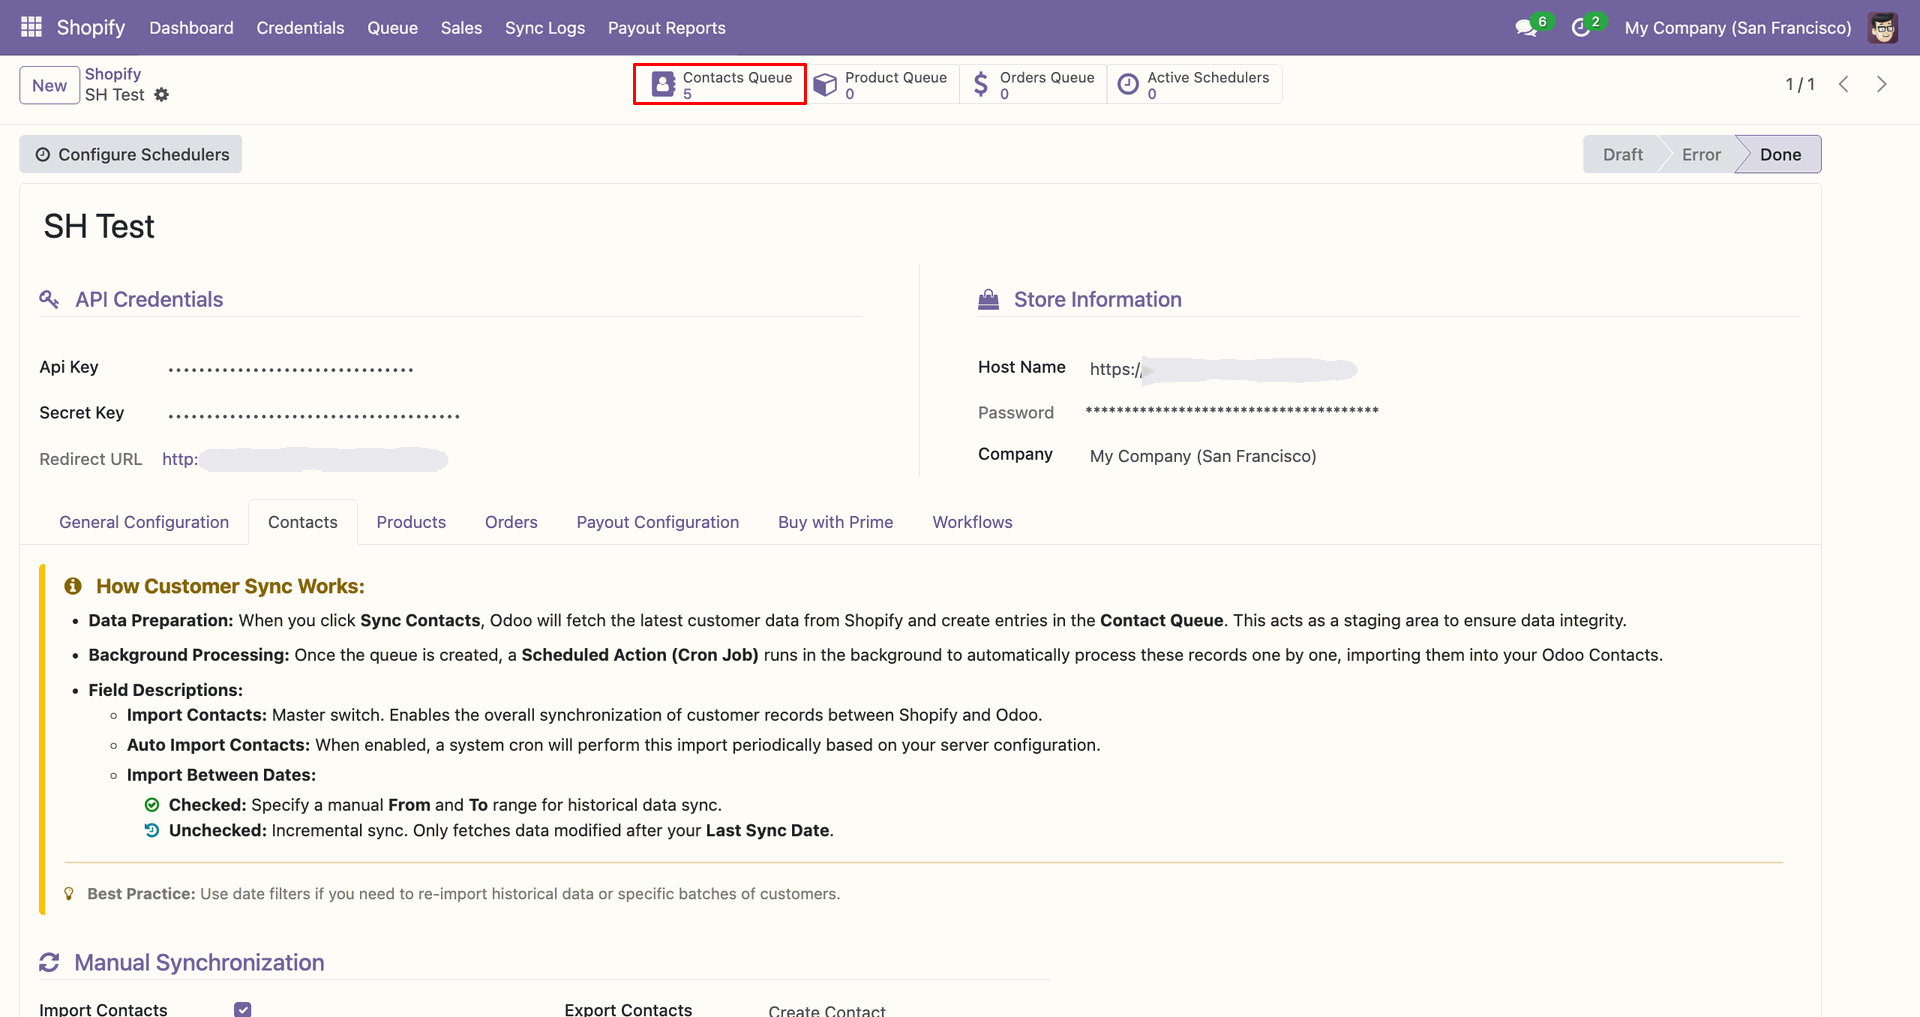
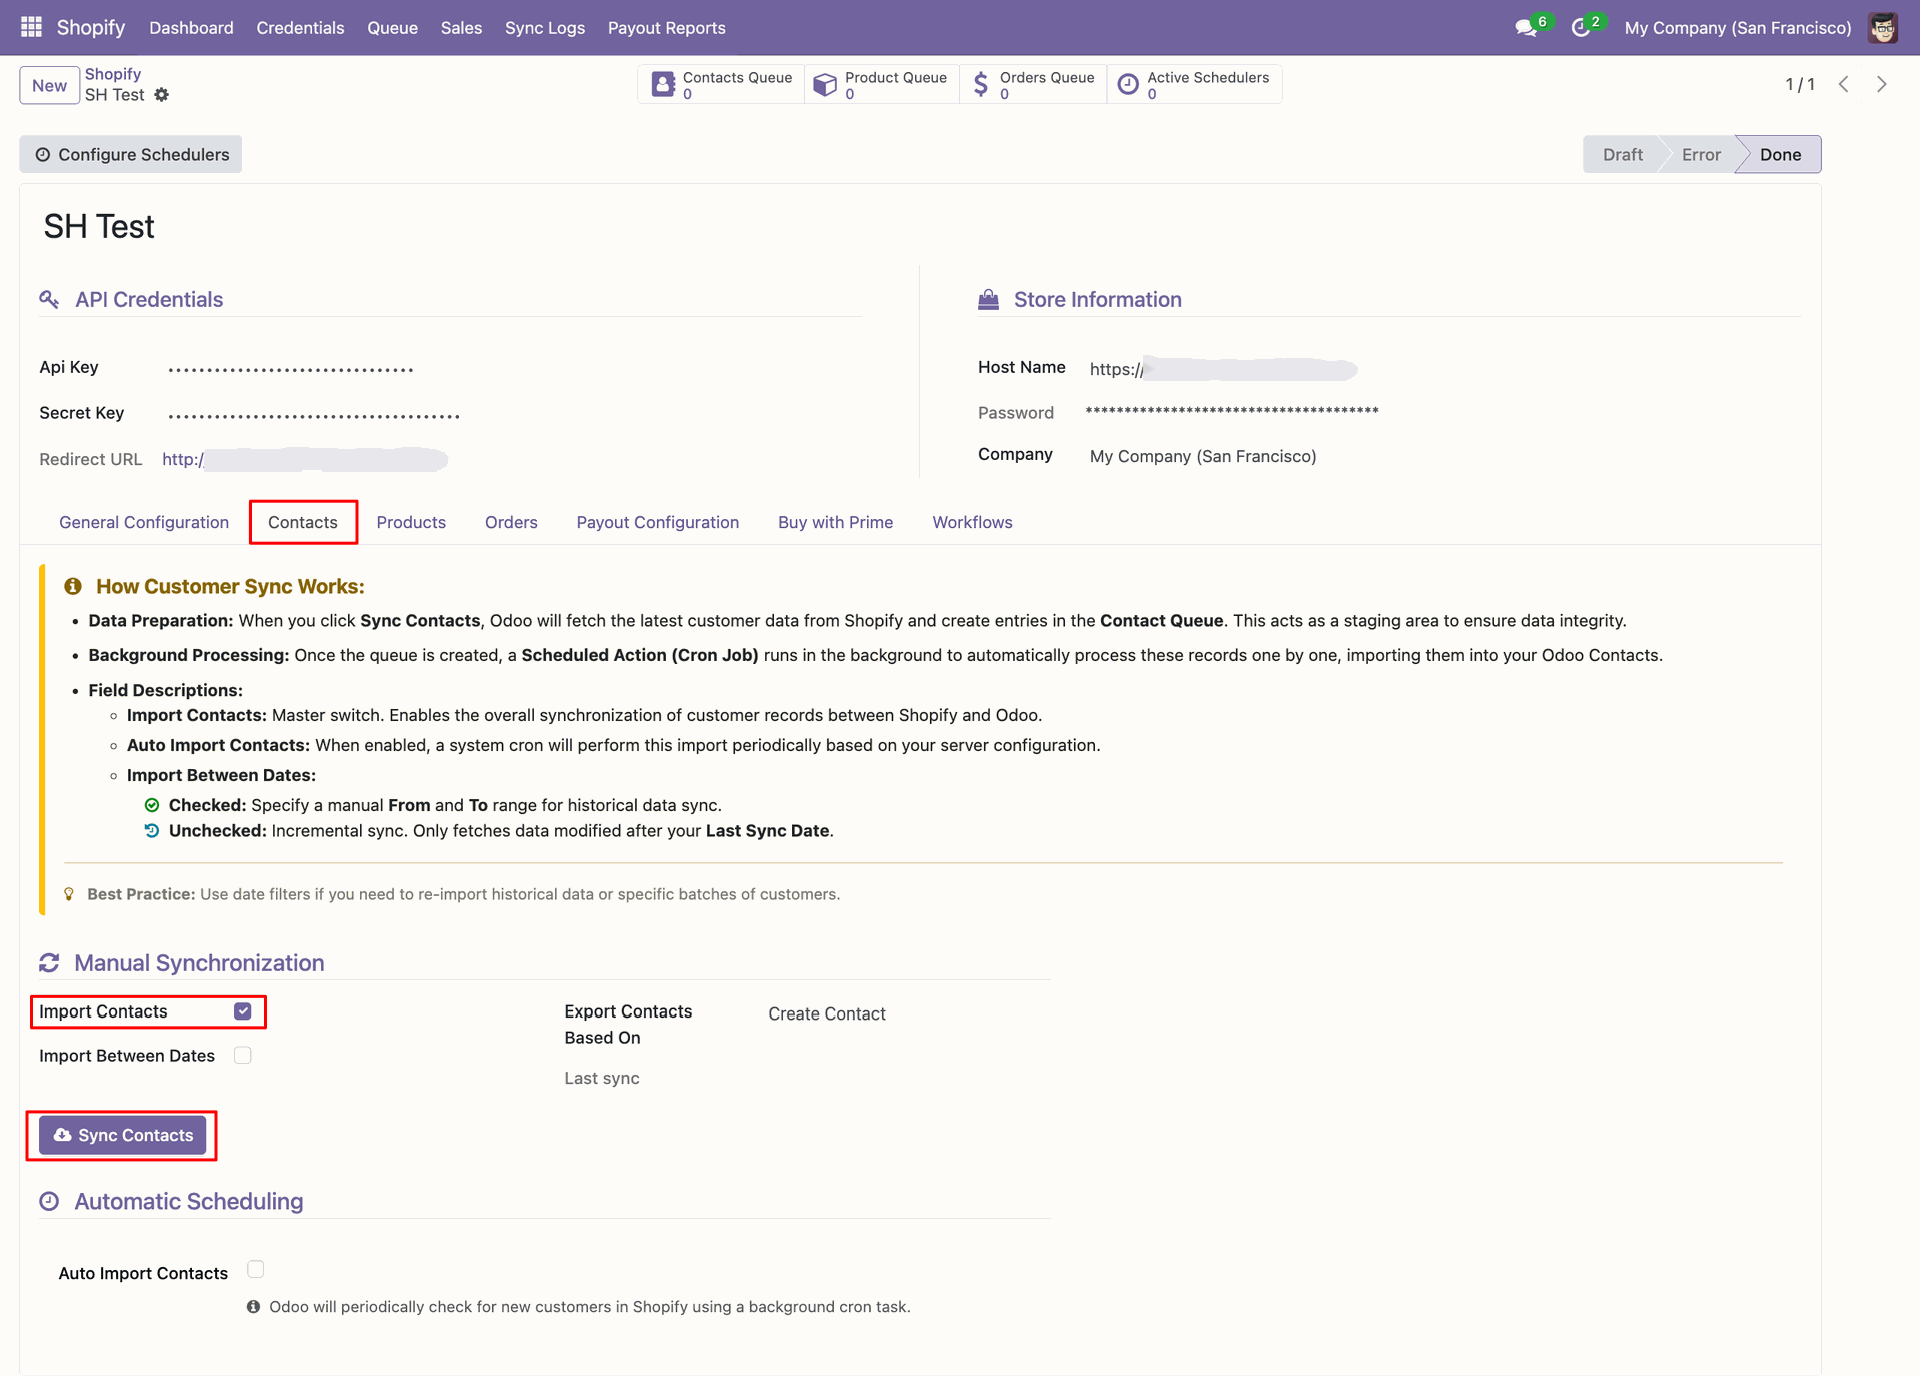
Open the Contacts tab, enable Import Contacts, and click Sync Contacts.
Import Contacts interface screenshot
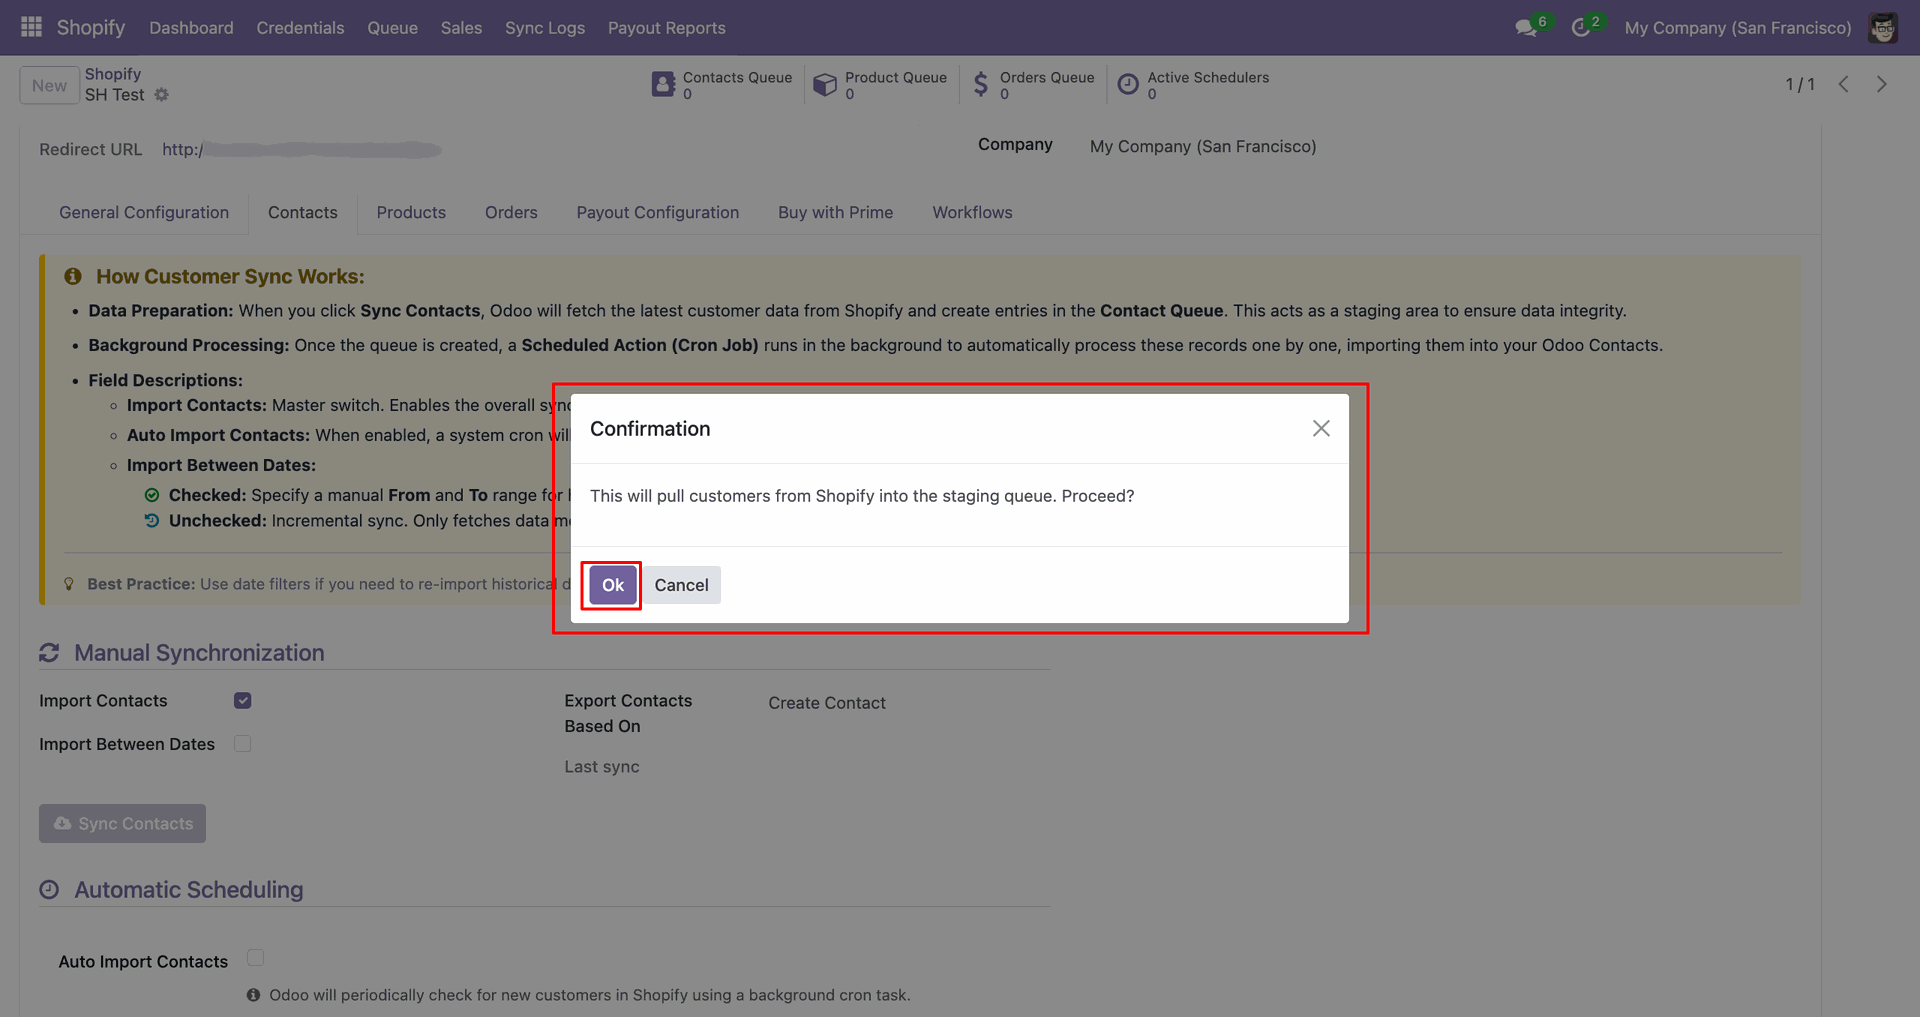
Confirm the staging queue popup by clicking OK to continue contact import.
Import Contacts interface screenshot
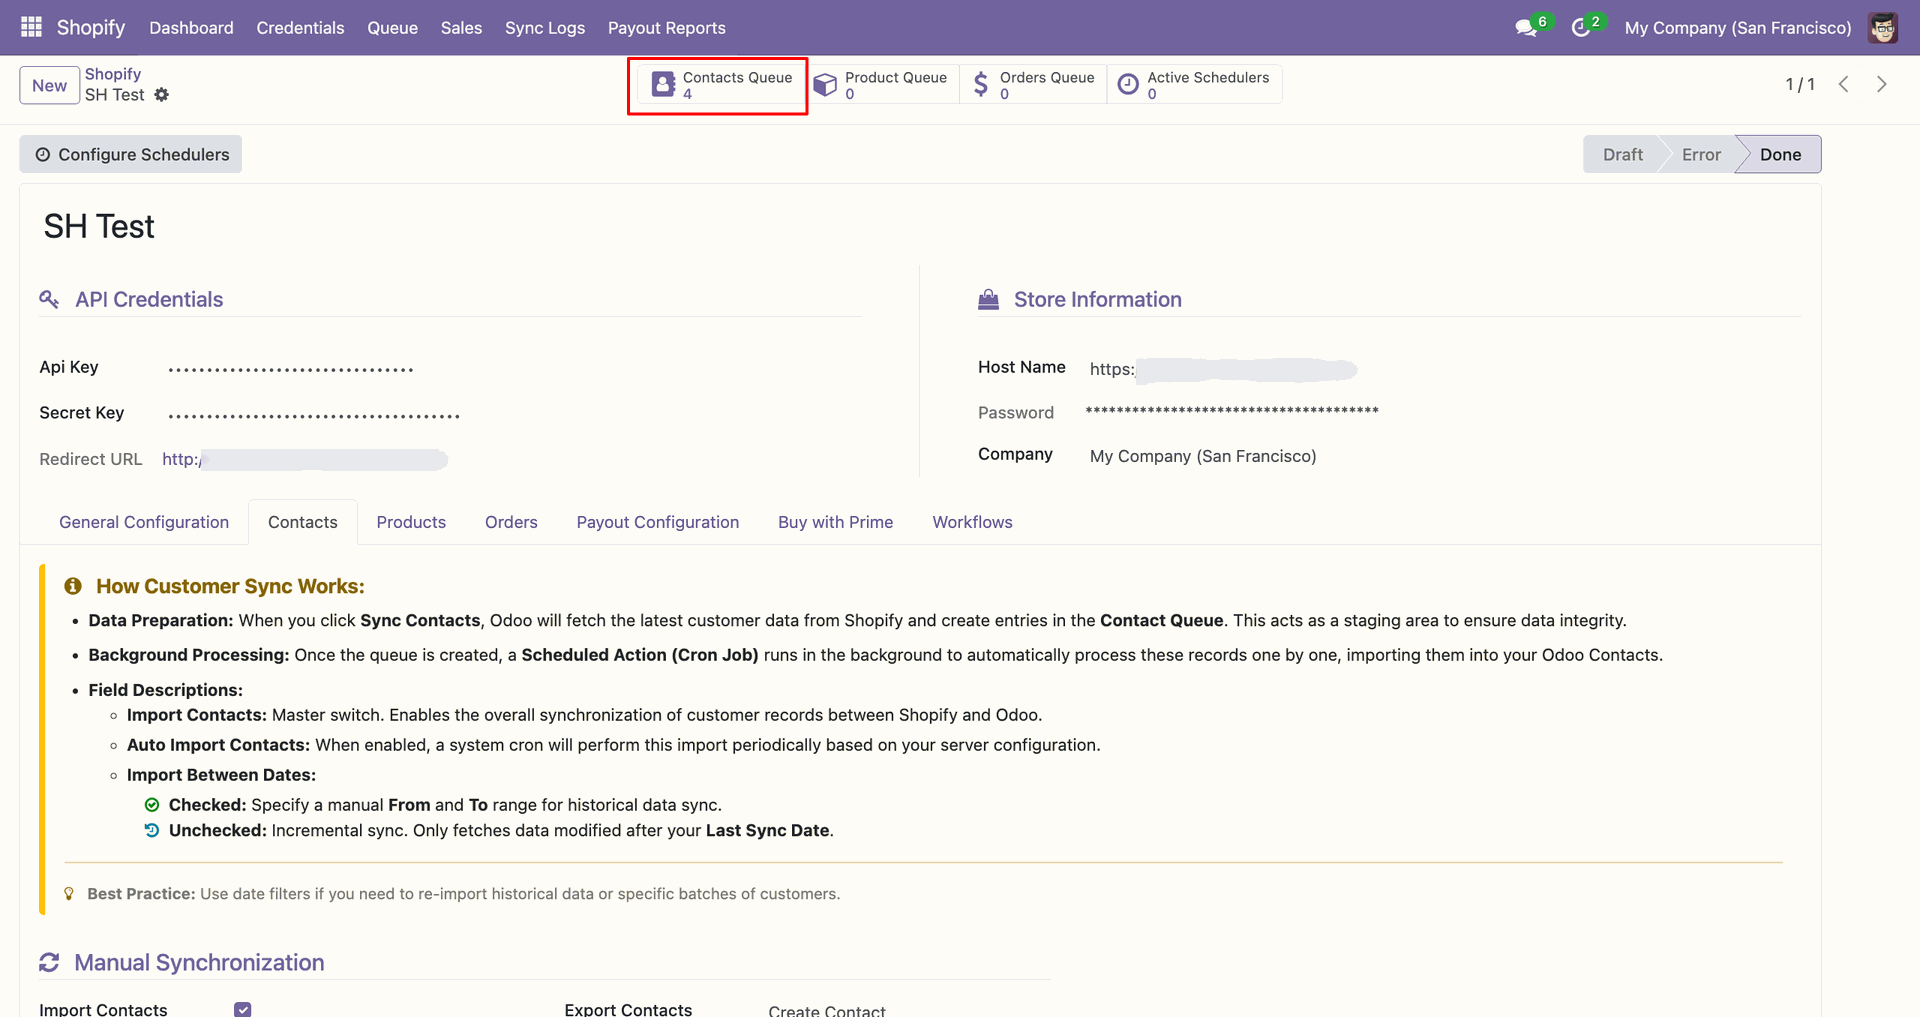
Use the Contacts Queue shortcut to review staged customer records after synchronization.
Import Contacts interface screenshot
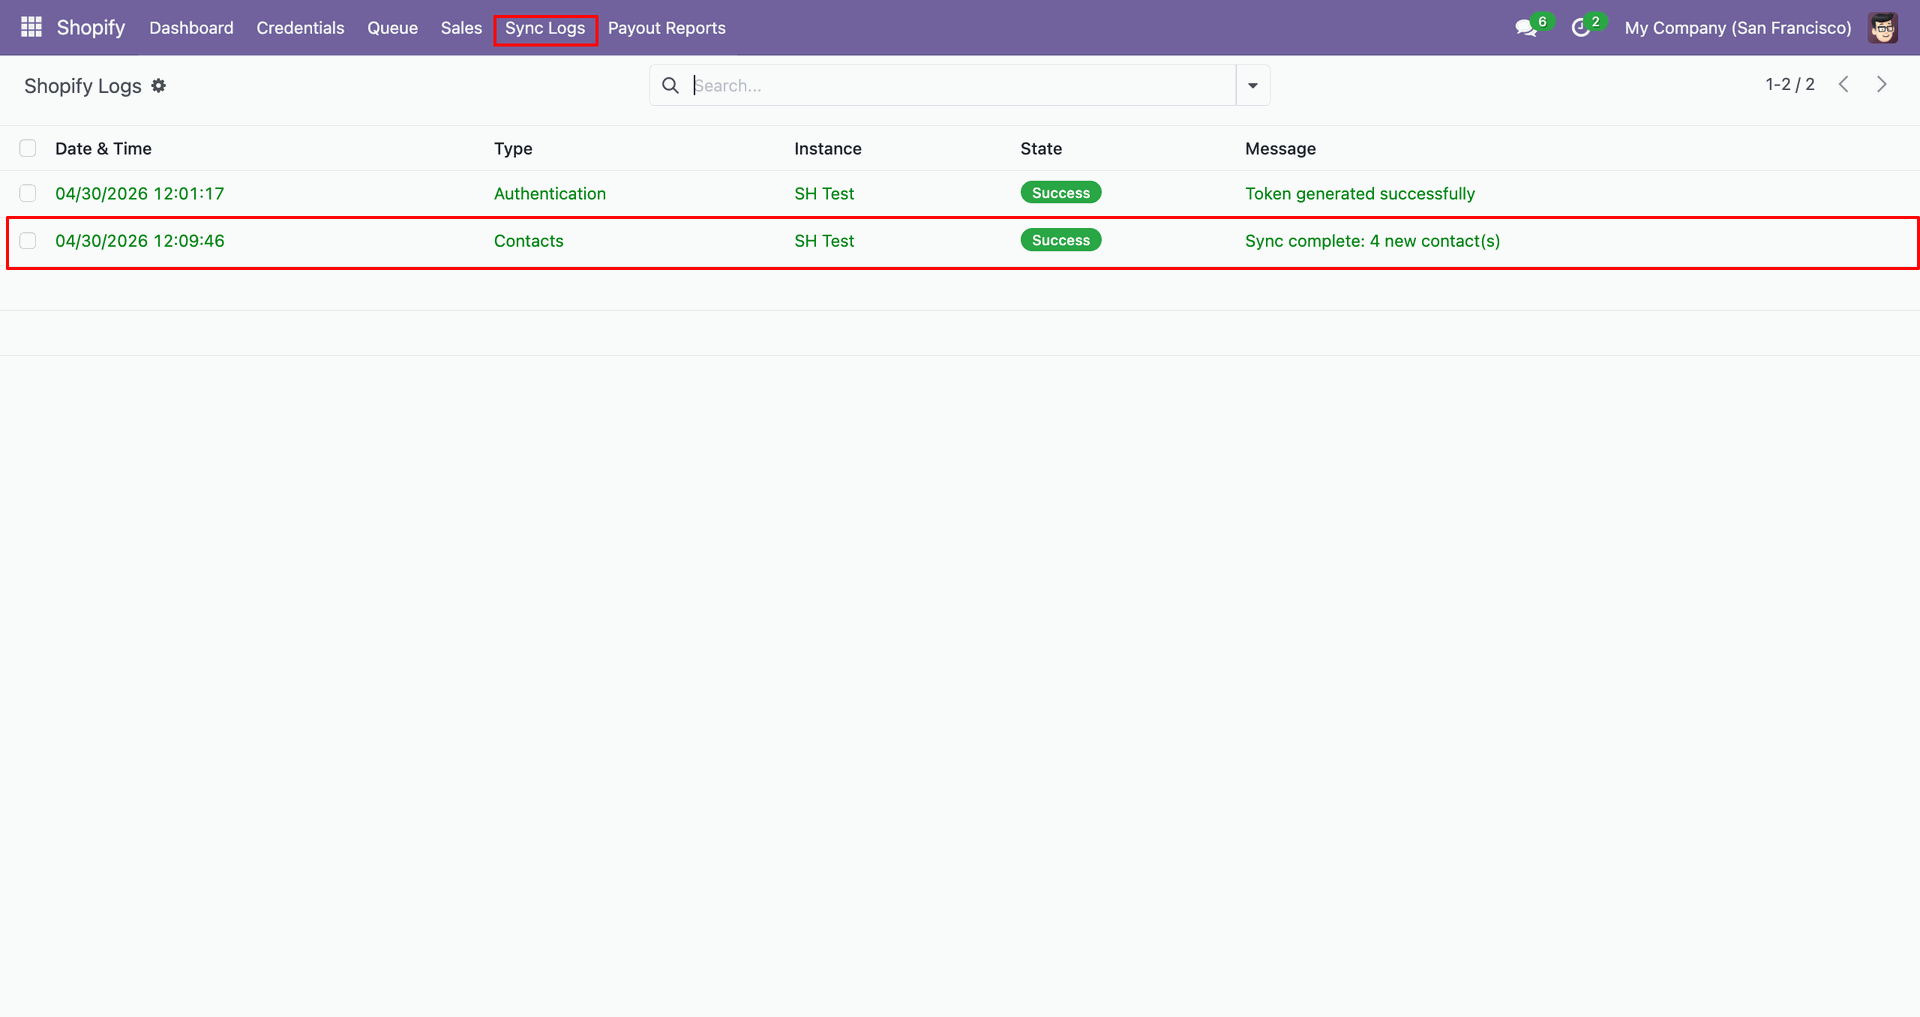
Check Sync Logs to verify the customer fetch completed and staged contacts.
Import Contacts interface screenshot
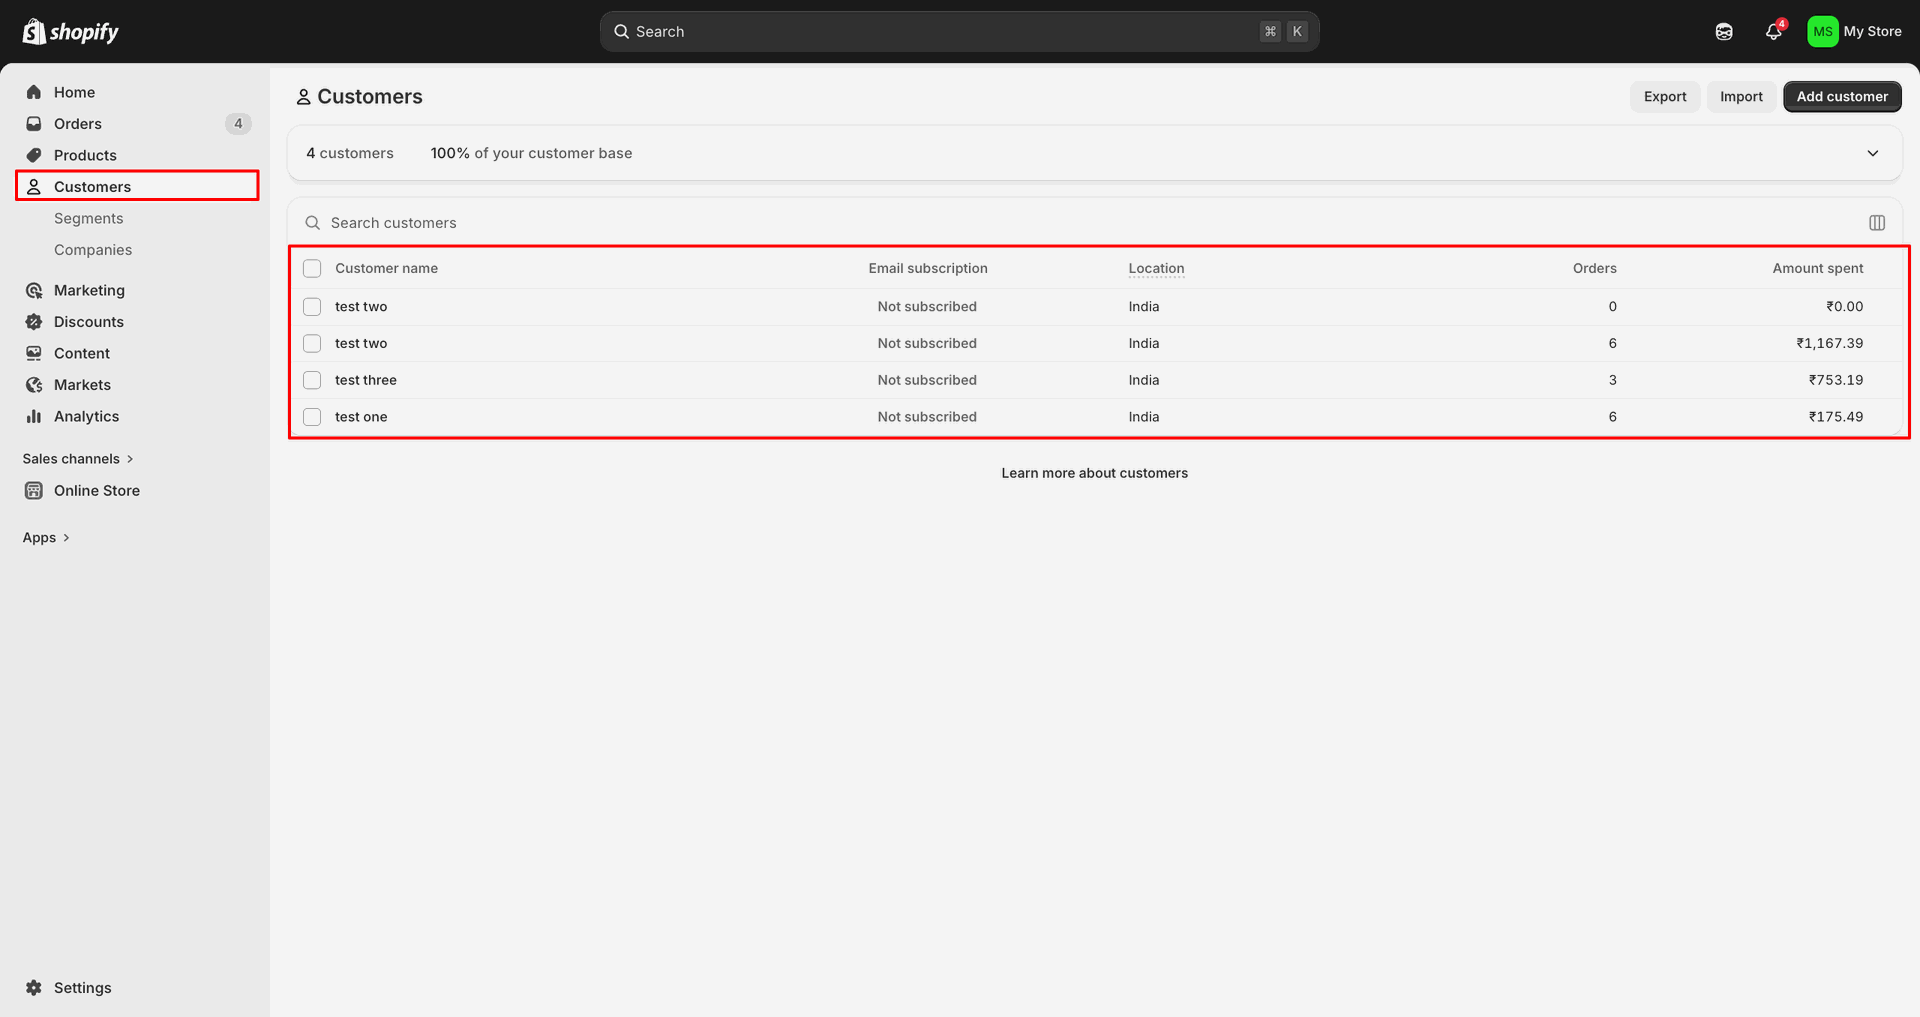
Open Customers in Shopify Admin to review the source customer records.
Import Contacts interface screenshot
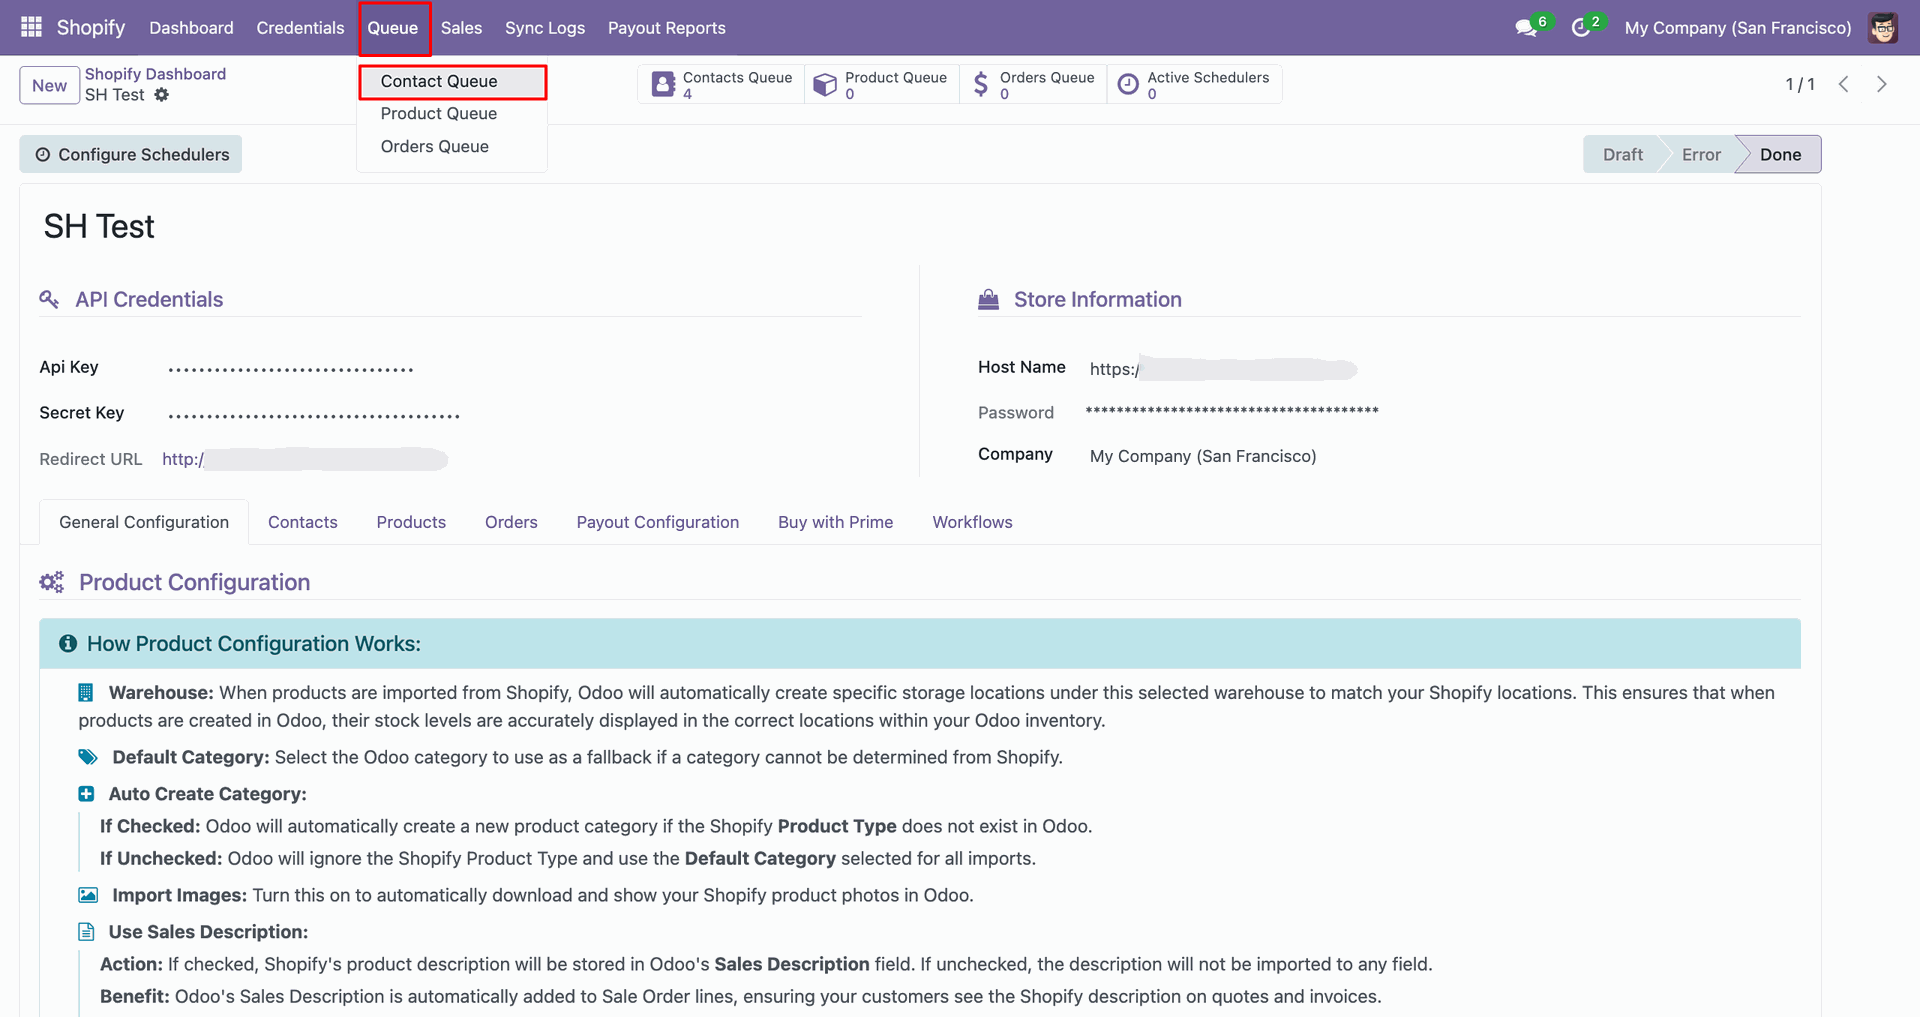
Open Contact Queue from the Queue menu to inspect imported customer entries.
Import Contacts interface screenshot
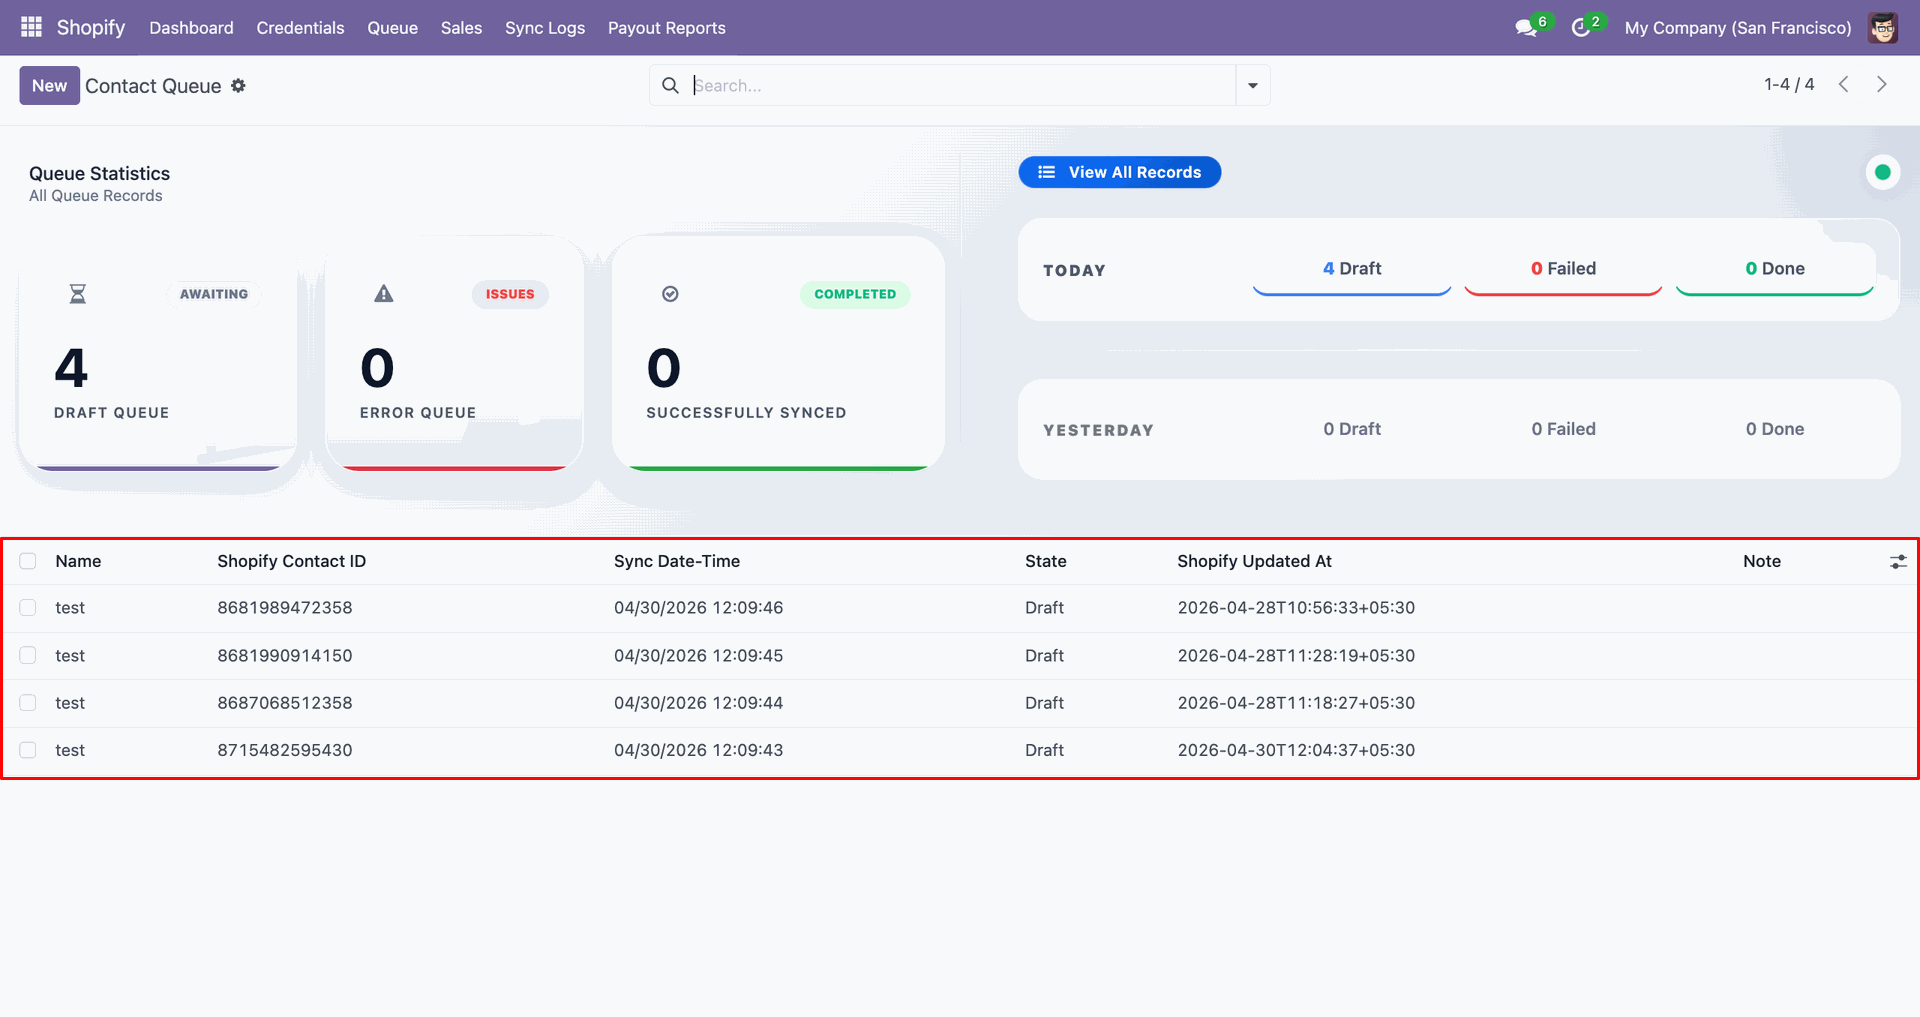
Review the Contact Queue list to compare staged customer IDs and timestamps.
Import Contacts interface screenshot
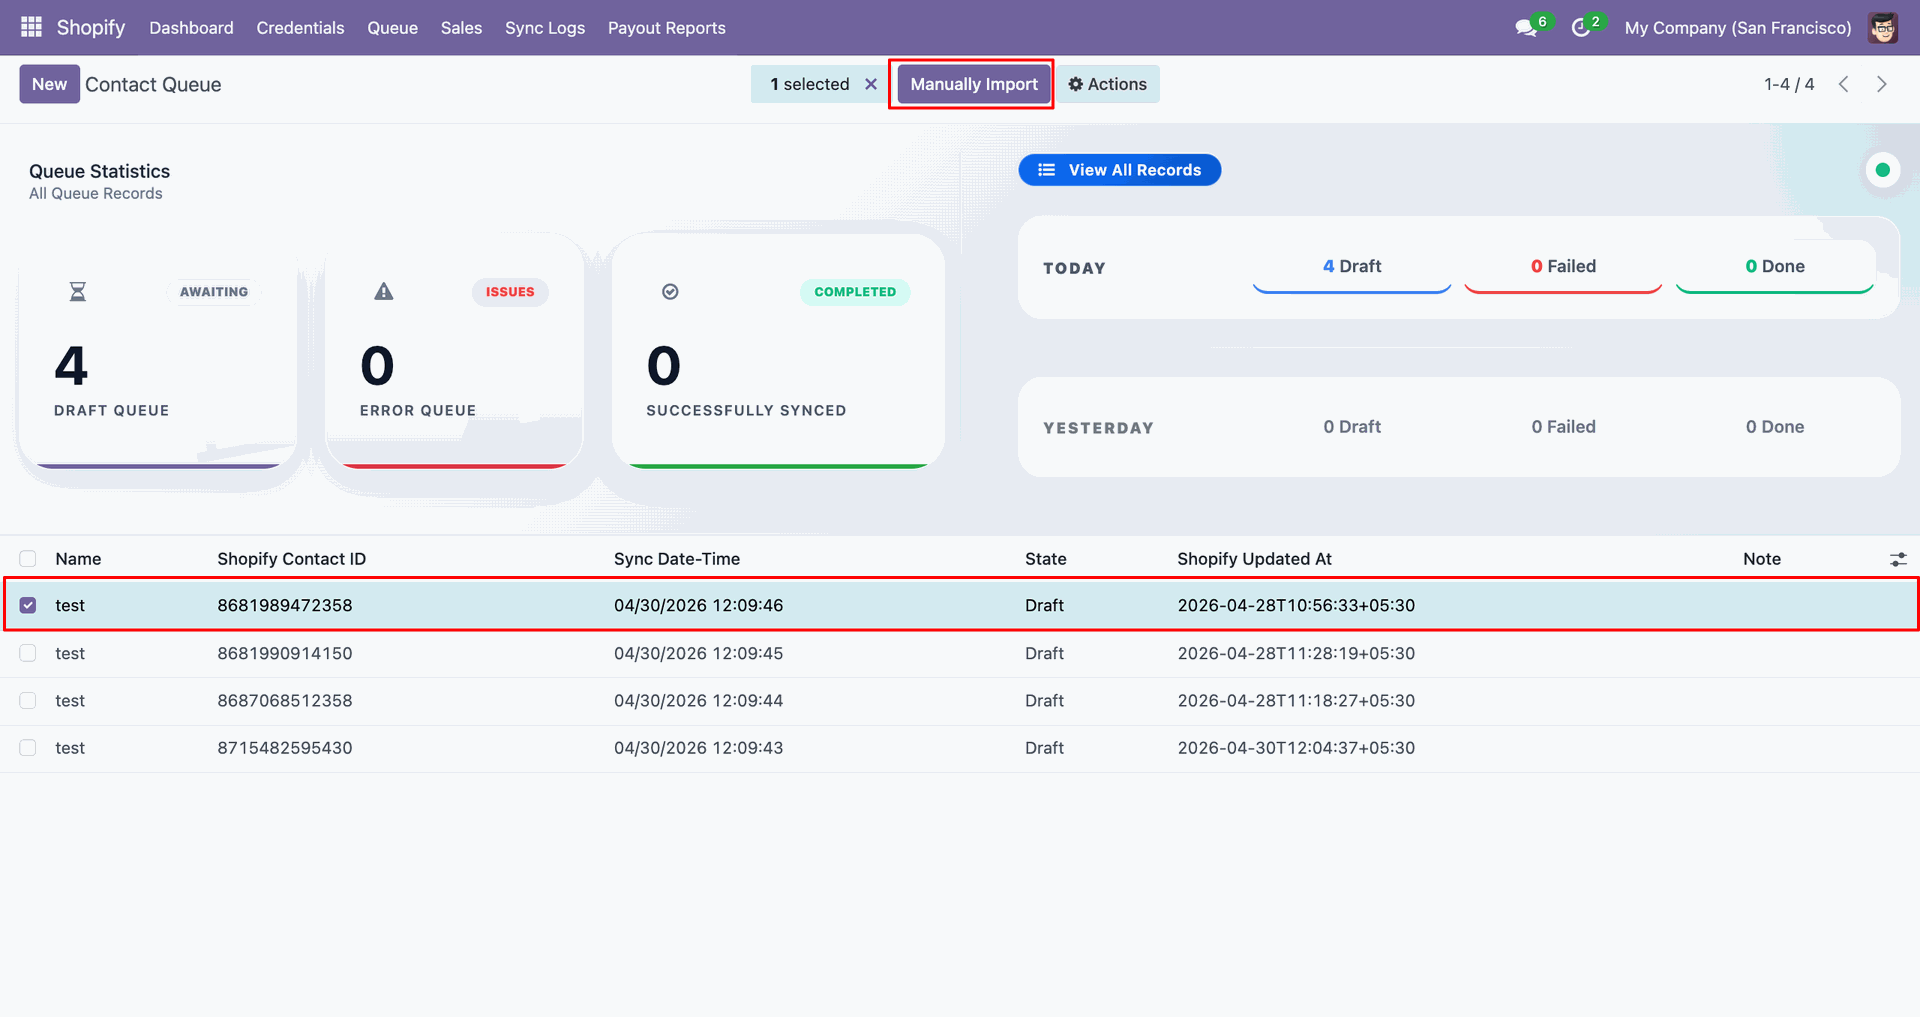
Select the staged contact line and click Manually Import to process it.
Import Contacts interface screenshot
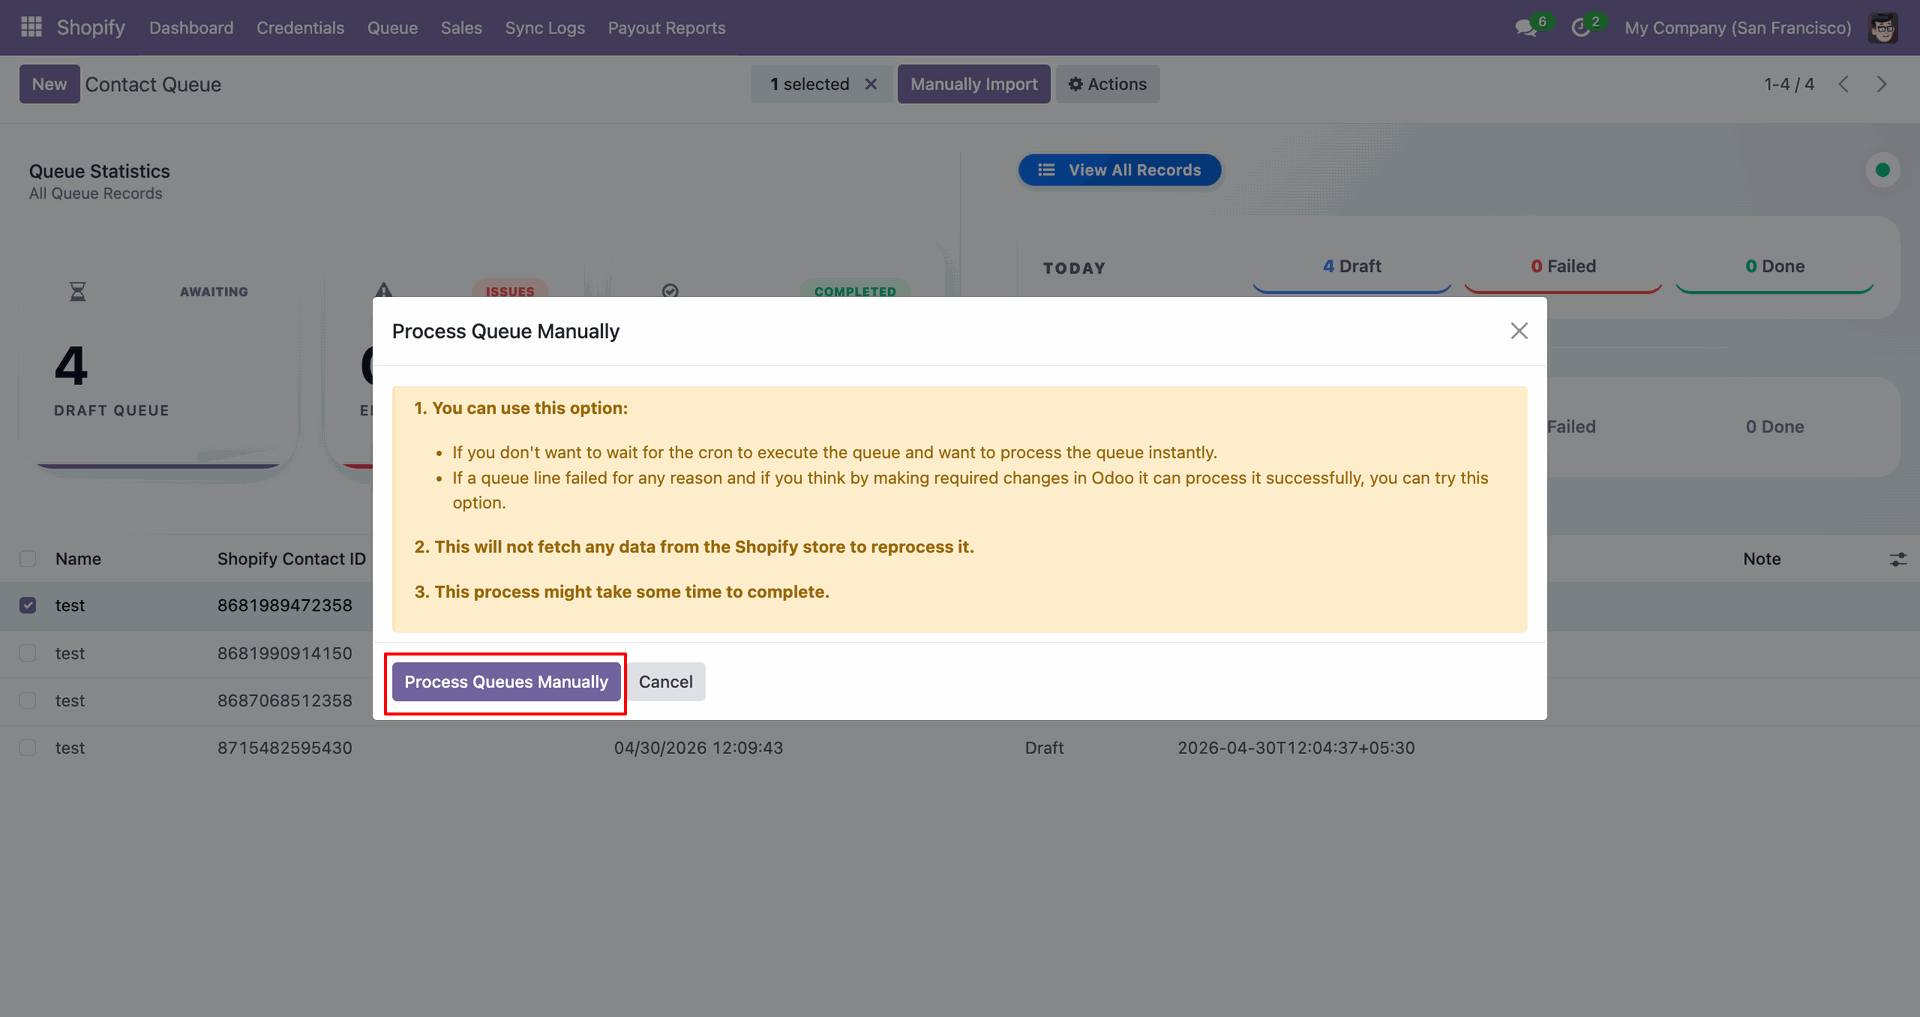
Click Process Queues Manually in the popup to import the selected customer.
Import Contacts interface screenshot
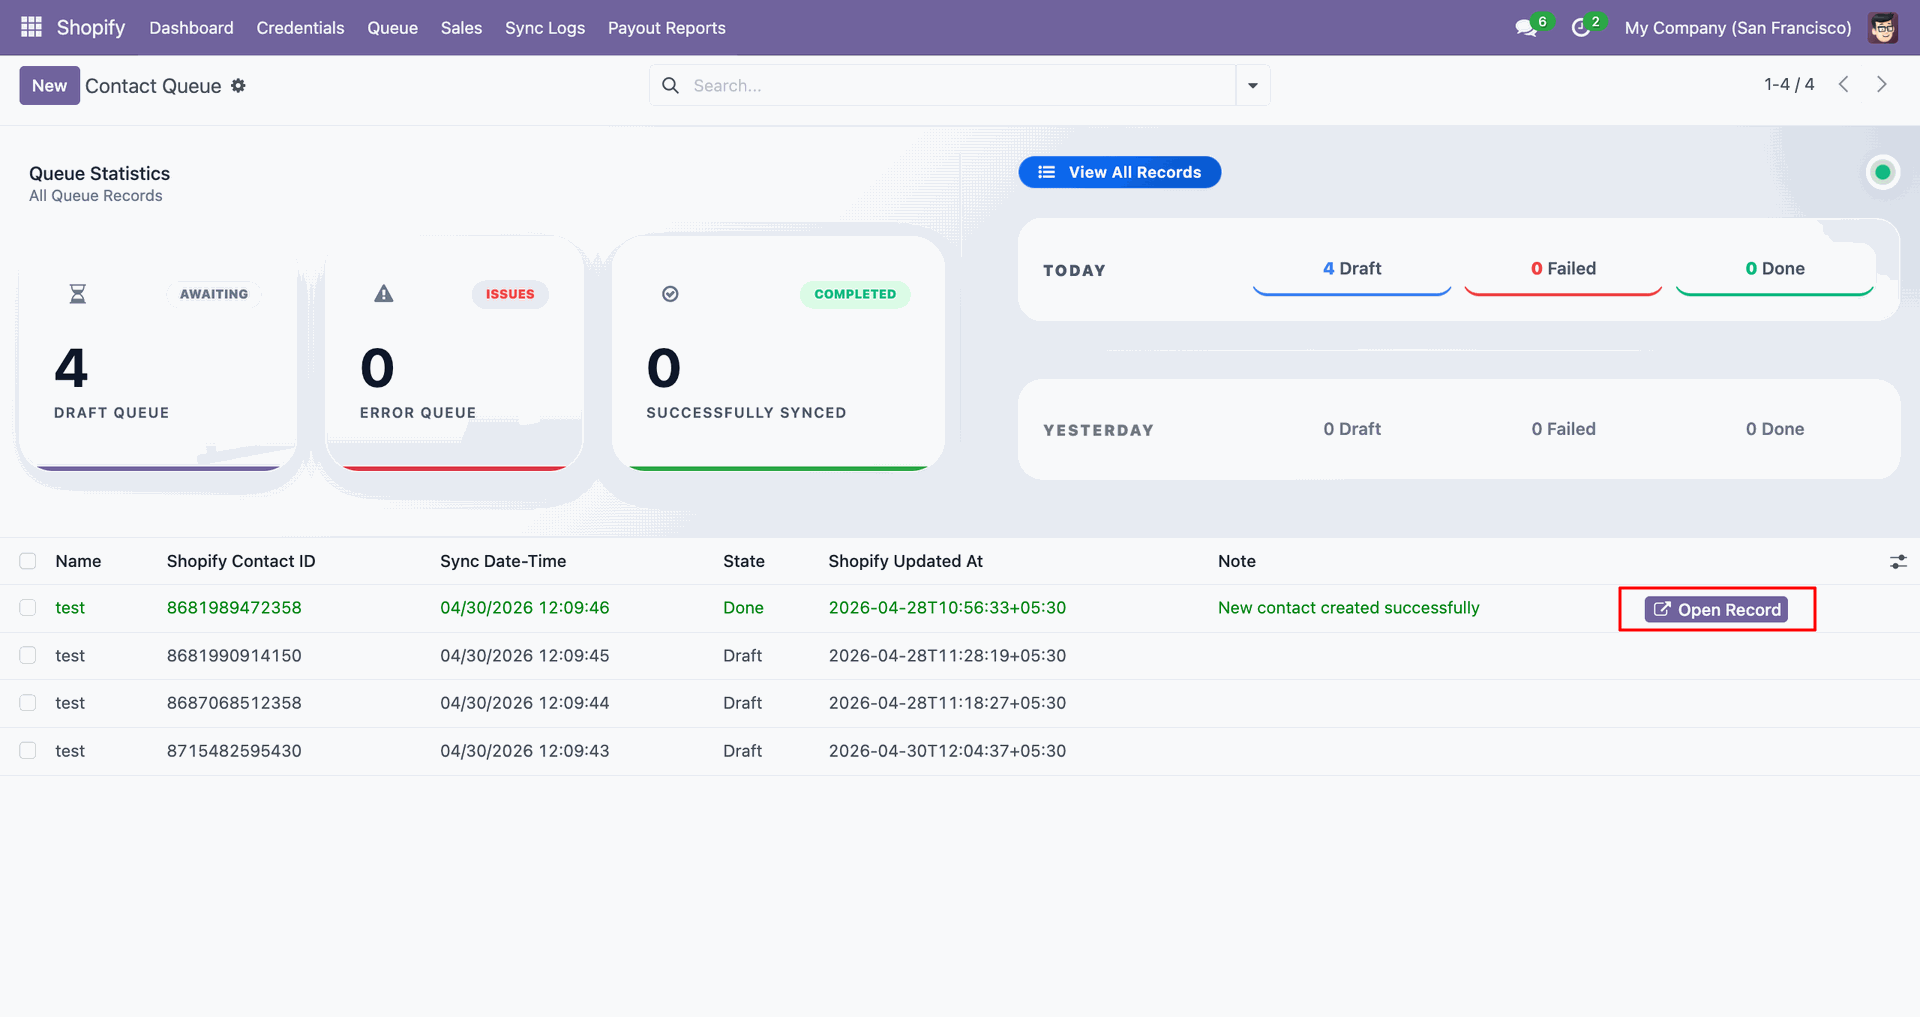
Use Open Record beside the completed queue line to open the Odoo contact.
Import Contacts interface screenshot
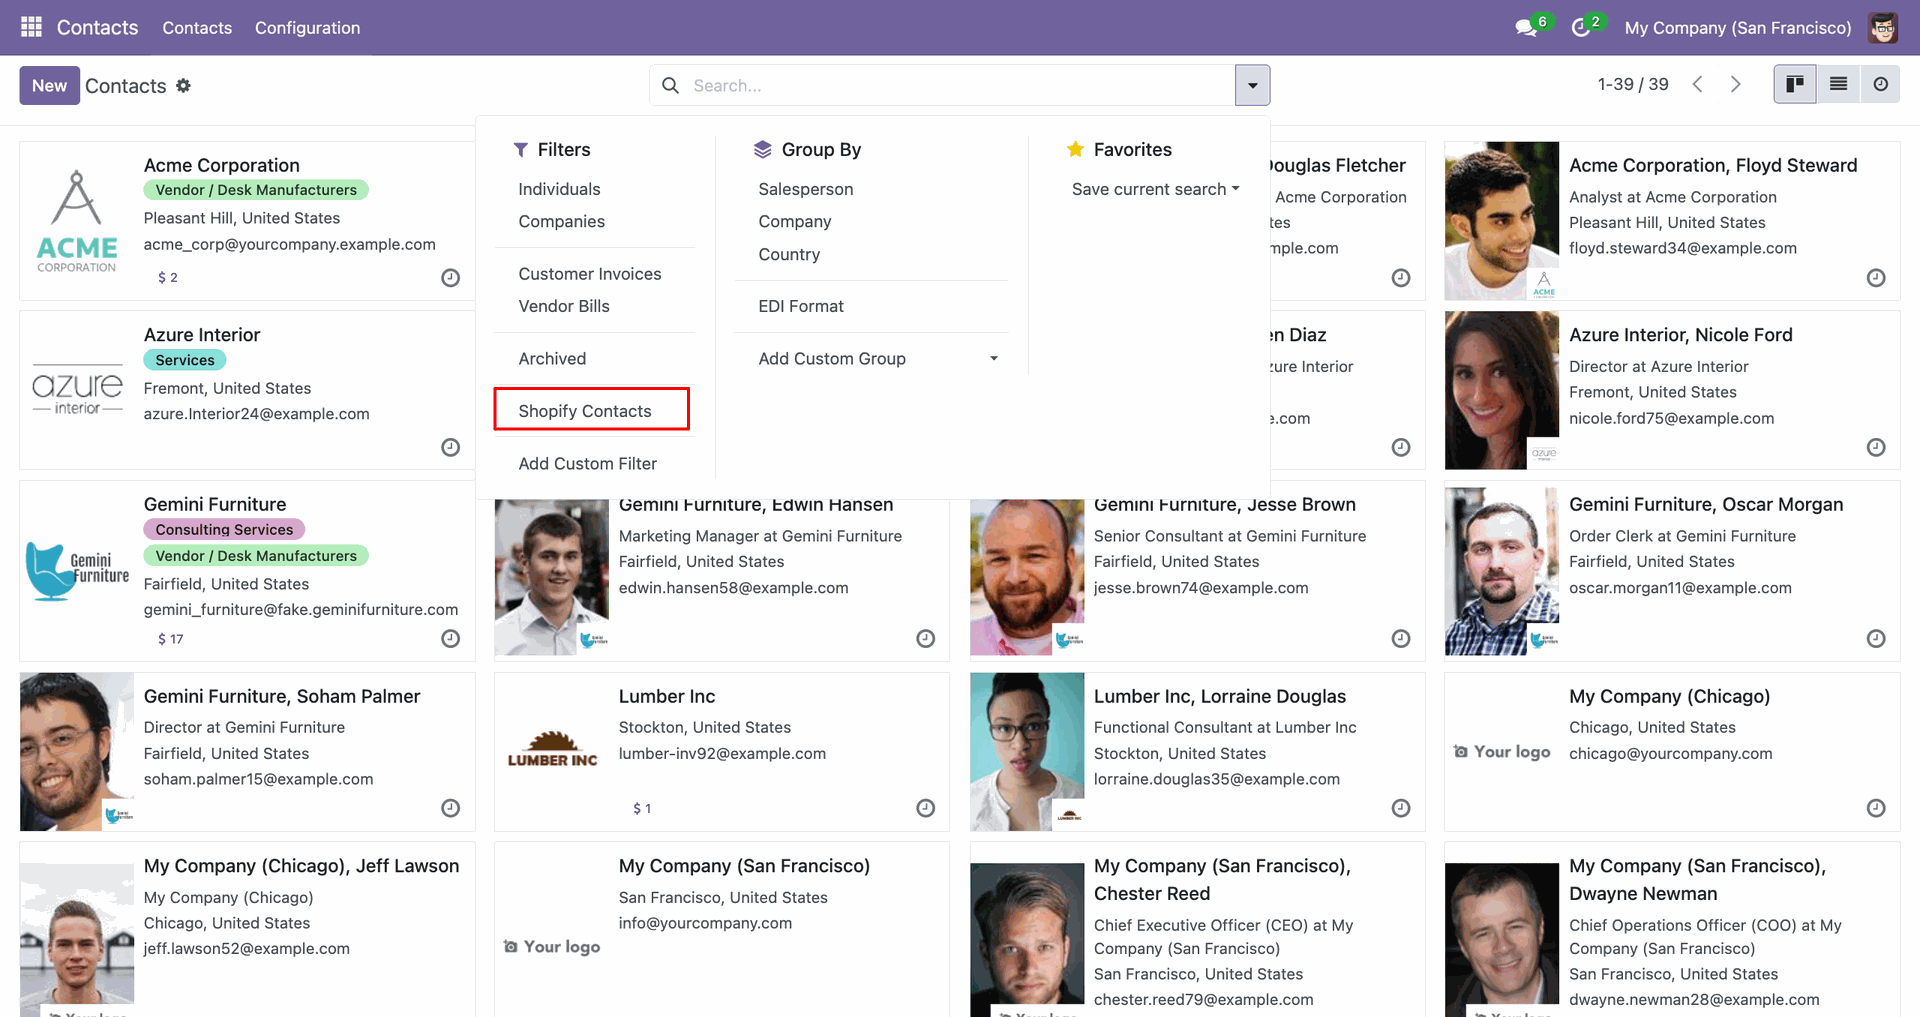
Apply the Shopify Contacts filter to display only imported customer records.
Import Contacts interface screenshot
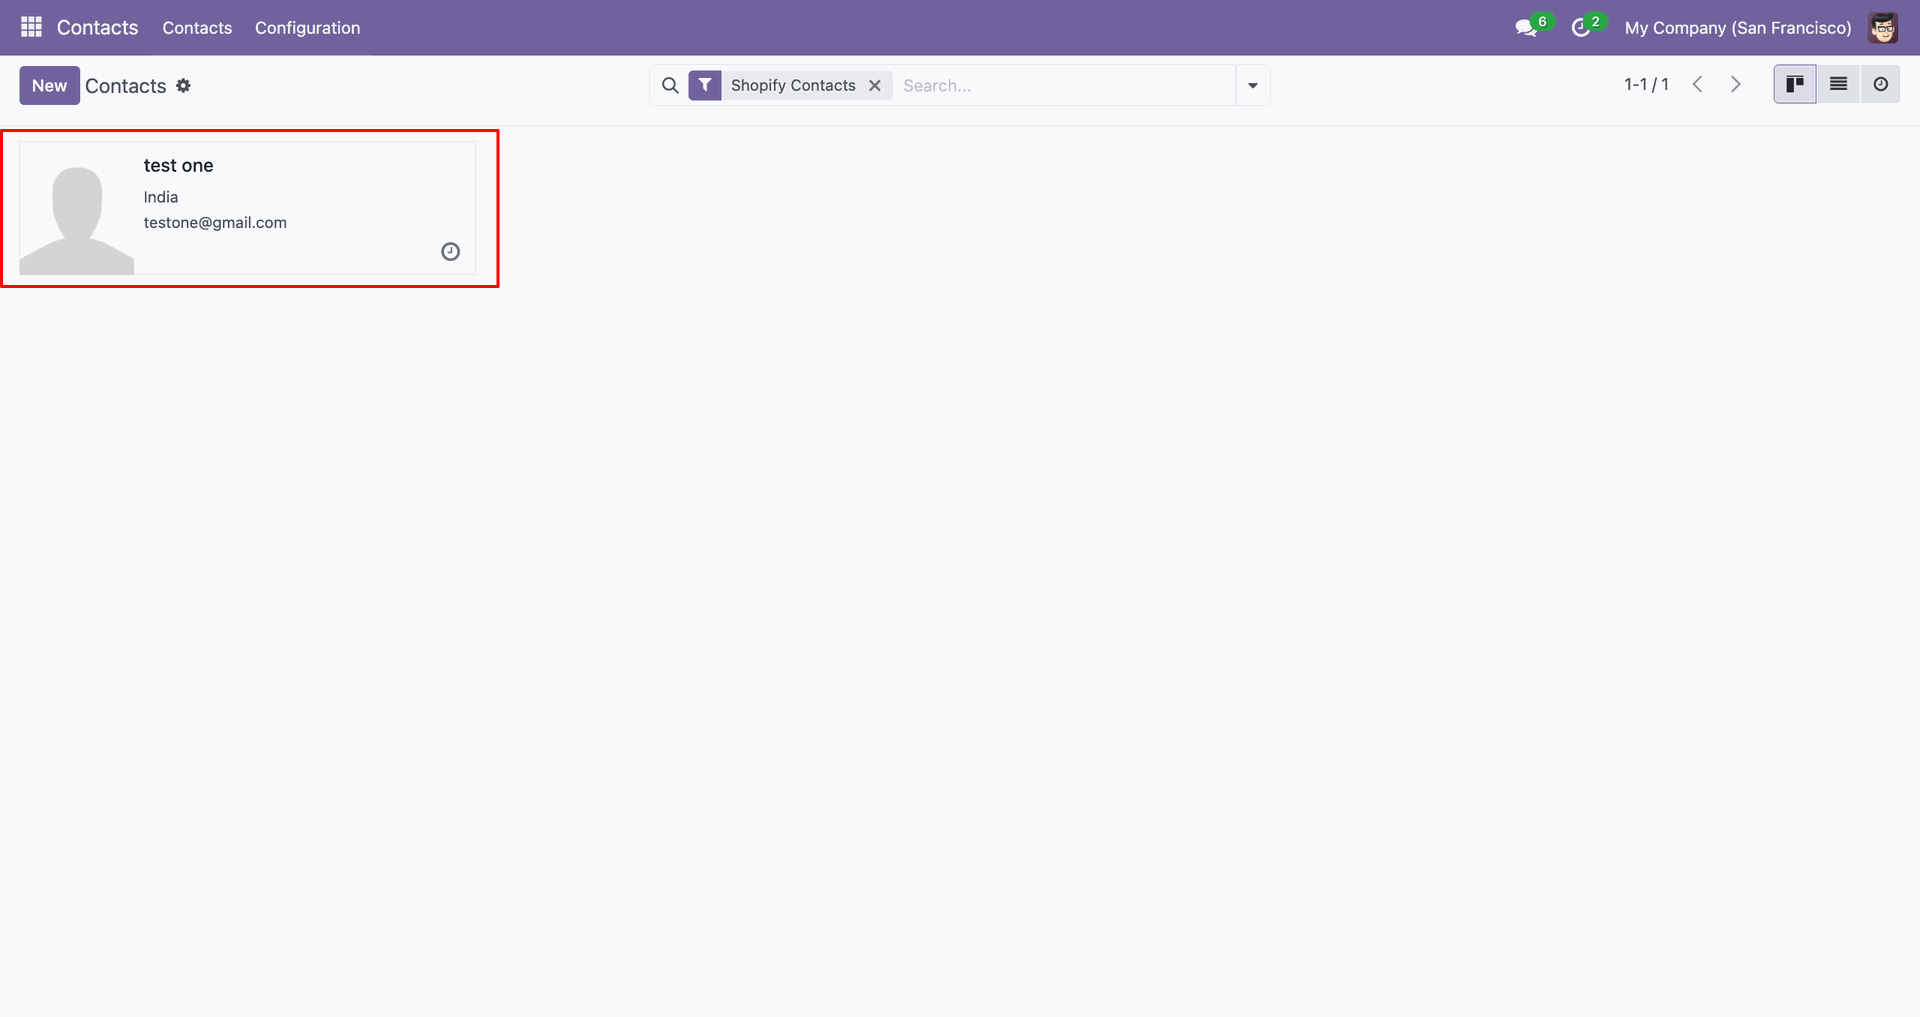
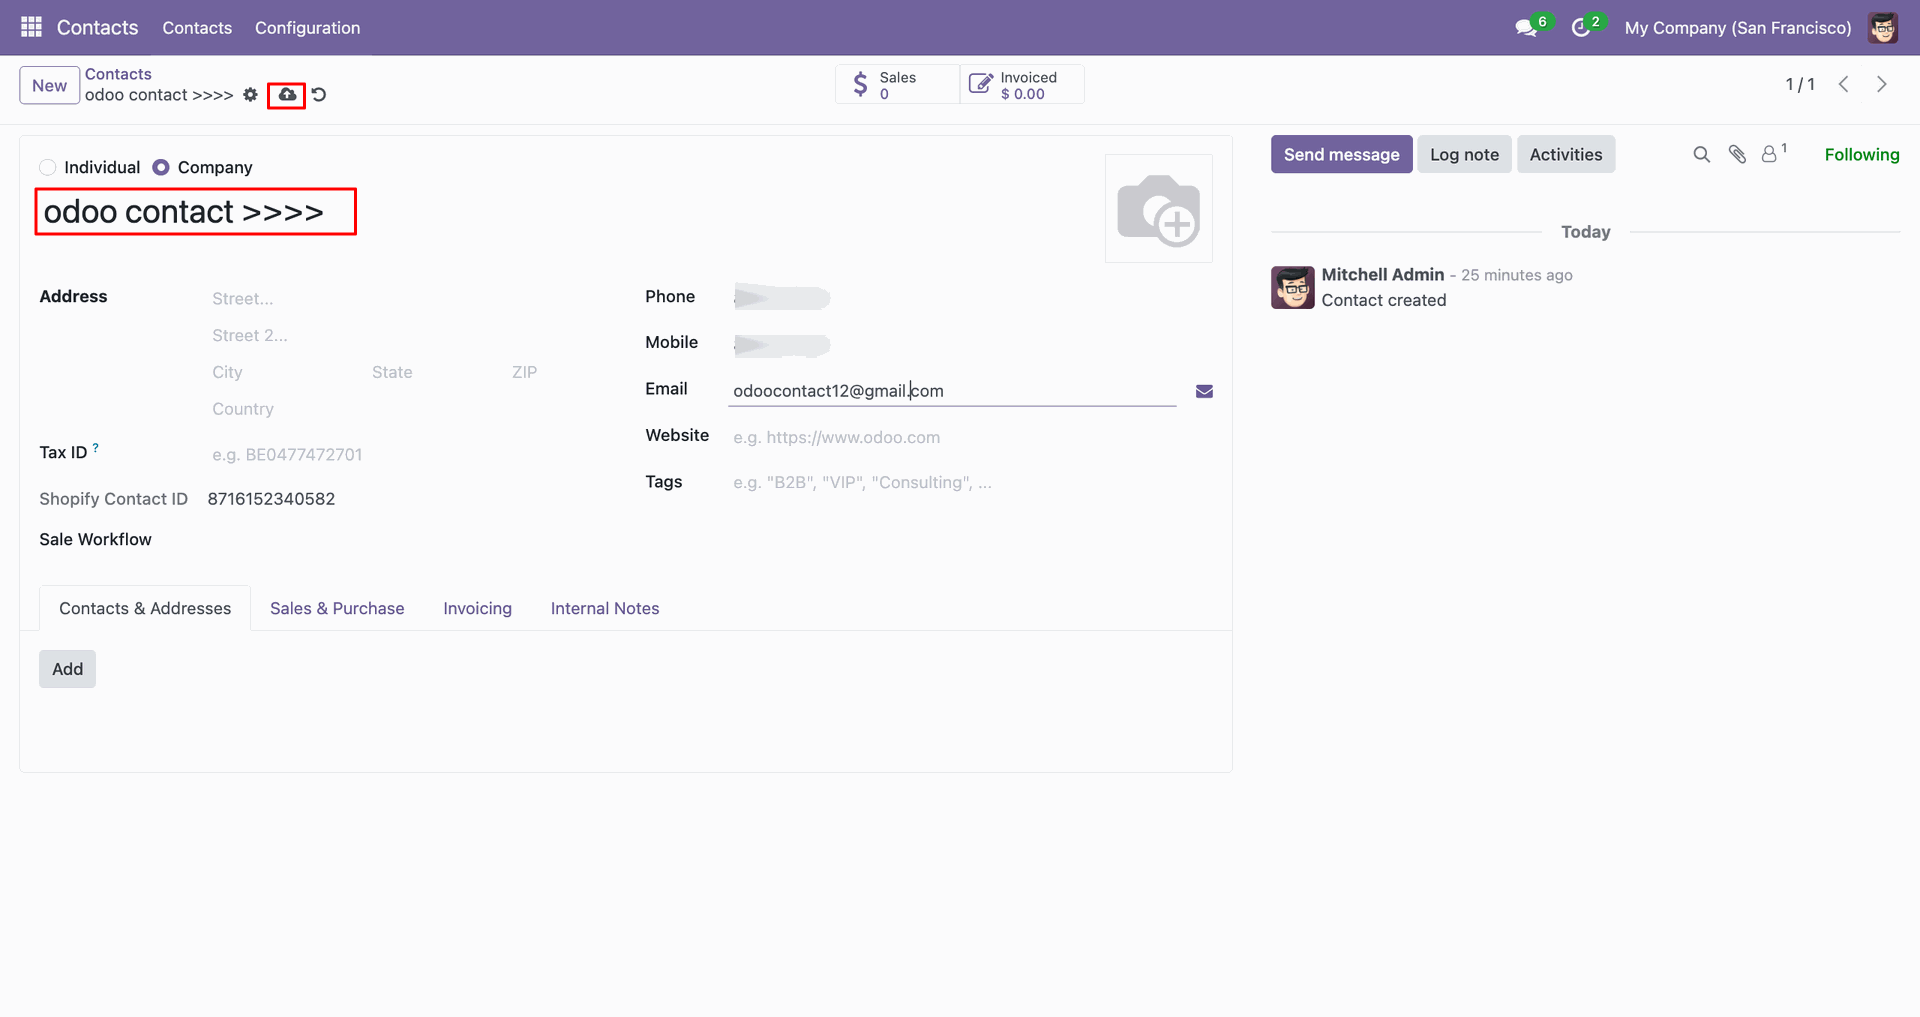
The imported contact card shows the synced customer name and email.
Import Contacts interface screenshot
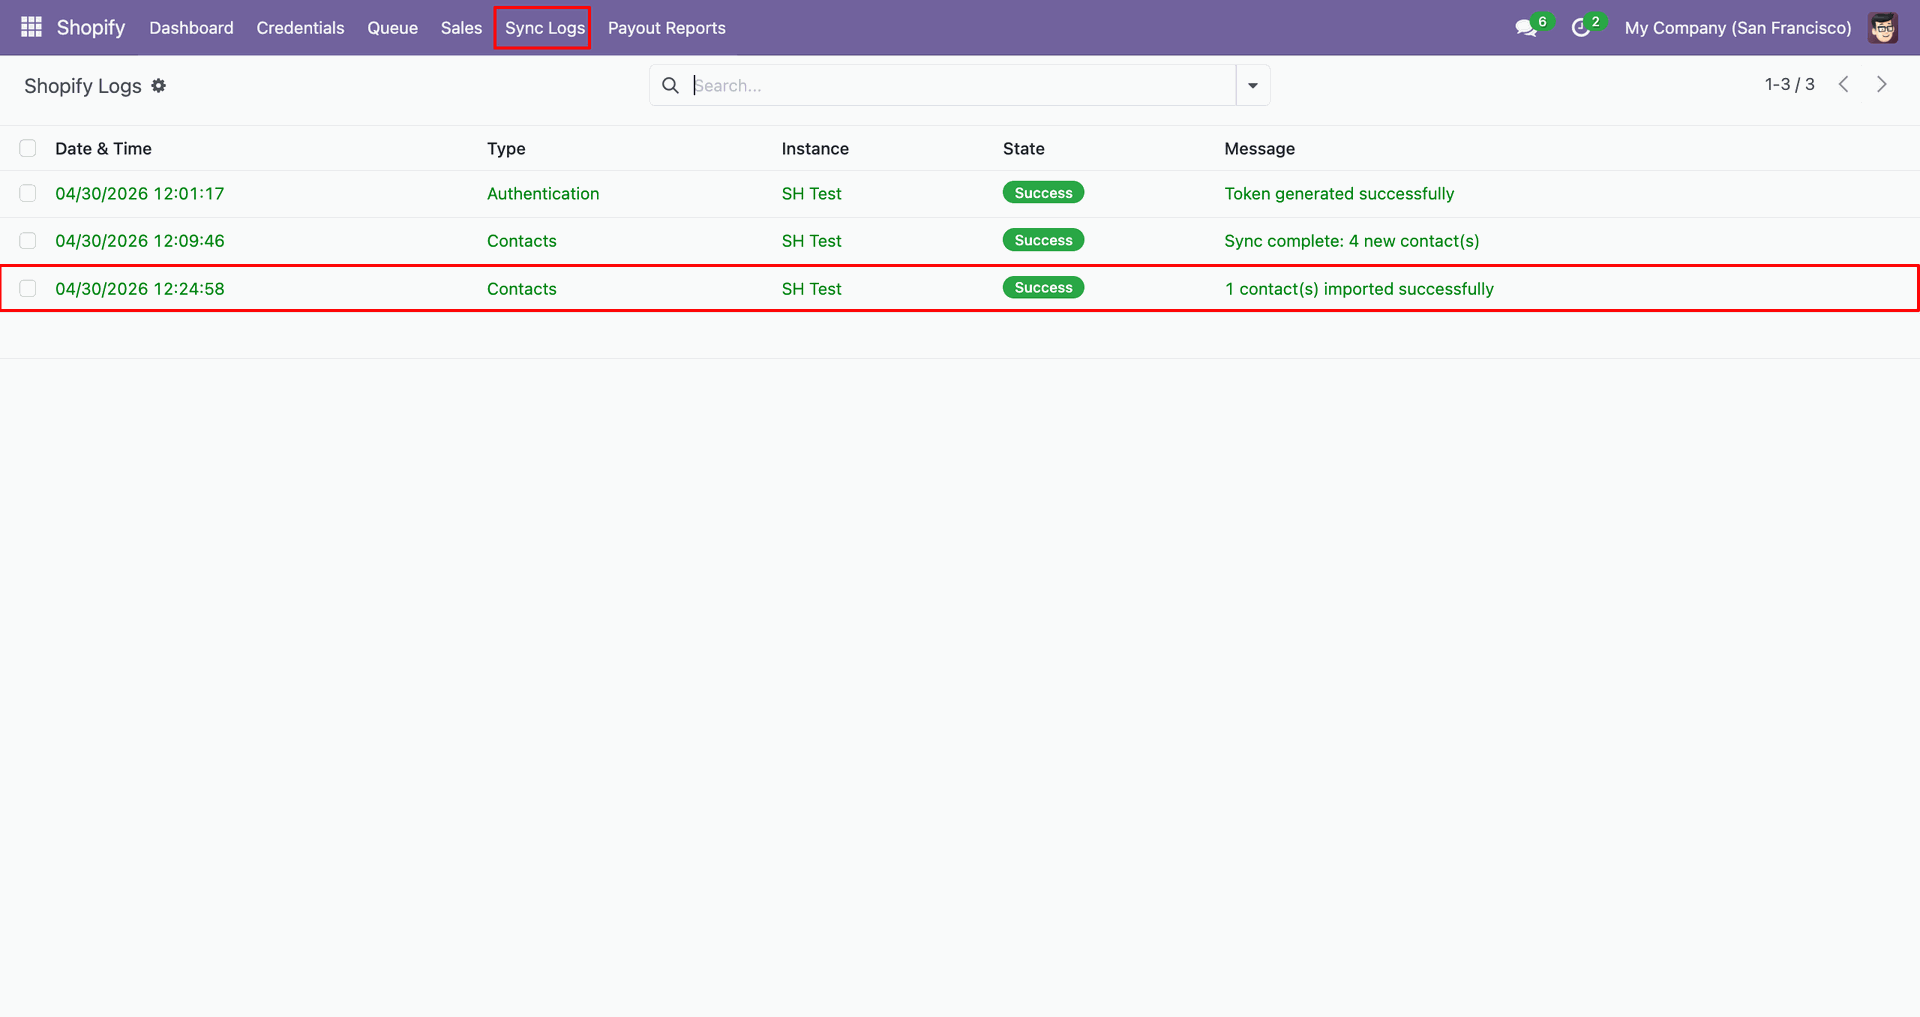
Review Sync Logs to confirm one staged contact imported successfully into Odoo.
Import Contacts interface screenshot
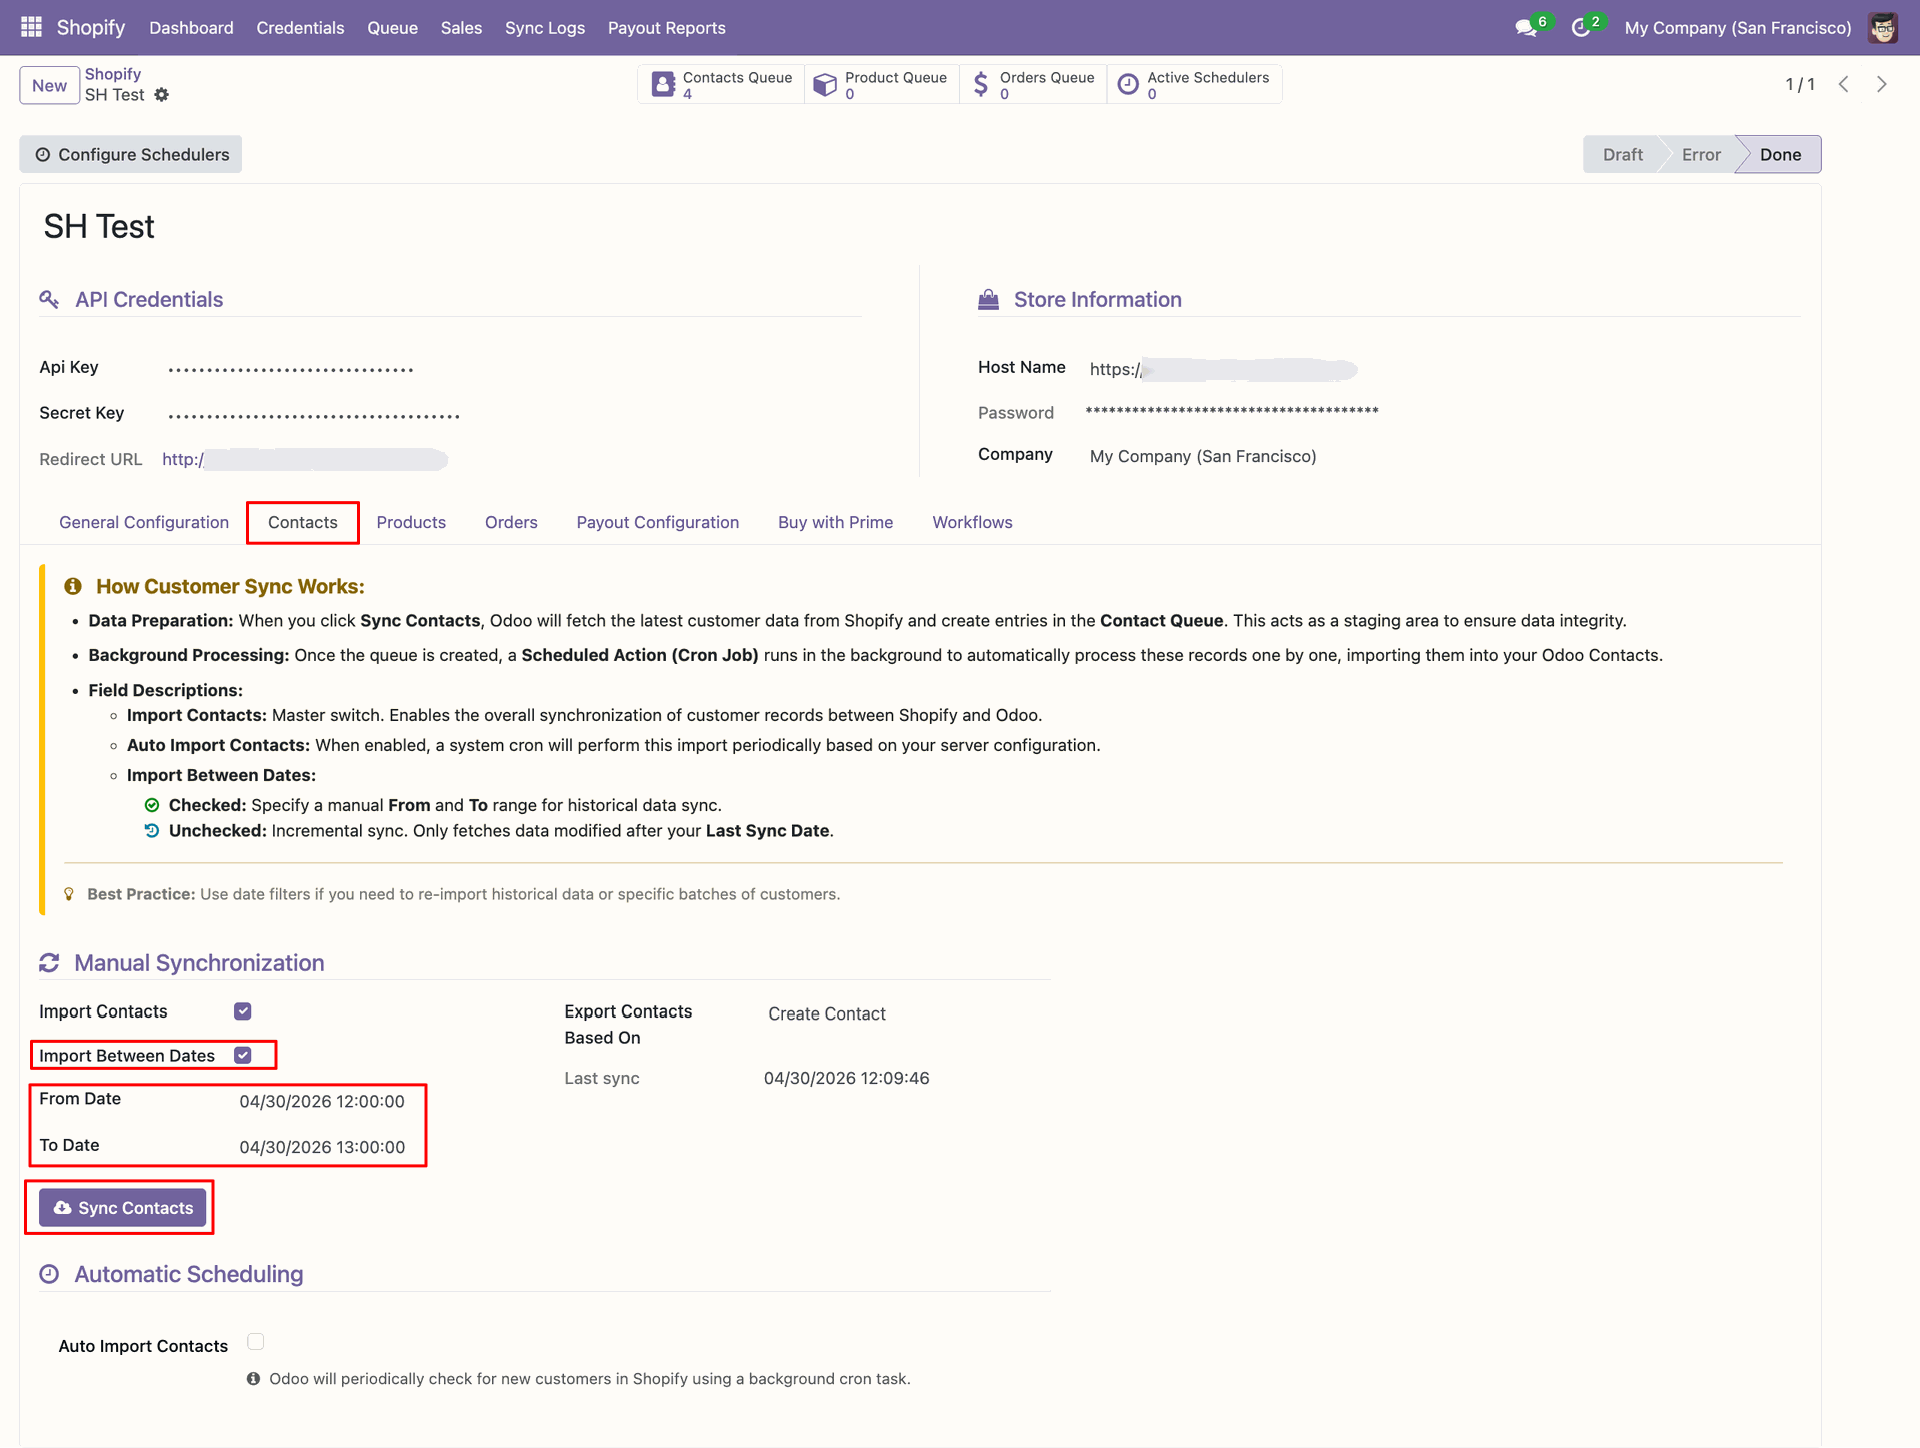
Set From and To dates, then click Sync Contacts for dated imports.
Import Contacts interface screenshot
Review the Contacts Queue counter after fetching records within the selected dates.
Import Contacts interface screenshot

Export Contacts
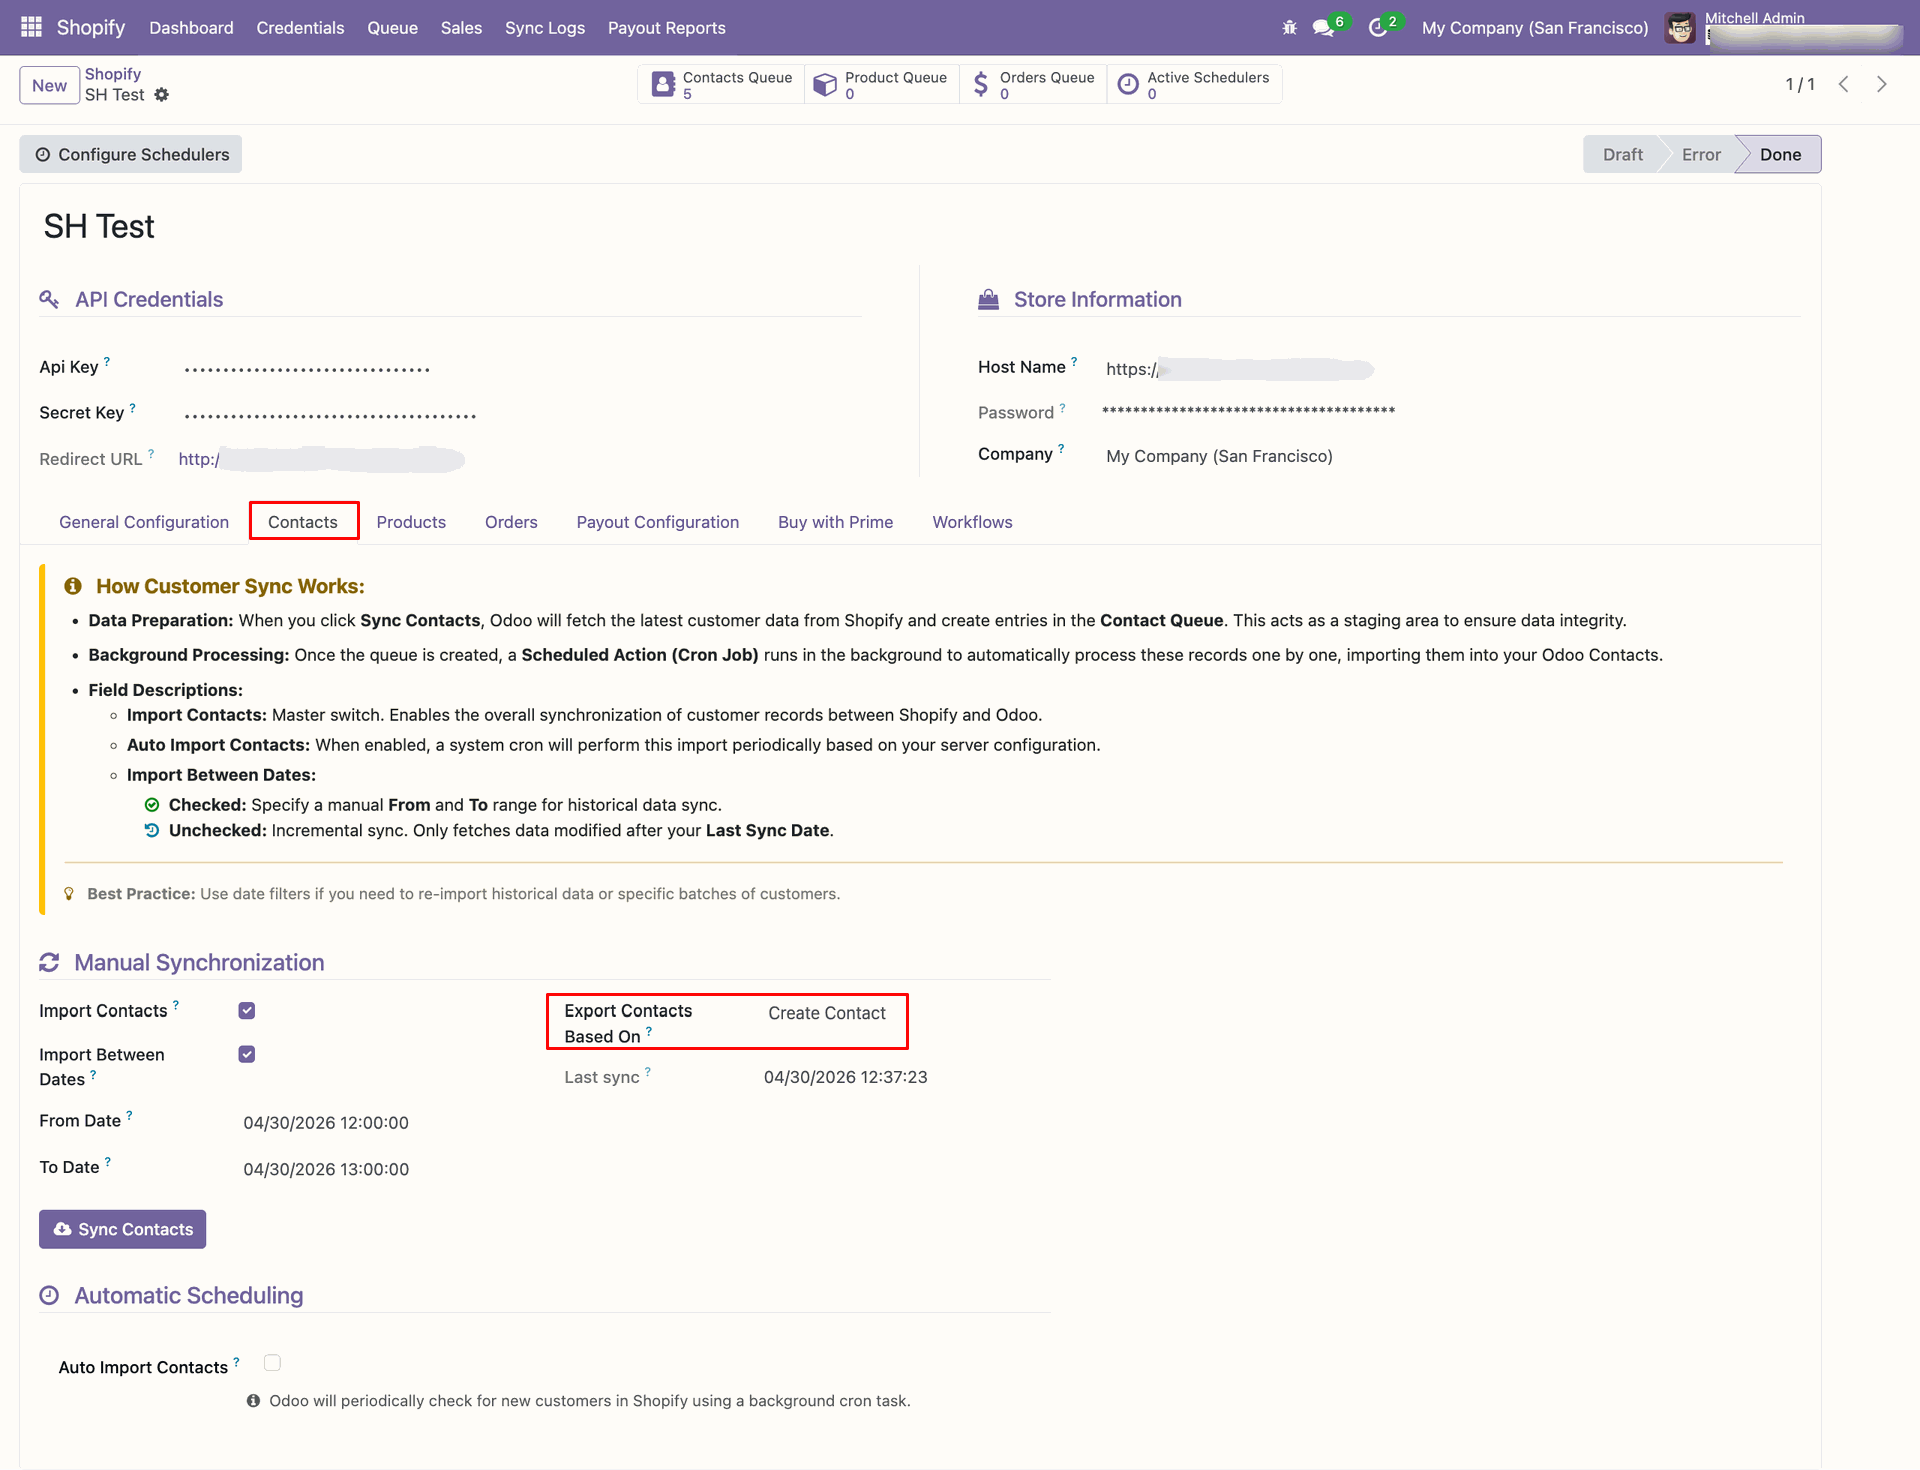
Set Export Contacts Based On to Create Contact before exporting new customers.
Export Contacts interface screenshot
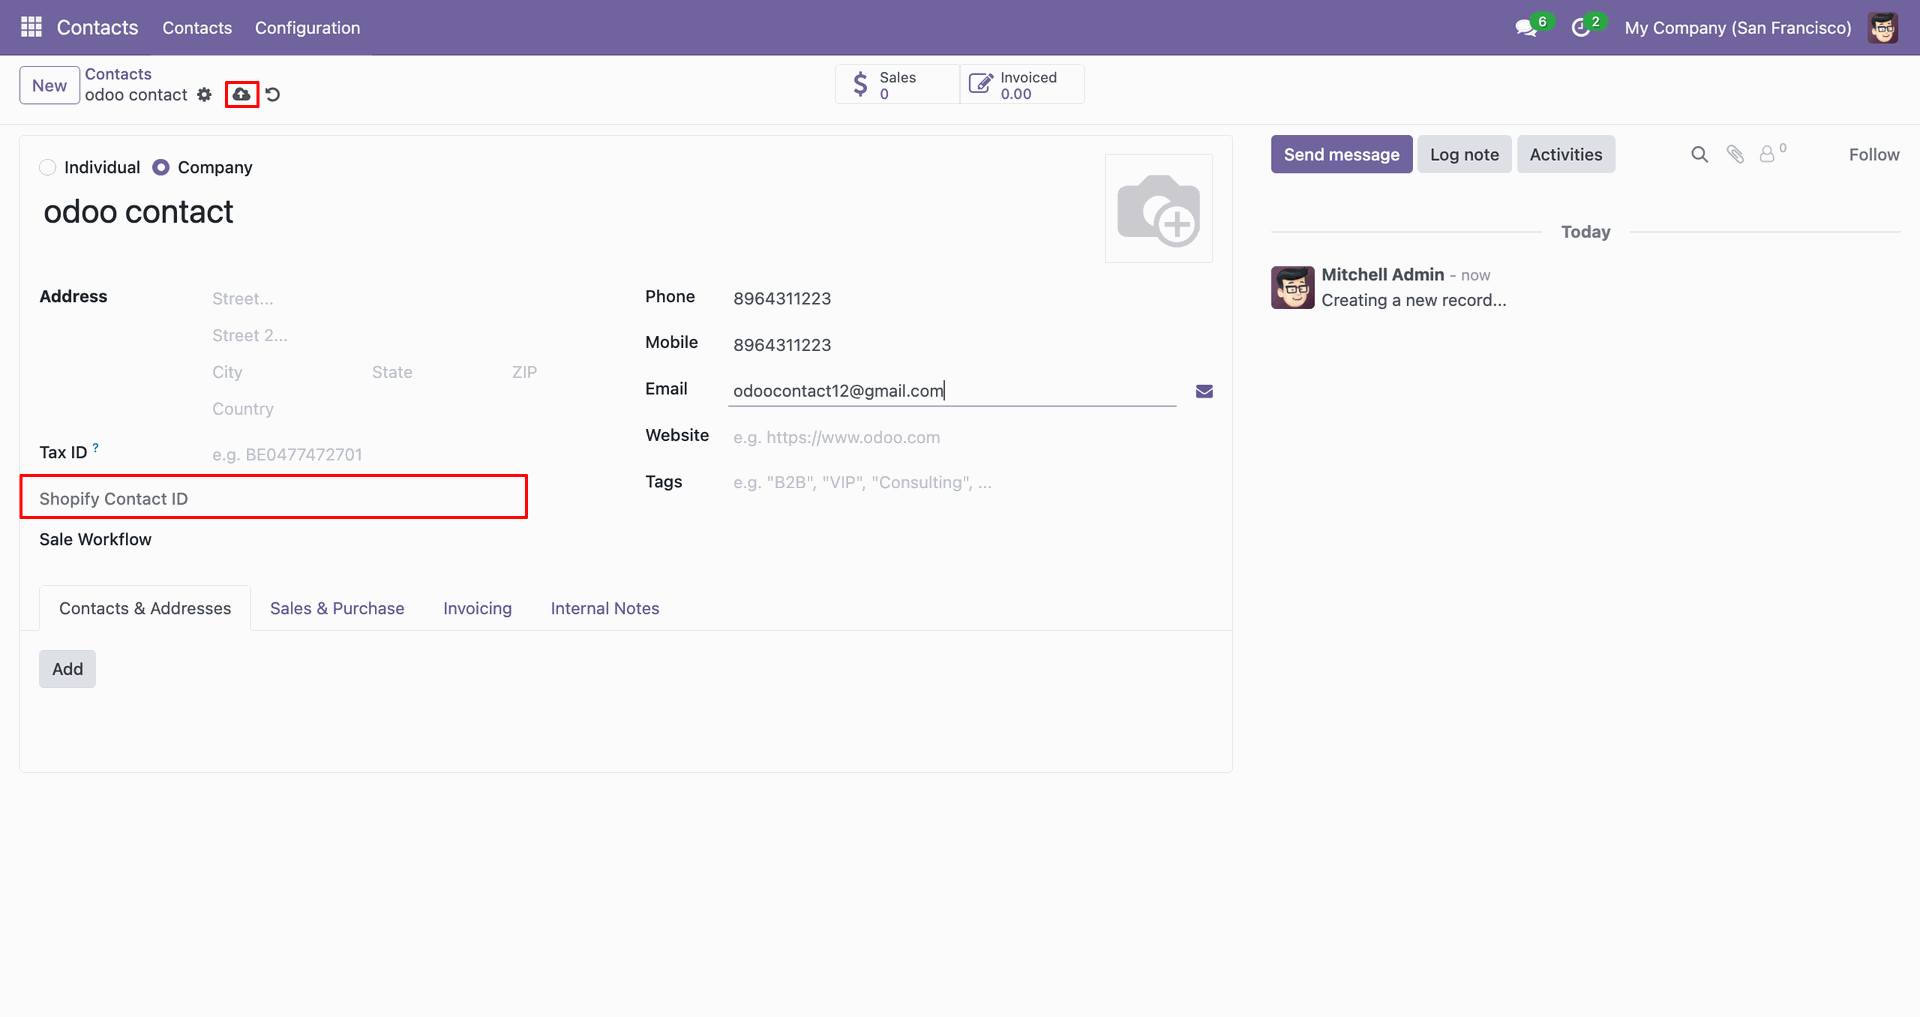
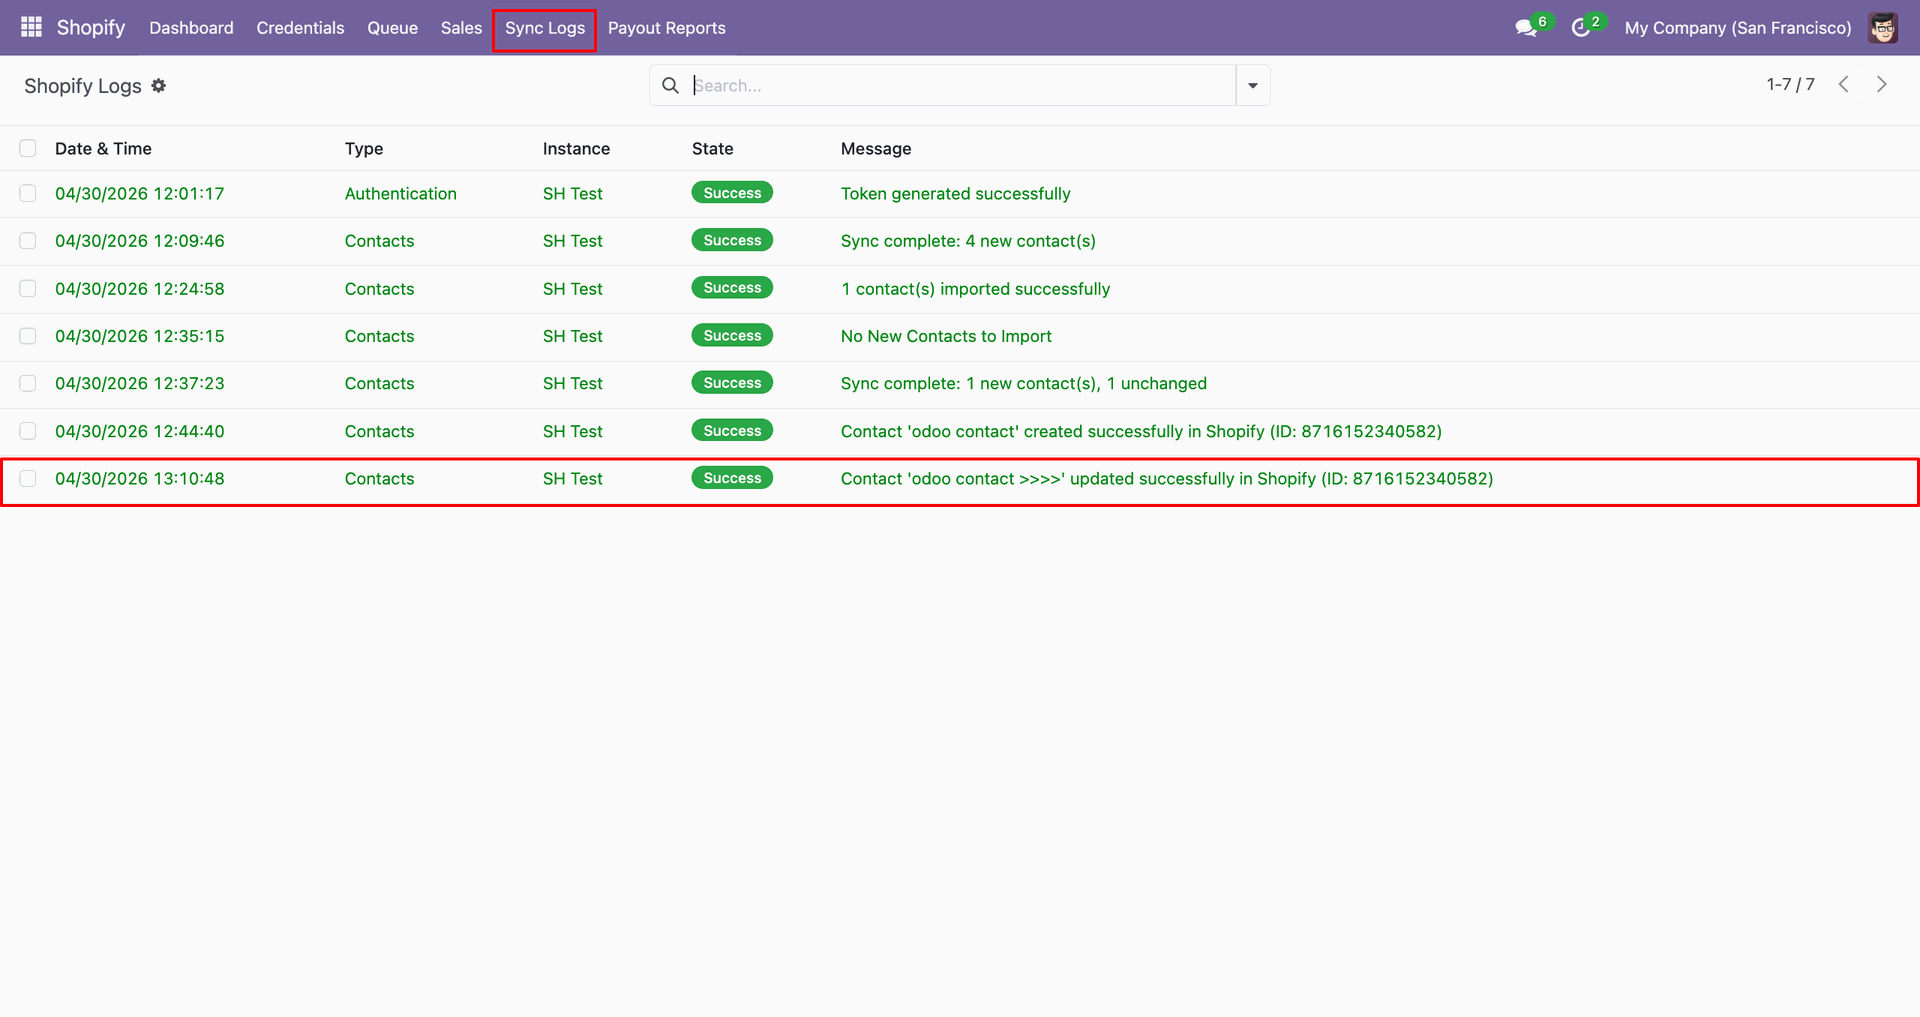
Use the export icon on the contact form to send this customer.
Export Contacts interface screenshot
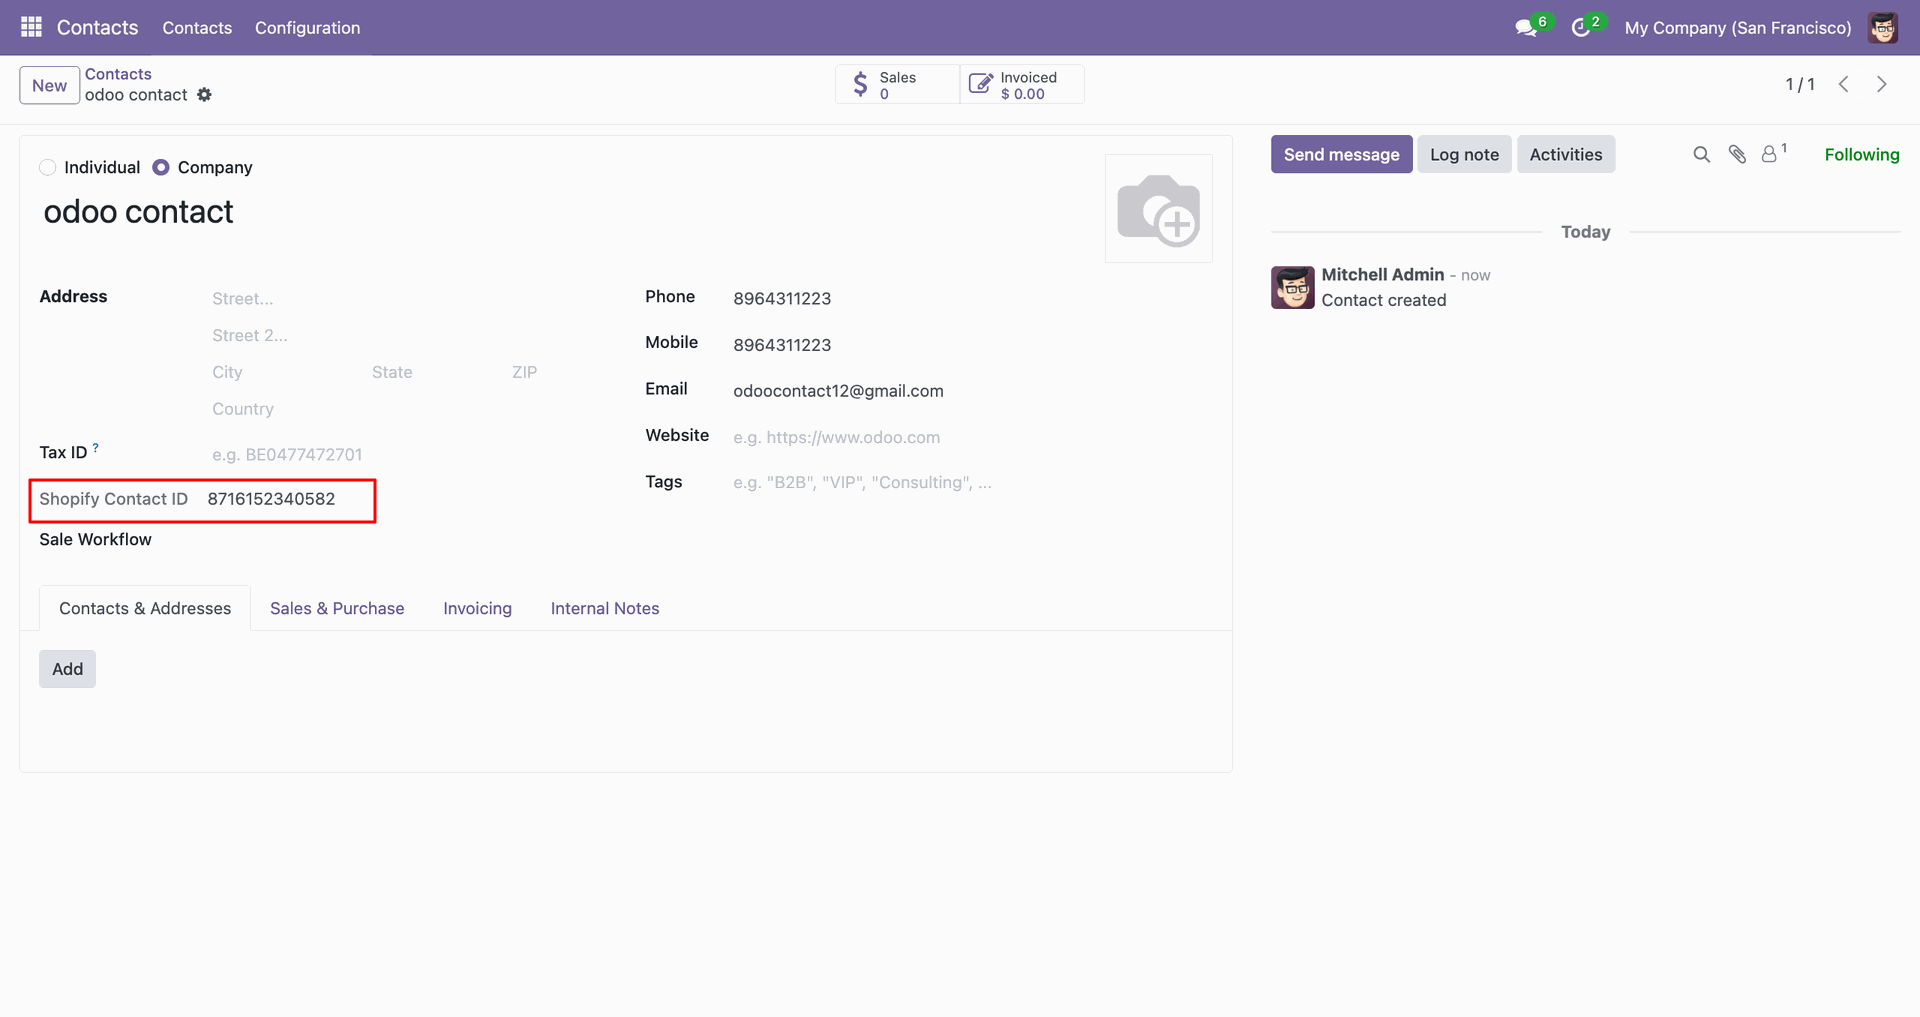
Review the Shopify Contact ID field after exporting the contact from Odoo.
Export Contacts interface screenshot
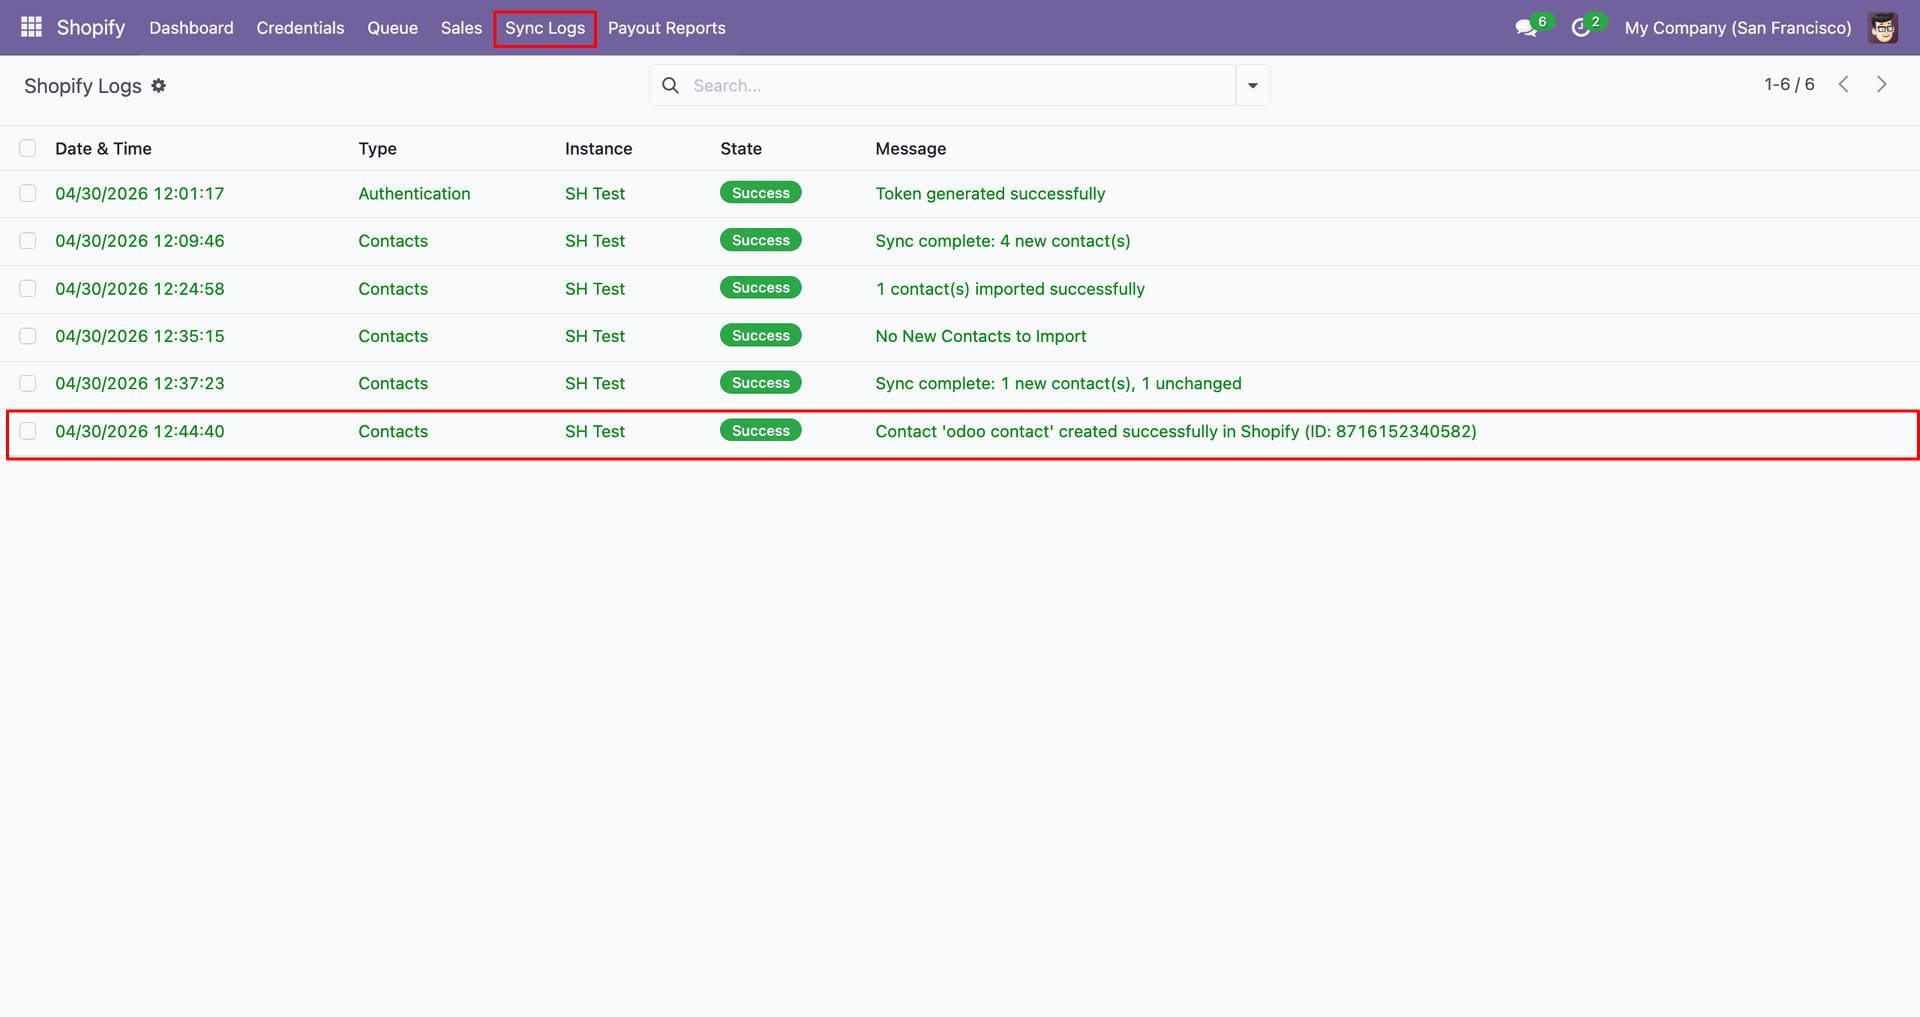
Check Sync Logs to confirm the customer was created successfully in Shopify.
Export Contacts interface screenshot
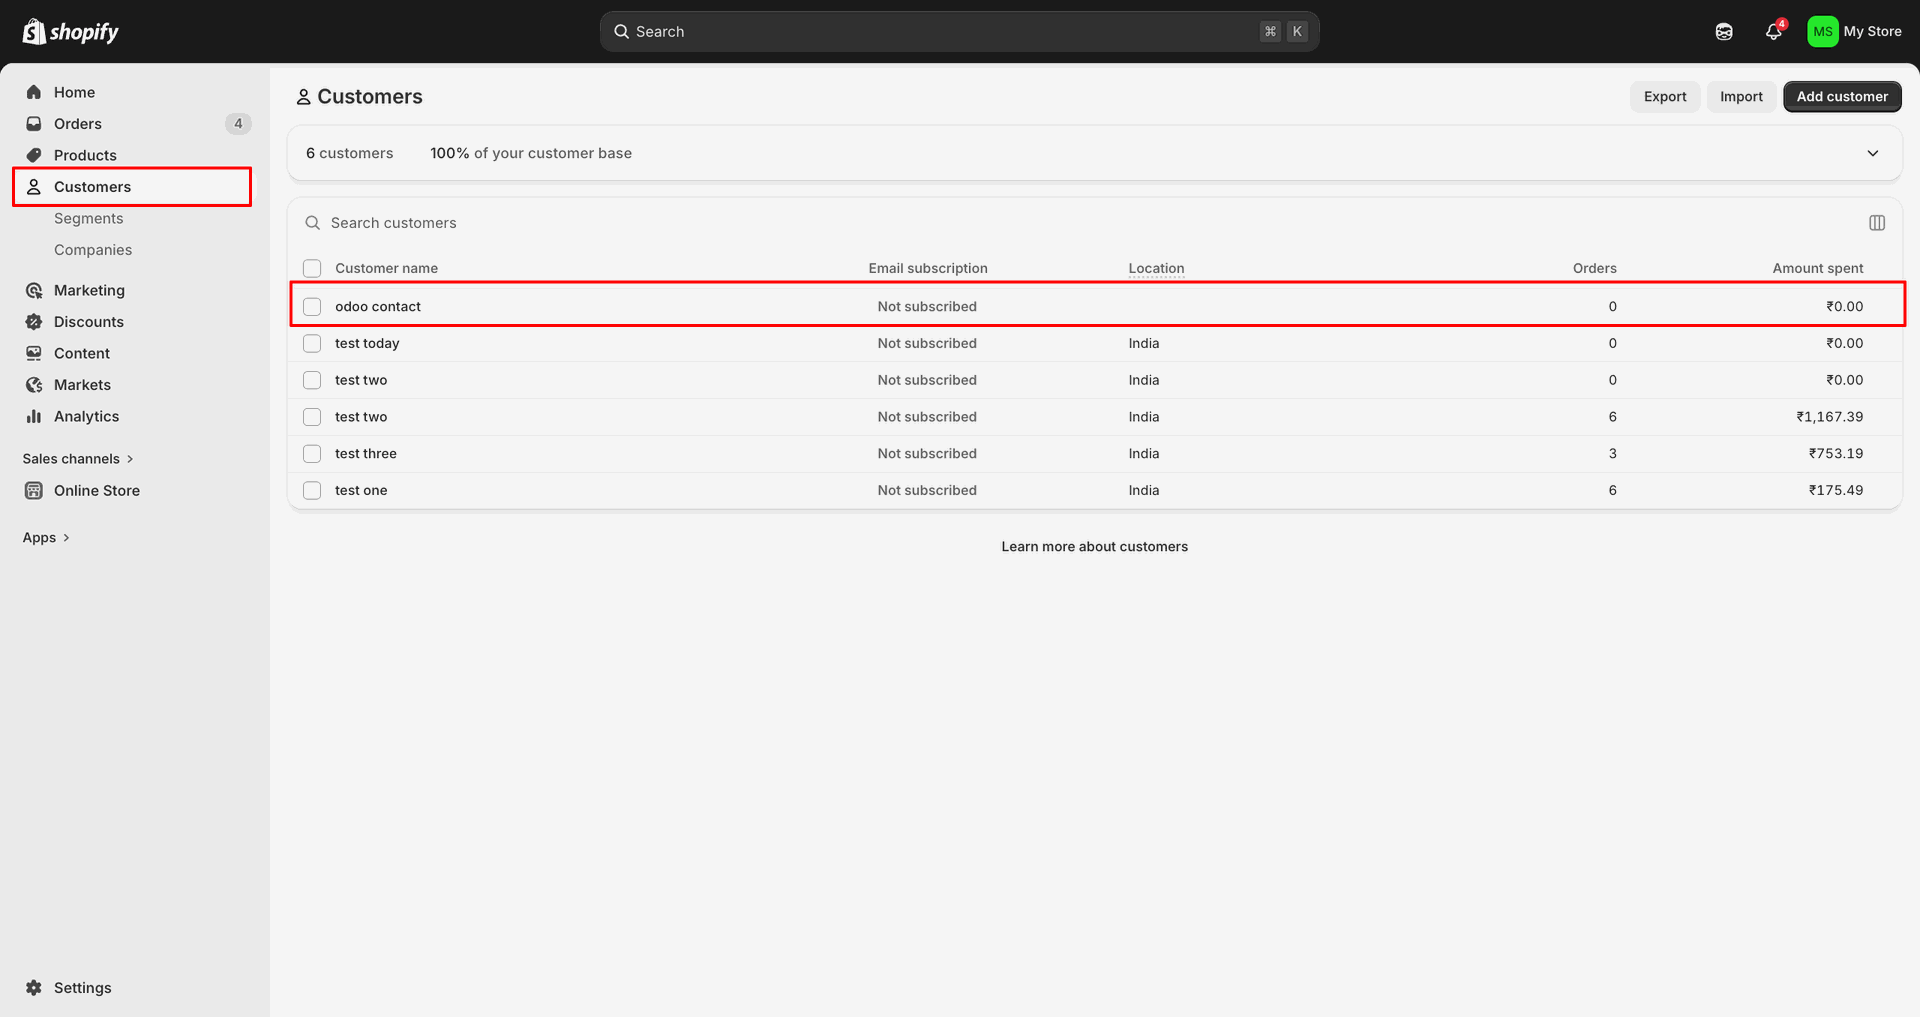
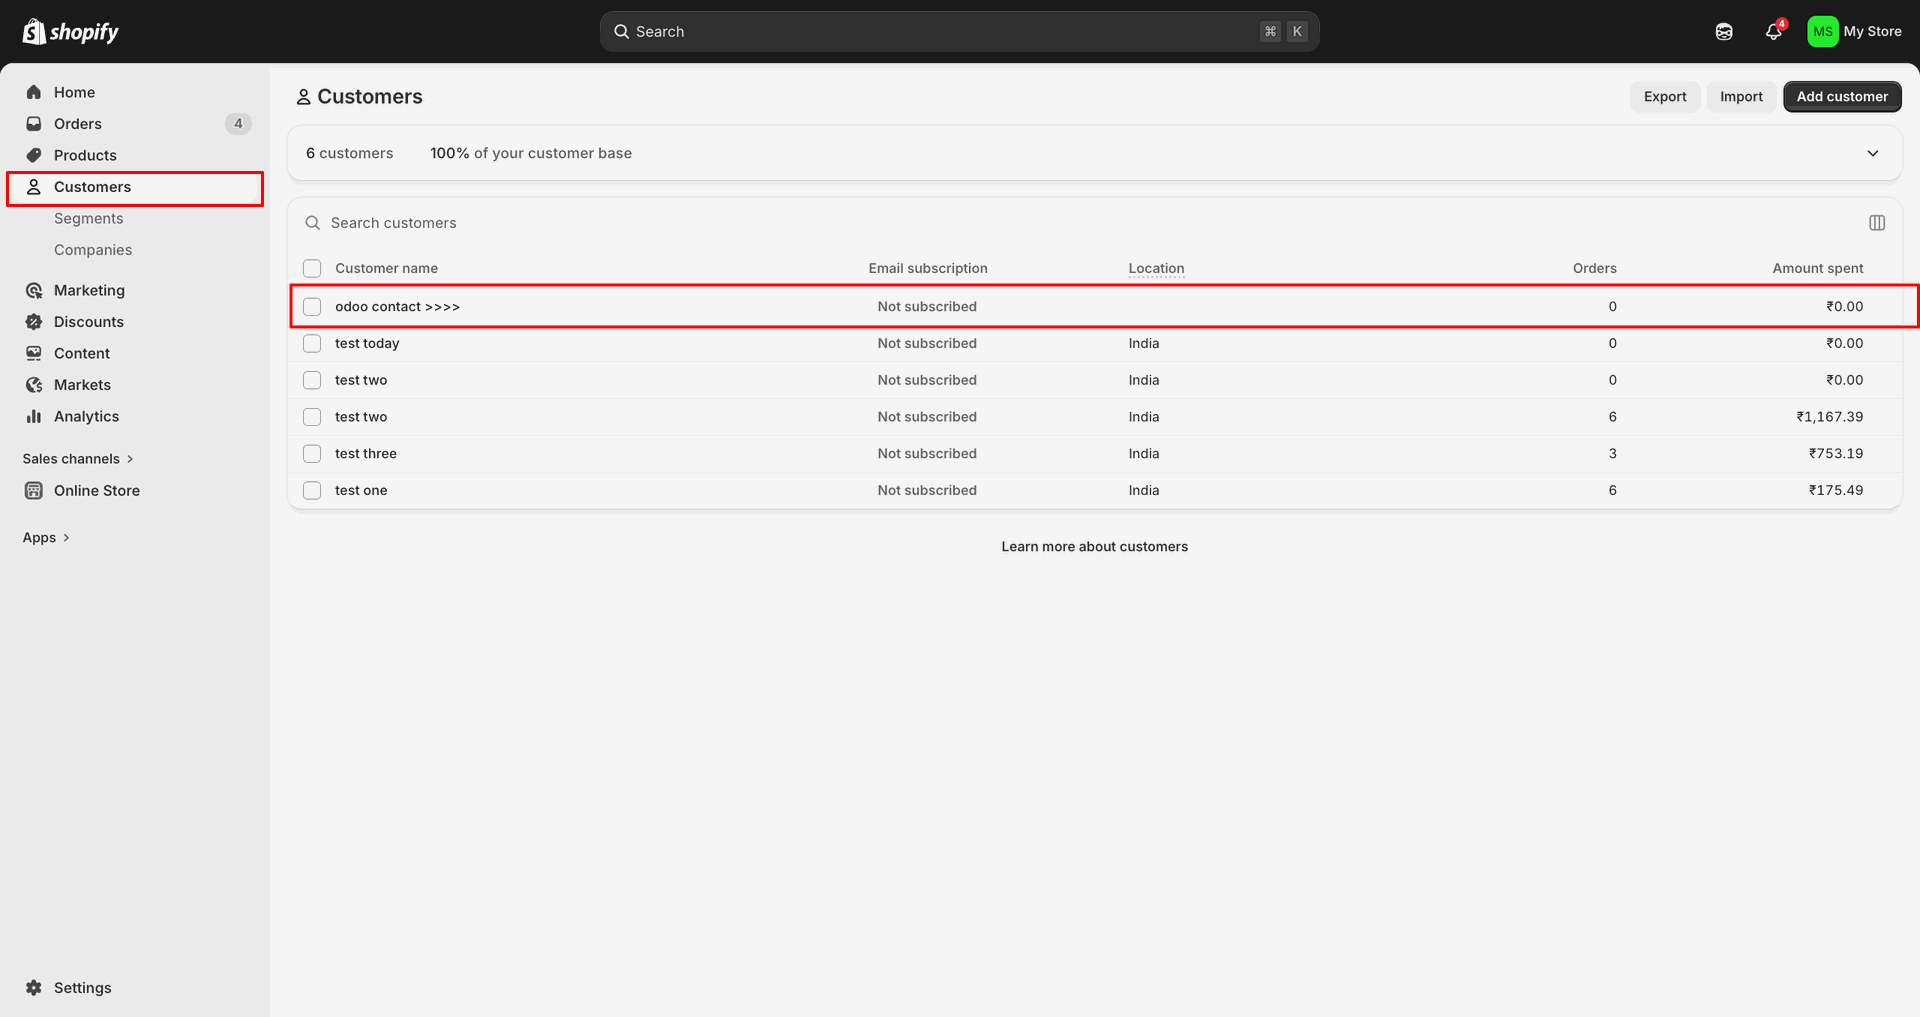
Verify the exported customer row appears in Shopify with the expected details.
Export Contacts interface screenshot
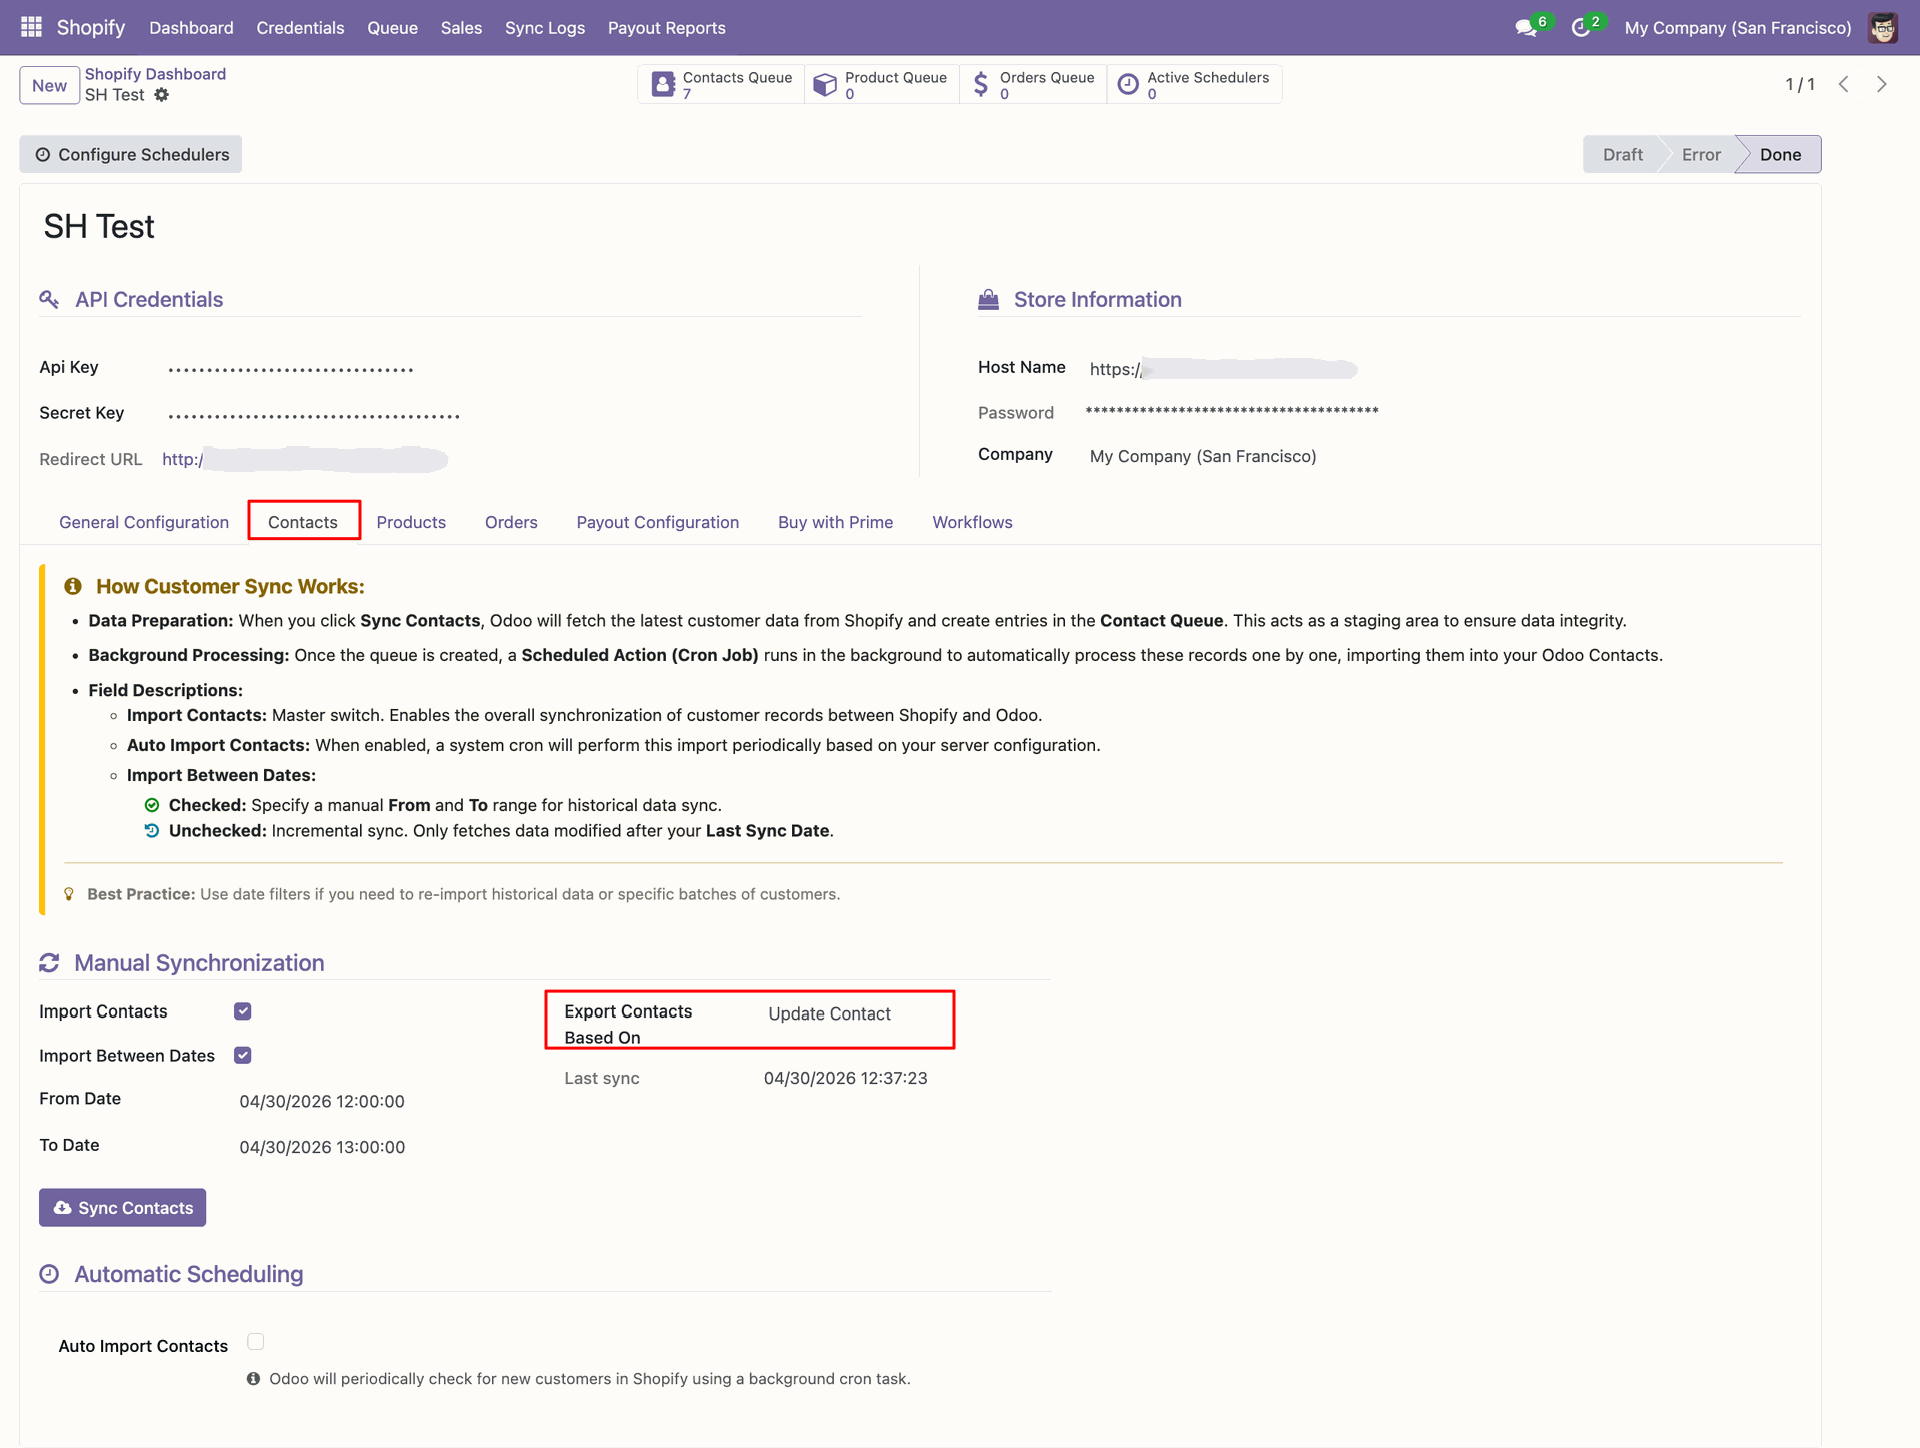
Set Export Contacts Based On to Update Contact before exporting customer changes.
Export Contacts interface screenshot
Update the Odoo contact name before exporting the revised customer information.
Export Contacts interface screenshot
Verify the updated customer row appears in Shopify after the contact export.
Export Contacts interface screenshot
Review Sync Logs to confirm the customer update was sent successfully.
Export Contacts interface screenshot

Import Orders

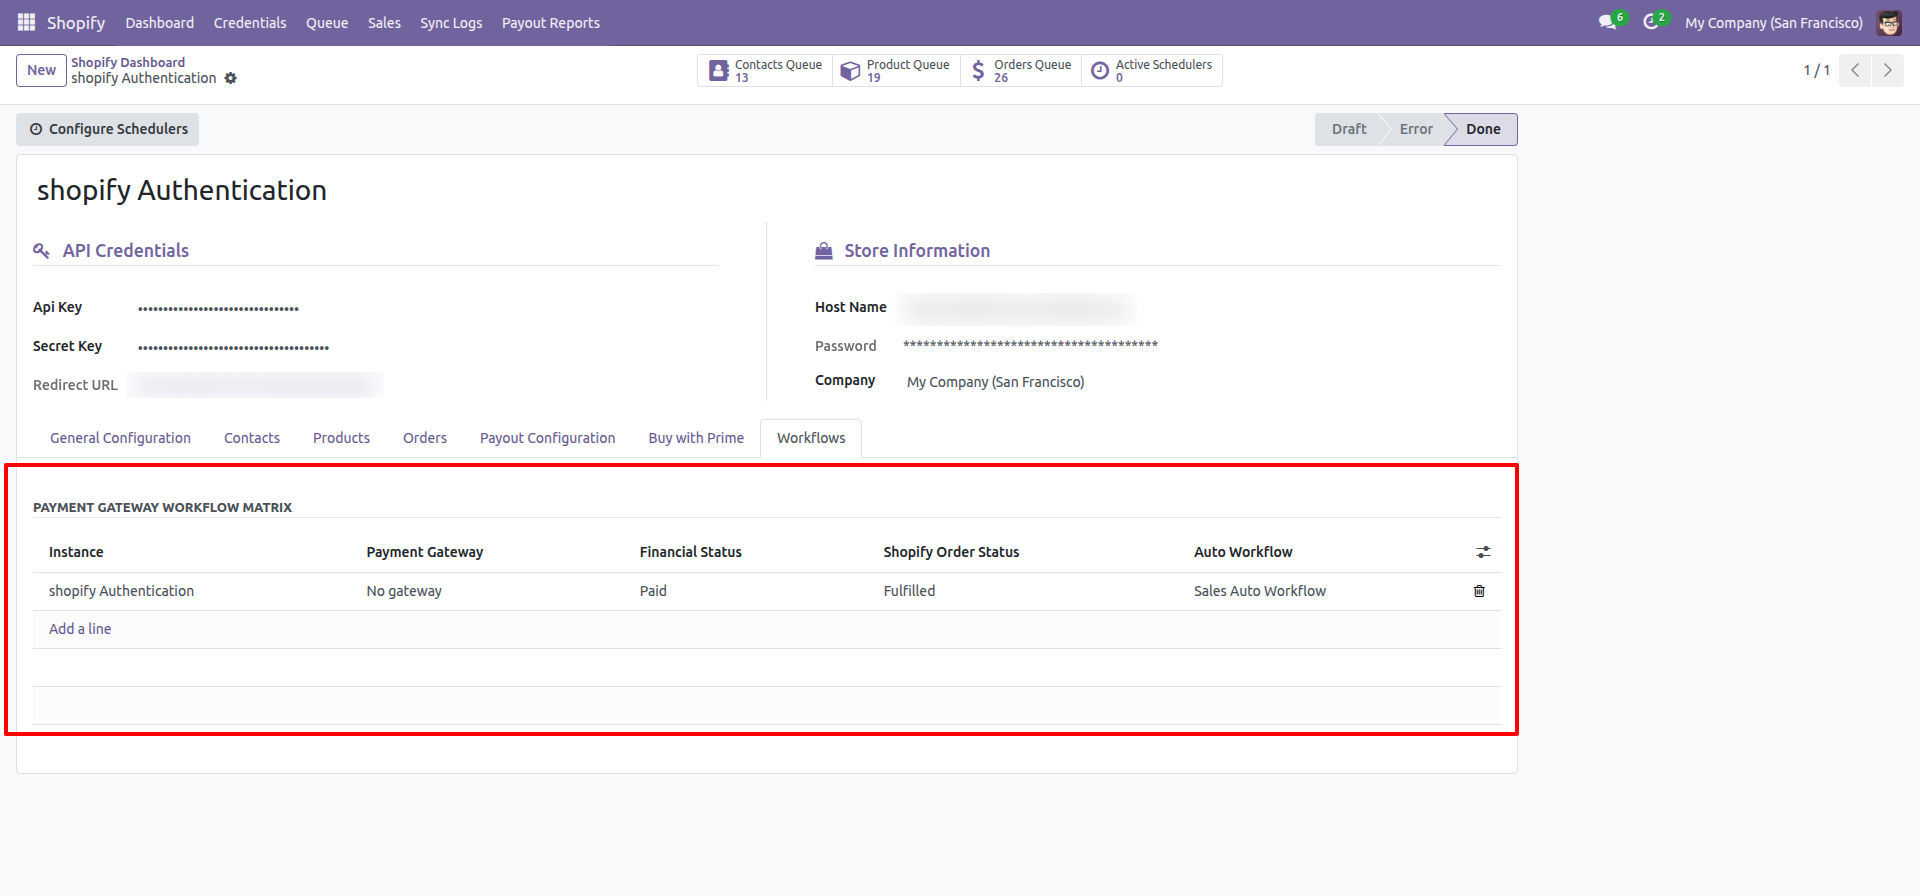
Review the Payment Gateway Workflow Matrix used to process imported Shopify orders.
Import Orders interface screenshot
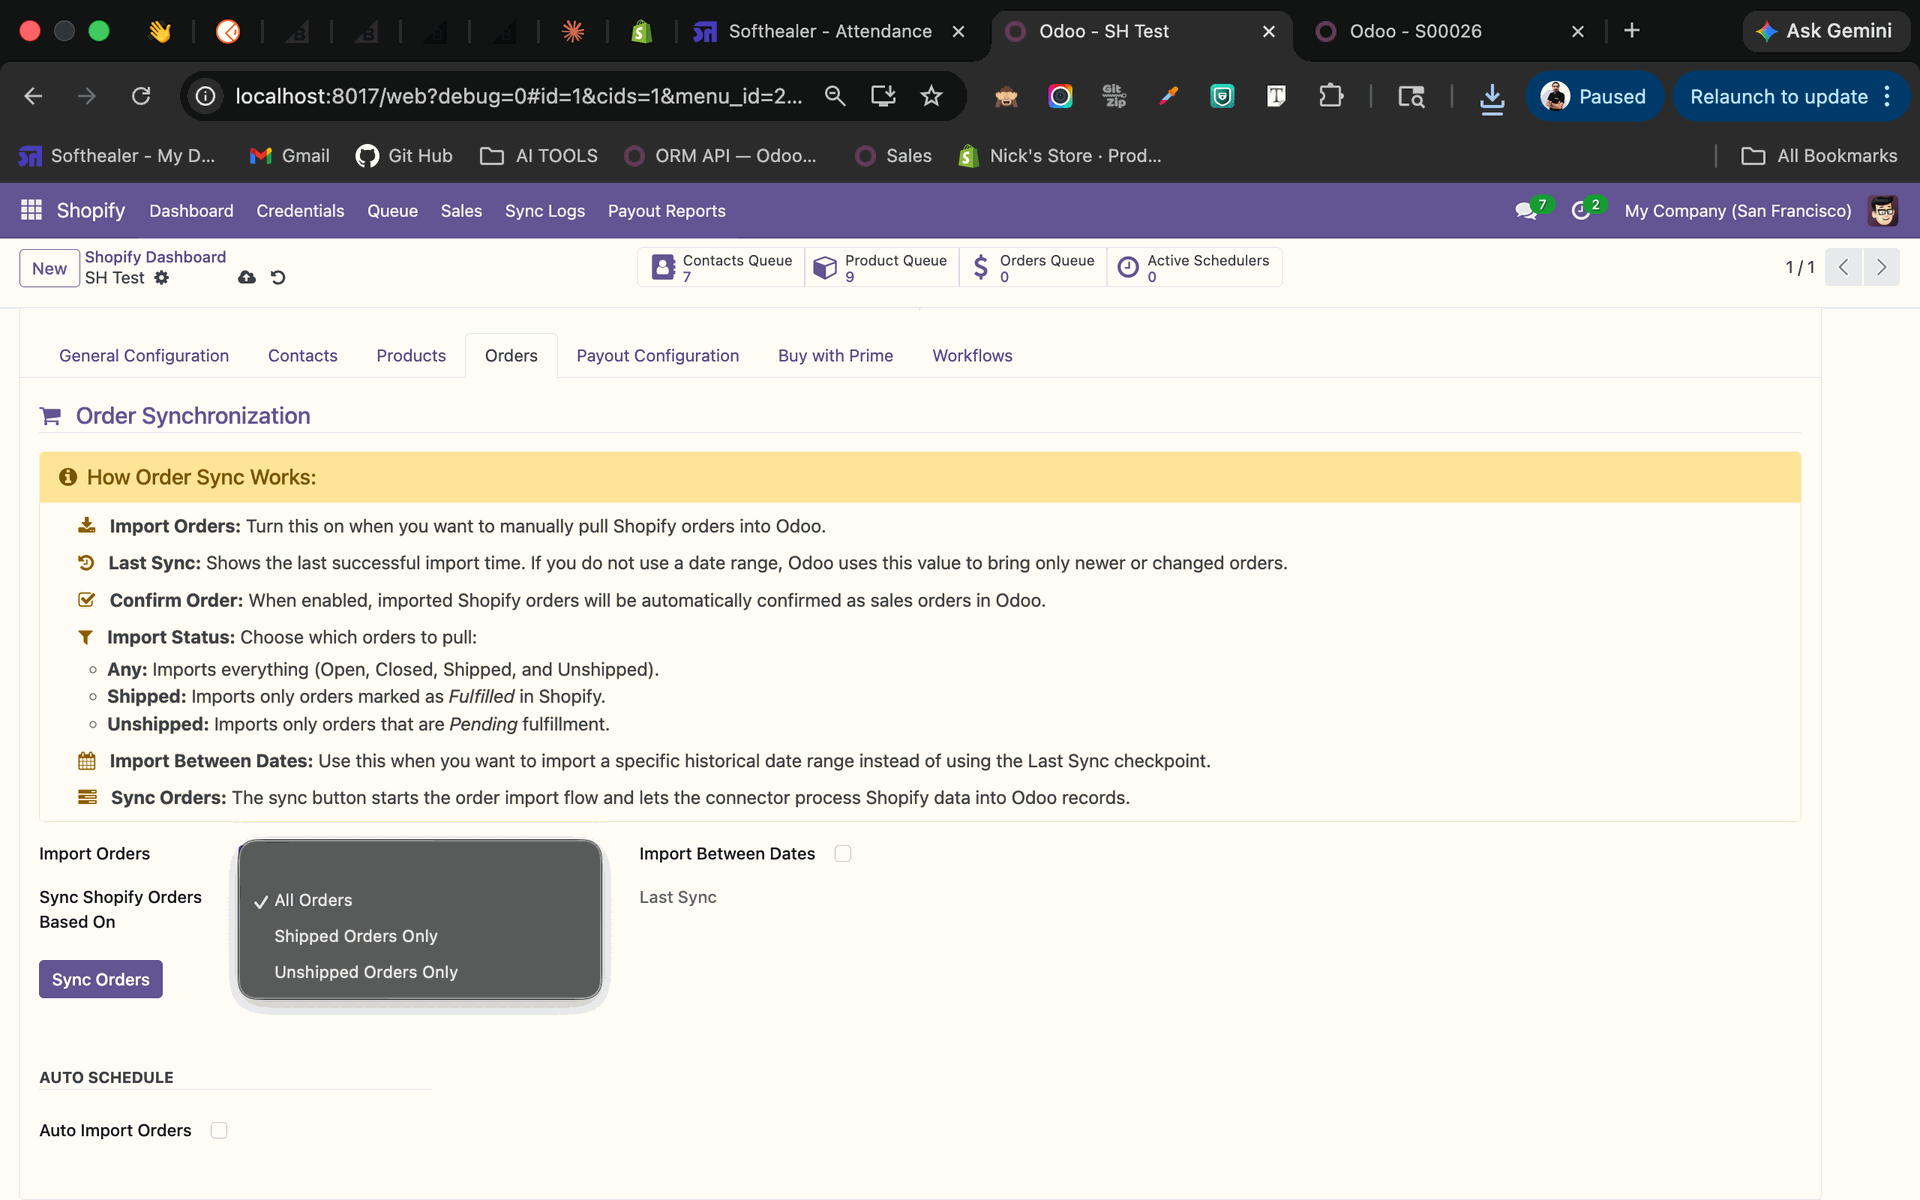
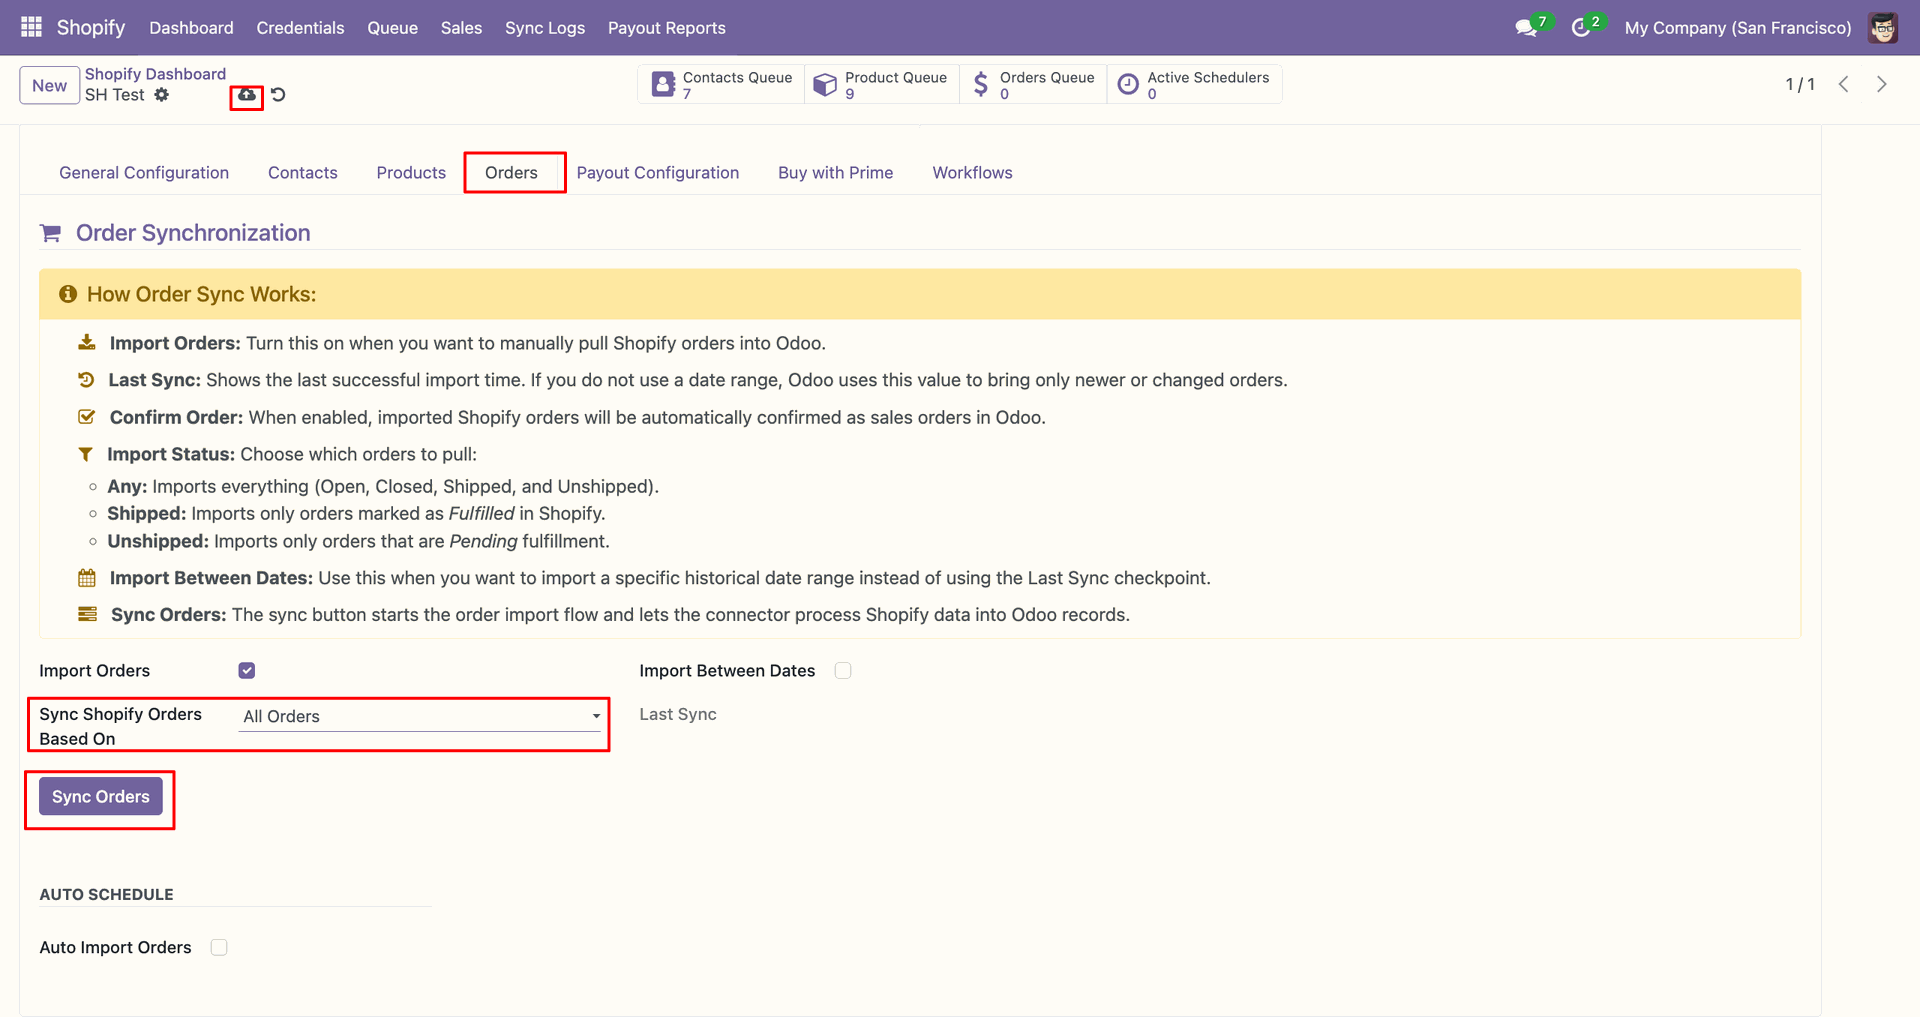
Choose which Shopify orders to fetch from the Sync Shopify Orders Based On list.
Import Orders interface screenshot
Select All Orders and click Sync Orders to fetch Shopify orders manually.
Import Orders interface screenshot
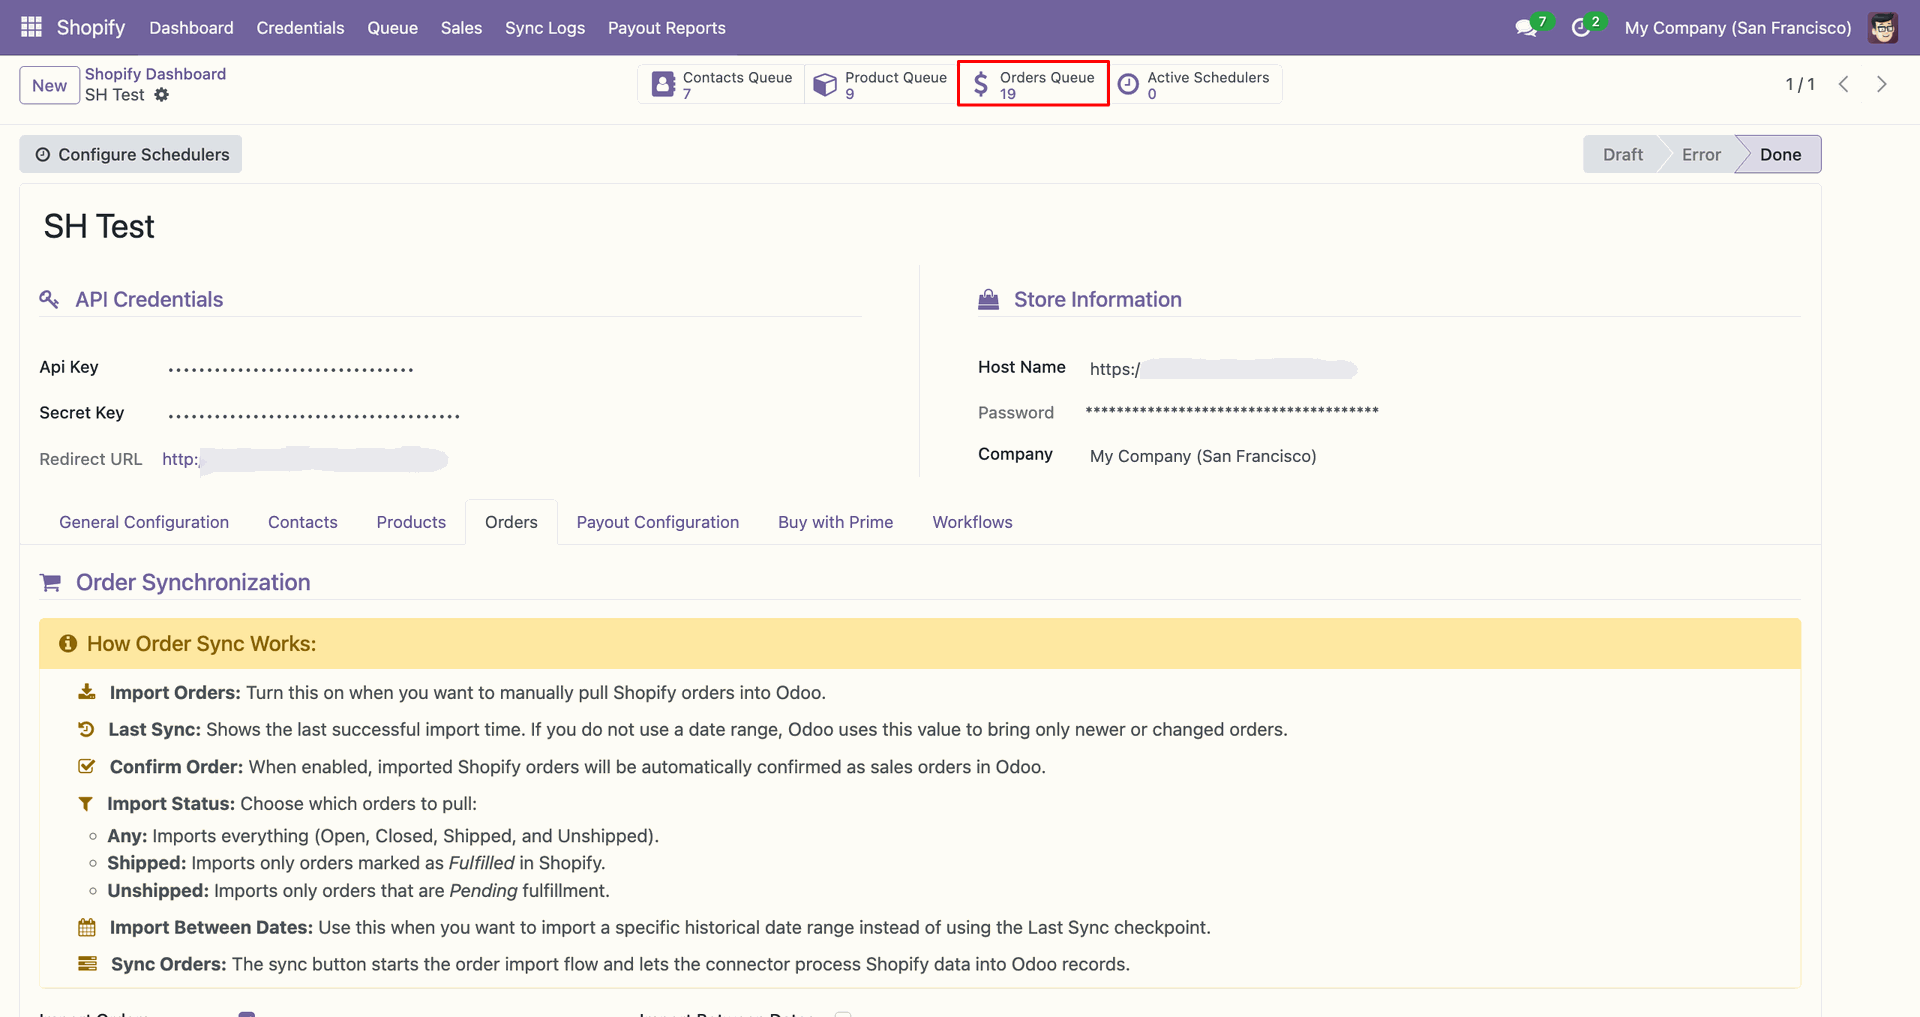
Use the Orders Queue shortcut to review staged order records after synchronization.
Import Orders interface screenshot
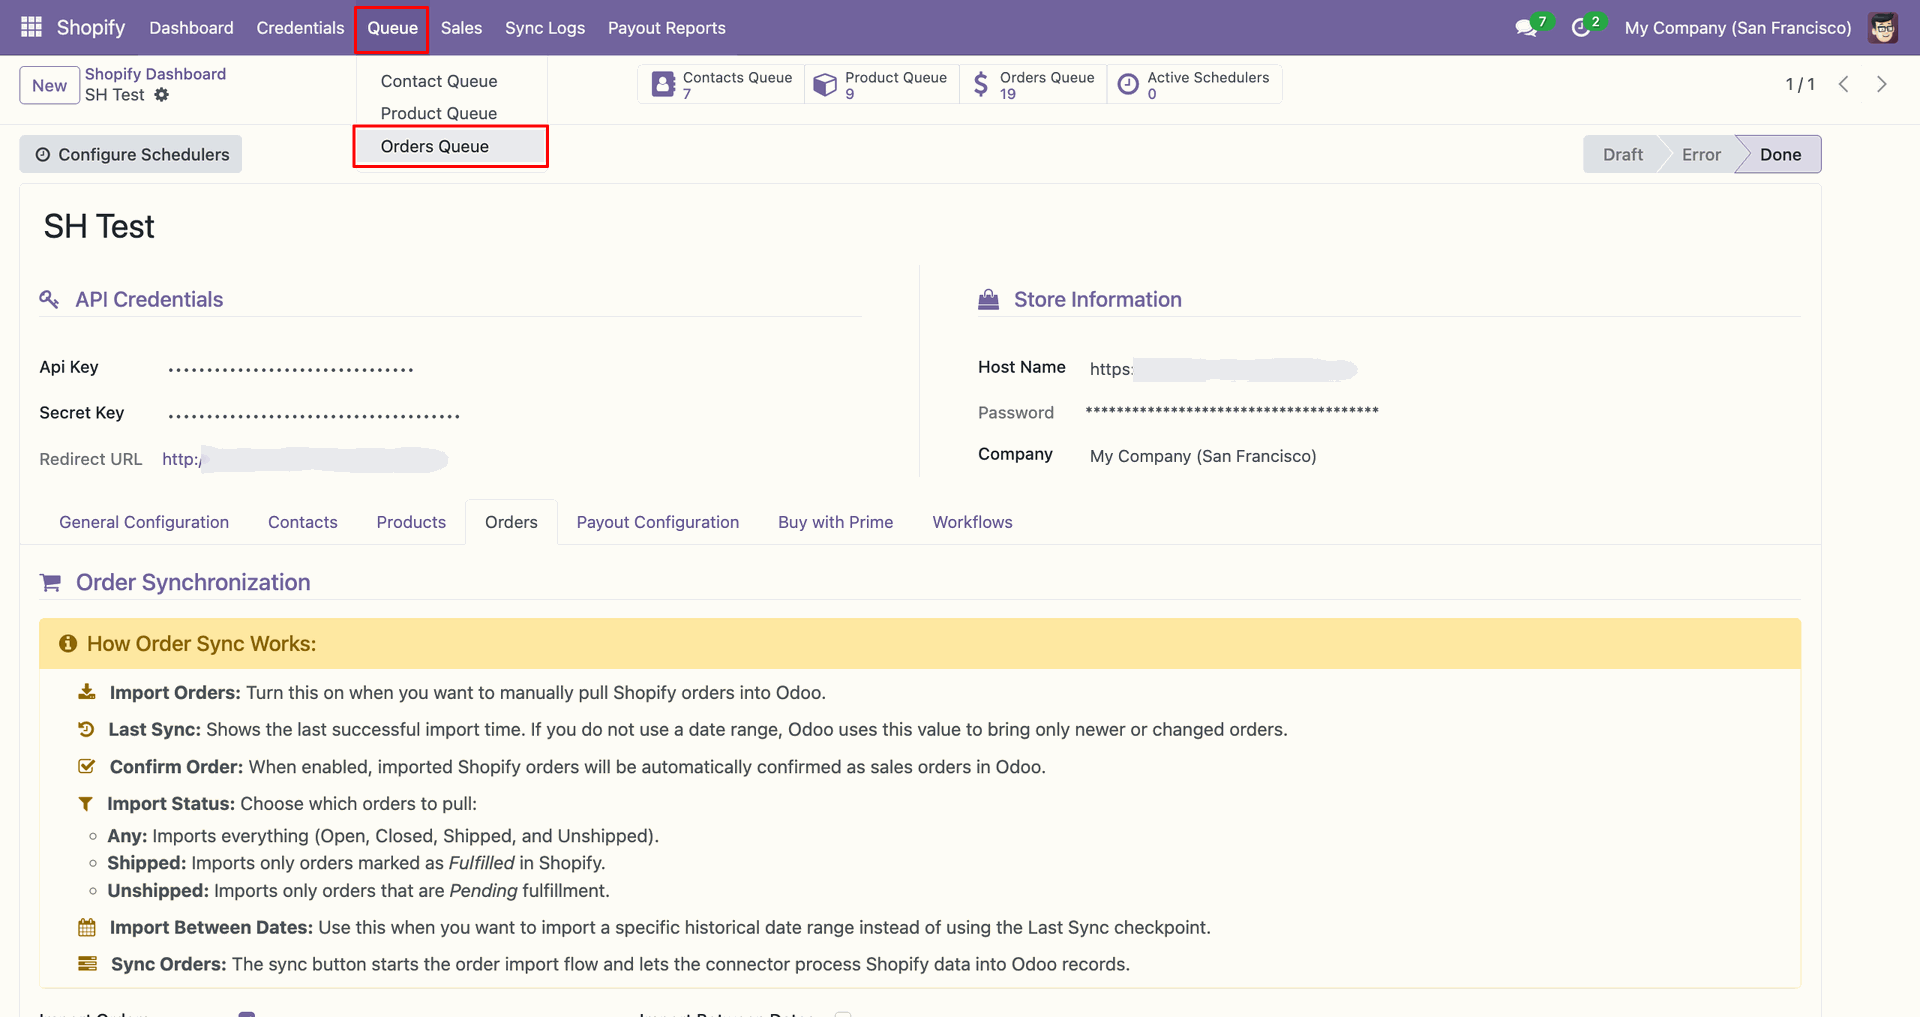
Open Orders Queue from the Queue menu to inspect imported order entries.
Import Orders interface screenshot
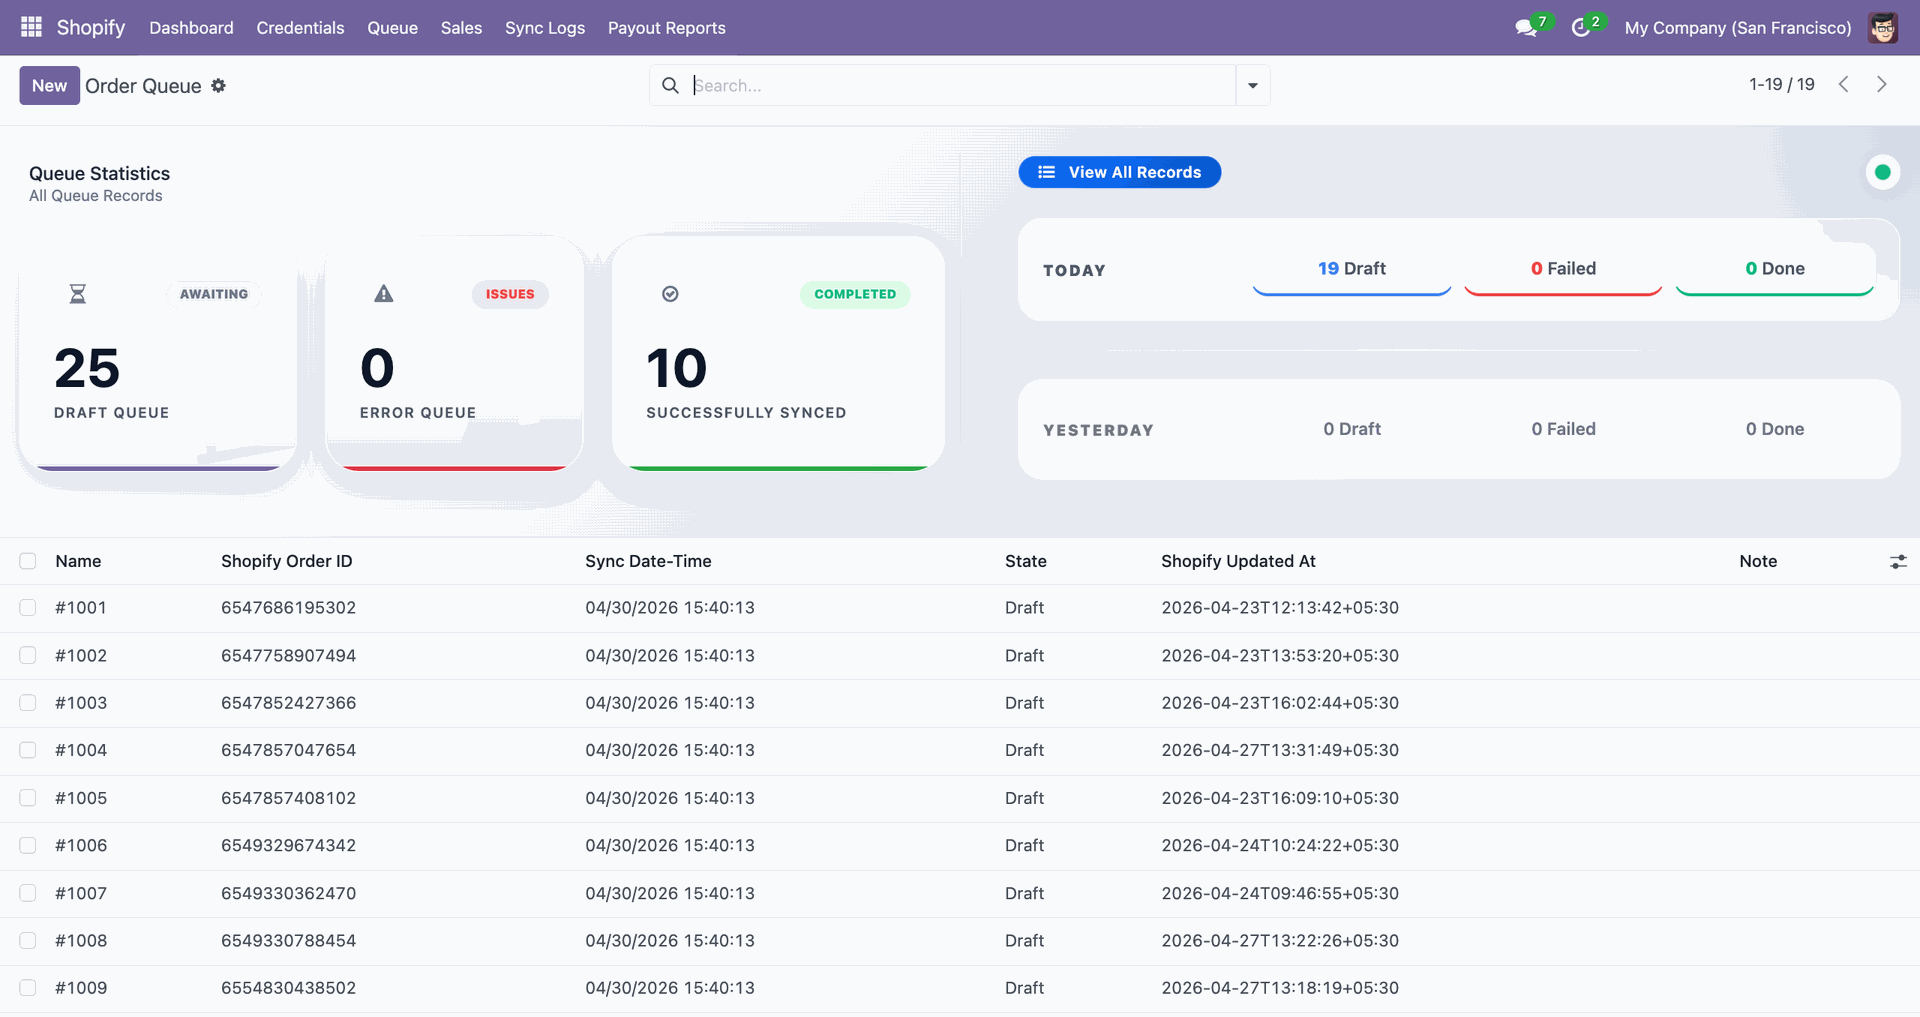
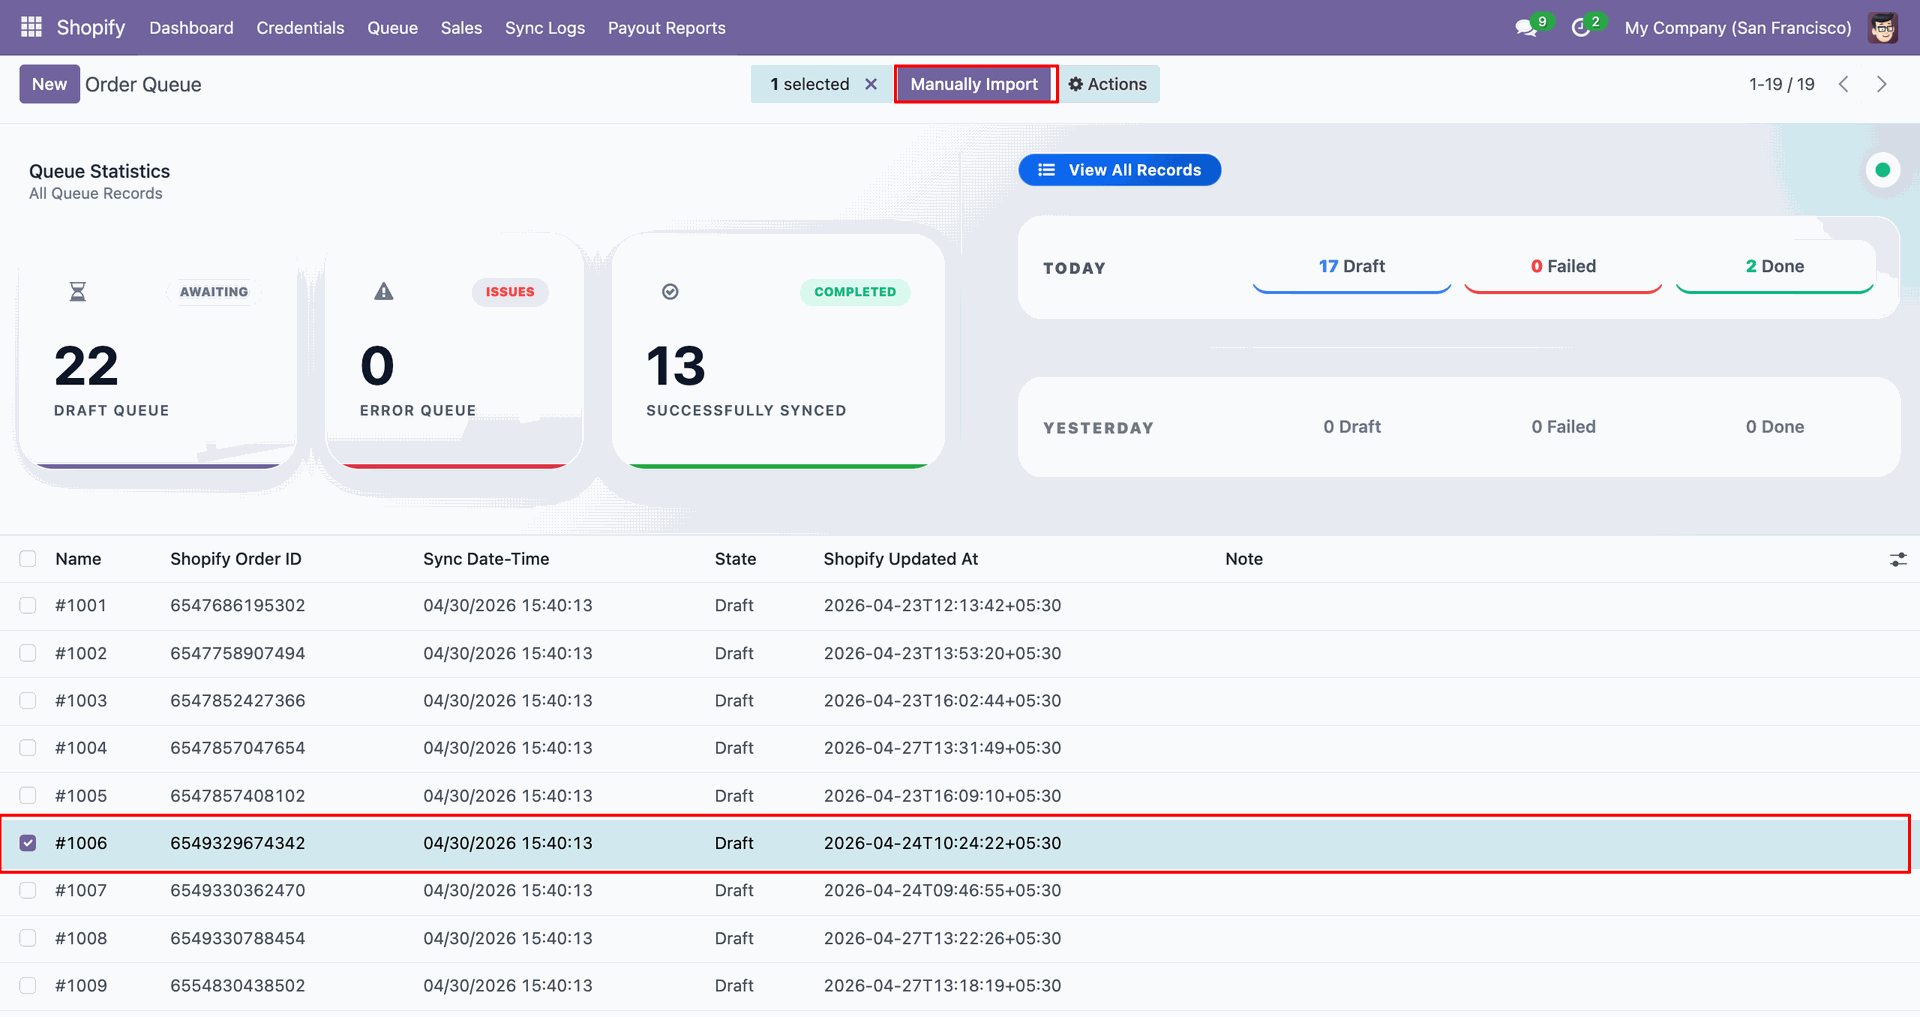
The Order Queue dashboard displays draft, completed, and failed order synchronization counts.
Import Orders interface screenshot
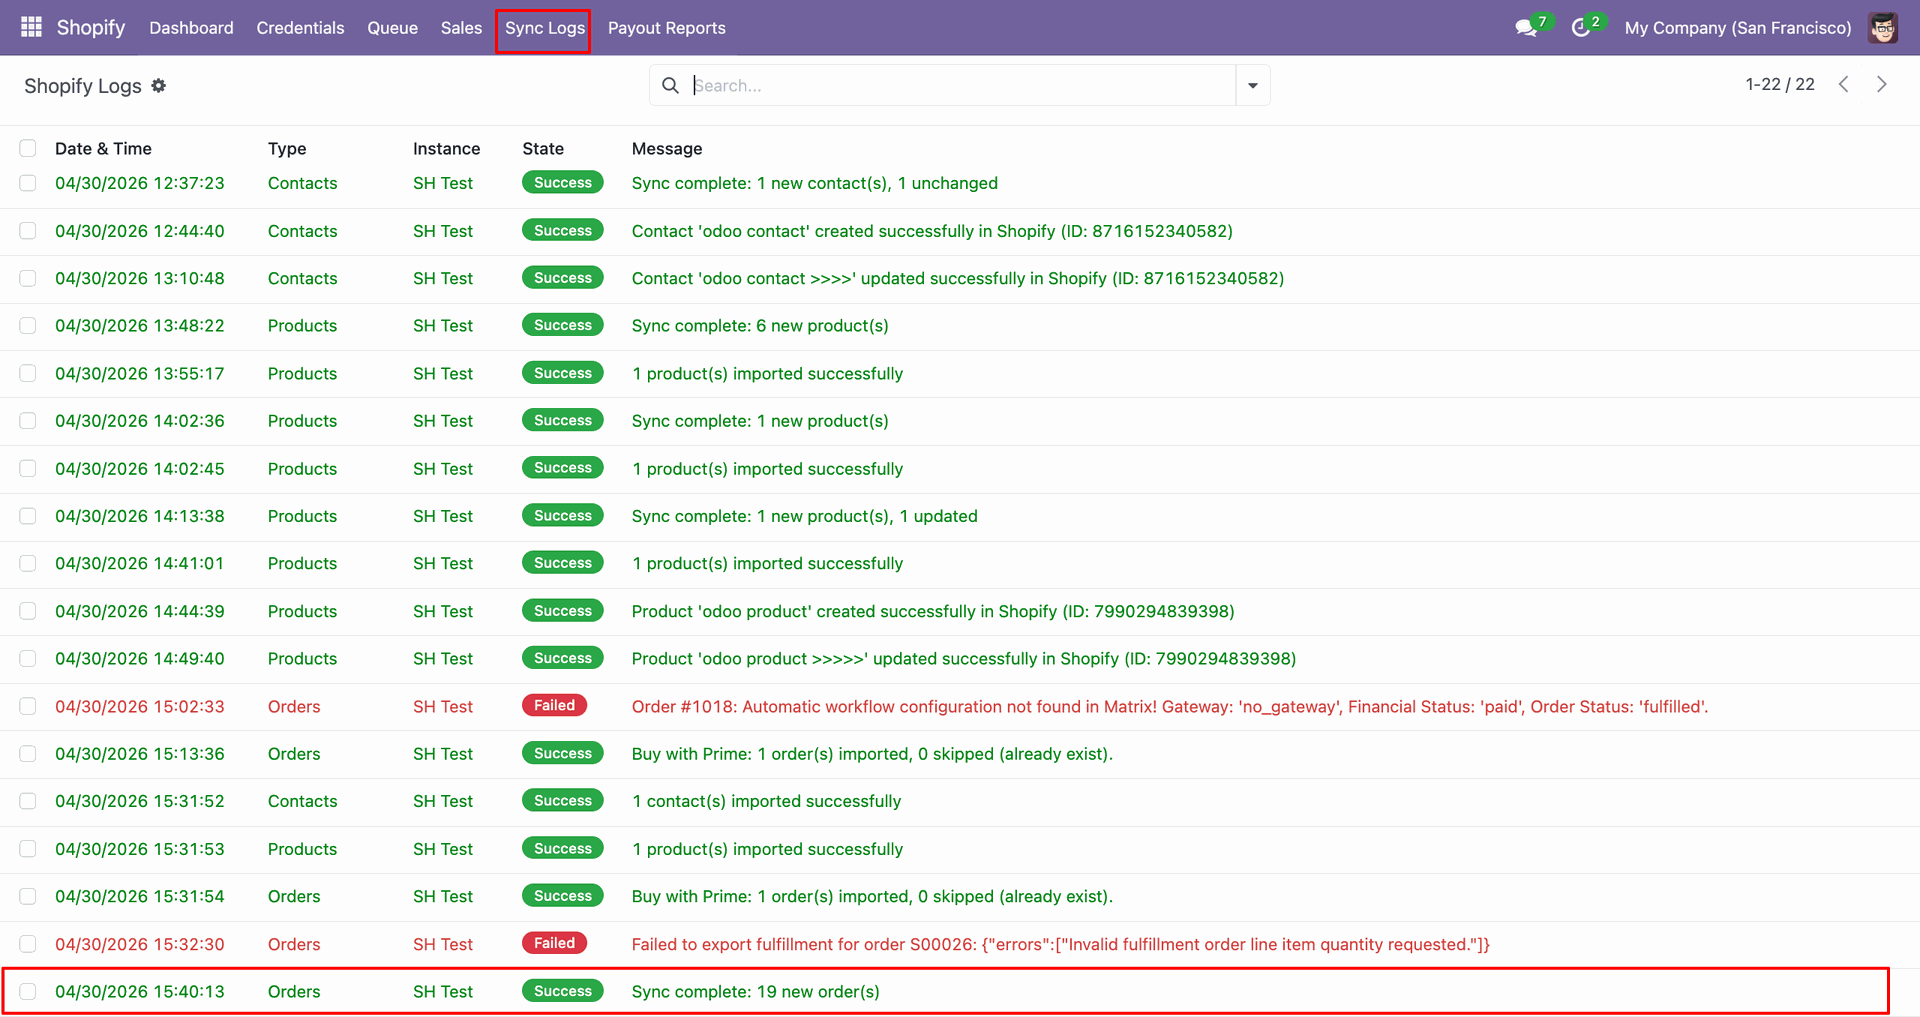
Check Sync Logs to confirm the order fetch completed with new records.
Import Orders interface screenshot
Select the queued order line and click Manually Import to process it.
Import Orders interface screenshot
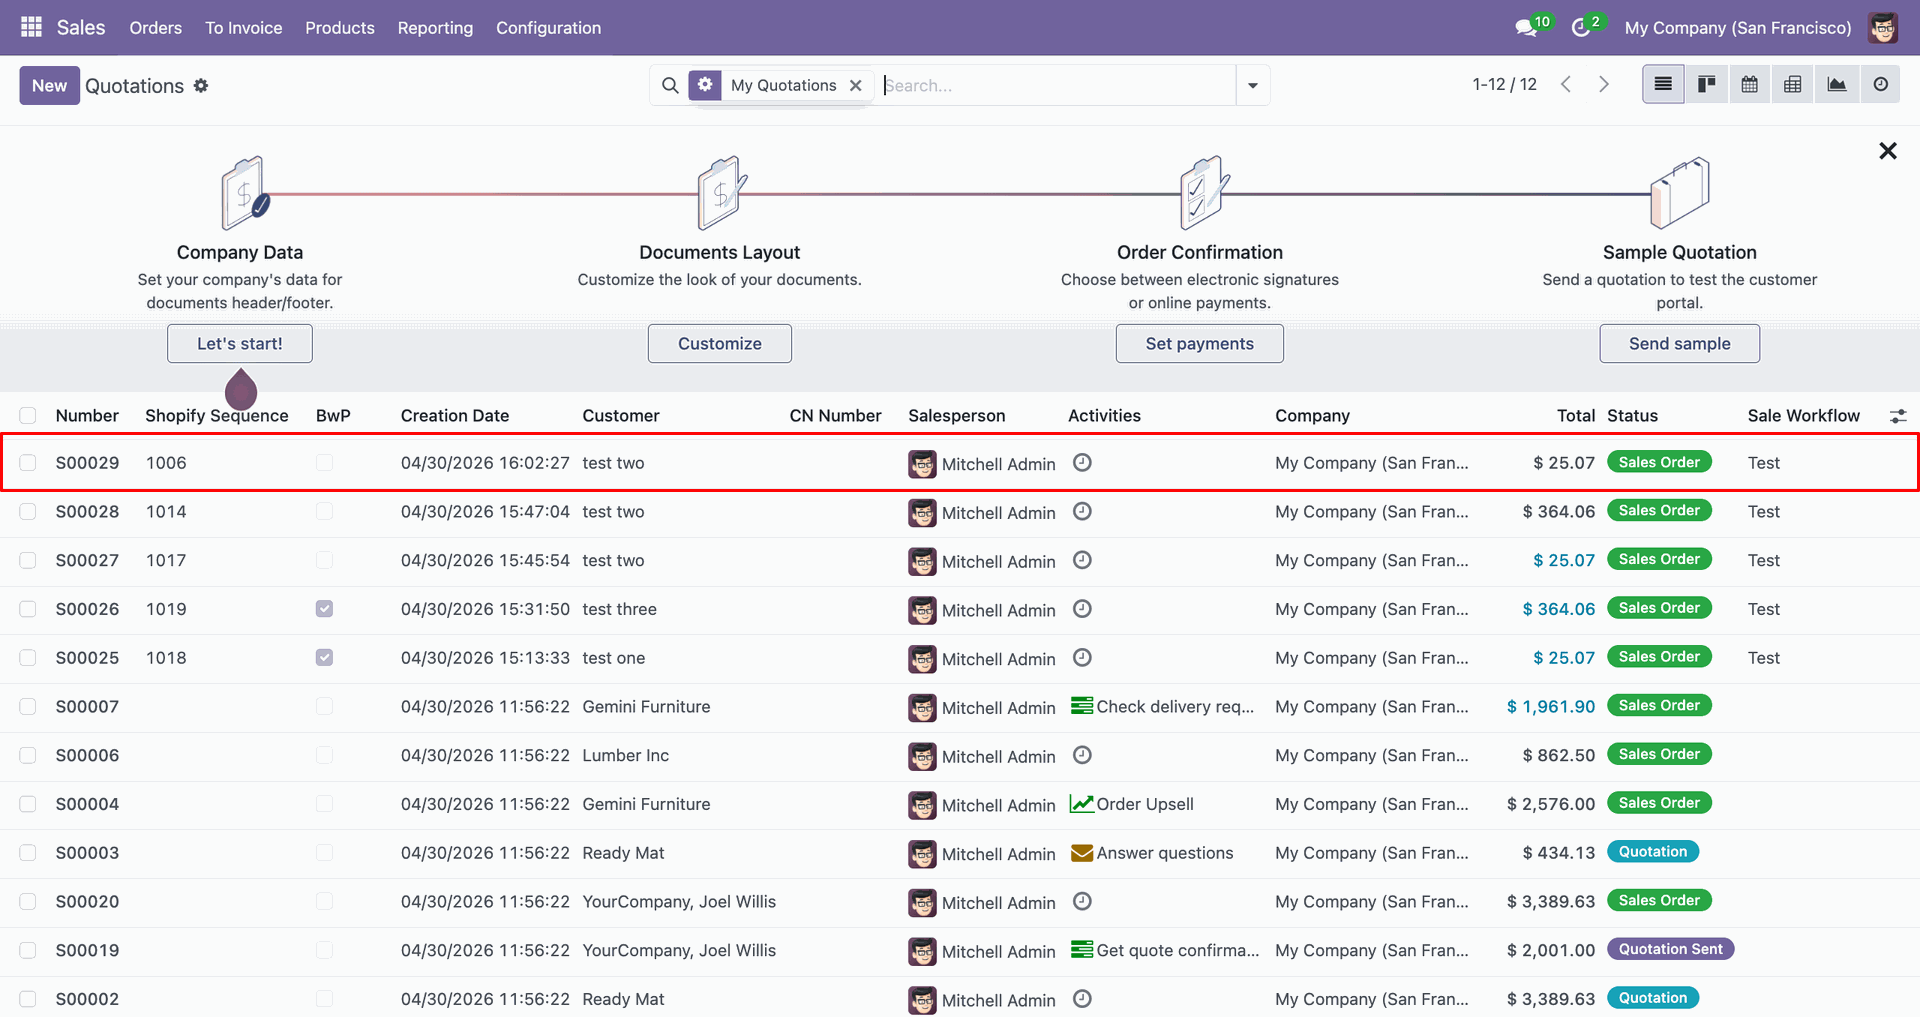
Review the imported sales order row in Odoo after queue processing completes.
Import Orders interface screenshot
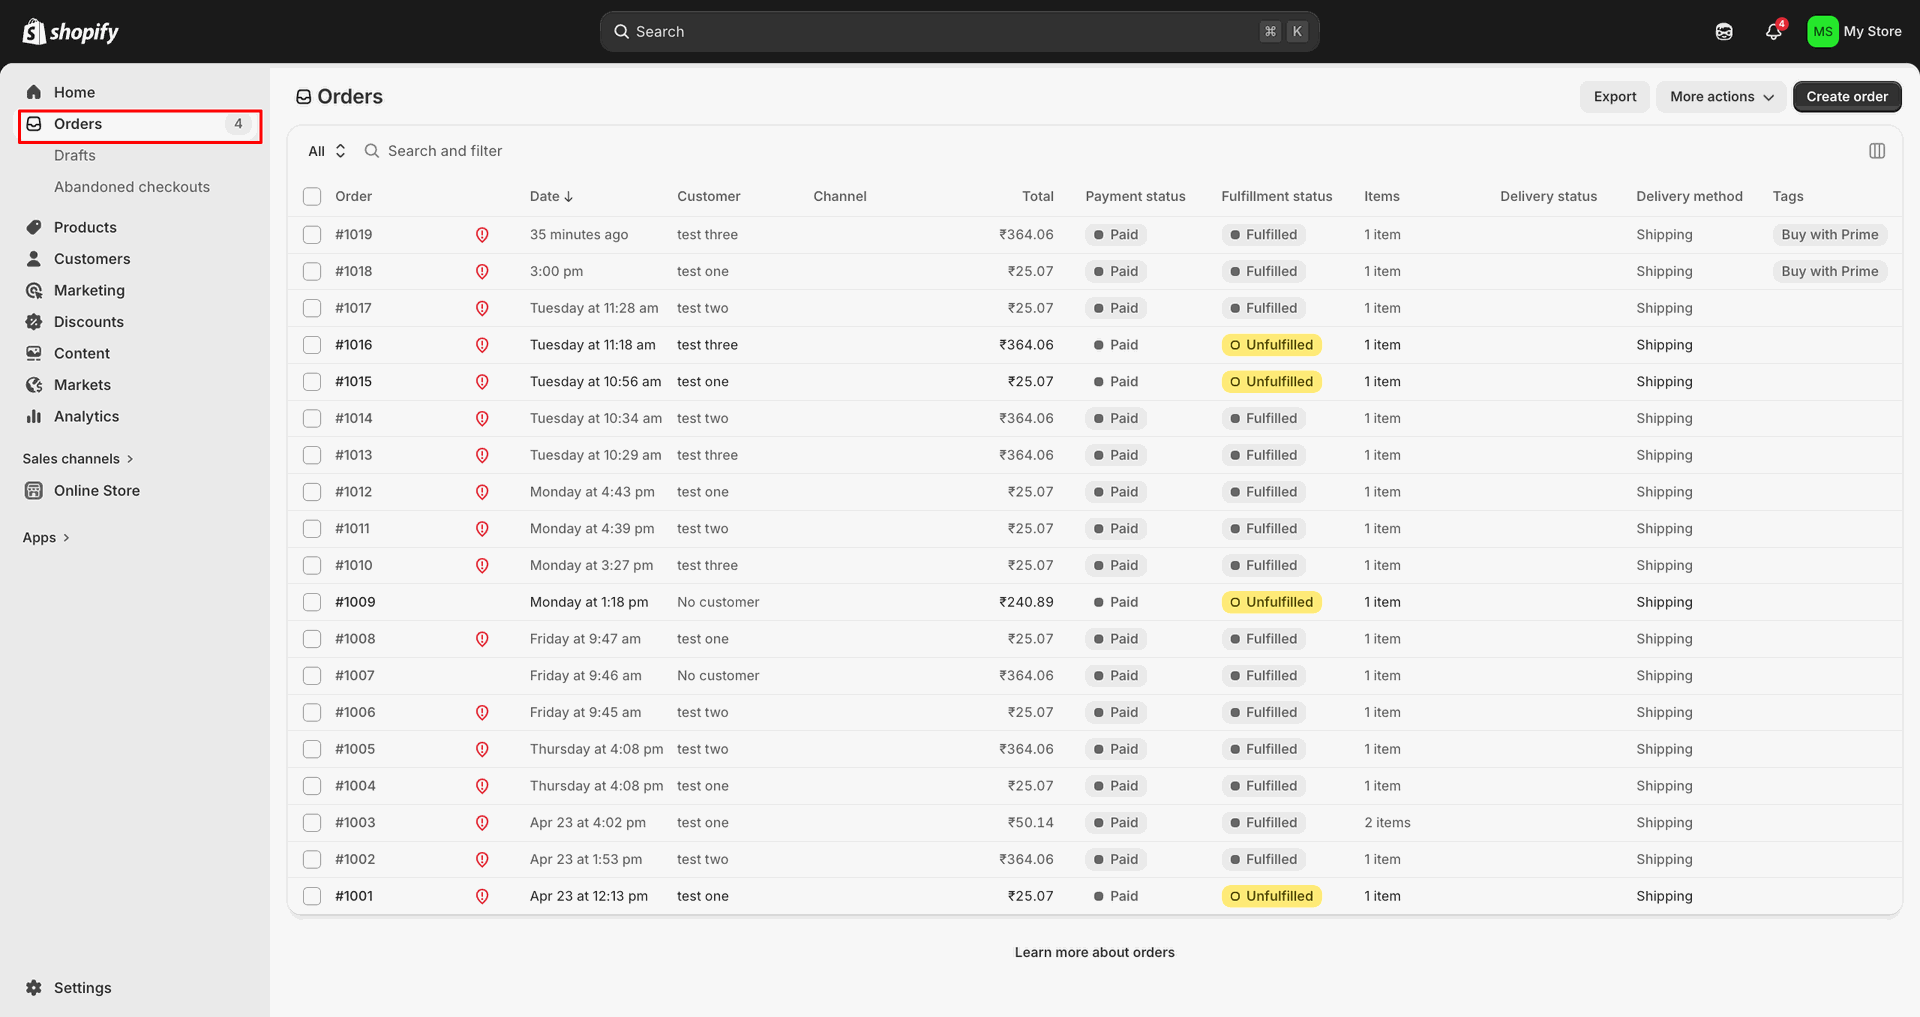
Open Orders in Shopify Admin to compare the source order records.
Import Orders interface screenshot

Webhook Automation

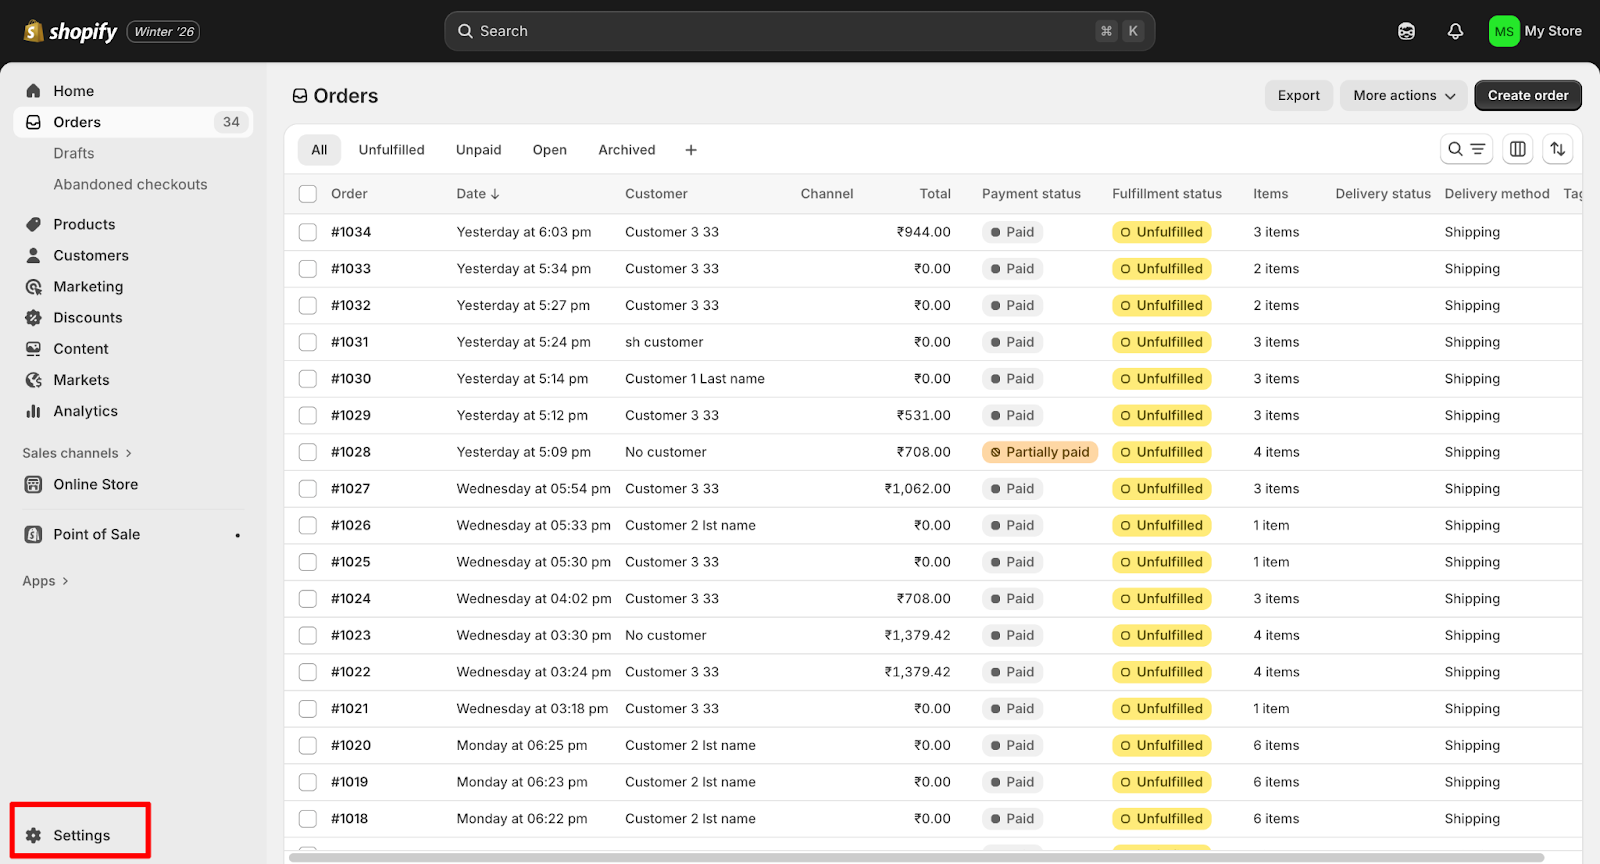
Open Settings in Shopify Admin to access webhook and notification options.
Webhook Automation interface screenshot
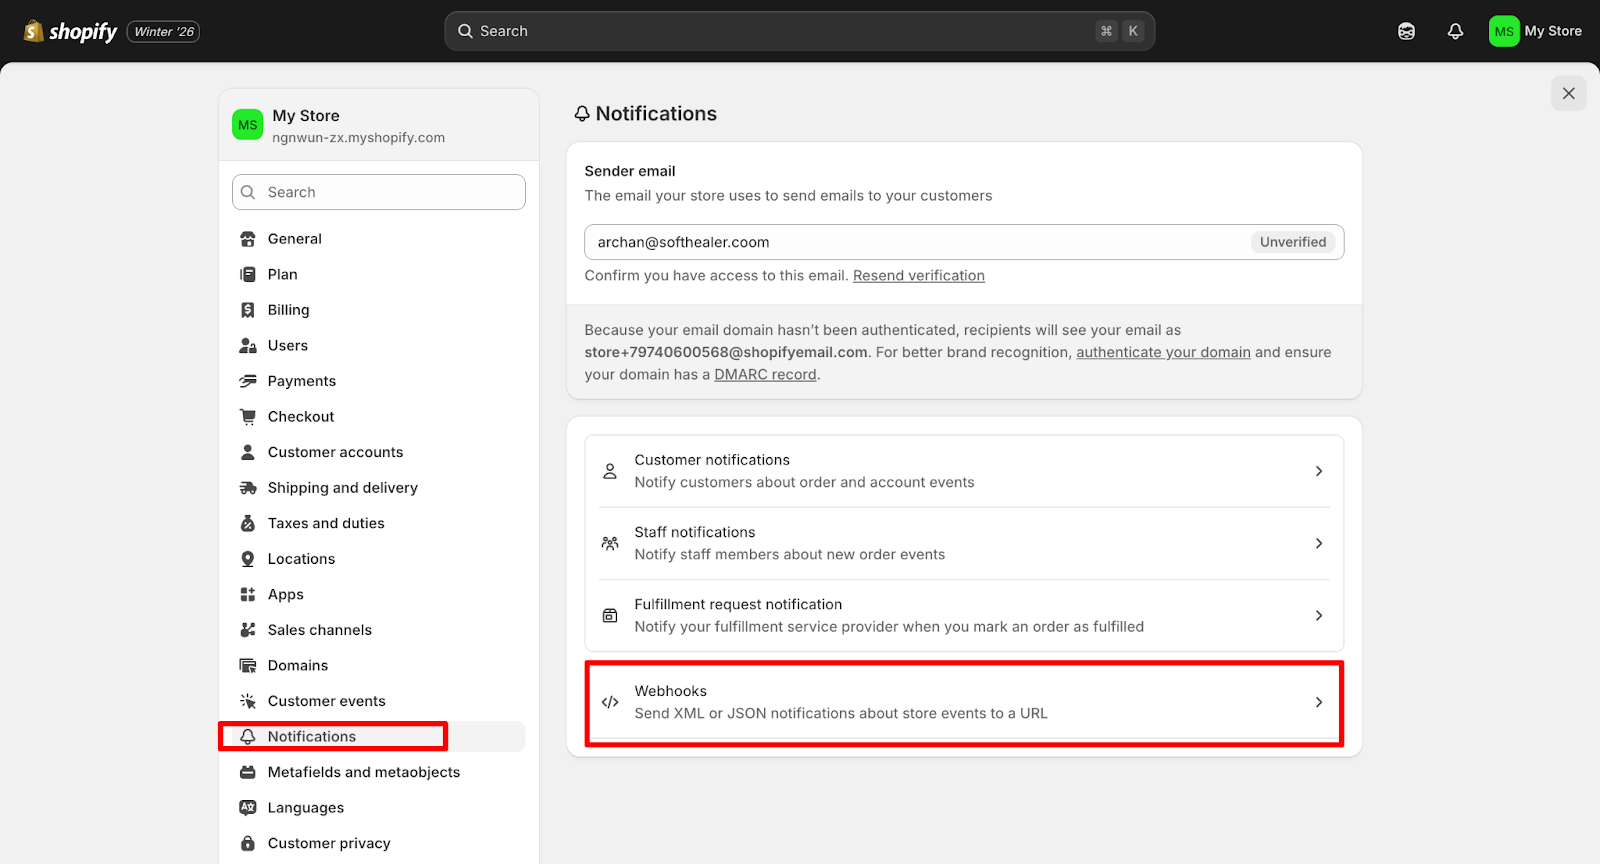
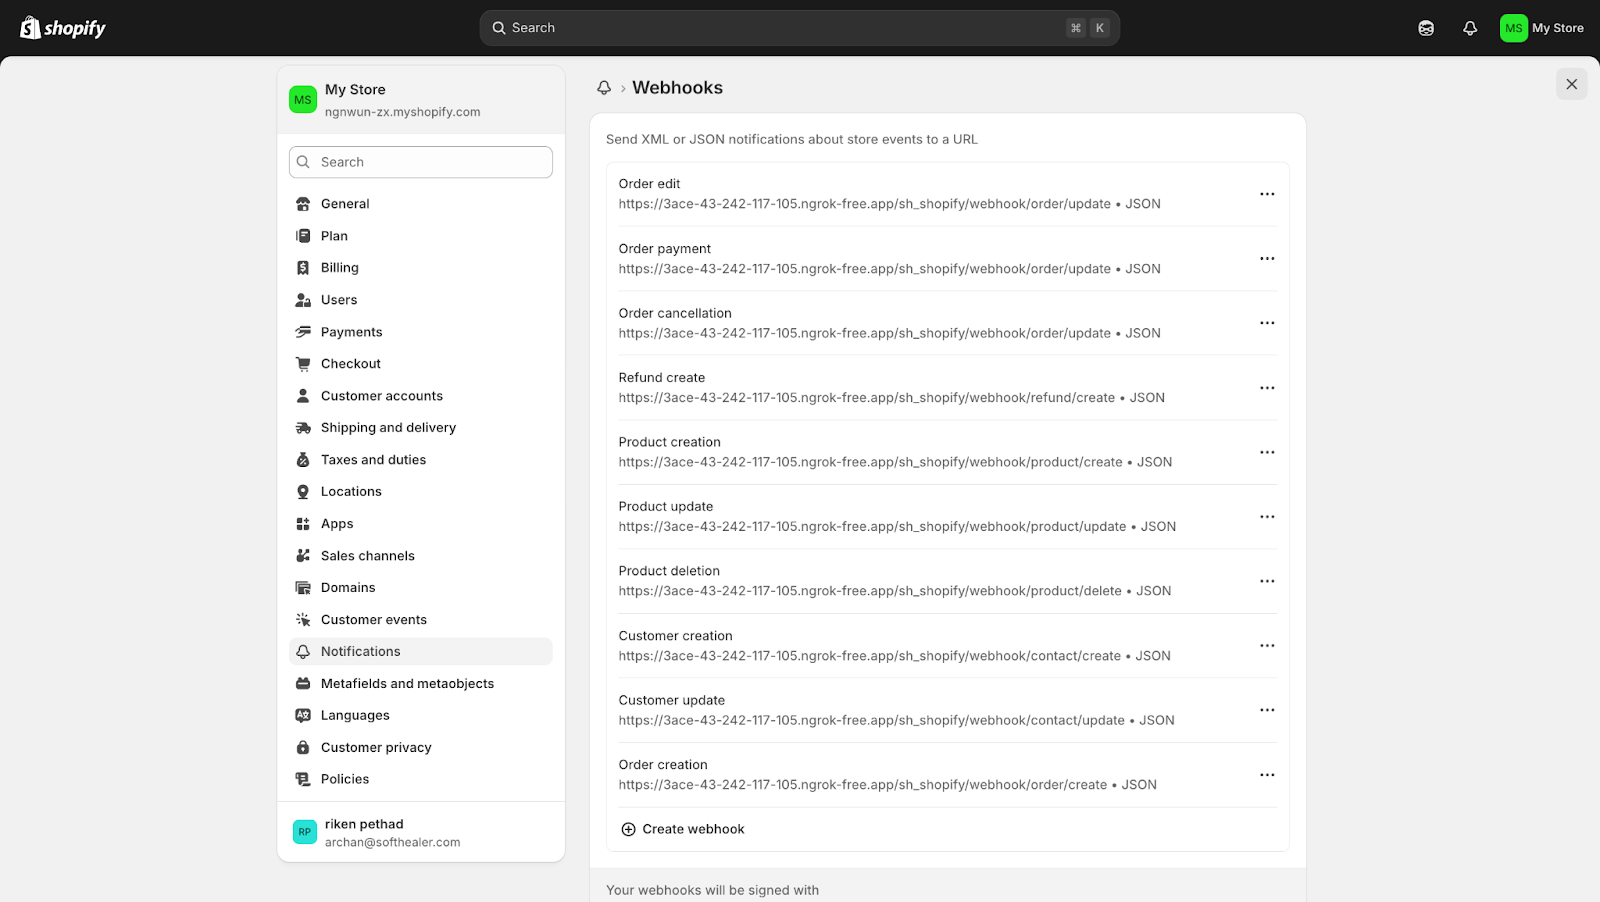
Open Notifications and select Webhooks to manage store event subscriptions.
Webhook Automation interface screenshot
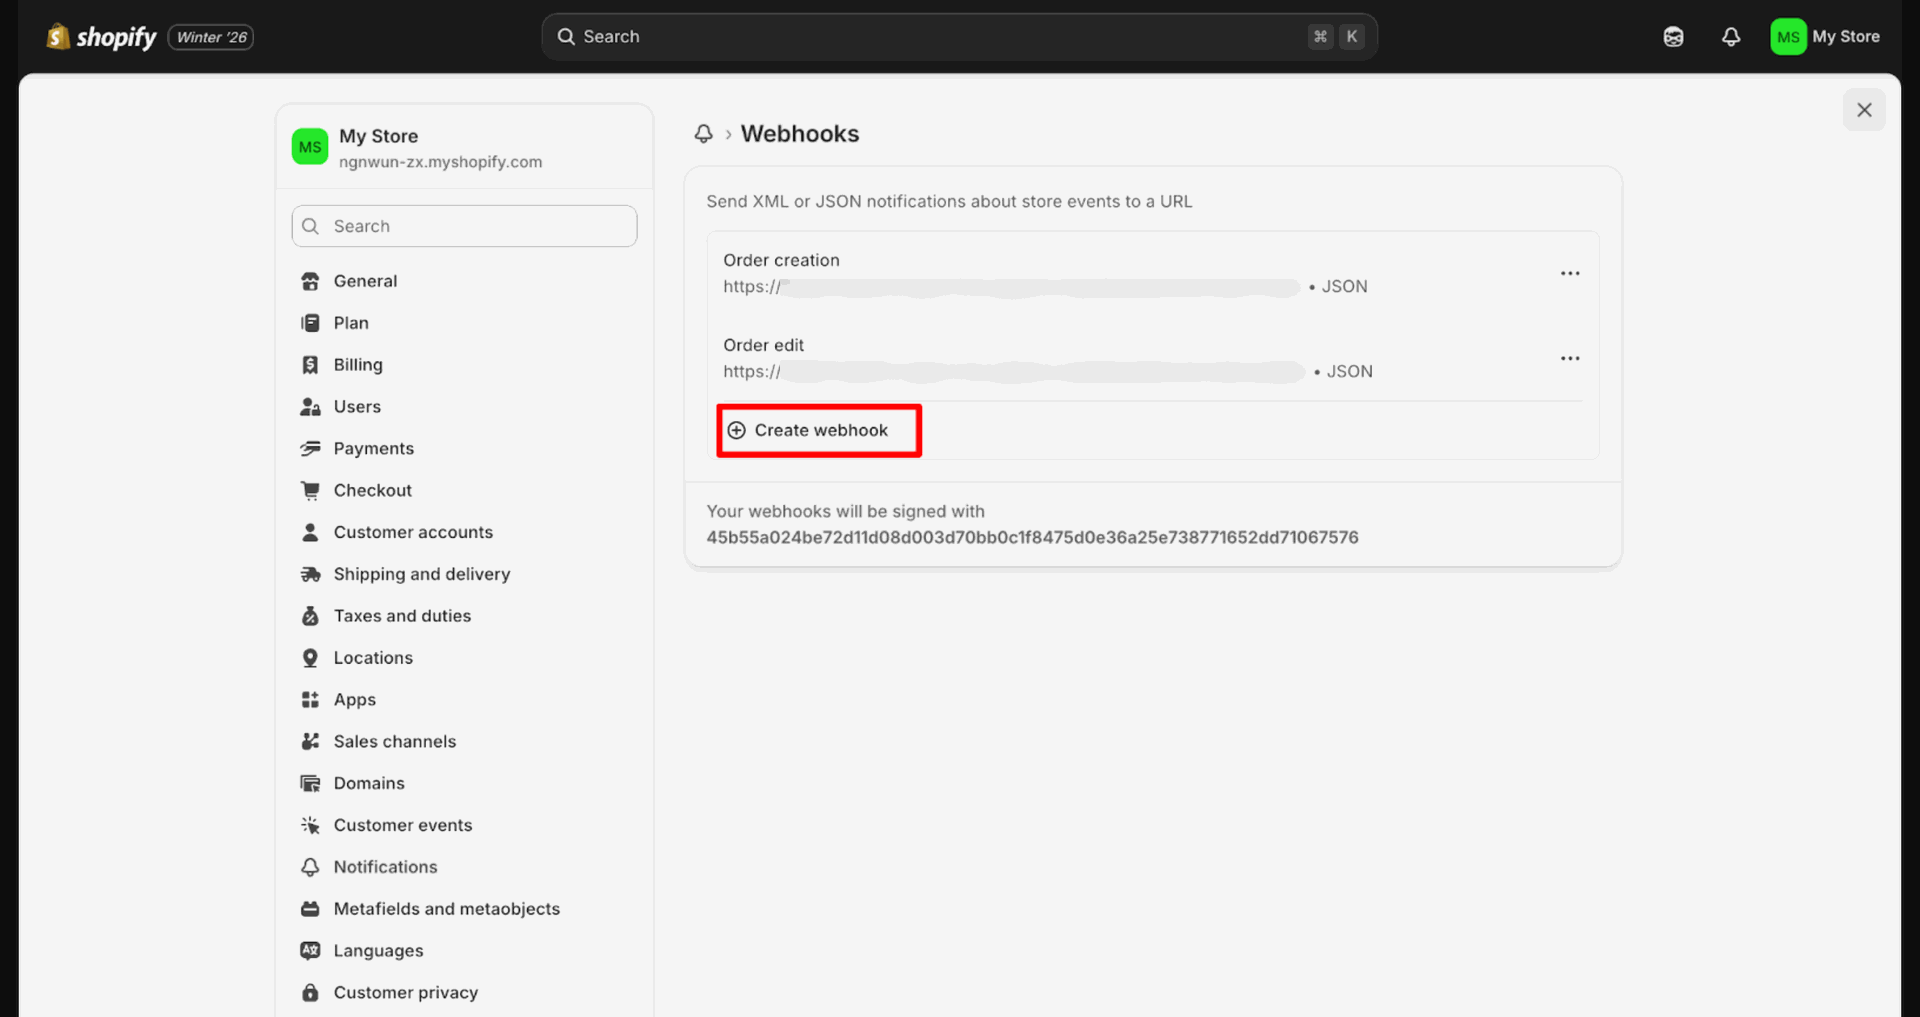
Click Create webhook to add a new event subscription endpoint.
Webhook Automation interface screenshot
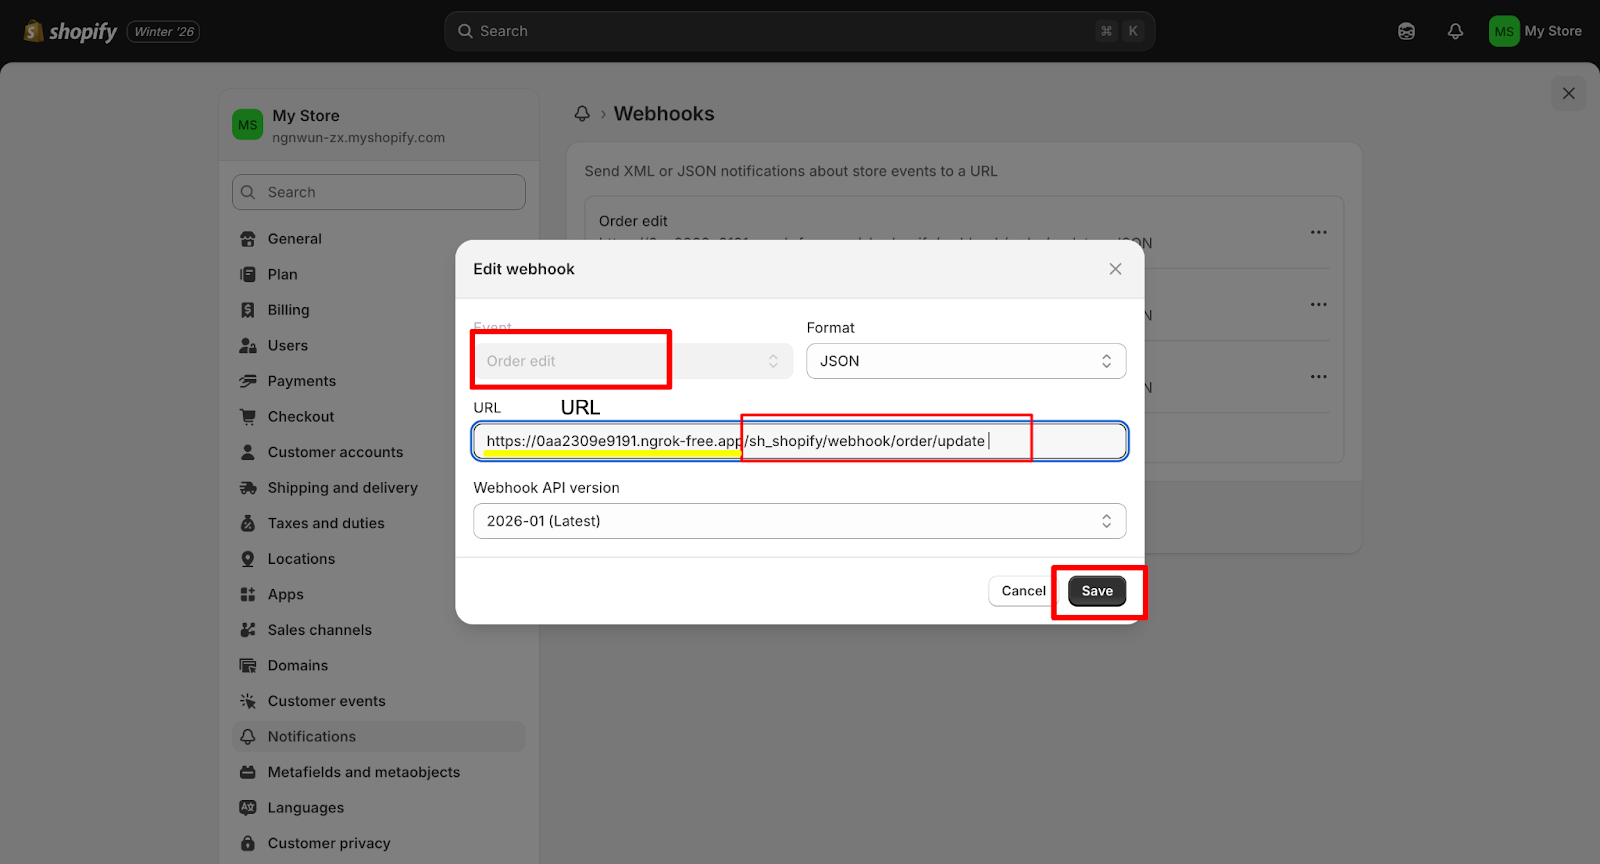
Select the event, enter the webhook URL, and click Save.
Webhook Automation interface screenshot
Review the Webhooks list to confirm each event URL is configured.
Webhook Automation interface screenshot

Auto Sale Workflow

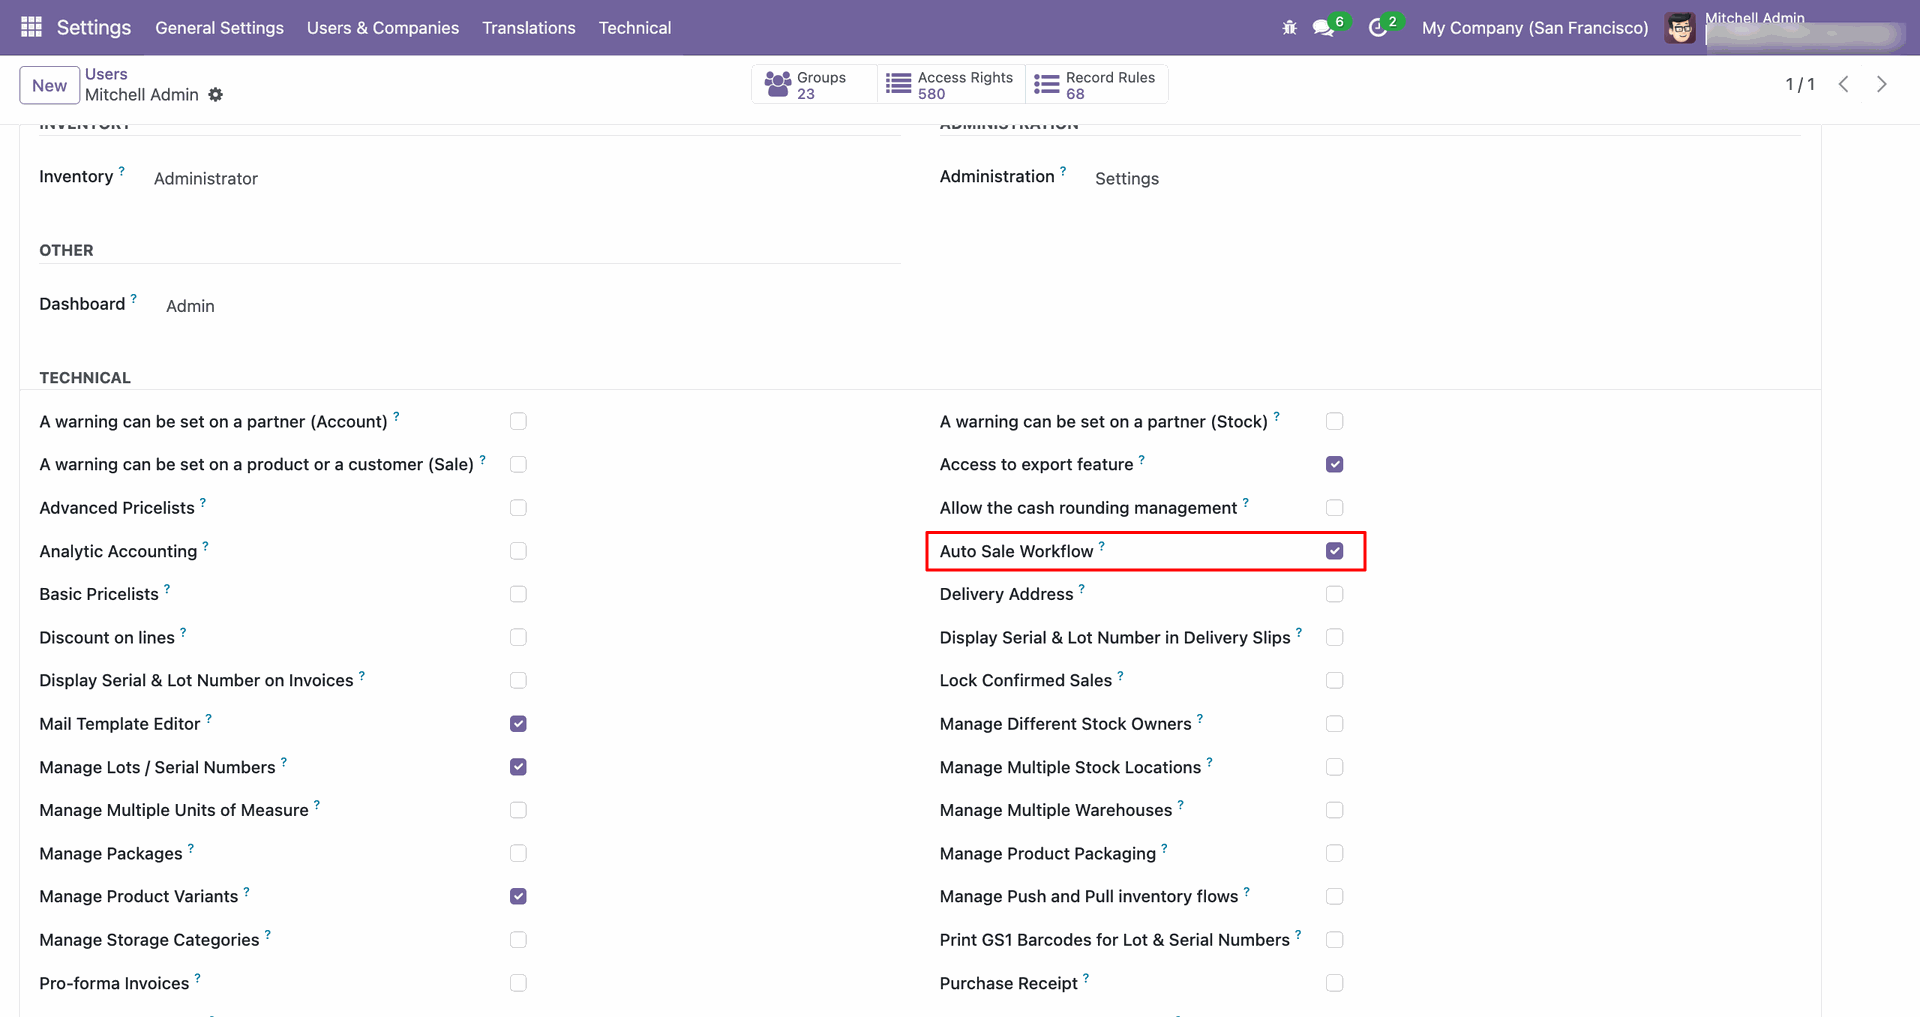
Enable the Auto Sale Workflow access right for the required user.
Auto Sale Workflow interface screenshot
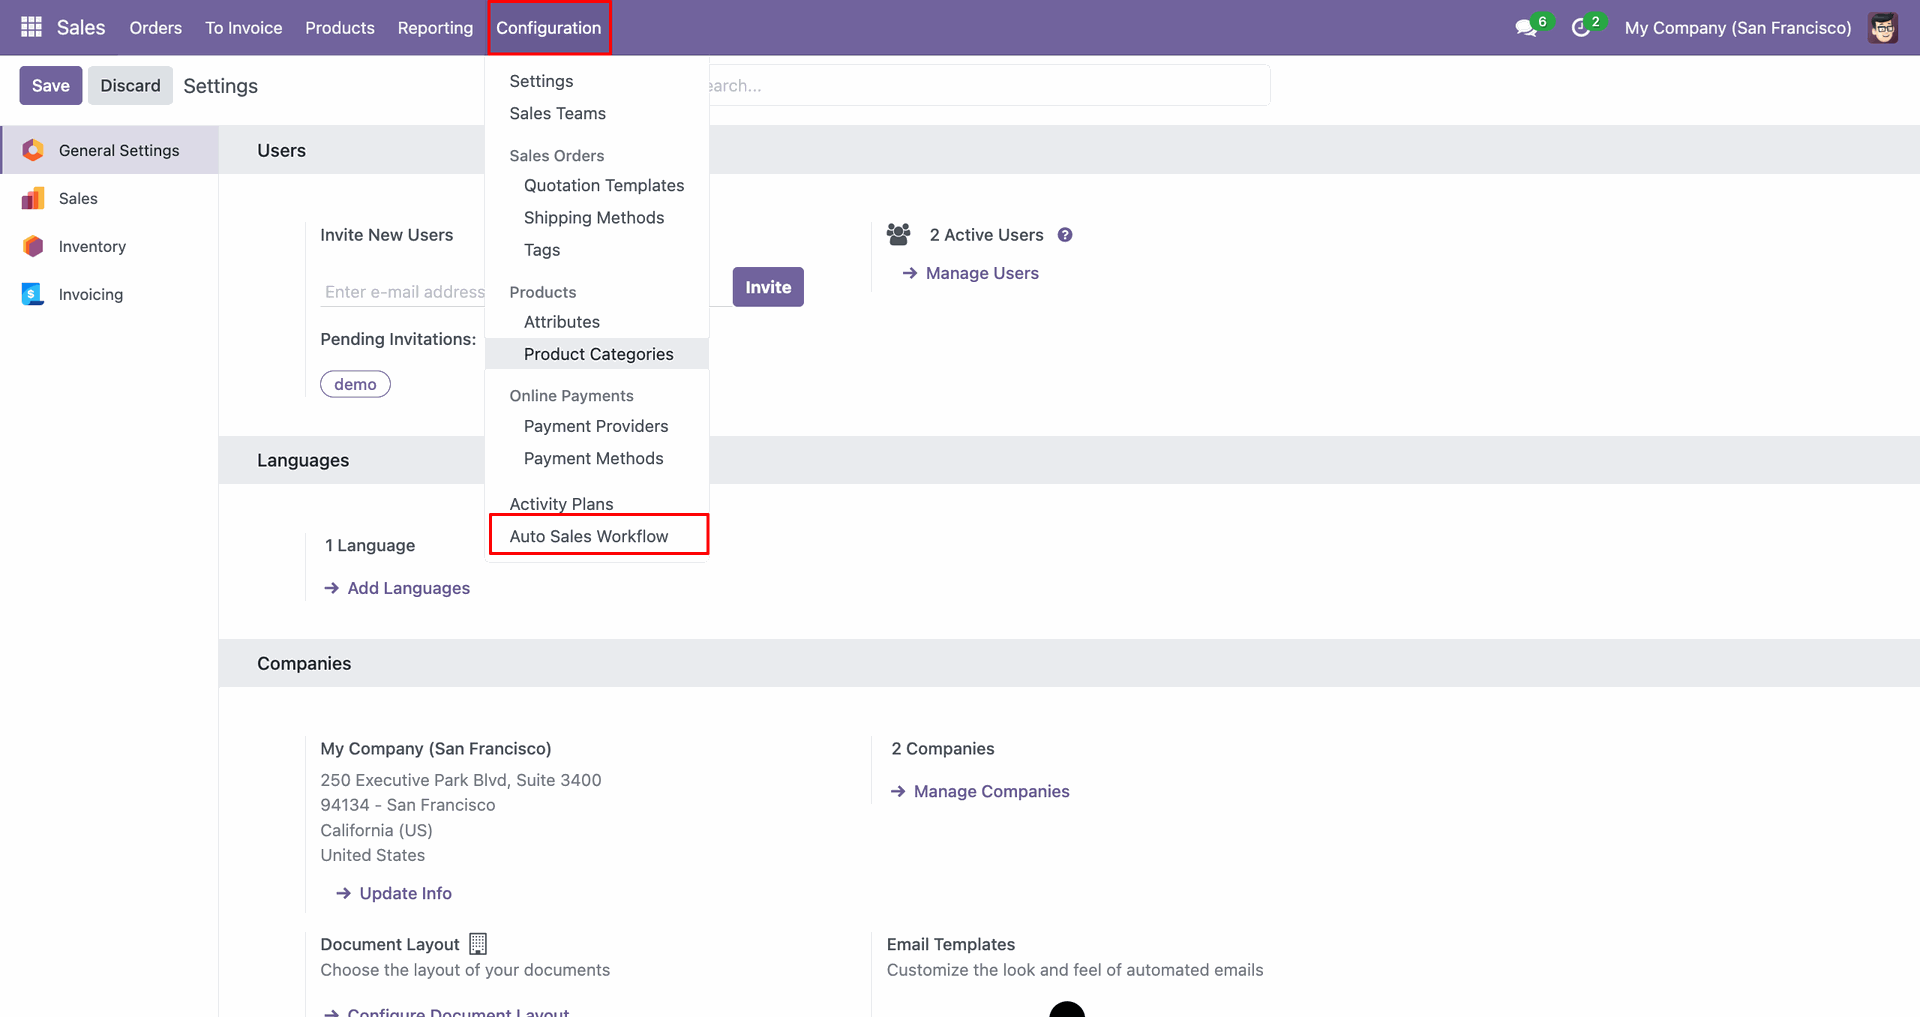
Open Auto Sales Workflow from Configuration to manage sales automation rules.
Auto Sale Workflow interface screenshot
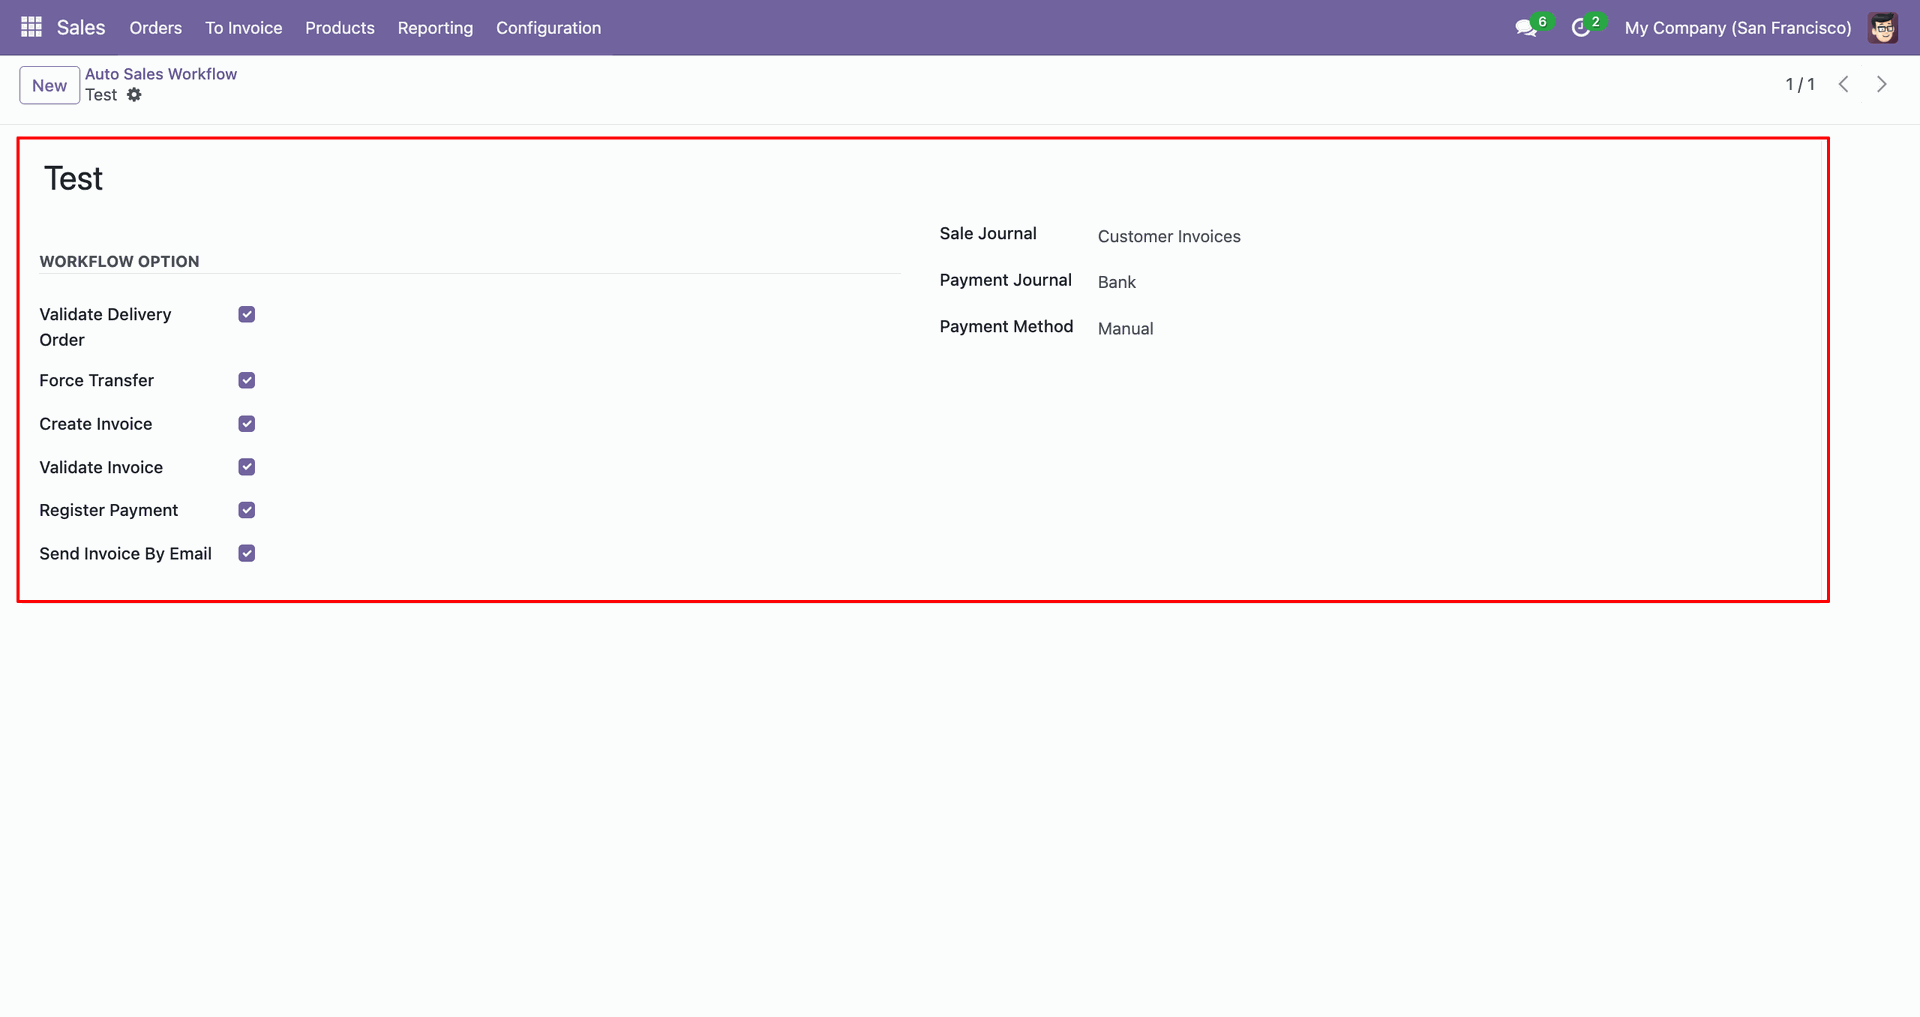
Review the Auto Sales Workflow settings and enabled actions for this rule.
Auto Sale Workflow interface screenshot
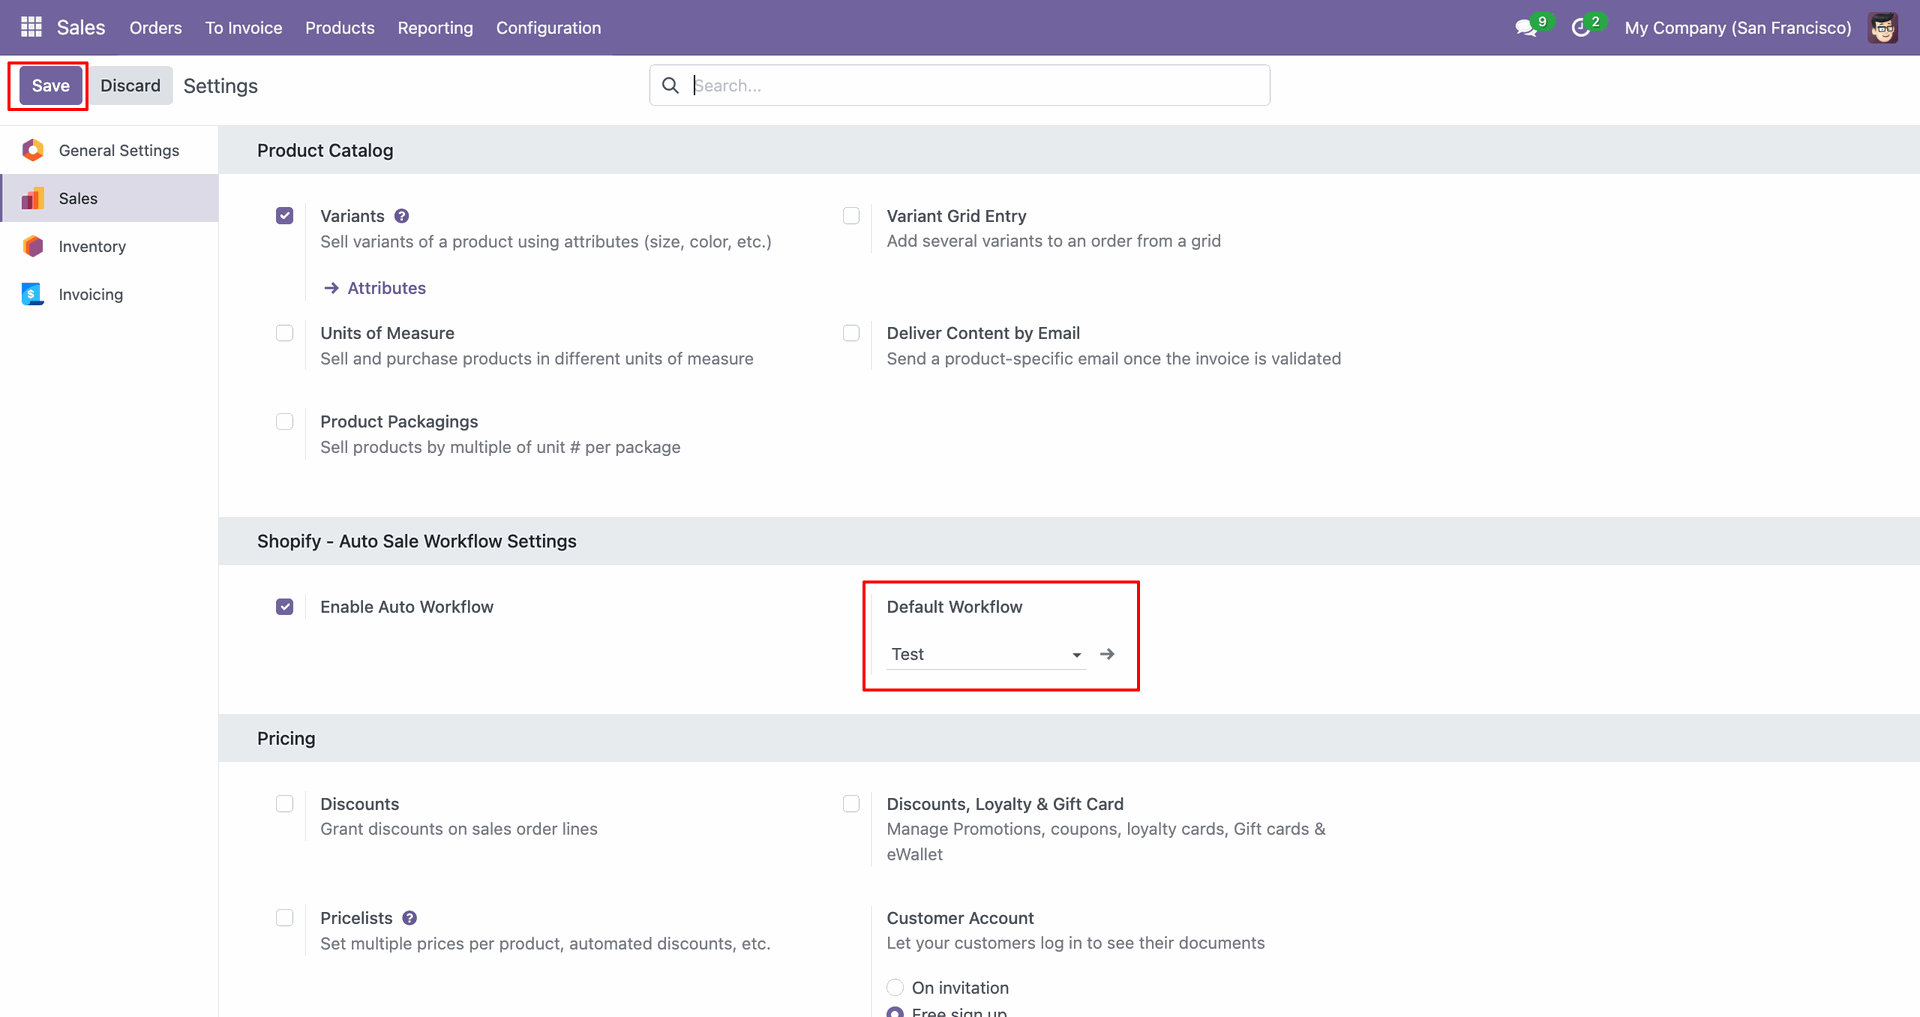
Set the Default Workflow in Settings to apply automatic sales processing.
Auto Sale Workflow interface screenshot

Buy With Prime Order

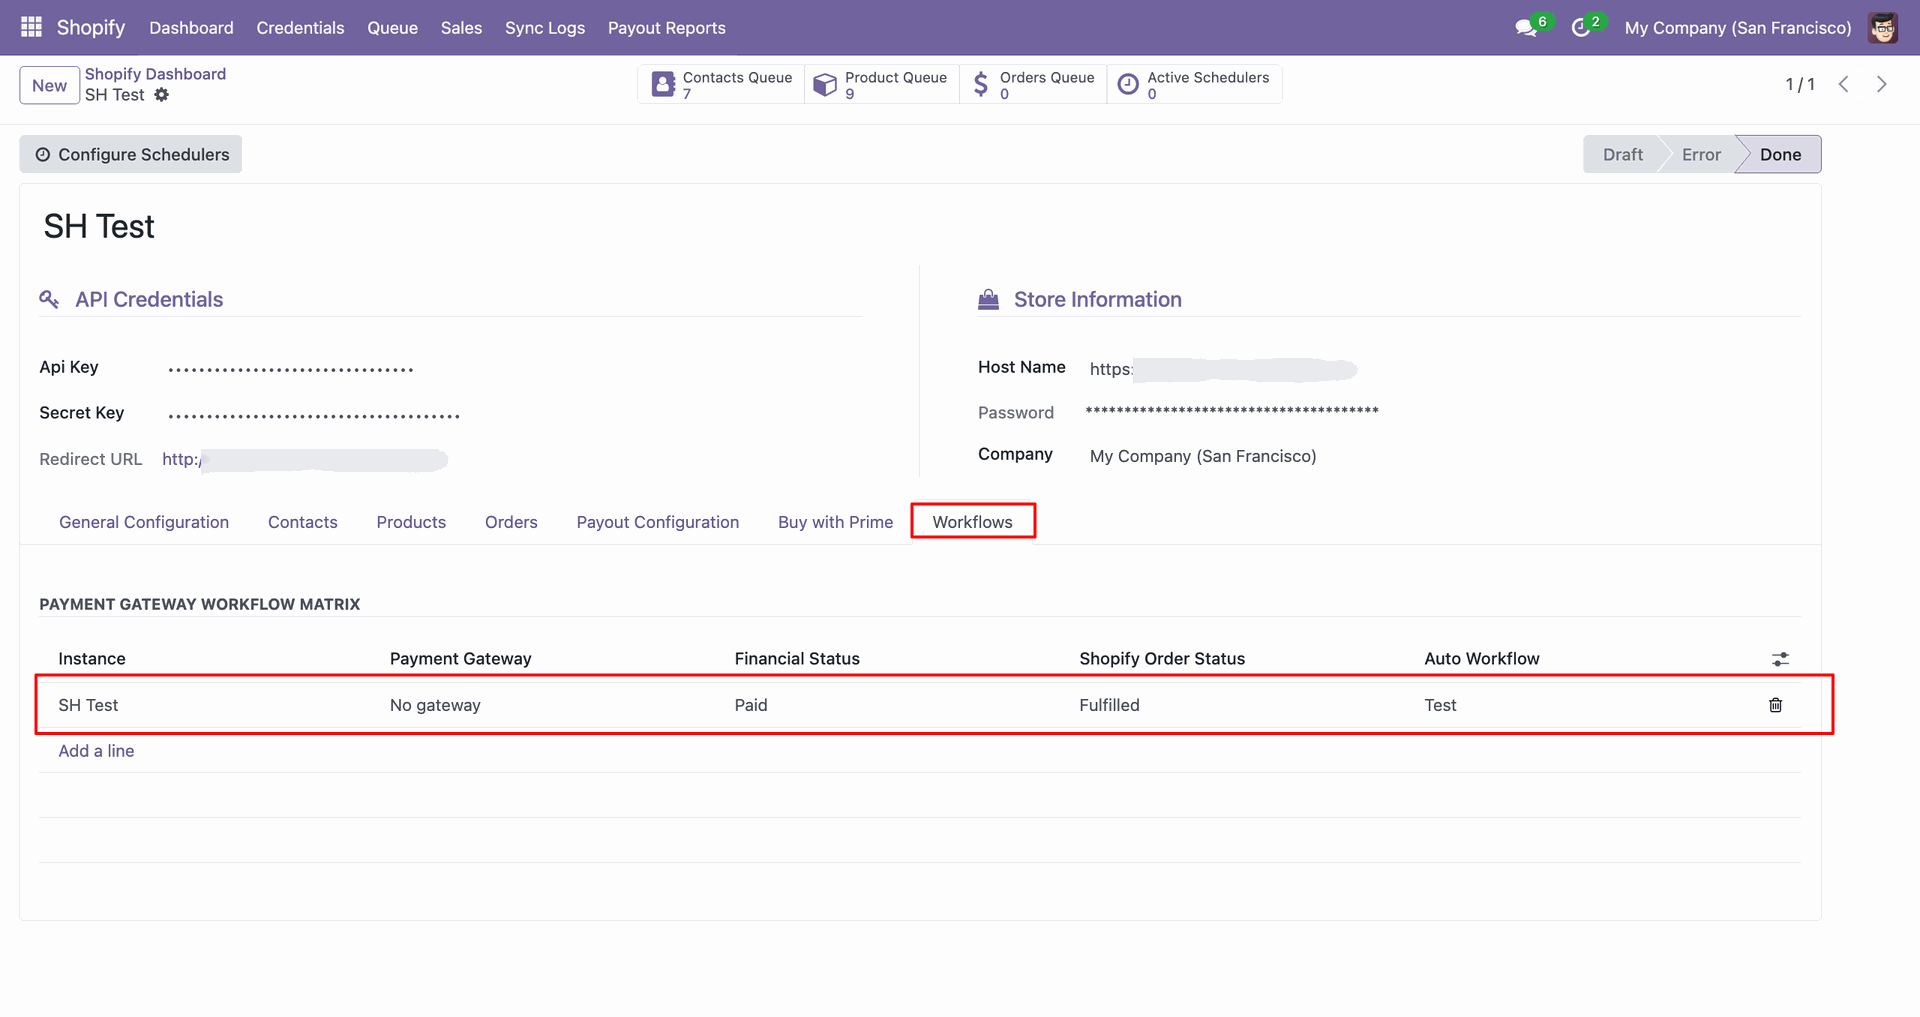
Review the workflow matrix row used for Buy with Prime order processing.
Buy With Prime Order interface screenshot
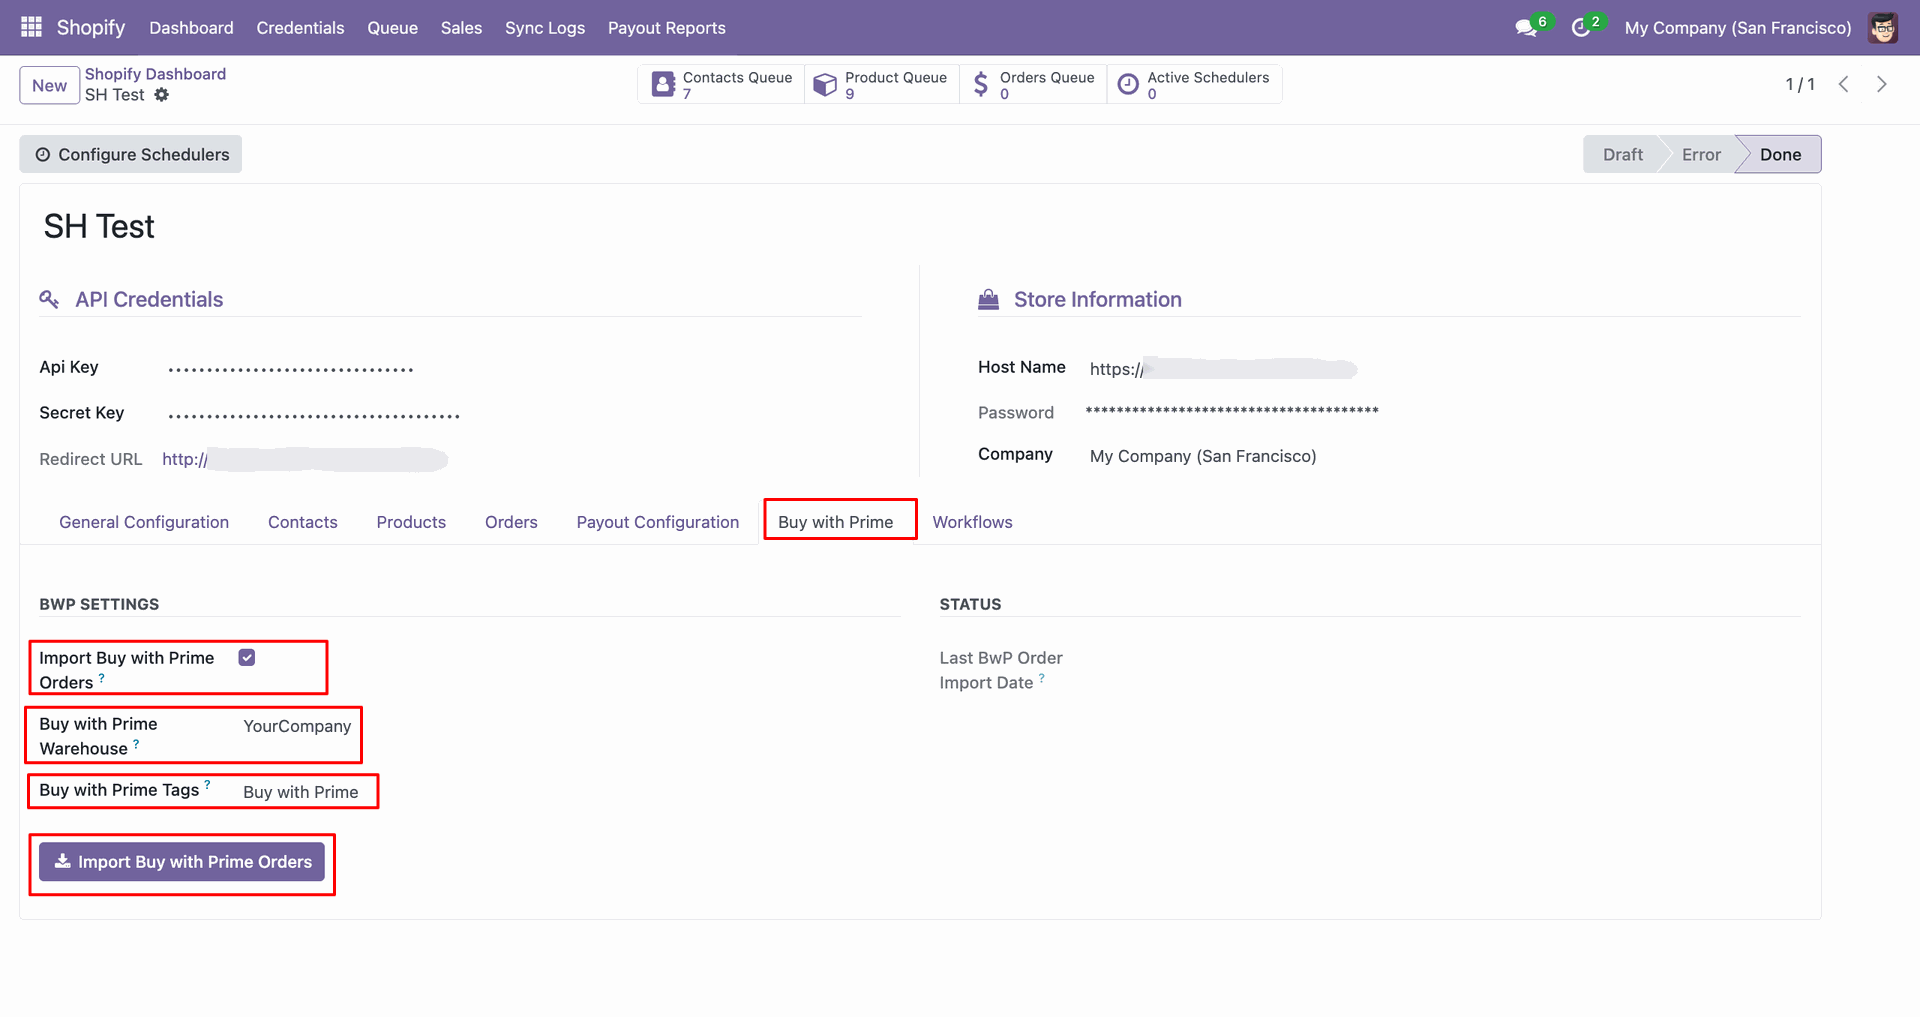
Open the Buy with Prime tab and click Import Buy with Prime Orders.
Buy With Prime Order interface screenshot
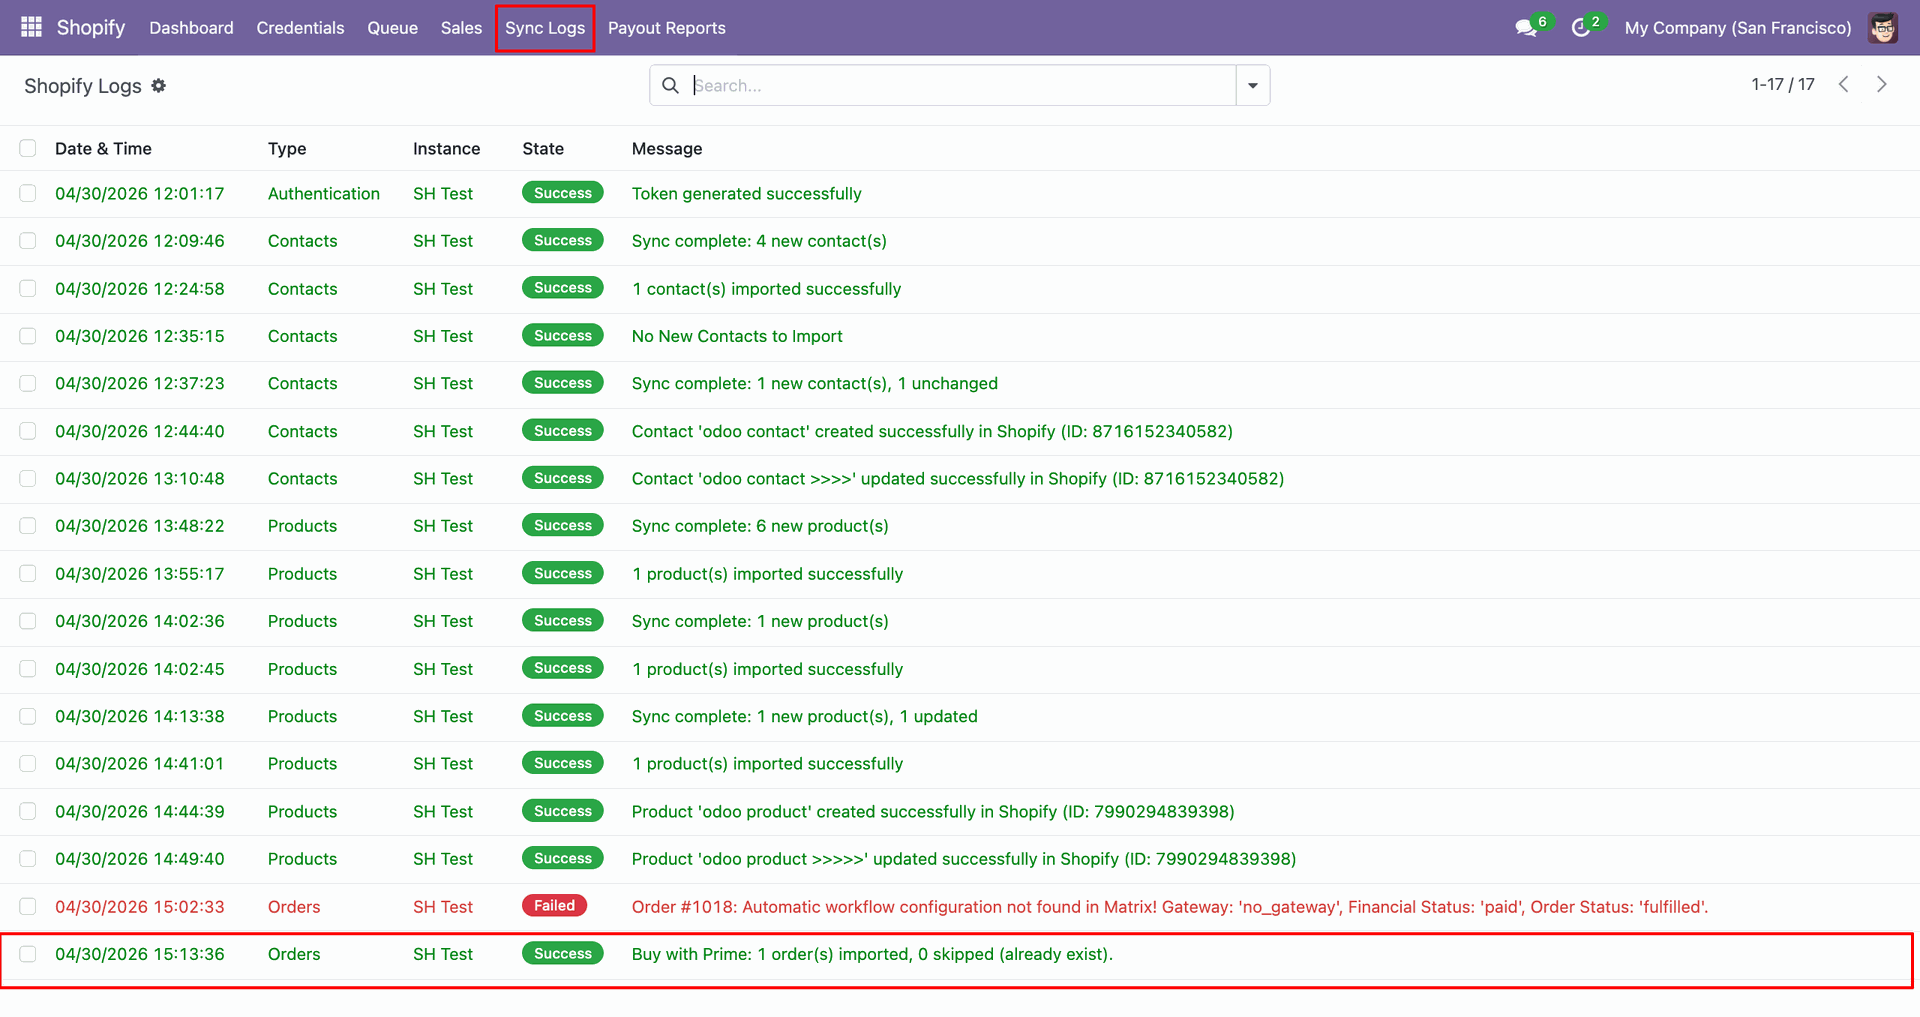
Check Sync Logs to confirm the Buy with Prime order import result.
Buy With Prime Order interface screenshot
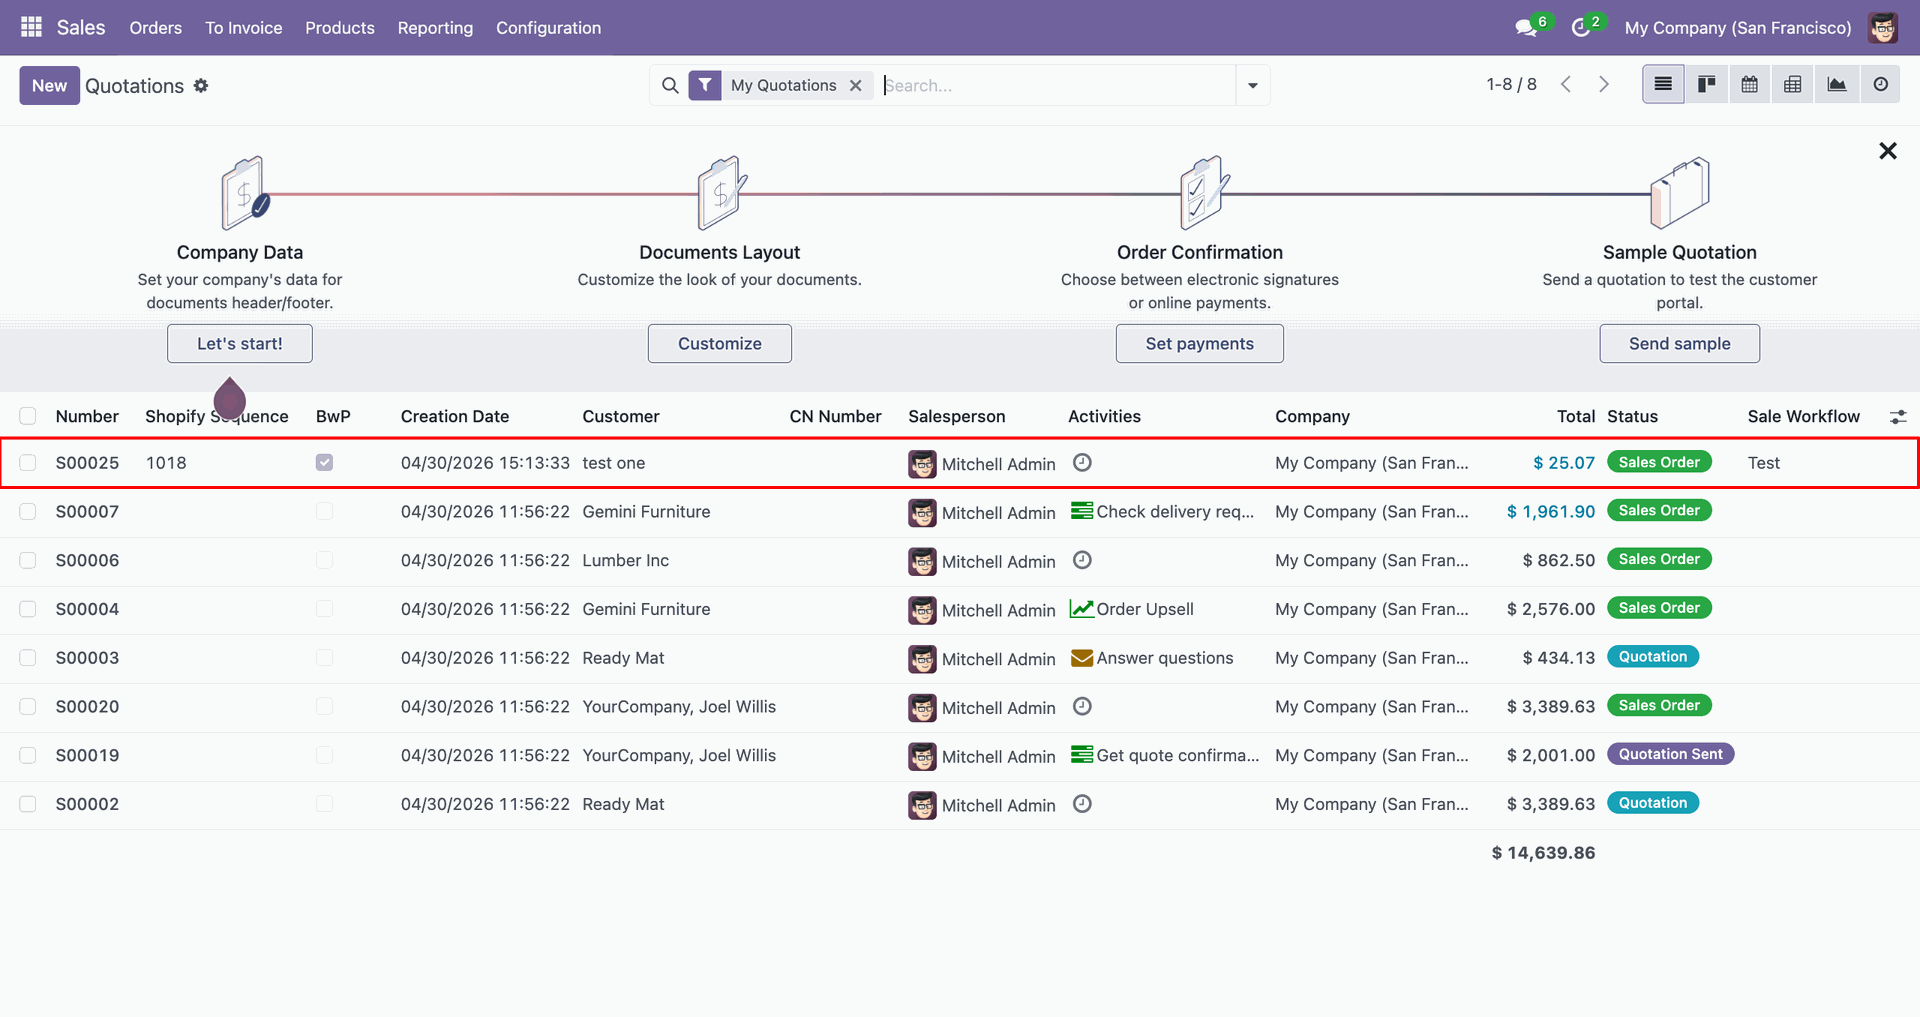
Review the imported Buy with Prime sales order row in Odoo.
Buy With Prime Order interface screenshot

Export Product Stock

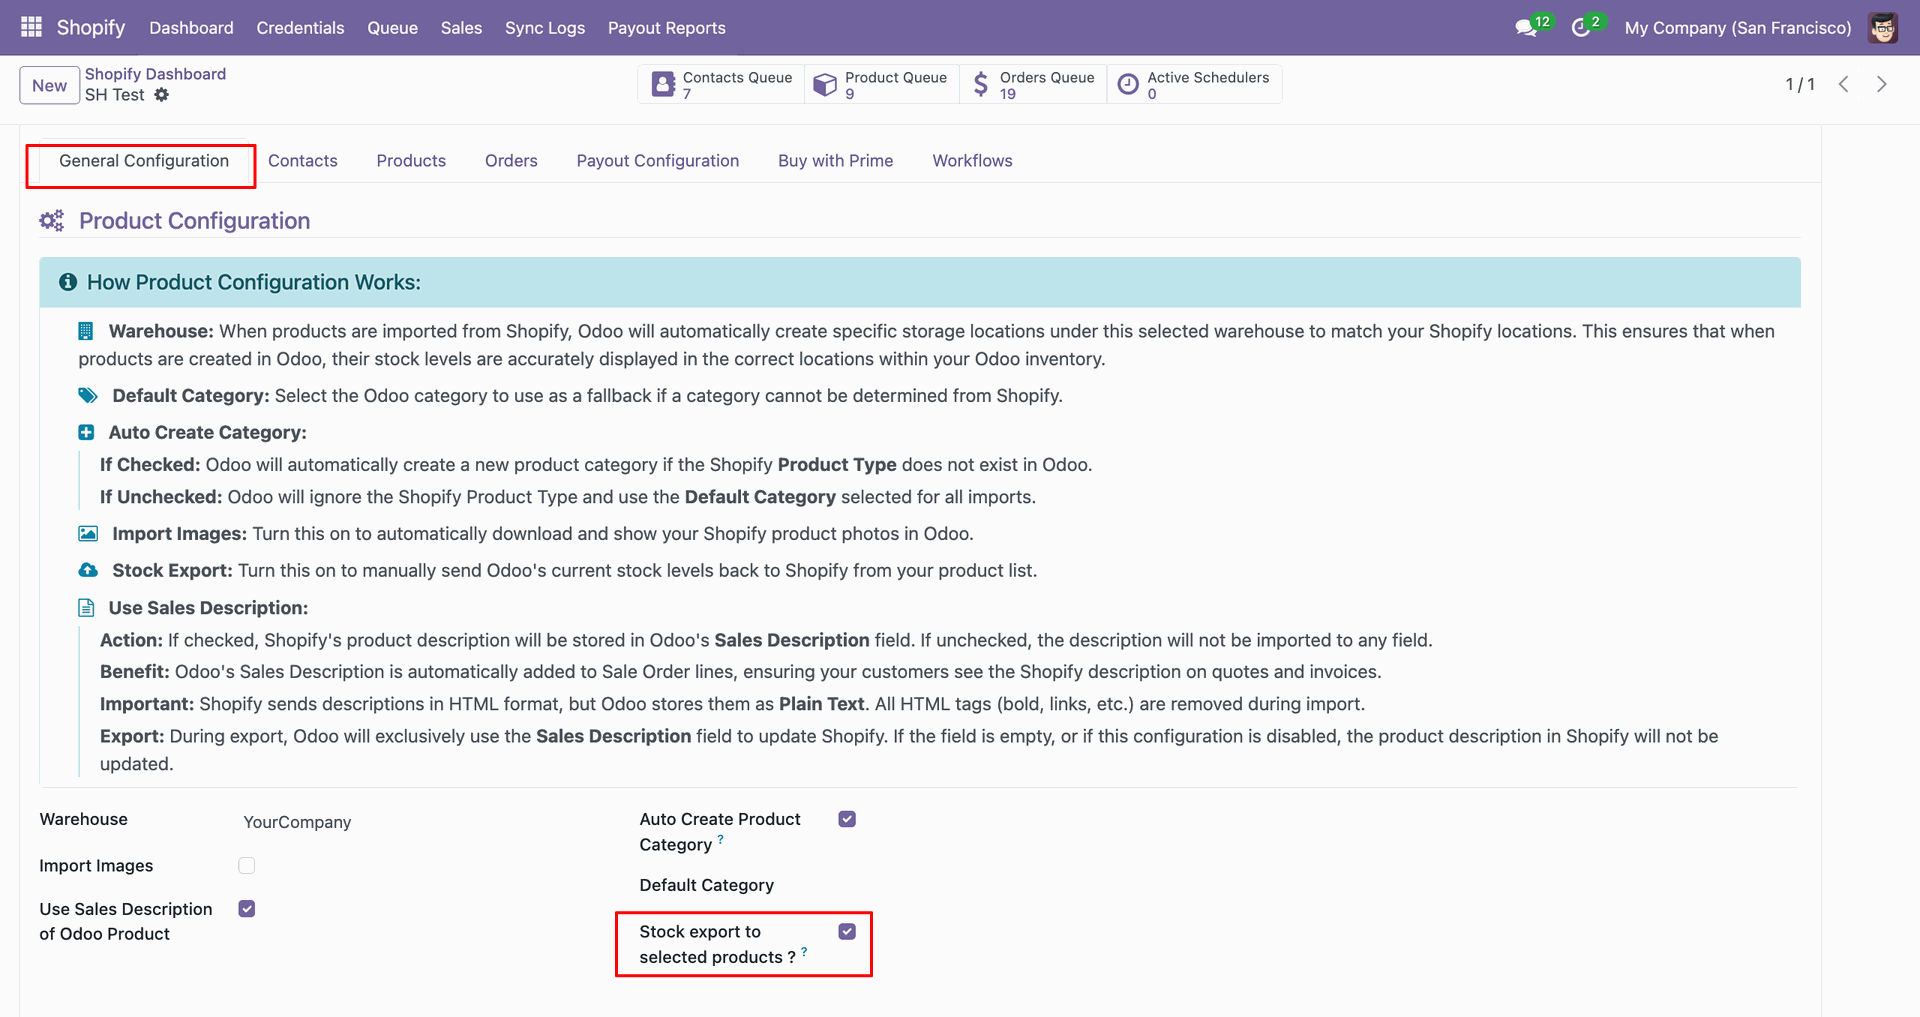
Enable Stock export to selected products from the Products configuration tab.
Export Product Stock interface screenshot
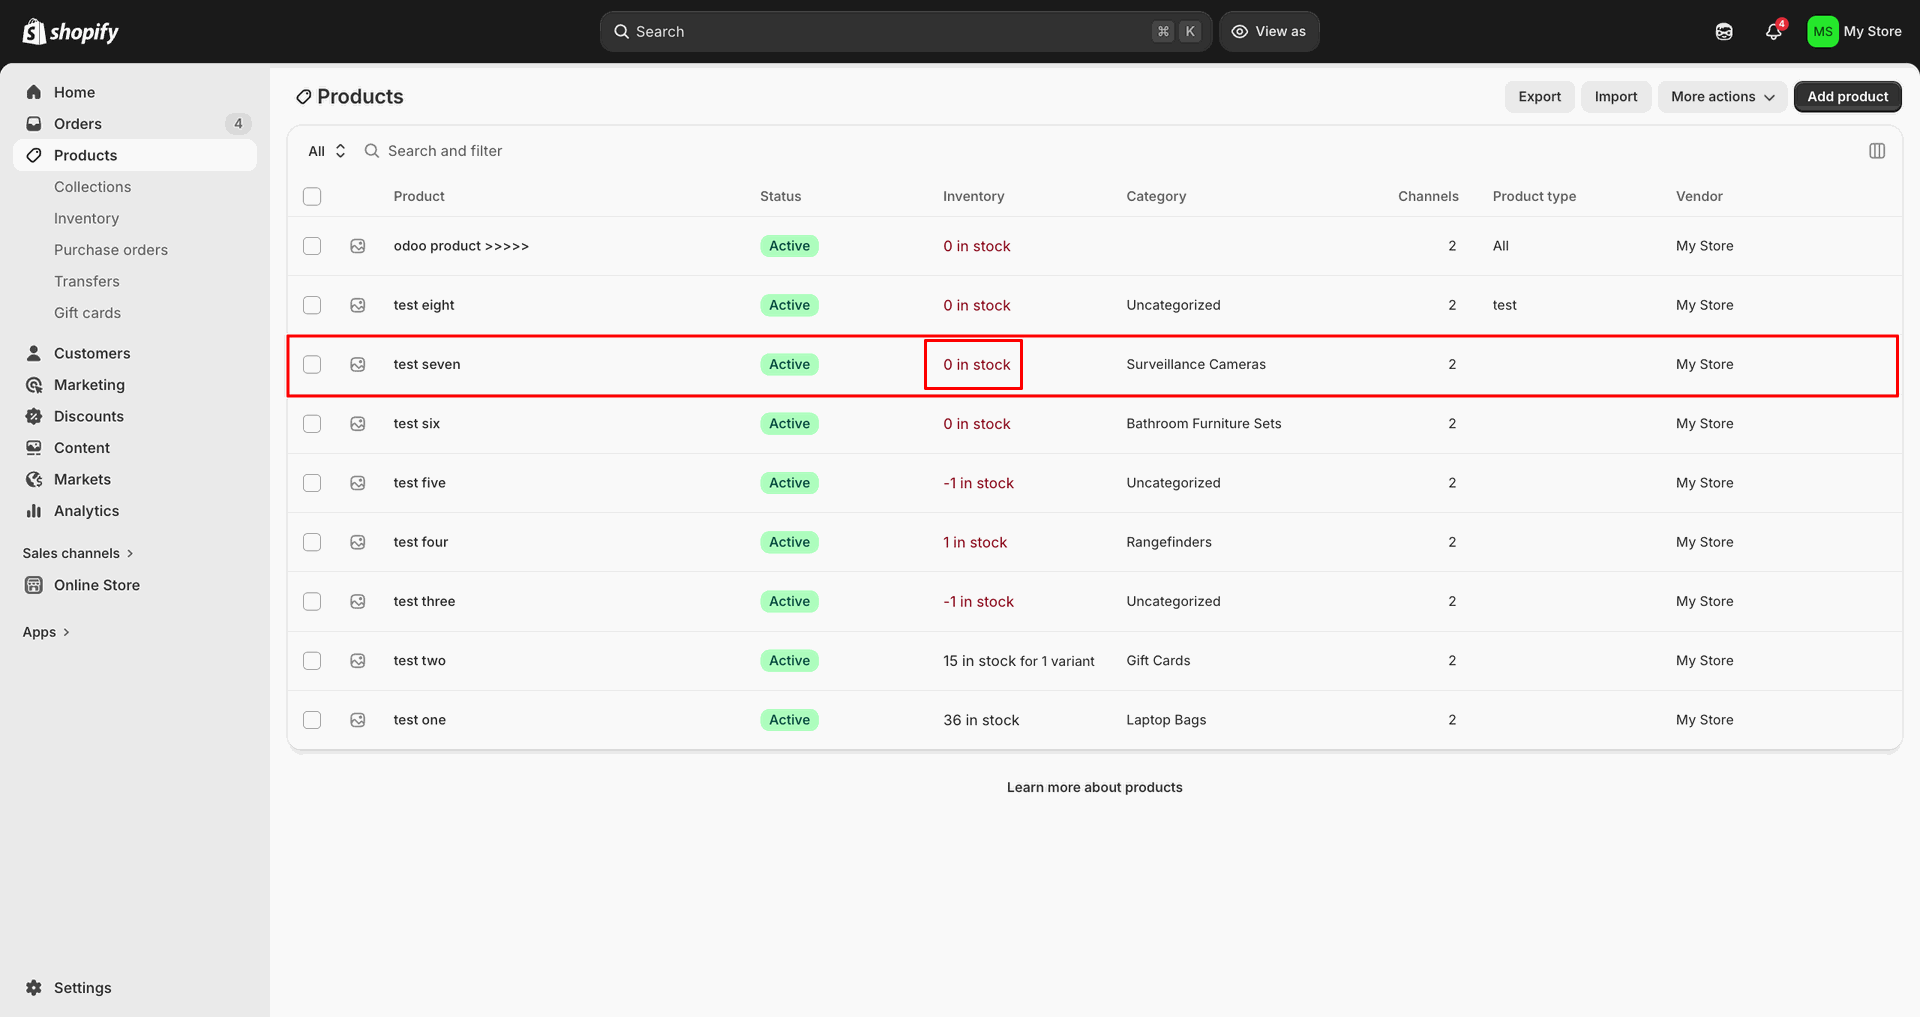
Open the Shopify product row to review its current inventory before export.
Export Product Stock interface screenshot
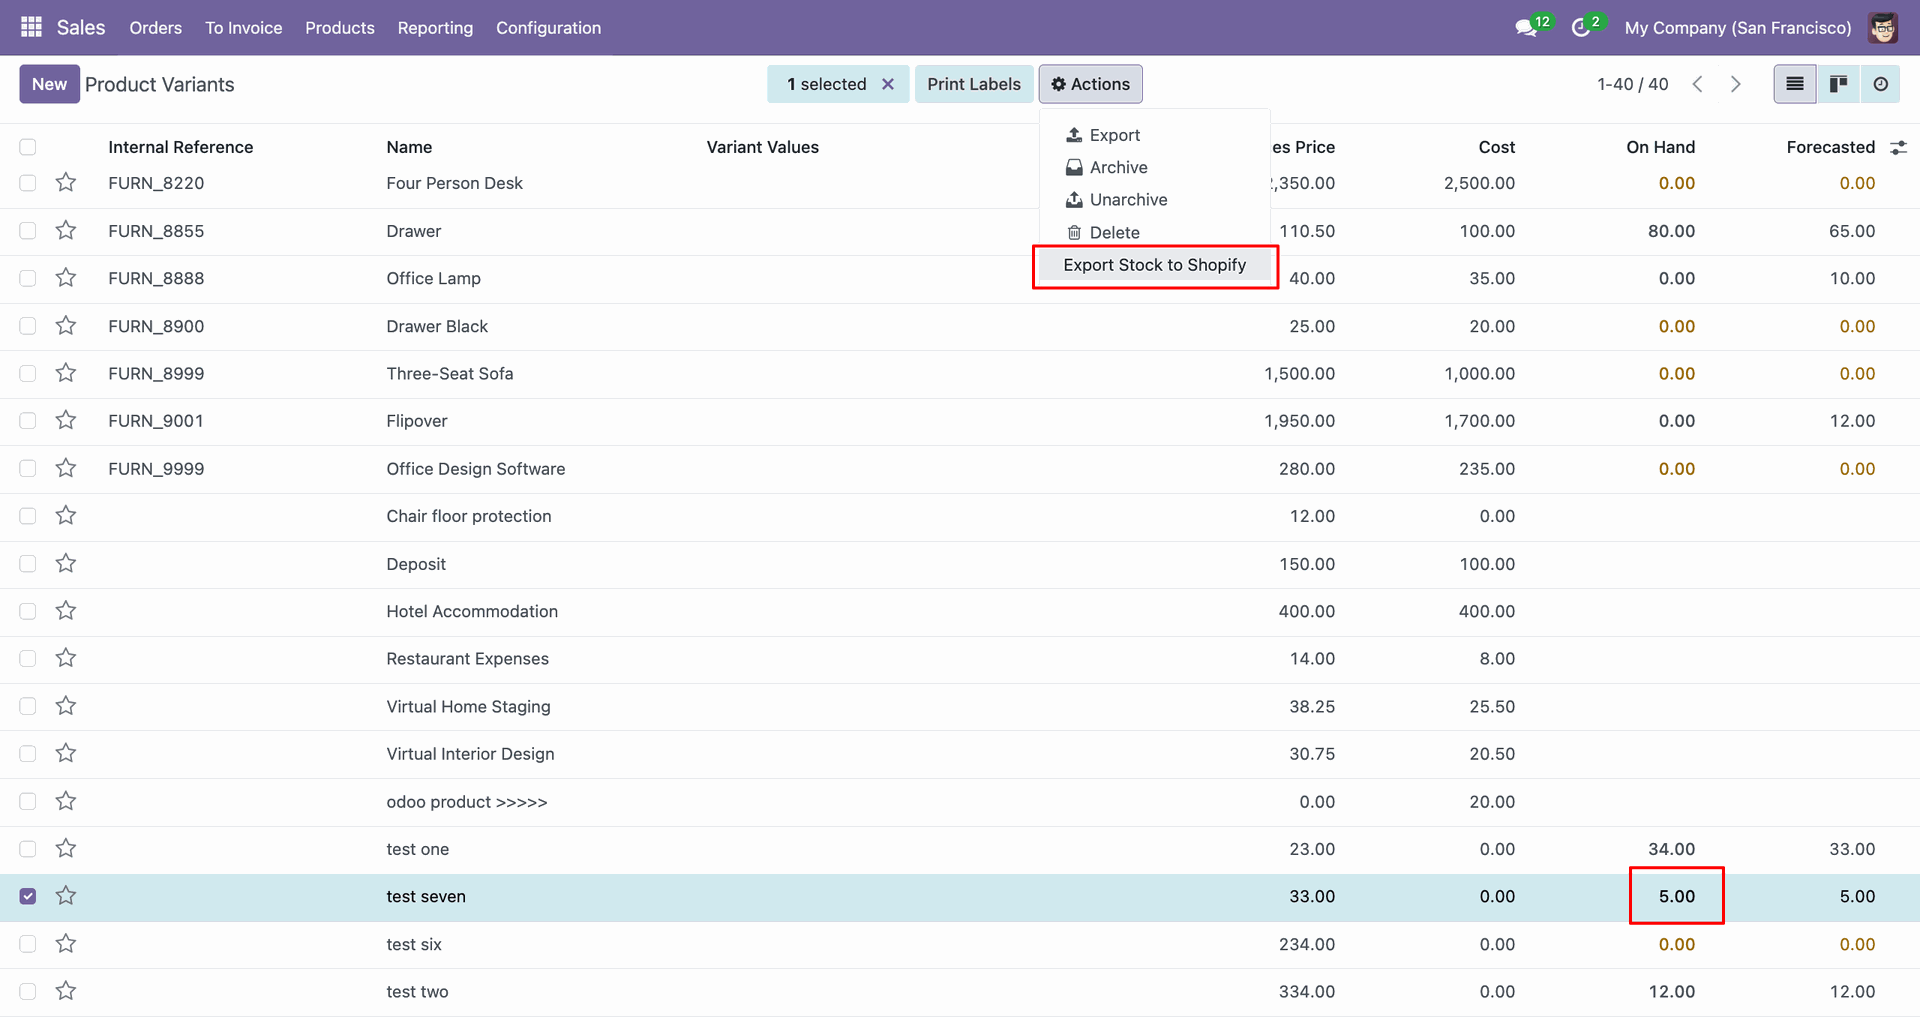
Select the variant line and choose Export Stock to Shopify from Actions.
Export Product Stock interface screenshot
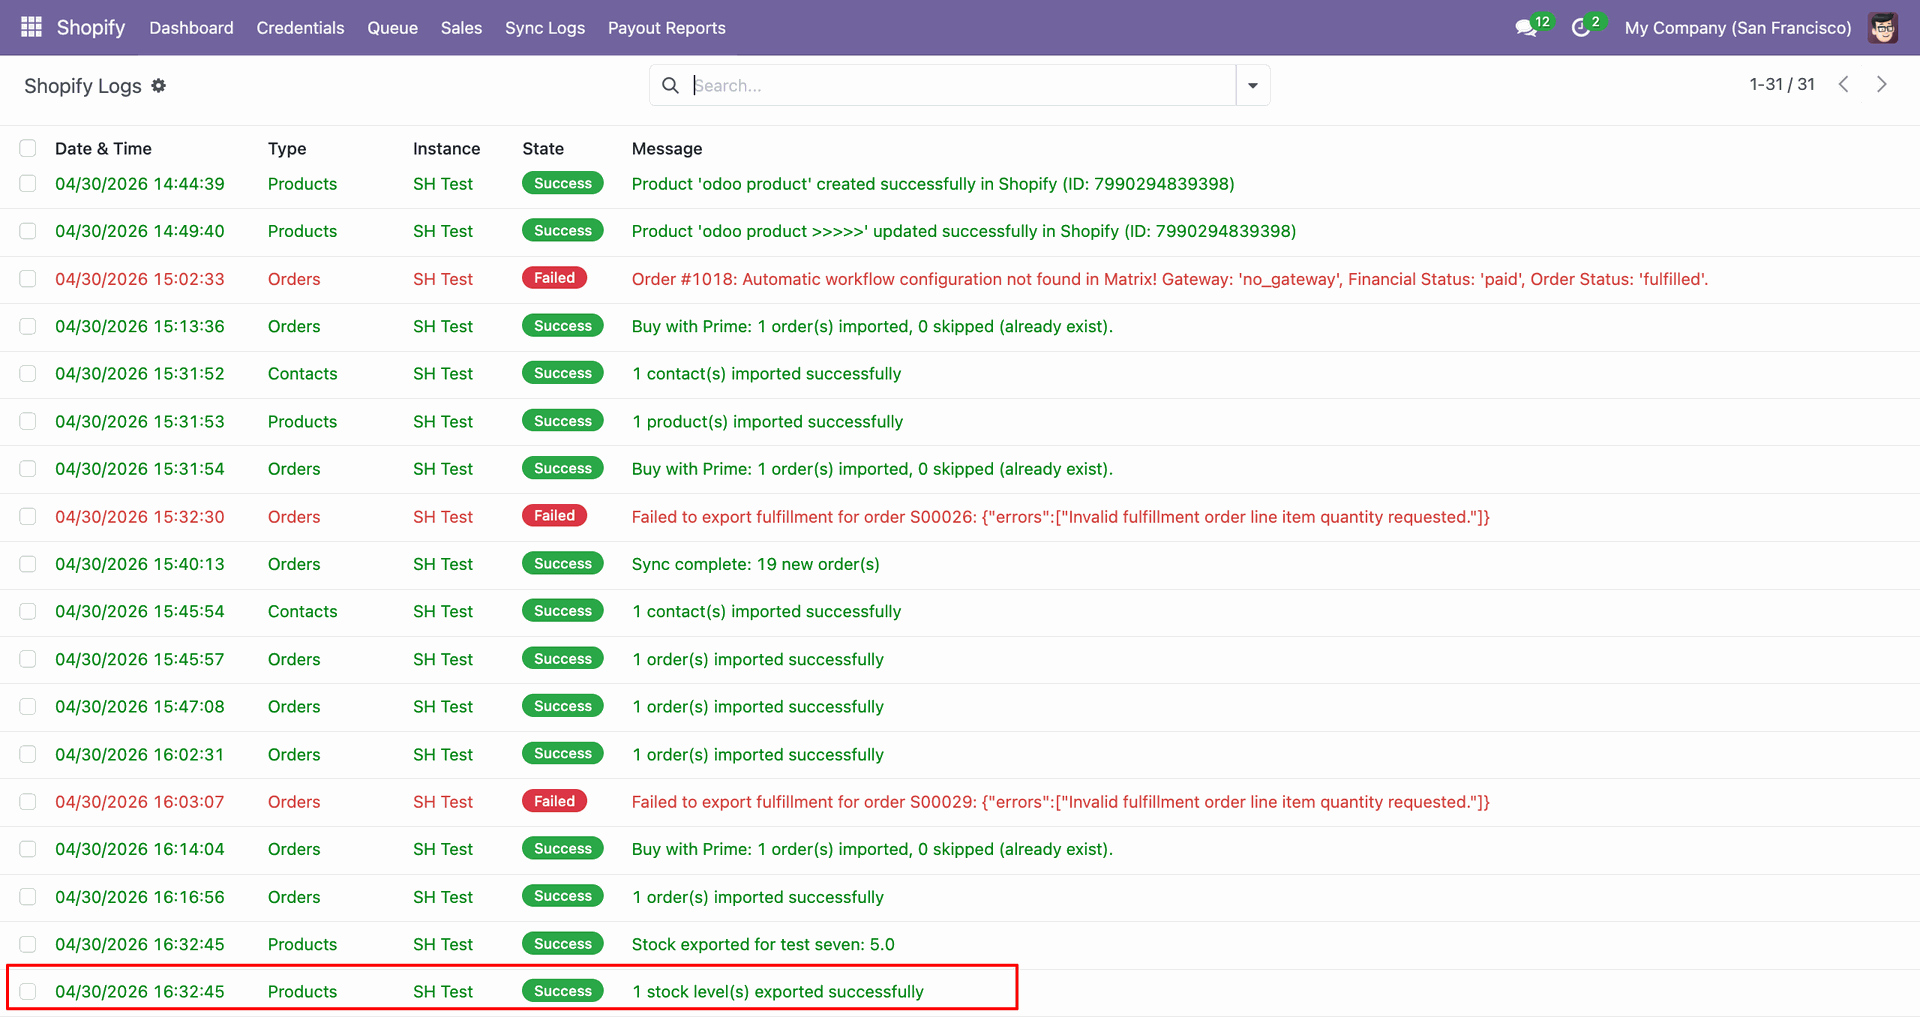
Check Sync Logs to confirm the stock export completed successfully for the product.
Export Product Stock interface screenshot
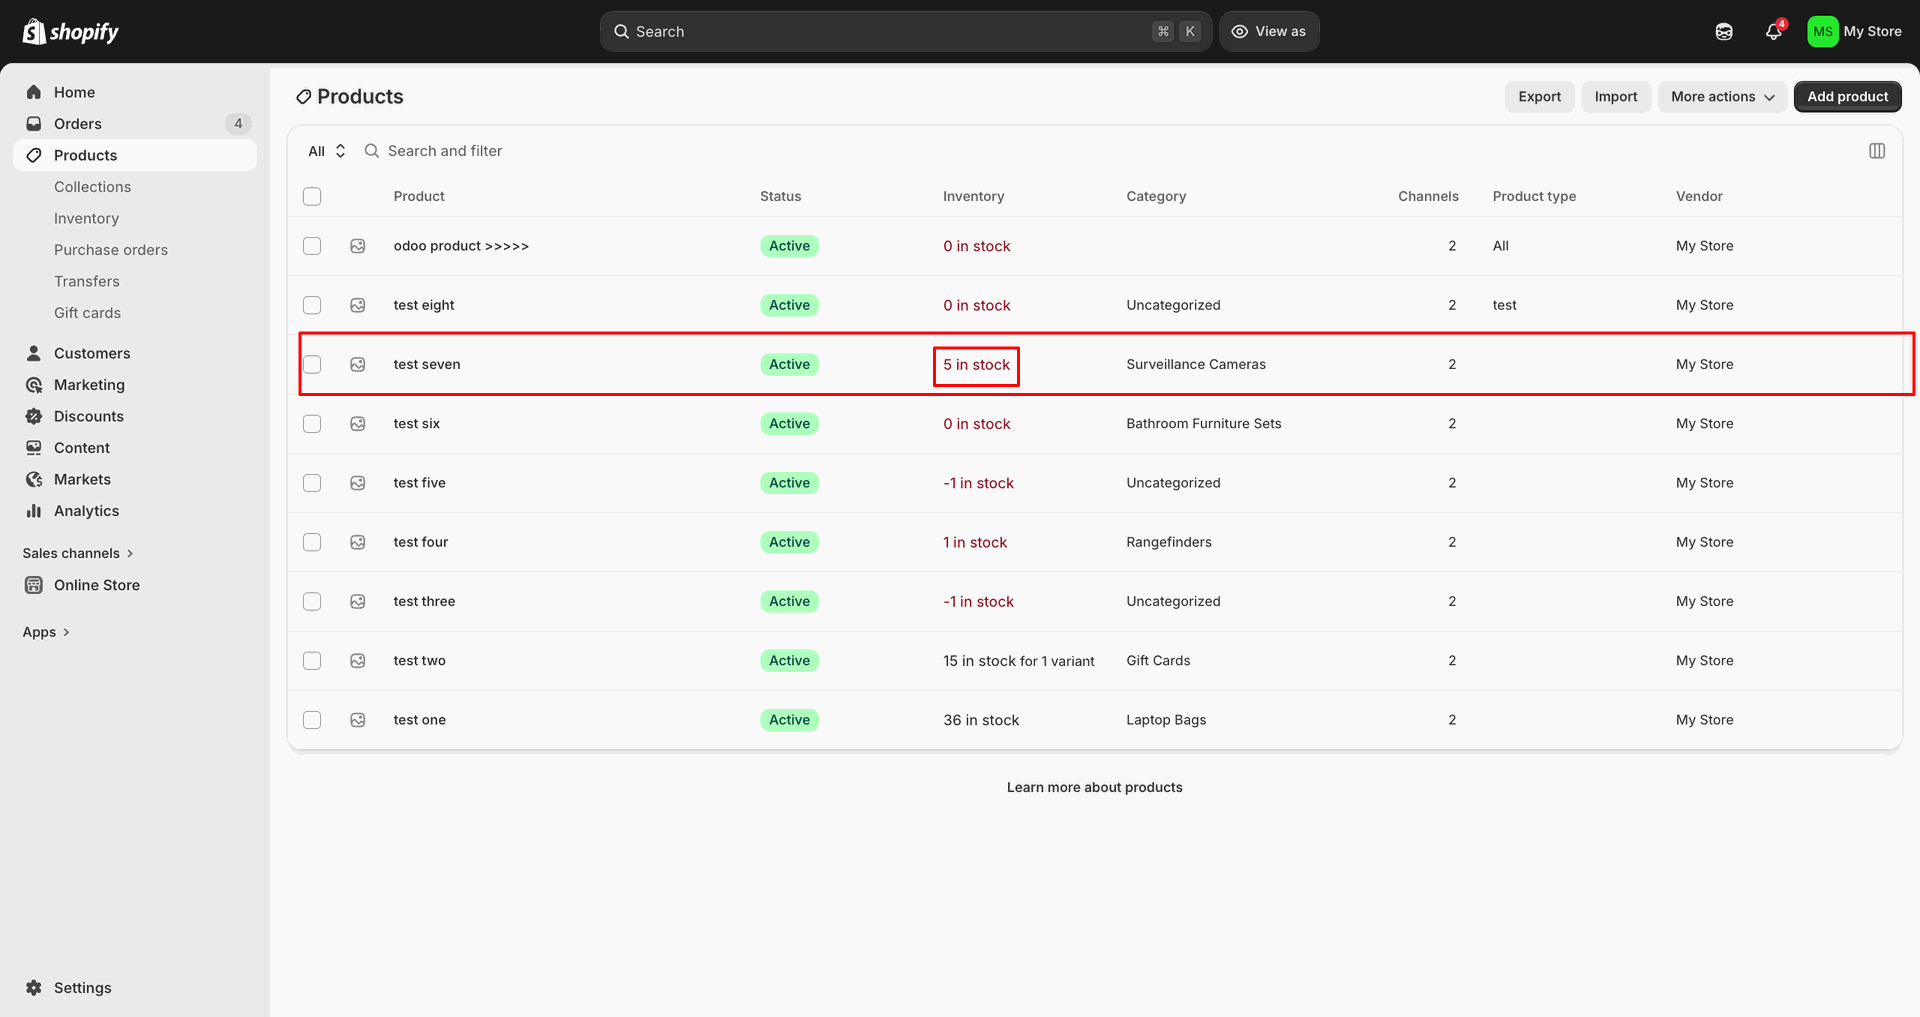
Verify the Shopify product row shows the updated stock after export.
Export Product Stock interface screenshot

Import Refund Orders

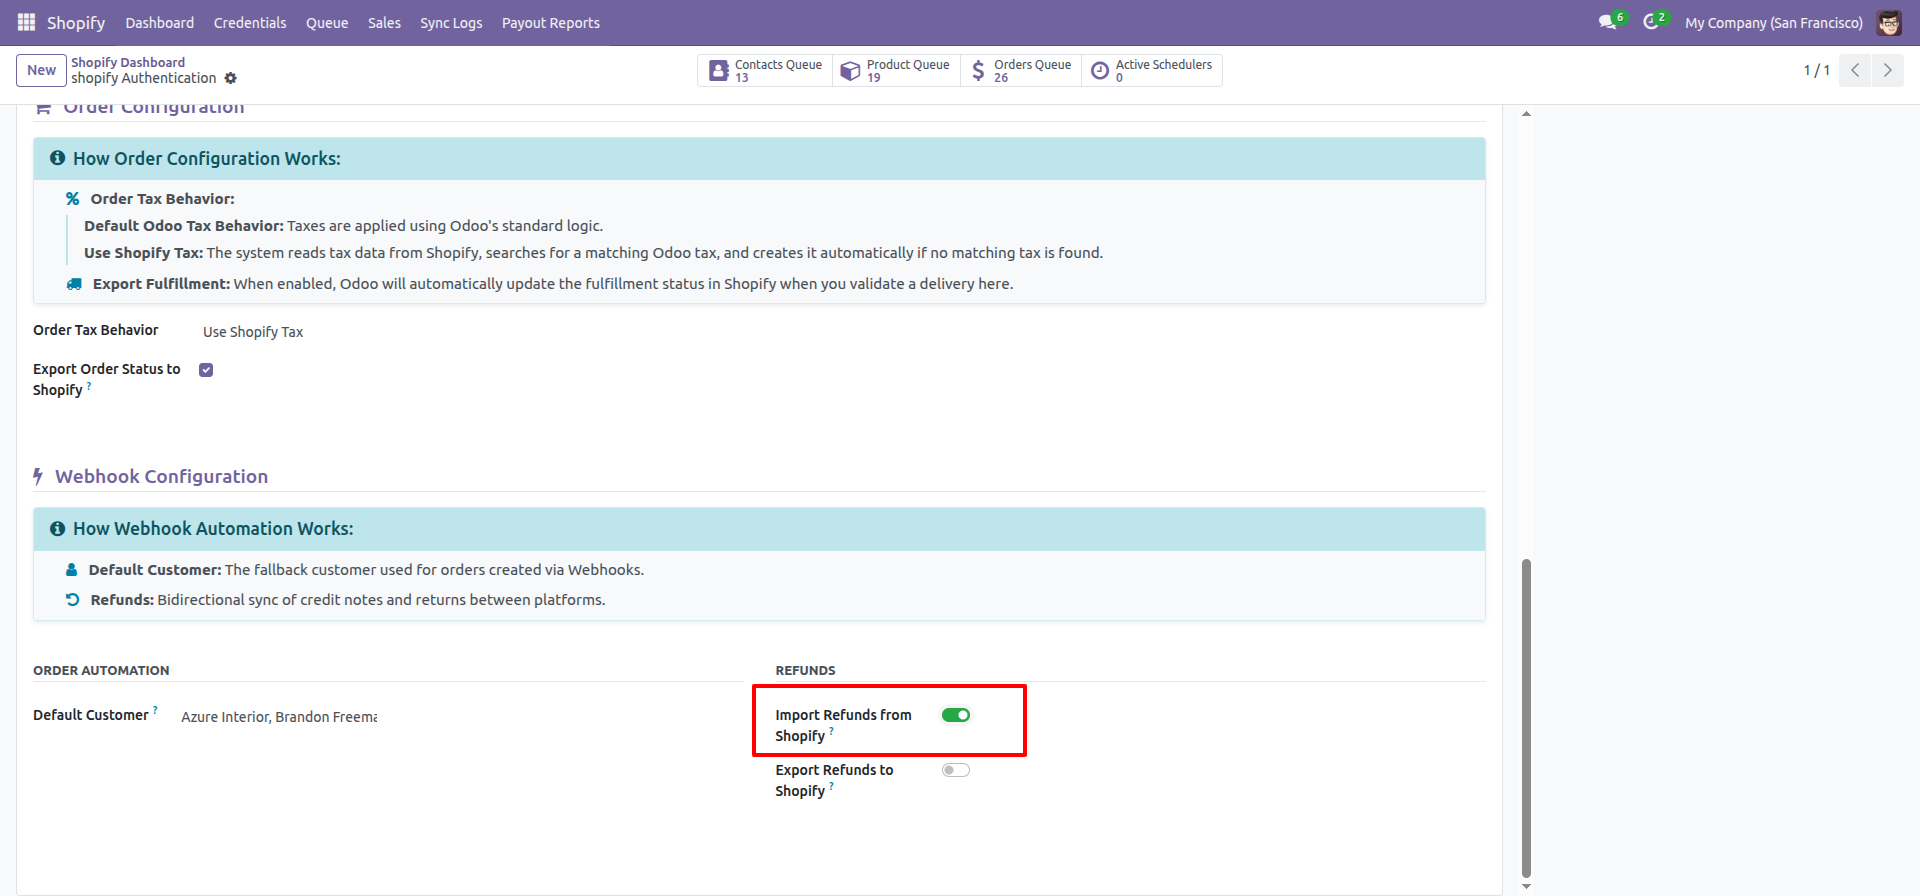
Enable Import Refunds from Shopify in the Refunds section to receive returns.
Import Refund Orders interface screenshot
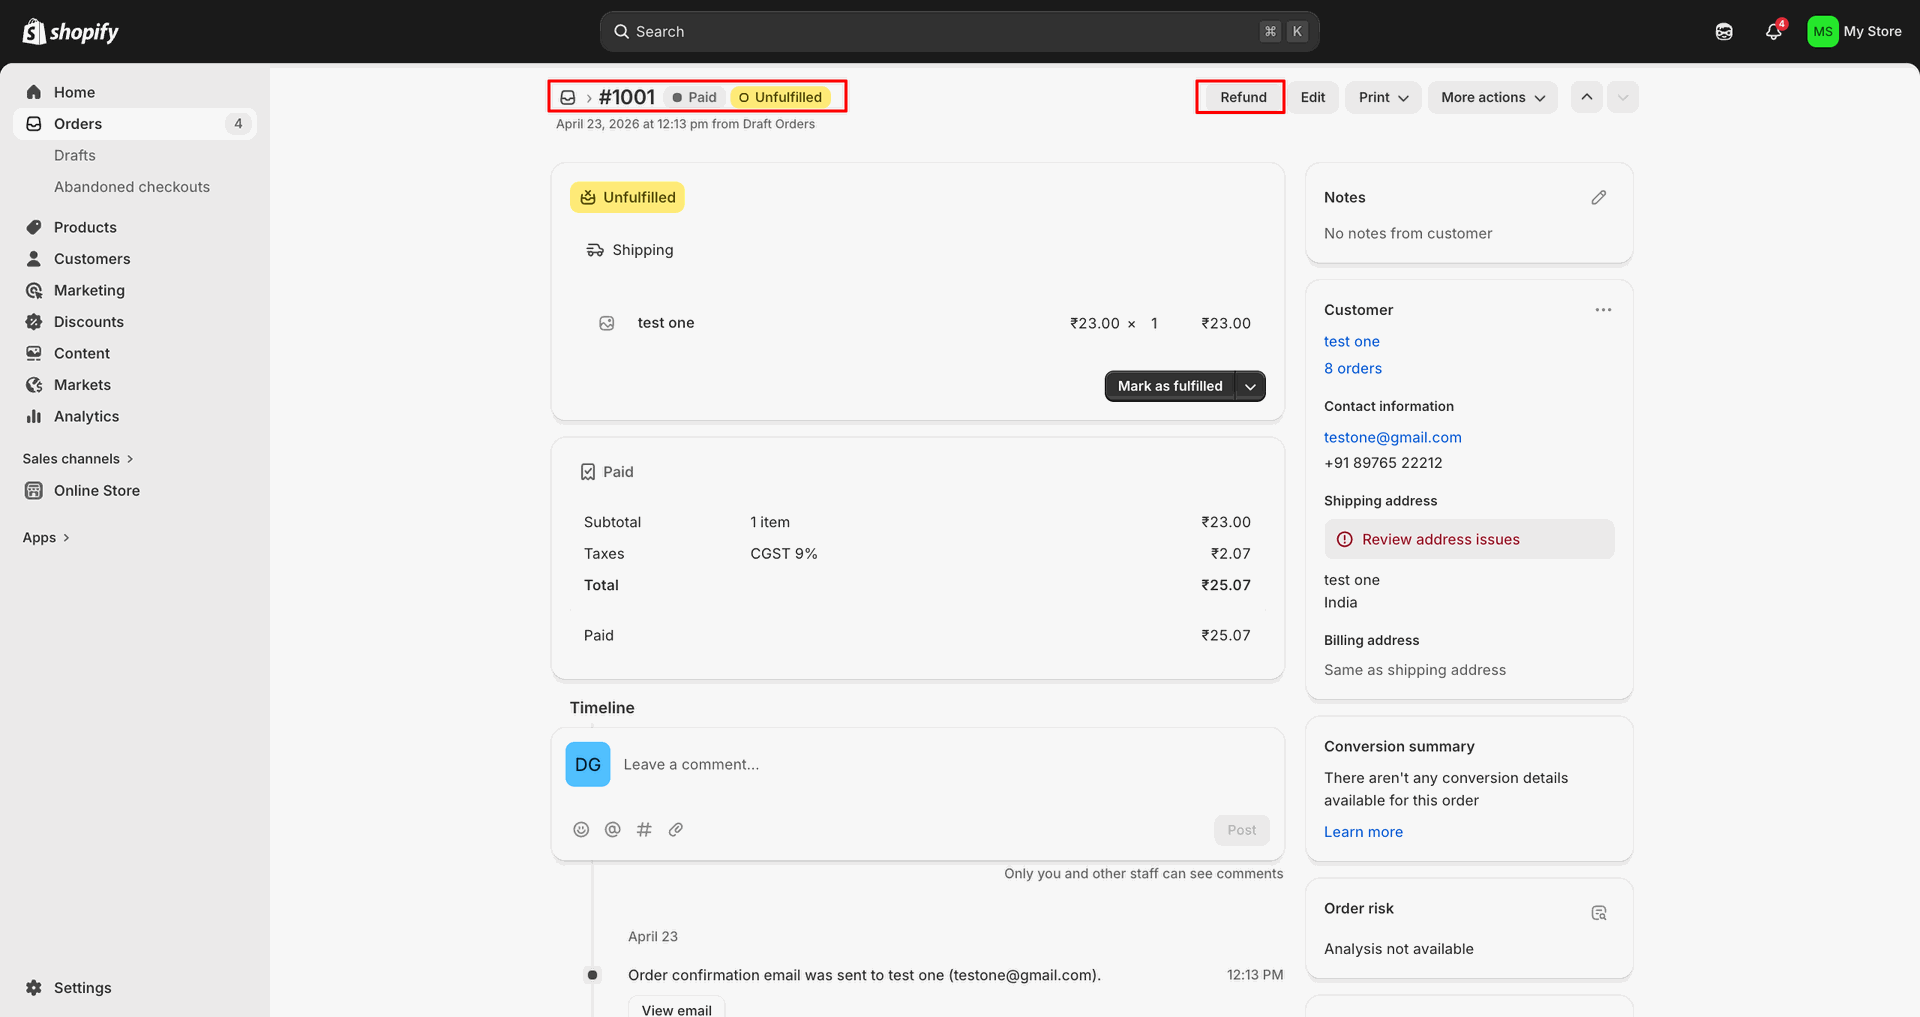
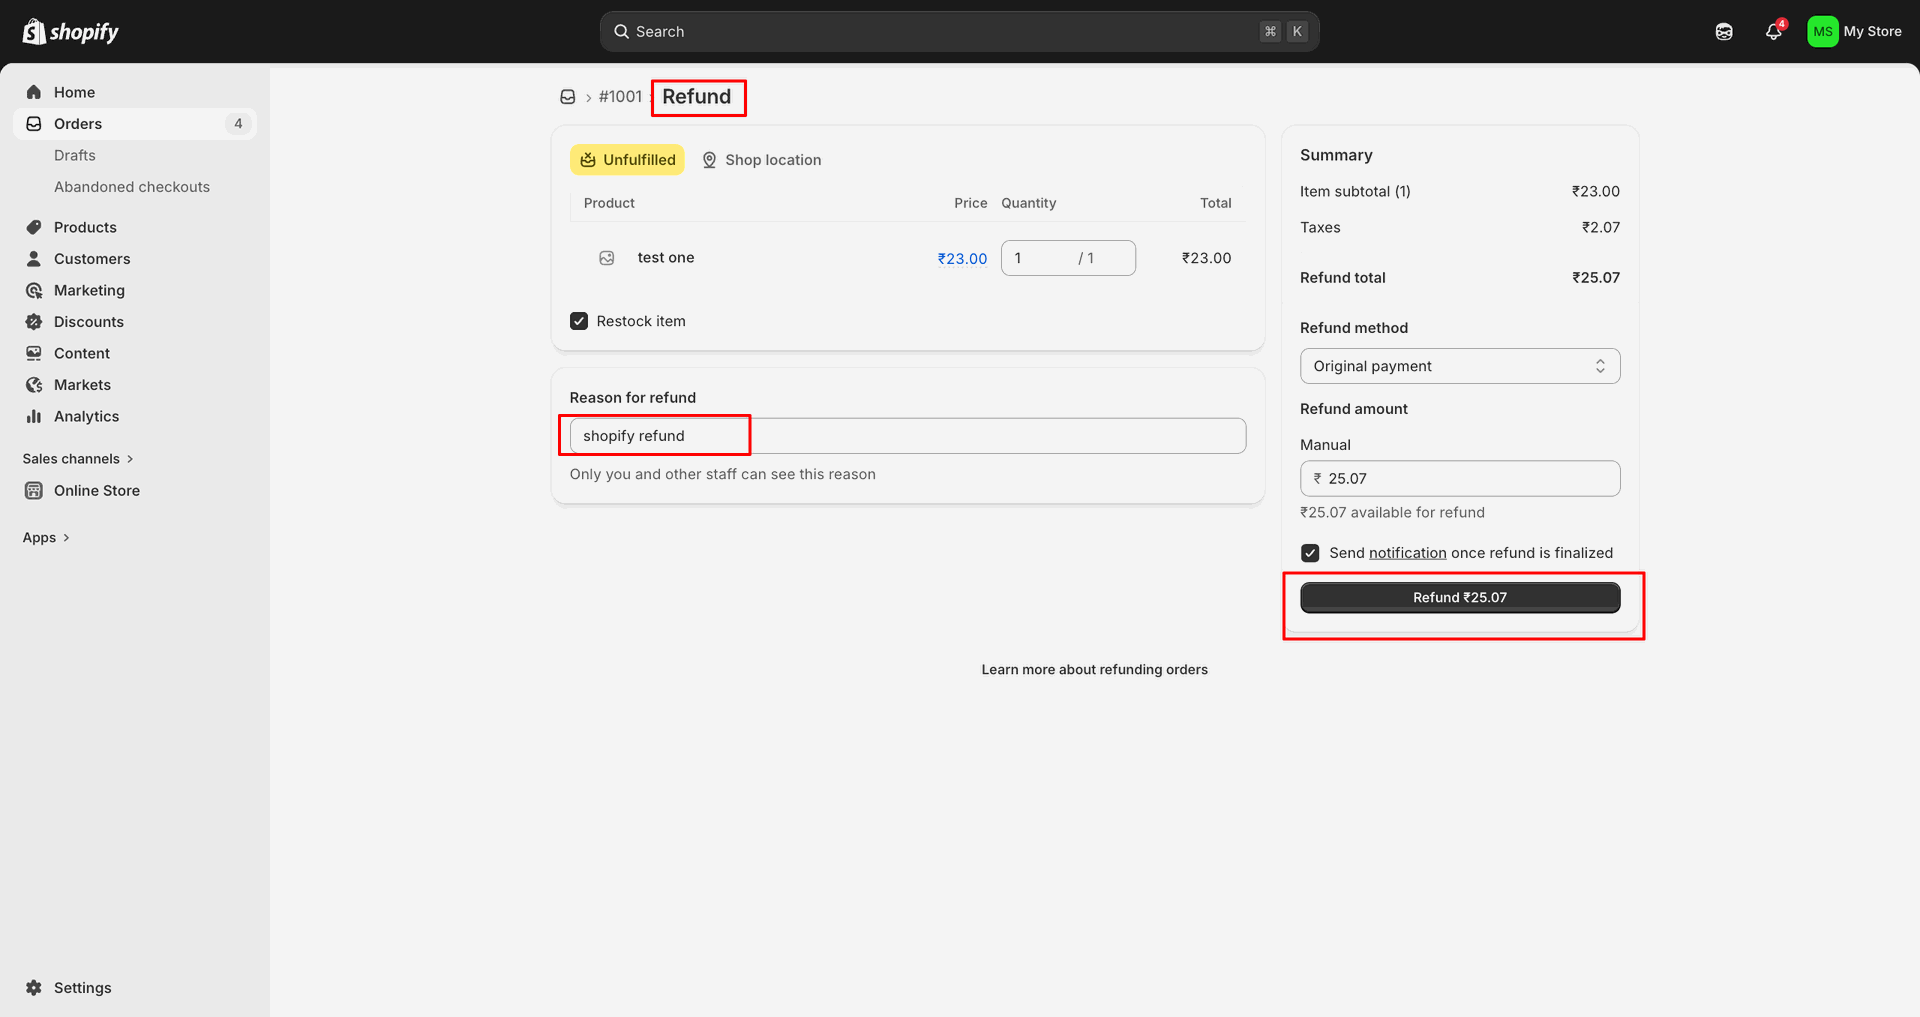
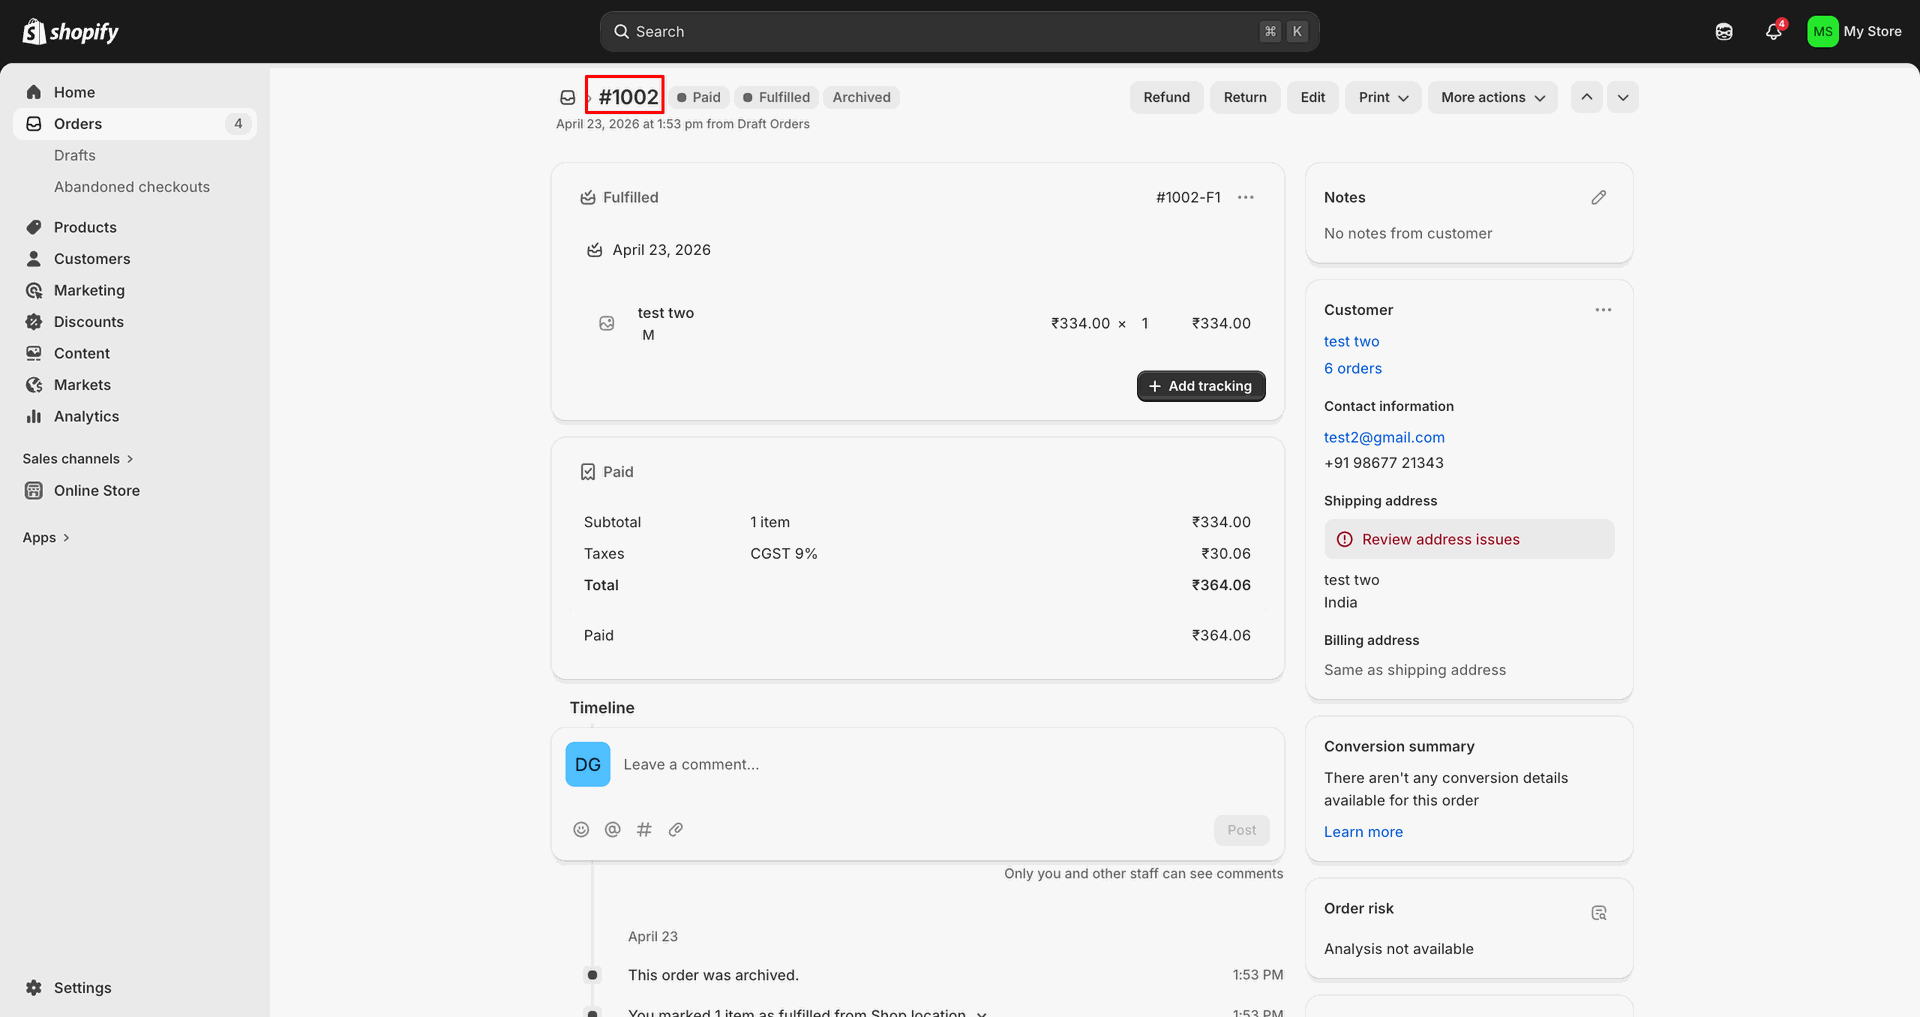
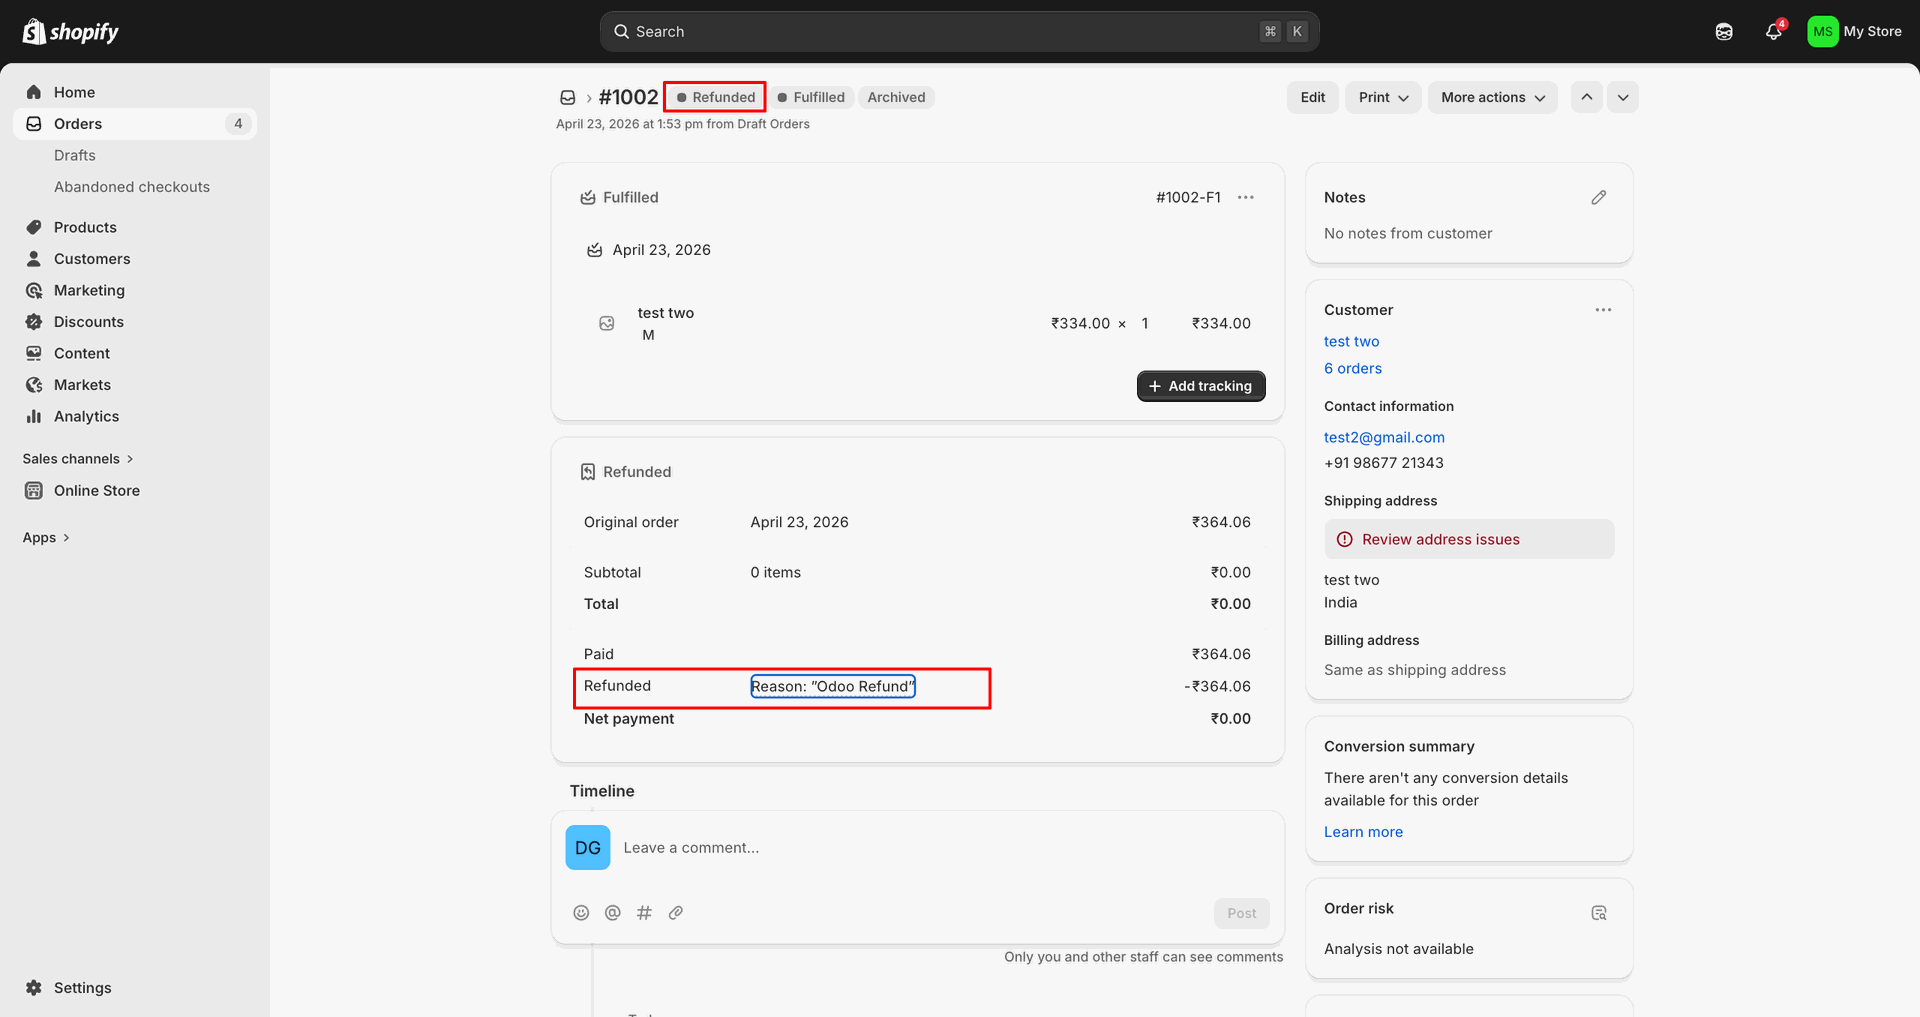
Open the refunded Shopify order to review its order number and status.
Import Refund Orders interface screenshot
Enter the refund reason and click Refund to submit the Shopify return.
Import Refund Orders interface screenshot
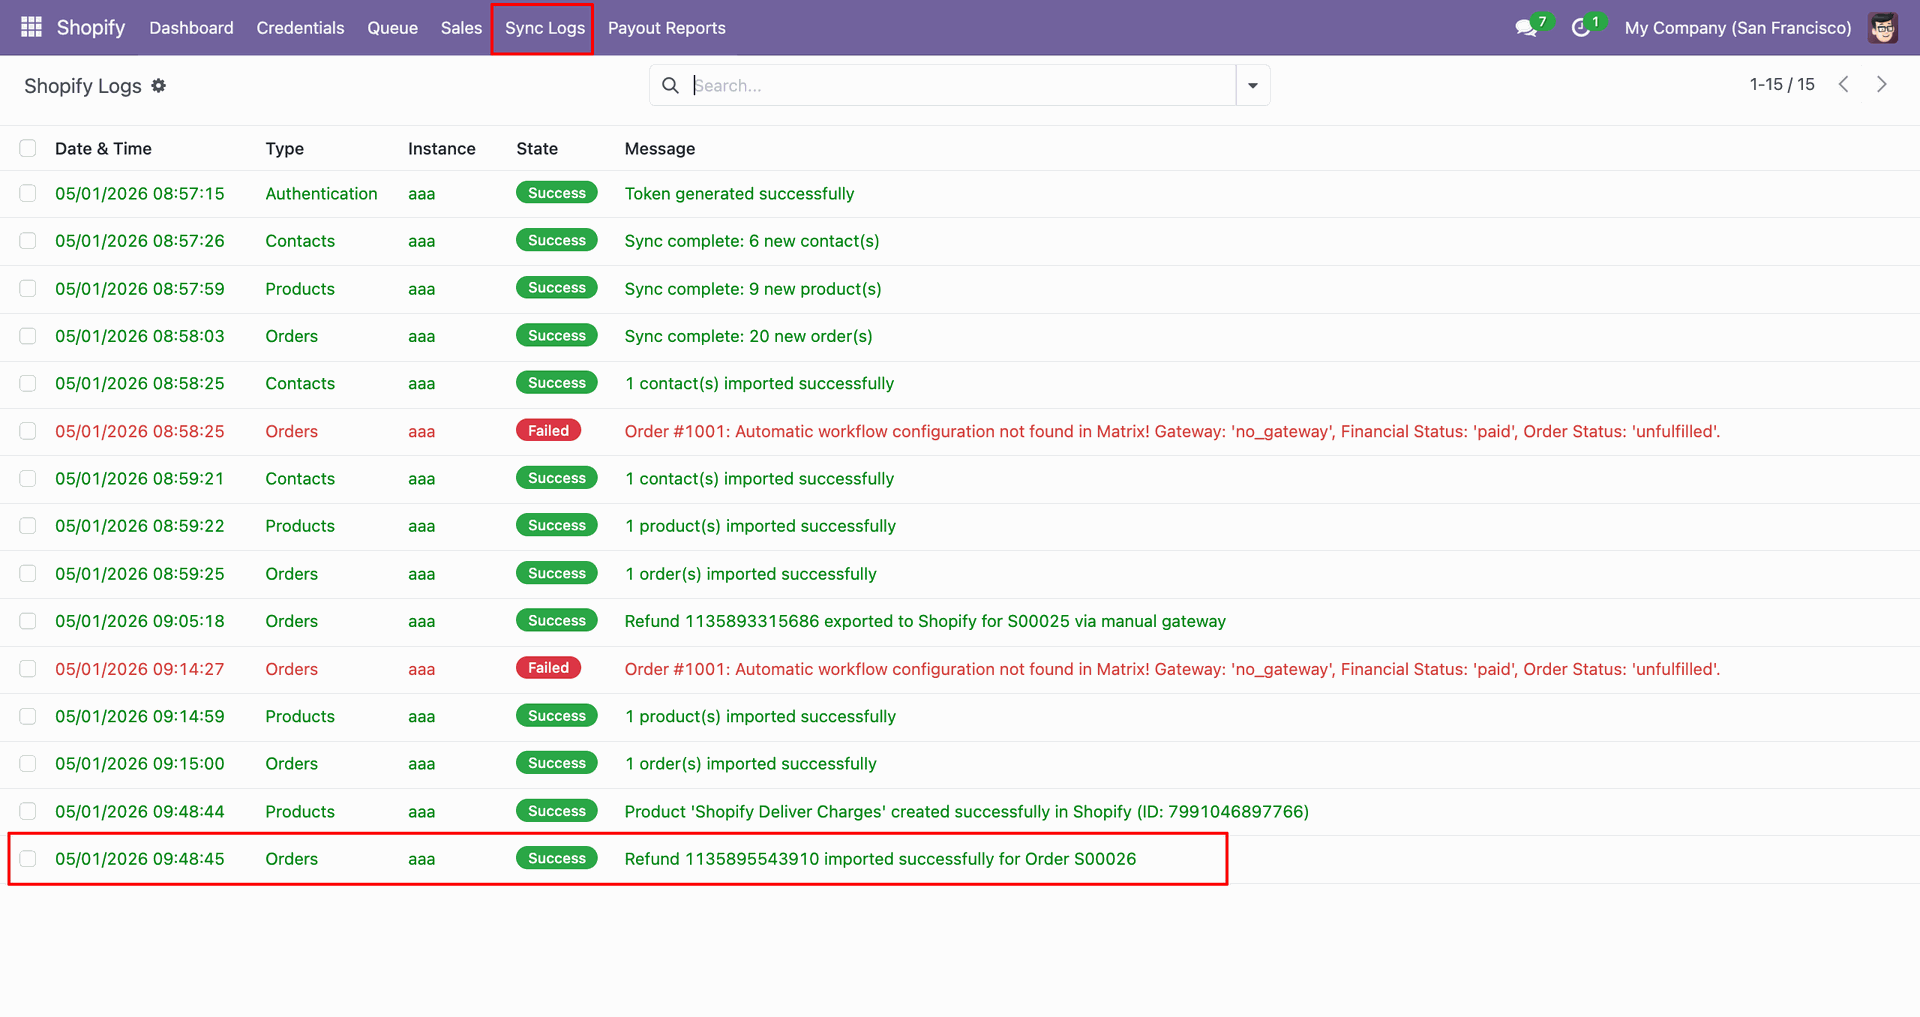
Check Sync Logs to confirm the refund was imported successfully for the order.
Import Refund Orders interface screenshot
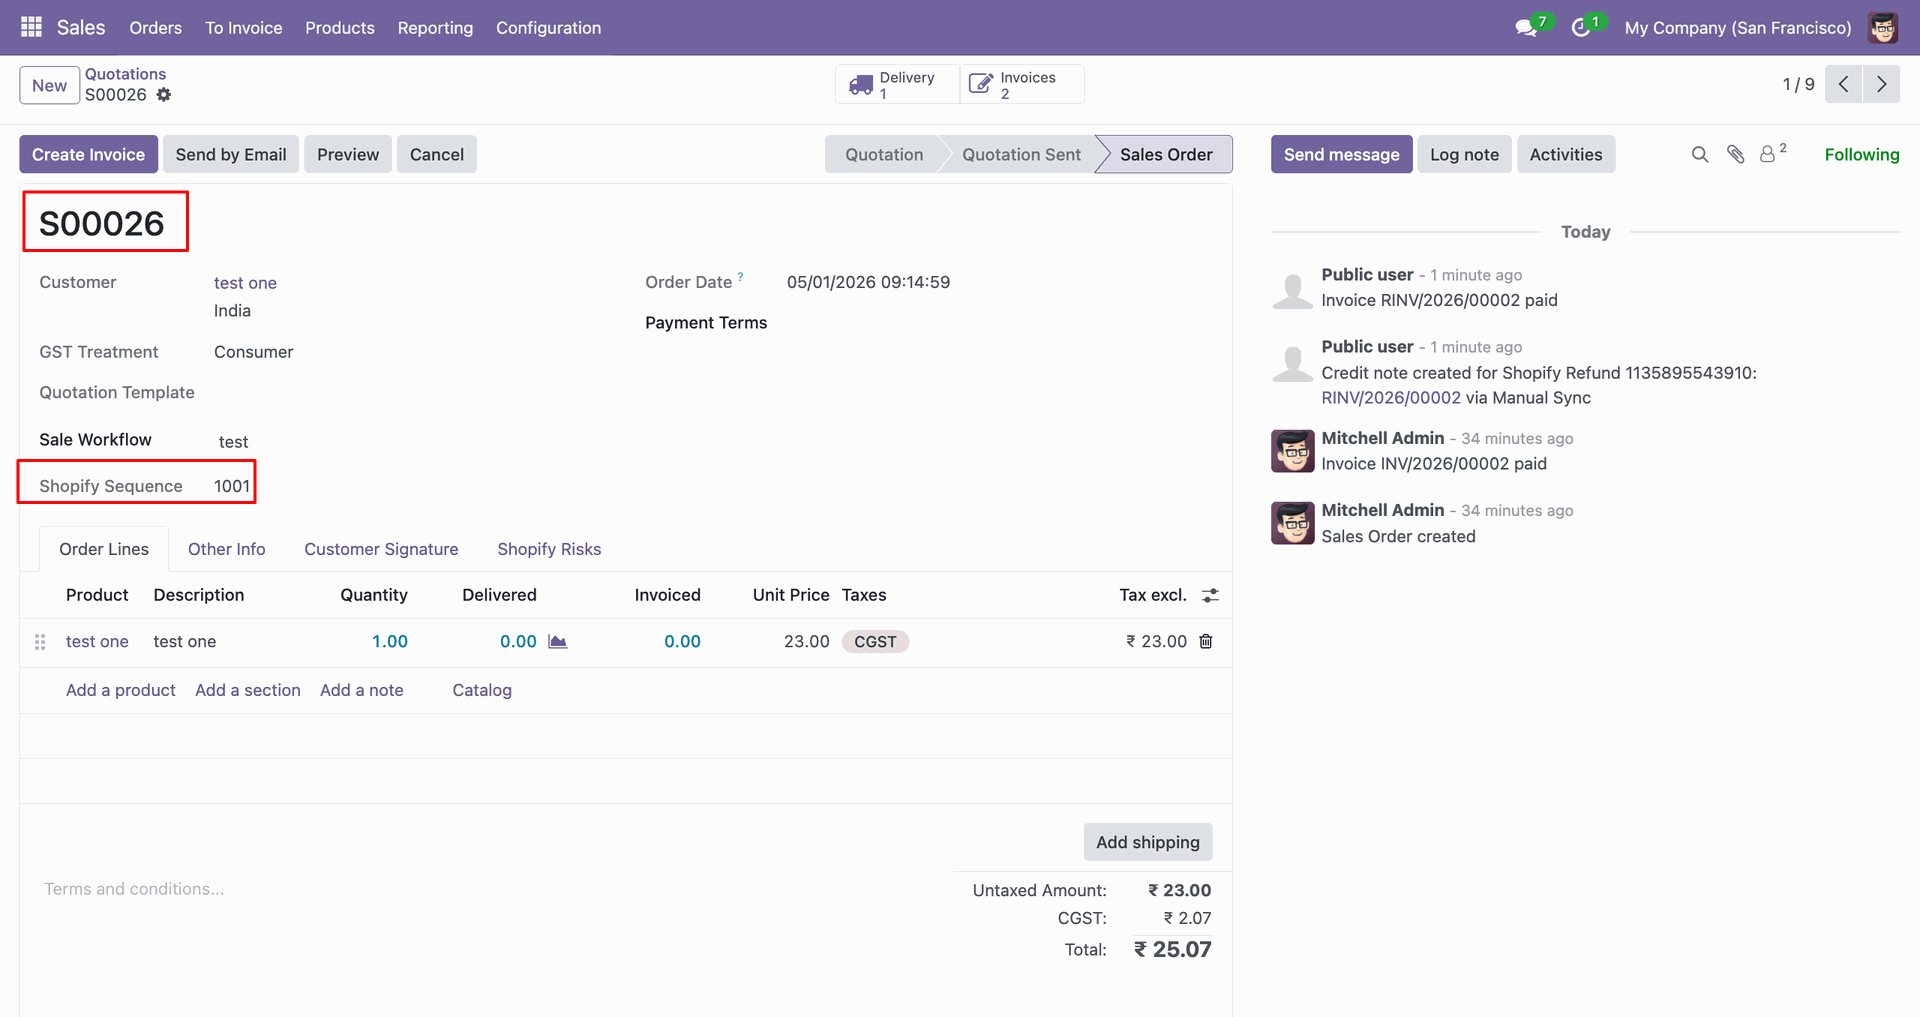
Review the imported sales order and Shopify Sequence created from the refund.
Import Refund Orders interface screenshot
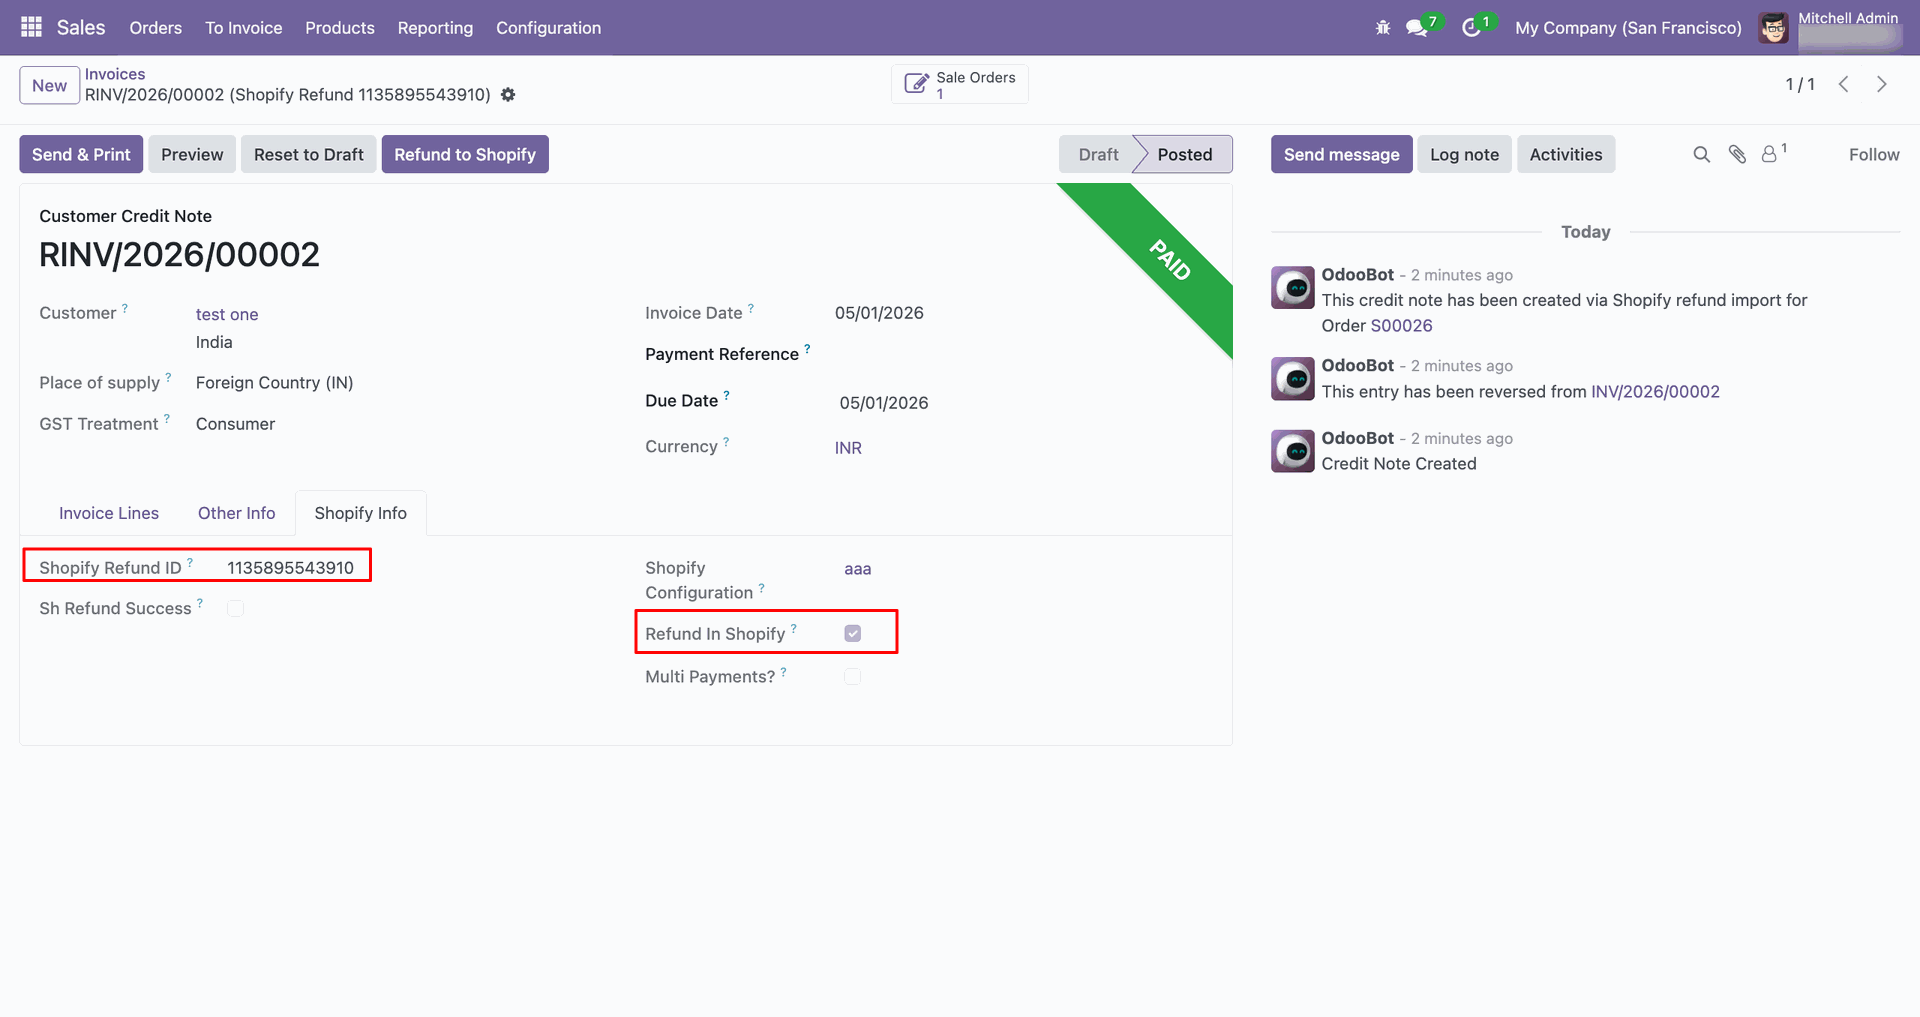
Review the credit note fields showing Shopify Refund ID and Refund in Shopify.
Import Refund Orders interface screenshot

Export Refund Orders

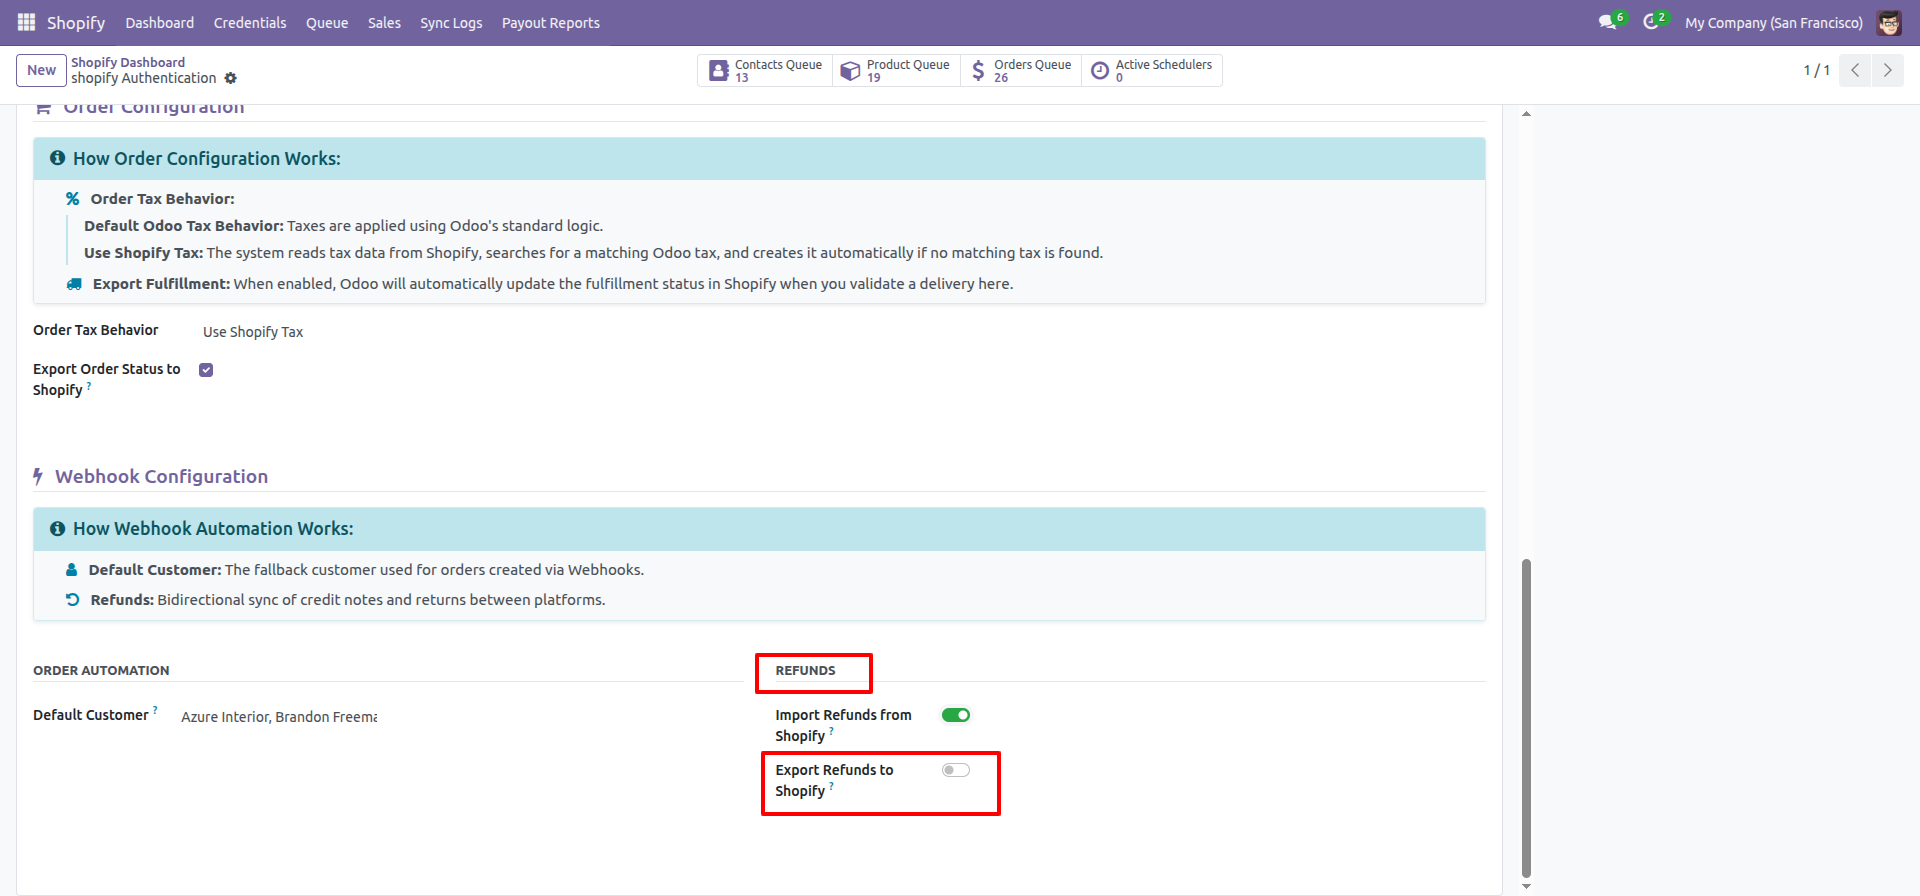
Enable Export Refunds to Shopify in the Refunds section before refund synchronization.
Export Refund Orders interface screenshot
Open the Shopify order that will receive the exported refund details.
Export Refund Orders interface screenshot
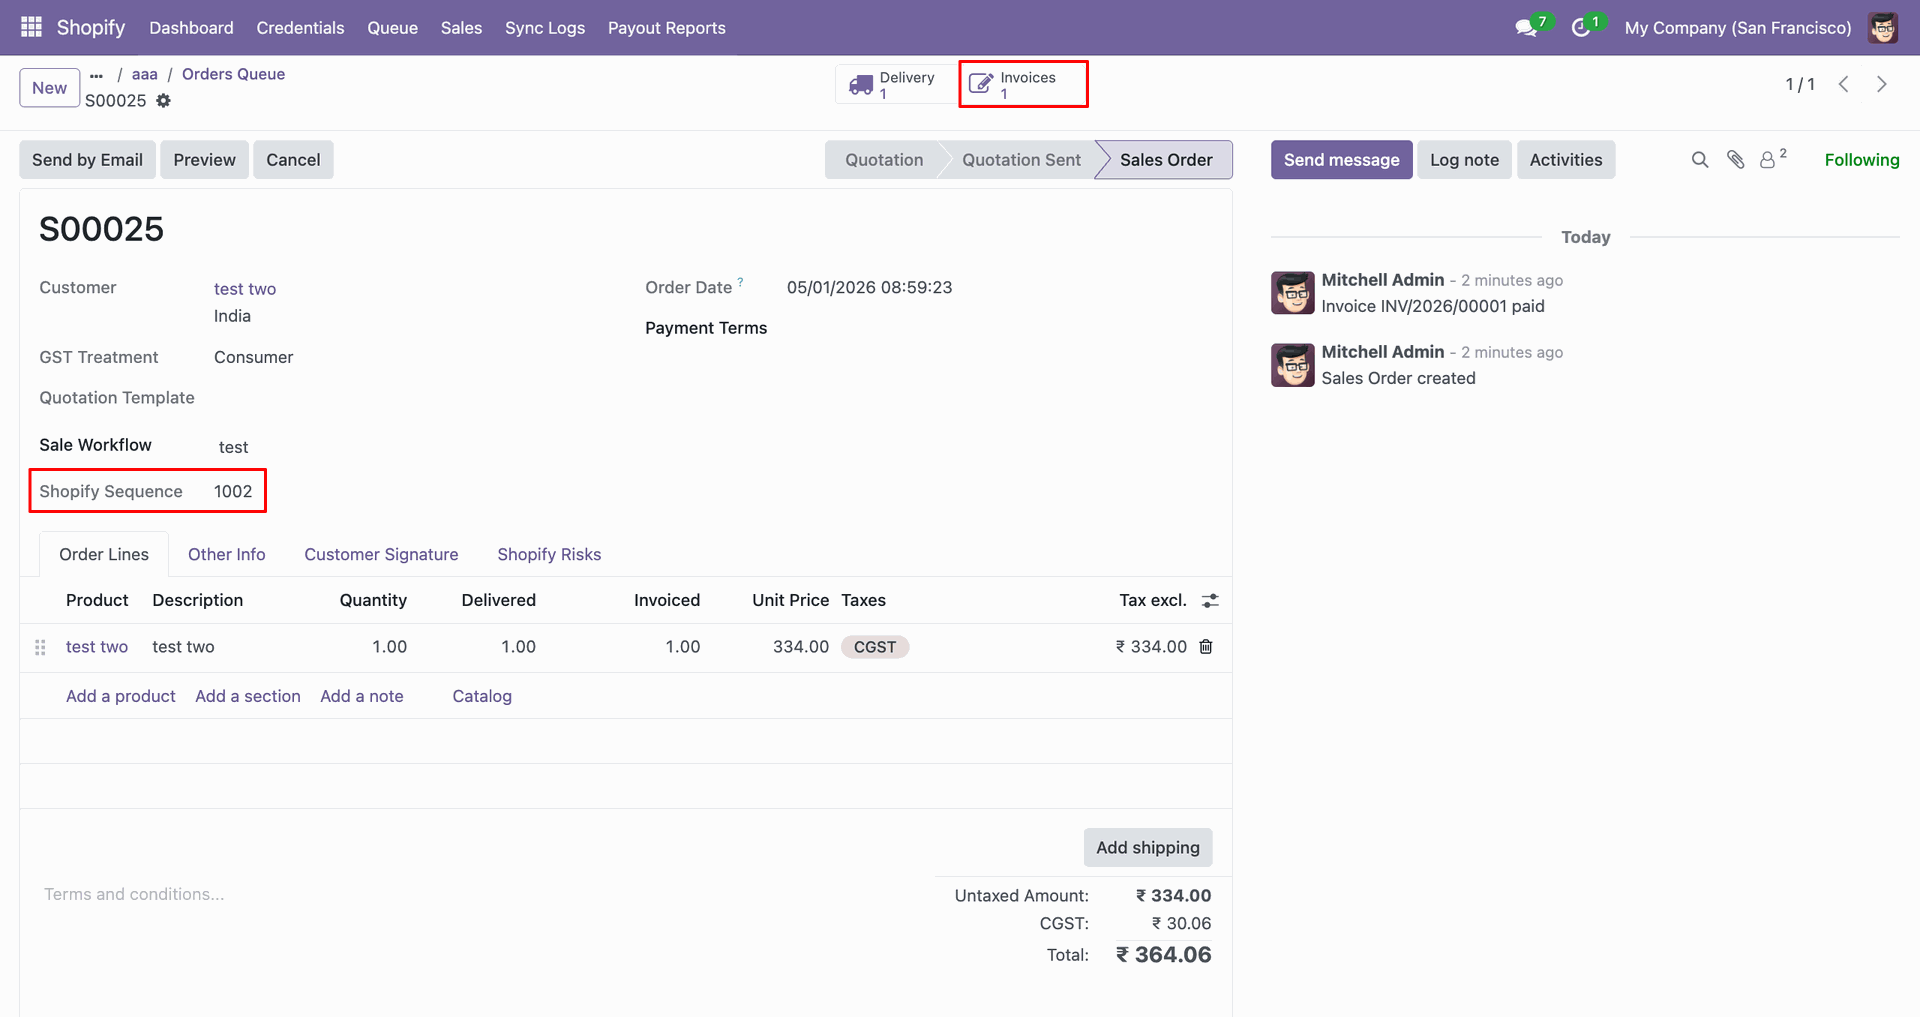
Open the Invoices smart button to create the refund from the sales order.
Export Refund Orders interface screenshot
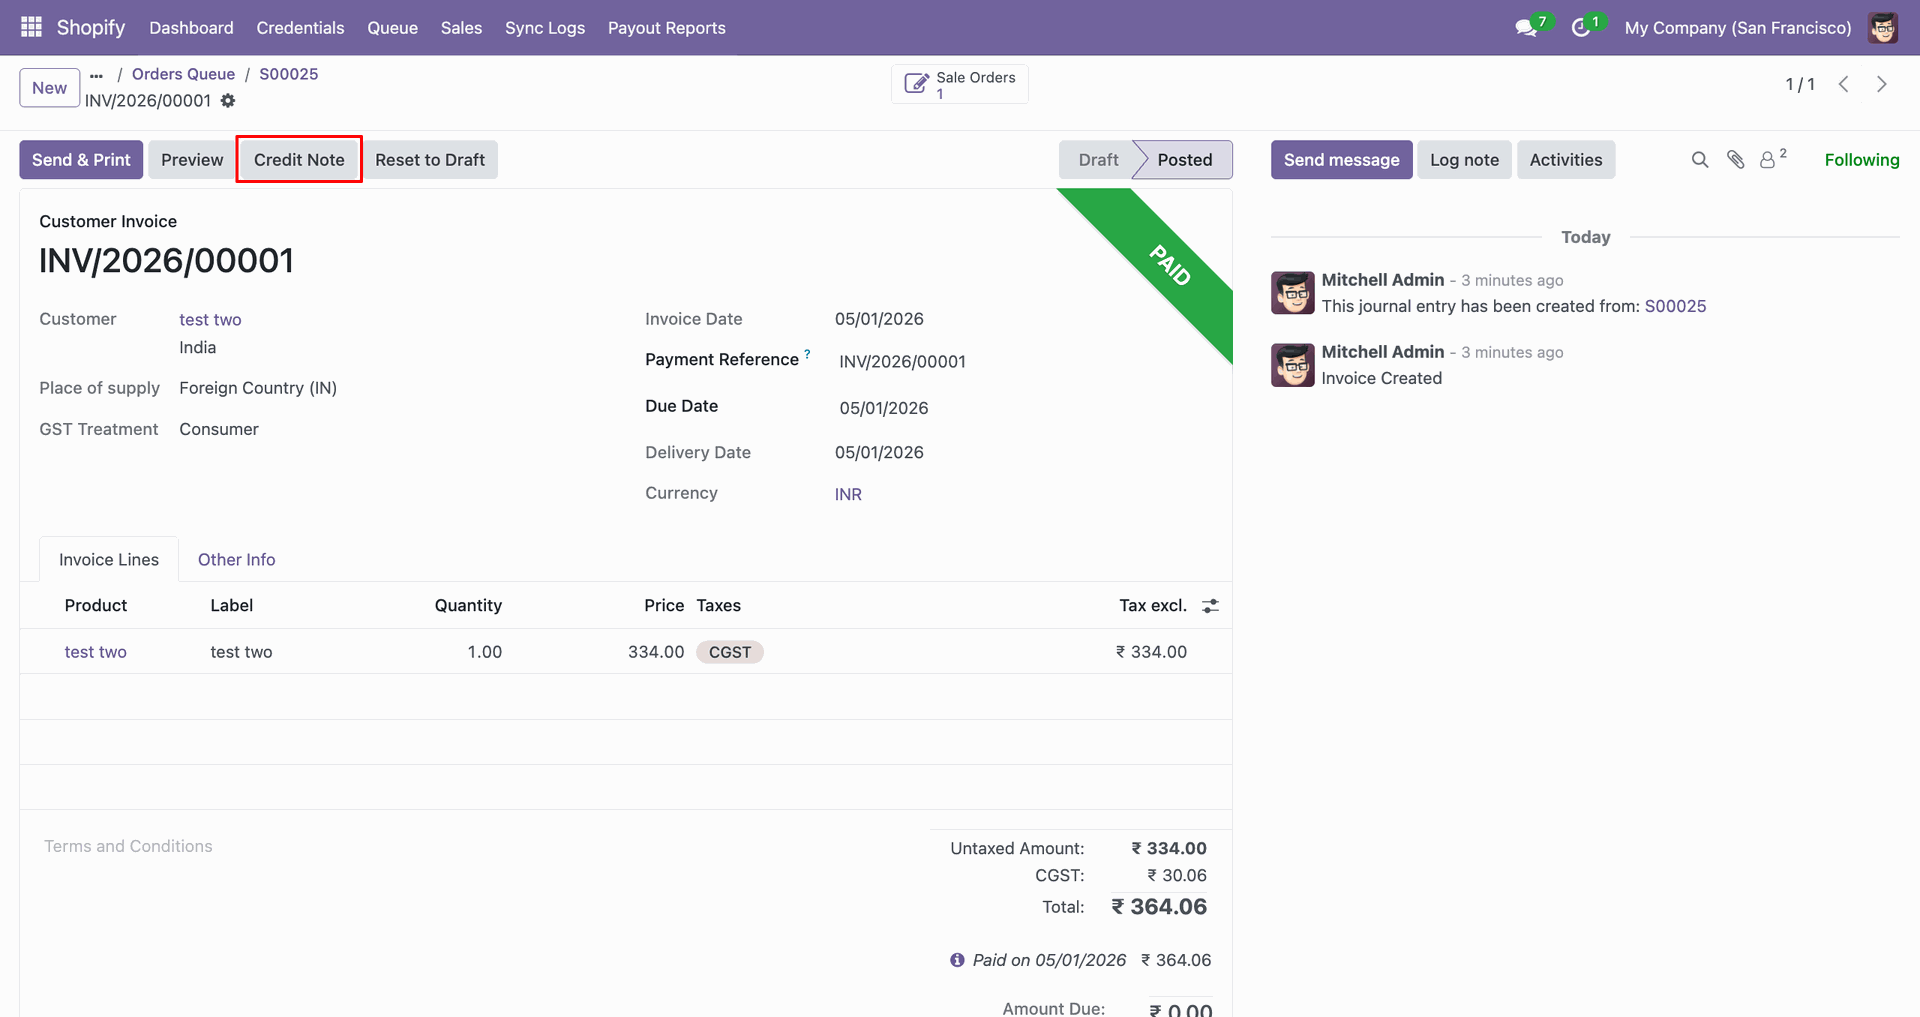
Click Create Note on the invoice to generate the customer credit note.
Export Refund Orders interface screenshot
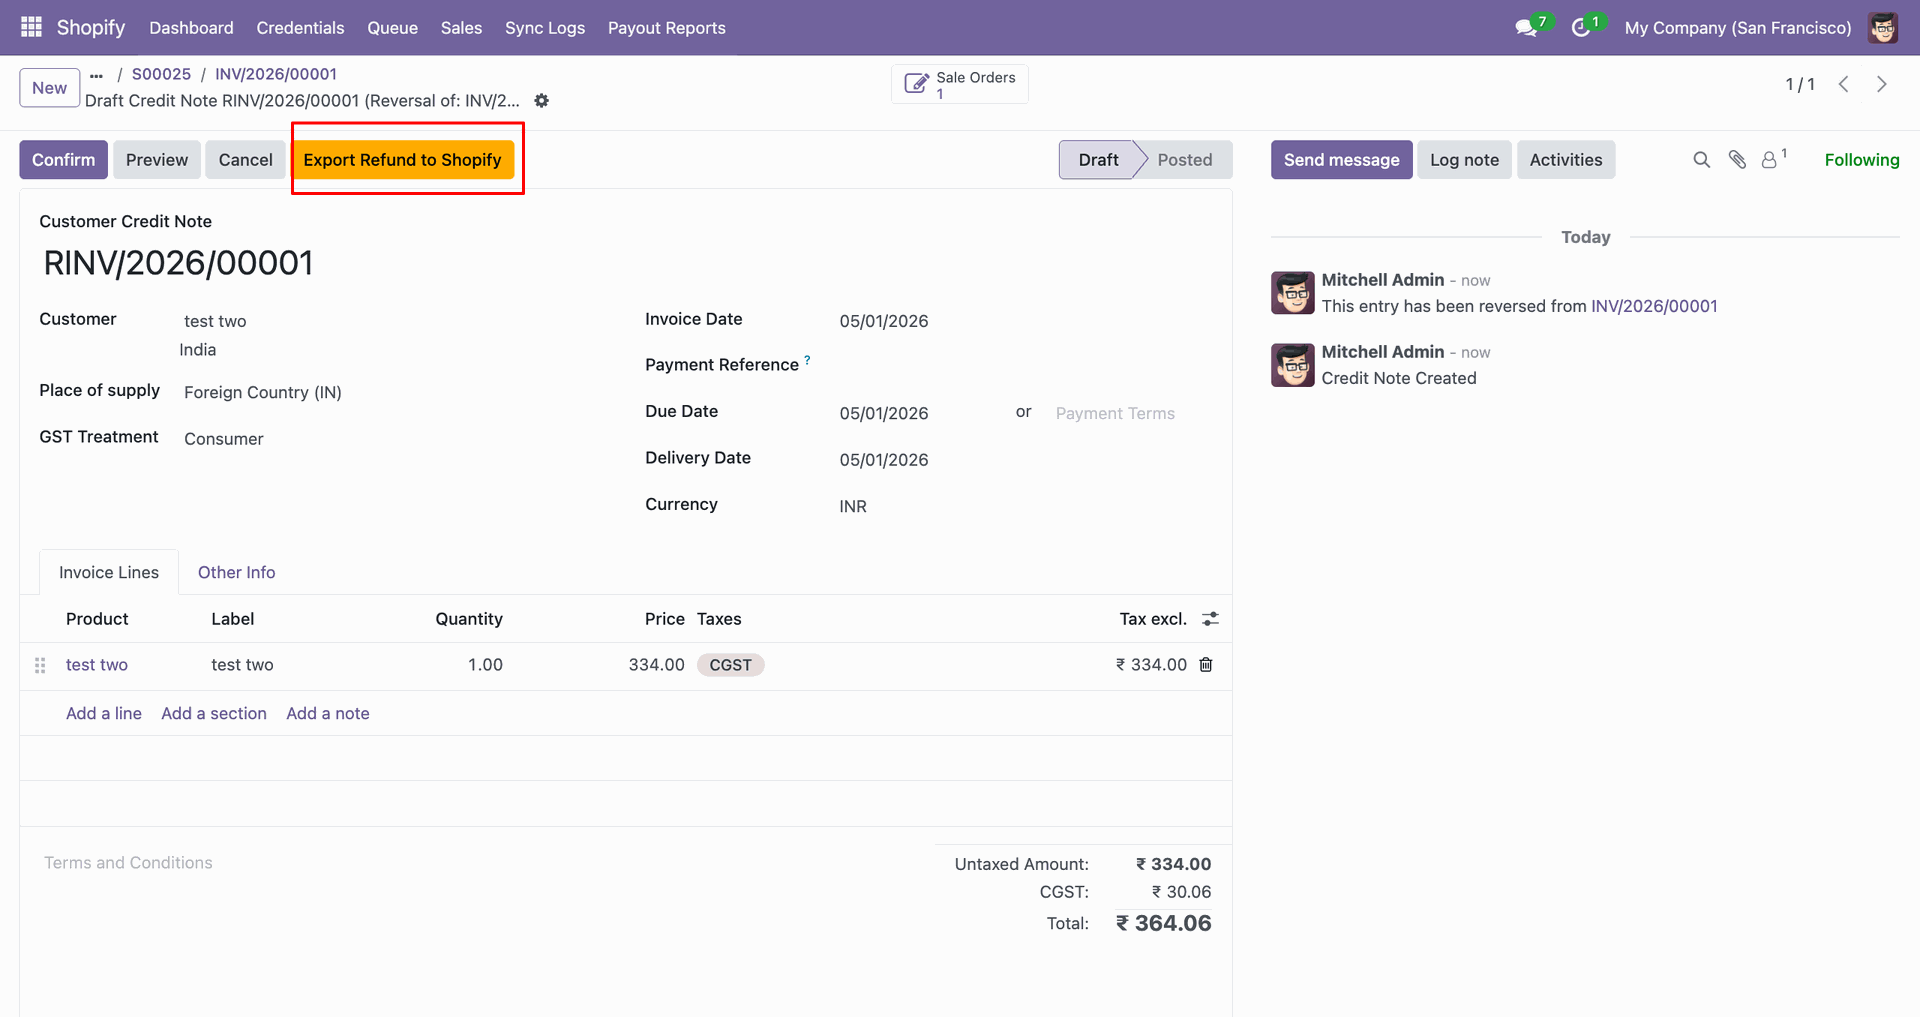
Click Export Refund to Shopify on the credit note to continue.
Export Refund Orders interface screenshot
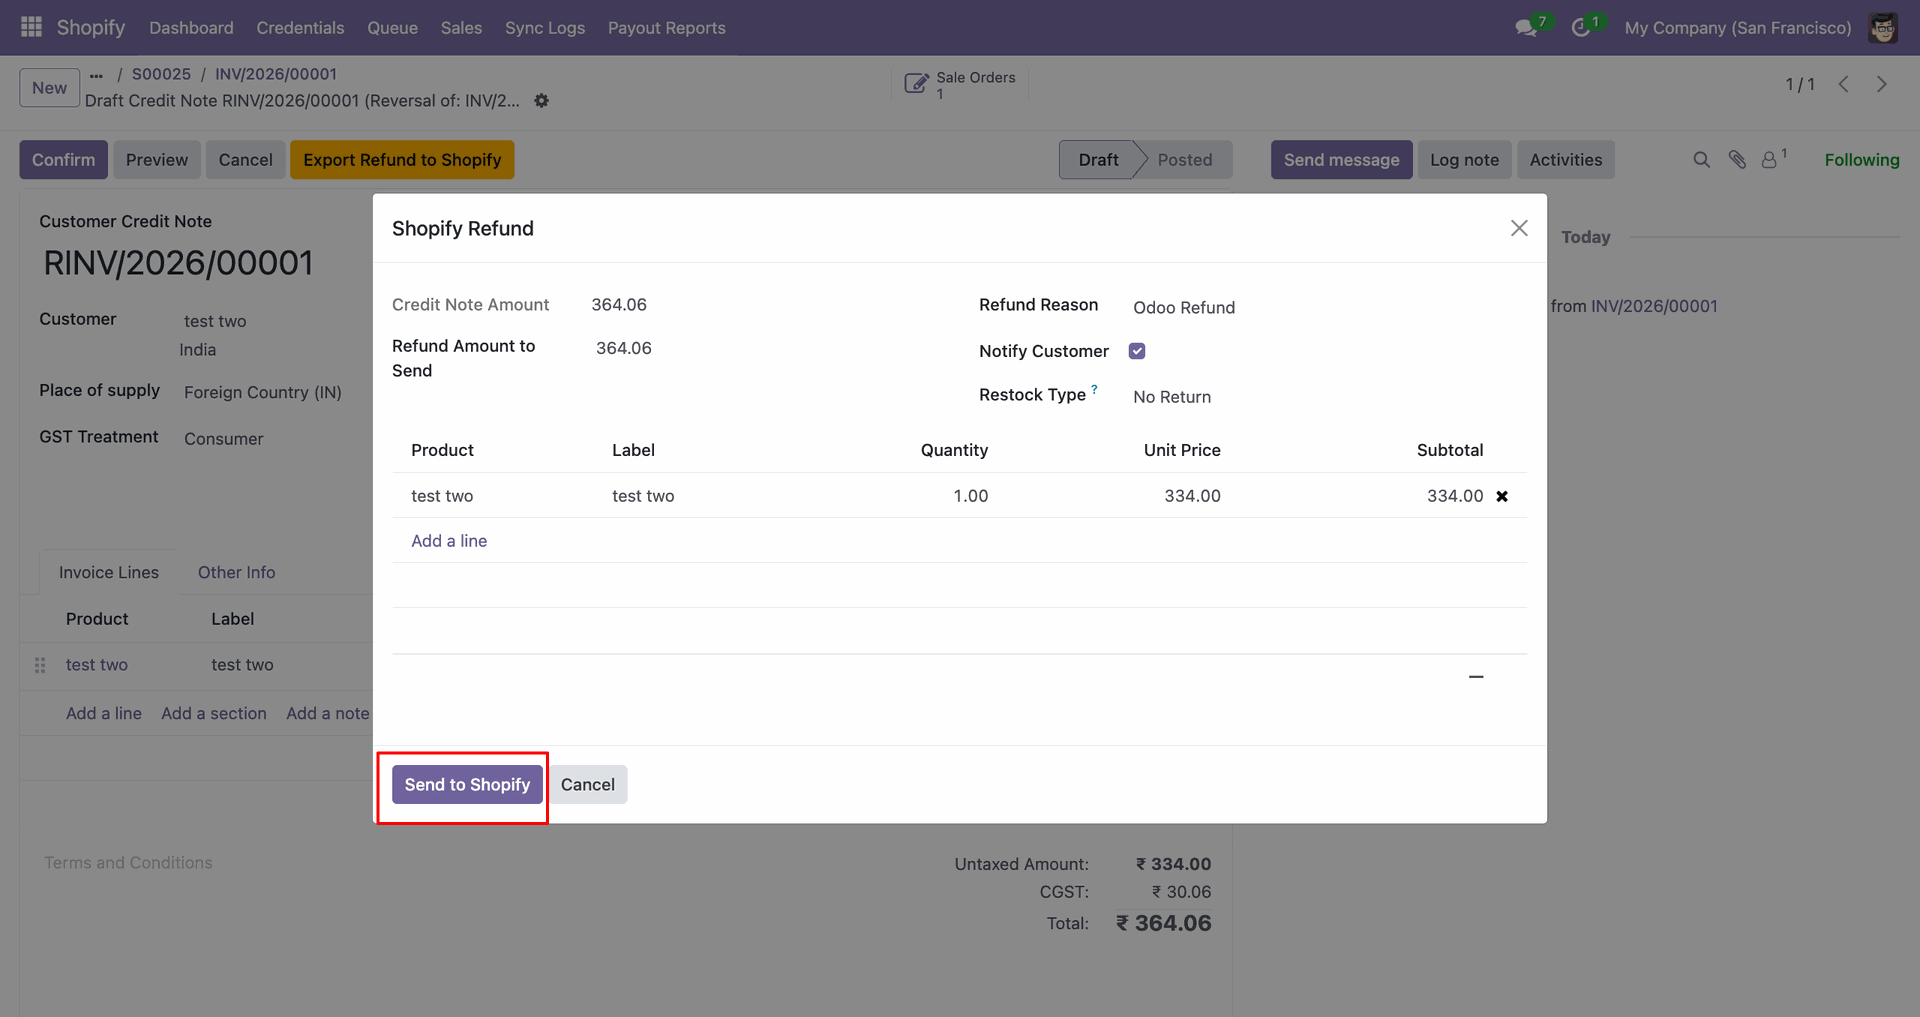
Review the Shopify Refund popup, then click Send to Shopify.
Export Refund Orders interface screenshot
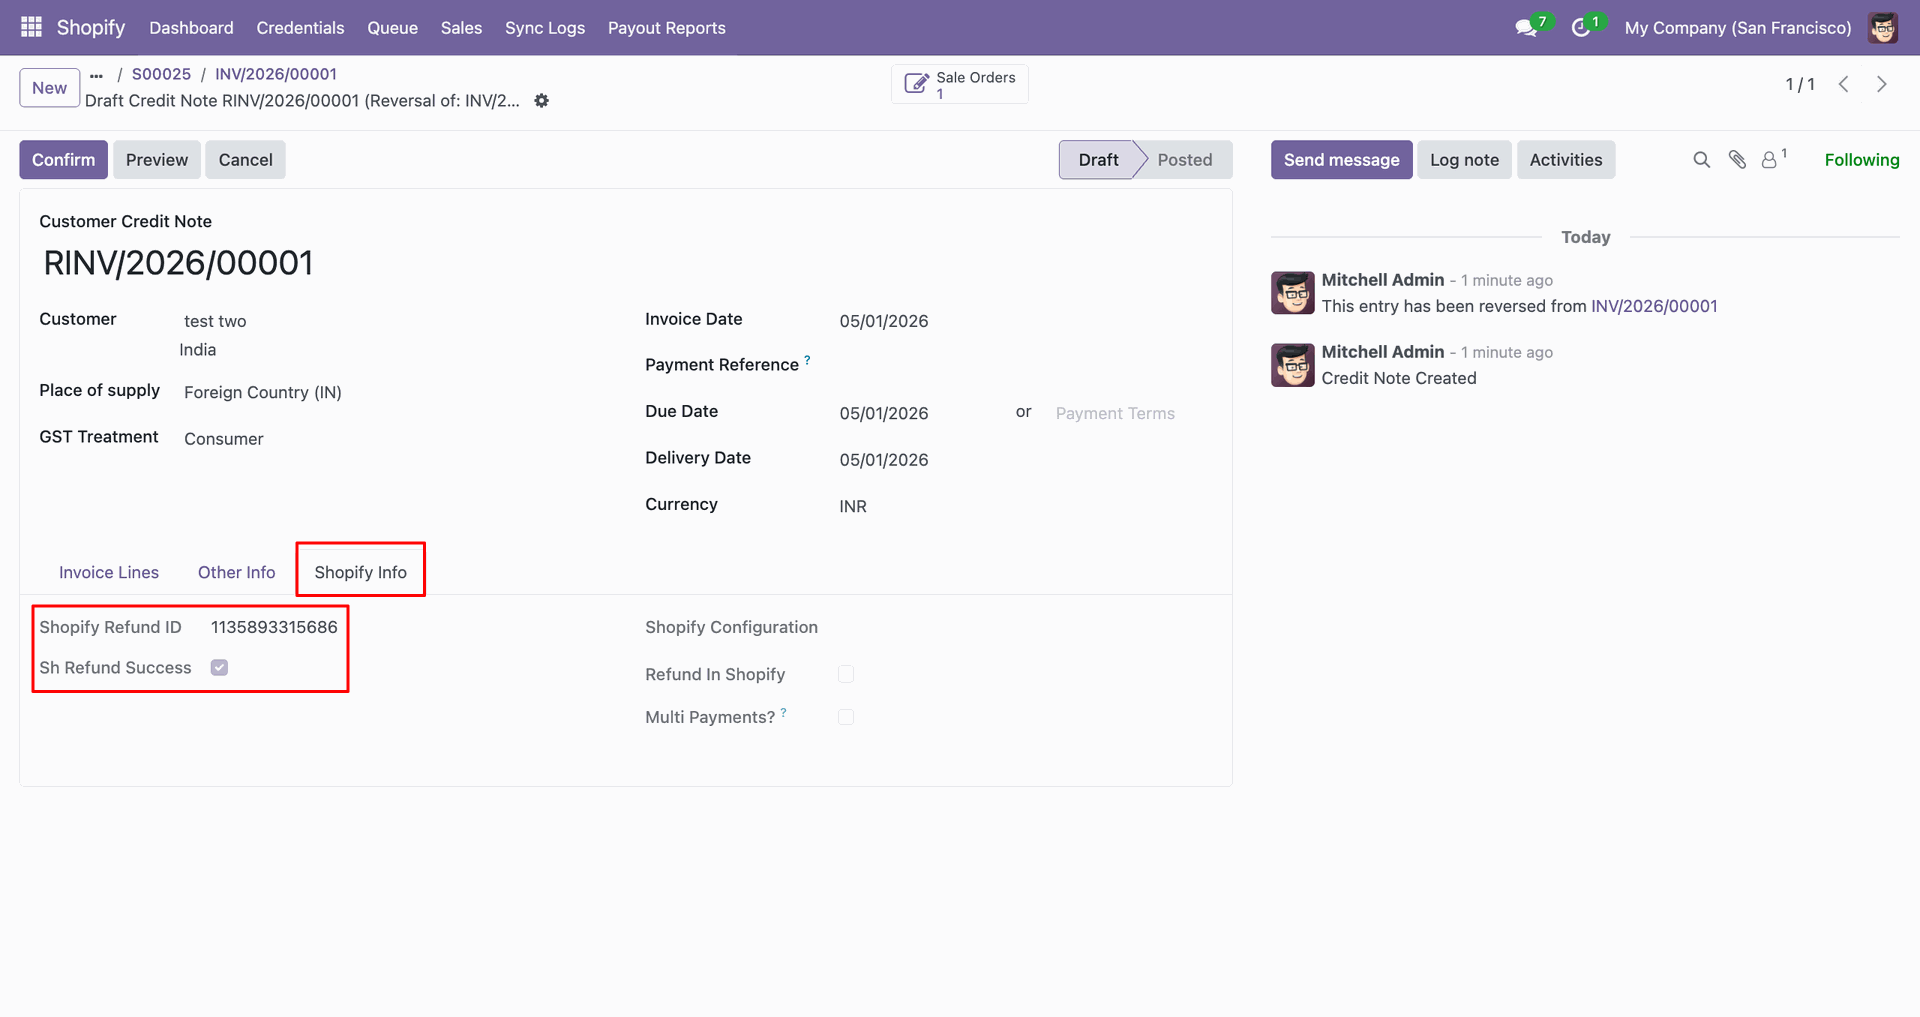
Review the Shopify Info tab to confirm refund IDs and status fields.
Export Refund Orders interface screenshot
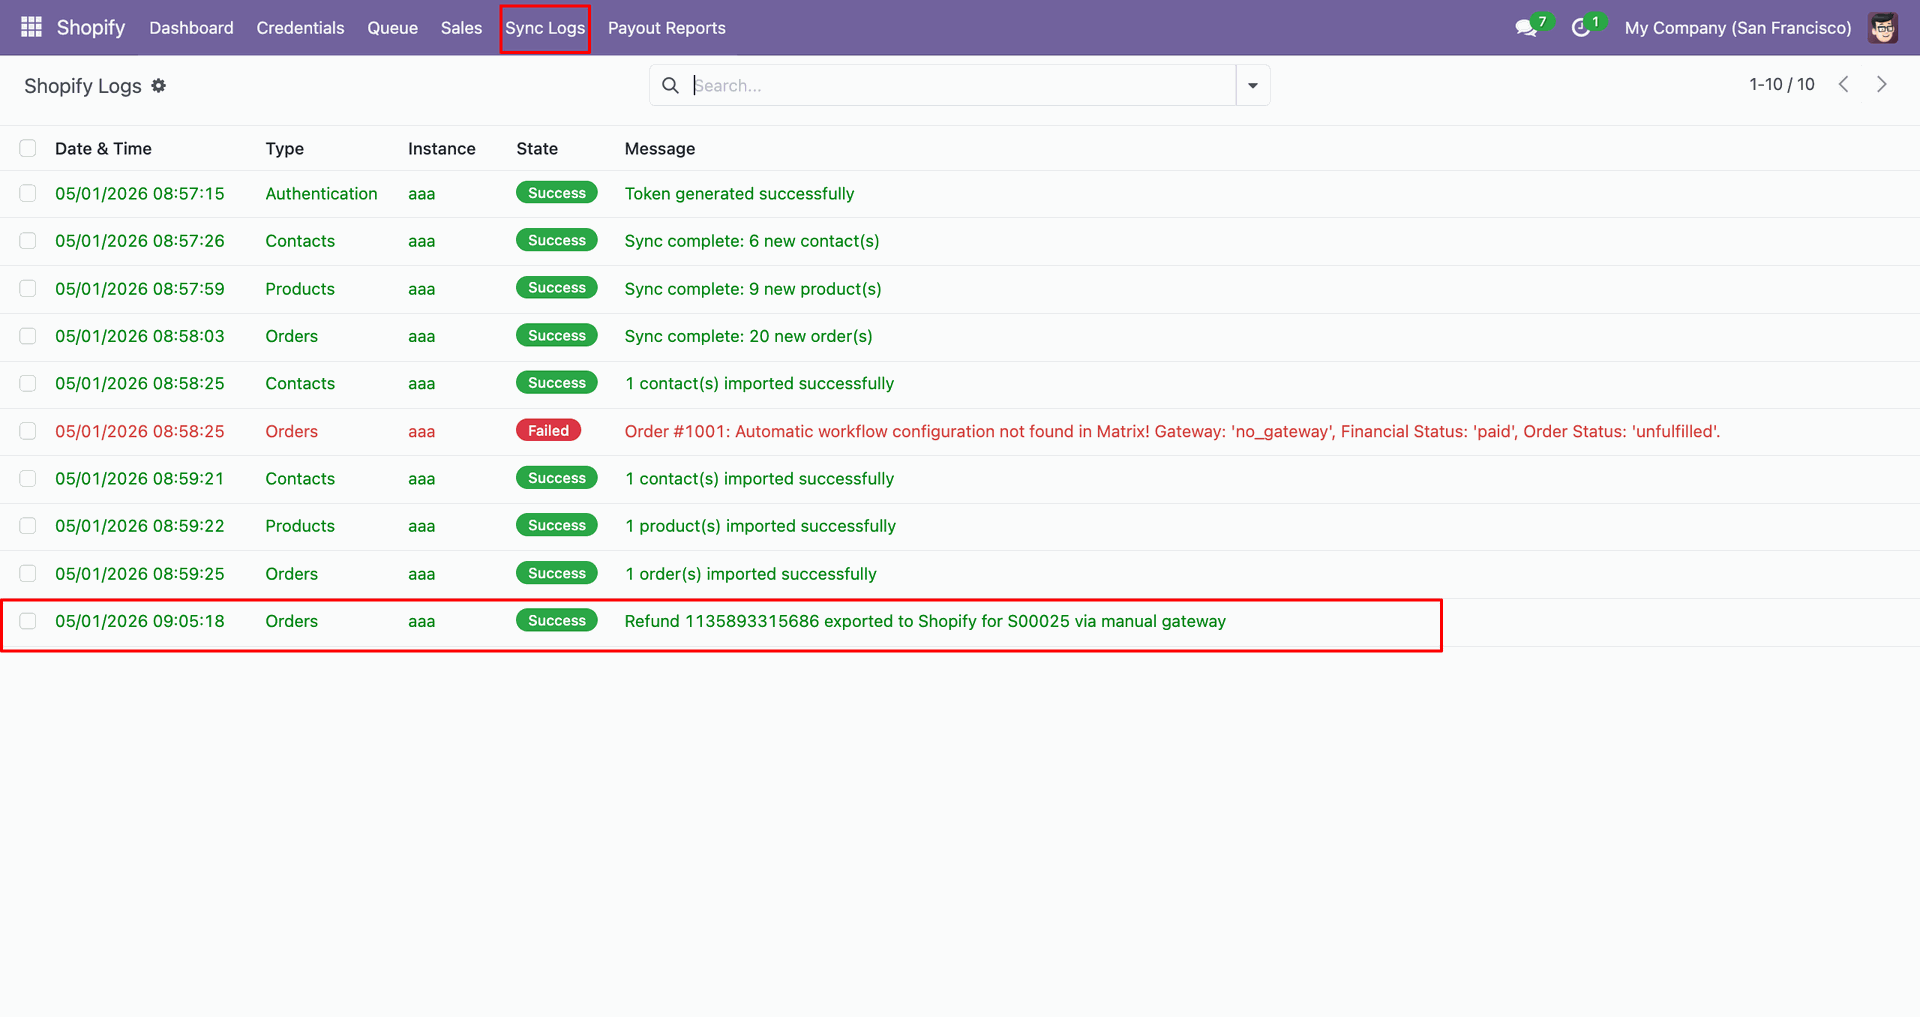
Check Sync Logs to confirm the refund was exported successfully to Shopify.
Export Refund Orders interface screenshot
Verify the refunded Shopify order shows the refund reason and amount.
Export Refund Orders interface screenshot

Contacts Create/Update using Webhook
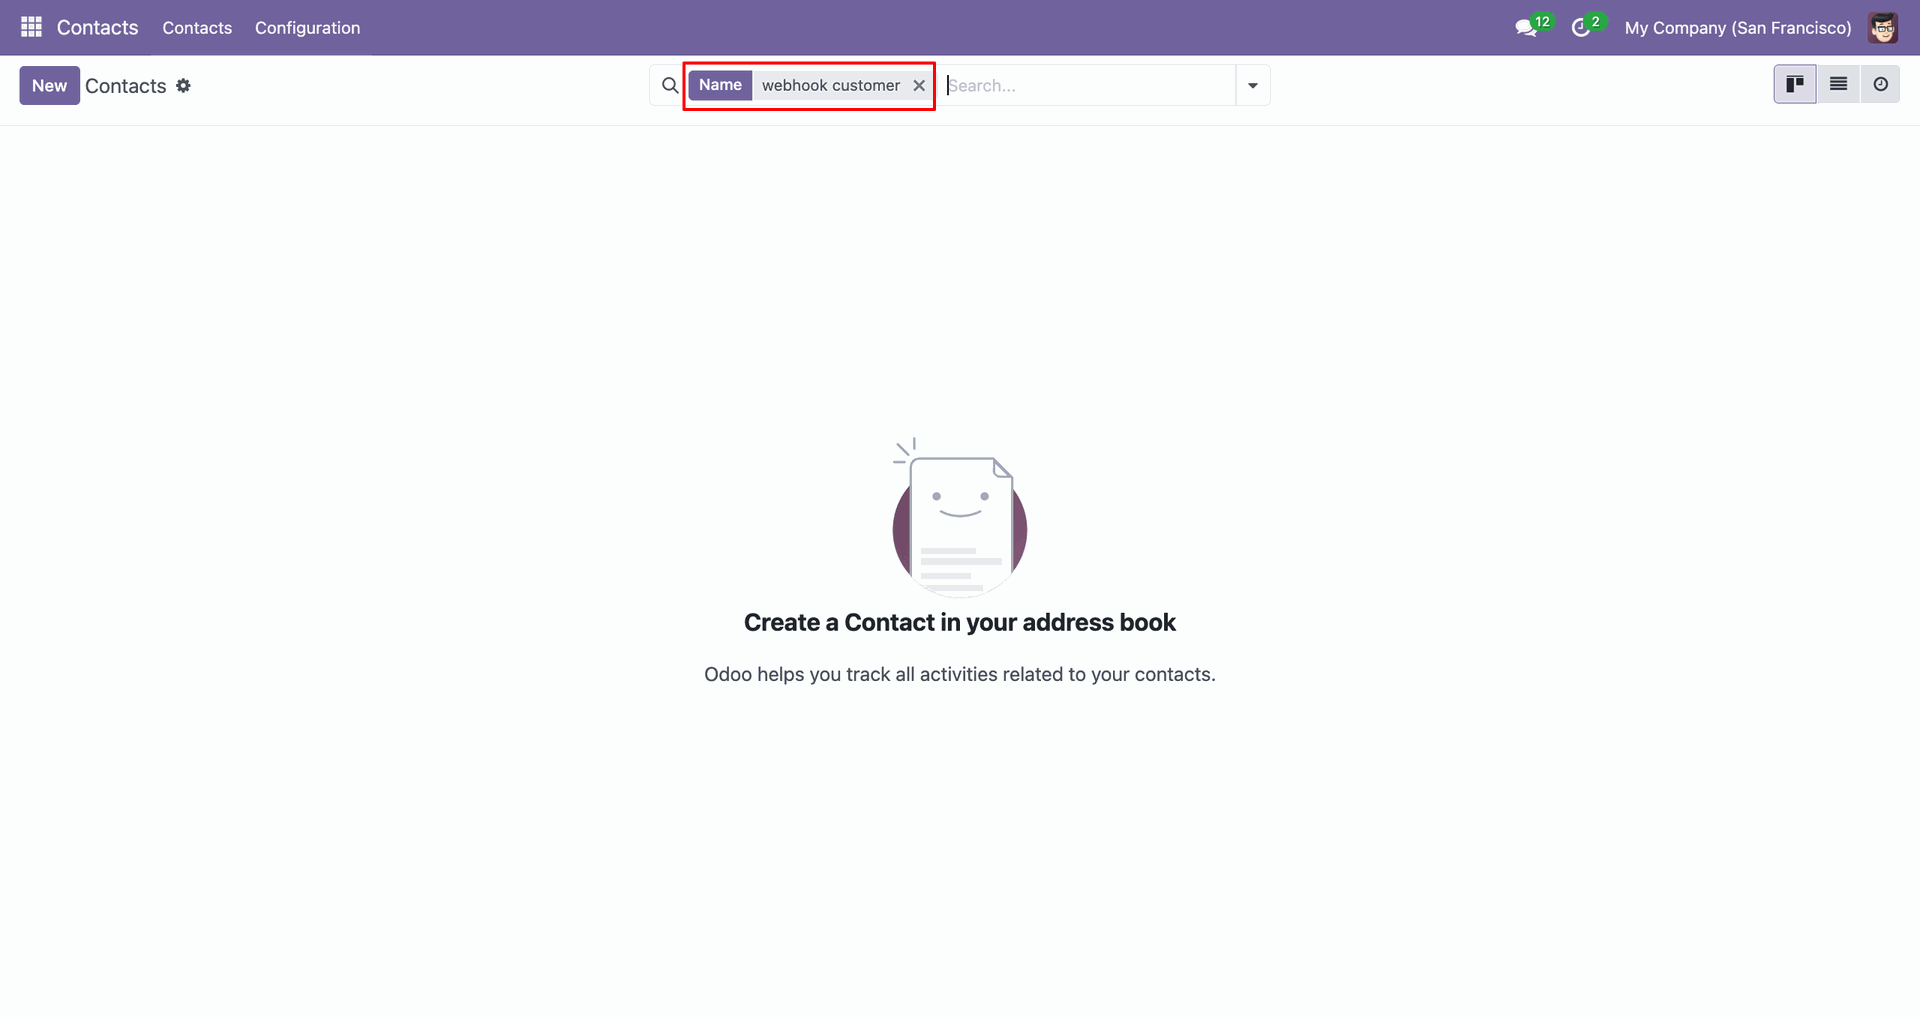
Use the Name search filter to find the webhook customer contact.
Contacts Create/Update using Webhook interface screenshot
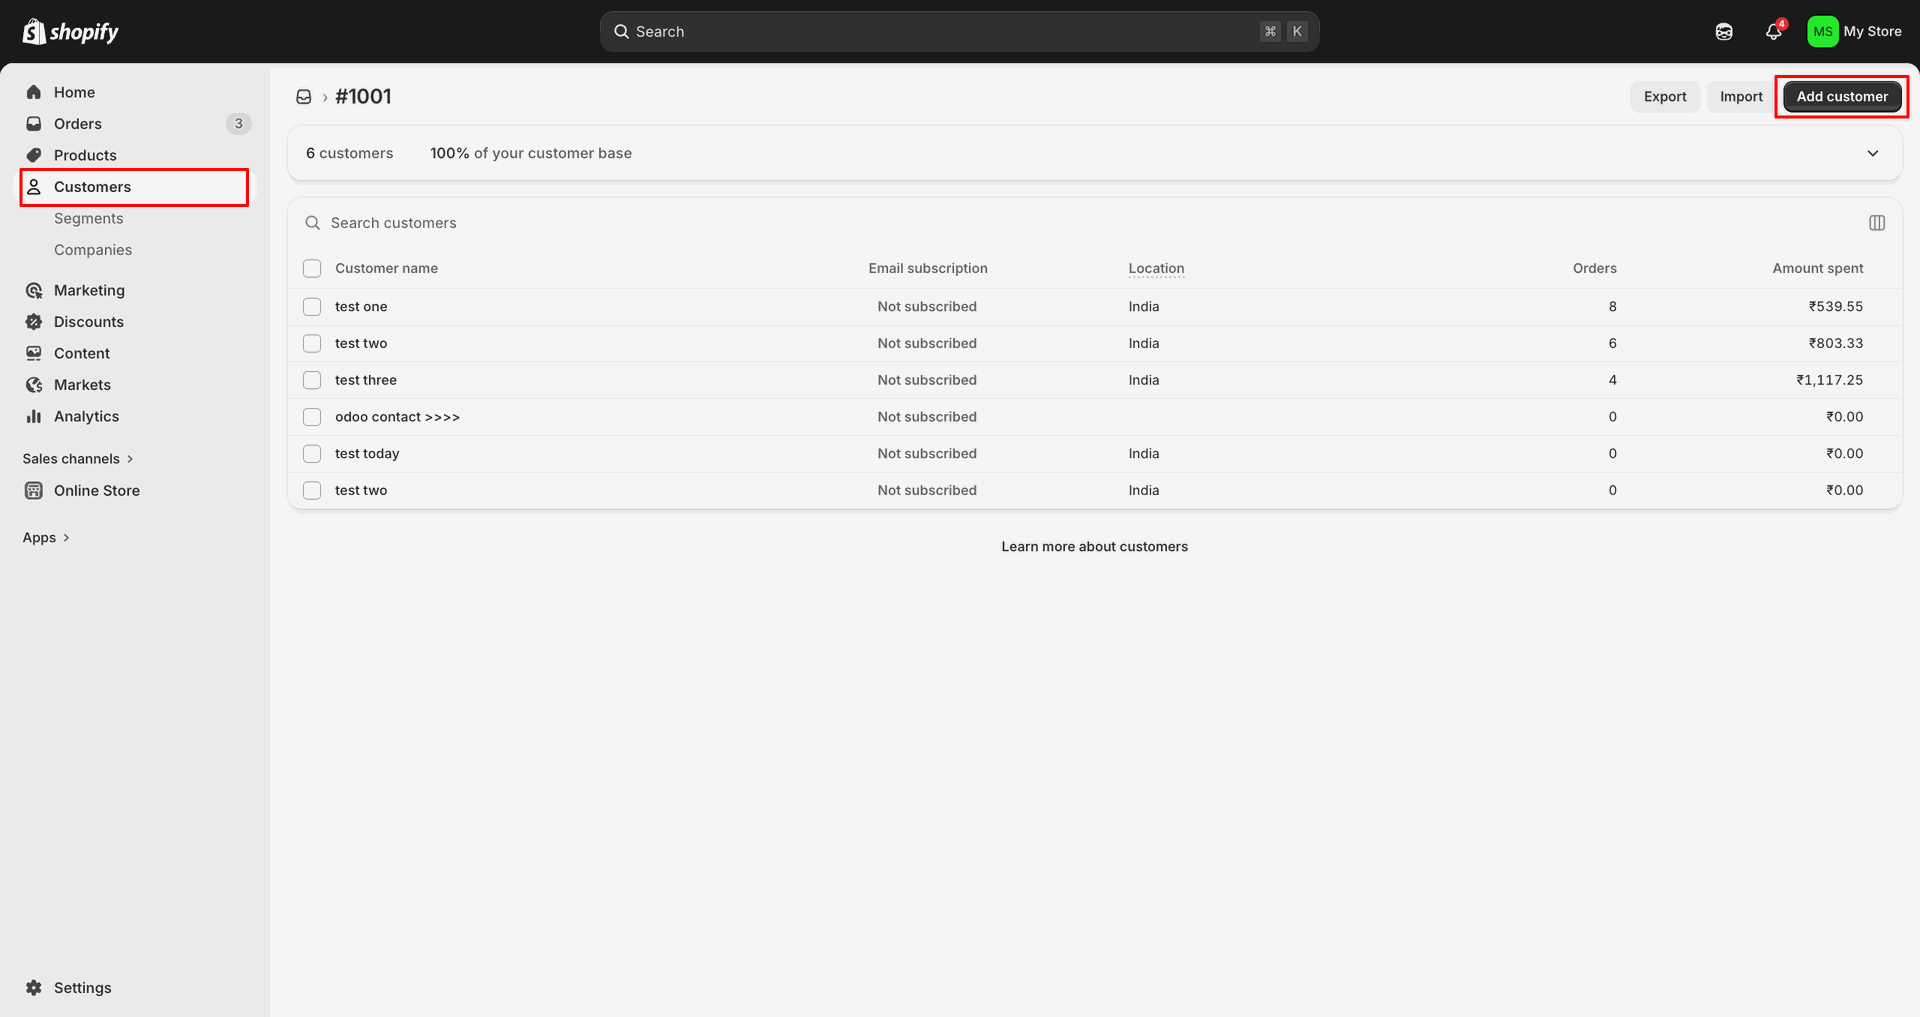
Click Add customer in Shopify to create a new customer record.
Contacts Create/Update using Webhook interface screenshot
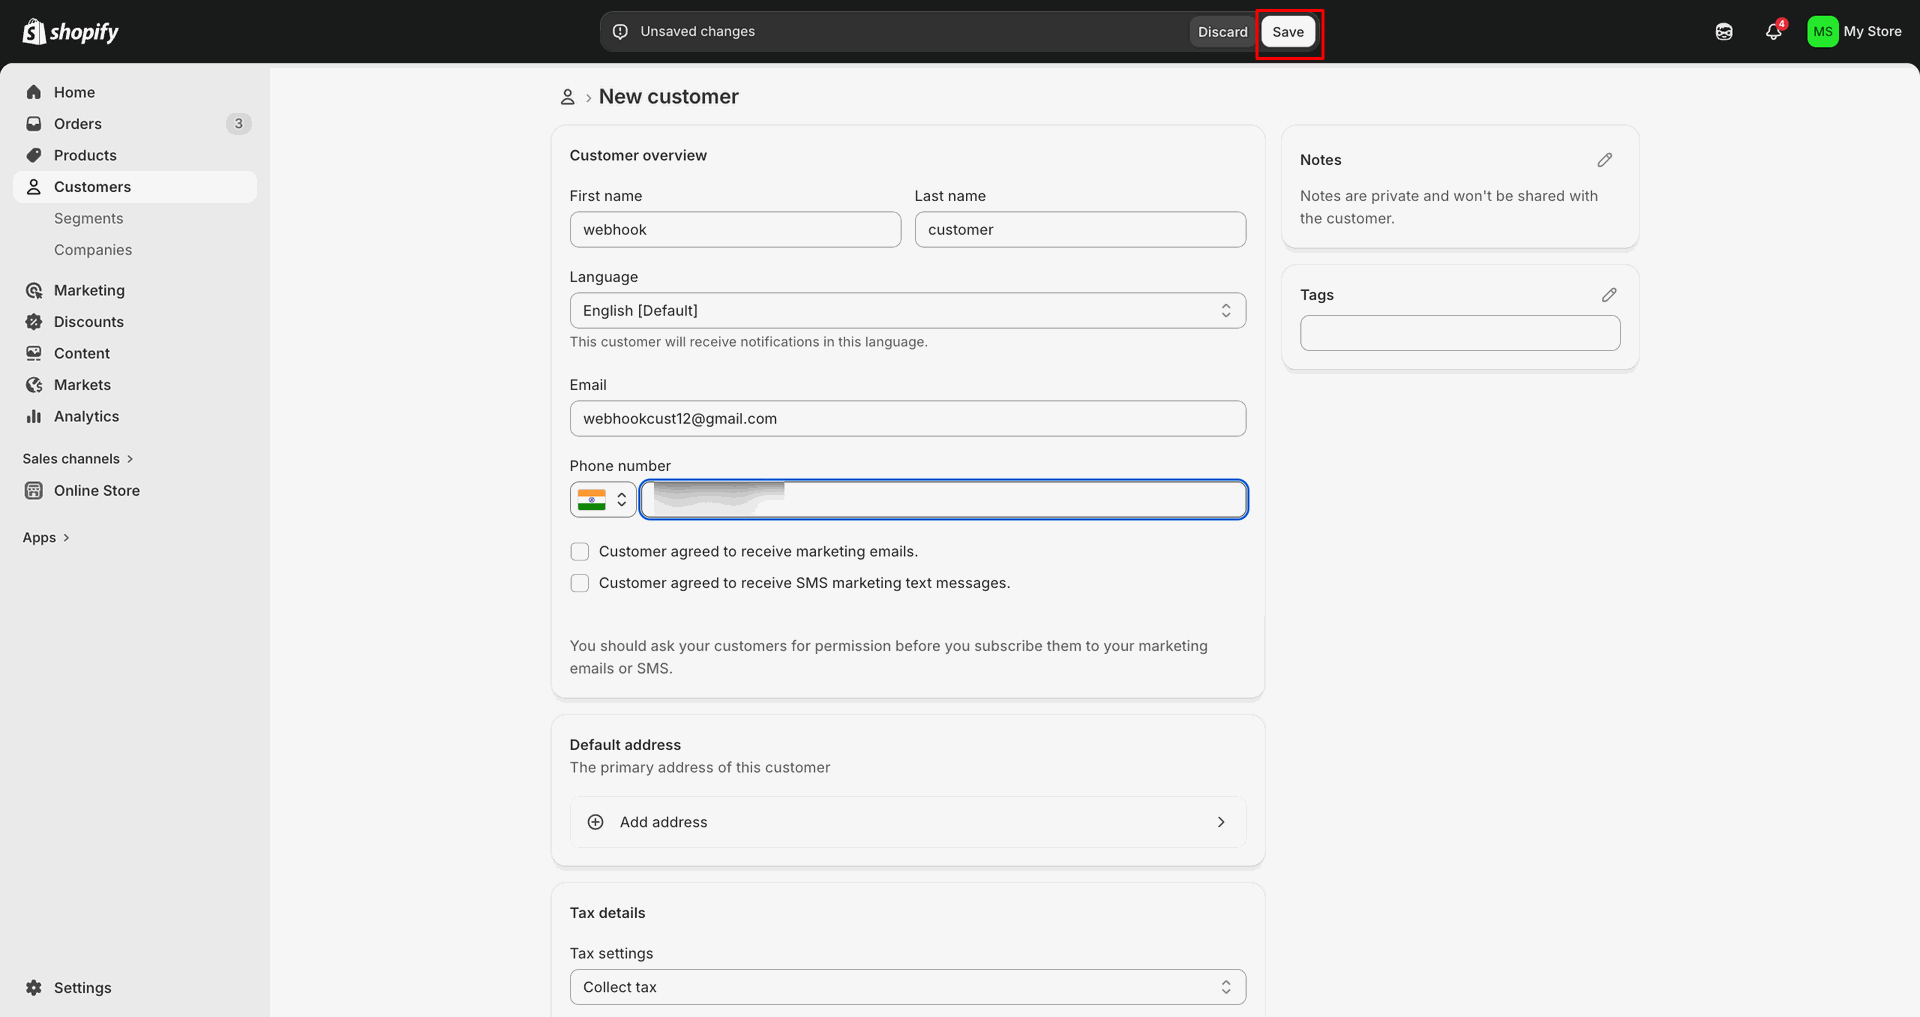
Enter customer details, update the phone number, and click Save.
Contacts Create/Update using Webhook interface screenshot
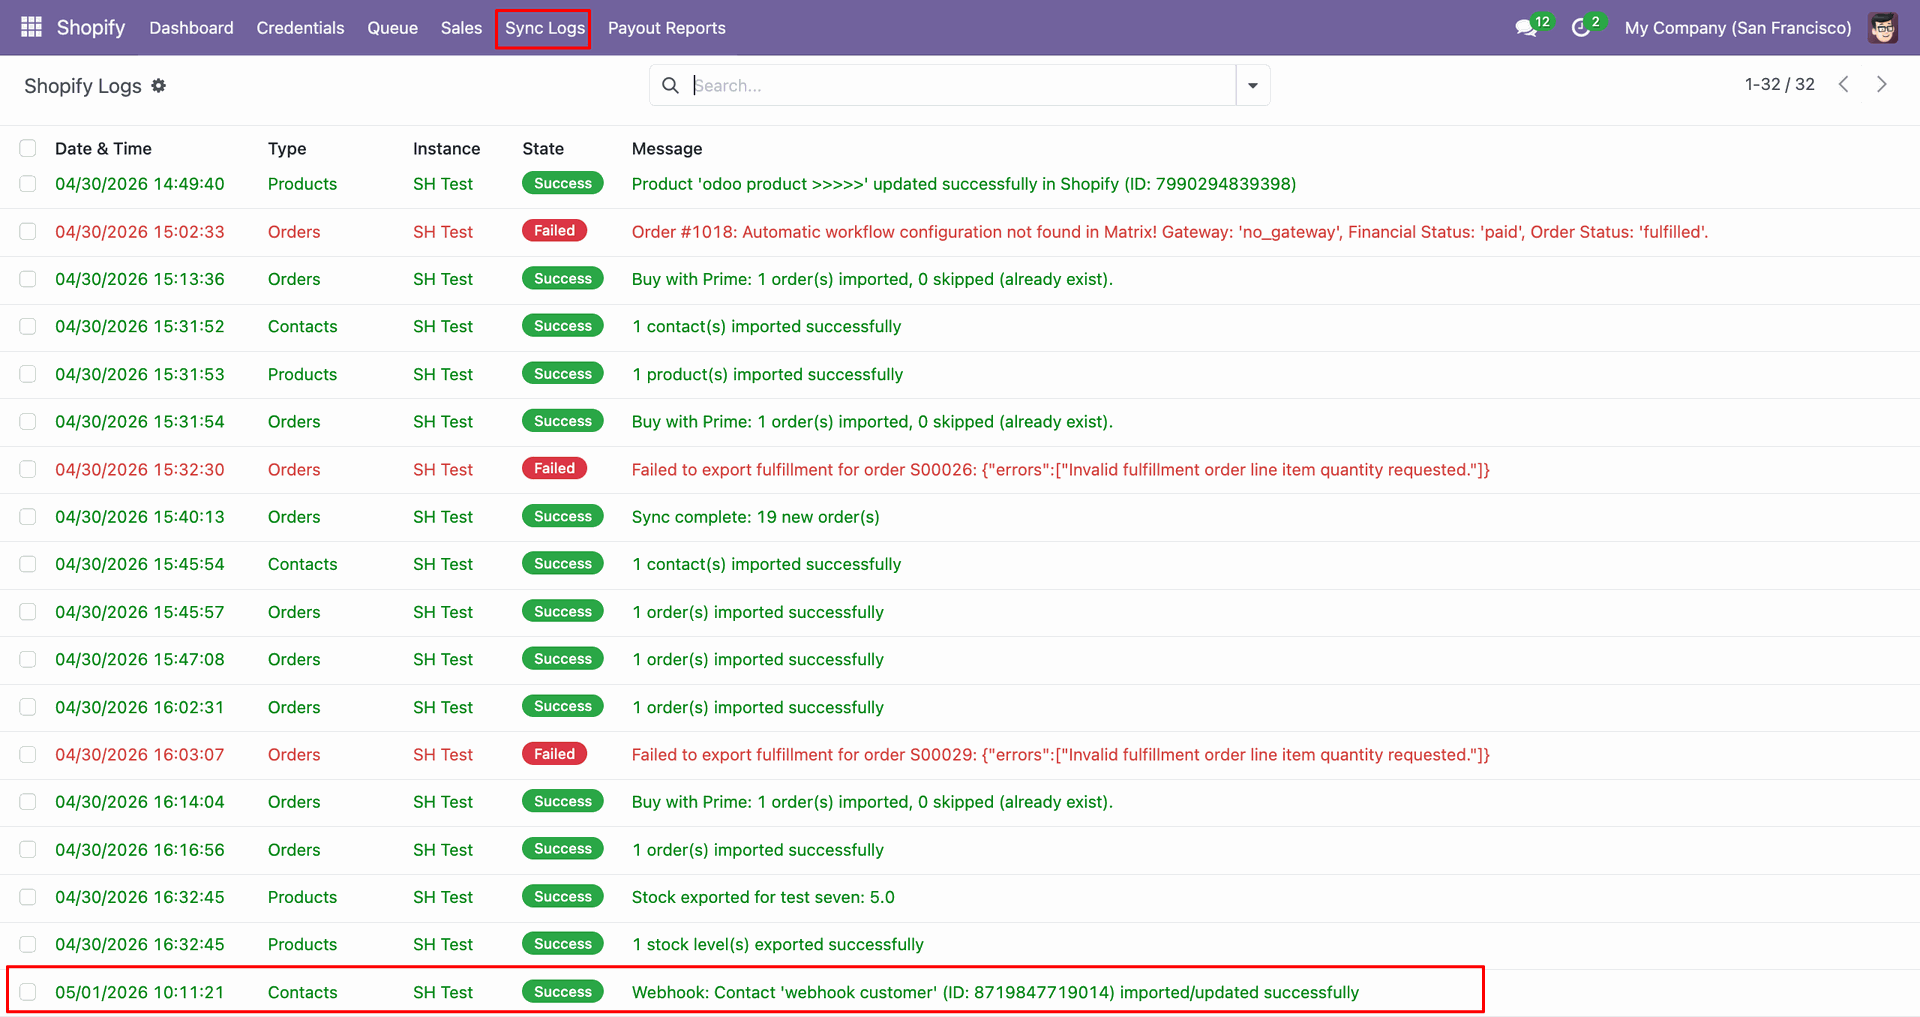
Check Sync Logs to confirm the webhook customer imported or updated successfully.
Contacts Create/Update using Webhook interface screenshot
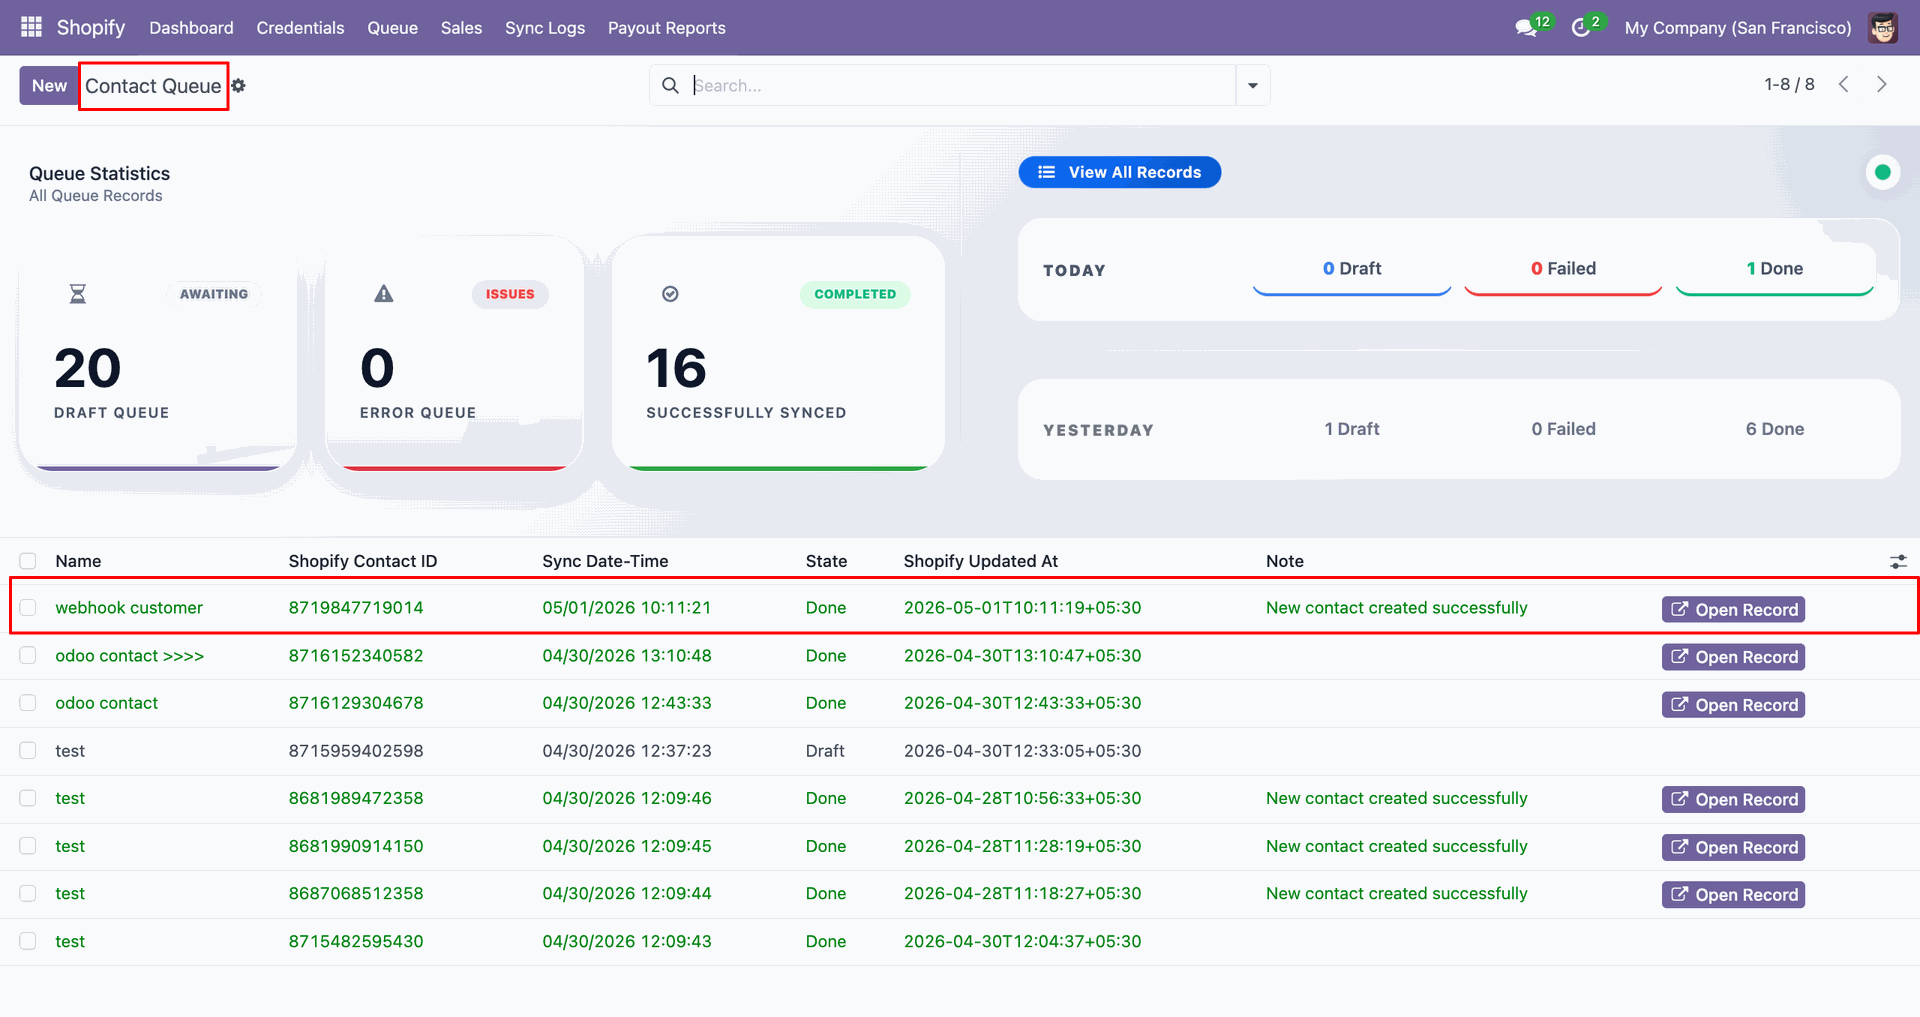
Open Contact Queue to review the webhook customer record and queue status.
Contacts Create/Update using Webhook interface screenshot
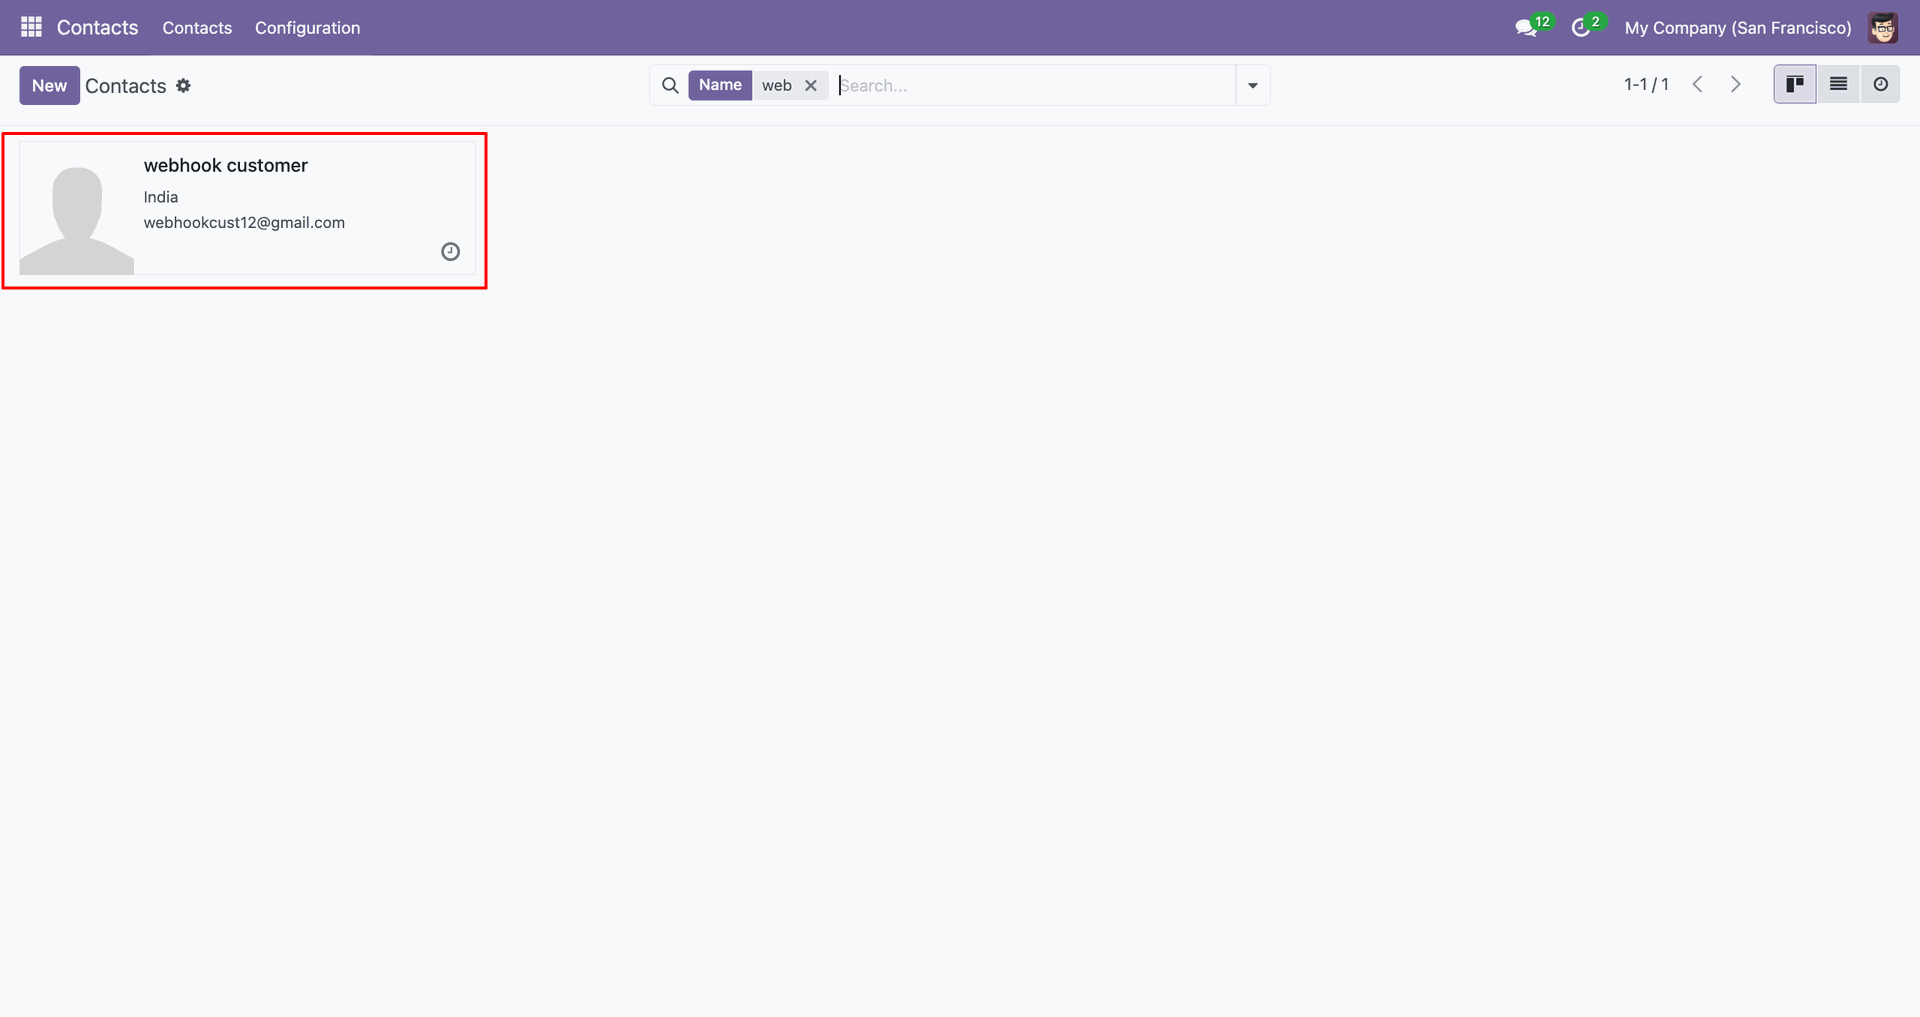
Open the webhook customer contact card to review the created Odoo record.
Contacts Create/Update using Webhook interface screenshot
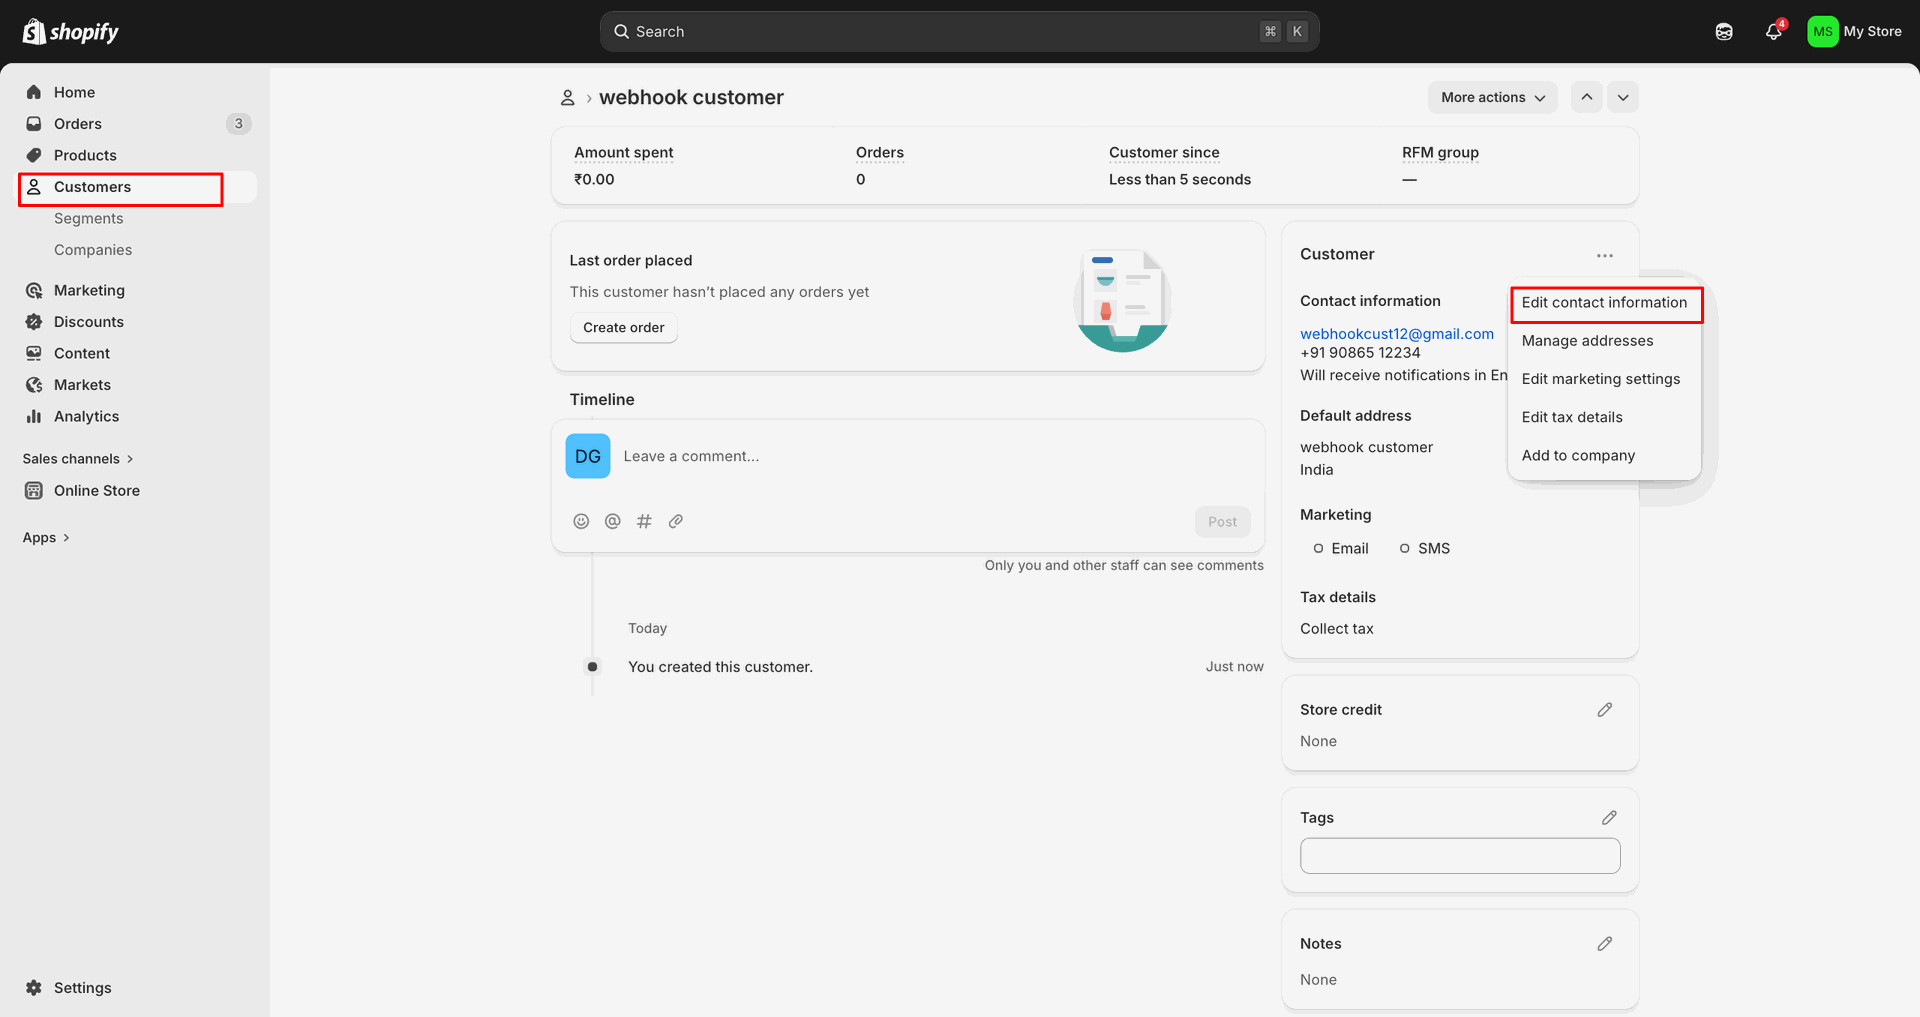
Choose Edit customer from Shopify to update the existing webhook customer.
Contacts Create/Update using Webhook interface screenshot
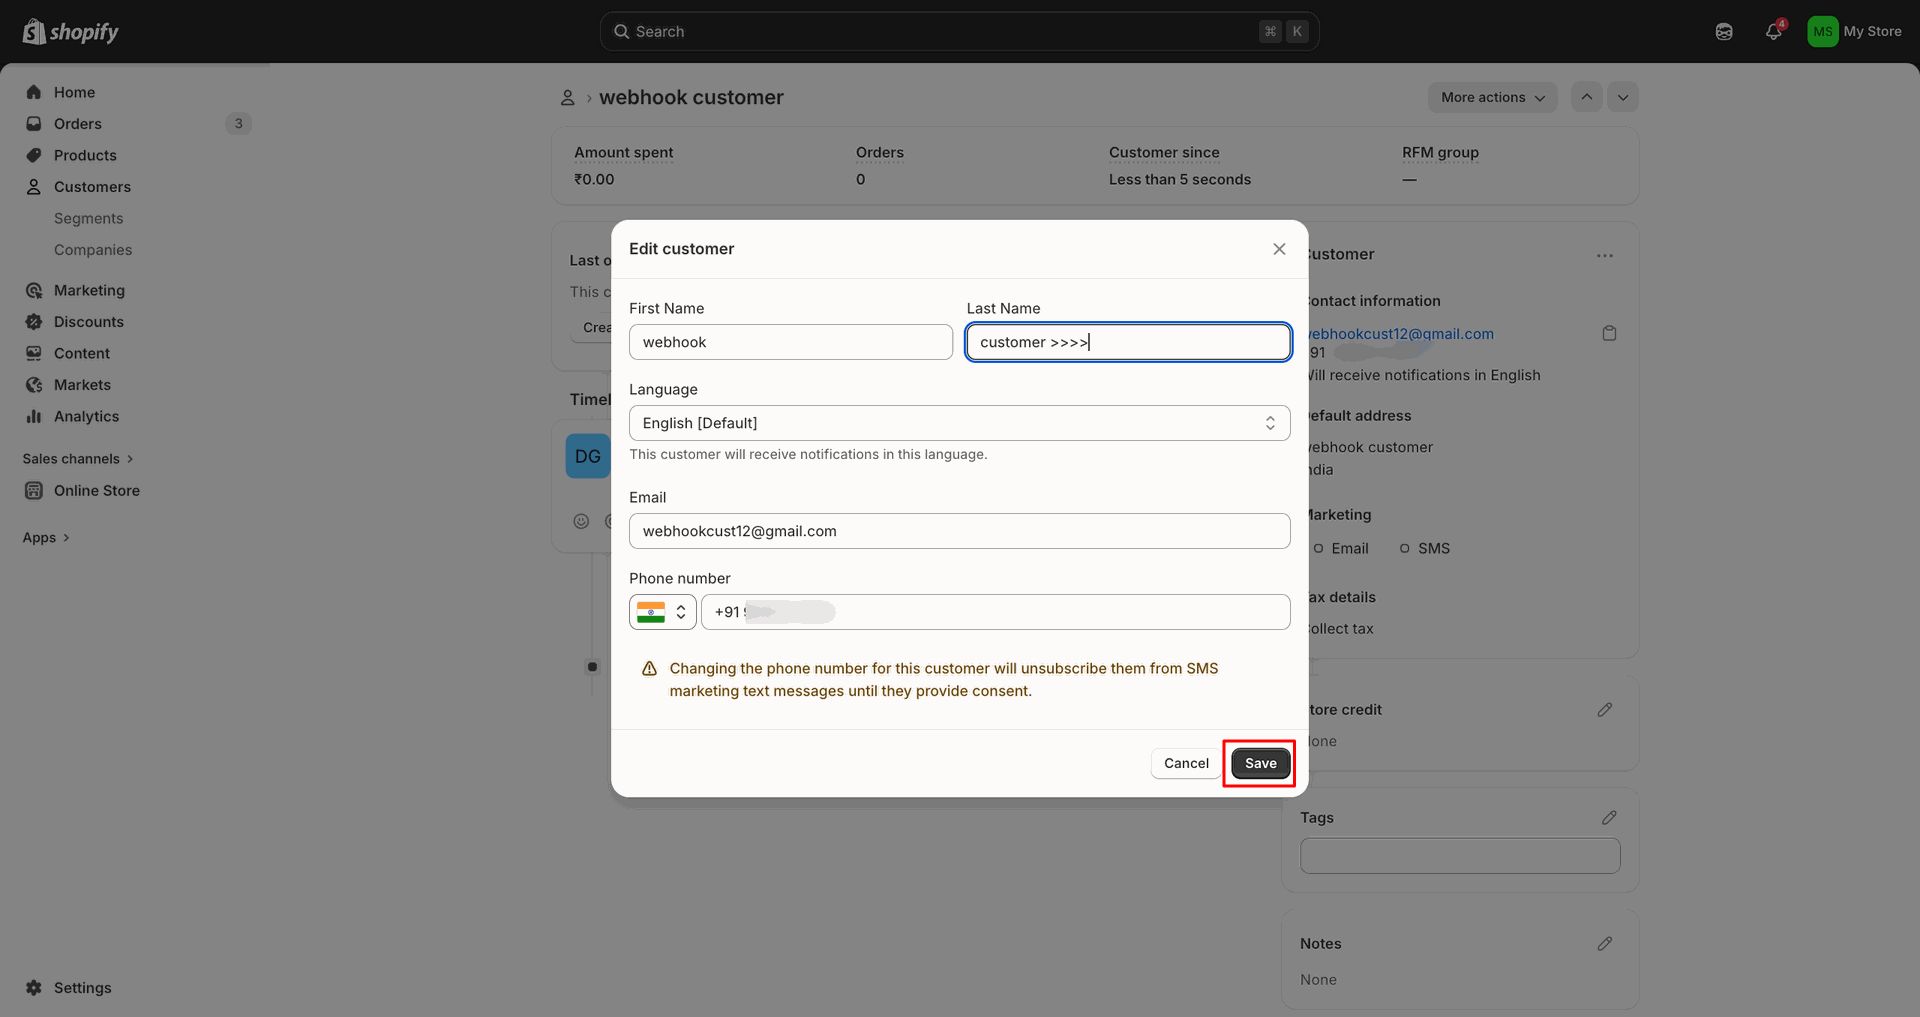
Change customer fields in the popup, then click Save to apply.
Contacts Create/Update using Webhook interface screenshot
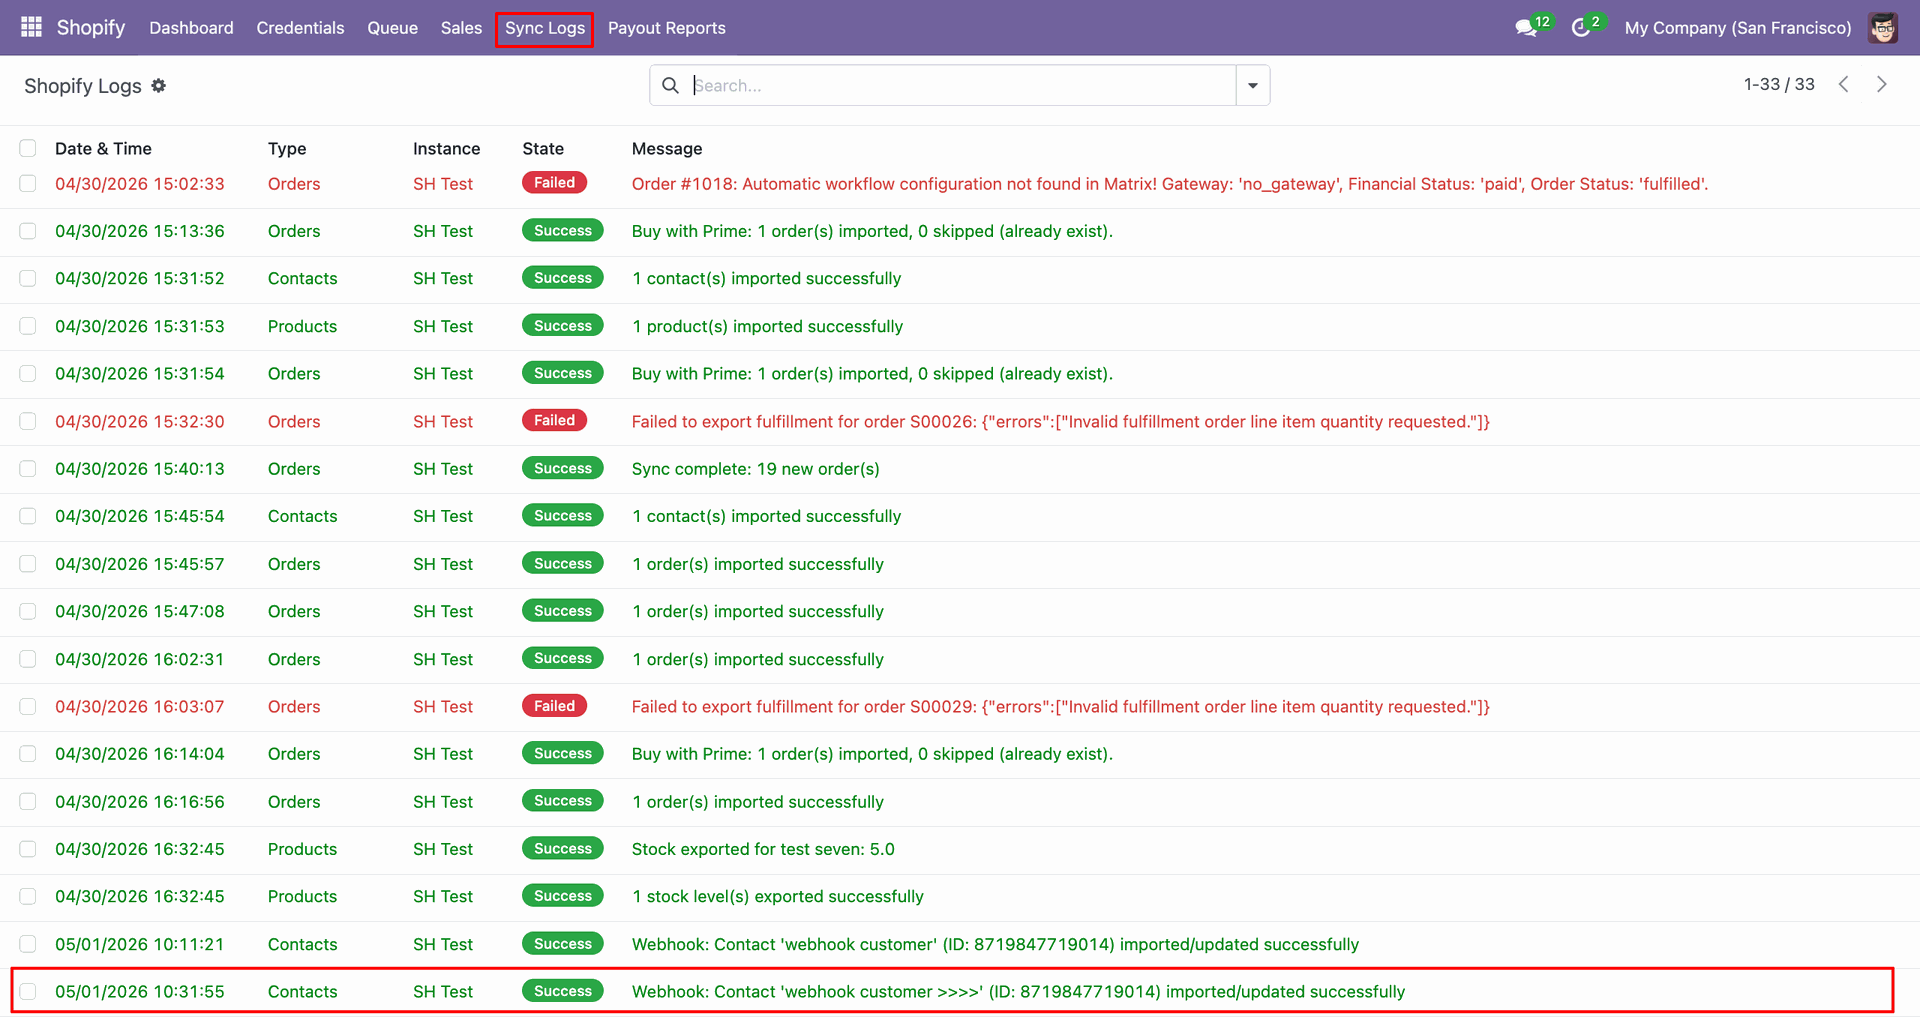
Review Sync Logs to confirm the webhook customer update processed successfully.
Contacts Create/Update using Webhook interface screenshot
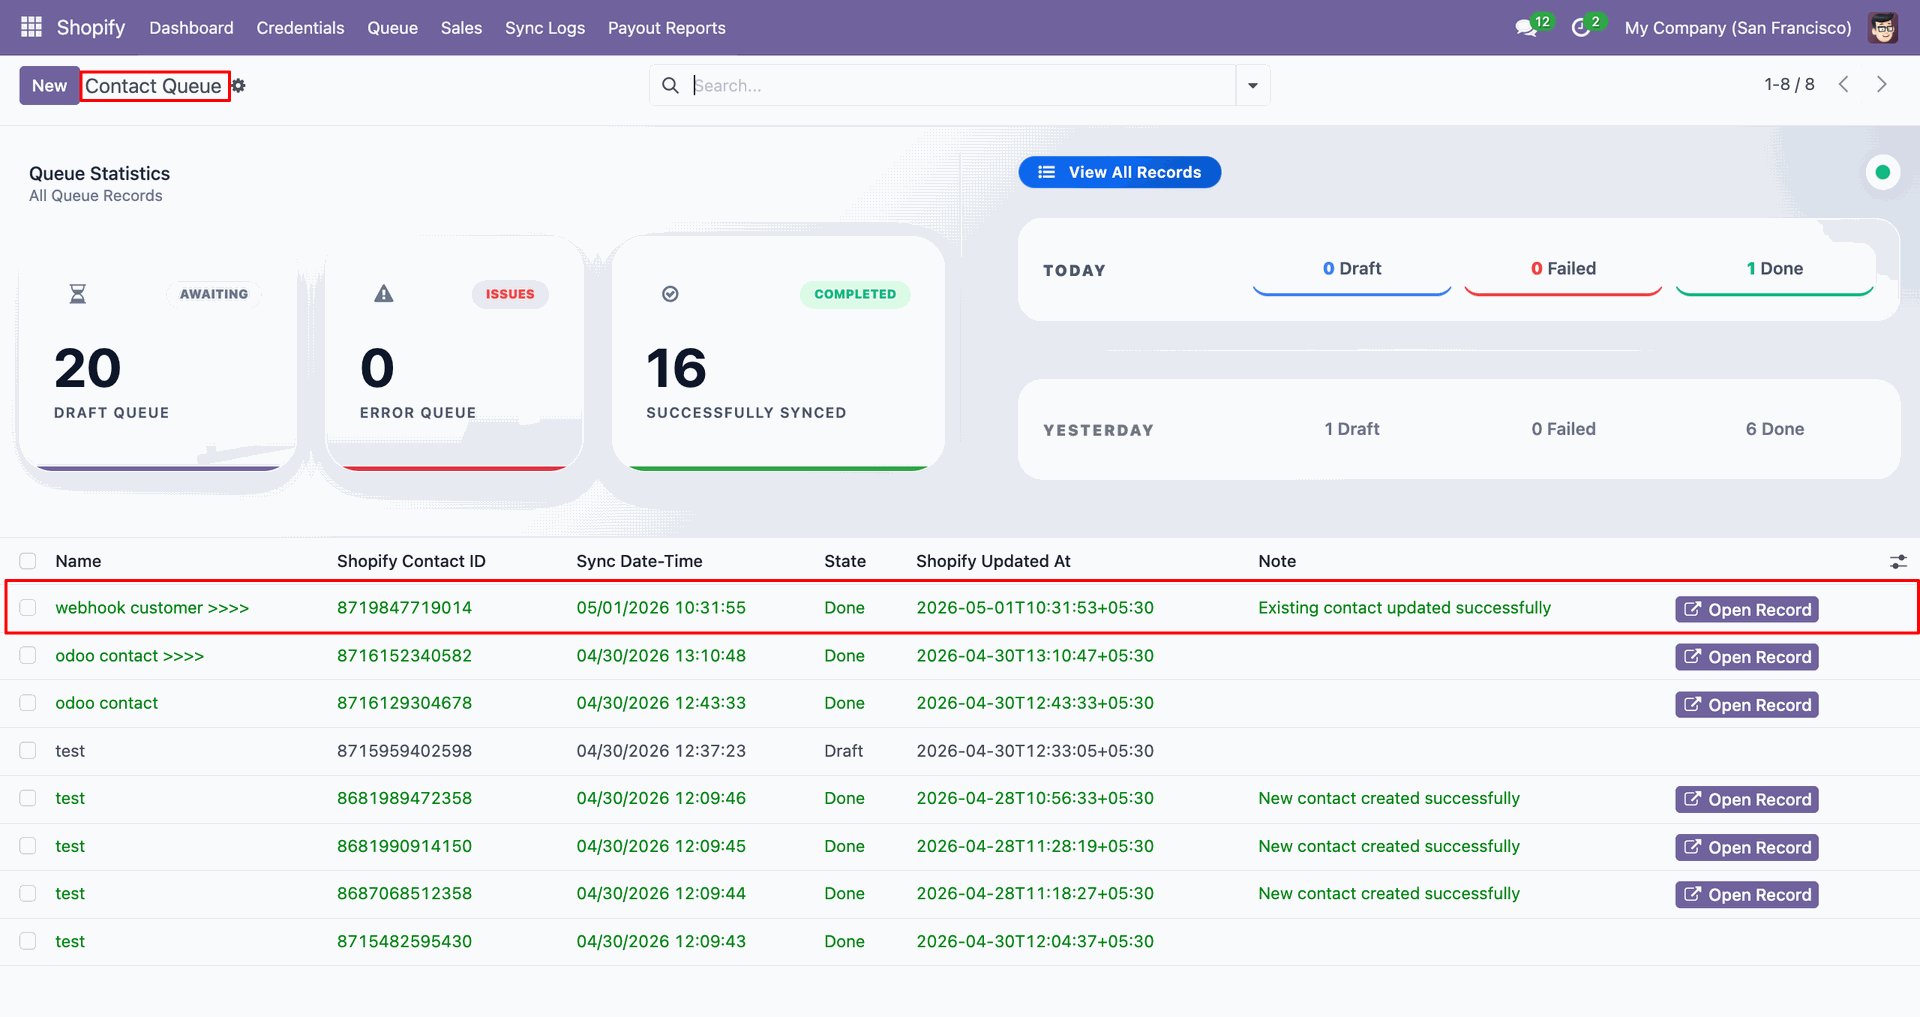
Inspect Contact Queue to verify the existing contact was updated successfully.
Contacts Create/Update using Webhook interface screenshot
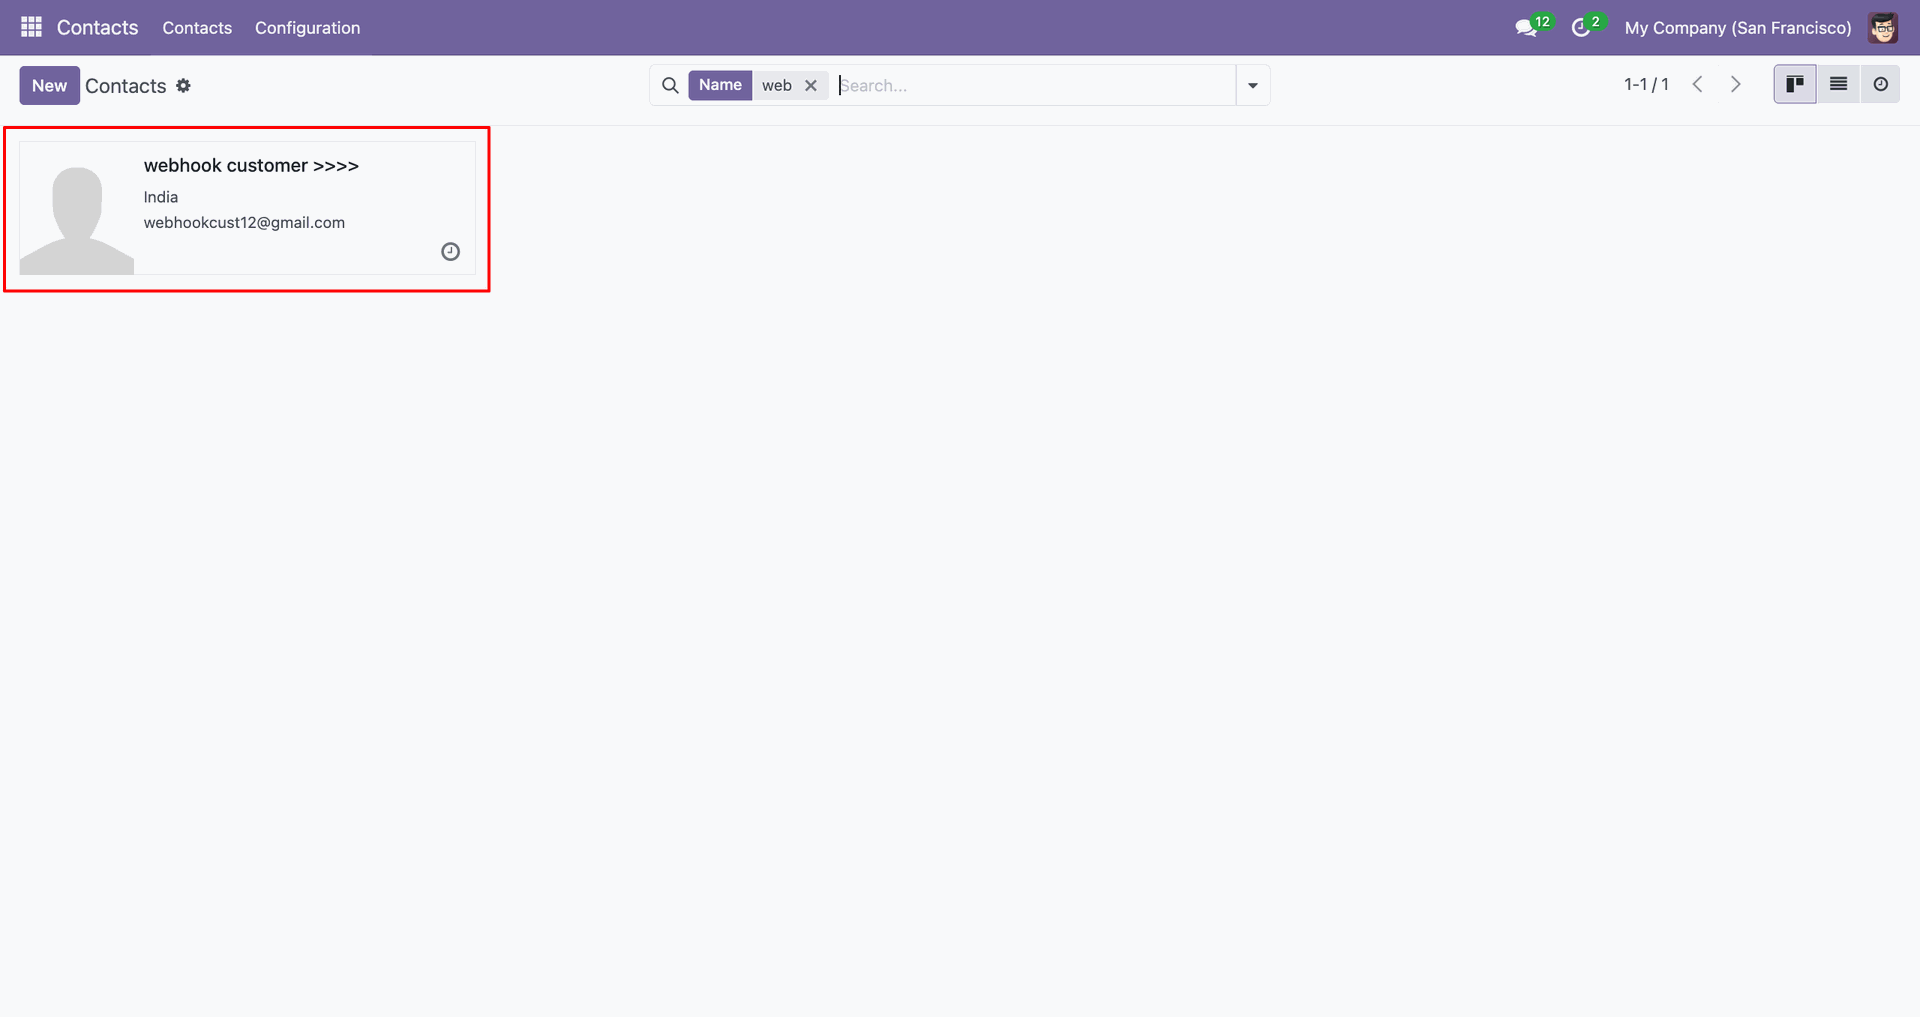
Open the updated webhook customer contact to review the changed name.
Contacts Create/Update using Webhook interface screenshot

Products Create/Update using Webhook
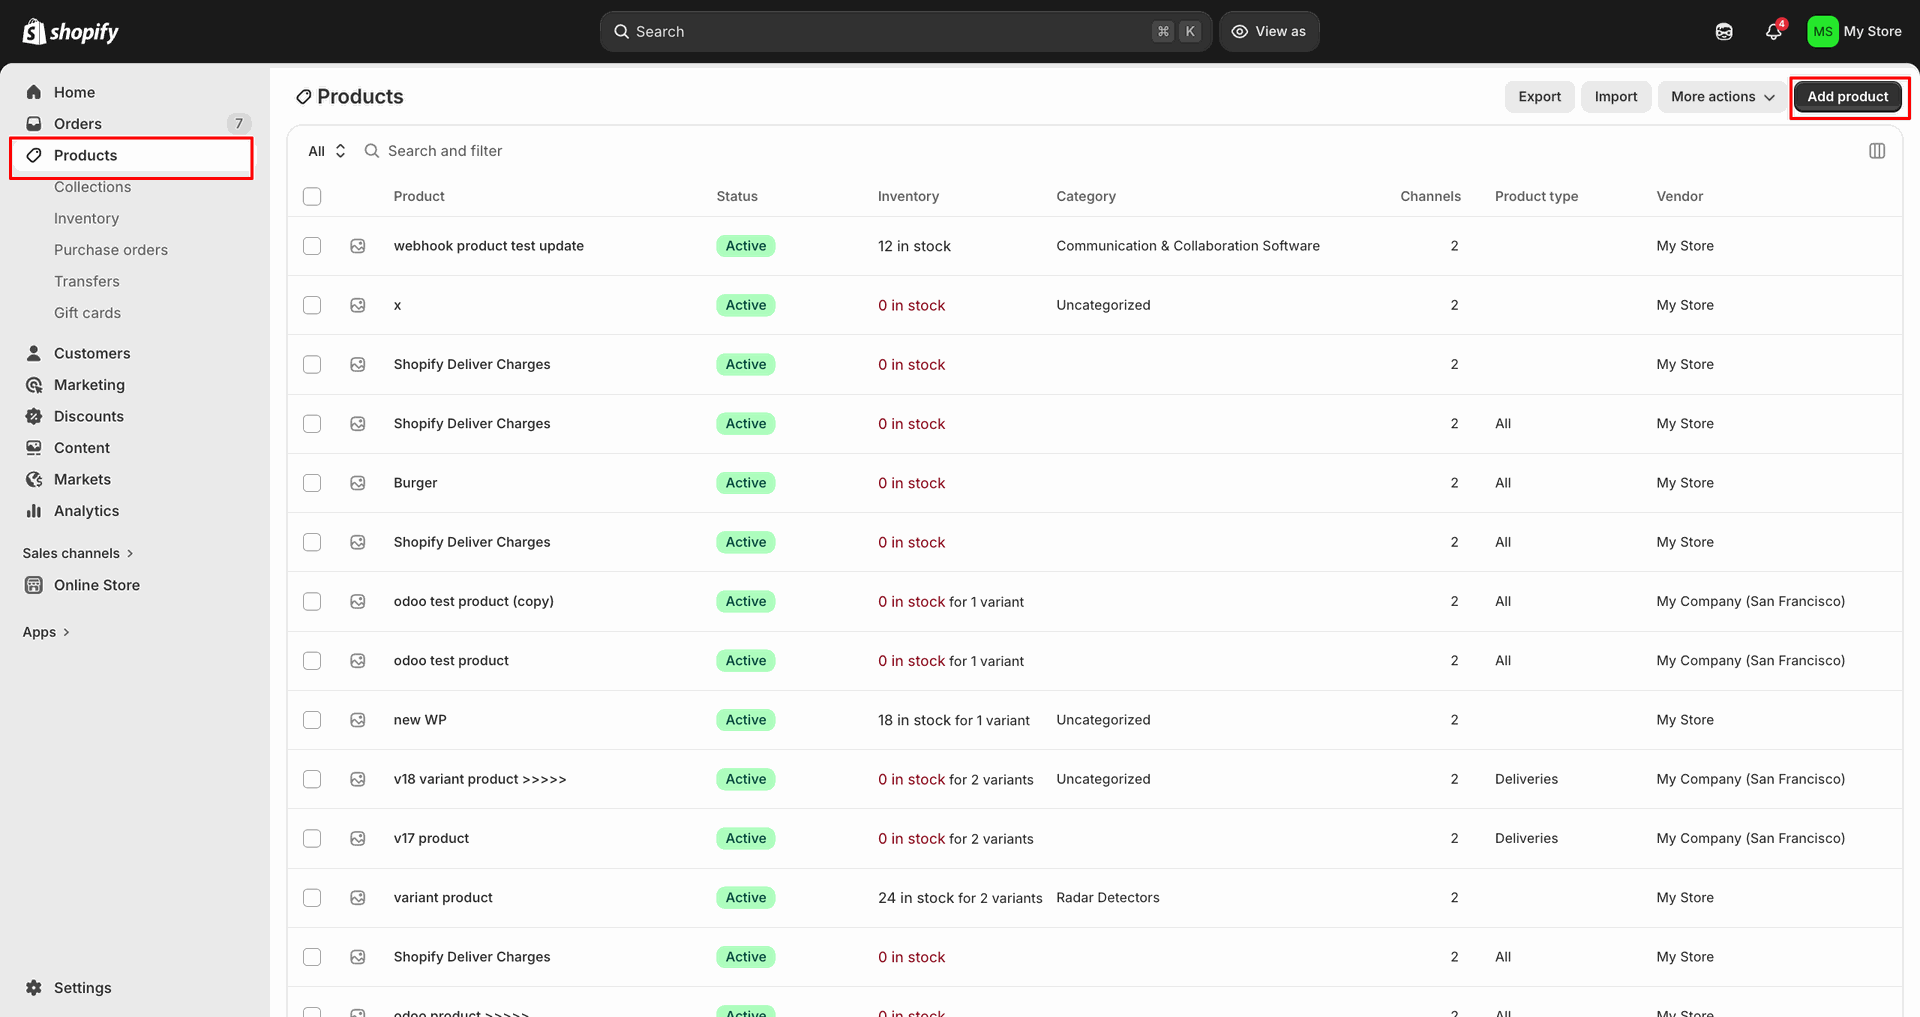
Click Add product in Shopify to create a new product record.
Products Create/Update using Webhook interface screenshot
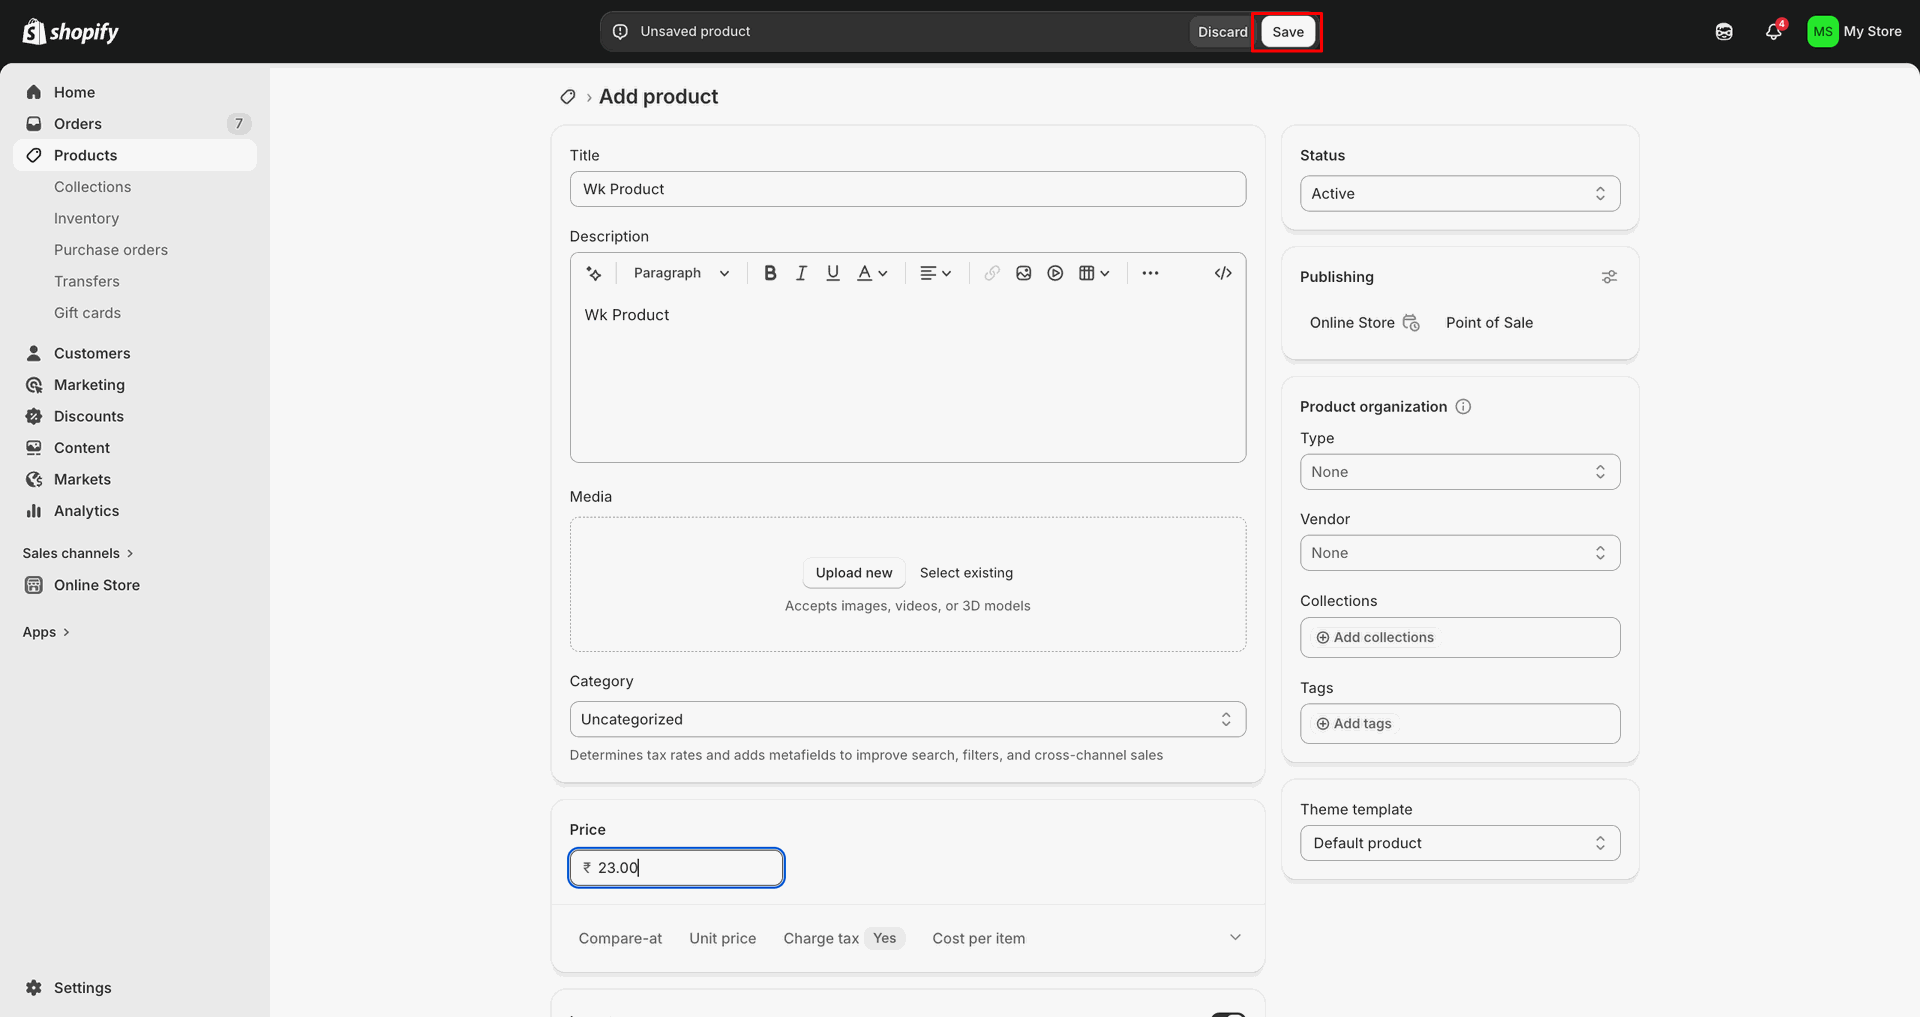
Enter product details and click Save.
Products Create/Update using Webhook interface screenshot
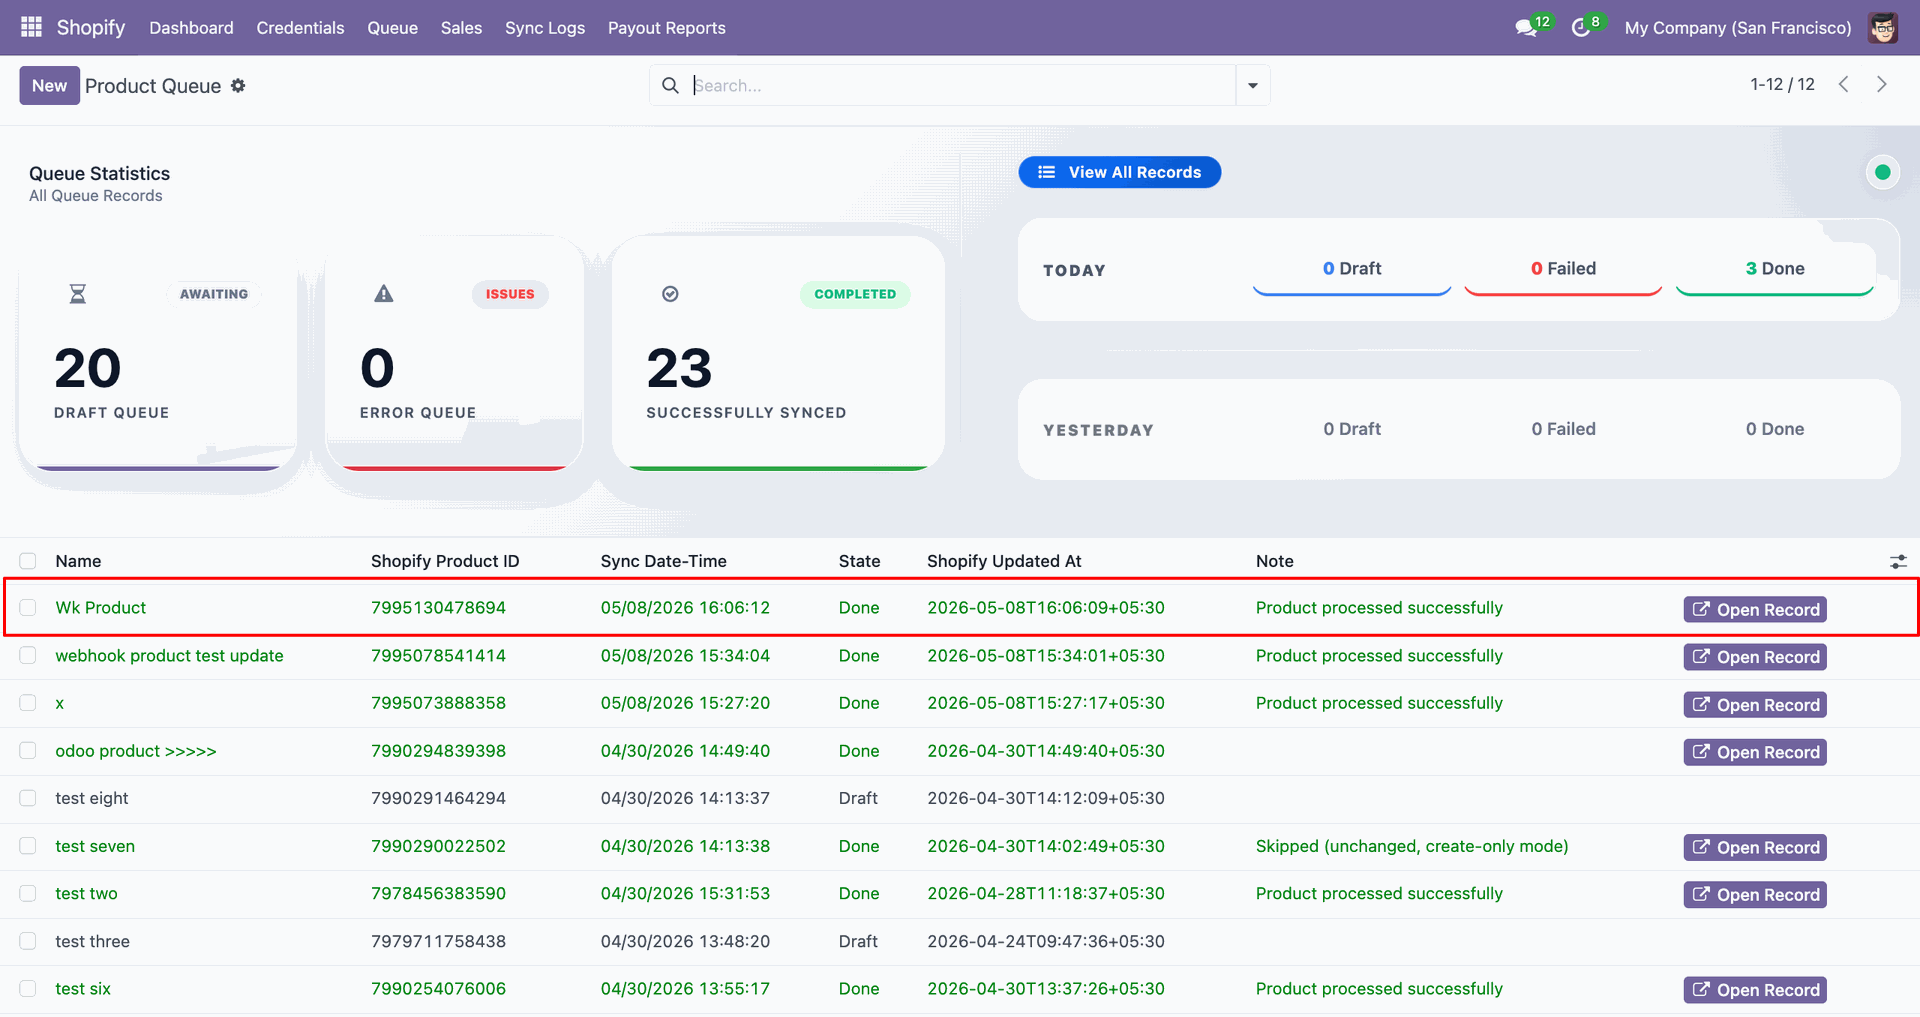
Check Sync Logs to confirm the webhook product imported or updated successfully.
Products Create/Update using Webhook interface screenshot
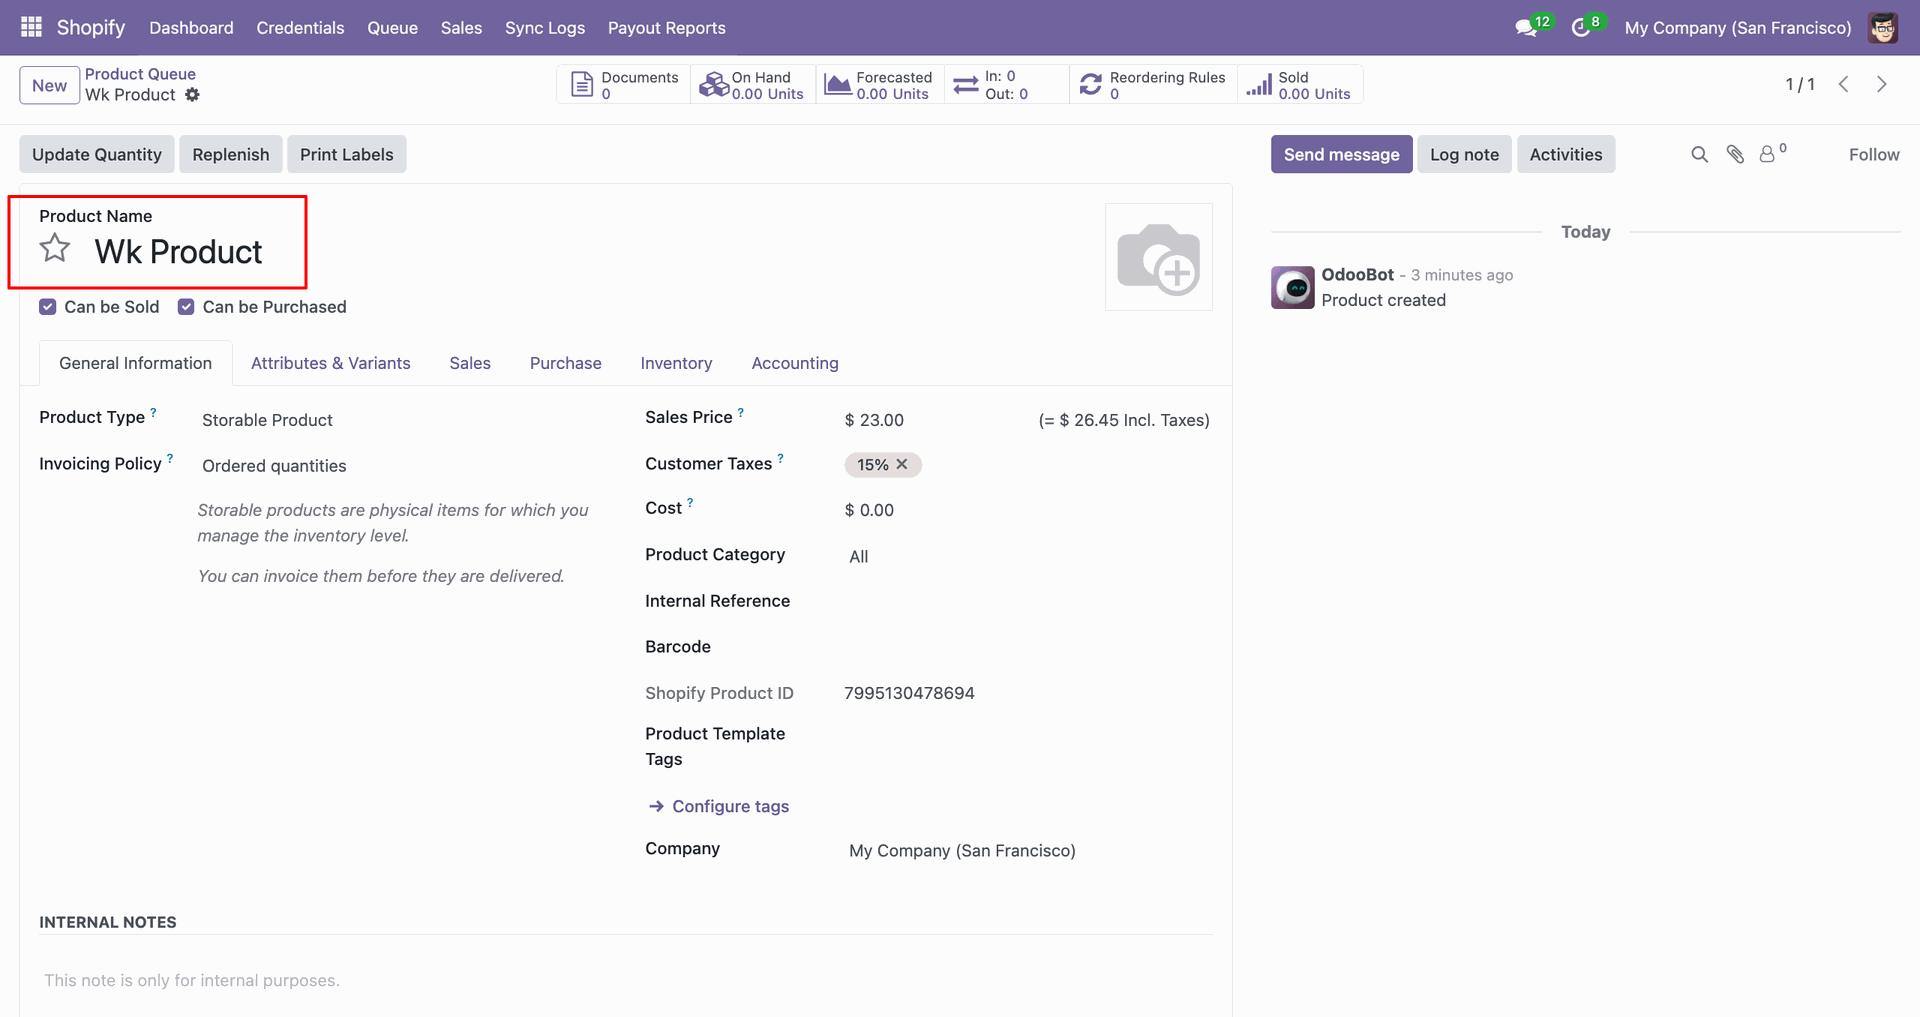
Open the webhook product contact card to review the created Odoo record.
Products Create/Update using Webhook interface screenshot
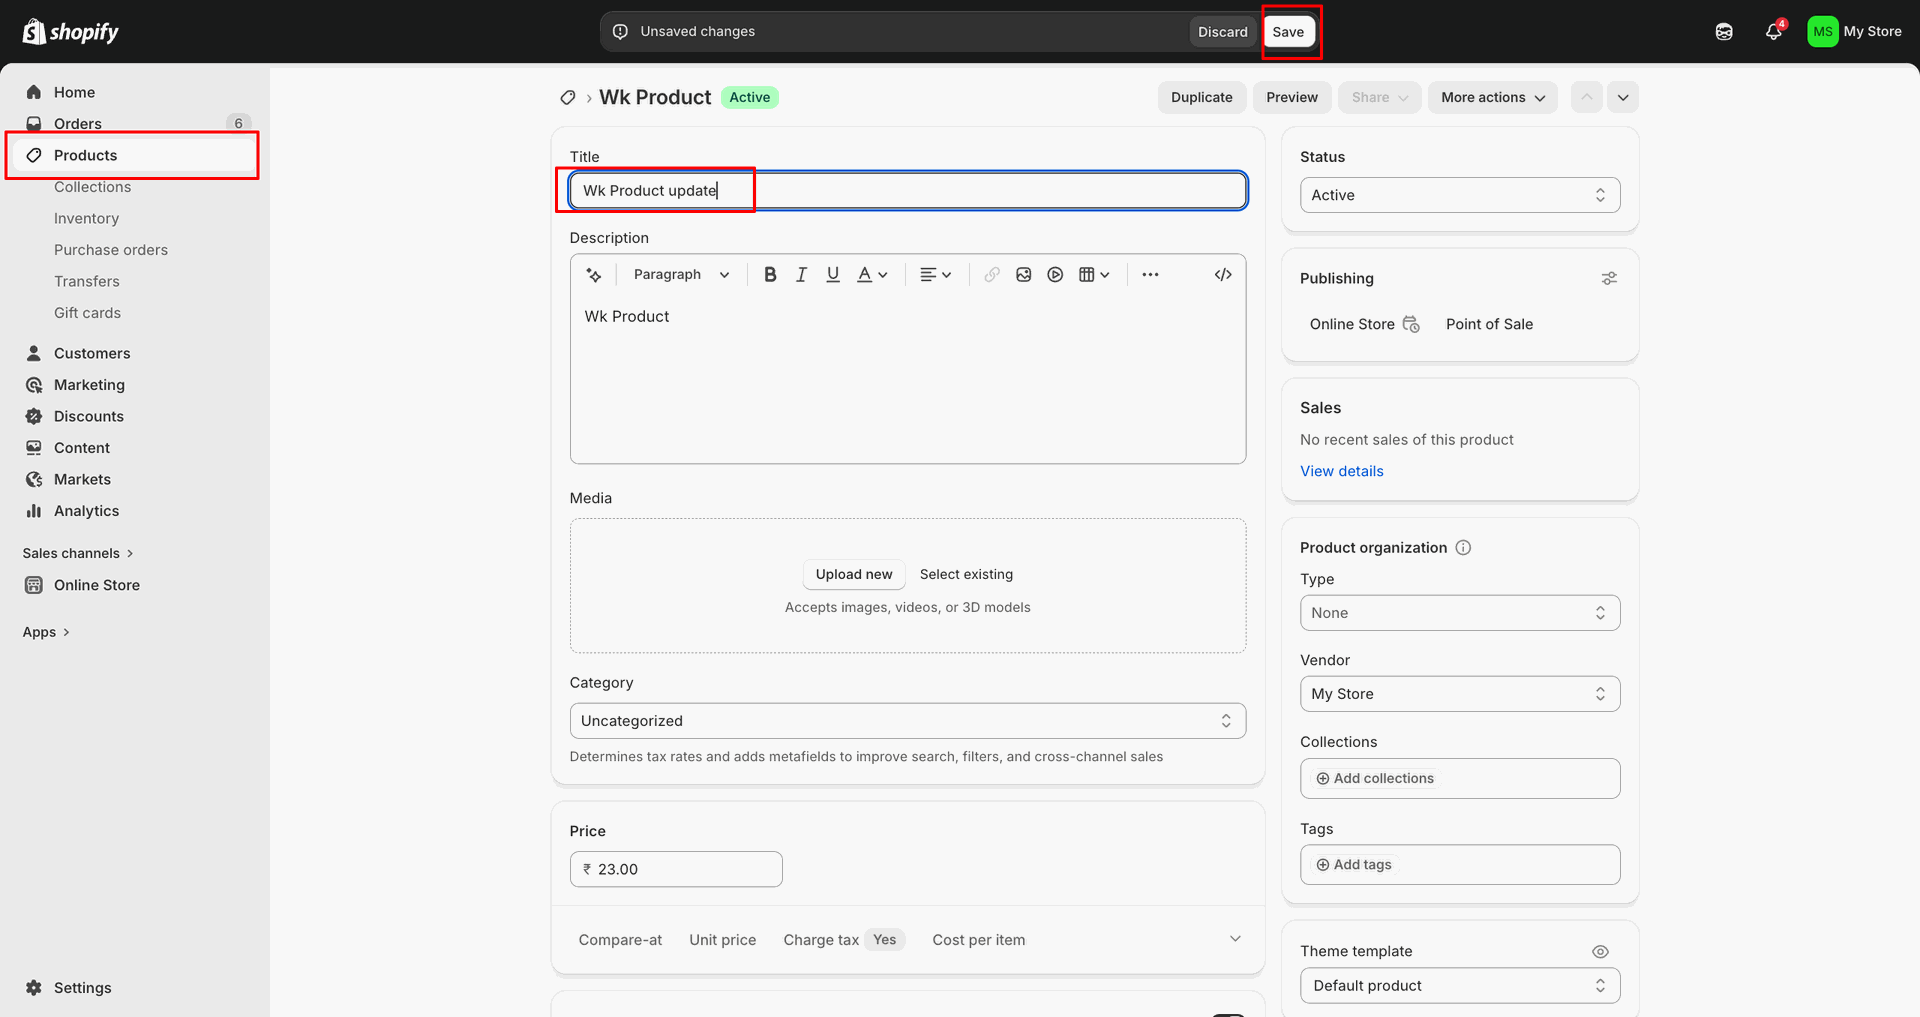
Change product name, then click Save to apply.
Products Create/Update using Webhook interface screenshot
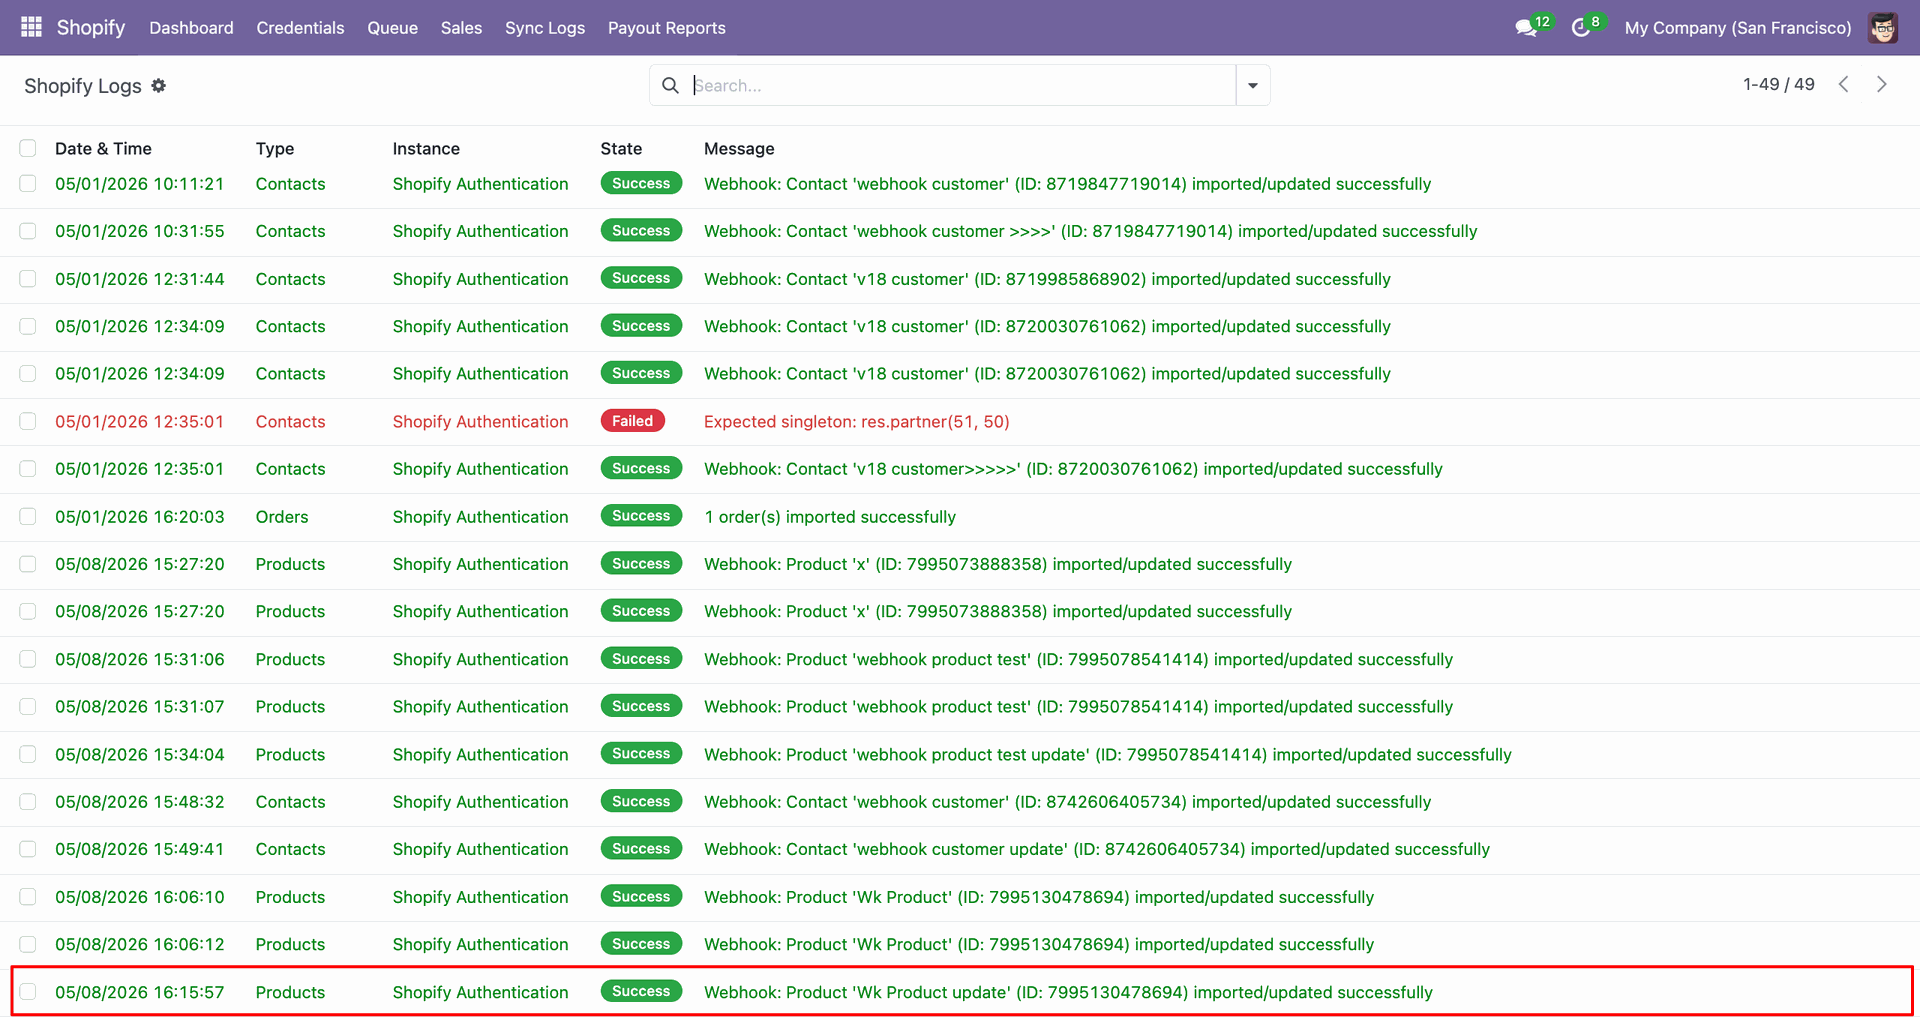
Review Sync Logs to confirm the webhook product update processed successfully.
Products Create/Update using Webhook interface screenshot
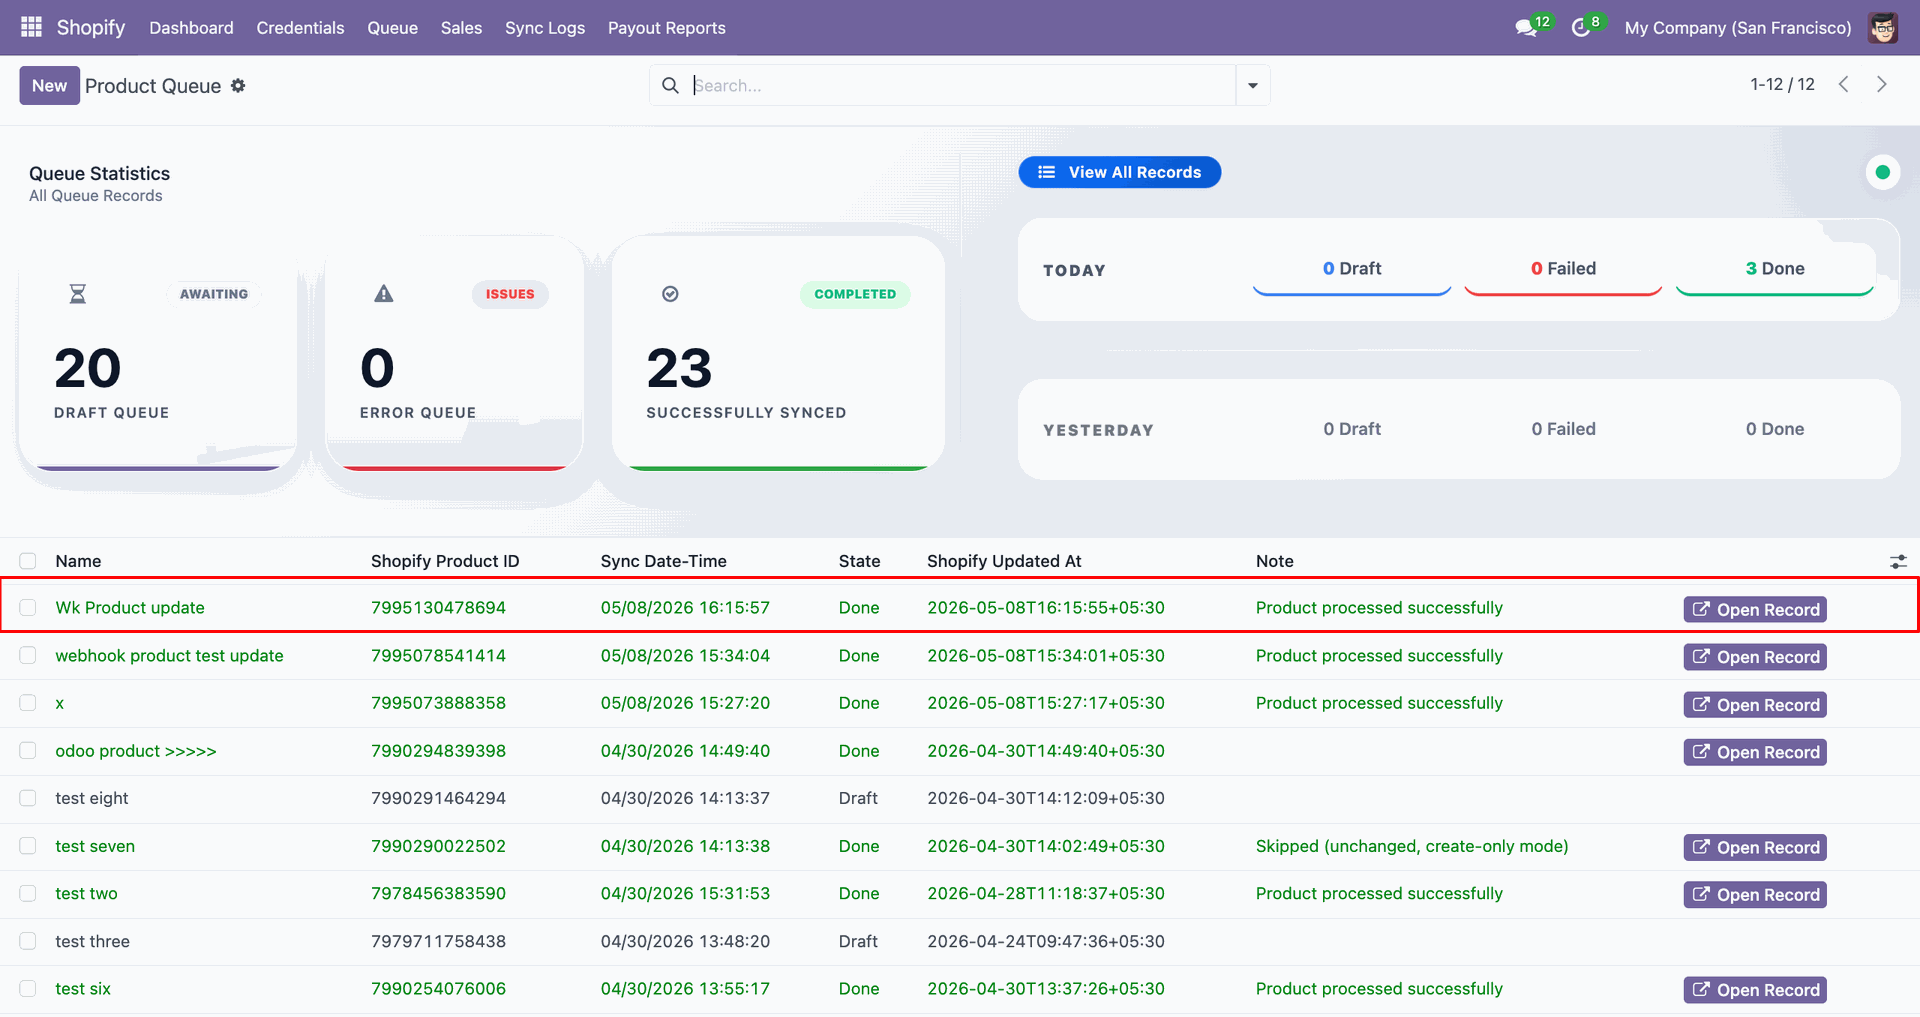
Inspect product Queue to verify the existing product was updated successfully.
Products Create/Update using Webhook interface screenshot

Order Fulfillment status

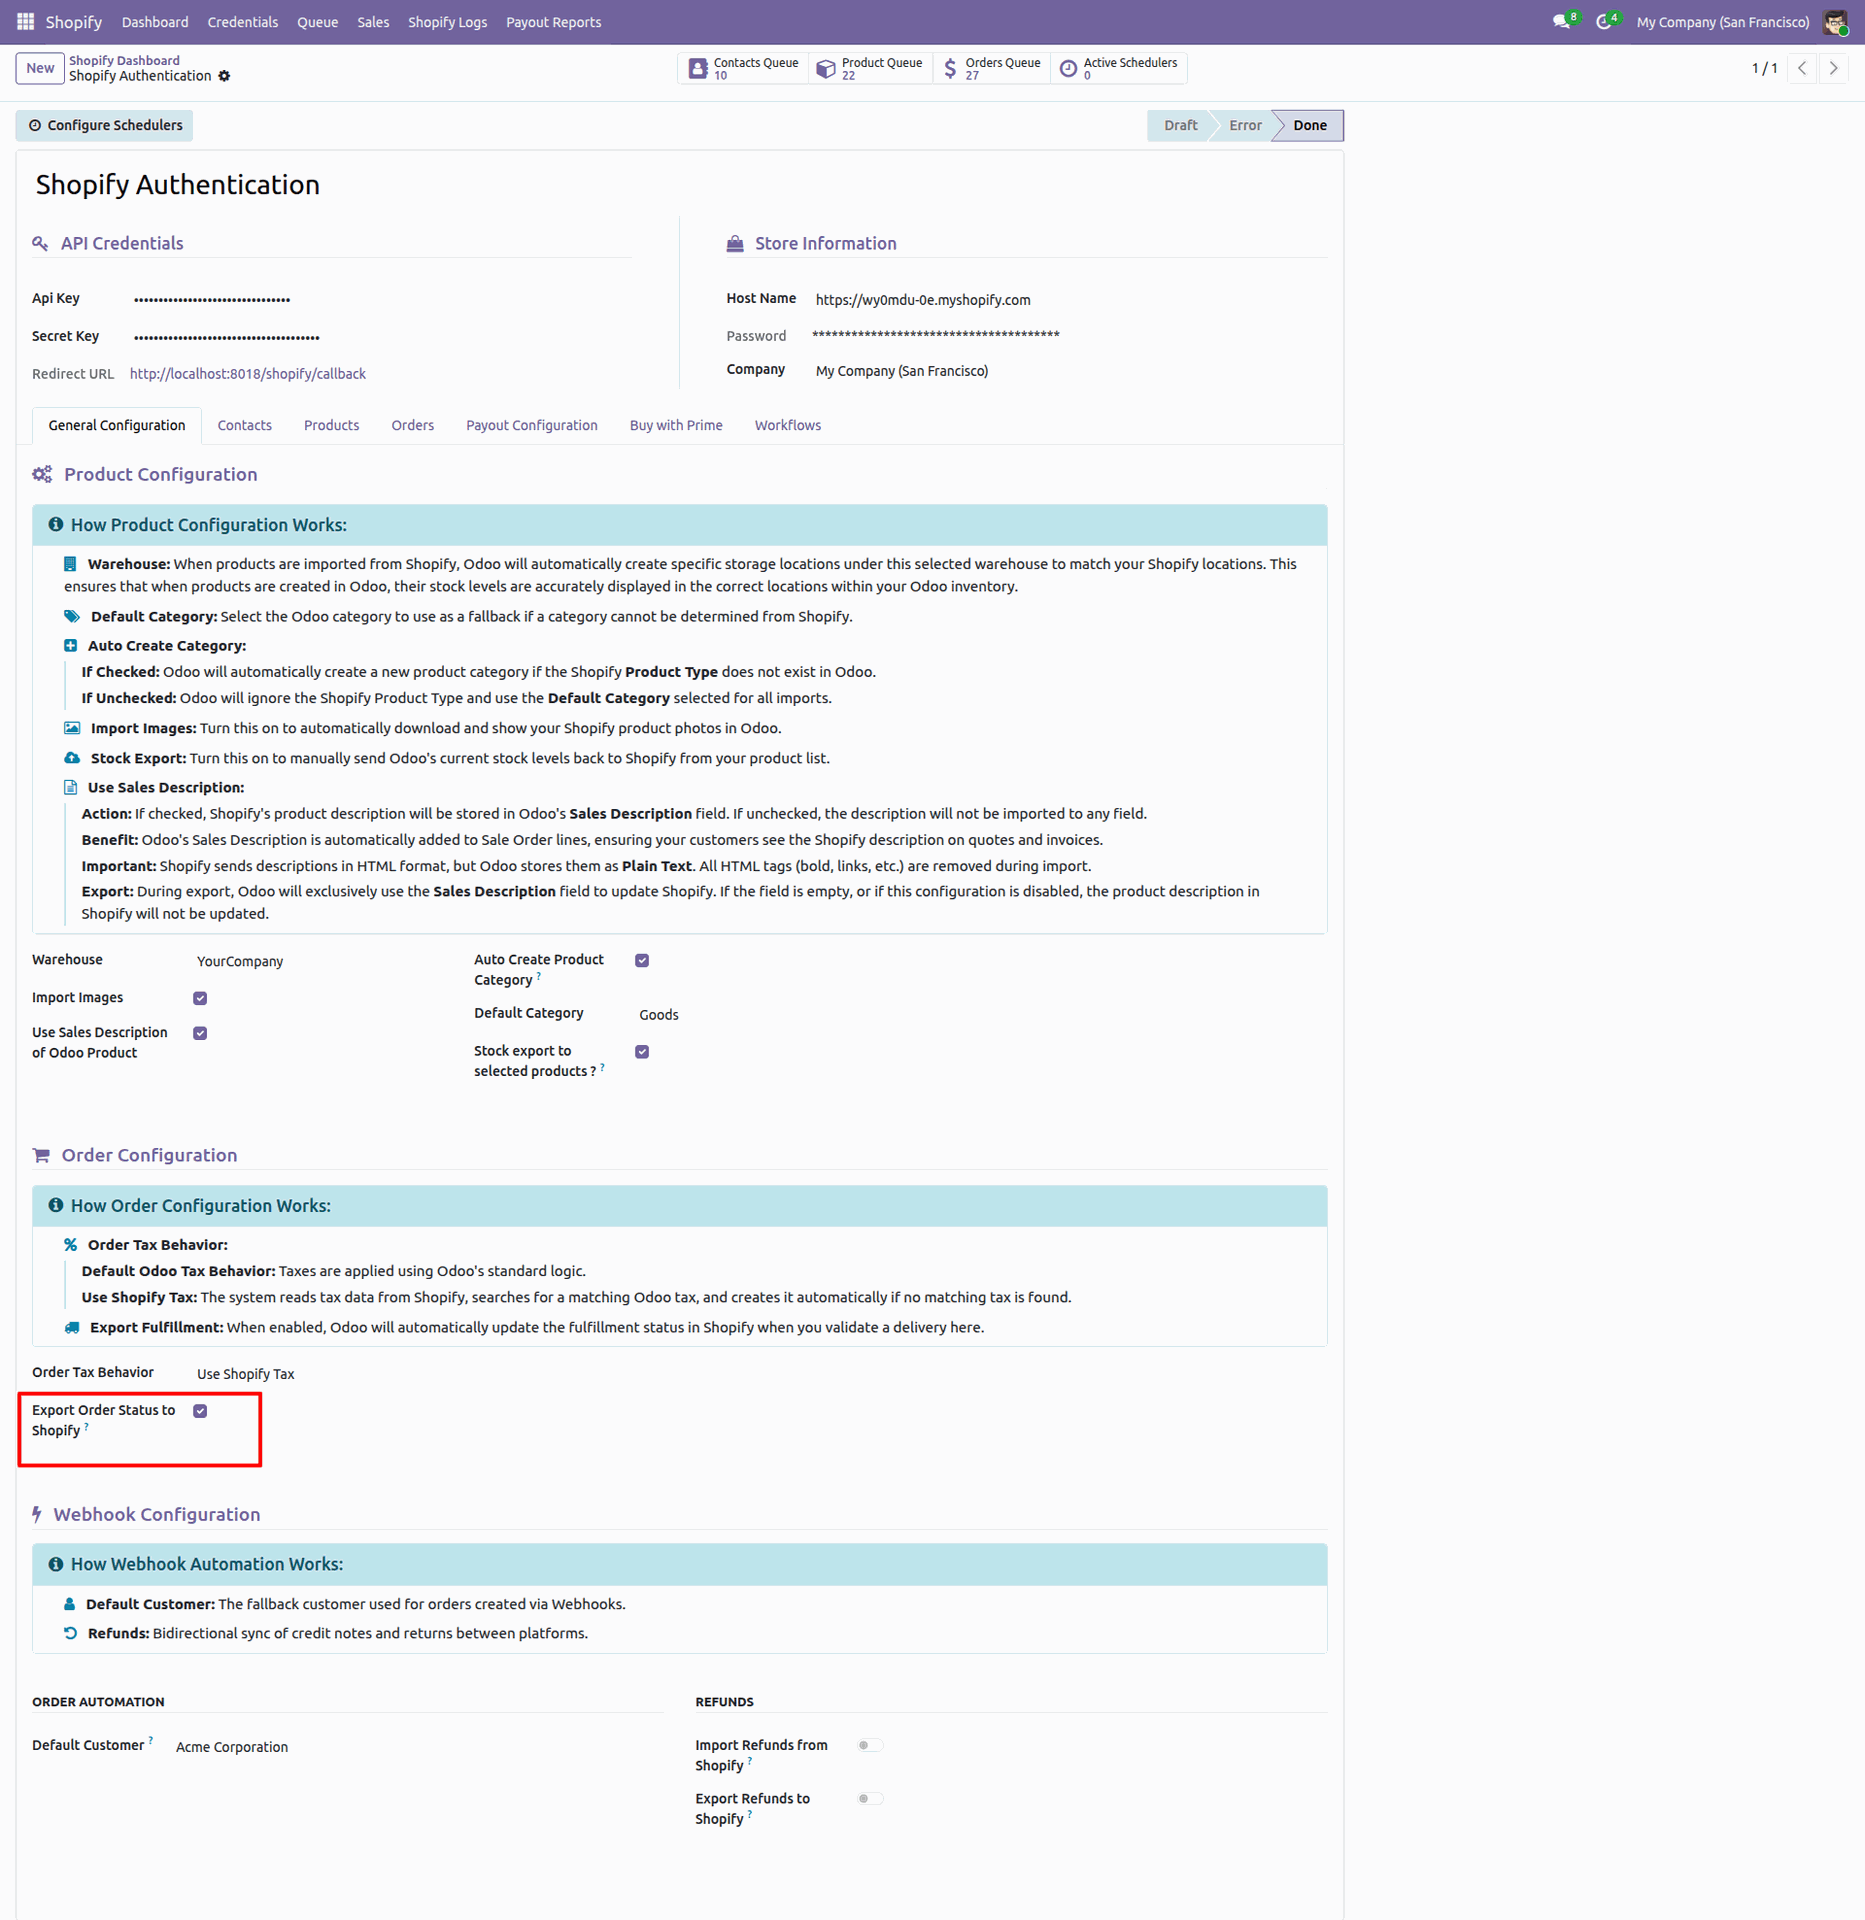
Enable 'Export Order Status to Shopify'.
Order Fulfillment status interface screenshot
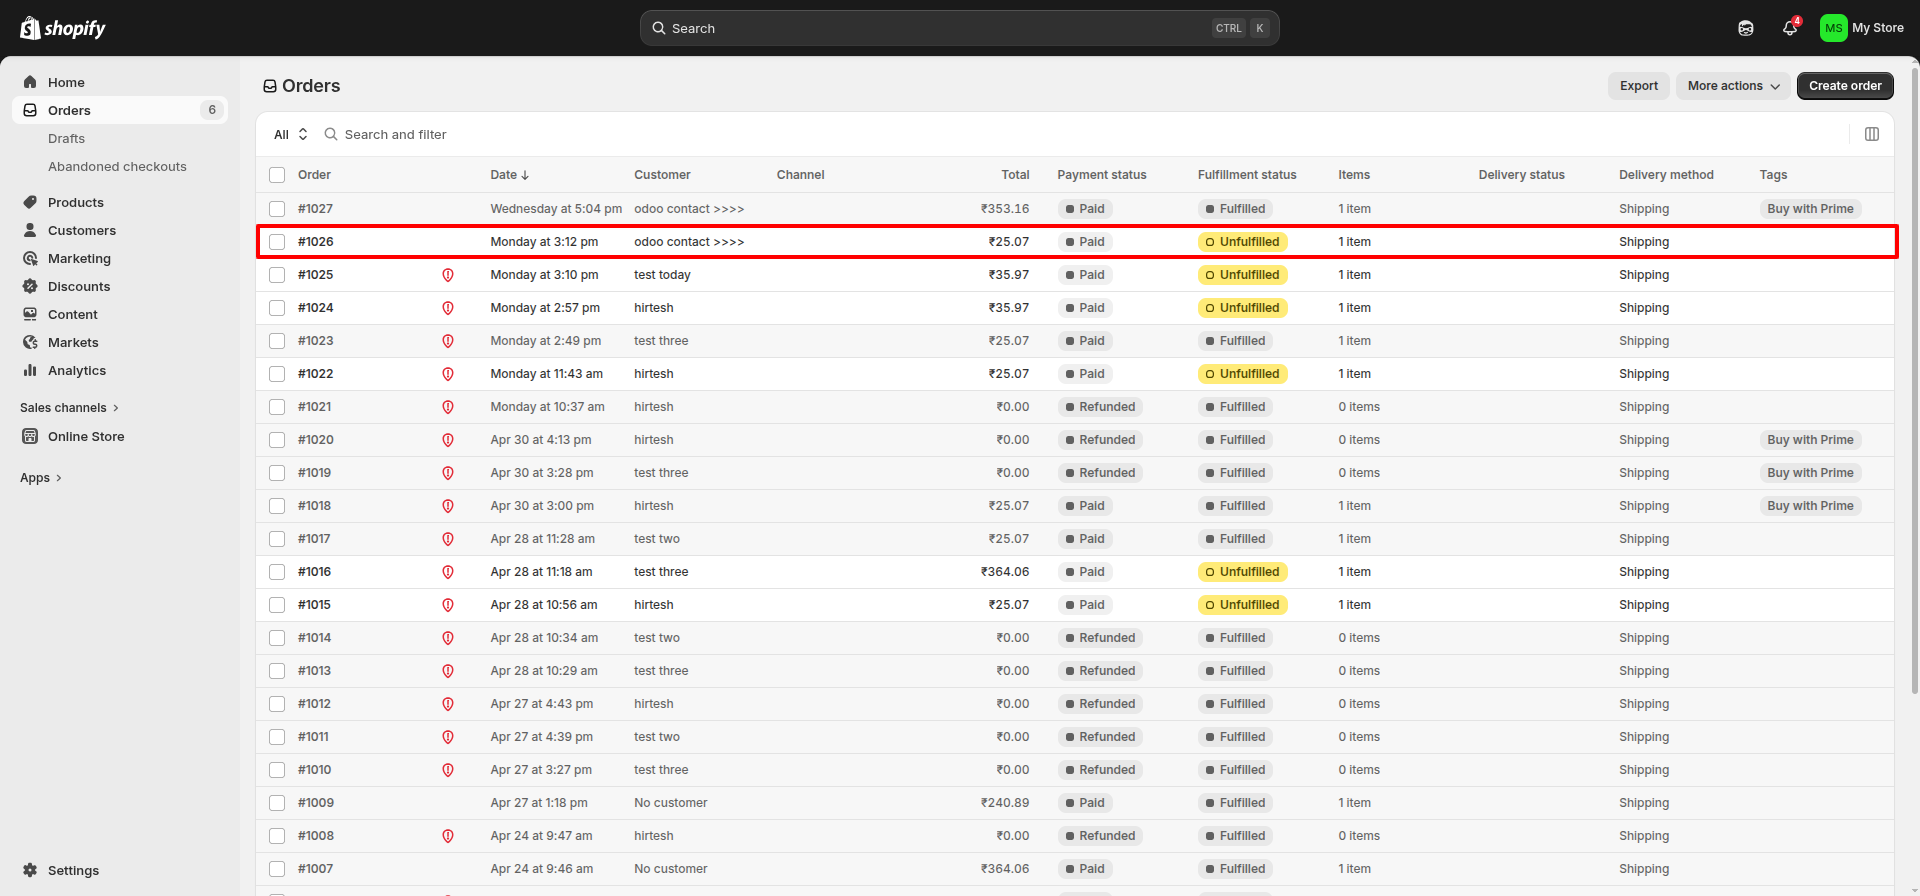
Current status is 'Unfulfilled'.
Order Fulfillment status interface screenshot
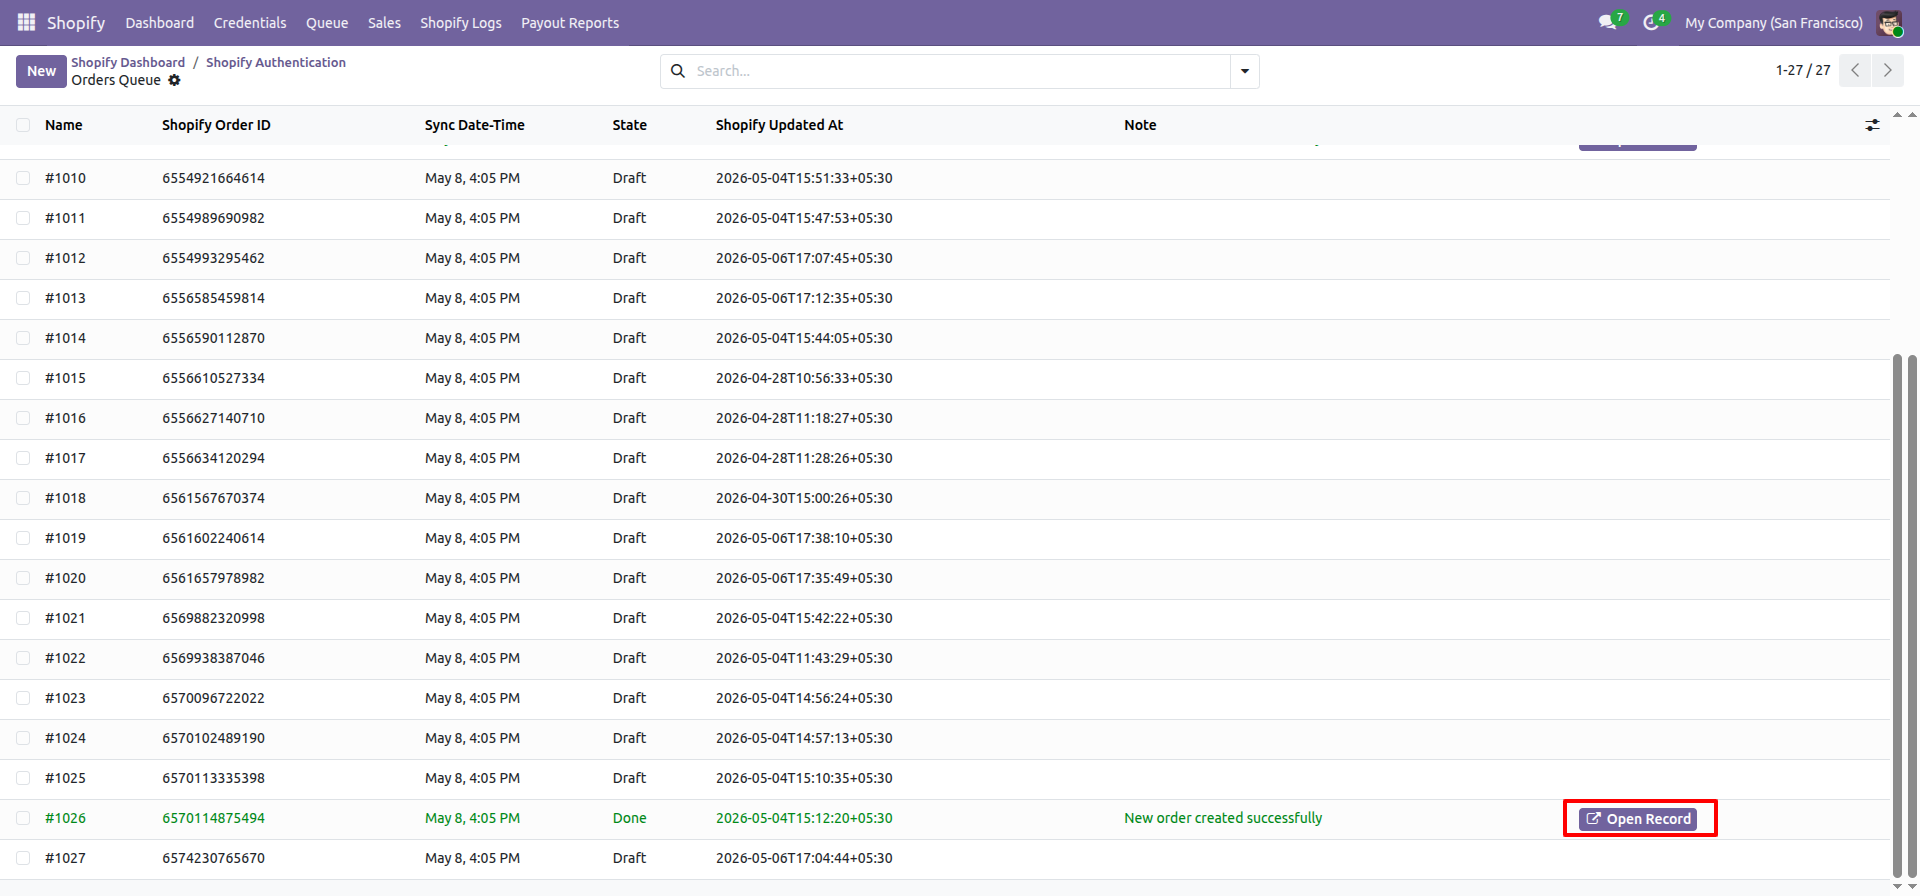
Click 'Open Record'.
Order Fulfillment status interface screenshot
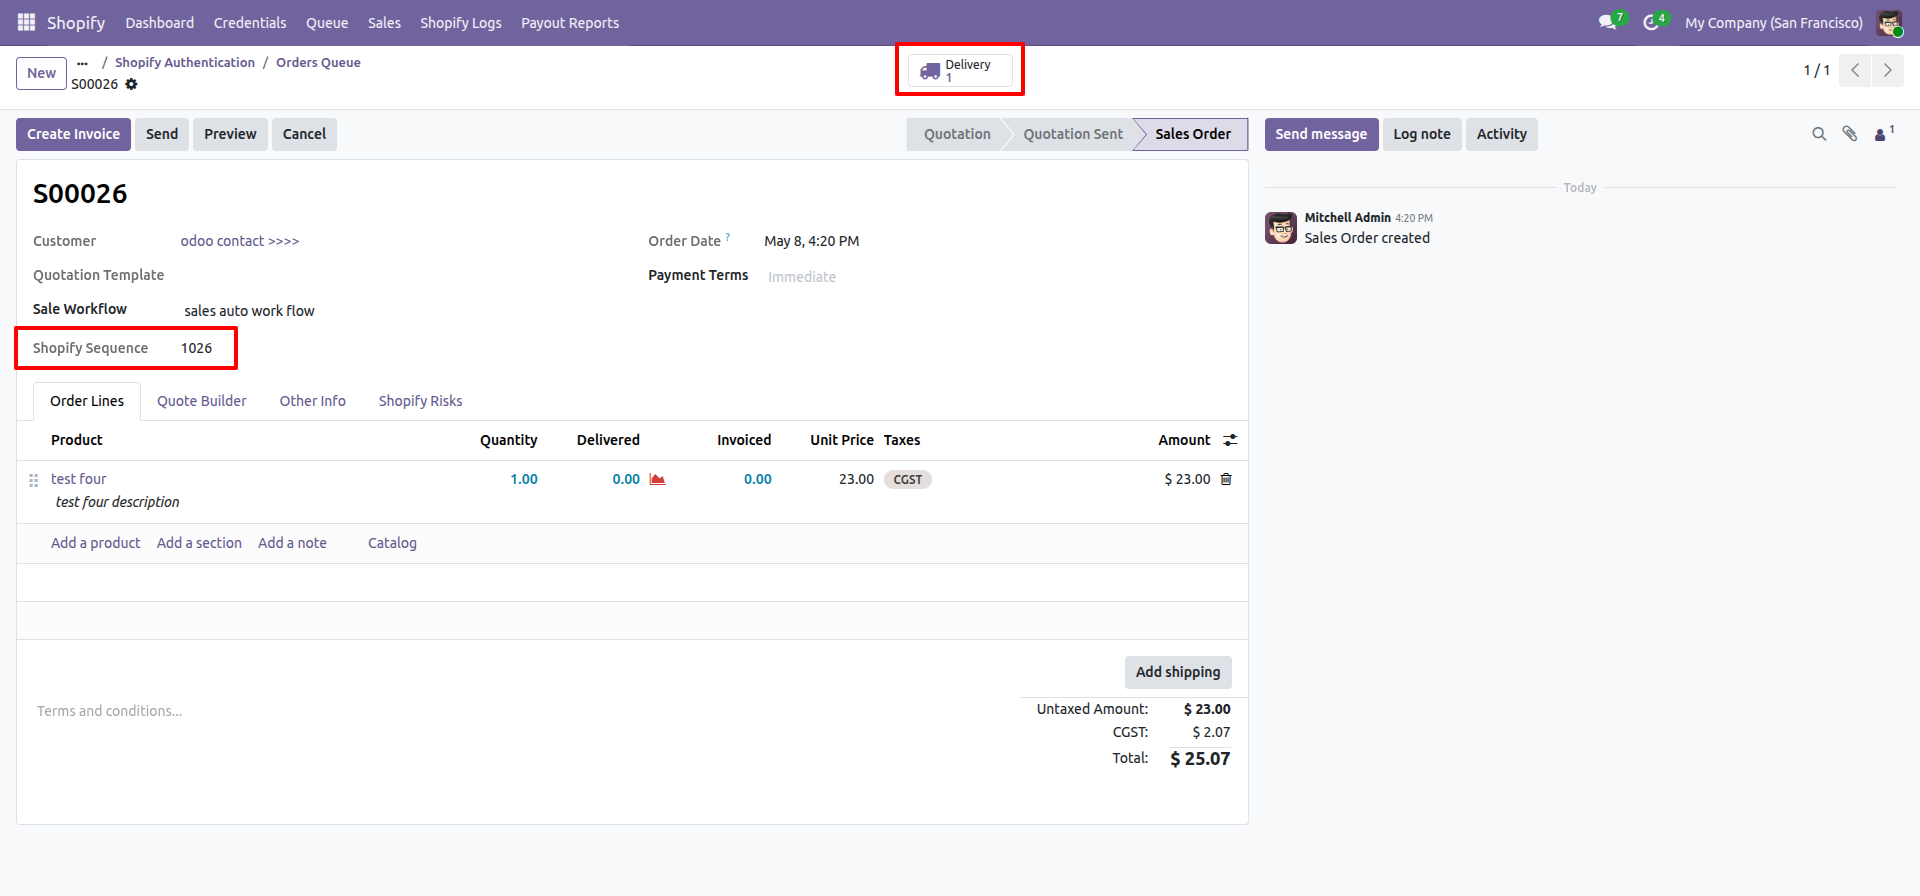
Order queue with Shopify sequence, Click ' Delivery'.
Order Fulfillment status interface screenshot
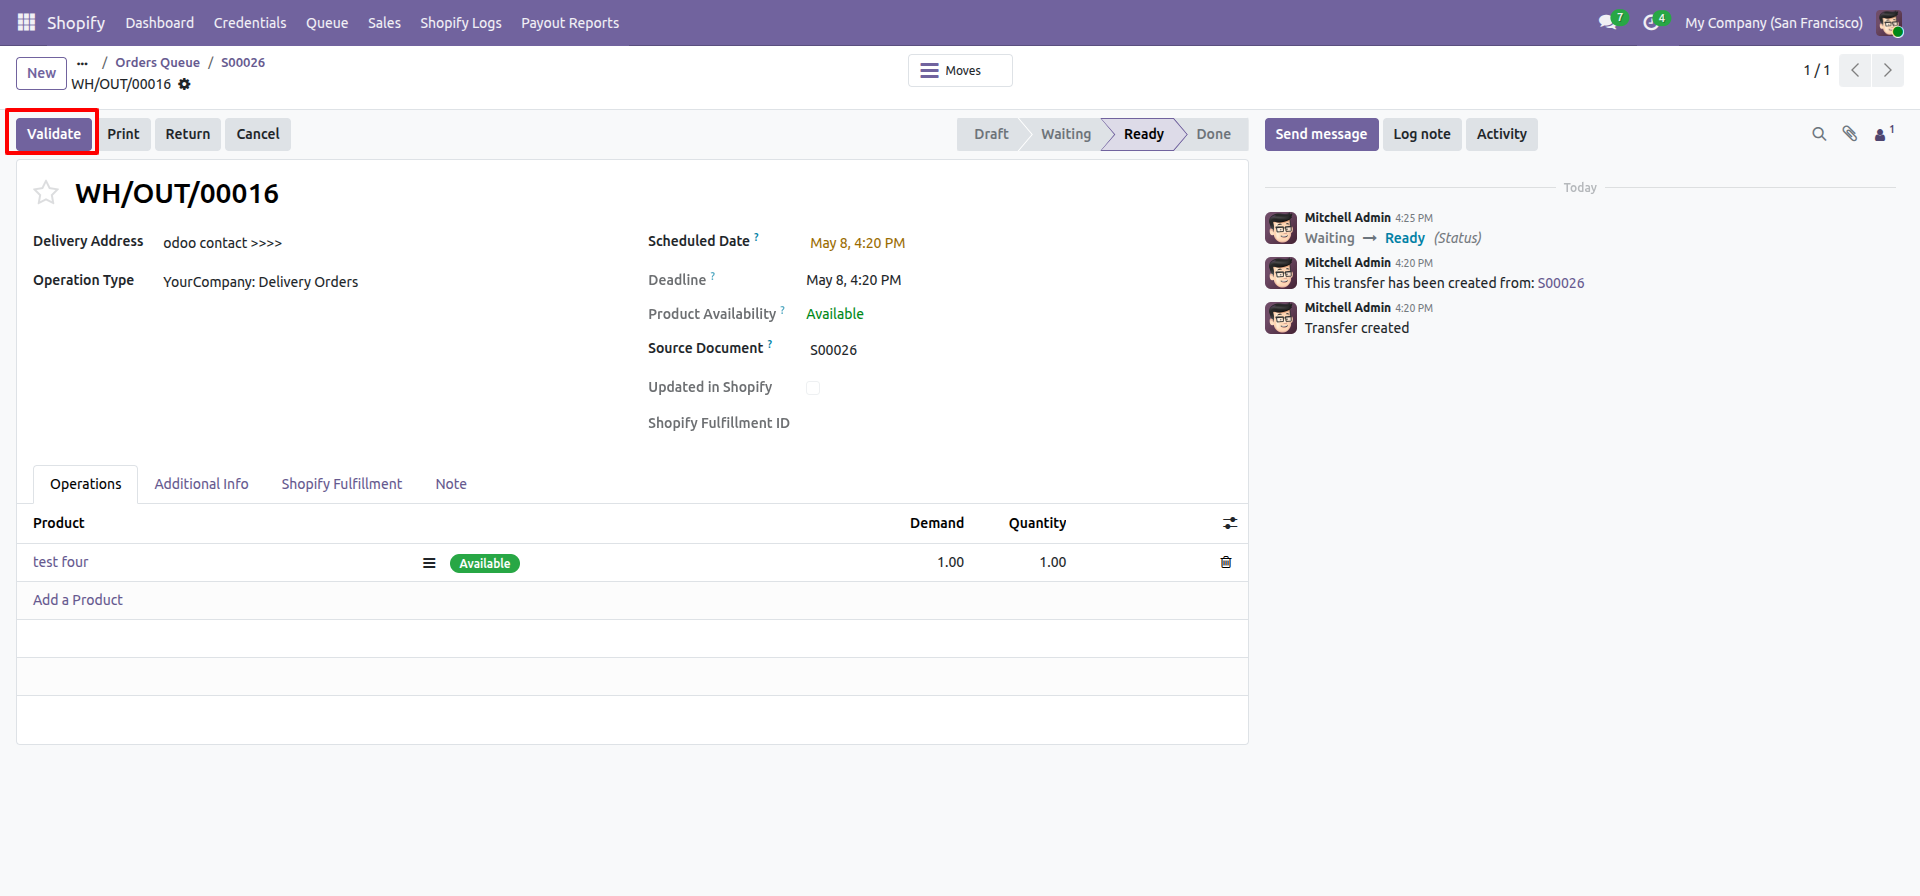
Click 'Validate'.
Order Fulfillment status interface screenshot
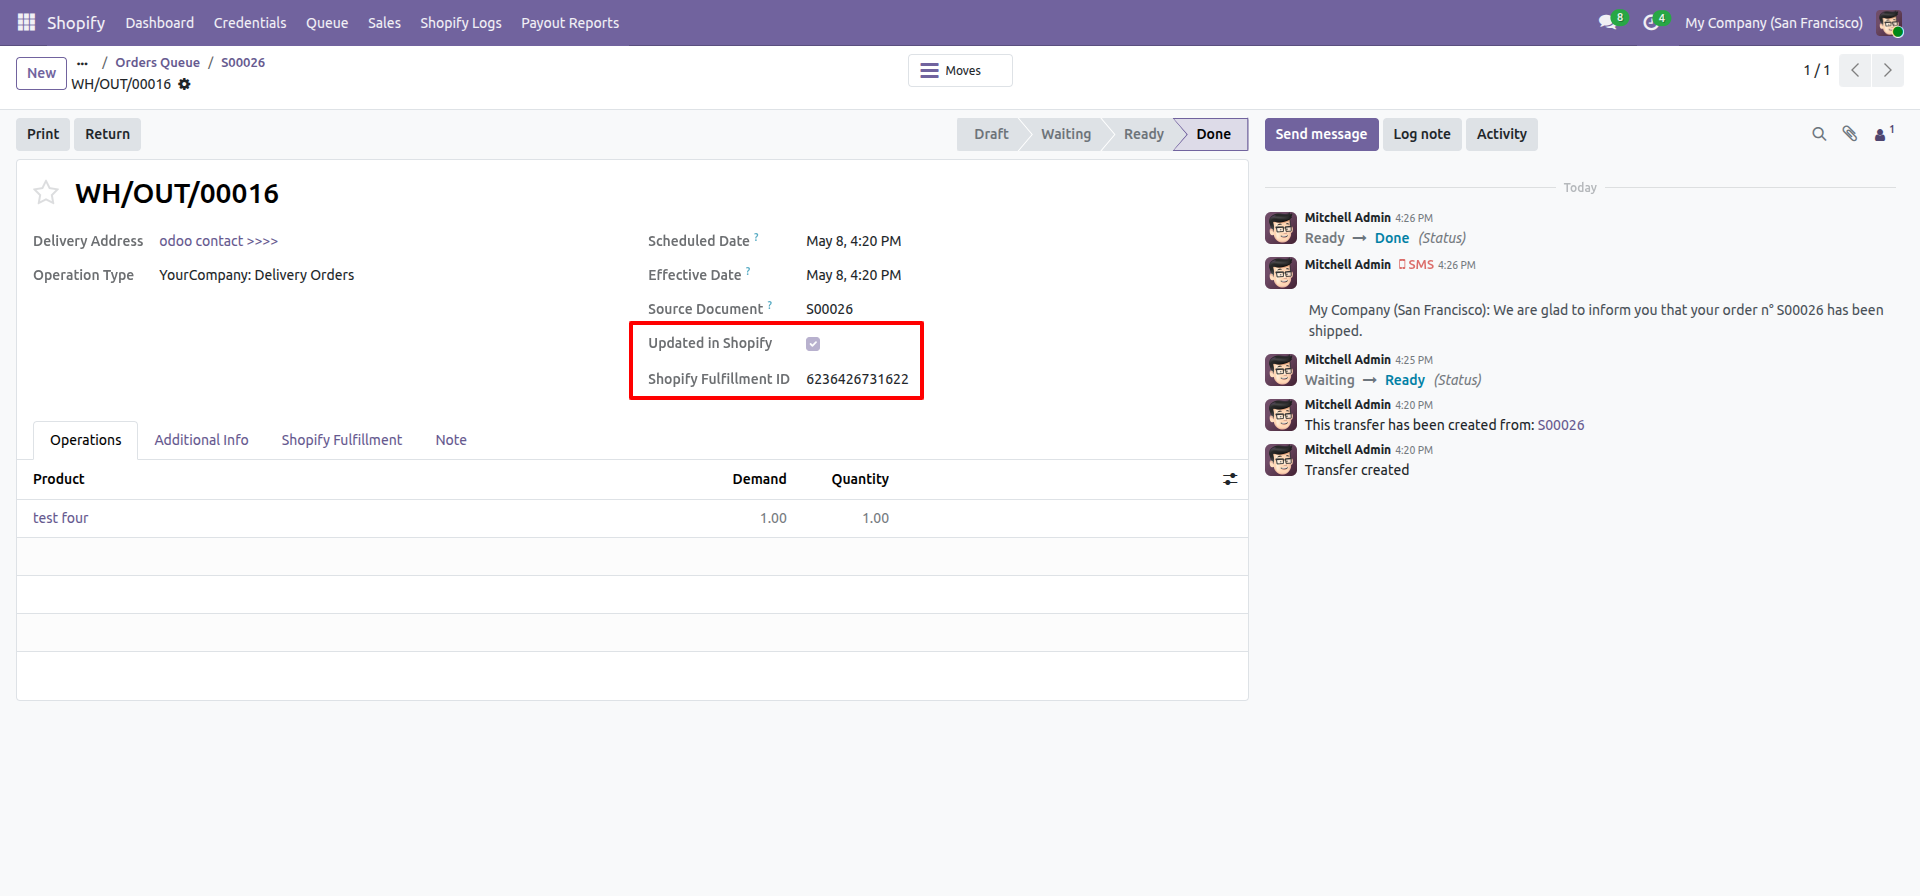
Stage moved to done with fulfillment ID.
Order Fulfillment status interface screenshot
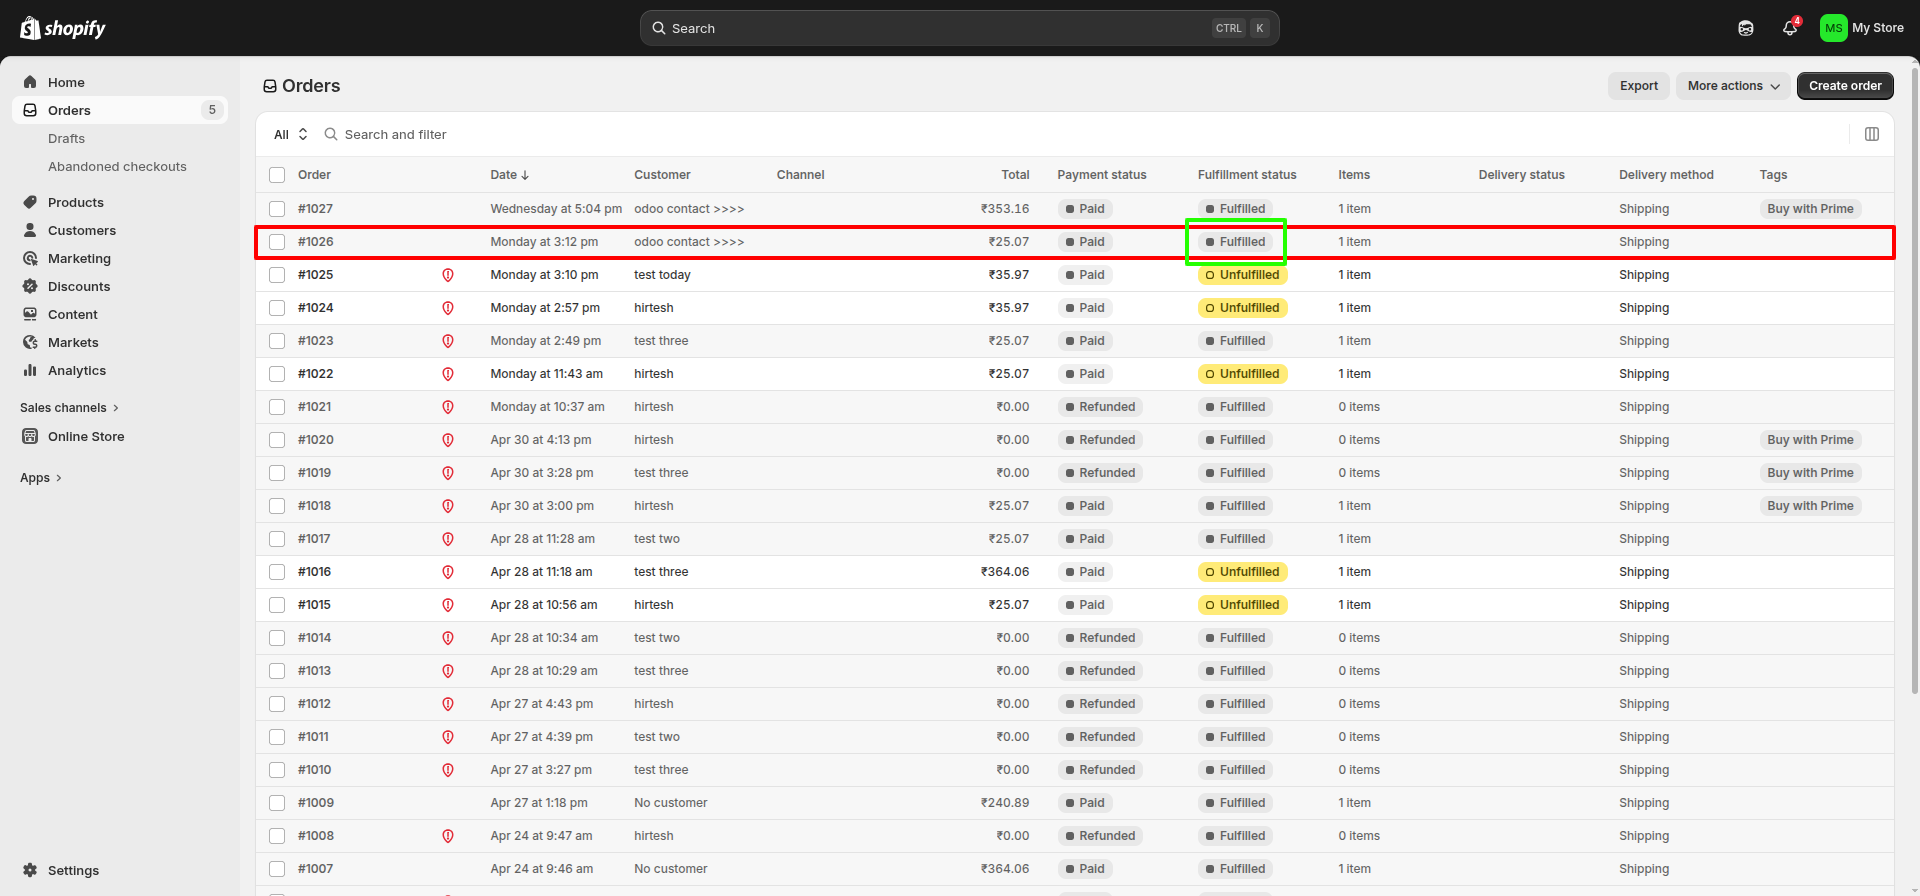
Shopify order with fulfillment status.
Order Fulfillment status interface screenshot
19.0.2.0.0
05 May 2026

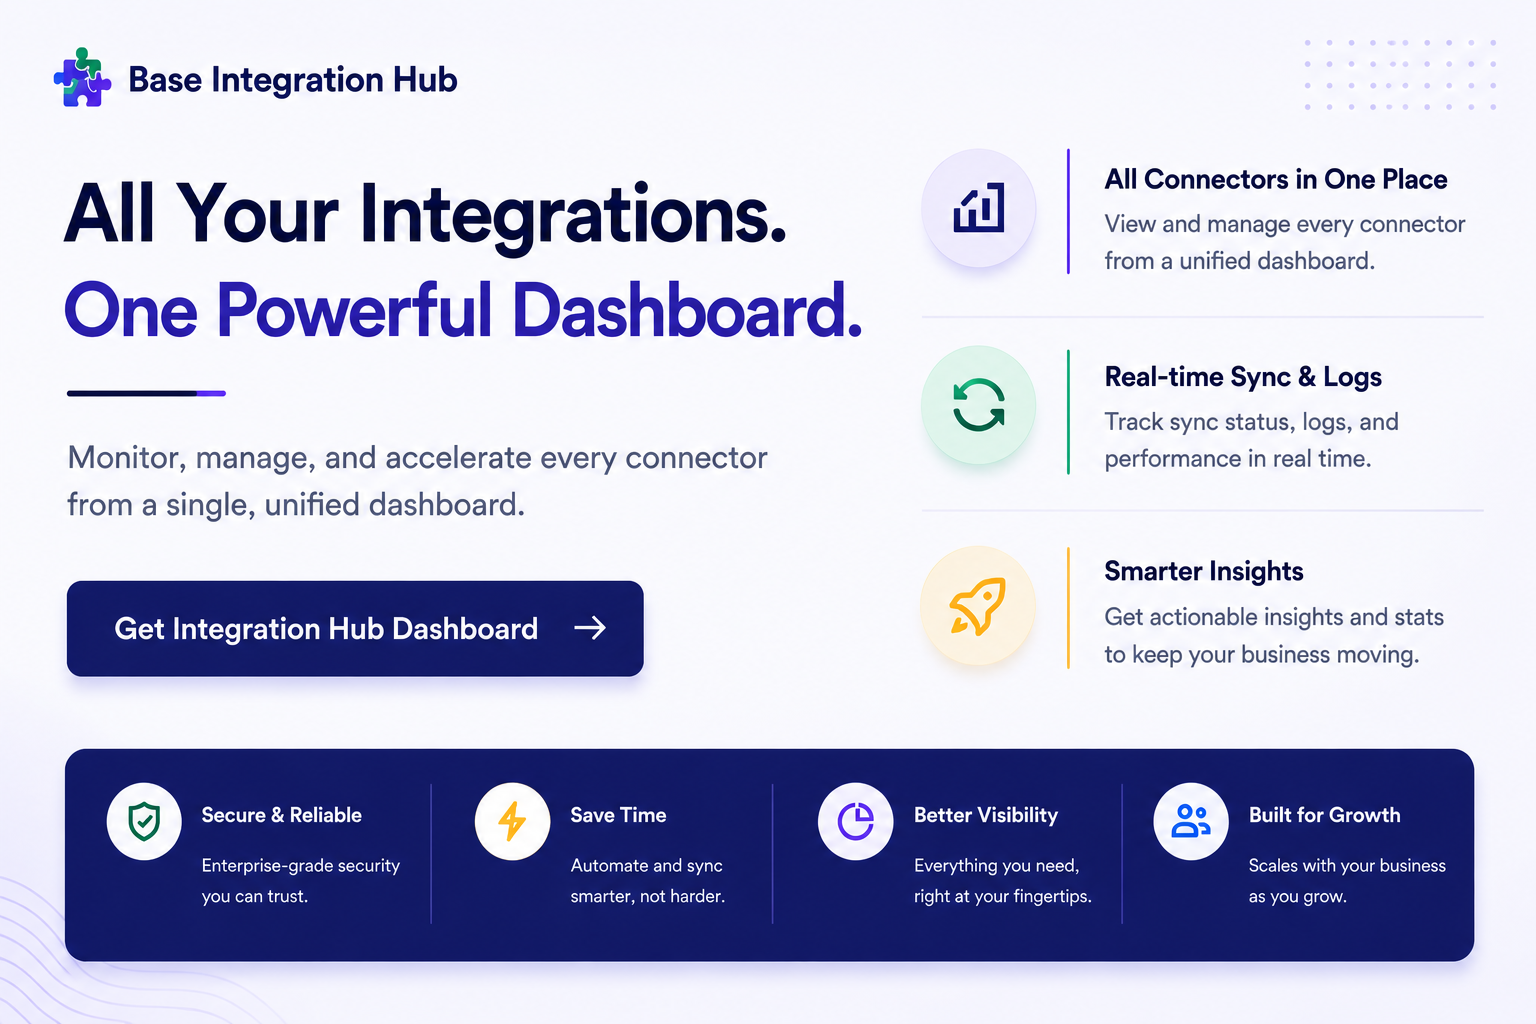
Updated the UI, expanded configuration coverage, added queue dashboard improvements, introduced dynamic cron creation, and added Integration Hub connectivity.

19.0.1.0.1
23 February 2026

Resolved installation issues to improve setup reliability and streamline deployment.

19.0.1.0.0
18 February 2026

Initial release of the Shopify Odoo Connector.

  • Yes, this app works perfectly with Odoo Enterprise (Odoo.sh & Premise) as well as Community.
  • No, this application is not compatible with odoo.com(odoo saas/Odoo Online)
  • Yes, we provide free support for 365 days from the date of purchase.
  • Yes, you will receive lifetime free updates for the version of the module you purchased.
  • No, there is no need to install any additional libraries.
  • Yes, for version 12 and above, you need to purchase the module separately for each version you intend to use.
  • No, exchanges or refunds are not allowed. Please make sure to select the correct version before purchasing.
  • You can contact us at support@softhealer.com for language translation support. We use Google Translator tools to provide translations in multiple languages, so the accuracy may vary. We welcome your suggestions to help improve translations.

Free Support

support@softhealer.com

Customization

sales@softhealer.com

Quick Chat

Reach us anytime

Premium Support

We're With You Every Step of the Way

Free 30-Min Pre-Purchase Overview
Schedule a complimentary 30-minute session with our product specialist before purchasing. We'll walk you through the module's features, answer your specific use-case questions, and confirm it's the right fit for your business.
Before Purchase
Free 1-Hour Configuration Support
After purchase, our technical team provides a complimentary 1-hour guided configuration session. We'll help you set up Shopify credentials, configure sync settings, and verify all data flows are working correctly.
After Purchase
Lifetime Free Email Support
All Softhealer modules come with lifetime free support via email. Reach out to support@softhealer.com anytime for bug reports, questions, or guidance on using the module.
Always Available
Sales Enquiries
sales@softhealer.com
Technical Support
support@softhealer.com
Demo & Trial
sales@softhealer.com
Response Time
Within 24 Working Hours

Discover Our Latest Apps

heading
NEW

Odoo Direct Print

  • Print Any Odoo PDF
  • Access From Anywhere
  • No IoT Required
And many more powerful features..

NEW

AI Insight Assistant

  • Dedicated AI Chat Interface
  • Instant Response Engine
  • Intelligent Data Understanding
And many more powerful features..

NEW

Knowledge Base System

  • Smart Dashboard
  • User & Manager Roles
  • Portal View
And many more powerful features..

Import purchase pricelist vendor details in product from csv/excel file )Import Vendor Details in Product from CSV/Excel file | Import Vendor Details in Product from CSV/Excel file v15

Transforming Businesses with Next-Gen Solutions

Our next-generation solutions are built to transform businesses and drive growth in the digital era.

Find Us

530, West Gate 2,
Ayodhya Chowk, 150 Feet Ring Road Rajkot, Gujarat 360006.

Find Us

131 South End, Croydon CRO 1BJ,
United Kingdom

Contact No.

HR : +91 90232 46069
Sales : +91 93288 25451
Support : +91 63571 93747

Contact No.

Sales : +44 7562 893296

Reach Us Read Blog Contact Us Submit Support Ticket Watch Video Tutorial
whatsapp-support-store whatsapp-support-store
Click to Chat