
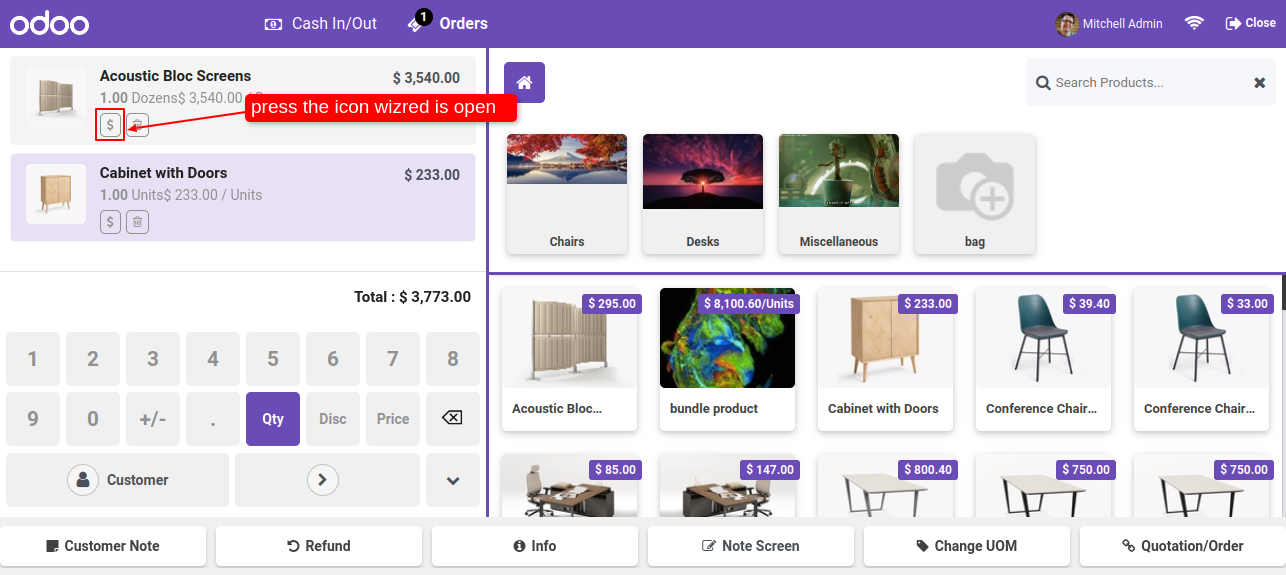
Point Of Sale
Retail Shop
 More Than 100+ Features


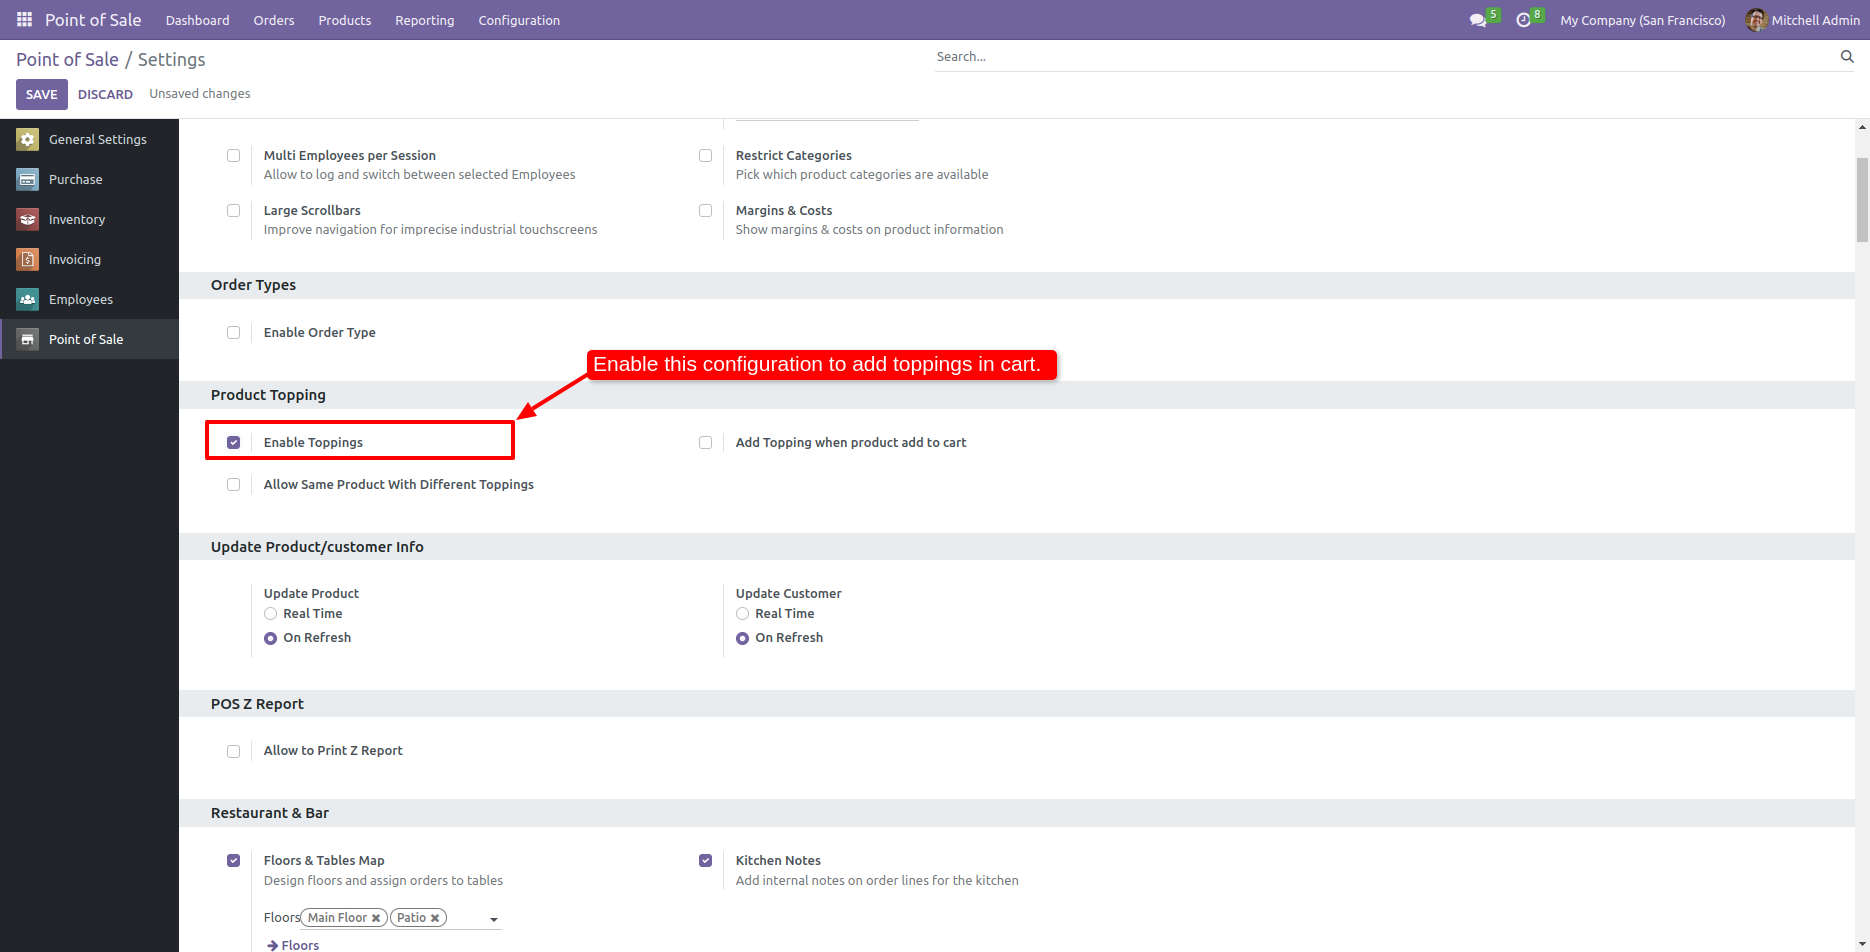
Go to the point of sale setting and tick 'Enable toppings'.
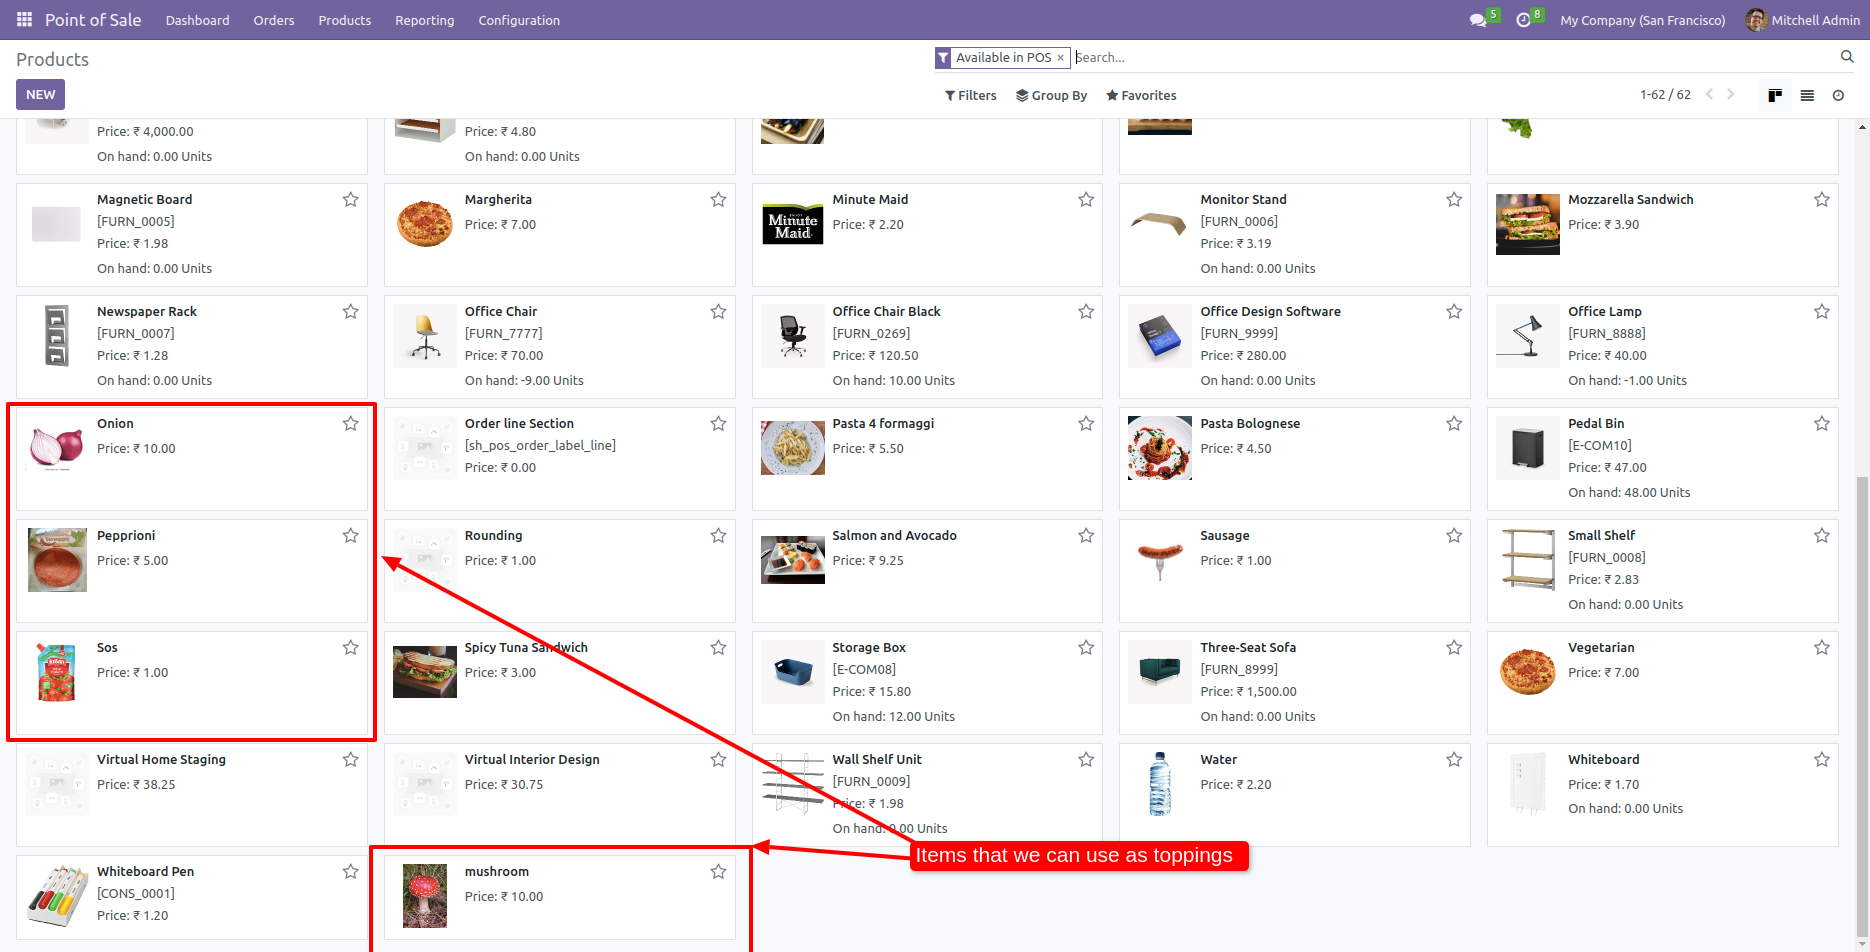
You can see the product which we add as a topping.
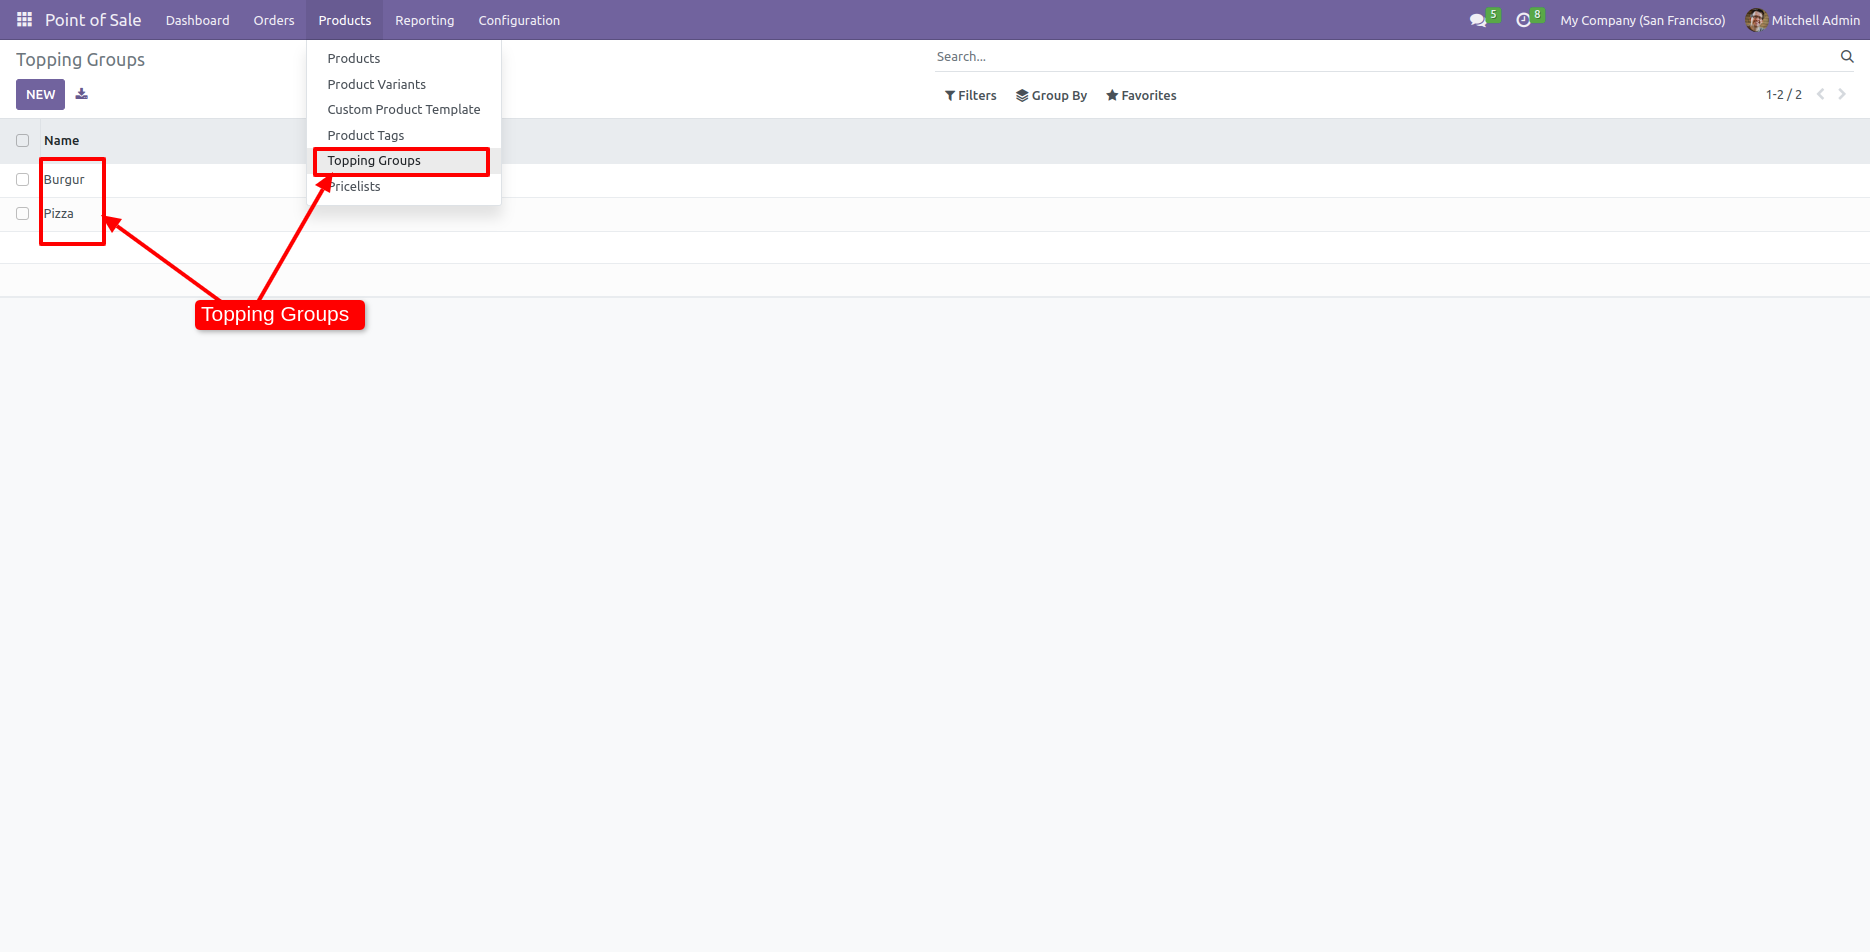
Tree view of the topping groups.
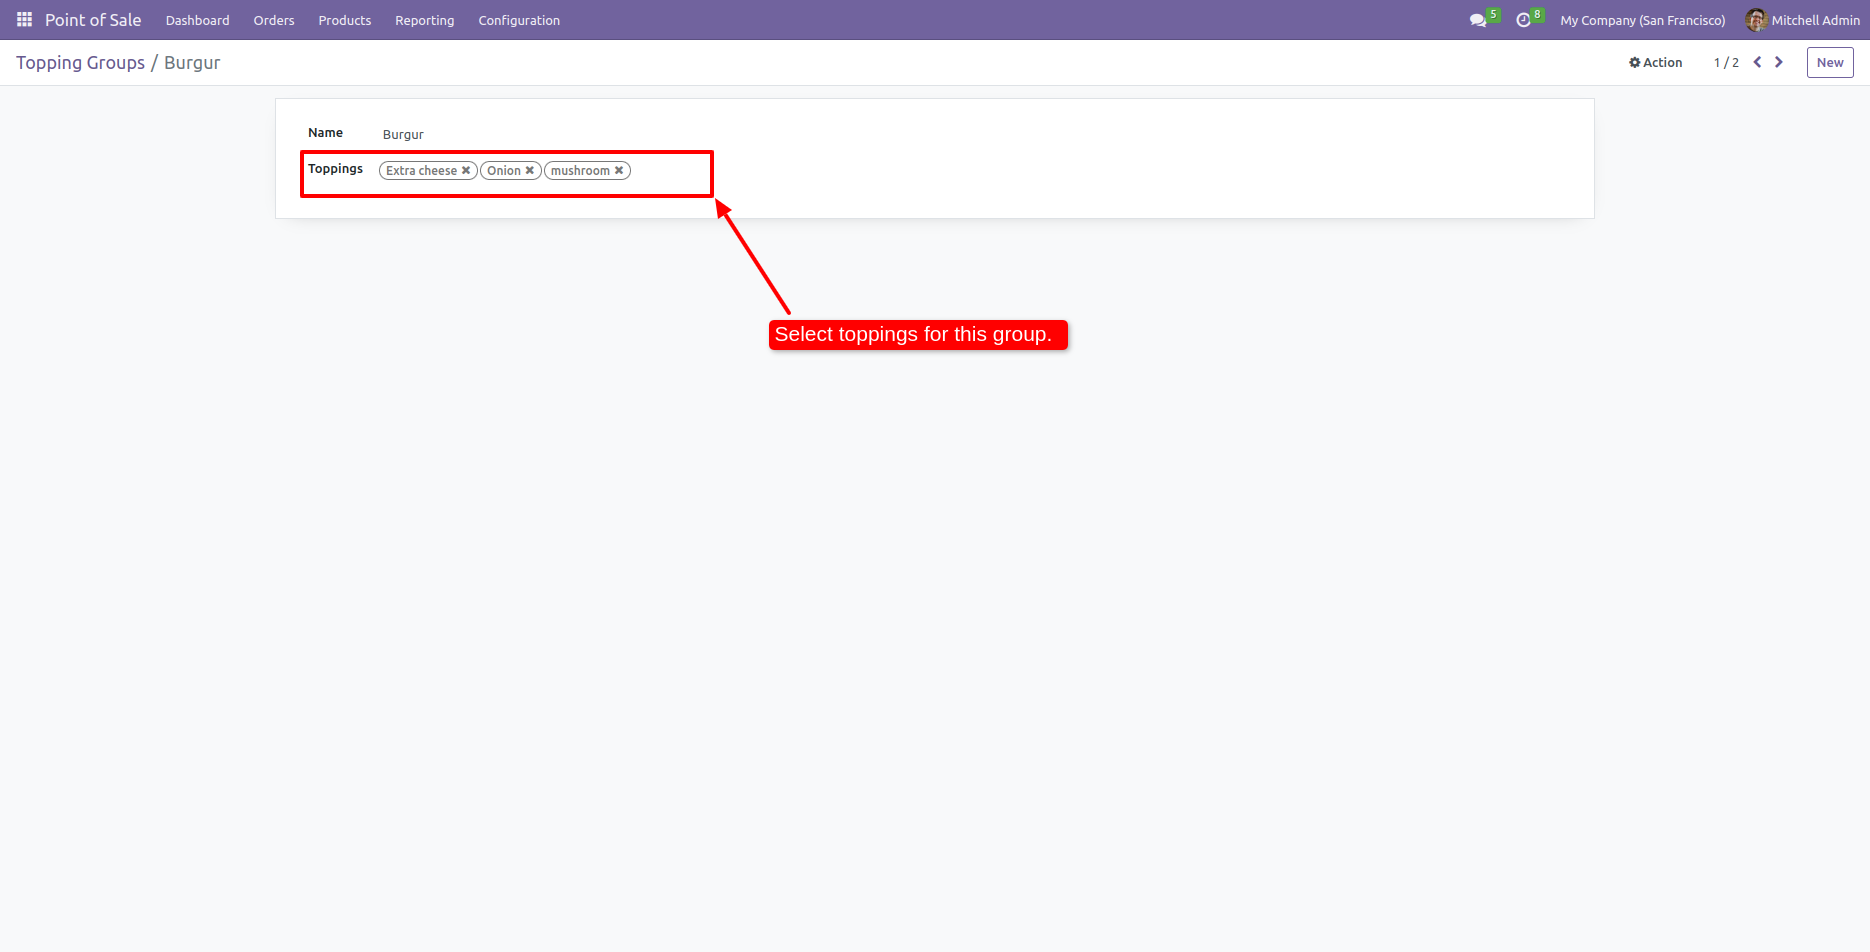
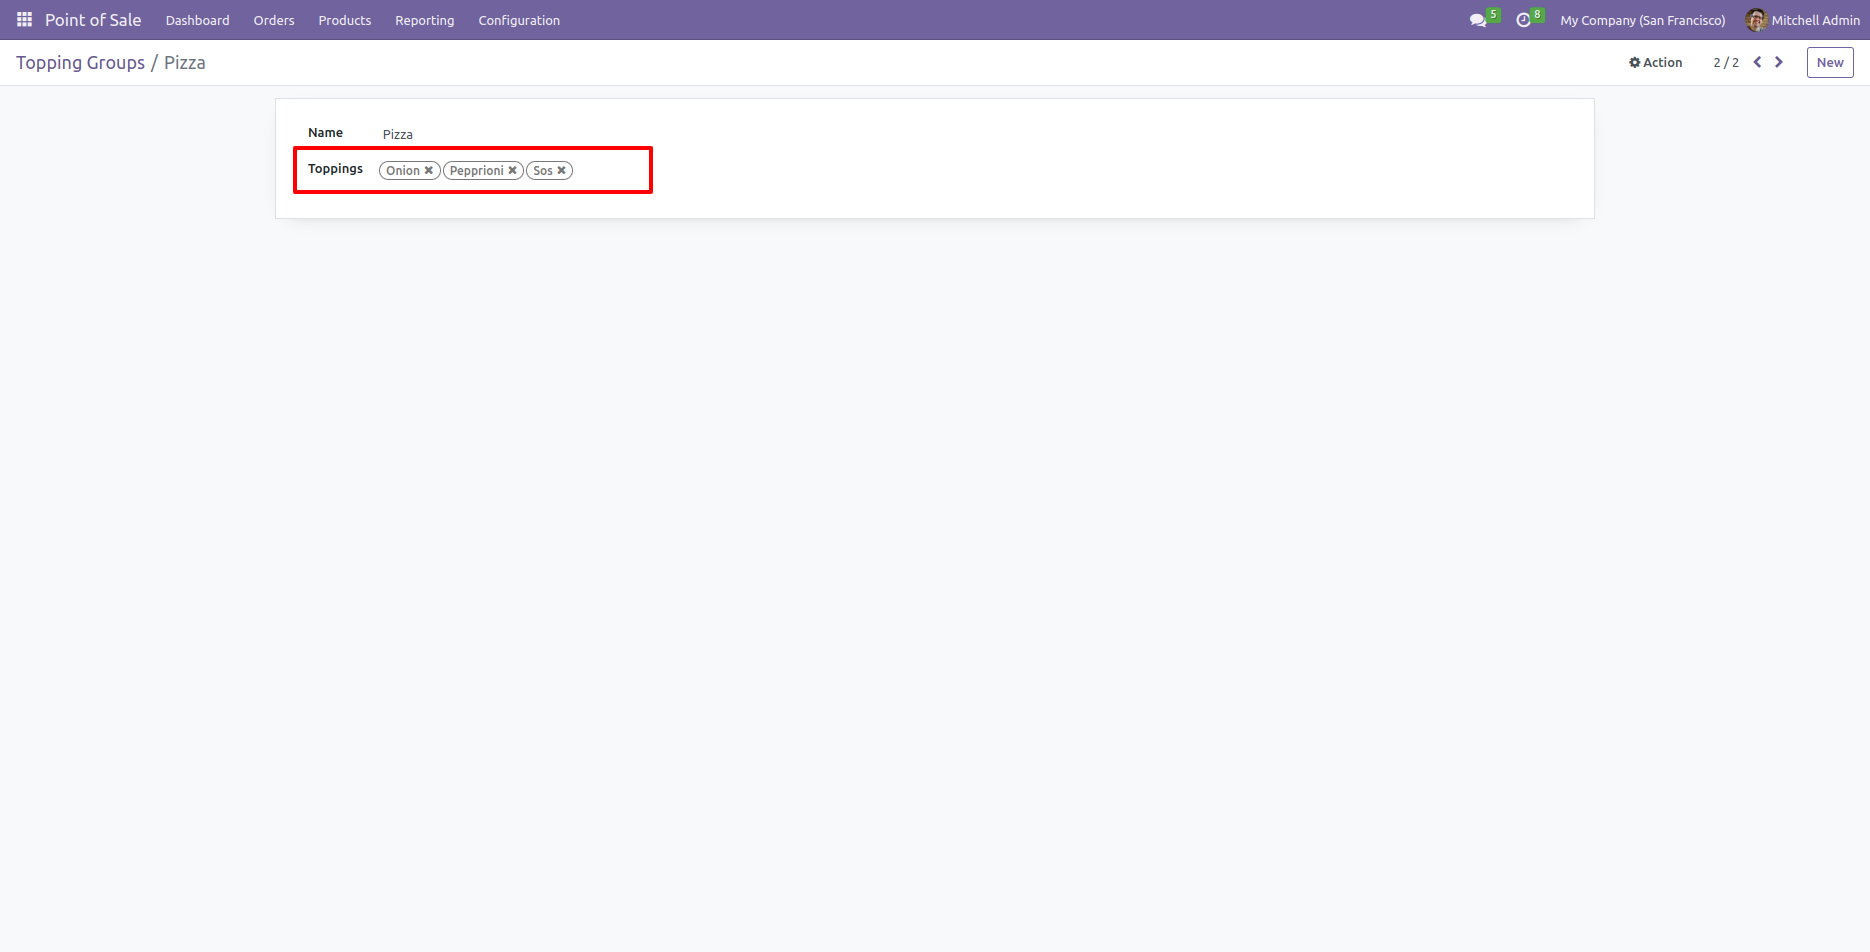
You can see the selected toppings in the form view of the topping groups.
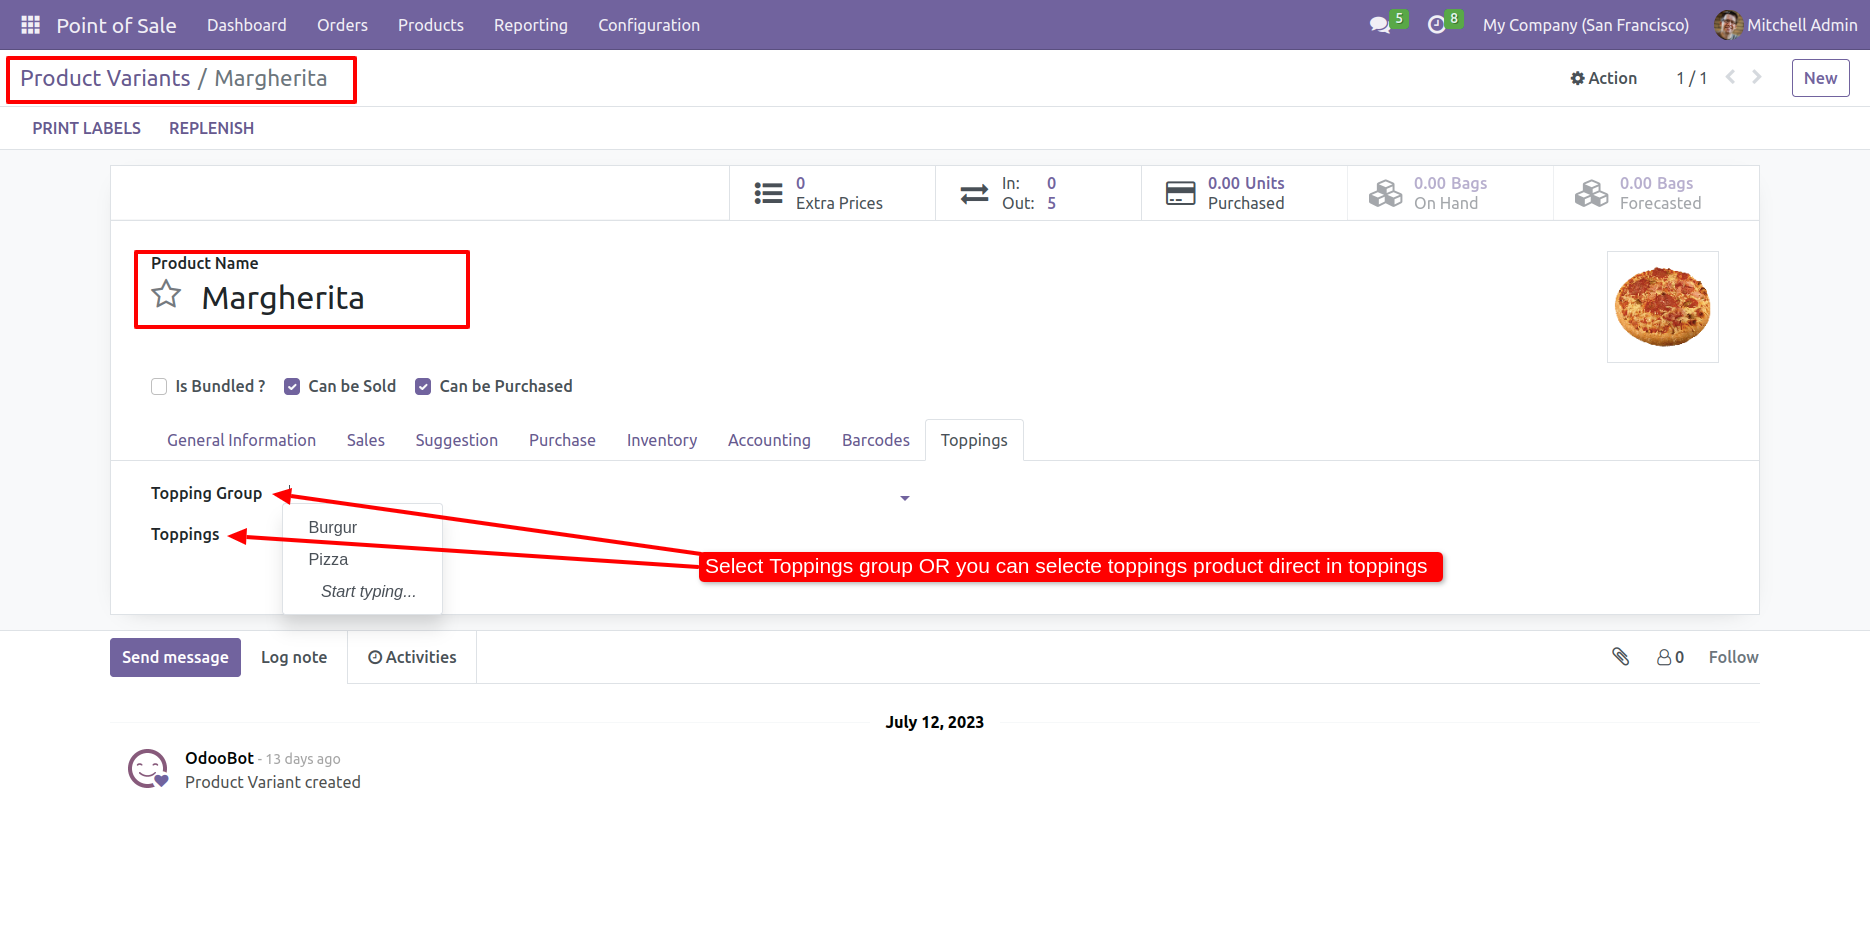
Here, you can select the topping product directly or you can also select the topping group.
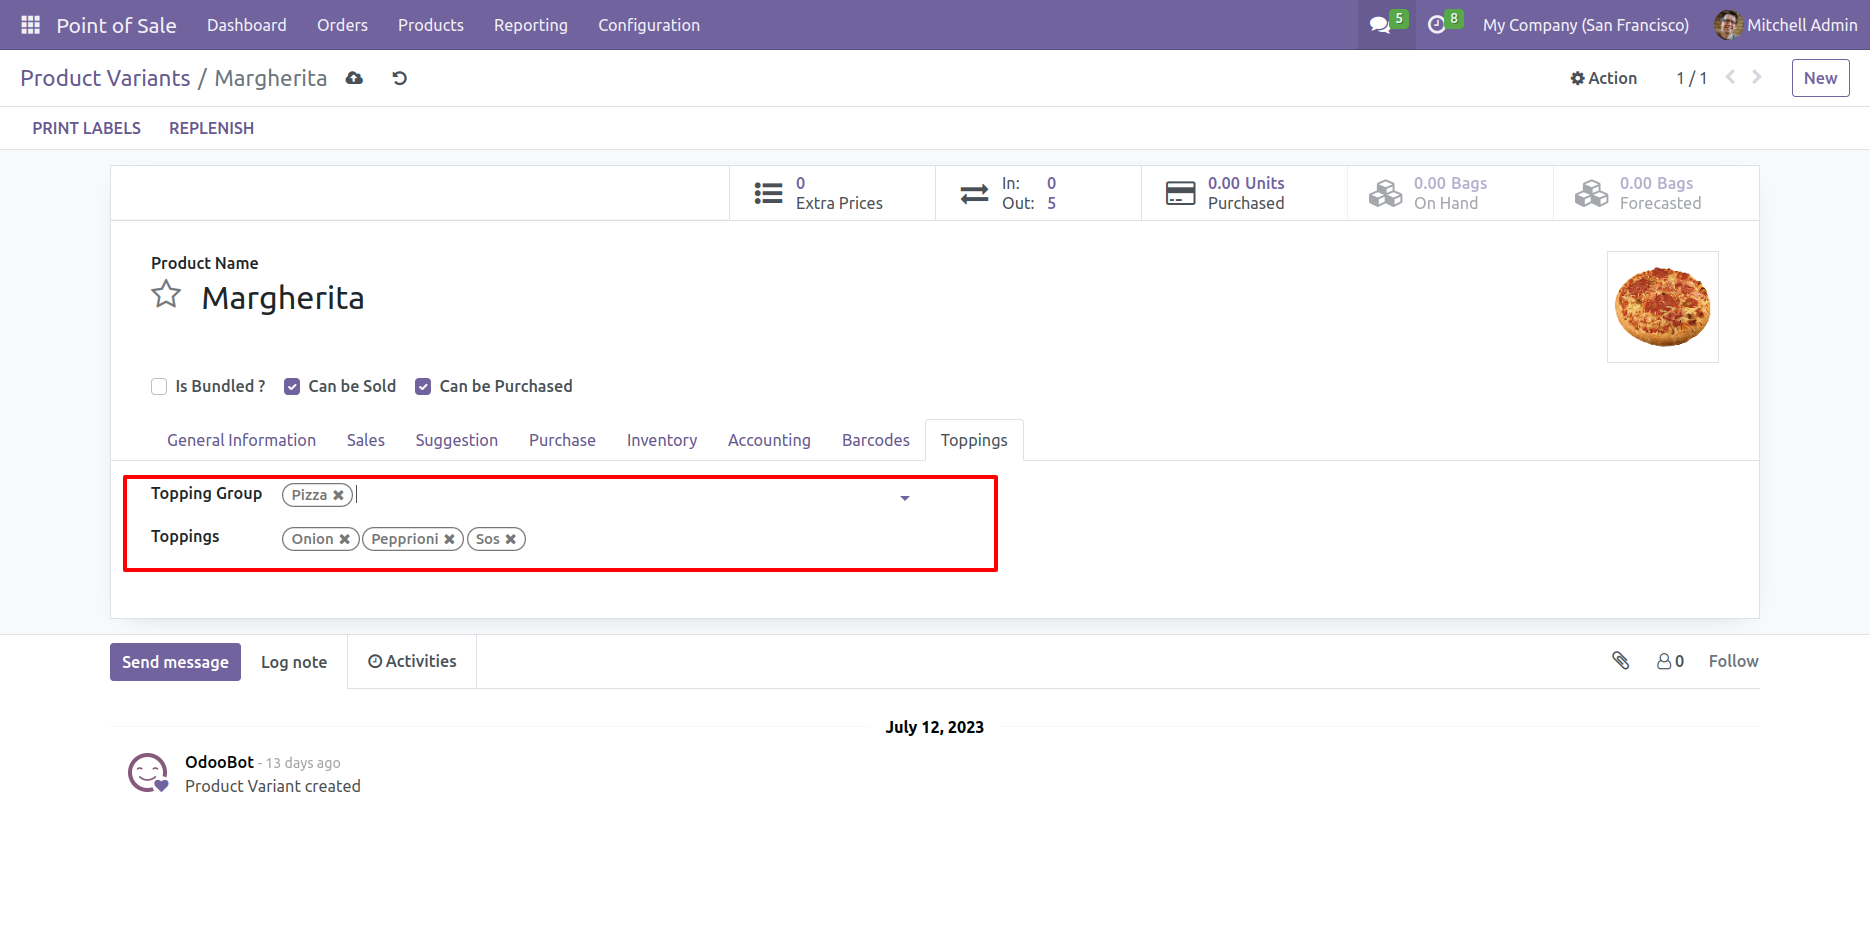
Select the topping product and topping group.
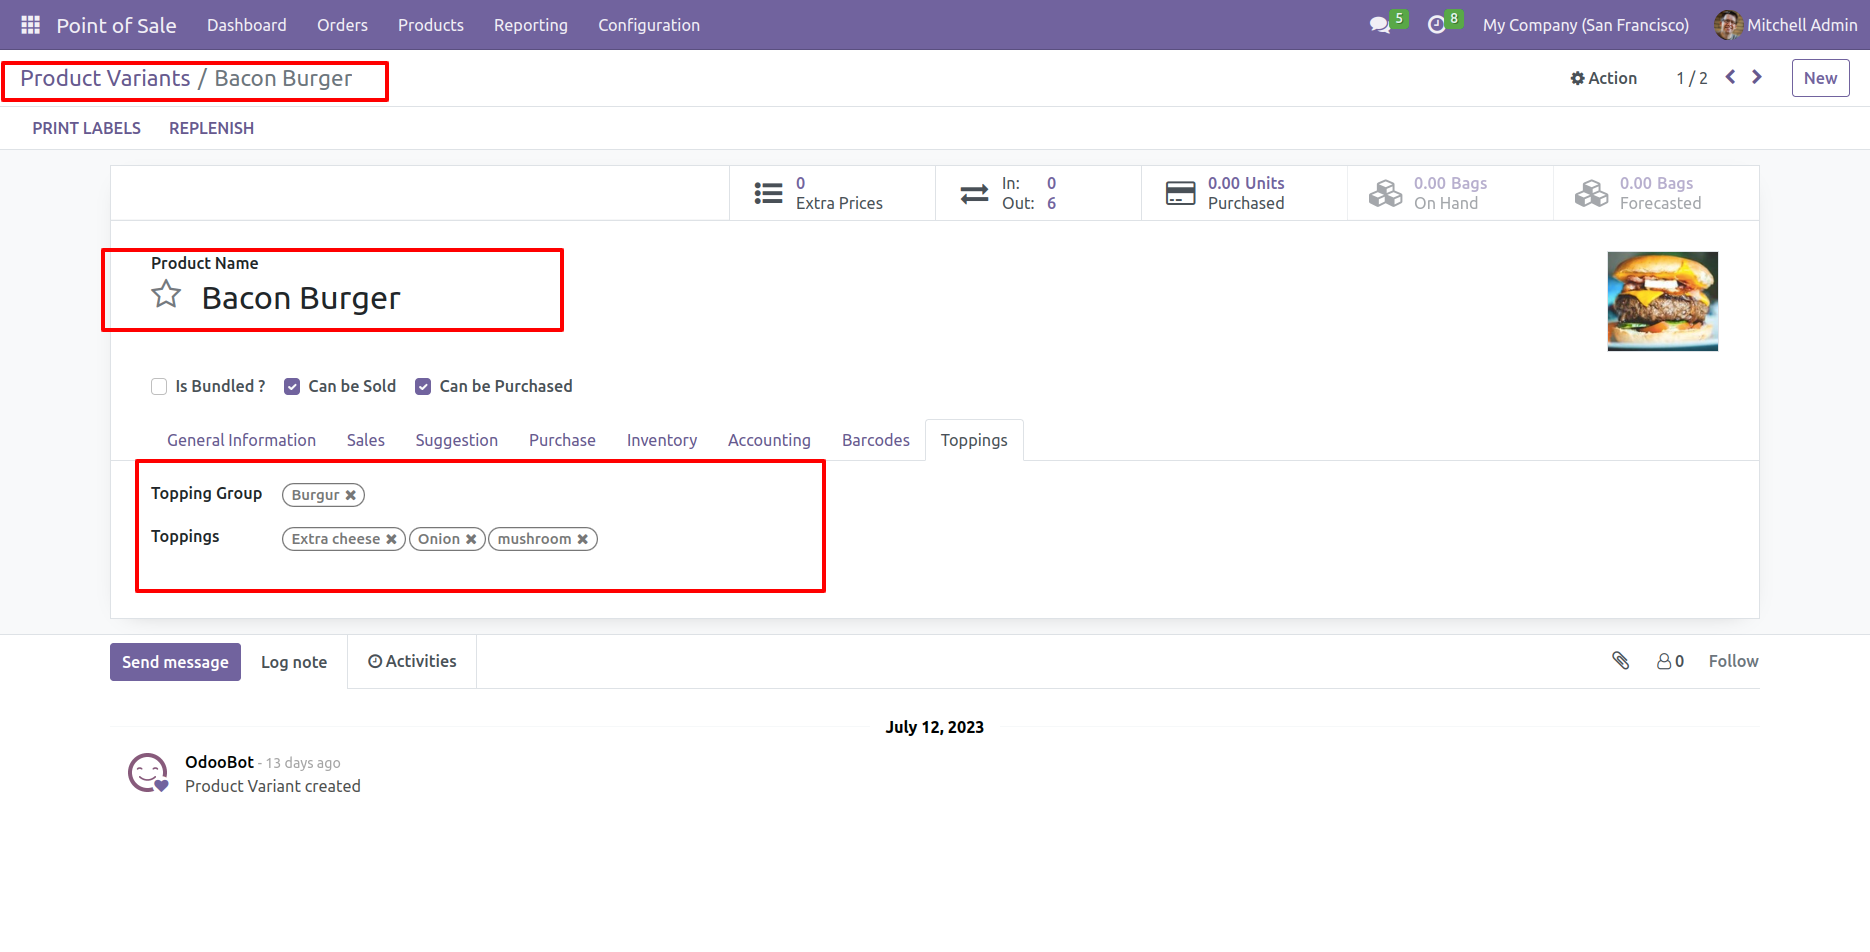
Select the topping product and topping group.
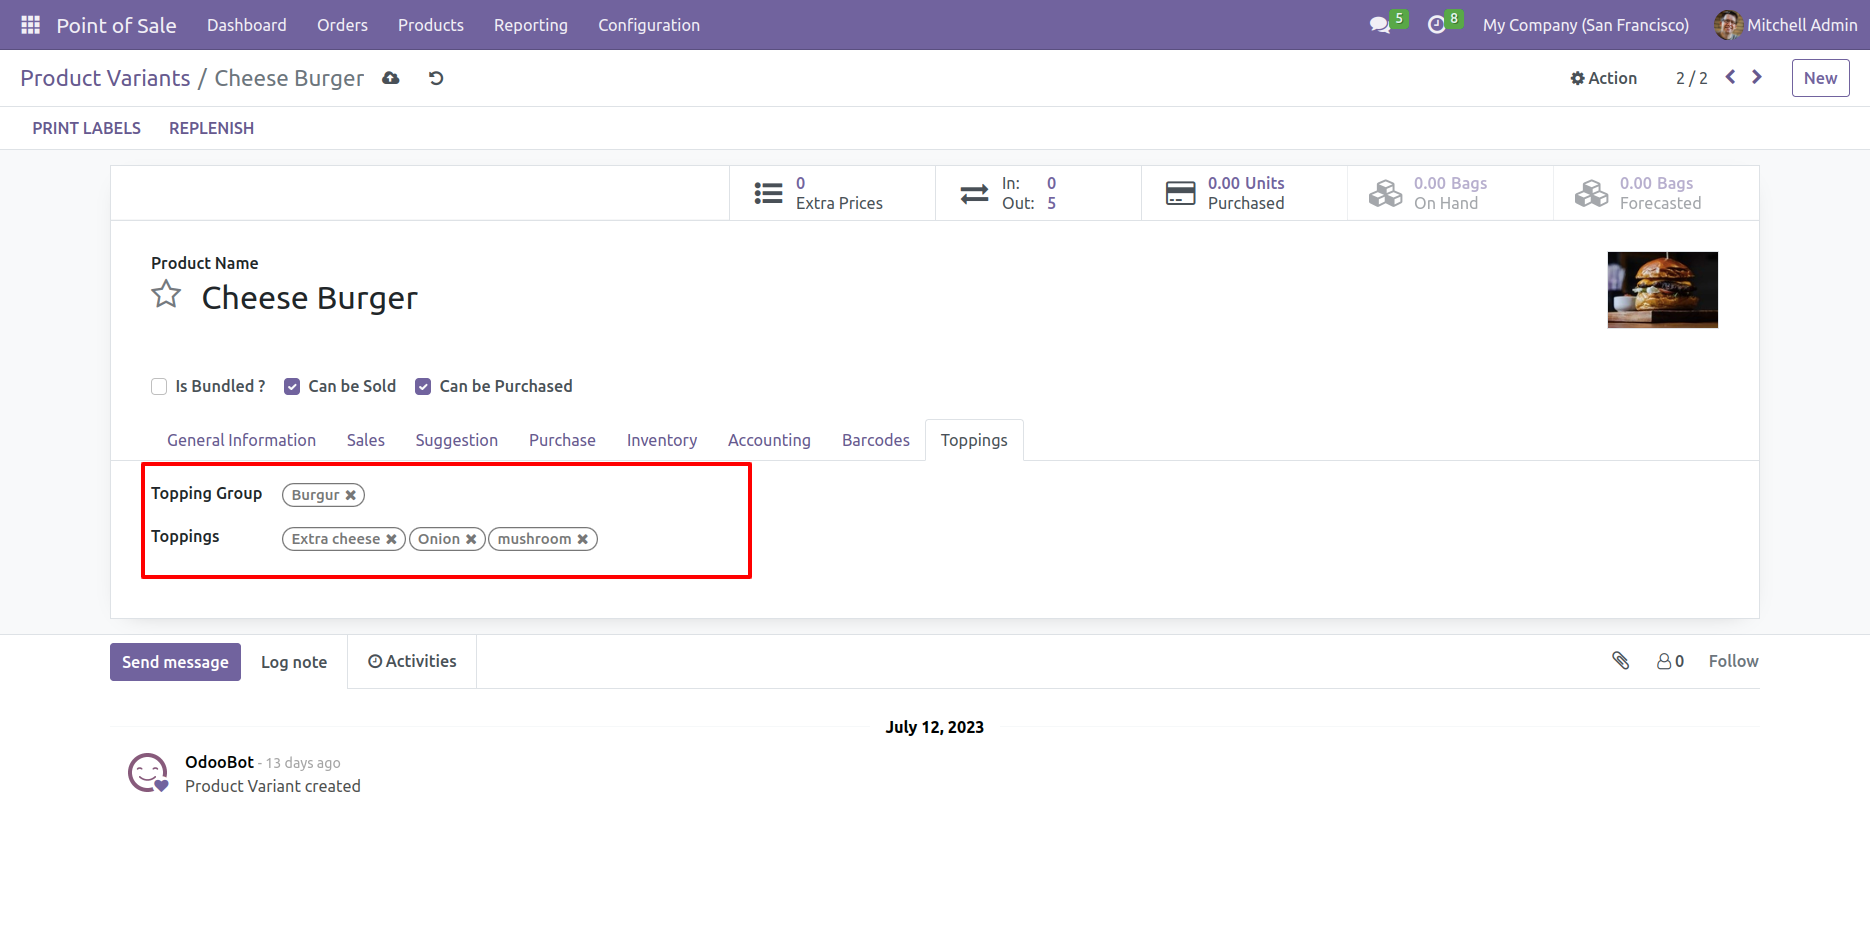
You can also select the product directly from toppings.

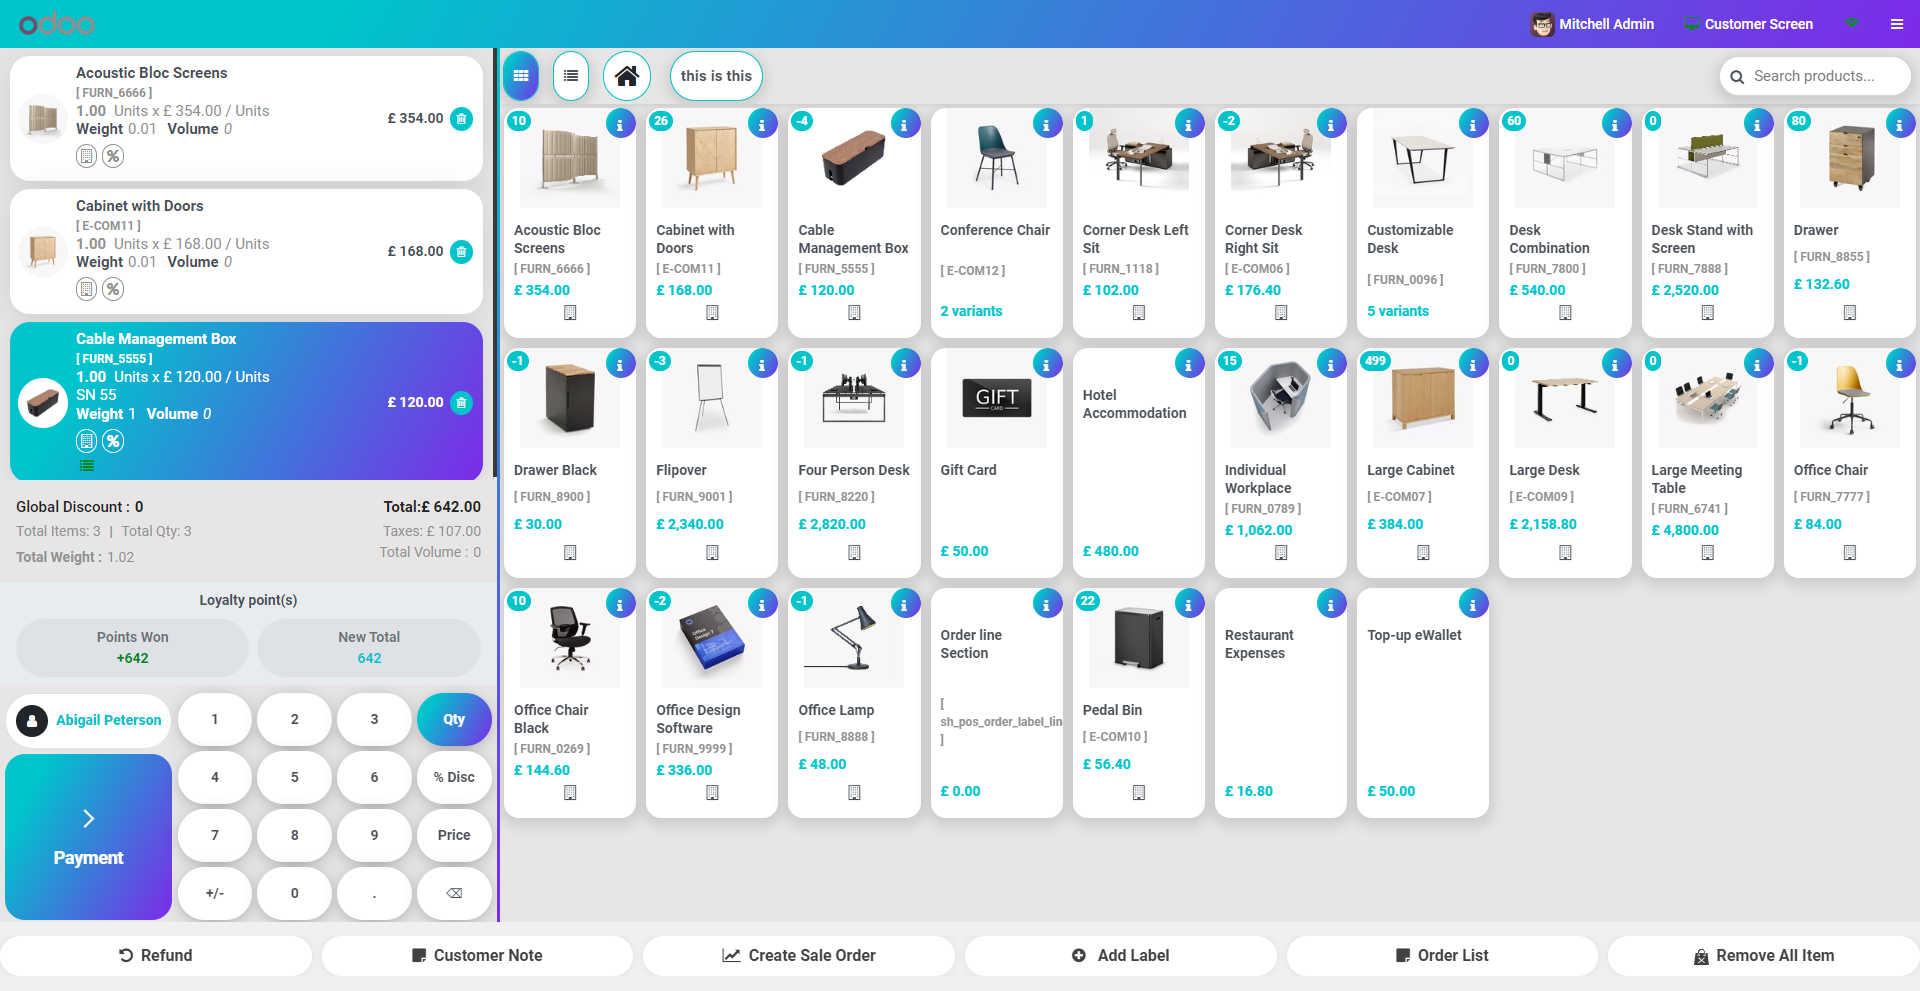
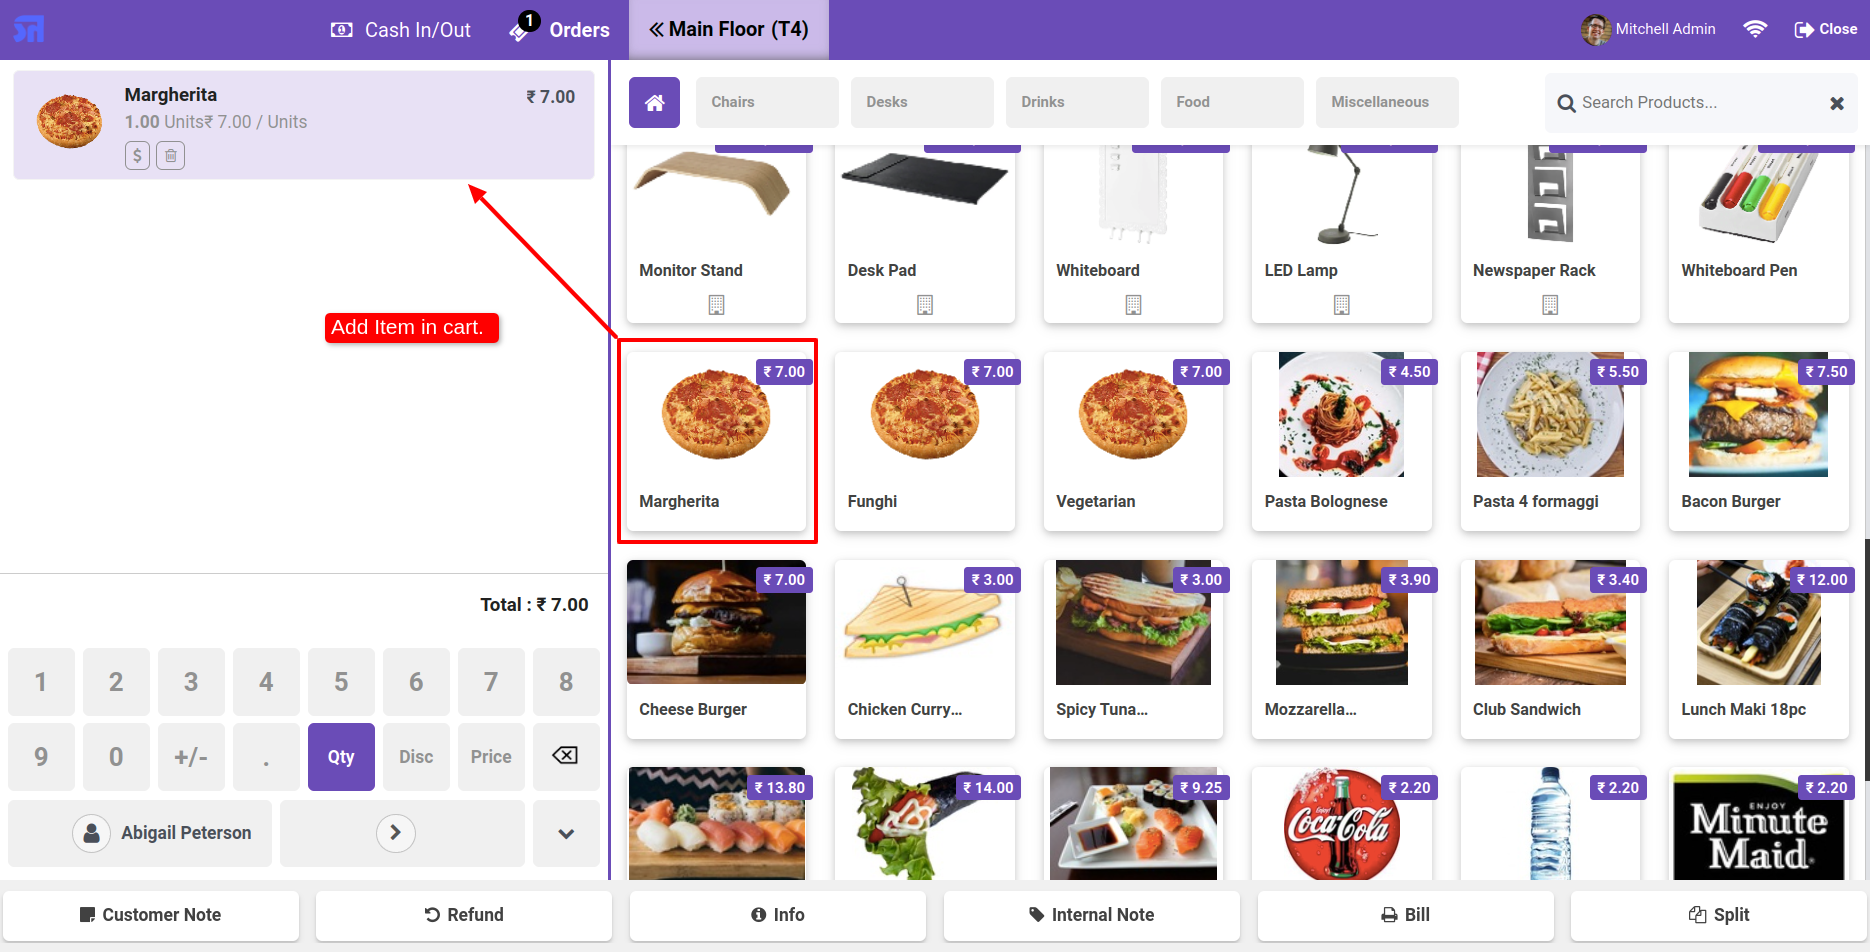
Add the product to the cart.
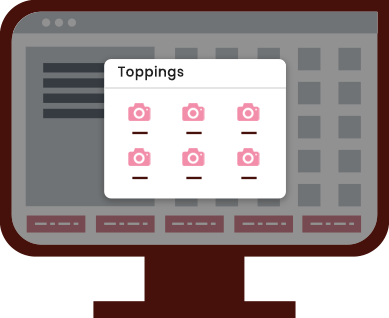
To add a topping, click on the order line. Topping wizard looks like below.
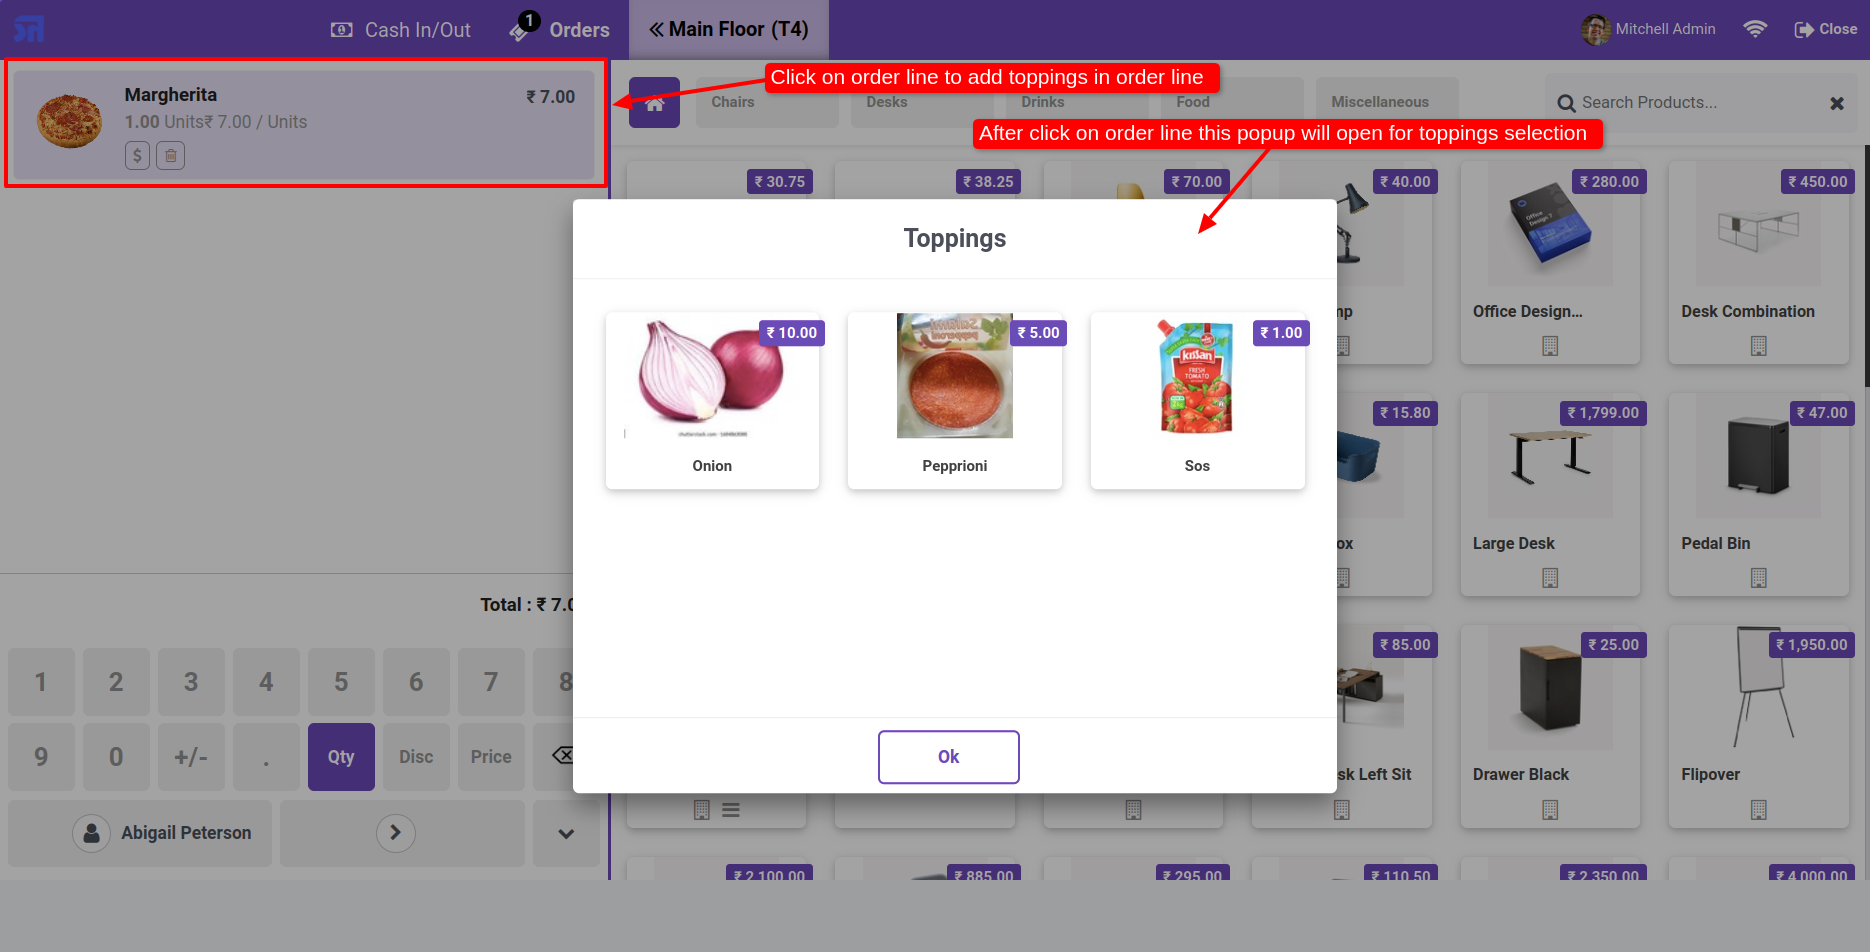
Select the topping products in the topping wizard.

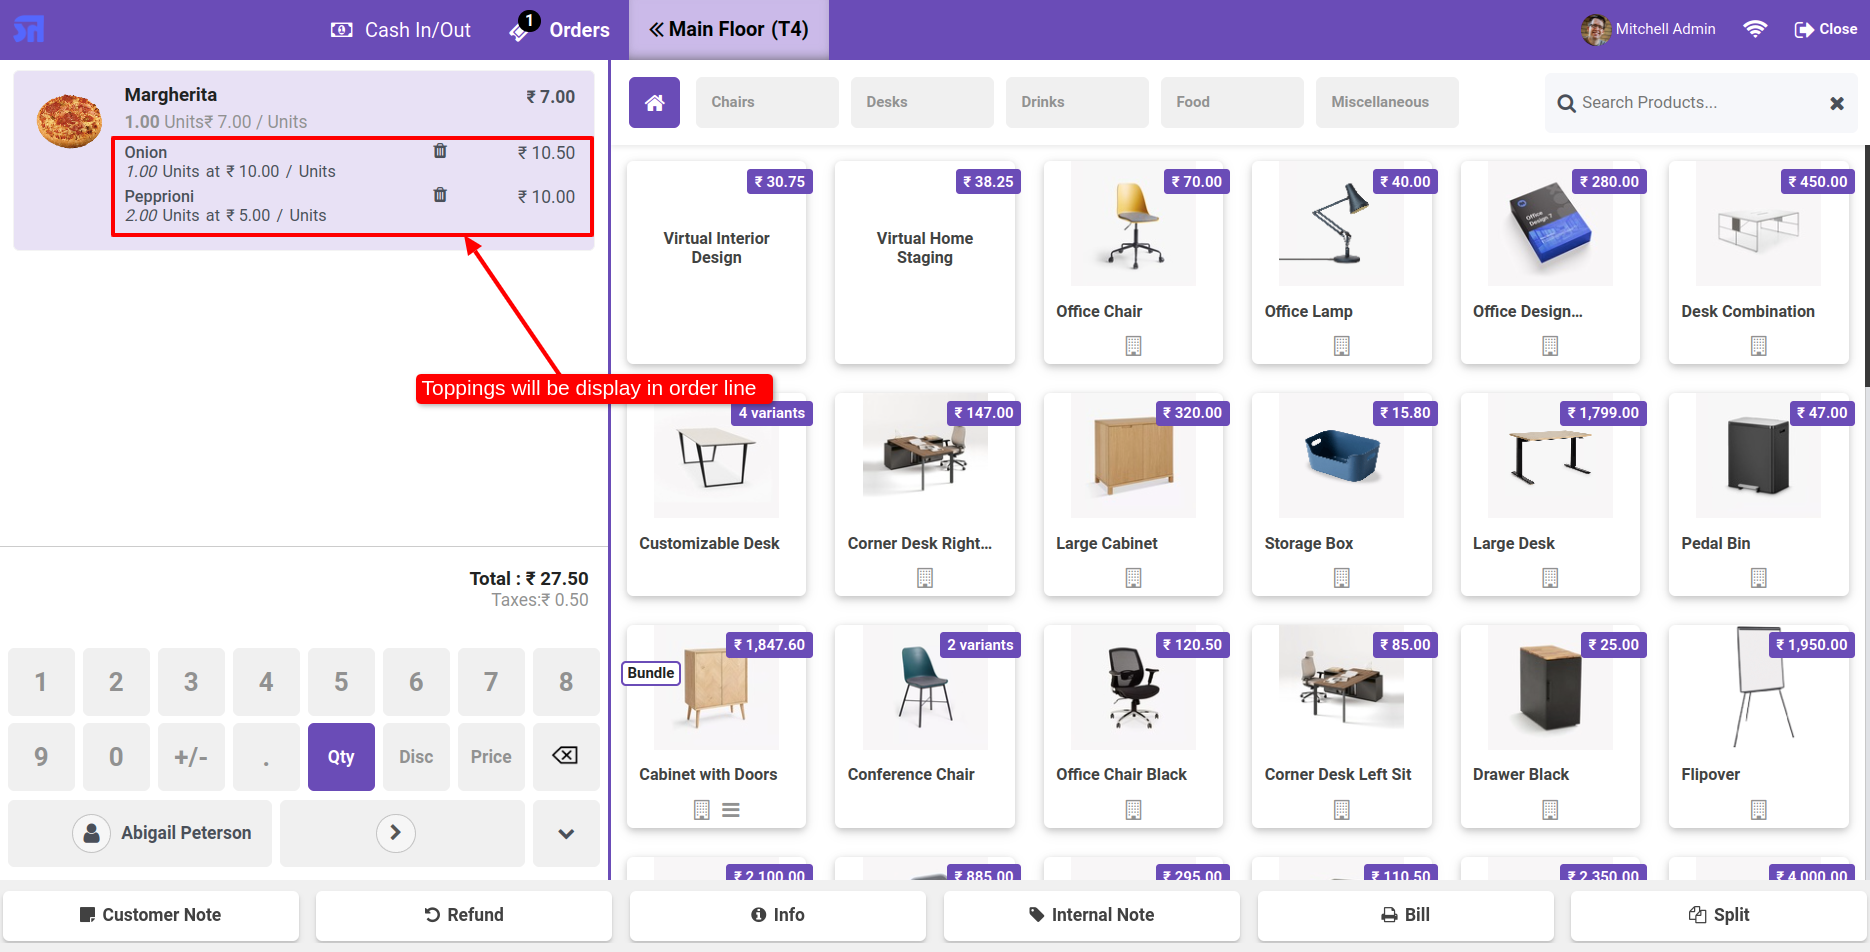
The topping will be displayed in the order line.
If you want to remove the toppings from the order line use the remove icon.
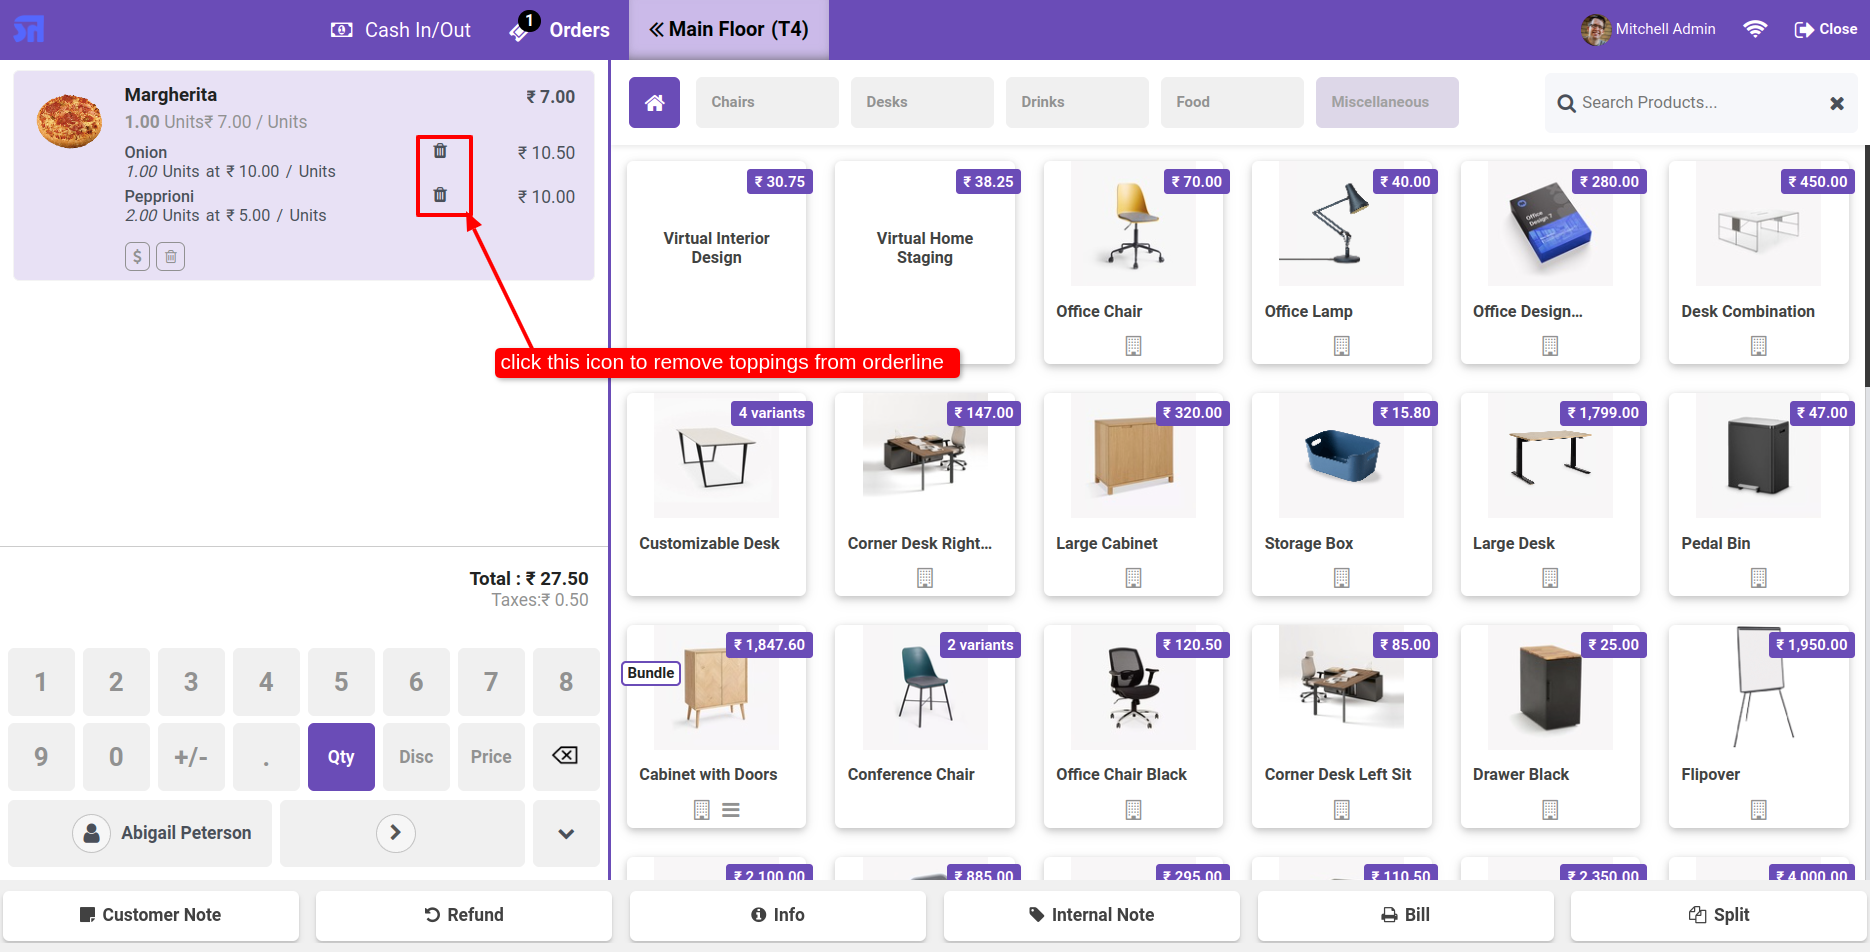
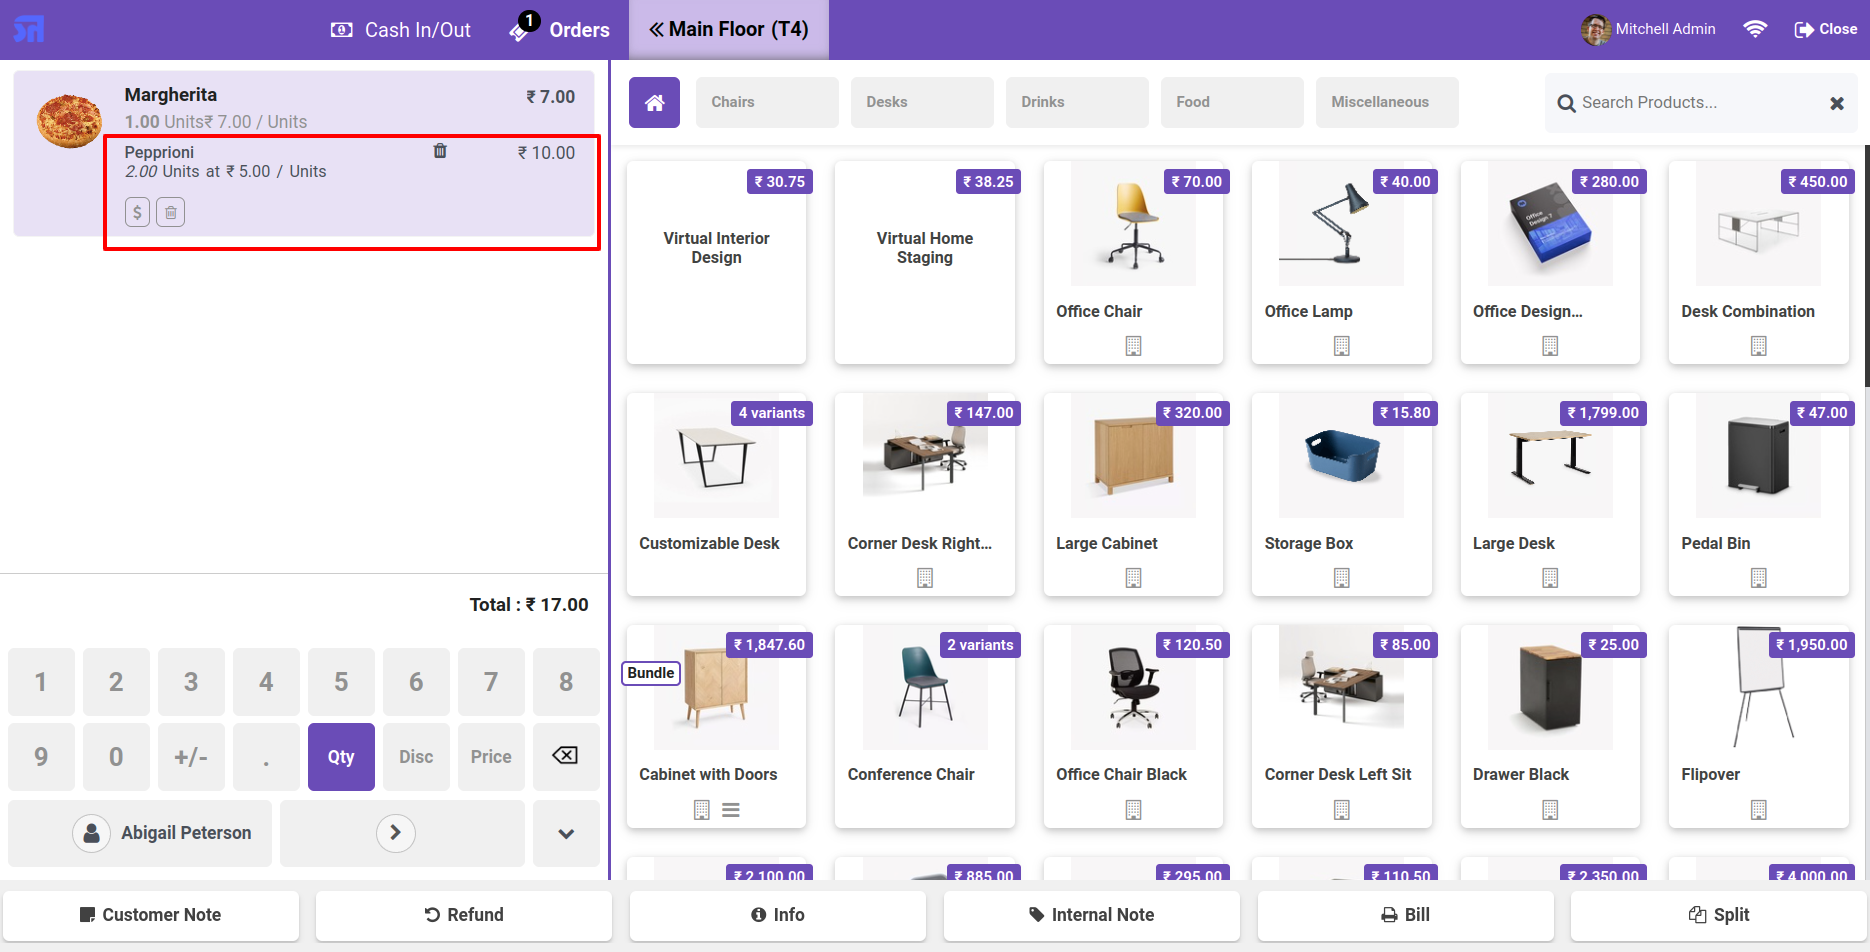
The one topping is removed from the order line.
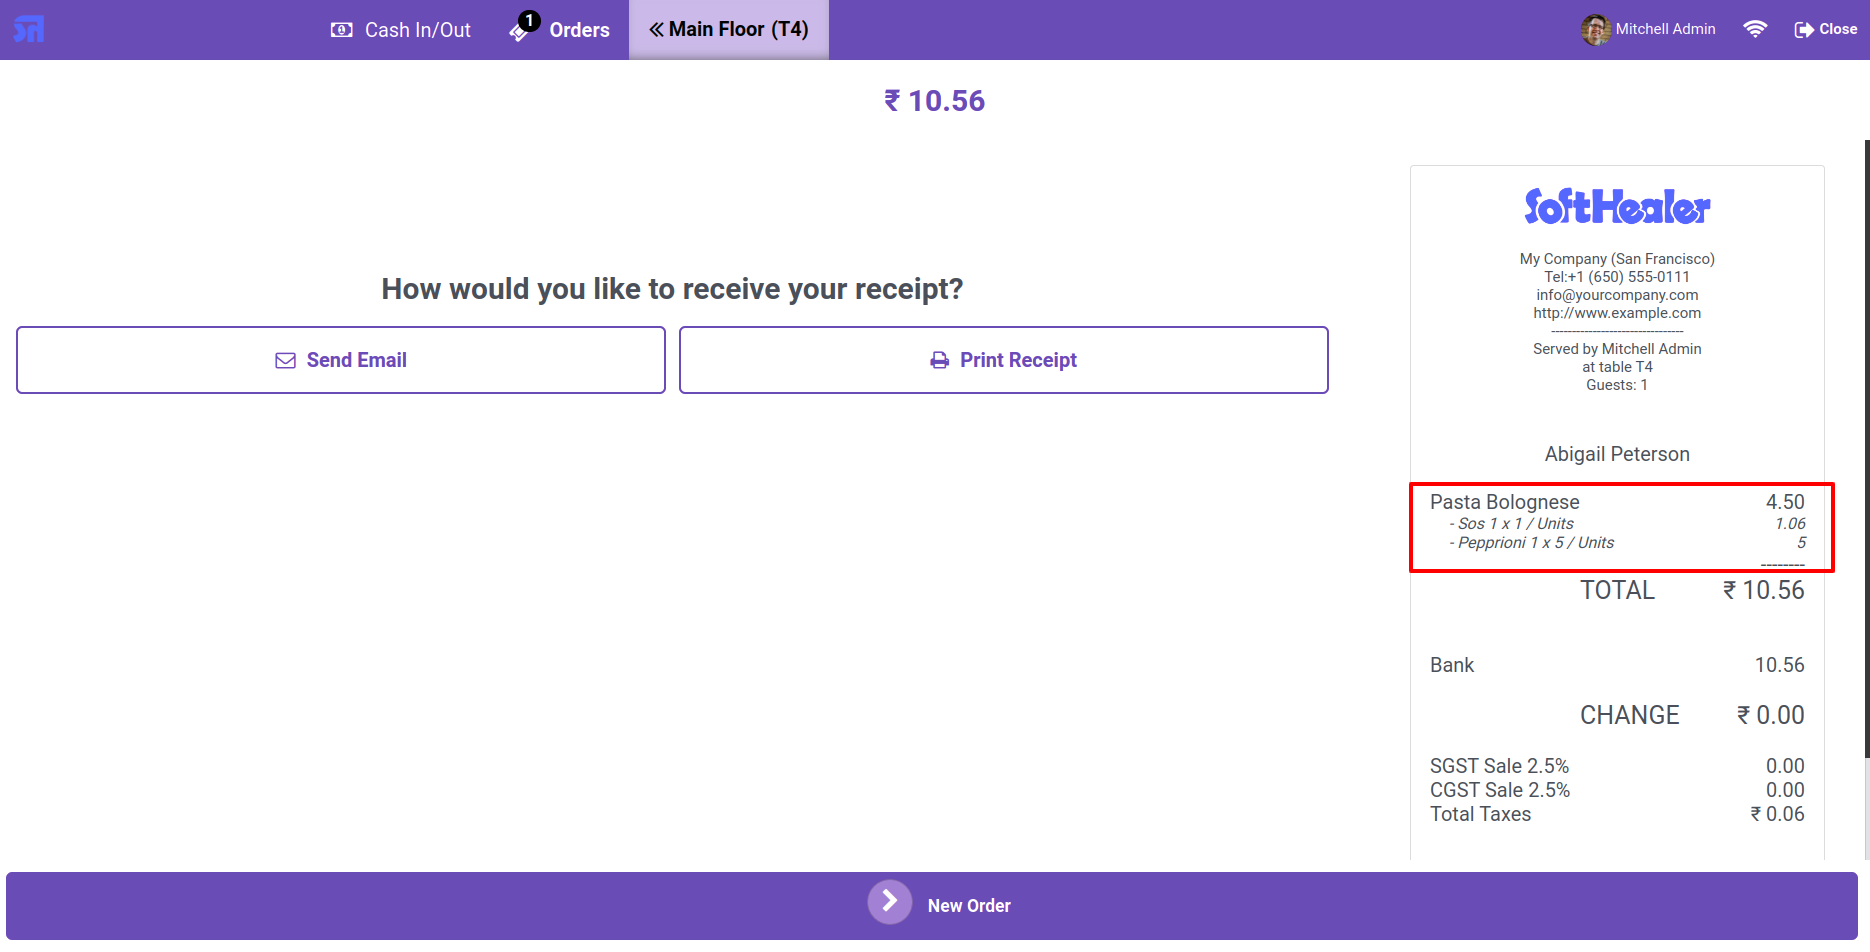
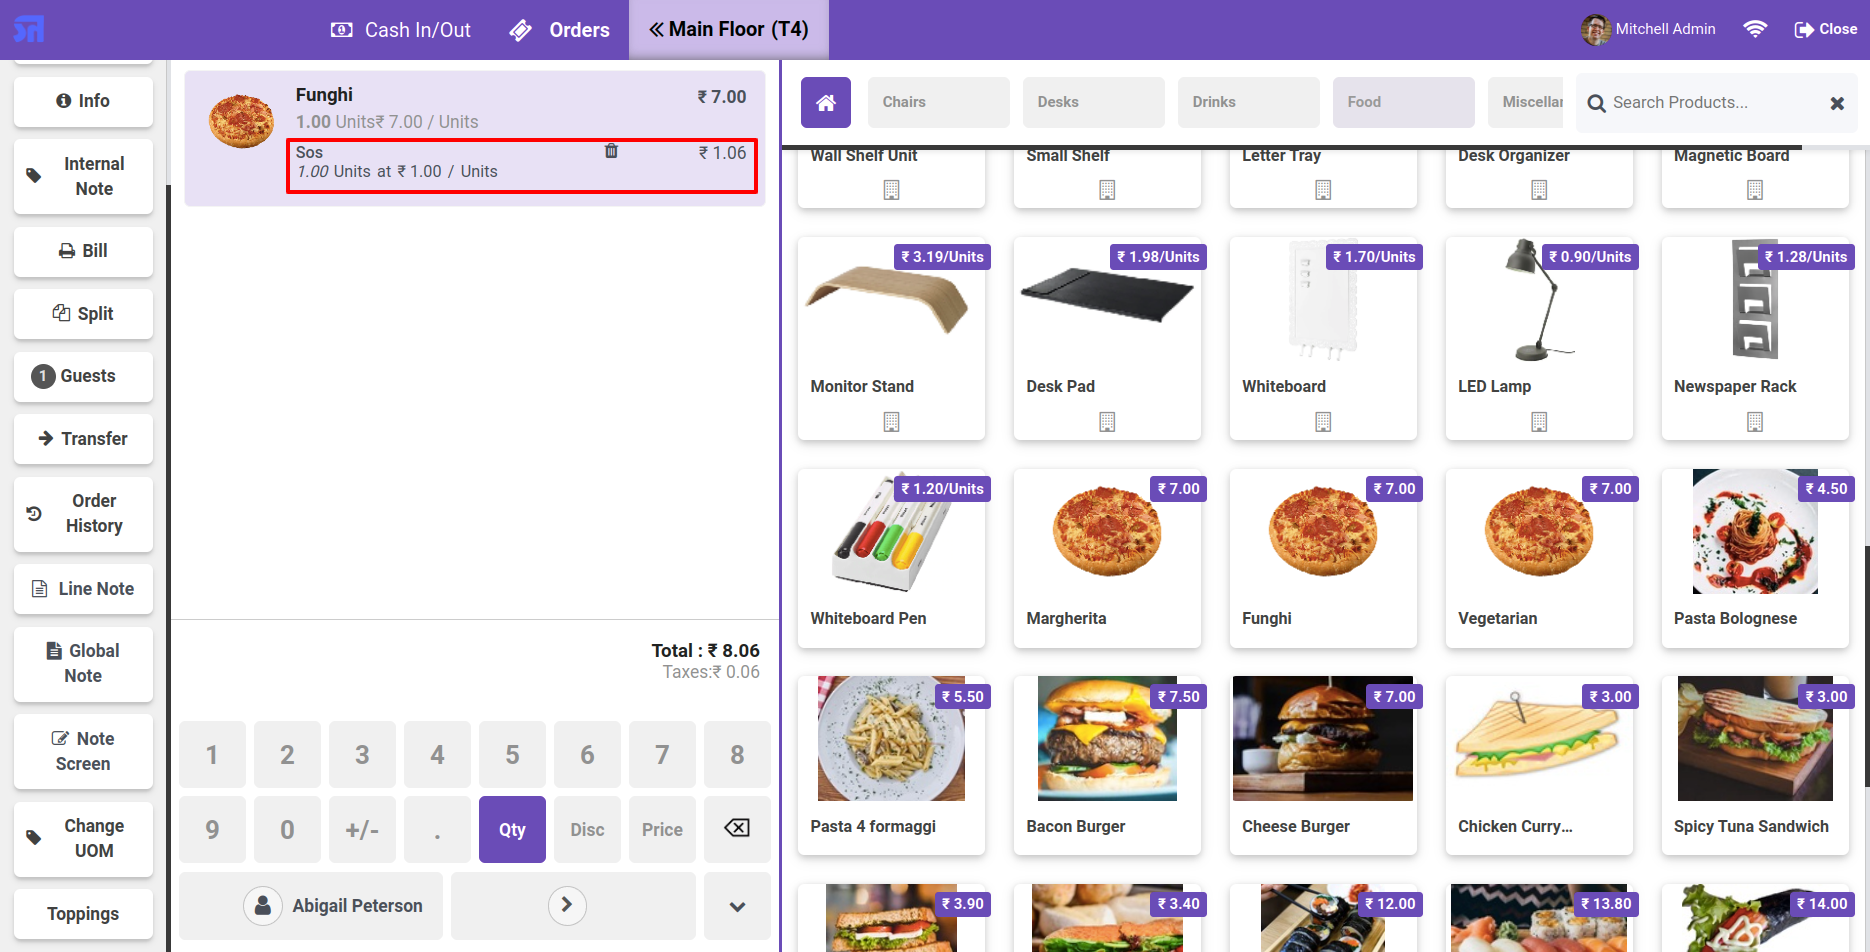
Add SOS topping product.
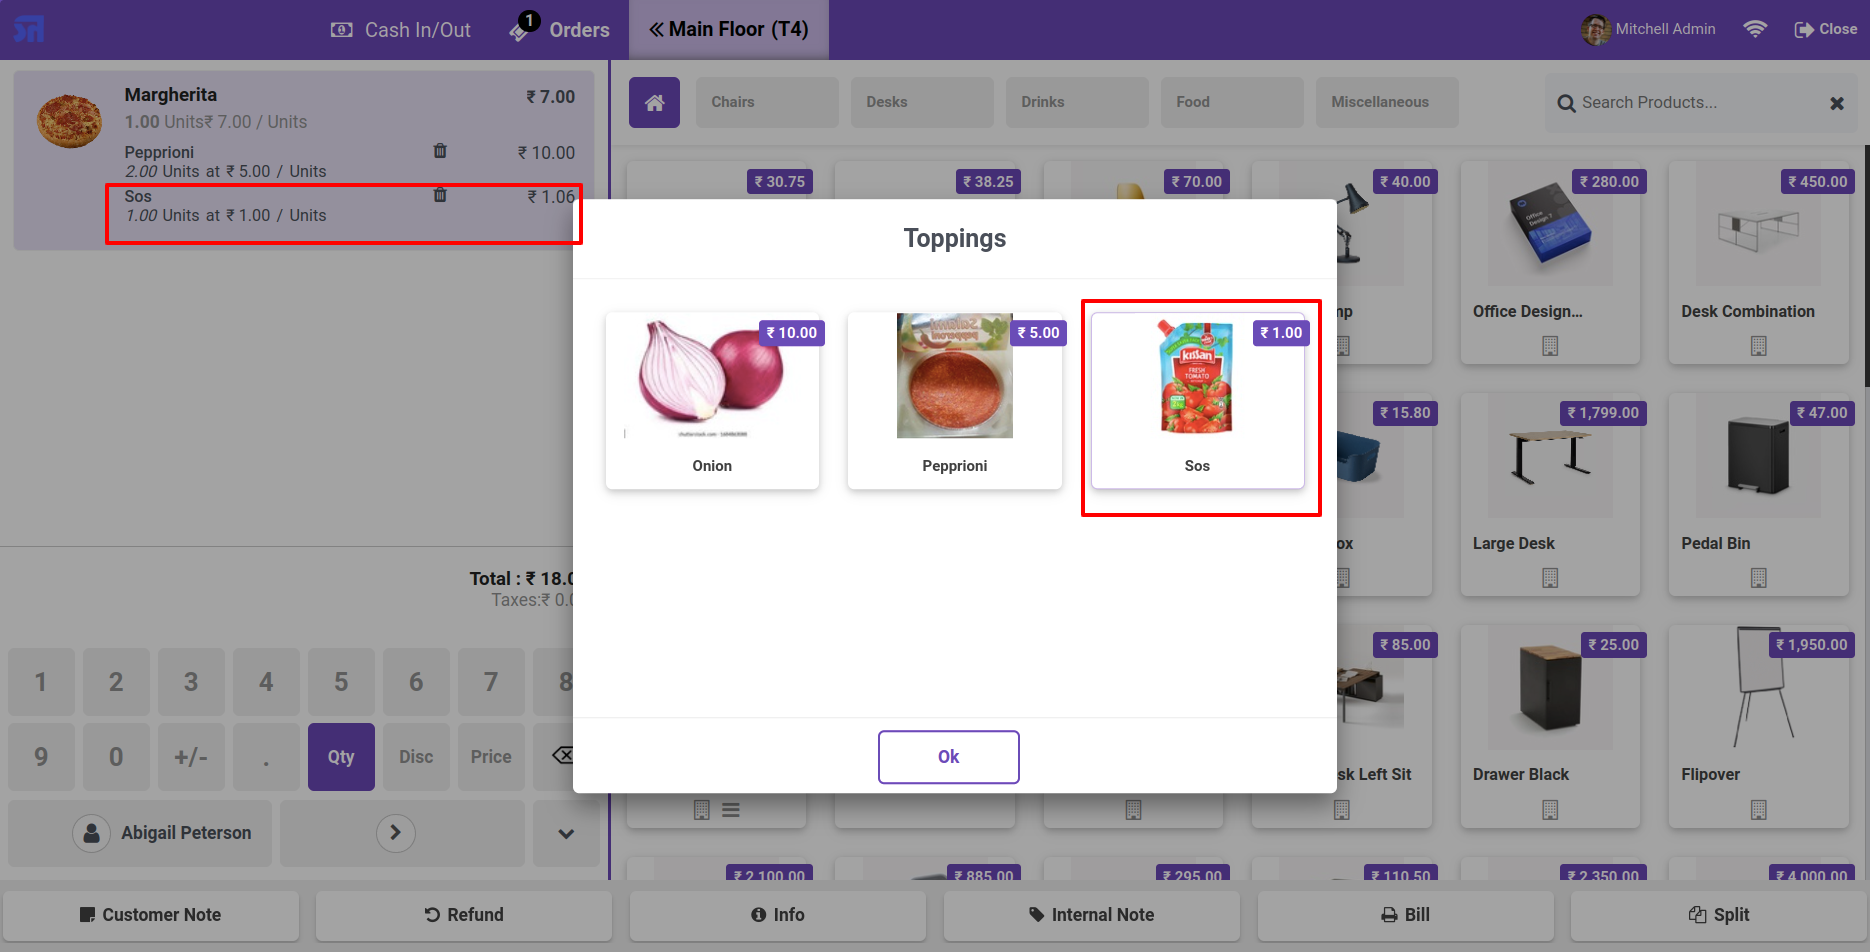
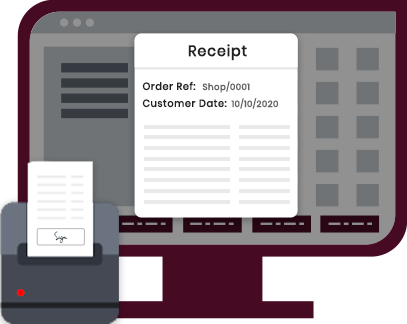
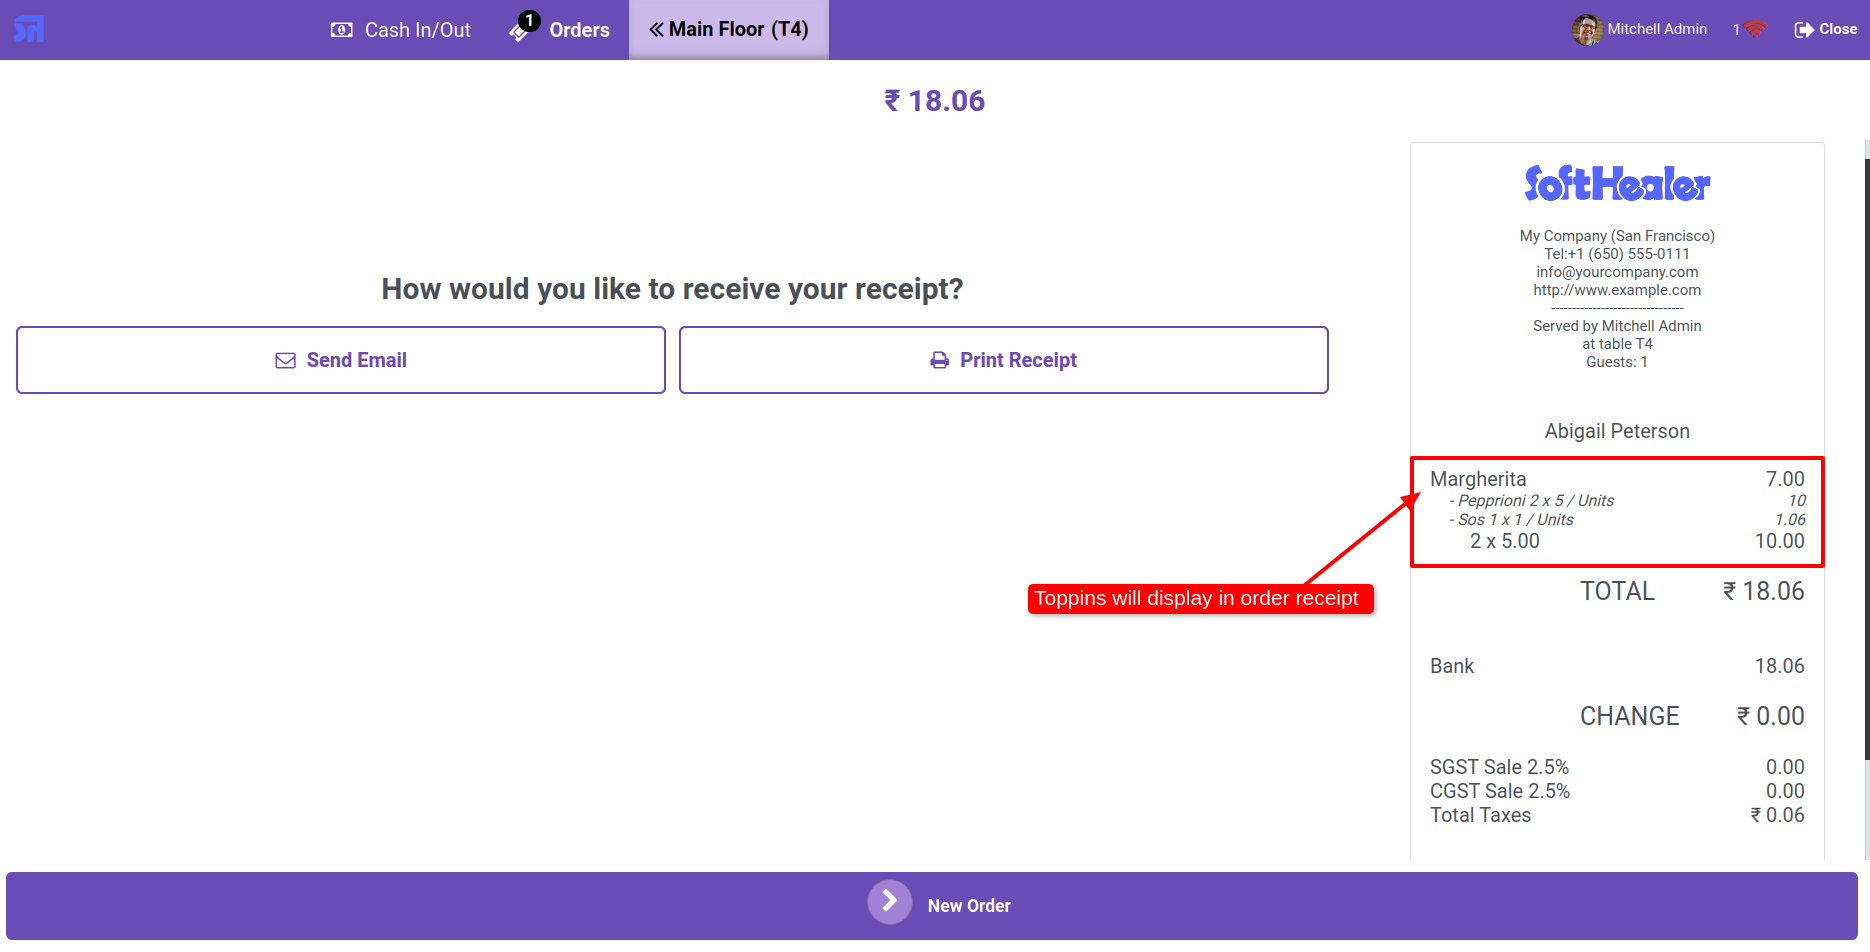
The topping products are also displayed on the receipt.
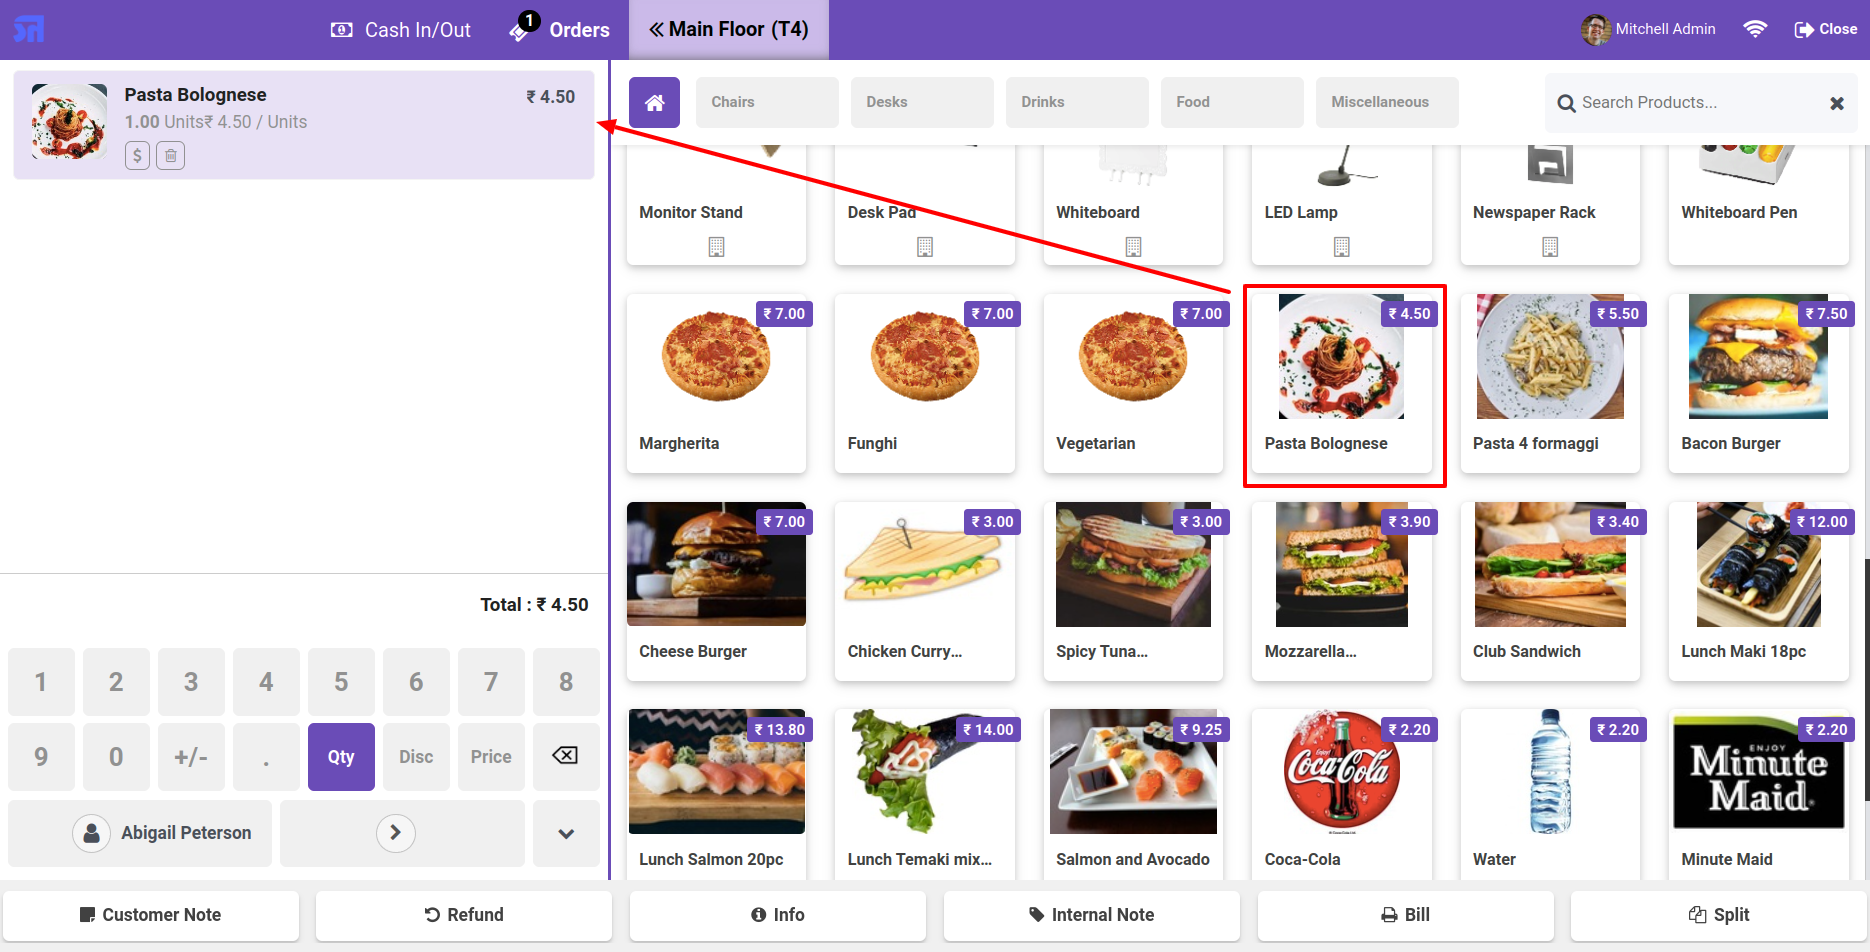
Add the product to the cart.
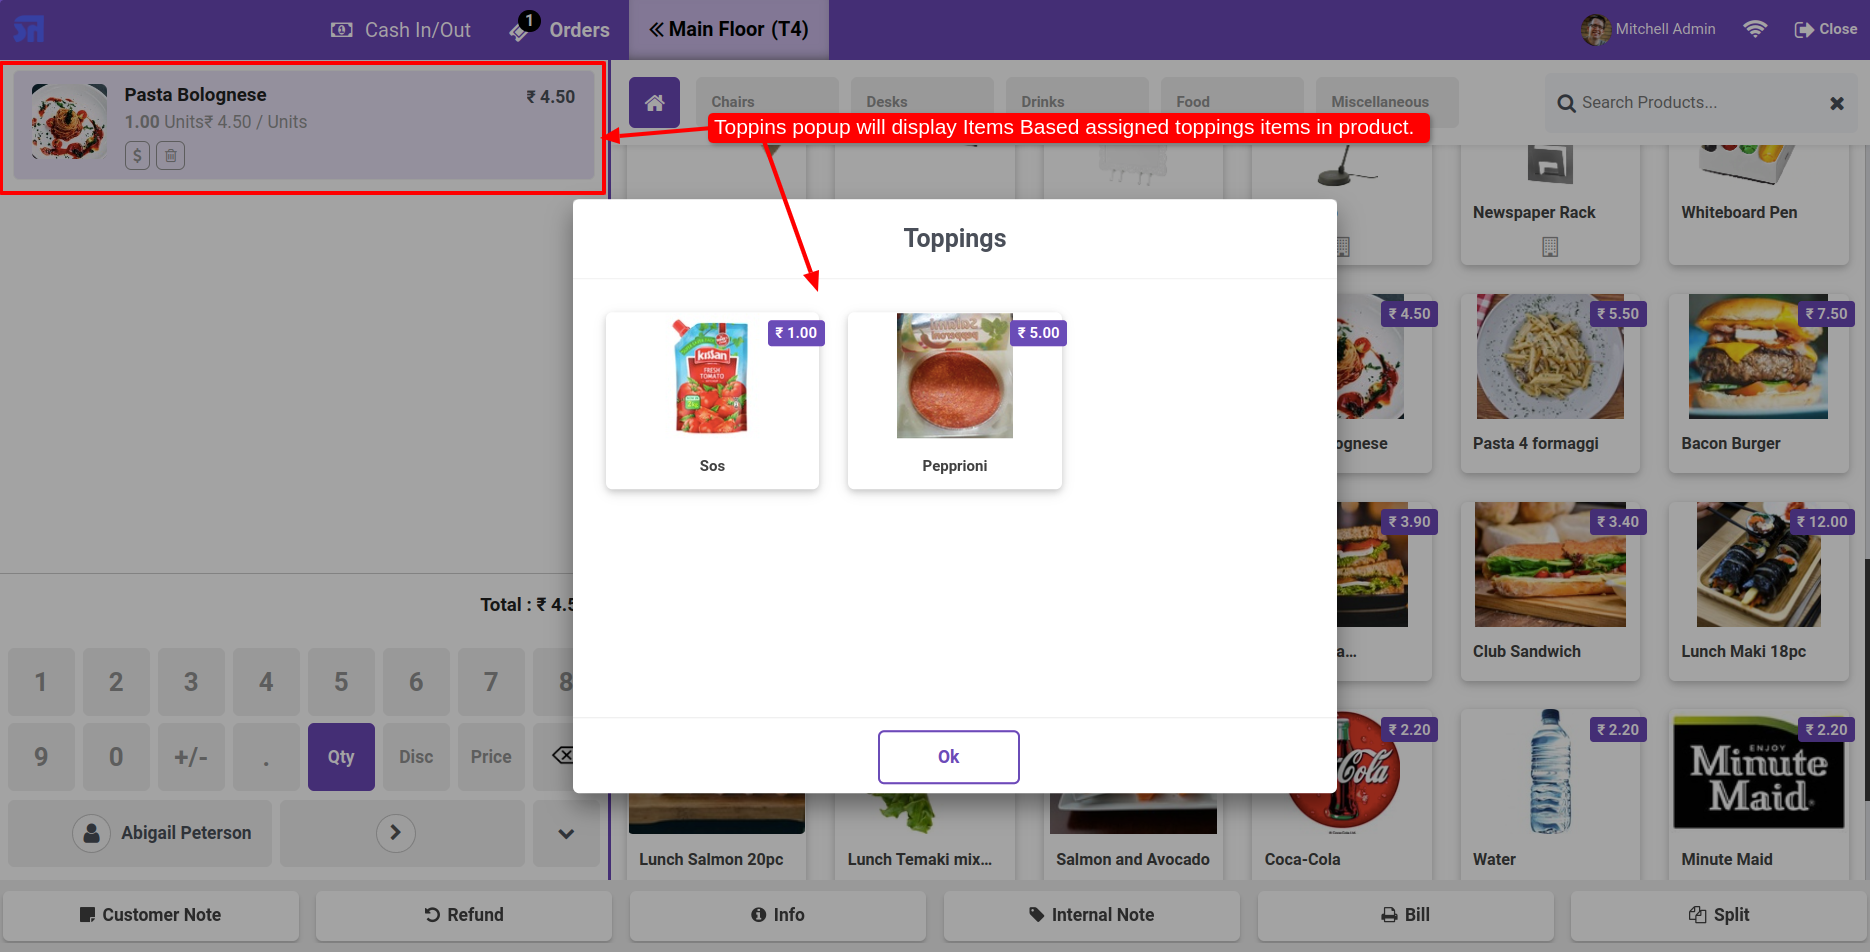
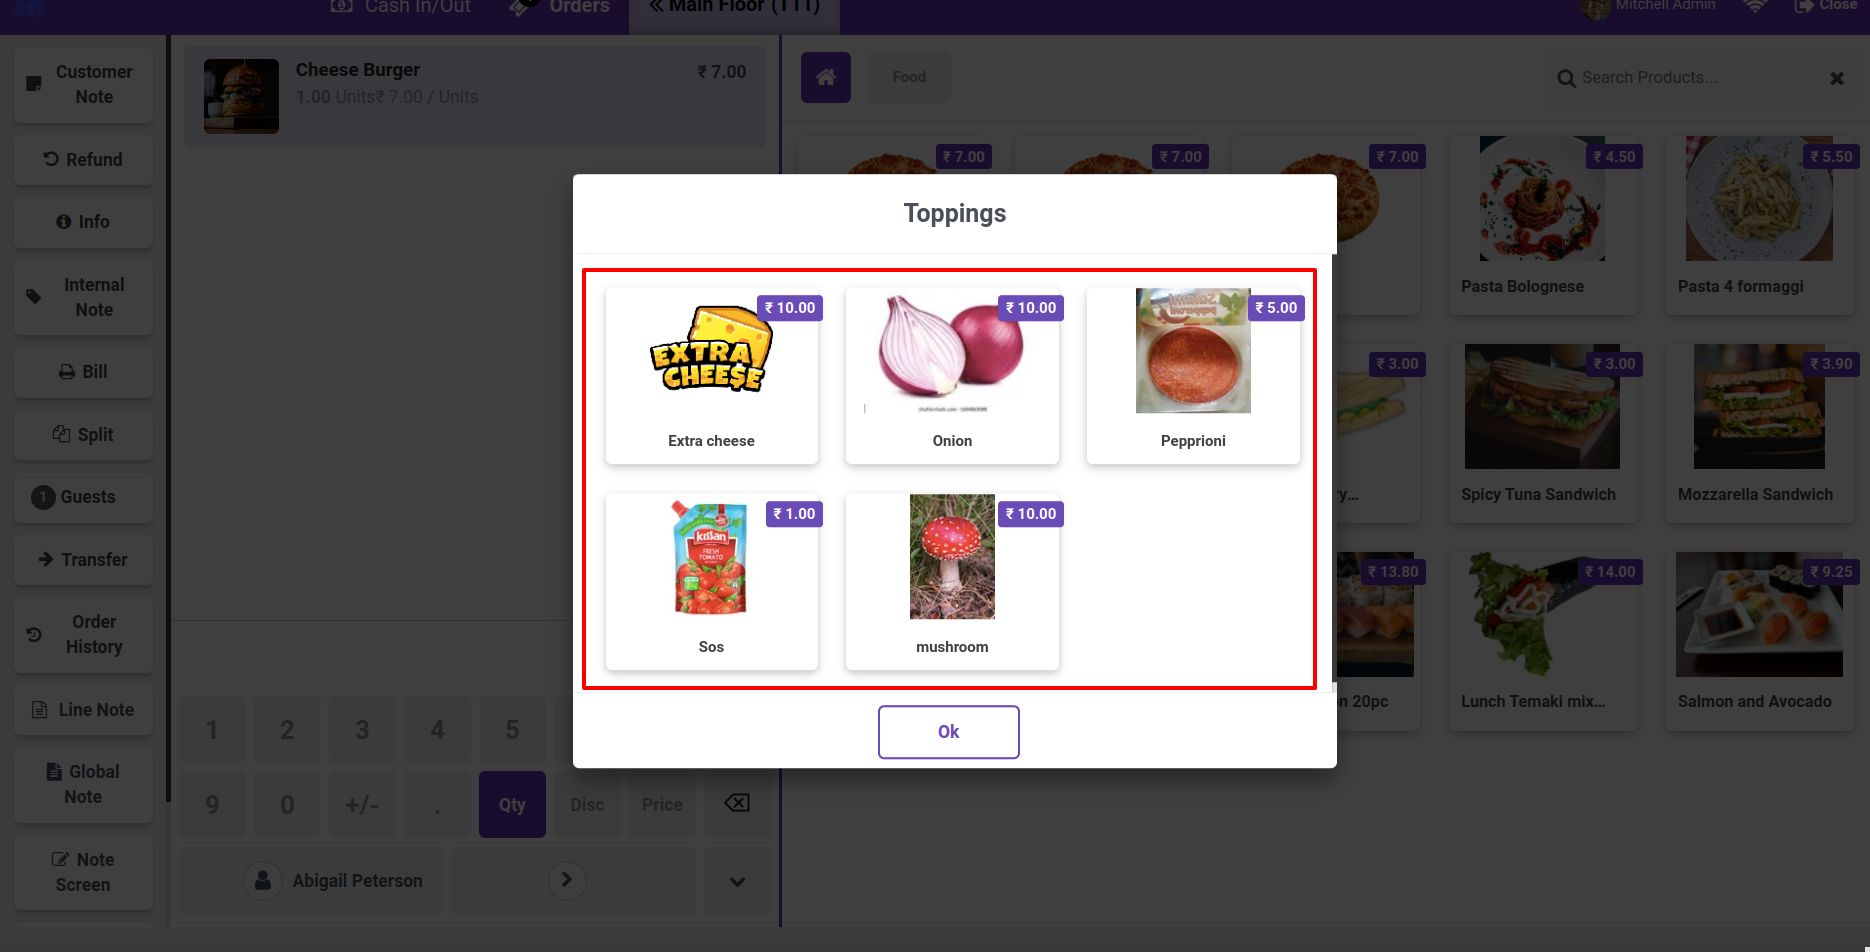
On the topping popup, only display the based assigned topping item in the product.
The topping product is displayed in the order line.

The topping products are also displayed on the receipt.
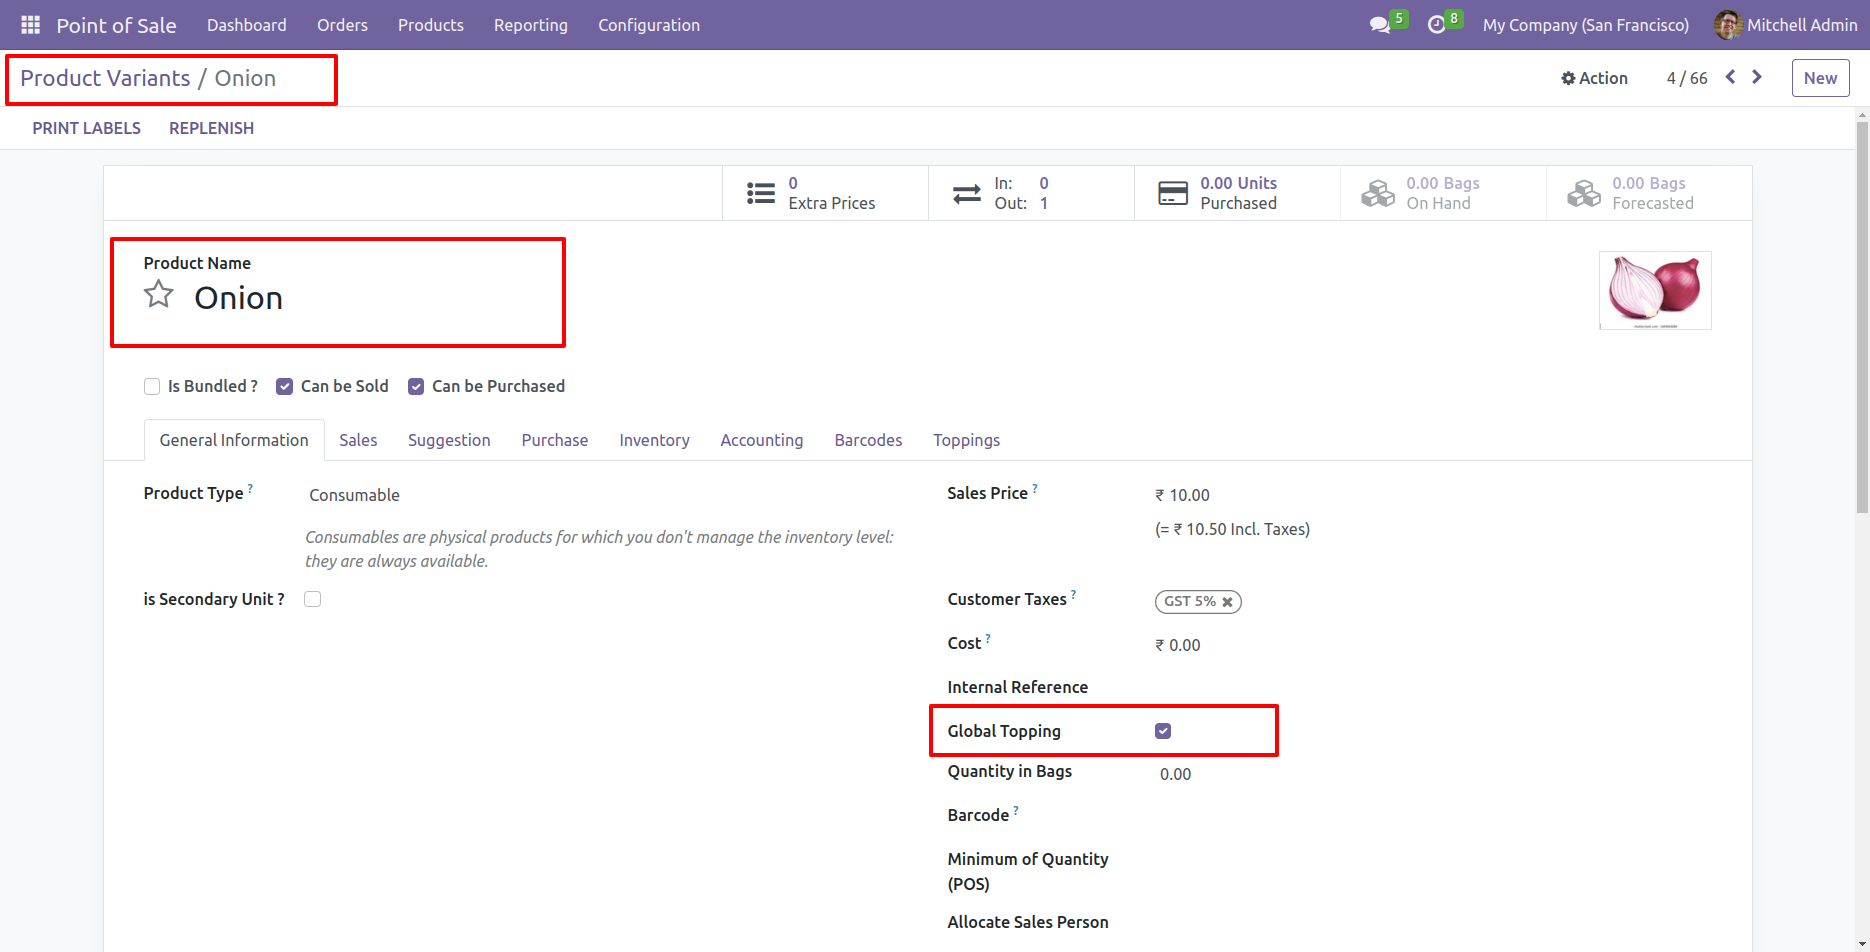
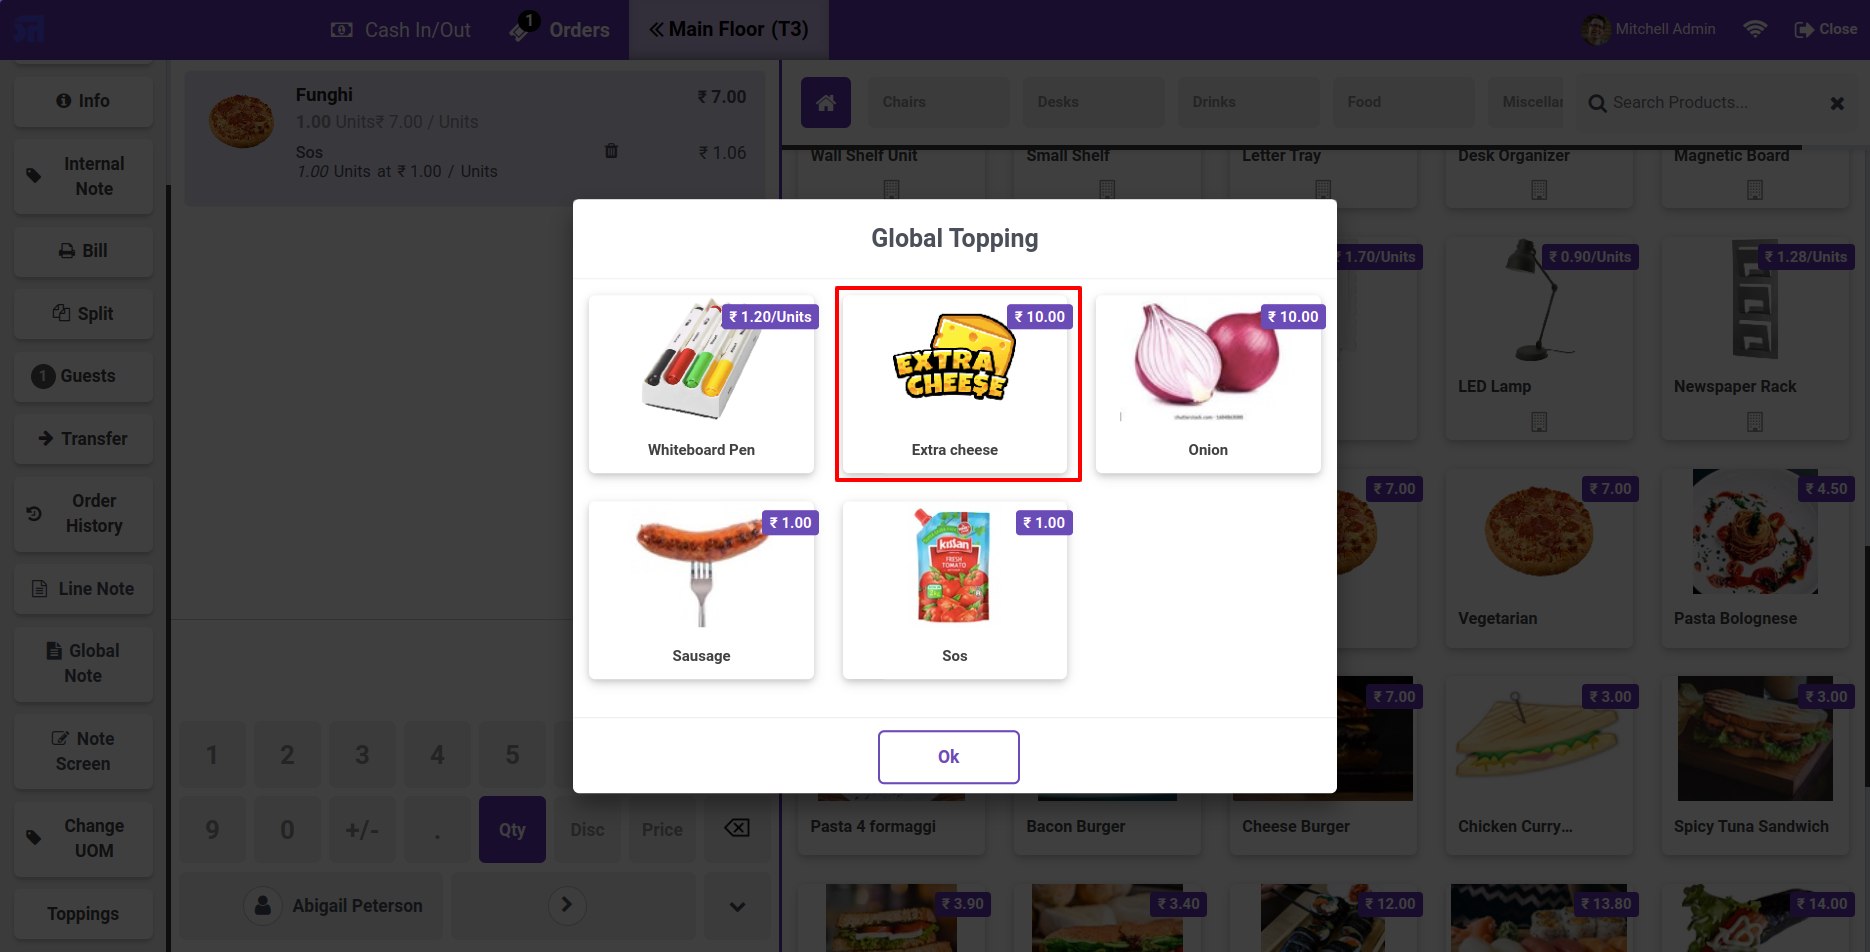
If you want to set a product as a global topping then enable the 'Global Topping' in the product variant.

Enable the 'Global Topping' feature.
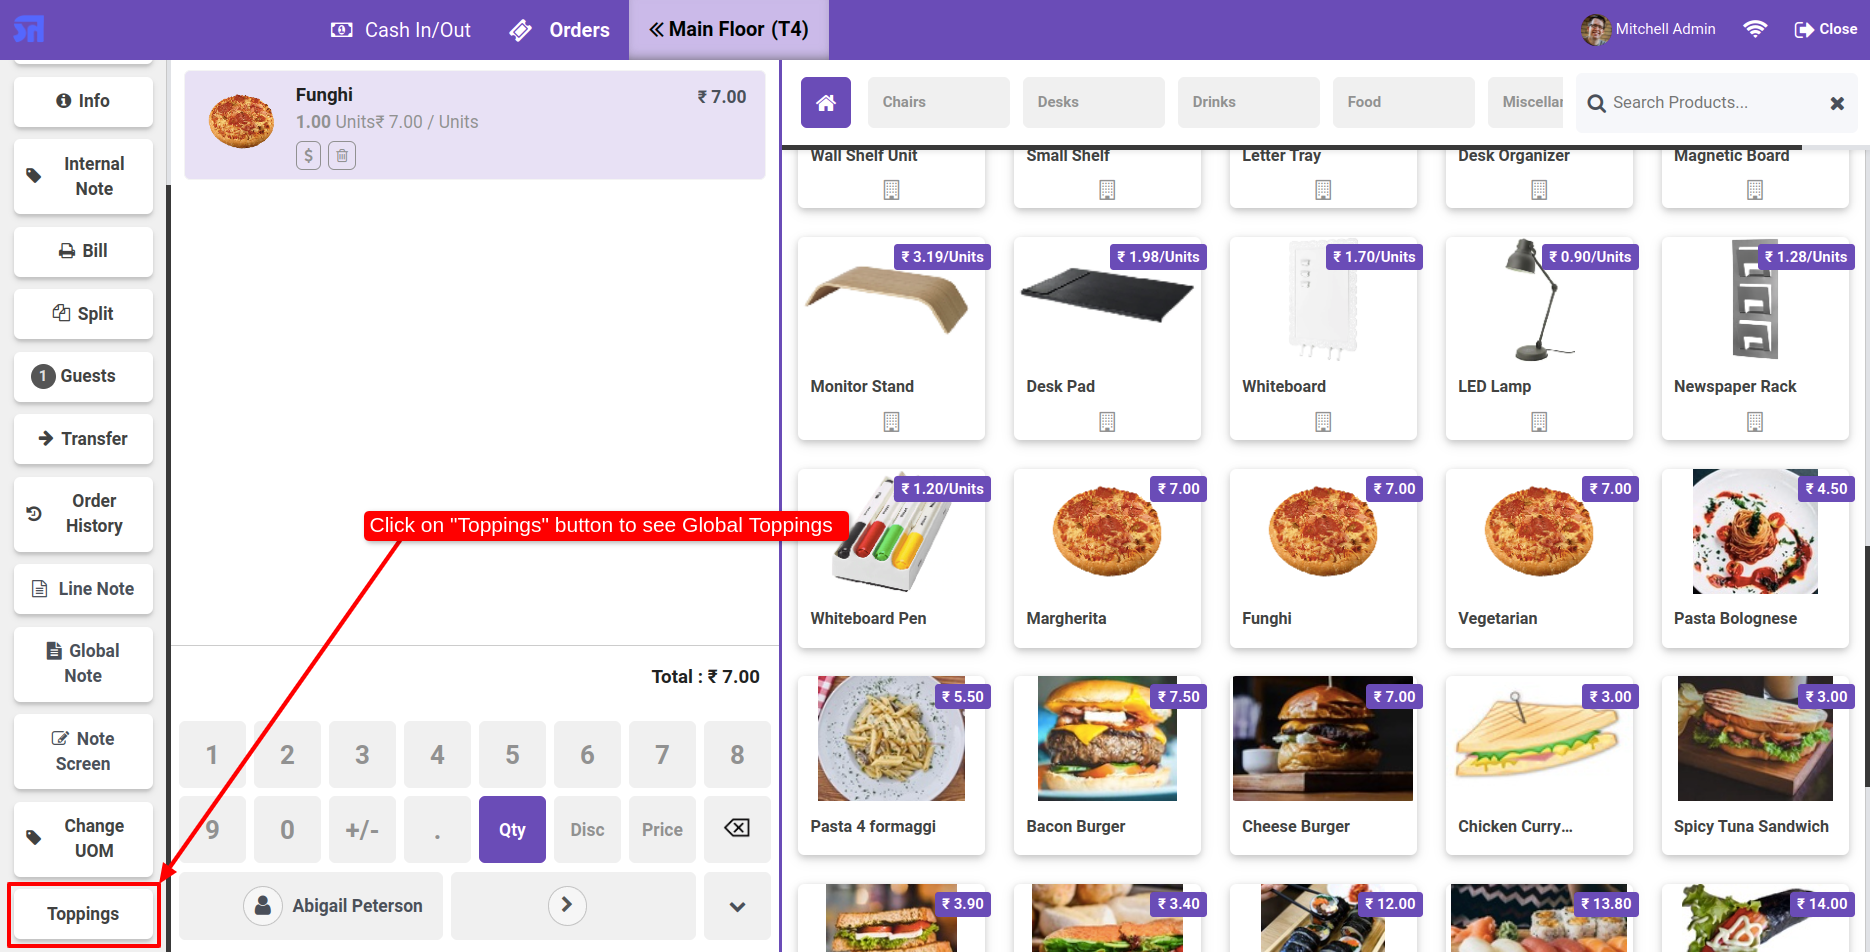
Click on the 'Topping' button to view the global toppings.
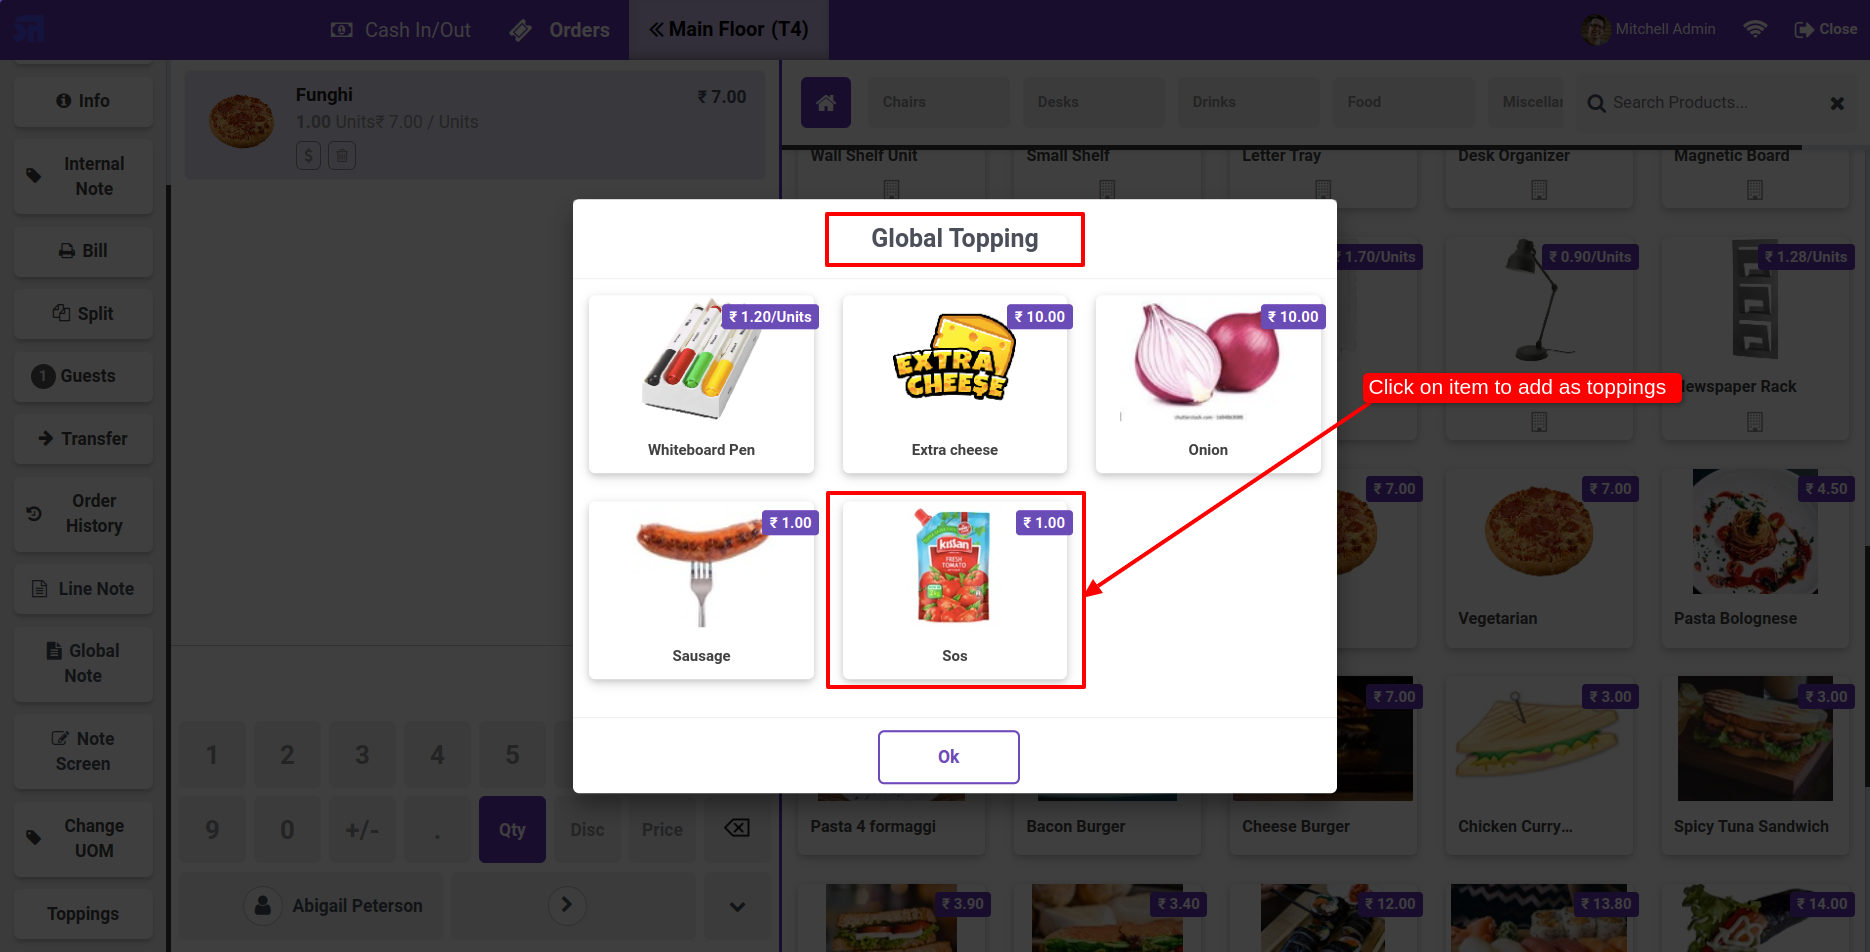
Click on the product to add it as a topping.
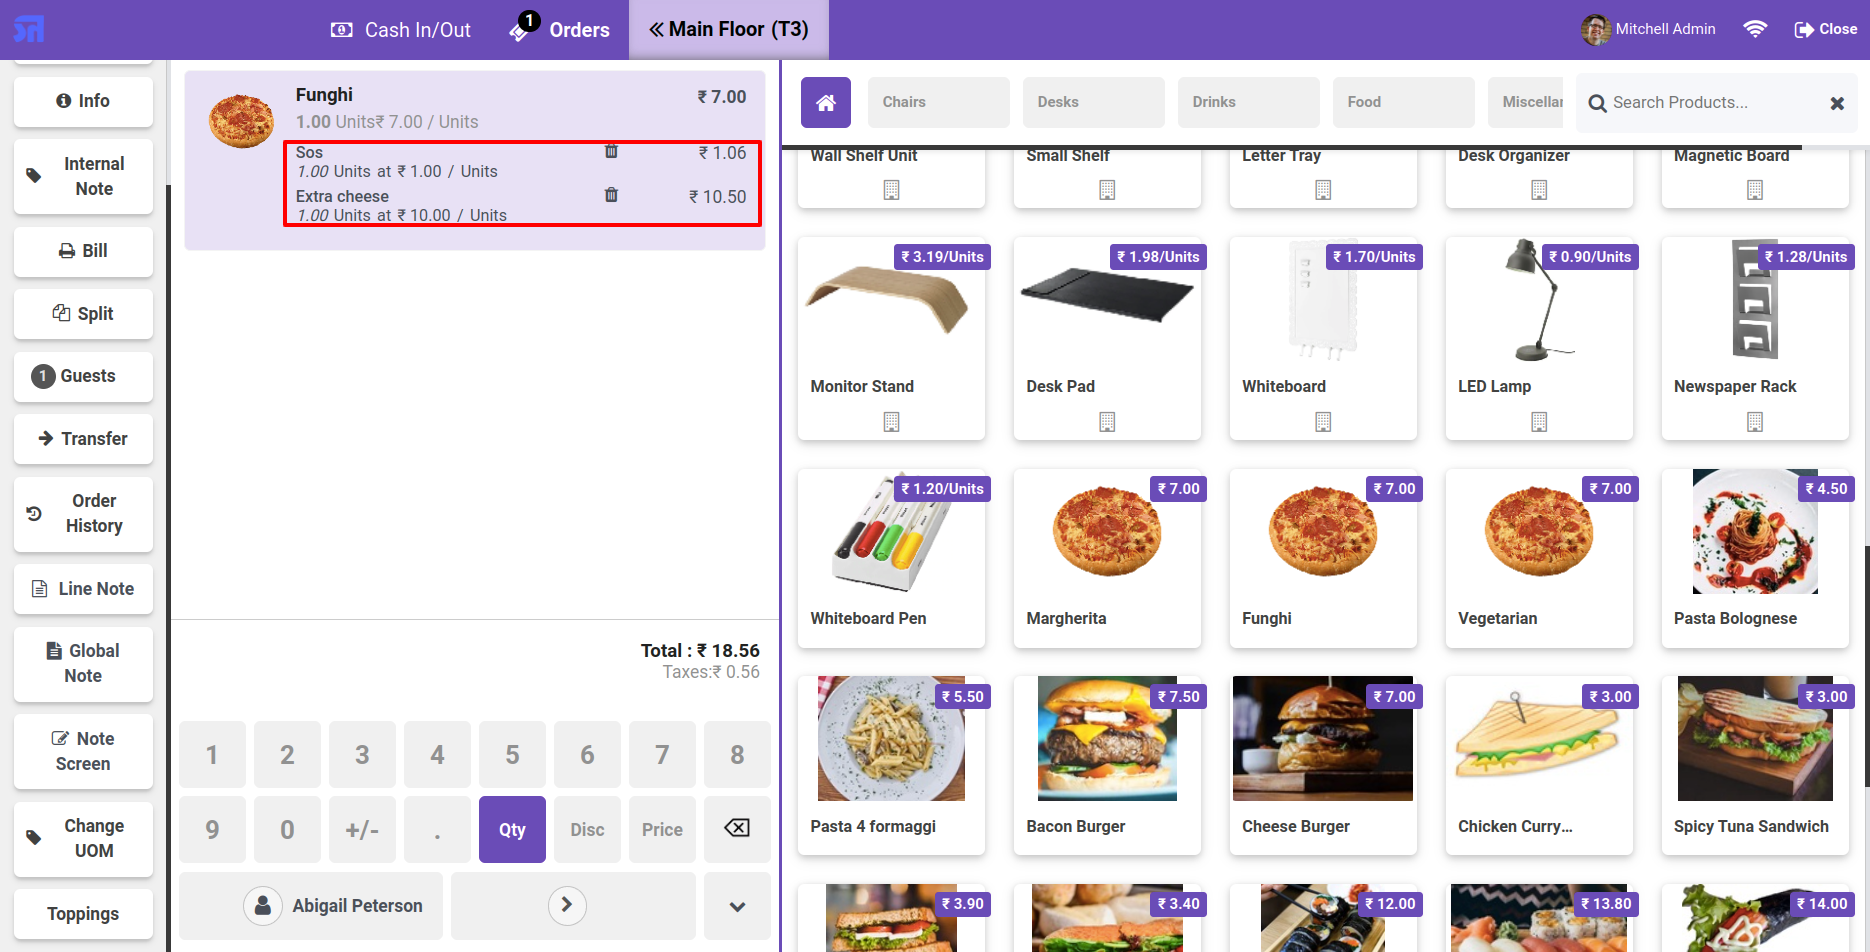
The topping product is added to the order line.
Add a product as a topping.
The topping product is added to the order line.
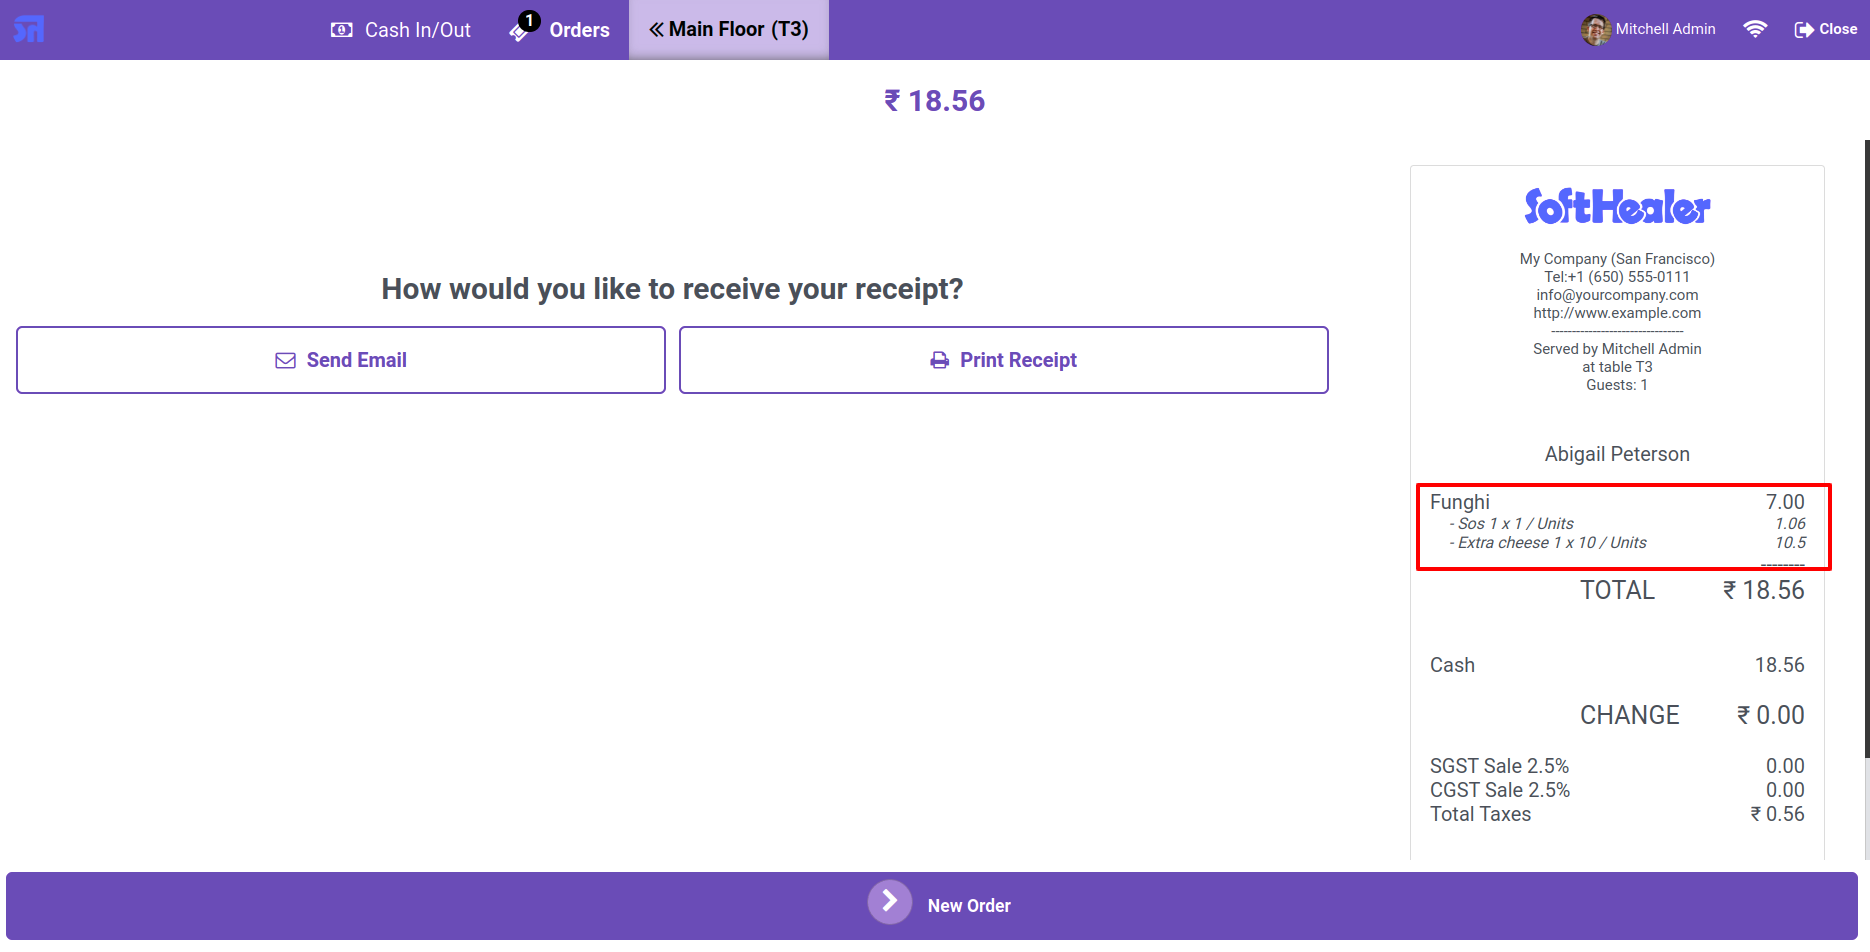
The topping products are displayed on the receipt.
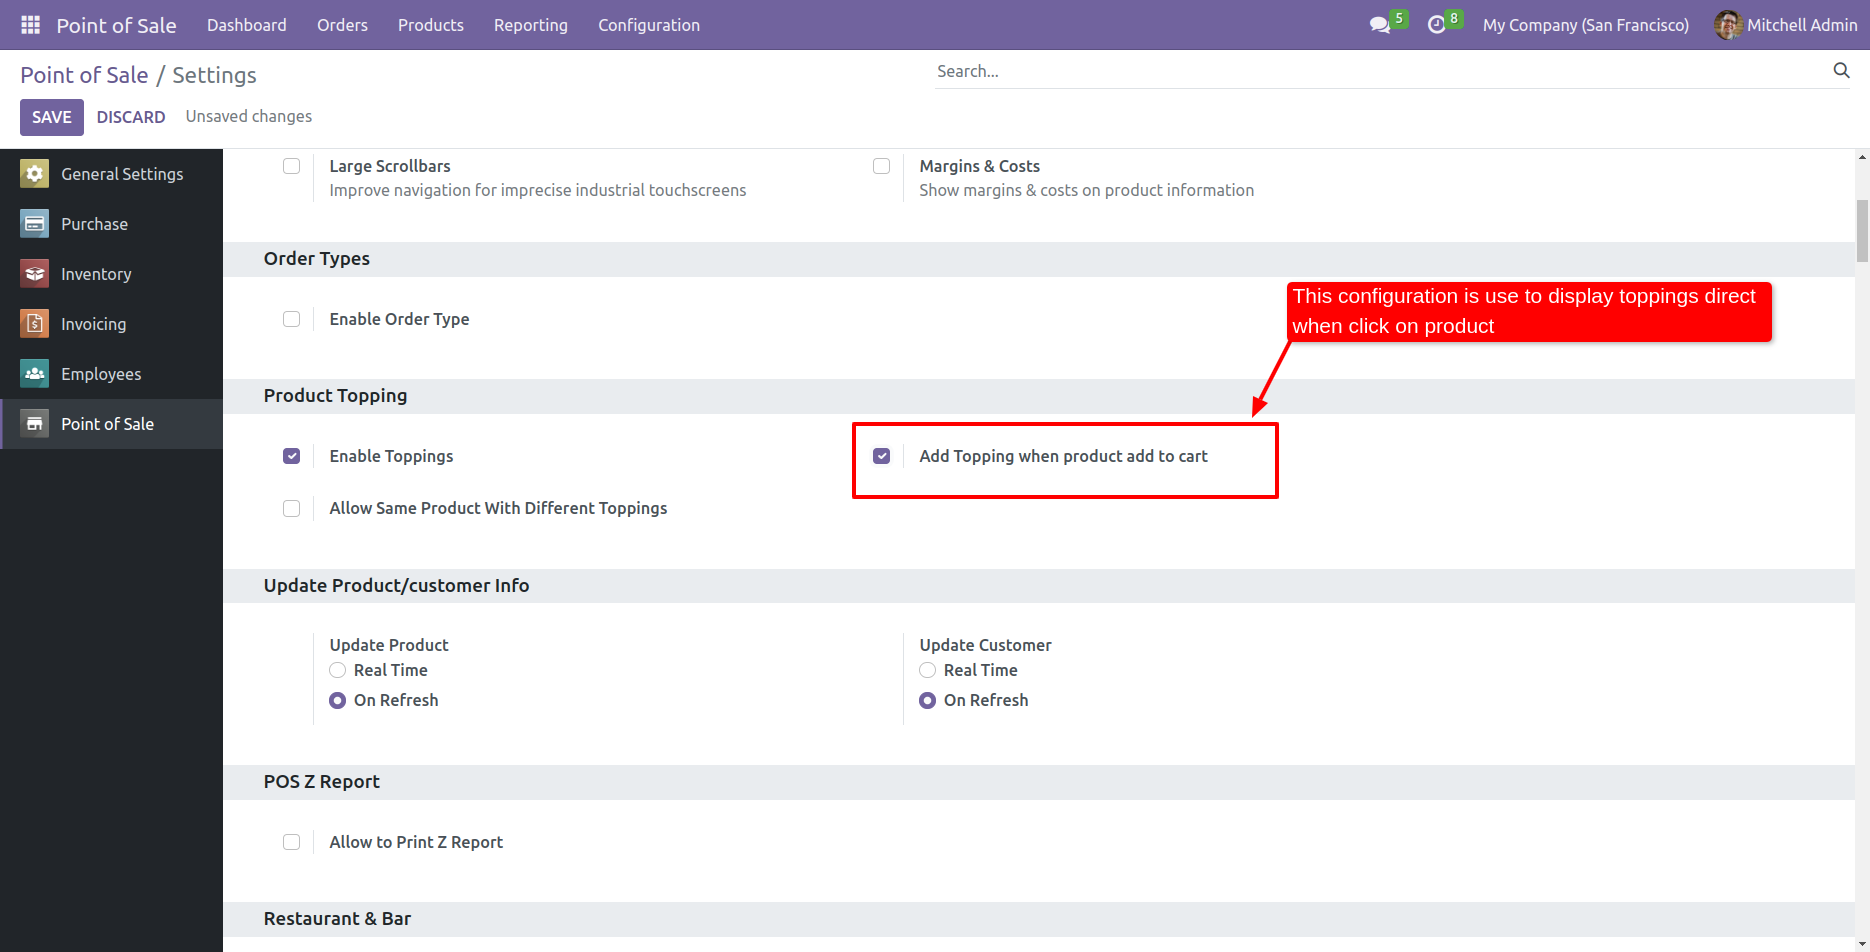
Go to the pos setting and enable the 'Add topping when a product adds to cart' feature.
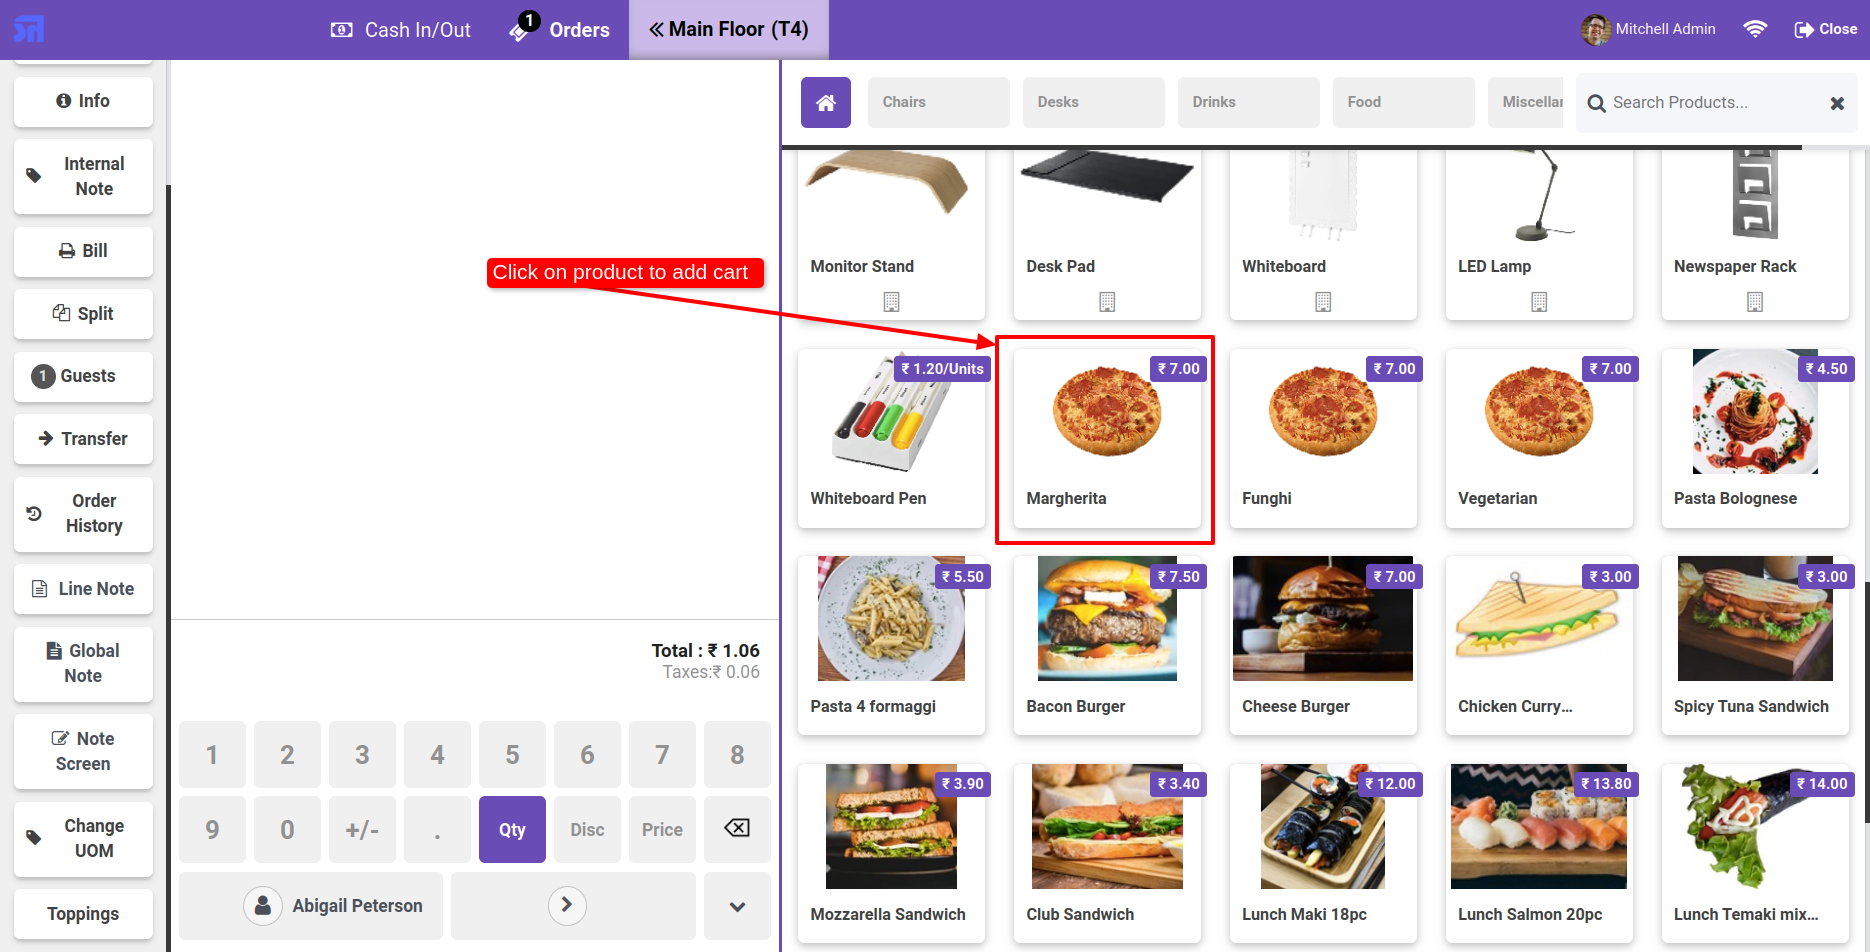
Add a product to the cart.
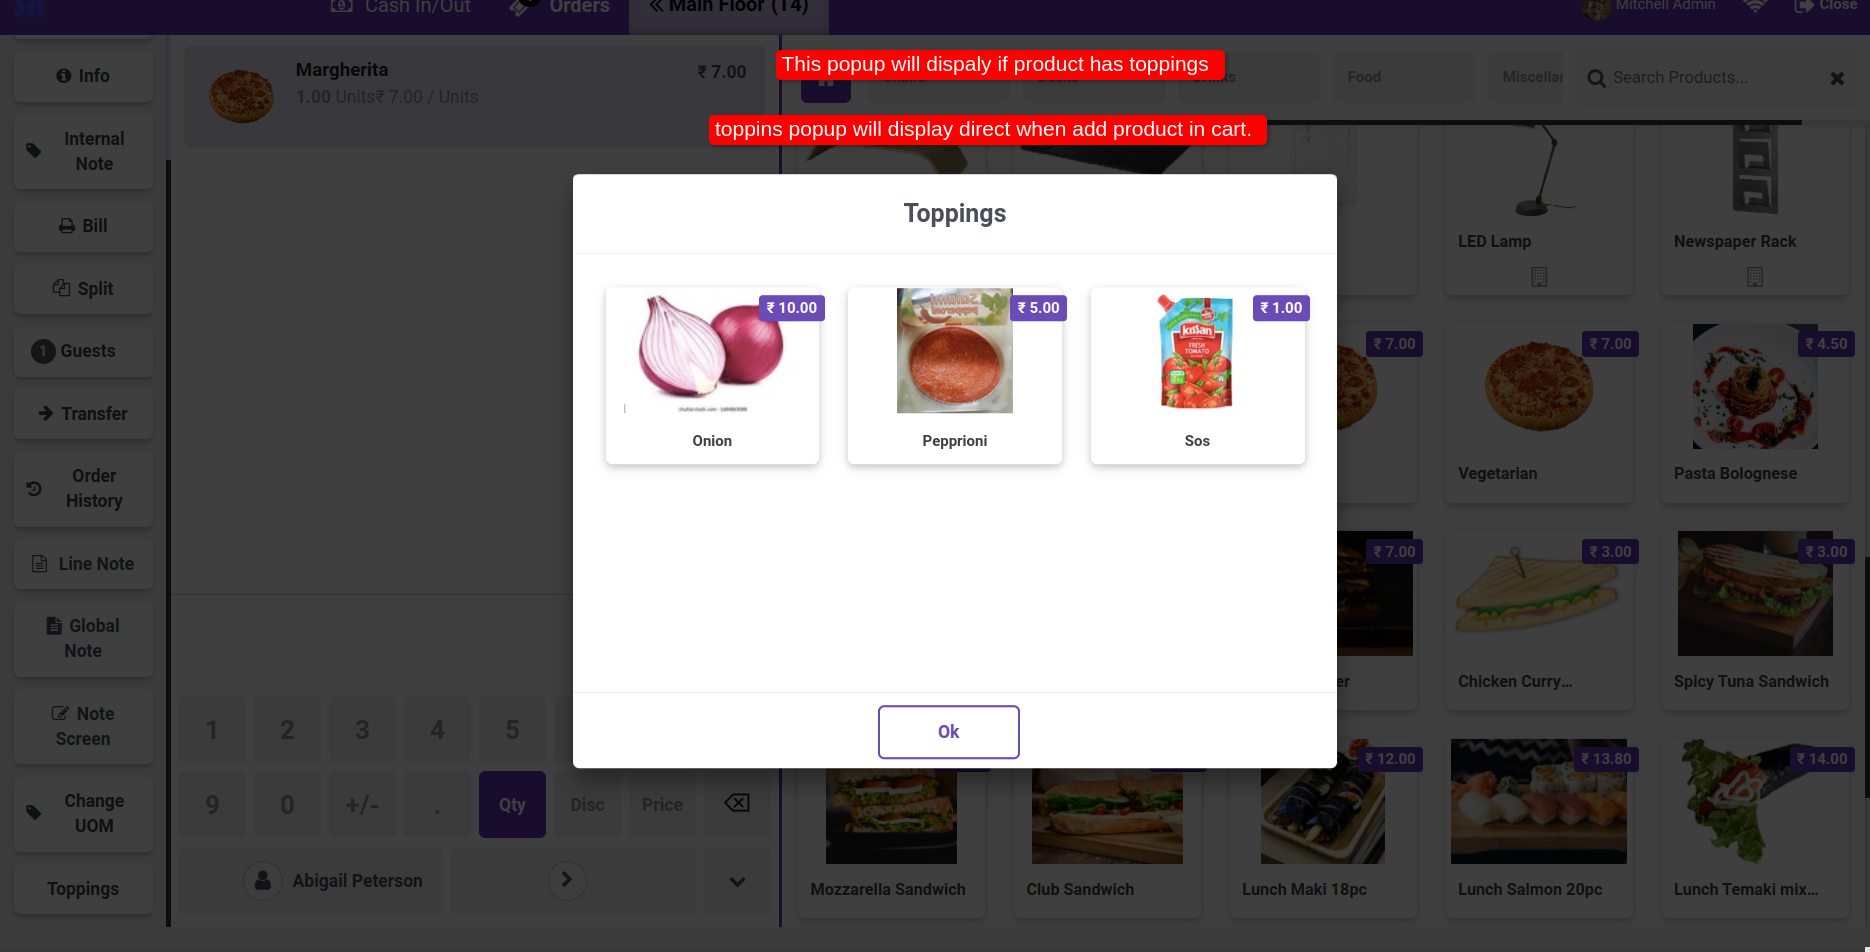
When you add the product to the cart, the topping wizard will appear.
Note: The topping wizard will appear if the product has a topping.
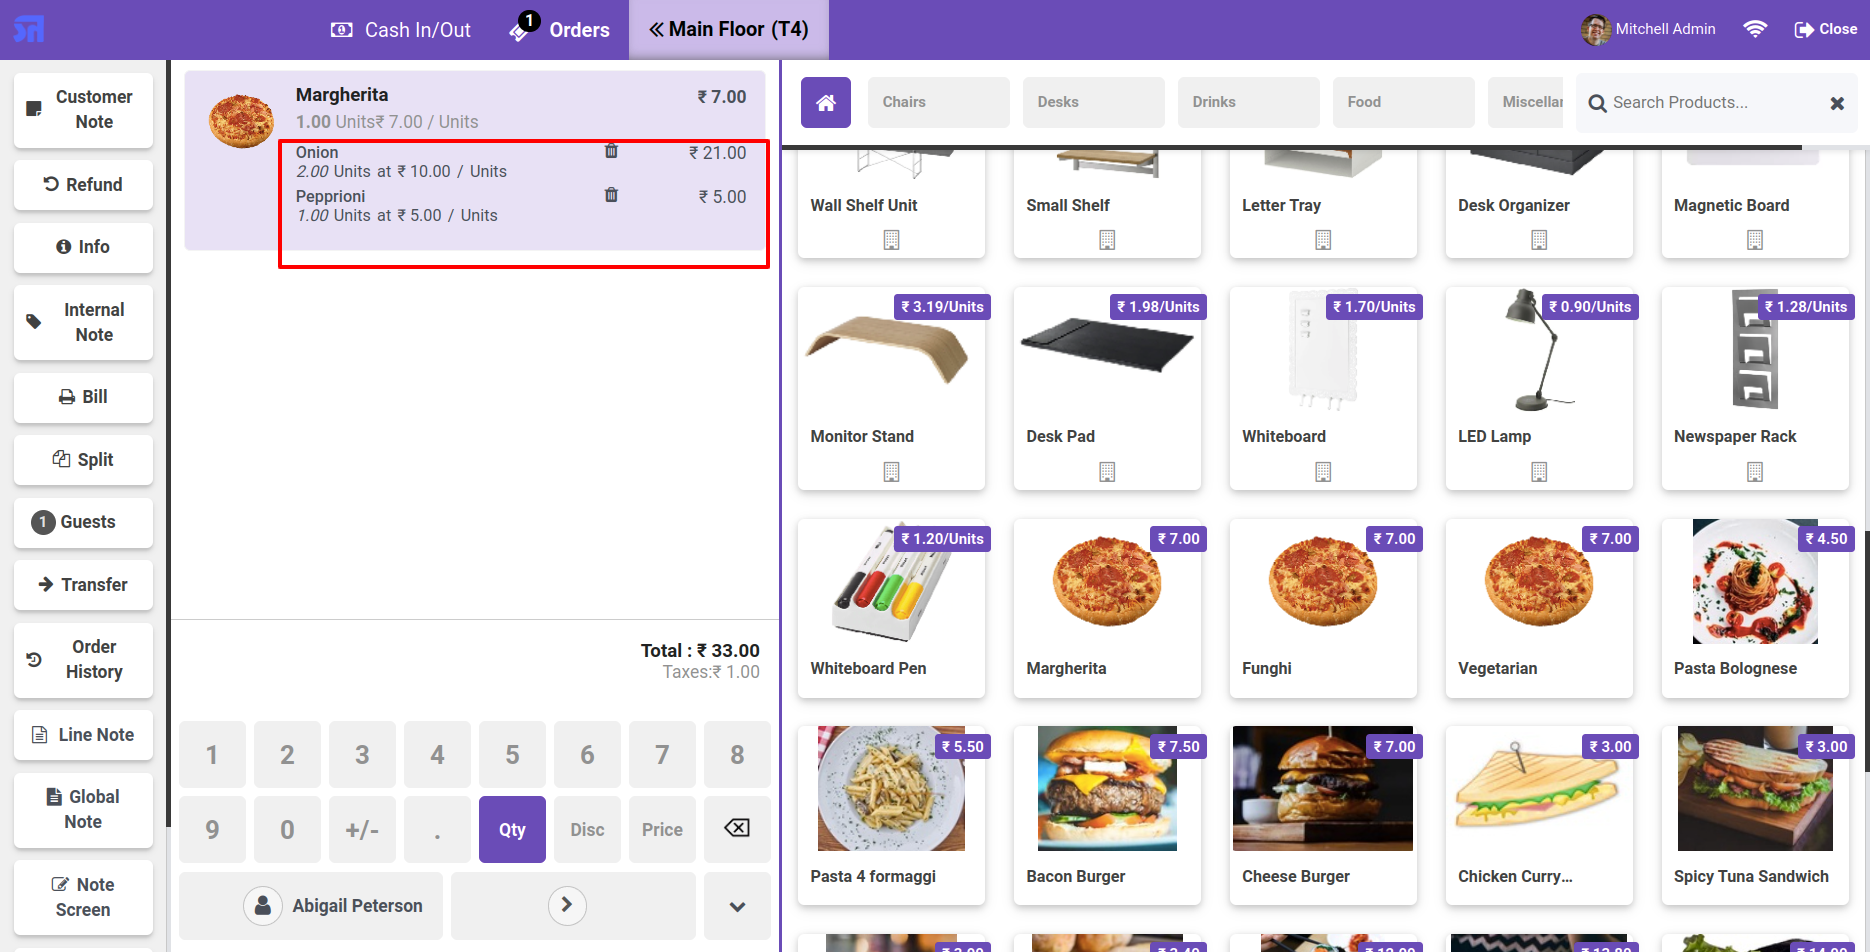
The topping product is added to the order line.
The topping products are displayed on the receipt.
Go to the pos setting and enable the 'Allow same product with different toppings' feature.

Add product to cart.
Add product to cart with different toppings.
The products displayed on the receipt with different-different toppings.
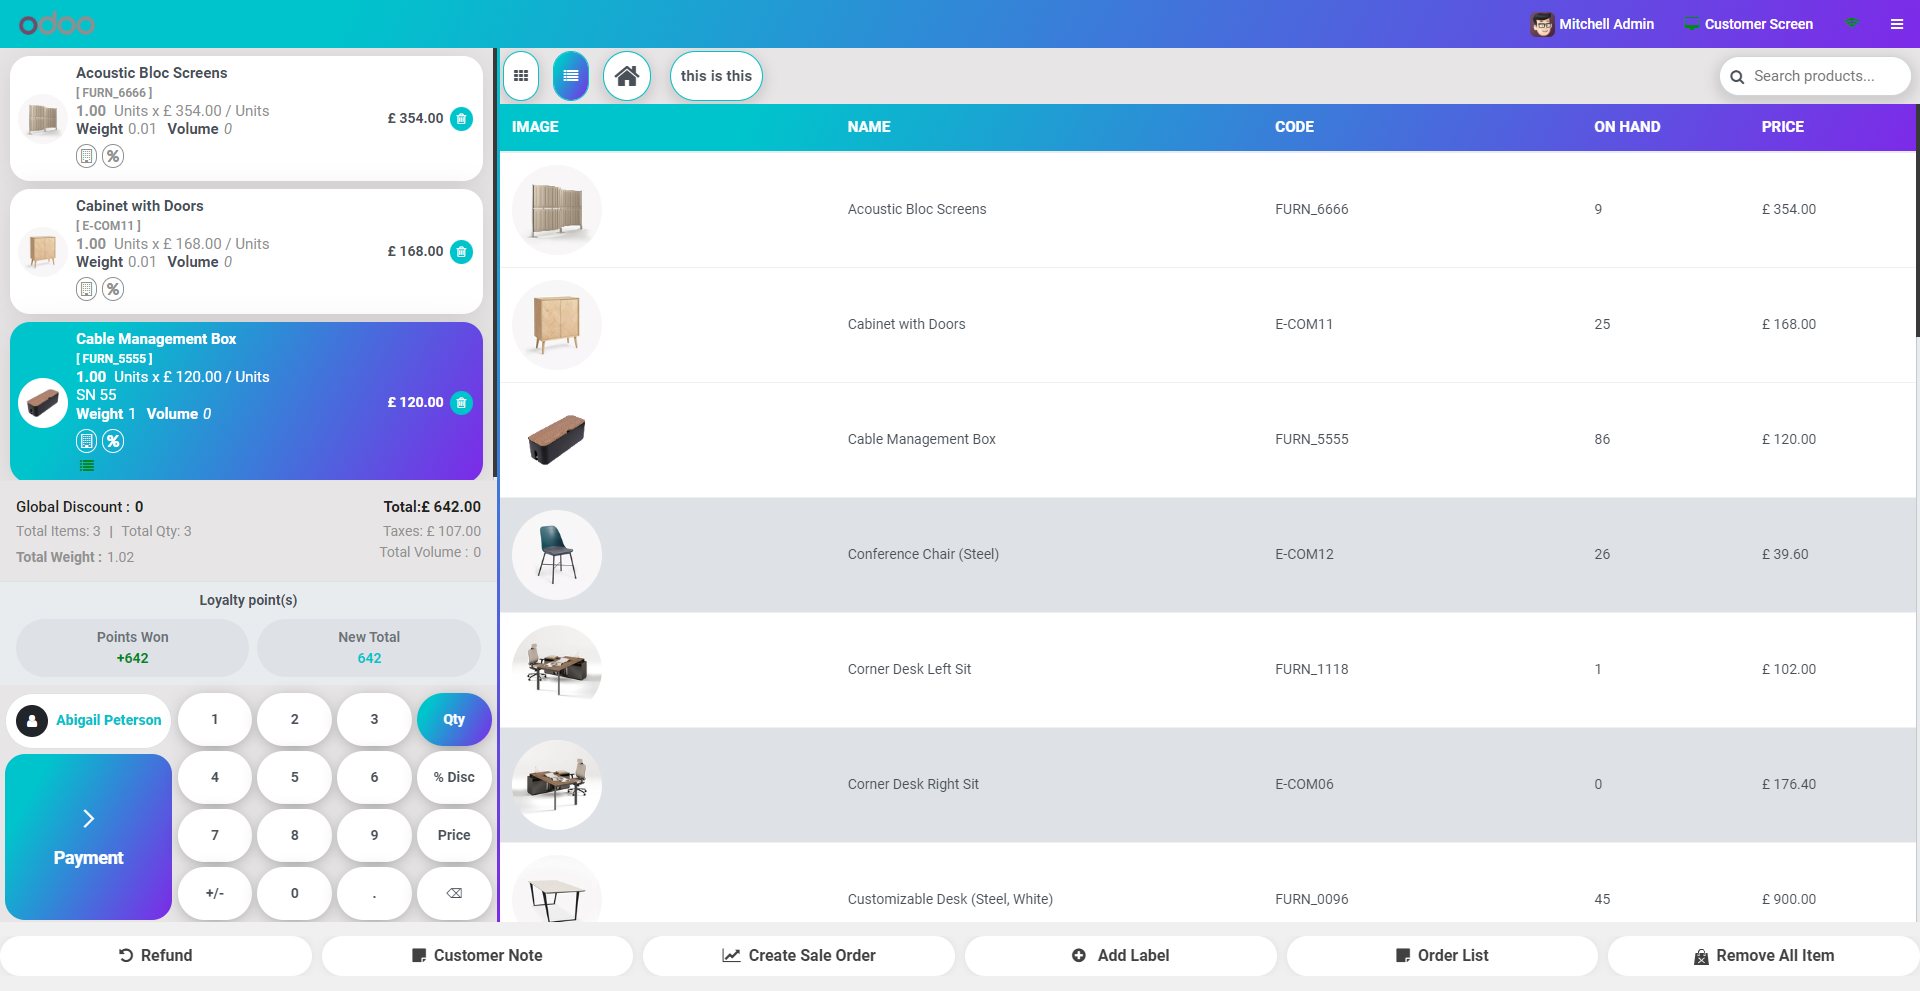
Tree view of the pos product categories.
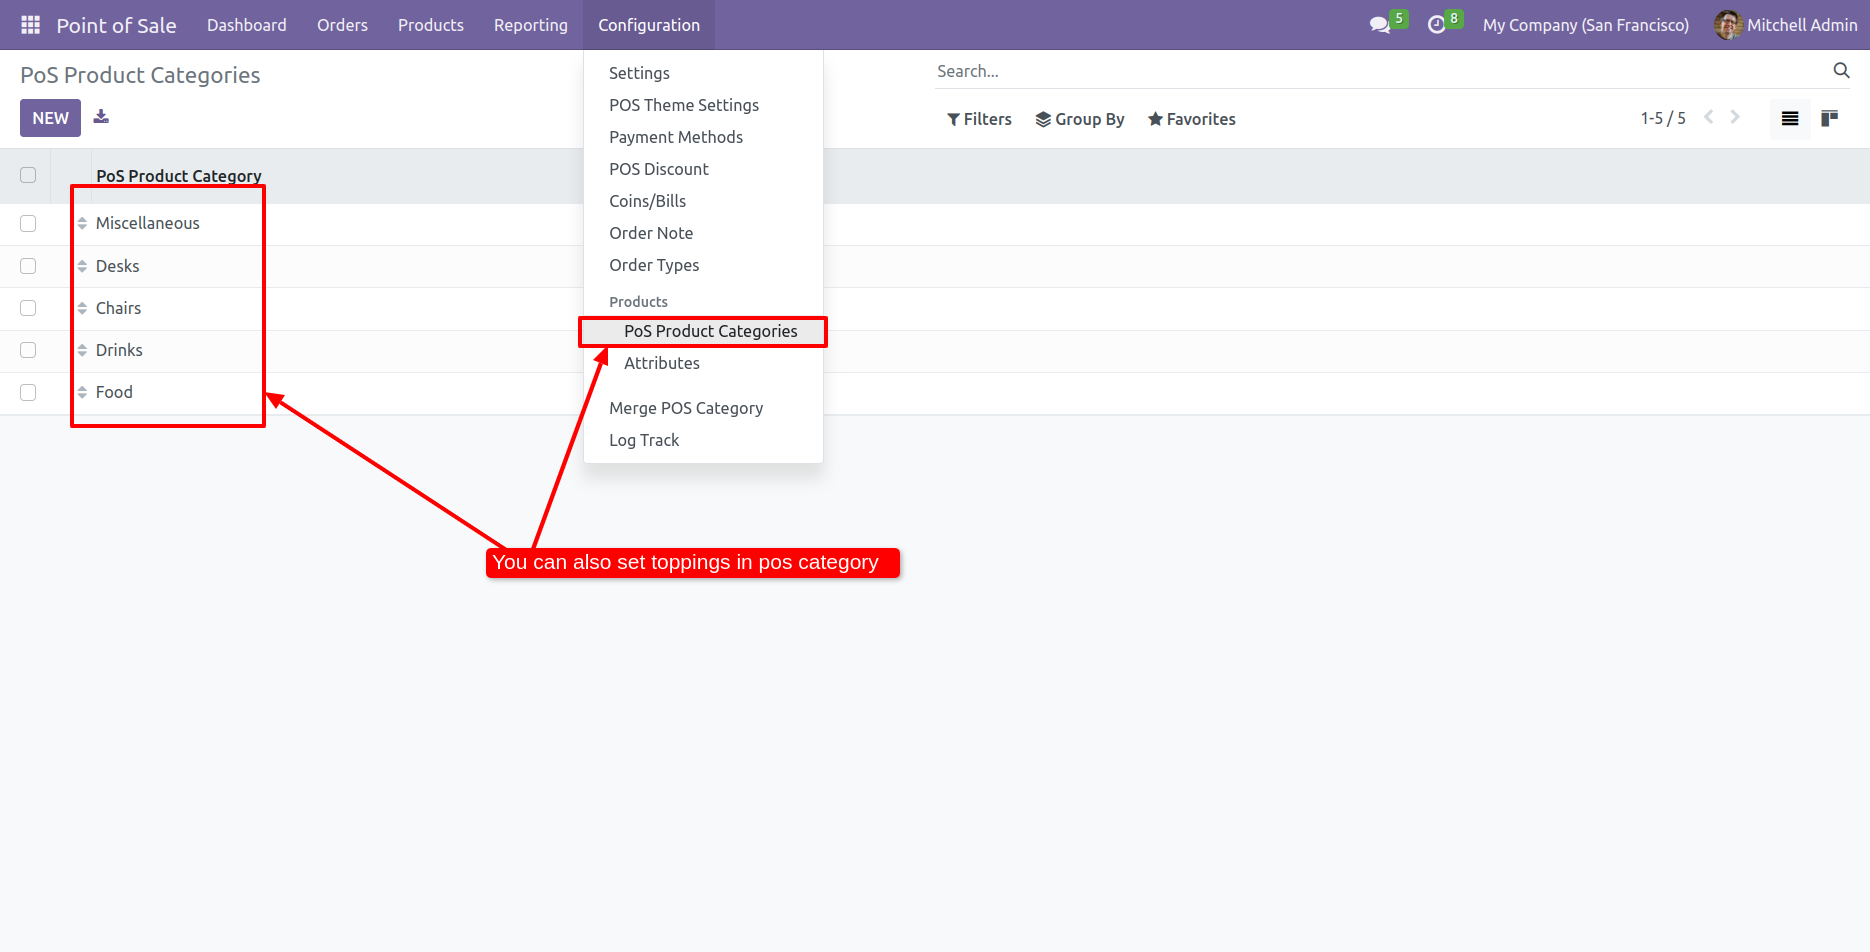
You can also add toppings in the pos product categories form view.
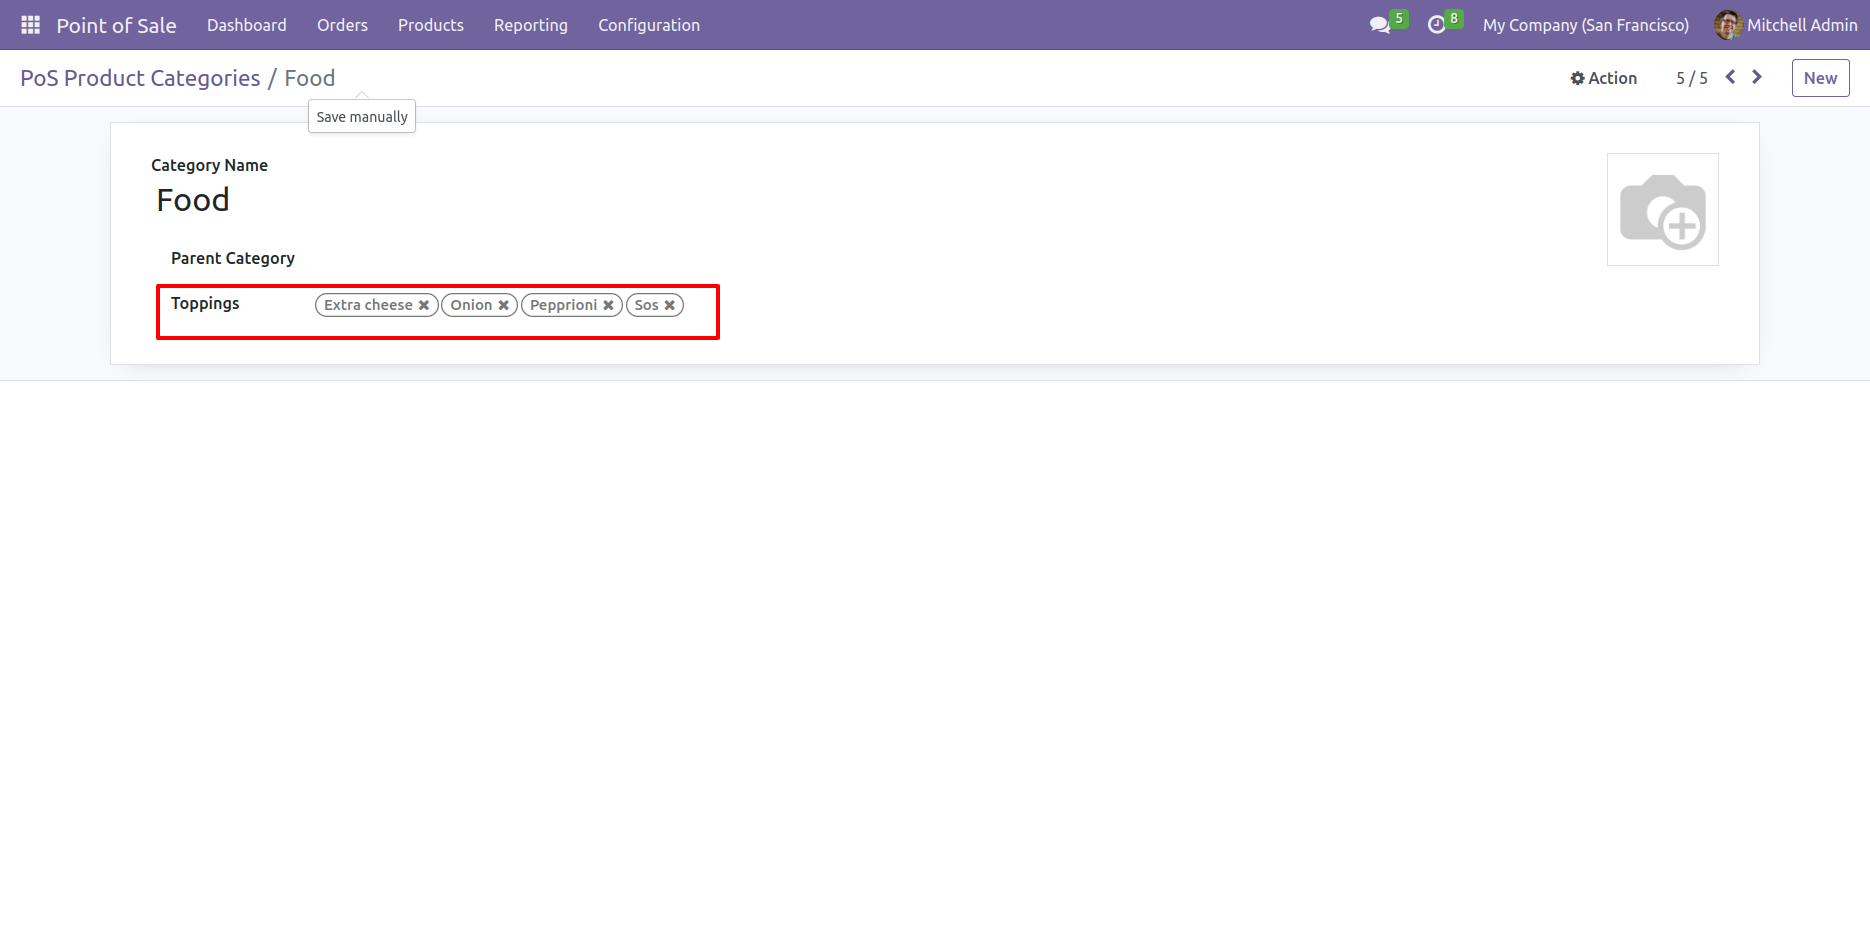
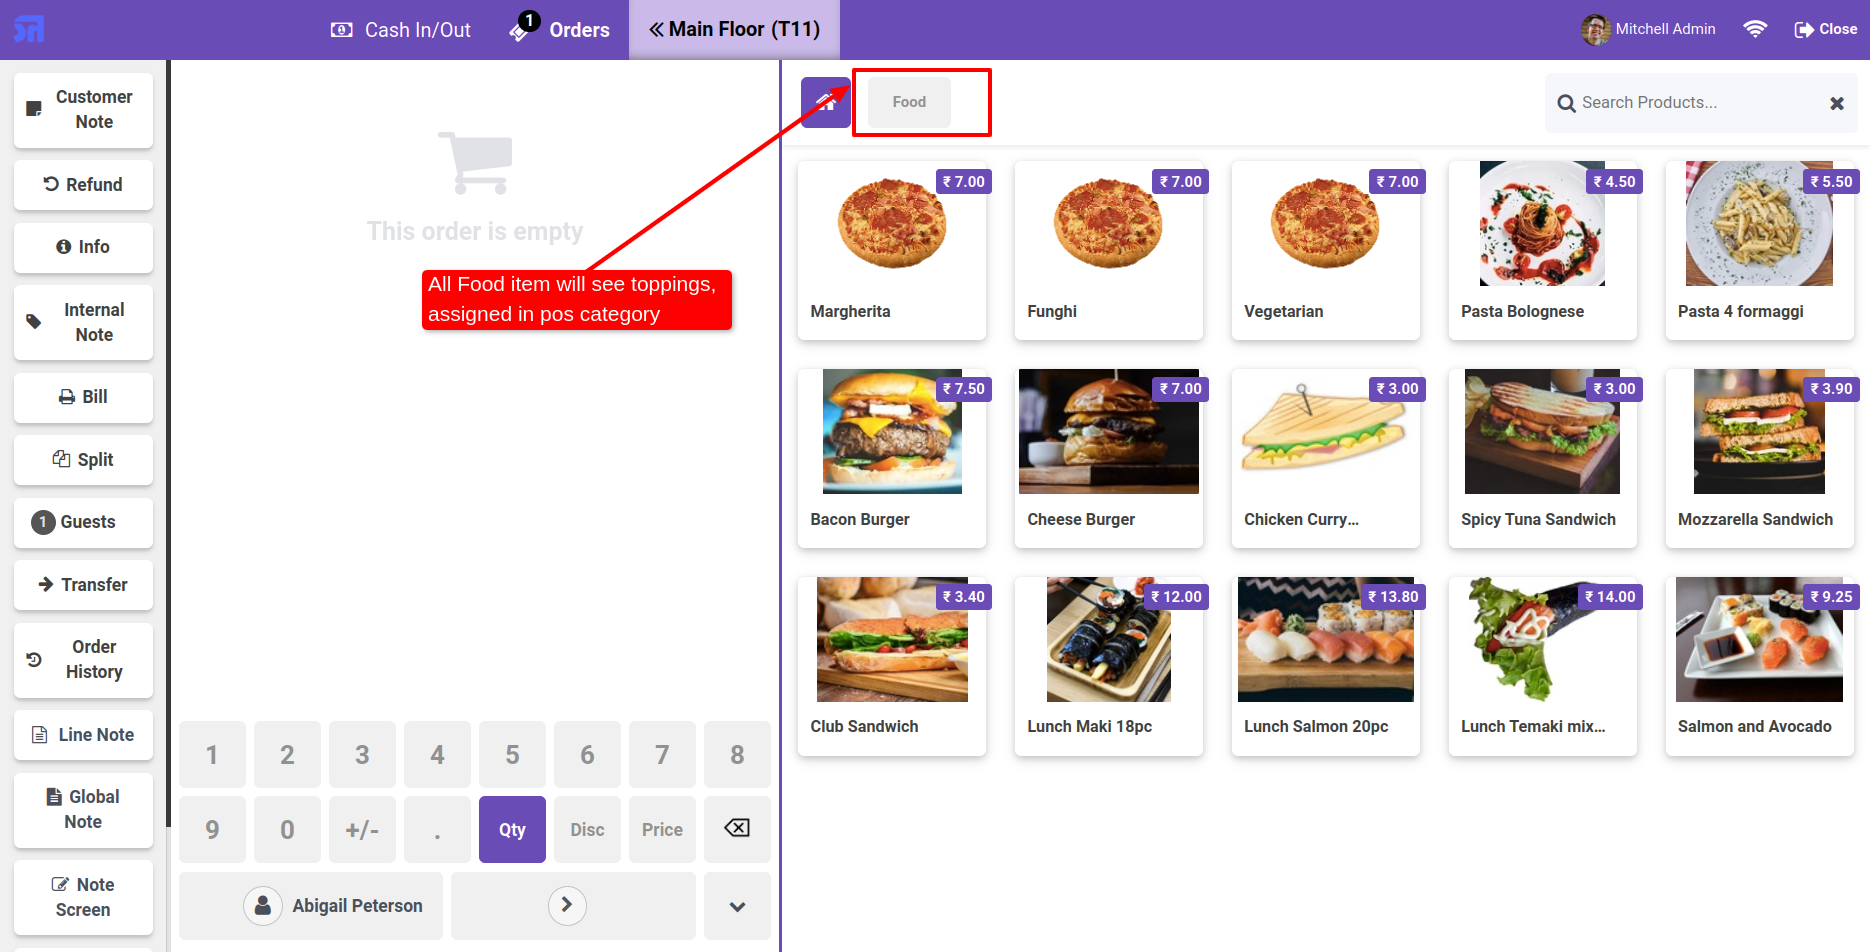
All the food products will see the toppings assigned in pos categories.
Form view of the toppings.
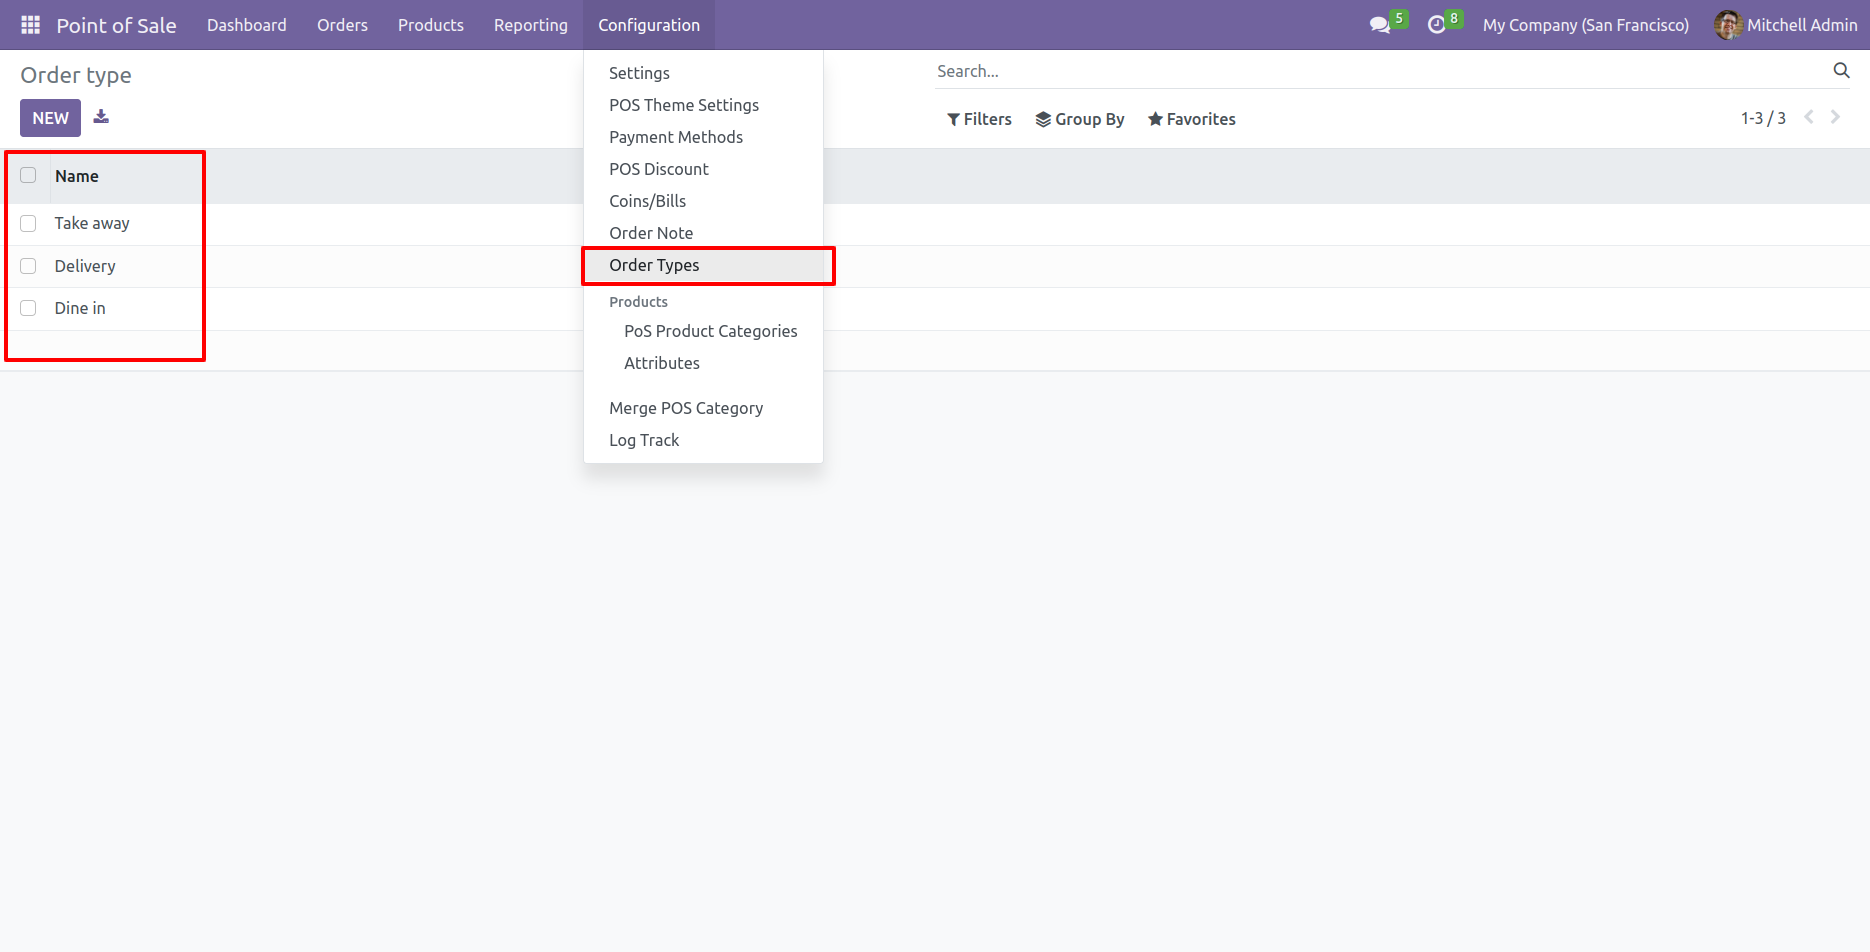
Open order types from the configuration menu. From there, you will find a list of existing order types, and also, you can create a new order type by clicking on the 'New' button.
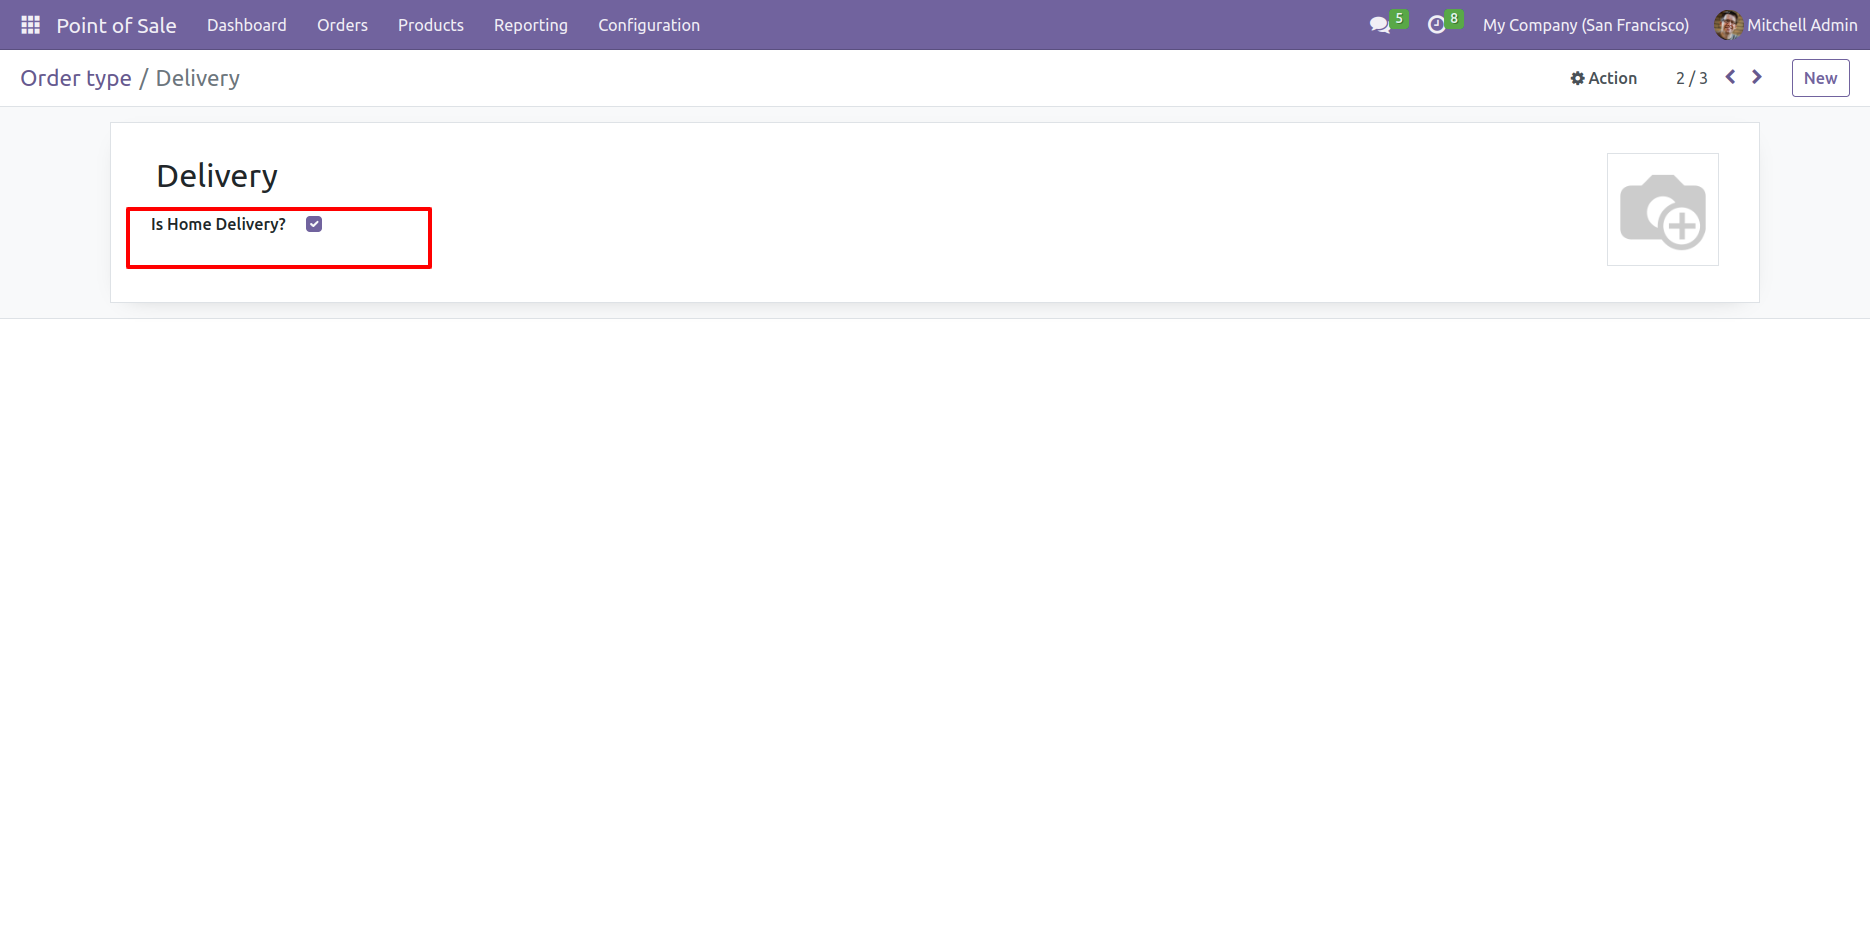
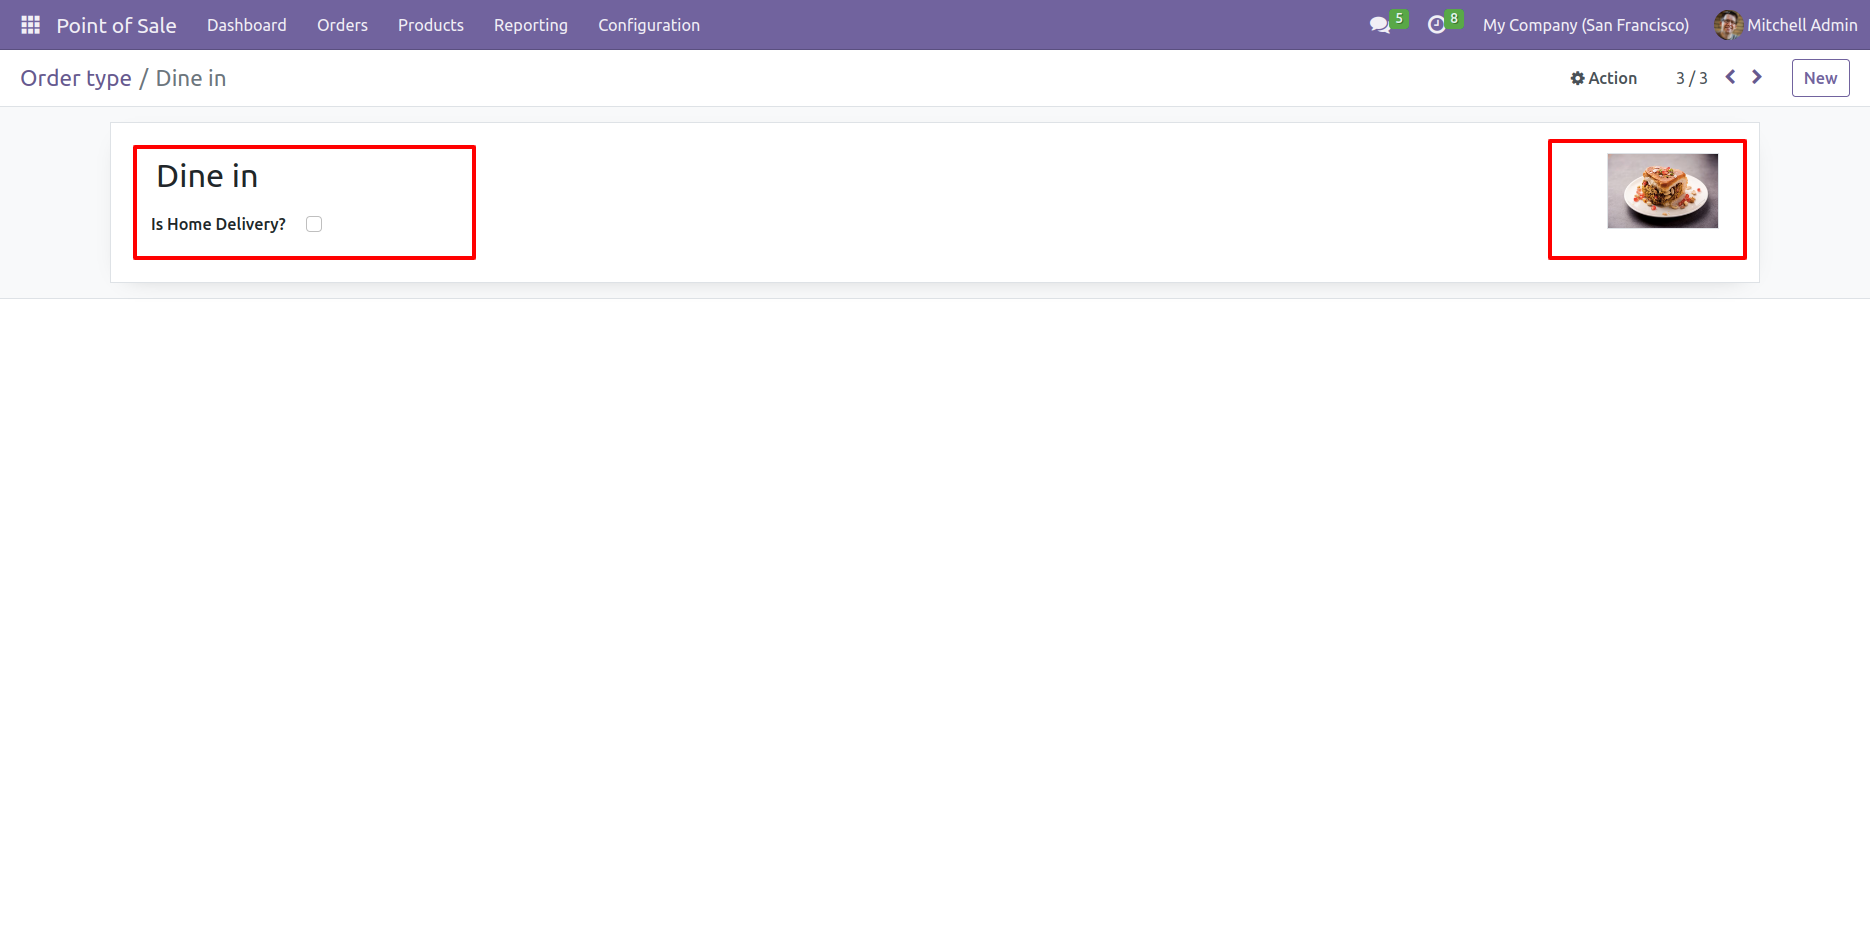
In the form view of the order type, you have the option to specify the image for the respective order type.

Tick home delivery option.
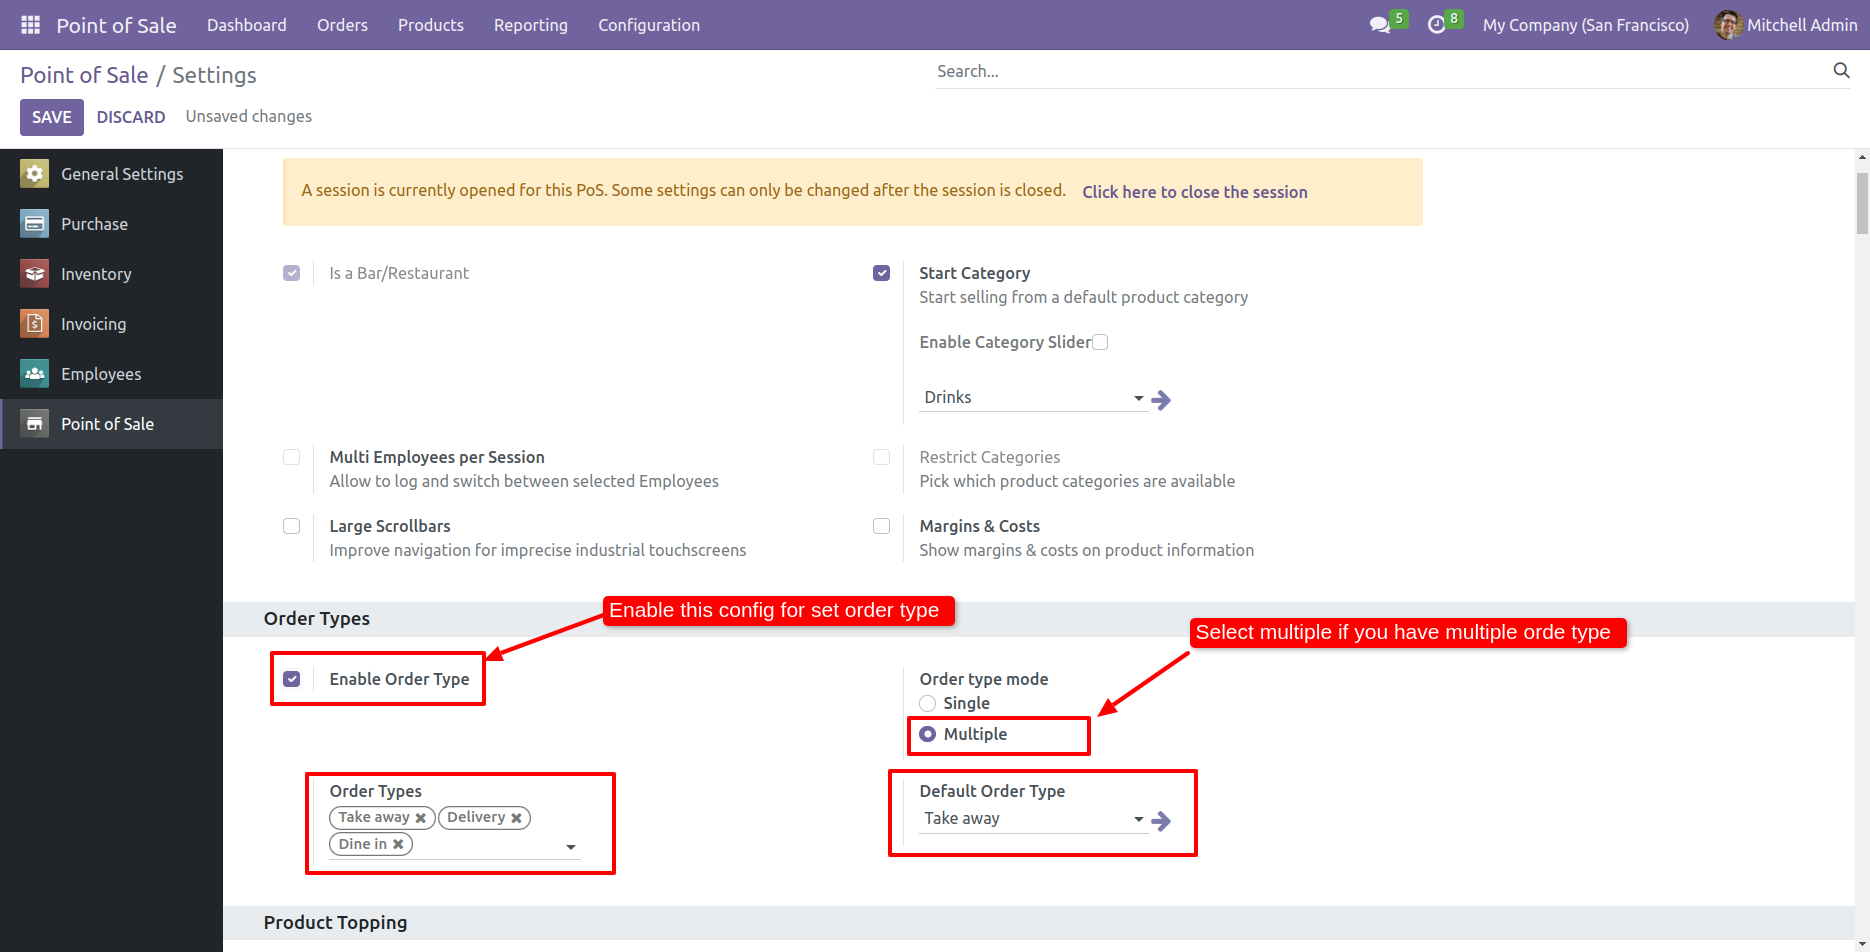
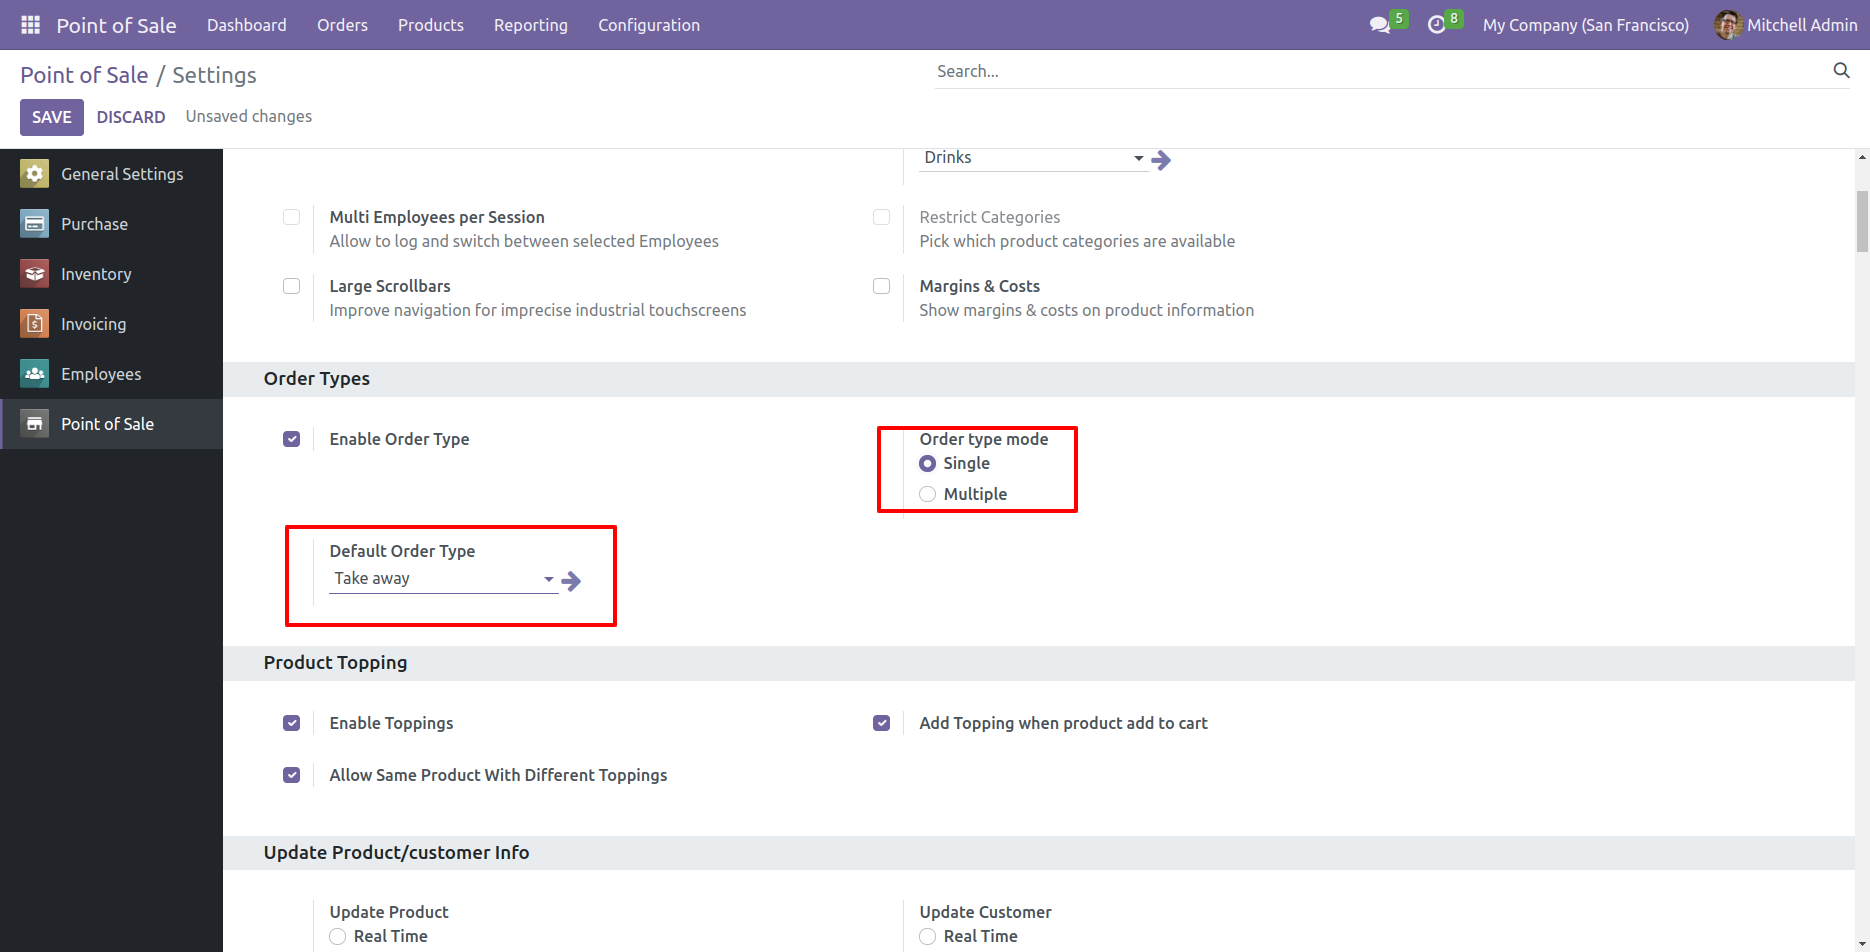
Go to the POS setting and enable 'Enable Order Type' and Select multiple order types,
if you have more than one order type.
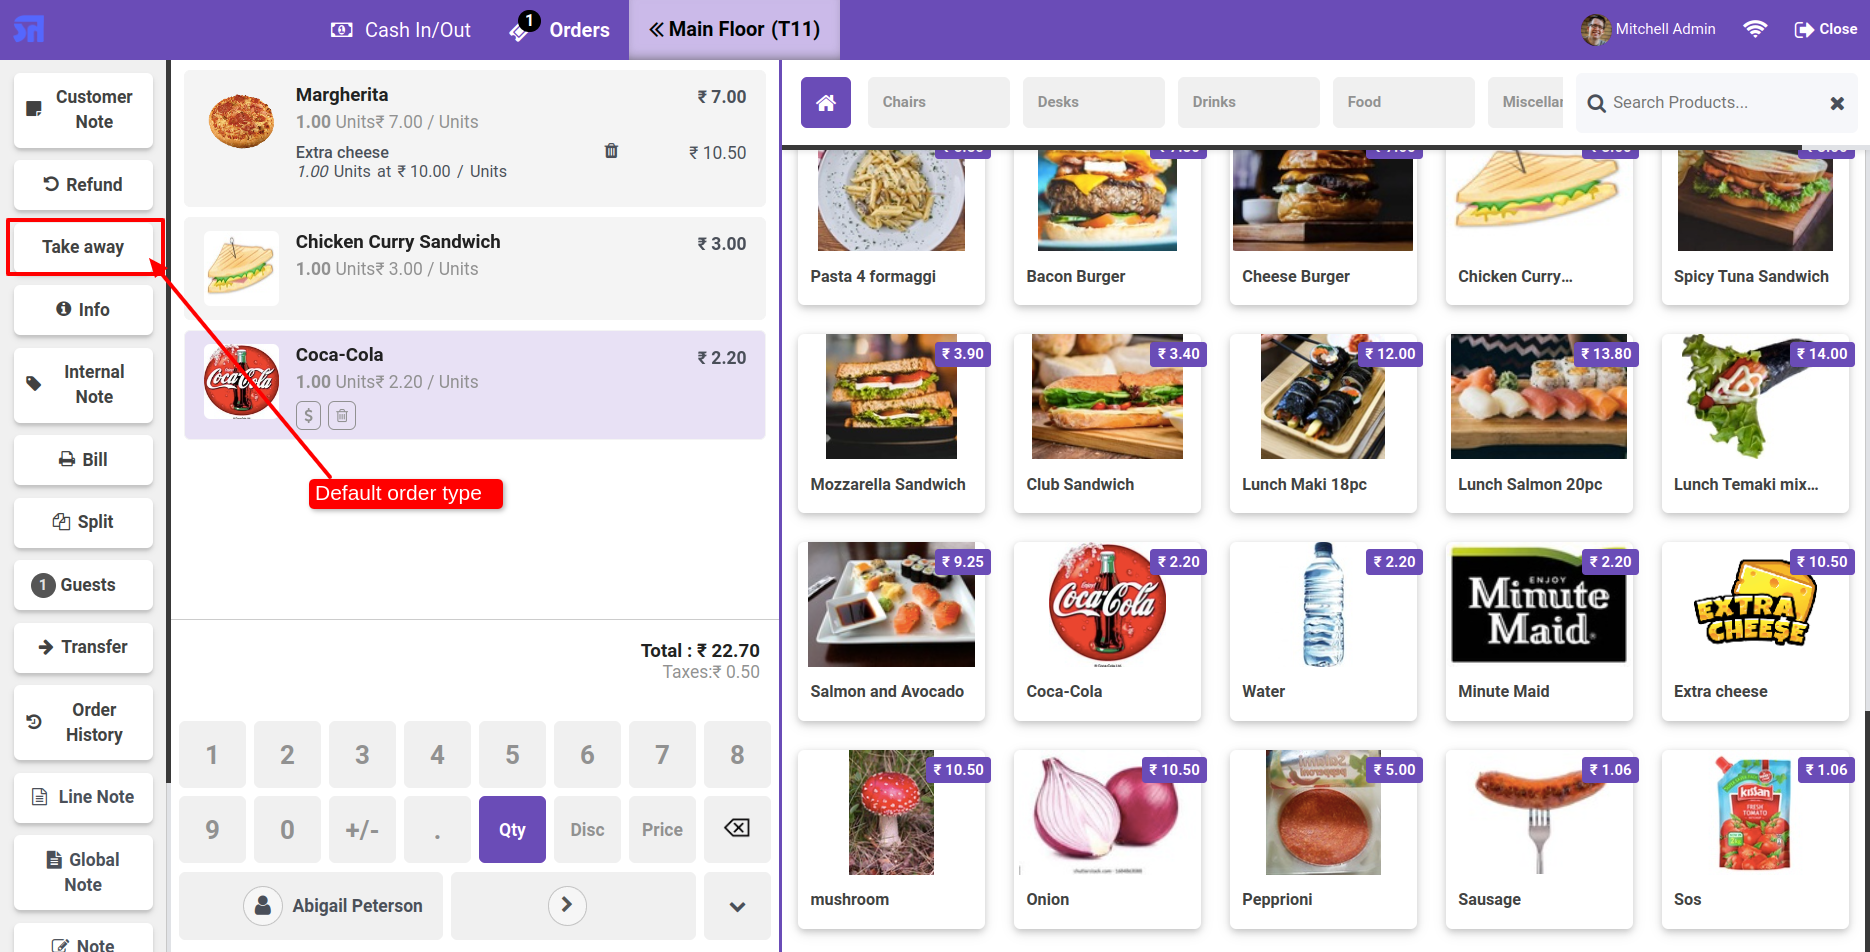
Add the list of the order types and also set the default order type 'Take away'.
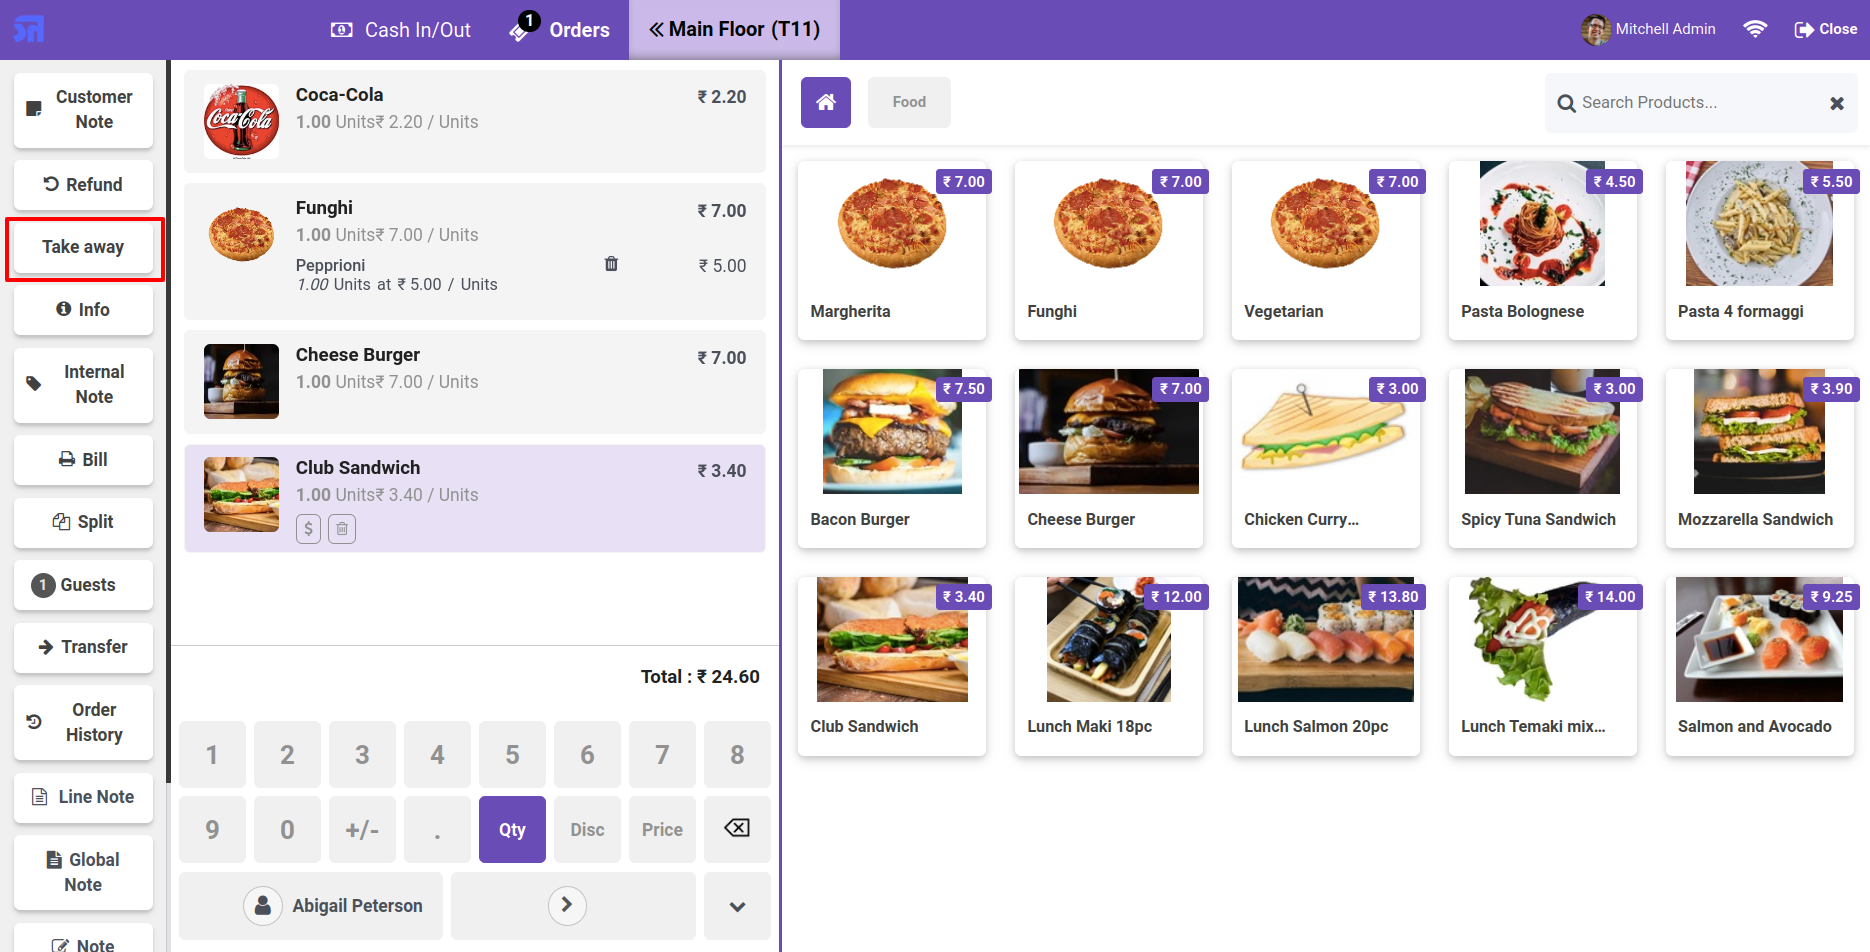
By default, the order type 'Take Away' is automatically selected.
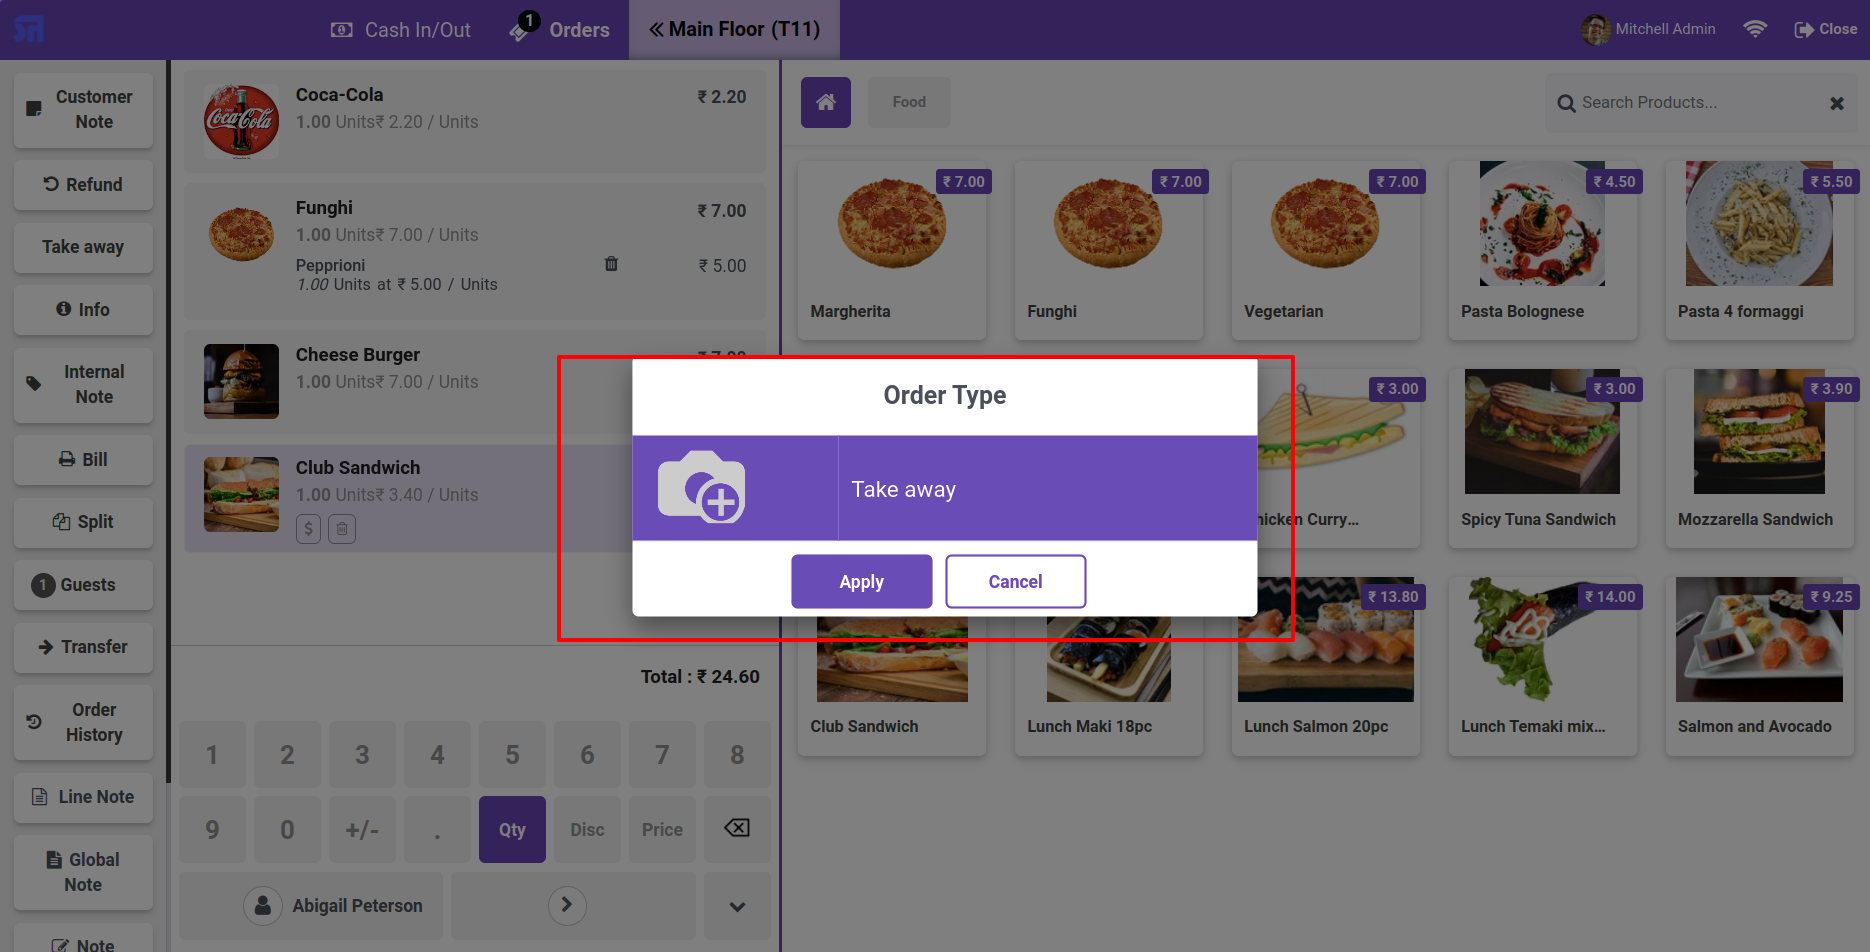
If you want to change the order type then click on the 'Take Away' button.
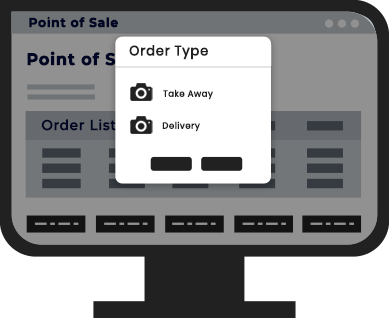
Select the desired order type on the order type wizard.
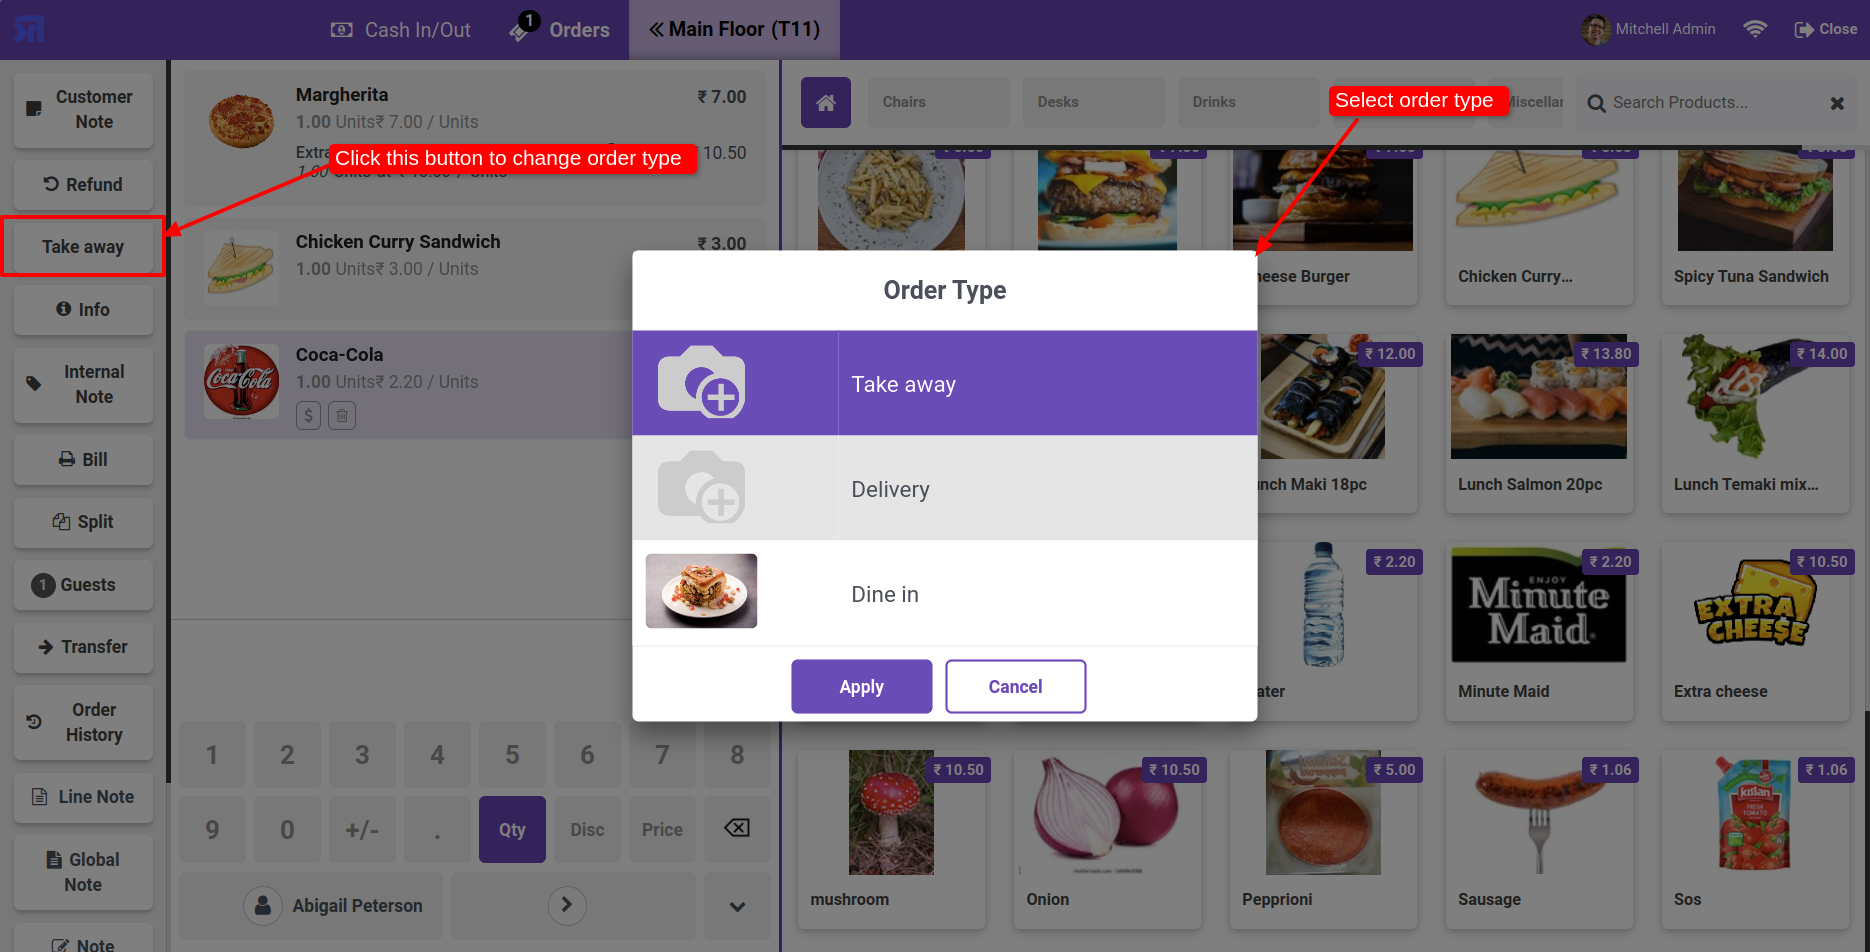
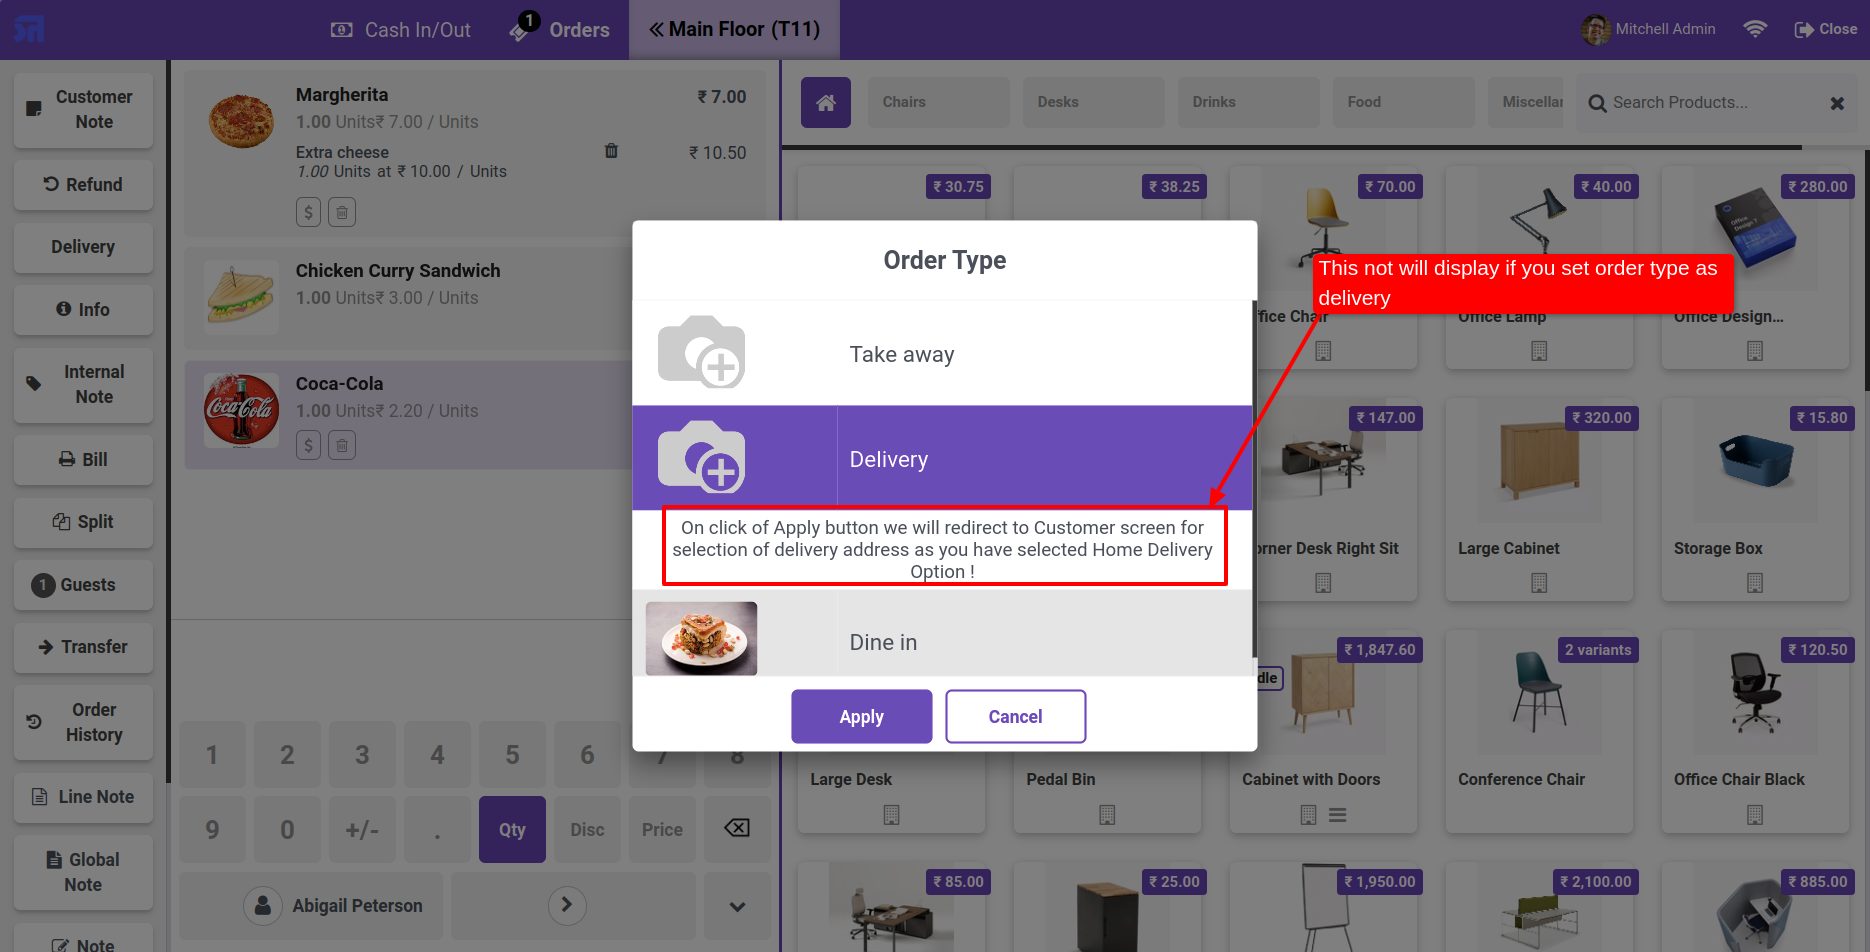
If you select the delivery order type, this selection option will not be displayed.
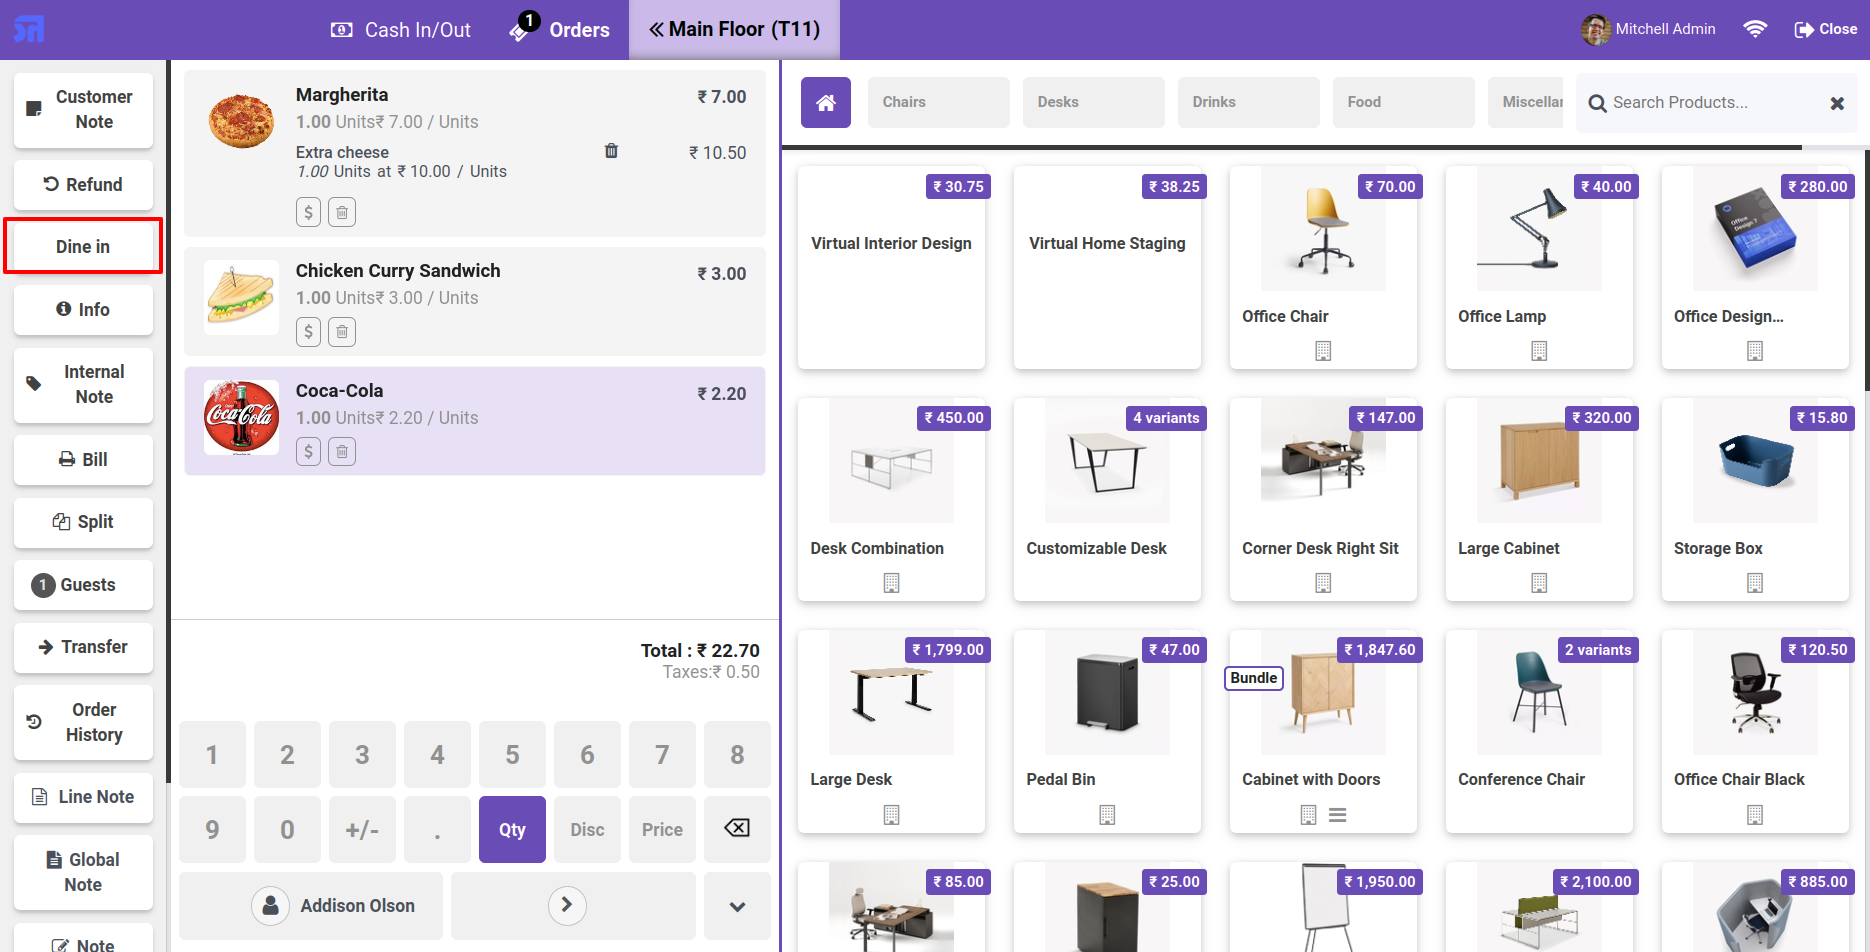
Select the 'Dine In' order type and click on the 'Apply' button.
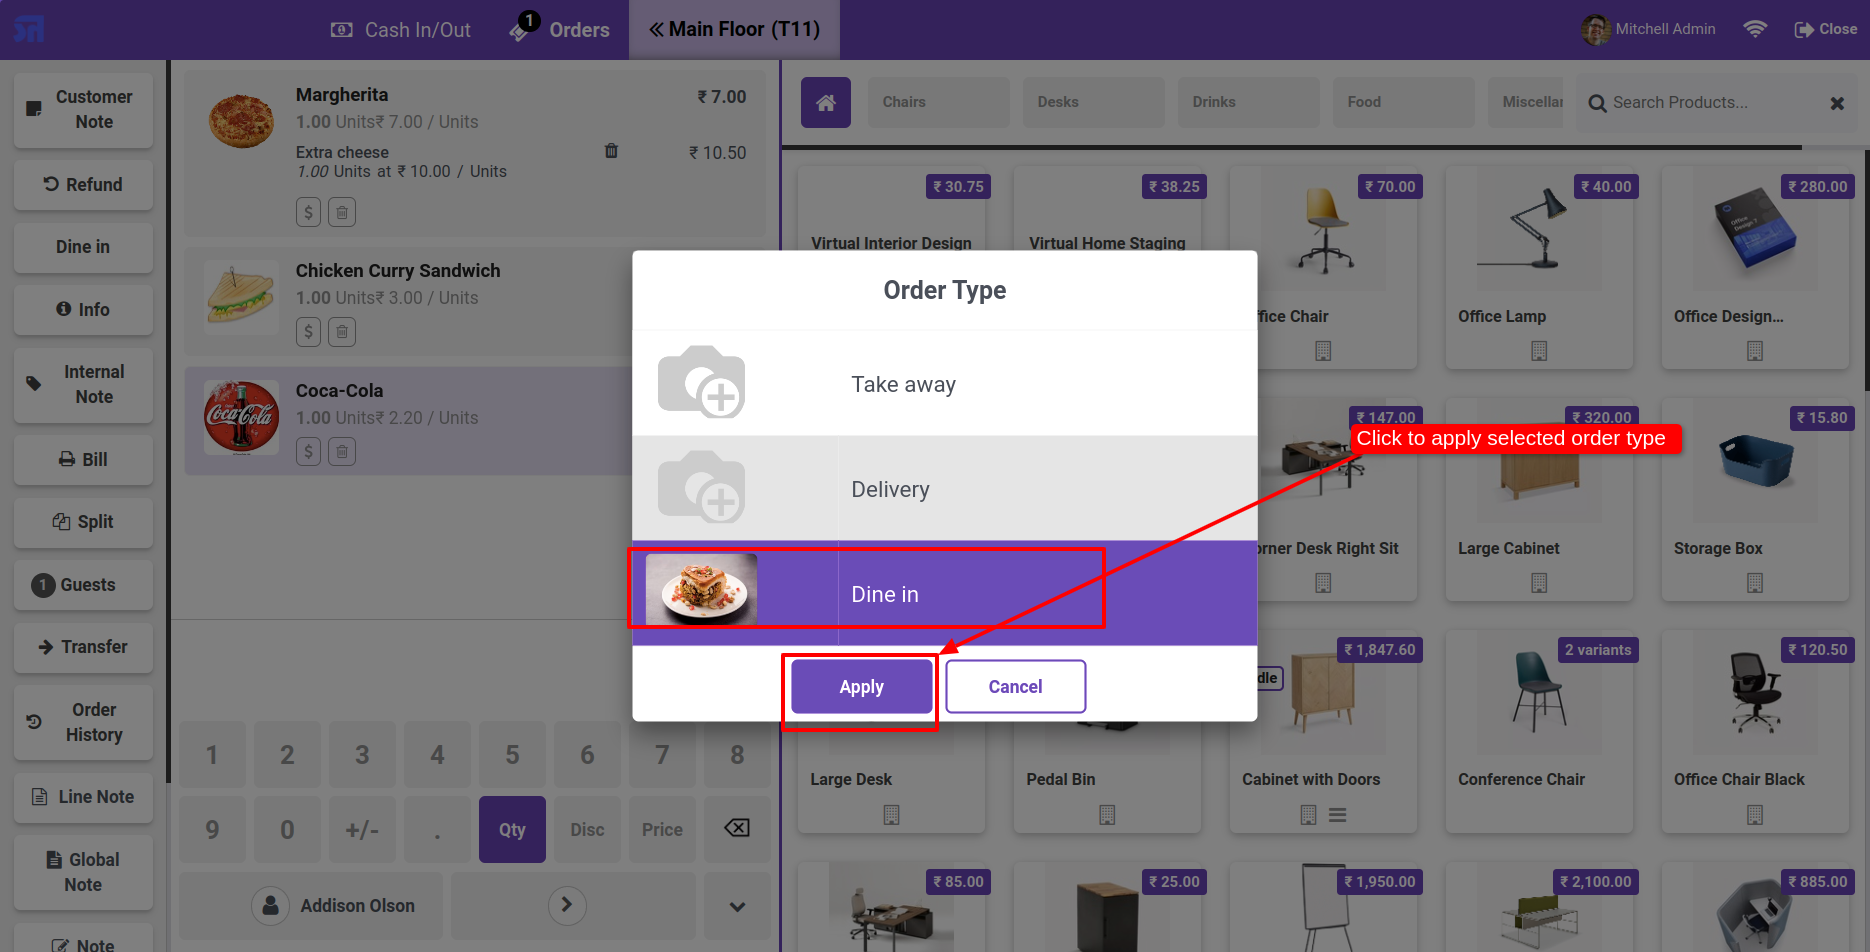
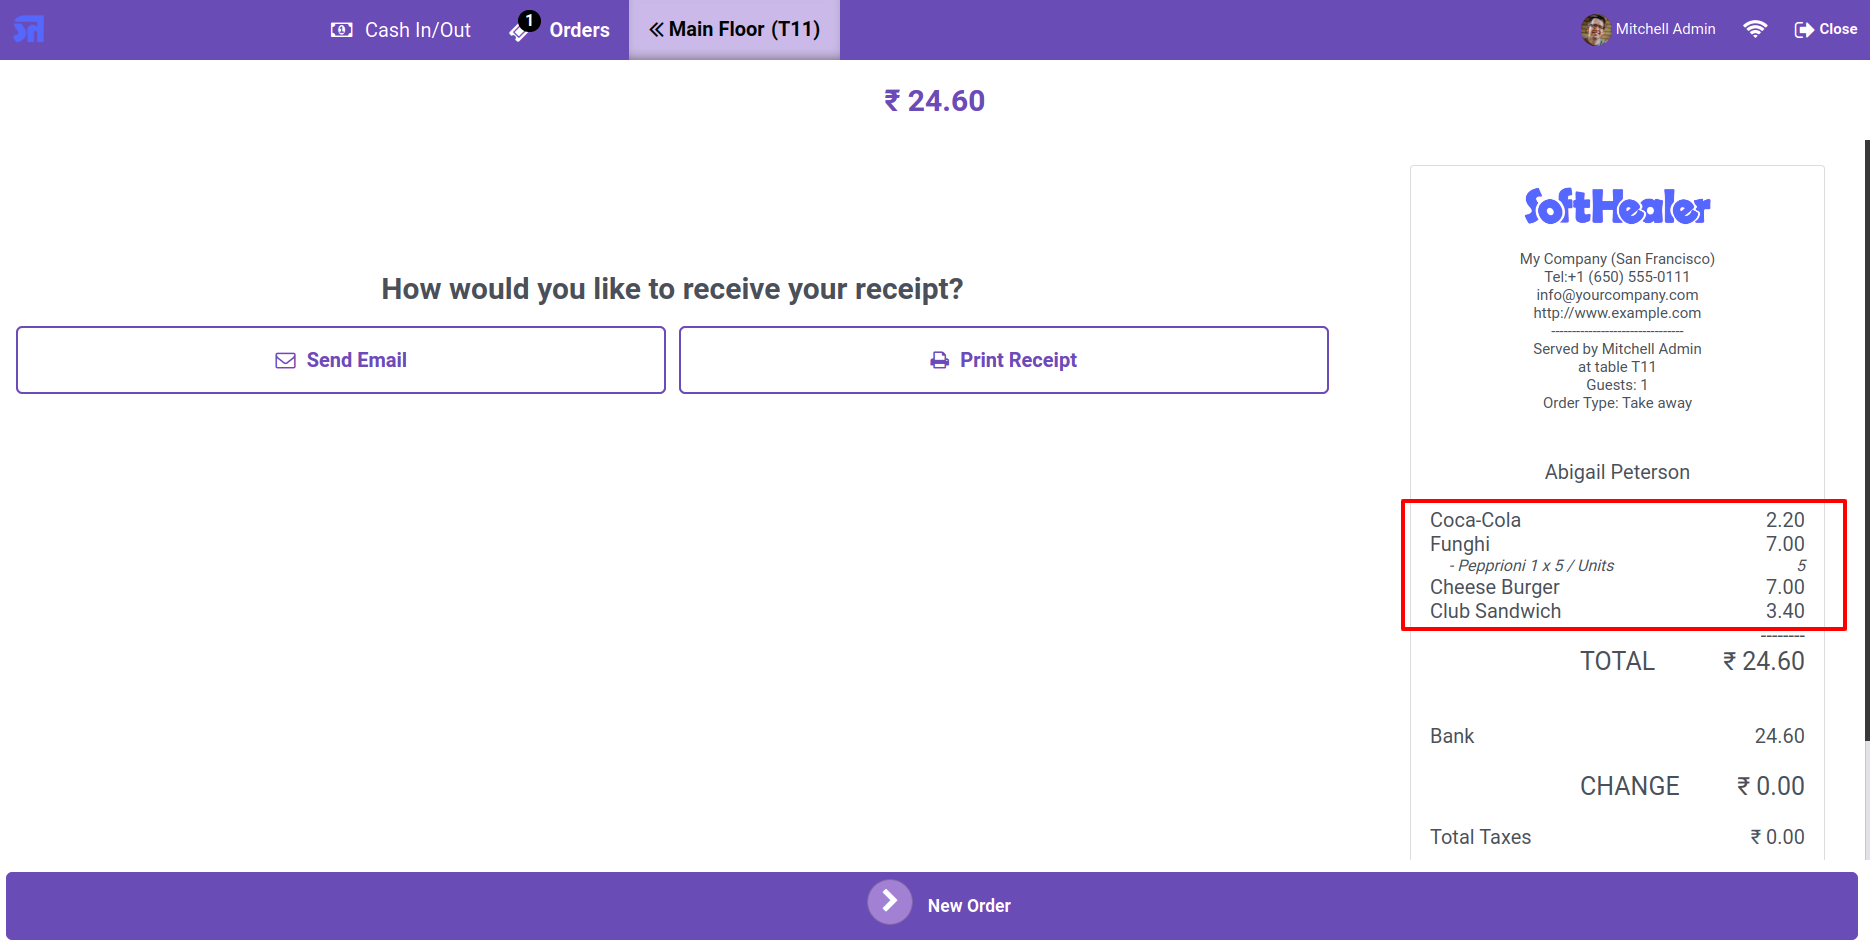
The order type is changed to 'Dine In'.
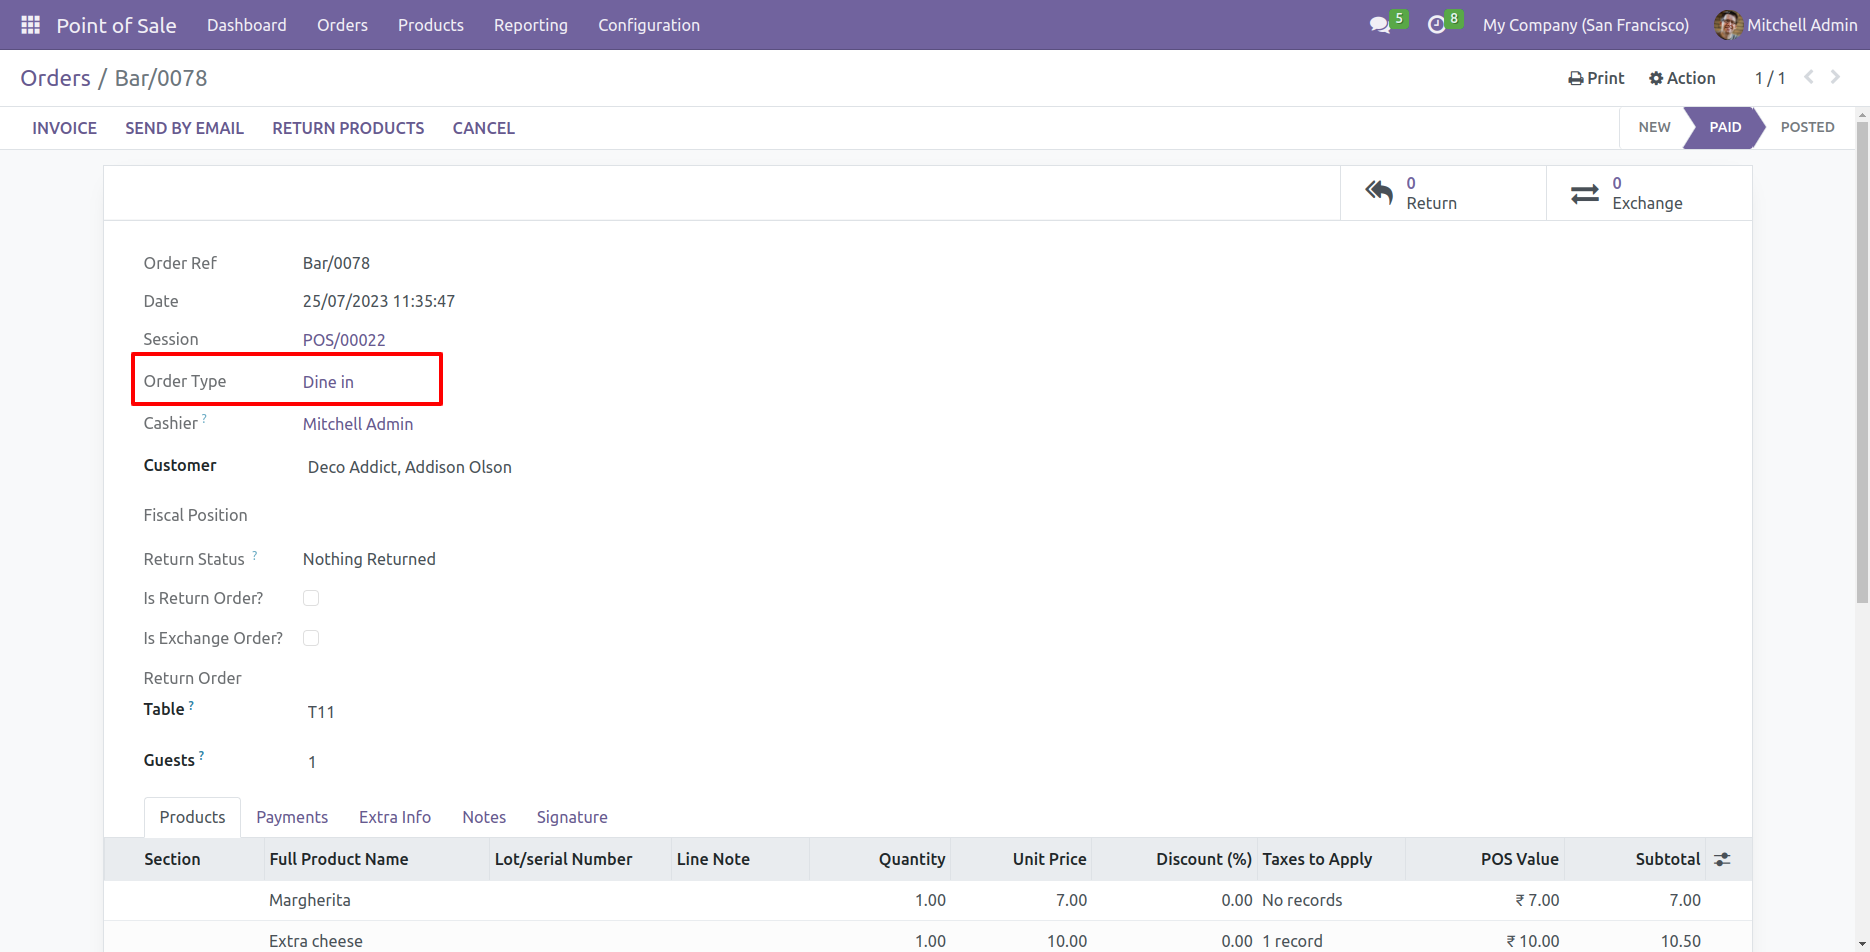
The order type is also visible on the receipt.

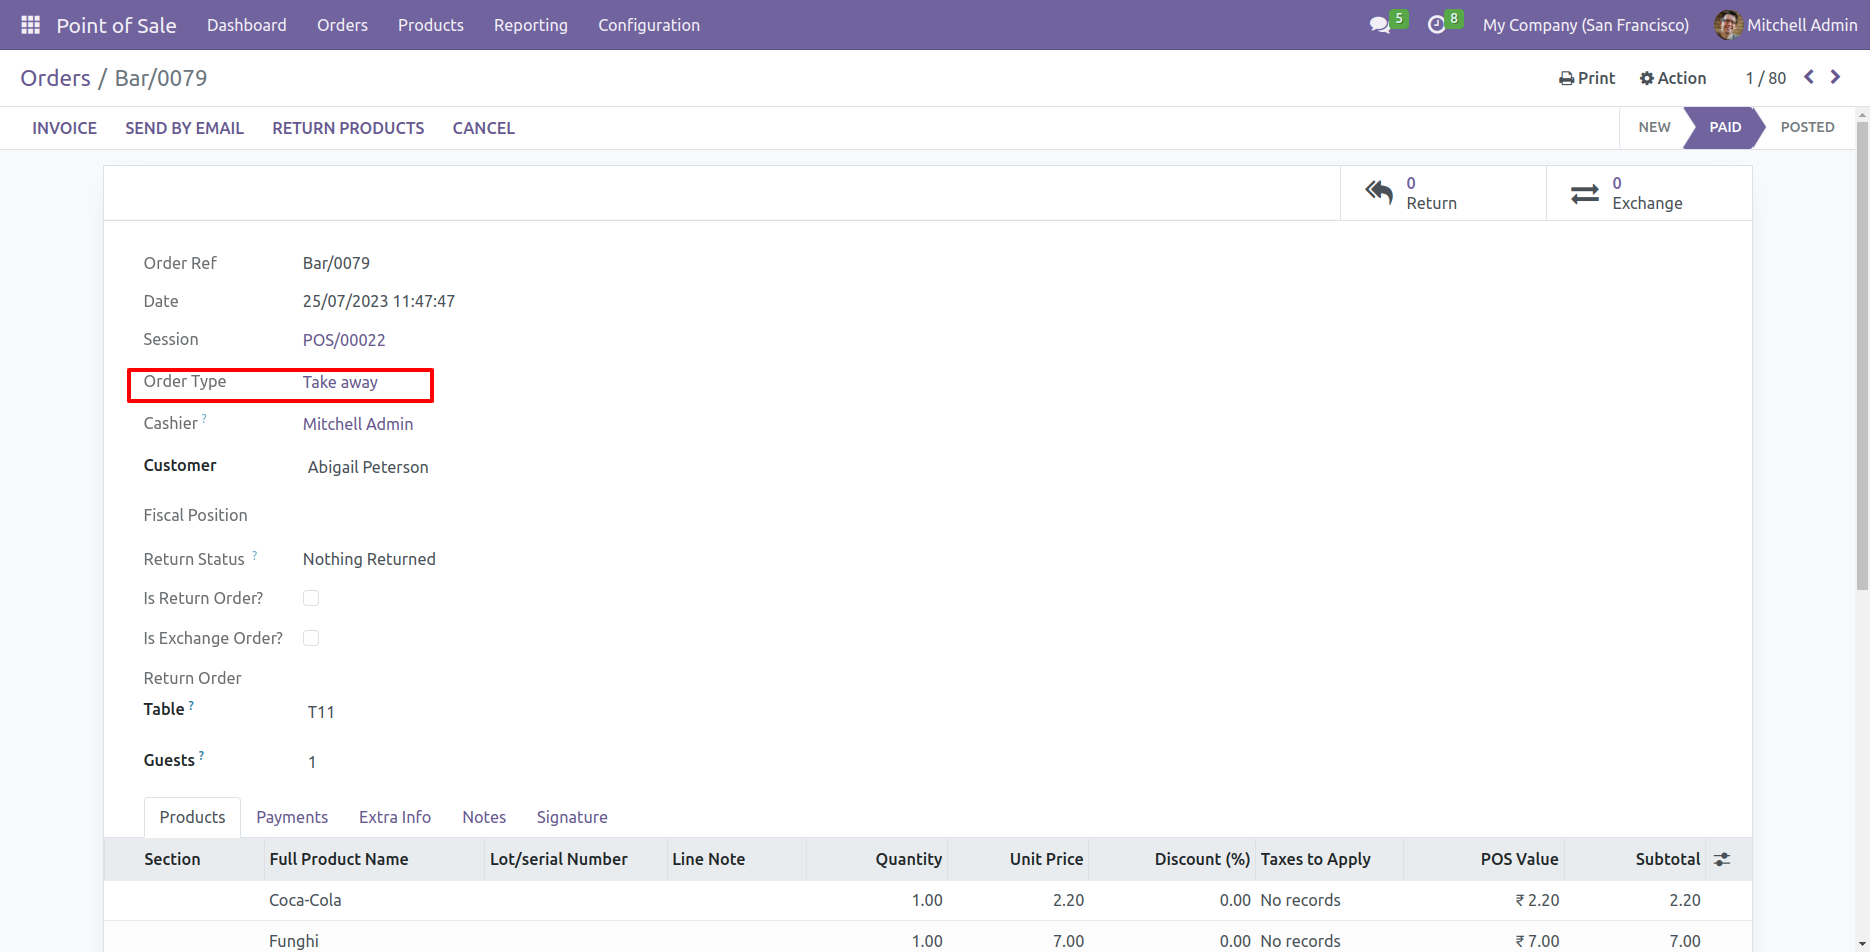
The order type is also visible in the order form view.
Go to the point of sale setting and select the default order type 'Take Away' and select the 'single' order type mode.
The order type is automatically selected.
In the order type wizard, you will only see the order type that you previously selected in the pos settings.
The order type is not visible on the receipt.
The order type is also visible in the form view of the order.
Enable these configurations.
Counter increase when a product adds to a cart.
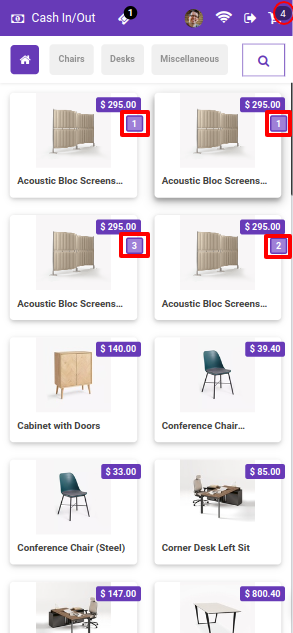
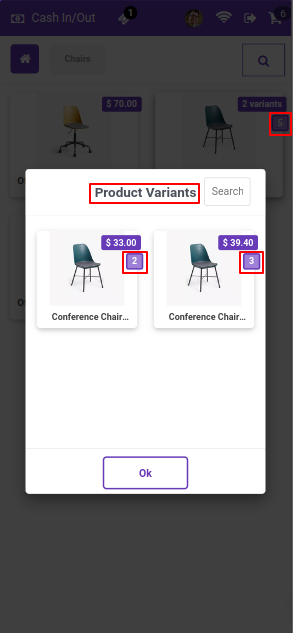
Variants with the product counter.
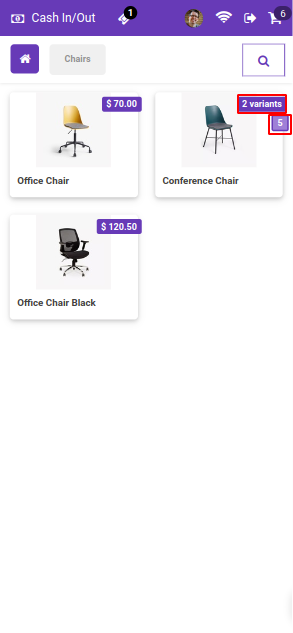
All counter in variant.
Enable these configurations.
Counter increase when a product adds to a cart.
Variants with the product counter.
All counter in variant.
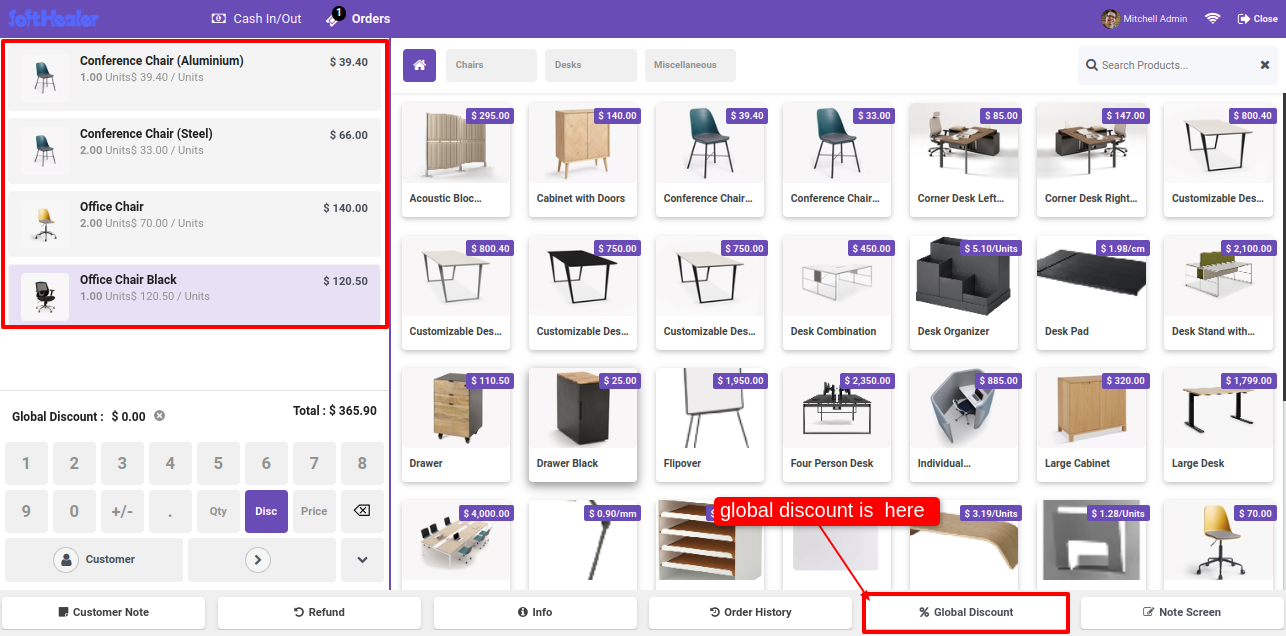
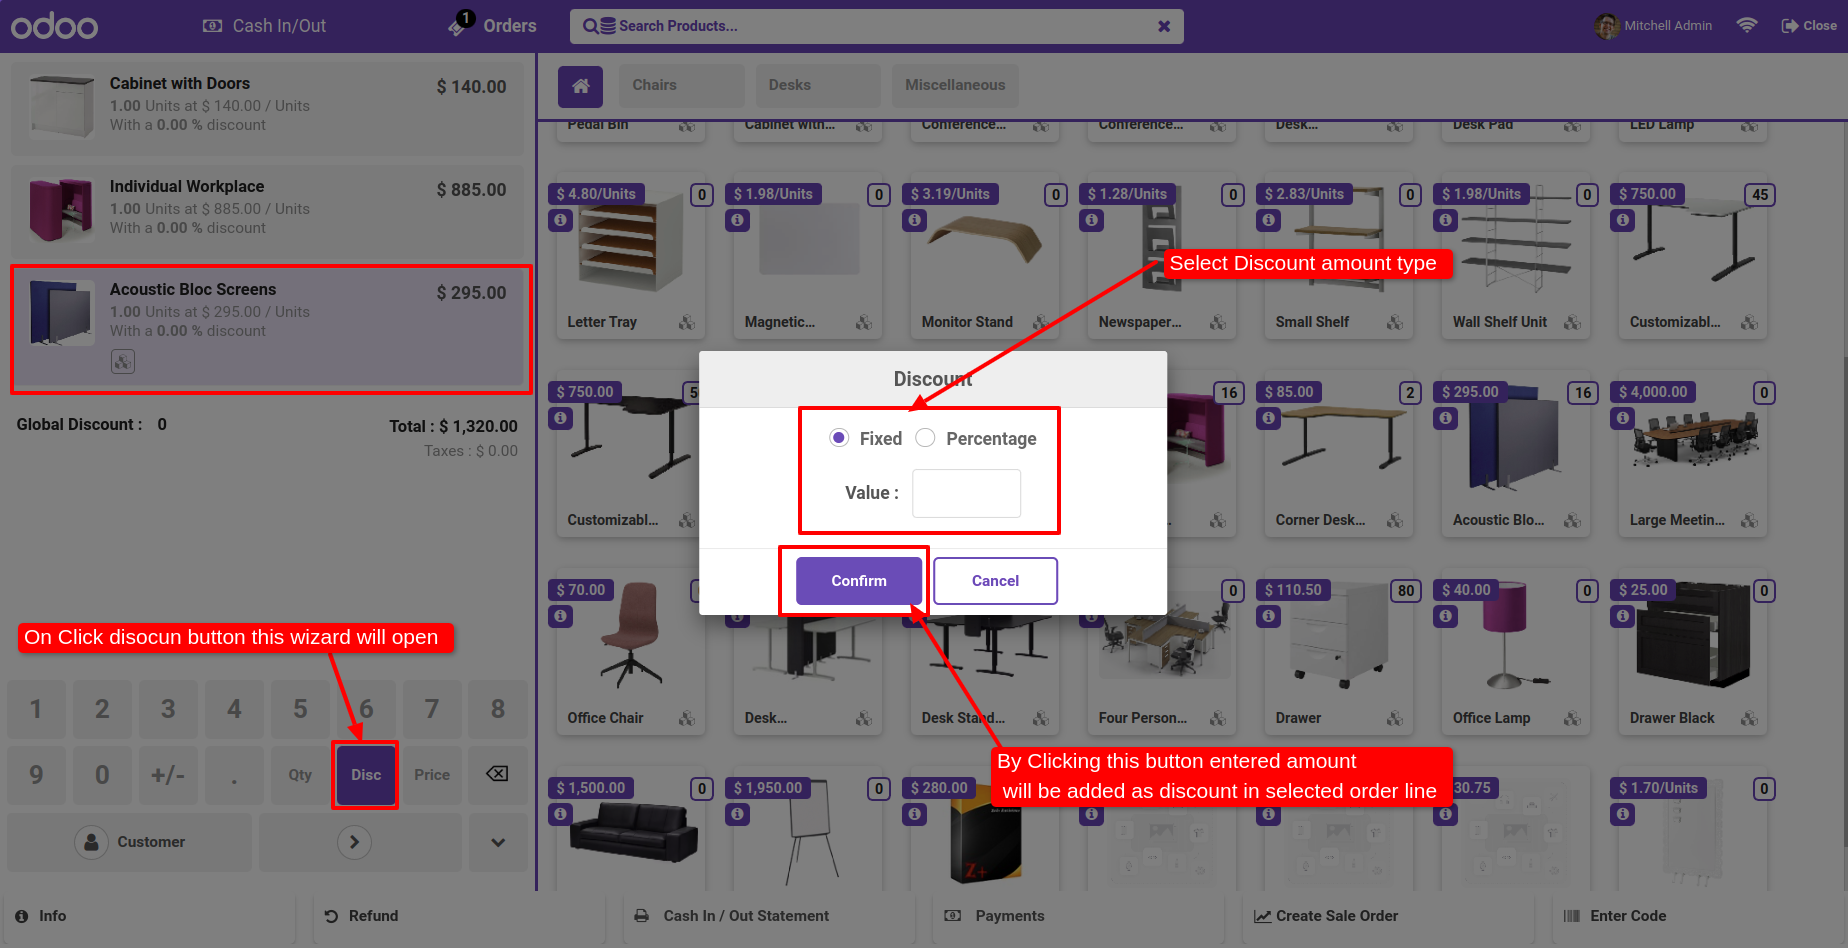
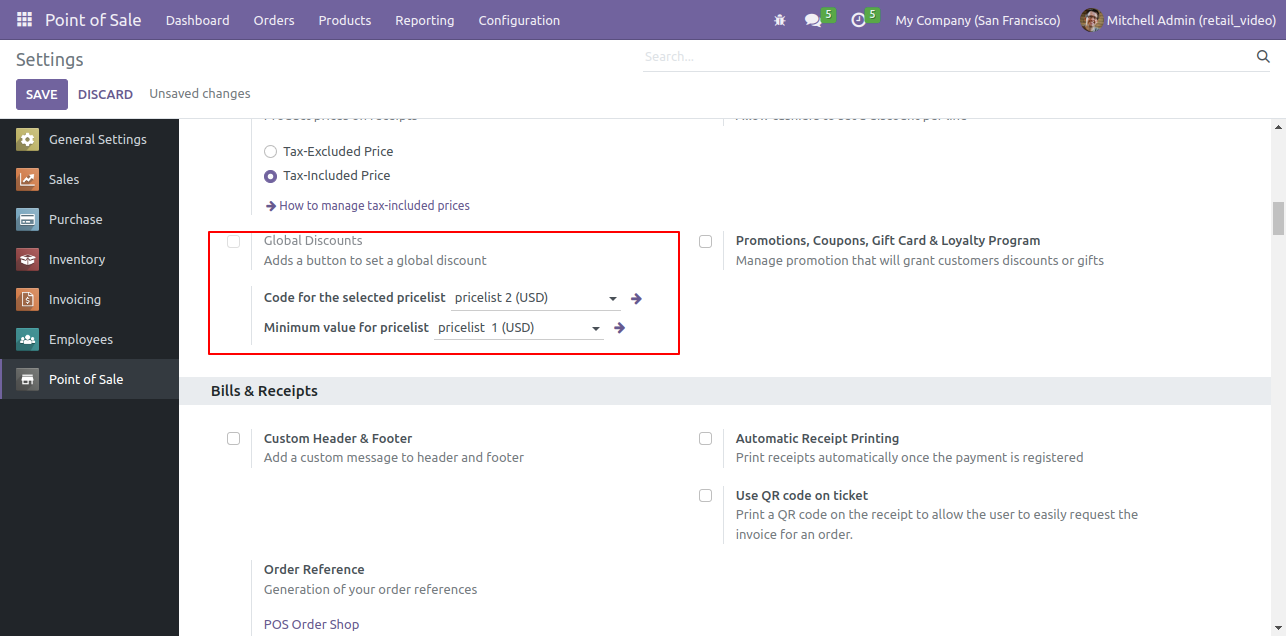
Goto pos config setting and enable 'Enable Global Discount' option.
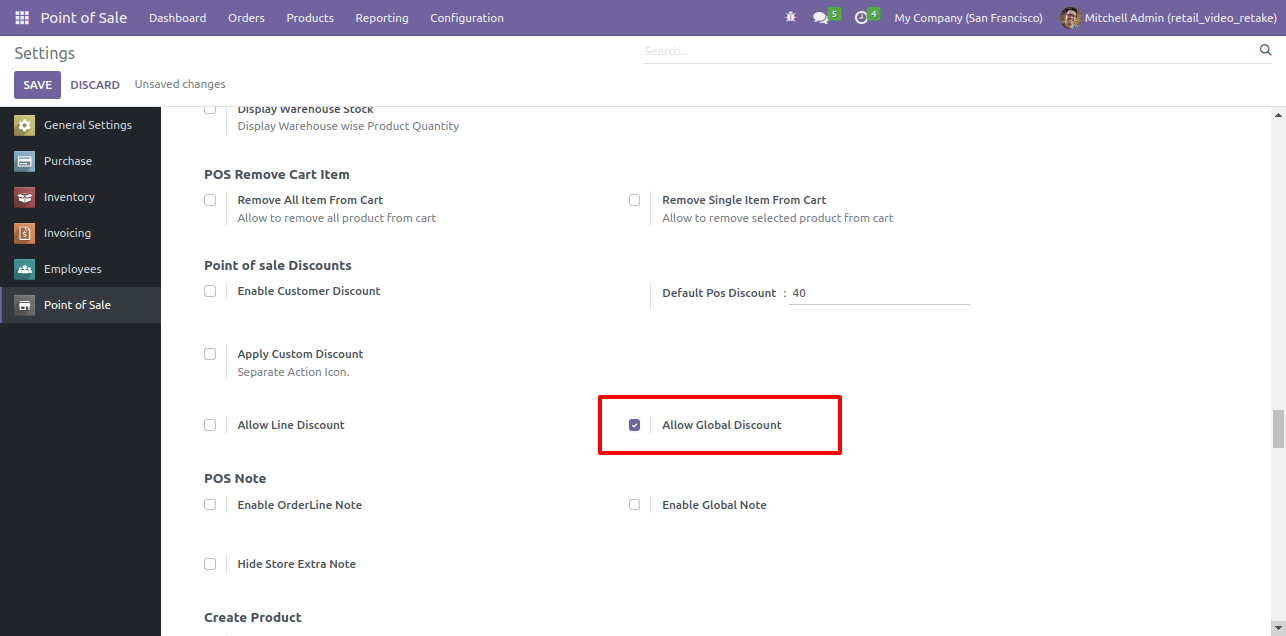
After enabling this option, the global discount button is visible. Add the product to the card and click on the 'Global Discount' button.
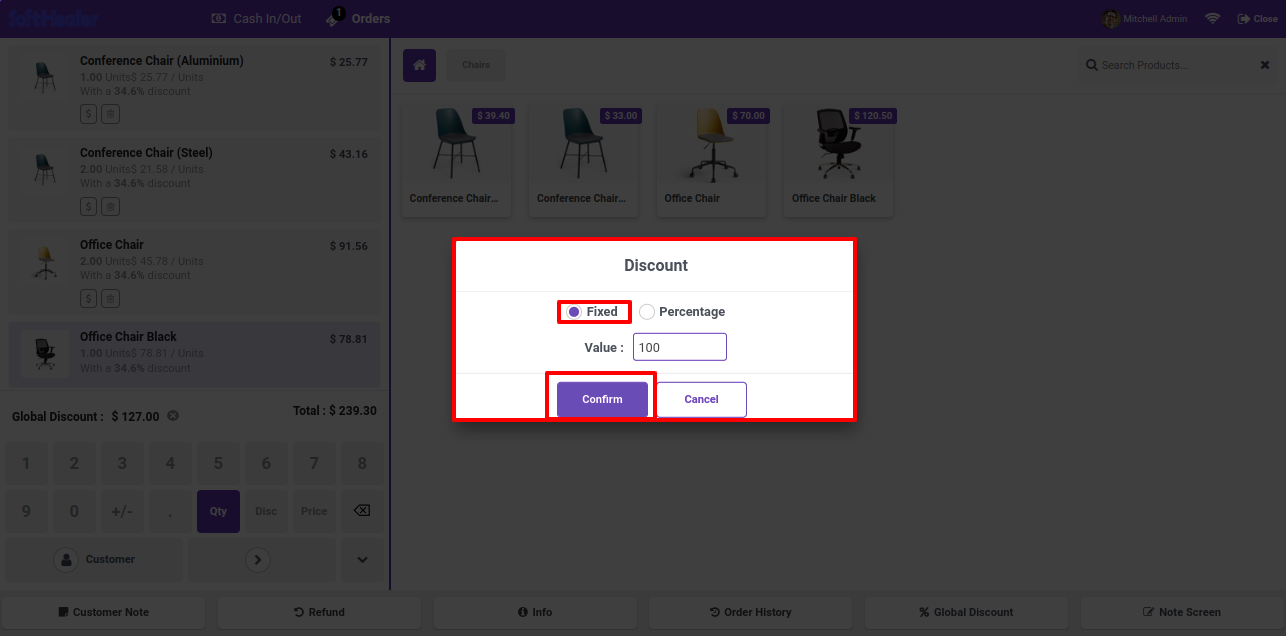
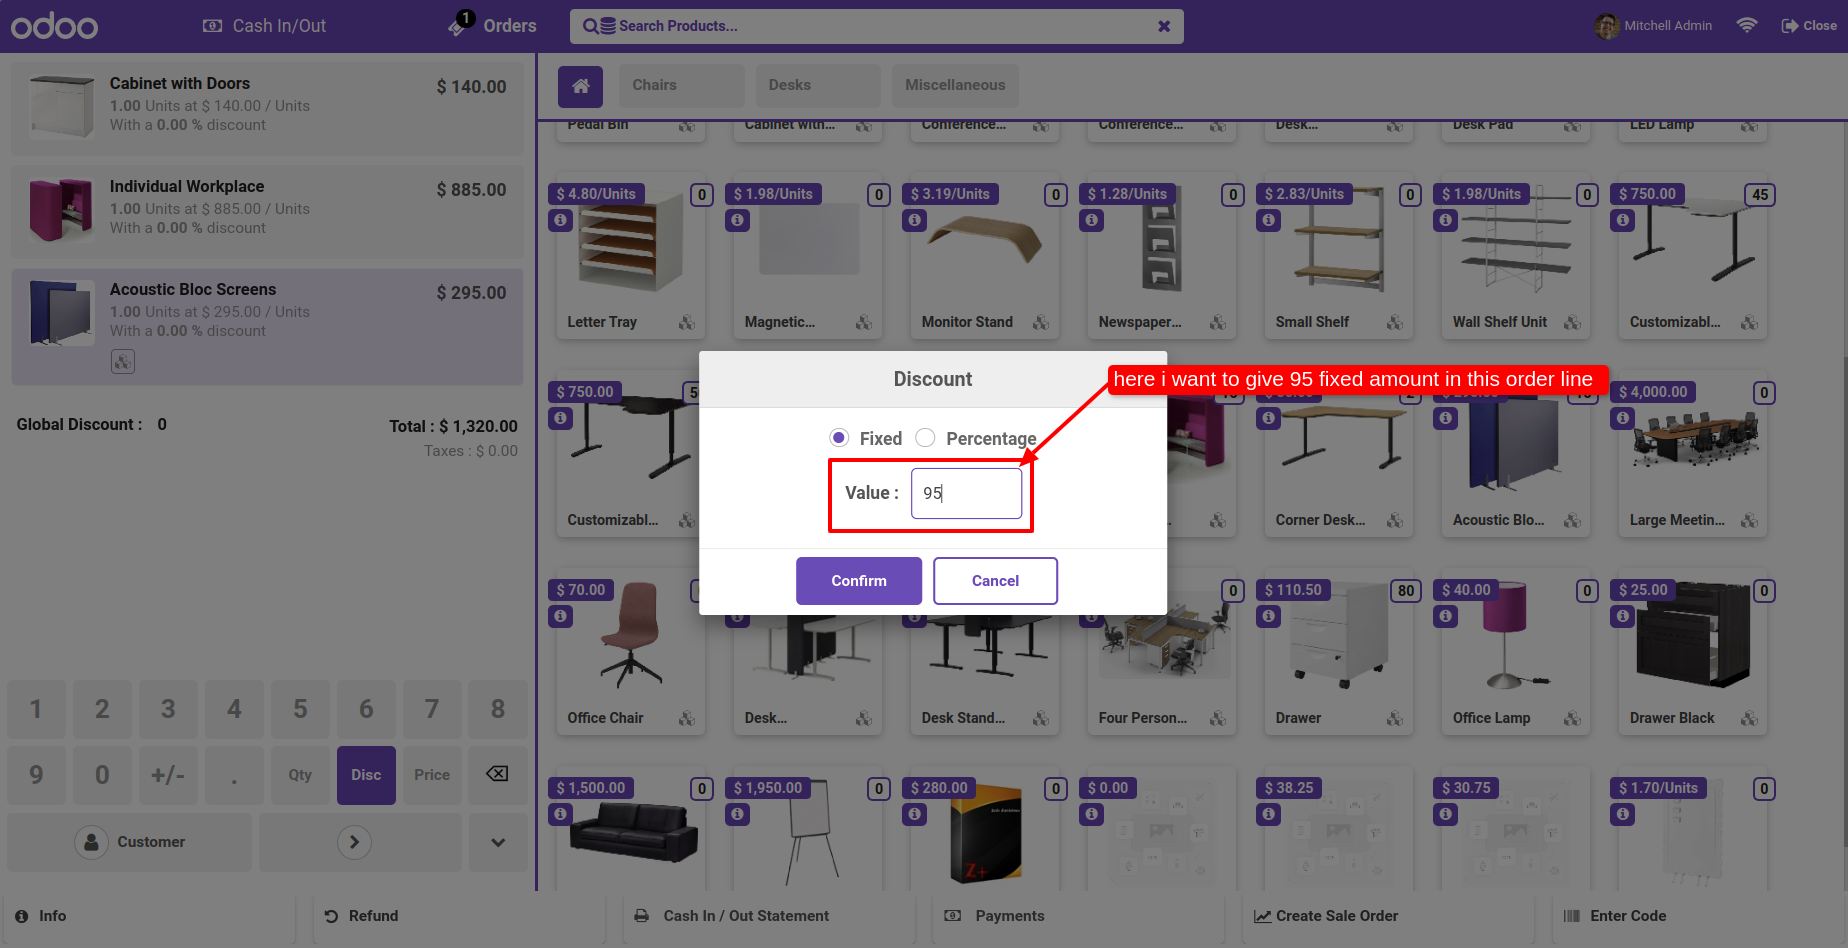
The discount wizard is looks like this. Select the discount type fixed and add the value. Confirm it.
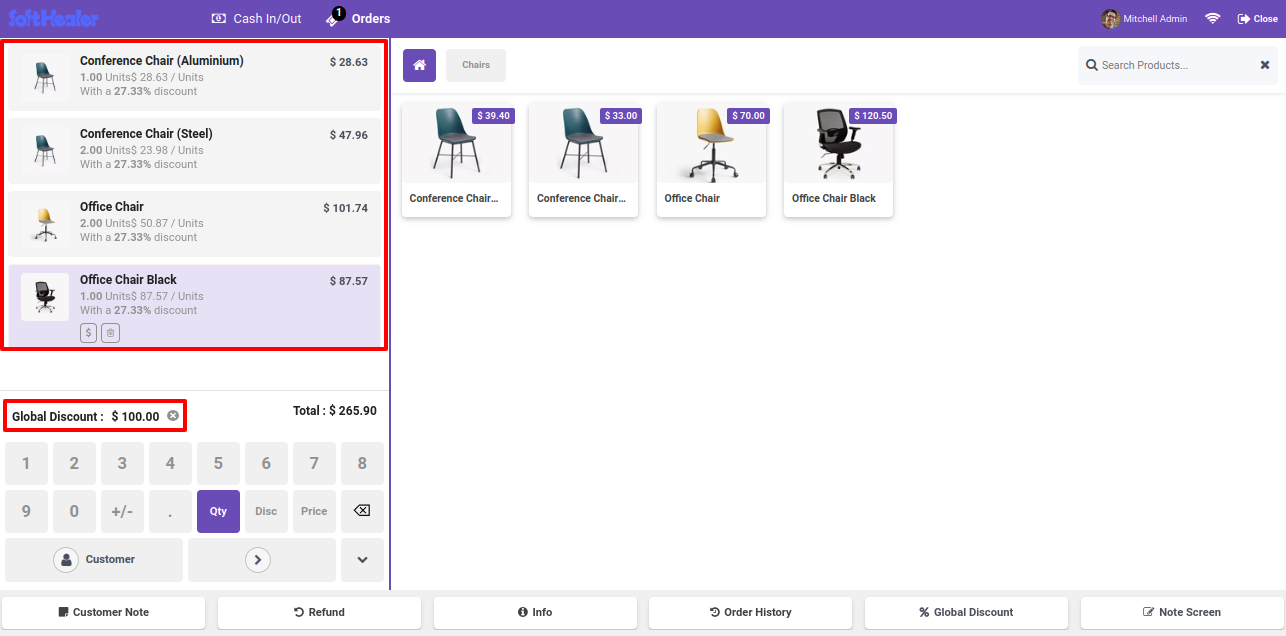
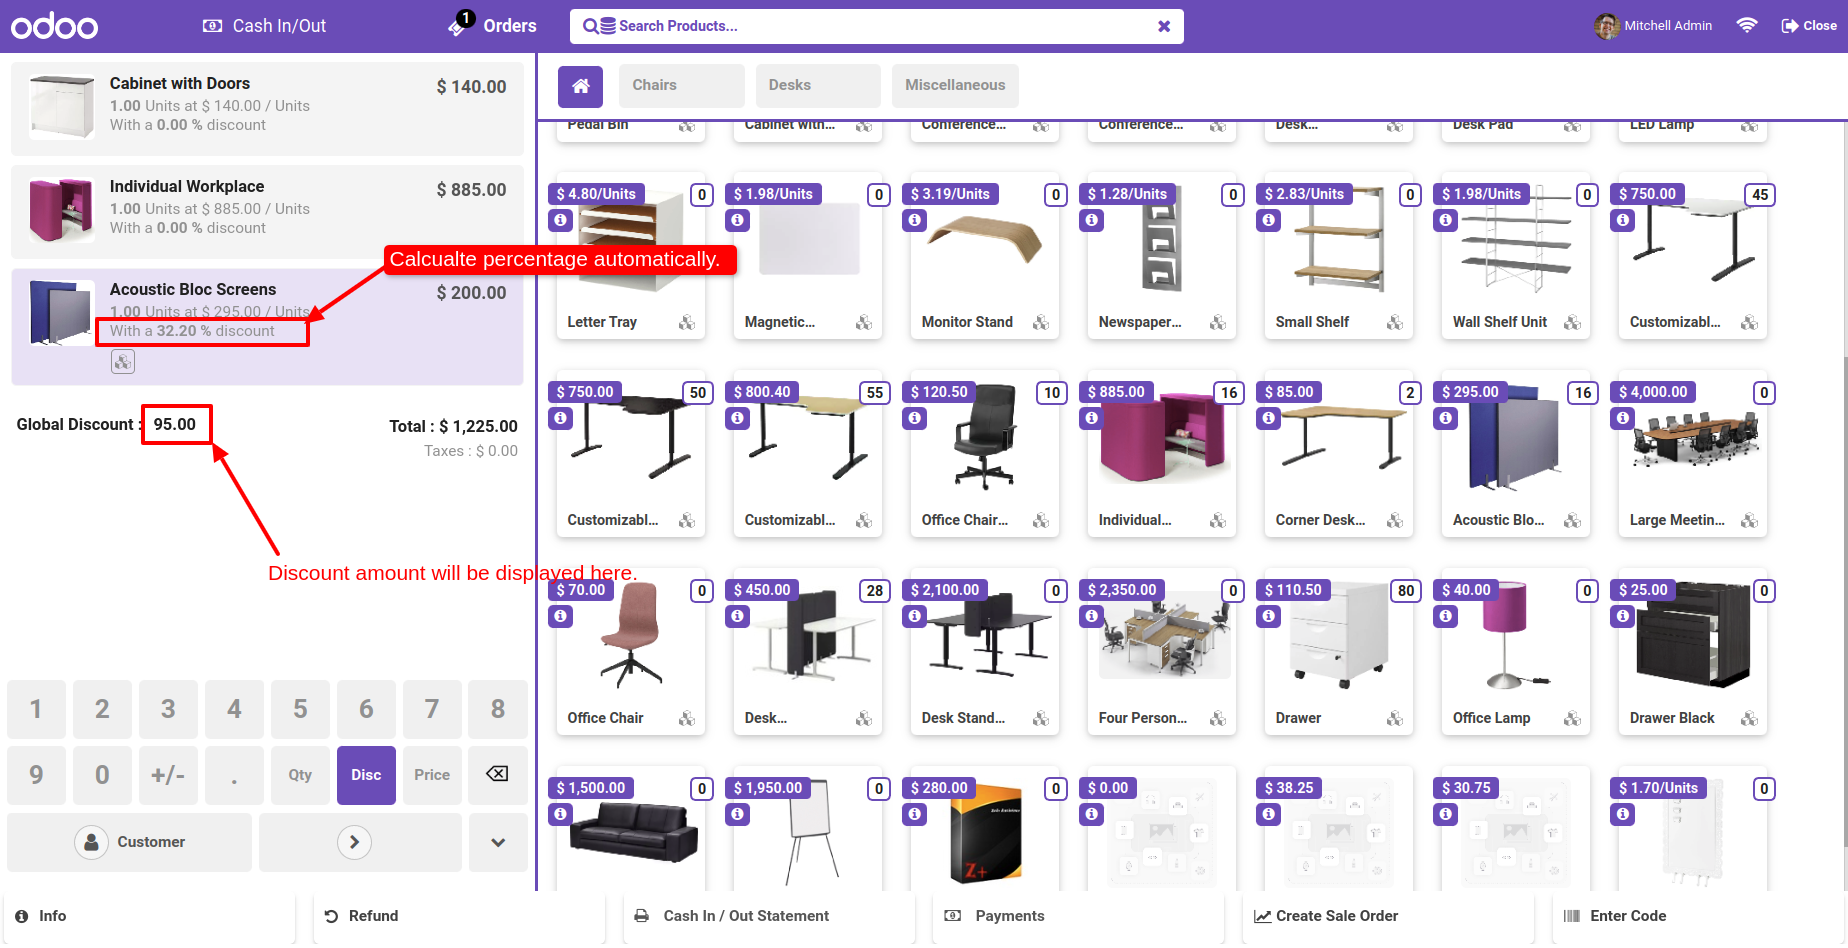
Fix discount automatically add and display amount in global discount
Fix discount automatically add in particular product.

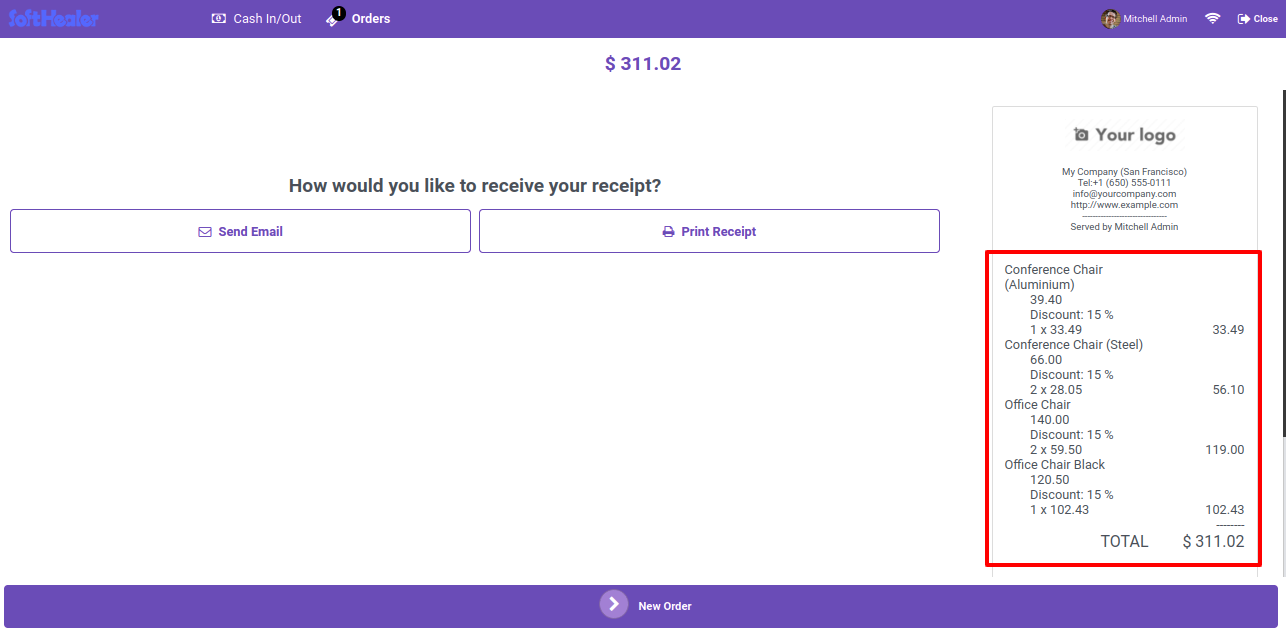
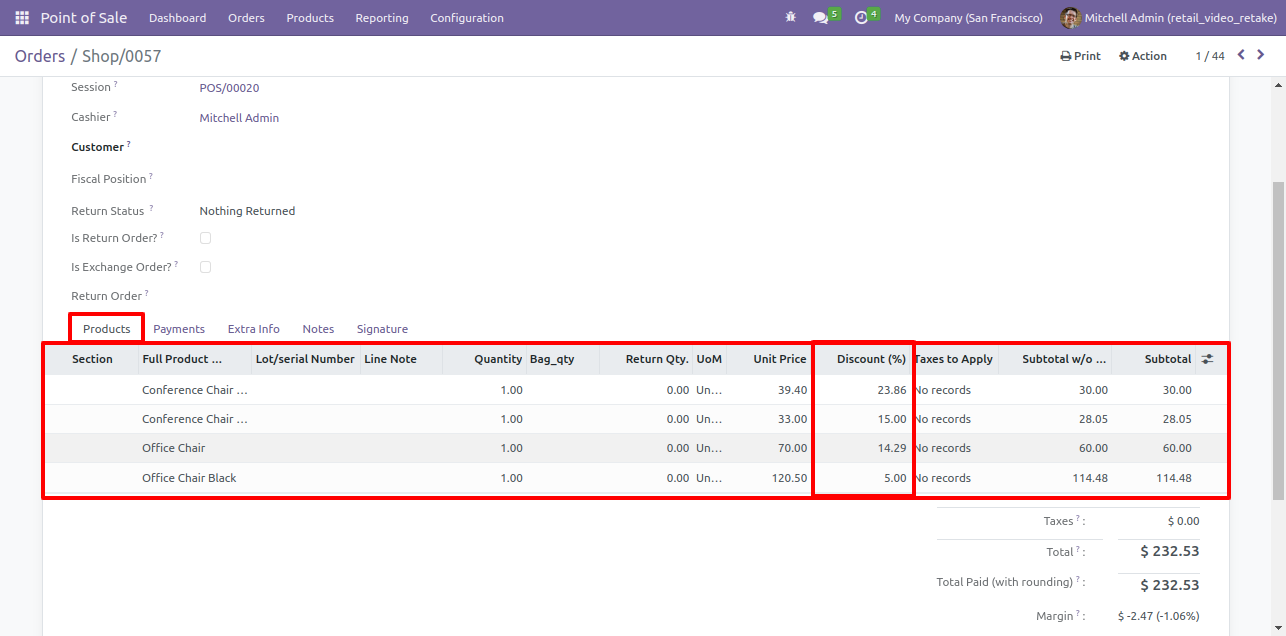
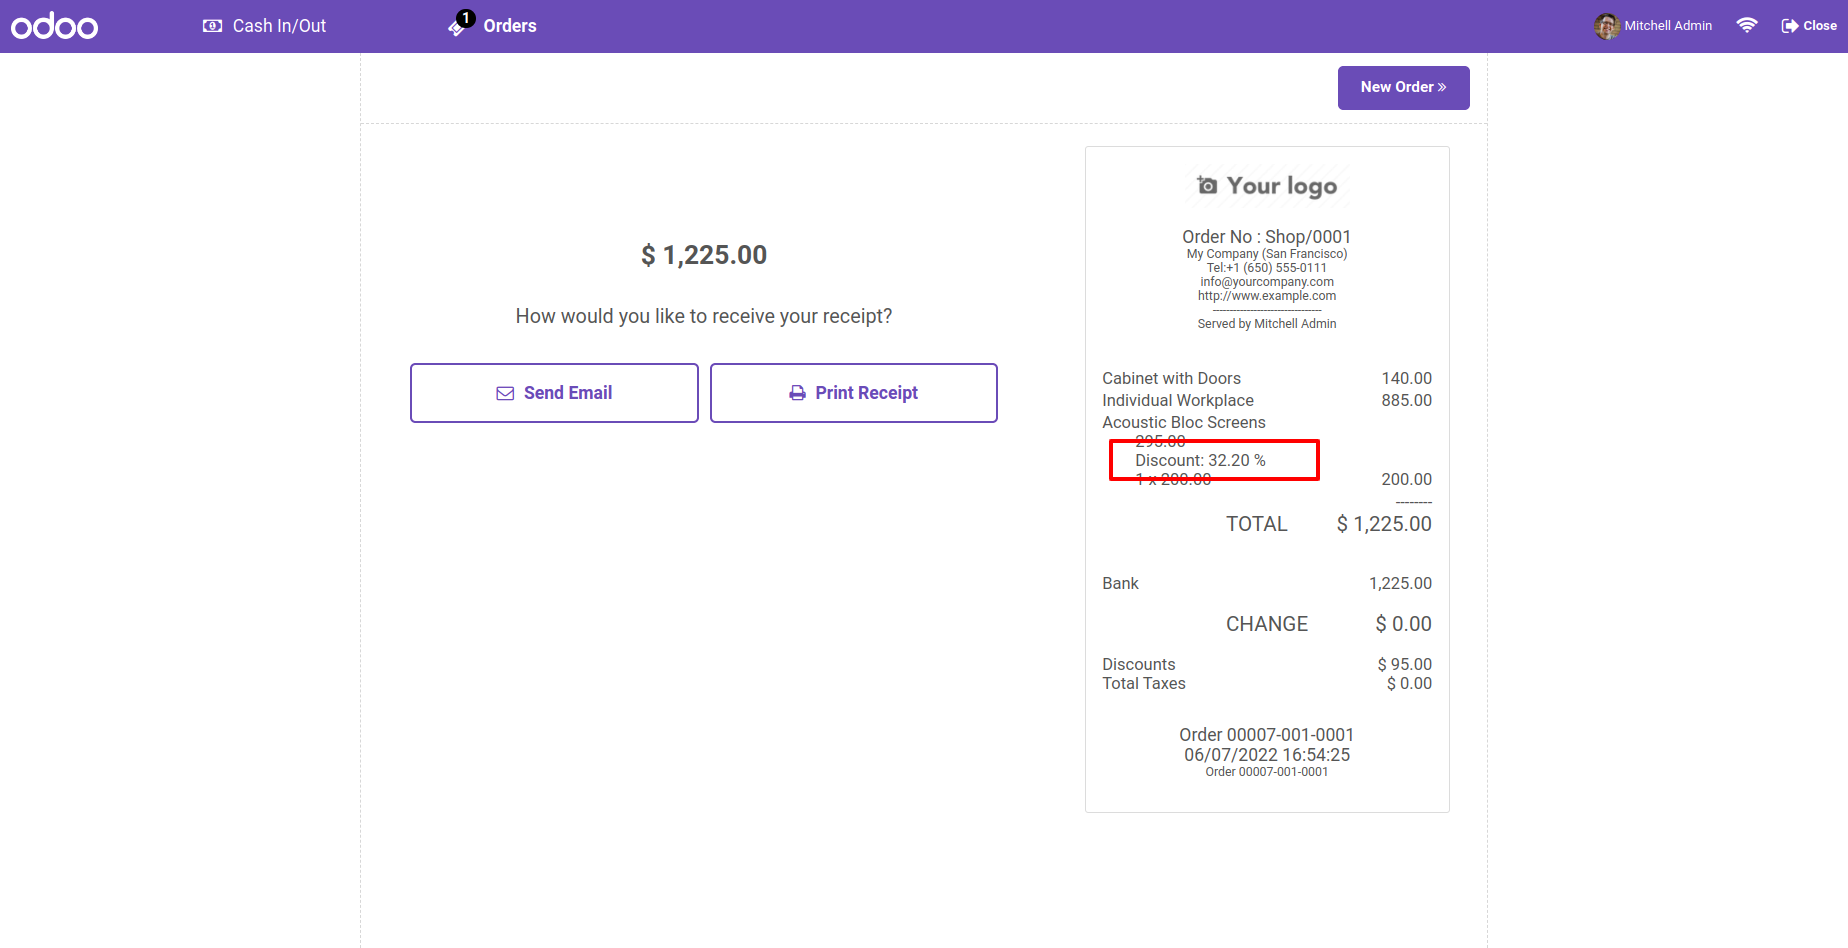
The global discount percentage is also displayed in the receipt.
Here you can see the discount value in the product tab.
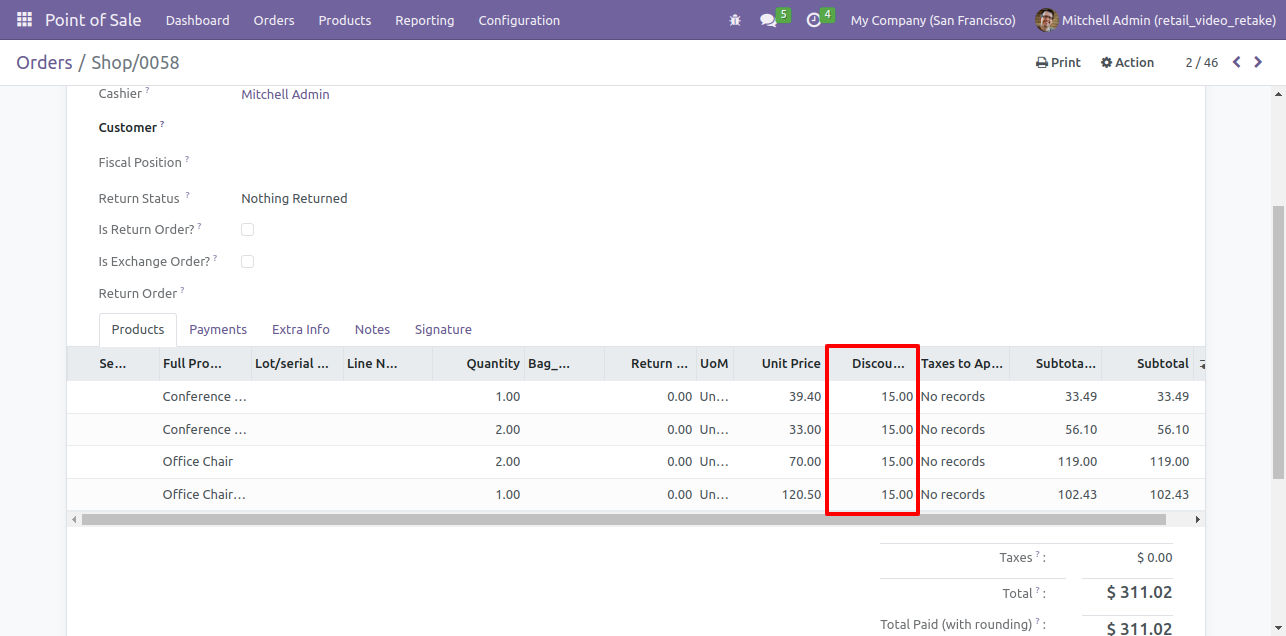
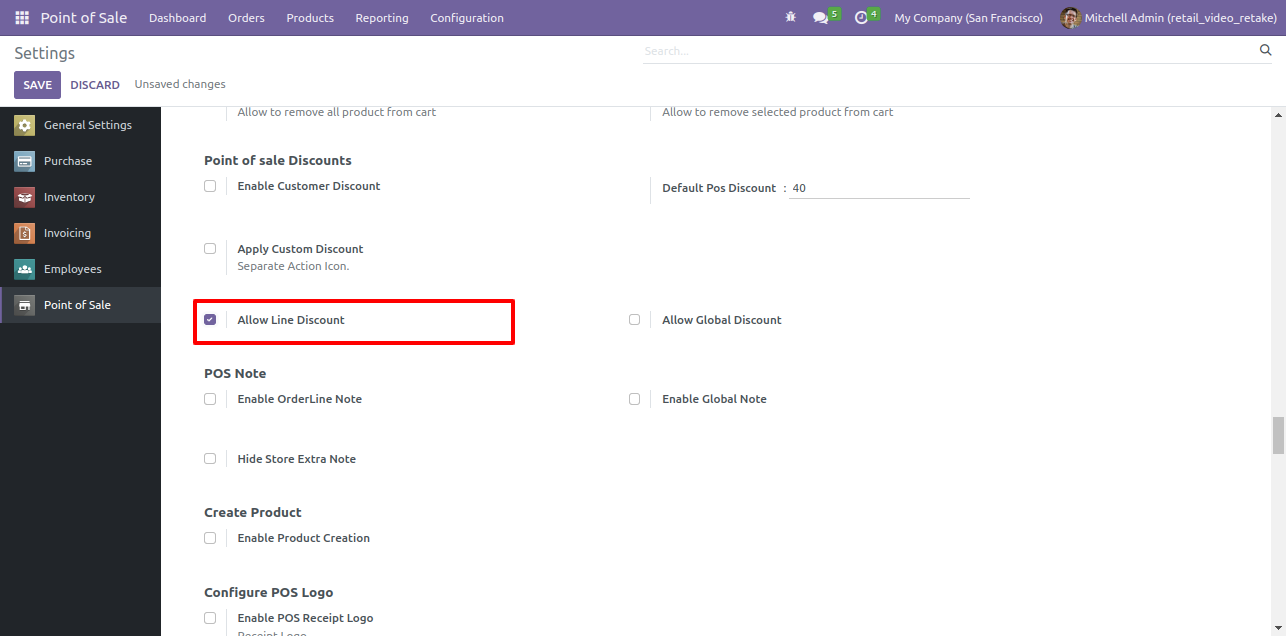
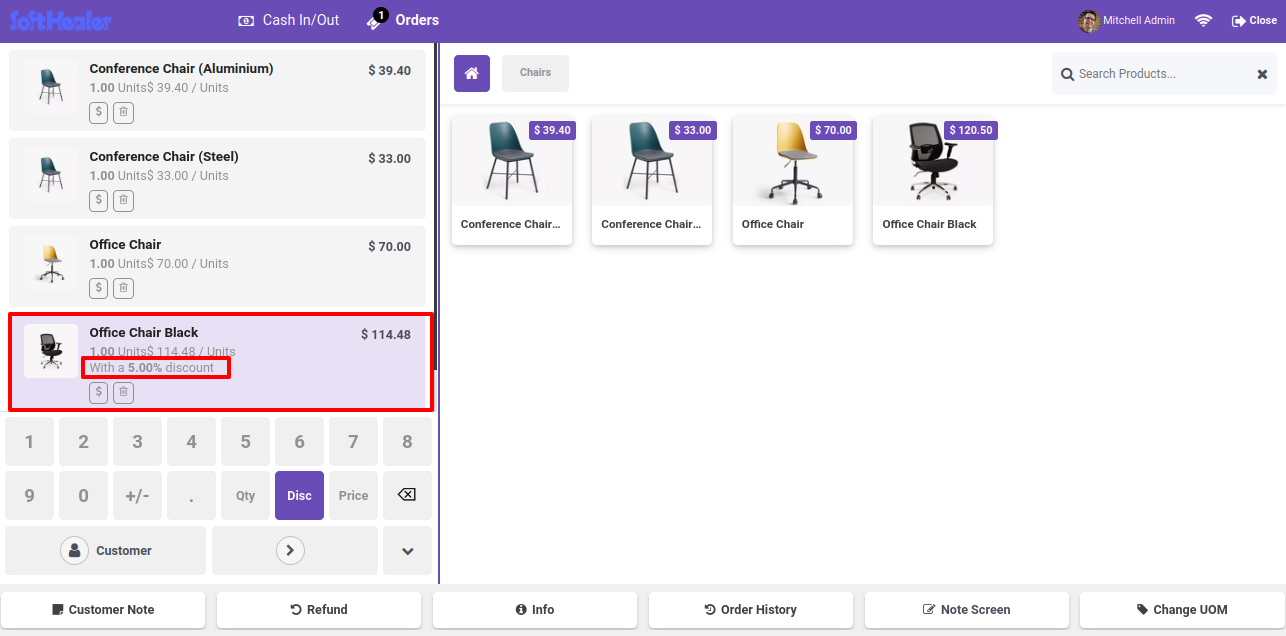
Goto pos config setting and enable 'Enable Line Discount' option.
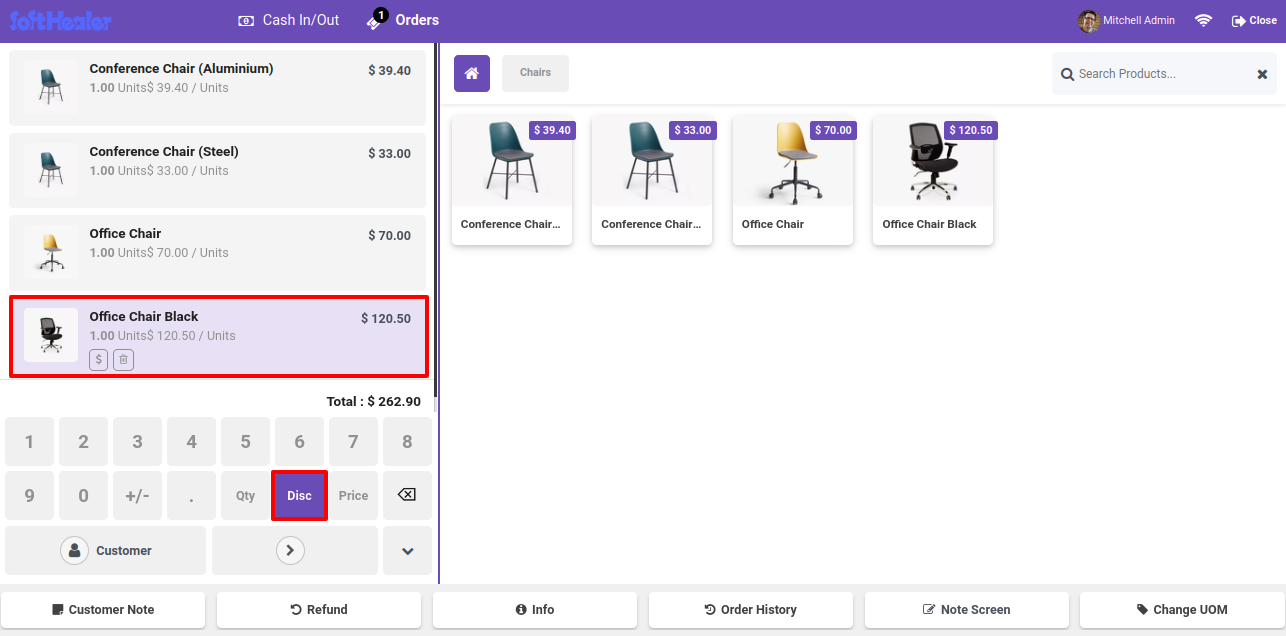
After enabling this option, the disc. button is visible. Add the product to the card and click on the 'disc.' button.
Select the discount type percentage. Add the value and confirm it.
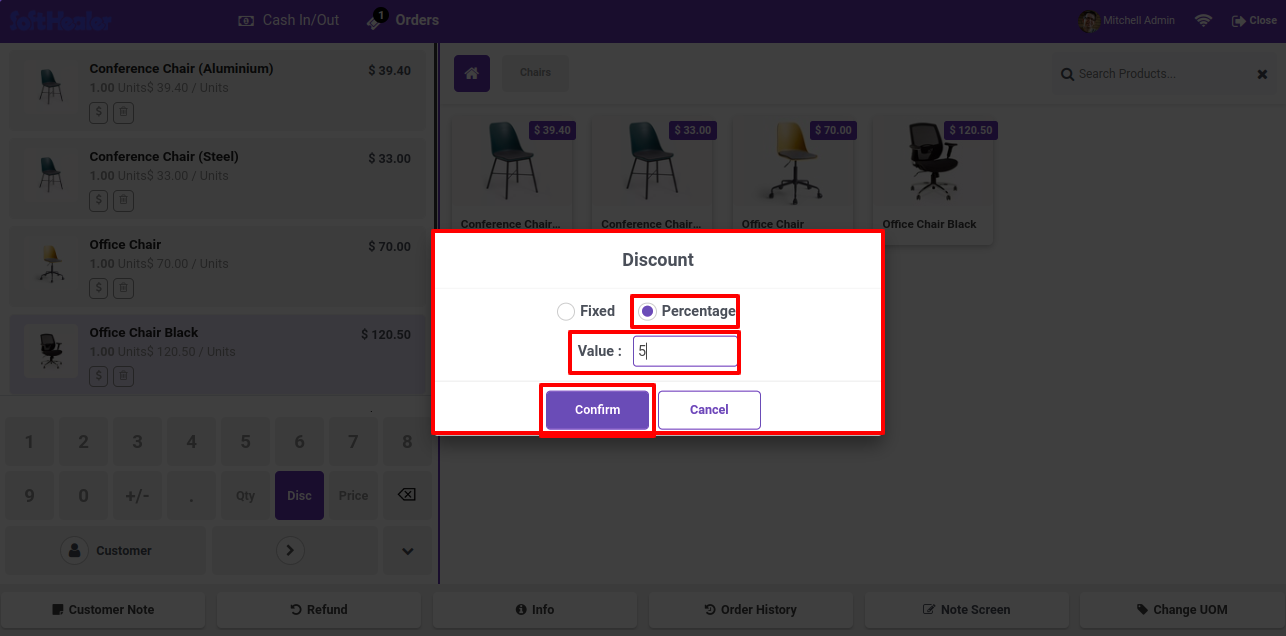
Percentage discount automatically add in line.
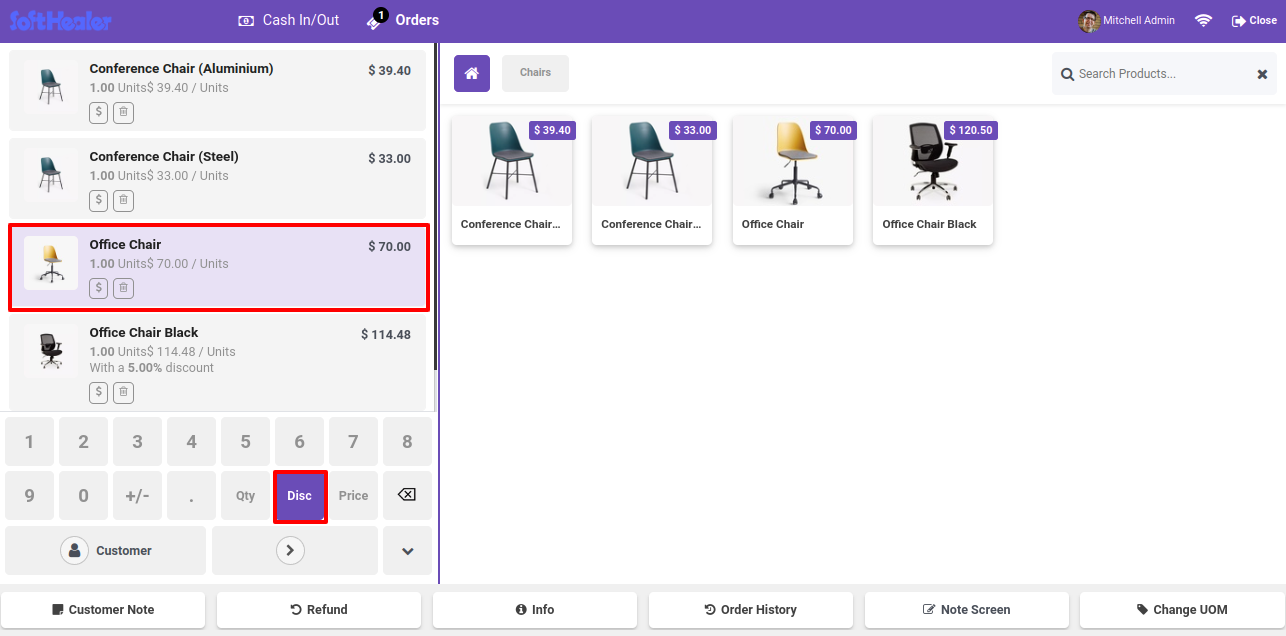
Add the product to the card and click on the 'disc.' button.
Select the discount type fixed. Add the value and confirm it.
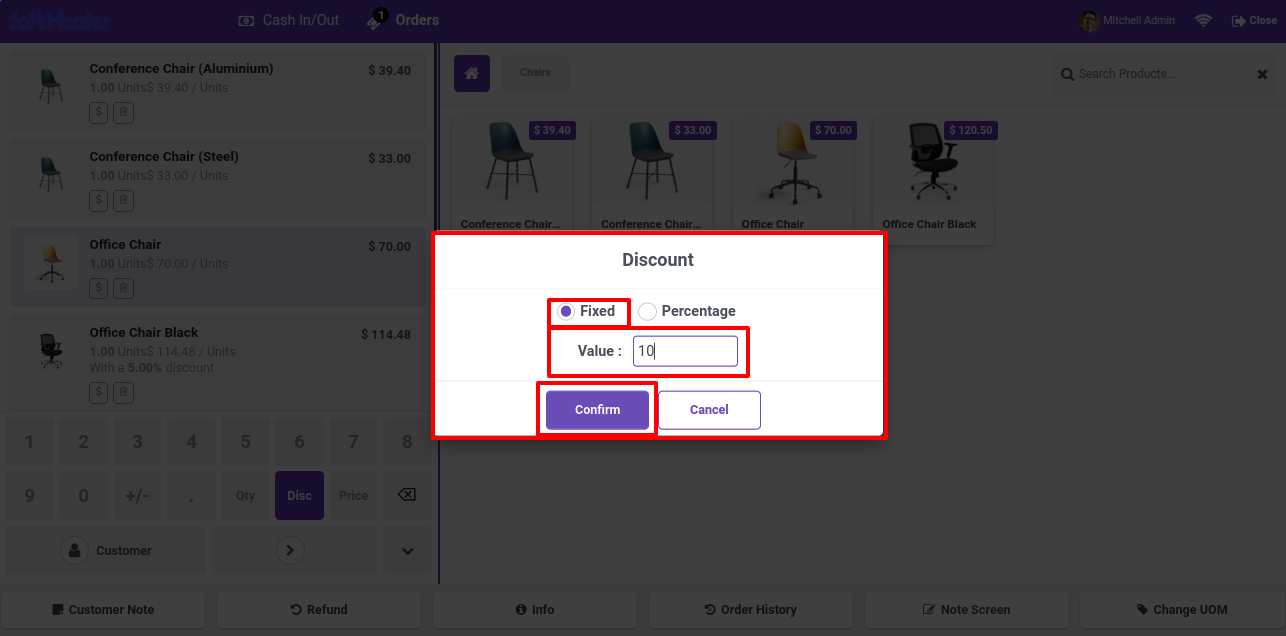
Fix discount automatically add in line.
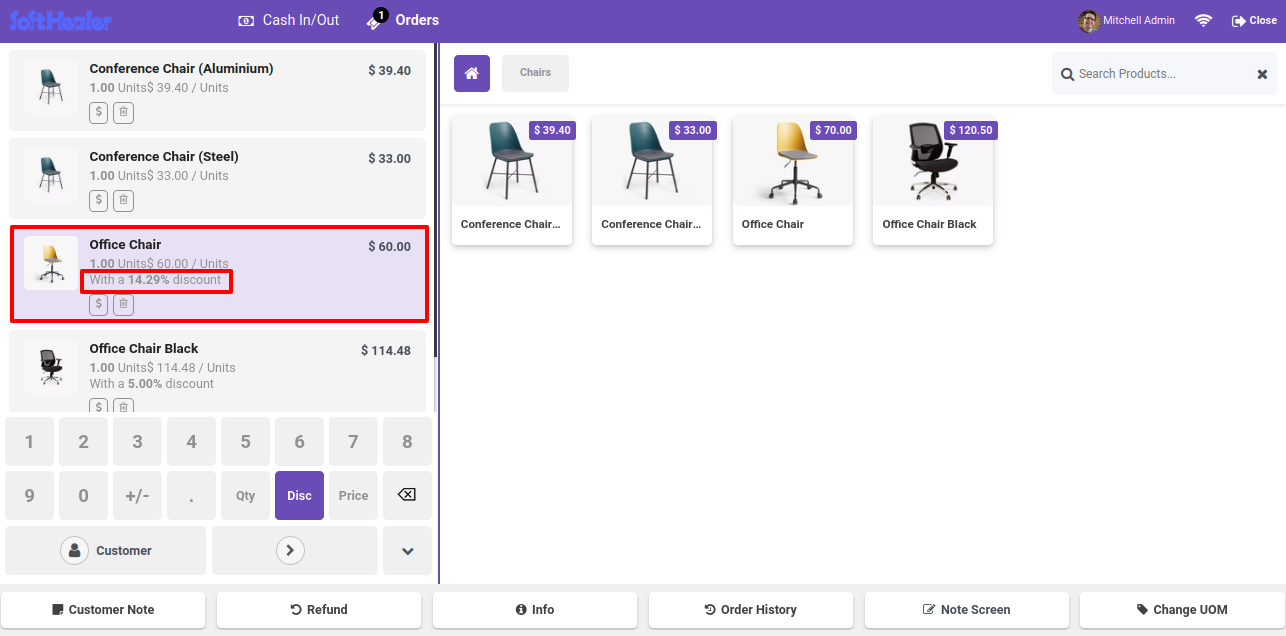
Fix discount automatically add in line.
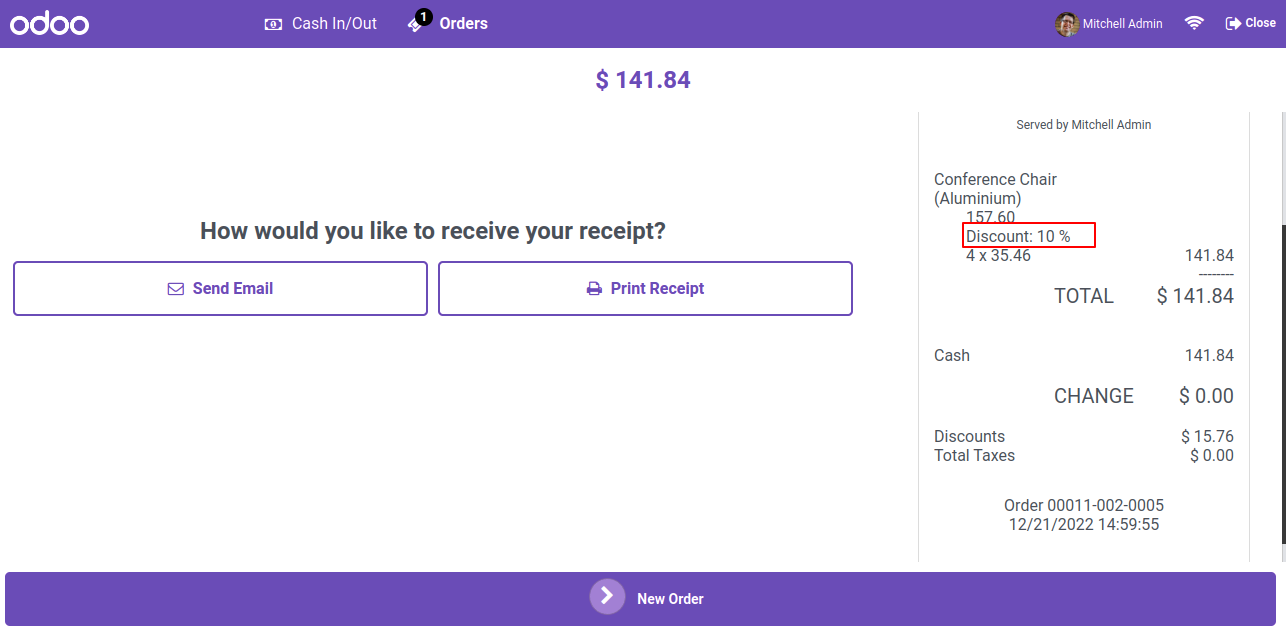
Discount Printed in Receipt Also.
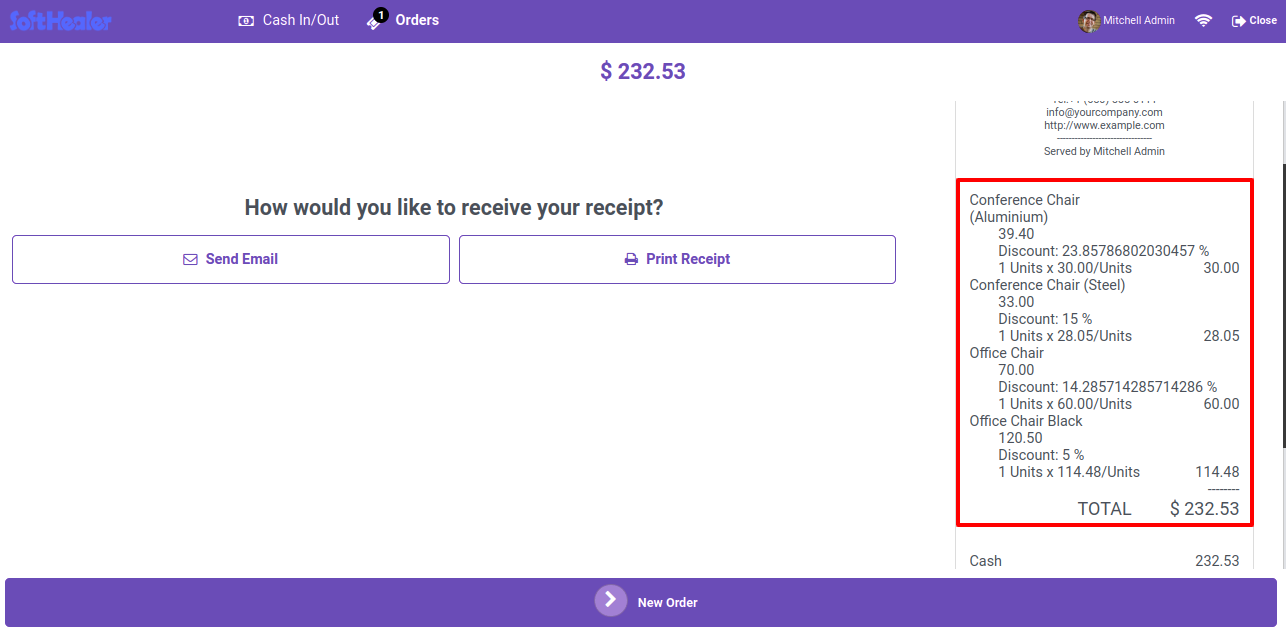
Here you can see the discount value in product tab.
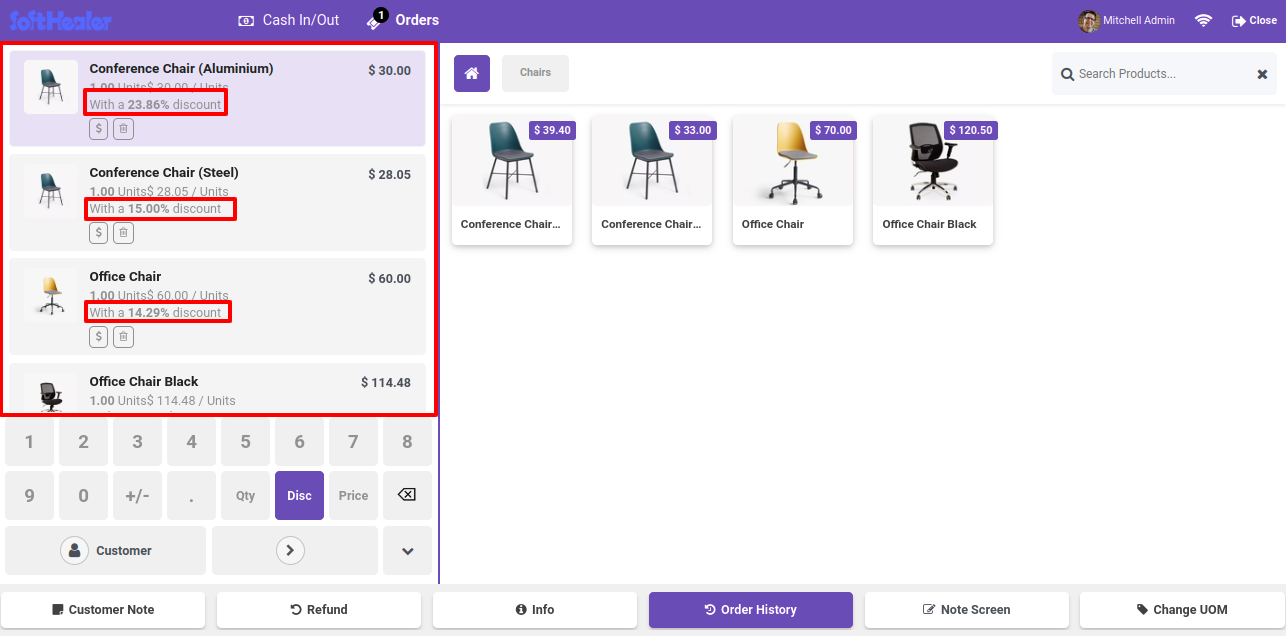
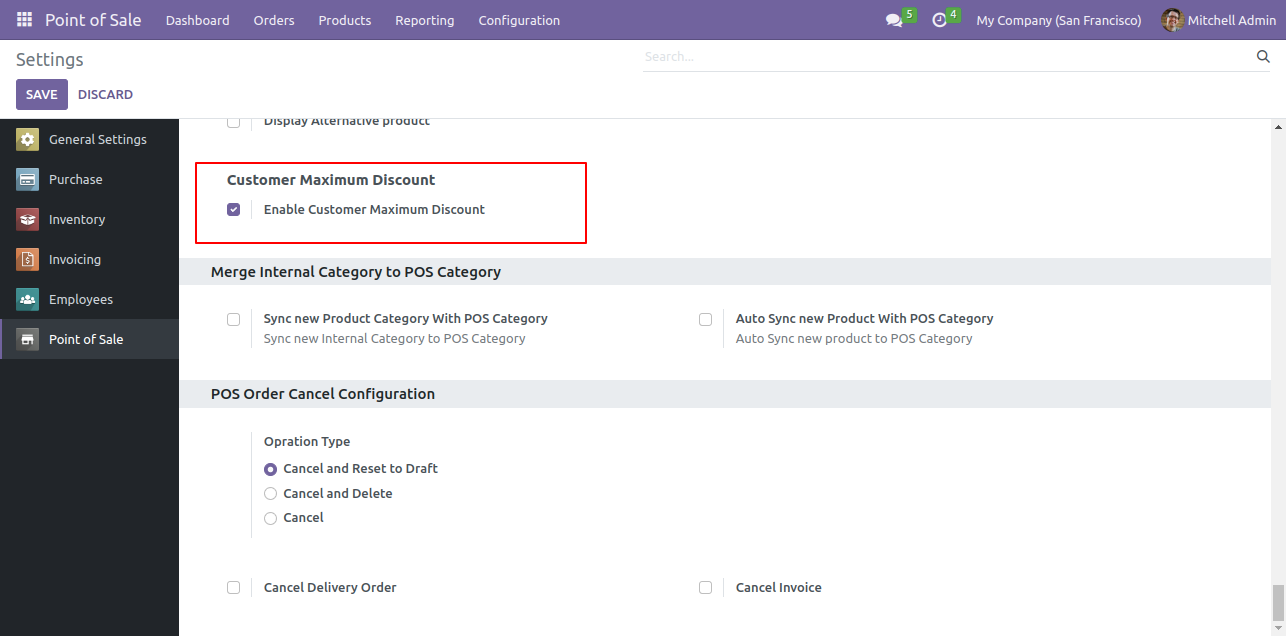
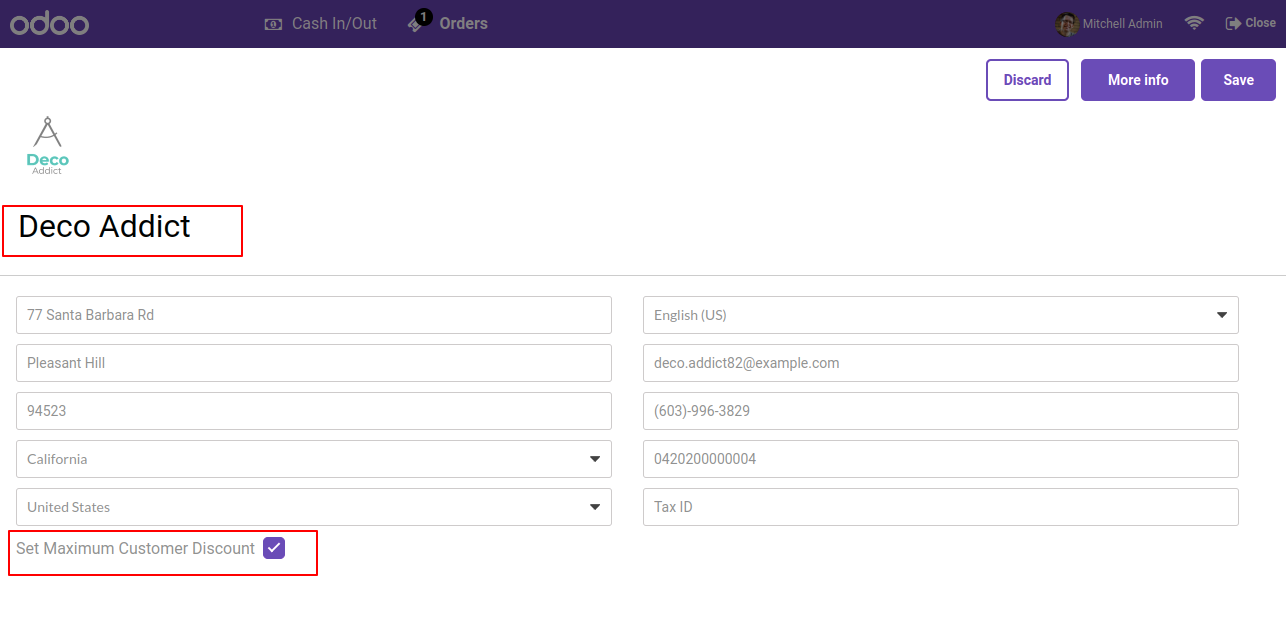
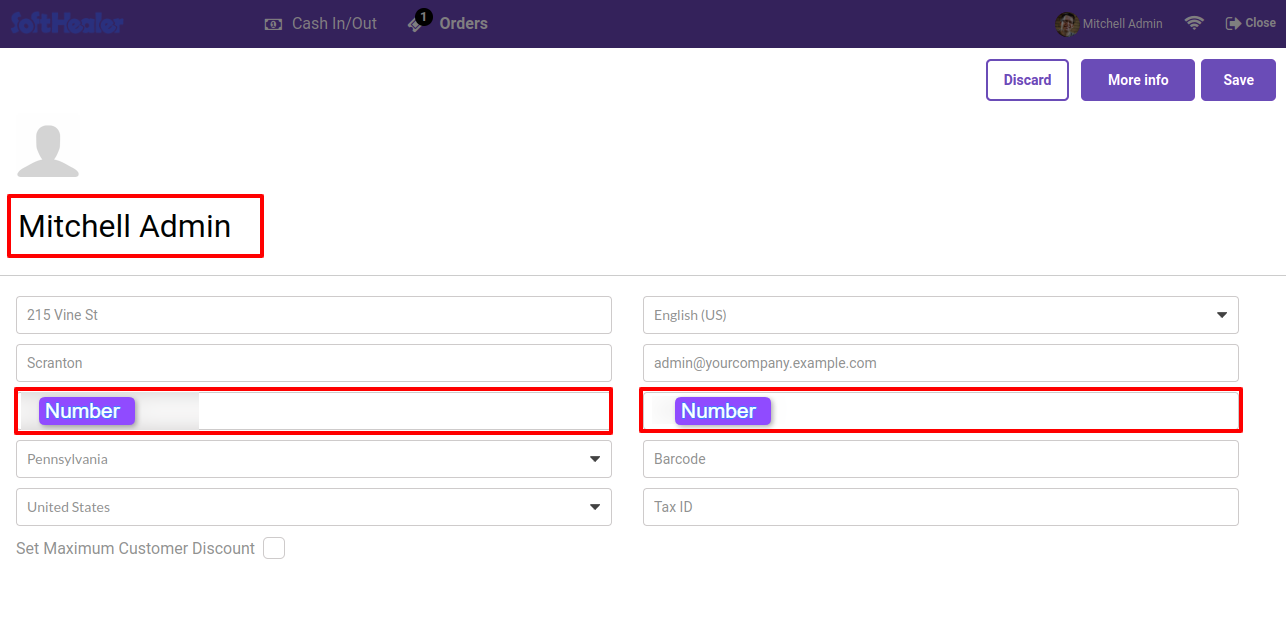
Goto pos config setting and enable 'Enable customer Maximum Discount' option.
Form view of the customer. Tick 'Set Maximum customer Discount' option.
In Customer see the option set Maximum Customer Discount. Select the 'Fixed' discount type.
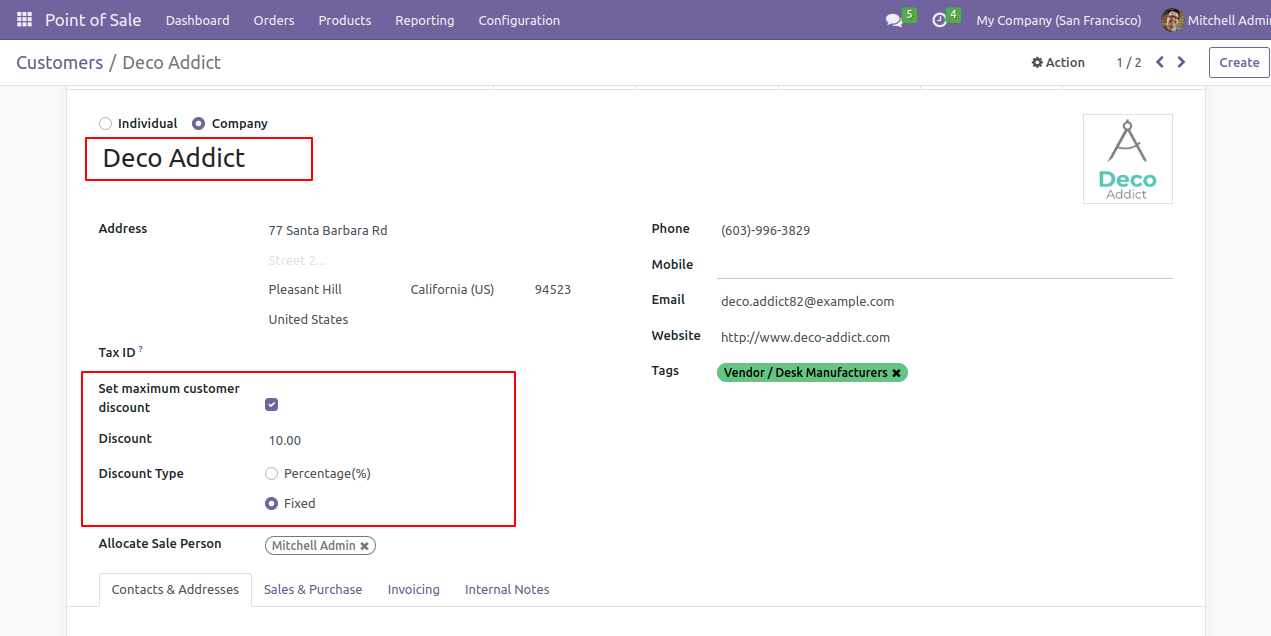
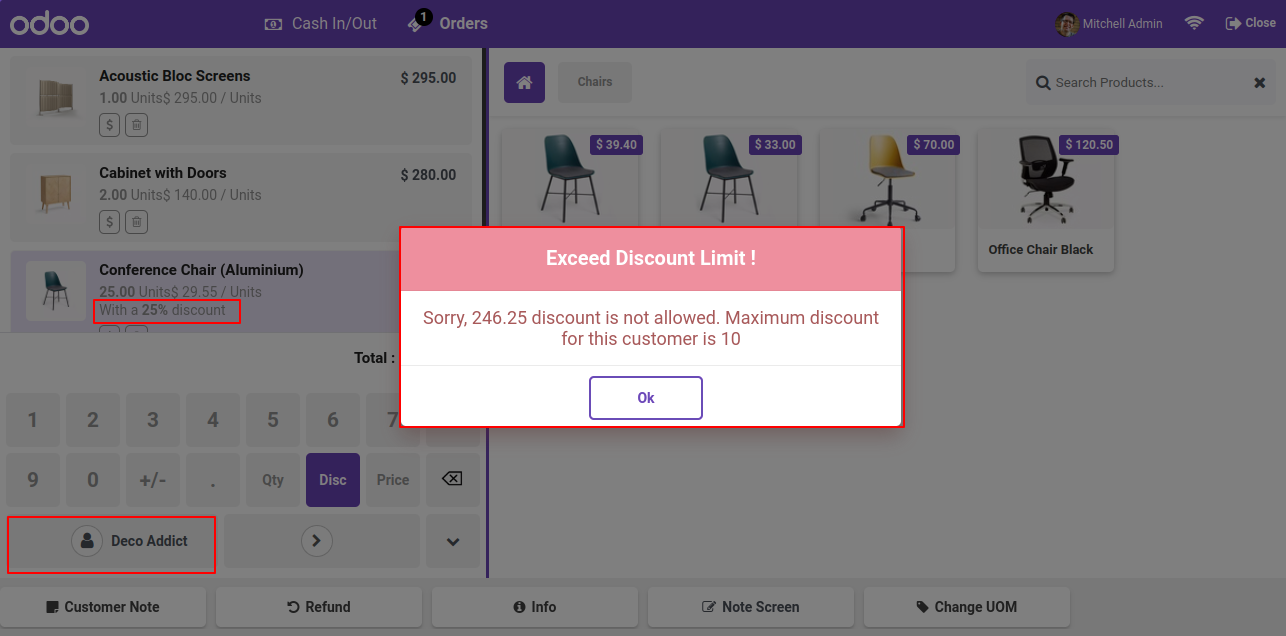
The Warring message Popup shows max Discount of Product.
In Customer see the option set maximum Discount. Select the 'Percentage' discount type.
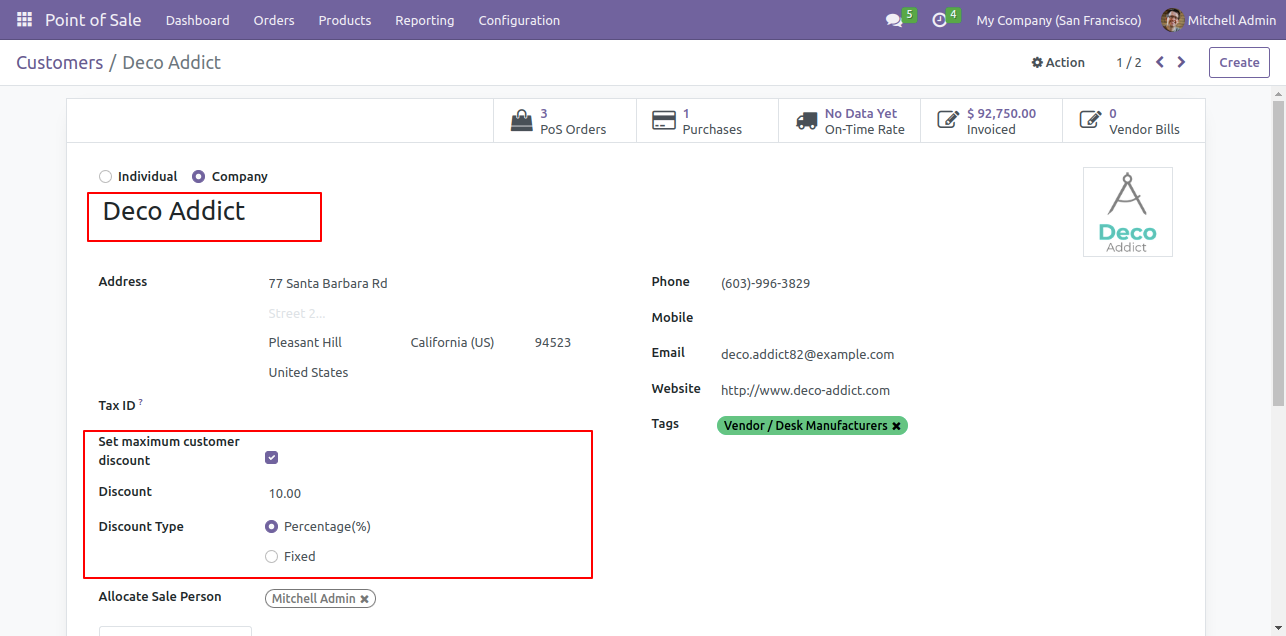
The Warring message Popup shows max Discount of Product.
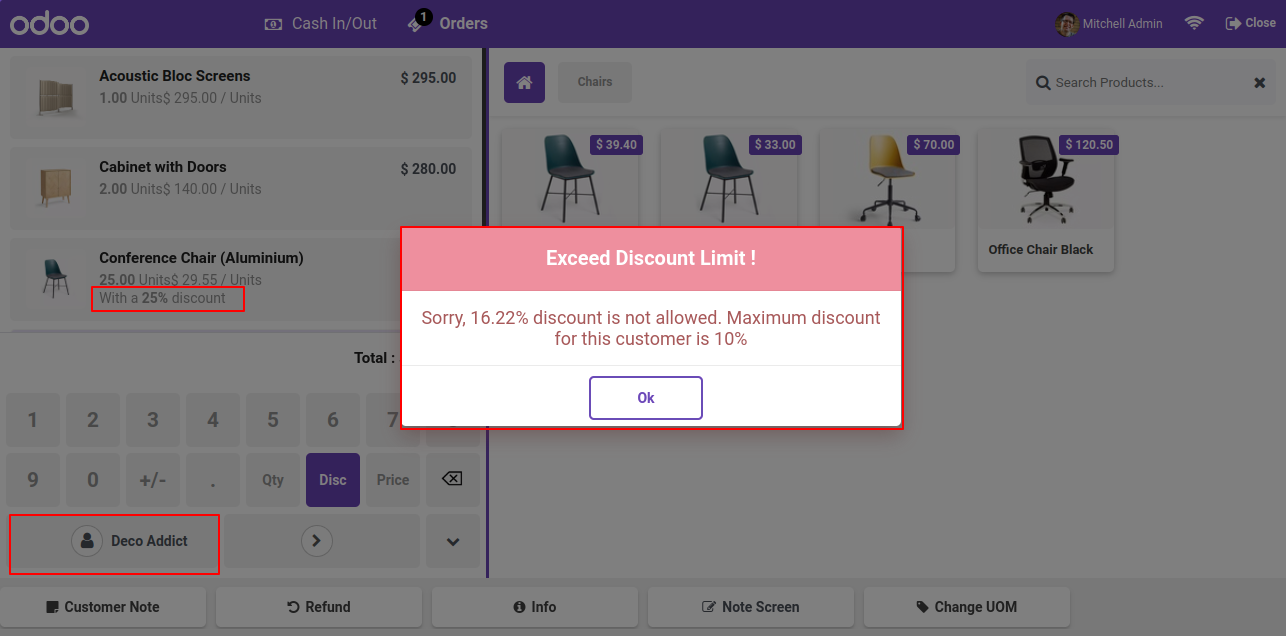
if the amount is lower then set amount then apply discount.
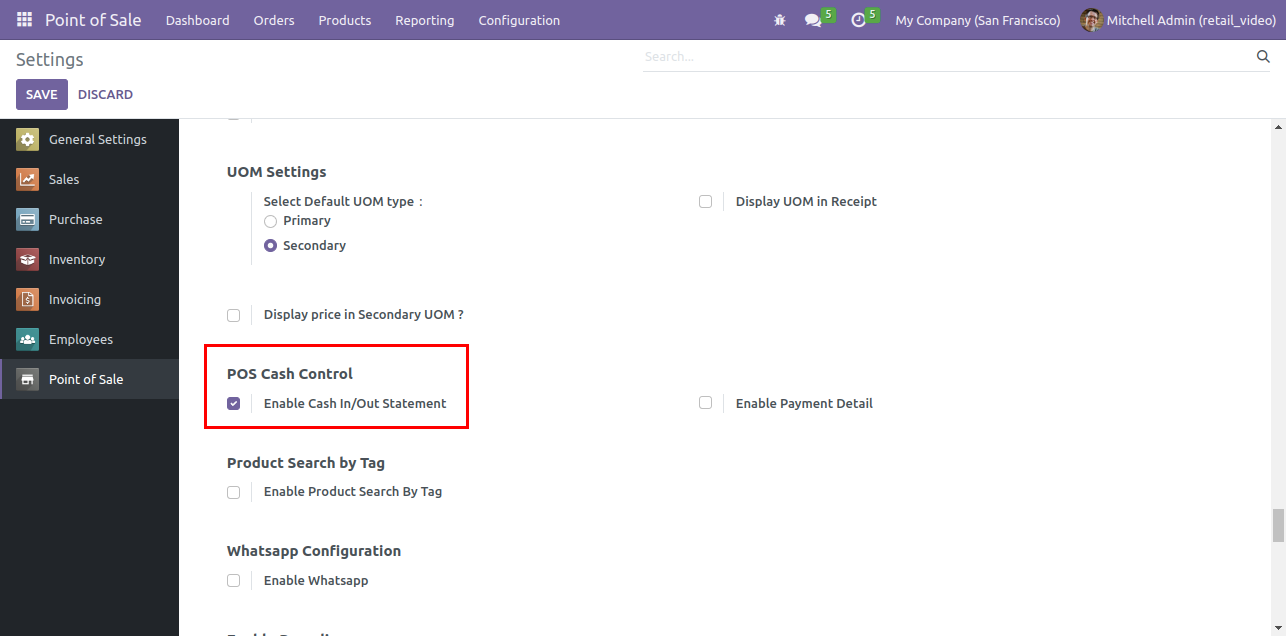
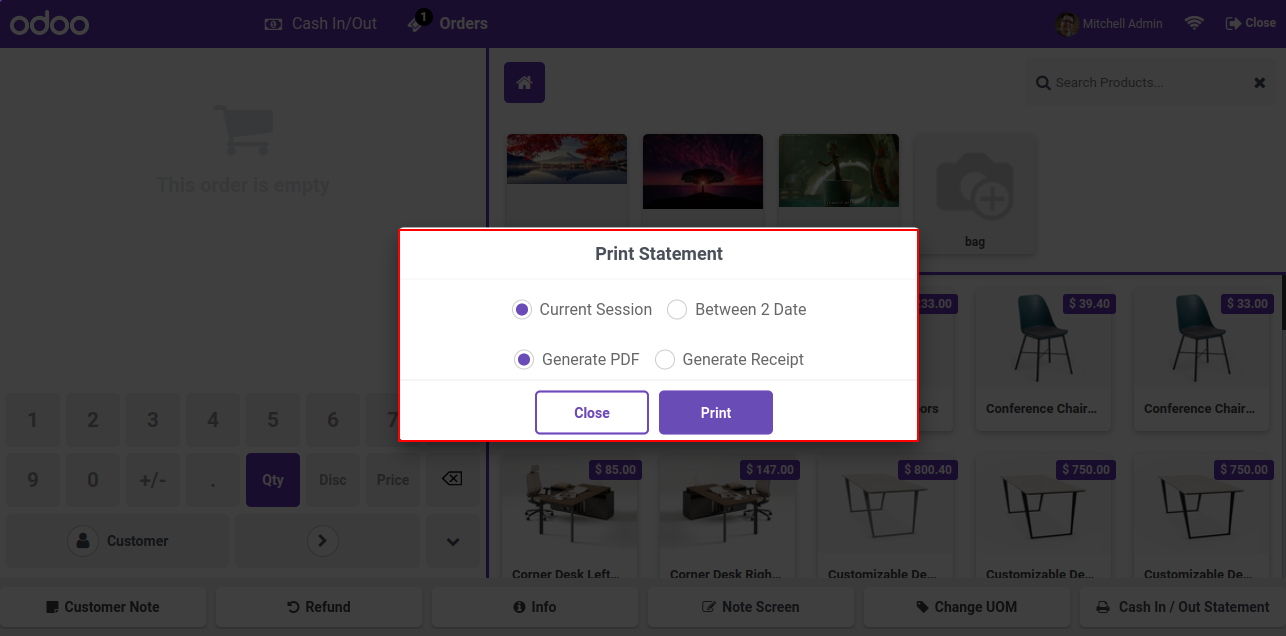
Enable the configuration for allow to generate cash In/Out statement from POS.
Press "Cash In/Out statement" to print the transaction statement of the current session or between two dates.
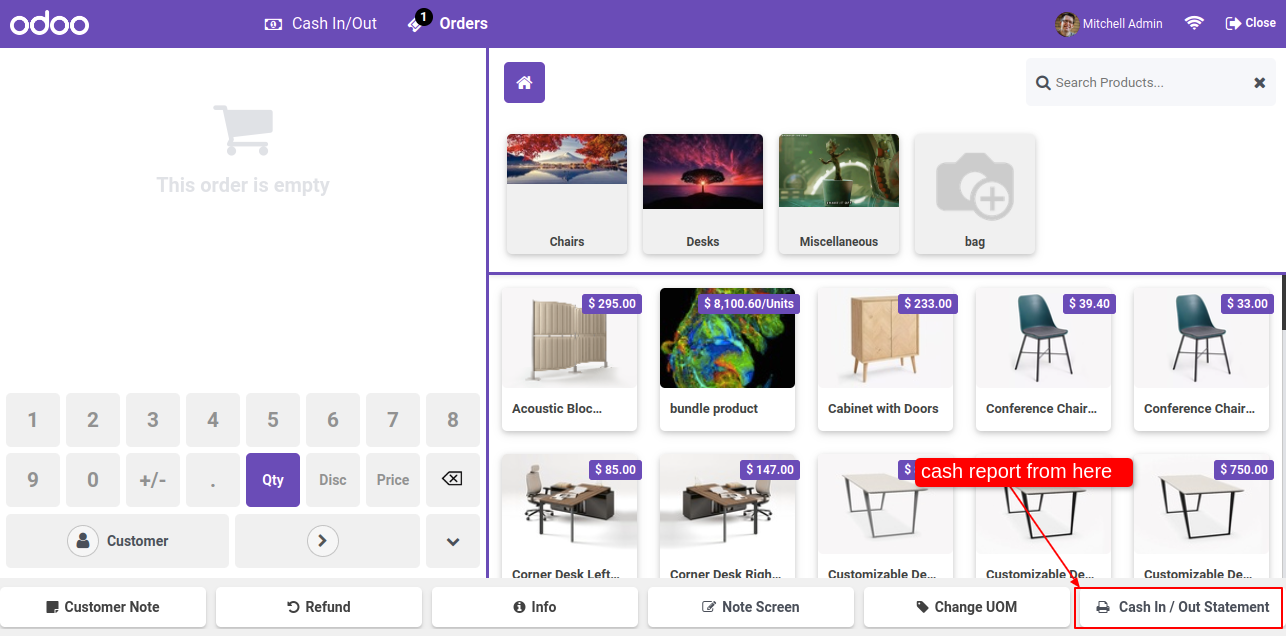
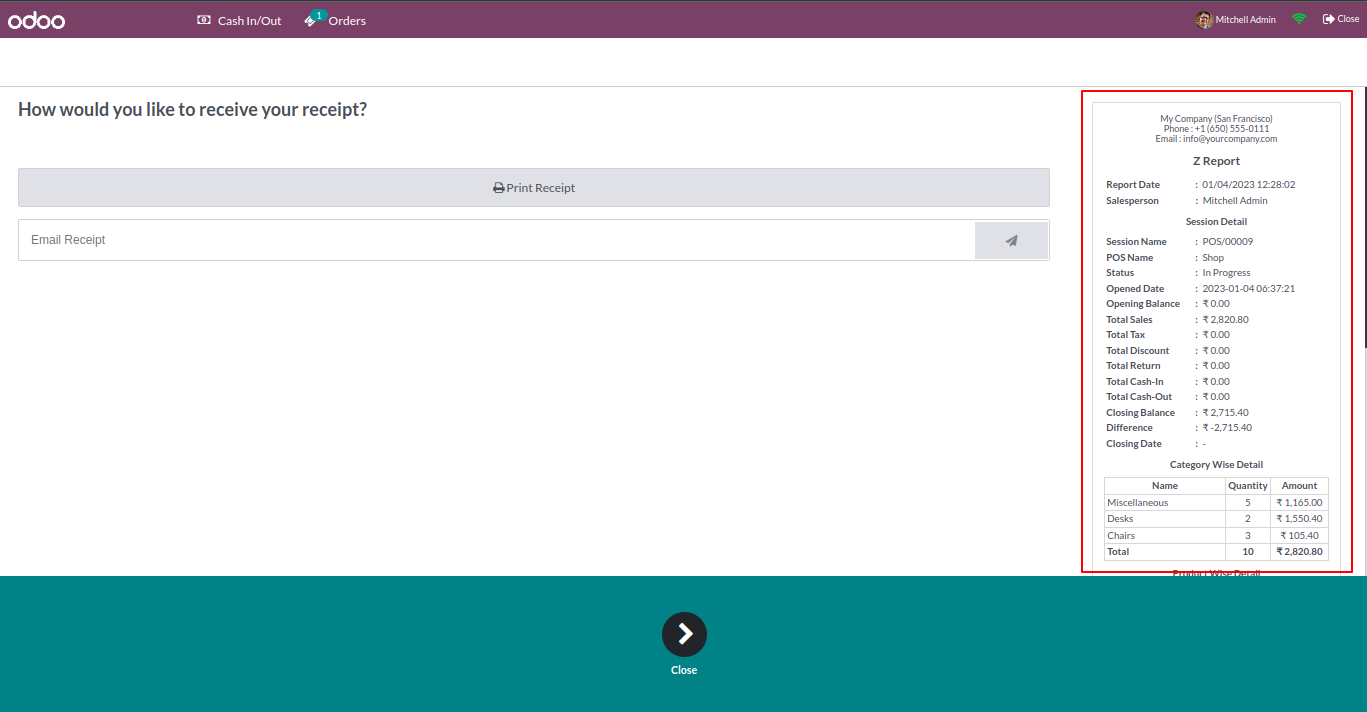
We provide 2 options in print transaction statement, 1) Generate PDF & 2) Generate Receipt.
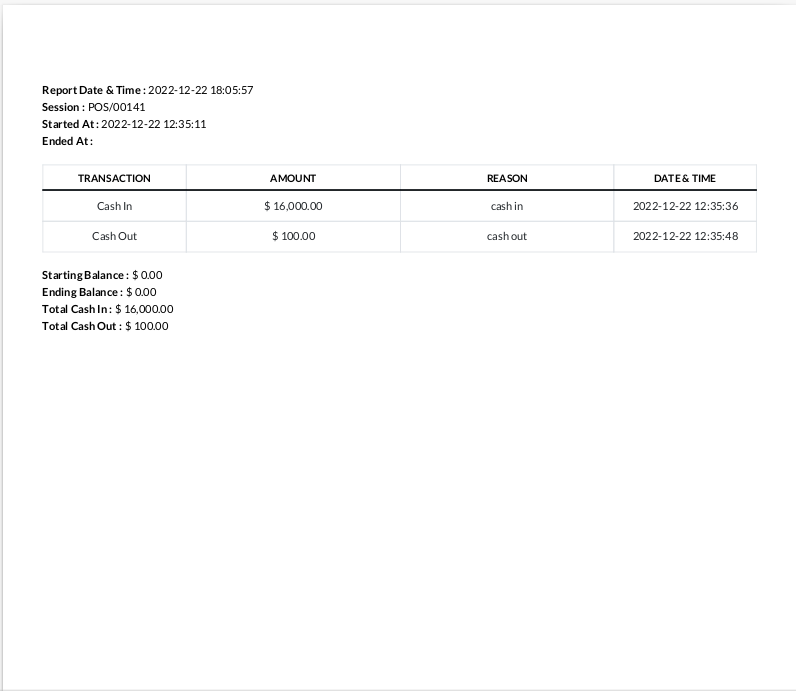
The transaction statement PDF report looks like this.
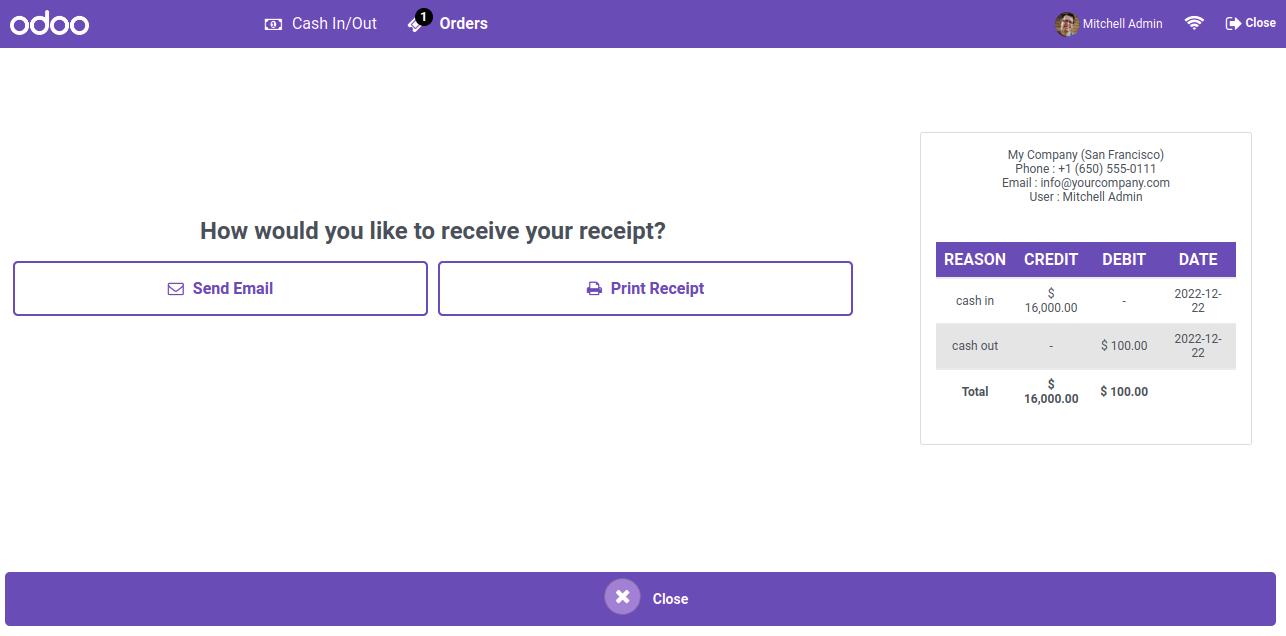
The transaction statement receipt looks like this.
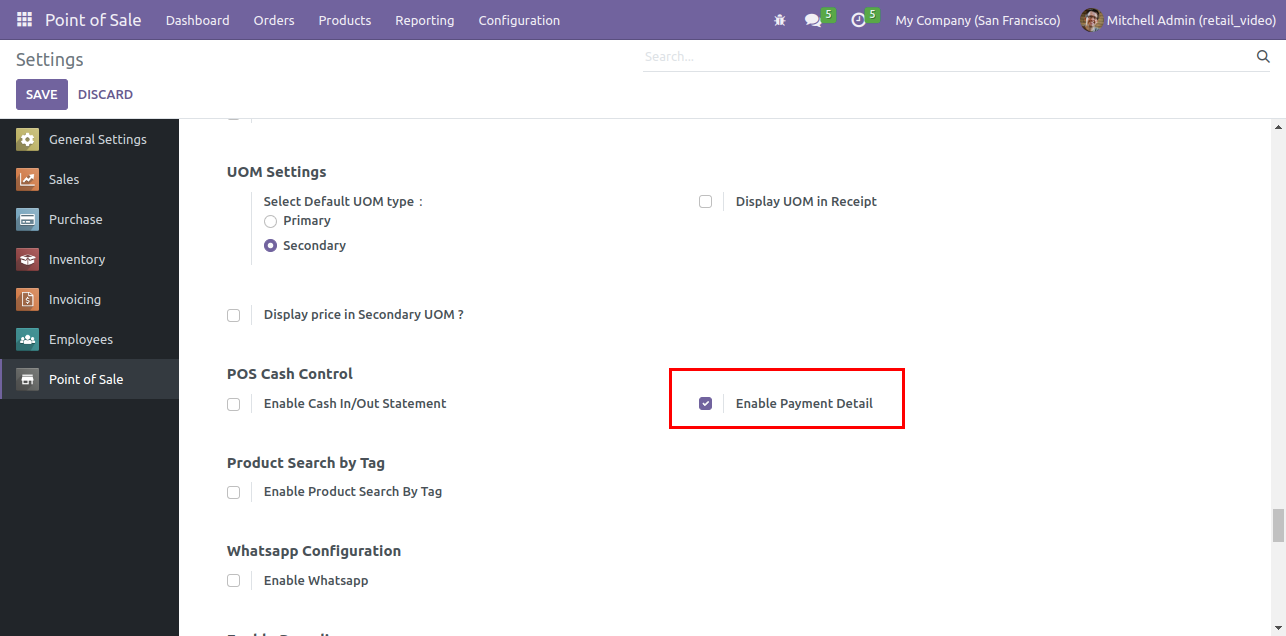
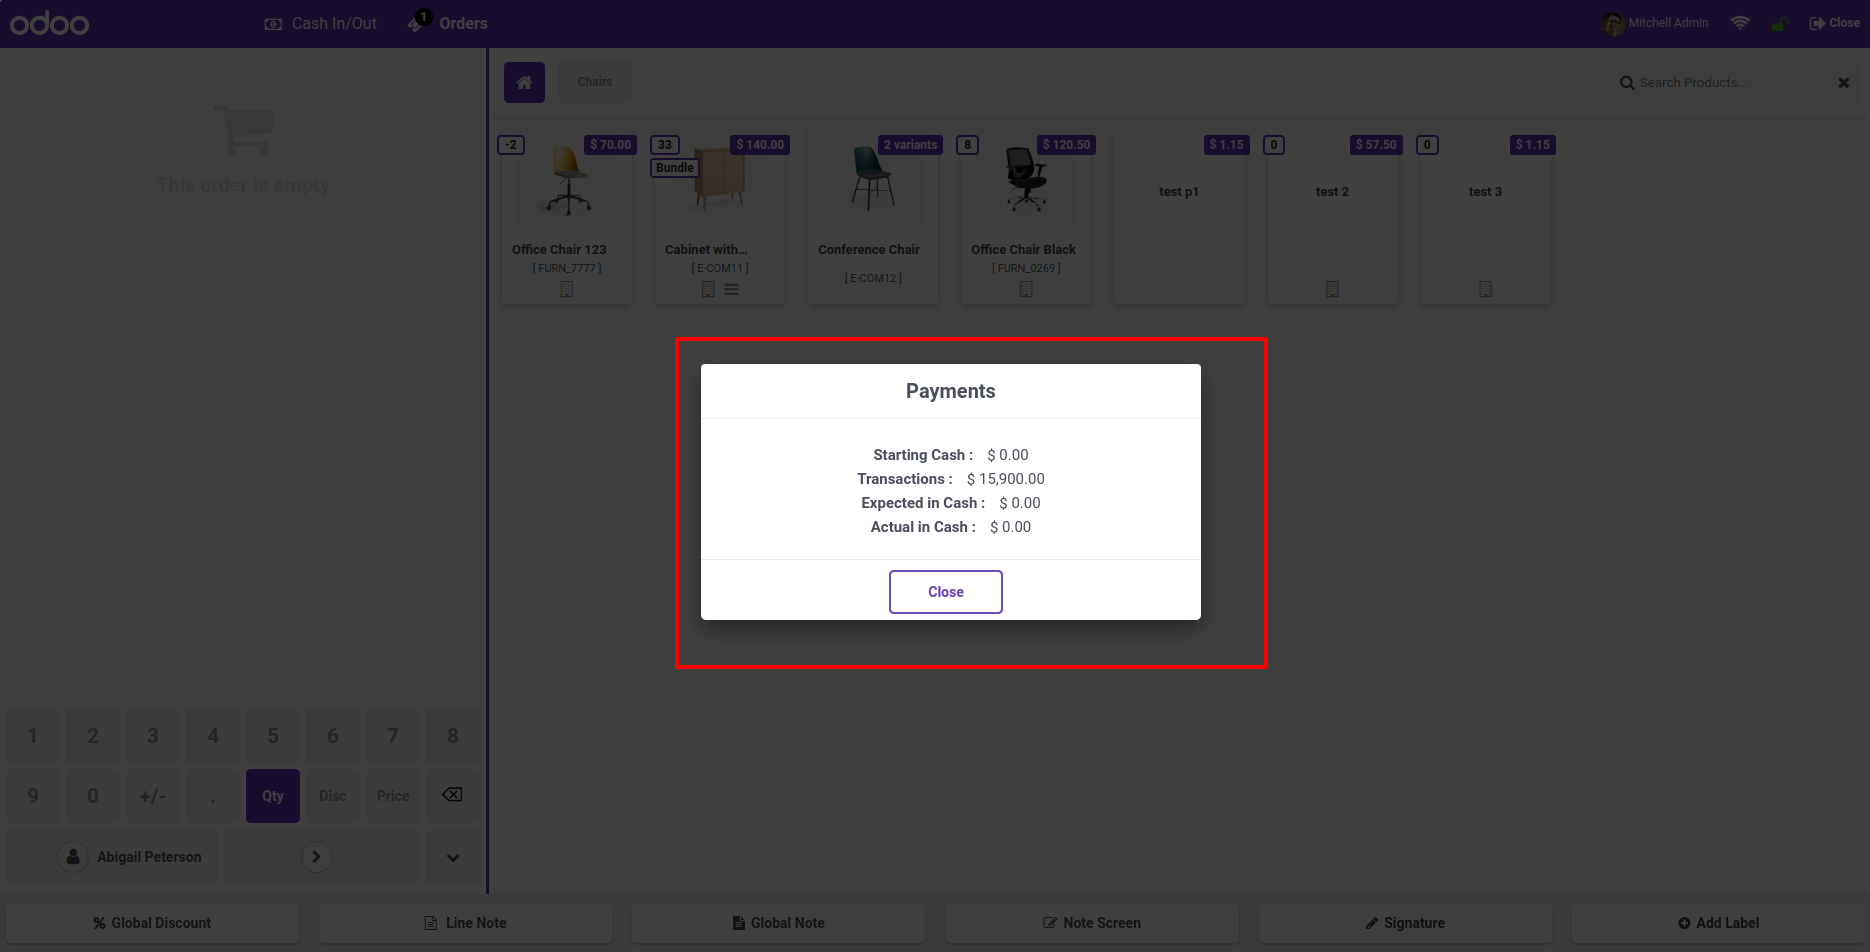
Enable the configuration to see transaction details.
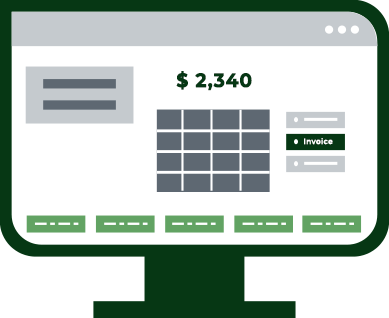
Click on the "Payments" to see total transactions.
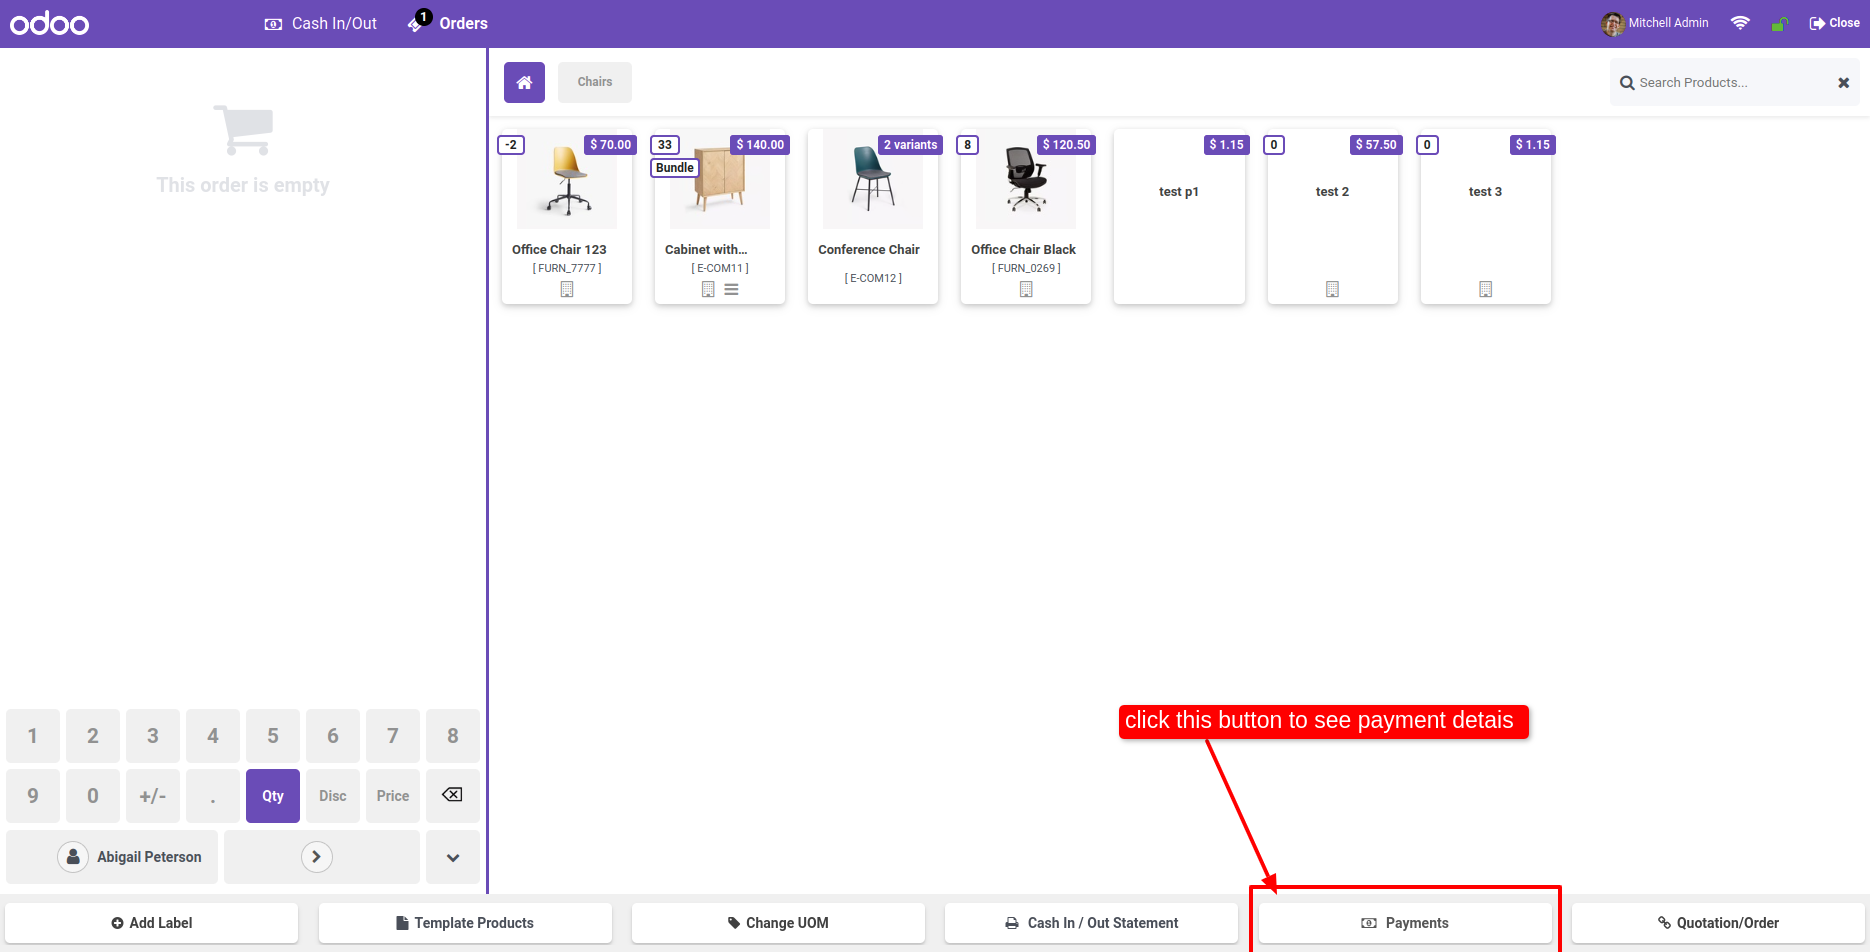
When you click on the payments, you can see all transactions.
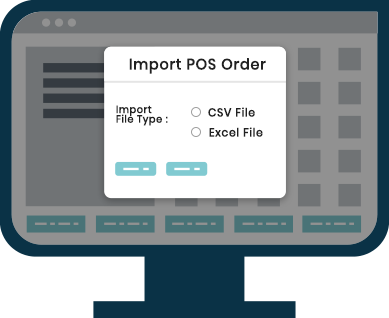
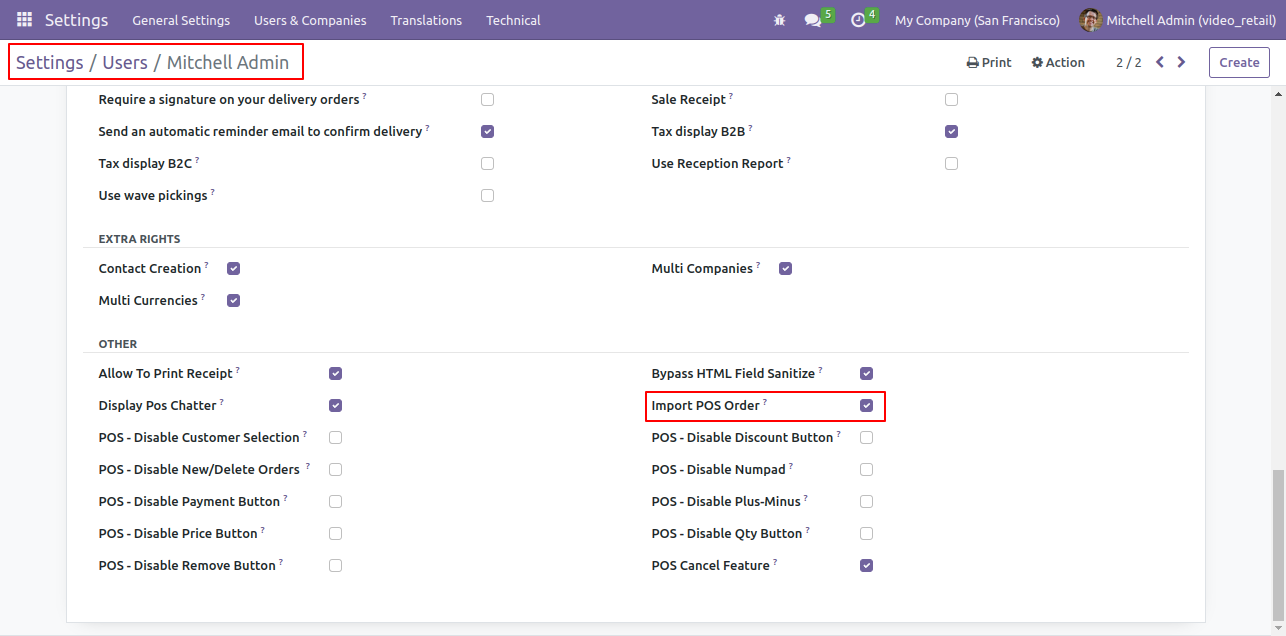
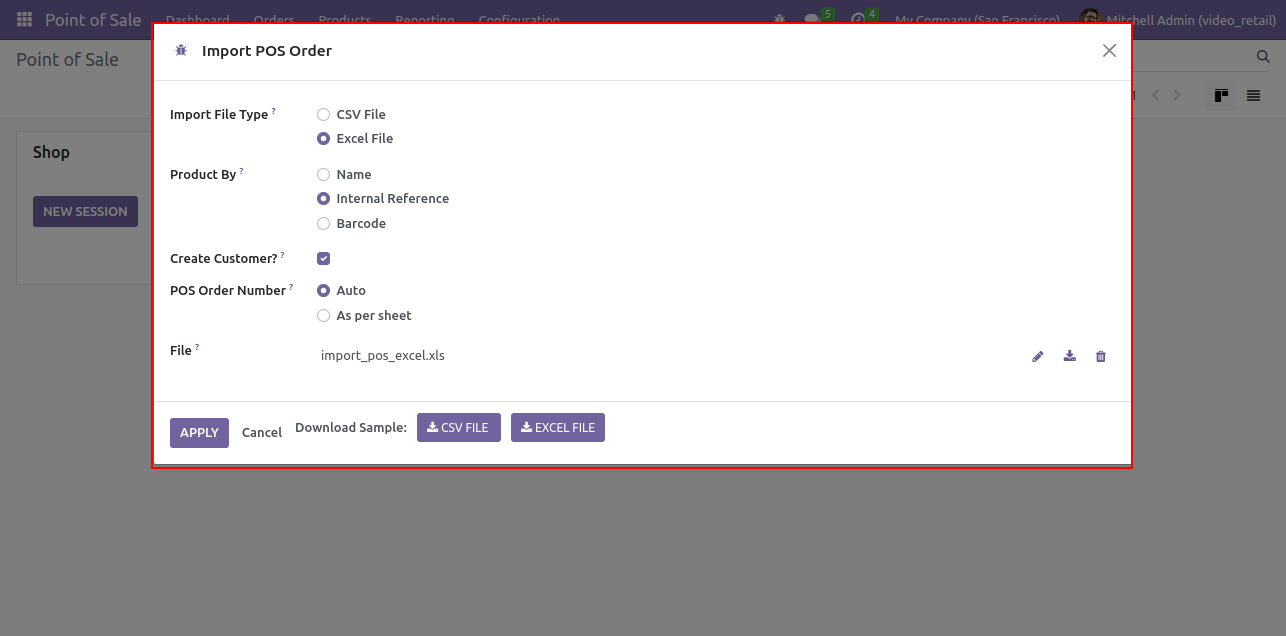
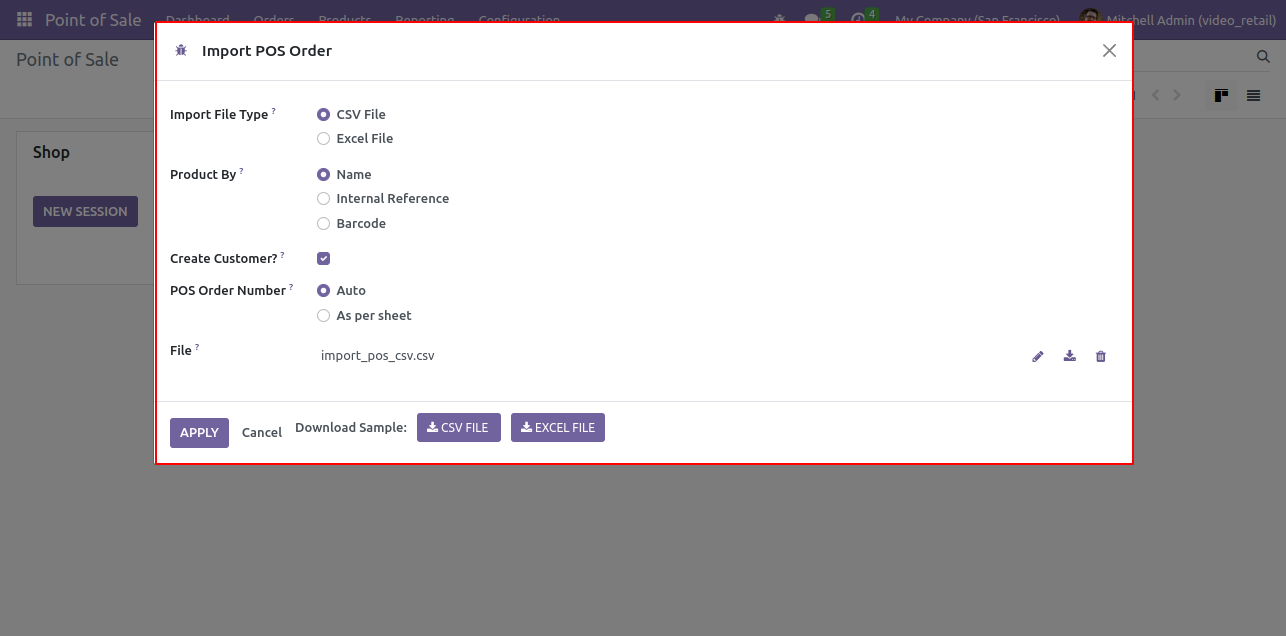
First, you need to tick the "Import POS Order" group to import product.
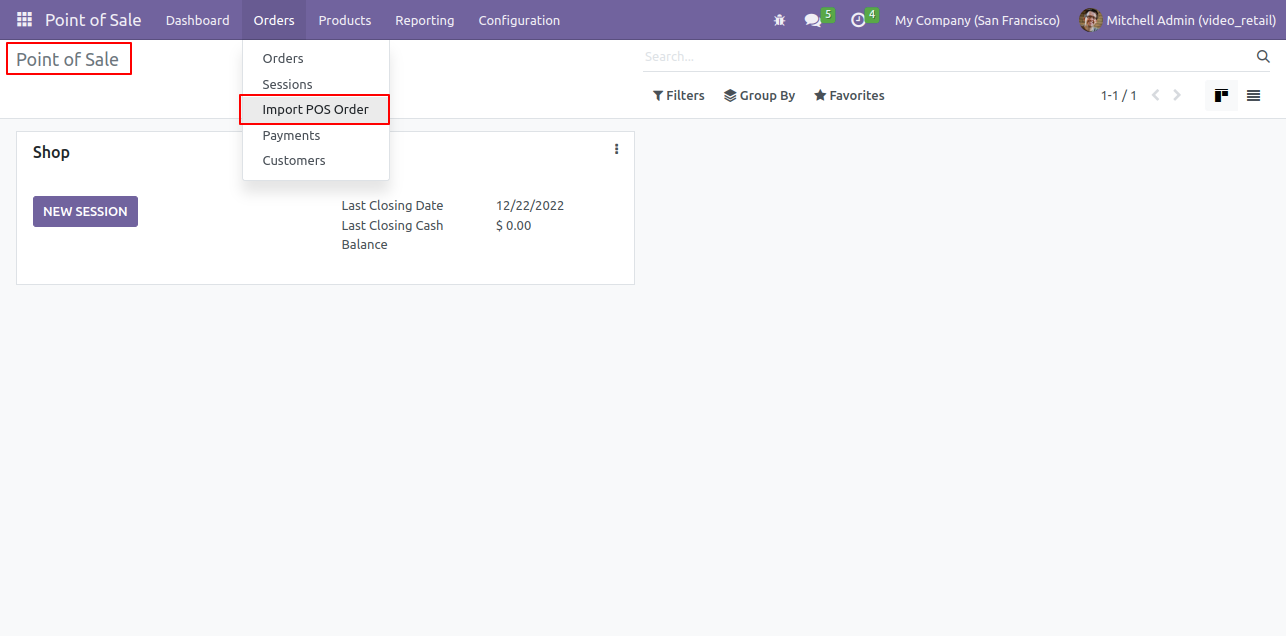
"Import POS Order" menu in orders.
After that one wizard will open and it's looks like below.
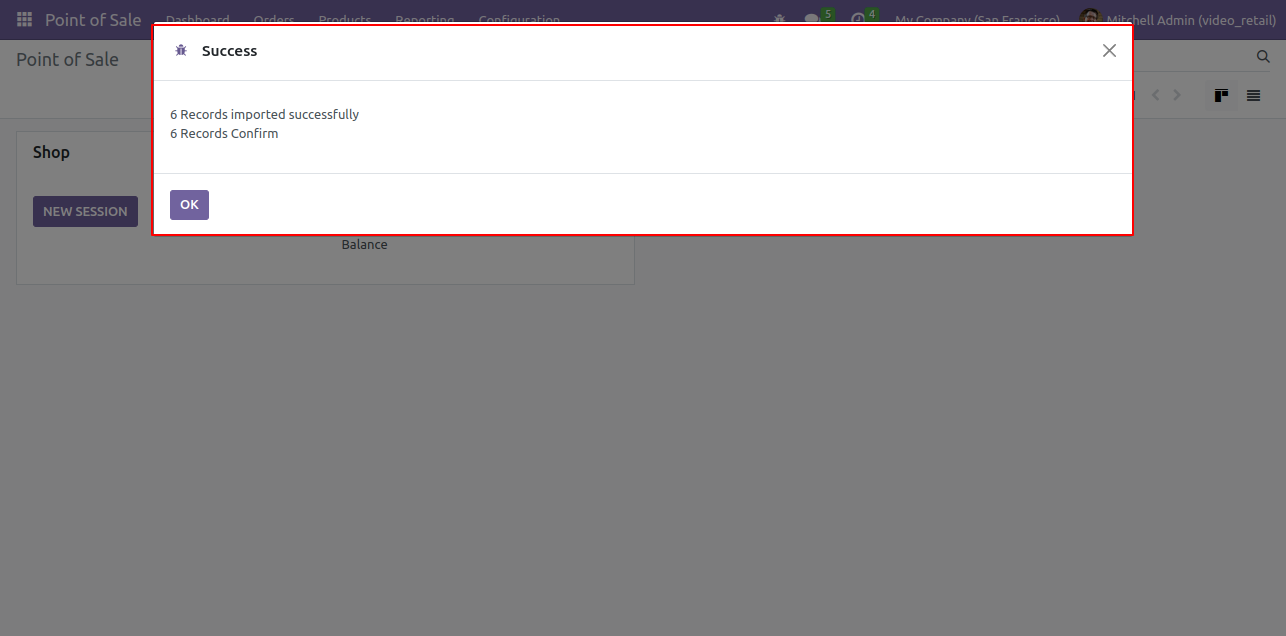
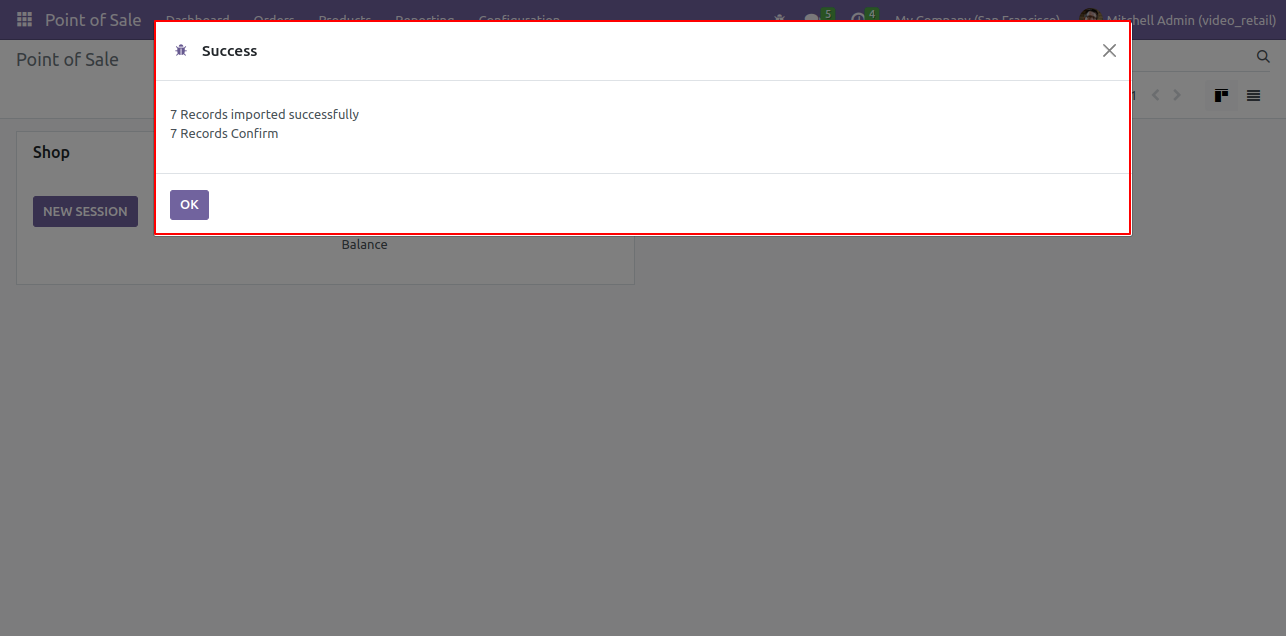
Success message looks like below it shows successfully imported records and also provides a list of unimported records with row number in sheet and relative details of product invalidation.
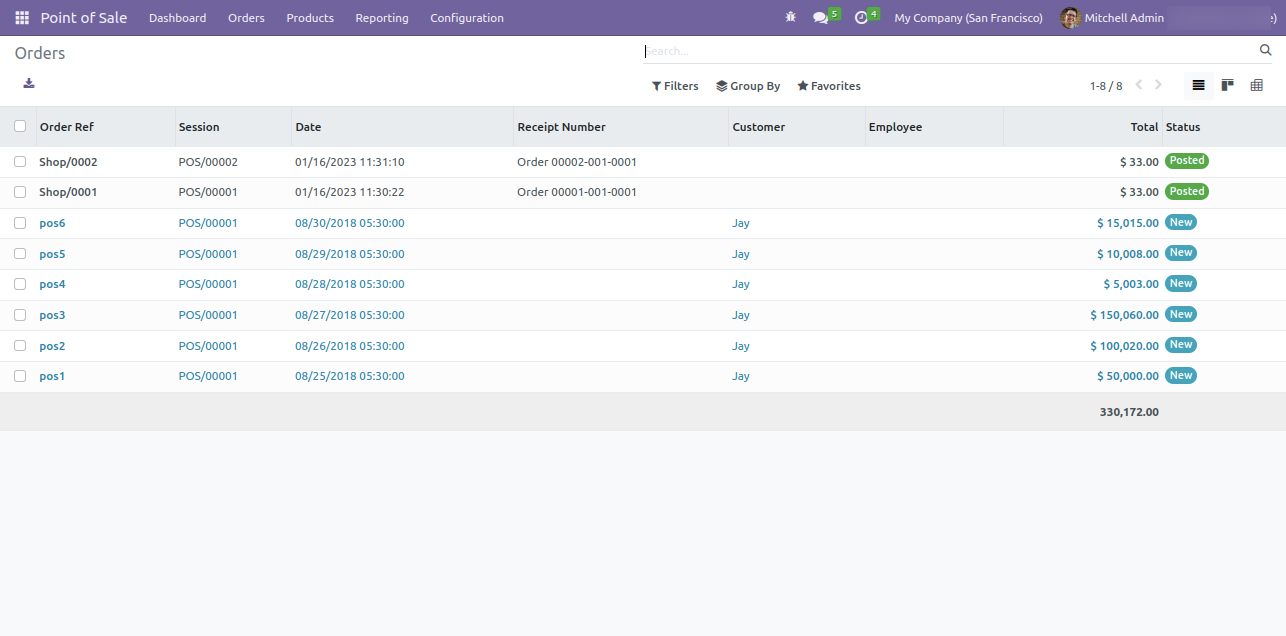
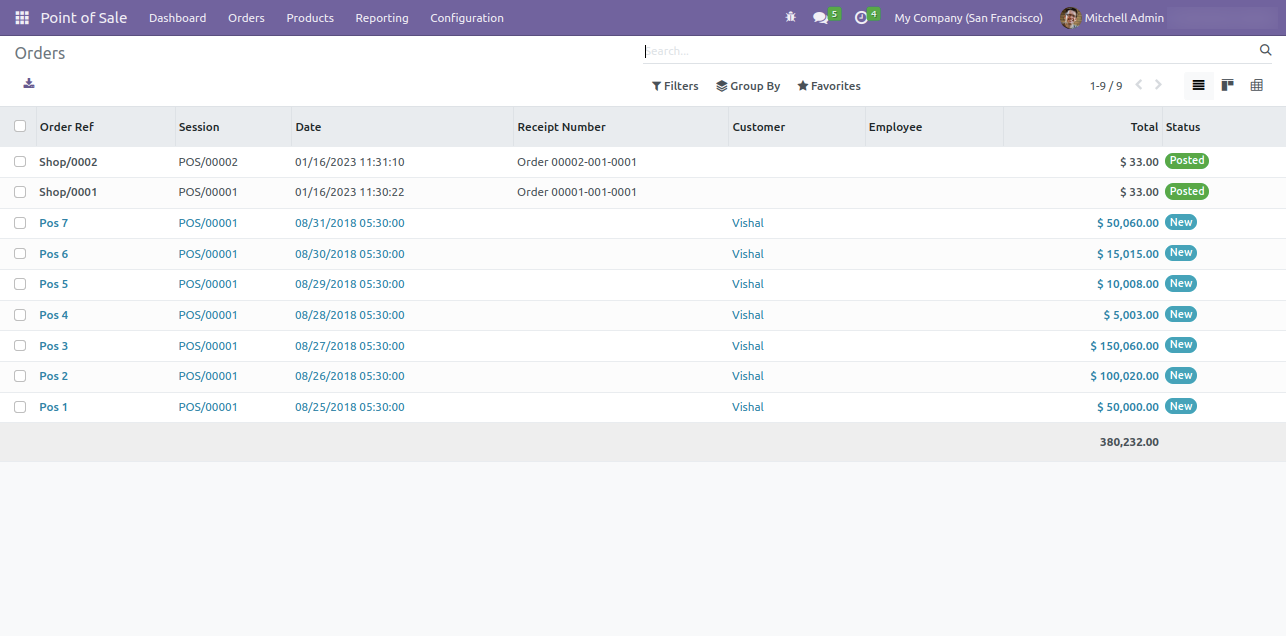
List view of the orders.
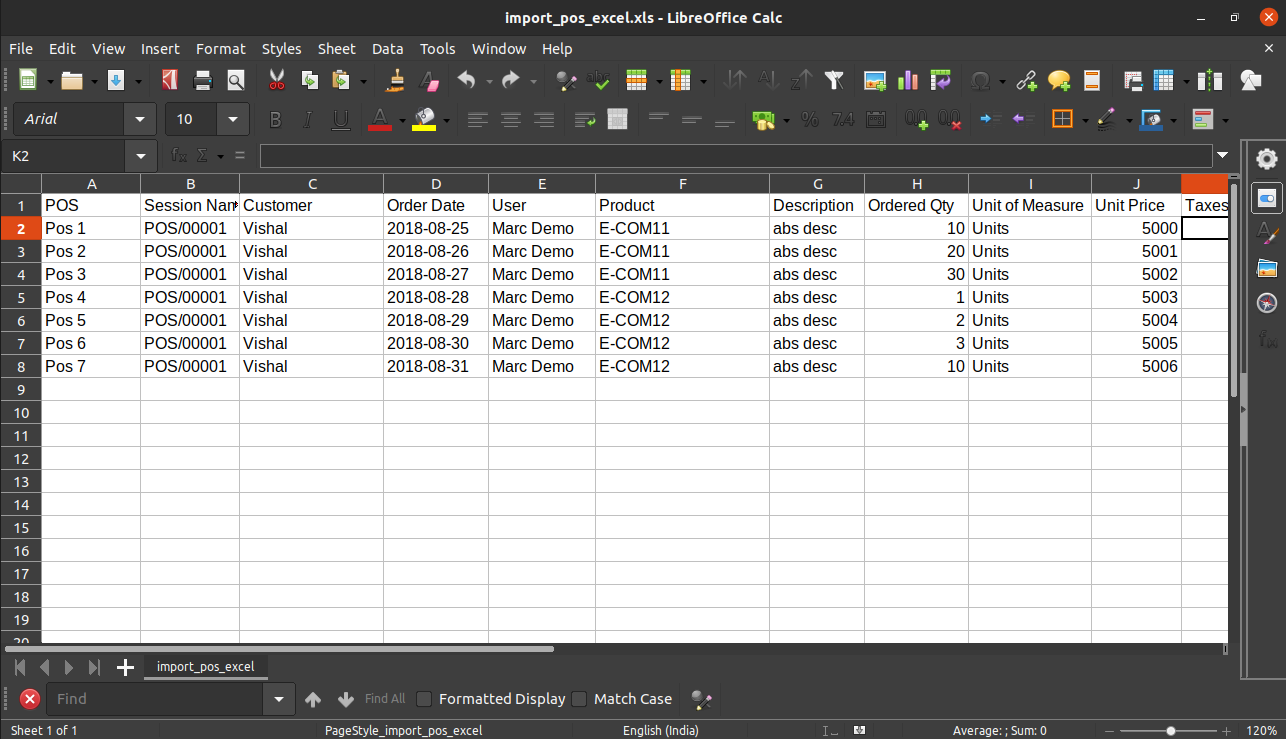
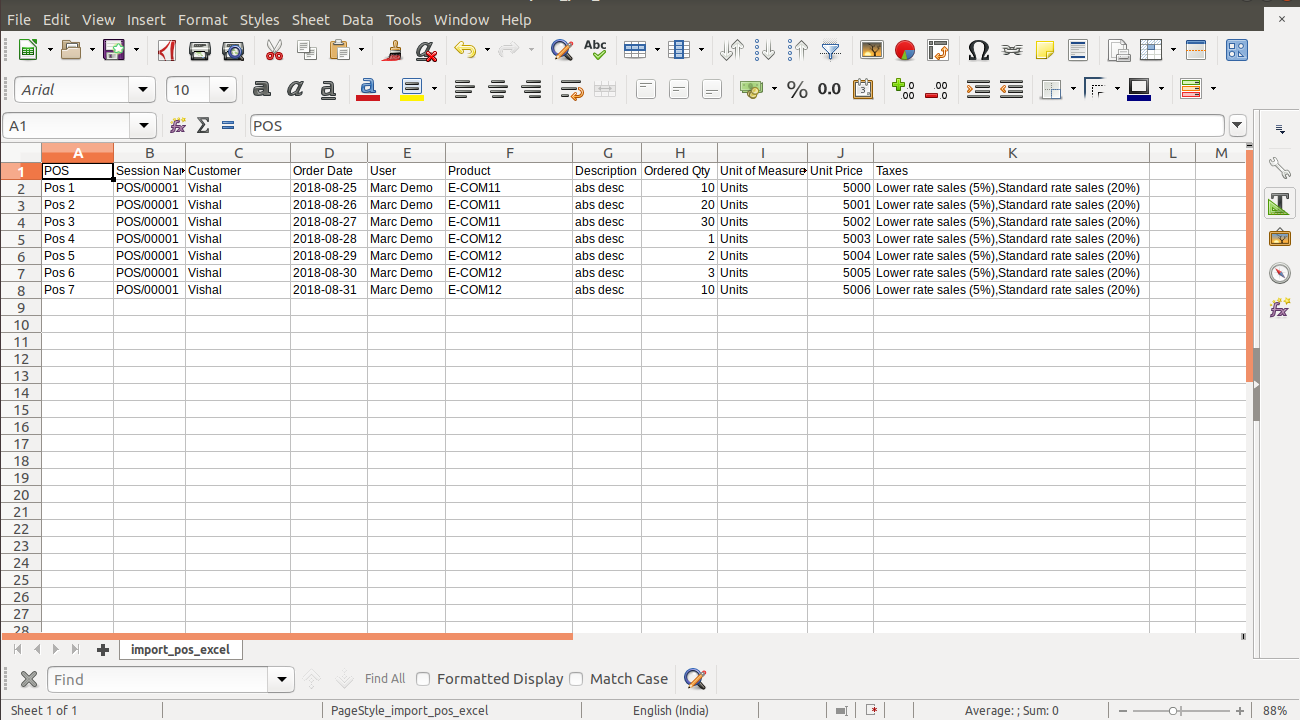
Excel file format.
"Import POS Order" menu in orders.
Import POS Order wizard looks like below.
Success message looks like below.
List view of the orders.
CSV file format.
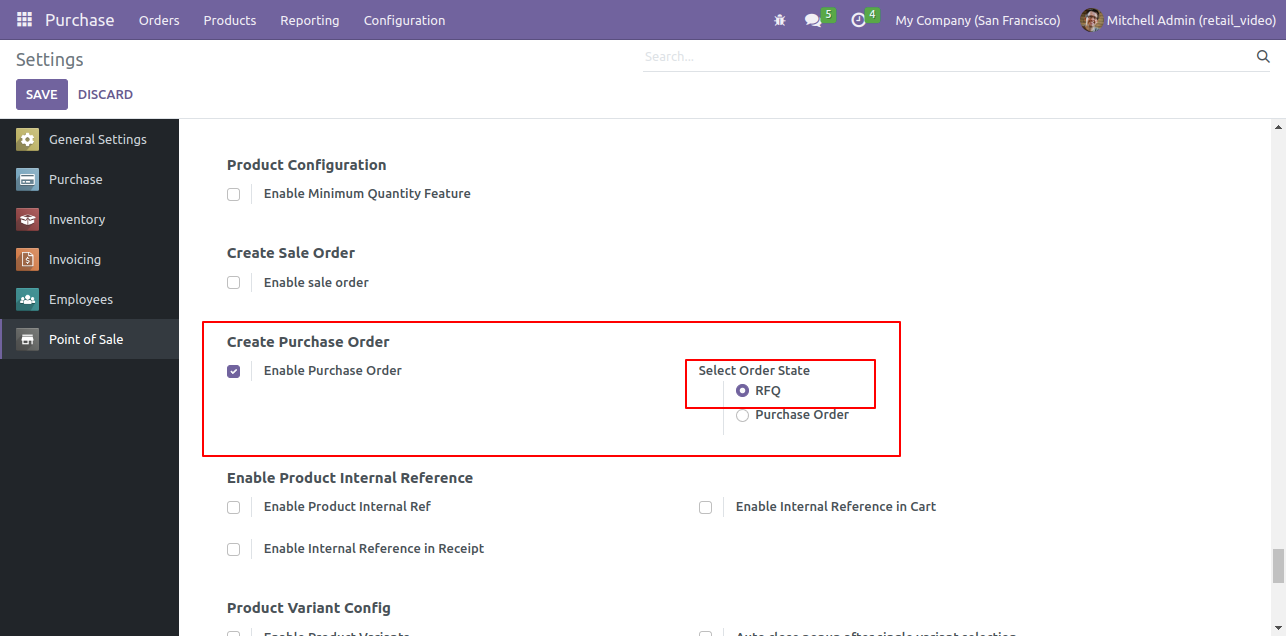
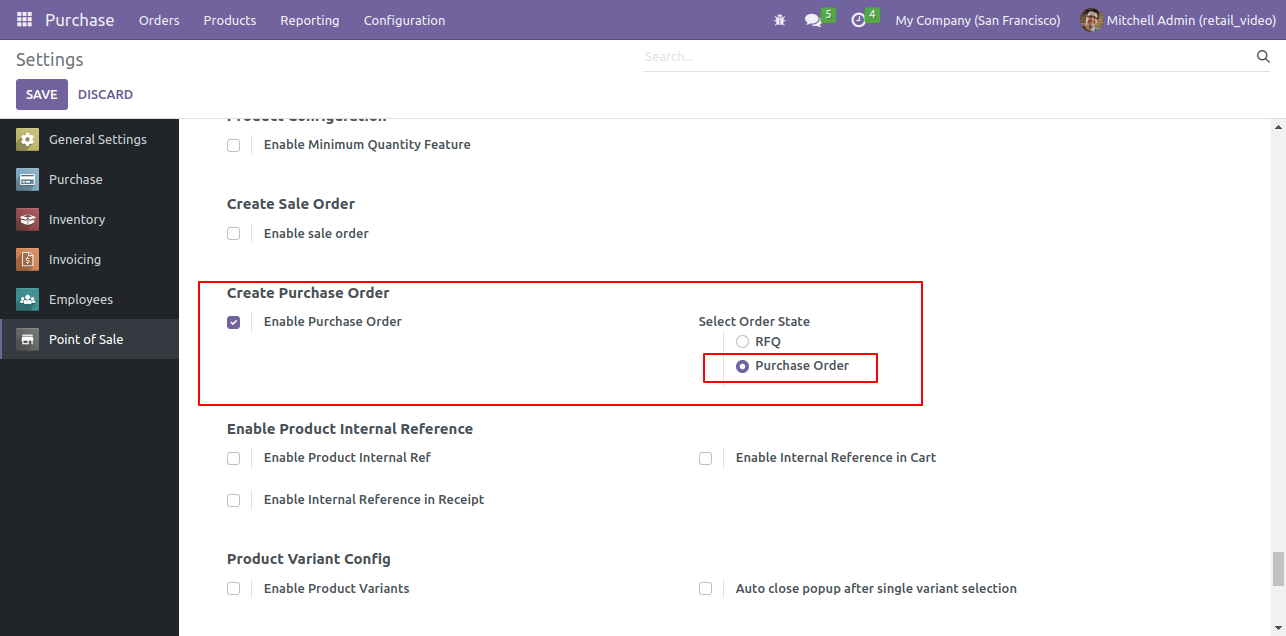
Enable 'Create Purchase Order' from pos setting. Select 'RFQ' order state.
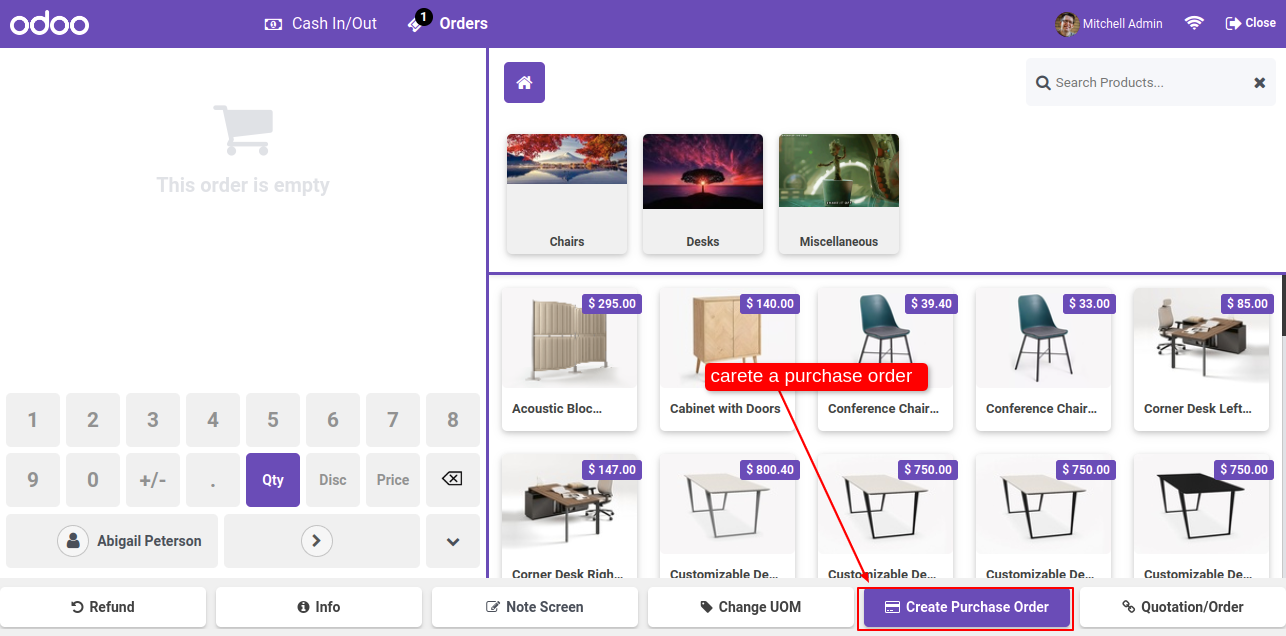
In pos screen you have one button 'Create Purchase Order'.
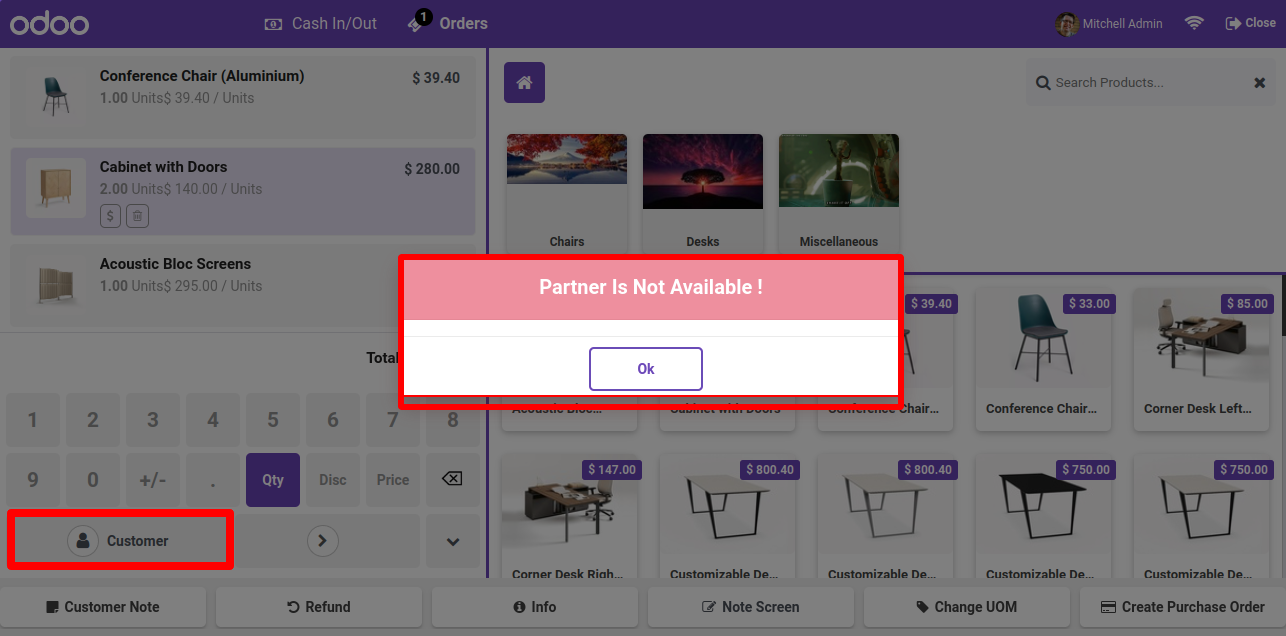
Ther error message pop-up looks like below.
Note: If you make a purchase order without selecting a customer at thet time this r pop-up will appear.
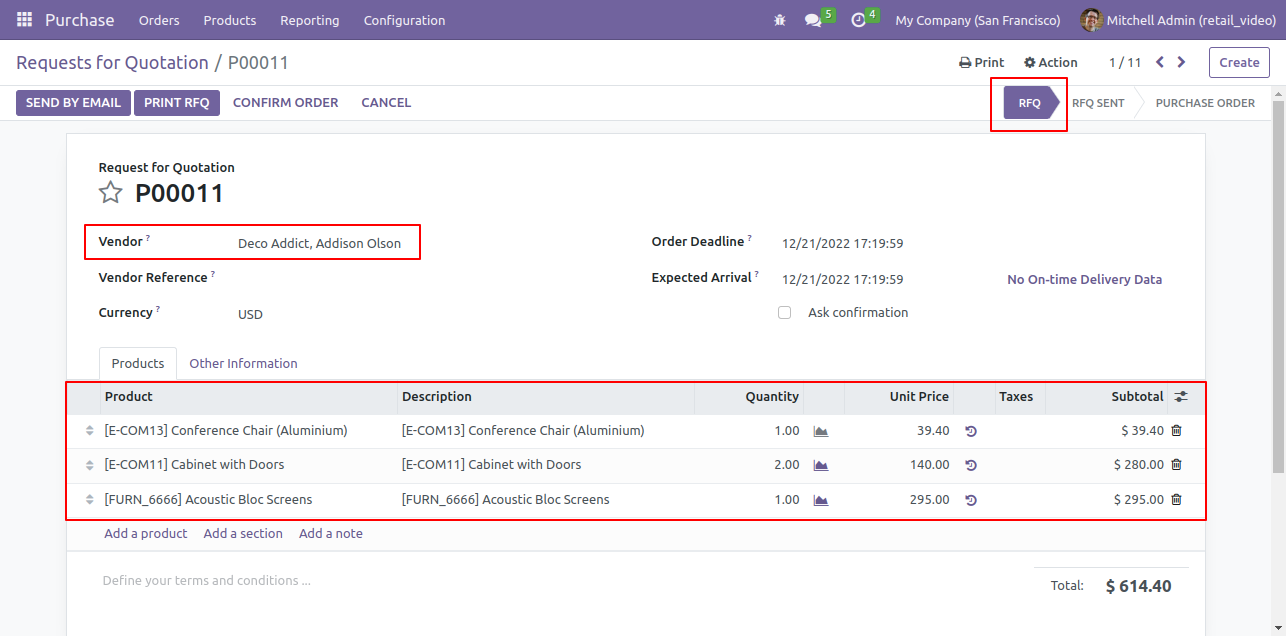
After click on 'Create Purchase Order' button, it will create a puchase rfq, in this popup you can see the purchase rfq number.

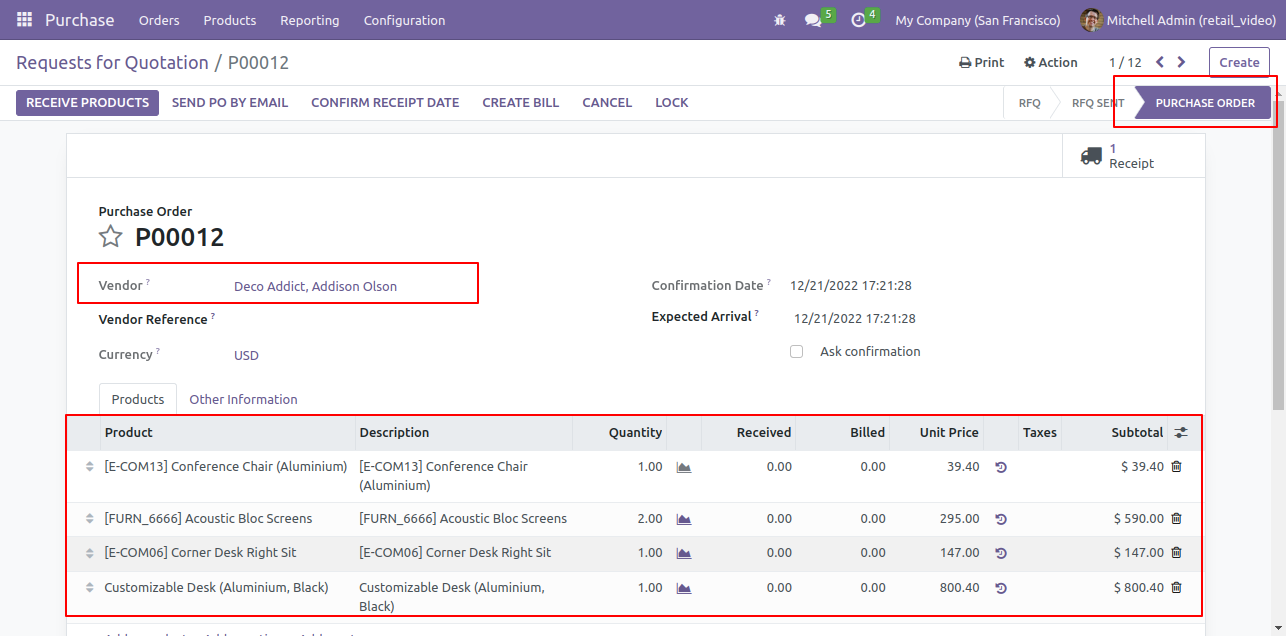
Purchase rfq created in backend.
Simply Select 'Purchase Order' as the order state if you wish to create a direct purchase order.
Now just add some products in cart, select customer and click on 'Create Purchase Order'. After that popup will appear, here you can see the purchase order number.
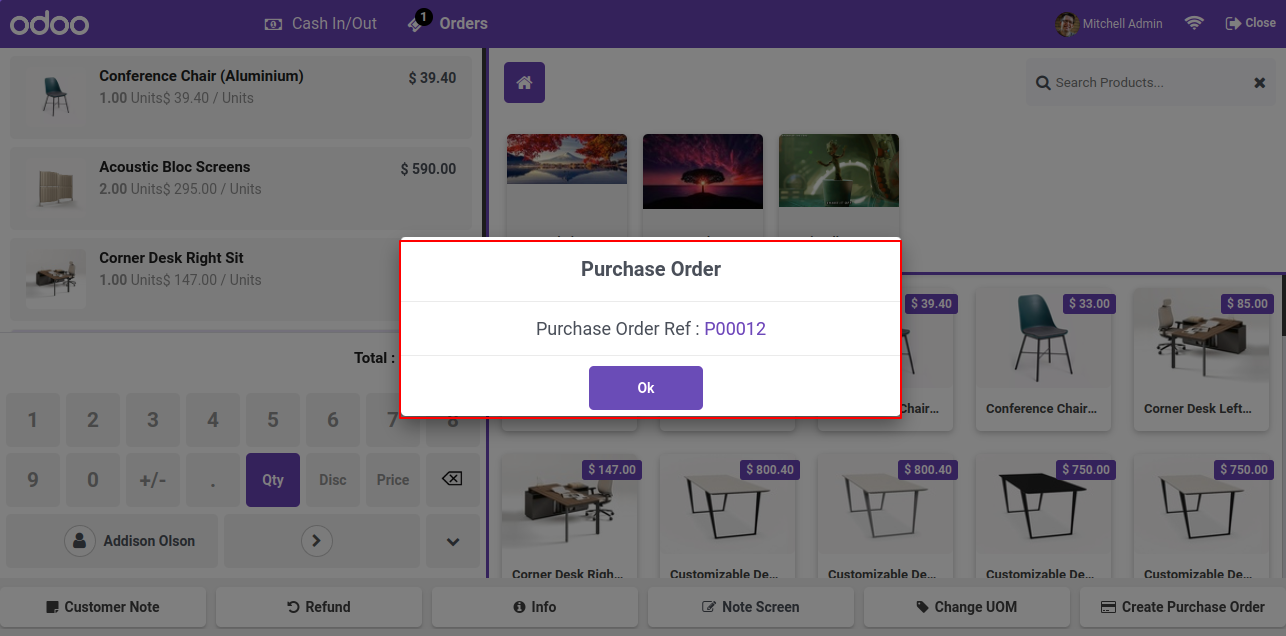
Now just add some products in cart, select customer and click on 'Create Purchase Order'. After that popup will appear, here you can see the purchase order number.
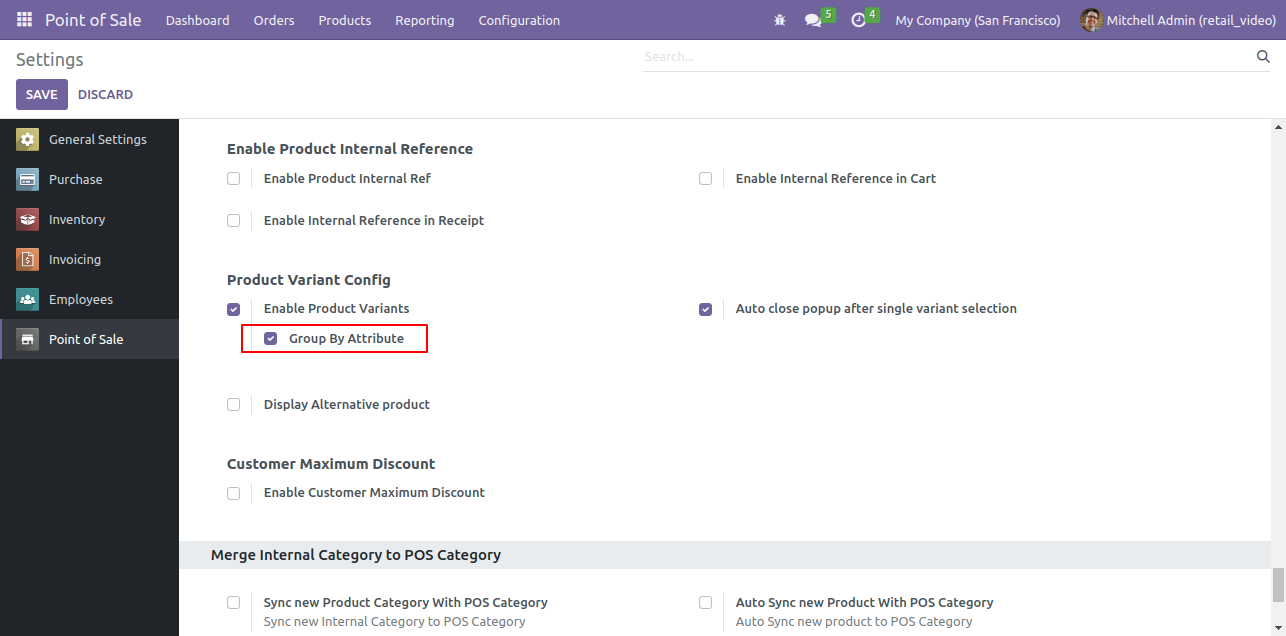
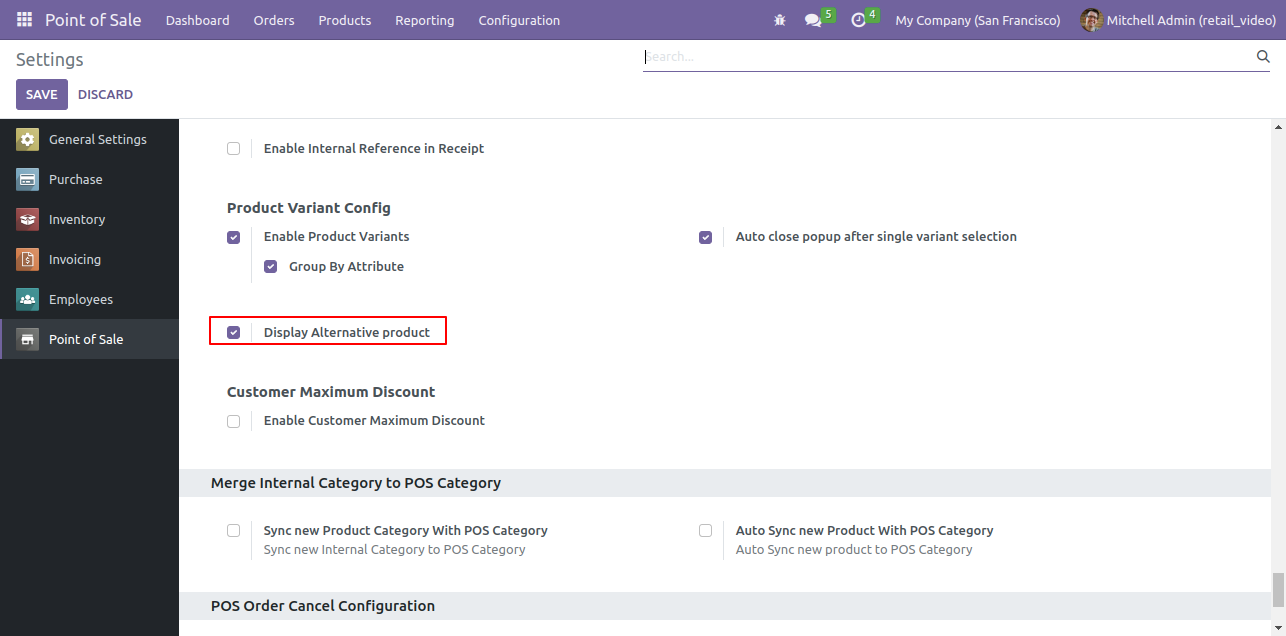
Goto pos setting and enable 'Enable Product Variants' feature. Upon enabling that, three options will appear. 1. Group by Attributes 2. Auto close popup after single variants select 3. Display Alternative product select the option as per your requirement.

Goto pos setting and enable 'Auto Close Popup After Single Variants Select' feature.
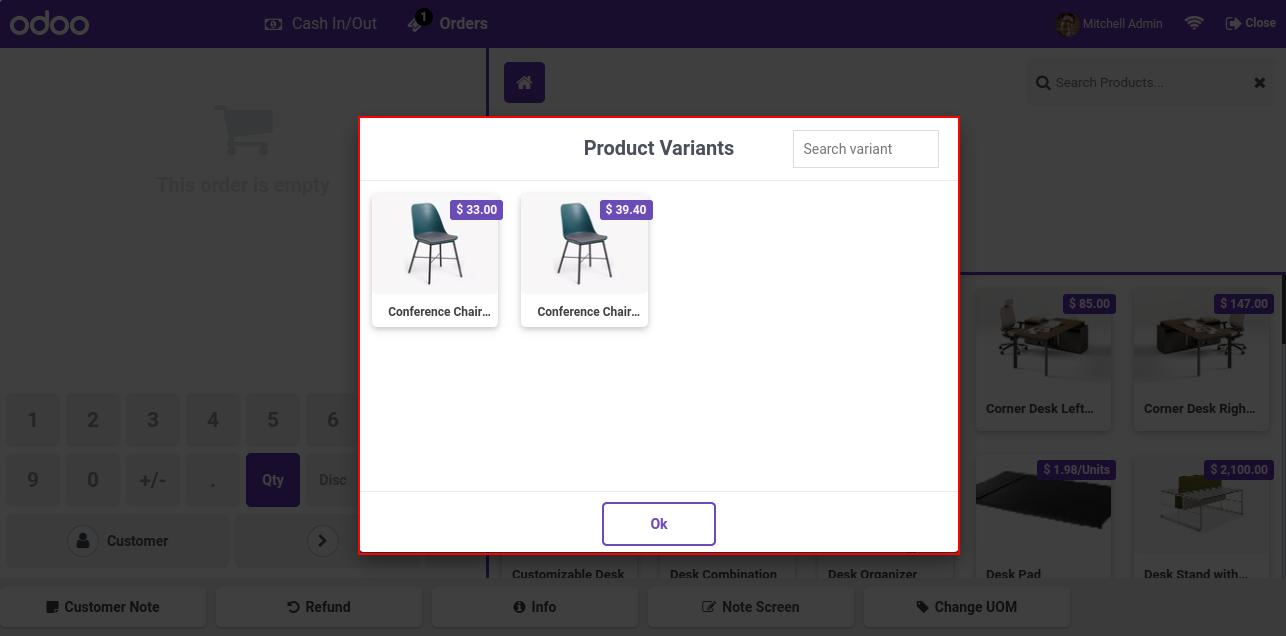
In popup you can search the variants also. click on the 'Ok' button.
Goto pos setting and enable 'Auto Close Popup After Single Variants Select' feature.

Click on any particular product.
In popup you can search the variants also. click on the 'Ok' button.
When you click on the ok button the pop-up will automatically closed.
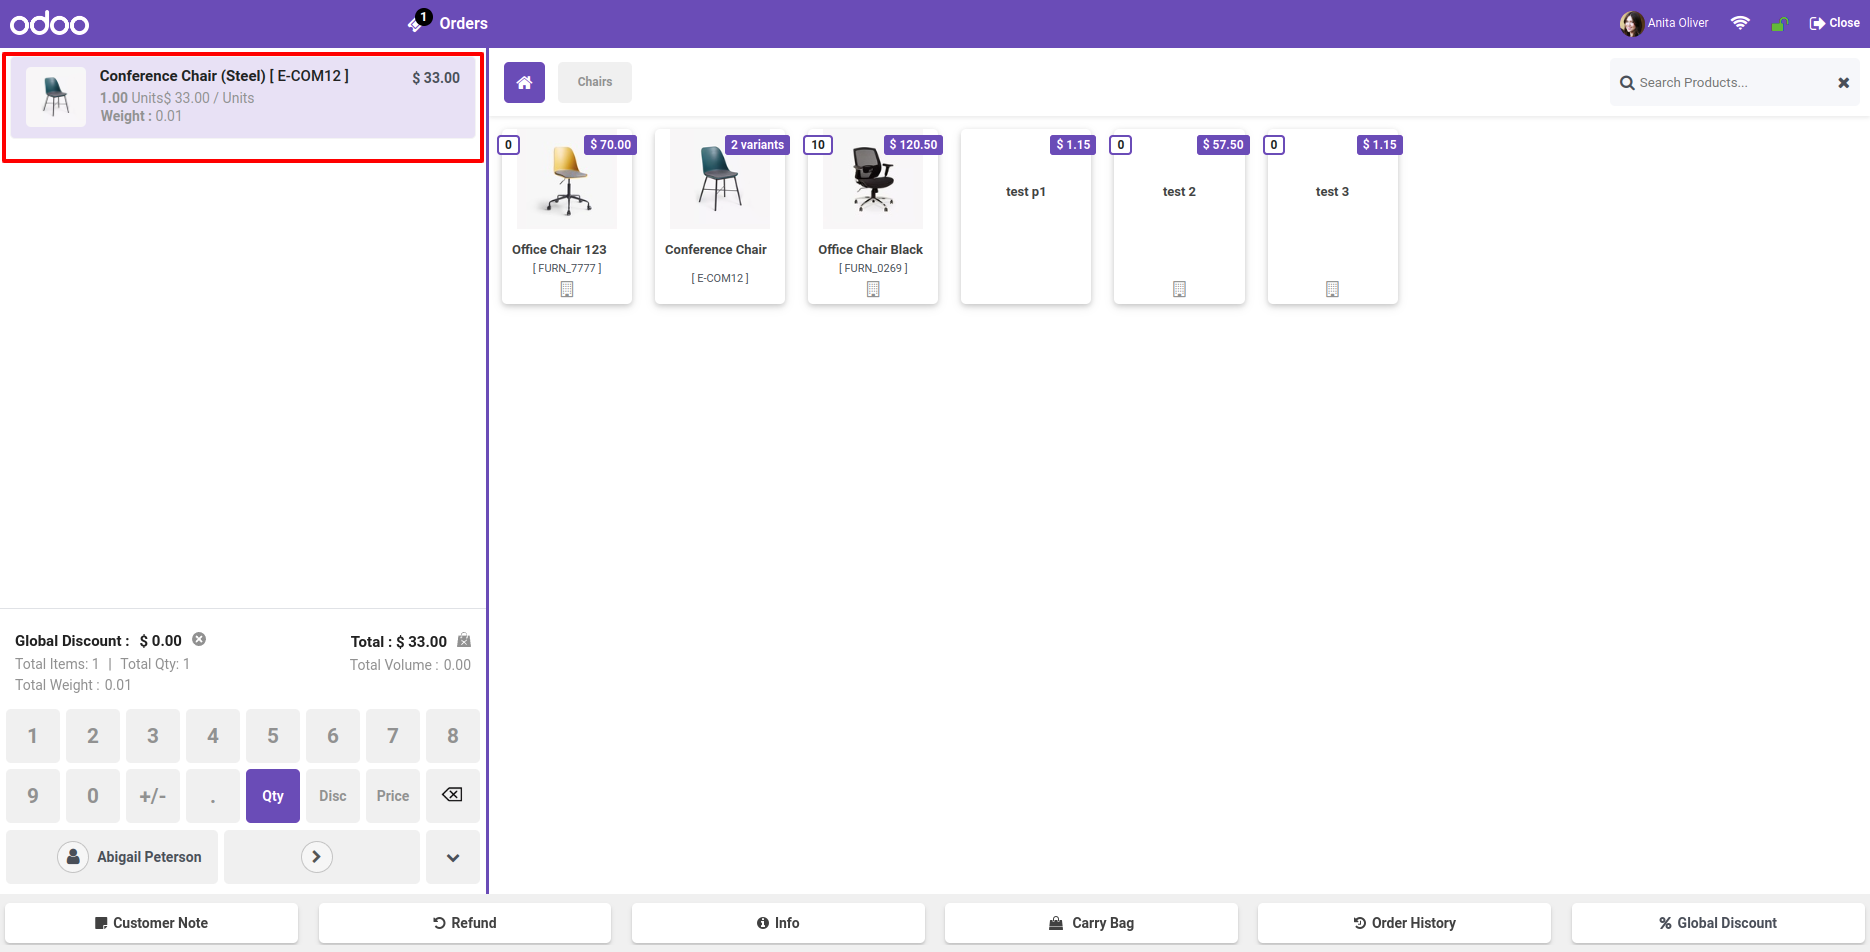
click on variant to add order line.
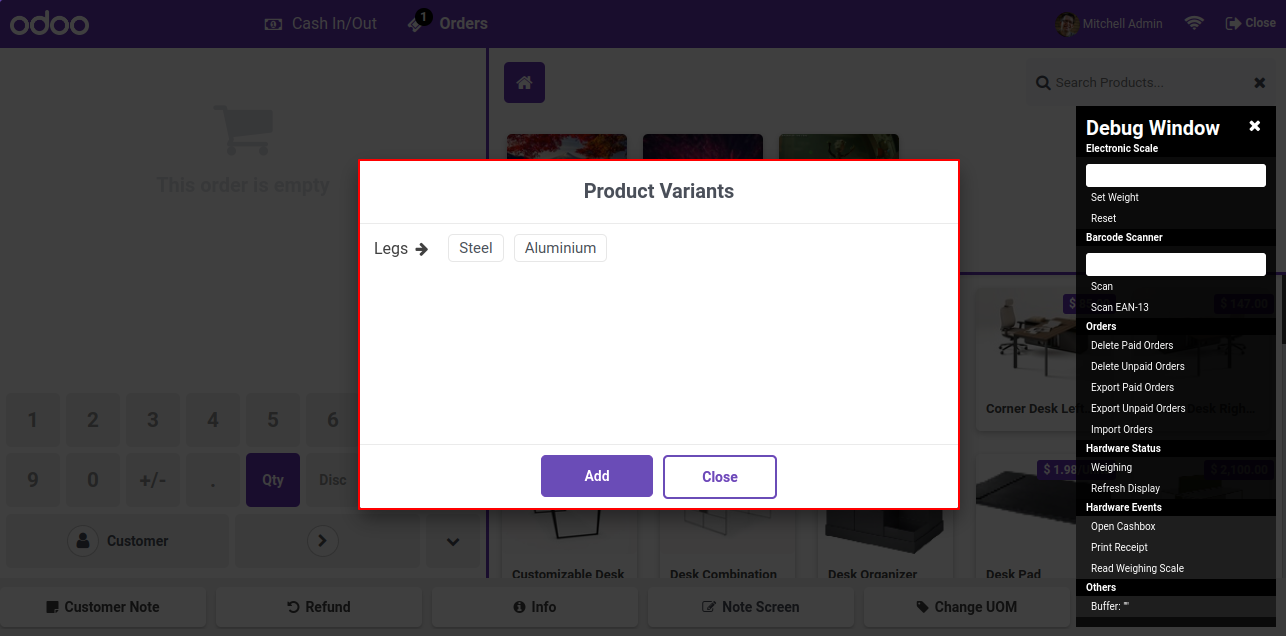
Goto pos setting and enable ' Group By Attributes' feature.
In pos screen product variants popup, here you can see the product variants with attribute group by.
Now enable 'Display Alternative Products'.
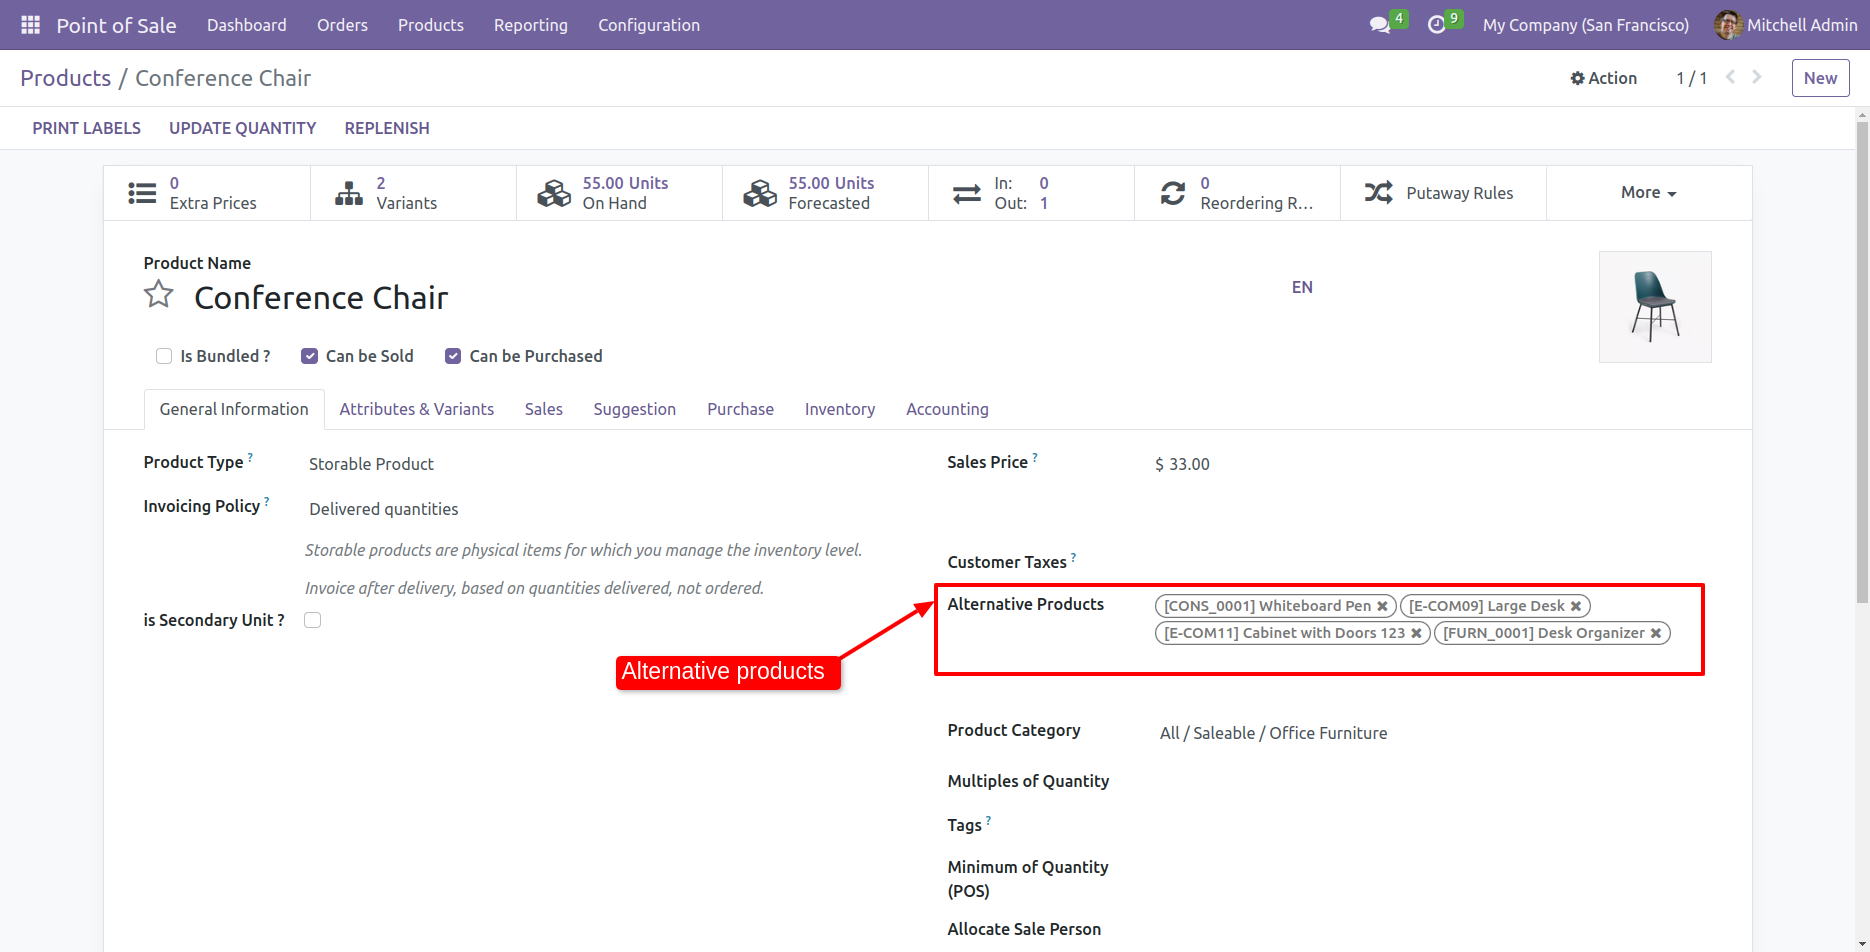
form view of the product. Select the alternative products here.
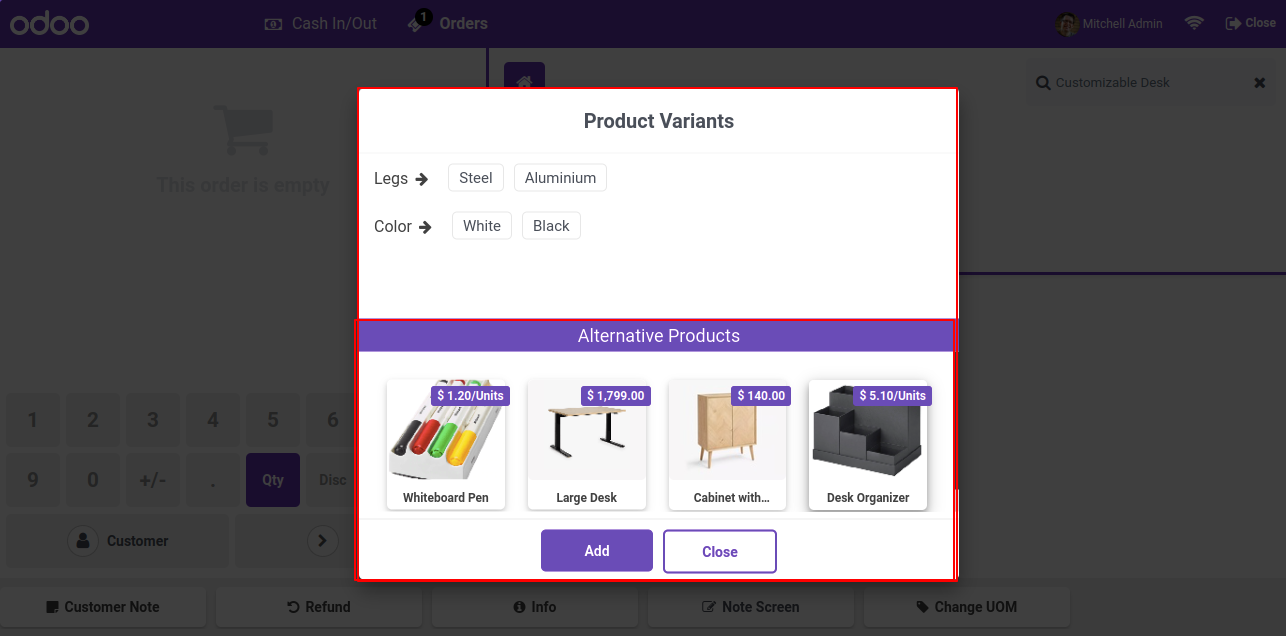
In pos, you can see the alternative products in the variants popups.
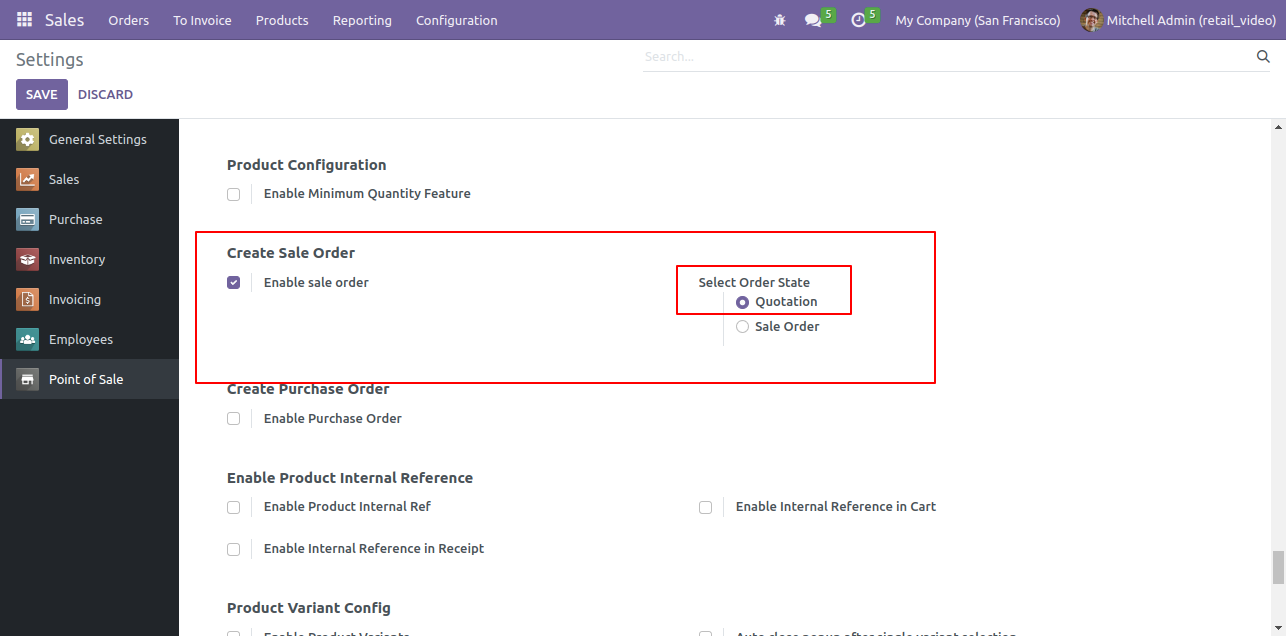
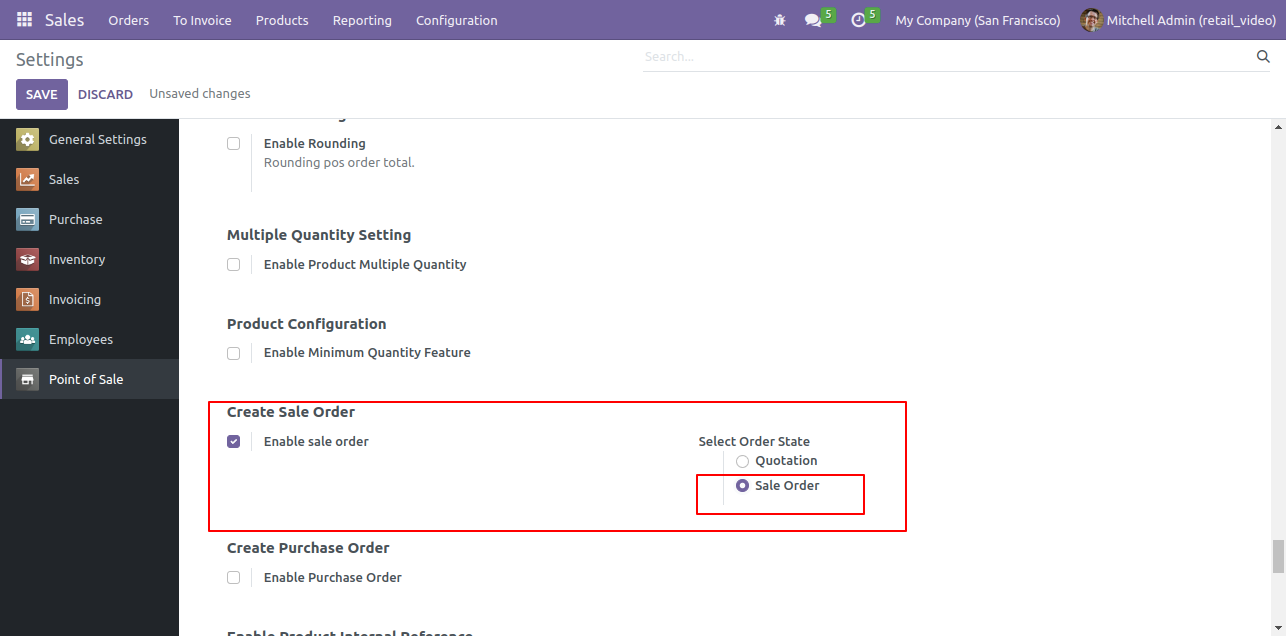
Goto pos setting and enable 'Enable Sale Order' feature. Upon enabling that, two options will appear. 1. Quotation 2. Sale Order . Select as per your requirement.
Make one order in pos and click on the 'Create Sale Order'.
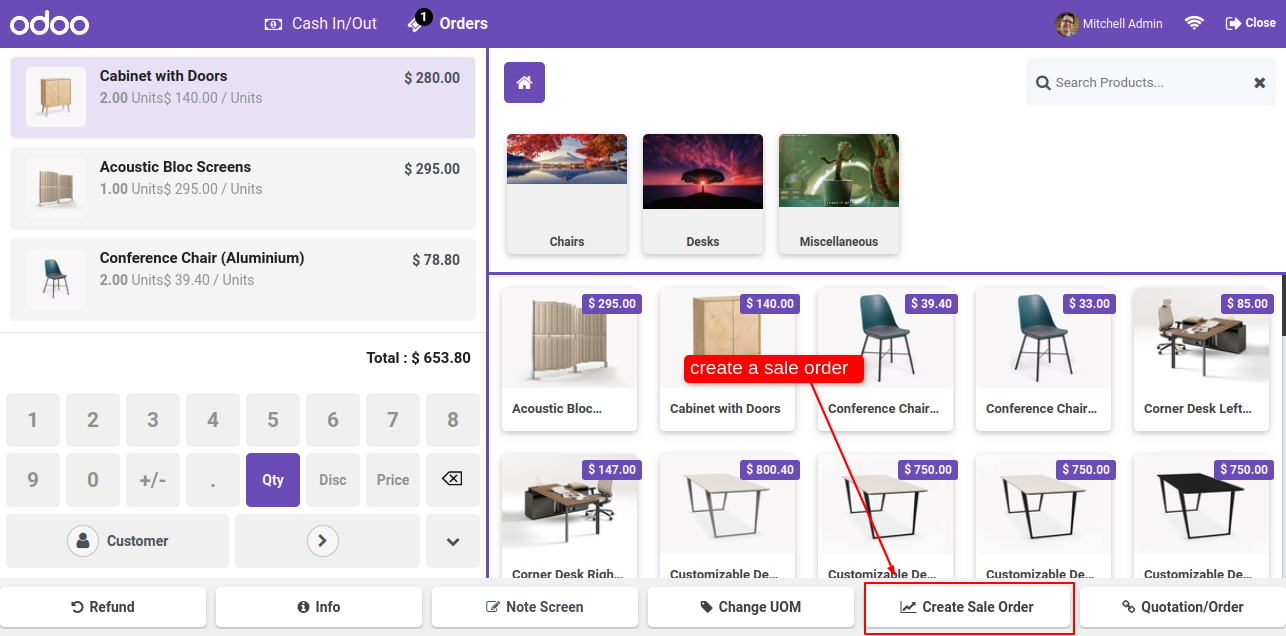
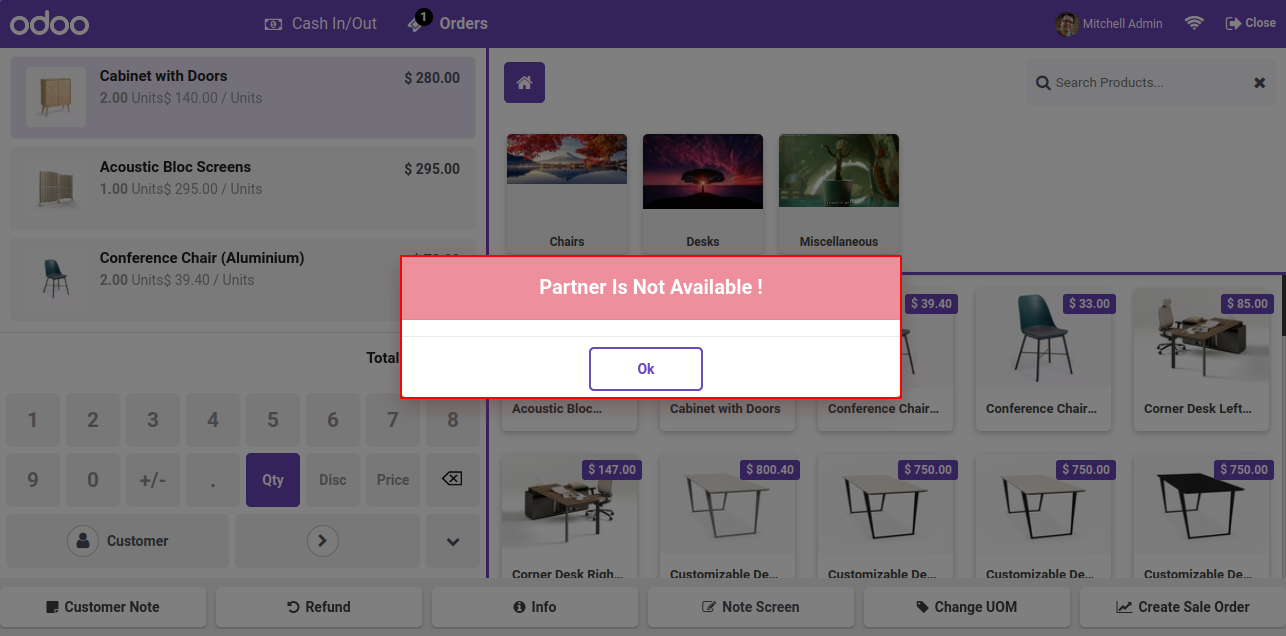
The error message pop-up looks like below.
Note: If you make a sale order without selecting a customer at that time this error pop-up will appear.
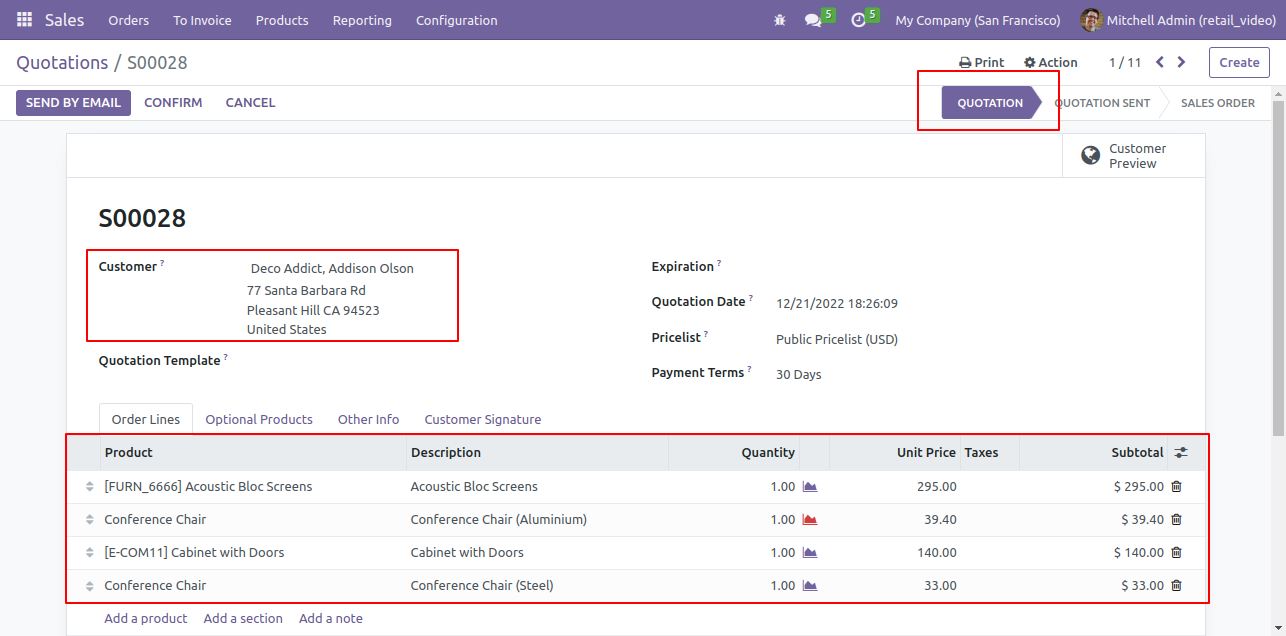
After click on that button, it will create a quotation, in this popup you can see the quotation number.
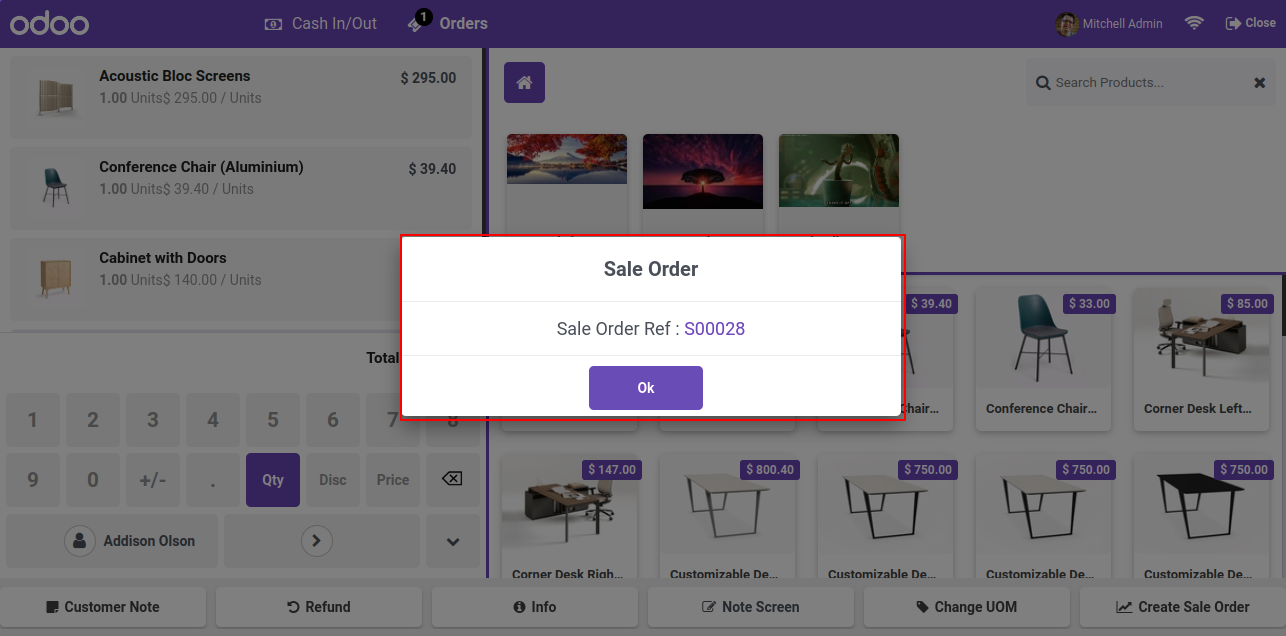
After that it will create quotation in sales.
For creating a sale order, select 'Sale Order'.
After click on that button, it will create a sale order, in this popup you can see the sale order number.
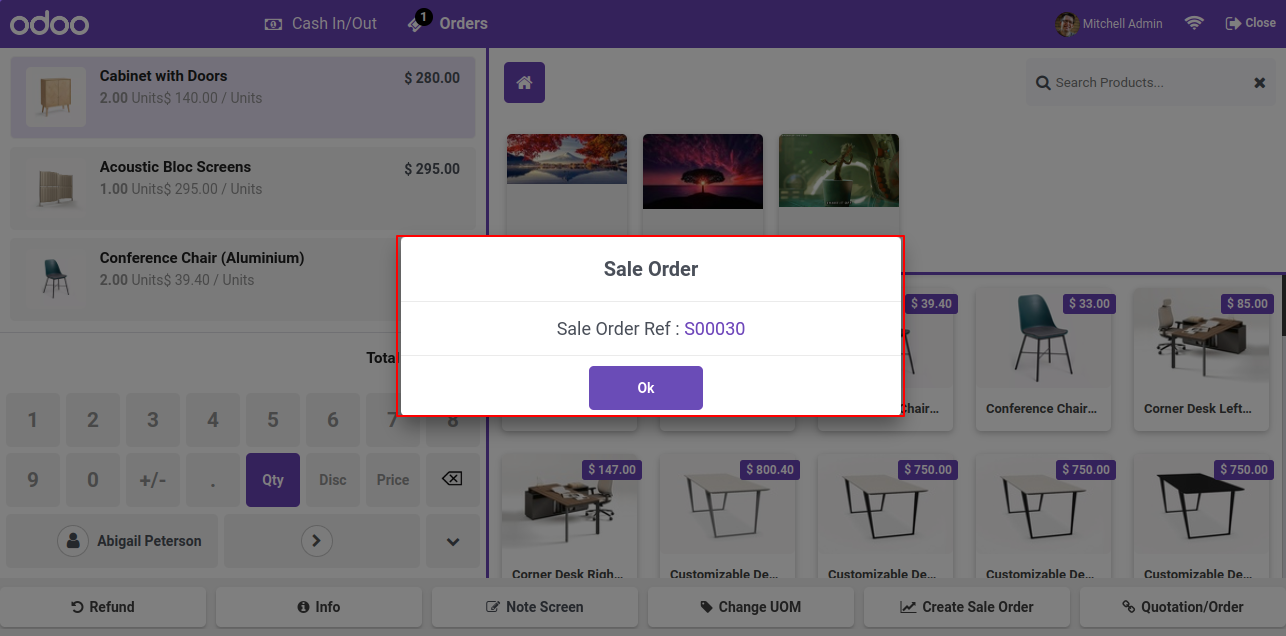
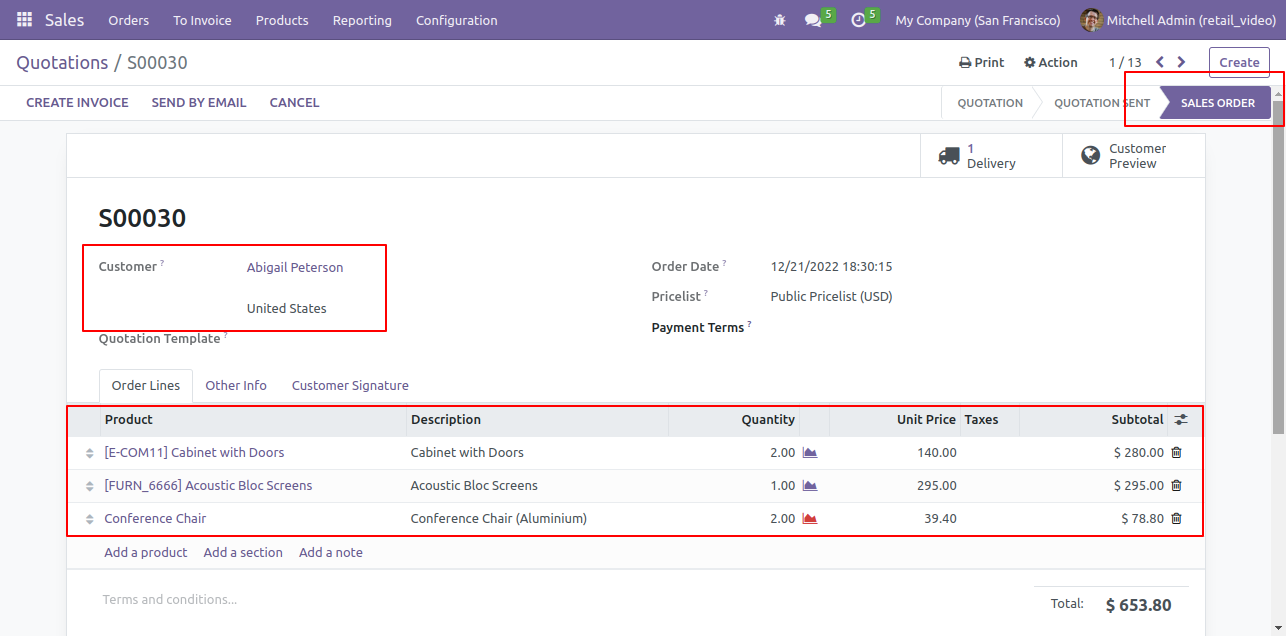
After that it will create sale order in sales.
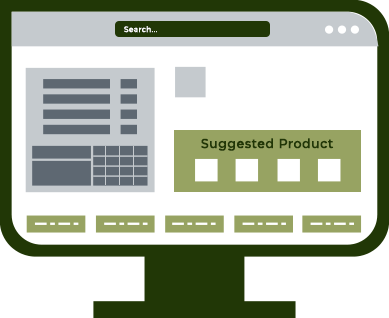
Goto pos setting and enable 'Enable Product Suggestion' option.
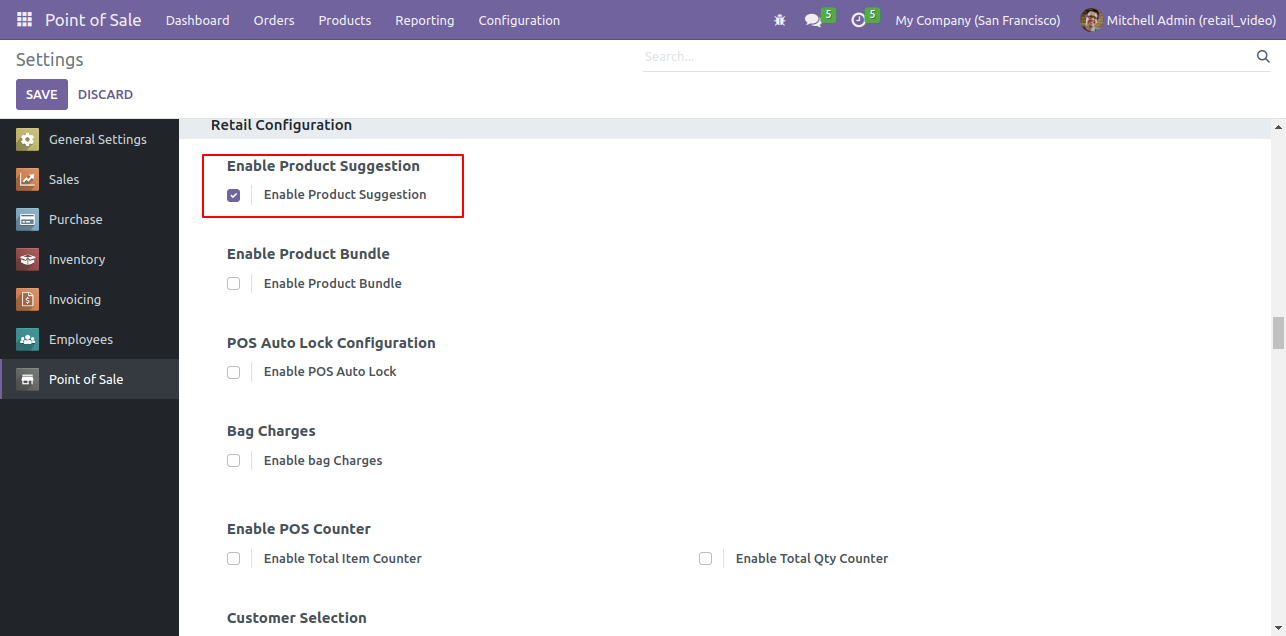
First you have to define the suggestion products in the particular products.
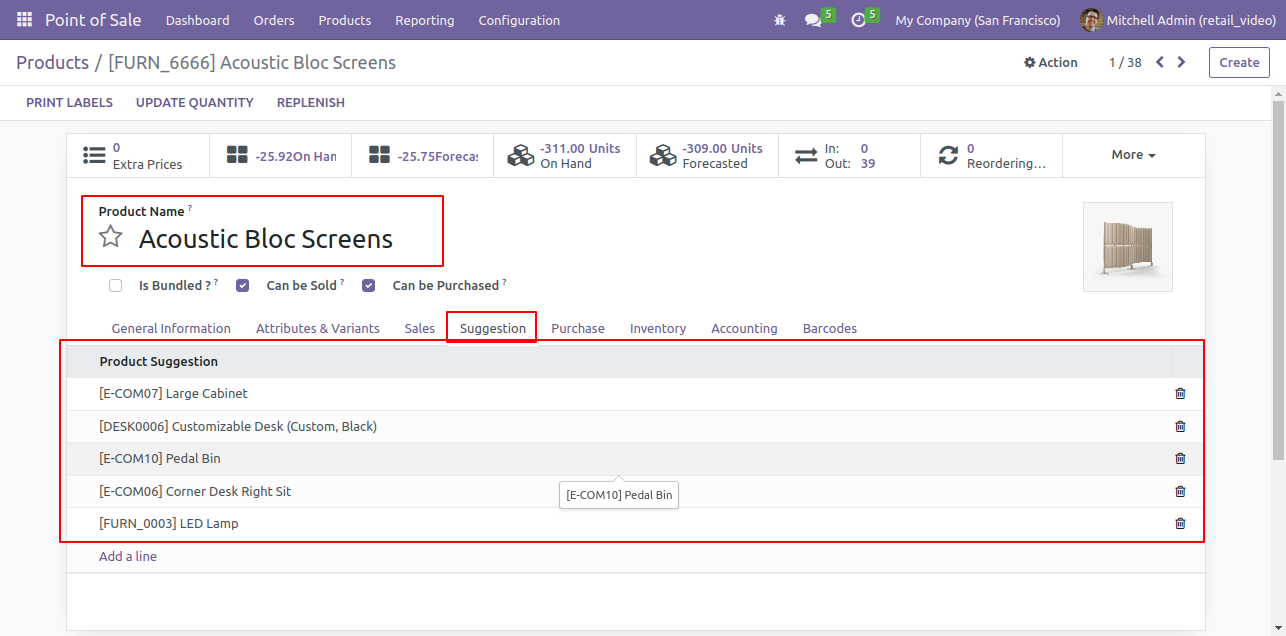
After that, when you find the particular product, at that time you can see the suggested product.

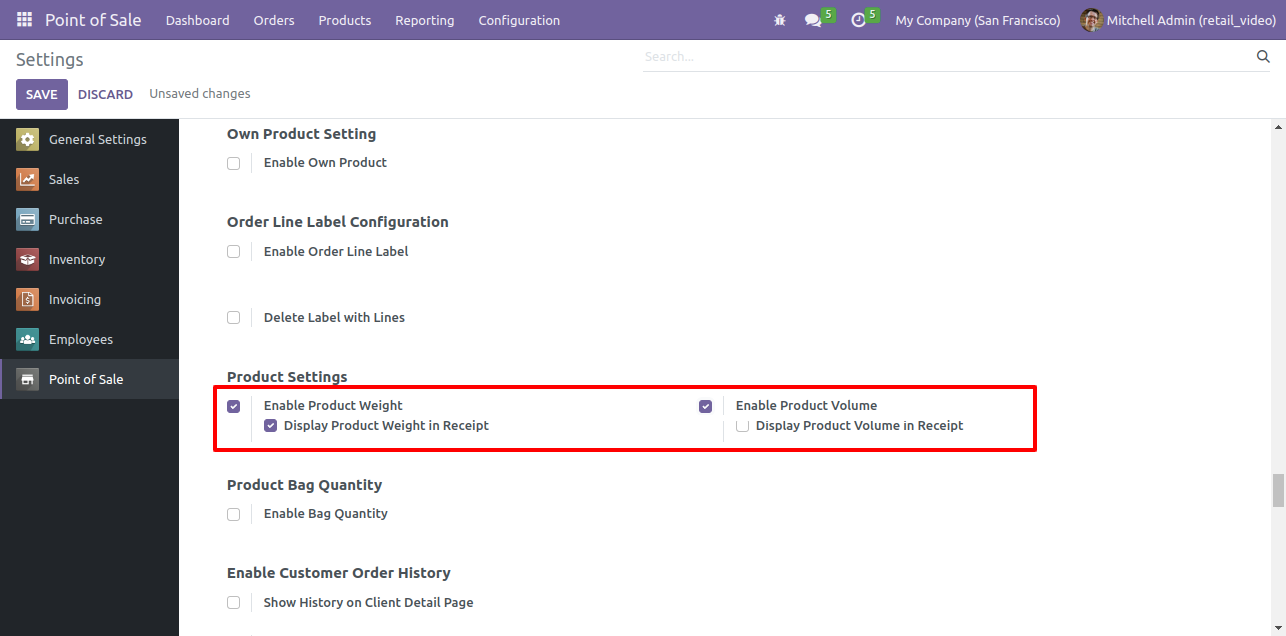
Goto pos setting and enable product weight and volume feature. Upon enabling that, two options will appear. 'Display Product Weight In receipt' & 'Display Product Volume In receipt'. Tick 'Display Product Weight In receipt' option.
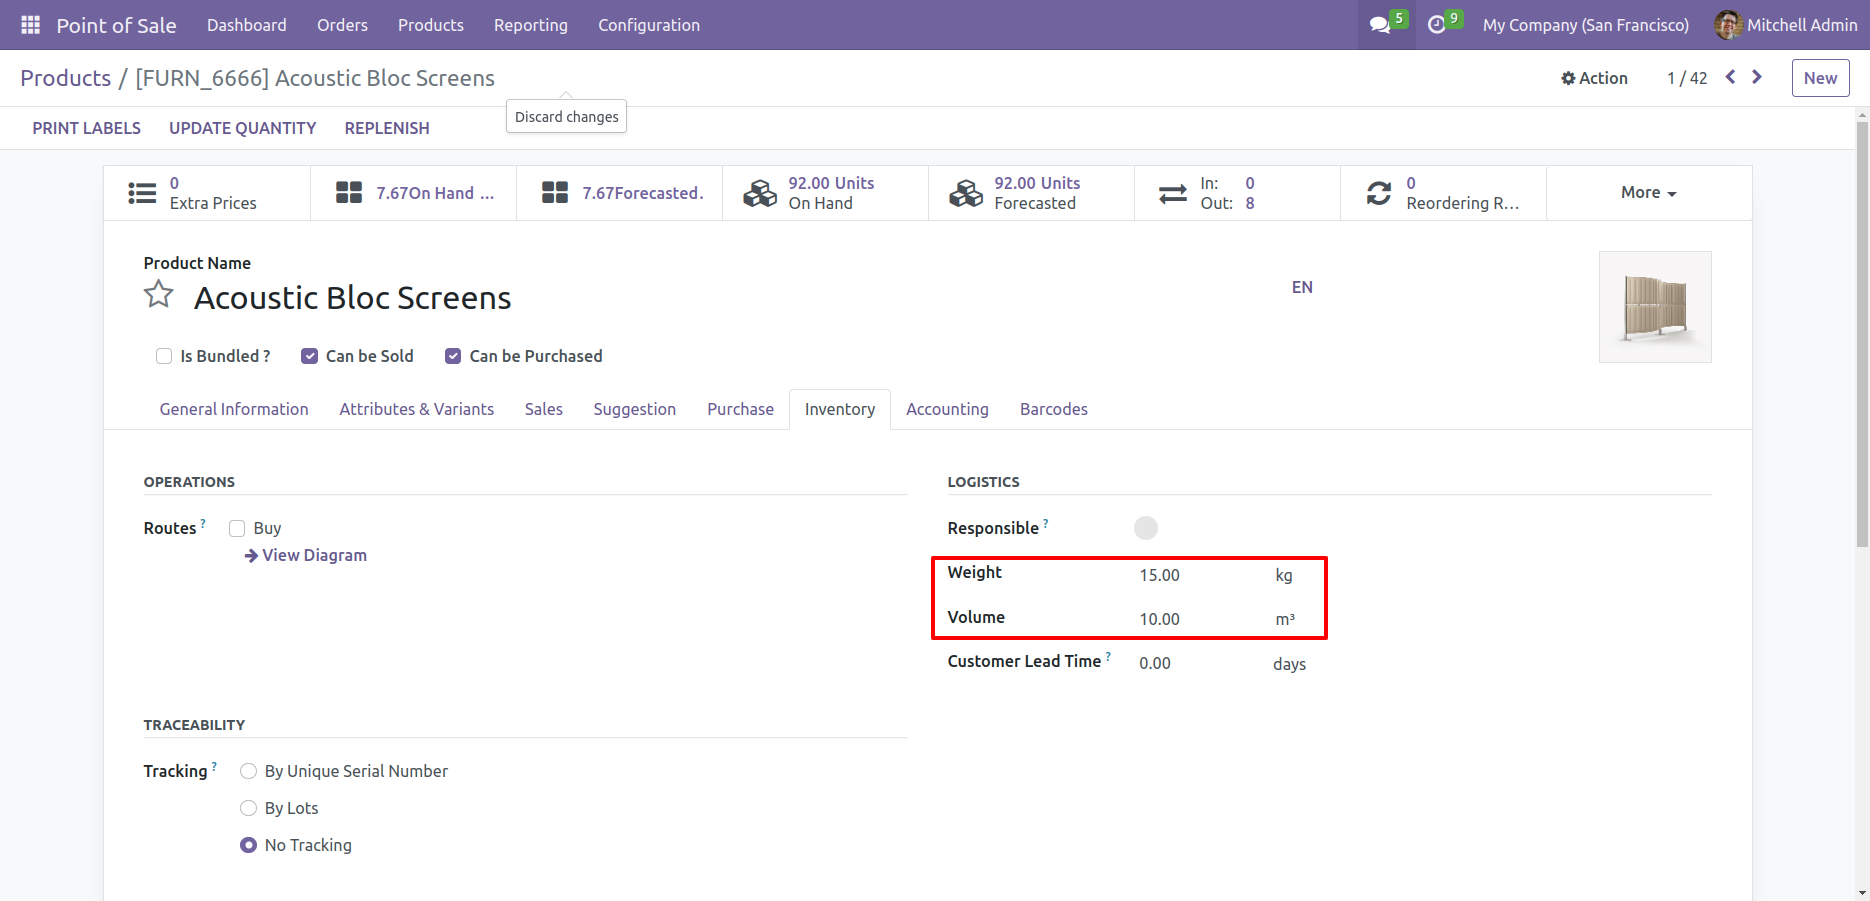
set weight and volume information in products.
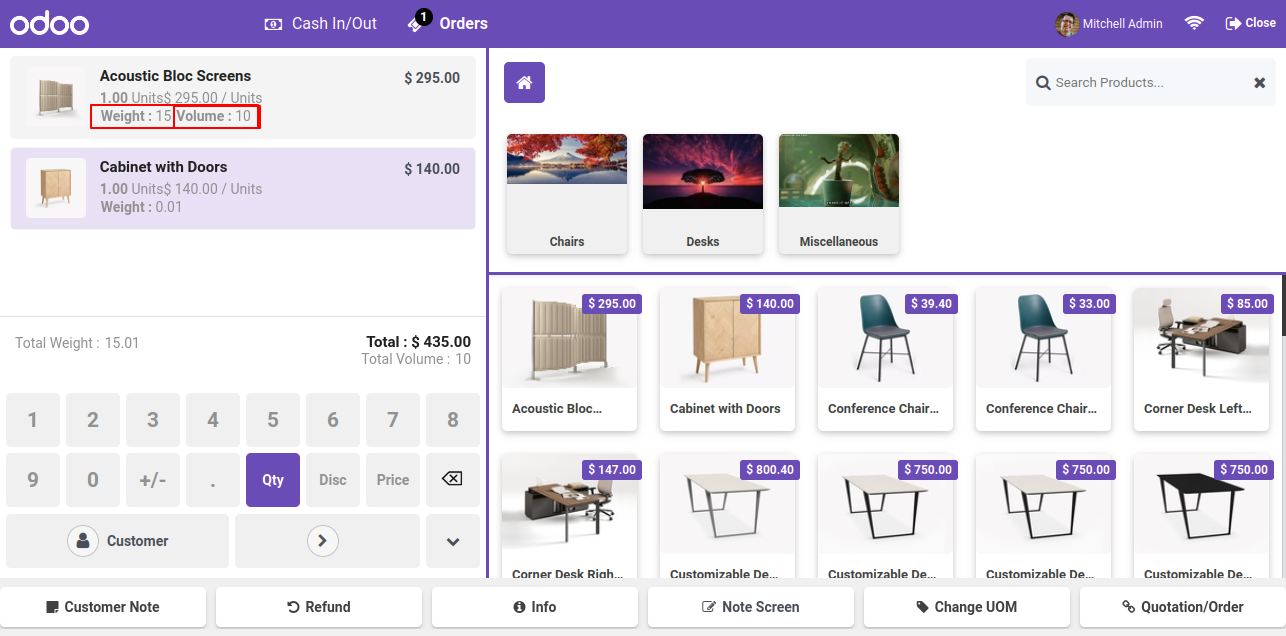
Now you can see the products weight and volume information in the pos cart.
Products weight information in the receipts as well.
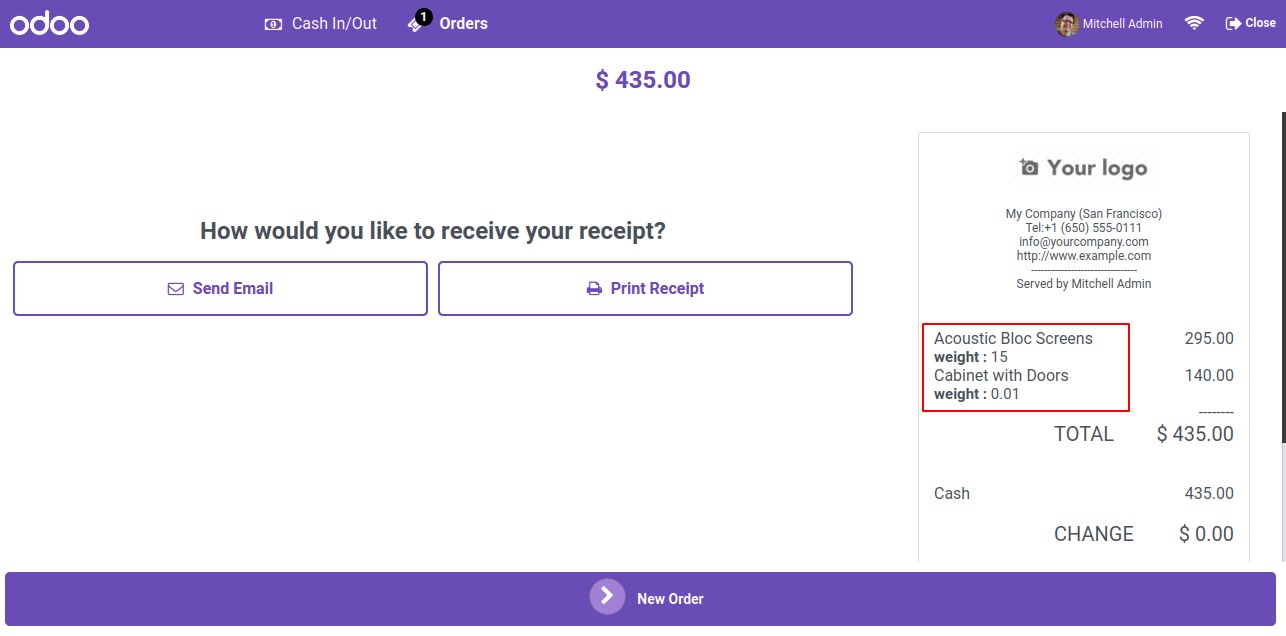
Products weight information in the receipts as well.
Note: The volume information is note added in the receipts because the 'Display Product Volume In receipt' option is unable.
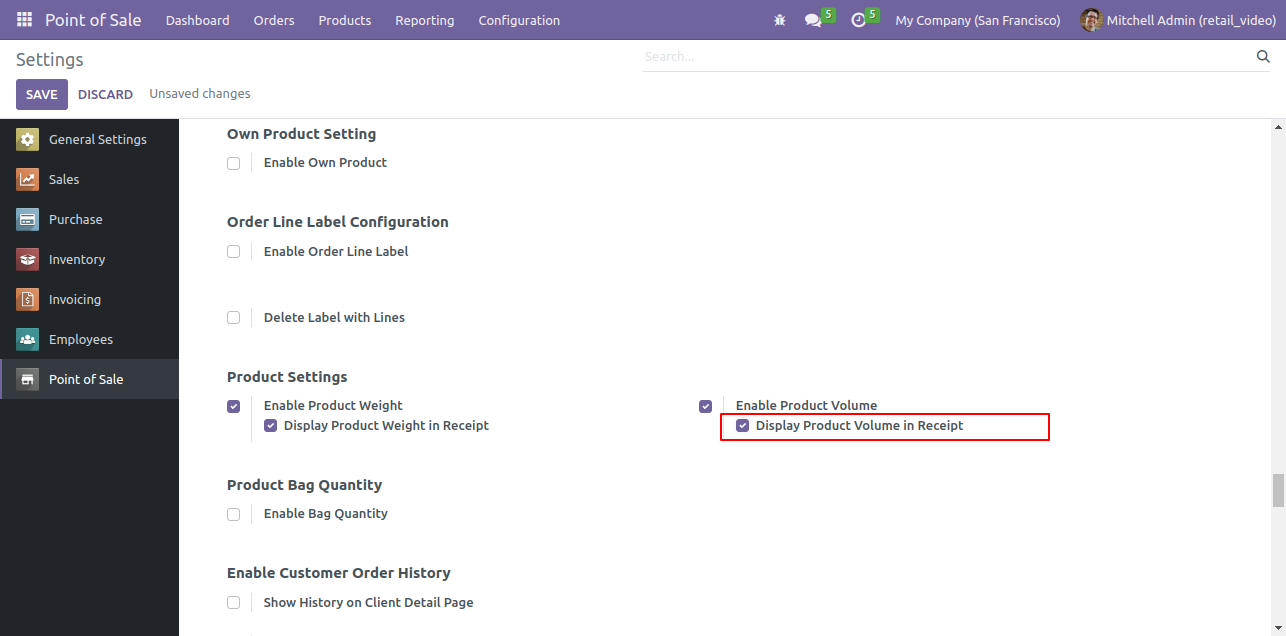
Goto pos setting and tick 'Display Product Volume In receipt' option.
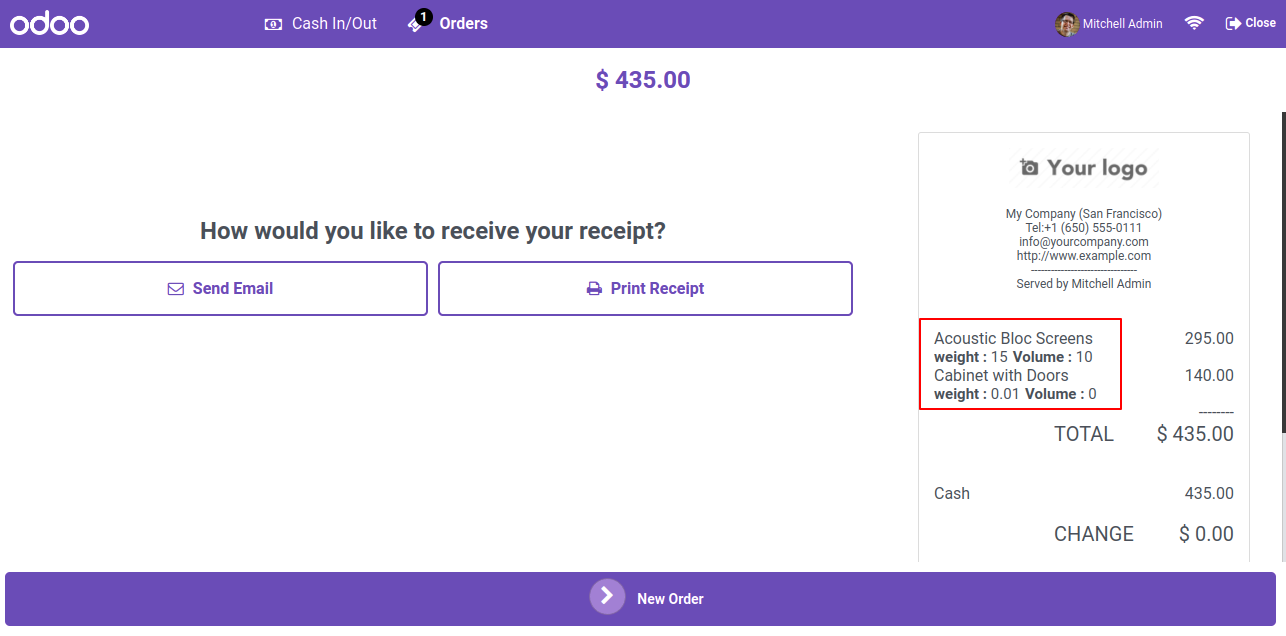
Products weight and volume information in the receipts as well.
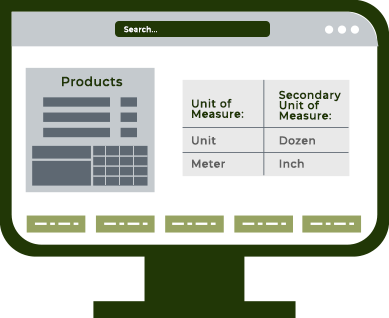
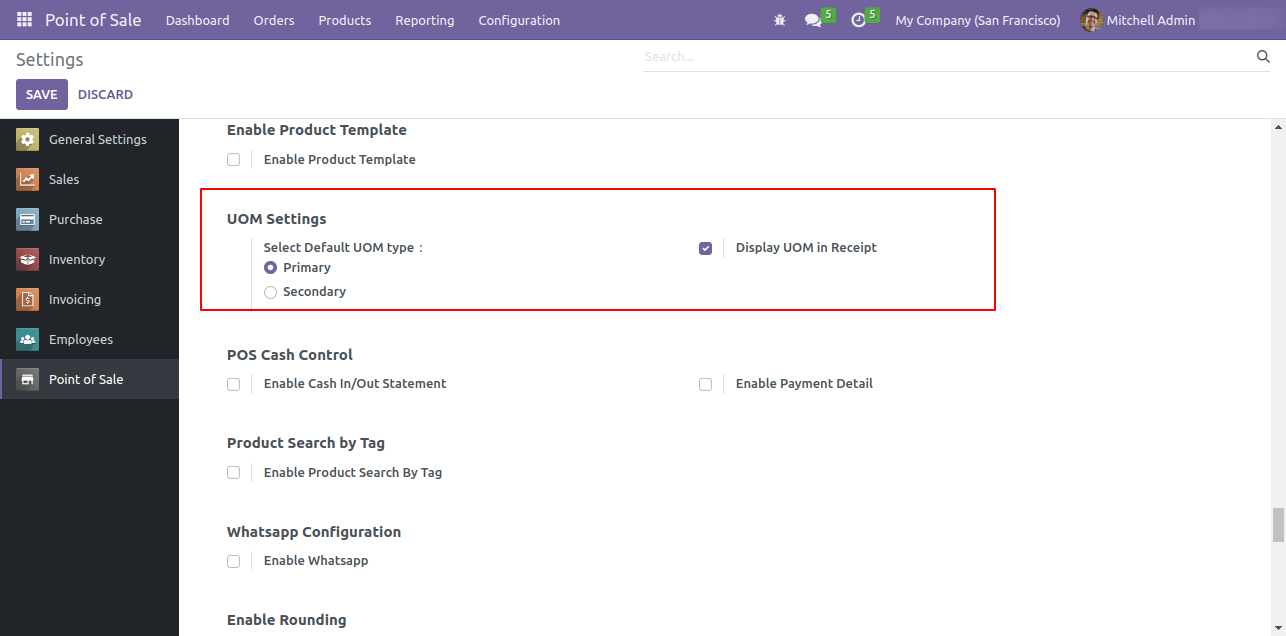
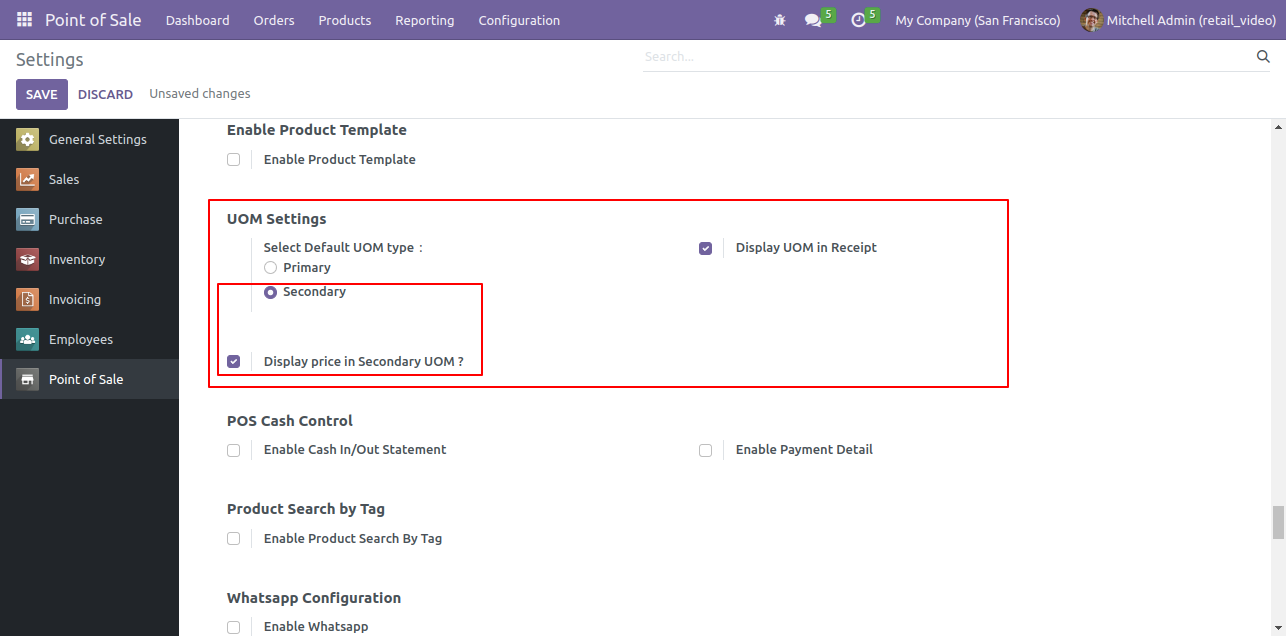
Go to pos setting and select default uom, check uom in receipt and display price in primary UoM.
Goto products and set appropriate primary unit of measure.
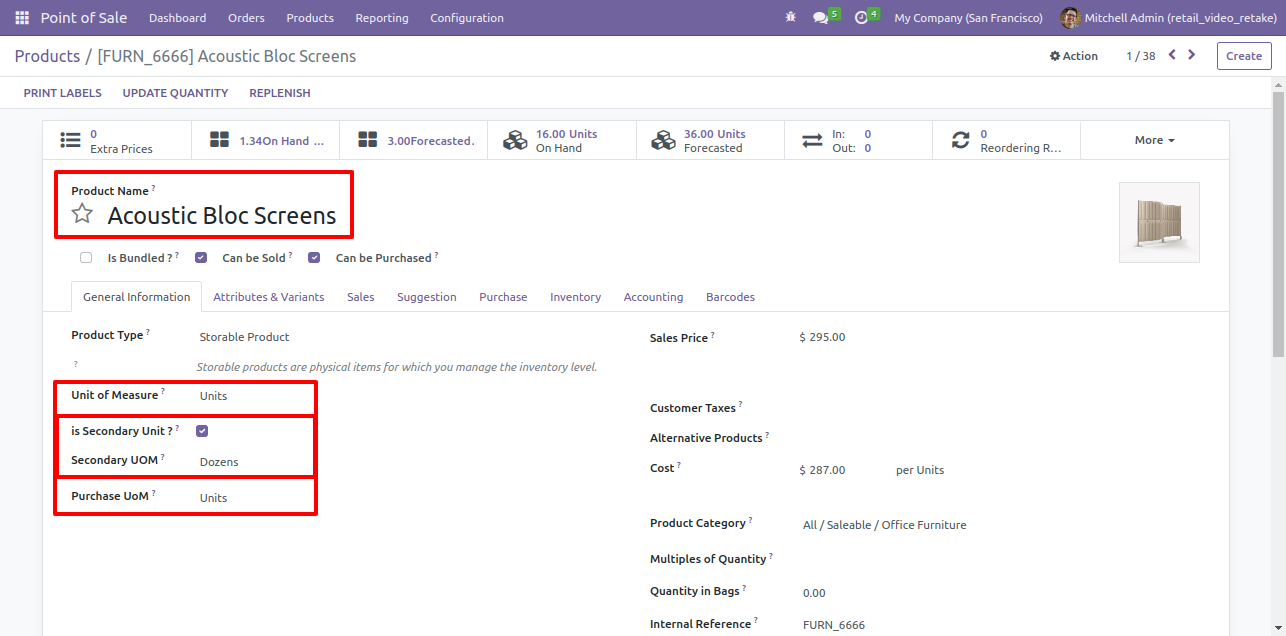
set appropriate primary unit of measure.
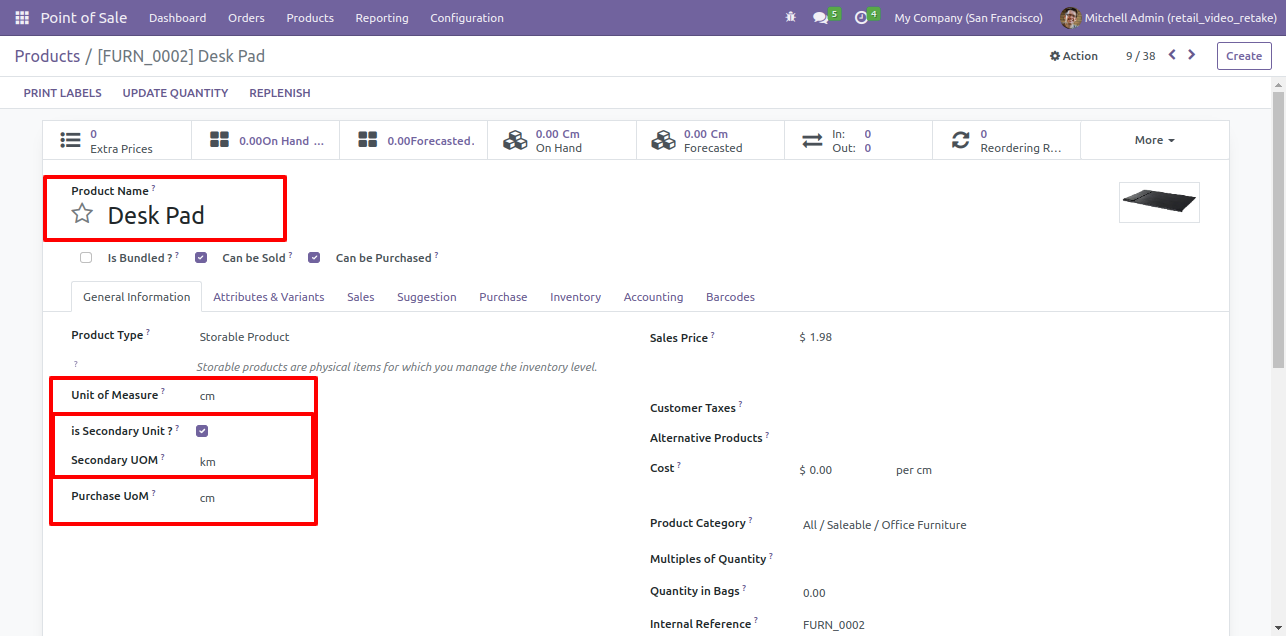
set appropriate primary unit of measure.
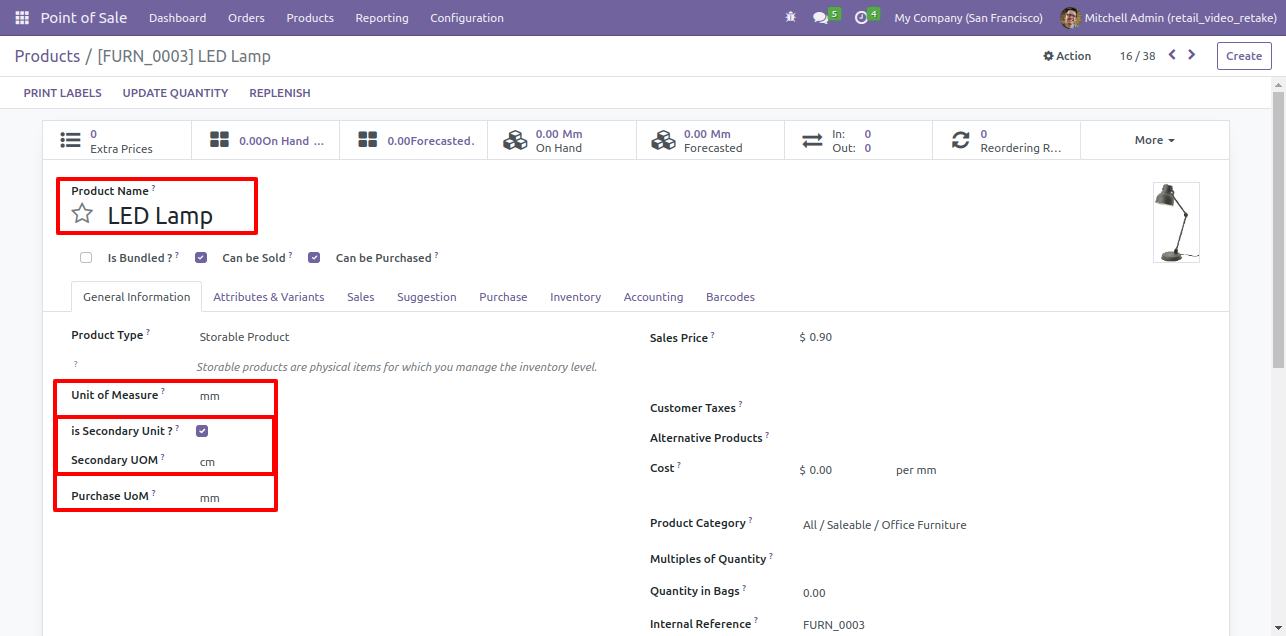
It will change unit of measure with price.
It will change unit of measure.

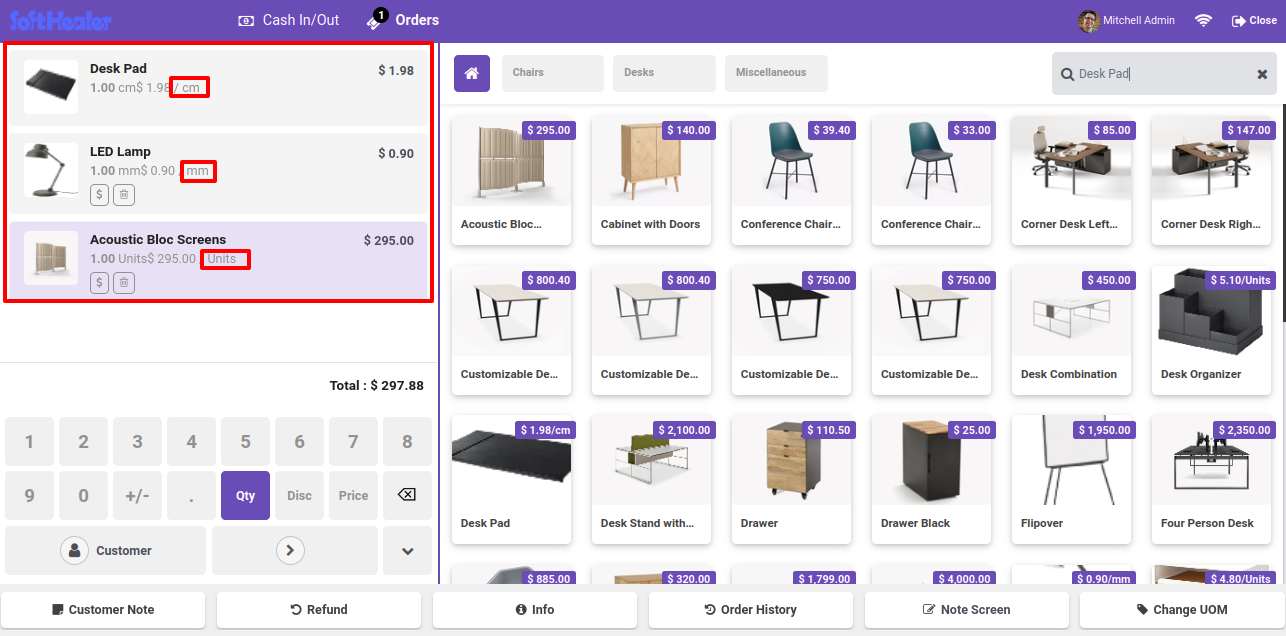
You can also set/change the uom by clicking on the 'Change UOM' button.
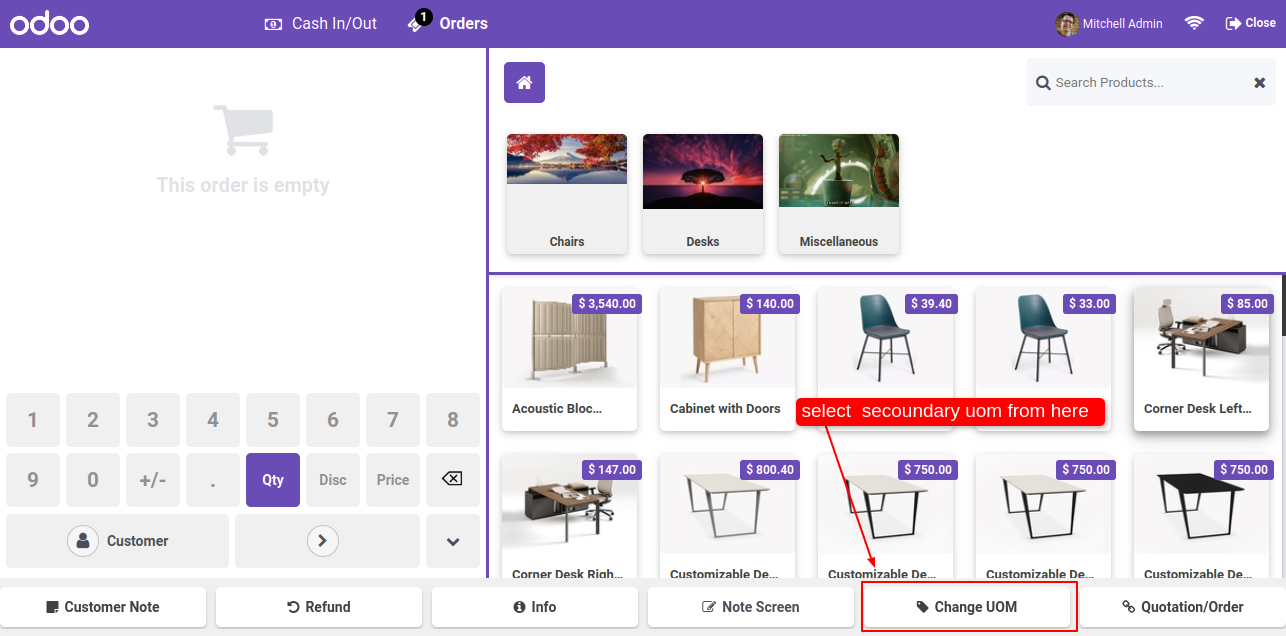
After that, select UOM wizard will appear. Select the unit.
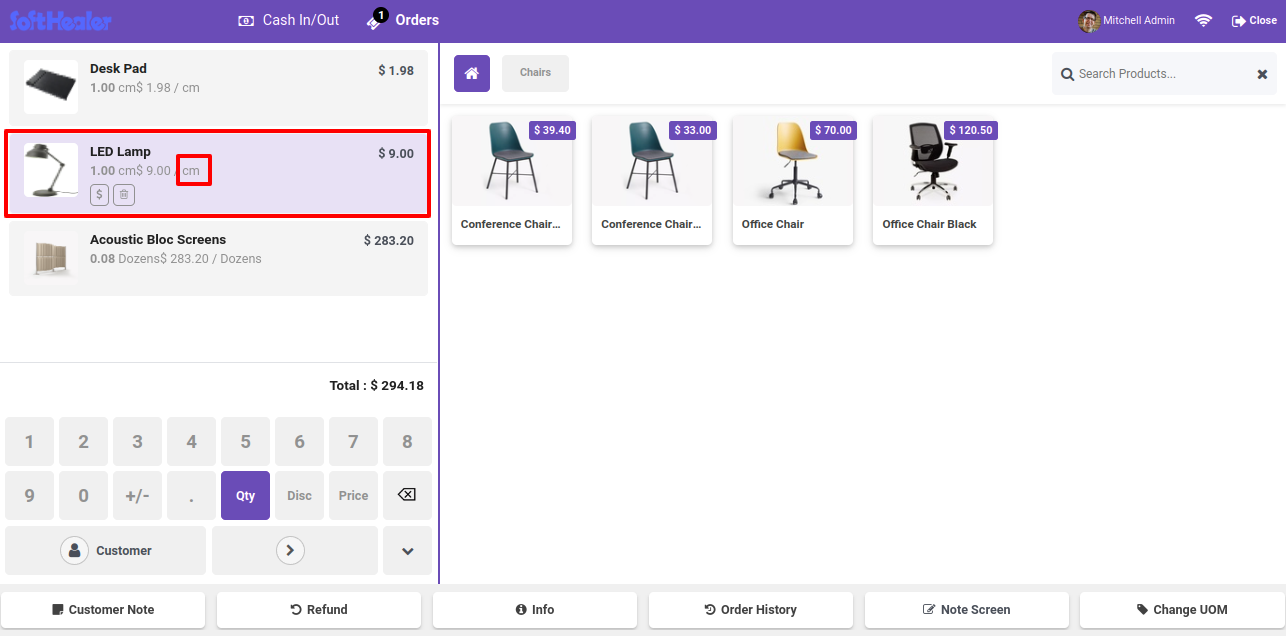
Here, you can see the changed uom.
Now the uom is mm. Click on the Change UOM' button.
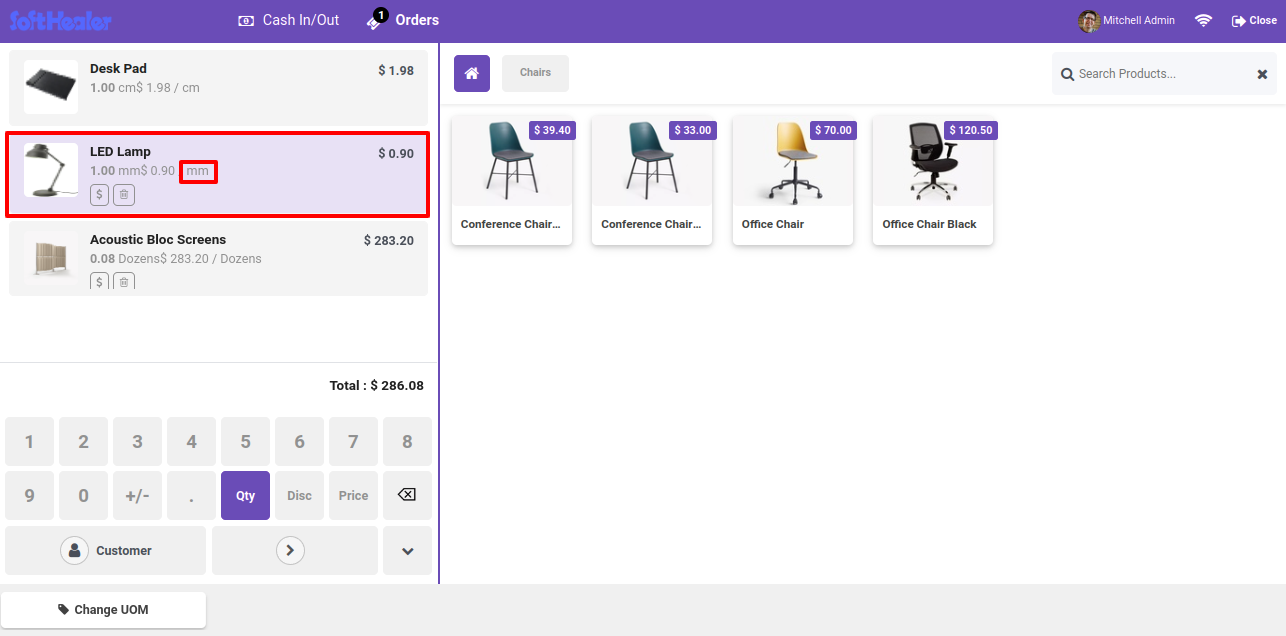
Select the cm in select UOM wizard.
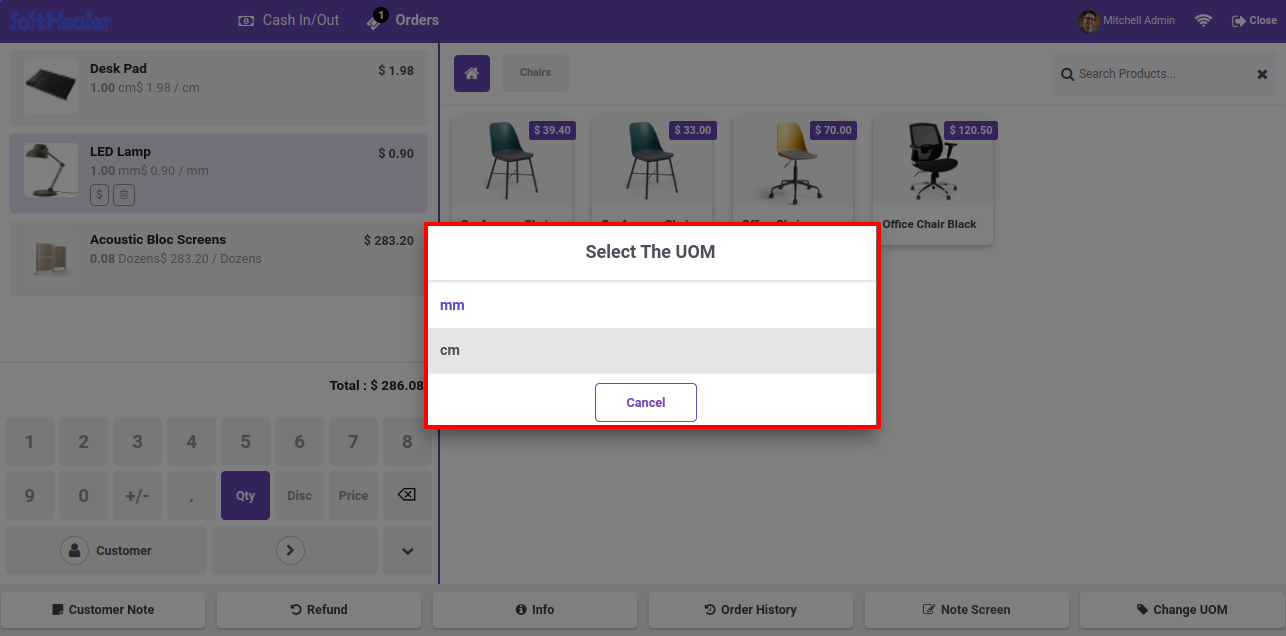
Now, you can see the uom is replaced by cm.
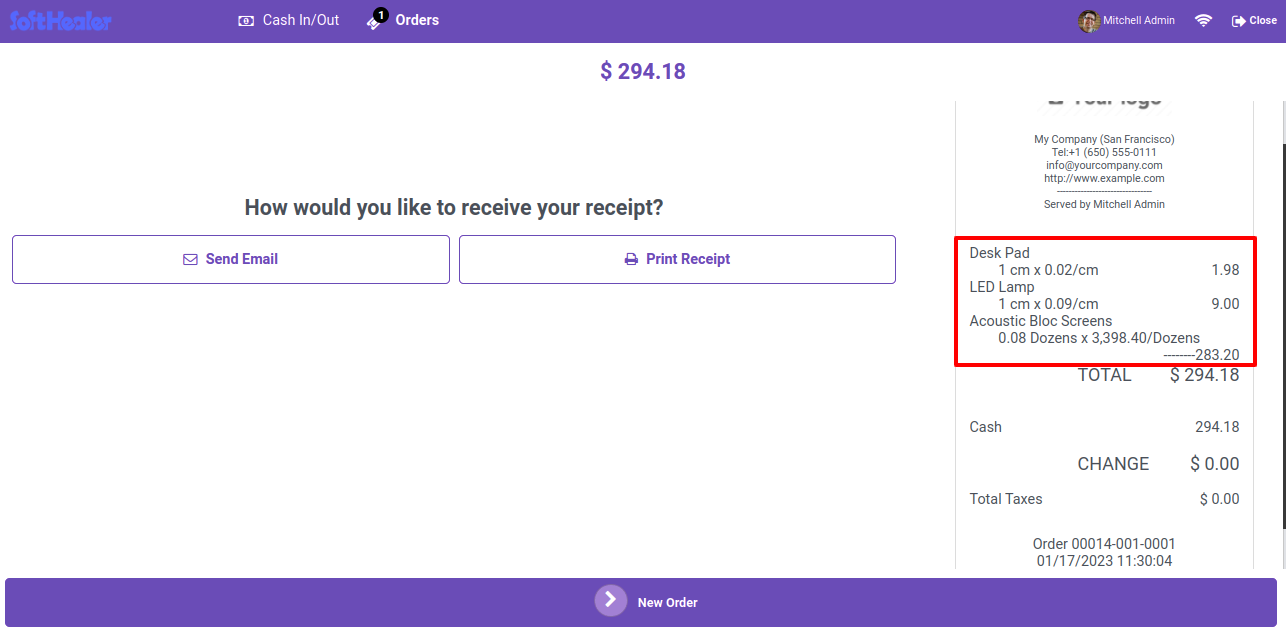
Unit of Measure details in receipt.
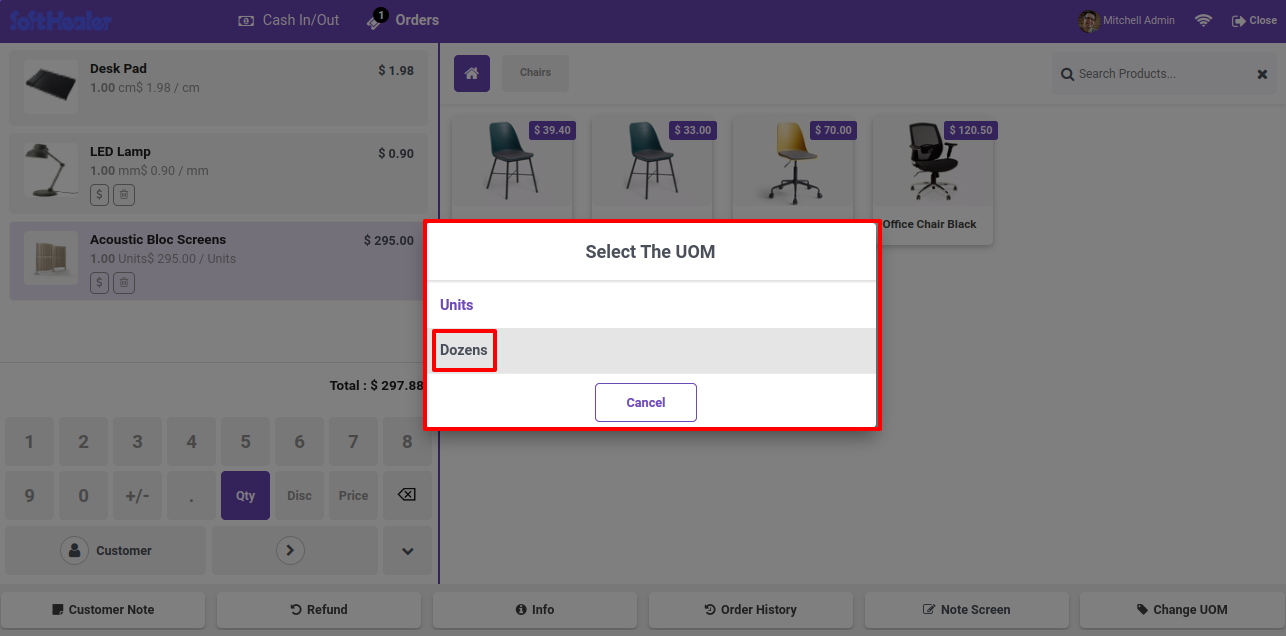
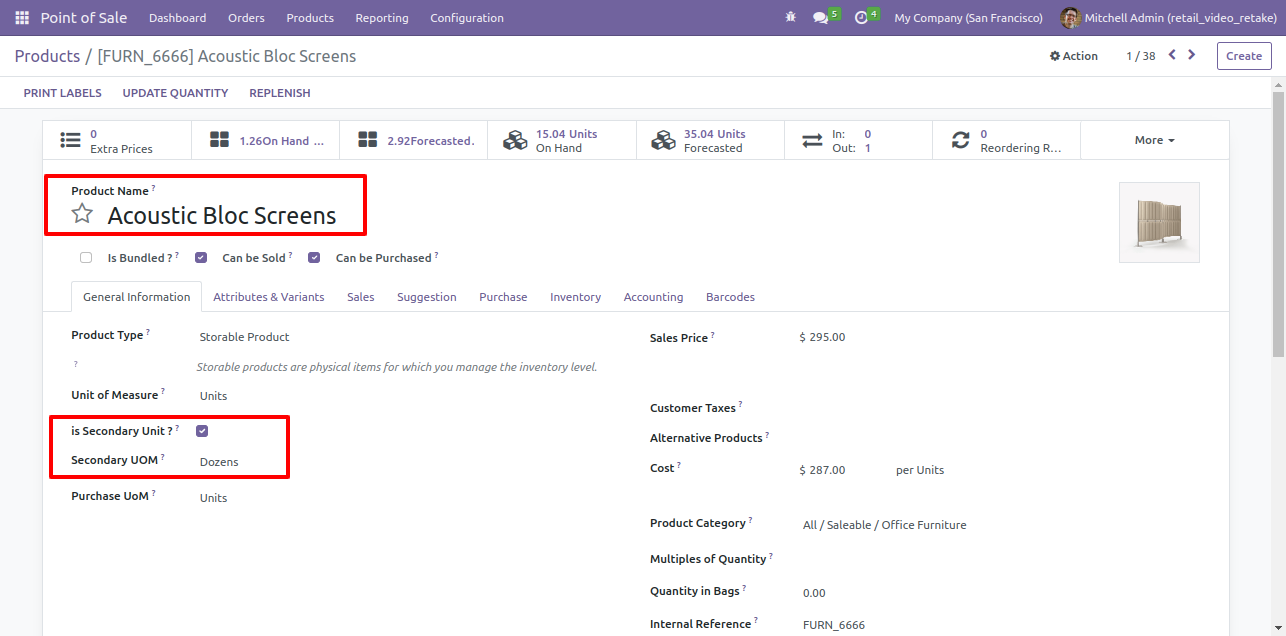
Goto pos setting and select default uom, check uom in receipt and display price in sec UoM.
Goto products and set appropriate secondary unit of measure.
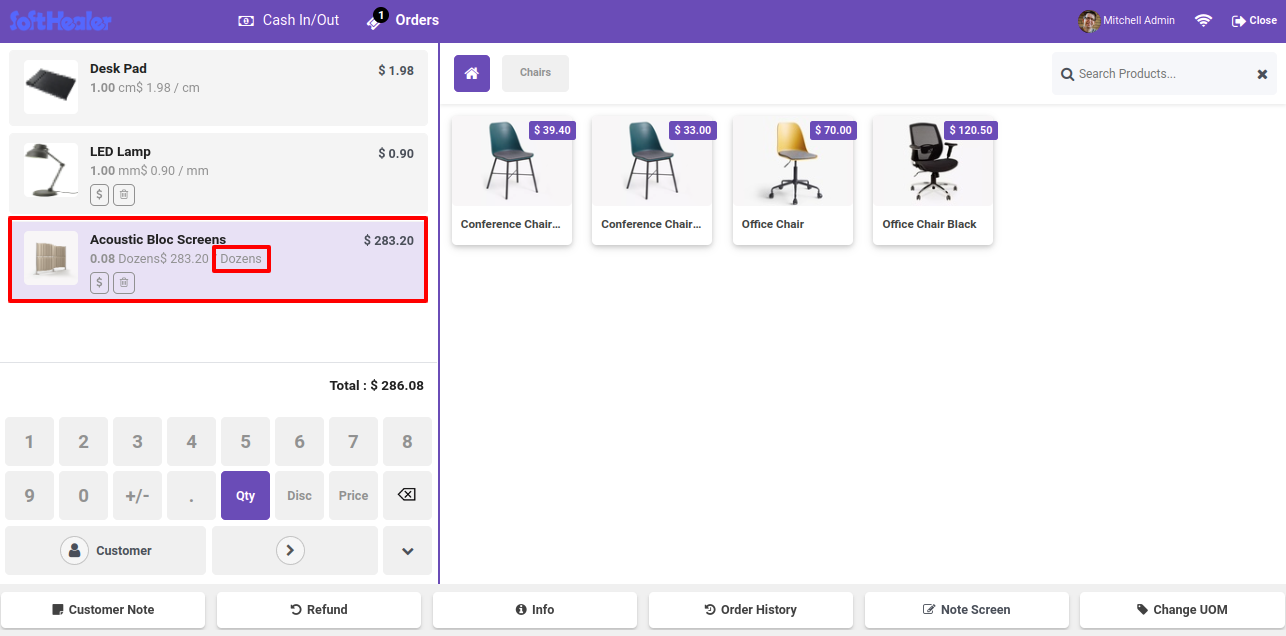
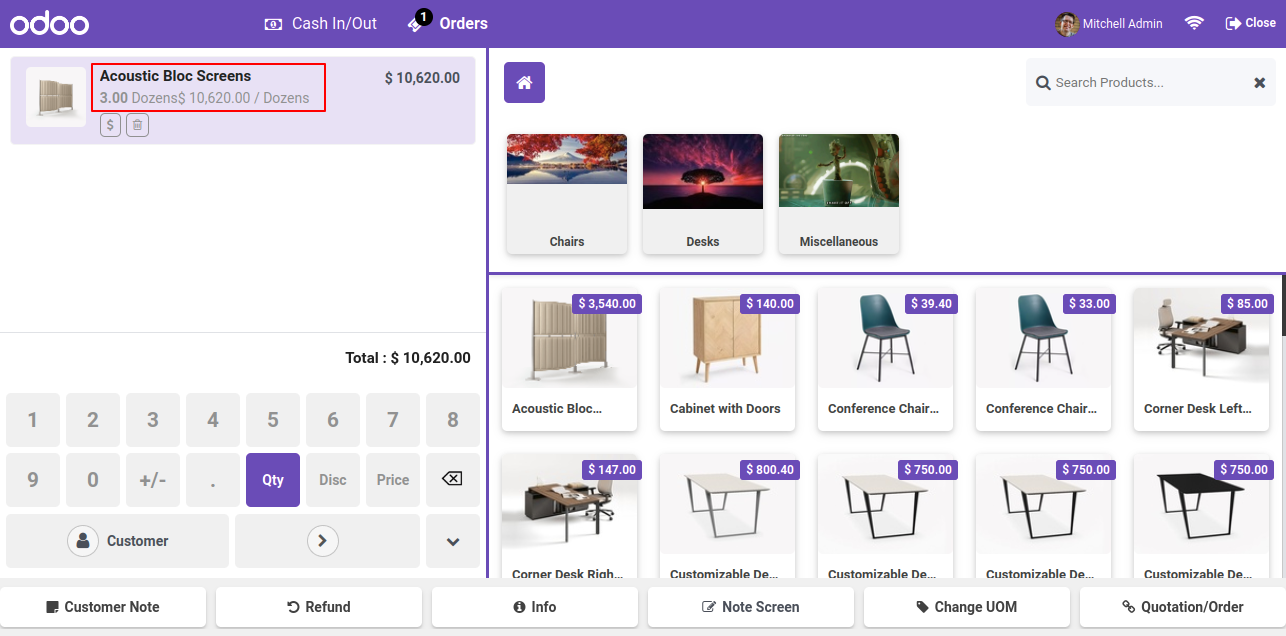
It will change unit of measure with price.
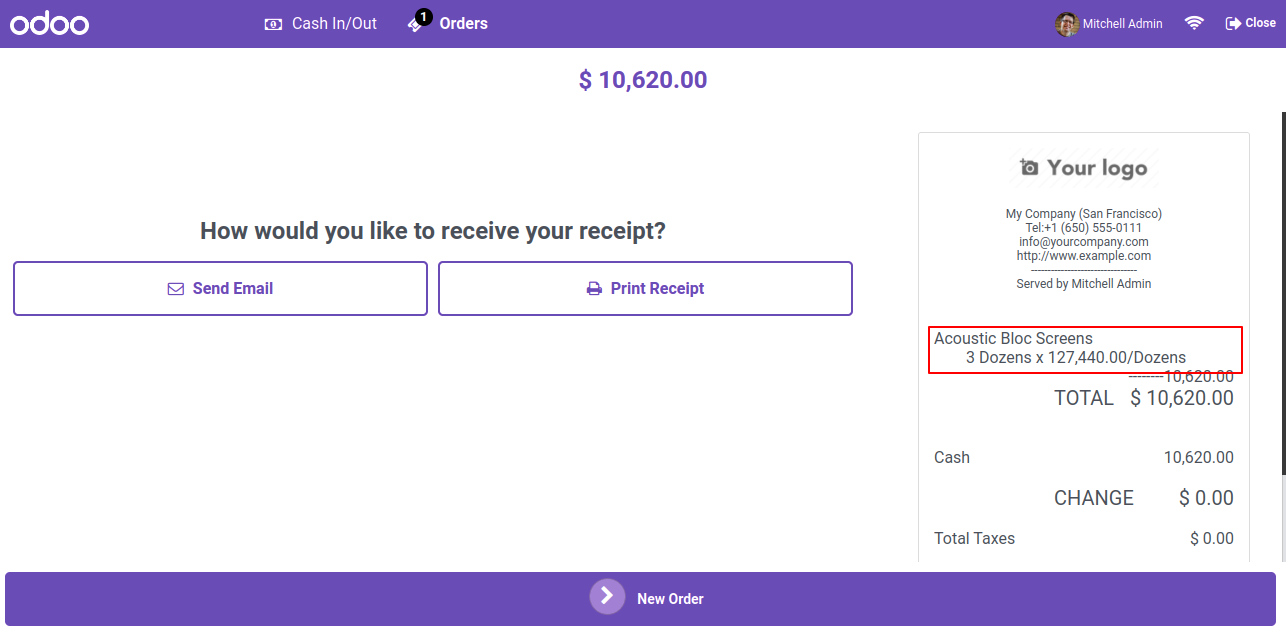
Unit of Measure details in receipt
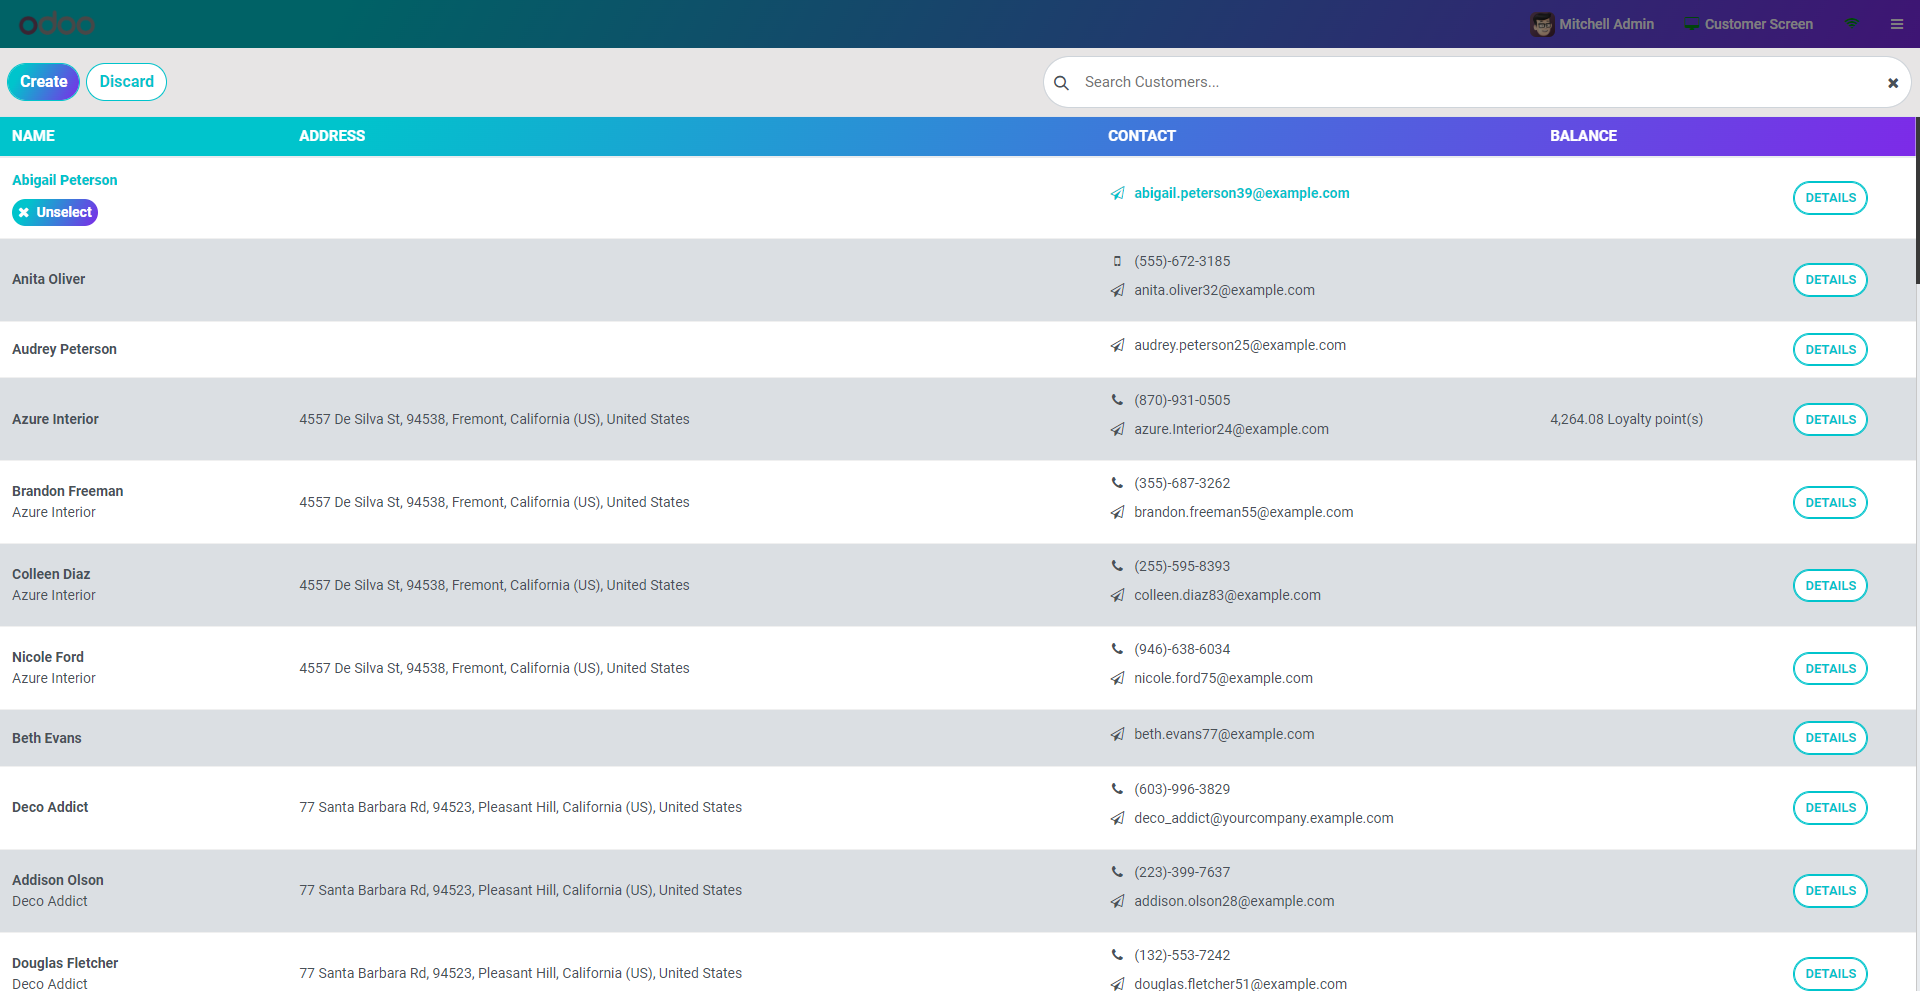
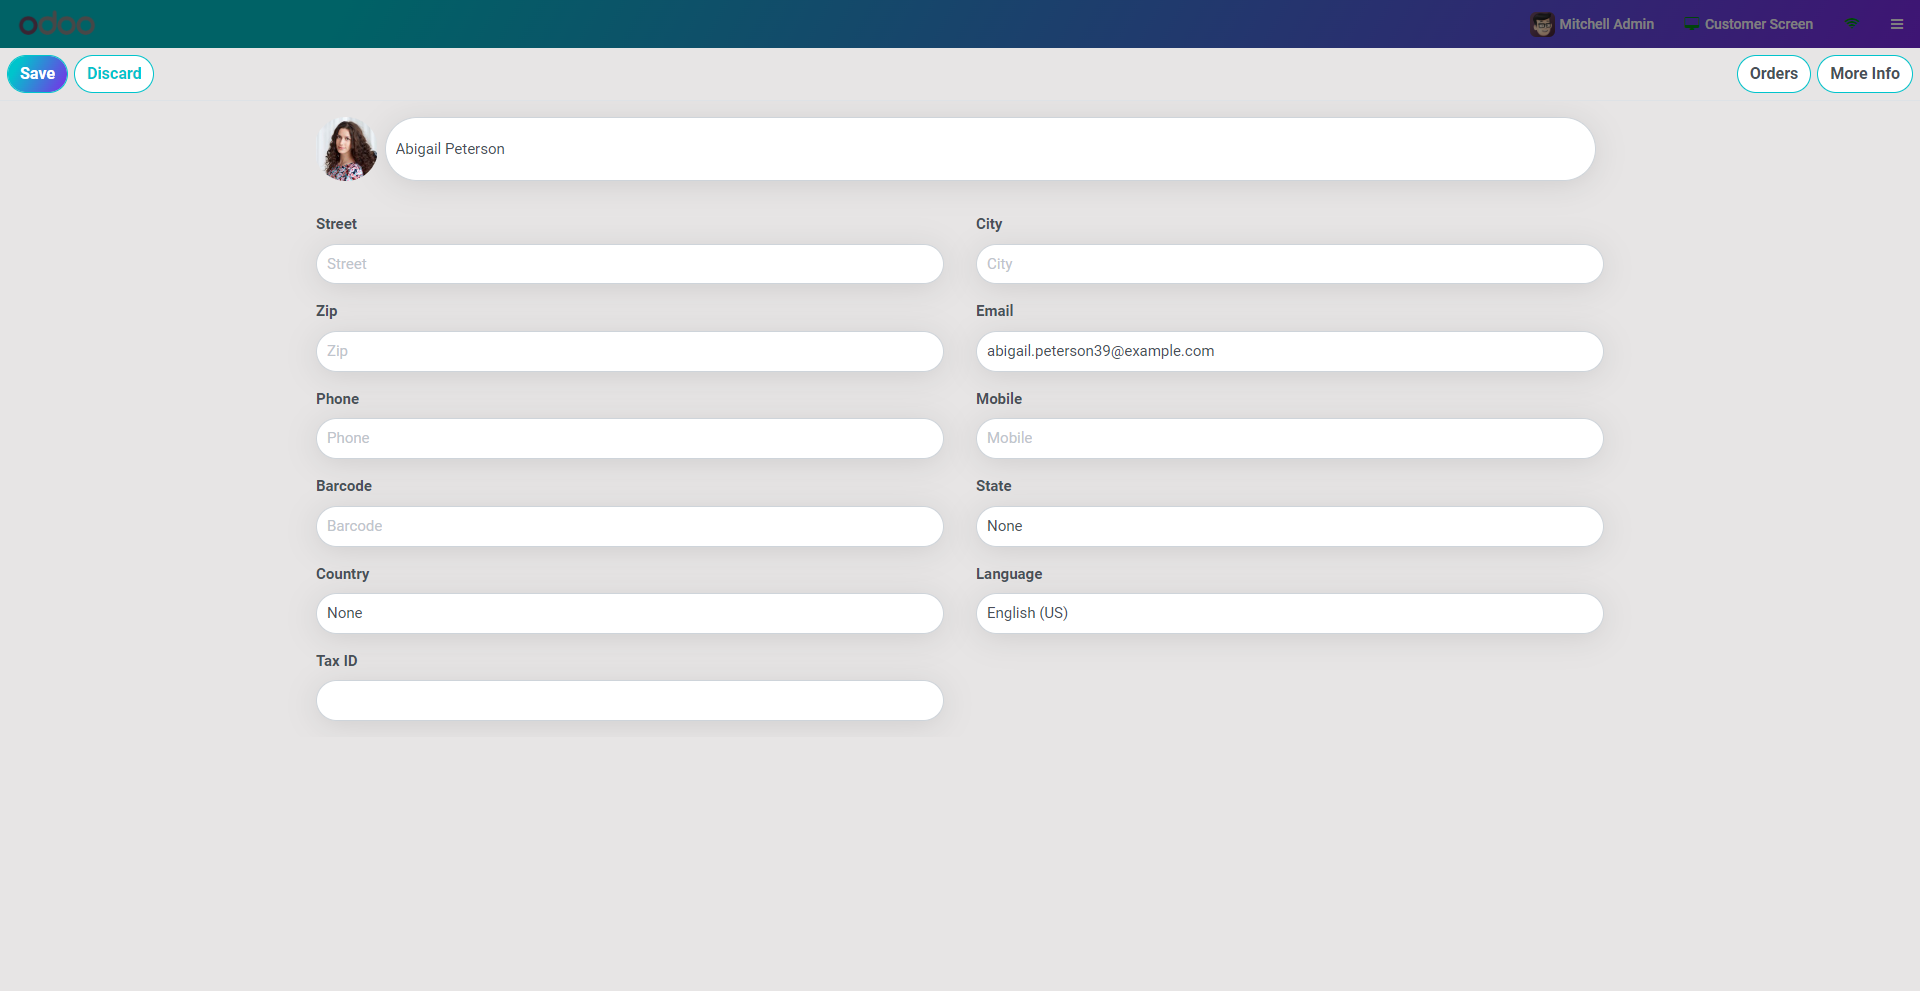
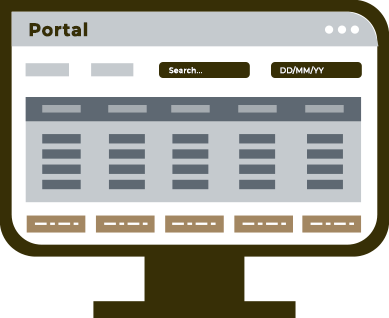
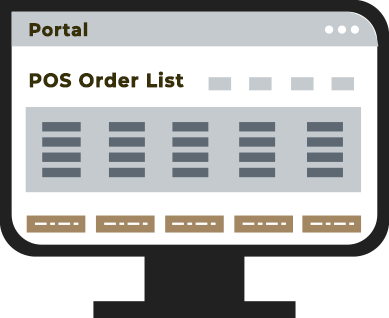
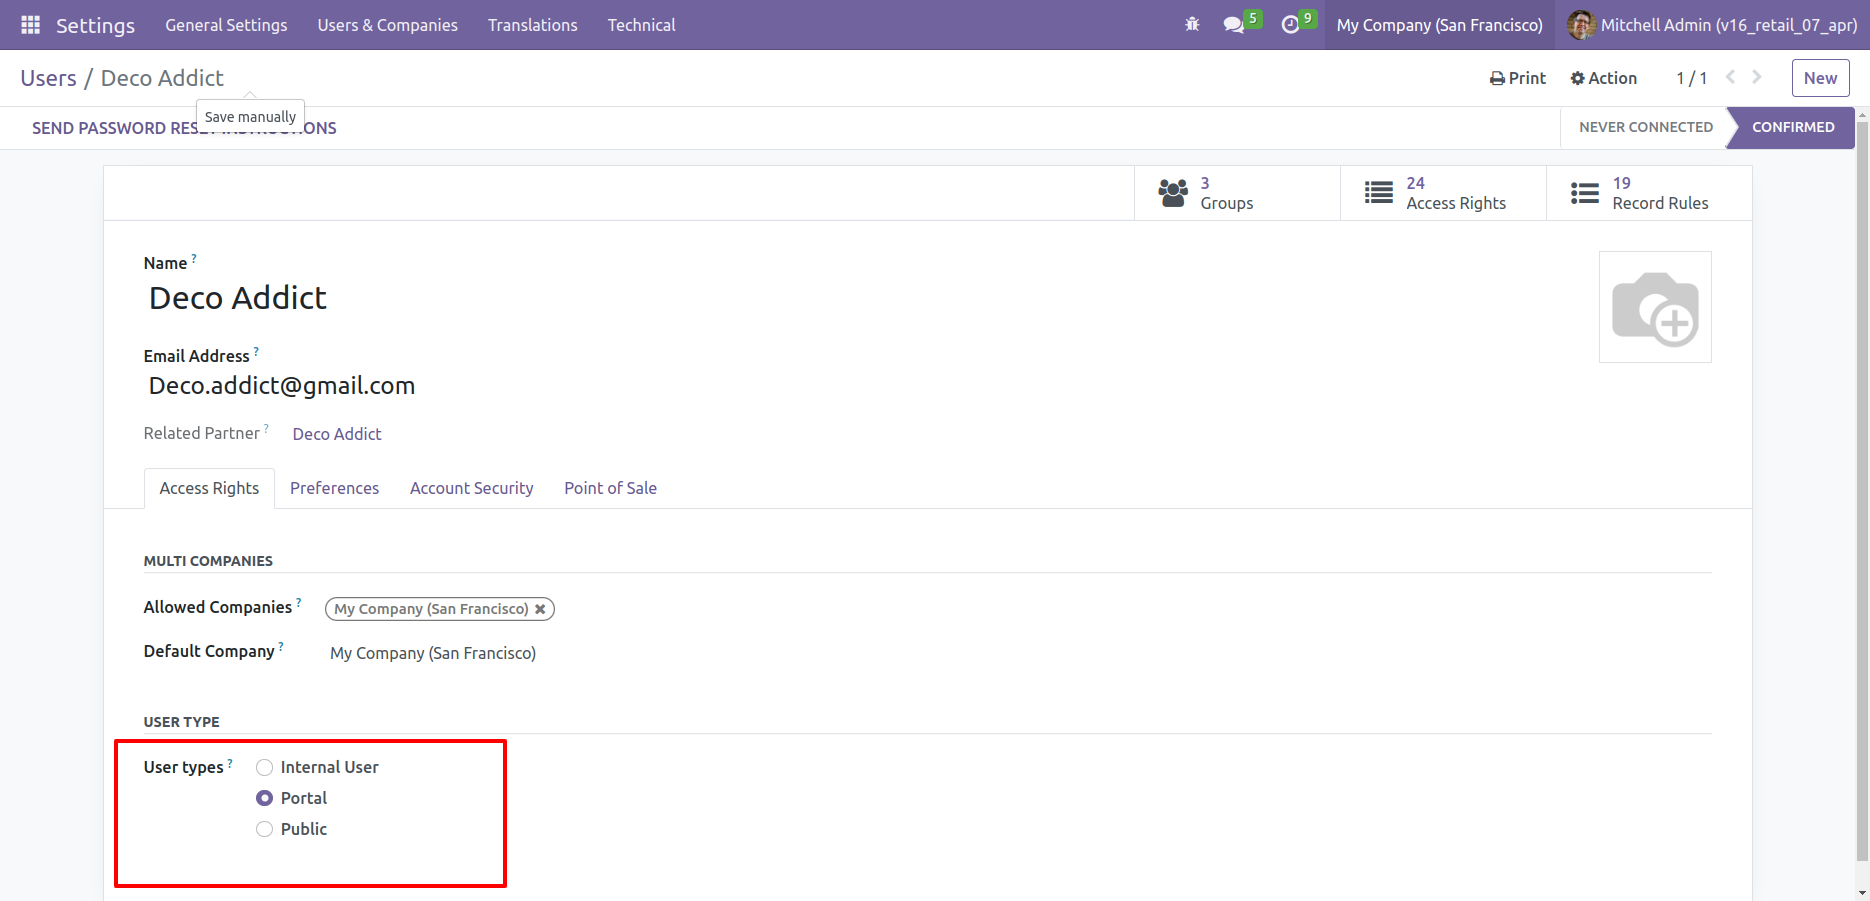
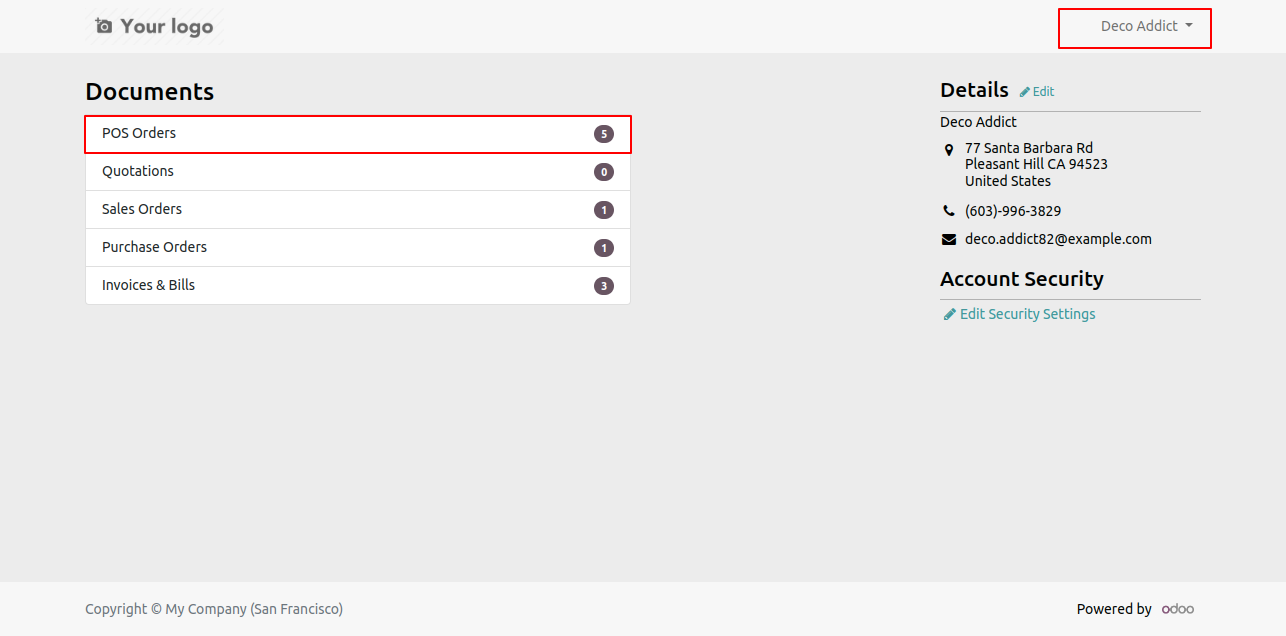
Goto User : Allow to Portal User.
In portal those user can see his pos orders
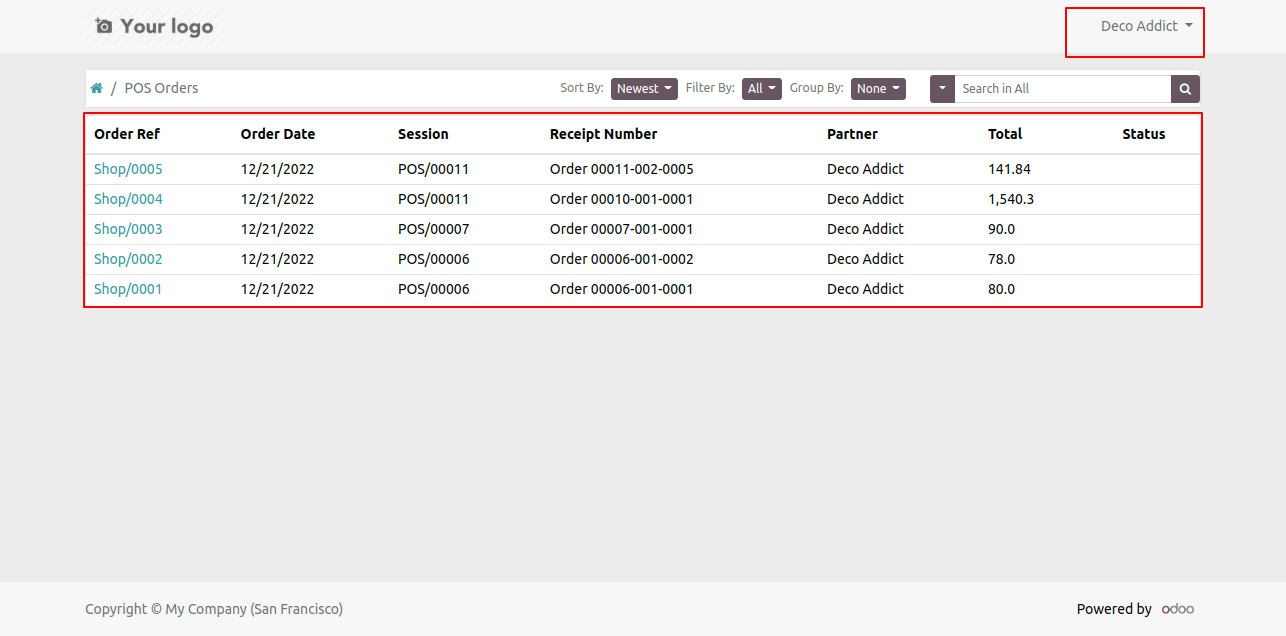
PoS Order List.
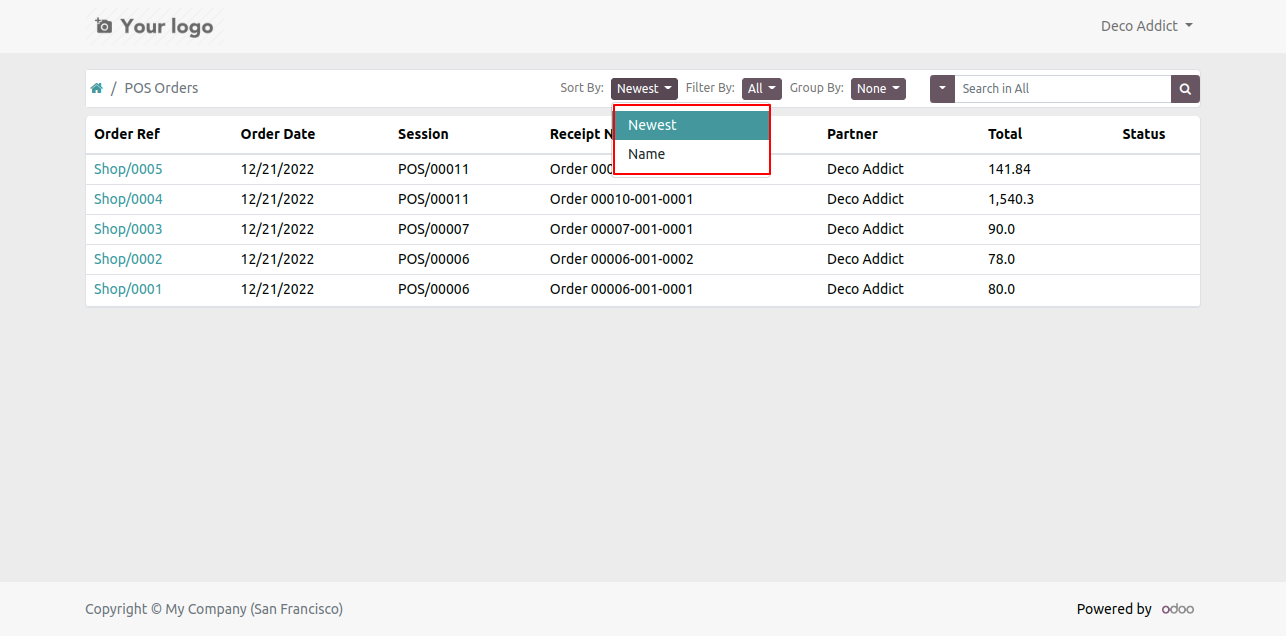
PoS Order short by newest and name.
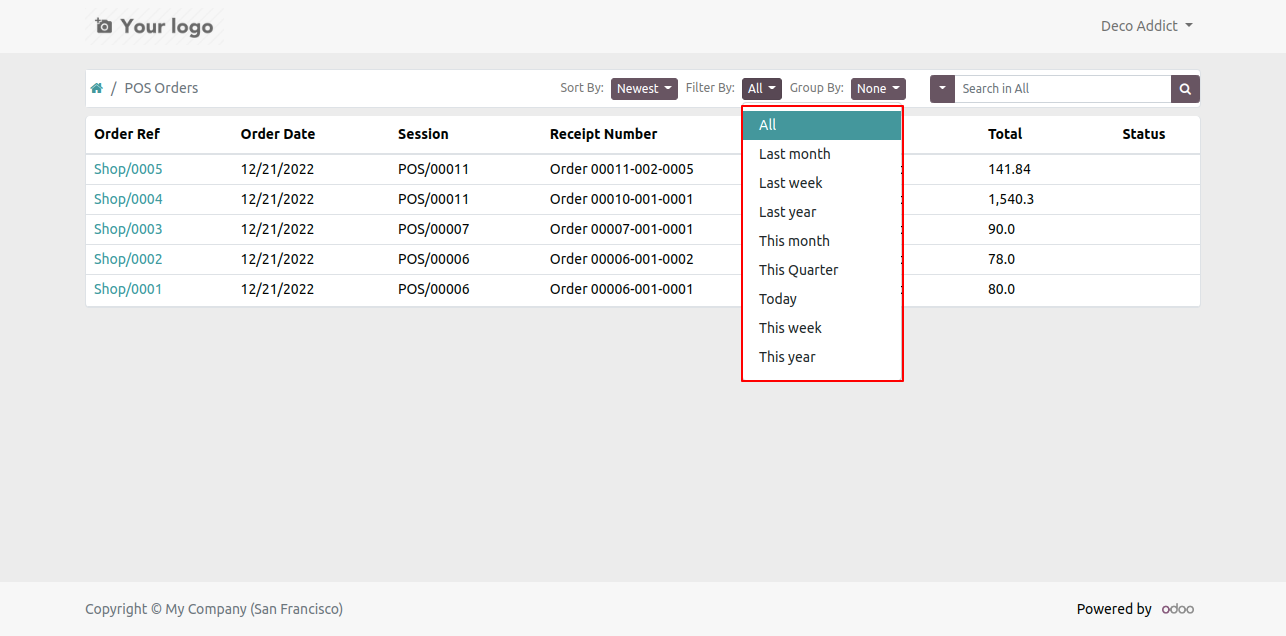
PoS Order Filter by Days and Months.
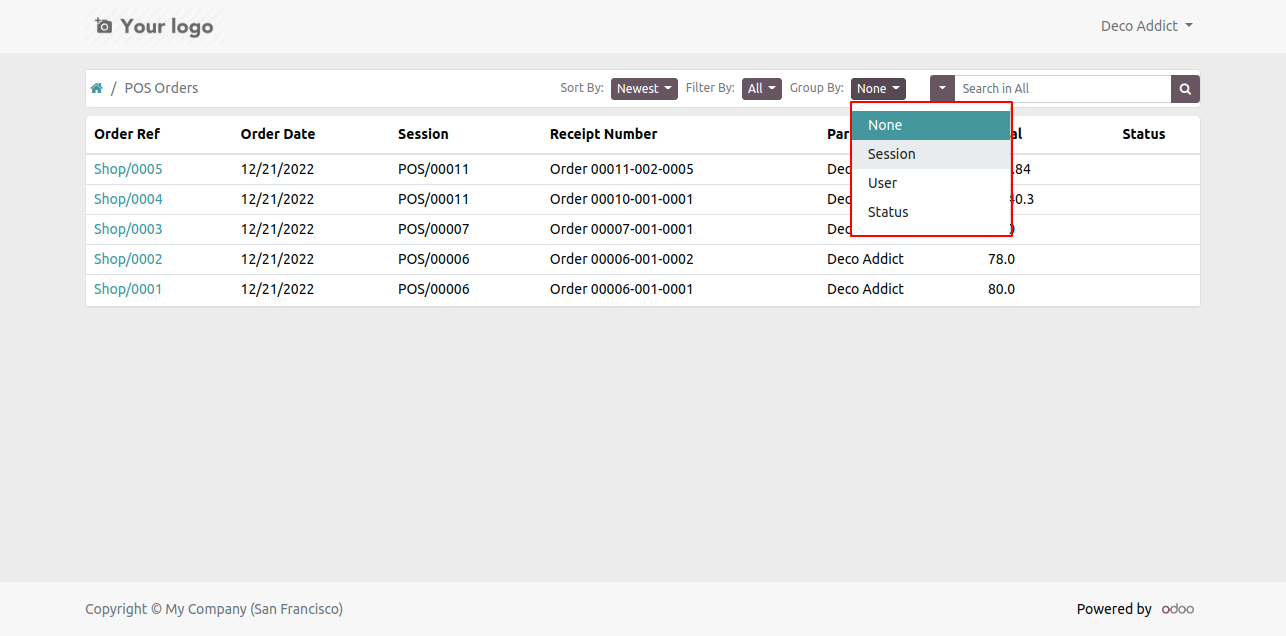
PoS Order group by none, users, session and status as well.
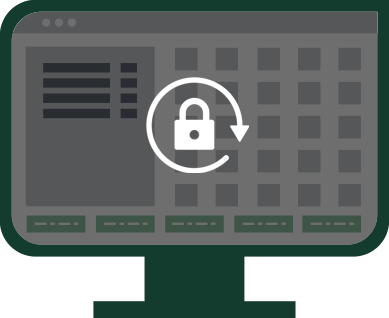
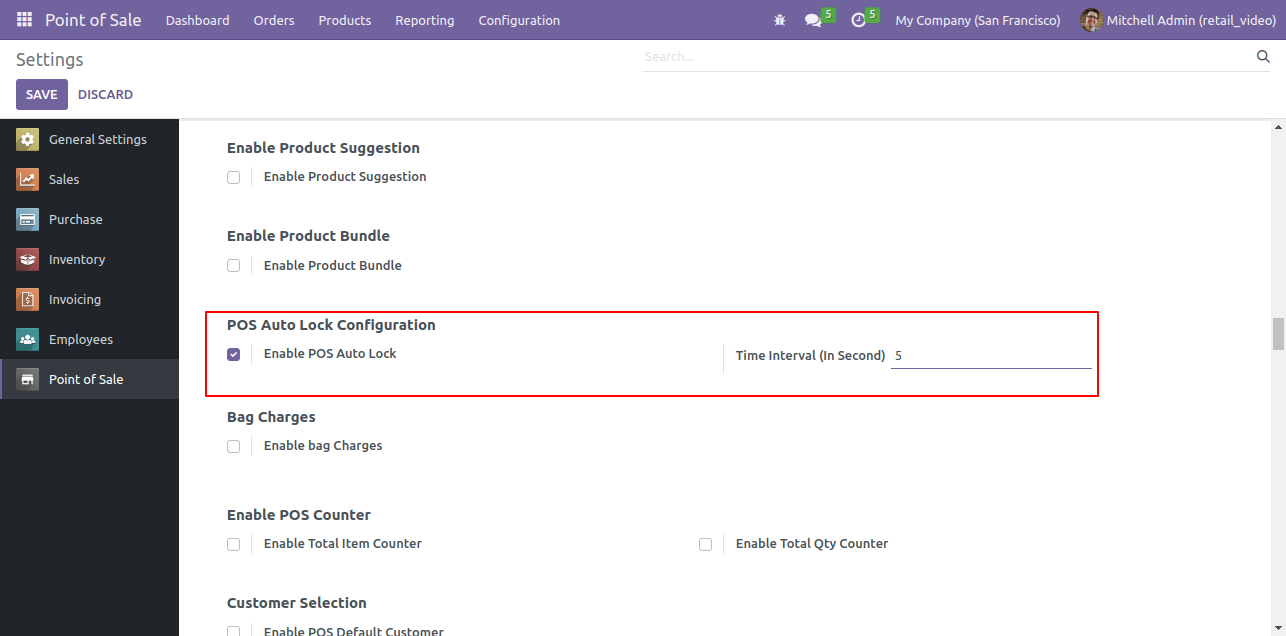
Goto pos config setting and Enable Auto Lock and set auto lock apply after delay time.
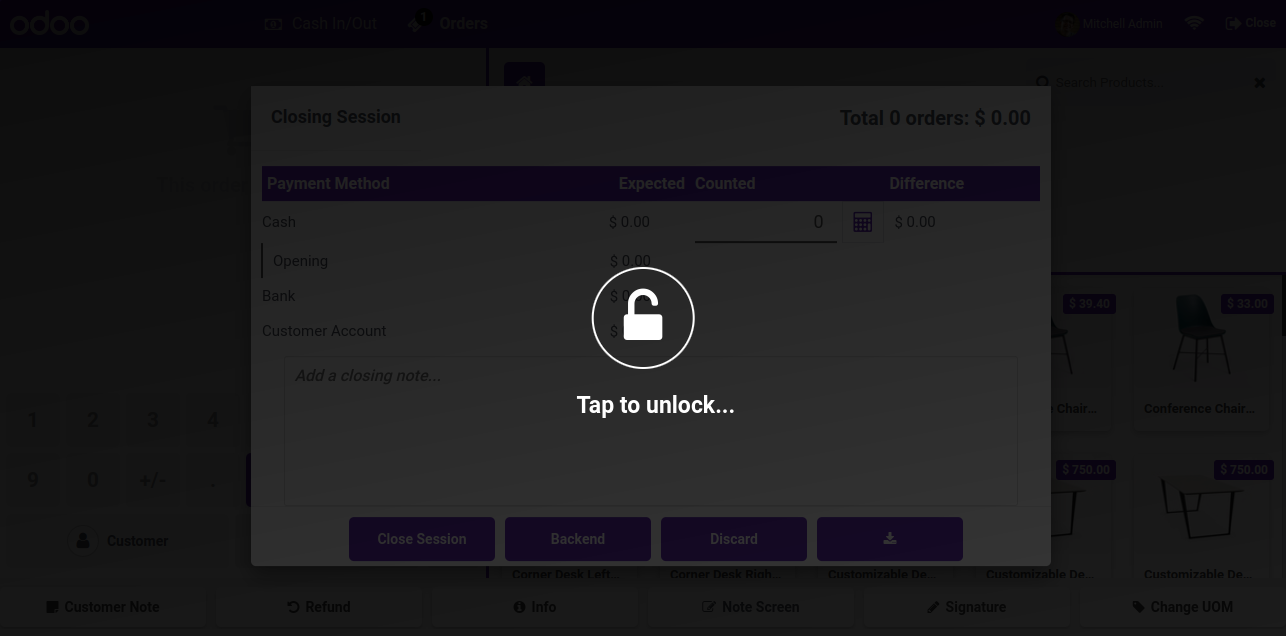
POS Screen Locked
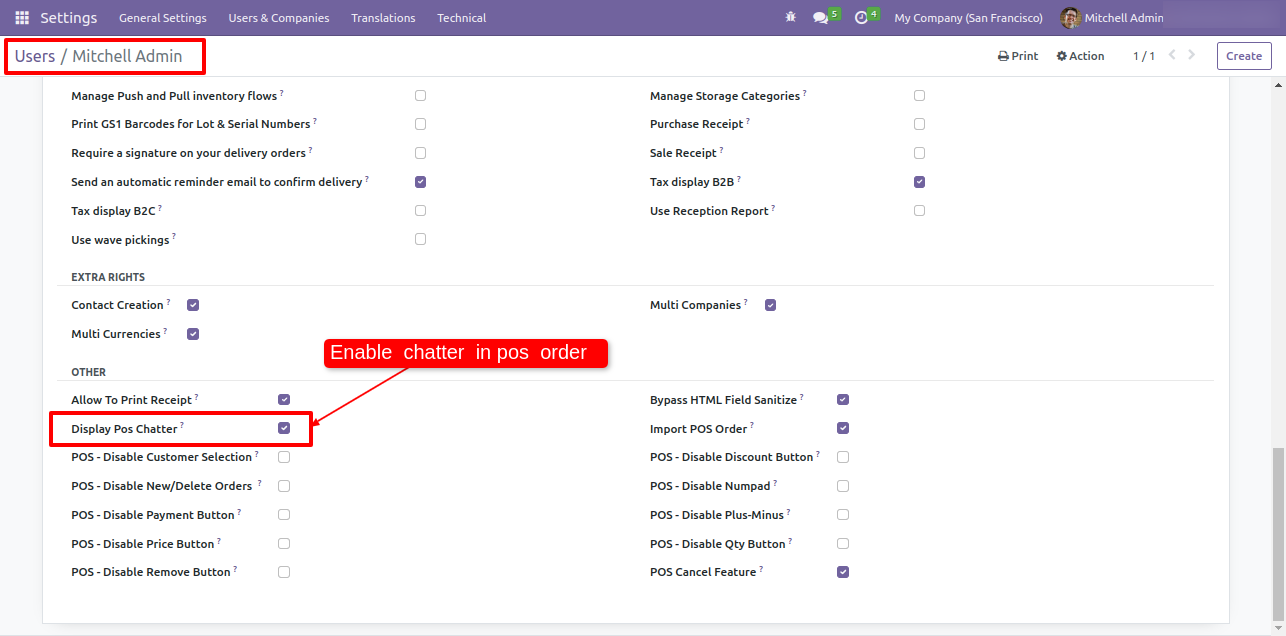
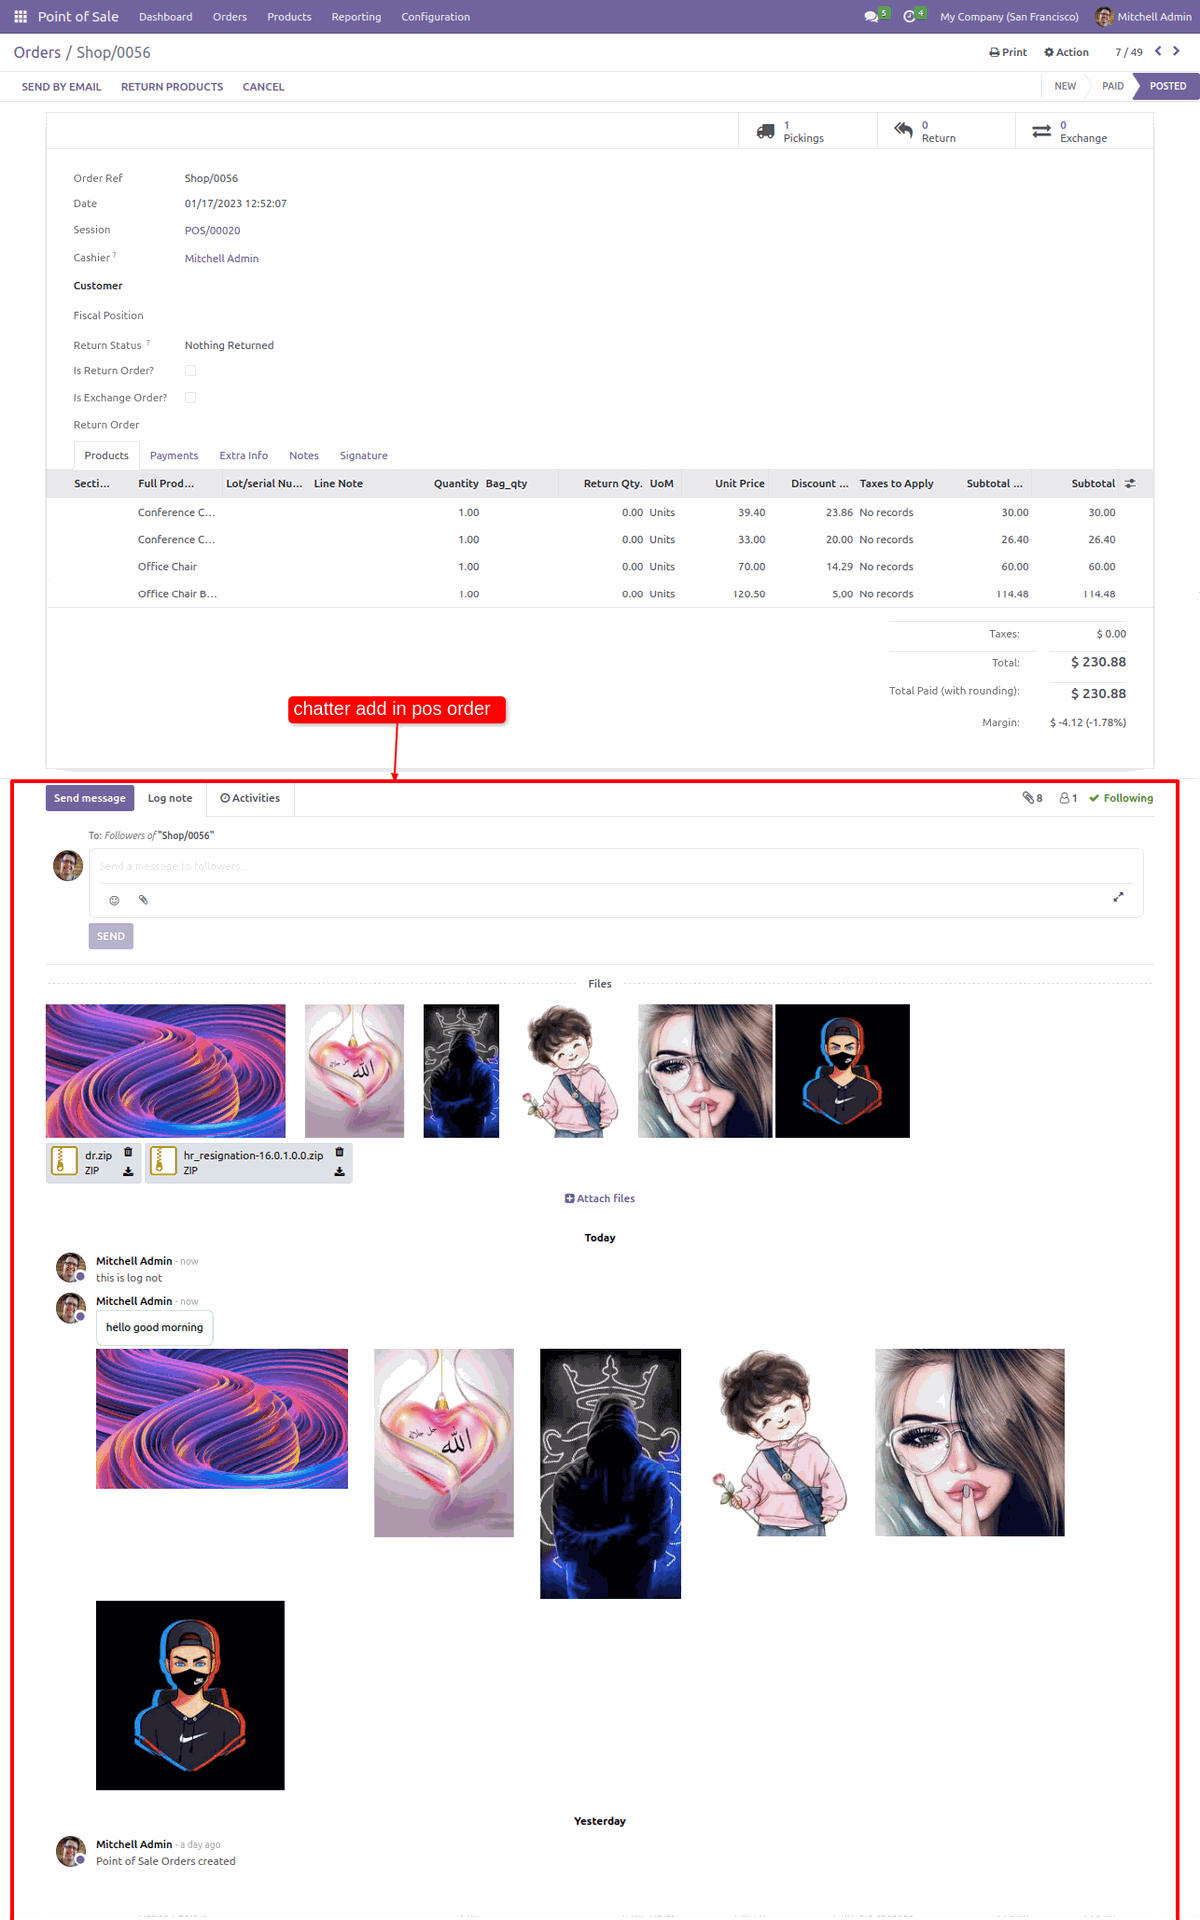
Goto user setting and tick 'Display Pos Chatter'.
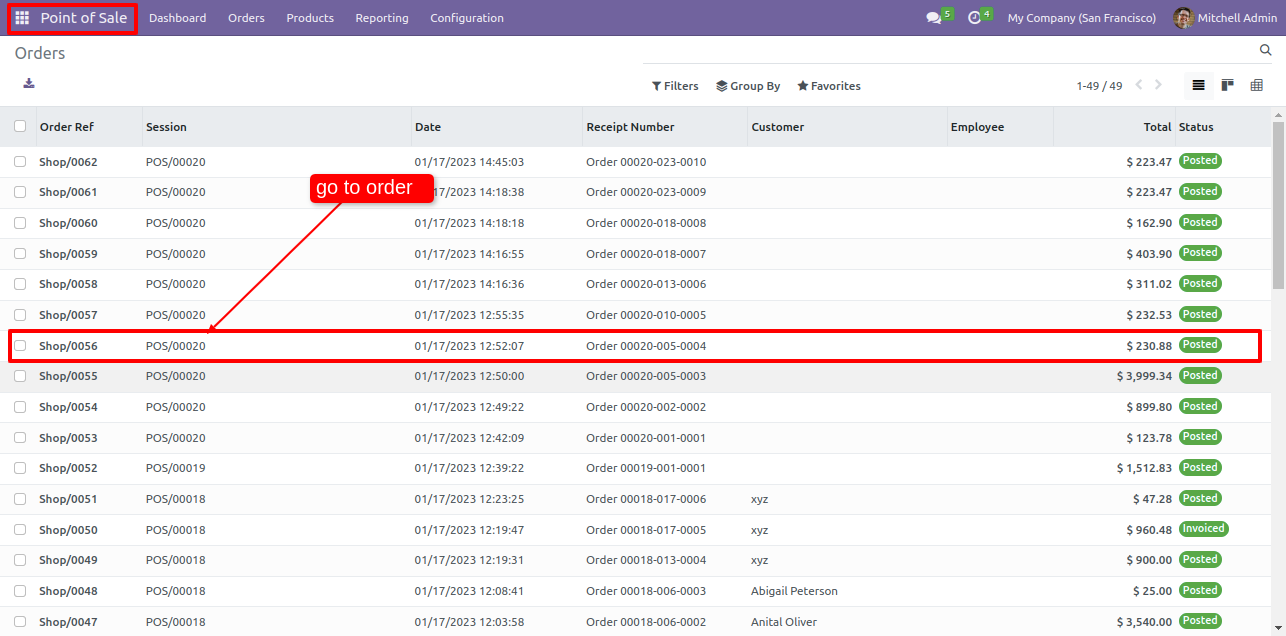
Open orders in pos.
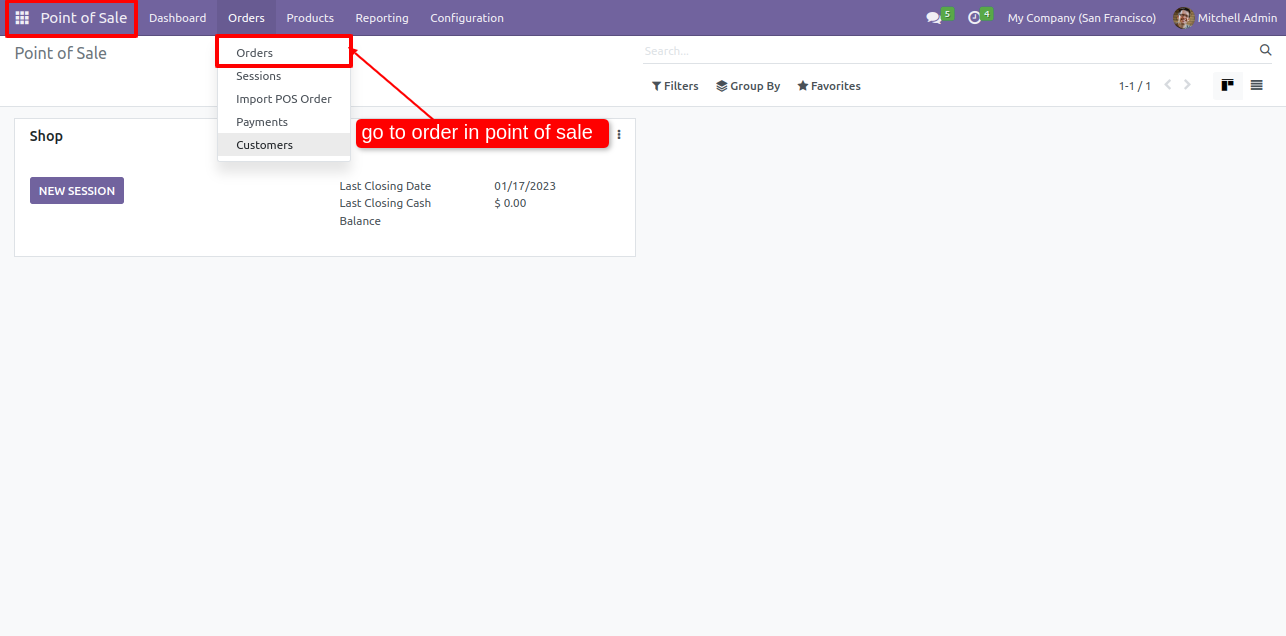
List view of the orders. Open any one order.
you can see the chatter is added in the pos order.
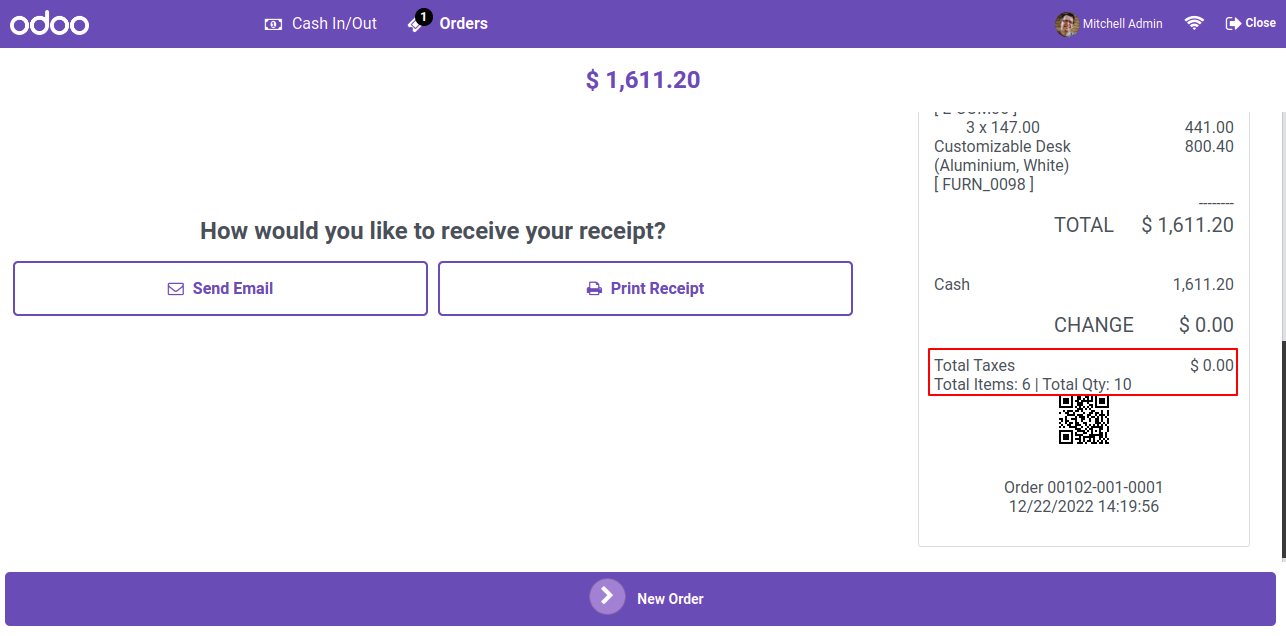
Goto pos setting and enable 'Enable Pos Counter'. and enable appropriate options.
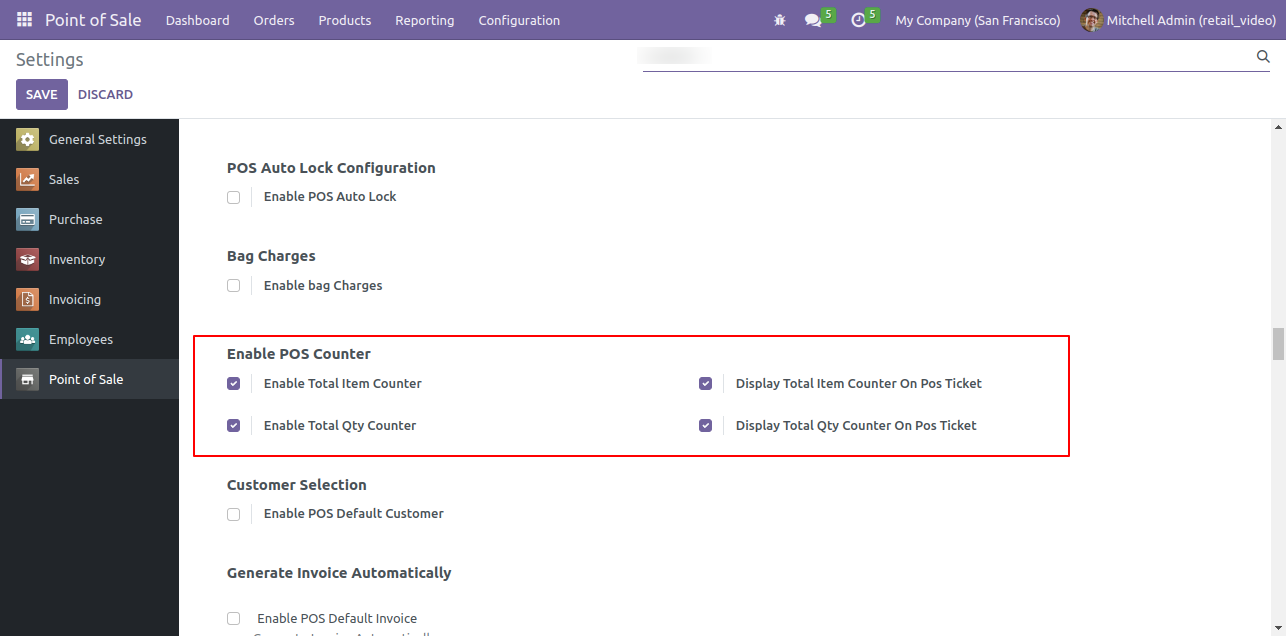
You can see the counter in pos cart.
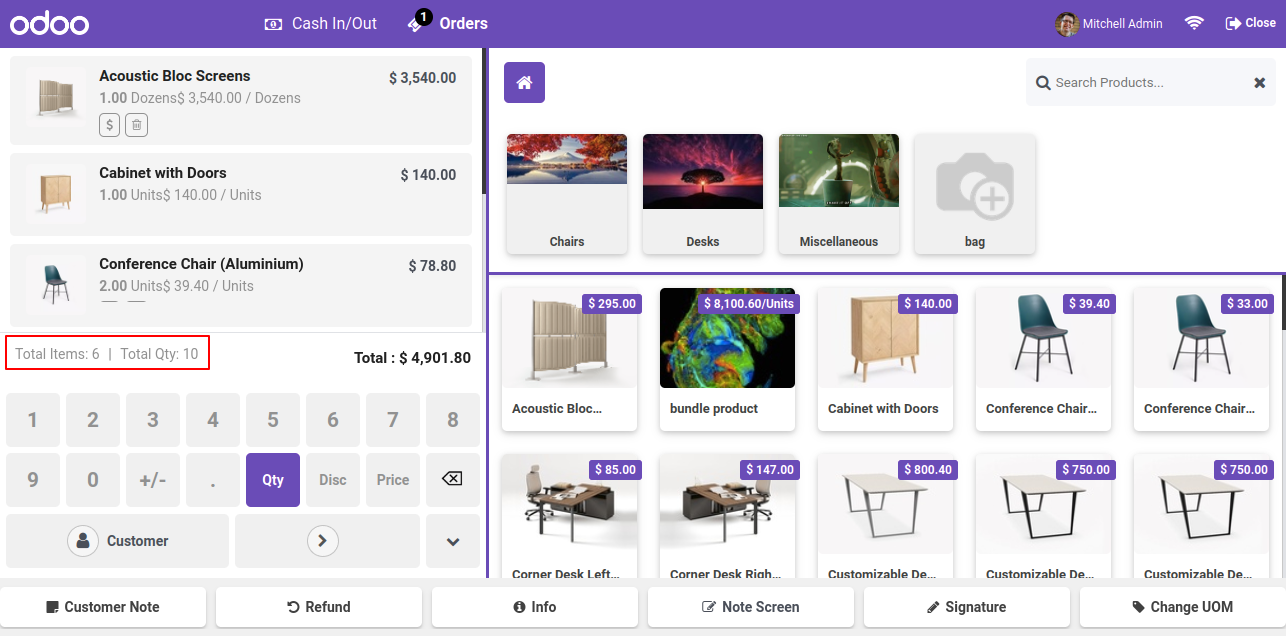
product counter details in pos receipts
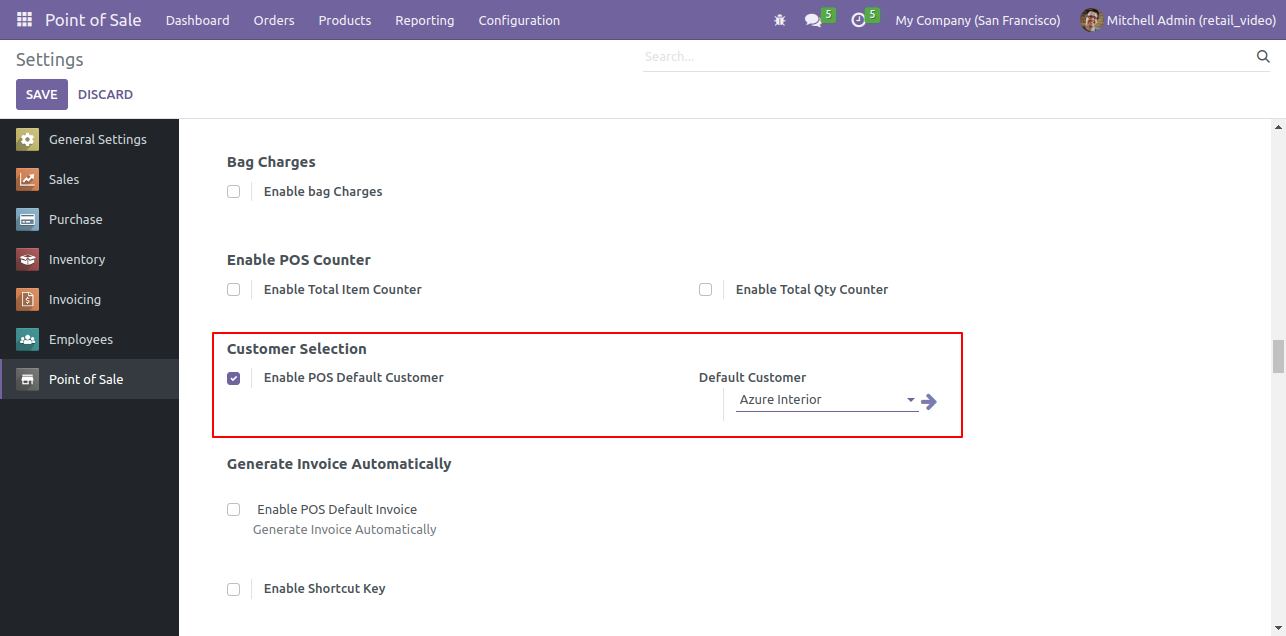
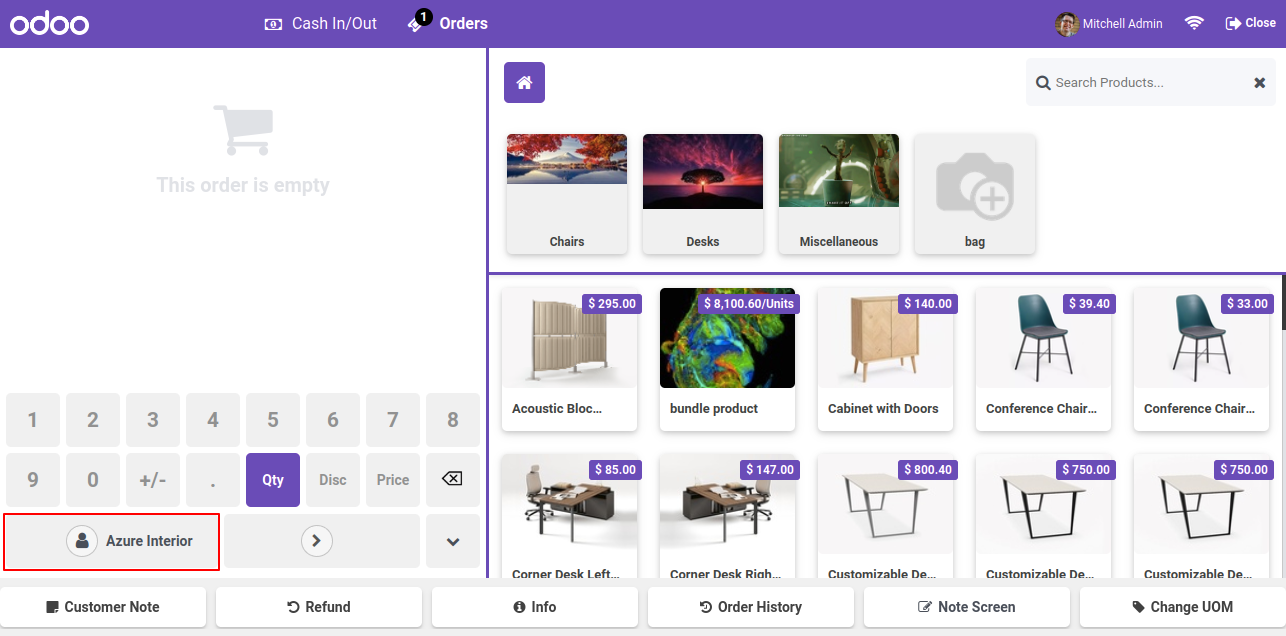
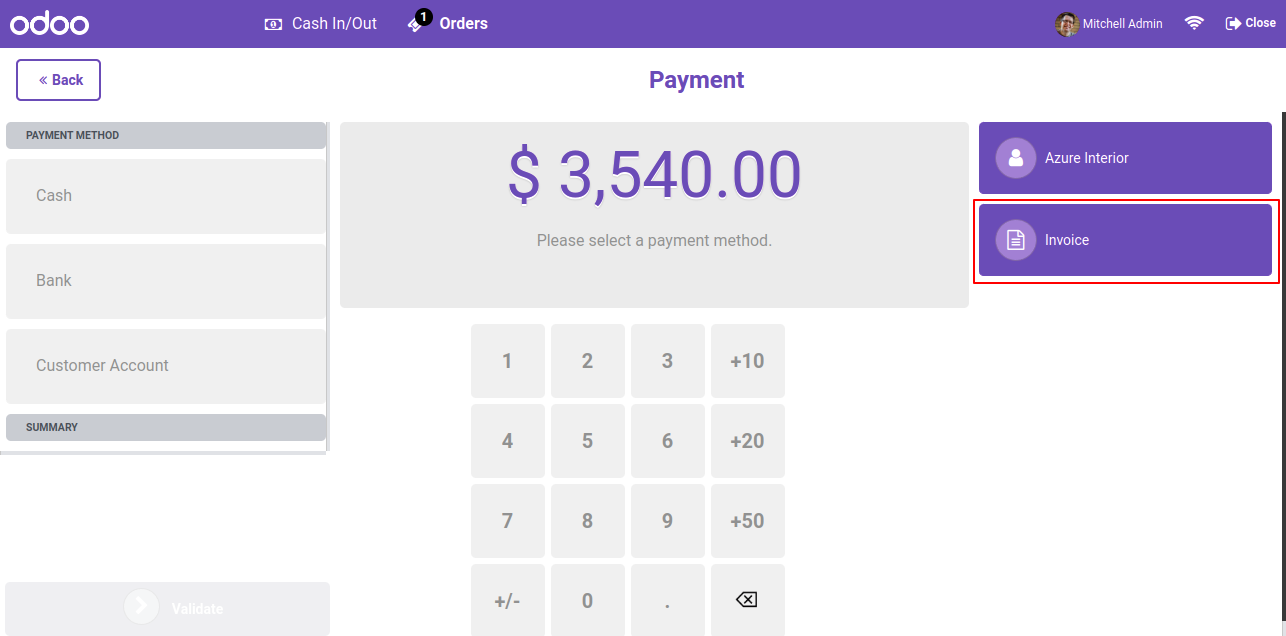
Goto pos setting enable 'Enable Default Pos Customer' Feature and set default customer.
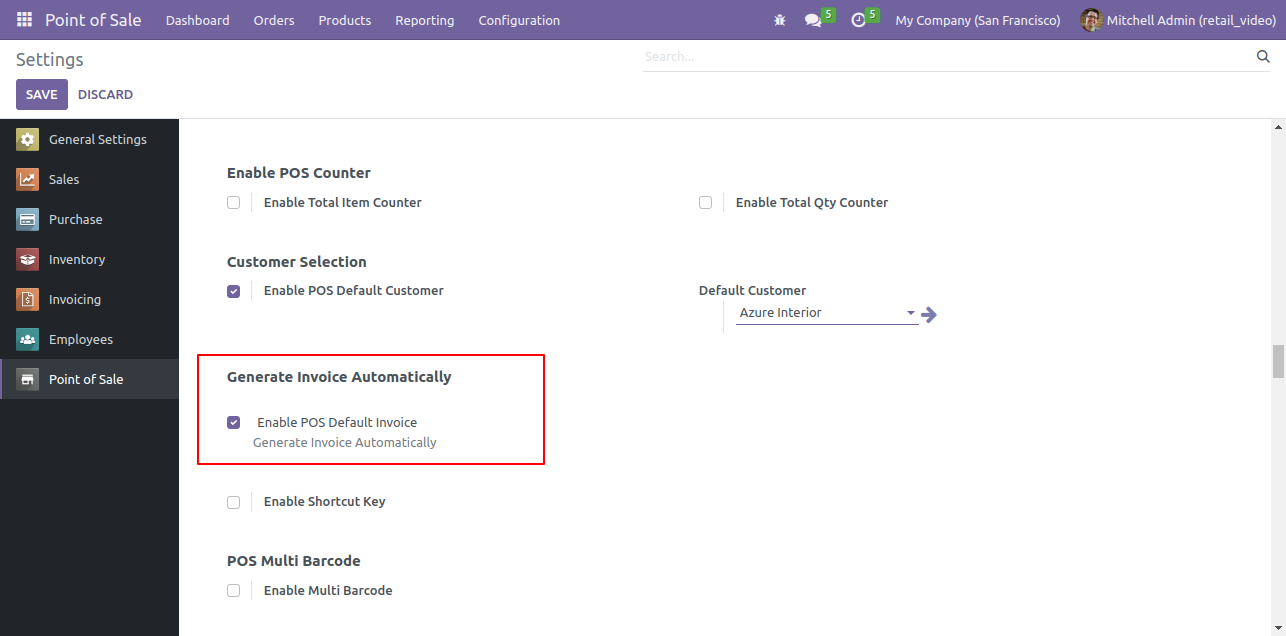
Goto pos setting and enable 'Enable Pos Default Invoice'.
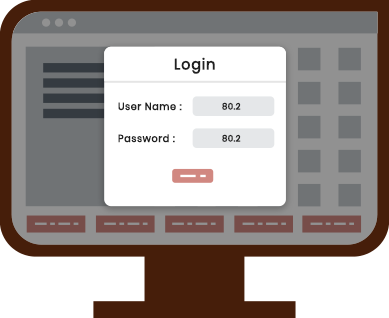
Goto user setting : Goto pos tab and enable direct logout and set default pos config.

Login view.
Here, you can see the user name.
You can close the session using 'Close' button.
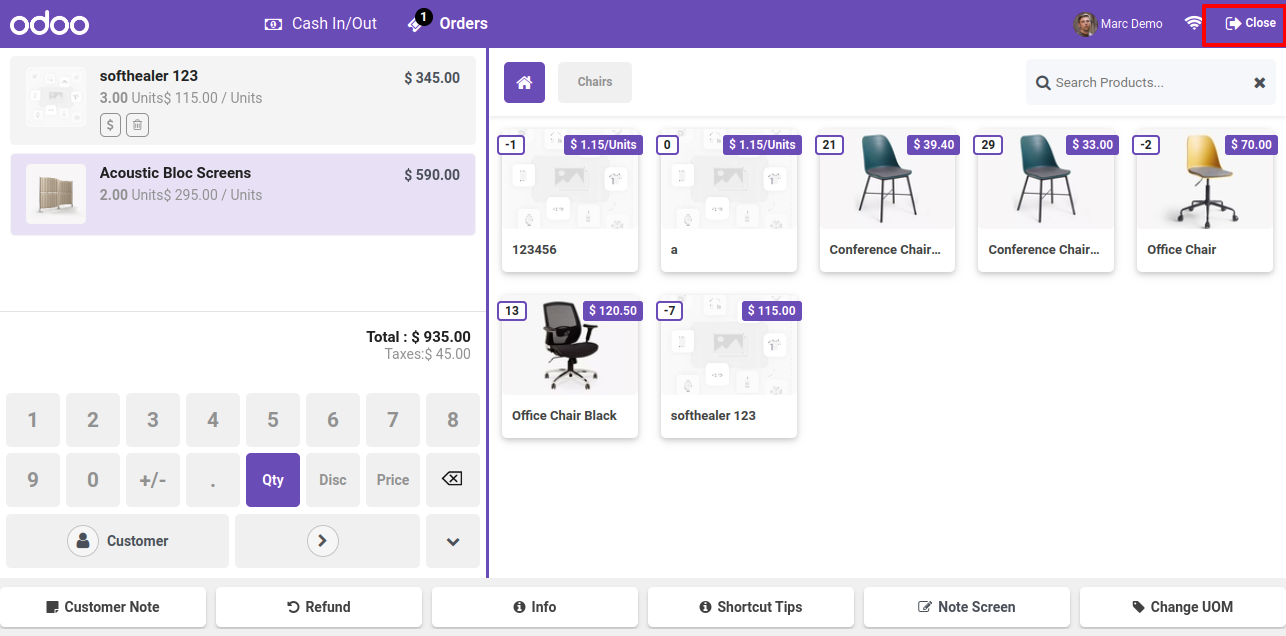
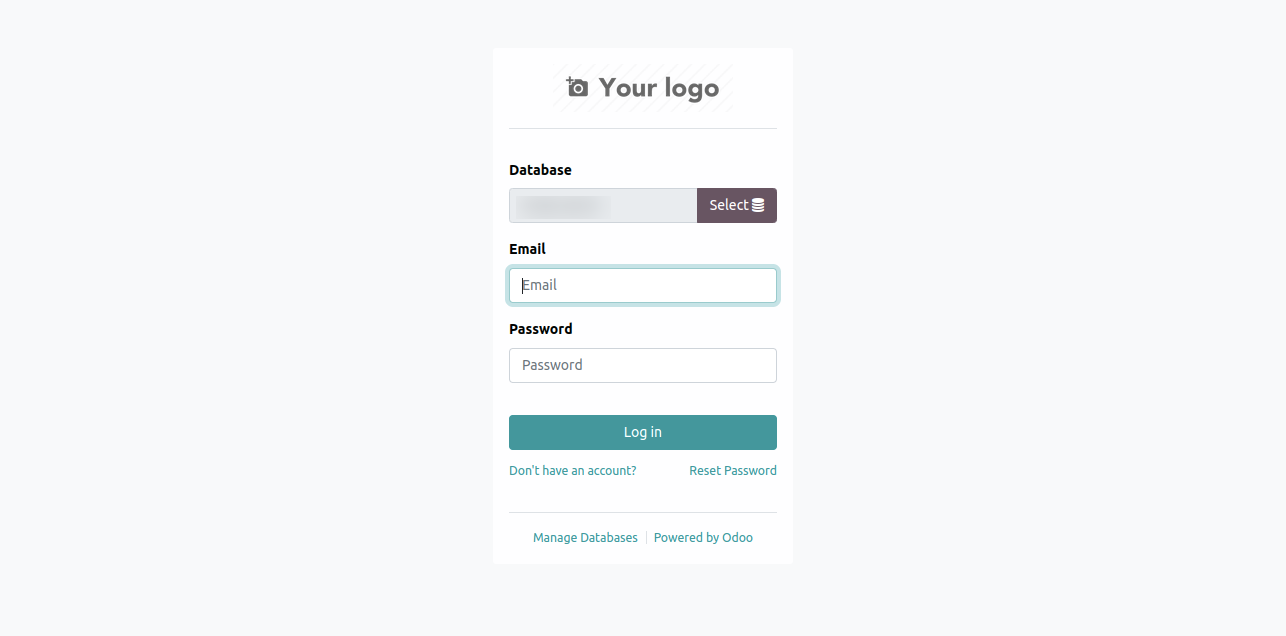
After closing the session, login page is displayed.
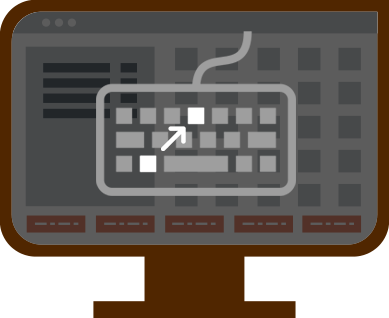
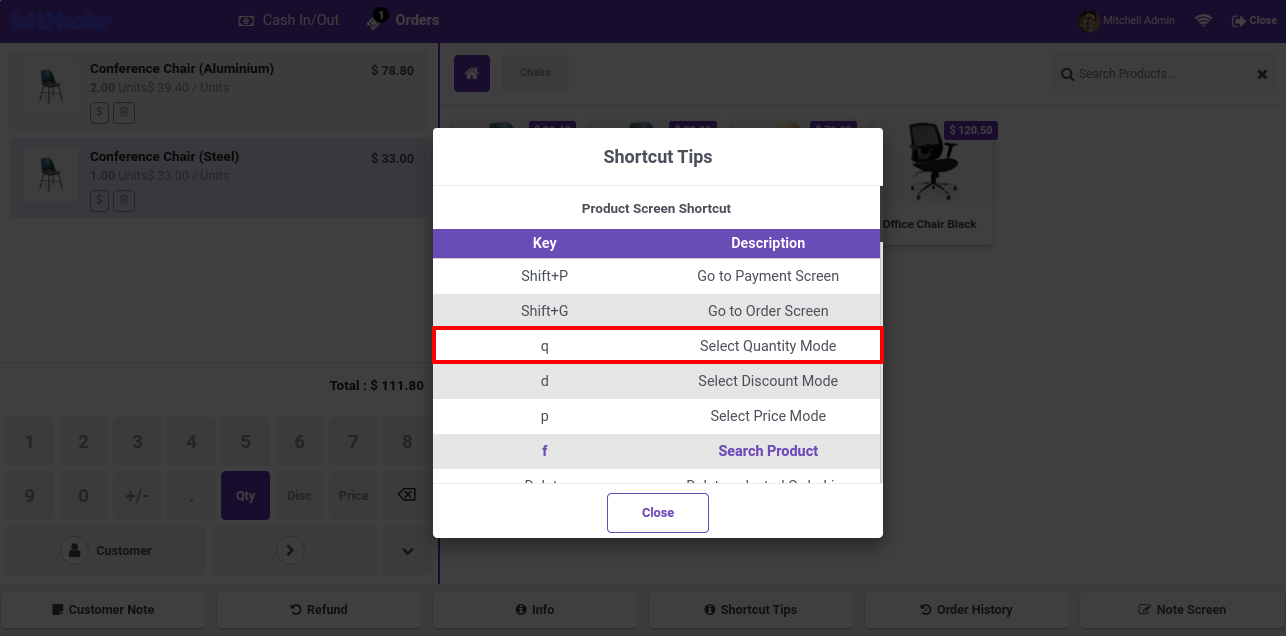
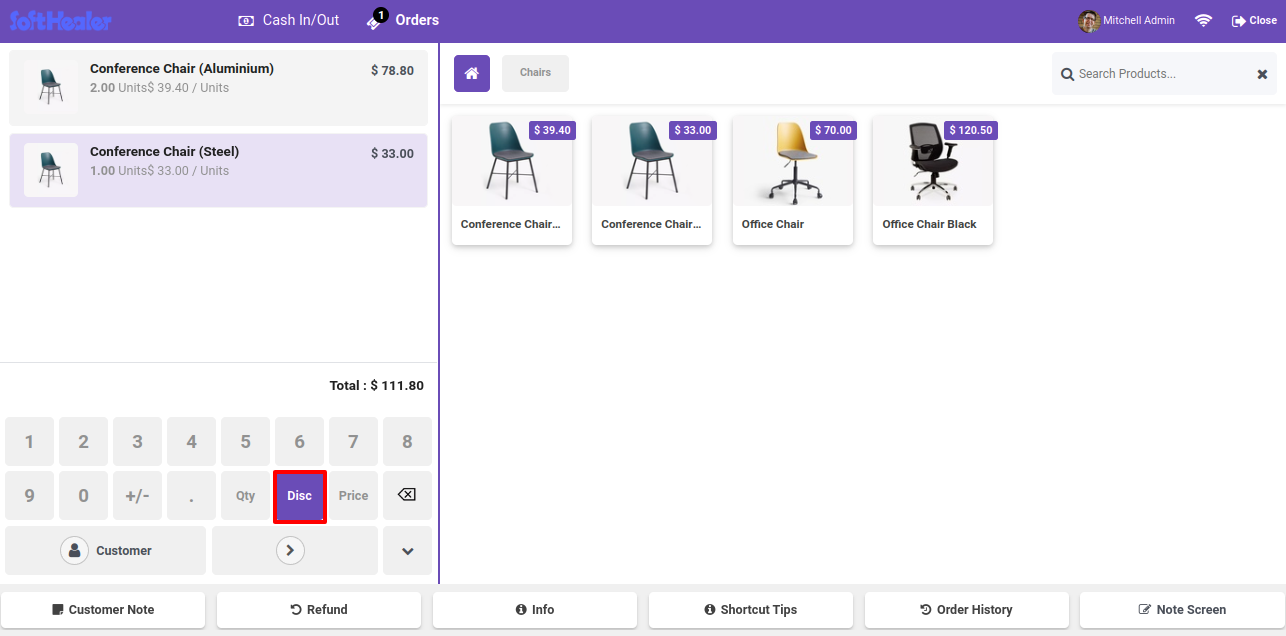
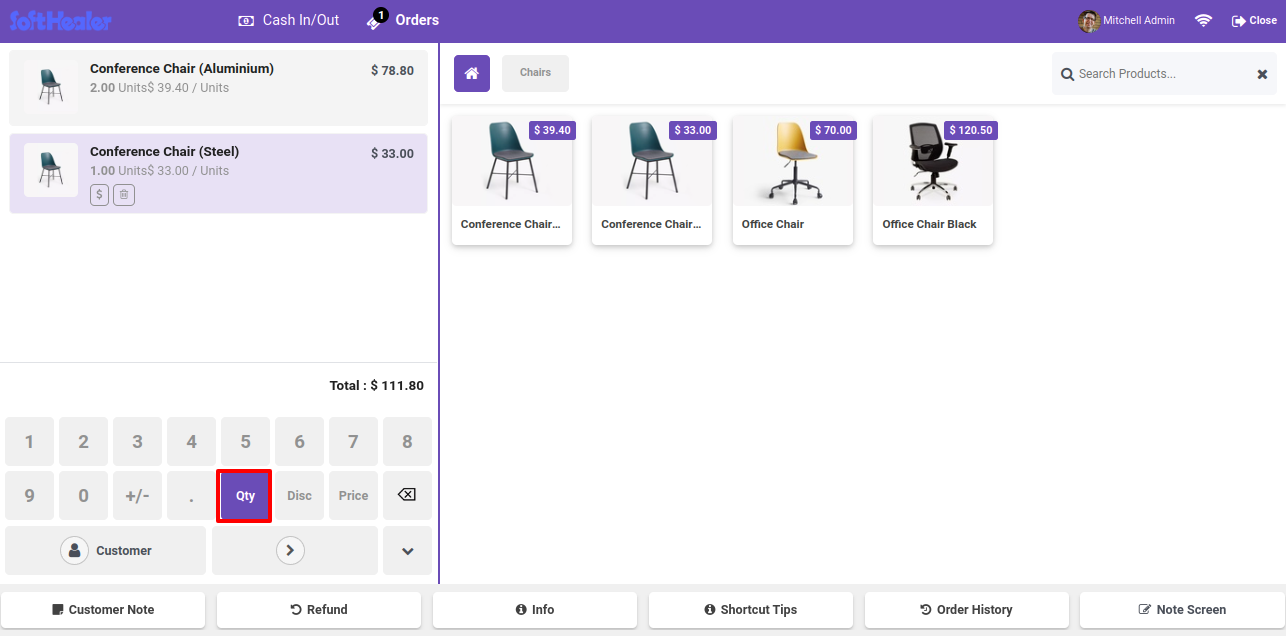
Goto pos setting and enable 'Enable Shortcut Key' and config them as per your requirement.
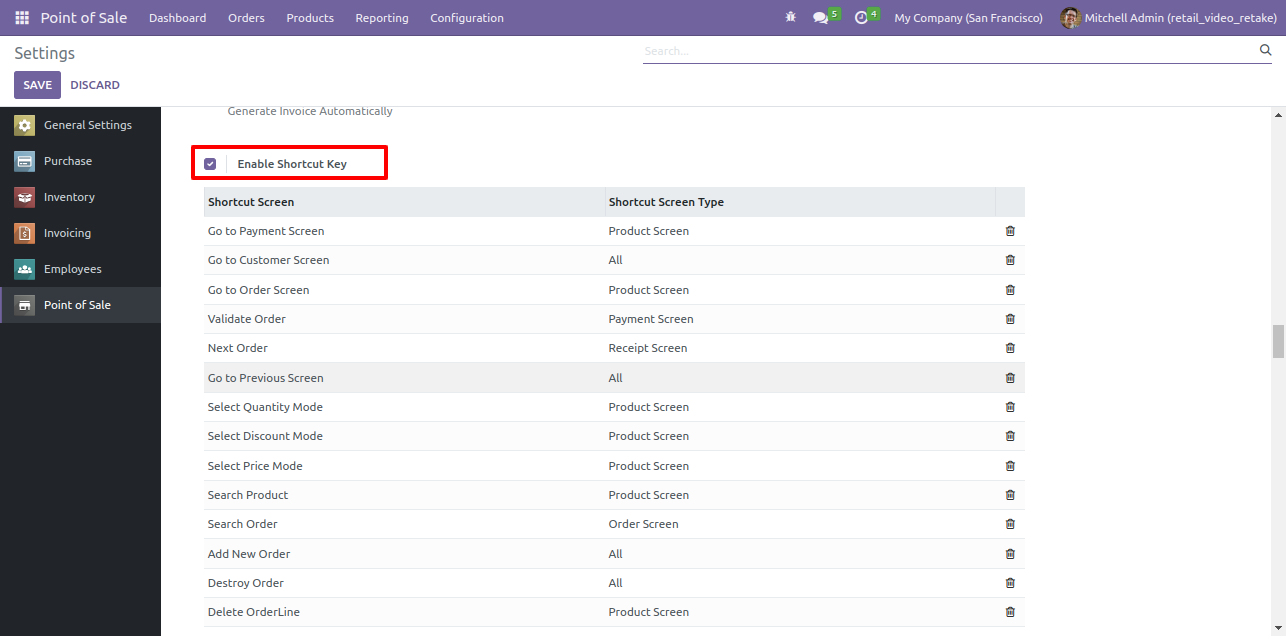
Here in pos, 'Shortcut Tips' menu visible.
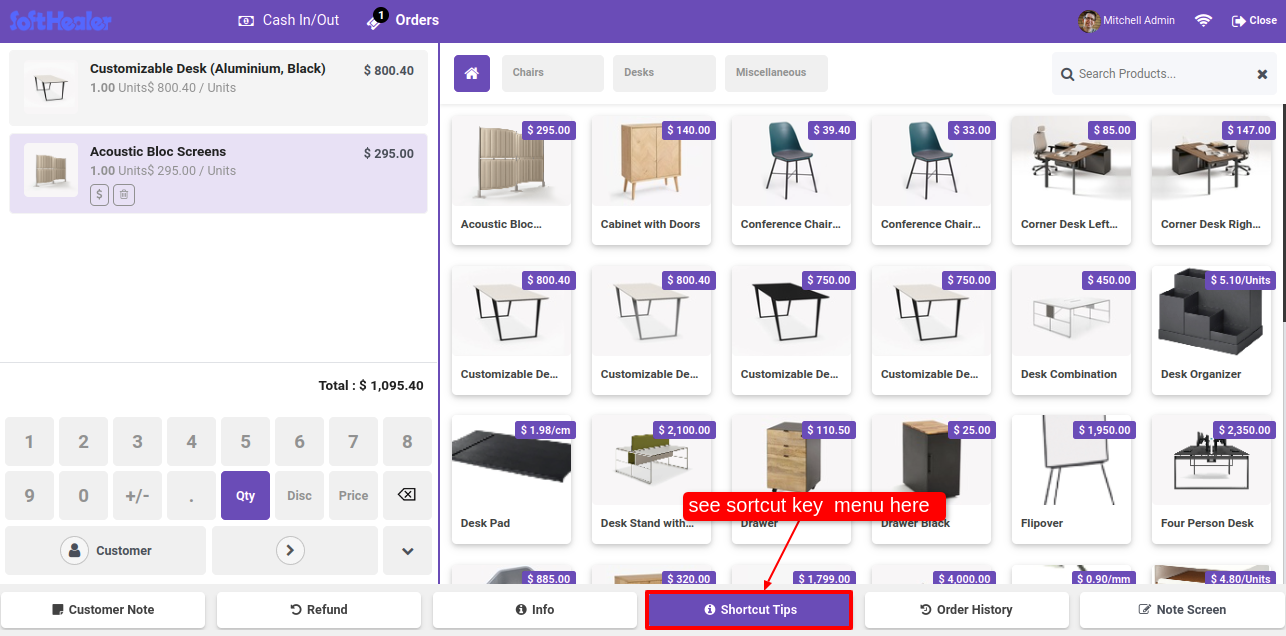
After click on that menu, Shortcut Tips wizard will be appear.
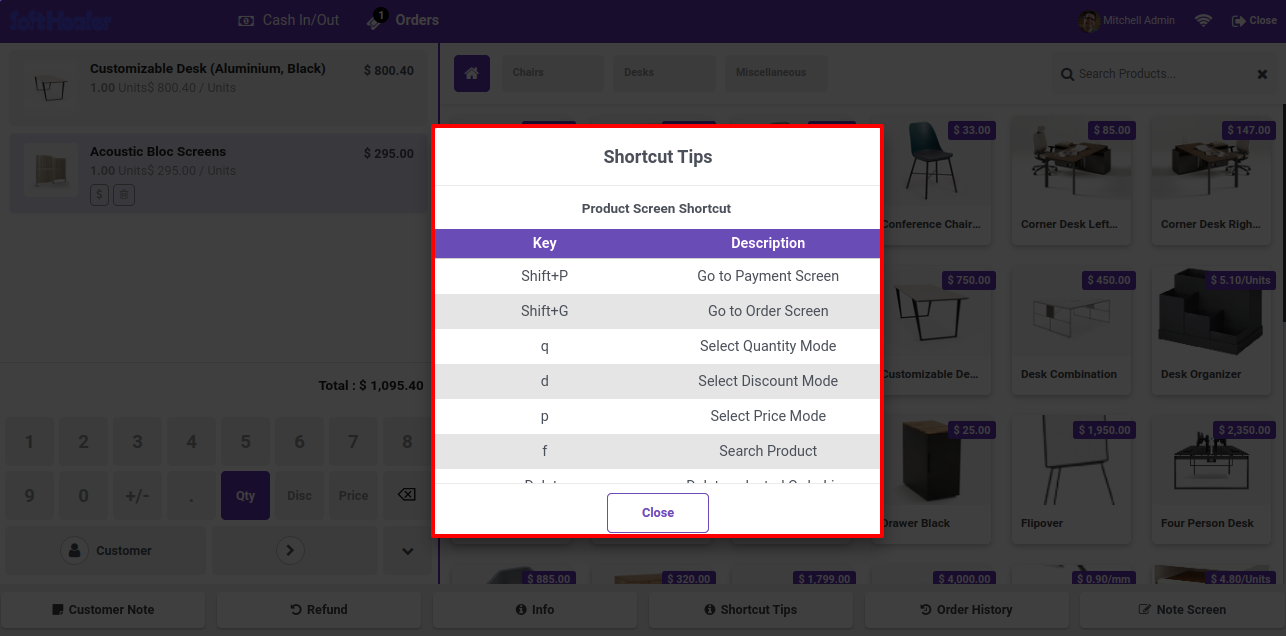
You can edit or add the product screen shortcut.
Click on the Disc button.
After that, Shortcut Tips wizard will be appear.
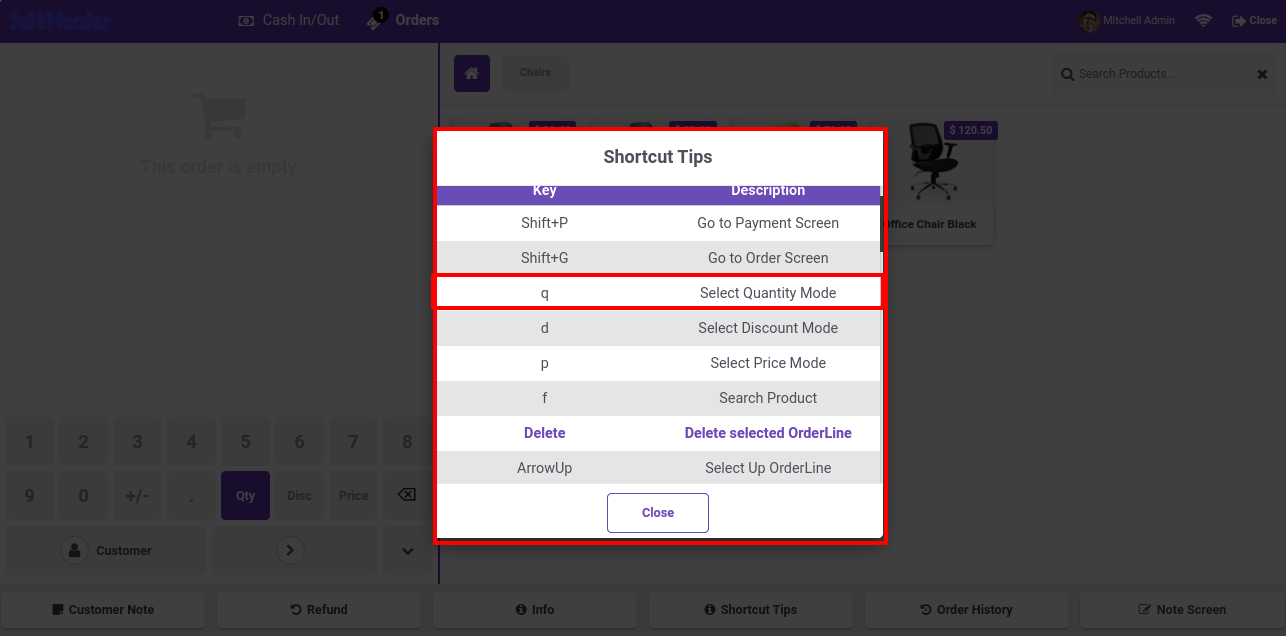
Click on the Qty button.
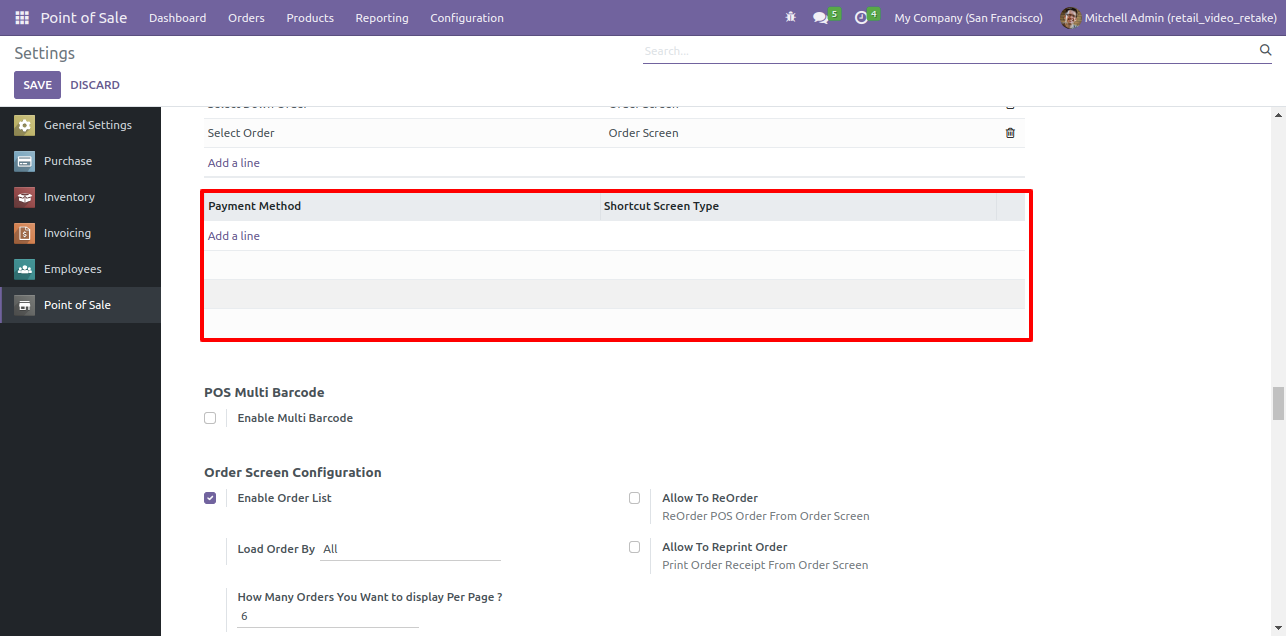
After that, you will be redirect to the payment method section within the setting. To add the payment method shortcut key, click on the add line.
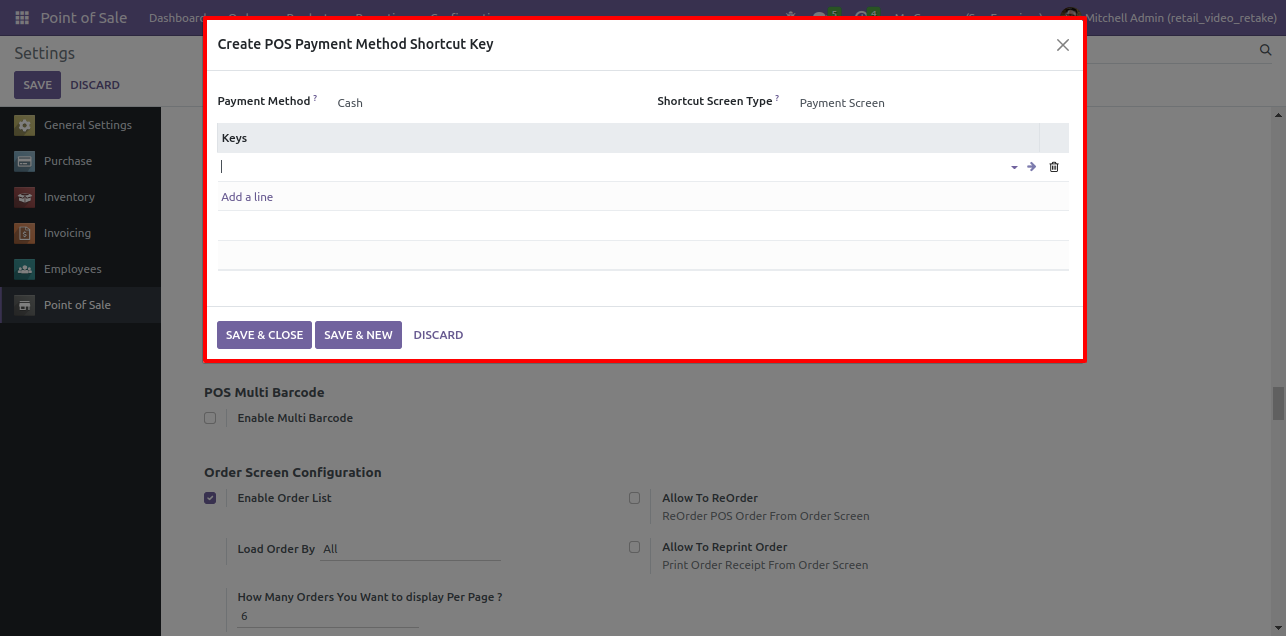
The Create post payment shortcut key wizard will be appear. Add the method and keys here and save.
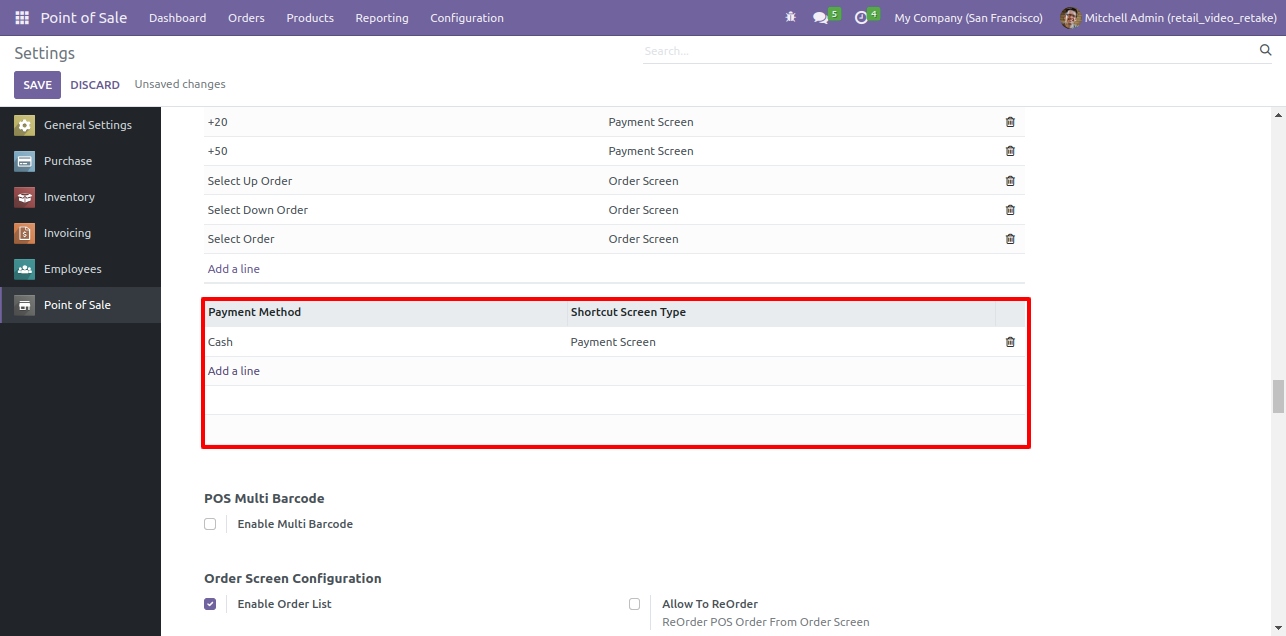
Here, you can see the payment method is added with the shortcut screen type.
The payment method is visible in payment page.
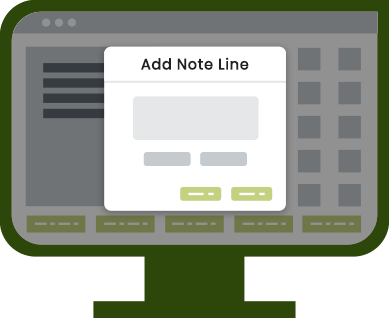
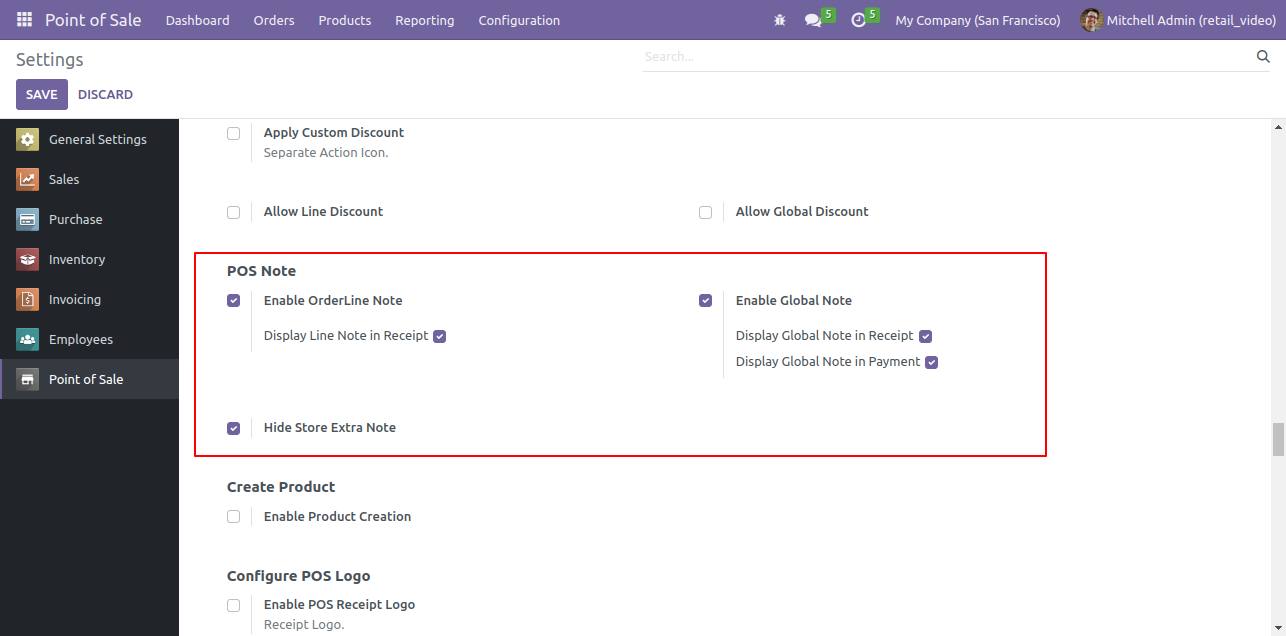
Goto user config setting and enable "PoS Notes" features.
We
After enable that feature you can see those button in pos screen. One for global notes and another for line
notes.
We
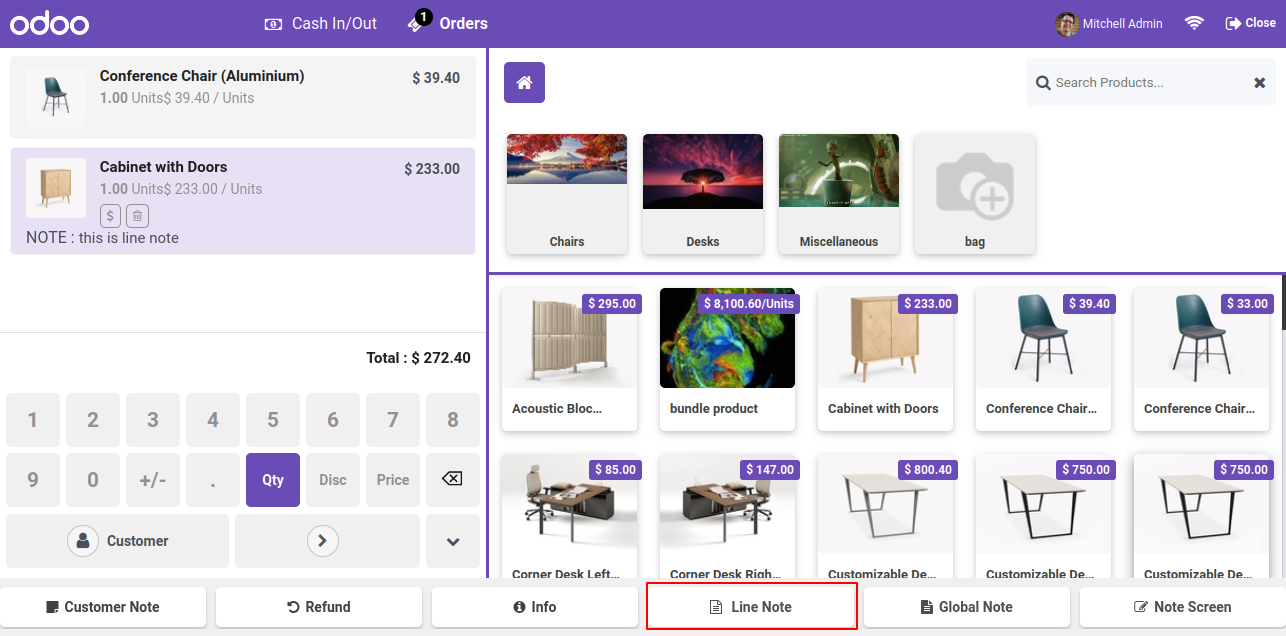
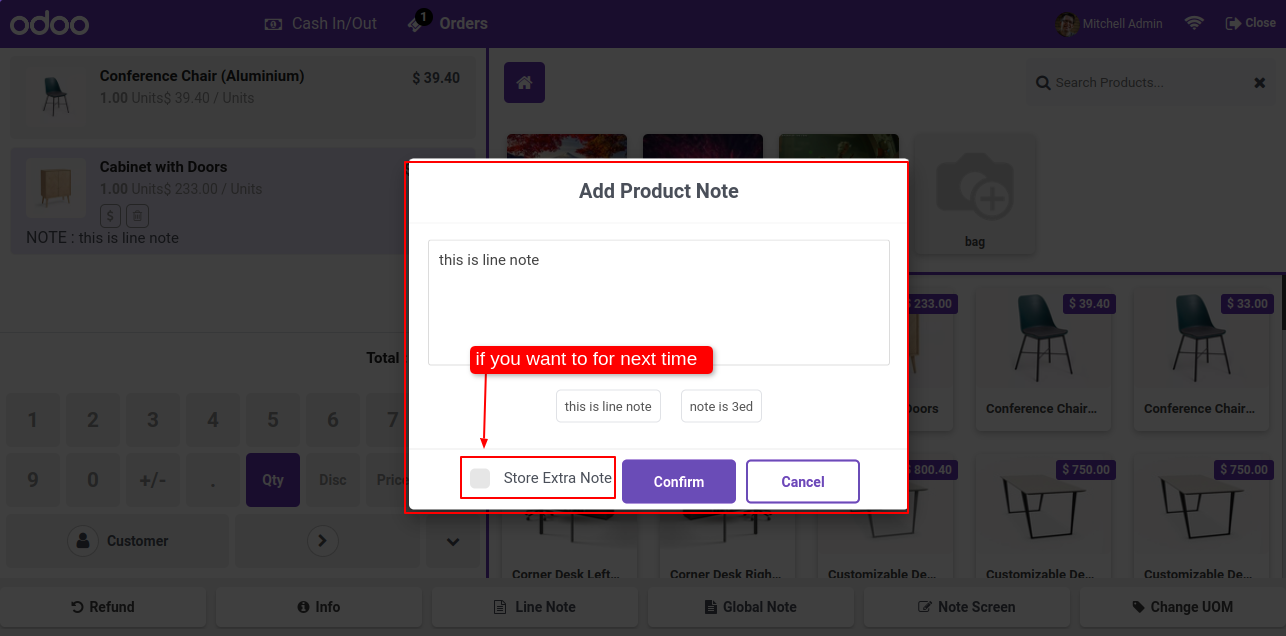
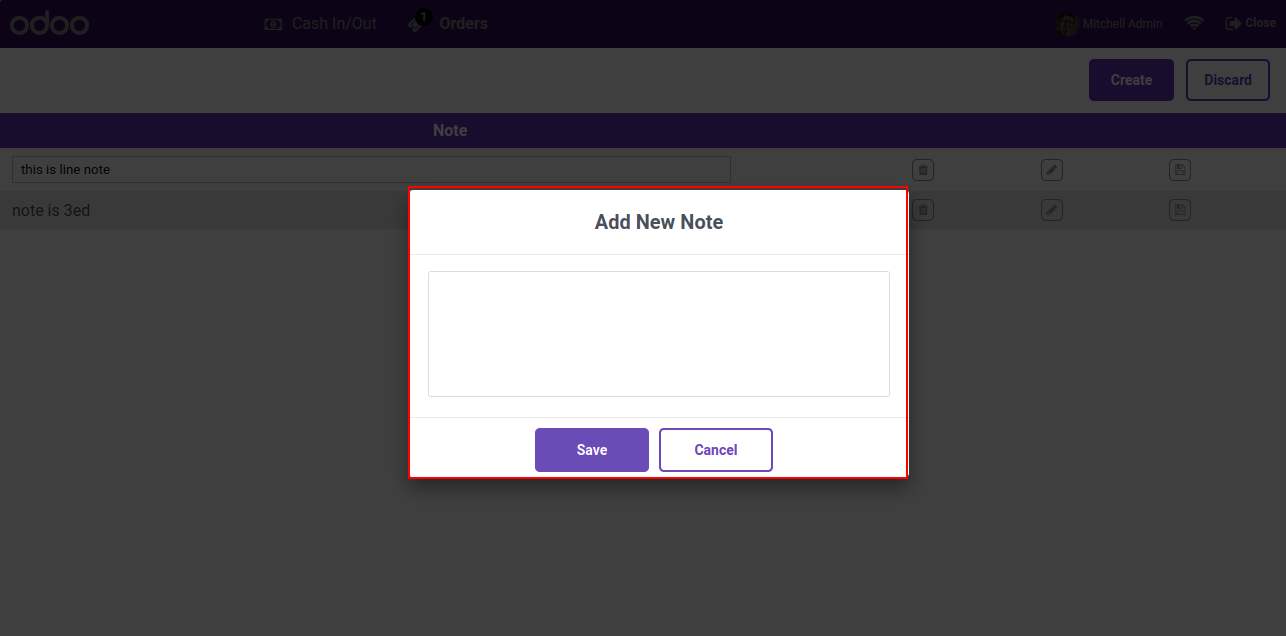
After click on pen icon in order line, this wizard will popout, here you can add your line notes and also you
can save these notes for future reference.

We
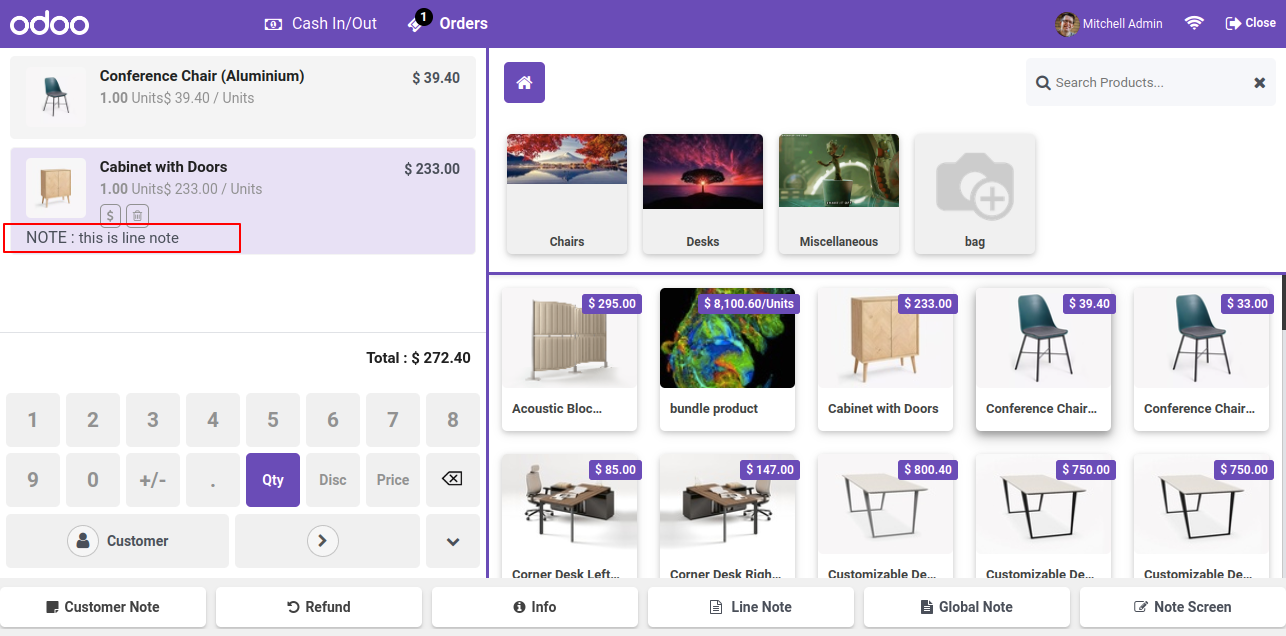
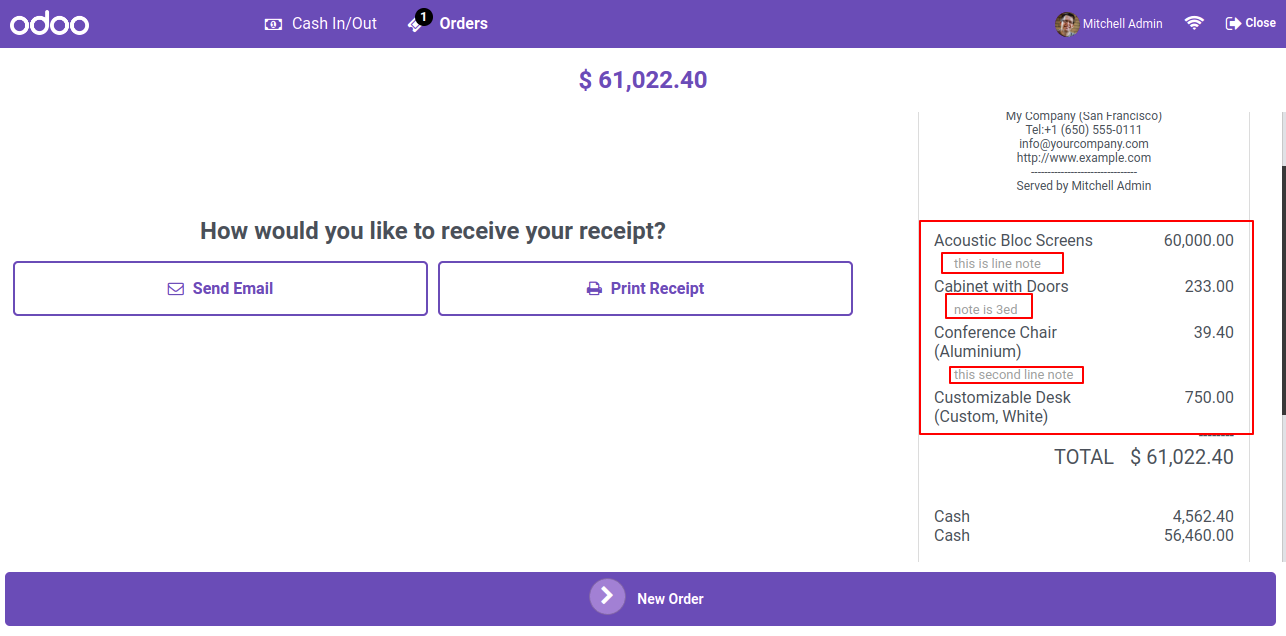
Line notes added into line.
We
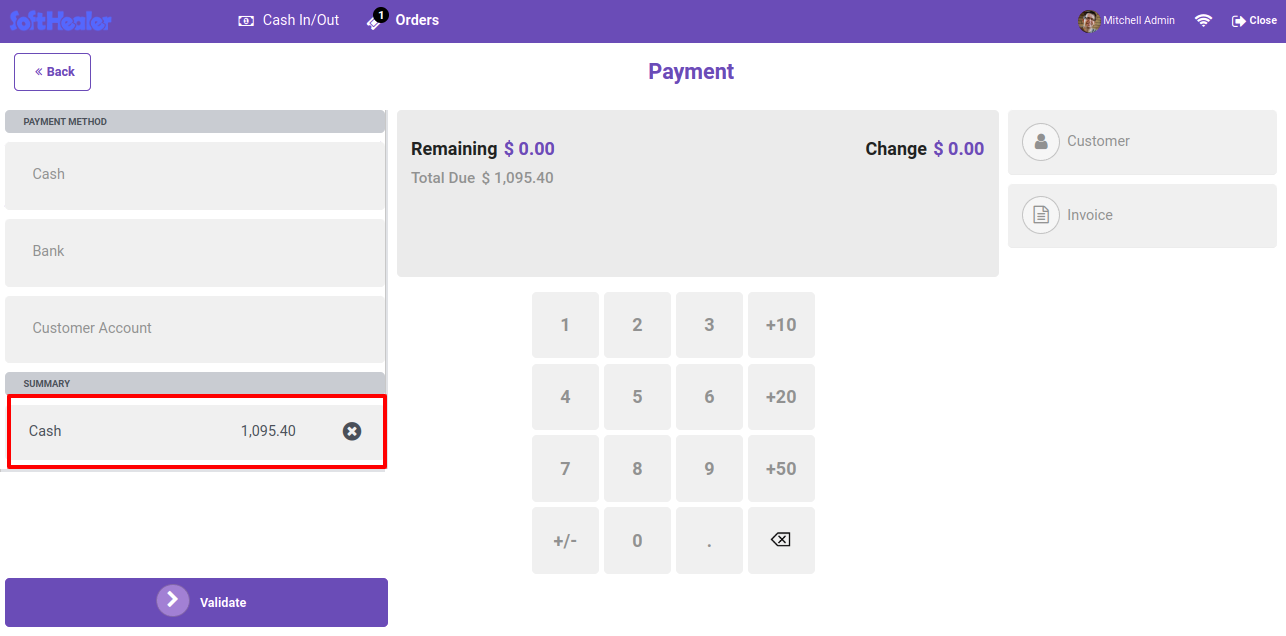
Now click on "Global Notes", and add your global notes here.
We
In Payment screen, here also you can add global notes.
We
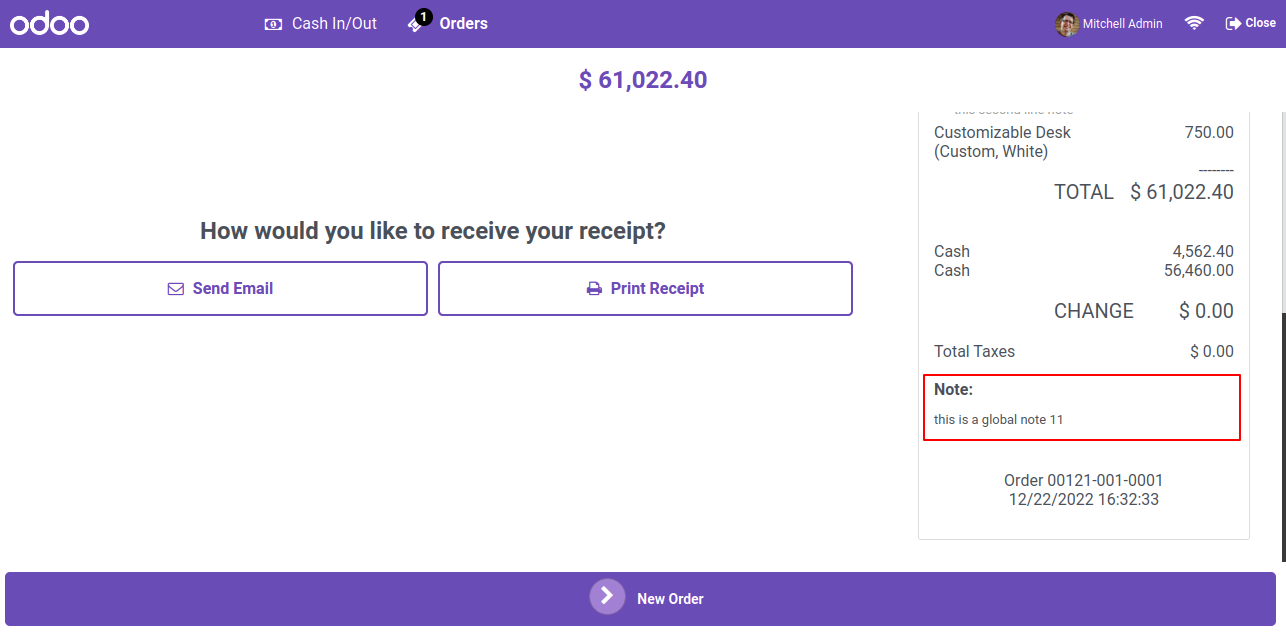
On pos receipt you can see global notes as well.
We
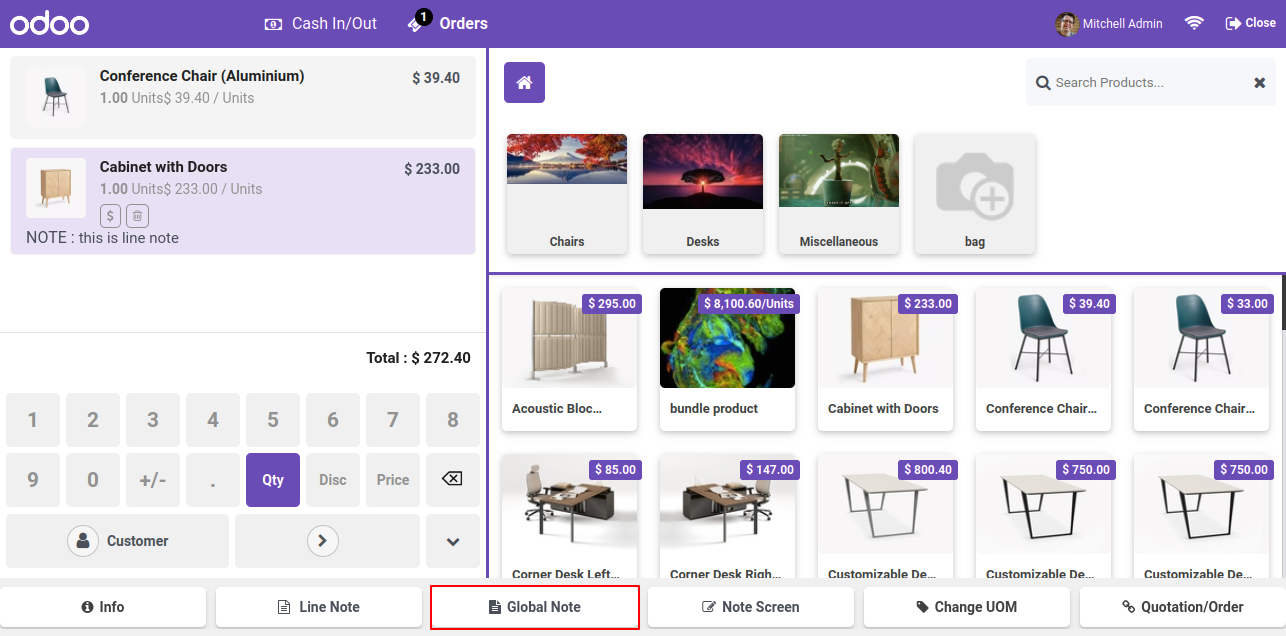
Just click on 'Note Screen' Button, here you can see your save notes in pos.
We
Just click on 'Note Screen' Button, here you can see your save notes in pos.

We
Just click on 'Note Screen' Button, here you can see your save notes in pos.
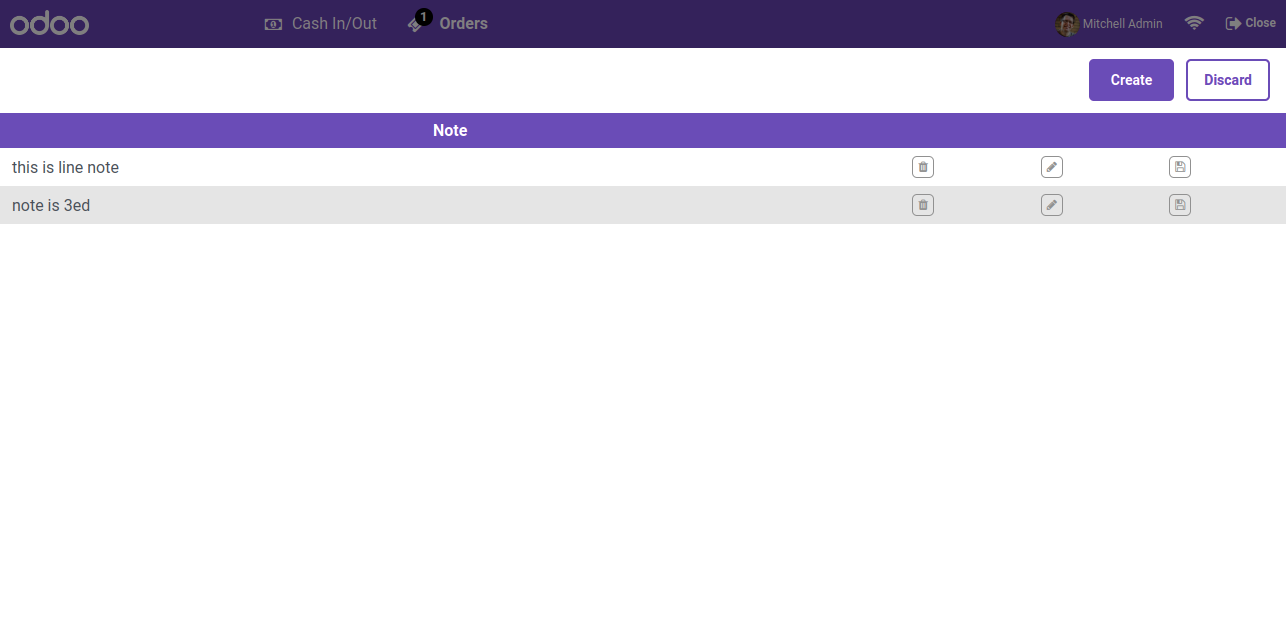
We
Just click on 'Note Screen' Button, here you can see your save notes in pos.
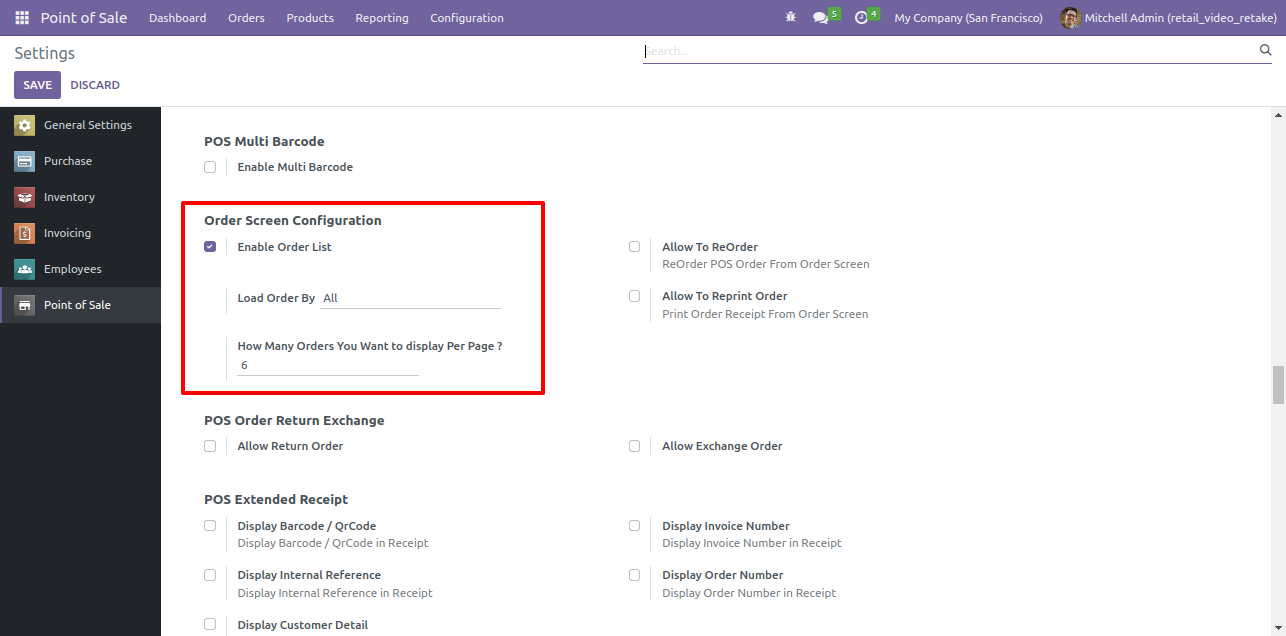
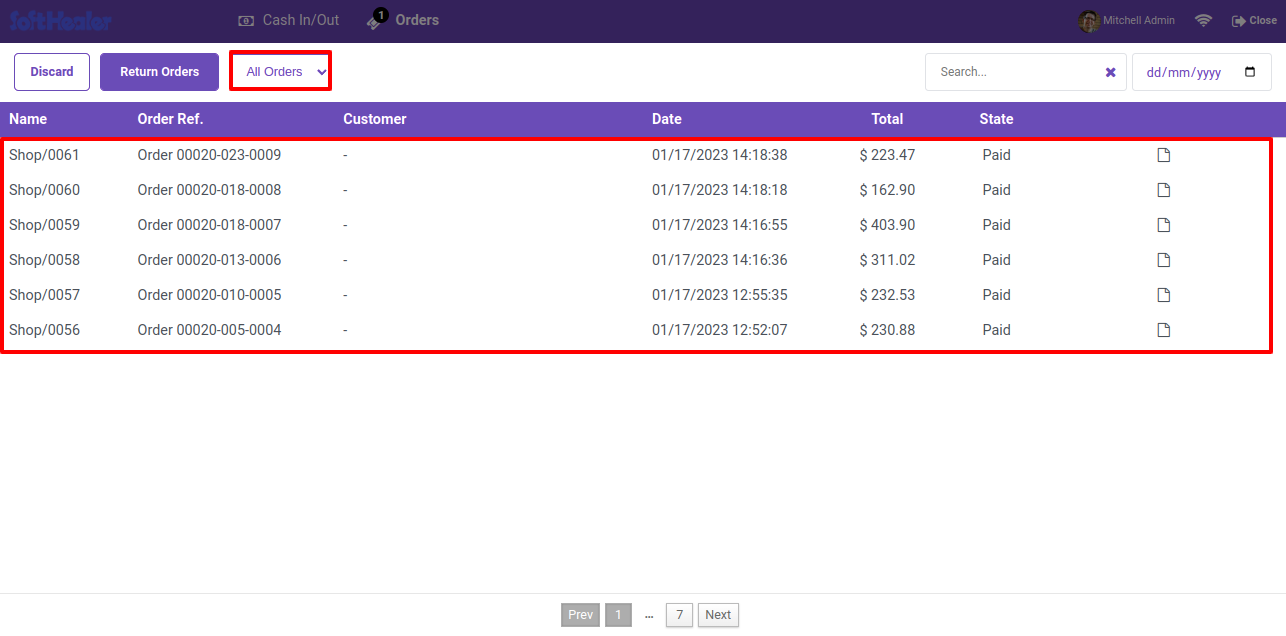
Goto pos setting and enable 'Enable Order List'. After enable that feature, there you can see many options. You can load orders by all, session wise, day wise. Easy to define the number of order in one page.
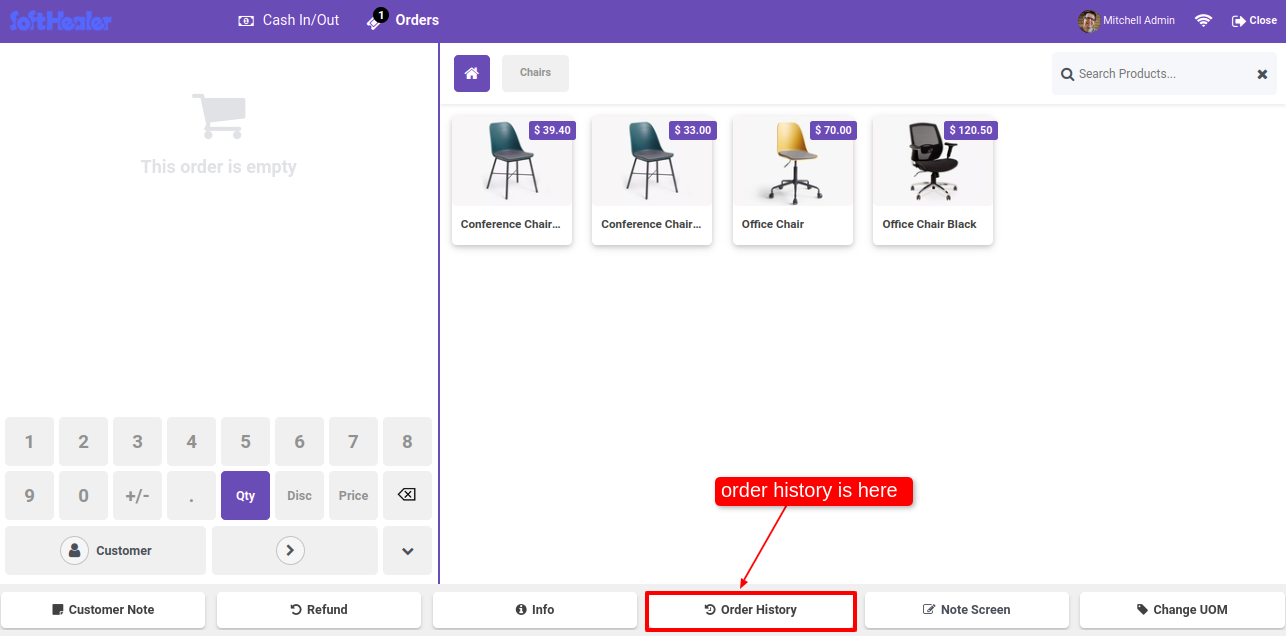
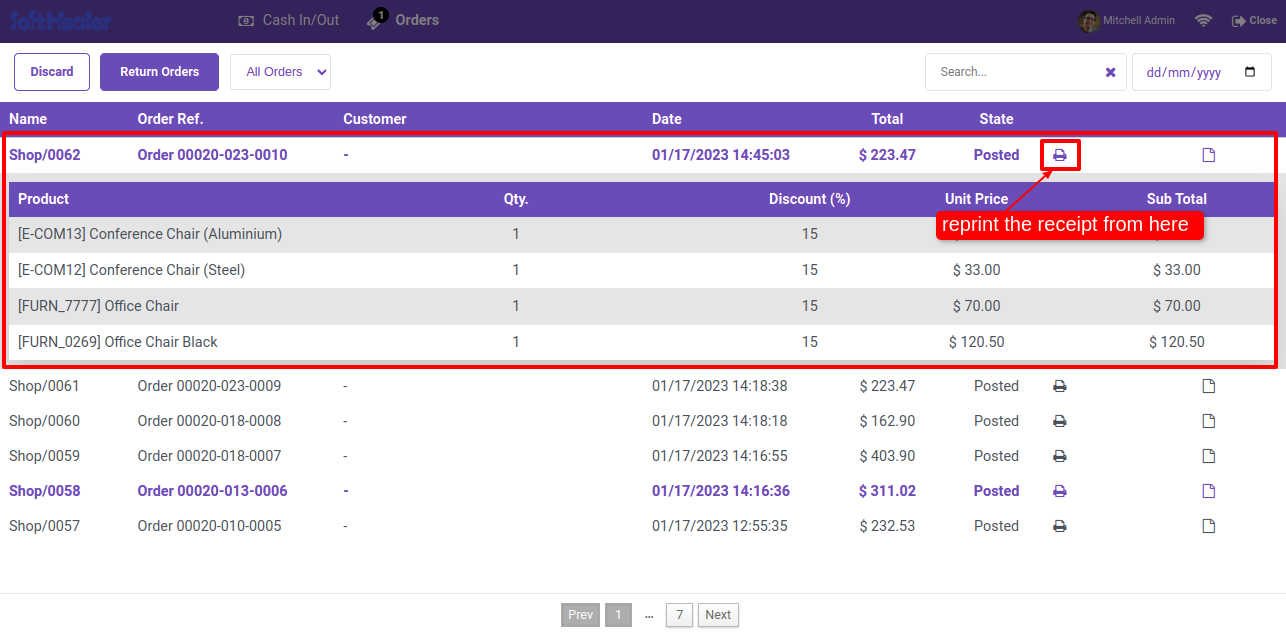
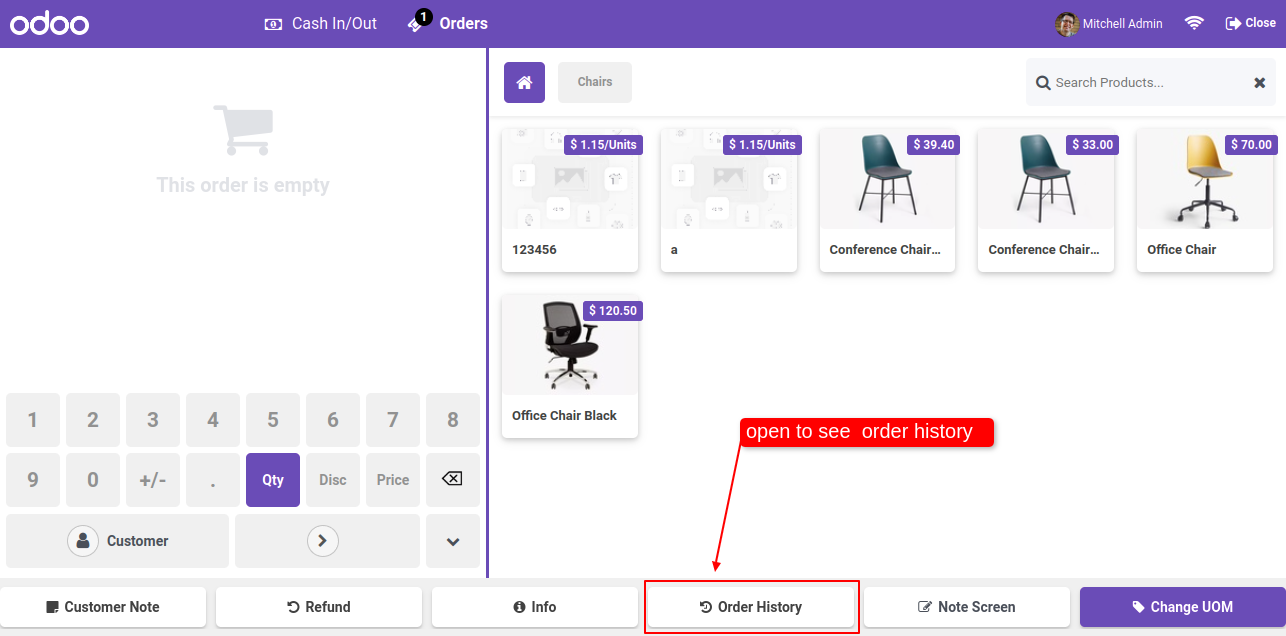
After enabling order list option you can see the 'Order History' button in the pos screen.
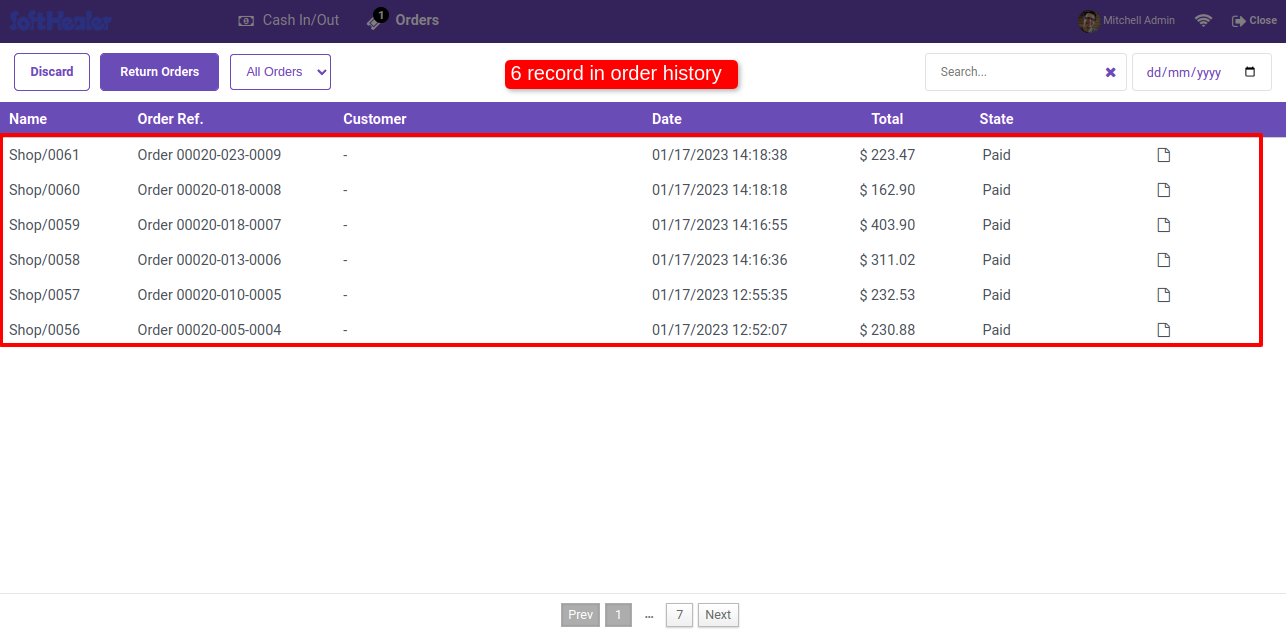
Using this button you can see the history of the orders. Click on that button.
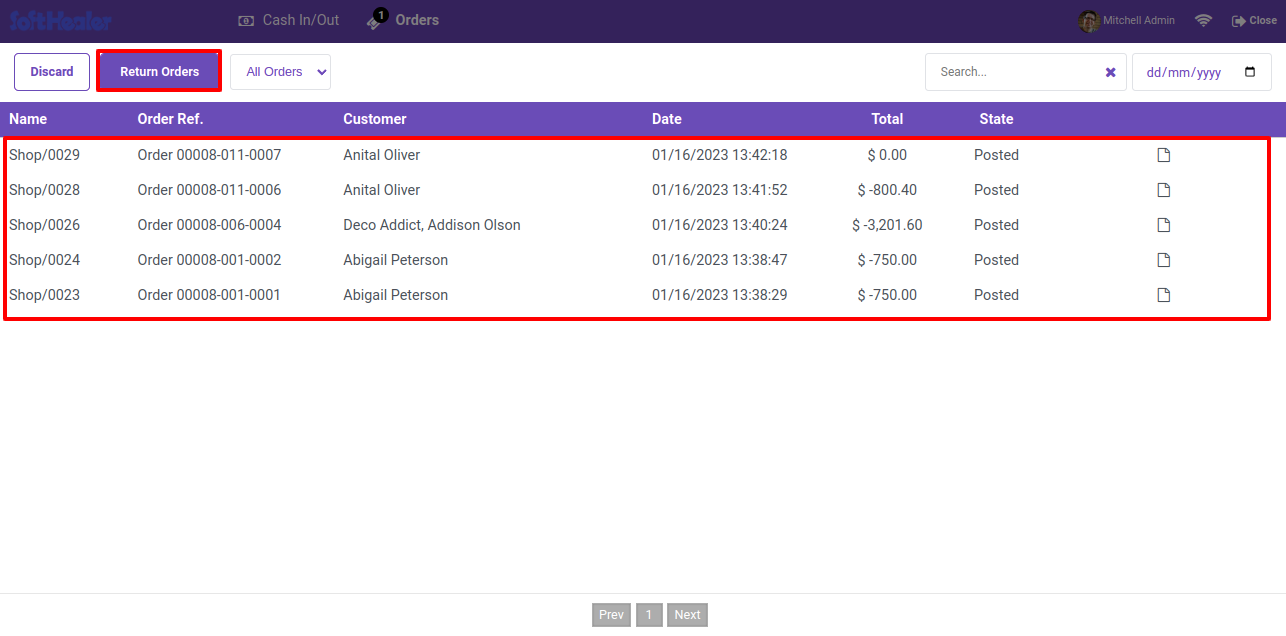
Here, you can see the order history.
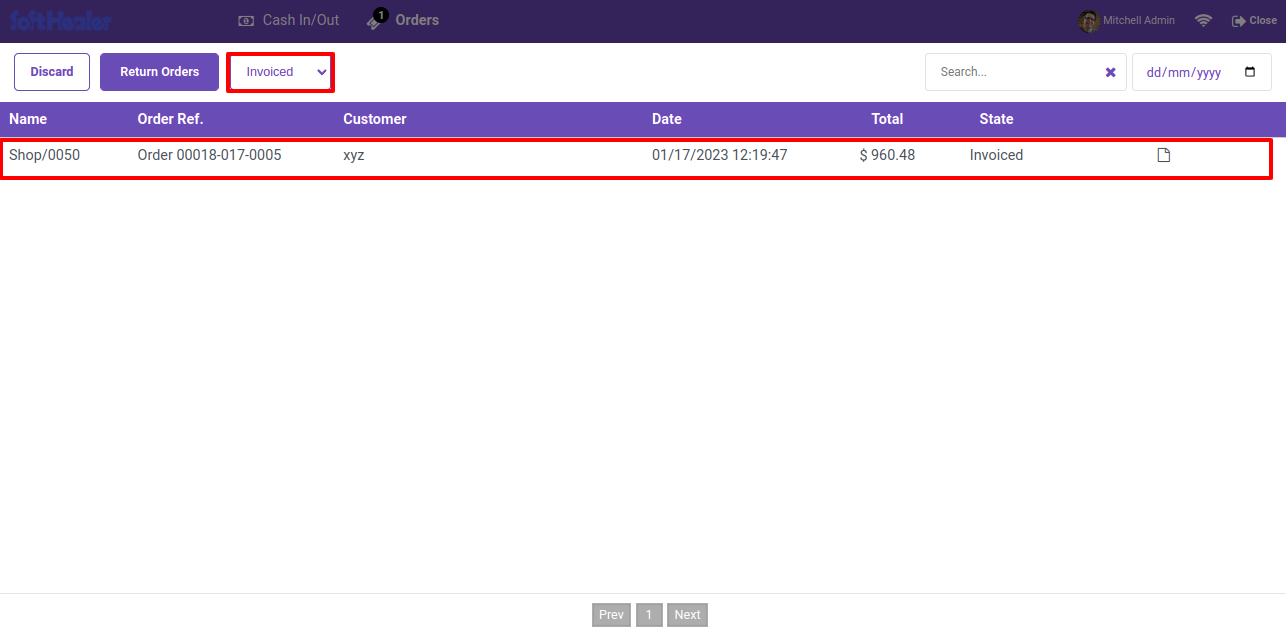
You can filter the order history. Filter the order history list by invoiced.
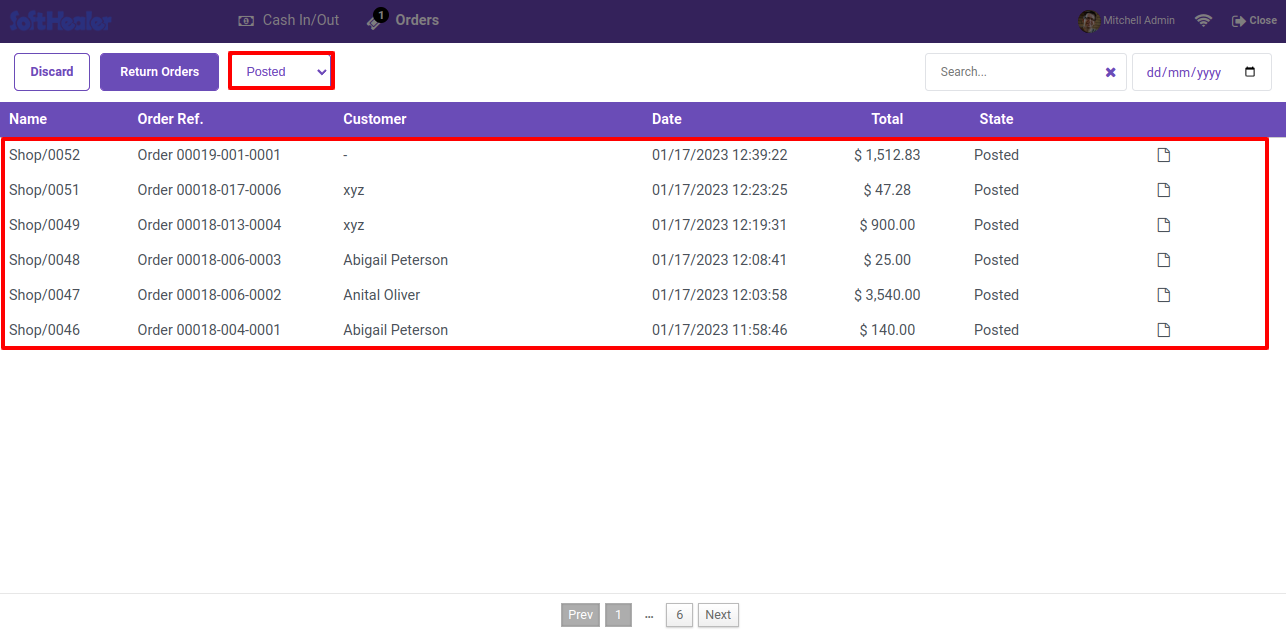
Filter the order history list by posted.
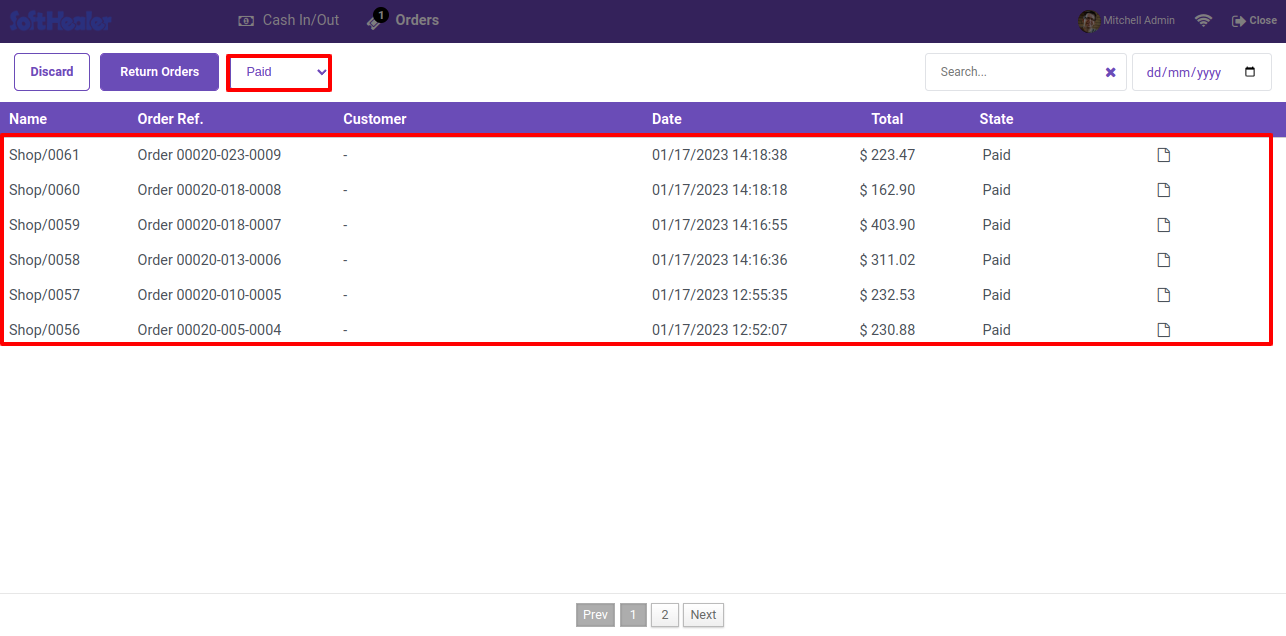
Filter the order history list by paid.
Filter the order history list by all orders.
Filter the order history list by return orders.
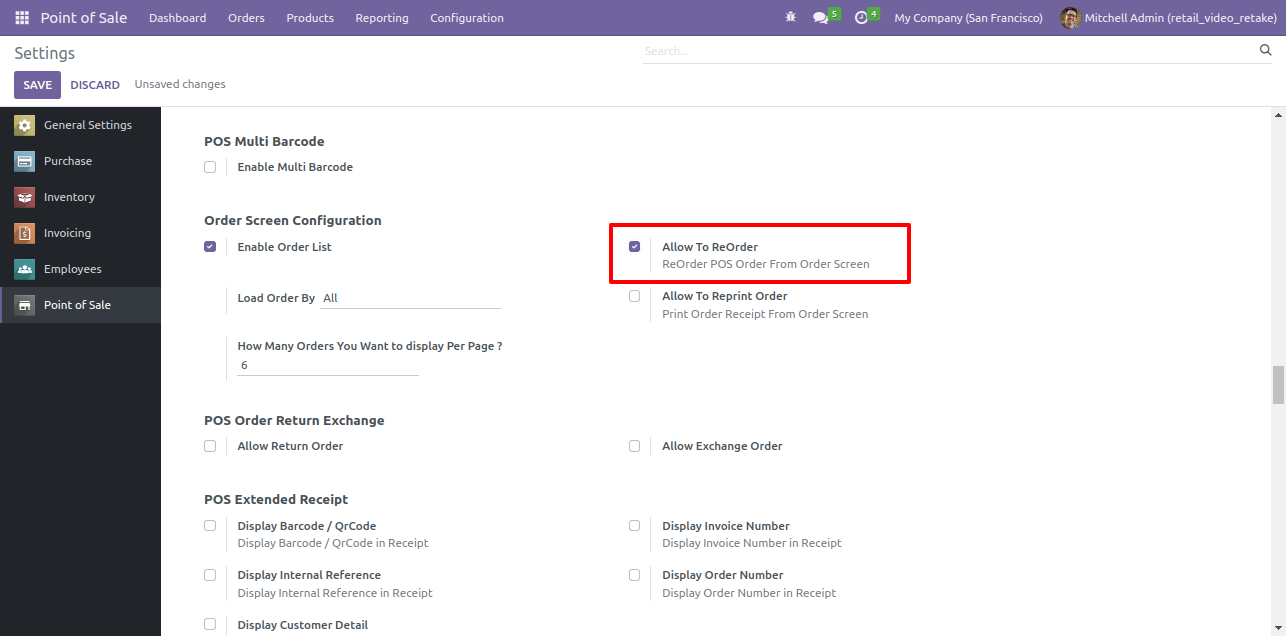
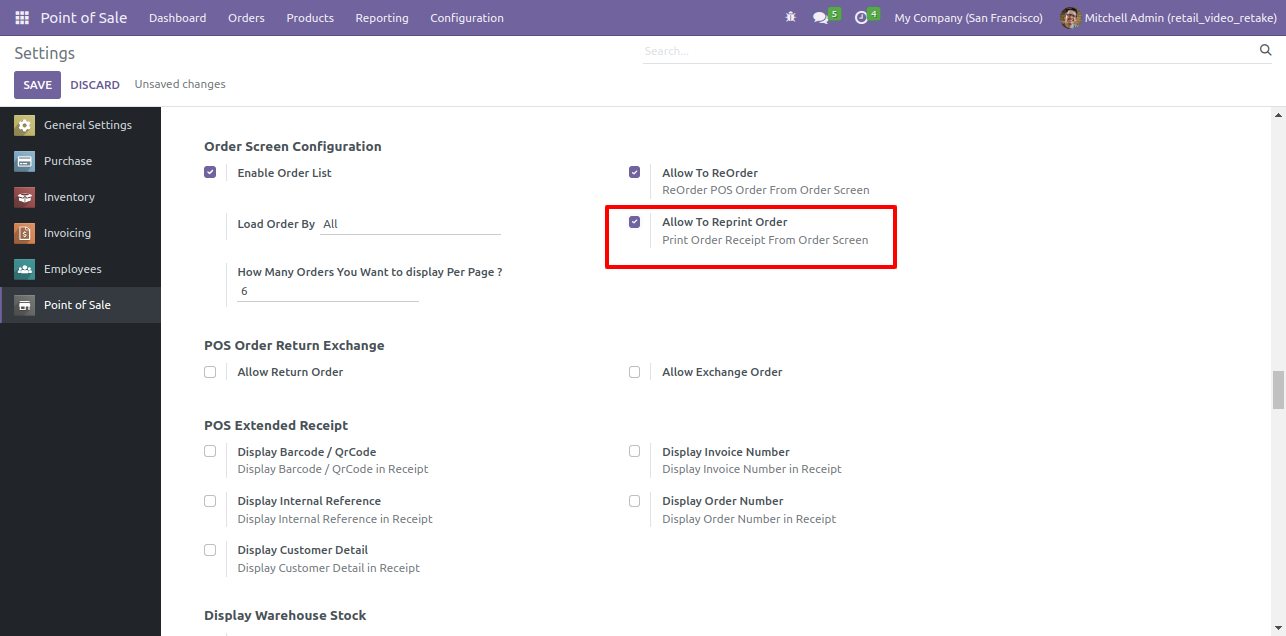
Goto the pos setting and tick the 'Allow To Reorder' feature.
After enabling this feature you can see the reorder button. To reorder, click on the 'Reorder' button.
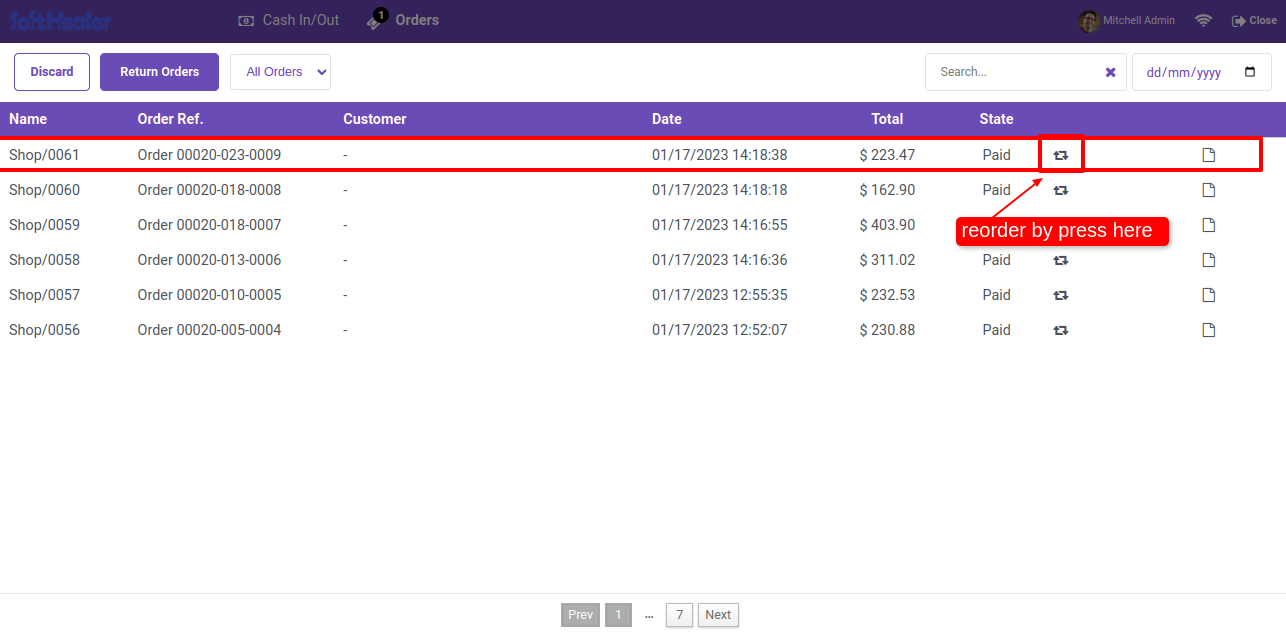
After clicking on this, you will be redirect to the pos screen.
The product that was previously ordered will be automatically selected.
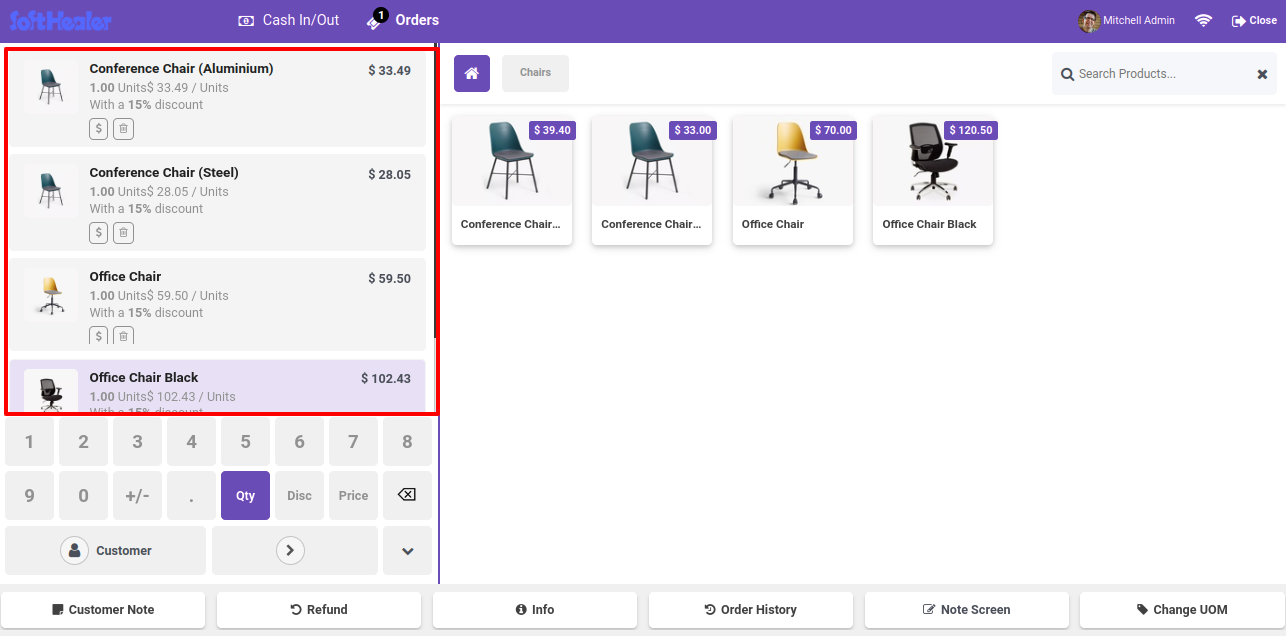
All the product is visible on receipt.
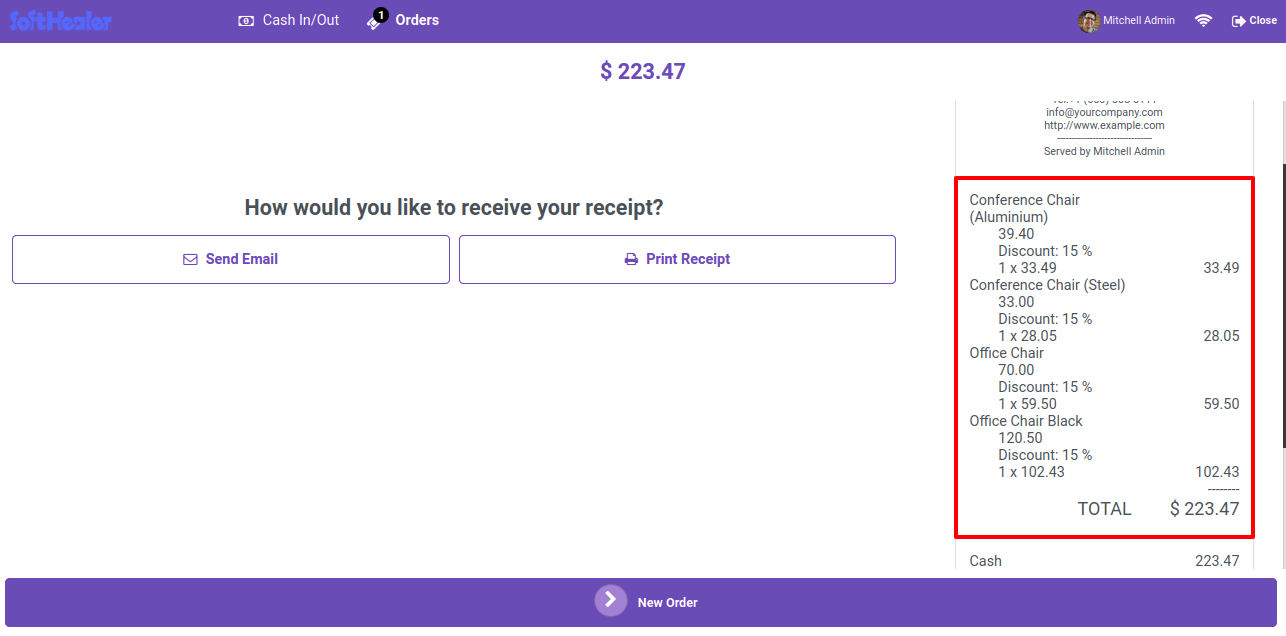
Goto pos setting and enable 'Allow To Reprint Order'.
All the product is visible on receipt.
After enabling this feature you can see the reprint button.
To reprint the receipt, click on the 'Reprint' button.
Printed receipt.

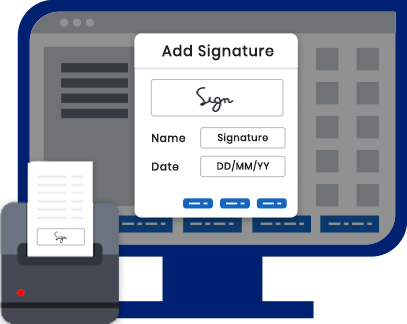
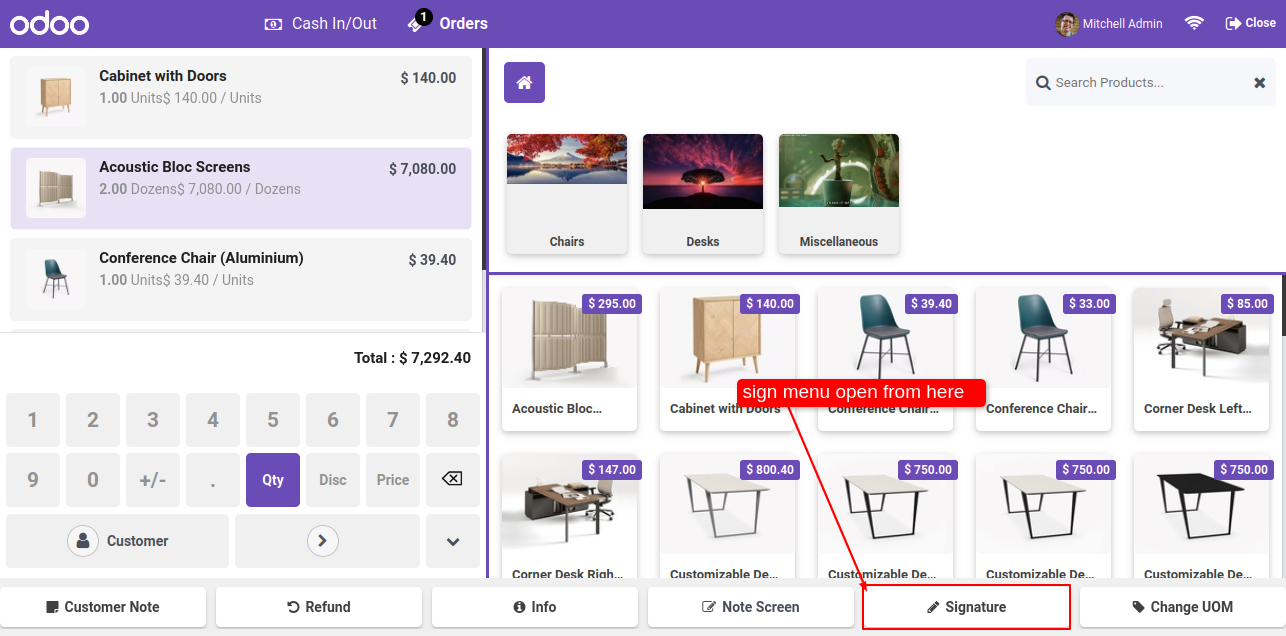
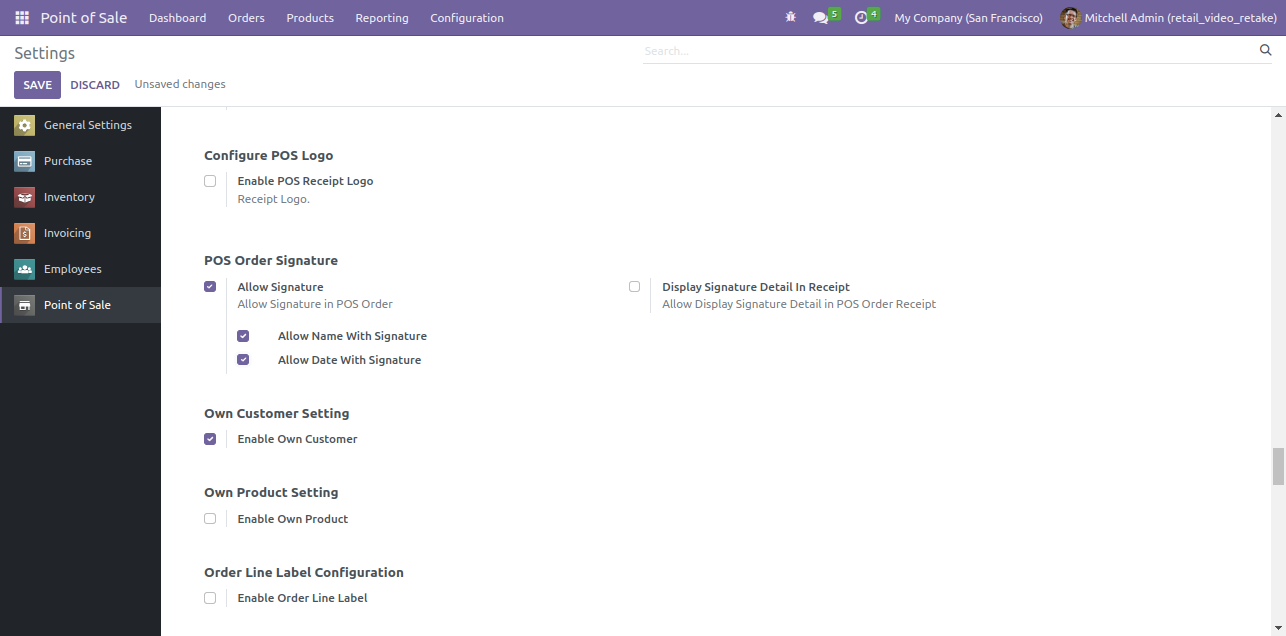
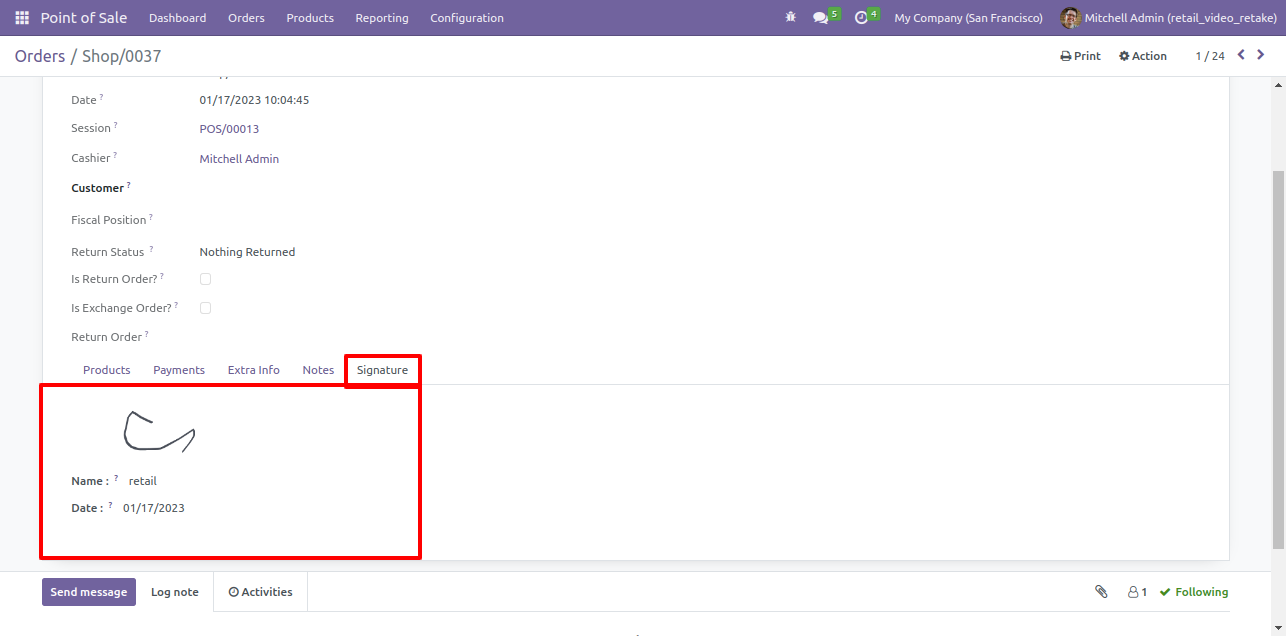
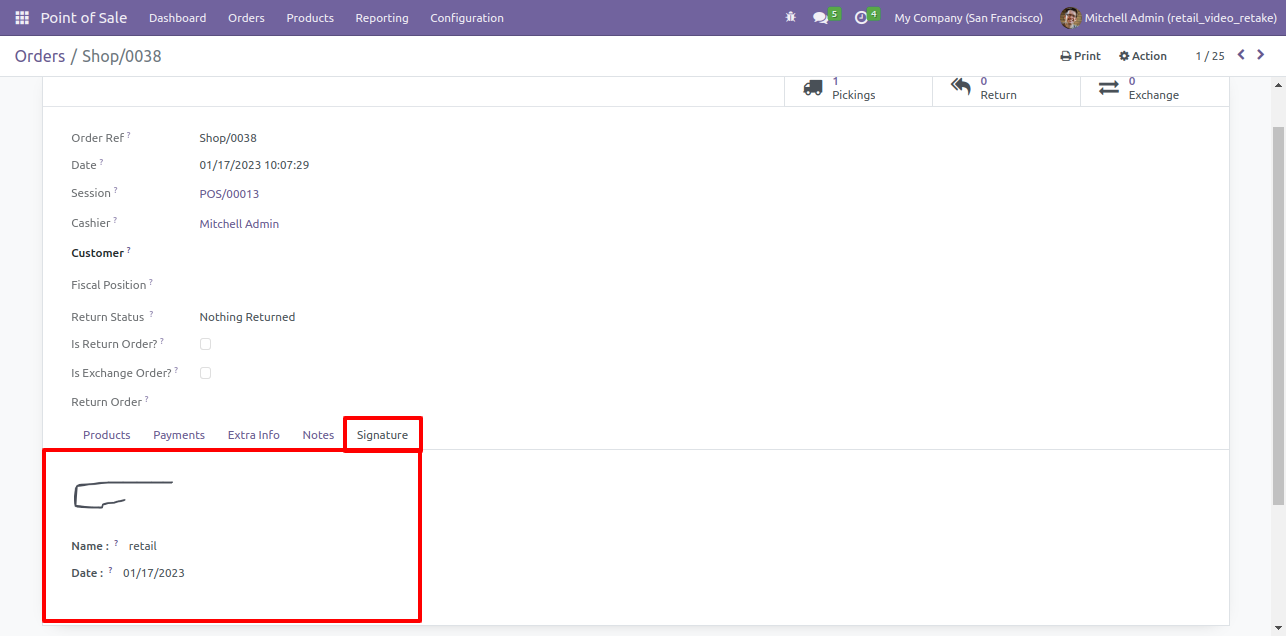
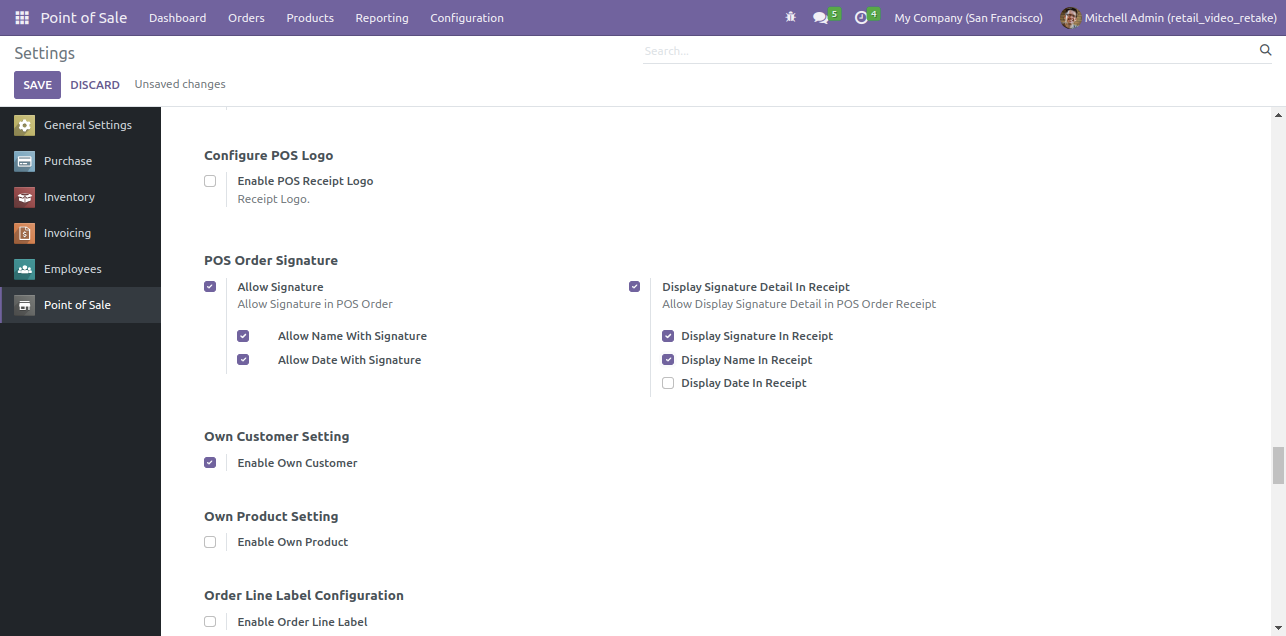
Goto pos setting and enable "Allow Signature" also enable allow name with signature.

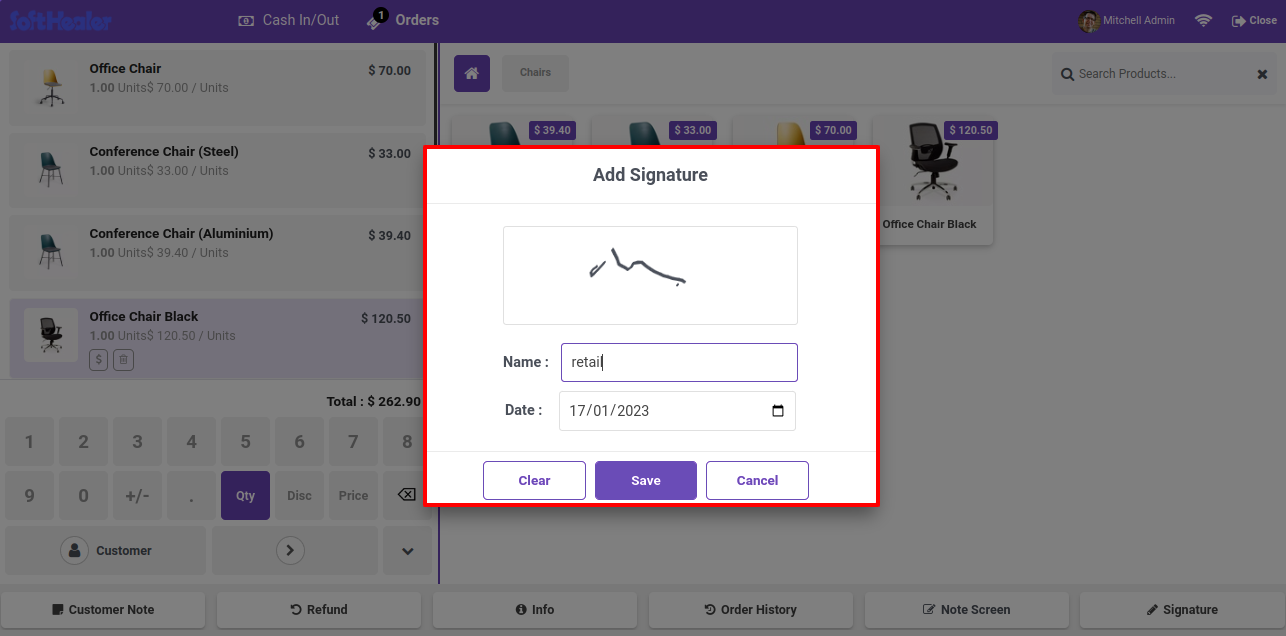
Goto pos screen and click on 'Signature'.
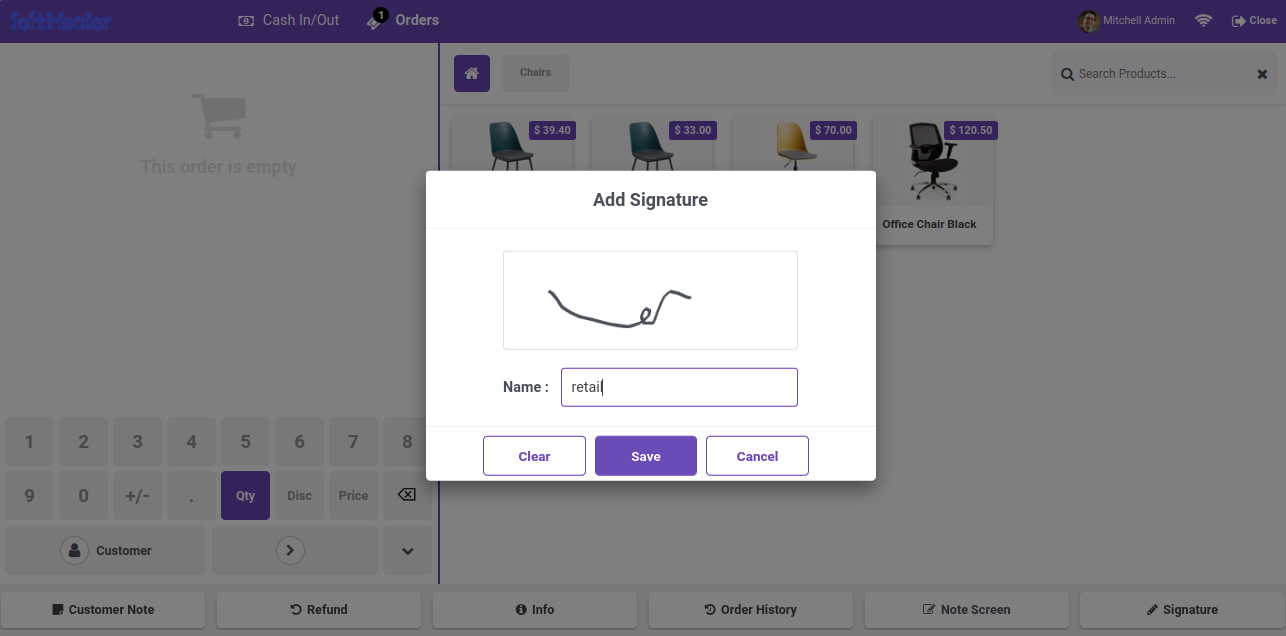
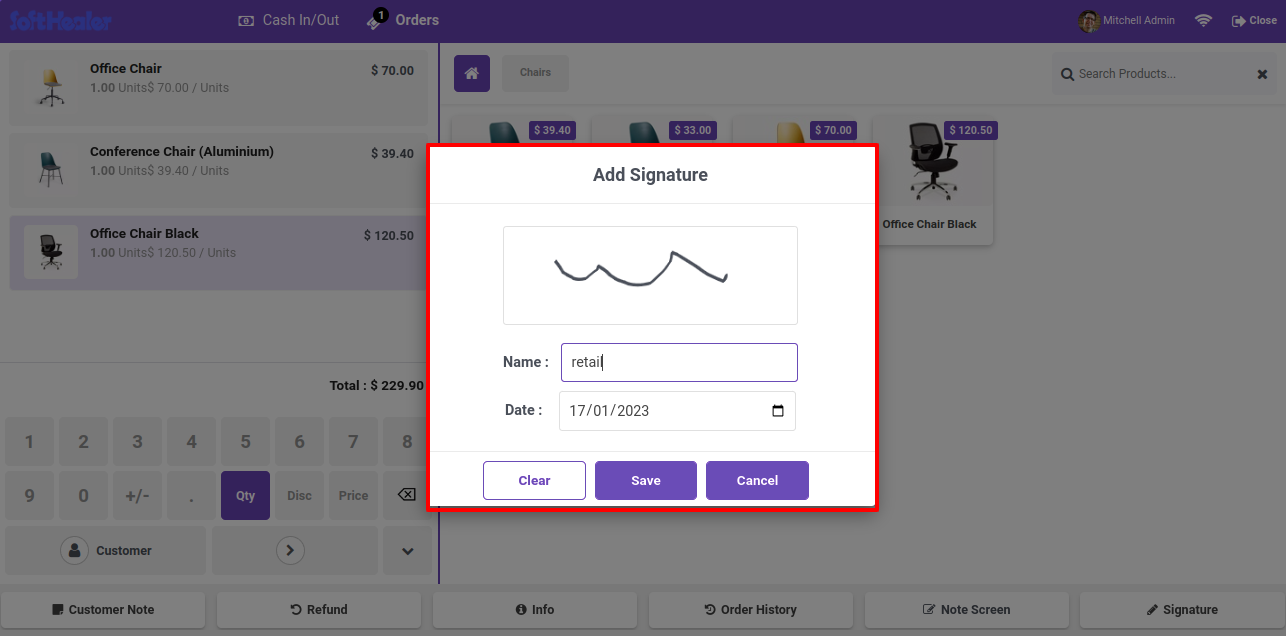
After that this wizard will popout, here draw your signature, add name and click on the Save.
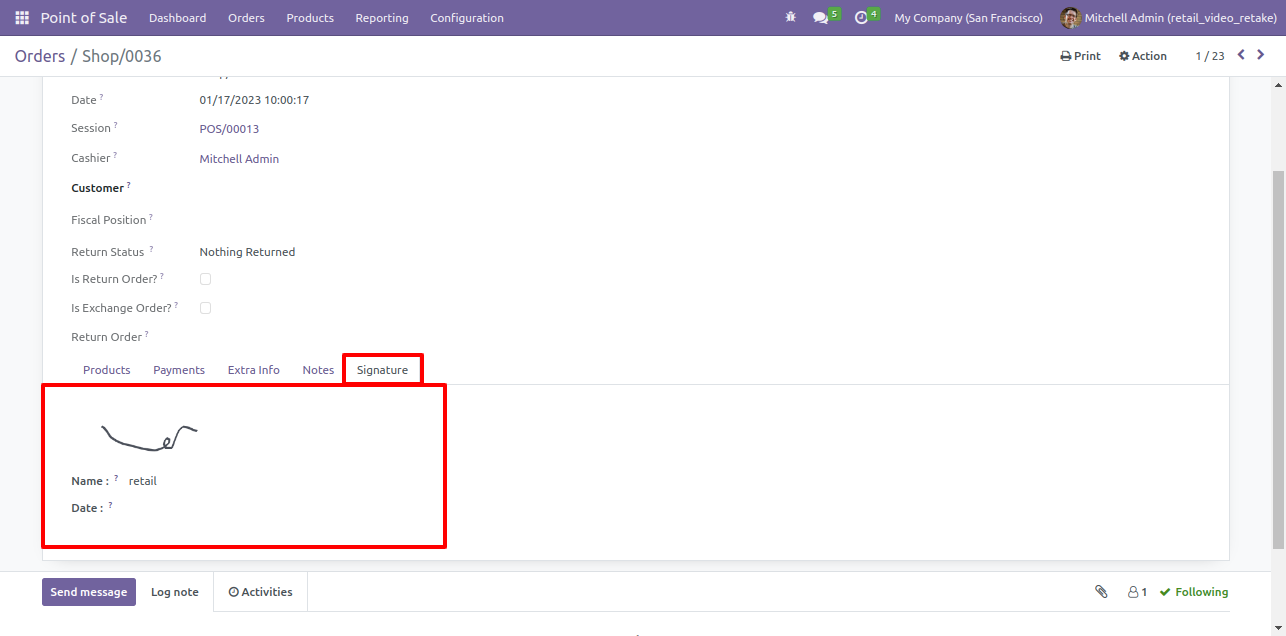
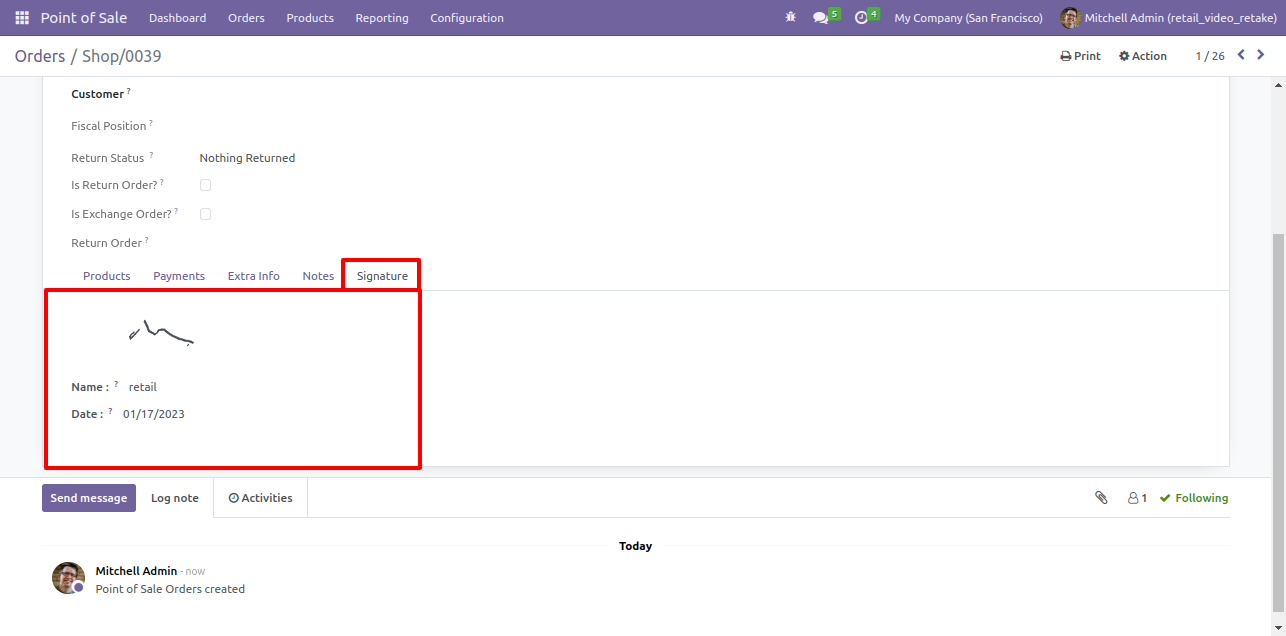
Signature will display on pos order form view with name.
Goto pos setting and also enable allow date with signature.
Goto pos screen and click on 'Signature'.
After that this wizard will popout, here draw your signature, add name and date and click on the Save.
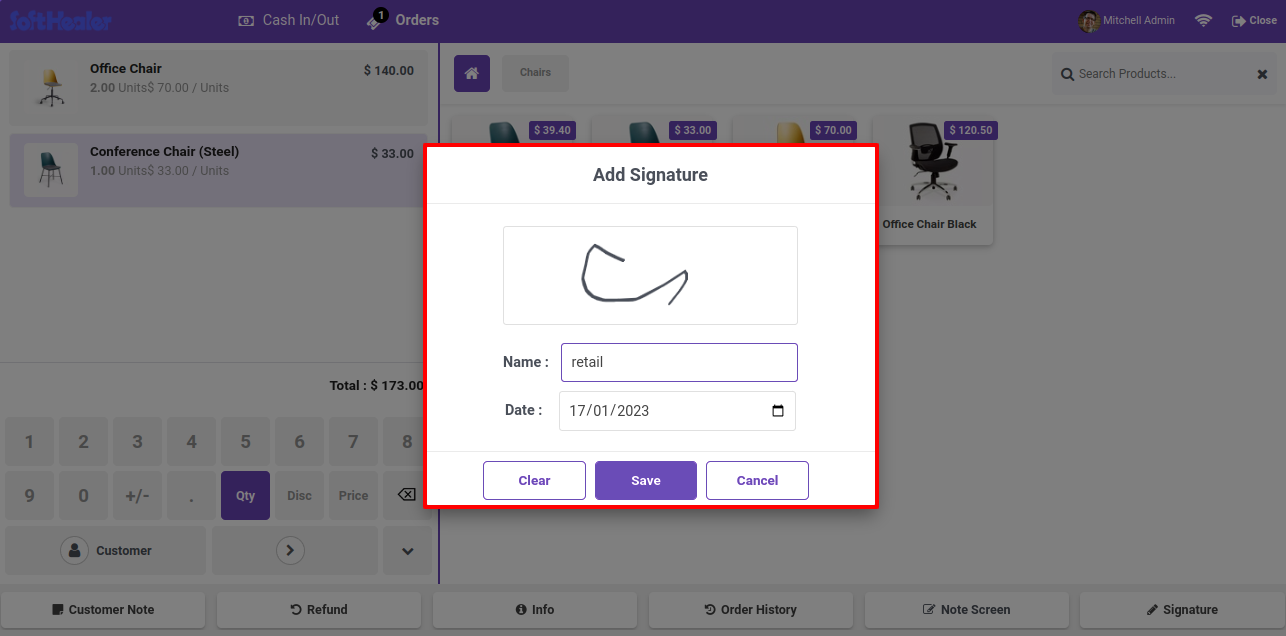
Signature will display on pos order form view with name and date.
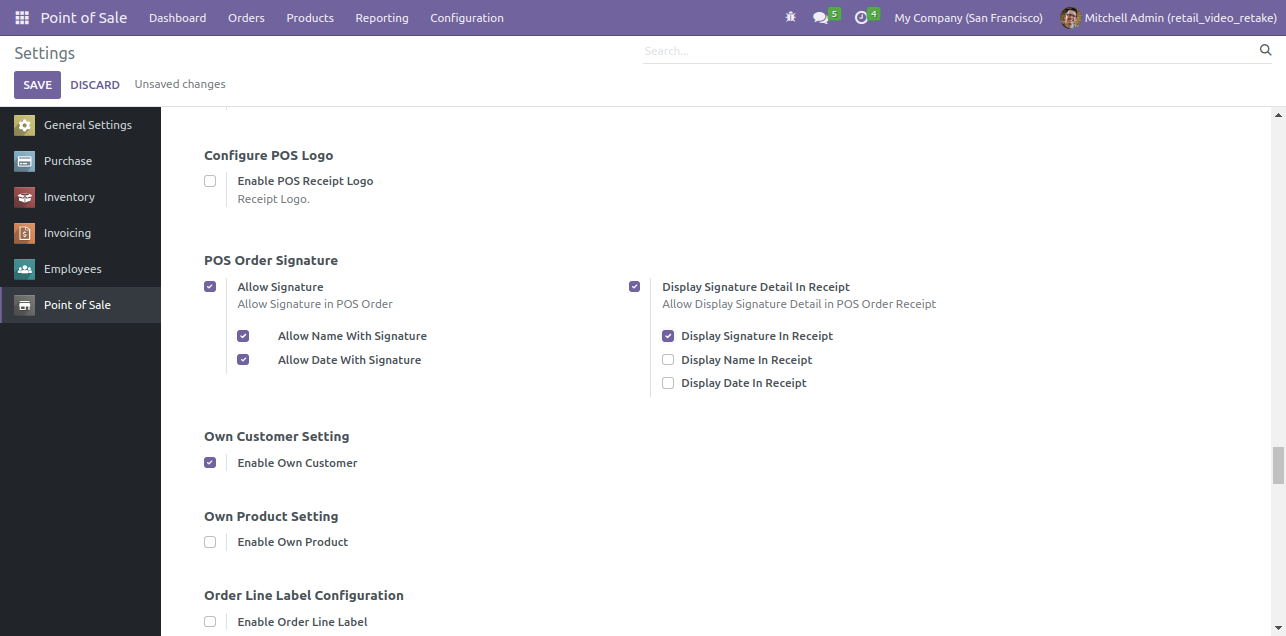
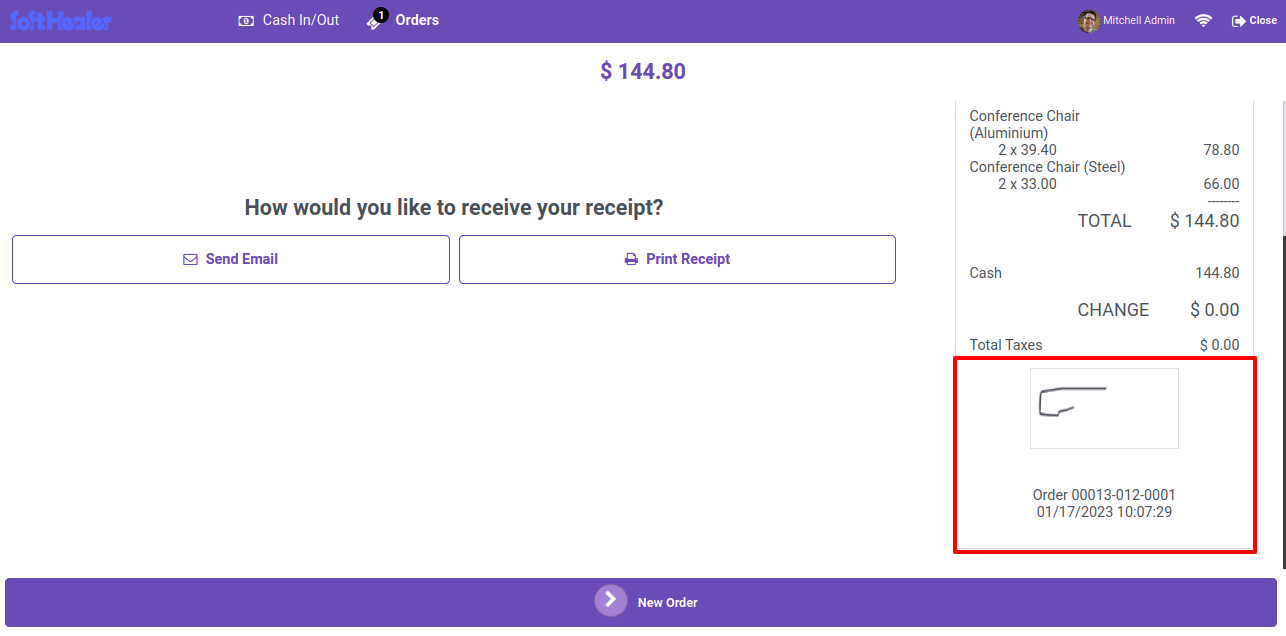
Goto pos setting and enable "Display Signature Details In Receipt" also enable display signature in receipt.
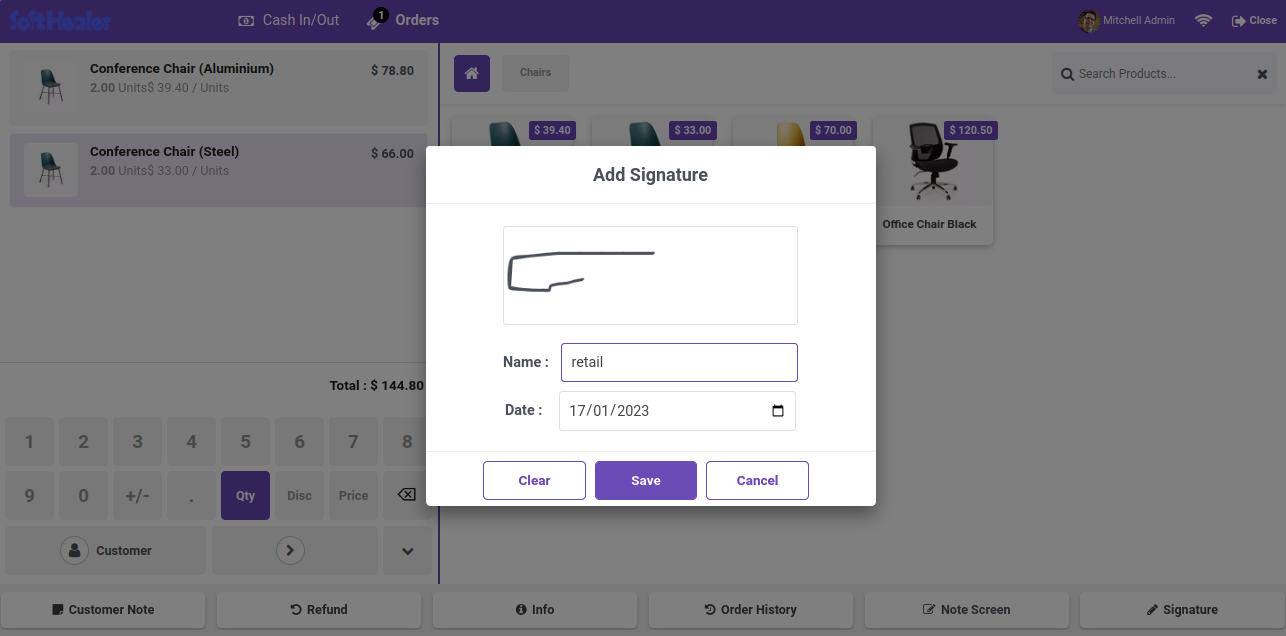
Goto pos screen and click on 'Signature'.
Goto pos setting and enable "Allow POS Signature" also enable appropriate options.
Signature will display on pos receipt.
Signature will display on pos order form view with name.
Goto pos setting and enable "Display Signature Details In Receipt" also enable display name in receipt.
Goto pos screen and click on 'Signature'.
After that this wizard will popout, here draw your signature, add name and date and click on the Save.
Signature will display on pos receipt with name.
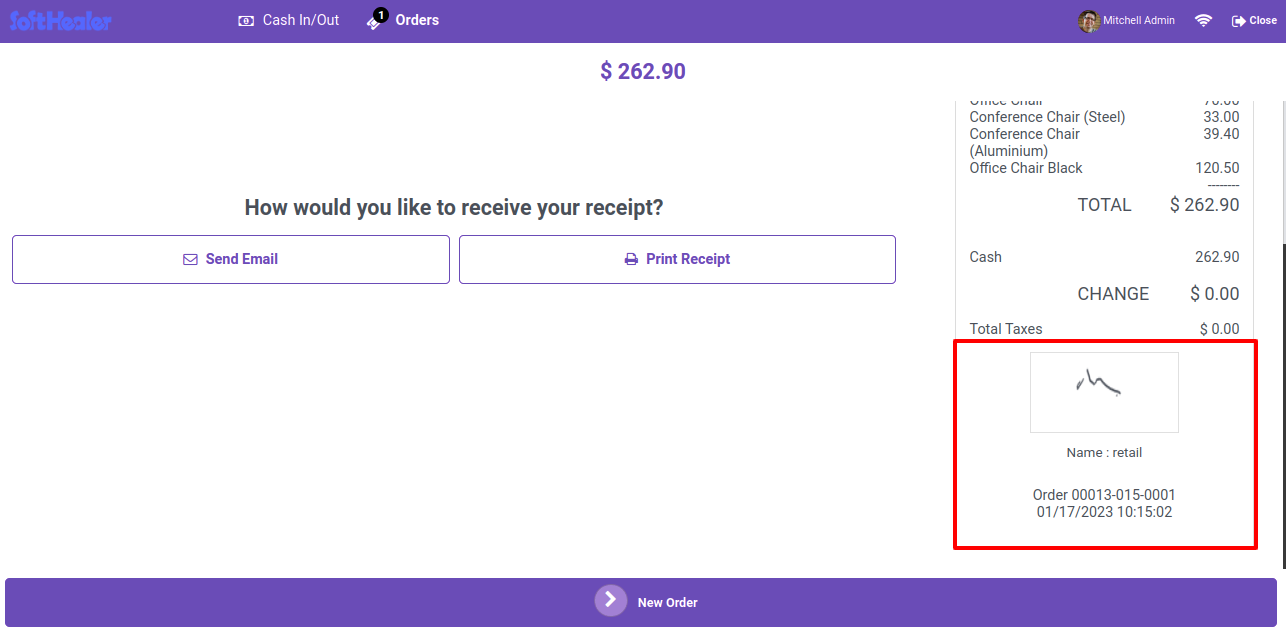
Signature will display on pos receipt with name and date.
Goto pos setting and enable "Display Signature Details In Receipt" also enable display date in receipt.

After that this wizard will popout, here draw your signature, add name and date and click on the Save.
Signature will display on pos receipt with name & date.
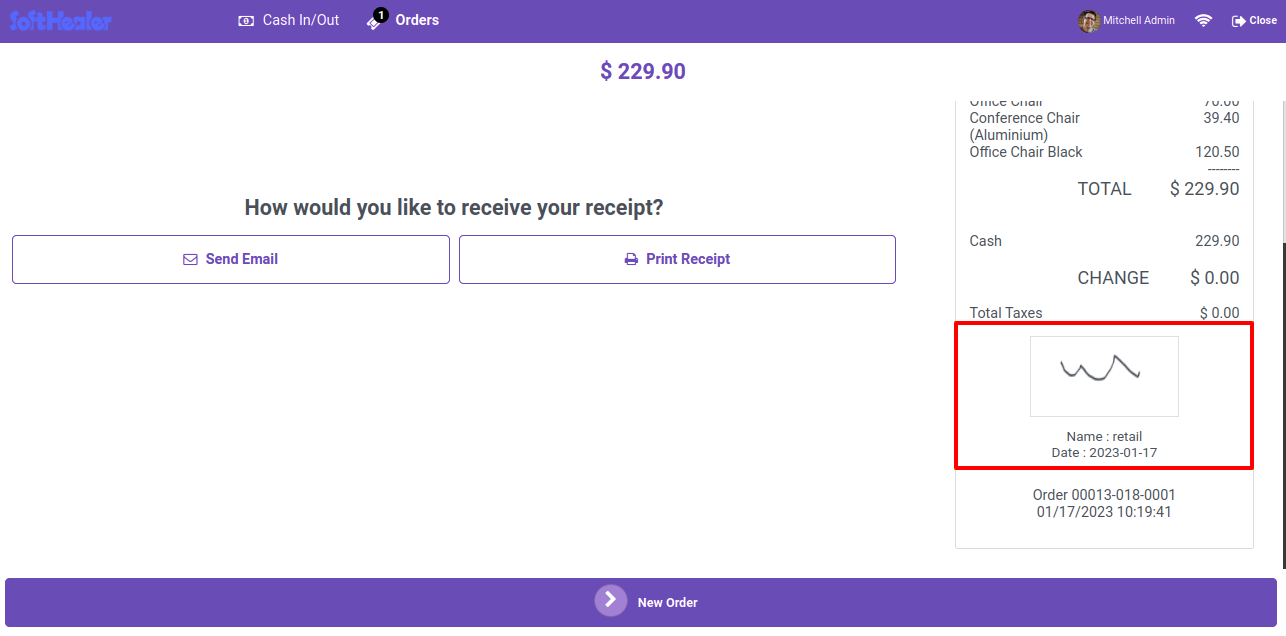
Signature will display on pos receipt with name and date.

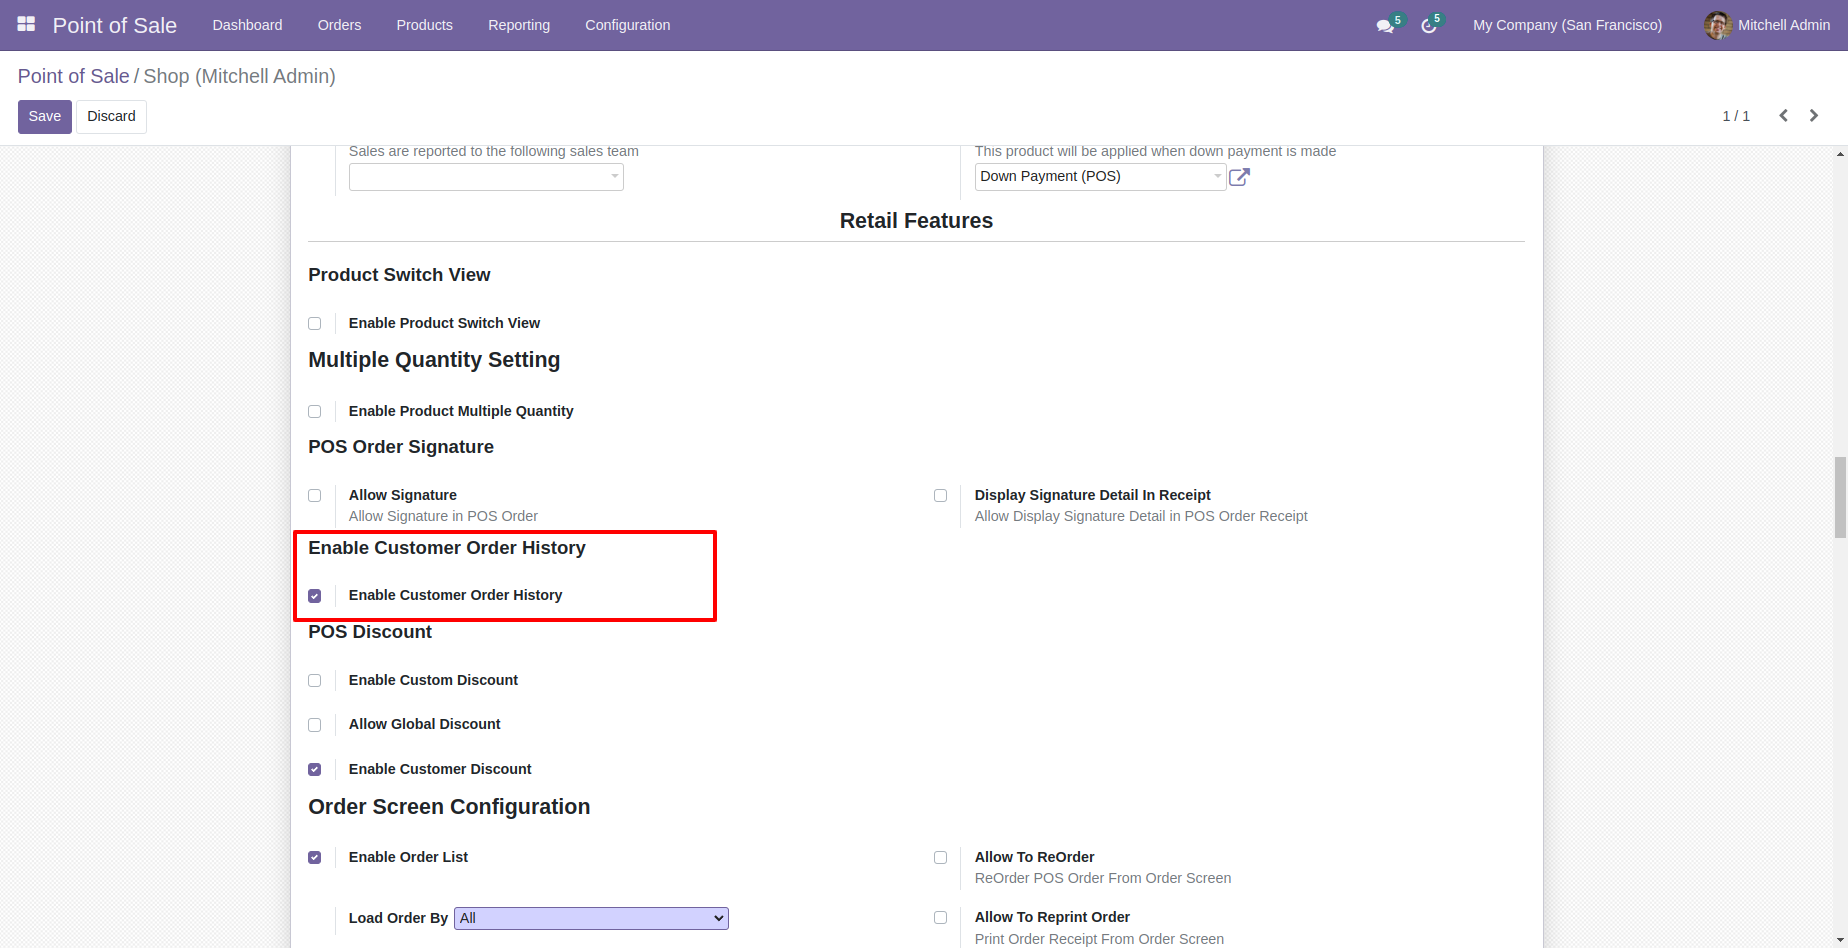
Enable Customer Order History in POS.
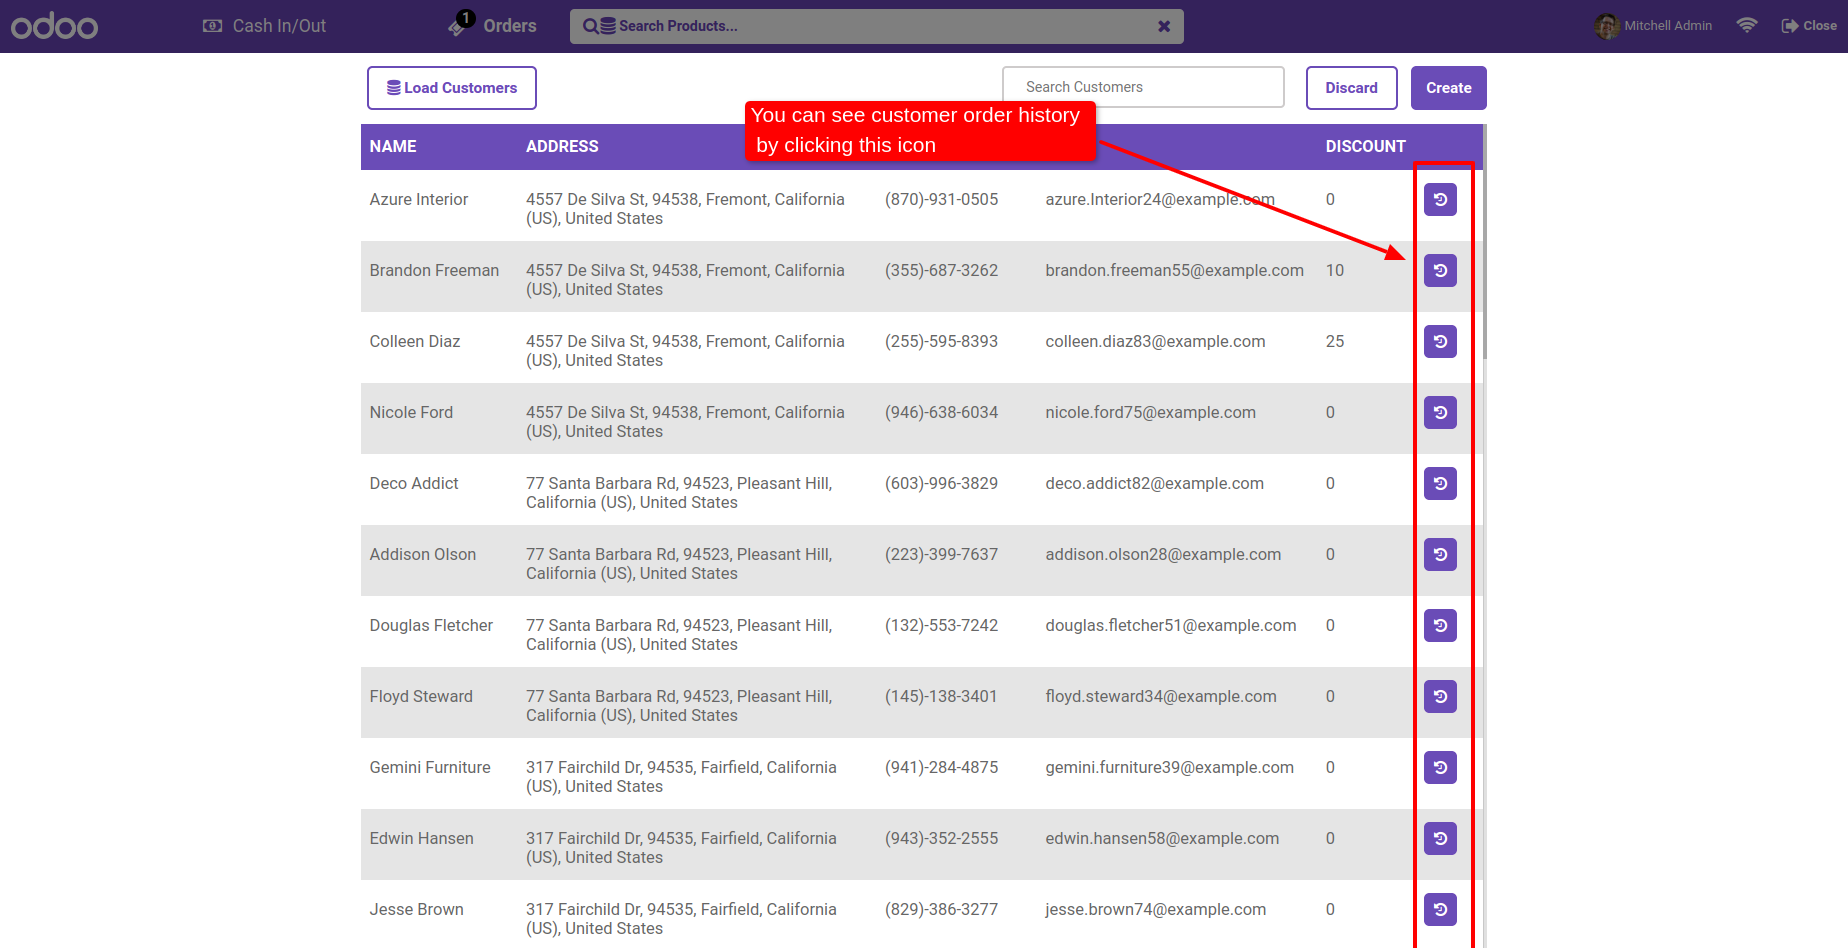
See Customer Order History By clicking icon in pos
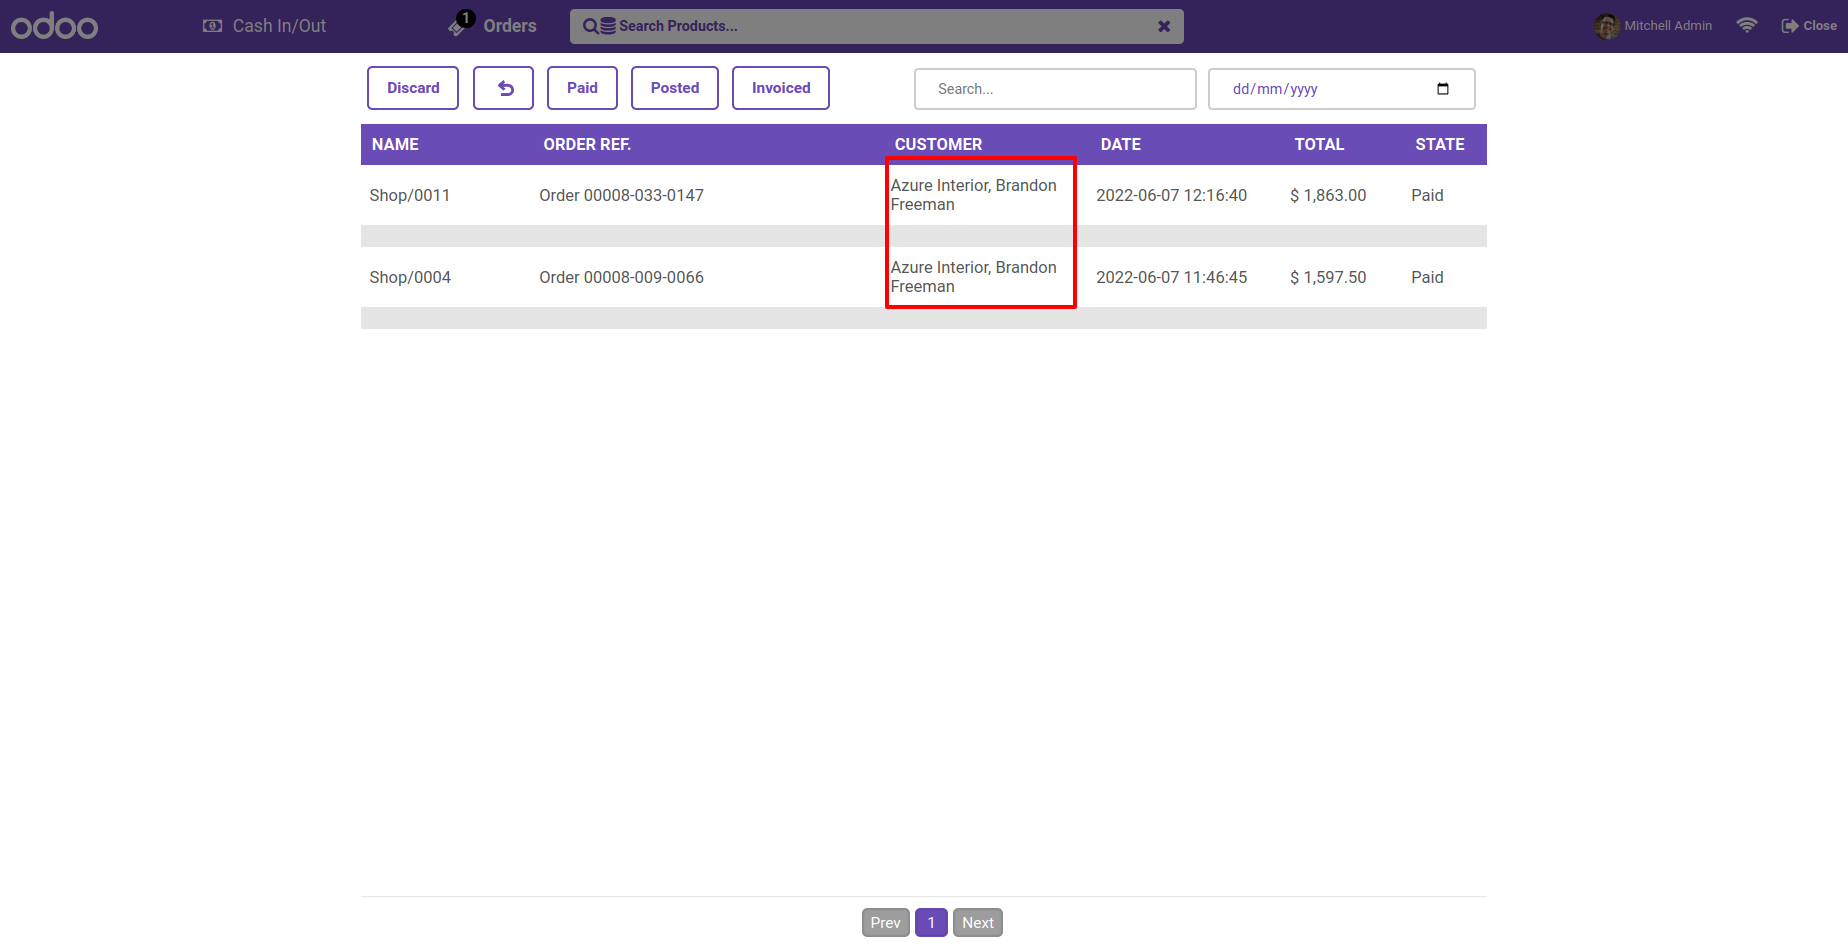
See Customer Name In History of POS.
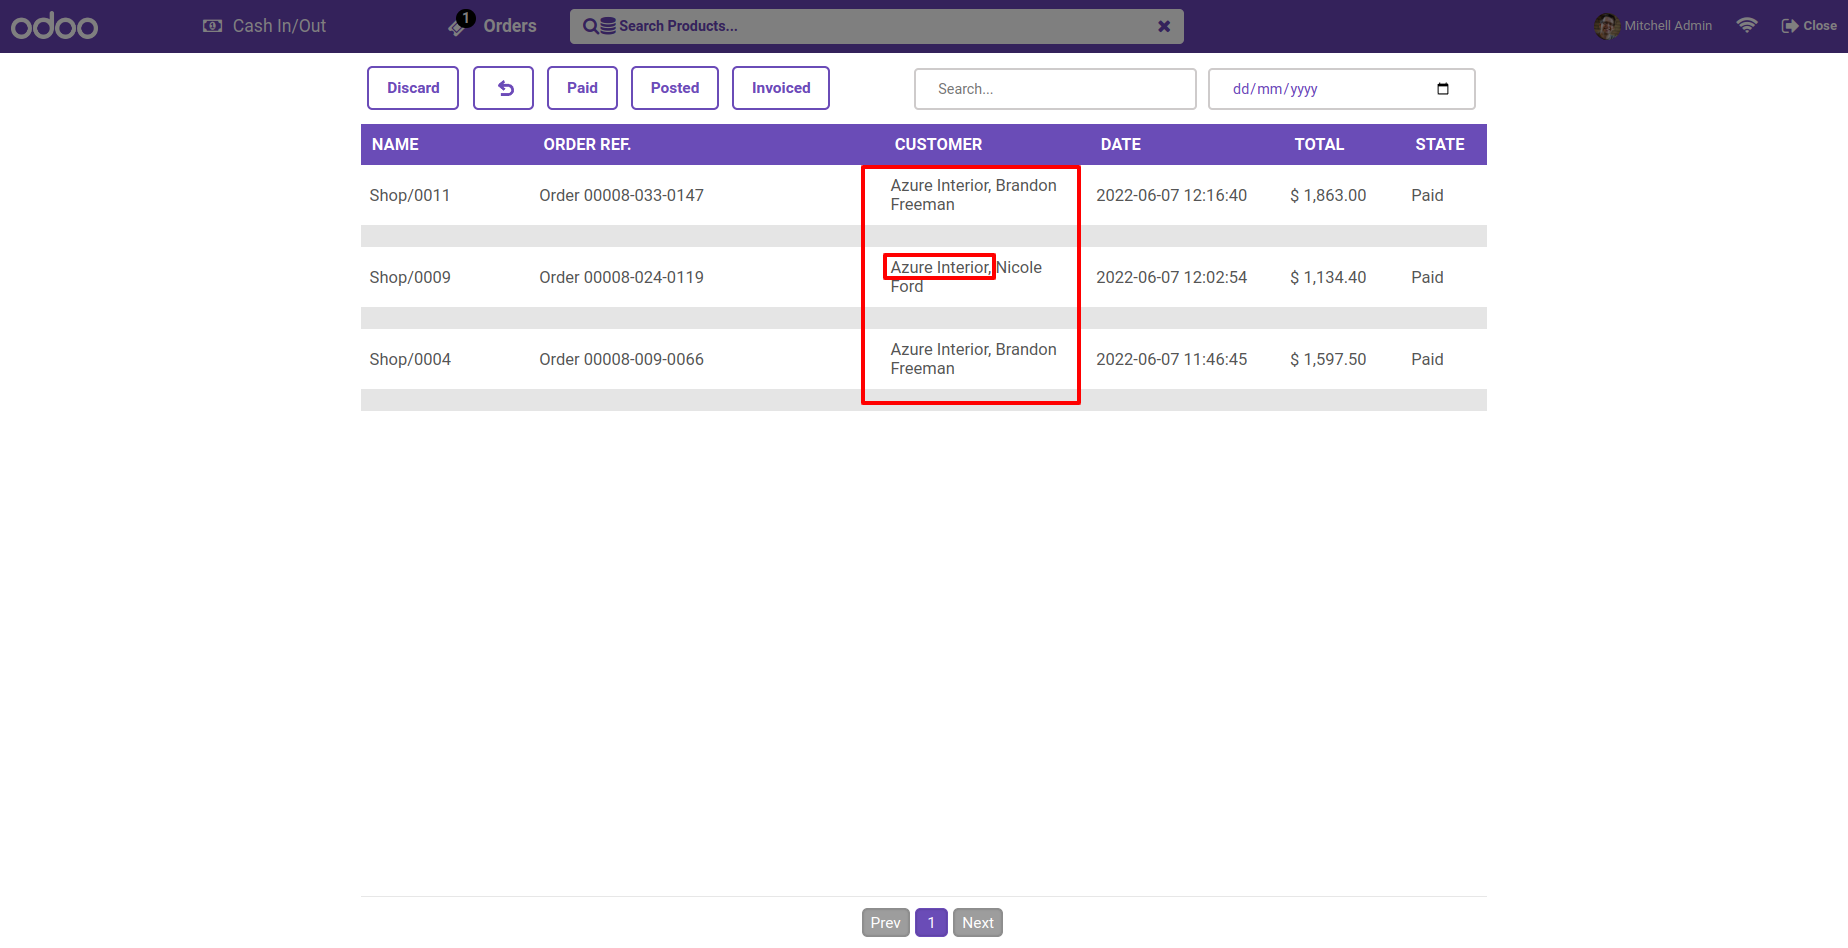
See Customer Name In POS by Order.
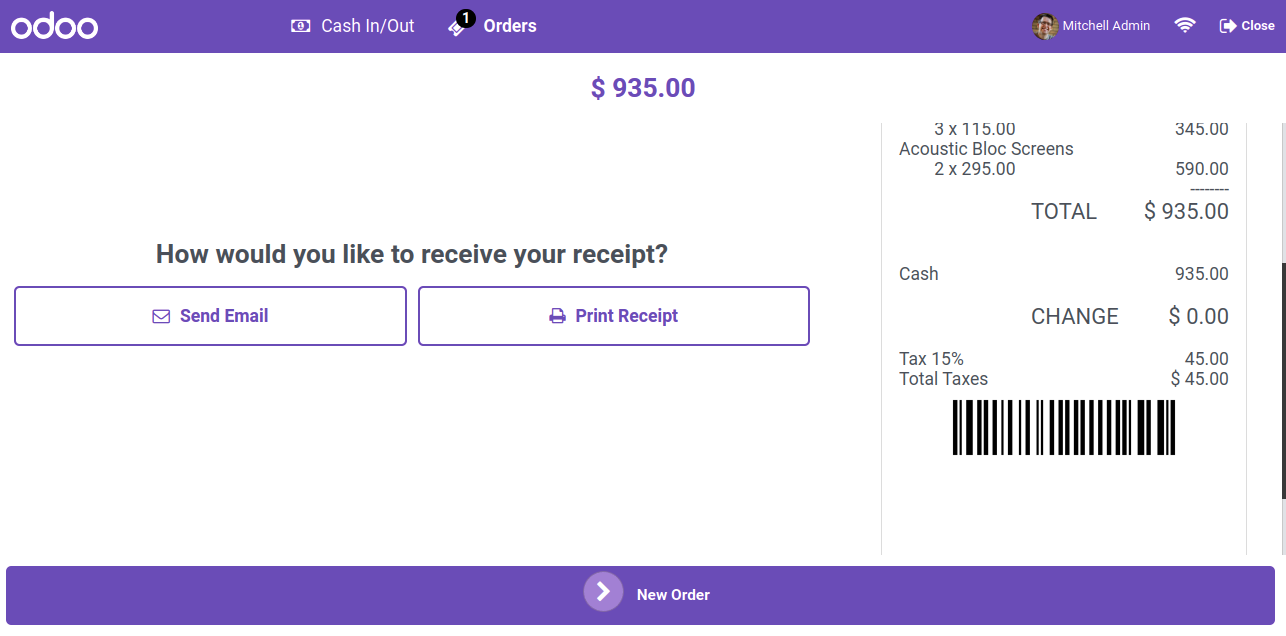
Goto pos setting and enable display barcode/QRcode option. here you have several options like display barcode, QR code on receipt. Select barcode option.
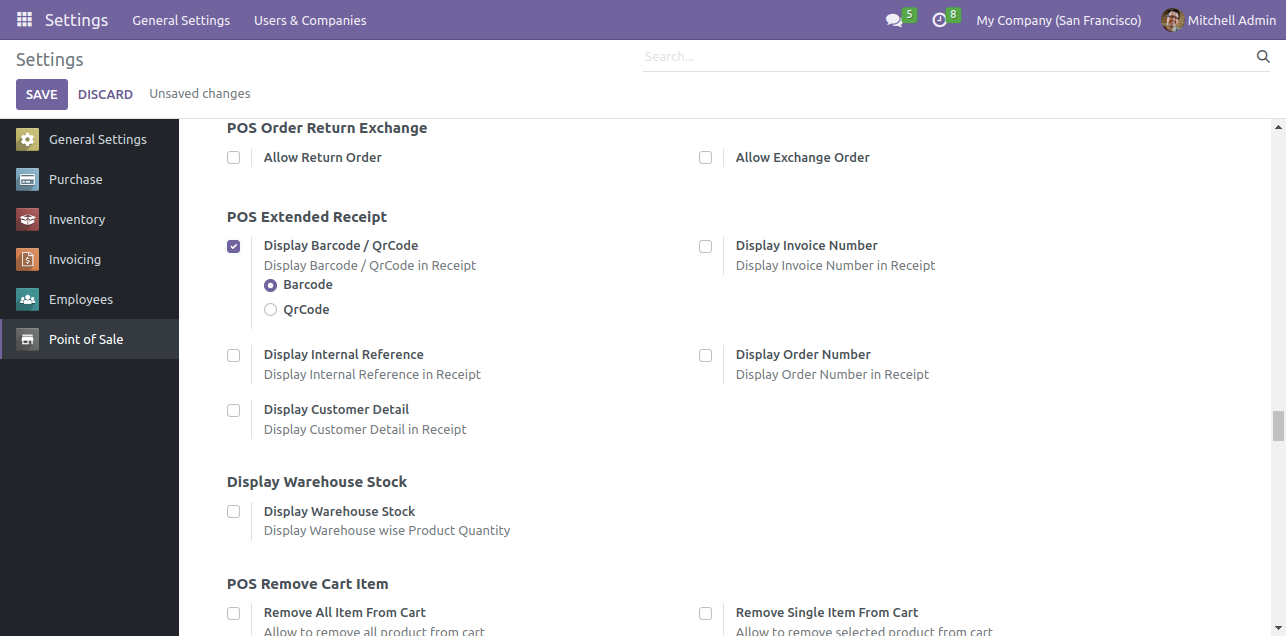
The barcode will be displayed on the receipt.
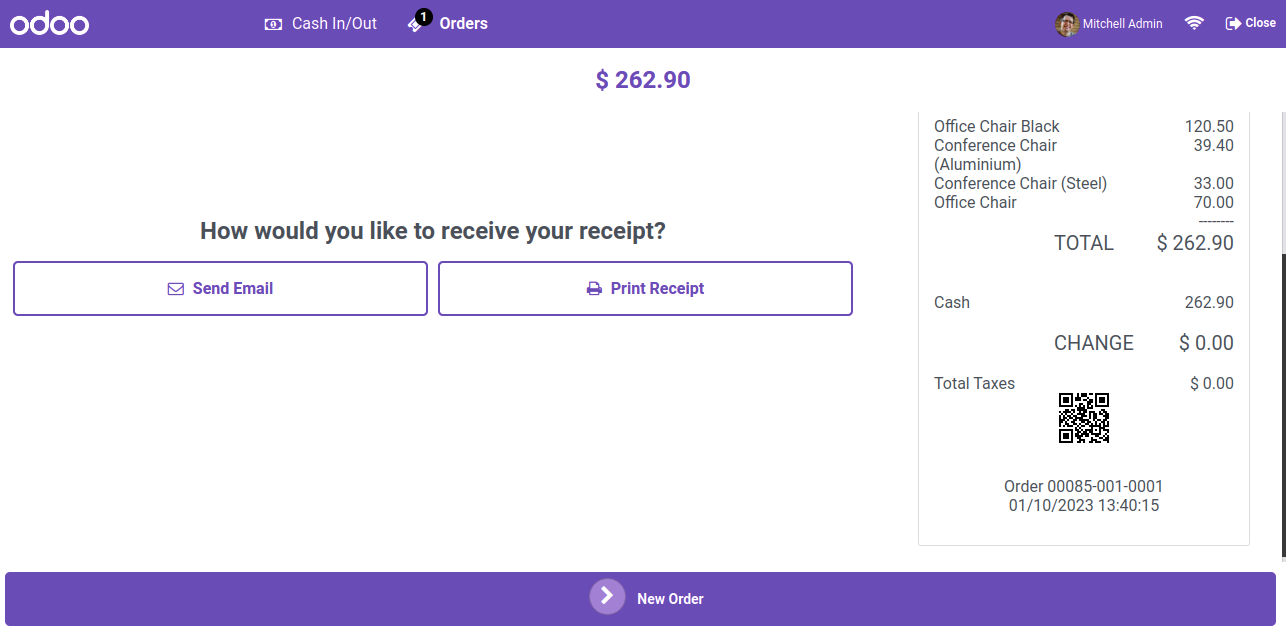
Select QRcode option.

The QRcode will be displayed on the receipt.
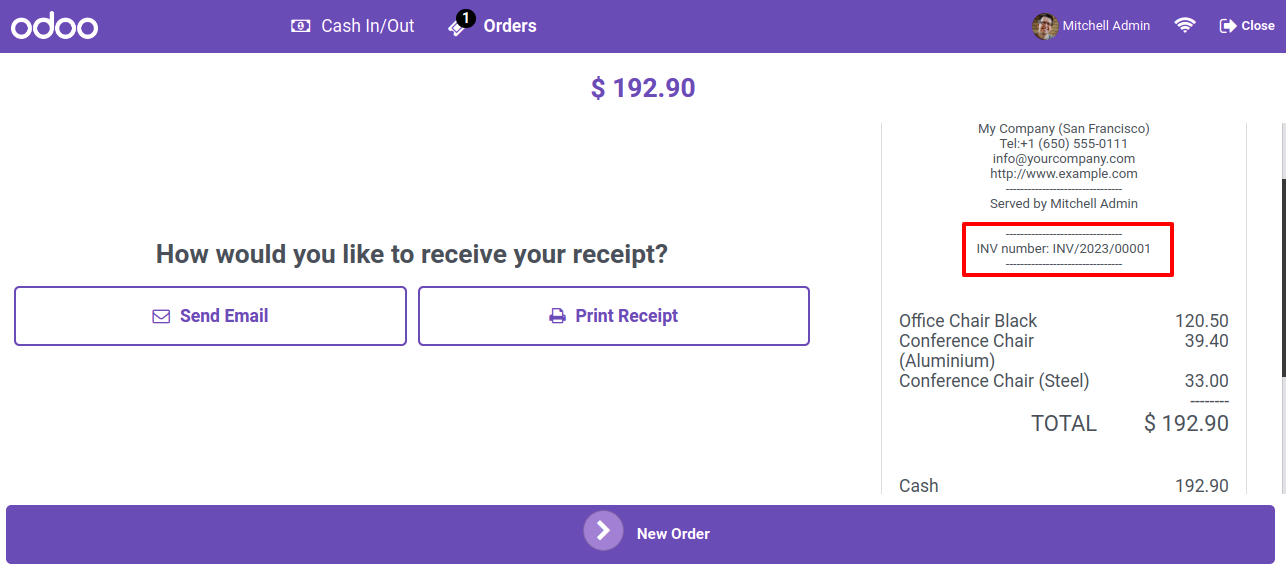
Goto pos setting and enable display invoice number option.
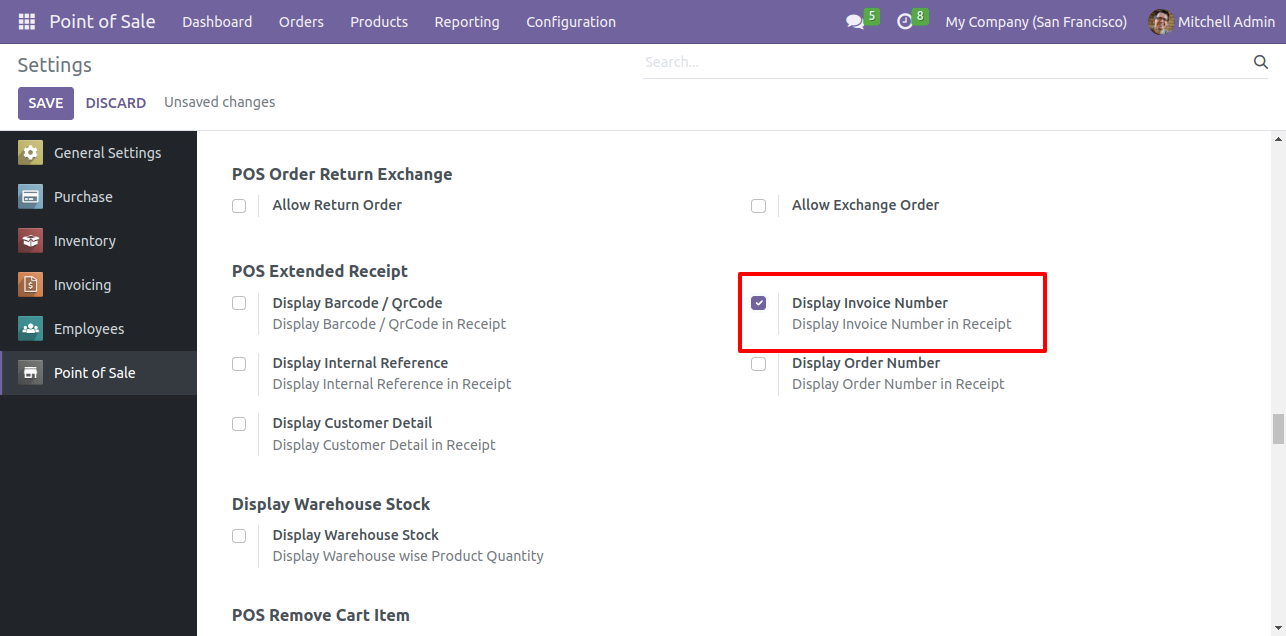
The invoice number will be displayed on the receipt.
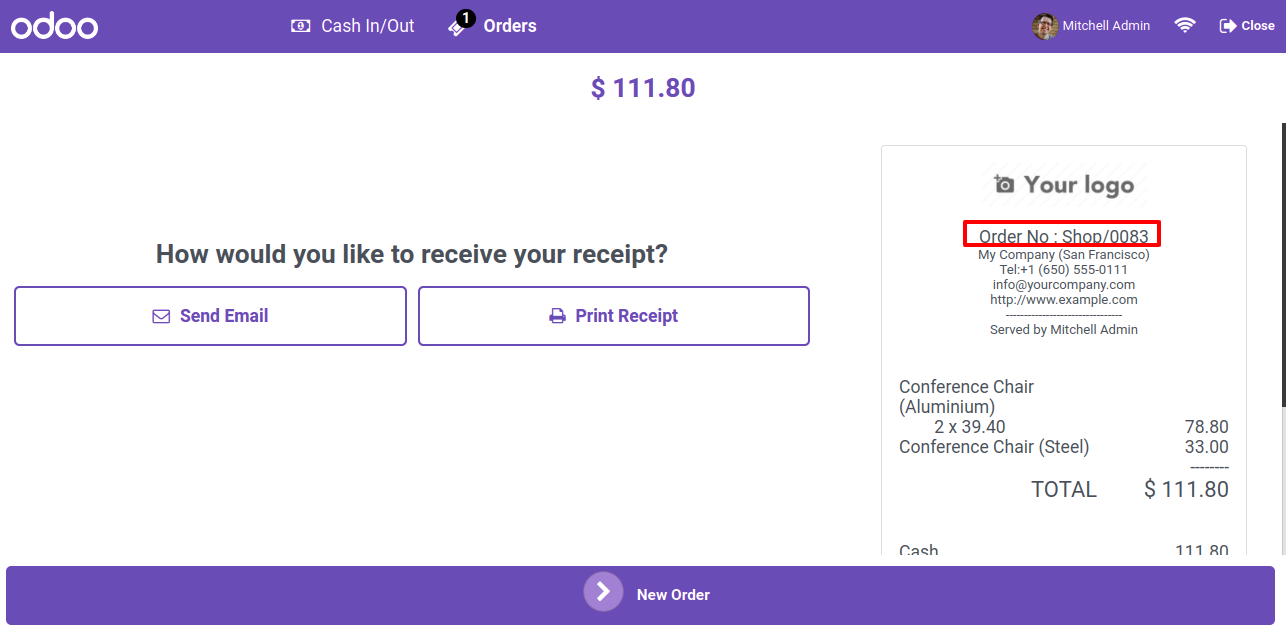
Goto pos setting and enable display order number option.

The order number will be displayed on the receipt.
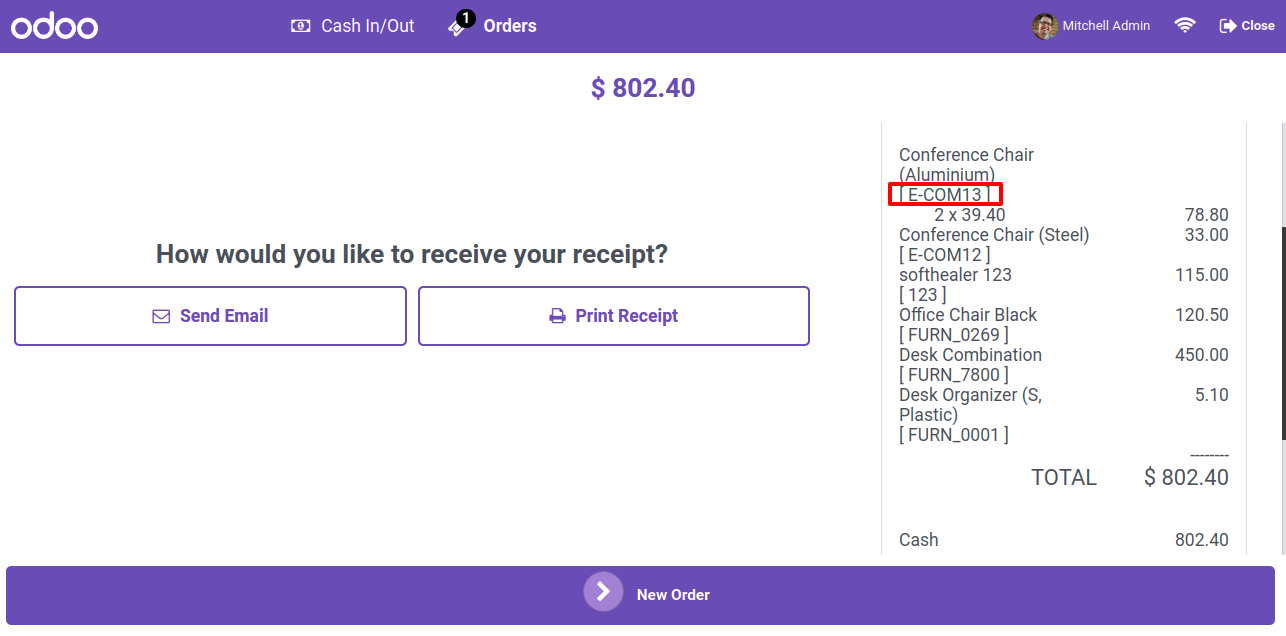
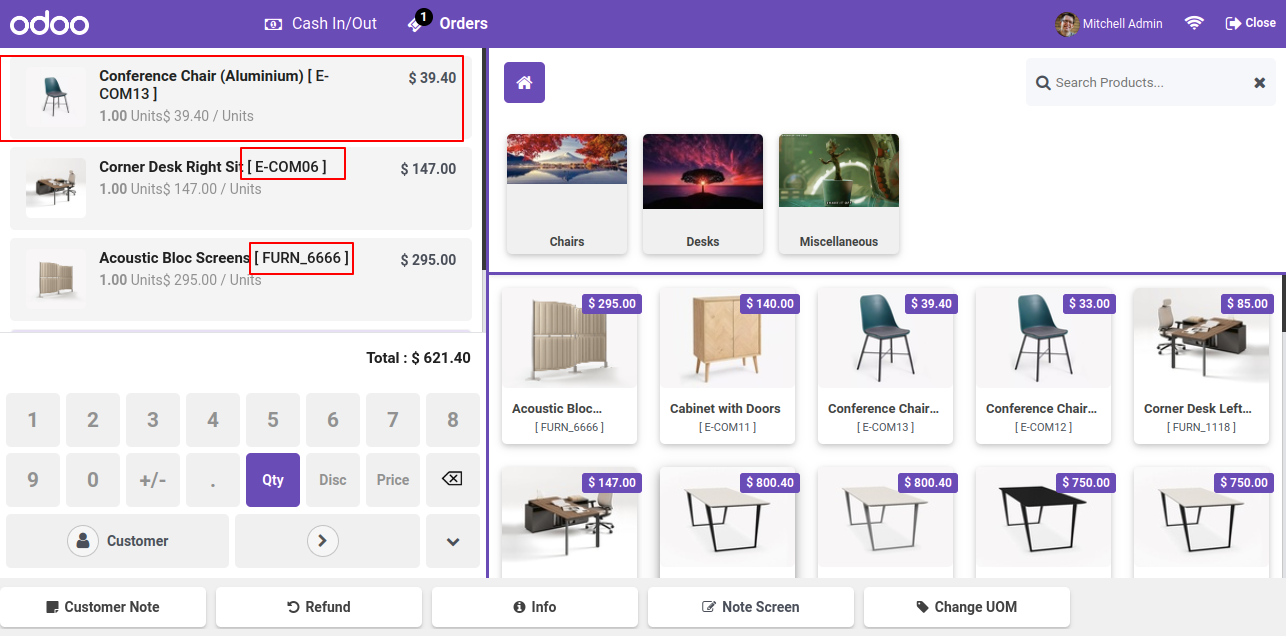
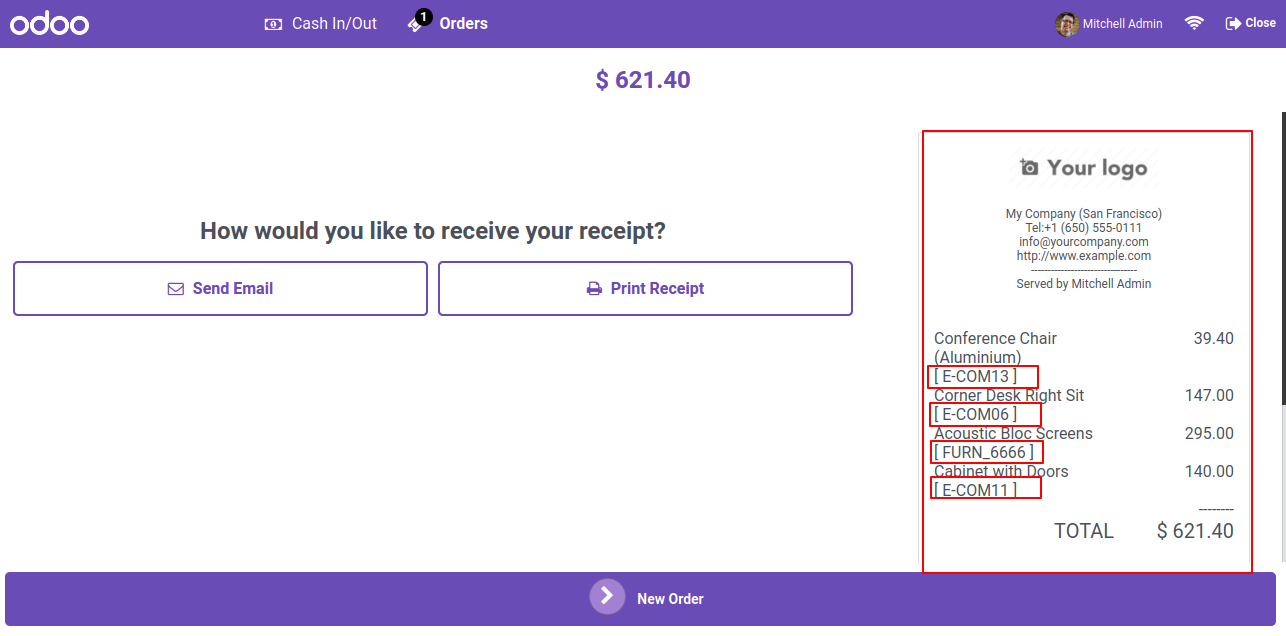
Goto pos setting and enable display internal reference option.
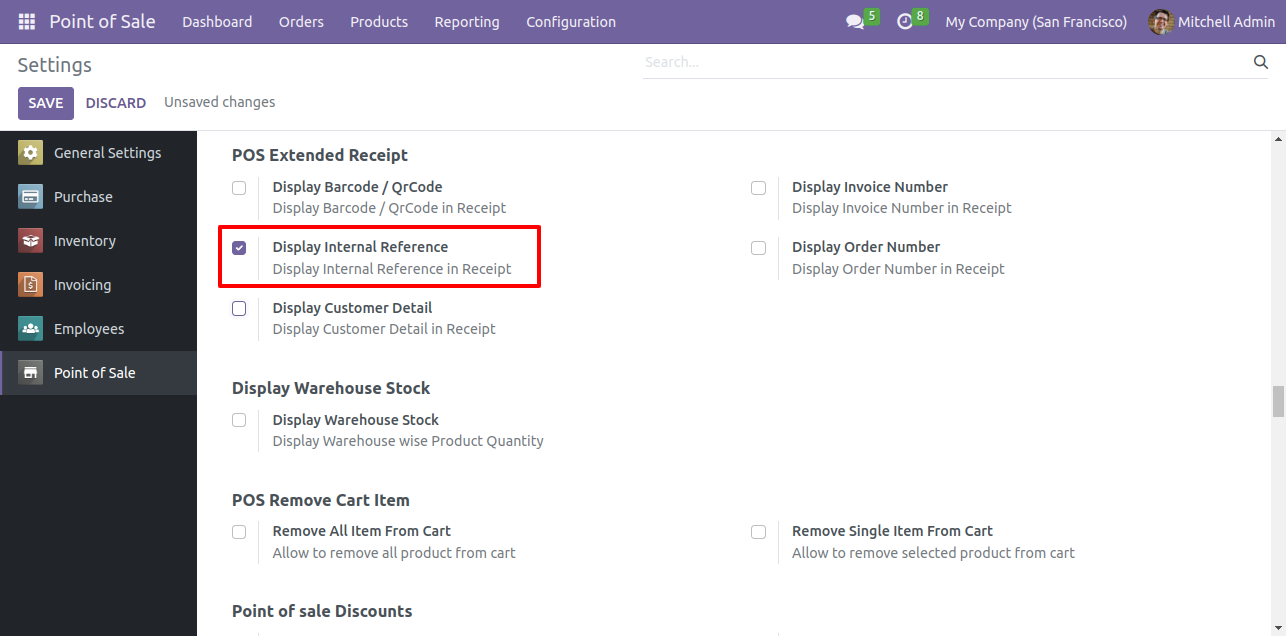
The internal reference code will be displayed on the receipt.
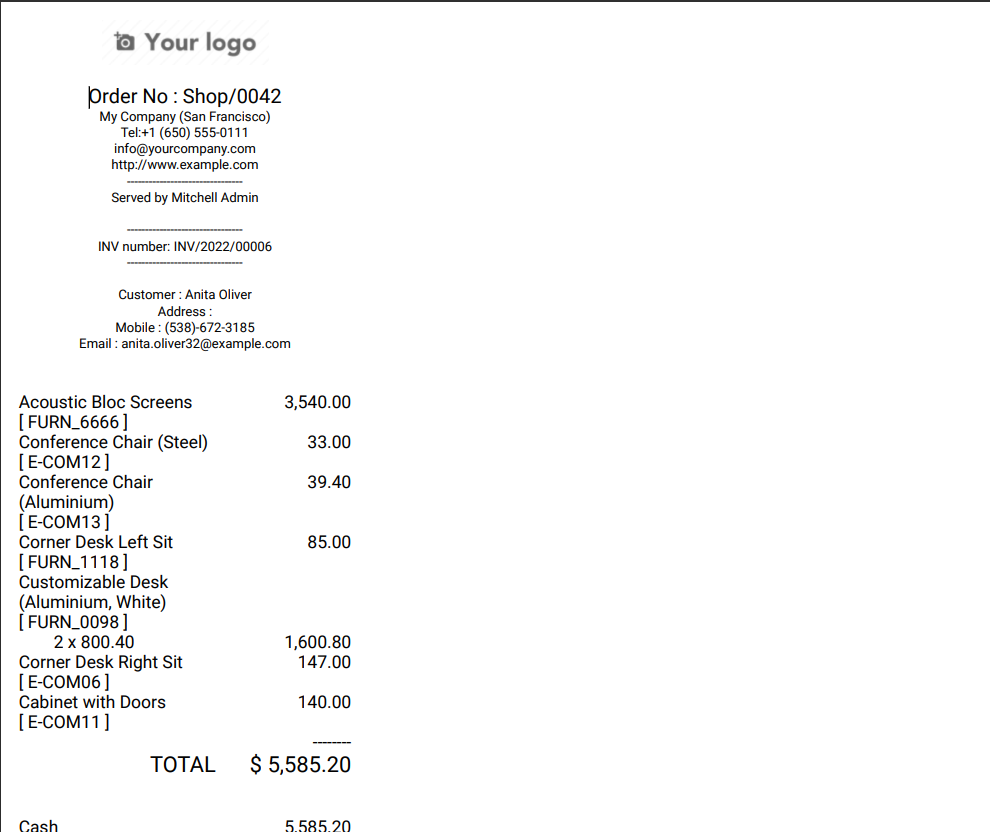
Goto pos setting and enable display customer detail option. here you have several options like display the customer name, address, mobile, phone, and email options. Enable all the options.
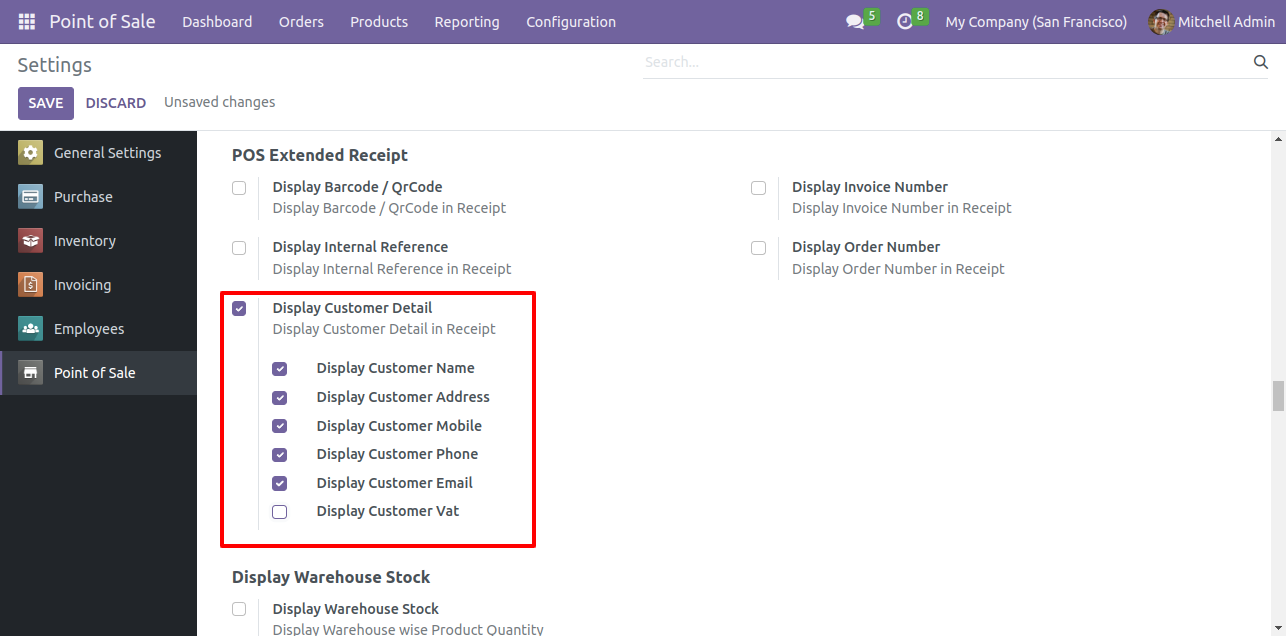
The customer details will be displayed on the receipt.

PDF view.
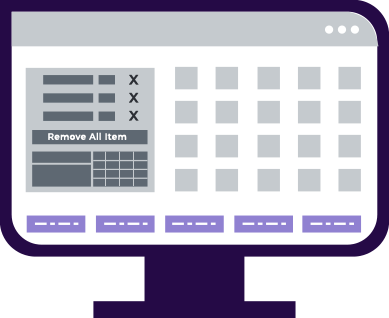
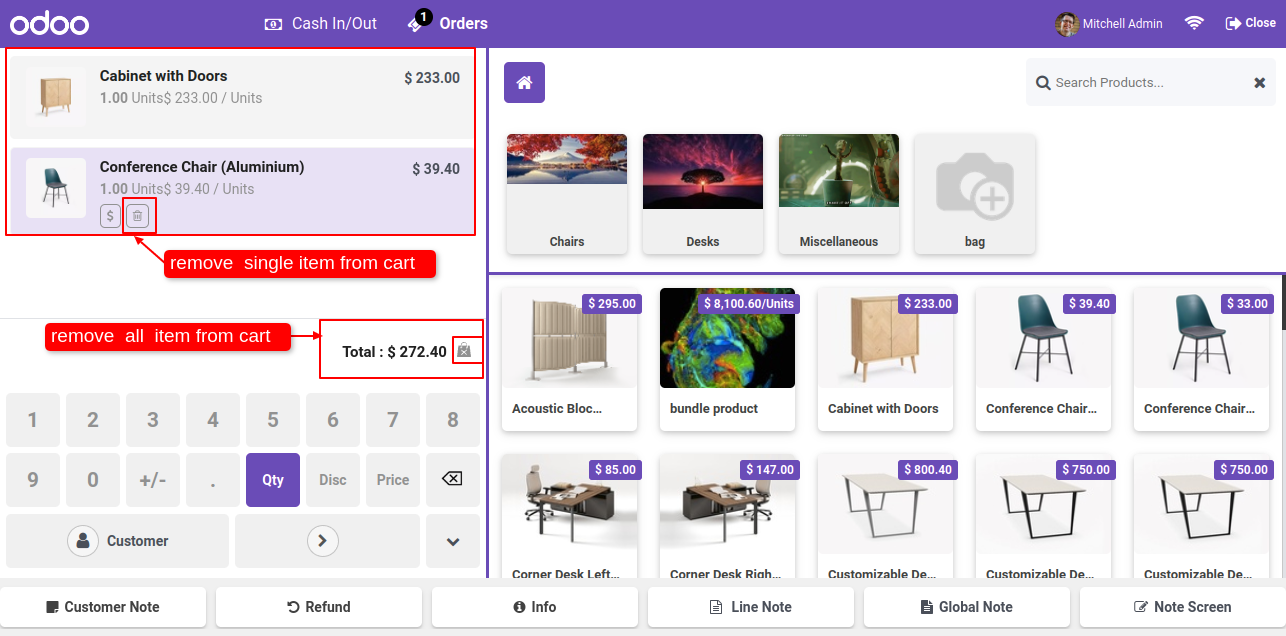
Goto pos setting ==> Here, you have two different options for pos remove cart item like Remove all item from cart and Remove single item from cart.
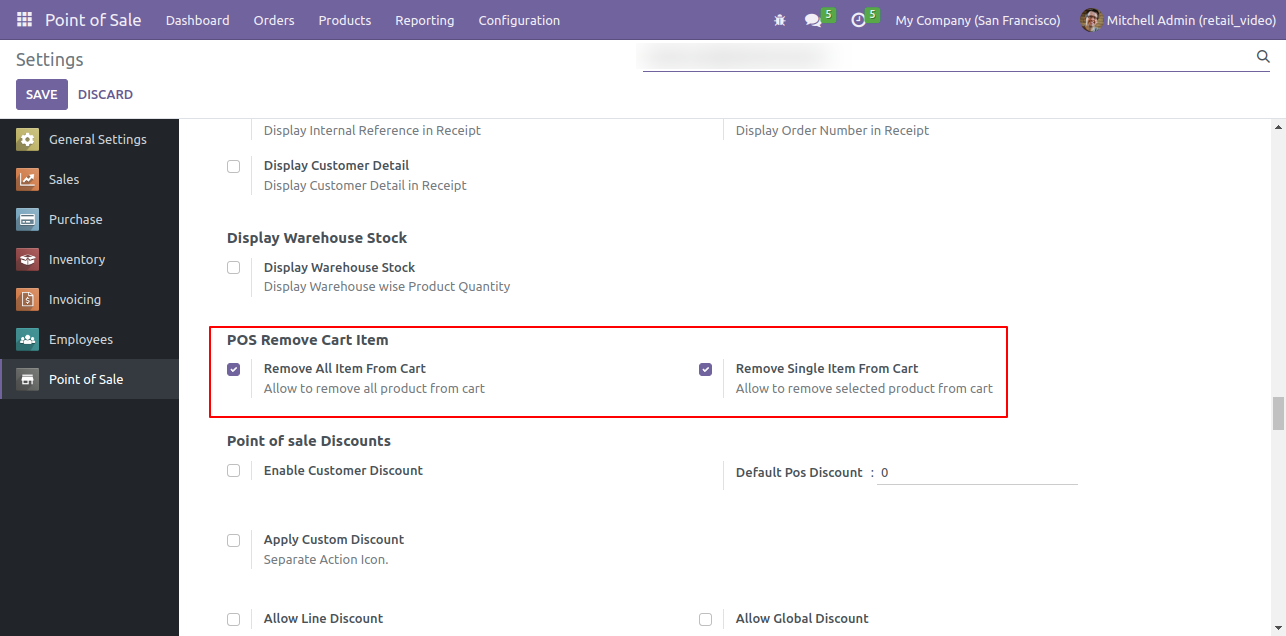
Here, you can see the Remove all item from cart and Remove single item from cart buttons.
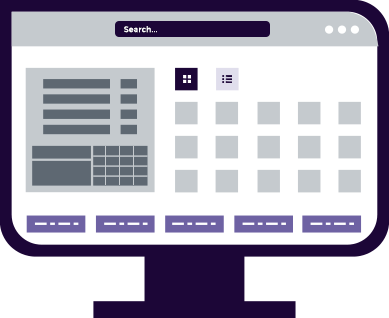
Goto the pos theme setting from the pos config.
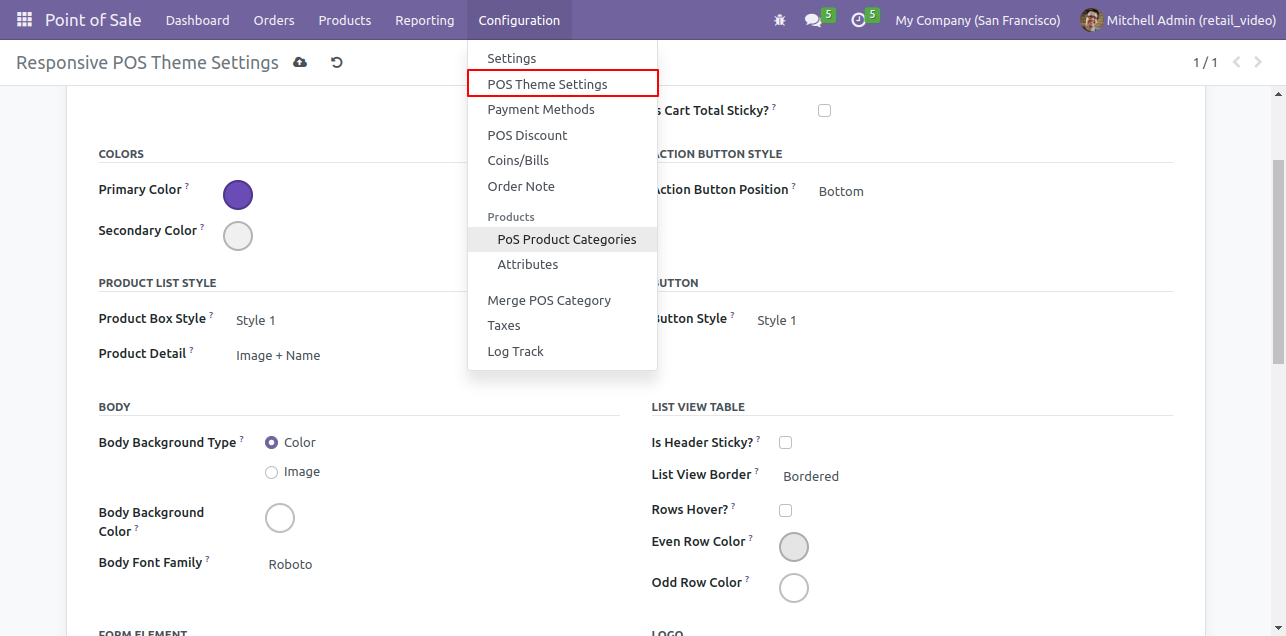
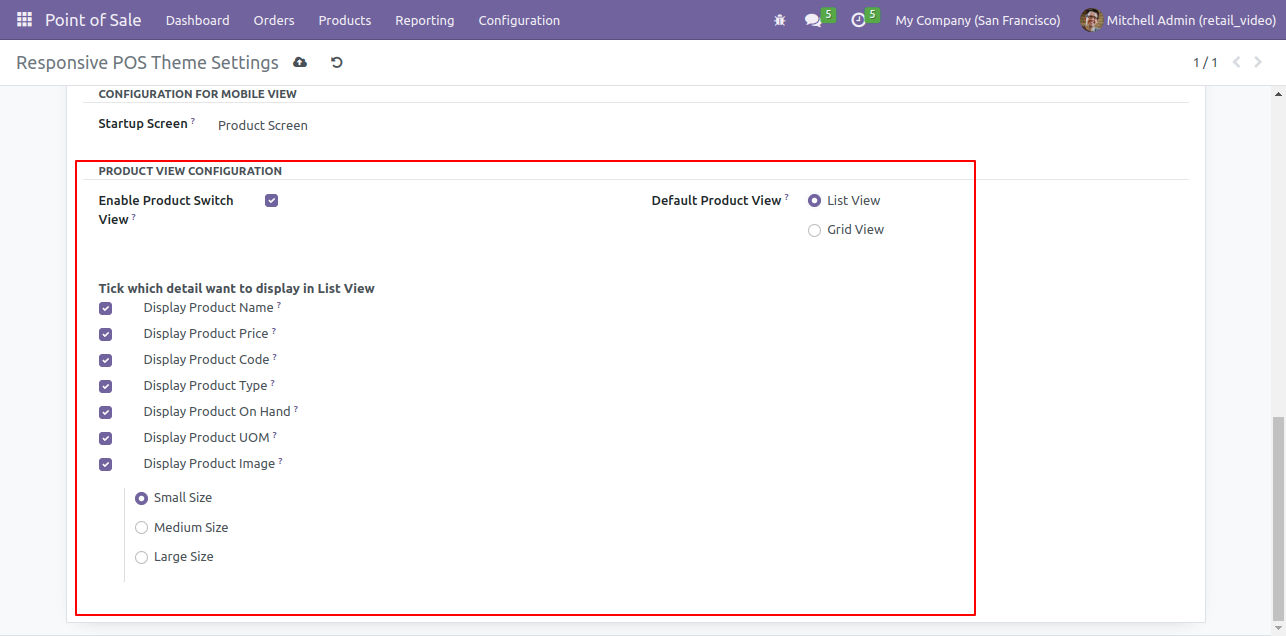
Enable 'Enable Product Switch View'. There are several options to display product in list or grid view, with lots of products details as well.
Select all the features and also select the image size small.
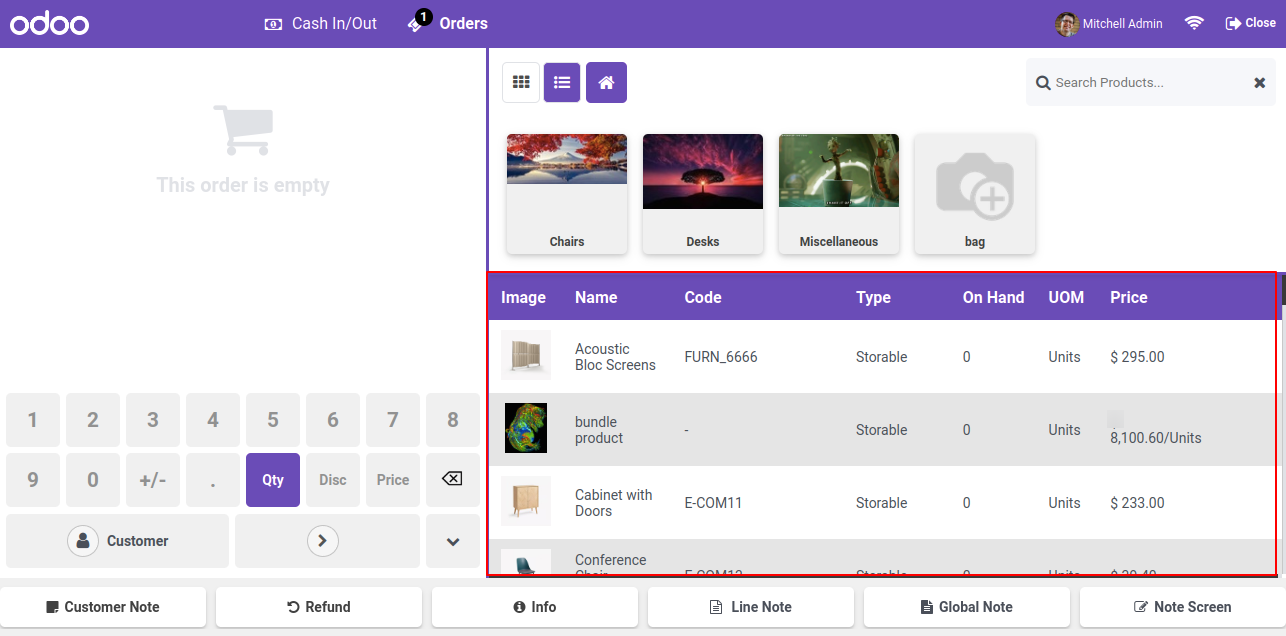
In the pos screen, you can see all the enabled details of the product and the size of the image is small.
Grid view looks like this.

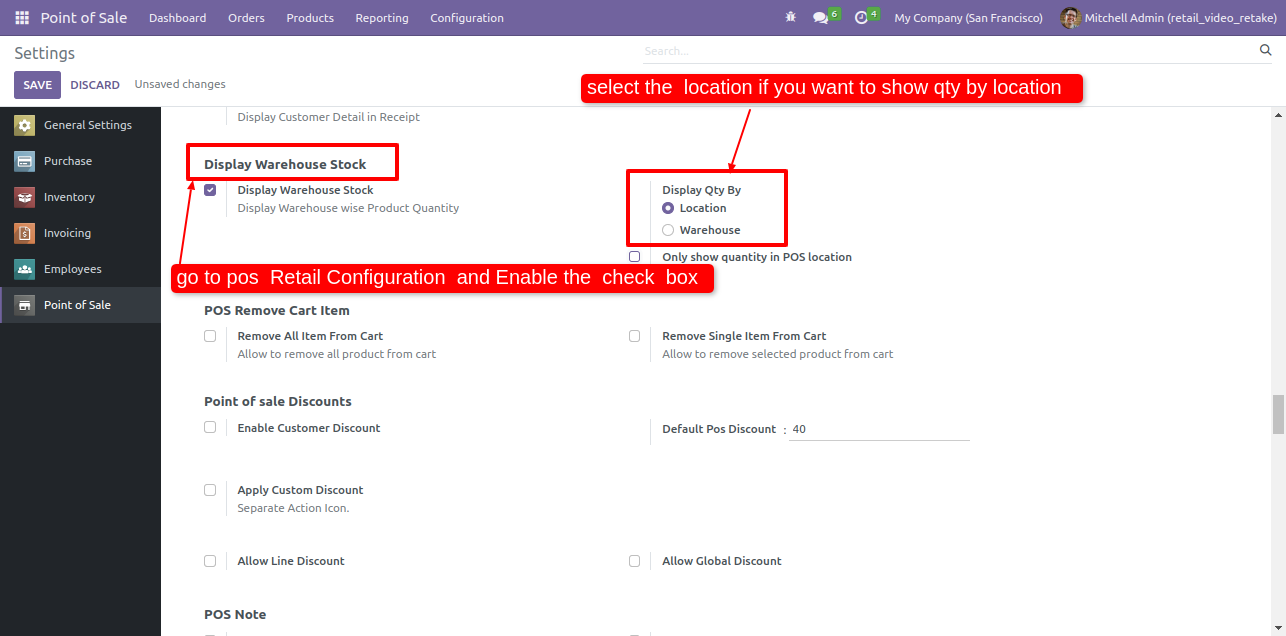
Goto pos setting and enable 'In Real Time (recommended)' option.
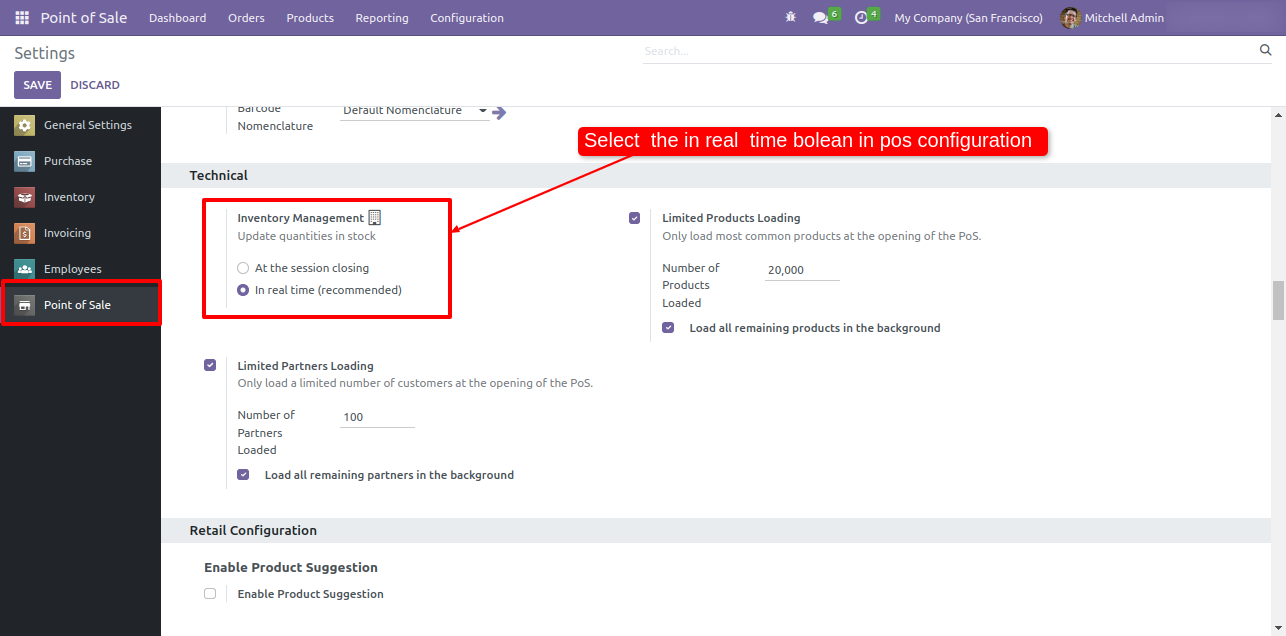
Also enable the 'Display warehouse stock ' option and select the display qty by 'Location'.
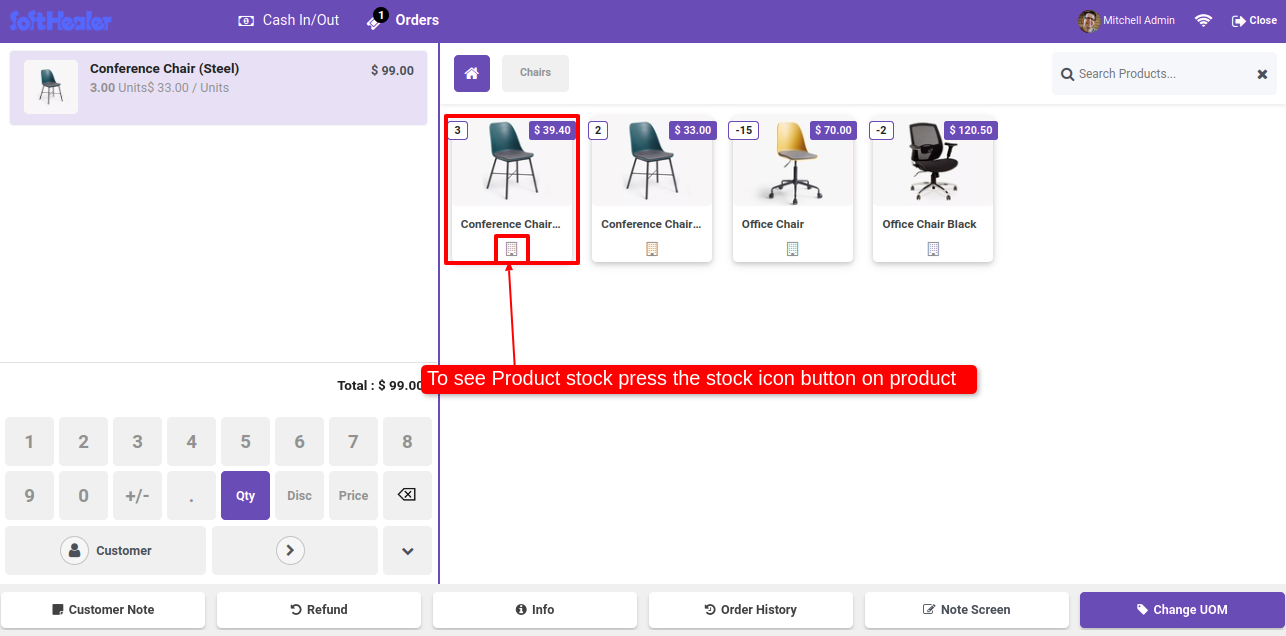
To see the product stock, press the stock icon button on product on pos screen.
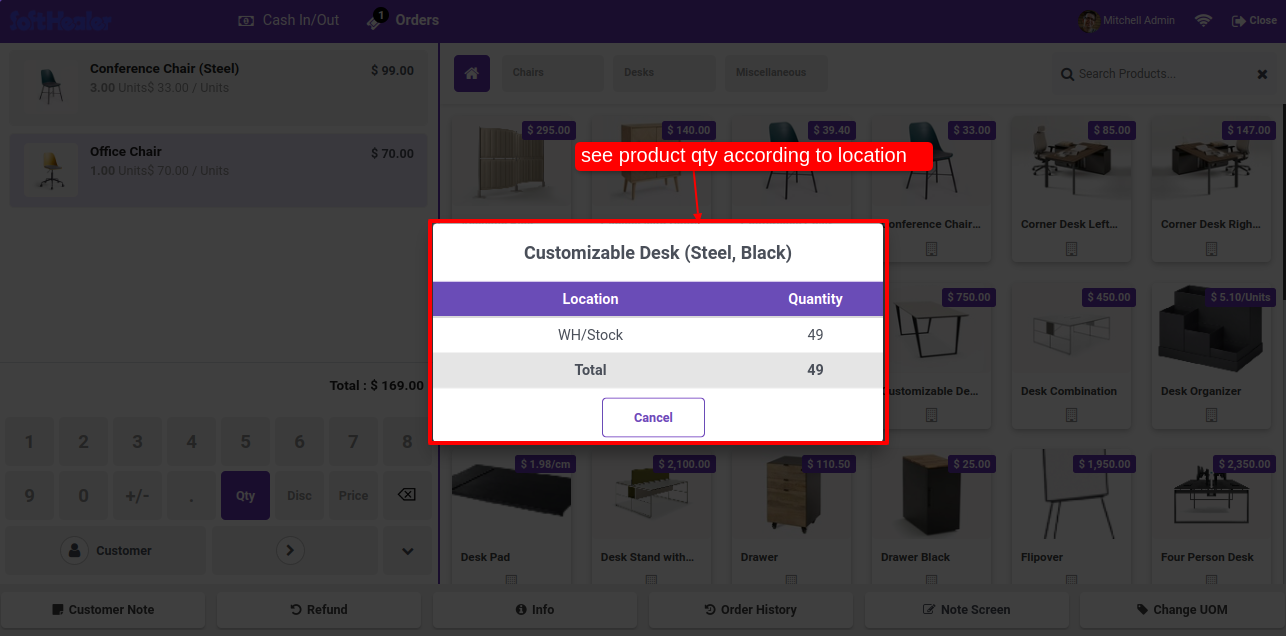
Here you can see the product qty according to location.
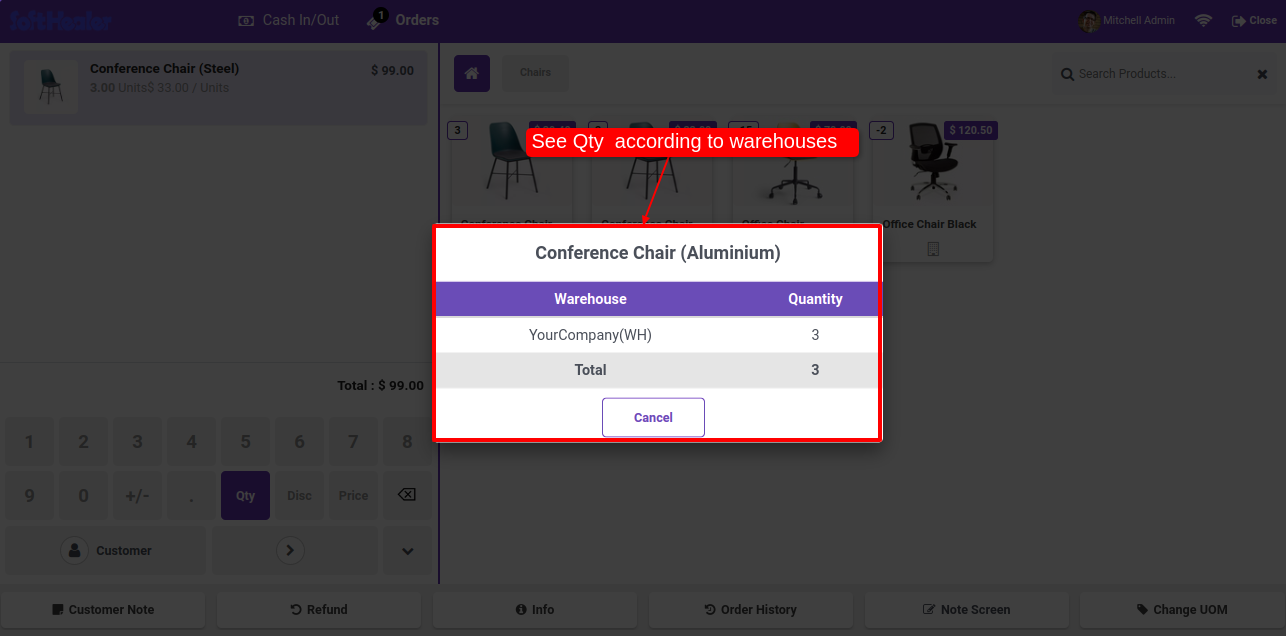
Goto pos setting and select the display qty by 'Warehouse'.
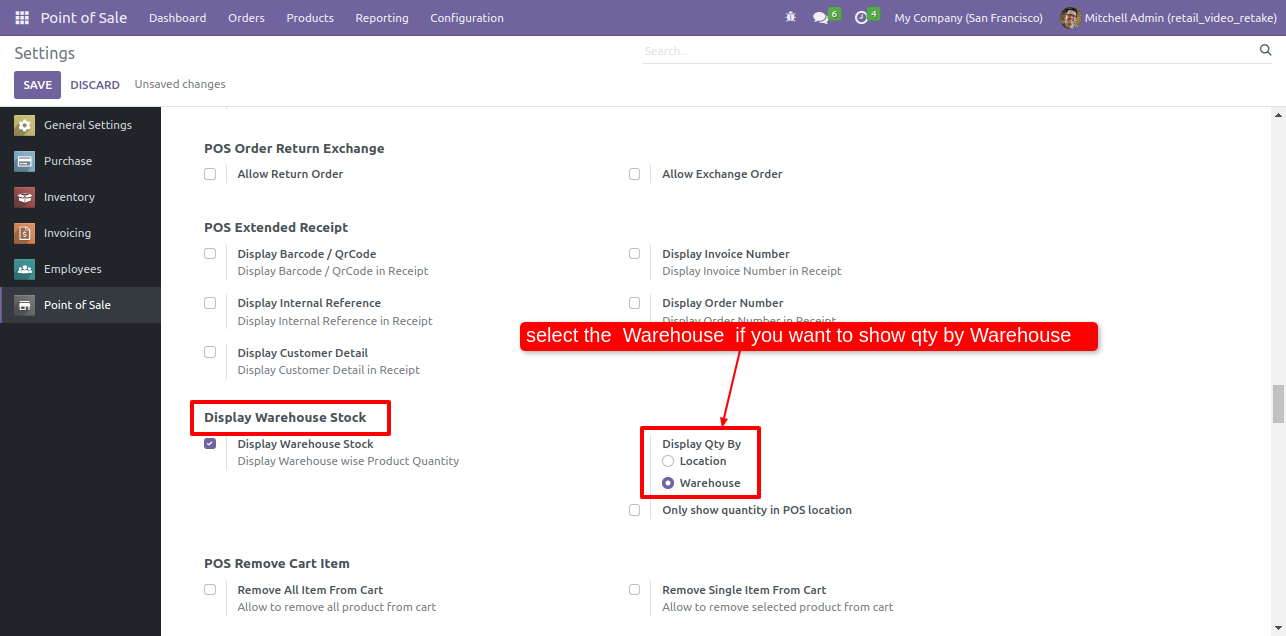
Here you can see the product qty according to warehouse.
Goto pos setting and enable the 'Display Warehouse Stock' & 'Only Show Quantity In Pos Location' options and Select the location which
location stock you want to show in pos shop.
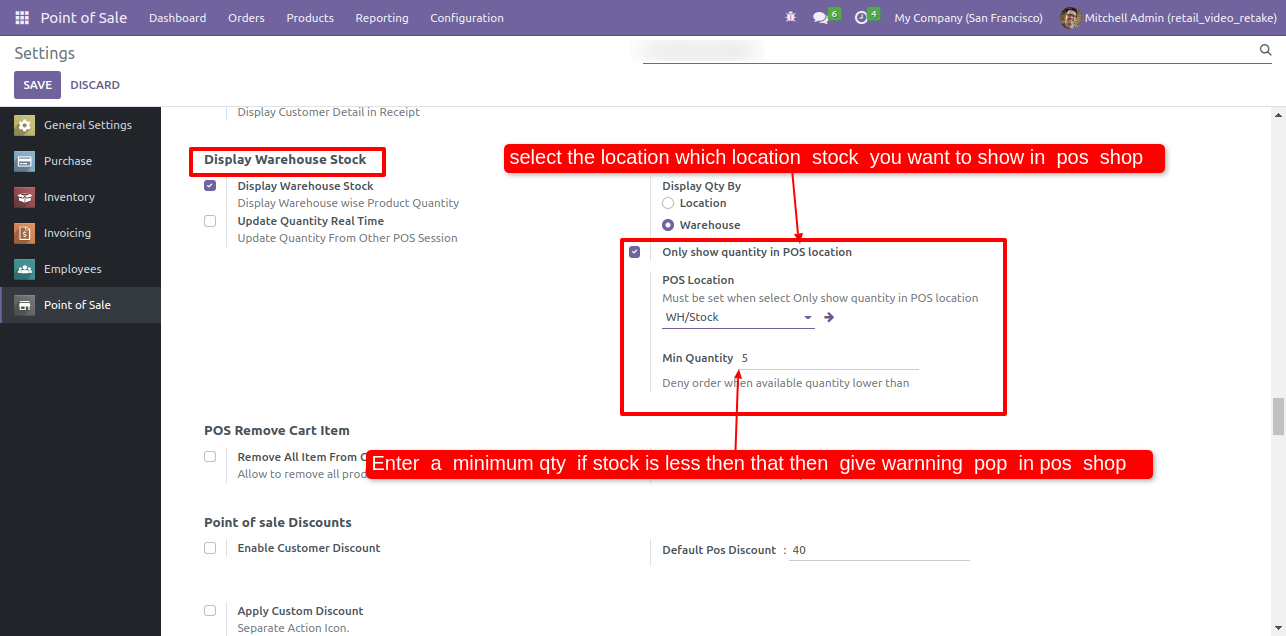
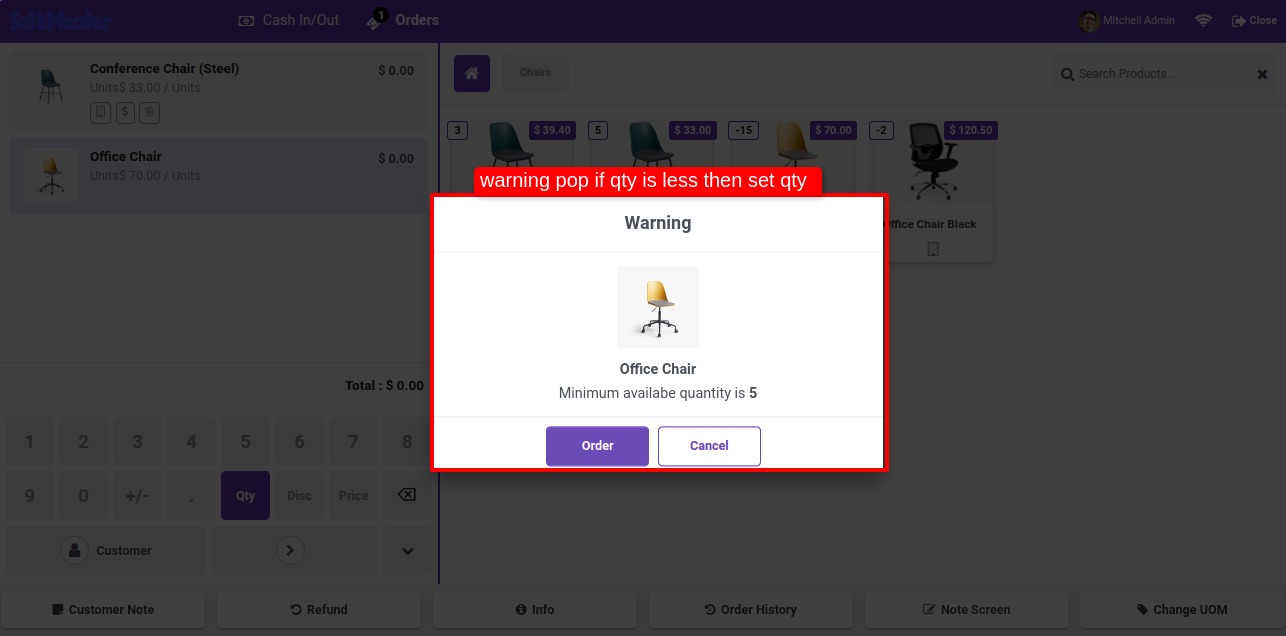
Warning pop-up will appear if qty is less then set qty.
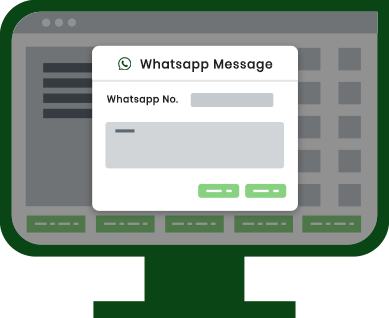
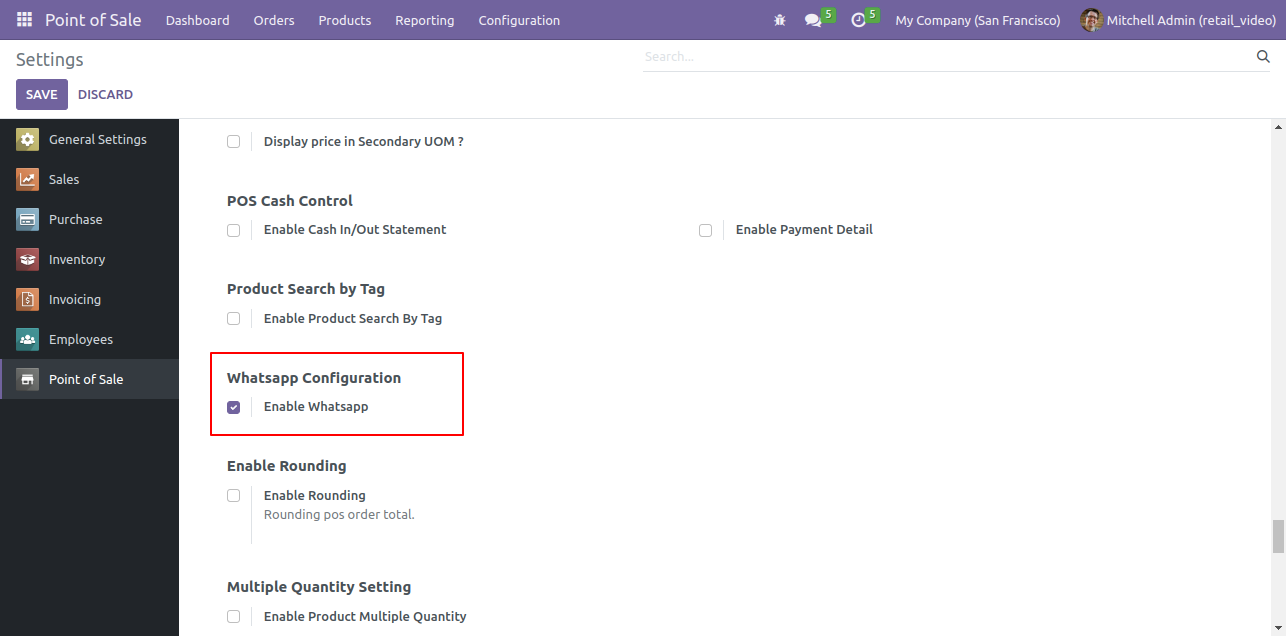
Goto pos setting and enable Whatsapp Features.
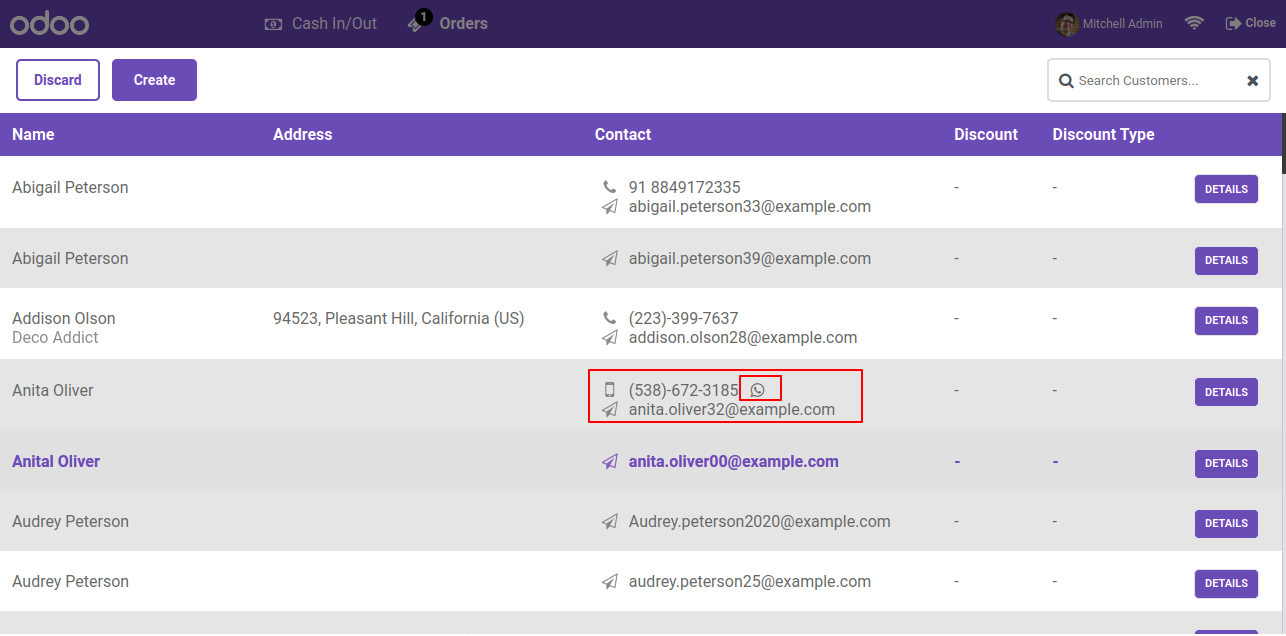
Just Add customer mobile number in customer details.
Add product.
Select the customer.
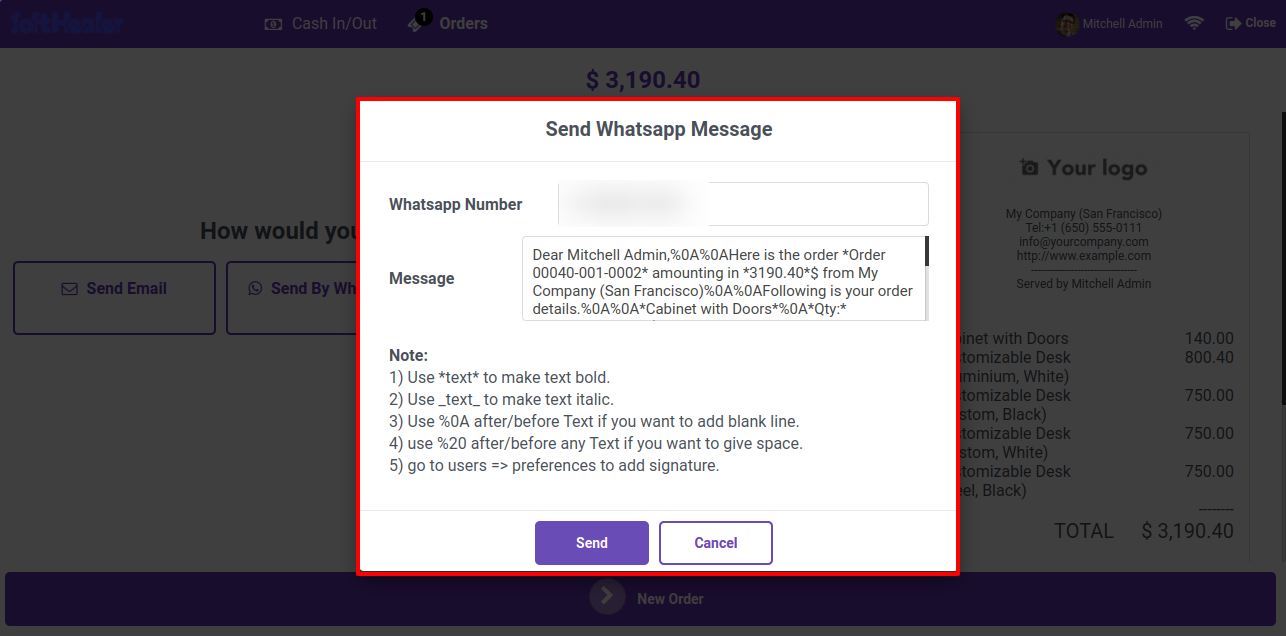
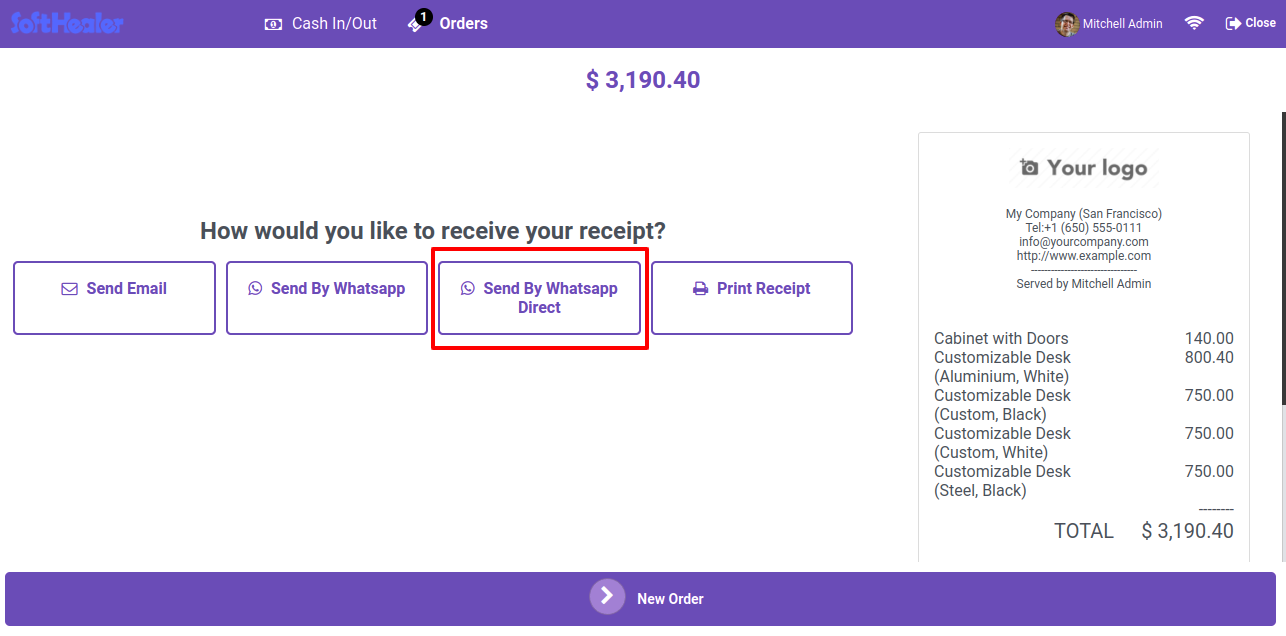
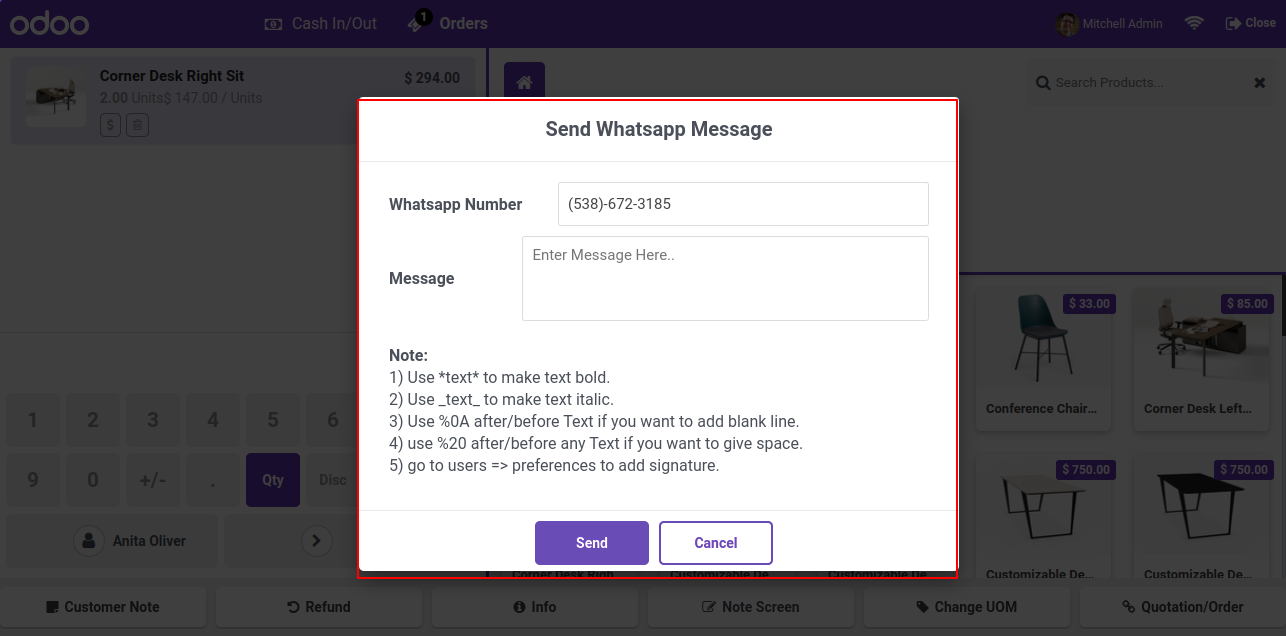
Make order and create receipt, here you have two options to send on whatsapp.
1. Customise message and then send, 2. Send direct (Without message customize)
Click on 'Send By Whatsapp'.

After that, send whatsapp message wizard will appear. Here you can edit your message.
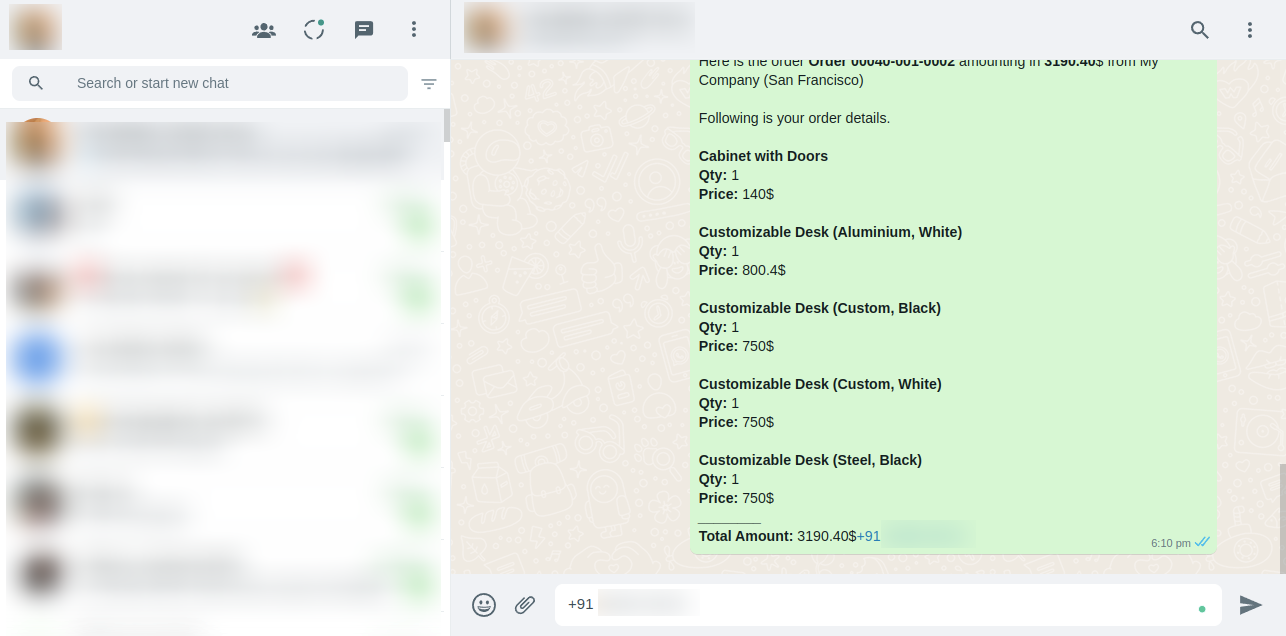
After that you will redirect to that customer chat screen.
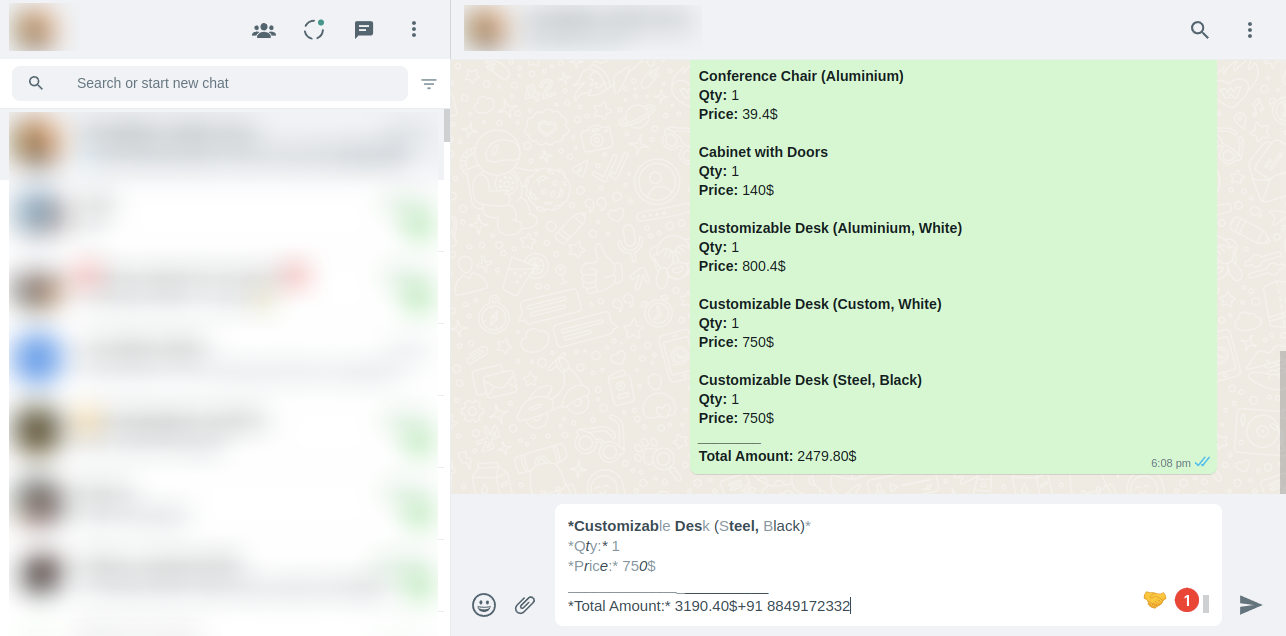
Message Sent.
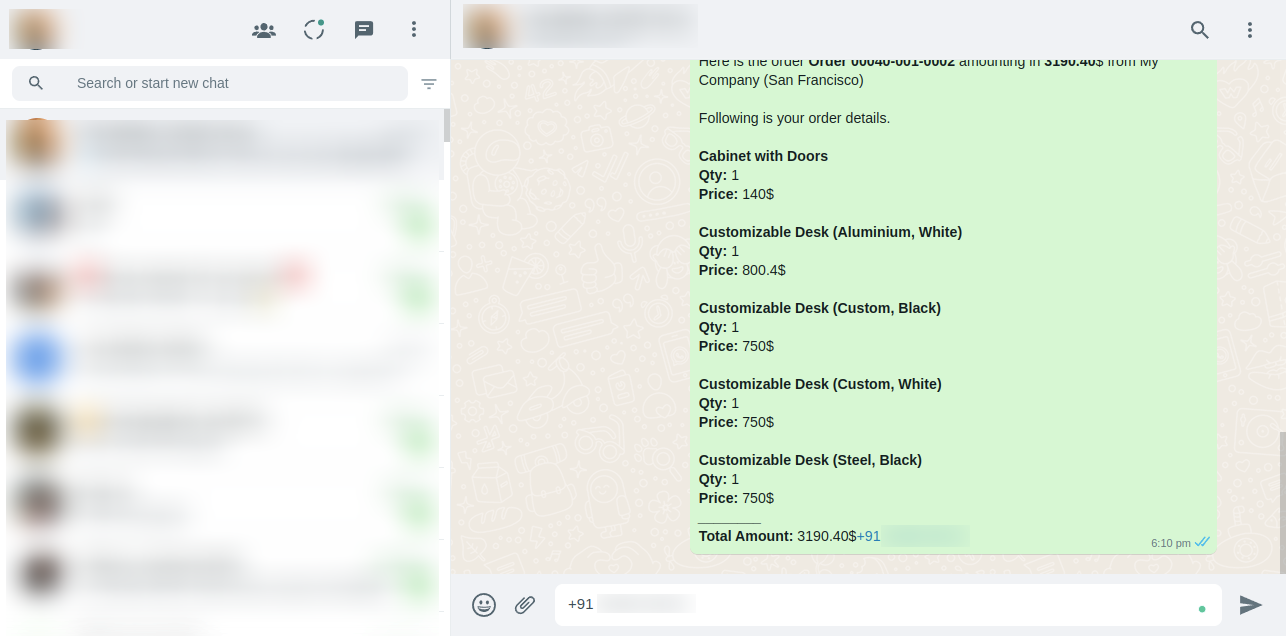
Make order and create receipt and click on send by whatsapp direct option.
After that you will redirect to that customer chat screen.
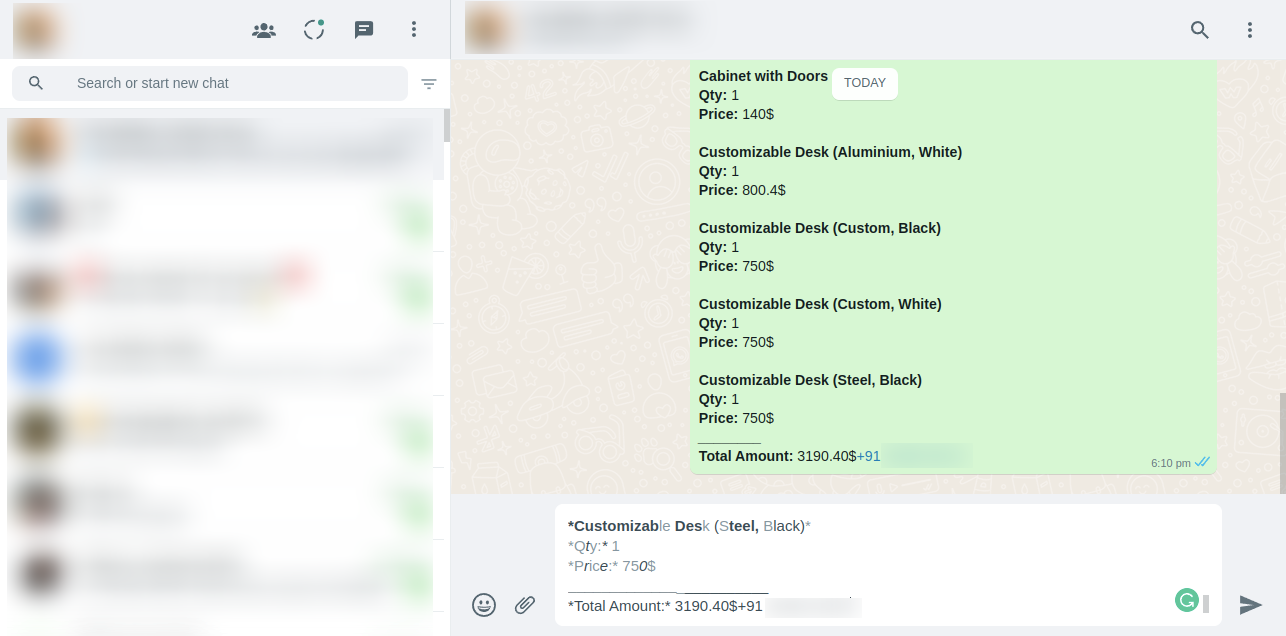
Message Sent.
Second Flow = >>
Click on the whatsapp icon.
Message Sent
Click on the 'Ok' button.
Message Sent

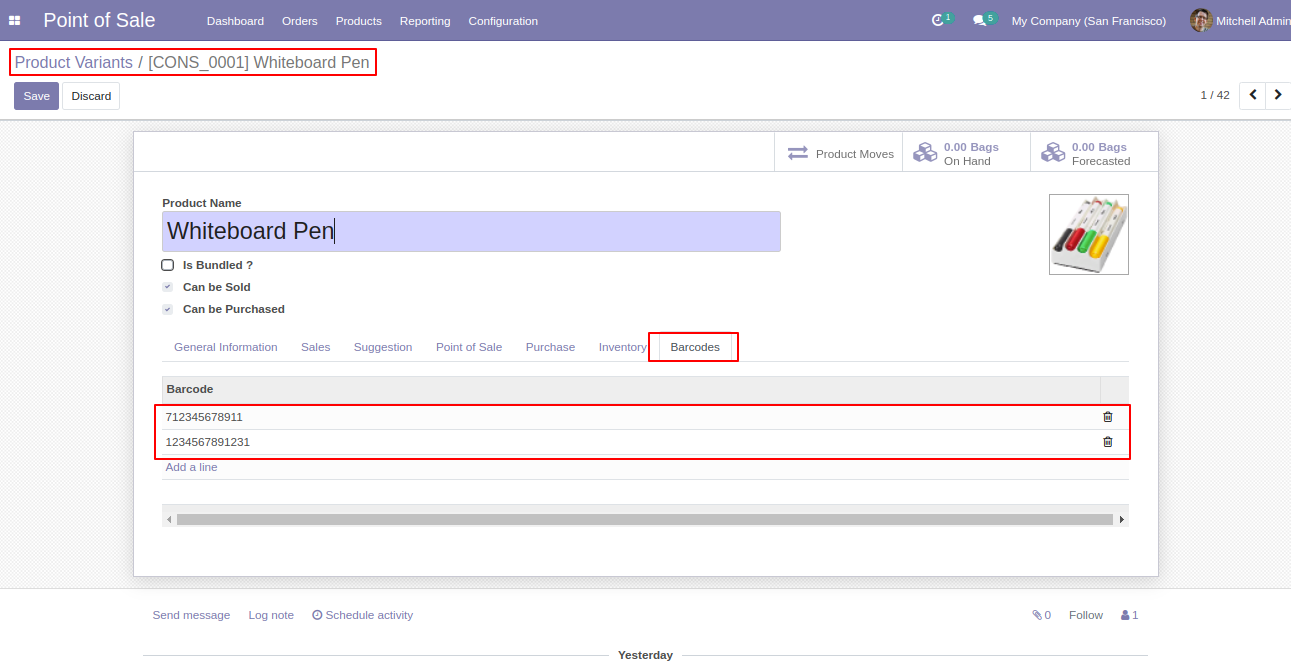
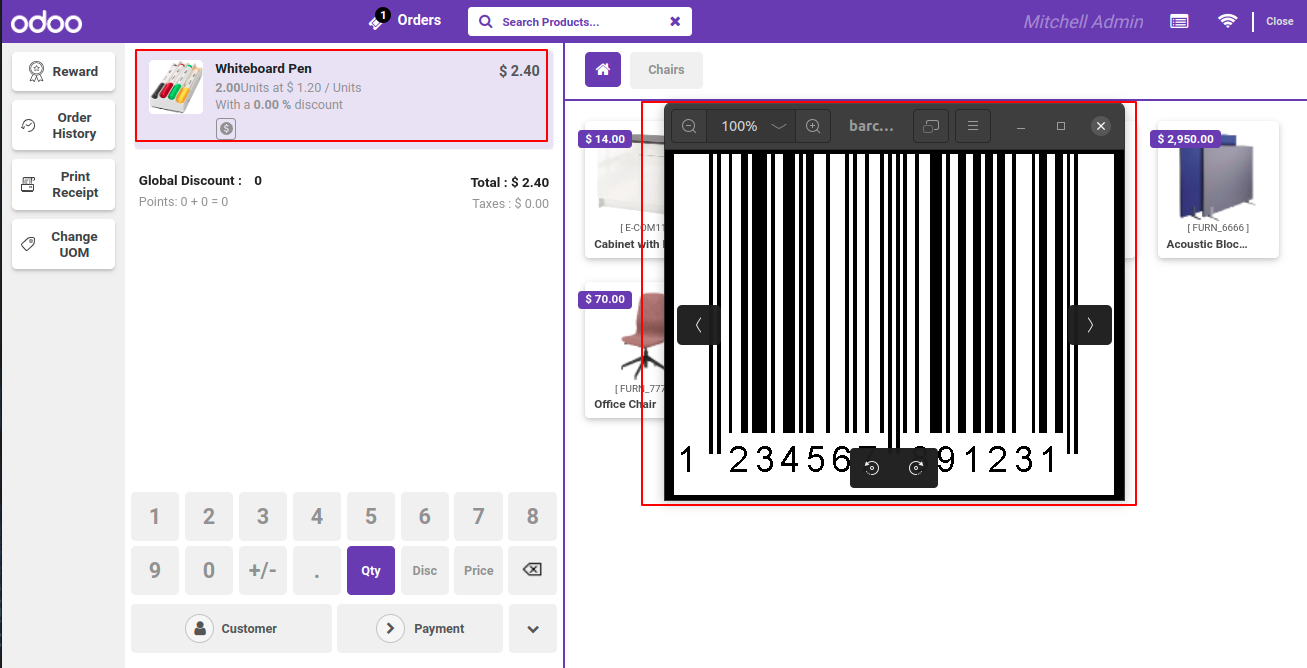
See Tab In Barcode In Product Variant. Add Barcode in Whiteboard pen.
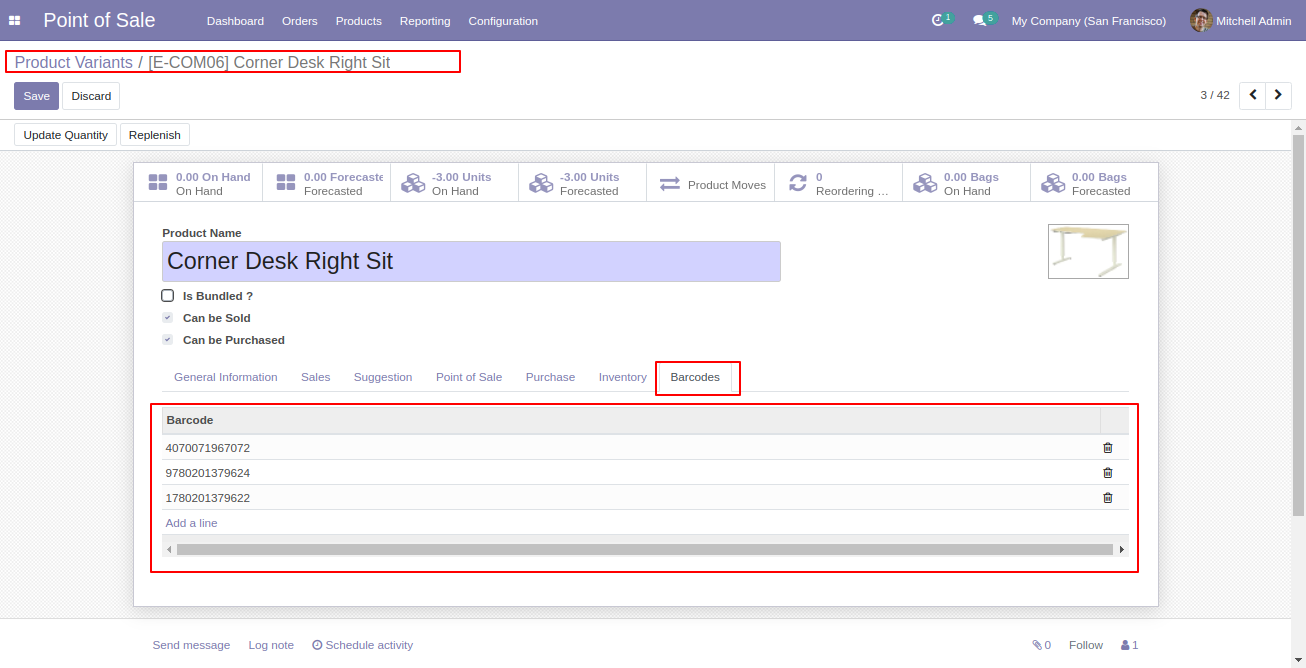
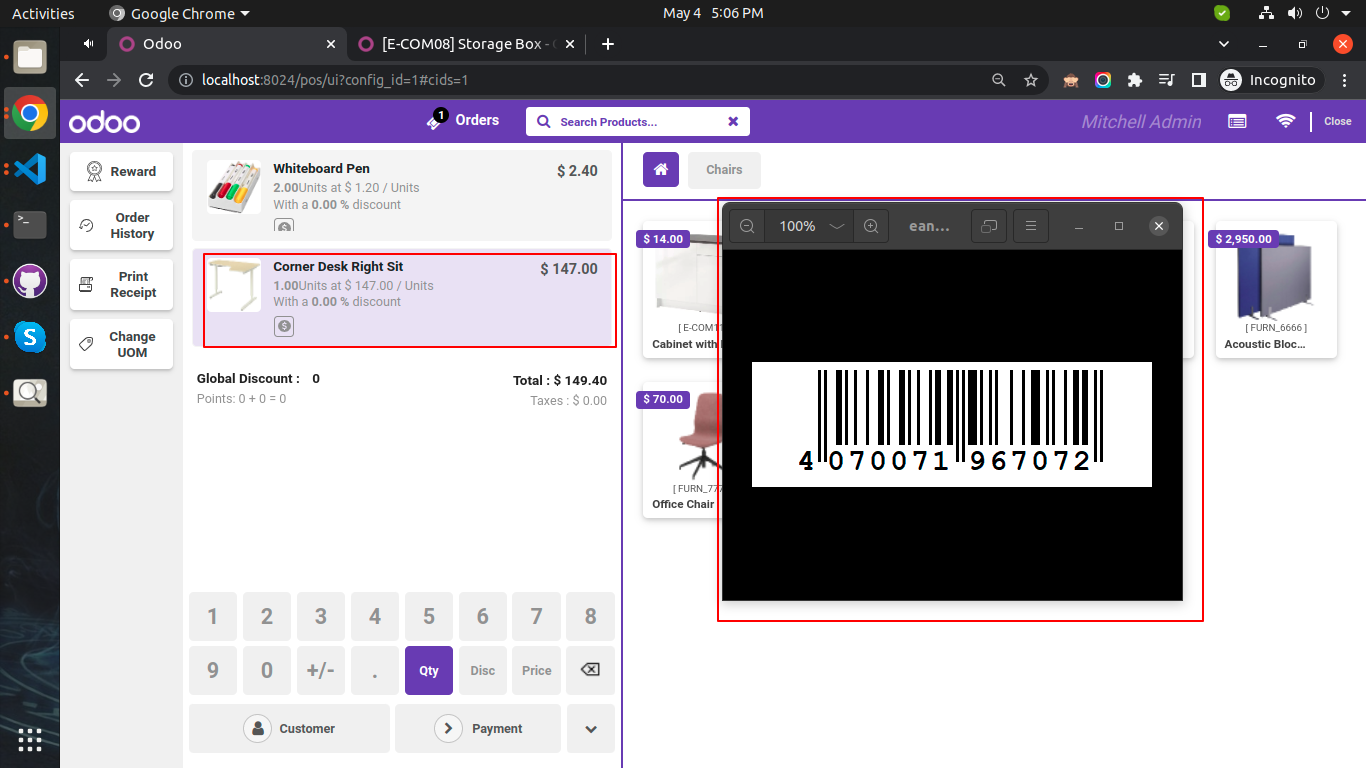
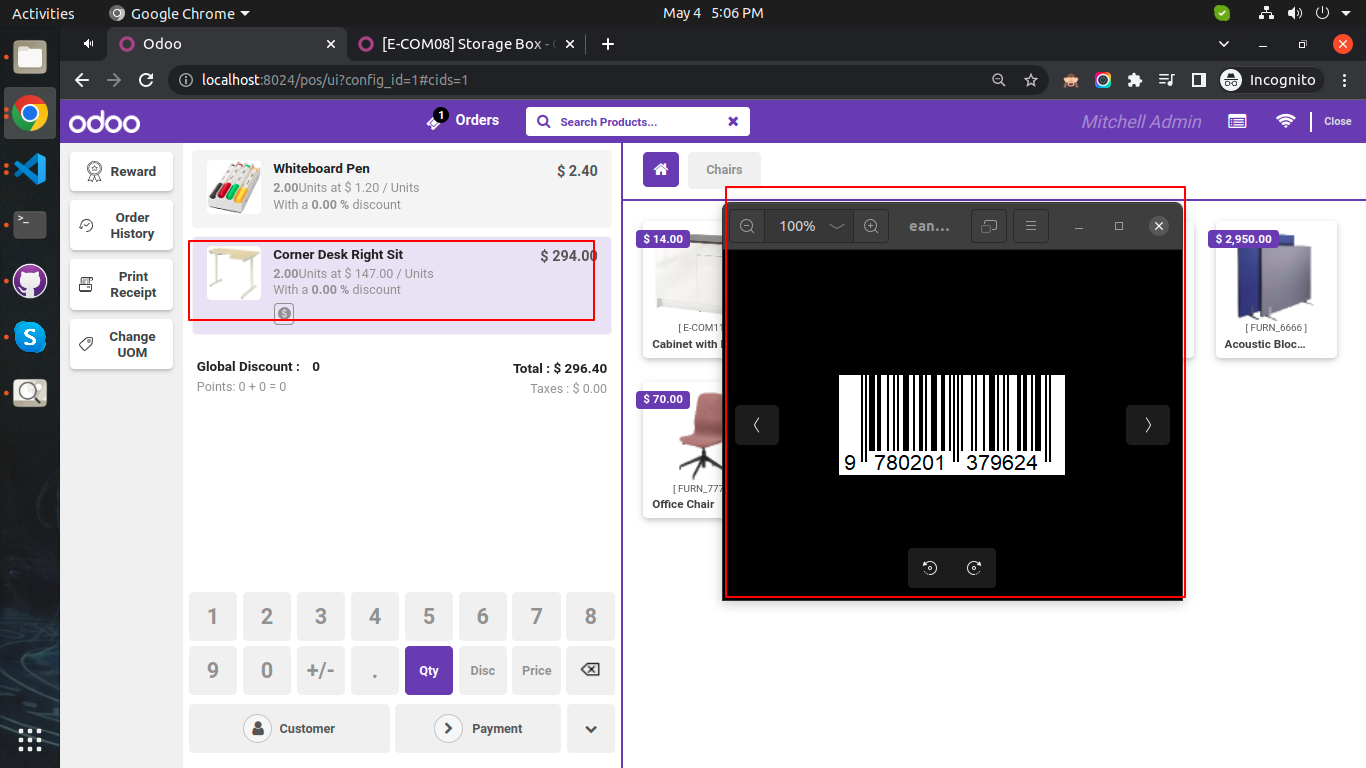
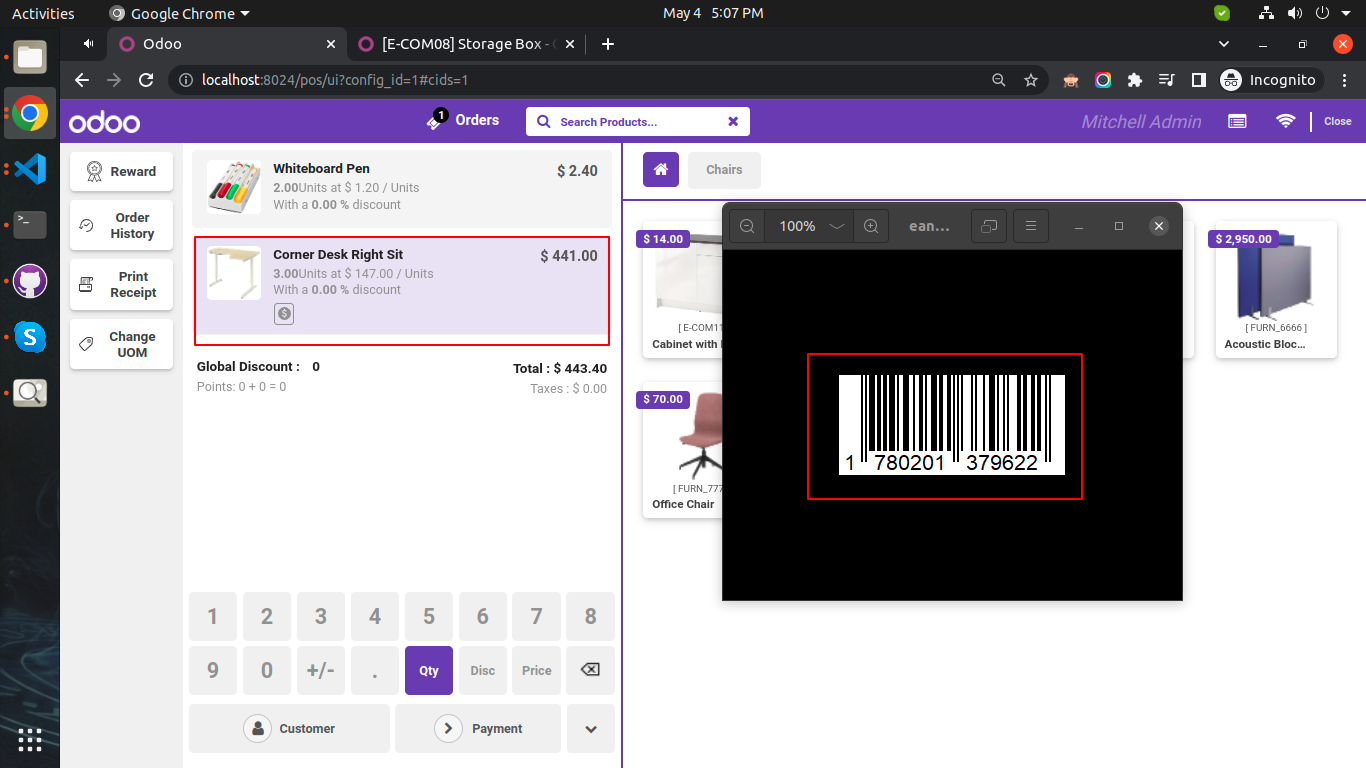
Add multiple Barcode In Corner Desk Right Sit.
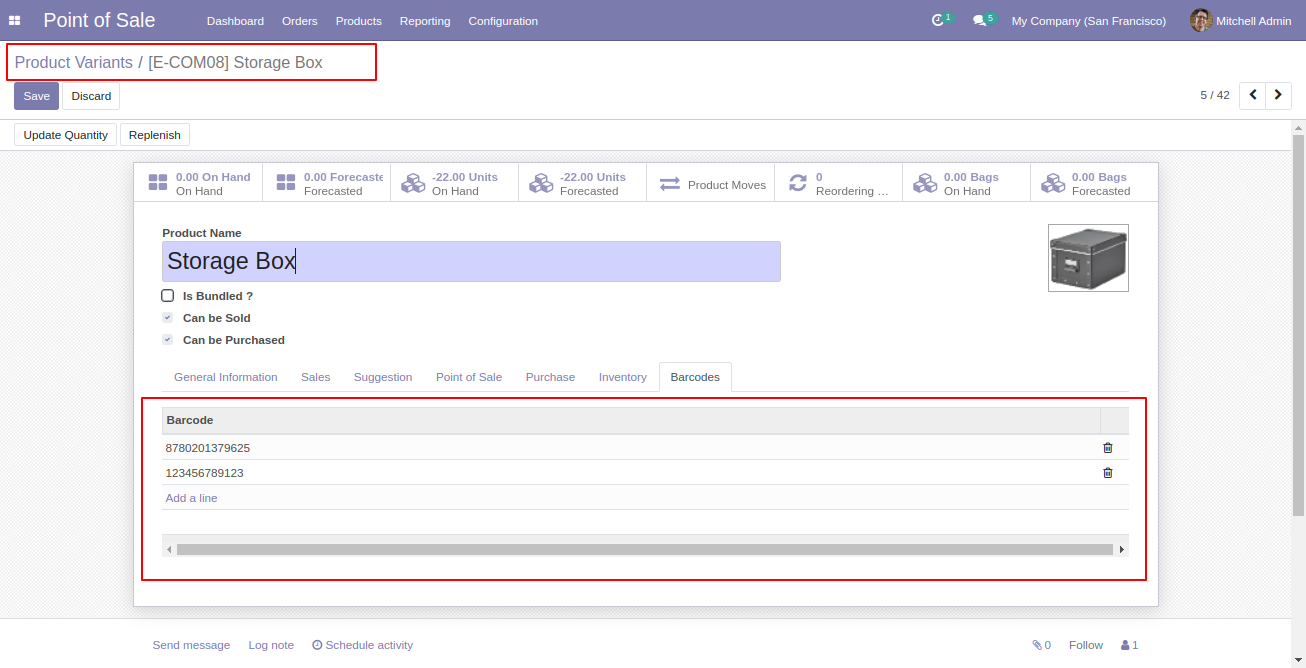
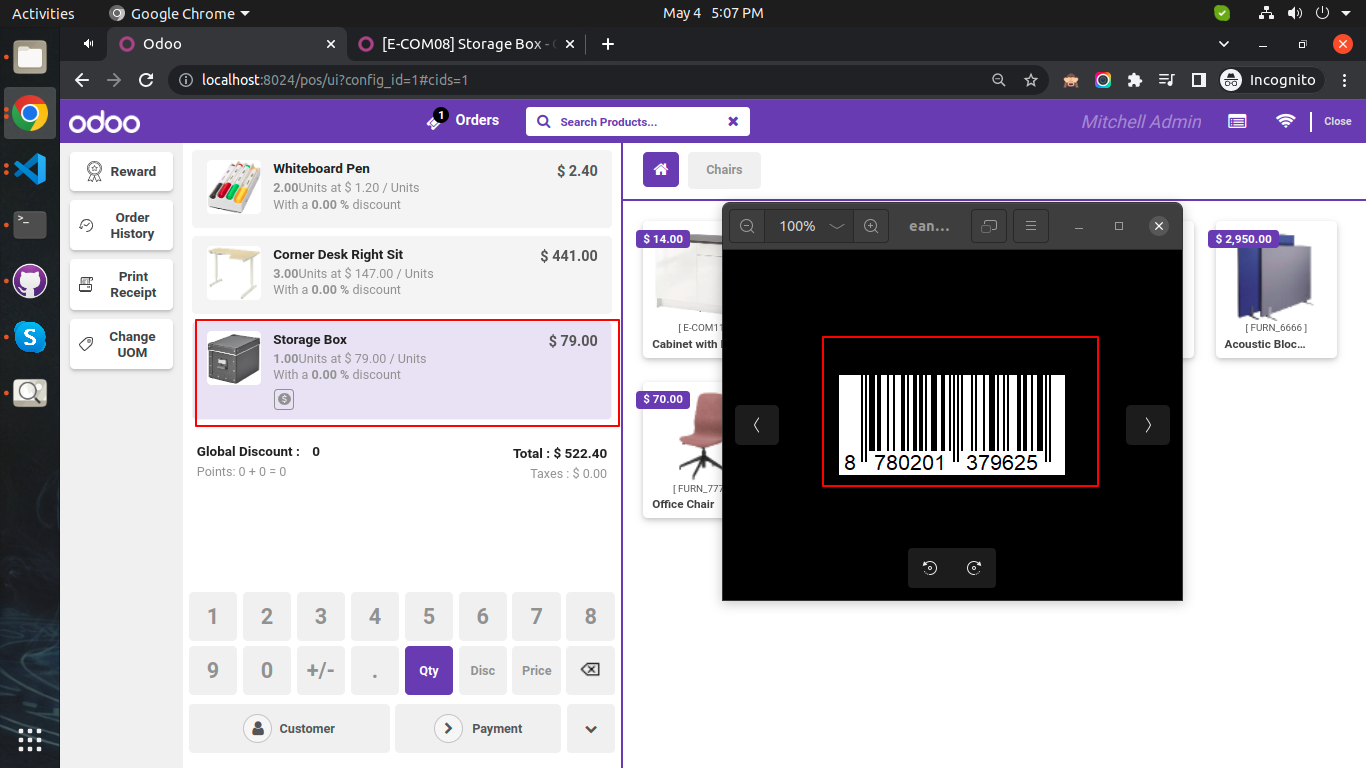
Add multiple Barcode In Storage Box.
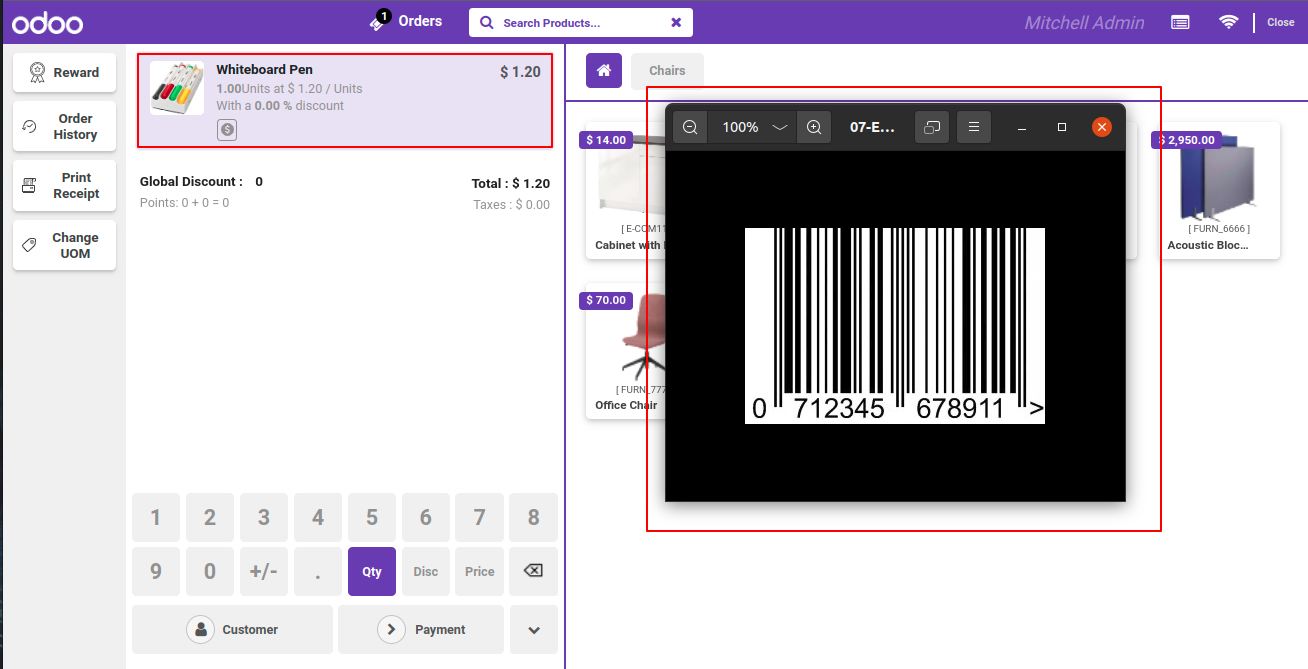
Scan 1 Barcode It will Automatically Add in Cart.
Scan 2 Barcode It will Automatically Update Qty in Cart.
Scan barcode It Will Add one Product In Cart.
Scan 2 barcode It Will update qty of Product In Cart.
Scan 3 barcode It Will update qty of Product In Cart.
Scan barcode It Will Add one Product In Cart.
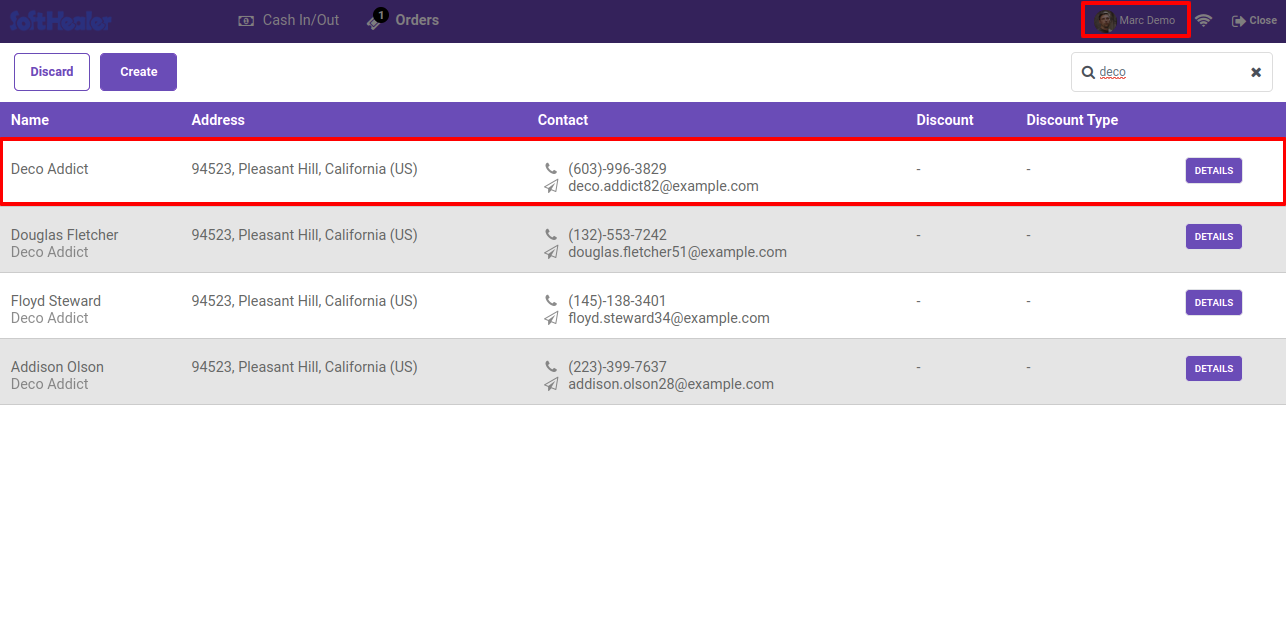
Goto pos setting and enable 'Enable Own Customer' feature.

Now goto customer form view and set 'Allocated Sales Person'.

That salesperson can see those customers only.
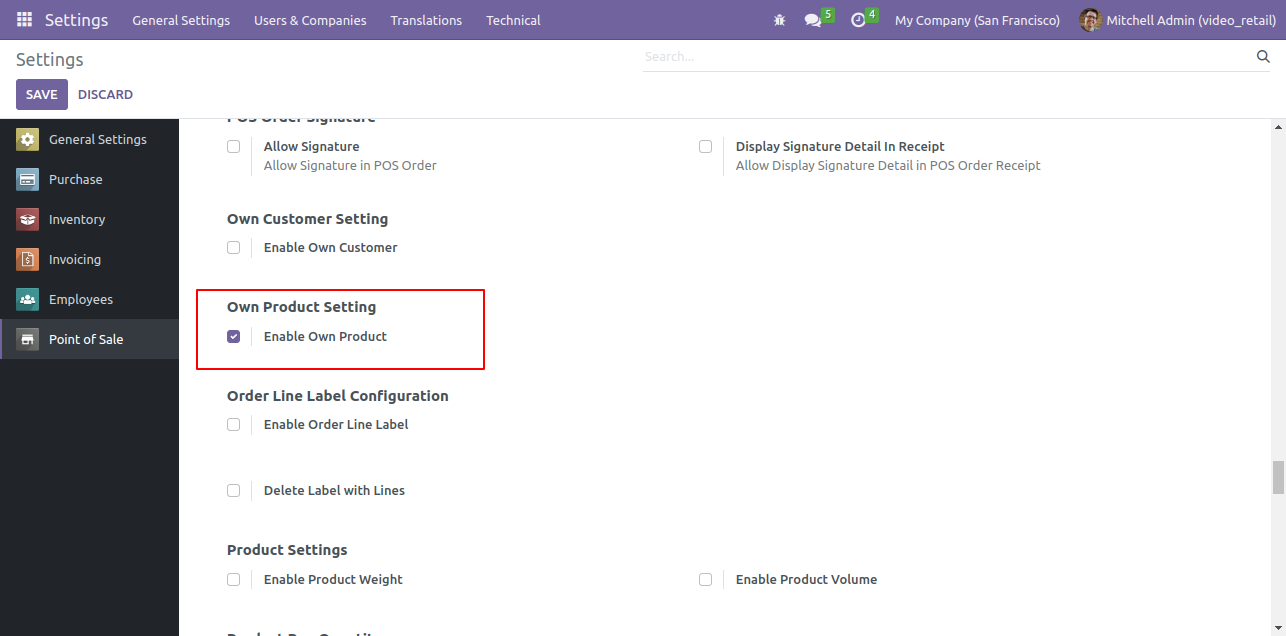
Goto pos setting and enable 'Enable Own Products' feature.
Now goto product form view and set 'Allocated Sales Person'.
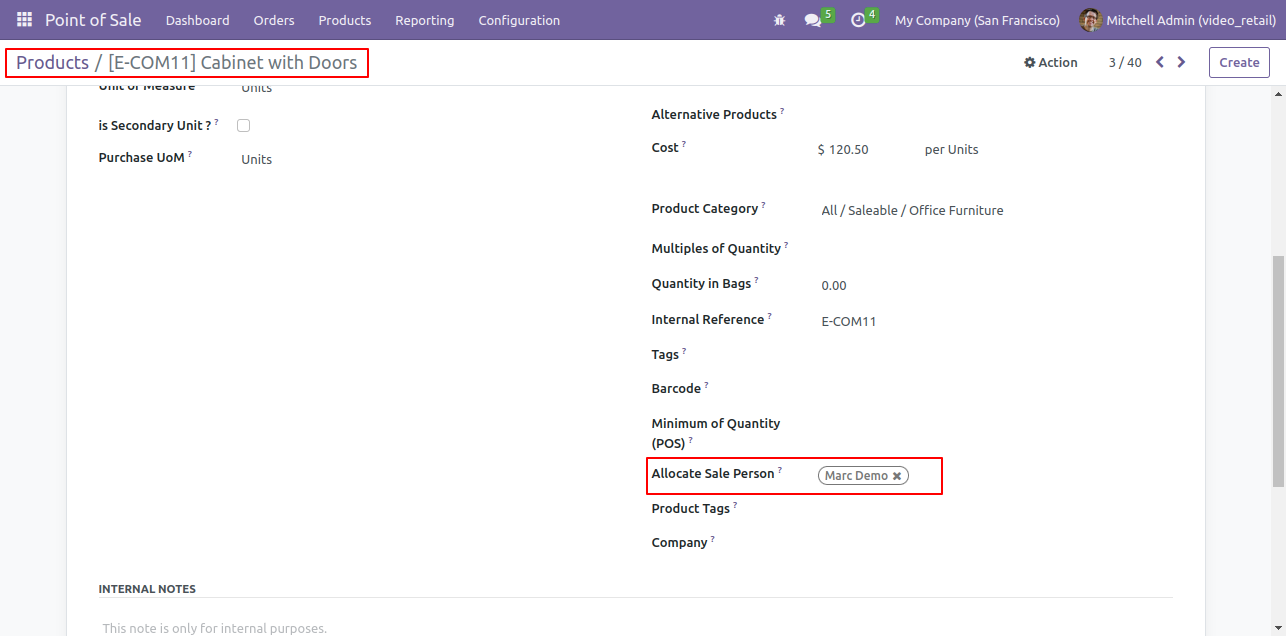
That salesperson can see those products only.
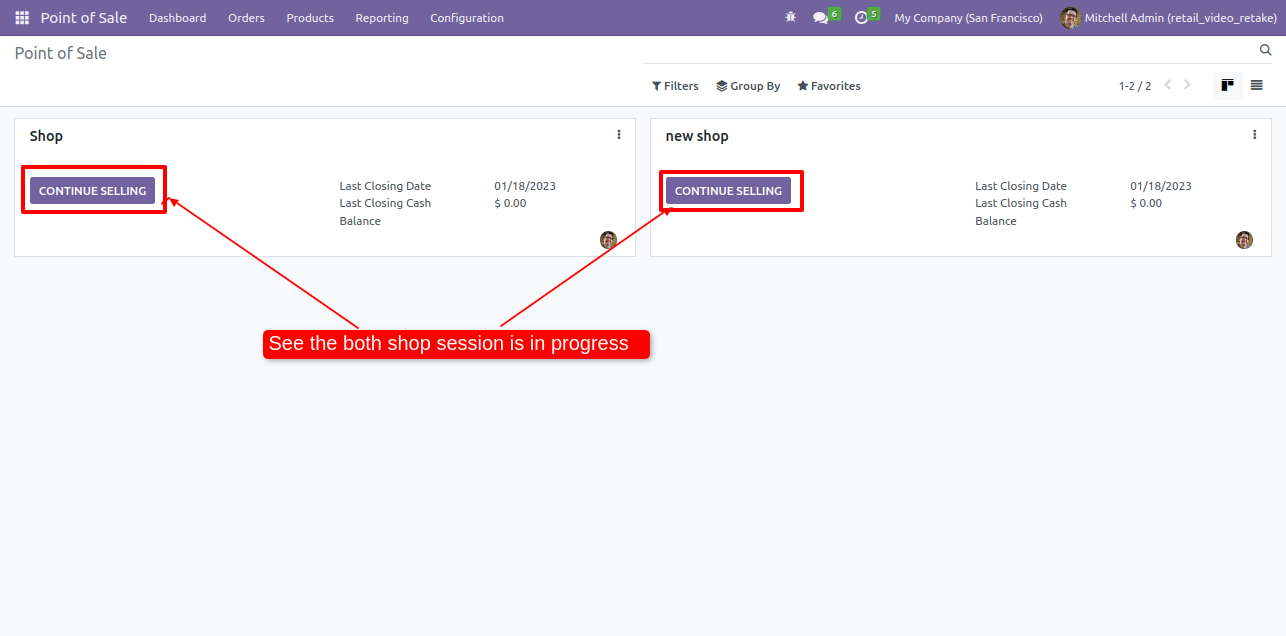
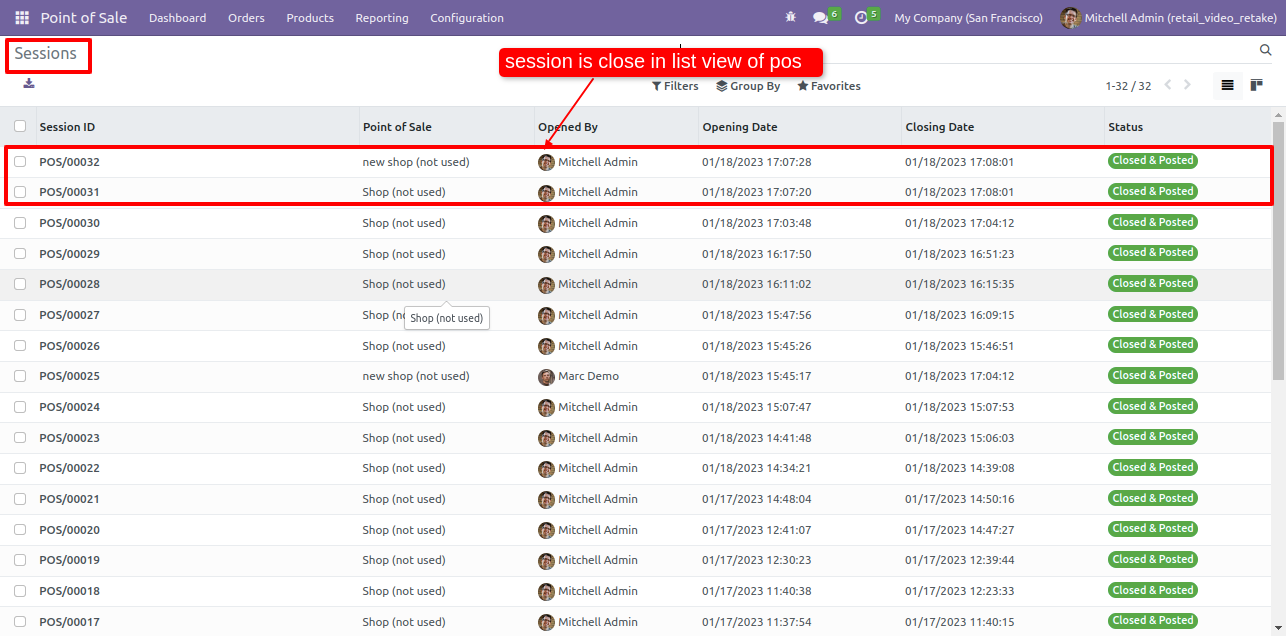
Goto point of sale. Here, you can see the new shop & new shop both shop session is in progress.
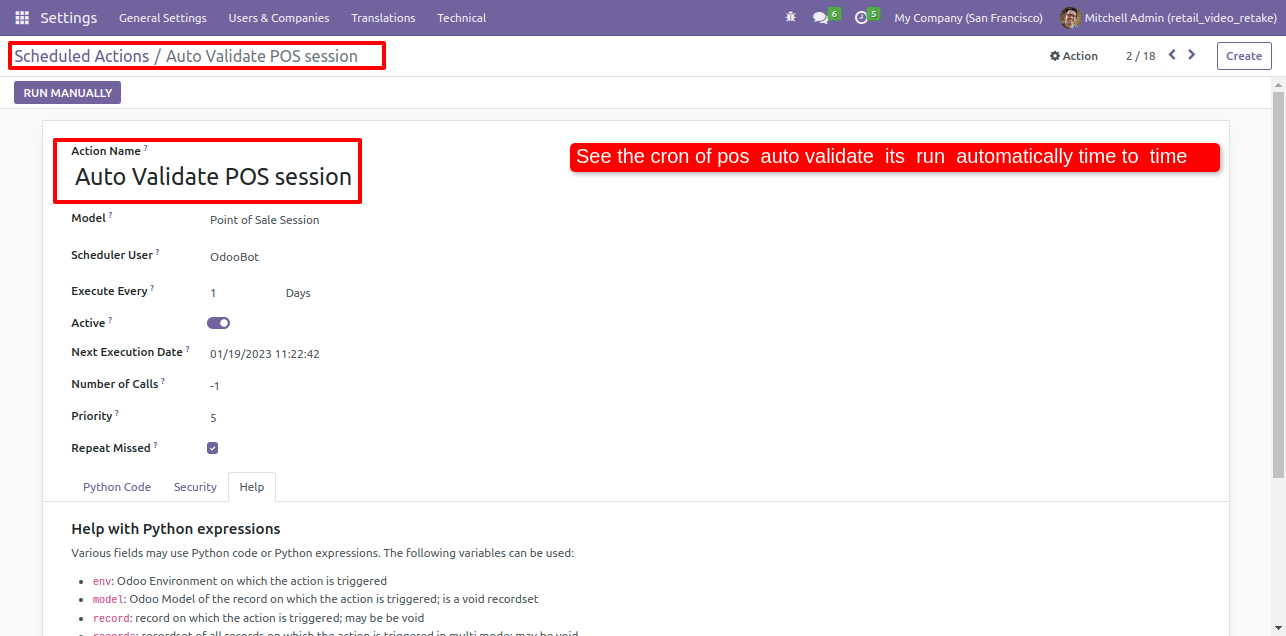
Form view of the scheduled action of the auto validate POS session.
Here, you can see the cron of the auto validate POS, it's run automatically time to time.
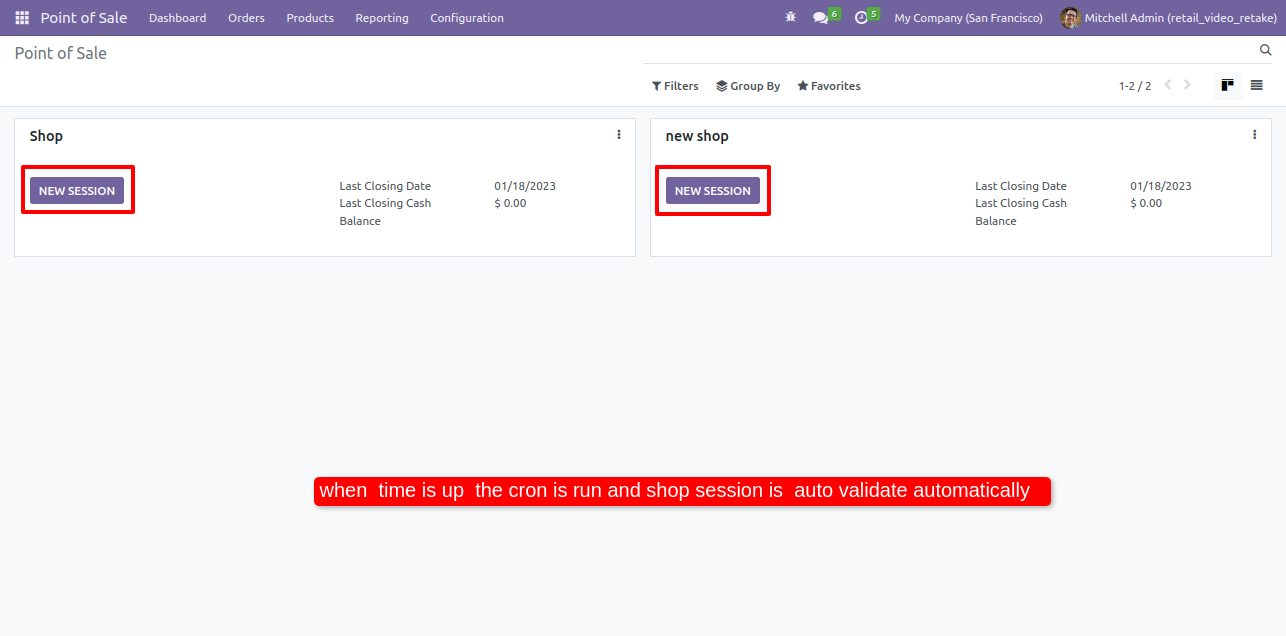
When the time is up the cron is automatically run and the session is auto validate.
In the list view of the session you can see the session is close&posted.
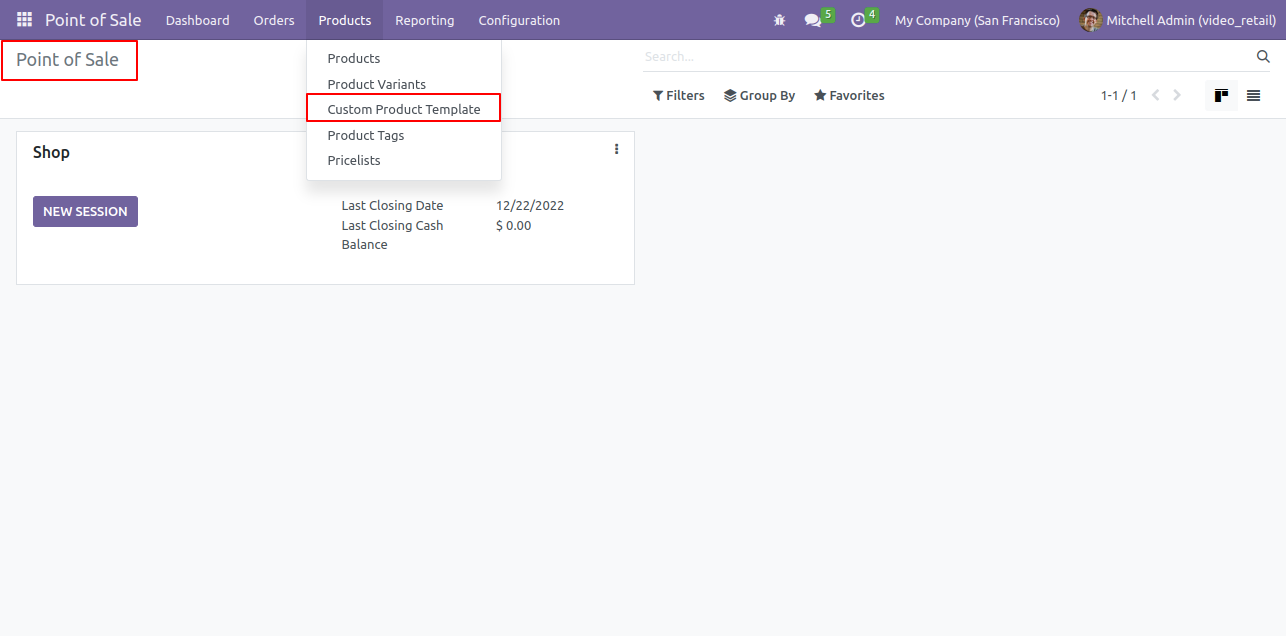
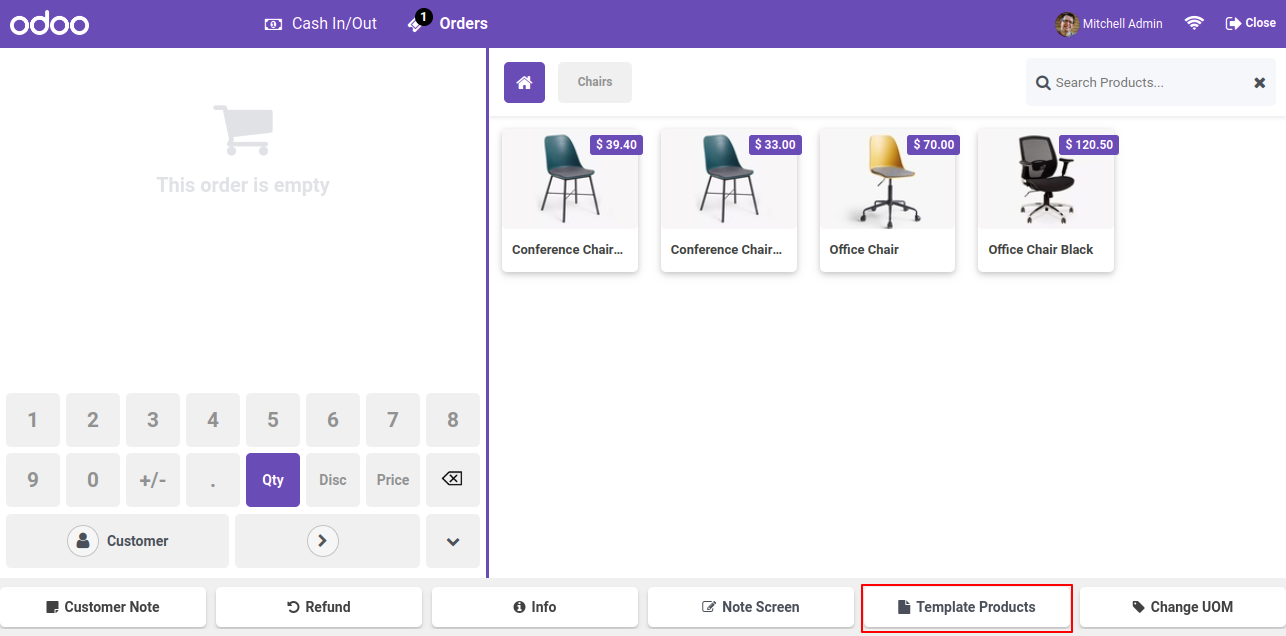
Goto pos setting : enable 'Enable Product Template' feature

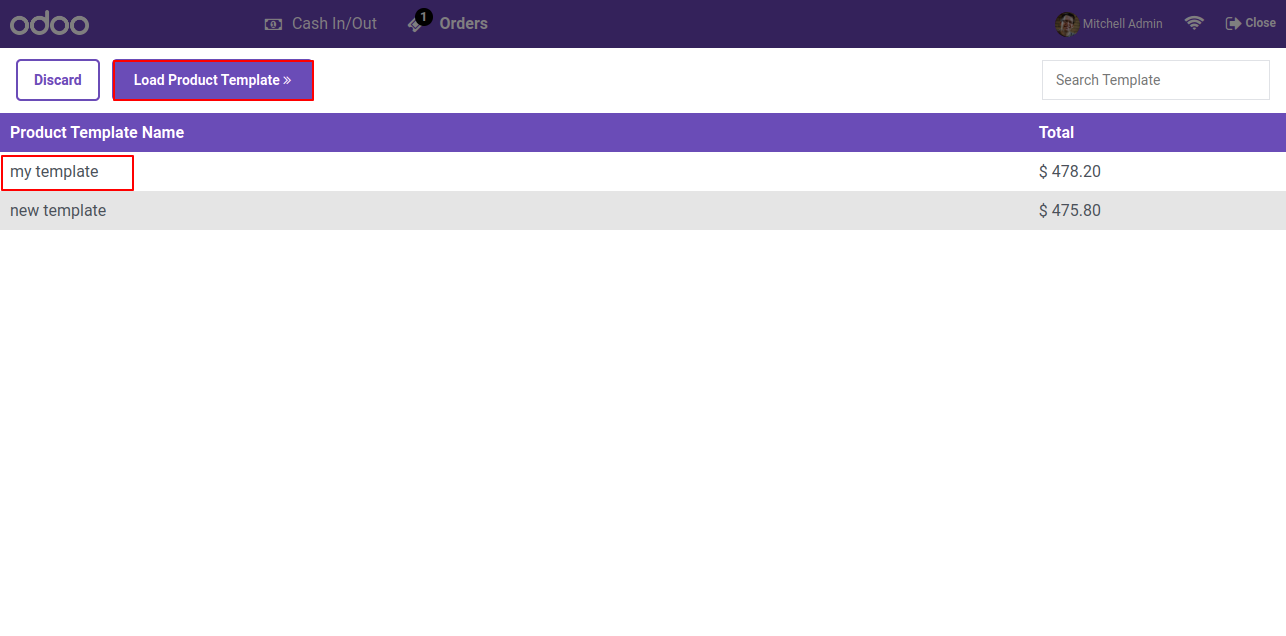
Open the custom product Template from the products menu.
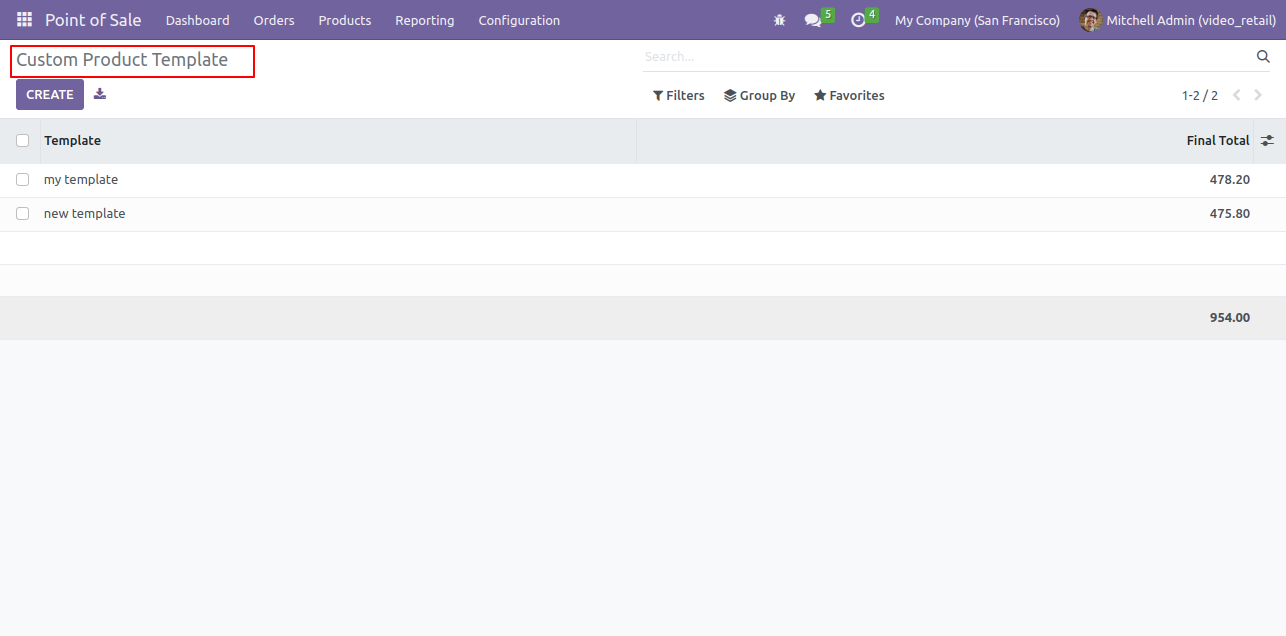
Tree view of the custom product template.
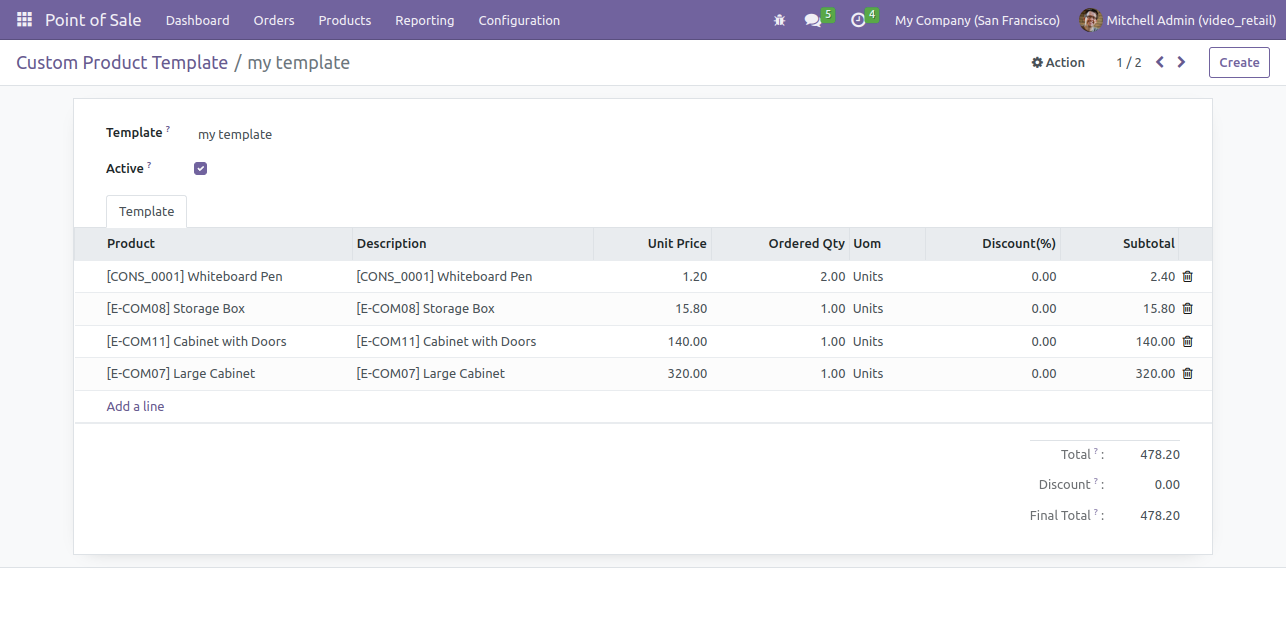
Form view of the custom product template. To active a template, tick active option.
Goto pos screen and click on 'Product Template' button.
Here, you can see the list of product templates and select and add to pos cart.
You can see the product in the pos cart, which you selected in that template.
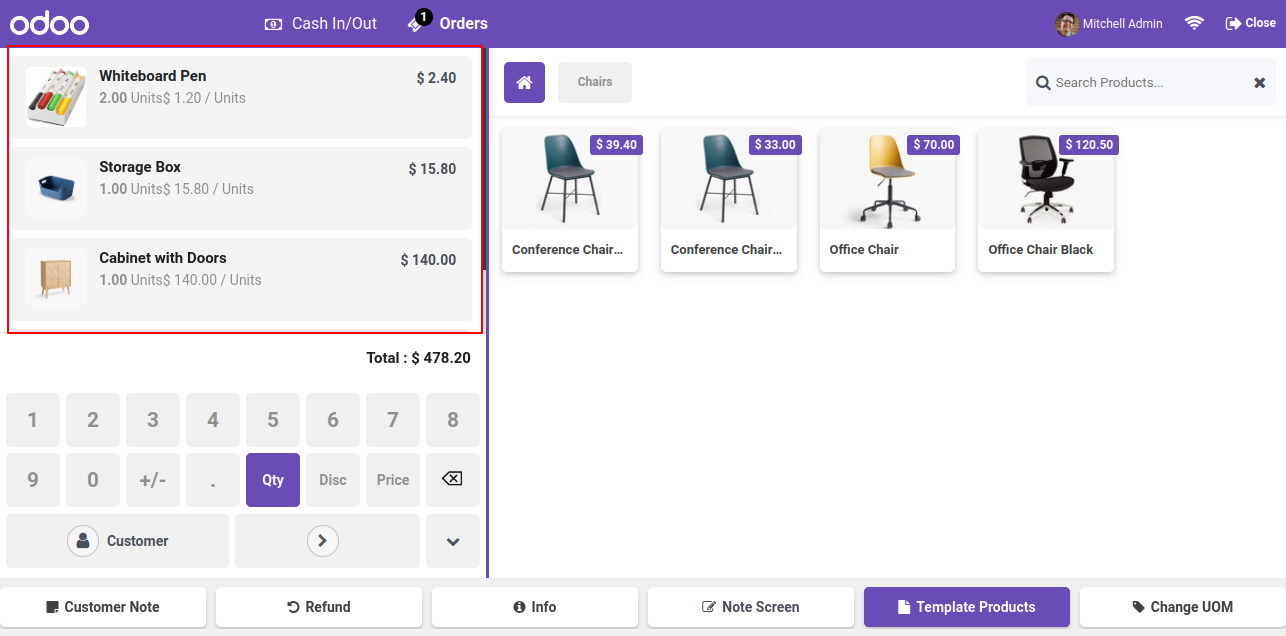
You can also see the product in the receipt.

Enable The Feature Customer Discount and Also Use Standard discount.
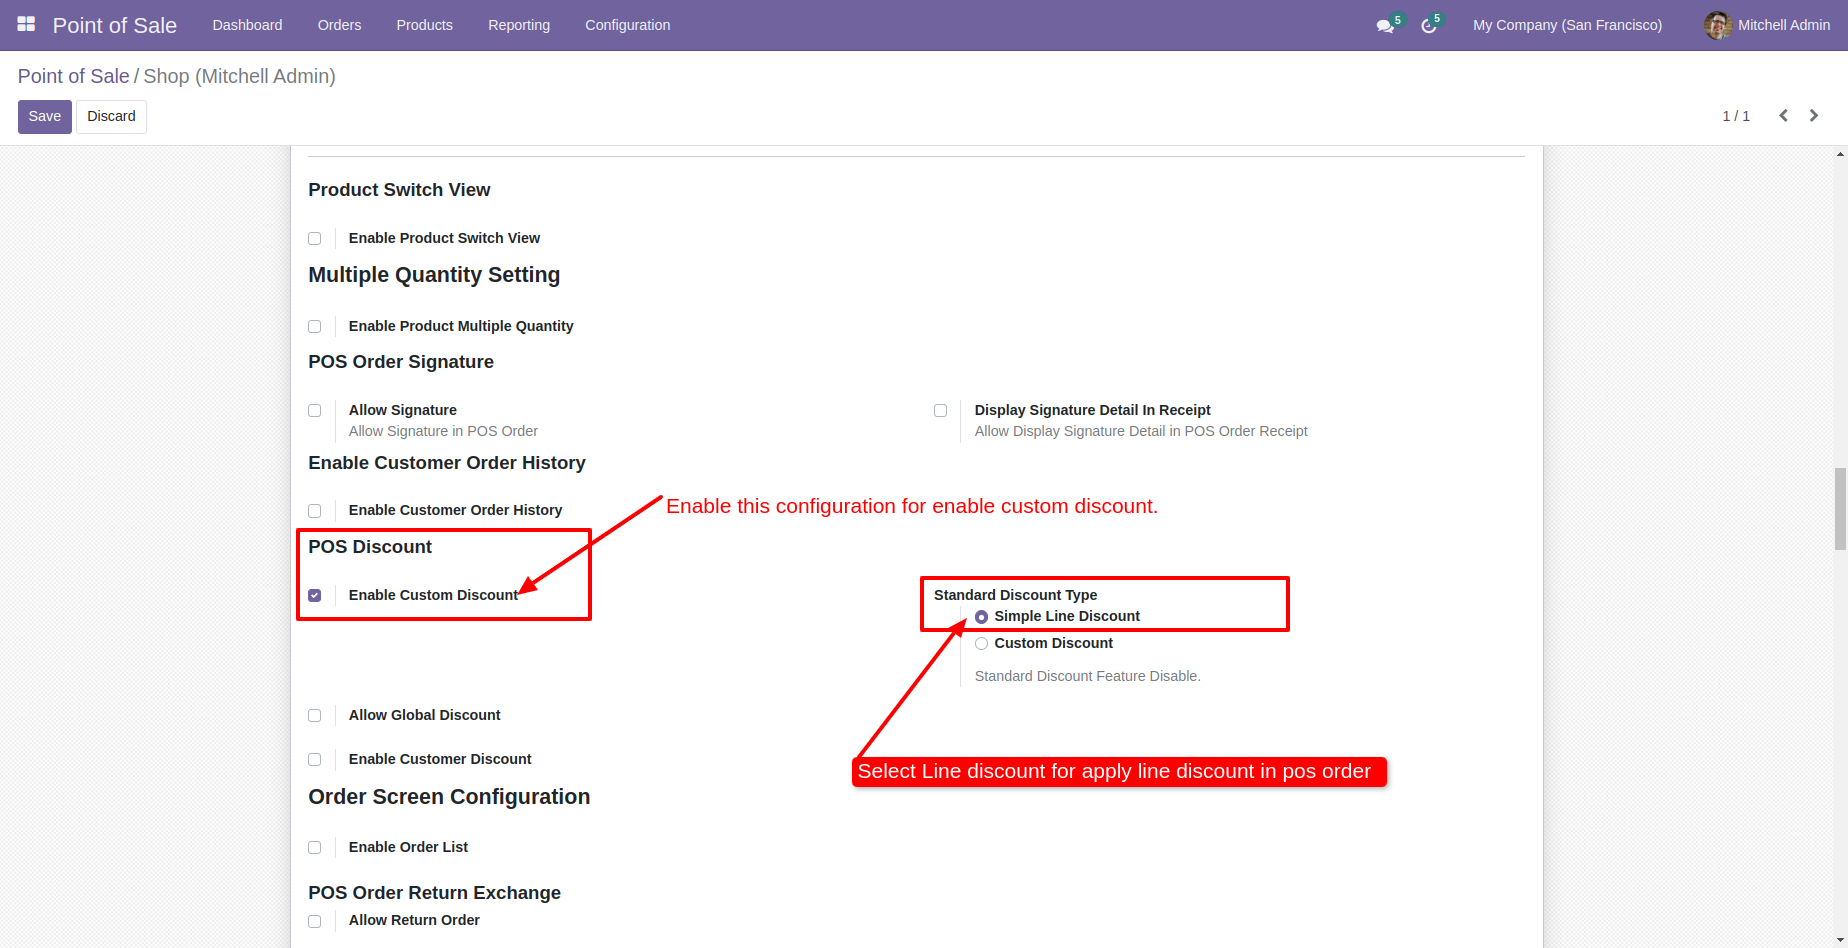
When Click The Discount Button One Wizred iS Open Add Discount Fix Or Percentage Wise By Press Confirm You Can Add Discount In Selected Line.
Select Fix and Add amount Press Confirm.
Fix Discount Automatically Add In Line And Display Amount in Global Discount.
Discount Printed in Receipt Also.
Select "Allow Global Discount" In POS Shop Configuration.
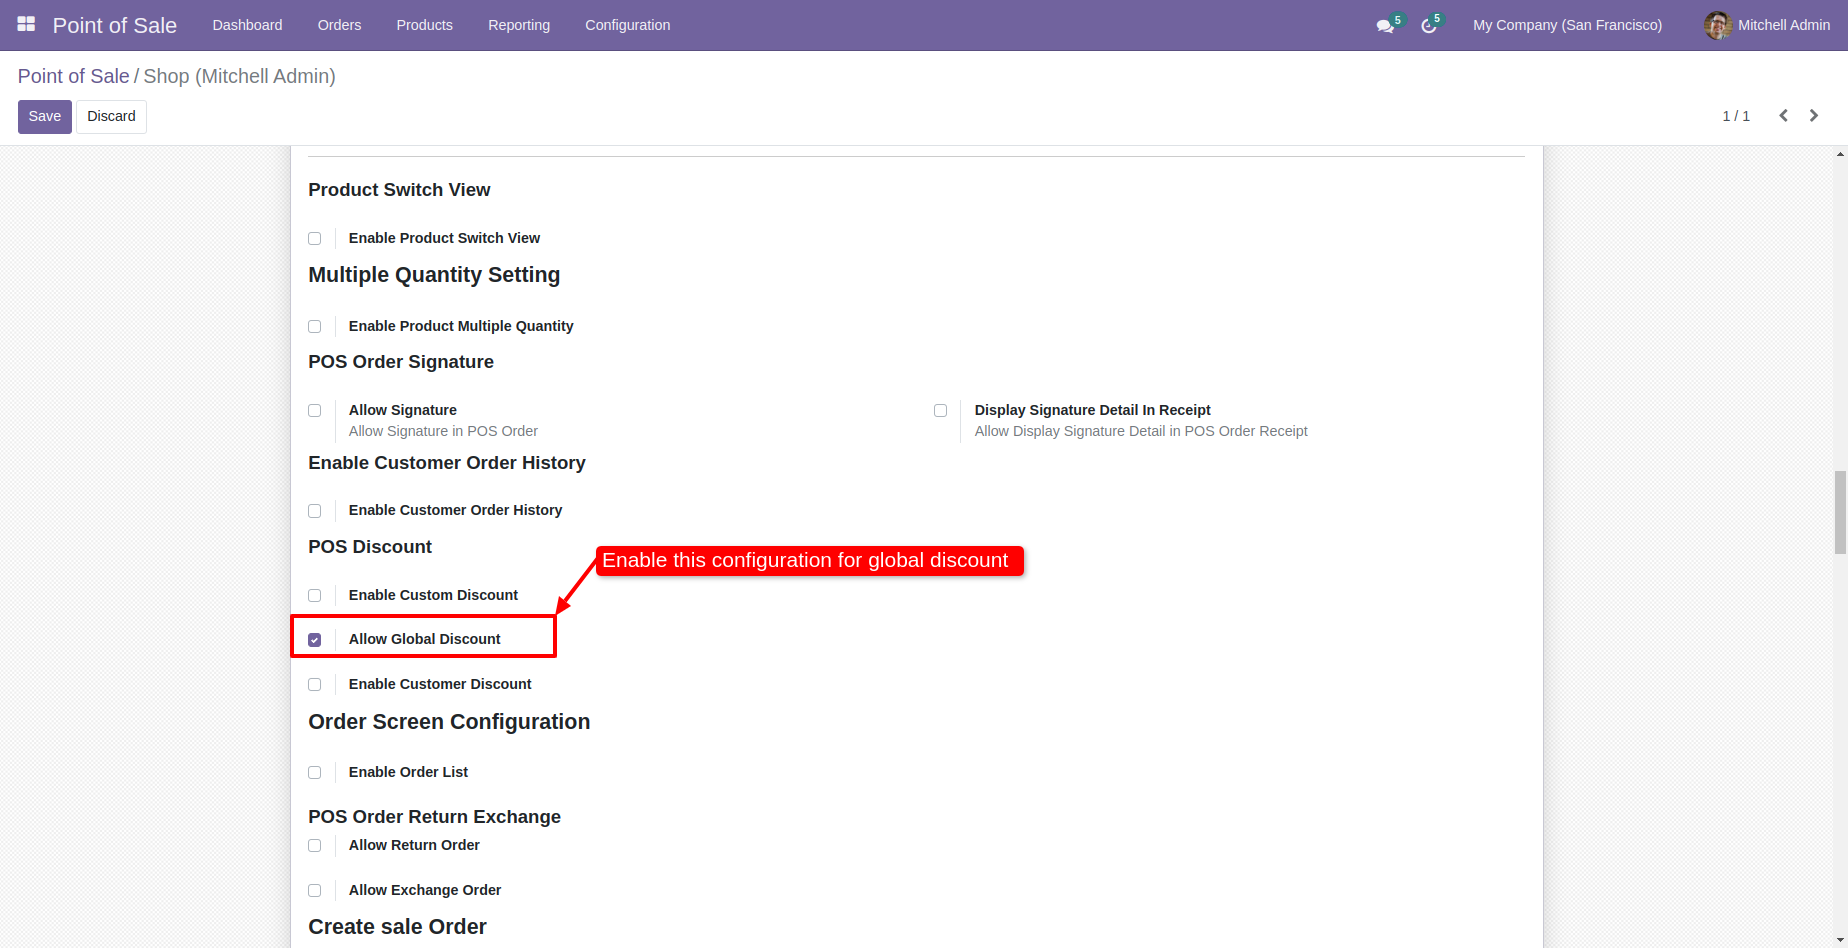
Global Discount Button Visible In POS.
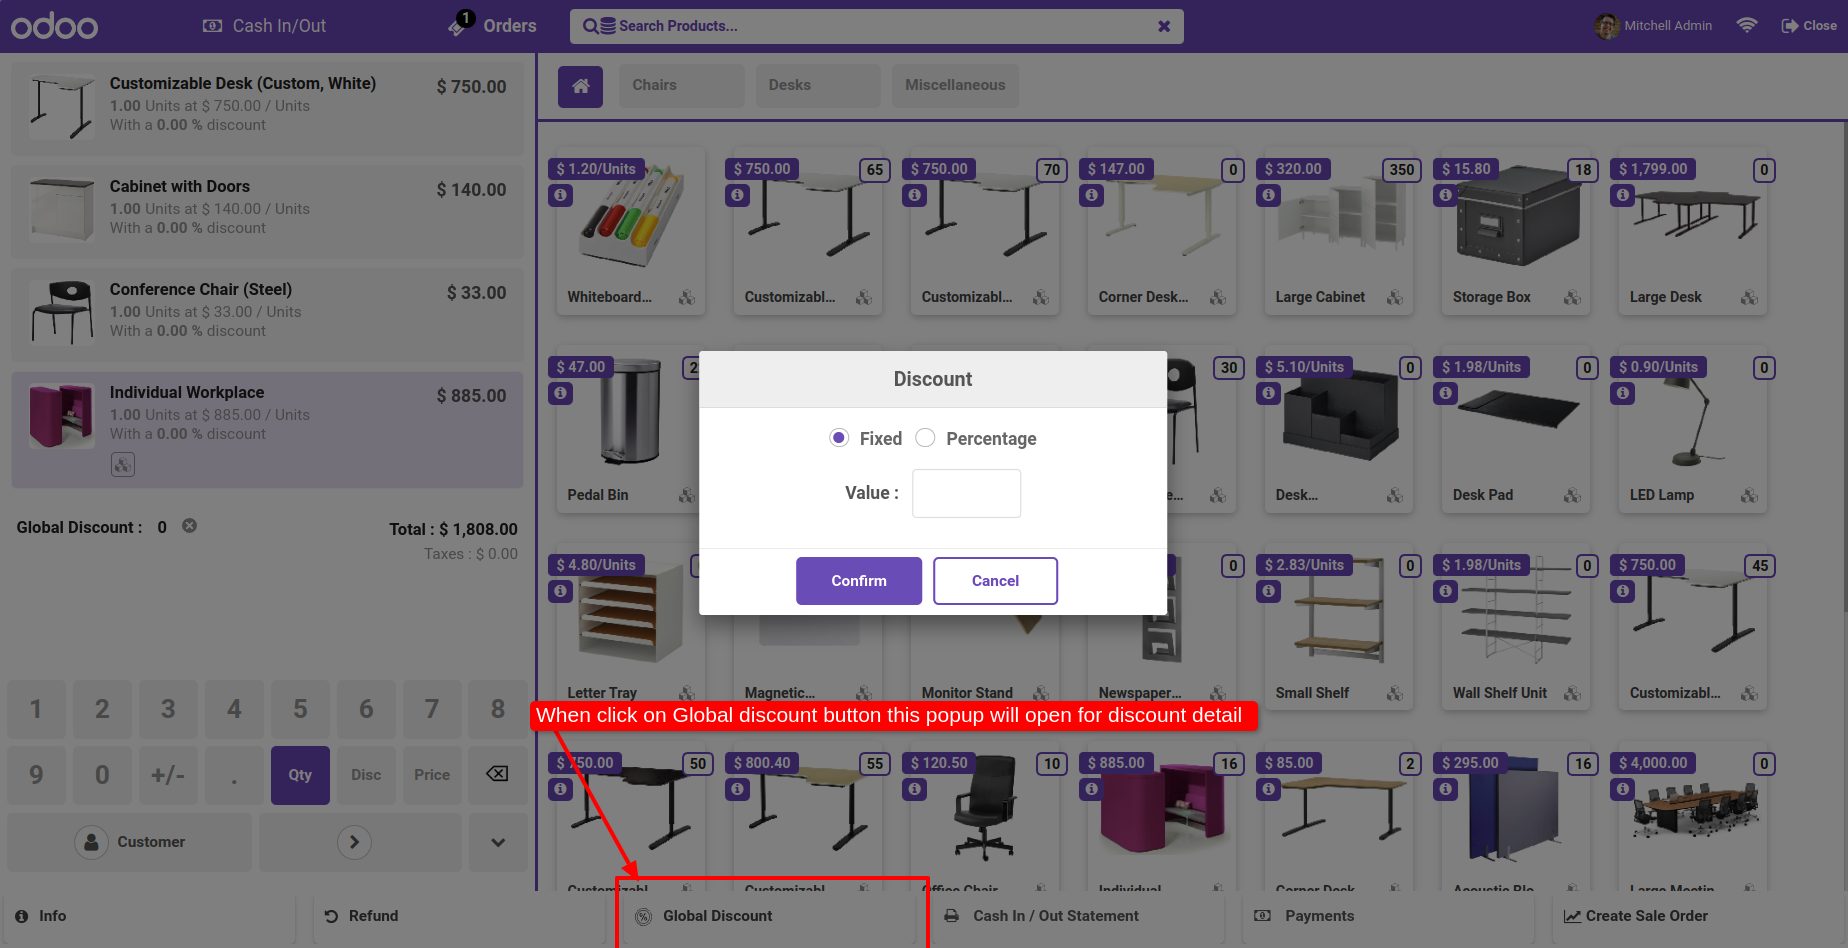
Discount Apply On Total Amount of Order. Select Fix and Add Amount.
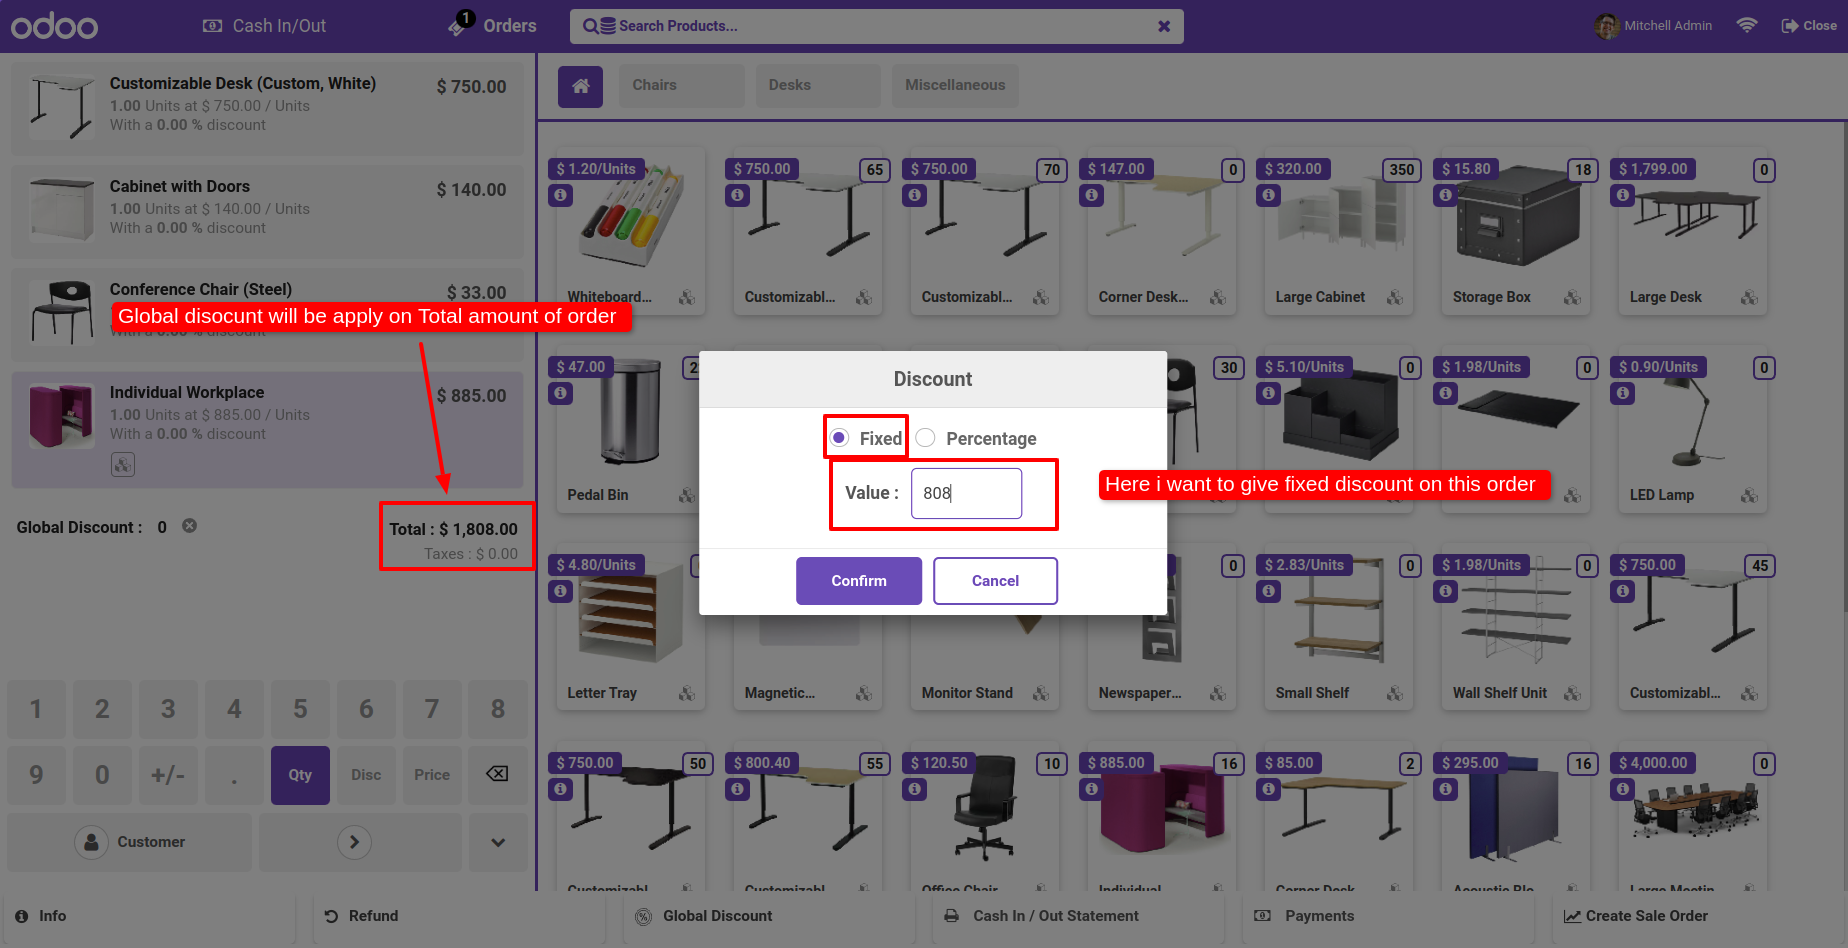
Discount will Apply in every Product of Order Equally.
Discount will See In Receipt.
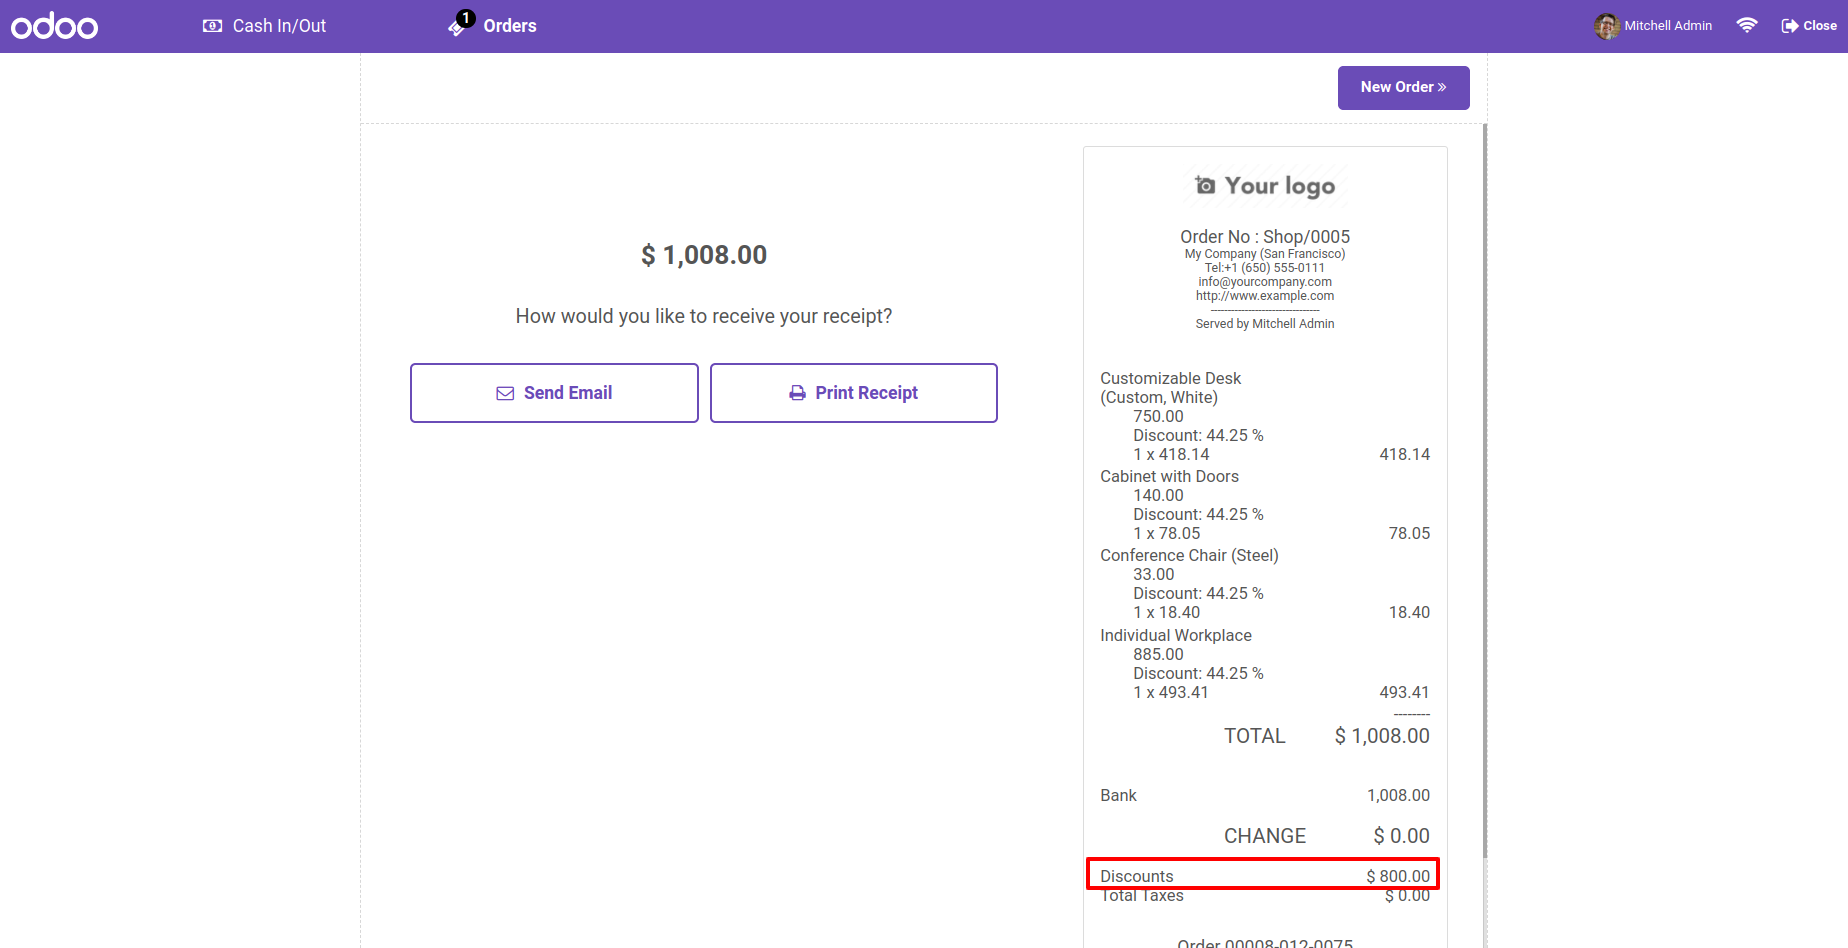
Goto pos setting and enable 'Enable Product internal Ref'.
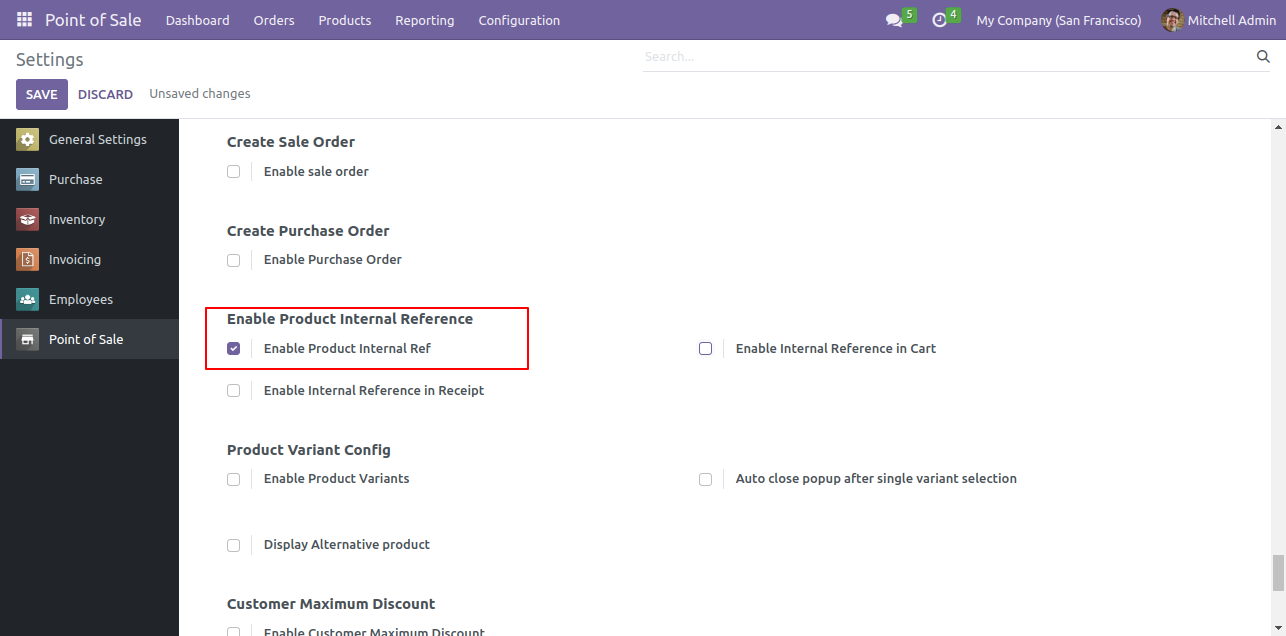
After that, the product internal reference is visible on pos screen.
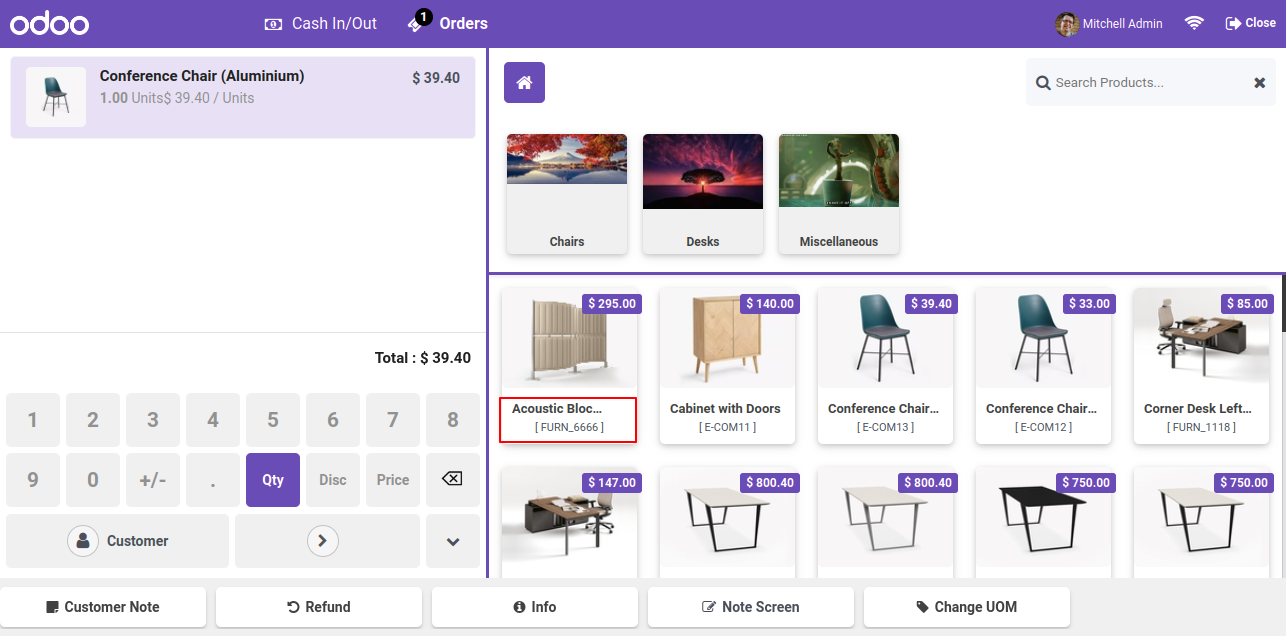
Goto pos setting na enable 'Enale internal Reference In Cart'.
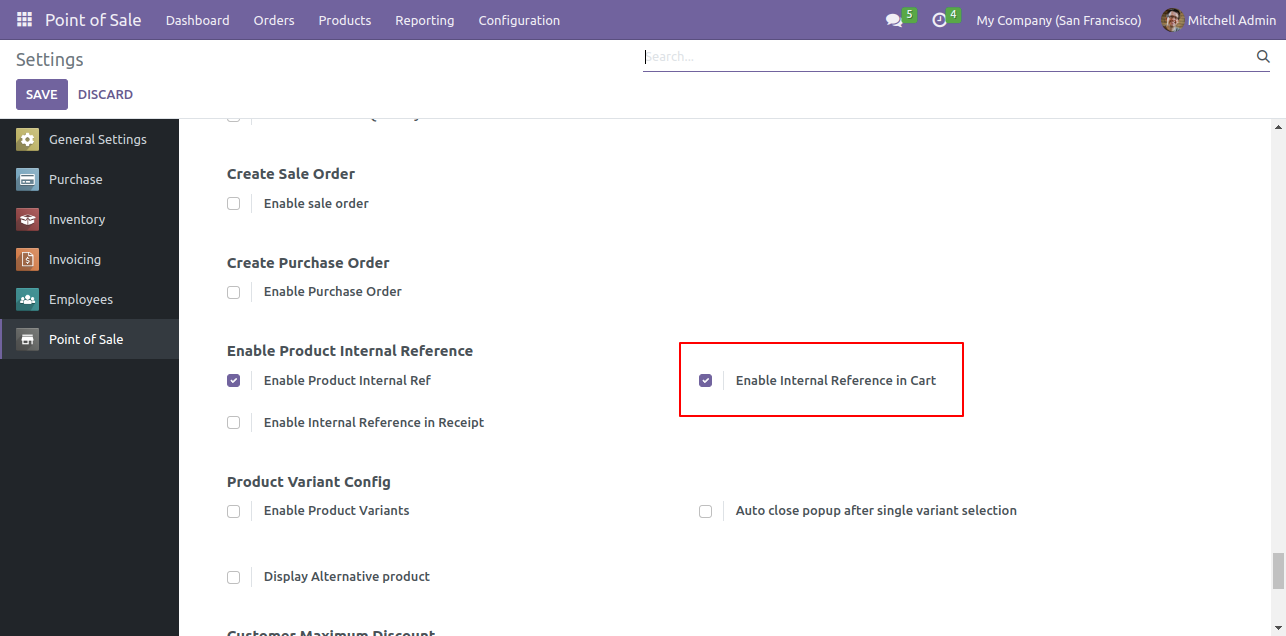
After enabling this, the product internal reference in cart is visible on pos screen.
Goto pos setting na enablee 'Enable internal Reference In Receipt'.
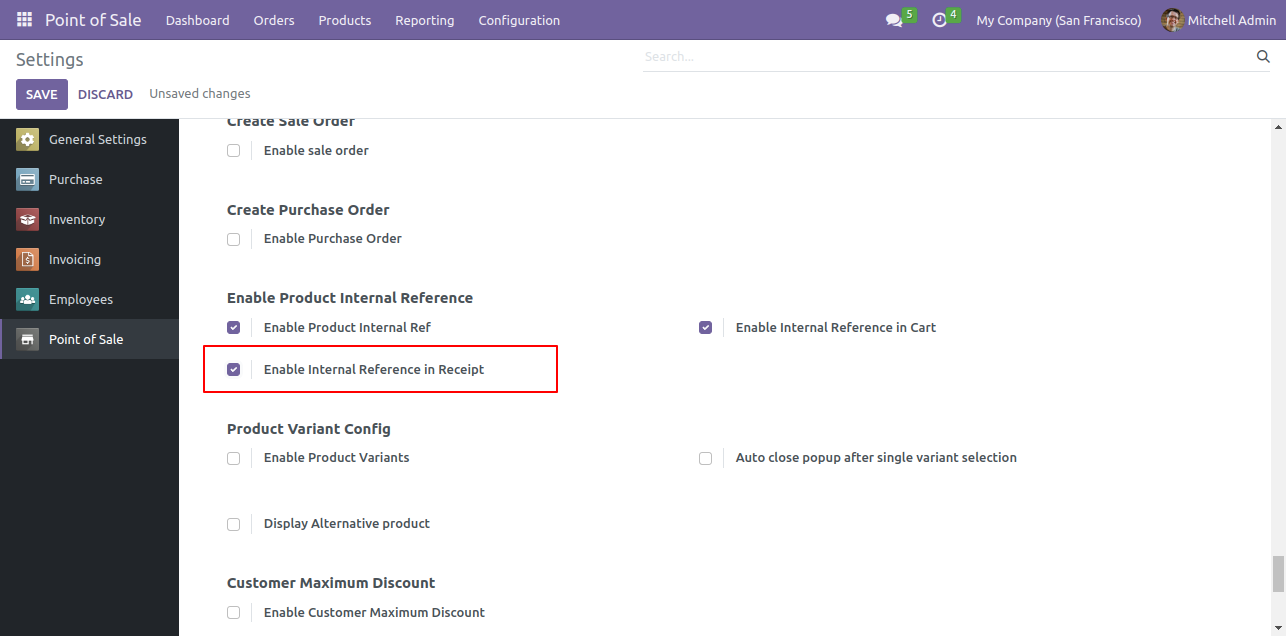
After enabling this, the product internal reference in Receipt is visible on pos screen.
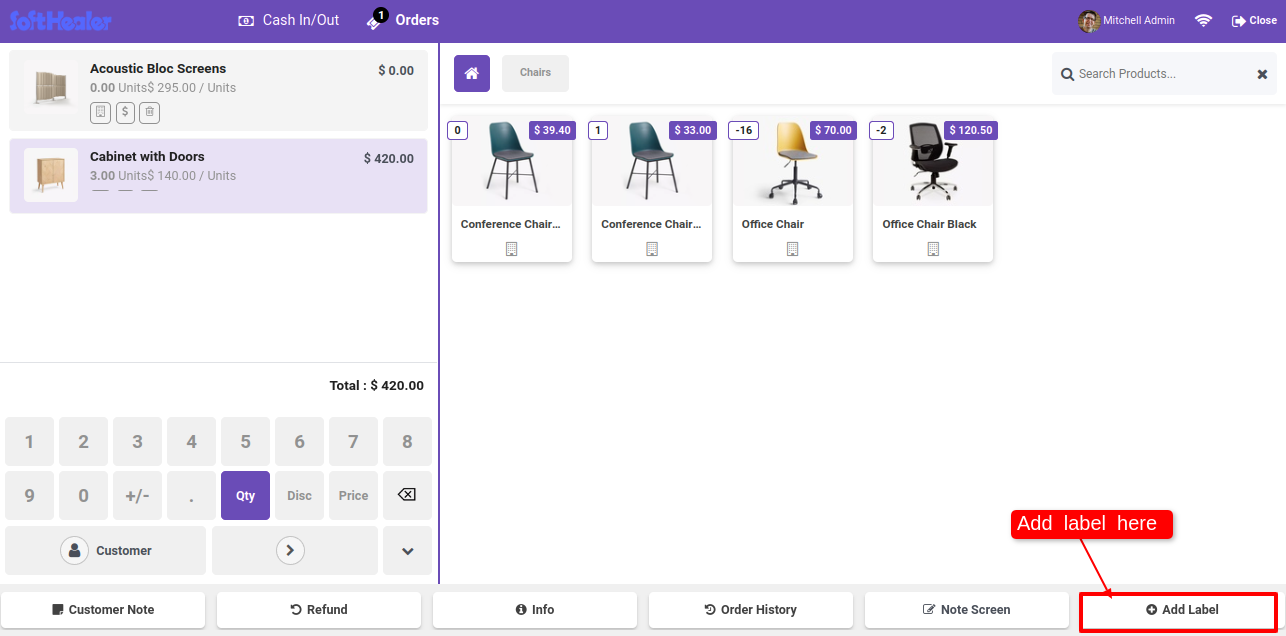
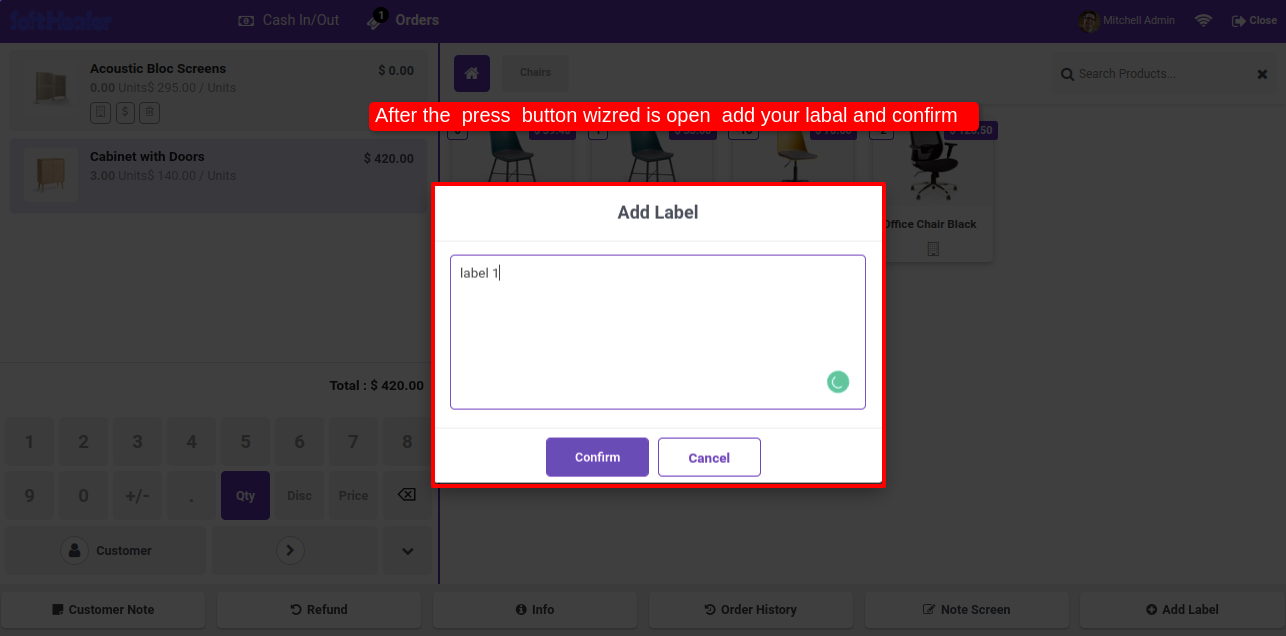
Goto pos setting and enable 'Enable Order Line Label' Configuration. Here you have several options like delete label with lines & print order line label in receipt.

After enabling this, the Add Label button is visible in the pos screen. To add label, Click on that button.
Add the label in th add label wizard and confirm it.
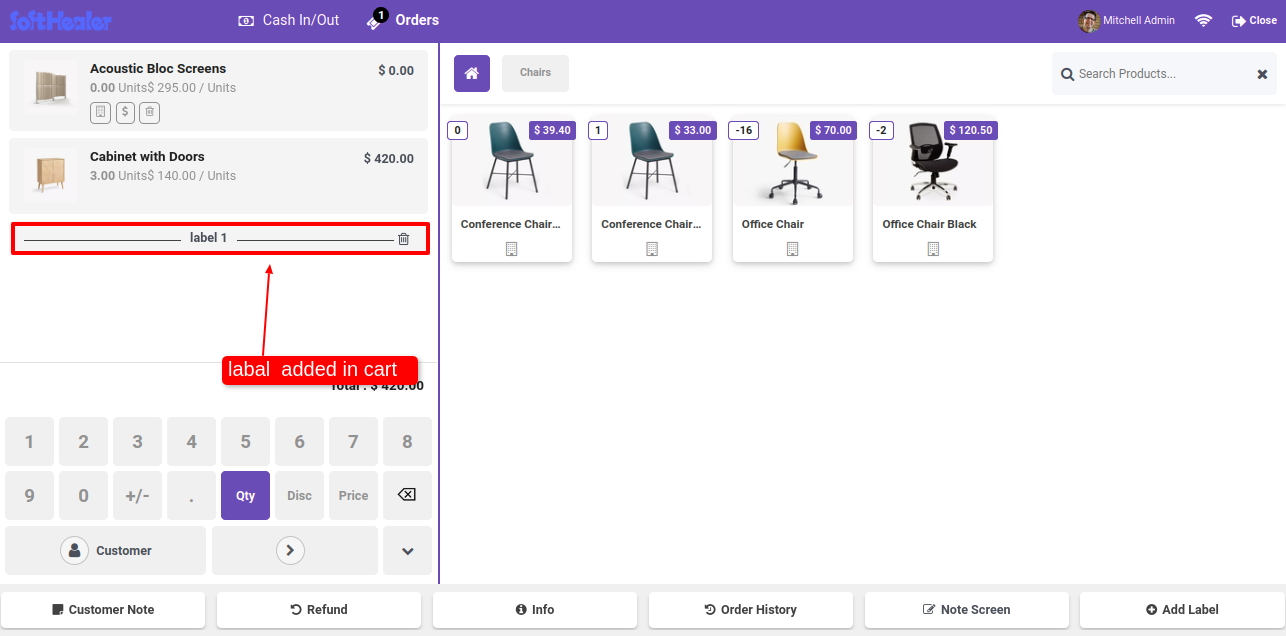
See the label is added in cart.
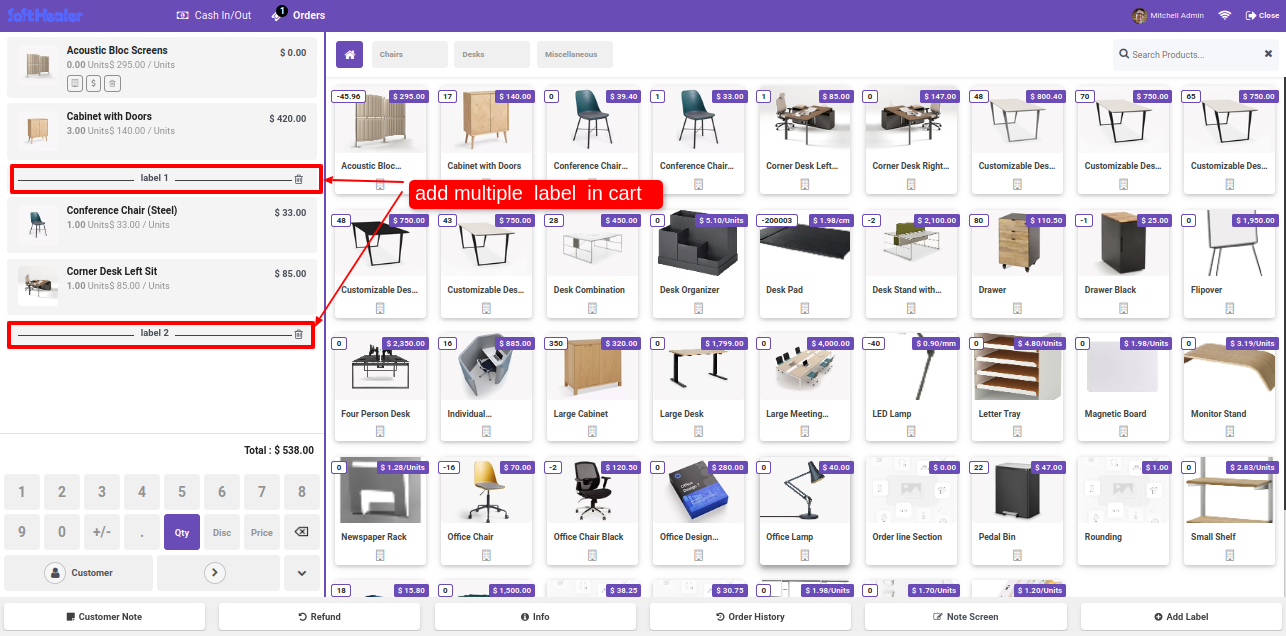
You can also add a multiple label in cart.
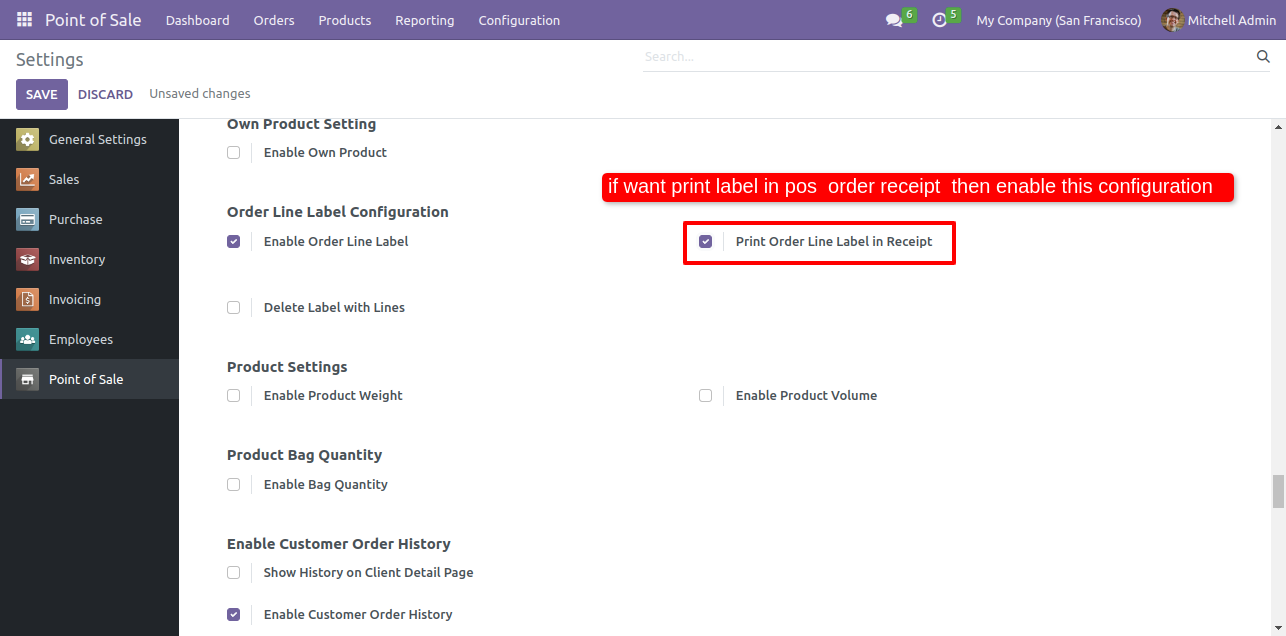
If you print a label in pos receipt then goto the pos setting and enable 'Print Order Line Label In Receipt' option.
See the label is printed in receipt.
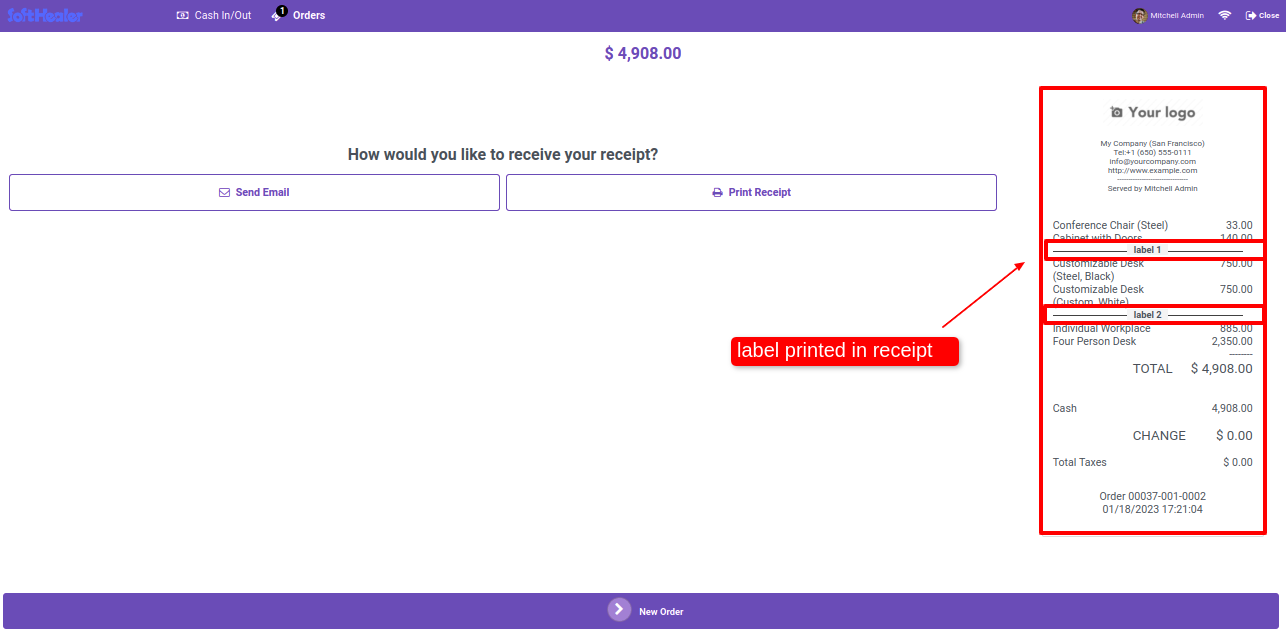
See animatated image for how label works.

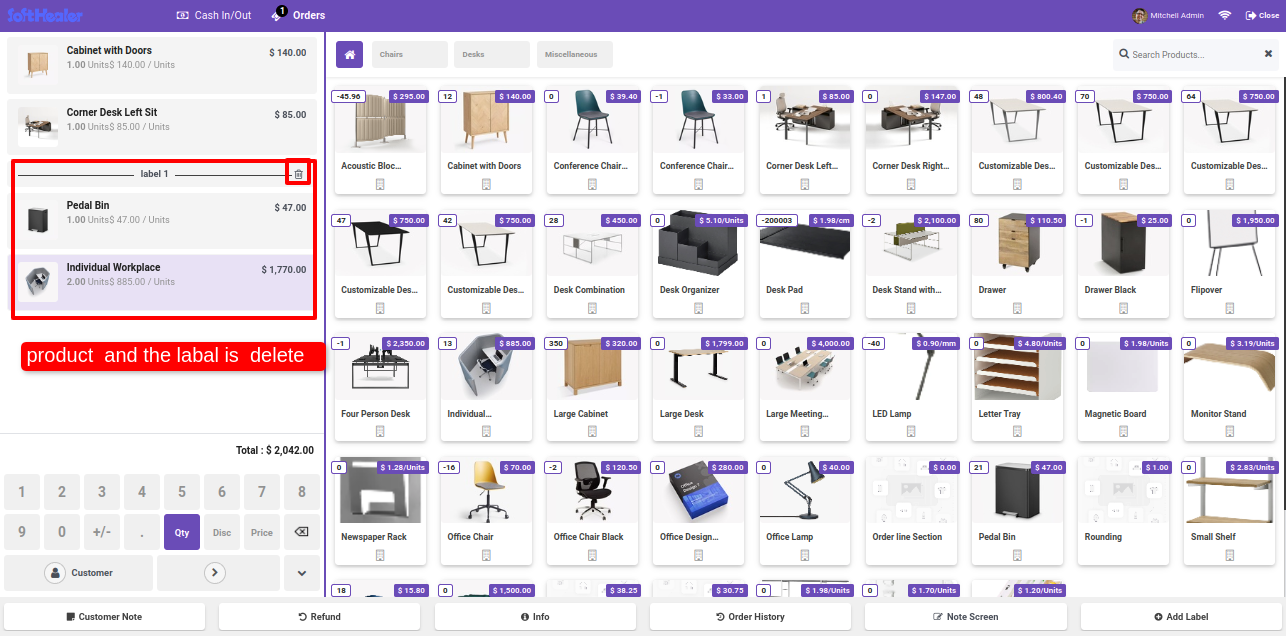
If you delete a label then goto the pos setting and enable 'Delete Label With Lines' option.
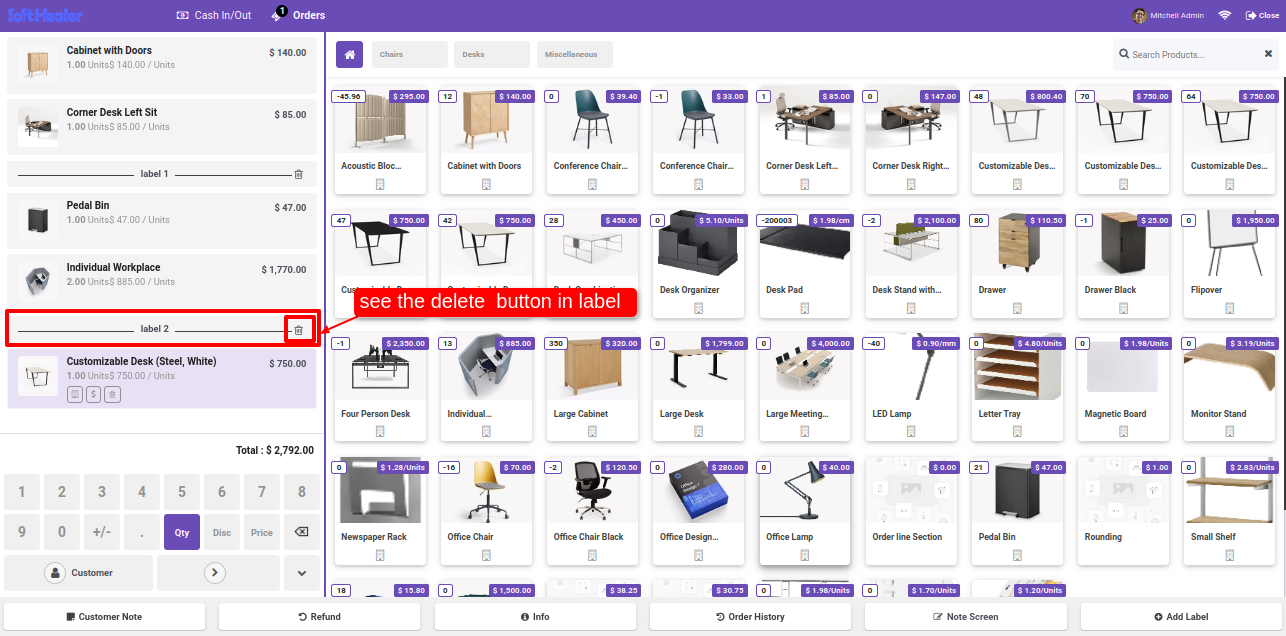
After that, the delete button is visible in pos cart. Click on the delete button of the product which you want to delete. When you click on the button the product will be deleted.
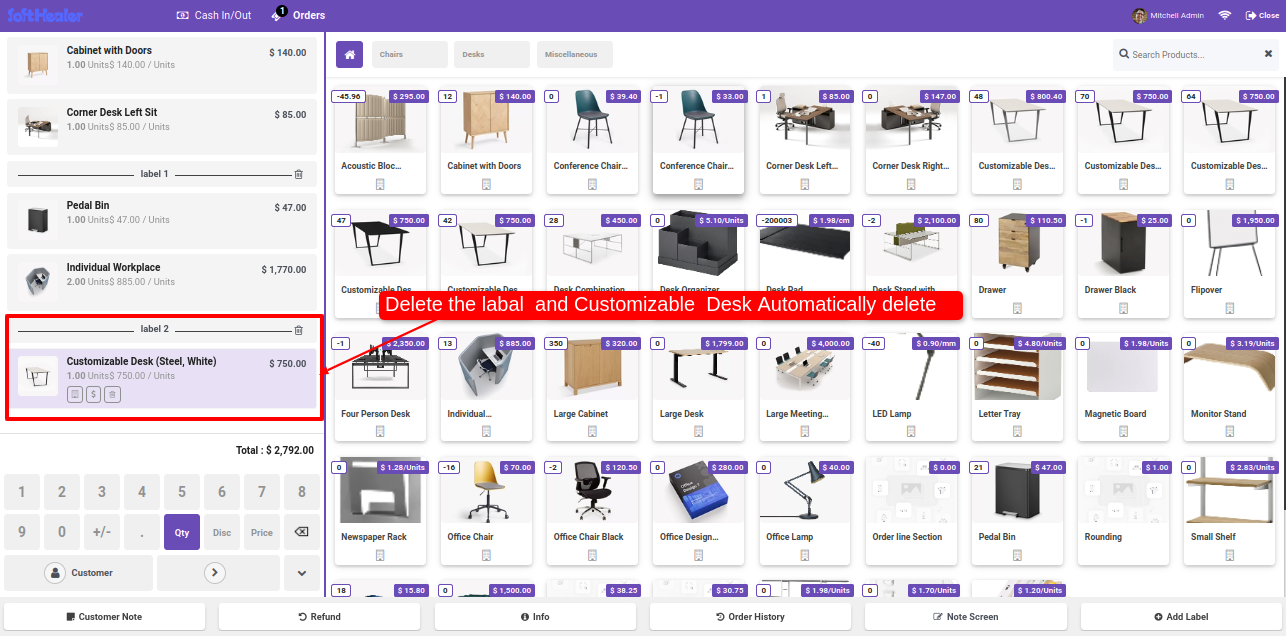
Click on the delete button of the label which you want to delete. When you click on the button the label will be deleted.
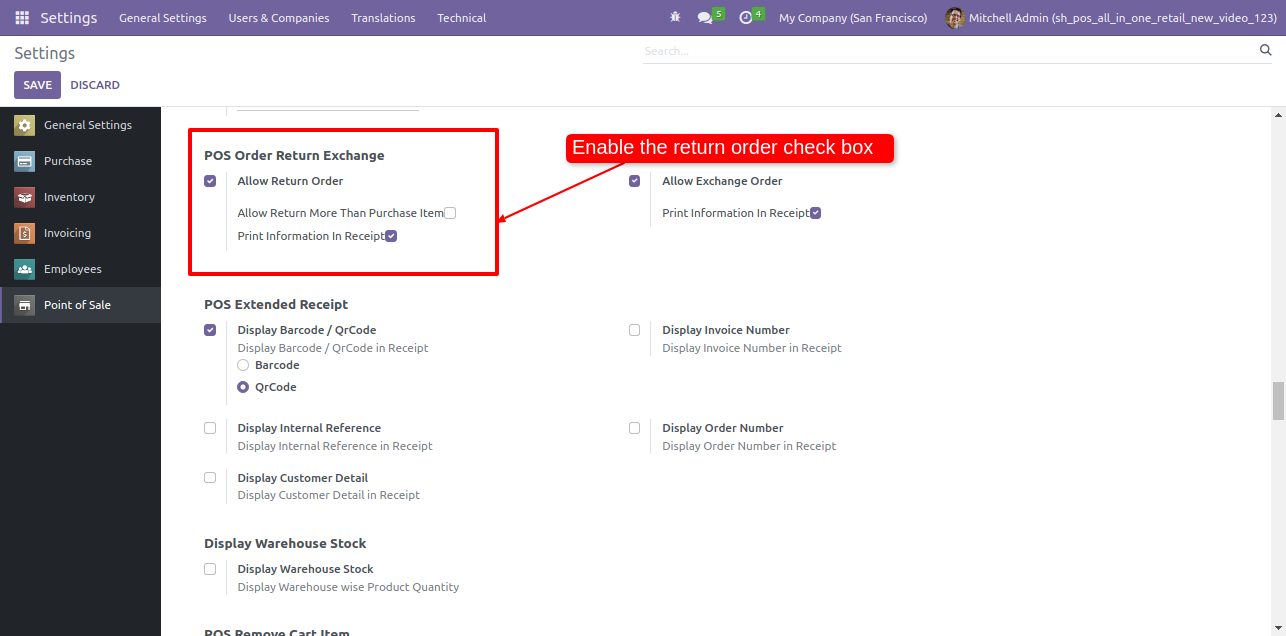
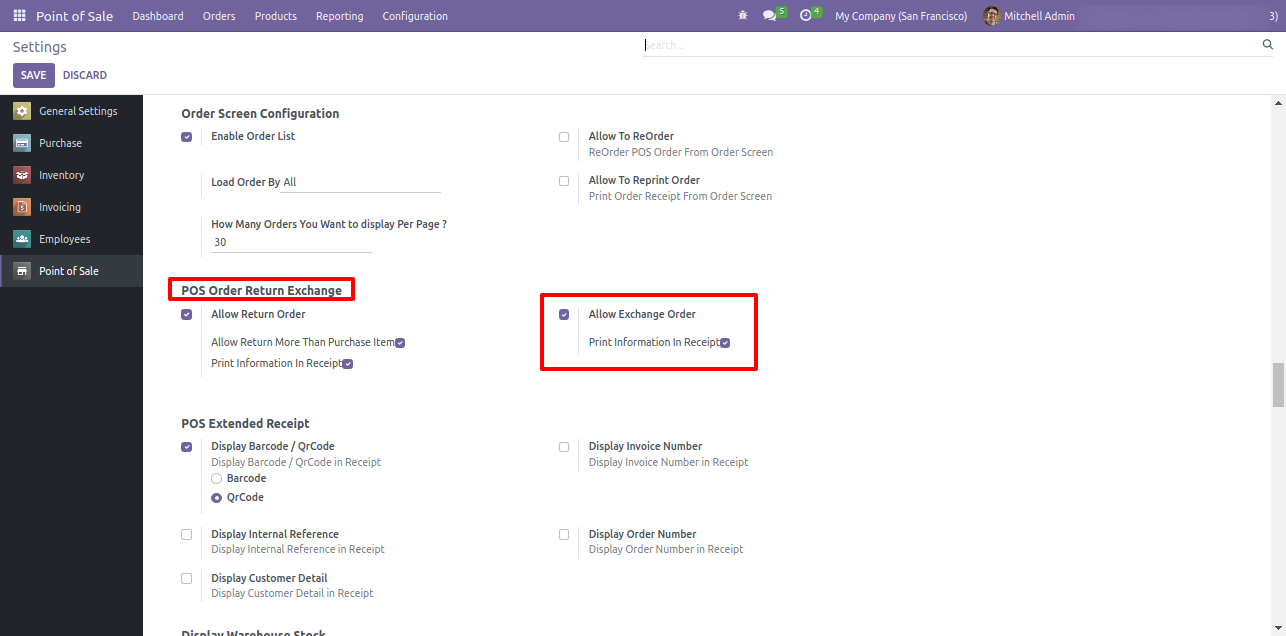
Goto pos setting ==> Enable 'Allow return order' & 'Allow exchange order' options. Also tick the print information im receipt option.
Receipt view.

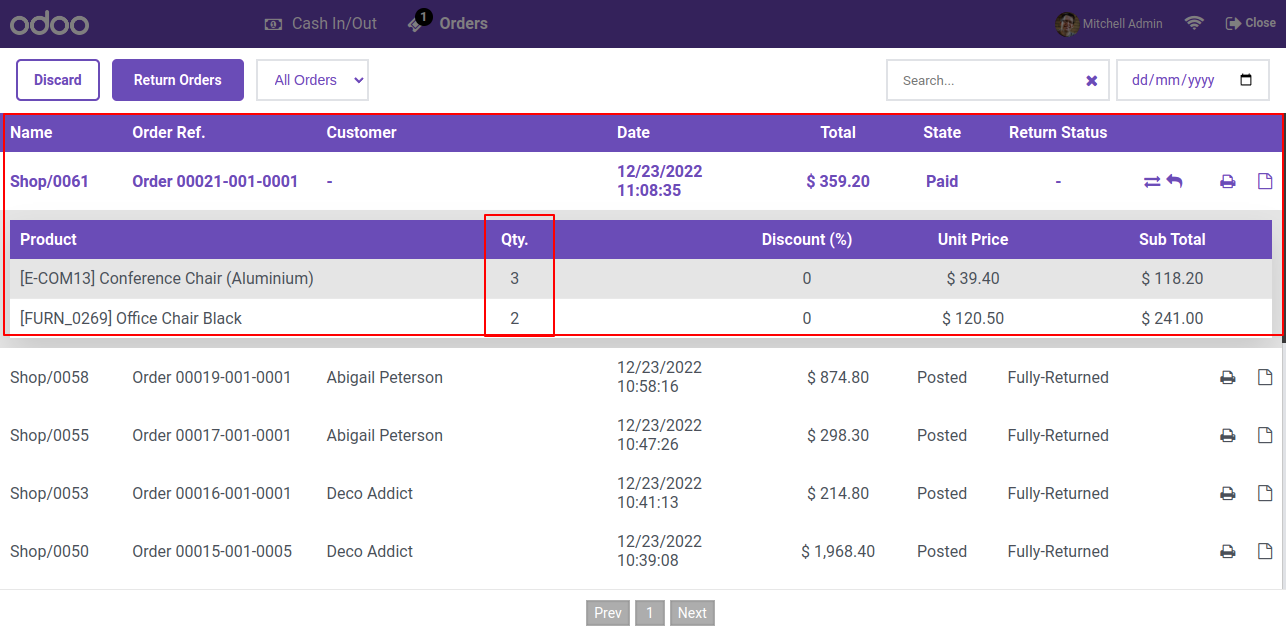
Click on the order history button to see the order history.
Tree view of the order history.
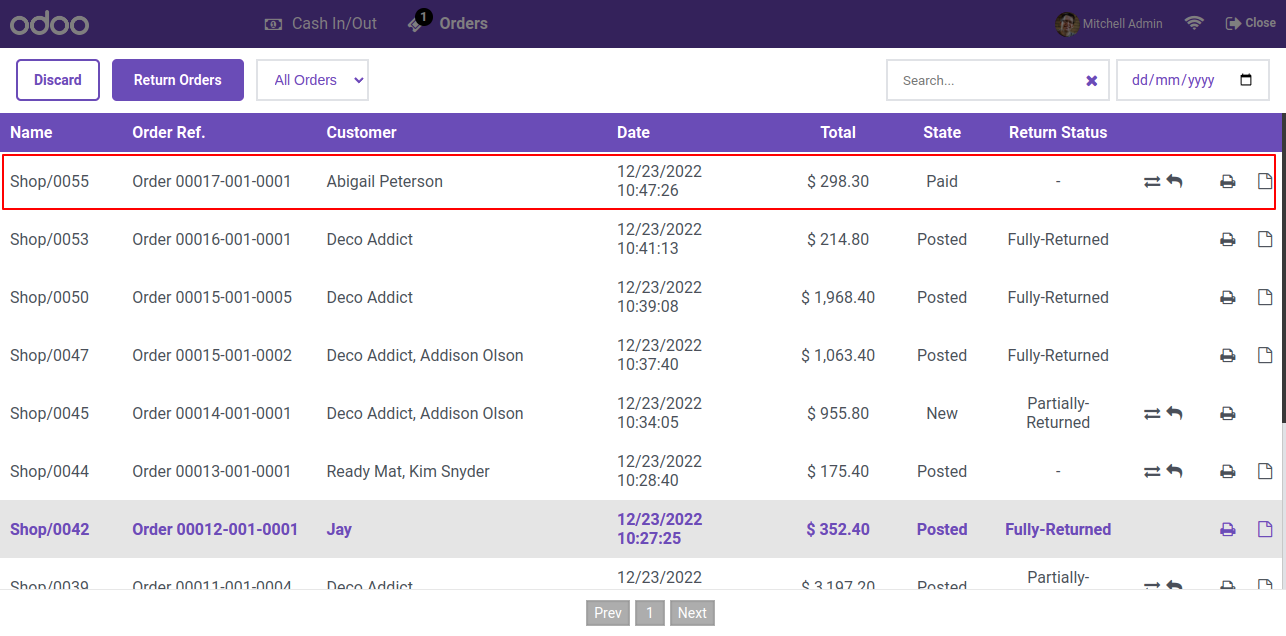
In the POS 'Order History' you can see the details of orders.
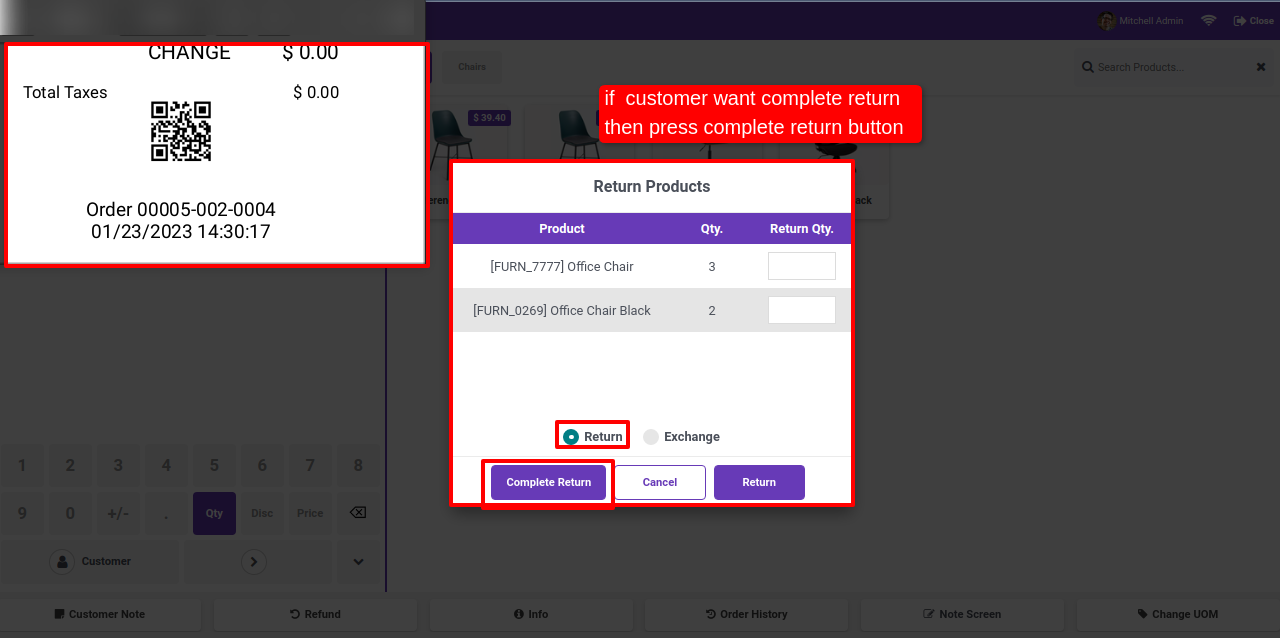
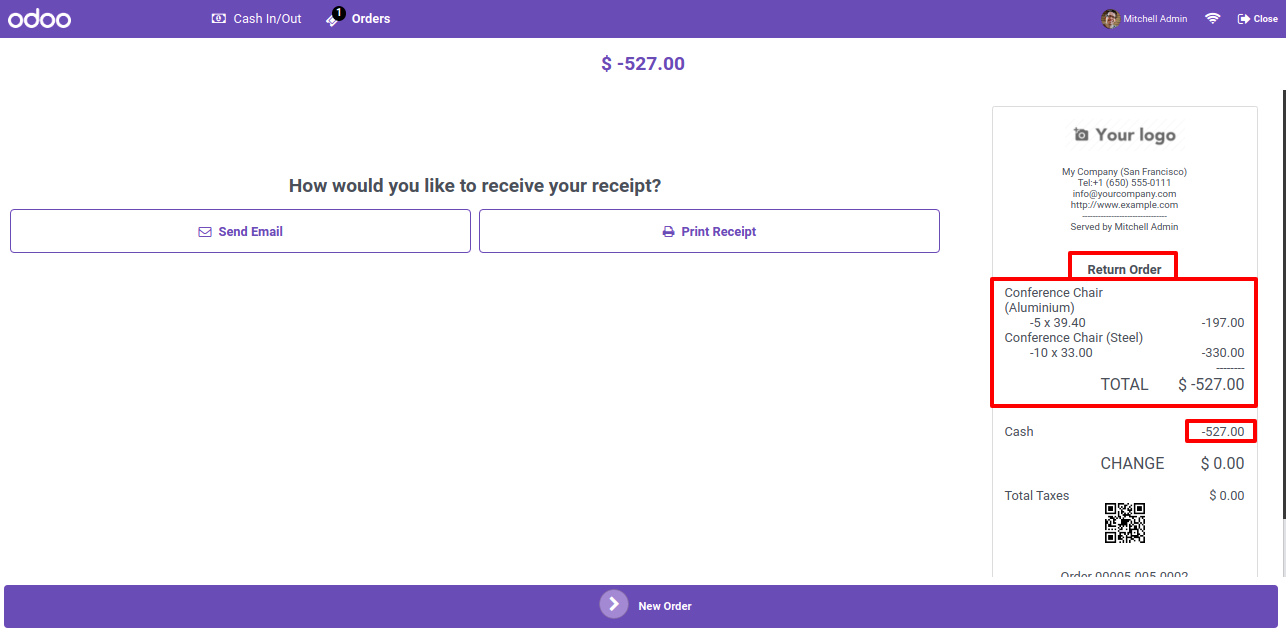
To return the product, click on the return order button.
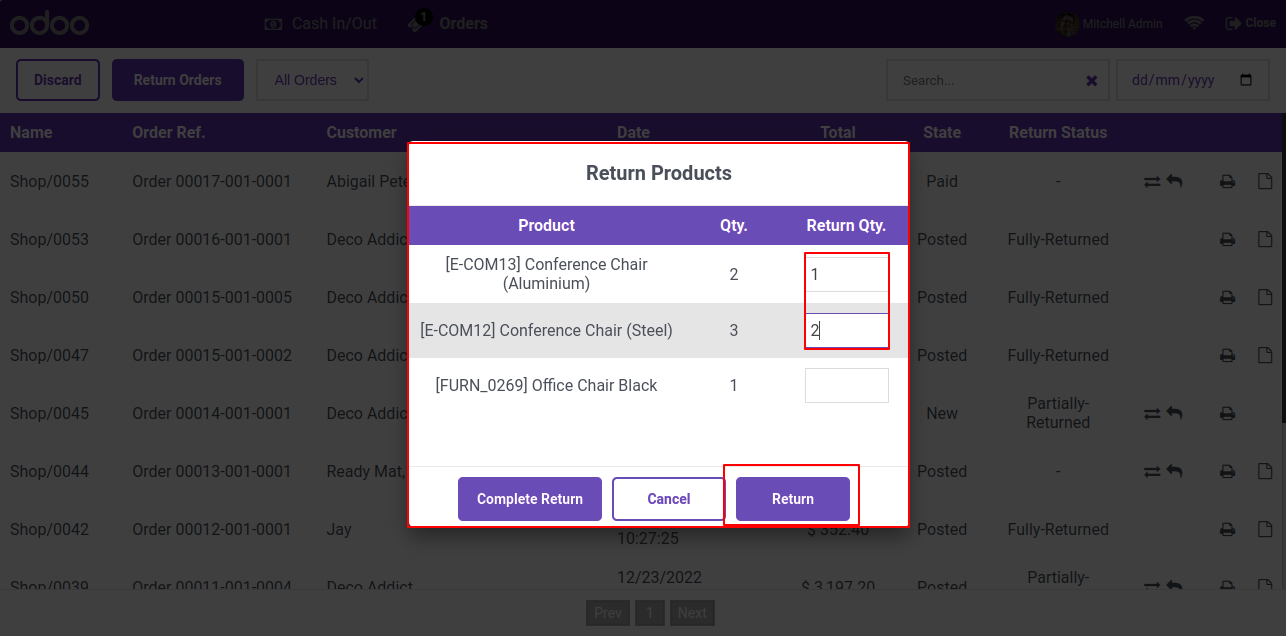
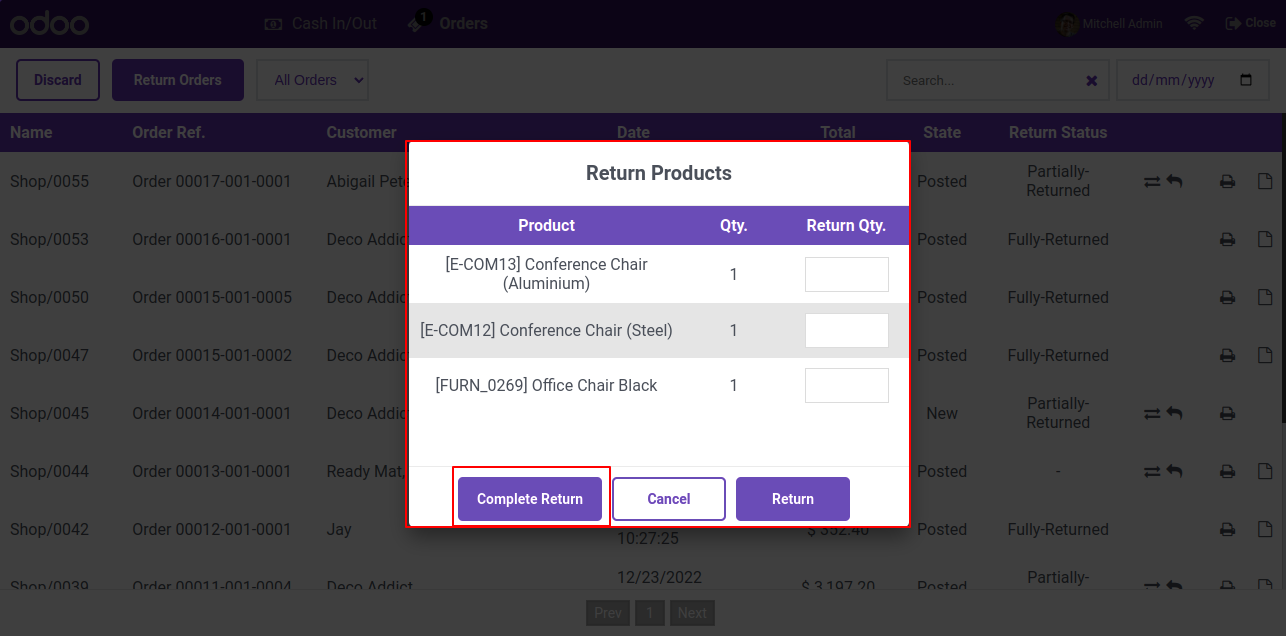
After that, a return product wizard will appear. Her, You can return the specific product quantity and
also return the whole order.
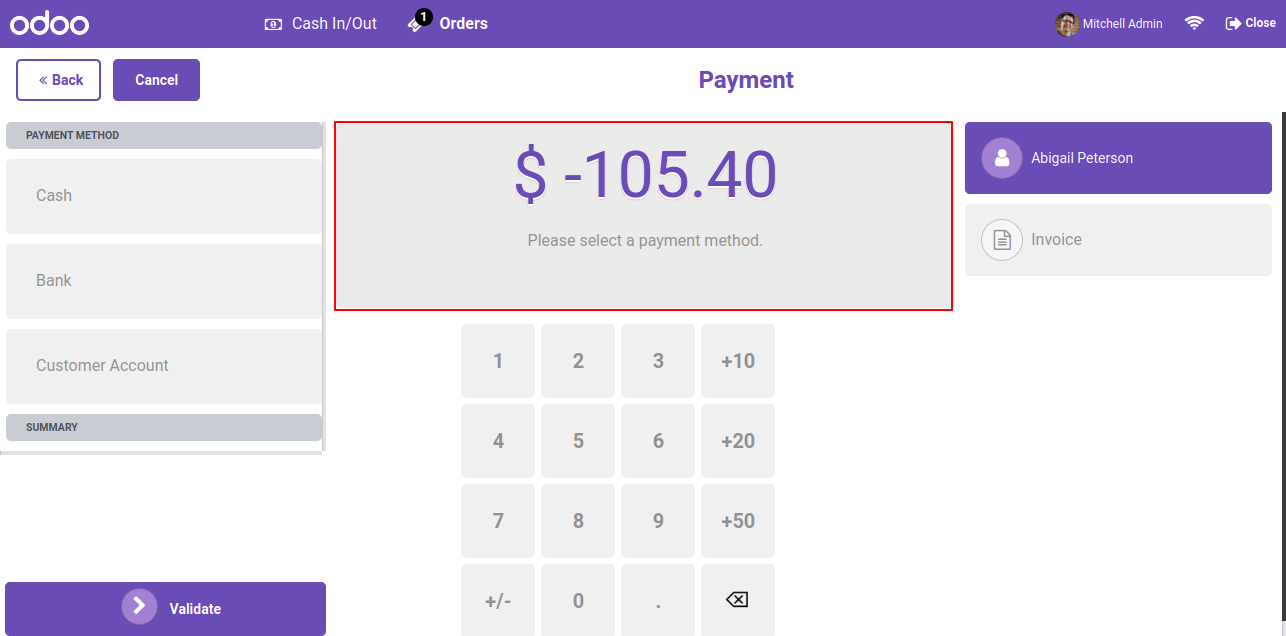
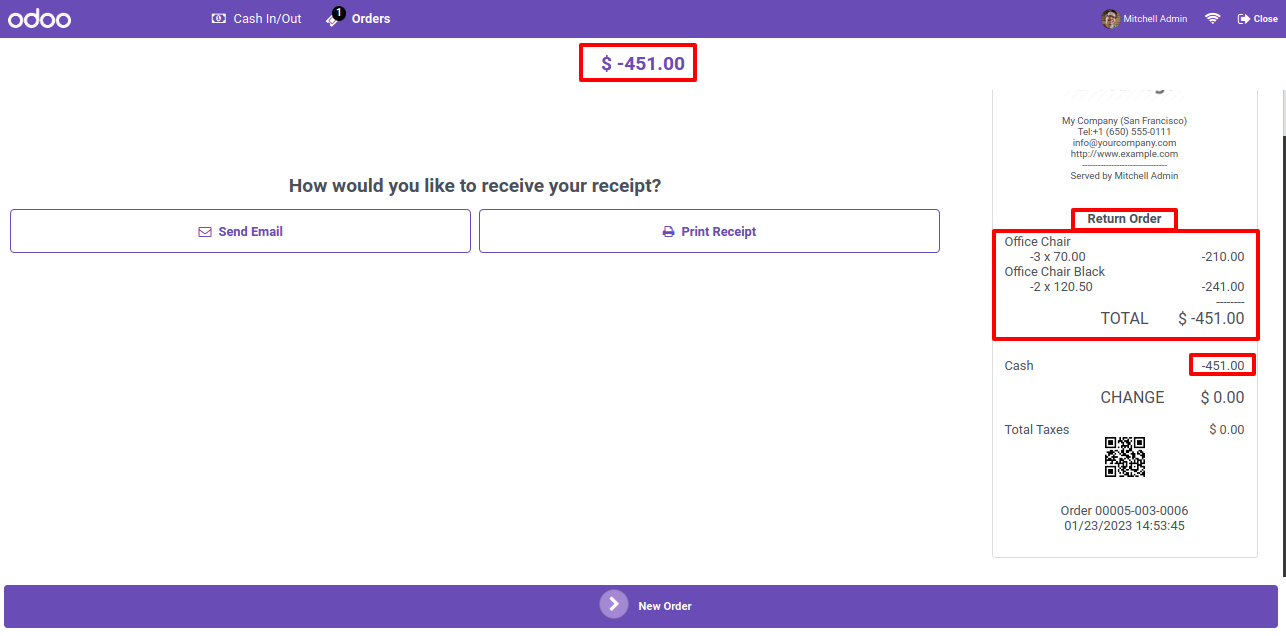
after clicking on the return button you will redirect to the payment page. Select the payment method like Cash, Bank or Custome account.
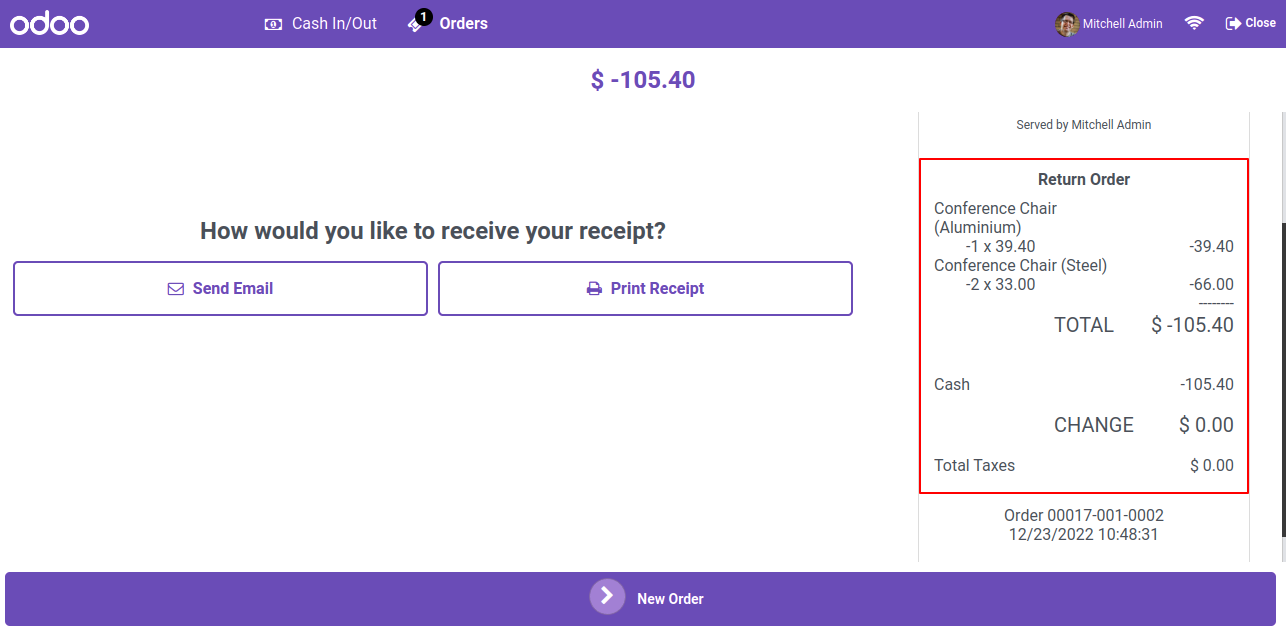
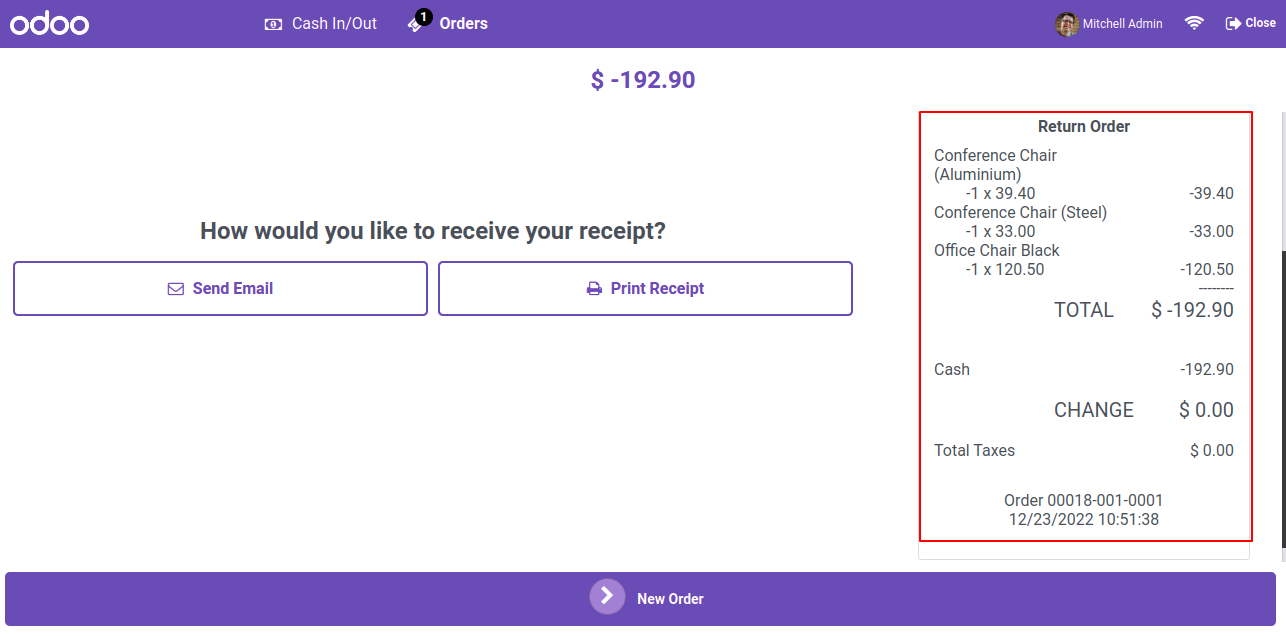
In the receipt you can see the return order history.
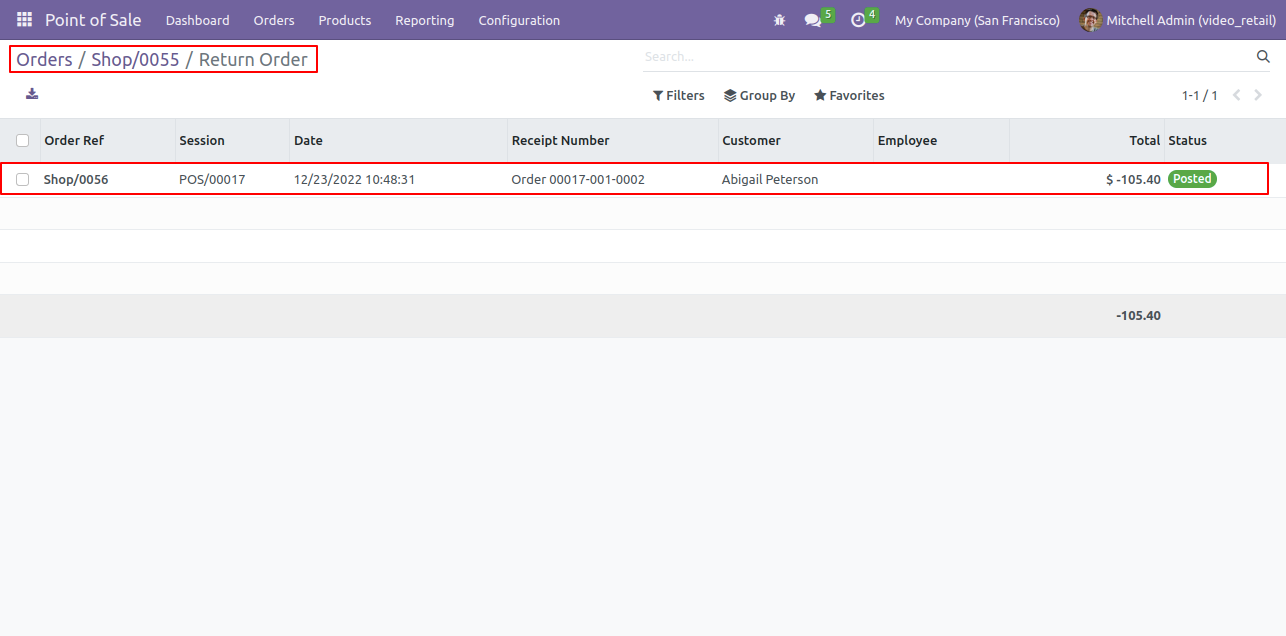
In the order form view, you can see the return order button.
To view the return order, click on the return order smart button.
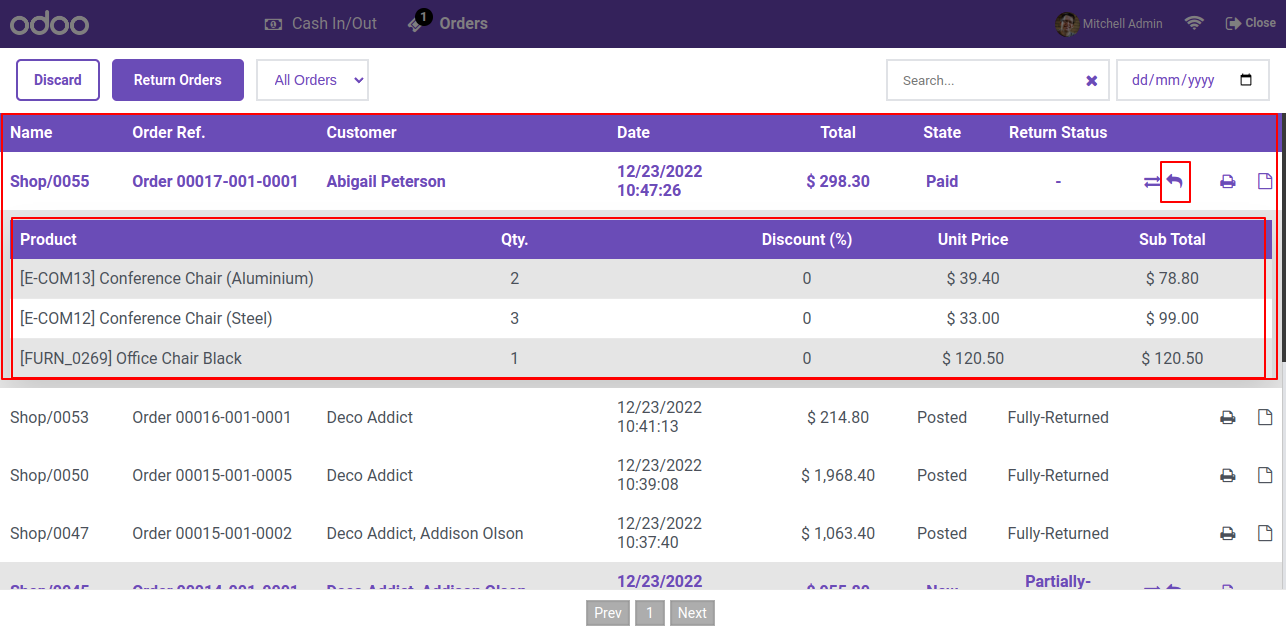
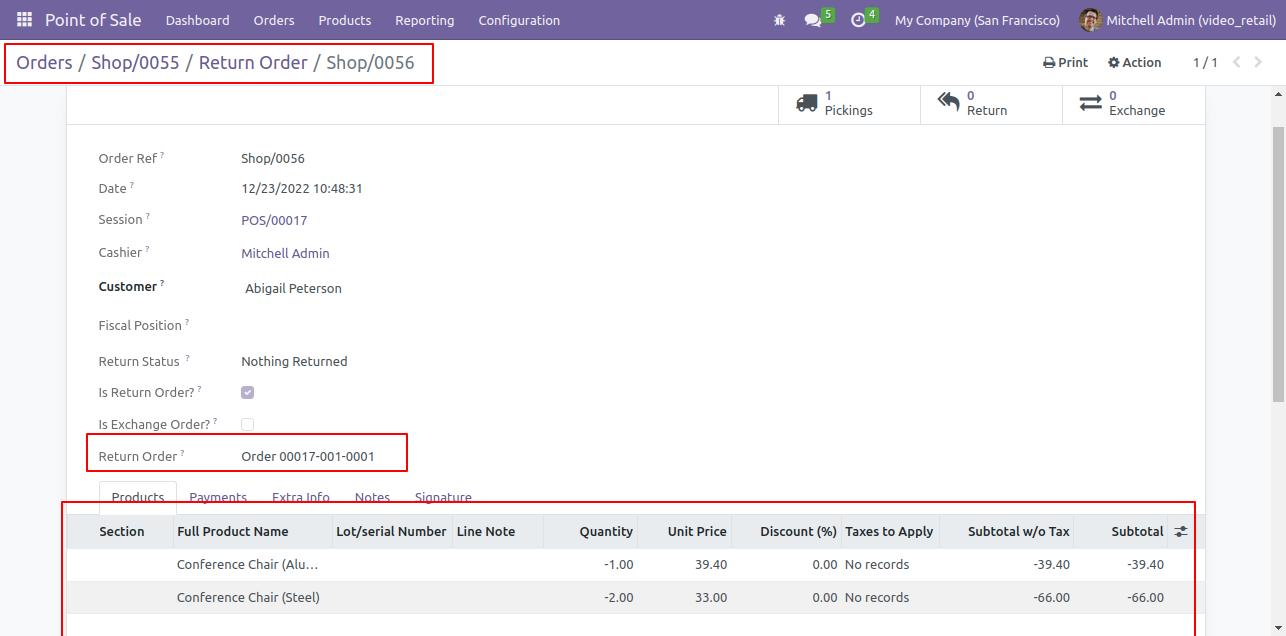
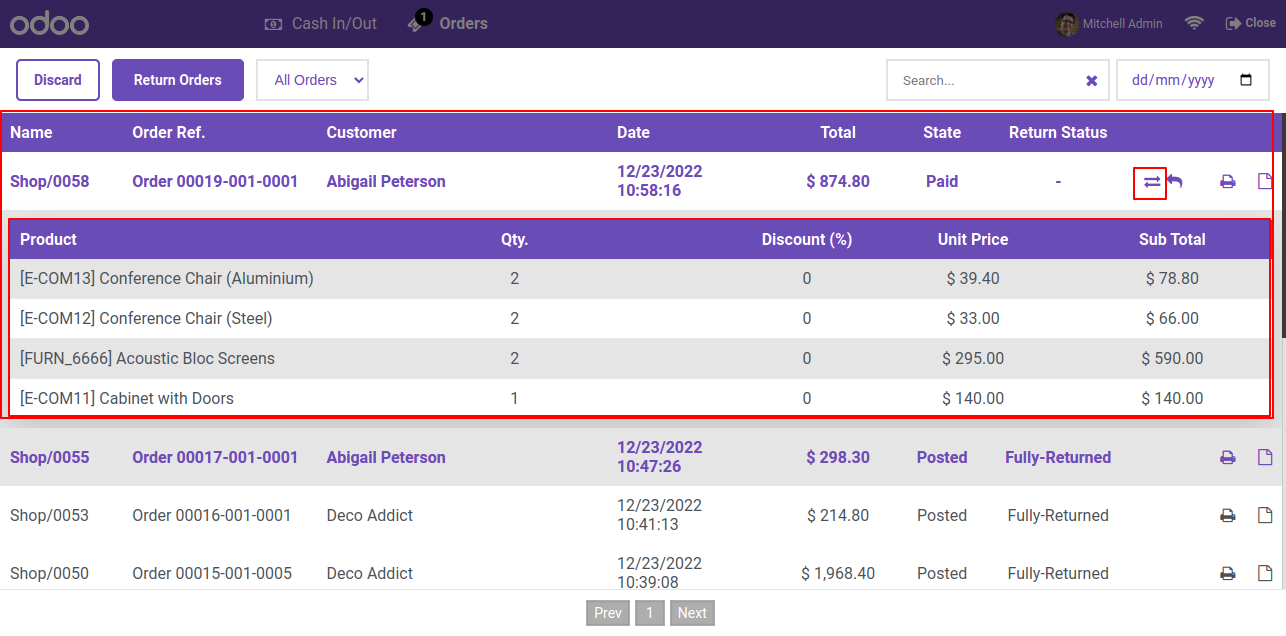
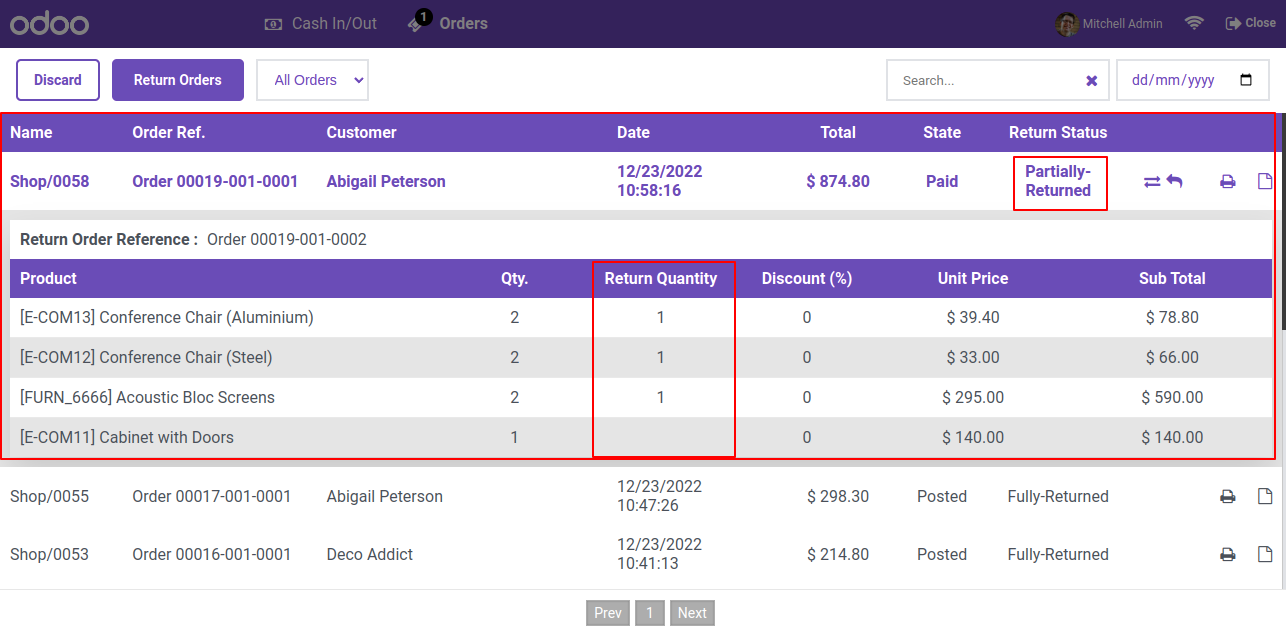
Trr view of the return order. You can also see the order details by clicking on that order.
Return order form view.
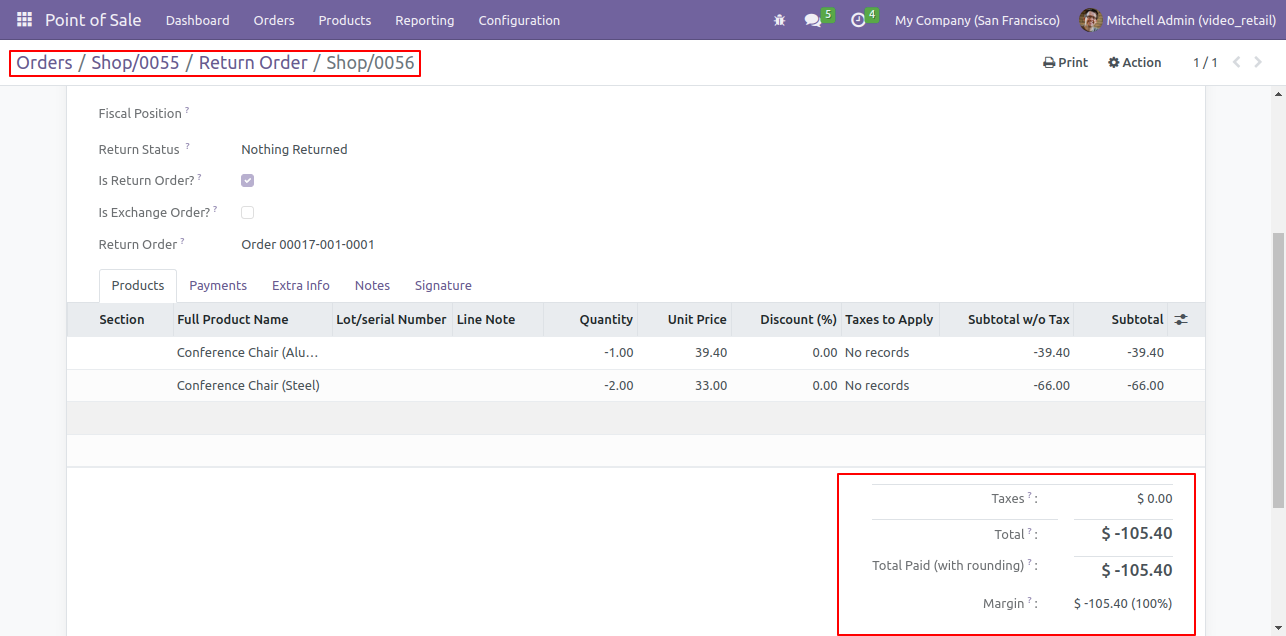
Here you can see the payment details.
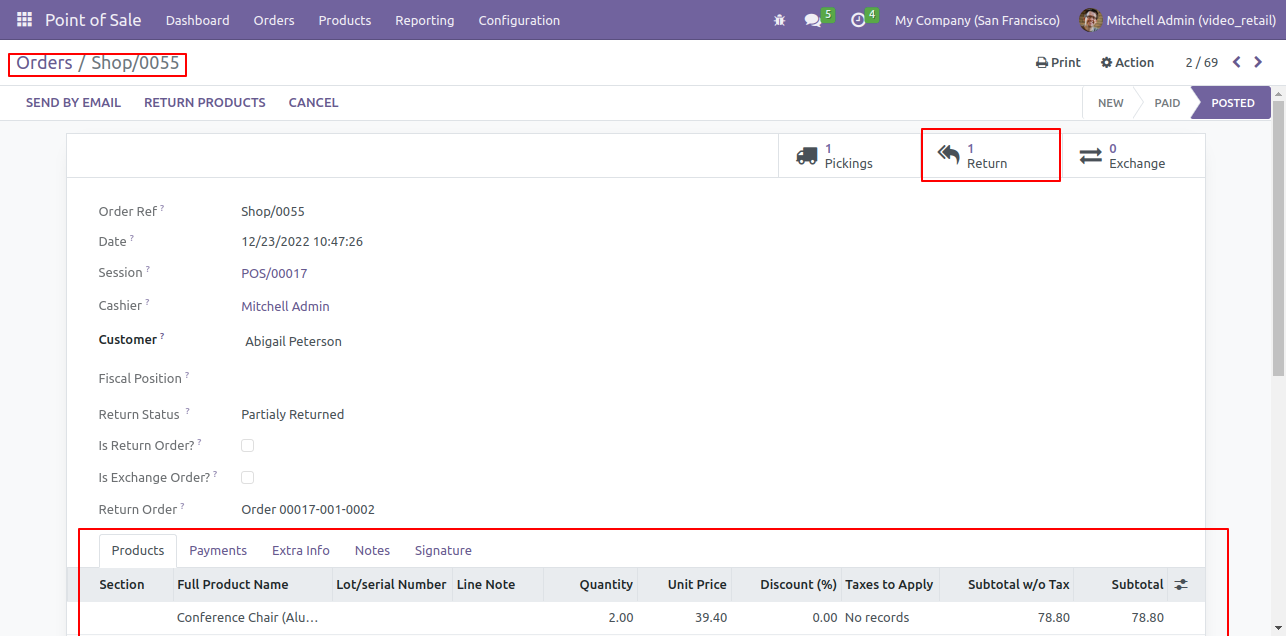
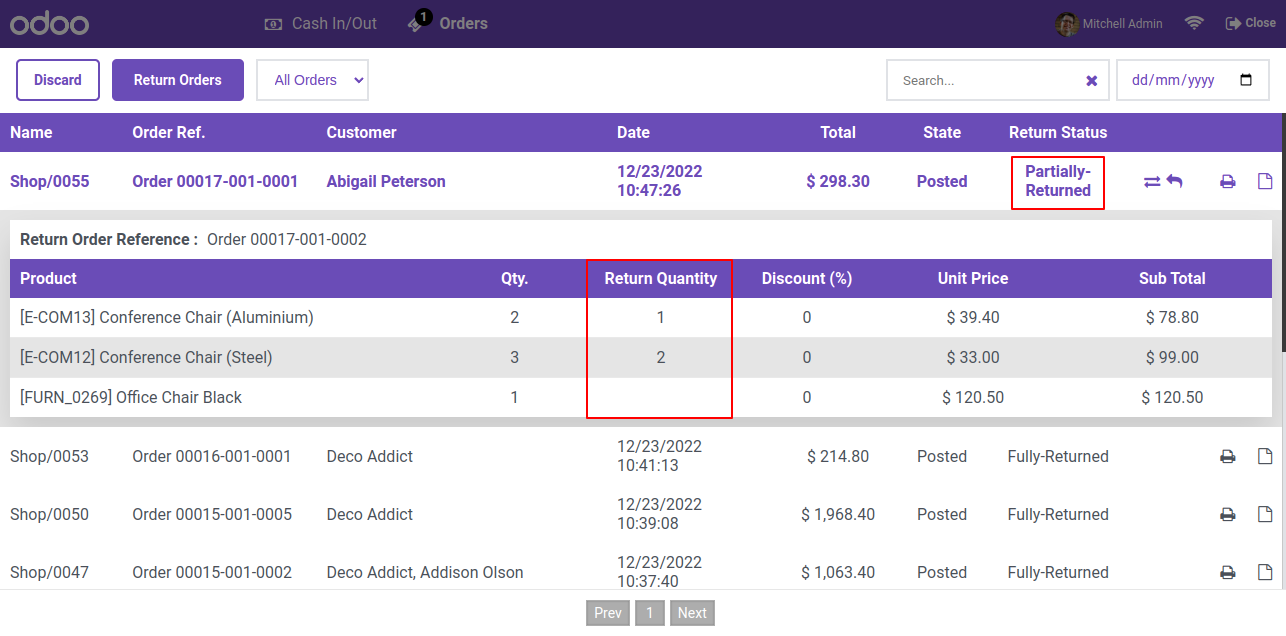
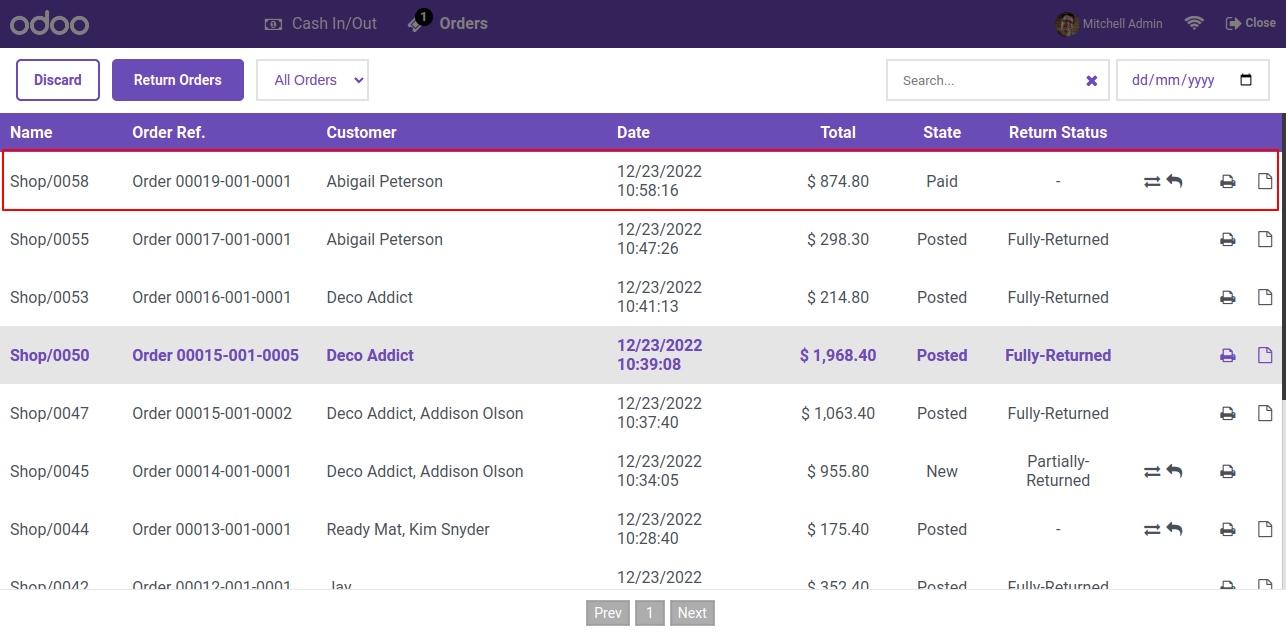
You can see the return order status is currently labeled as "Partially Returned," and the return quantity is also displayed.
To complete the return process, click on the 'Complete Return' button within the product Return wizard.
Select the payment method and make a payment.

The return order history can be visible within the receipt.
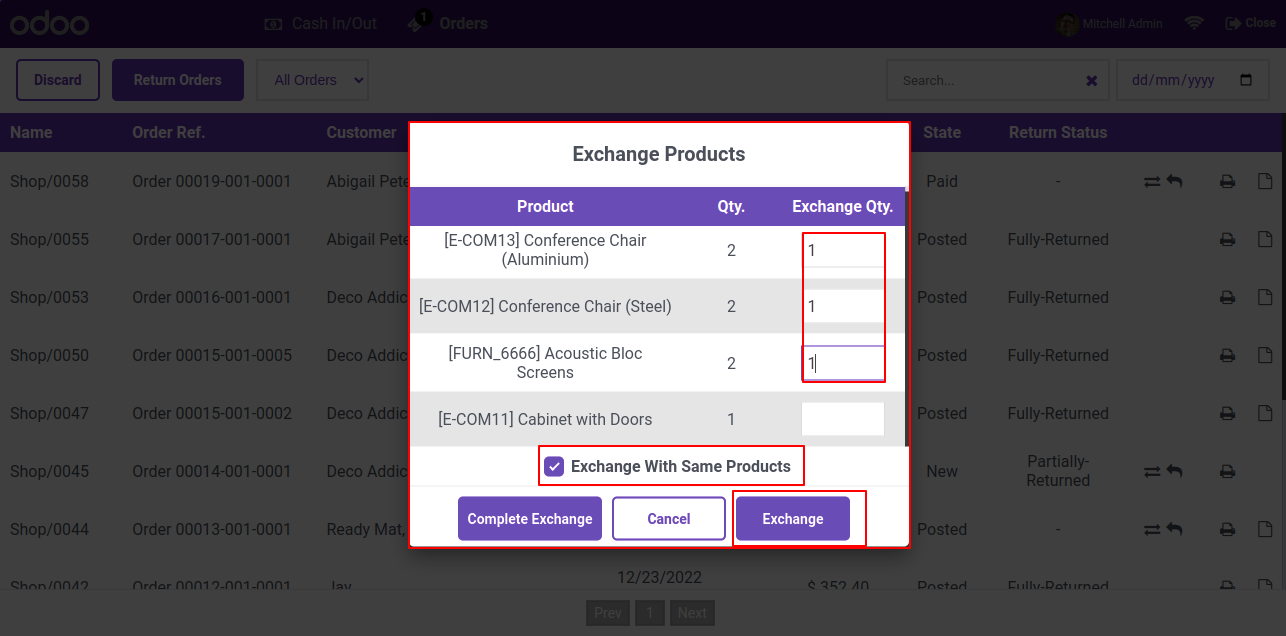
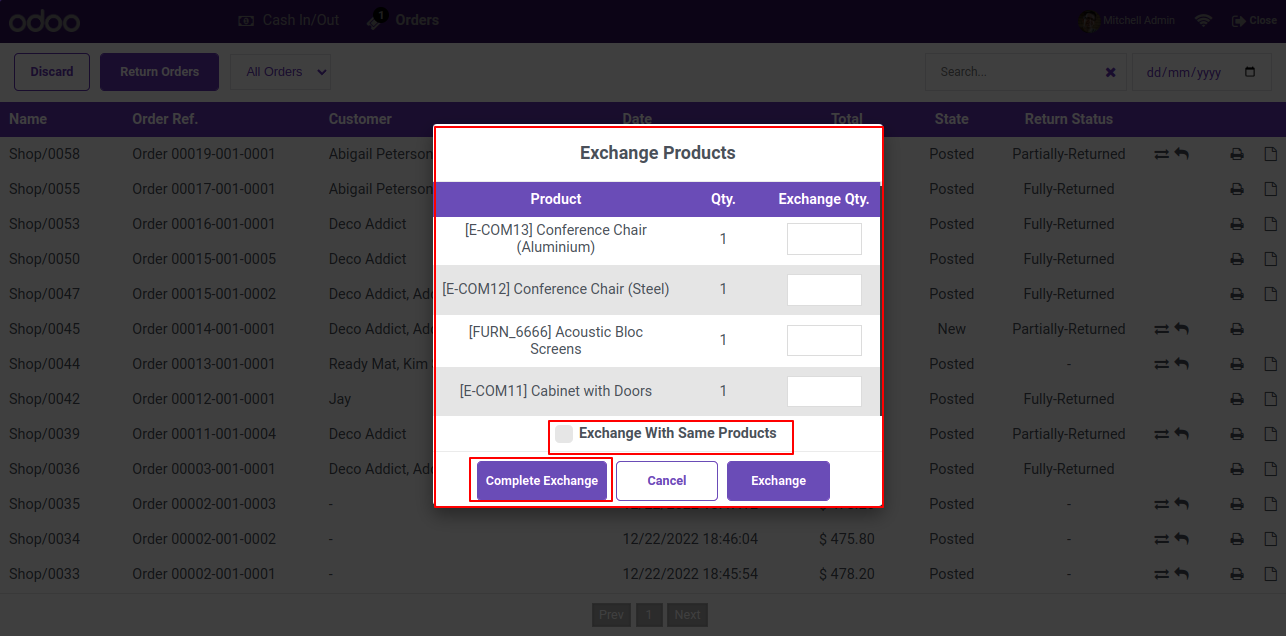
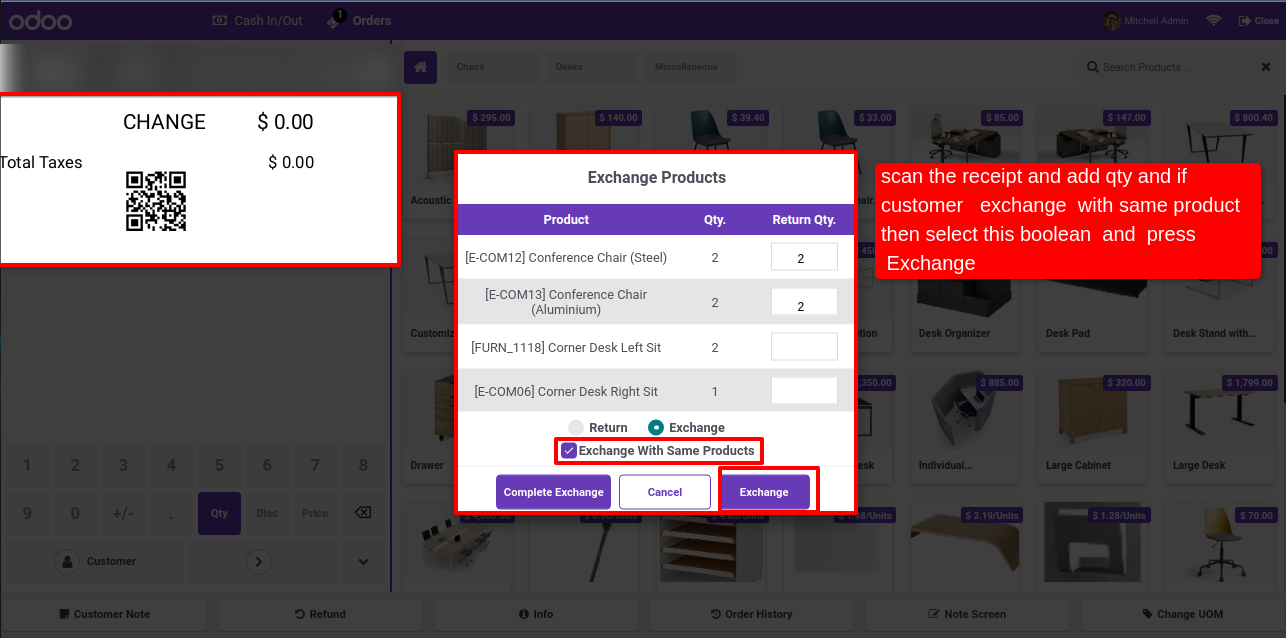
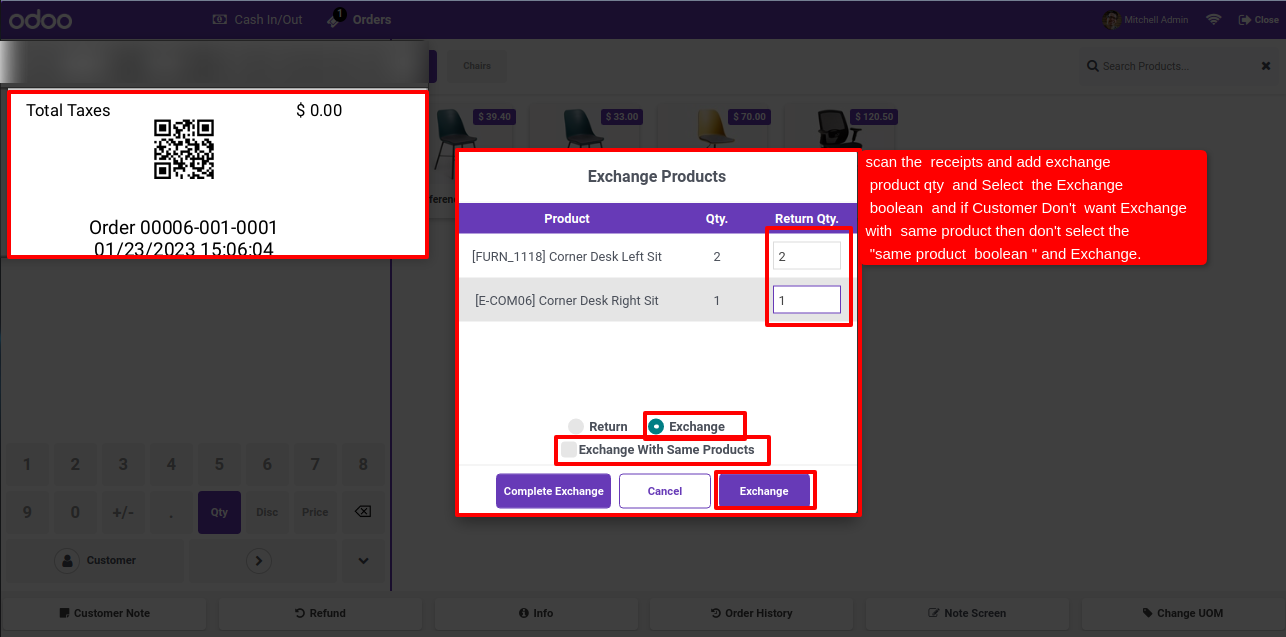
Tree view of the order history. To proceed with exchanging the product, click on the 'Exchange' button.
After that, exchange wizard will appear. You can exchange the specific product quantity and also exchange the whole order.
Enable the 'Exchange will same product' option and click on the 'Exchange' button.
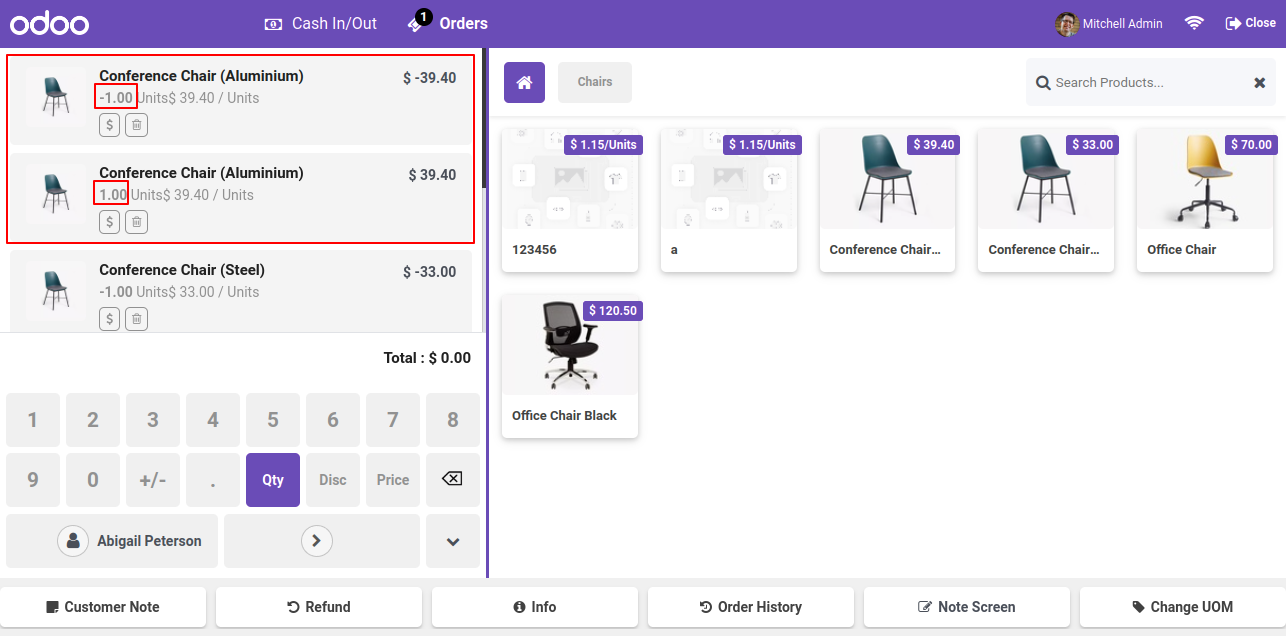
Make exchange order and proceed it. If you want to exchange with same products just tick 'Exchange With Same Product'.
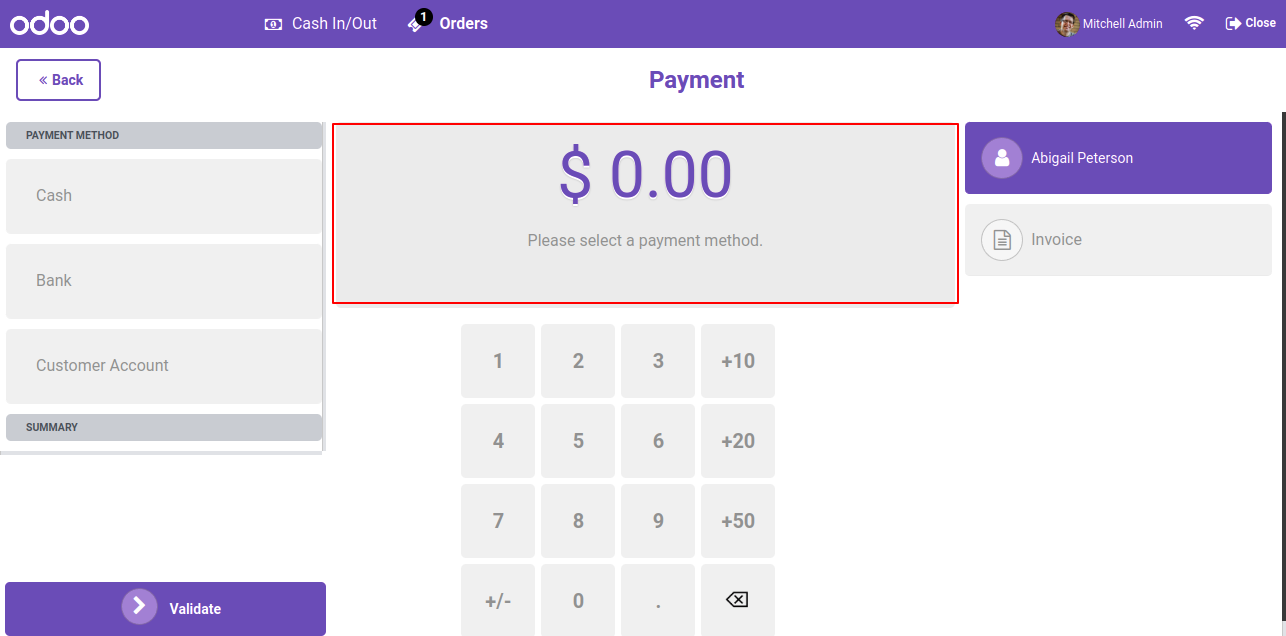
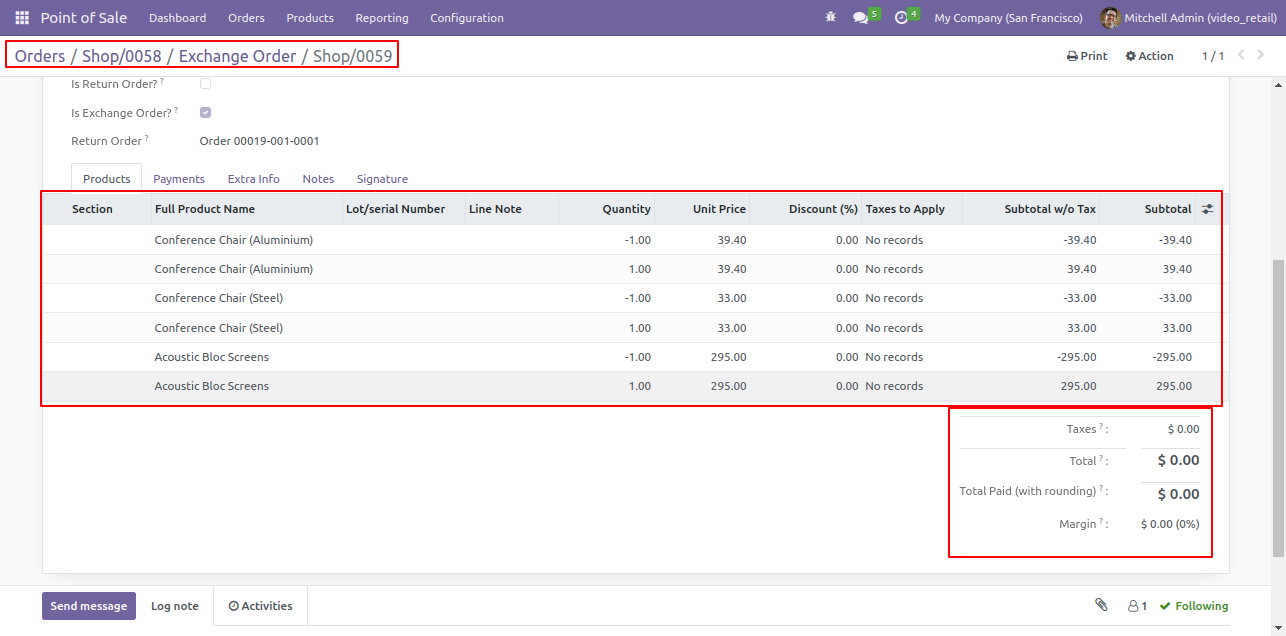
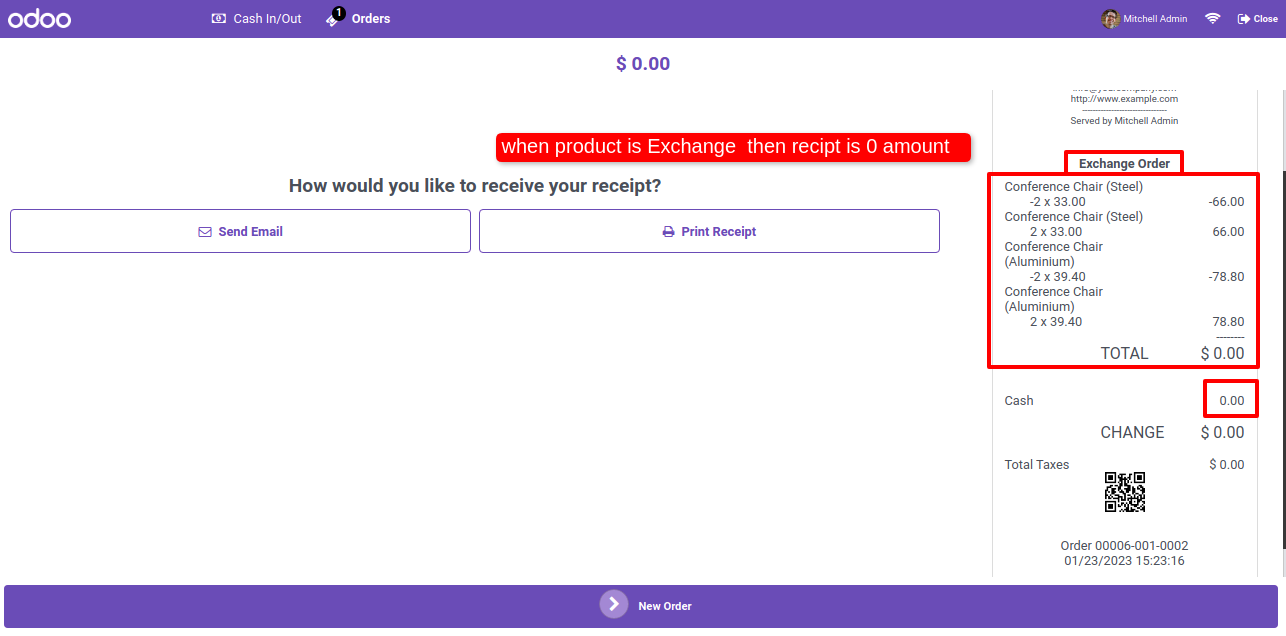
Here, you can see the payment value is zero.
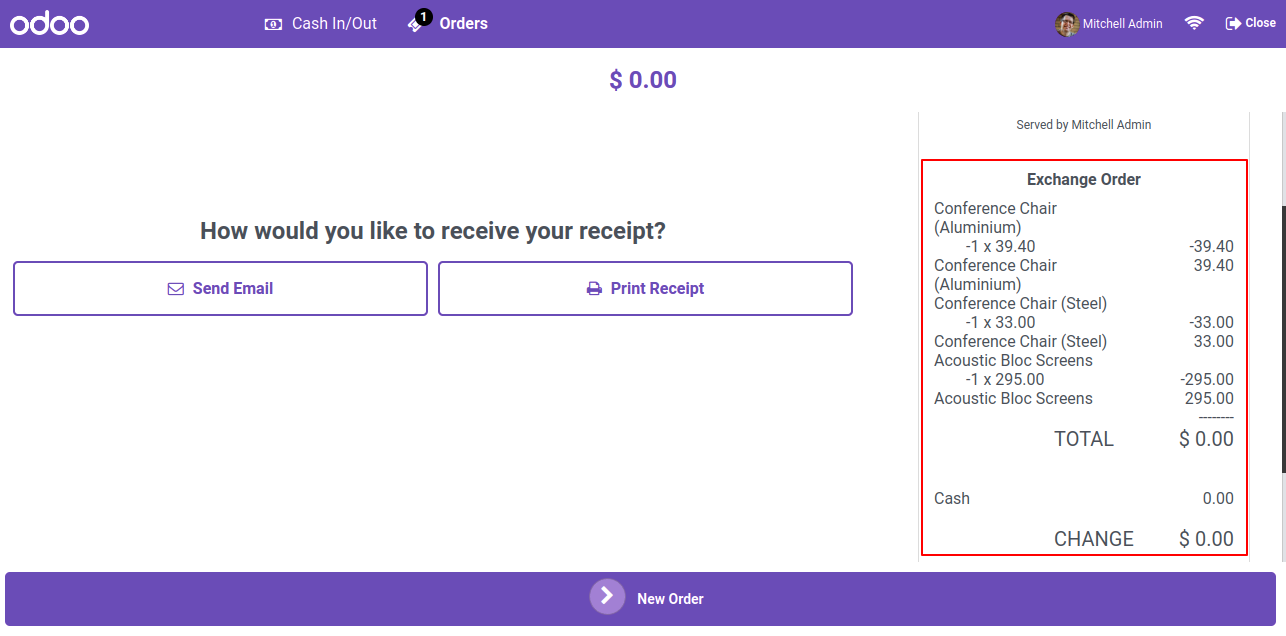
The exchange order history will be displayed in receipt.
The exchange order details is displayed in receipt.
You can see the exchange order status is currently labeled as "Partially Returned," and the return quantity is also displayed.
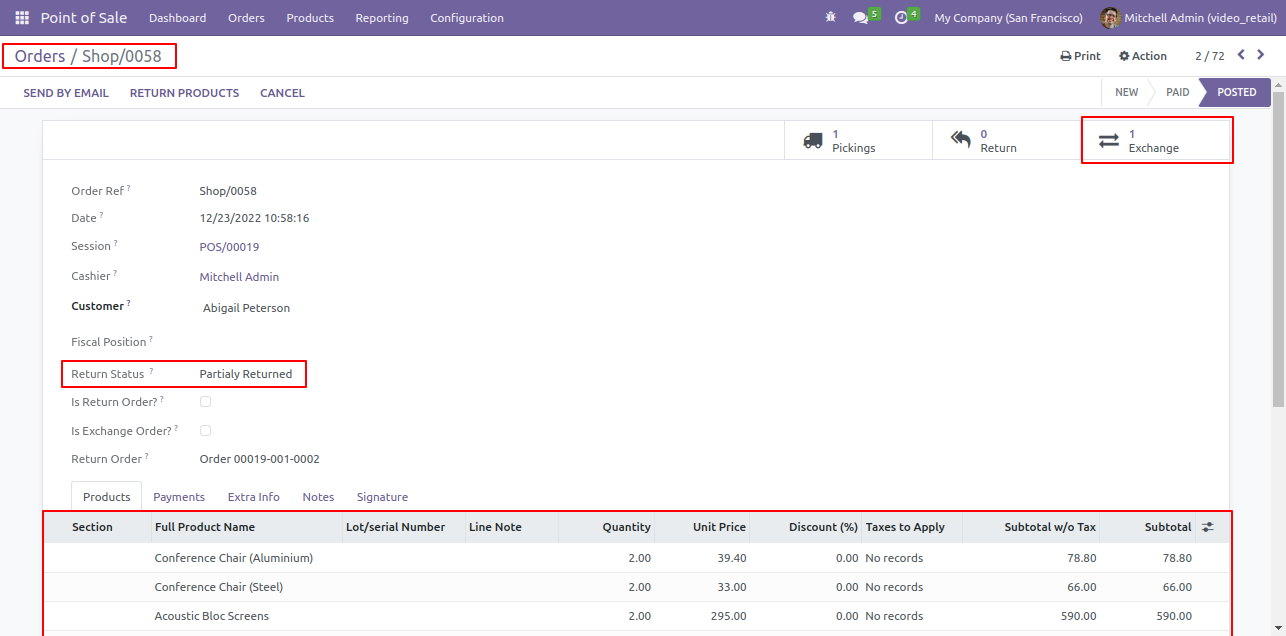
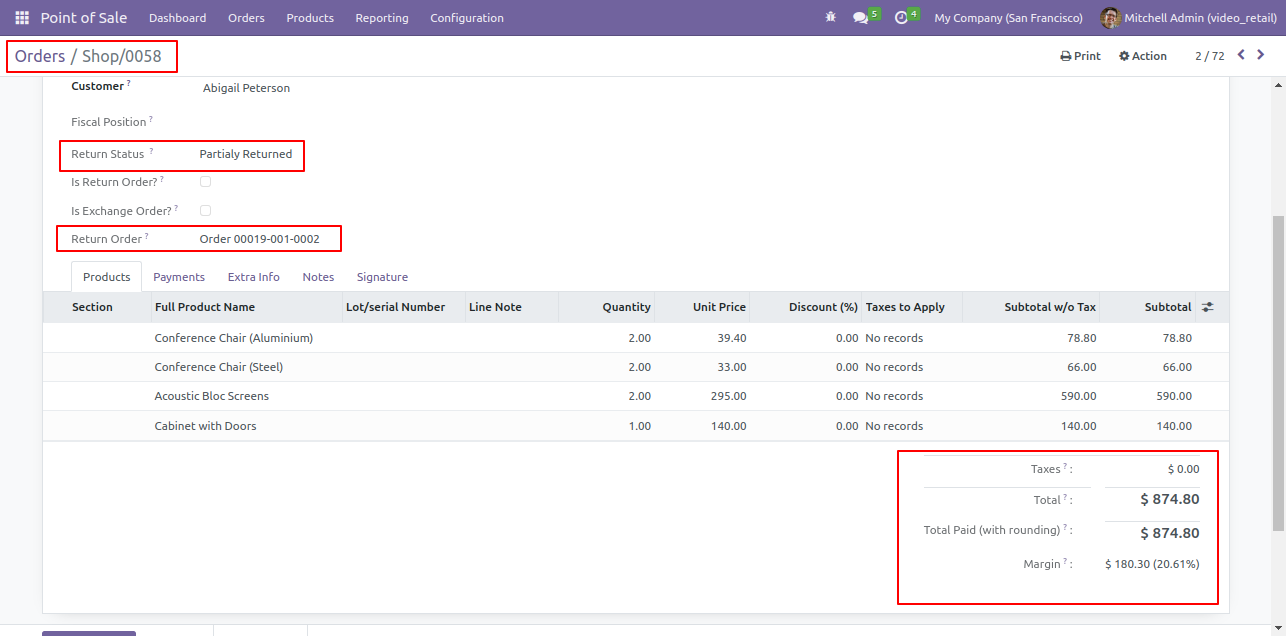
In backend pos order form view, Here you can see the order details first thing first,
if you exchange products means you have to return some products, so here it will create return order.
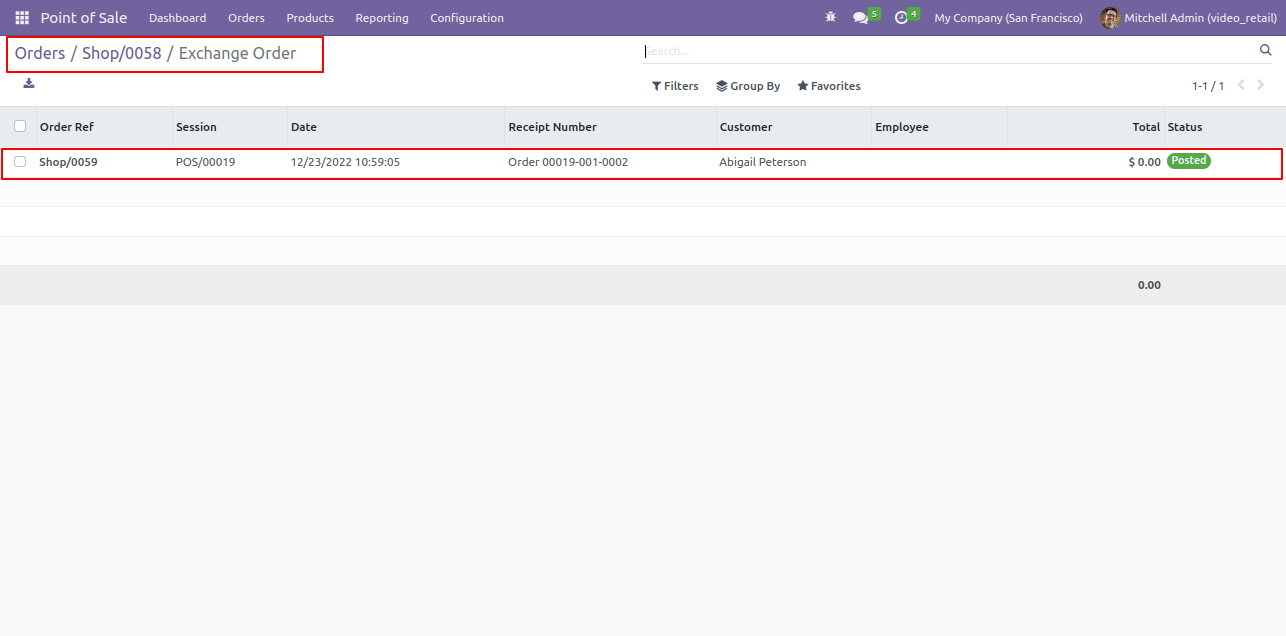
Here you can see the payment details. Now click on 'Exchange' smart button, it will redirect you to exchange order.
Exchange Order list view.
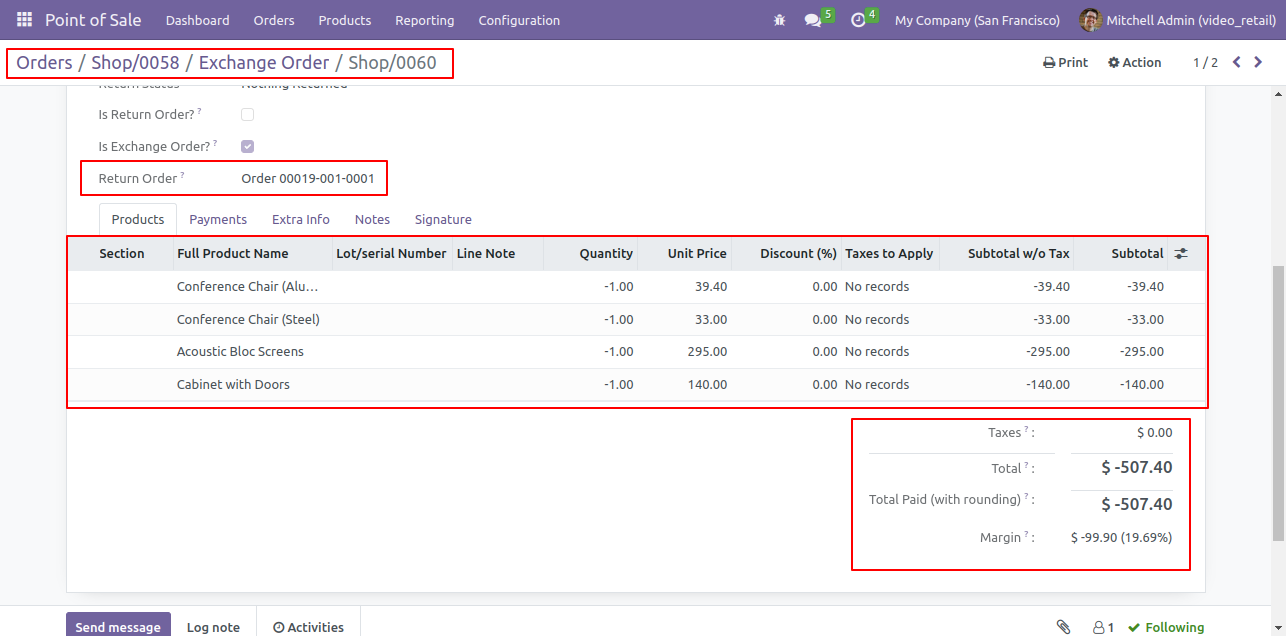
Exchange Order form view, here you can see the 'Is Exchange Order' true, 'Return Order' Reference number.
In Product line you can see which product you exchange.
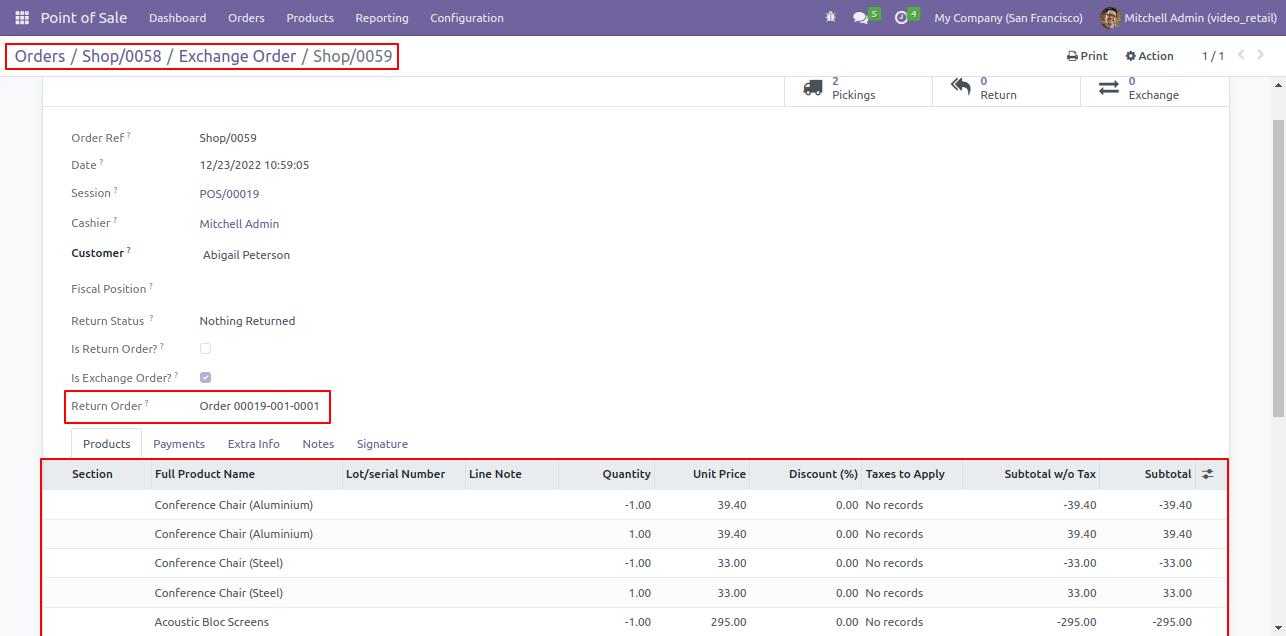
Here you can see the payment details.
Click on 'Return Order', Here you can see the exchange order history.
In PoS 'Return Order' you can see the details of exchange order with 'Return Order Reference' number.
Now click on the exchange icon.

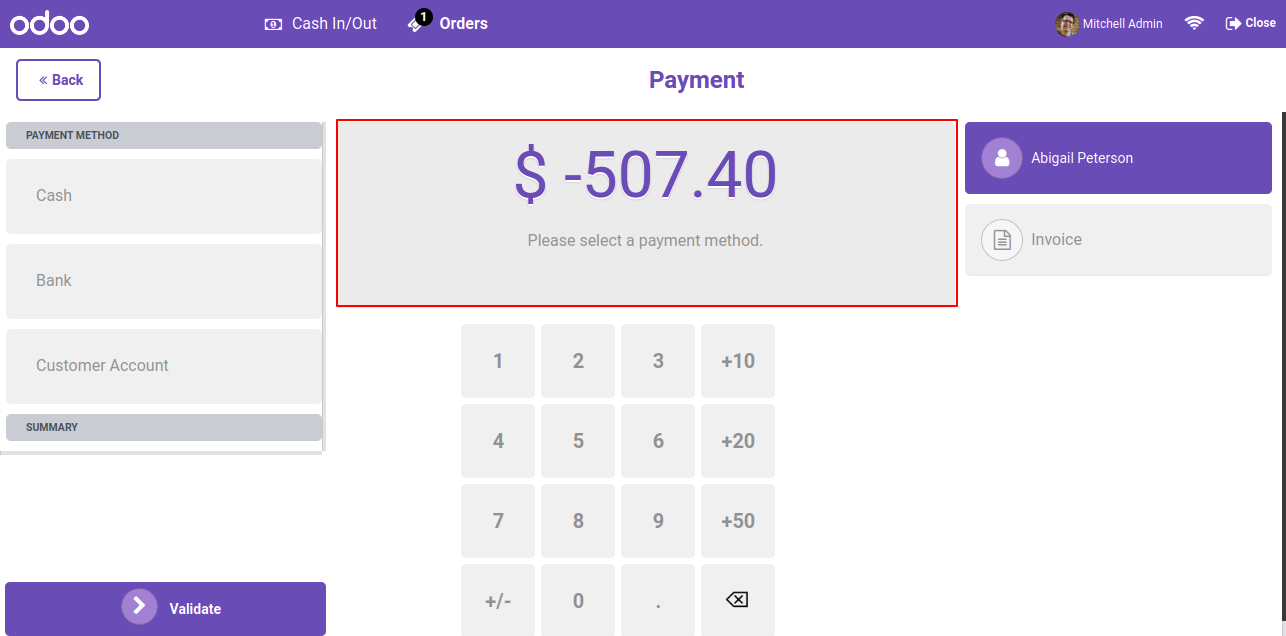
Make exchange order and proceed it. Untick 'Exchange with same order' option.
After click on 'Exchange' it will redirect to shop page, Here you can see the added quantity of exchange.
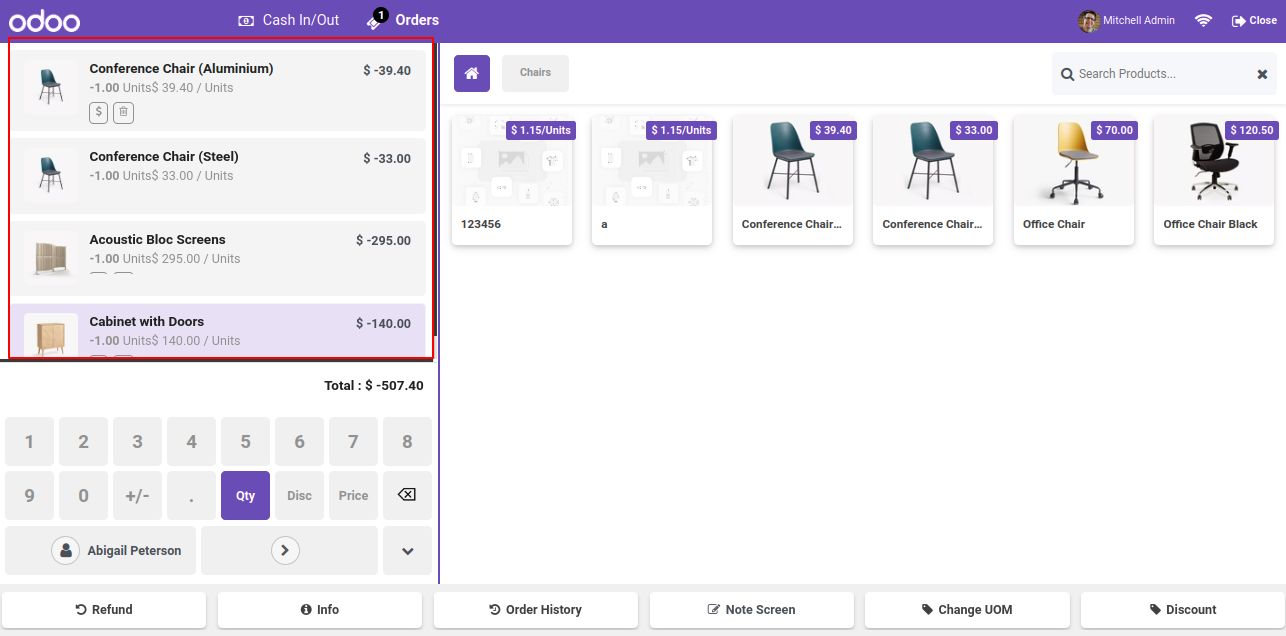
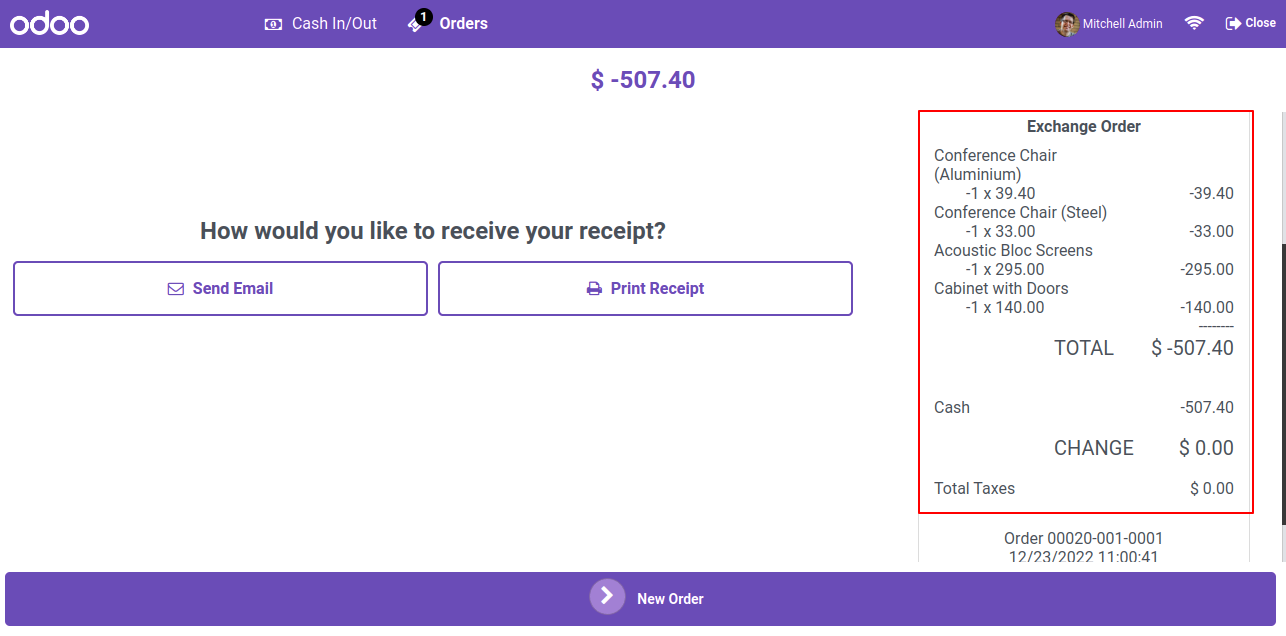
Payment view.
As you can see the details of Exchange order on order receipts.
In backend pos order form view, Here you can see the order details first thing first, if you exchange products means you have to return some products, so here it will create return order.
Now click on 'Exchange' smart button, it will redirect you to exchange order.
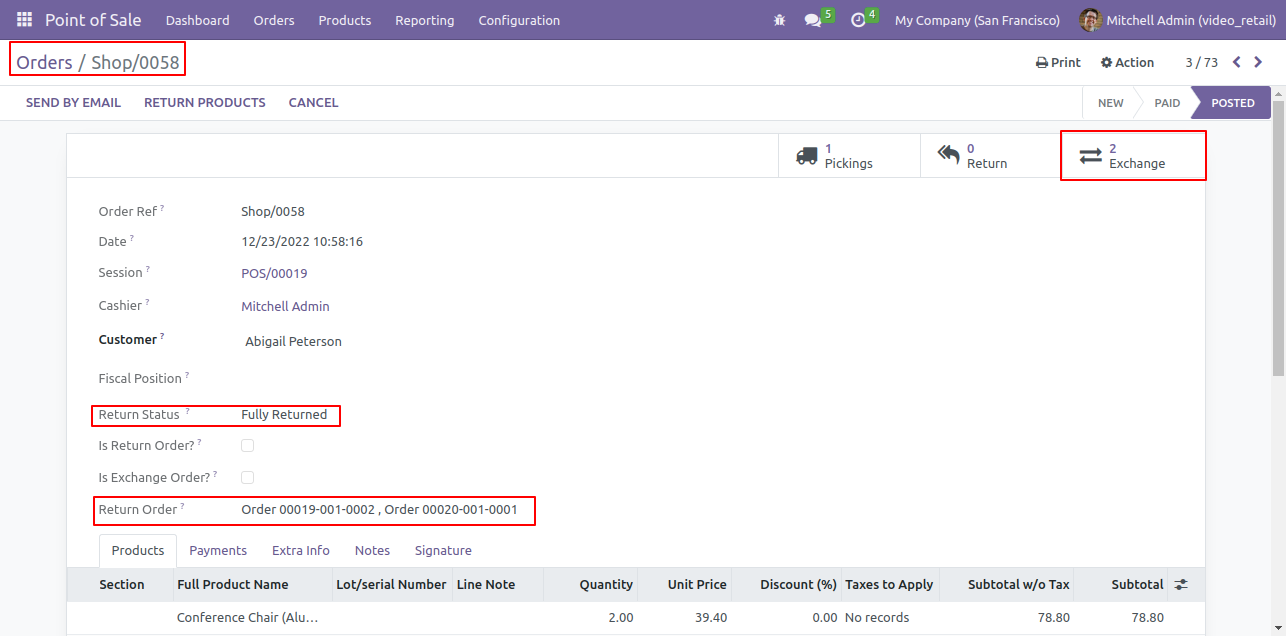
Exchange Order list view.

Exchange Order form view, here you can see the 'Is Exchange Order' true, 'Return Order' reference number. In Product line you can see which product you exchange.
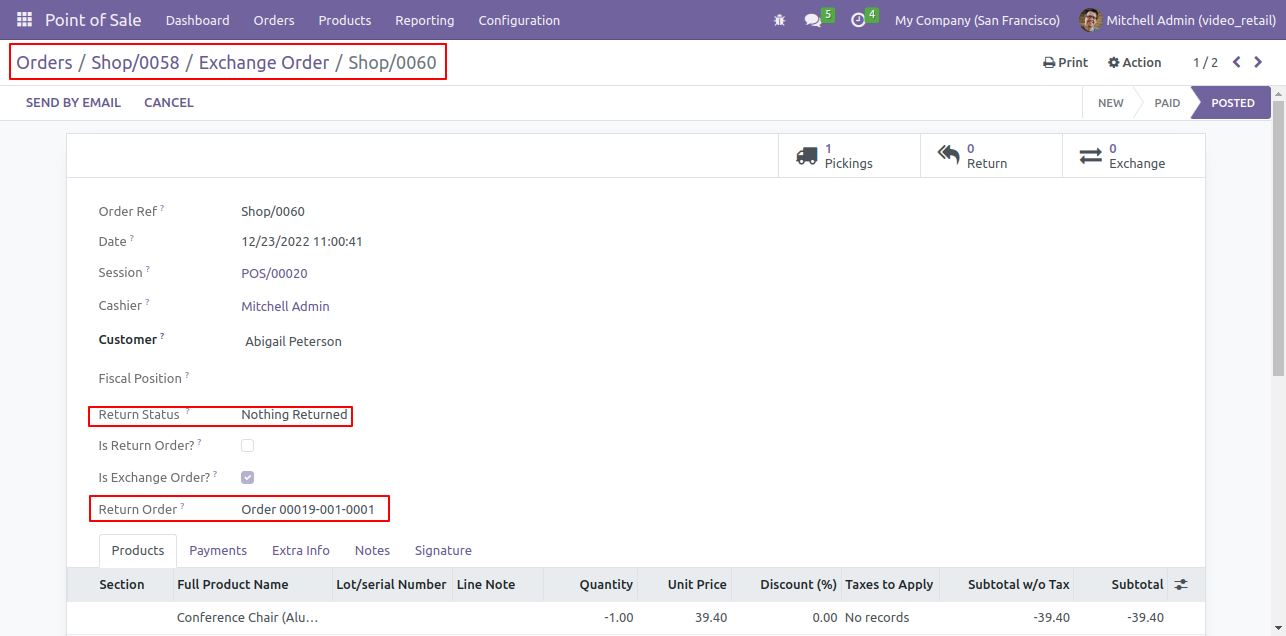
Here you can see the payment details.
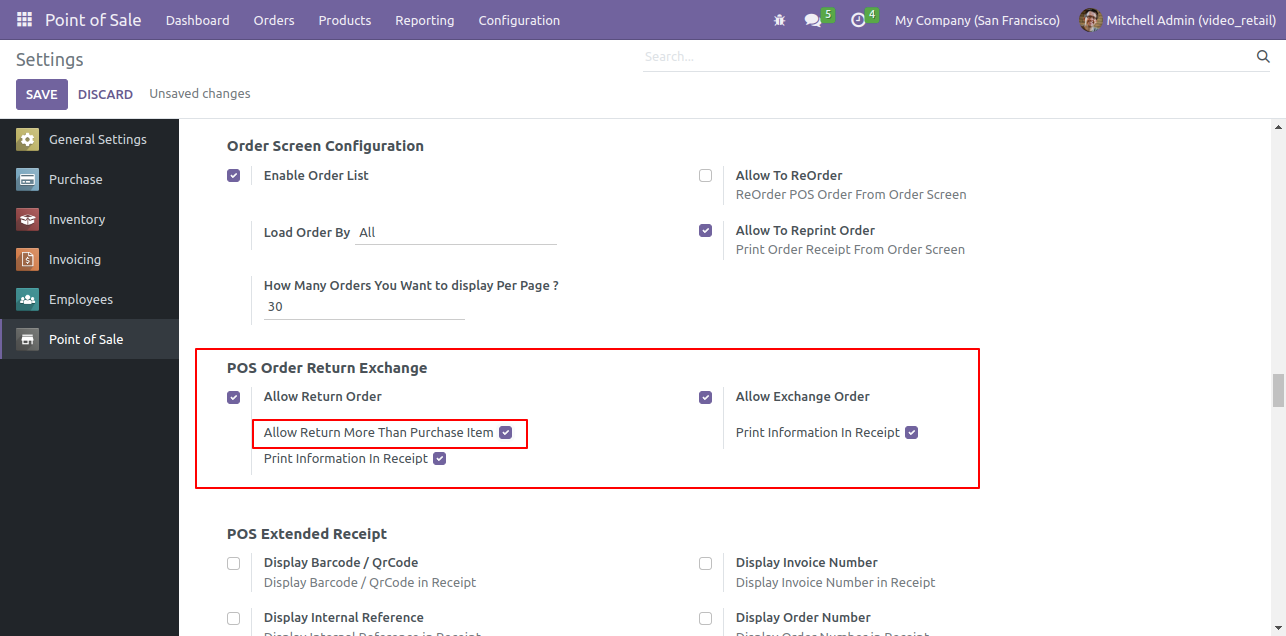
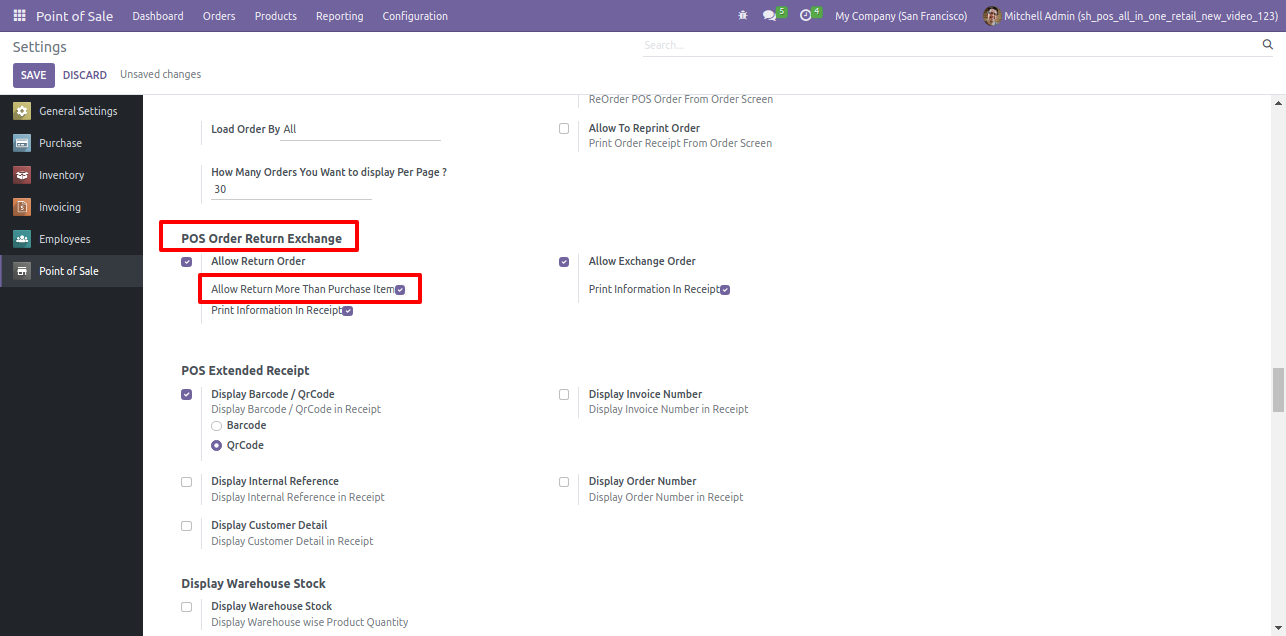
Goto pos setting and enable 'Allow return more then purchase item'.
Receipt view.

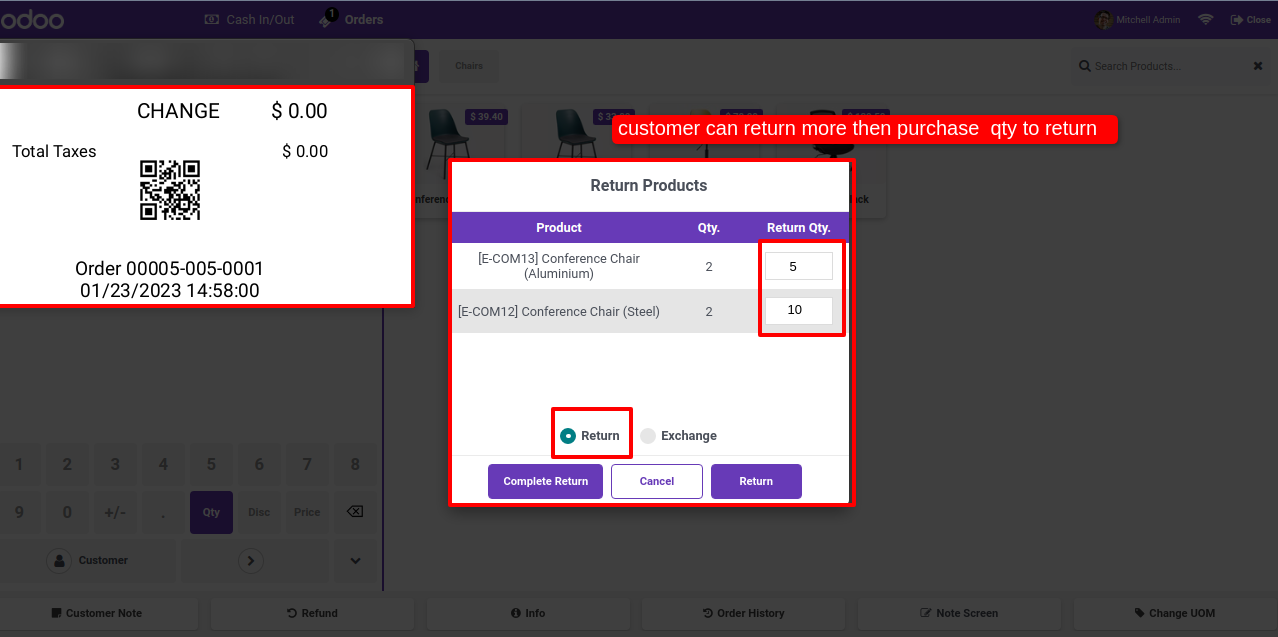
Click on 'Return Order' then you can see the order qty. Now click on the return icon.
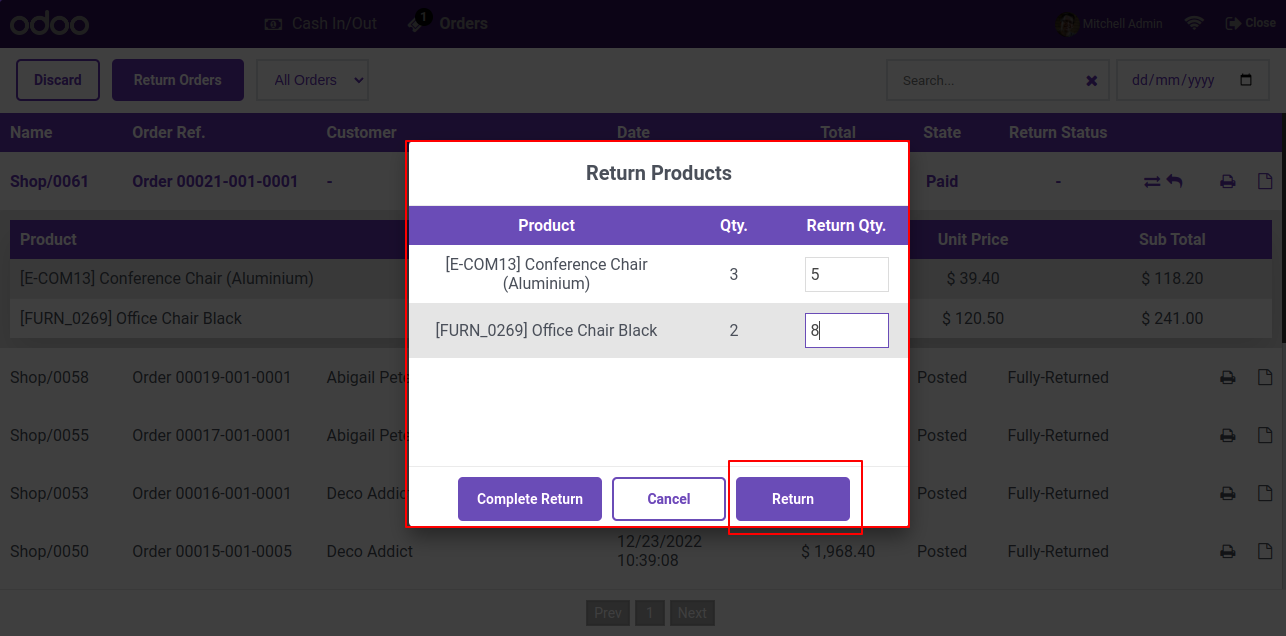
Make return order. Add the return qty more then the purchase qty and proceed it.
Payment view.
As you can see the details of return order on order receipts.
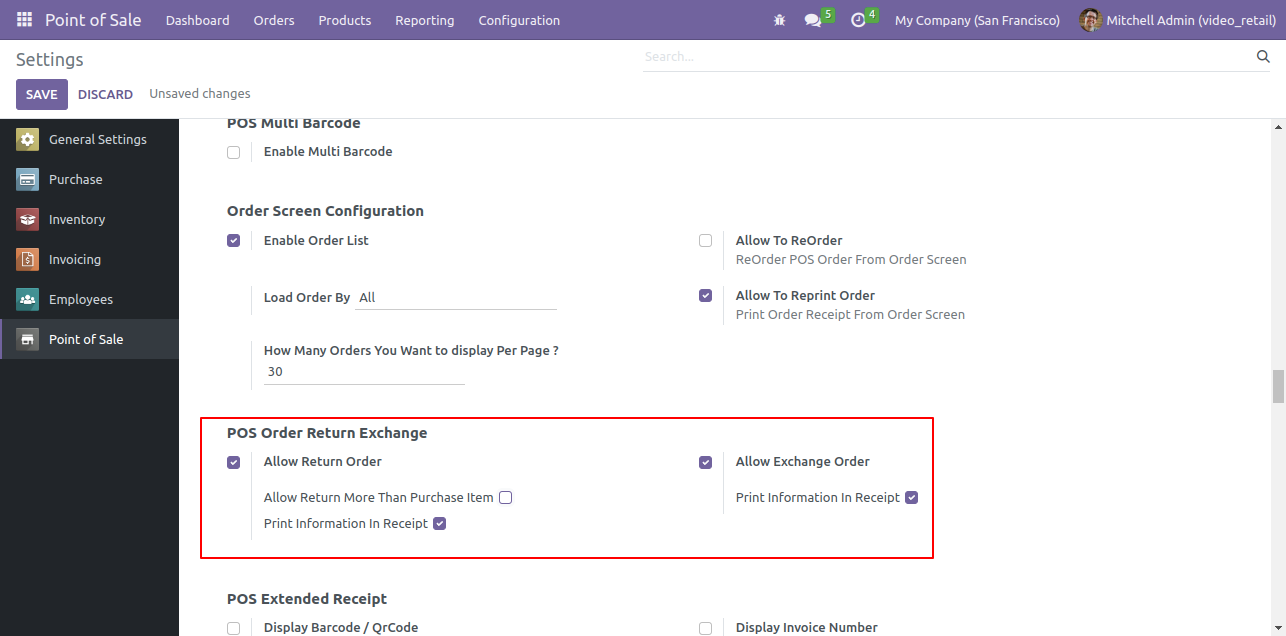
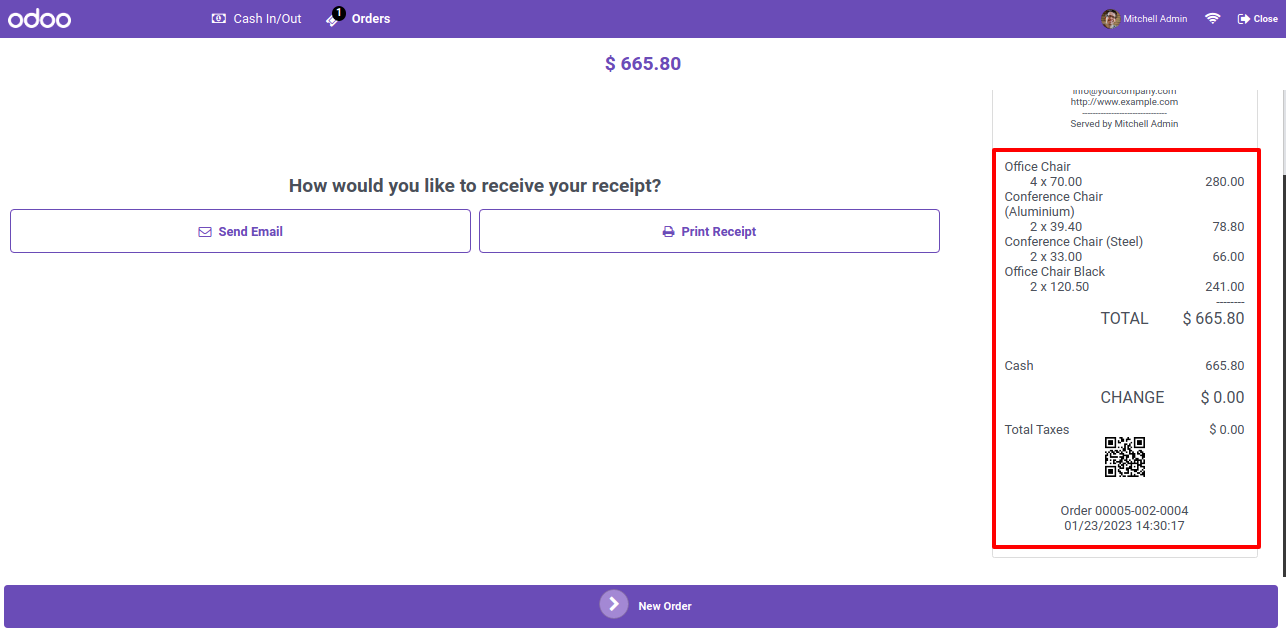
Goto pos setting ==> Enable 'Allow return order' option. Also tick the print information in receipt option.
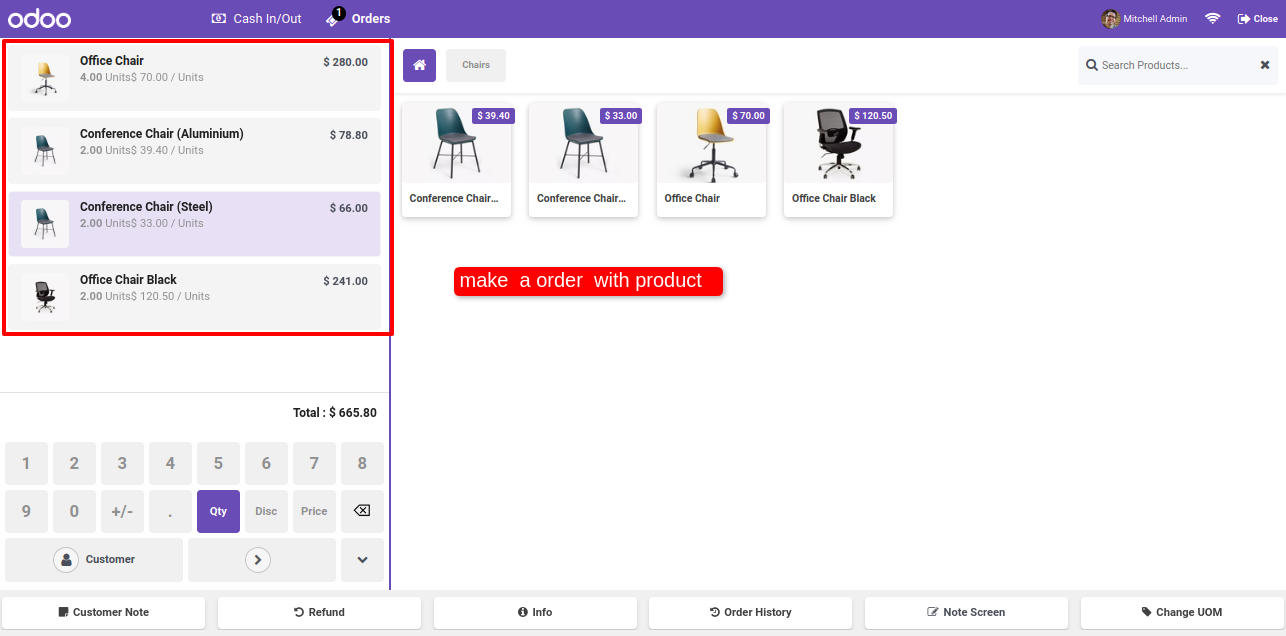
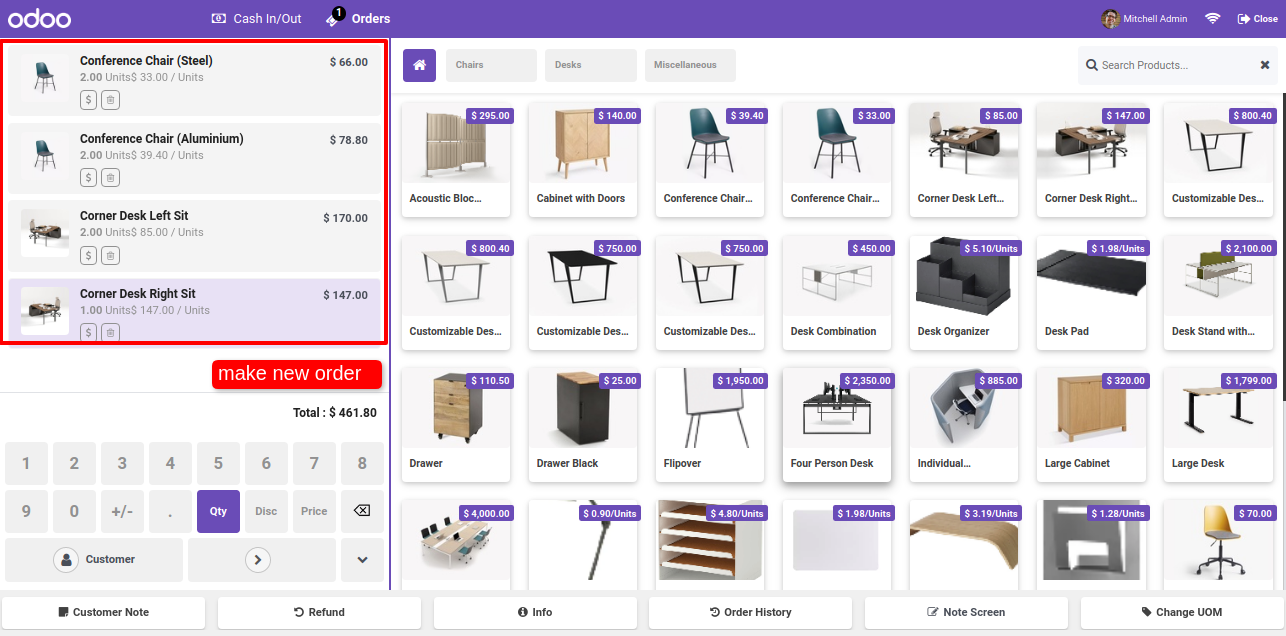
Make a order with product.
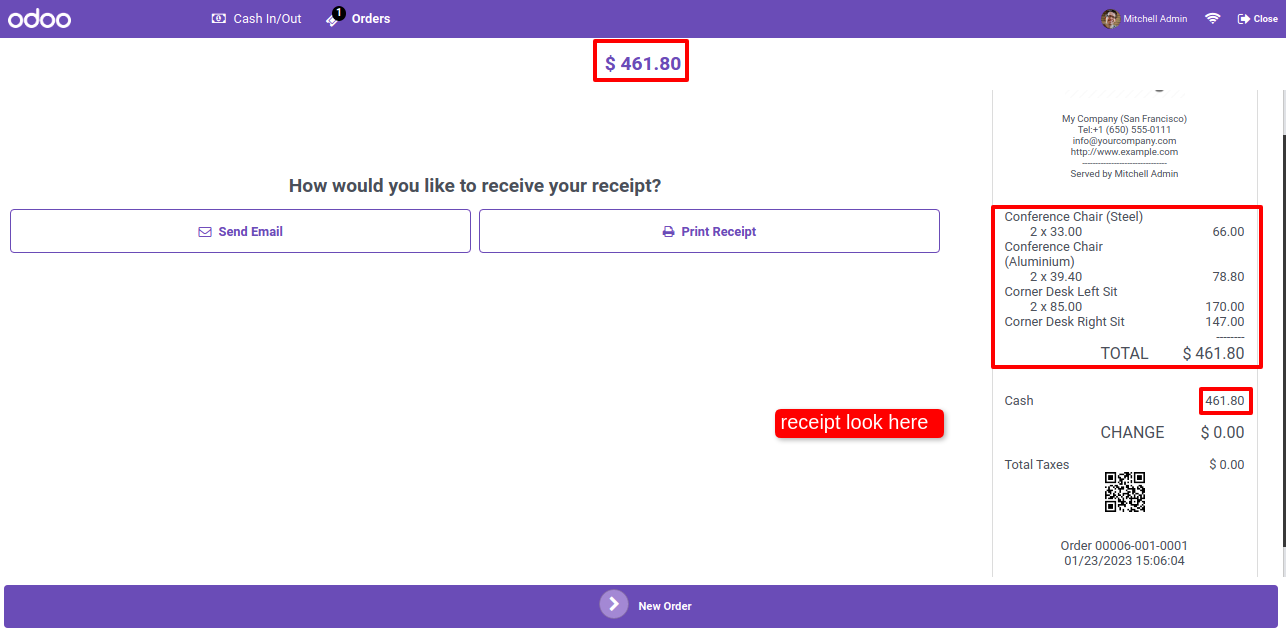
In the receipt you can see the order history.
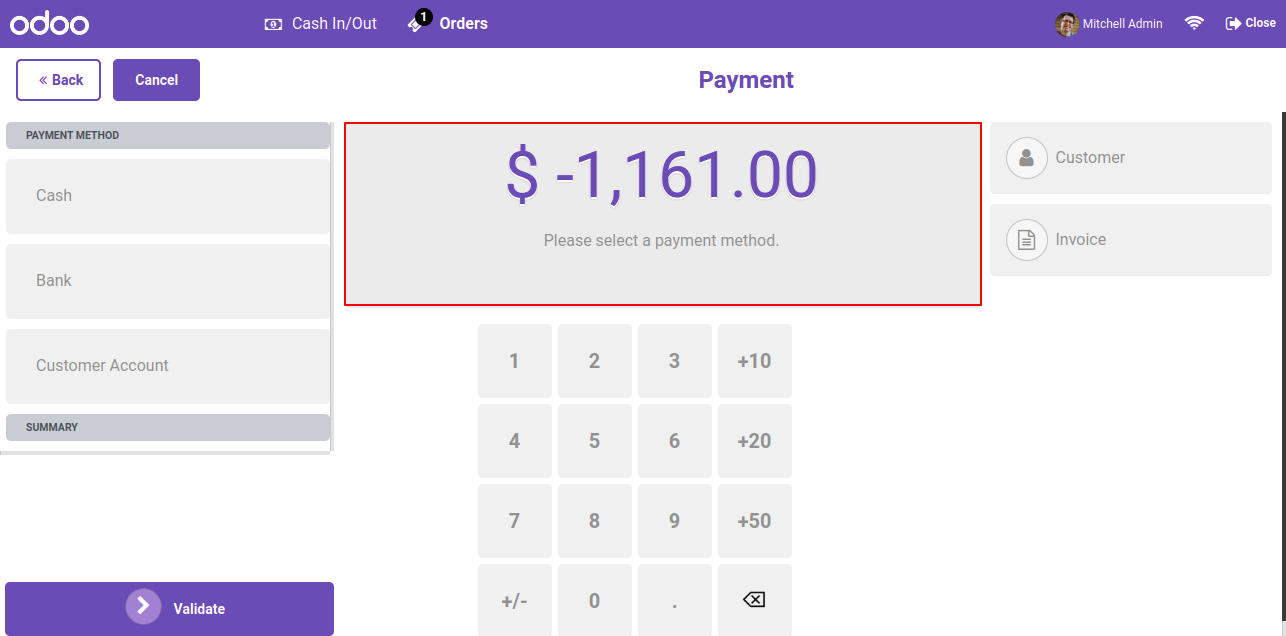
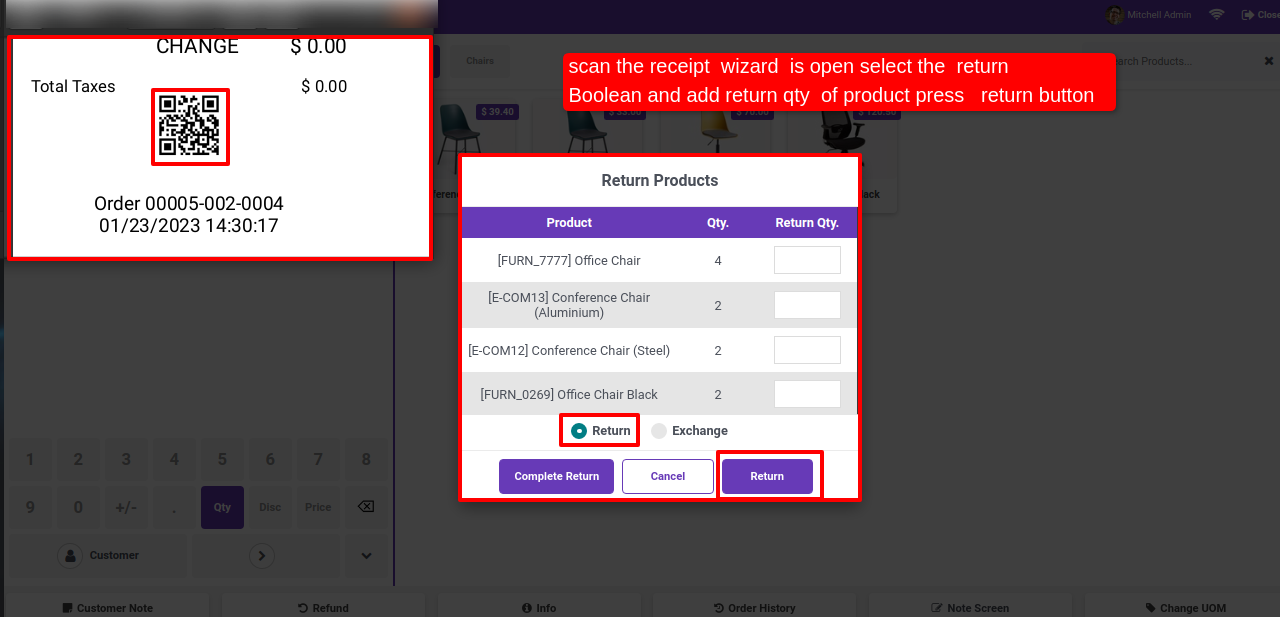
Now we scan the barcode, so this return - exchange popup opens.
Select the return option and add return qty of products and press return button.
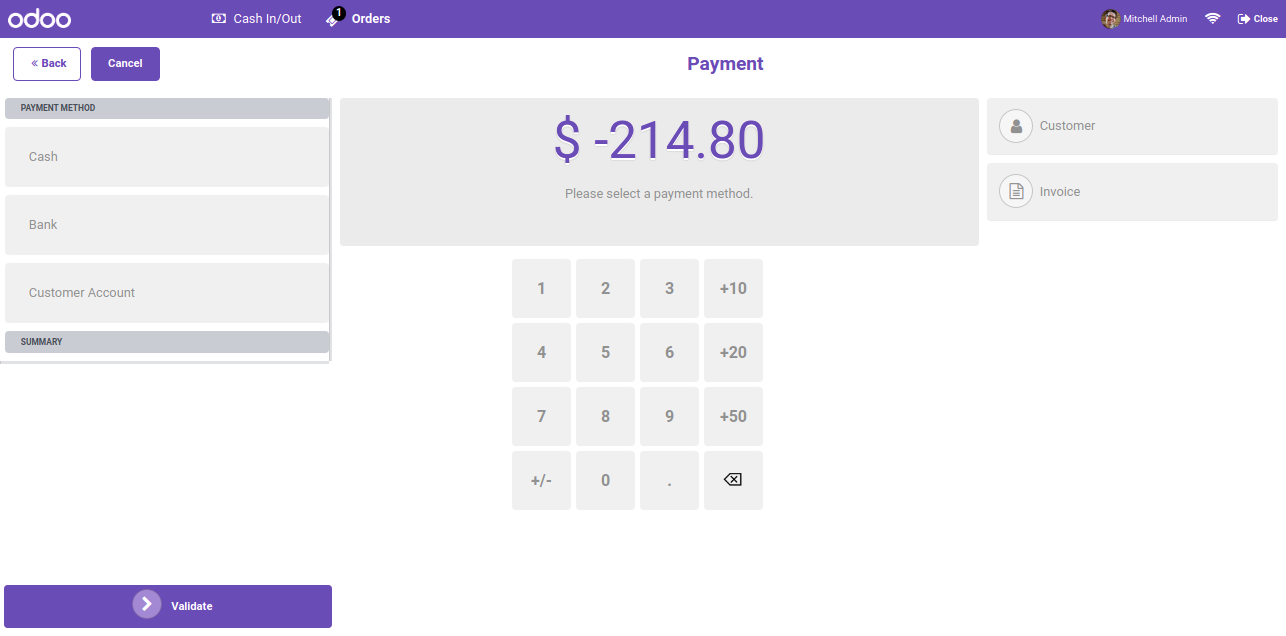
After clicking on the return button you will redirect to the payment page. To validate the payment, Click on the validate button.
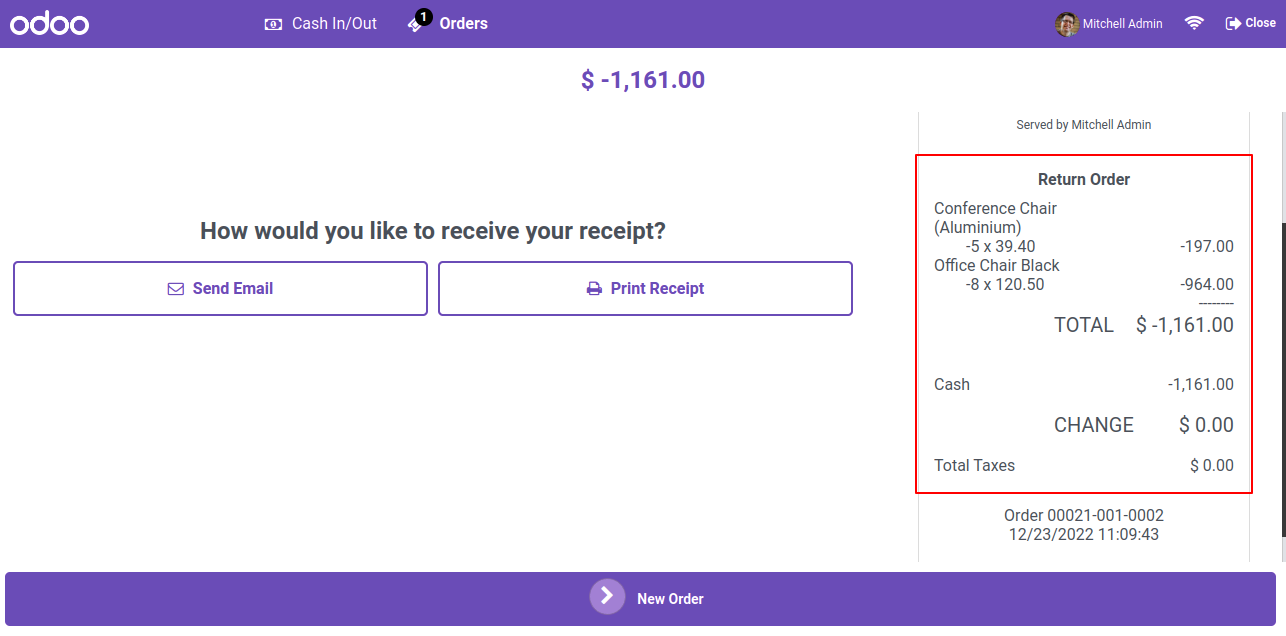
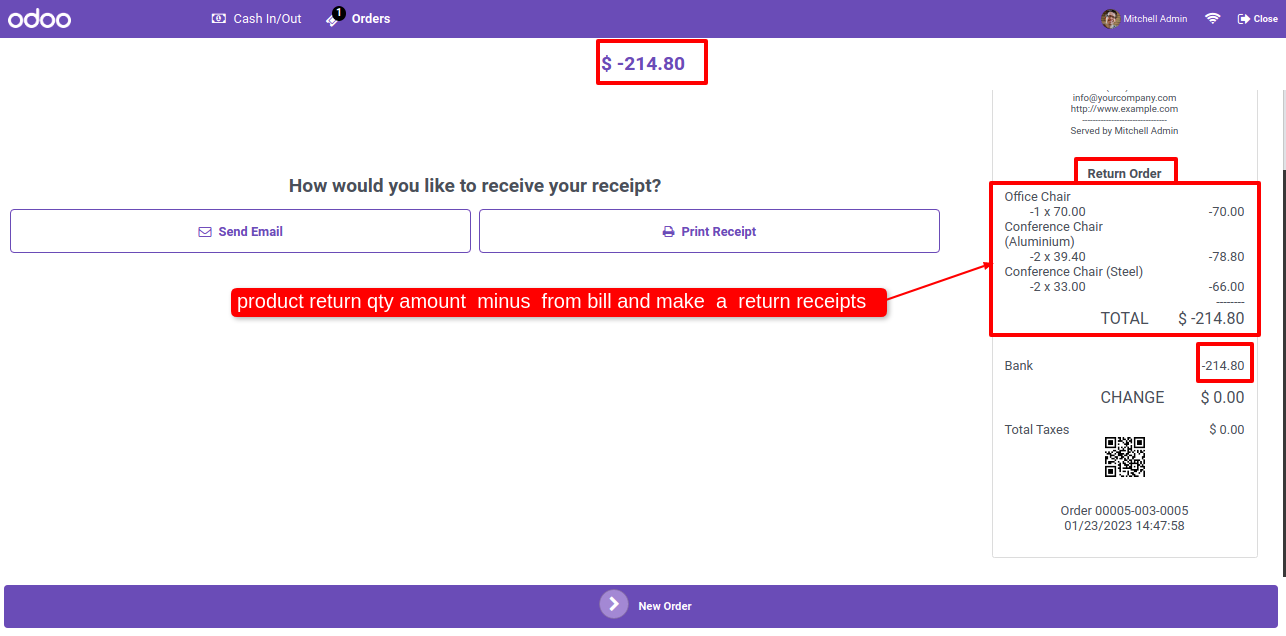
Here, you can see that the amount of the quantity of returned products as a minus value on the bill and make a return receipt.
If customer wants a complete return scan the barcode again and click on complete return button.
After clicking on the return button you will redirect to the payment page. To validate the payment, Click on the validate button.

Here, you can see the return order history.
The amount of the quantity of returned products as a minus value on the bill and make a return receipt.
Goto pos setting and enable 'Allow return more then purchase item'.
Now we scan the barcode, so this return - exchange popup opens.
Select the return option and add return qty more then the purchase qty and press return button.
Here, you can see the return order history. The amount of the quantity of returned products as a minus value on the bill and make a return receipt.
Goto pos setting ==> Enable 'Allow exchabge order' option.
Make a new order.
The purchase order receipt looks like below.
Now we scan the barcode, so this return - exchange popup opens. Select the exchange option and add exchange qty of products and press exchange button.
If you want to exchange with same products just select the 'Exchange With Same Product' boolean.
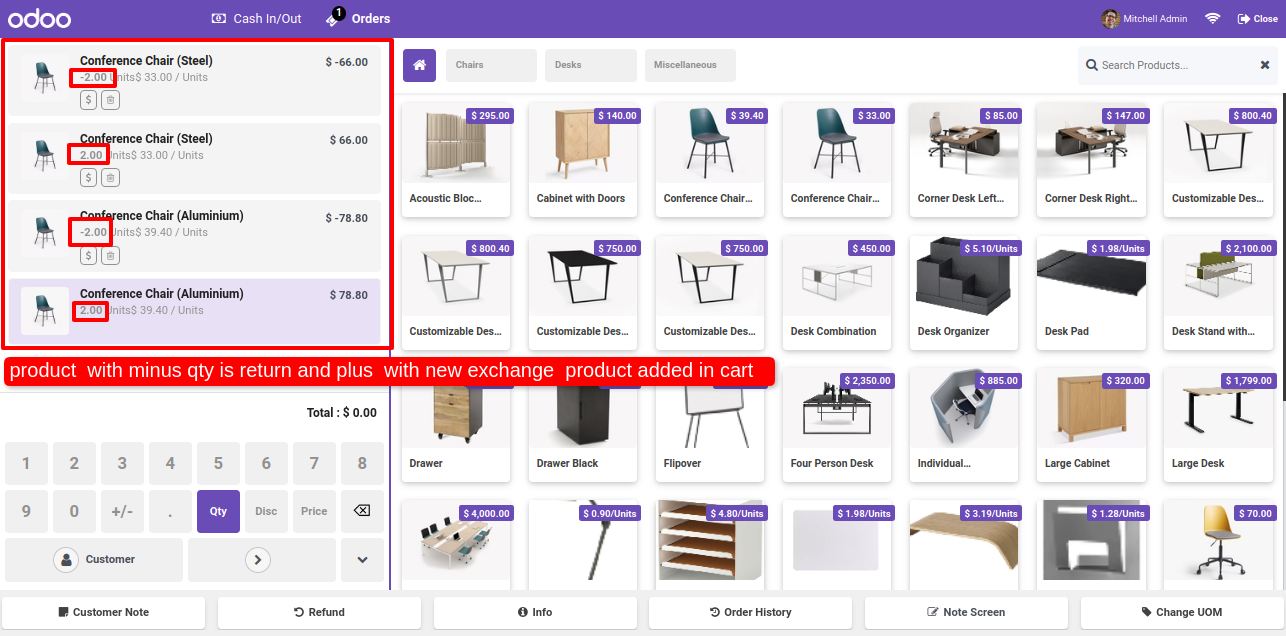
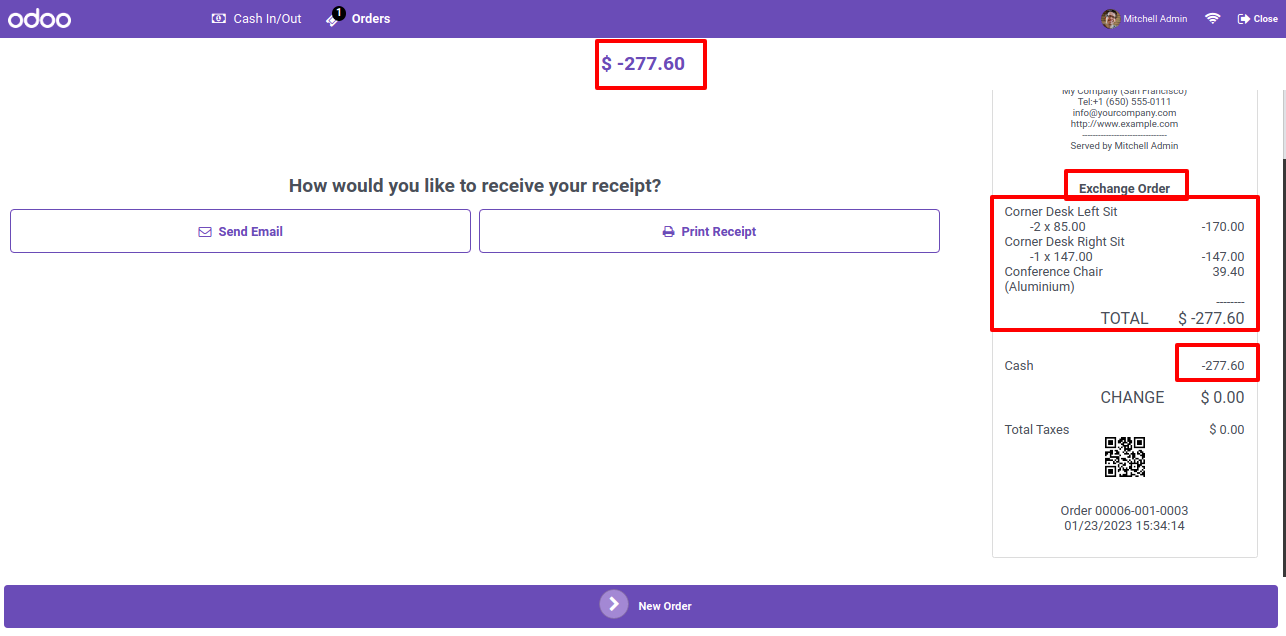
Here you can see the product with minus qty is return and plus with new exchange product added in cart.
When product will exchange then the receipt amount is zero.
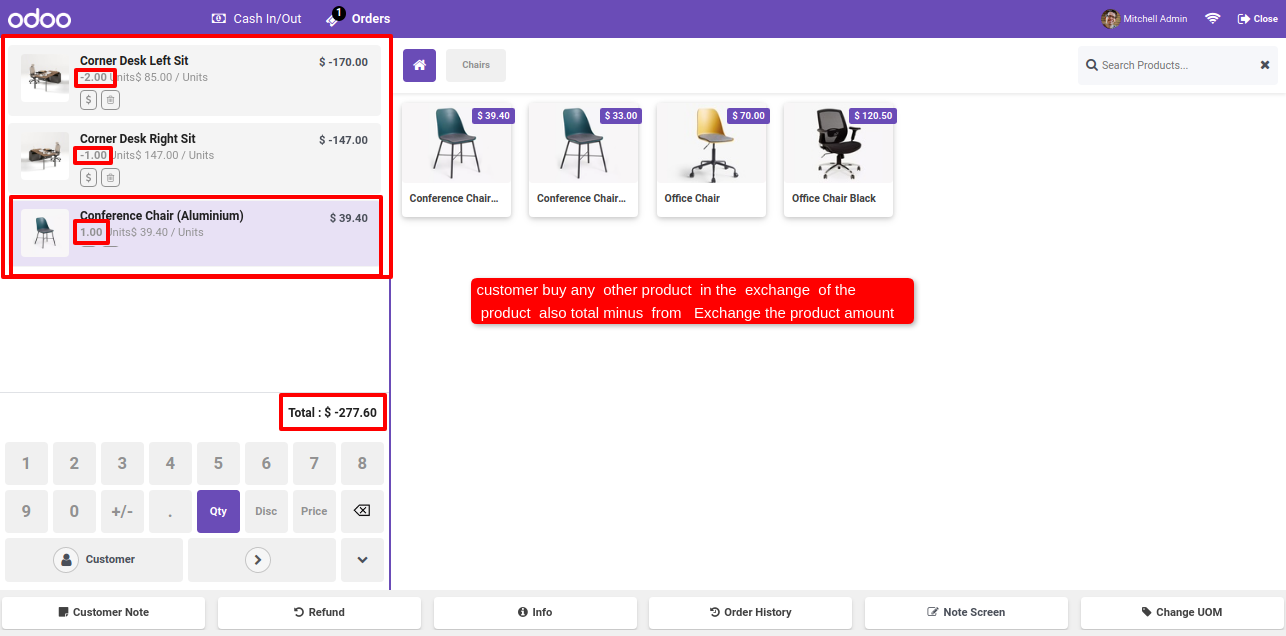
Now we scan the barcode, so this return - exchange popup opens. Select the exchange option and add exchange qty of products and press exchange button.
If you want to exchange with another products then no need to select the 'Exchange With Same Product' boolean.
The customer has the option to purchase another product in the exchange of the product, The total amount is deducted from the exchanged product's amount.
Here, you can see that the amount of the quantity of returned products as a minus value on the bill and make a return receipt.
Normally
the user has a logo or brand color, so the user can change primary
colors,
hover color, active menu color using primary color as per his brand
color.
Users can also change Secondary color, Secondary hover, Secondary active
colors.
Here you have another color option is gradients color. You can also set
gradient color for predefine theme 3 only.

You can easily change the color of Topbar(header) background color, hover color and active menu color.
You can customize your body with different options. There are two
options
for body background Image/Color. Also, you can change body font color
and
body font type with 8 different beautiful and clean font families
(Roboto,
Raleway, Poppins, Oxygen, Open Sans, Koho, Ubuntu).
Also, provide
google font family in this Backmate theme. So the user has a large range
of
body font type and set as your choice.

To Set google fonts on Just copy name of any google fonts. In theme setting goto 'Header Body Color' and select font family 'Googel Fonts'. After that on field is visible 'Google Font Family' here paste your font family name and click save. (* Refresh browser 2 3 times if not affect).

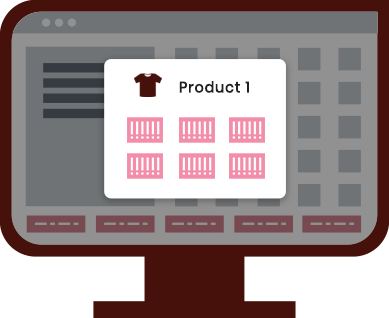
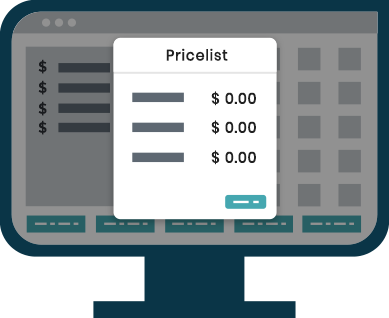
Goto pos setting and select Pricelist.
See Pricelist Symbol in POS Order Line.
When Press On Pricelist Symbol Wizard is open.
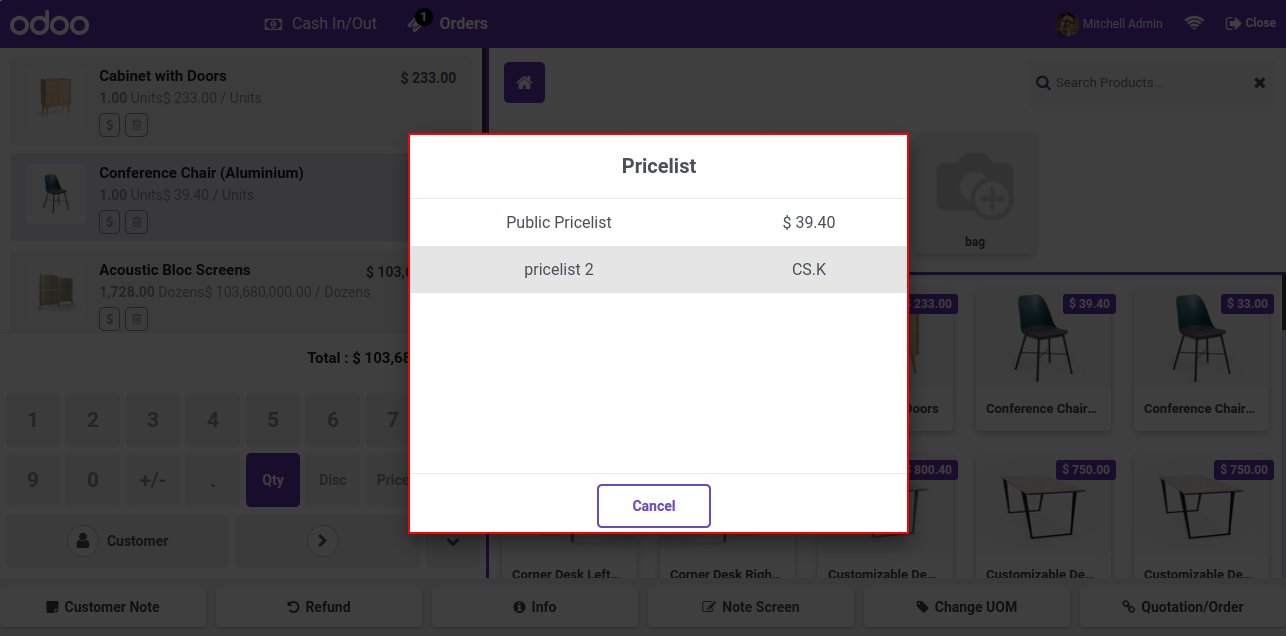
The selected Pricelist Add in order line.
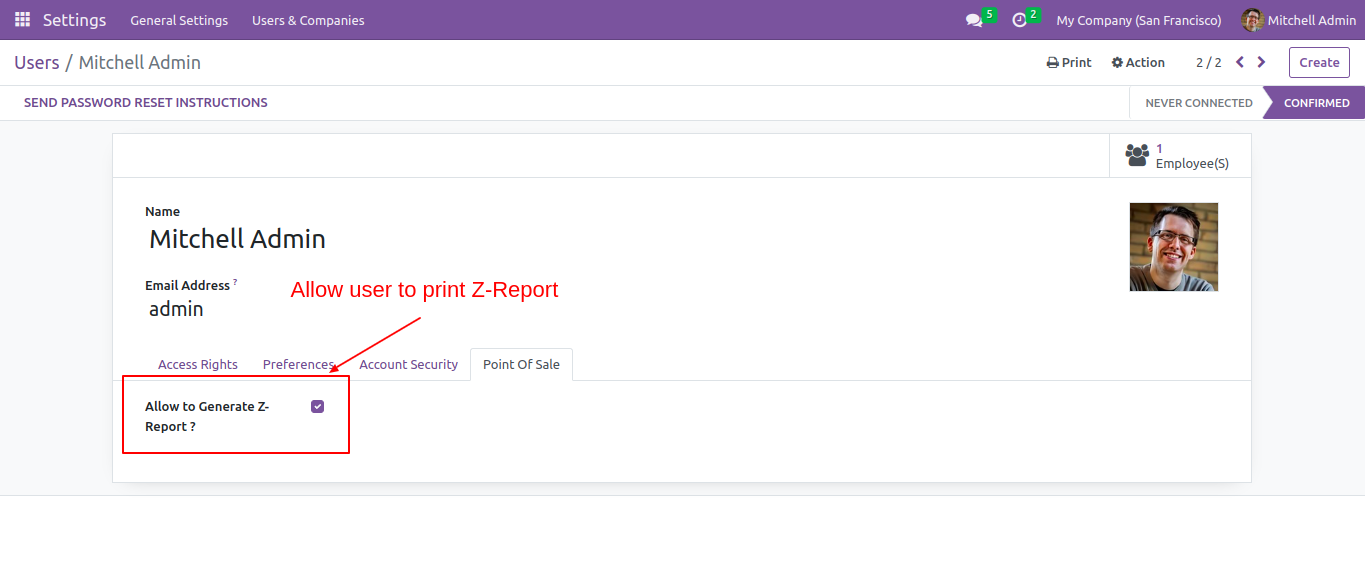
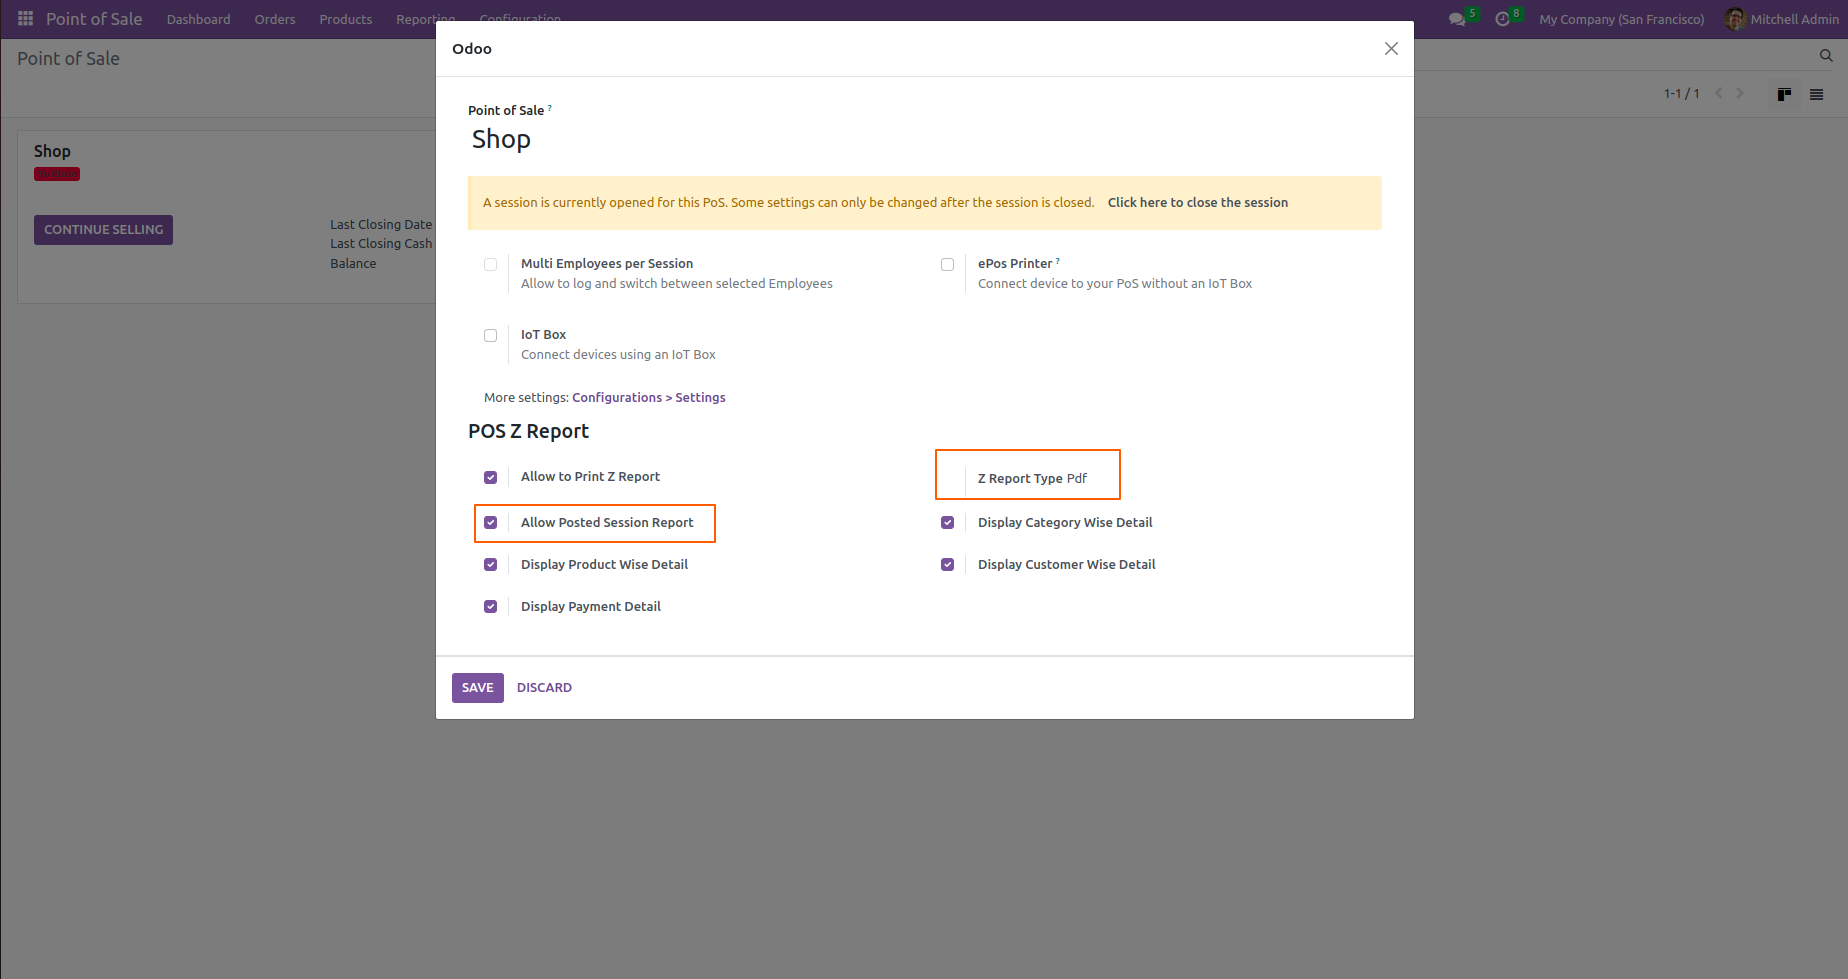
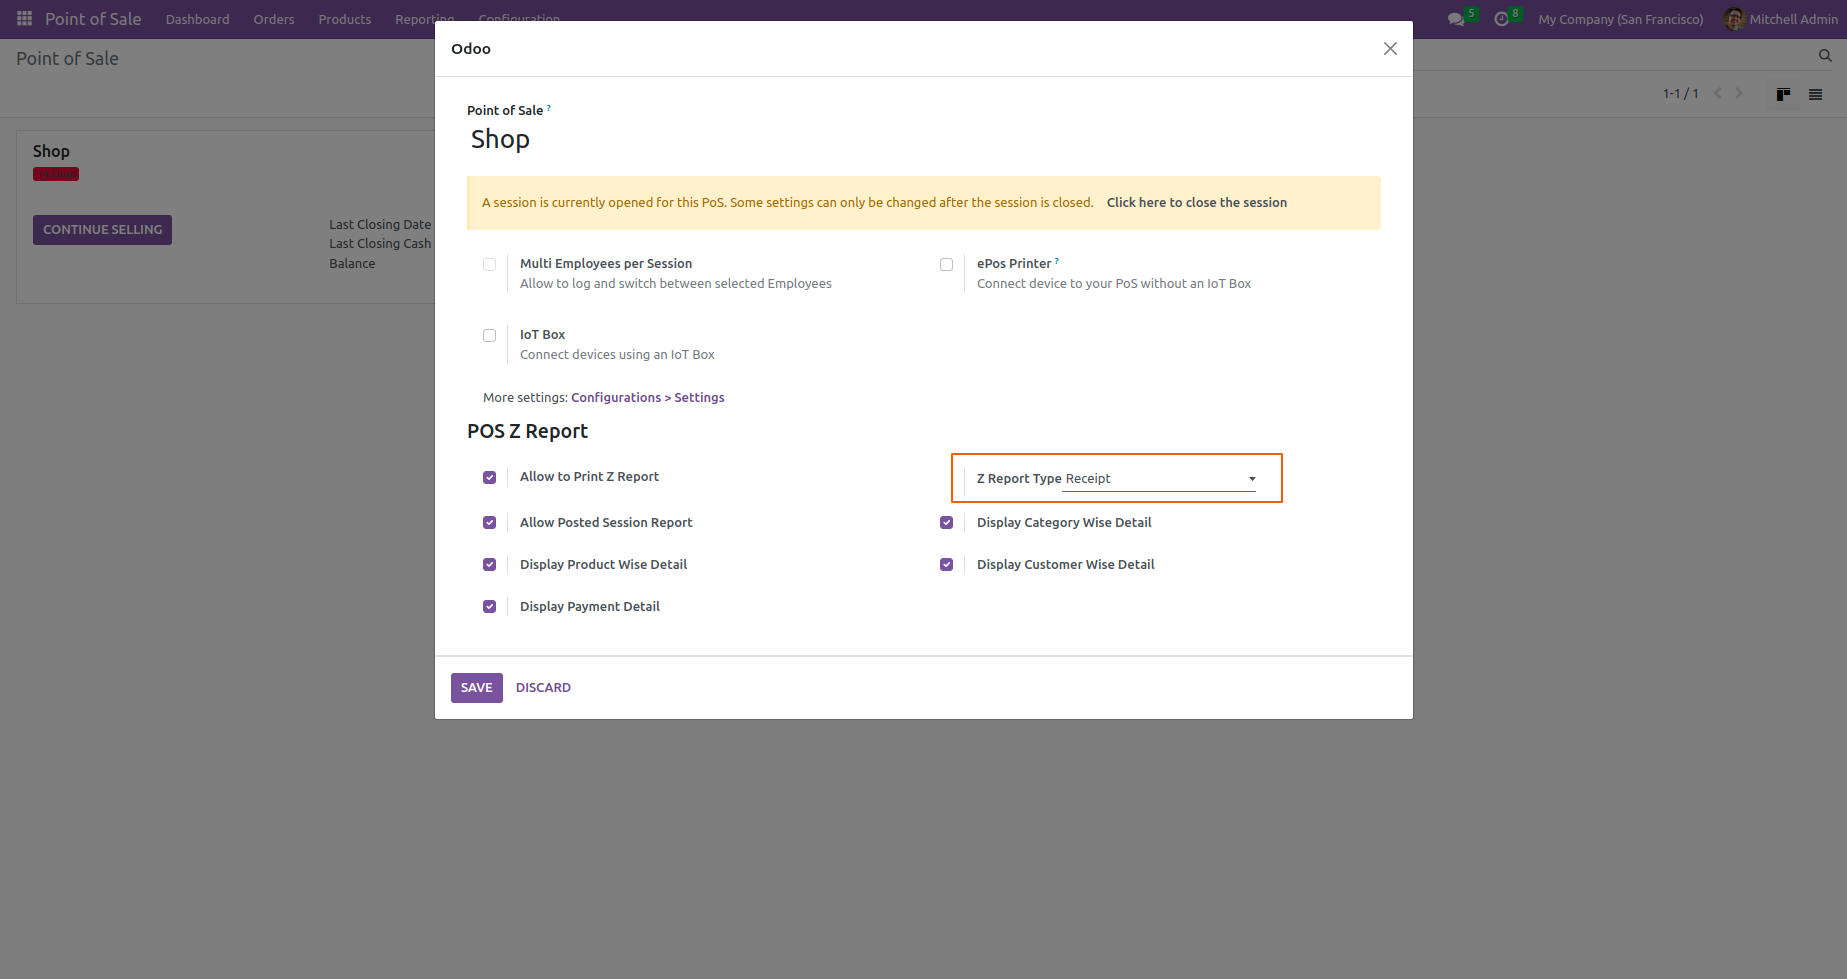
Go to user settings => Tick Allow to Generate Z-Report.
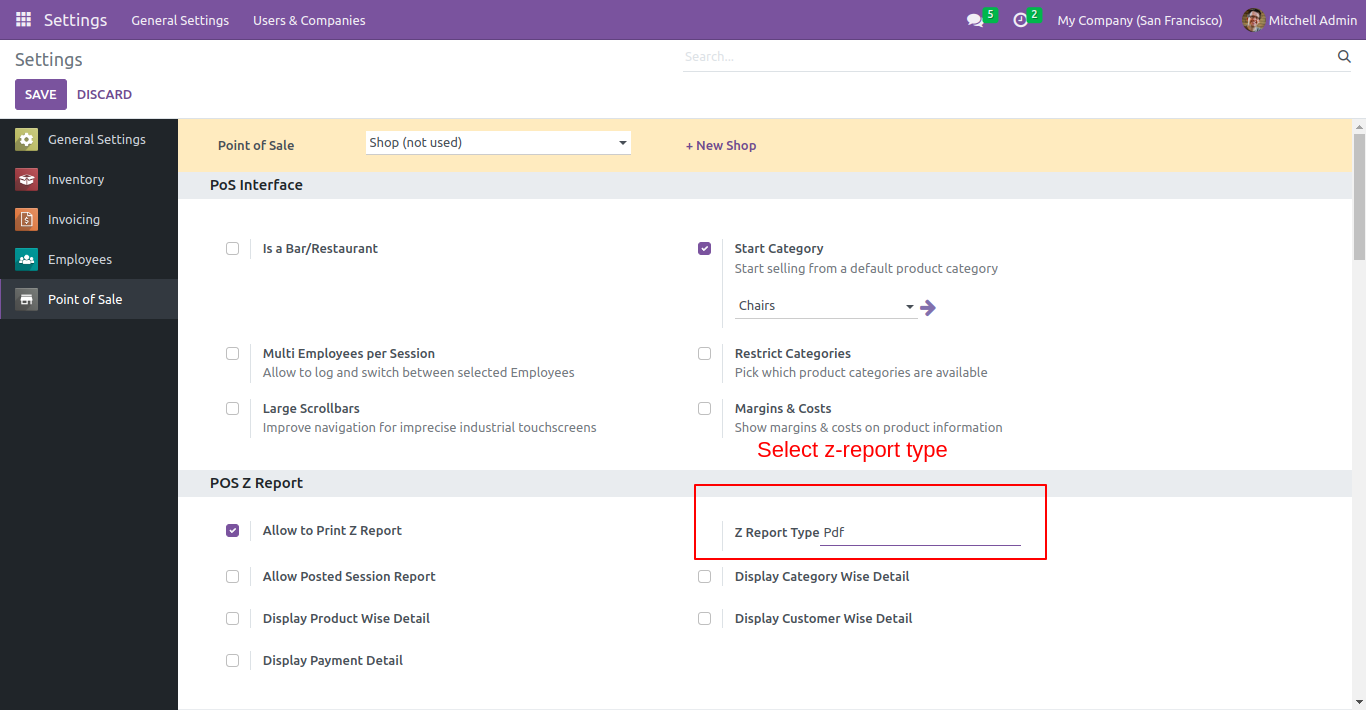
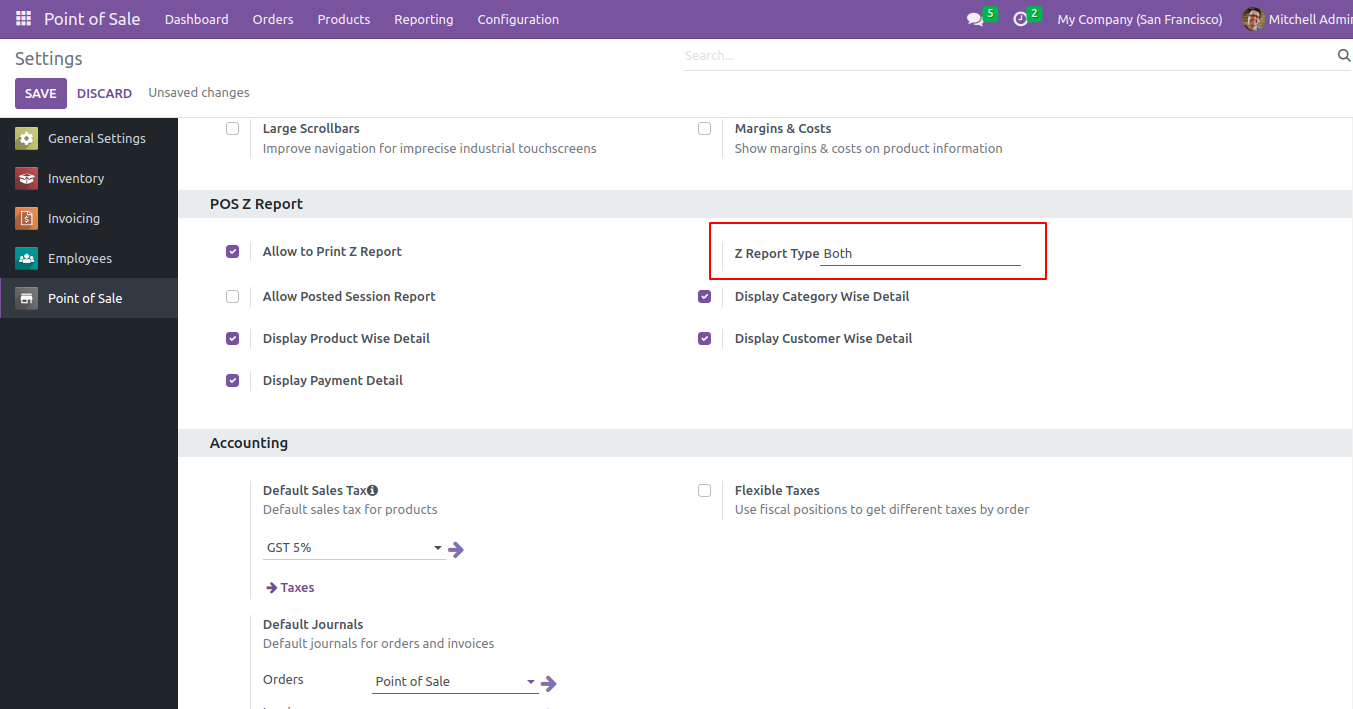
Go to POS settings => Tick Allow to Print Z-Report.
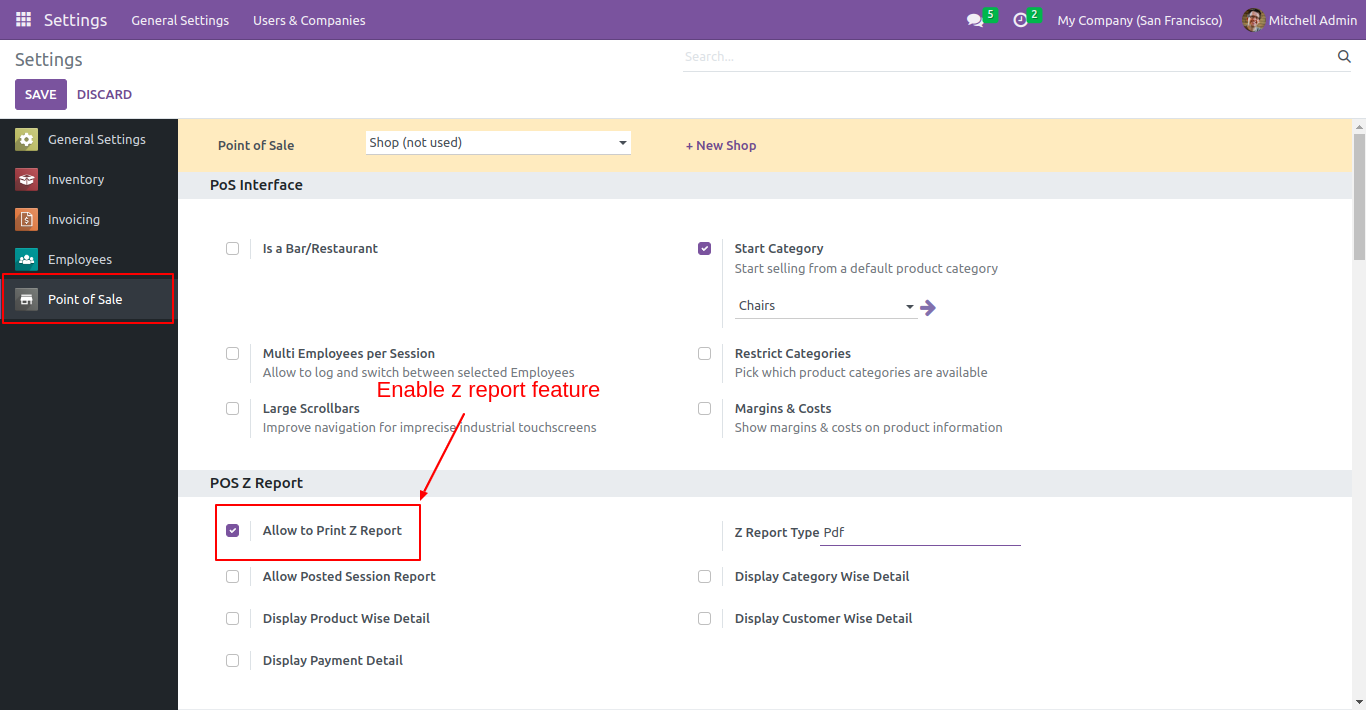
Select the format in which you want to print report.
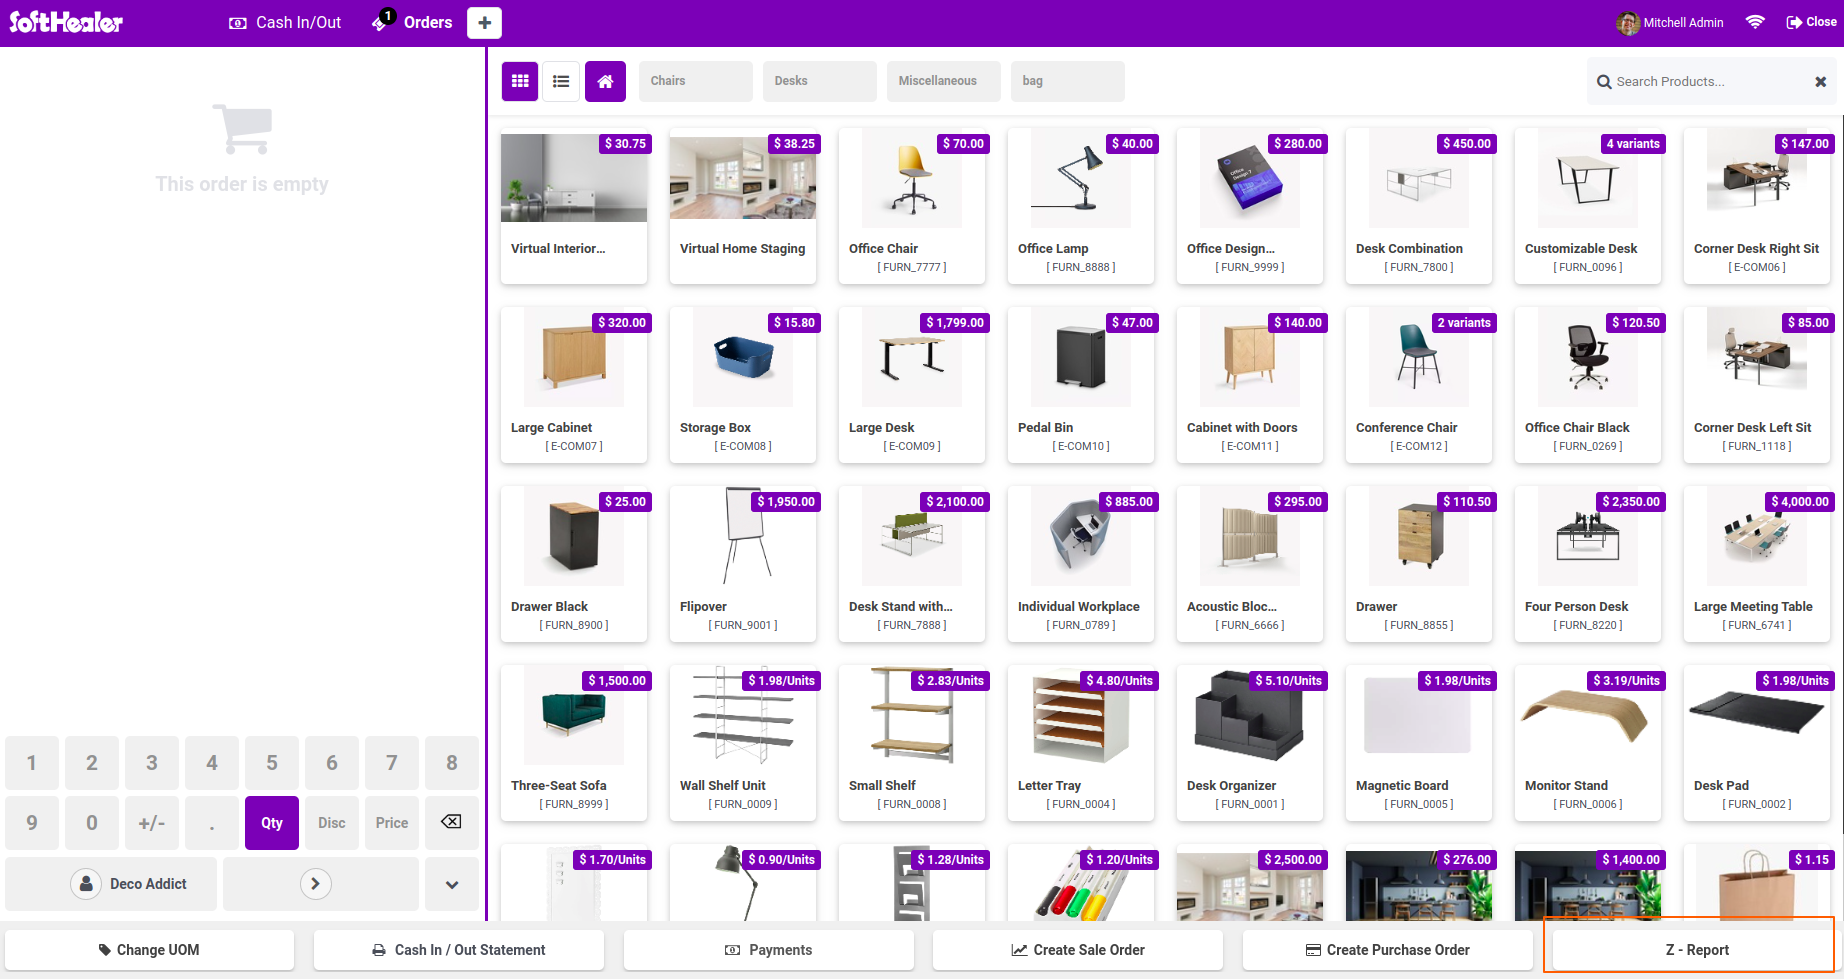
Z-Report button will be available on POS screen. Click on that button to print report in selected format.
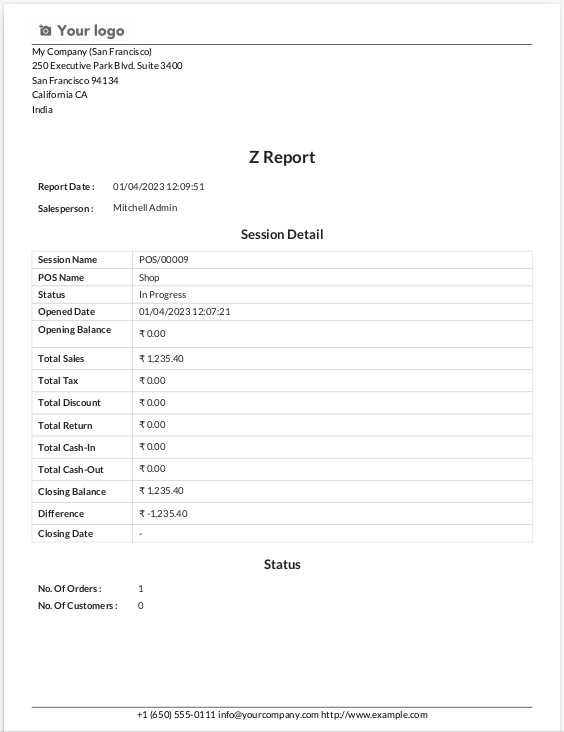
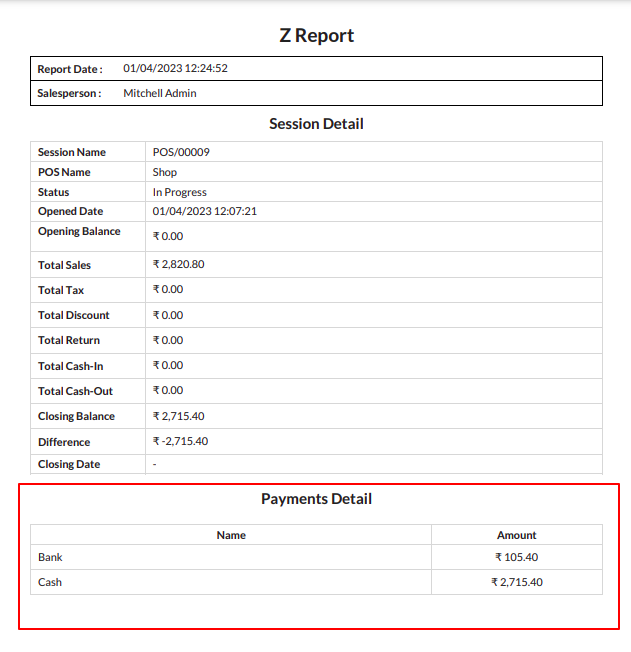
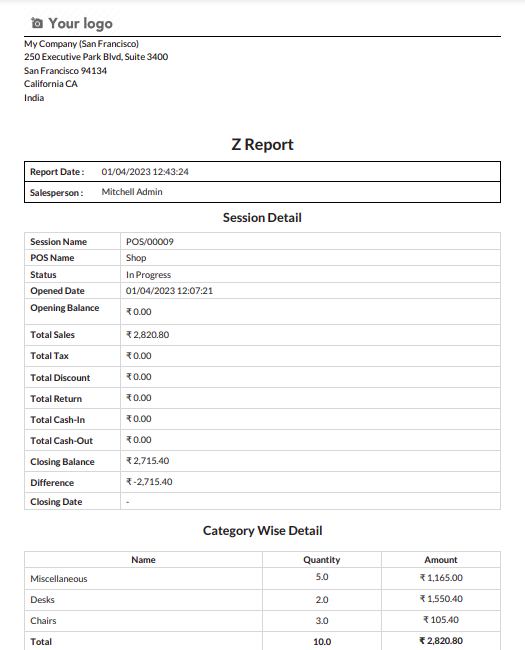
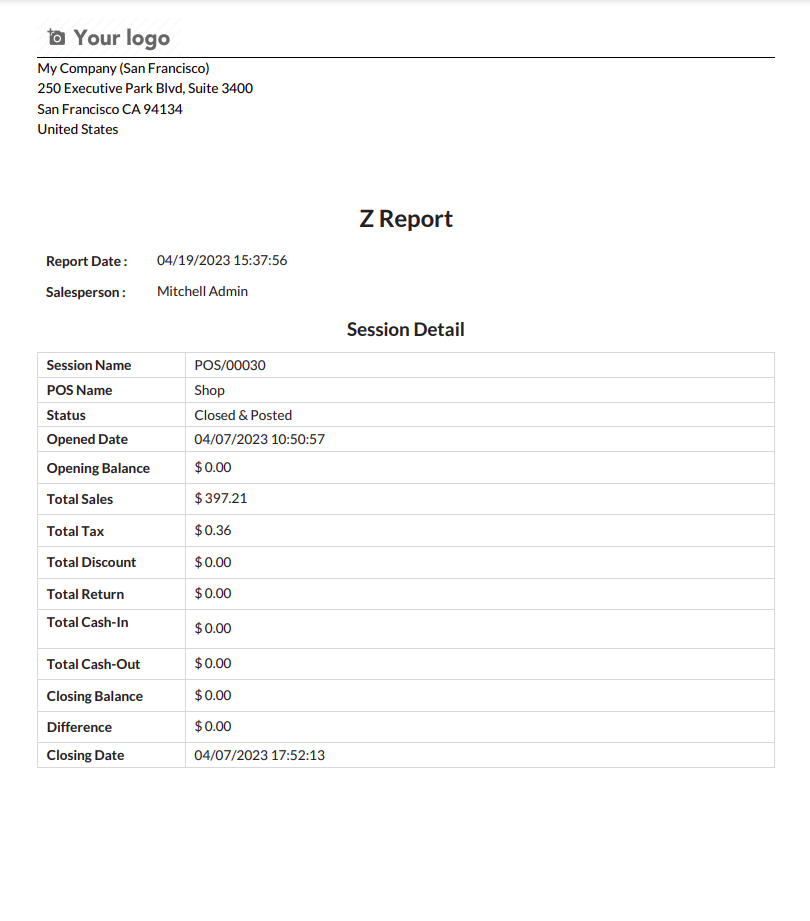
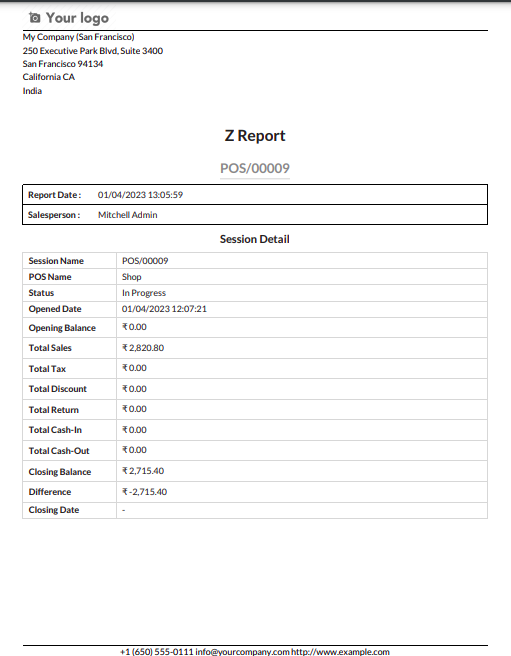
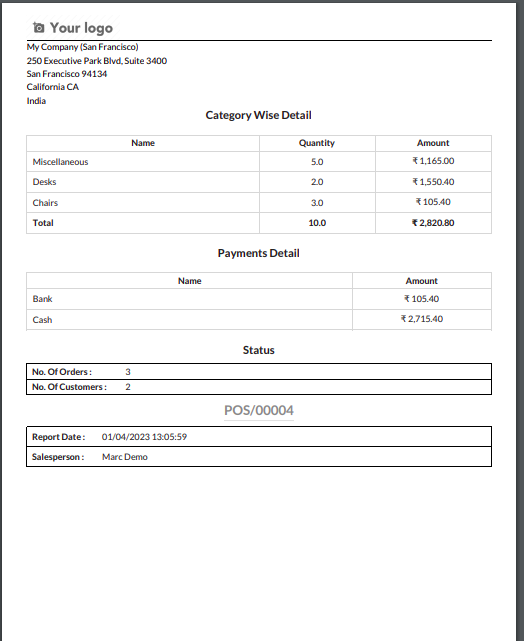
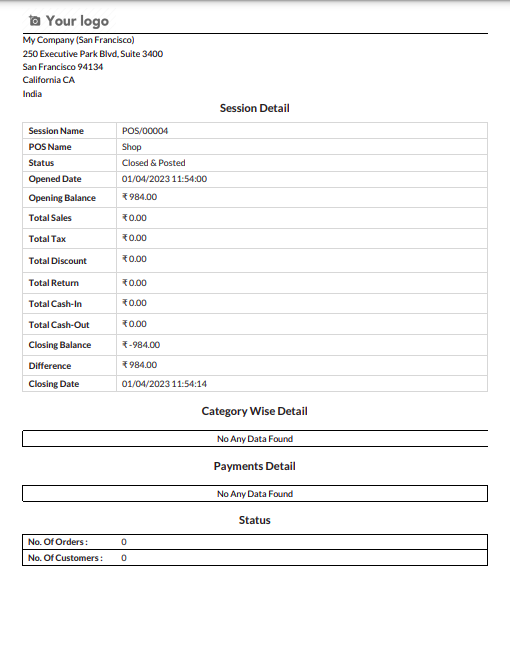
Z-Report for current session will look like below image.
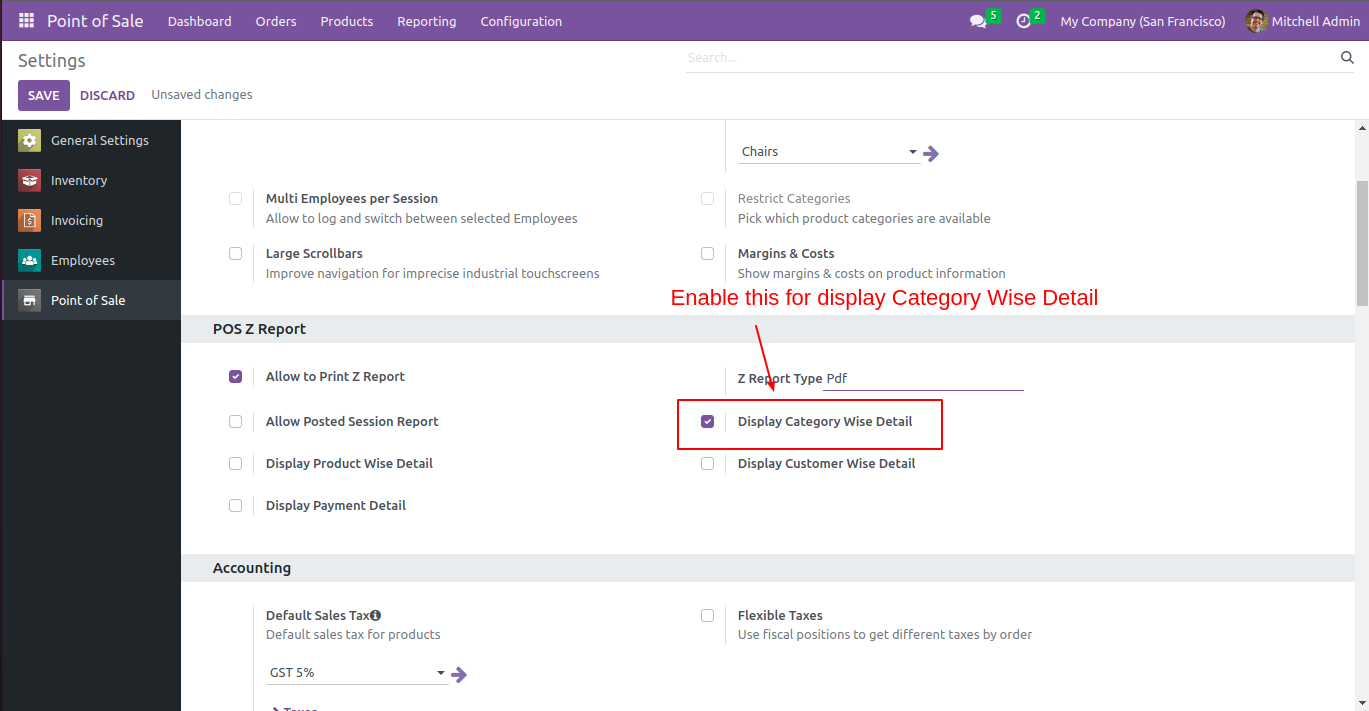
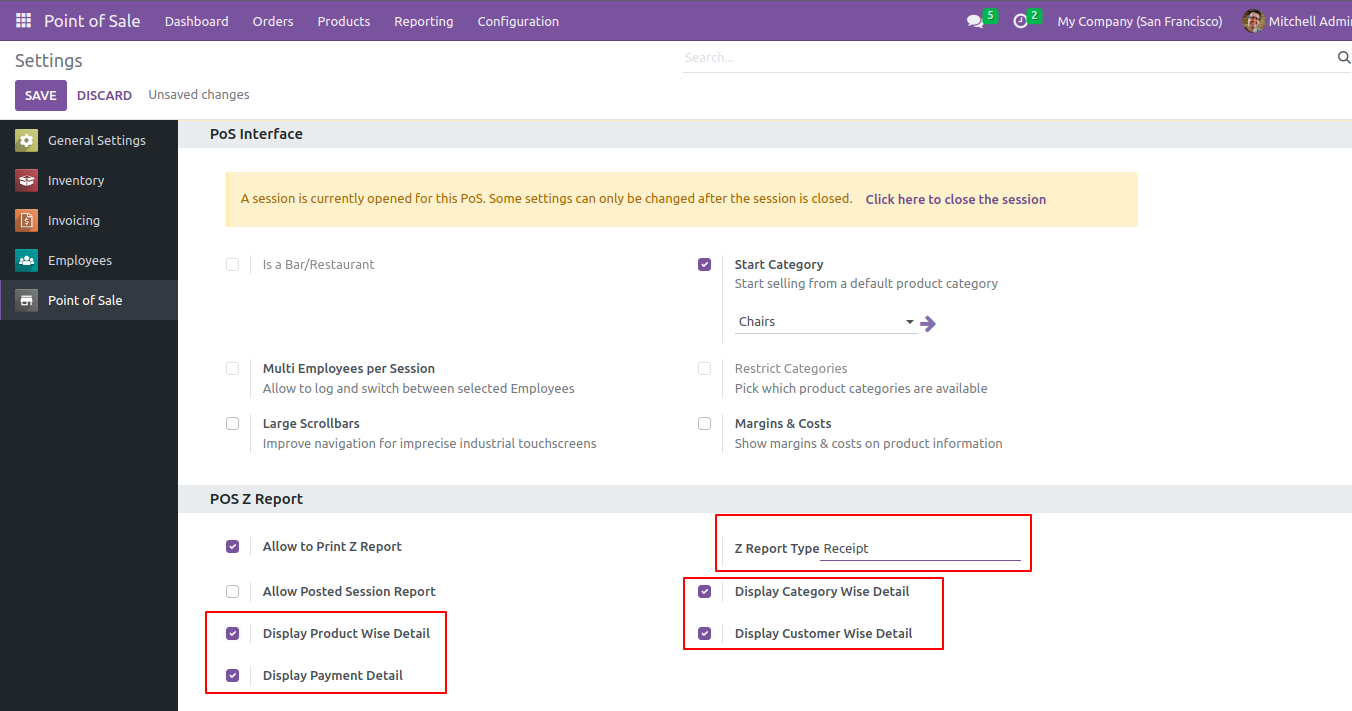
If you want to print the report category wise then go to pos setting and Tick "Display Category wise detail".
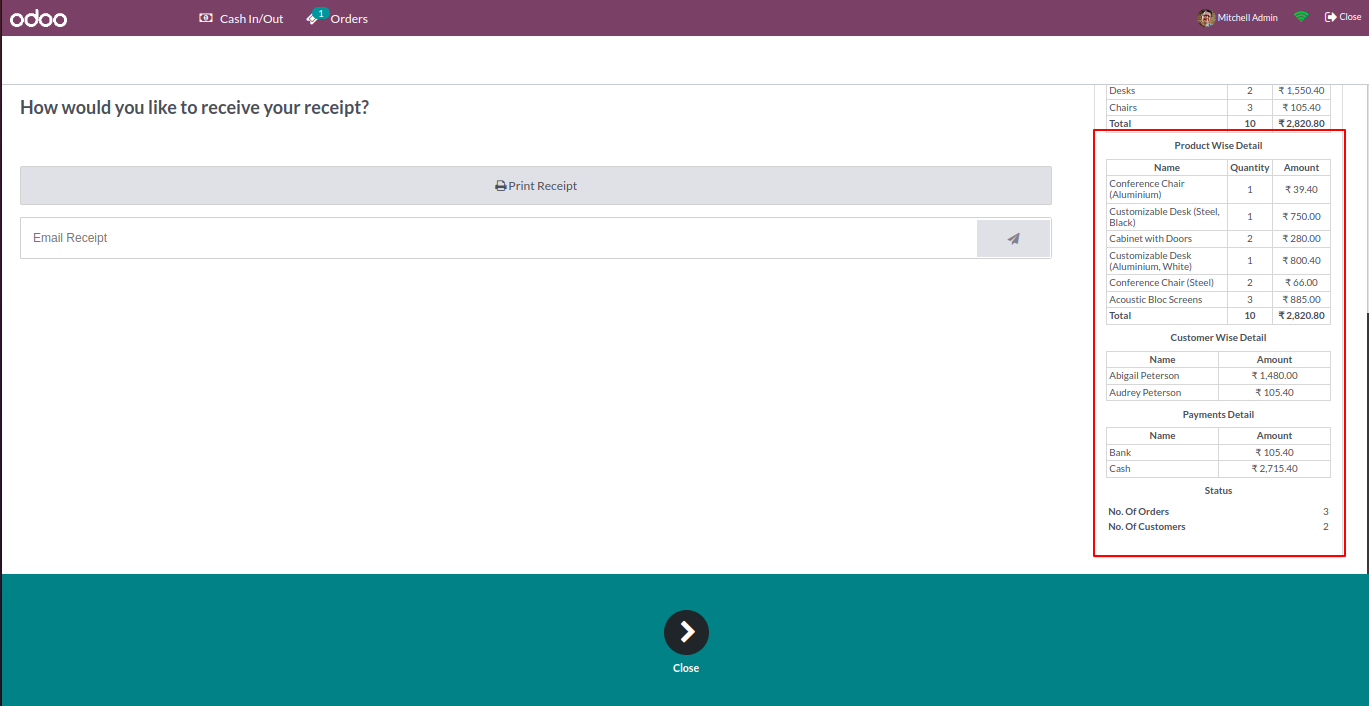
Category wise Z-Report looks like below.

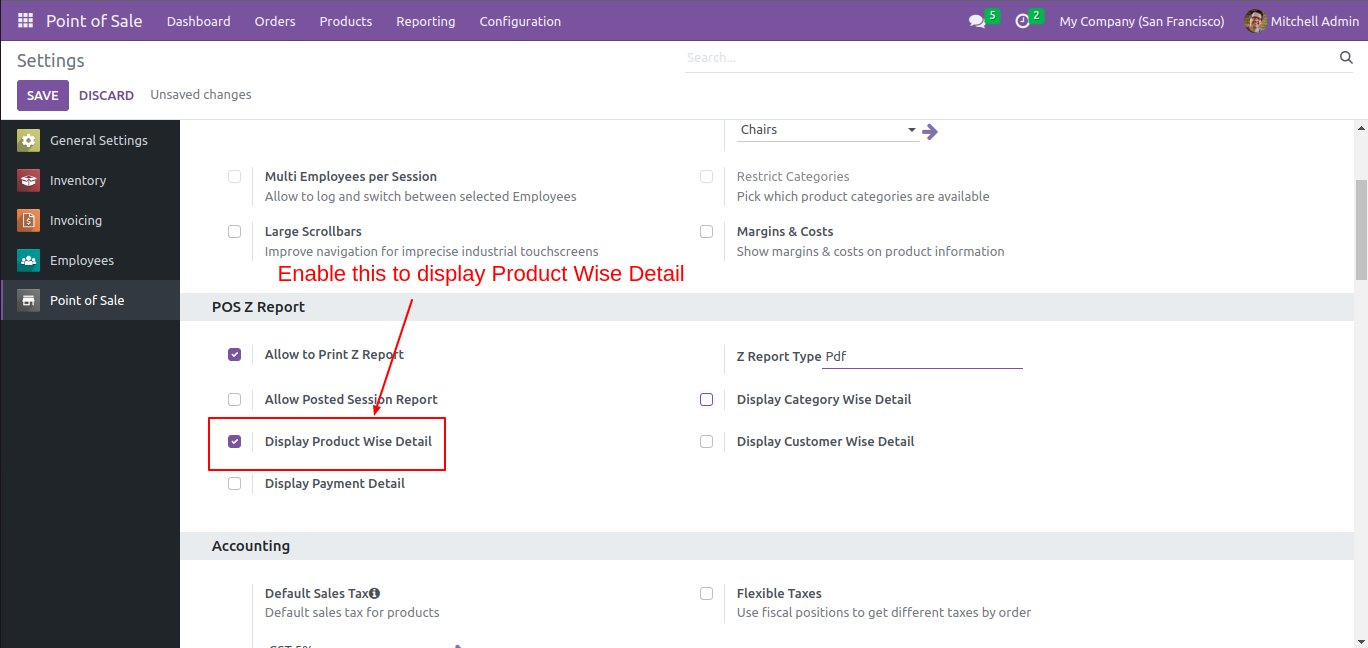
If you want to print the report product wise then go to pos setting and Tick "Display Product wise detail".
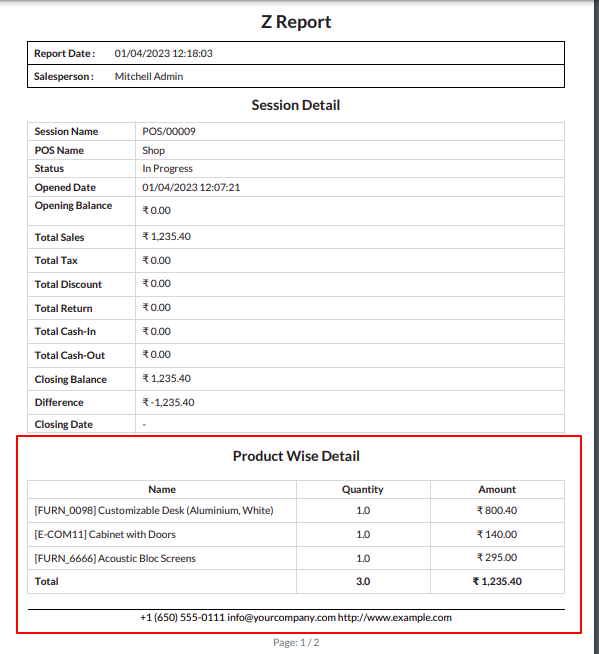
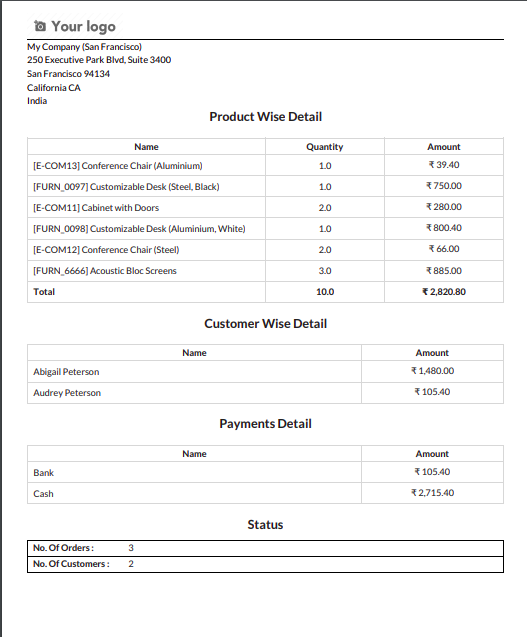
Product wise Z-Report looks like below.
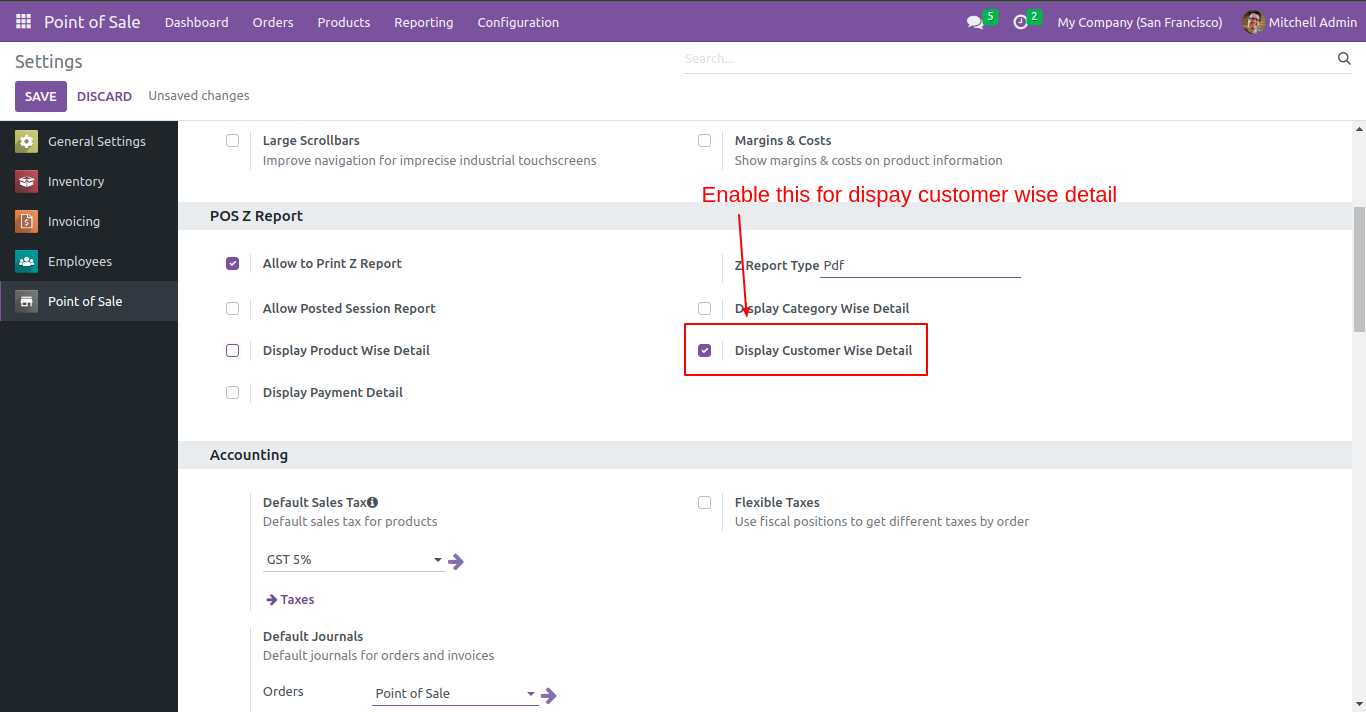
If you want to print the report customer wise then go to pos setting and Tick "Display Customer wise detail".
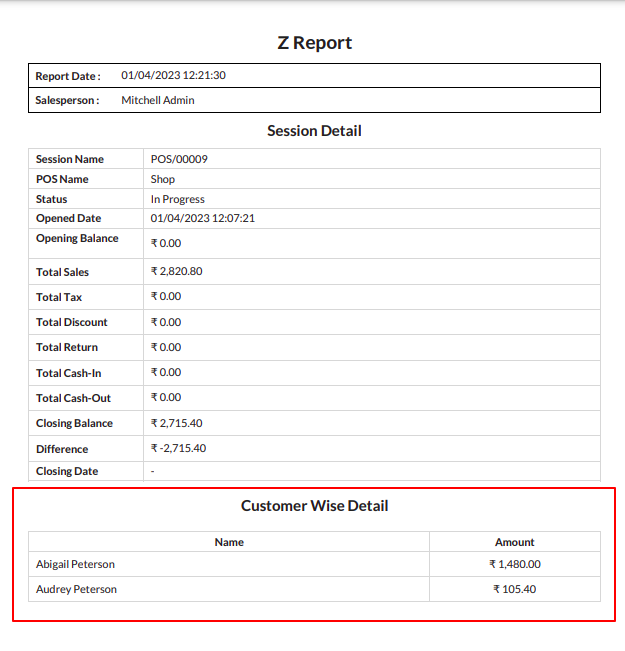
Customer wise Z-Report looks like below.
If you want to print the payment details of session then go to pos setting and Tick "Display Payment detail".
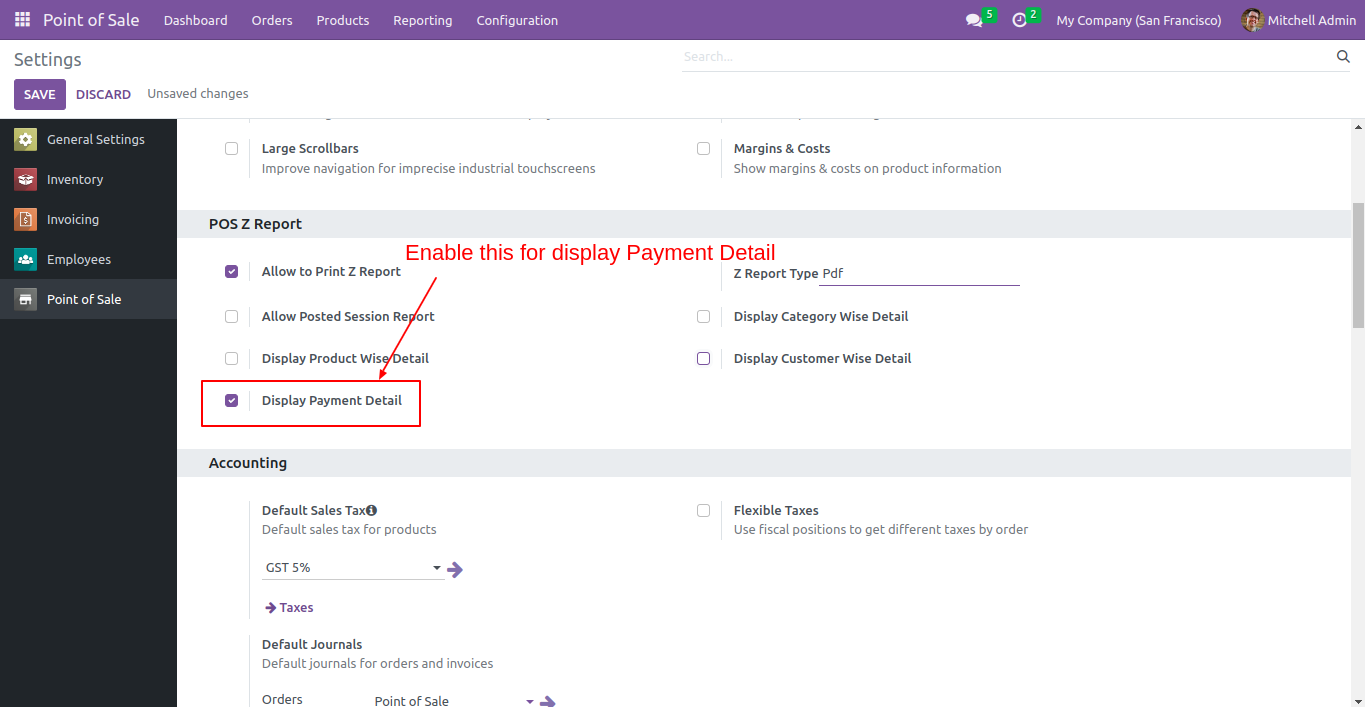
The Z-Report with Payment detail looks like below.
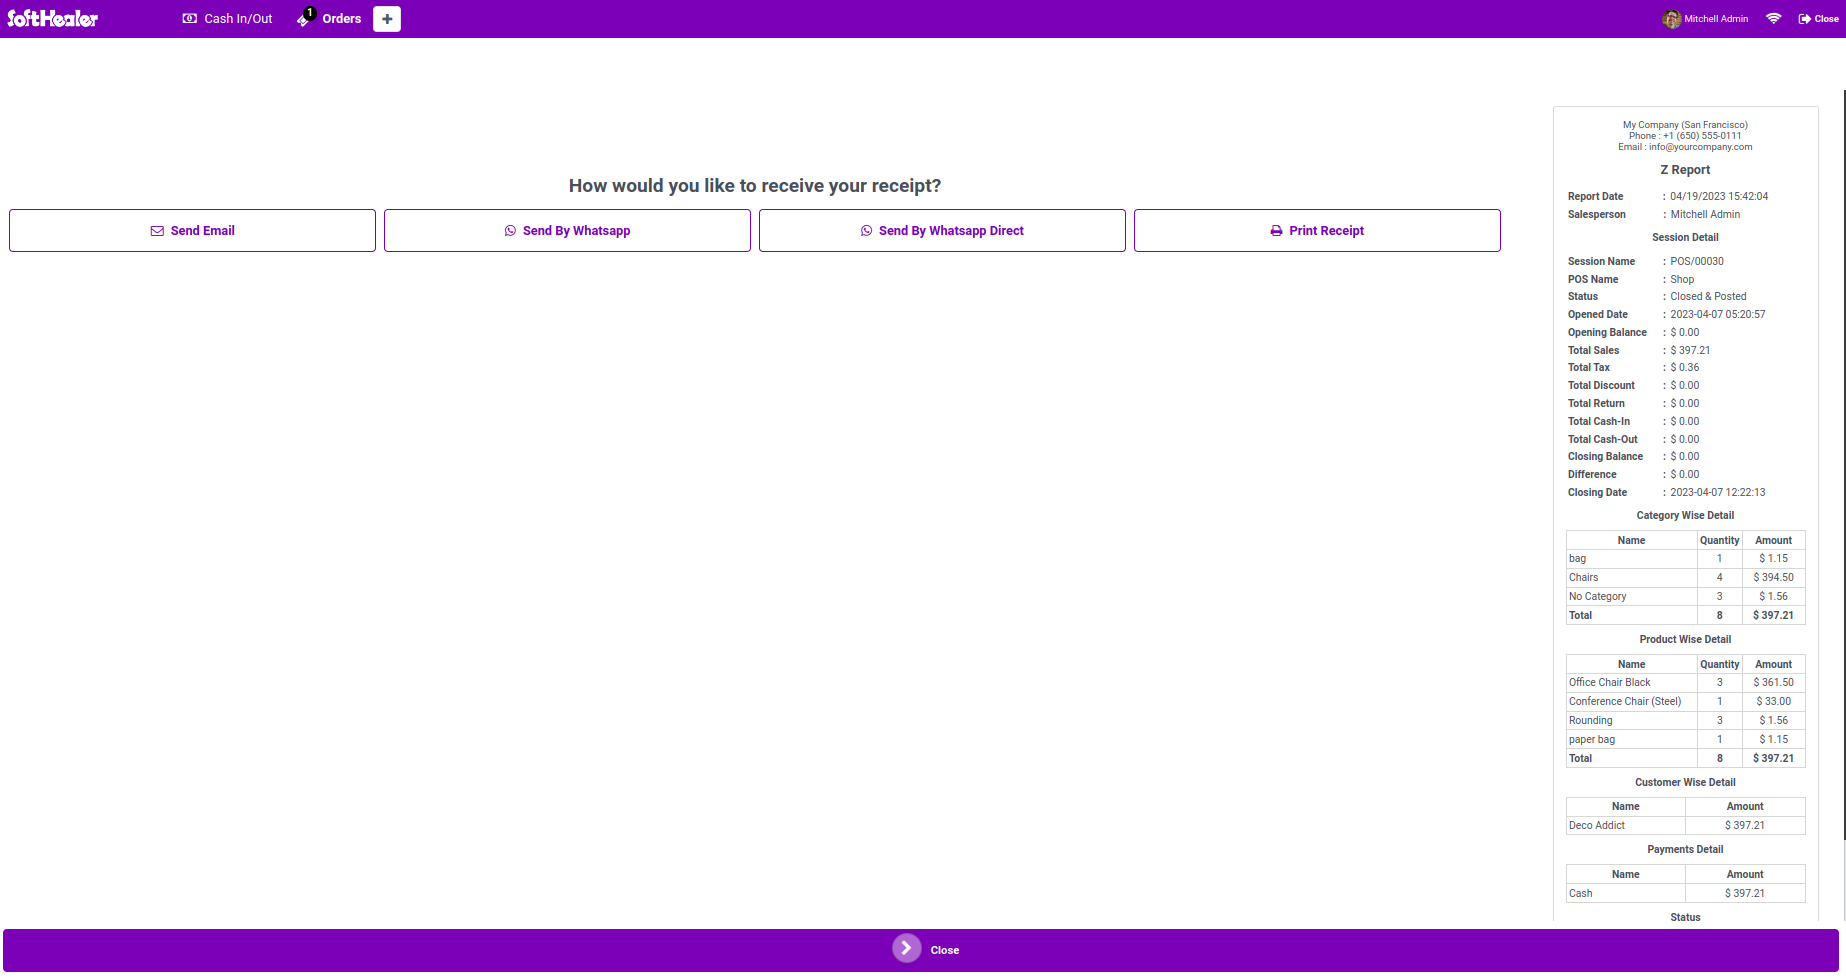
Now select the report method to receipt.
As Shown in image the report is printed in receipt format.

All details selected in Configuration are printed in receipt.
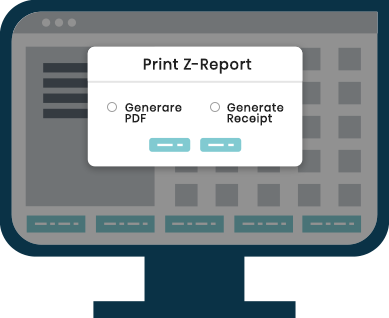
Now change the format to "Both".
Now when the user click on Z-Report one wizard will open with 2 format options. Select "Generate PDF" option
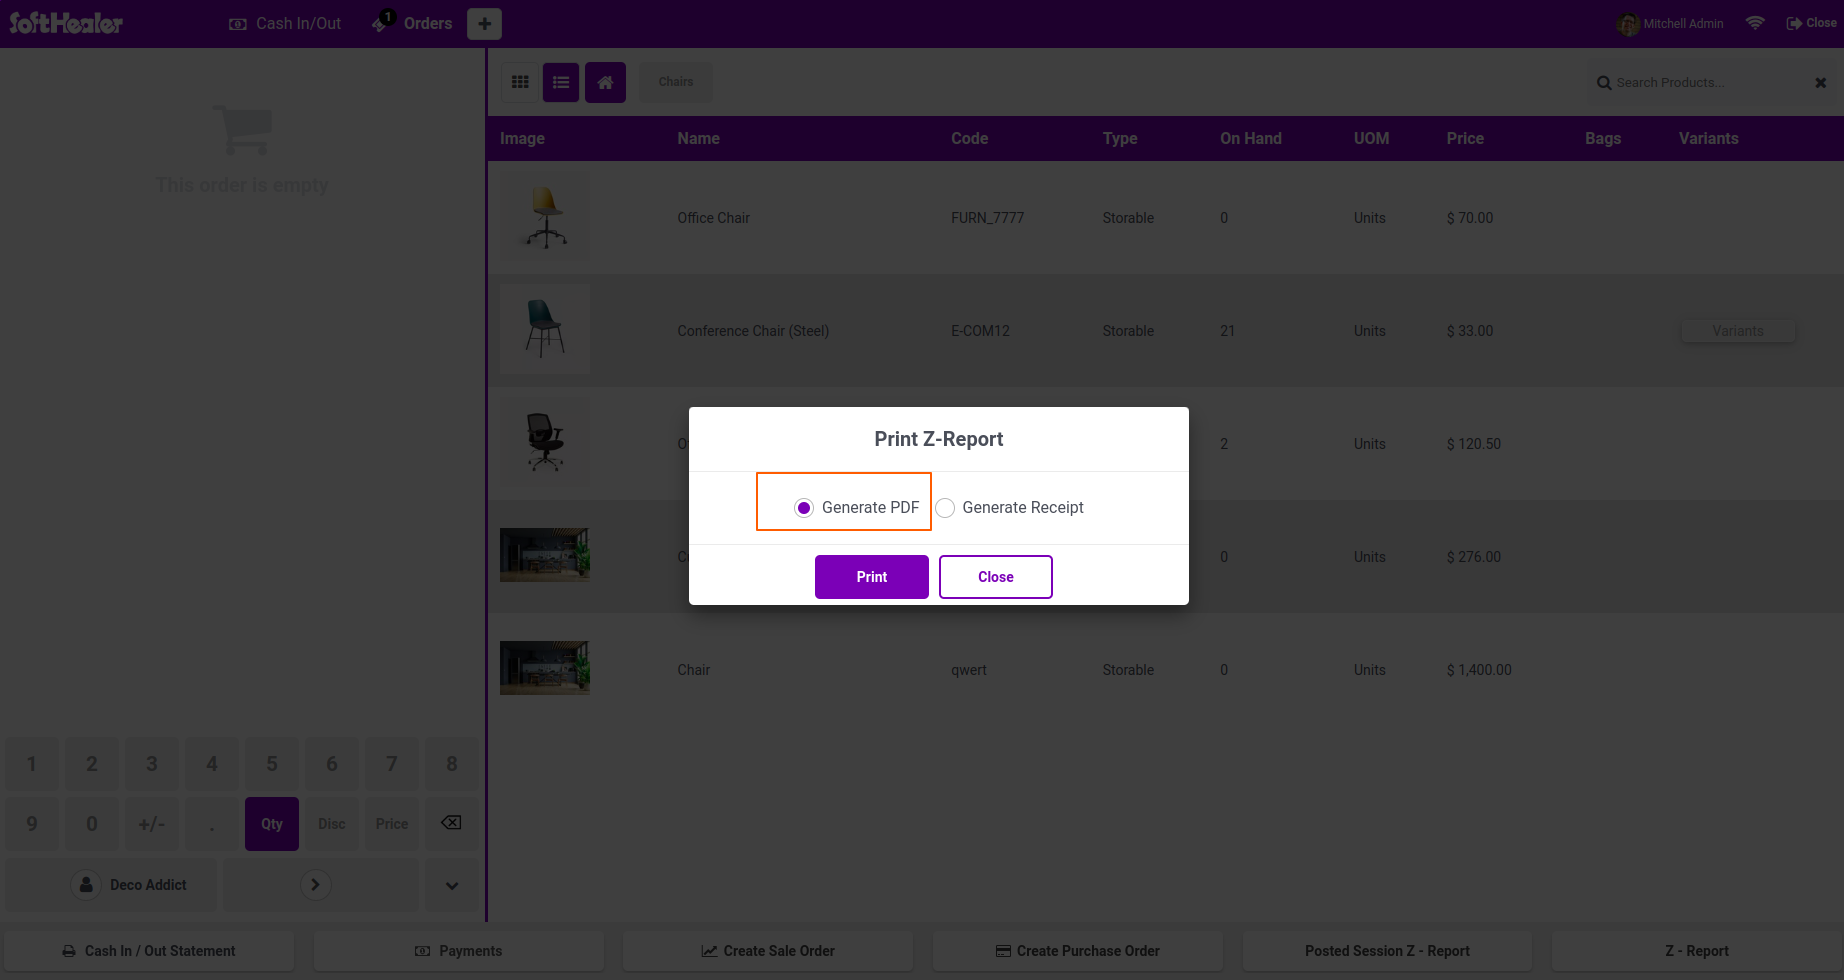
The report will be printed in PDF format.
All the details selected in configuration will be printed in pdf.
Now select "Generate Receipt".
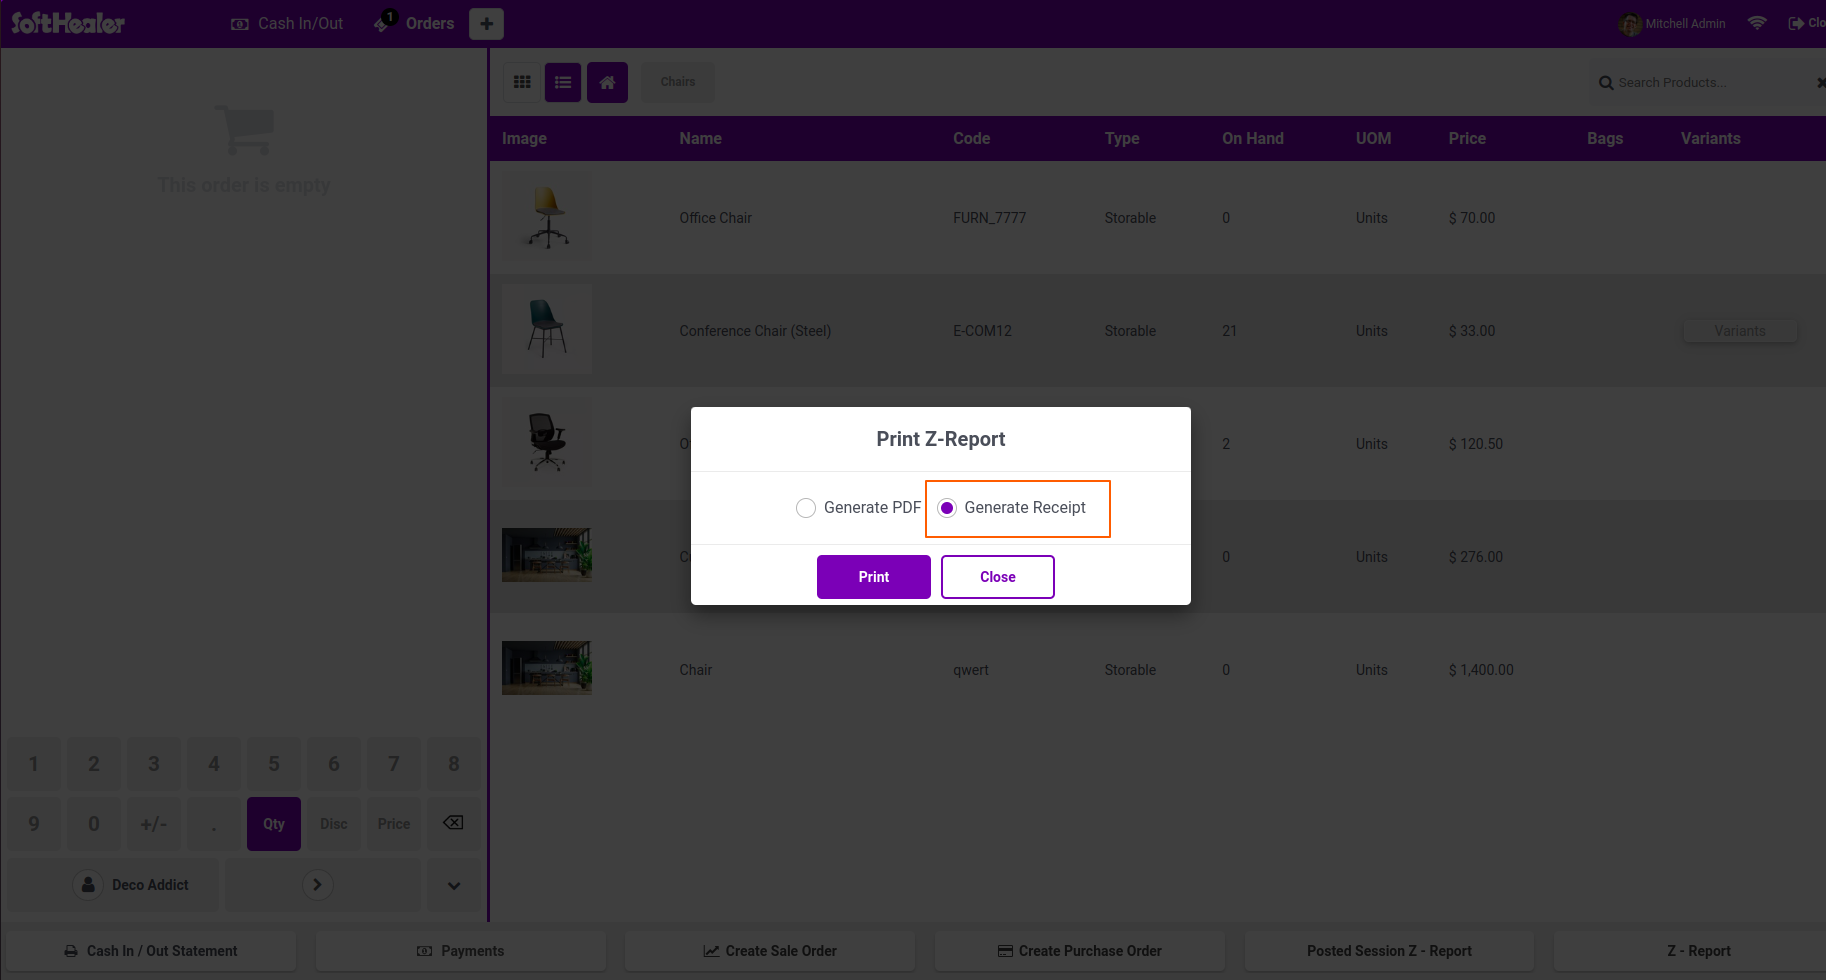
The report will be printed in receipt format.
All the details selected in configuration will be printed in receipt.

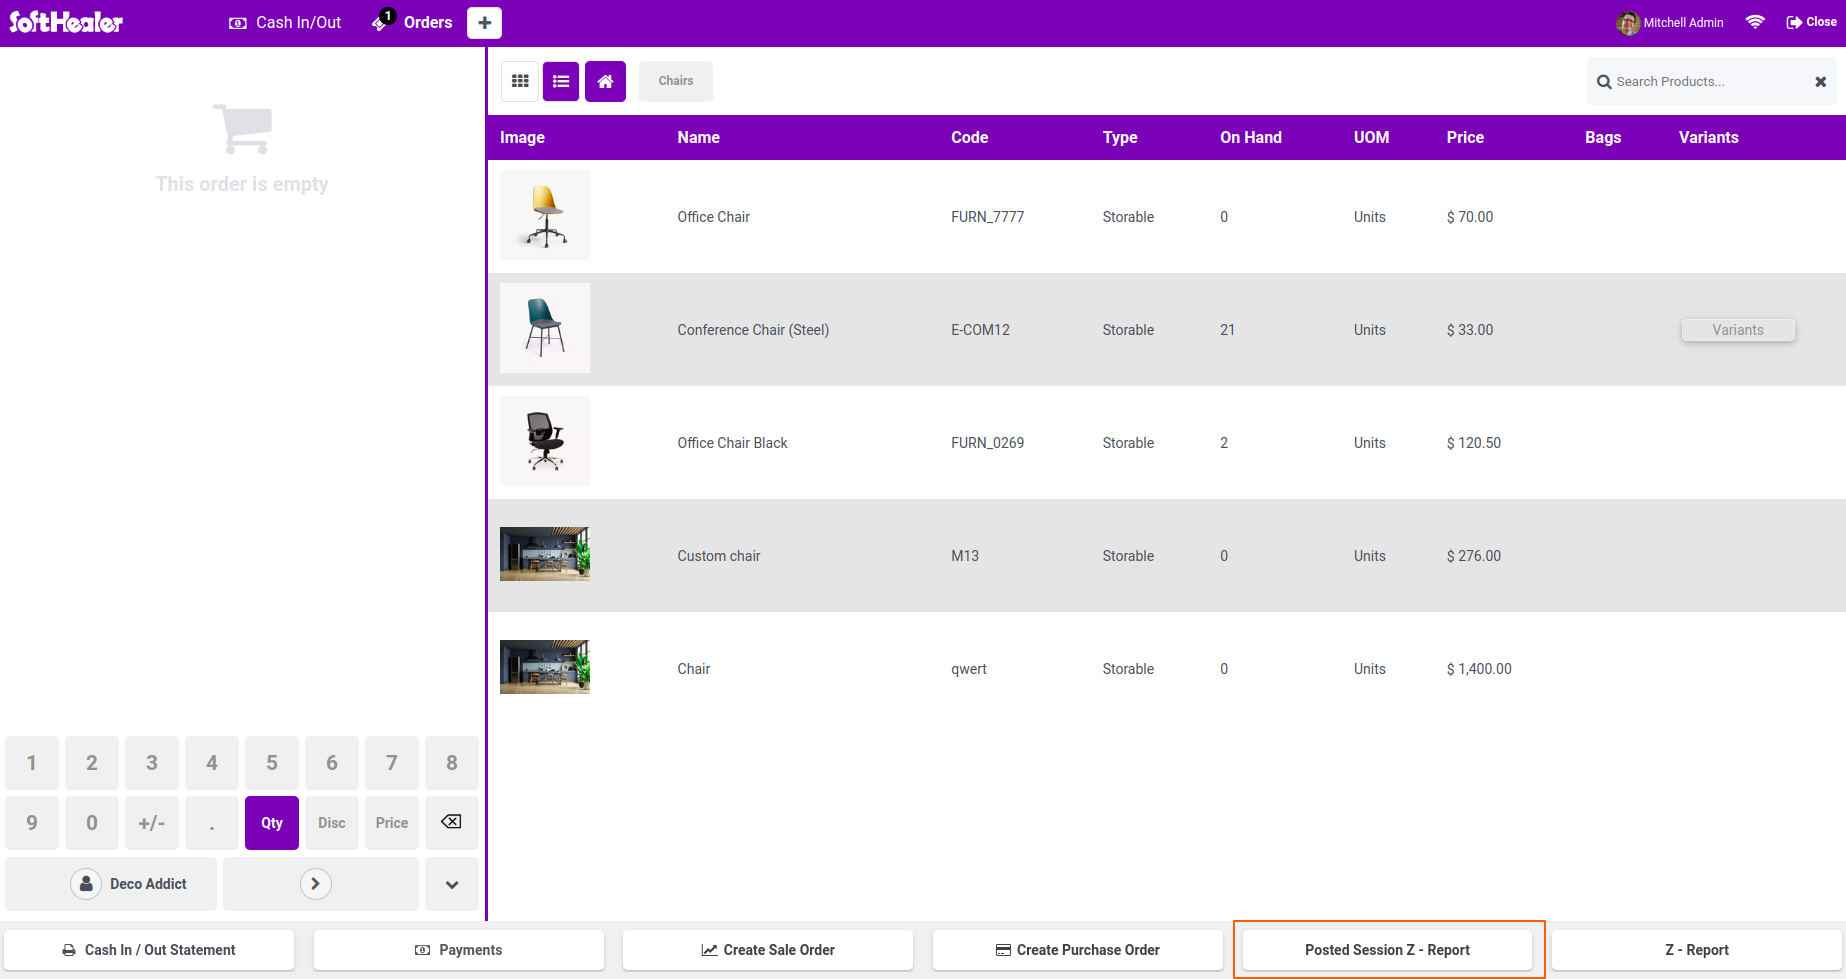
Go to POS setting and Tick Allow Posted Session Report. This will allow you to Generate and print Z-Report for posted sessions.
"Posted session Z-Report" button will be available on POS screen.
On clicking the button wizard will open. Select posted session of the current user.

Z-Report for selected session will be printed in pdf format.
Go to POS setting and change the format to receipt.
Z-Report for selected session will be printed in receipt format.
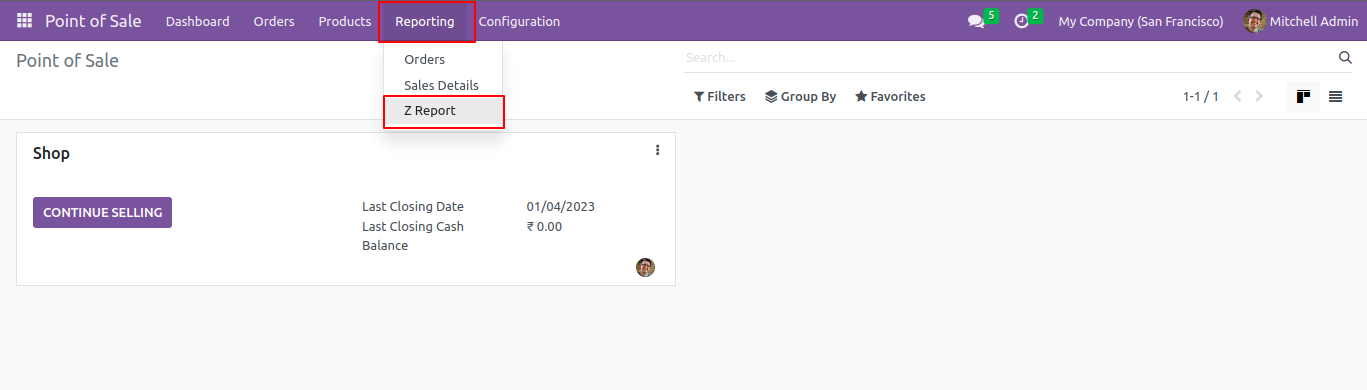
You can also find the Z-Report under Reporting menu of POS.
You can select multiple session and the details want in Z-Report.
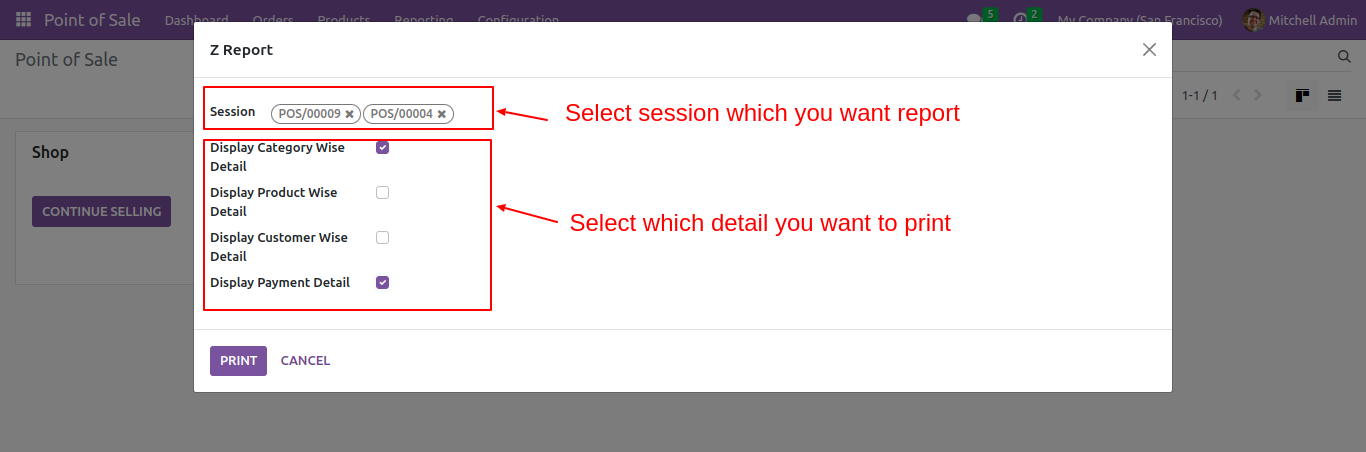
The Z-Report looks like below.
Z-Report for both sessions will be printed.
The selected details will be printed in Z-Report.
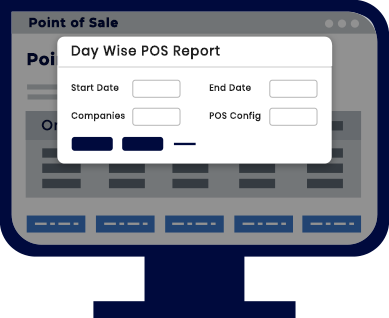
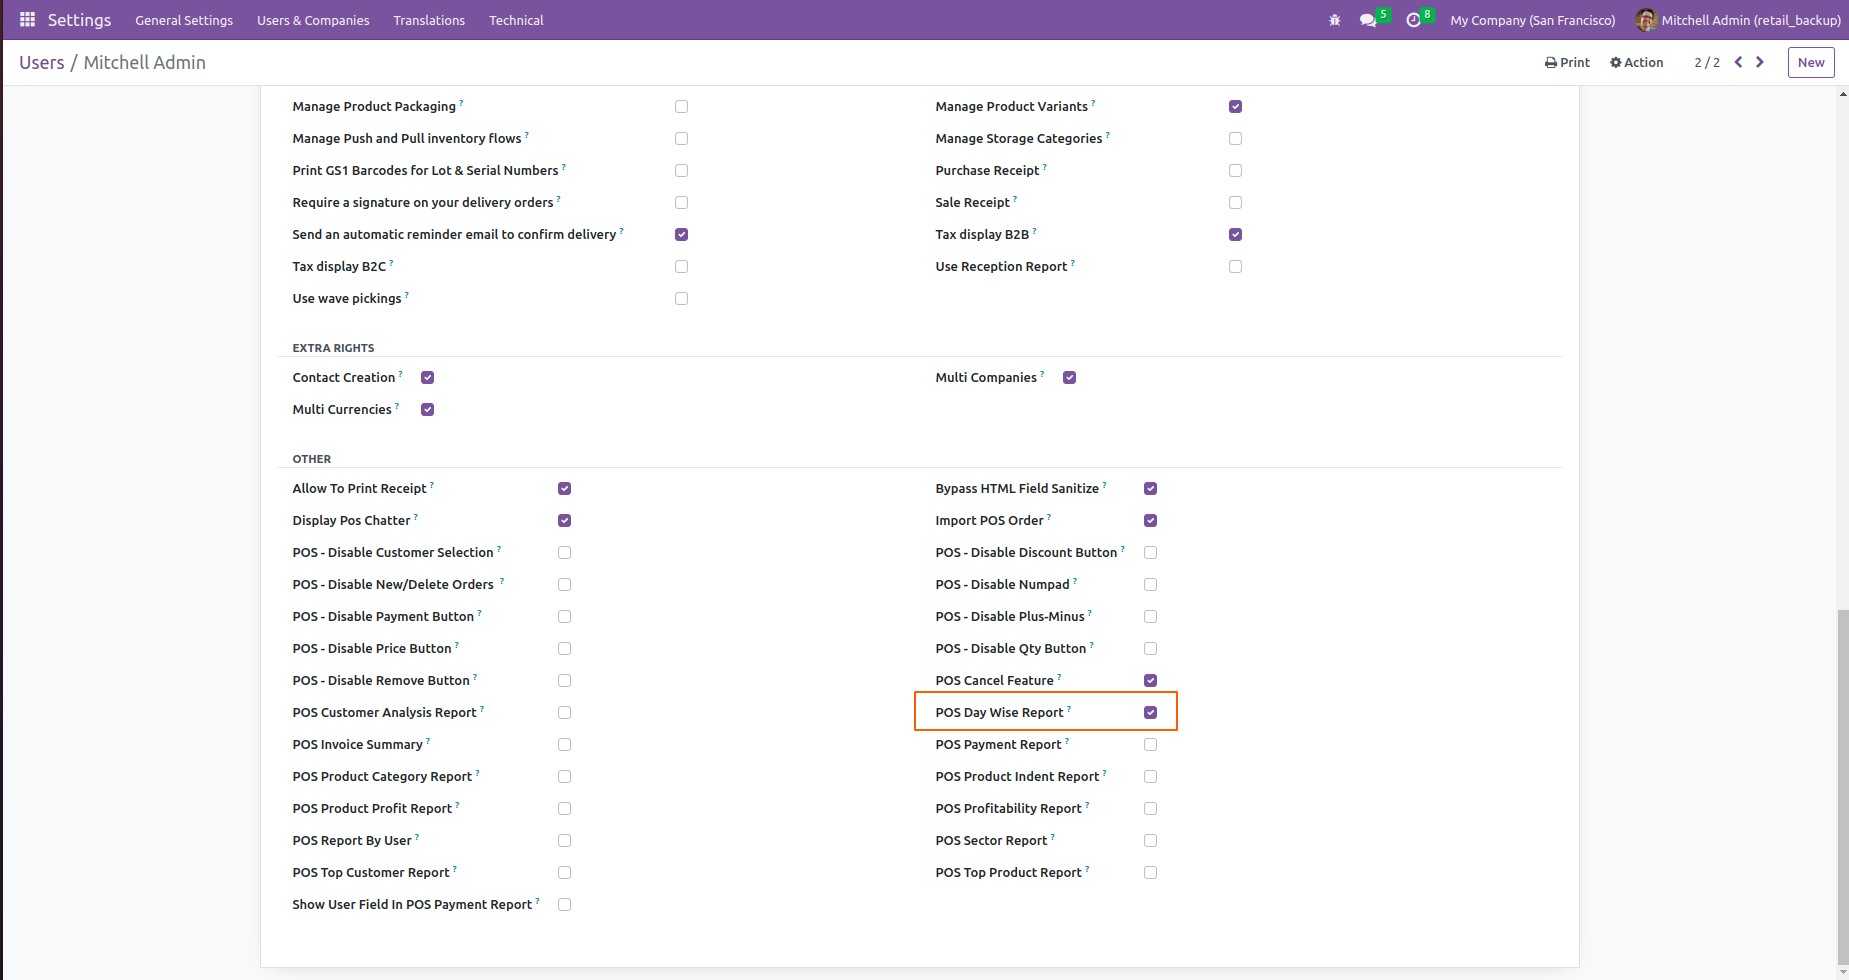
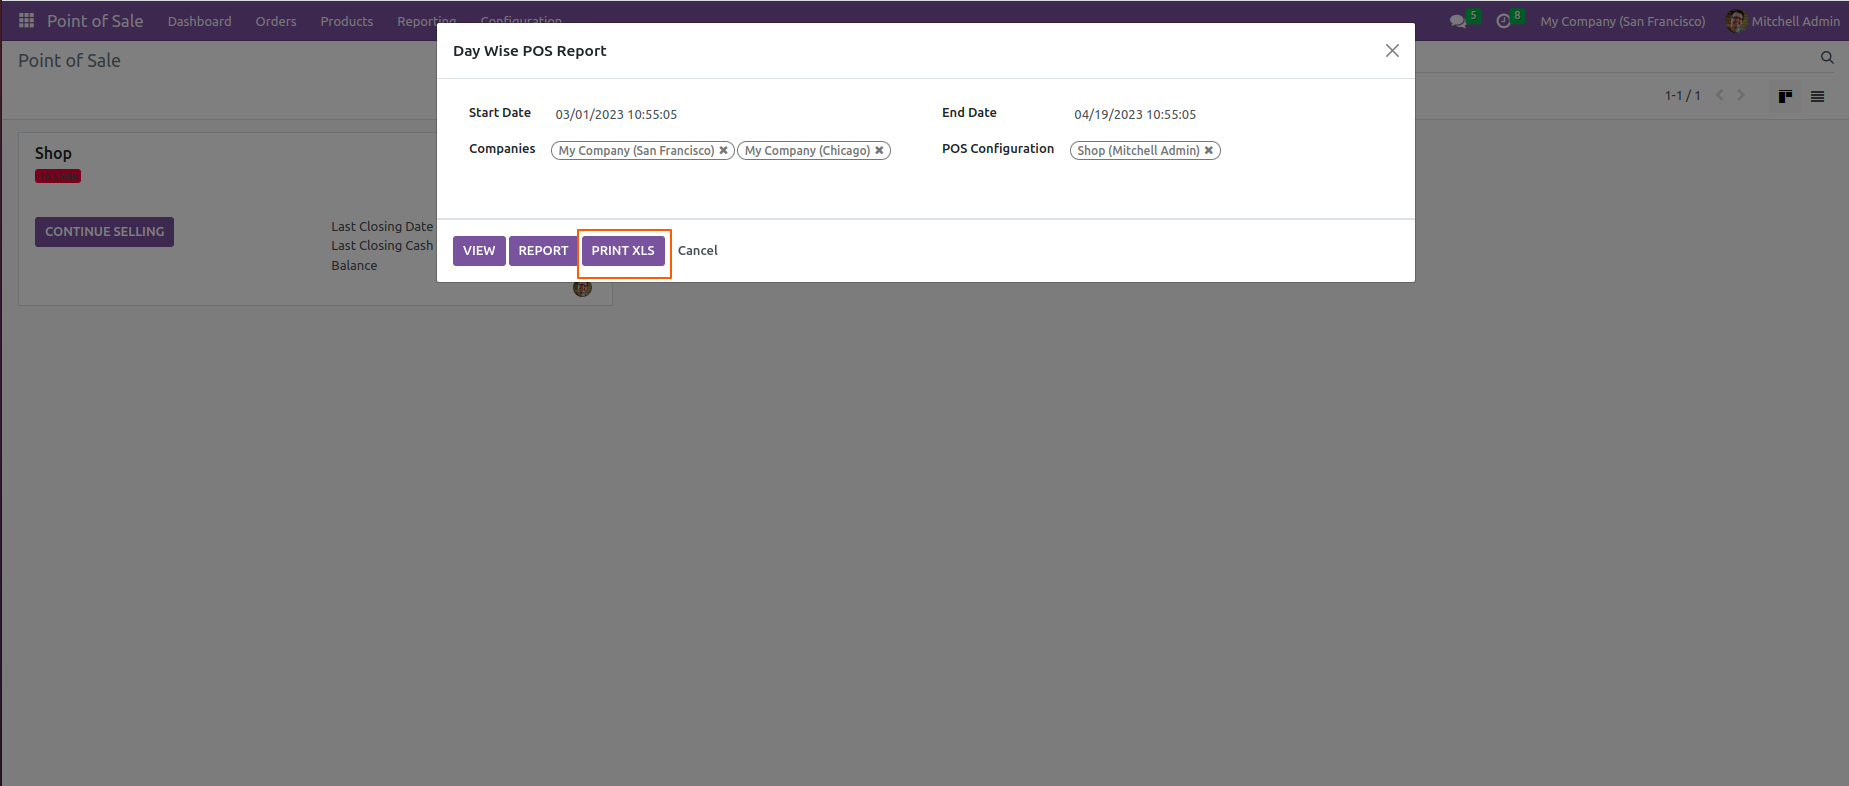
Enable "POS Day Wise Report".
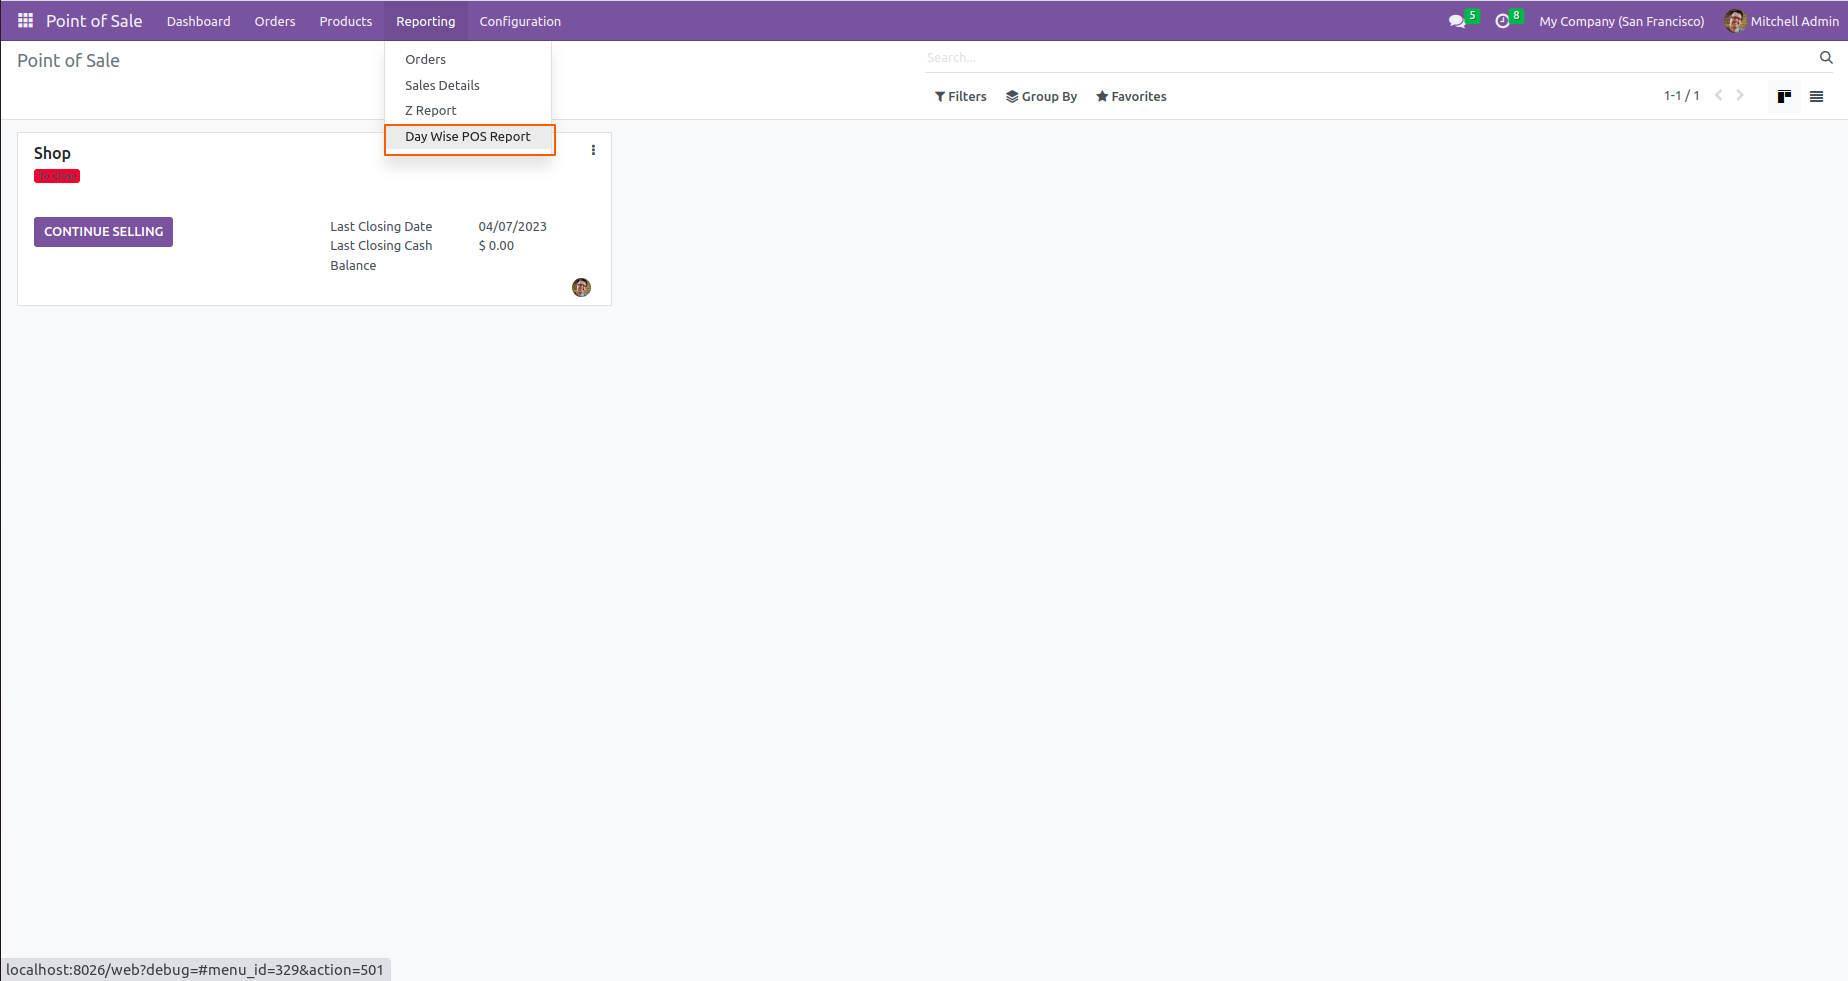
Go to "Day Wise POS Report".
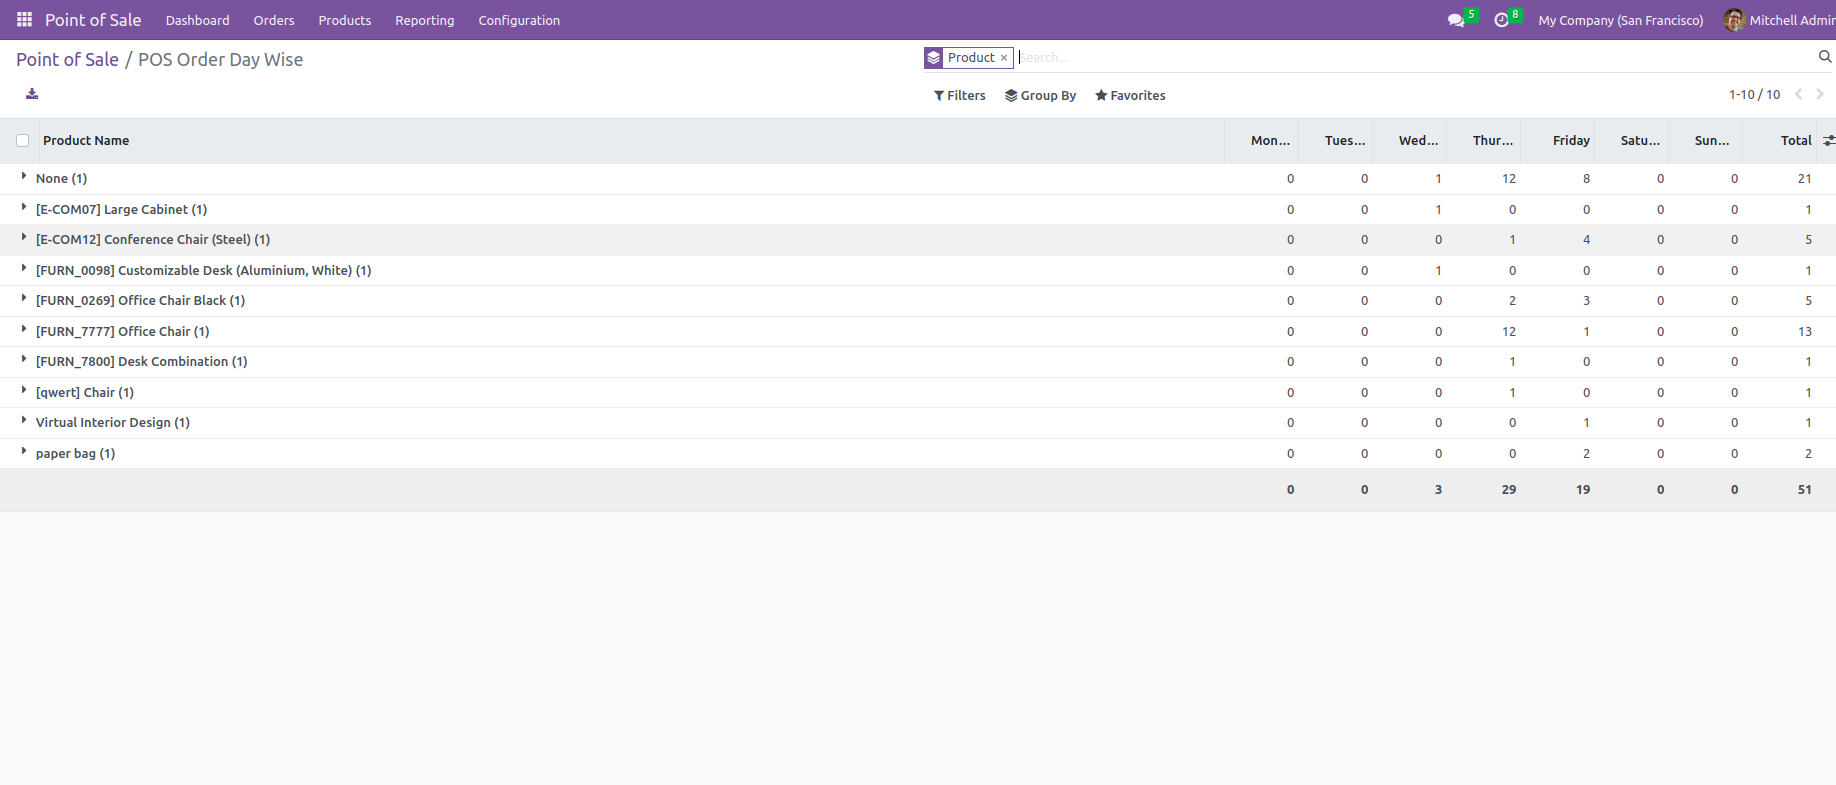
Set the date range for the PDF/Excel Report and fill the details. Press "View".

POS products day wise report for the given date range.
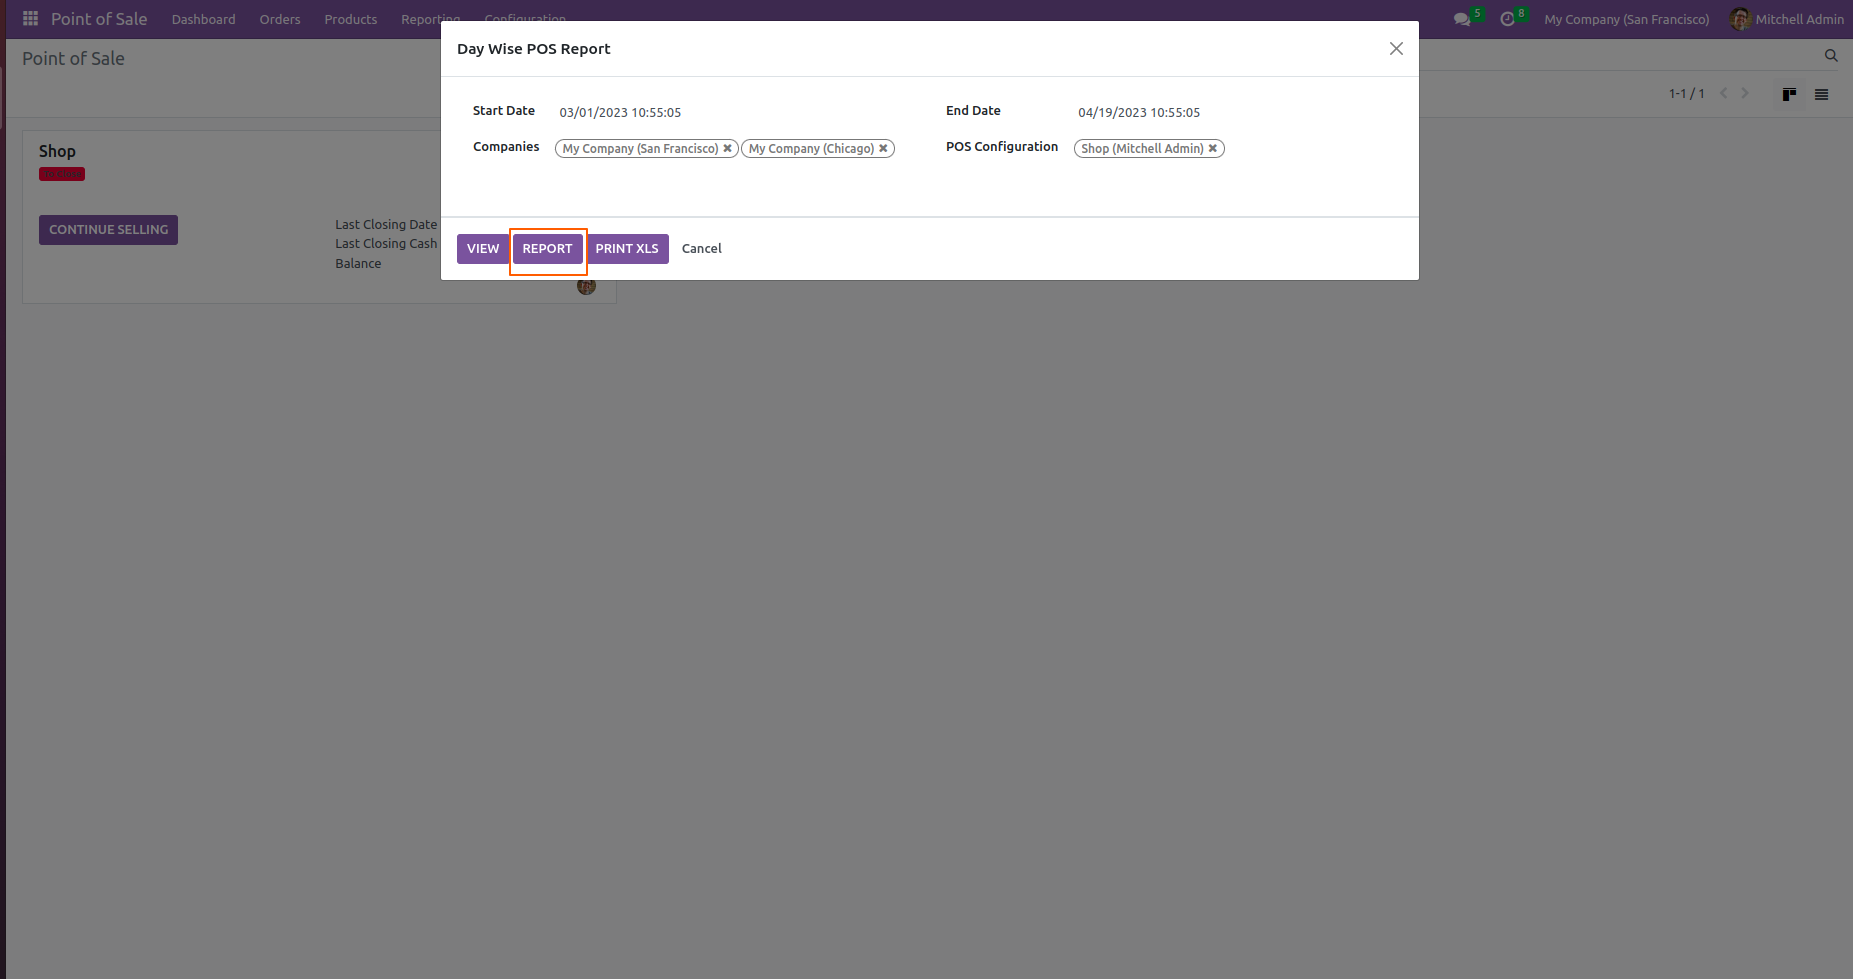
Set the date range for the PDF/Excel Report and fill the details. Press "Report".
POS products day wise report for the given date range in PDF Report.
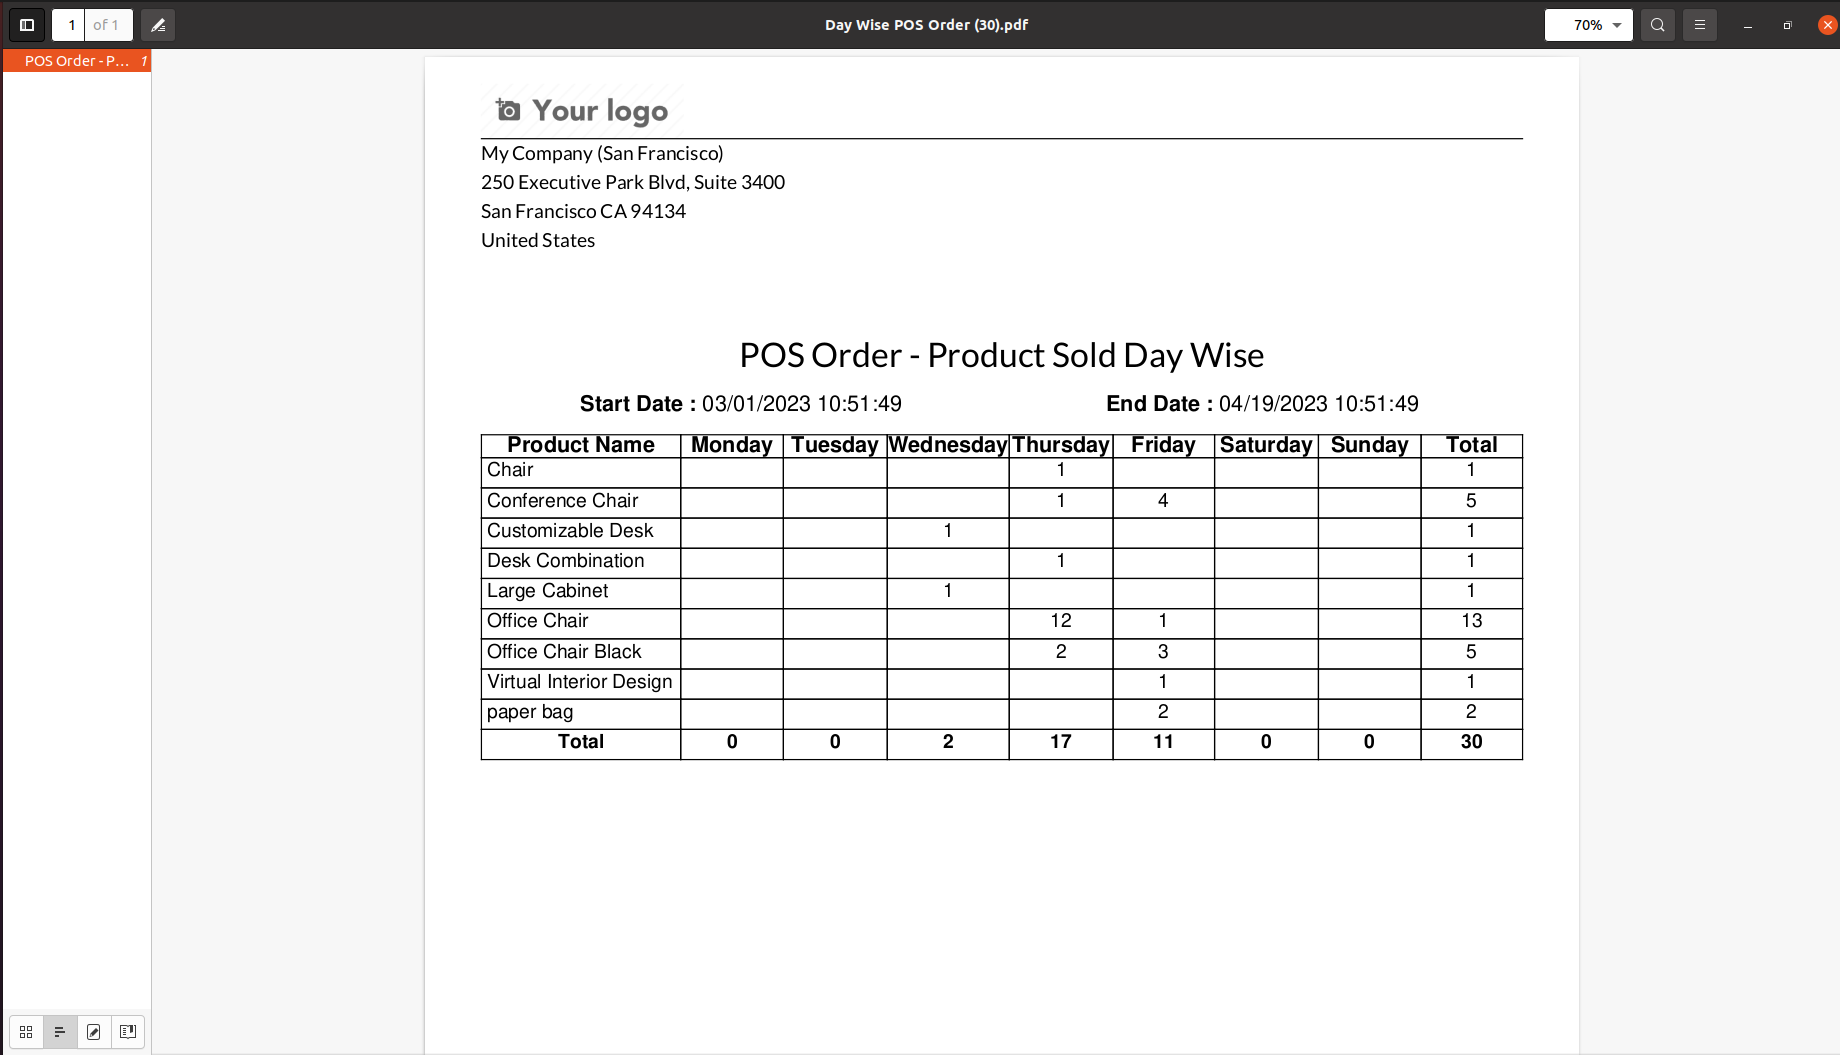
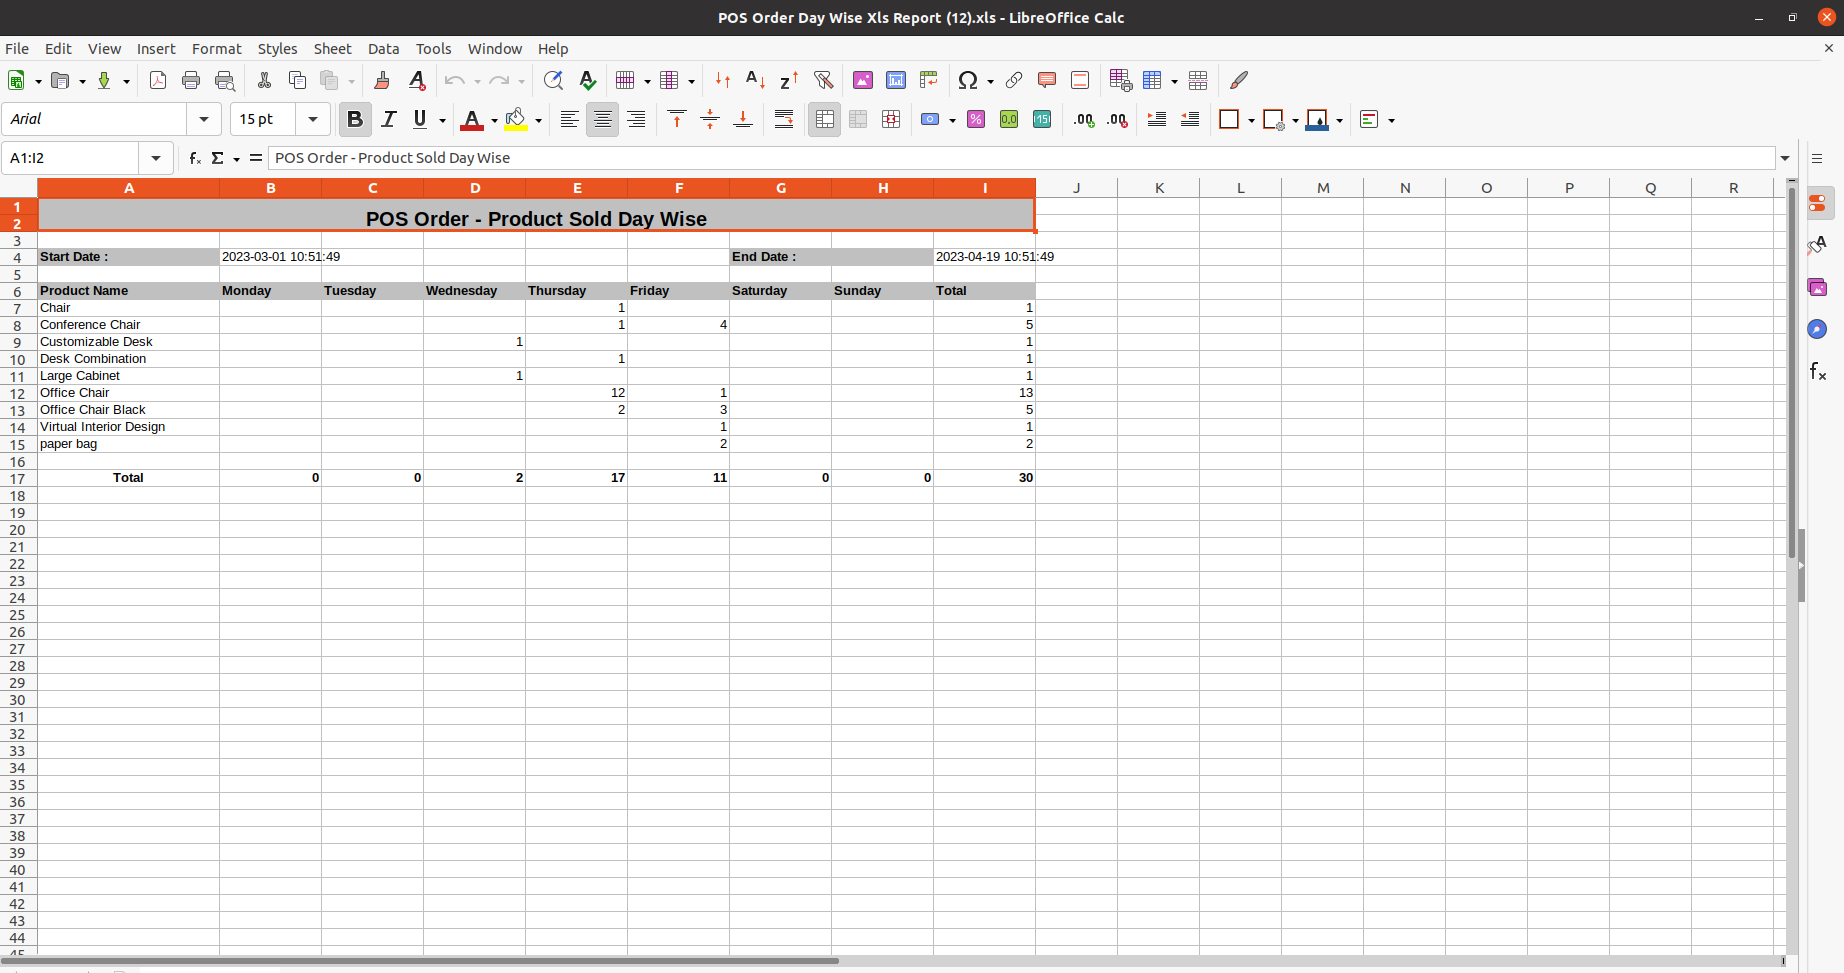
Set the date range for the PDF/Excel Report and fill the details. Press "Print XLS".
POS products day wise report with for the given date range in the excel report.
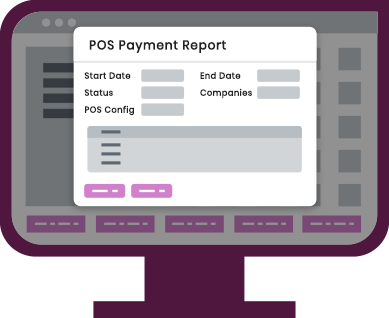
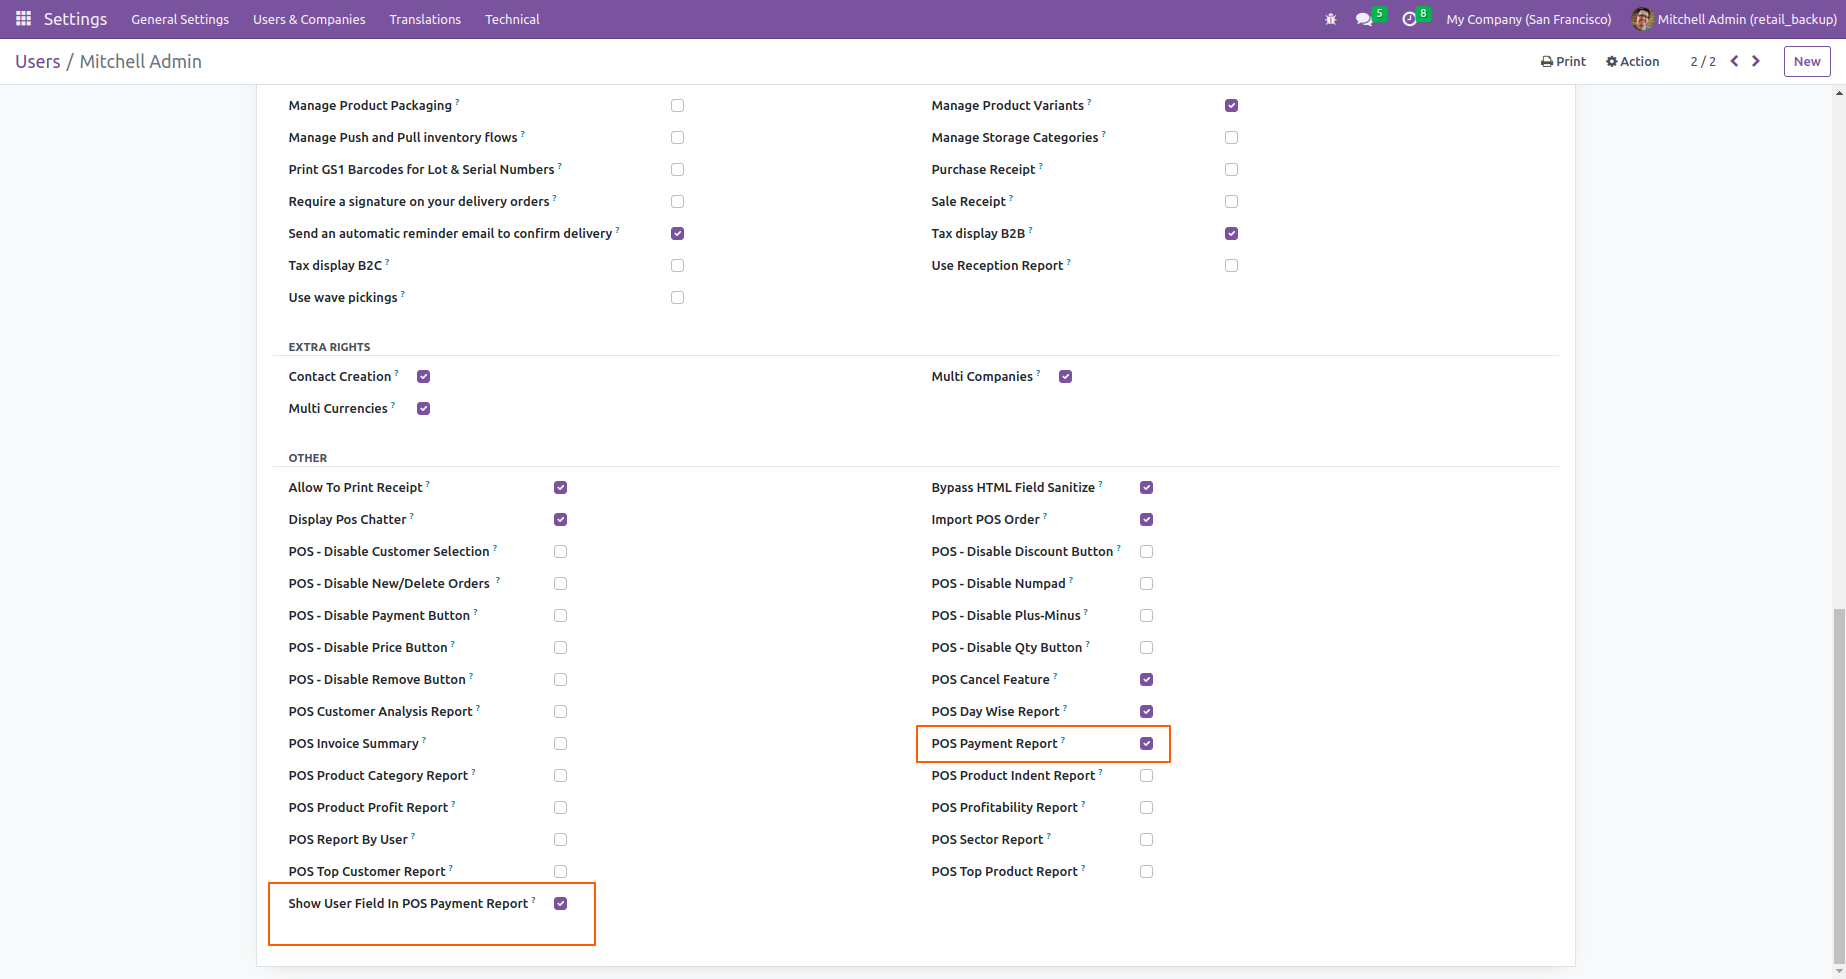
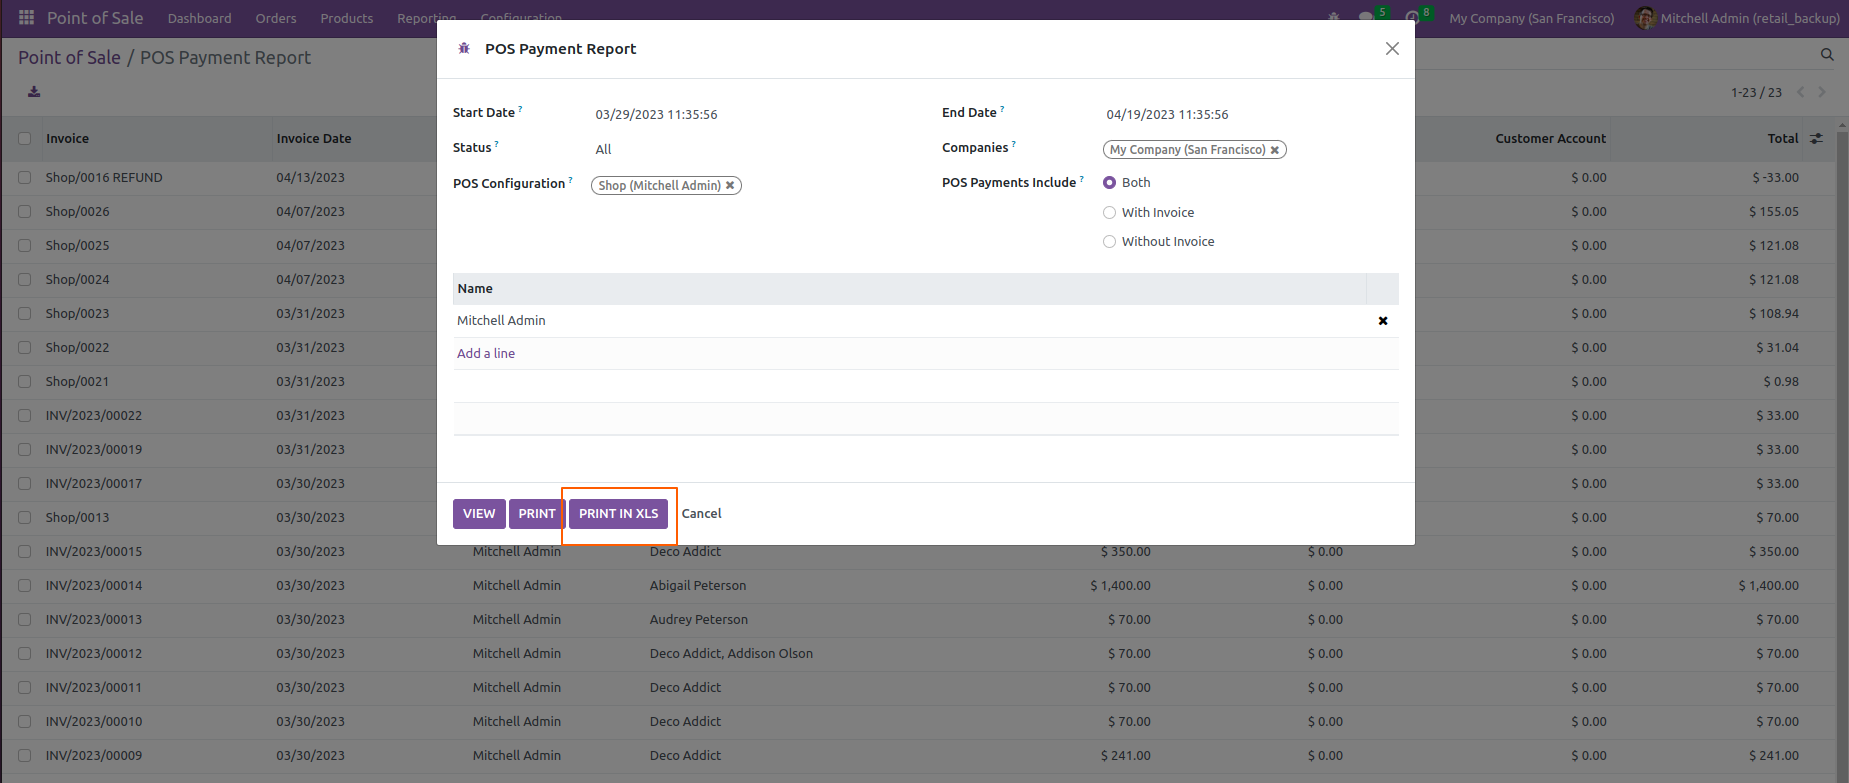
Go to user setting >> Enable the "Show User Field In POS Payment Report" and "POS Payment Report".
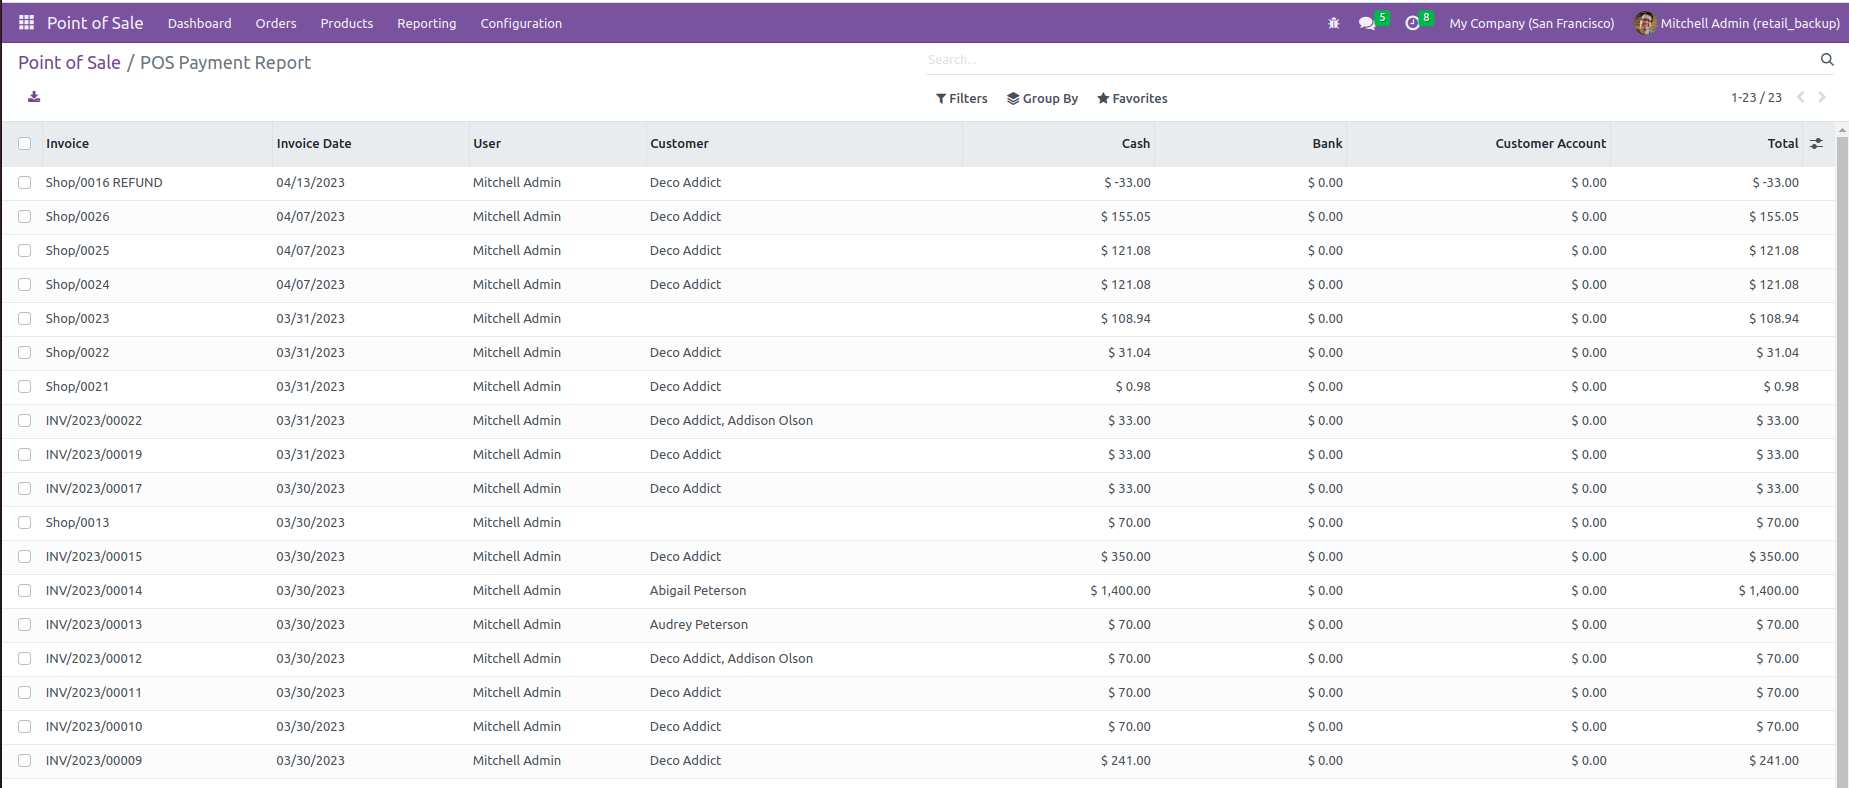
Go to "POS Payment Report".
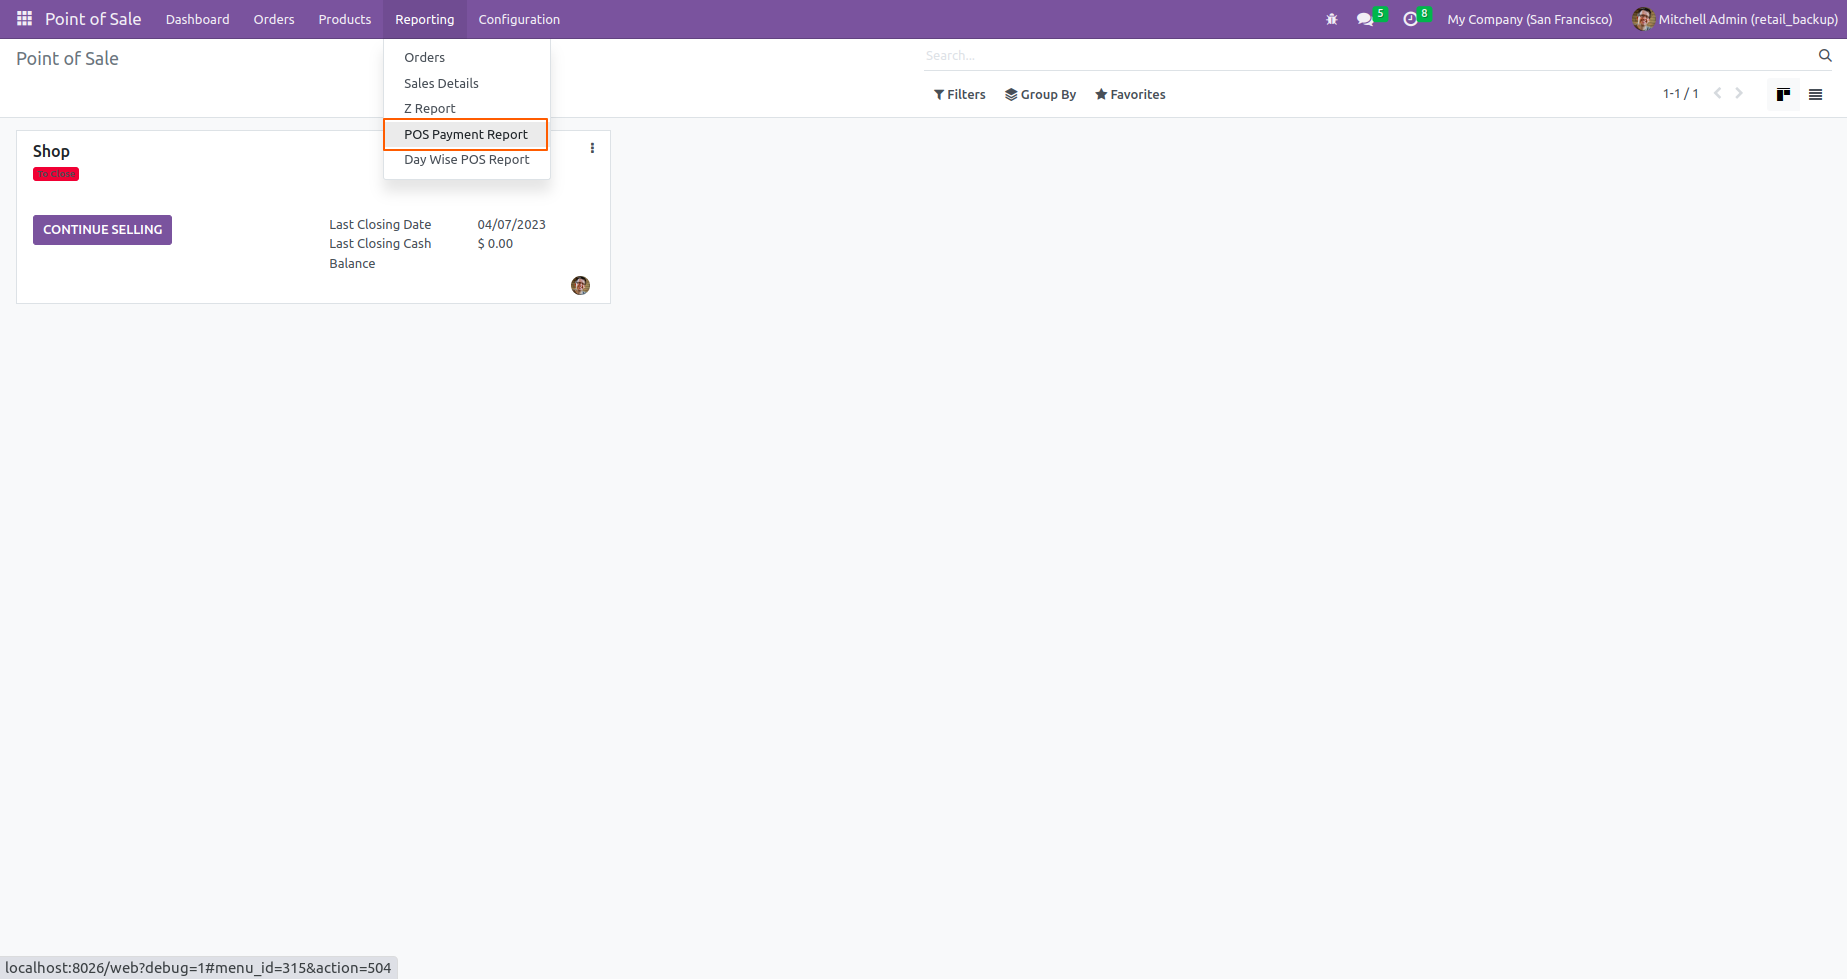
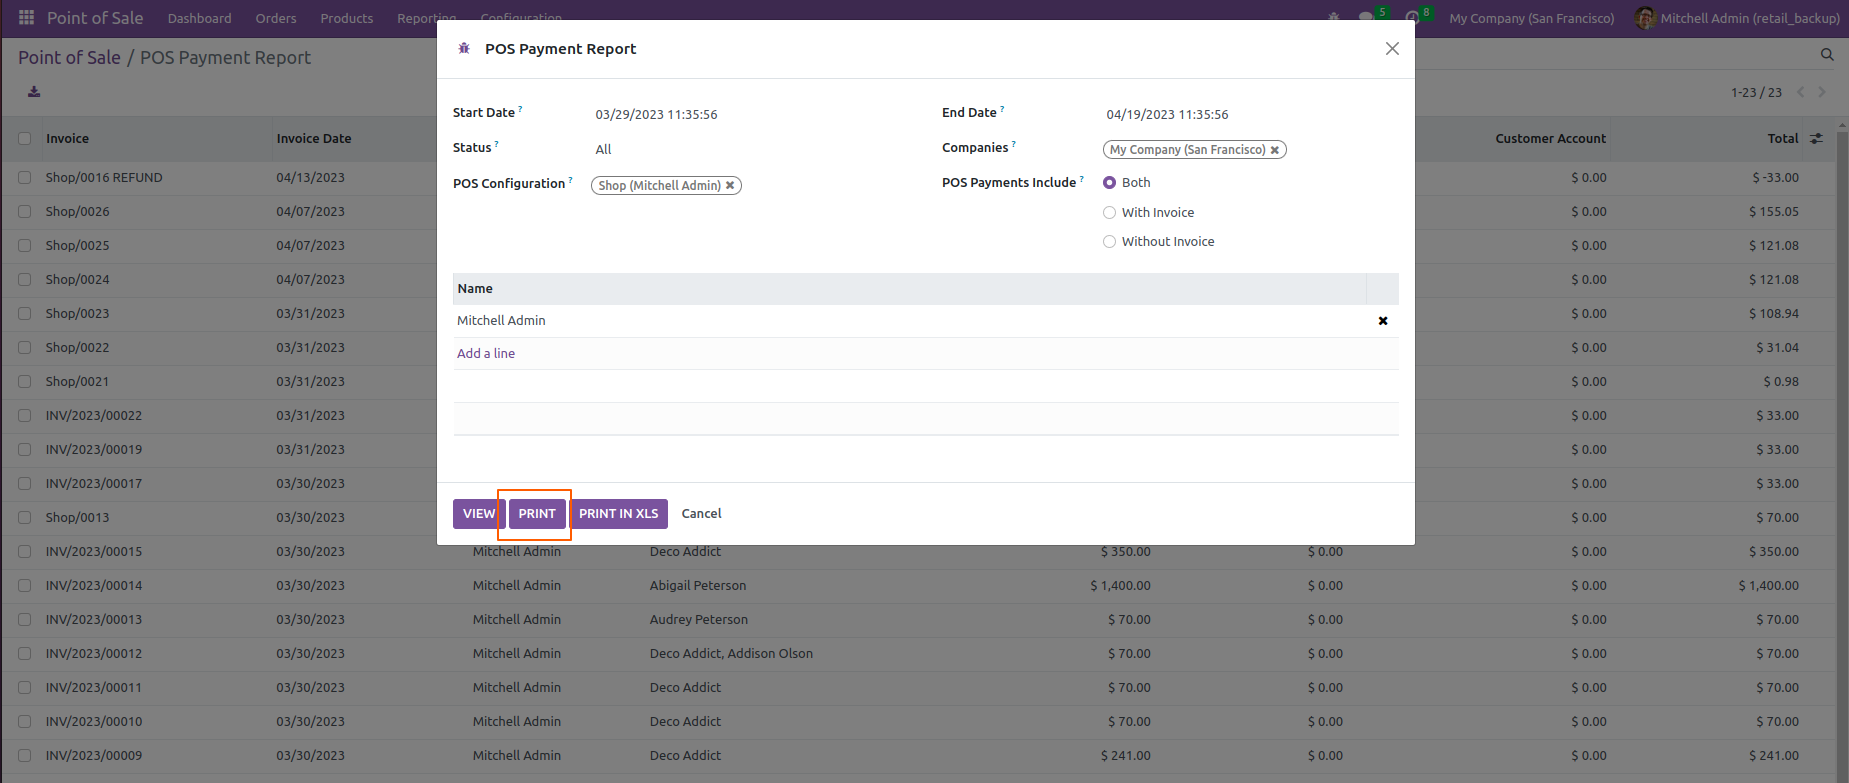
After that "POS Payment Report" wizard will be appear.
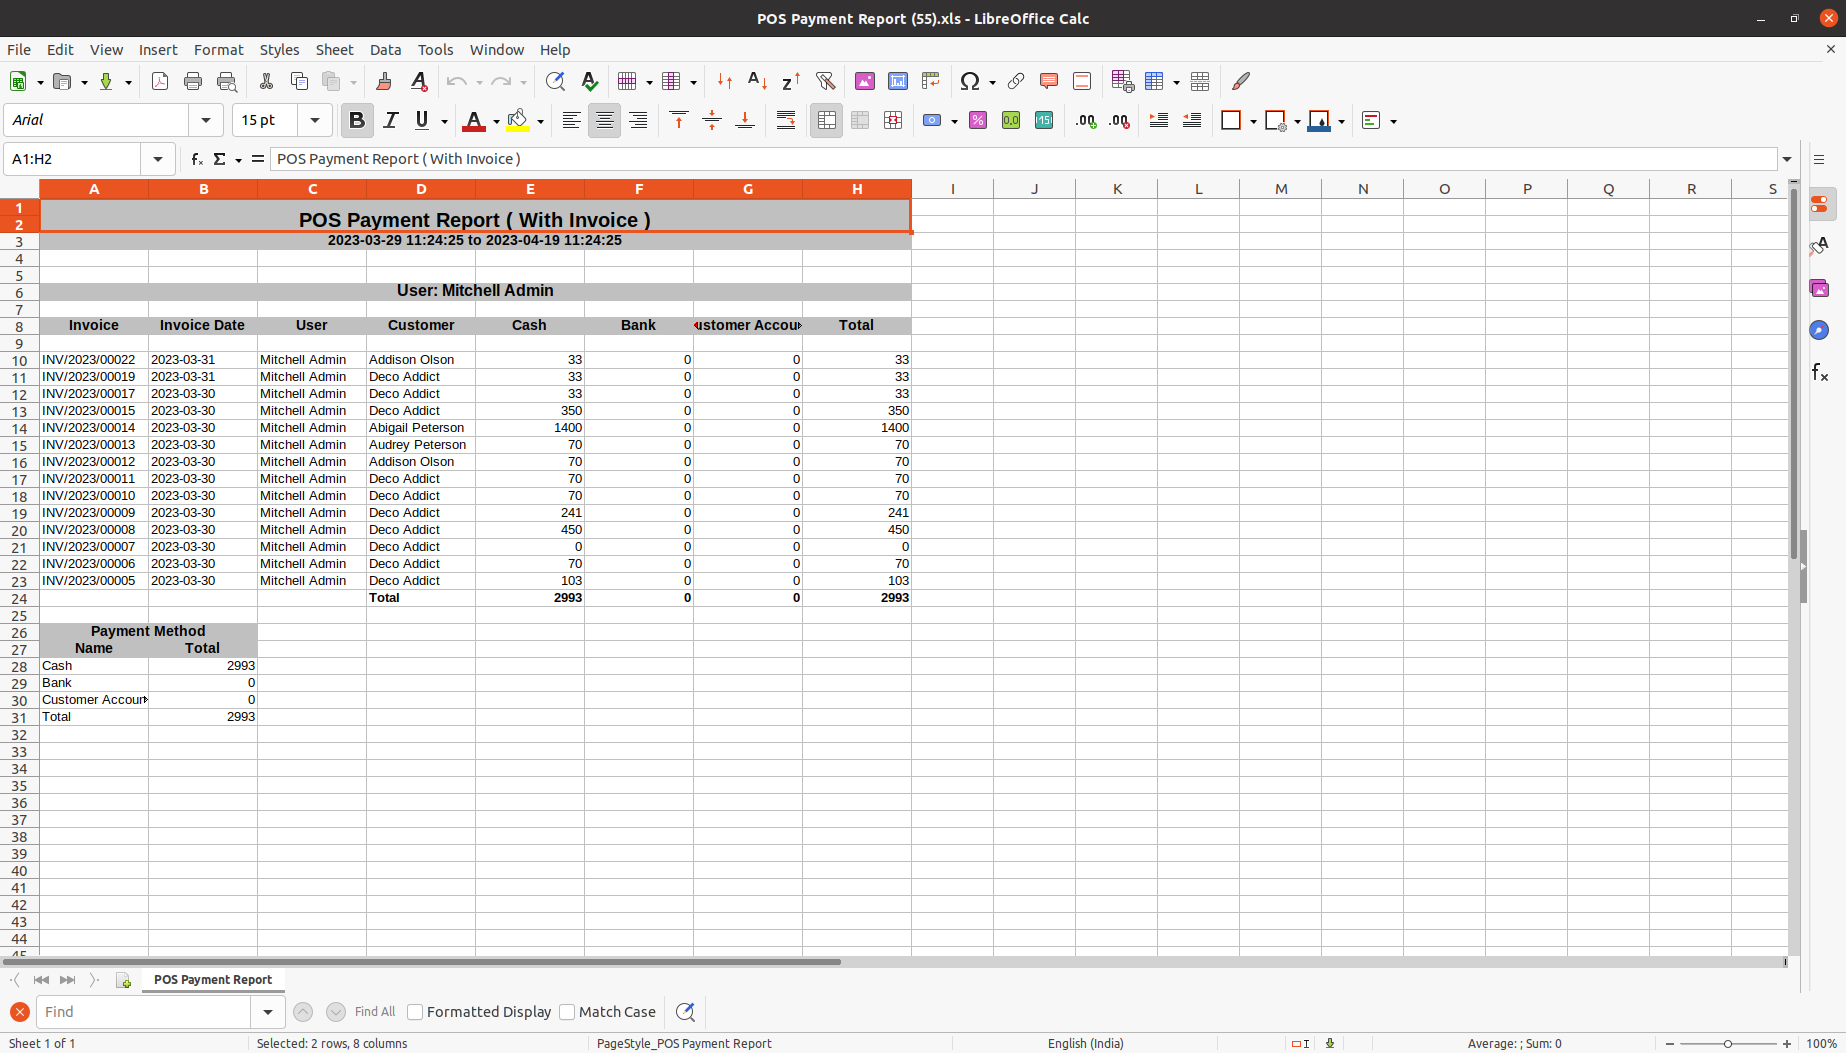
Here, You can select any of the "POS Payments Includ" options. This will allow you to choose between payments with an invoice, without an invoice, or both.
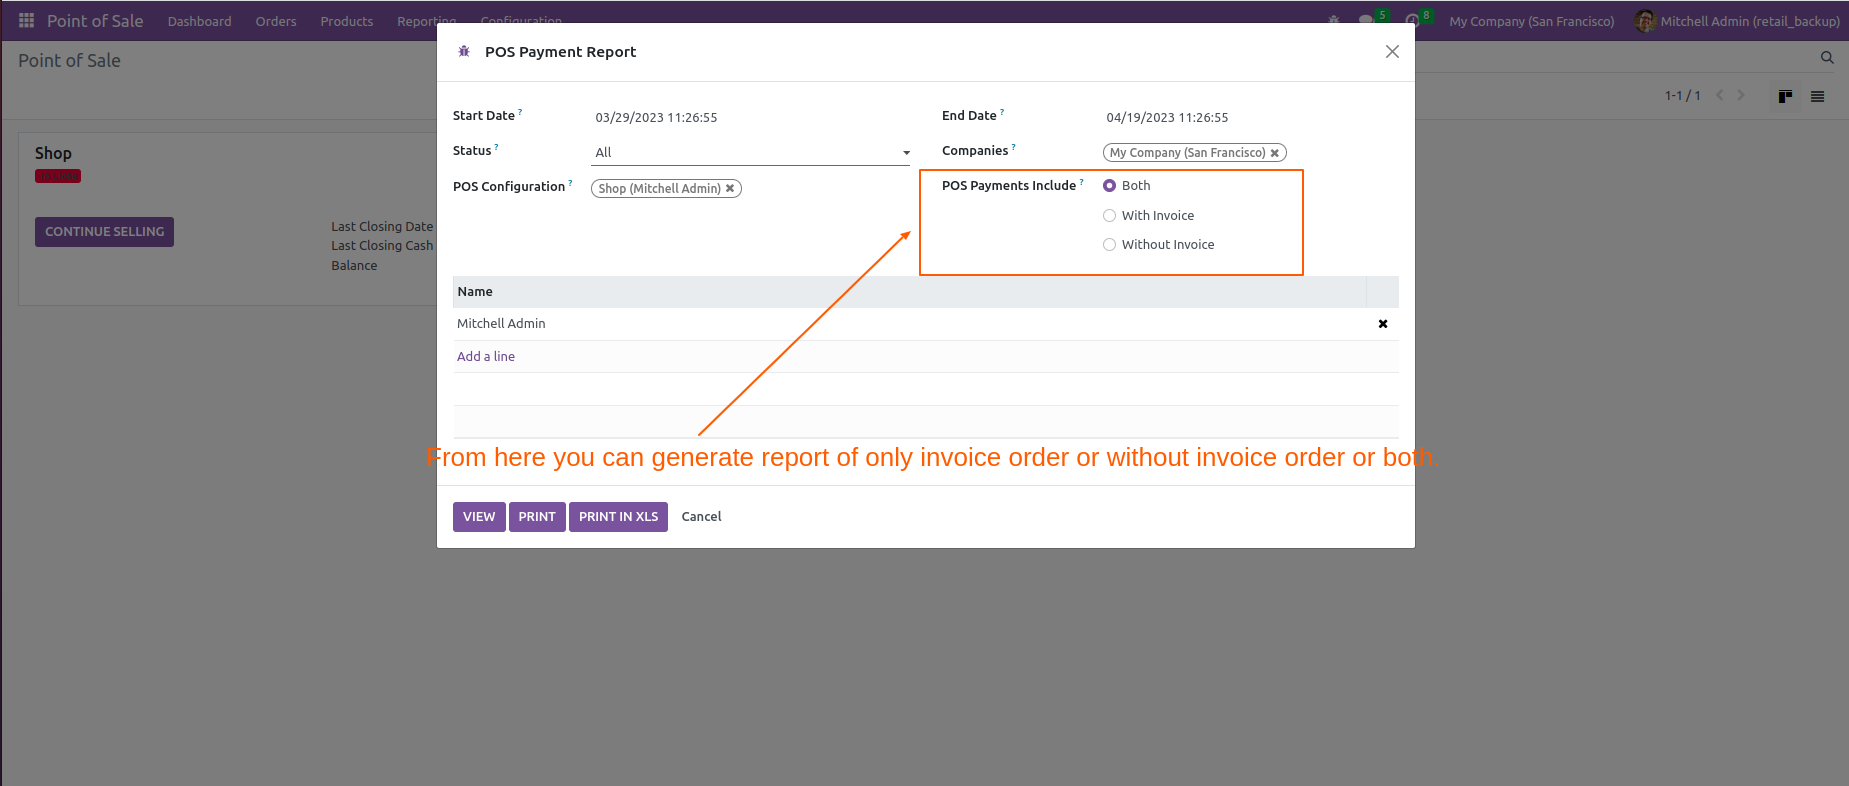
Select the status of order.
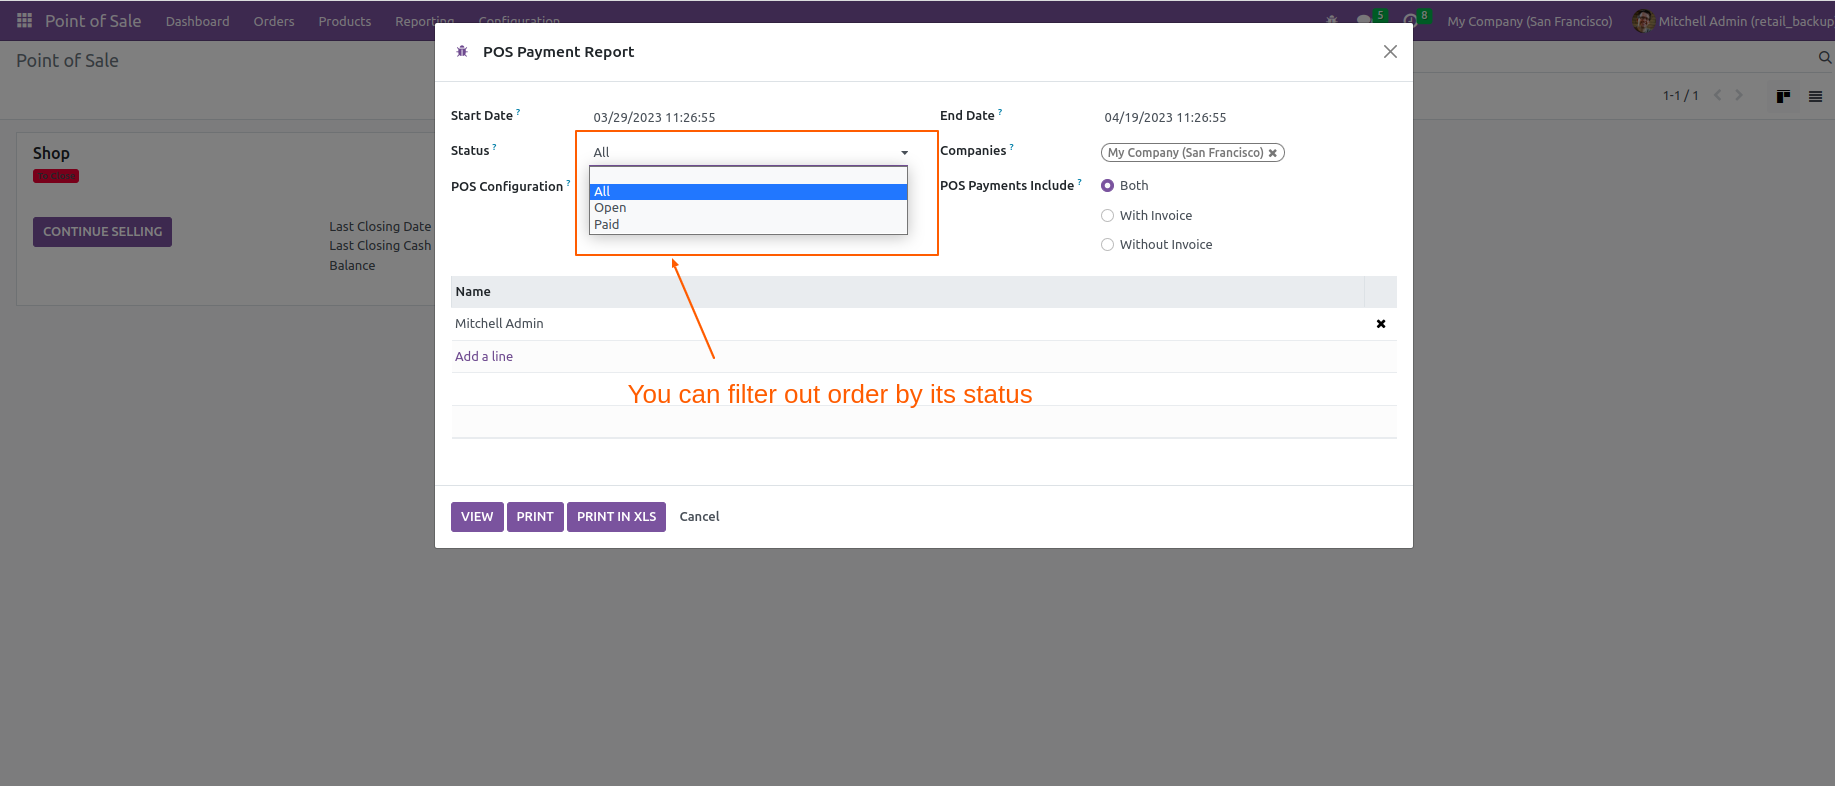
If you want to see the the selected POS Payment report list then click on the "VIEW" button.
Here, you can see the list view of the POS Payment report.
For printing the PDF, Click on the "PRINT" button.
PDF File.
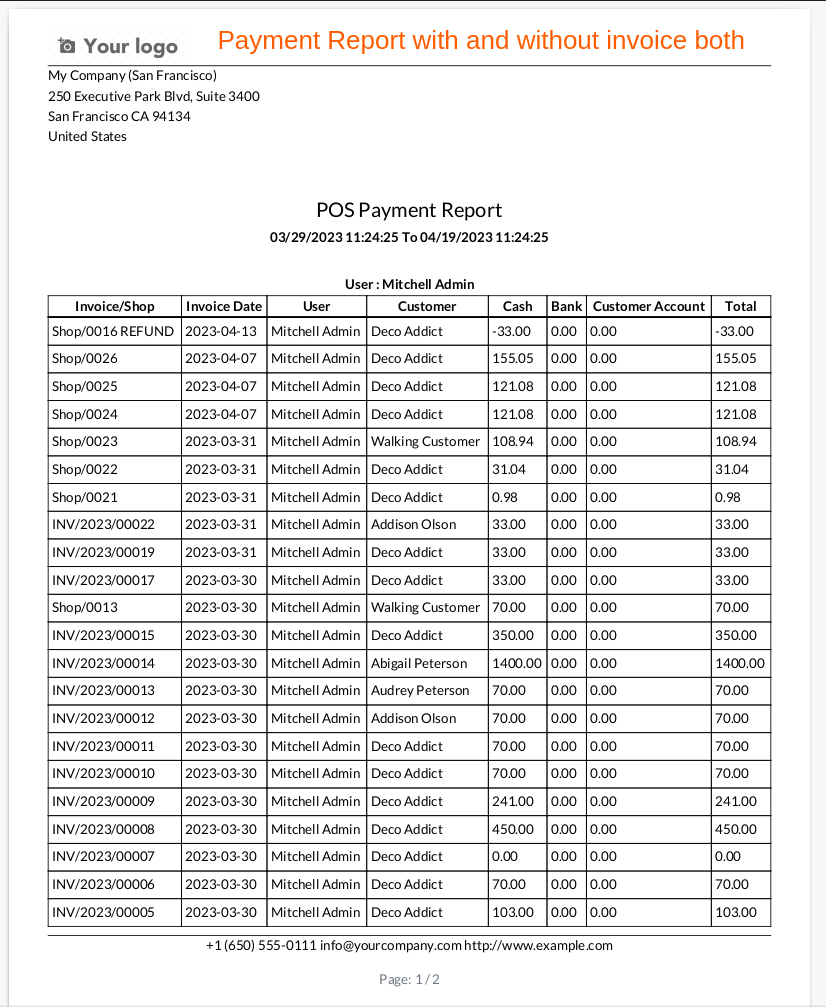
PDF File.
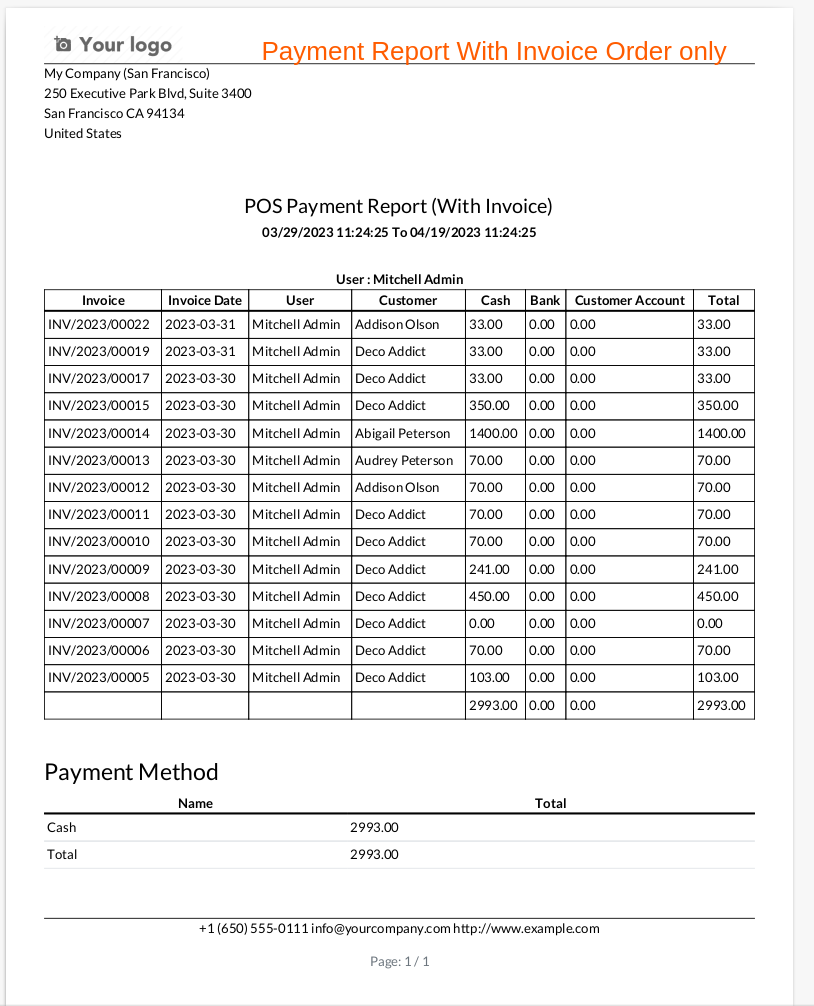
PDF File.
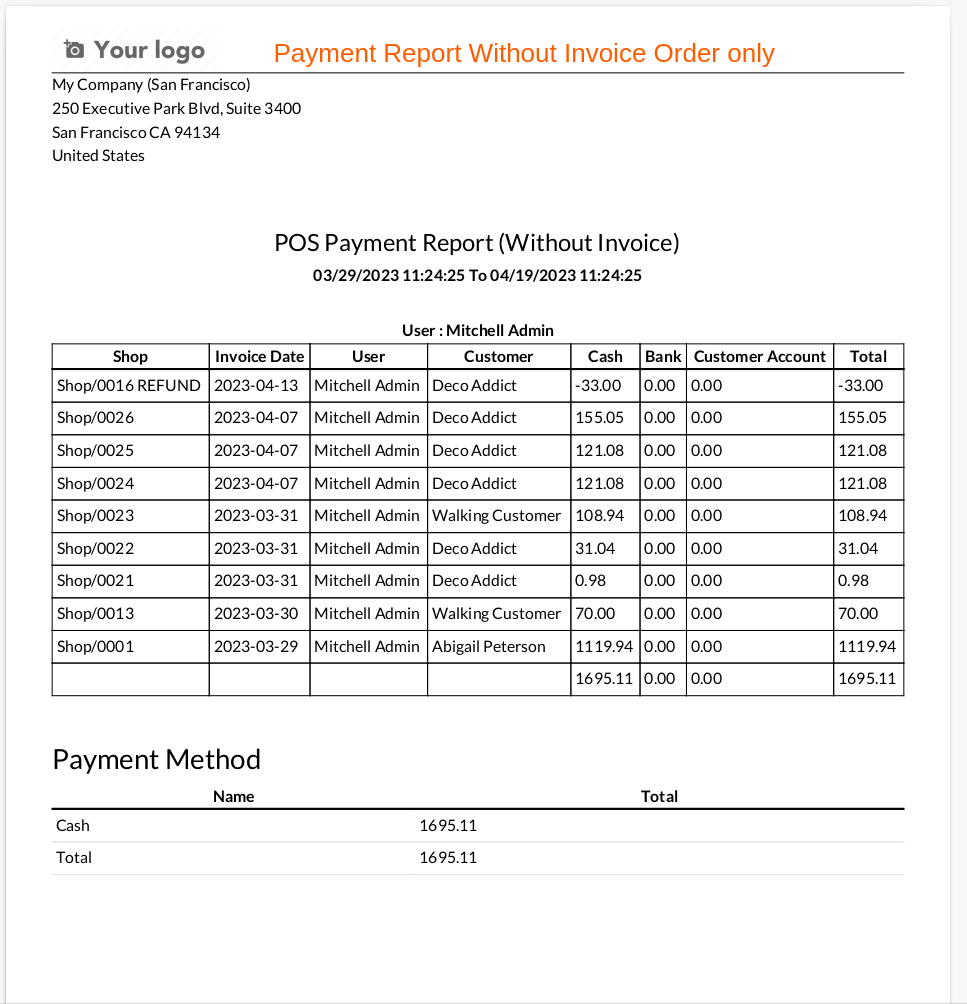
If you want to print the report in XLS file formate then, click on the "PRINT IN XLS" button.
XLS File.
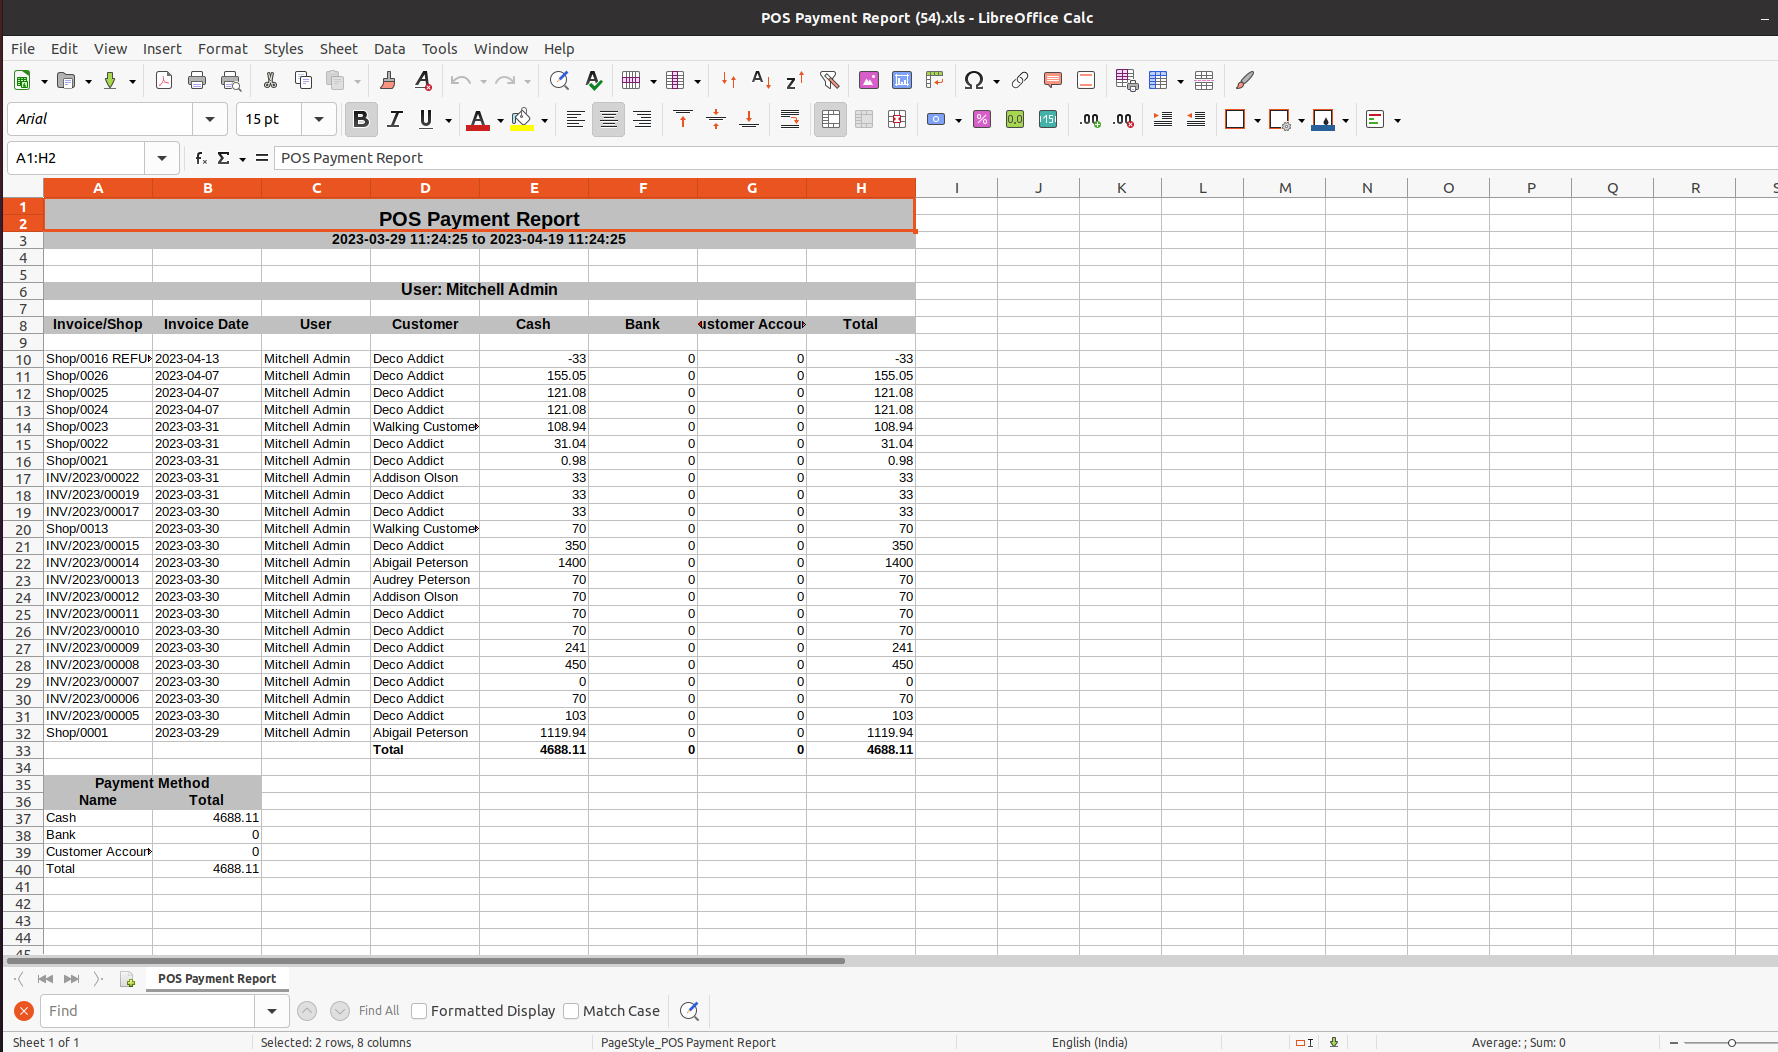
XLS File.
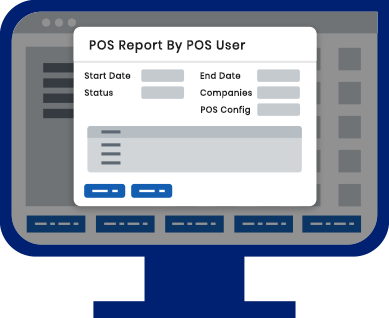
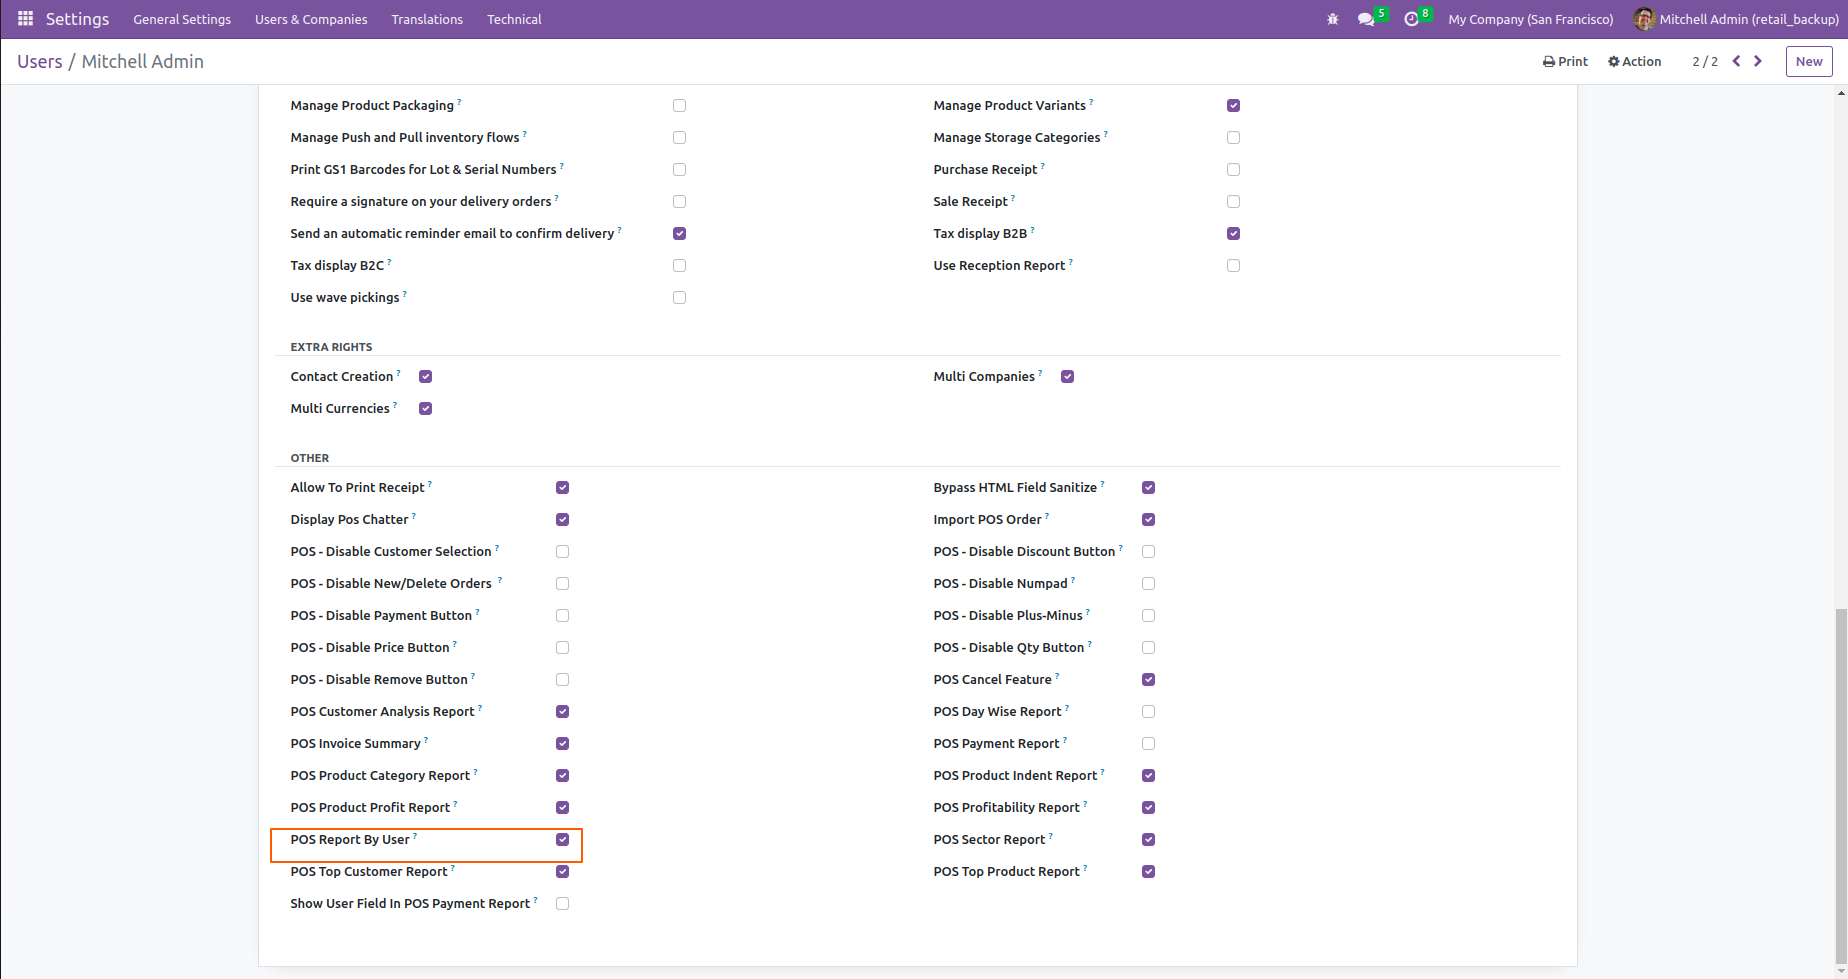
Go to user setting >> Enable the "POS Report By User".
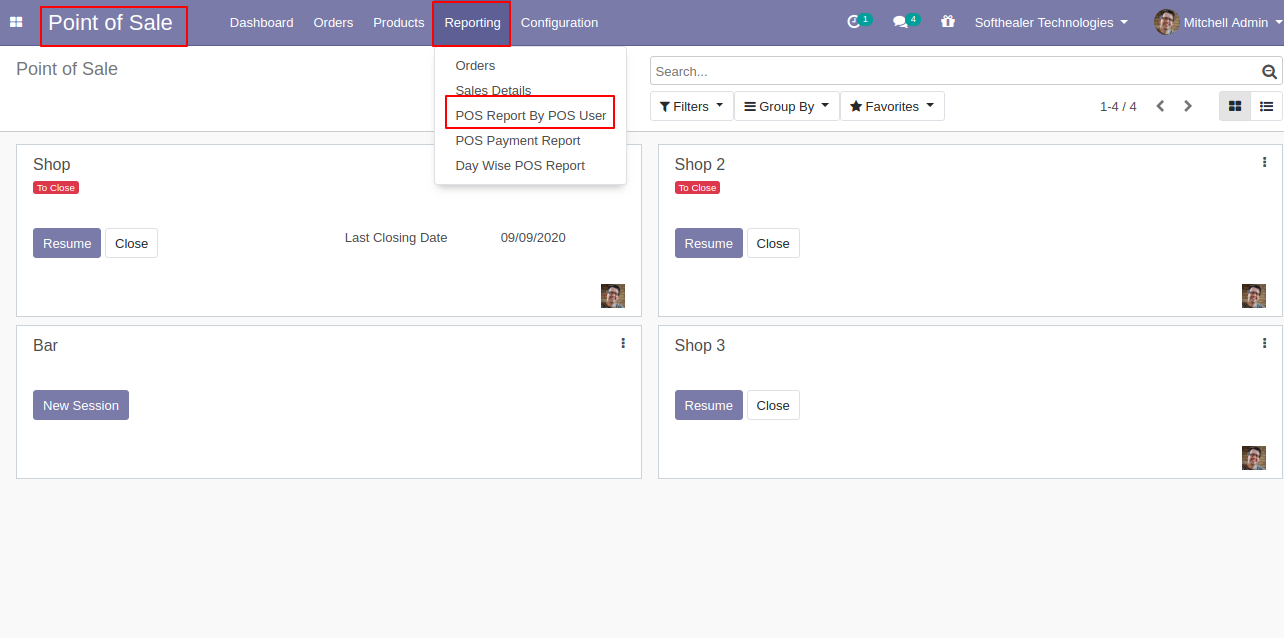
Go to "POS Report By POS User".
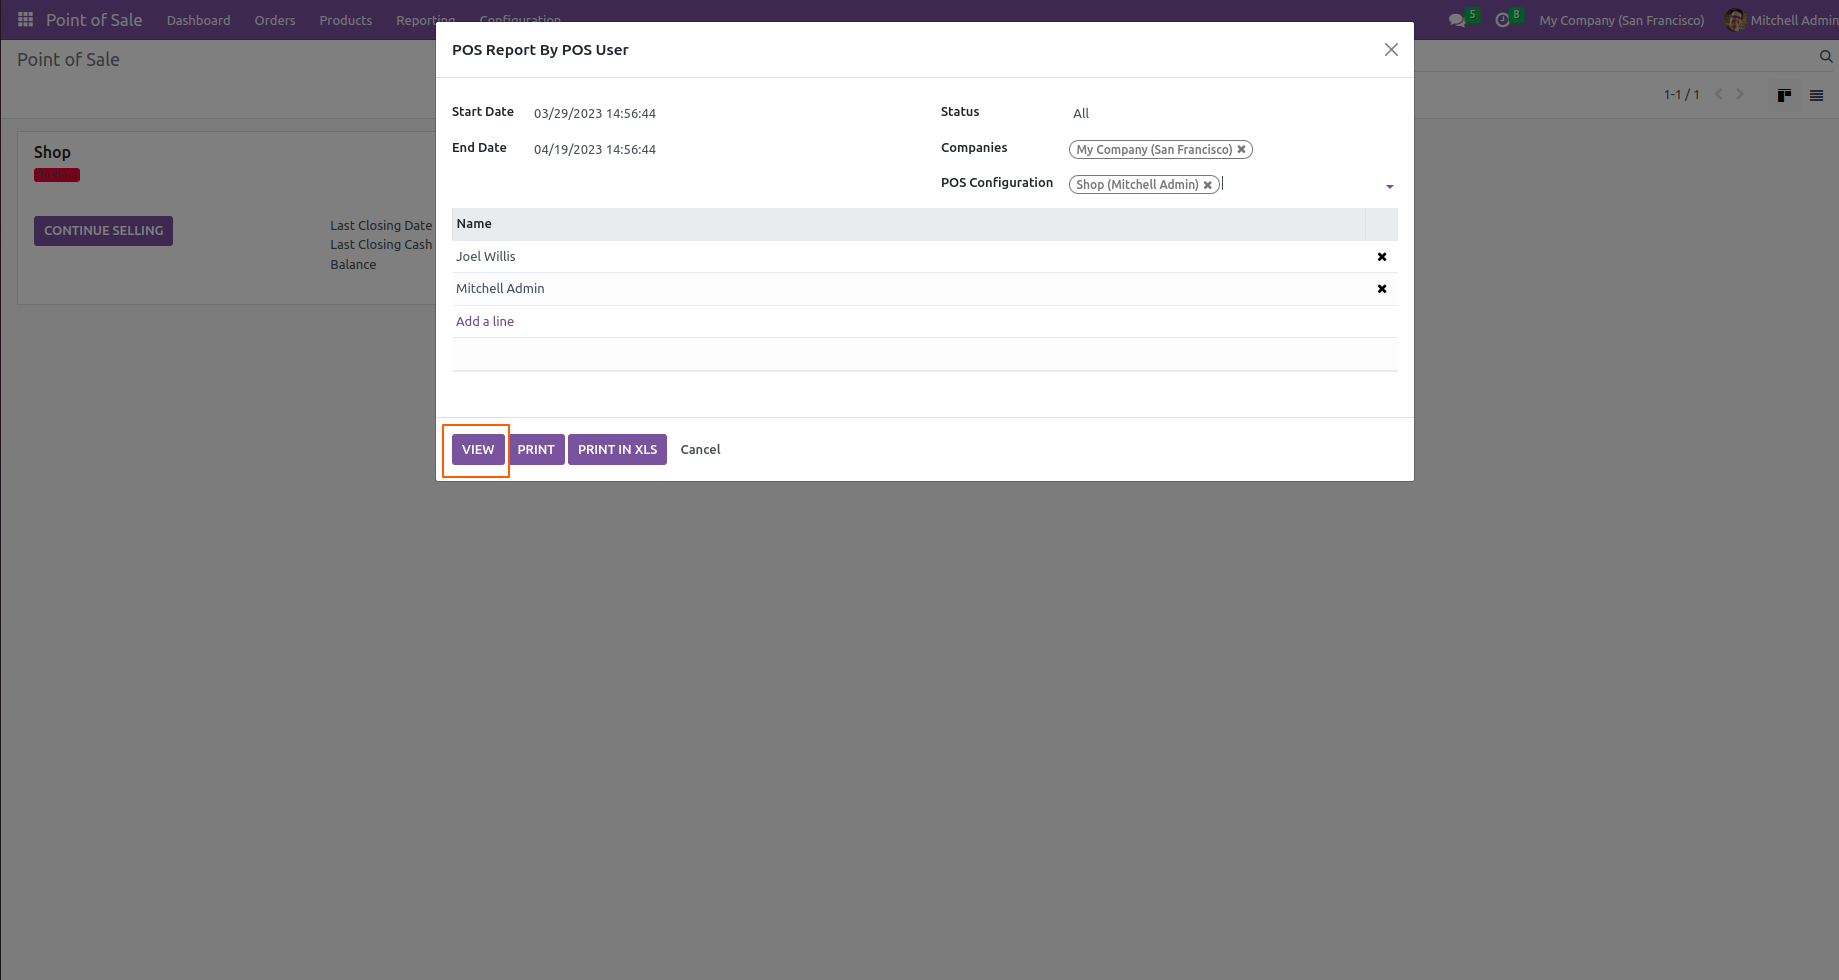
After that "POS Report By POS User" wizard will appear. Fill-up details.
If you want to see the the selected POS report by POS user list then click on the "VIEW" button.
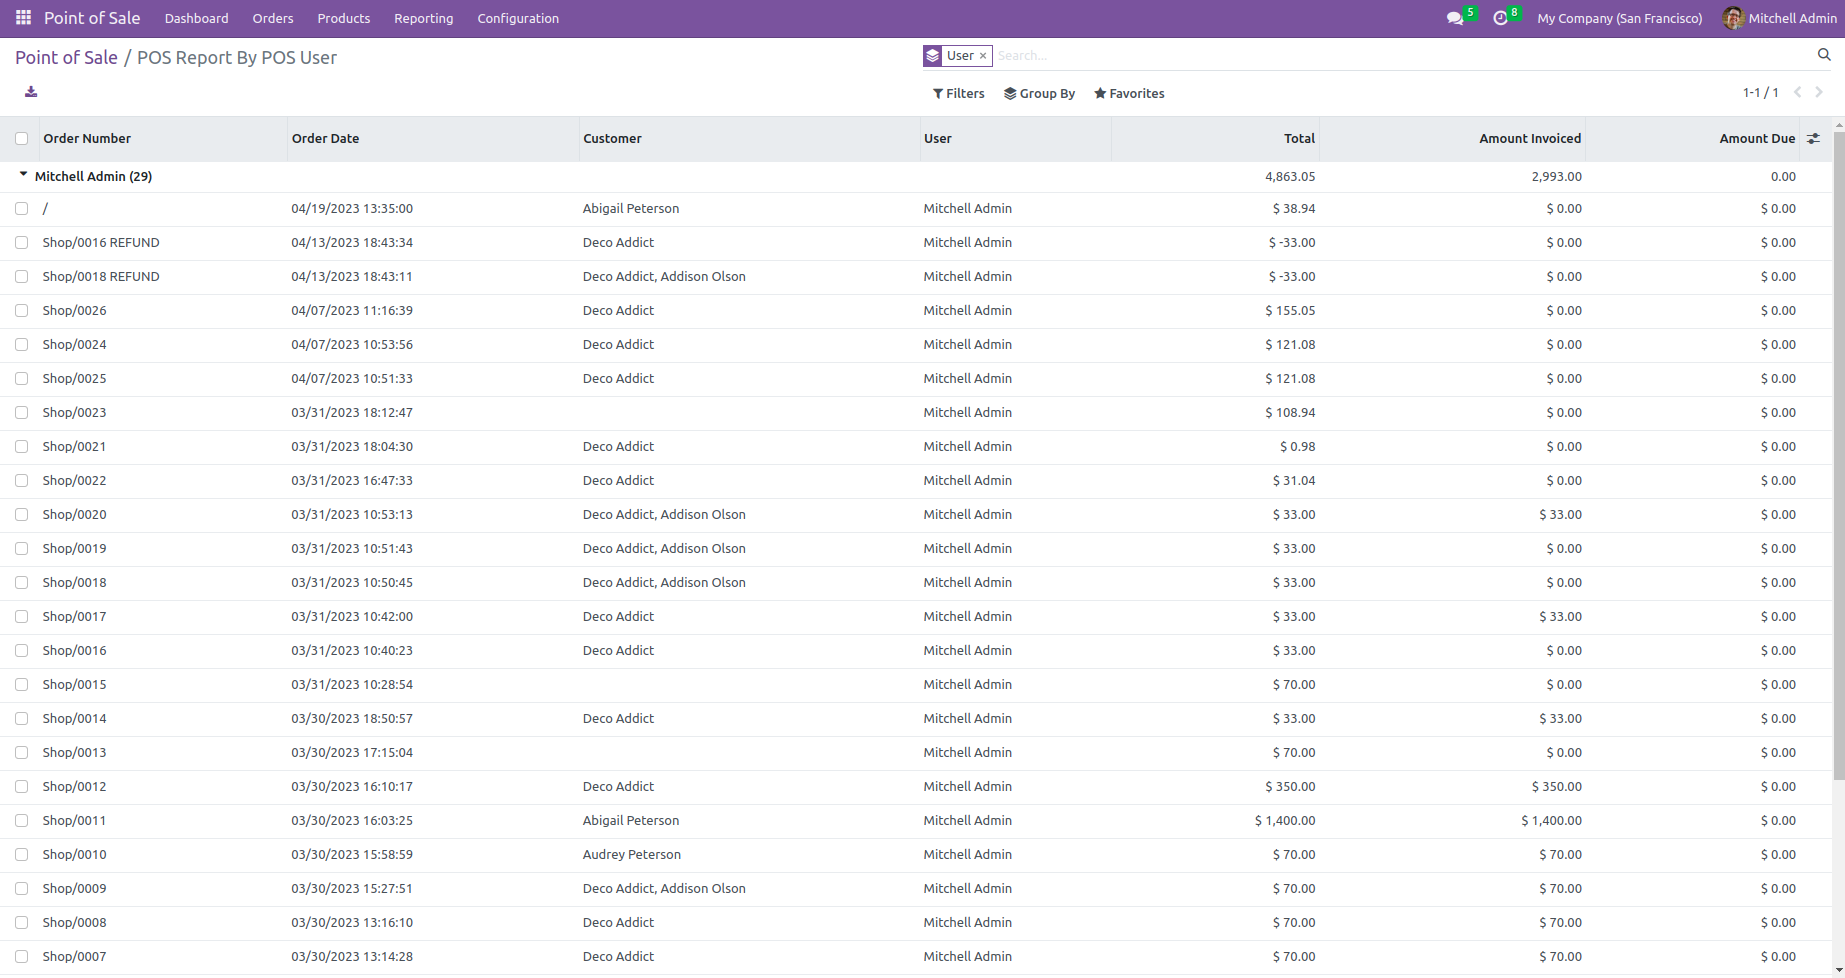
Here, you can see the list view of the POS report by POS user.
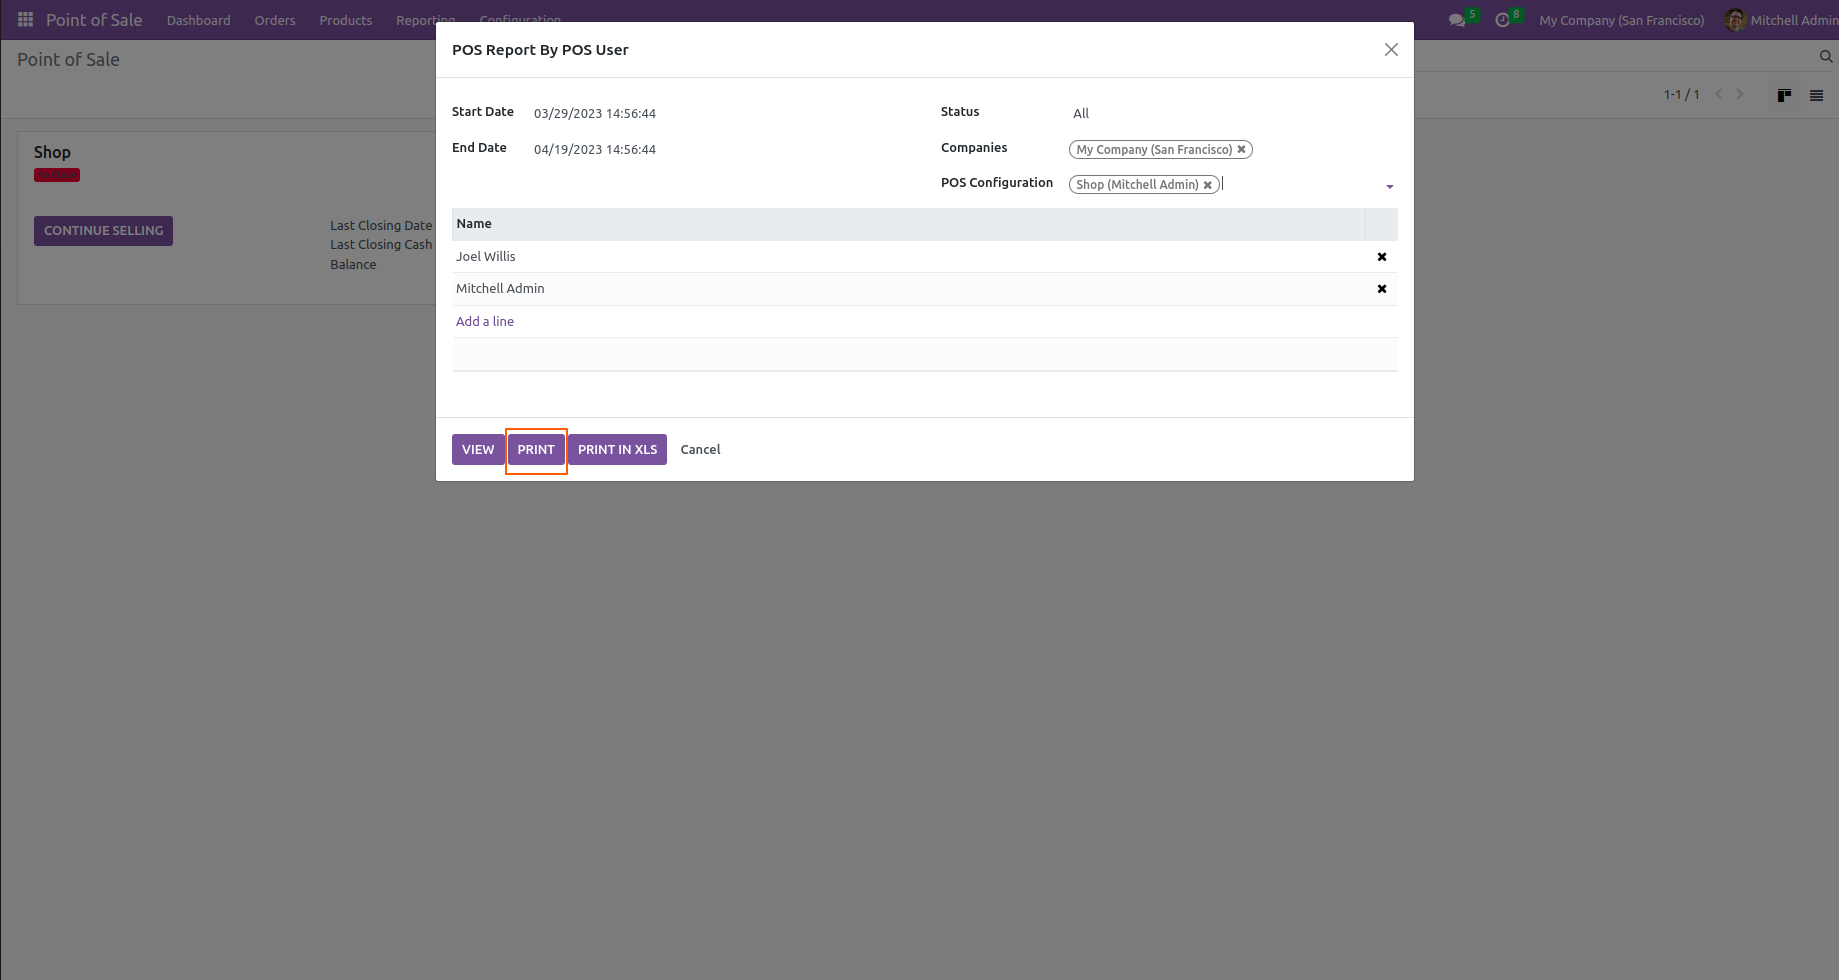
For printing the PDF, Click on the "PRINT" button.
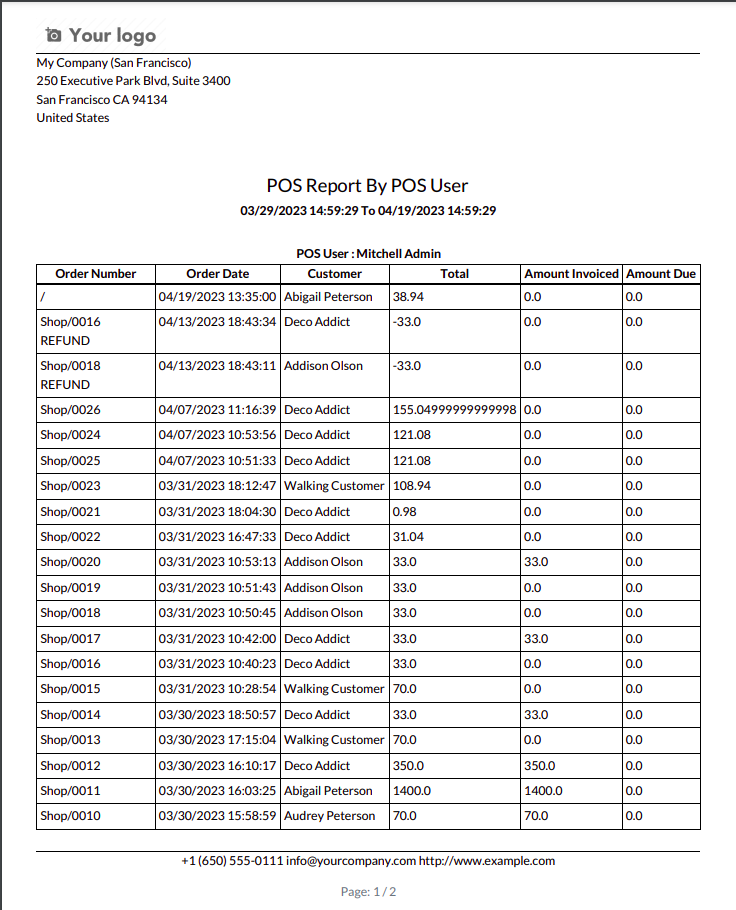
PDF File.
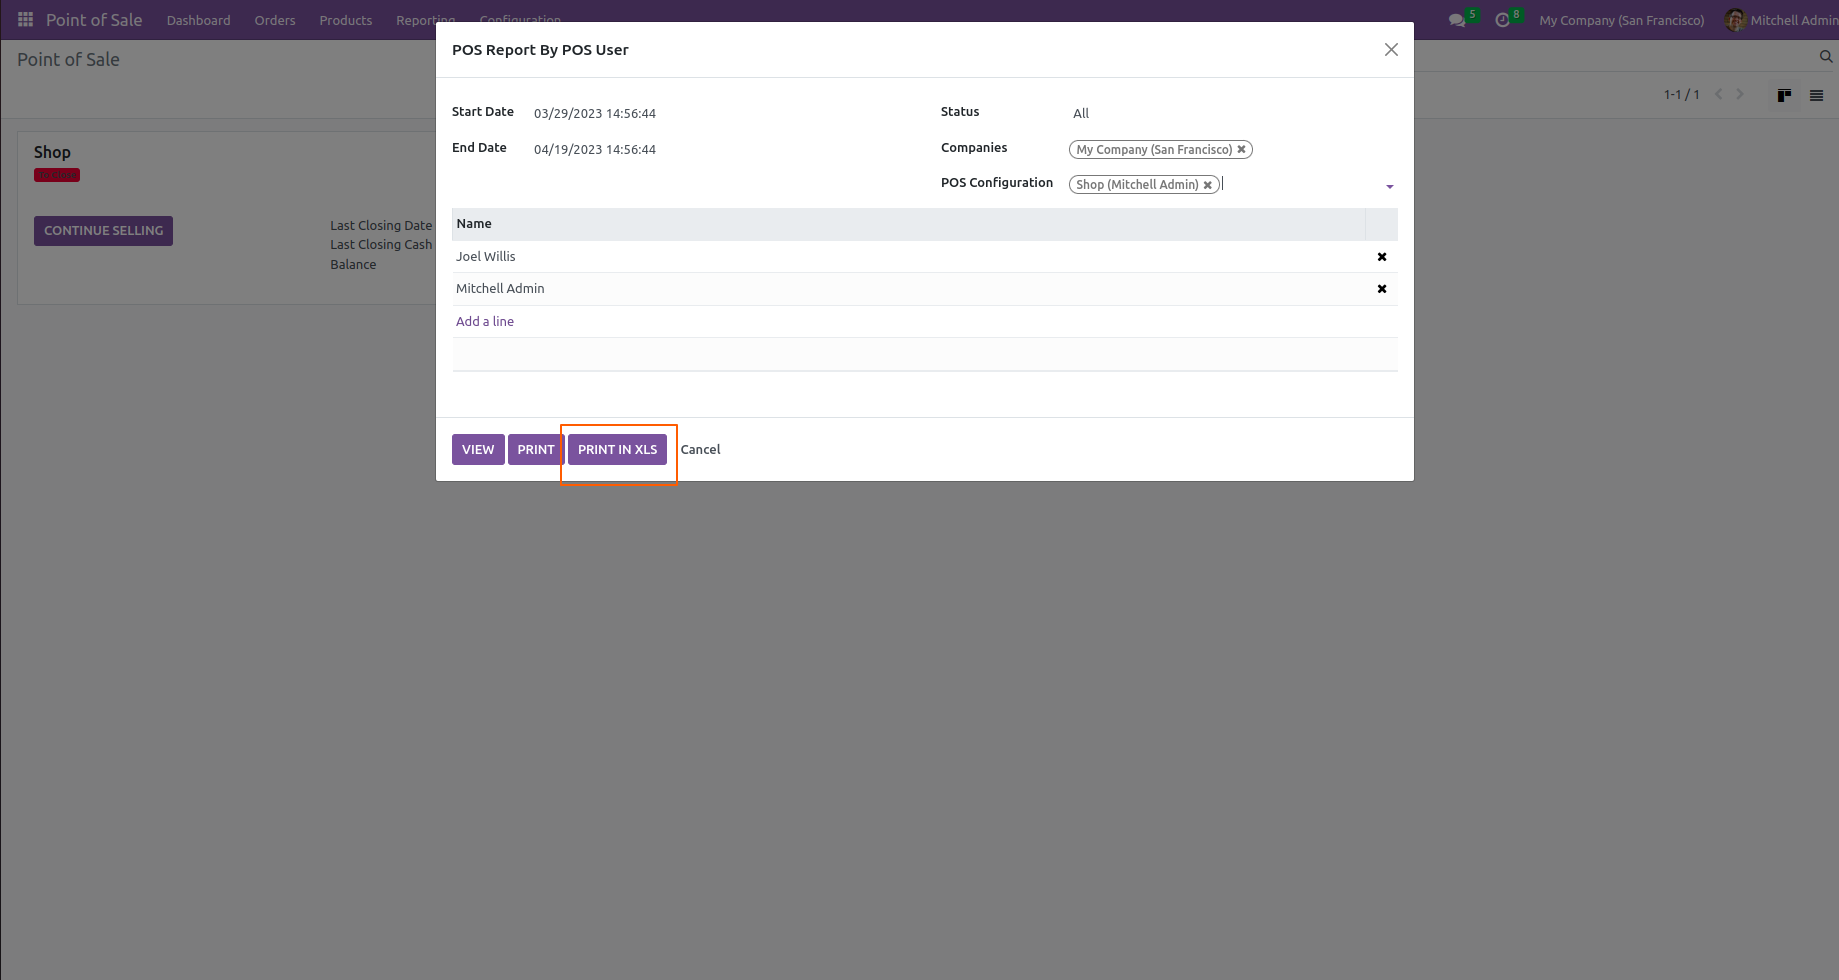
If you want to print the report in XLS file formate then, click on the "PRINT IN XLS" button.
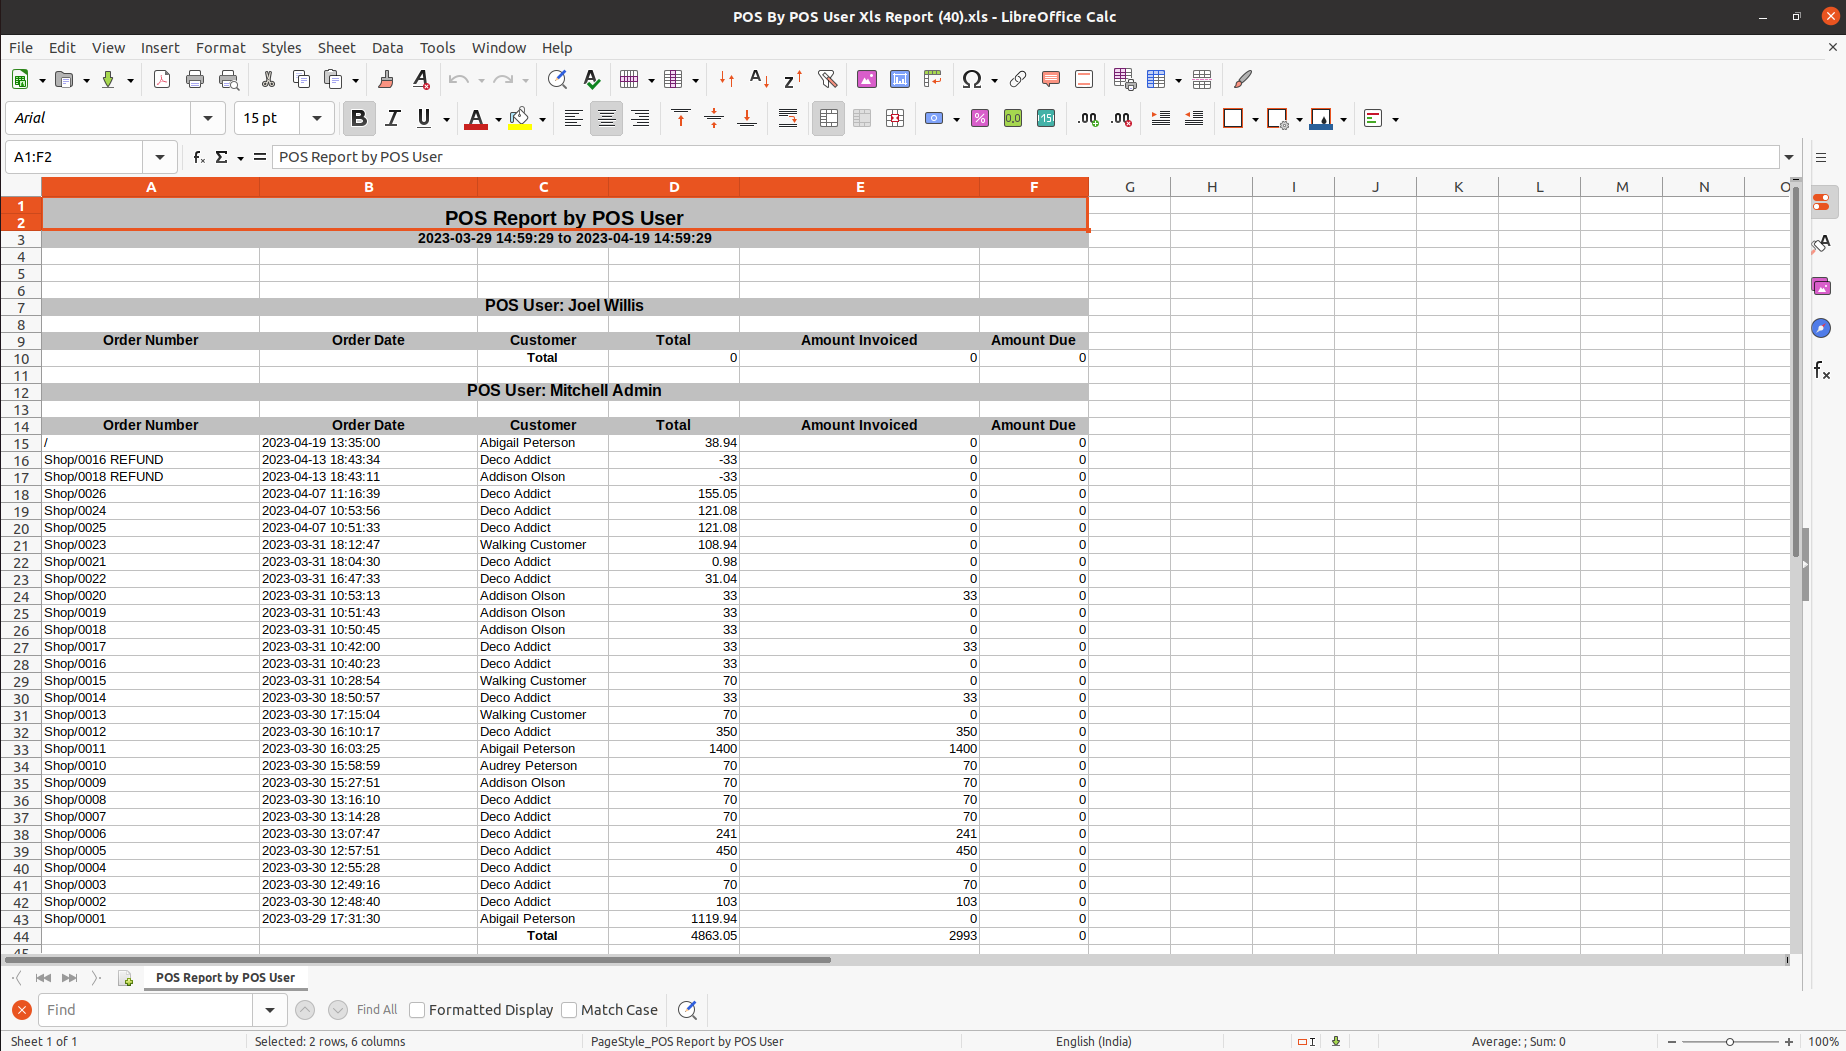
XLS File.
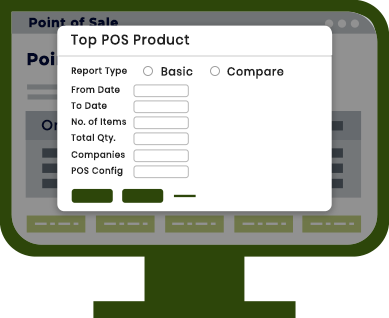
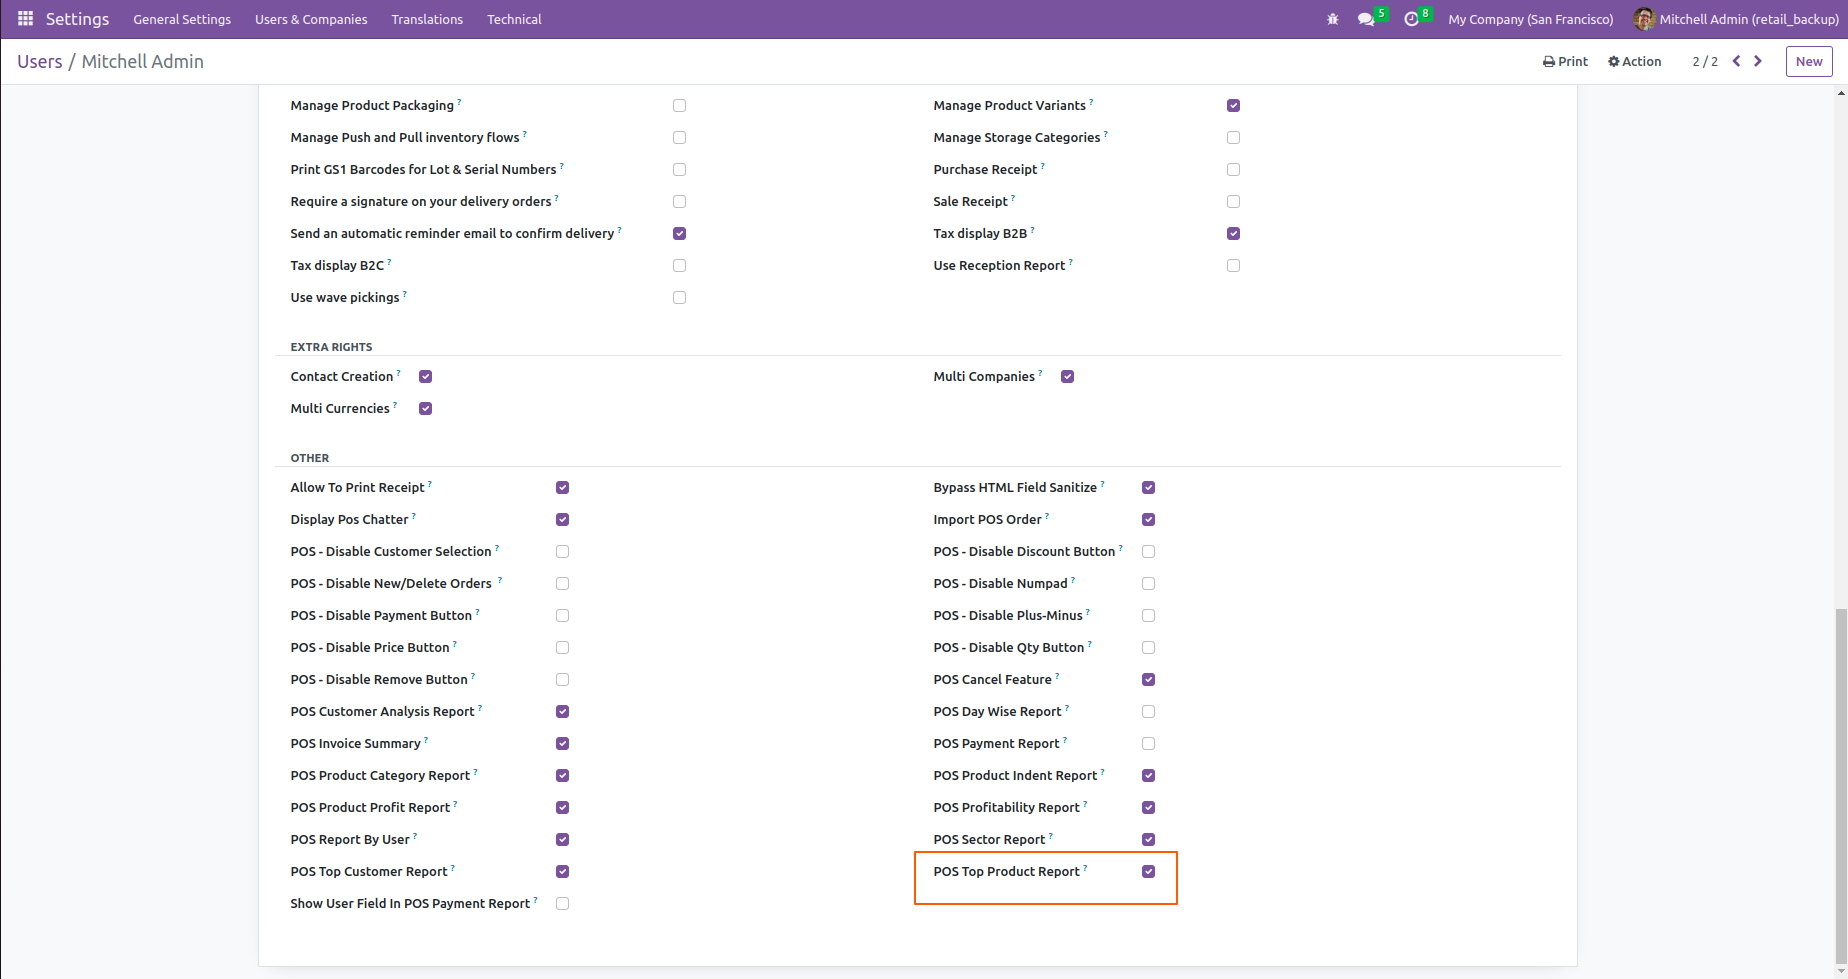
Go to user setting >> Enable the "POS Top Product Report".
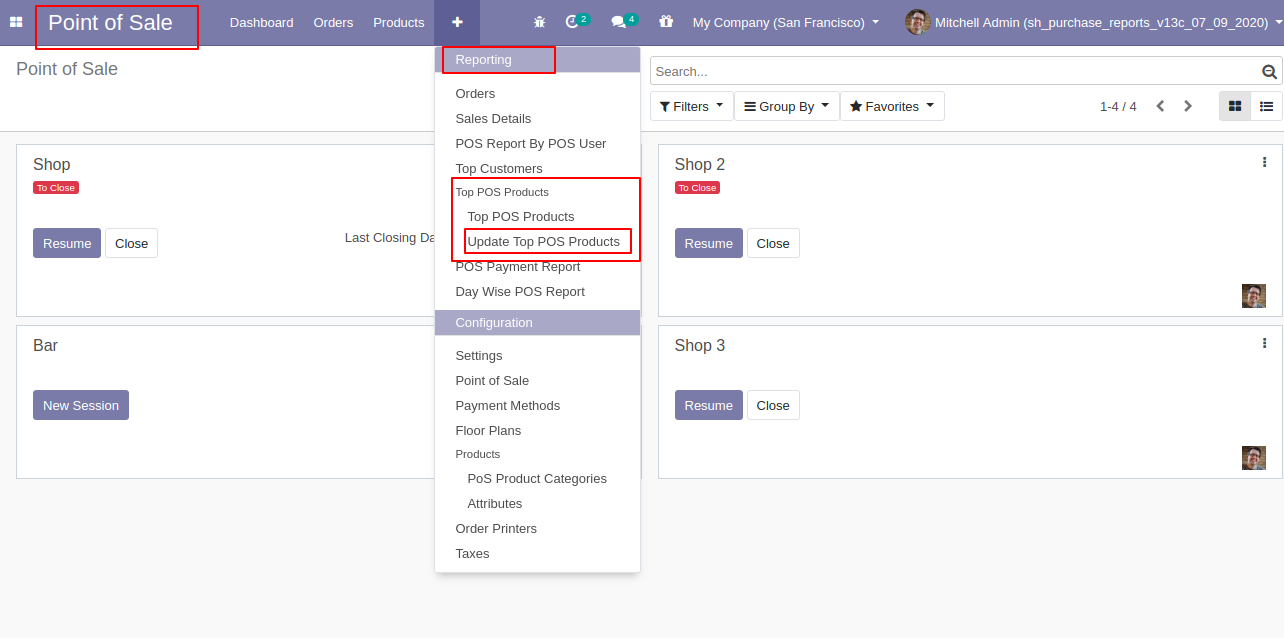
Go to "Update Top POS Product".
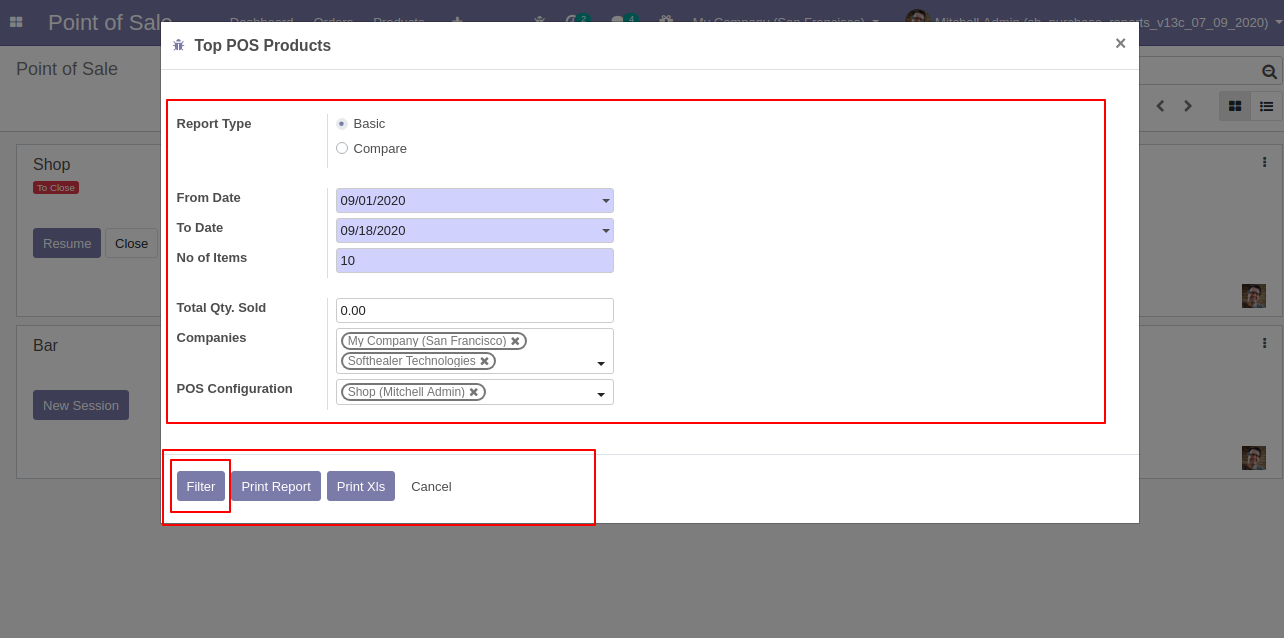
After that "Top POS Product" wizard will appear.
Click on the "Filter" button.
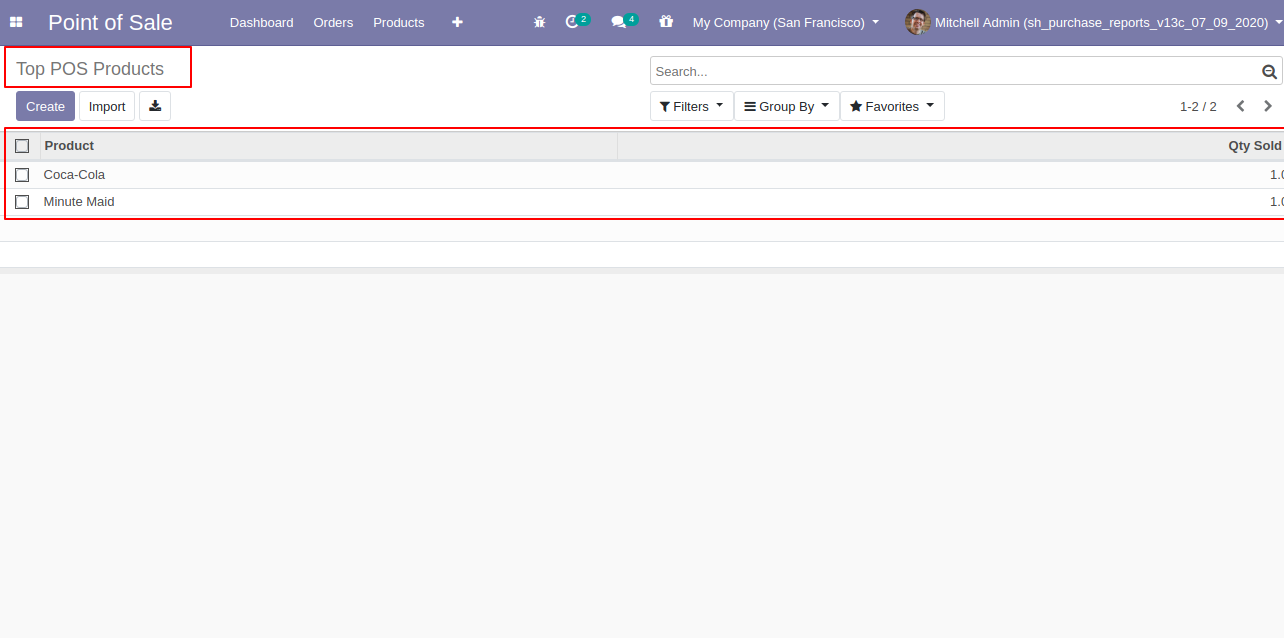
Here, you can see a list of top POS products only.
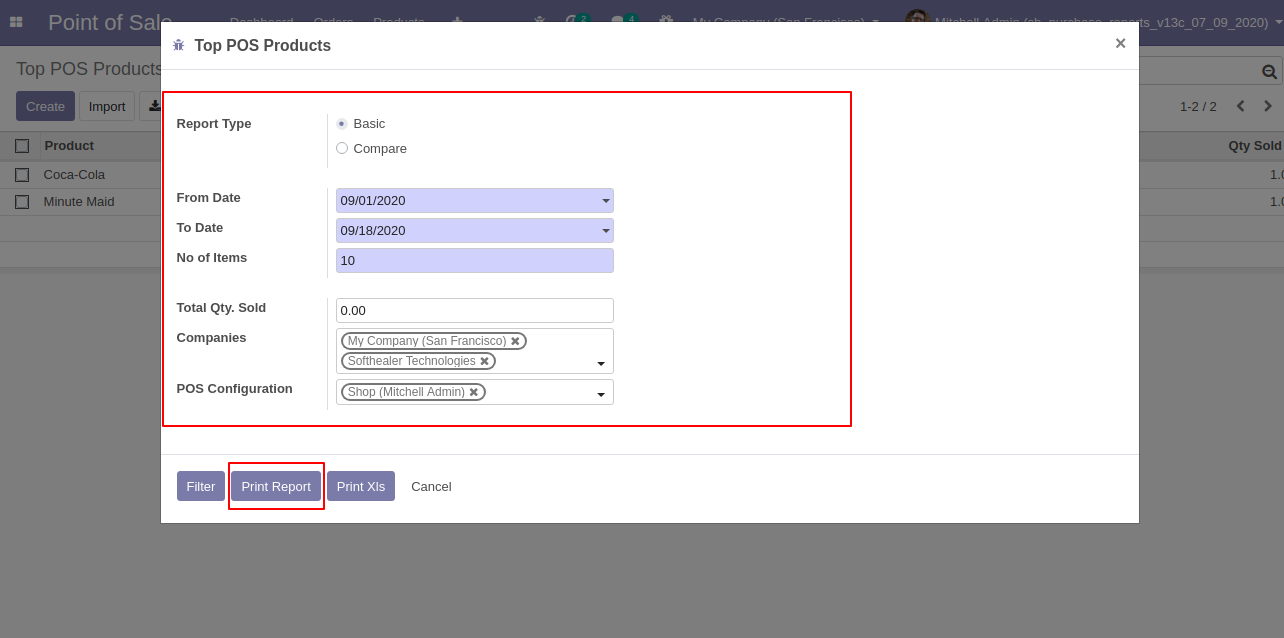
Select the report type= "Basic".
Click on the "PRINT REPORT" button.
PDF File.

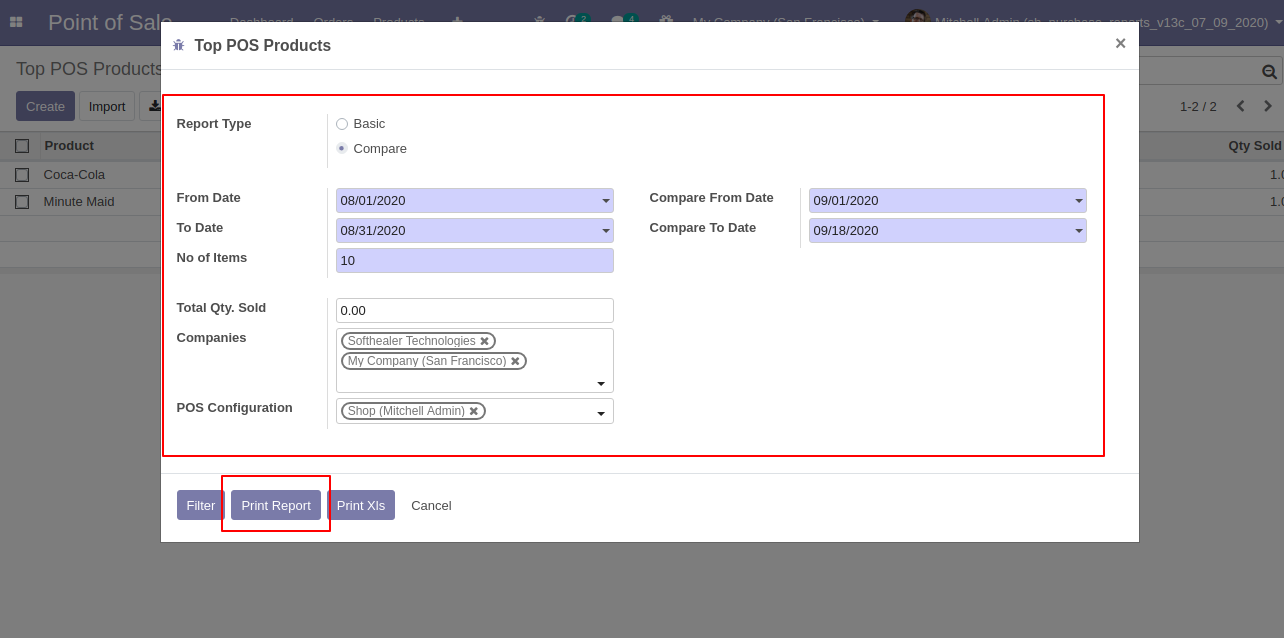
Select the report type= "Compare".
Click on the "PRINT REPORT" button.
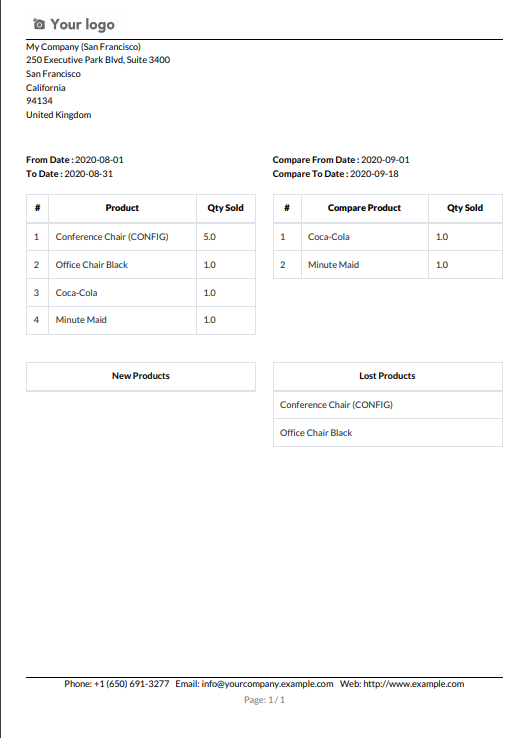
PDF File.
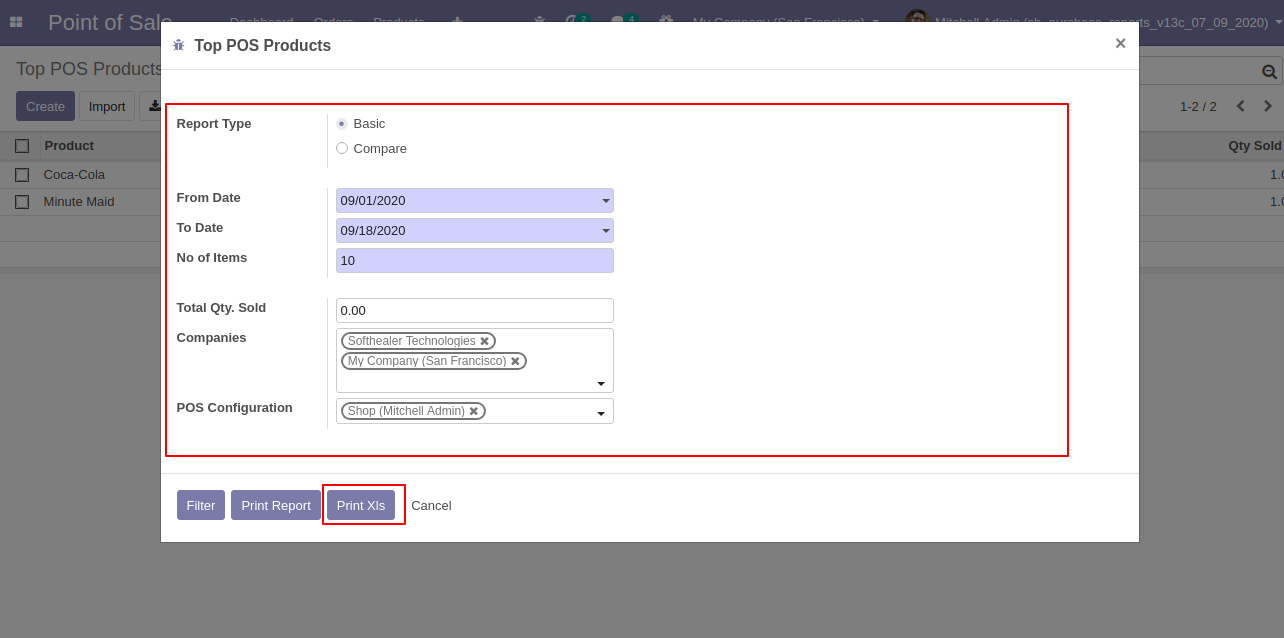
Select the report type= "Basic".
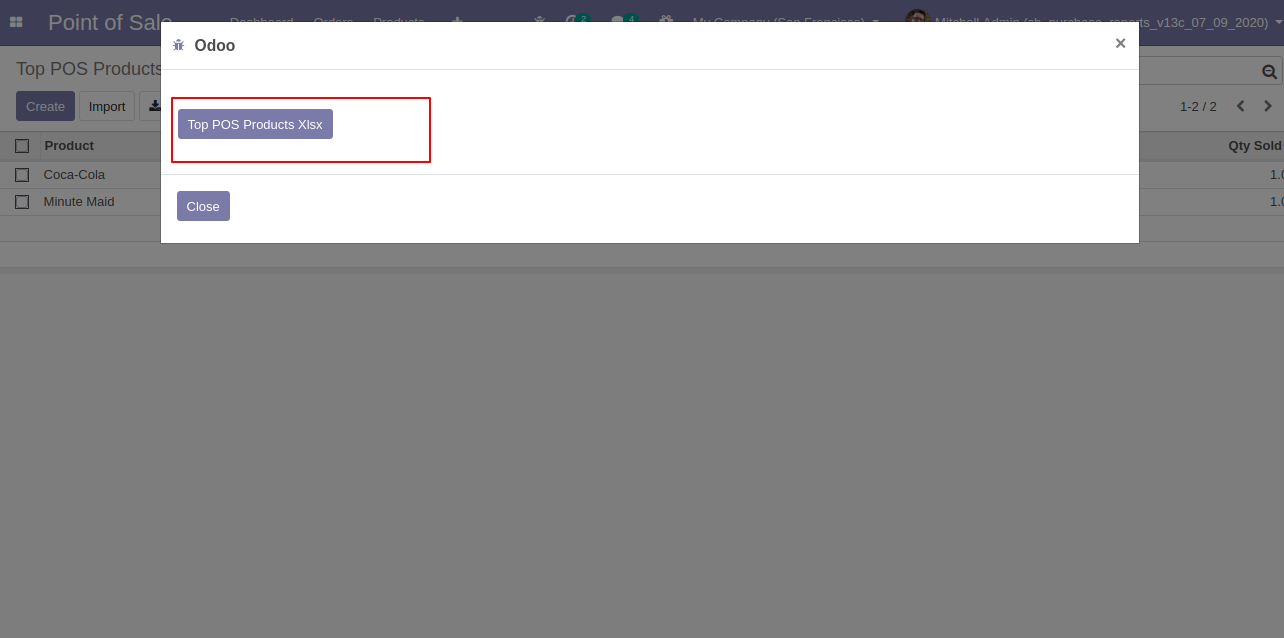
Click on the "PRINT XLS" button.
After that one wizard will appear.
Click on the "Top POS Product Xlsx".
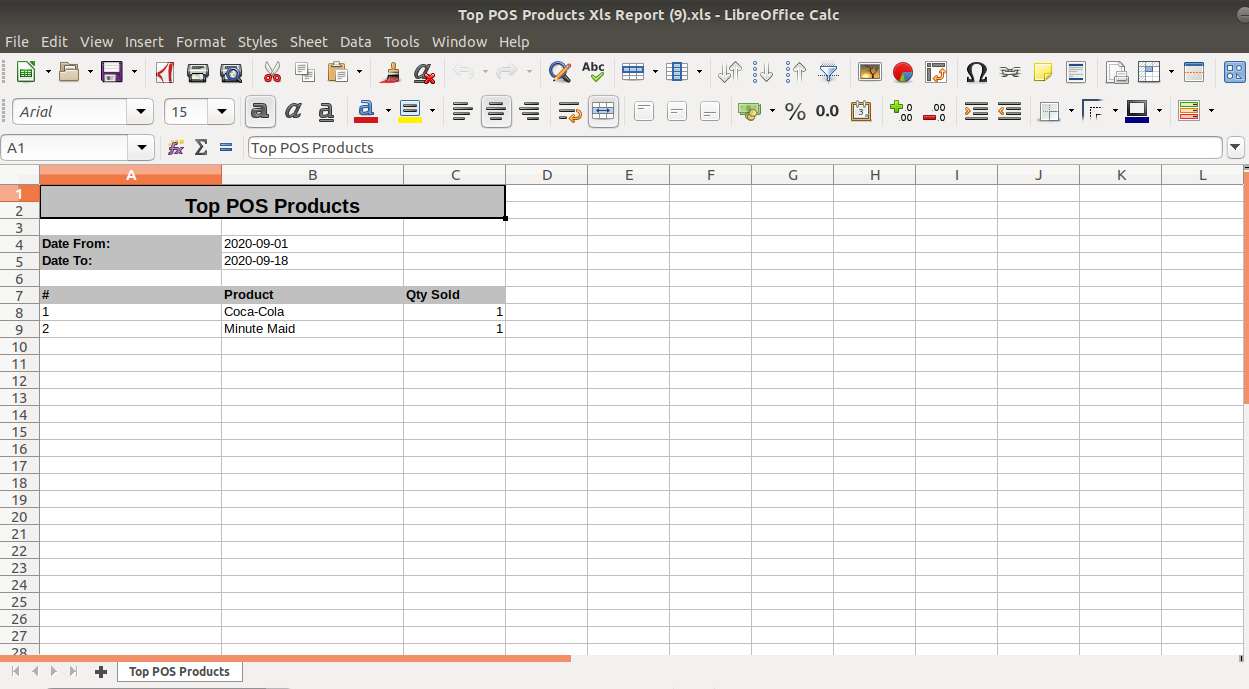
XLS File.
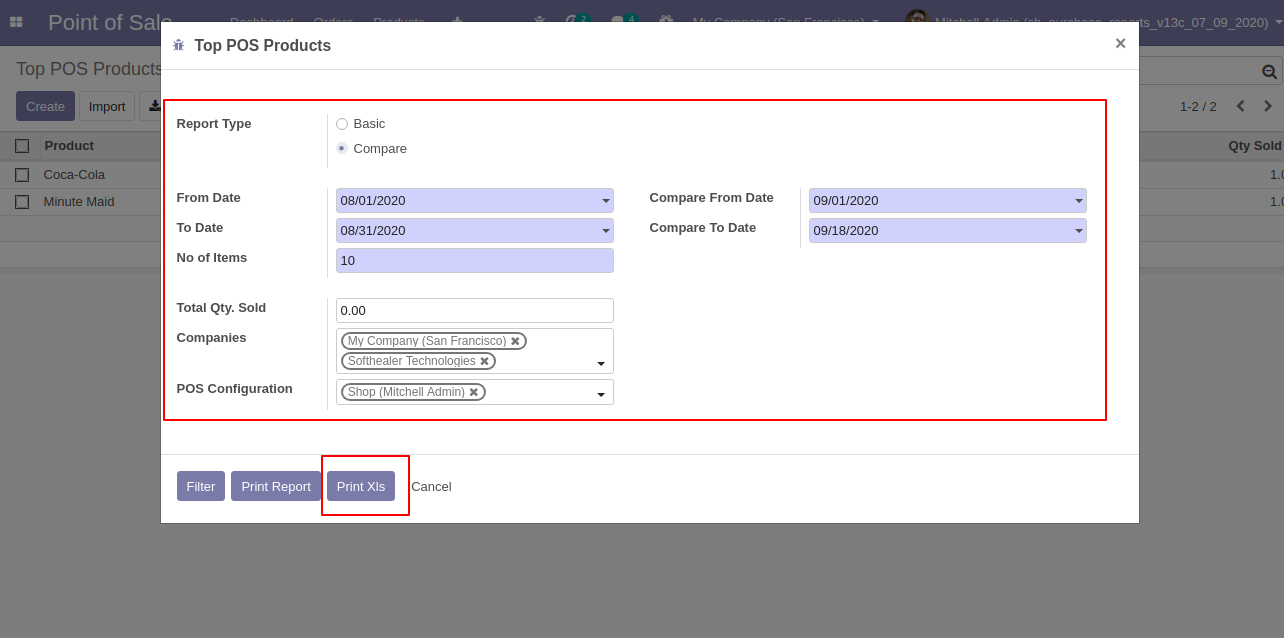
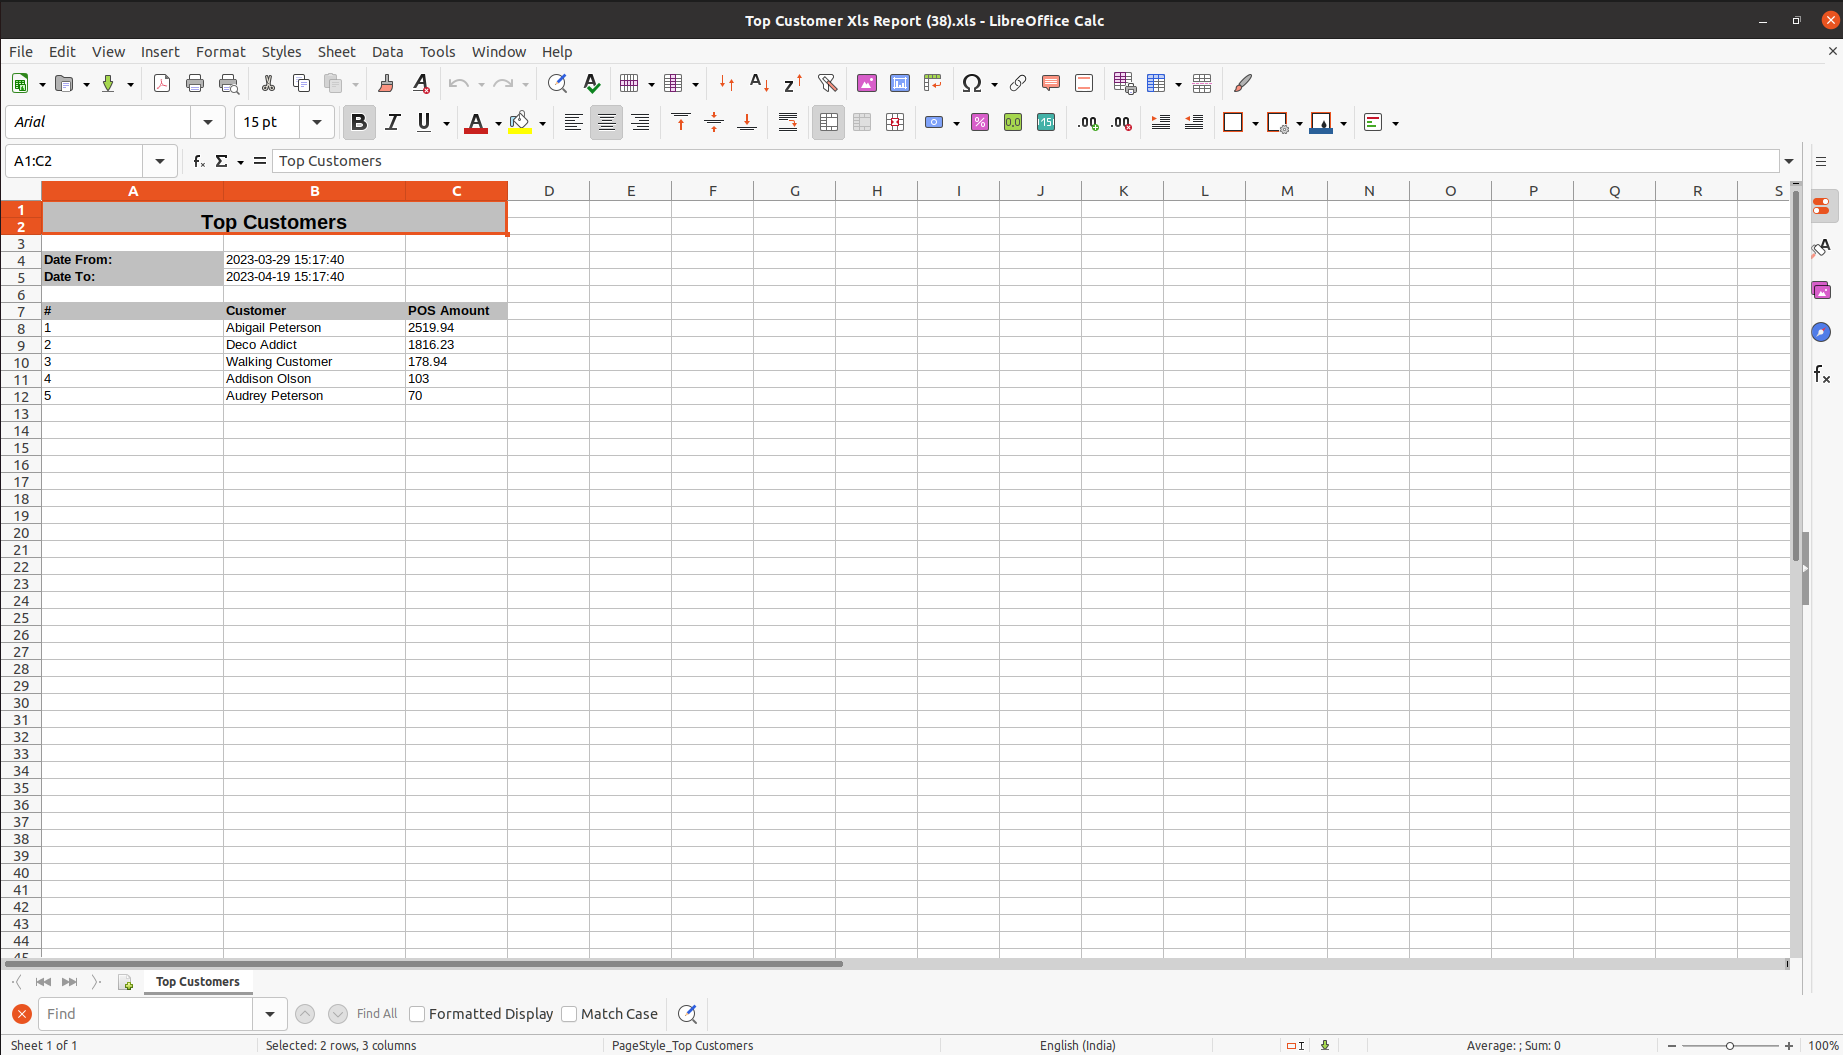
Select the report type= "Compare".
Click on the "PRINT XLS" button.
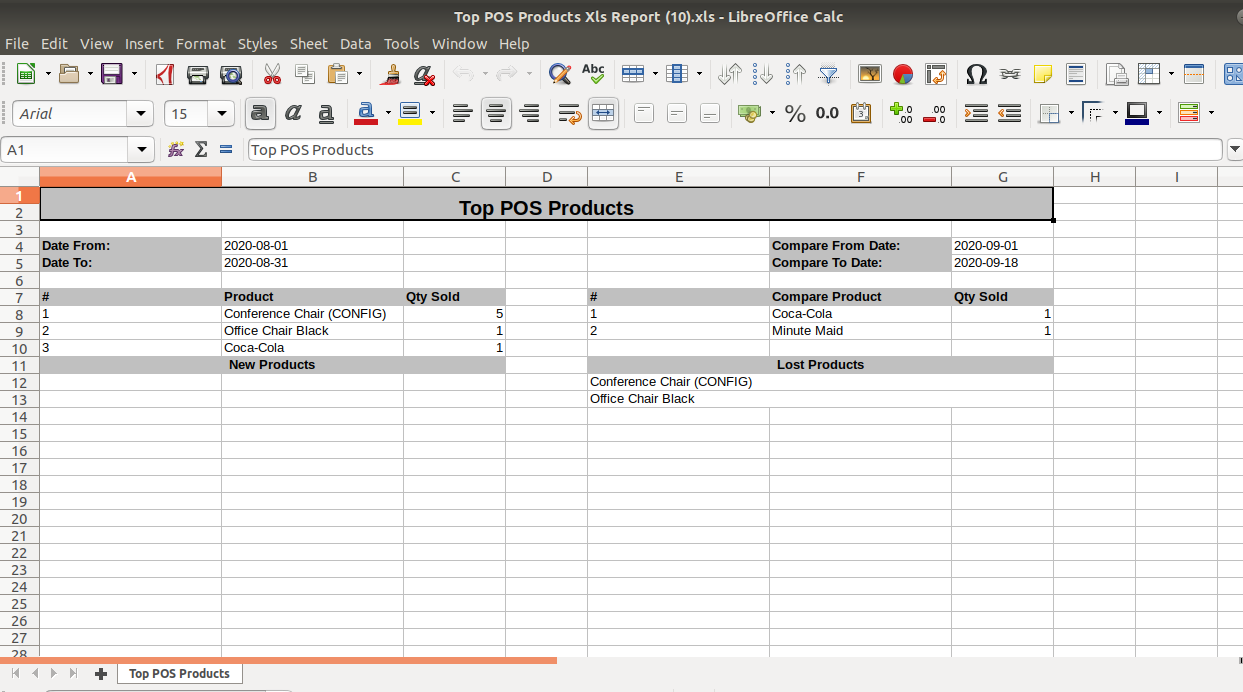
XLS File.
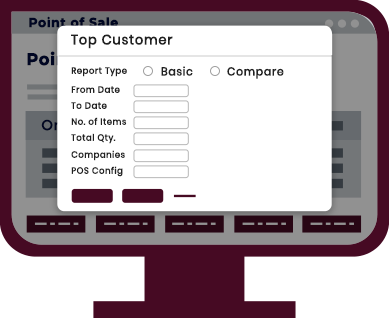
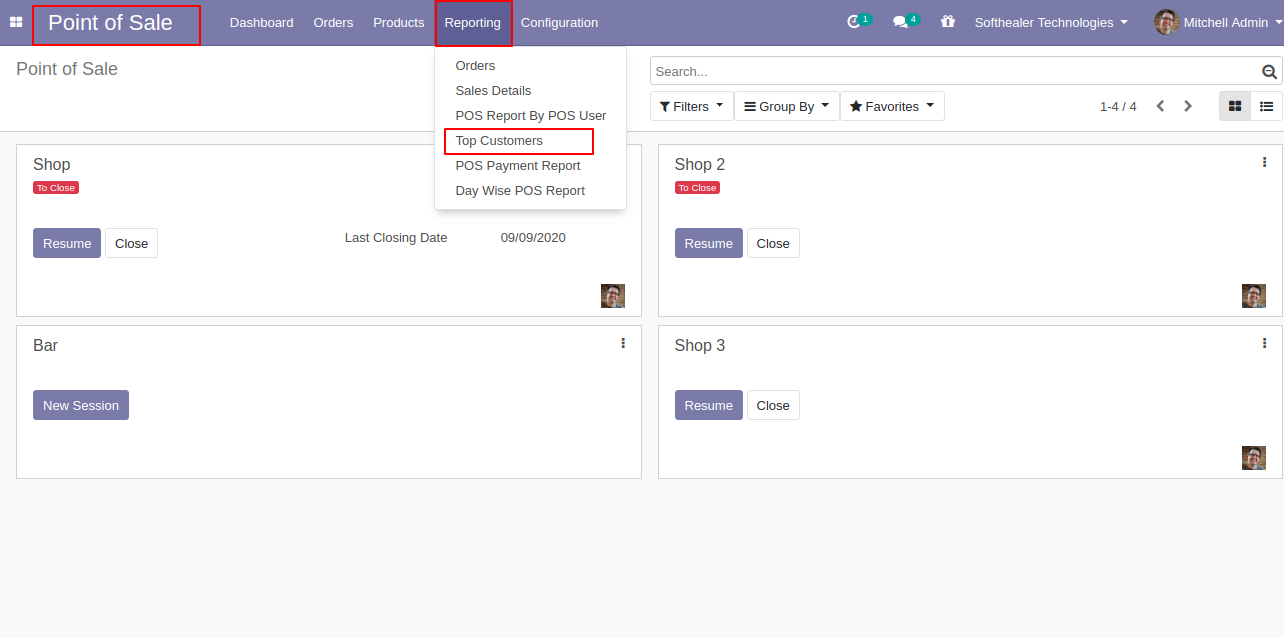
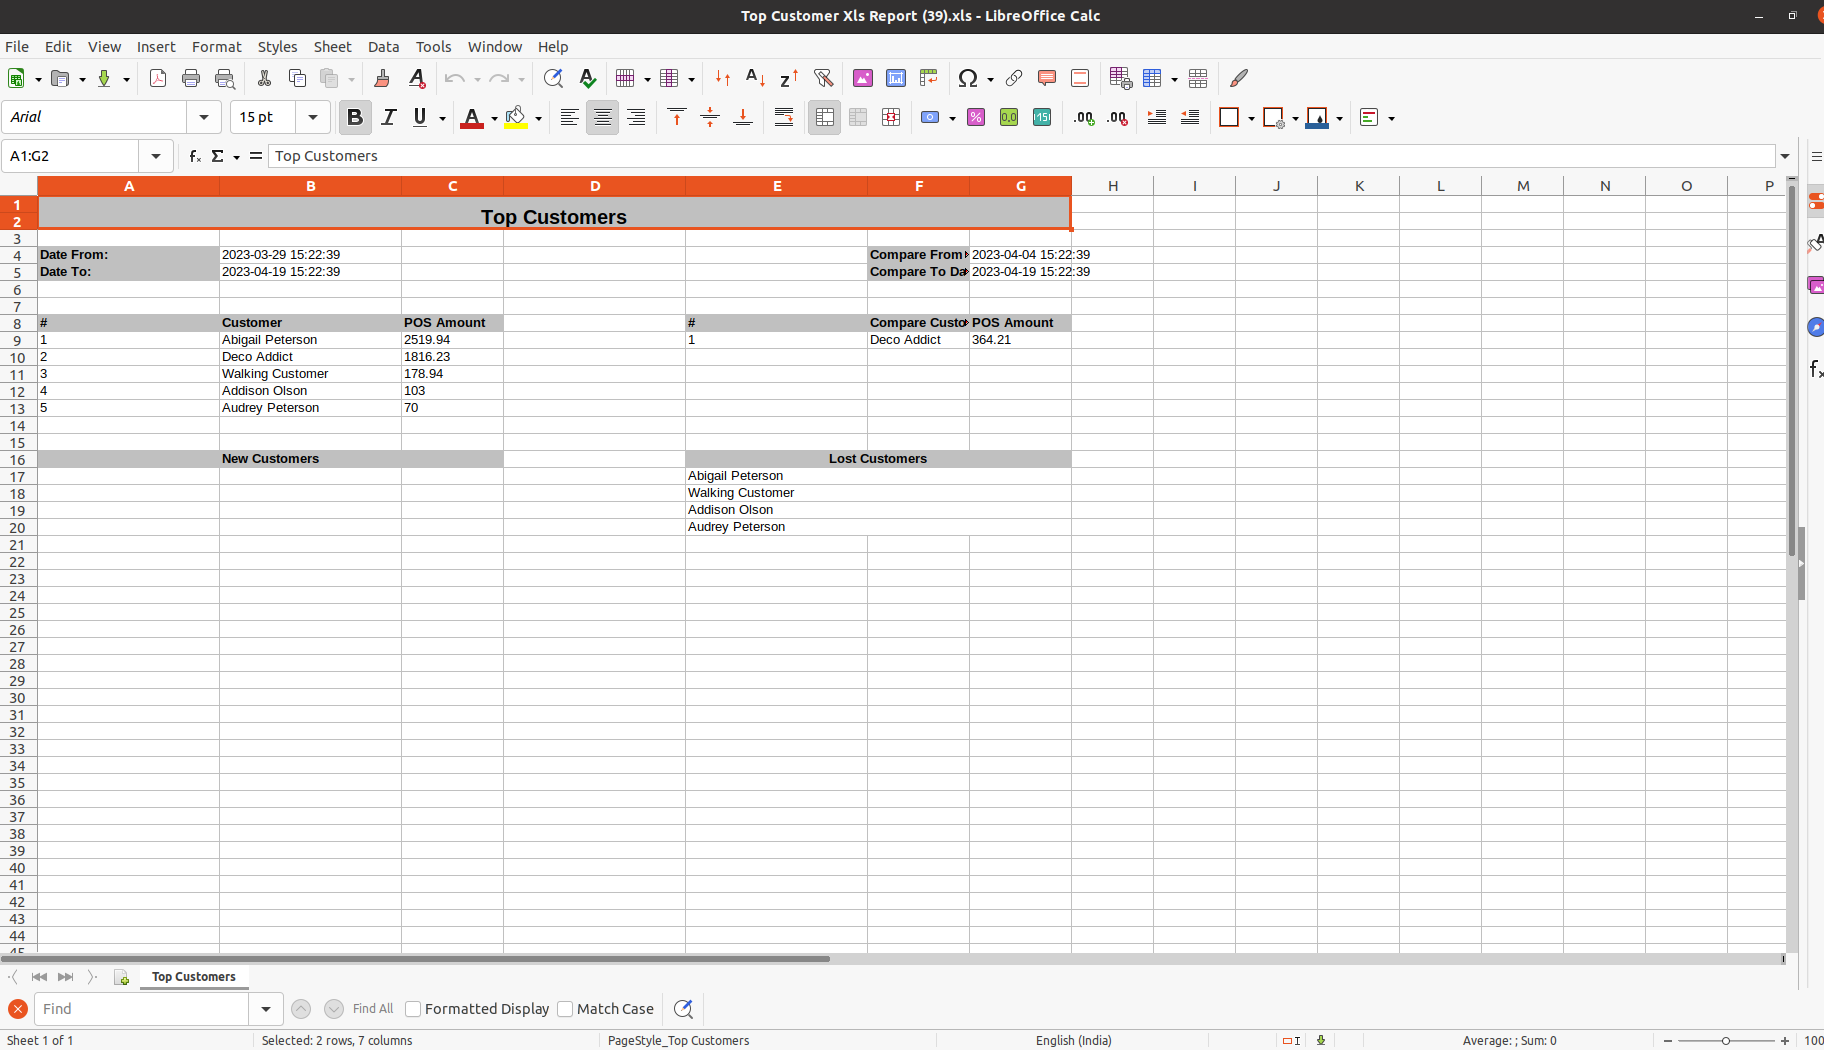
Go to user setting >> Enable the "POS Top Customer Report".

Go to "Top Customer".
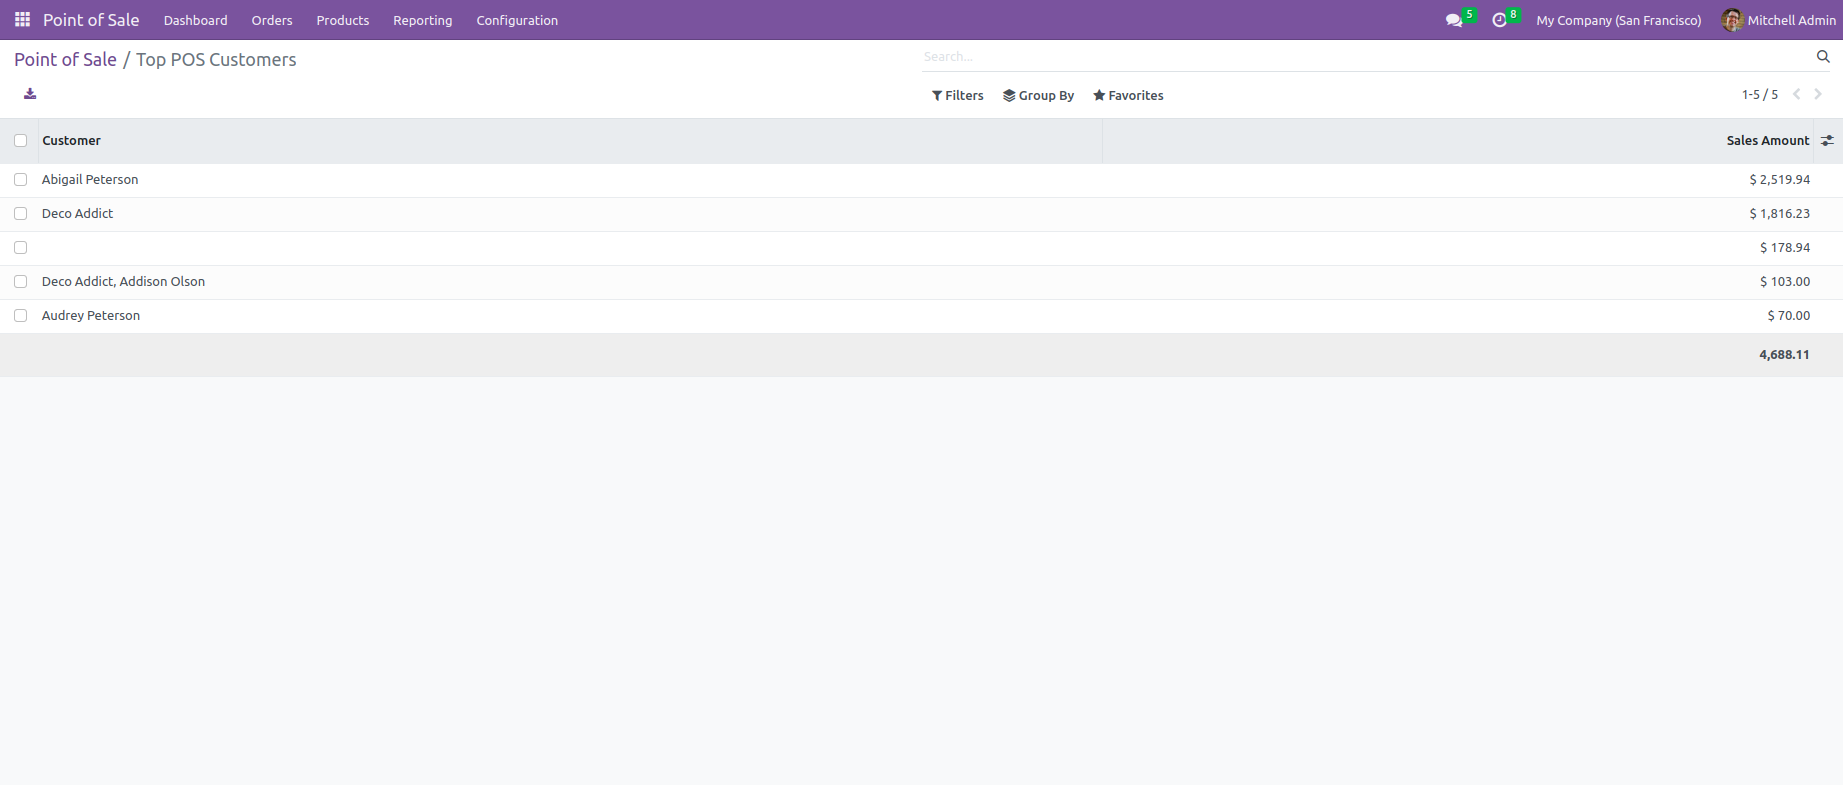
After that "Top Customer" wizard will apoear.
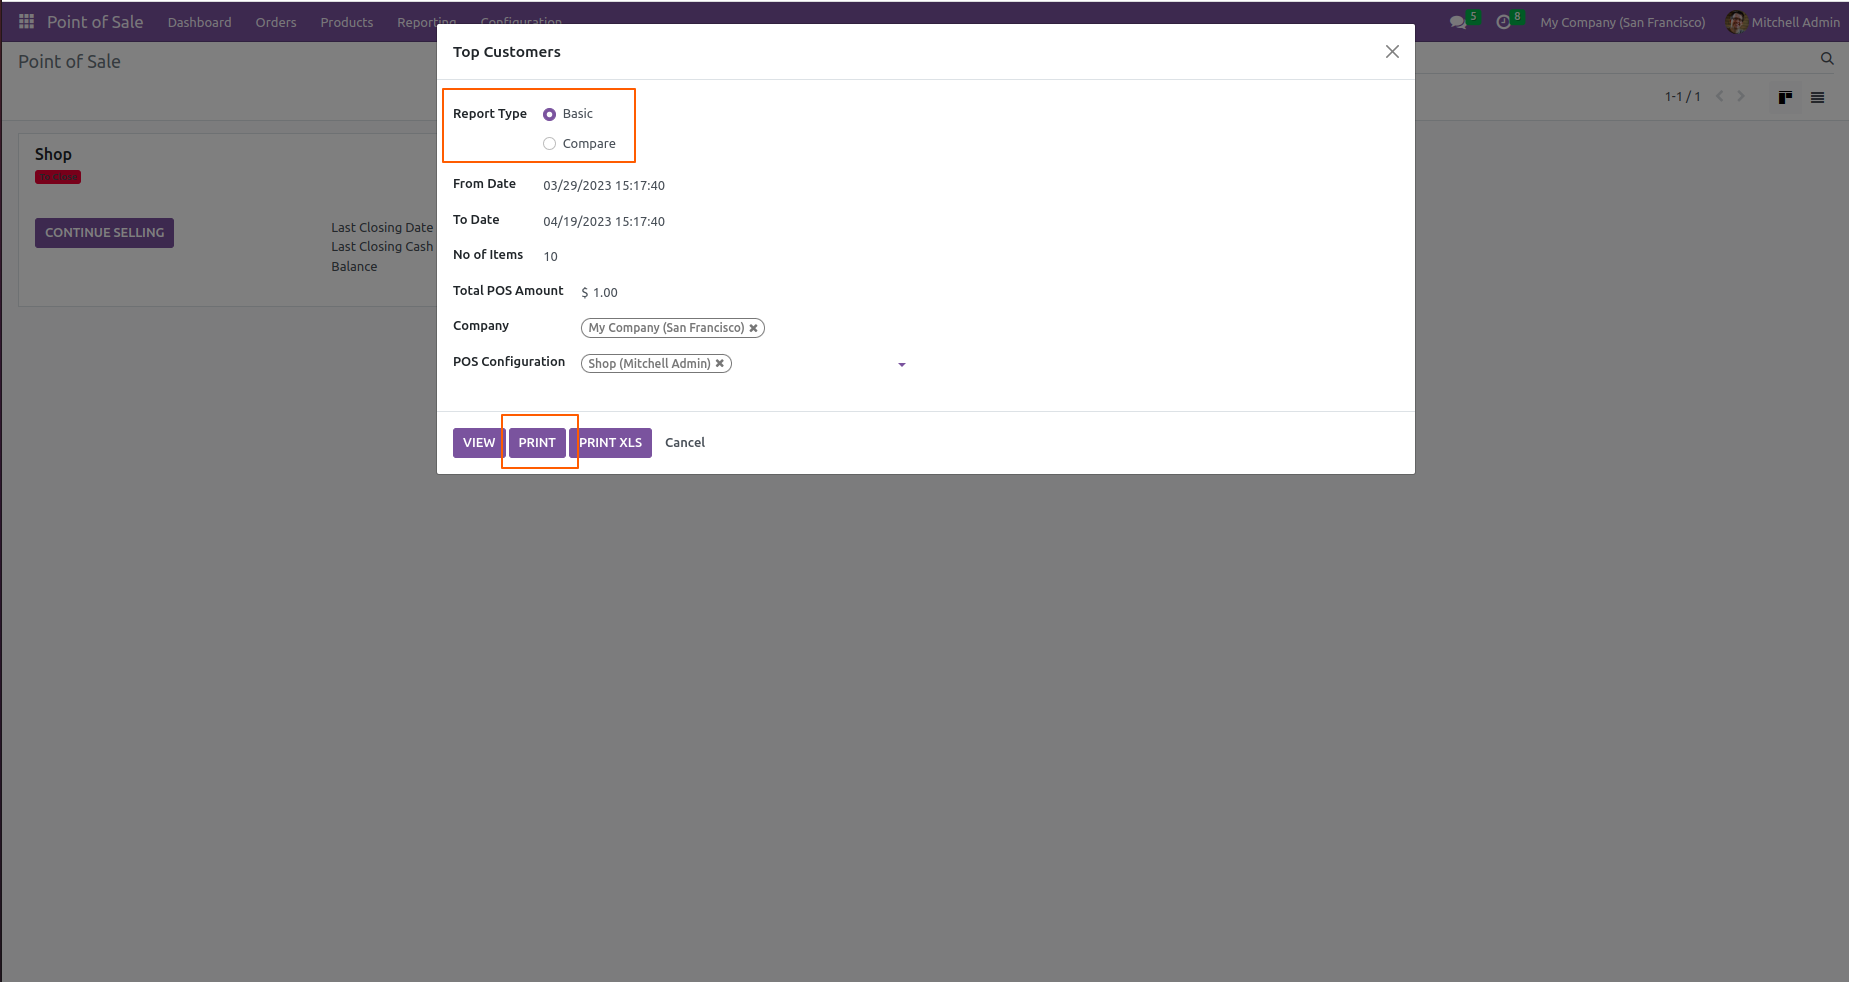
Select the report type=Basic".
For viewing the Top customer list. Click on the "VIEW" button.

Here, you can see the list view of Top POS Customer.
Select the report type= "Basic".
Click on the "PRINT" button.
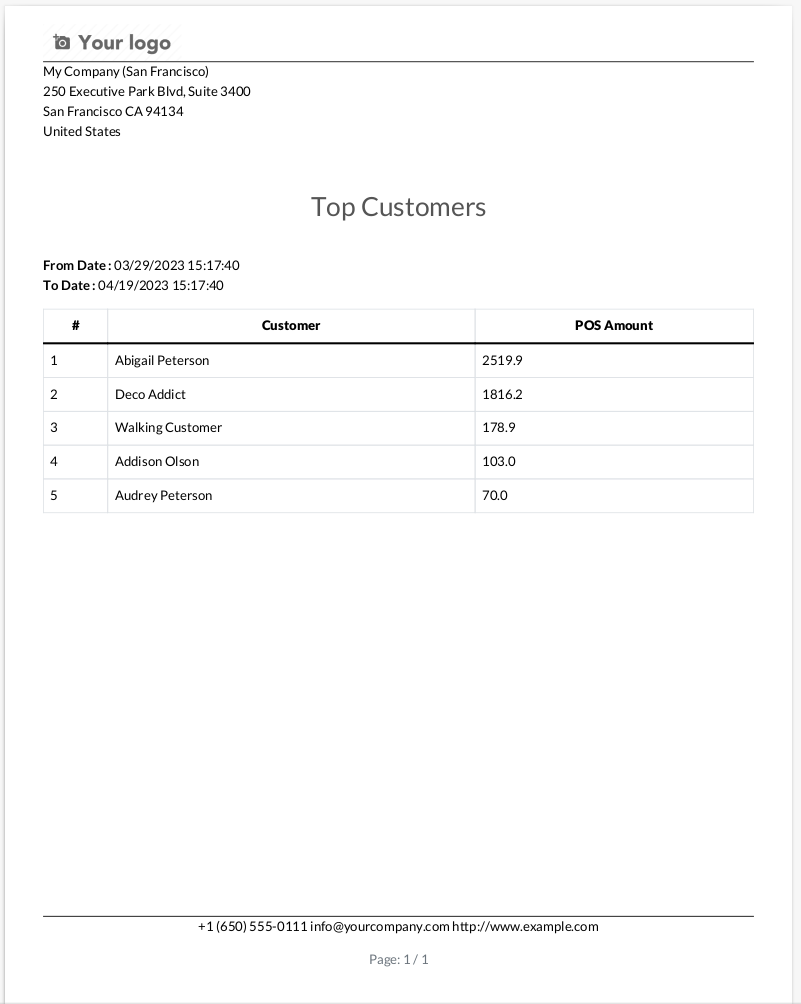
PDF File.
Select the report type=Basic".
Click on the "PRINT XLS" button.

XLS File.
Select the report type= "Compare".
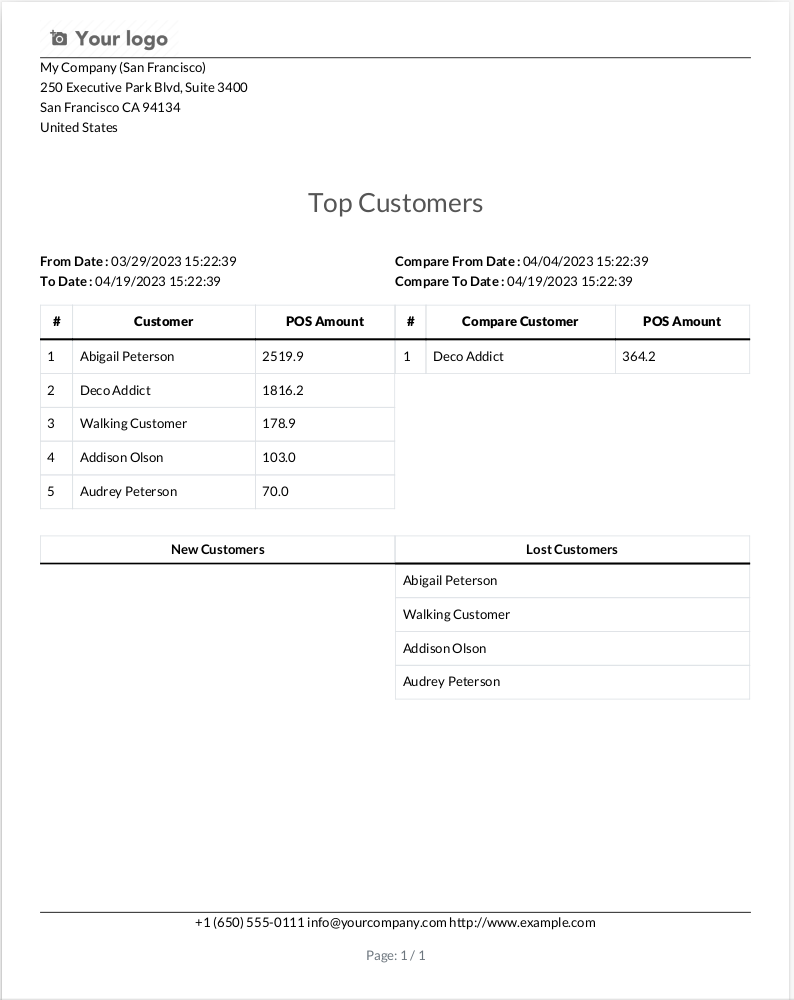
Click on the "PRINT" button.
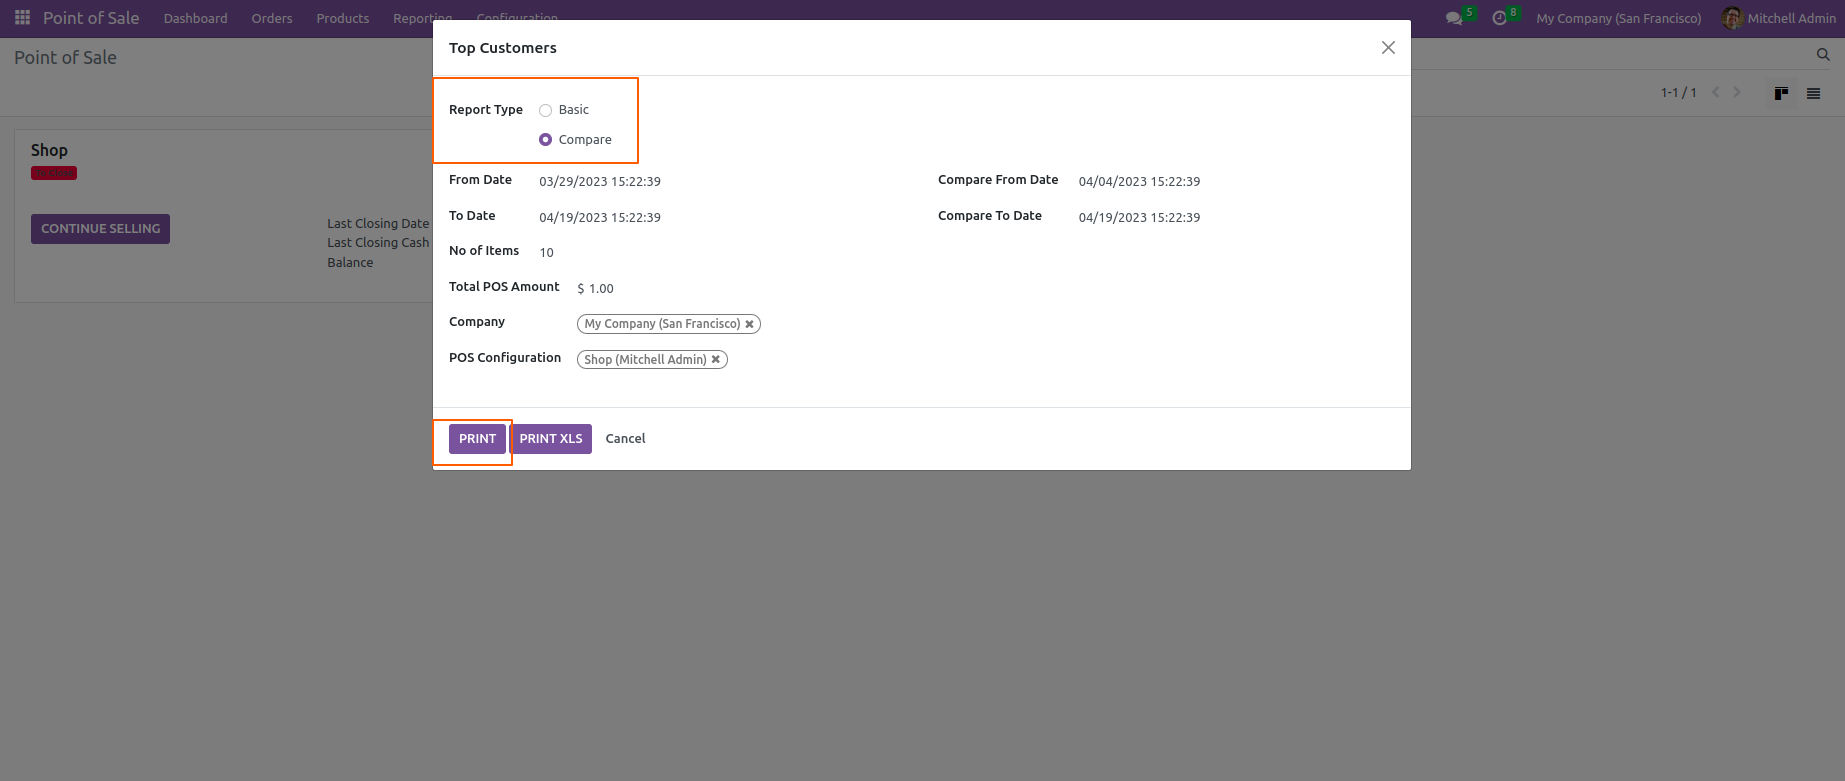
PDF File.
Select the report type= "Compare".
Click on the "PRINT XLS" button.
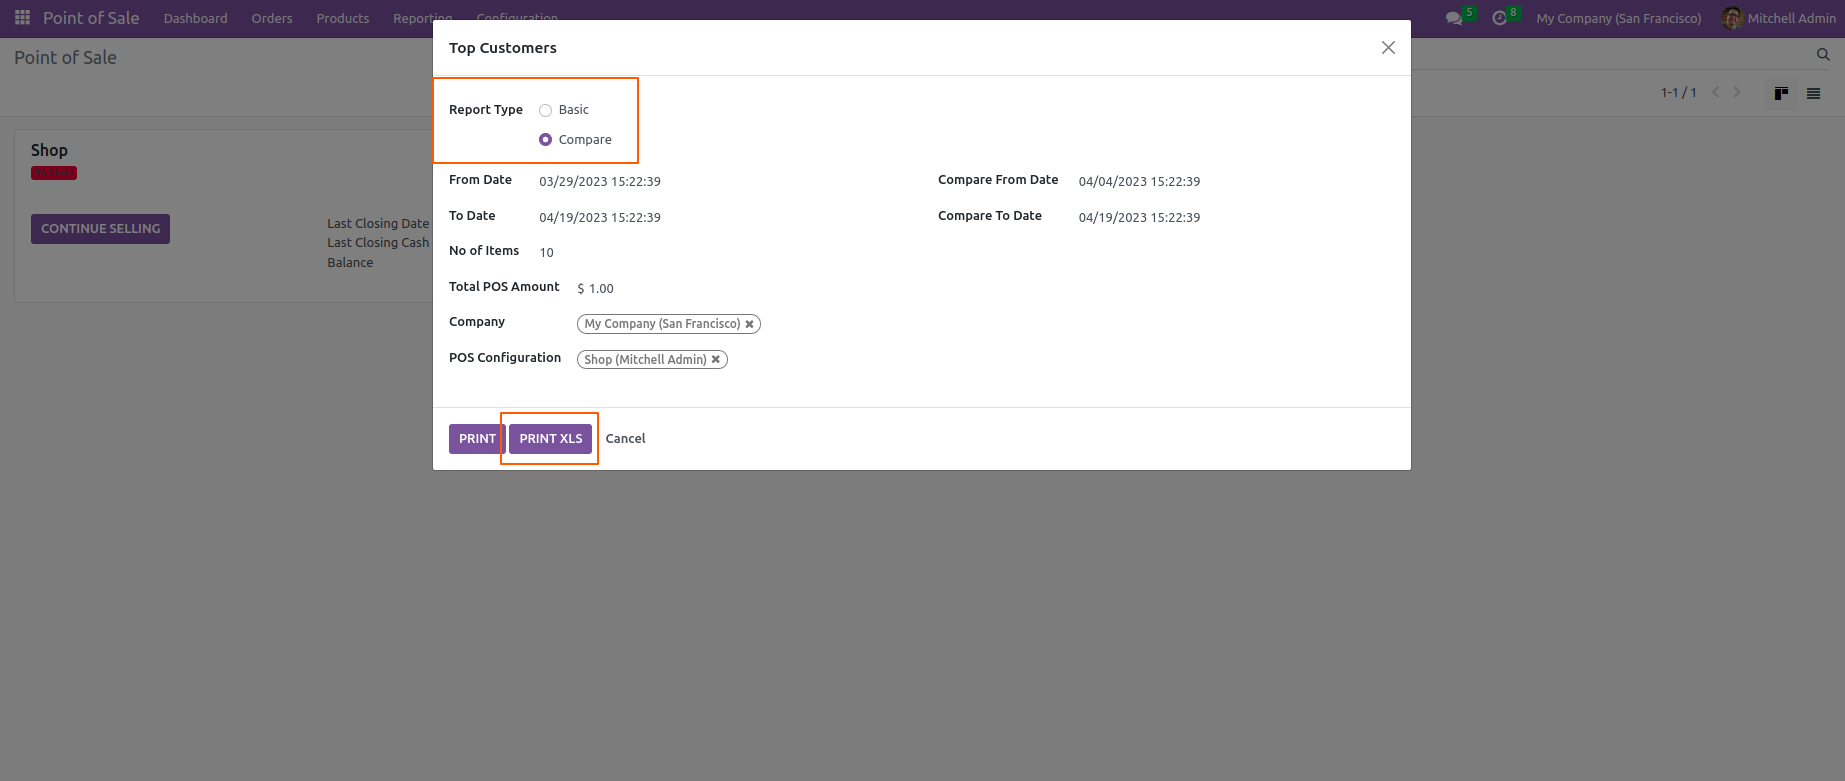
XLS File.
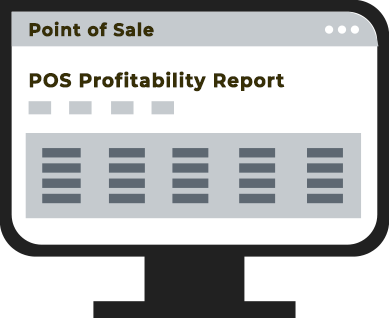
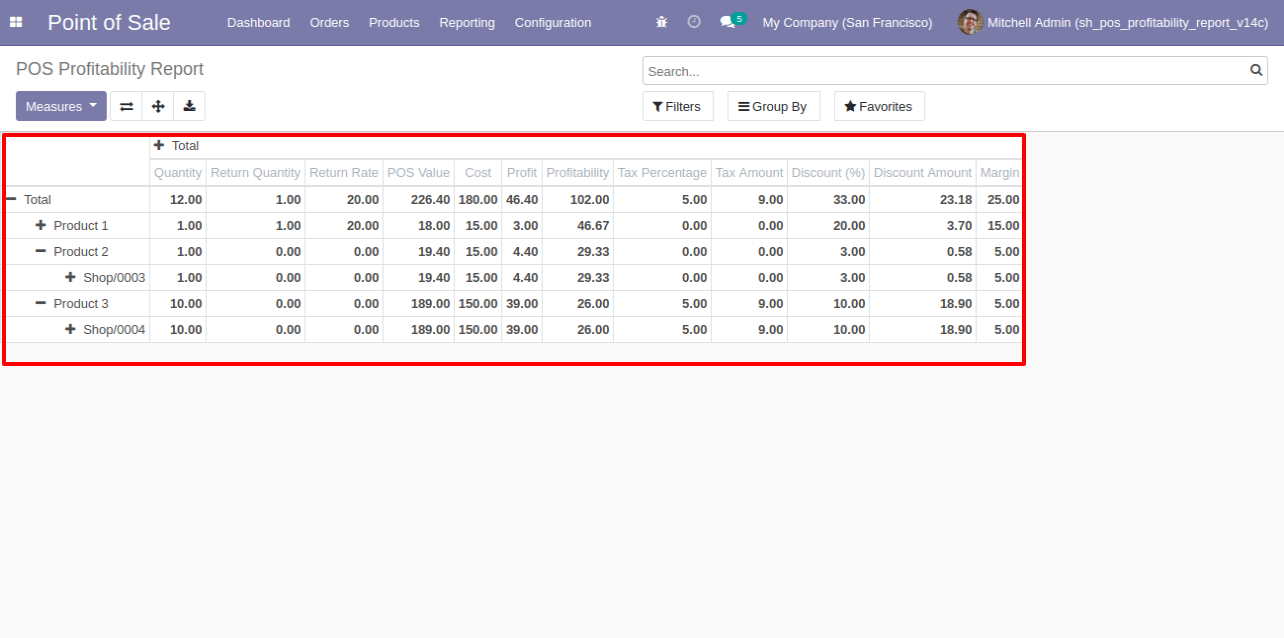
Go to user setting >> Enable the "POS Product Profitability Report".

Go to "POS Profitability Report".

Here, you can see the POS Profitability Report.
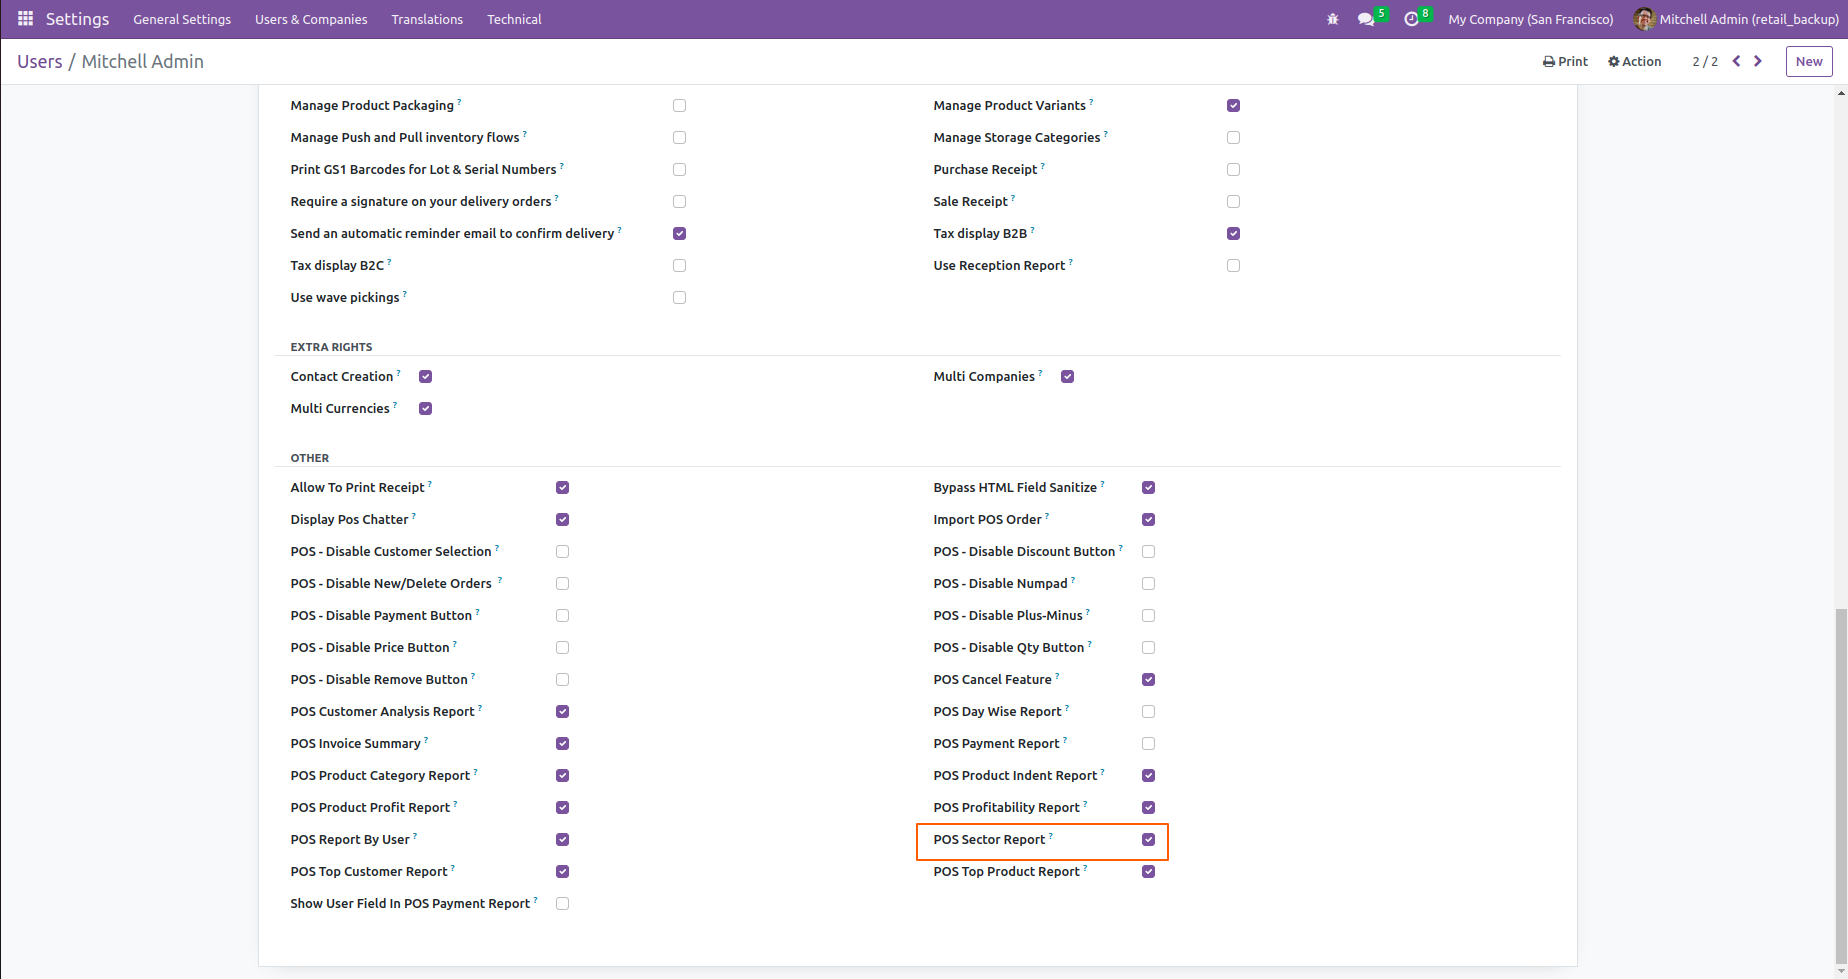
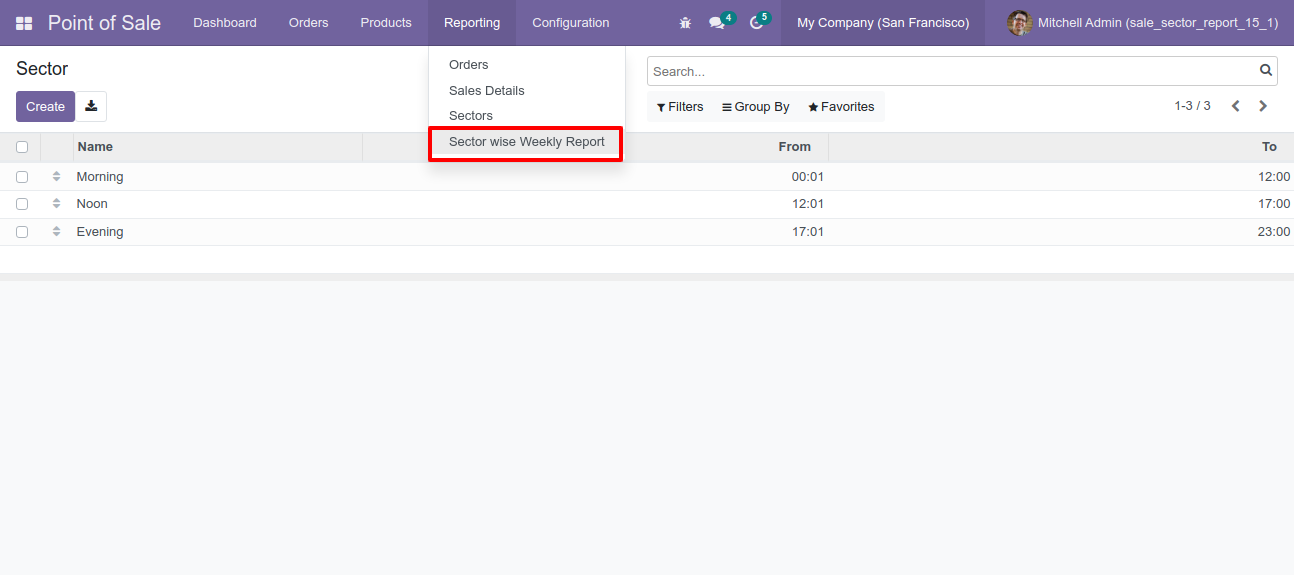
Go to user setting >> Enable the "POS Sector Report".
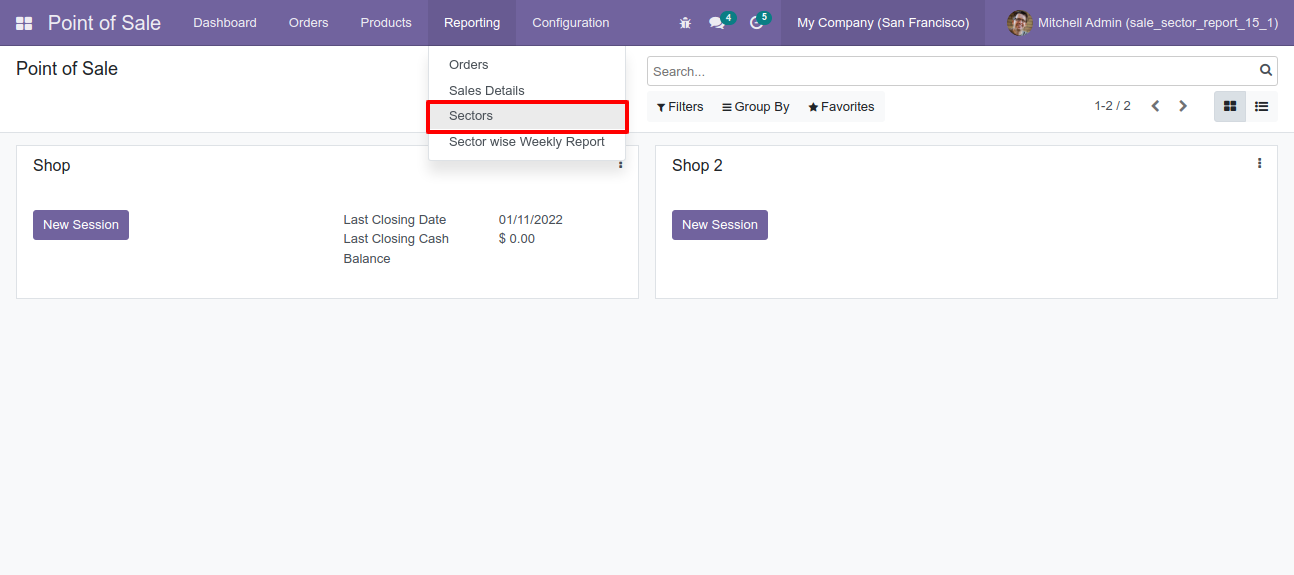
Go to "Sectors".
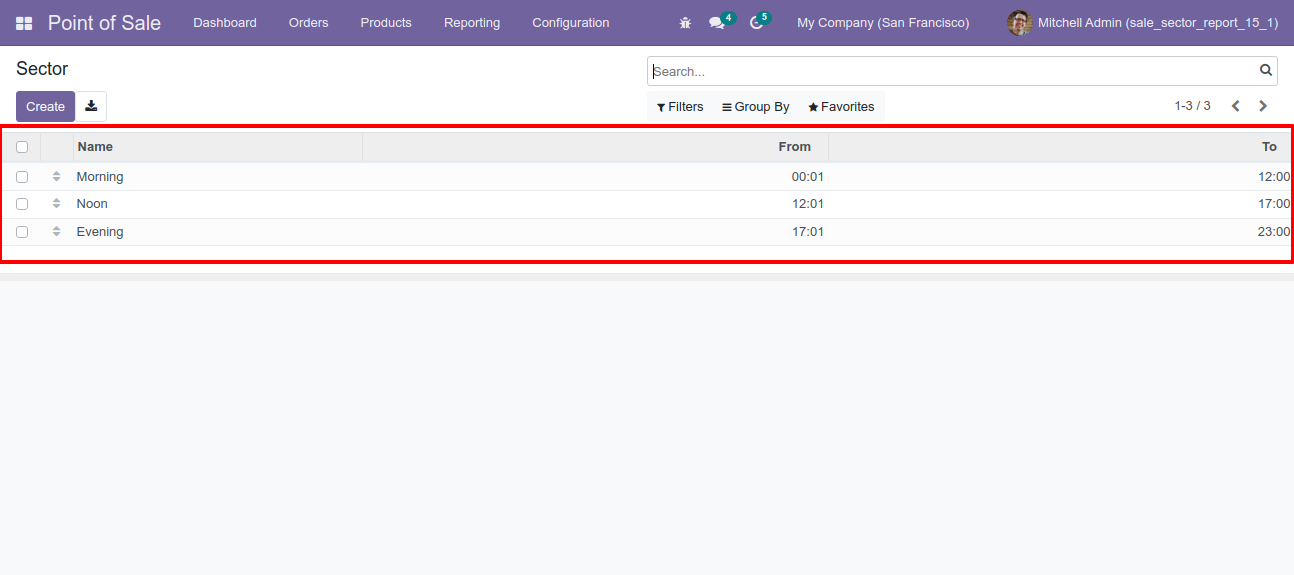
Here, You can see the sector form view.

Sector list view.
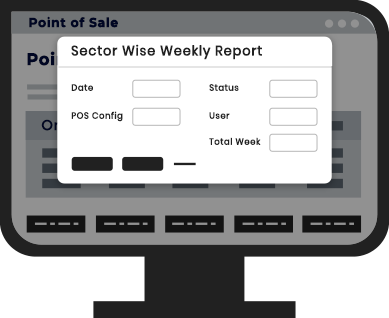
Go to "Sectors Wise Weekly Report".
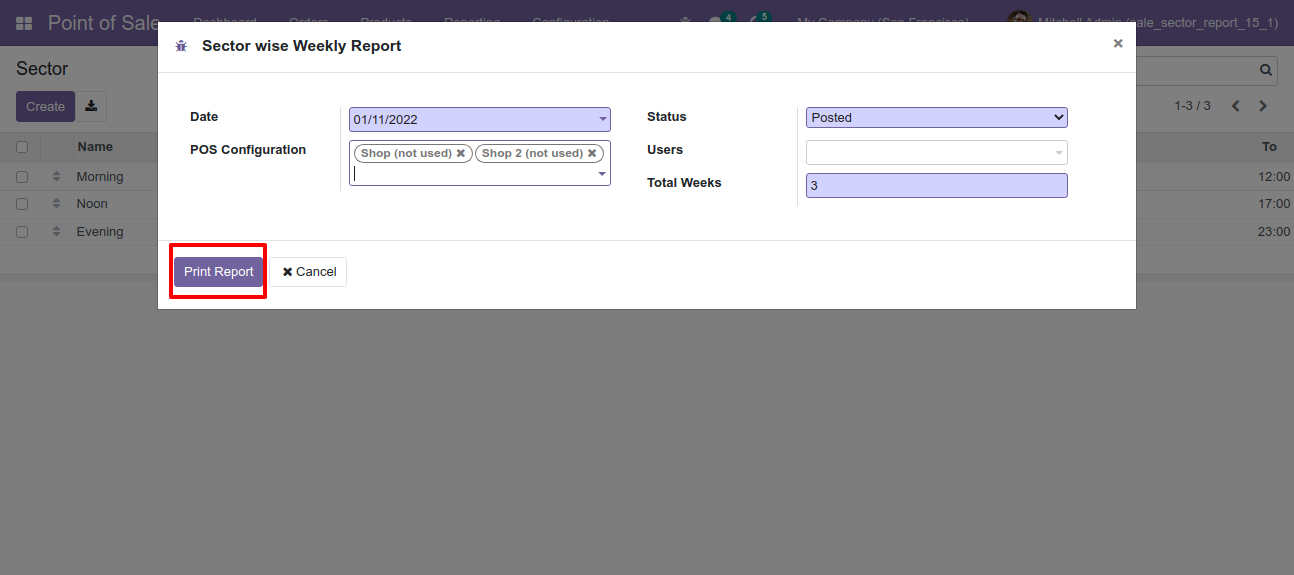
After that "Sectors Wise Weekly Report" wizard will appear.
Click on the "Print Report" button.
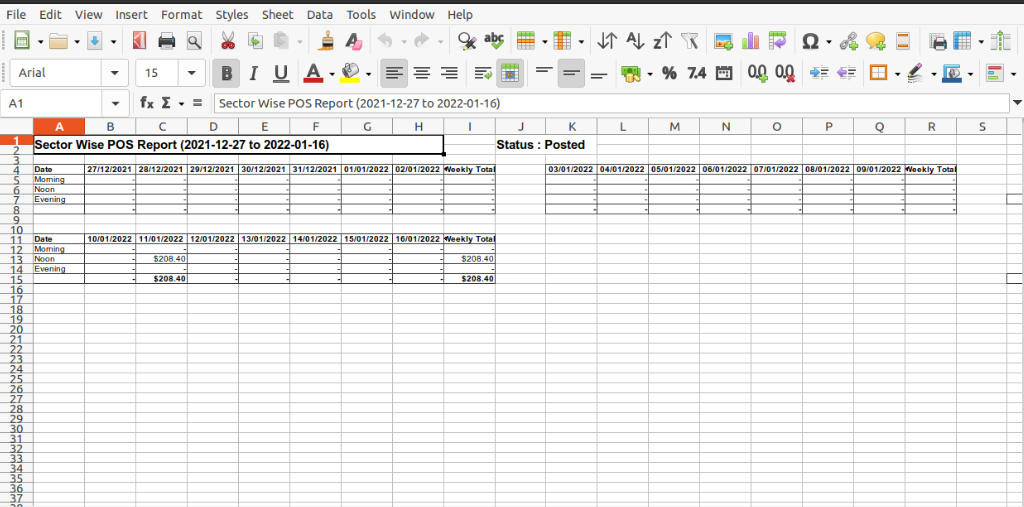
Report File.
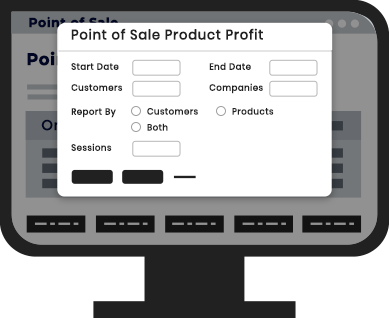
Go to user setting >> Enable the "POS Product Profit Report".

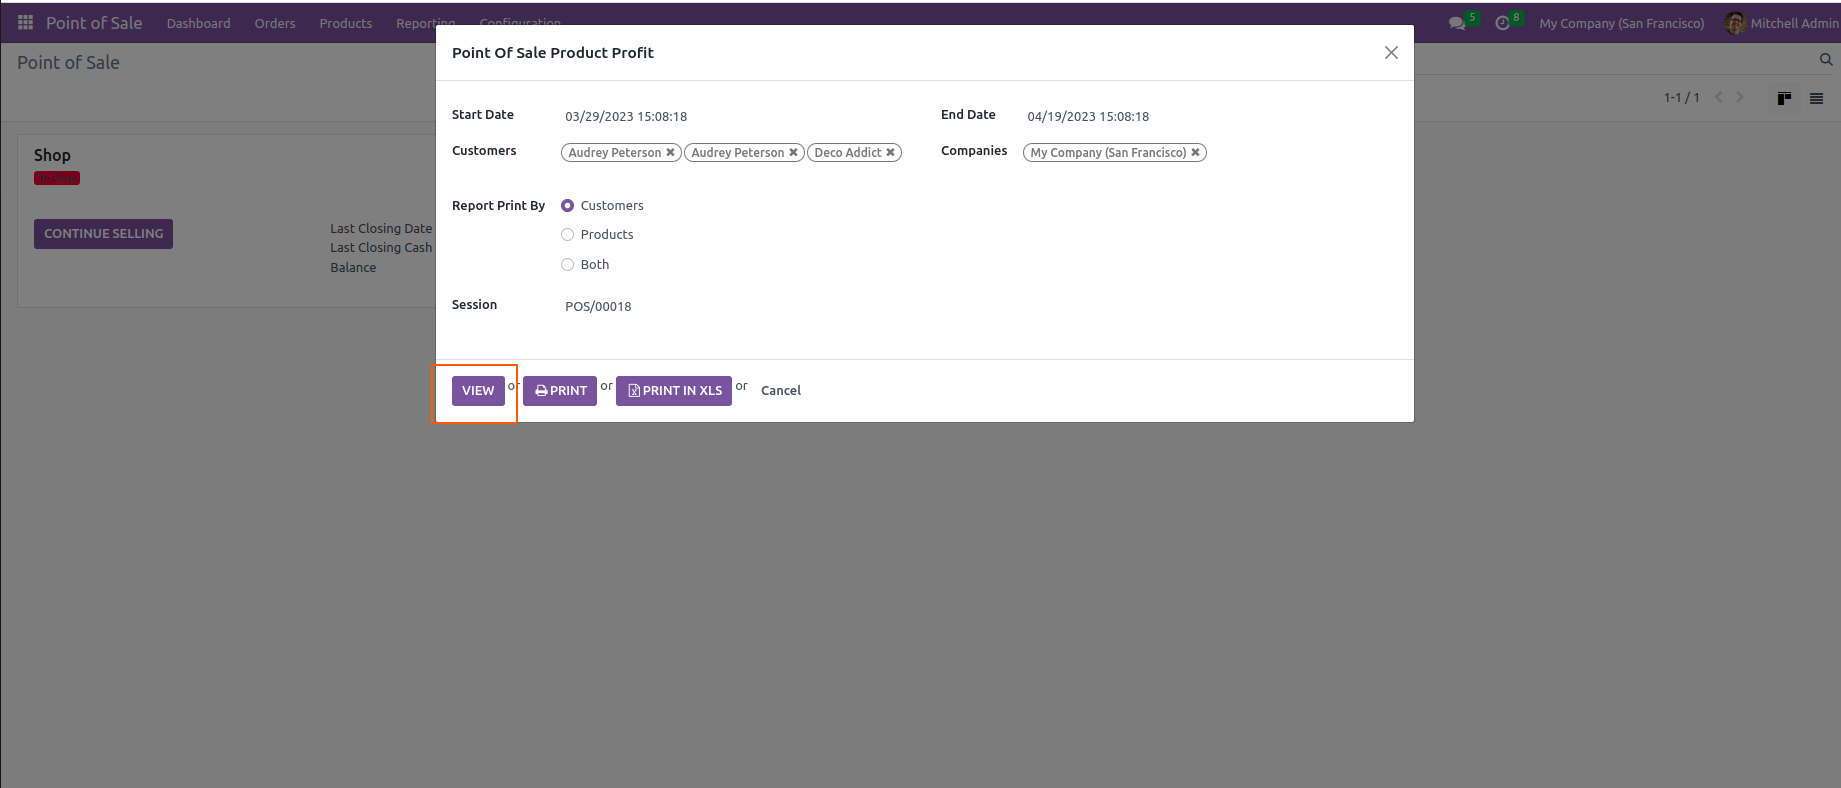
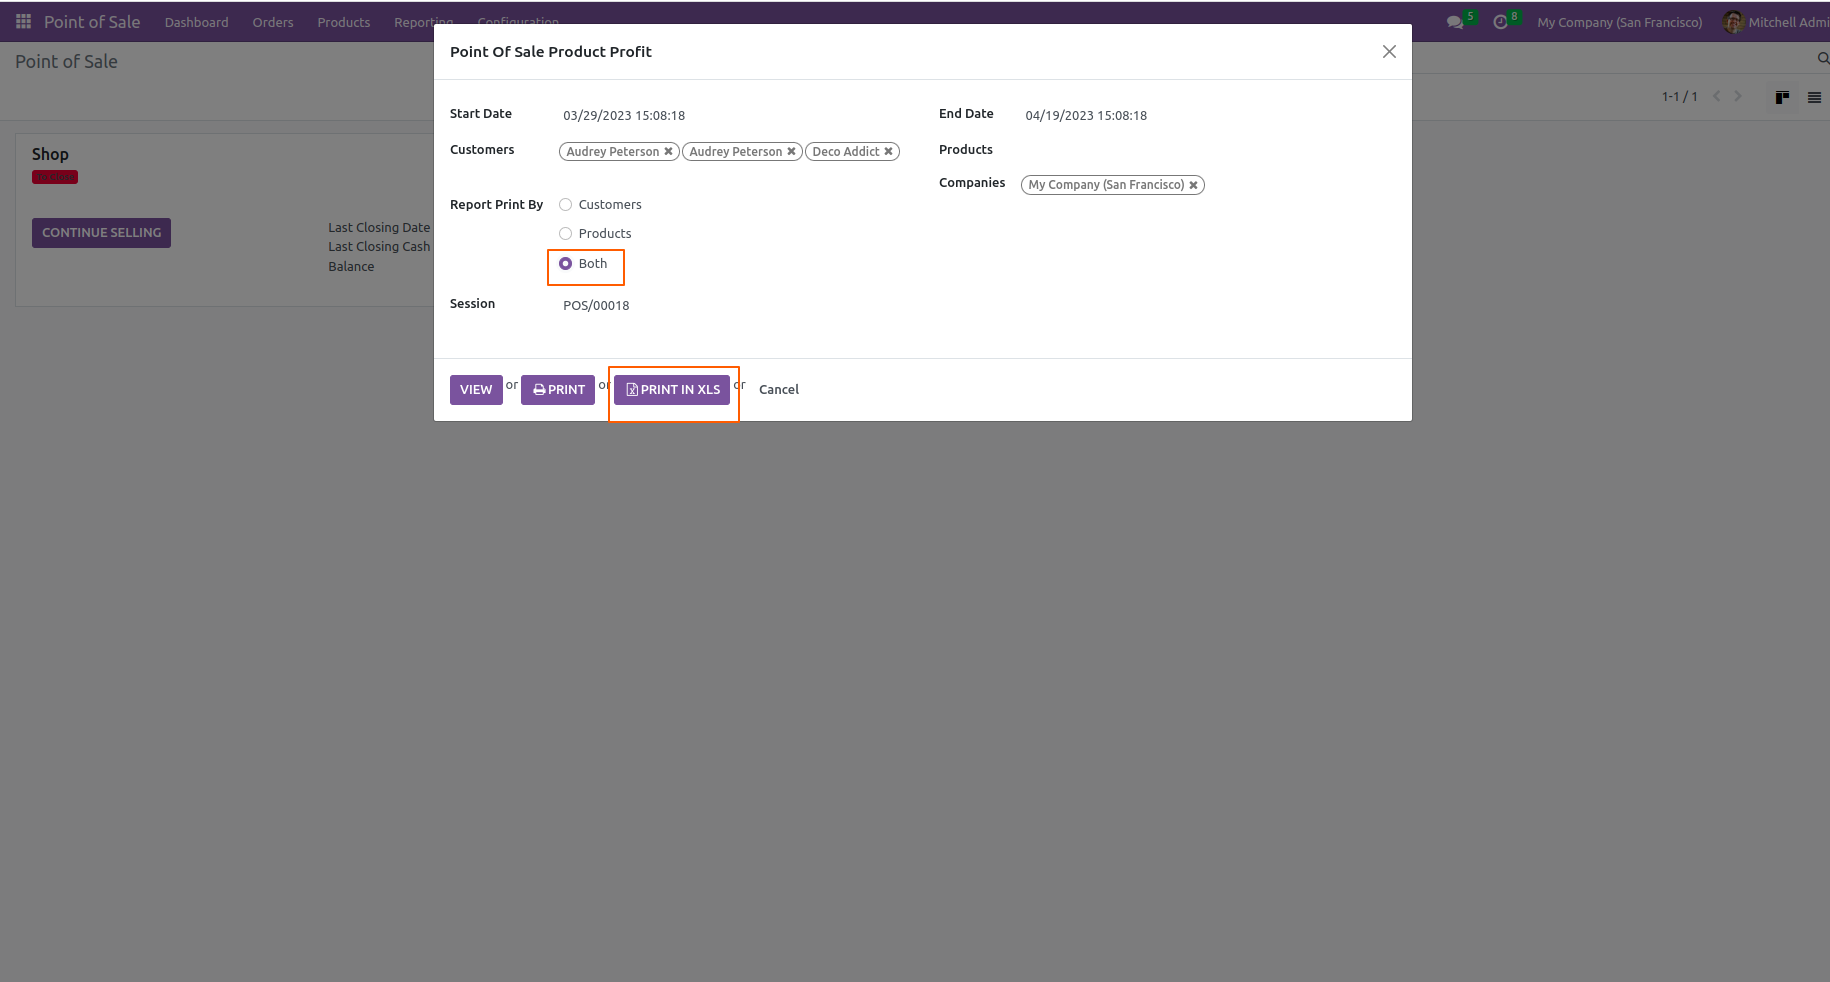
Go to "Point Of Sale Product Profit".
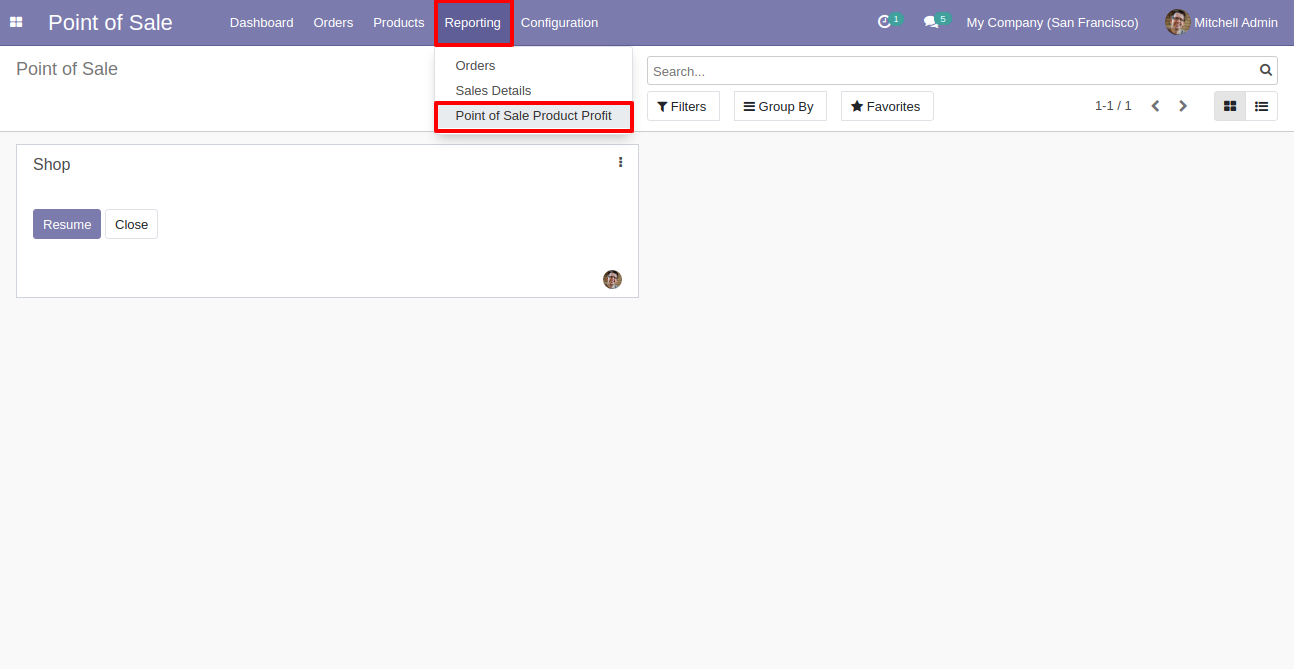
After that "Point Of Sale Product Profit" wizard will appear.
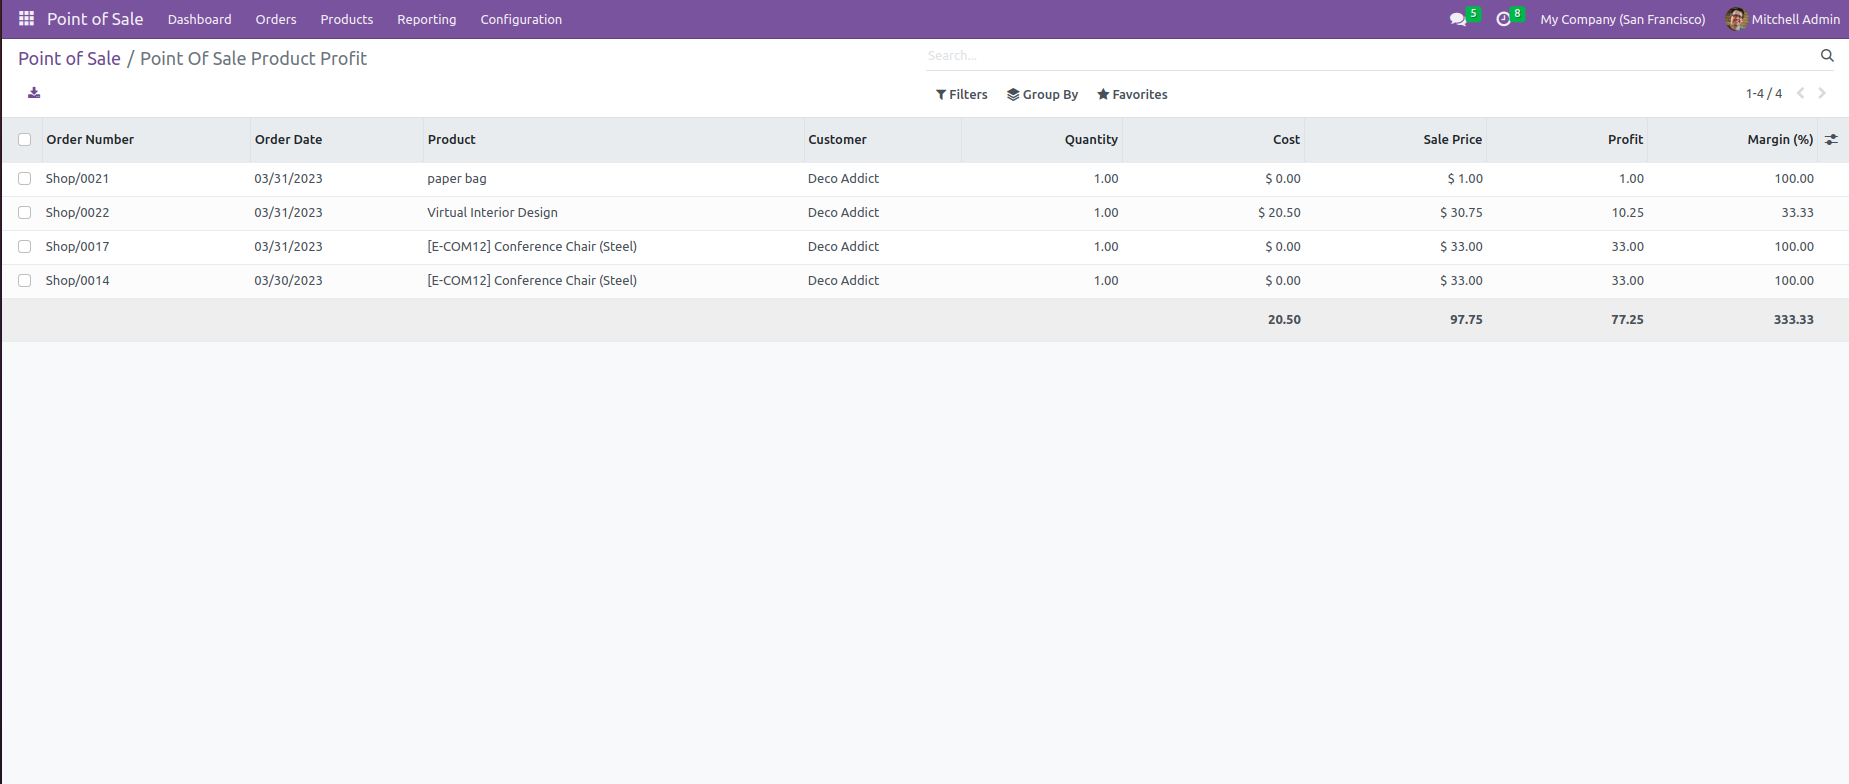
Click on the "VIEW" button.
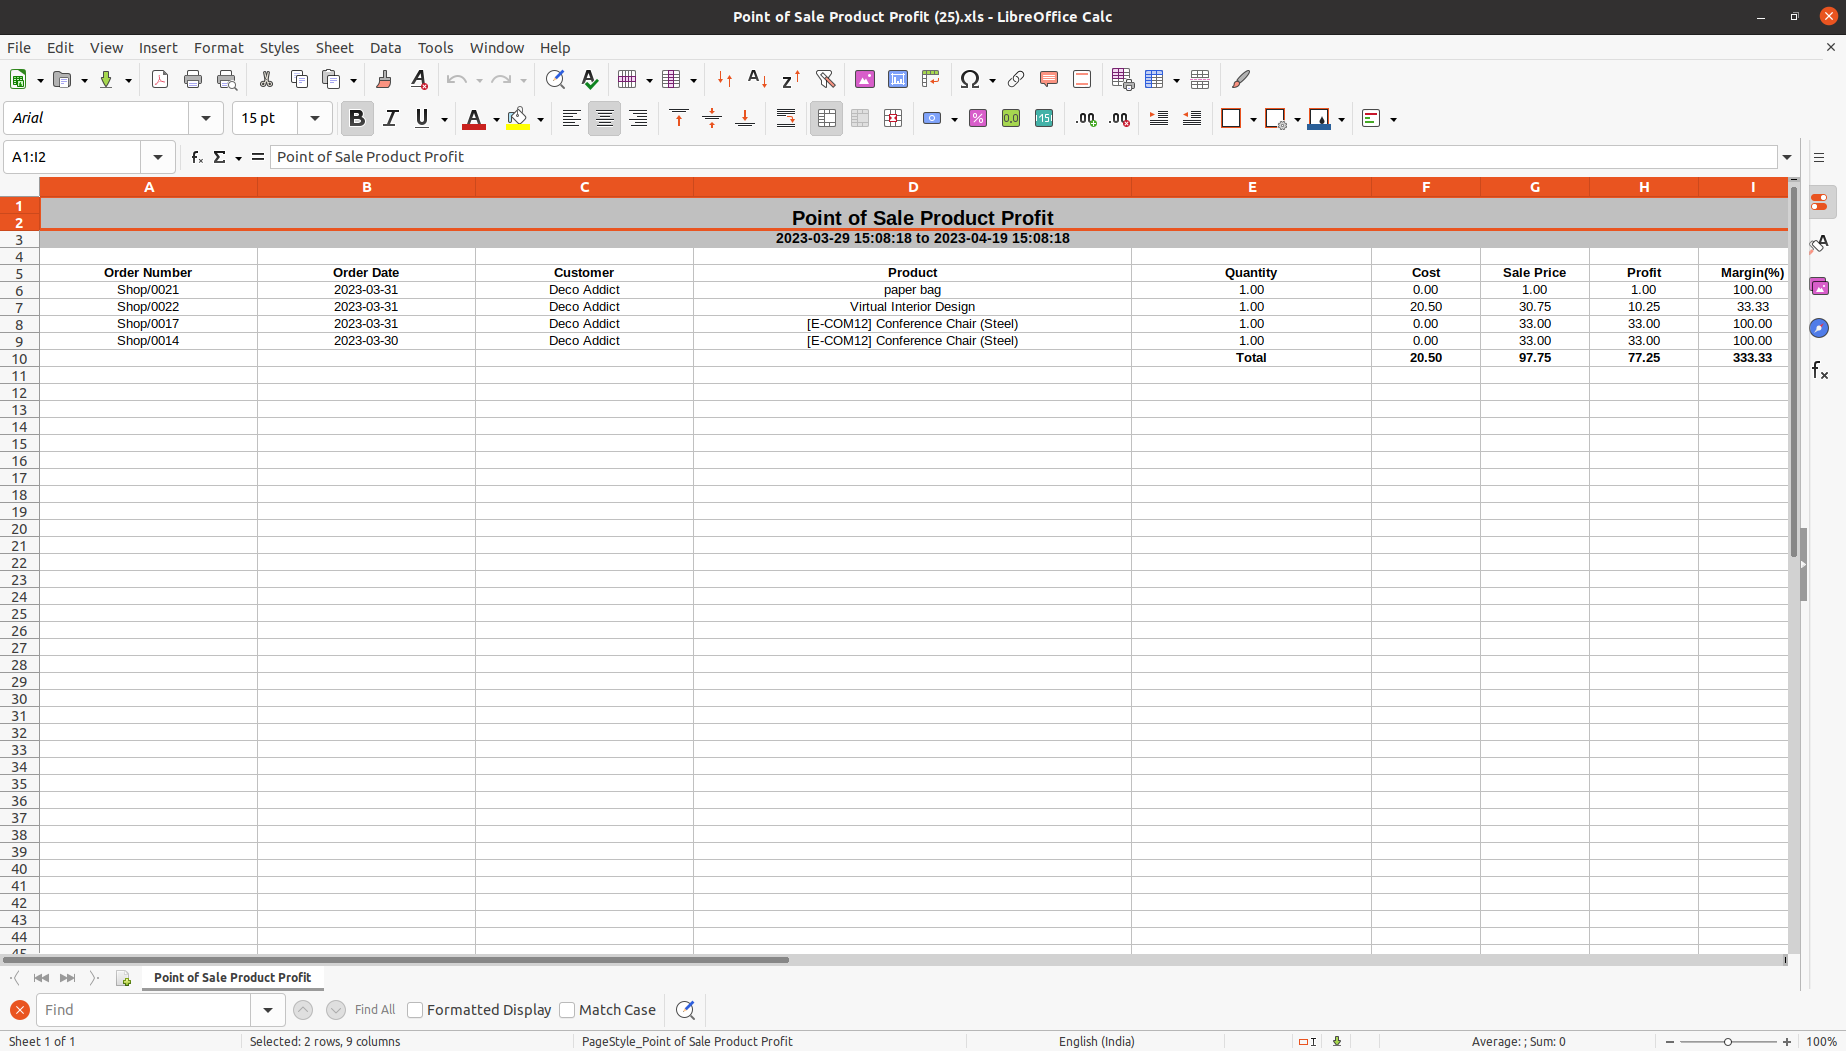
Here, you can see the list view of the point of sale product profit.
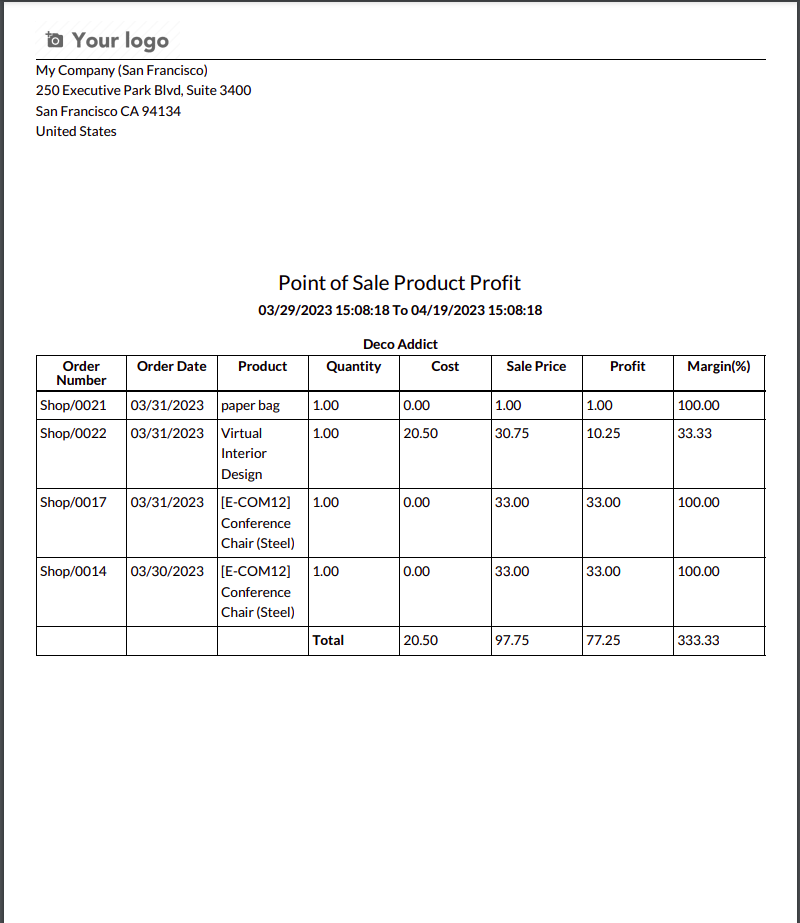
Select Report Print By = "Customers".
Click on the "PRINT" button.

PDF File.
Select Report Print By = "Both".
Click on the "PRINT IN XLS" button.
PDF File.
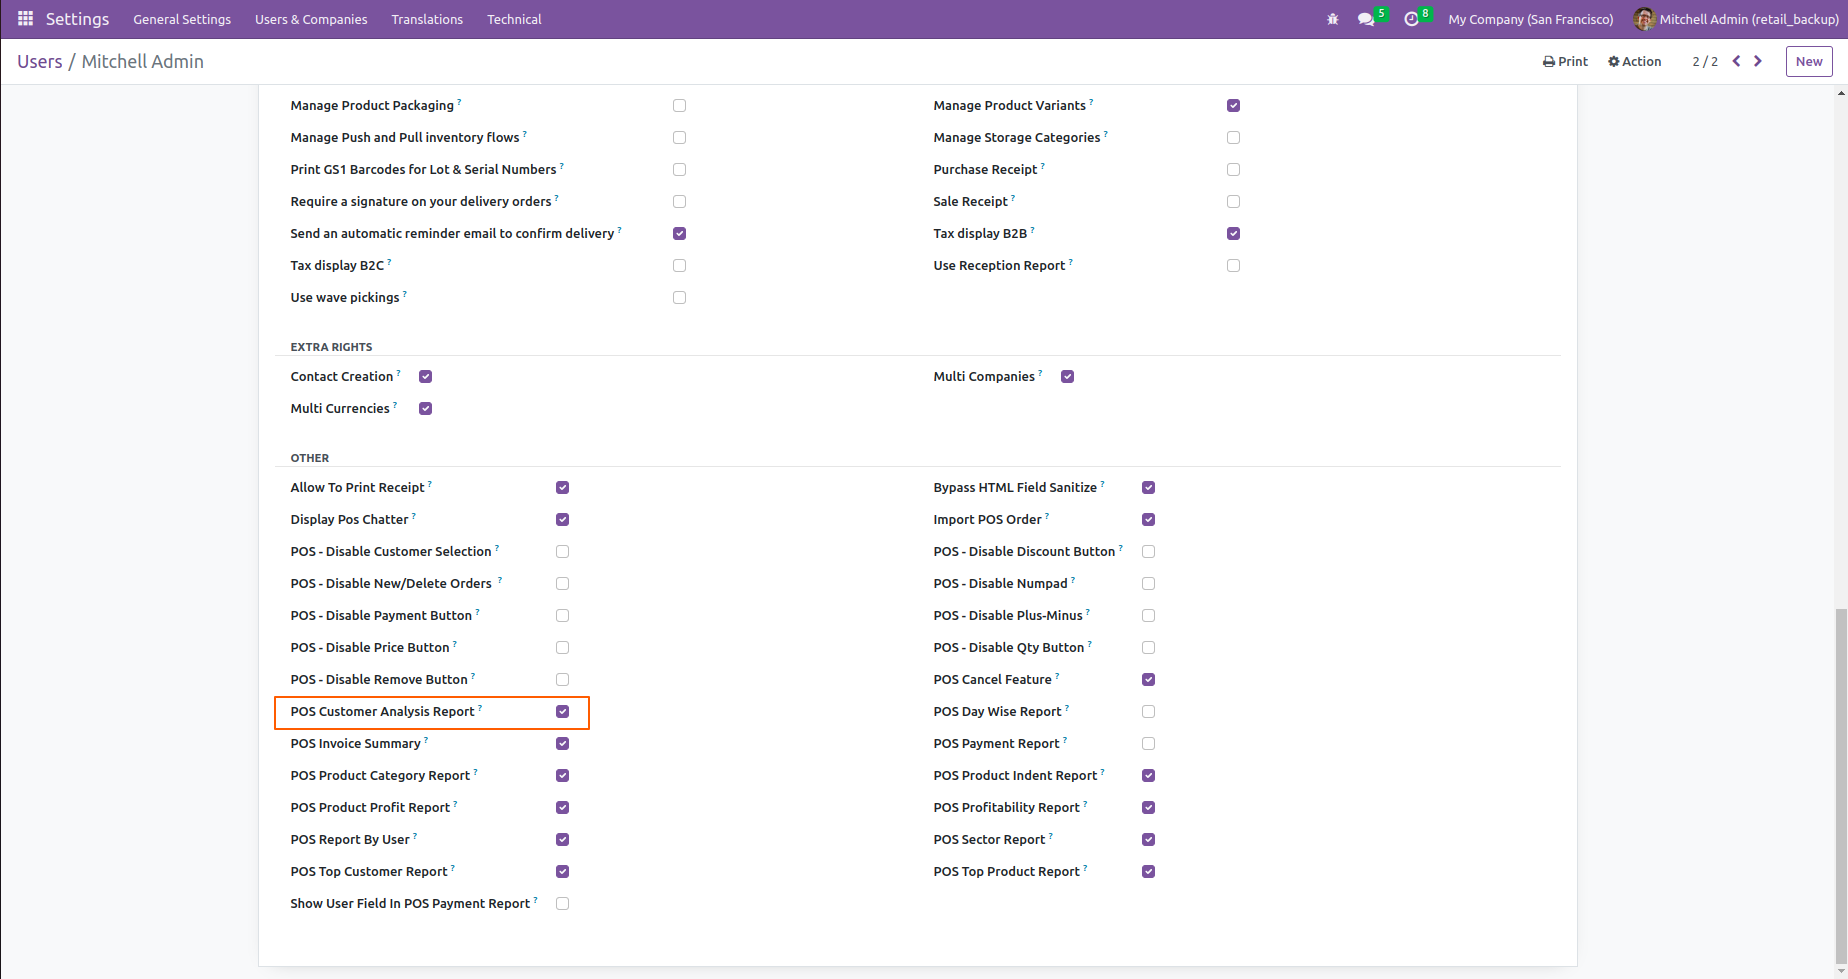
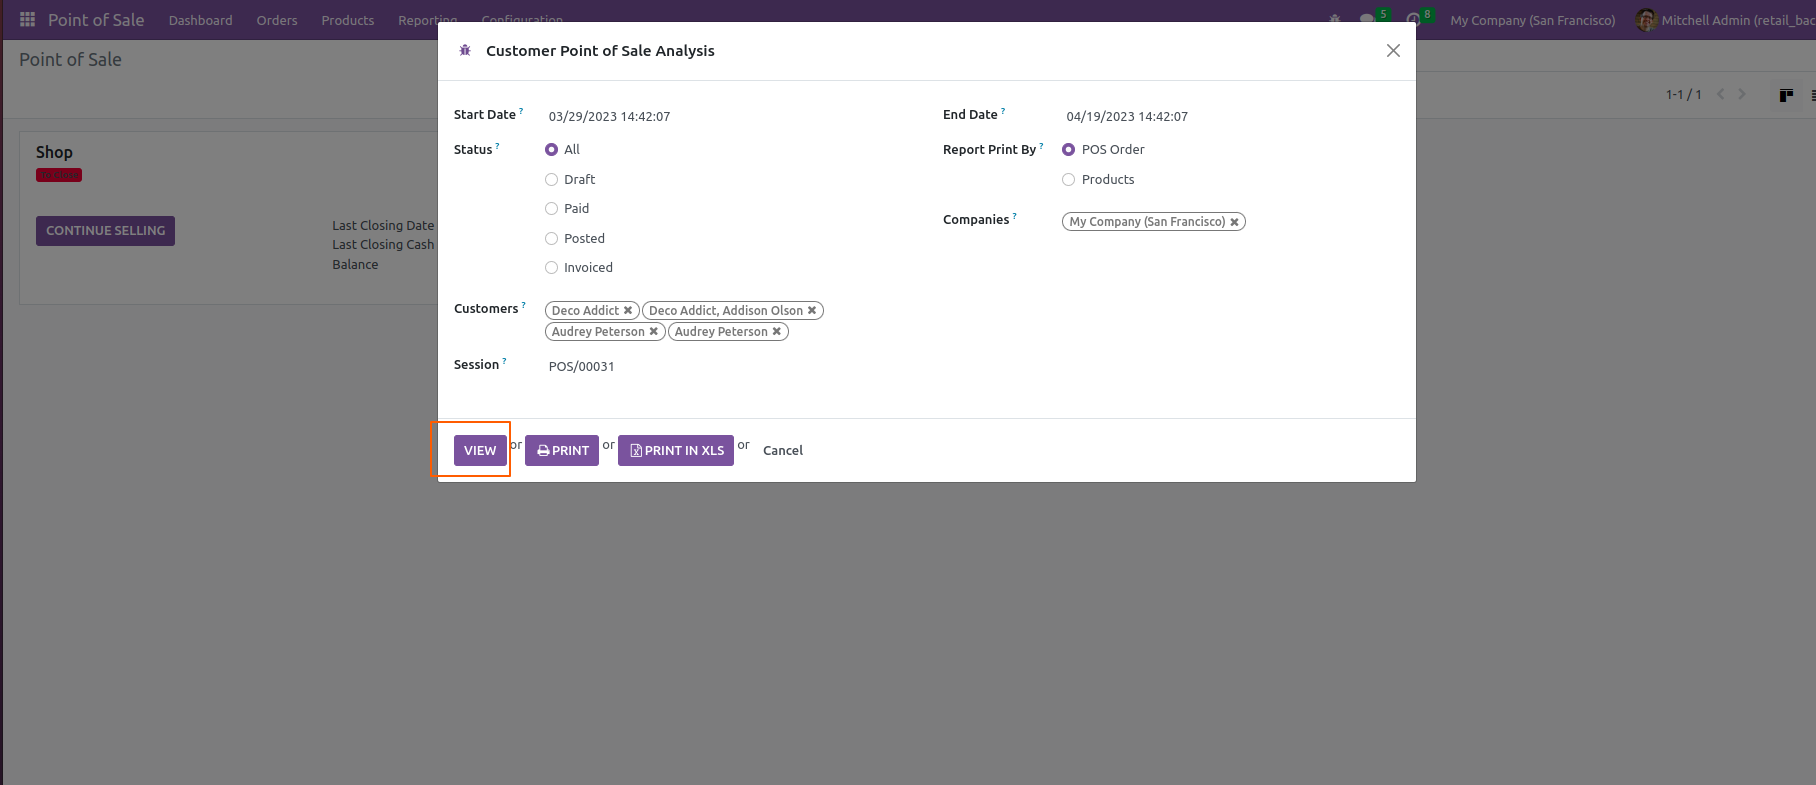
Go to user setting >> Enable the "POS Customer Analysis Report".
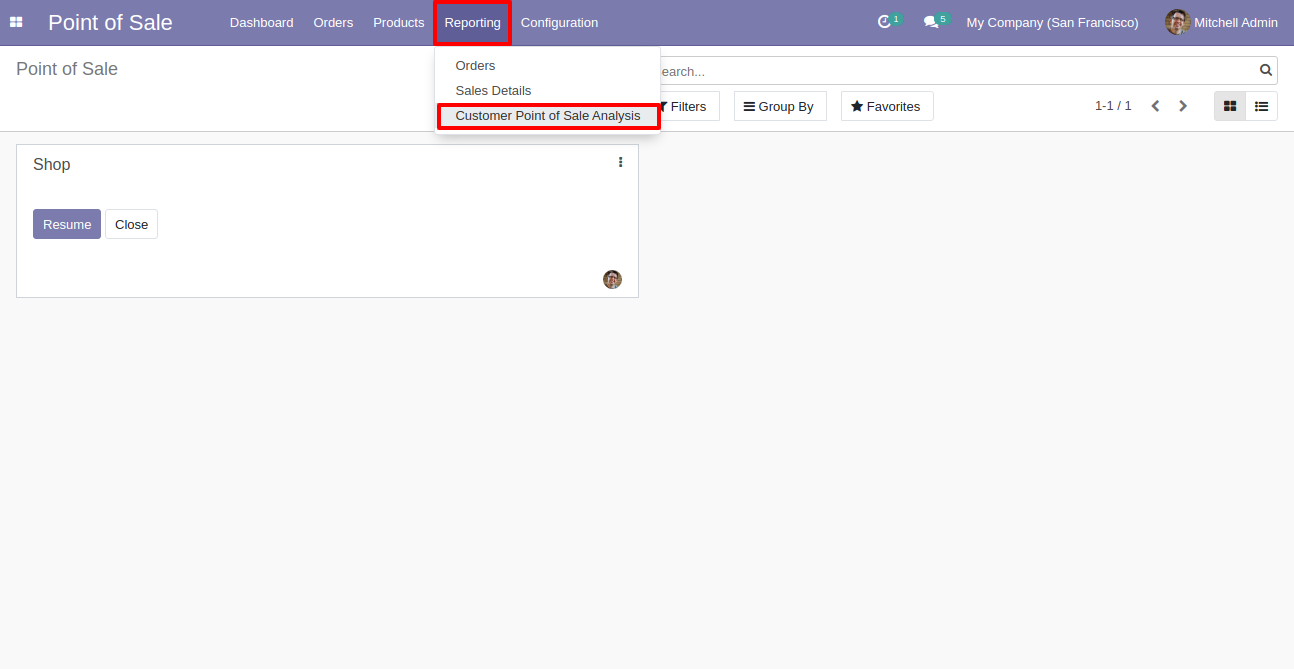
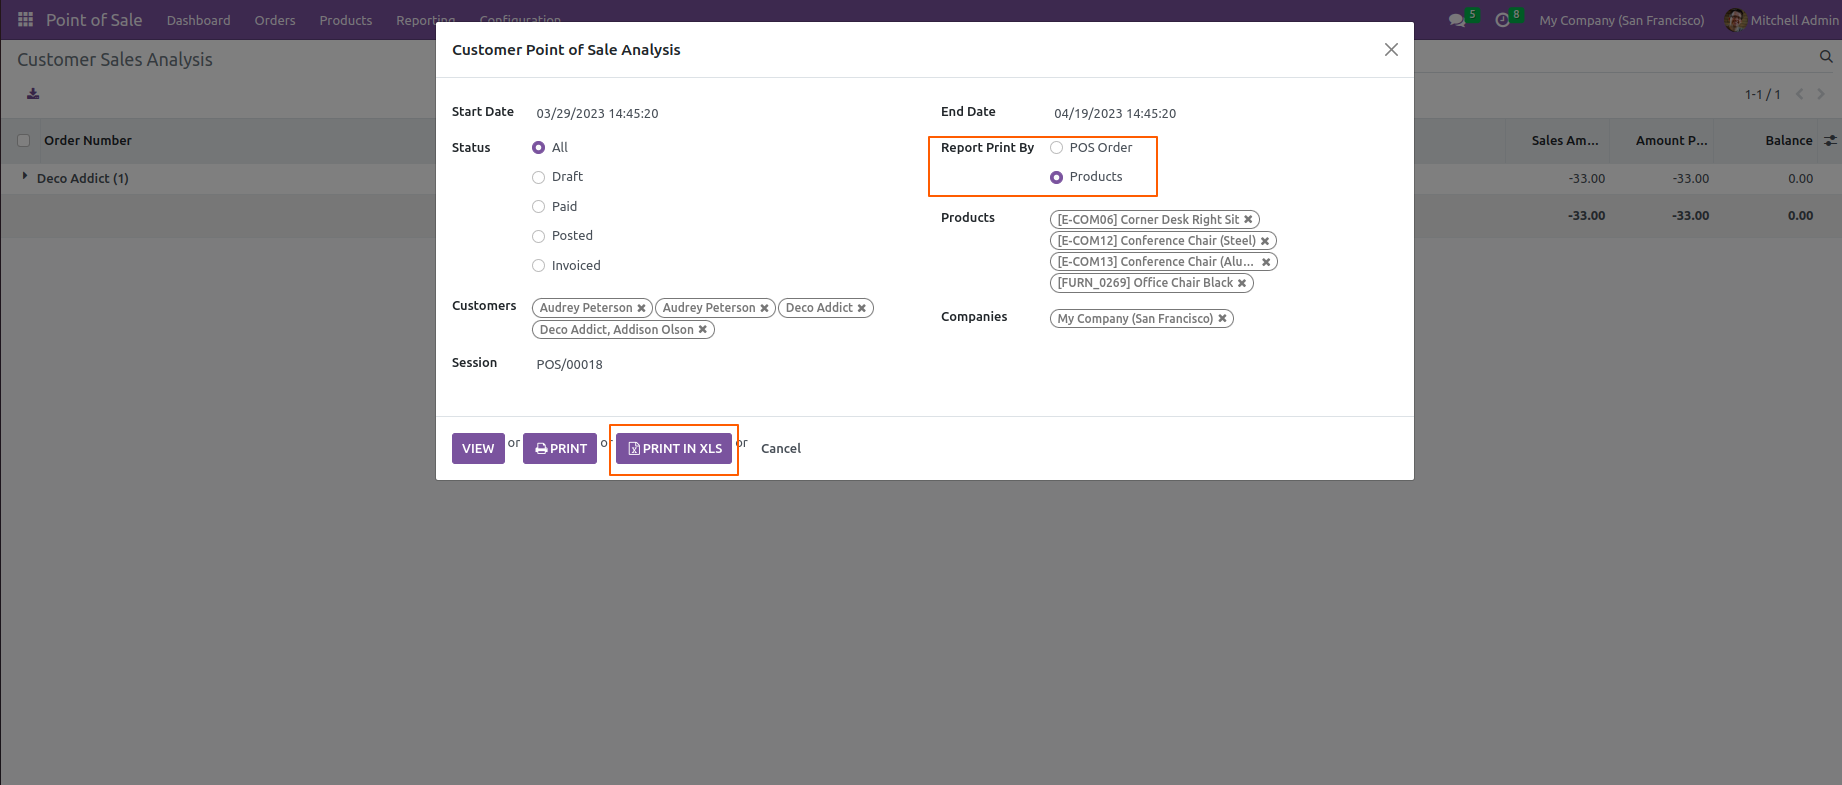
Go to "Customer Point Of Sale Analysis".
After that "Customer Point Of Sale Analysis" wizard will appear.
Select Status = "All".
Click on the "VIEW" button.
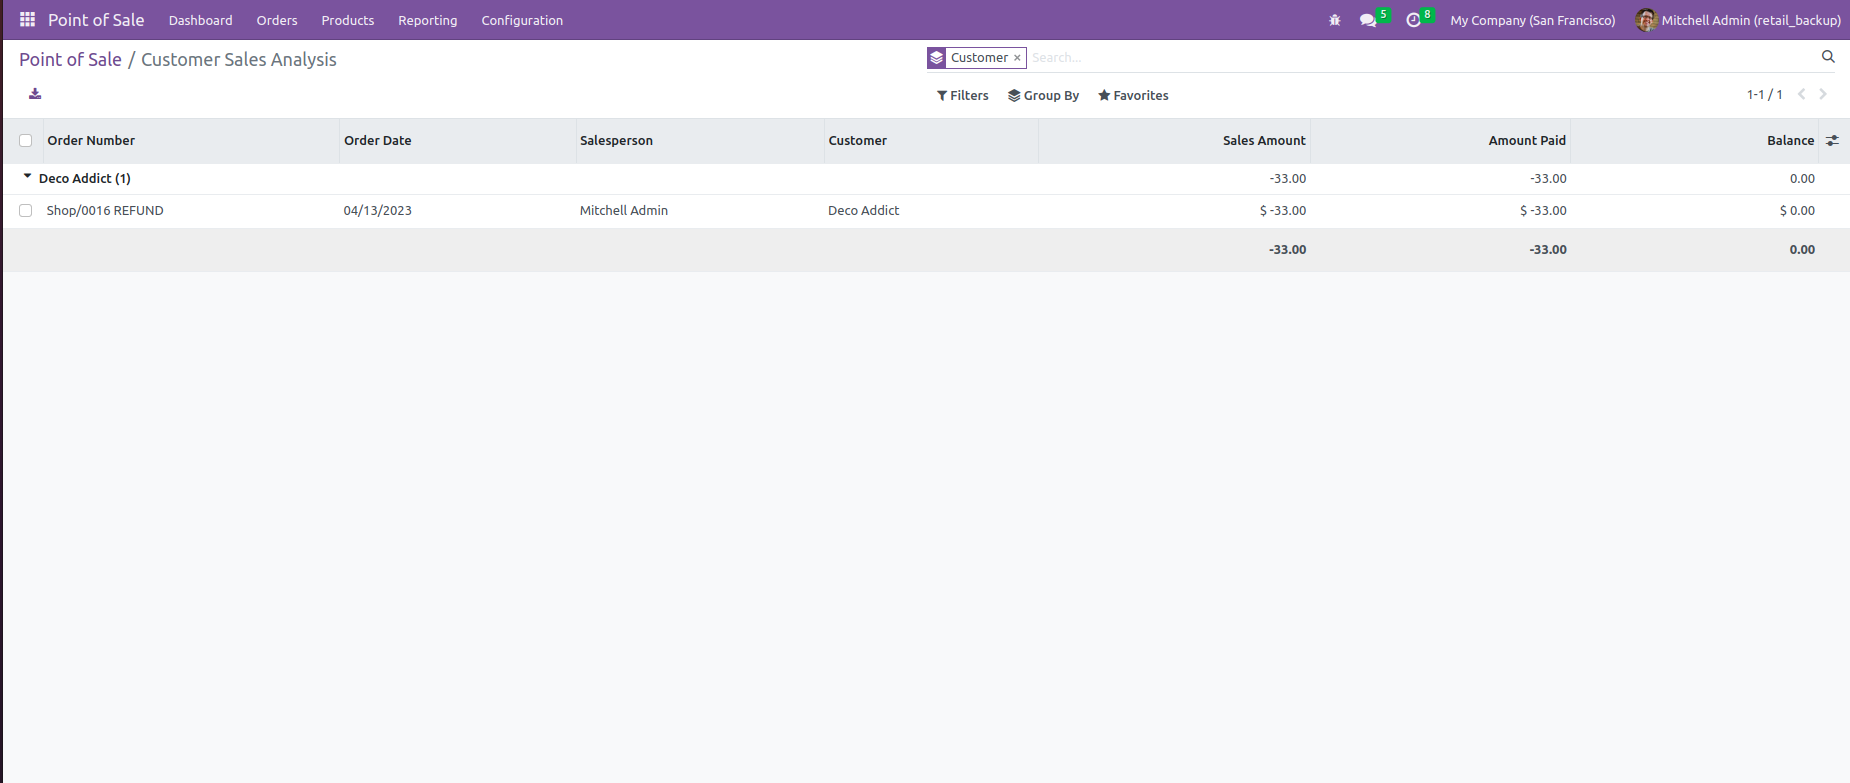
Here, you can see the list view of the customers sales analysis.
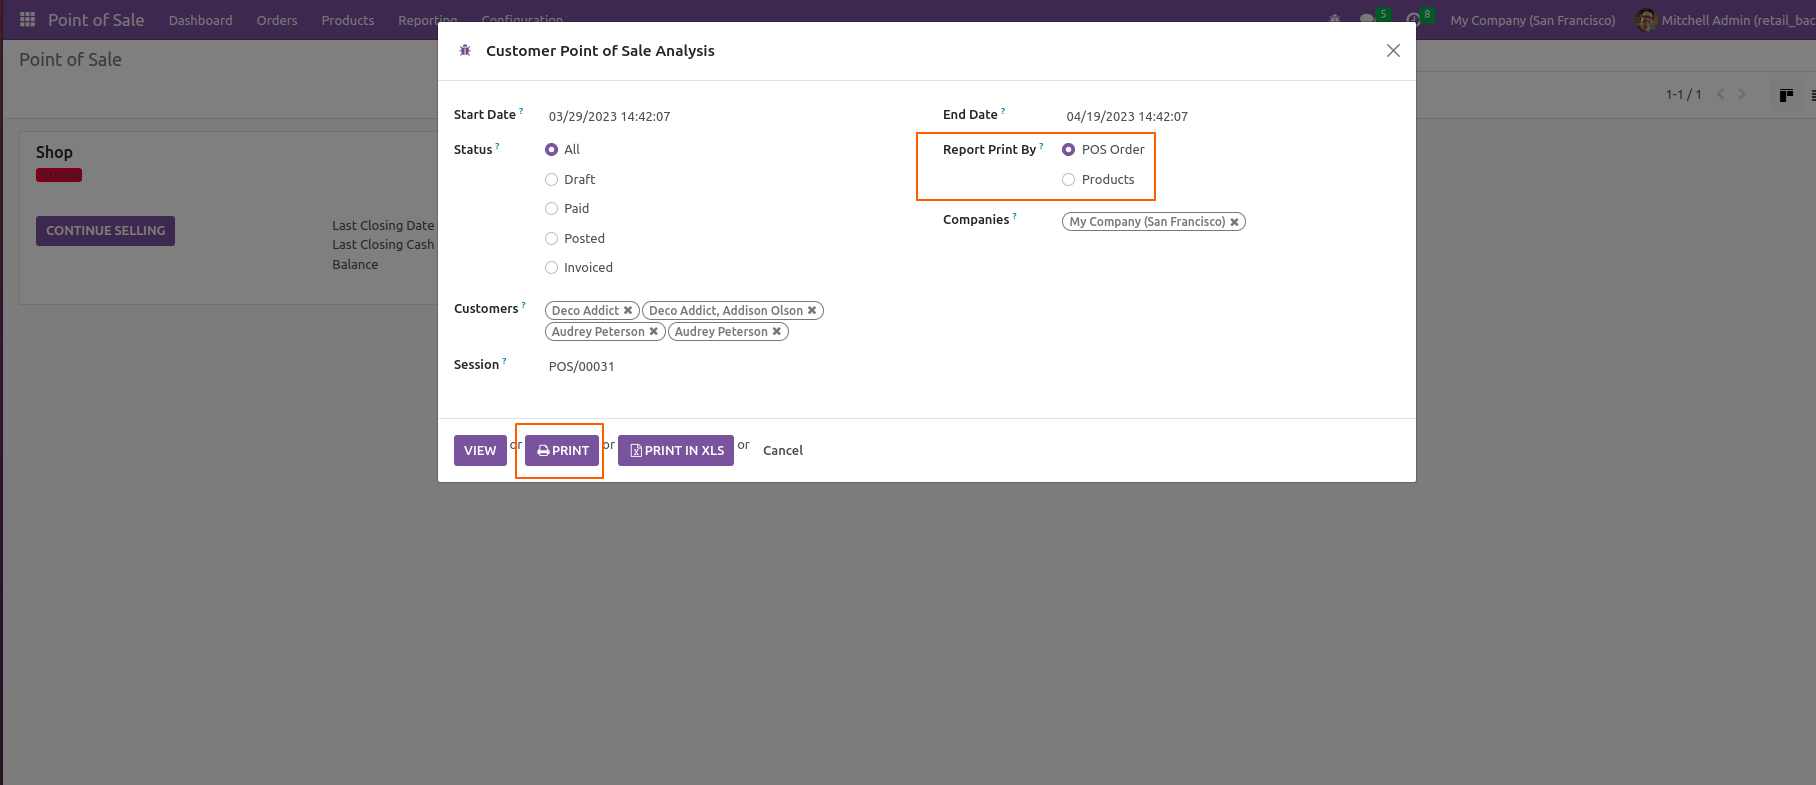
Select Report Print By = "POS Order".
Click on the "PRINT" button.
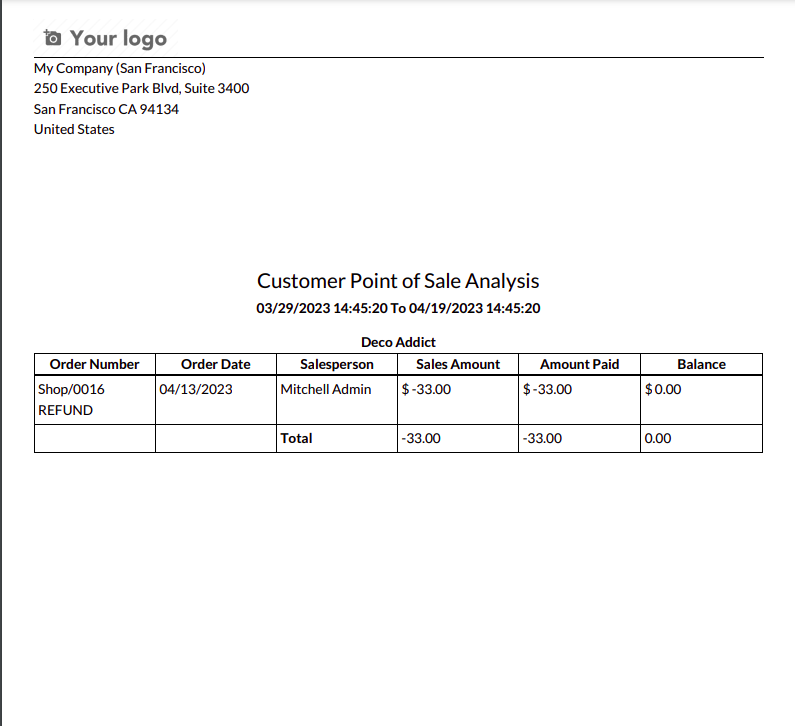
PDF File.
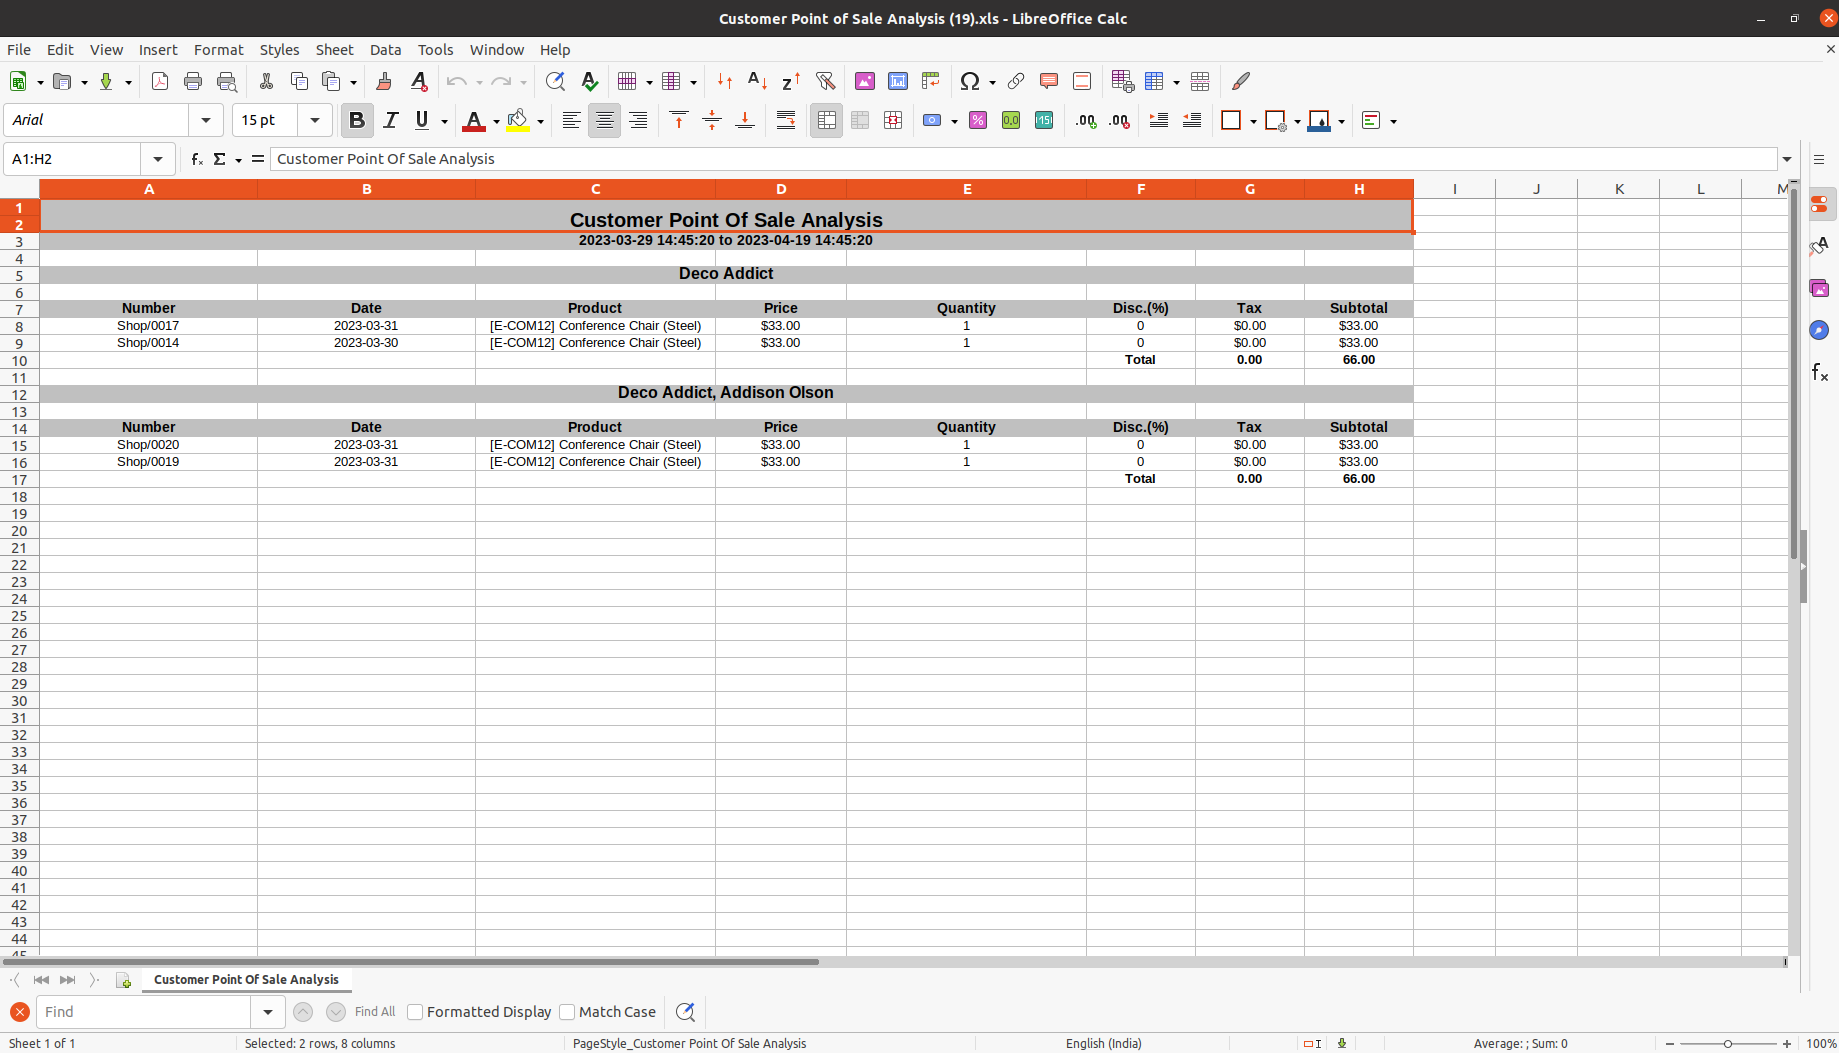
Select Report Print By = "Product".
Click on the "PRINT IN XLS" button.
XLS File.
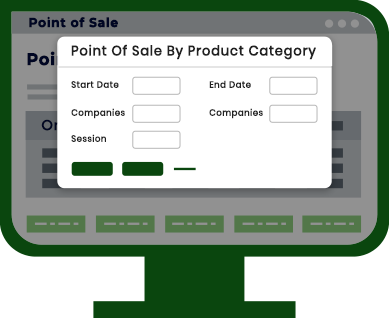
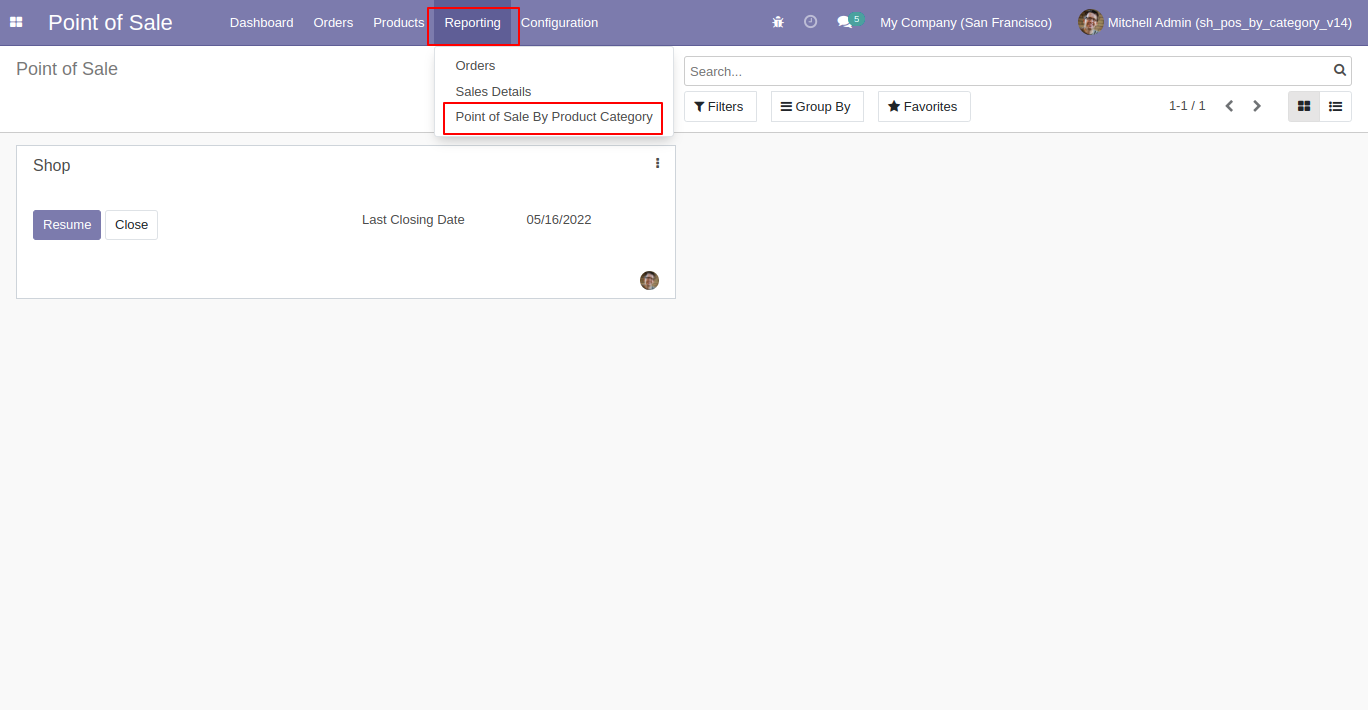
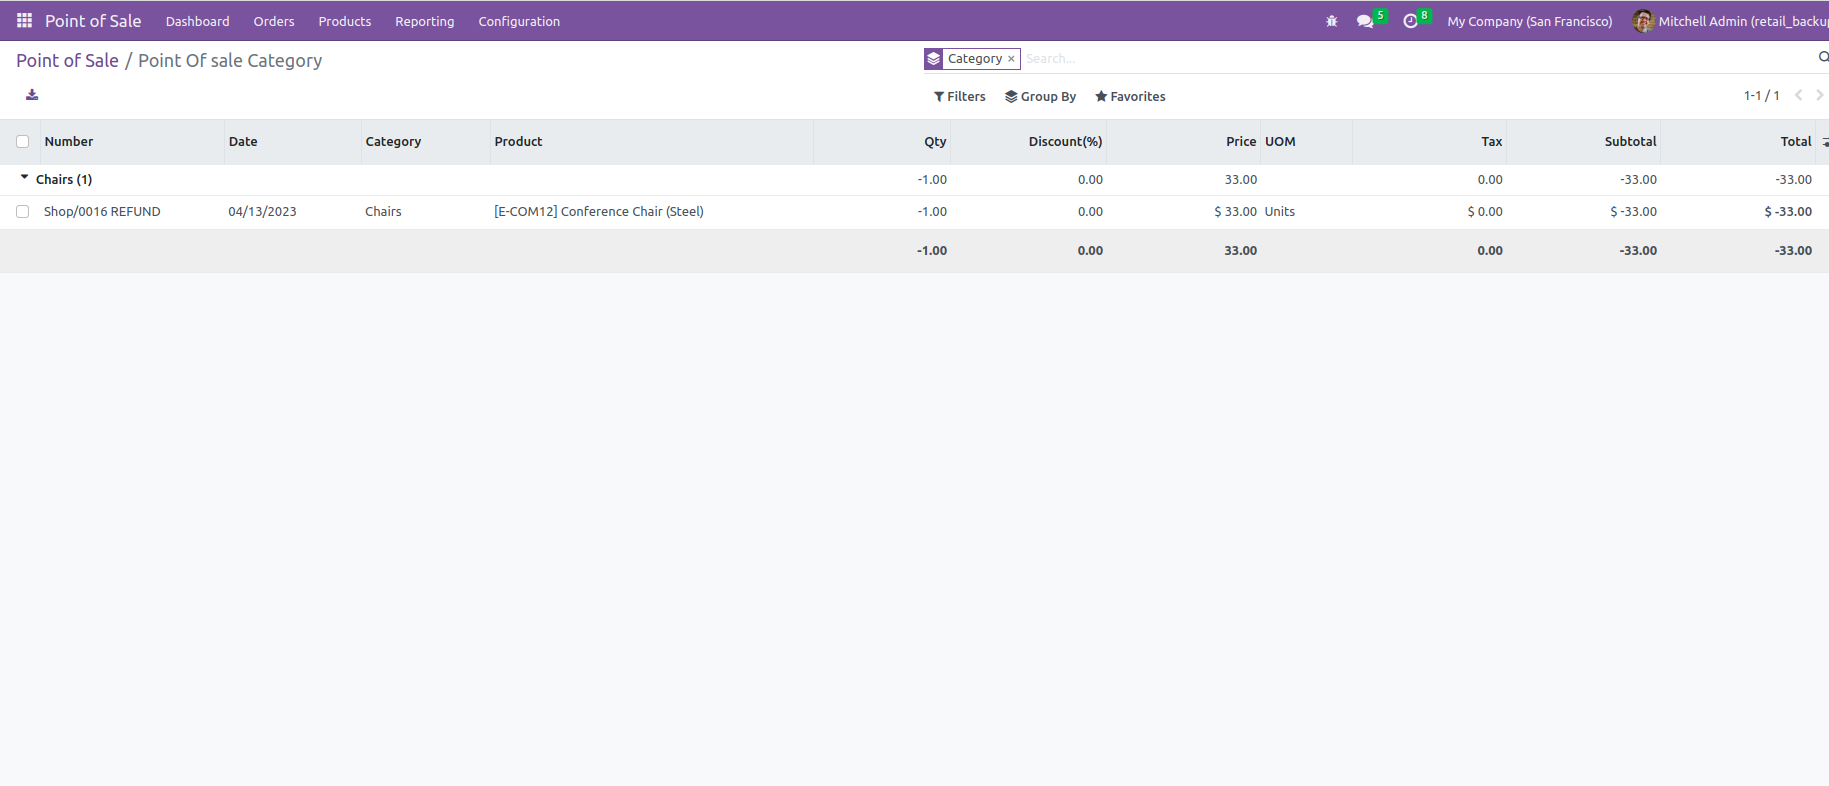
Go to user setting >> Enable the "POS Product Category Report".

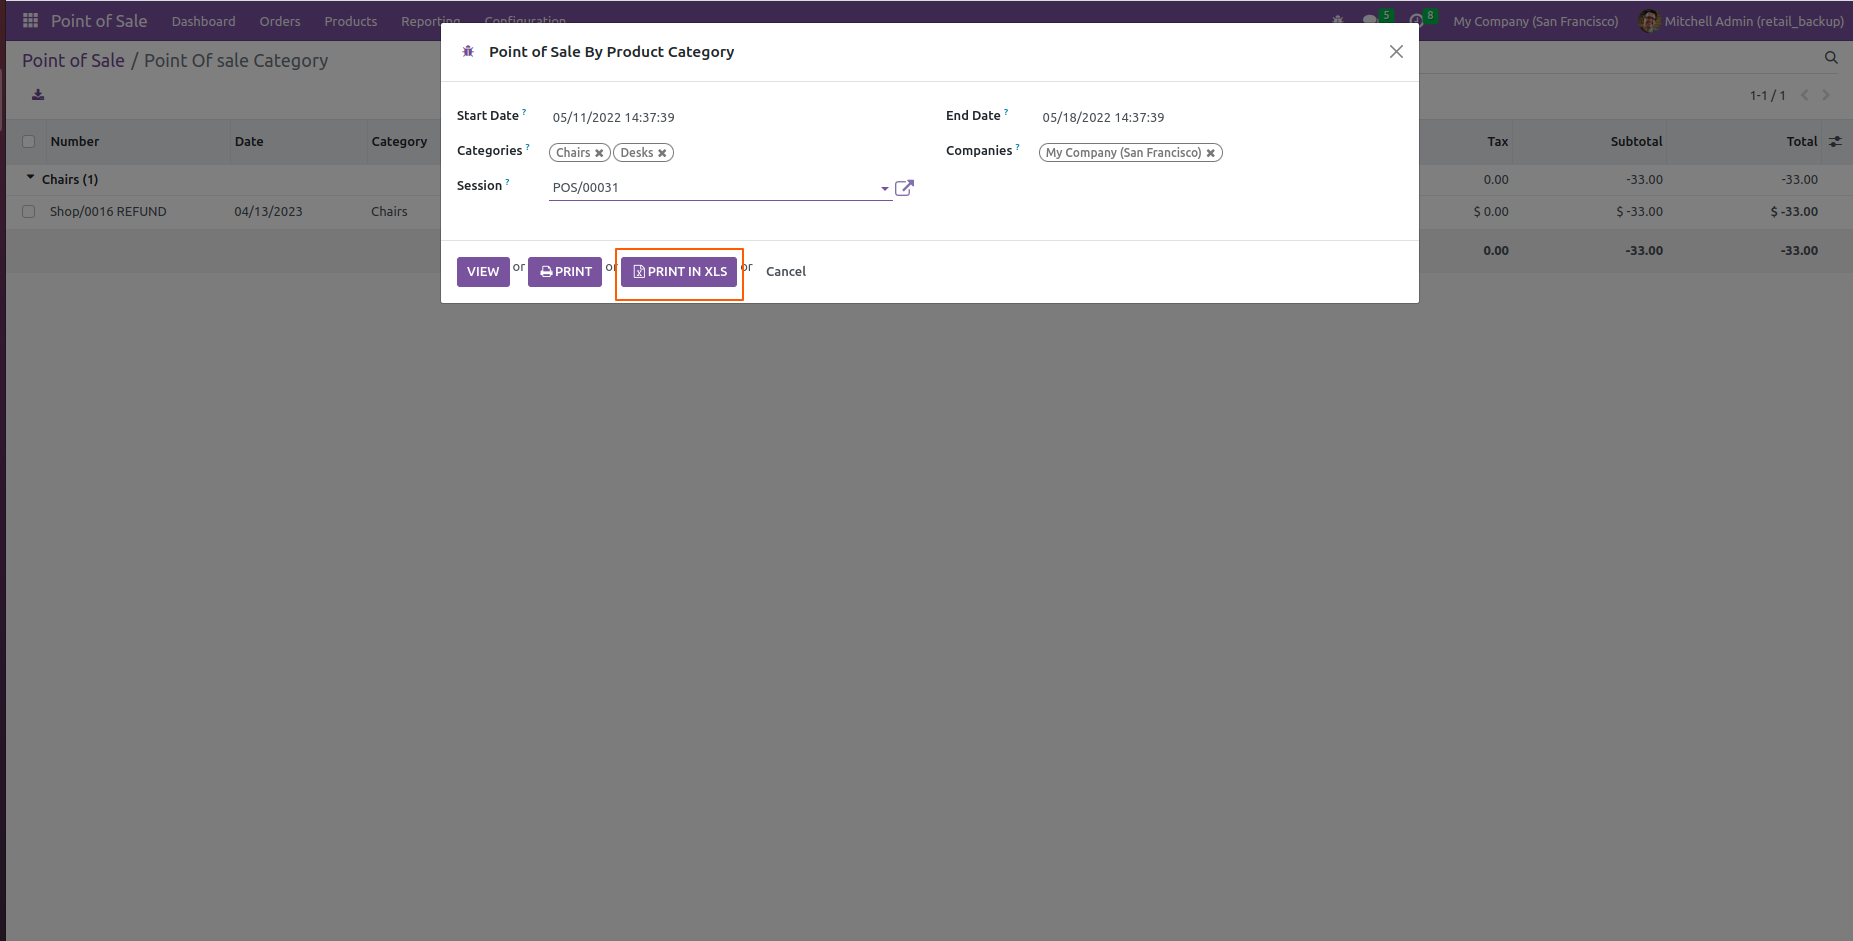
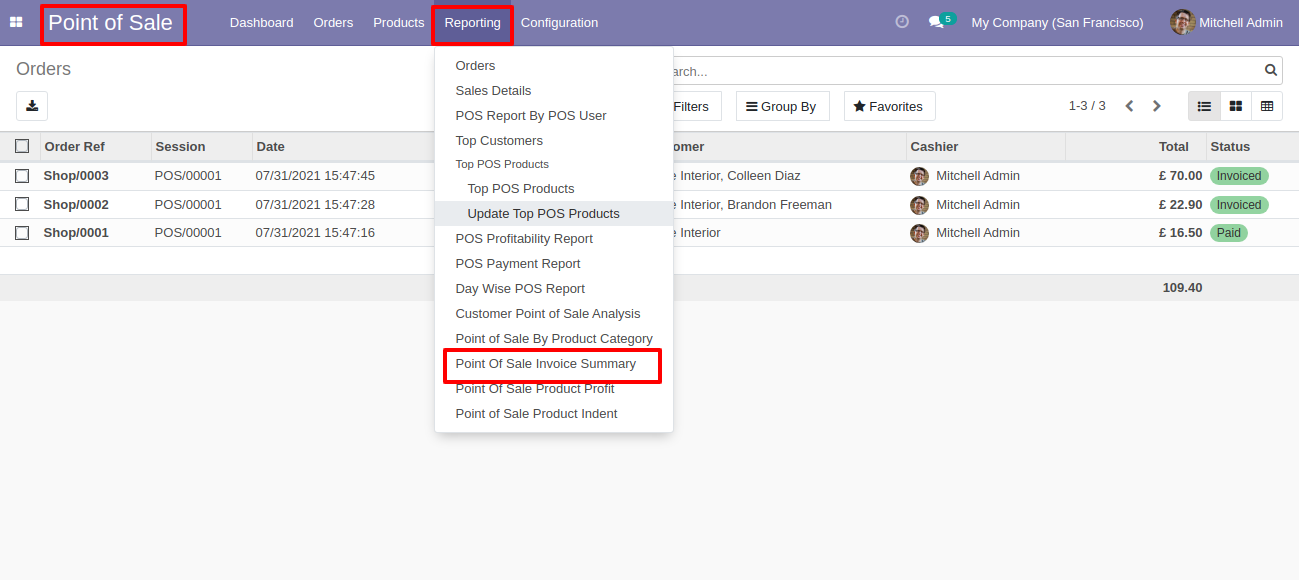
Go to "Point Of Sale By Product Category".
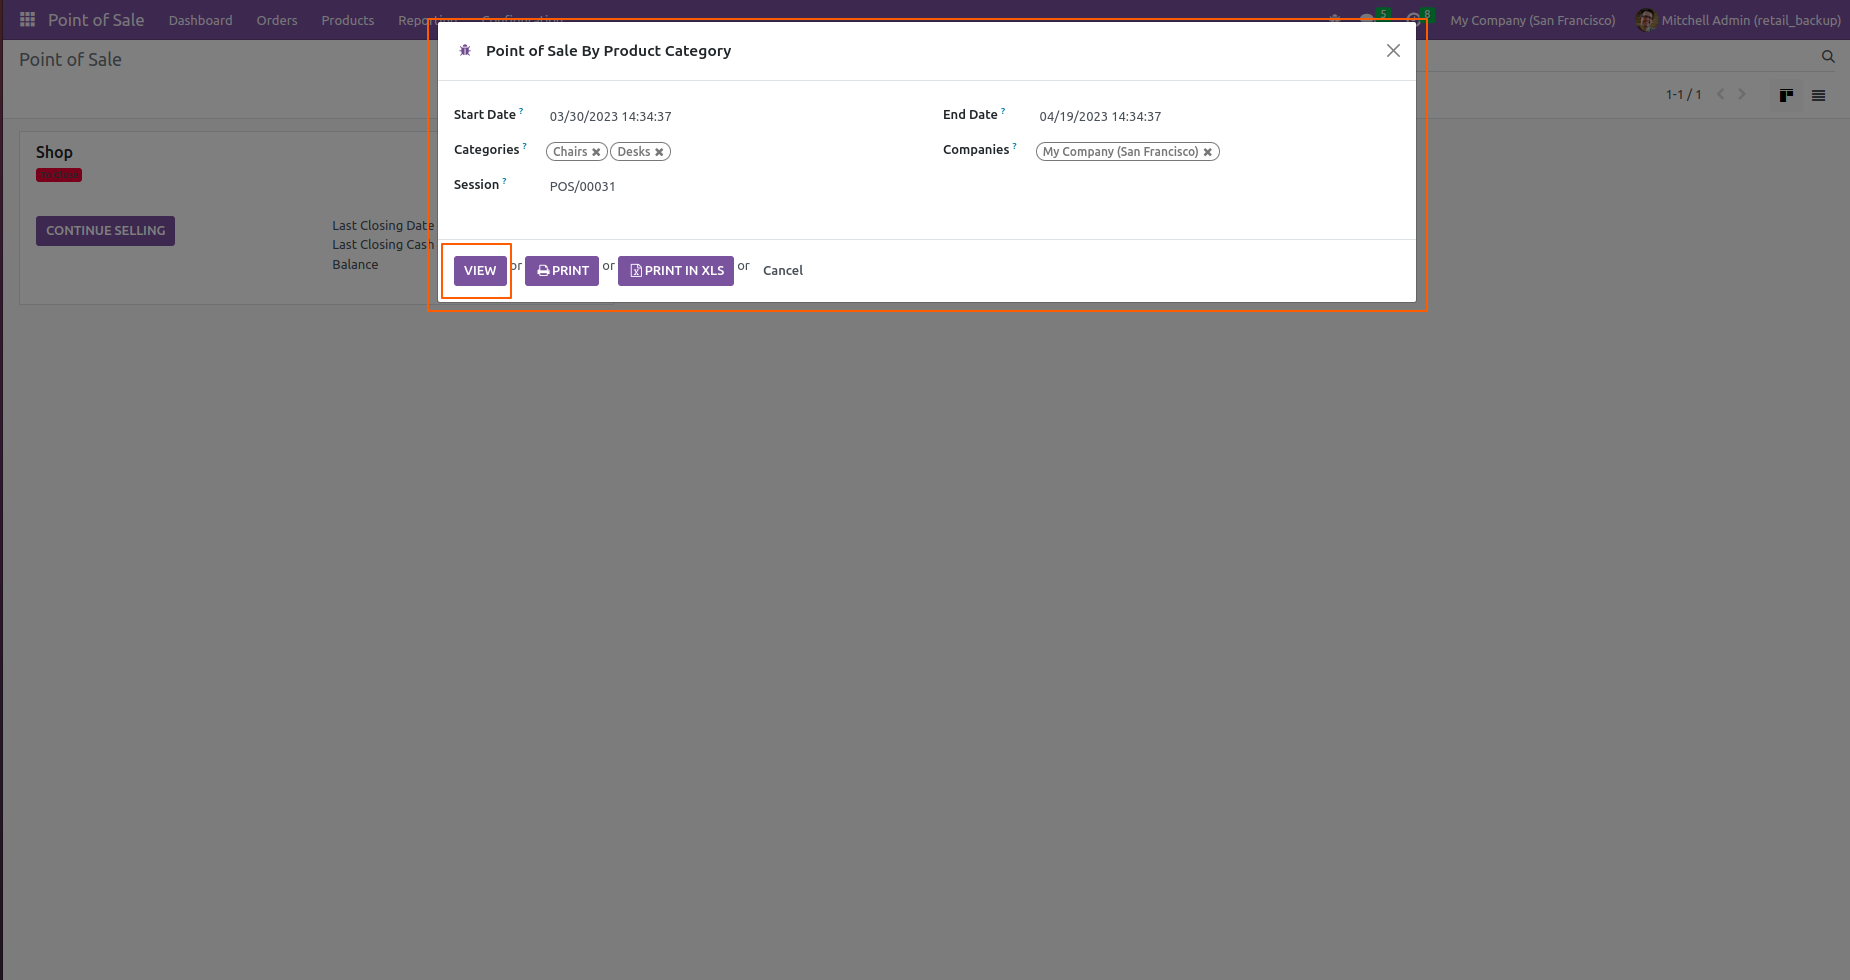
After that "Point Of Sale By Product Category" wizard will appear.
Click on the "VIEW" button.
Here, you can see the list view of the point of sale category.
For printing Point Of Sale By Product Category report, Click on the "PRINT" button.

PDF File.
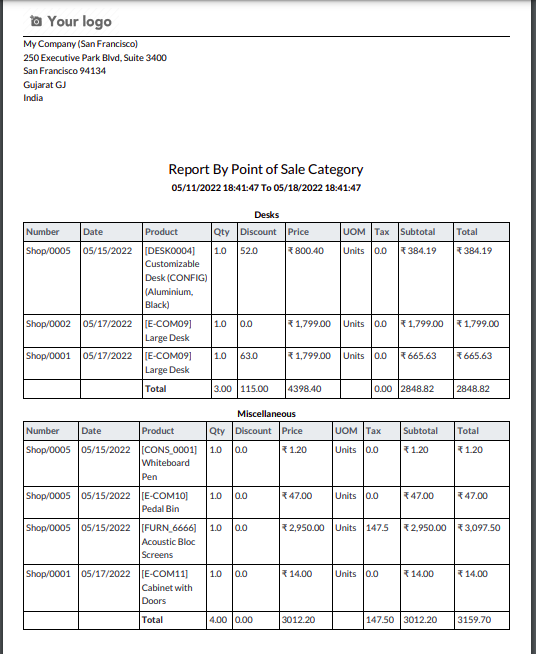
For printing Point Of Sale By Product Category report in XLS formate, Click on the "PRINT IN XLS" button.
XLS File.

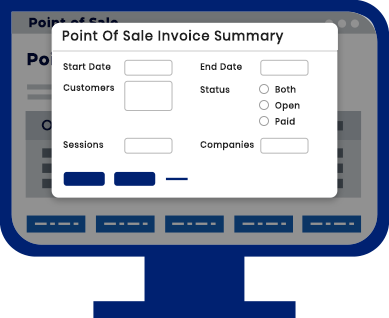
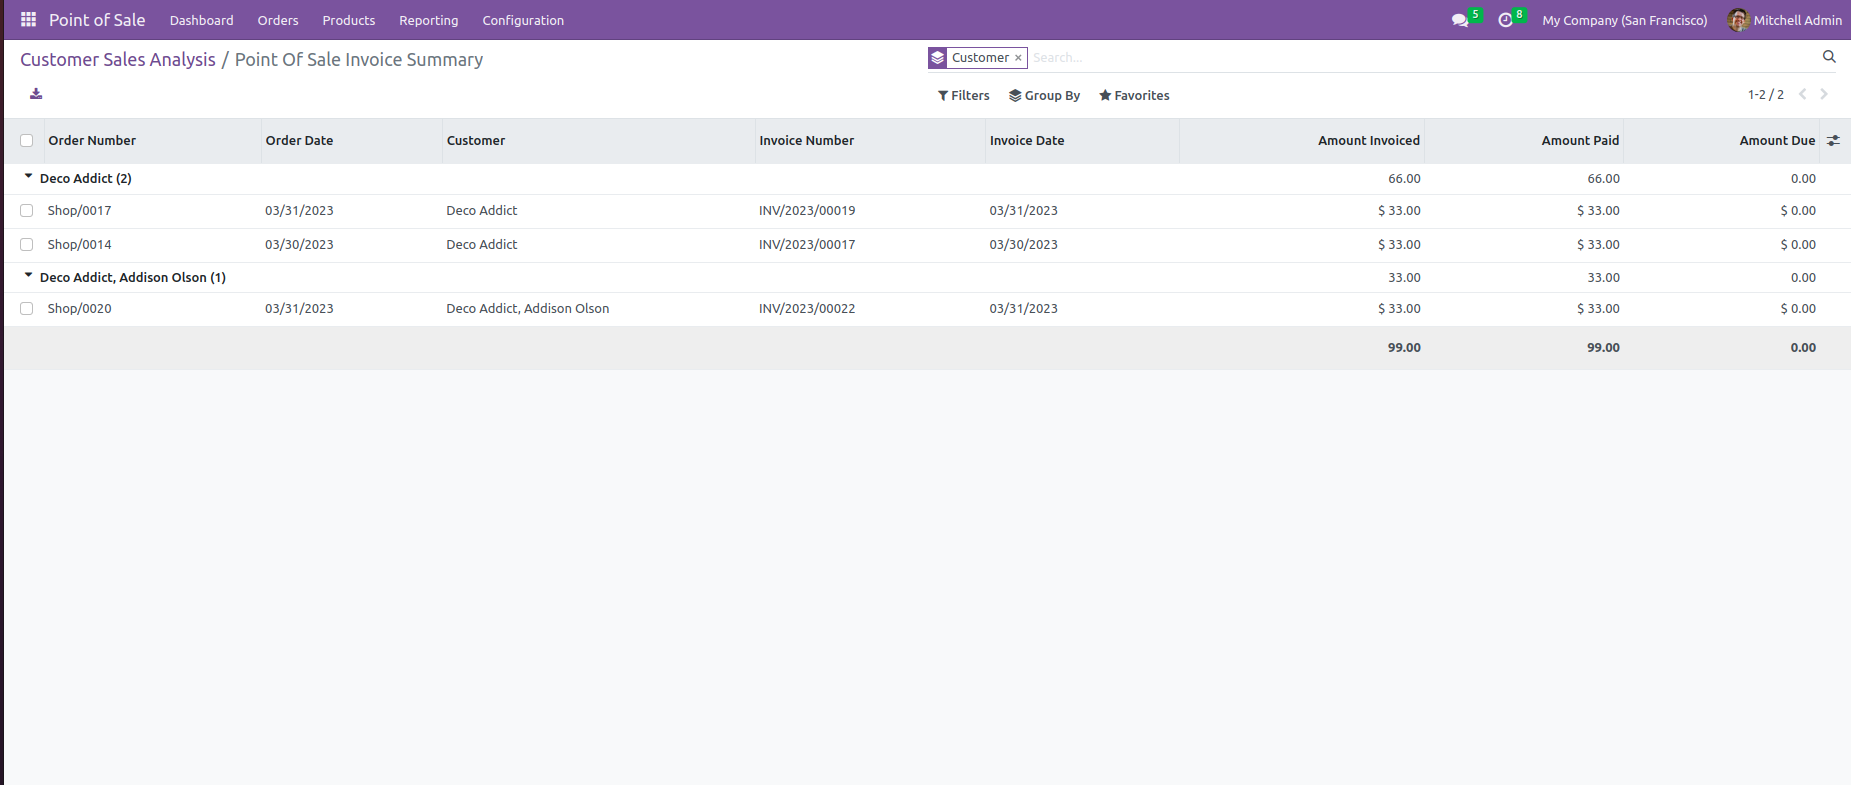
Go to user setting >> Enable the "POS Invoice Summary".

Go to "Point Of Sale Invoice Summary".
After that "Point Of Sale Invoice Summary" wizard will appear.
Click on the "VIEW" button.

Here, you can see the list view of the Point Of Sale Invoice Summary.
For printing Point Of Sale Invoice Summary report, Click on the "PRINT" button.

PDF File.
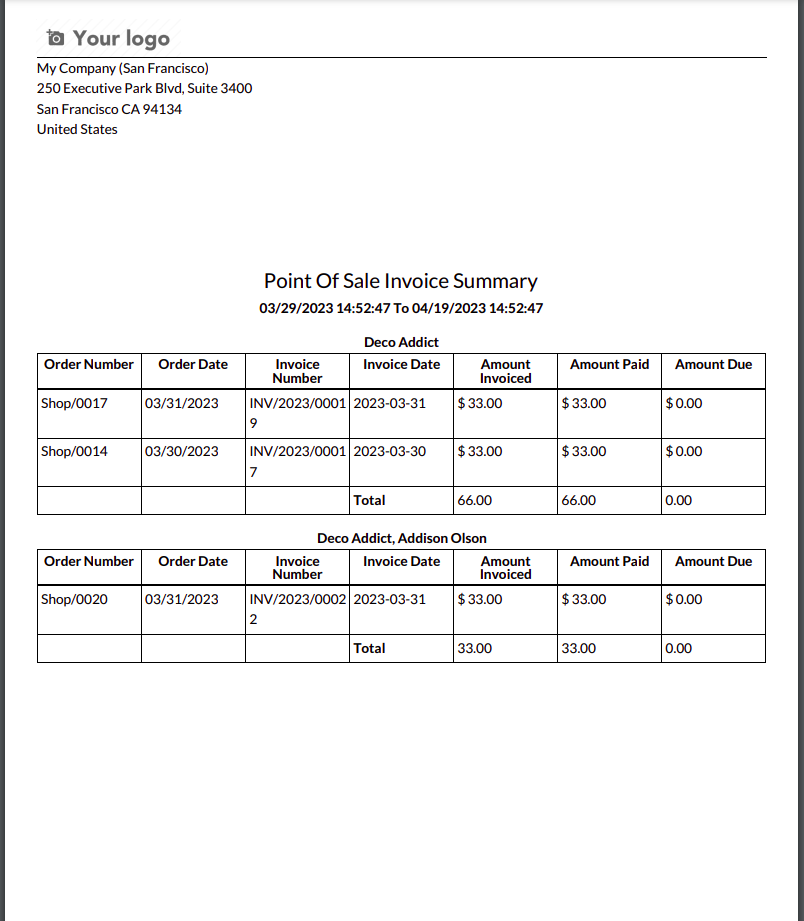
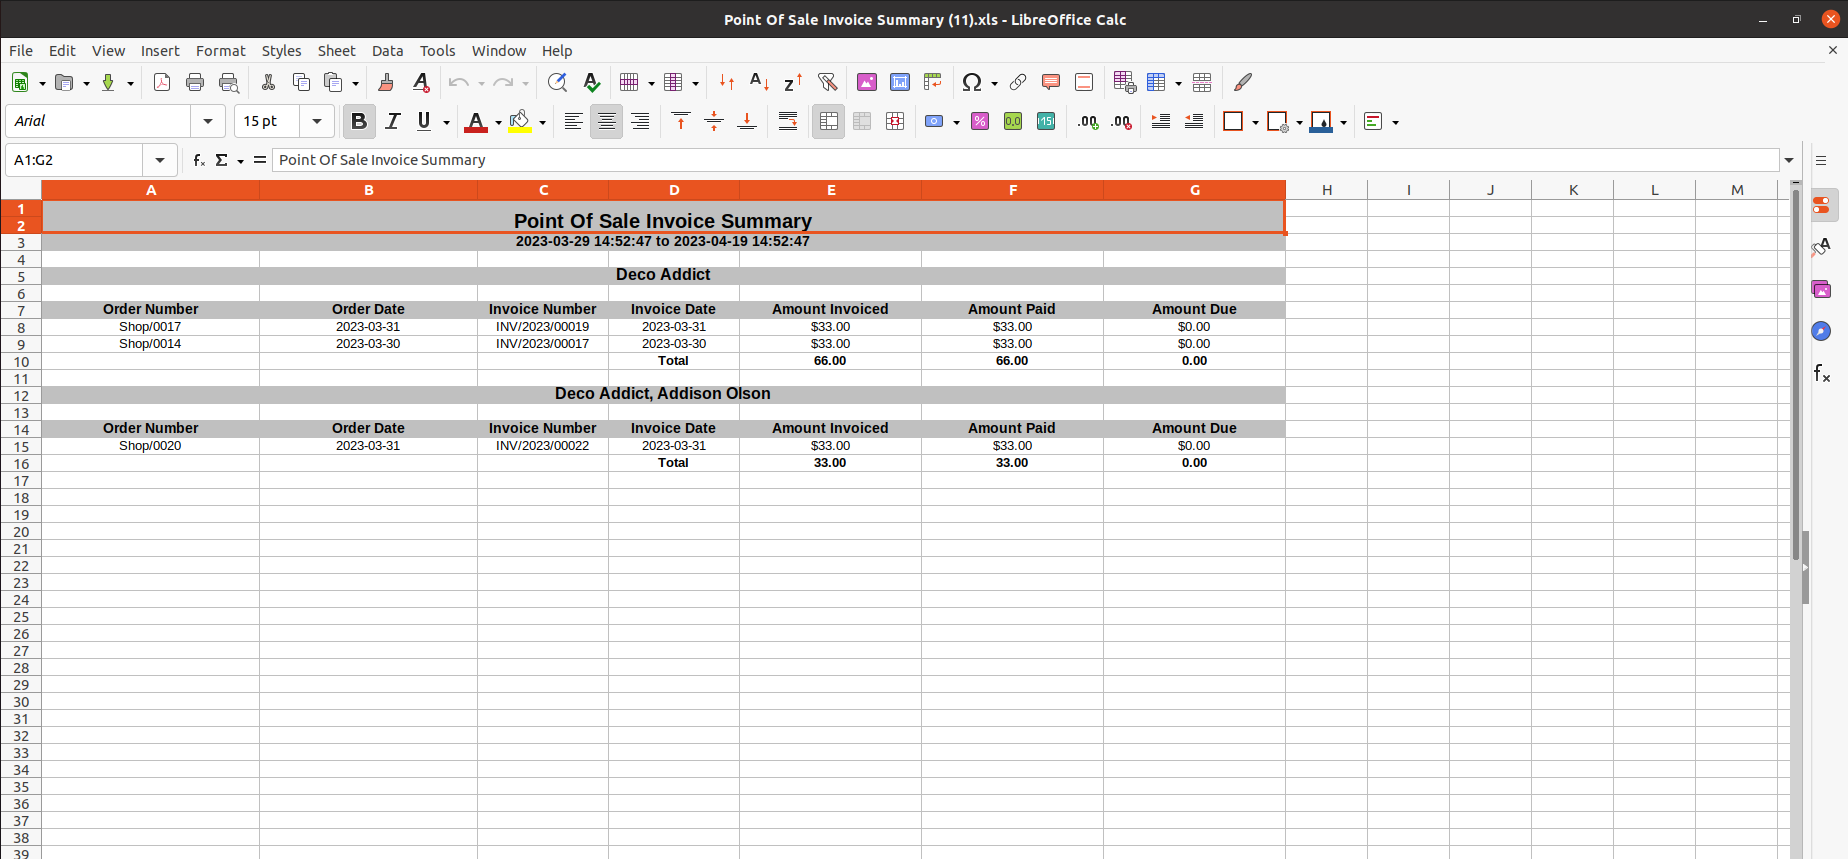
For printing Point Of Sale Invoice Summary report in XLS formate, Click on the "PRINT IN XLS" button.
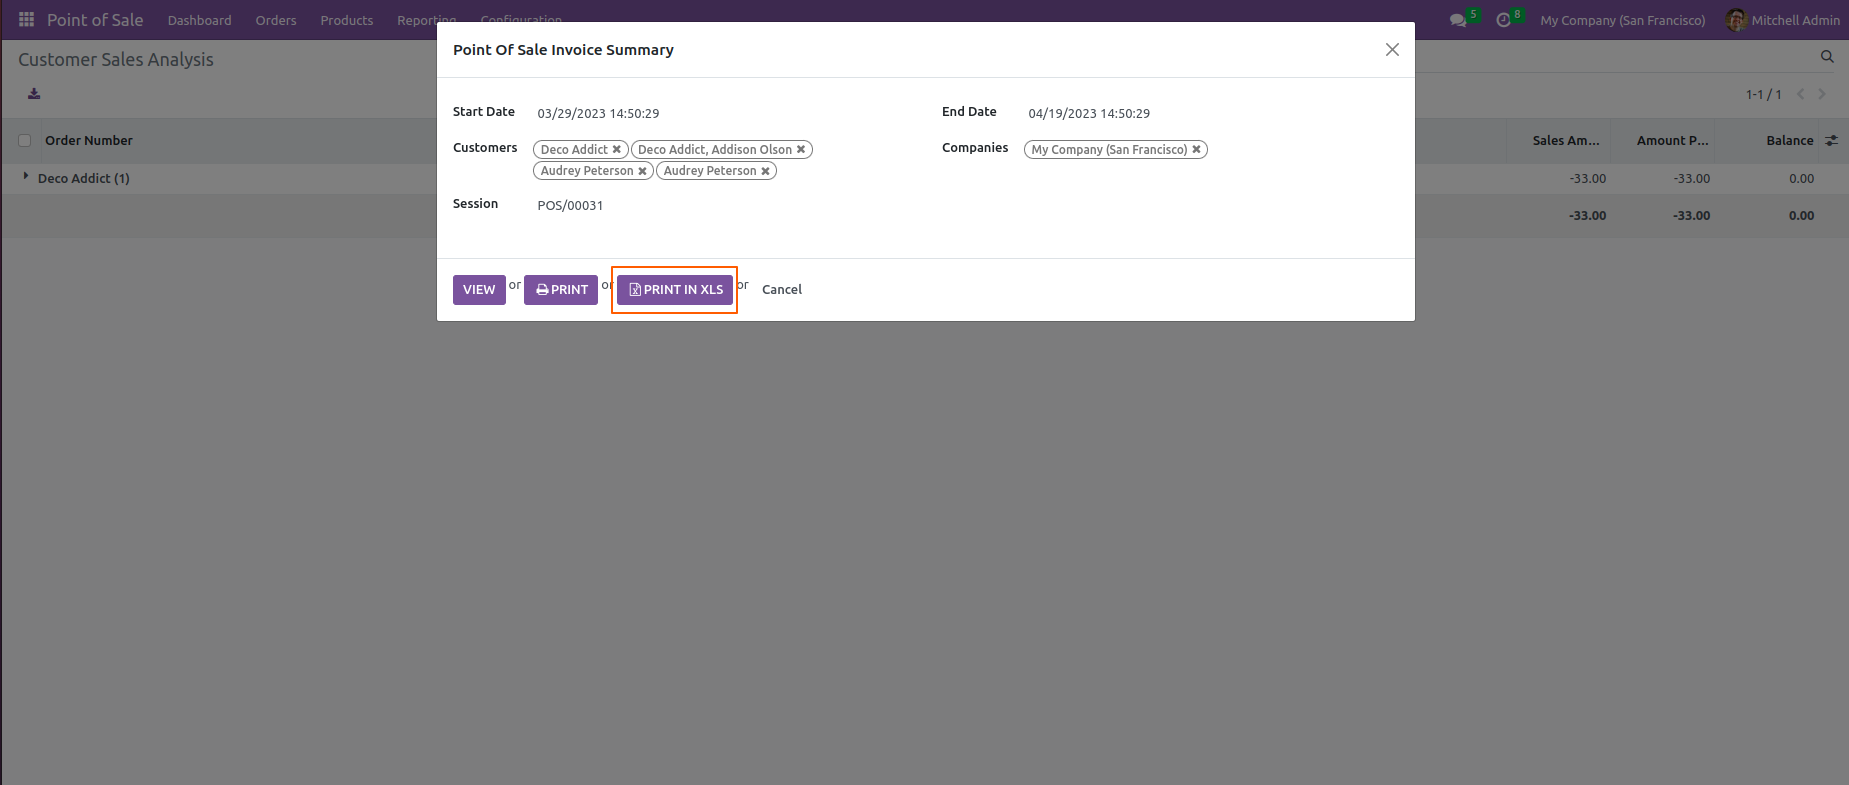
XLS File.
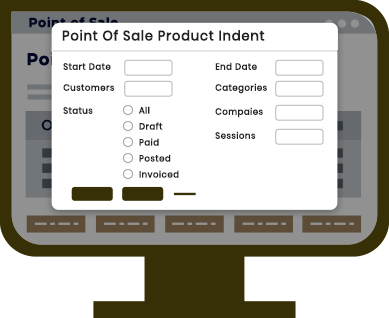
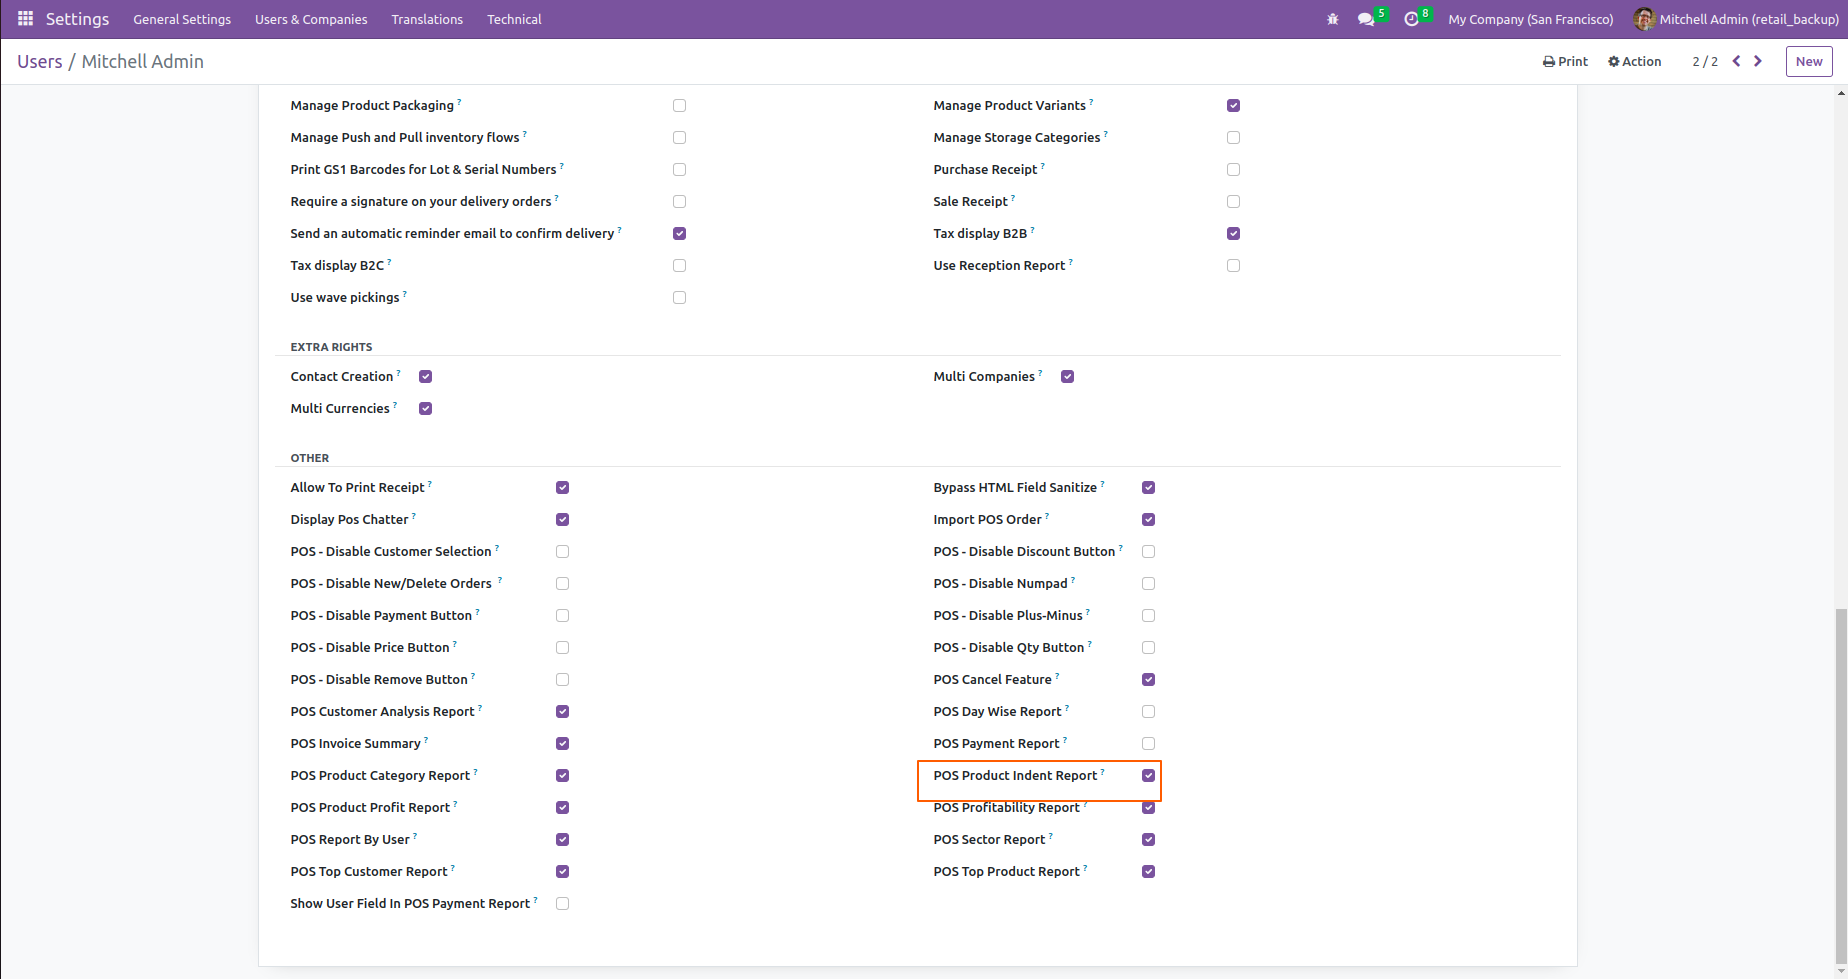
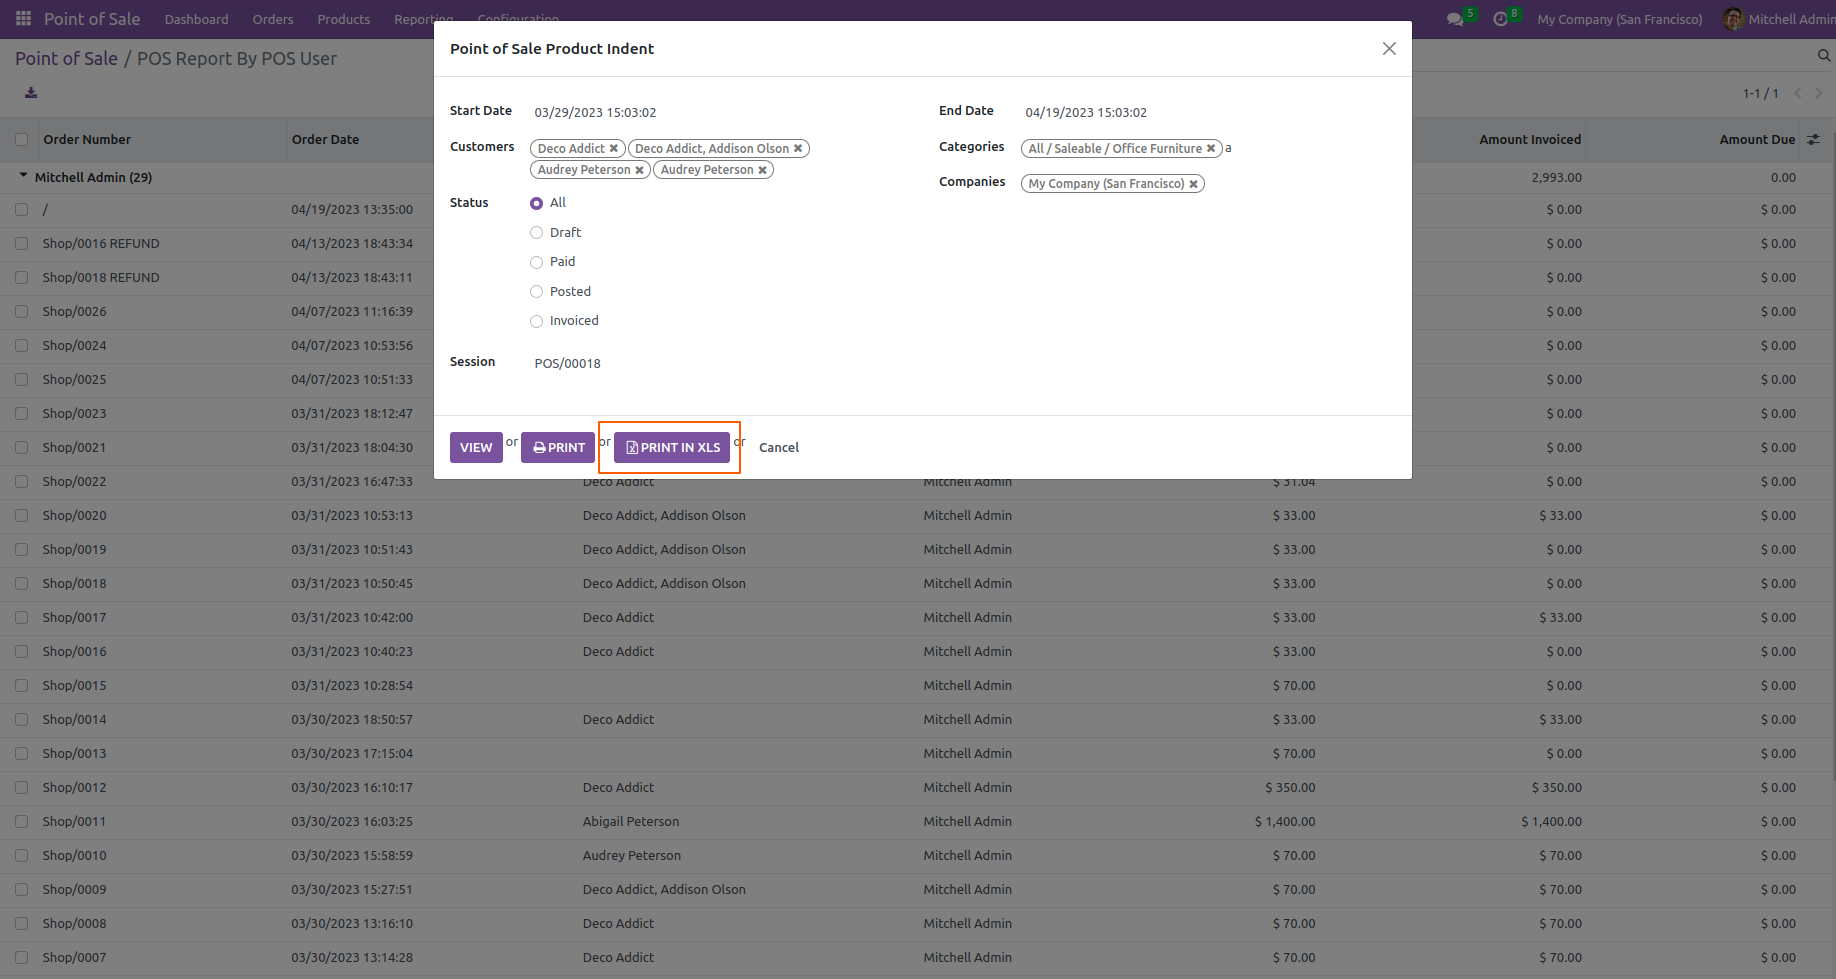
Go to user setting >> Enable the "POS Product Indent Report".
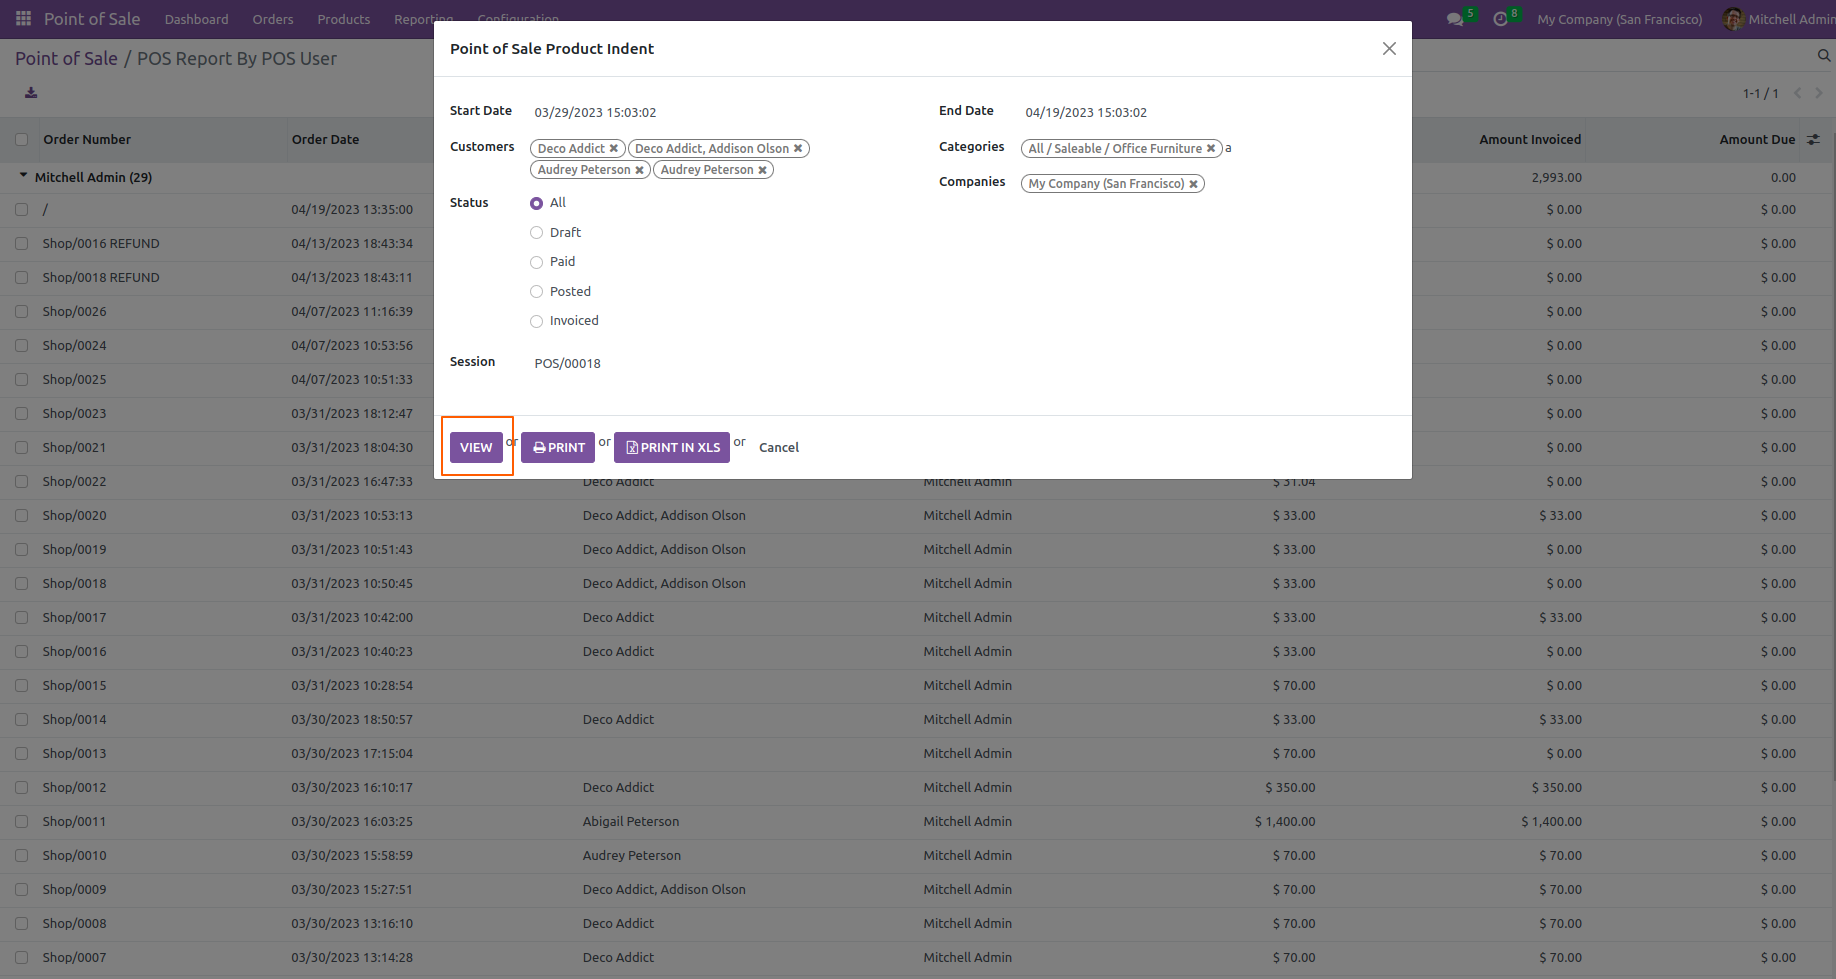
Go to "Point Of Sale Product Indent".

After that "Point Of Sale Product Indent" wizard will appear.
Select Status = "All".
Click on the "VIEW" button.
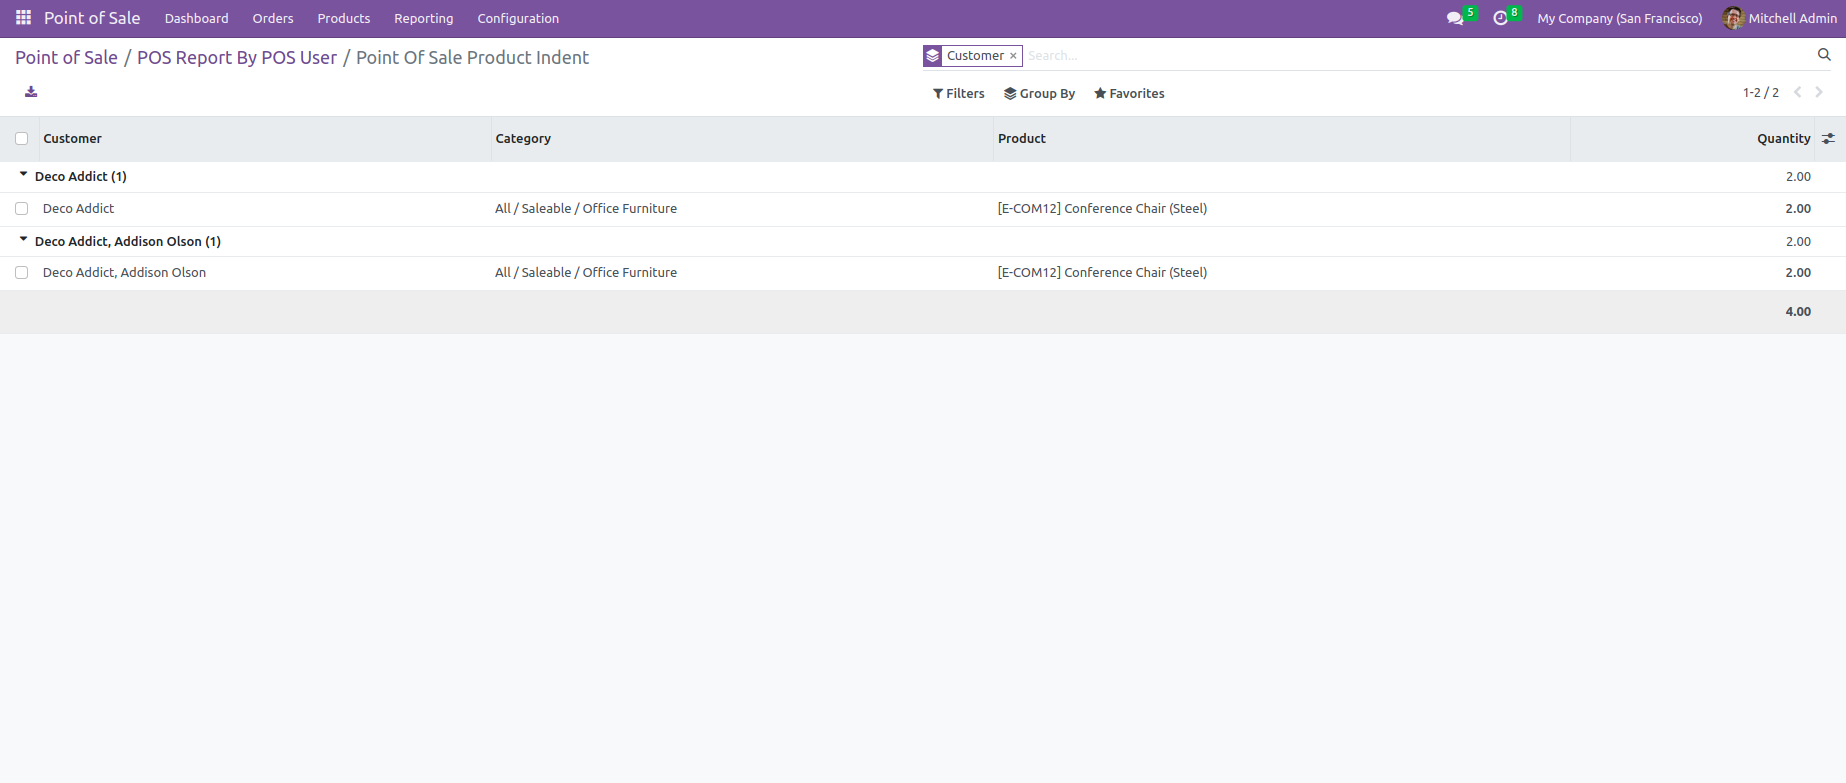
Here, you can see the list view of the Point Of Sale Product Indent.
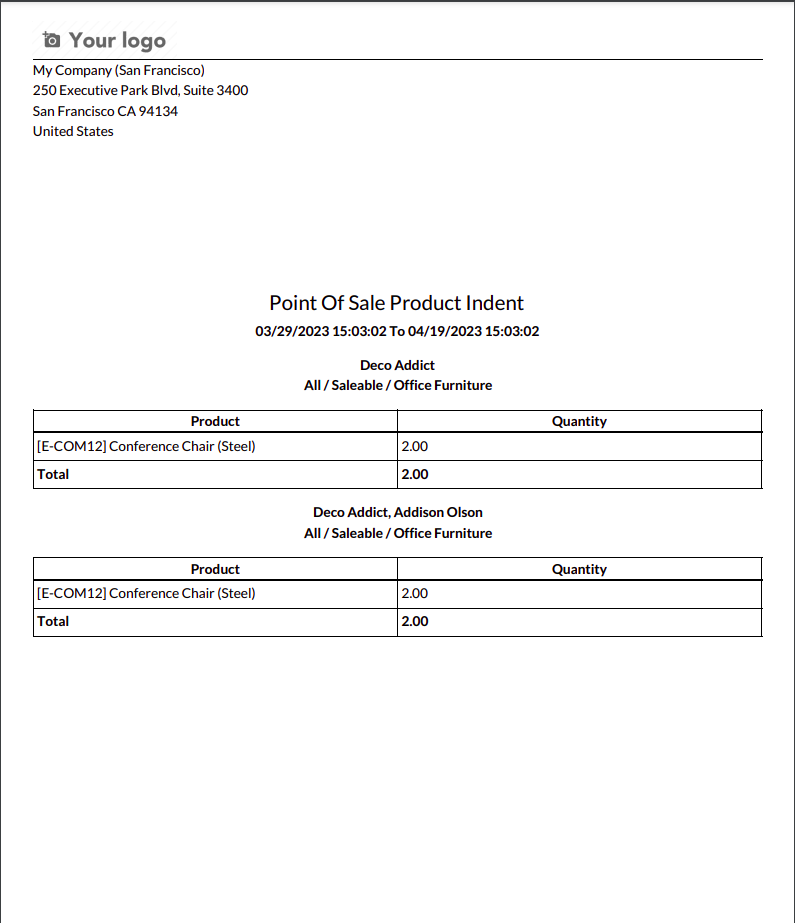
For printing Point Of Sale Product Indent report, Click on the "PRINT" button.

PDF file.
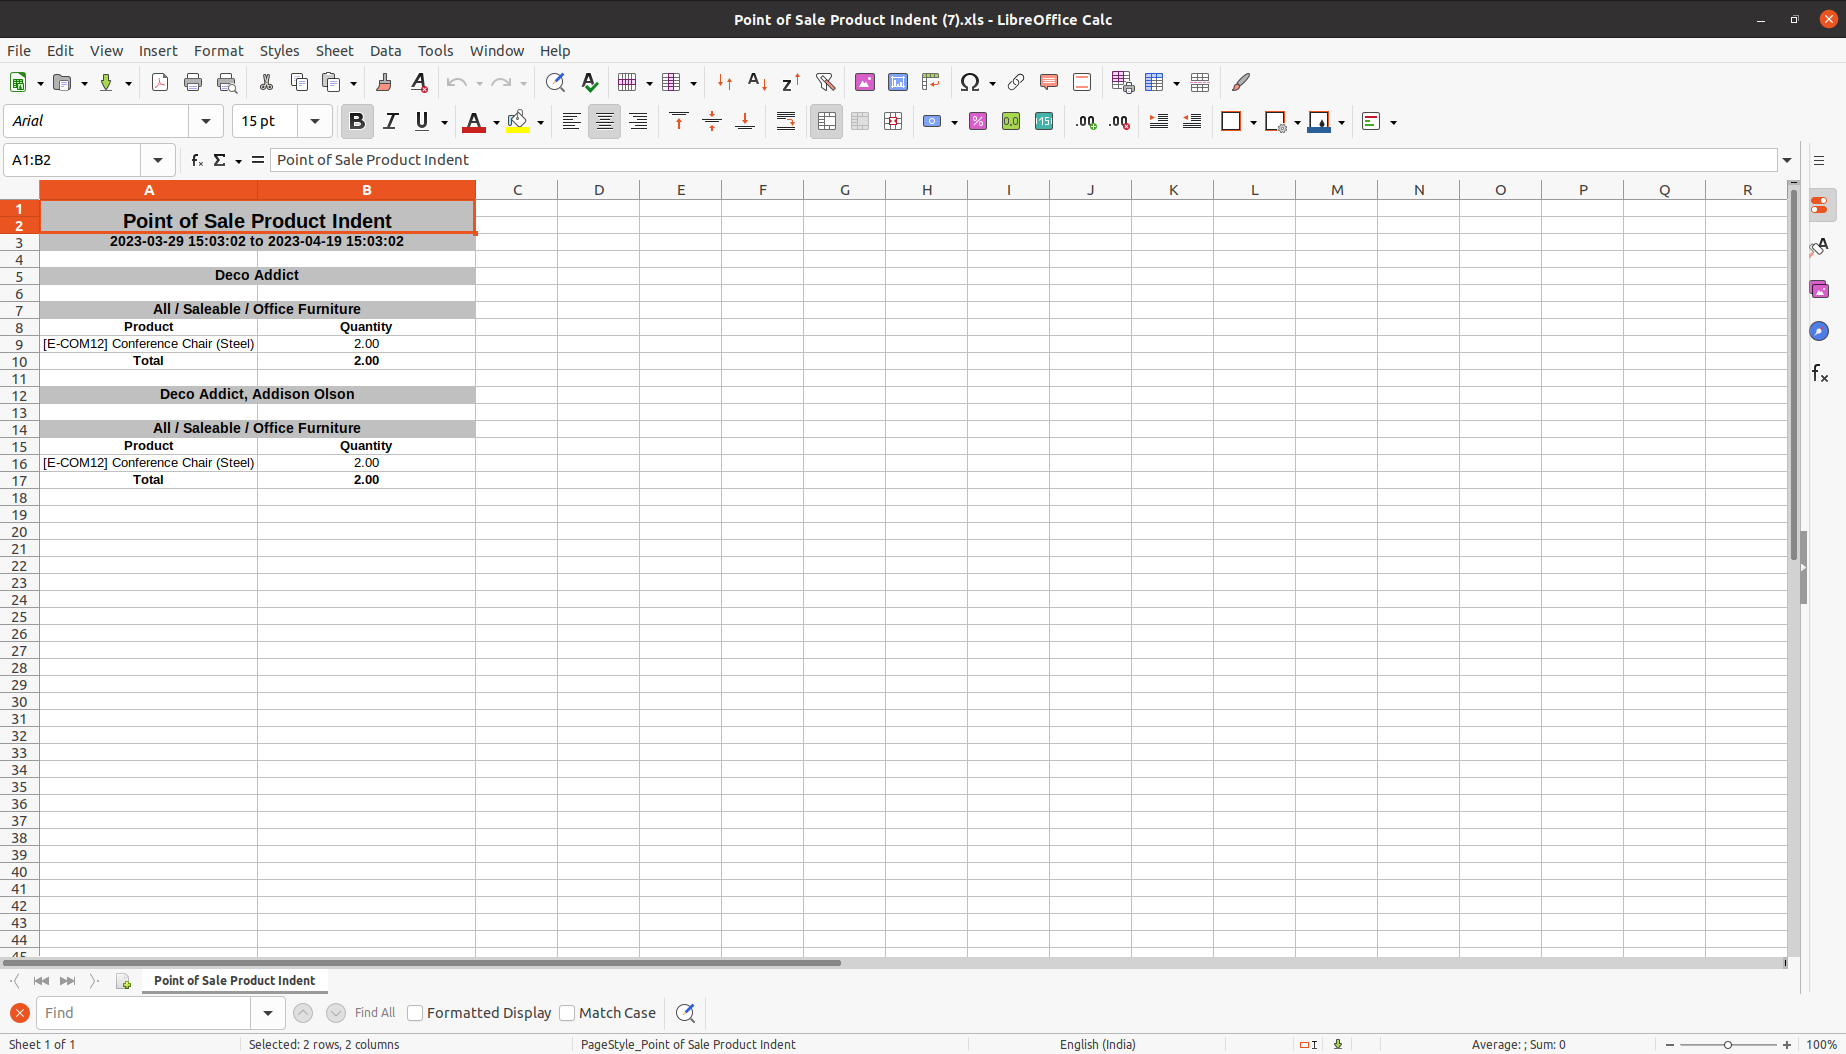
For printing Point Of Sale Product Indent report in XLS formate, Click on the "PRINT IN XLS" button.
XLS File.
Version 17.0.9 | Released on : 20th August 2024
Version 17.0.8 | Released on : 08th August 2024
Version 17.0.7 | Released on : 25th July 2024
Version 17.0.6 | Released on : 03rd July 2024
Version 17.0.5 | Released on : 08th June 2024
Version 17.0.4 | Released on : 20th May 2024
Version 17.0.3 | Released on : 14th May 2024
Retail Phase 2
Version 17.0.2 | Released on : 13th April 2024
Version 17.0.1 | Released on : 11th November 2023
- Yes, this app works perfectly with Odoo Enterprise (Odoo.sh & Premise) as well as Community.
- Yes, we provide free support for 100 days.
- Yes, you will get free update for lifetime.
- No, you don't need to install addition libraries.
- Yes, You have to download module for each version (13,14,15,16) except in version 12 or lower.
- No, We do not provide any kind of exchange.
- Please Contact Us at [email protected]to request customization.
- No, this application is not compatible with odoo.com(odoo saas).
Theme style 4