












Excel Odoo Connector

The Excel Odoo Connector provides a seamless way to fetch and work with Odoo data directly inside Microsoft Excel. After generating an API key and connecting your Odoo instance, you can browse any Odoo model, select fields, preview records, and instantly load them into Excel. This connector is built for users who prefer spreadsheet-based workflows but need real-time access to Odoo data. It eliminates manual exports, improves accuracy, and saves hours of repetitive work.

Features

Connect with Odoo Using API Key
You can securely connect Excel with your Odoo database using your generated API key.

Select Odoo Model Inside Excel
You can search and select any Odoo model directly from the Excel sidebar.

Load Model Fields
You can load all available fields of the selected Odoo model with a single click.

Choose Fields to Fetch
You can select the exact fields you want to fetch using simple checkboxes.

Excel Task Pane Integration
Seamlessly embeds functionality within Excel through a task pane, allowing users to access features without leaving their workbook.
Excel-to-Odoo
Record Updates 
Update existing Odoo records directly from edited Excel rows.
Excel Sync
Log History
STrack successful and failed Excel synchronization operations with detailed logs.
Reload Odoo
Data in Excel
Refresh the current Excel worksheet with the latest data from Odoo.

Preview Odoo Data
You can preview the selected Odoo records in a pop-up window before importing them.

Import Data into Excel Sheet
You can import all previewed Odoo records directly into your Excel sheet.

Refresh Odoo Models
You can refresh the entire Odoo model list whenever new models or fields are added.

Check Connection Status
You can instantly see whether your Odoo connection is active by successfully connected status line.
Automatic Excel
Synchronization
Automatically synchronize Excel data with Odoo to keep records up to date.
Advanced Field
Type Support
Import and synchronize selection, date, datetime, boolean, monetary, and relational fields accurately.
Filtered
Data Import
Import only the required records using configurable data filters.
Excel Connector
Dashboard
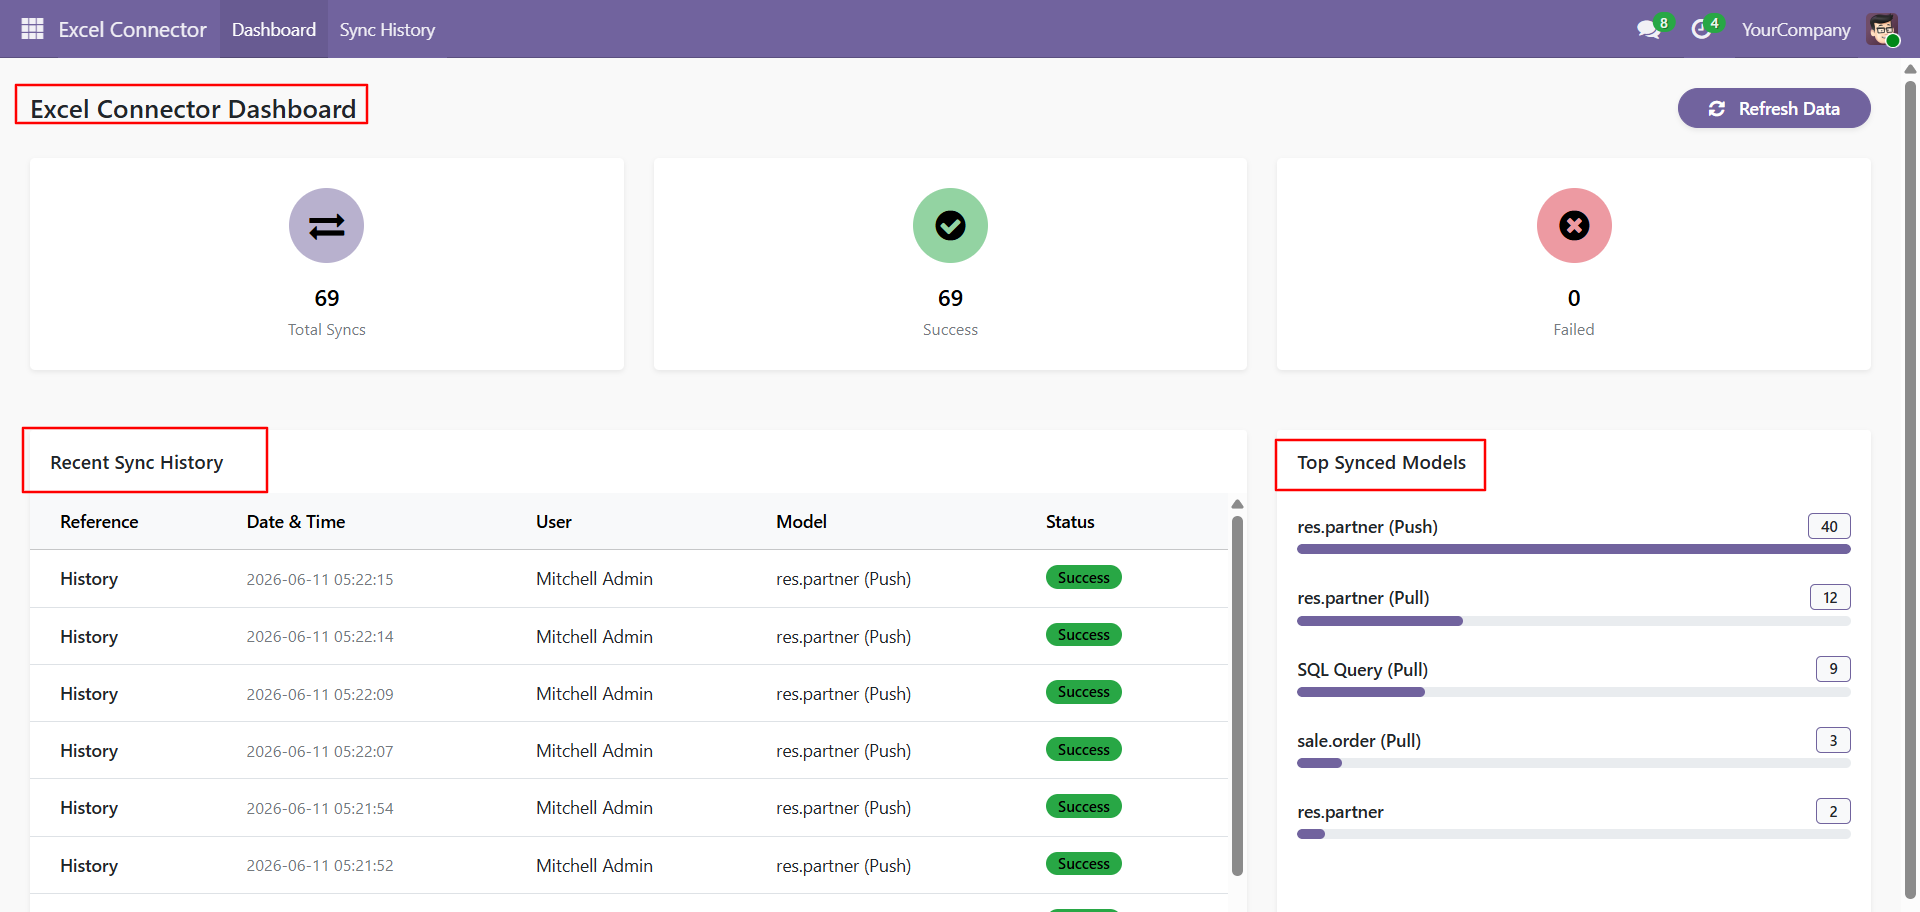
Monitor synchronization status, import/export activities, and connector statistics from a centralized dashboard.

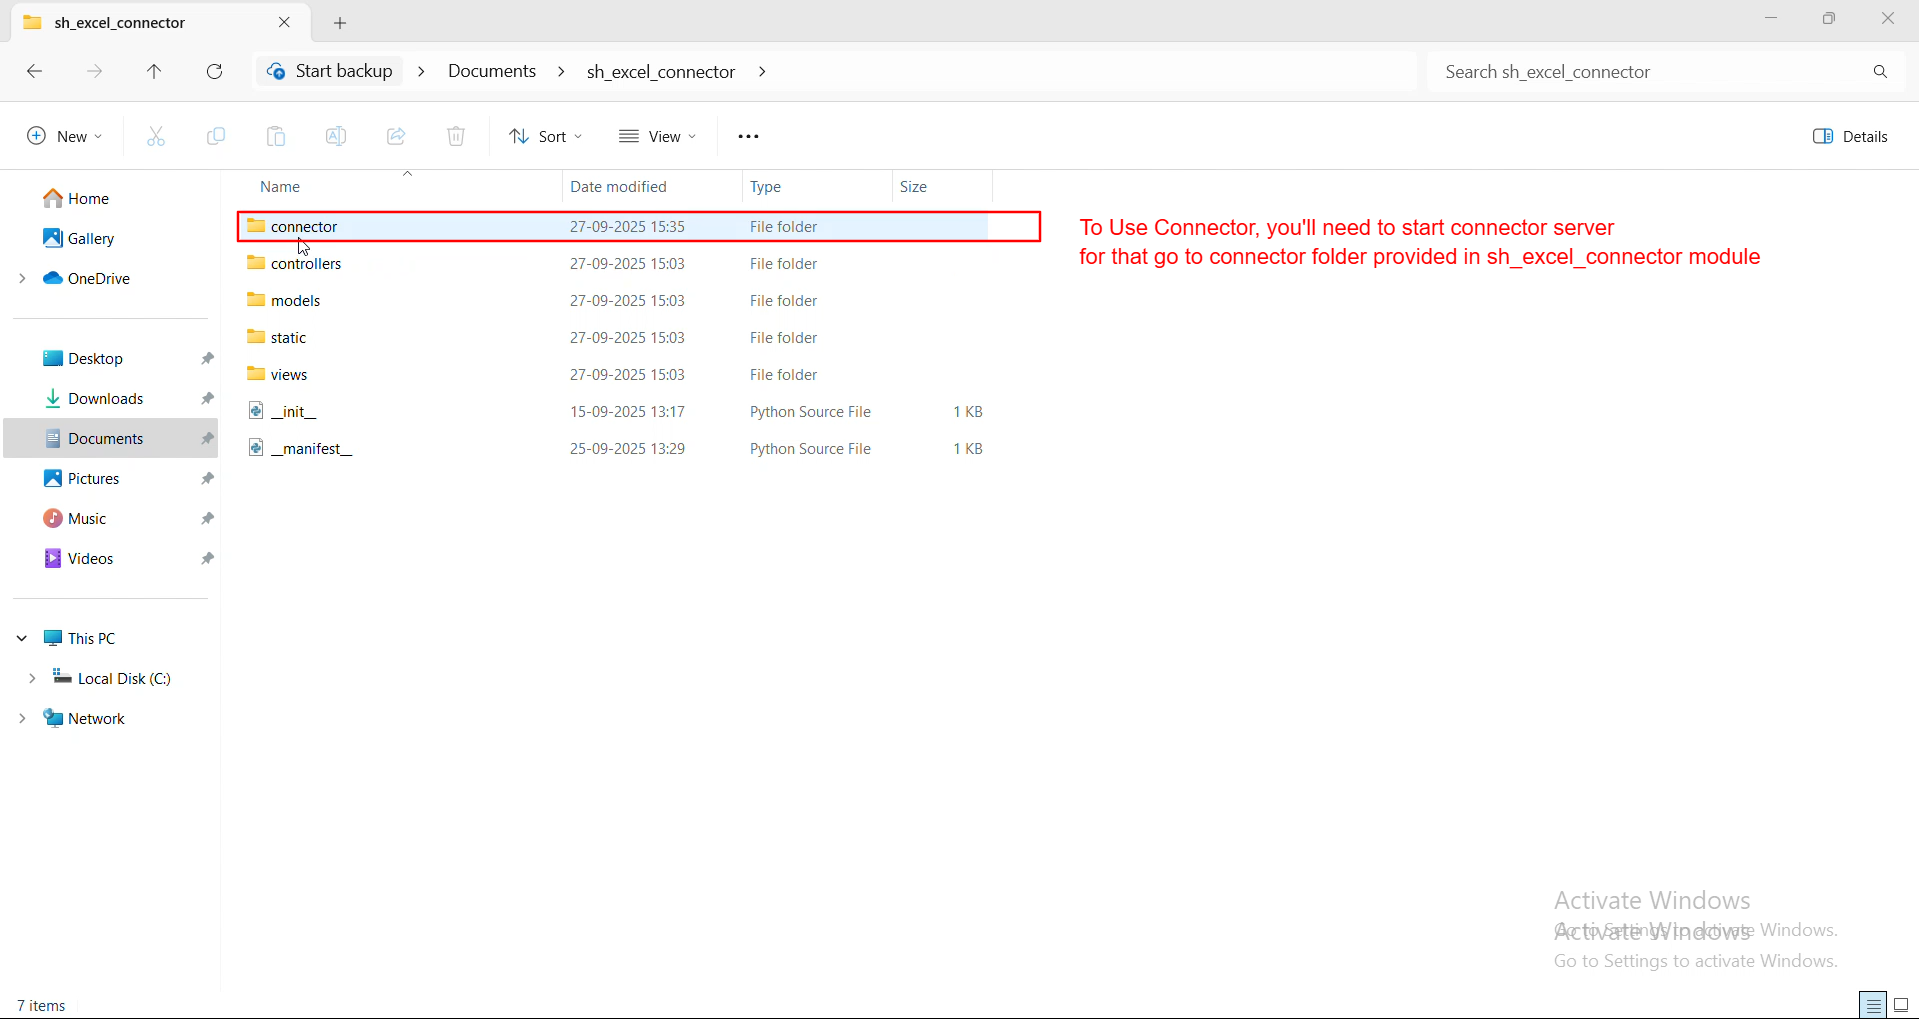
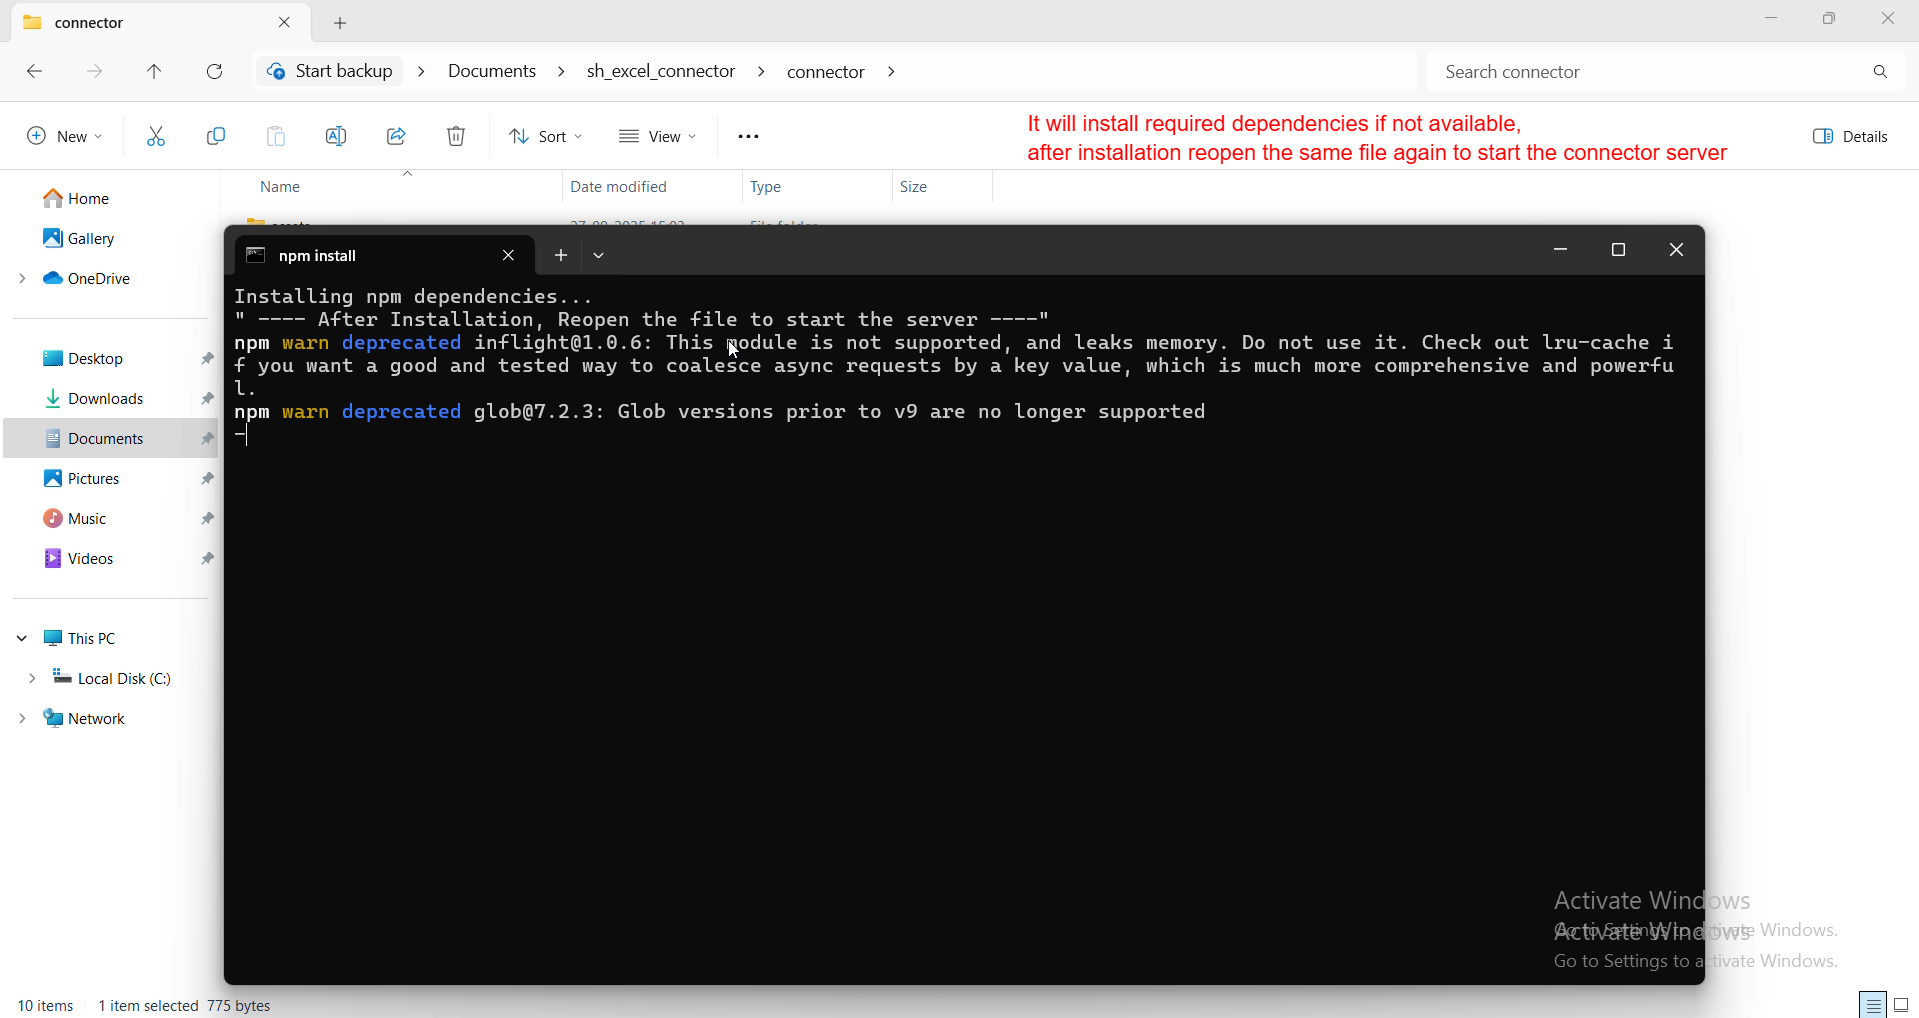
You can start the connector server by opening the connector folder included inside the Excel Odoo module.
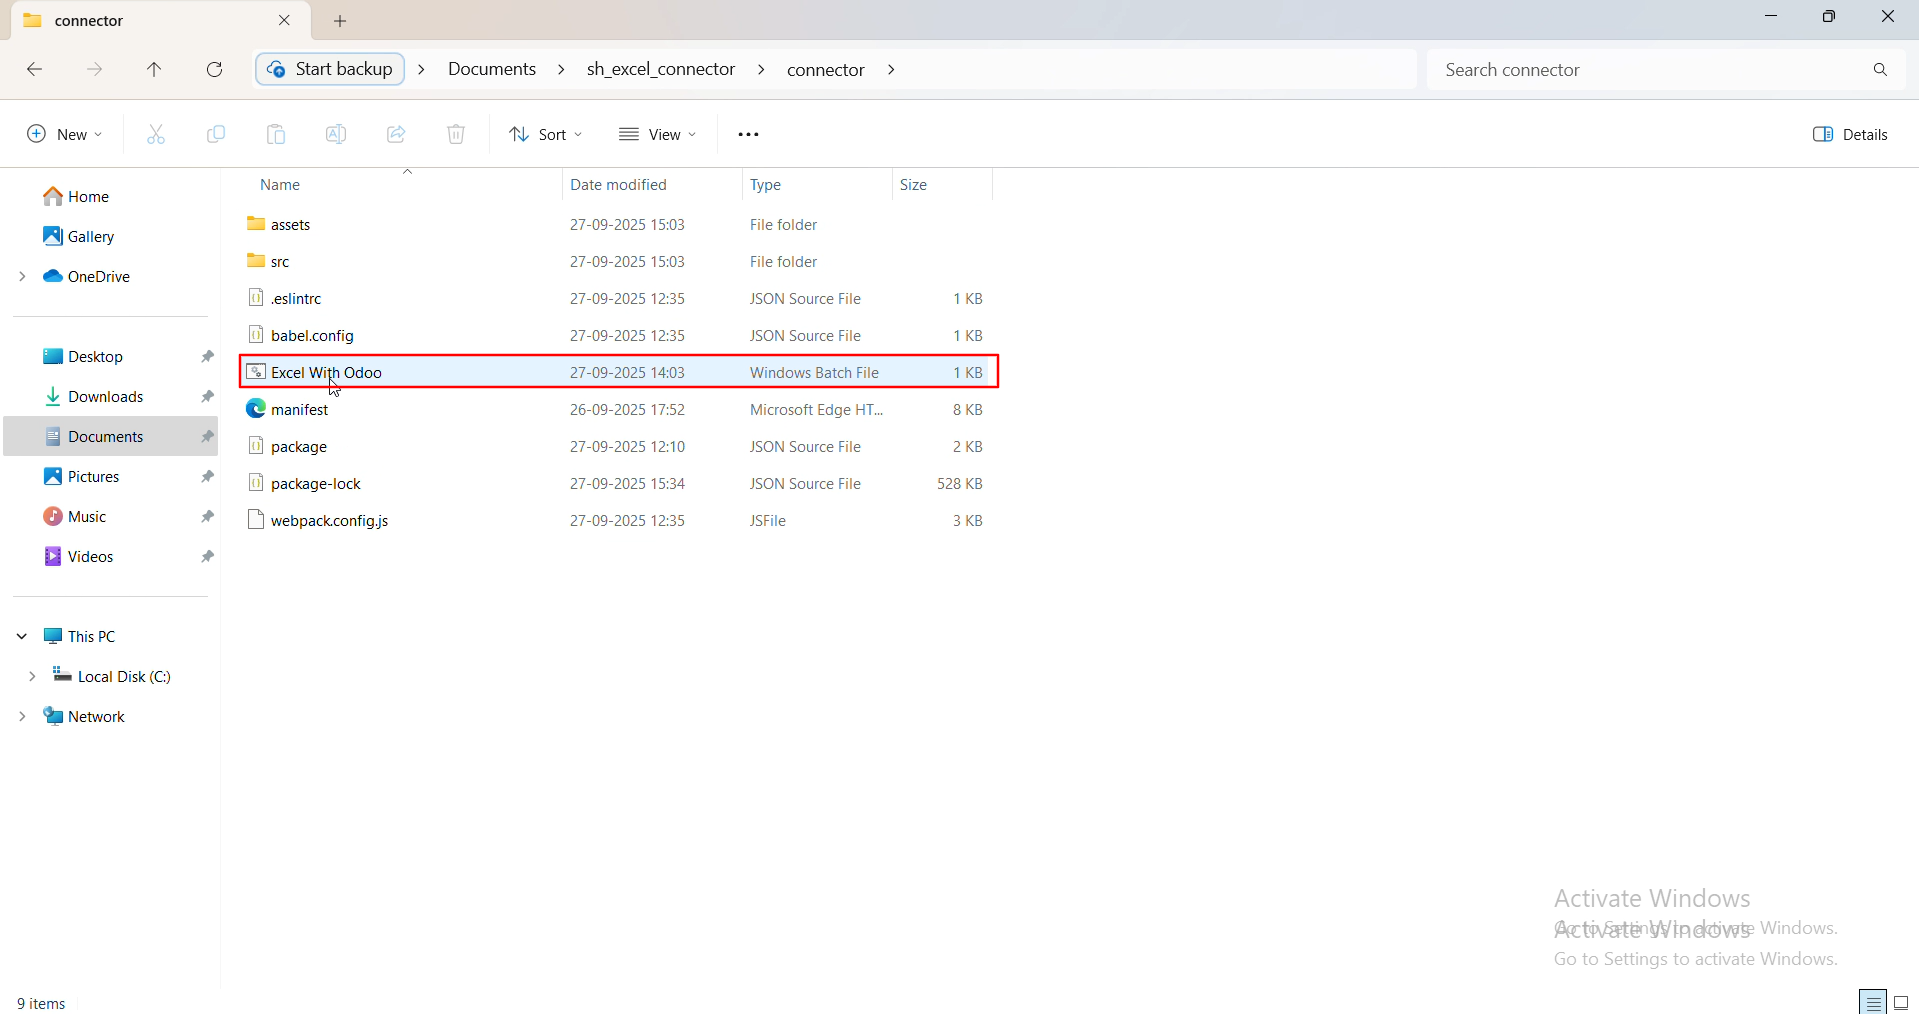
You can start the Excel Odoo connector server by simply running the Excel With Odoo file.
It will automatically install all required dependencies, and once the installation finishes, you just reopen the same file to start the connector server.
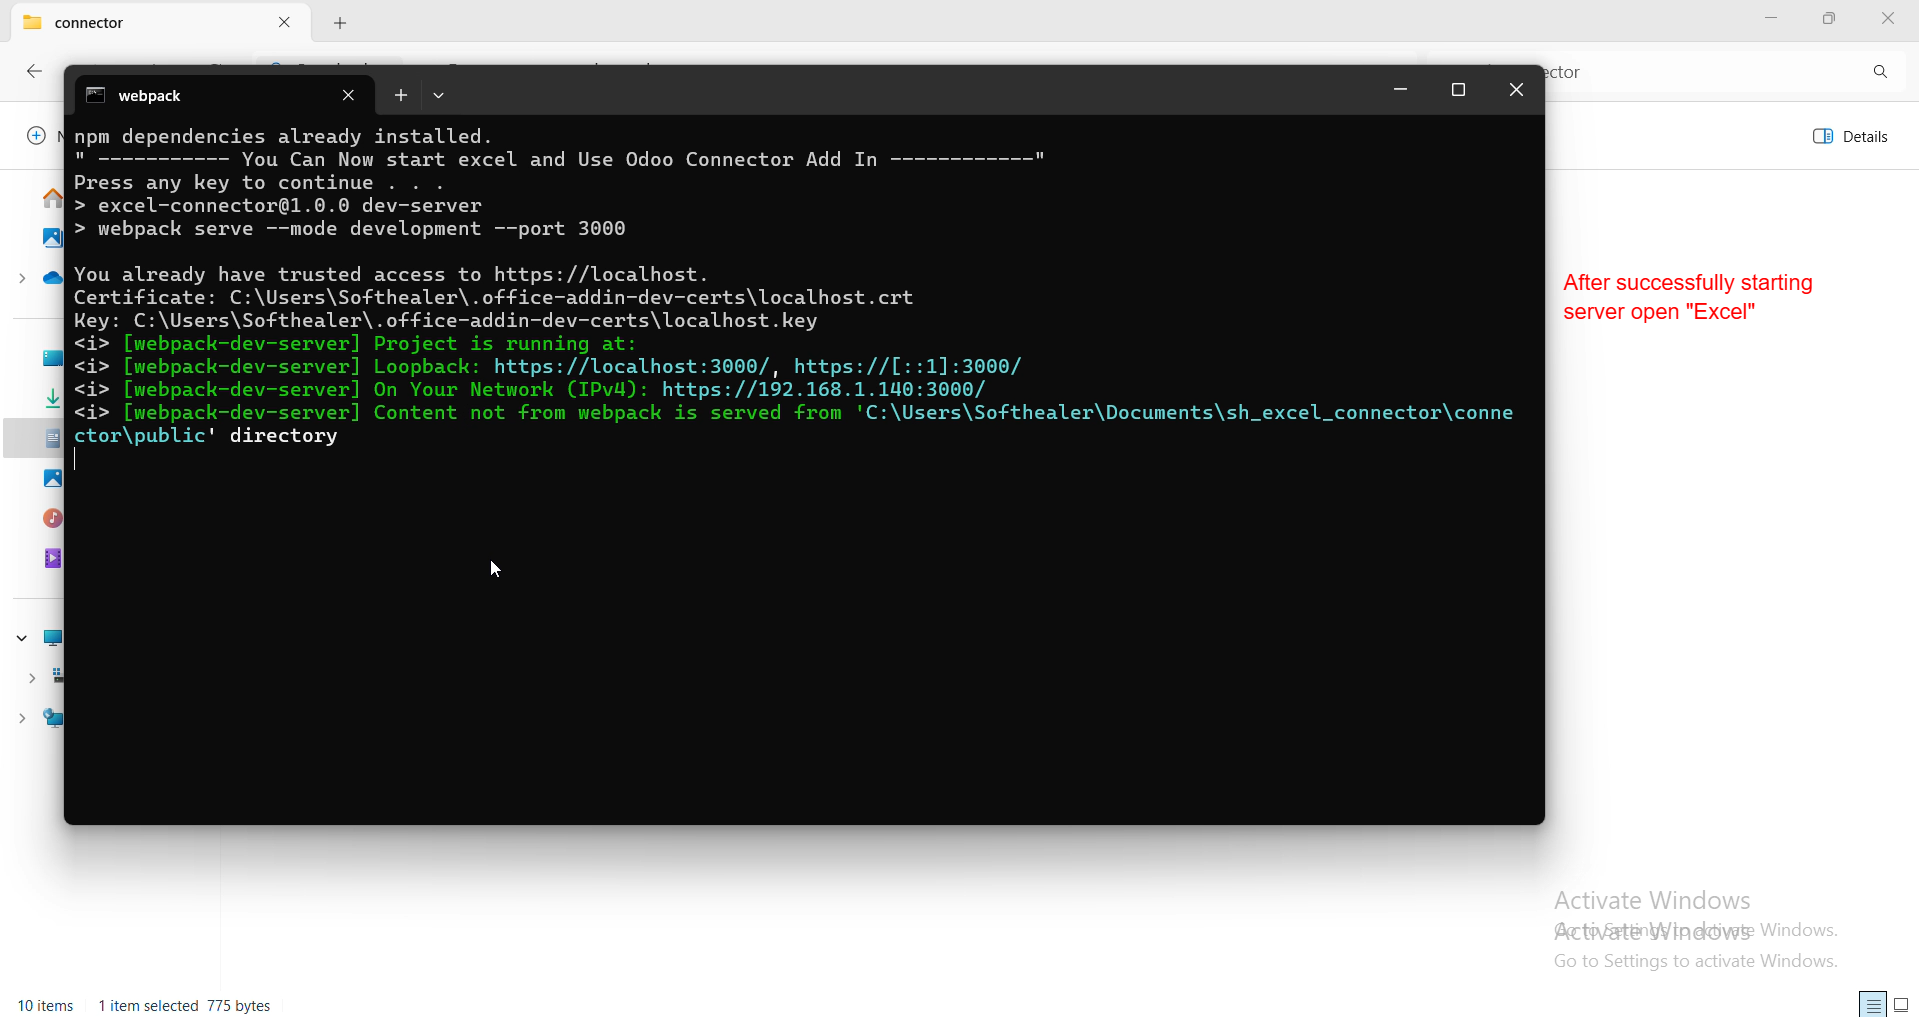
After successfully starting the server, open Excel to launch the Odoo Connector.
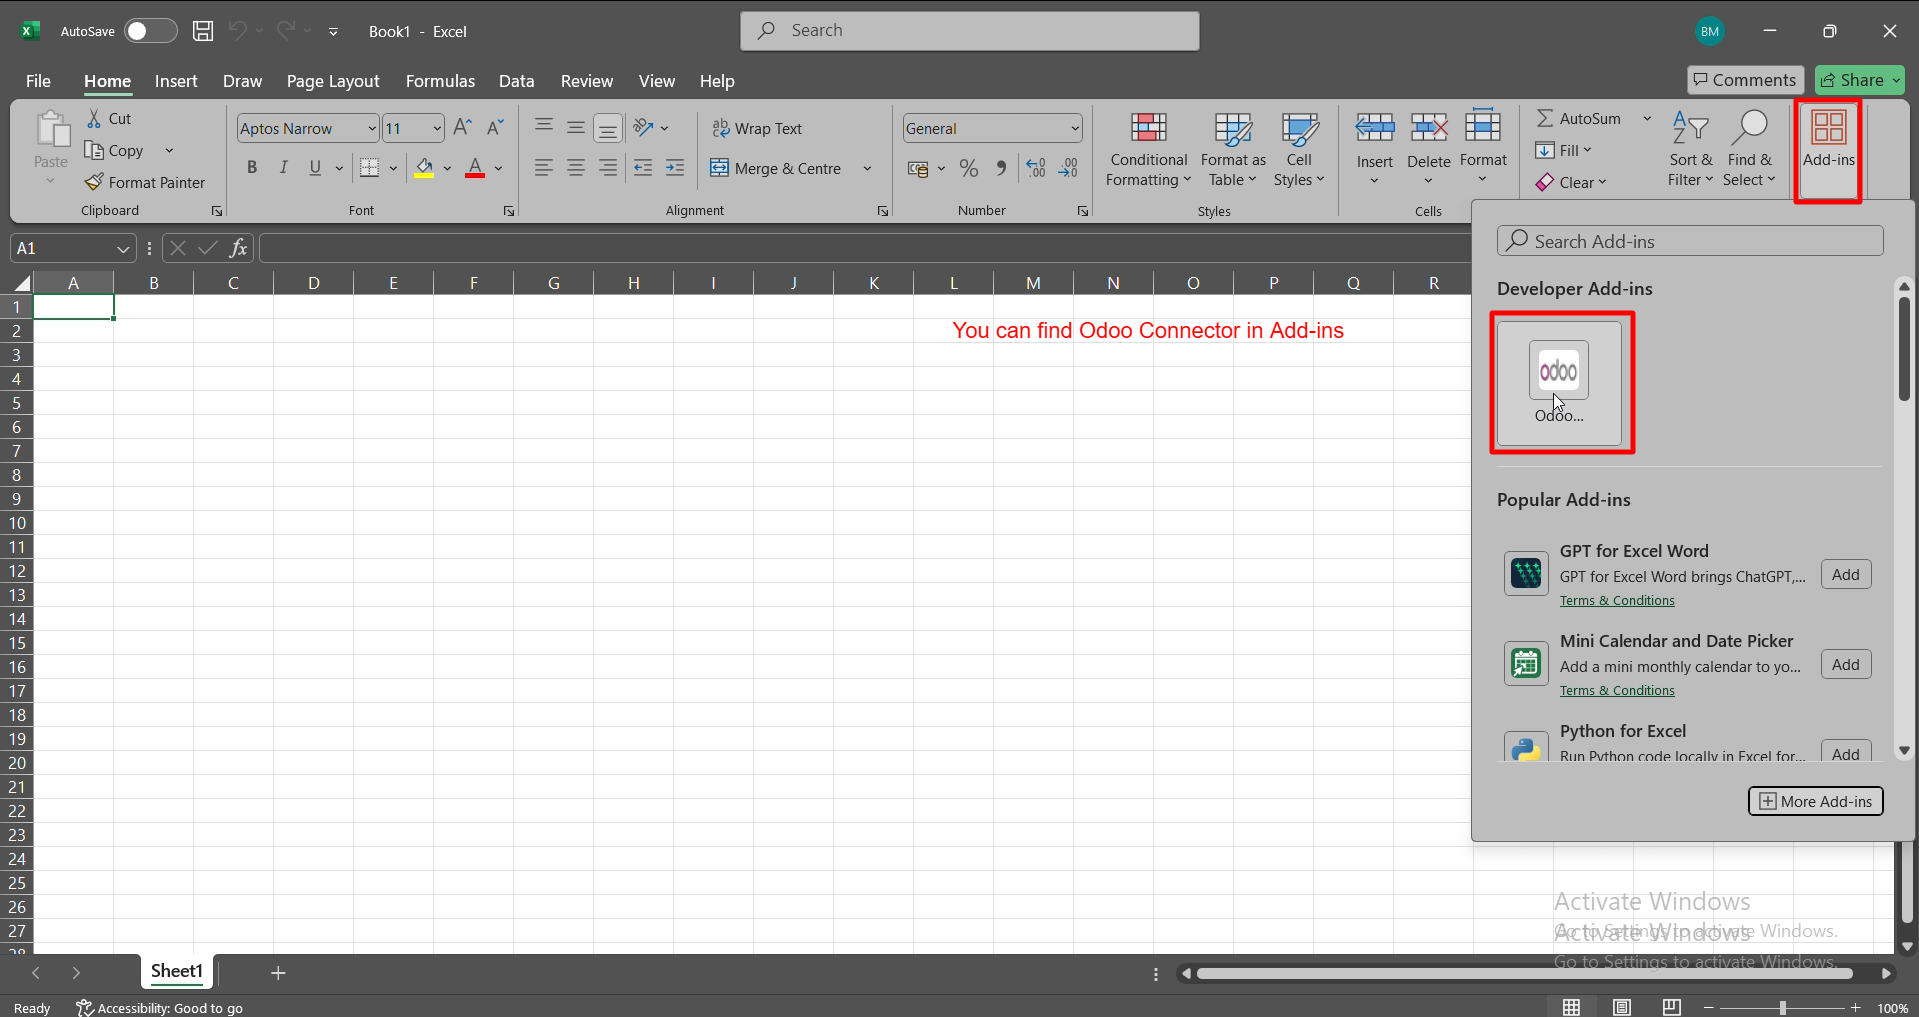
You can open Excel and access the Odoo Connector directly from the Add-ins panel.
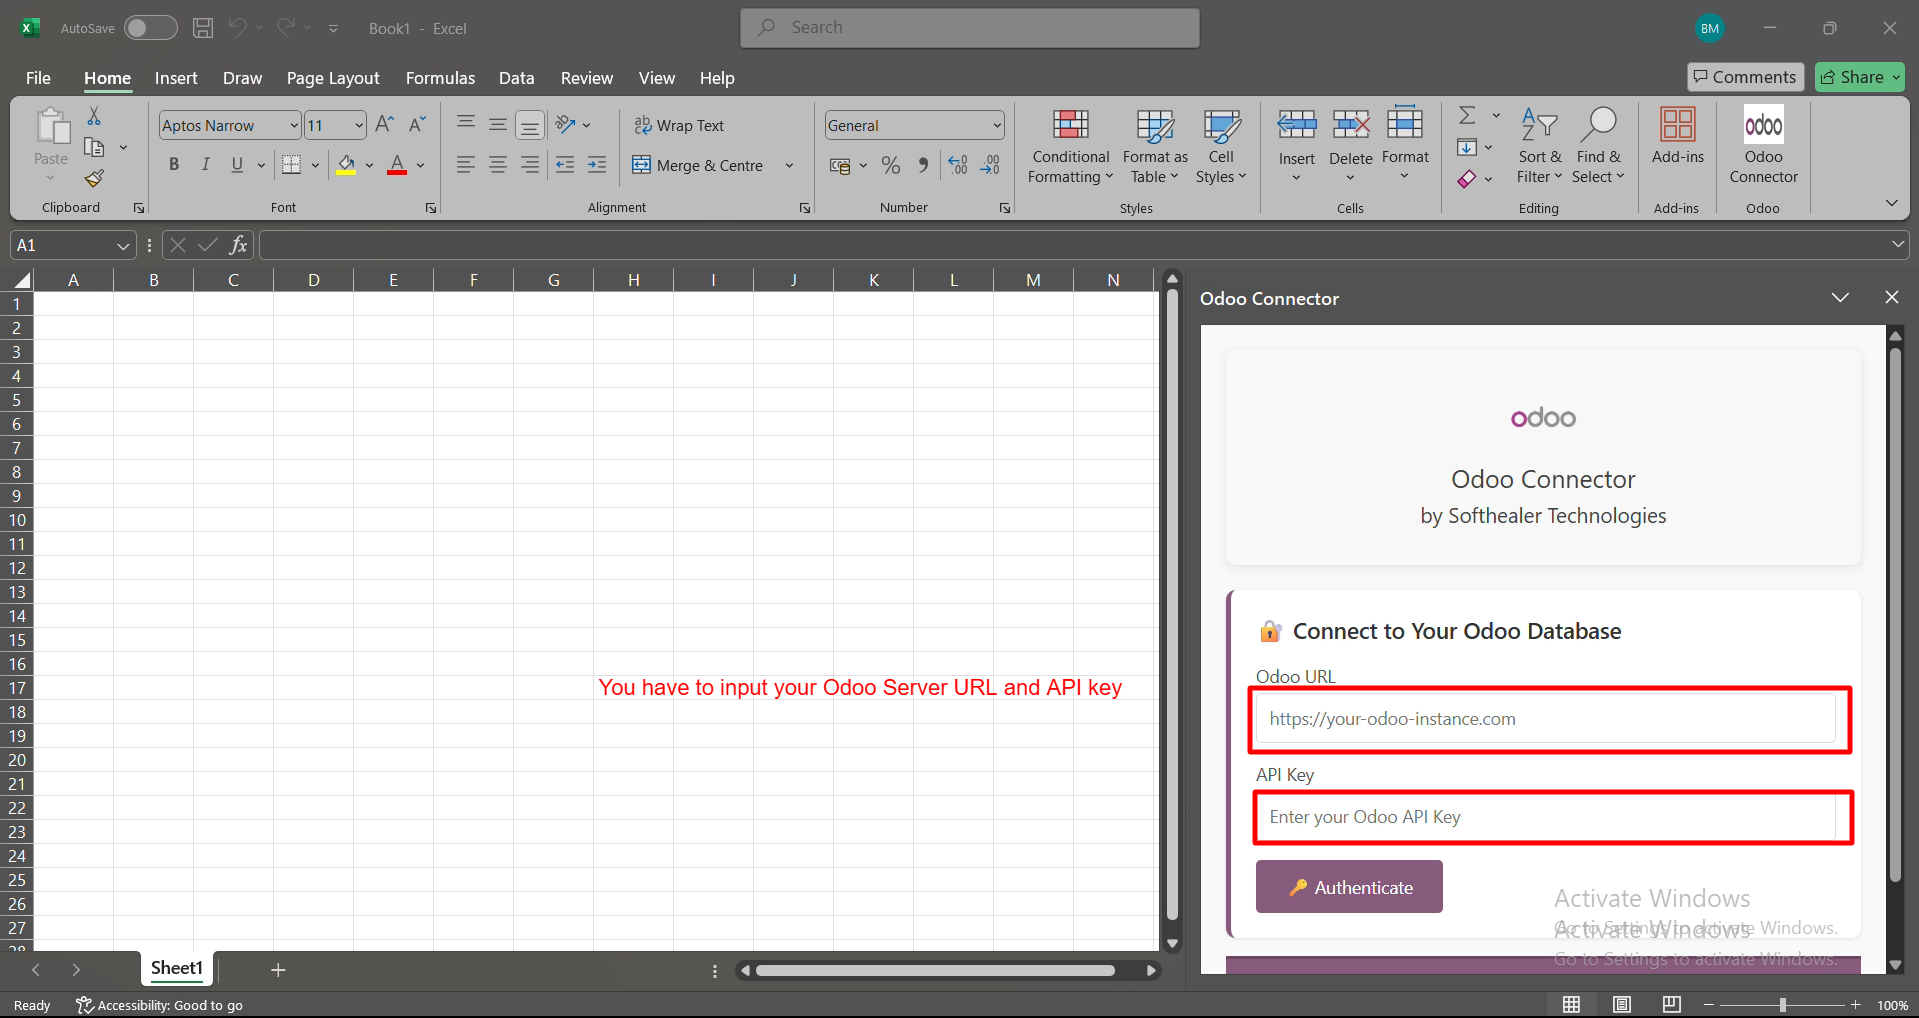
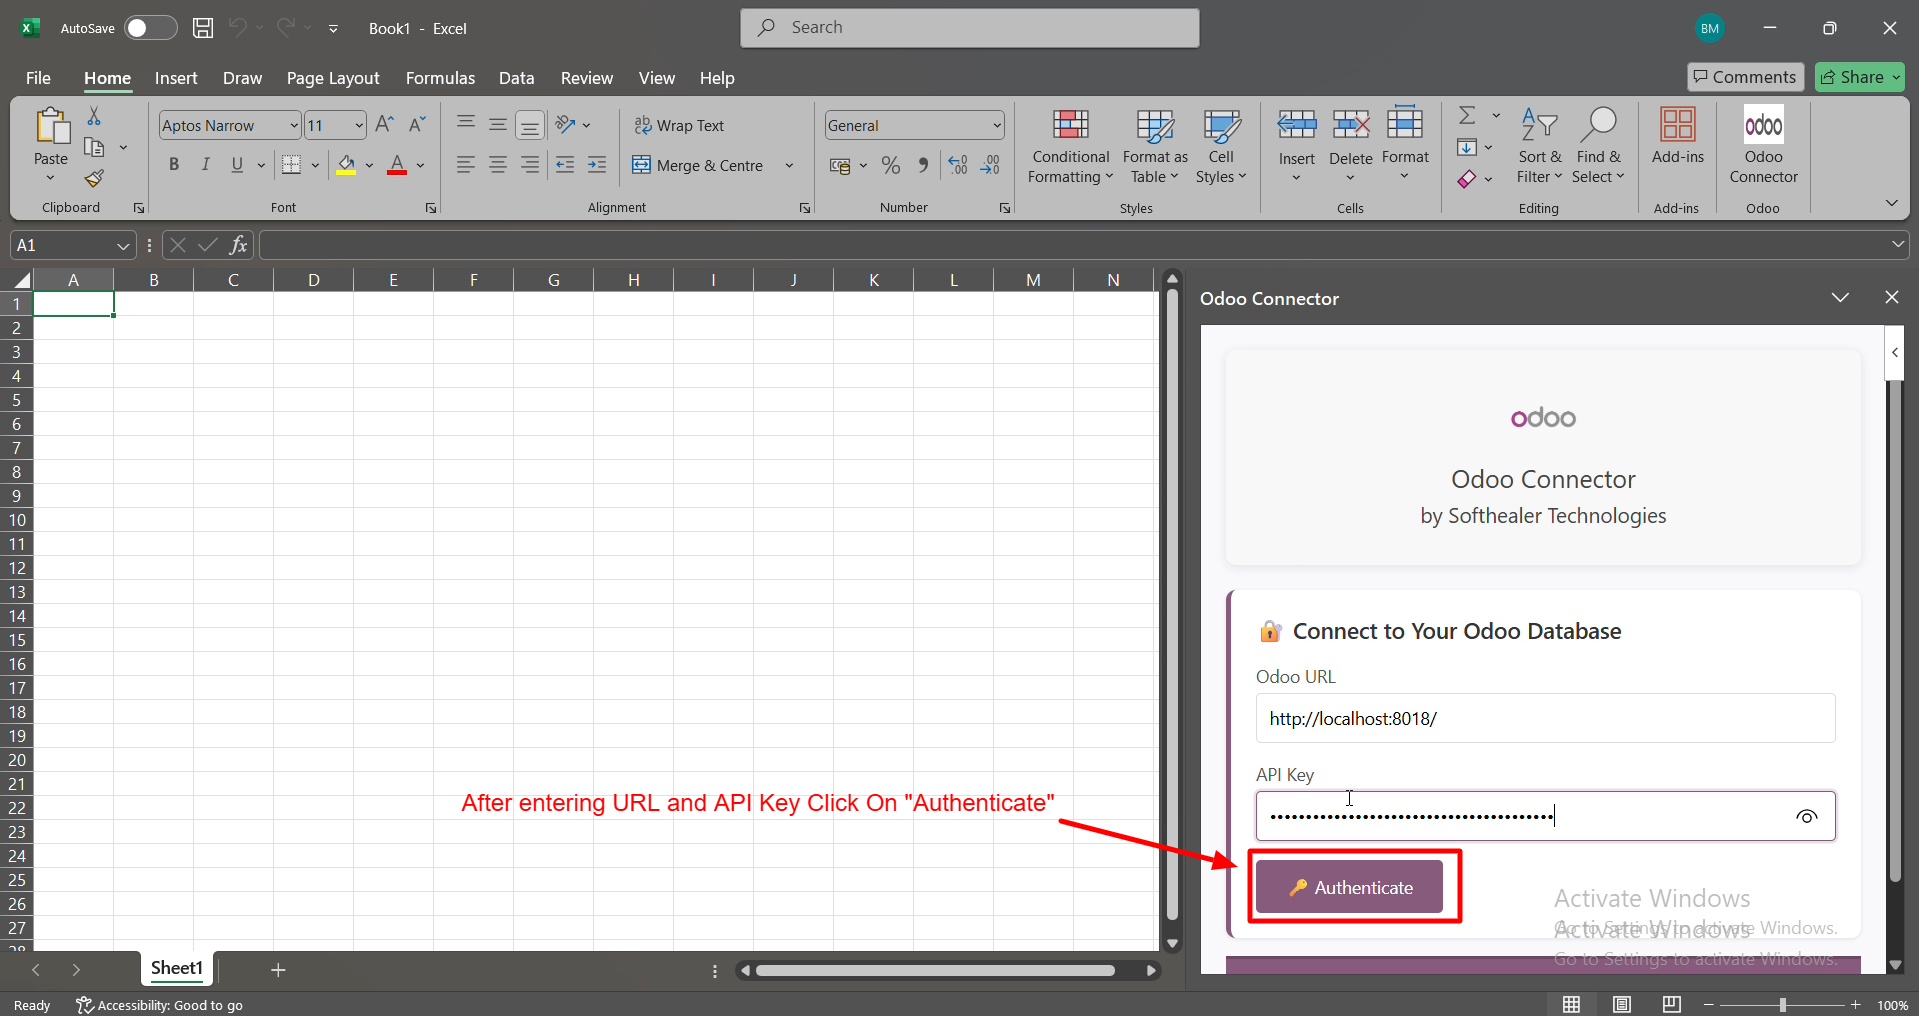
You can open the Odoo Connector and instantly connect by entering your Odoo URL and API Key.
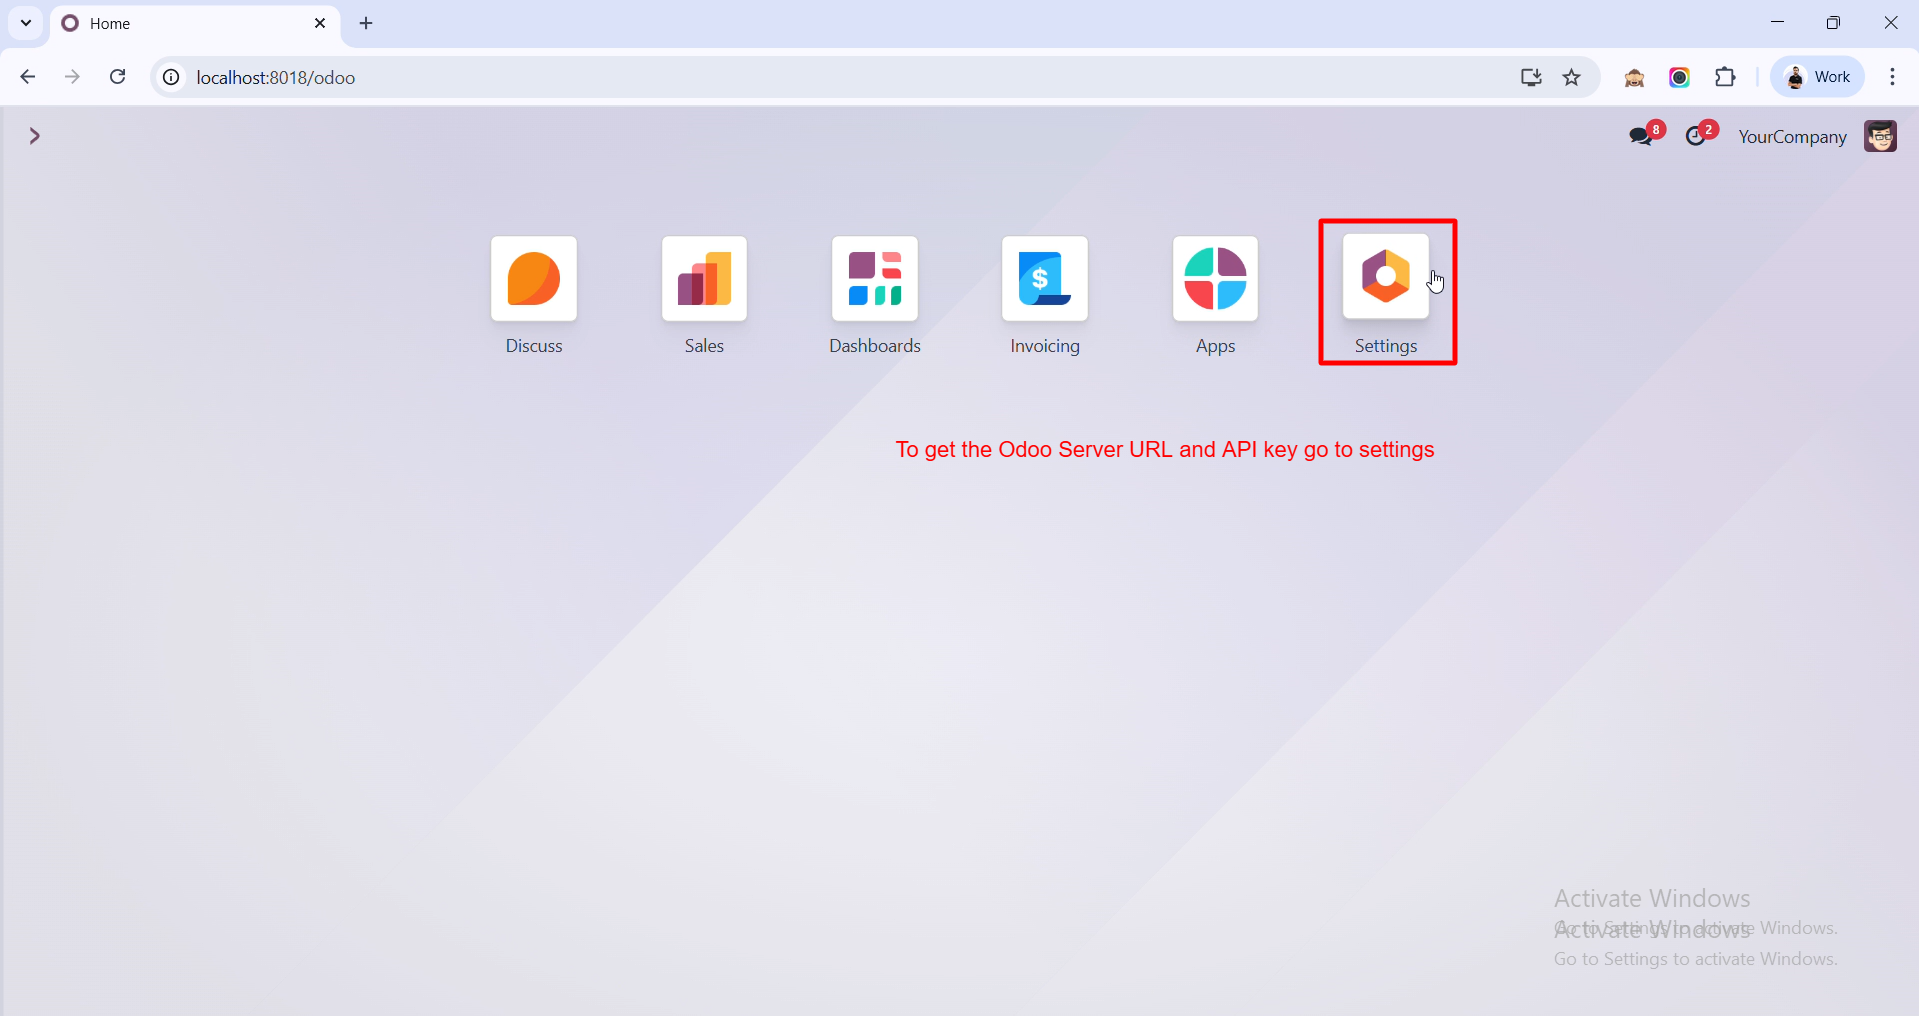
To get your Odoo Server URL and API Key, go to the Settings.
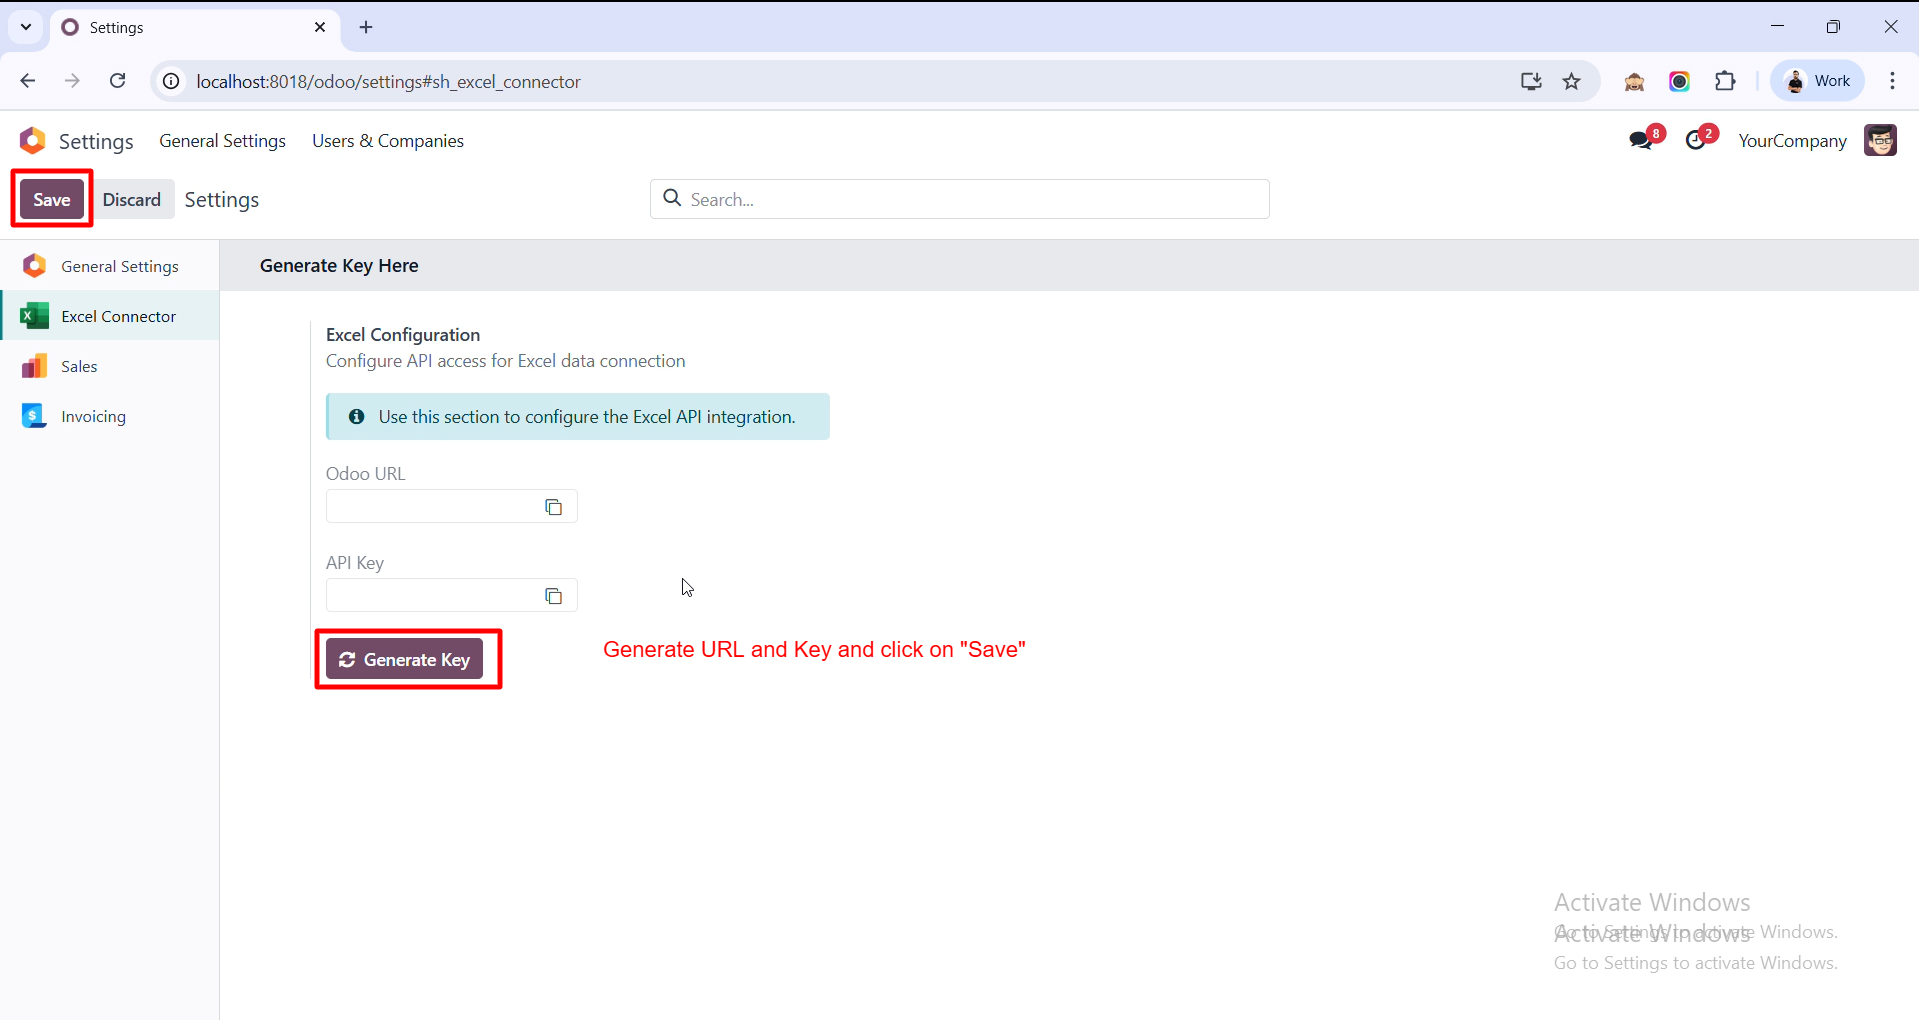
Generate your Odoo URL and API Key using Generate Key, then click Save to apply the configuration.
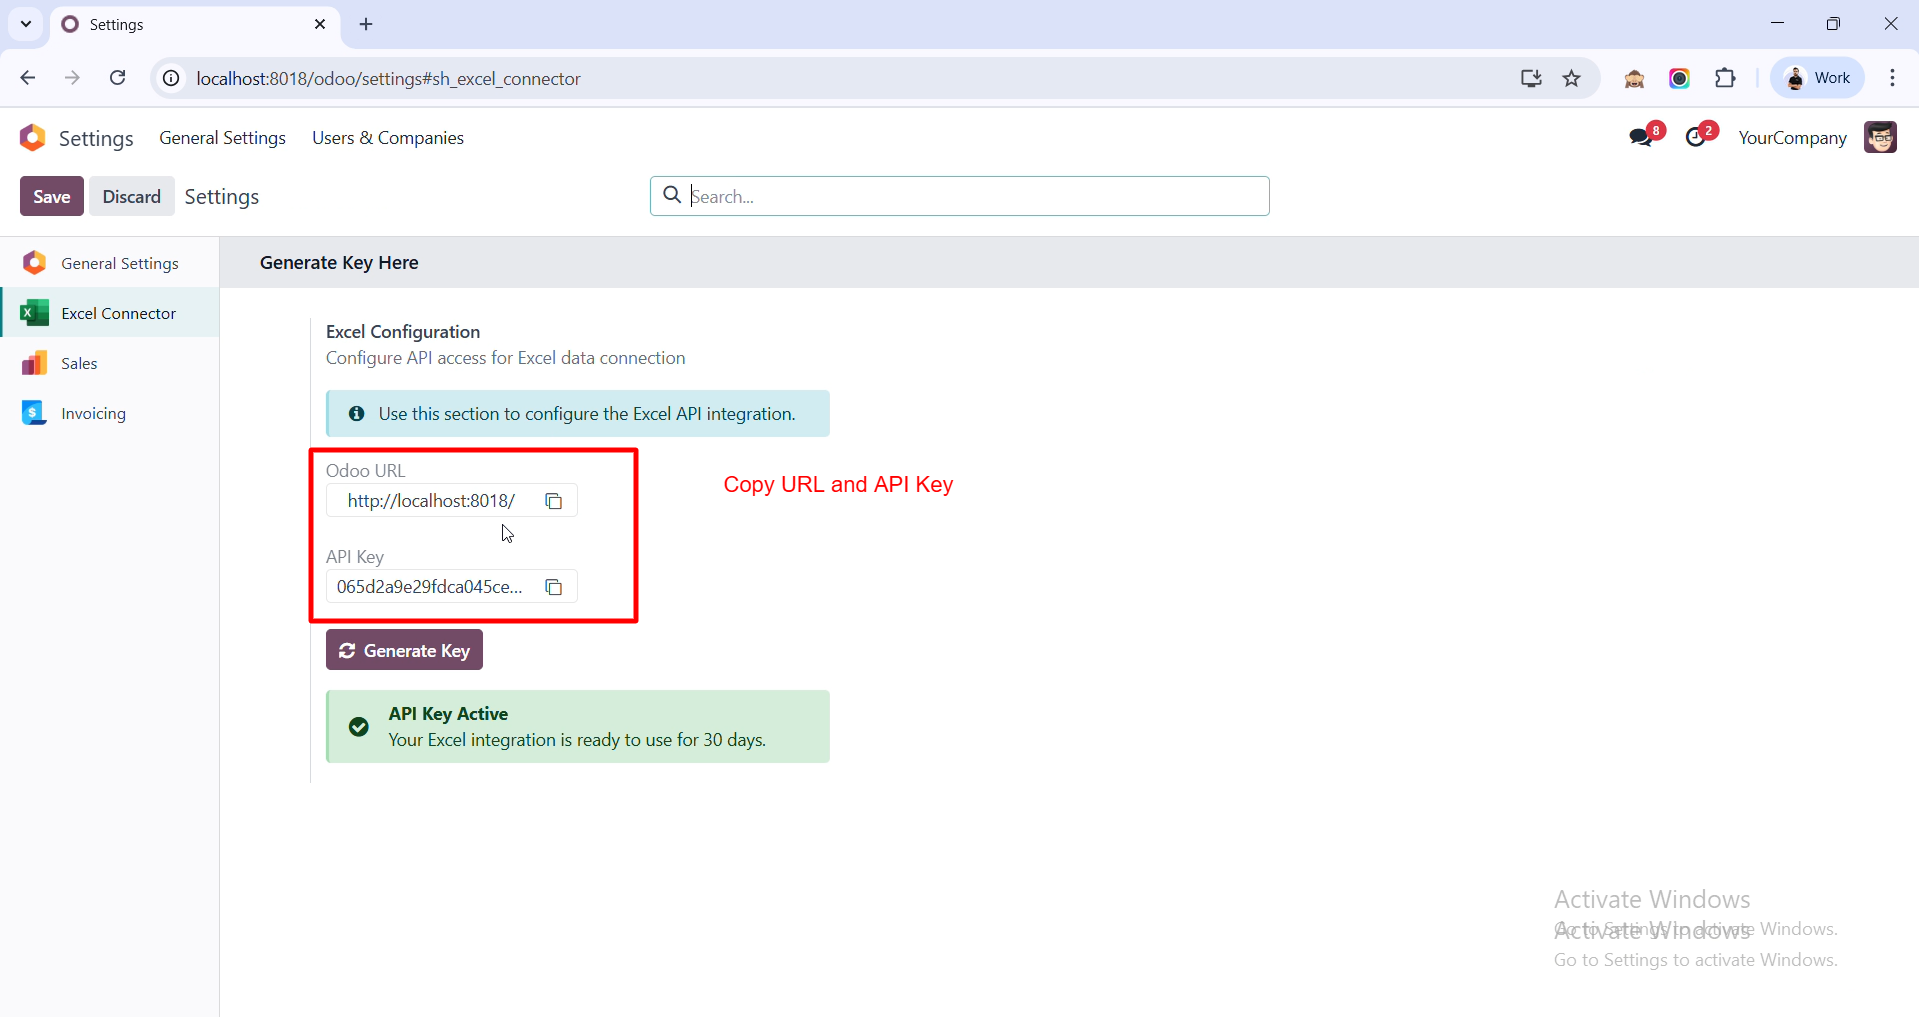
You can copy your Odoo URL and API Key from here to use in the Excel Odoo Connector.
After entering your Odoo URL and API Key, simply click Authenticate to connect your Excel with Odoo.
You can search and select any Odoo model to fetch its fields into Excel.
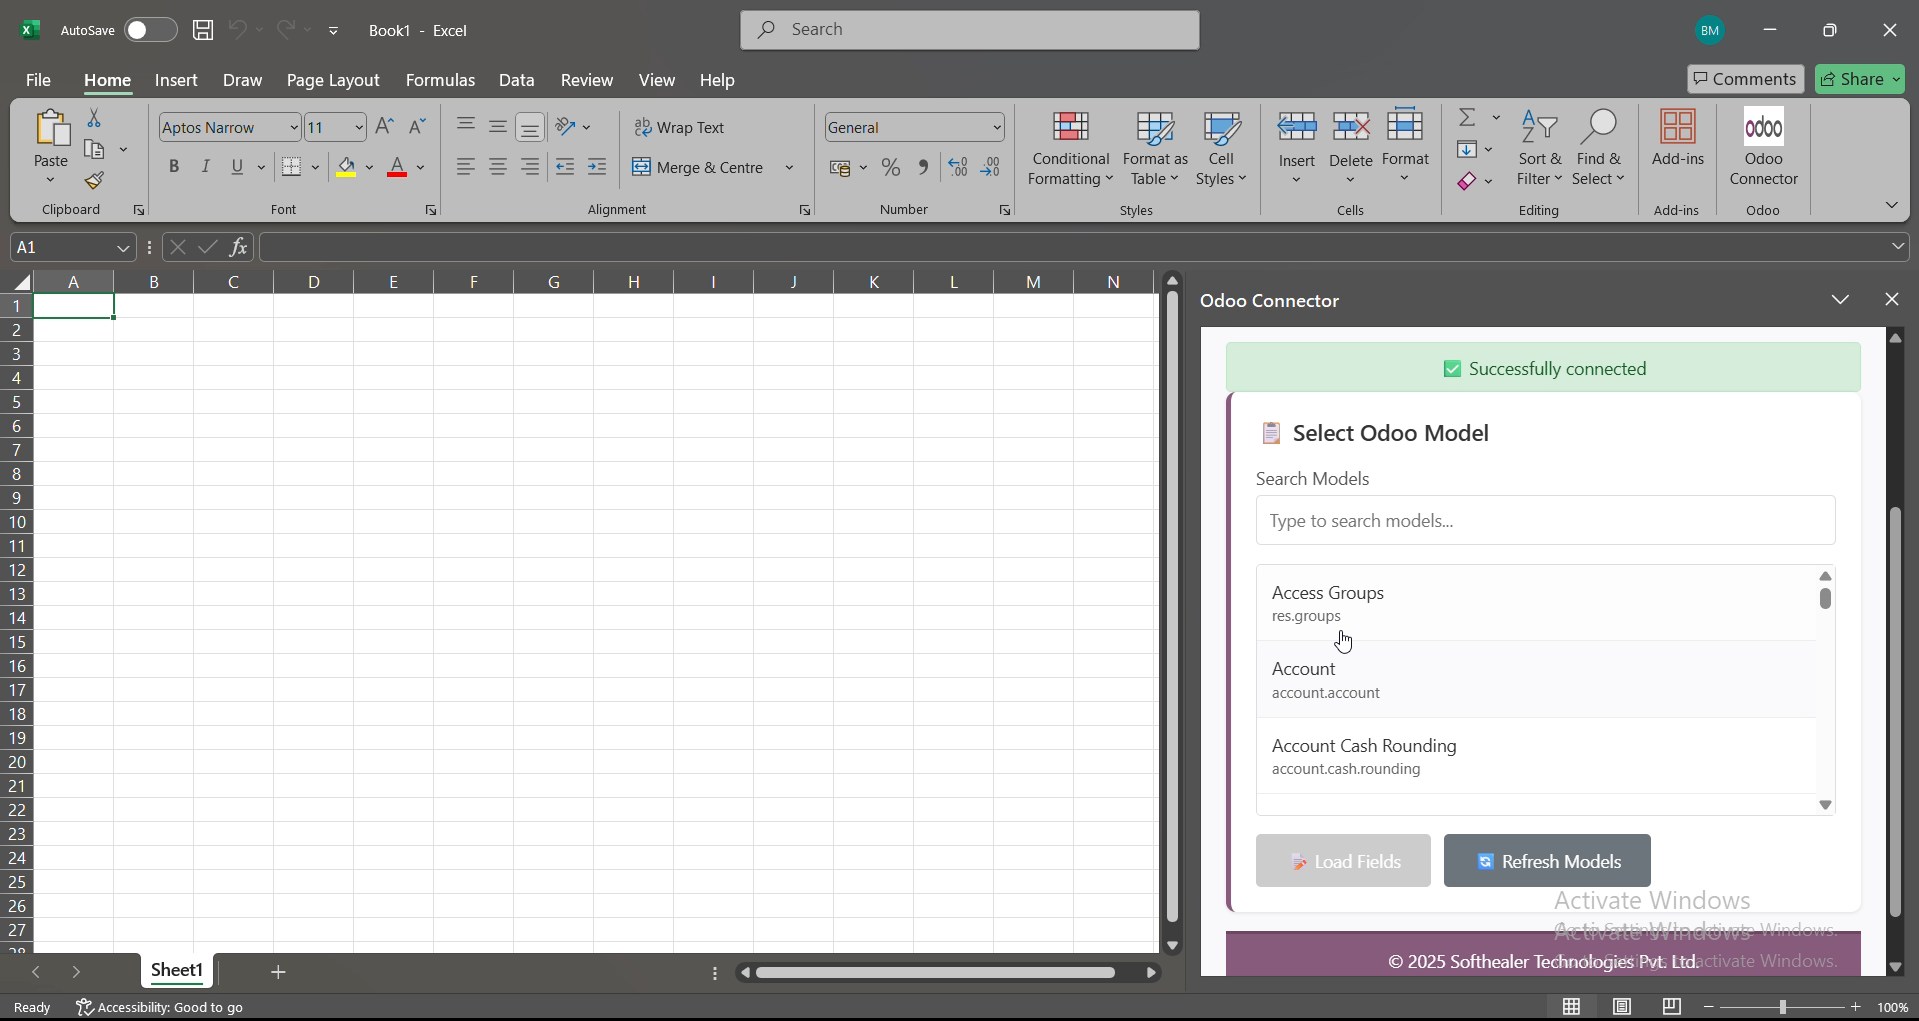
Select the fields you want to fetch and then click Preview Data to instantly see your Odoo records.
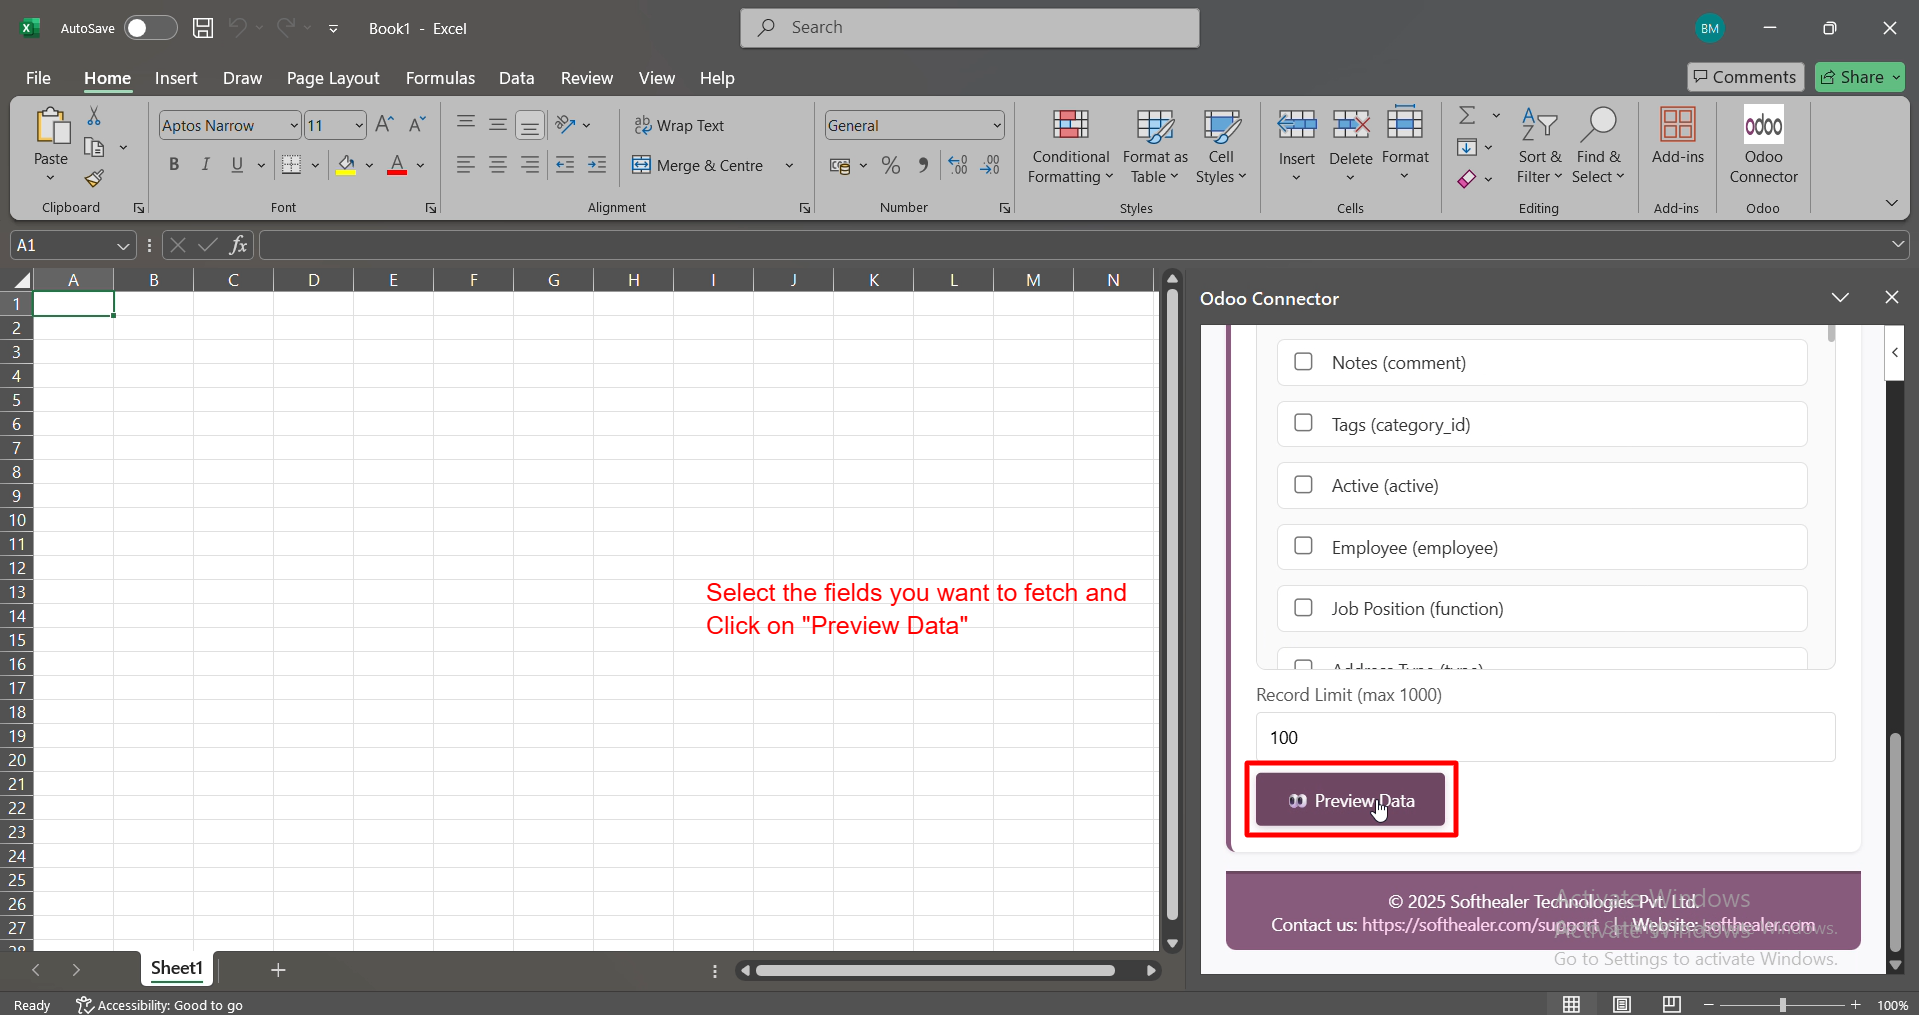
You can import all the previewed Odoo data into Excel instantly by clicking the Import to Excel button.
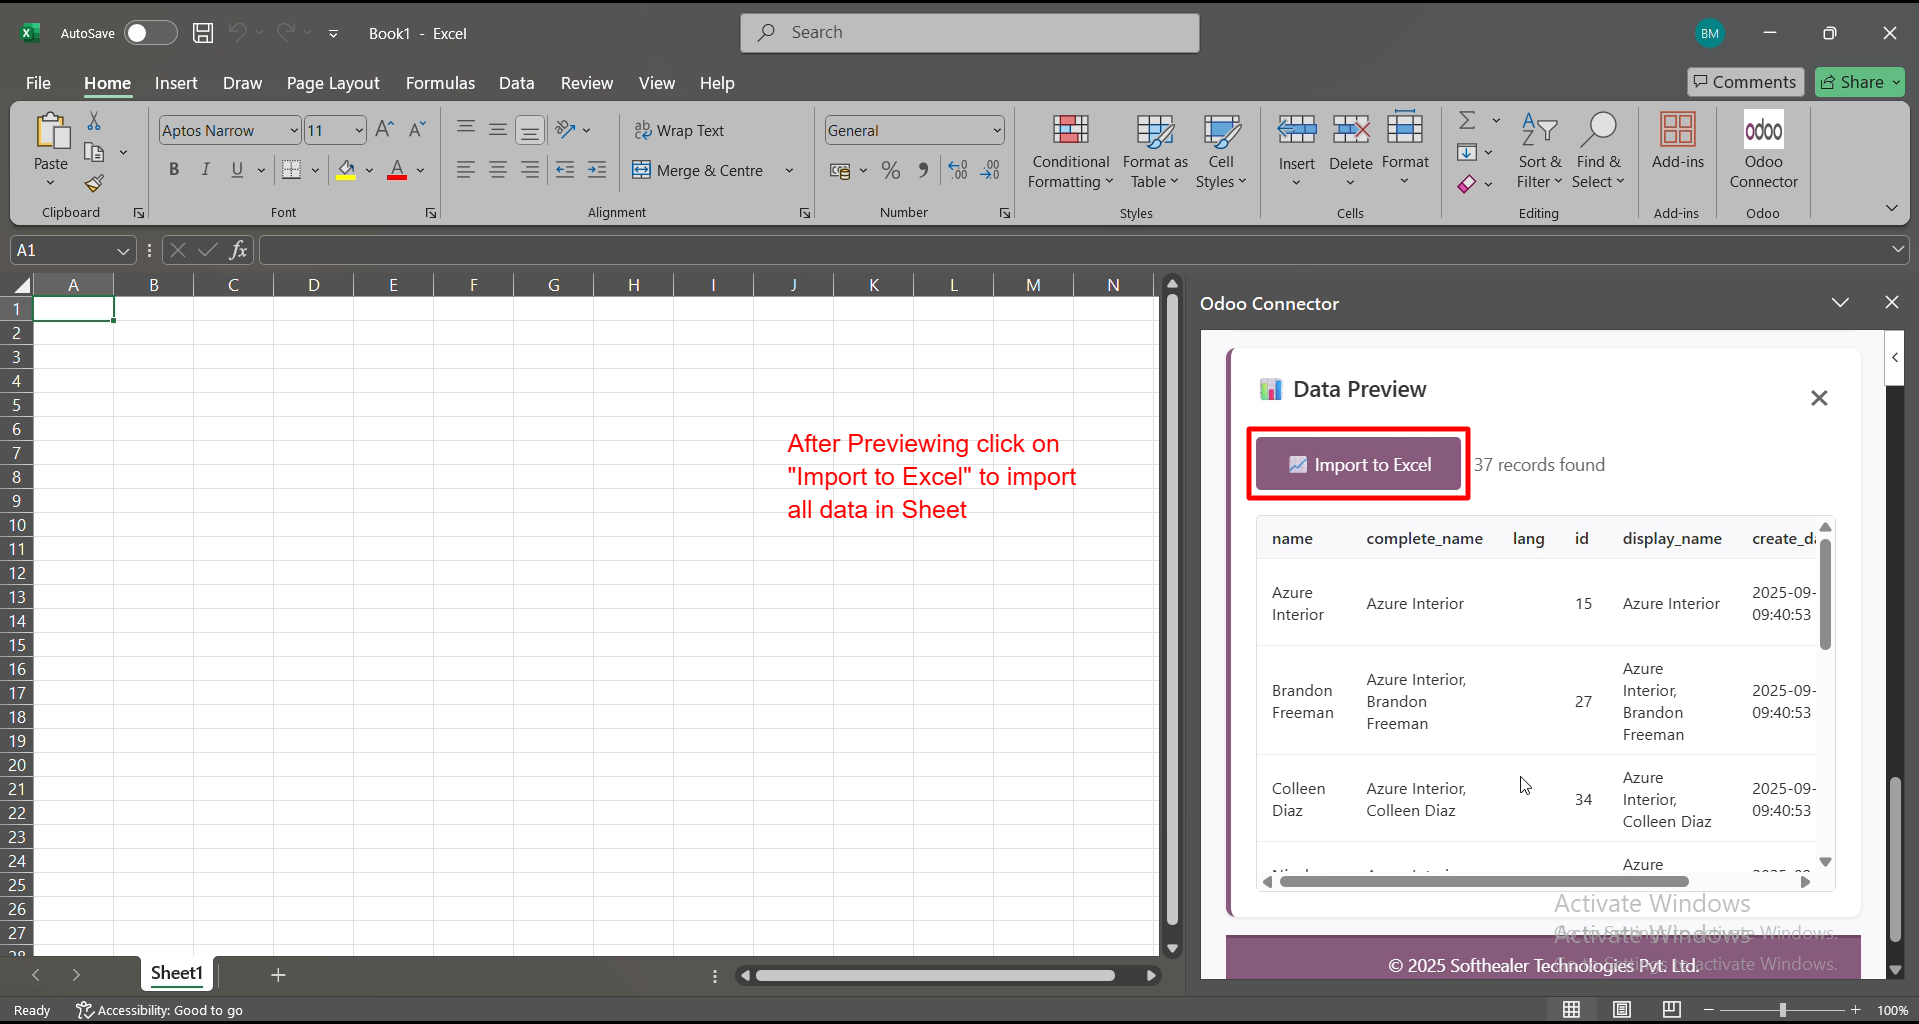
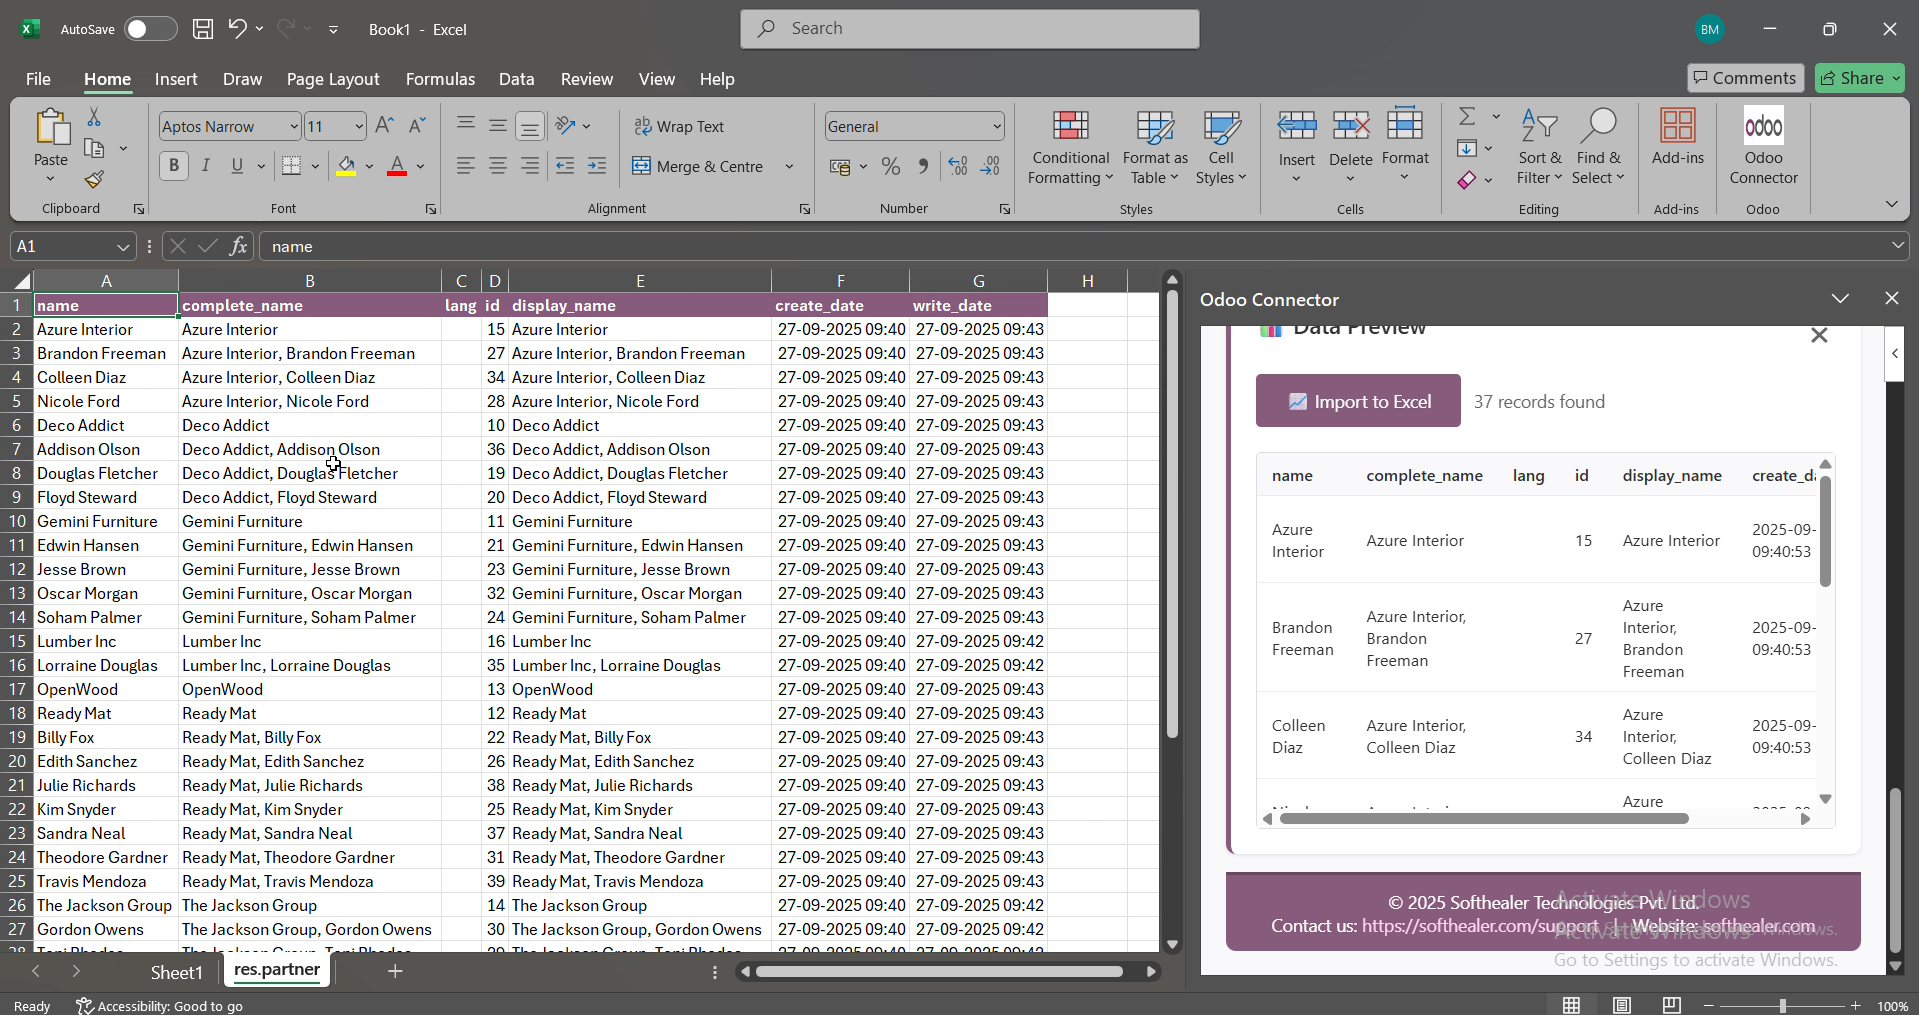
Your Odoo data is now imported into Excel and displayed in a new sheet for immediate use.
Go to Excel and enable the Auto Refresh from Odoo option to automatically fetch the latest data from Odoo.
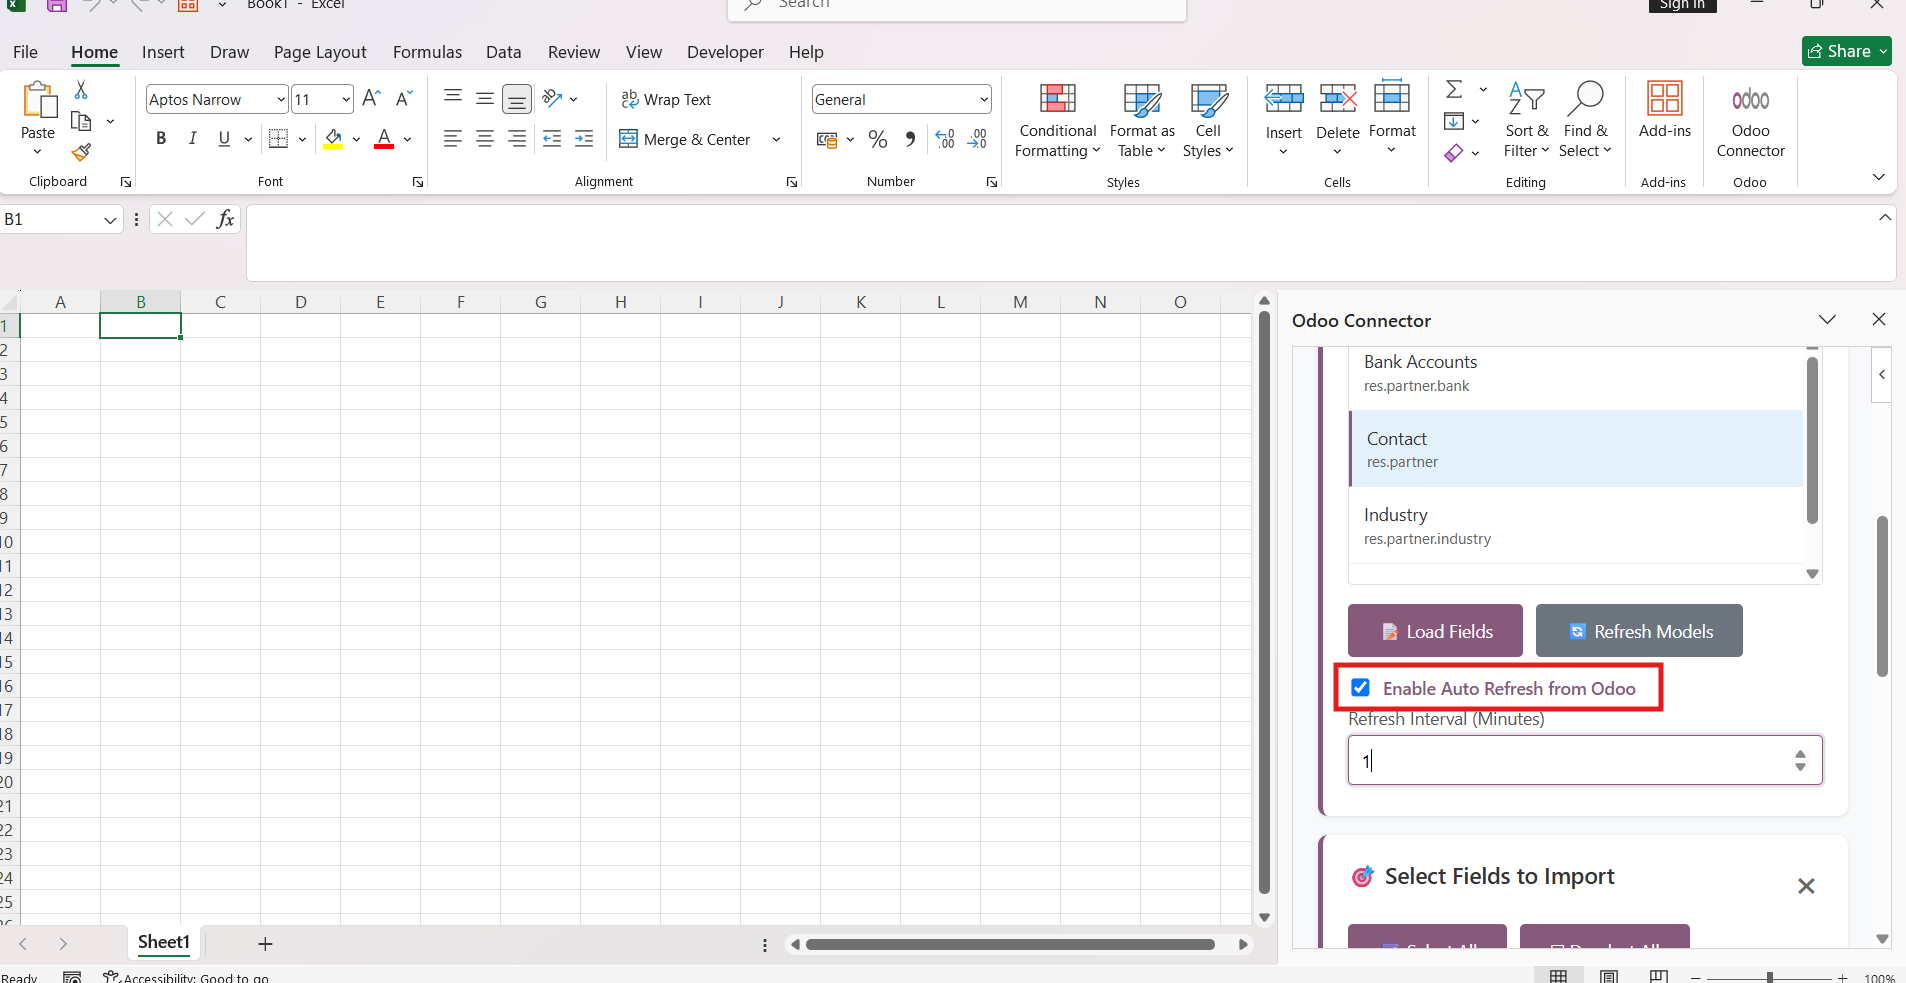
A confirmation wizard will open. Click the Confirm button to enable Auto Refresh from Odoo.
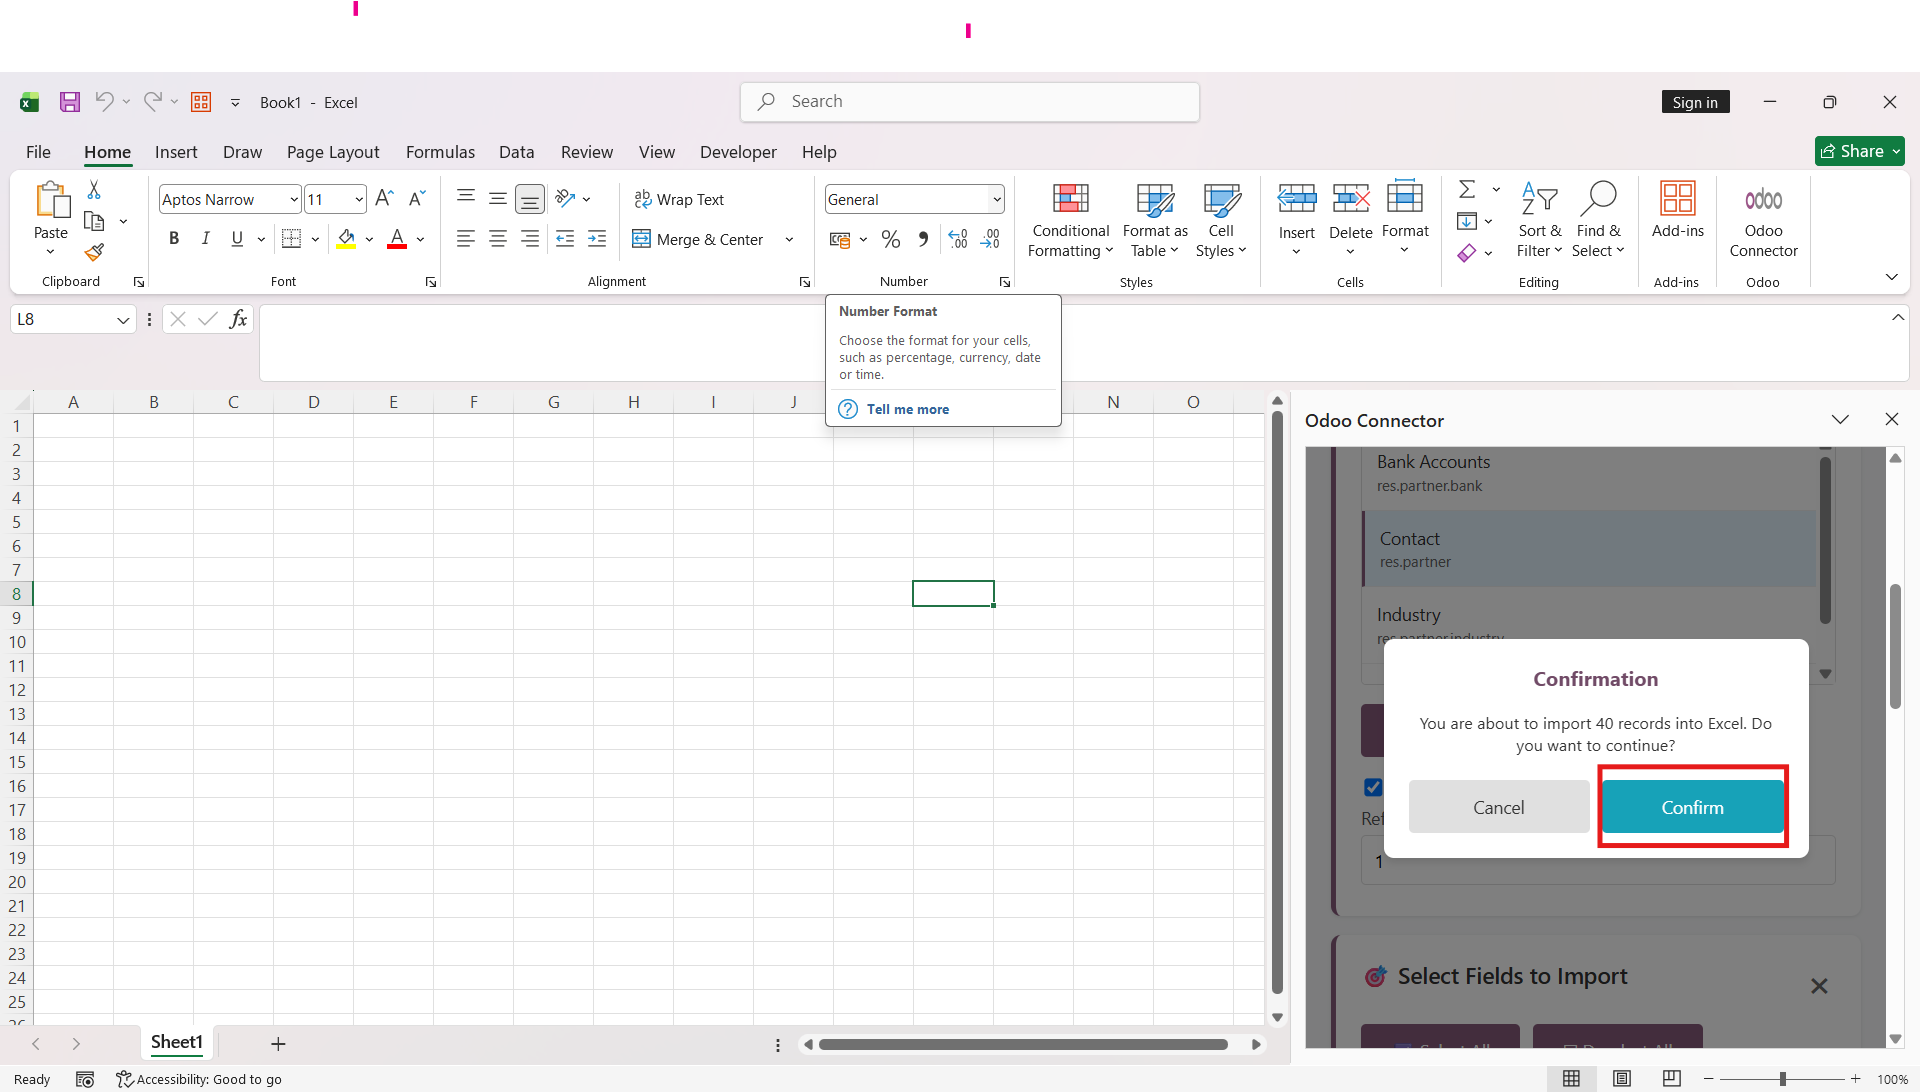
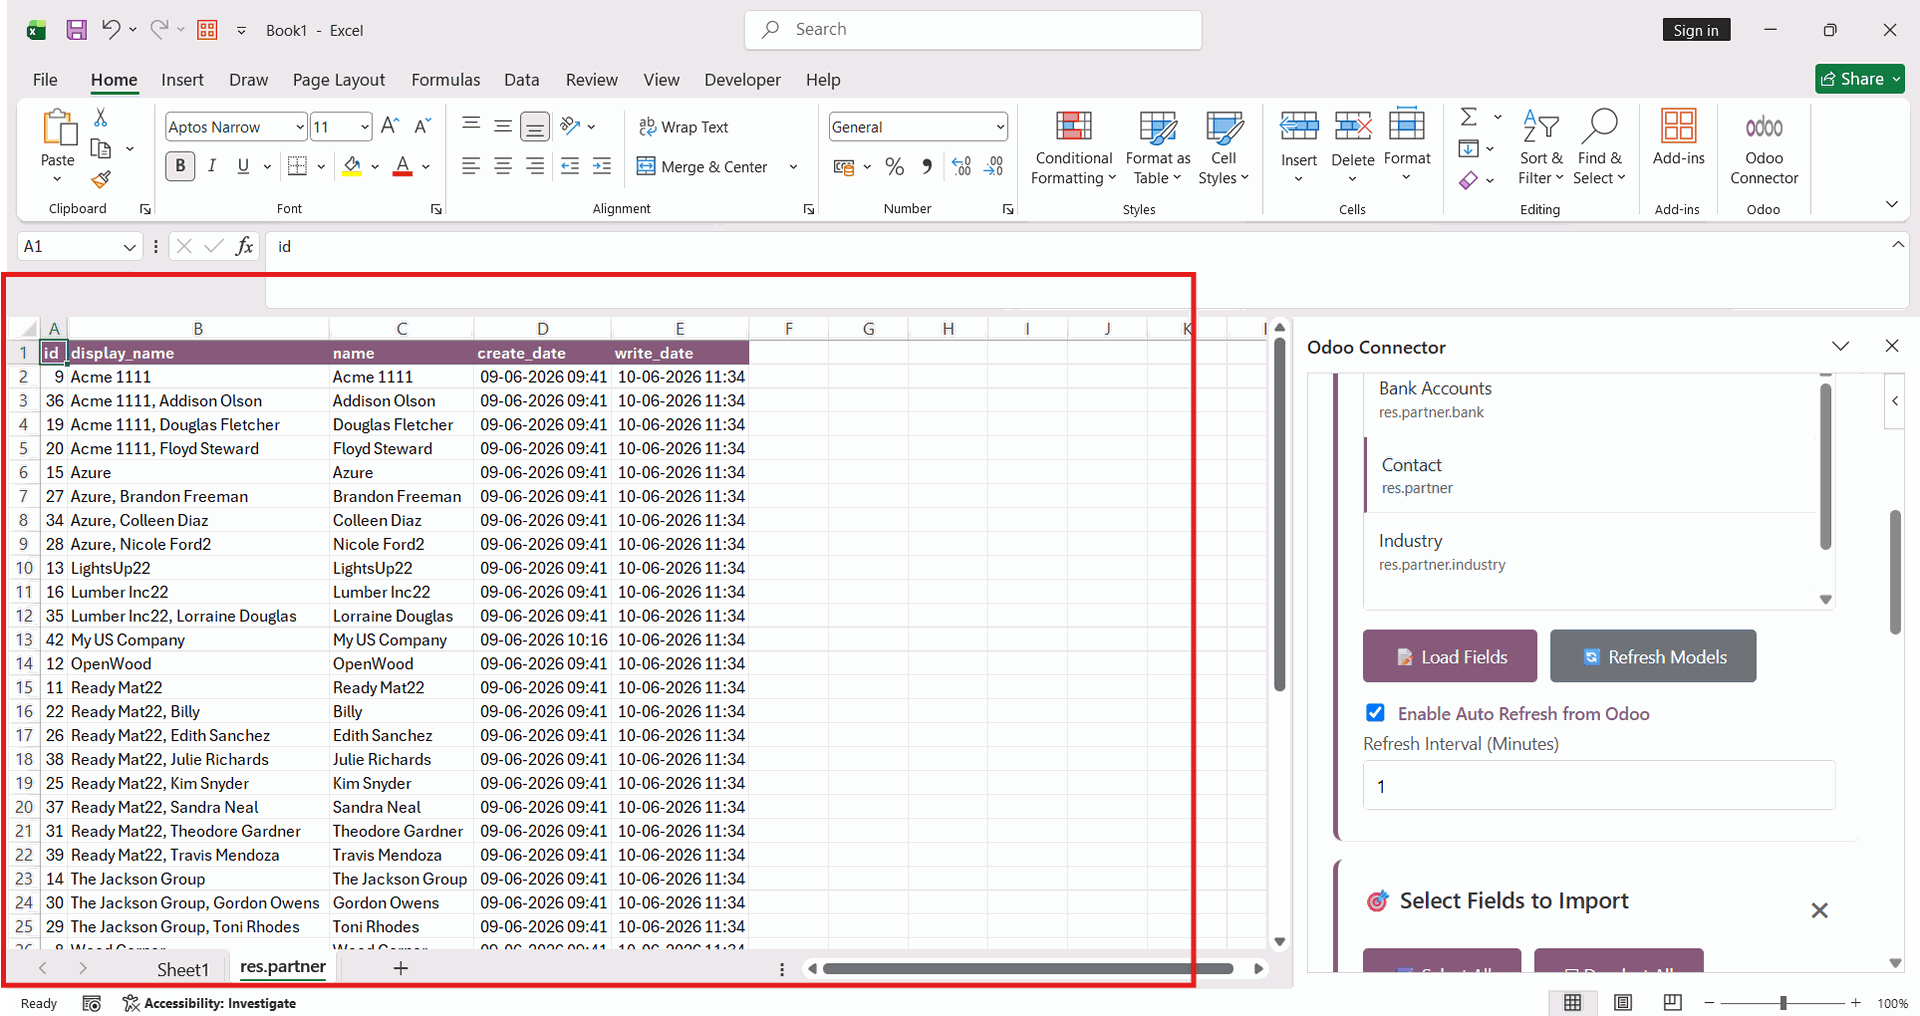
The latest contact details fetched from Odoo are automatically populated into the Excel worksheet.
Click the Add Rule button in Excel to create a new synchronization rule for importing or updating data from Odoo.
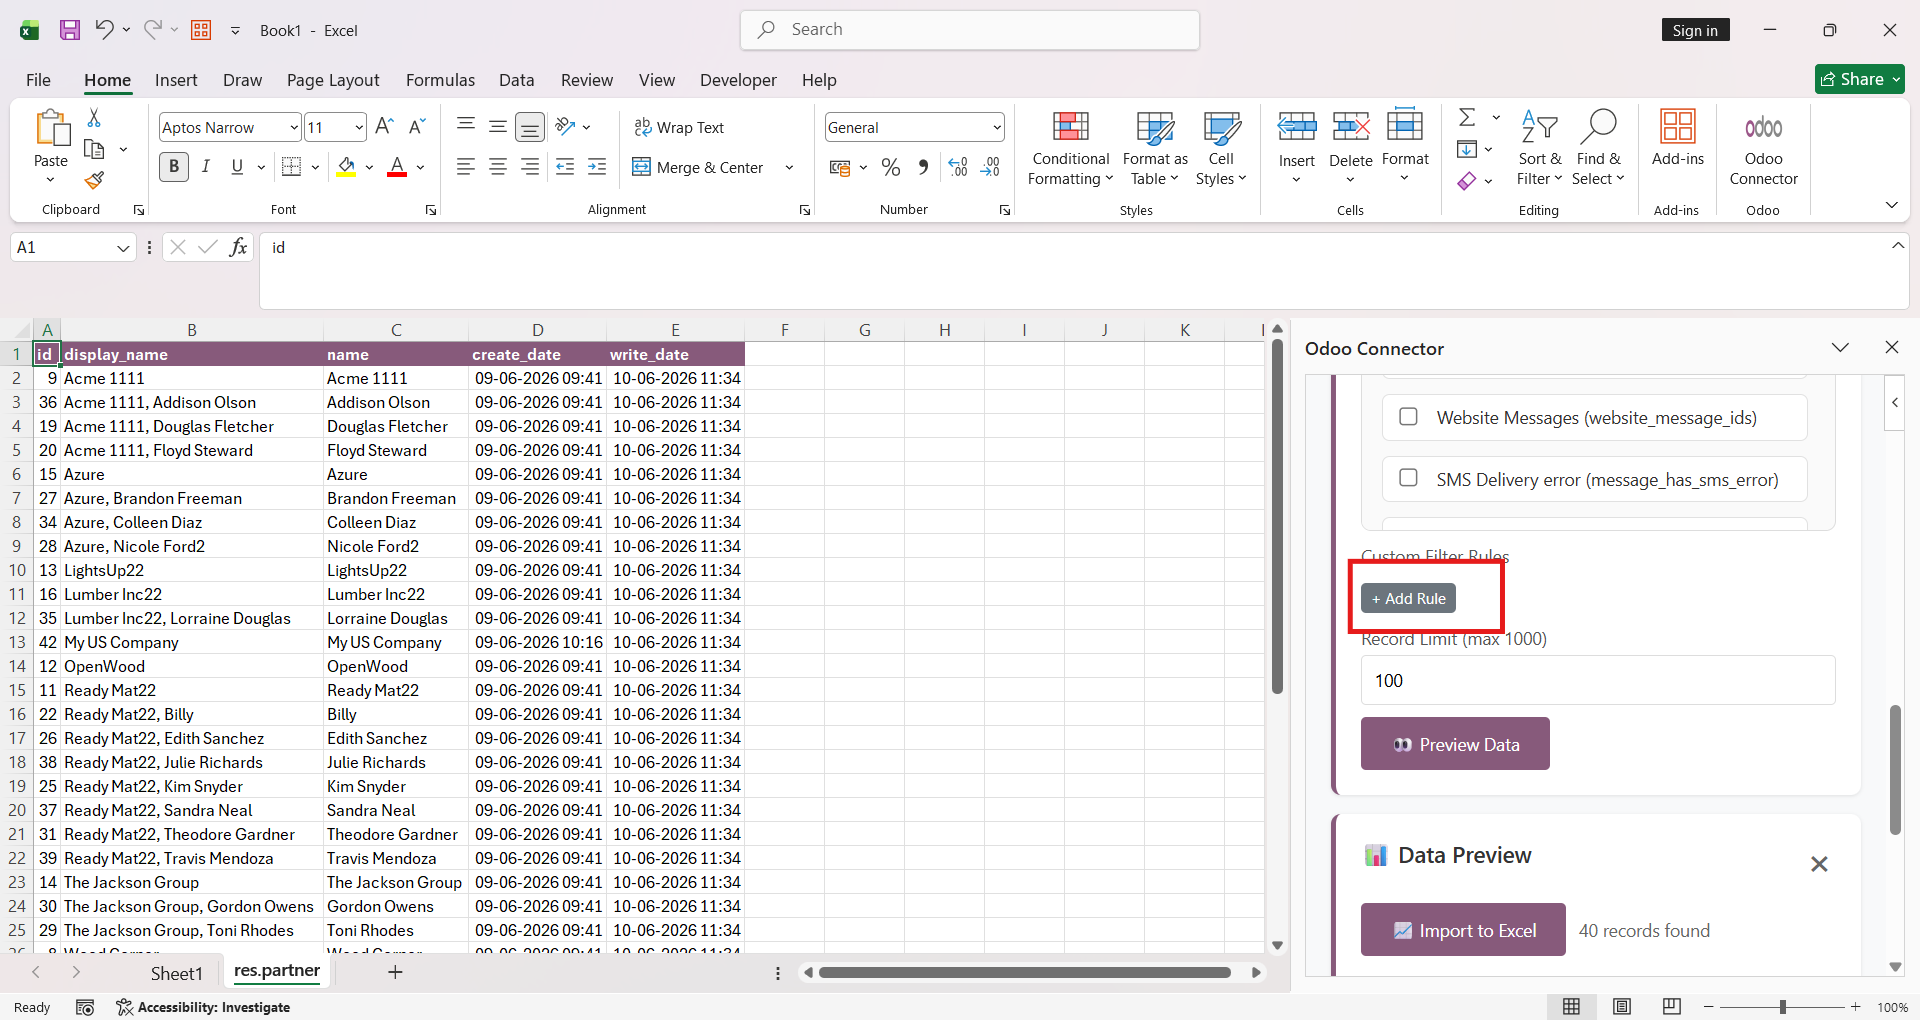
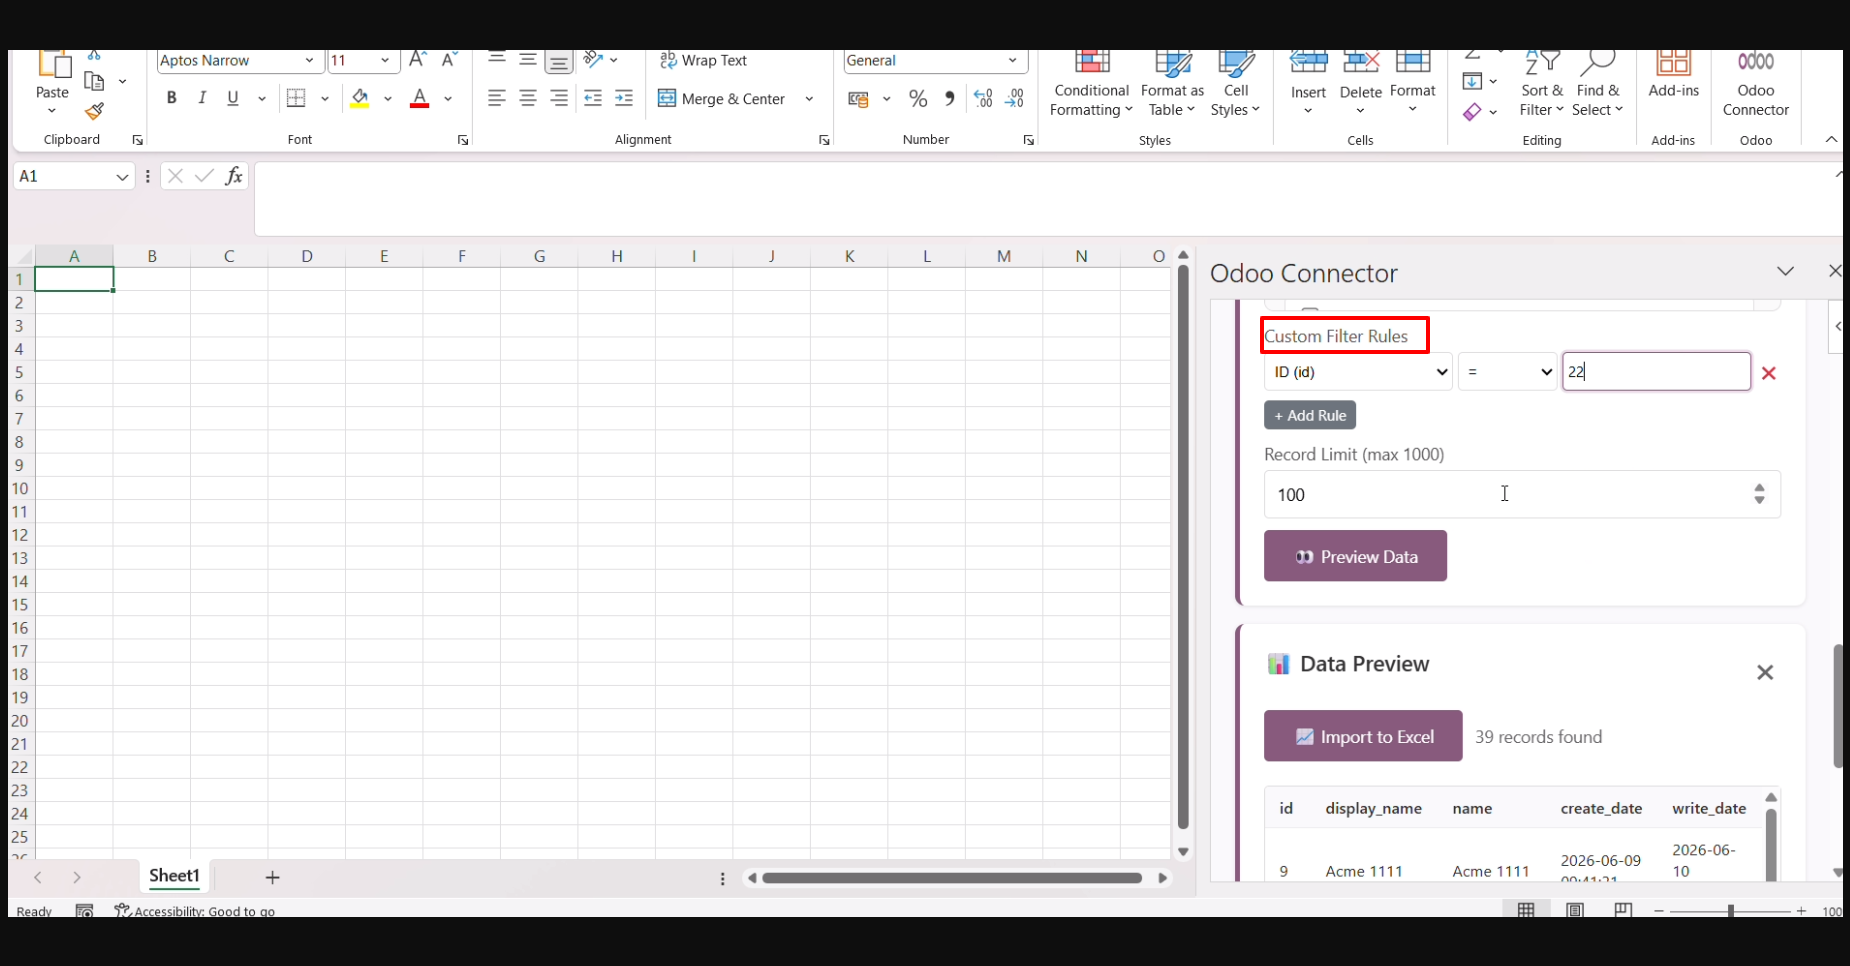
Add custom filter rules to define the criteria for fetching only the required records from Odoo into Excel.
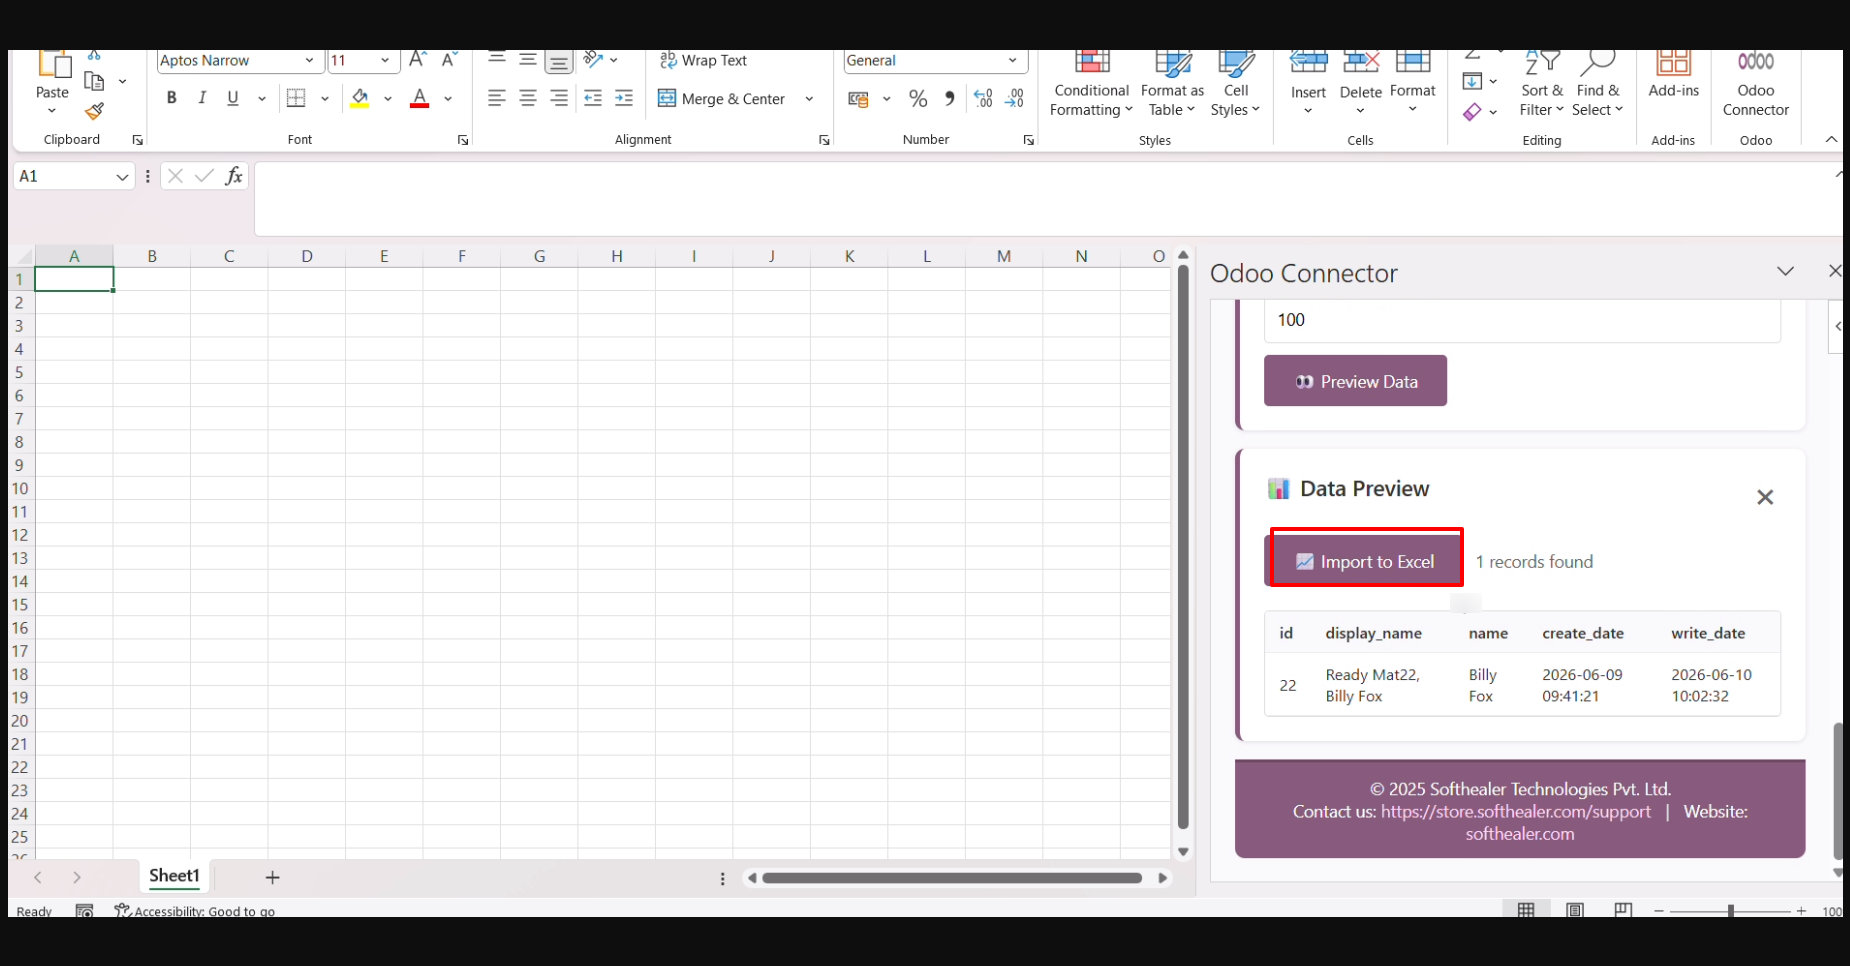
Users can preview the filtered records before importing. Click the Import to Excel button to import the filtered data into the Excel worksheet.
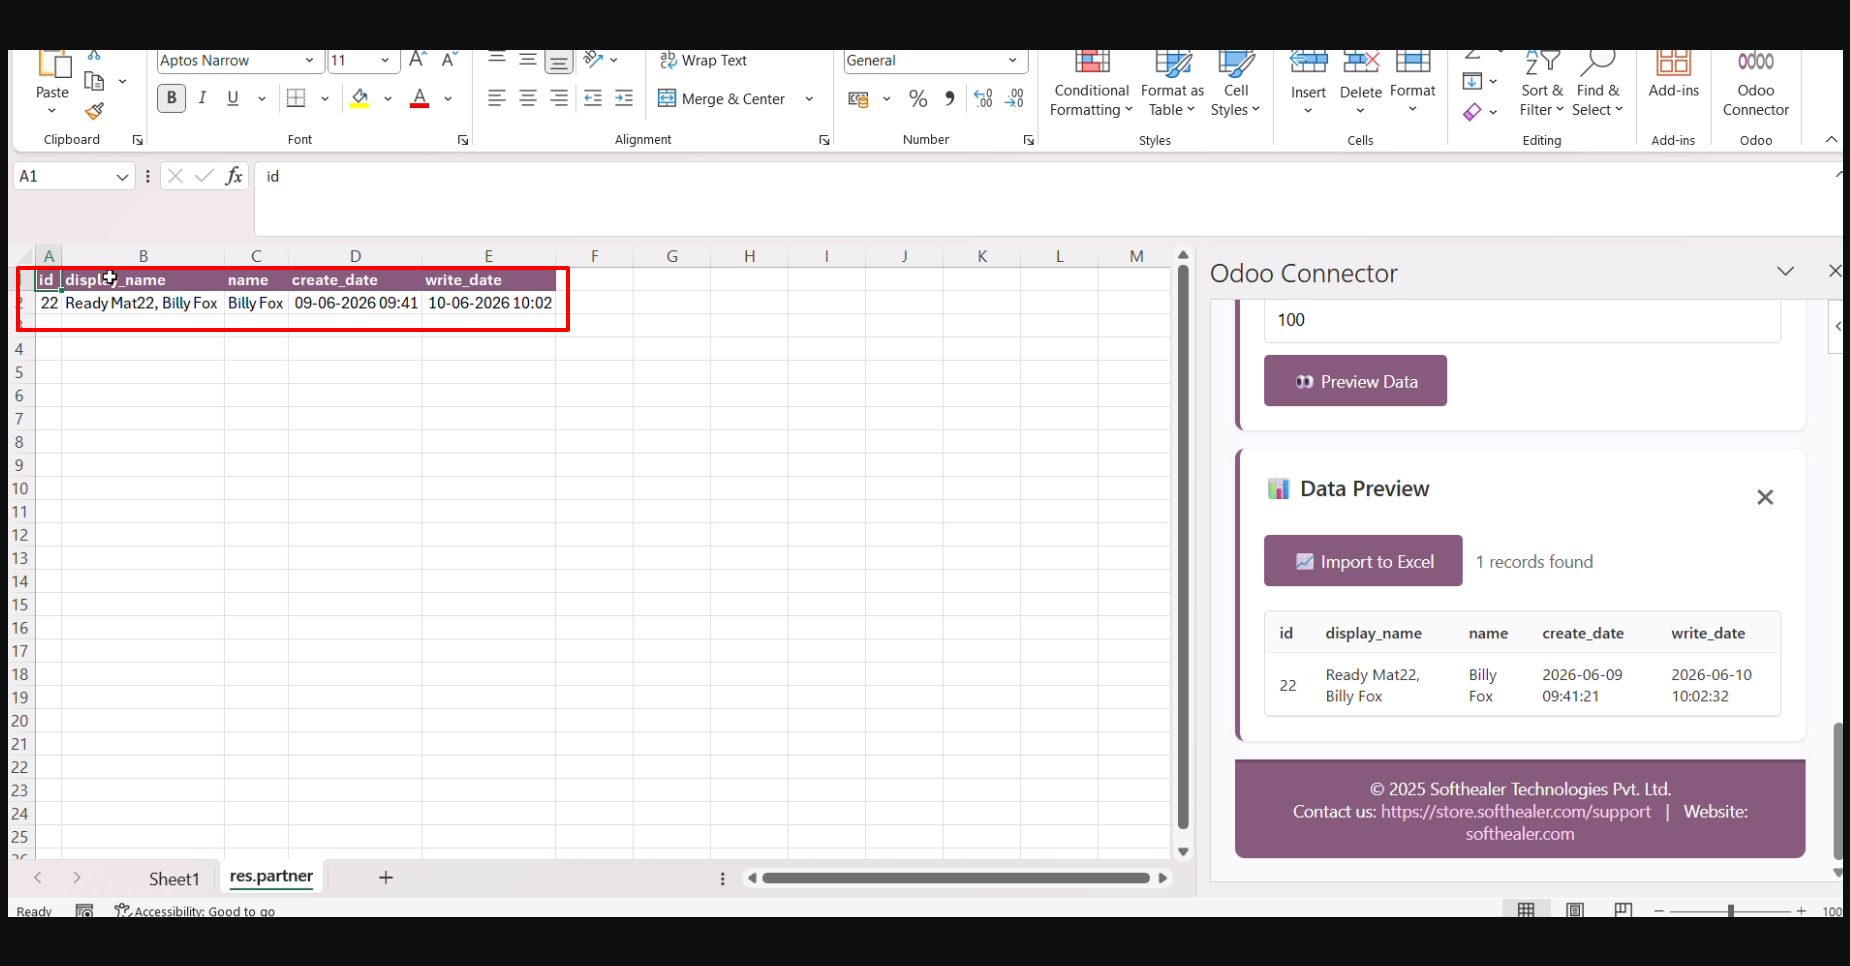
The filtered data is successfully imported into the Excel worksheet based on the configured filter rules.
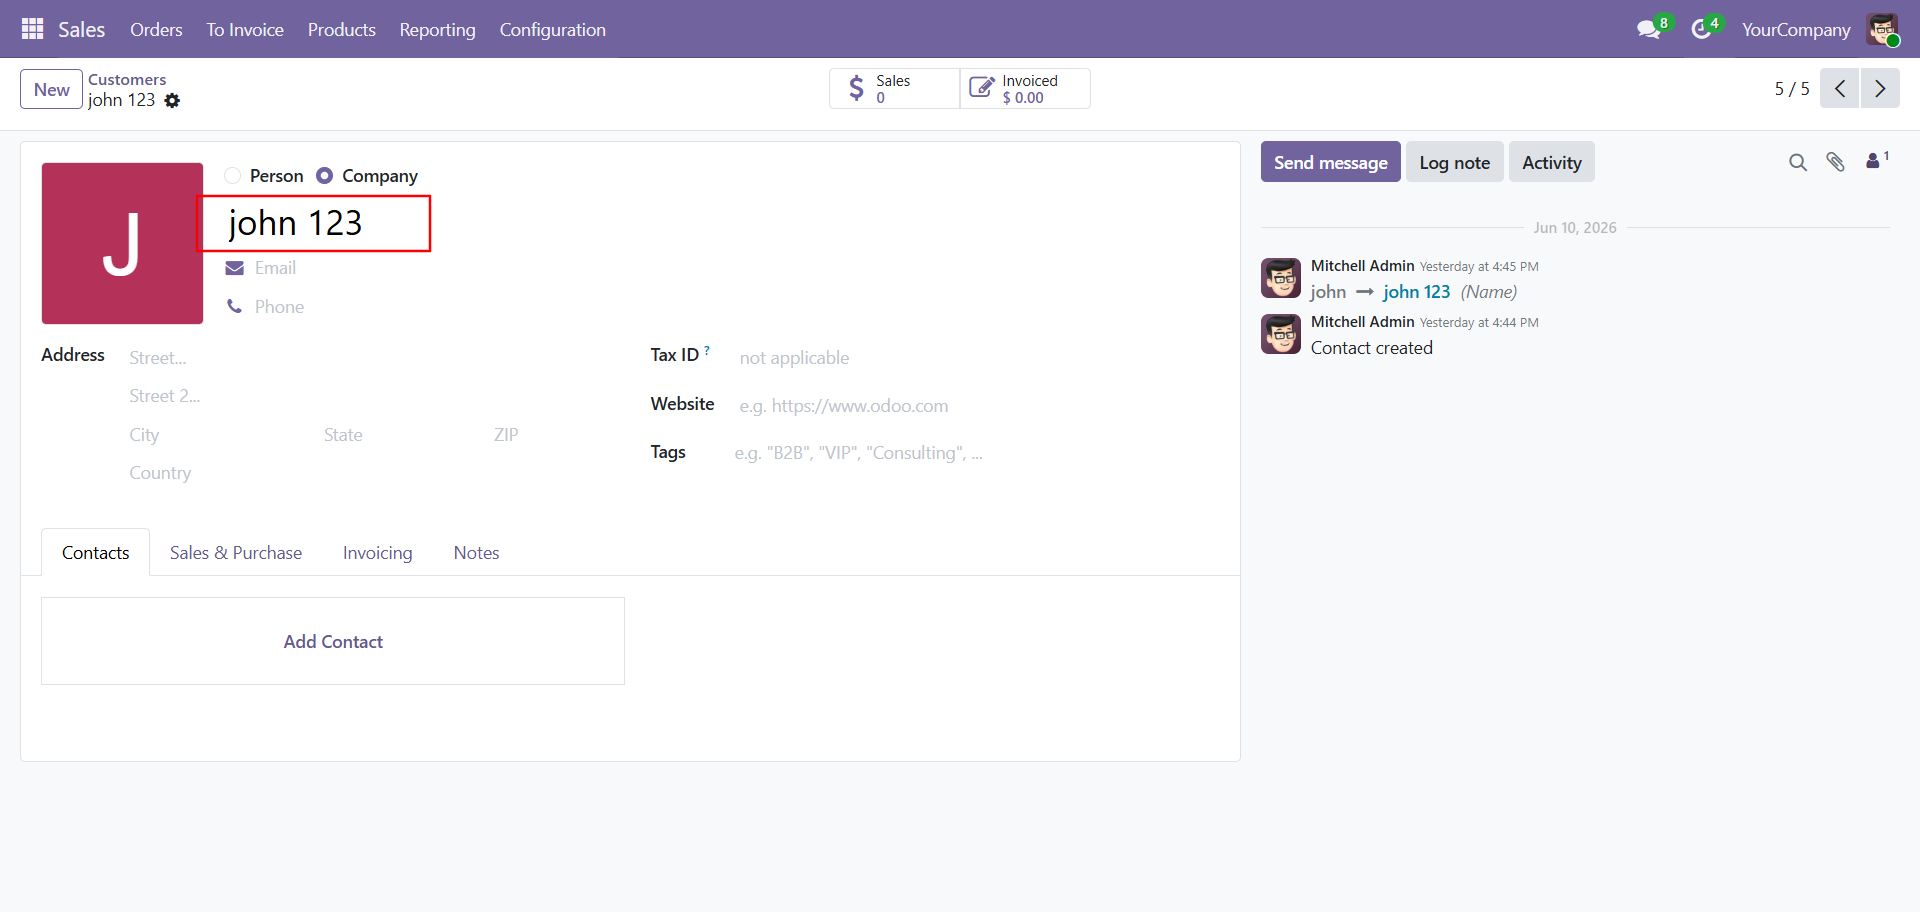
Create a new contact in Odoo to add it to the system for future synchronization and management.
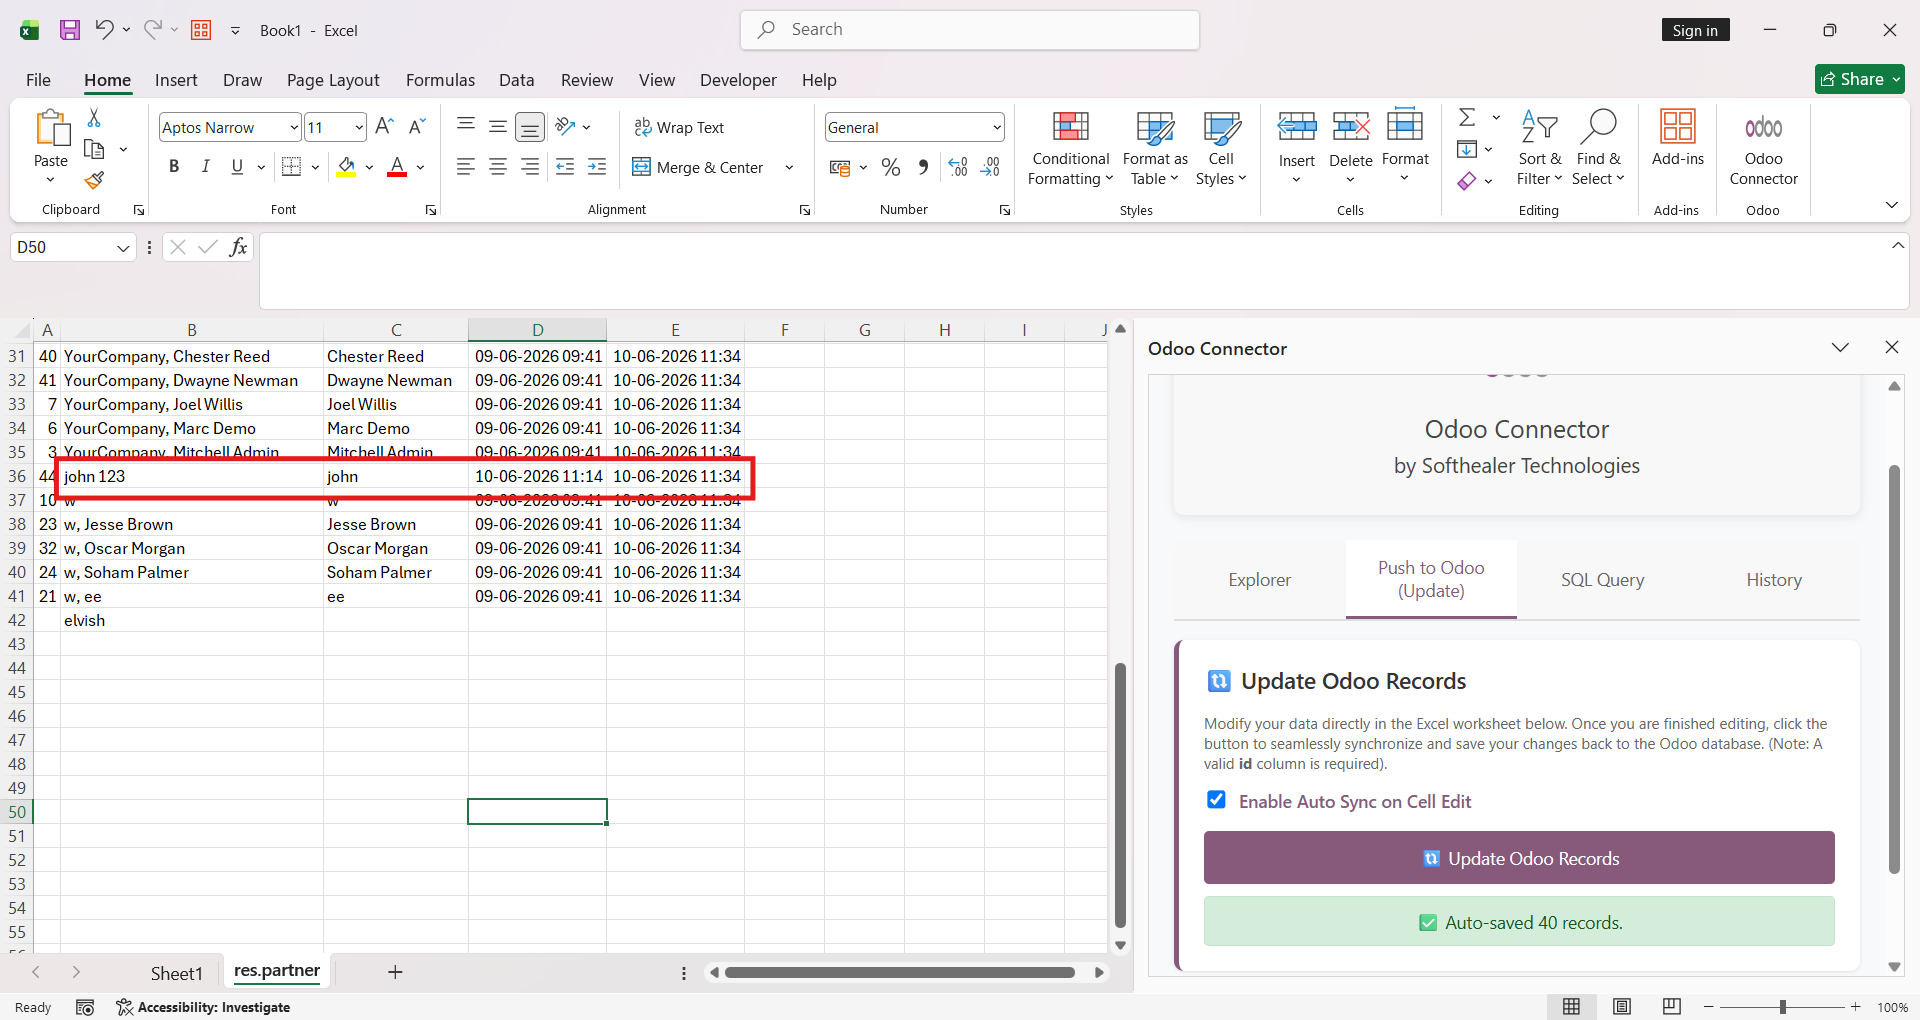
Click the Update Odoo Records from Excel button to synchronize the modified Excel data back to the corresponding records in Odoo.
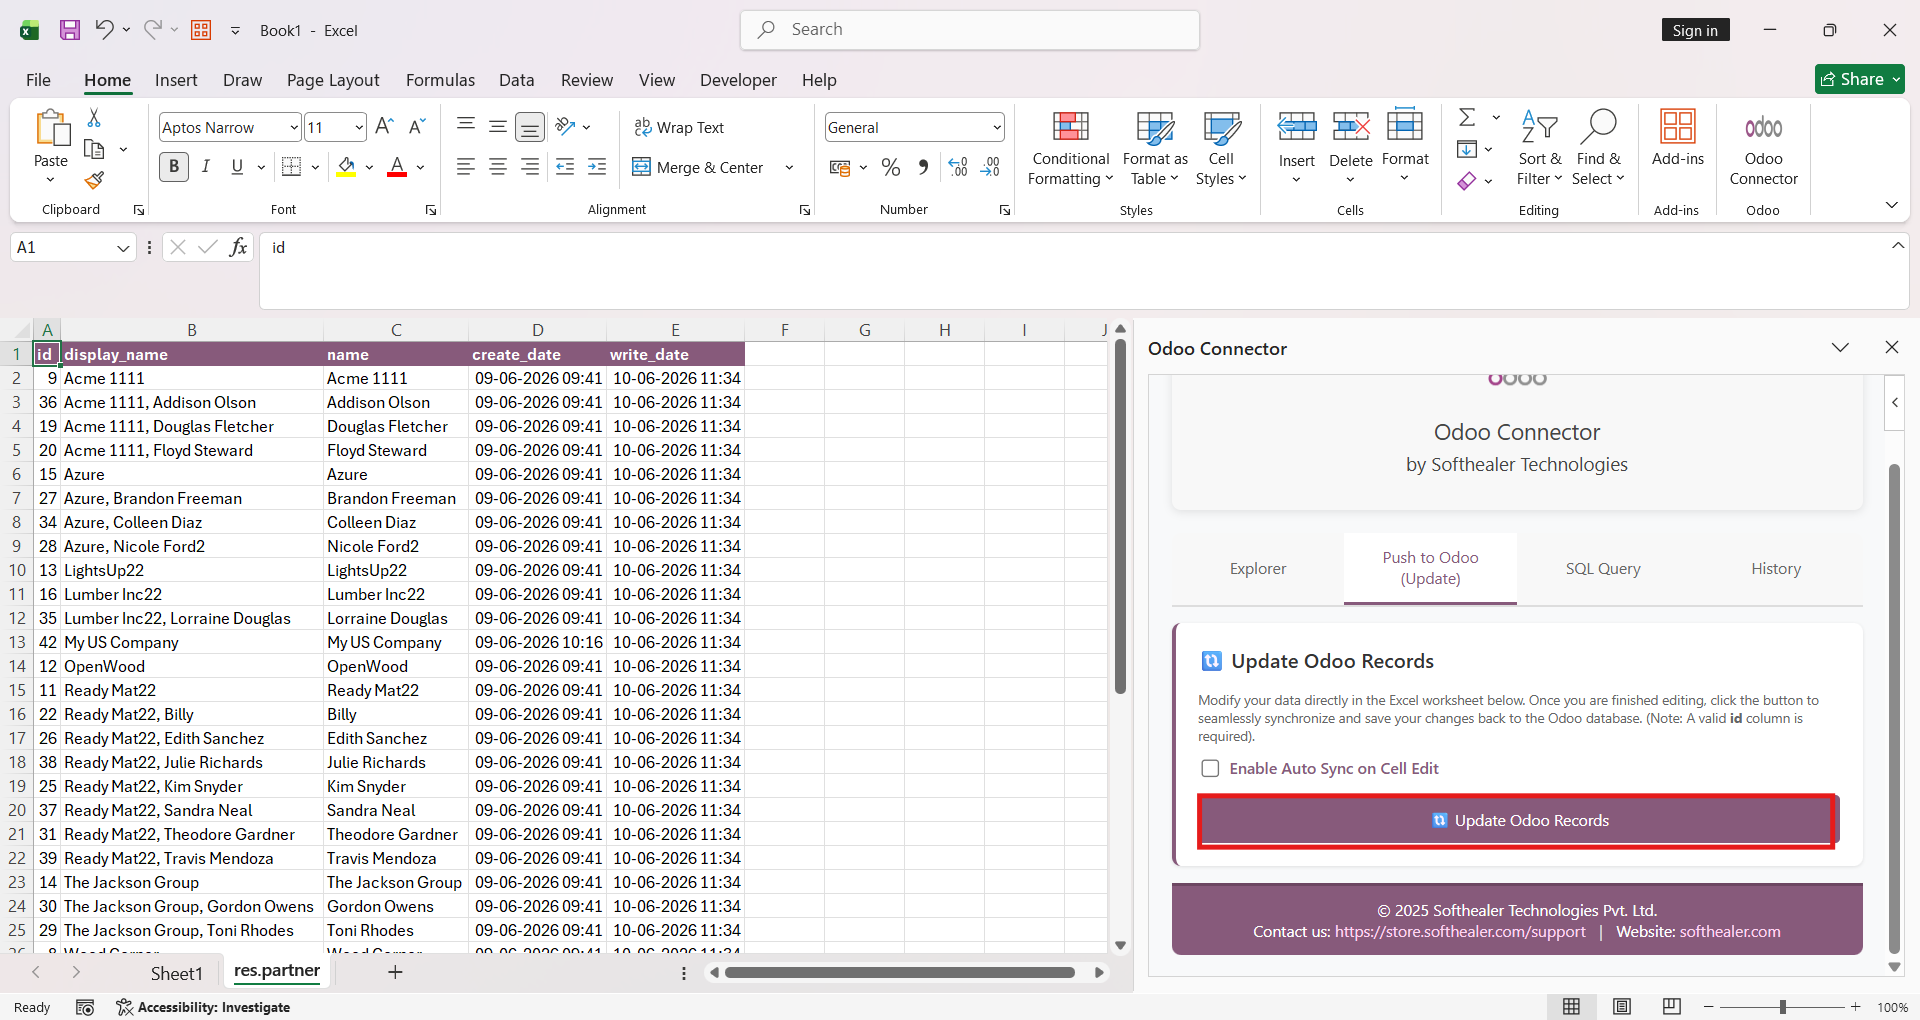
The newly created Odoo contact is automatically added to the Excel worksheet.
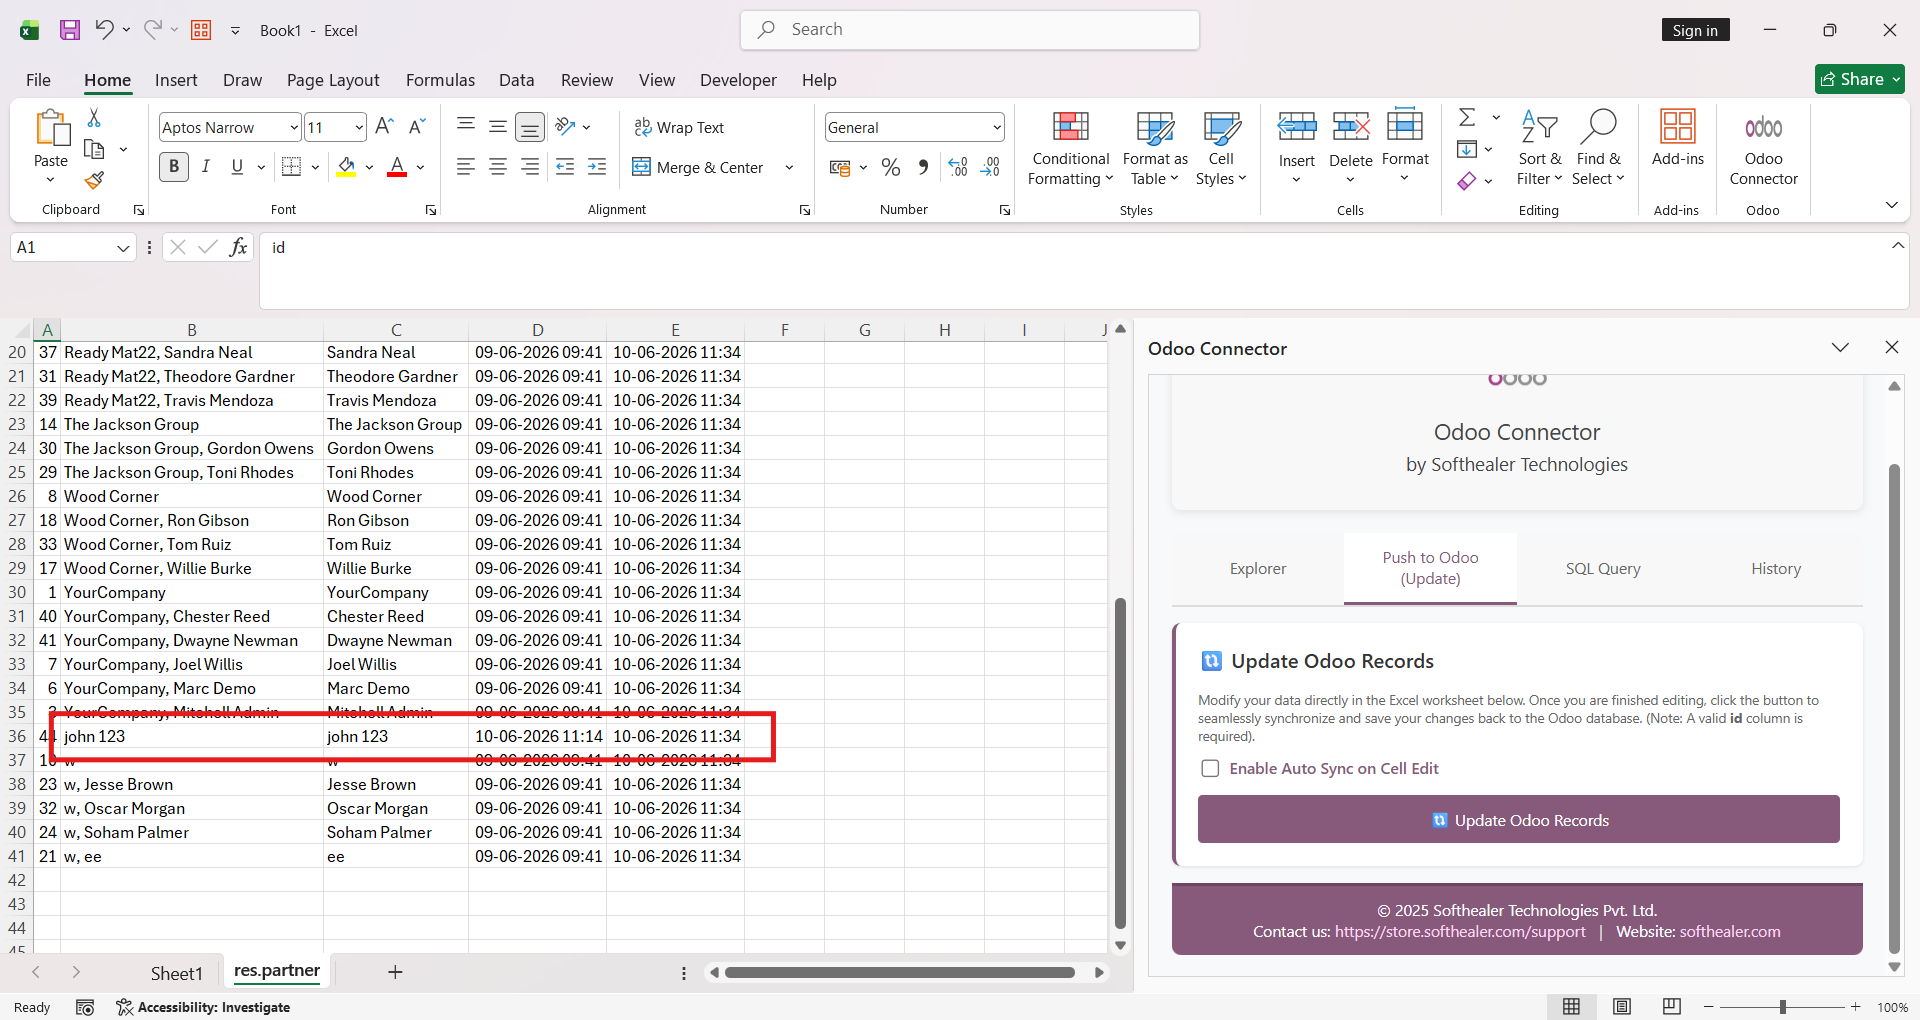
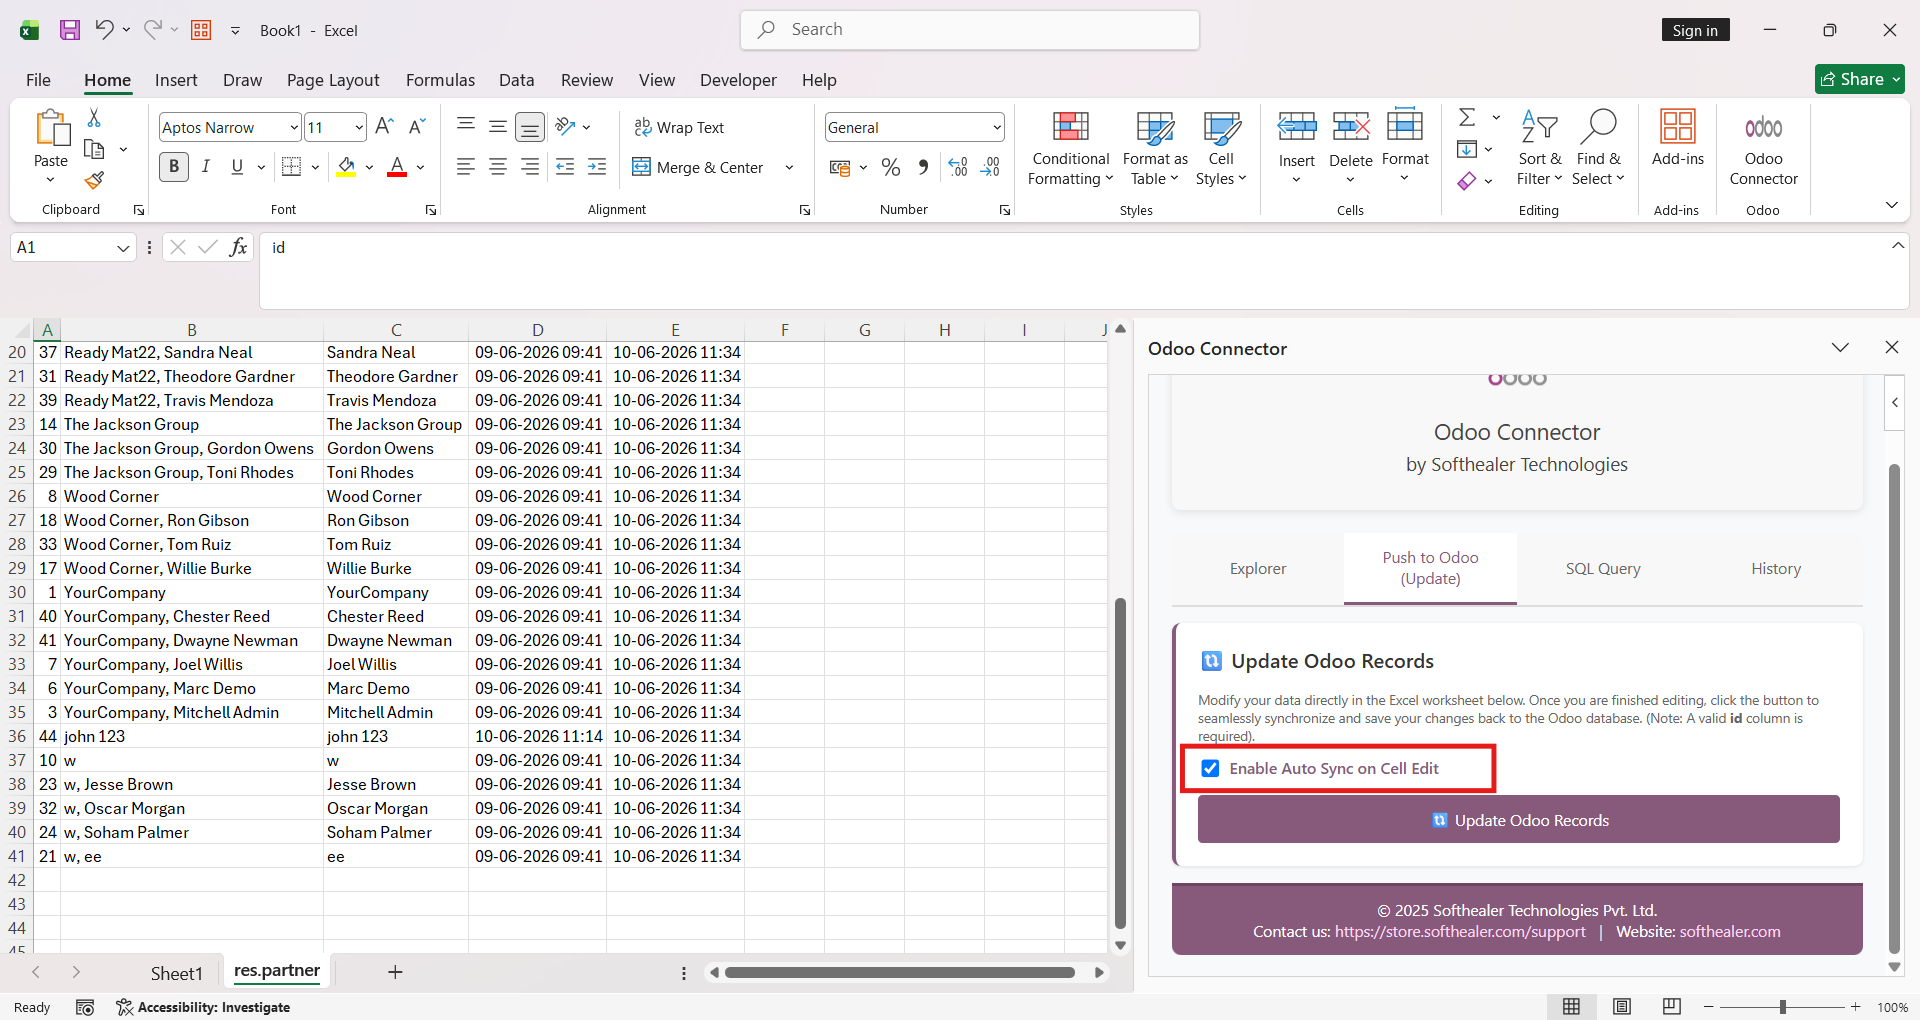
Enable the Auto-Sync on Cell Edit option in Excel to automatically synchronize cell changes with Odoo in real time.
Update the contact details in Odoo to synchronize the latest changes with the connected Excel worksheet.
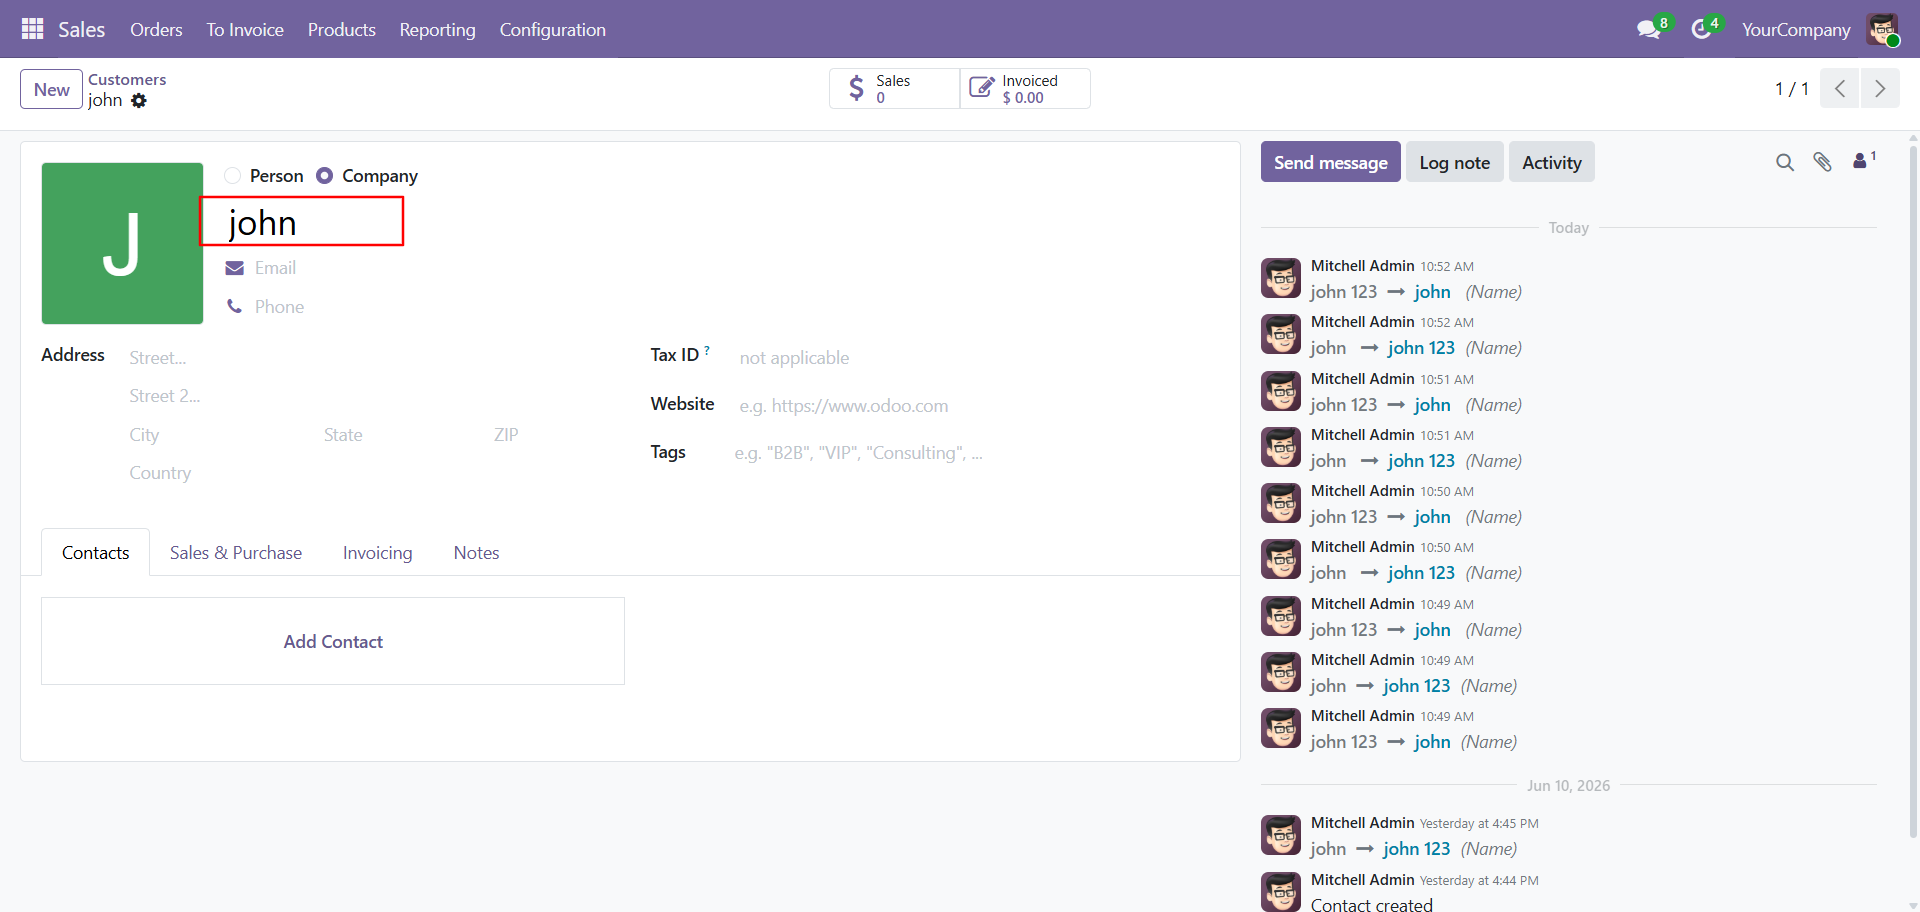
The updated Odoo record is automatically synchronized and reflected in the Excel worksheet.
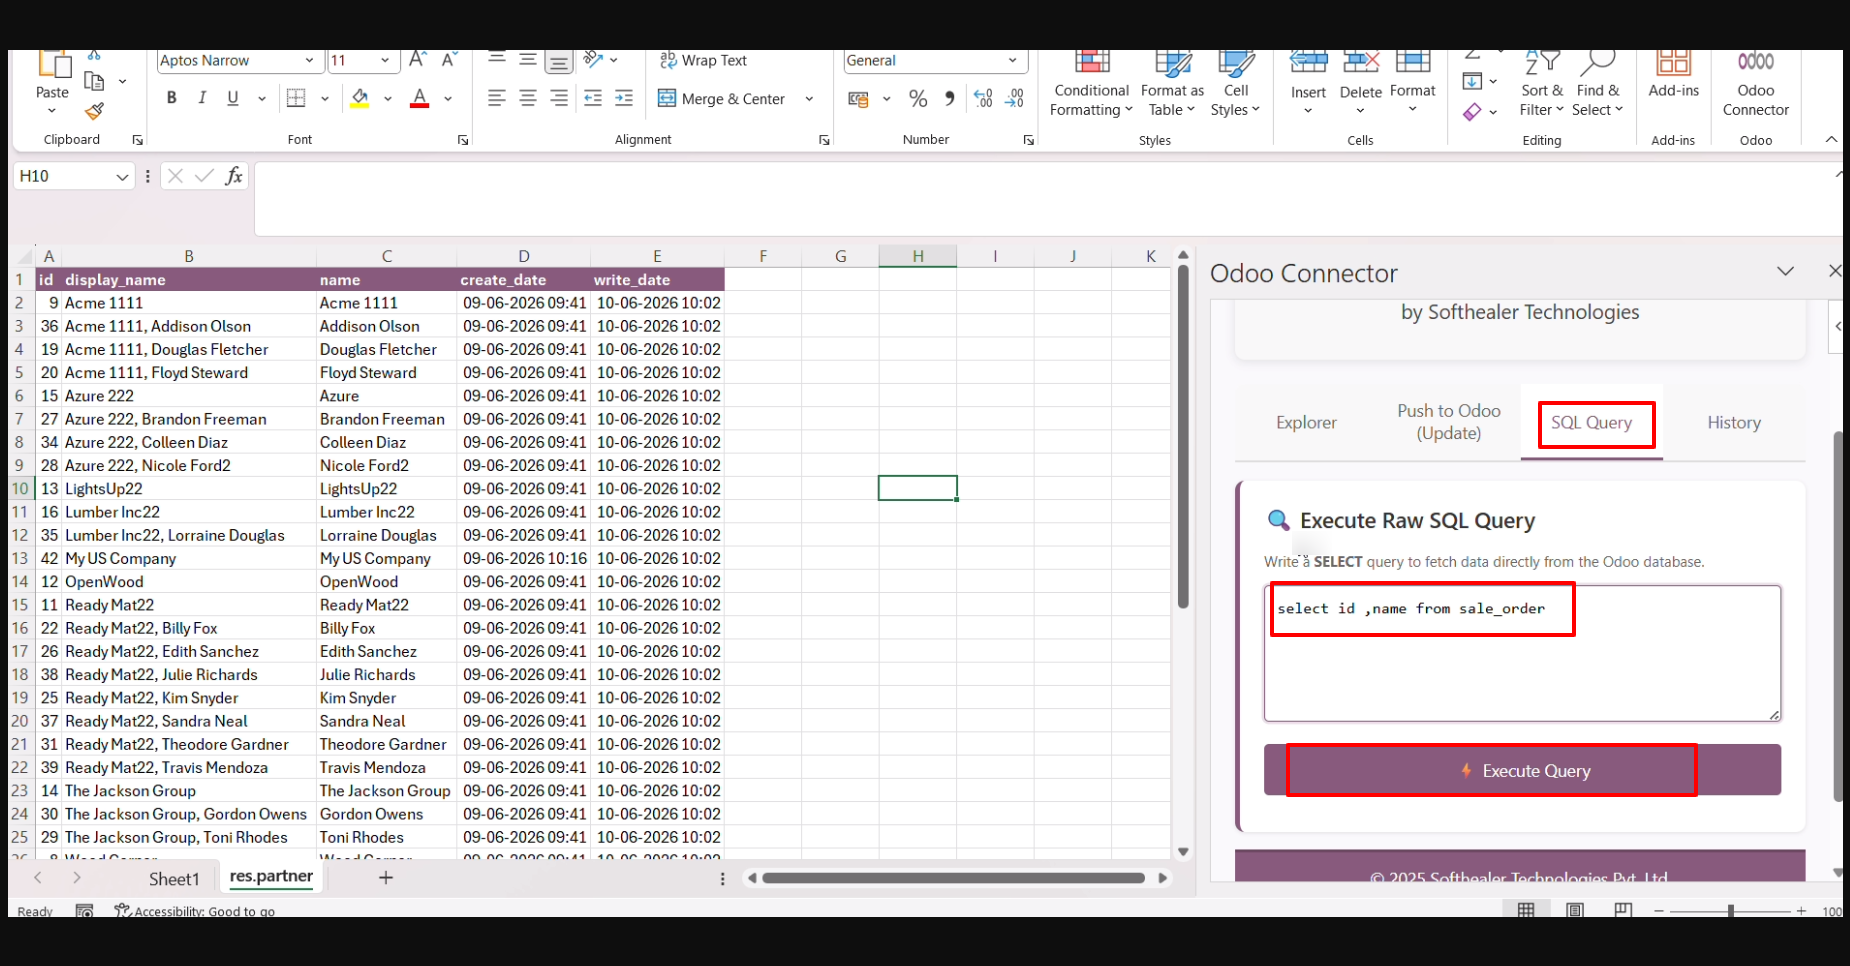
Add an SQL query in the SQL Query field and click the Execute Query button to retrieve the requested data from the database.
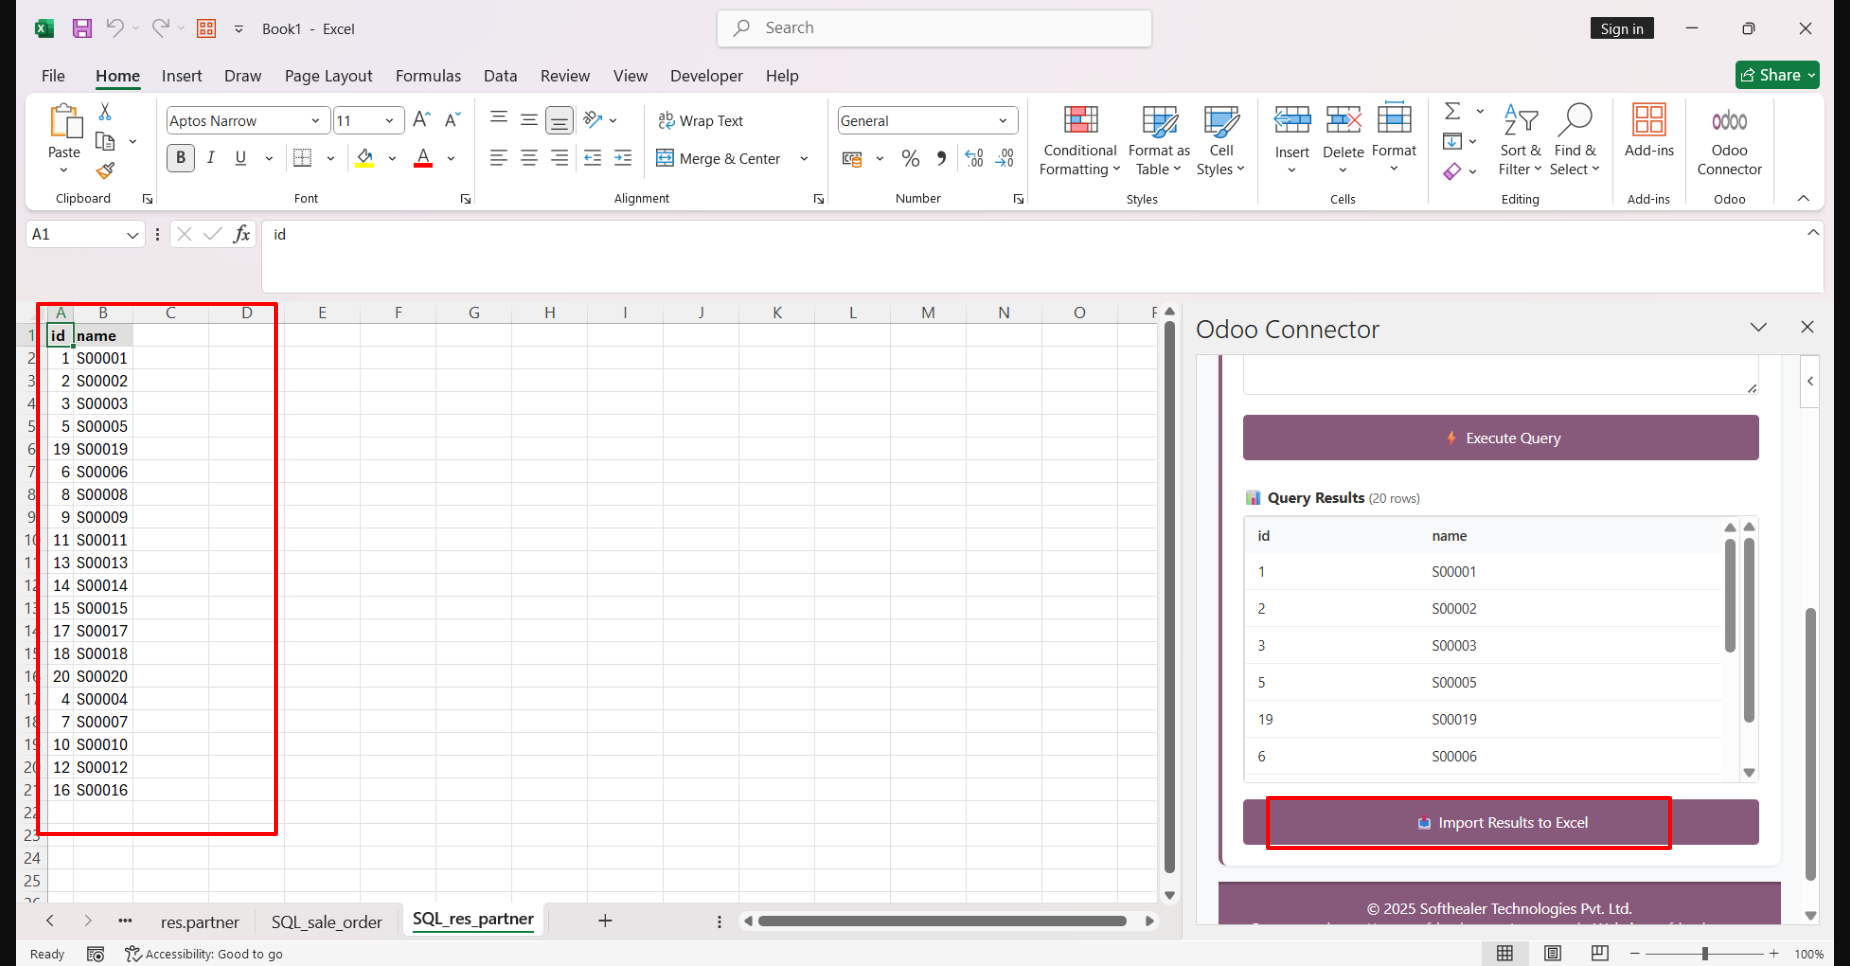
The query results will be displayed for preview. Click the Import Results to Excel button to import the retrieved data into the Excel worksheet.
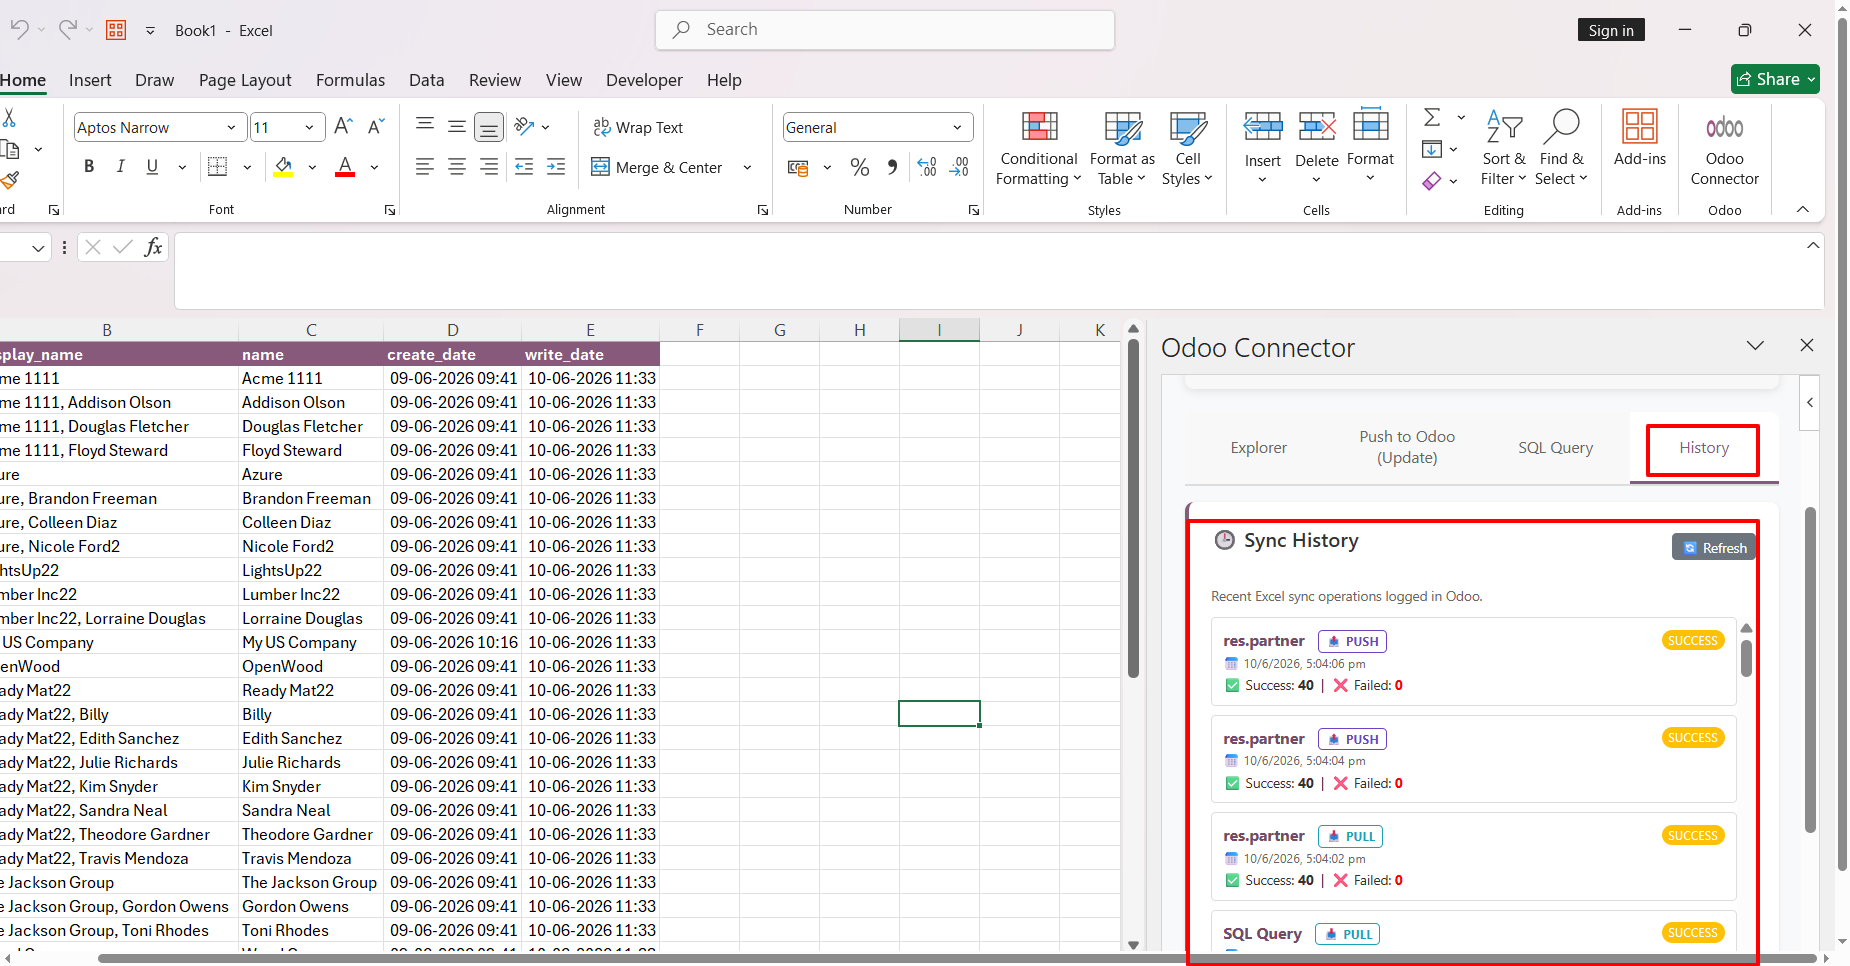
The Sync History is also available in Excel, allowing users to view the status and details of previous synchronization activities.
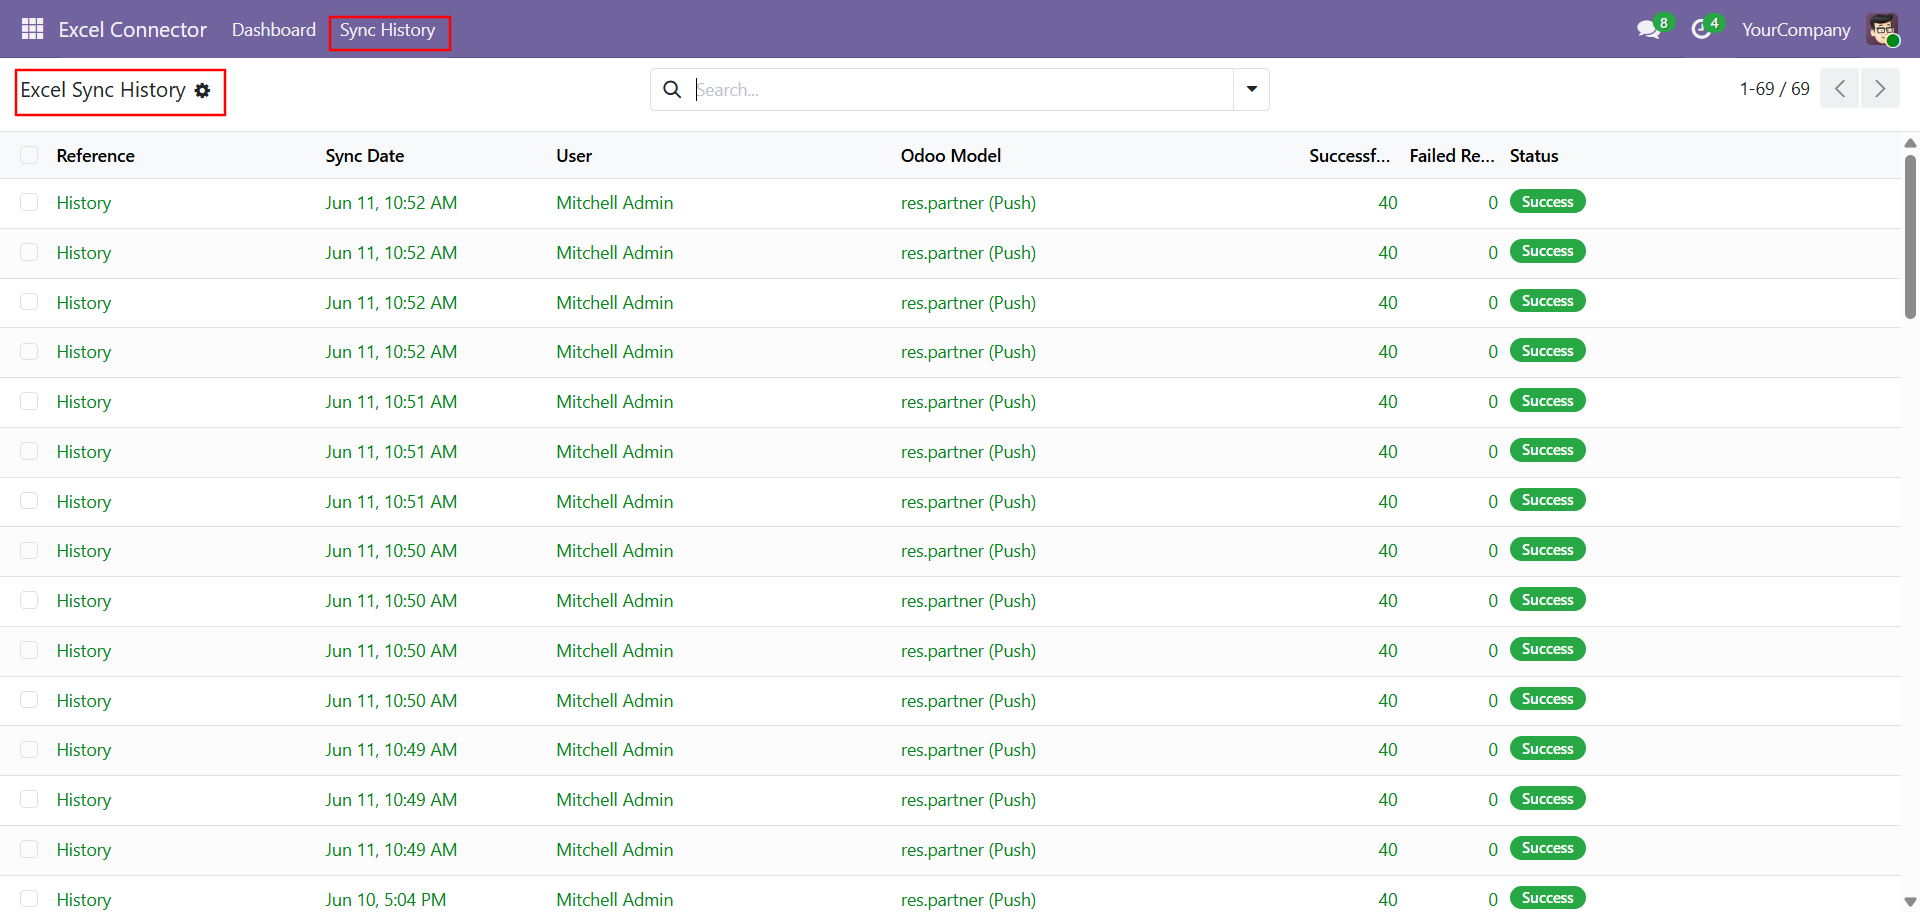
The Sync History is also available in Odoo, allowing users to view the status, timestamp, and details of all synchronization activities.
The Excel Connector Dashboard displays Total Sync, Total Successful Syncs and Total Failed Syncs count, along with Recent Sync Log History and Top Synced Models for quick monitoring of synchronization activities.
Version 18.0.2.0.0 | Released on : 02nd July 2026
Version 18.0.1.0.0 | Released on : 16th December 2025
- Yes, this app works perfectly with Odoo Enterprise (Odoo.sh & Premise) as well as Community.
- No, this application is not compatible with odoo.com(odoo saas/Odoo Online)
- Yes, to test this module, please contact us at sales@softhealer.com.
- Please contact us at sales@softhealer.comto request customization.
- Yes, we provide free lifetime support for the version you purchased.
- Yes, you will receive lifetime free updates for the version of the module you purchased.
- No, there is no need to install any additional libraries.
- Yes, for version 12 and above, you need to purchase the module separately for each version you intend to use.
- No, exchanges or refunds are not allowed. Please make sure to select the correct version before purchasing.
- You can contact us at support@softhealer.com for language translation support. We use Google Translator tools to provide translations in multiple languages, so the accuracy may vary. We welcome your suggestions to help improve translations.
Discover Our Latest Apps