
All In One Basic Import - Partner, Product, Sales, Purchase, Accounts, Inventory

This module is useful to import data from CSV/Excel file. You can import custom fields from CSV or Excel.
Related Modules
Features
- Easy to import custom fields.
- Easy to import custom fields from CSV or Excel.
- Easy to import Text, Integer, Float, Character, Boolean, Selection, Many2one, Many2many custom fields.
- The separate group assigns to for mass import buttons view.
- You can do mass import from one view.
- The separate group assigns to for mass import buttons view.
- Import Data Using CSV/Excel.
- Skip error data and notify row no at the end of import.
- The separate group assigns to for mass import buttons view.
- Very well formated Excel and CSV files.
- Well, documentation and Videos.
- All-time support.
- No special configuration required, install it, use it.
- This module saves your important time.
- It reduces human efforts.
-
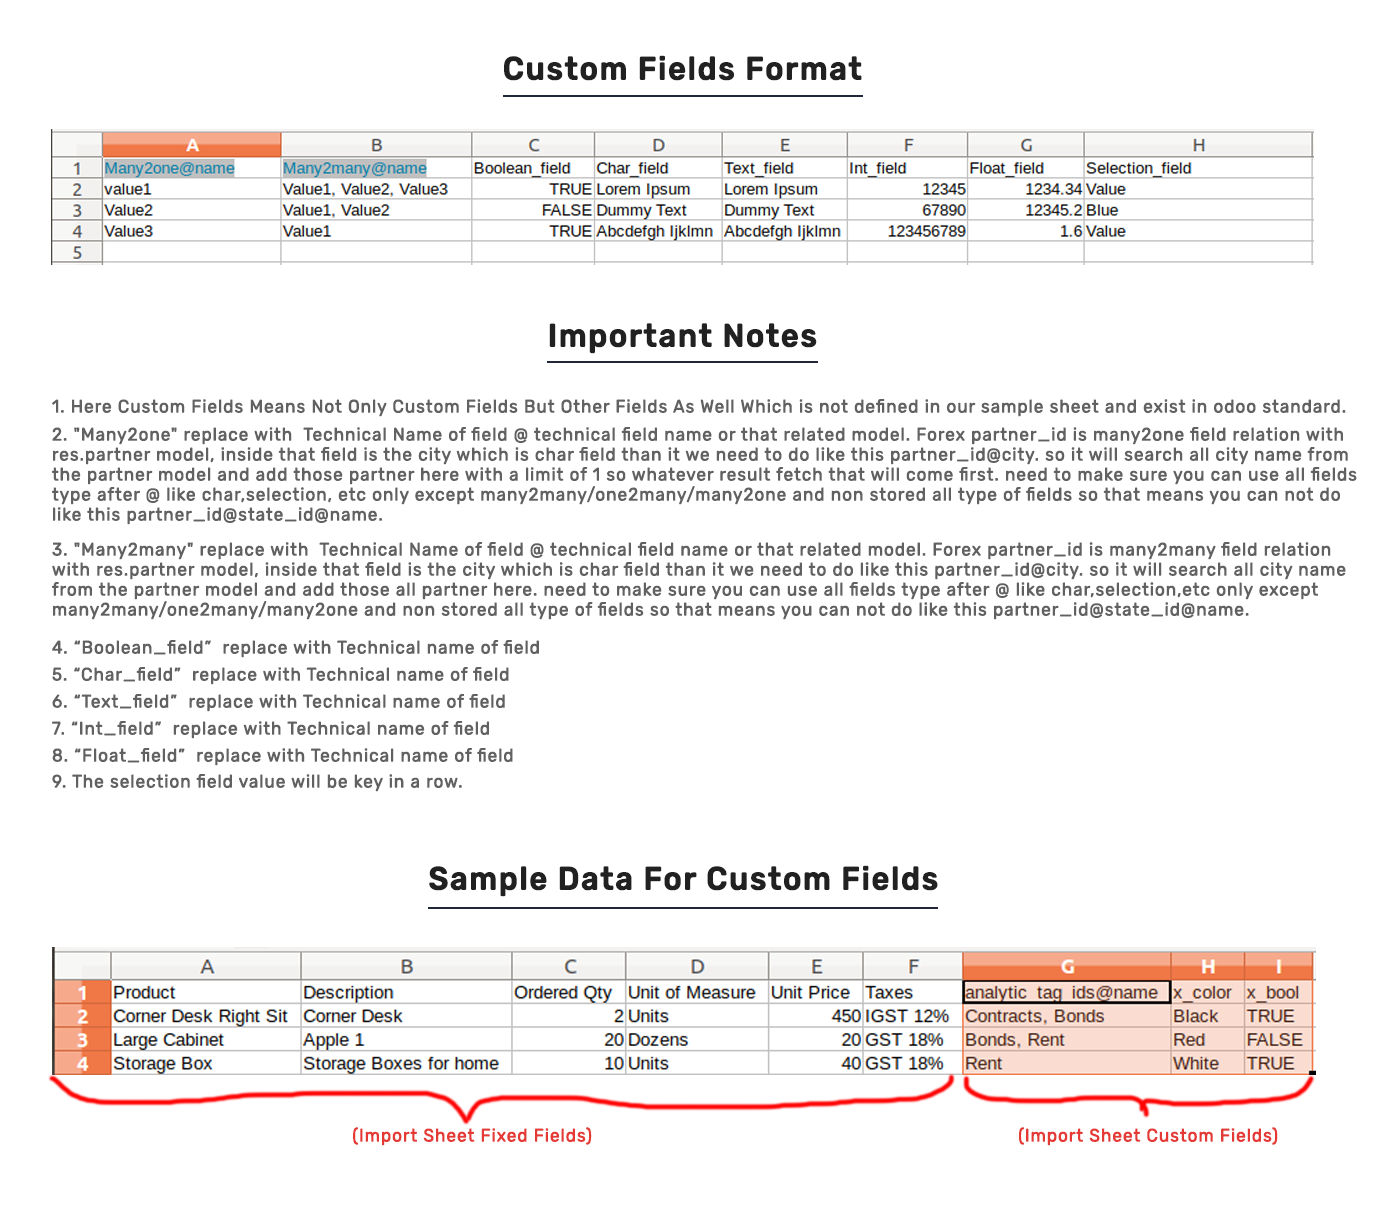
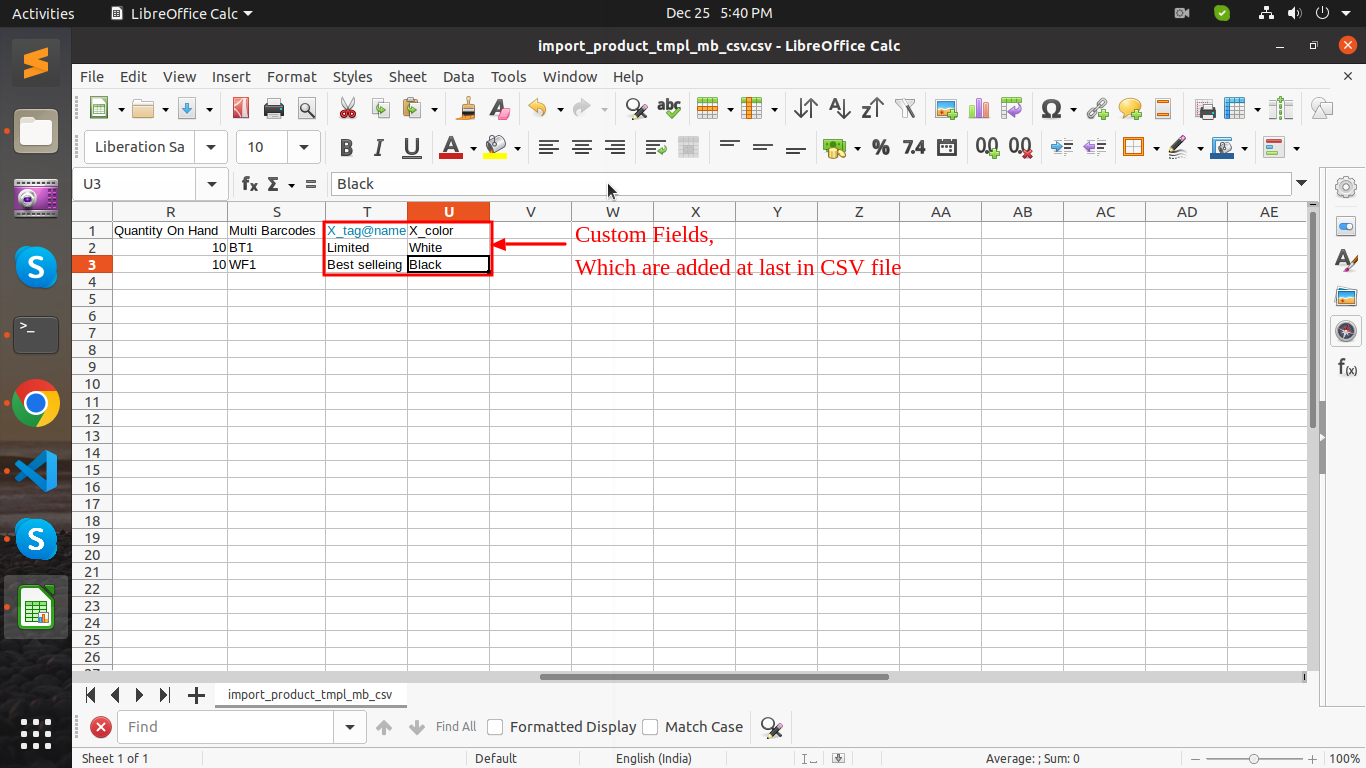
Custom fields
added into,
import product
template, import
invoice lines, import
customers/suppliers,
import variant, import
purchase order lines,
import variant, import
sale order lines from
CSV/Excel
modules.
Important Notes
- Don't remove the column from the sample sheet given, you can leave an empty column if the column is not the required type. You can see the table above for that.
- Don't change the sample sheet column sequence.
-
Don't use excel if you
don't know the column
formatting part which
is given in the sample
sheet. Use CSV in this
case. If you want to use excel and want to clear the format then please check this video.
- Add Custom Fields or Non-Exist Standard odoo fields at the end, For adding those fields pls check the custom fields section.
You can import all the things at one place. You can do mass import from one view.

The separate group assigns to for mass import buttons view.

Features
- Easy to import lot/serial picking from CSV/Excel file.
- You can transfer a lot/serial pickings from one to other locations.
- Easy to import custom fields.
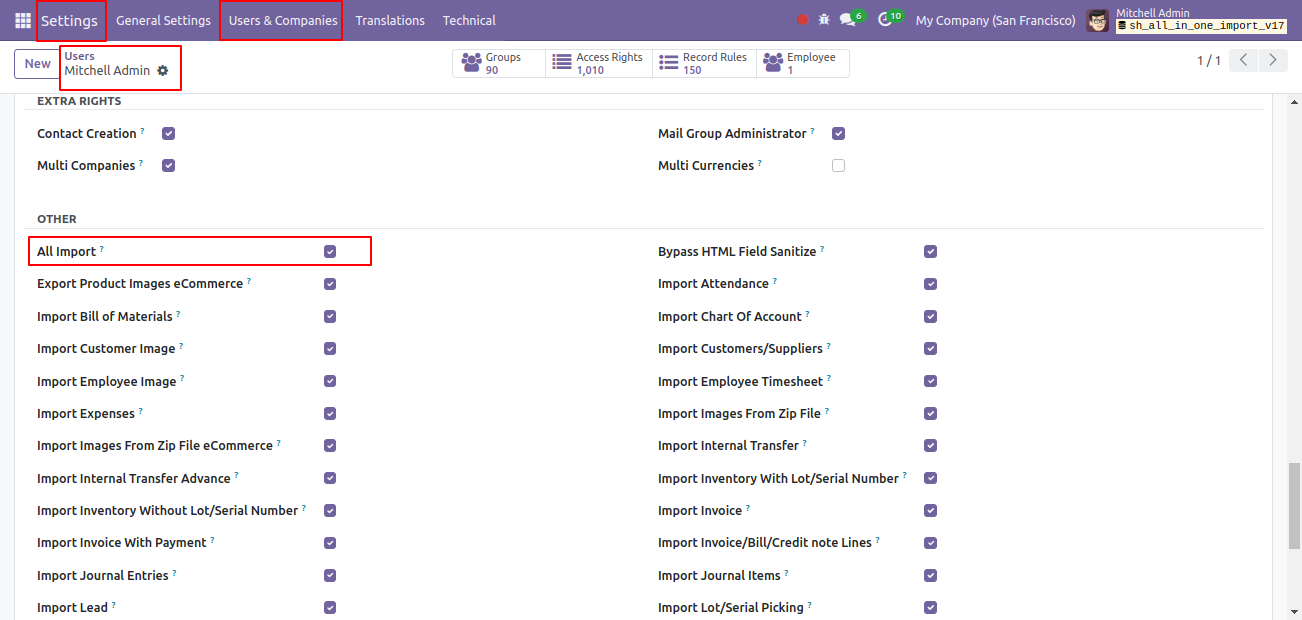
Tick the group "Imports Lot/Serial Picking".

Select "By Lots" in PS47 cable.
The PS47 cable on hand qty is 0(Zero) now.
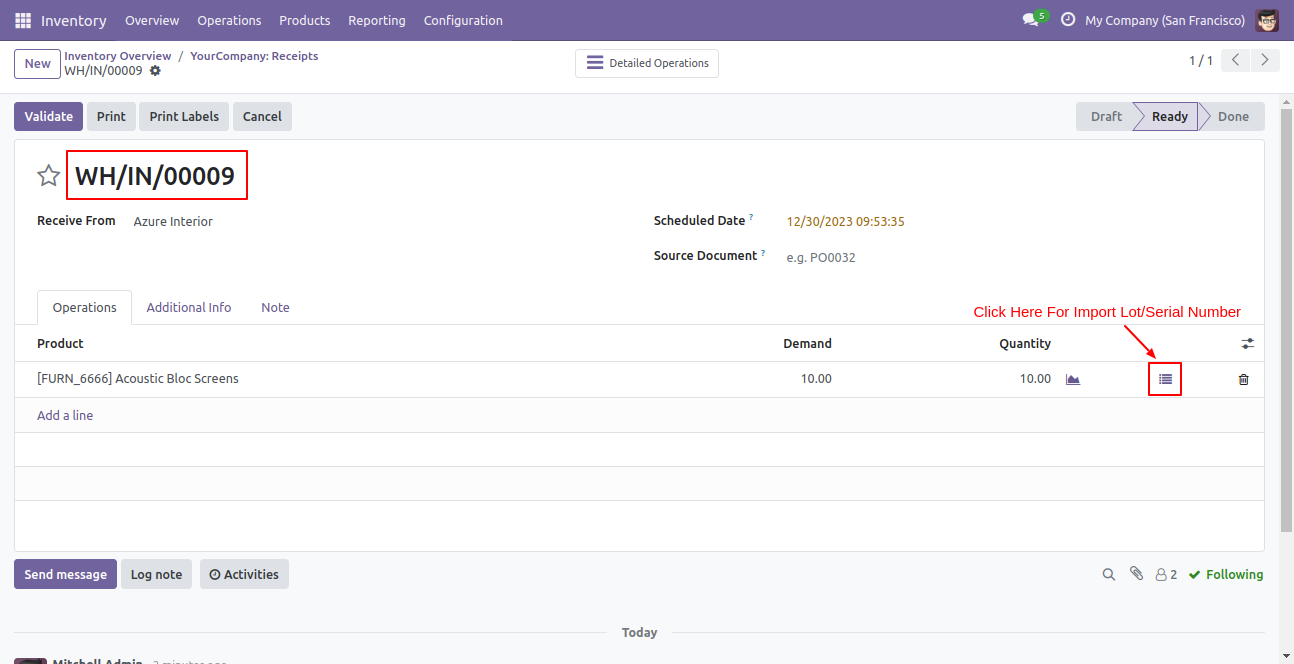
Cable management box demand qty is 10(Ten) and our done qty is 0(Zero). So we import lot/serial using the smart button that button is given besides "Done QTY".
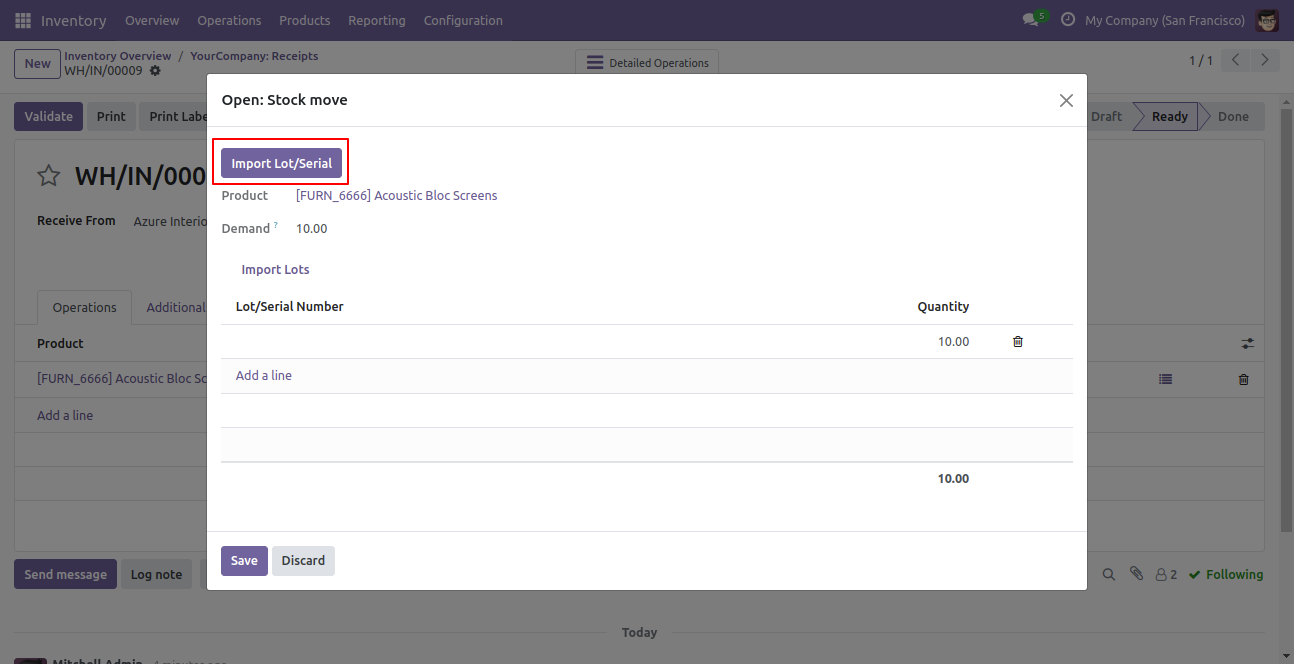
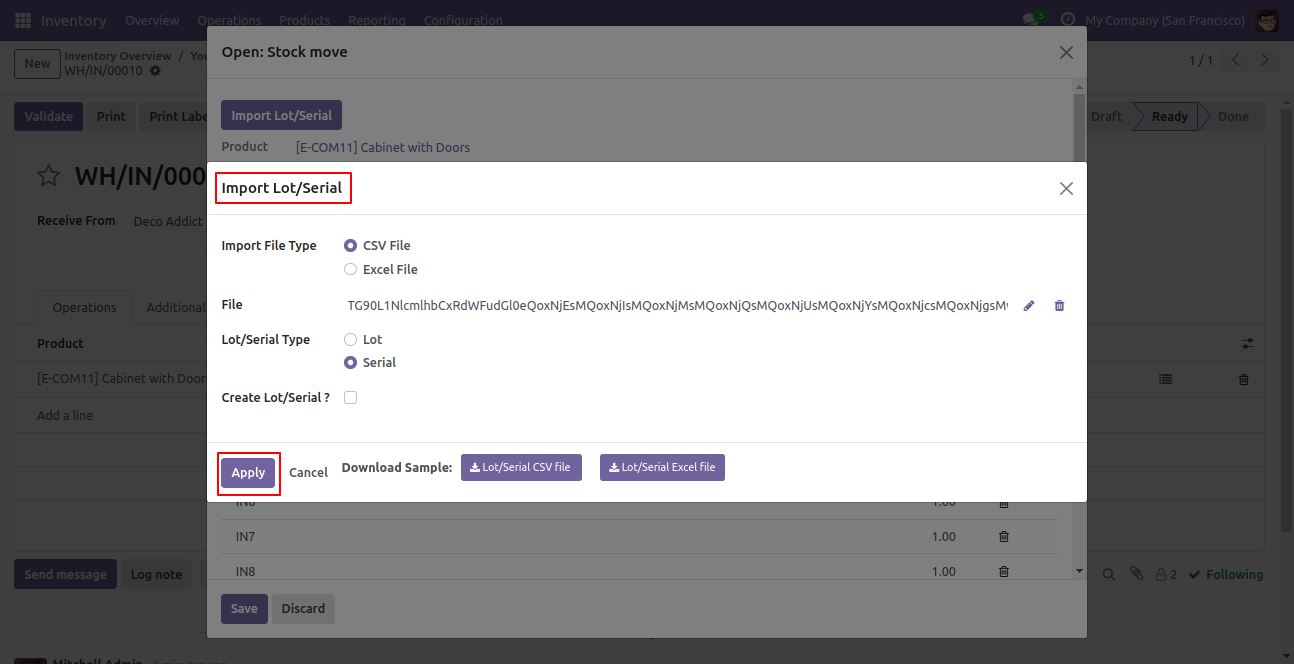
After pressing that button this wizard opens, press the "Import Lot/Serial" button.
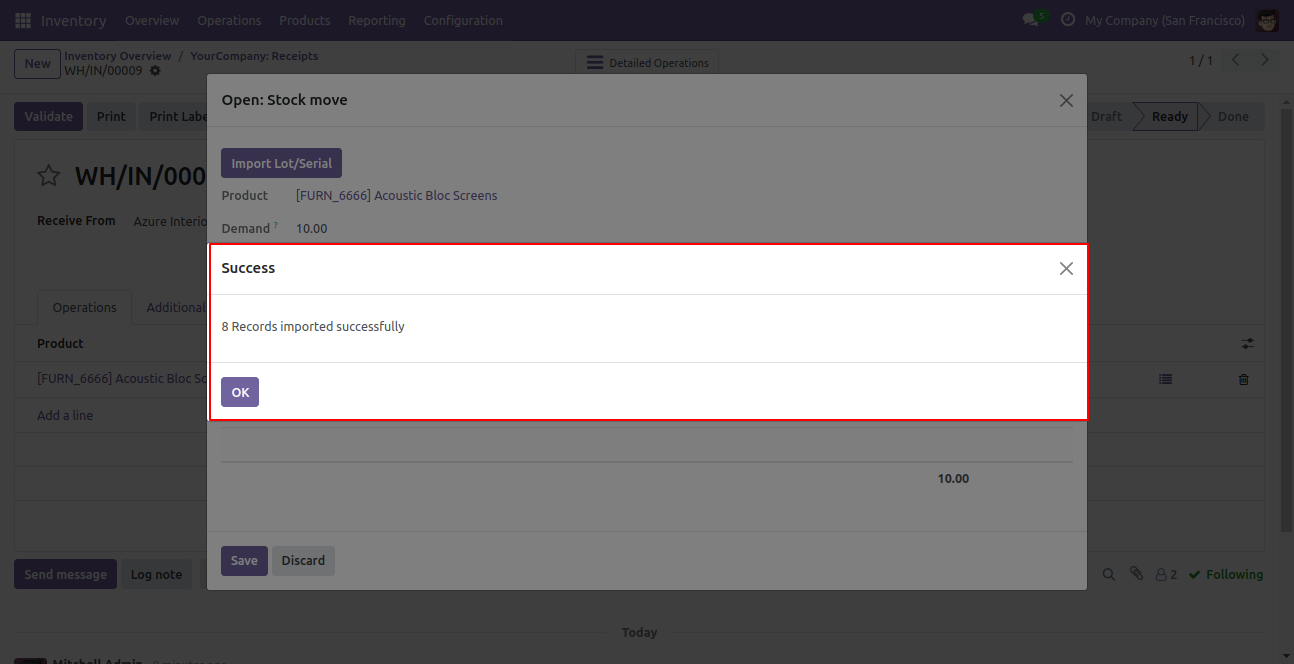
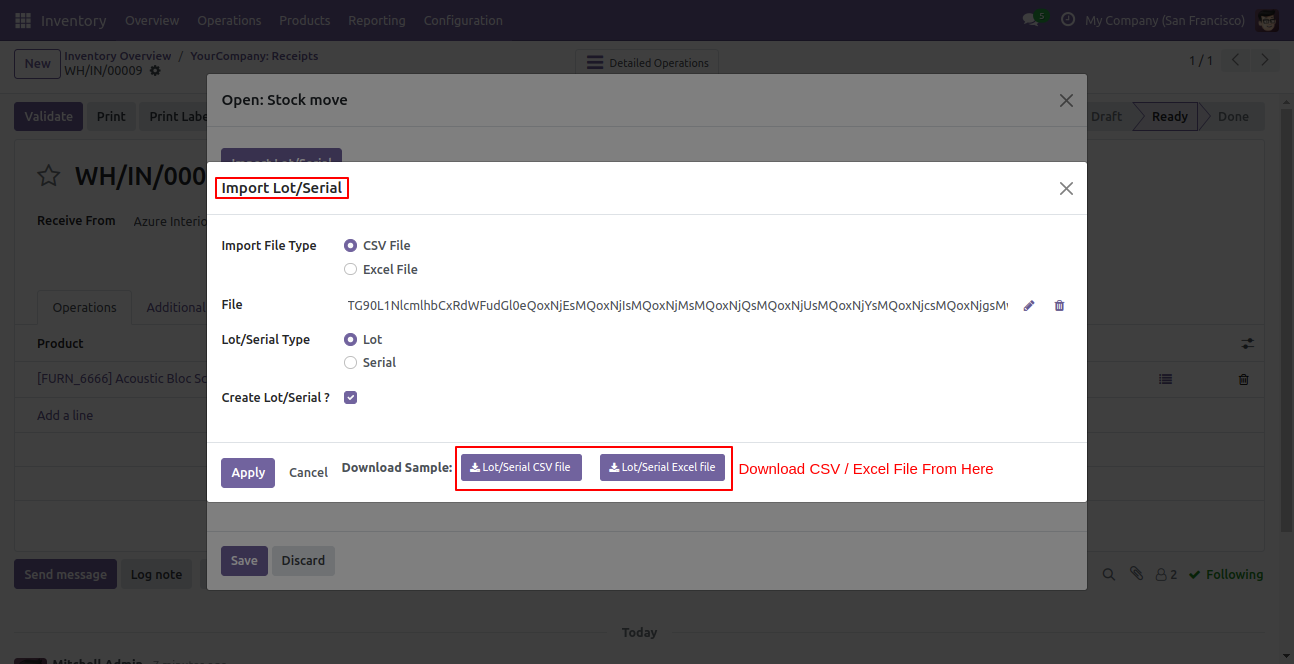
Select the import file type, choose the file type & select lot/serial type, and press the "Apply" button.

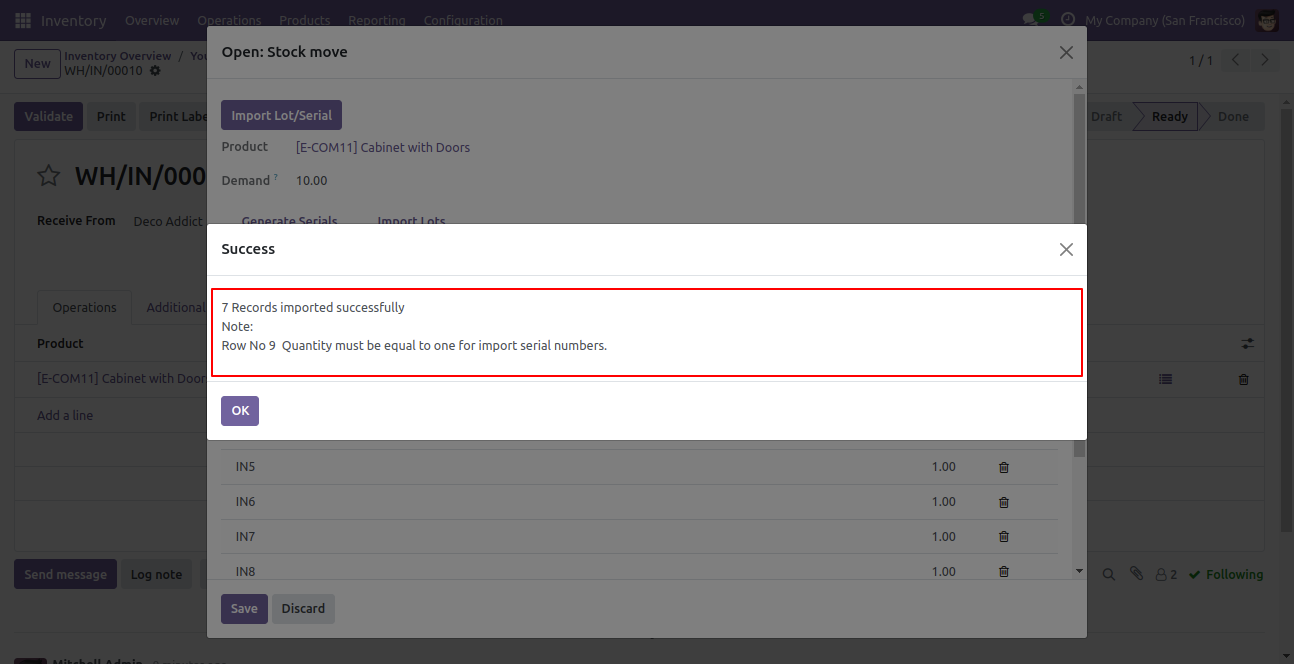
Success message looks like below.

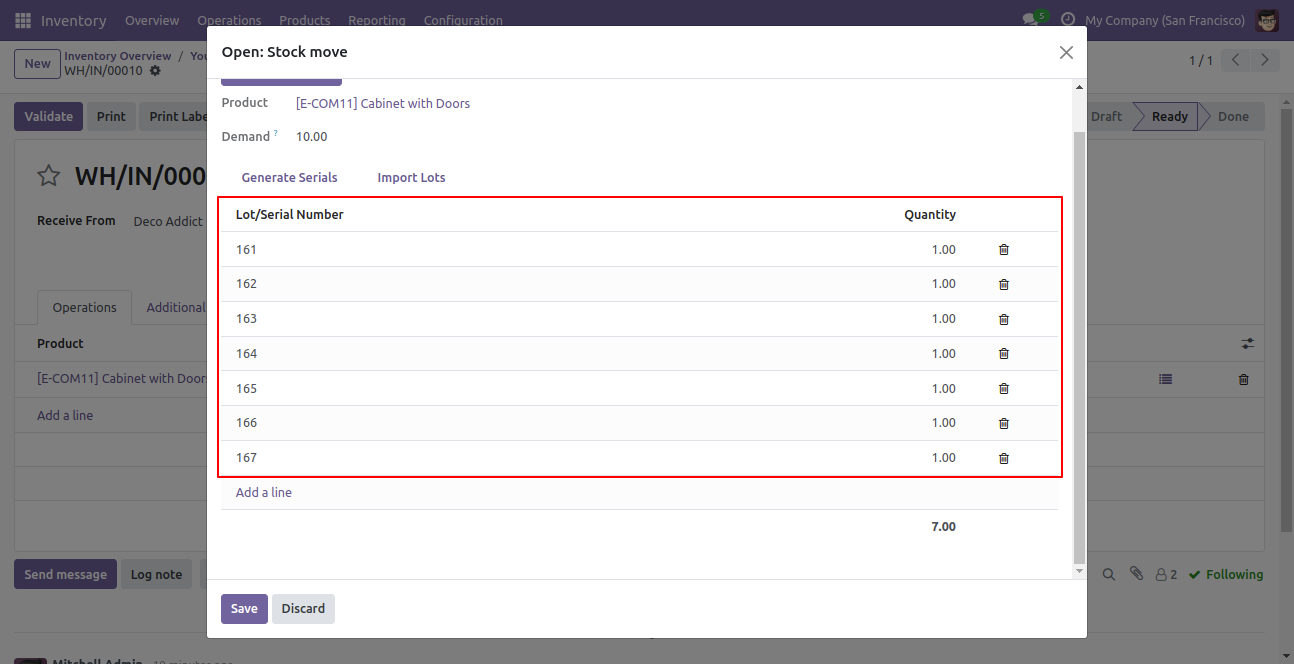
Stock move pop-up.
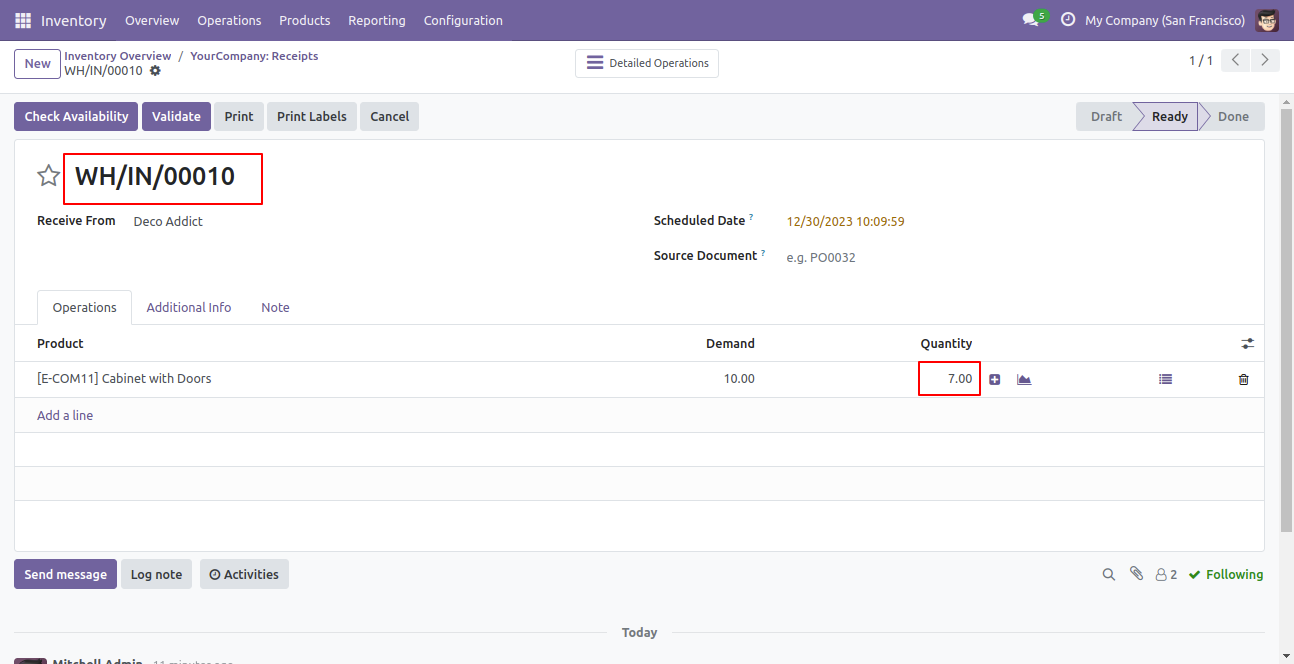
Now we press the 'Validate' button and our stage is changed from ready to done.
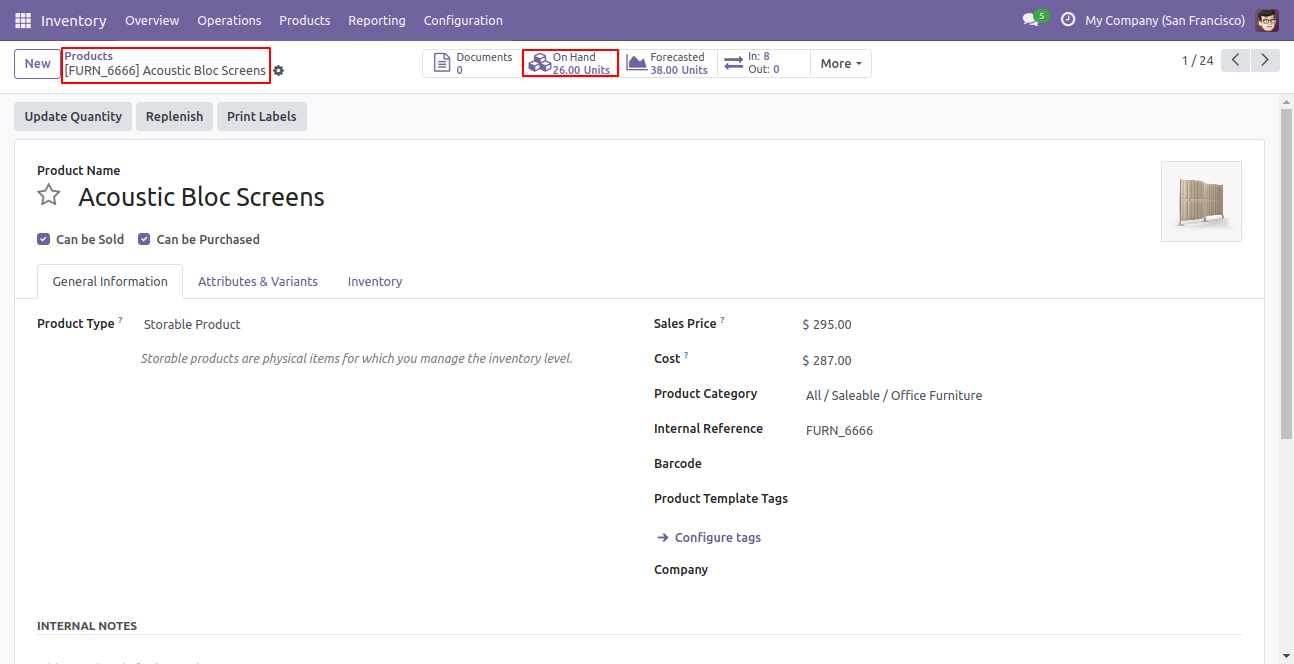
Now the Acoustic Bloc Screens product on hand qty is changed.
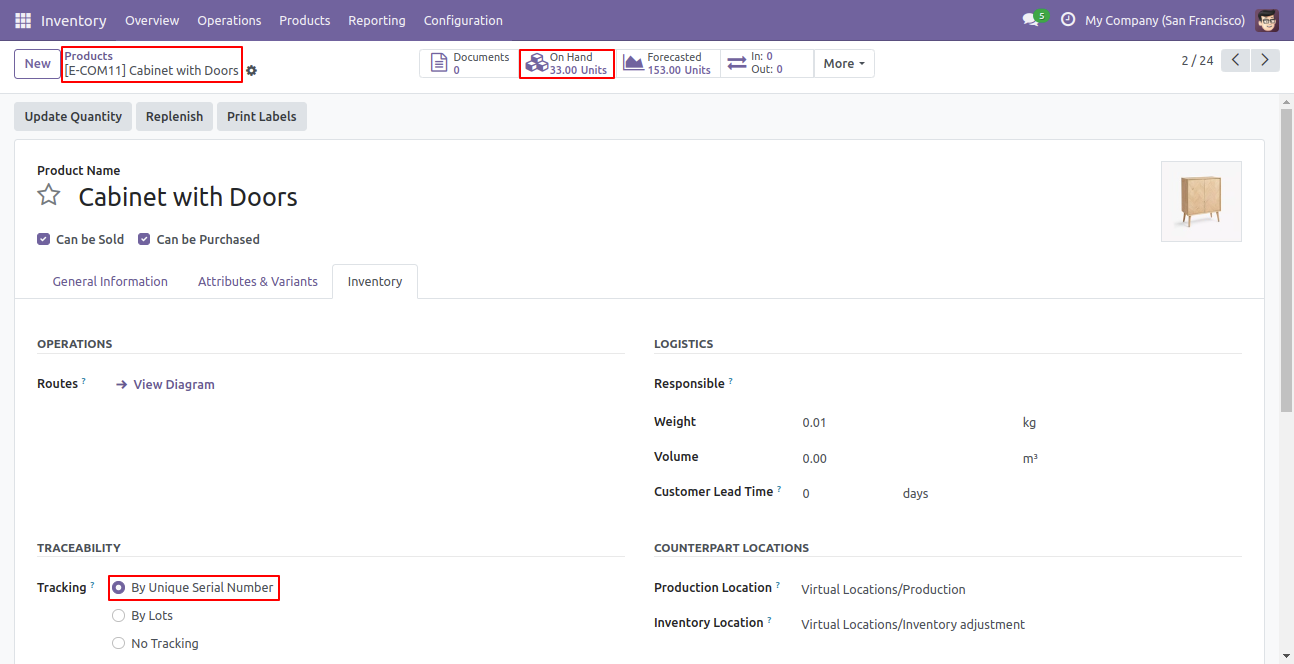
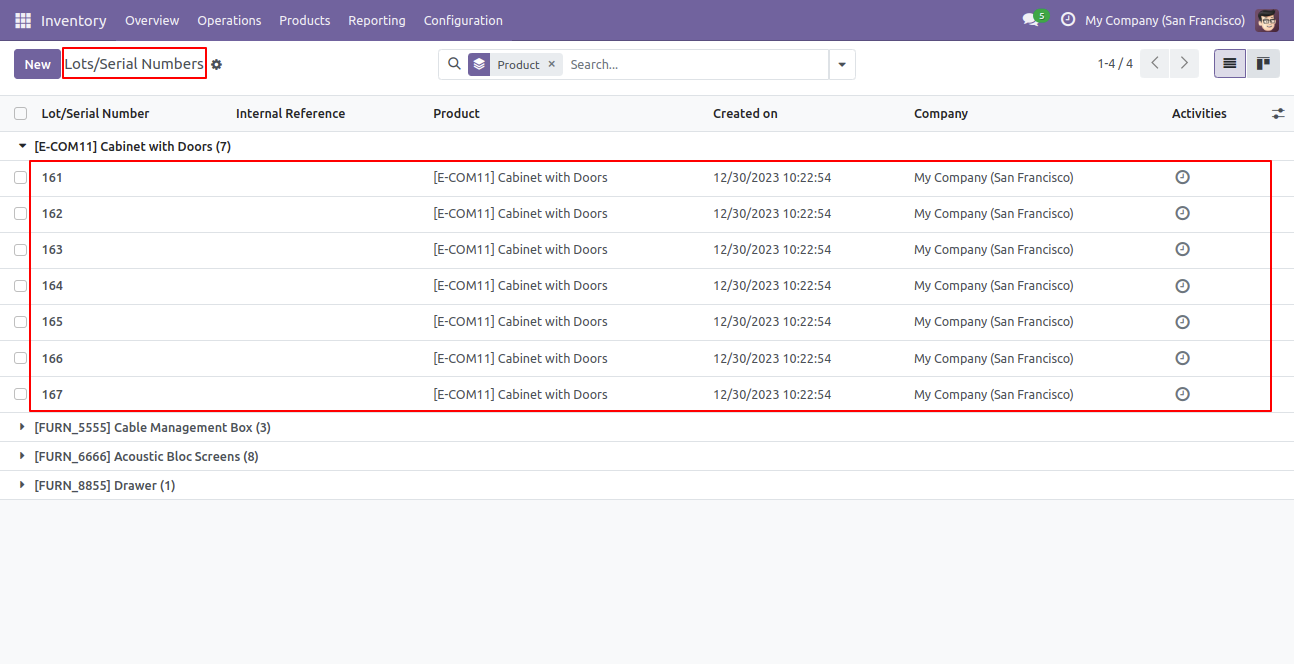
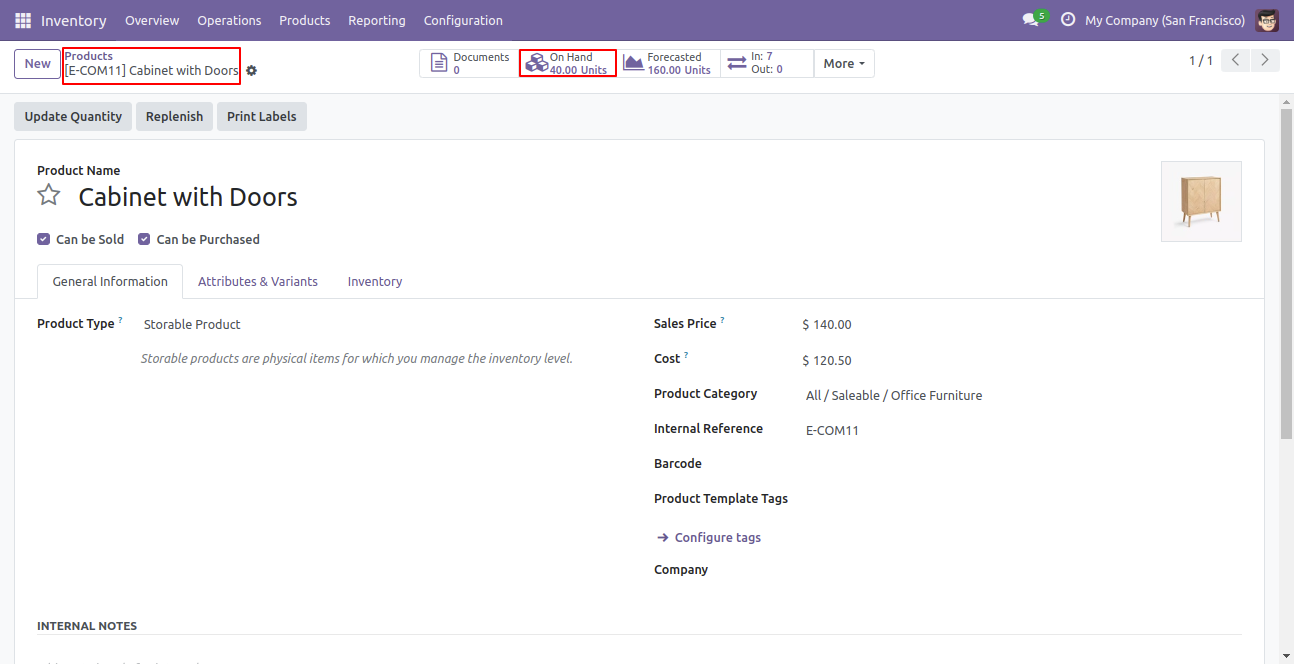
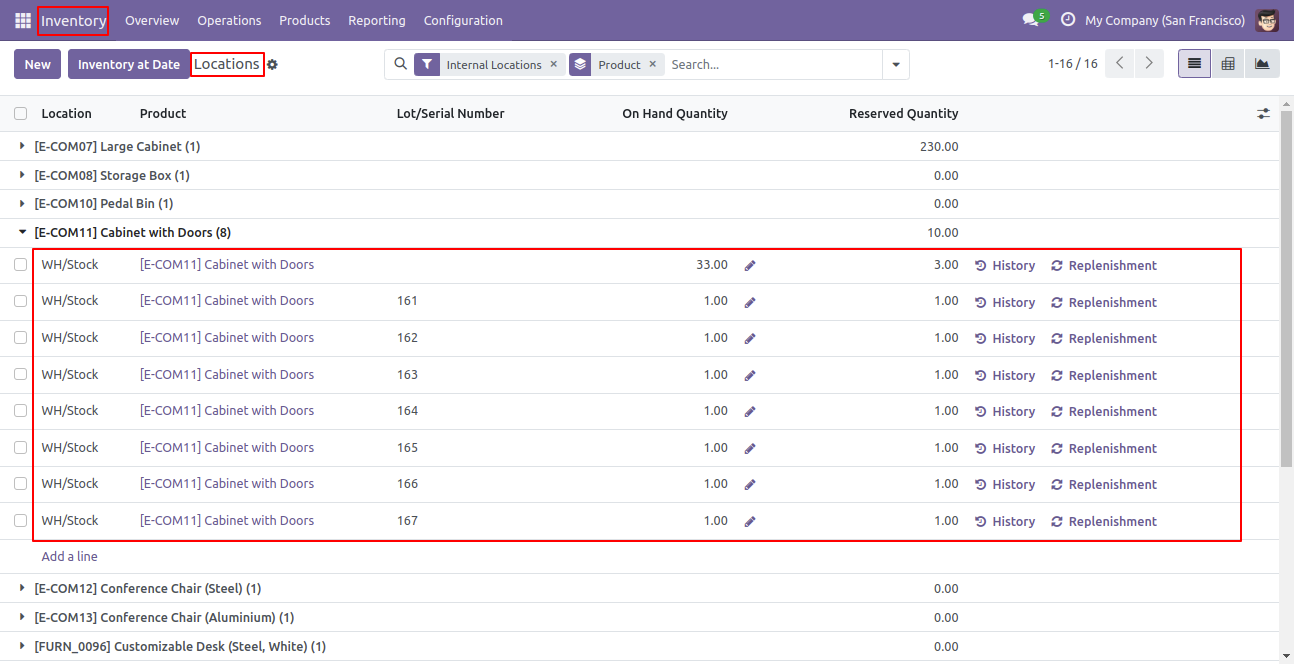
Select 'By Unique Serial Number' in Cabinet with doors product and the on-hand qty is 0(Zero) now.
Detailed operations with the imported lot/serial picking.
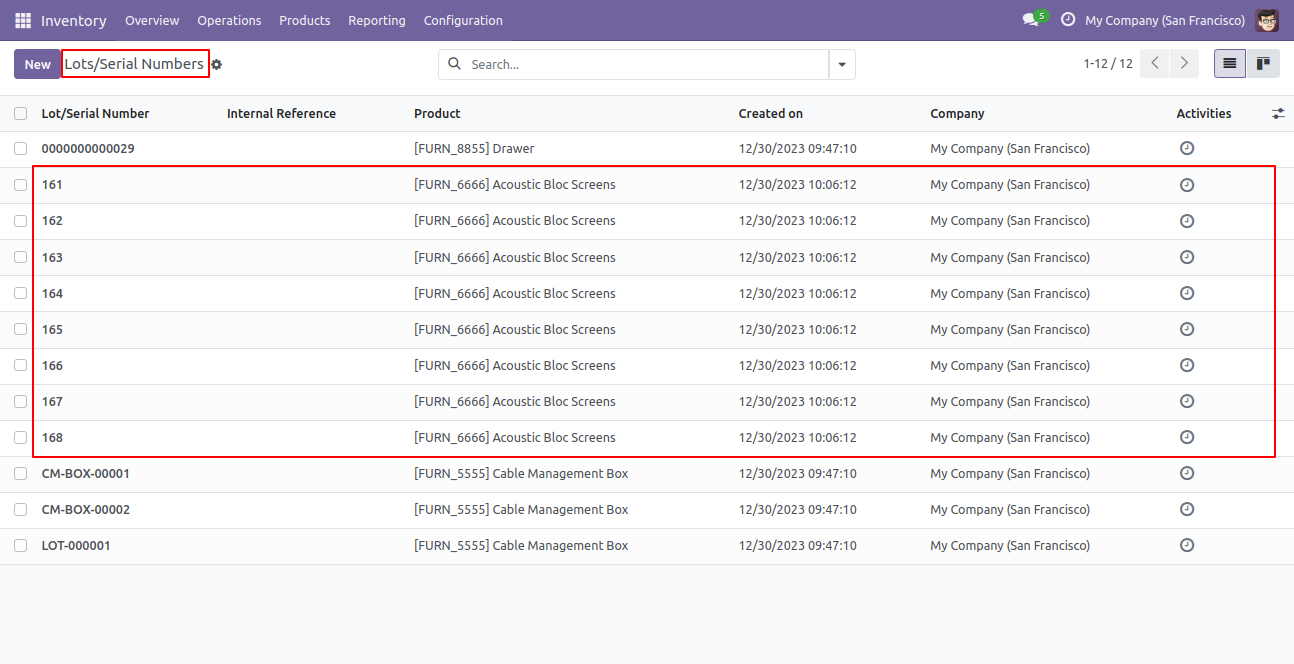
Lot/Serial Numbers list view with imported lot/serial picking.
Now the Hard Disk on hand qty is changed.
Select source and destination location, our Hard Disk qty demand is 5(five) and done qty is 0(Zero).
Press the "Import Lot/Serial" button to import lot/serial picking..
Select the import file type, choose the file type & select lot/serial type, and press the "Apply" button. When you transfer lot/serial picking, you have the option to create a lot/serial on the destination location.
The 'Detail operations' list view looks like this.

The "Current Stock" list view looks like this.

Your CSV/Excel format looks like below.

Your CSV/Excel format looks like below.

Features
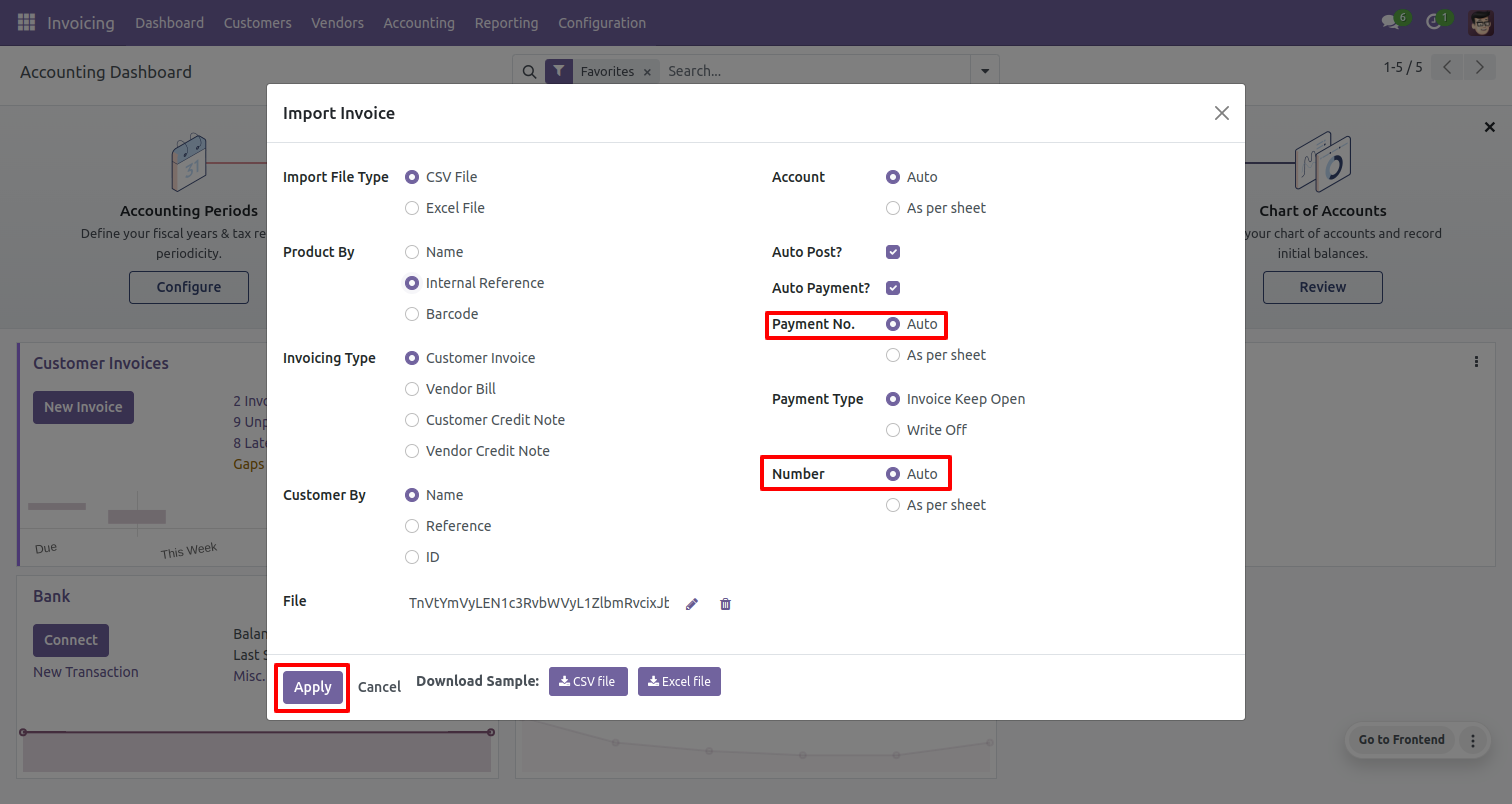
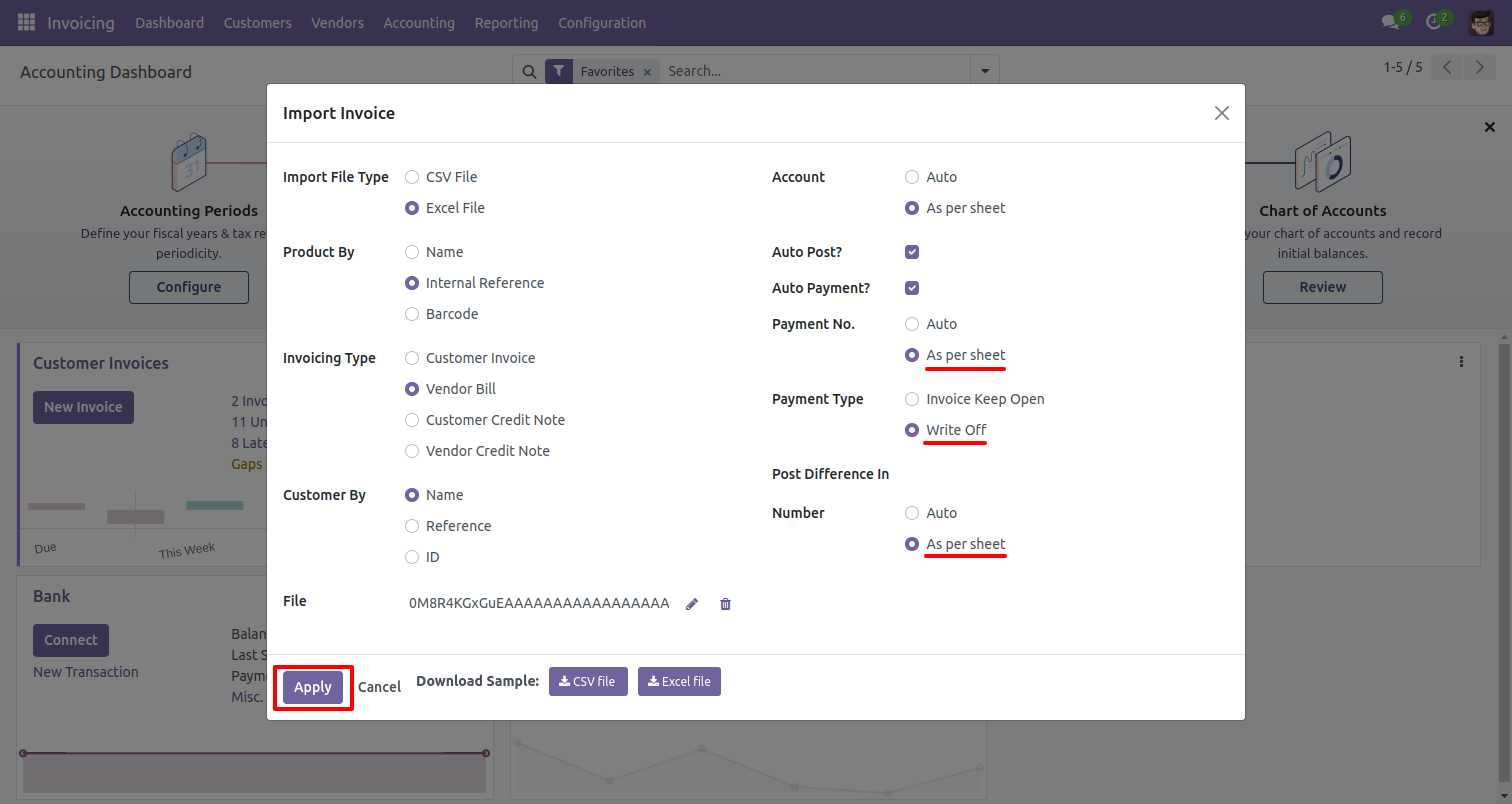
- Easy to import invoices/bills with payment from CSV or Excel file.
- Import product by name, barcode, internal reference.
- You can import invoice with partial payment & fully paid.
- We provide 'Auto Post' and 'auto Payment' option while importing.
- You can download the sample file format.
- Easy to import partner by Name, Reference, Id.
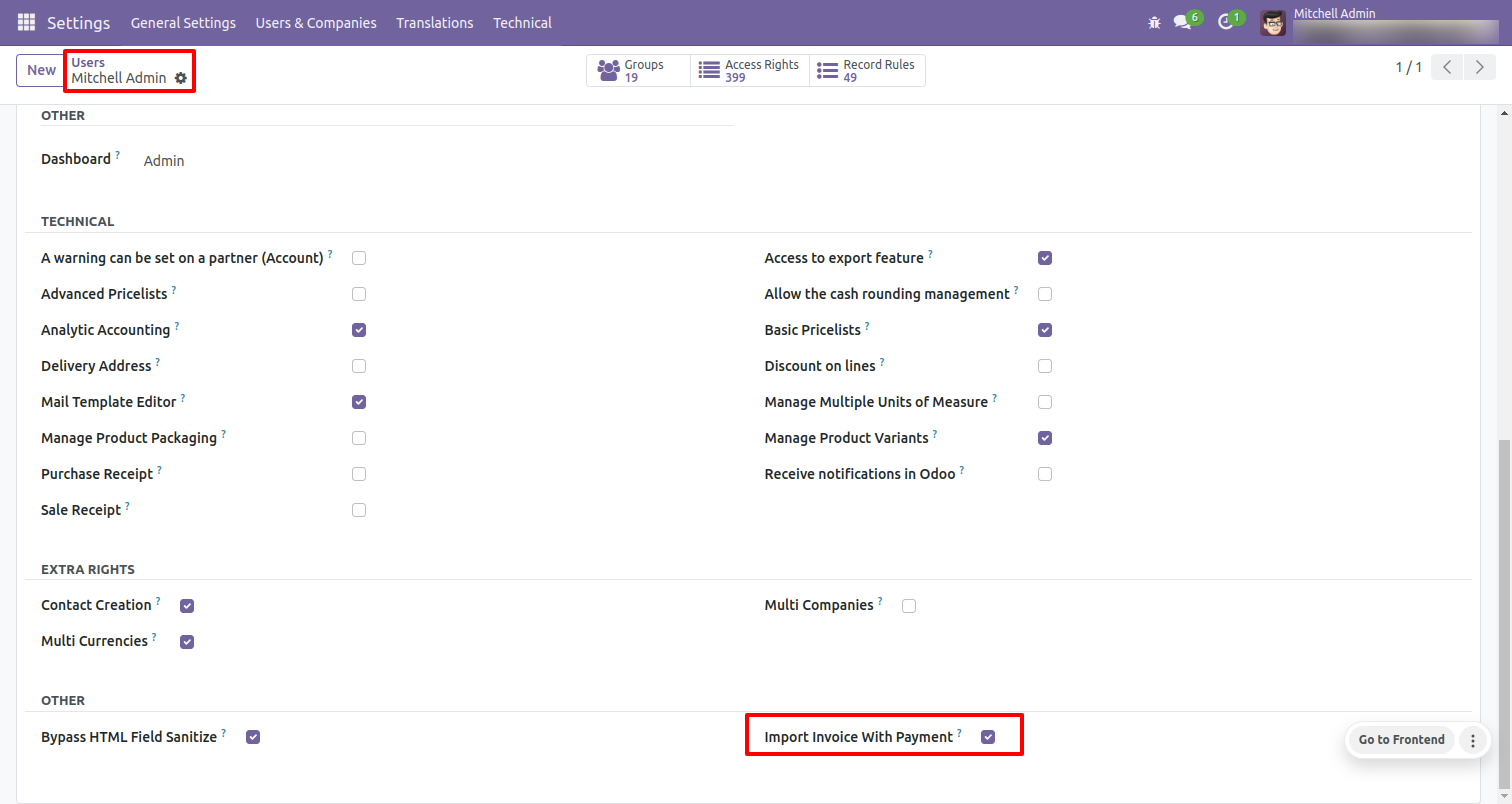
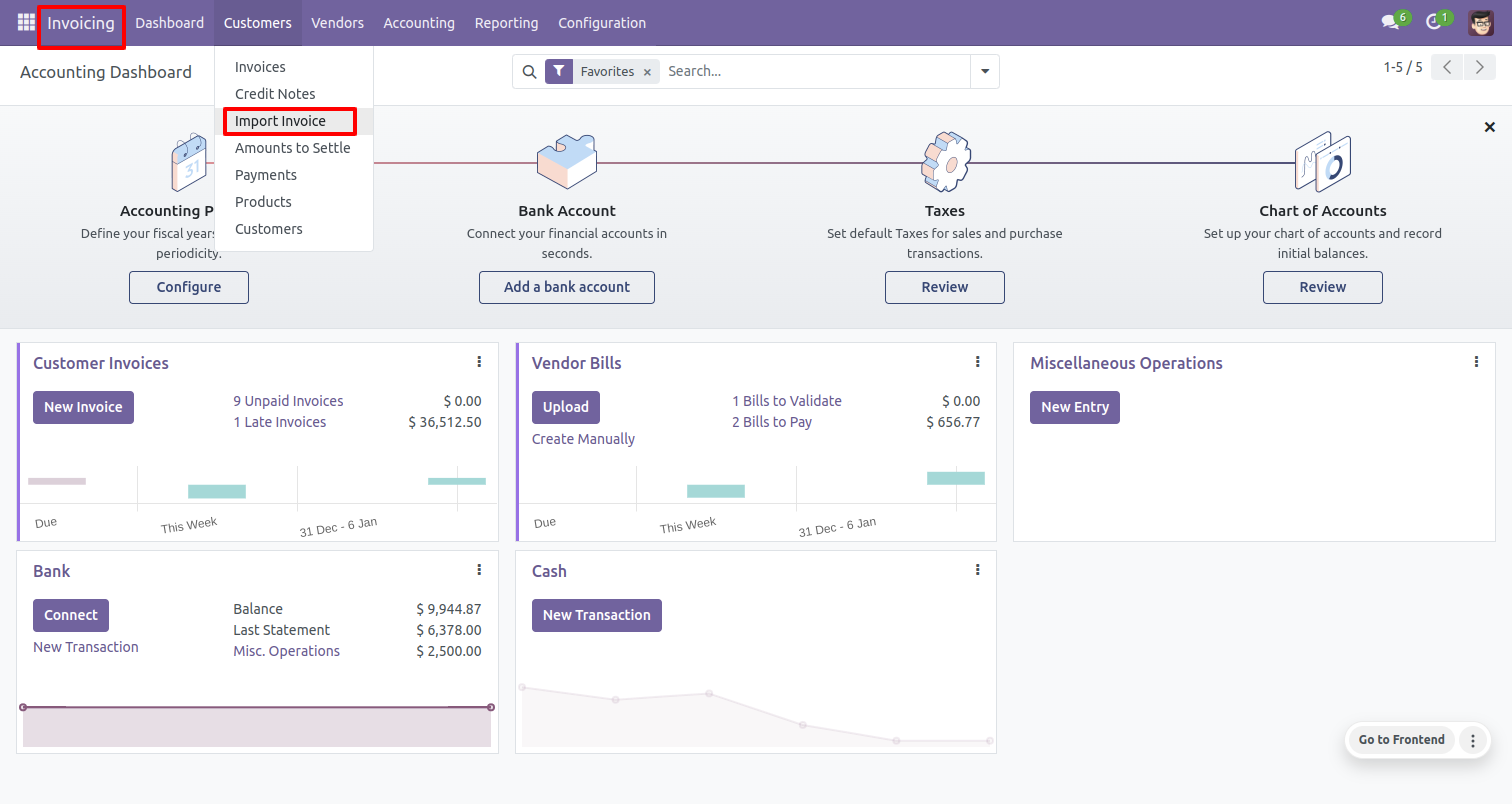
Enable the 'Import Invoice With Payment' group.
Click on the 'Import Invoice With Payment' menu.
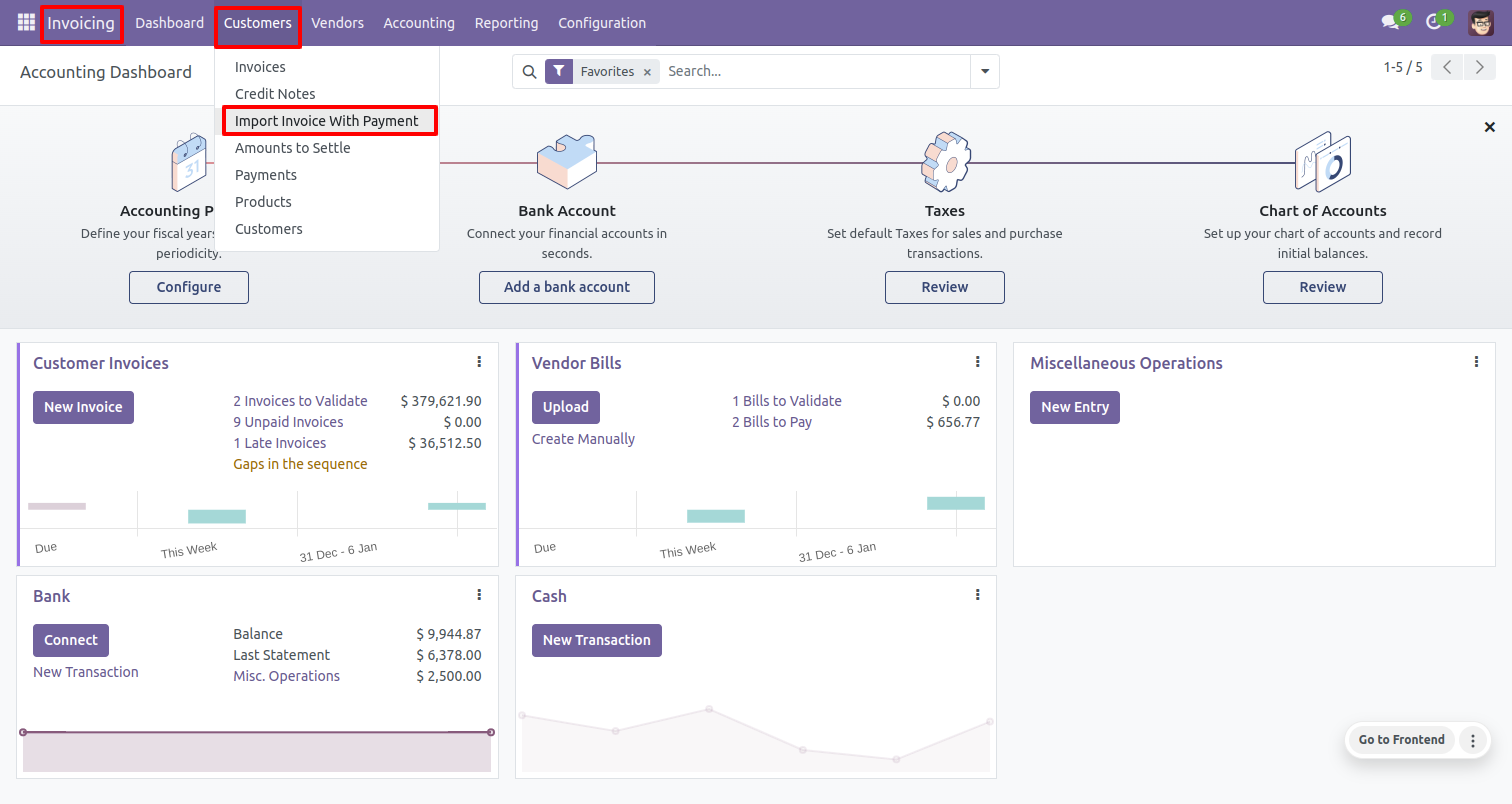
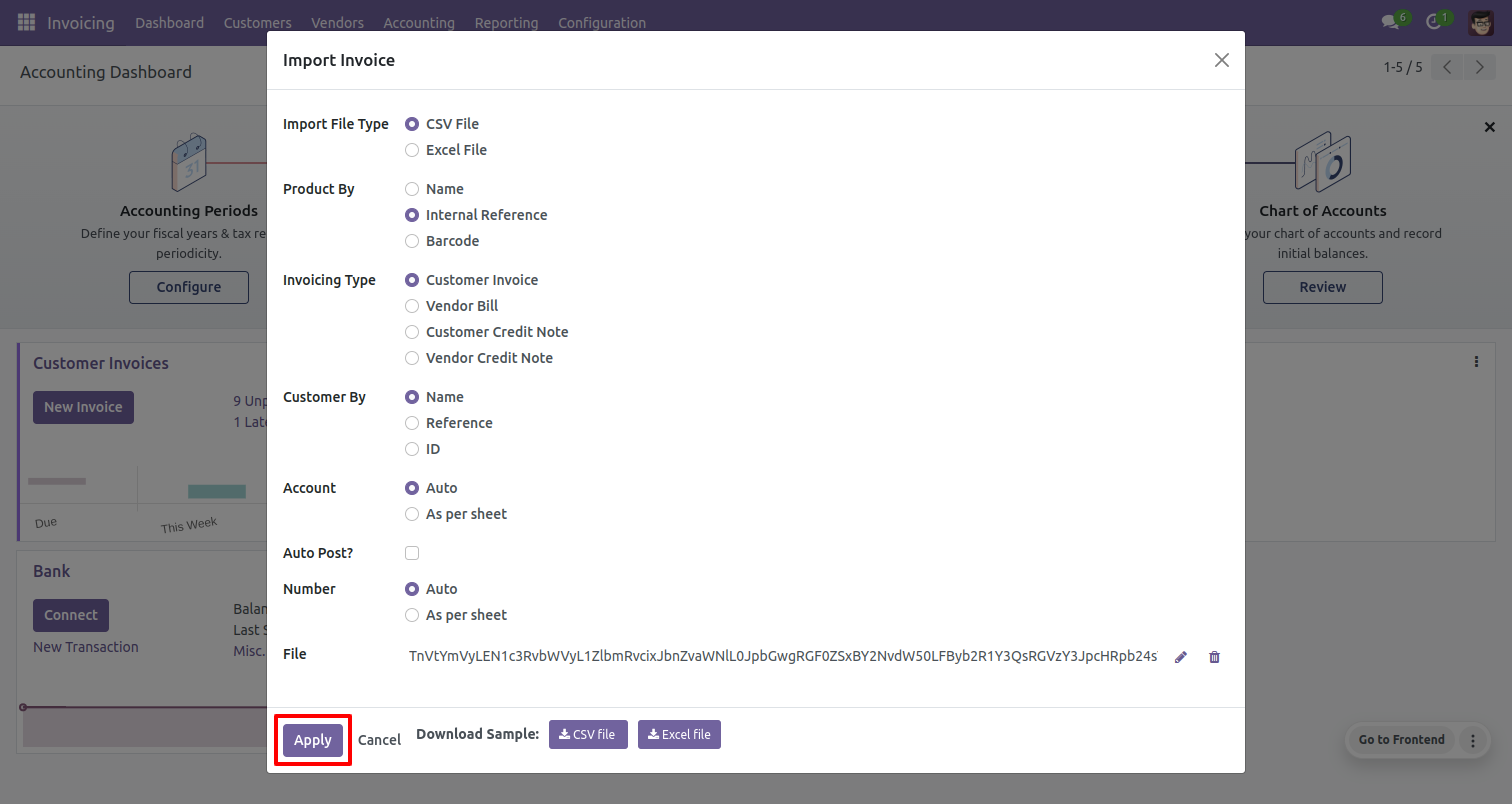
After that, this wizard will open enter details and apply it.
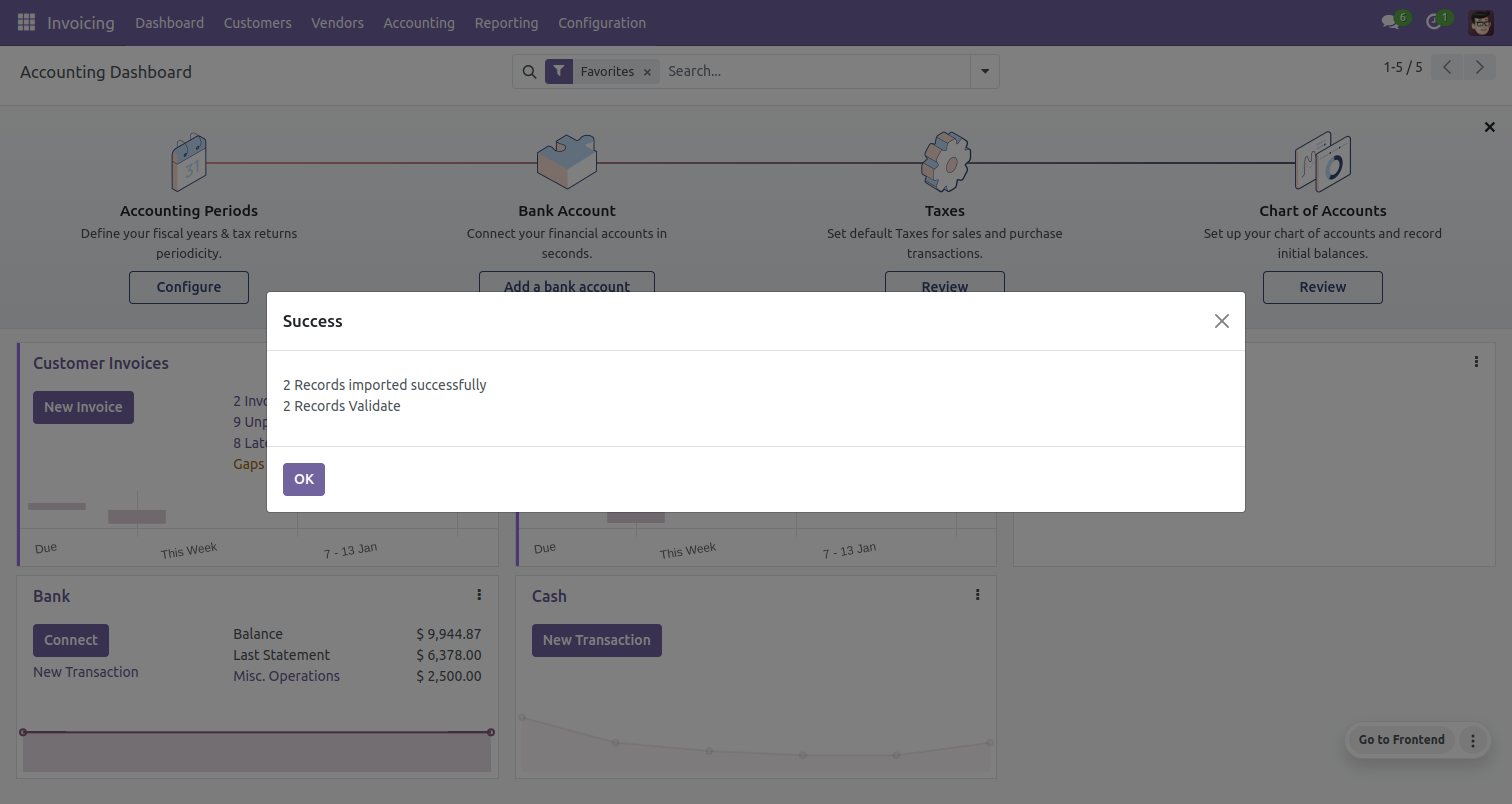
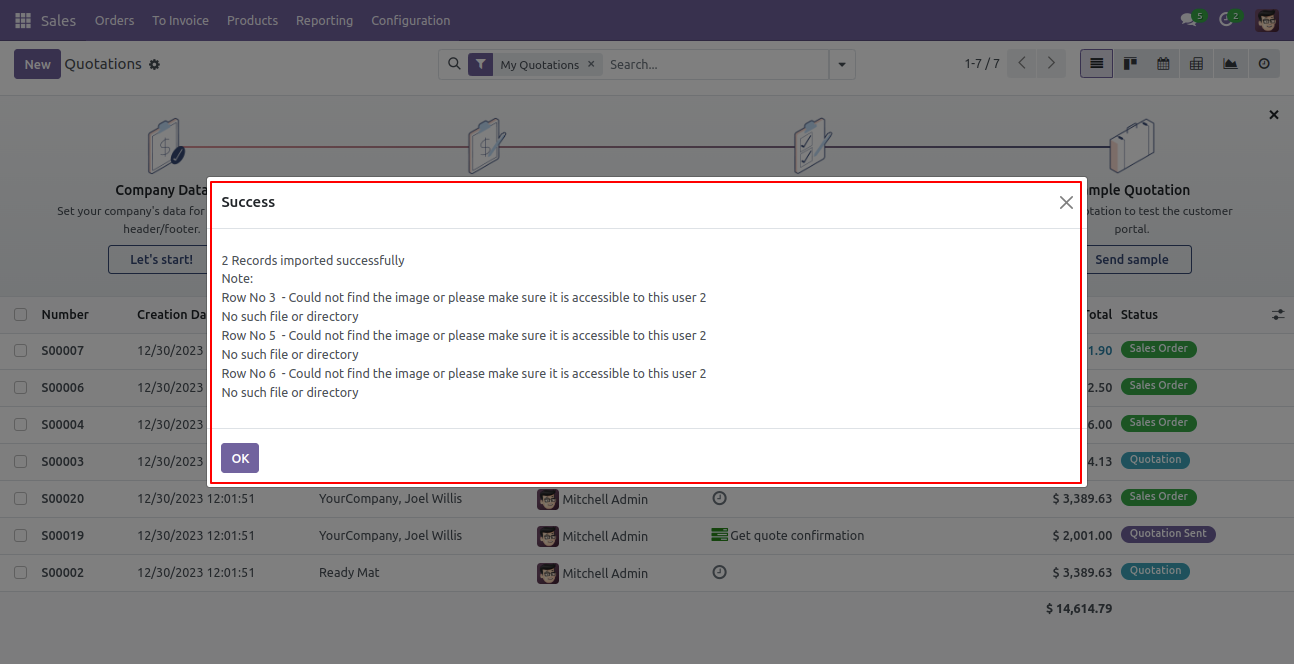
Success message looks like below it's shows successfully imported records and also provides list of unimported records with row number in sheet and relative details of data invalidation.
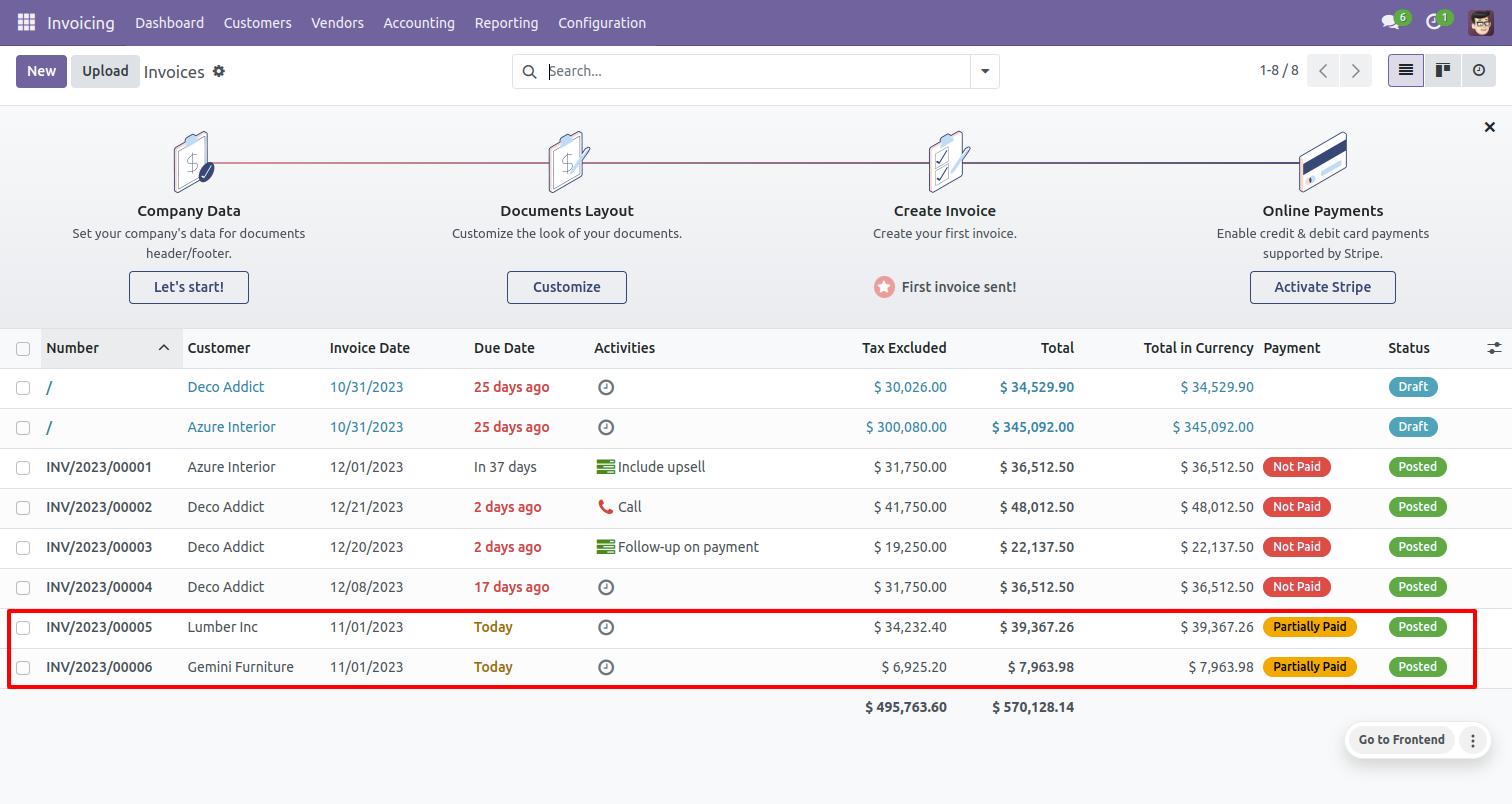
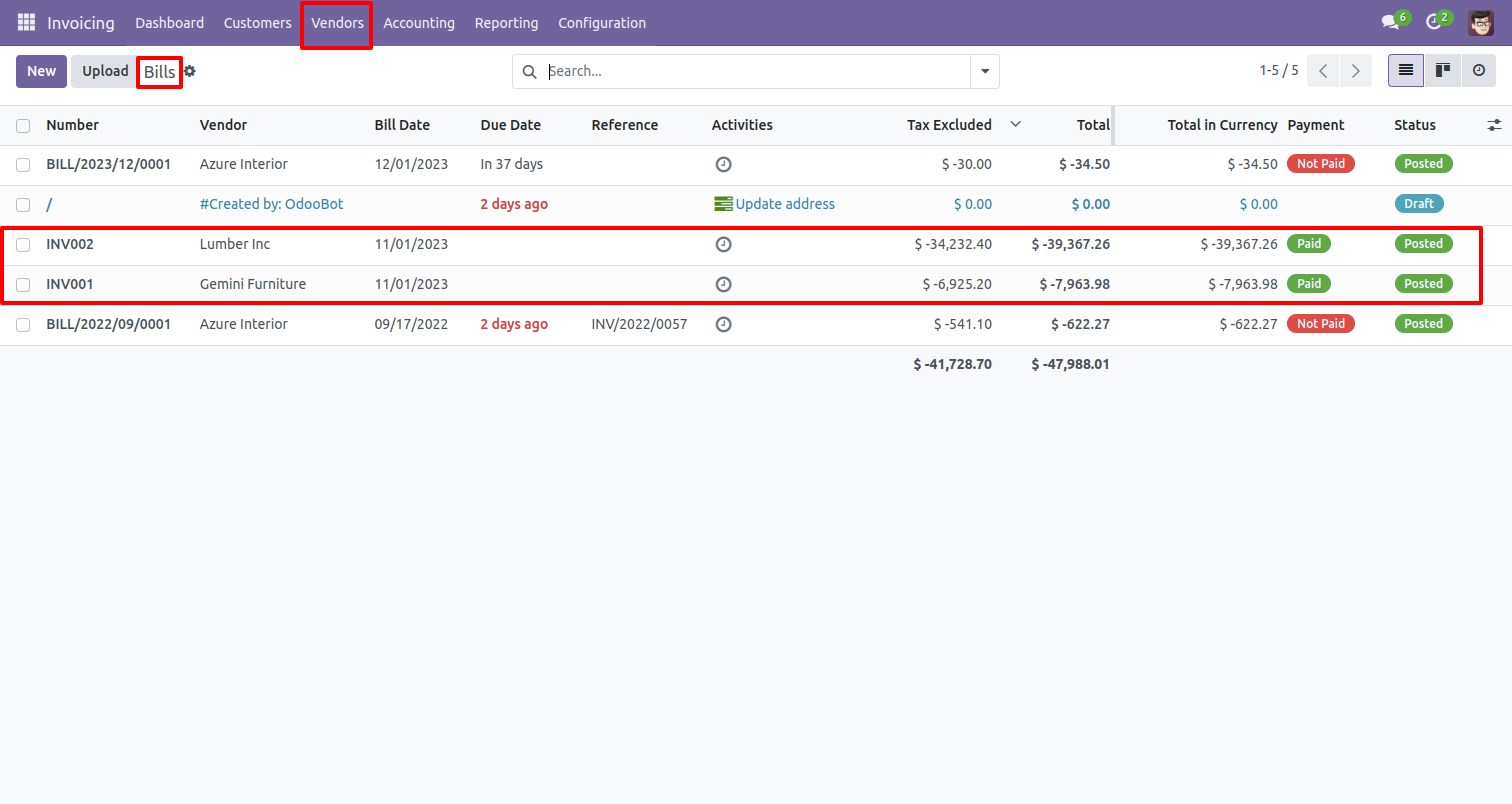
Imported data with list view.
Following fields are imported.
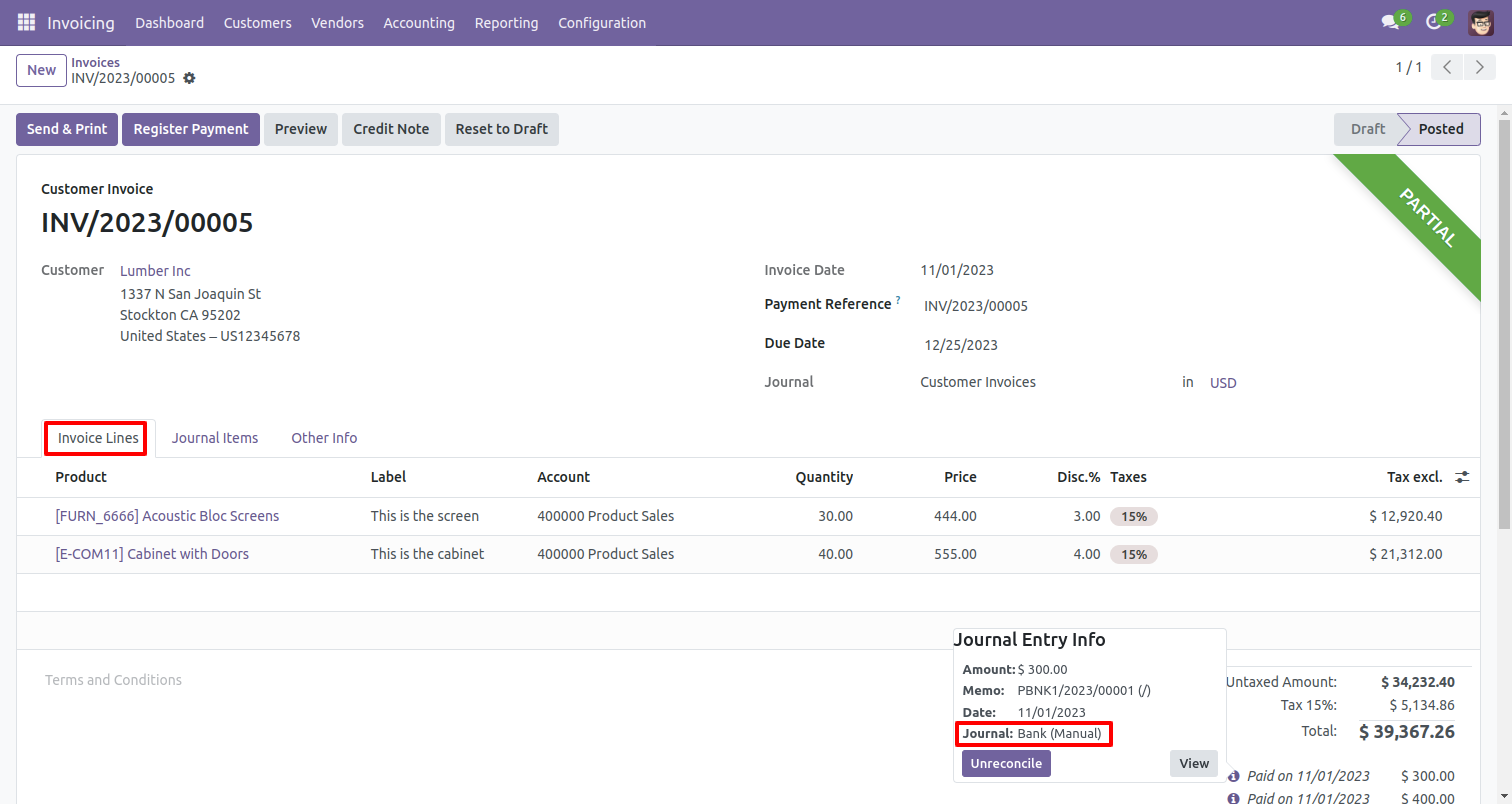
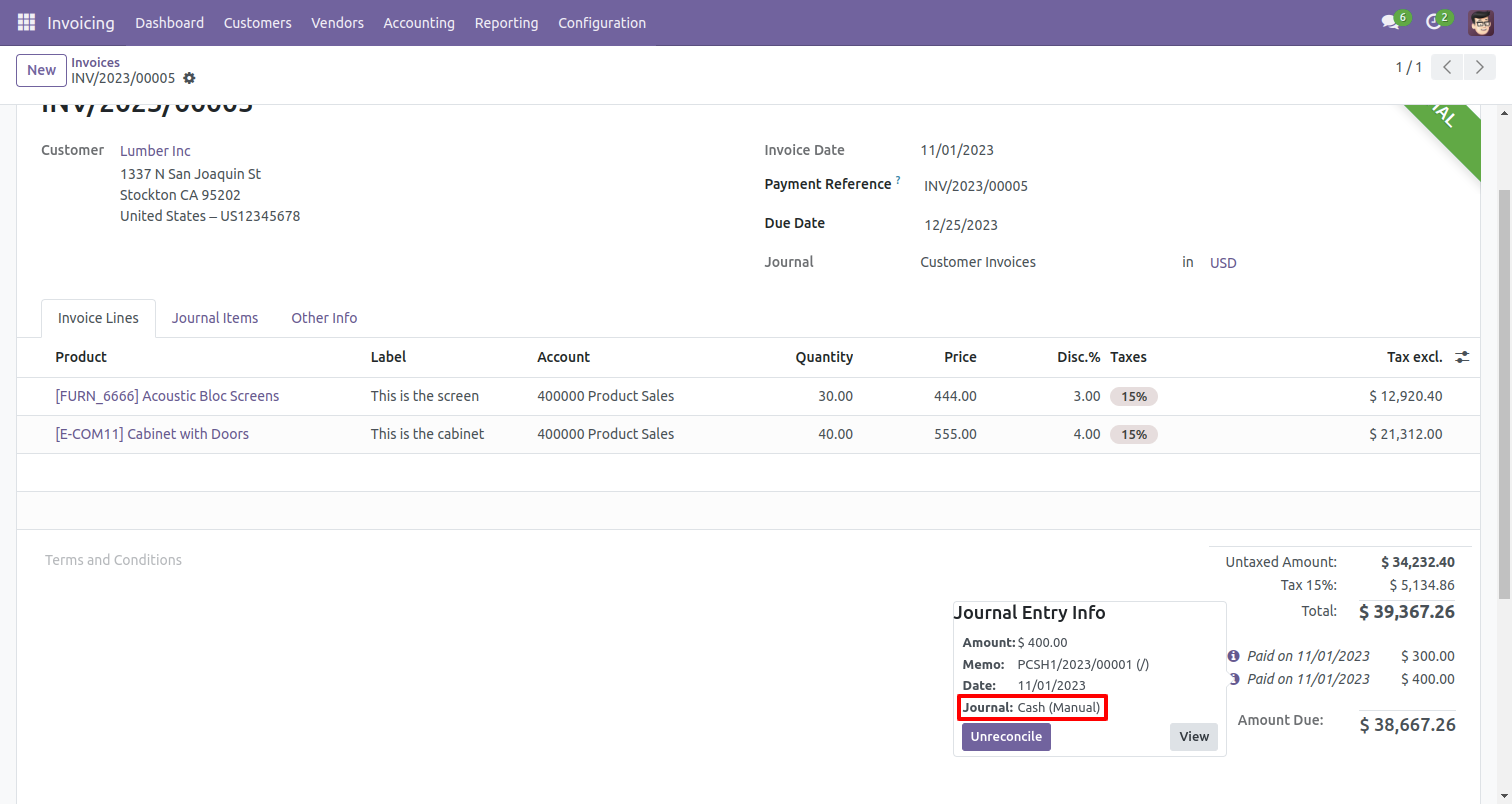
You can import invoice with the different payment method.
Imported data with list view.
Following fields are imported.
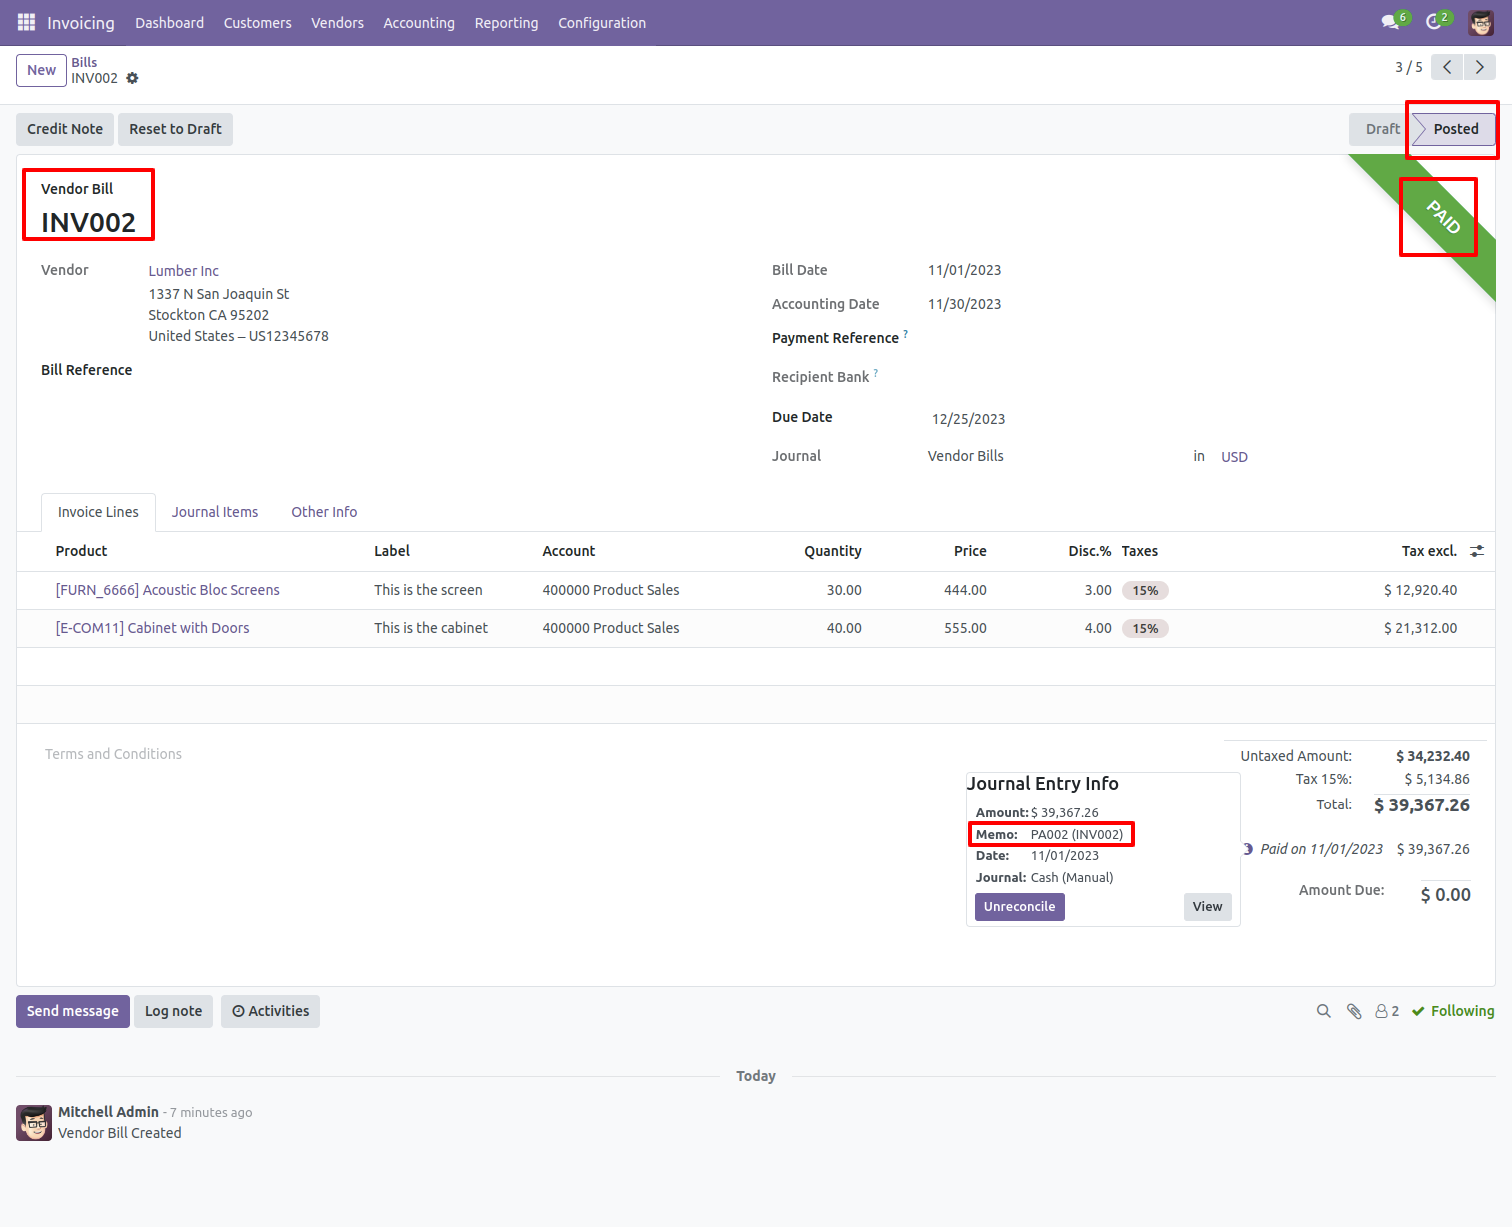
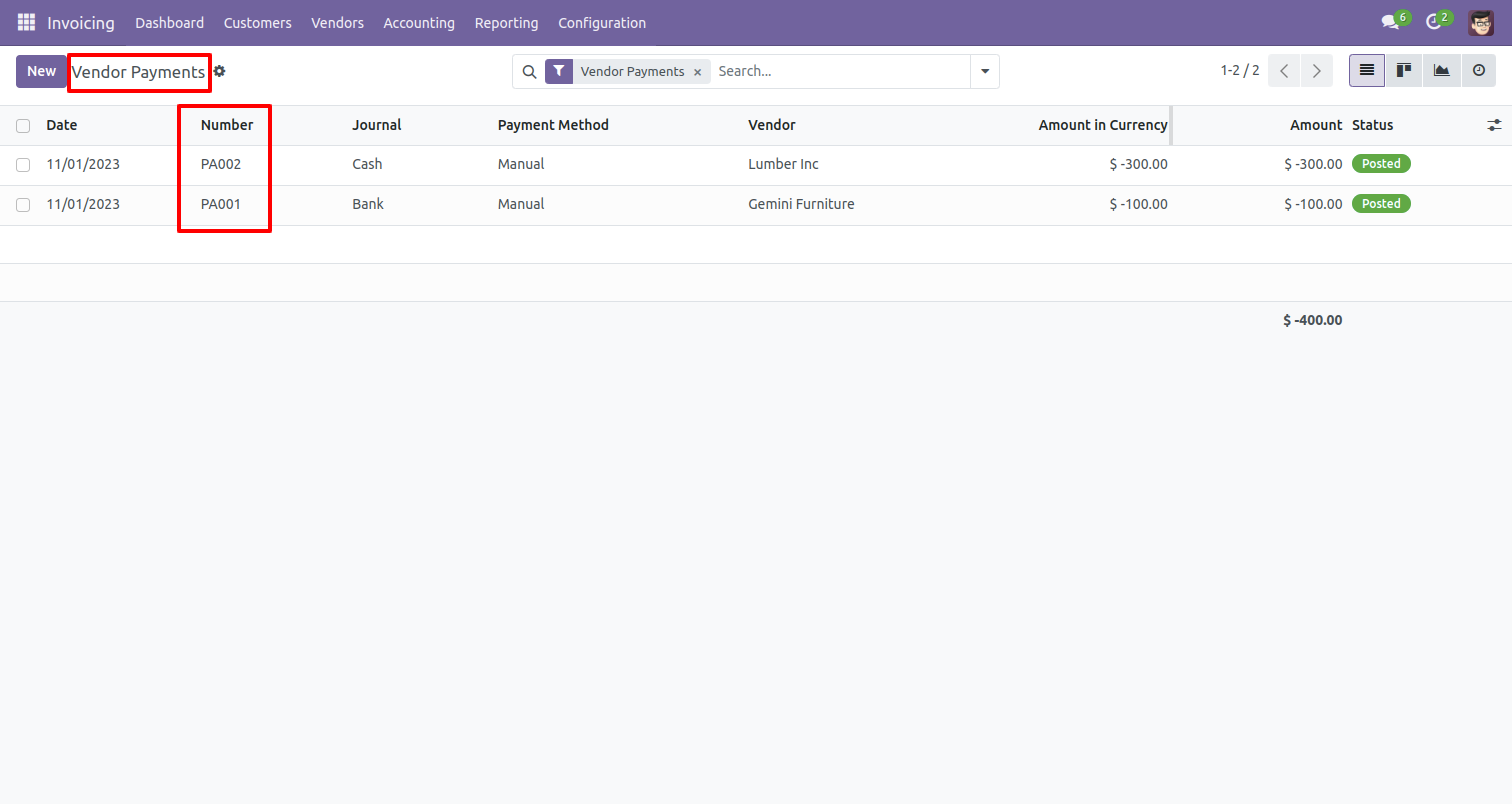
List view of the vendor payments, here you can see the memo number.
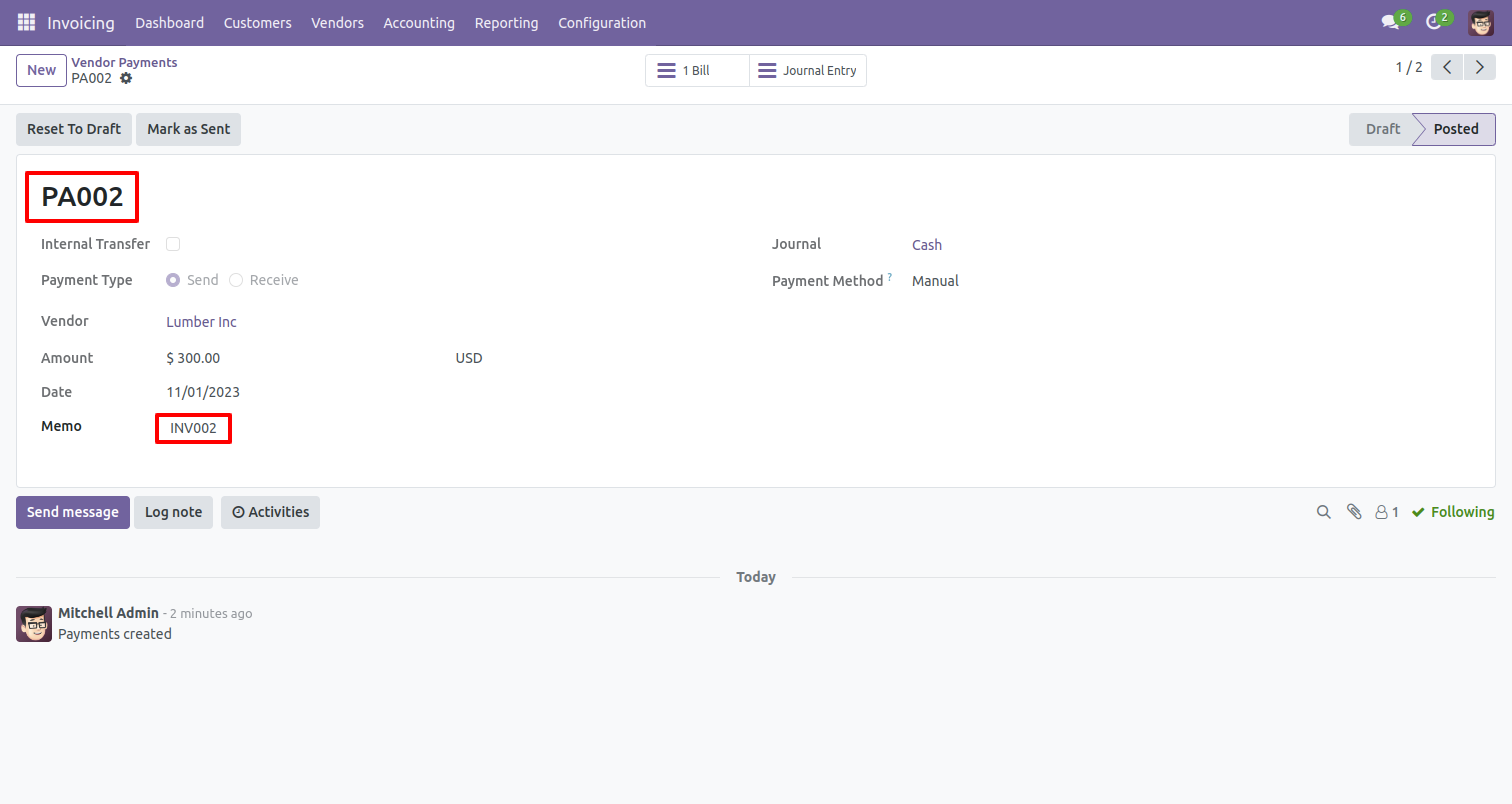
The memo number is in the vendor payments form view.
Features
- Easy to import inventory from CSV or Excel file.
- Import inventory by product name, barcode & internal reference number.
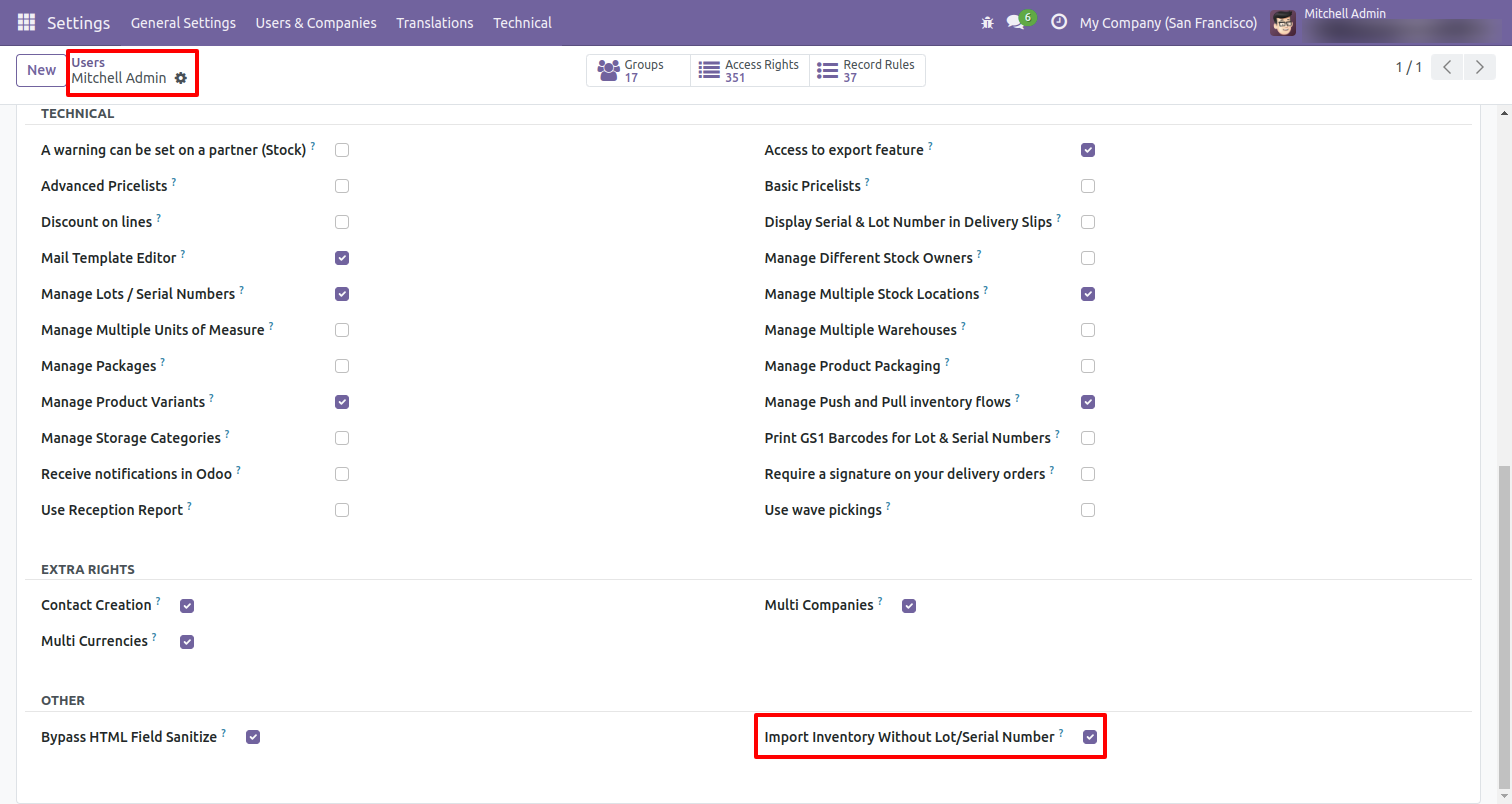
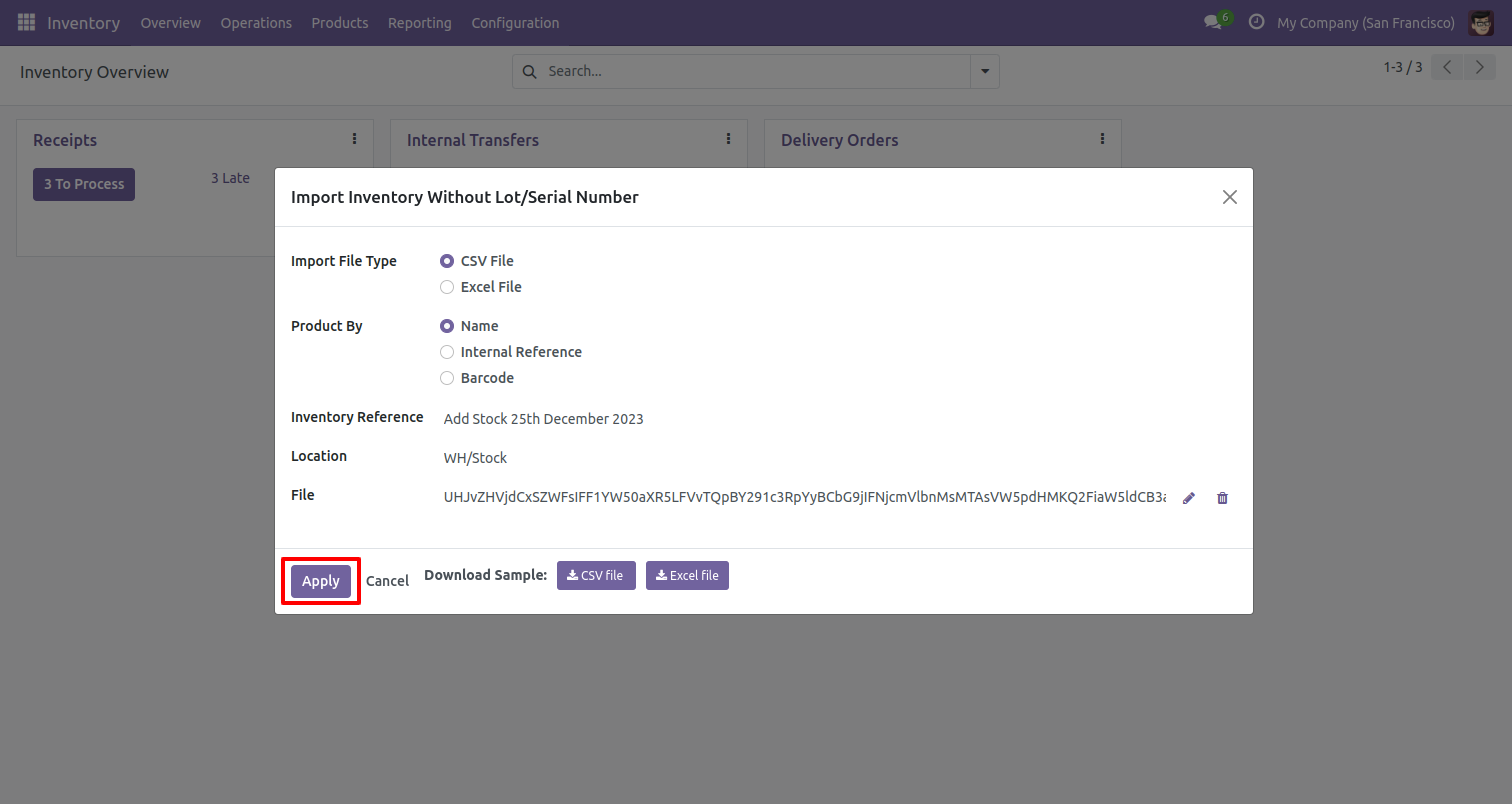
First, you need to tick the 'Import Inventory Without Lot/Serial Number' group to import inventory without lot/serial number.
'Import Inventory Without Lot/Serial Number' menu in operations.

When you click the 'Import Inventory Without Lot/Serial Number' menu, the wizard will open that looks like below.
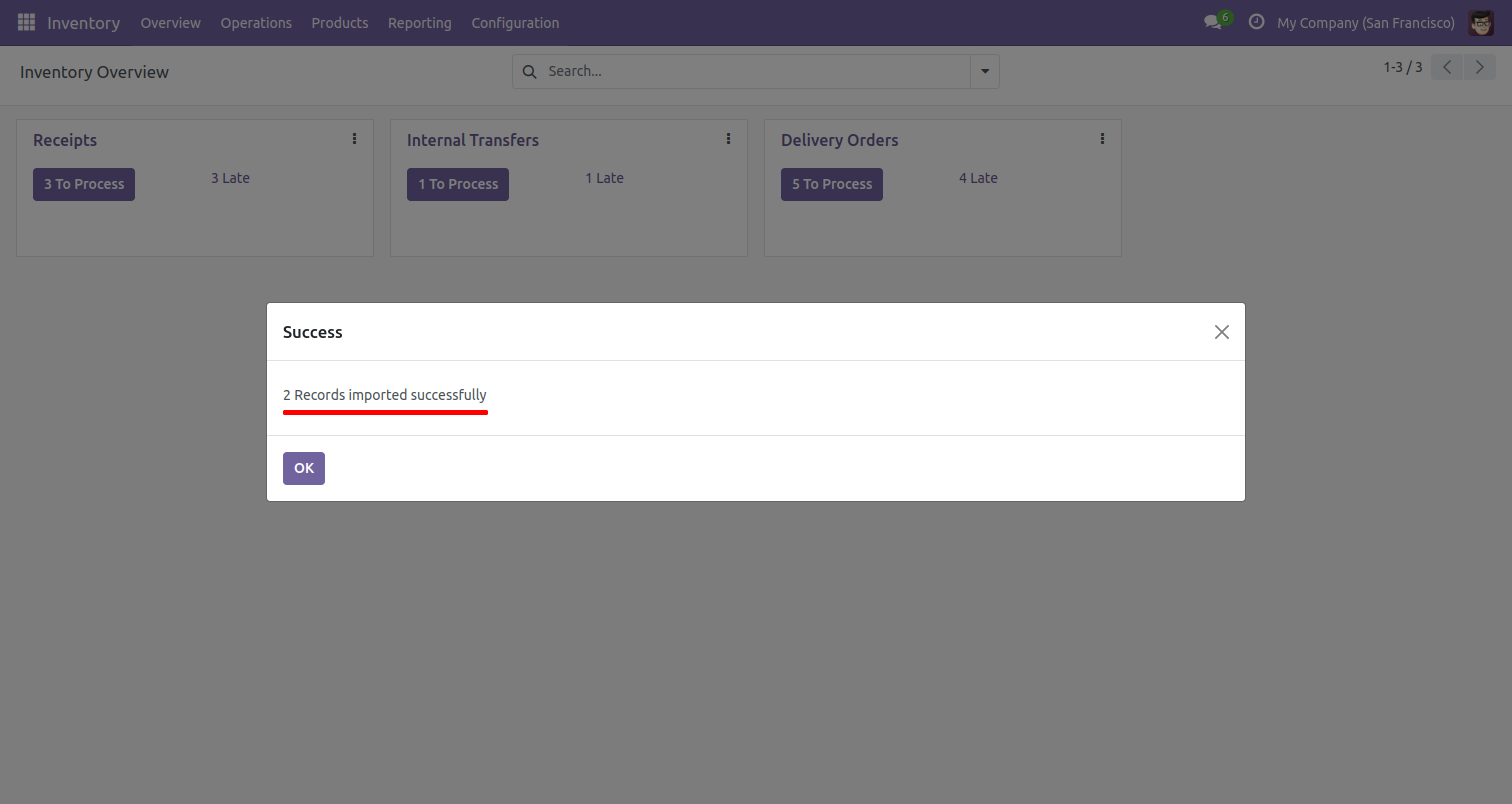
Success message looks like below.
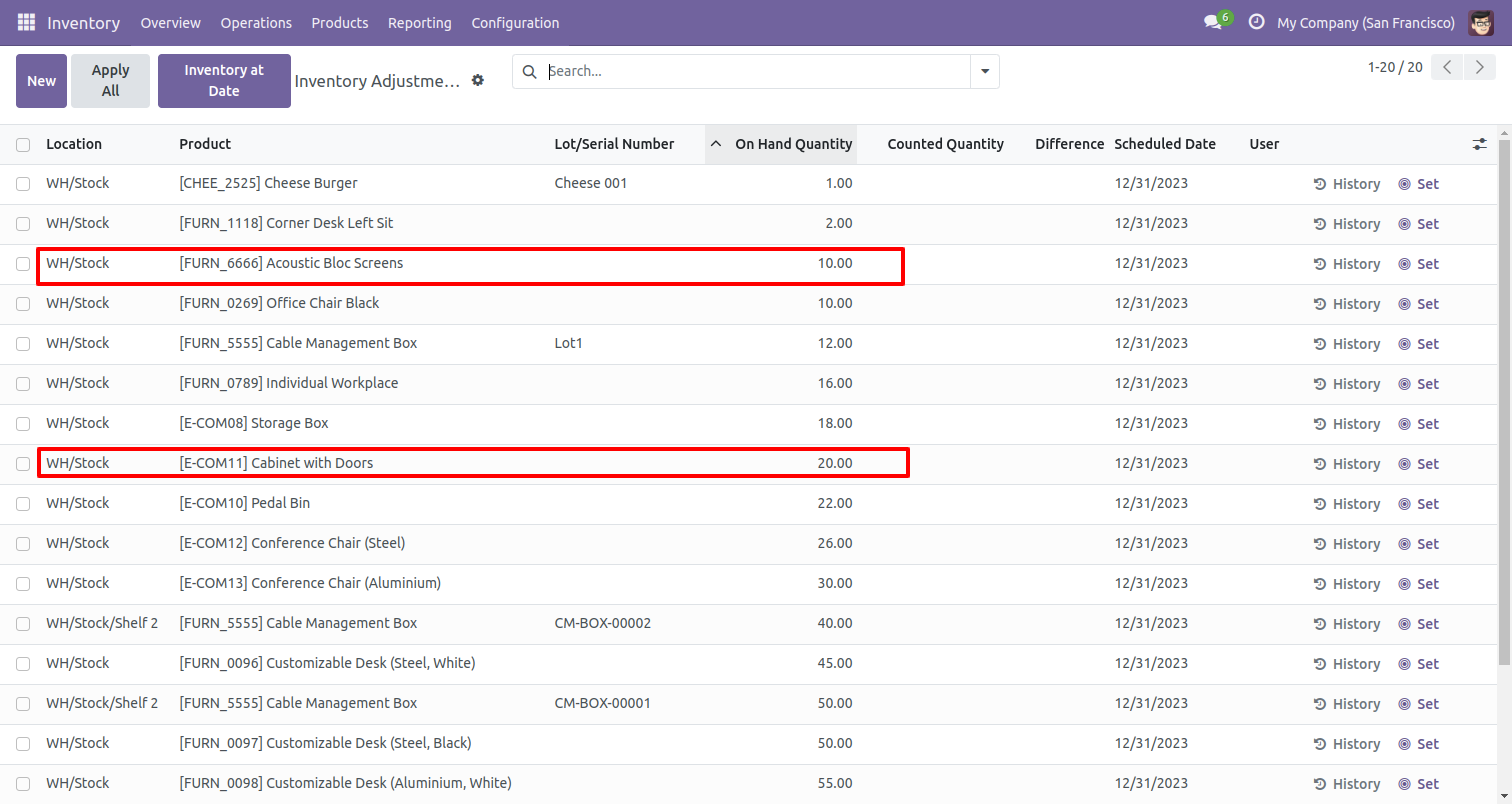
Imported records tree view.
Your CSV file format must match like below.

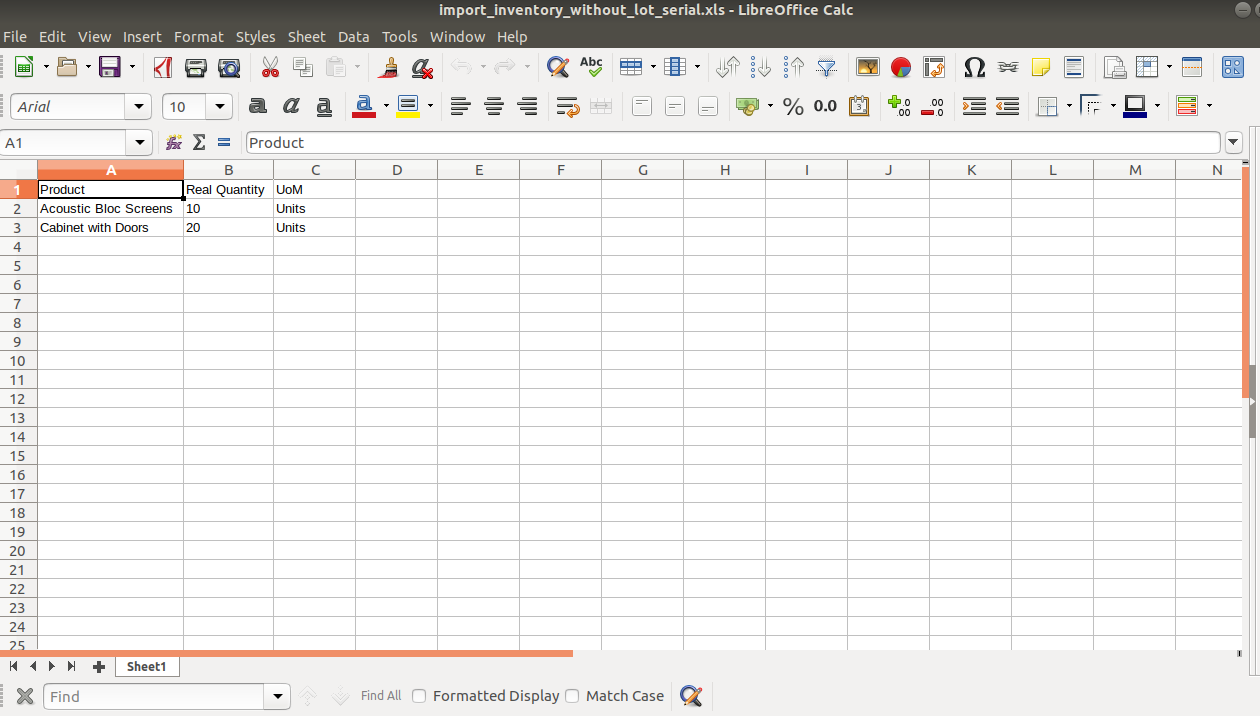
Your Excel file format must match like below.
Features
- Import products/product templates from CSV or Excel.
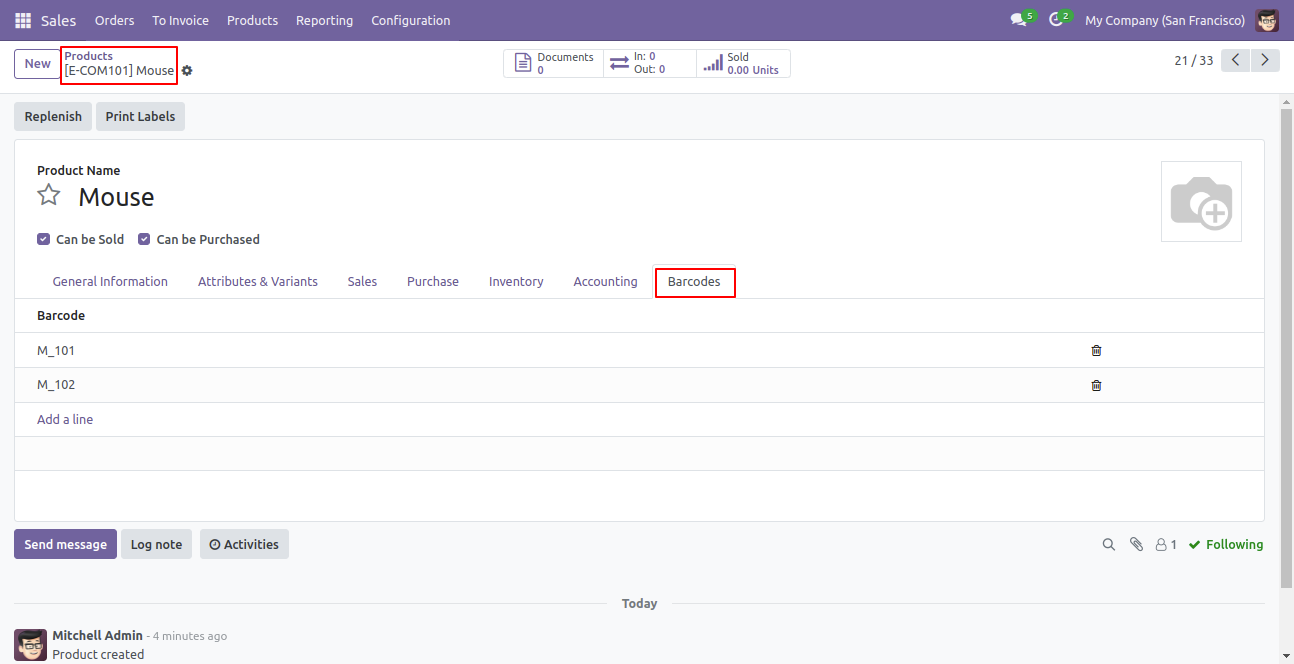
- You can import multiple barcodes for single products and product variants.
- Import product by Name, Barcode, Internal Reference.
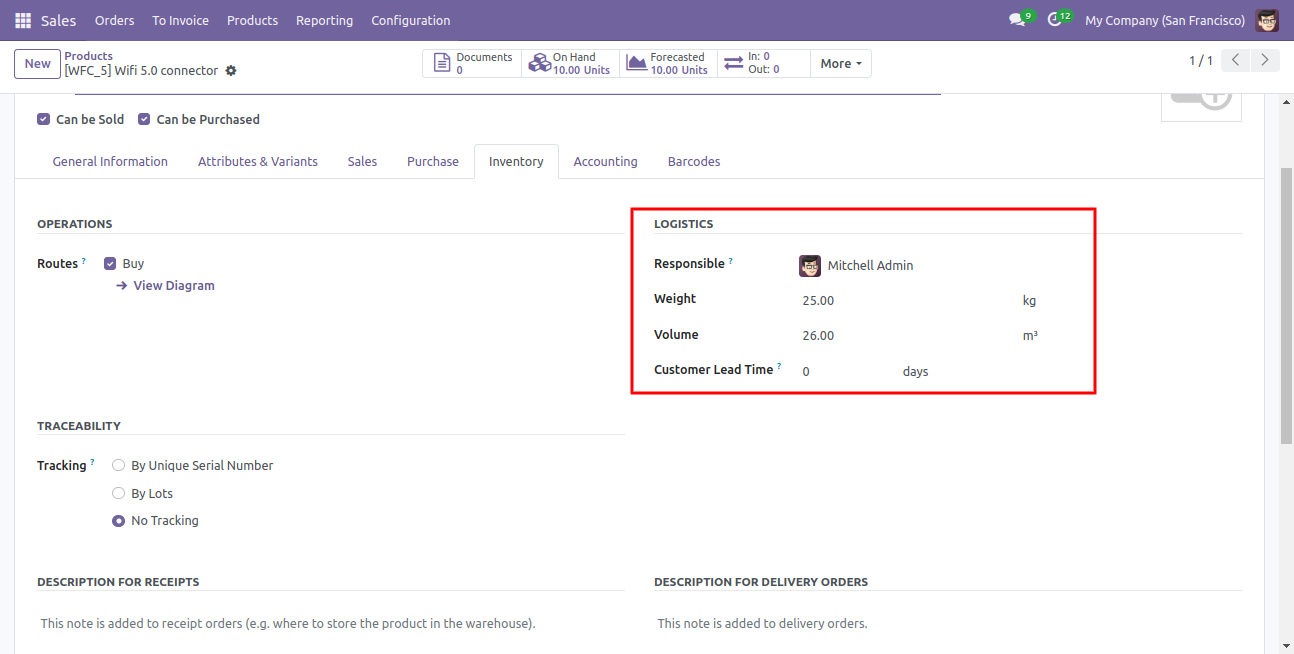
- Import product image by path/URL. (Local URL means URL of your odoo server files location, please note it is not your odoo user local system path.)
- Easy to import products with stock on-hand quantity.
- Easy to import custom fields from CSV or Excel.
- Easy to import Text, Integer, Float, Character, Boolean, Selection, Many2one, Many2many custom fields.
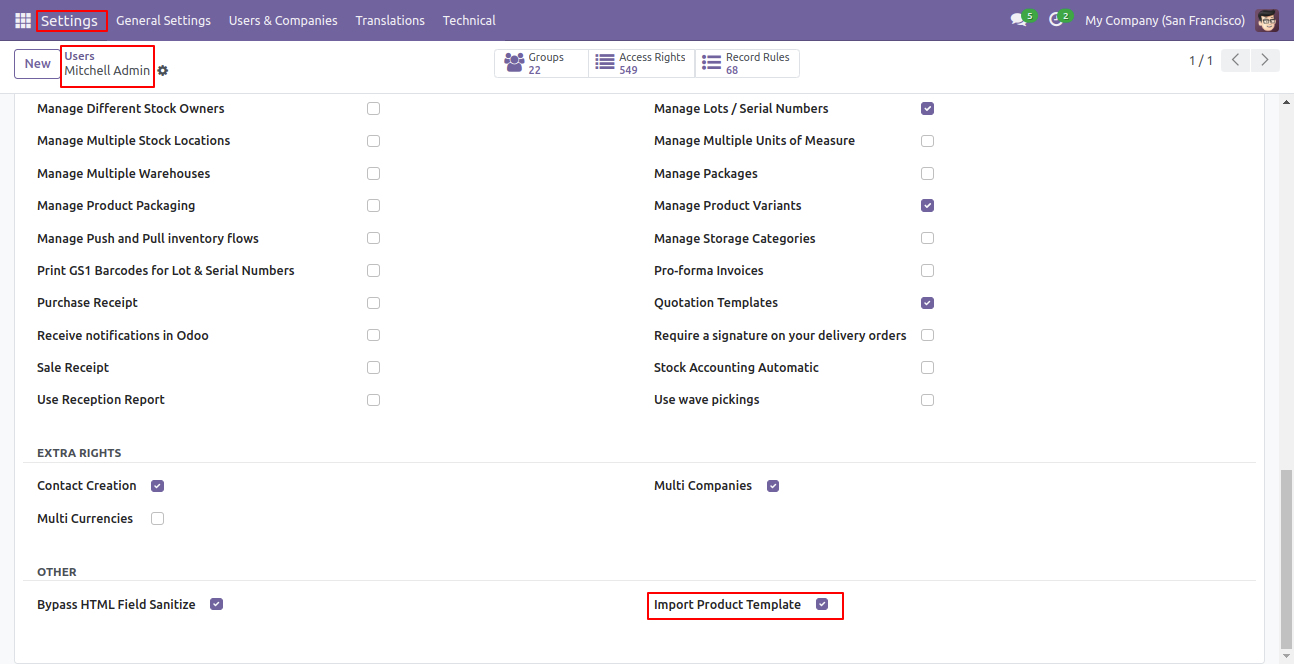
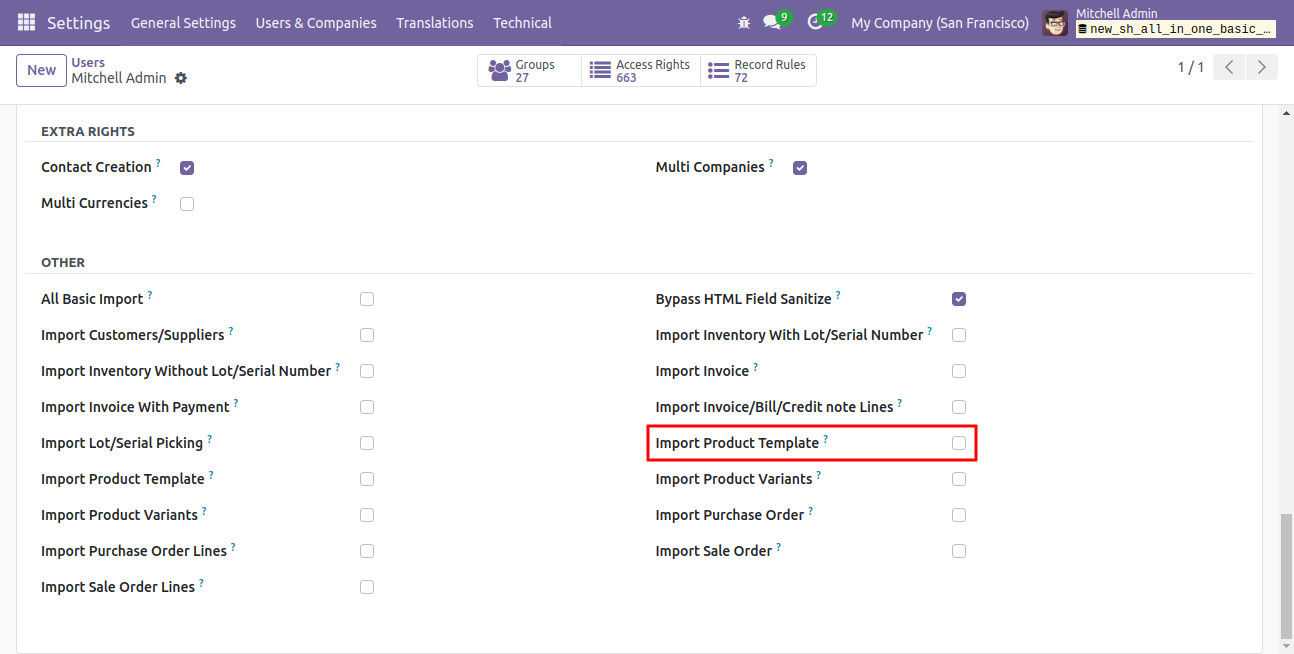
First, you need to tick the 'Import Product Template' group to import product template.
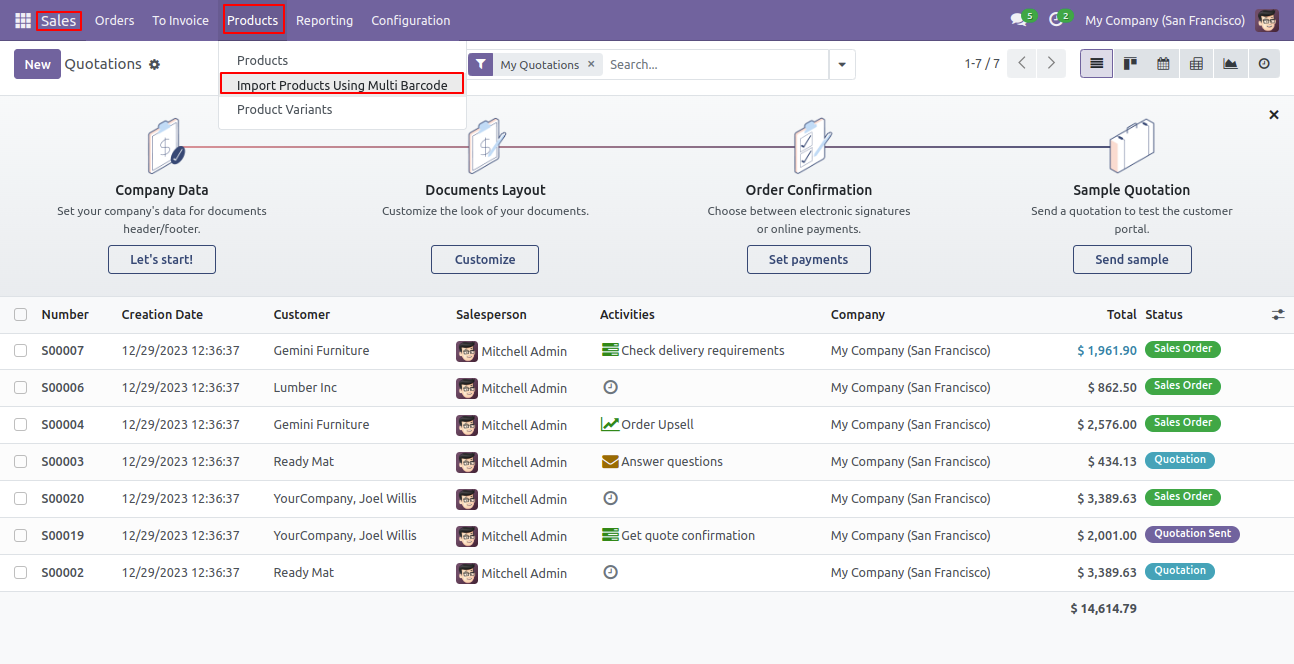
'Import Products Using Multi Barcode' menu in products.
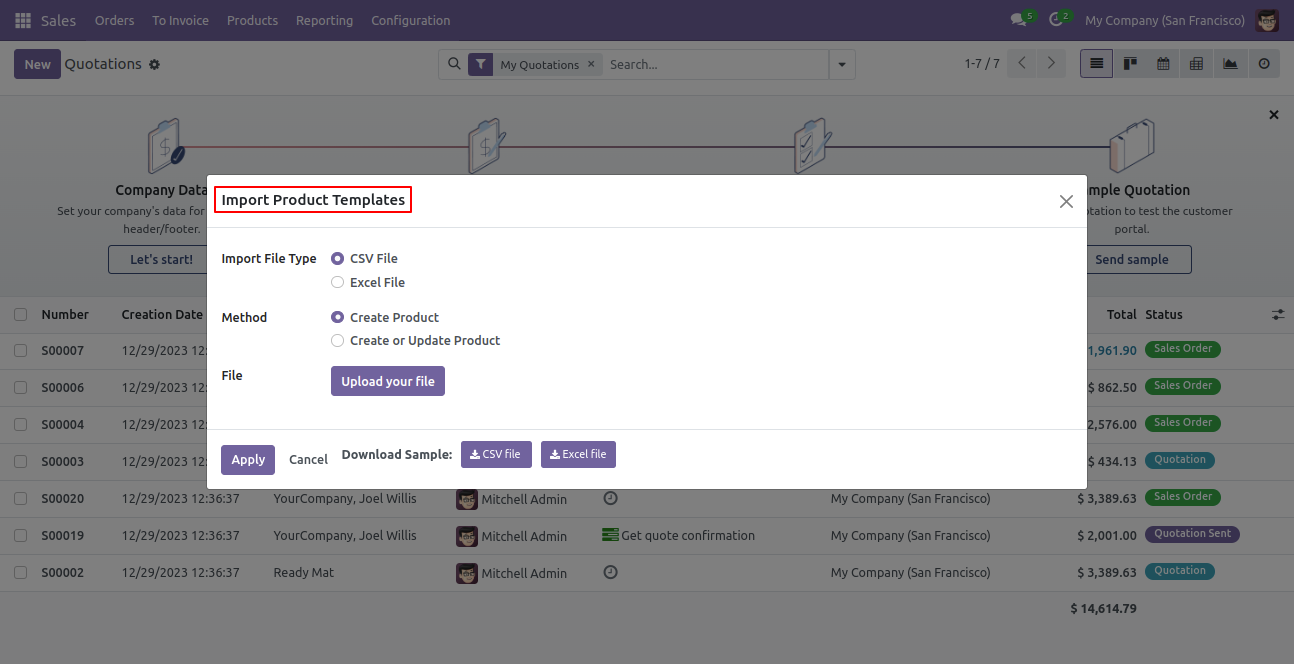
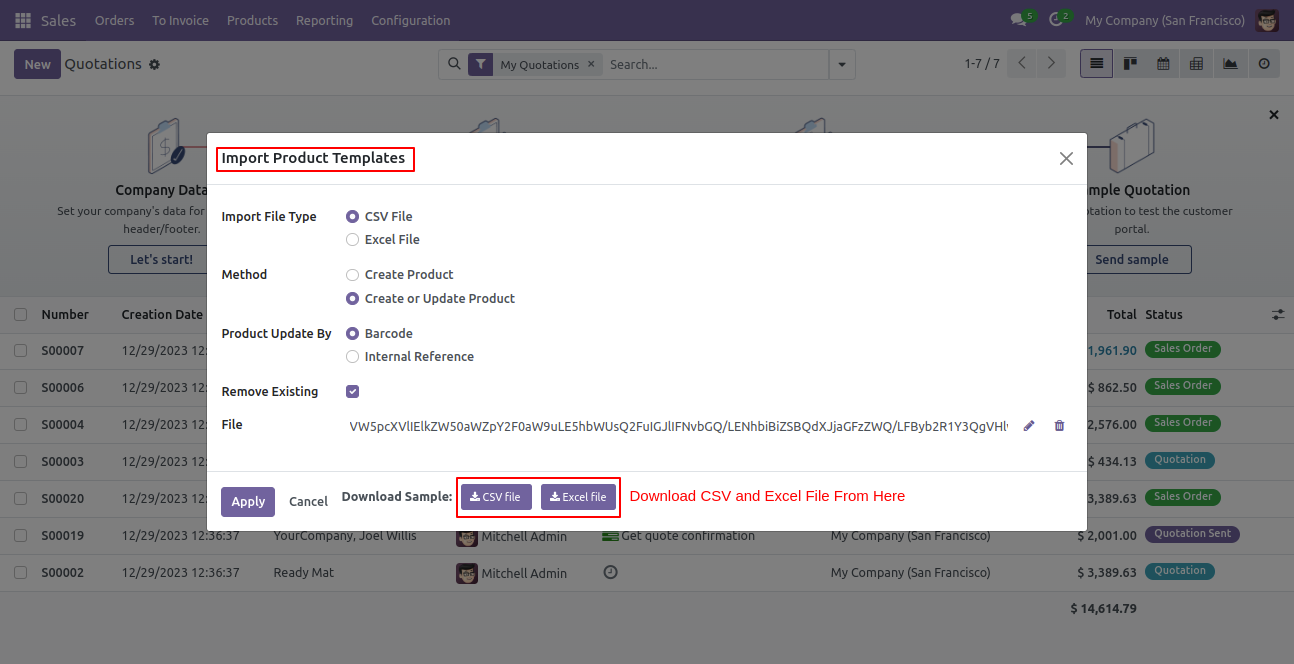
When you click the 'Import Product templates' button, the wizard will open, here you can choose the import file type(CSV/Excel), method(create product/create or update product), product update by(Barcode/Internal Reference), remove existing(If you tick this tickbox then remove existing barcode otherwise not) and file.
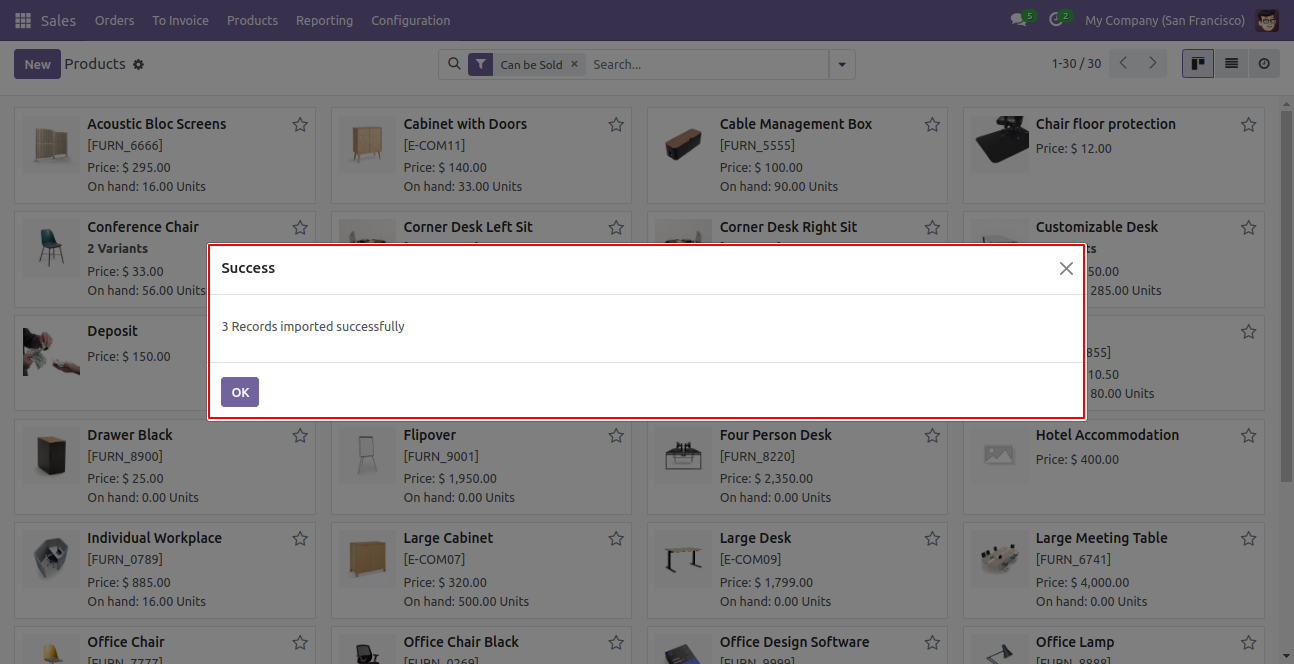
Success message looks like below it shows successfully imported records and also provides a list of unimported records with row number in sheet and relative details of data invalidation.
The following fields are imported.
The following barcodes are imported.
The following fields are imported.
The following fields are imported.
The following fields are imported.
Your CSV file must match like below.
Your Excel file must match like below.
Features
- You can create or update product variants by barcode, name & internal reference.
- You can import multiple barcodes for single products and product variants.
- You can identify the same name product/product variant by 'Unique Identification' fields.
- Easy to import Product Variant (image, price, quantity, stock, etc) from CSV or Excel.
- Easy to import custom fields with product variants.
- You can import product images by image URL or local image path. (Local URL means URL of your odoo server files location, please note it is not your odoo user local system path.)
- Easy to import products with stock on-hand quantity.
- Easy to create and update product variants.
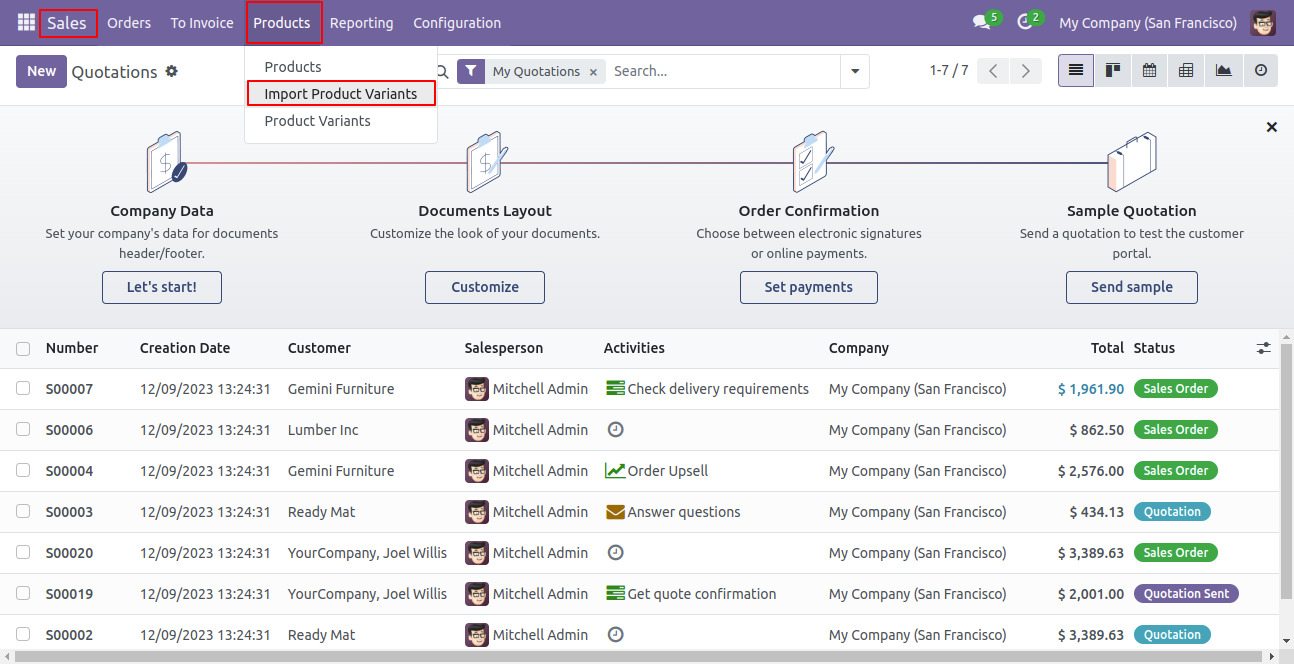
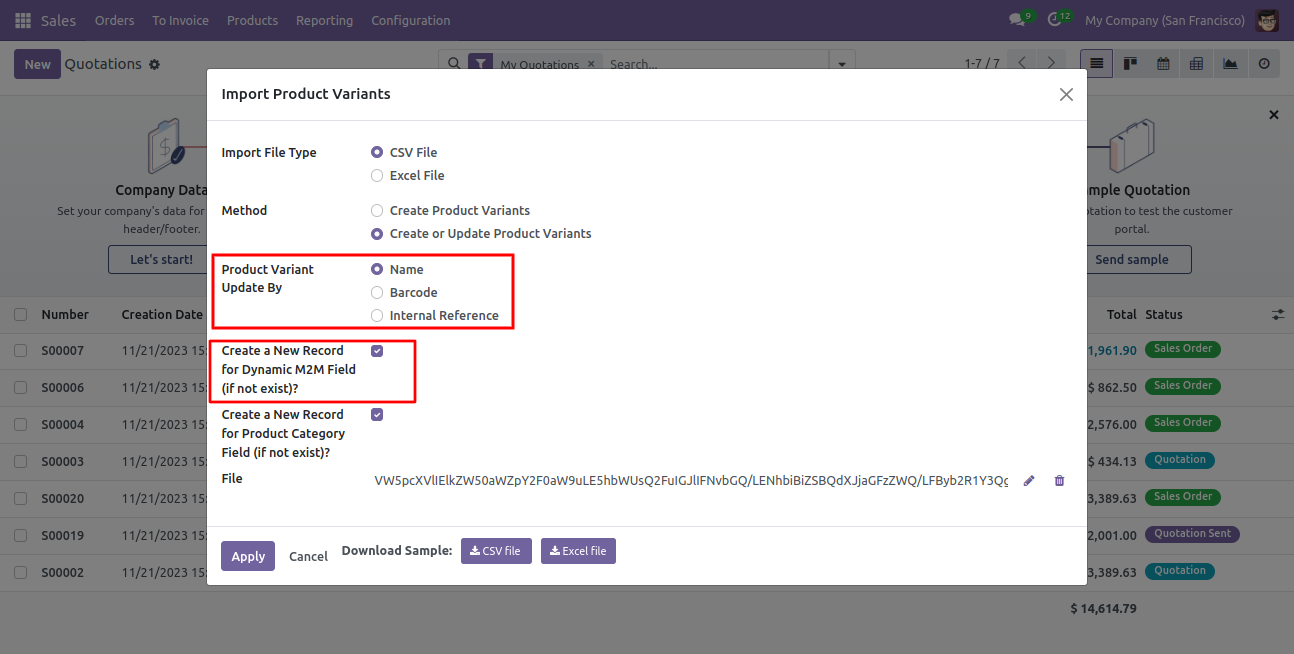
First, you need to tick the "Import Product Variants" group to import product Variant.
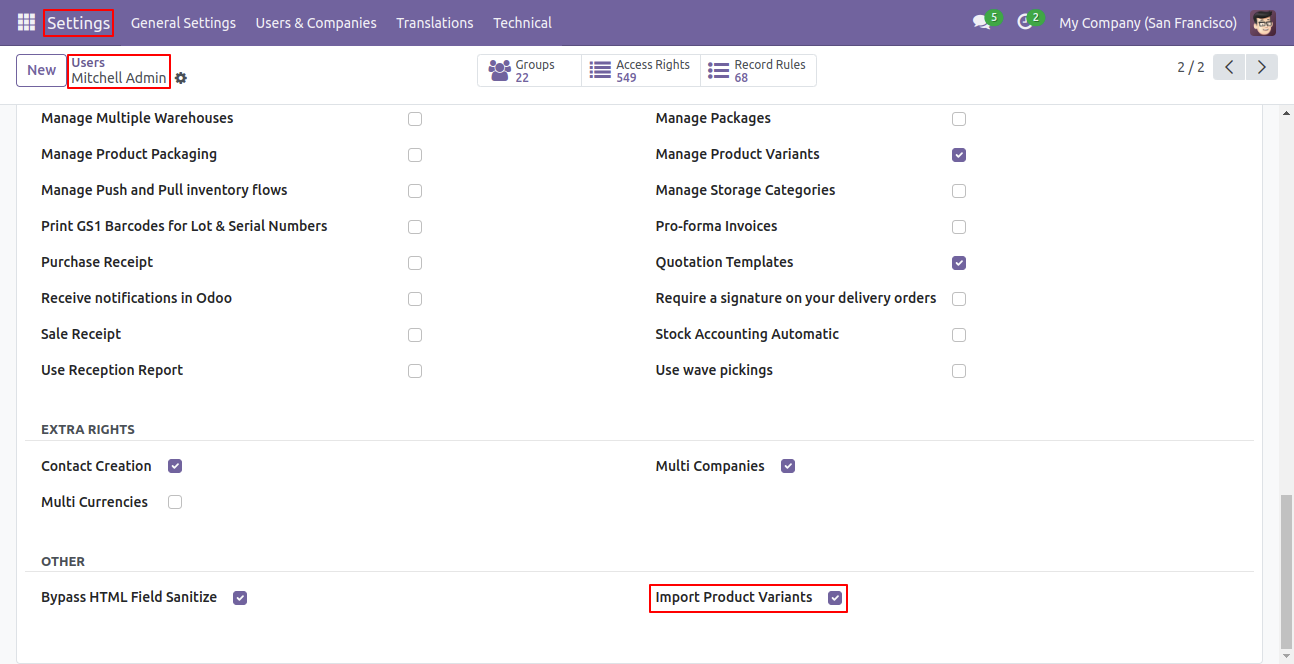
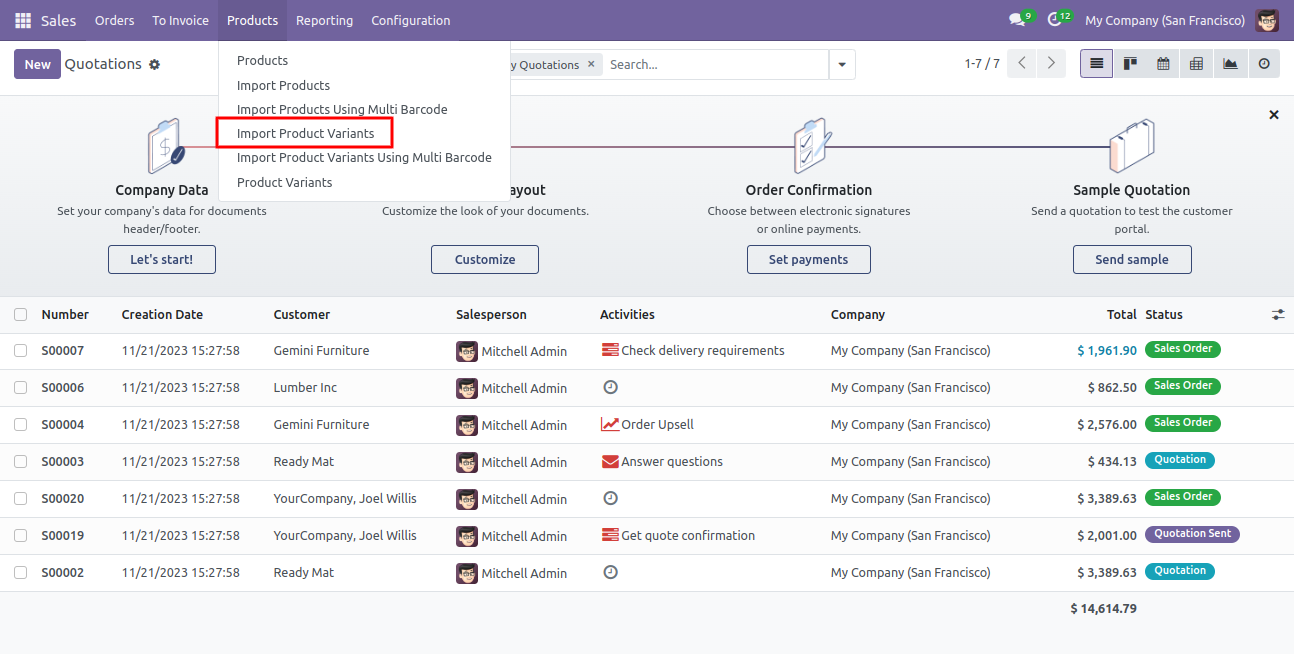
'Import Product Variants' menu in products.
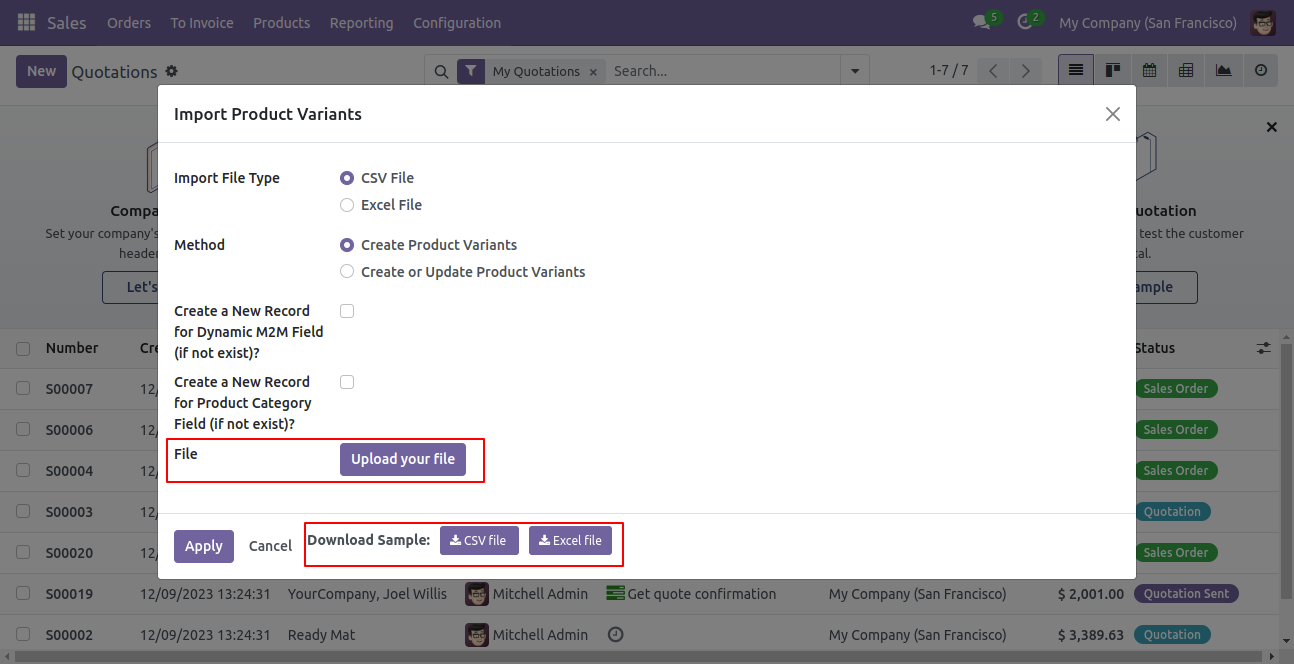
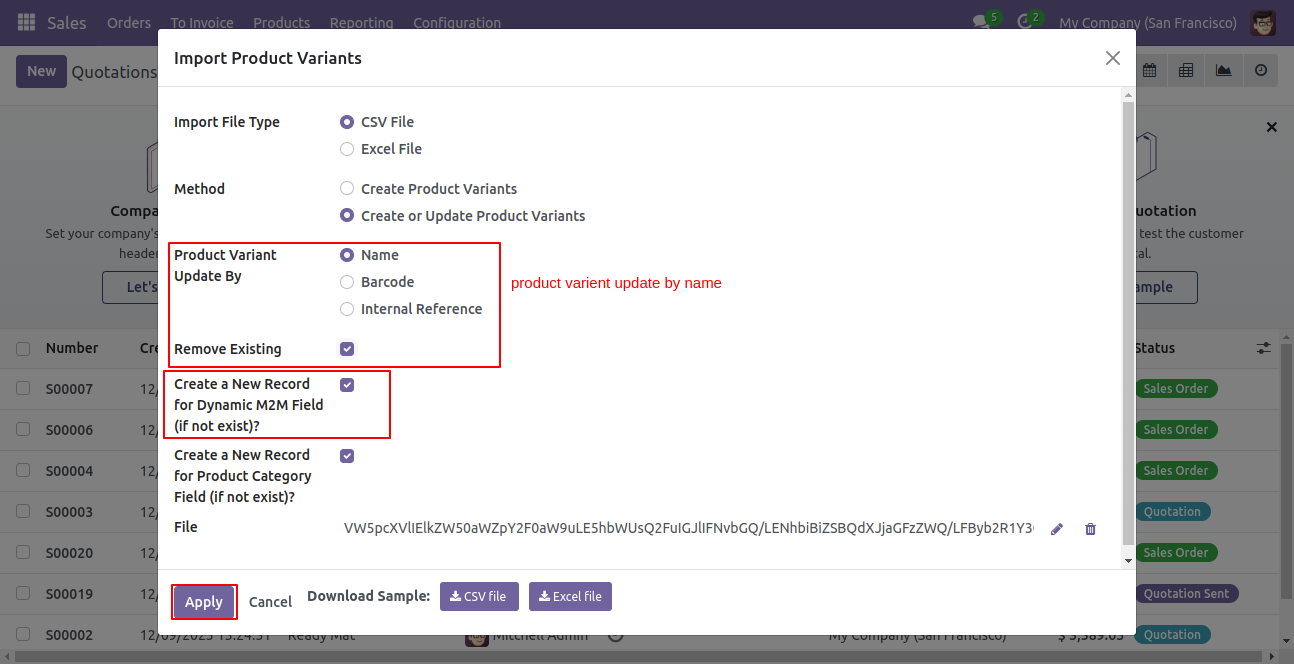
When you click the "Import Product Variants" button, the wizard will open, here you can choose the import file type(CSV/Excel), method(create product/create or update product), product update by(Name/Barcode/Internal Reference), remove existing(If you tick this tickbox then remove existing barcode otherwise not) and file.
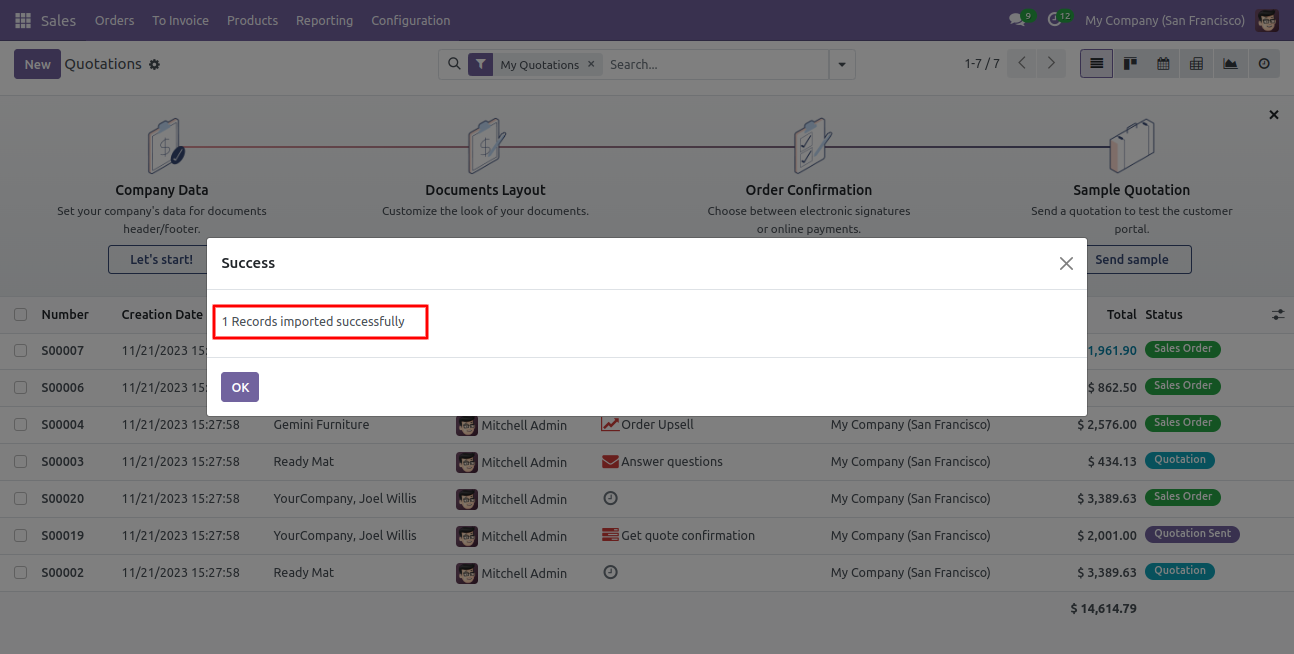
Success message looks like below it shows successfully imported records.
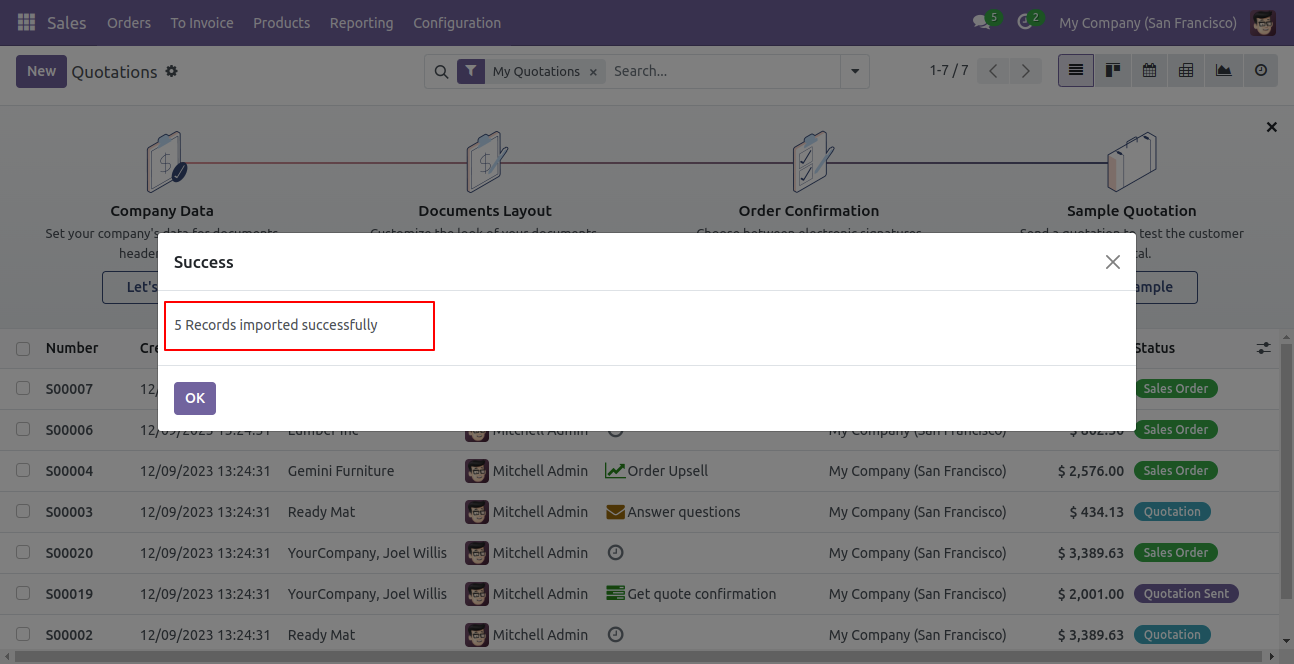
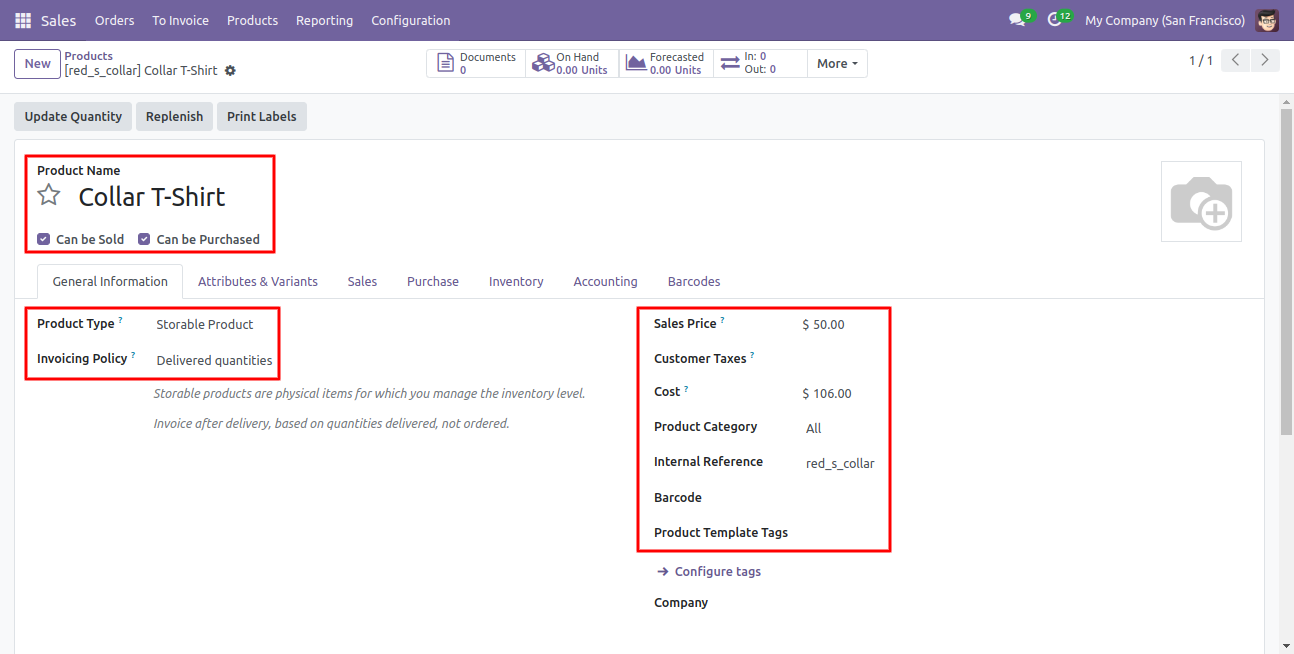
The following product template fields are imported.
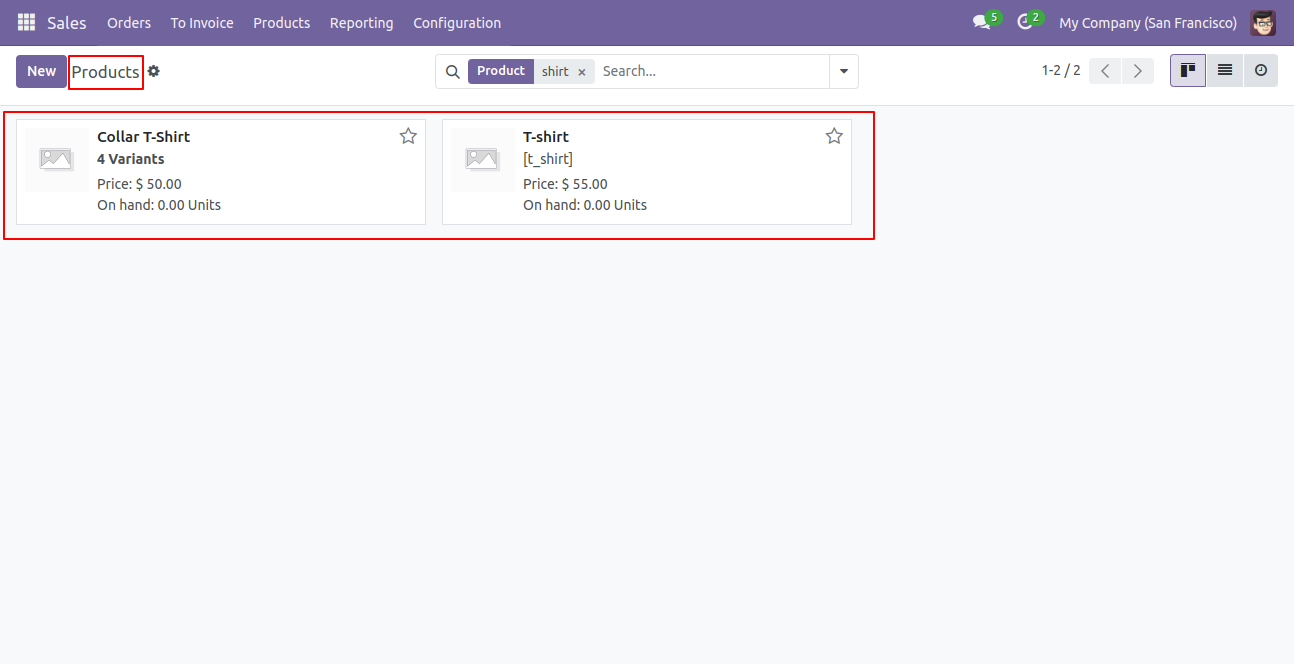
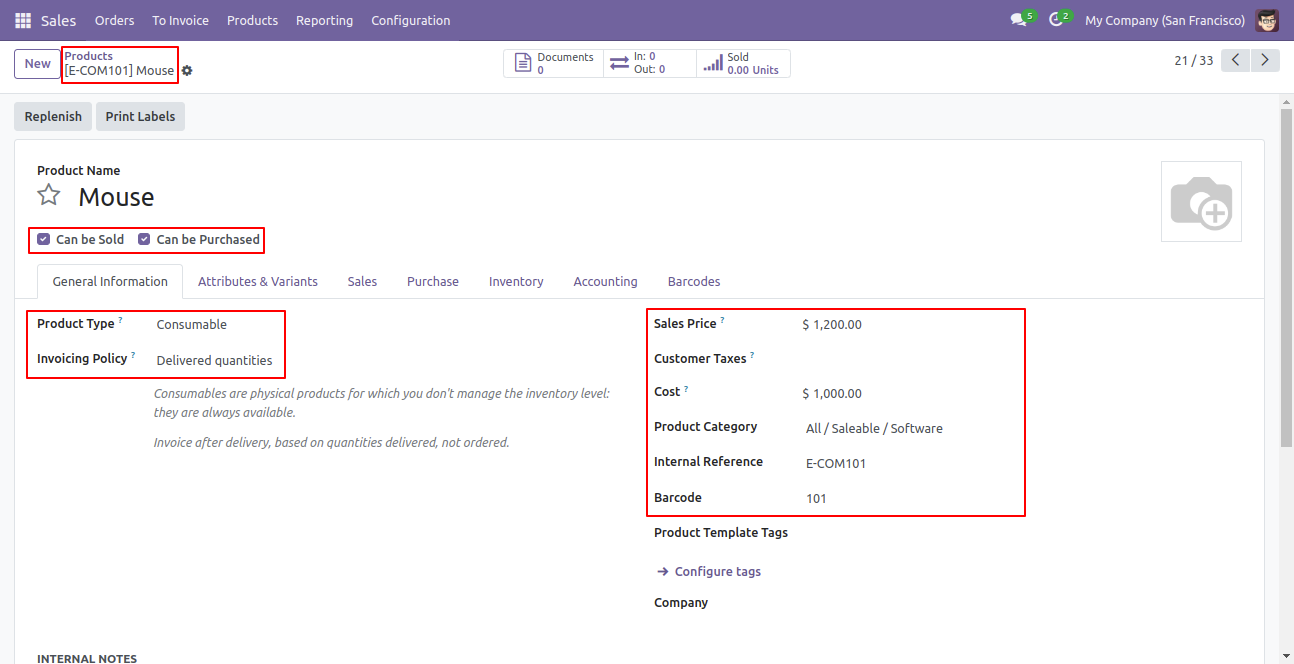
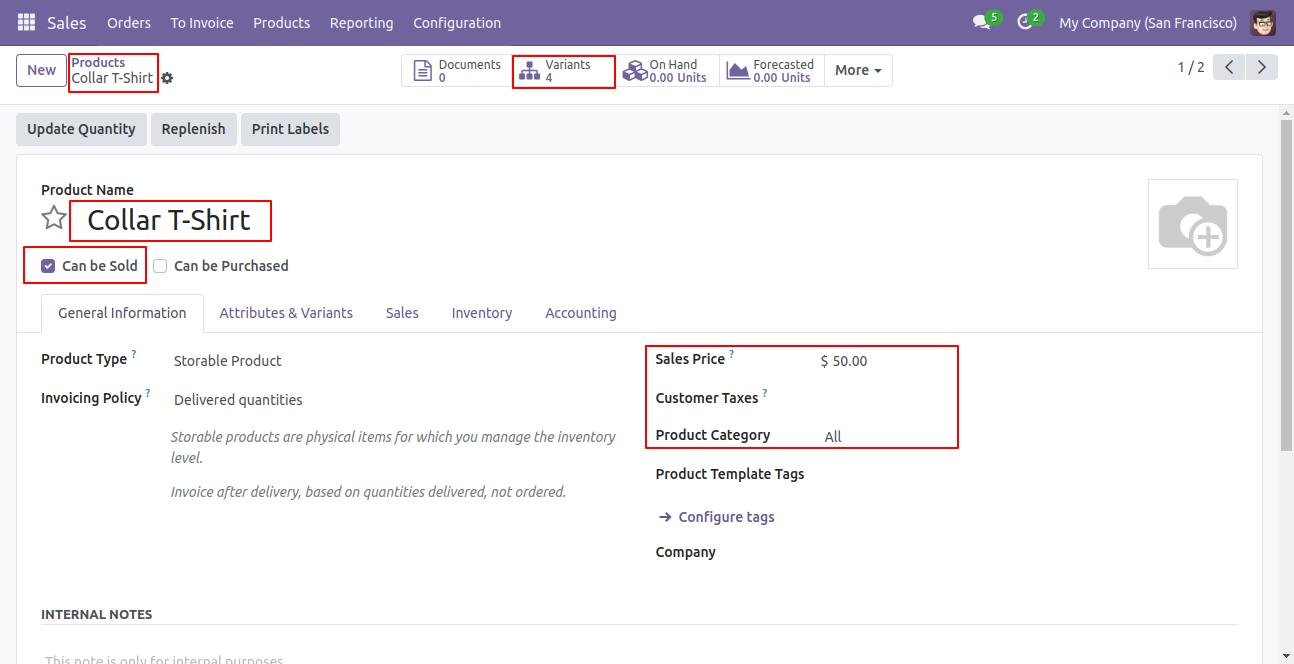
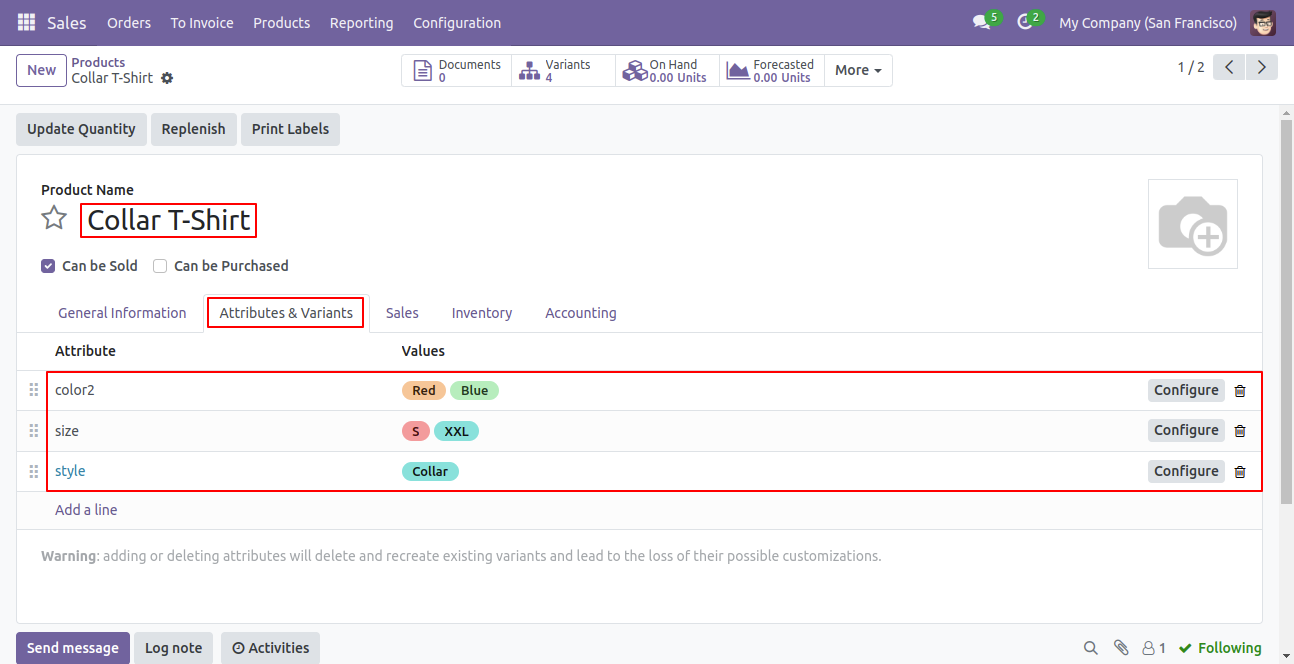
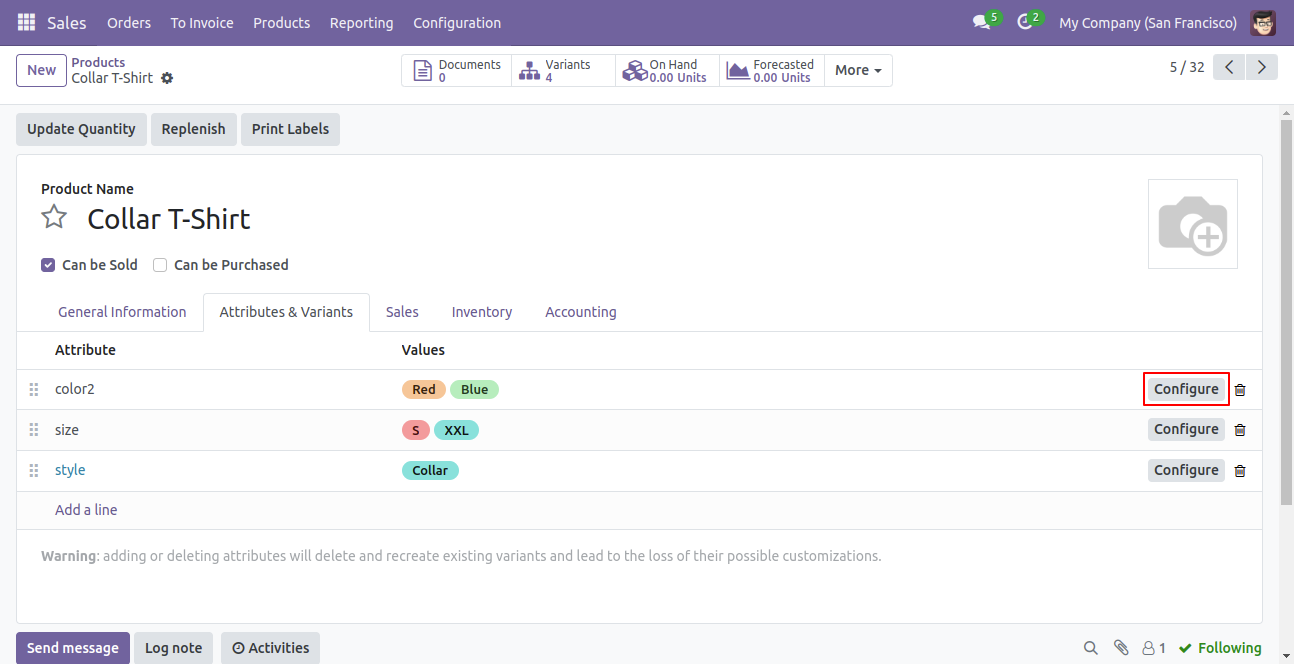
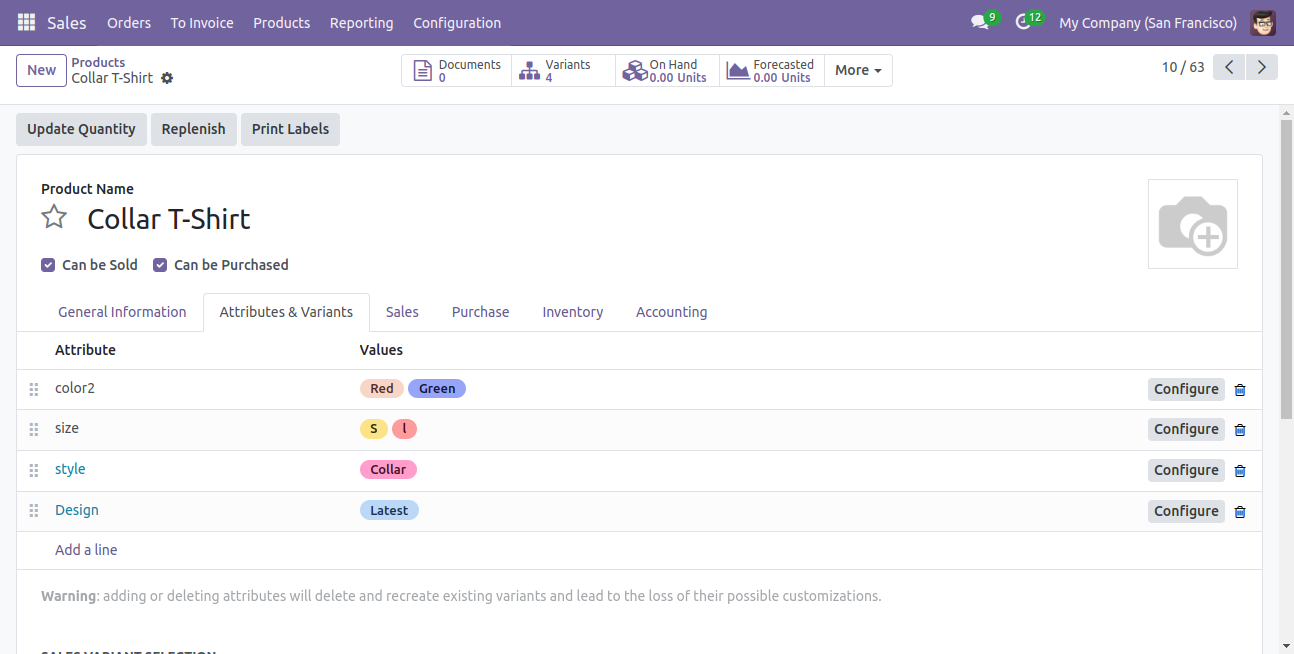
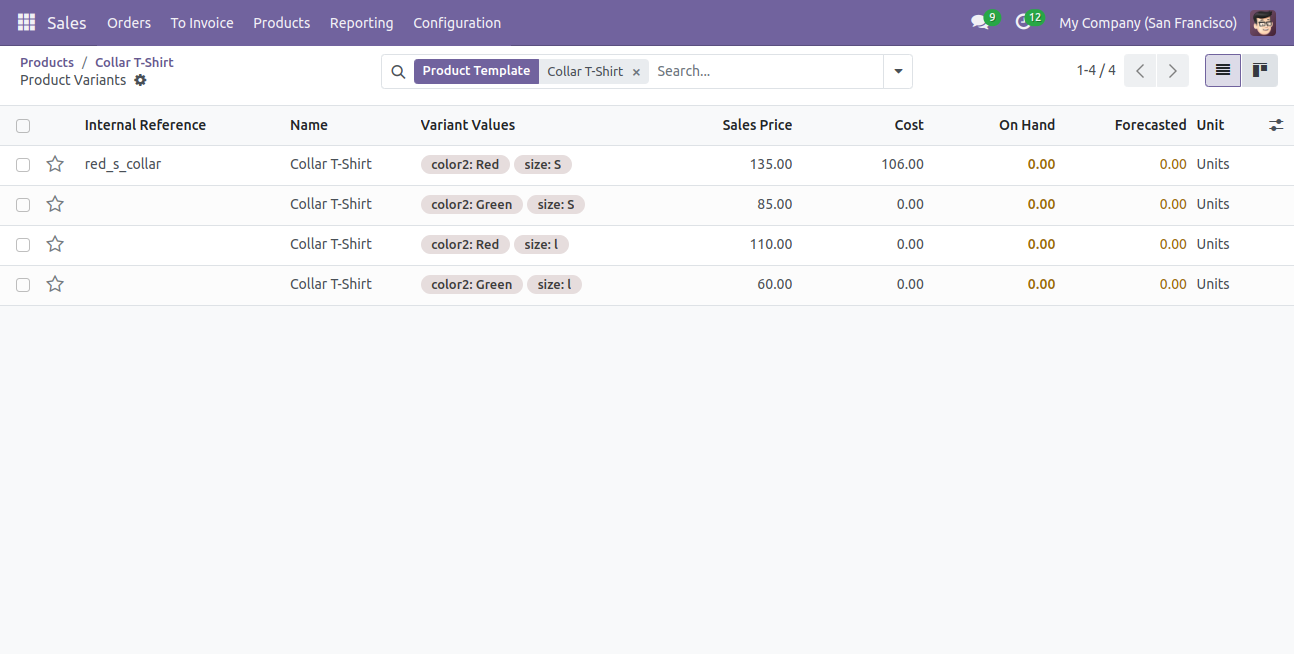
We see the imported product 'Collar T-Shirt' fields.
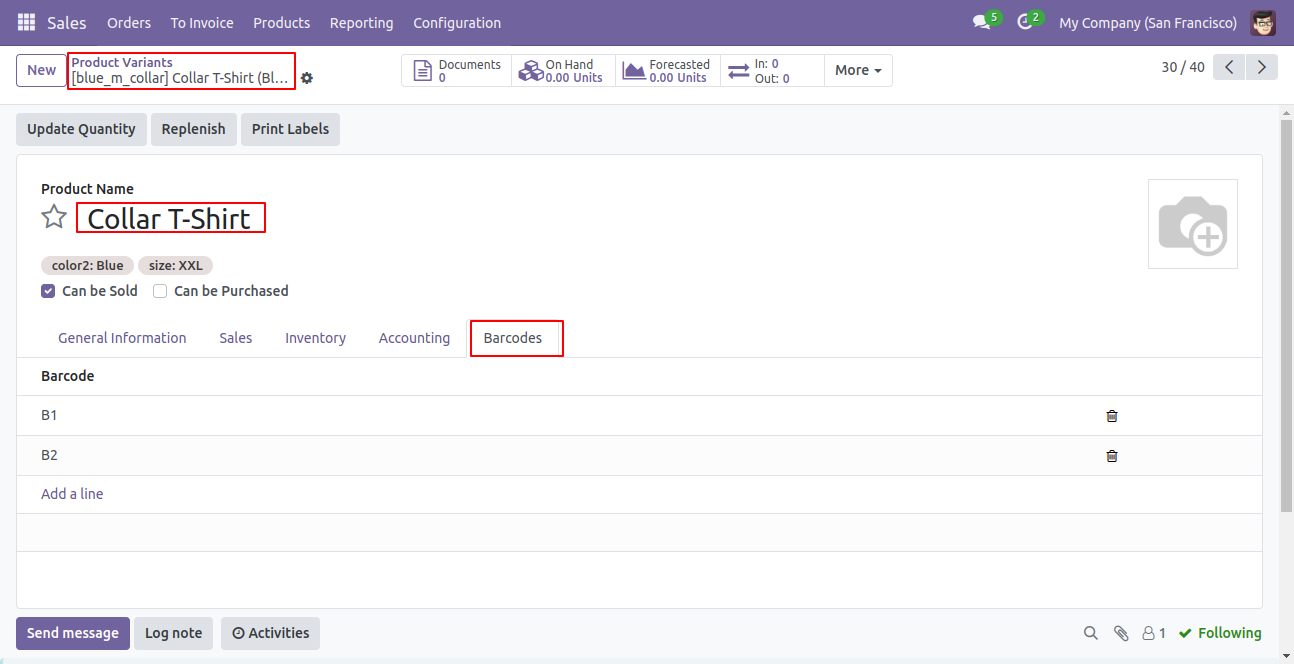
Product variants.
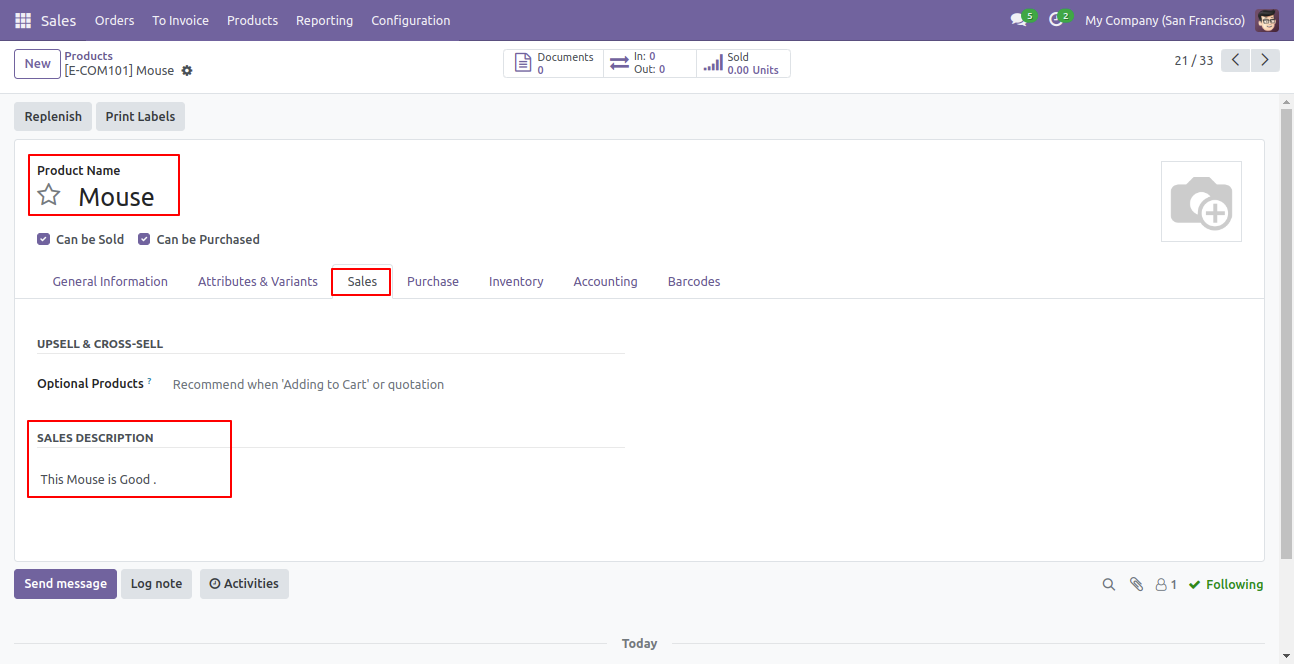
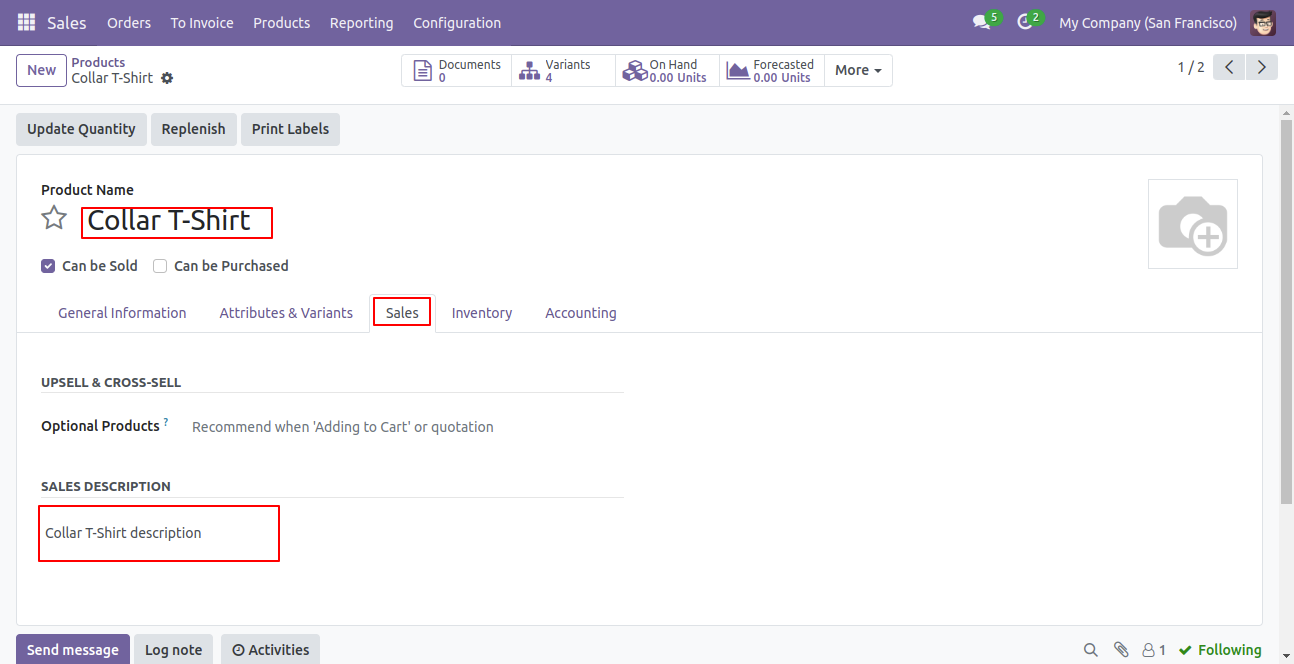
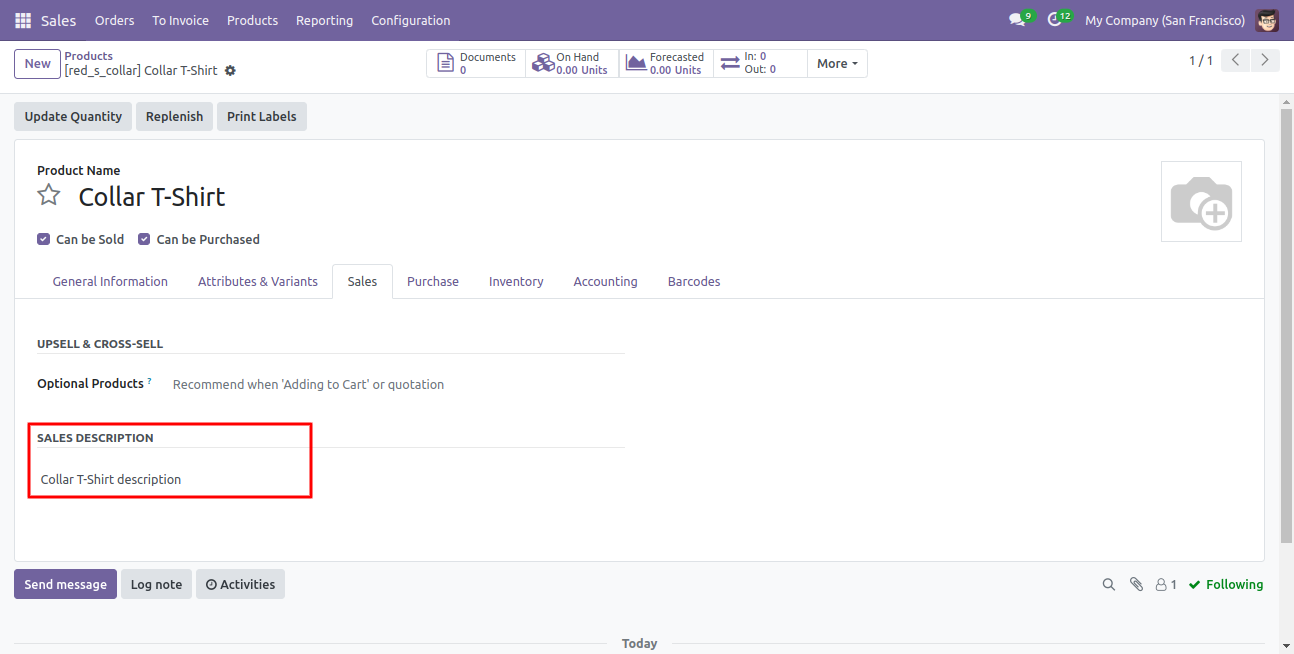
The 'Sales' tab in the product 'Collar T-Shirt'.
The following barcodes are imported.
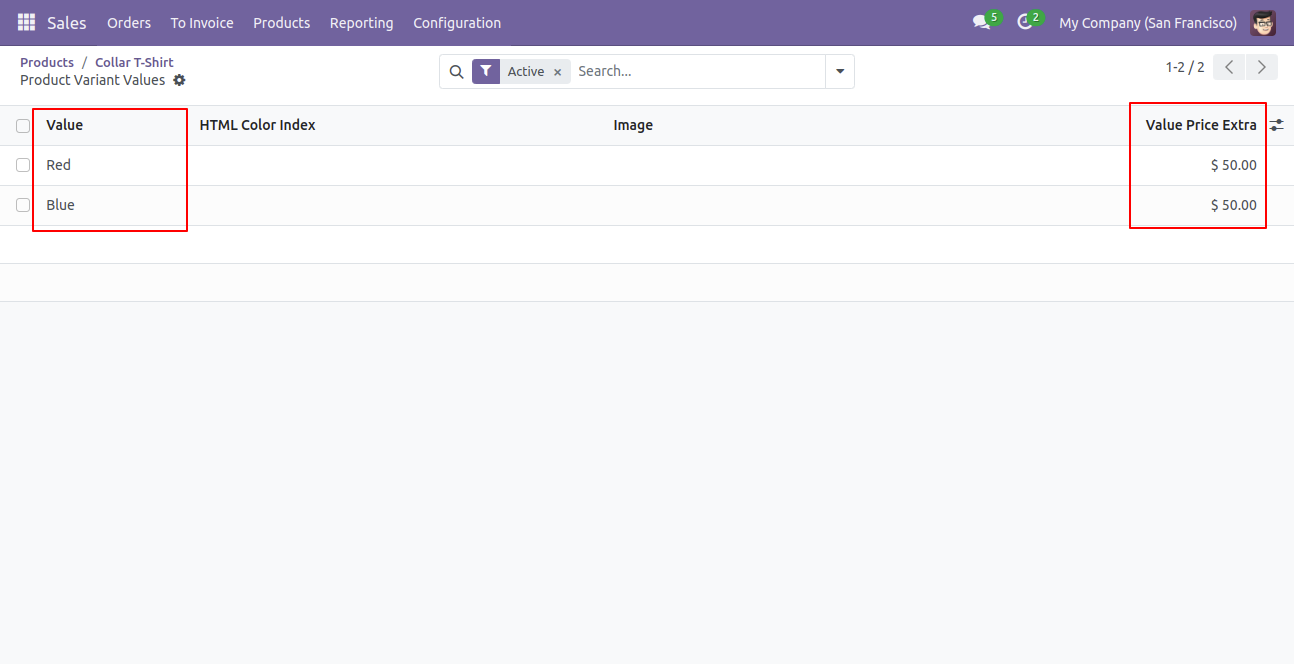
You can configure the product from here.
Product variant imported succesfully.
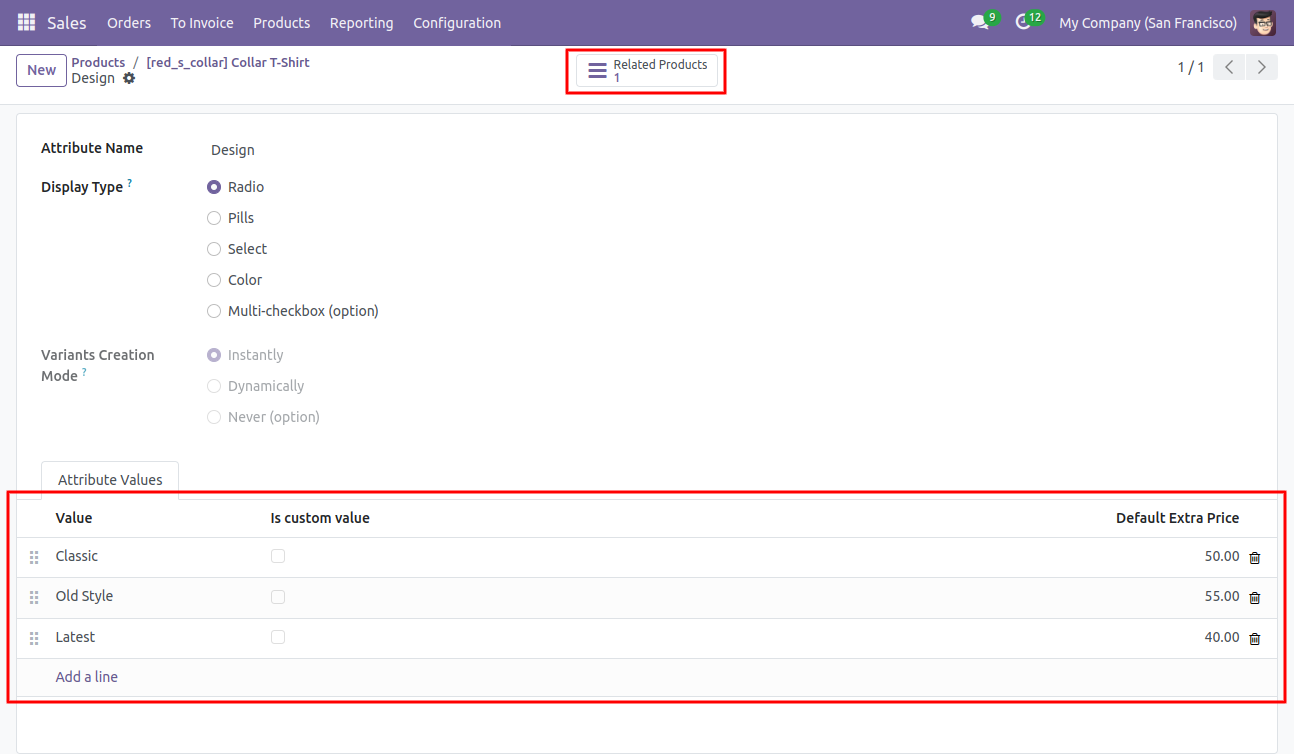
Custom Fields.
Features
- You can create or update product variants by barcode, name & internal reference.
- You can identify the same name product/product variant by "Unique Identification" fields.
- Easy to import Product Variant (image, price, quantity, stock, etc) from CSV or Excel.
- Easy to import custom fields with product variants.
- You can import product images by image URL or local image path. (Local URL means URL of your odoo server files location, please note it is not your odoo user local system path.)
- Easy to import products with stock on-hand quantity.
First, you need to tick the 'Import Product Variants' group to import product Variant.
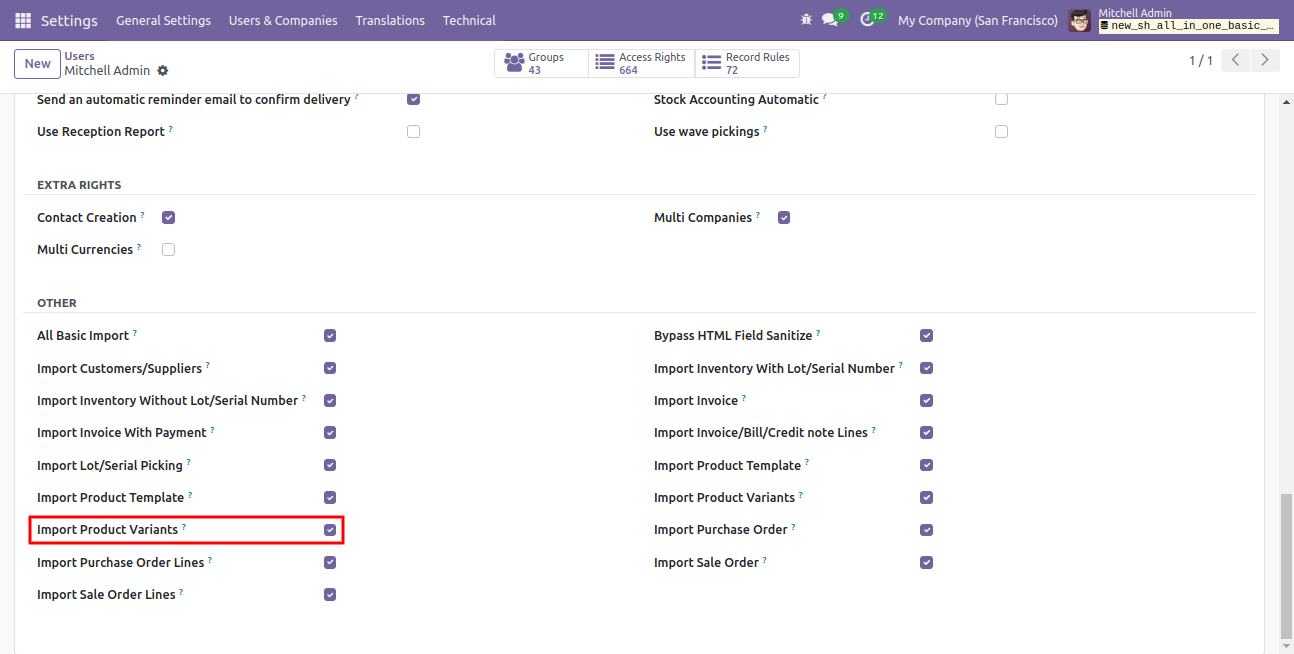
'Import Product Variants' menu.
After that one wizard open here you can import products with product variants From CSV/Excel.
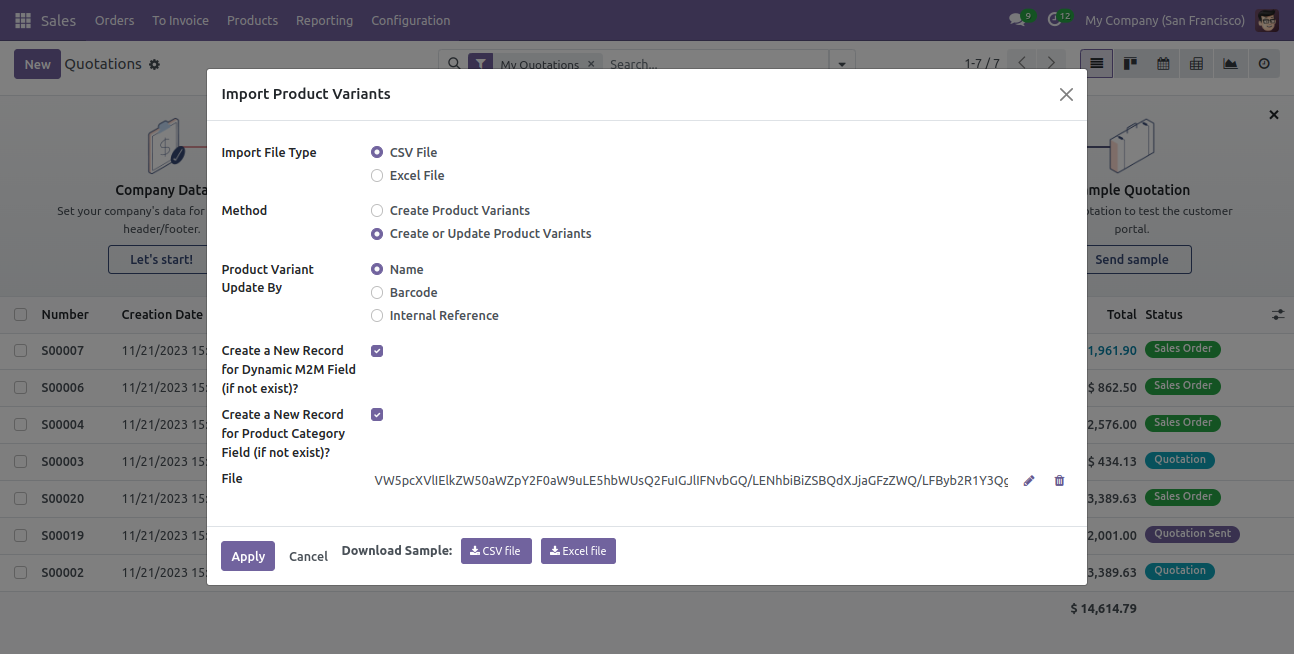
You can create or update product variants by barcode, name & internal reference.
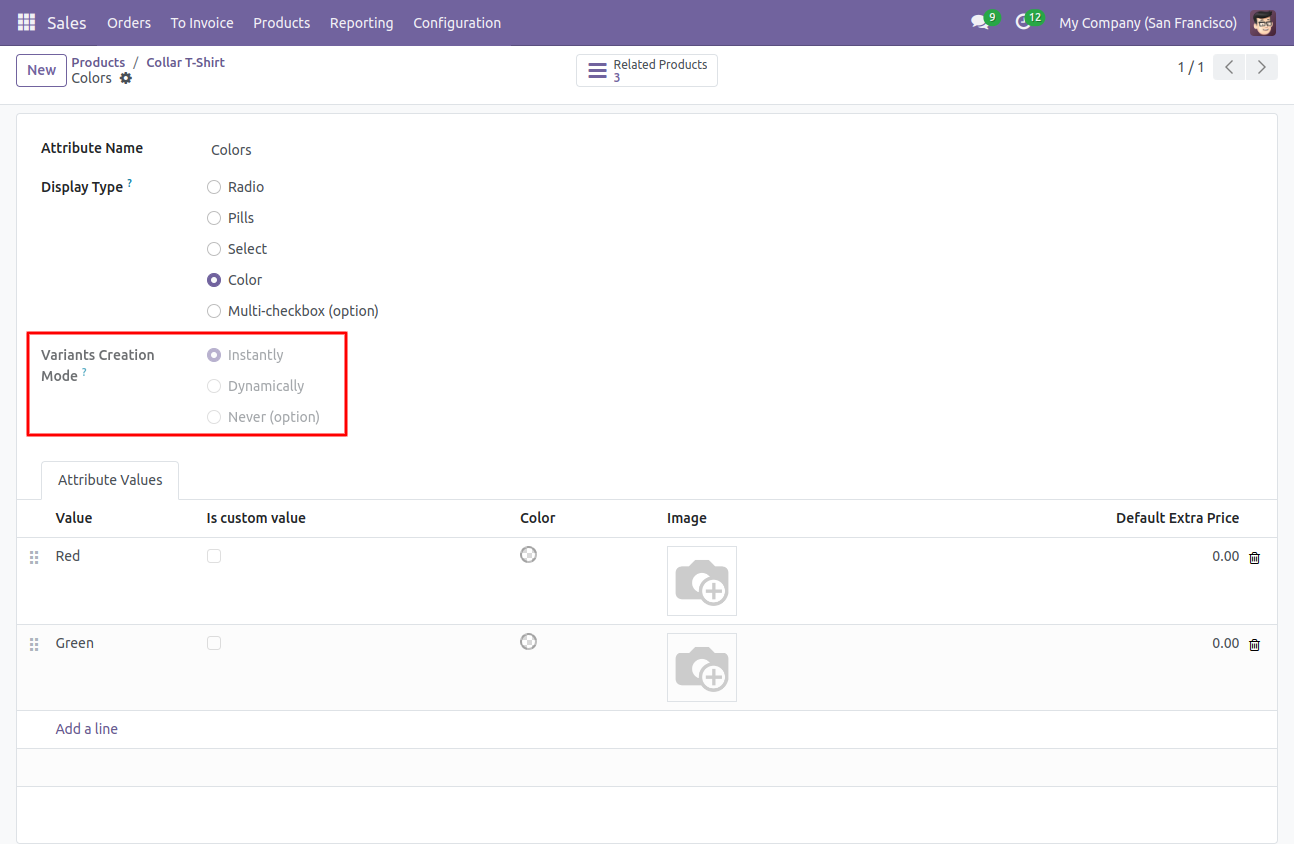
Please tick this option during import to create record auto for many2many.
Success message looks like below it shows successfully imported records.
The following product template fields are imported.
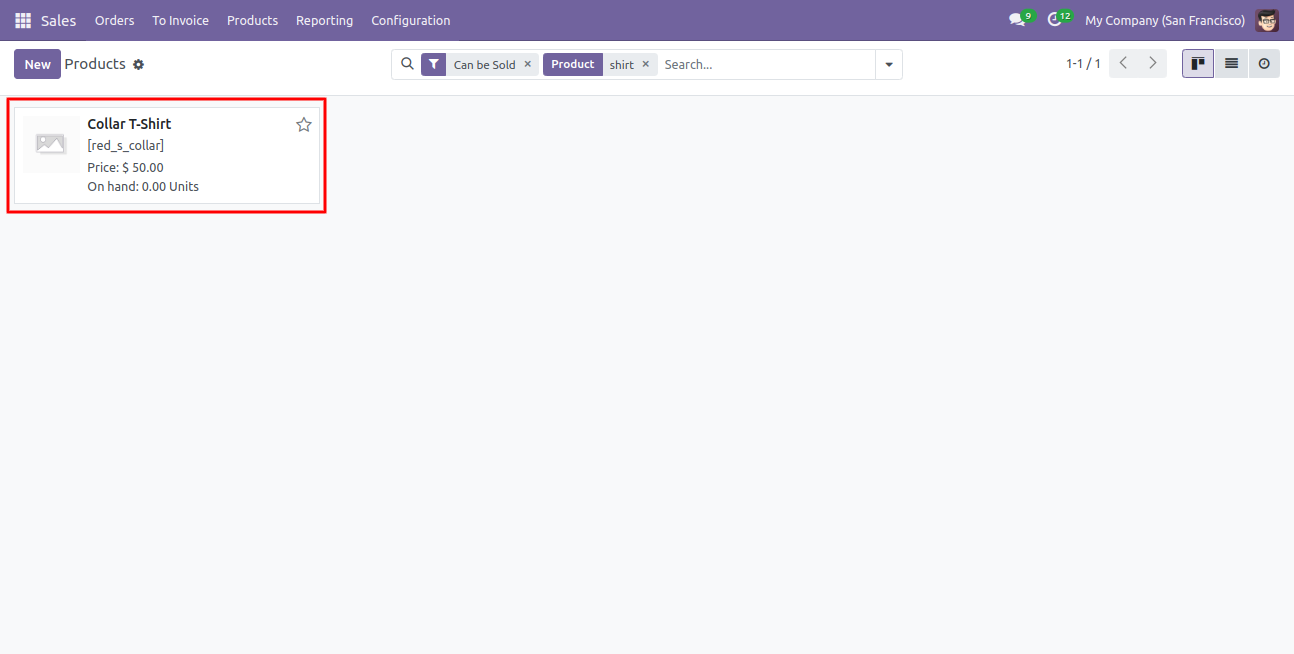
We see the imported product 'Collar T-Shirt' fields.
Product variants.
The 'Sales' tab in the product 'Collar T-Shirt'.
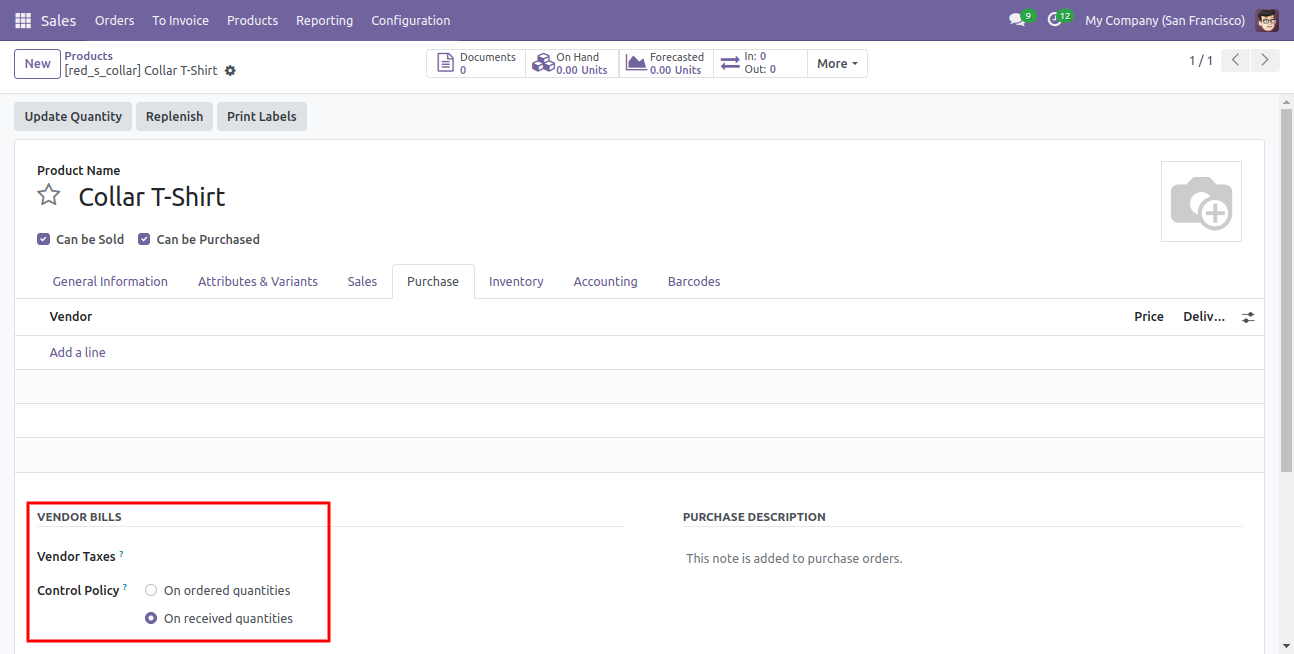
The 'Purchase' tab in the product 'Collar T-Shirt'.
Product variant imported succesfully.
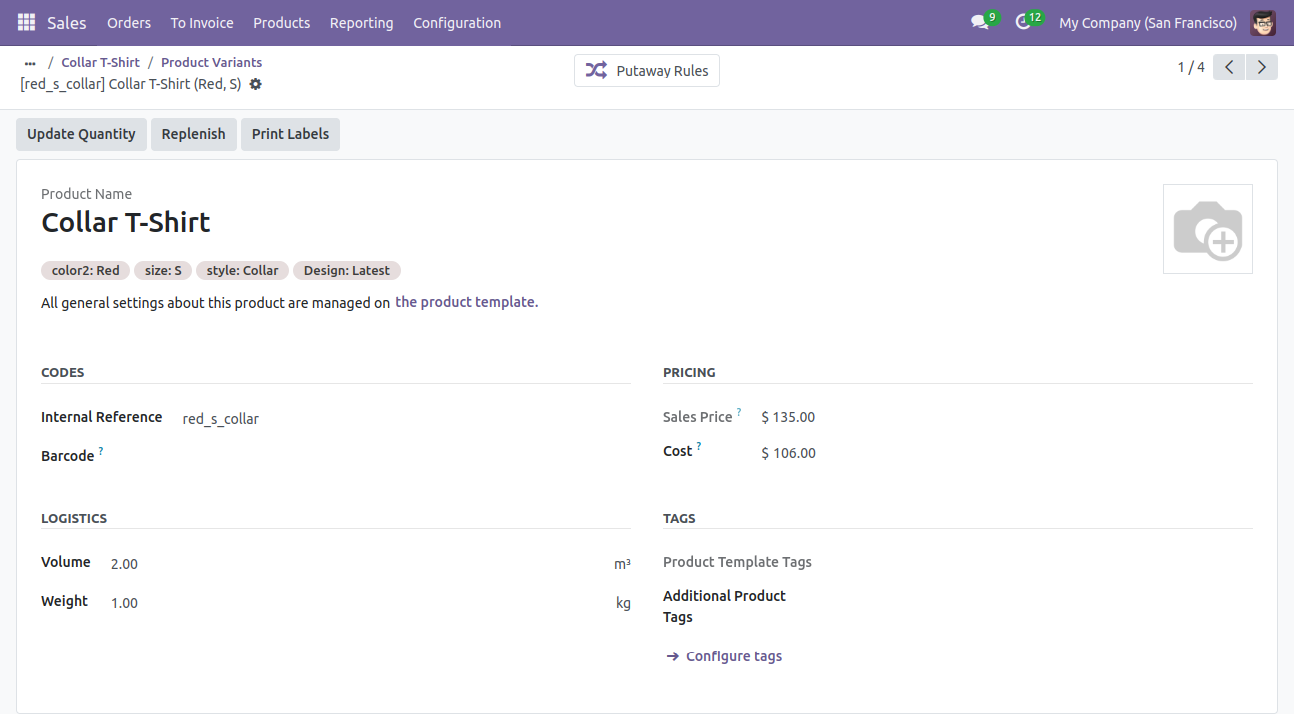
Product variant details with on hand qty.
You can see the product variant field which is imported.
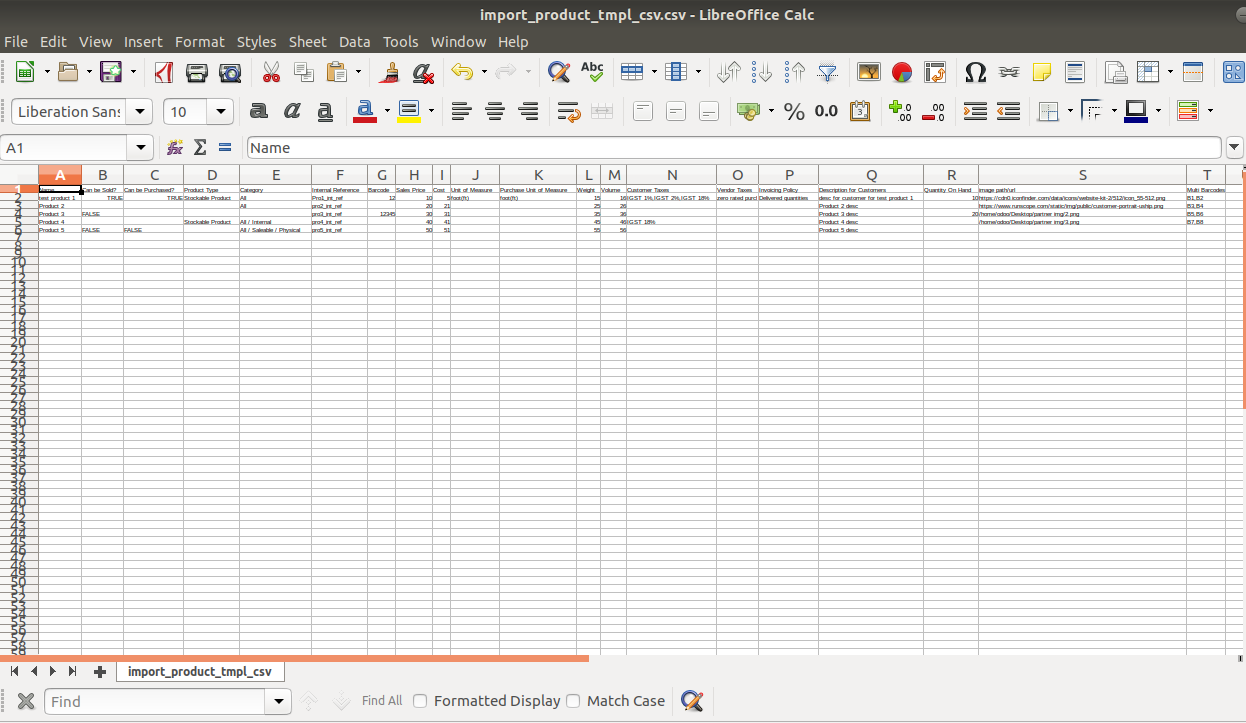
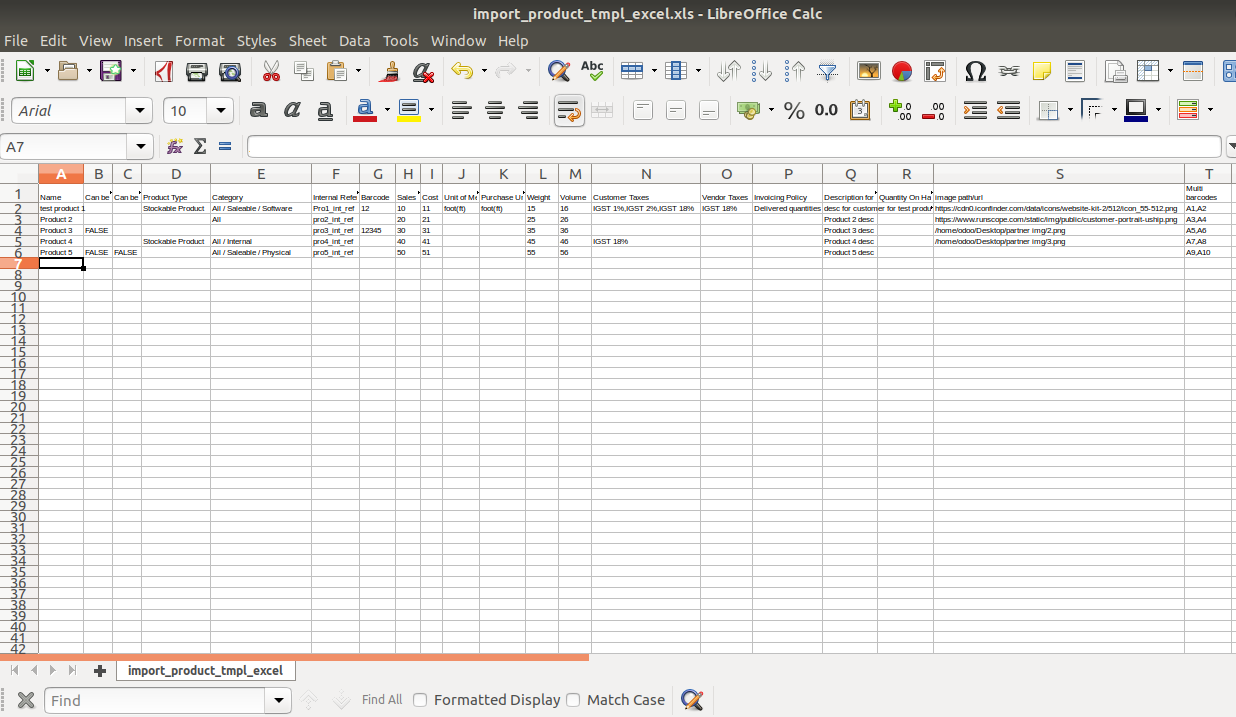
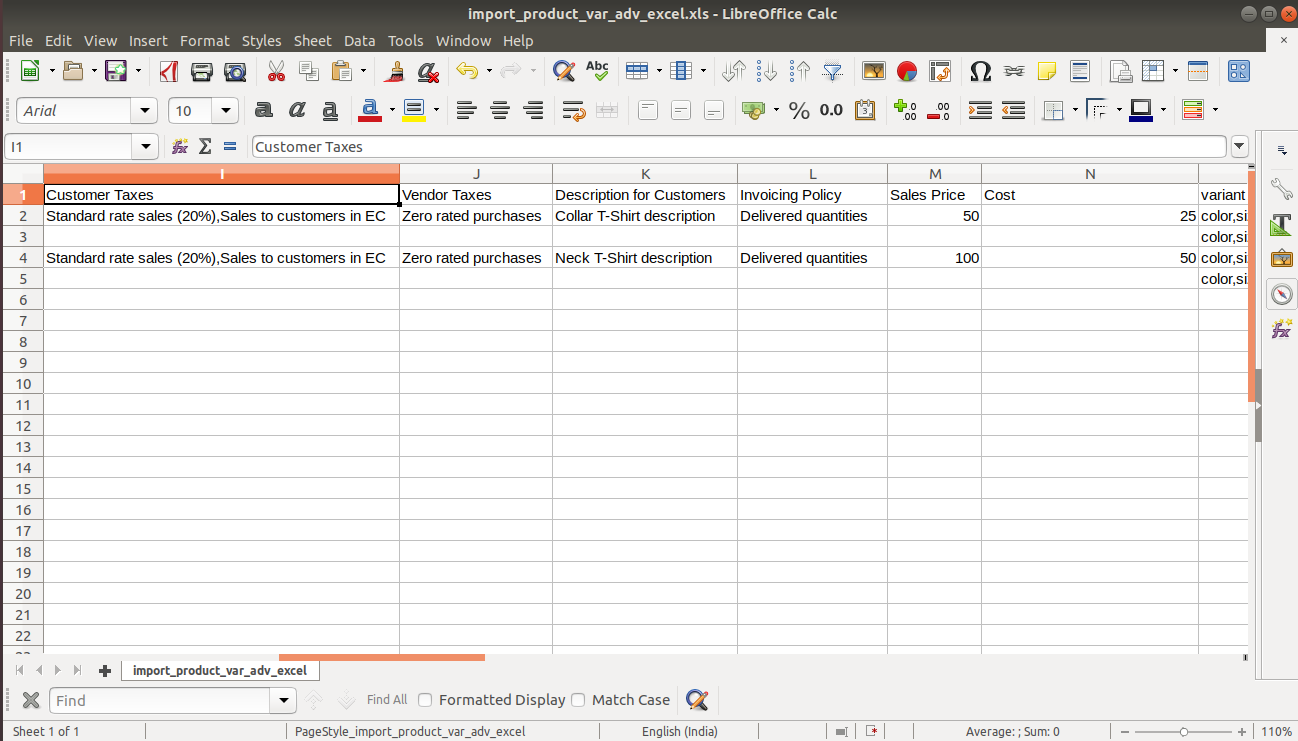
Your CSV/Excel file format must match like below.
In the 'Can be sold & purchased?' take true by default if not provided.
In the 'Product type' take consumable by default if not provided.
Take the same name as ERP in the 'UOM'.

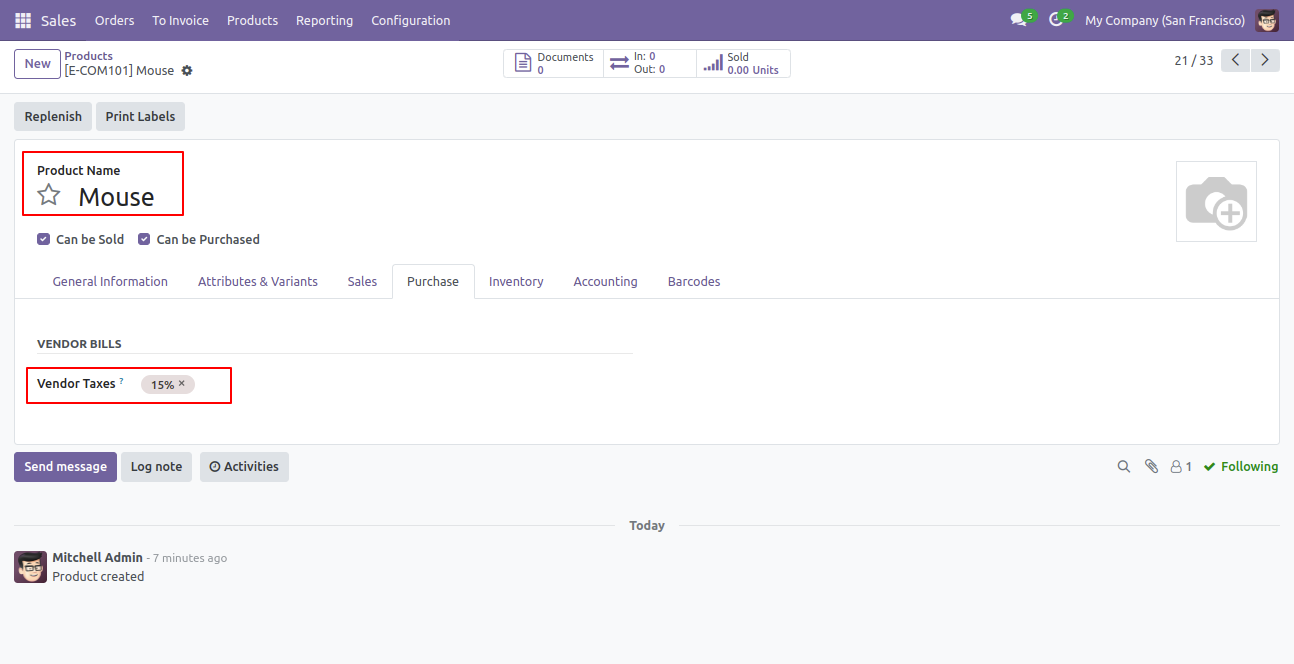
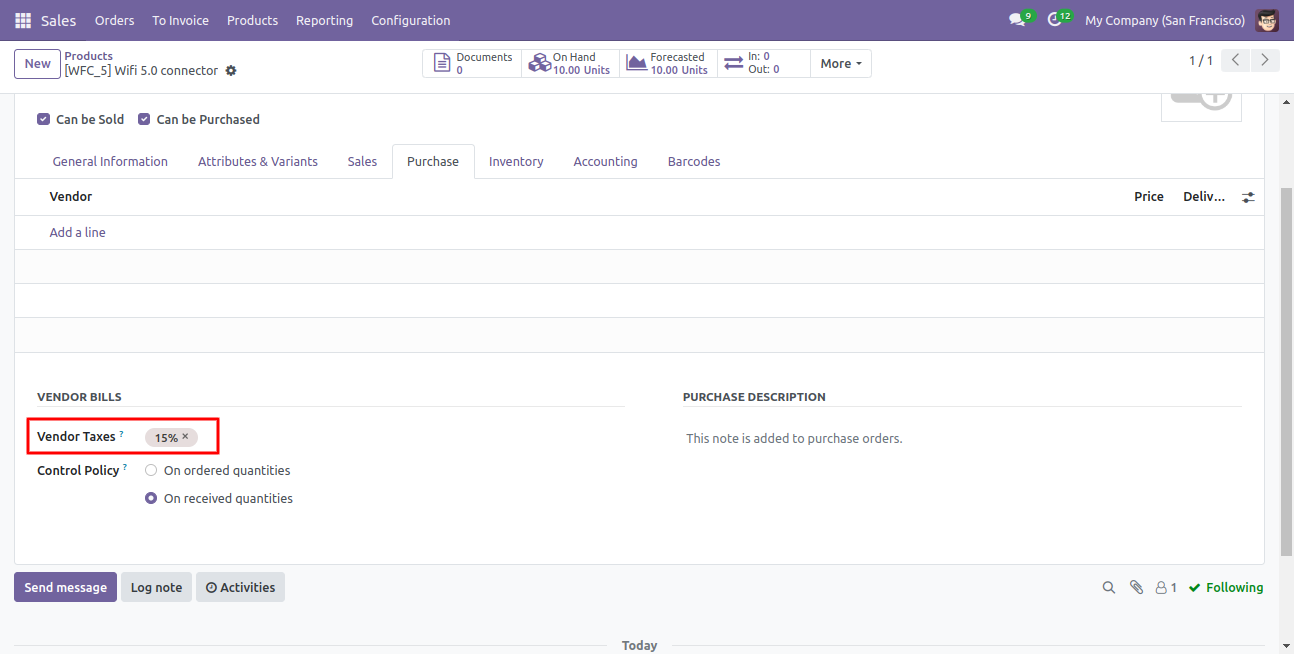
Taxes are separated by comma(,).
Enter the same text of selection field the same as ERP in the 'Invoice policy' otherwise by default it takes ordered quantities.
You can import any number of custom fields. All custom fields must exist on the product.product model.
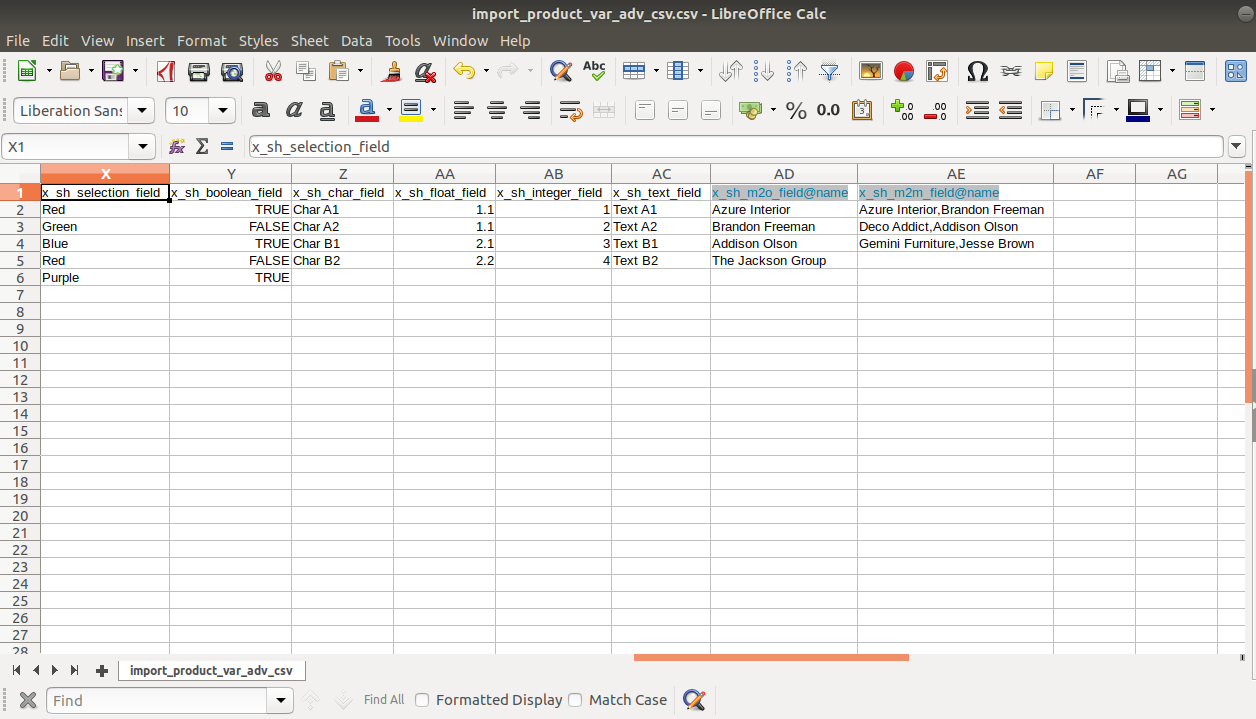
You can import any number of custom fields. All custom fields must exist on the product.product model.

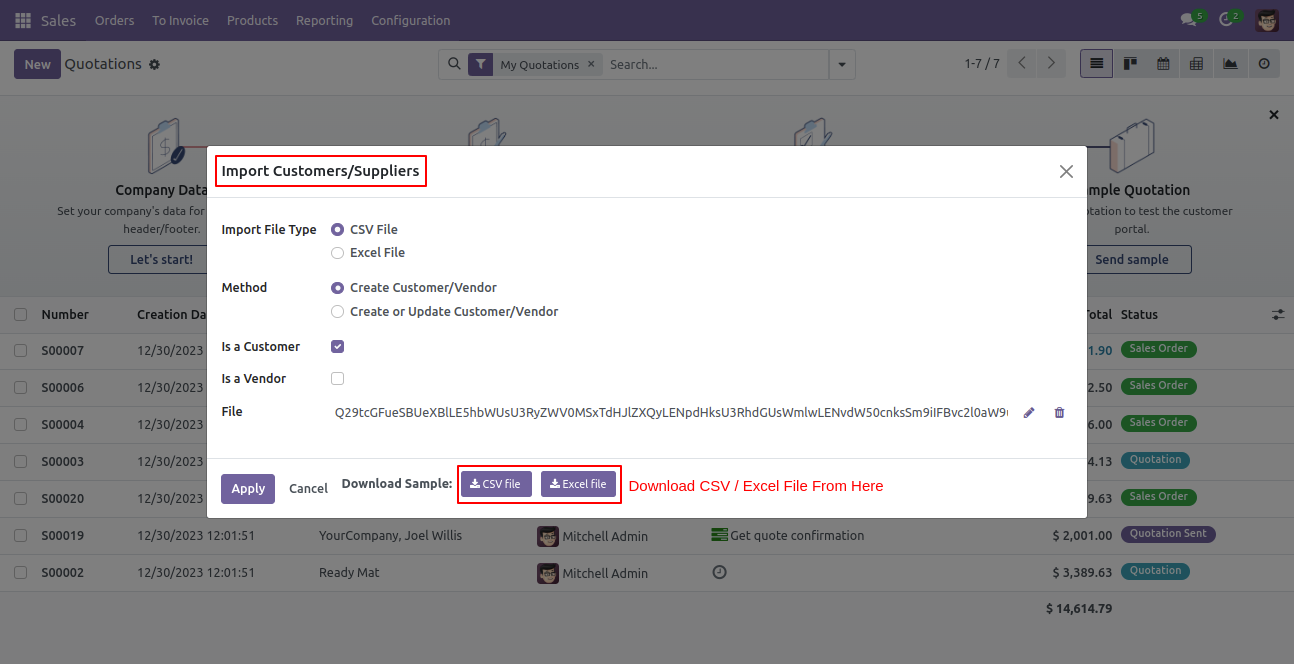
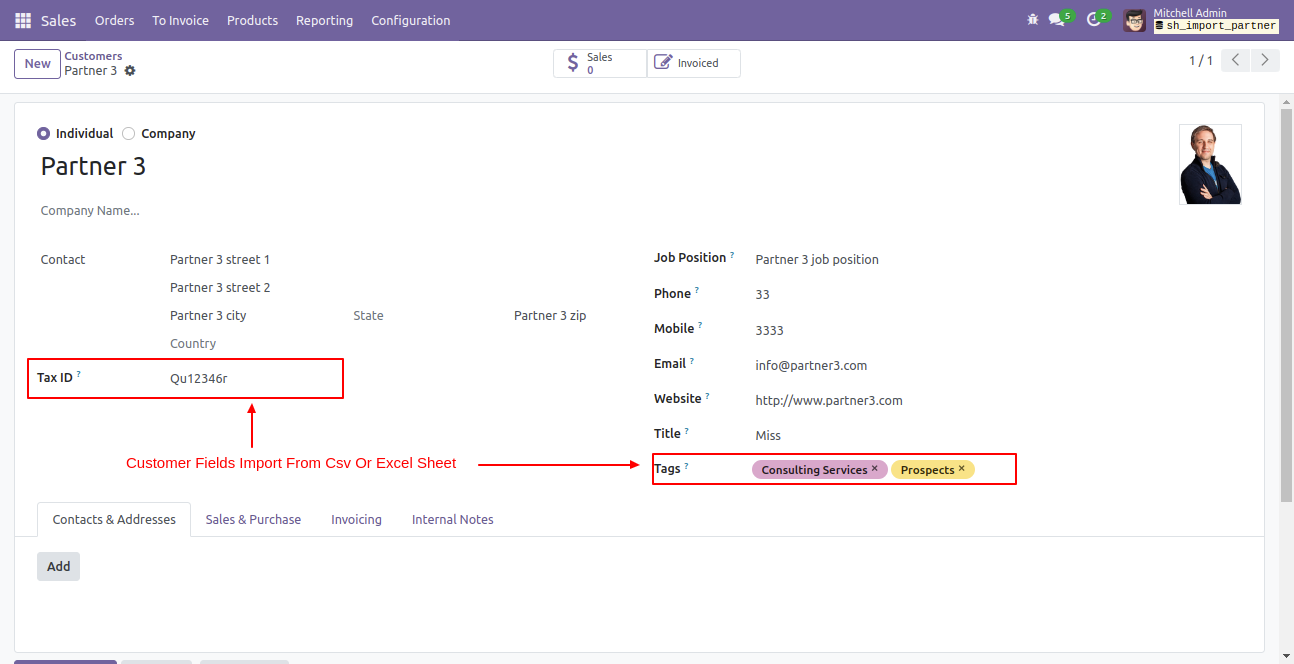
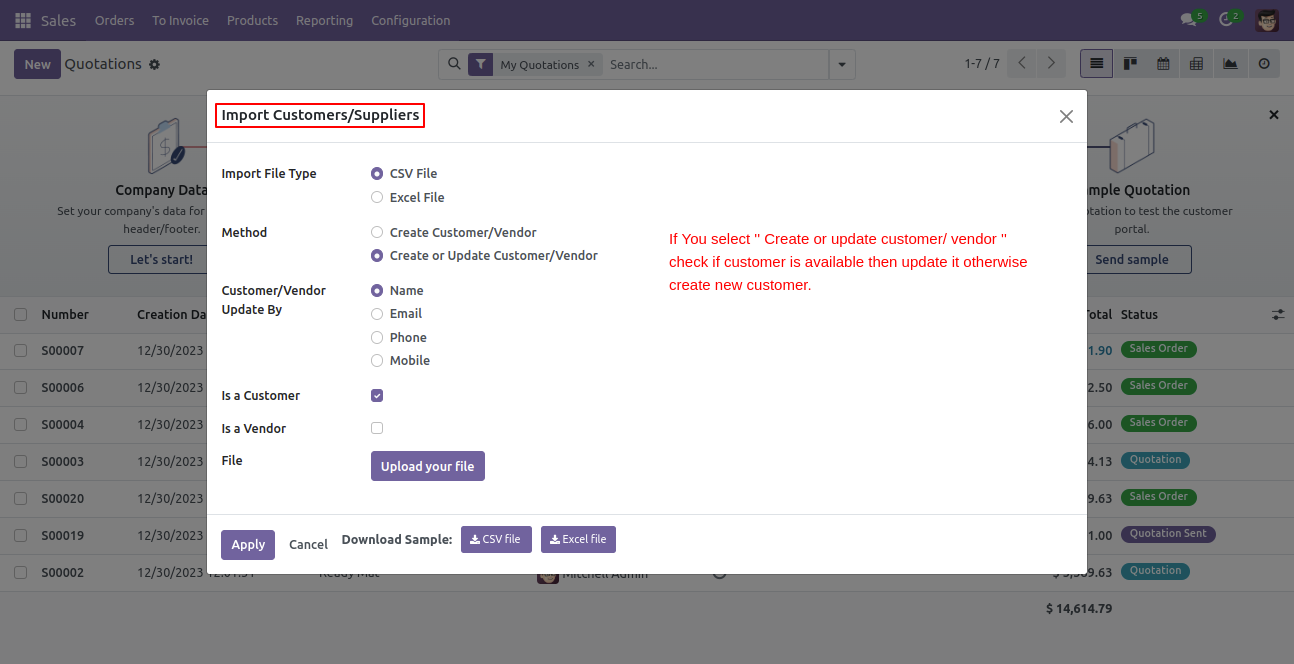
Features
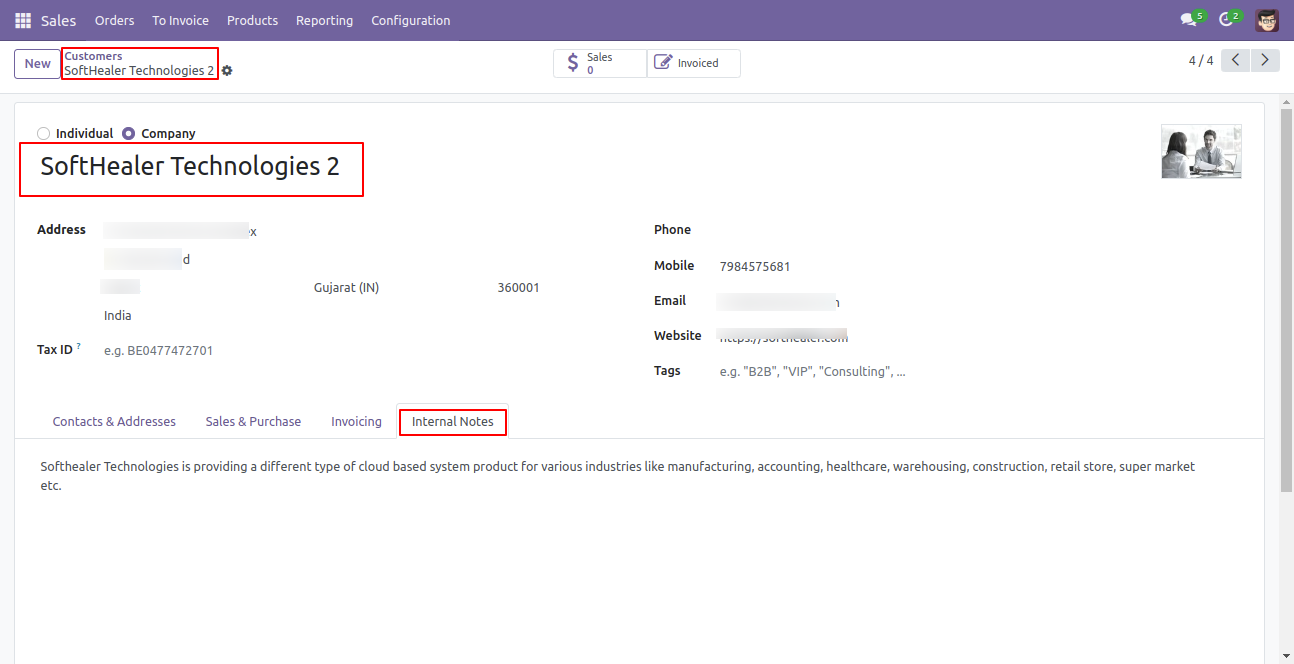
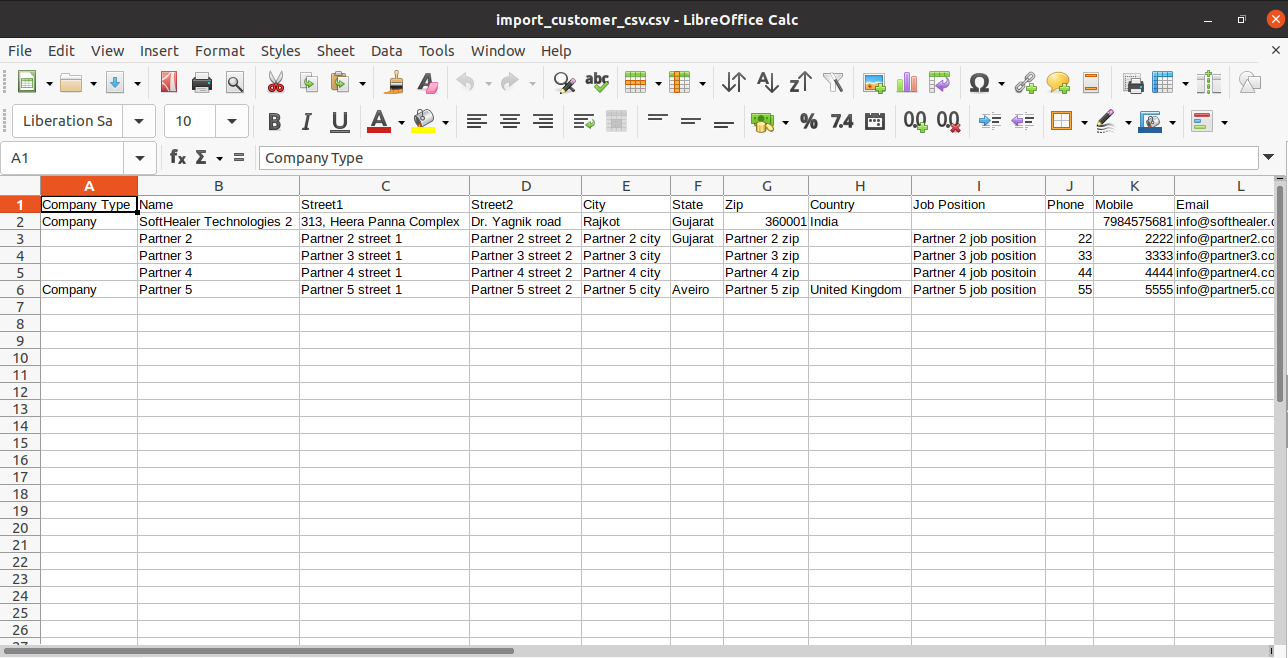
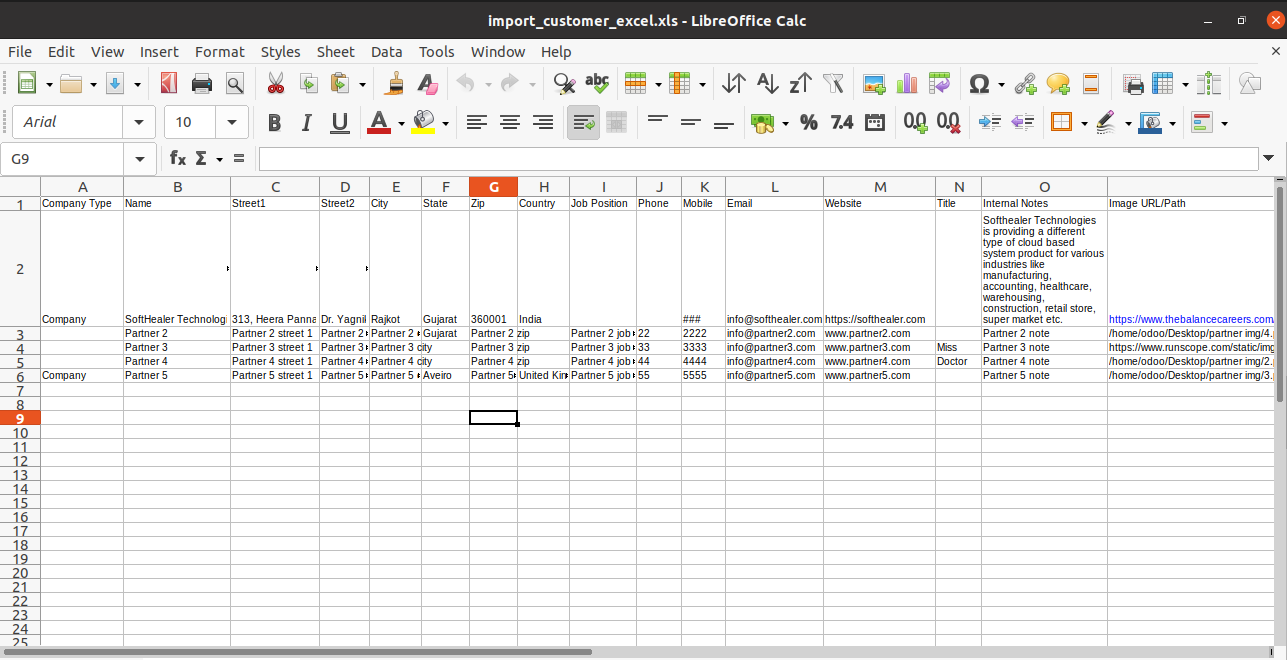
- You can update customers/suppliers with name, email, phone, mobile field.
- Easy to import customers/suppliers/vendors from CSV/Excel file.
- Easy to import custom fields.
- Easy to import custom fields from CSV or Excel.
- Easy to import Text, Integer, Float, Character, Boolean, Selection, Many2one, Many2many custom fields.
- Easy to import image by path/URL (Local URL means URL of your odoo server files location, please note it is not your odoo user local system path.)
Enable the 'Import Expenses' group.
Click on the 'Import Expense' menu.
After that, this wizard will open enter details and apply it. You can import expense or expense sheet from CSV/Excel file.
You can import expense employees by name, work phone, work email & badge ID and expense products by name, internal reference or barcode.
Select file and click on the 'Apply' button.
Success message looks like below it's shows successfully imported records.
Imported data with form view.
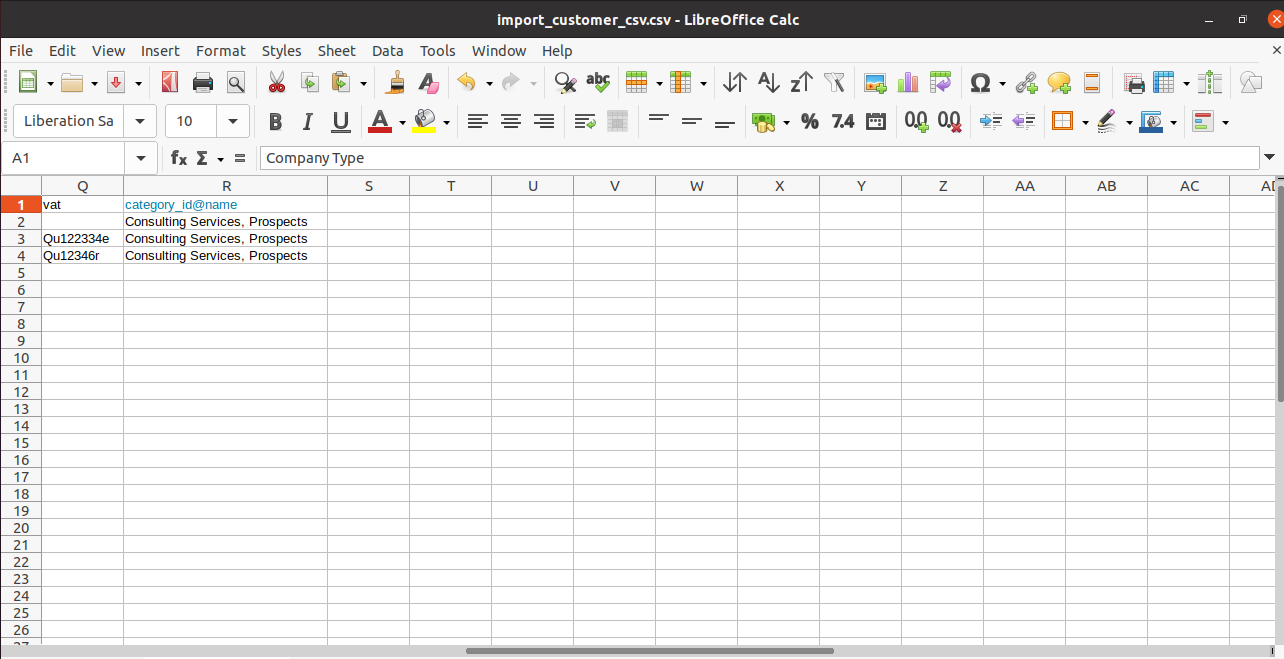
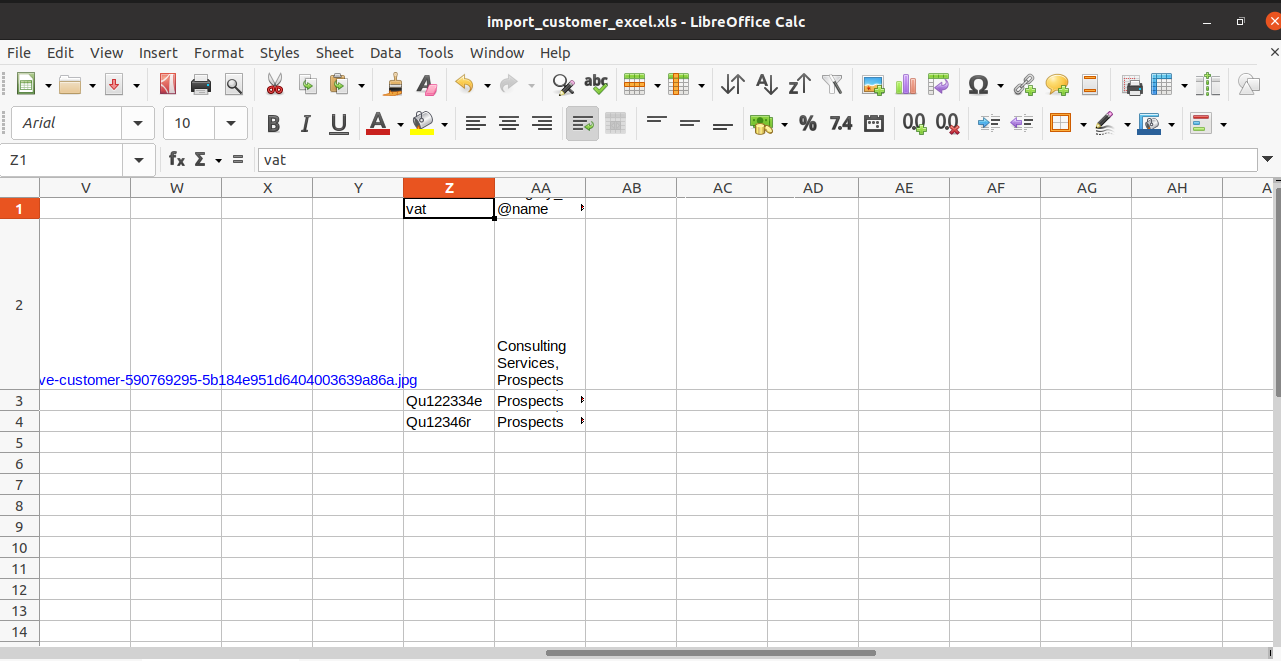
Your CSV/Excel/XLS file format must match like below.
Now we import expense sheet.
Imported data form view.
Your CSV/Excel/XLS file format must match like below.
Features
- Import products/product templates from CSV or Excel.
- You can import multiple barcodes for single products and product variants.
- Import product by Name, Barcode, Internal Reference.
- Import product image by path/URL. (Local URL means URL of your odoo server files location, please note it is not your odoo user local system path.)
- Easy to import products with stock on-hand quantity.
- Easy to import custom fields from CSV or Excel.
- Easy to import Text, Integer, Float, Character, Boolean, Selection, Many2one, Many2many custom fields.
- This module is compatible with Odoo's Multi-Company Feature.
First, you need to tick the 'Import Product Template' group to import product template.
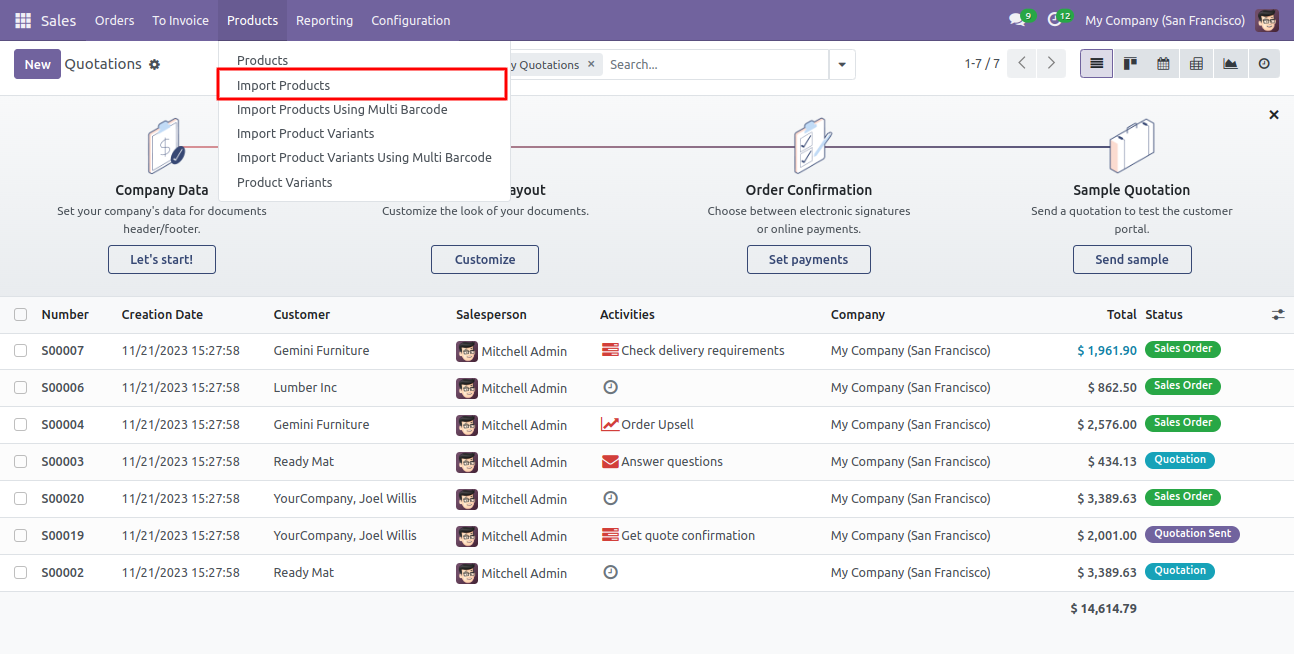
'Import Products' menu in products.
When you click the 'Import Products' button, the wizard will open that looks like below.

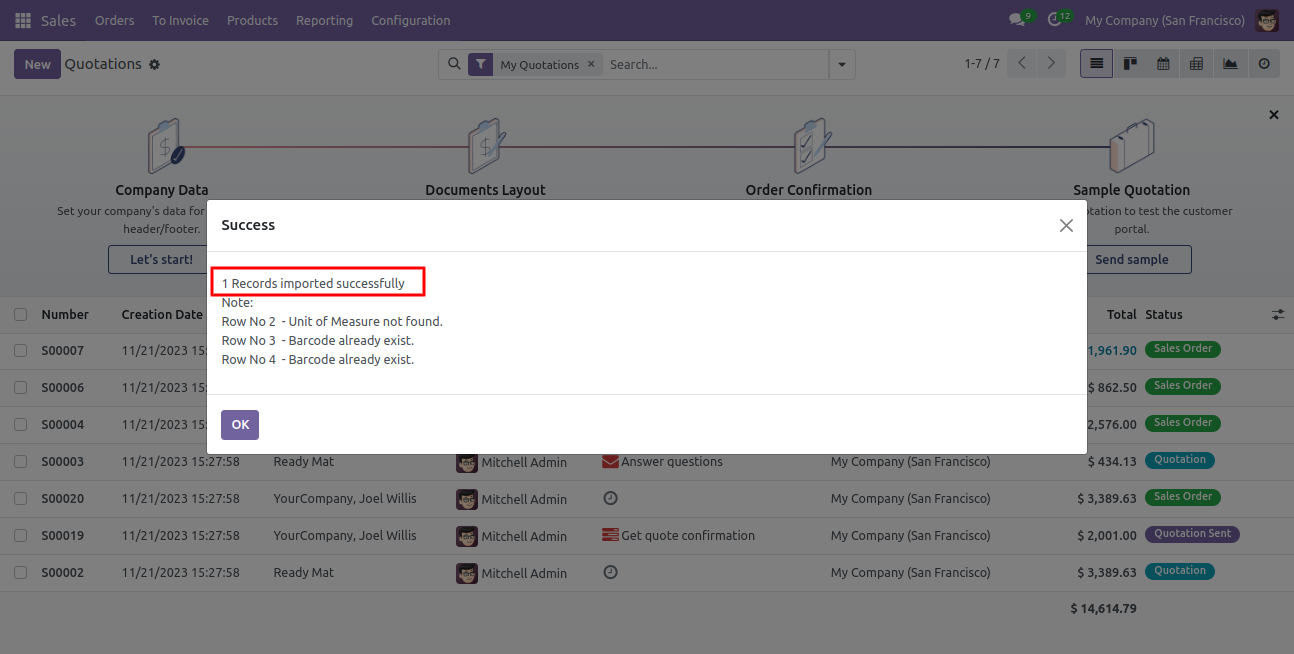
Success message looks like below it shows successfully imported records and also provides a list of unimported records with row number in sheet and relative details of data invalidation.
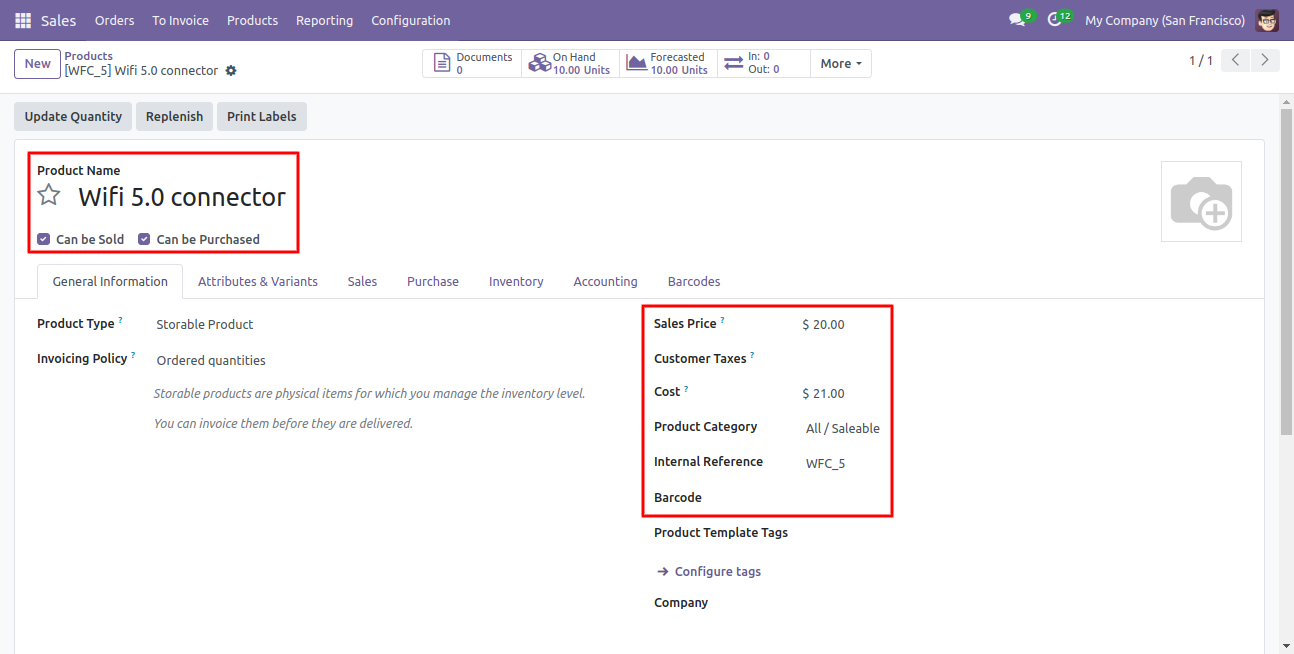
The following fields are imported.
Your csv file must match like below.
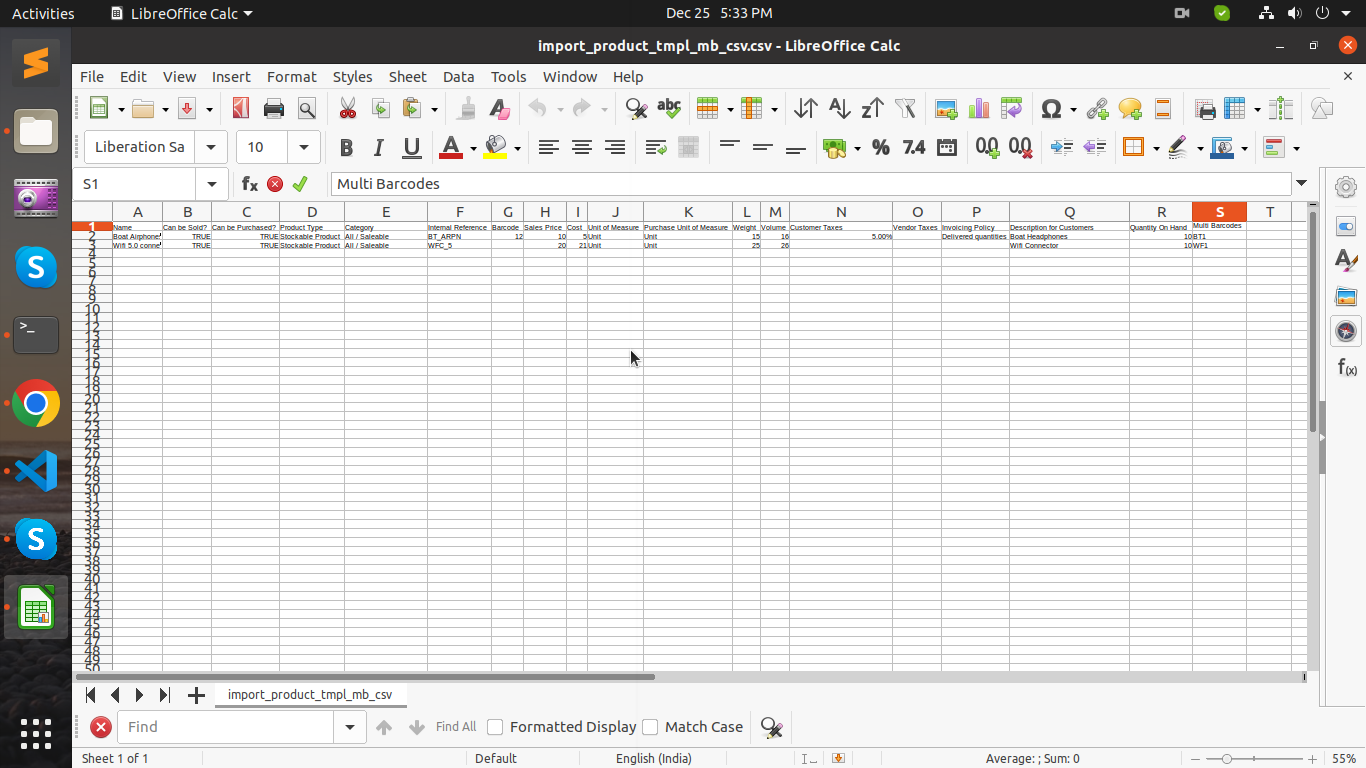
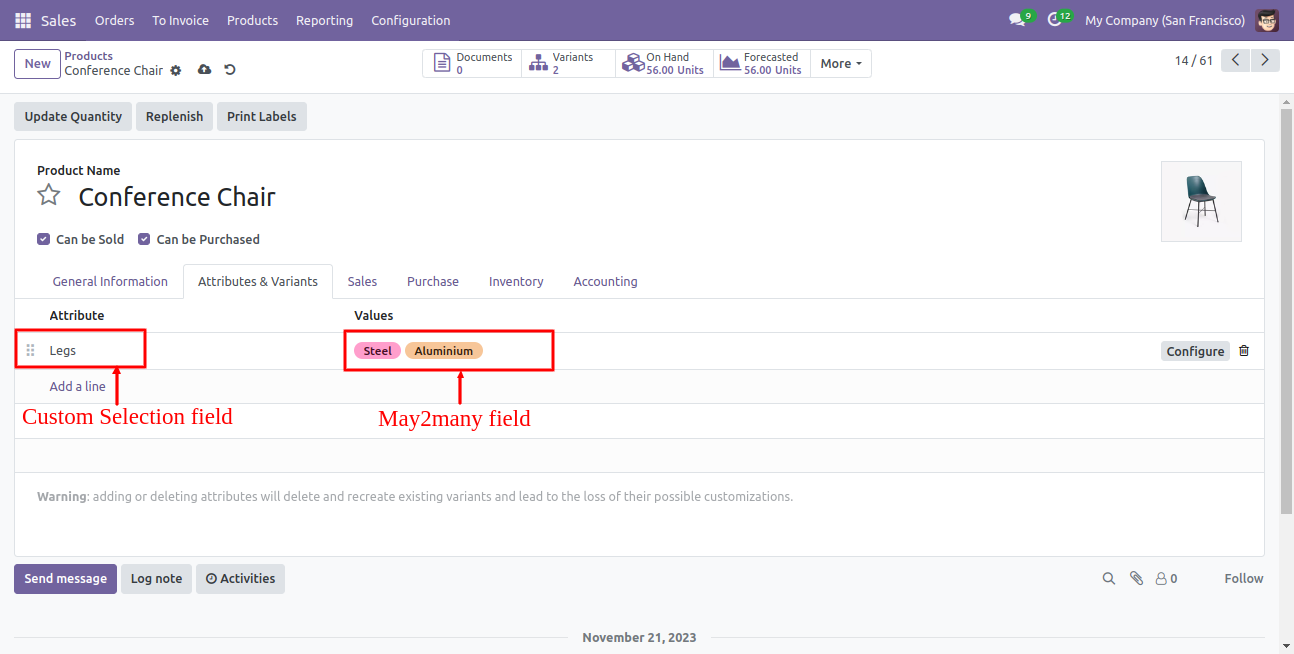
Product template import with many2many & custom selection fields.
Your CSV file must match like below.
Features
- You can import unit price based on sheet.
- You can import unit price based on pricelist.
- Easy to import sale orders.
- Import from csv or excel.
- Add product by Name, Barcode, Internal Reference.
- Auto Confirm Sale option.
- Create customer if never exist option.
- Quotation/Order Number auto/as per sheet option.
- Import customer by Name, Reference, Id.
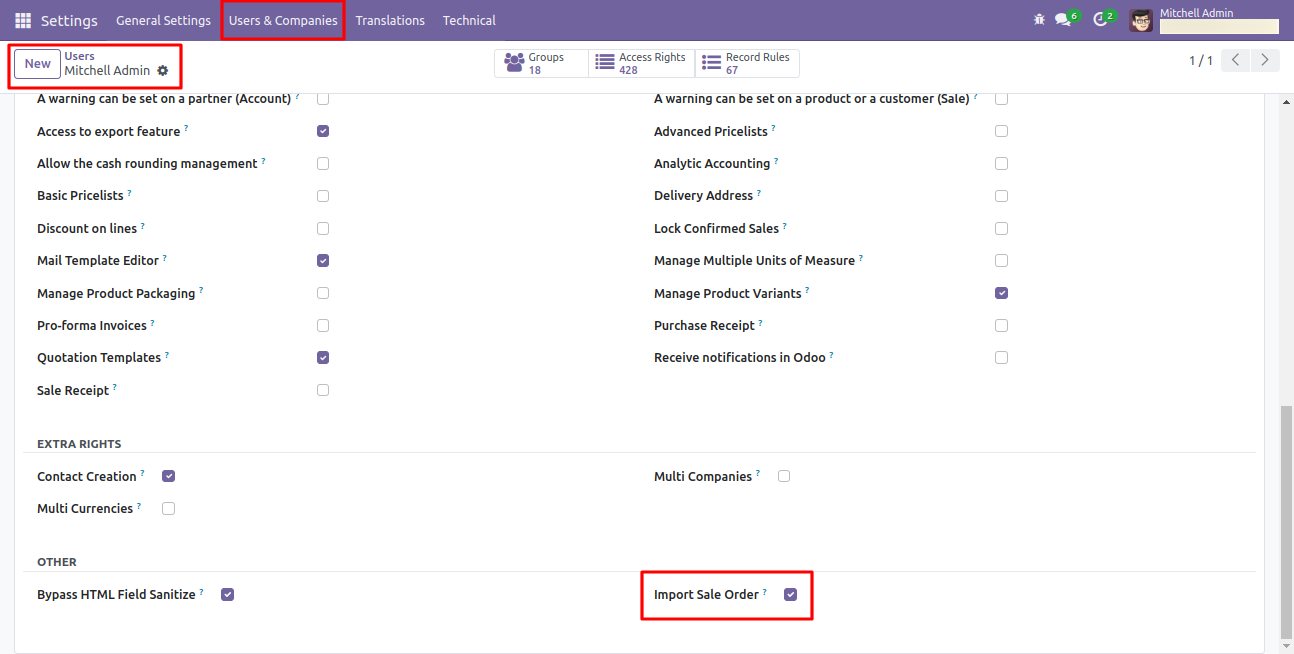
First you need to tick "Import Sale Order" group in order to import sale order
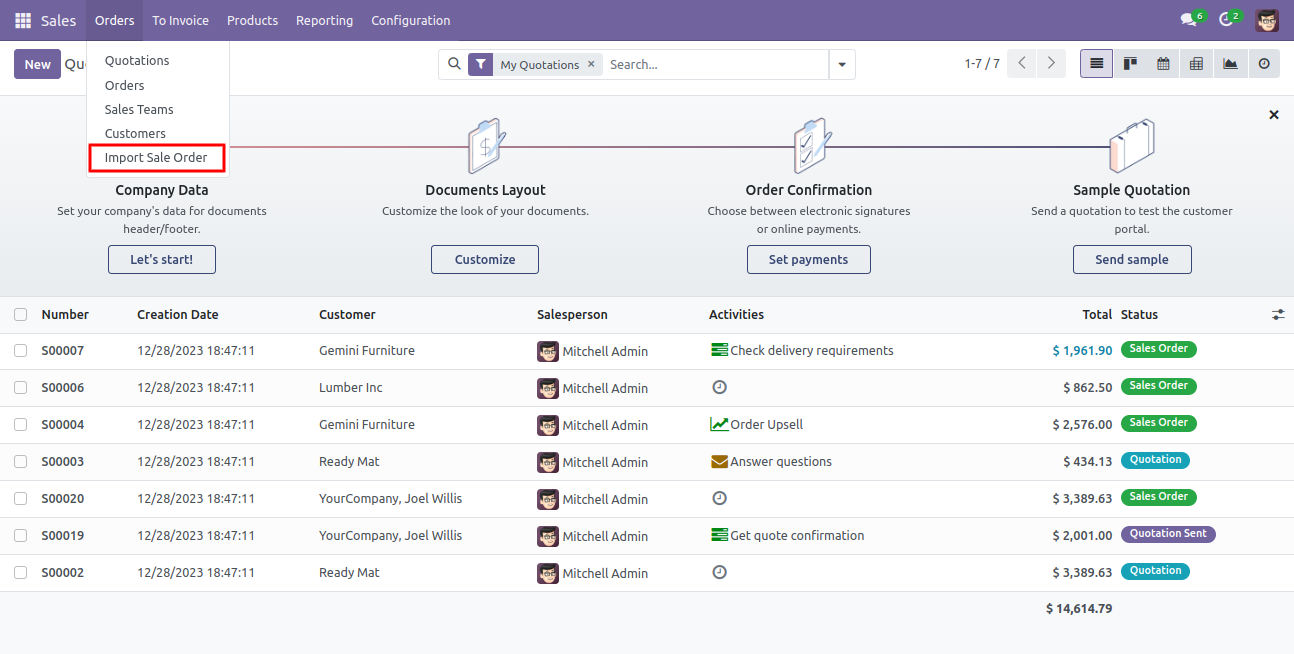
'Import Sale Order' menu in orders.
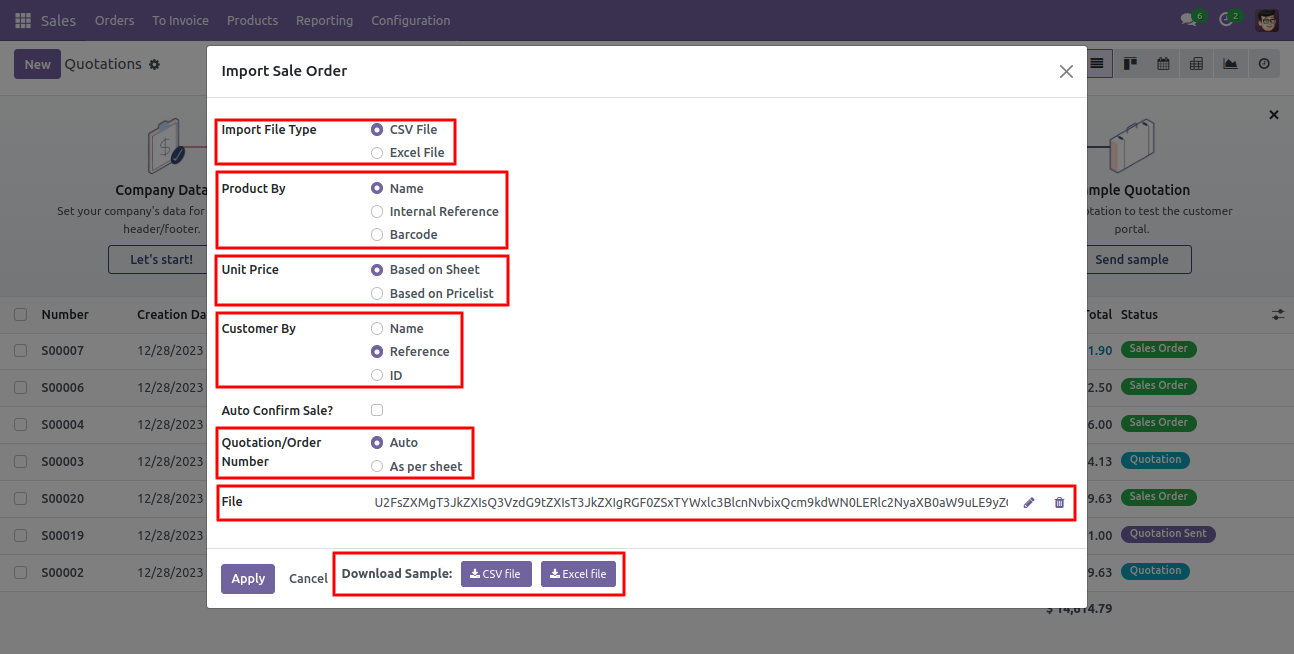
When you click 'Import Sale Order' menu, wizard will open that looks like below
Success message looks like below it's shows successfully imported records and also provides list of unimported records with row number in sheet and relative details of data invalidation.
Following fields are imported.

CSV/XLS file format must match like below.
Features
- You can import unit price based on sheet.
- You can import unit price based on pricelist.
- Easy to import product by Name, Barcode, Internal Reference.
- Easy to import custom fields from CSV or Excel.
- Easy to import Text, Integer, Float, Character, Boolean, Selection, Many2one, Many2many custom fields.
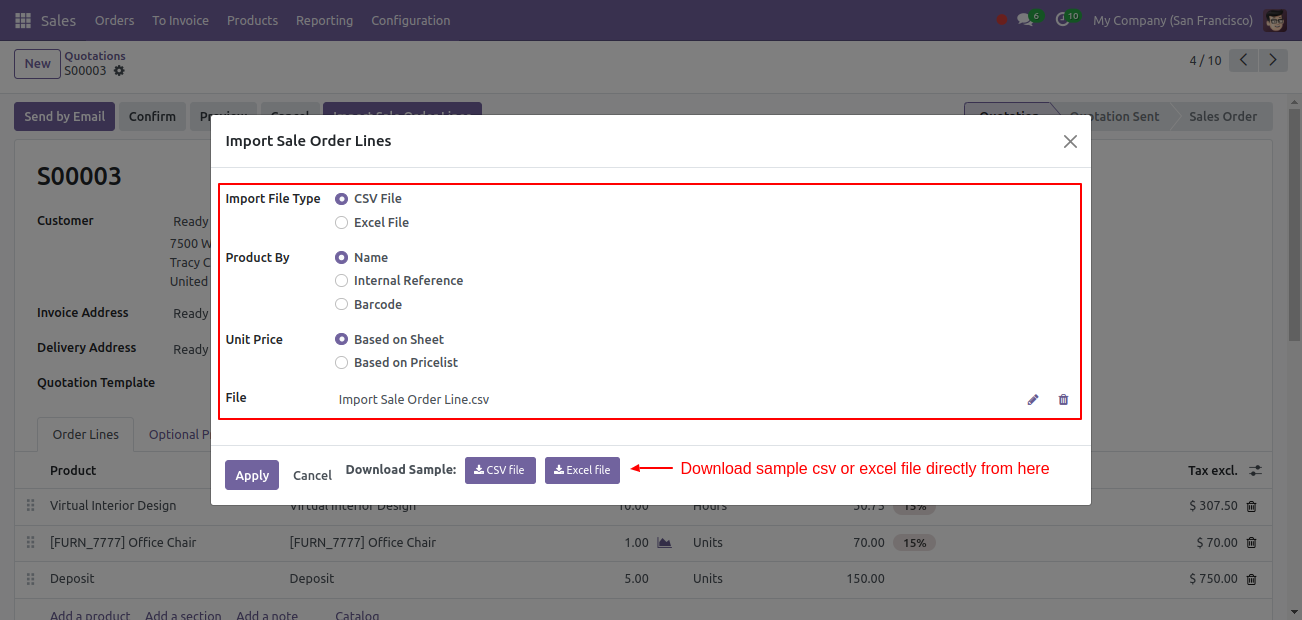
First, you need to tick the 'Import Sale Order Lines' group to import the sale order lines.

'Import Sale Order Lines' button in the sale order form view.
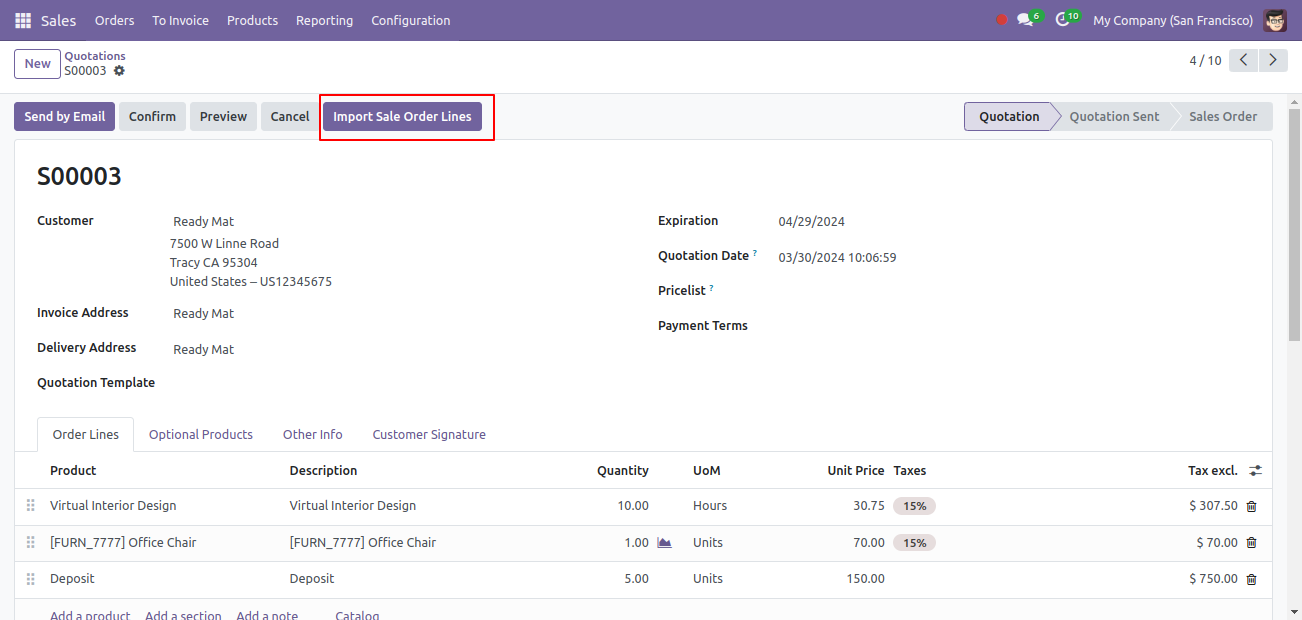
When you click the 'Import Sale Order Lines' menu, the wizard will open and it looks like below.
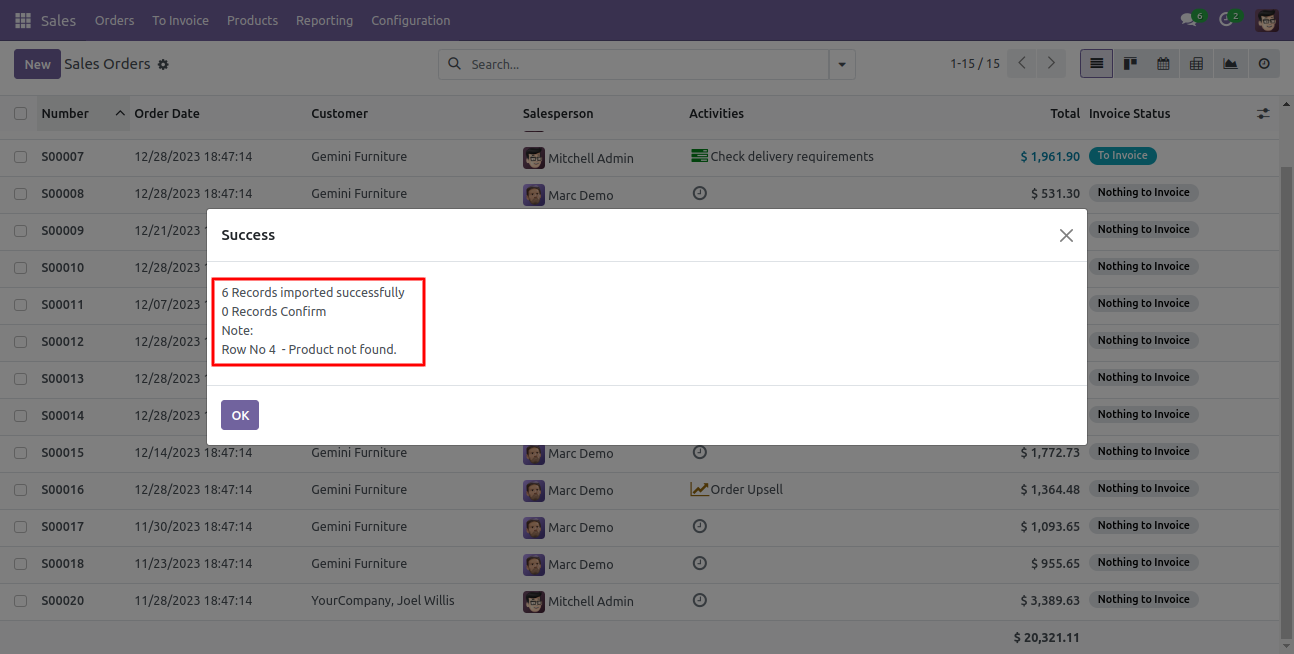
Success message looks like below it shows successfully imported records and also provides a list of unimported records with row number in sheet and relative details of data invalidation.
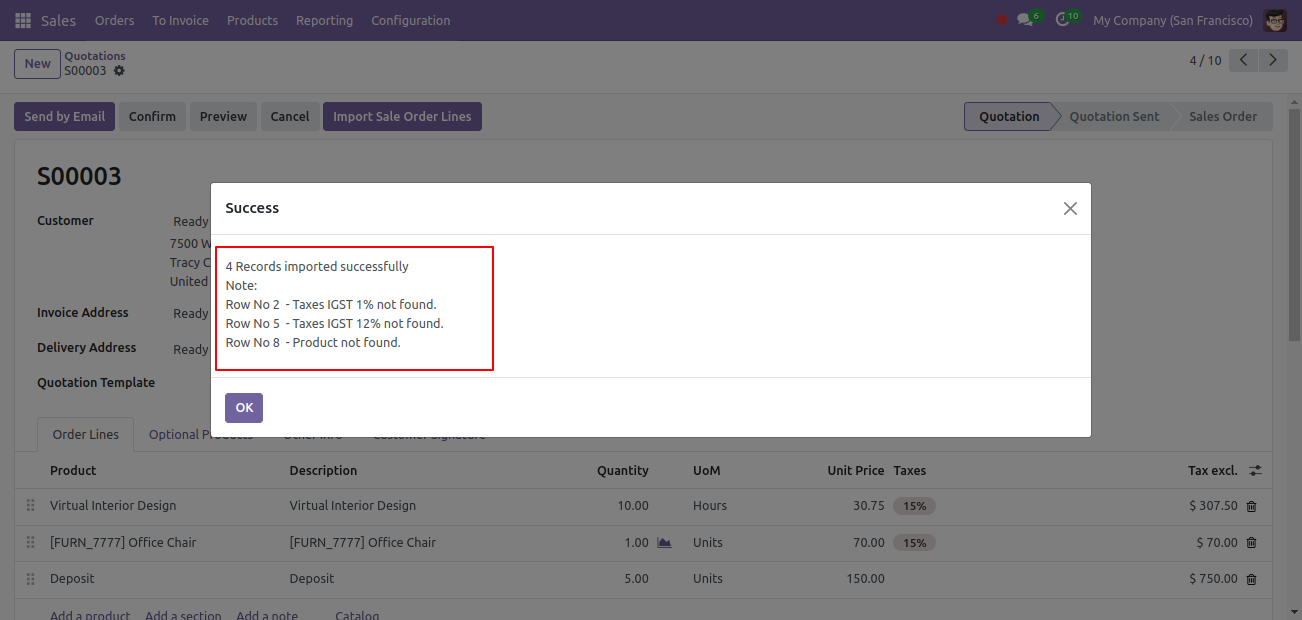
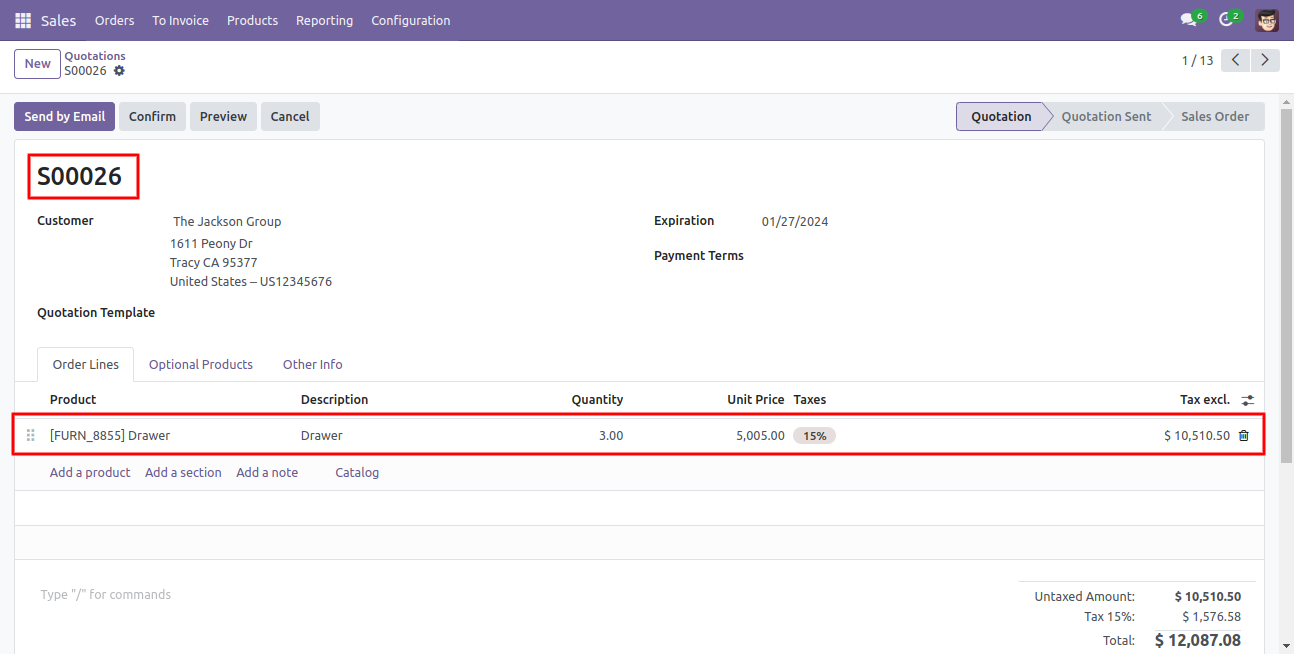
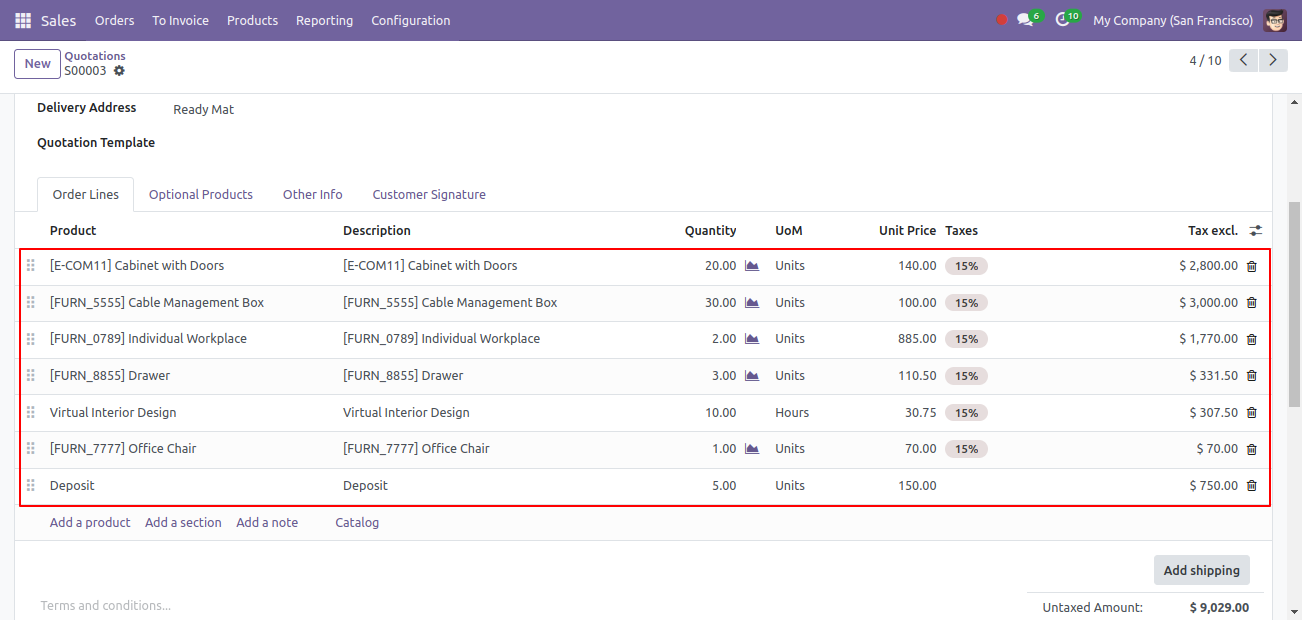
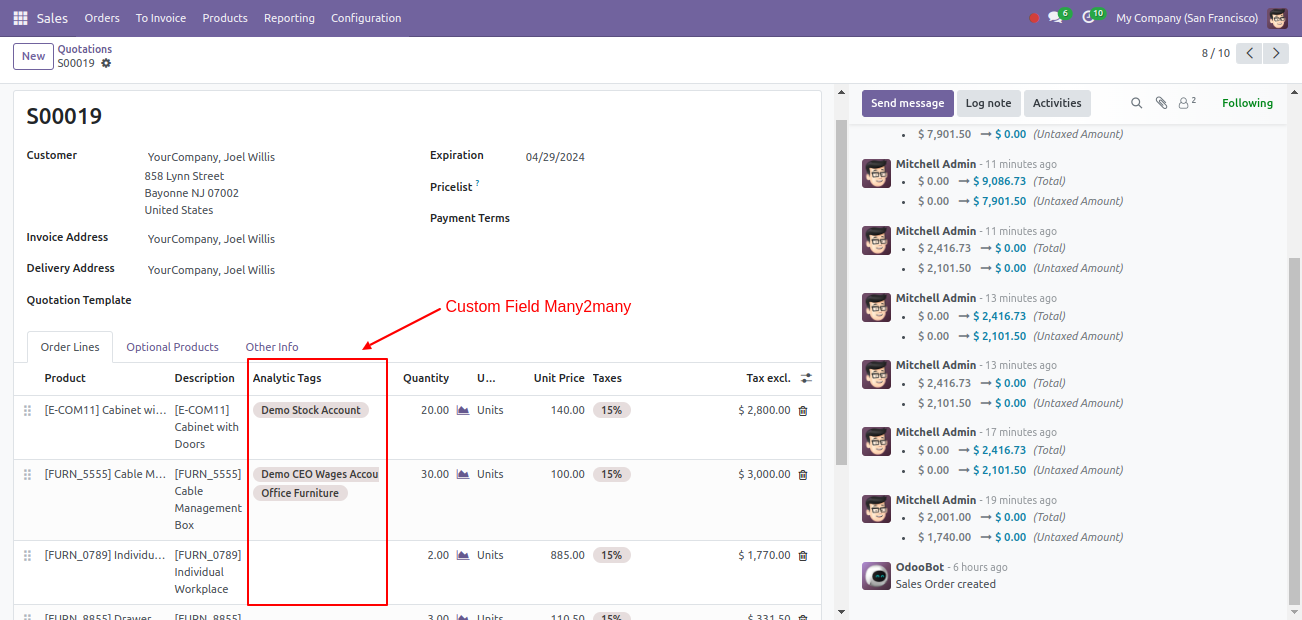
The following sale order lines are imported.
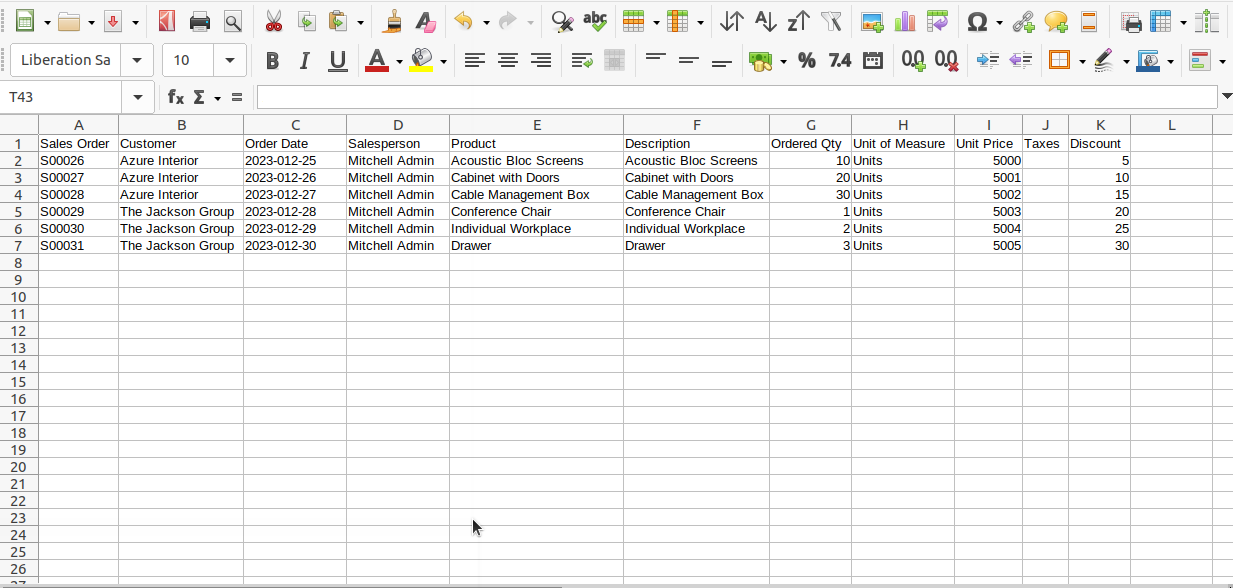
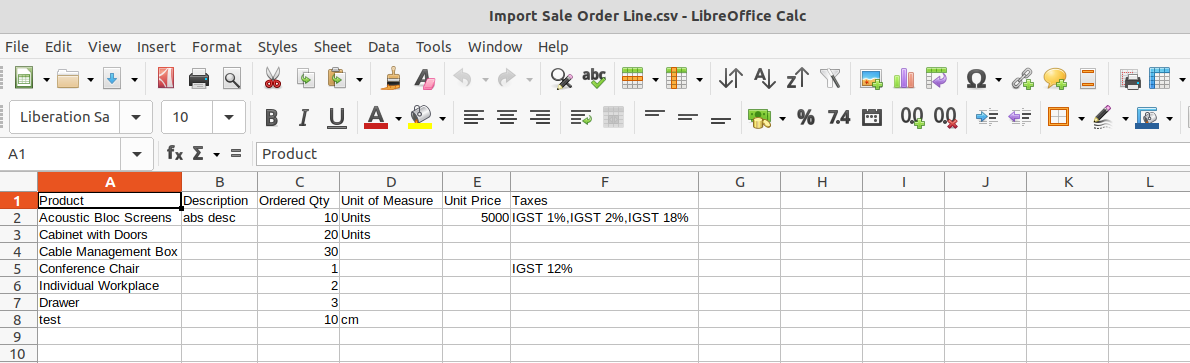
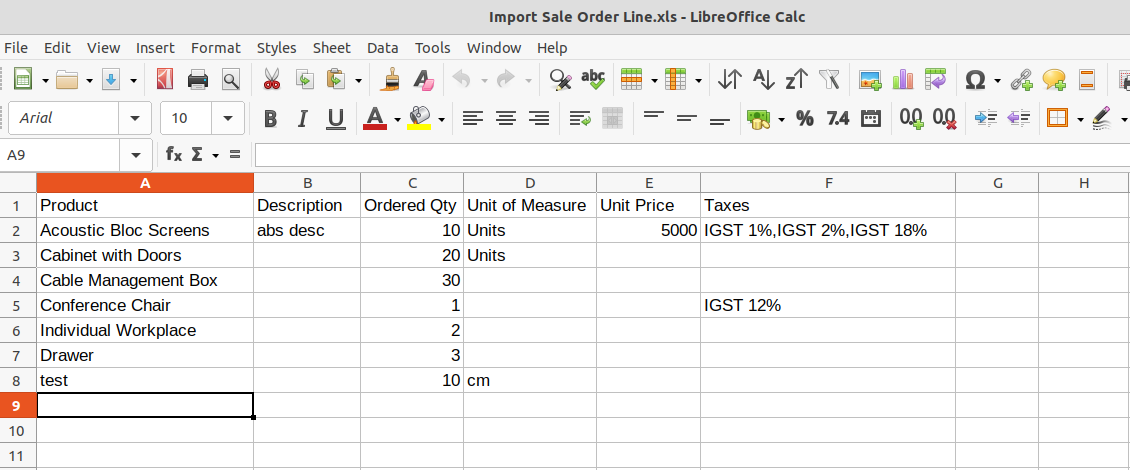
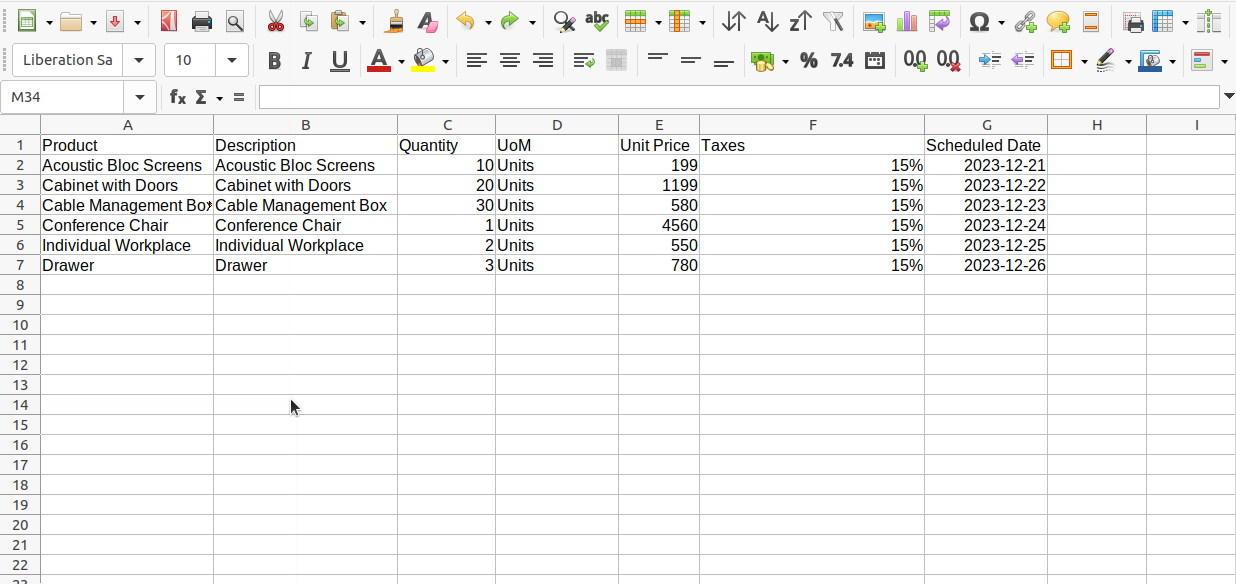
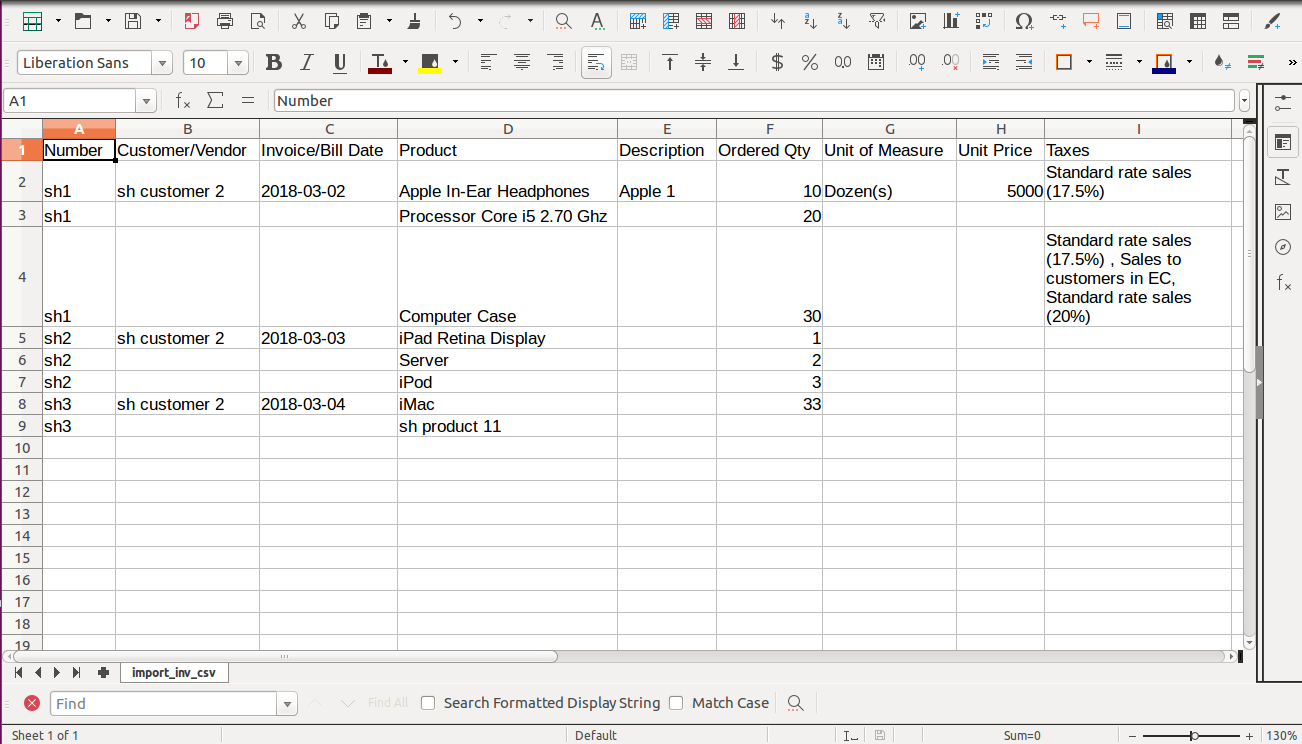
Your CSV file format must match like below.
Your Excel file format must match like below.
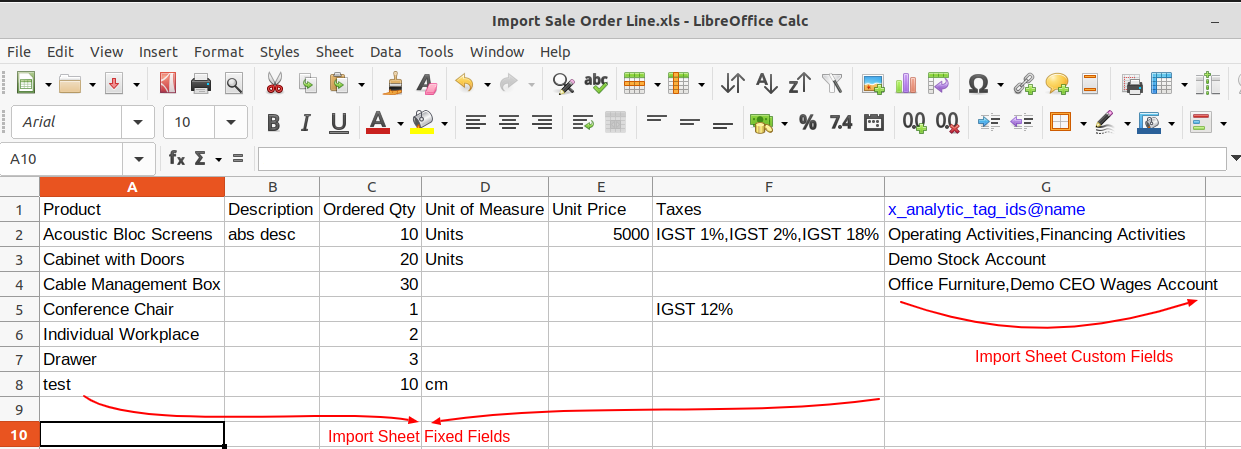
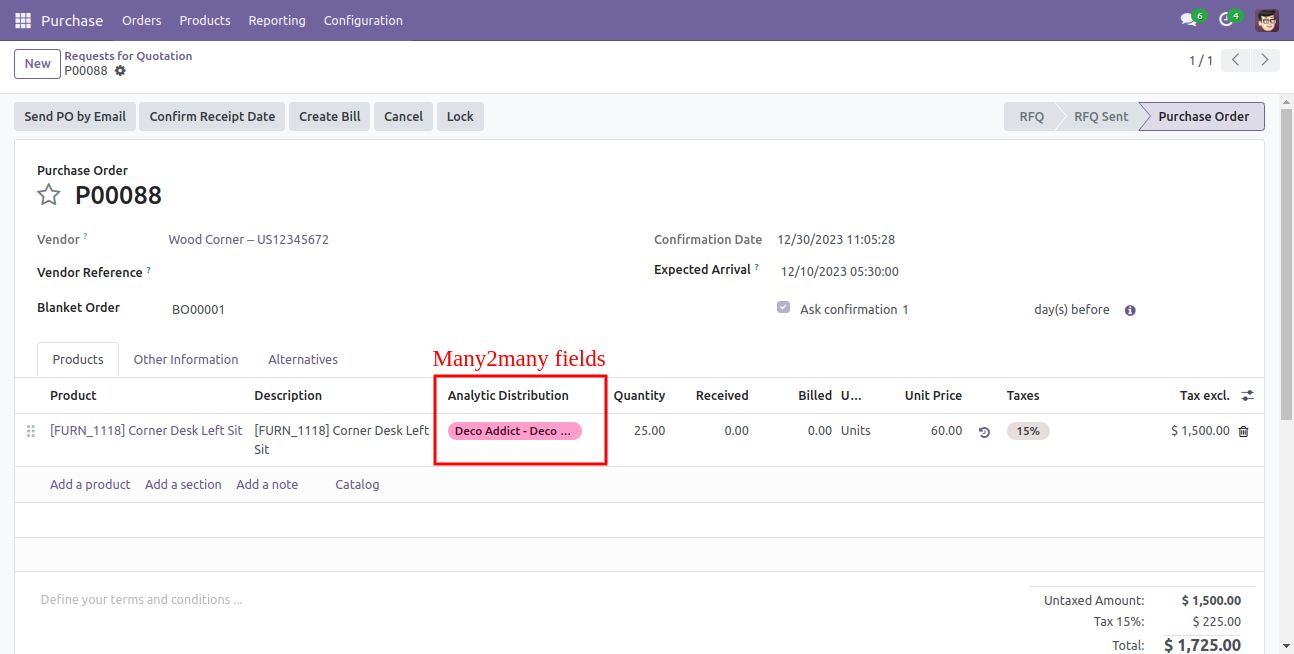
Sale order line import from CSV sheets with many2many fields.
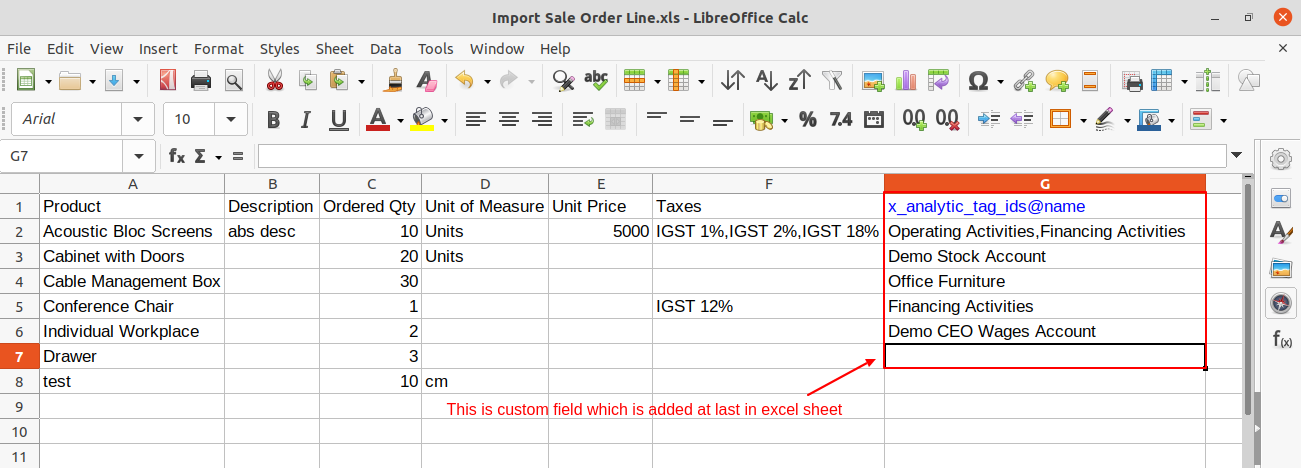
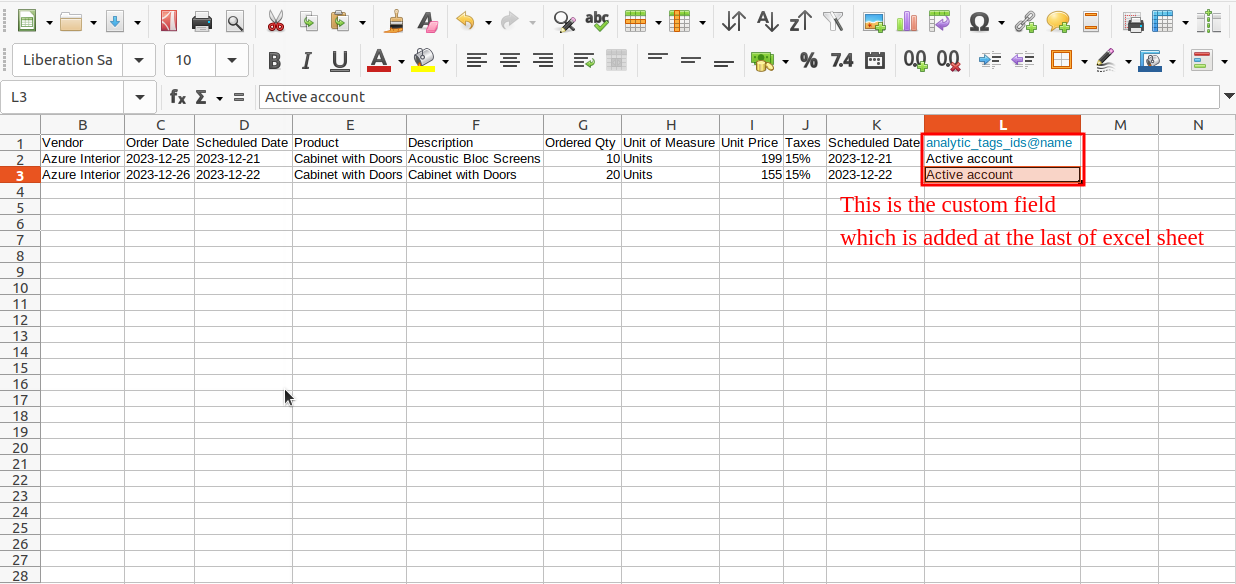
Your CSV file must match like below and add custom fields after the last column.

Your Excel file must match like below and add custom fields after the last column.
Features
- Import stock inventory by product Name, Barcode &Internal Reference.
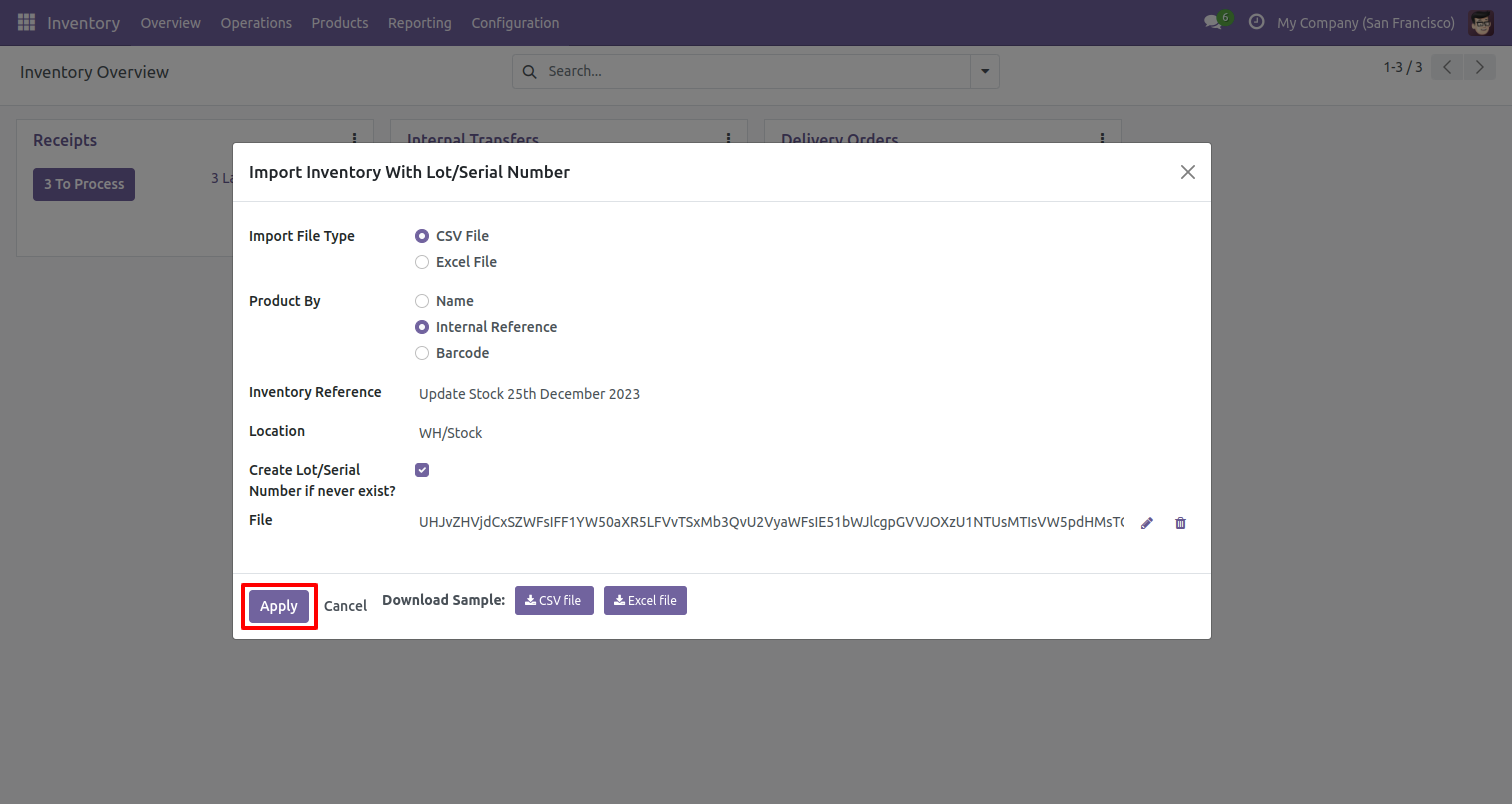
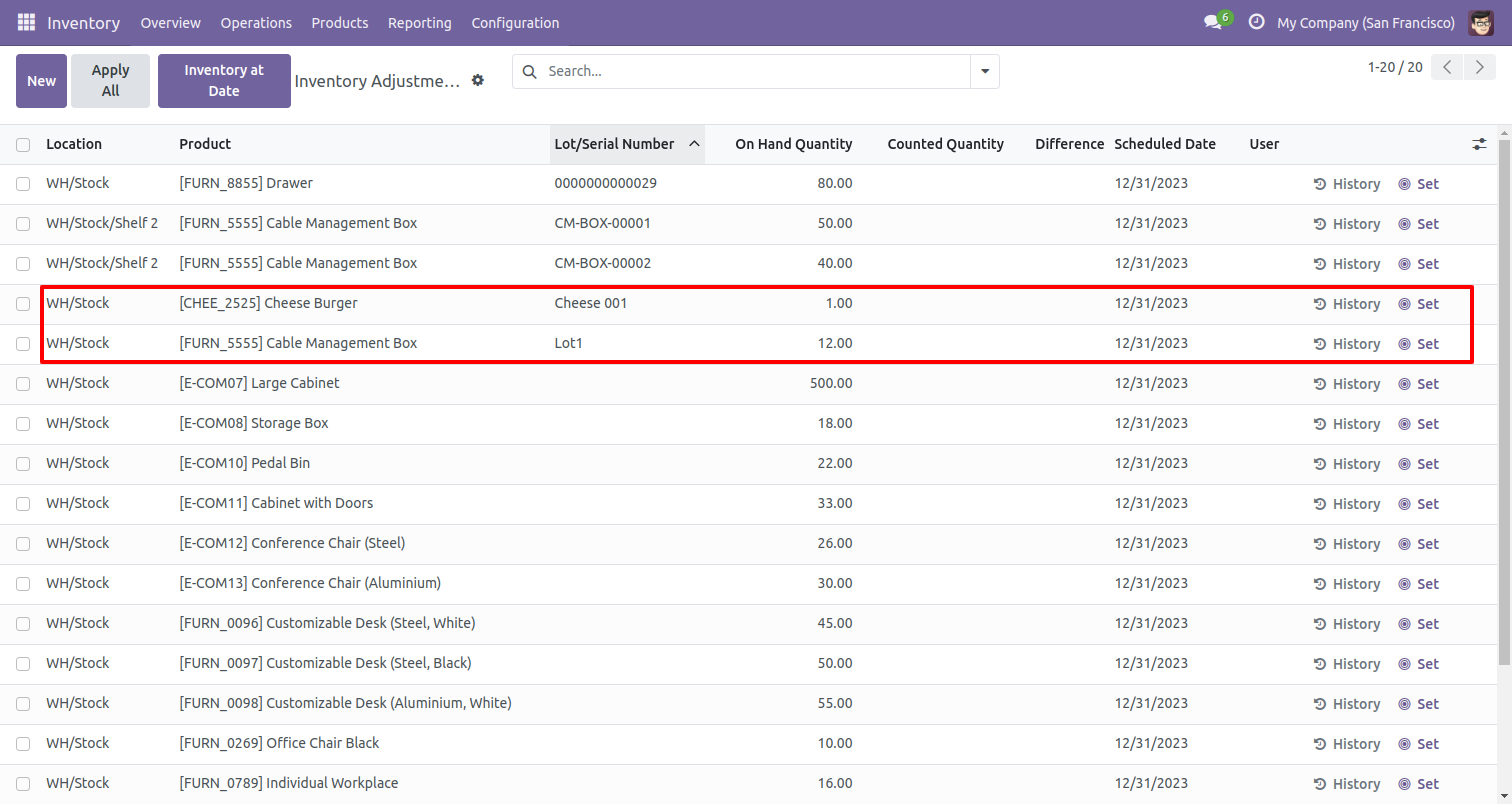
- Import Lot/Serial Number and also create new Lot/Serial Number if never exist.
First, you need to tick the 'Import Inventory With Lot/Serial Number' group to import stock inventory with lot/serial number.
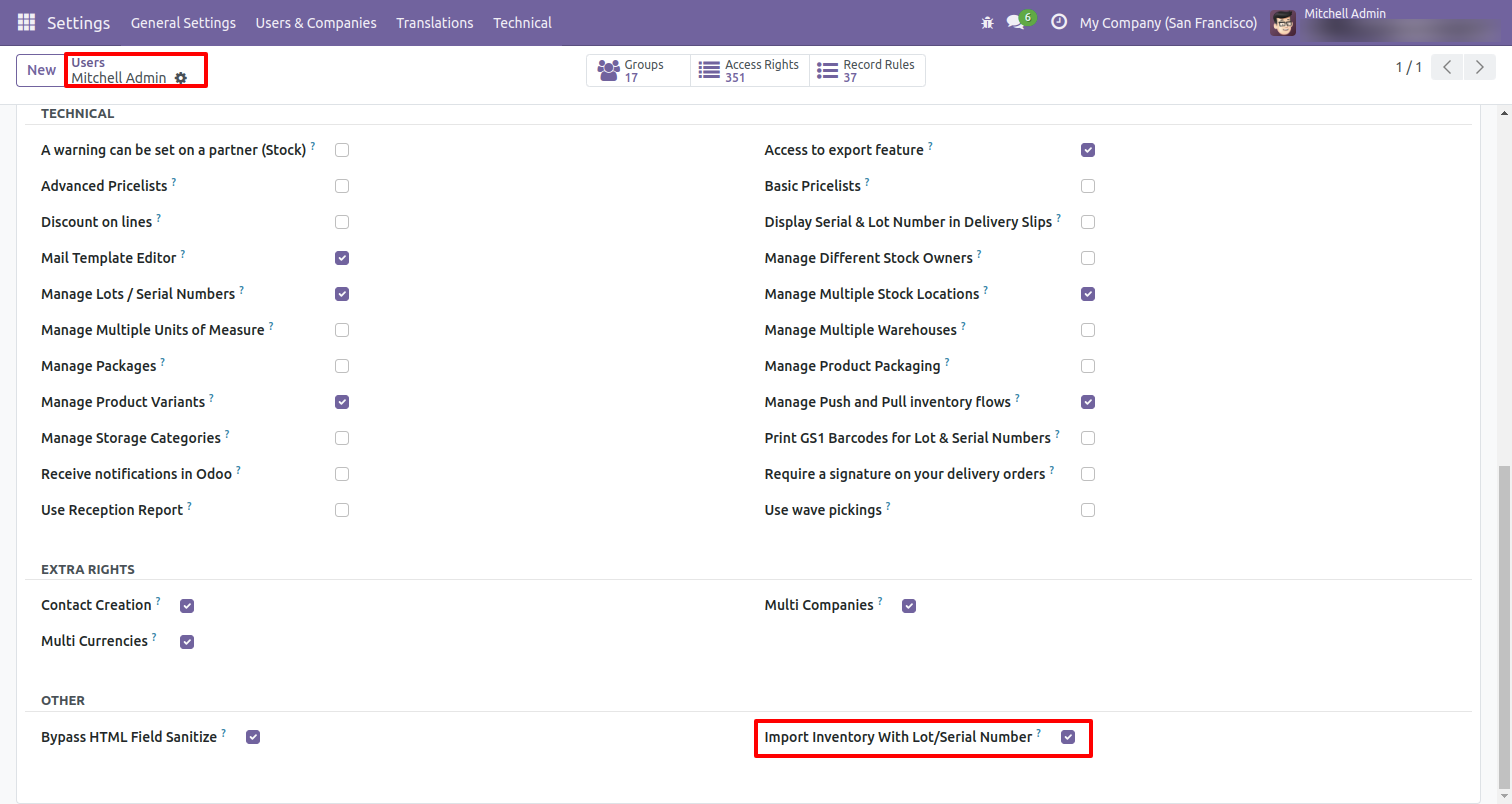
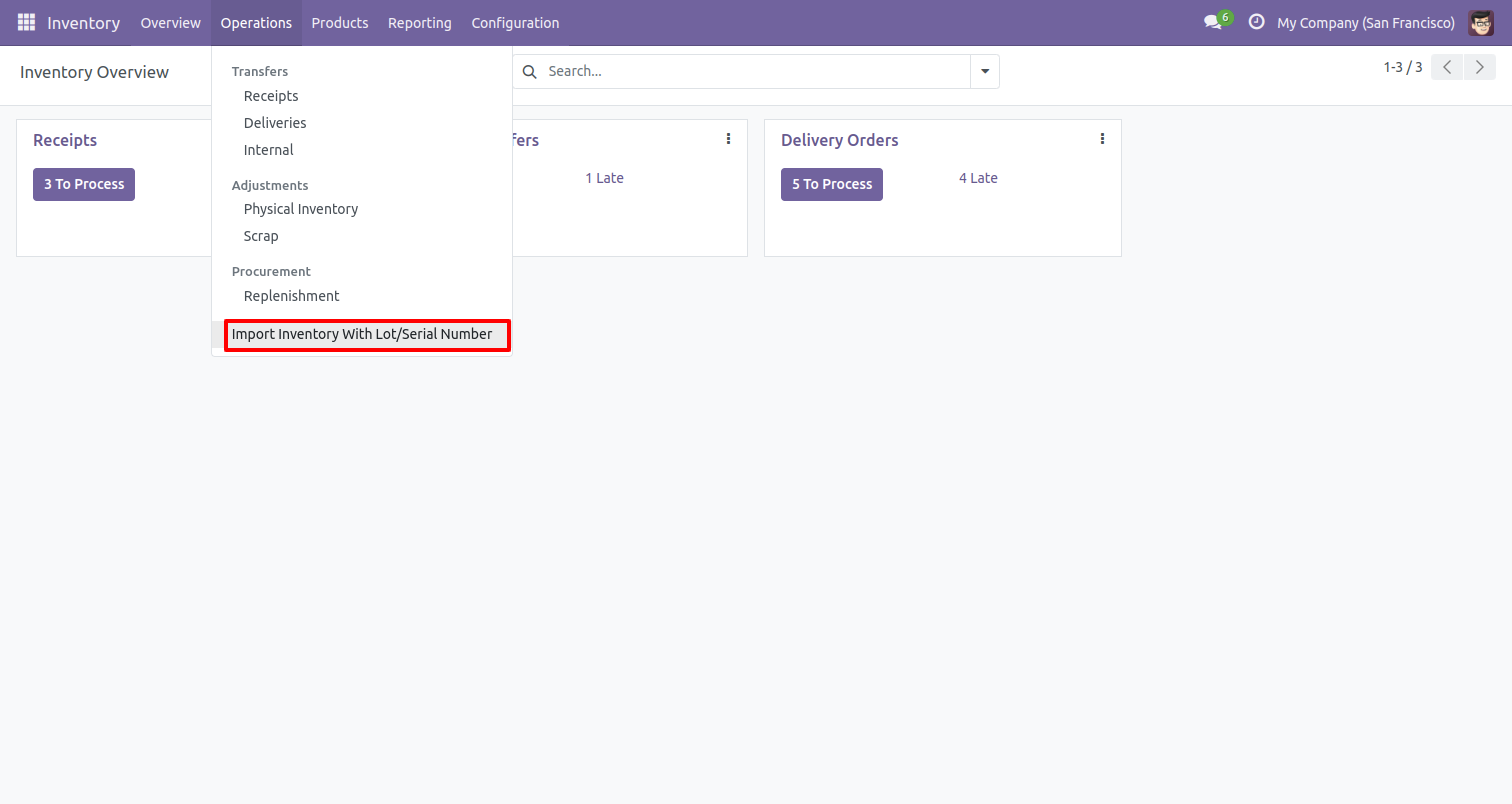
'Import Inventory With Lot/Serial Number' menu in operations.
When you click the 'Import Inventory With Lot/Serial Number' menu, the wizard will open that looks like below.
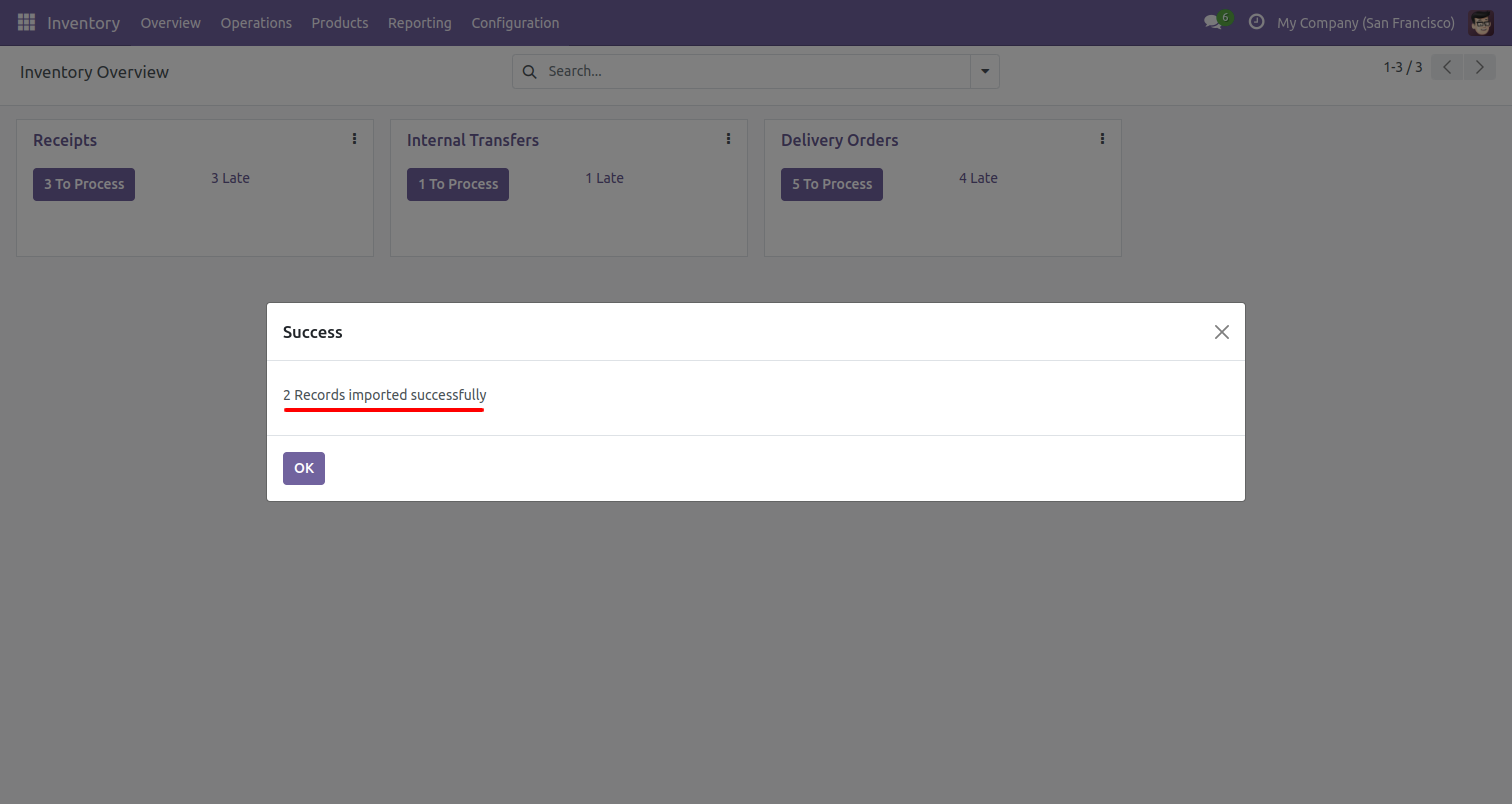
Success message looks like below it hows successfully imported records and also provides a list of unimported records with row number in sheet and relative details of data invalidation.
New lot/Serial Number created if never exist.
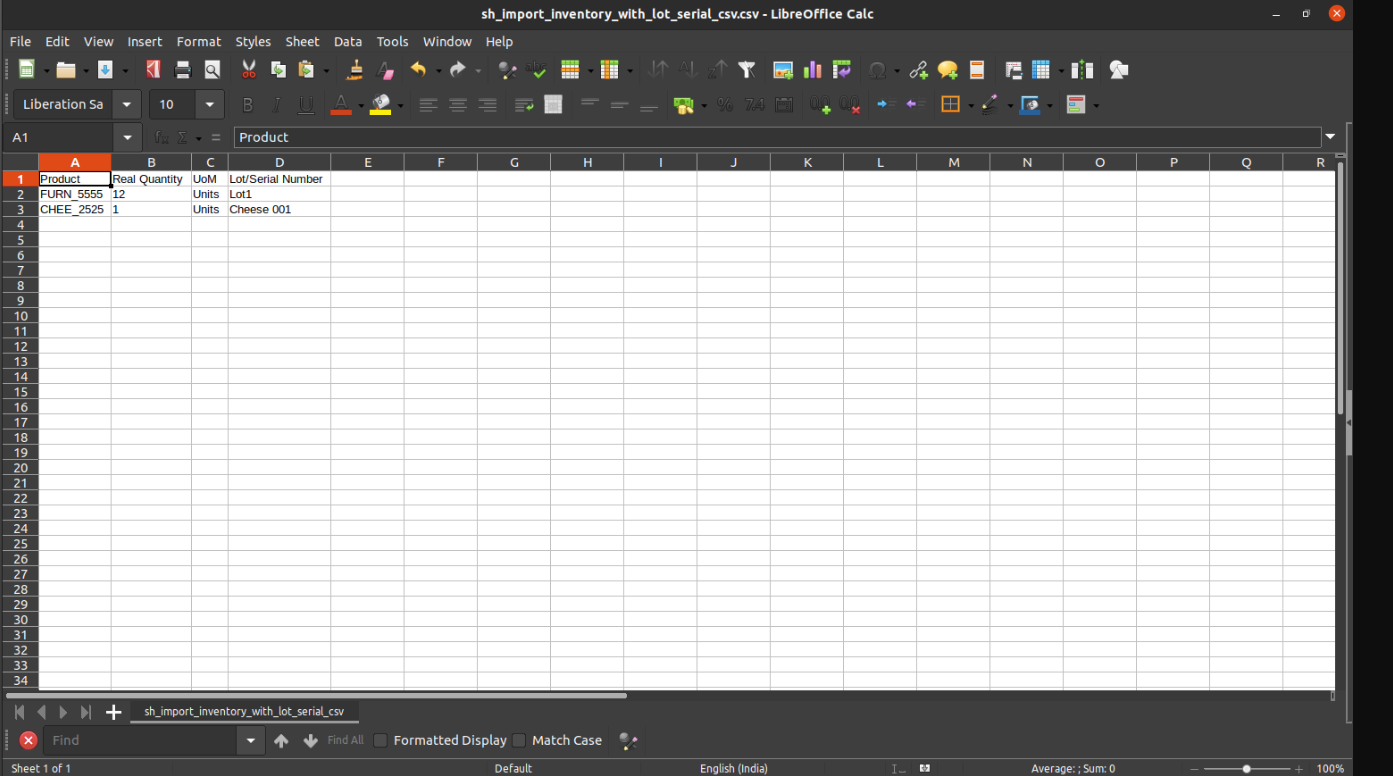
Your CSV file format must match like below.
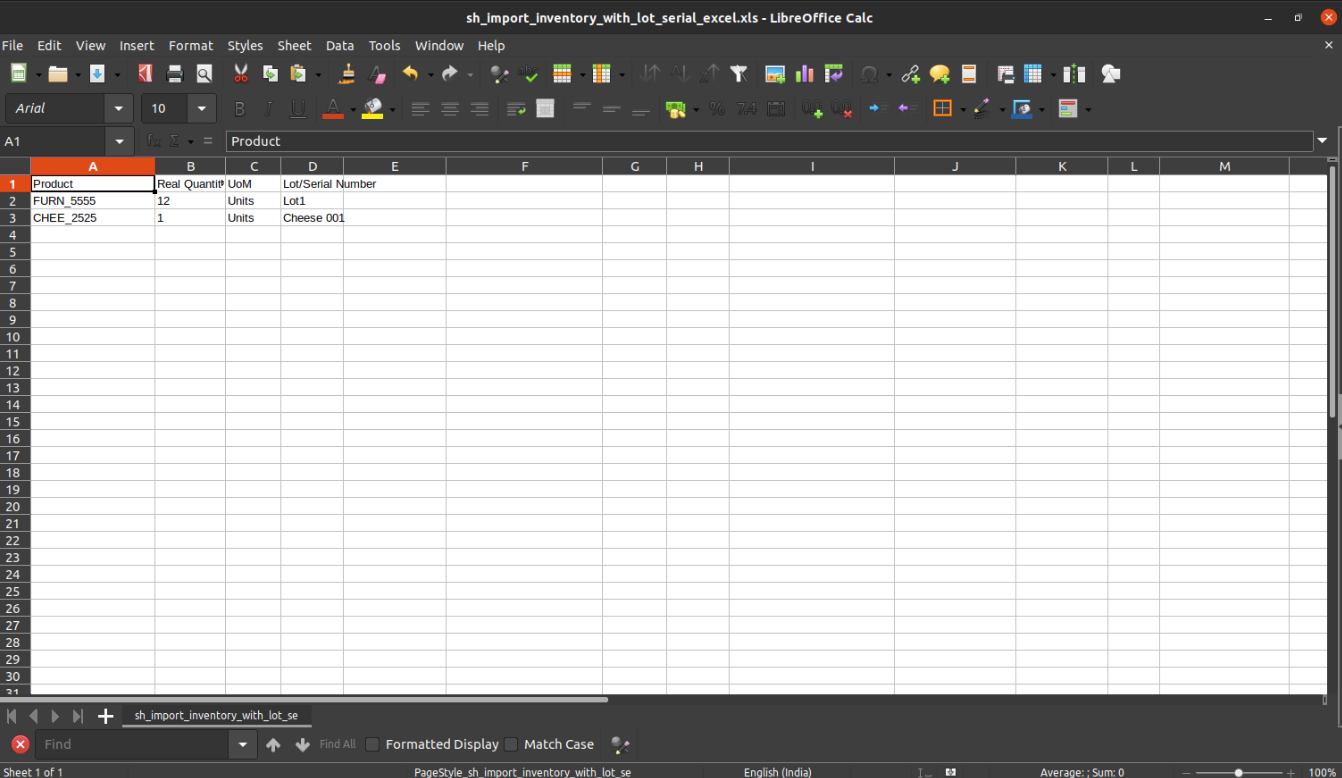
Your Excel file format must match like below.
Features
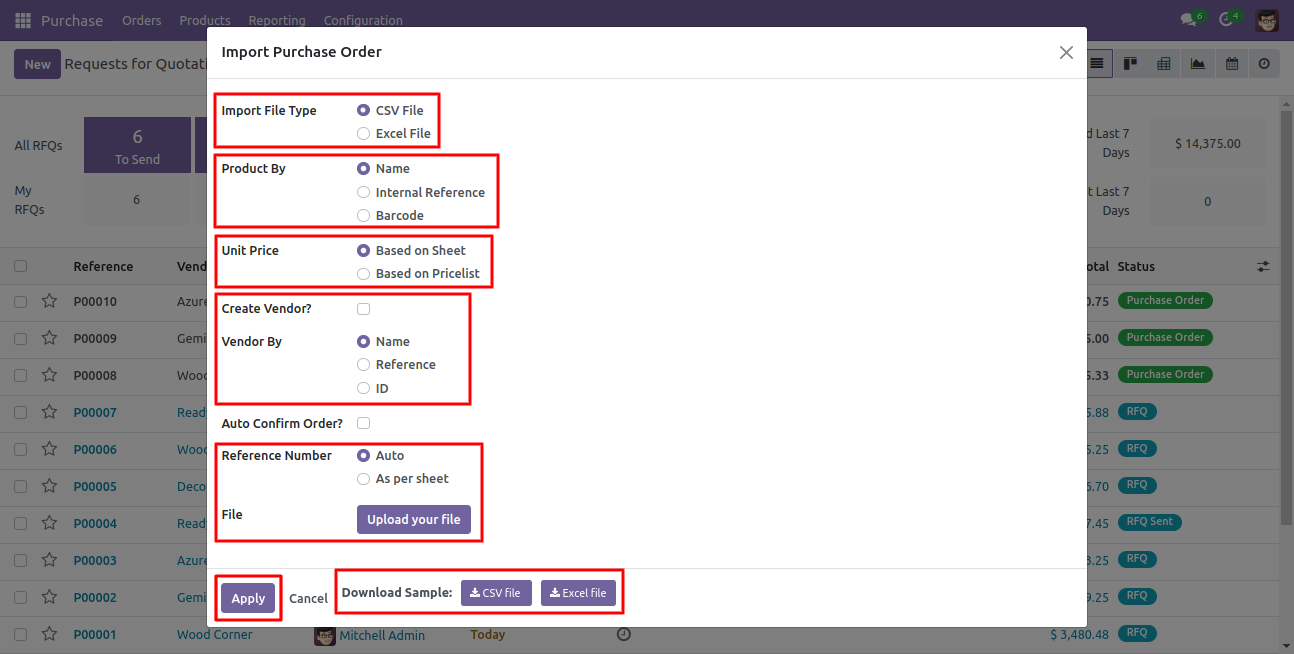
- You can import unit price based on sheet.
- You can import unit price based on pricelist.
- Easy to import
- Import csv or excel
- Import product by Name, Barcode, Internal Reference
- Auto Confirm Order option
- Create vendor if never exist option
- Reference Number auto/as per sheet option
- Easy to import vendor by Name, Reference, Id.
First you need to tick 'Import purchase Order' group in order to import purchase order
'Import Purchase Order' menu in purchase
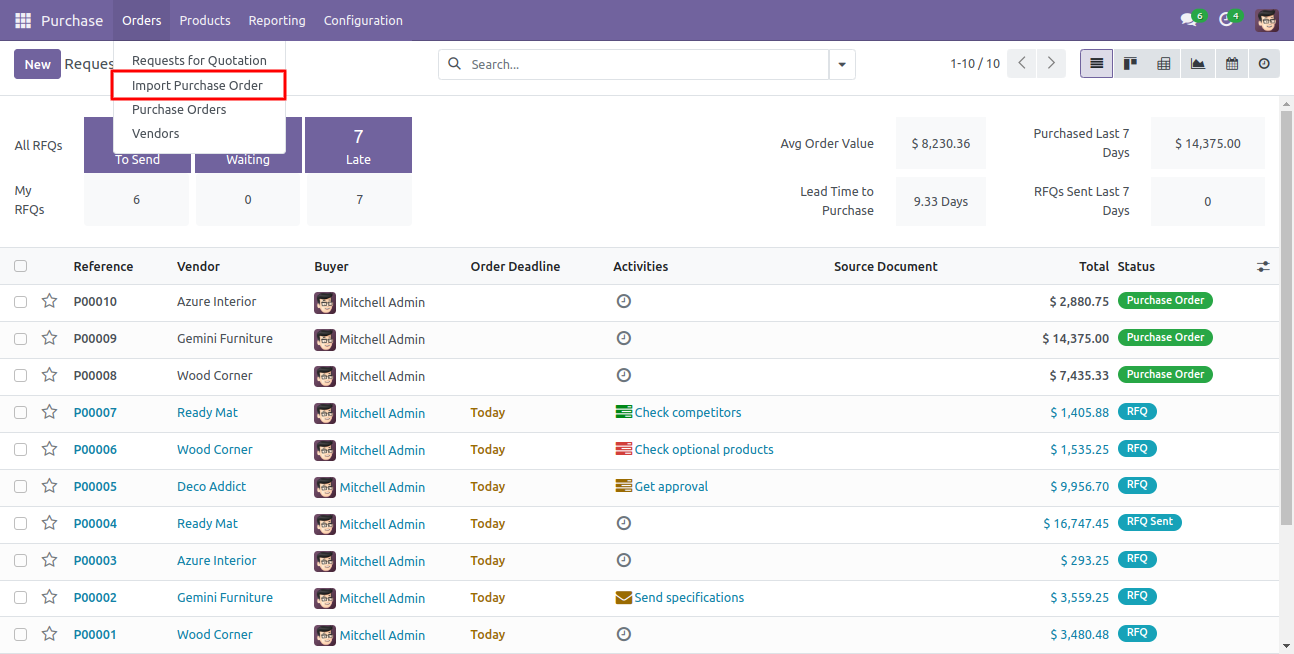
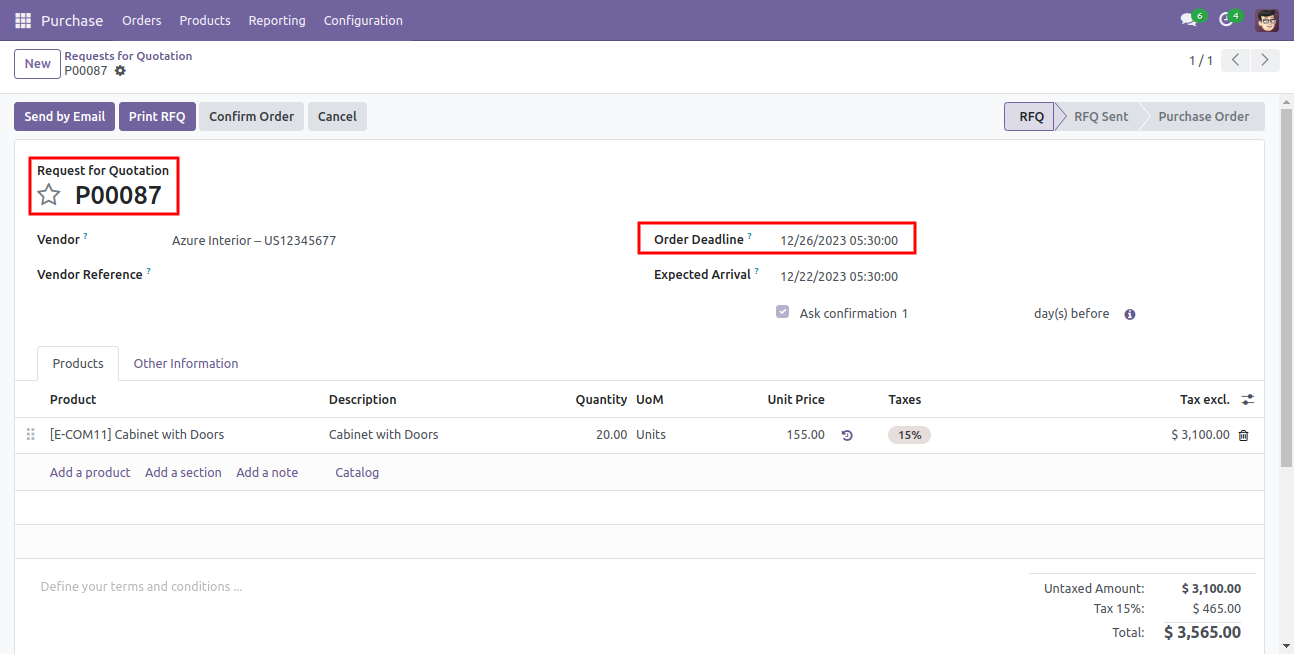
When you click "Import Purchase Order" menu, wizard will open that looks like below
Following fields are imported.
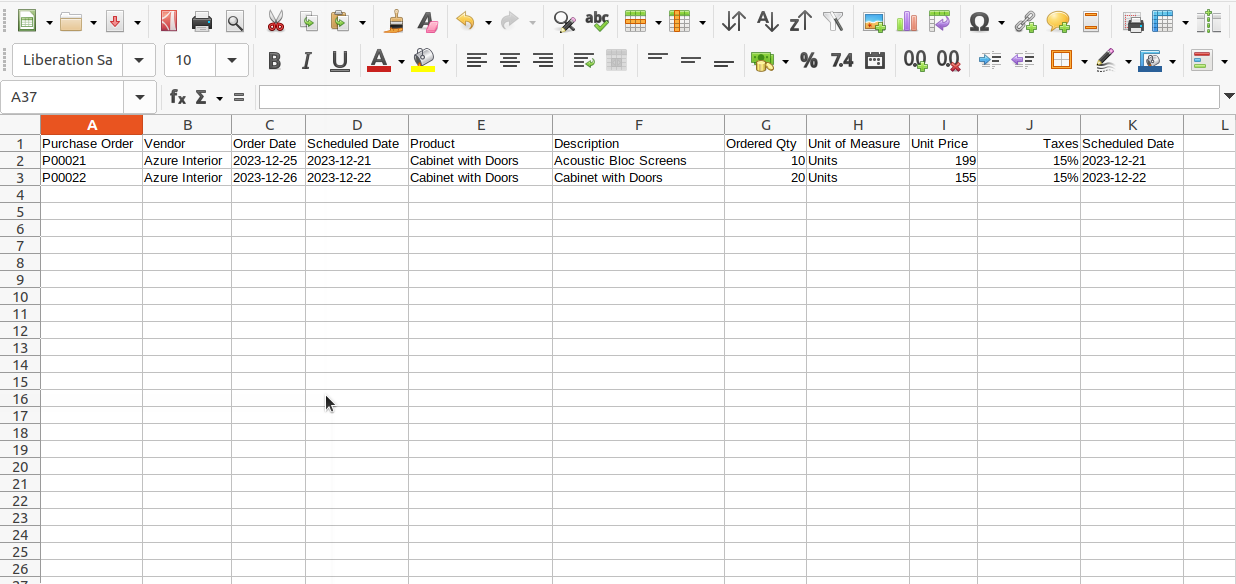
CSV/XLS file format must match like below.
Features
- You can import unit price based on sheet.
- You can import unit price based on pricelist.
- Easy to import custom fields.
- Easy to import custom fields from CSV or Excel.
- Easy to import Text, Integer, Float, Character, Boolean, Selection, Many2one, Many2many custom fields.
- Import CSV or Excel.
- Easy to import product by Name, Barcode, Internal Reference.
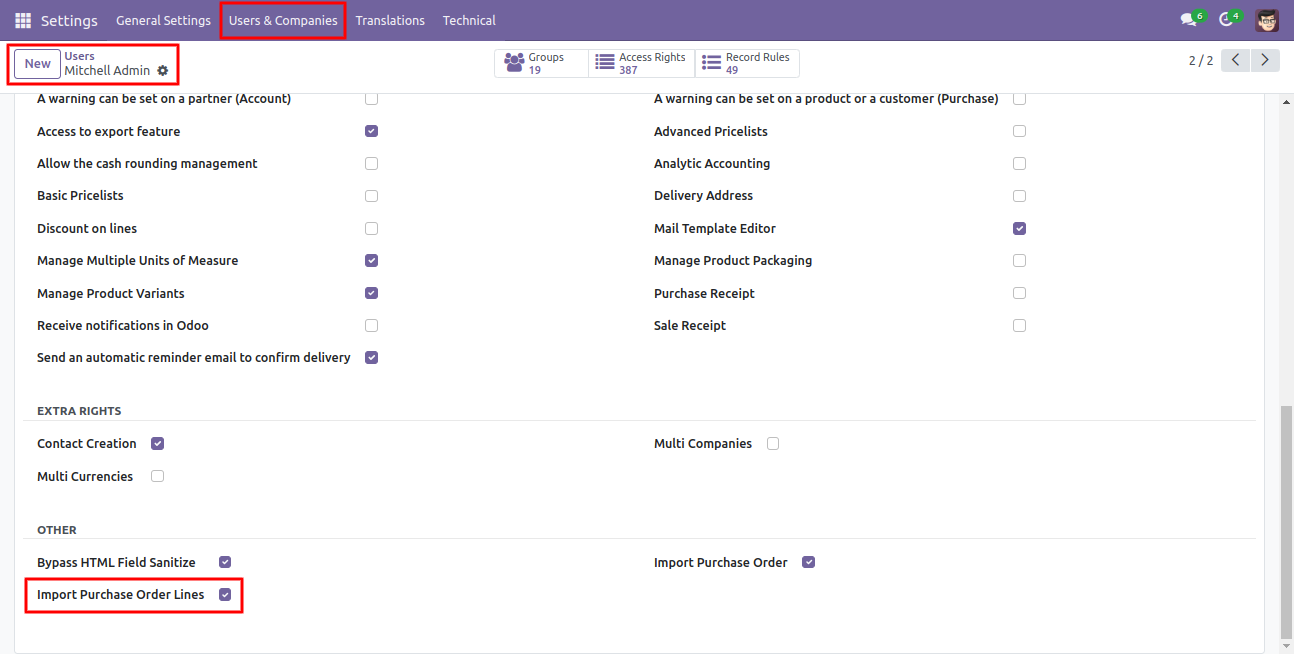
First, you need to tick the 'Import Purchase order lines' group to import the Purchase order lines.
'Import Purchase Order Lines' button in RFQ/Purchase order form view.
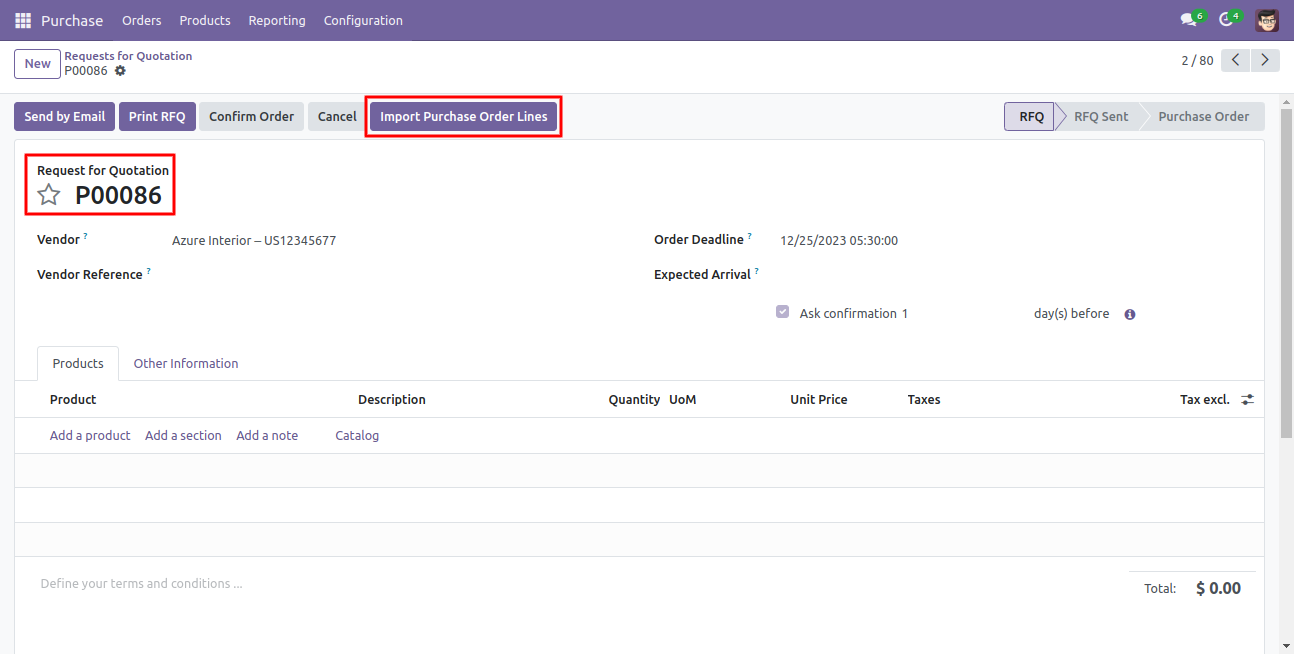
When you click the 'Import Purchase Order Lines' menu, the wizard will open and it looks like below.

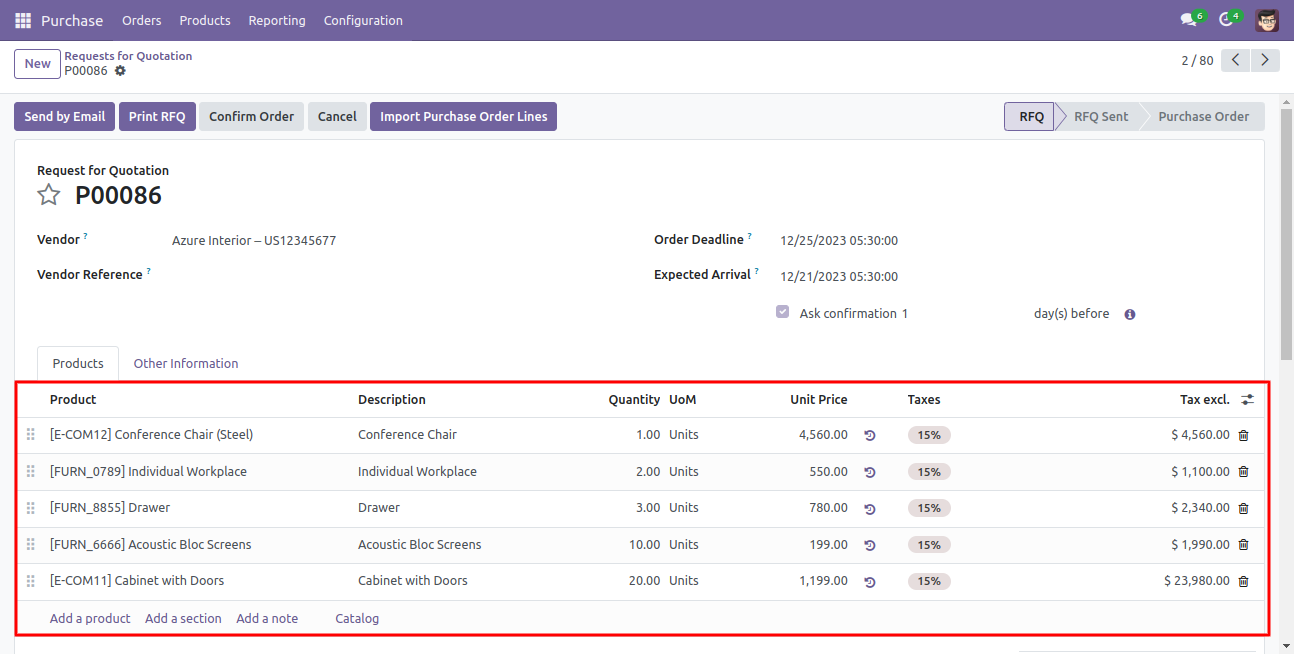
The following purchase order lines are imported.
Purchase order line import from CSV/XLS sheets with many2many.
Your CSV file must match like below and add custom fields after the last column.
Features
- Easy to import.
- Import csv or excel.
- Import product by Name, Barcode, Internal Reference.
- Auto Validate invoice/bill option.
- Import Customer/Vendor Credit Notes.
- Import invoice/bill.
- Invoice/Bill Number auto/as per sheet option.
- Import partner by Name, Reference, Id.
First you need to tick 'Import Invoice' group in order to import Invoice
When you click 'Import Invoice' menu, wizard will open that looks like below
Success message looks like below it's shows successfully imported records and also provides list of unimported records with row number in sheet and relative details of data invalidation.
Following fields are imported.
Your CSV file format must match like below.
Your Excel file format must match like below.

Features
- Import invoice/bill lines.
- Import From CSV or Excel.
- Import product by Name, Barcode, Internal Reference.
- Import Customer/Vendor Credit Notes lines.
- Easy to import Text, Integer, Float, Character, Boolean, Selection, Many2one, Many2many custom fields.
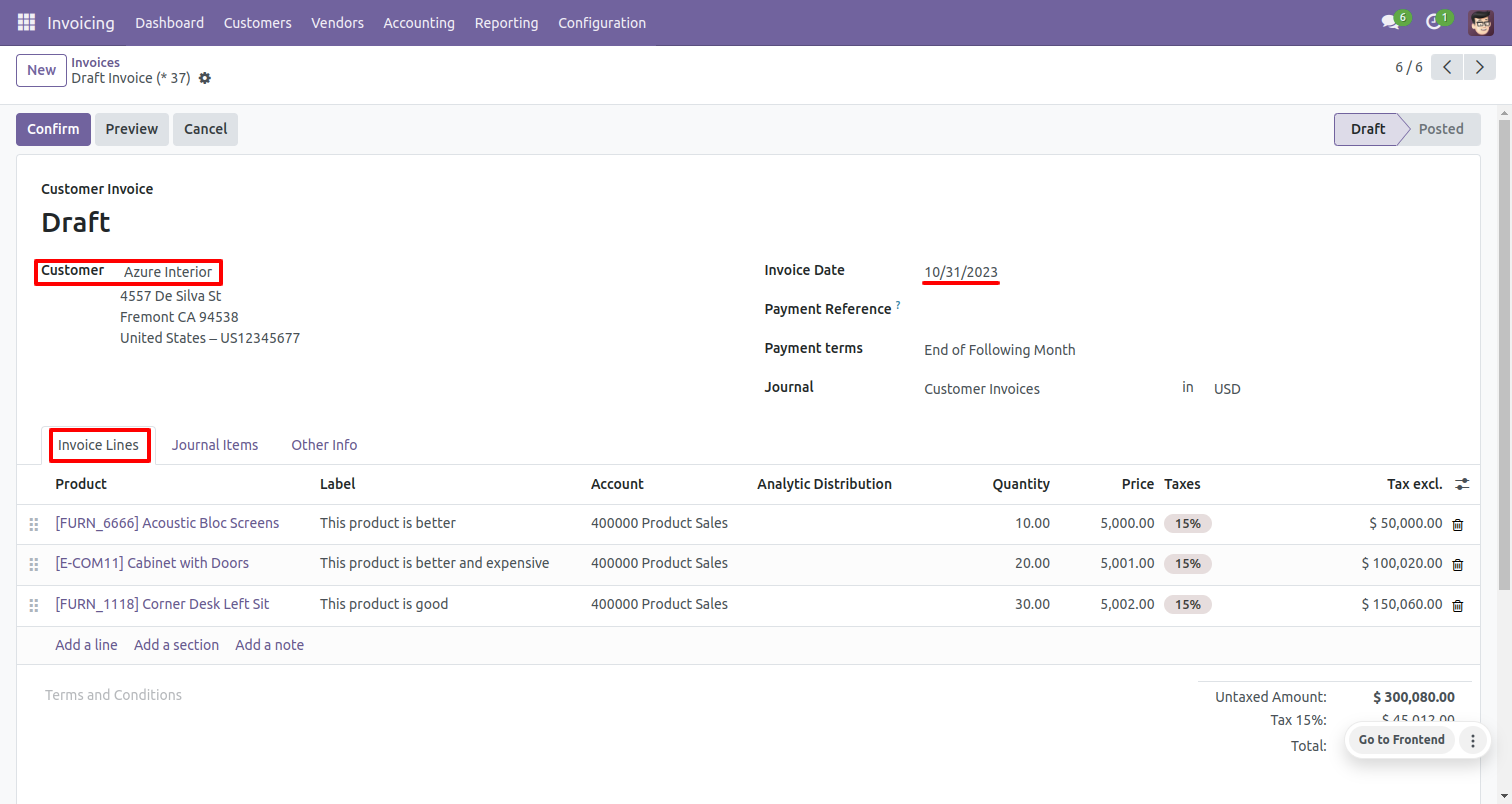
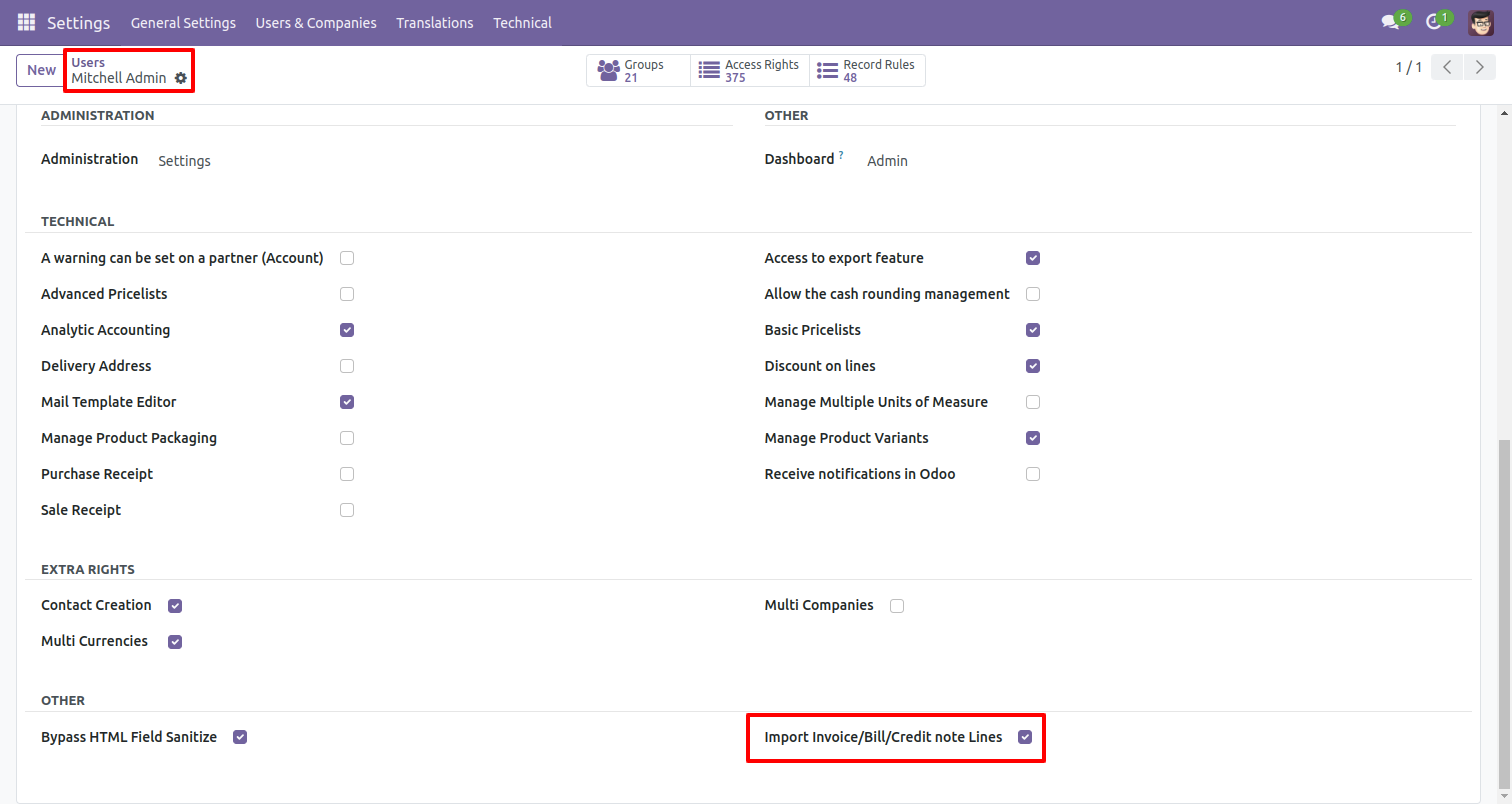
First, you need to tick the 'Import Invoice/Bill/Credit note Lines' group to import invoice/bill/credit note lines.
'Import Invoice/Credit note Lines' button in customer invoice form view.
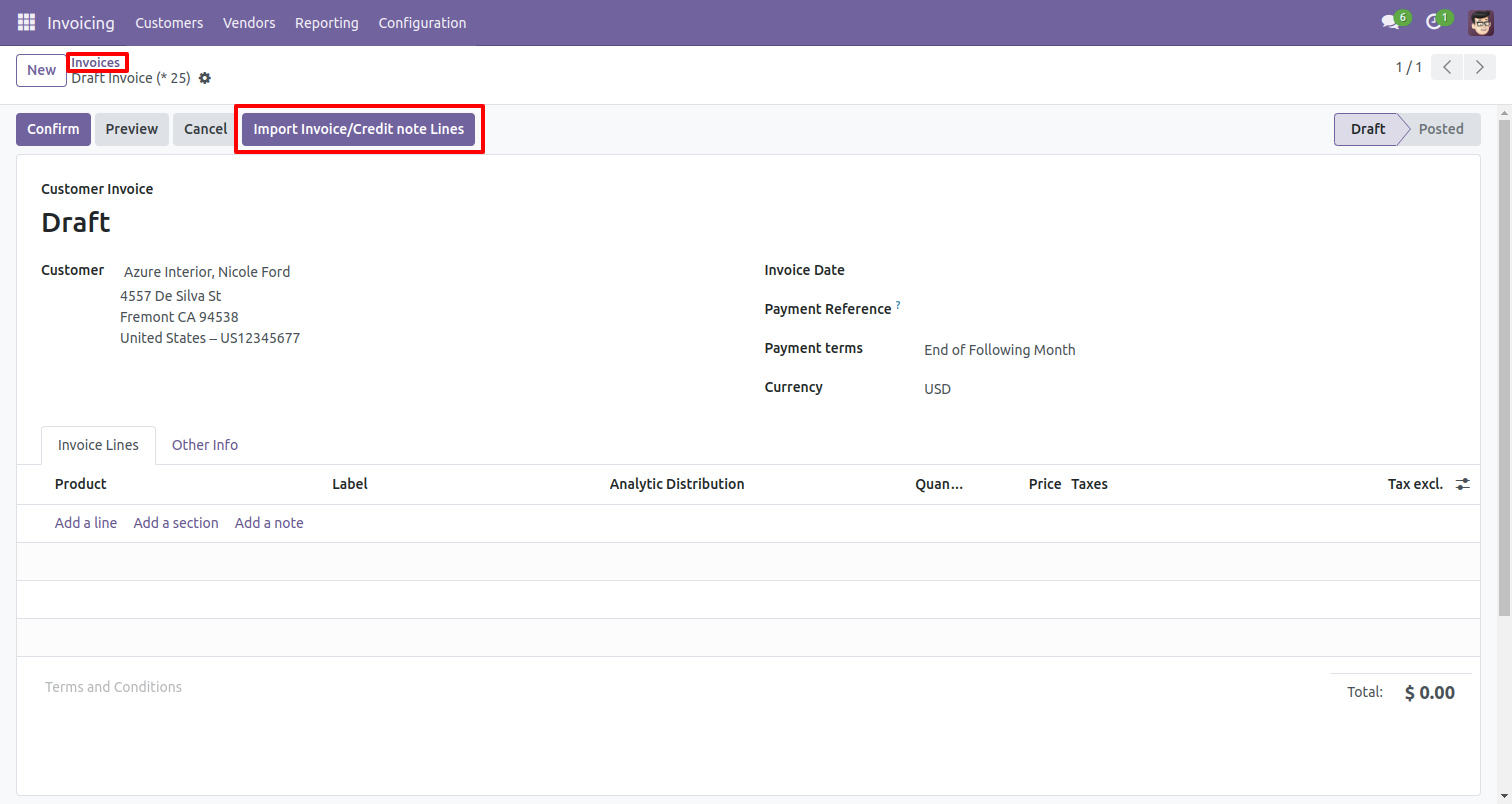
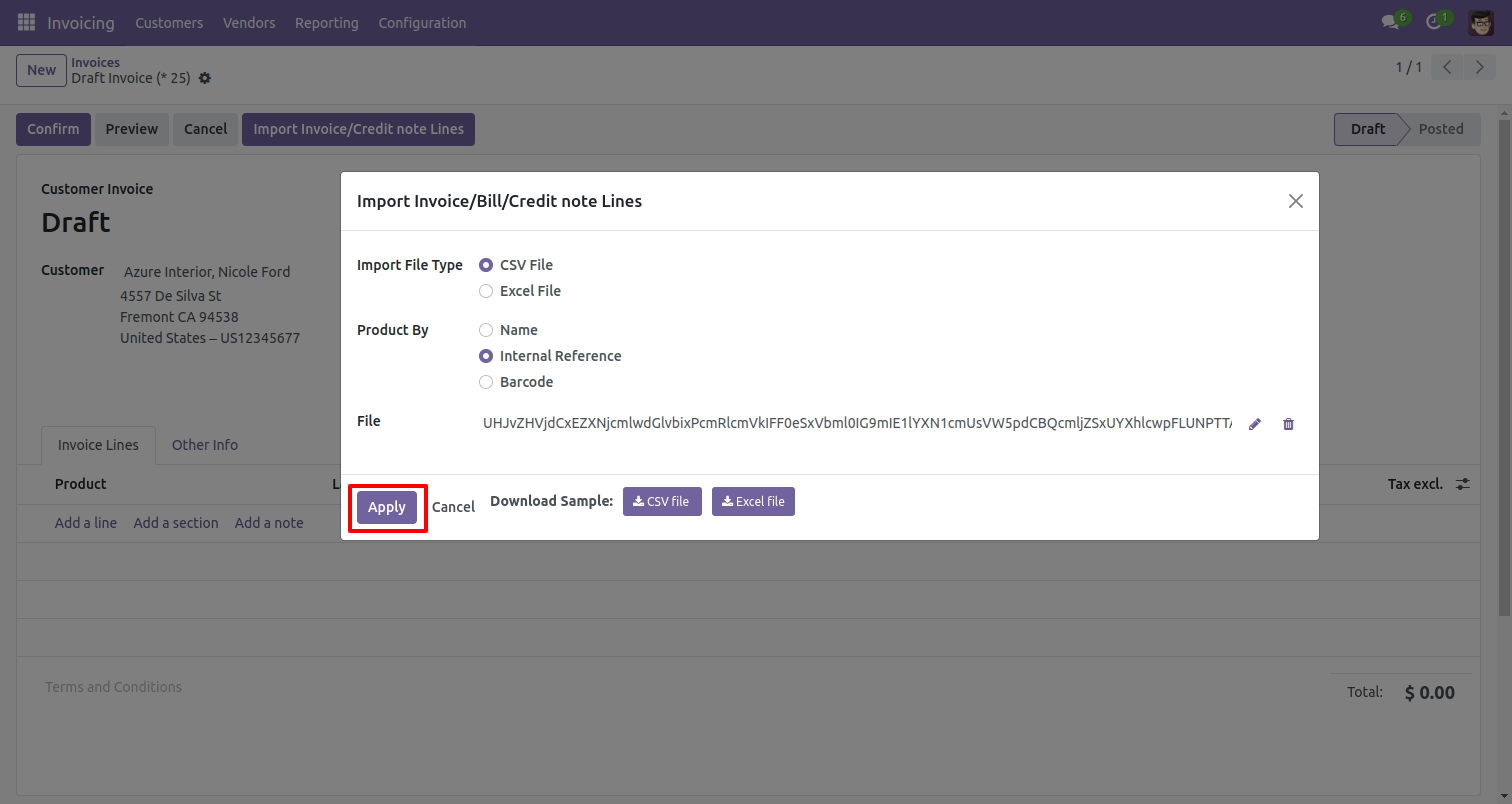
When you click the 'Import Invoice/Credit note Lines' button, the wizard will open that looks like below.
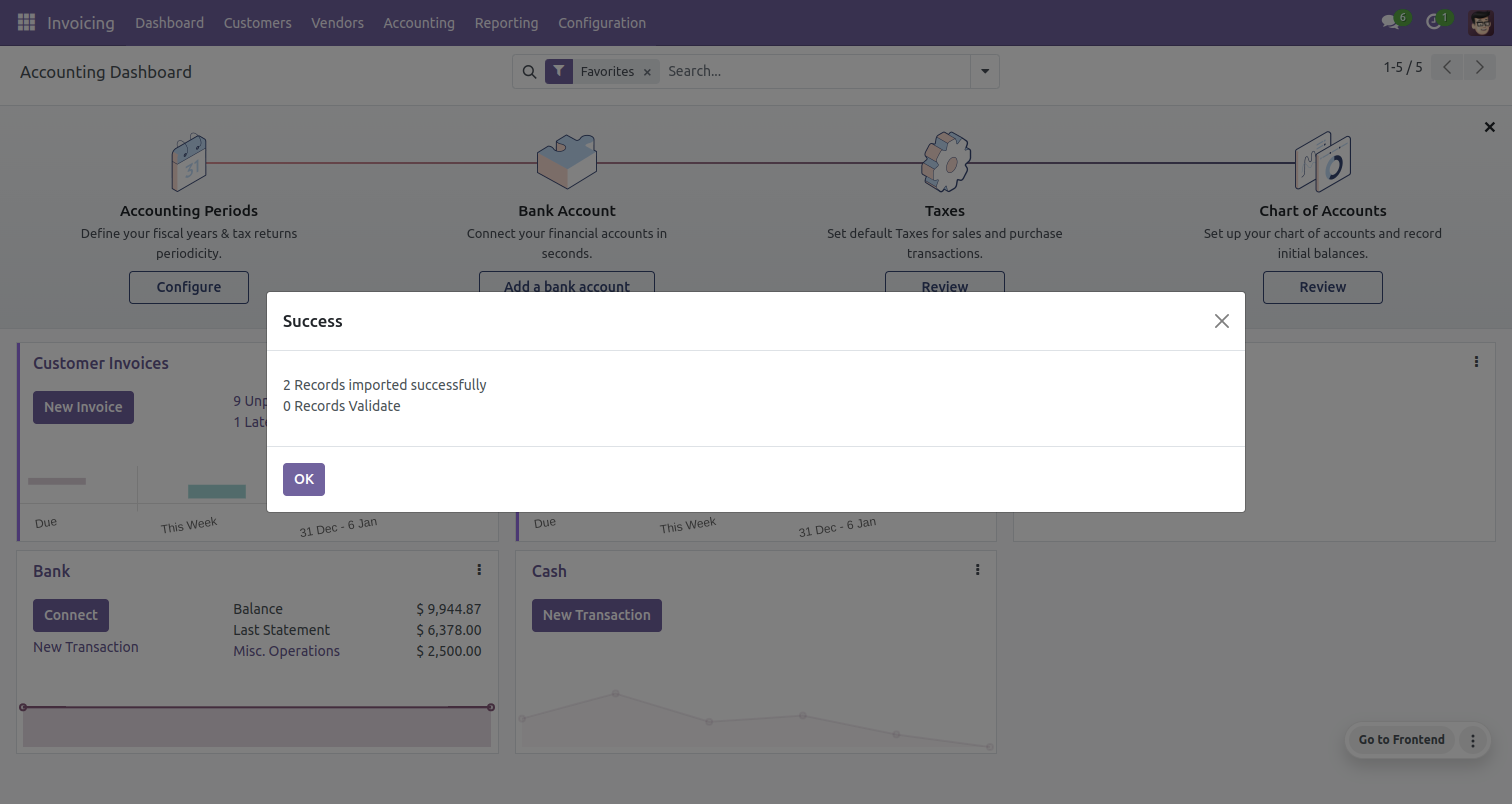
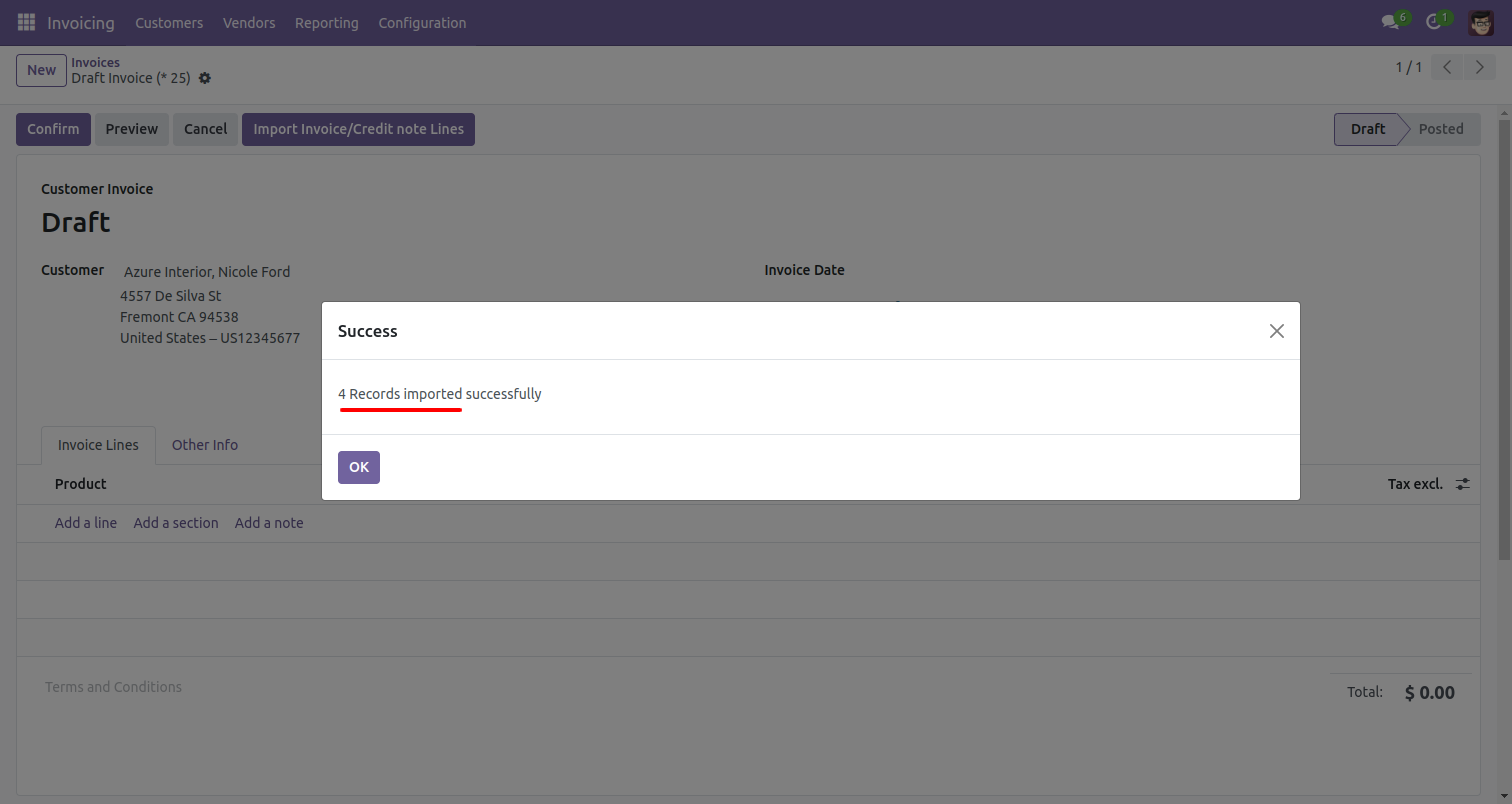
Success message looks like below it shows successfully imported records and also provides a list of unimported records with row number in sheet and relative details of data invalidation.
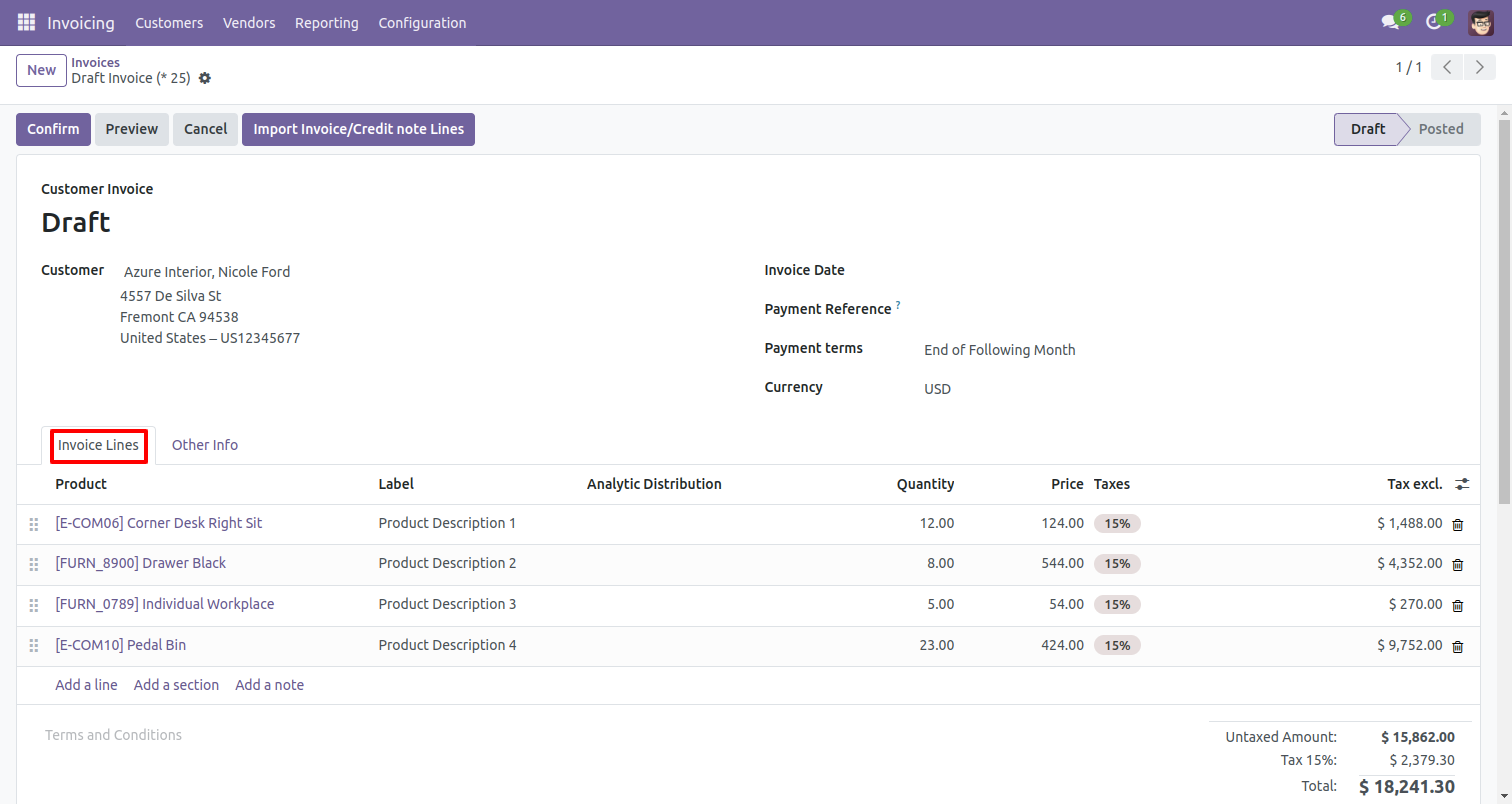
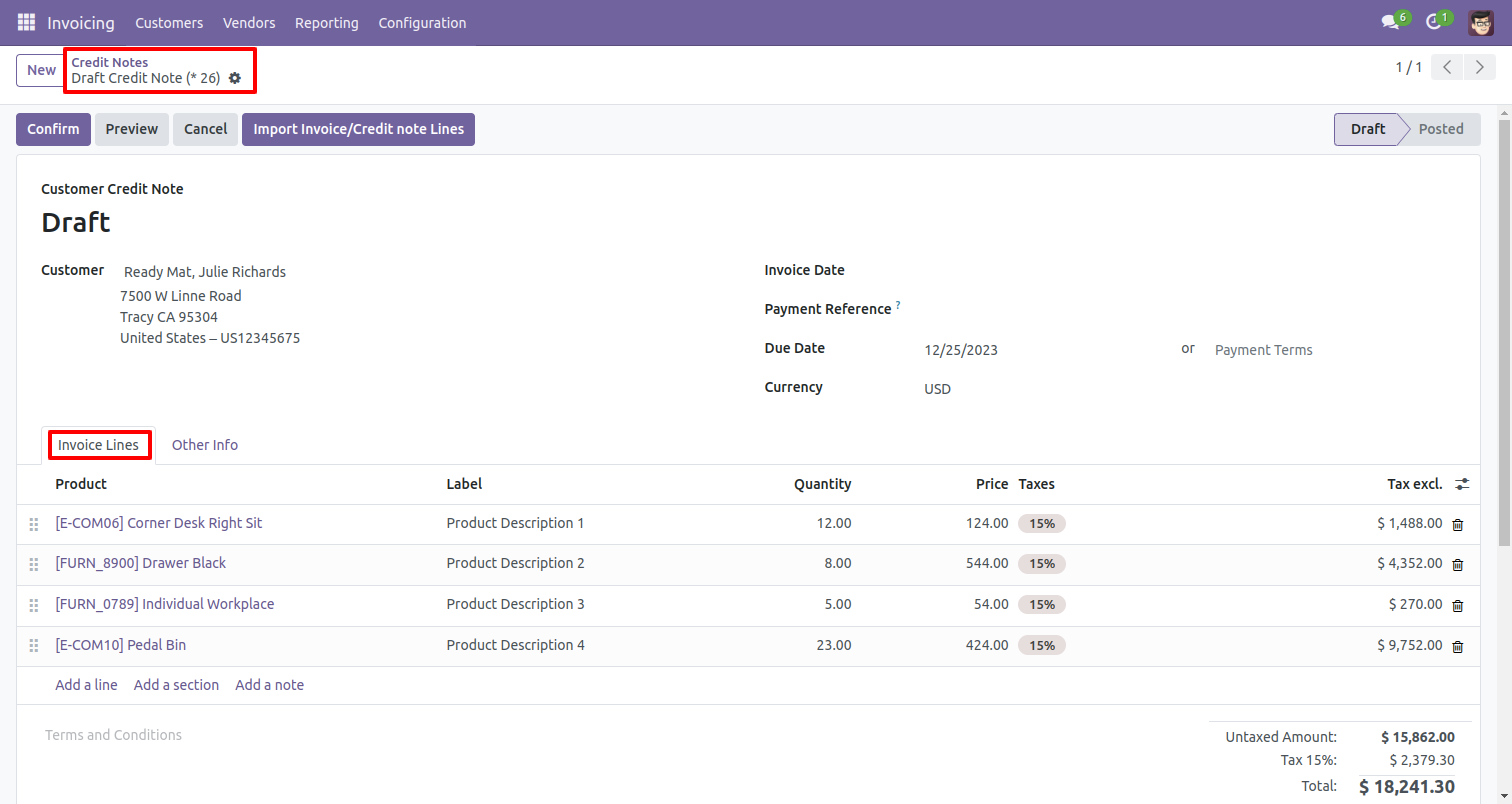
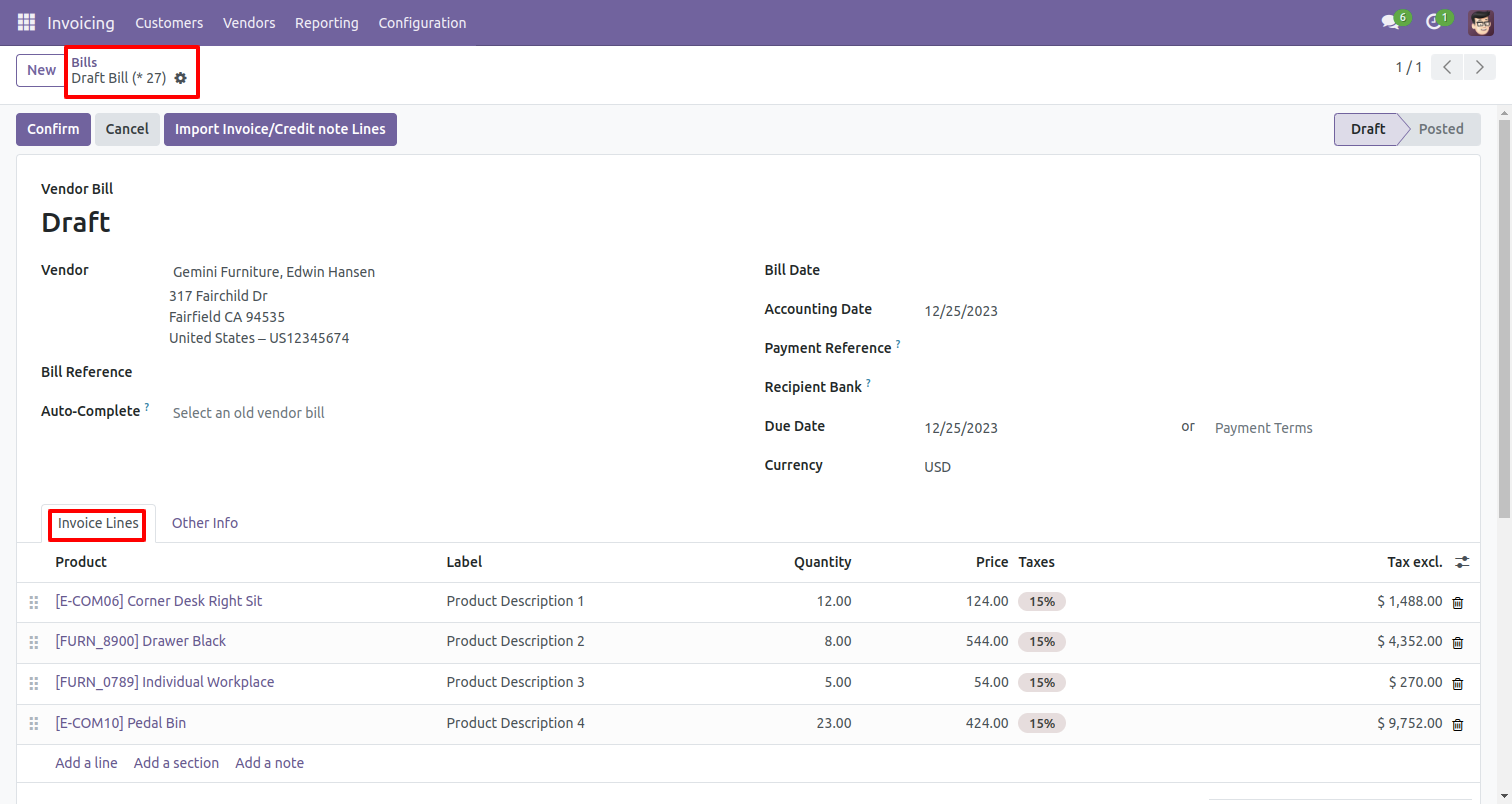
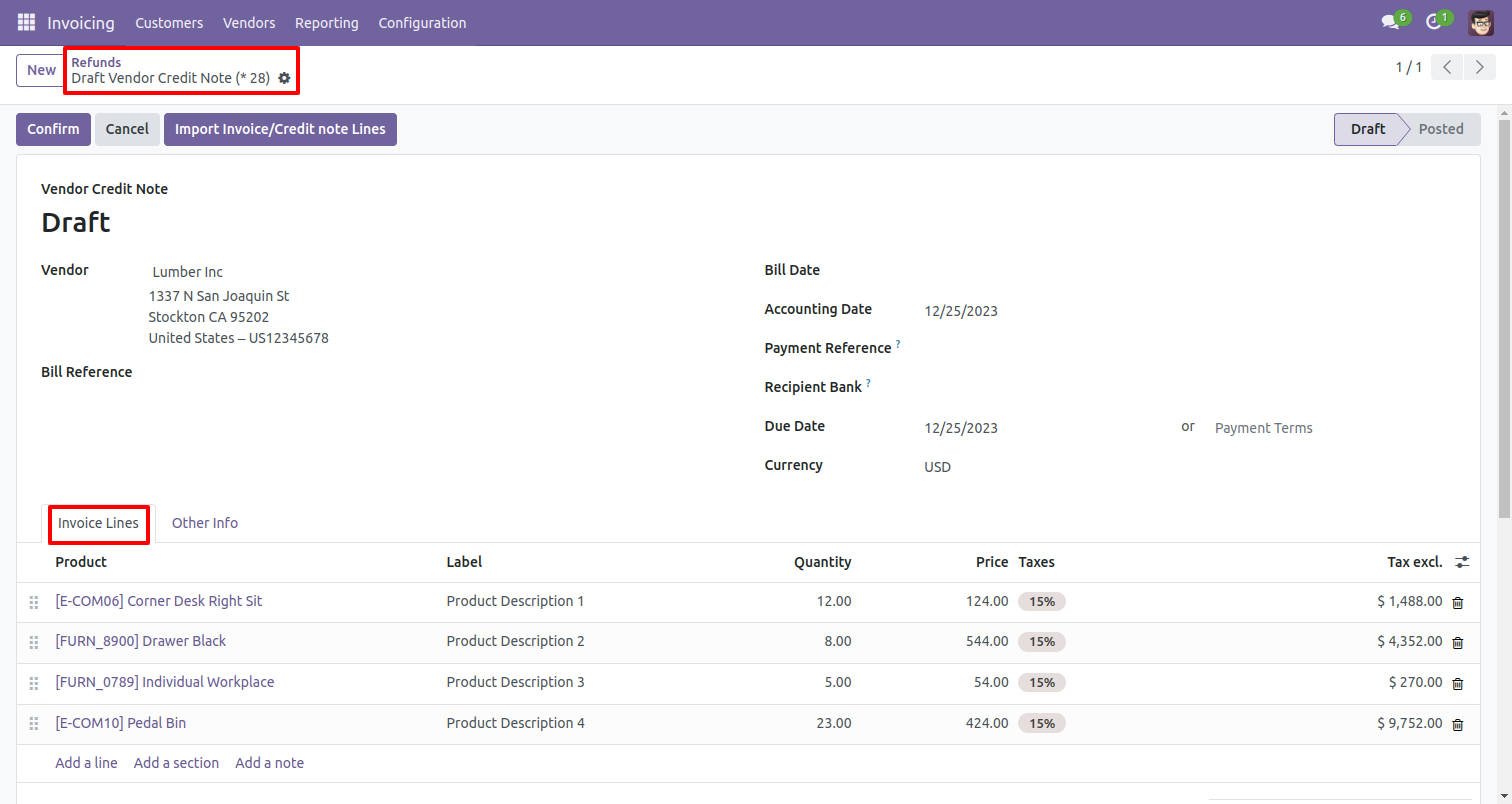
The following invoice lines are imported.
You can also import customer credit note lines.
You can also import Vendor Bill lines.
You can also import vendor credit note lines.
Version 17.0.4 | Released on : 11th August 2025
Version 17.0.3 | Released on : 3rd June 2025
Version 17.0.2 | Released on : 09th May 2025
Version 17.0.1 | Released on : 18th December 2023
- Yes, this app works perfectly with Odoo Enterprise (Odoo.sh & Premise) as well as Community.
- Please Contact Us at sales@softhealer.comto request customization.
- Yes, we provide free support for 100 days.
- Yes, you will get free update for lifetime.
- No, you don't need to install addition libraries.
- Yes, You have to download module for each version (13,14,15) except in version 12 or lower.
- No, this application is not compatible with odoo.com(odoo saas).
- No, We do not provide any kind of exchange.
