












All In One Backdate - Advance

Our All In One Backdate Odoo Backdate App provides complete Backdate Management Software for sales, purchase, accounting, MRP, and inventory transactions with selected confirmation backdates. This Backdating Software lets users apply custom backdates and remarks, while Mass Backdate Management simplifies bulk updates in one click. It provides centralized Backdate Transaction Management and Backdate Audit Log history across related stock moves, product moves, journal entries, and business documents.
Key Features
Sale Order Backdate
Users can create, confirm, and manage Sales Orders with a custom backdate,
while maintaining a complete audit trail of all backdate changes across related documents.
Sales Order Backdate Feature:
- Sales Confirmation Backdate
- Mass Sales Order Backdate
- Backdate Remarks
- Mandatory Backdate Reason
- Backdate in Accounting
- Backdate in Delivery Orders
- Backdate in Stock Moves
- Sale Backdate Audit Log History

Manufacturing Order Backdate
Create and confirm Manufacturing Orders with a custom backdate while
maintaining a complete audit trail across related records.
MRP Backdate Feature:
- Mass MRP Order Backdate
- Backdate Remarks
- Mandatory Backdate Reason
- Backdate in Journal Entries
- Backdate in Stock Moves
- MRP Backdate Audit Log History
Inventory Backdate
Create and confirm delivery orders, receipts, and internal transfers
with a custom backdate for accurate inventory transaction records.
Inventory Backdate Management Feature:
- Mass Receipt/Delivery Order/Internal Transfer Backdate
- Backdate Remarks
- Mandatory Backdate Reason
- Backdate in Stock Moves
- Picking Backdate Audit Log History
Inventory & Invoice Backdate
Confirm incoming orders, delivery orders, internal transfers, Scrap Orders and Journals with a custom backdate.
Inventory & Invoice Backdate Feature:
- Mass Picking/Scrap Order Backdate
- Backdate Remarks
- Mandatory Backdate Reason
- Backdate in Stock Moves
- Backdate in Journals
- Backdate Audit Log History
Purchase Order Backdate
Users can create, confirm, and manage Purchase Orders with a custom backdate,
while maintaining a complete audit trail of all backdate changes across related documents.
Purchase Backdate Feature:
- Purchase Confirmation Backdate
- Mass Purchase Order Backdate
- Backdate Remarks
- Mandatory Backdate Reason
- Backdate in Bills
- Backdate in Receipts
- Backdate in Stock Moves
- Purchase Backdate Audit Log History
Invoice/Bill Backdate
Create and confirm customer invoices, vendor bills, credit notes, debit notes,
and customer/vendor payments with a custom backdate while maintaining accurate transaction records.
Invoice Backdate Management Feature:
- Mass Invoice/Bill/Credit Notes/Debit Notes Backdate
- Backdate Remarks
- Mandatory Backdate Reason
- Backdate in Journal Entries
- Invoice/Bill Backdate Audit Log History
Scrap Order Backdate
Create and confirm scrap orders with a custom backdate for accurate inventory records.
Scrap Order Backdate Feature:
- Mass Scrap Backdate
- Backdate Remarks
- Mandatory Backdate Reason
- Backdate in Stock Moves
- Scrap Order Backdate Audit Log History
Inventory Adjustment Backdate
Update inventory adjustments with a custom backdate.
Inventory Adjustment Backdate Feature:
- Inventory Adjustment Backdate
- Backdate Remarks
- Mandatory Backdate Reason
- Backdate in Stock Moves
- Backdate in Stock Valuation
- Inventory Adjustment Backdate Audit Log History

Configuration for account backdate, enable features as per requirement.
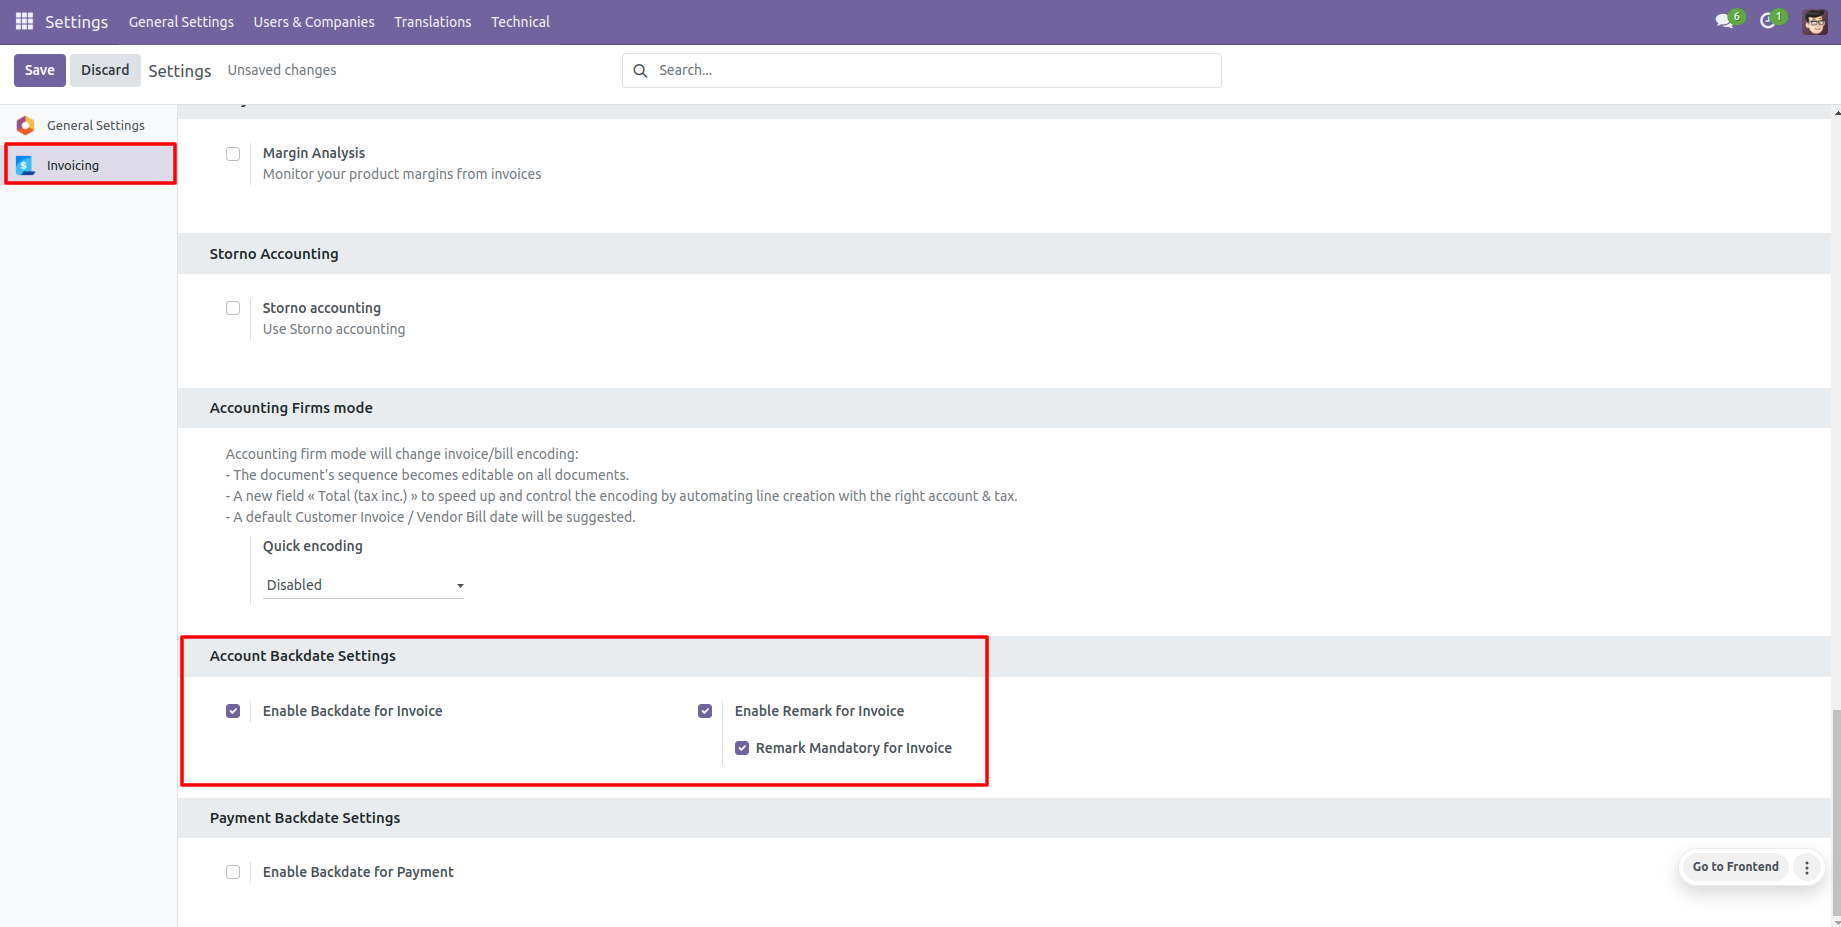
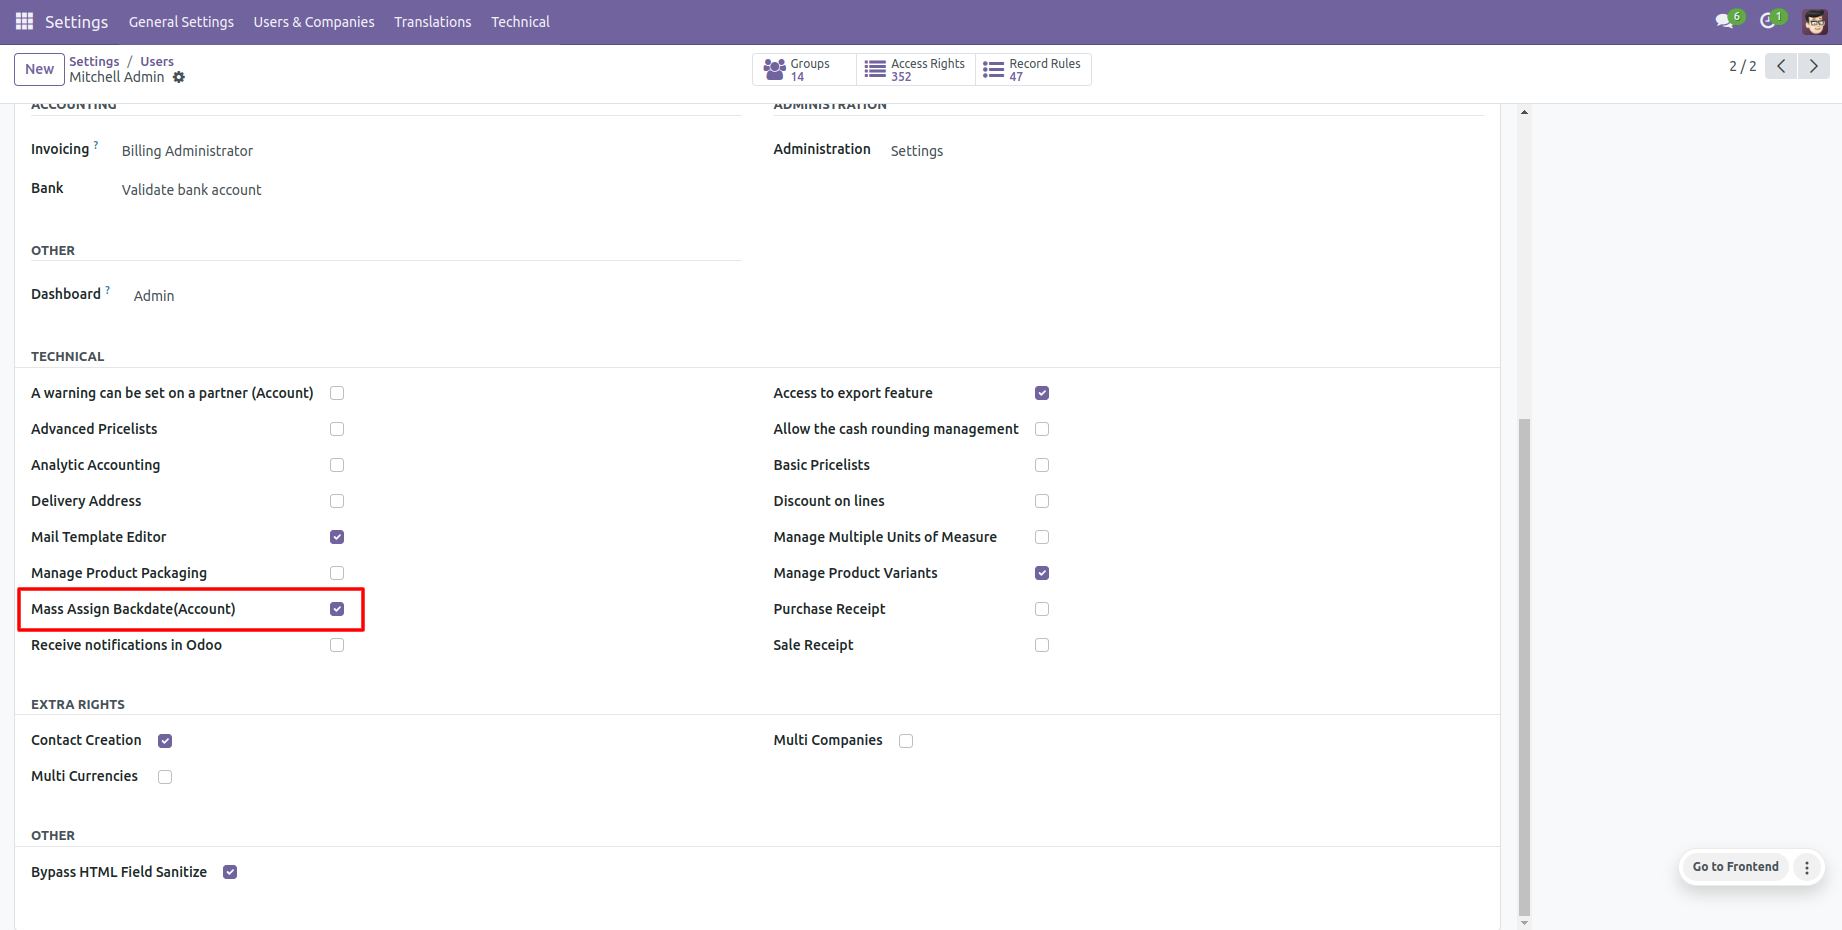
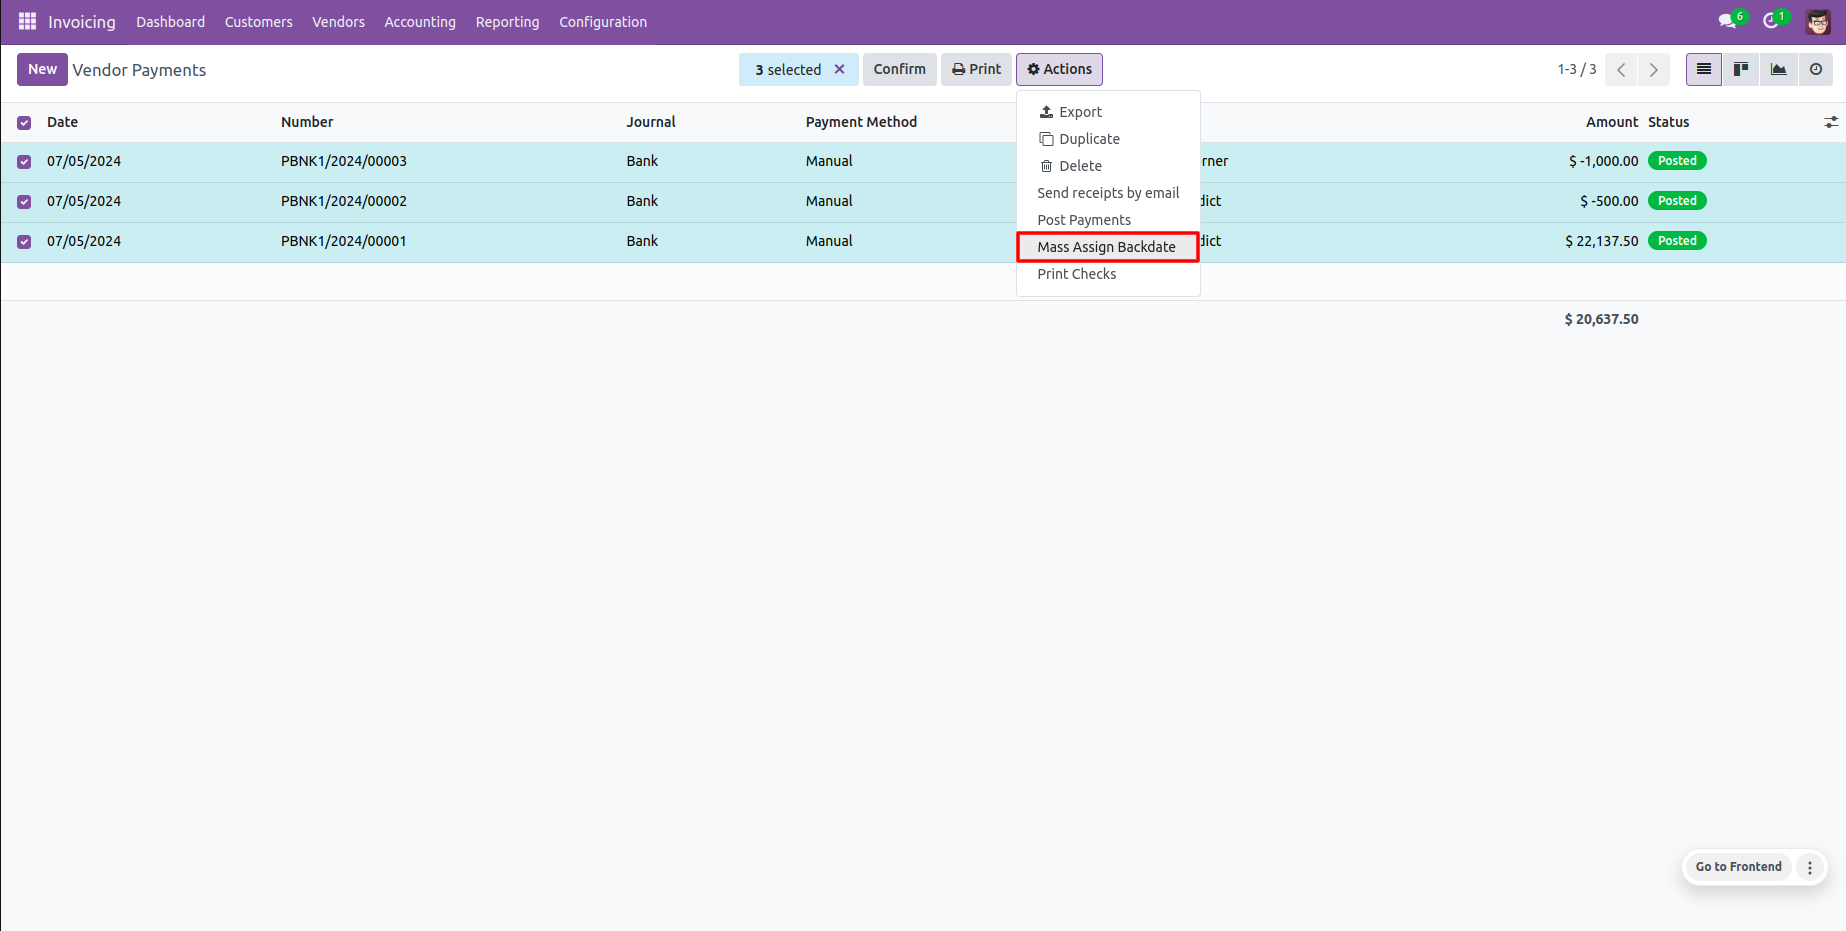
If you enable "Mass Assign Backdate" then you can mass assign backdate.
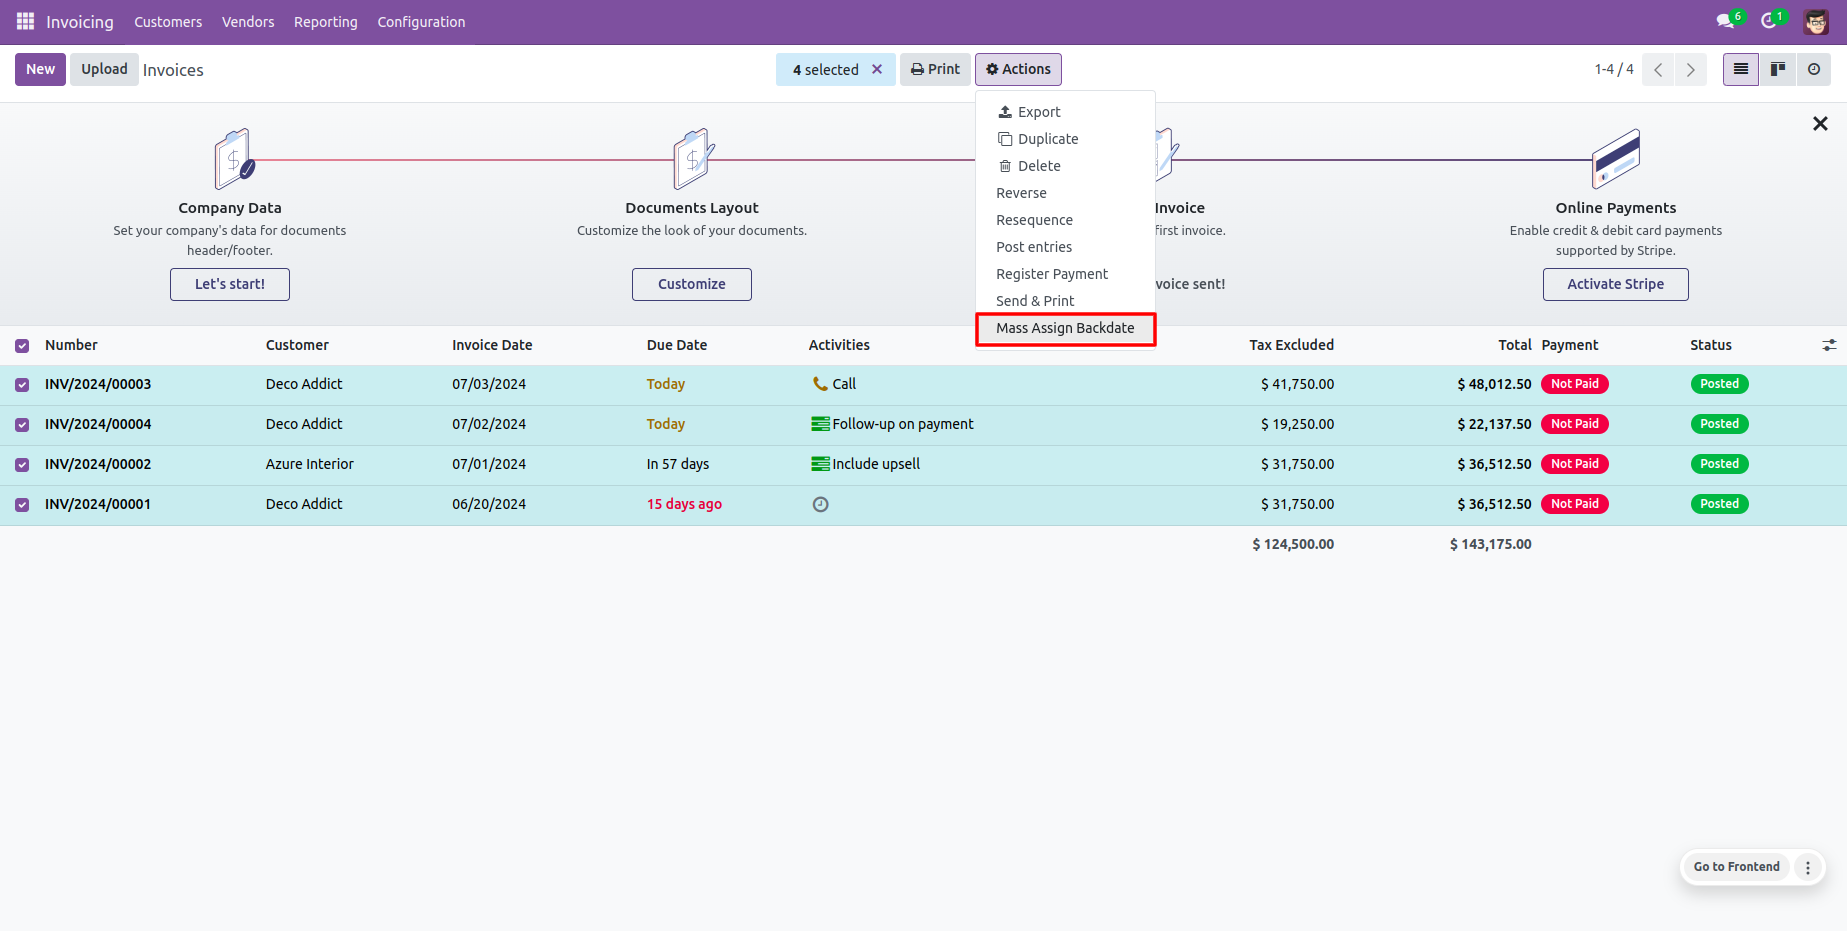
Select orders from the list view then click "Mass Assign Backdate".
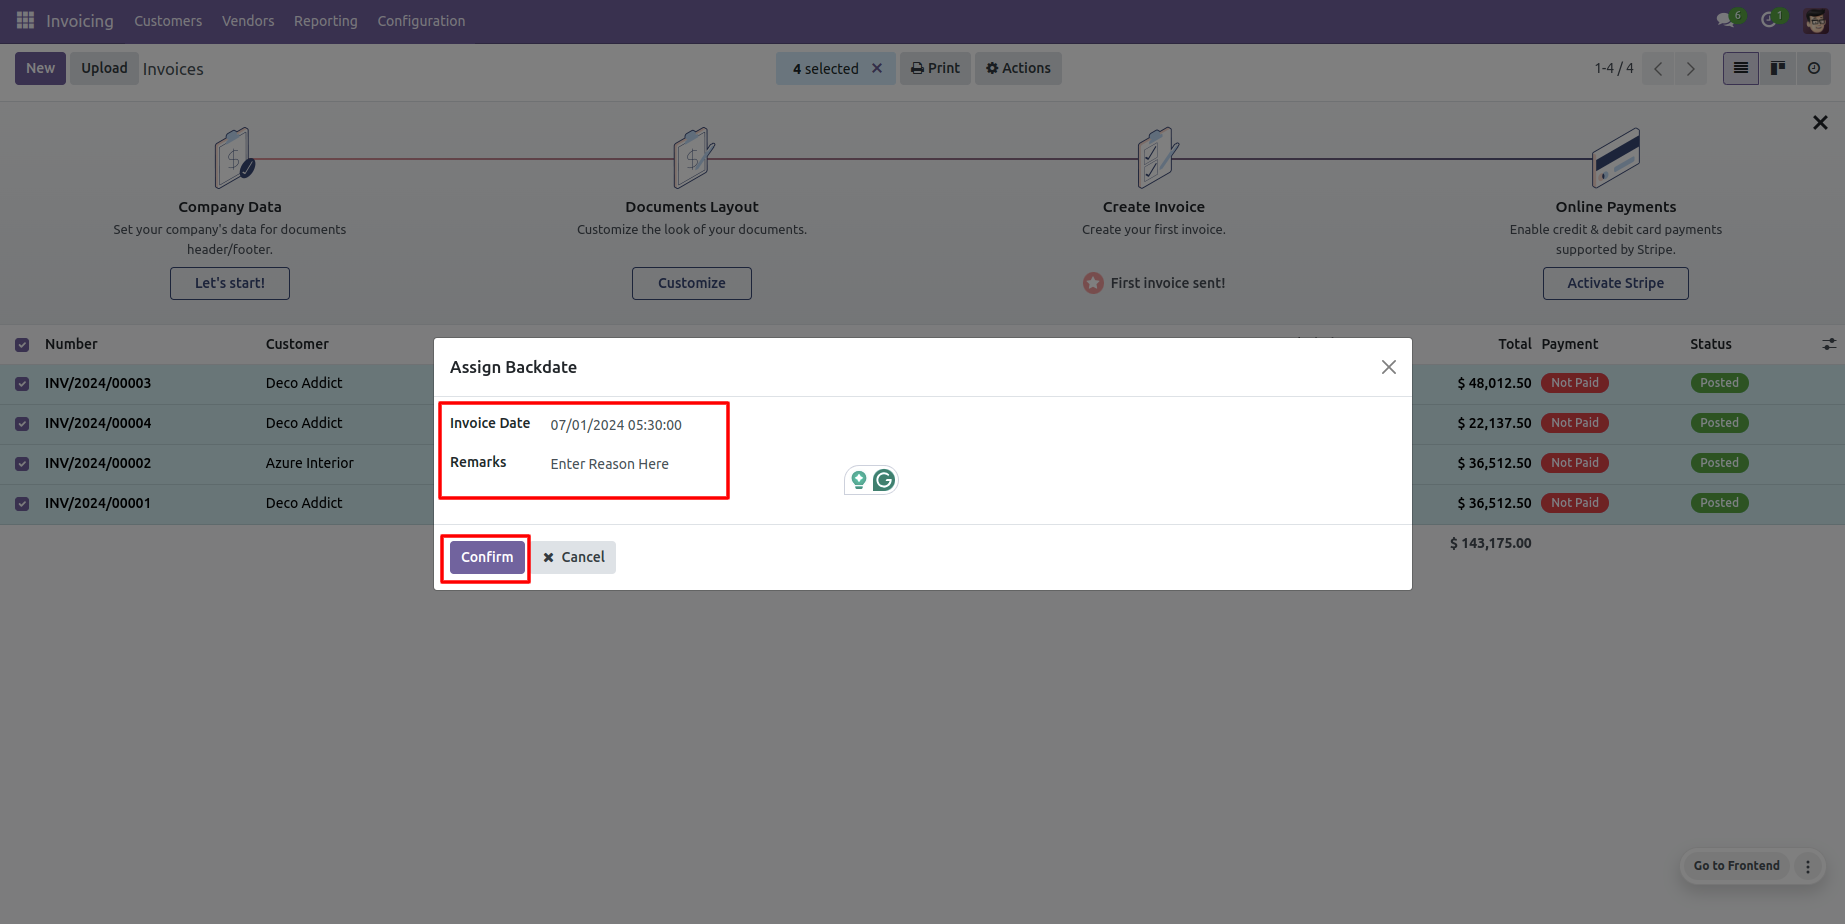
After that, this wizard opens, enters the order date and remarks. Here remarks come if you have enabled that feature.
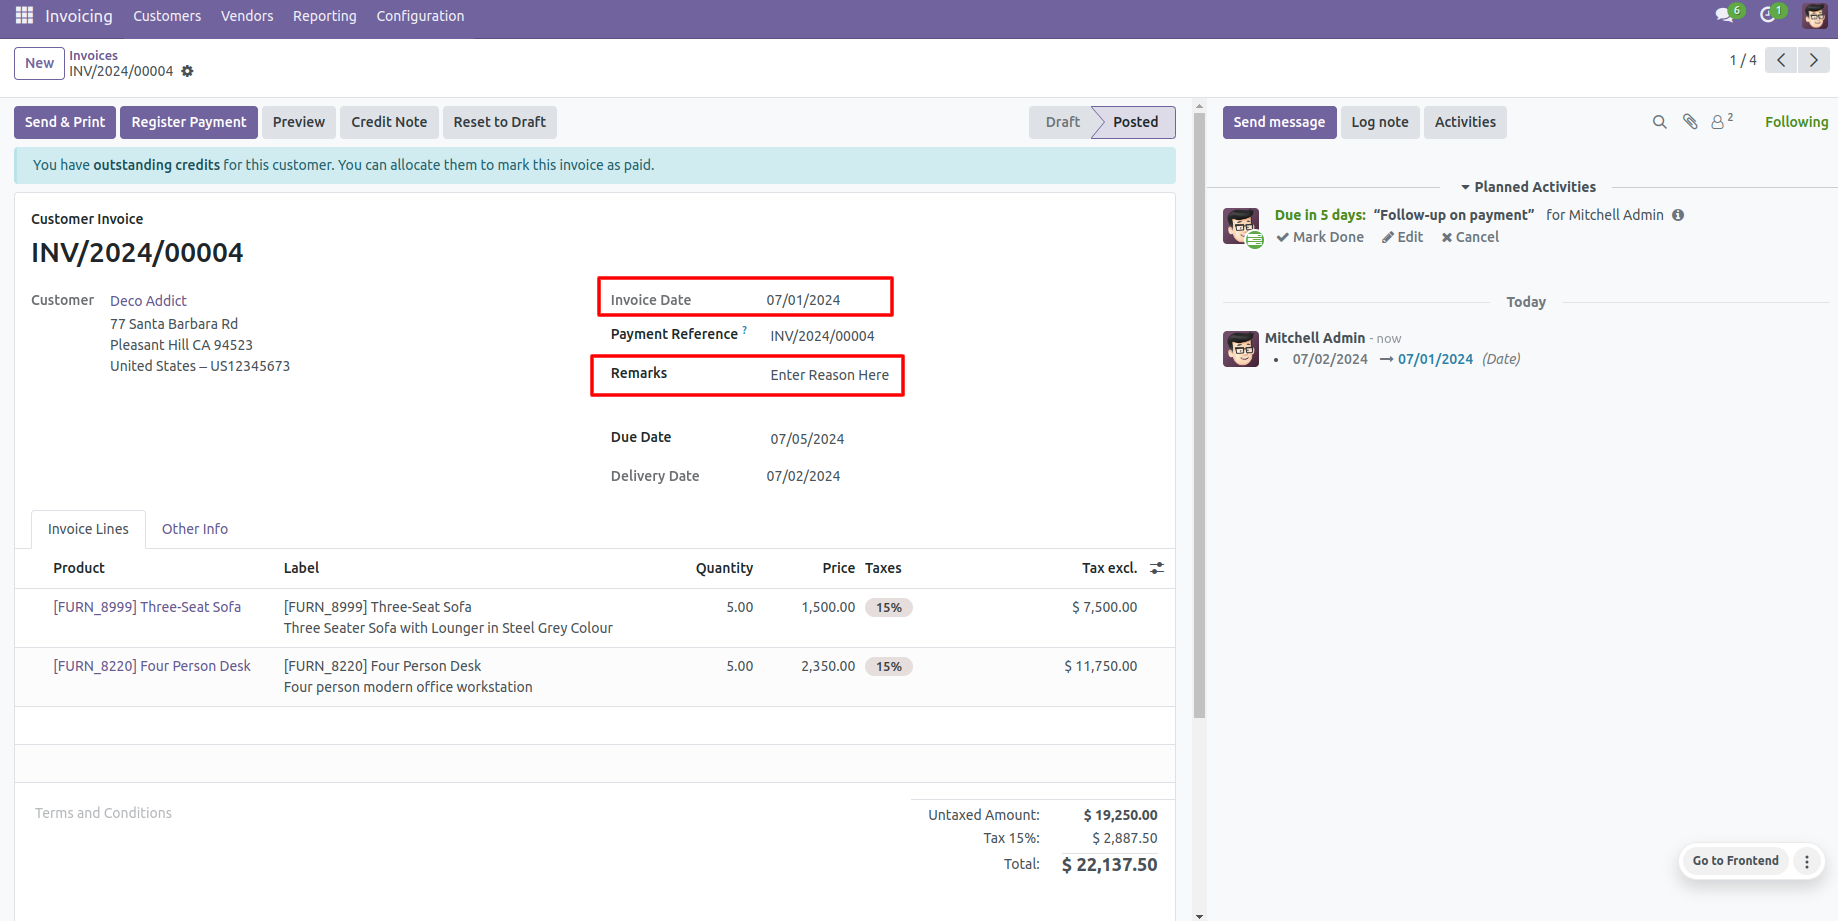
Invoice form view with backdate and remarks.
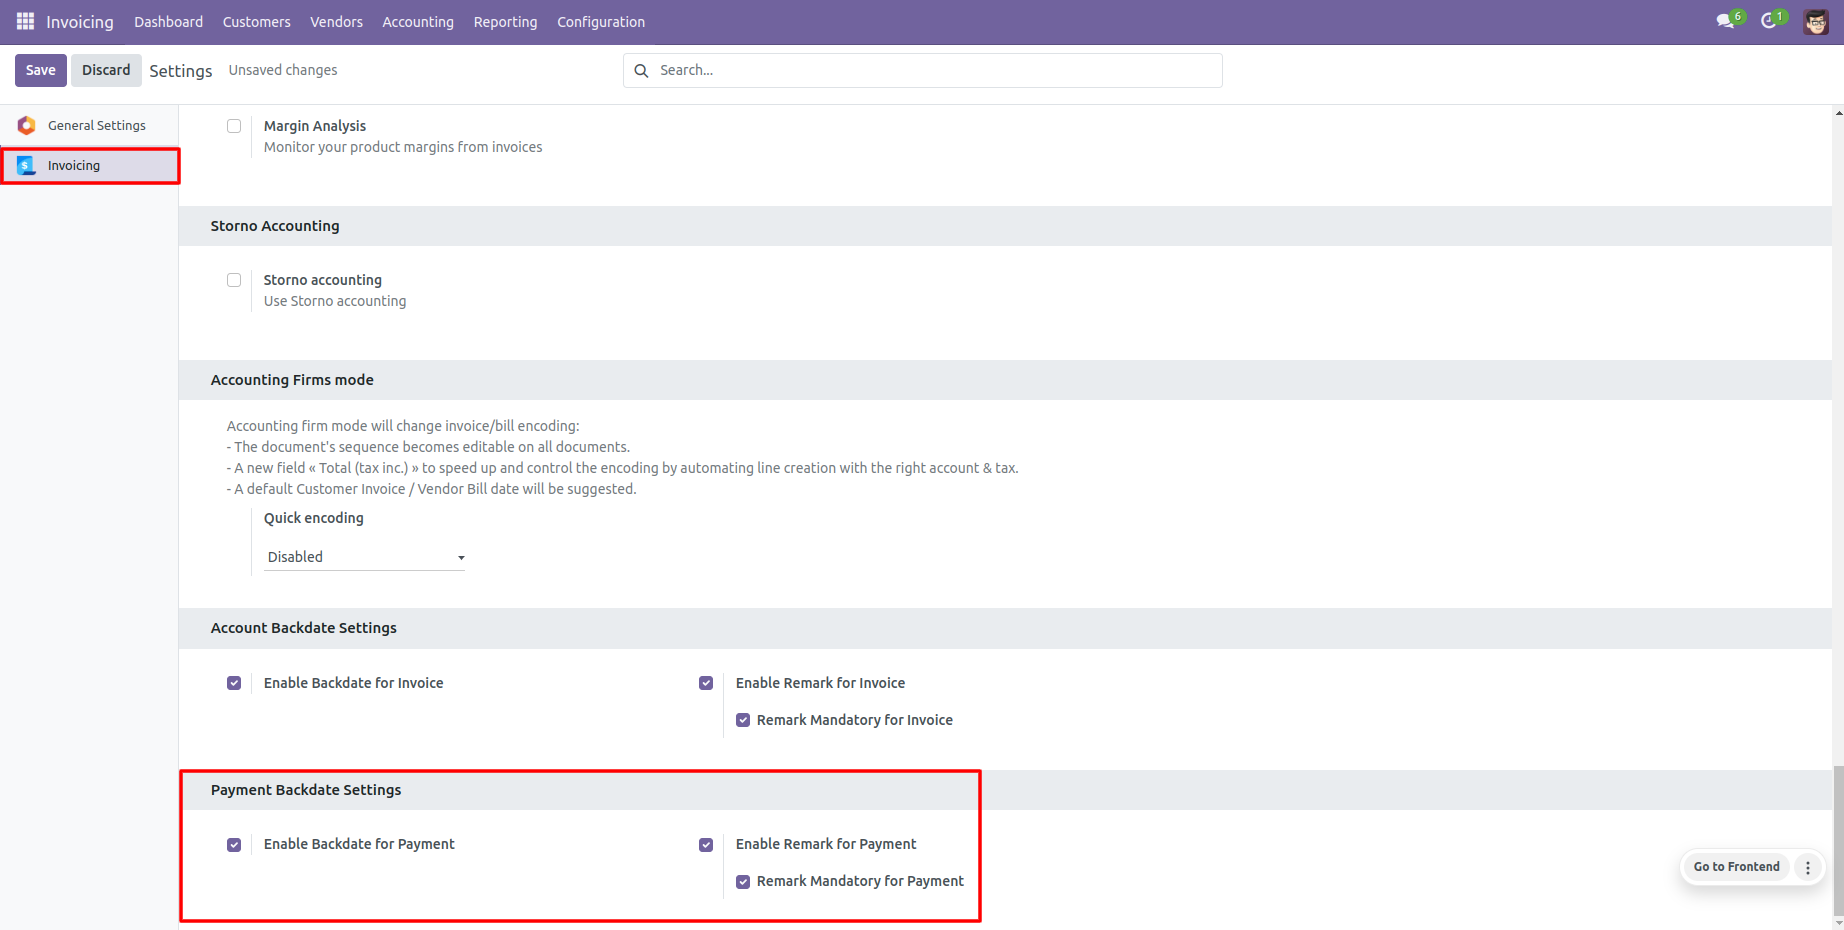
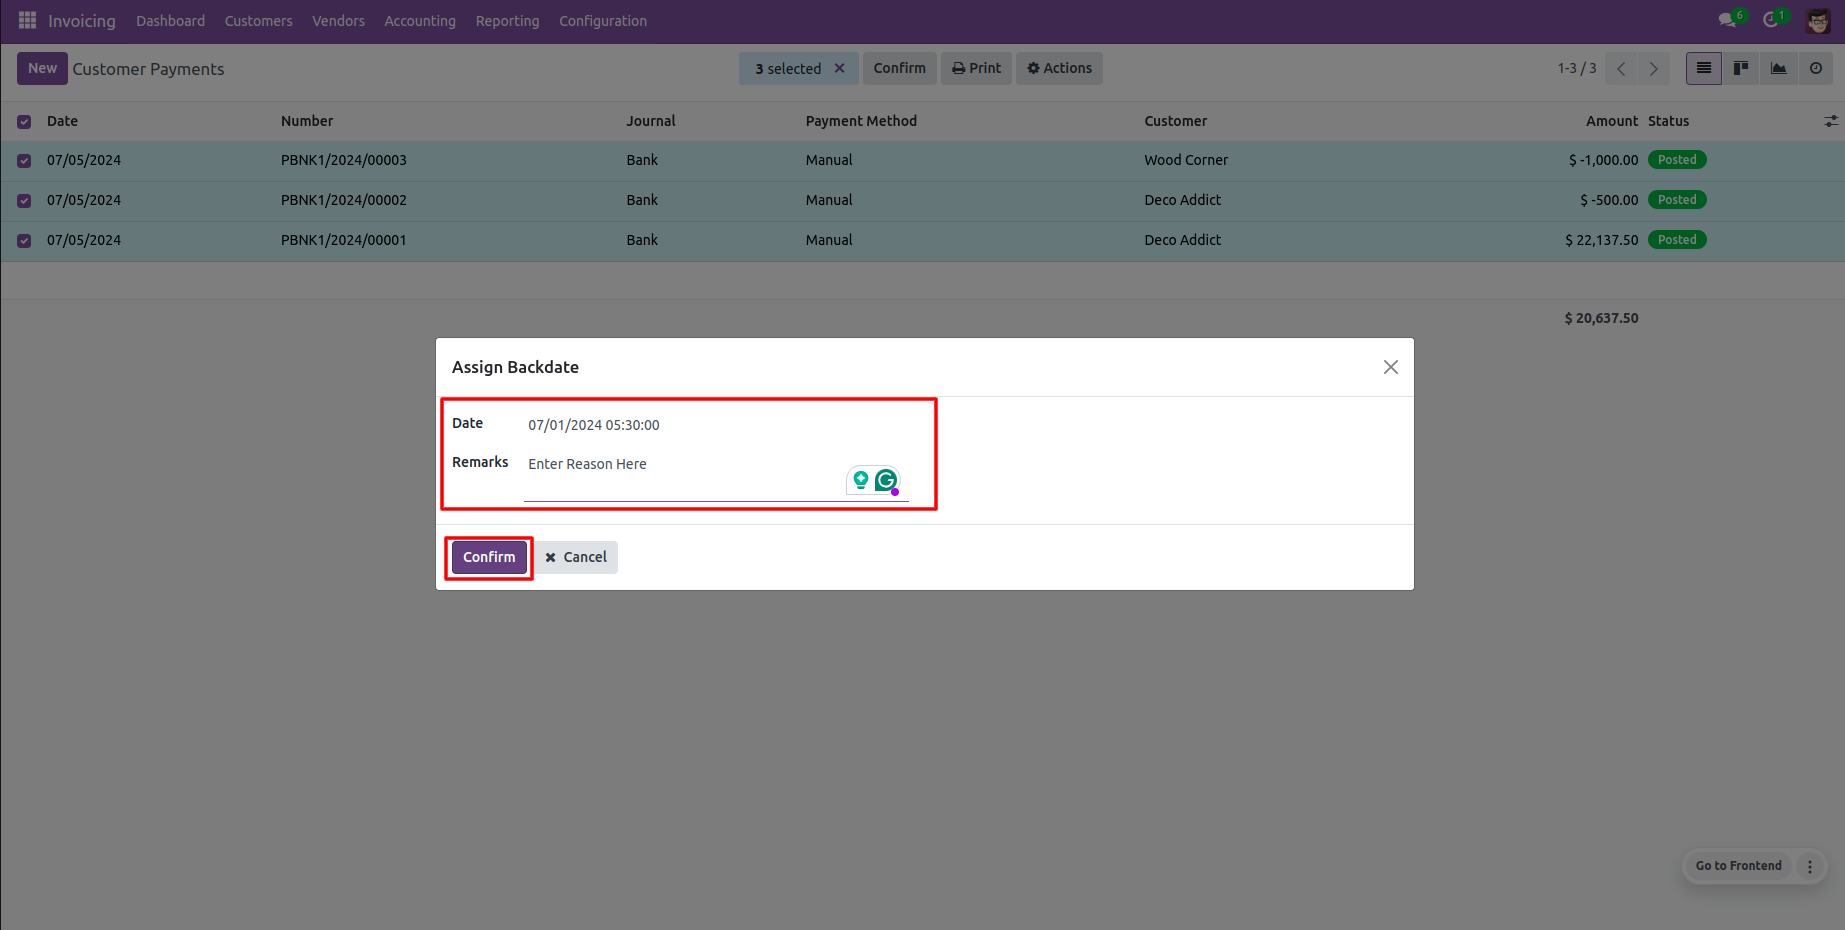
Configuration for payment backdate, enable features as per requirement.
If you enable "Mass Assign Backdate" then you can mass assign backdate, Select orders from the list view then click "Mass Assign Backdate".
After that, this wizard opens, enters the order date and remarks. Here remarks come if you have enabled that feature.
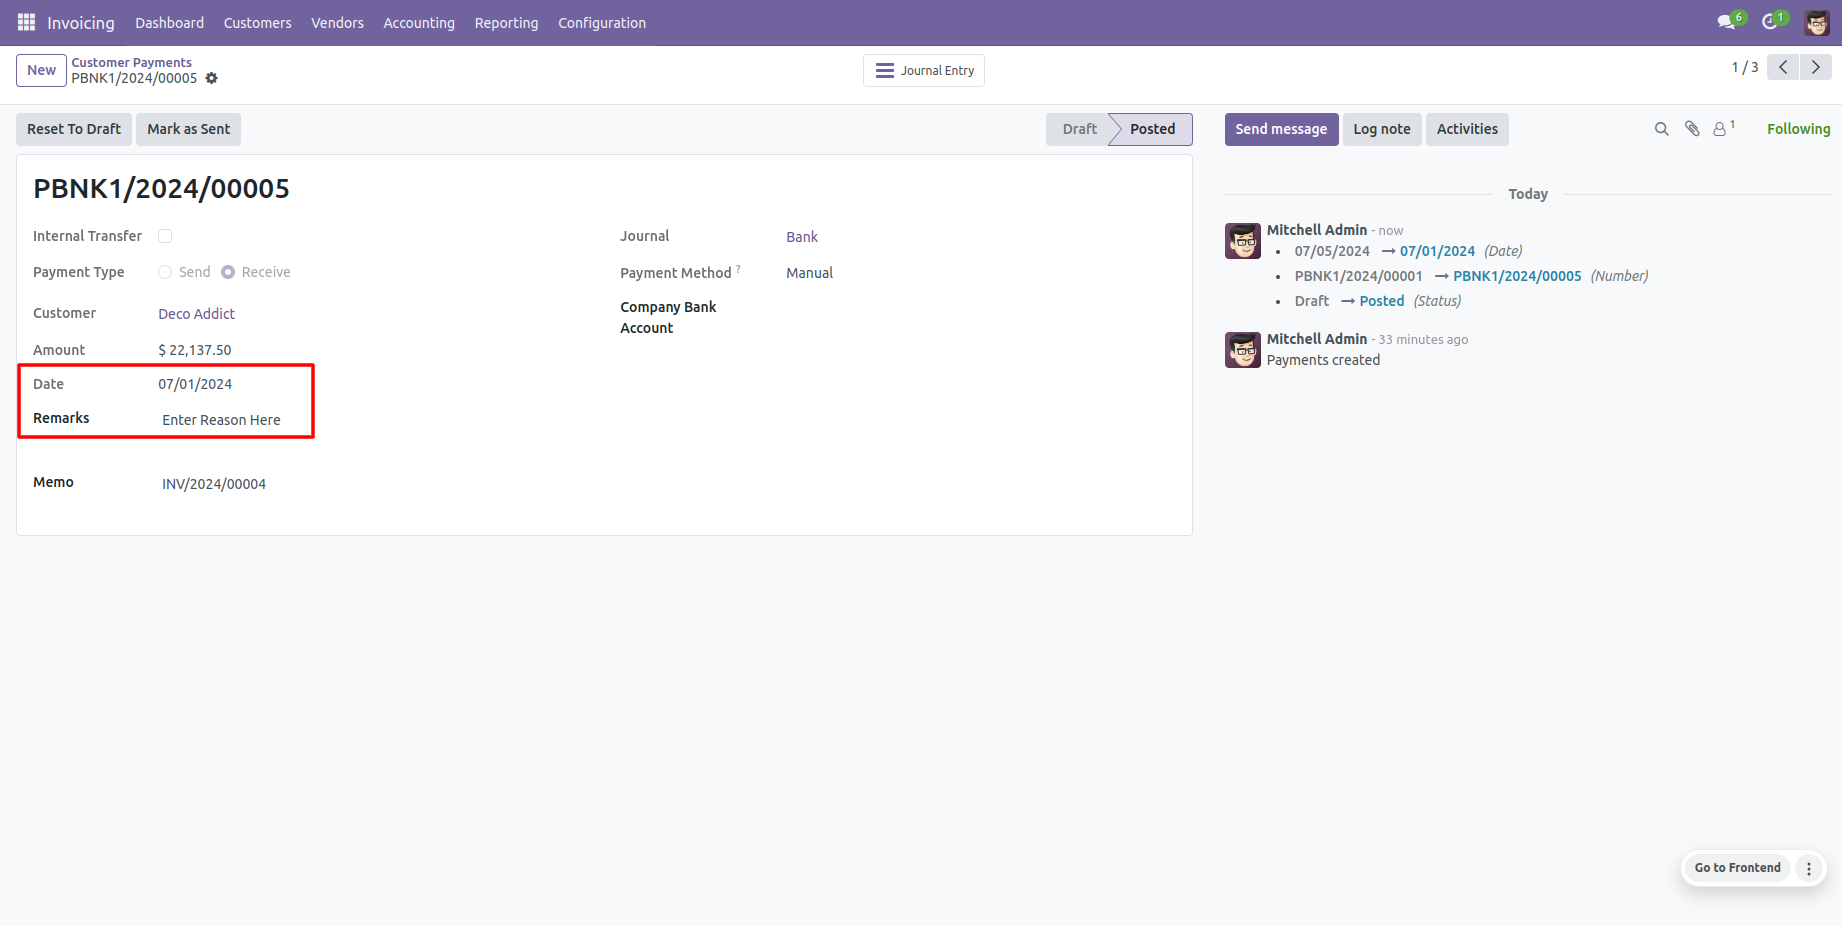
Payments form view with backdate and remarks.
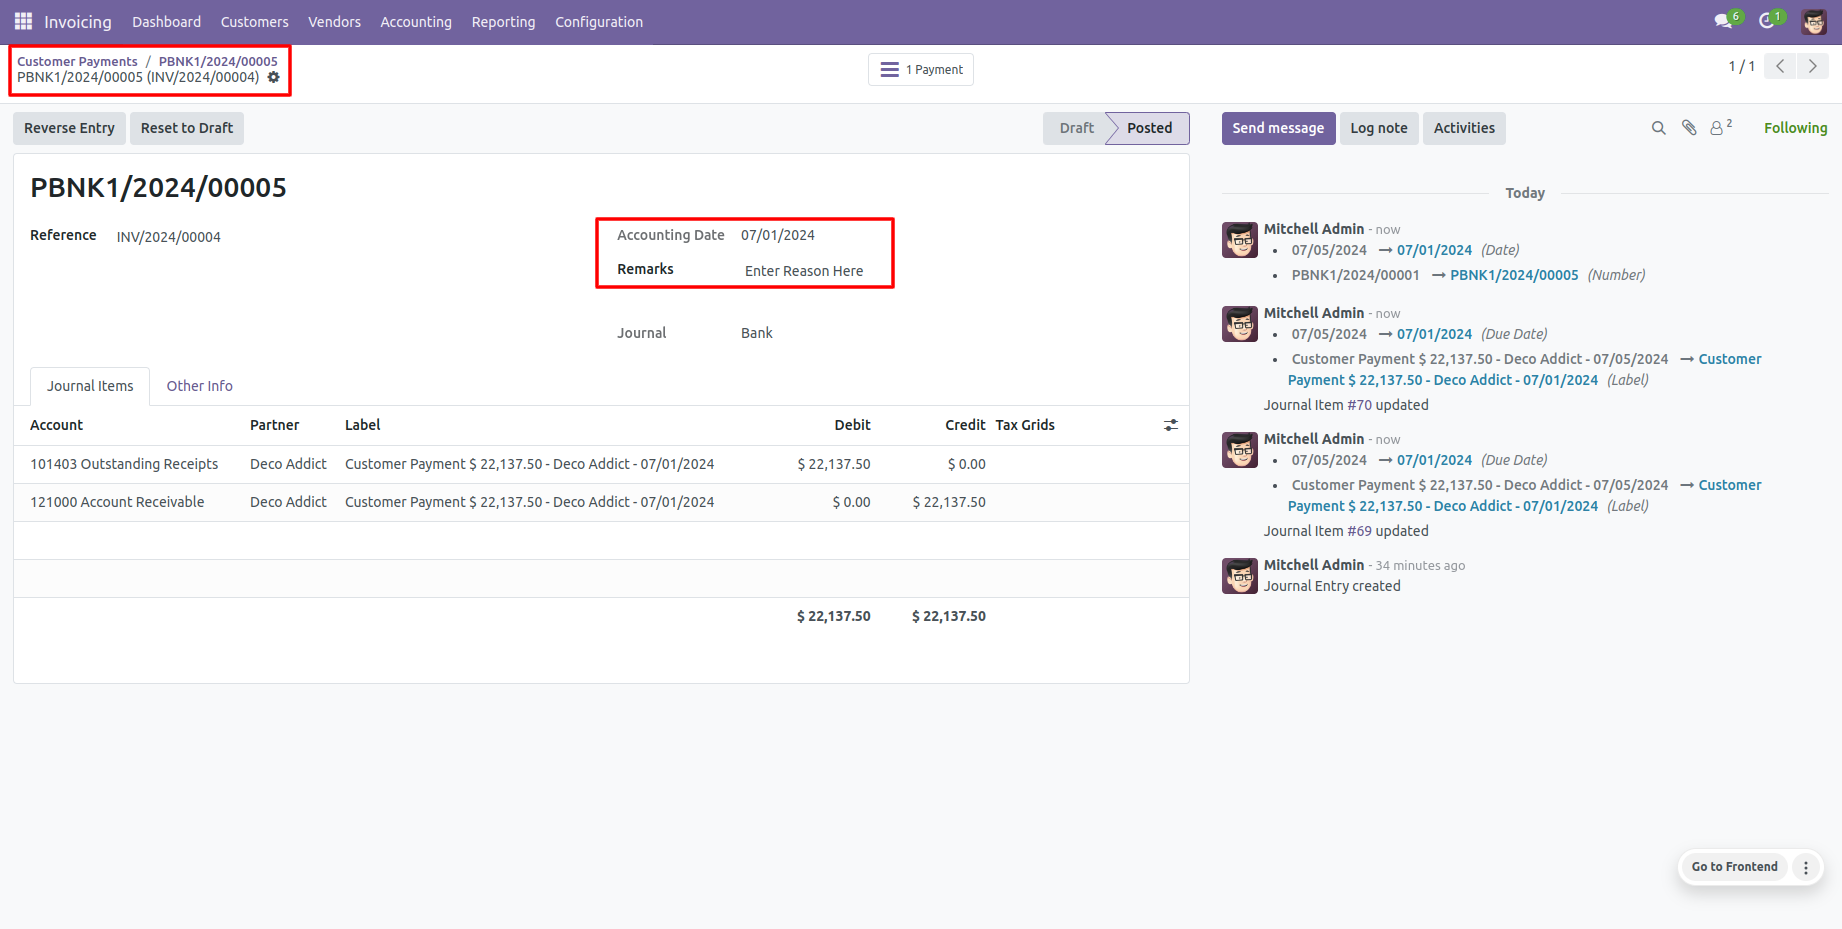
Journal entries with backdate and remarks.
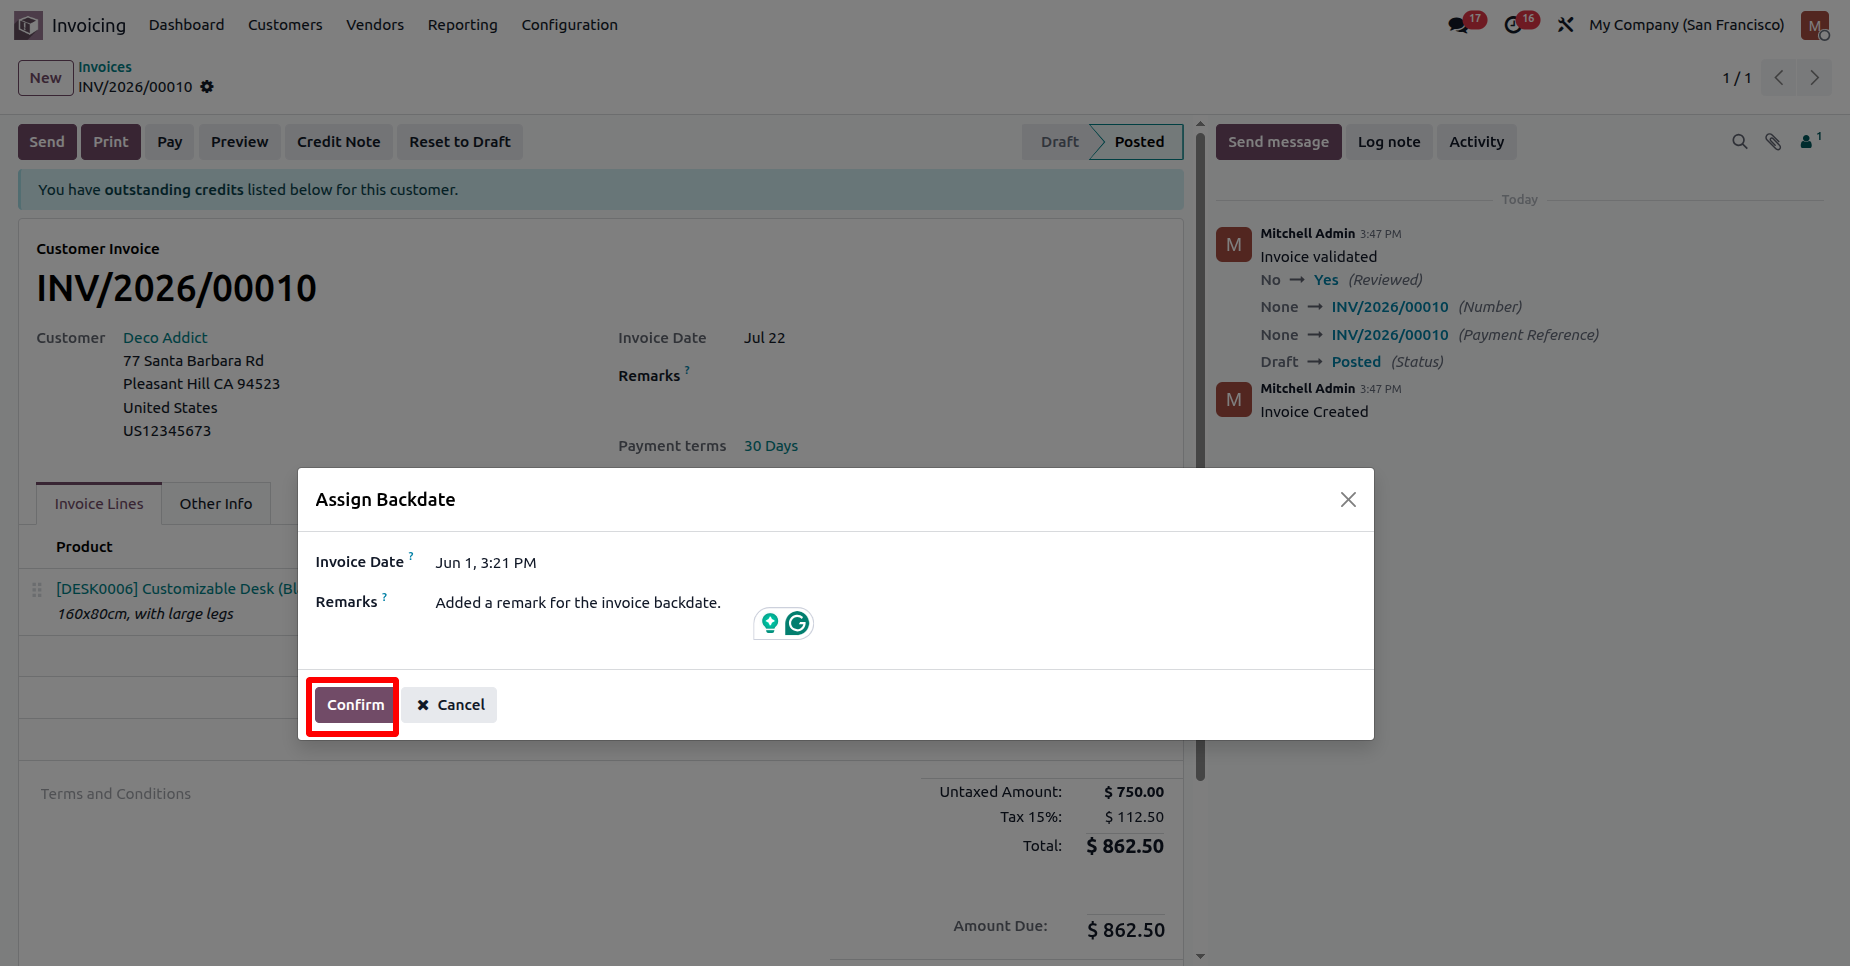
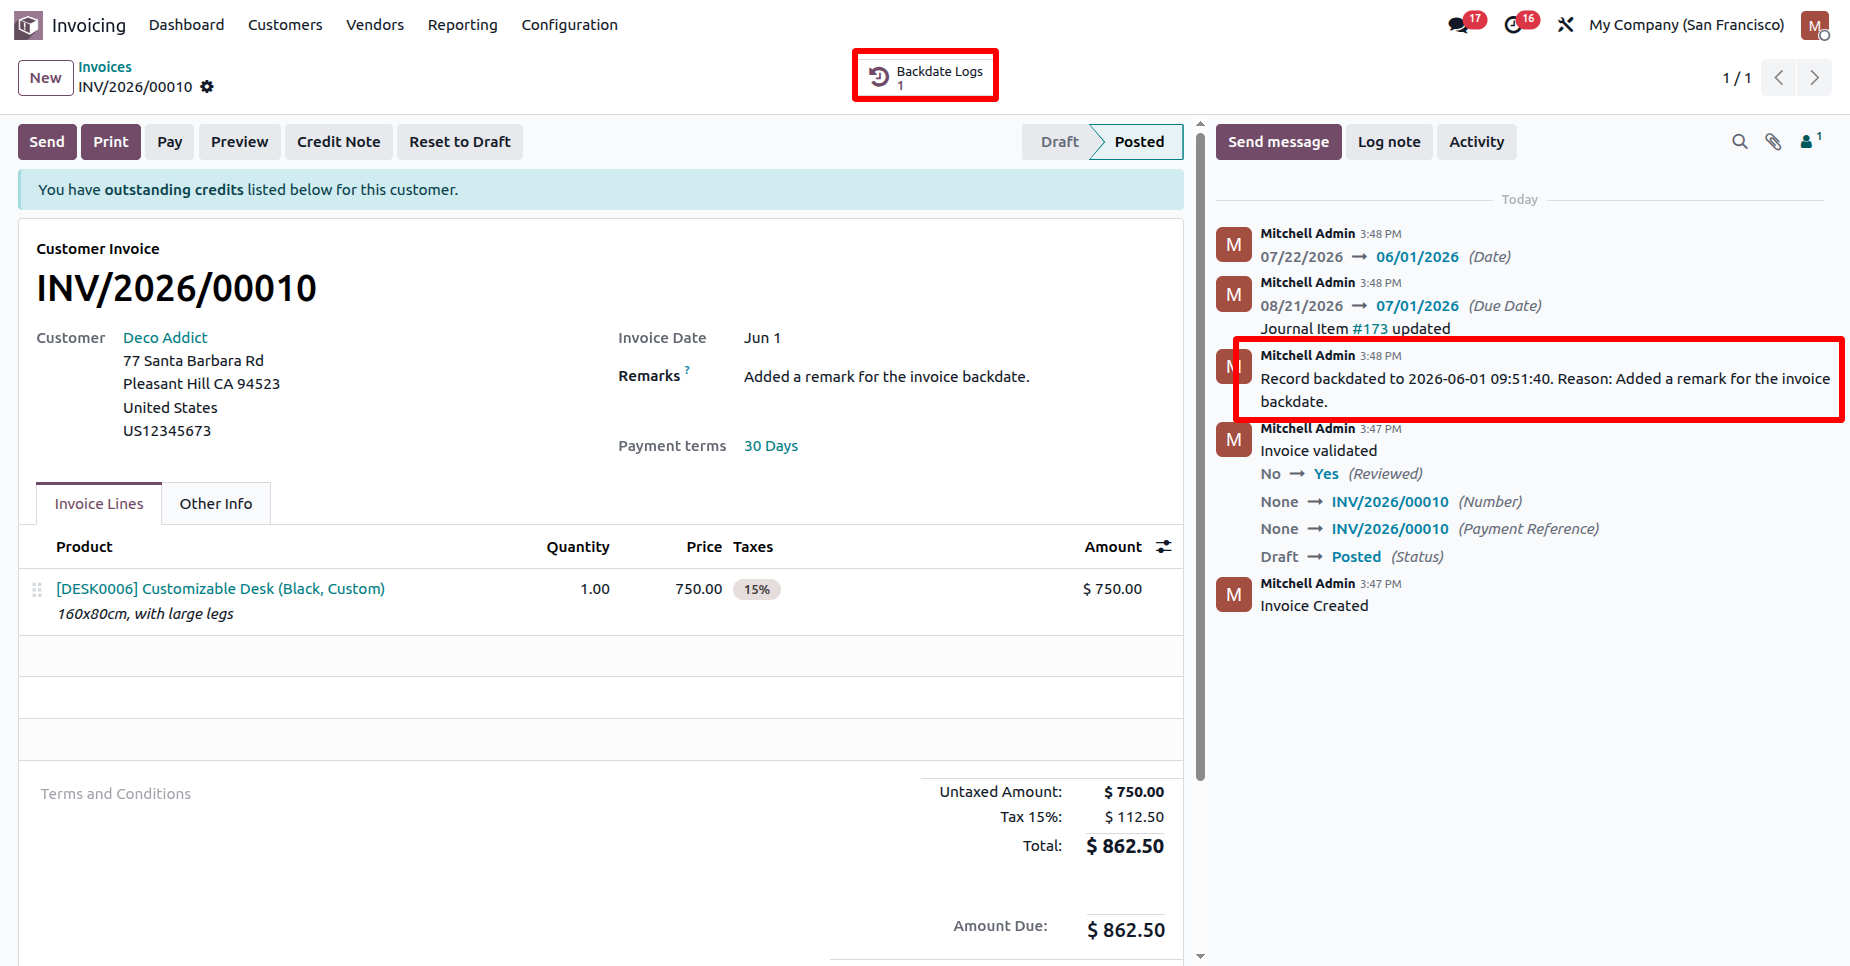
Assign the desired backdate, then click the Confirm button to apply the backdate to the selected Invoice.
The Invoice Date is updated to the selected backdate. The backdate change is also recorded in the Chatter, and the same audit entry is available through the Backdate Log smart button on the Invoice form view.
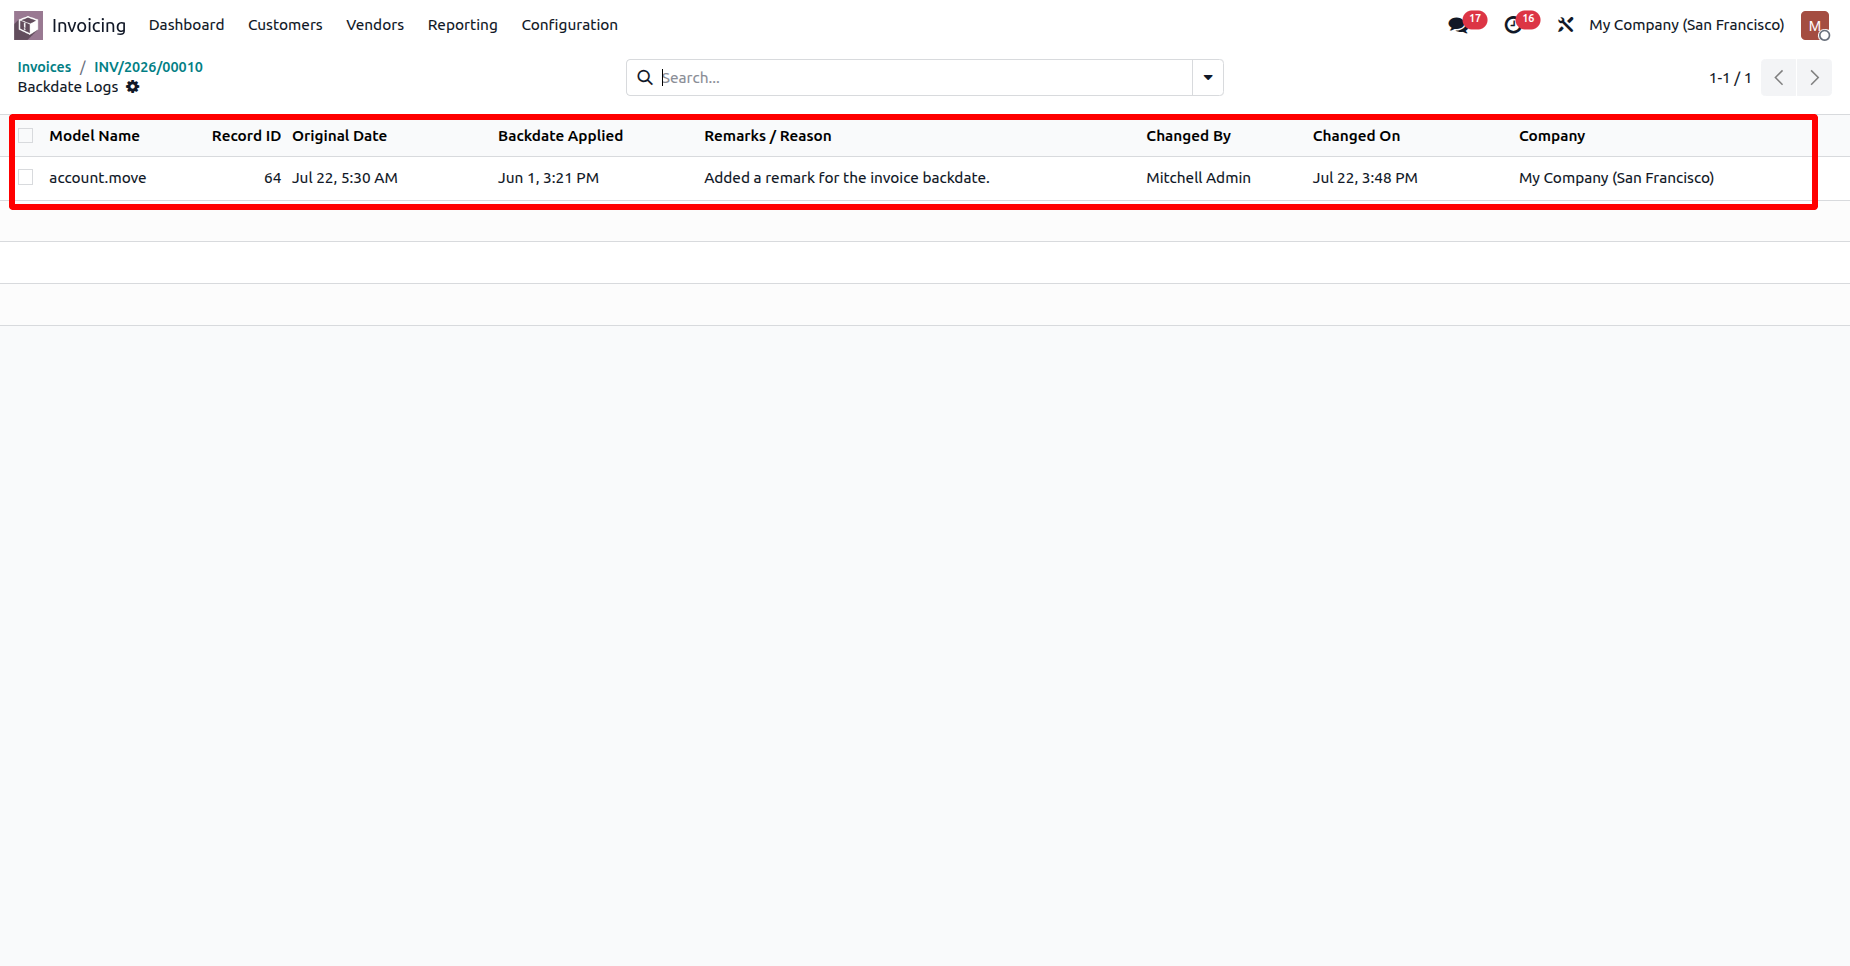
Clicking the Backdate Logs smart button opens the Backdate Logs list view, where users can view the complete audit history of all backdate changes made to the Invoice.
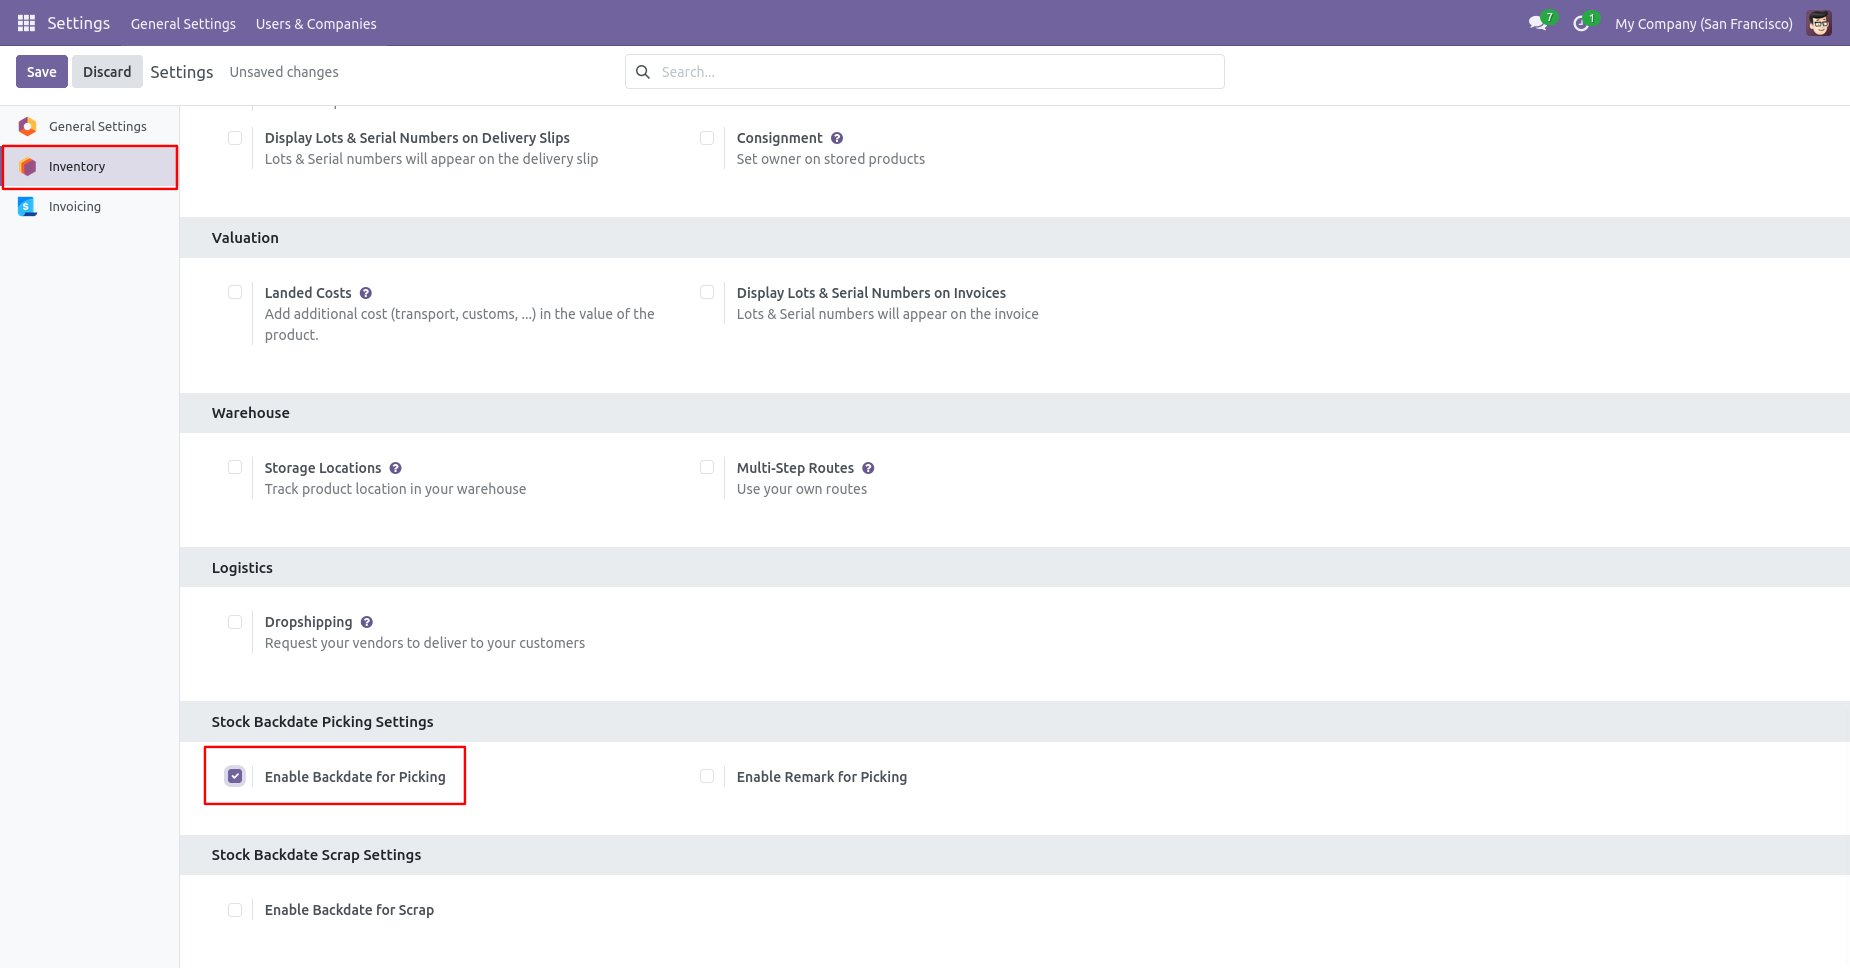
Configuration for picking backdate, Tick the 'Enable Backdate For Picking' boolean.
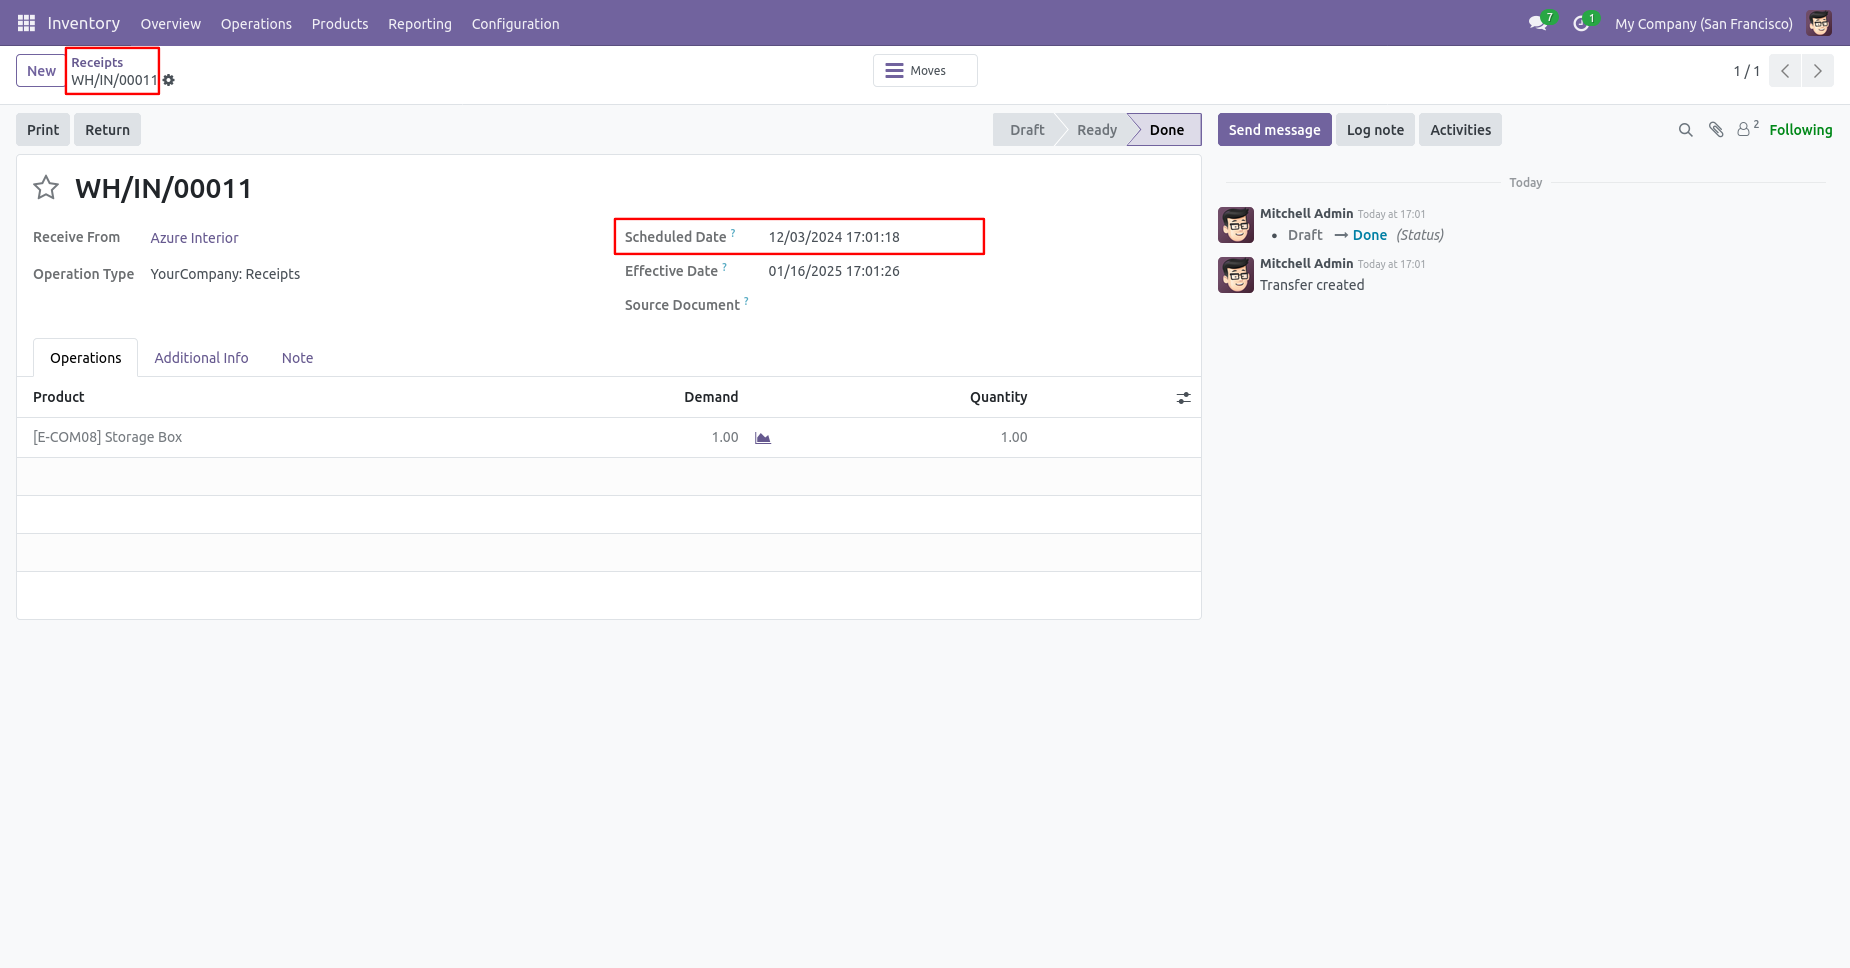
Receipt form view with backdate.
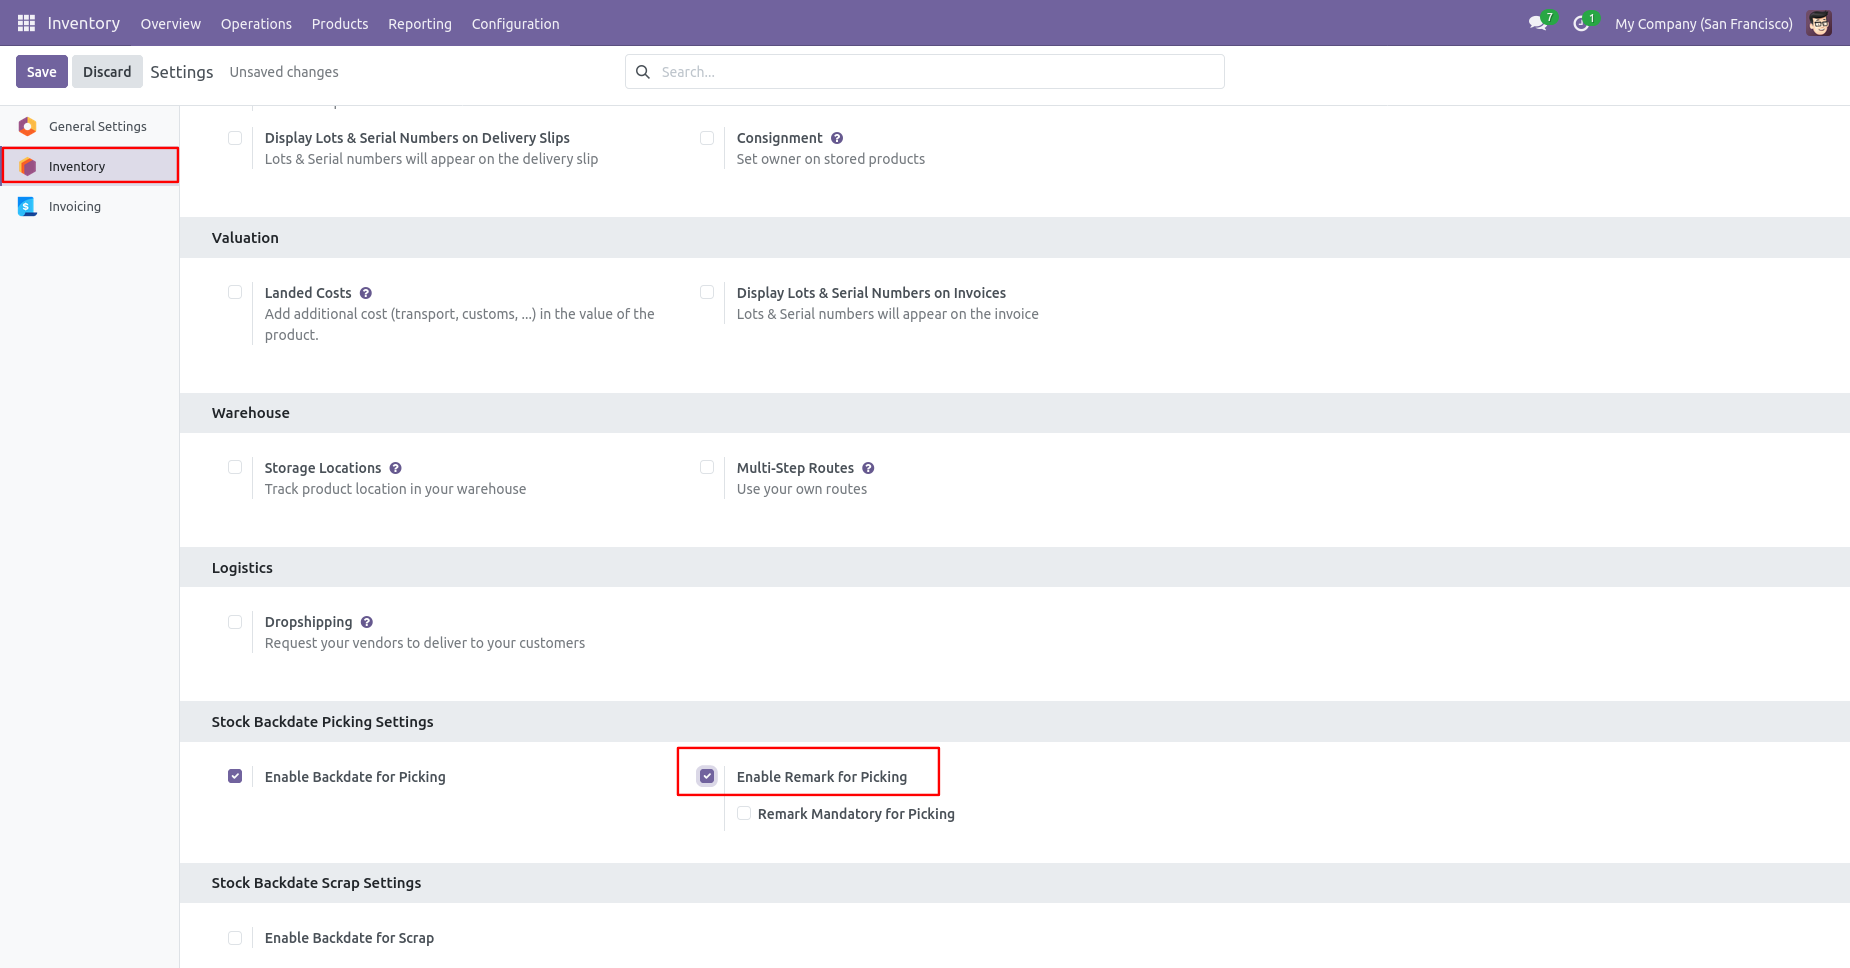
Tick the 'Enable Remark For Picking' boolean.
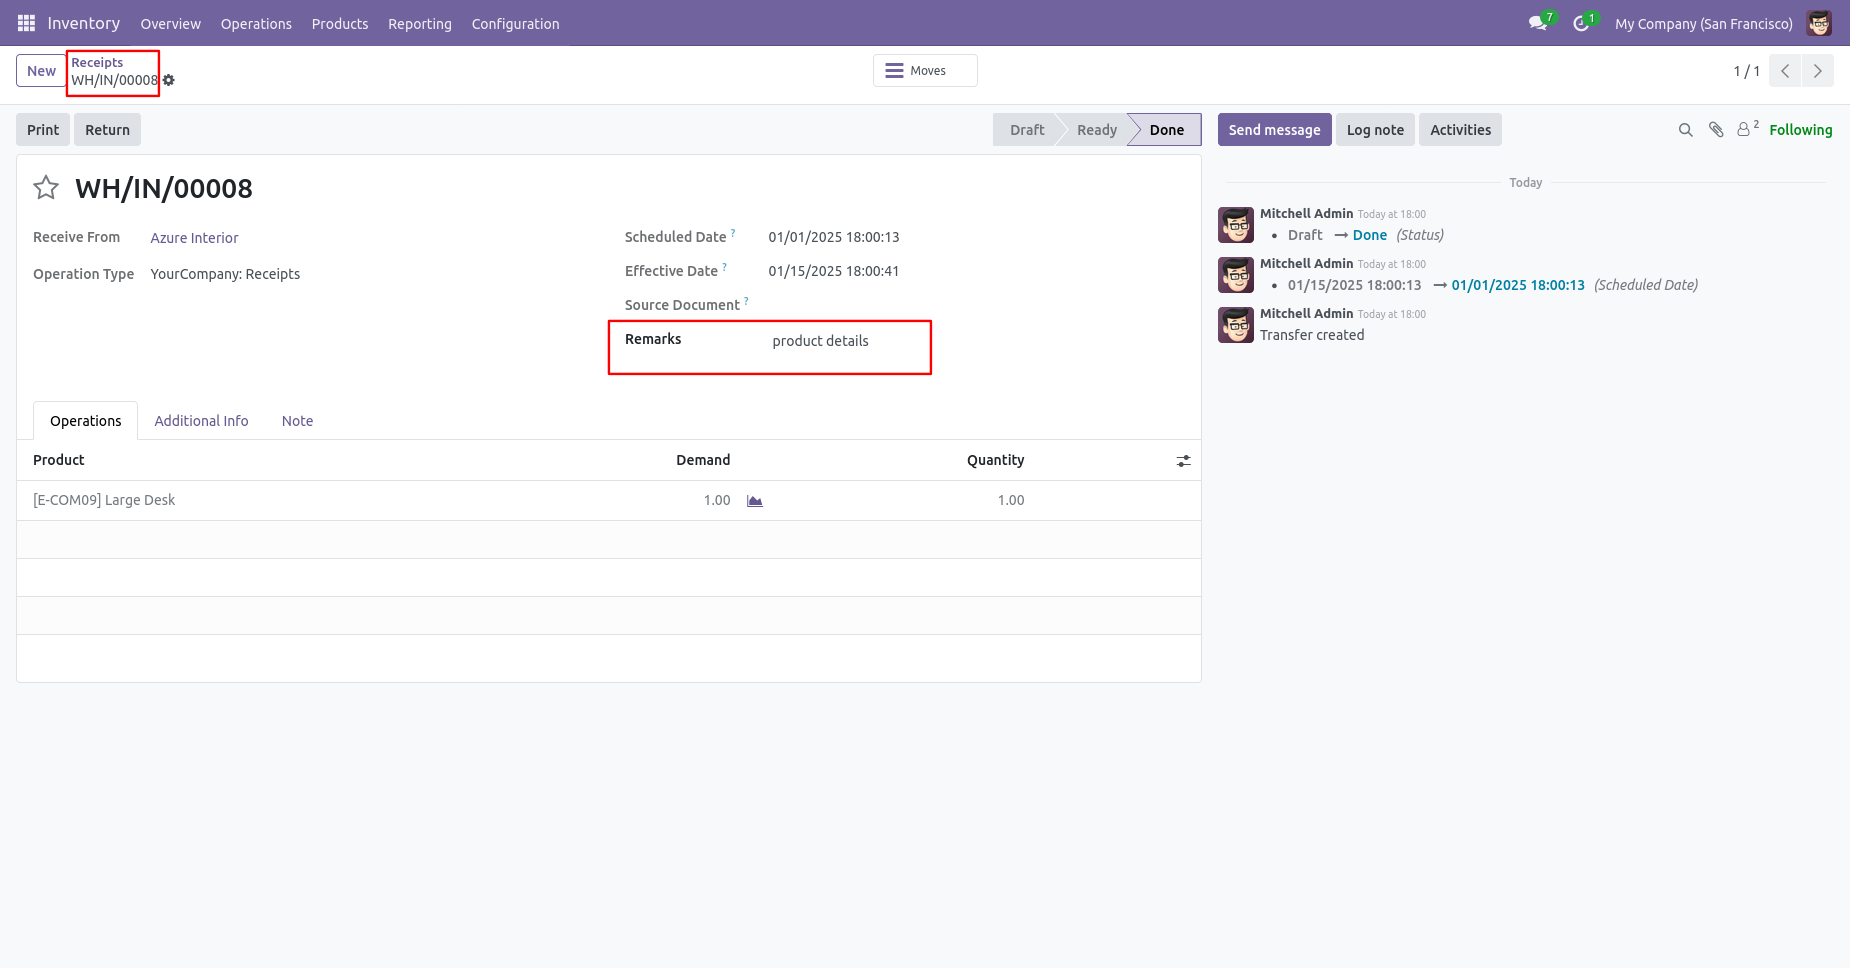
Receipt form view with remarks.
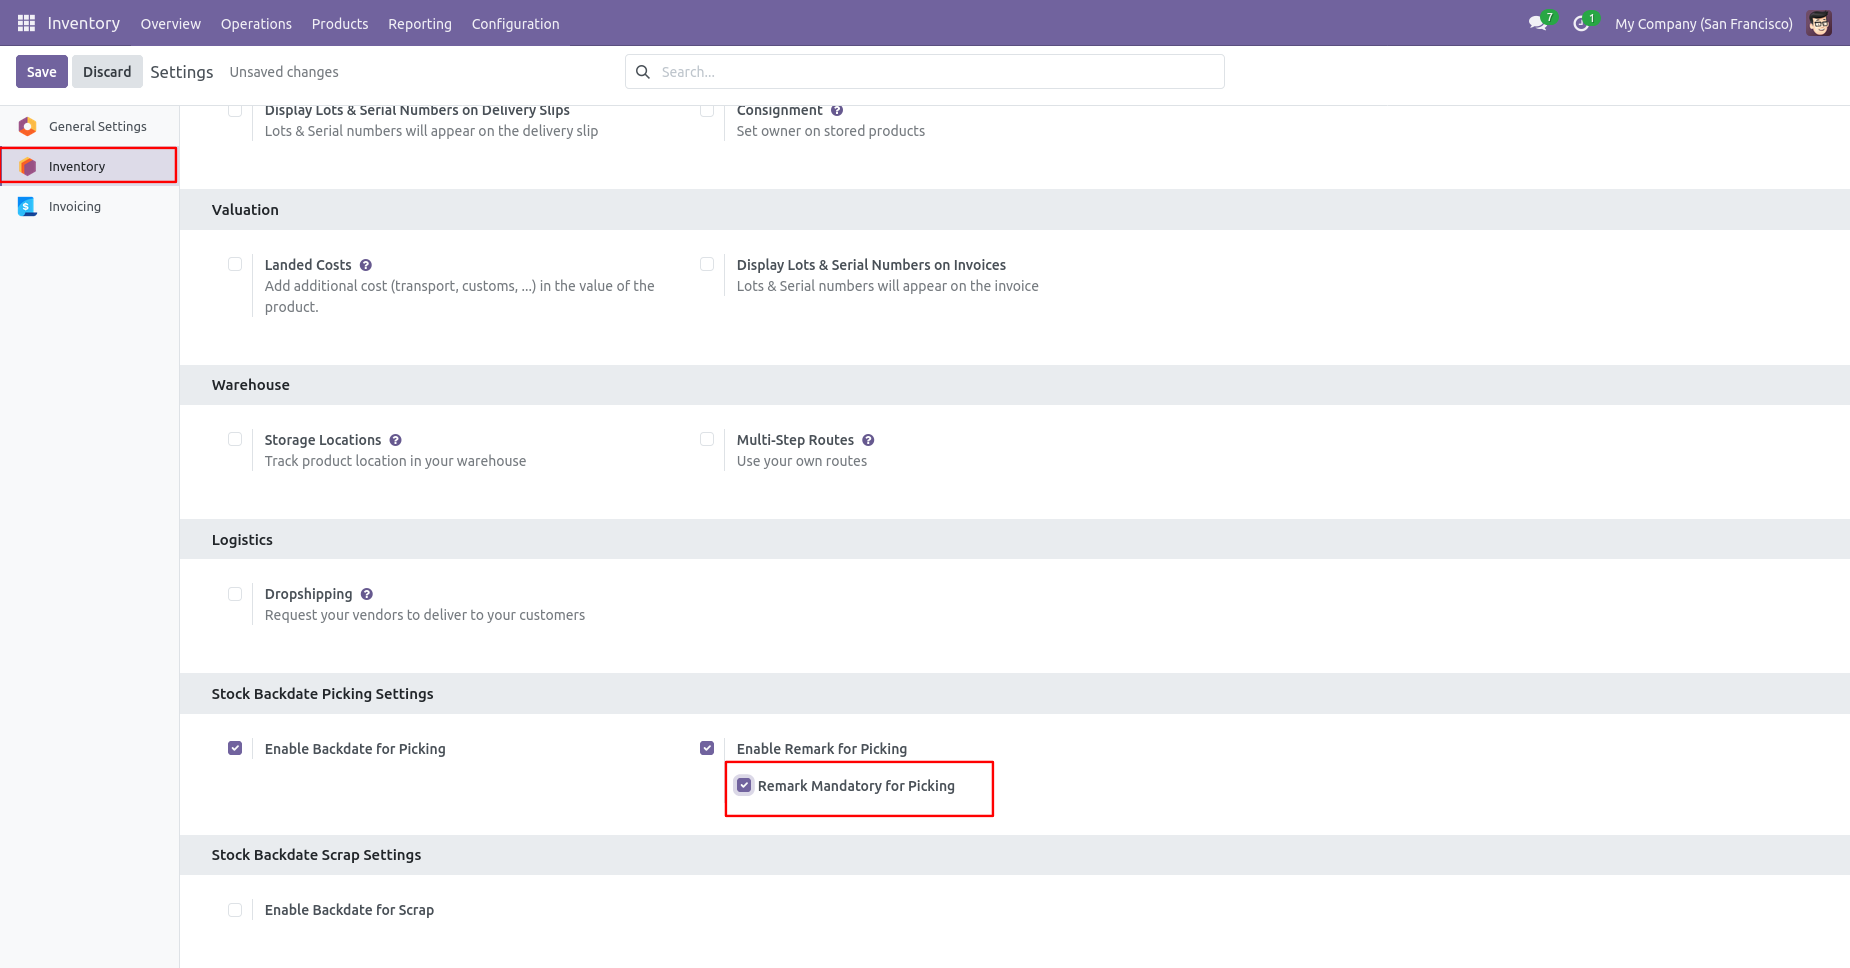
Tick the 'Remark Mandatory For Picking' boolean.
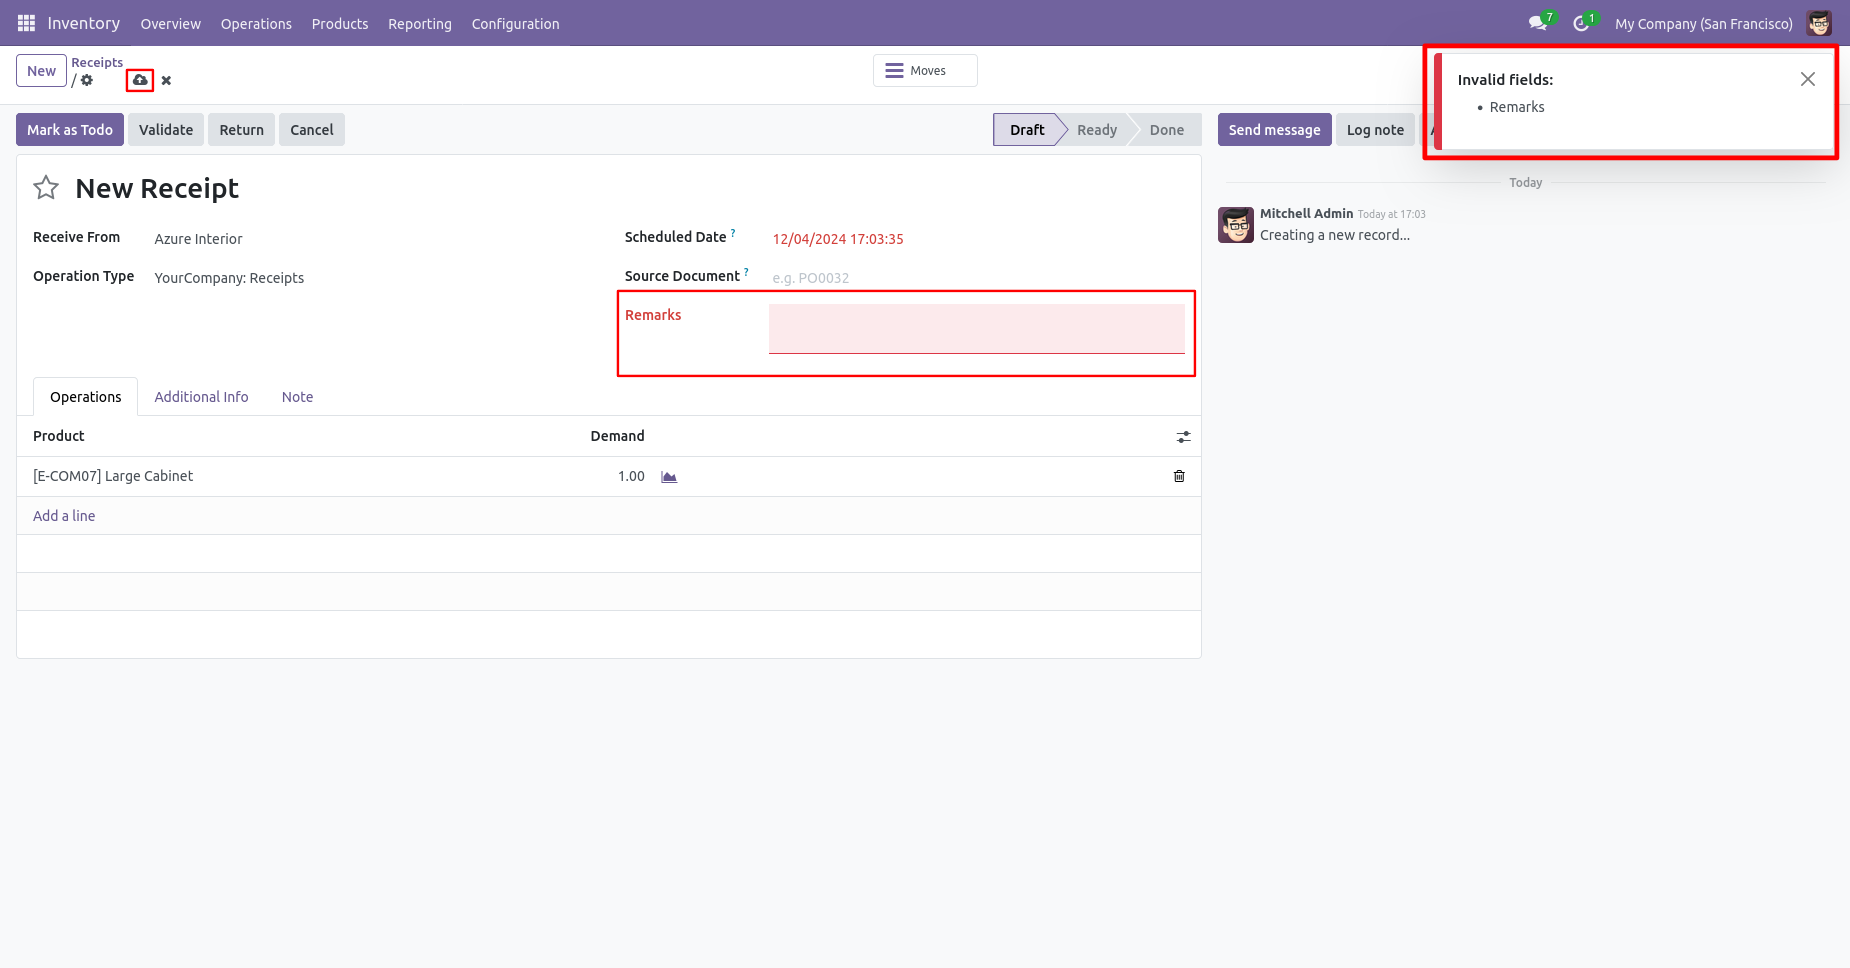
You can't save the receipt without entering a remark.
If you enable 'Mass Assign Backdate' then you can mass assign backdate.
Select orders from the list view then click 'Mass Assign Backdate'.
After that, this wizard opens, enters the order date, and remarks. Here, remarks come if you have enabled that feature.
Receipt form view with backdate and remarks.
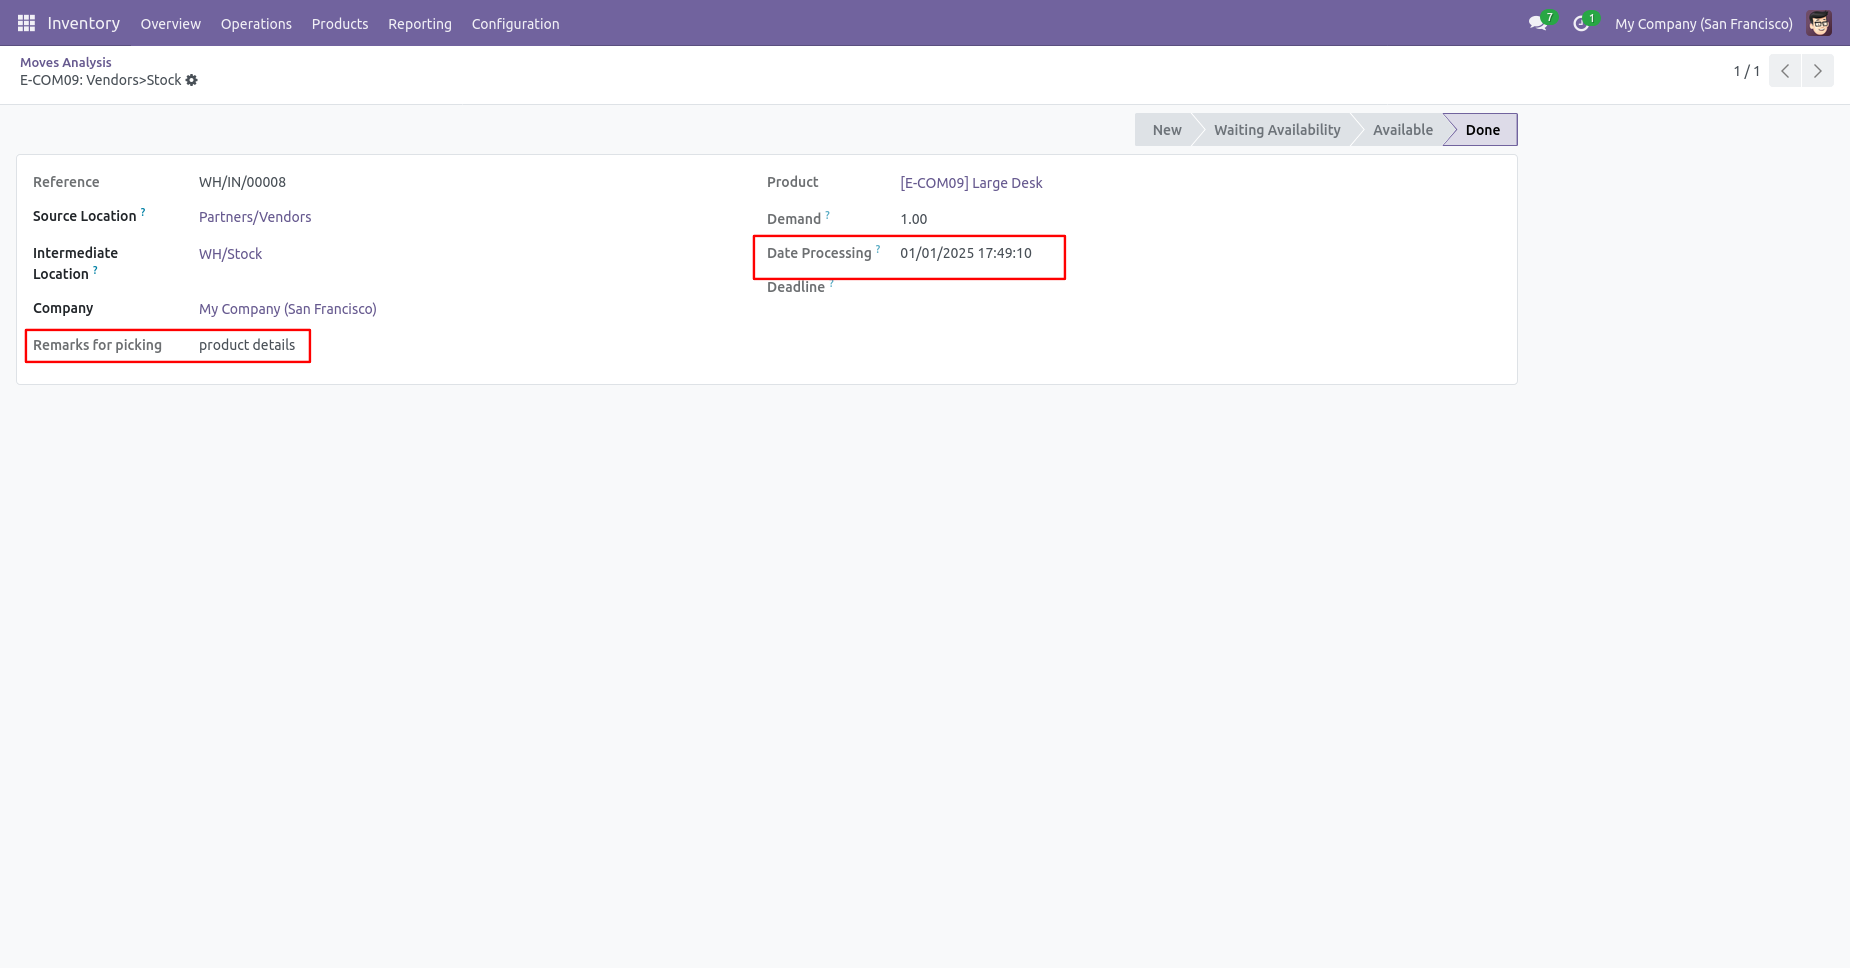
Move analysis with backdate and remarks.
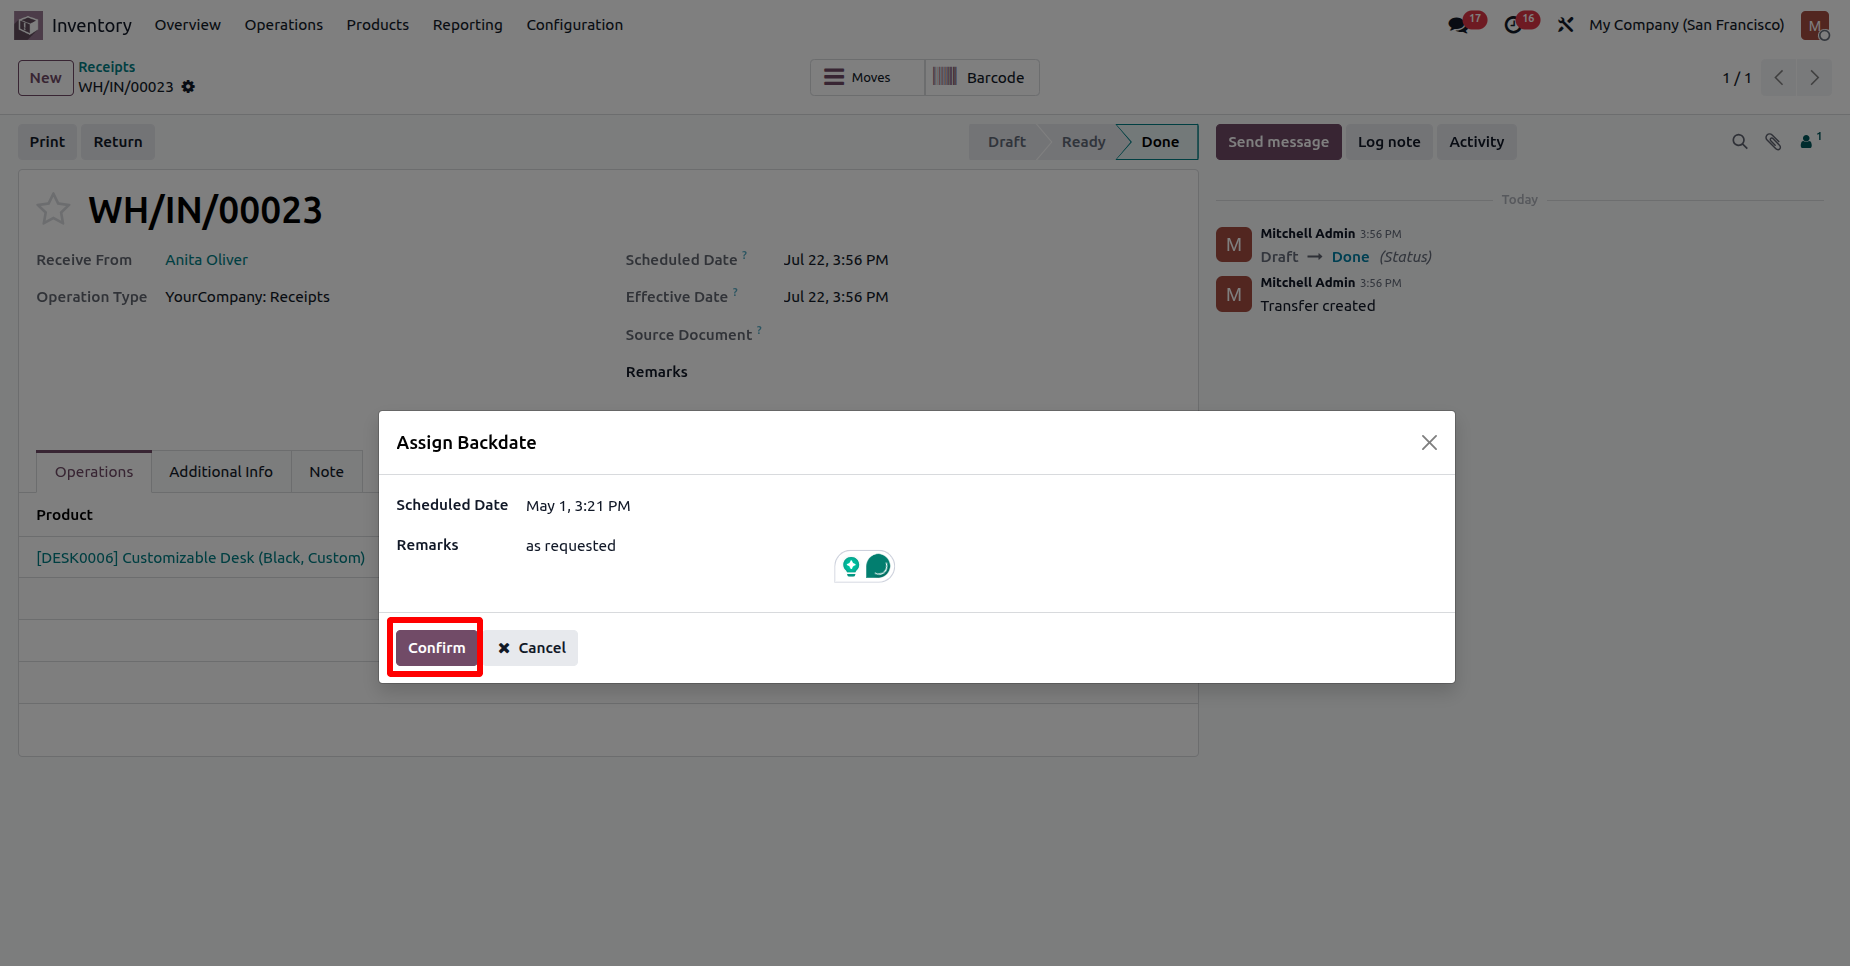
Assign the desired backdate, then click the Confirm button to apply the backdate to the selected Picking Order.
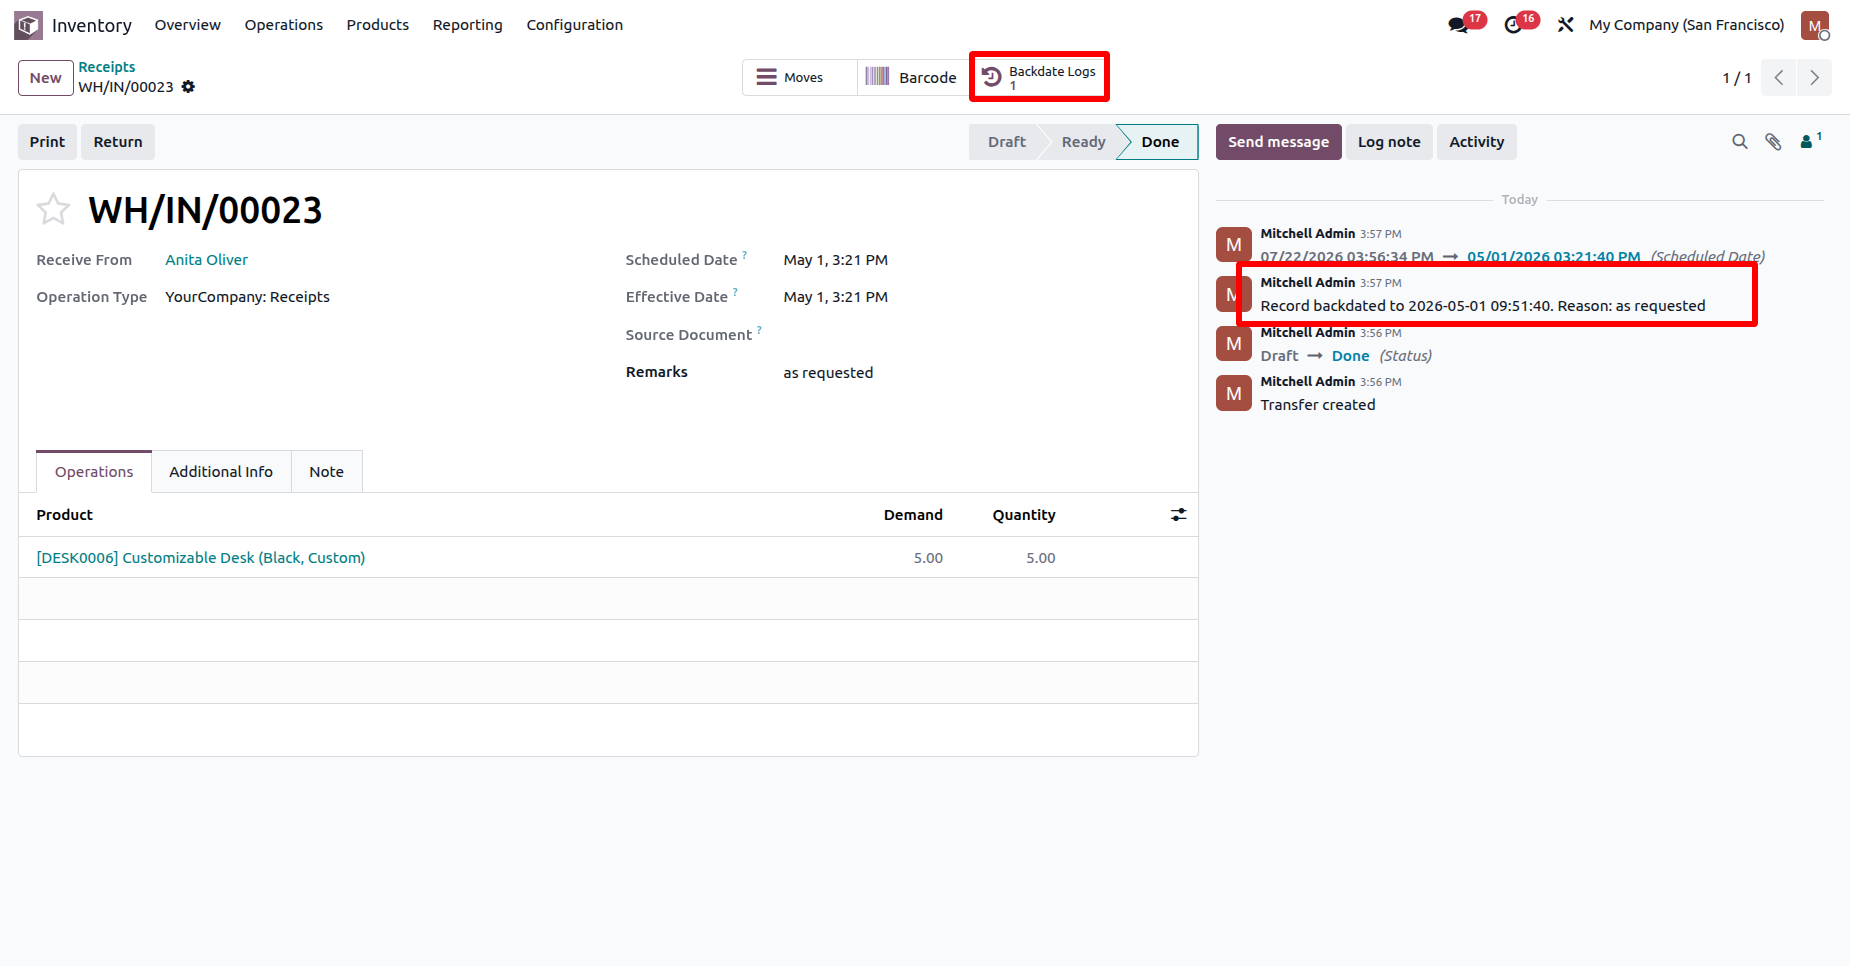
The Picking Order Date is updated to the selected backdate. The backdate change is also recorded in the Chatter, and the same audit entry is available through the Backdate Log smart button on the Picking Order form view.
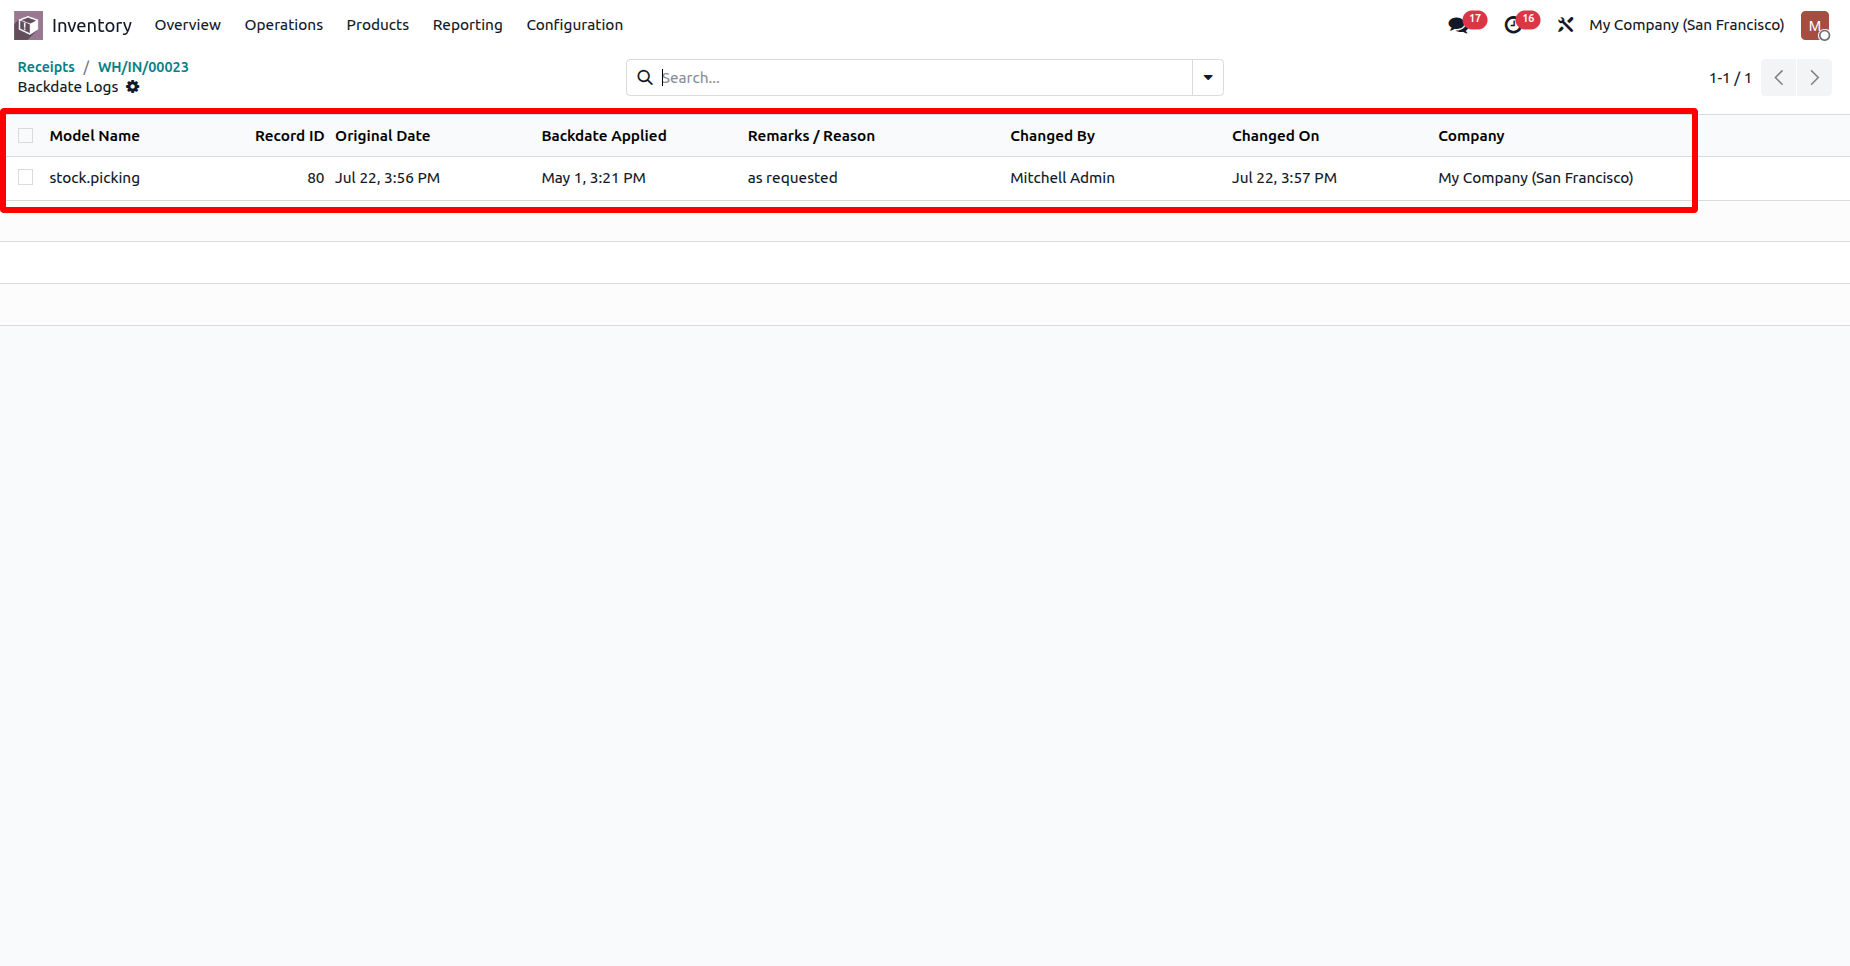
Clicking the Backdate Logs smart button opens the Backdate Logs list view, where users can view the complete audit history of all backdate changes made to the Picking Order.
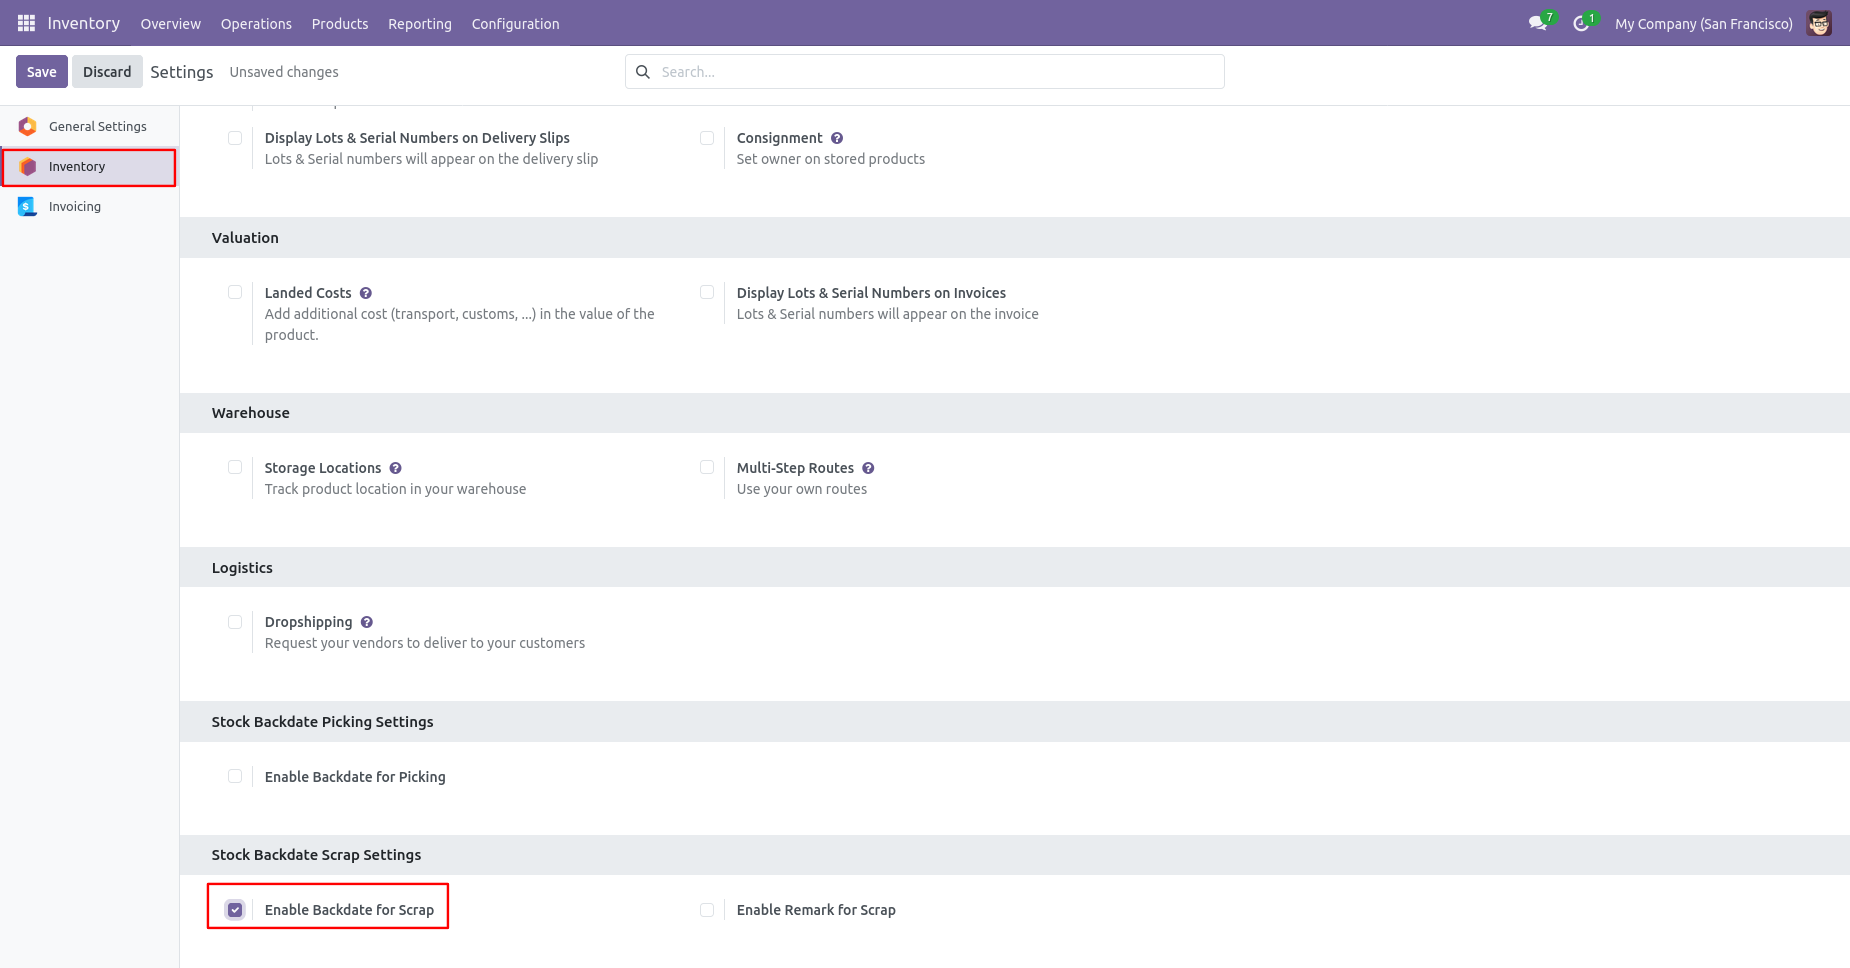
Configuration for picking backdate, Tick the 'Enable Backdate For Scrap' boolean.
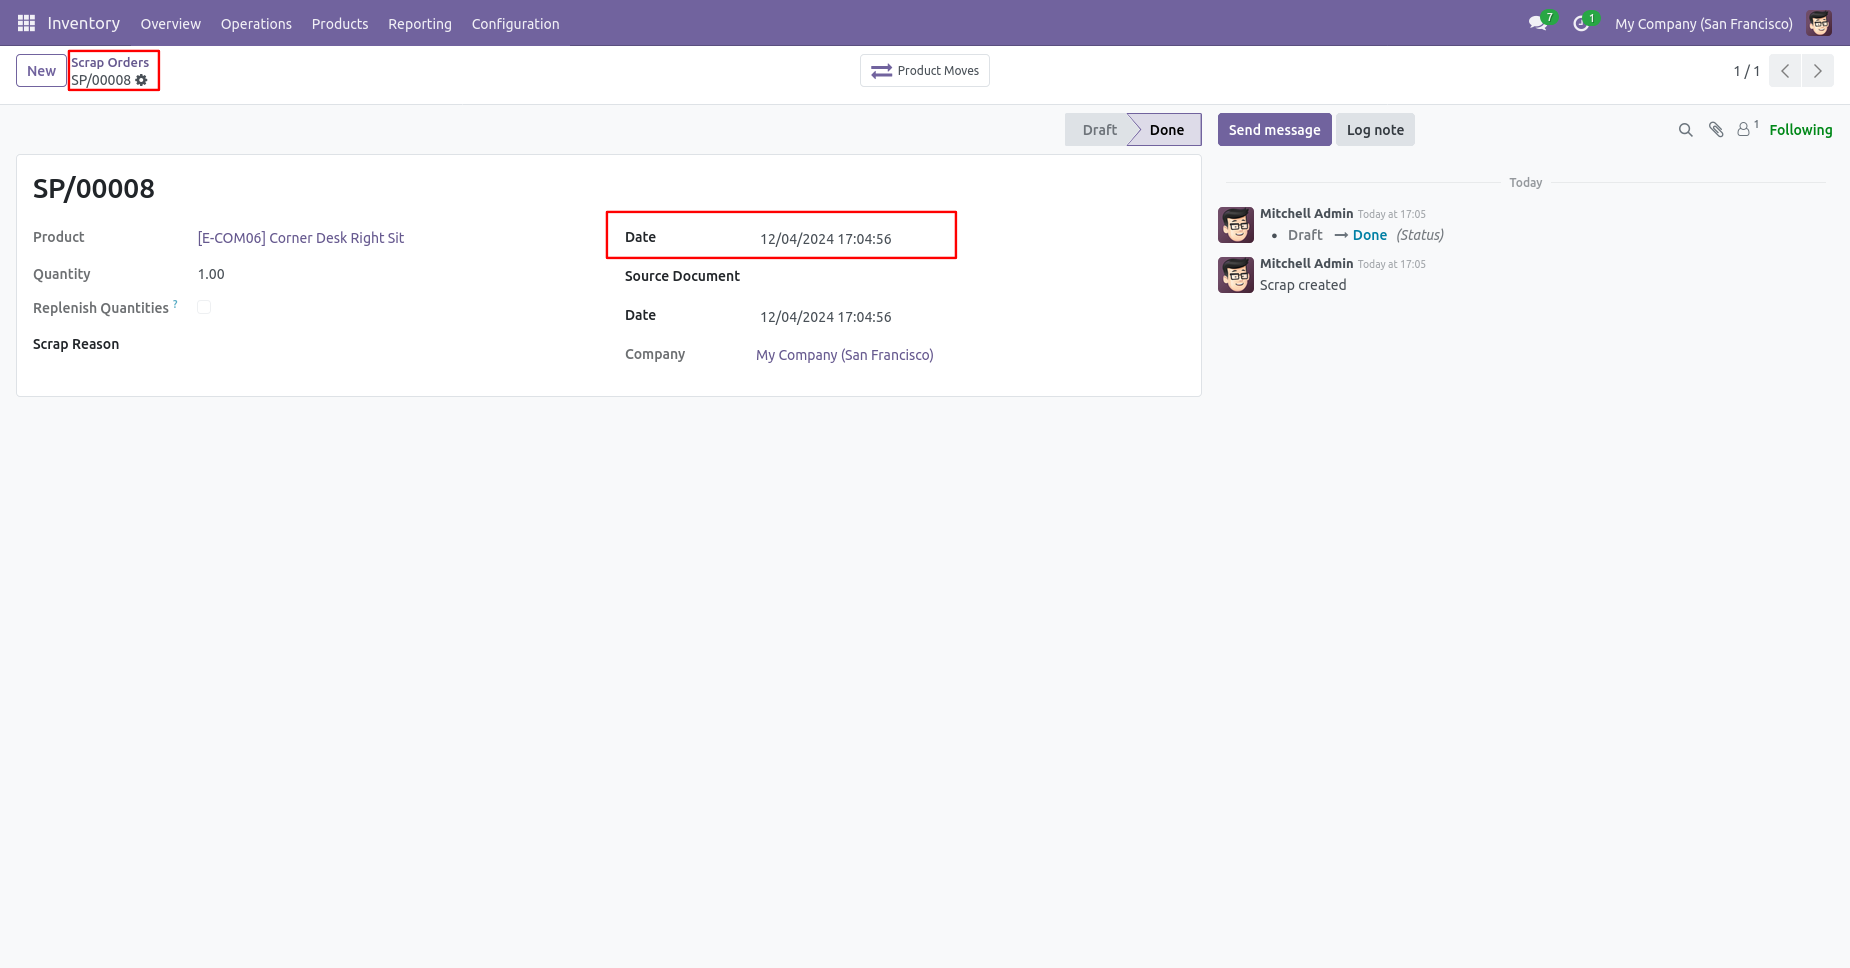
Scrap order form view with backdate.
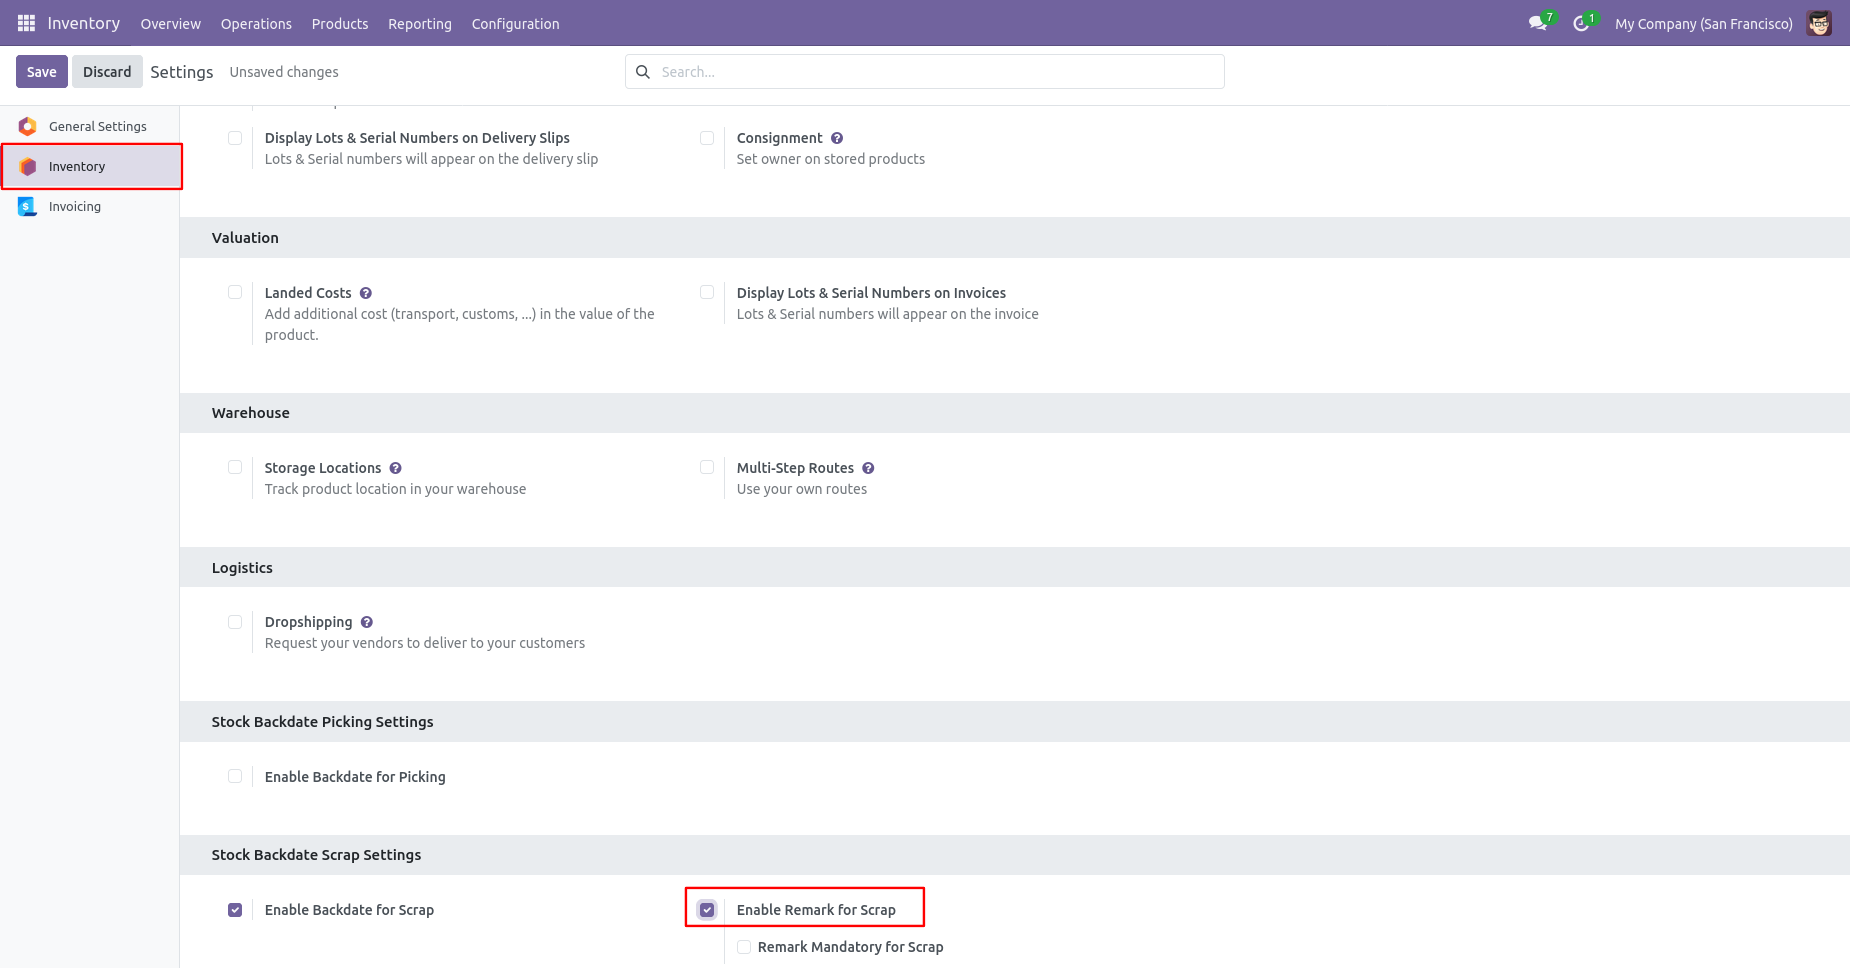
Tick the 'Enable Remark For Scrap' boolean.
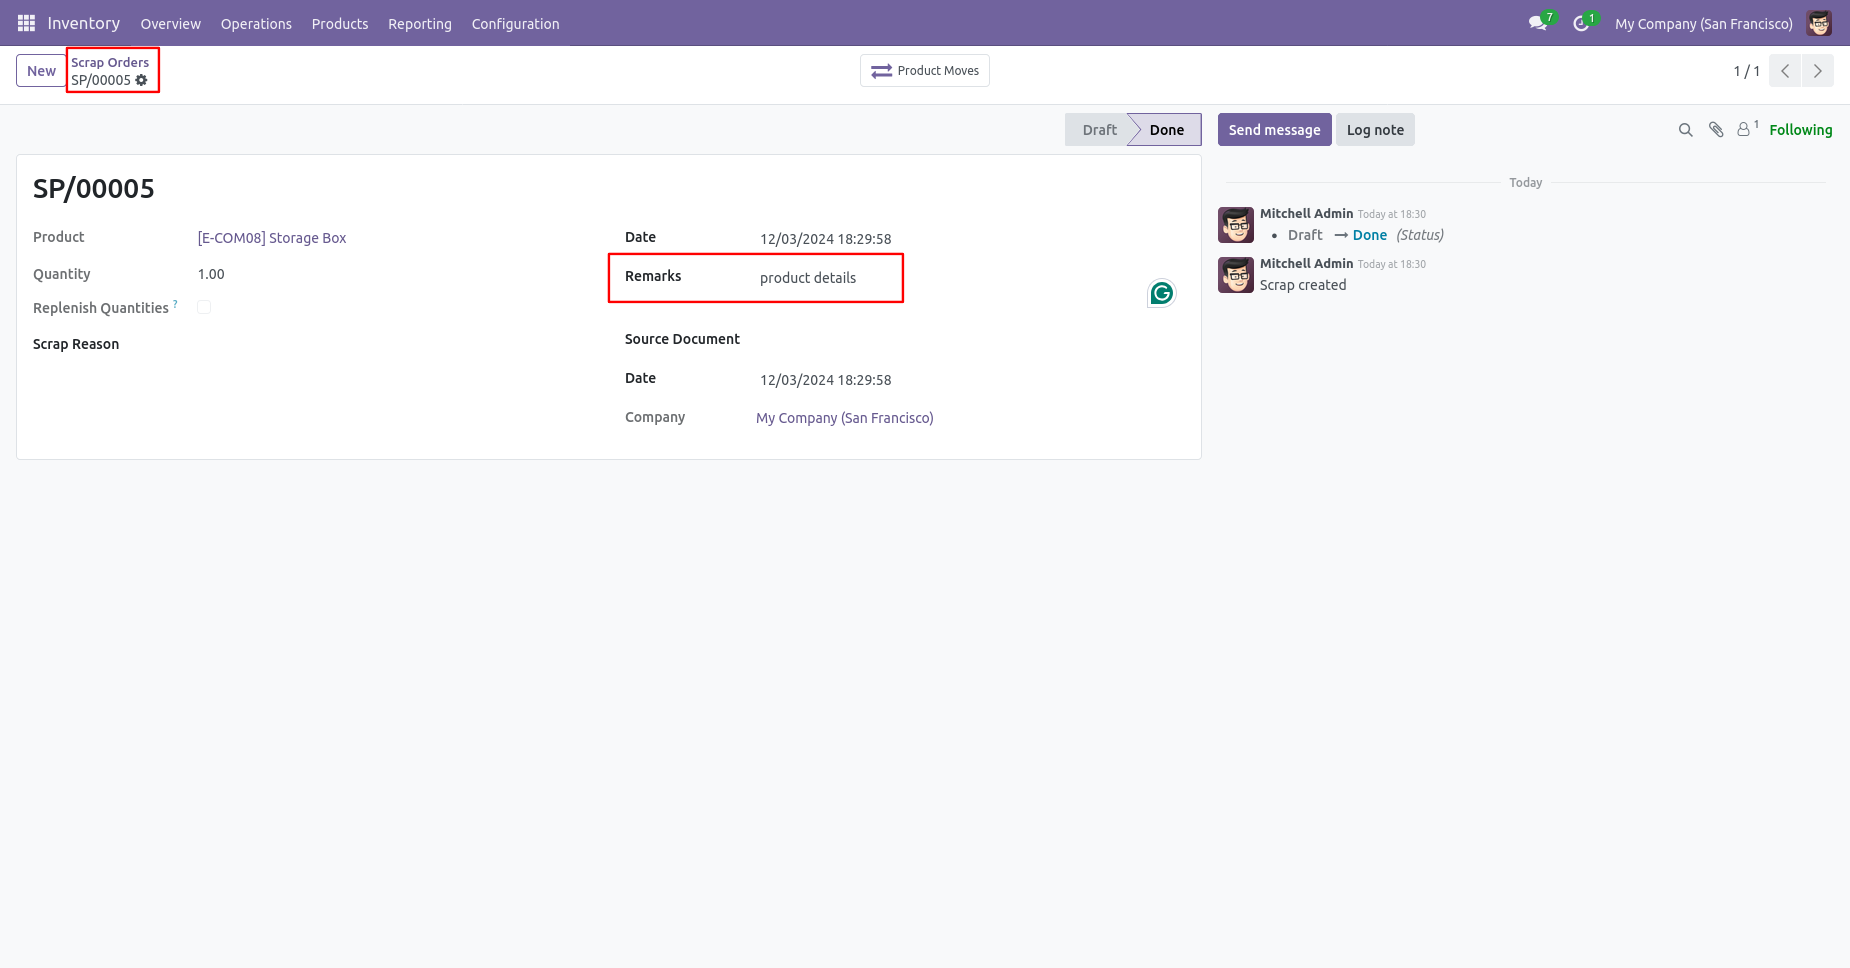
Scrap order form view with remark.
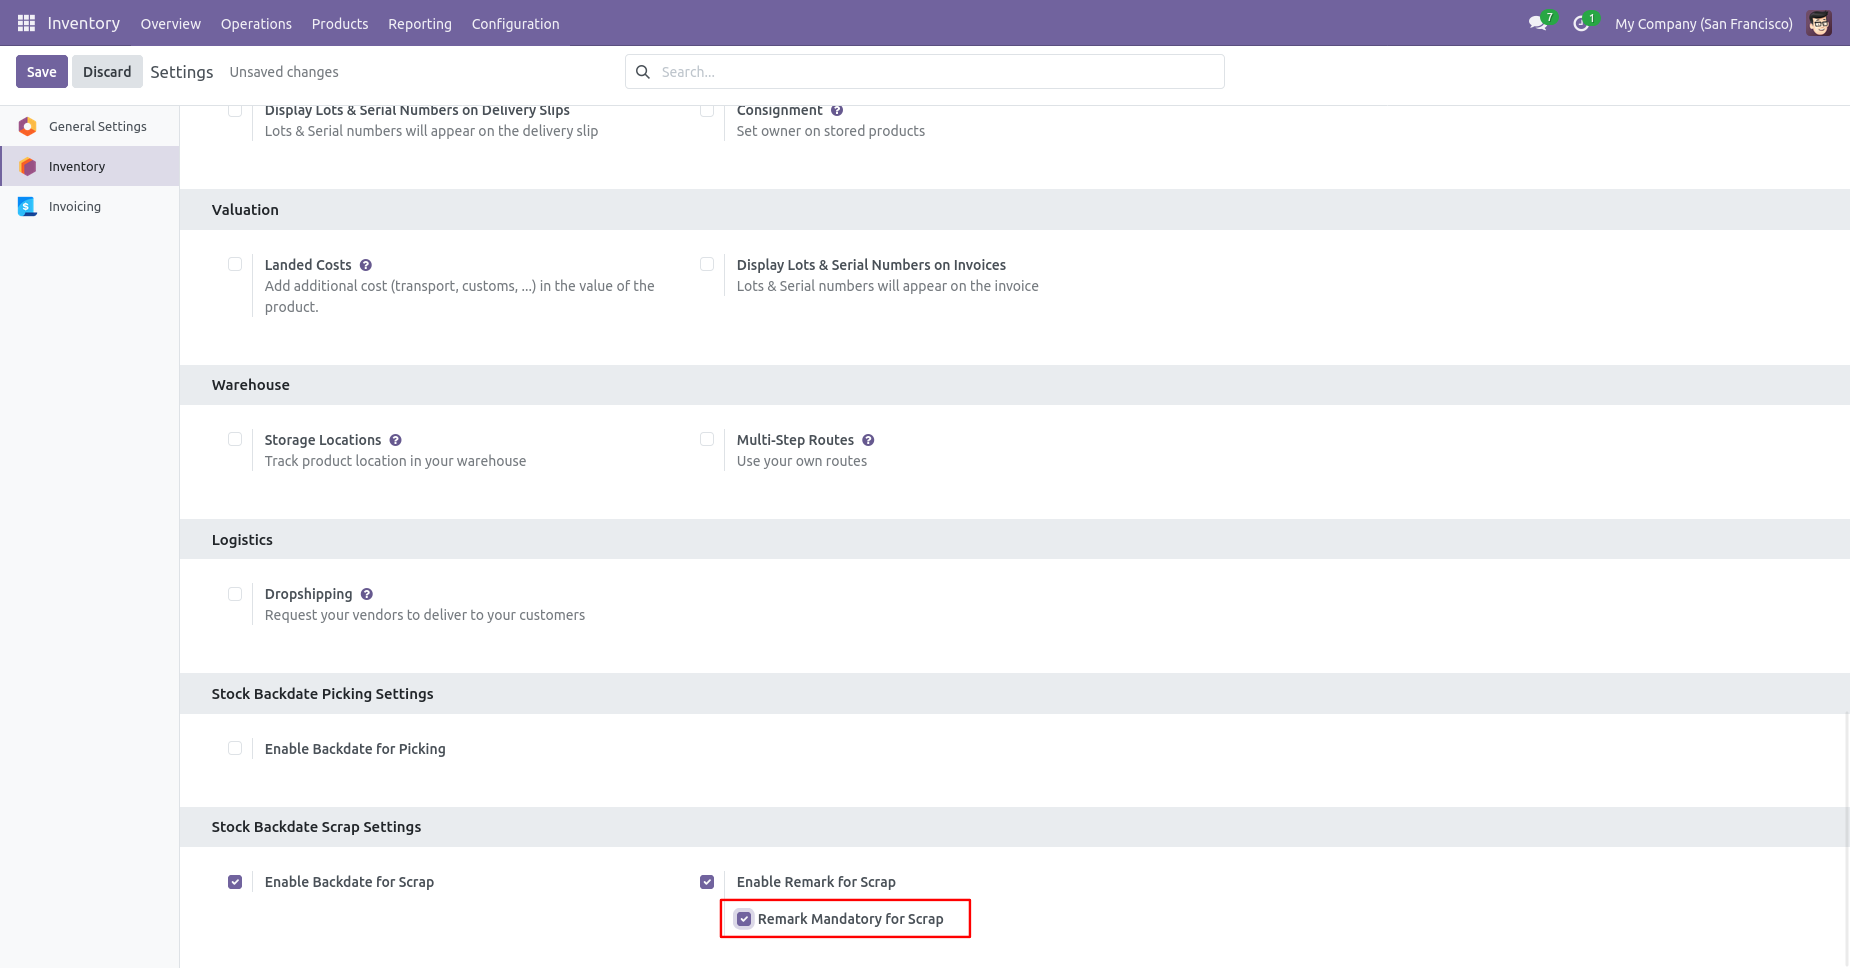
Tick the 'Remark Mandatory For Scrap' boolean.
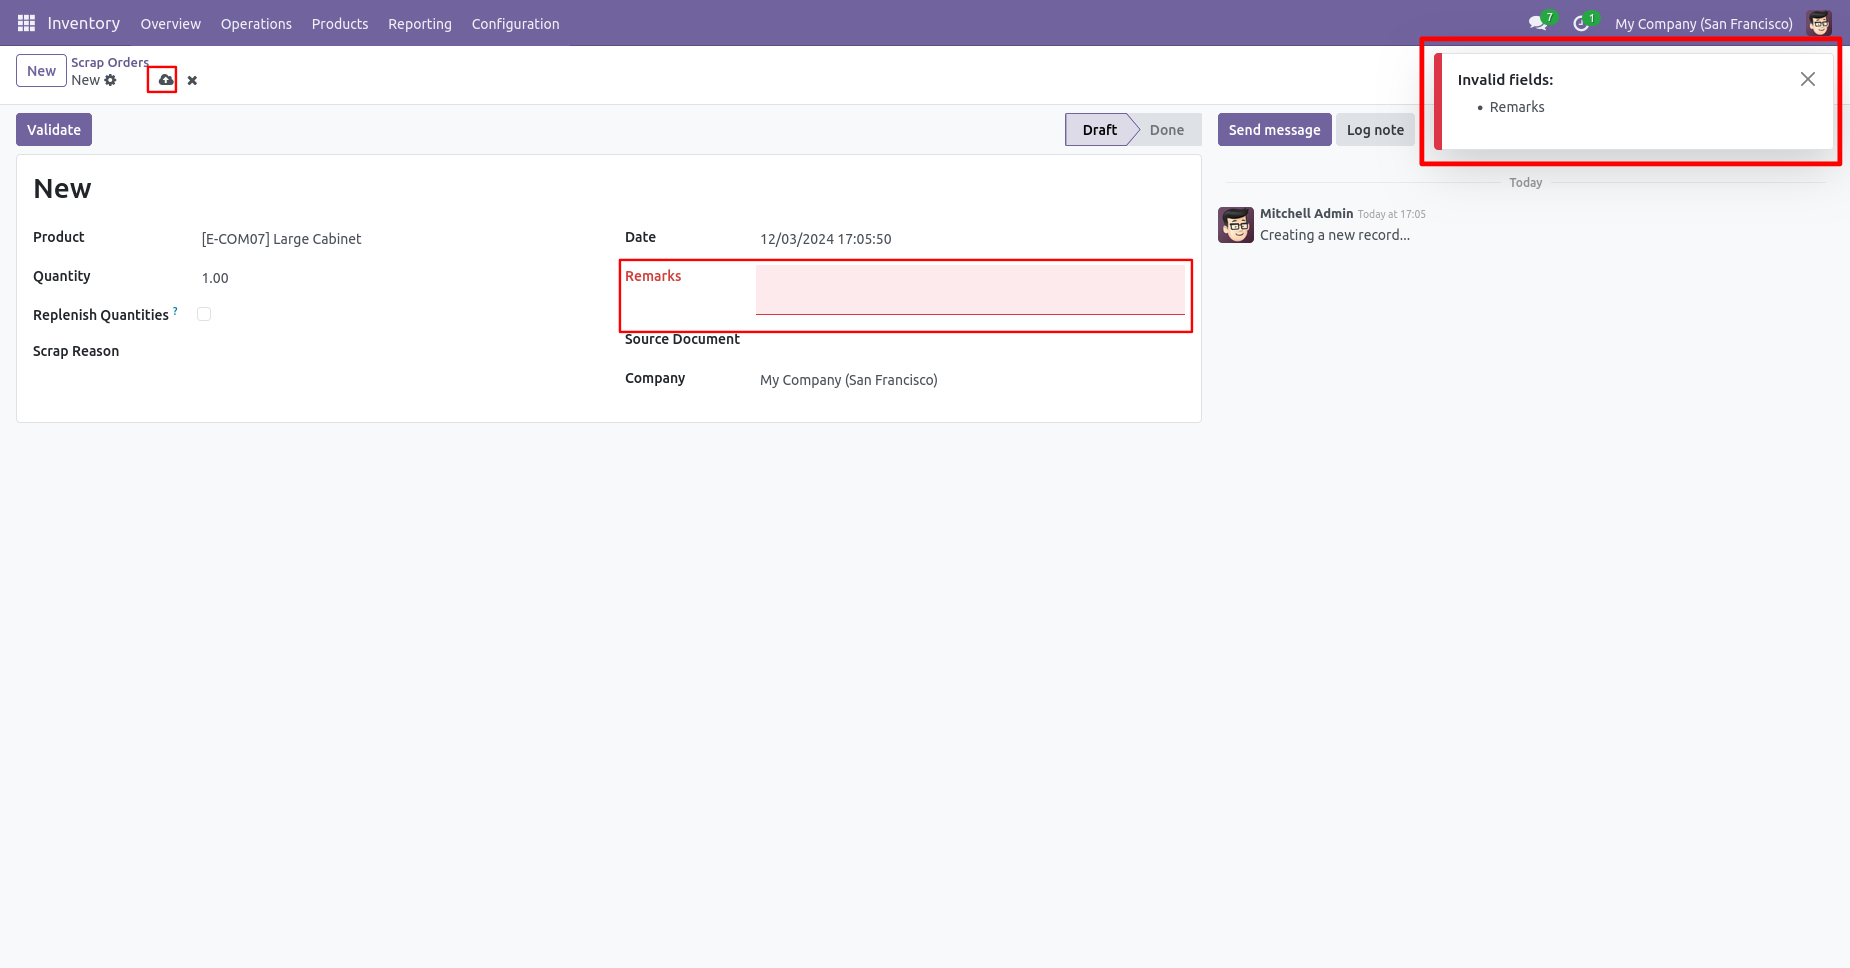
You can't save the Scrap Order without entering a remark.
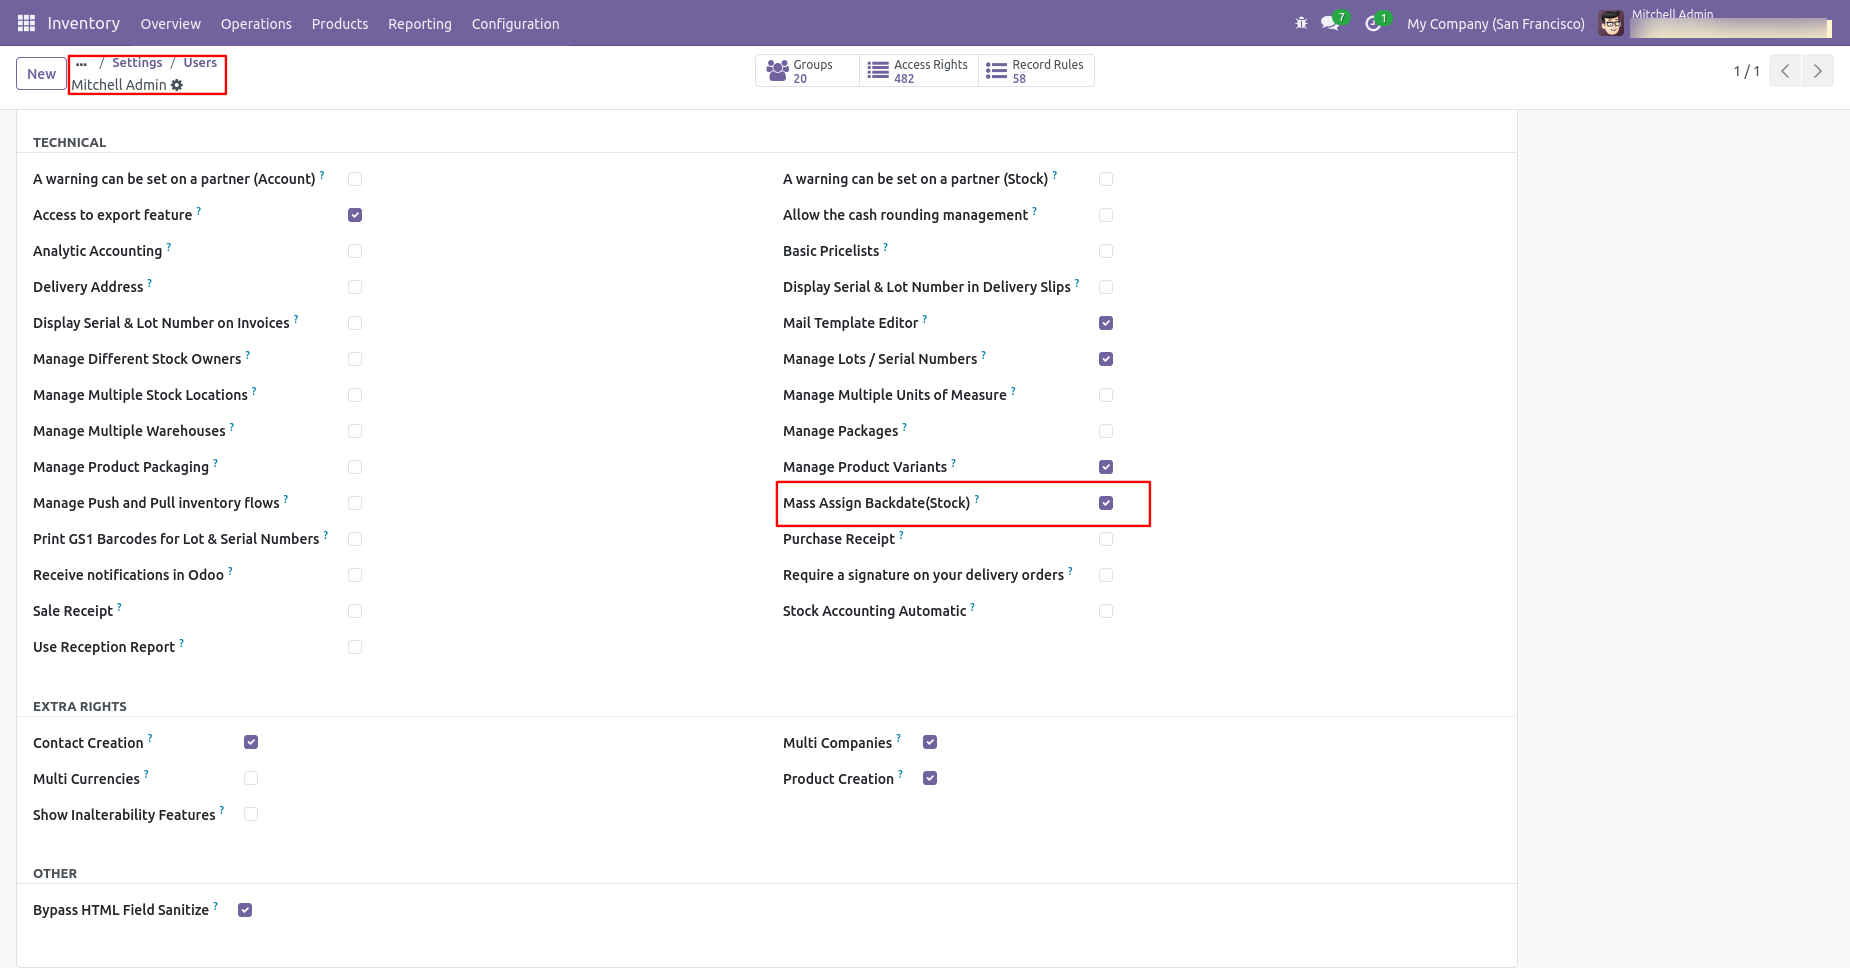
If you enable 'Mass Assign Backdate' then you can mass assign backdate.
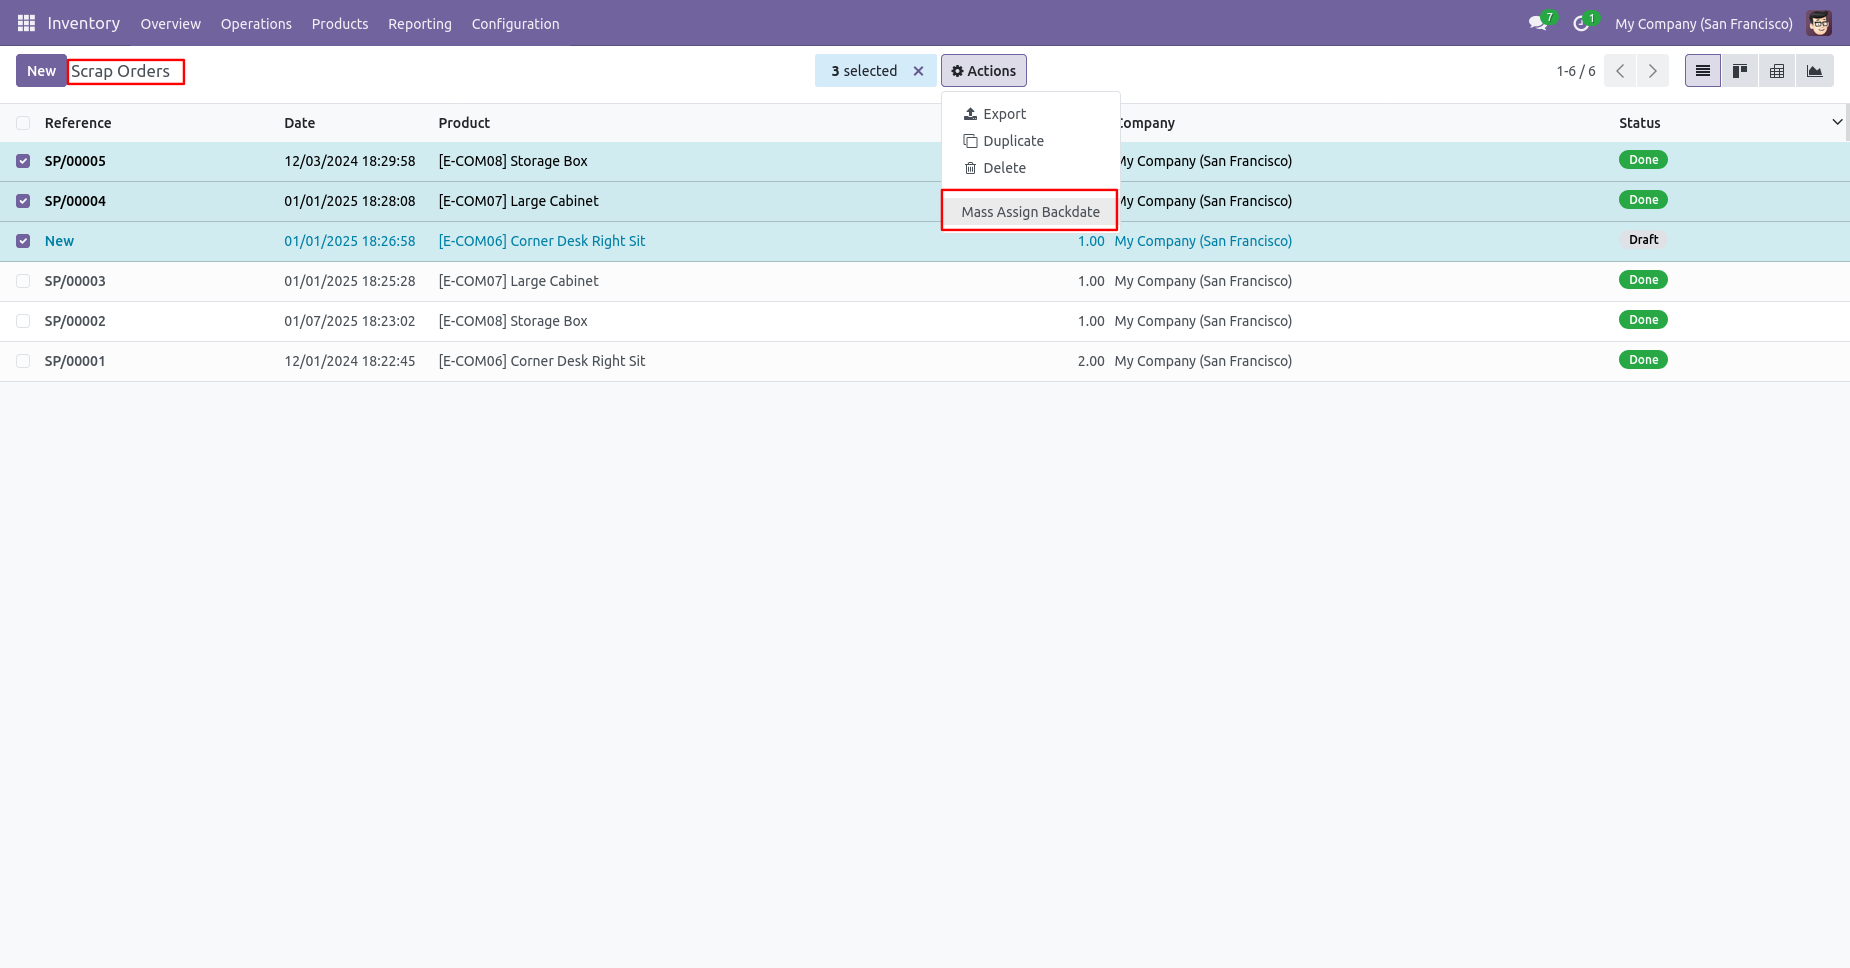
If you enable 'Mass Assign Backdate' then you can mass assign backdate, Select orders from the list view then click 'Mass Assign Backdate'.
After that, this wizard opens, enters the order date, and remarks. Here, remarks come if you have enabled that feature.
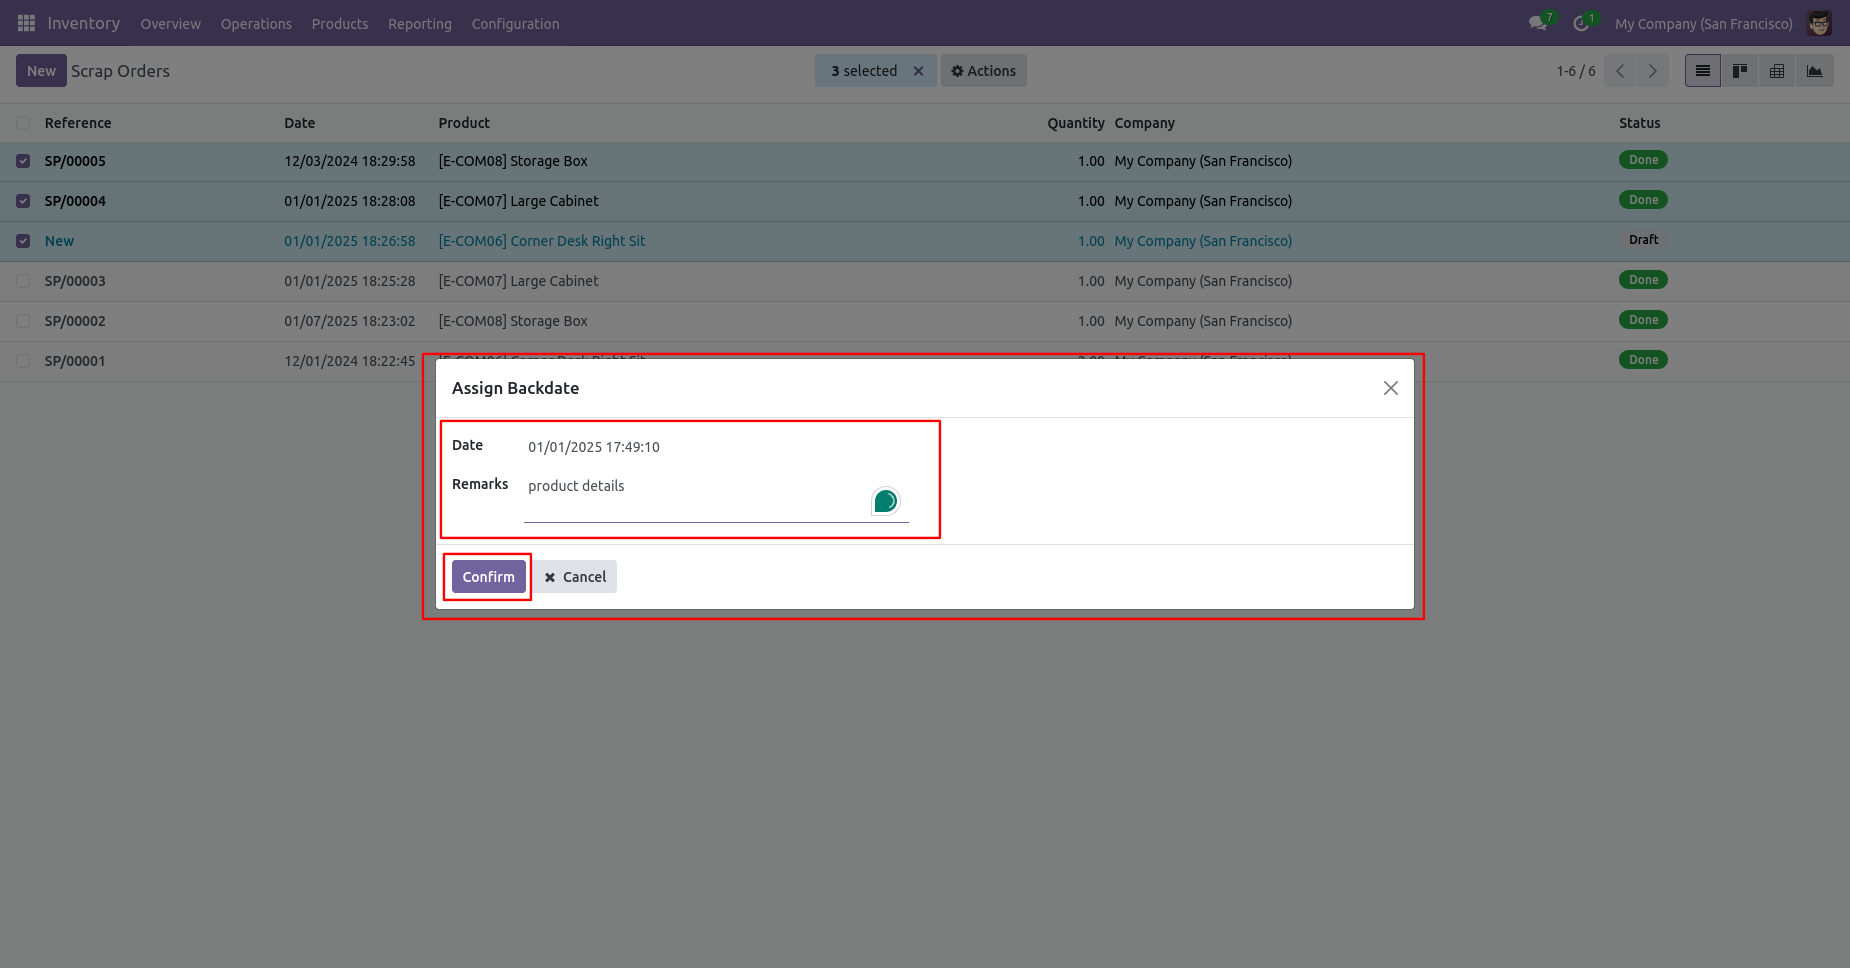
Scrap order form view with backdate and remarks.
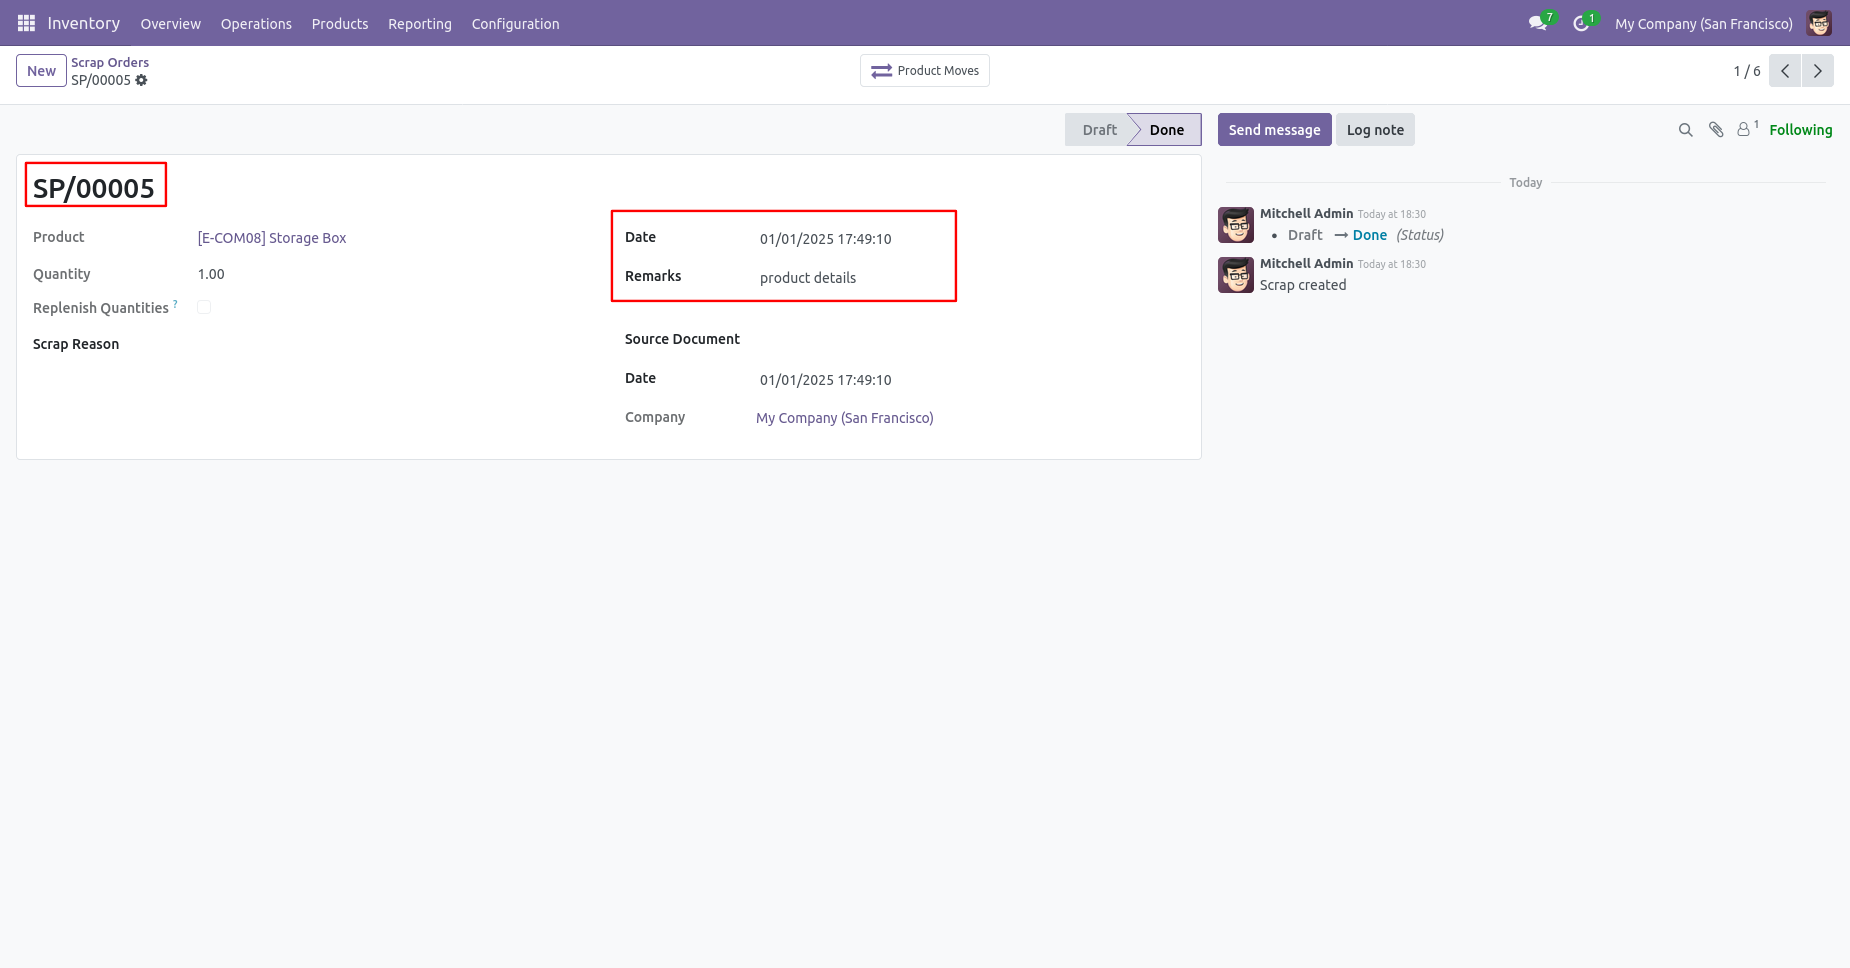
Moves analysis with backdate and remarks.
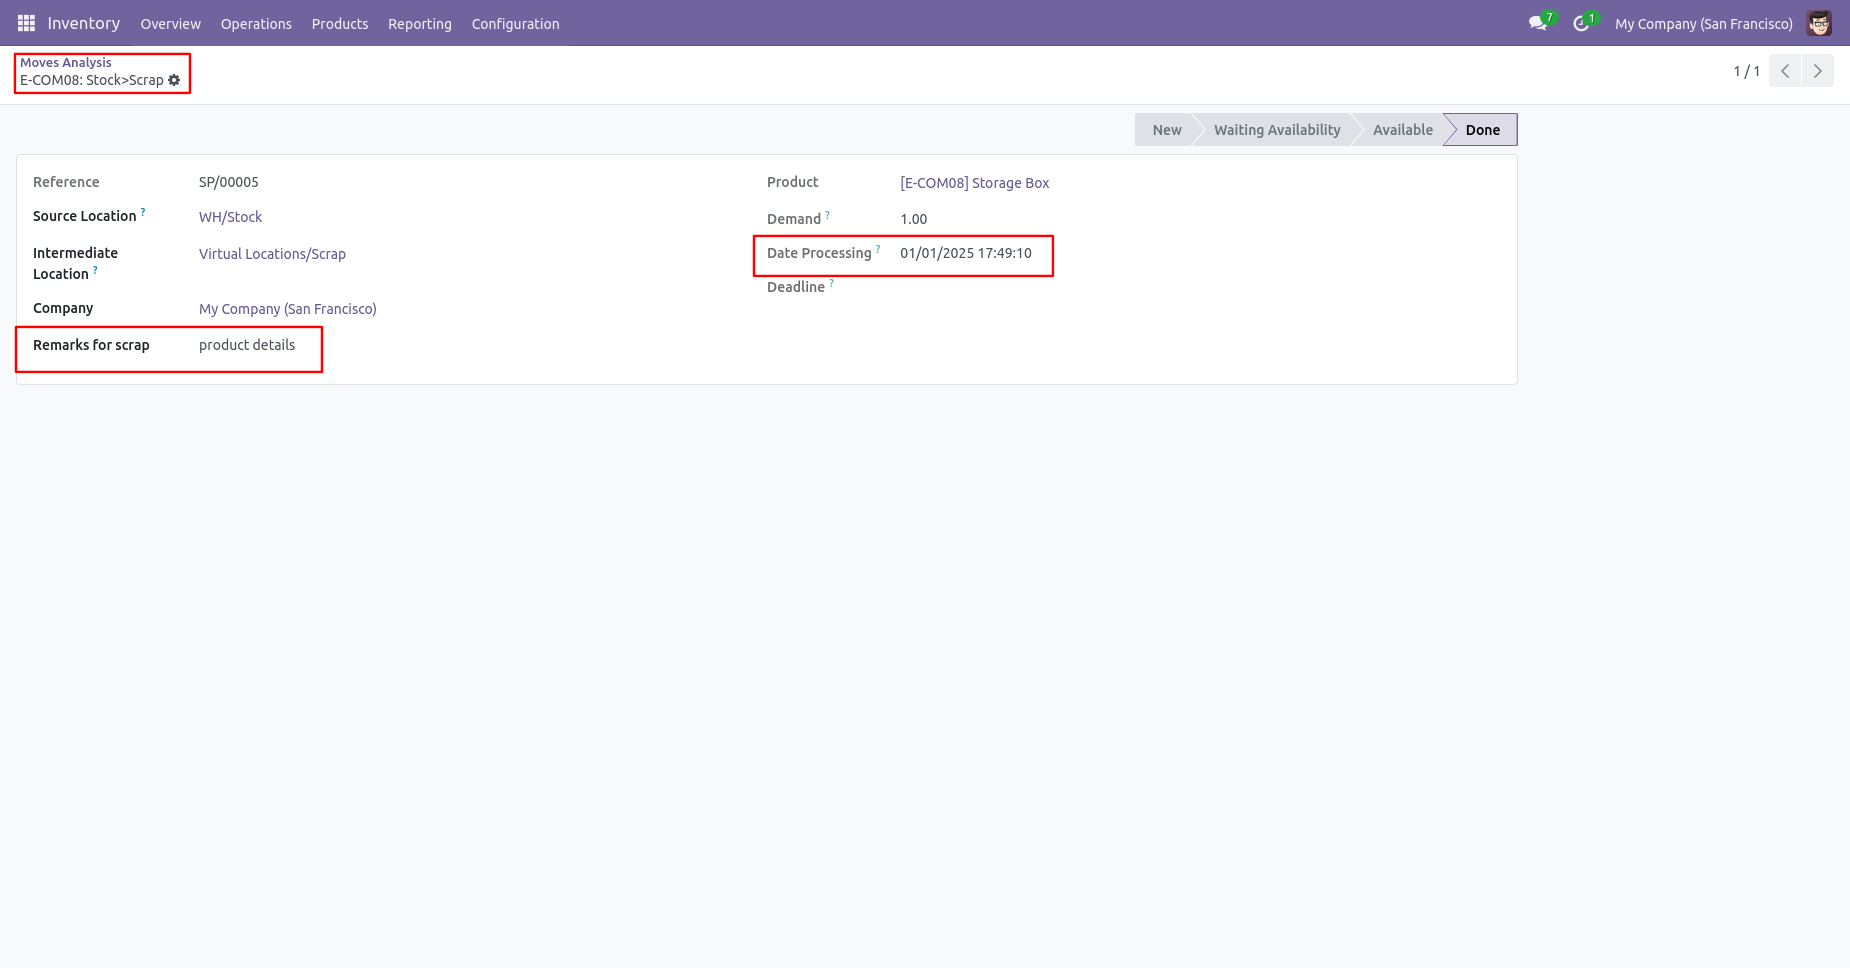
Assign the desired backdate, then click the Confirm button to apply the backdate to the selected Scrap Order.
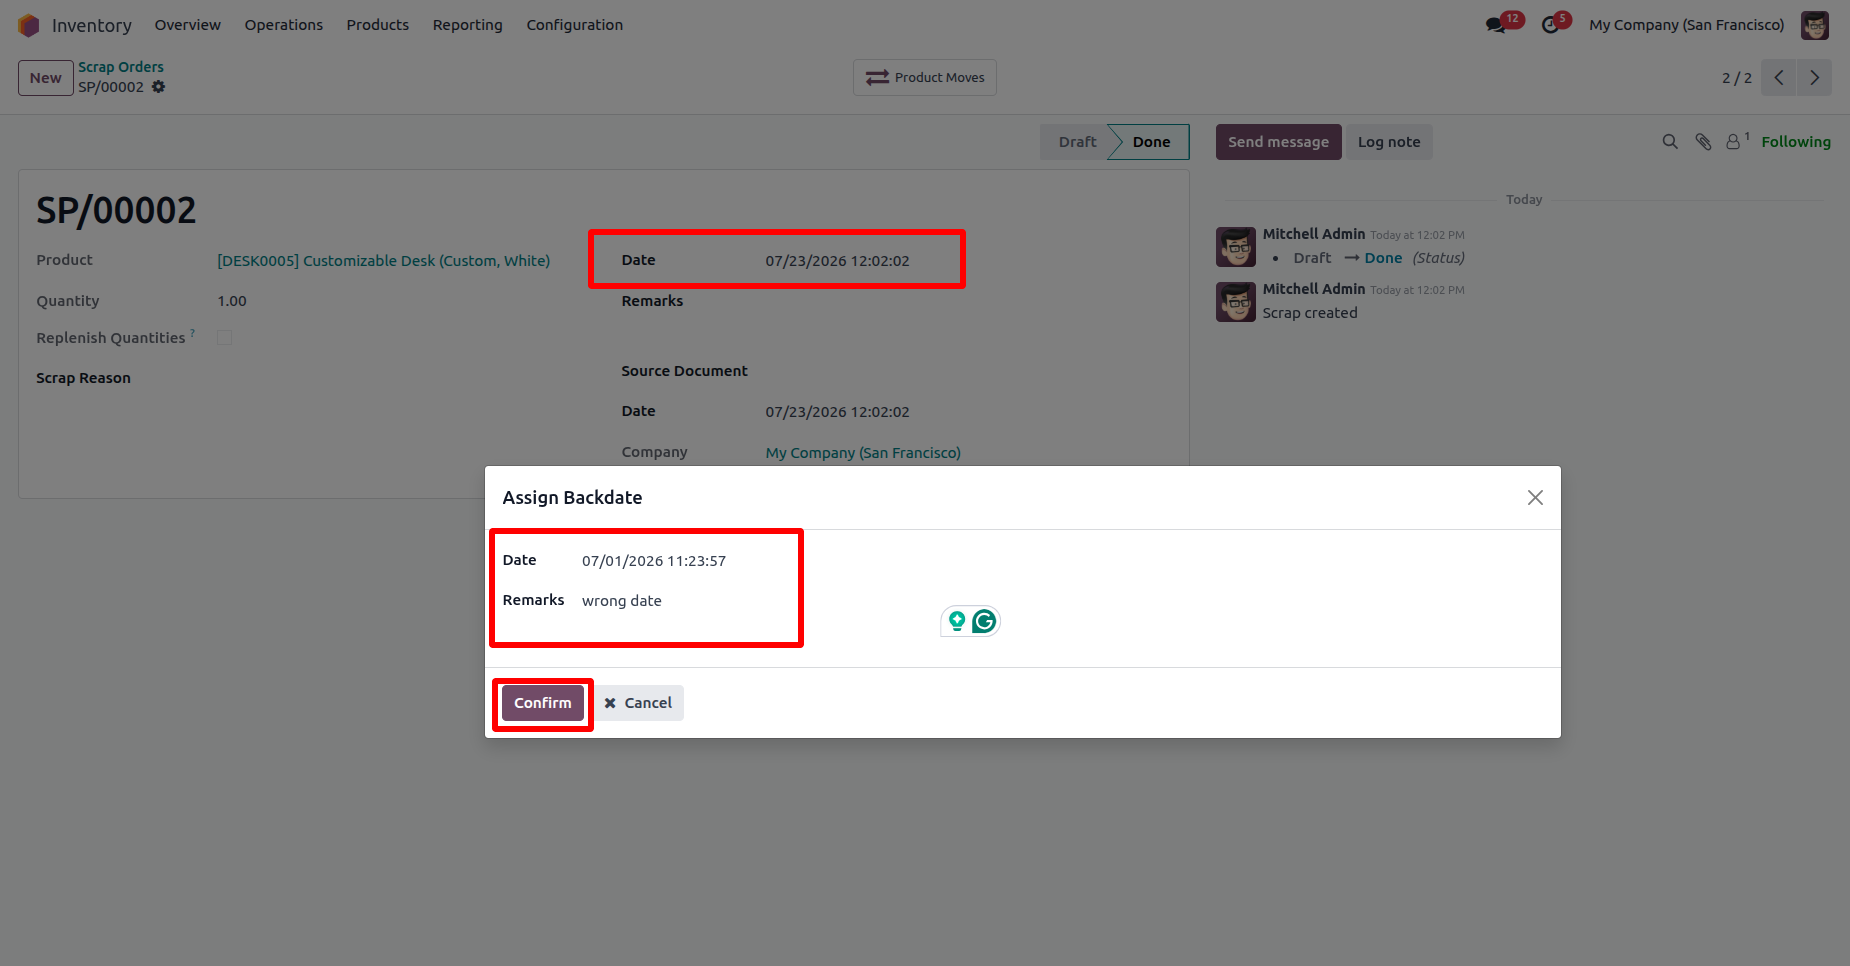
The Scrap Order Date is updated to the selected backdate. The backdate change is also recorded in the Chatter, and the same audit entry is available through the Backdate Log smart button on the Scrap Order form view.

Clicking the Backdate Logs smart button opens the Backdate Logs list view, where users can view the complete audit history of all backdate changes made to the Scrap Order.

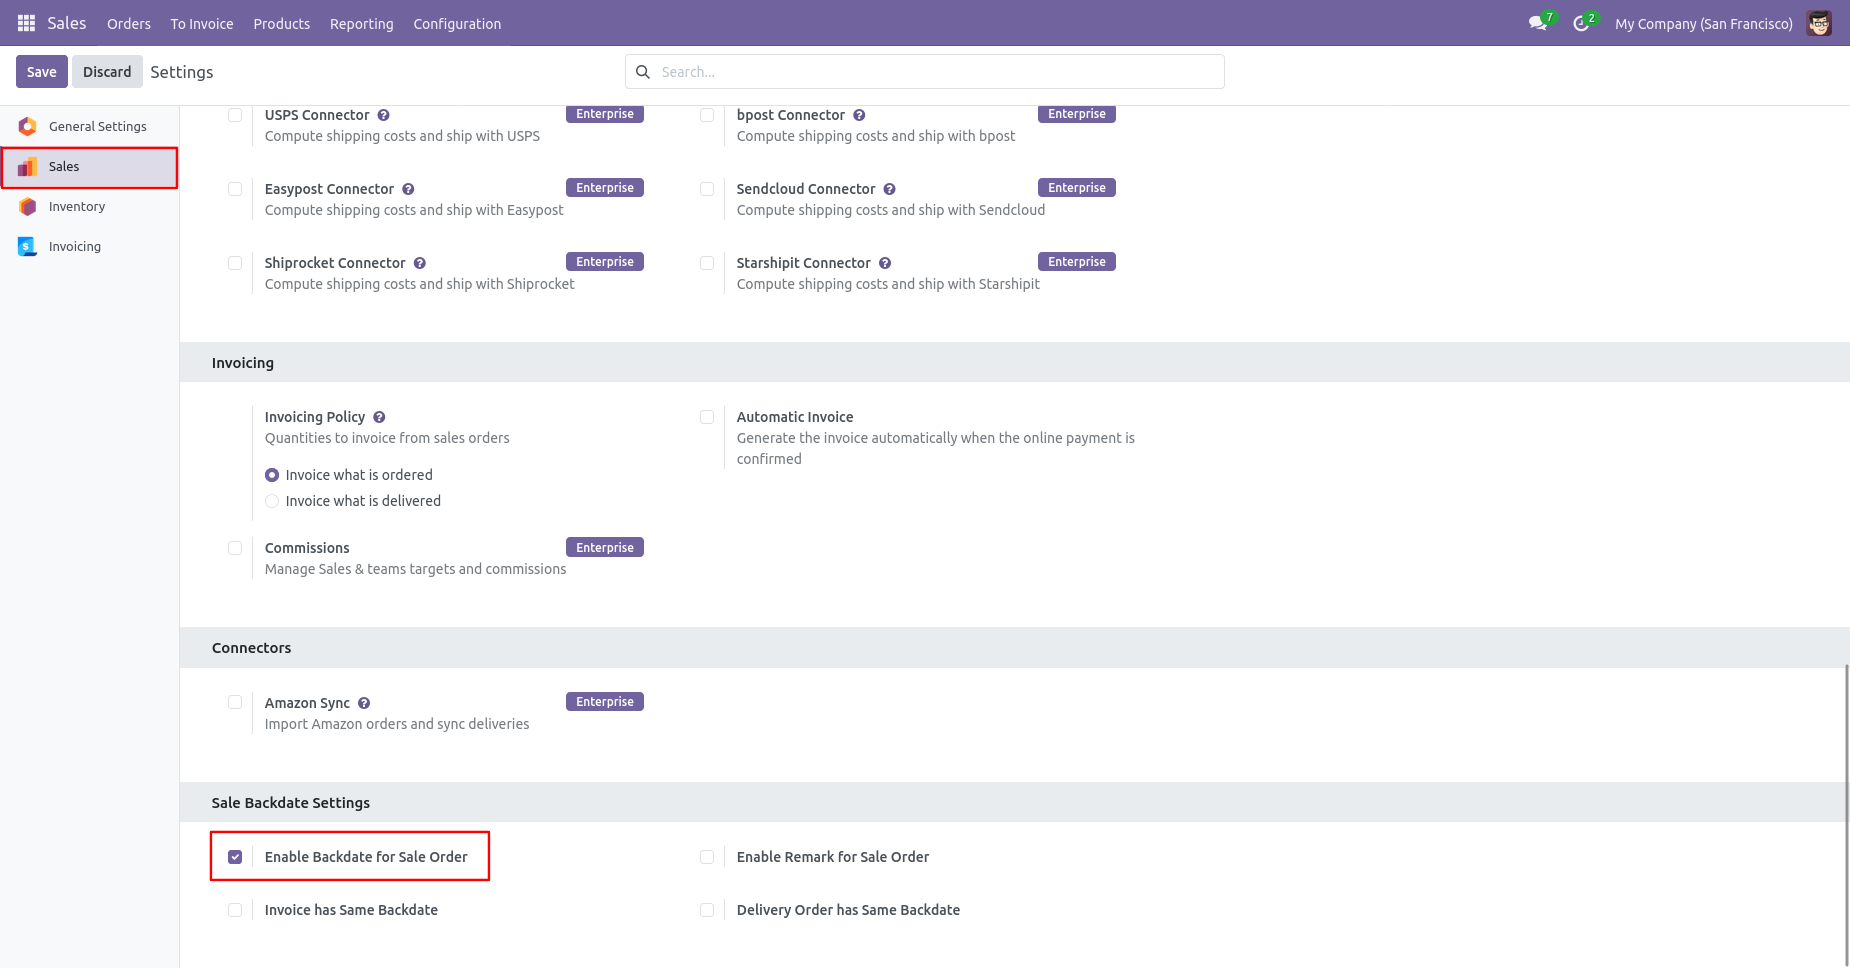
Go to the sales settings and enable the 'Enable Backdate For Sale Order' option.
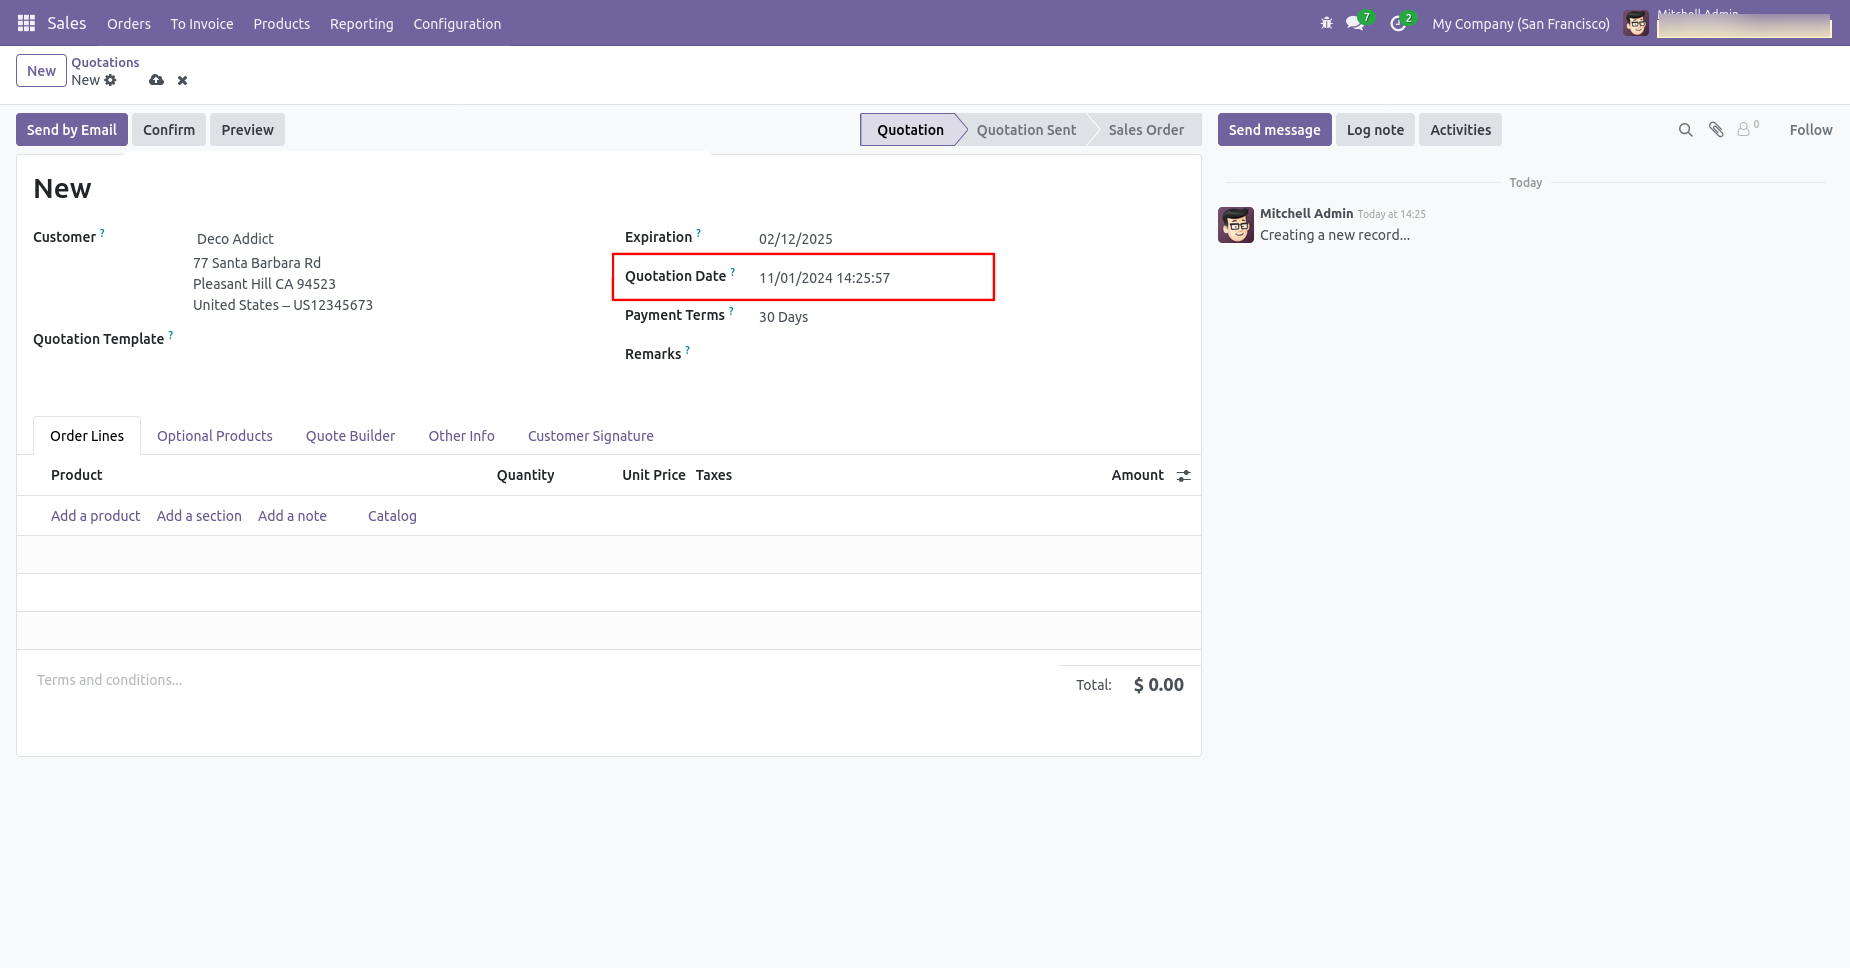
Sale order form view with backdate.
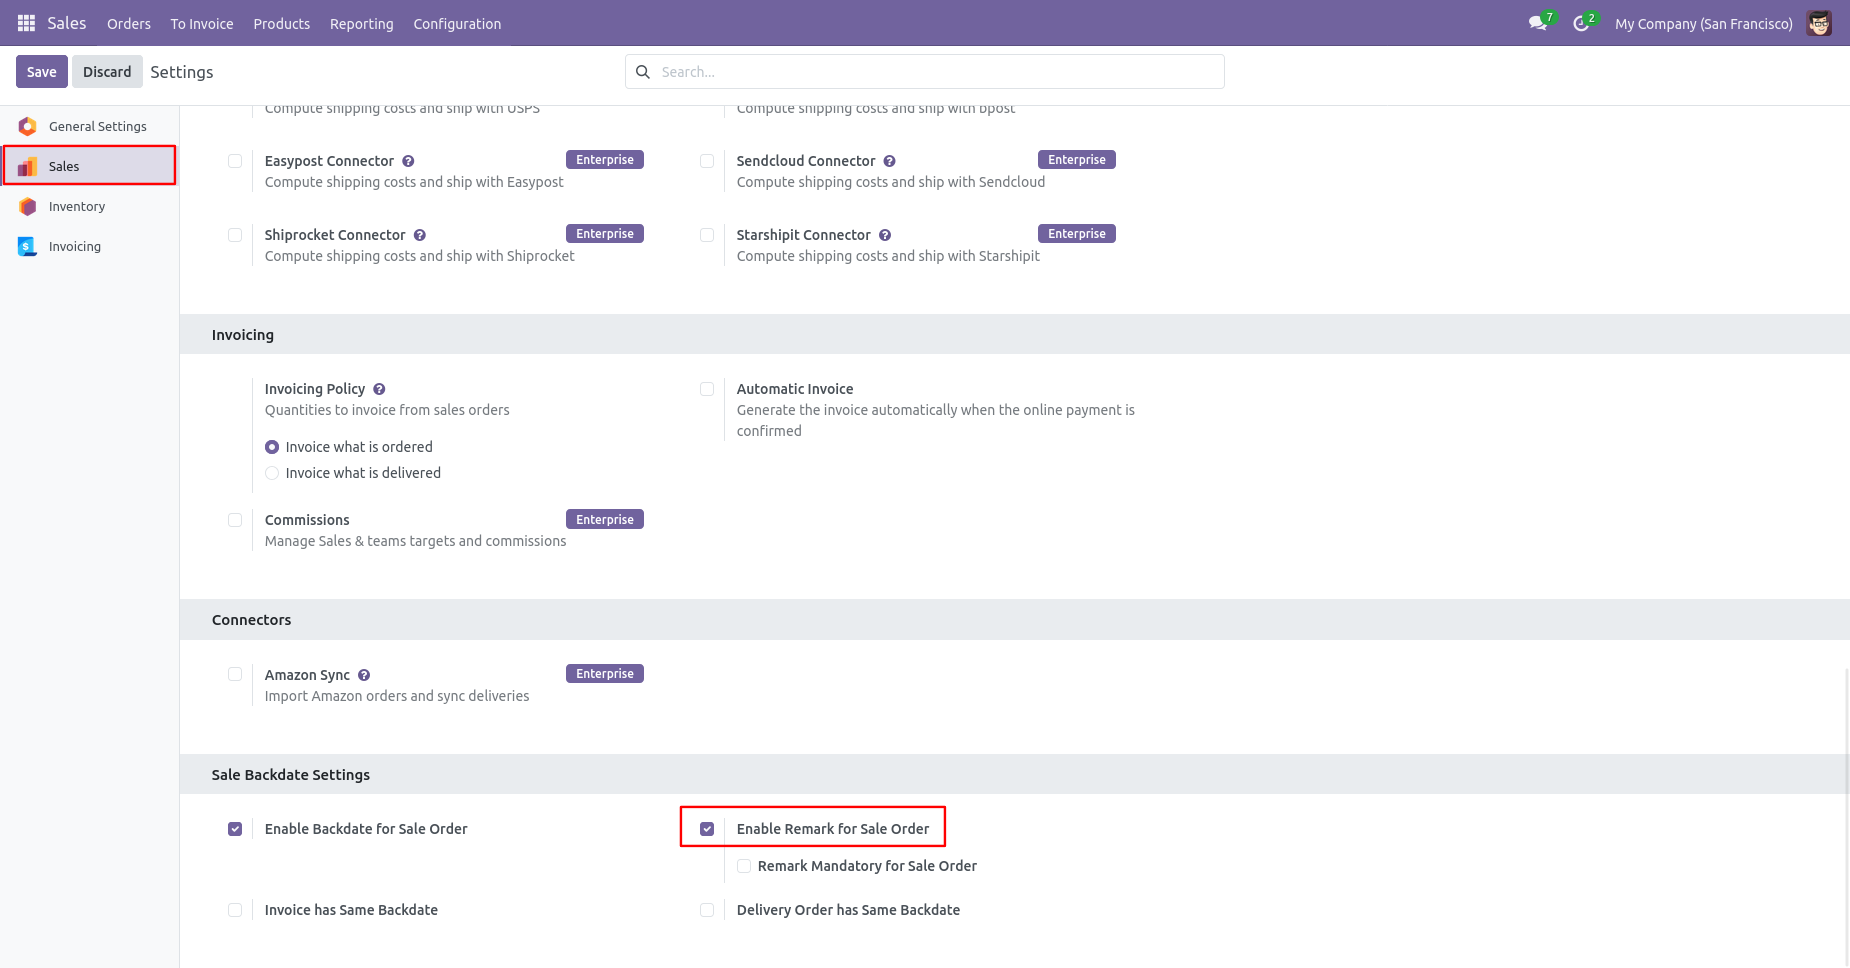
Enable the 'Enable Remark For Sale Order' option.
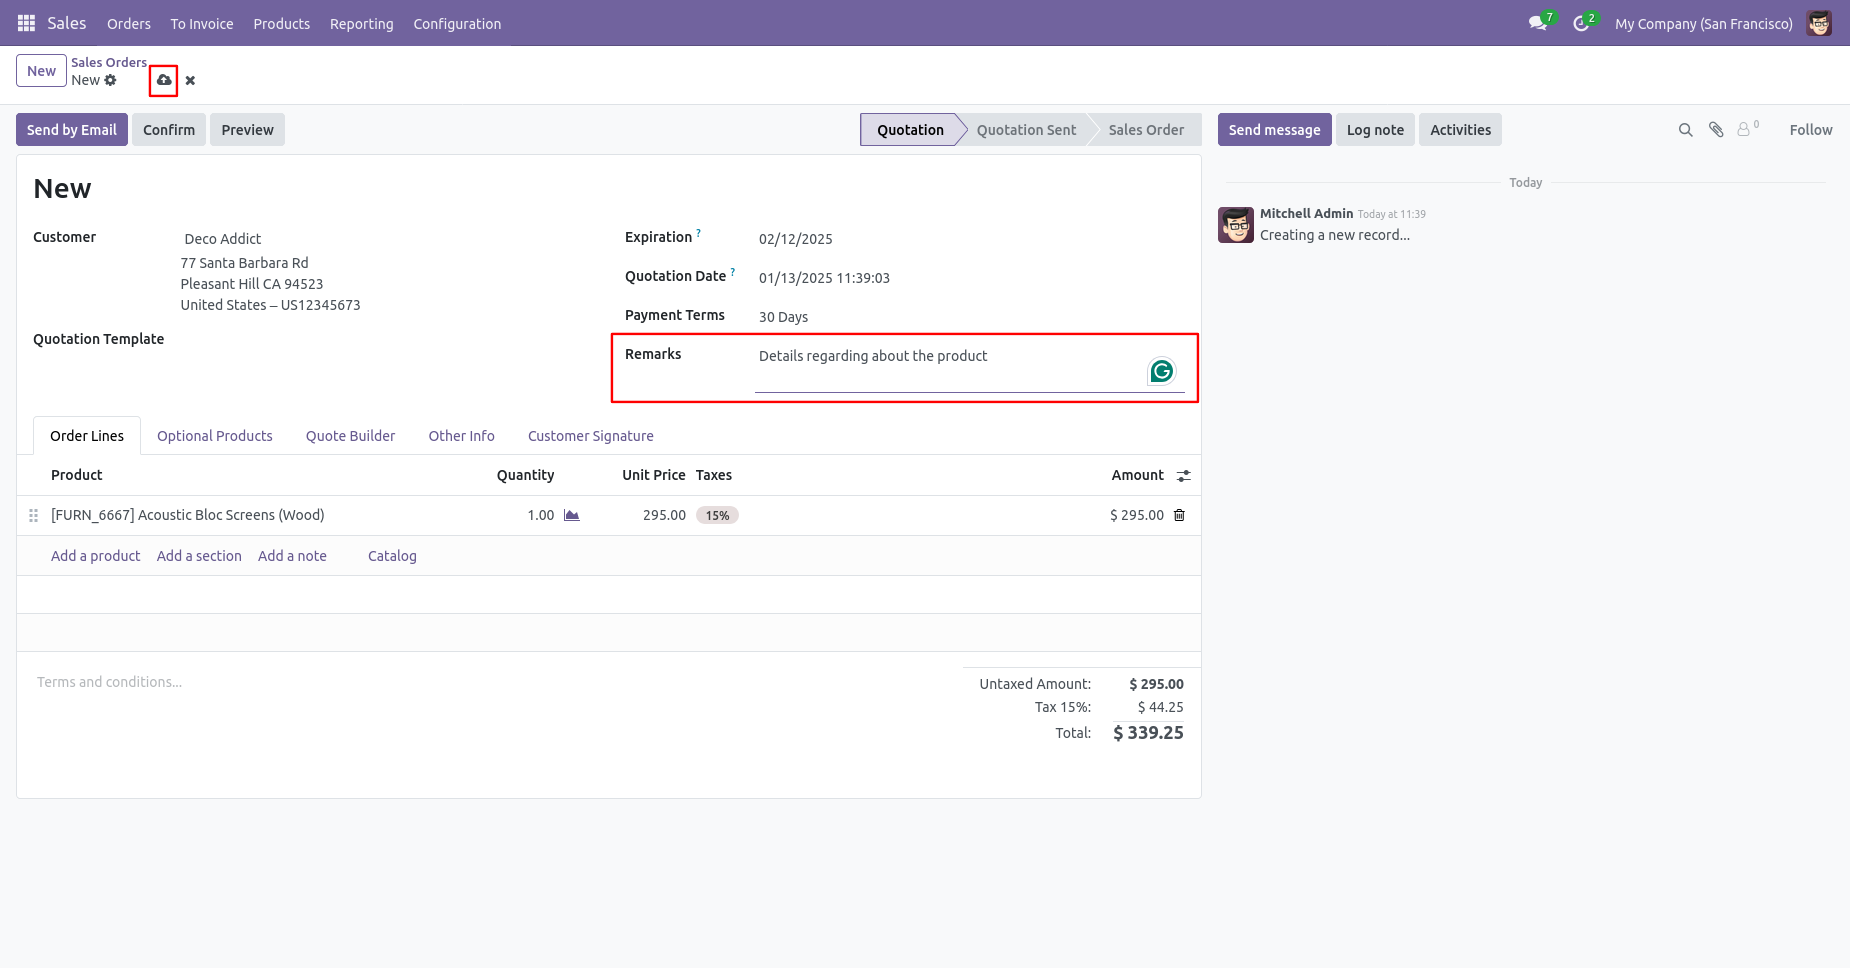
Sale order form view with remarks.
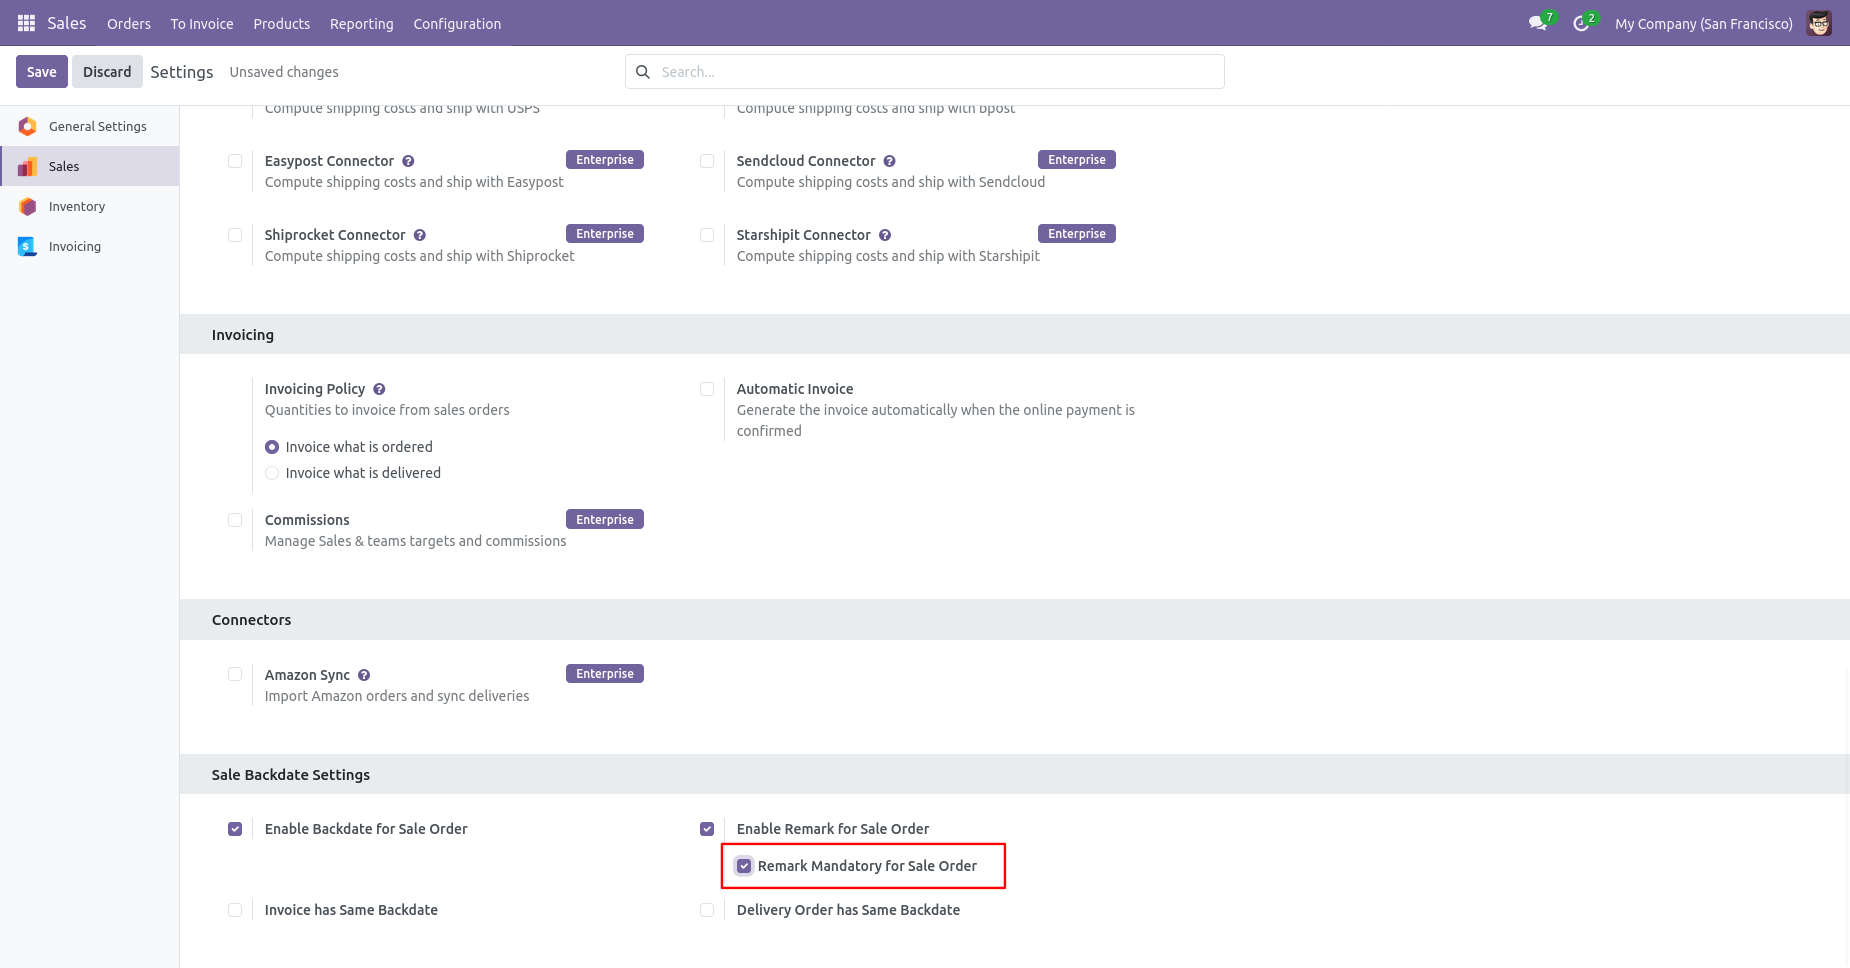
Enable the 'Remark Mandatory For Sales Order' option.
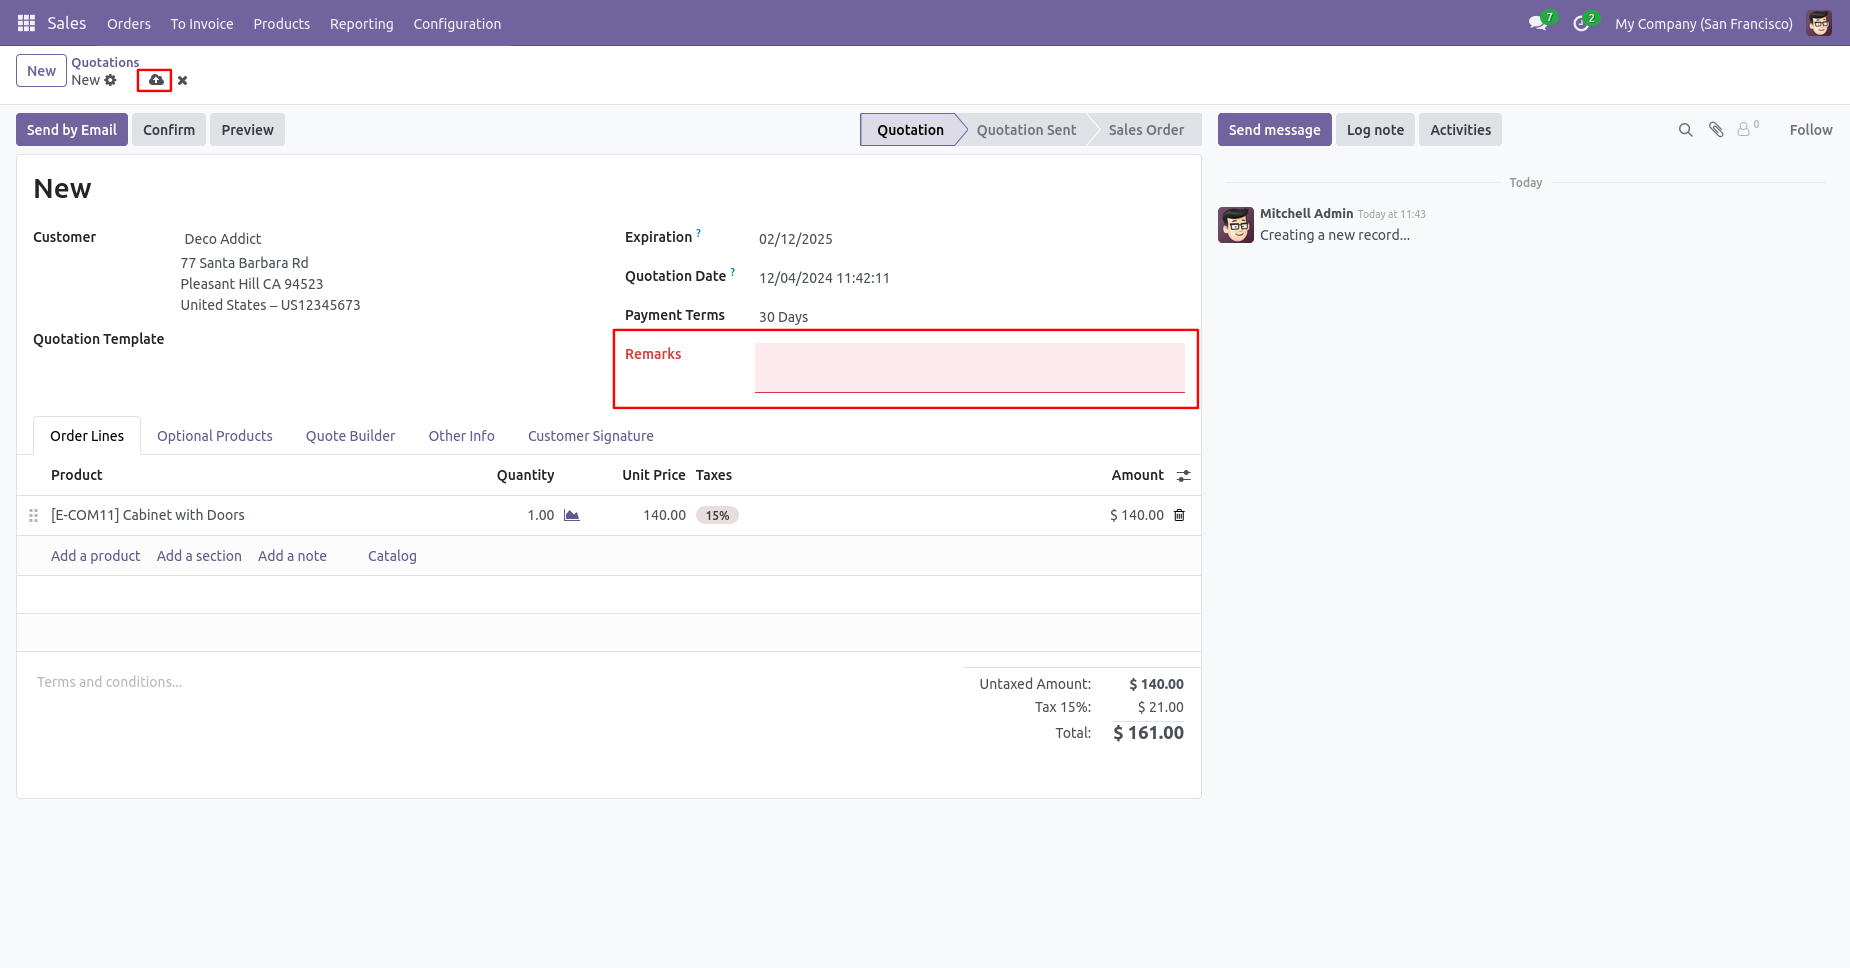
You can't save the SO without entering a remark.
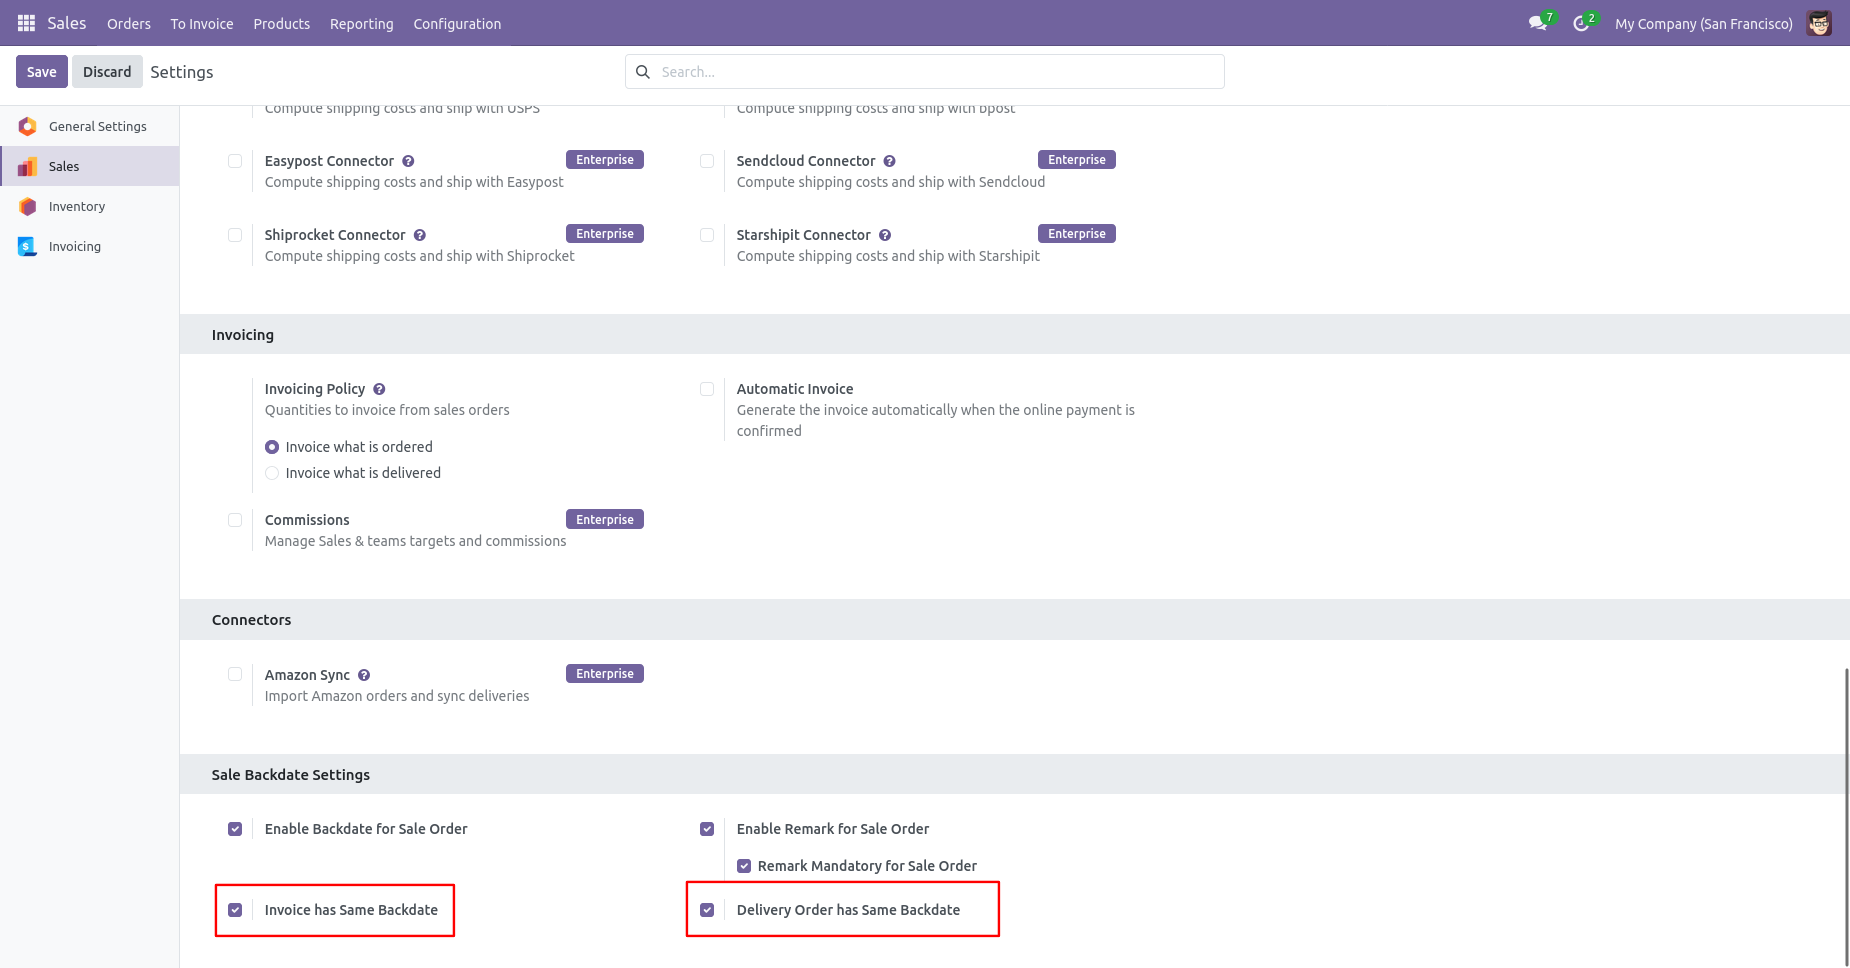
Enable the 'Invoice Has Same Backdate' & 'Delivery Order has Same Backdate' option.
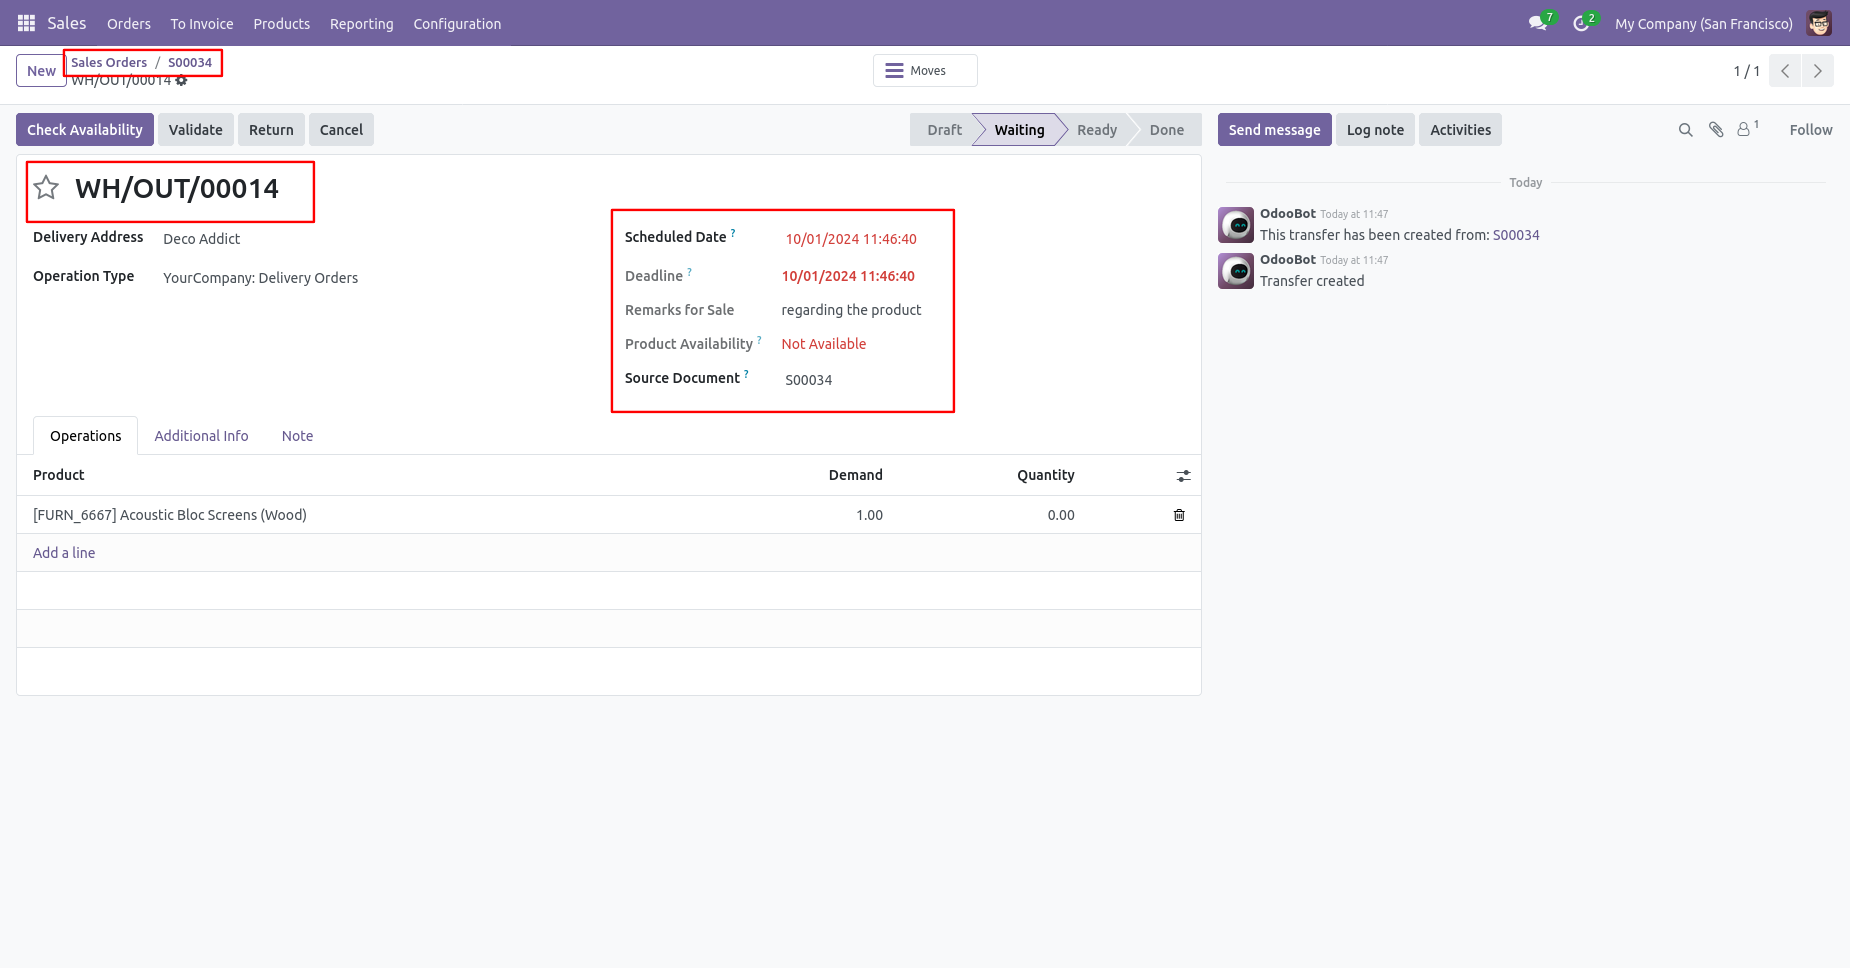
Delivery order with backdate and remarks.
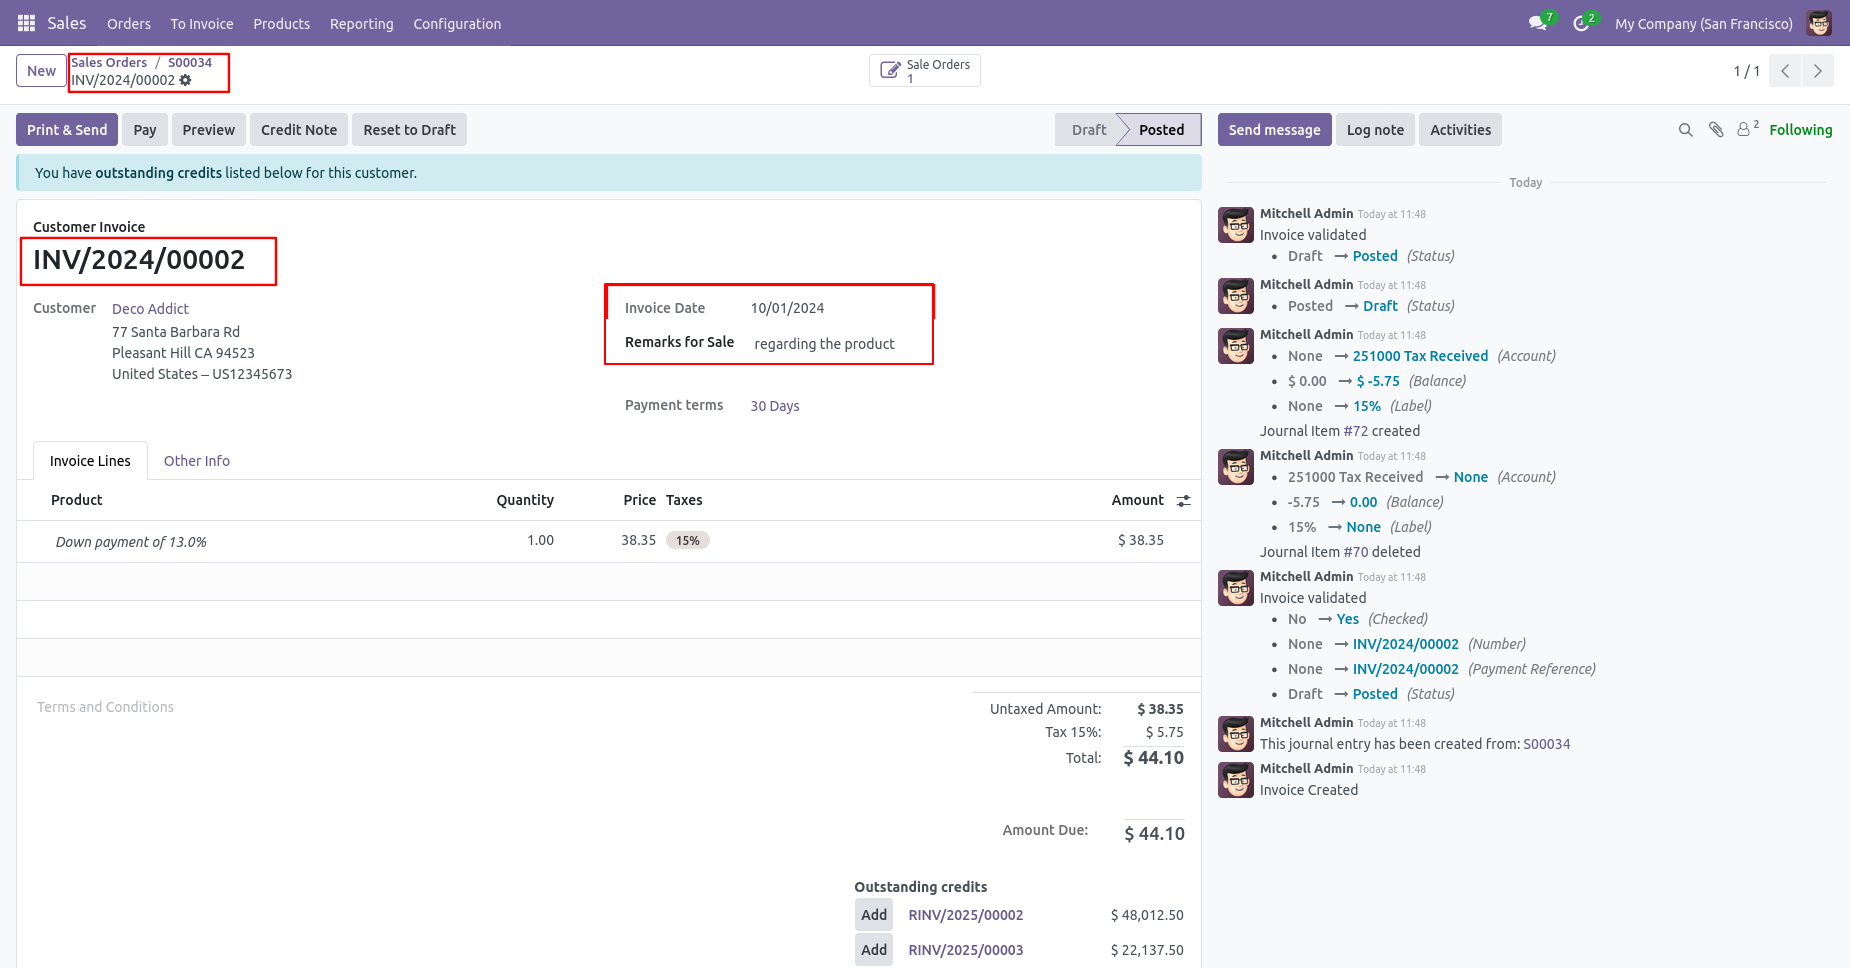
Invoice with backdate and remarks.
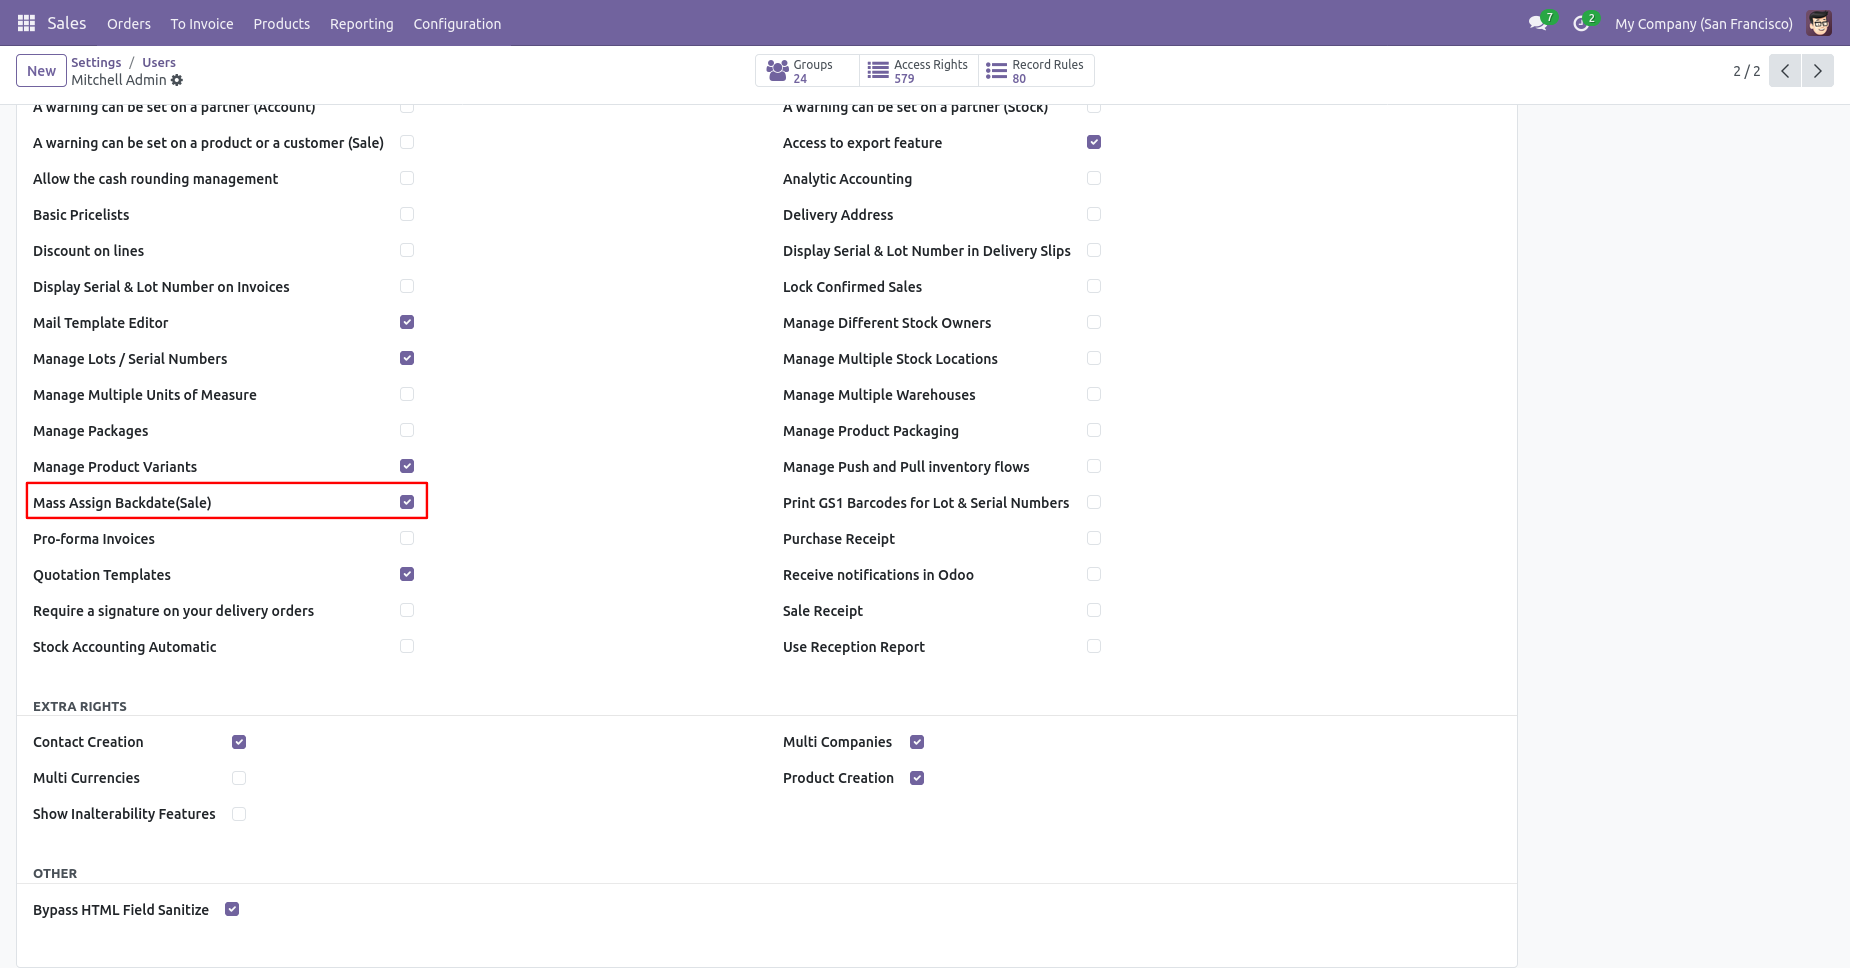
Enabling 'Mass Assign Backdate' allows you to assign backdates in sales in bulk.
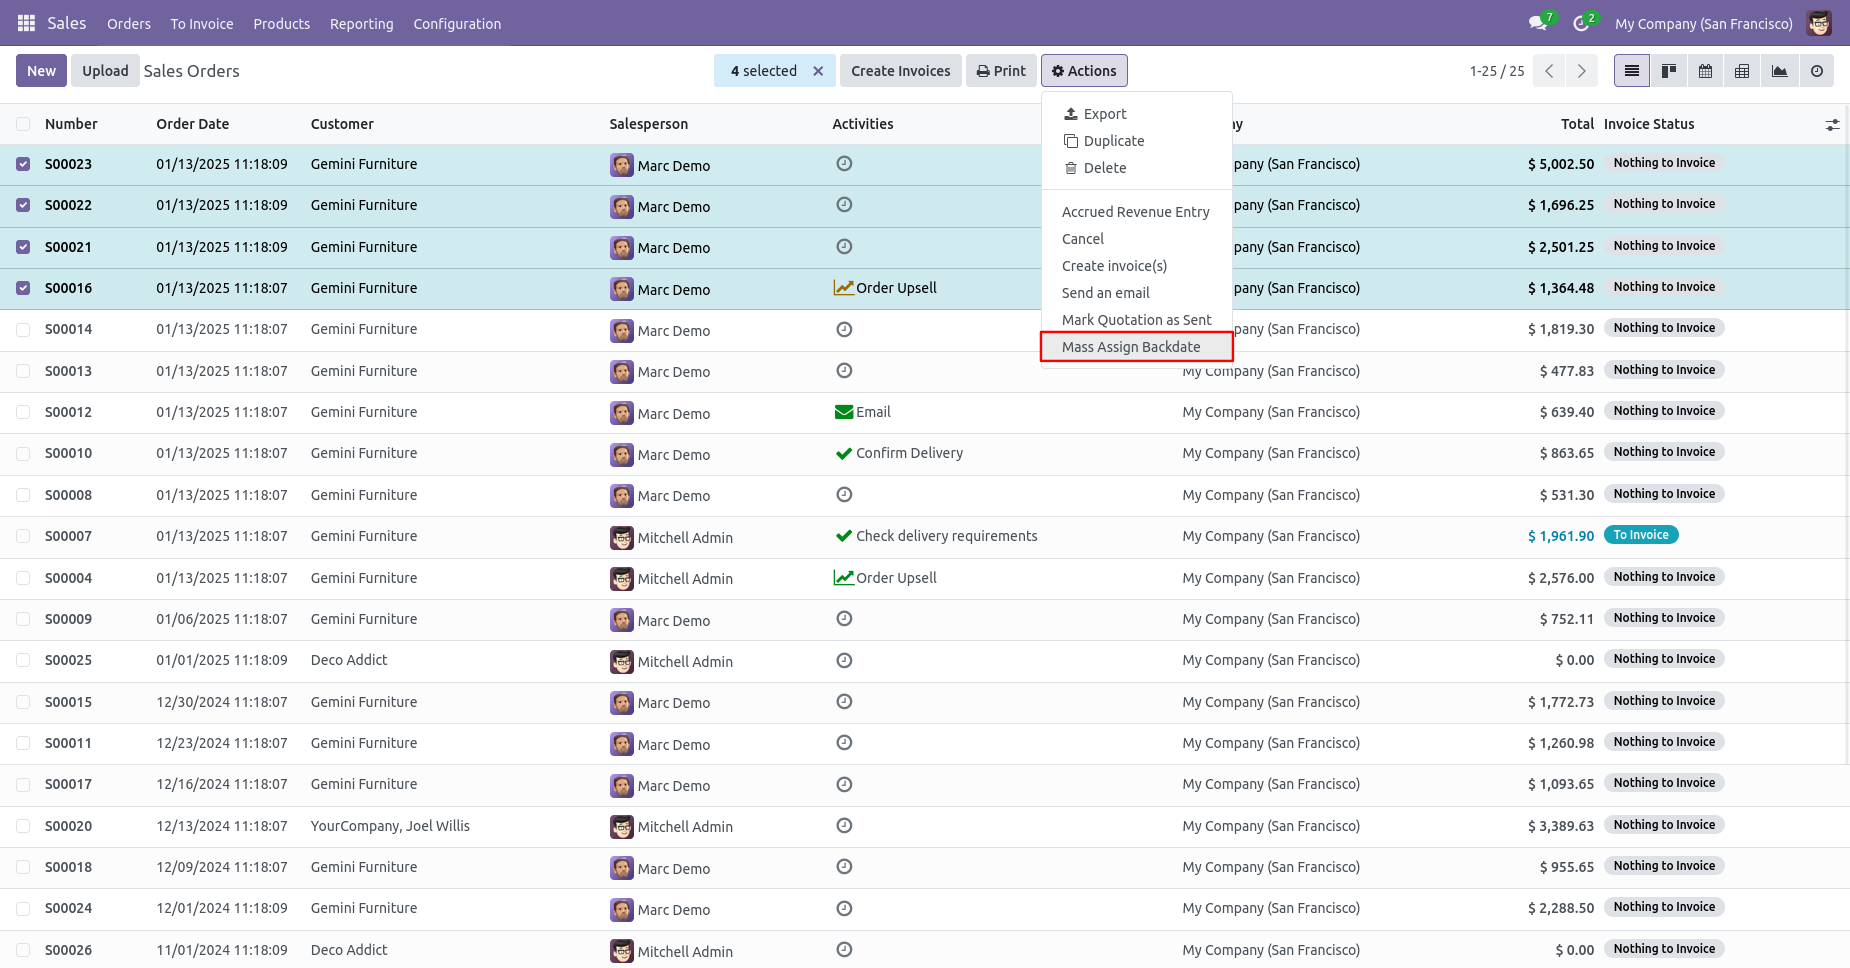
From the list view, select sale orders and click on 'Mass Assign Backdate'.
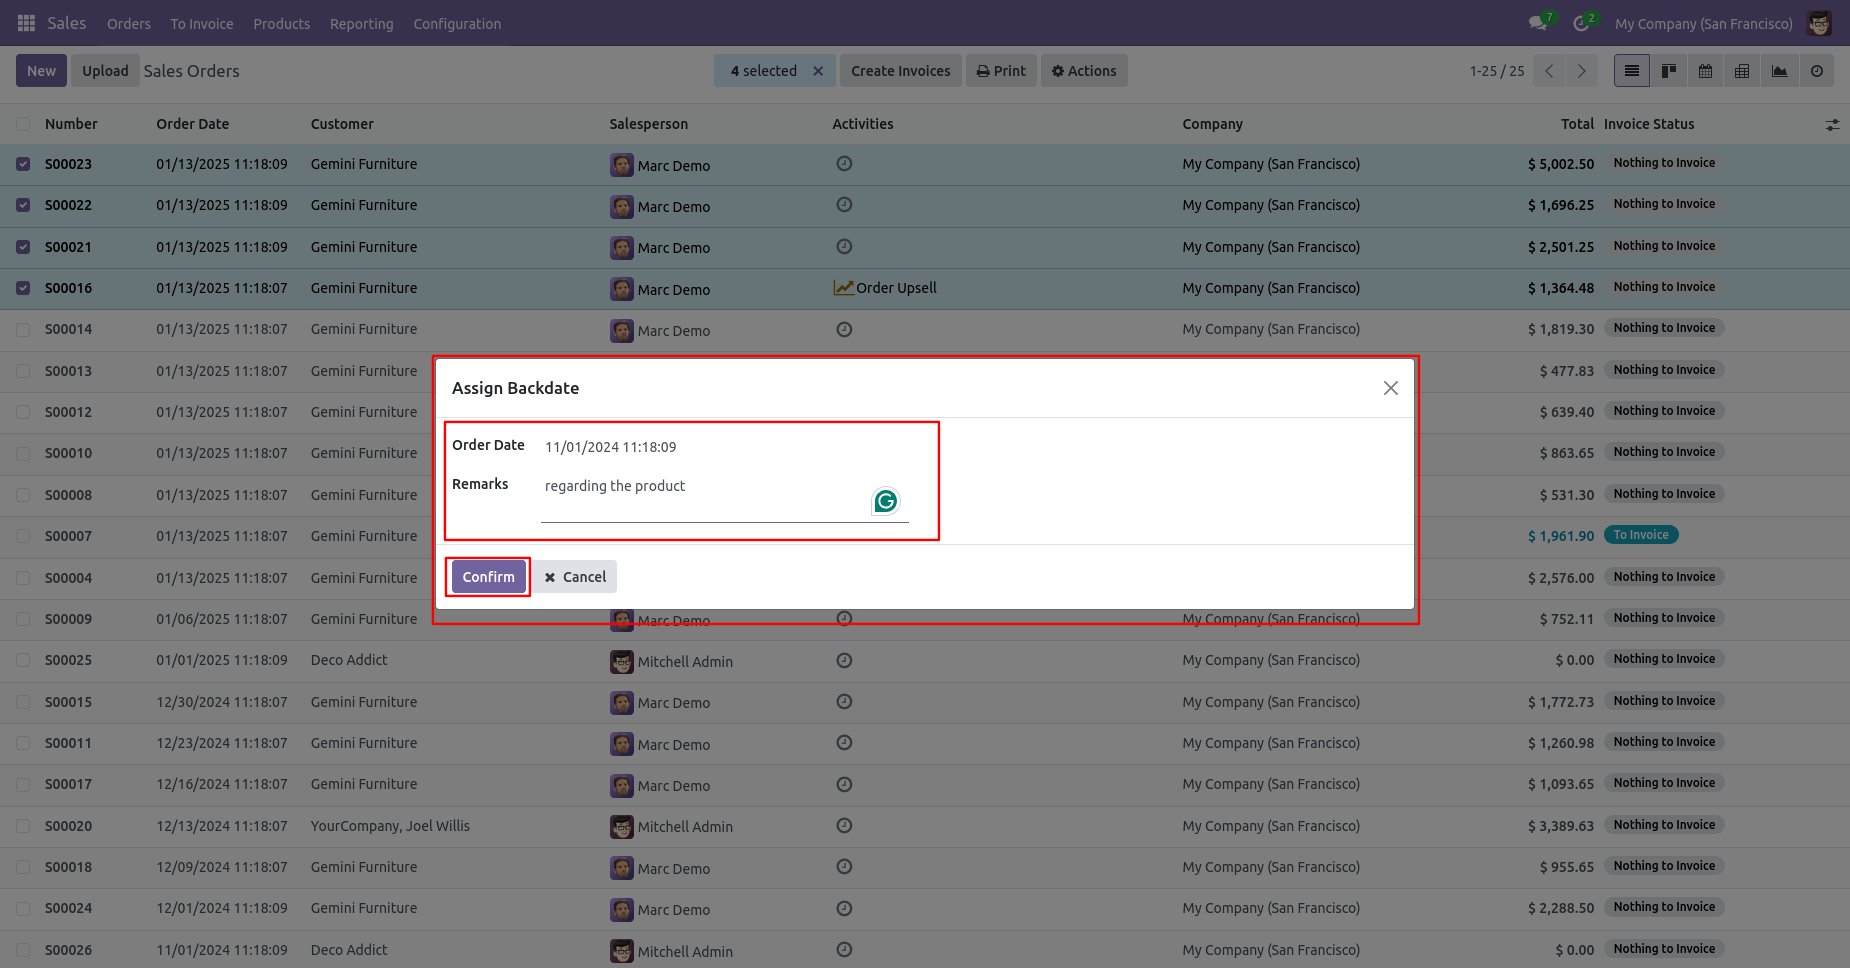
After that, this wizard opens, enters the order date and remarks. Here remarks come if you have enabled that feature.
Sale order form view with backdate and remarks.
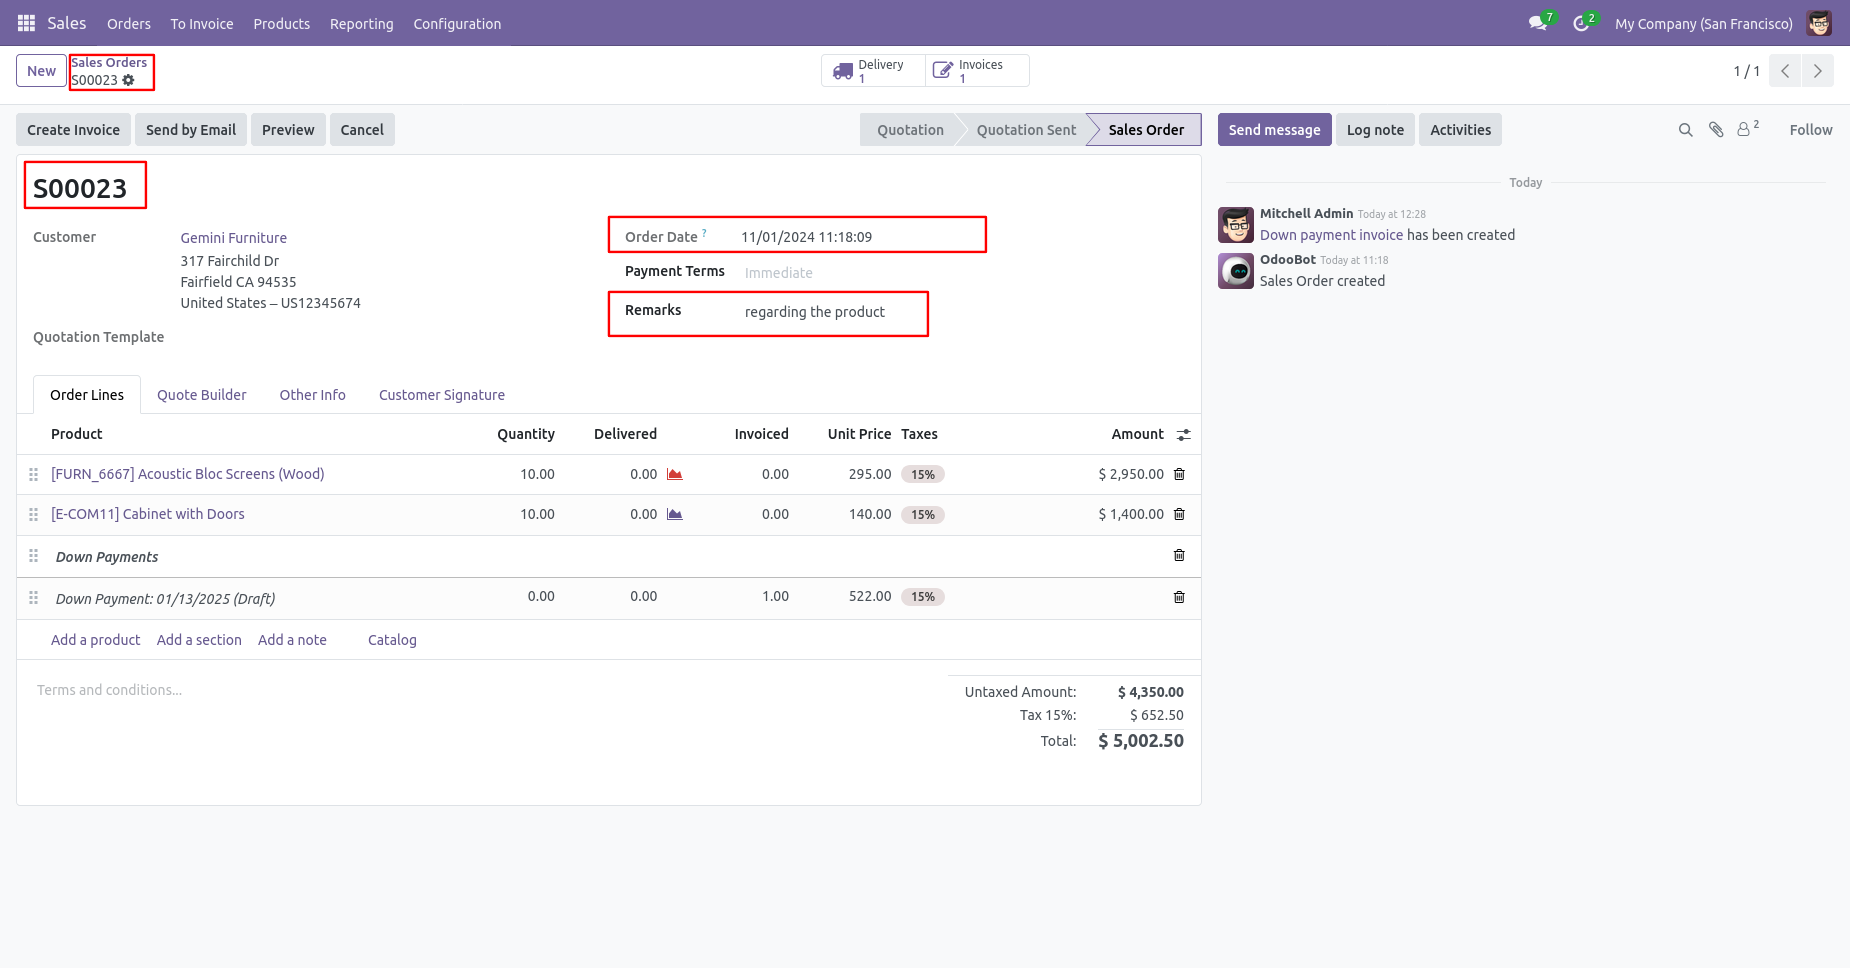
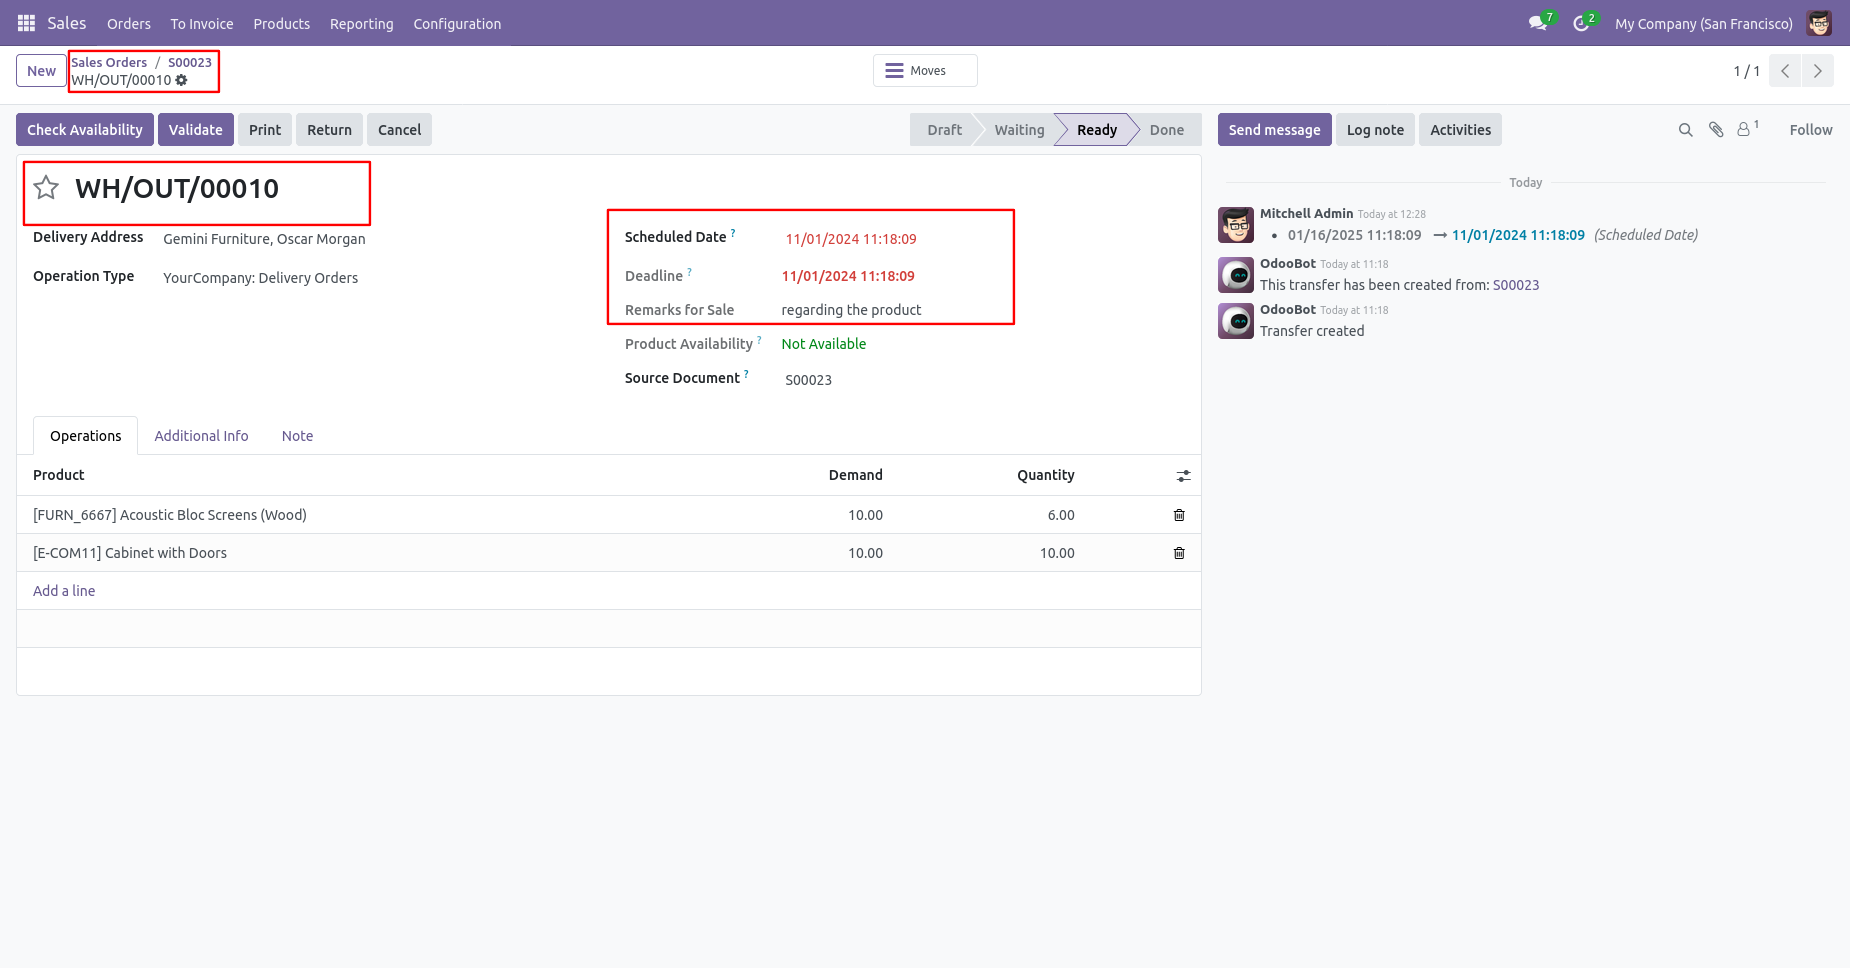
Delivery order with backdate and remarks.
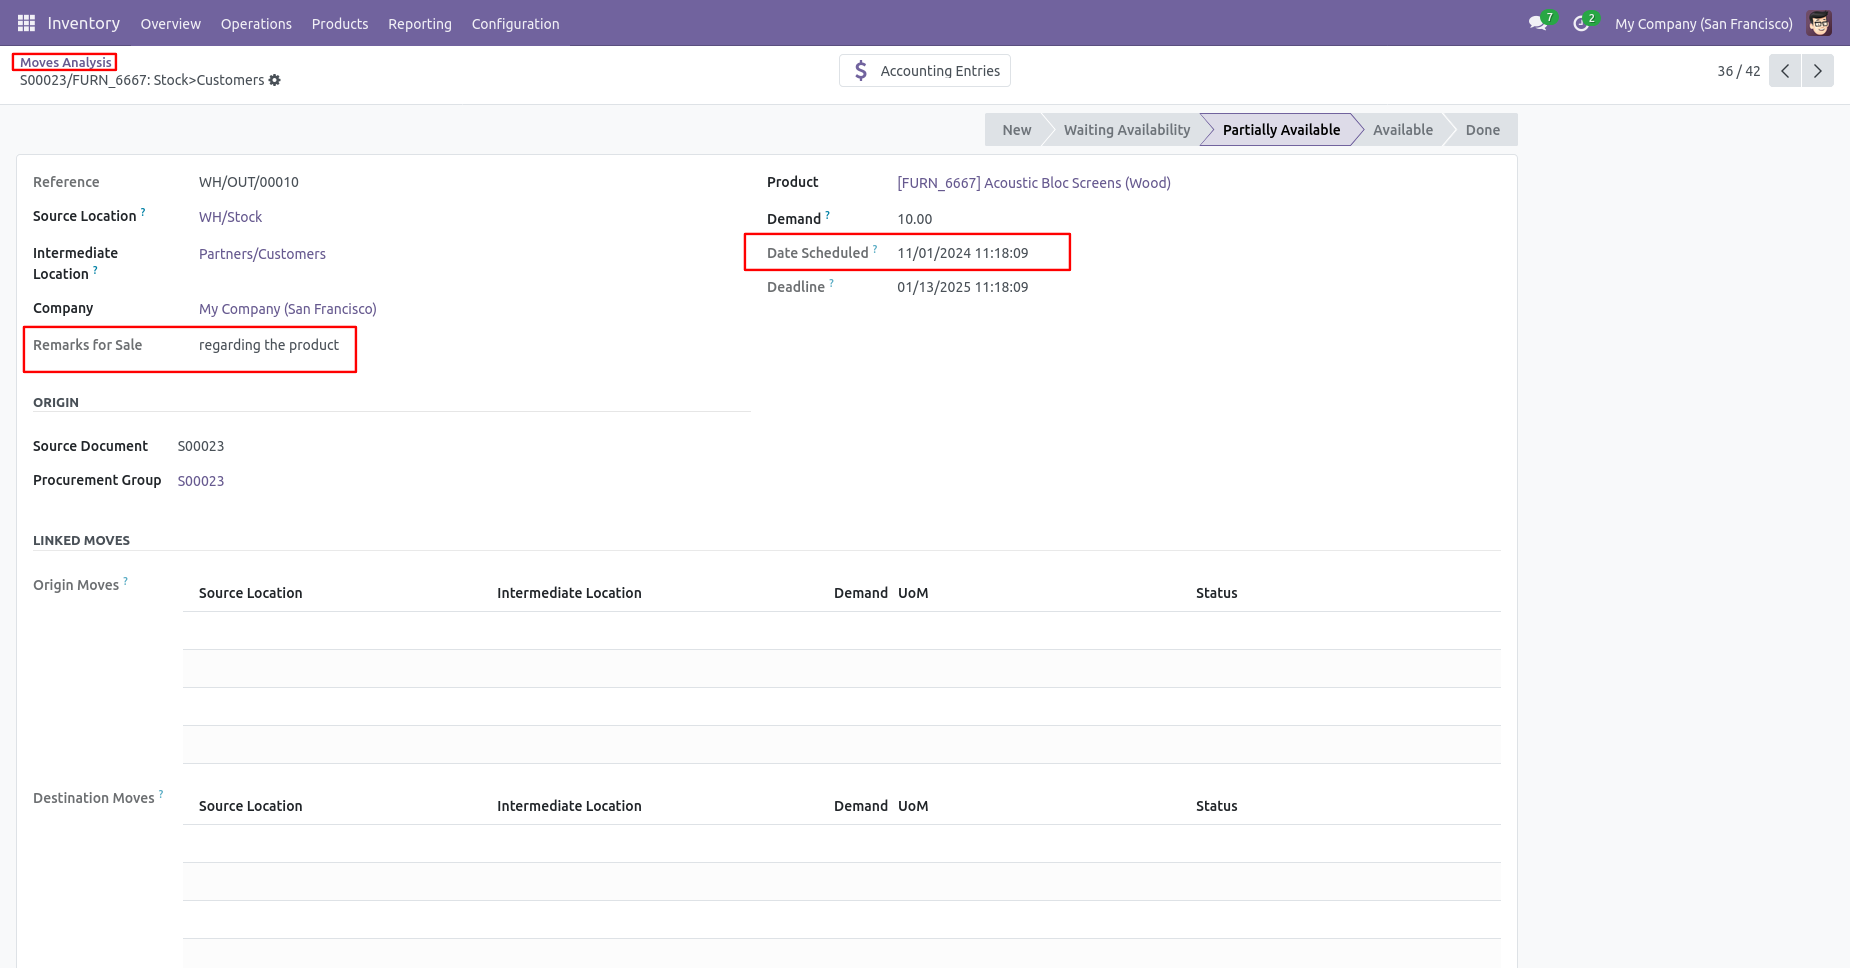
Move analysis with backdate and remarks.
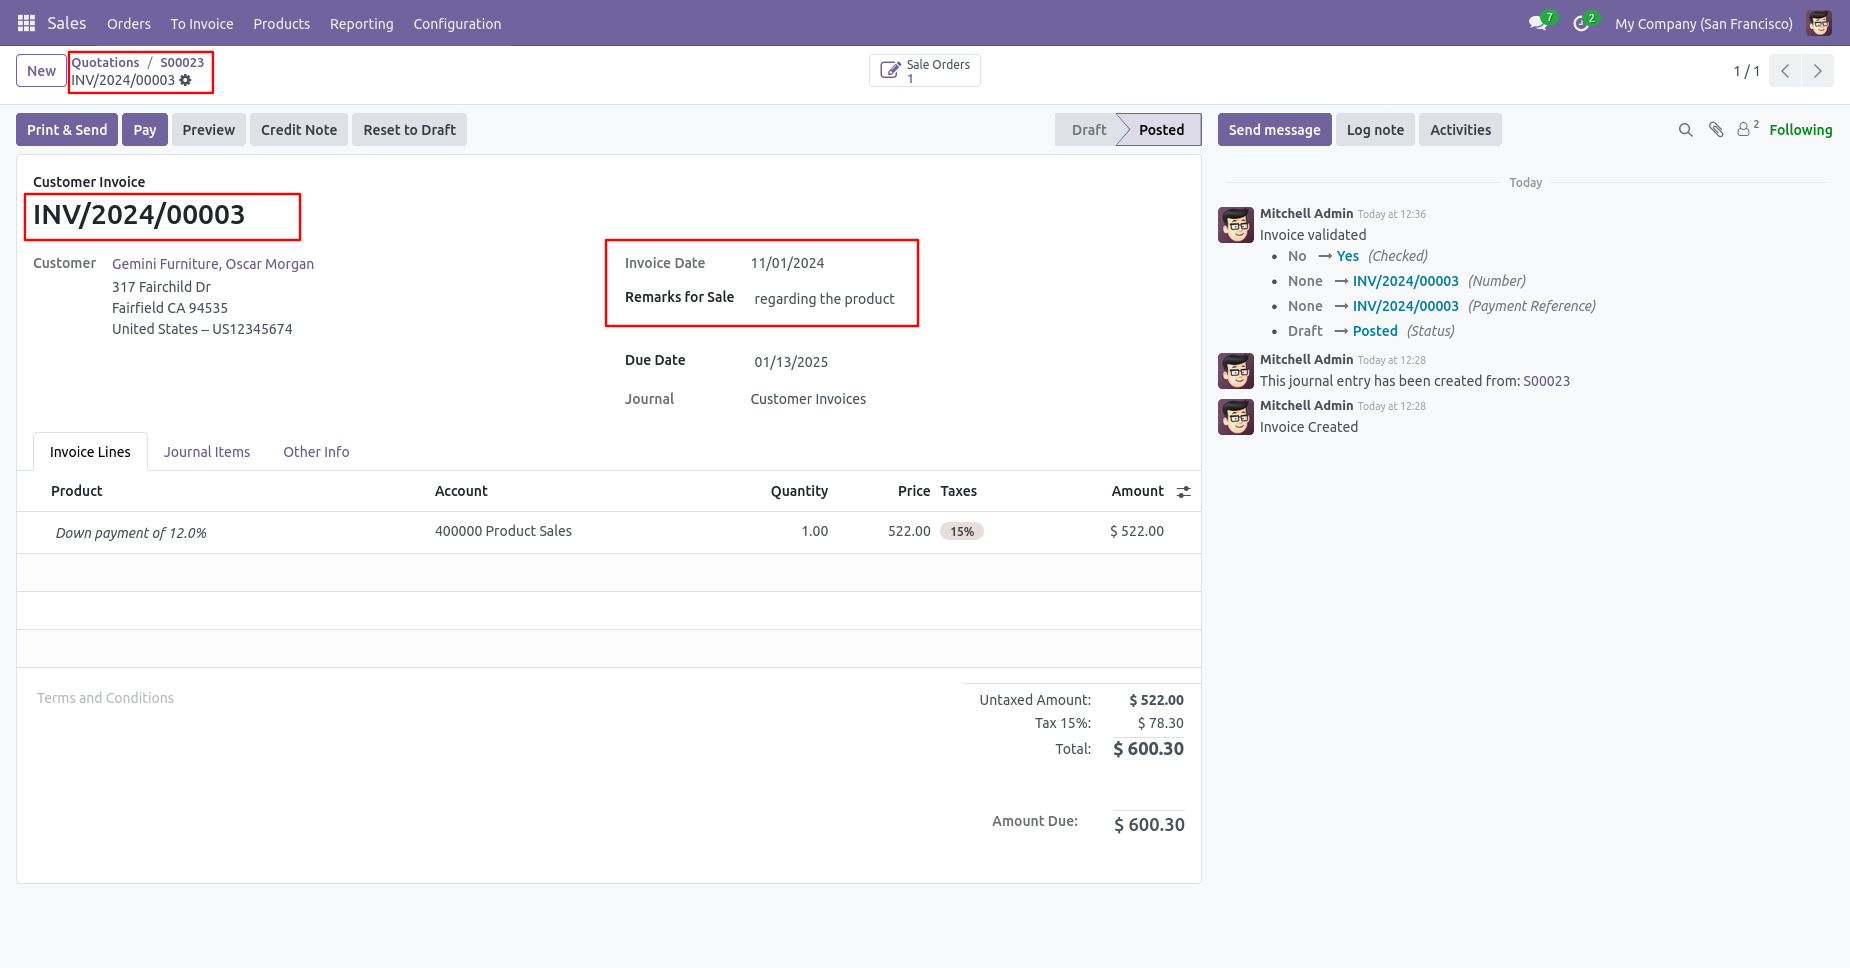
Invoice date with backdate and remarks.
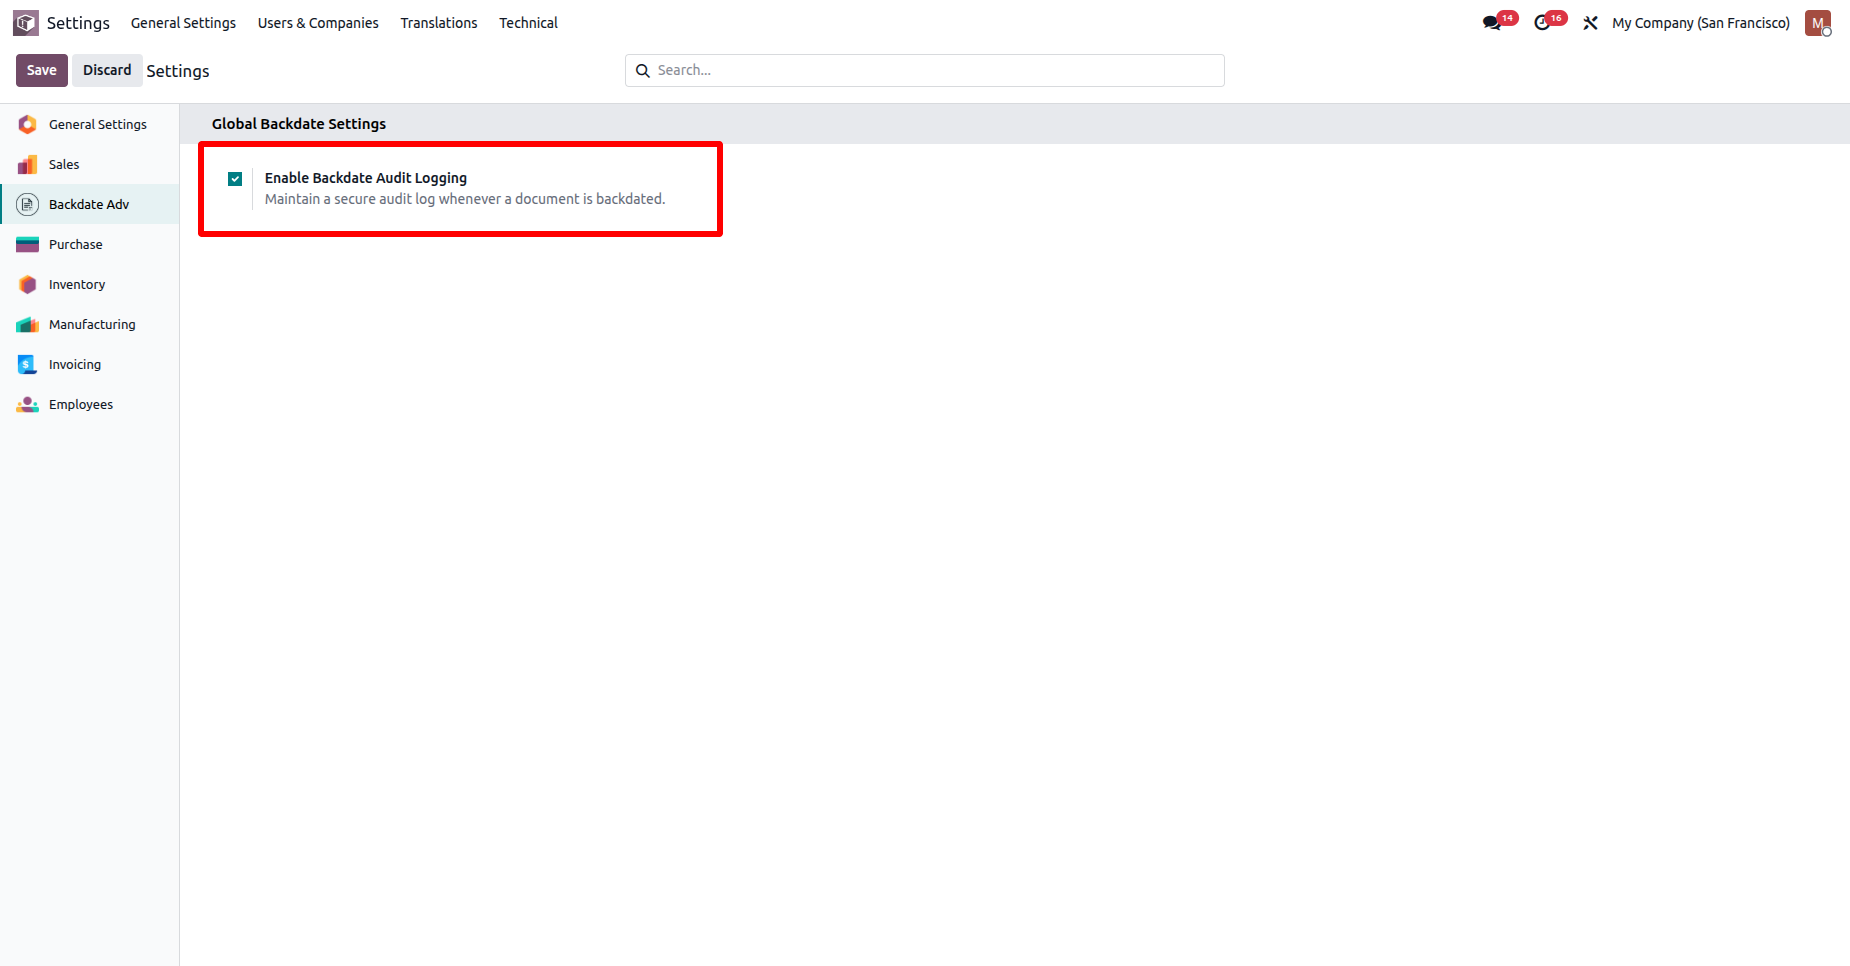
Go to the Sales -> Configuration -> Settings, then enable the Backdate Audit Logging option to track and maintain an audit log for all sales order backdate changes.
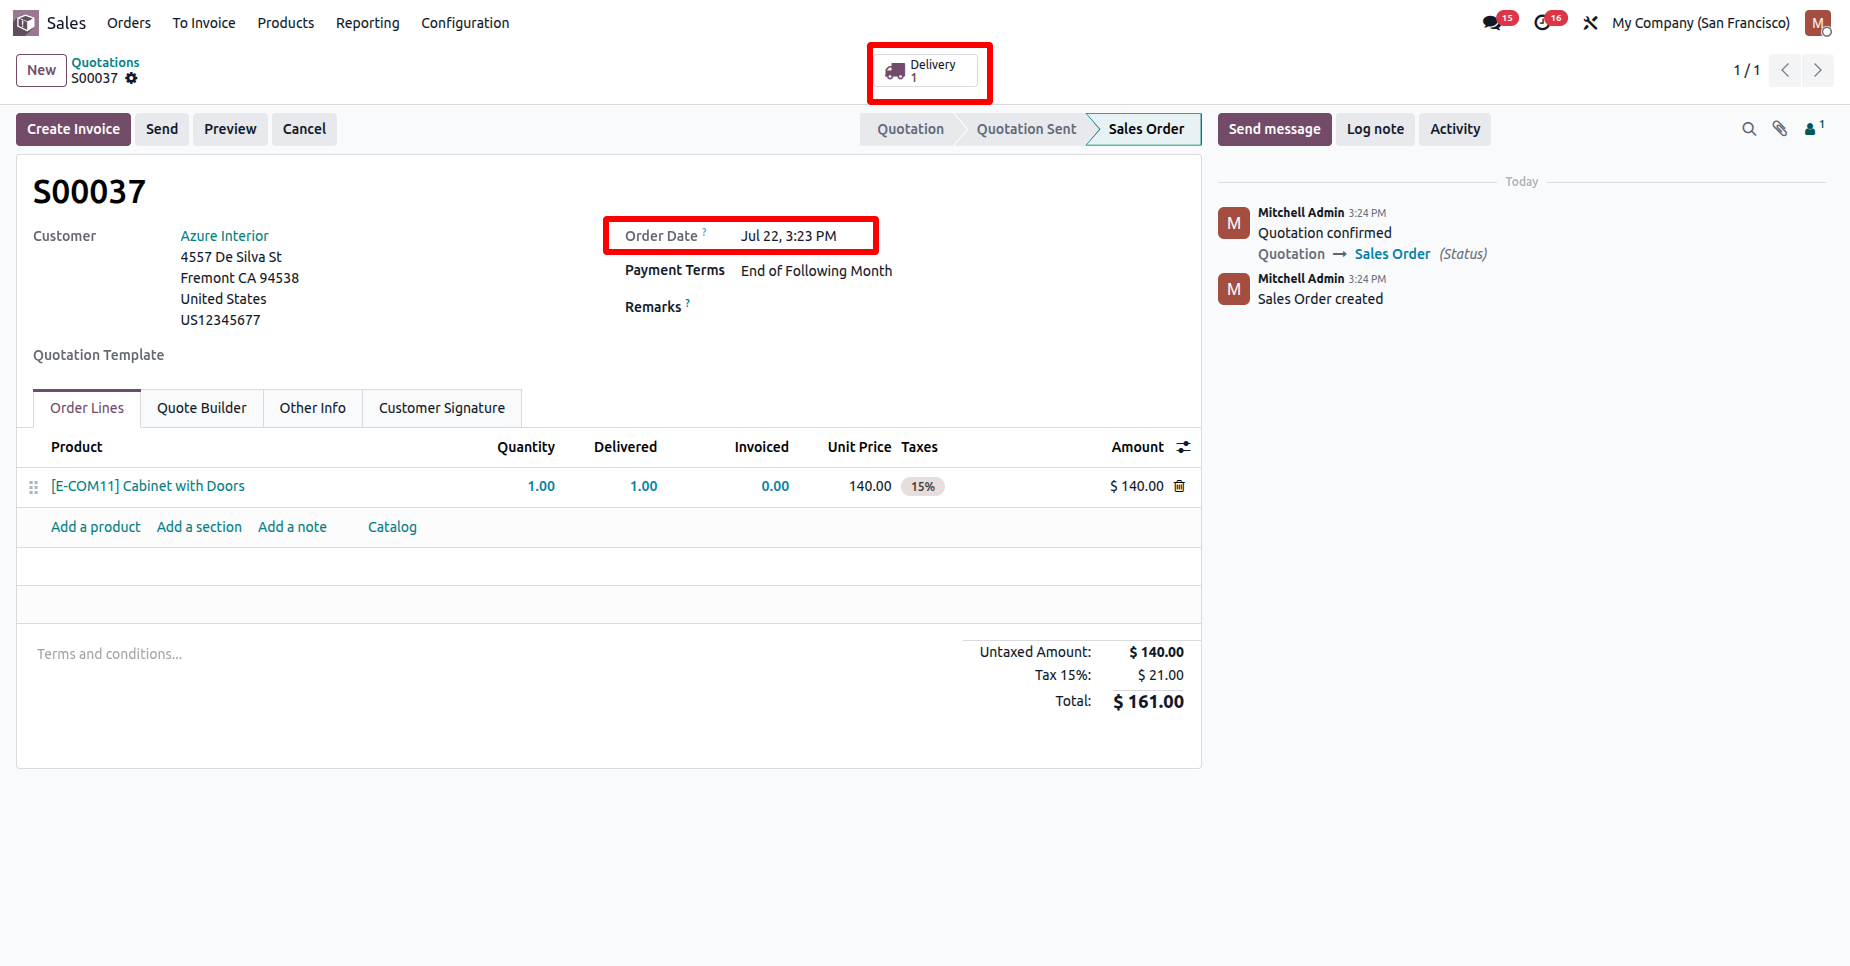
Create a Sales Order and confirm it to automatically generate the corresponding Delivery Order.
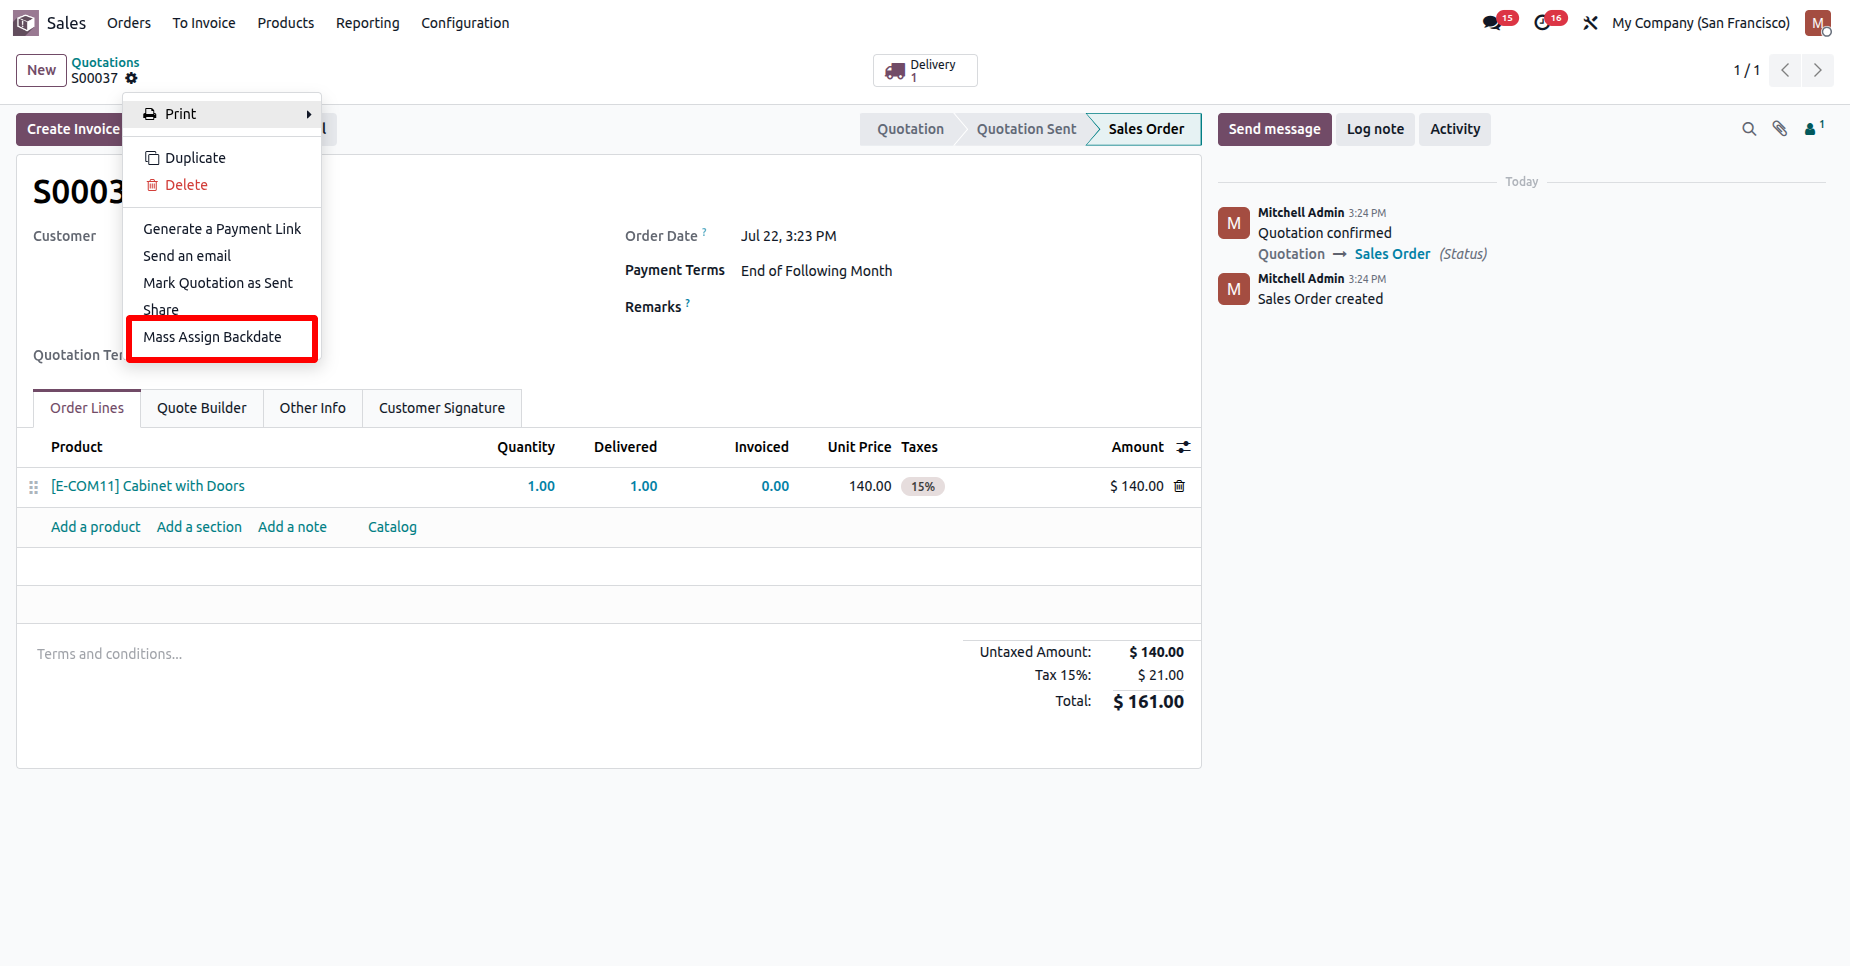
Select Mass Assign Backdate from the Action menu in the Sales Order form view to assign a backdate to the selected sales order.
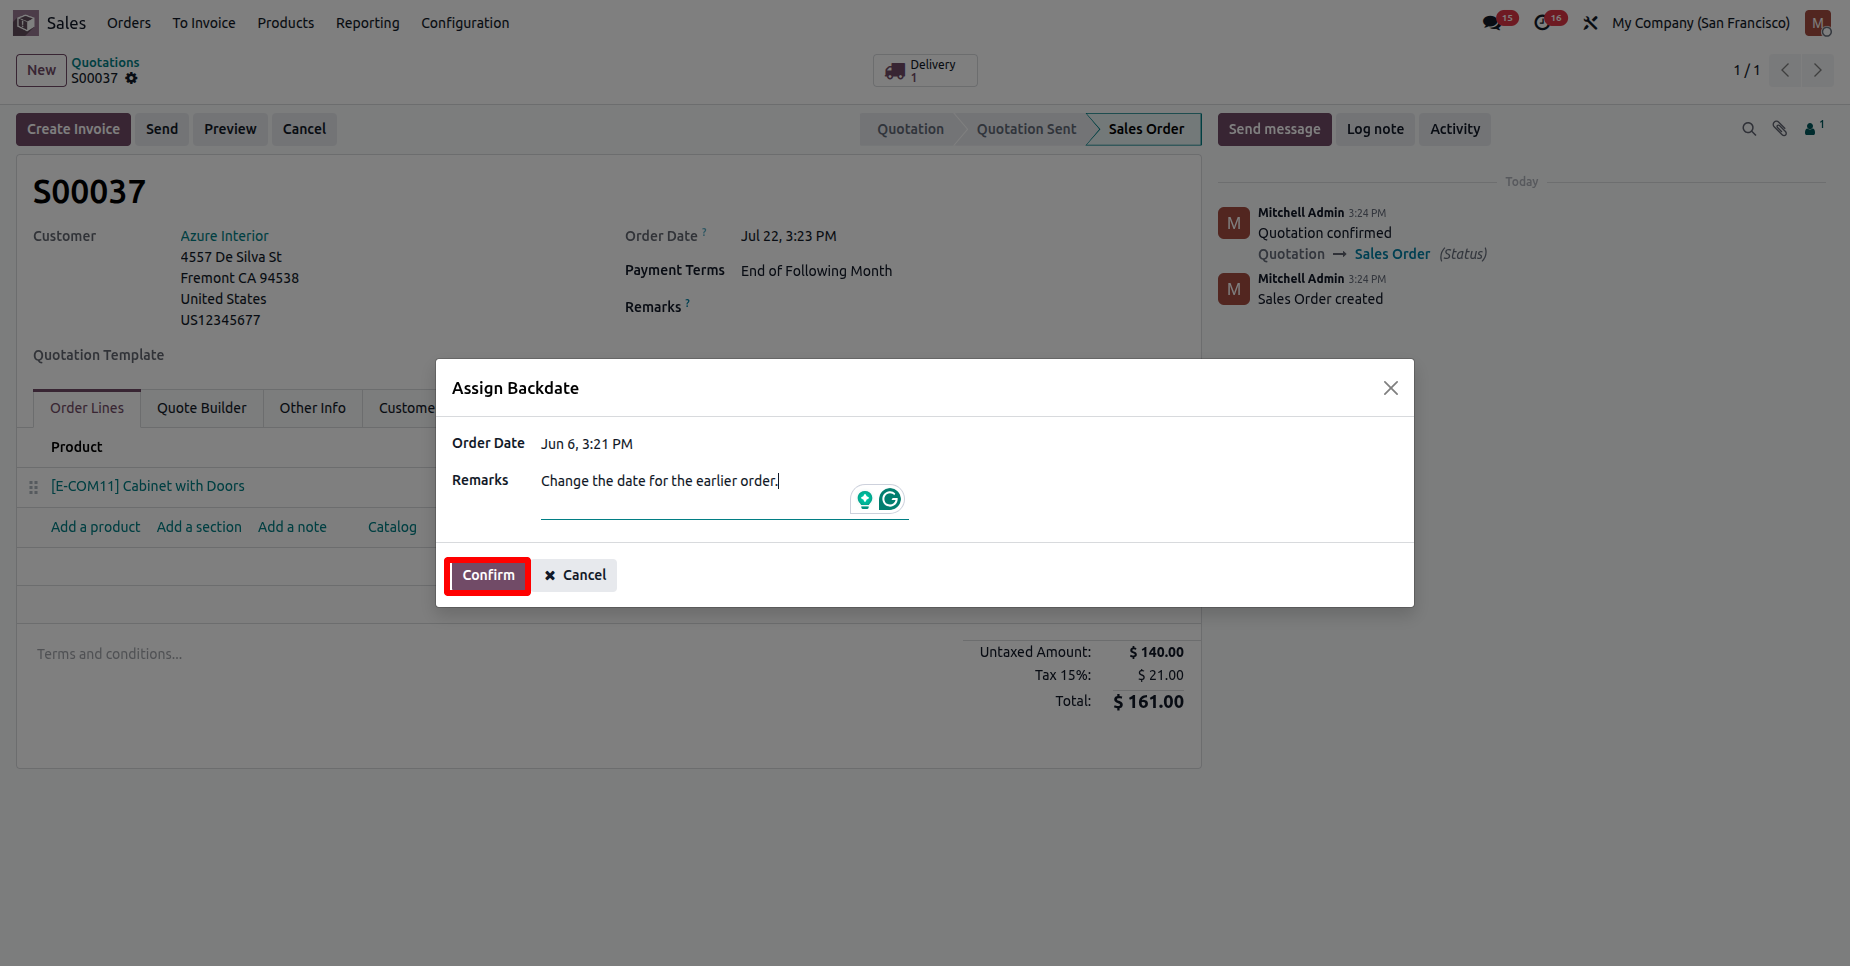
Assign the desired backdate, then click the Confirm button to apply the backdate to the selected Sales Order(s).
The Sales Order Date is updated to the selected backdate. The backdate change is also recorded in the Chatter, and the same audit entry is available through the Backdate Log smart button on the Sales Order form view.
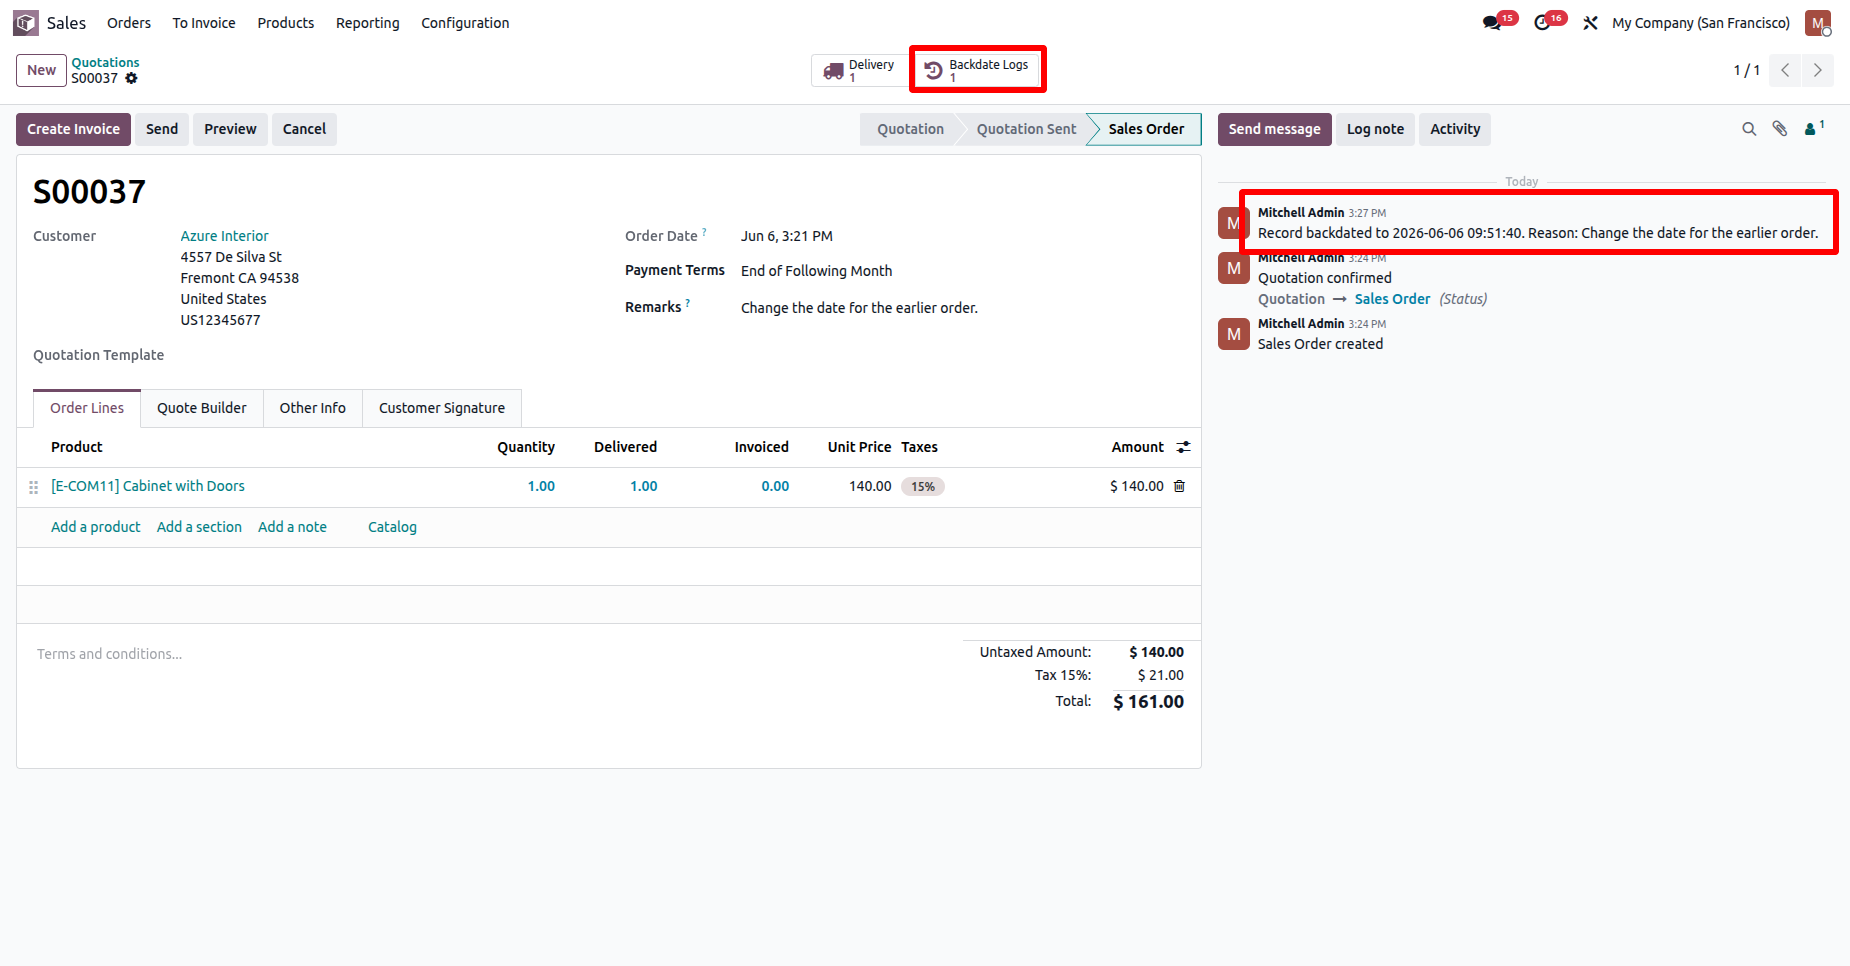
Clicking the Backdate Logs smart button opens the Backdate Logs list view, where users can view the complete audit history of all backdate changes made to the Sales Order.
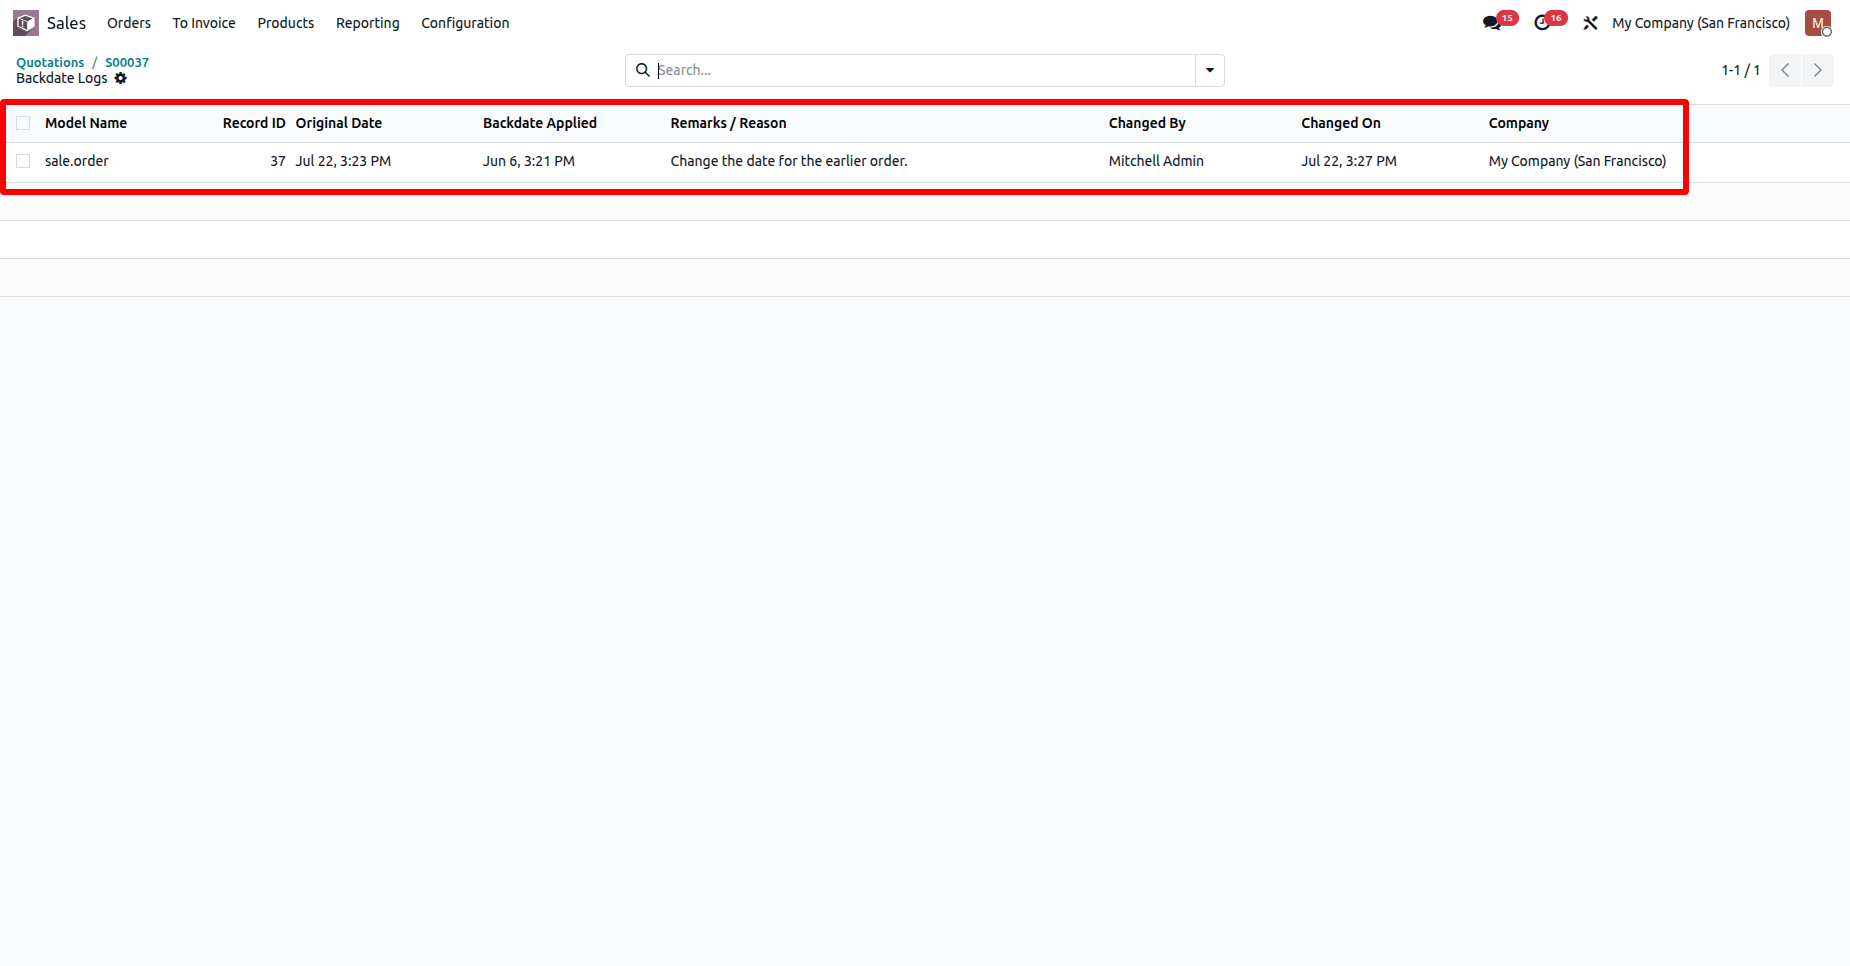
Users can also view the Backdate Logs smart button on the Delivery Order form view, providing quick access to the audit history of all backdate changes related to the delivery order.
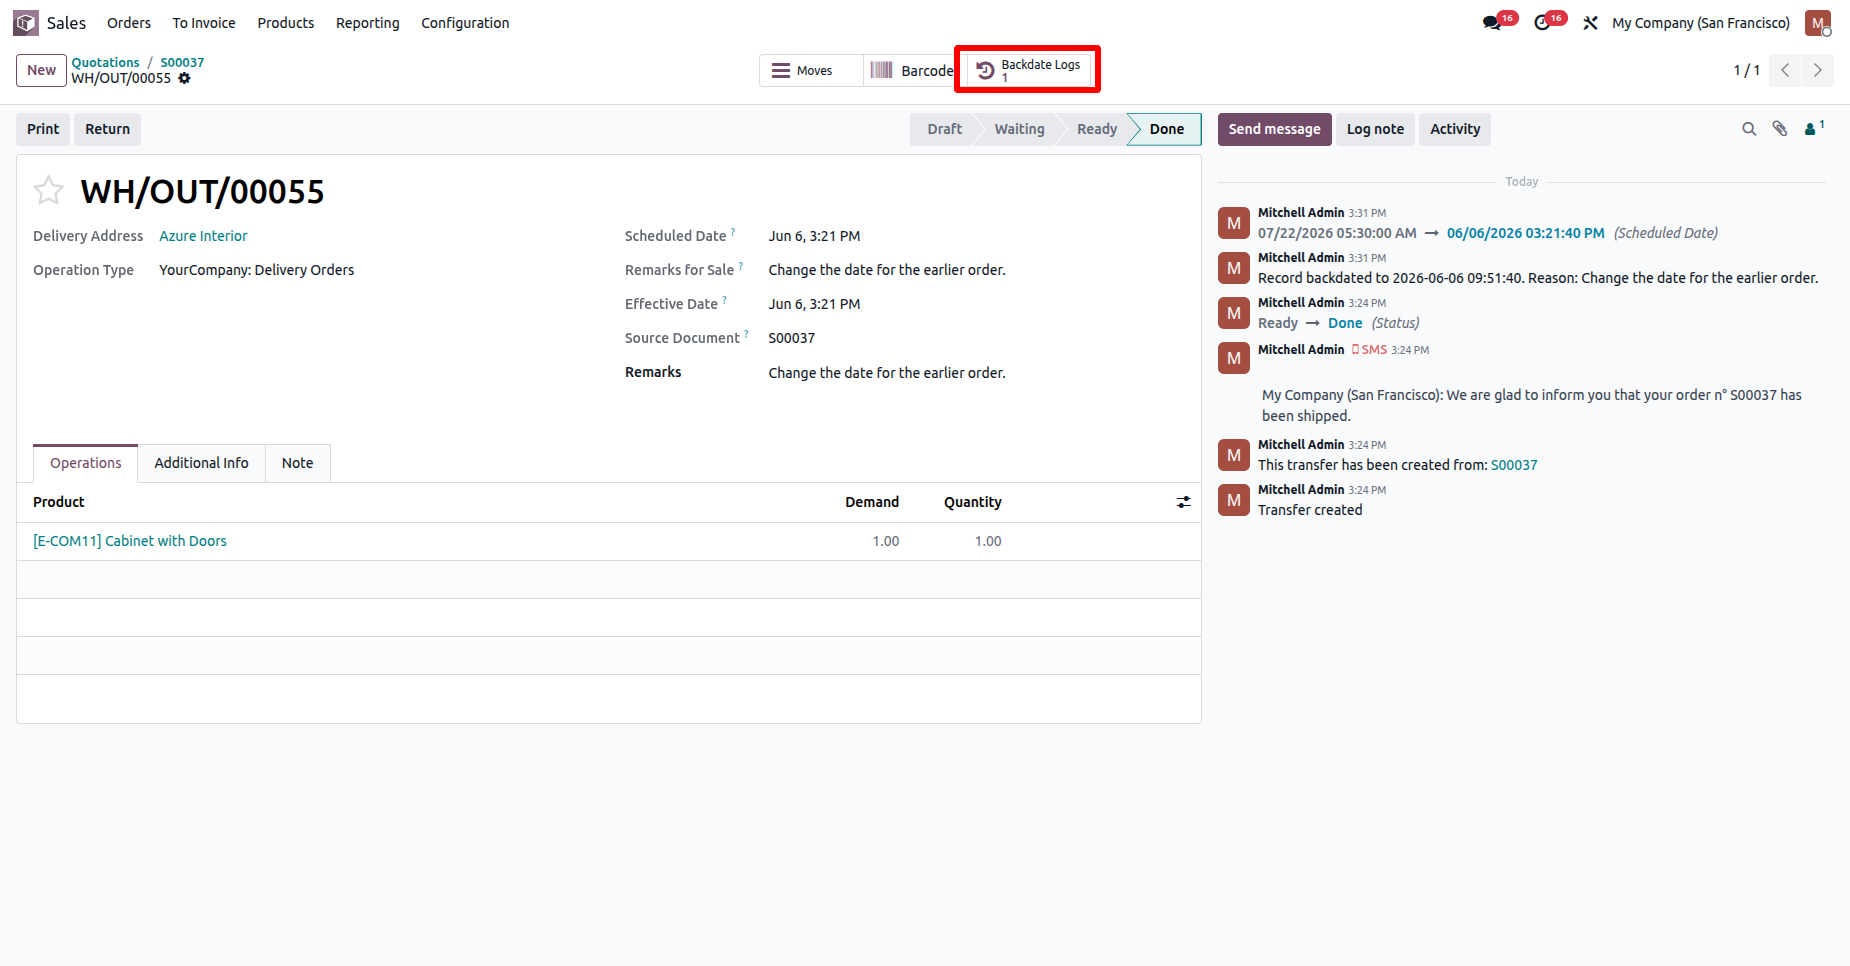
Clicking the Backdate Logs smart button opens the Backdate Logs list view, displaying the complete audit history of all backdate changes associated with the Delivery Order.
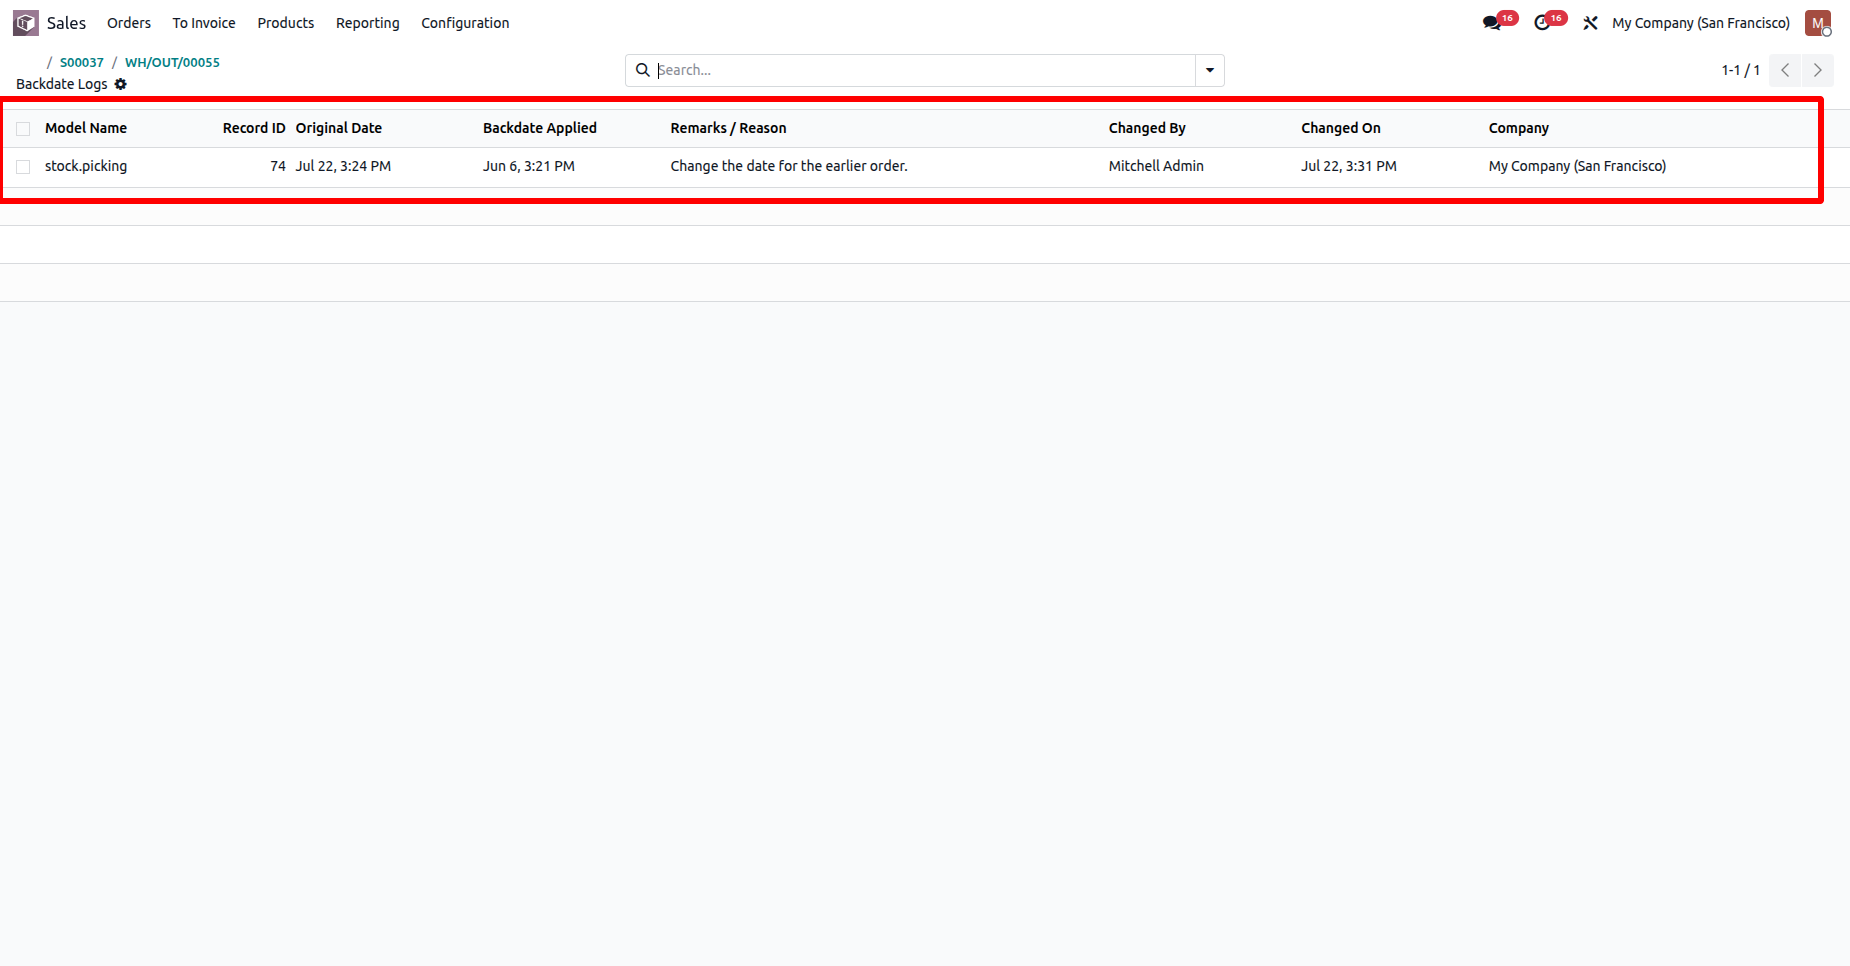
The Backdate Logs are also available from the Log History menu under the Backdate Audit application, allowing users to view the complete audit trail of all backdate changes in a centralized location.
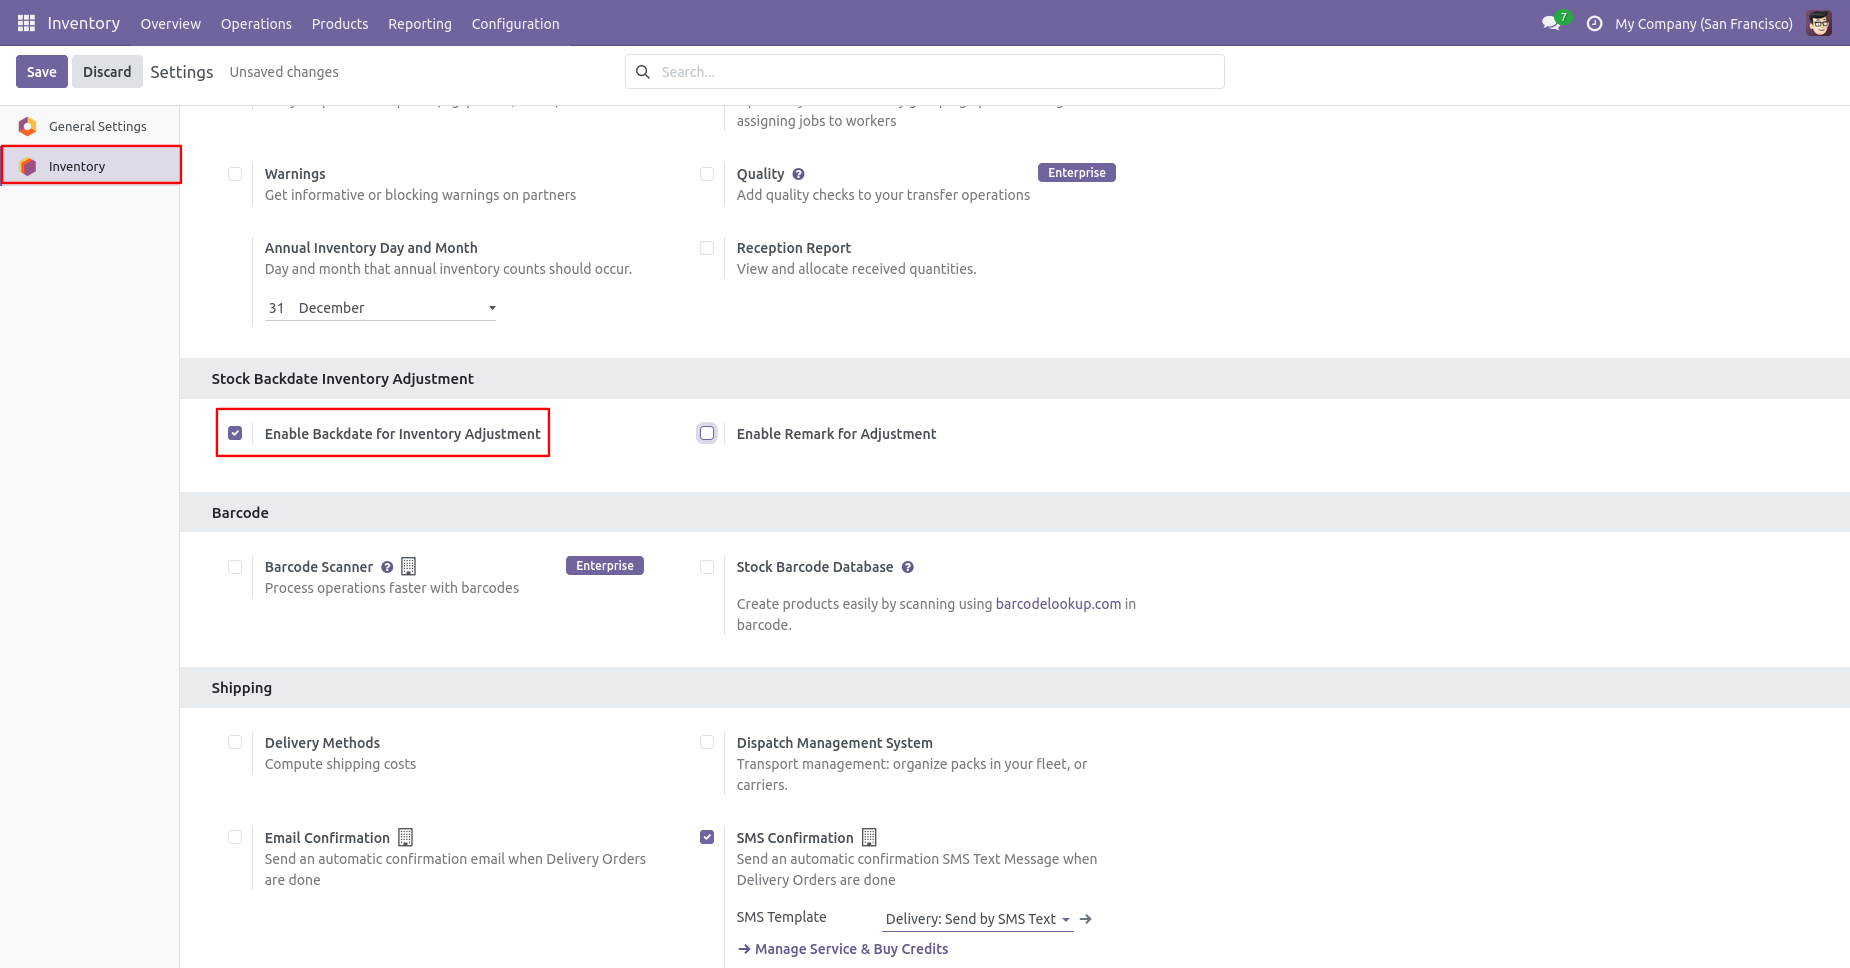
Enable the 'Enable Backdate For Inventory Adjustment' for configuration for picking backdate.
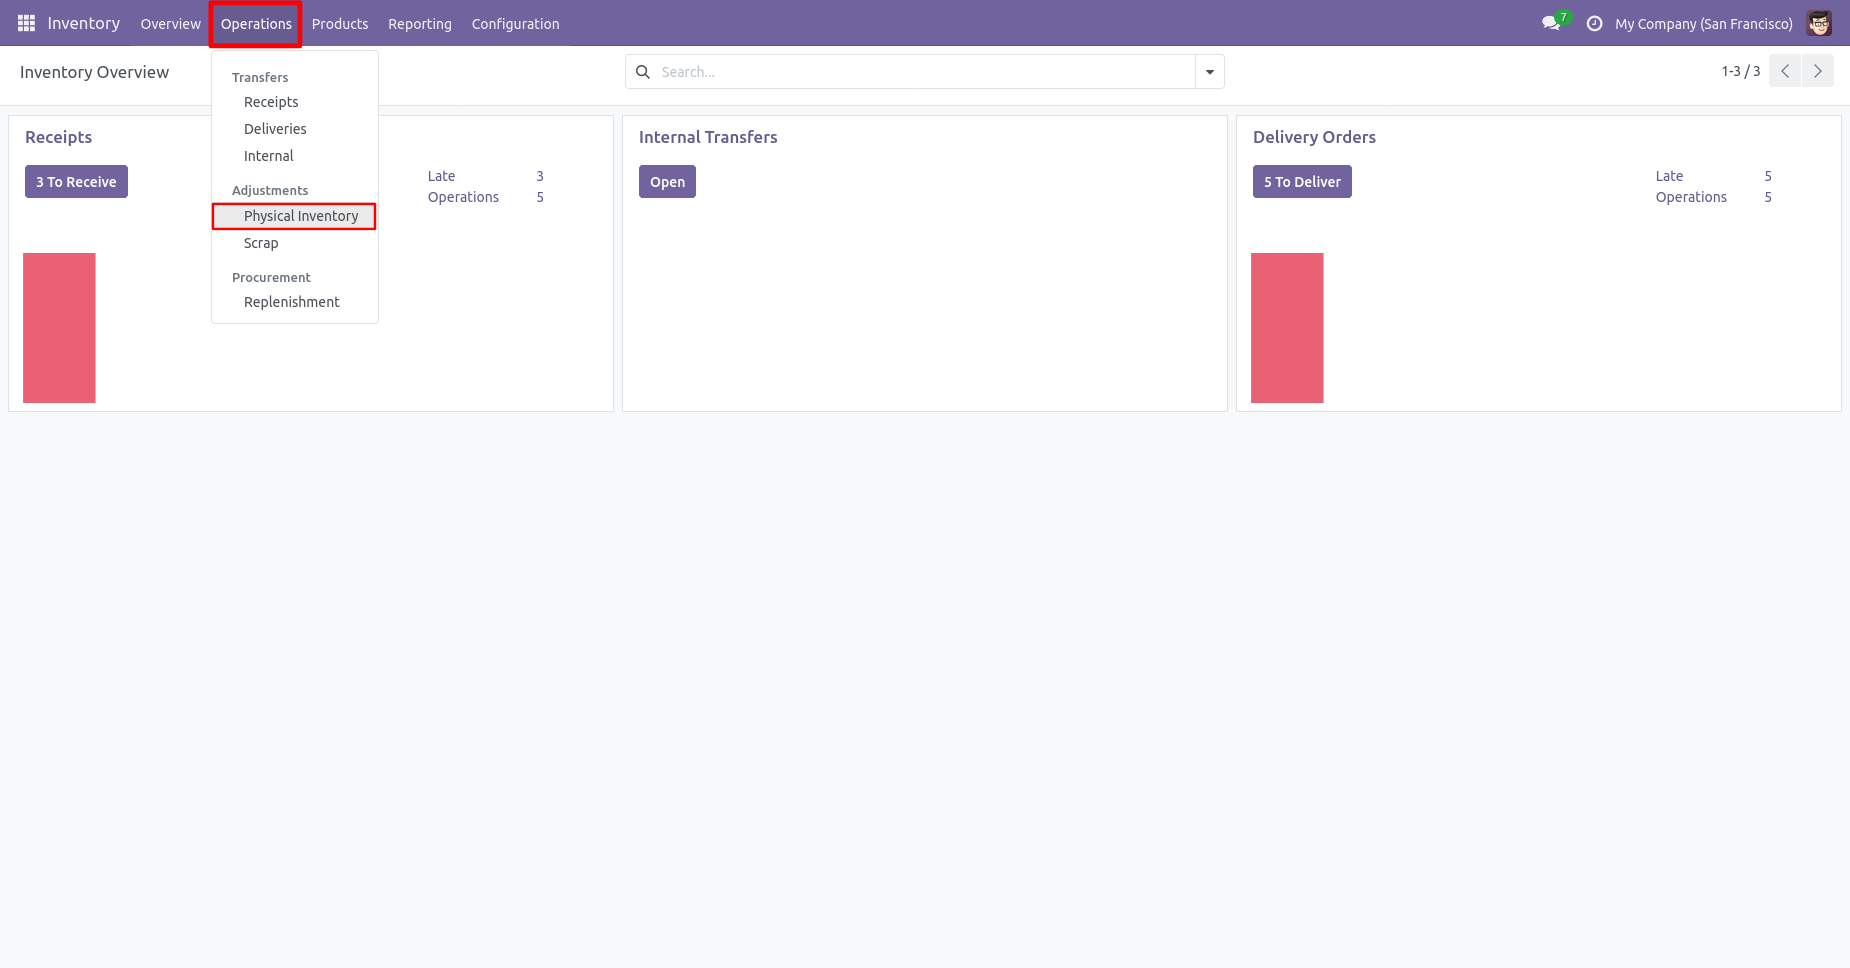
Go to Inventory ==> Operations ==> Physical Inventory.
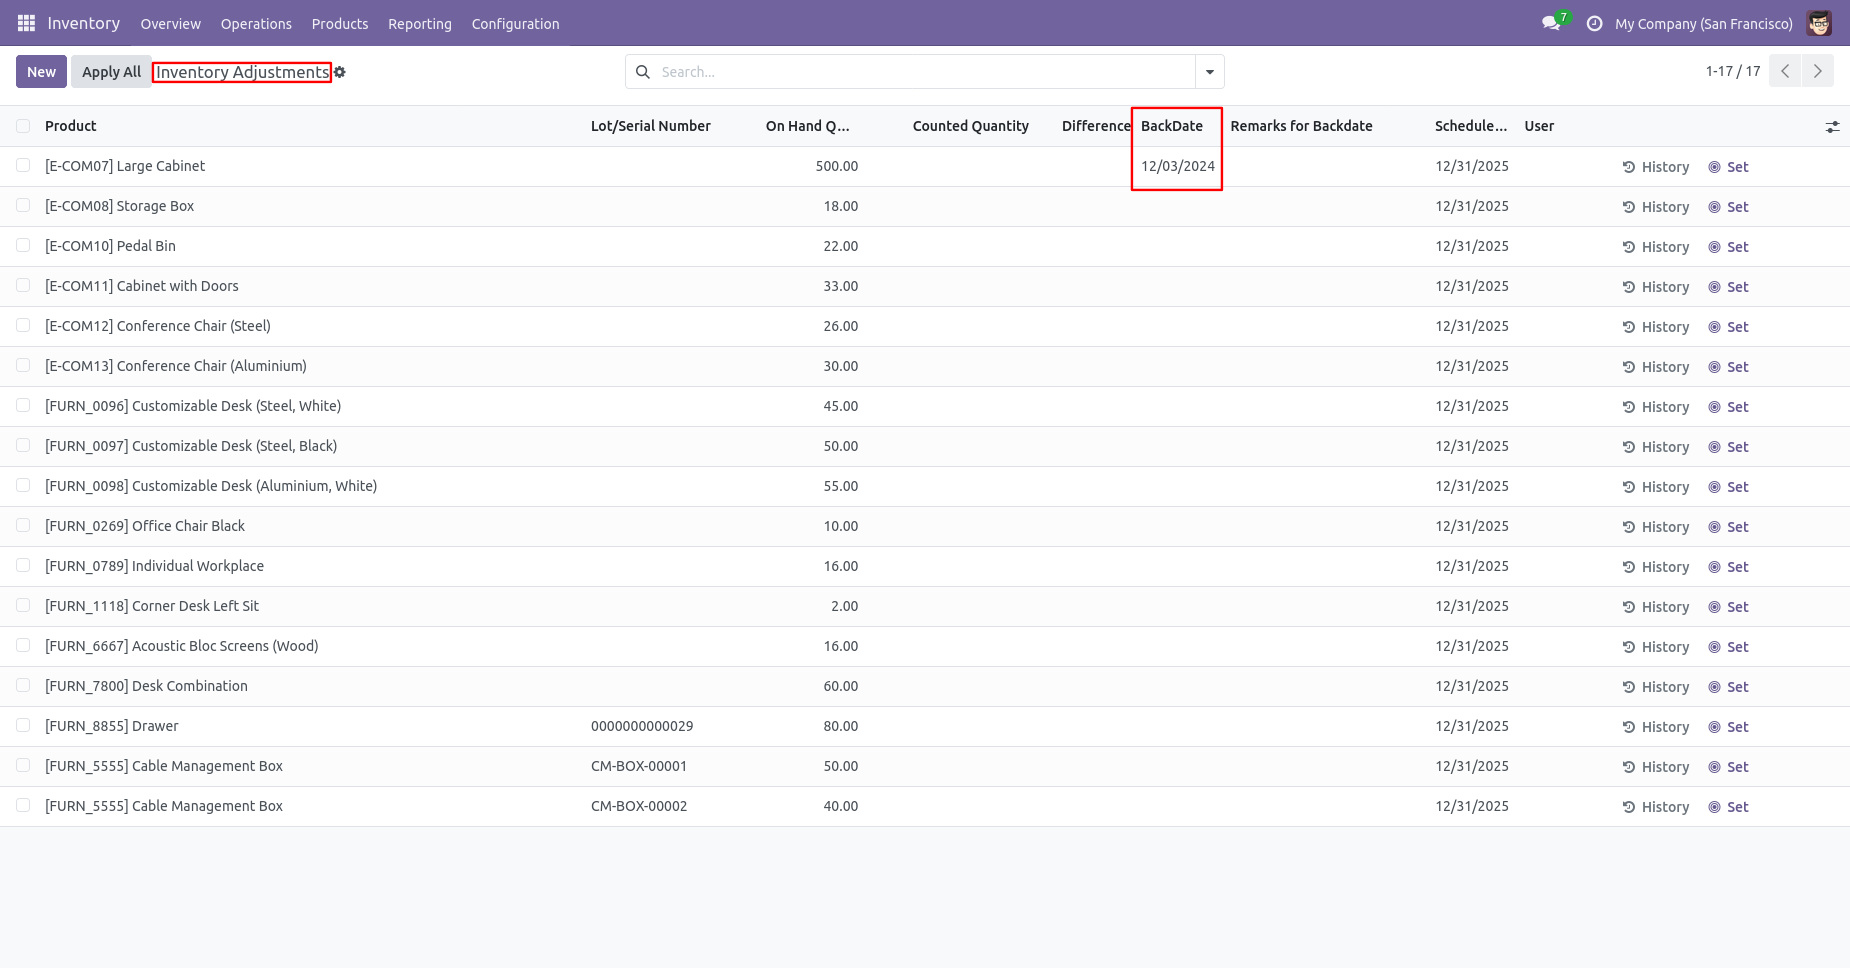
Select the product that you want to change backdate.
To adjust the inventory, you can select the counted
quantity, choose a backdate and then click on "Save and
Apply".
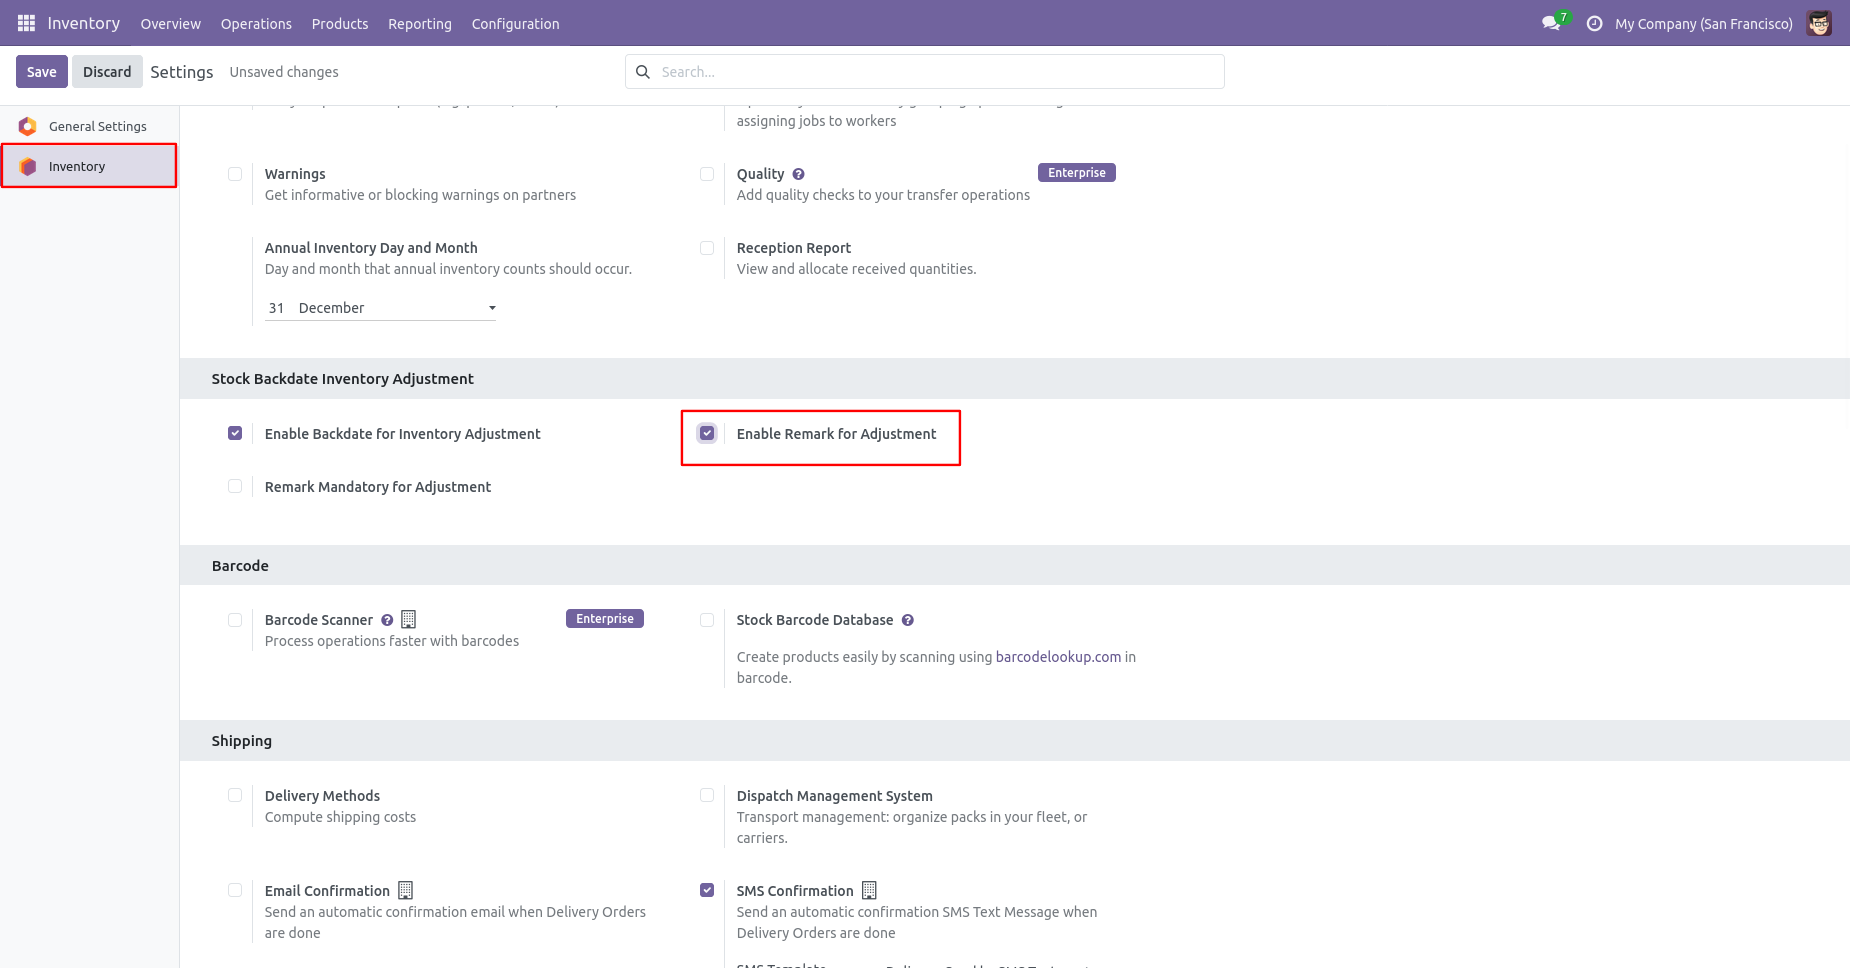
Enable the 'Enable Remark for Adjustment'.
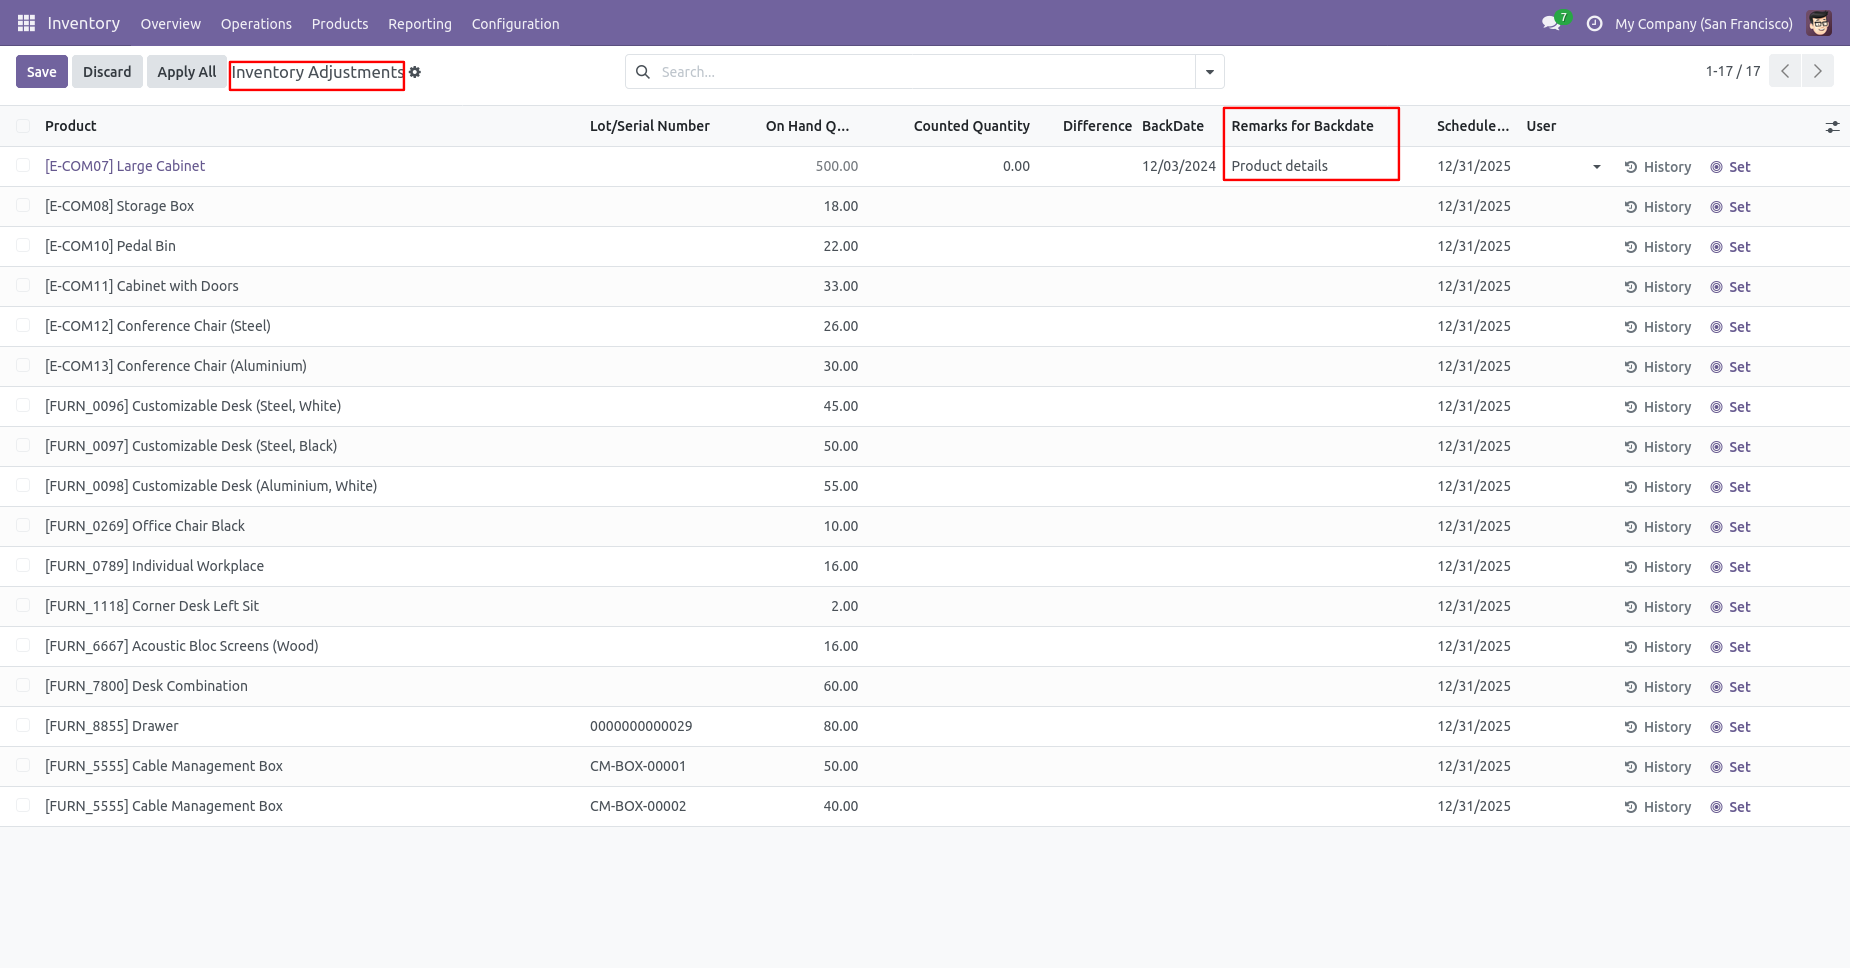
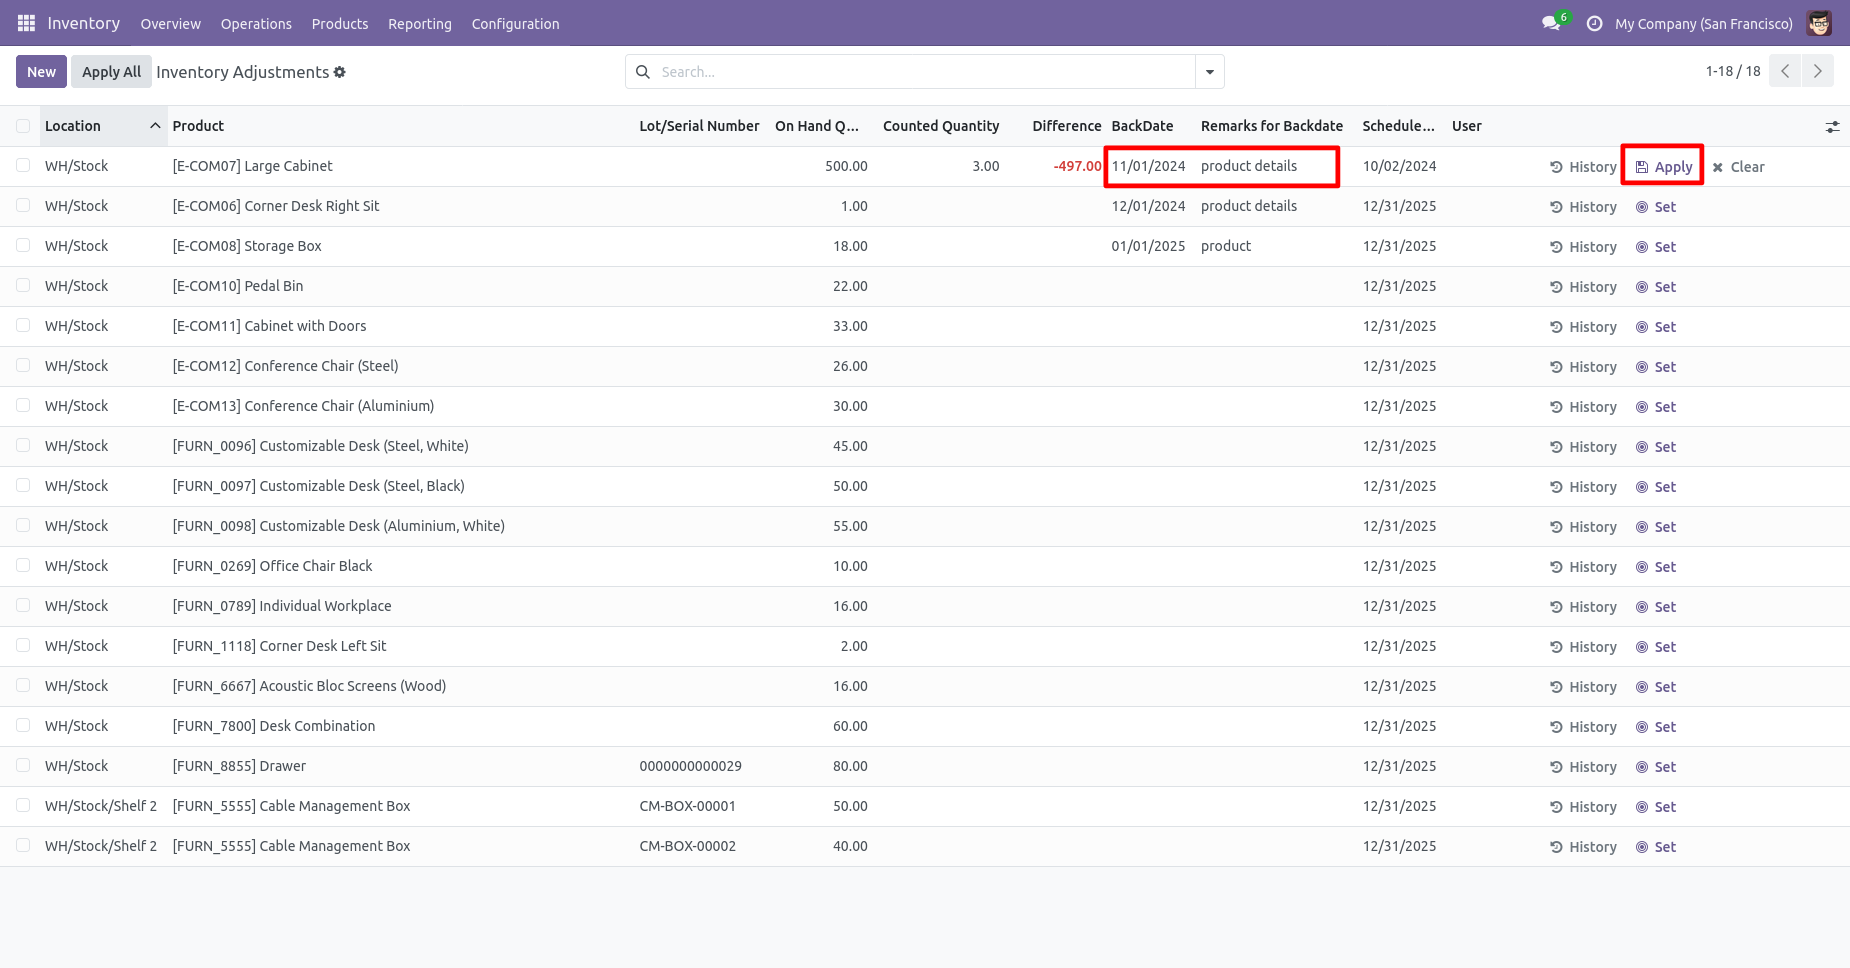
Inventory adjustments with remarks.
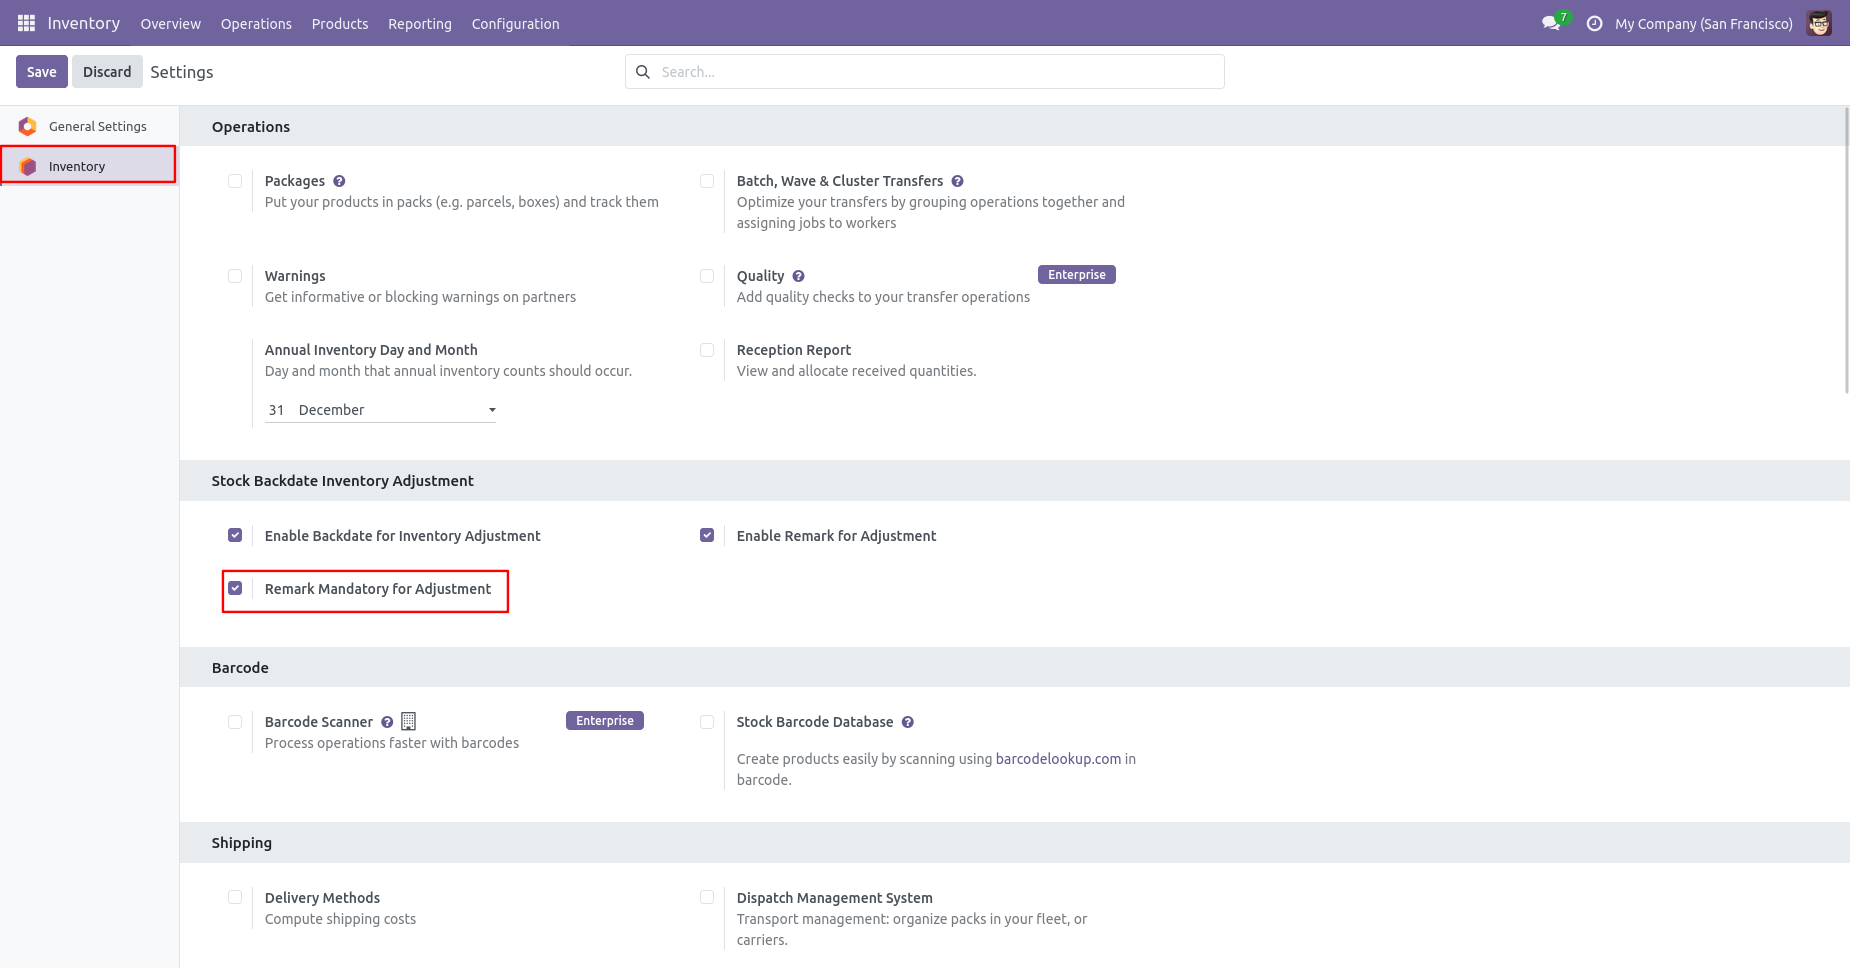
Enable the 'Remark Mandatory for Adjustment'.
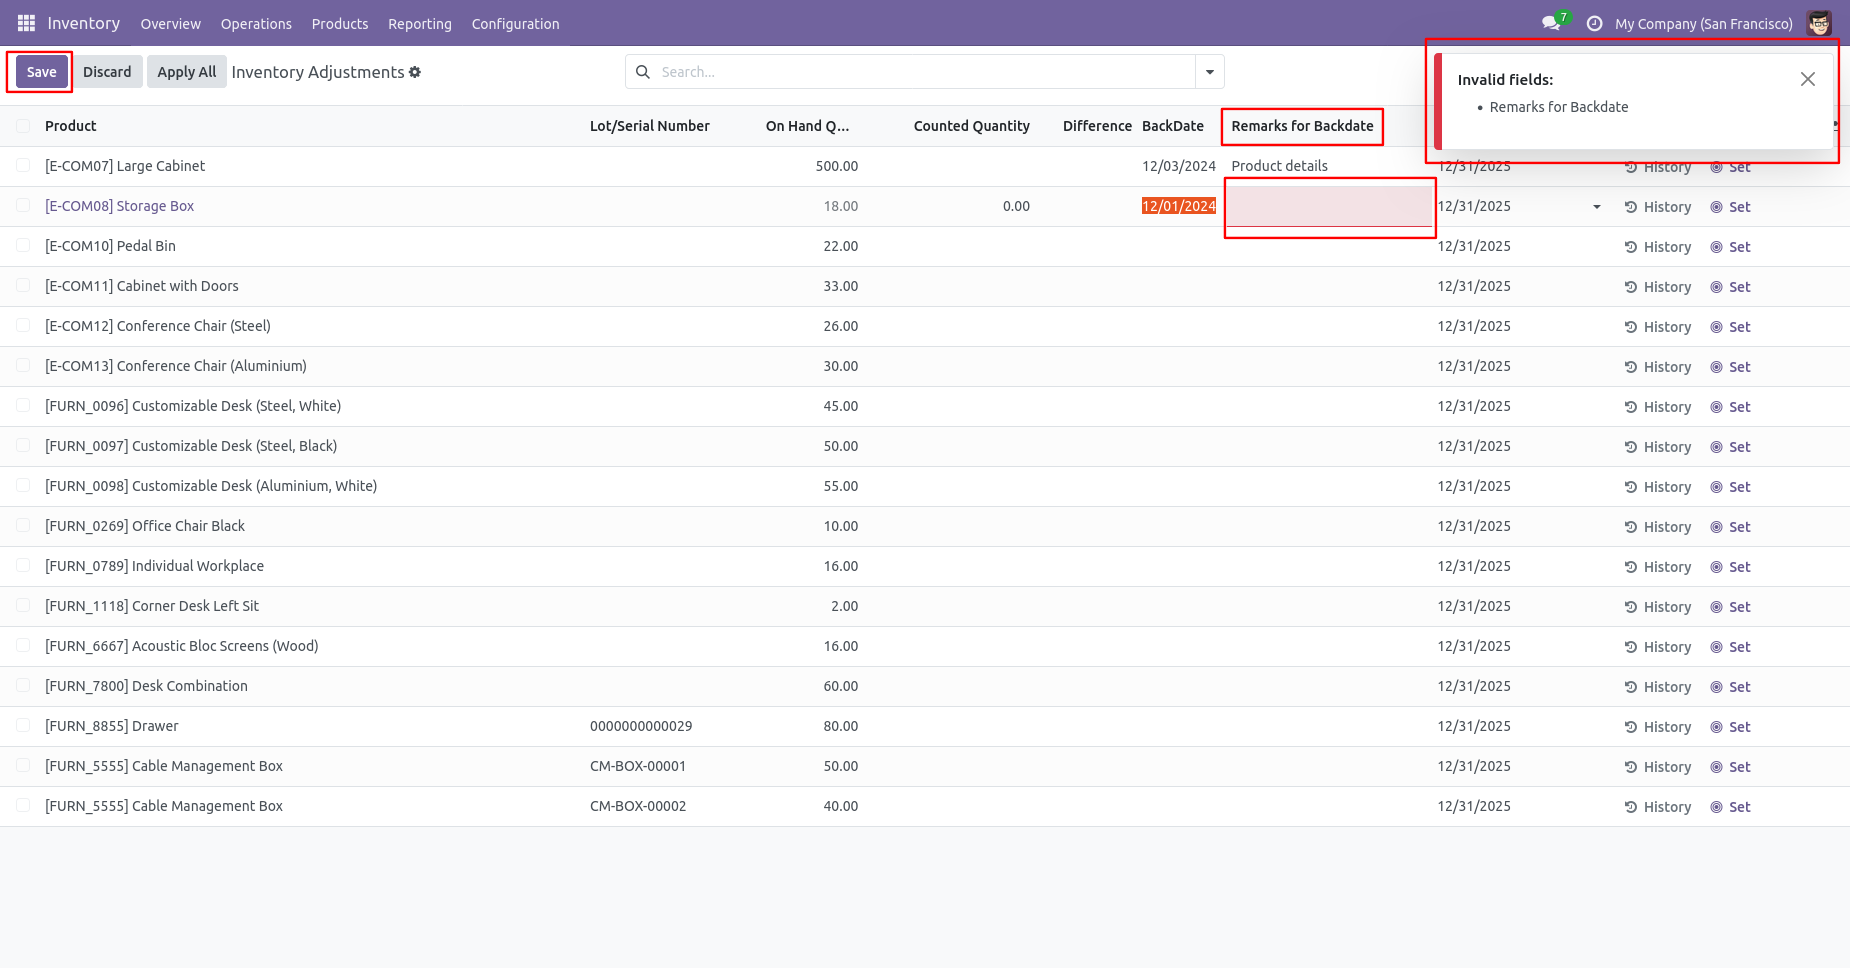
If you do not add remarks, it will give an error message.
Add remarks and then click on "Save and Apply".
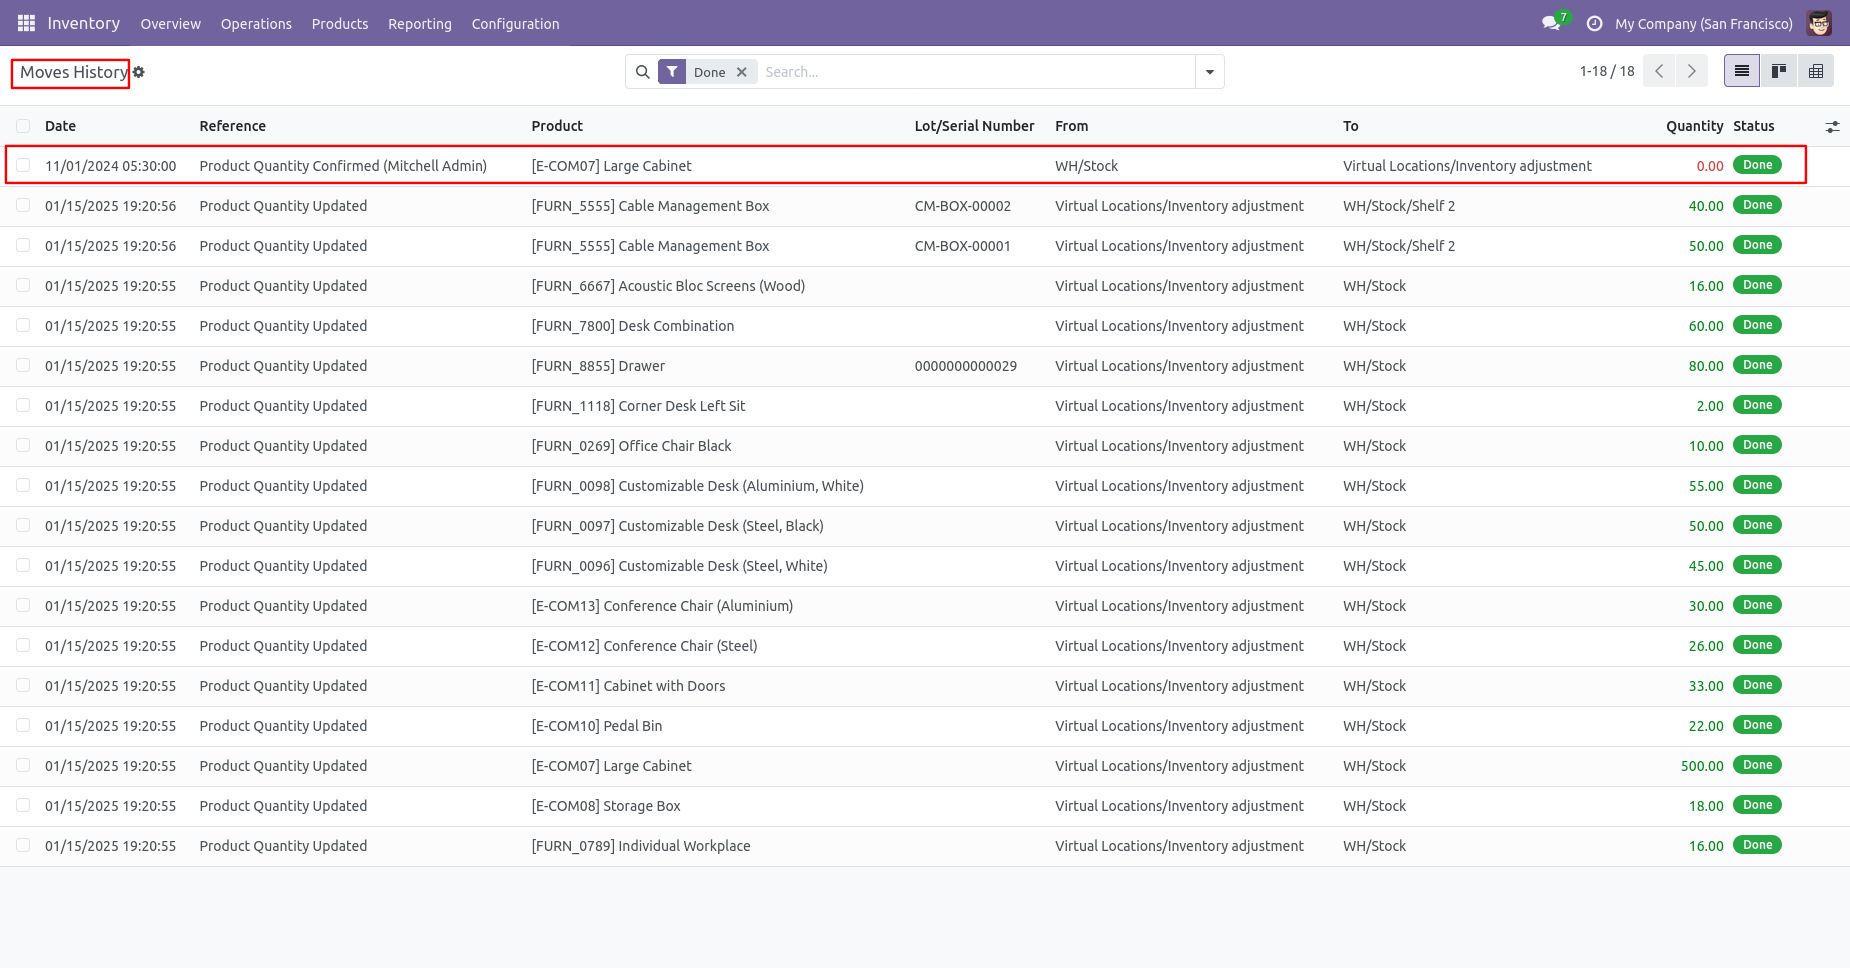
Product moves history with backdate and remarks.
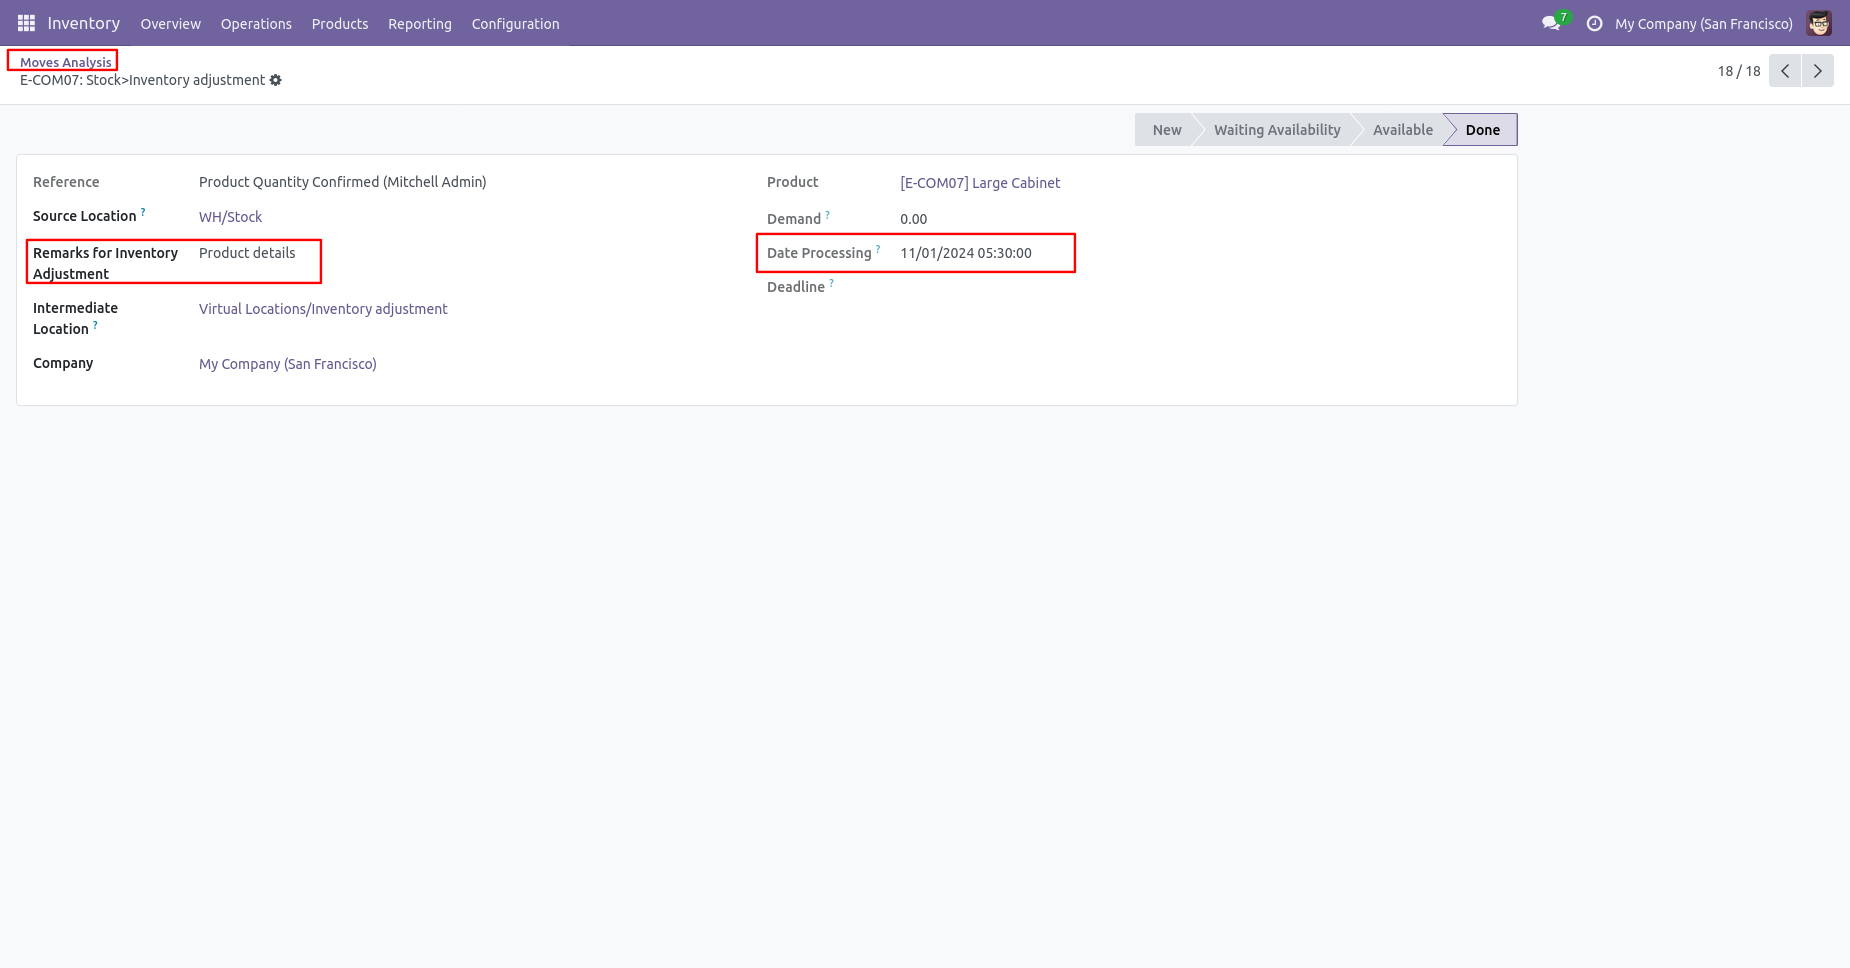
Inventory adjustment form view with backdate and remarks.
Enter the desired backdate in the Backdate column, then click the Apply button to update the selected record with the specified product inventory adjustment backdate.
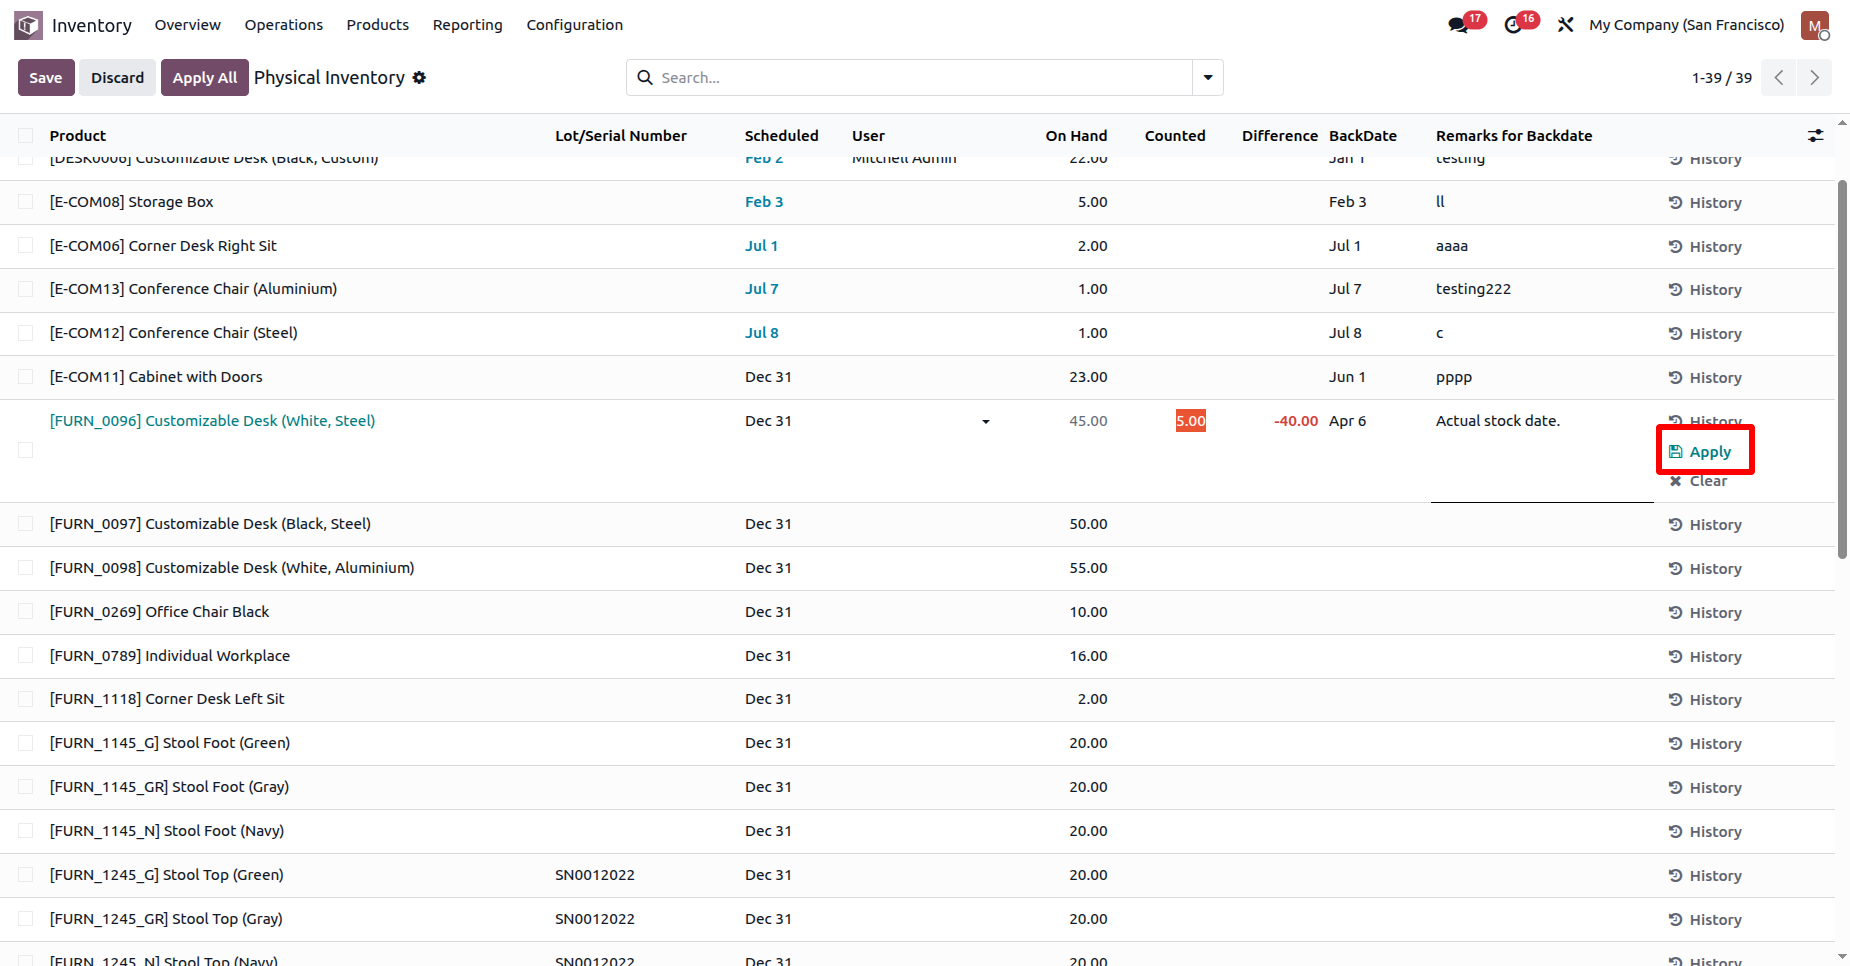
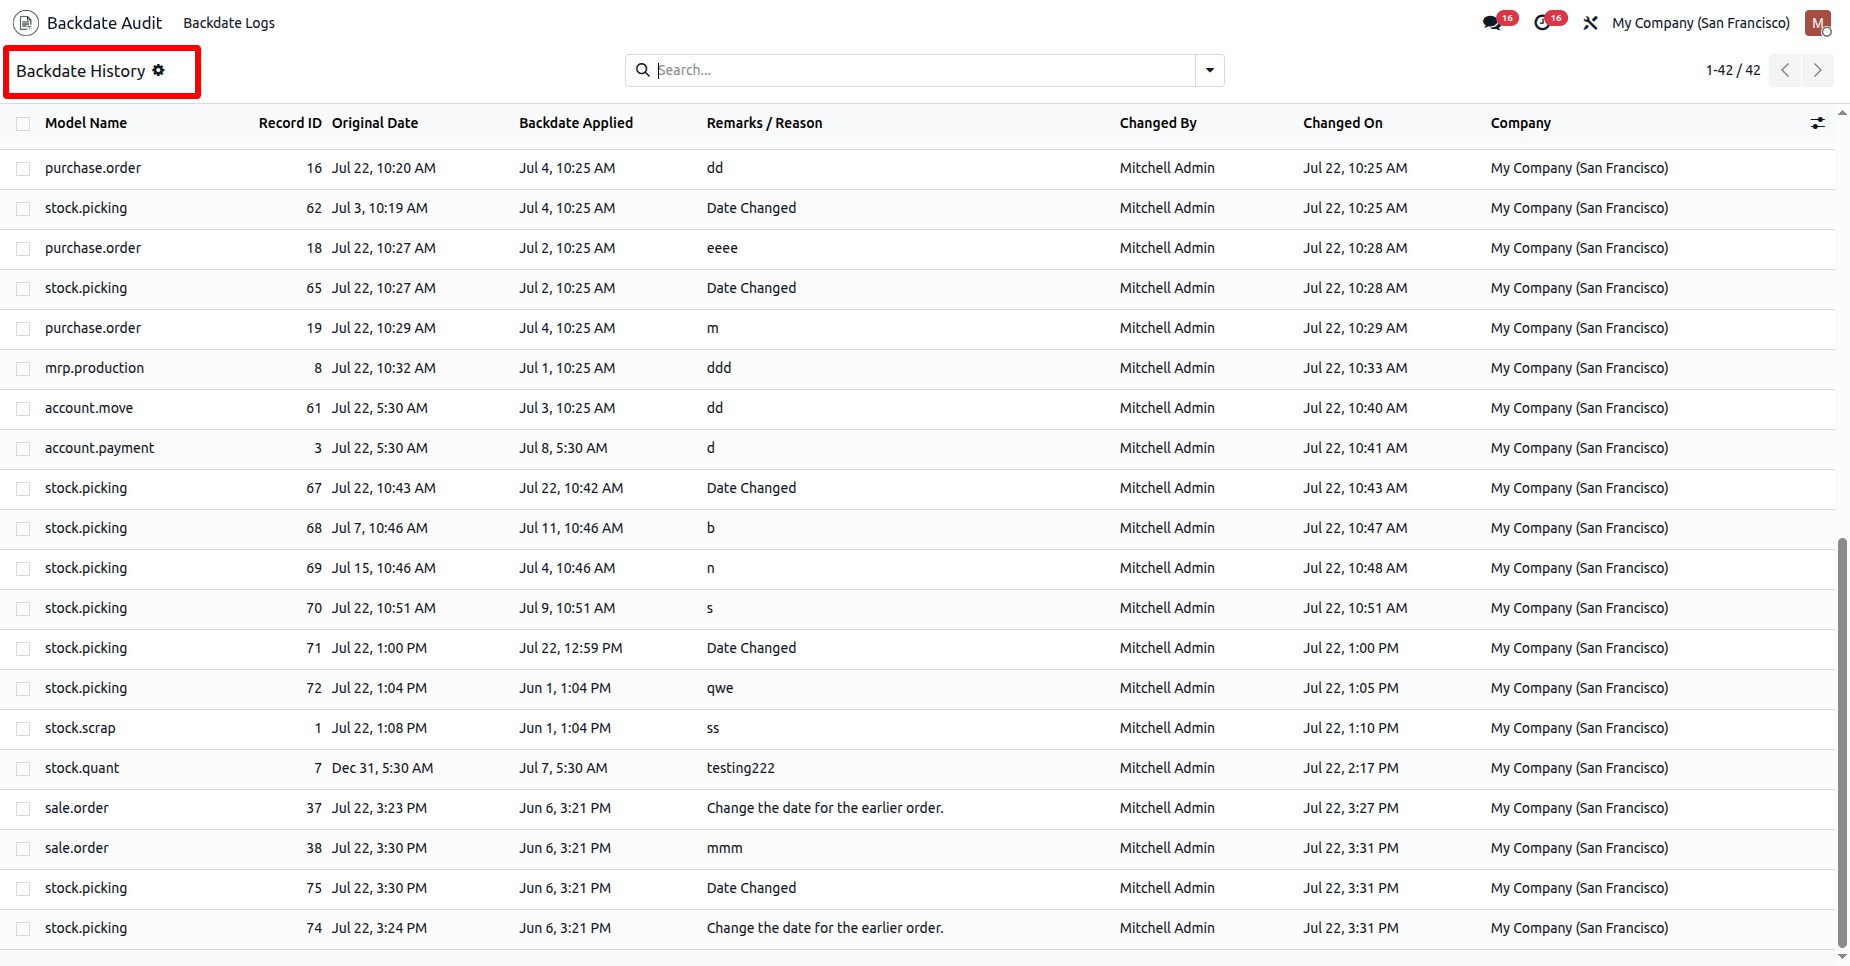
The backdate is successfully applied to the selected product in the Inventory Adjustment. Users can view the corresponding audit entry under the Backdate History menu.
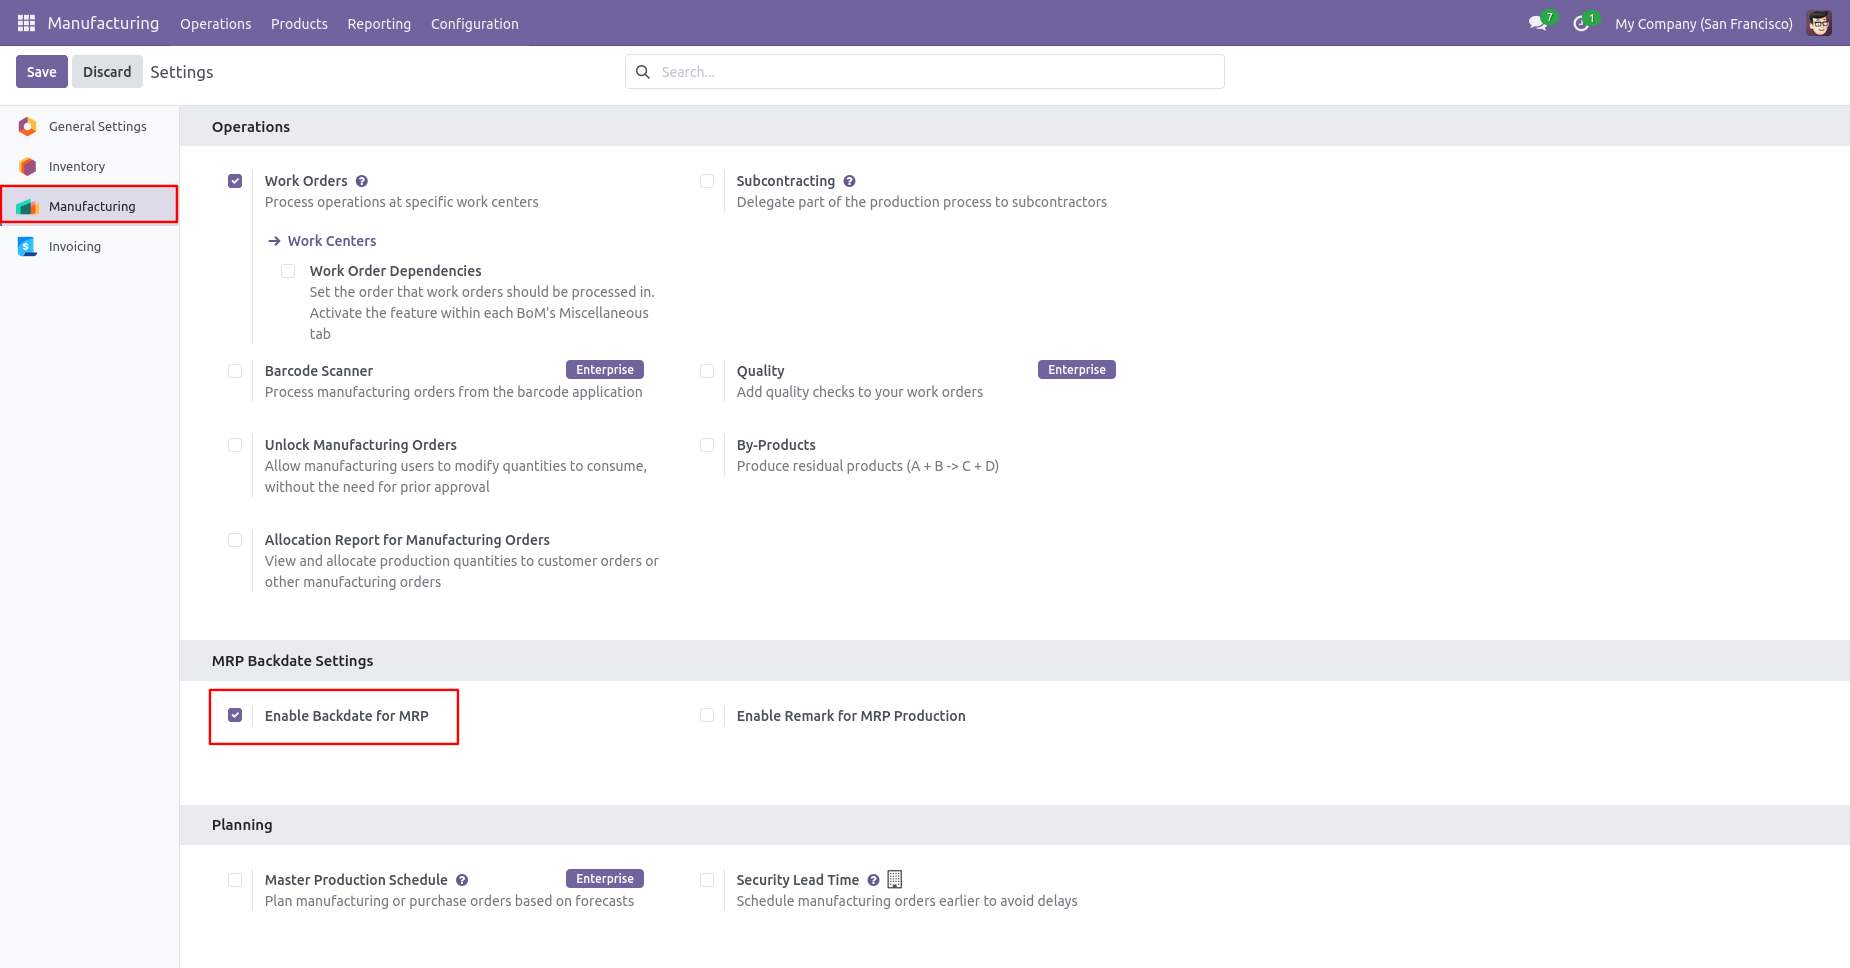
Configuration for MRP backdate, enable 'Enable Backdate For MRP'.
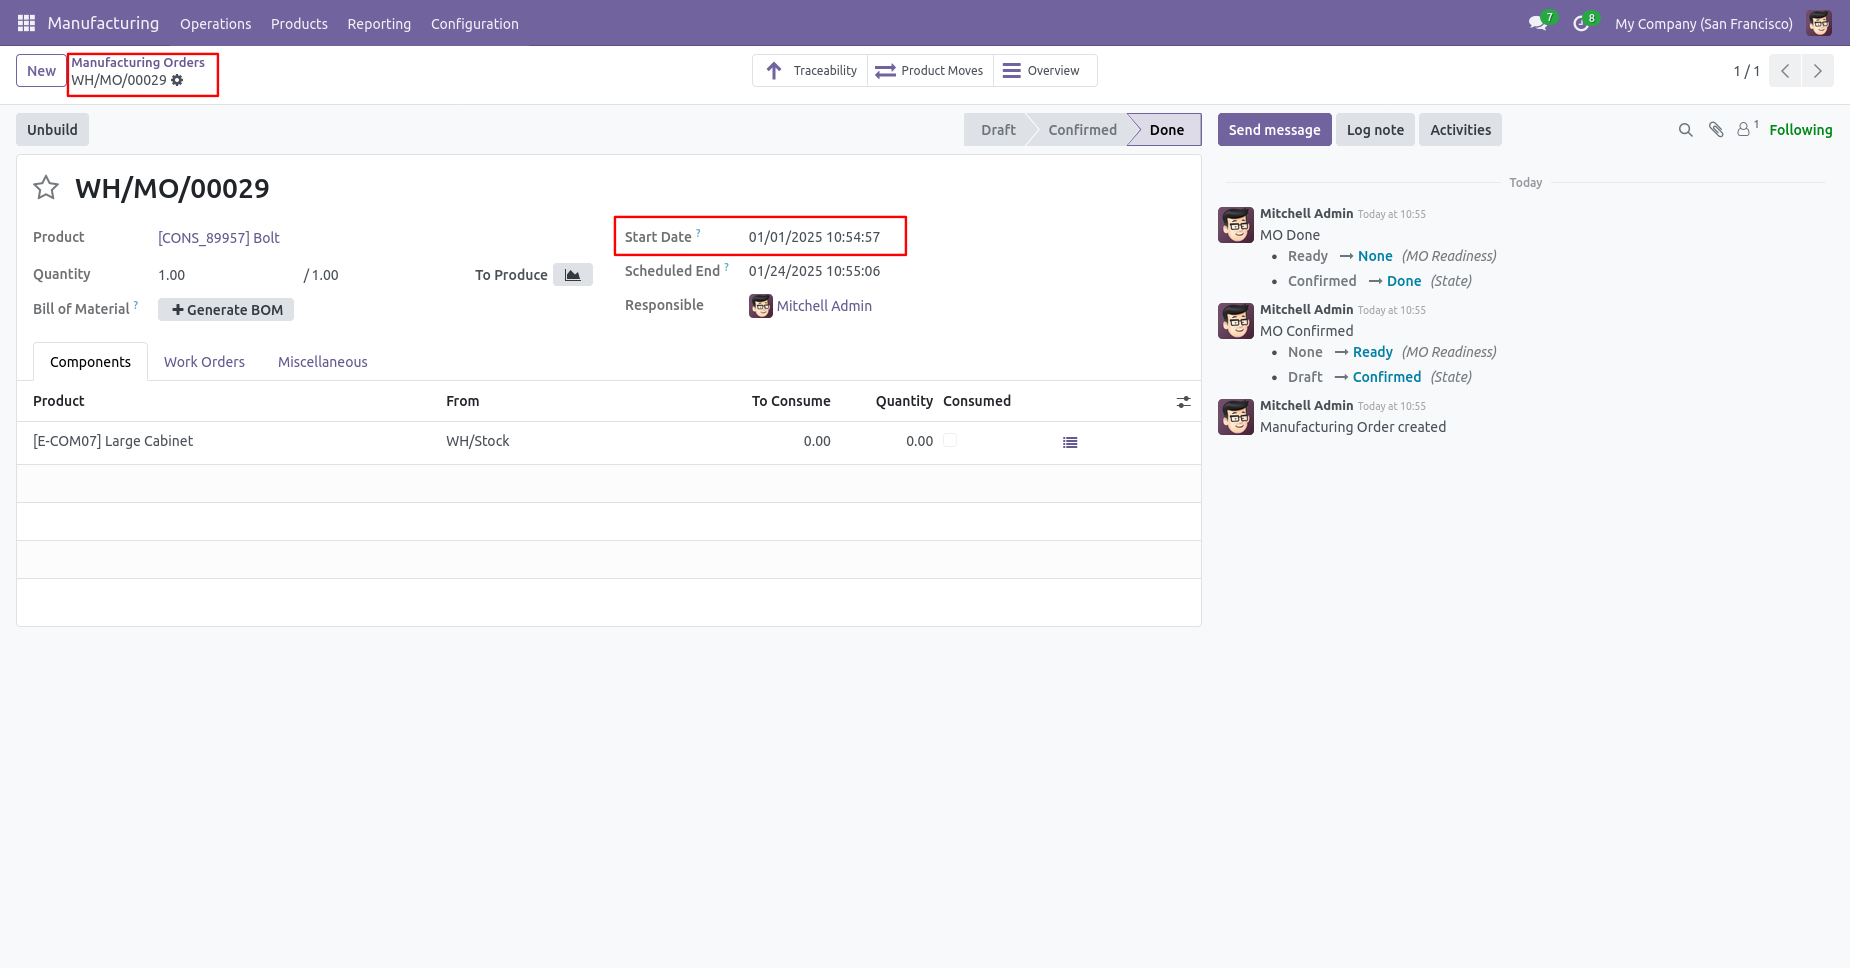
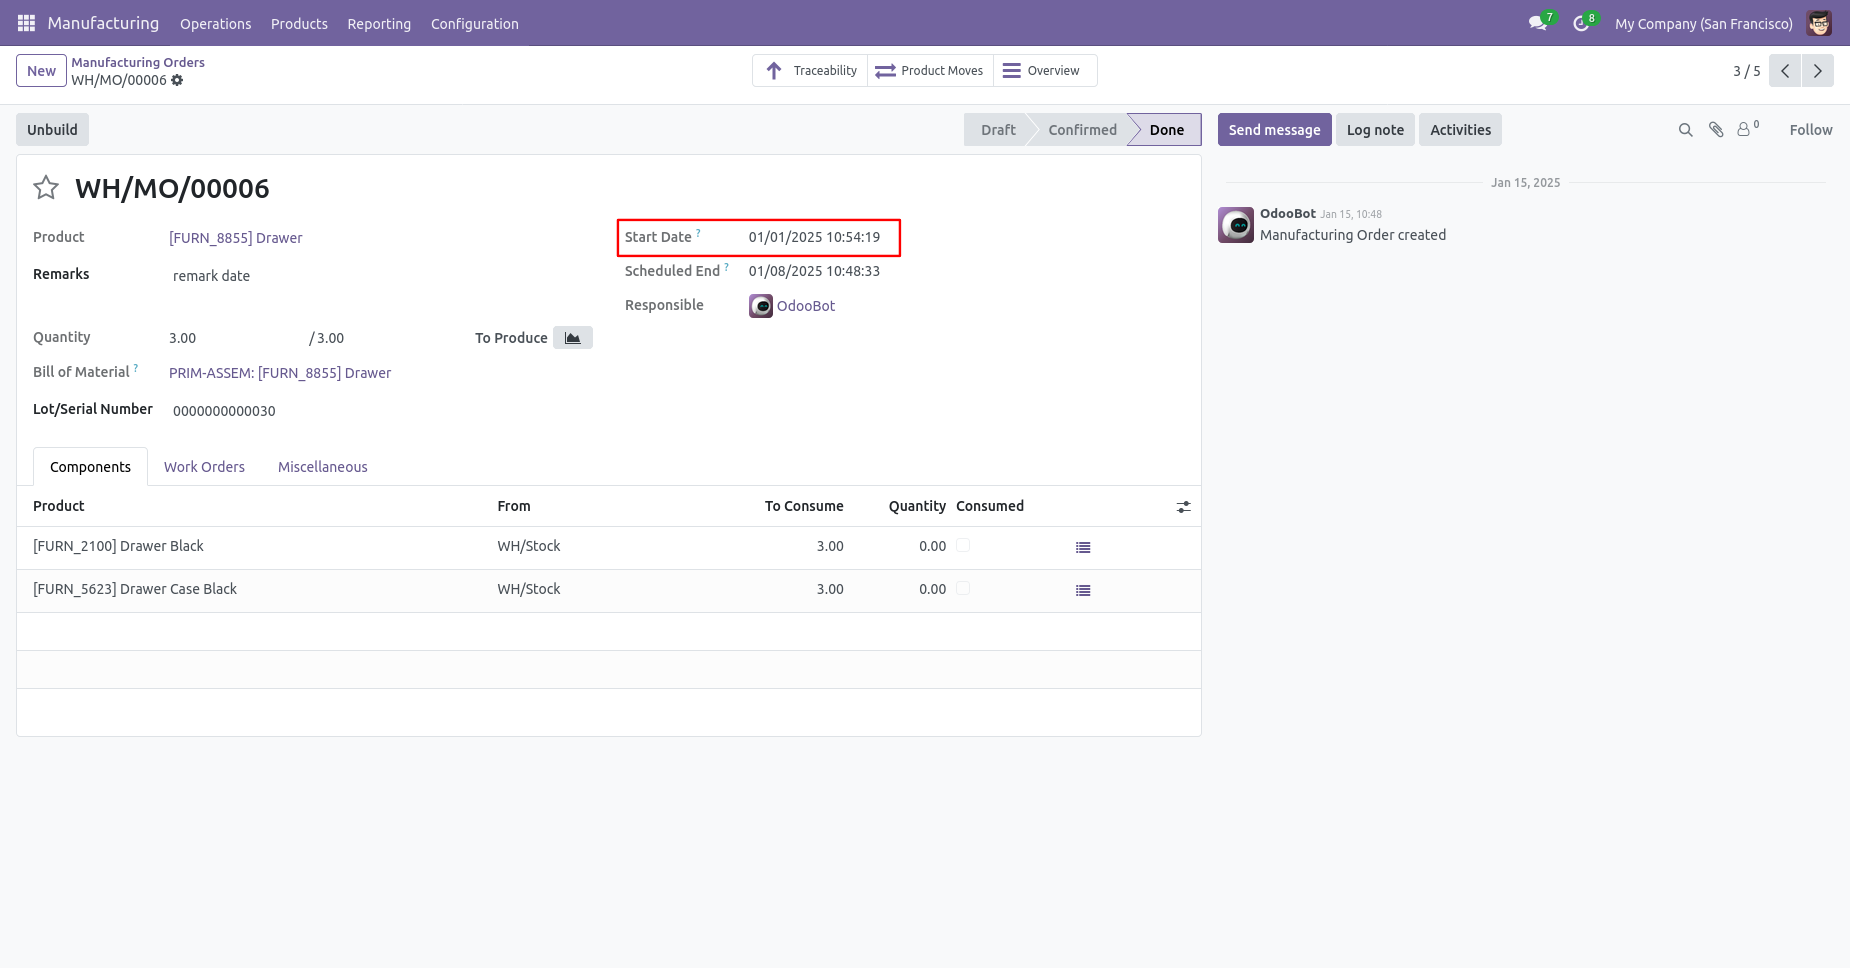
MRP order form view with backdate.
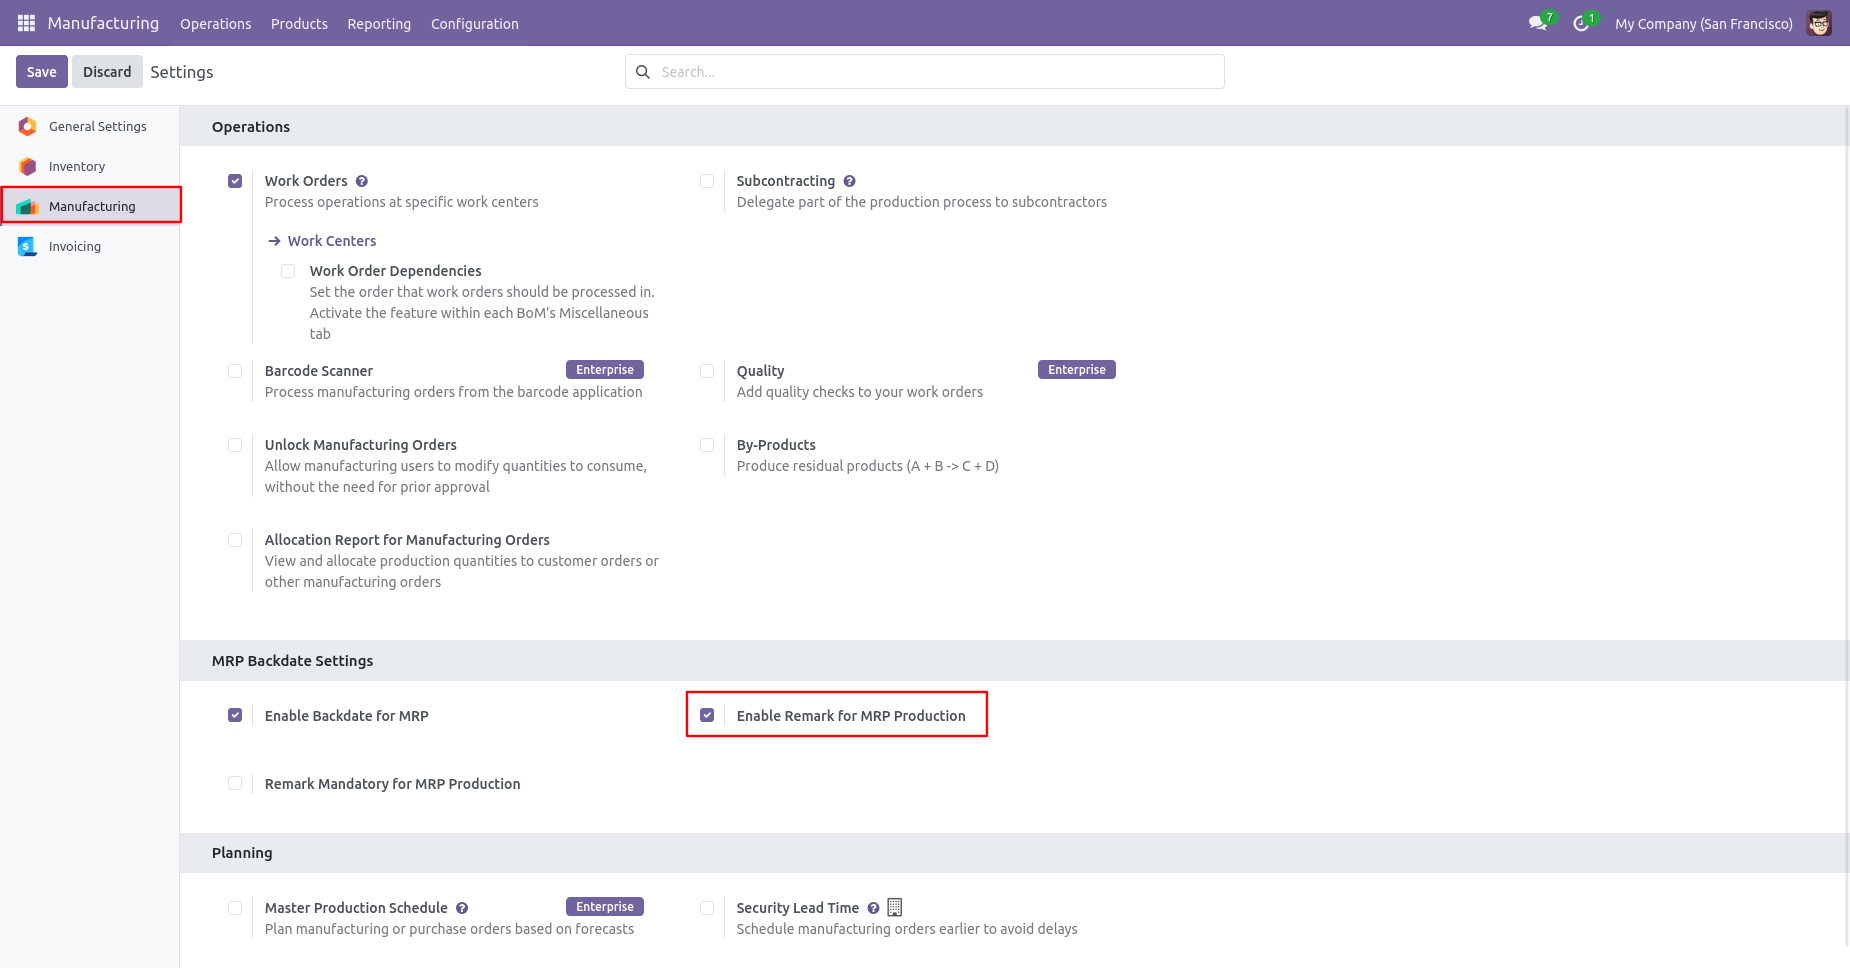
Go to the Manufacturing setting and Enable 'Enable Remark For MRP Production'.
MRP order form view with backdate and remarks.
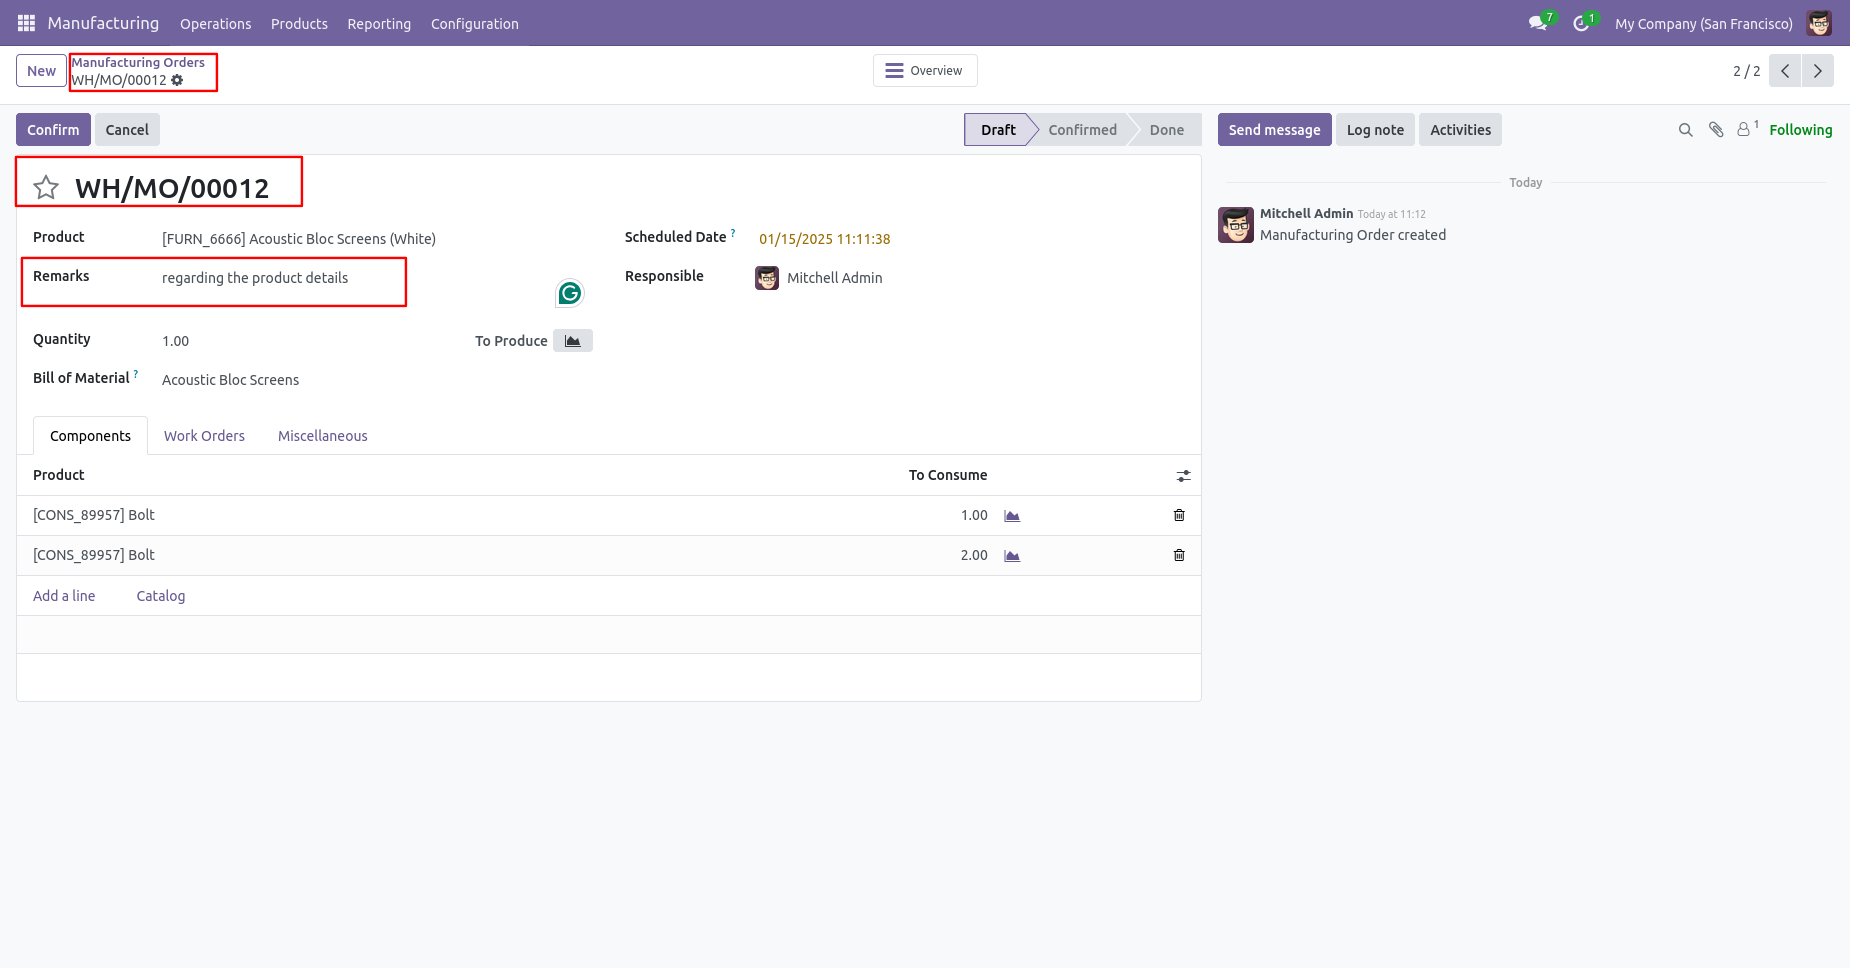
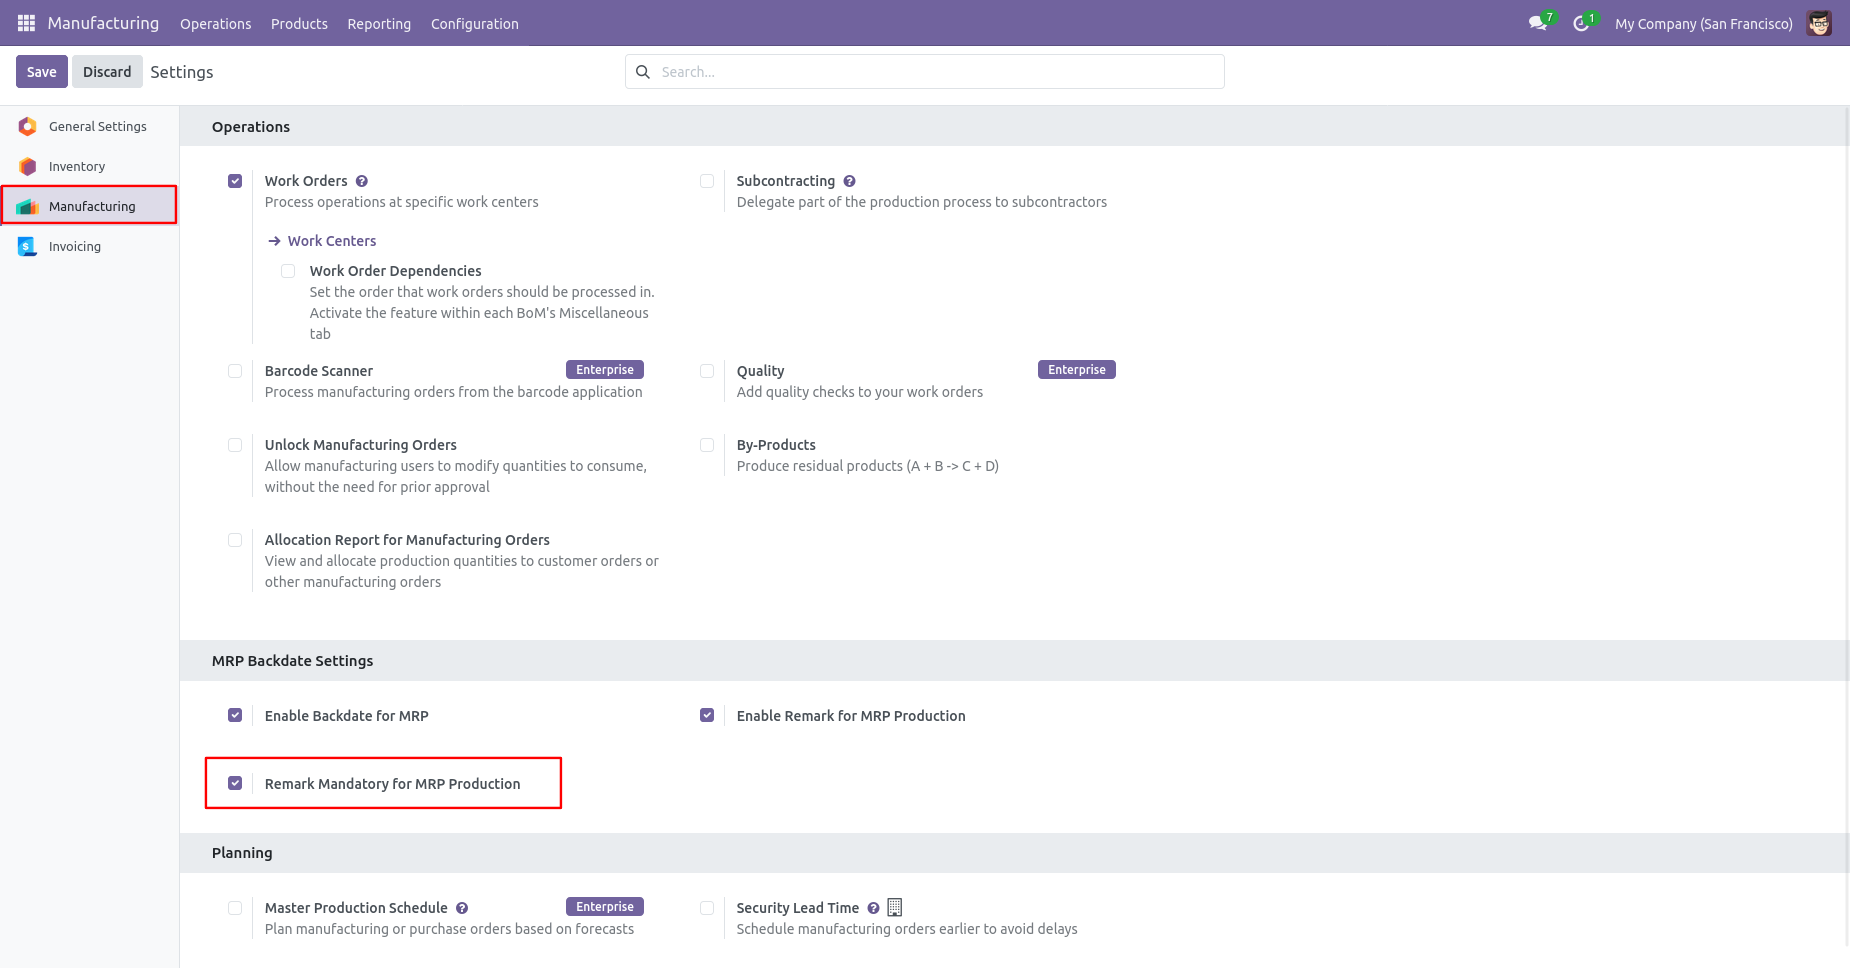
Go to the Manufacturing setting and Enable 'Remark Mandatory For MRP Production'.
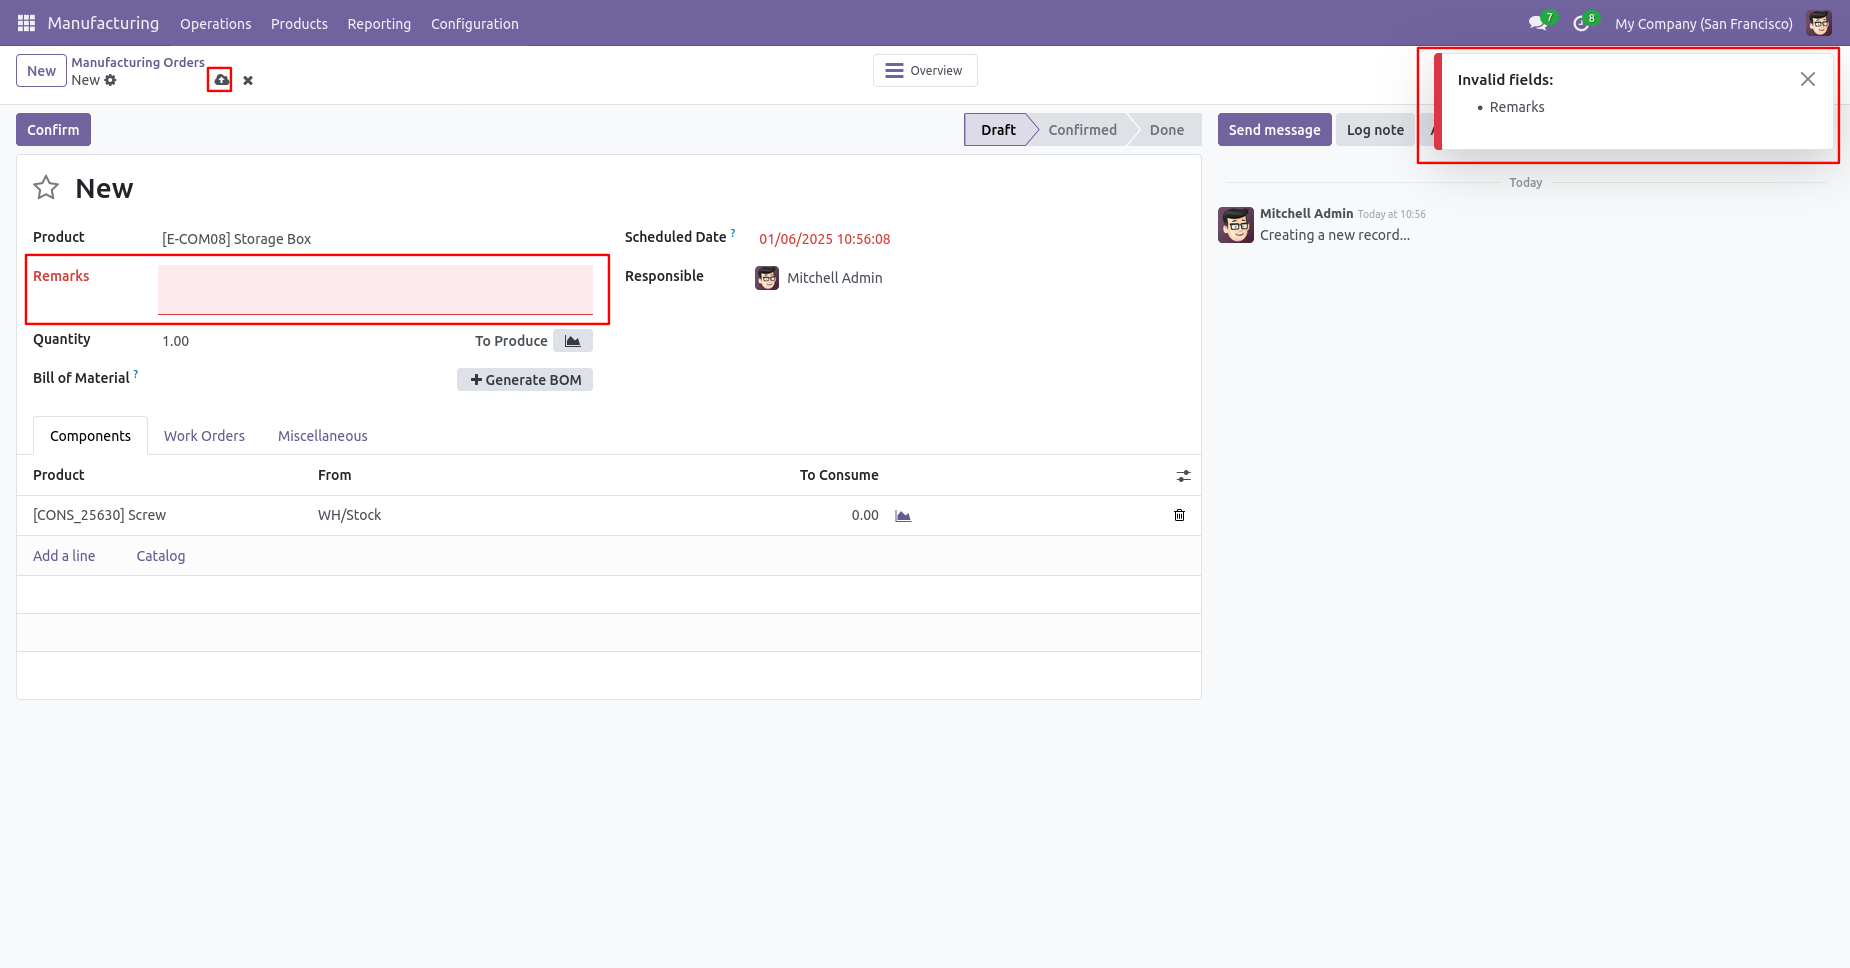
You can't save the MRP order without entering a remark.
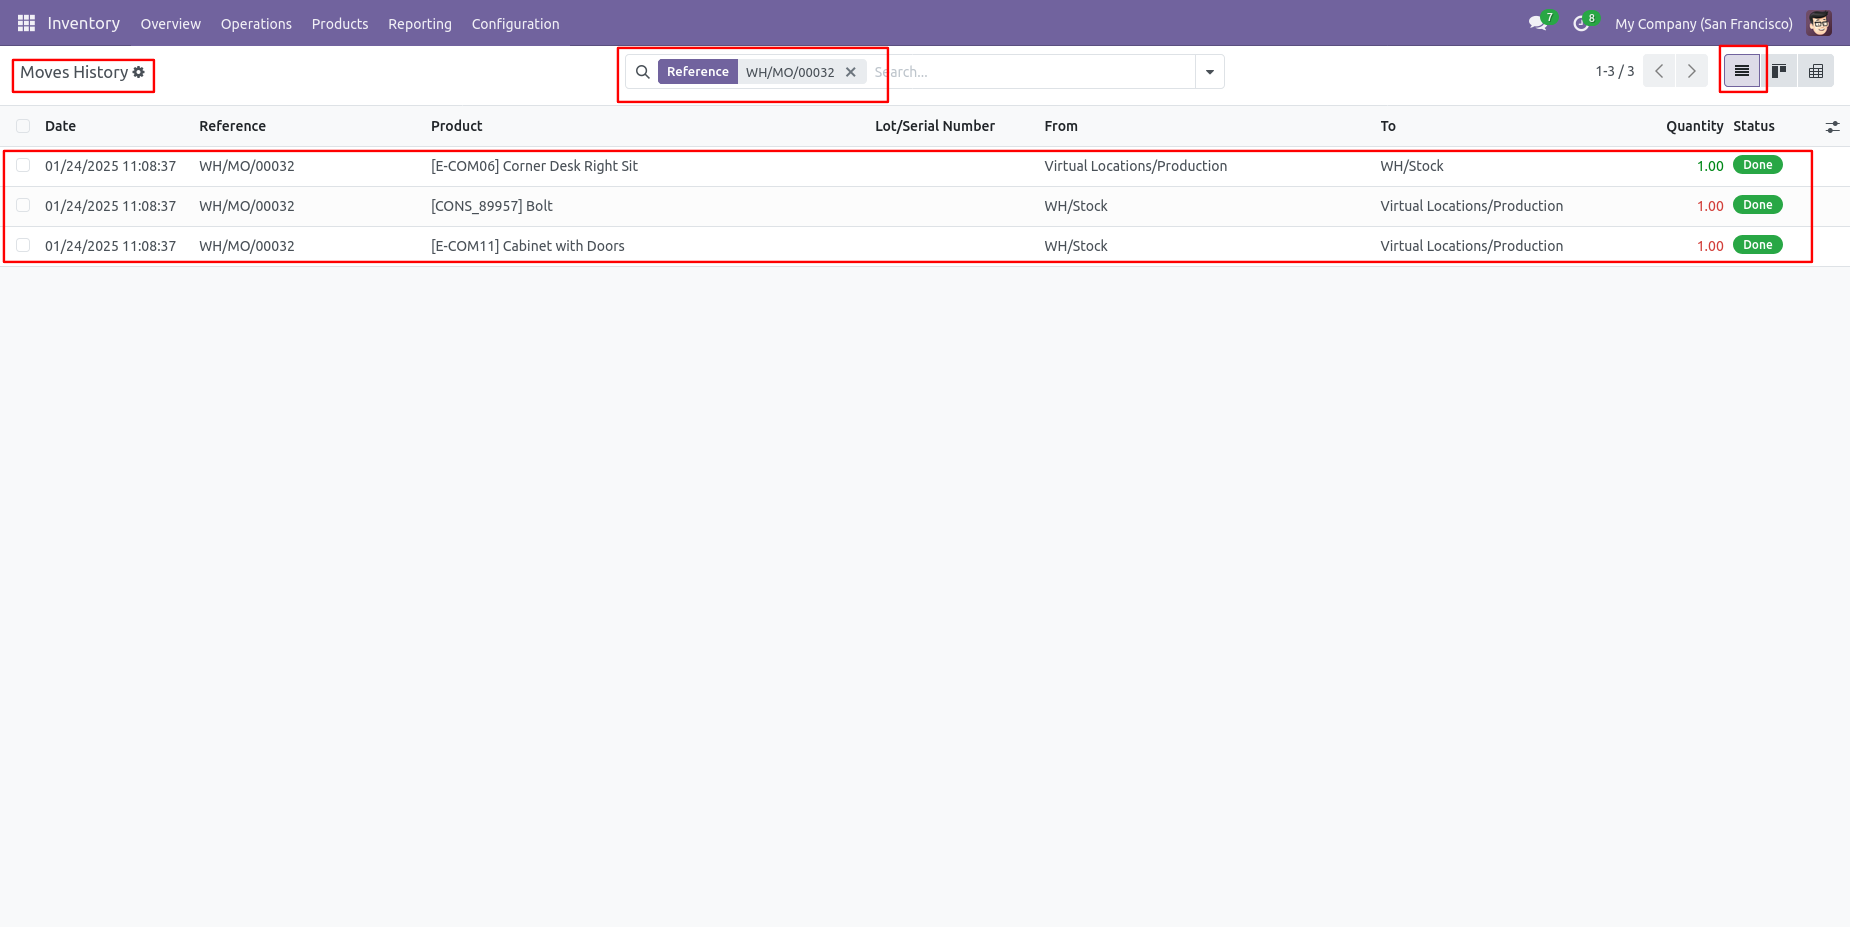
Tree view of moves history.
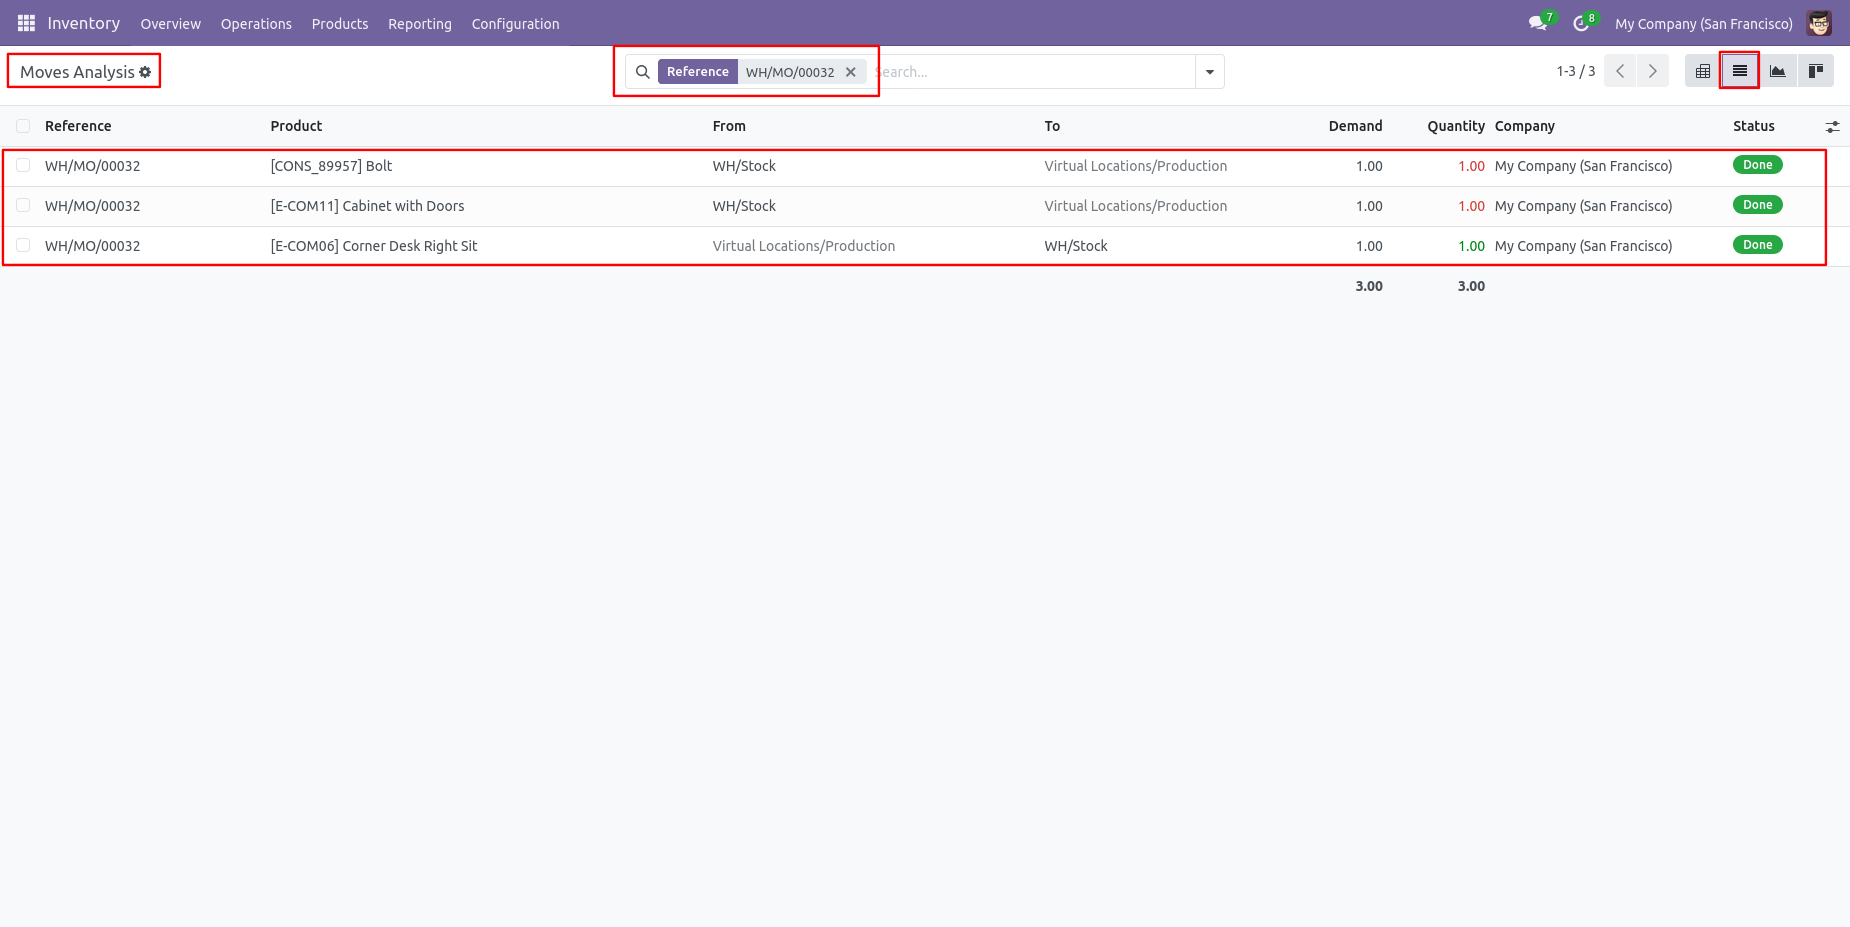
Tree view of moves analysis.
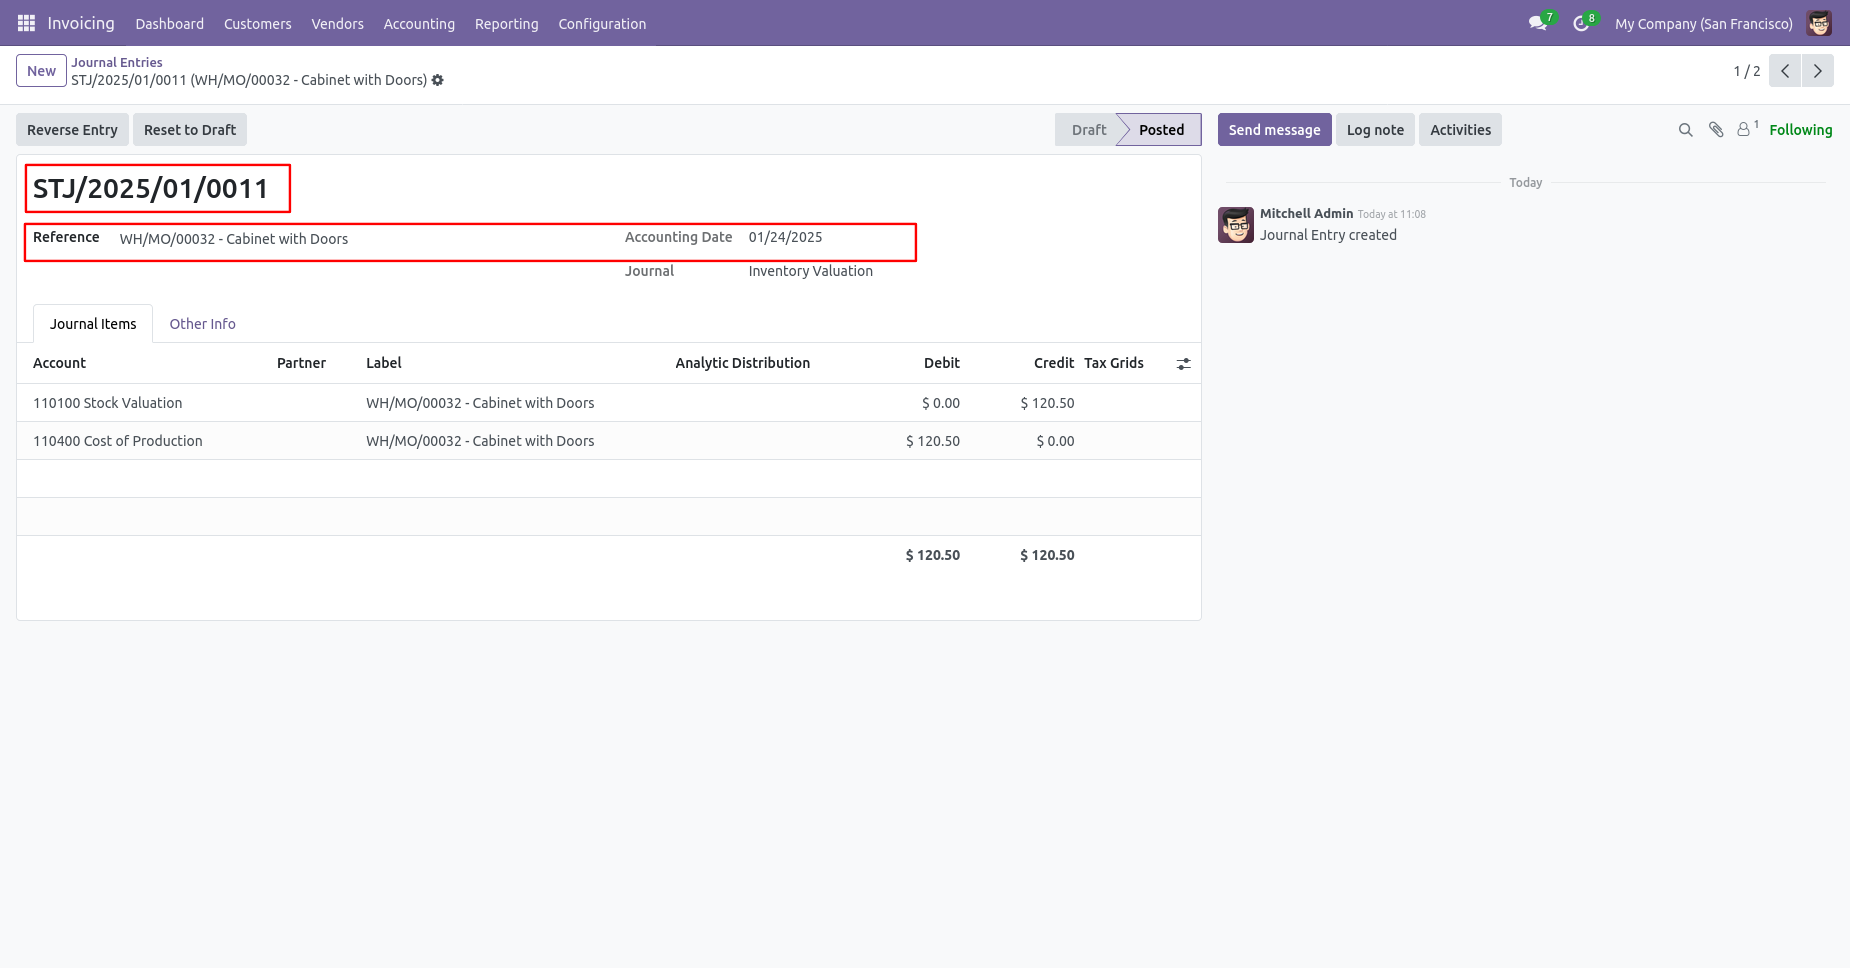
Journal entries with backdate and remarks.
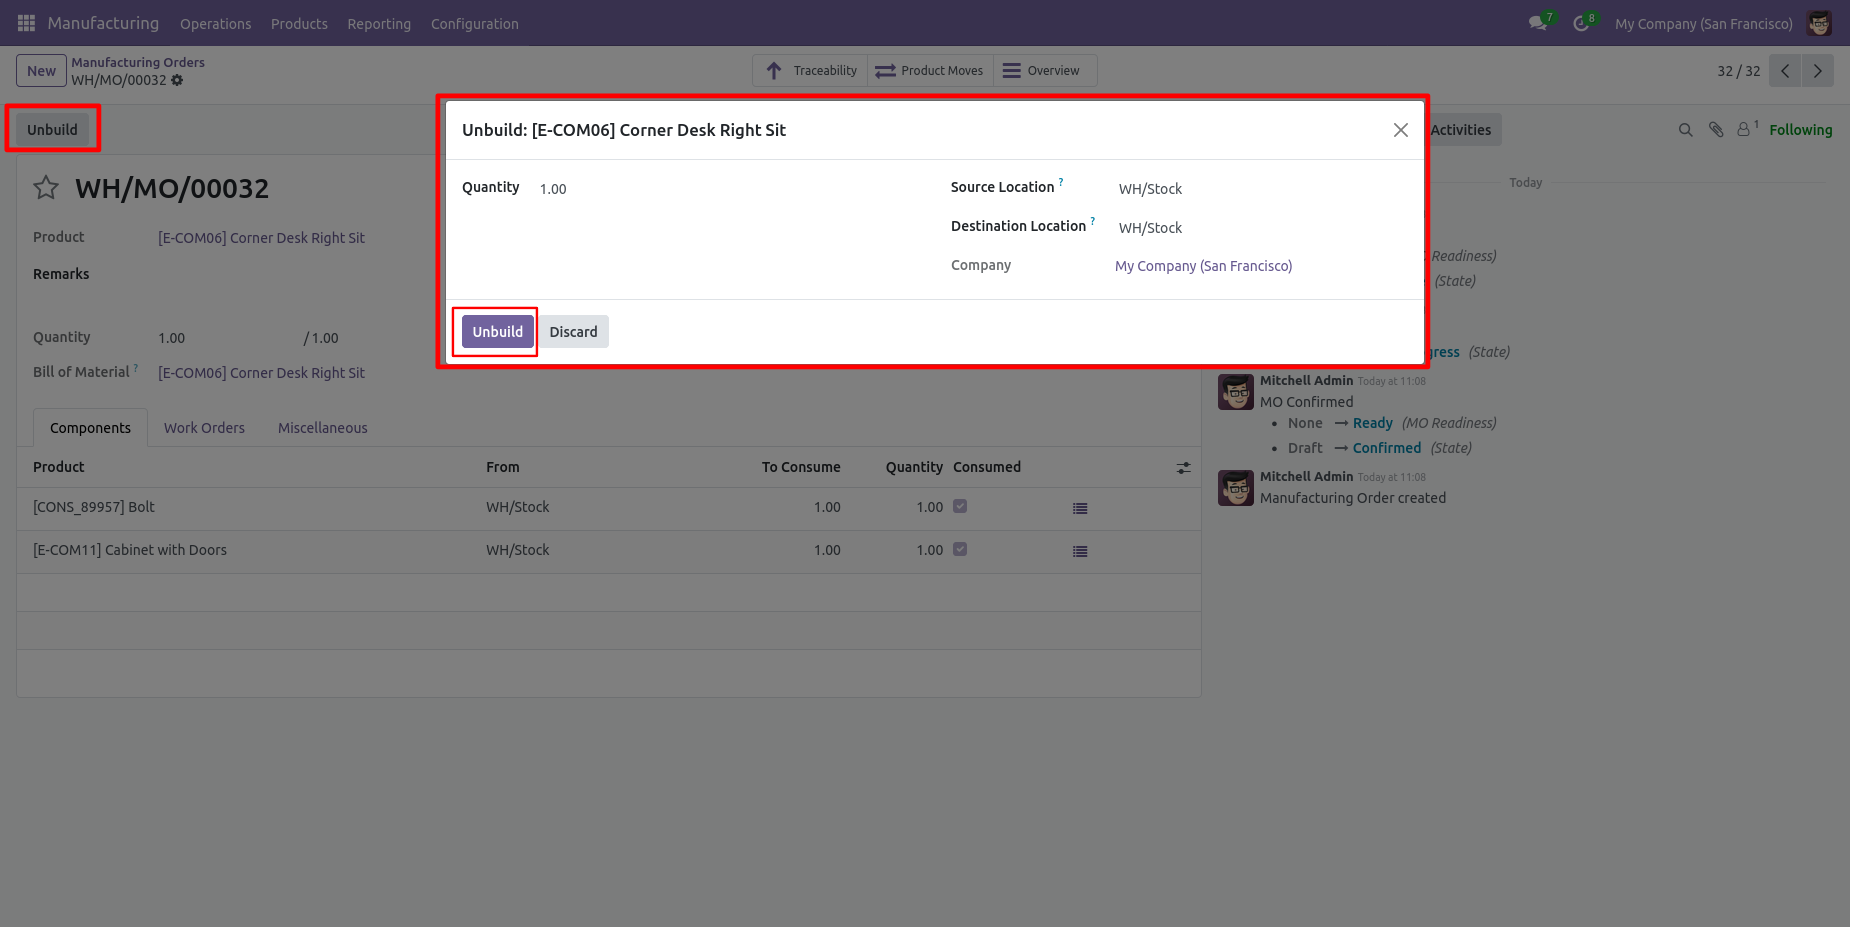
To unbuild the MO, click on the 'Unbuild' button.
After that, 'Unbuild' wizard will appear, fill details and
click on the 'Unbuild' button.
Form view of the unbuild order.
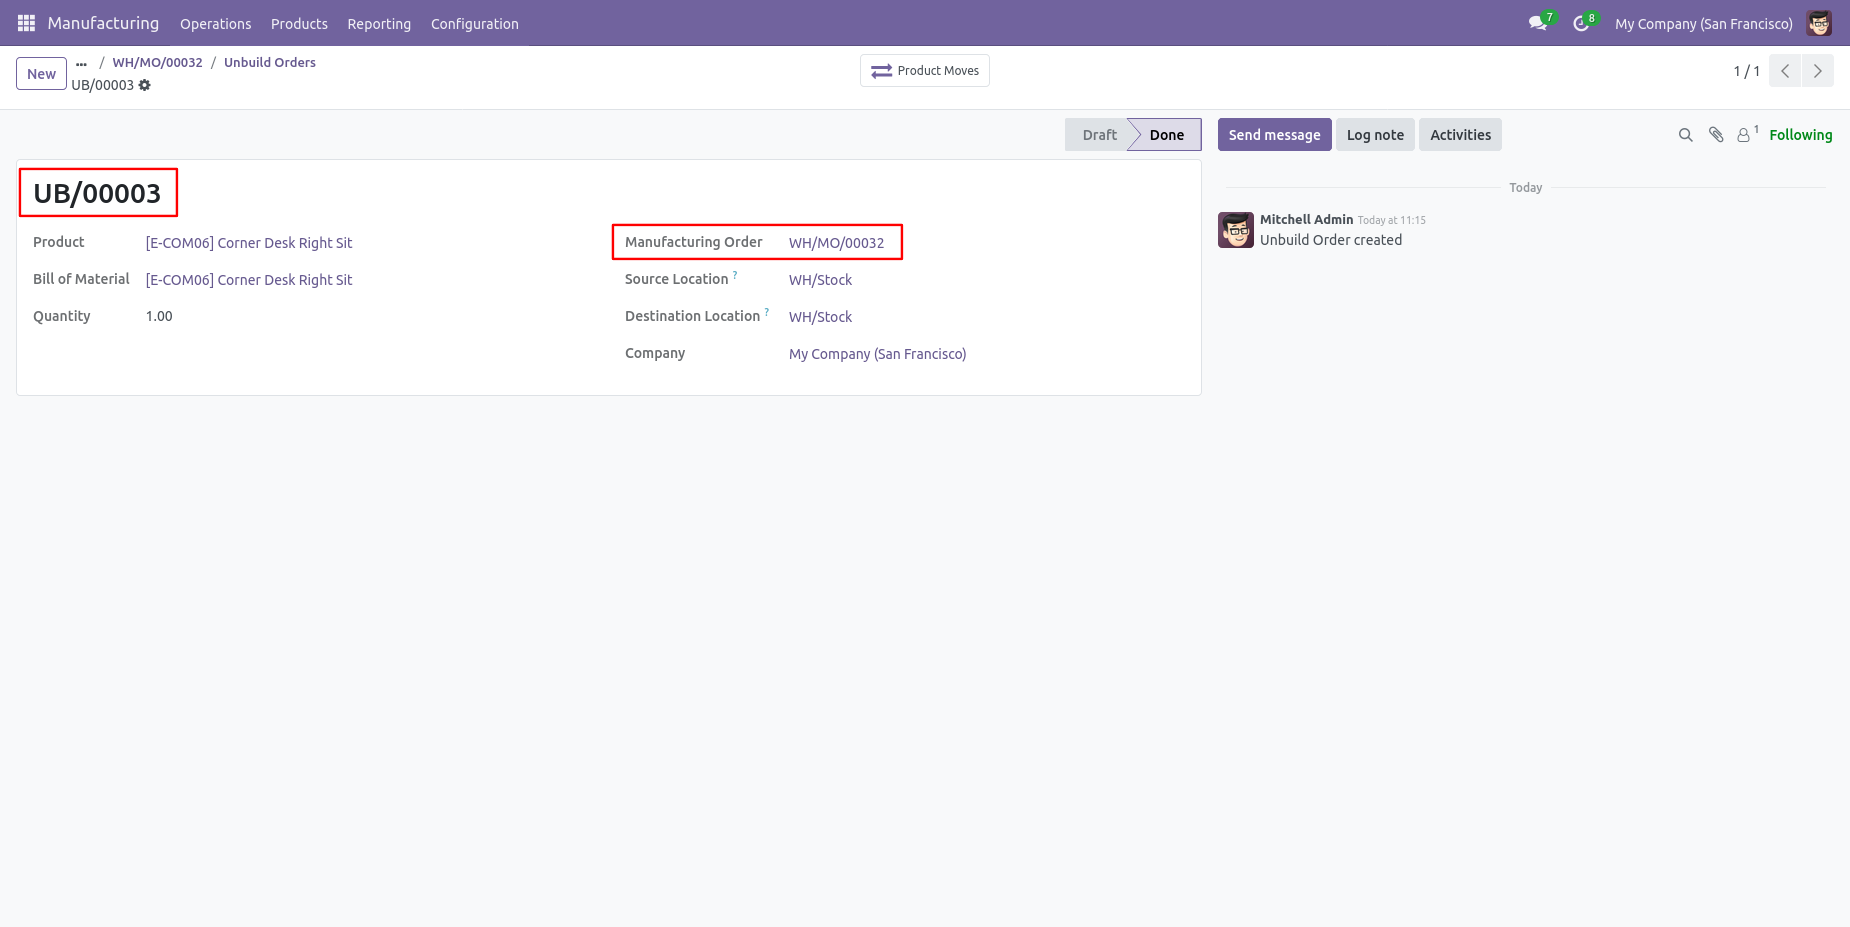
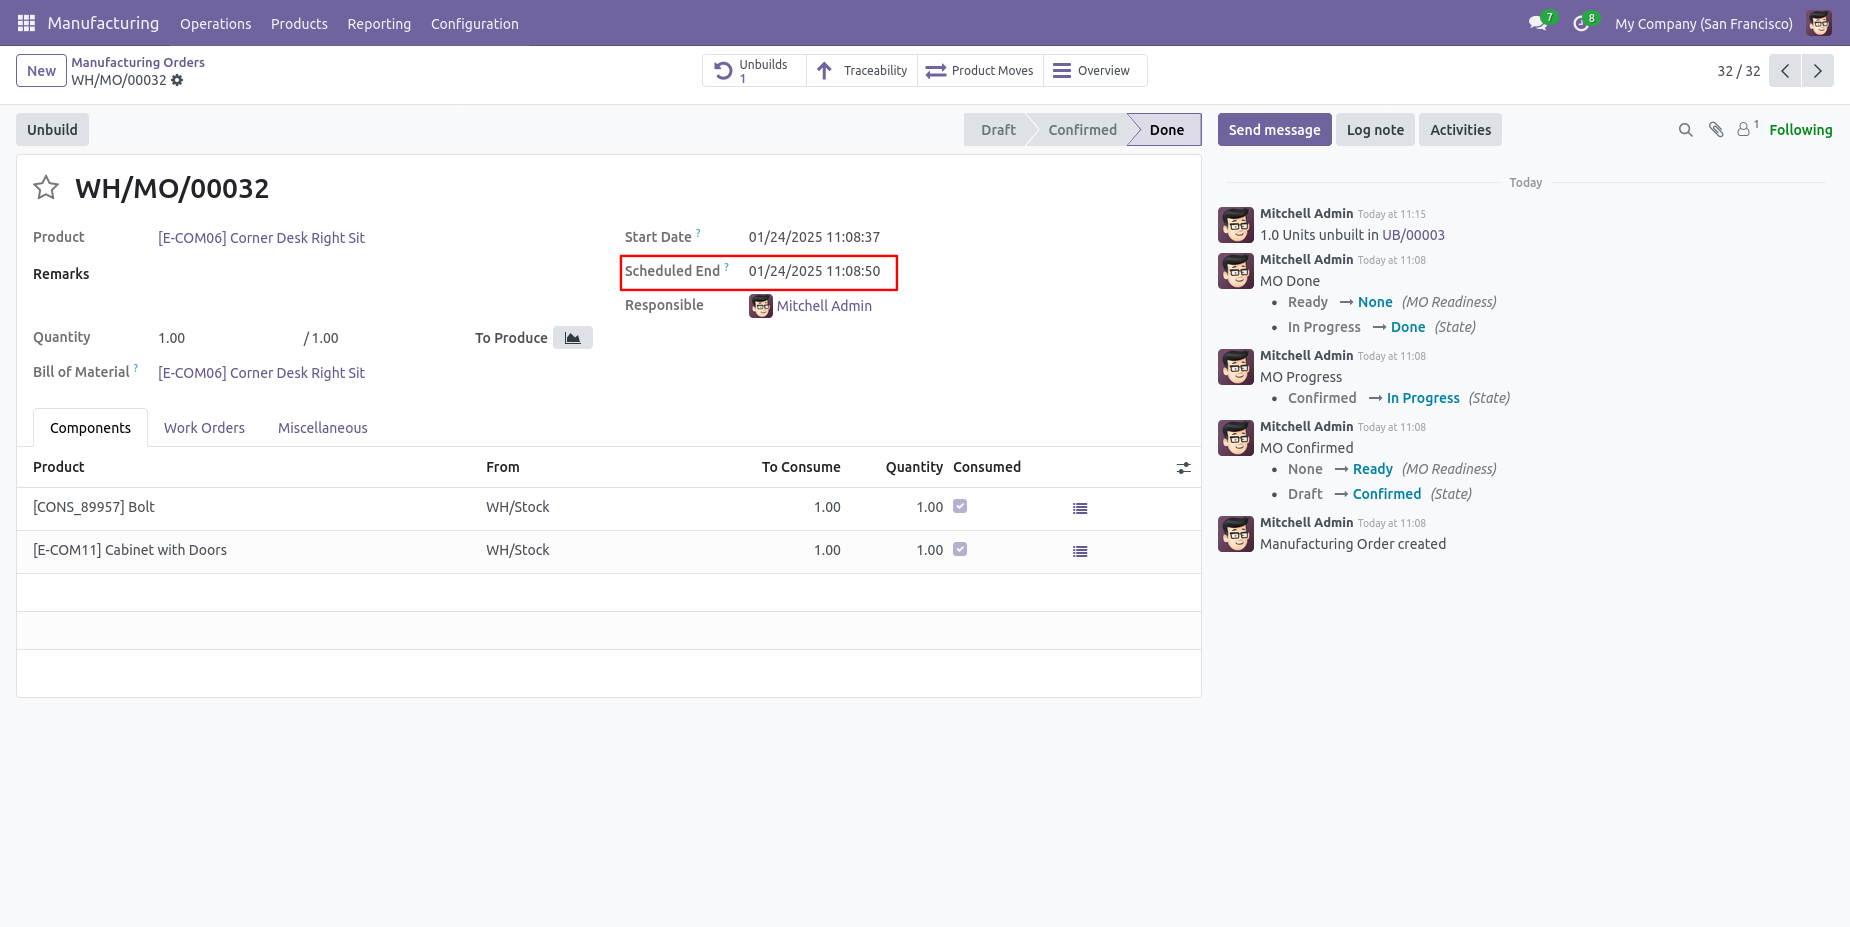
You can see schedule manufacturing order date.
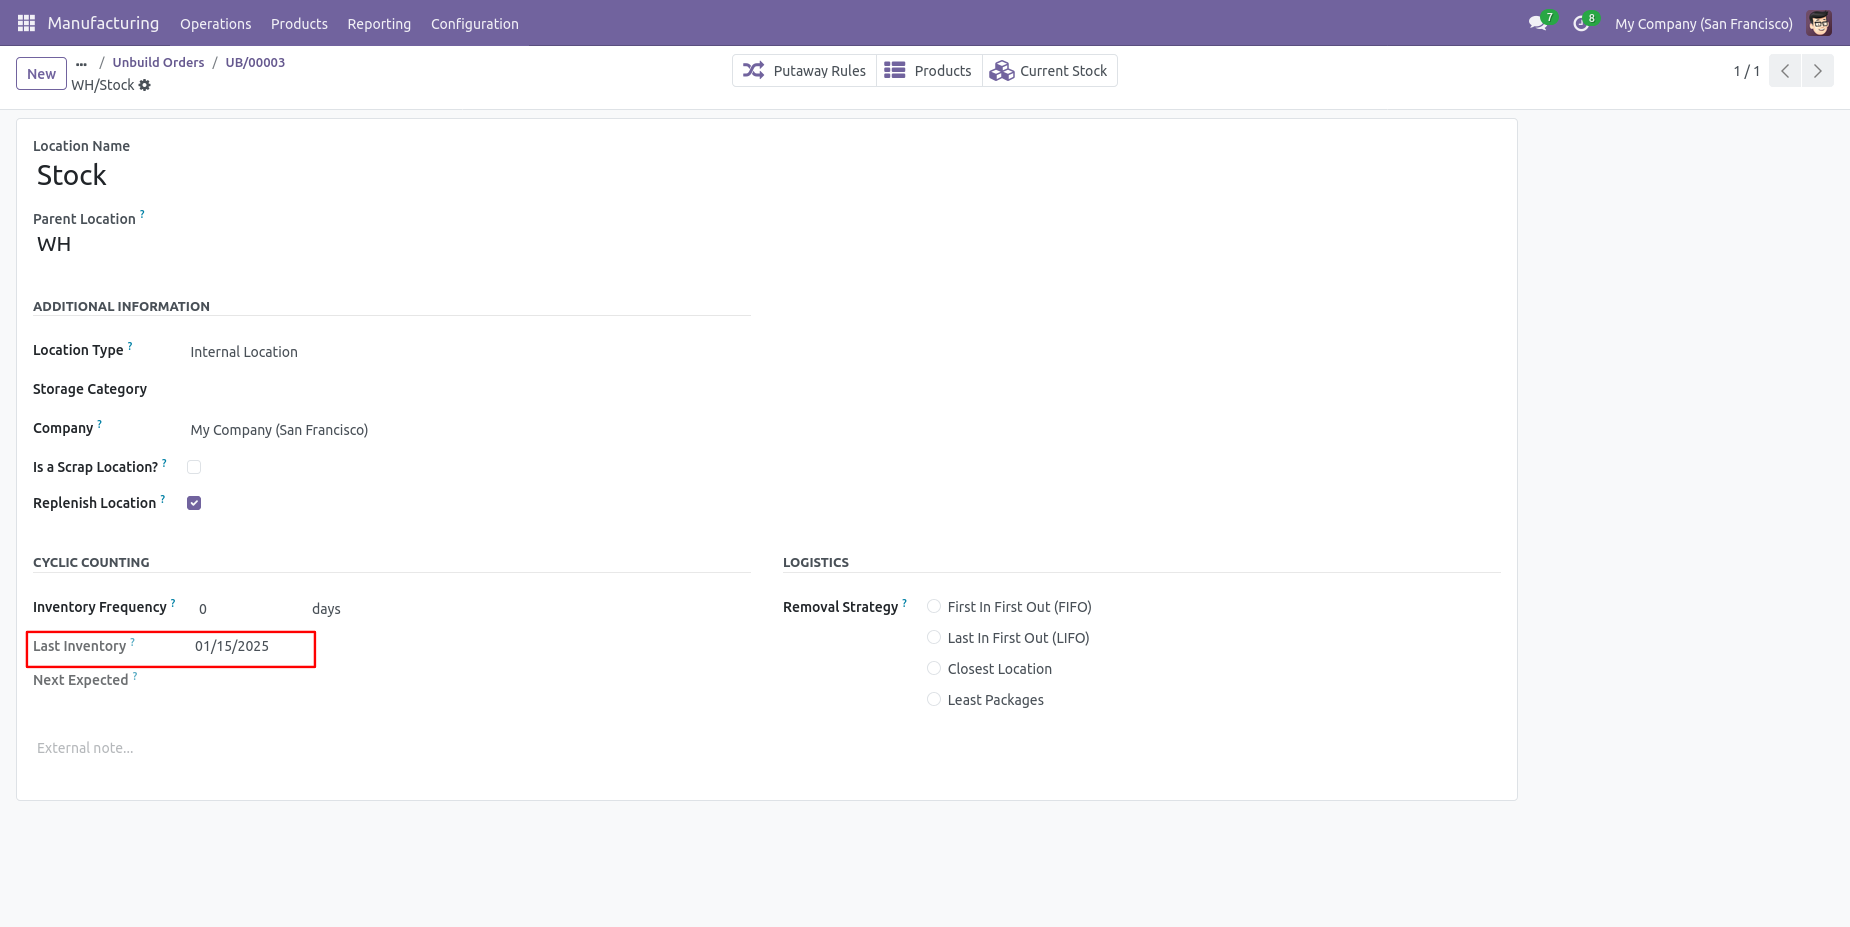
You can see selected last inventory date.
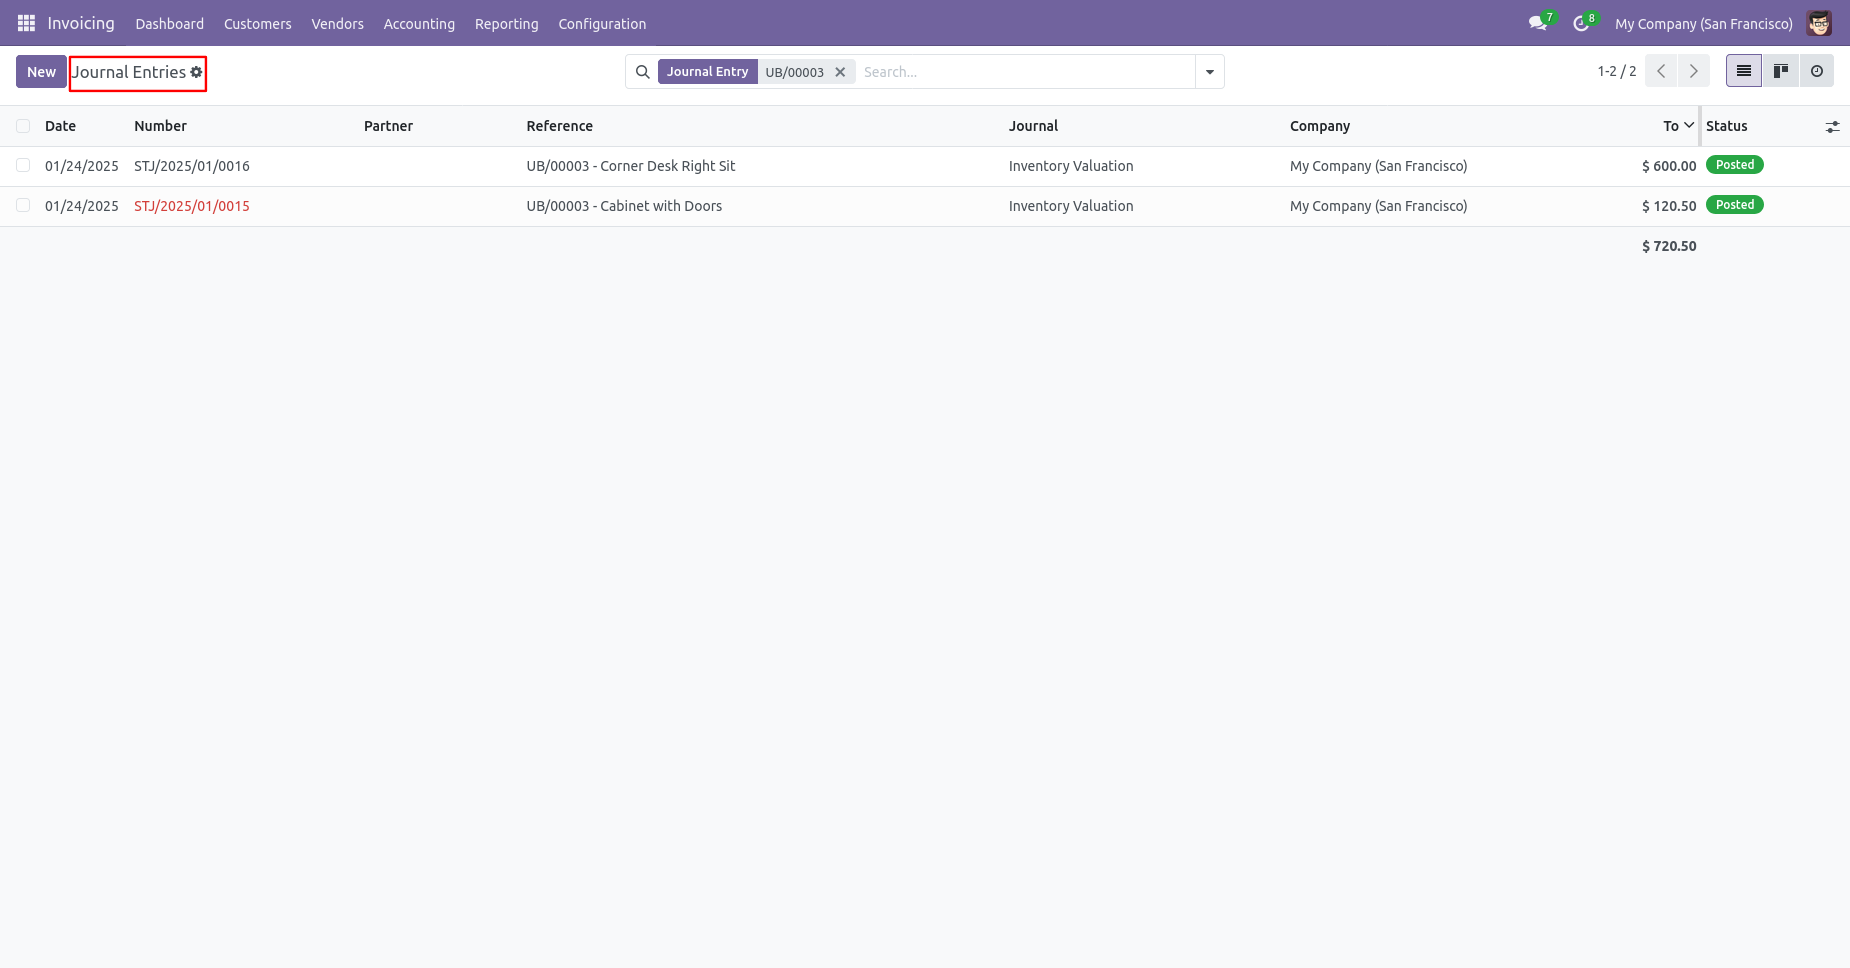
That MO date passed in the unbuild order journal entries.
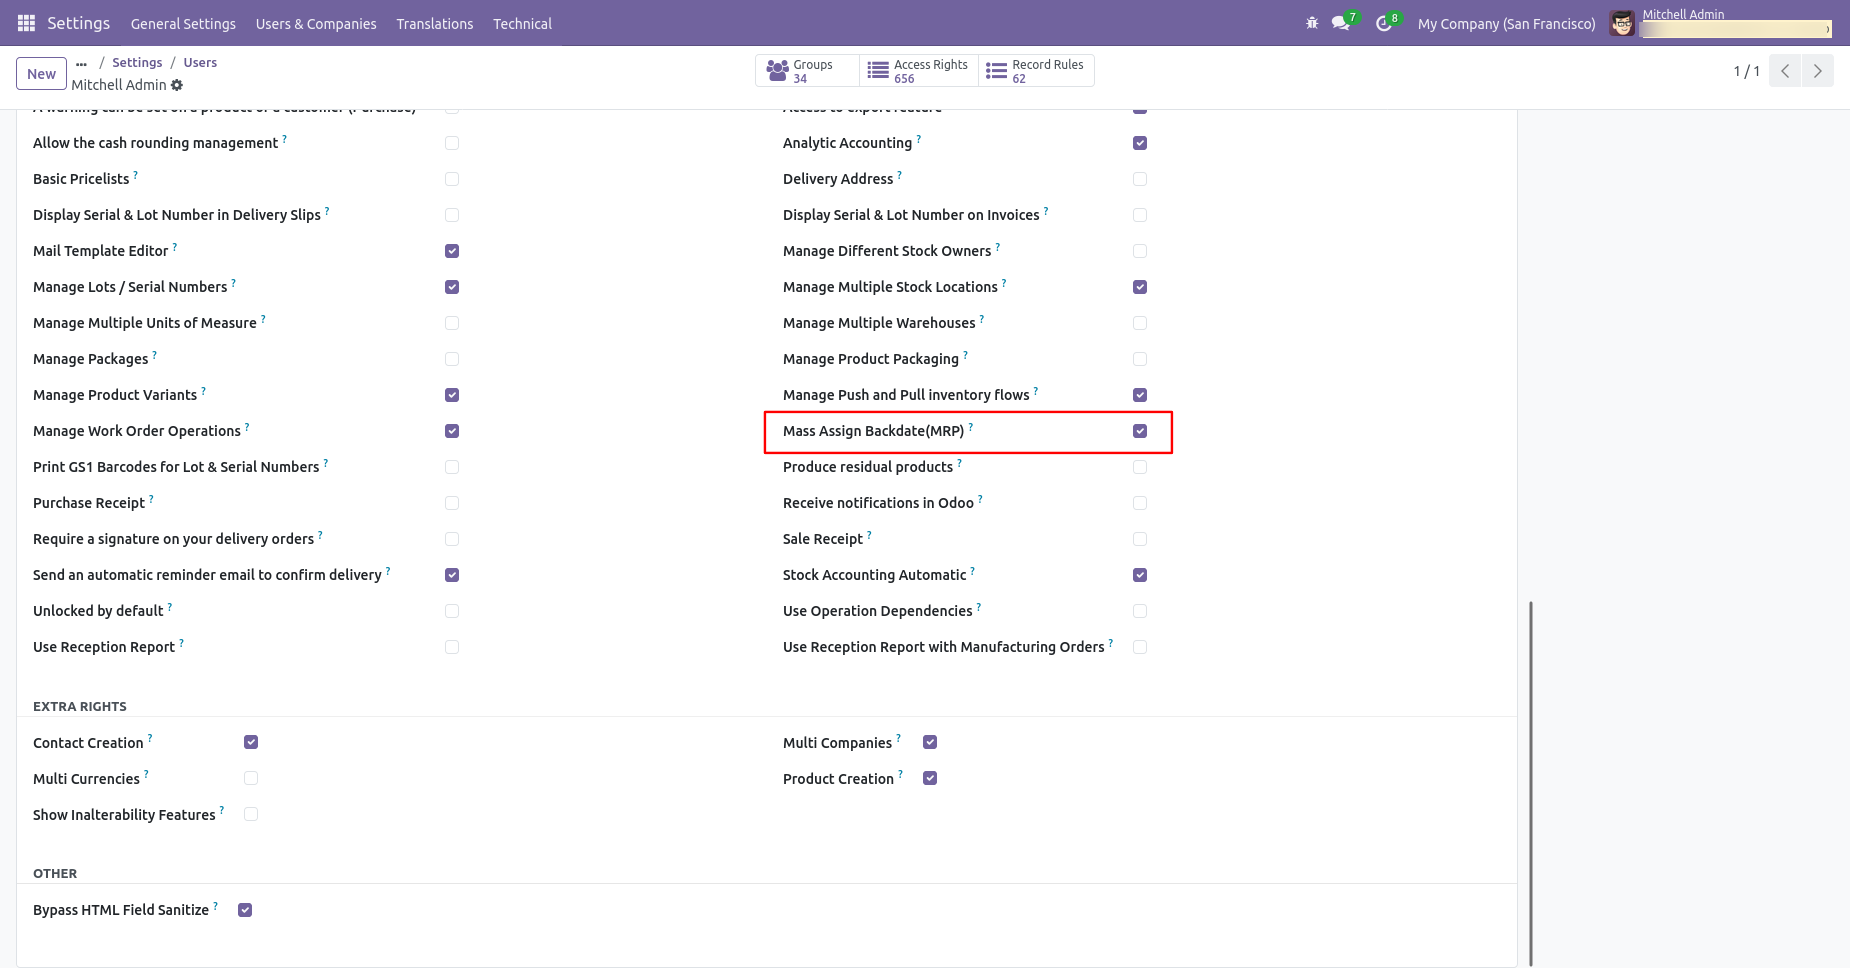
If you enable 'Mass Assign Backdate' then you can mass assign backdate in MRP.
Select MRP orders from the list view then click 'Mass Assign Backdate'.
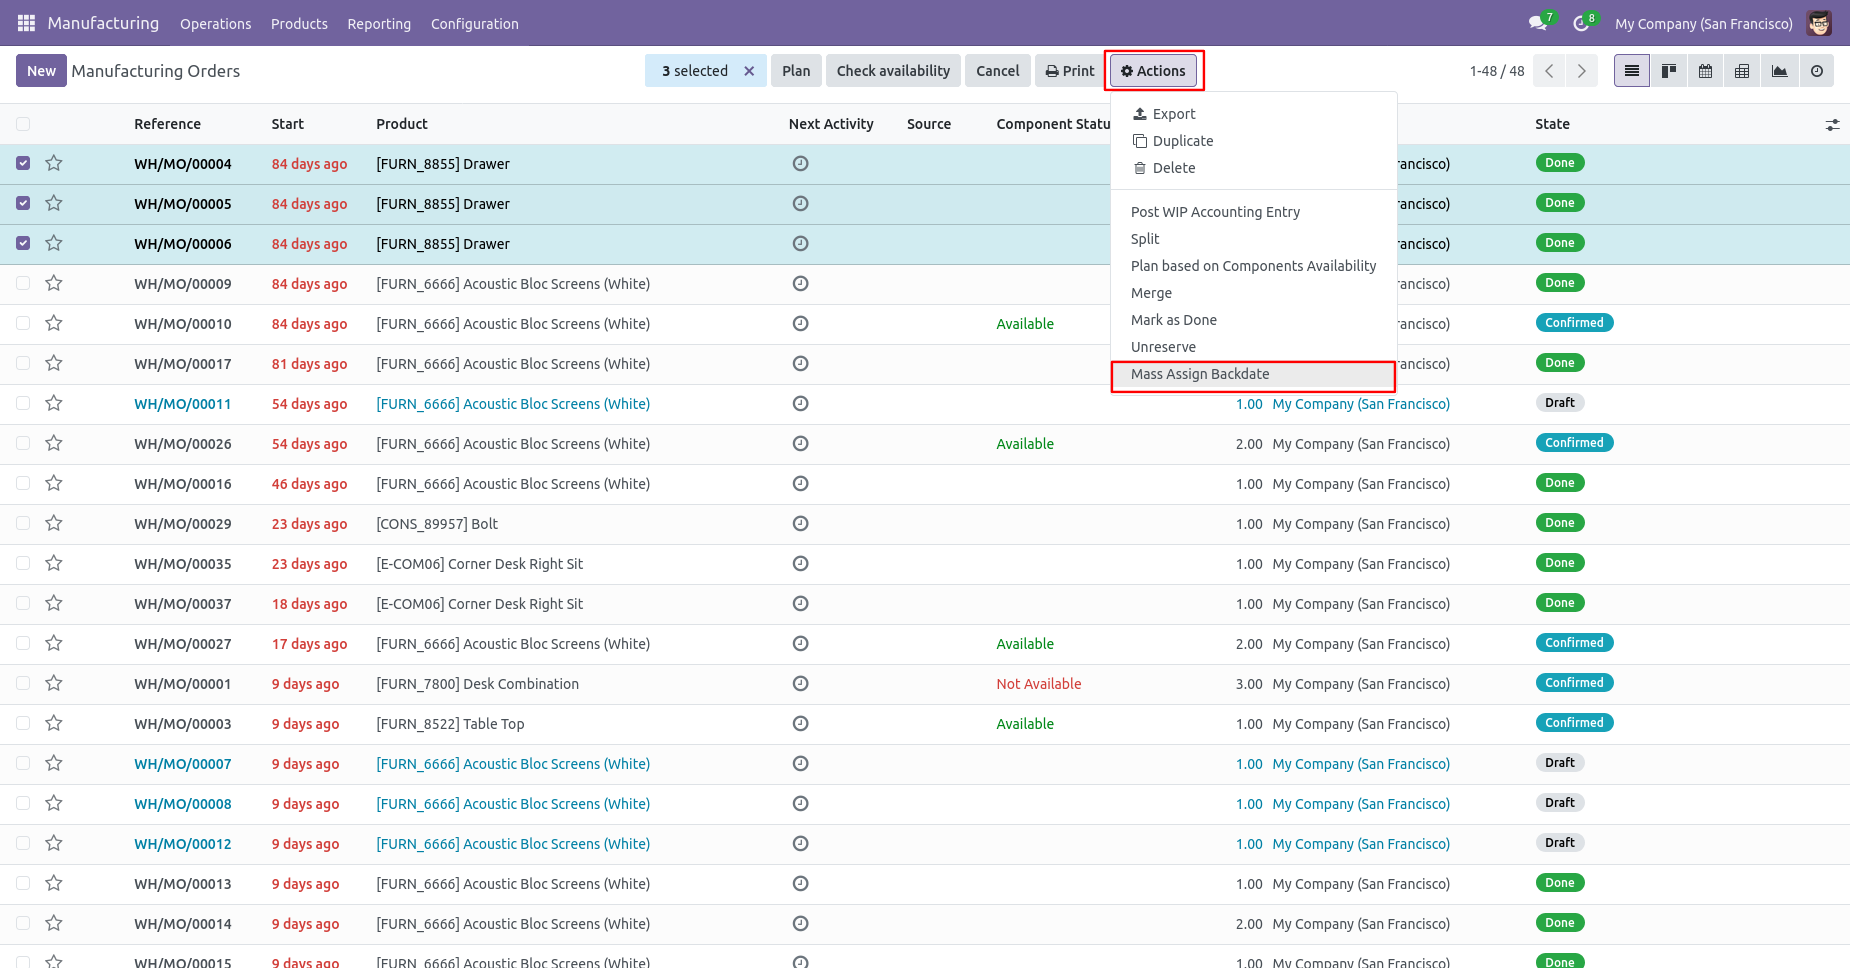
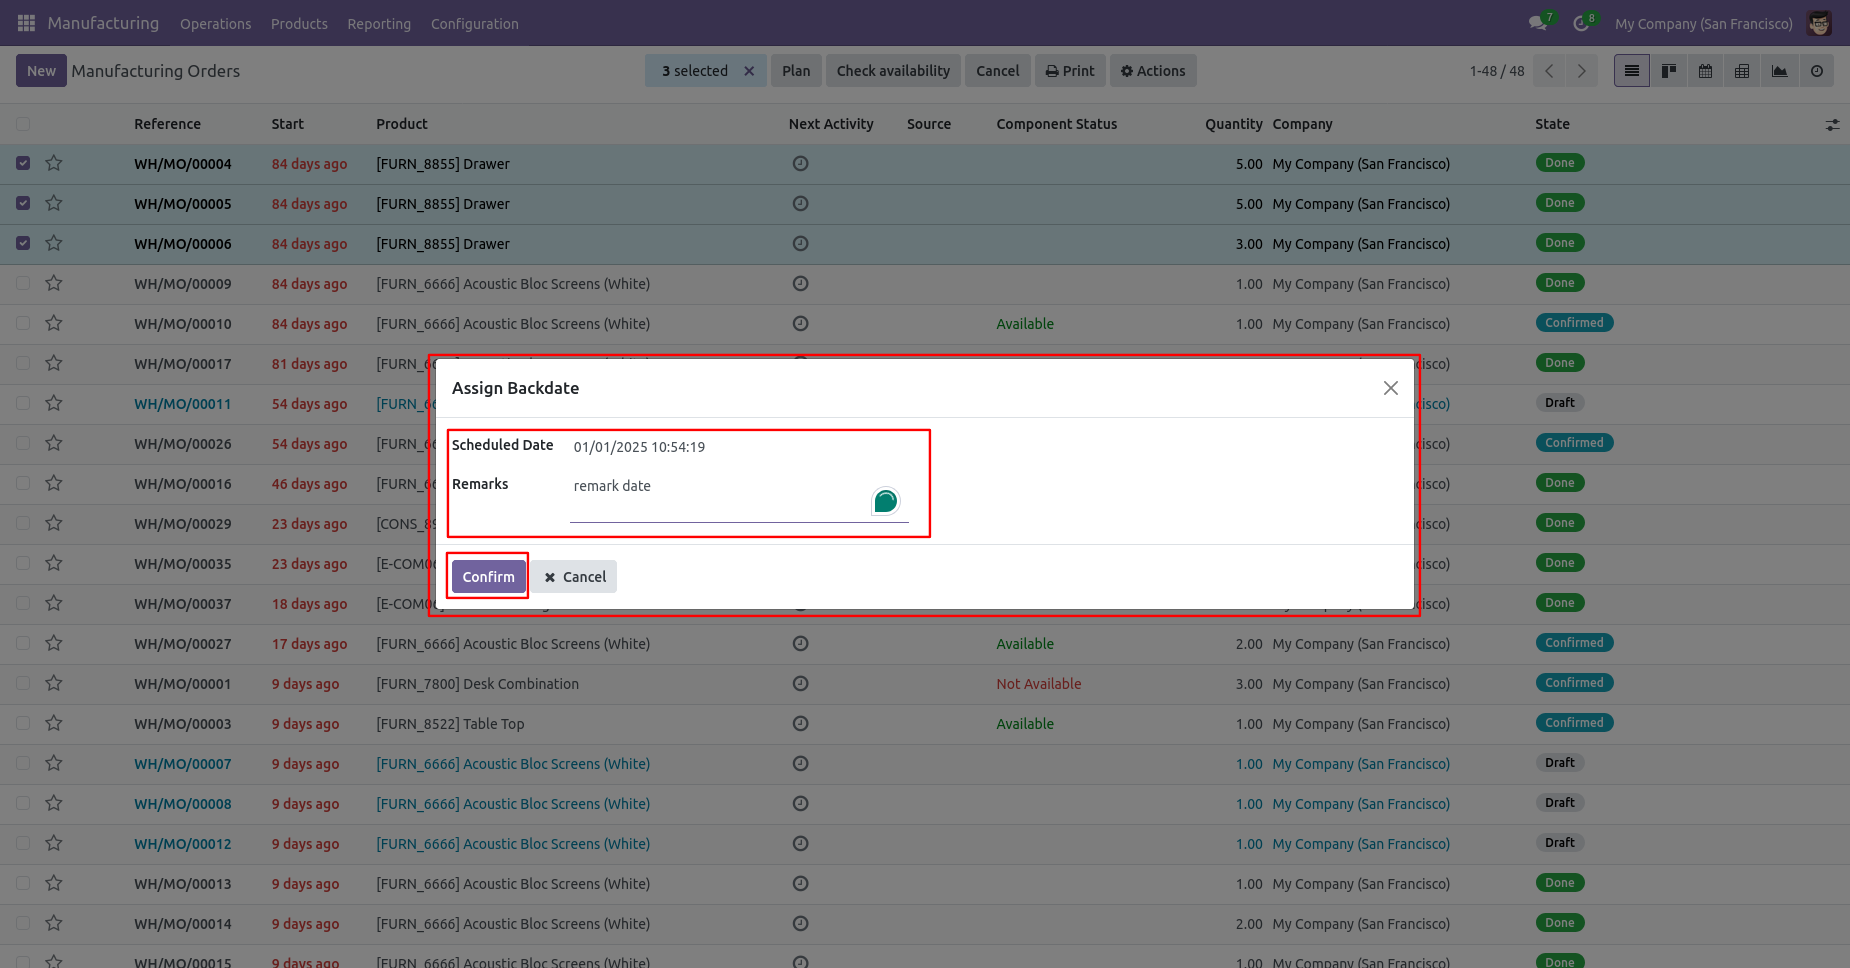
After that, this wizard opens, enters the order date and remarks. Here remarks come if you have enabled that feature.
MRP order form view with backdate and remarks.
Assign the desired backdate, then click the Confirm button to apply the backdate to the selected MRP Order.
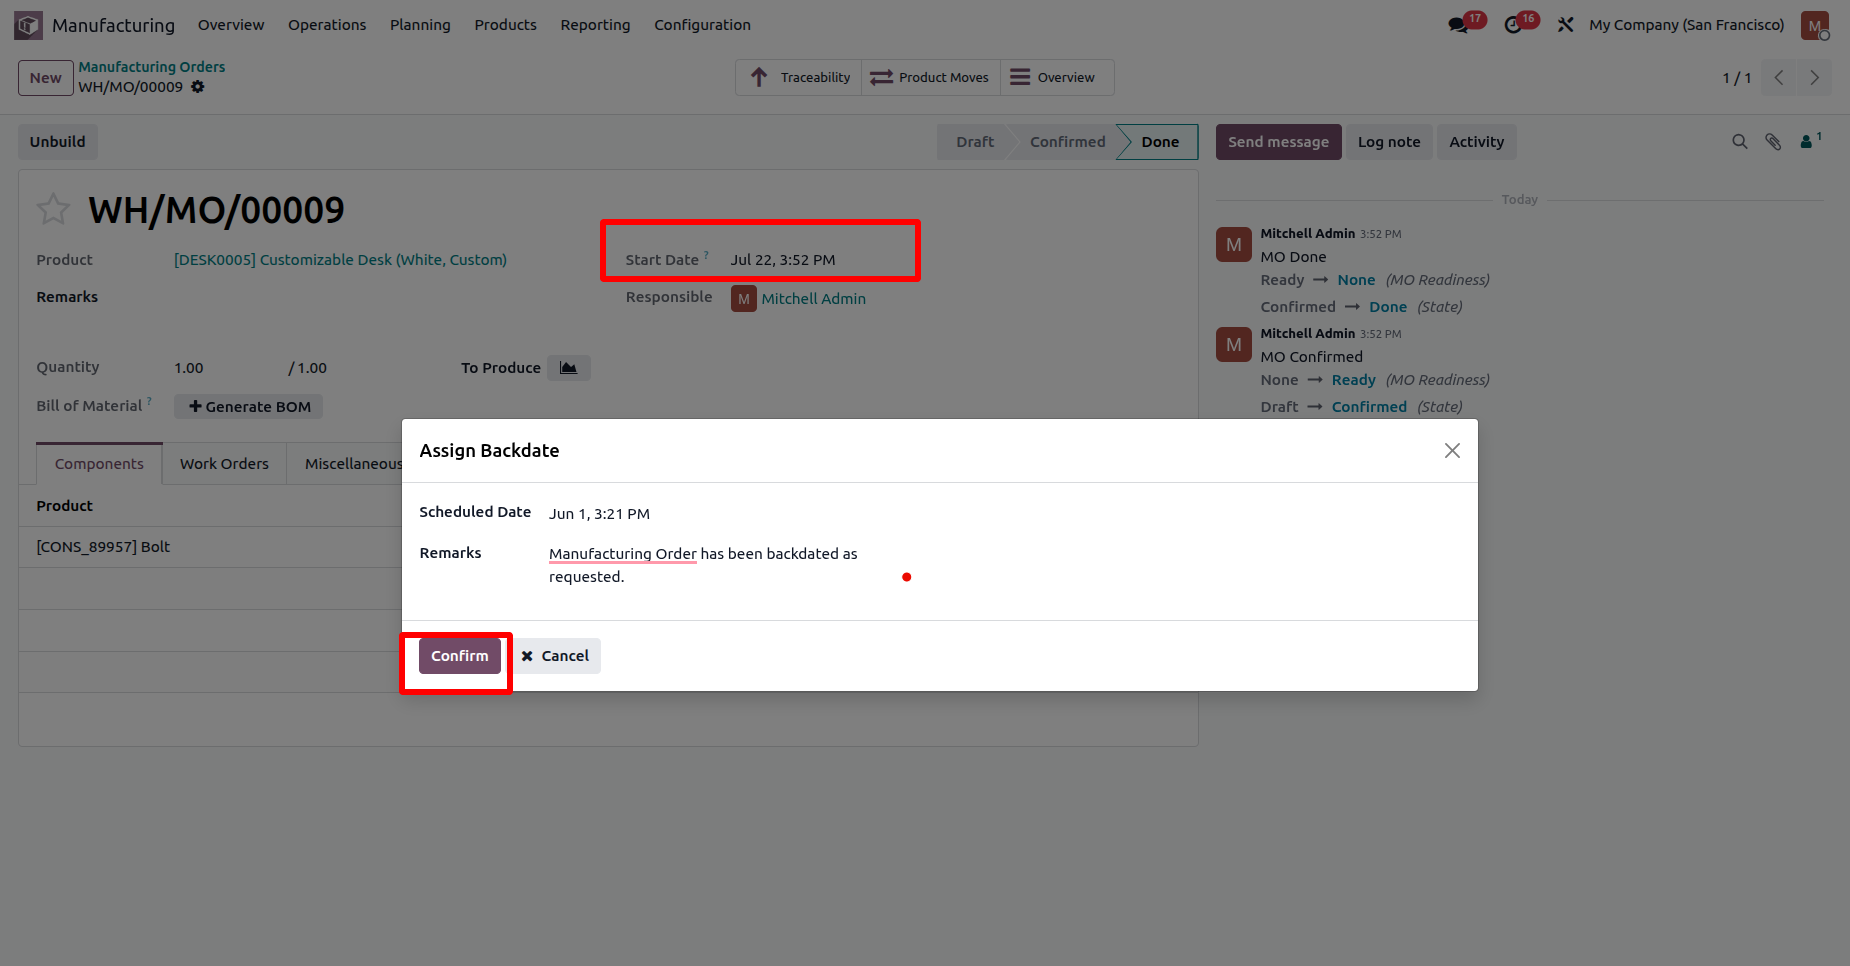
The MRP Order Date is updated to the selected backdate. The backdate change is also recorded in the Chatter, and the same audit entry is available through the Backdate Log smart button on the MRP Order form view.
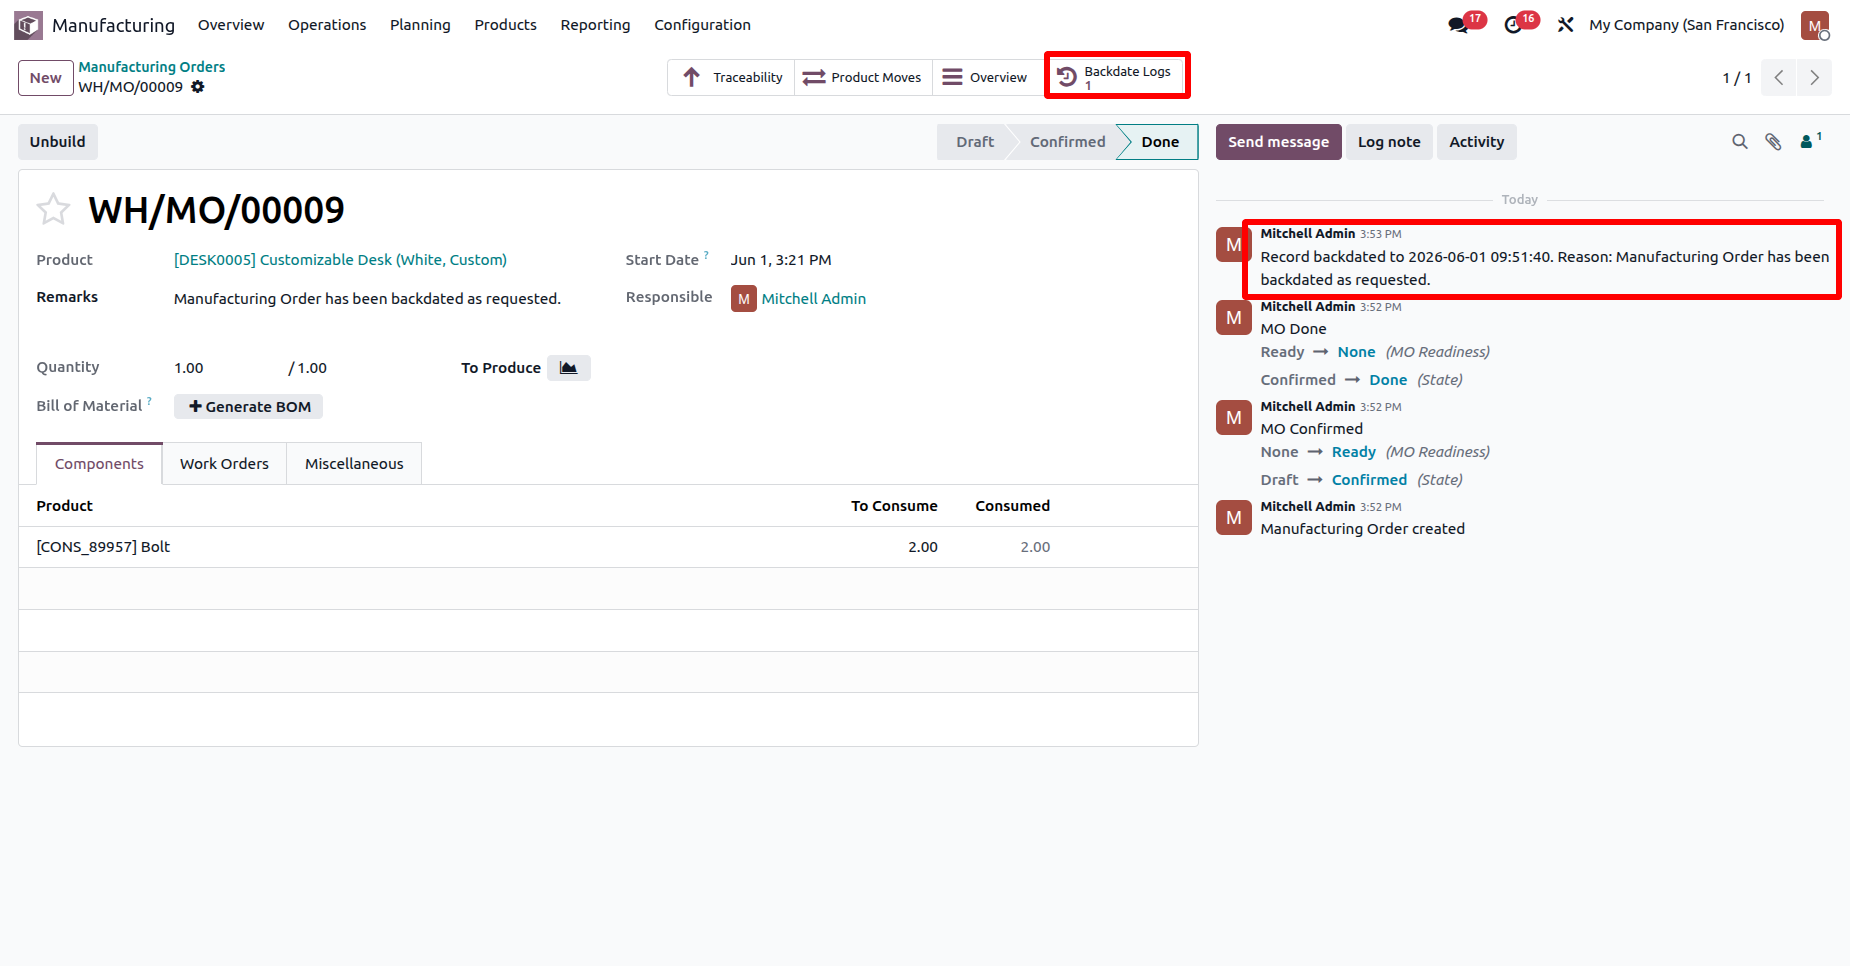
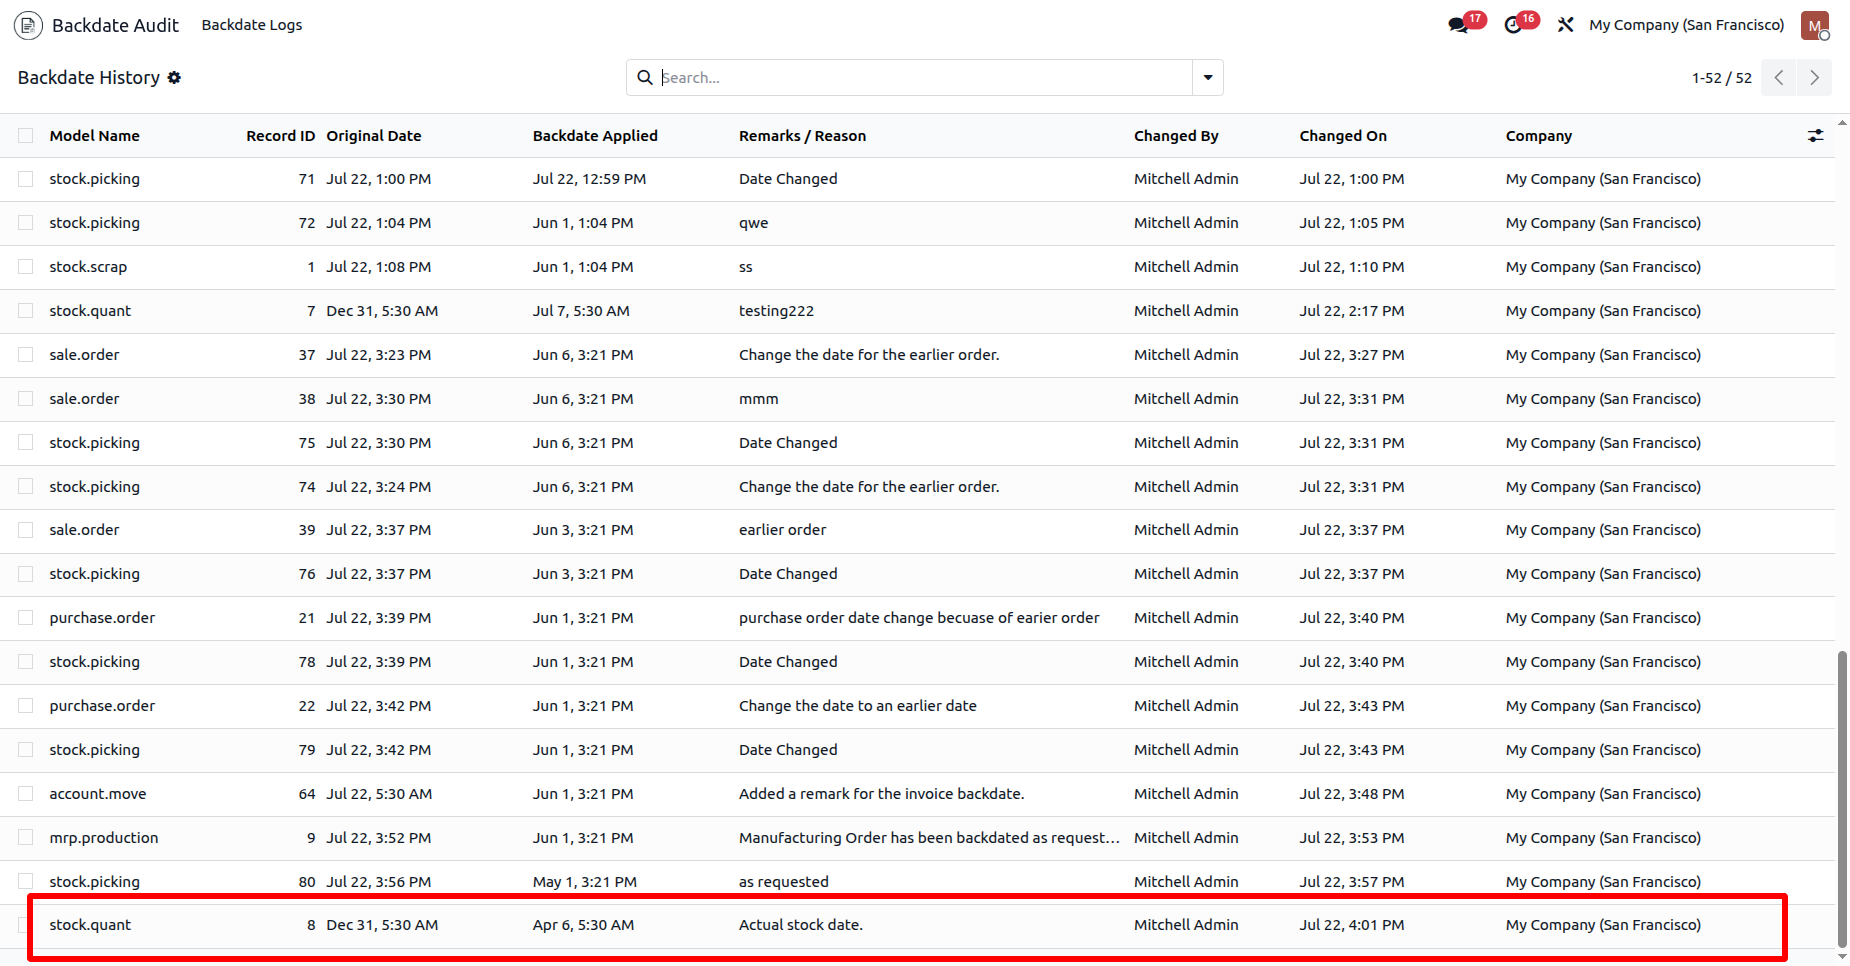
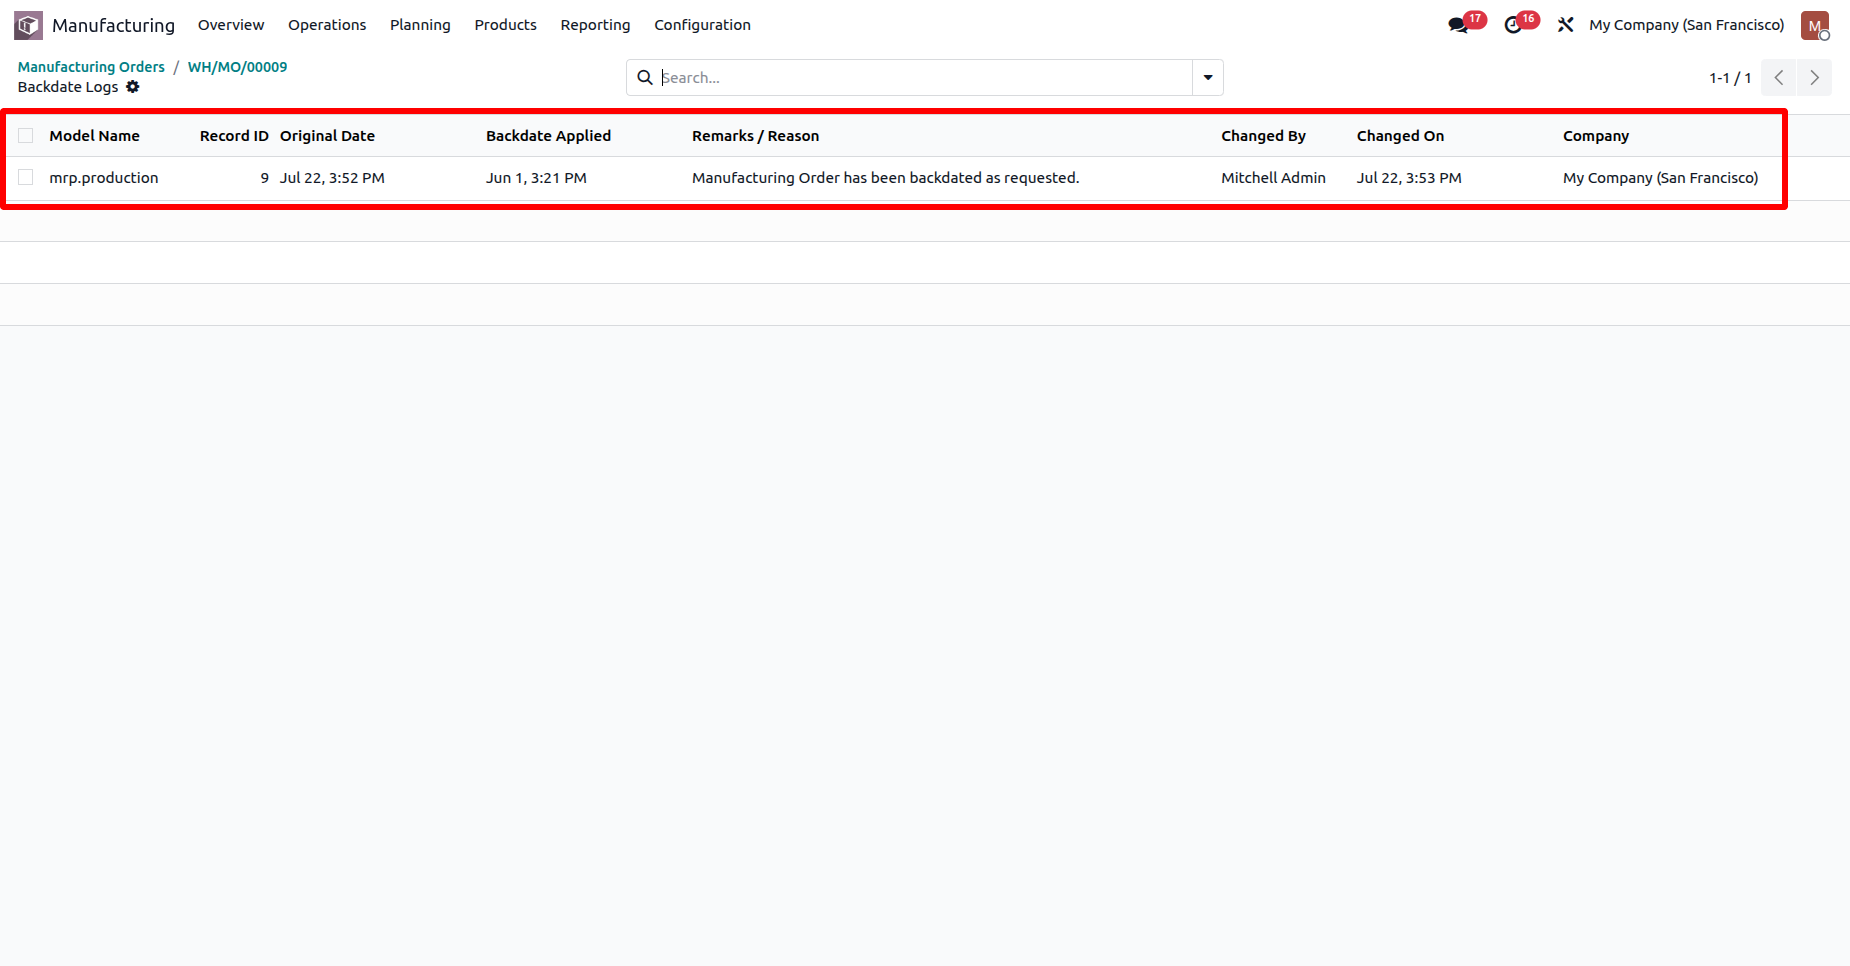
Clicking the Backdate Logs smart button opens the Backdate Logs list view, where users can view the complete audit history of all backdate changes made to the MRP Order.
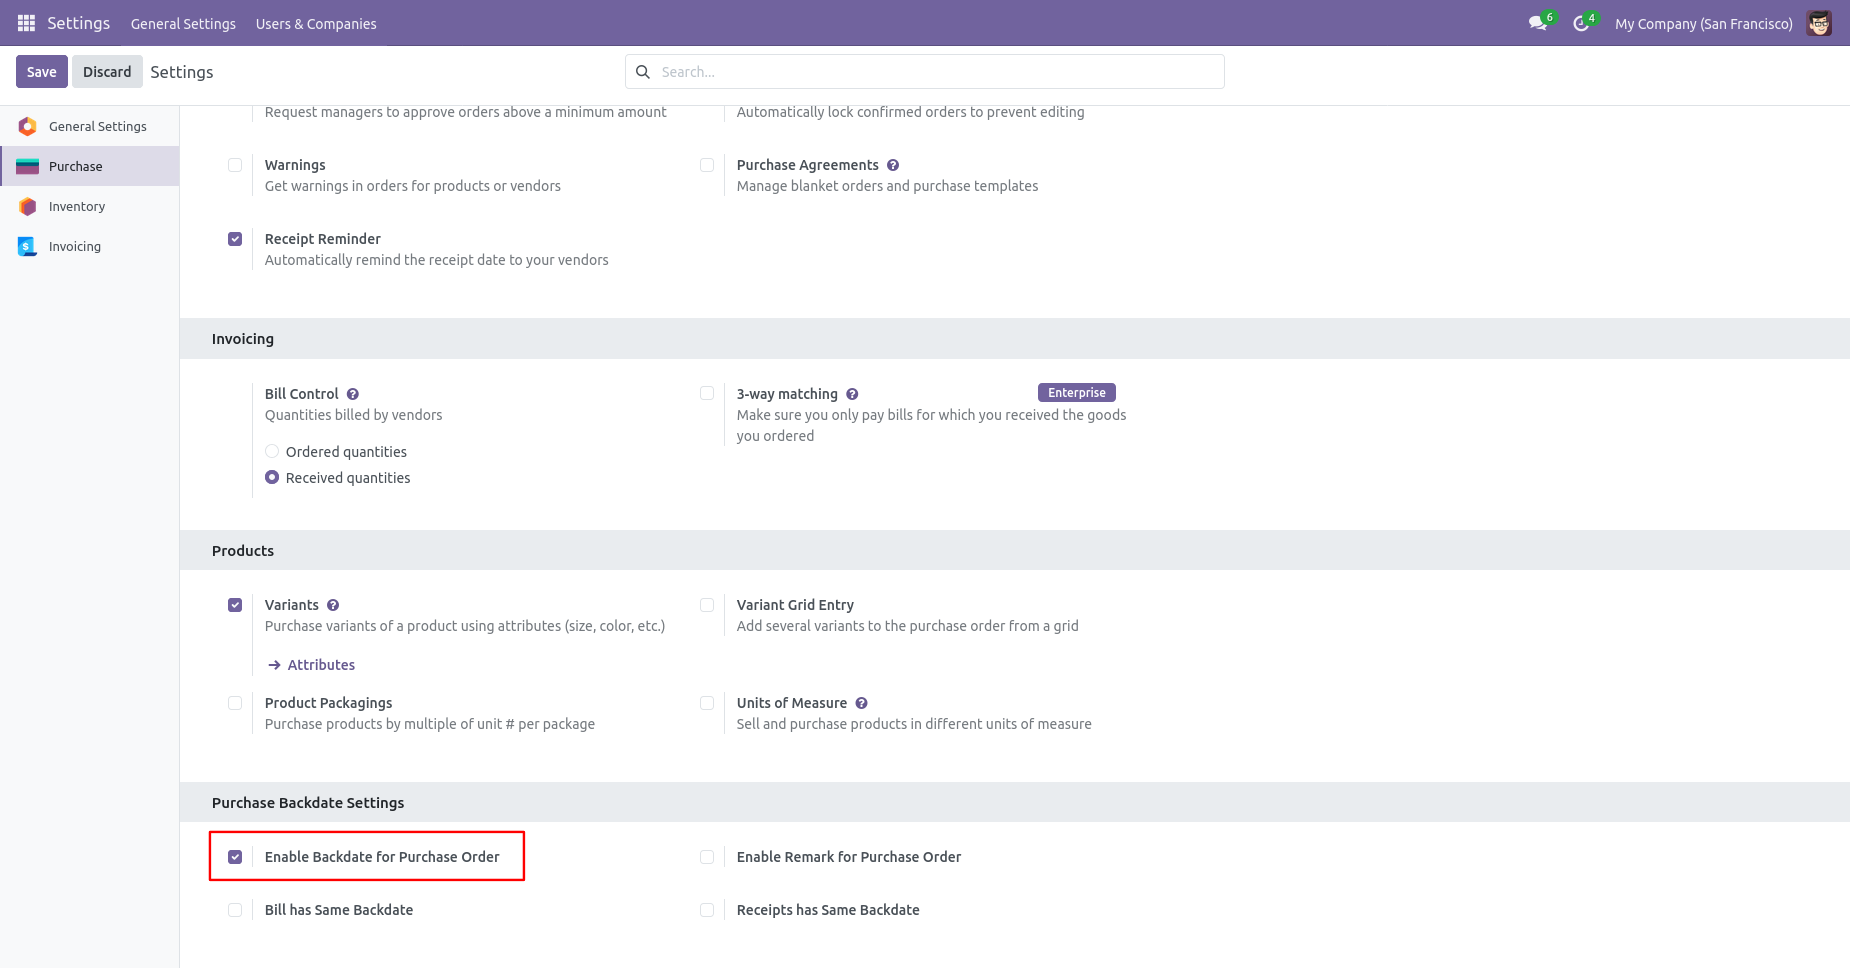
Go to the purchase settings and enable the 'Enable Backdate For purchase Order' option.
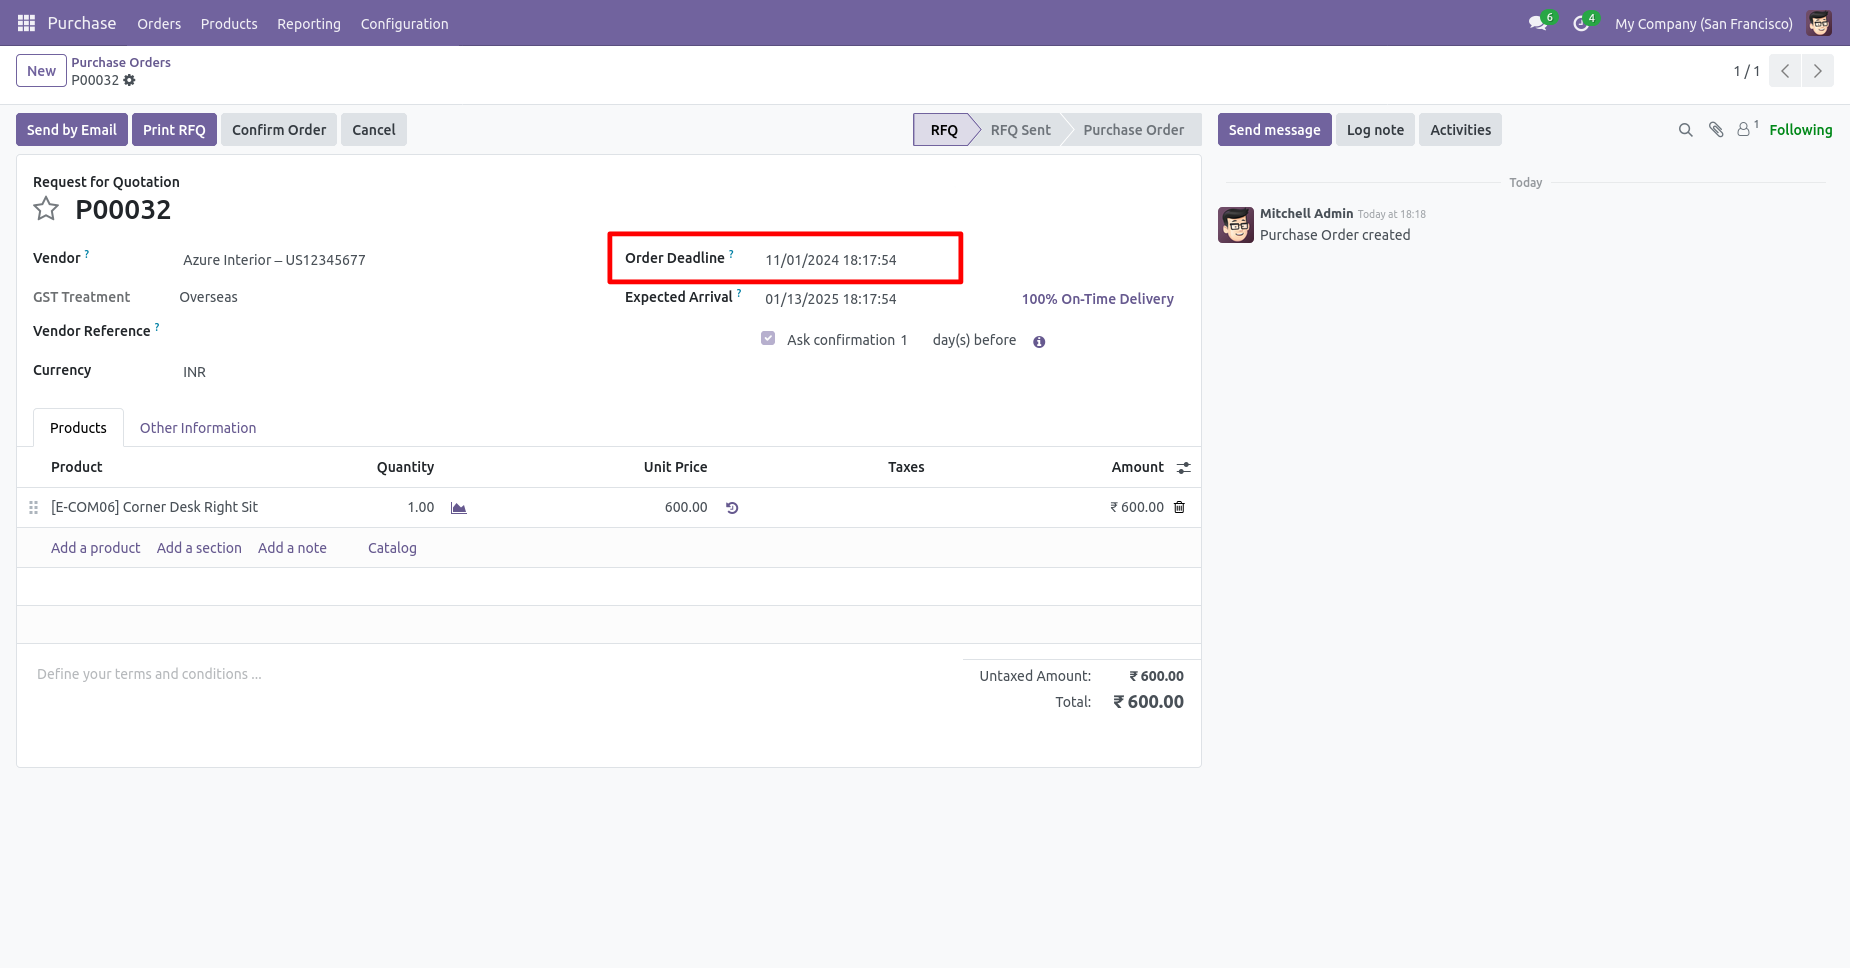
Purchase order form view with backdate.
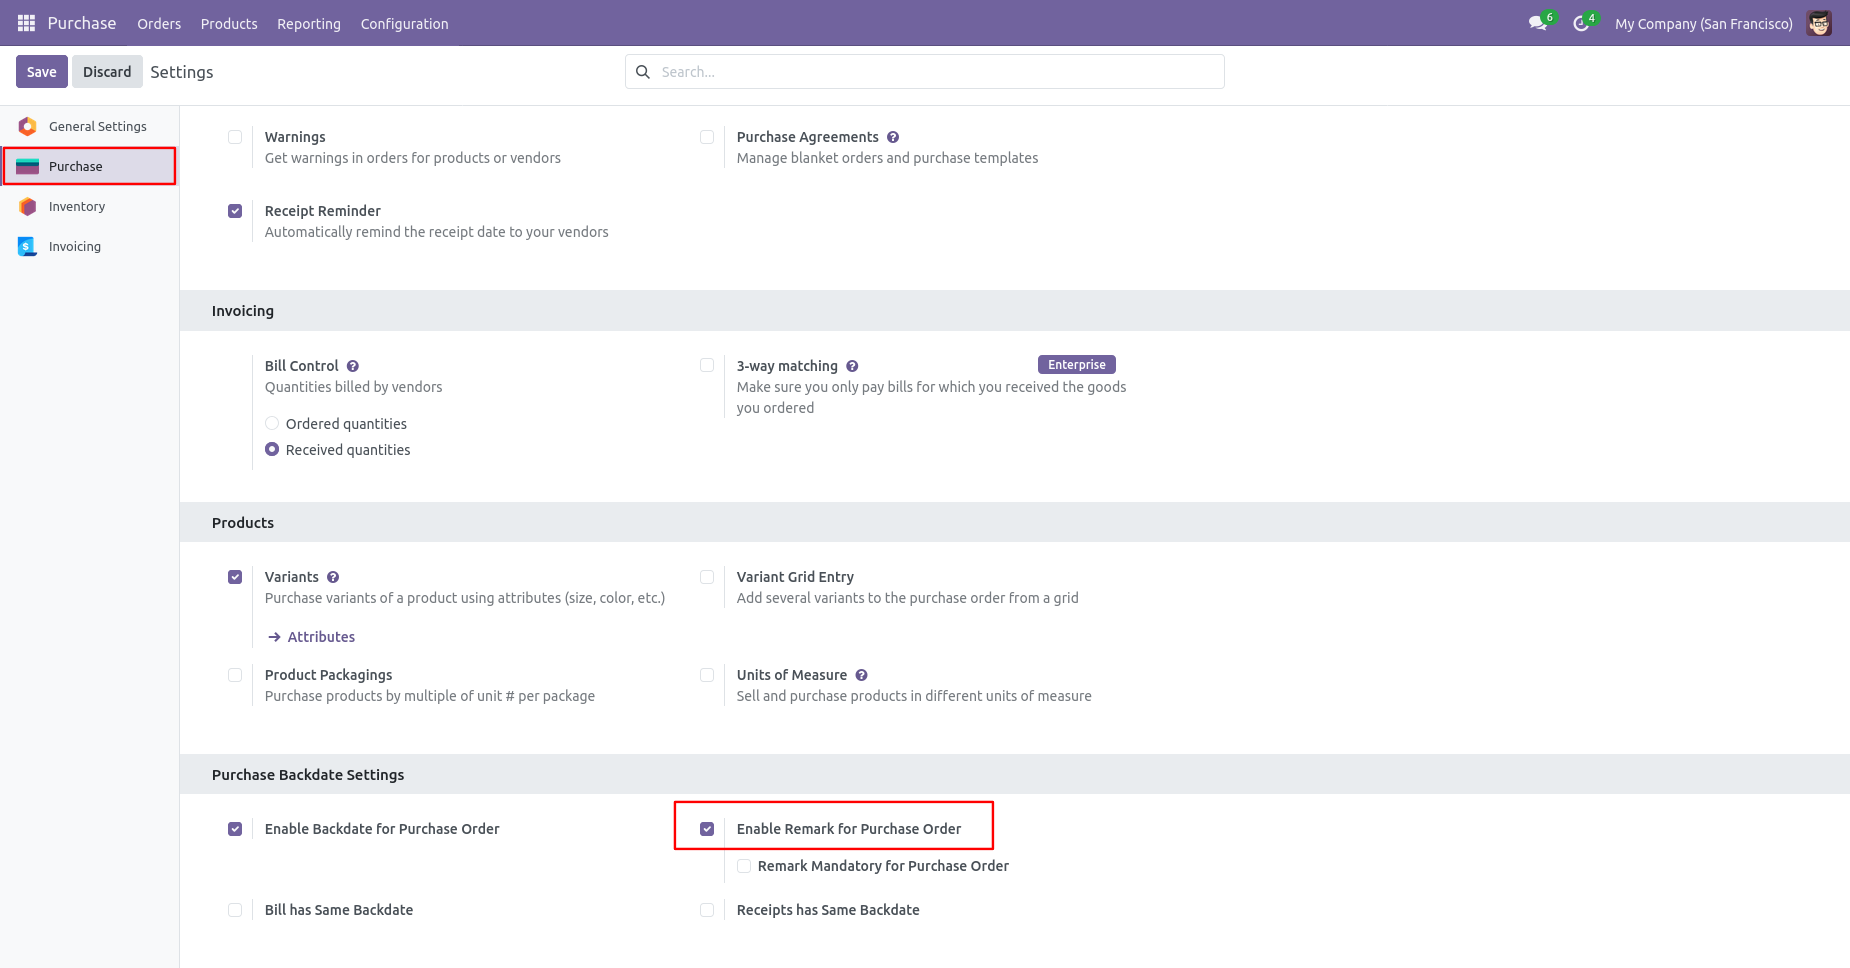
Enable the 'Enable Remark For Purchase Order' option.
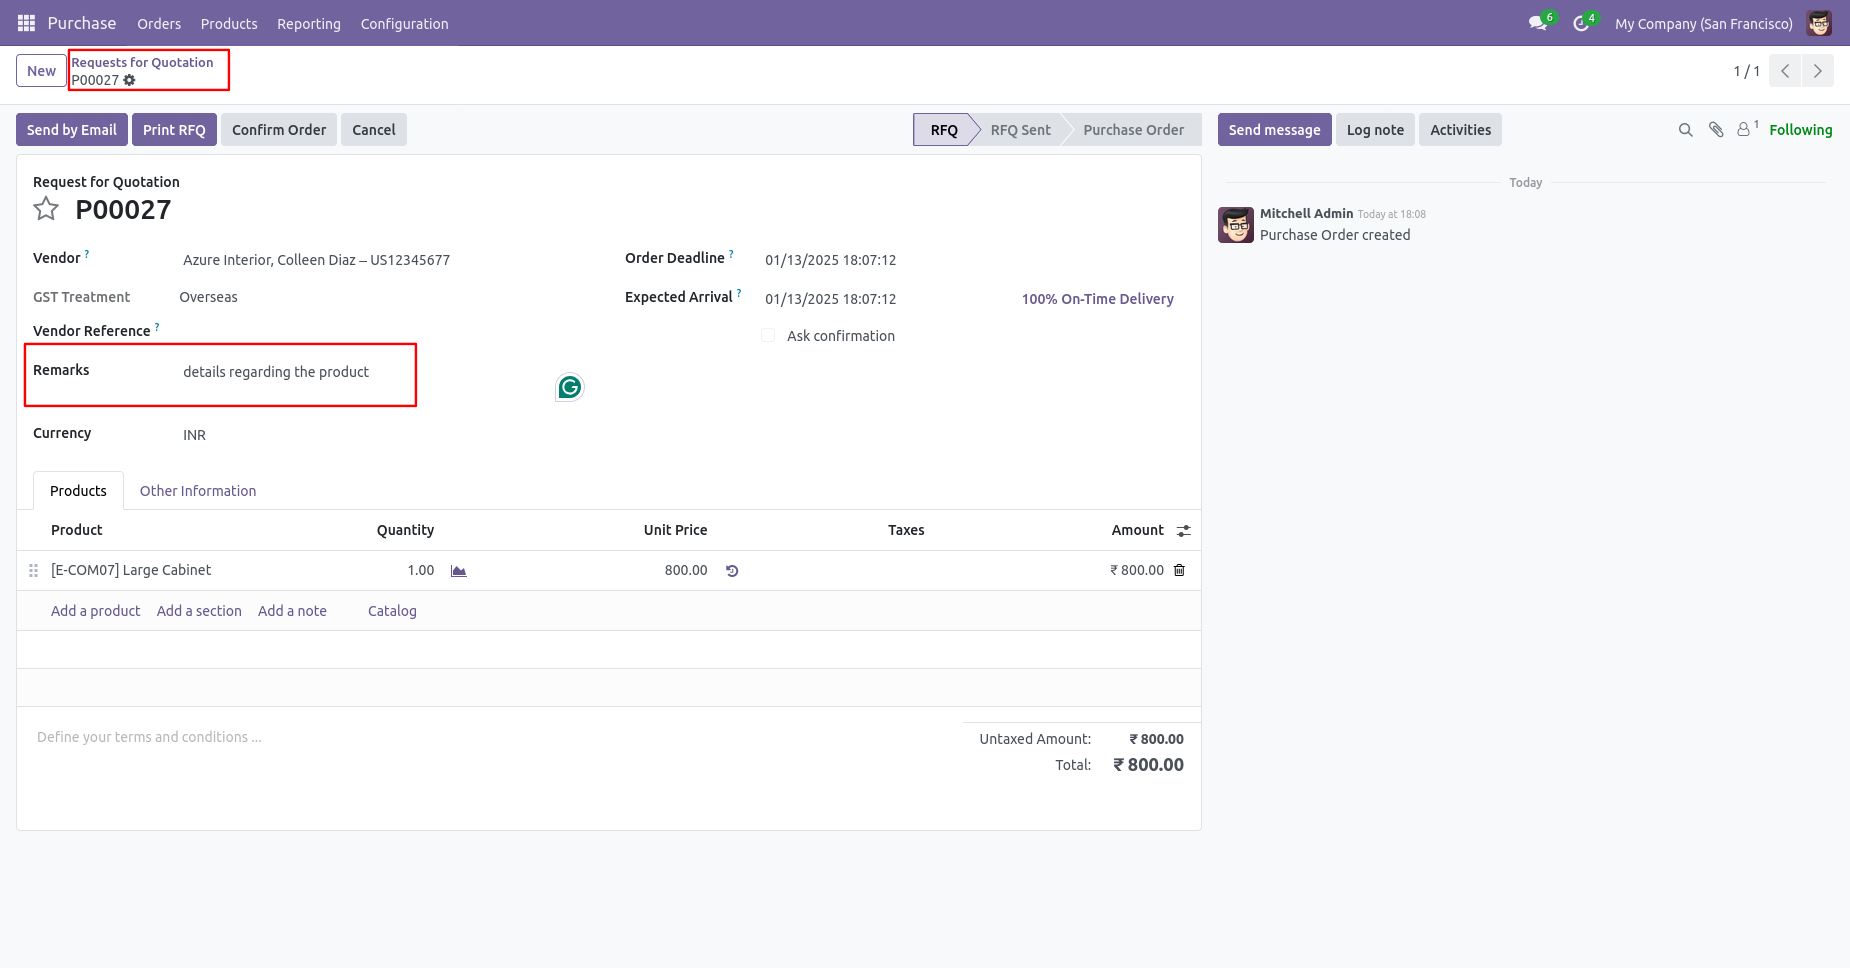
Purchase order form view with remarks.
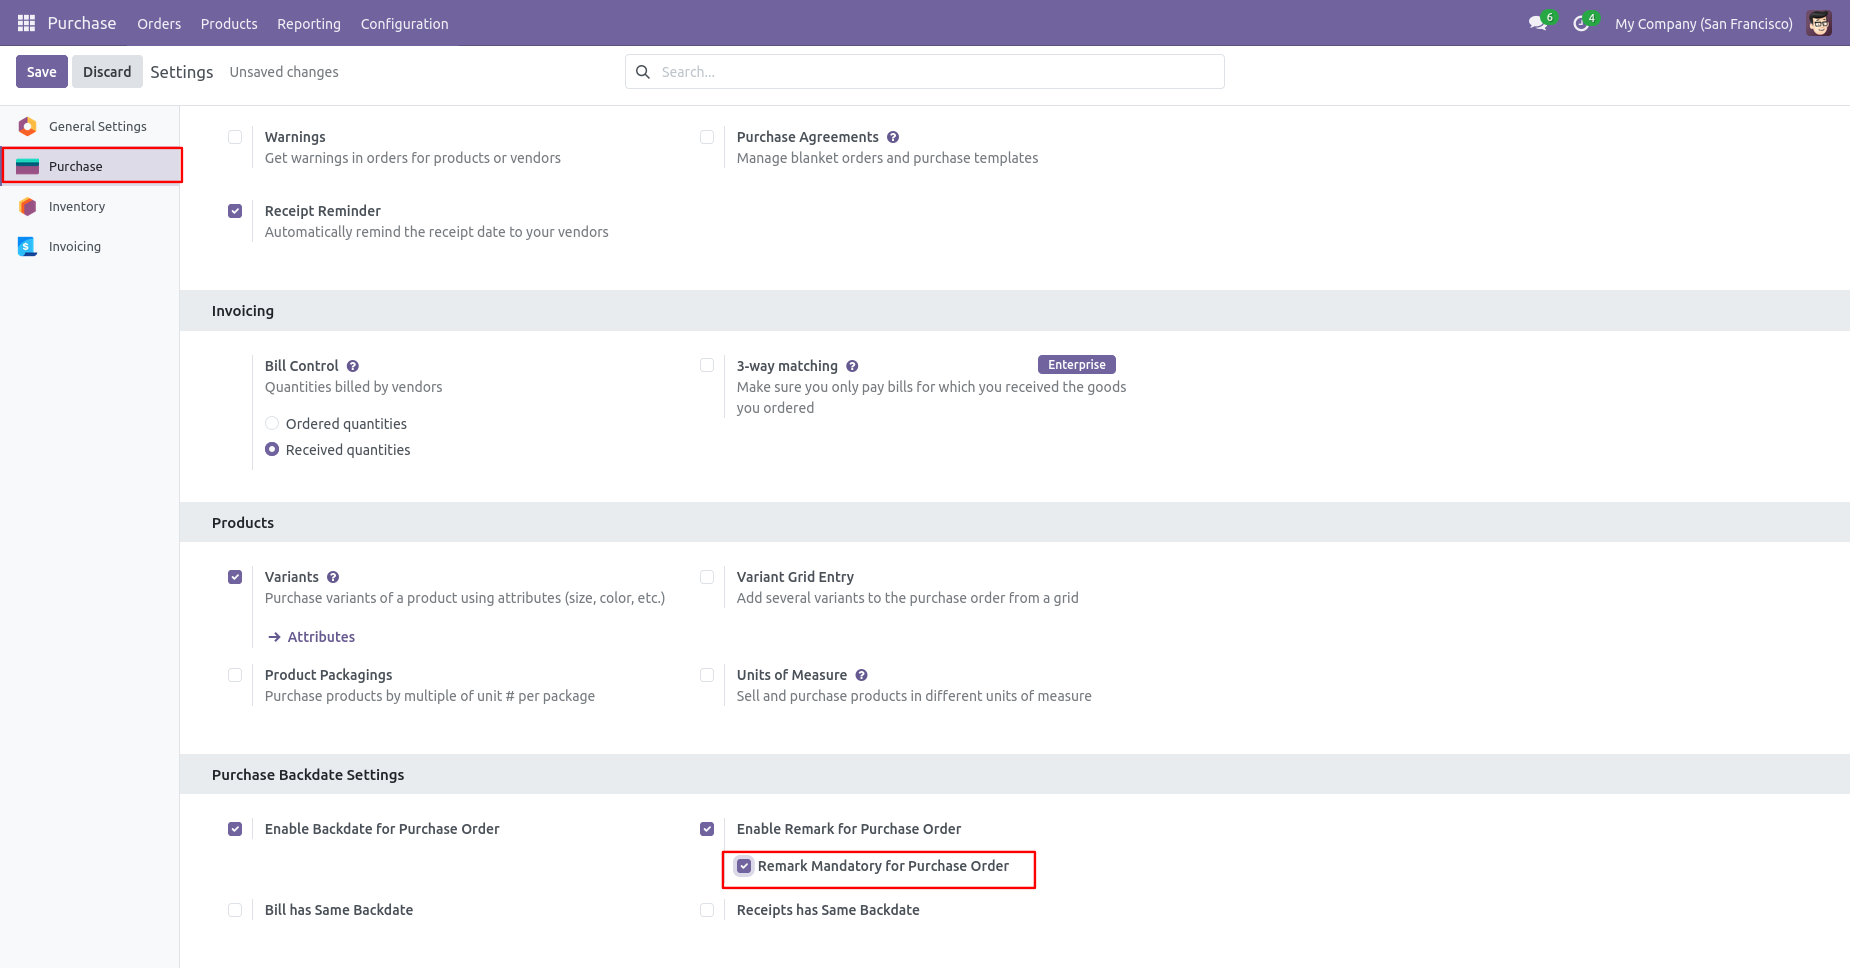
Enable the 'Remark Mandatory For Purchase Order' option.
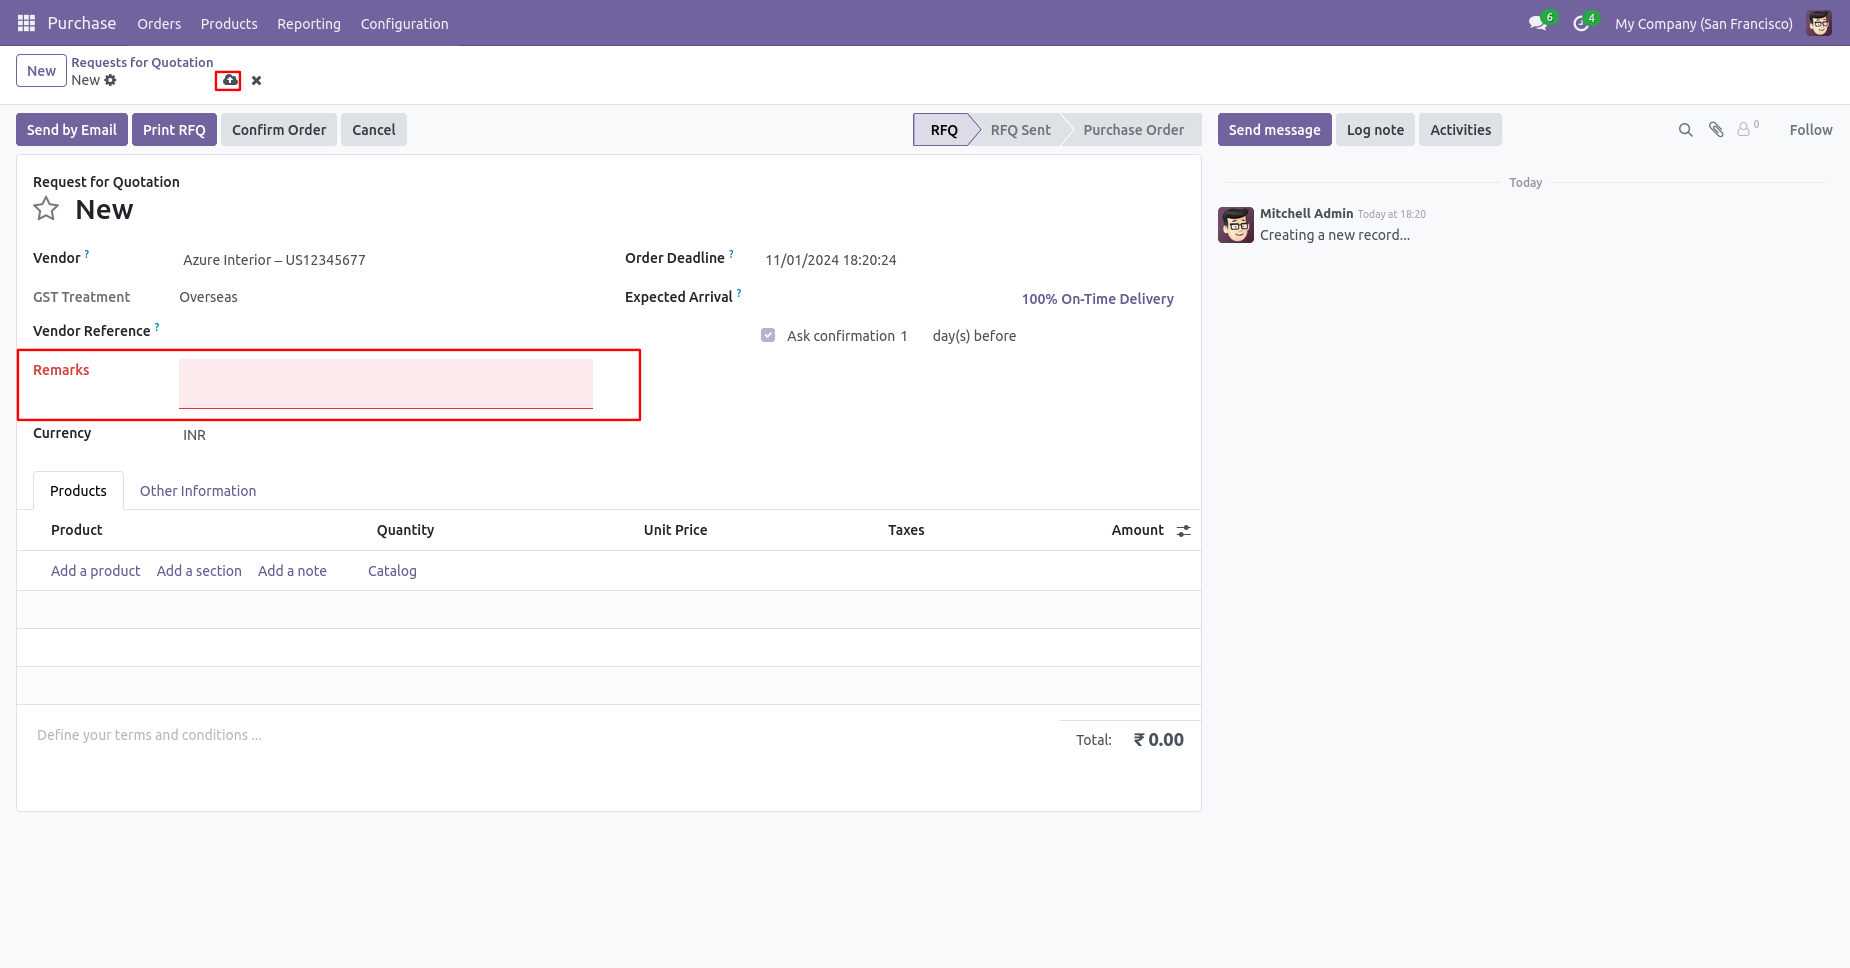
You can't save the PO without entering a remark.
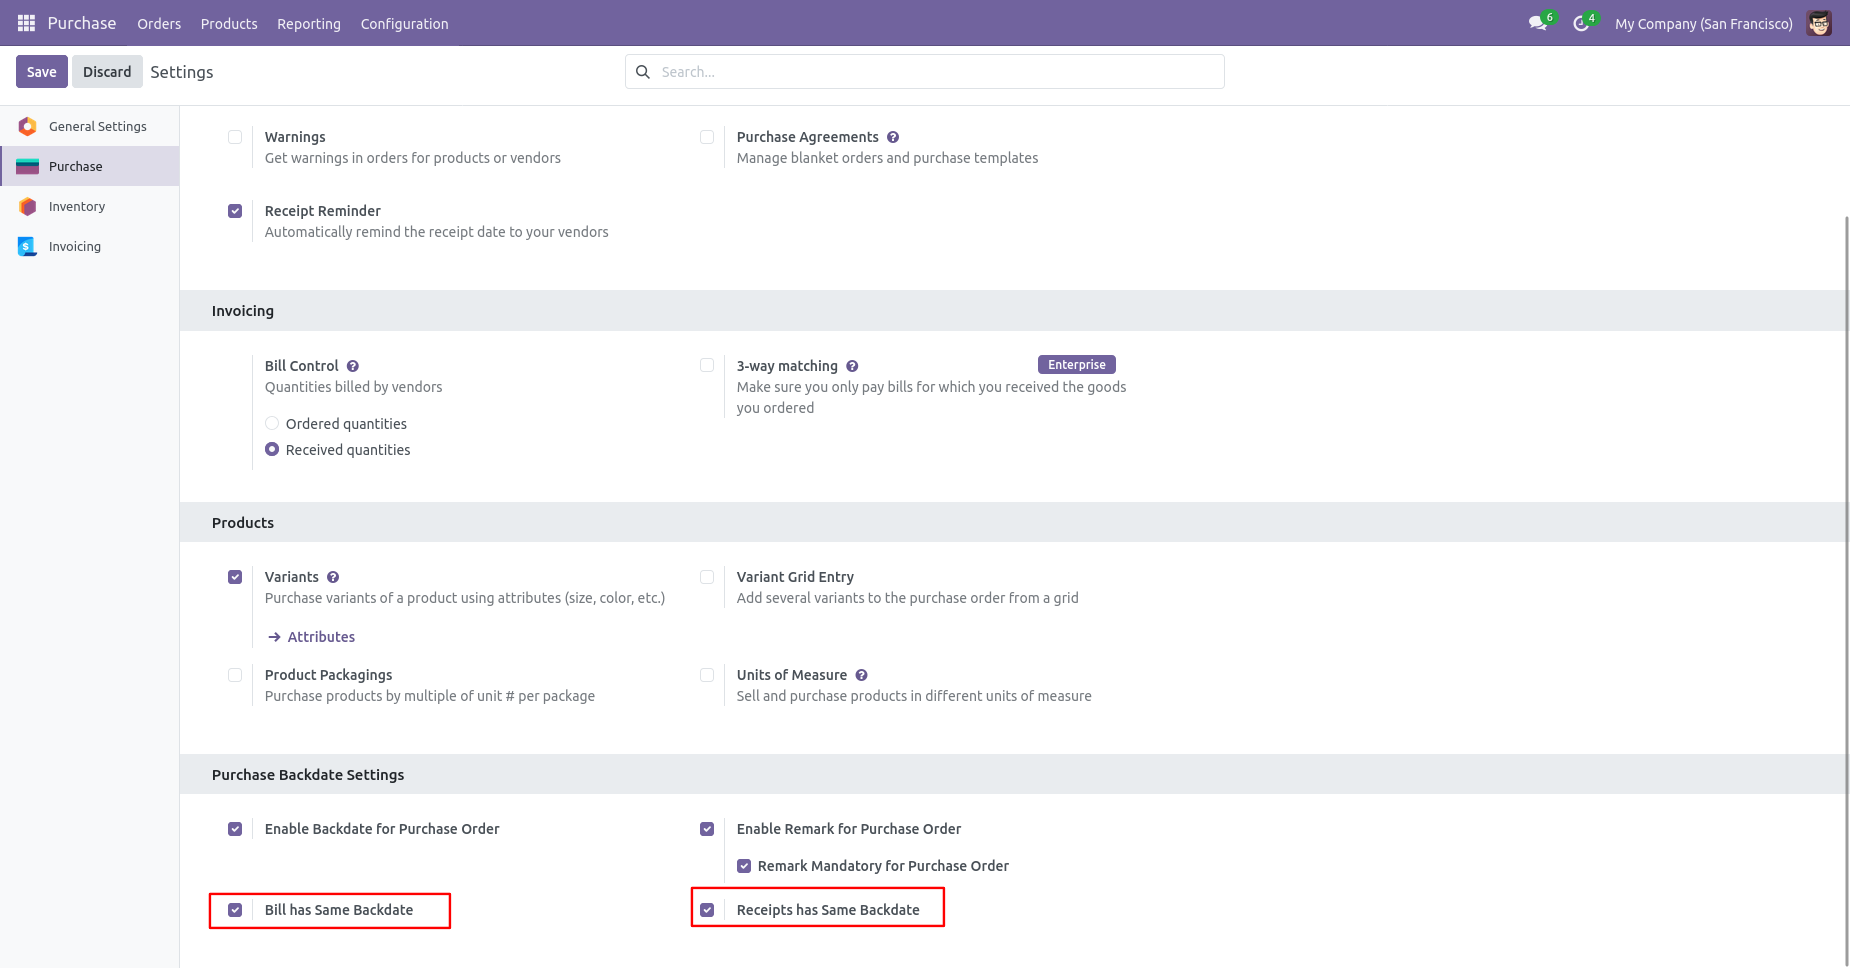
Enable the 'Bill Has Same Backdate' & 'Receipt has Same Backdate' option.
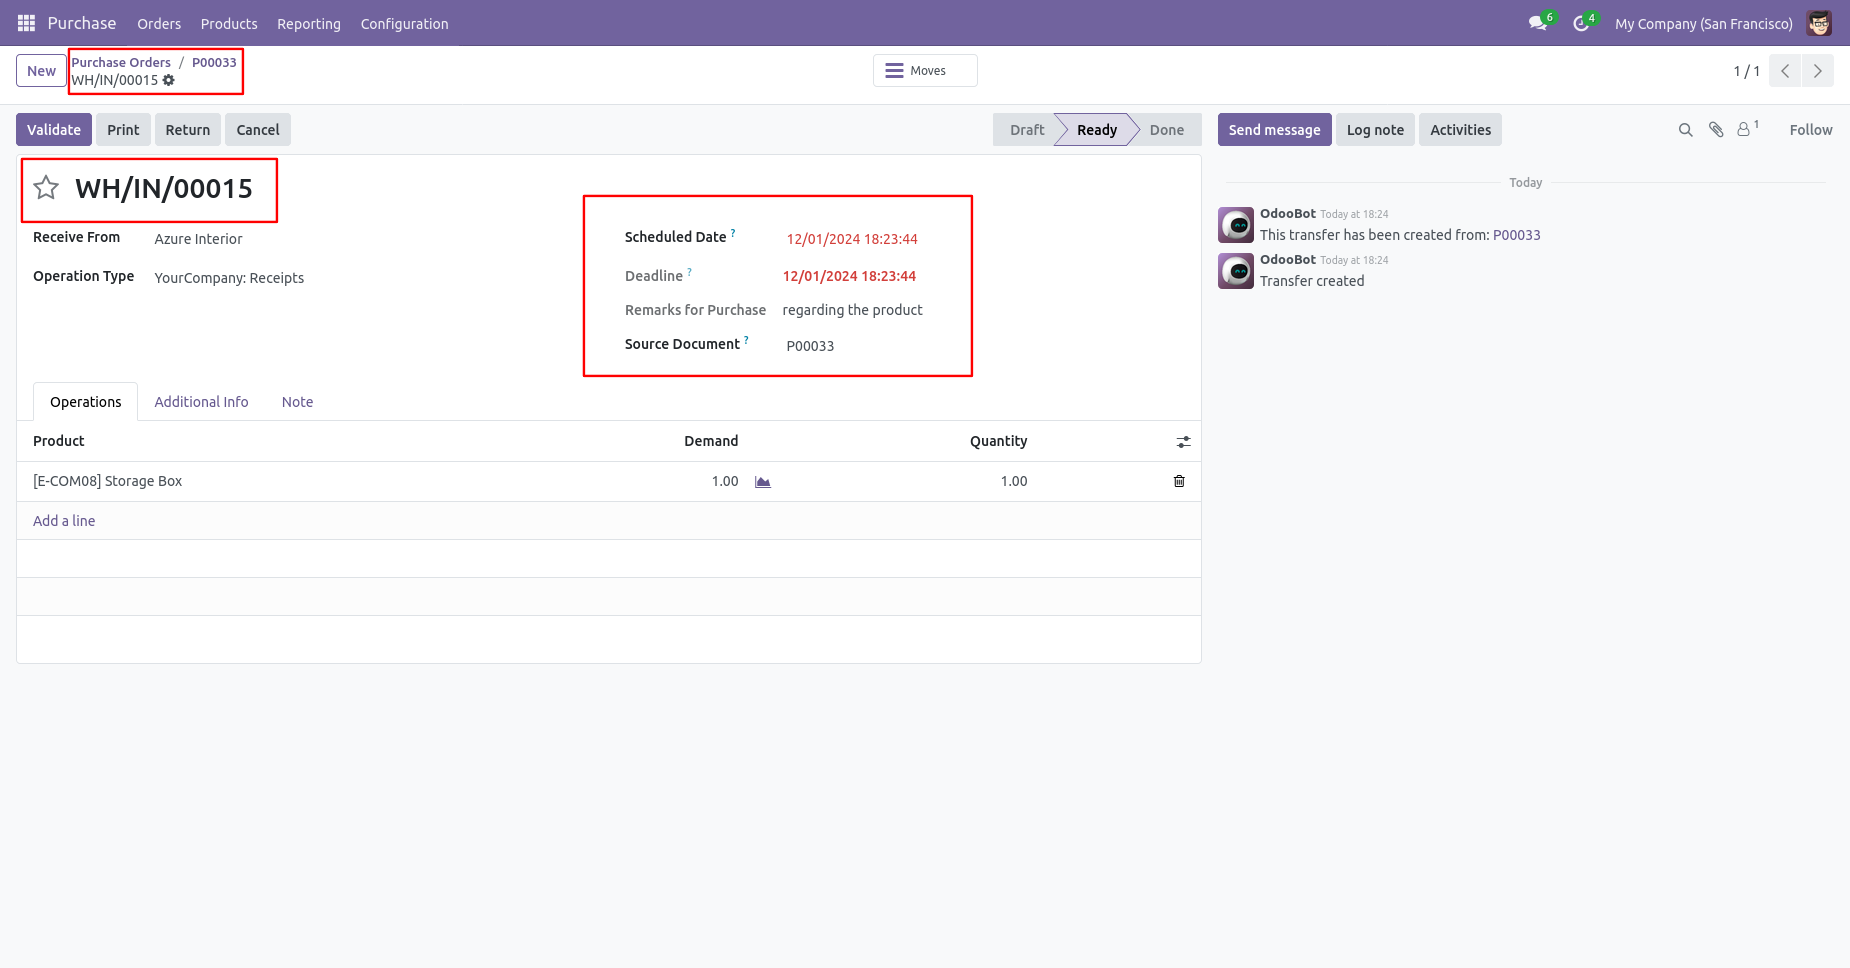
Receipt with backdate and remarks.
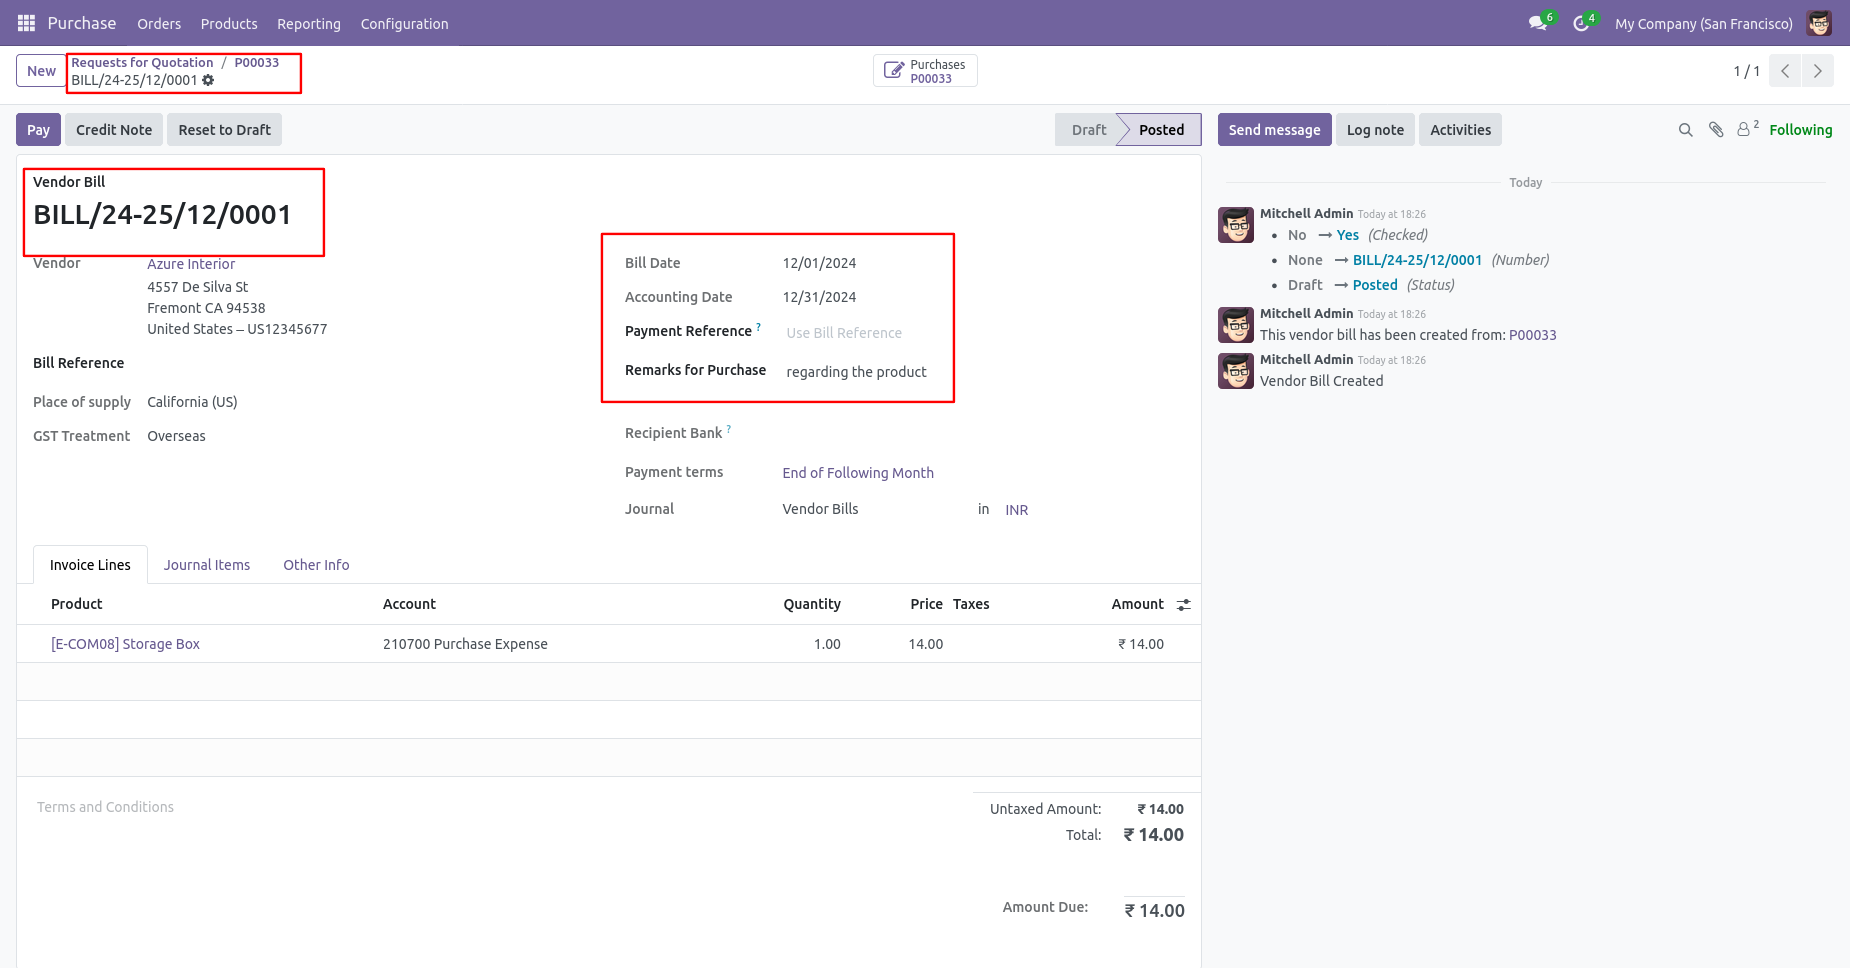
Bill with backdate and remarks.
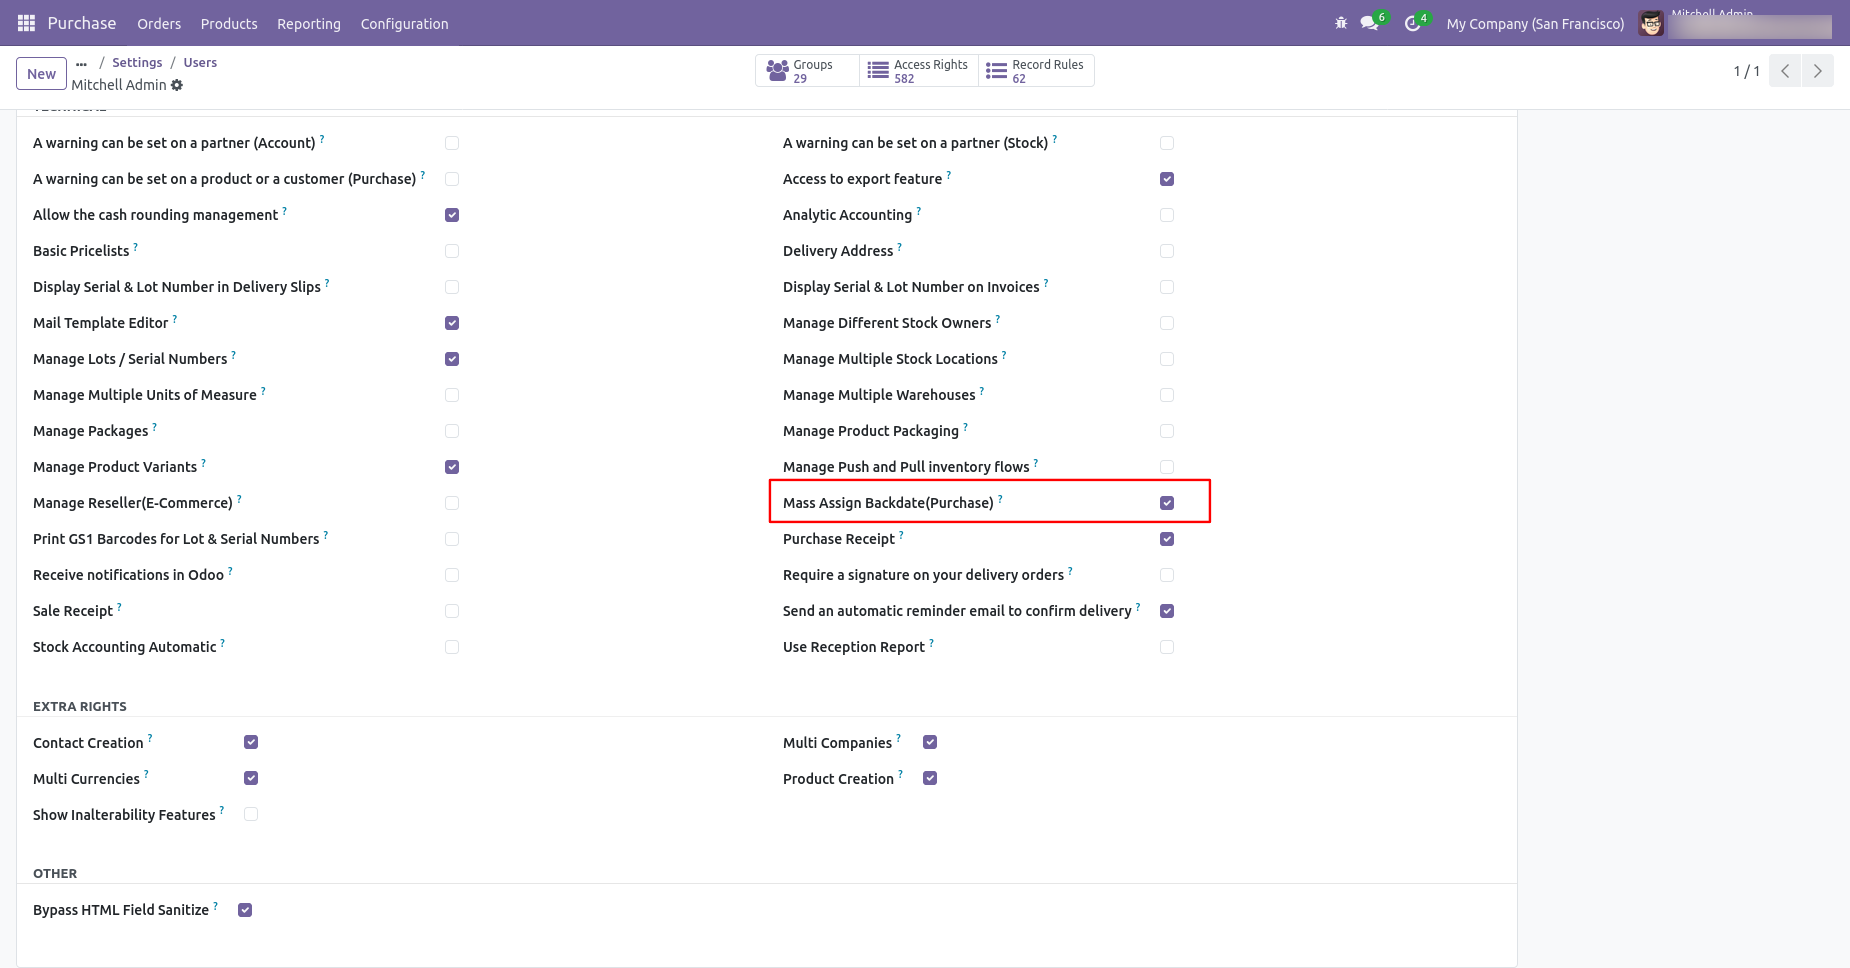
Enabling 'Mass Assign Backdate' allows you to assign backdates in purchase in bulk.
From the list view, select purchase orders/RFQs and click on 'Mass Assign Backdate'.
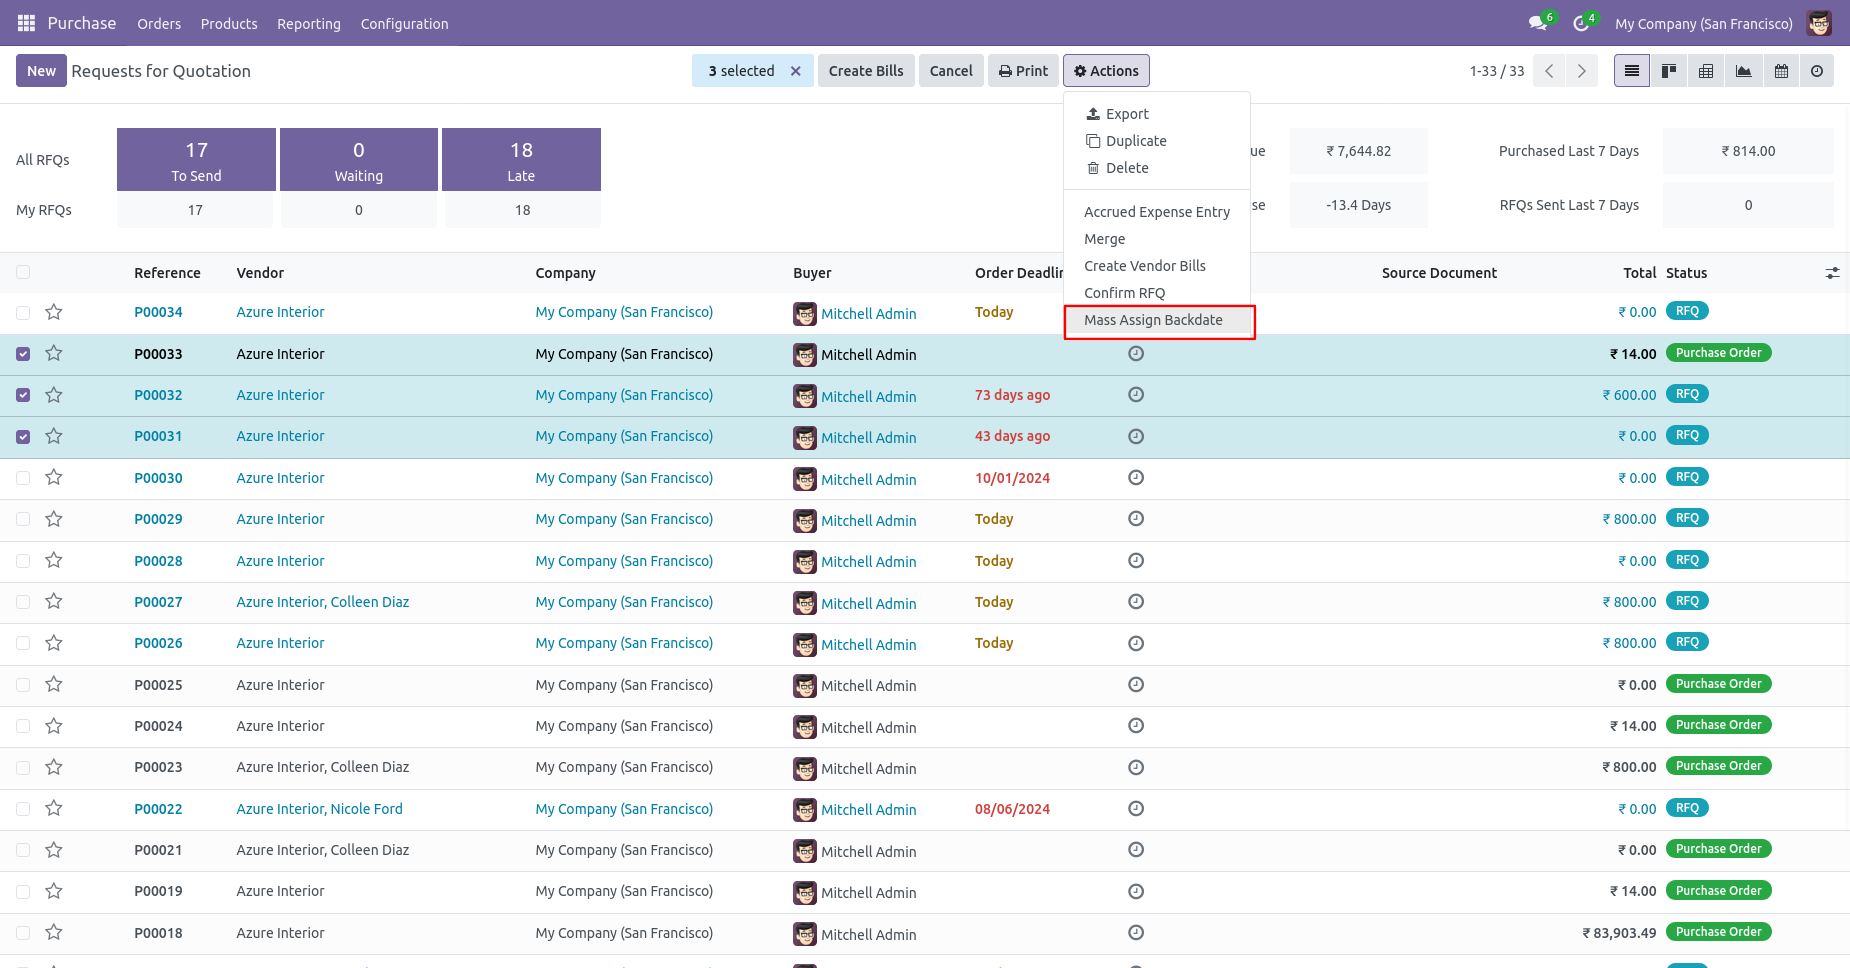
After that, this wizard opens, enters the order date and remarks. Here remarks come if you have enabled that feature.
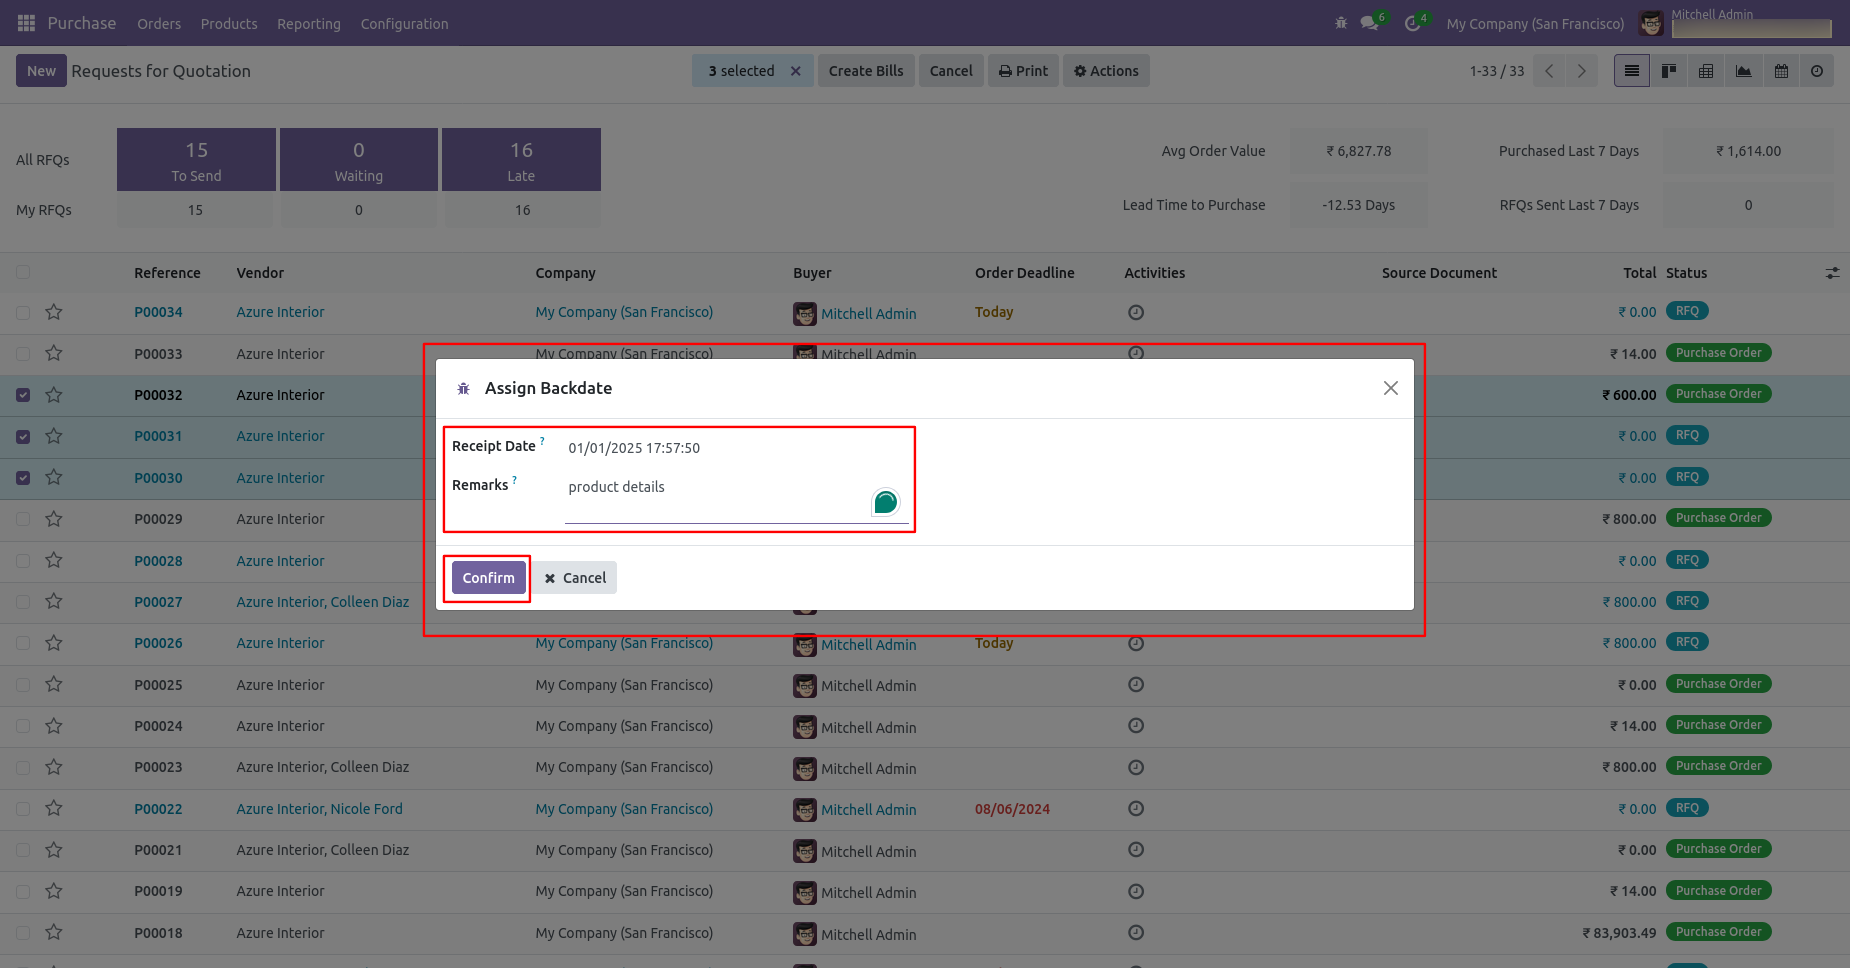
Purchase order form view with backdate and remarks.
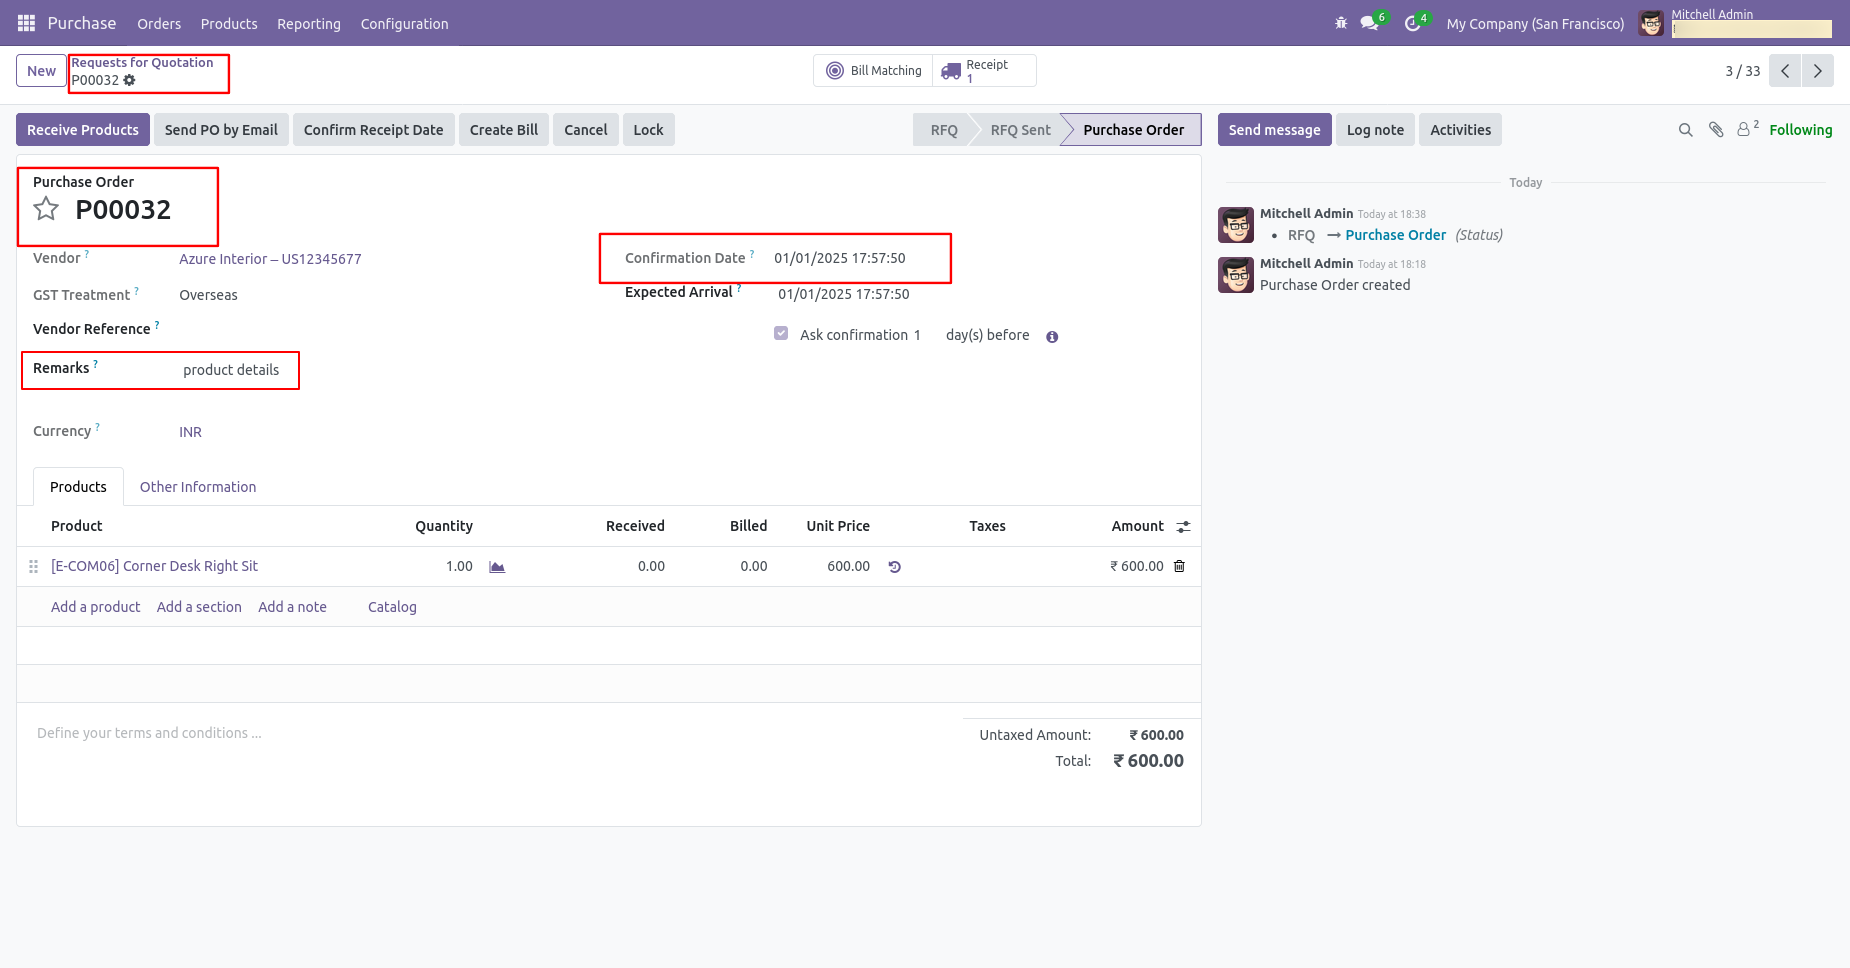
Receipt with backdate and remarks.
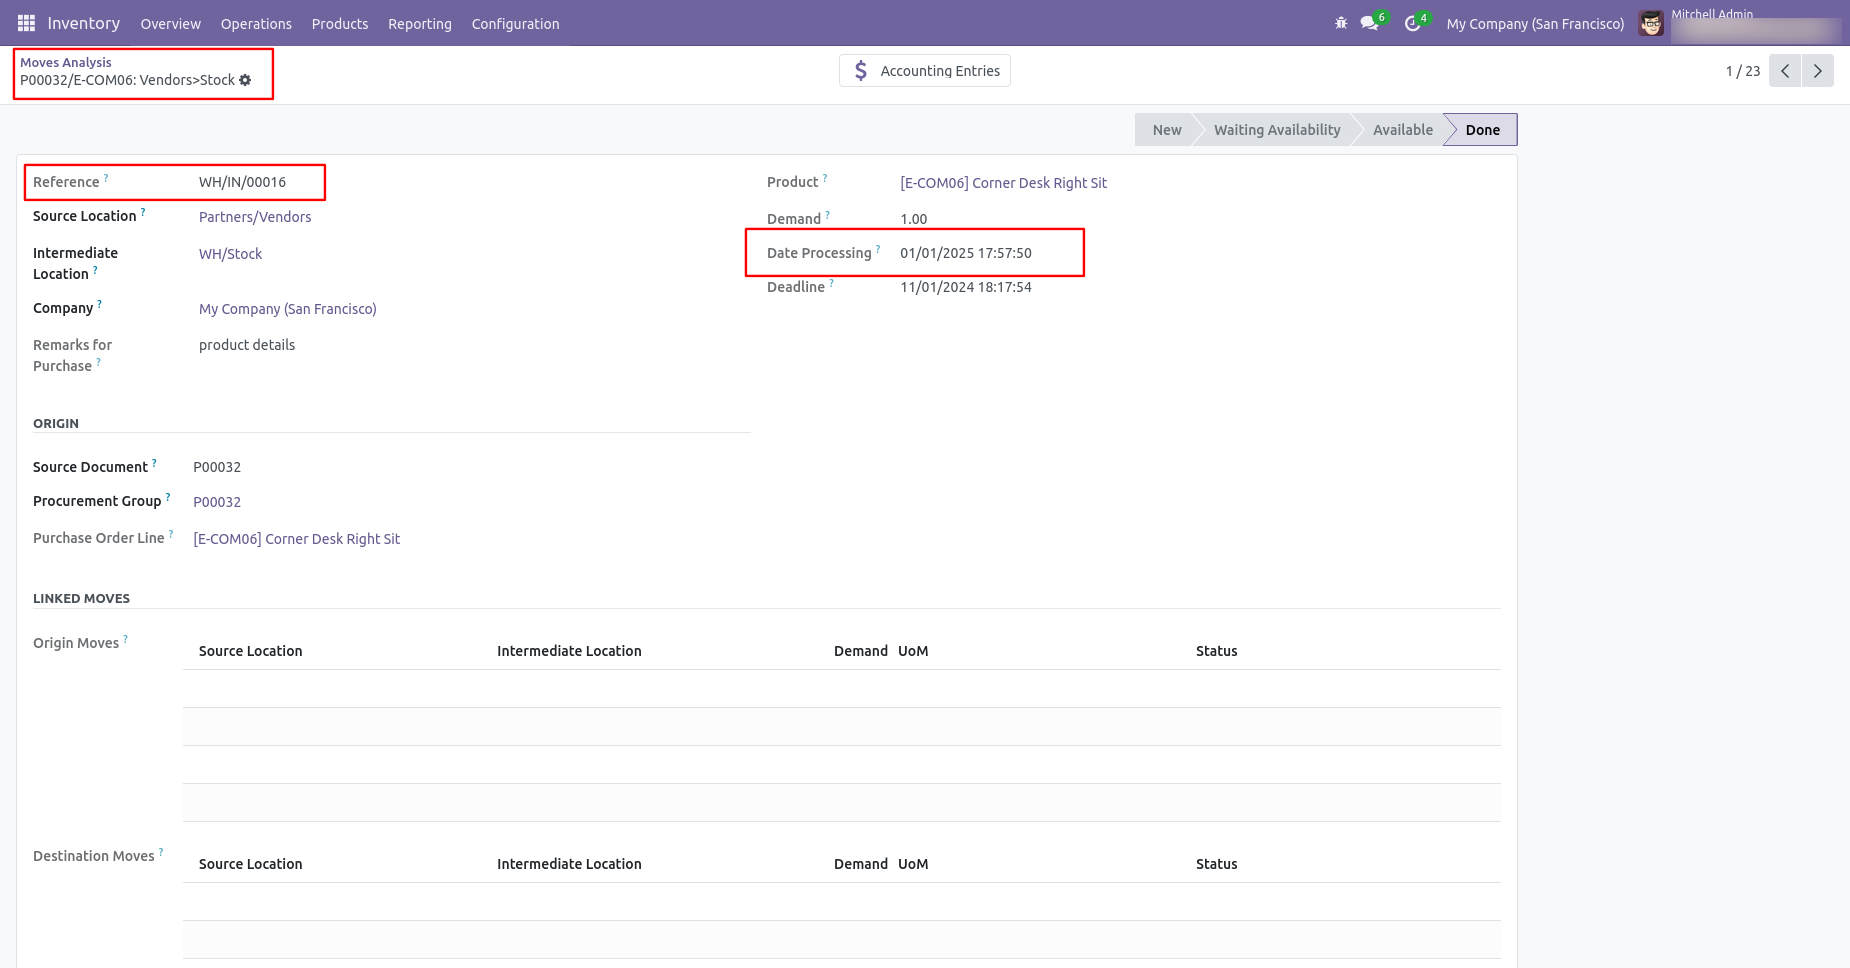
Move analysis with backdate and remarks.
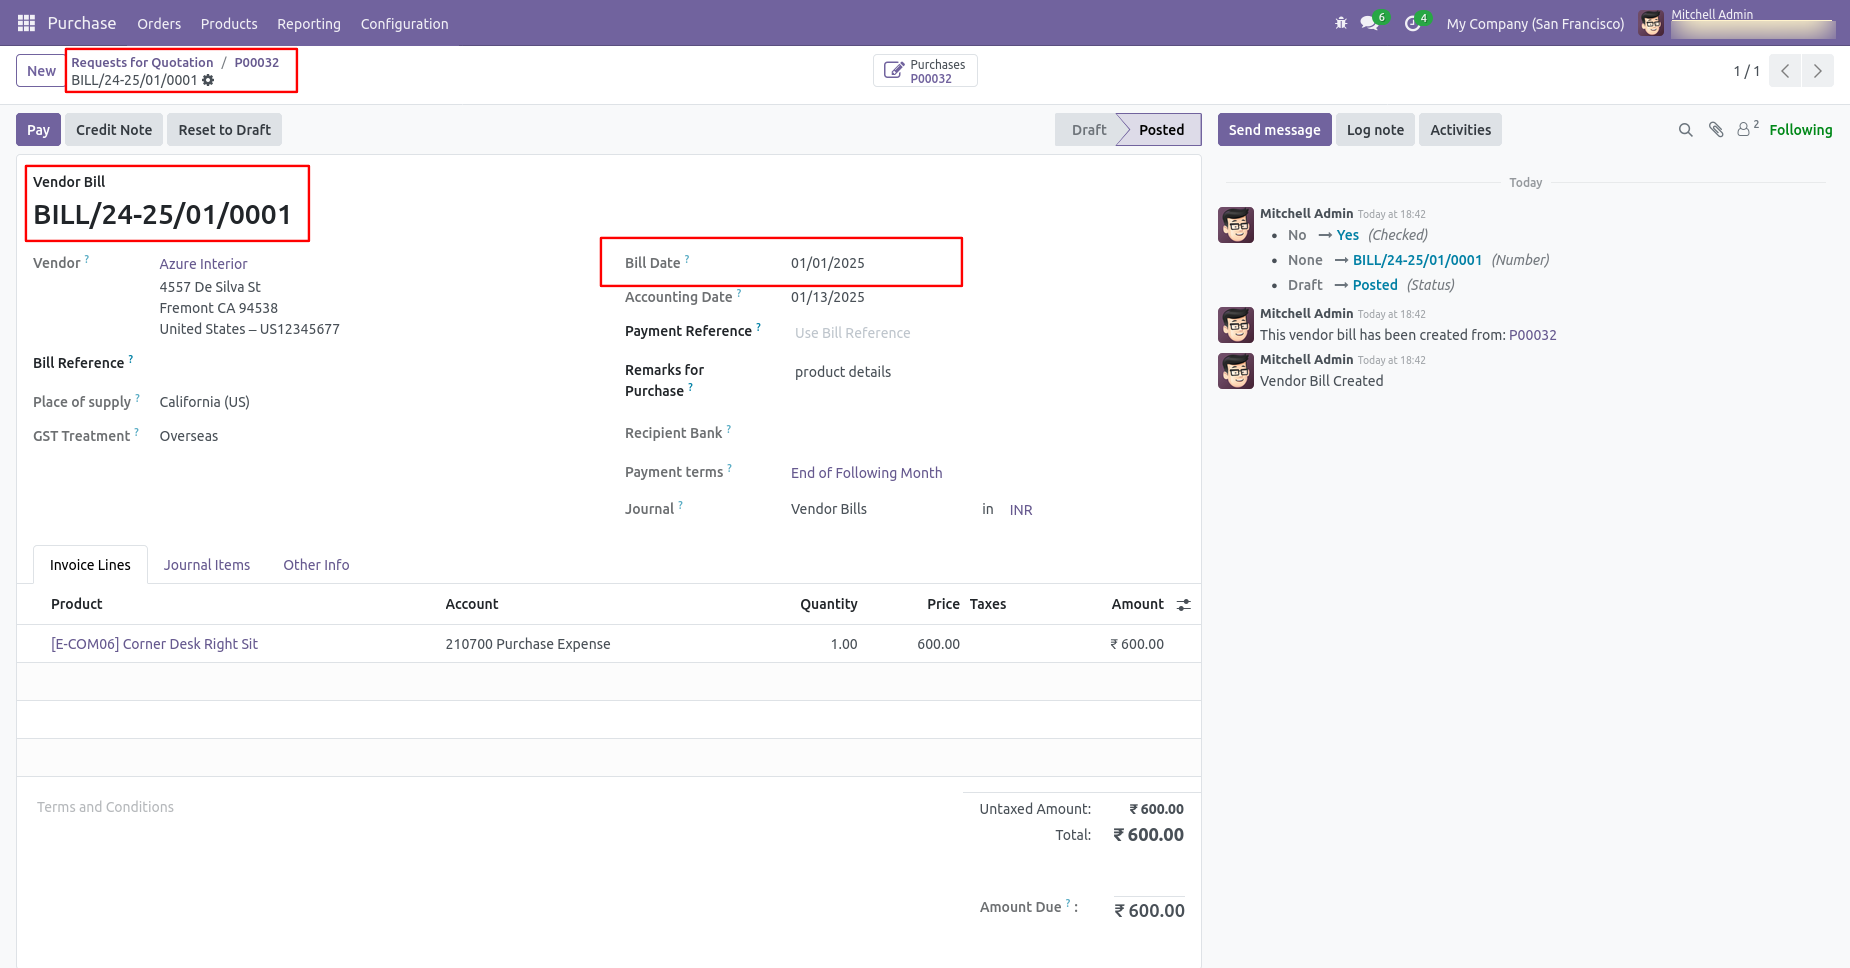
Bill date with backdate and remarks.
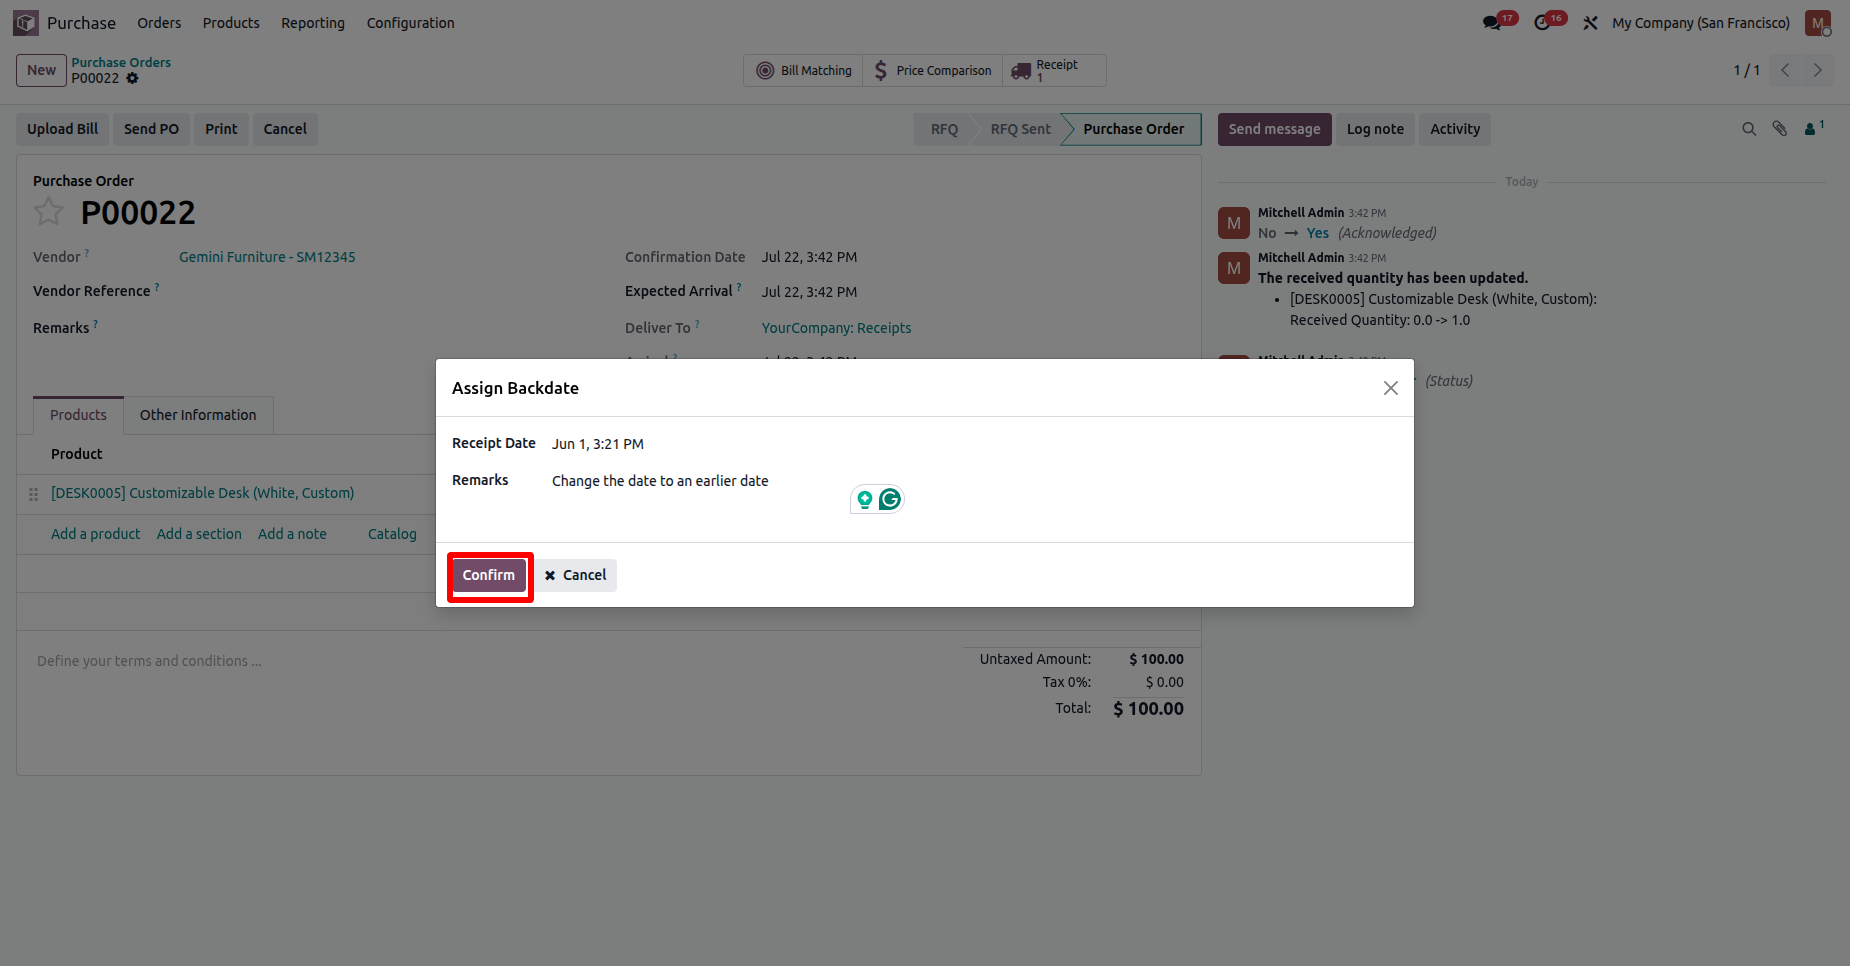
Assign the desired backdate, then click the Confirm button to apply the backdate to the selected Purchase Order.
The Purchase Order Date is updated to the selected backdate. The backdate change is also recorded in the Chatter, and the same audit entry is available through the Backdate Log smart button on the Purchase Order form view.
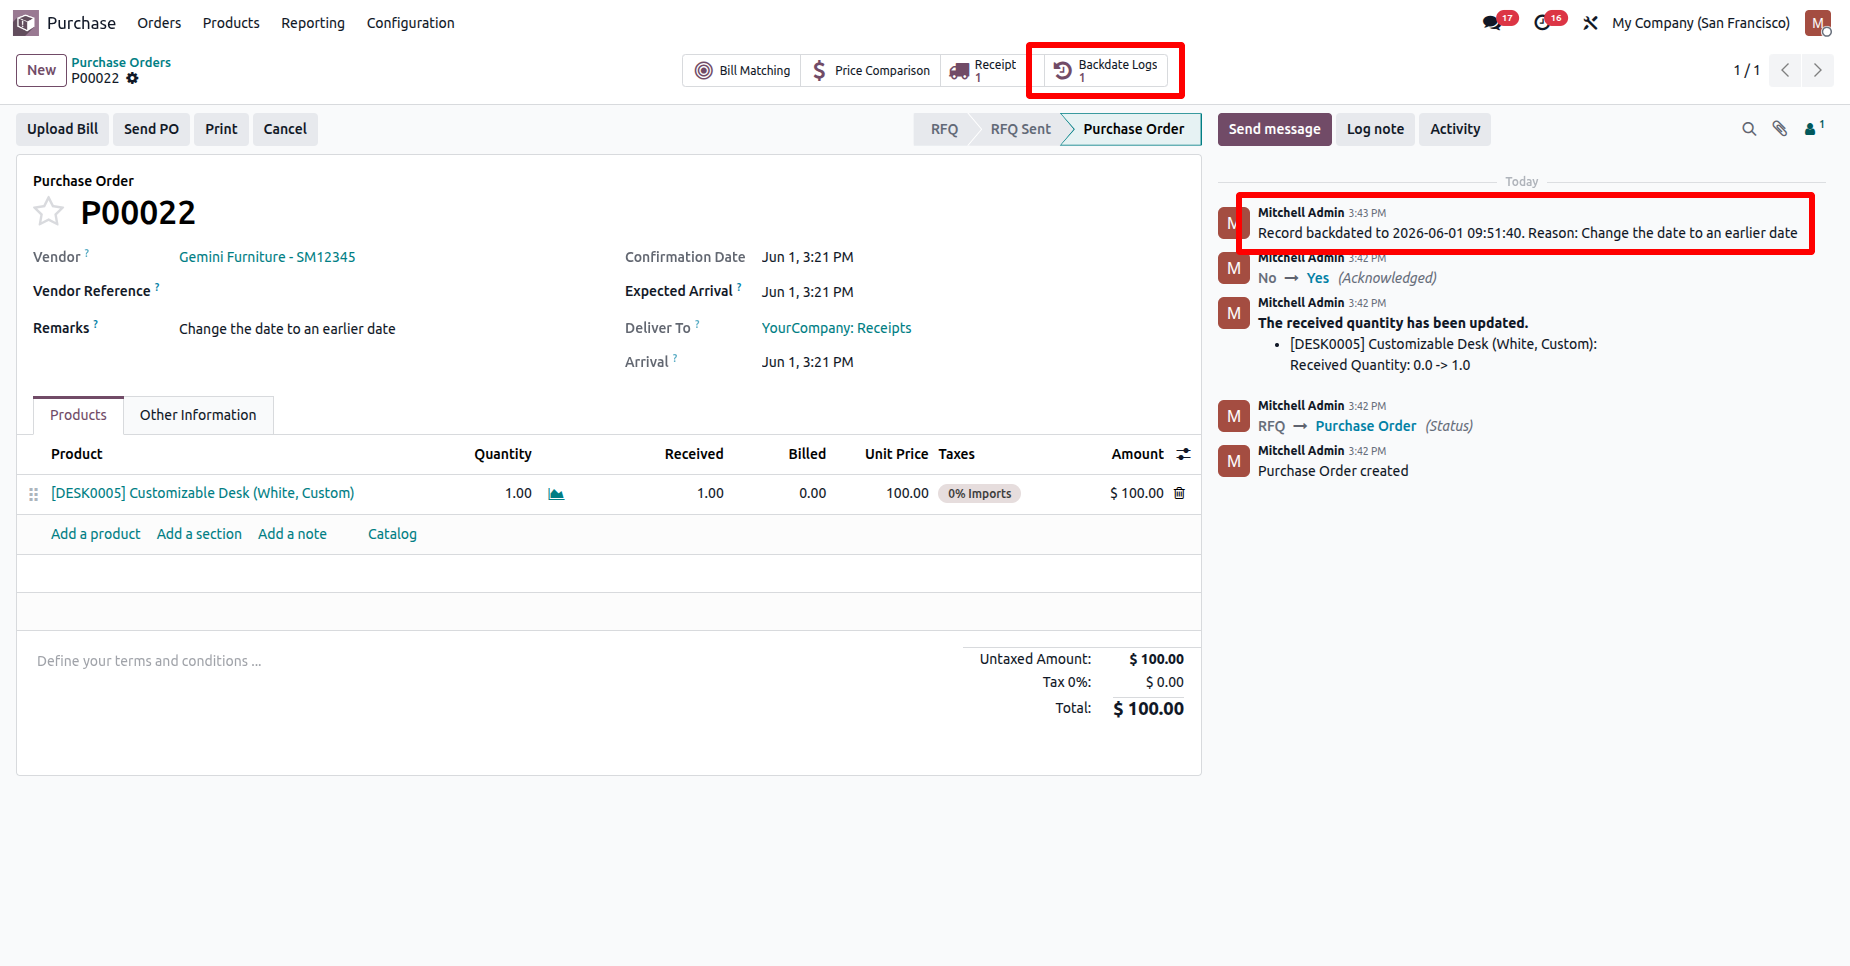
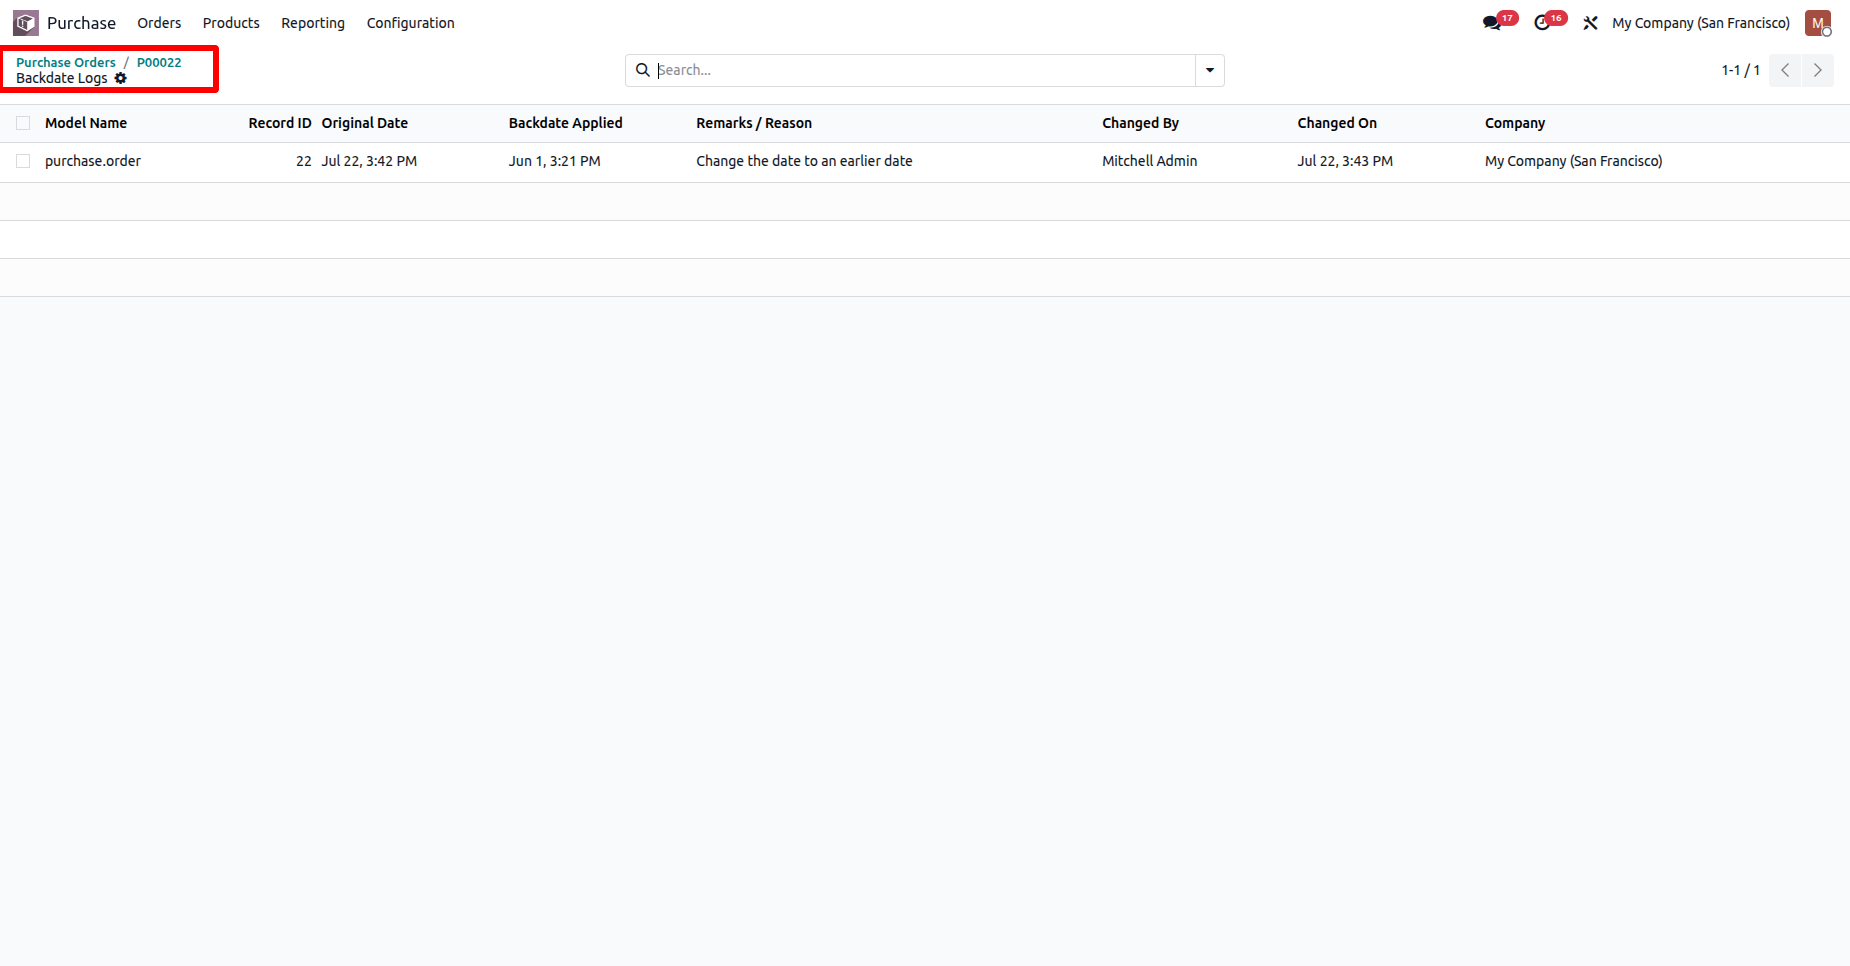
Clicking the Backdate Logs smart button opens the Backdate Logs list view, where users can view the complete audit history of all backdate changes made to the Purchase Order.
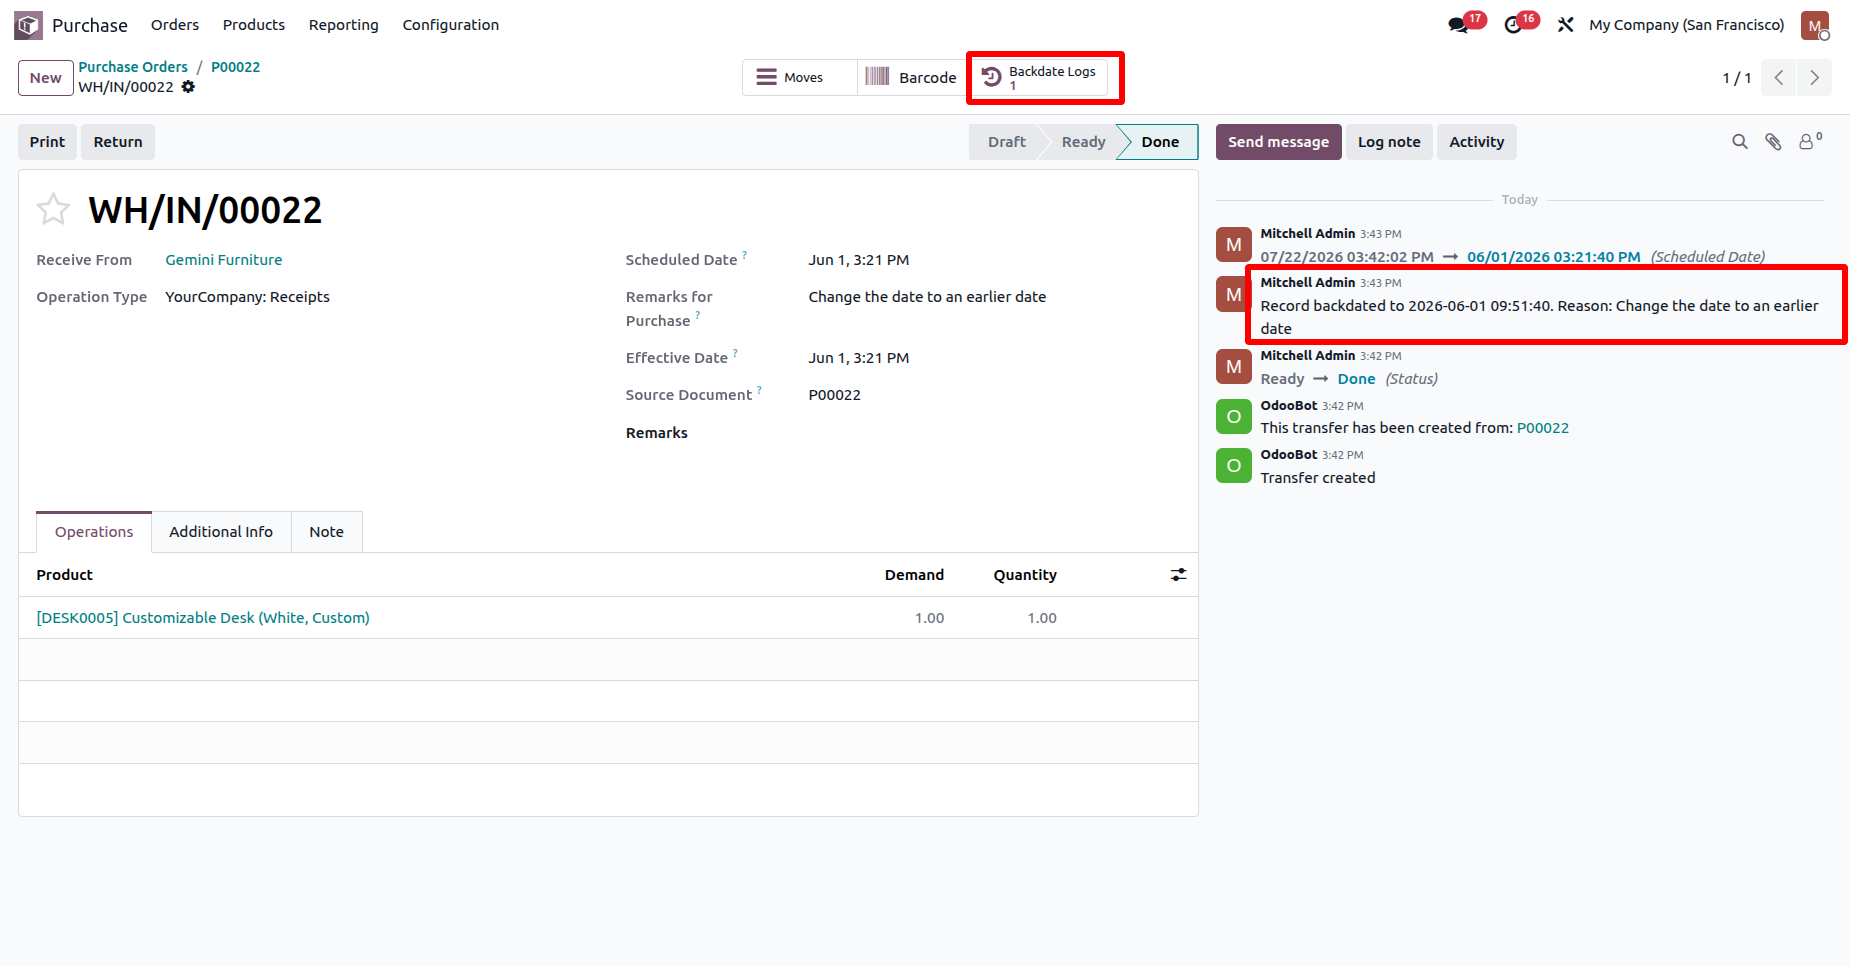
Users can also view the Backdate Logs smart button on the Receipt form view, providing quick access to the audit history of all backdate changes related to the Receipt.
Backdate For Picking
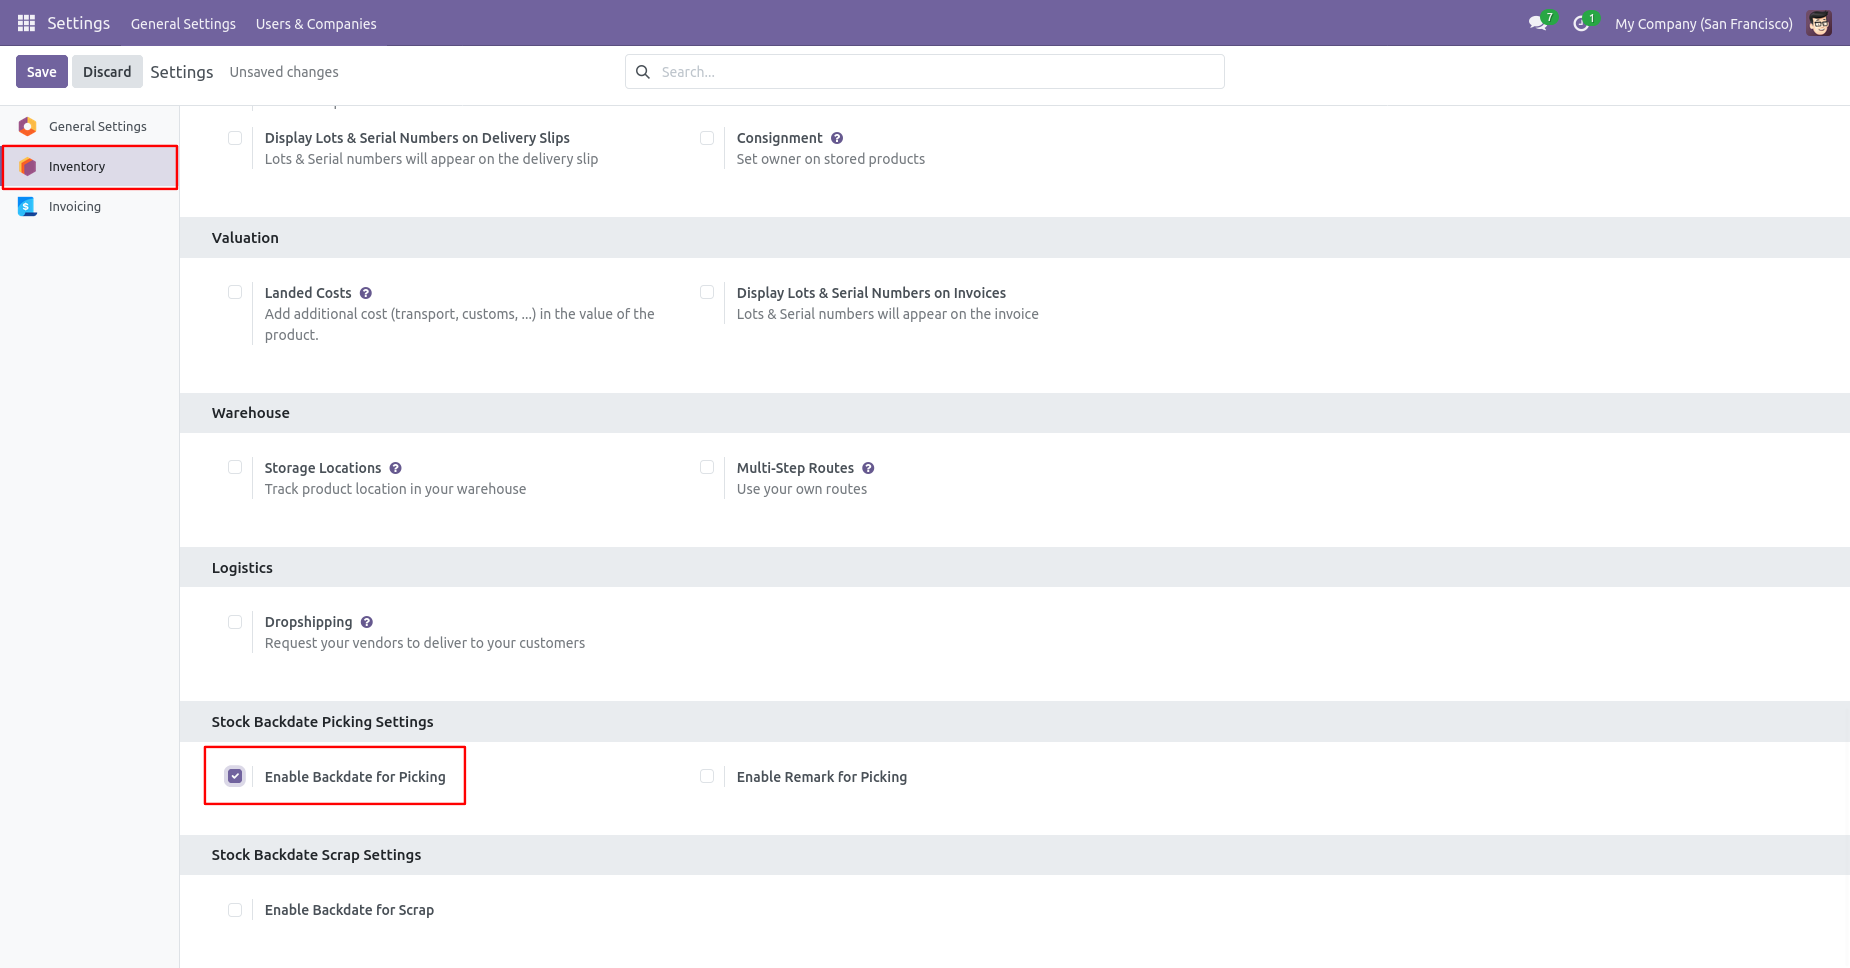
Configuration for picking backdate, Tick the 'Enable Backdate For Picking' boolean.
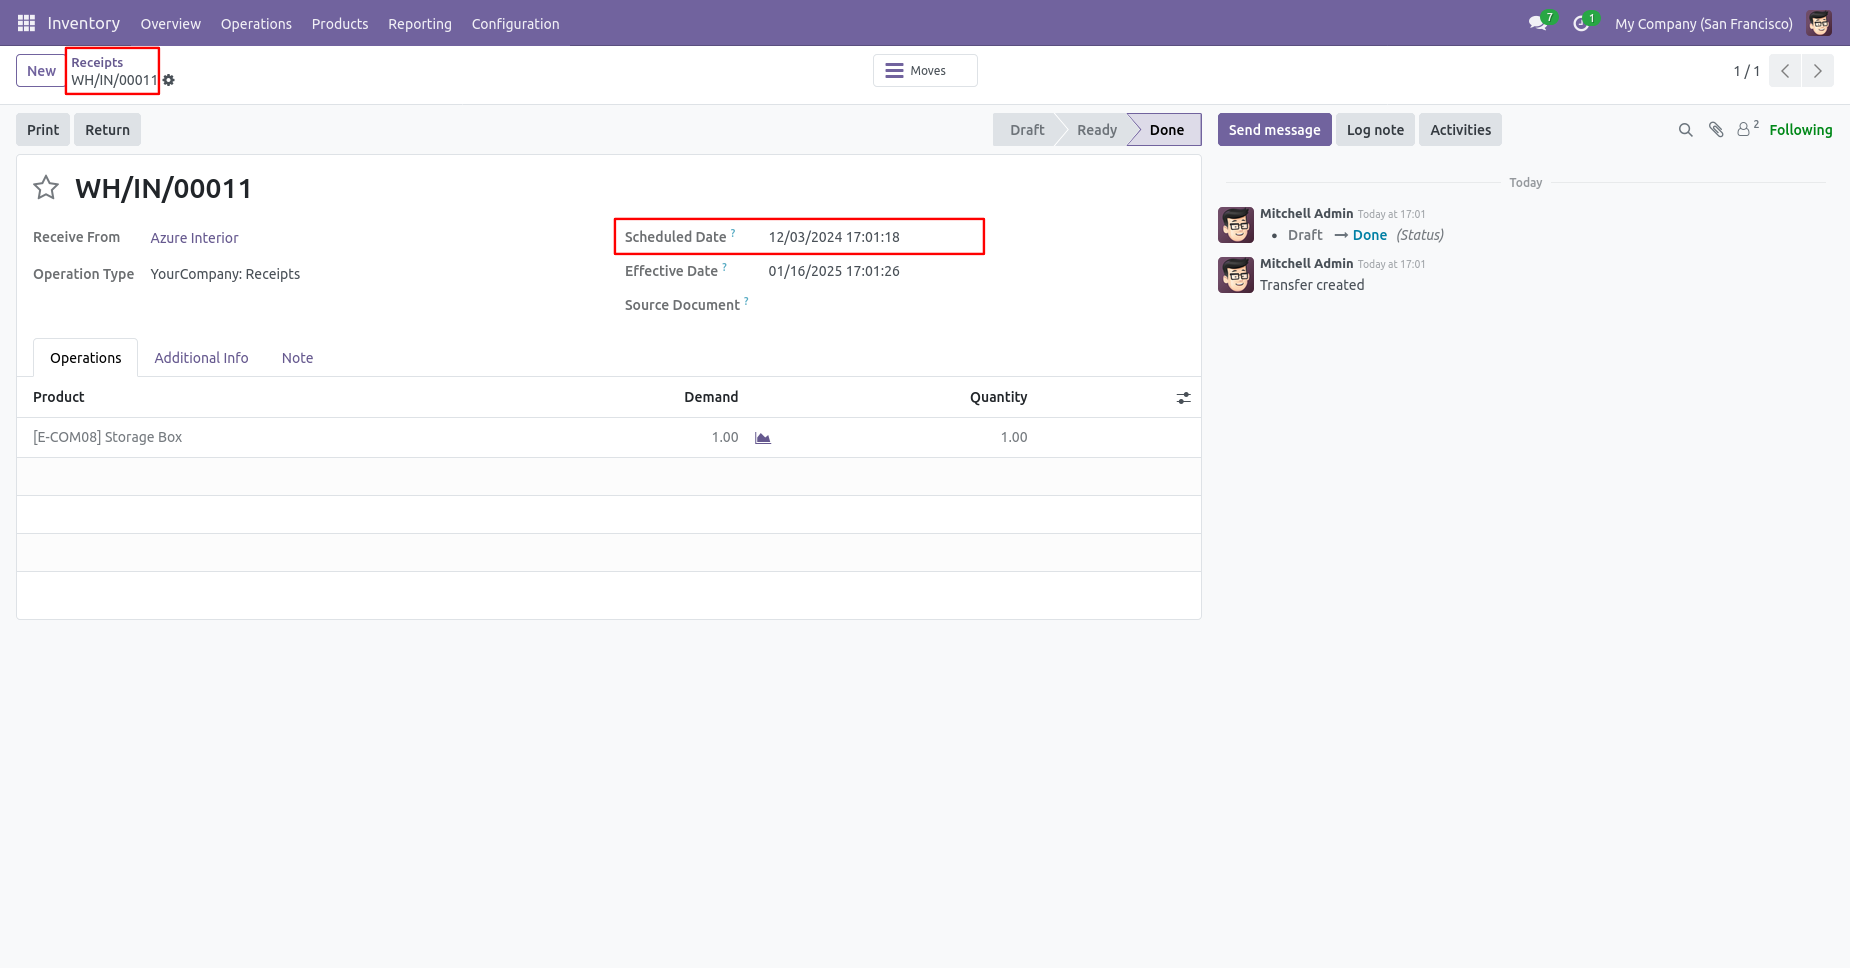
Receipt form view with backdate.
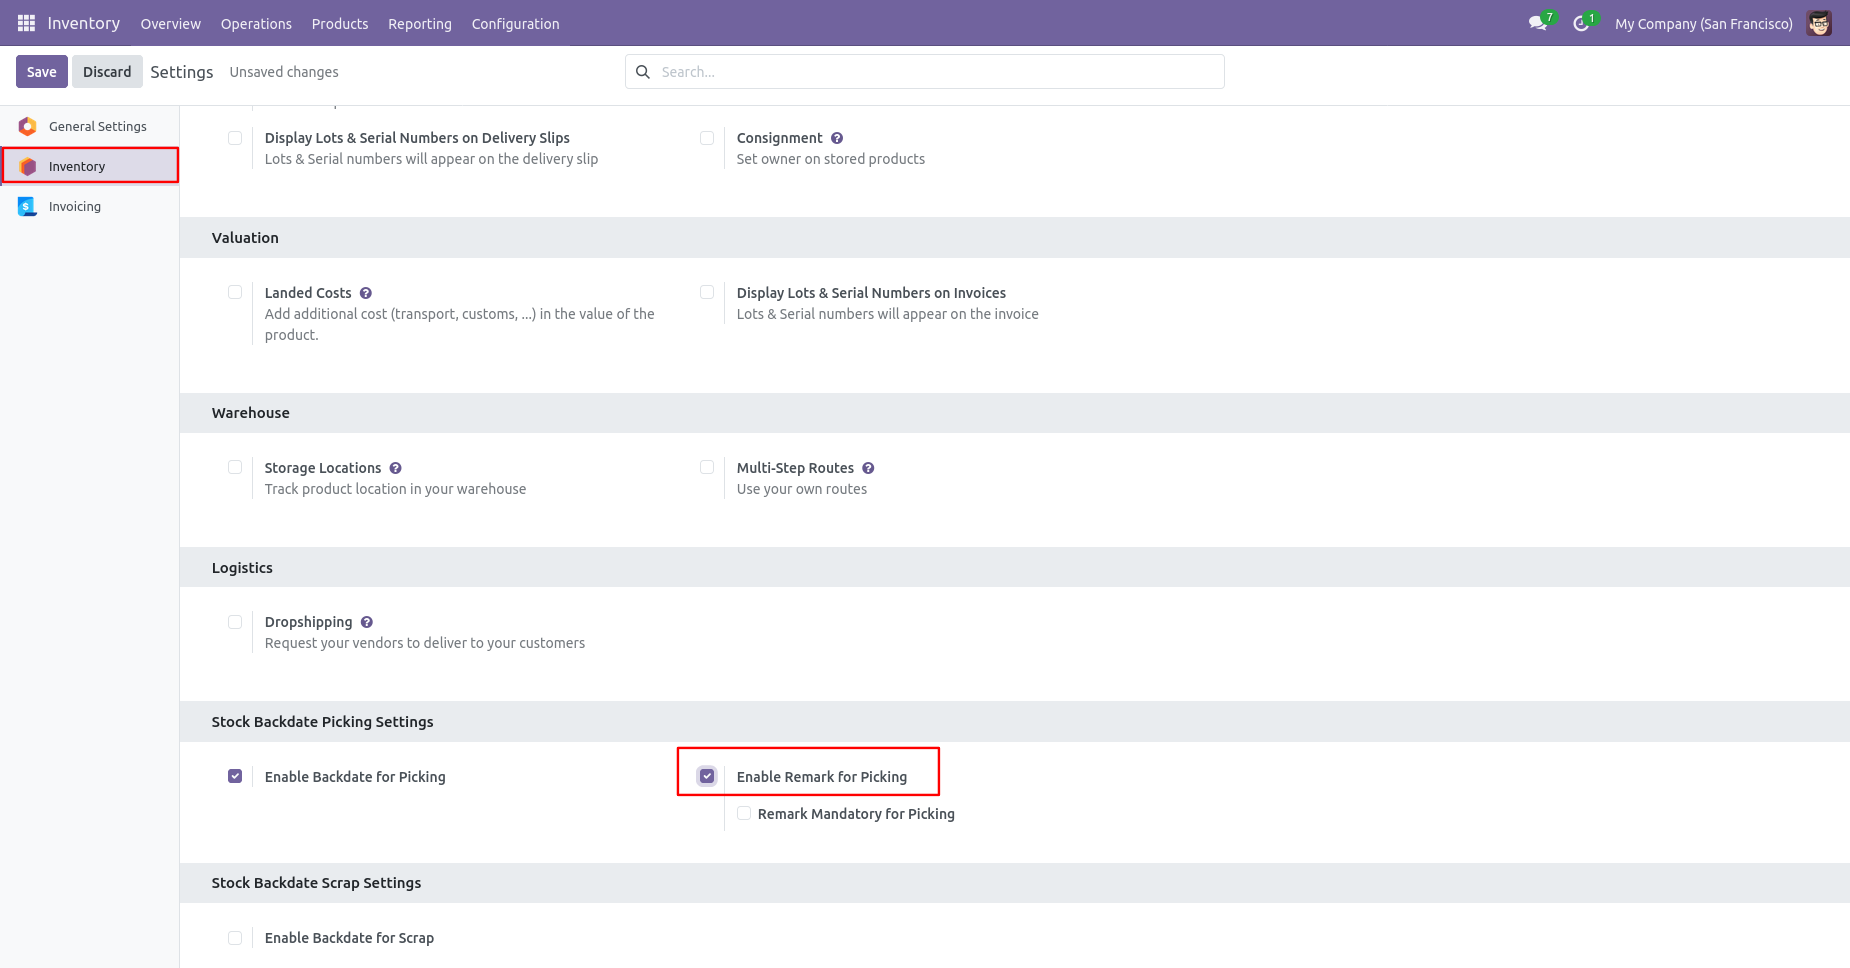
Tick the 'Enable Remark For Picking' boolean.
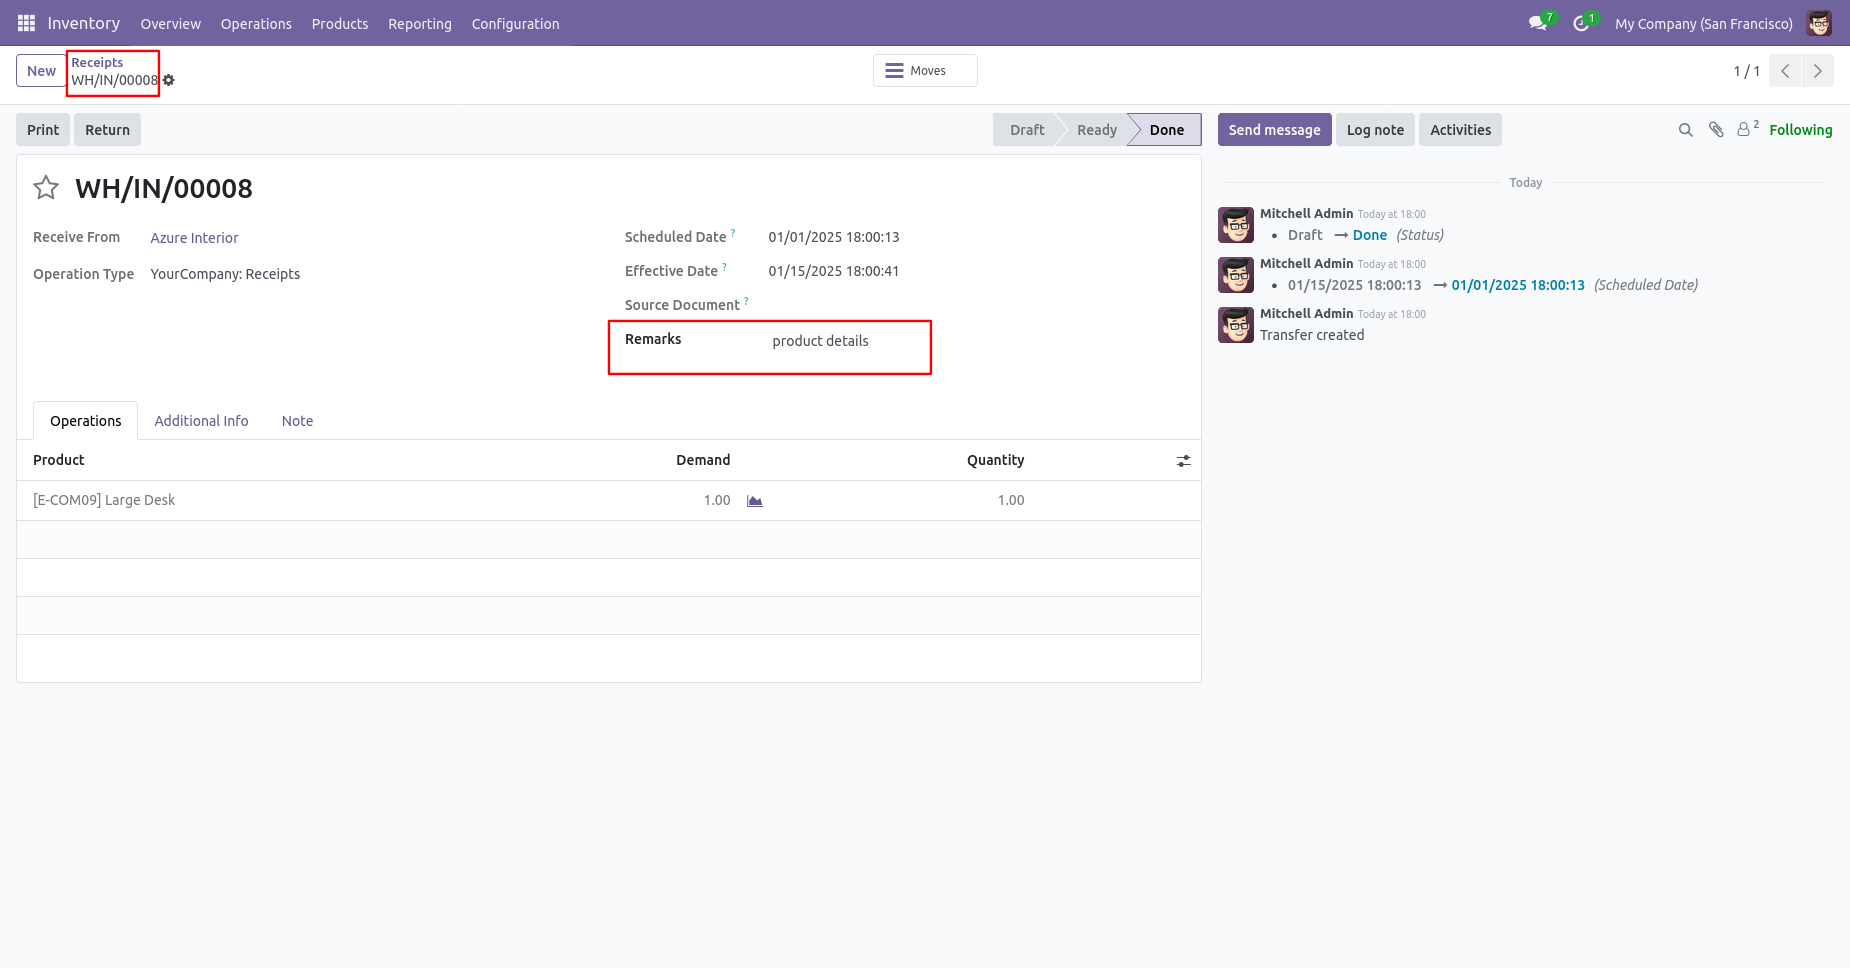
Receipt form view with remarks.
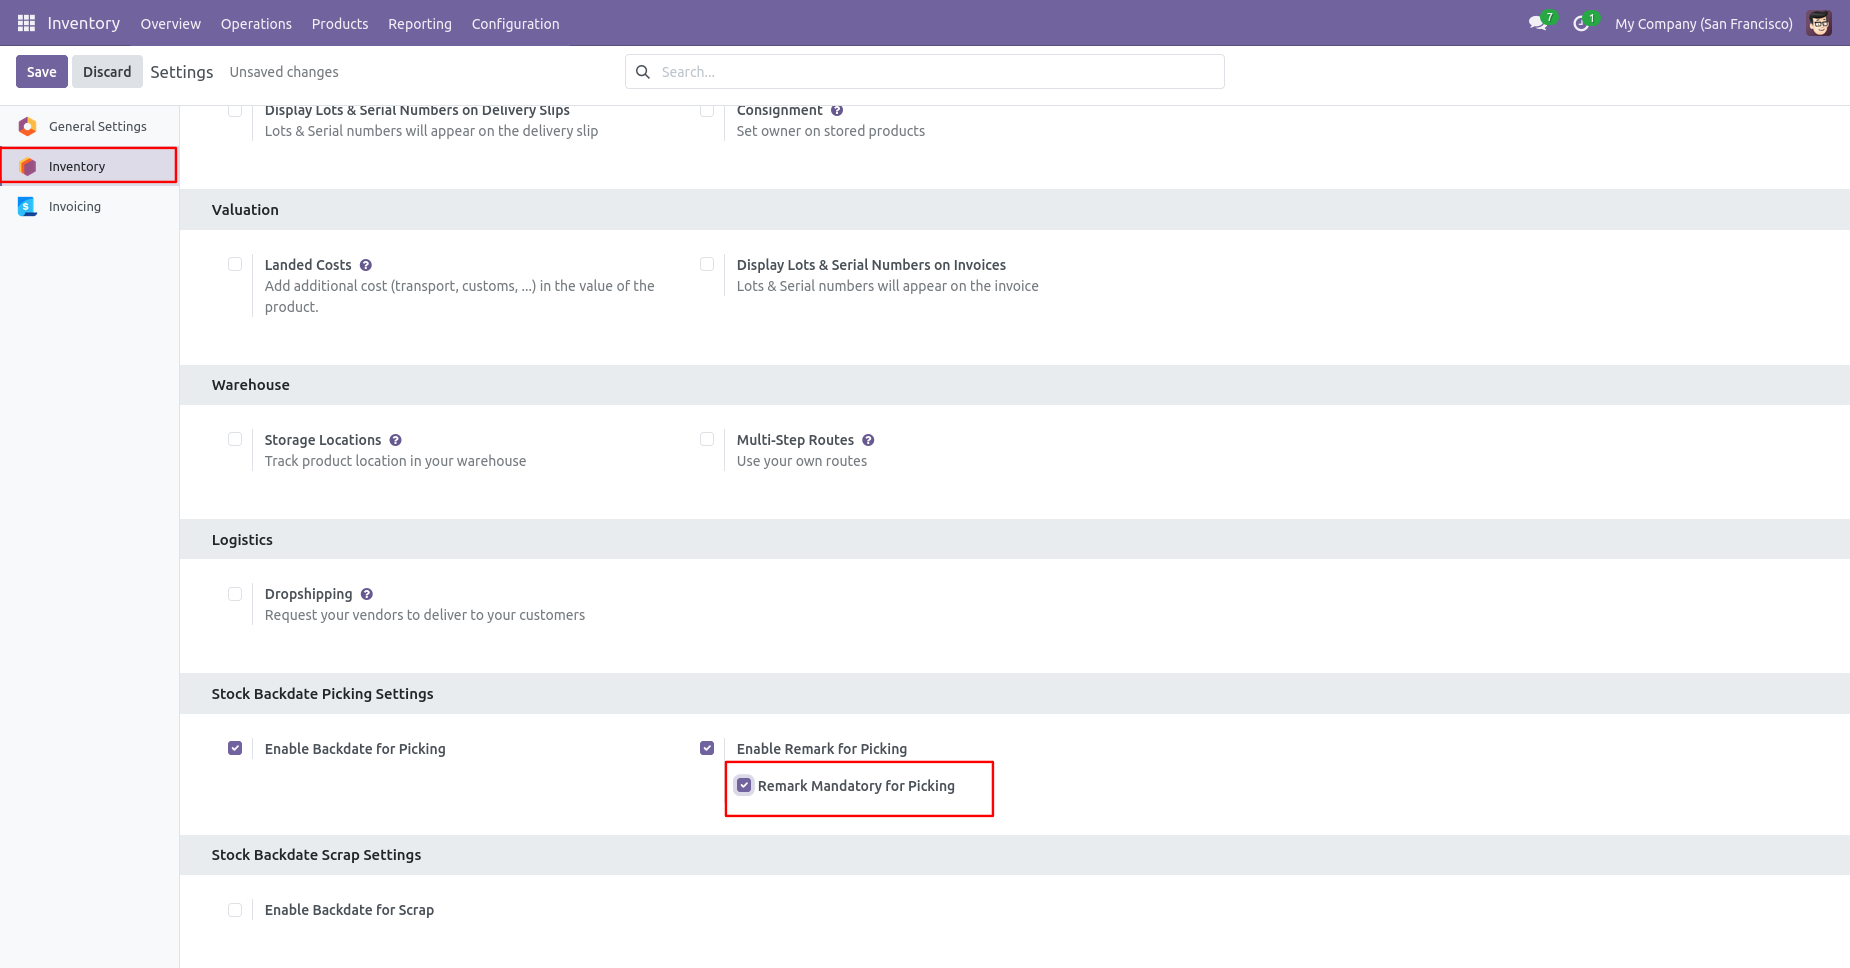
Tick the 'Remark Mandatory For Picking' boolean.
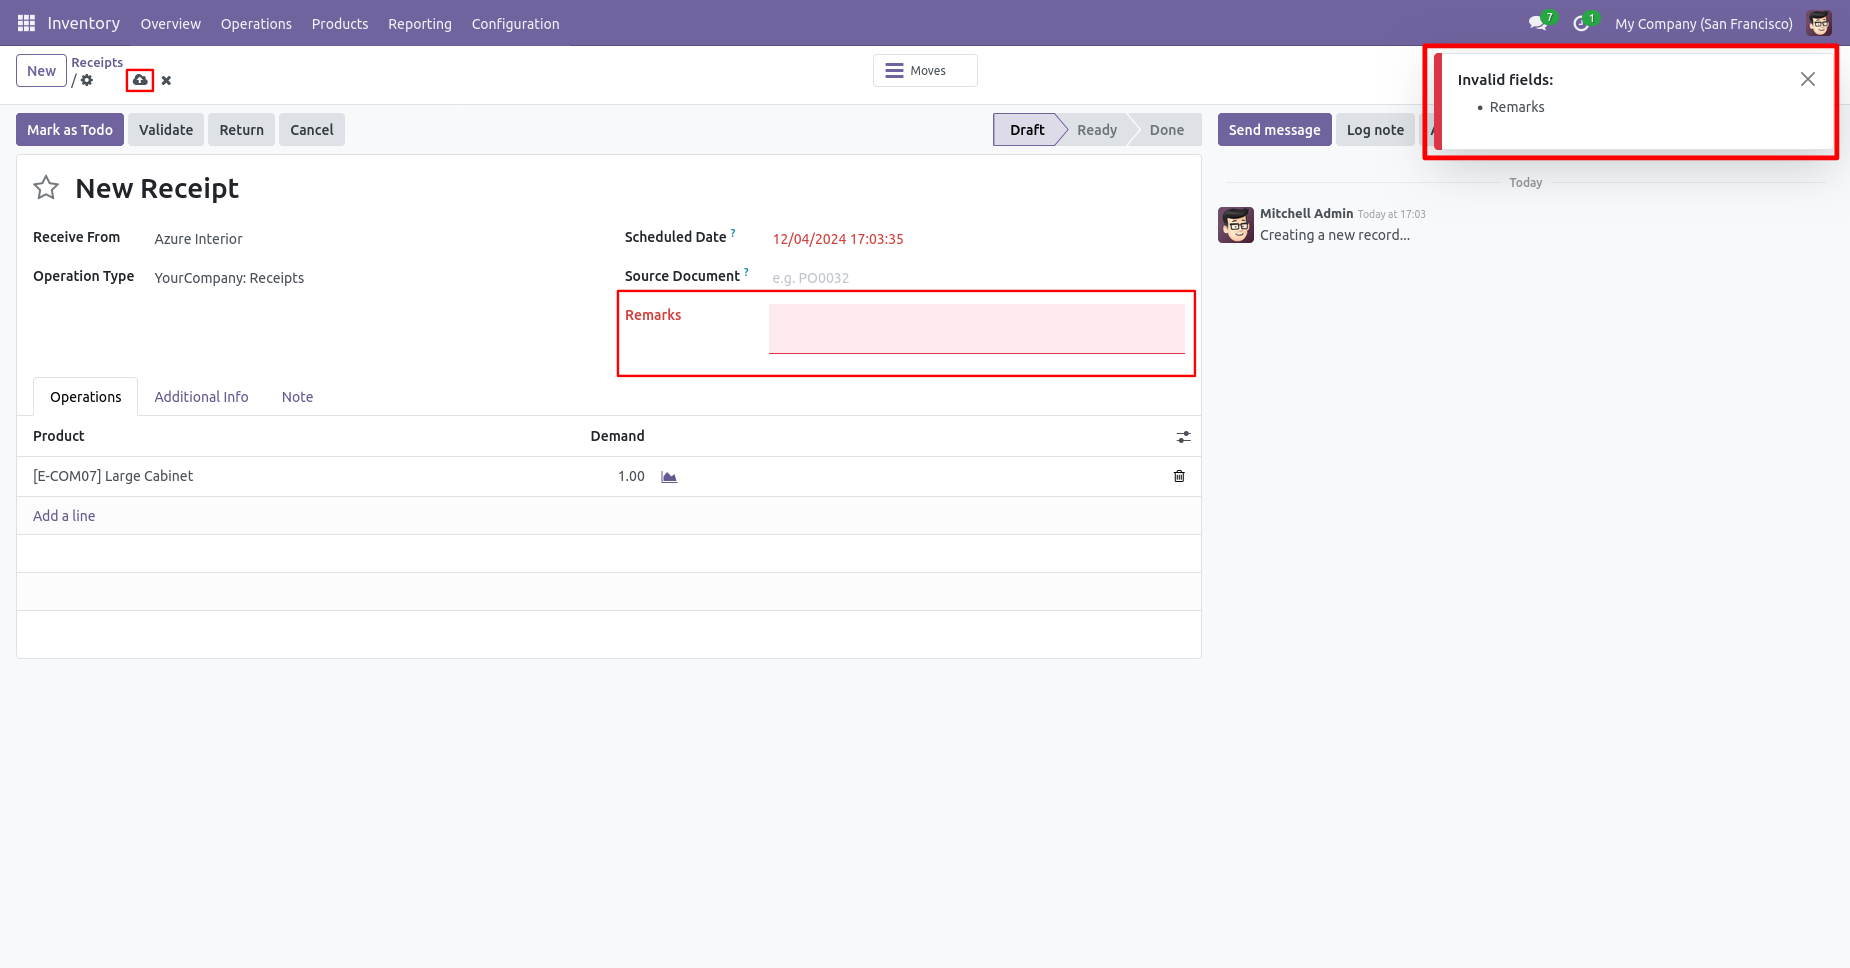
You can't save the receipt without entering a remark.
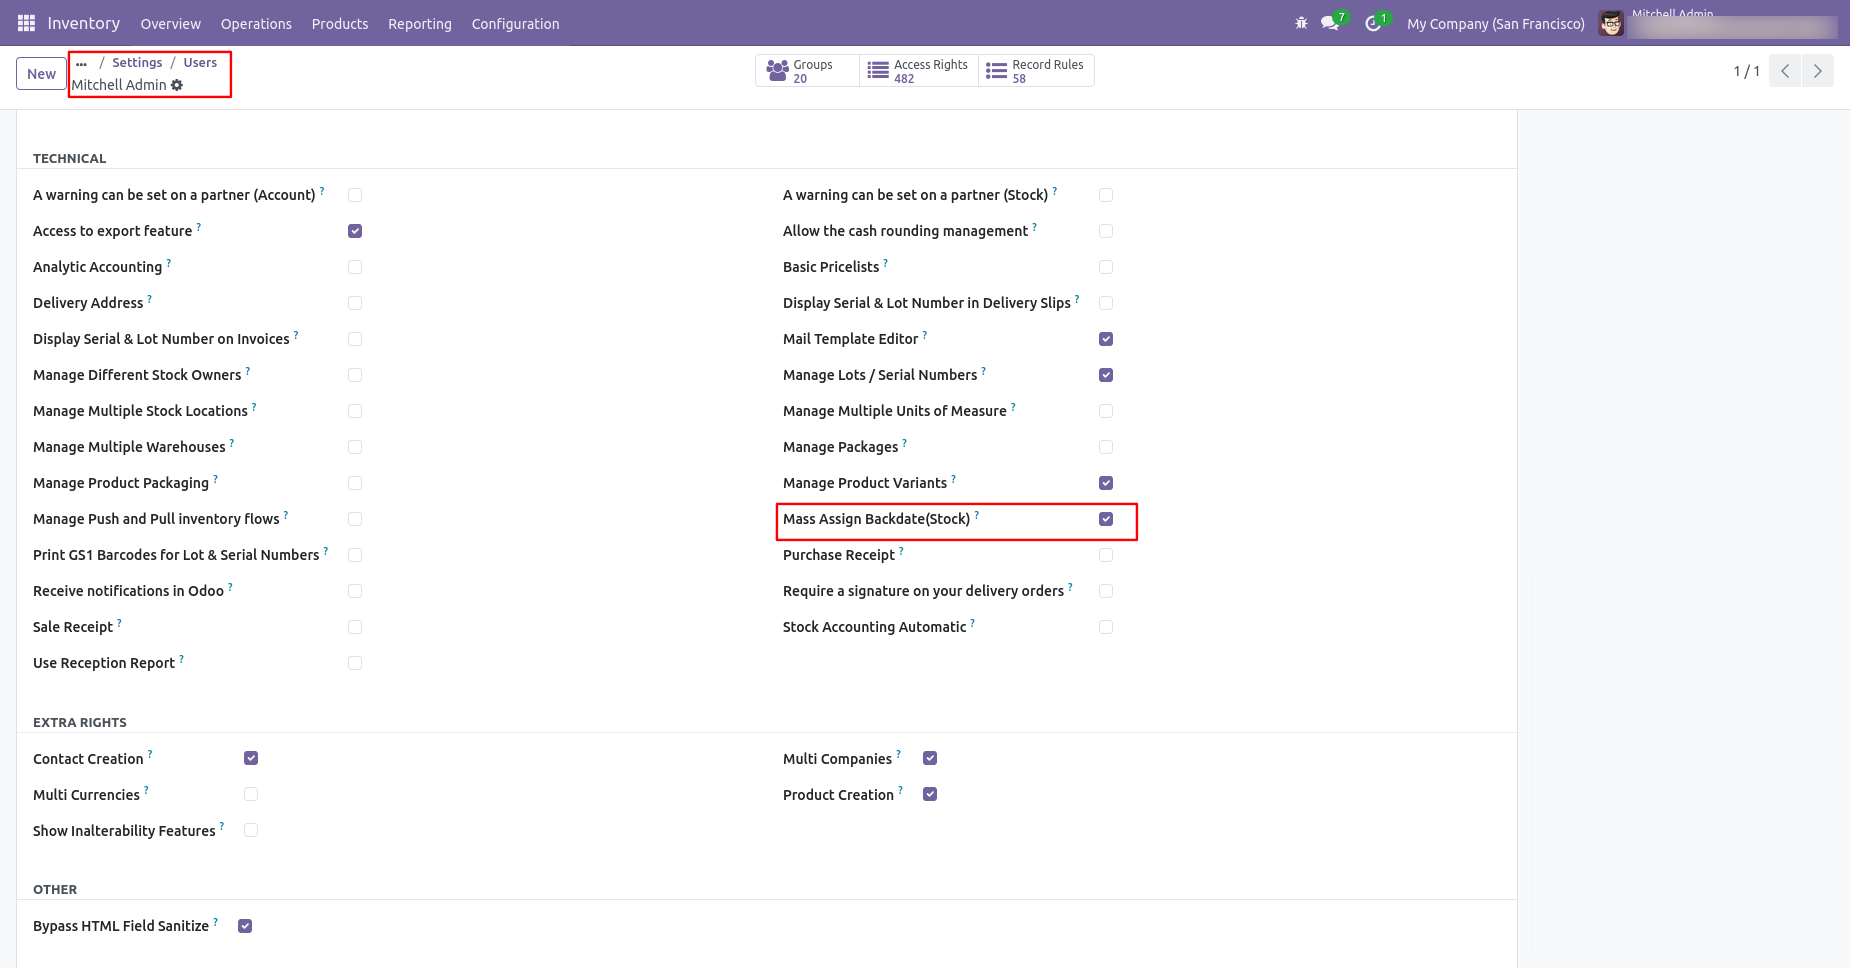
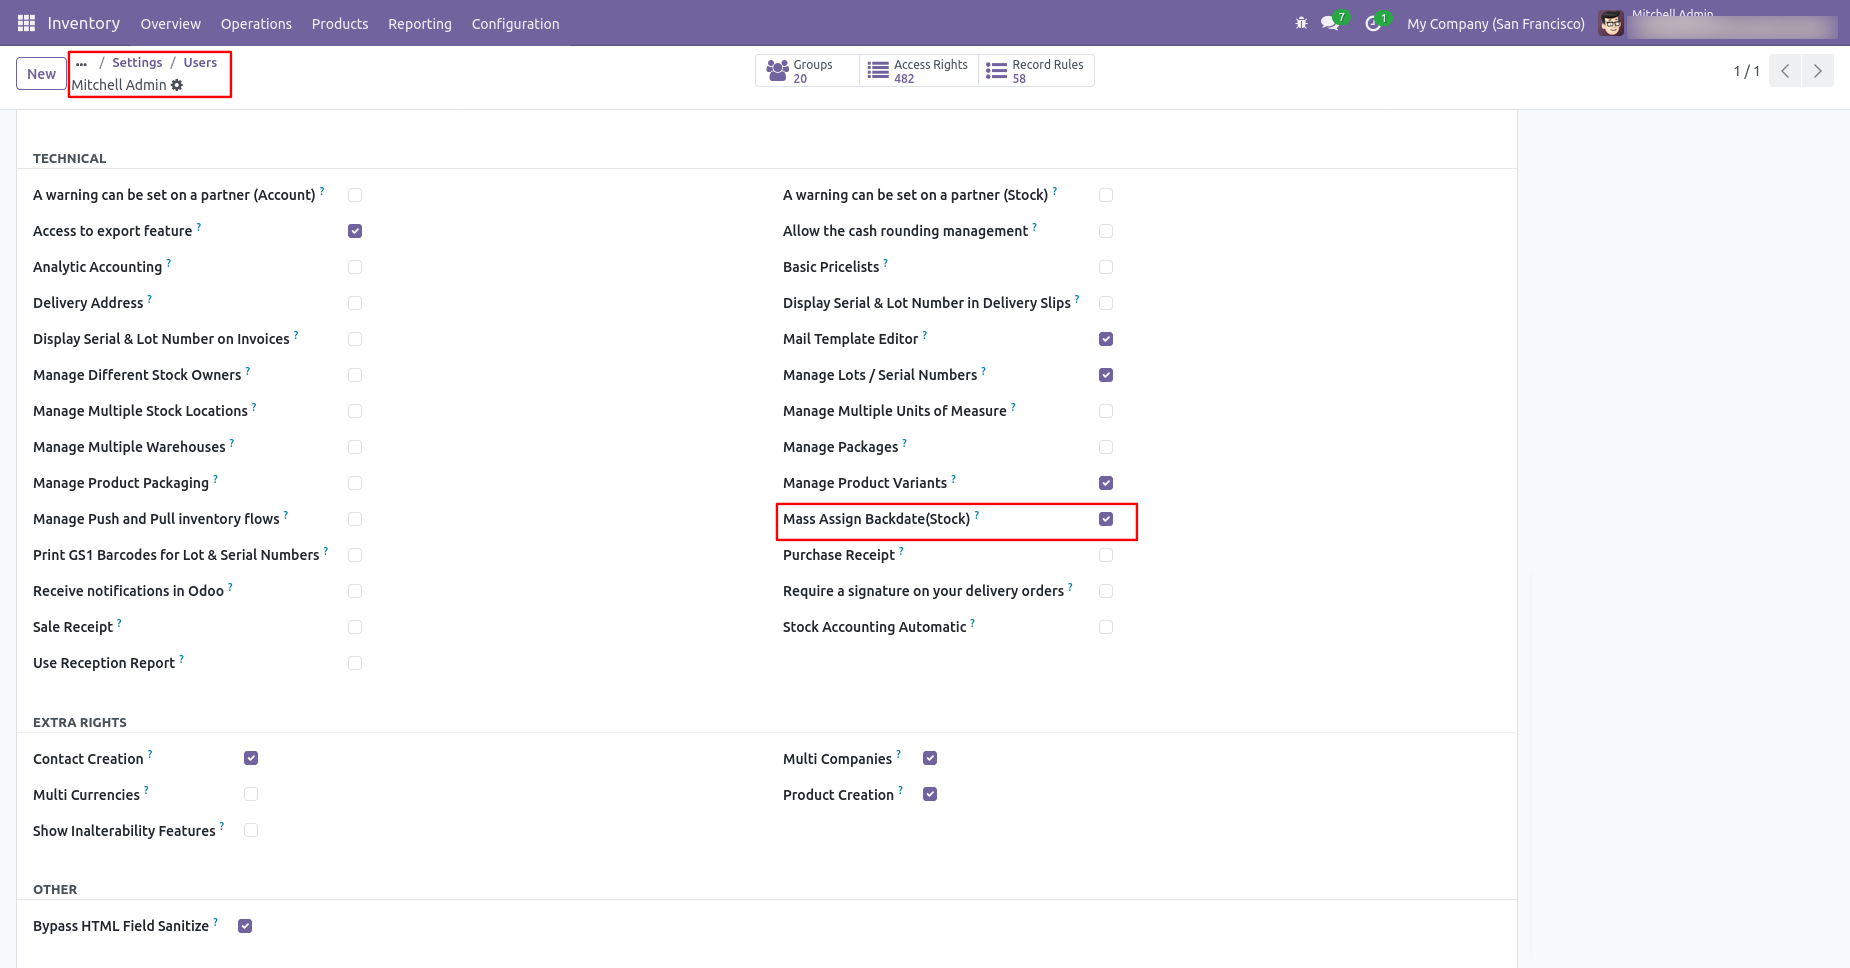
If you enable 'Mass Assign Backdate(Stock)' then you can mass assign backdate.
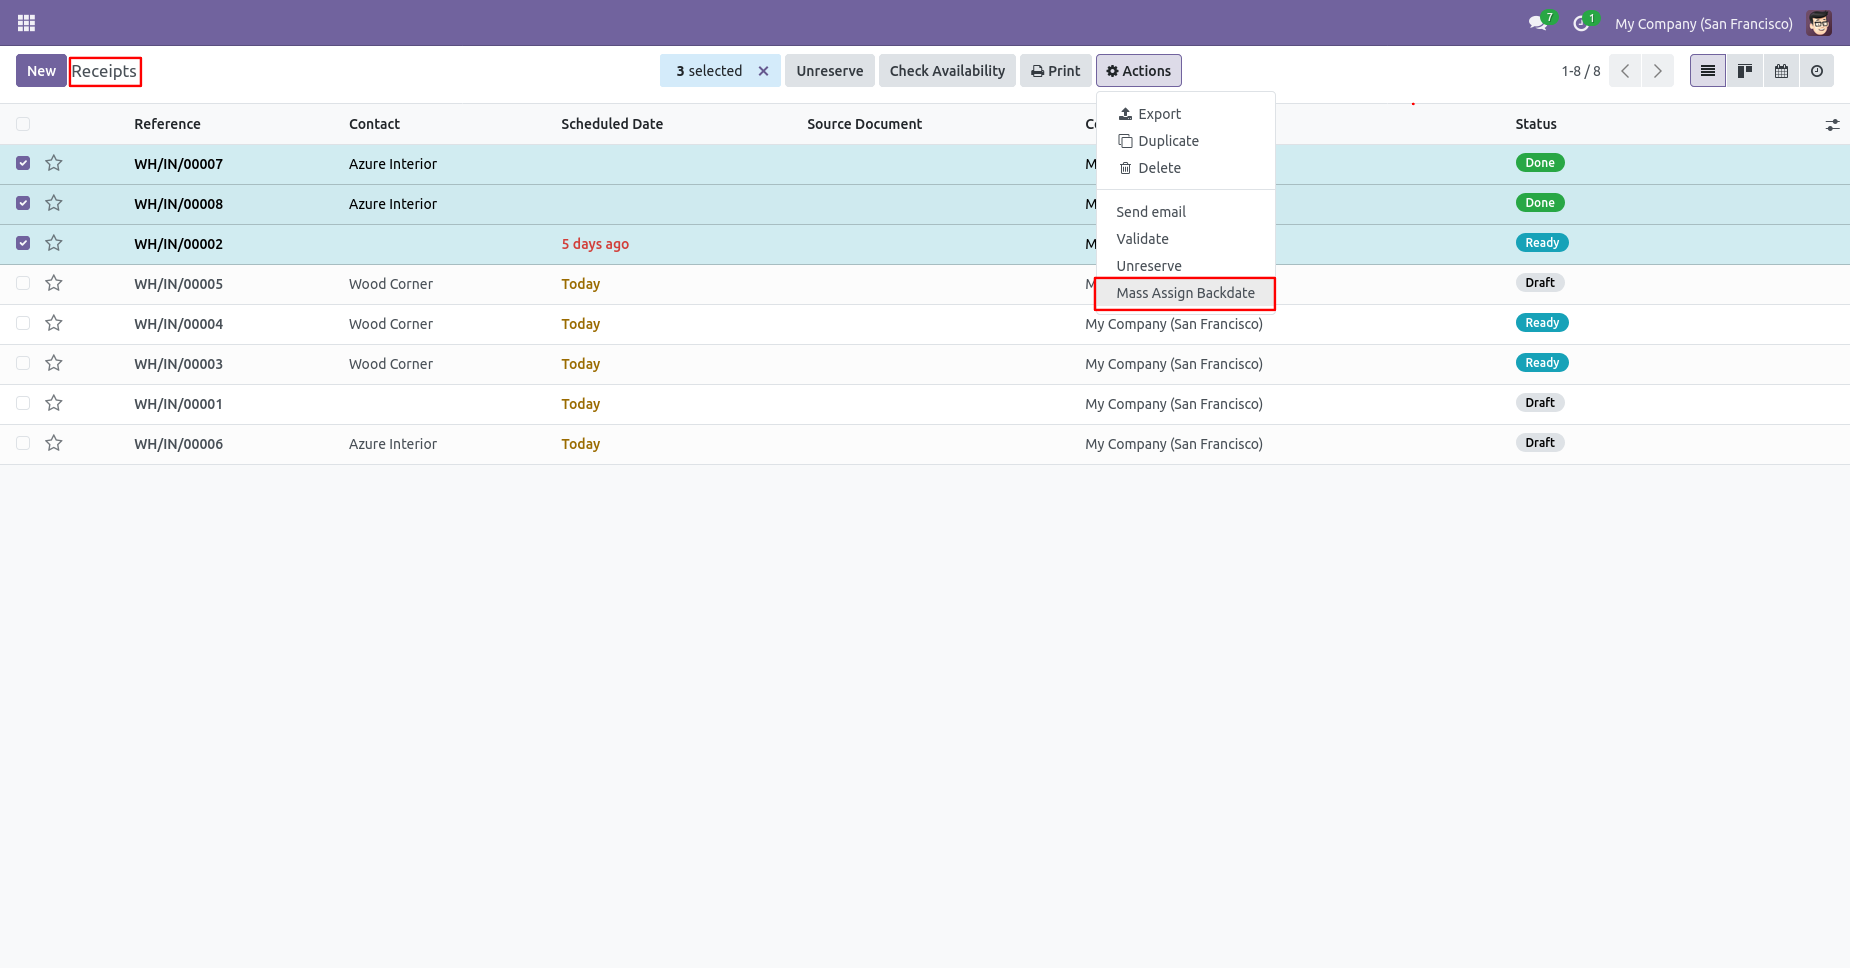
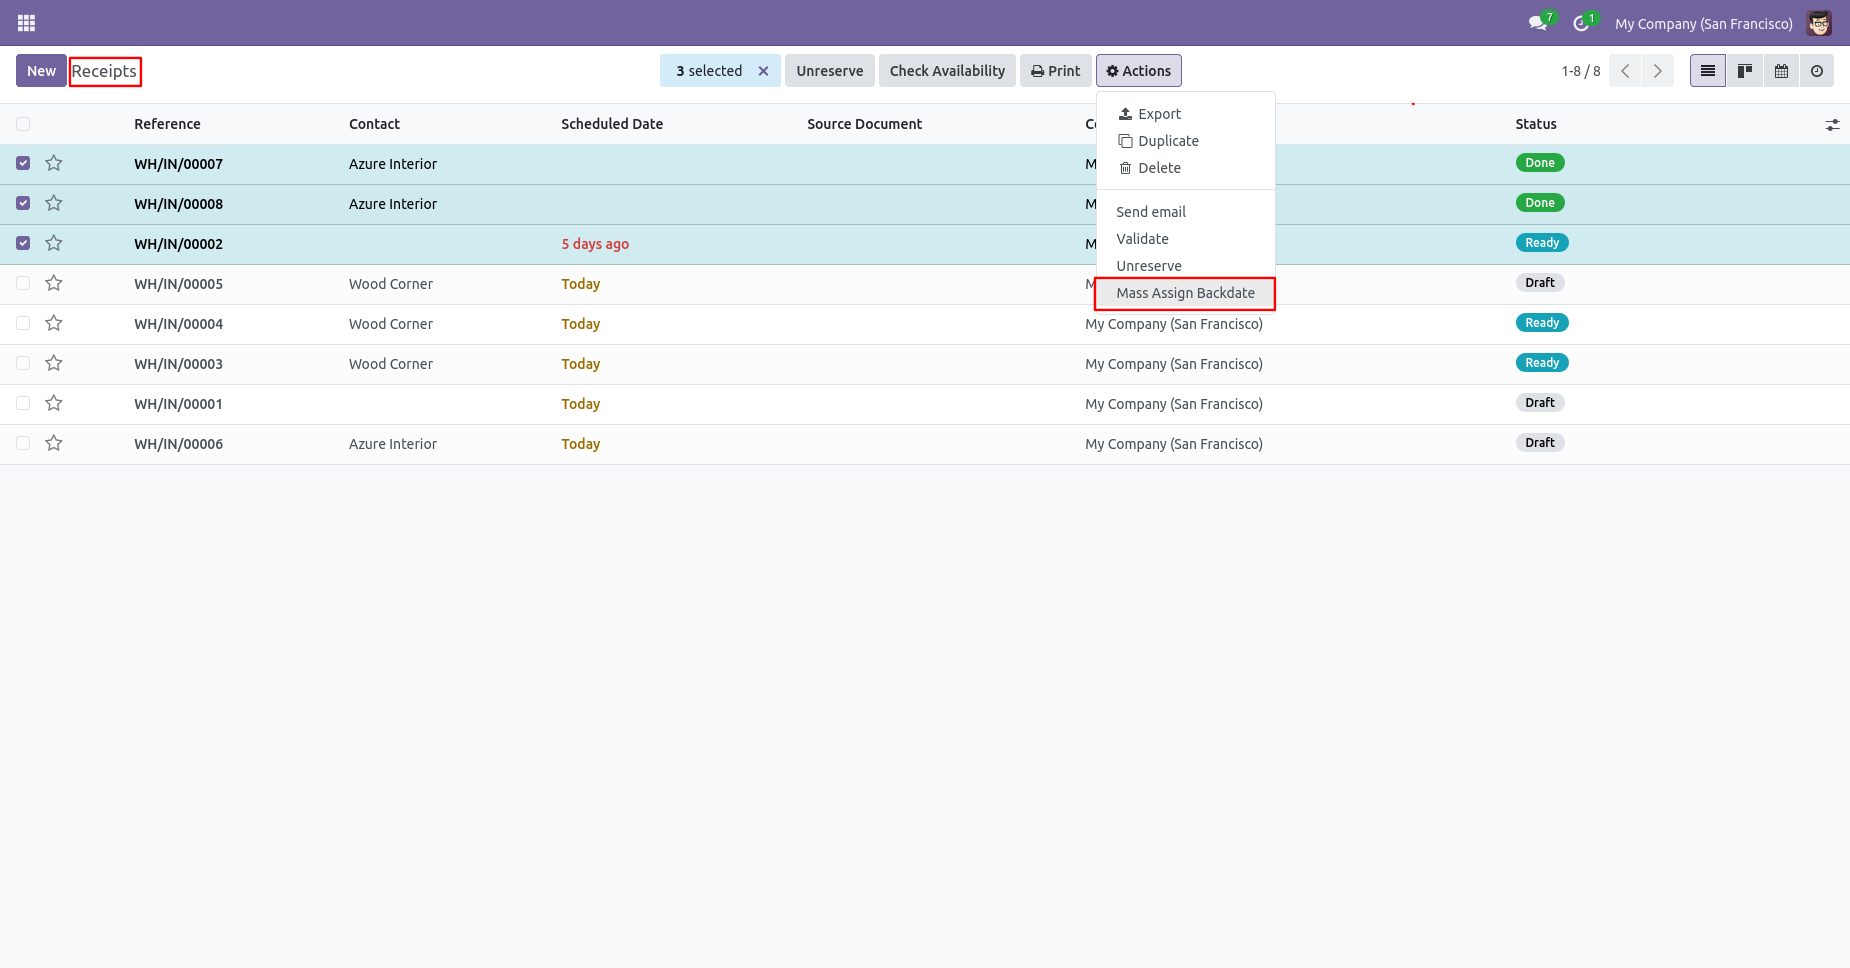
Select orders from the list view then click on the 'Mass Assign Backdate' from the 'Action' button.
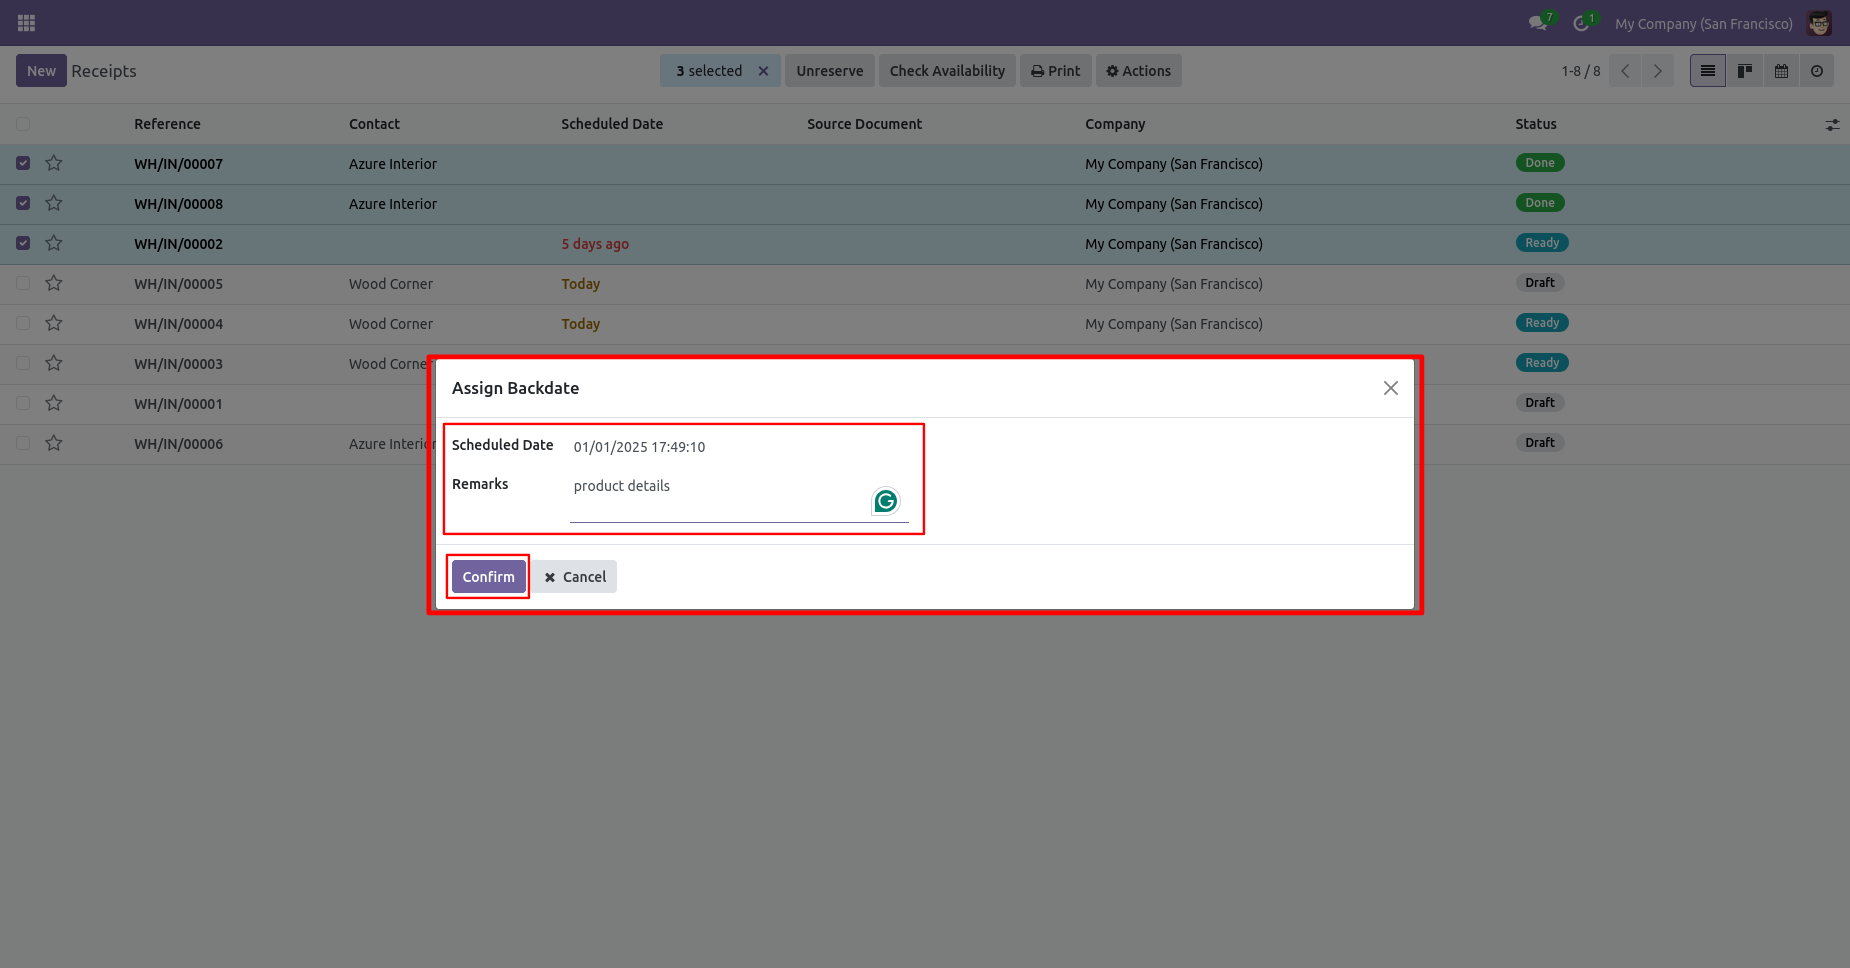
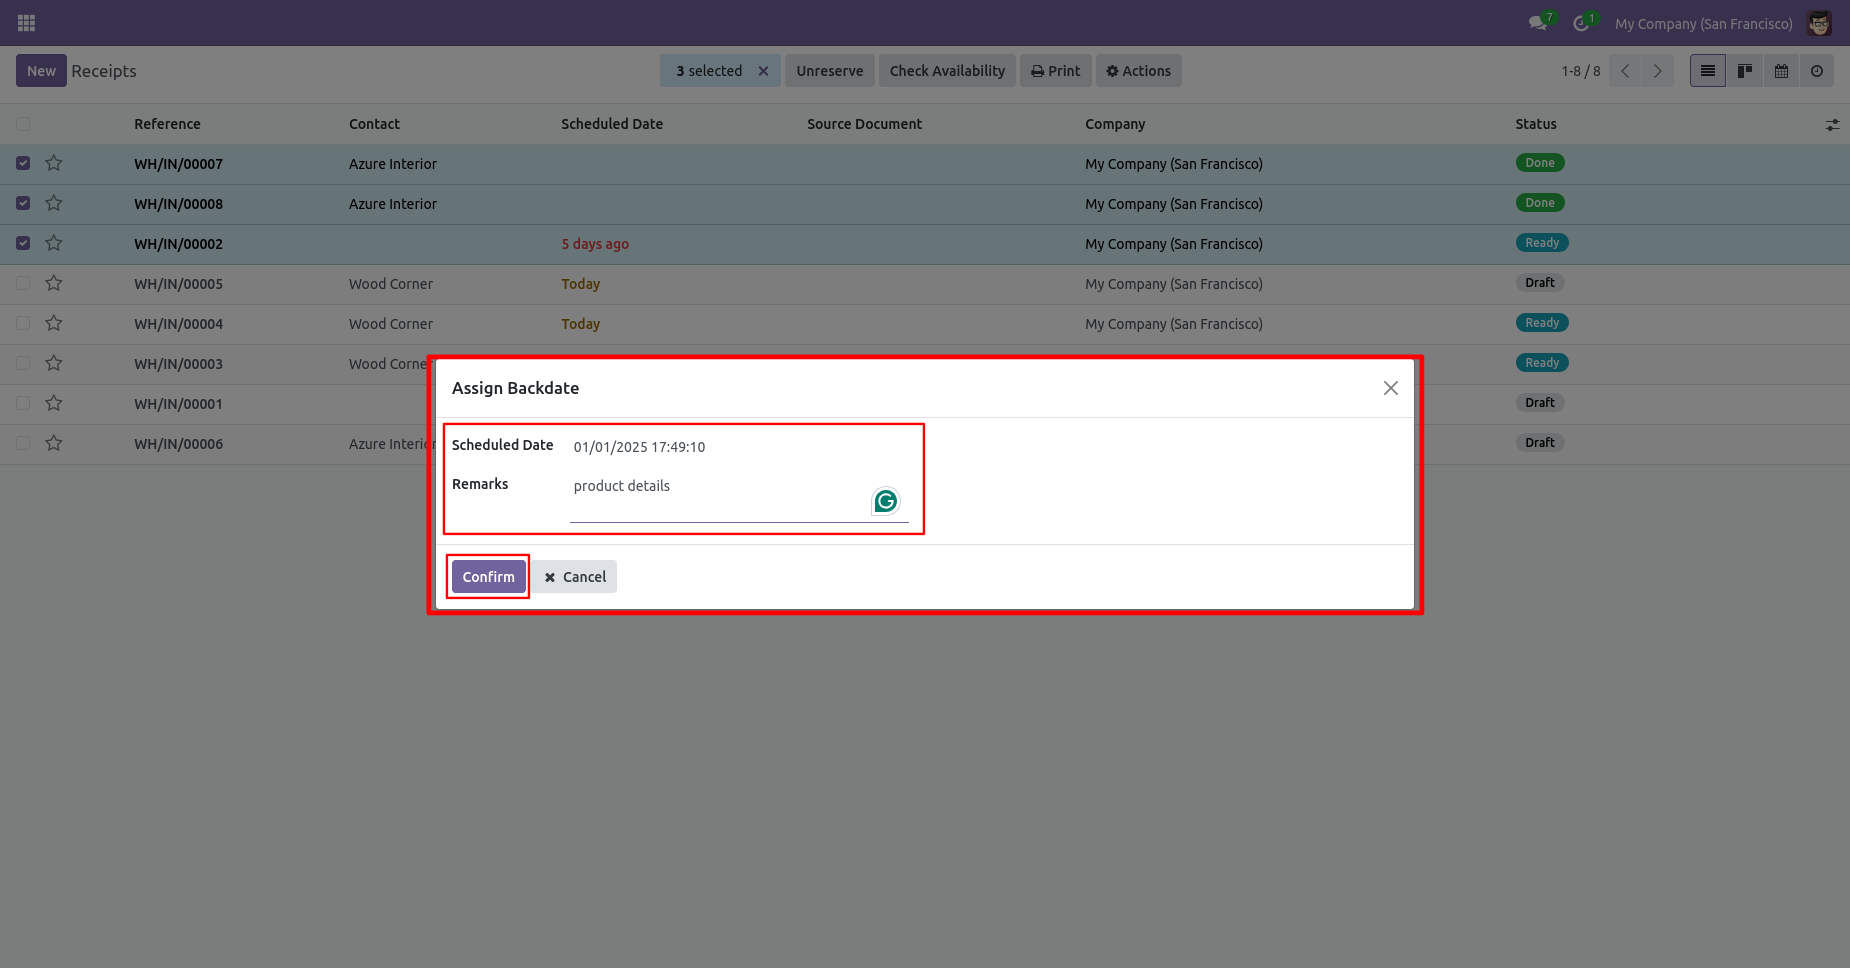
After that, this wizard opens, enters the order date and remarks. Here remarks come if you have enabled that feature.
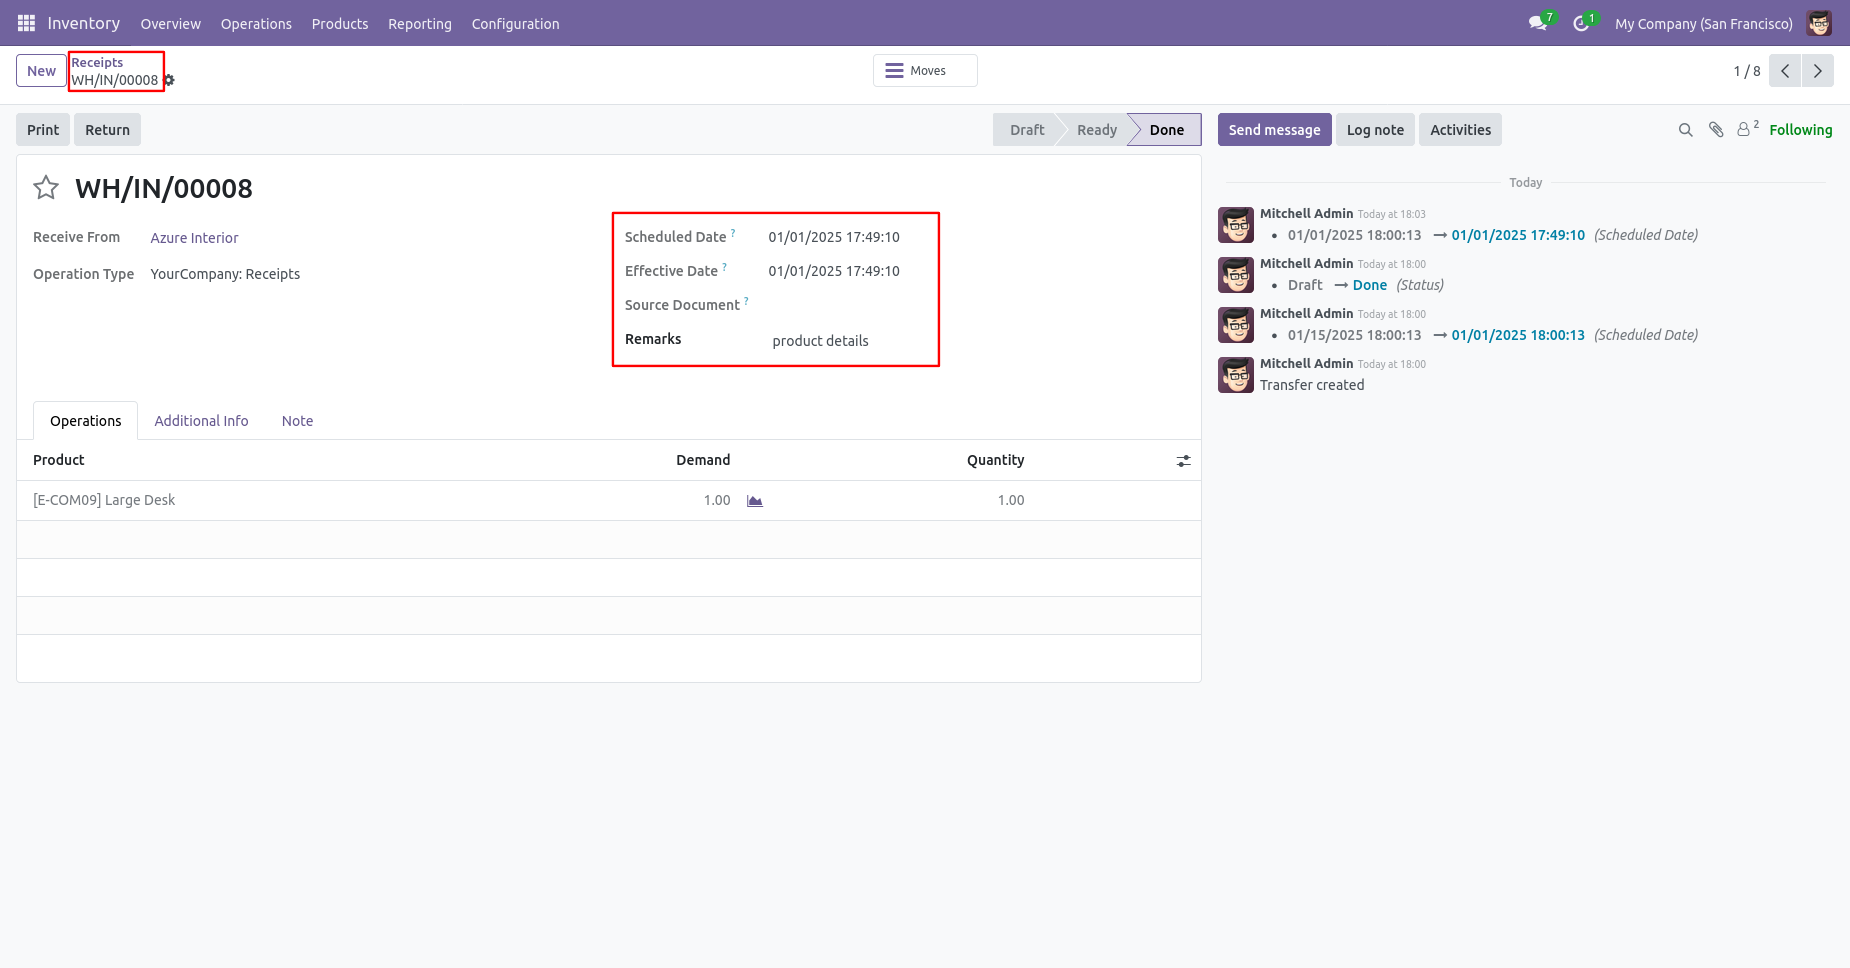
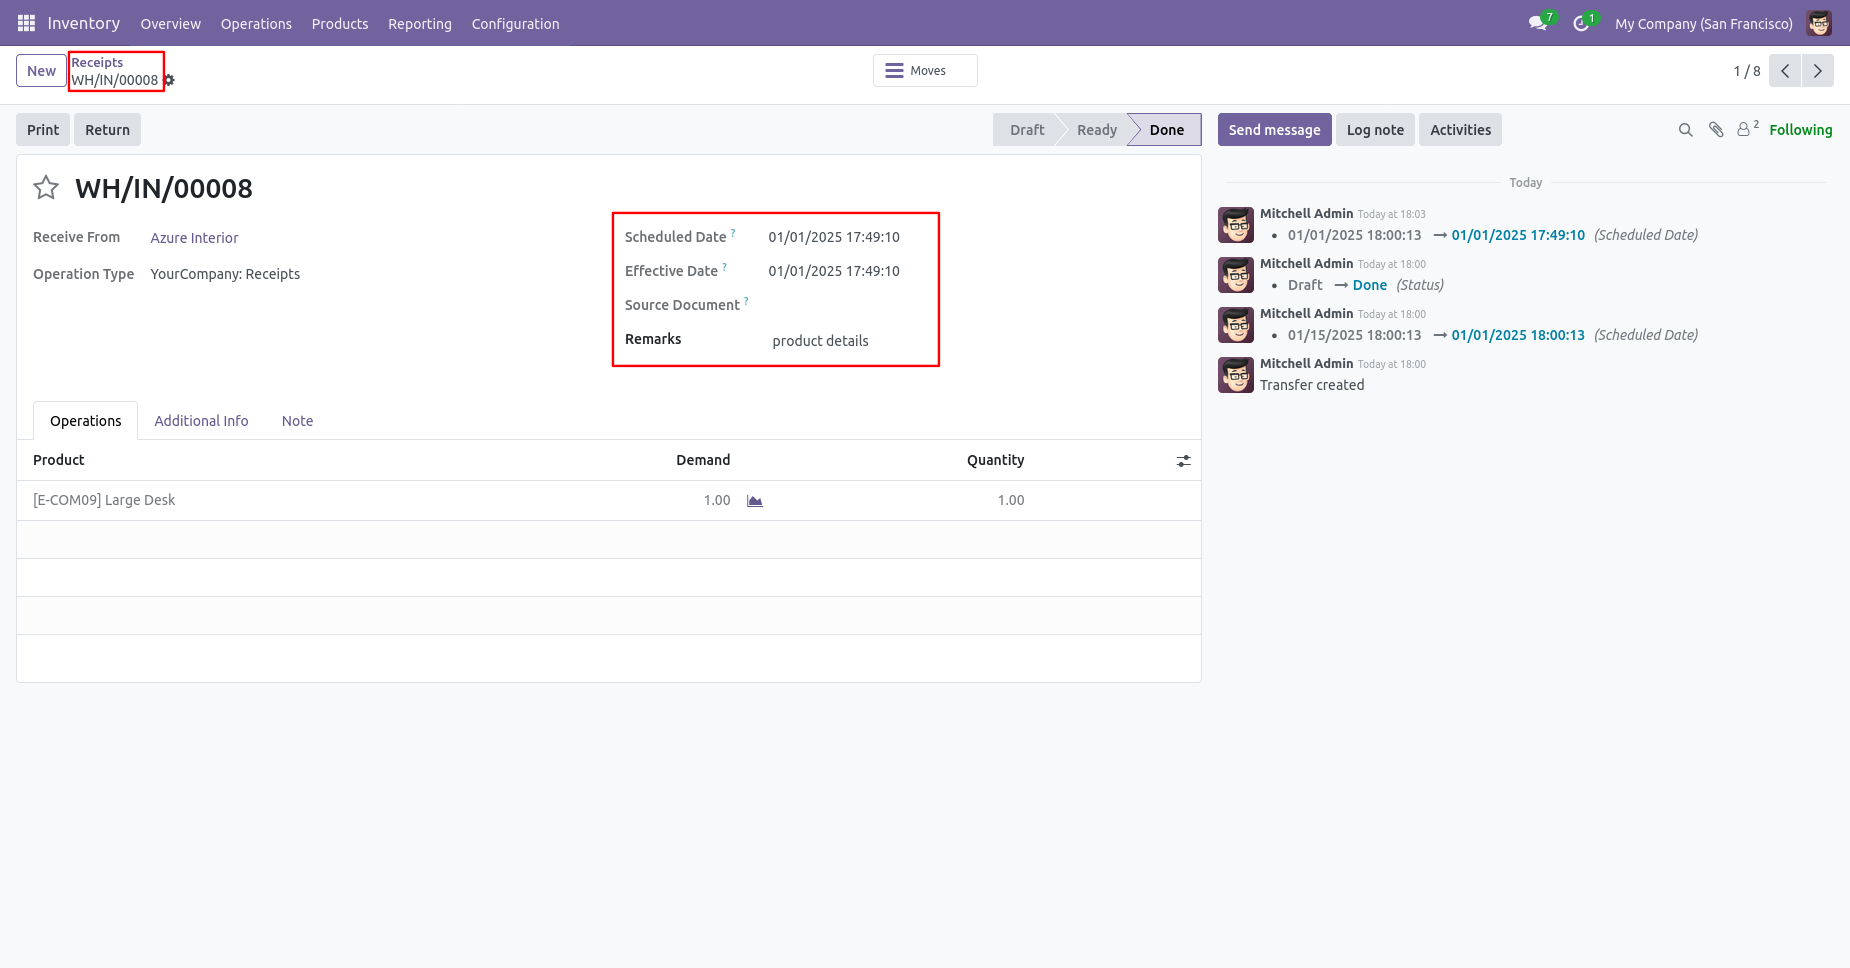
Receipt form view with backdate and remarks.
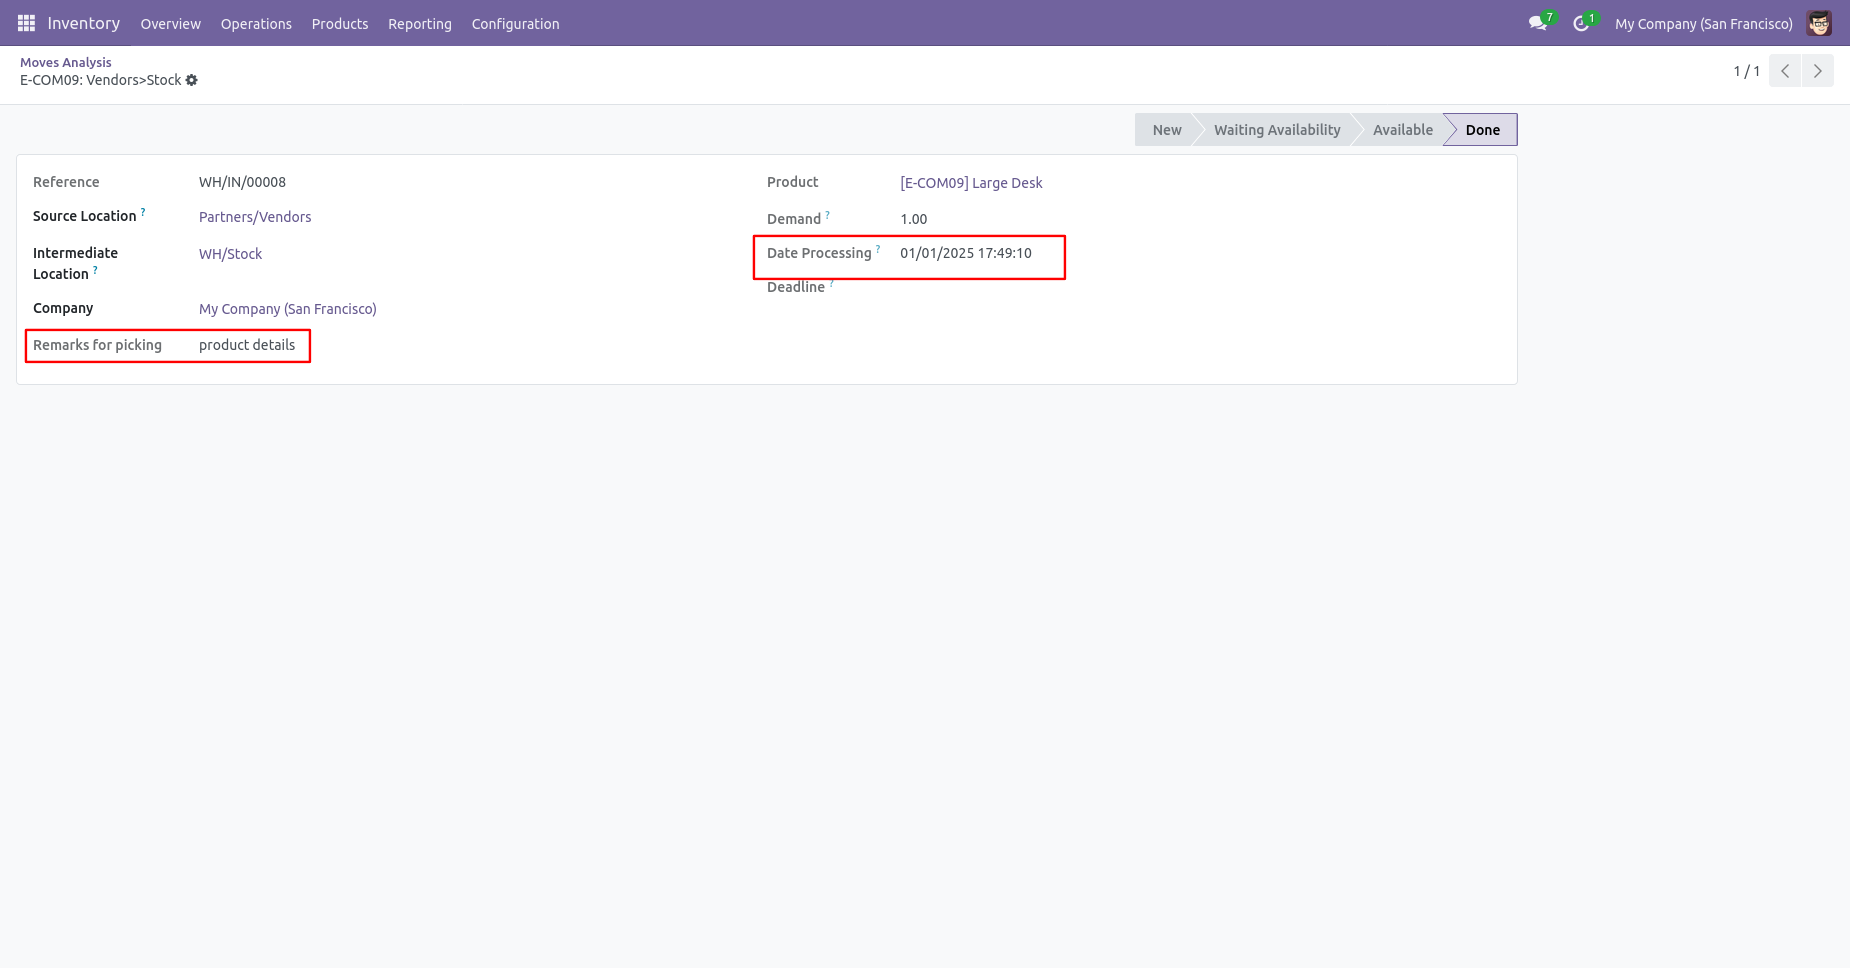
Move analysis with backdate and remarks.
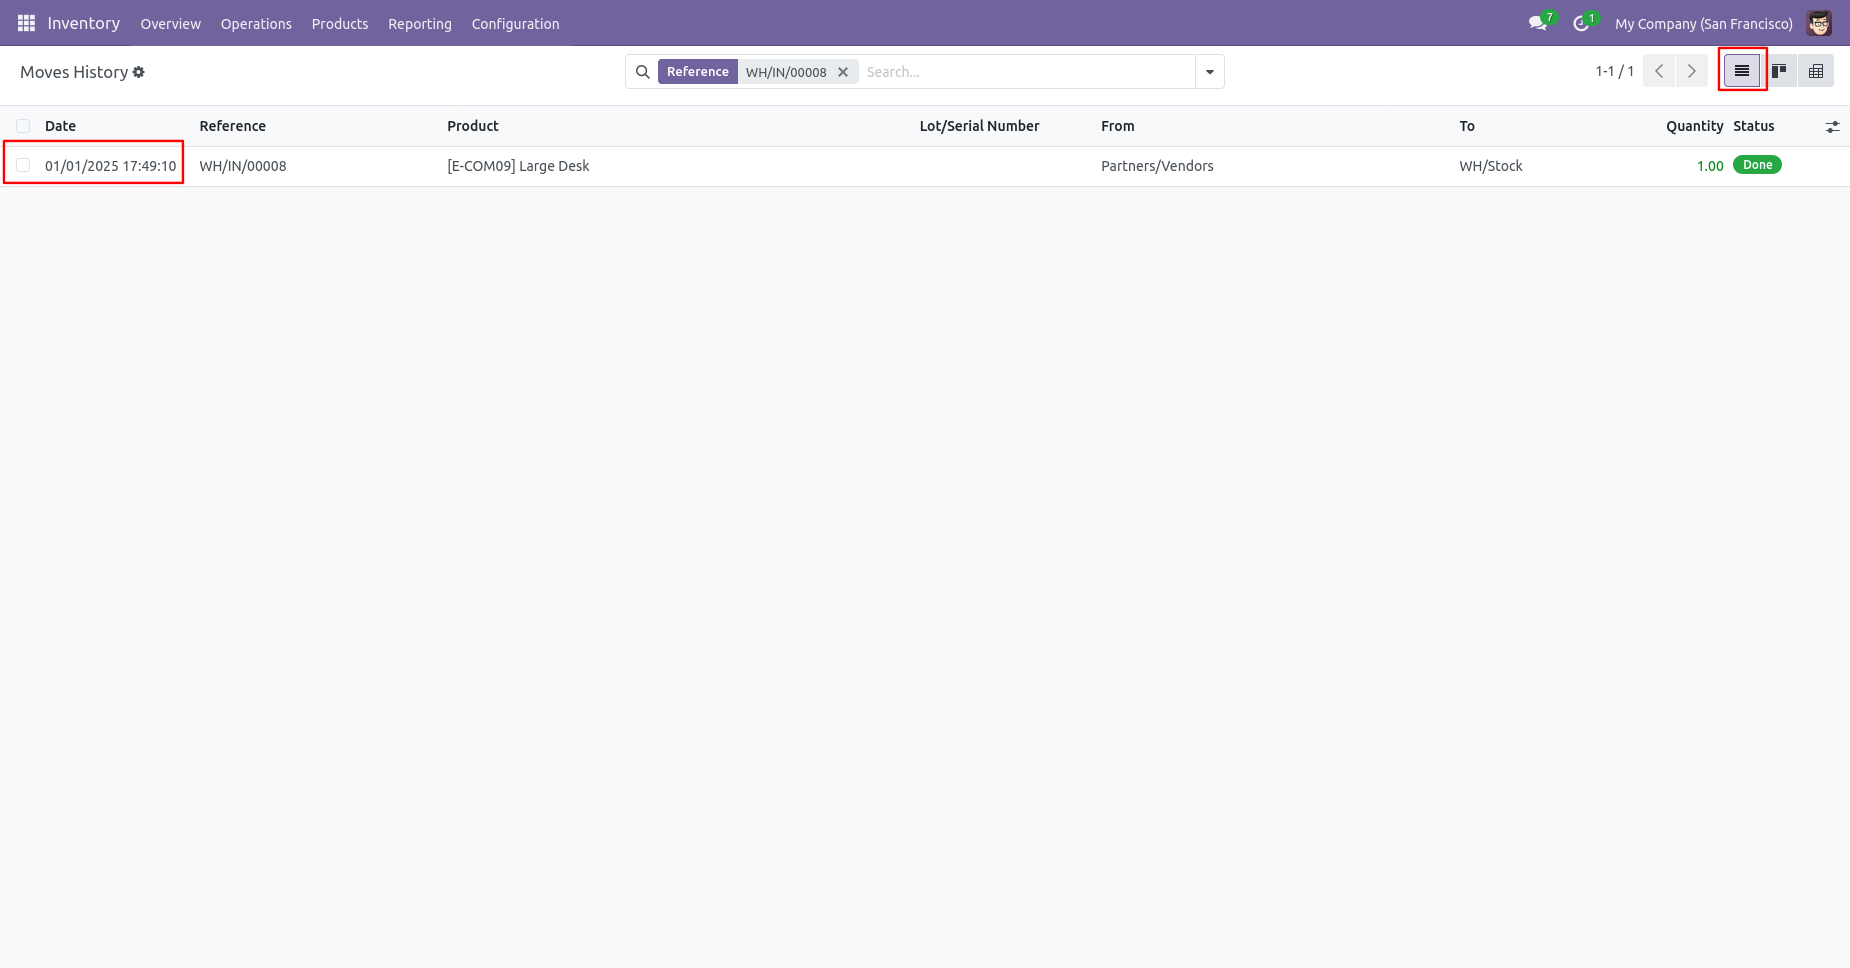
Move history with backdate and remarks.
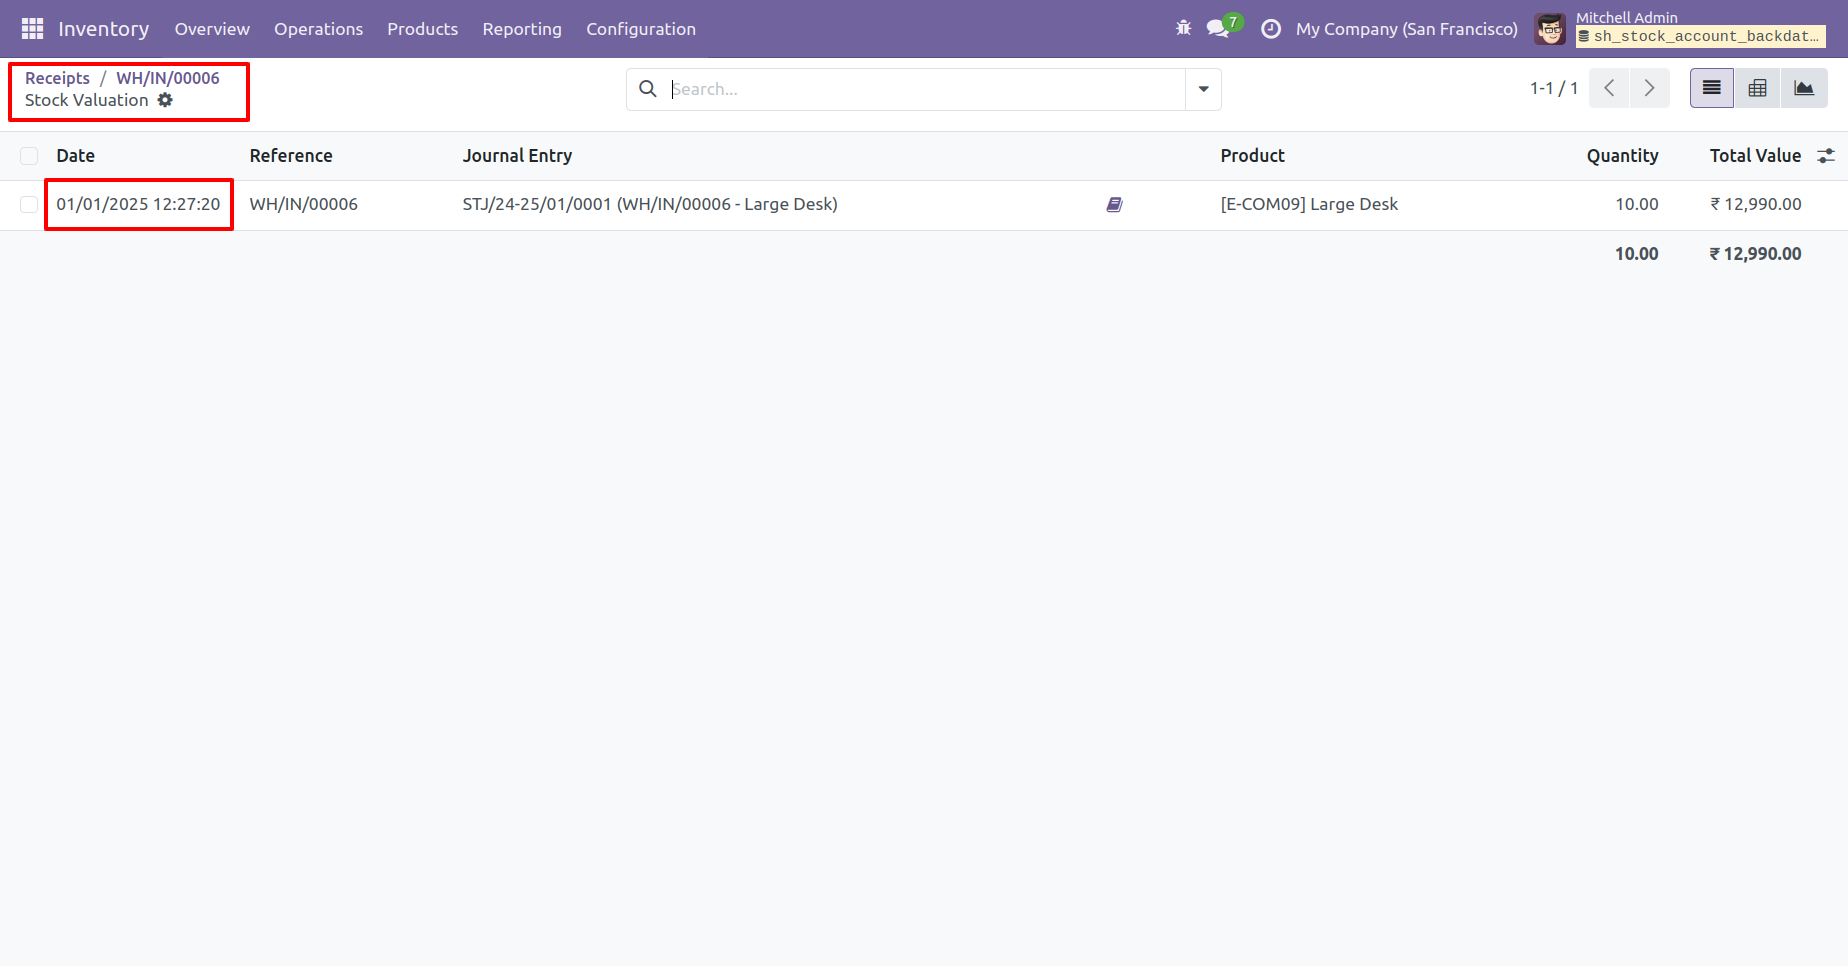
Stock valuation with backdate.
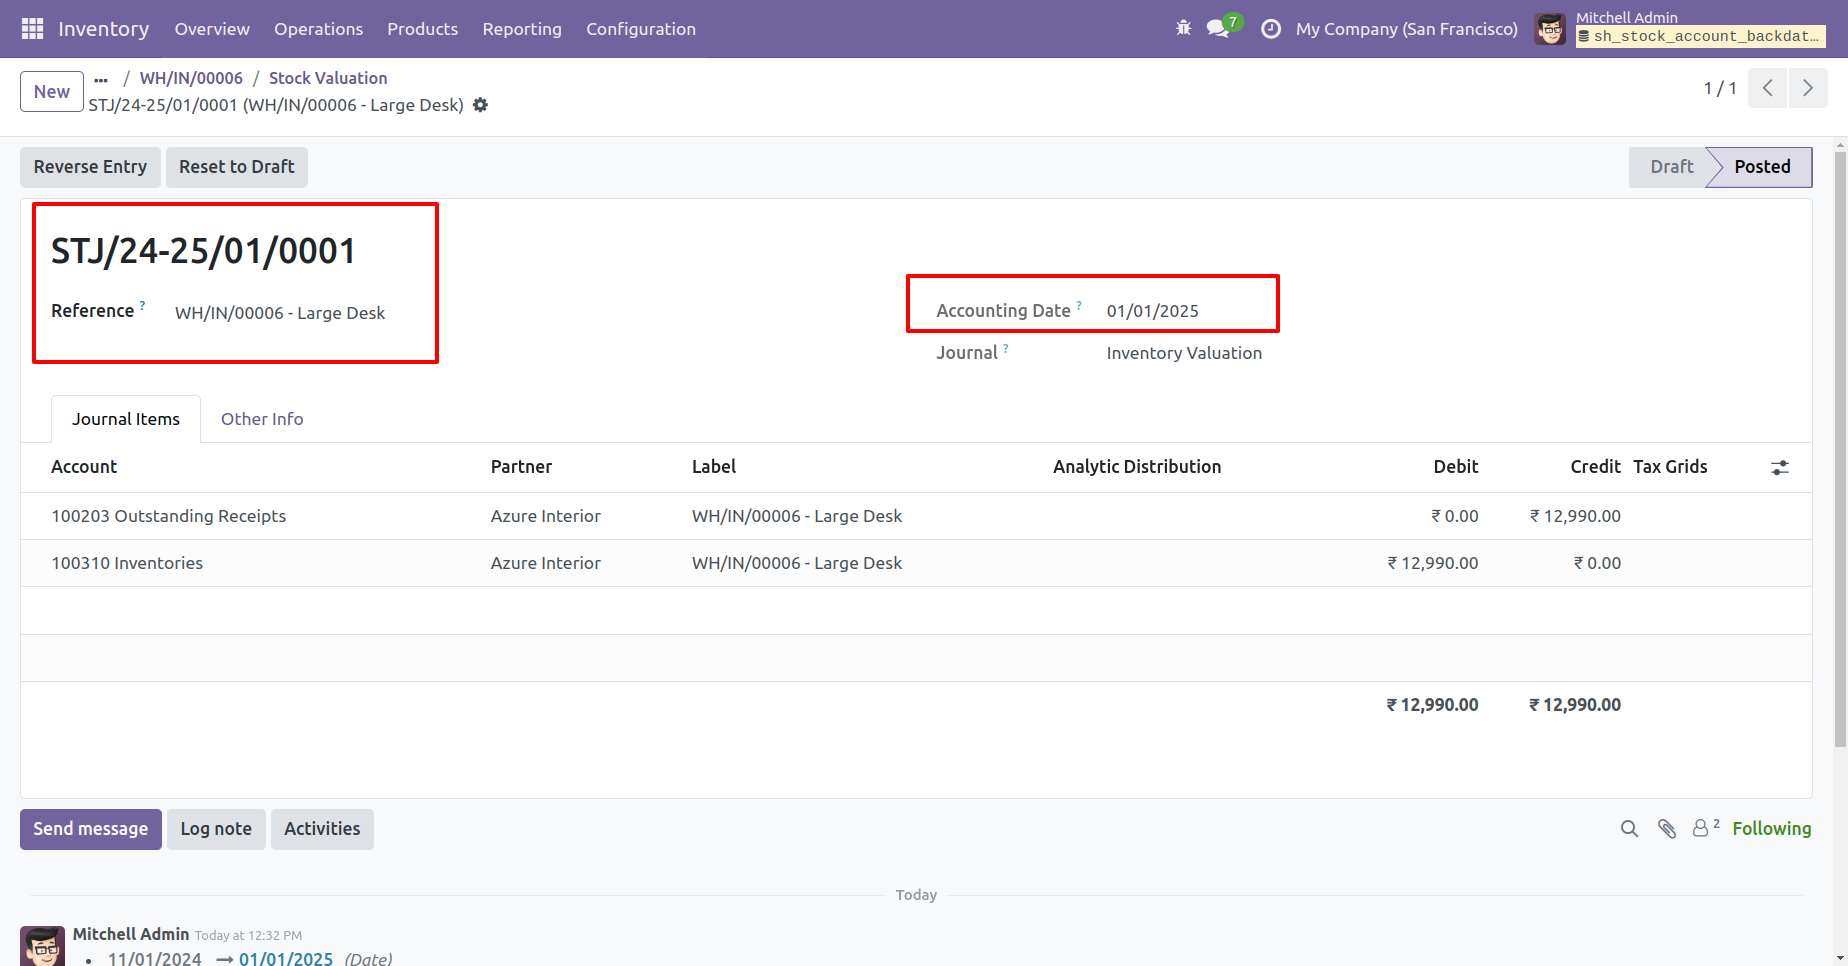
Journal entries with backdate.
Backdate For Scrap
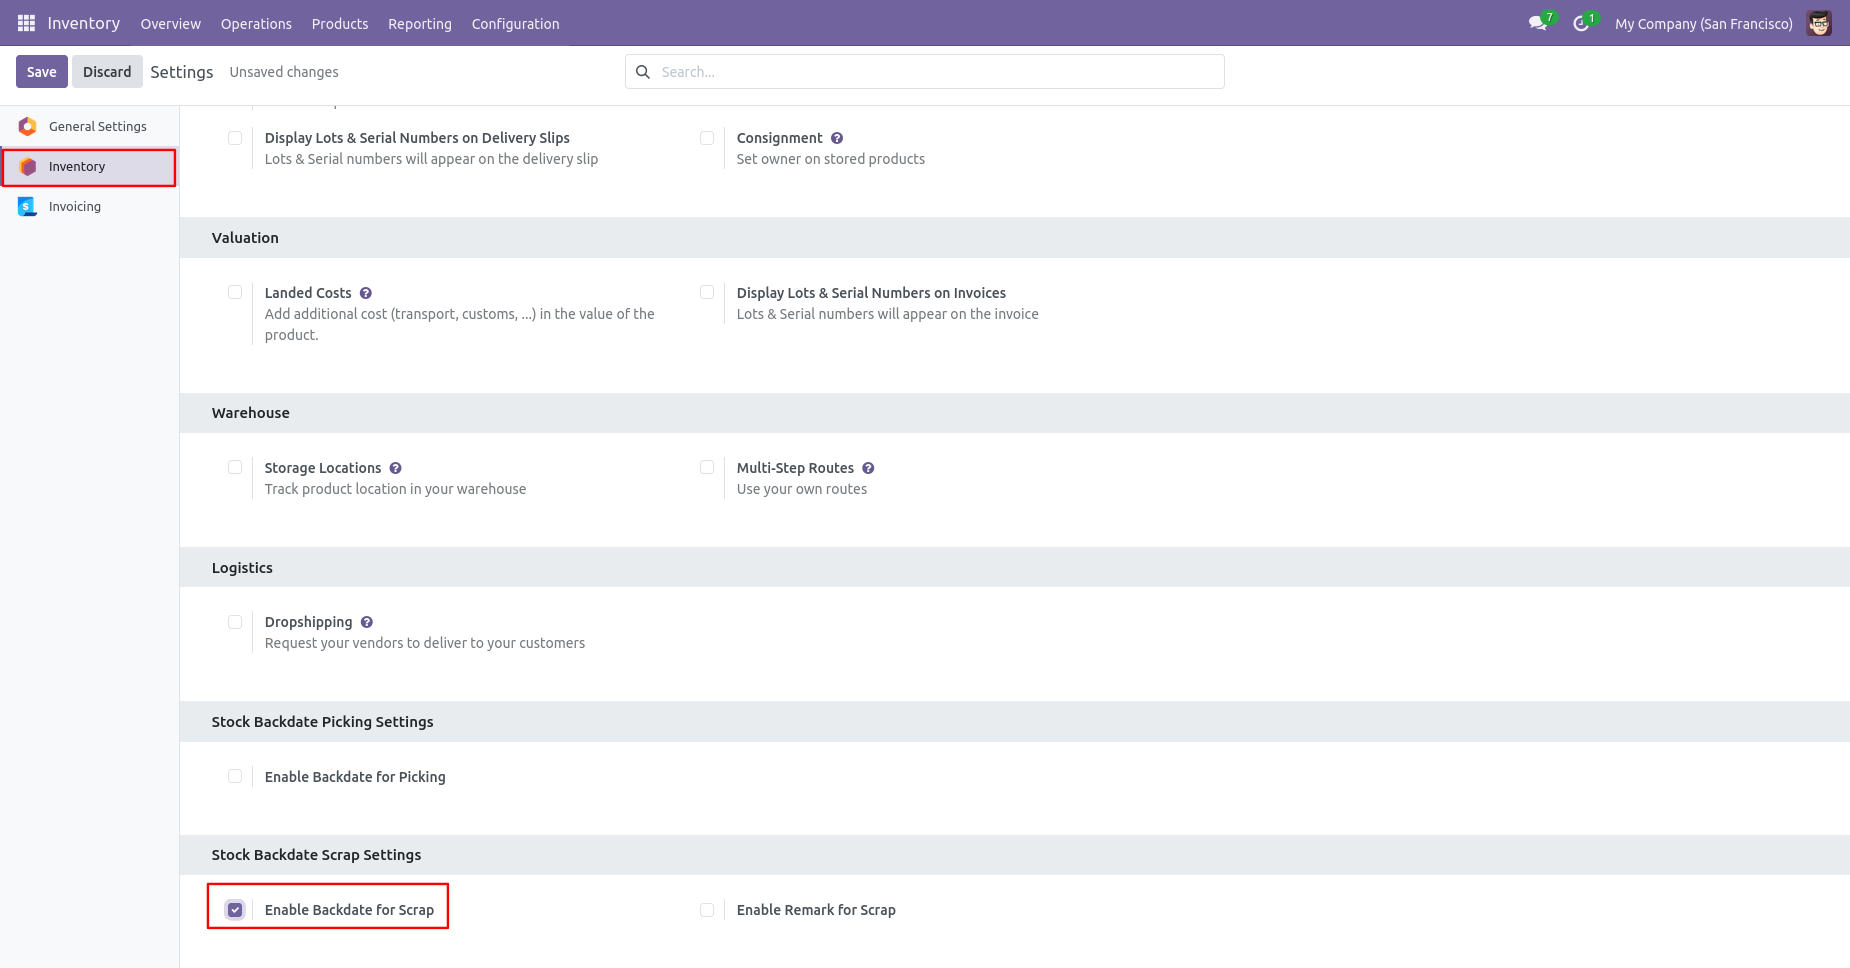
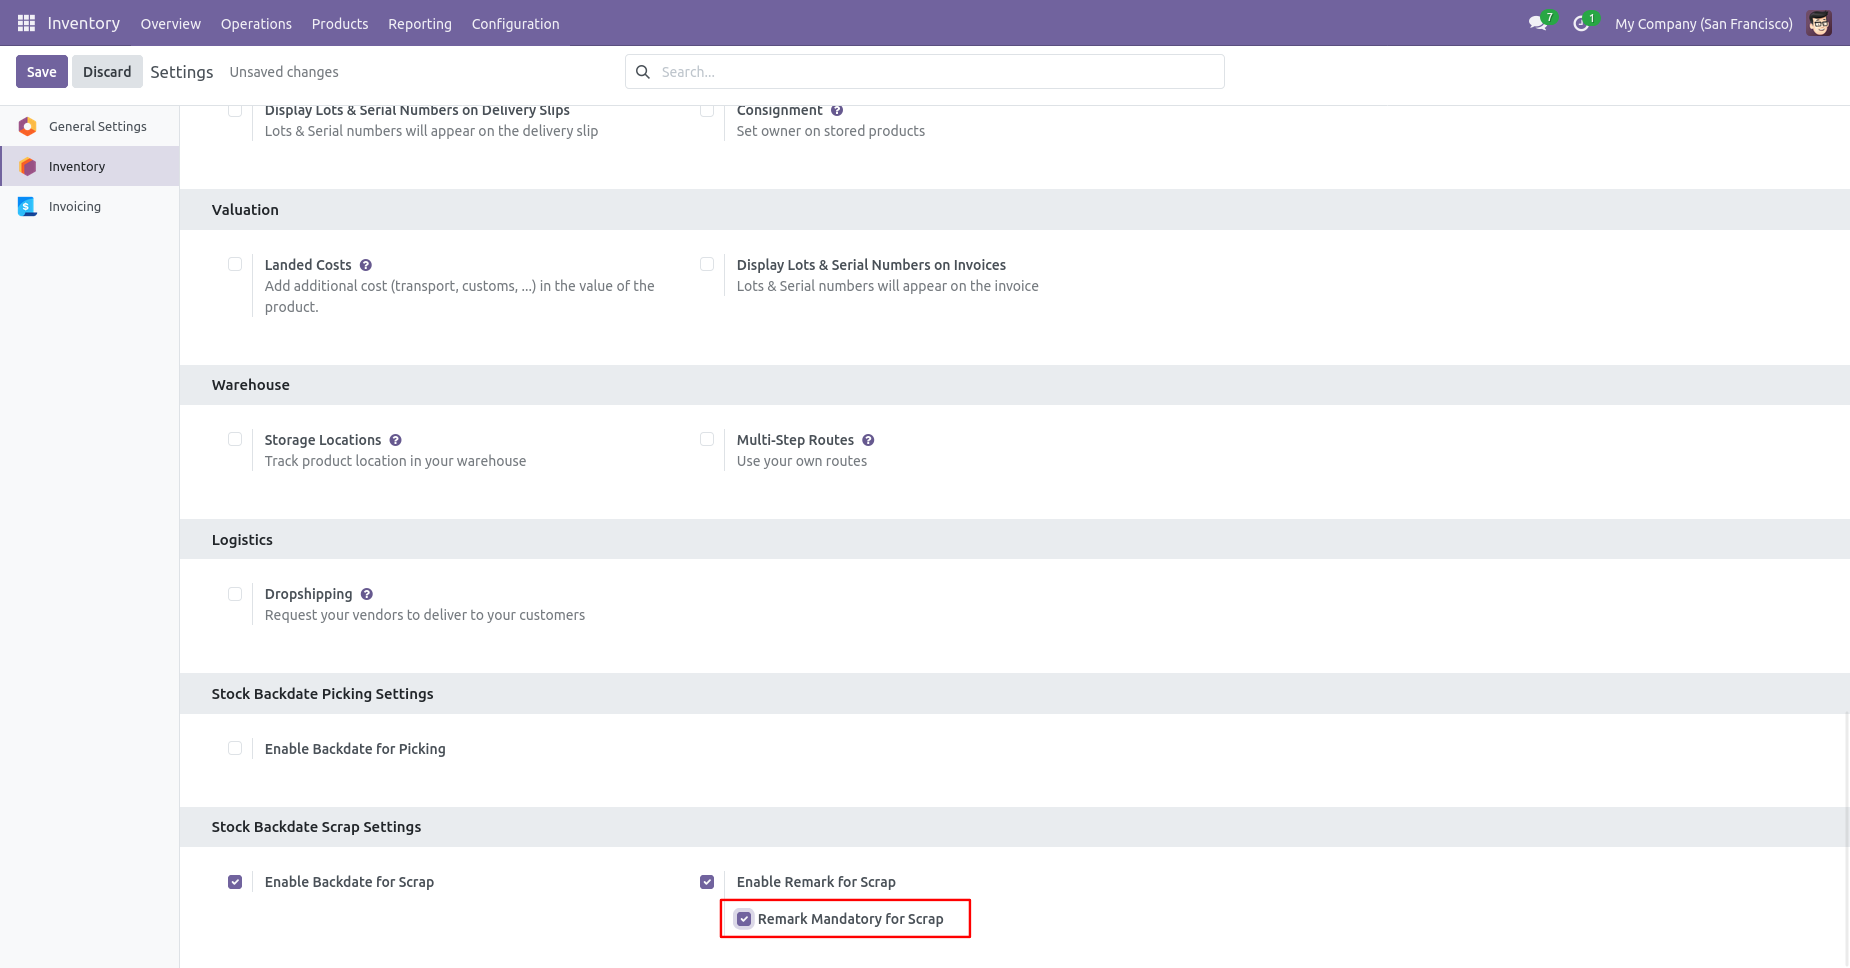
Configuration for picking backdate, Tick the 'Enable Backdate For Scrap' boolean.
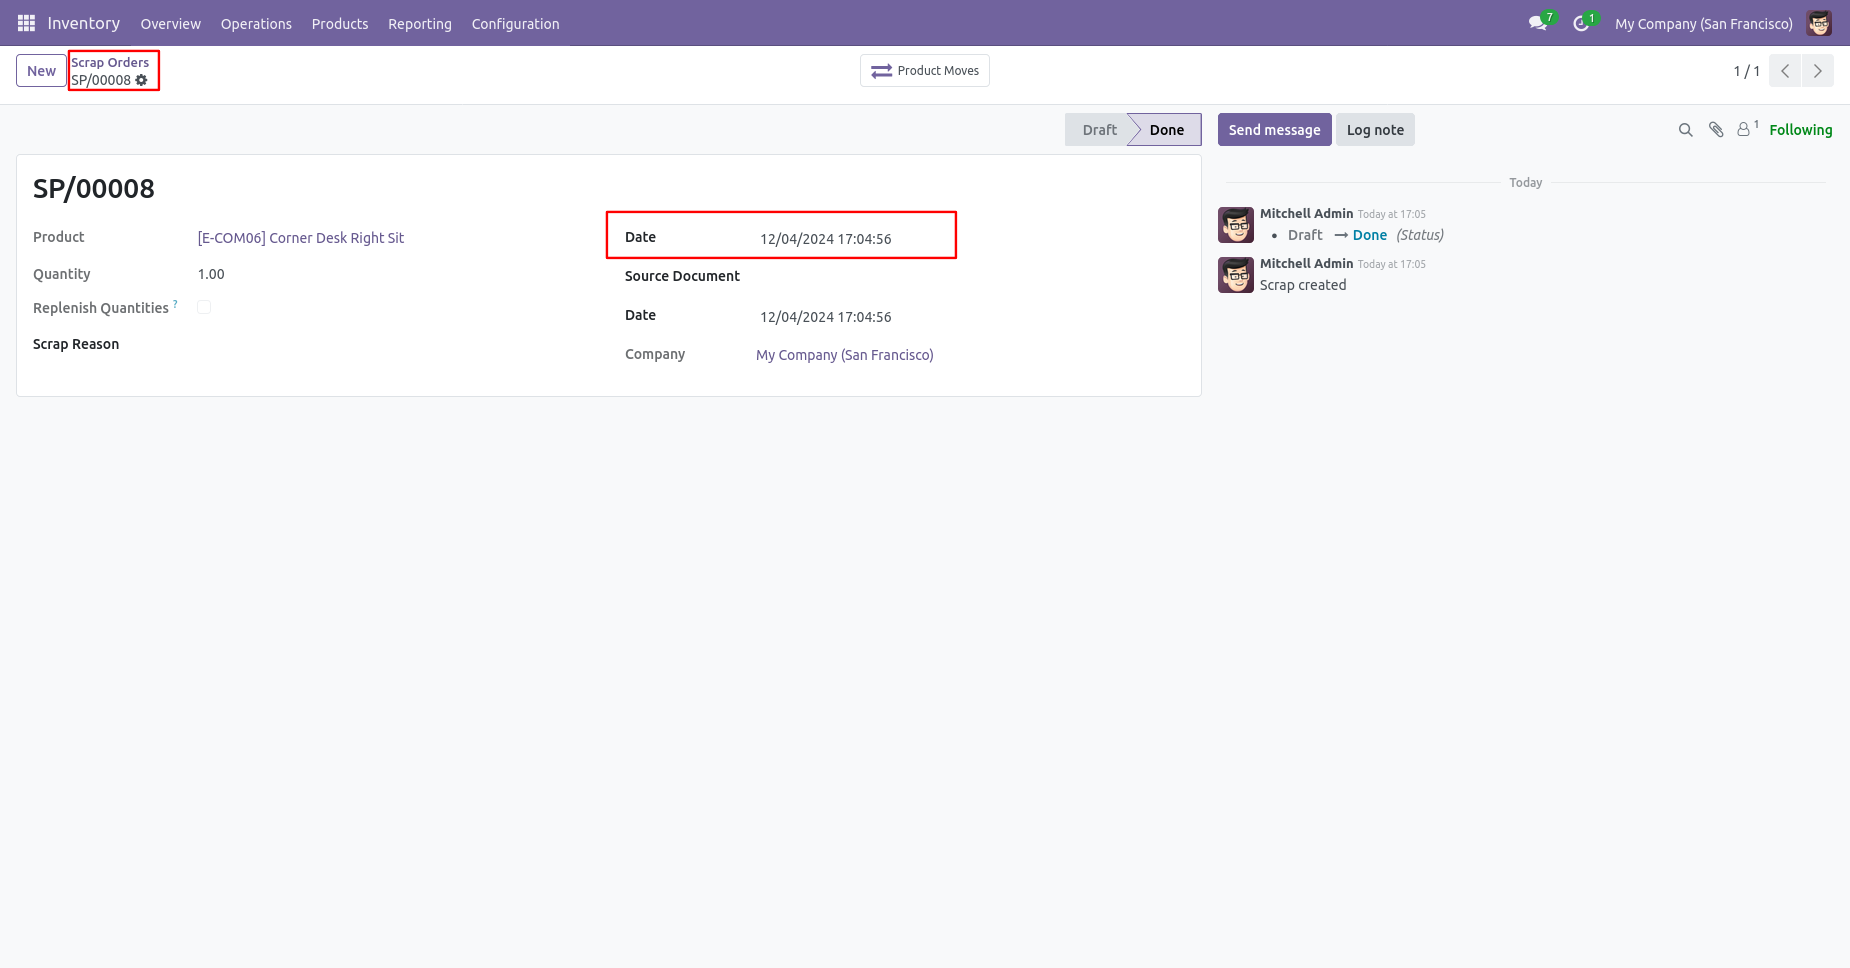
Scrap order form view with backdate.
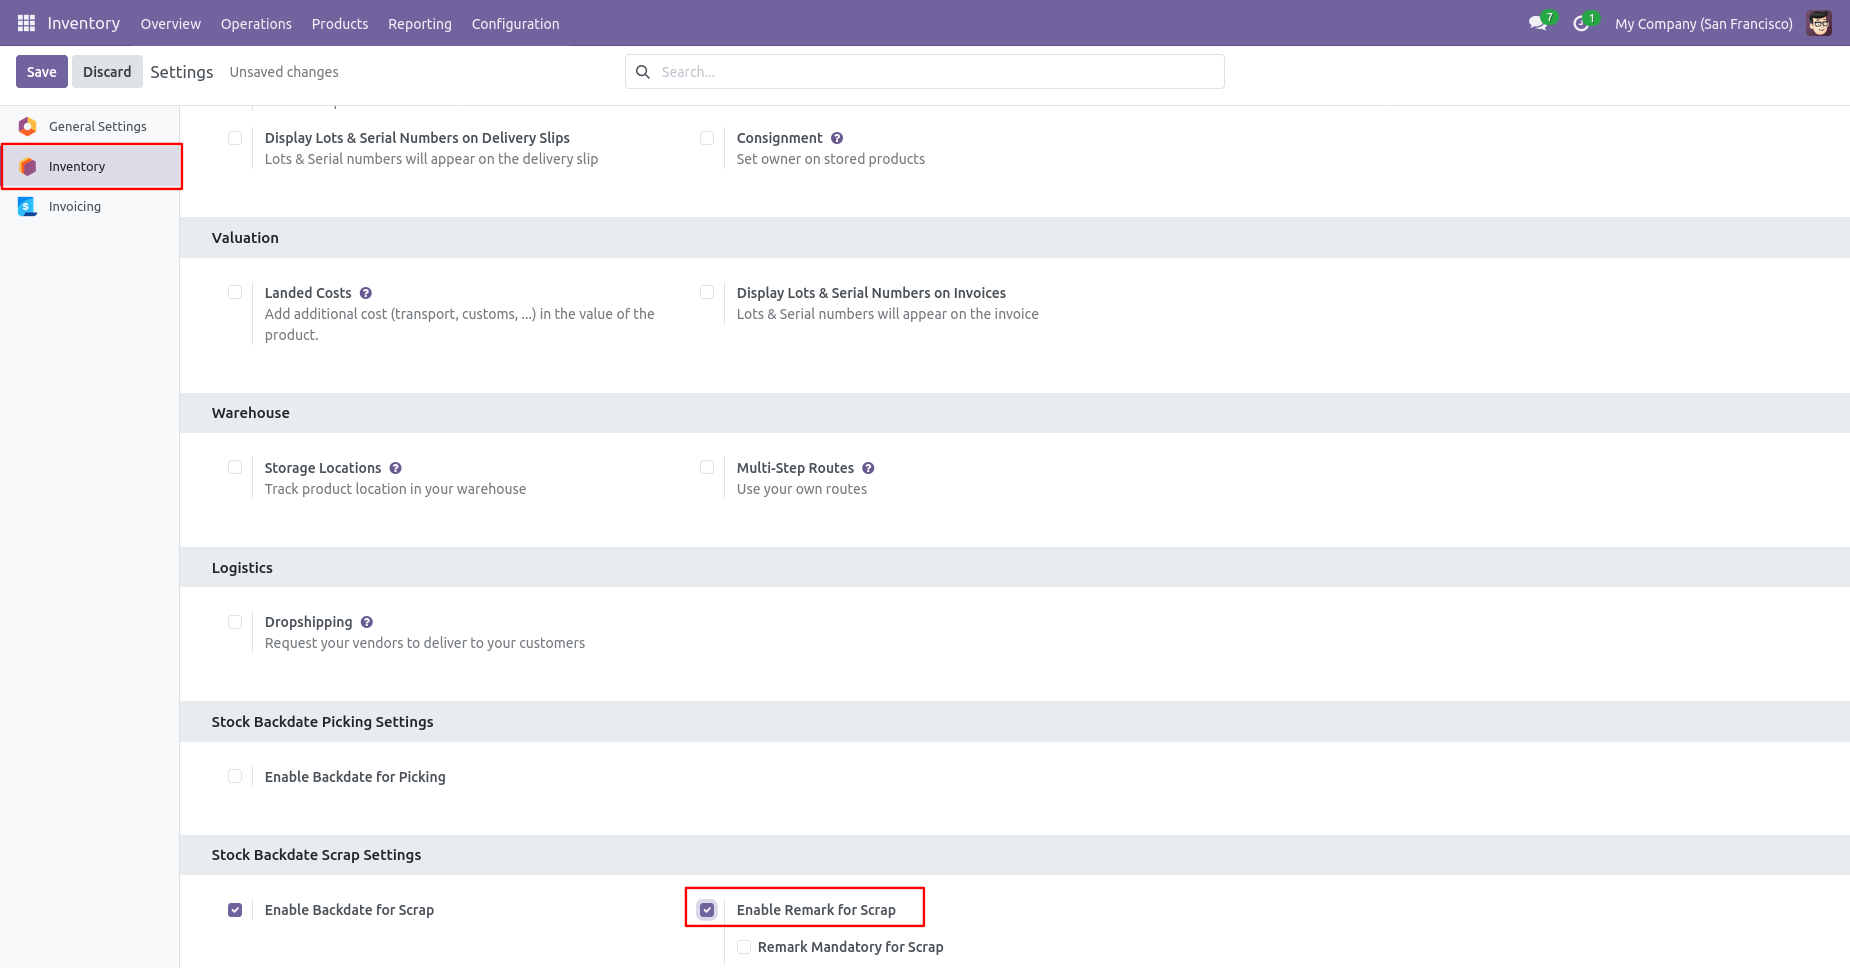
Tick the 'Enable Remark For Scrap' boolean.
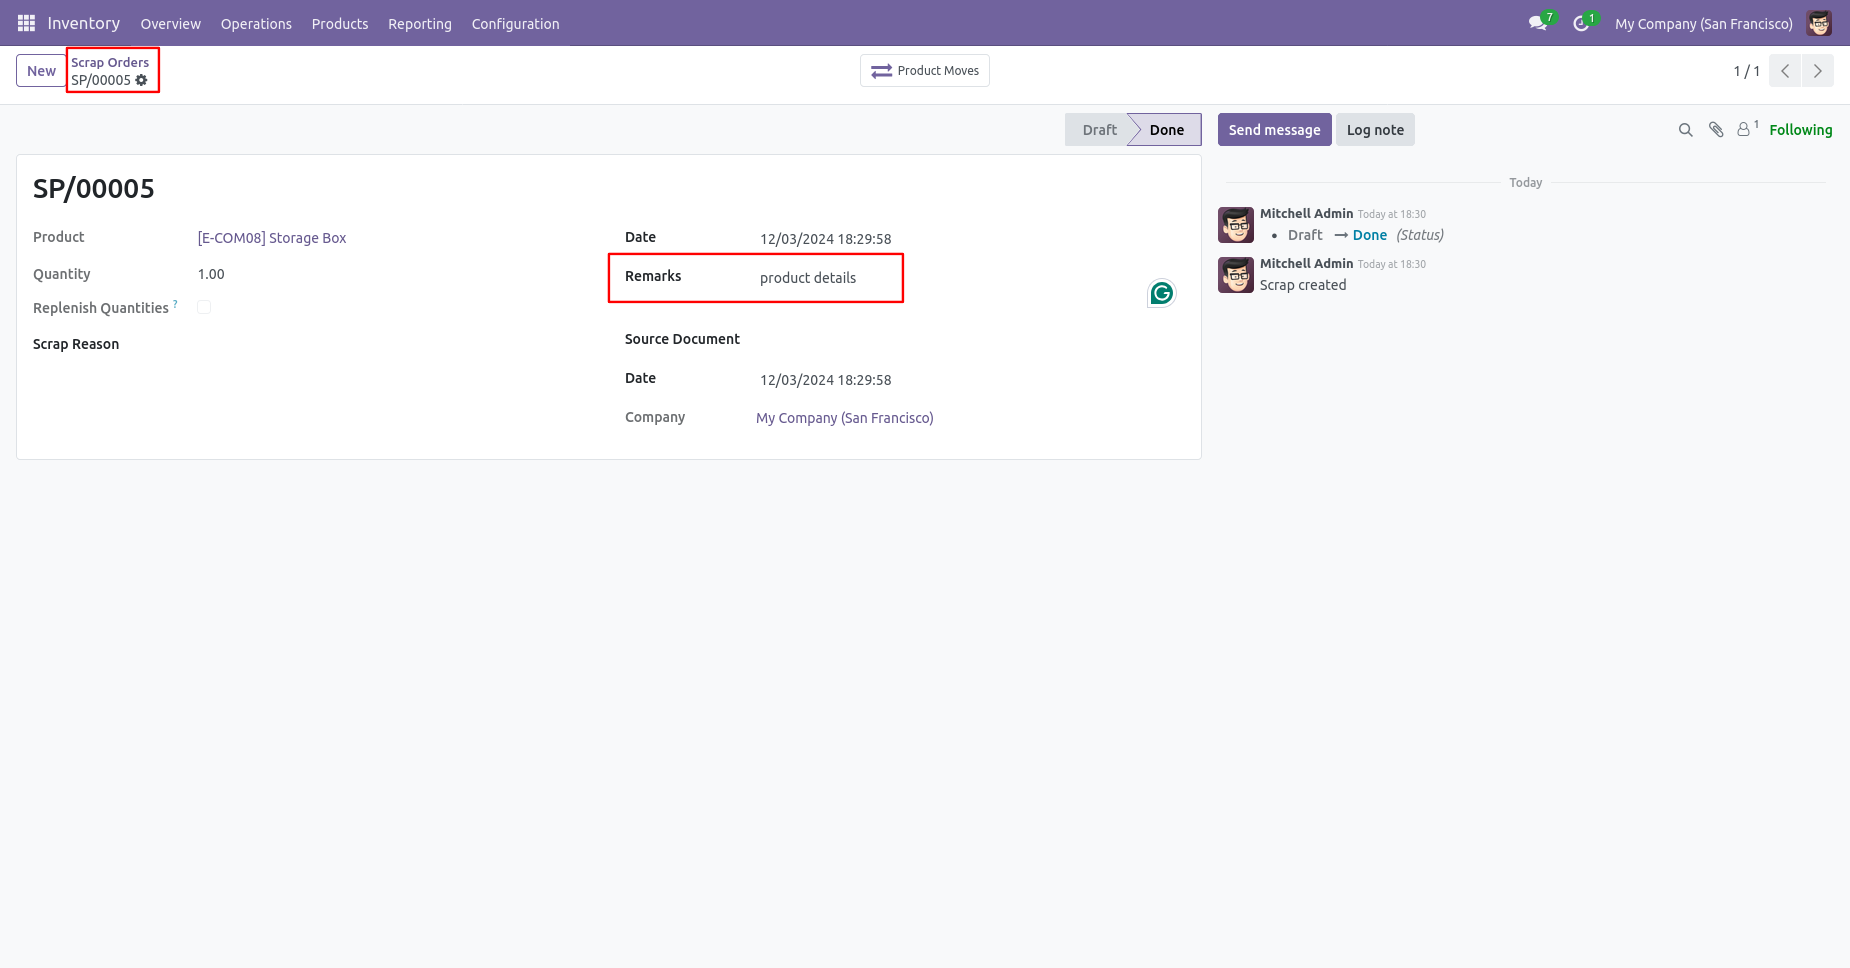
Scrap order form view with remark.
Tick the 'Remark Mandatory For Scrap' boolean.
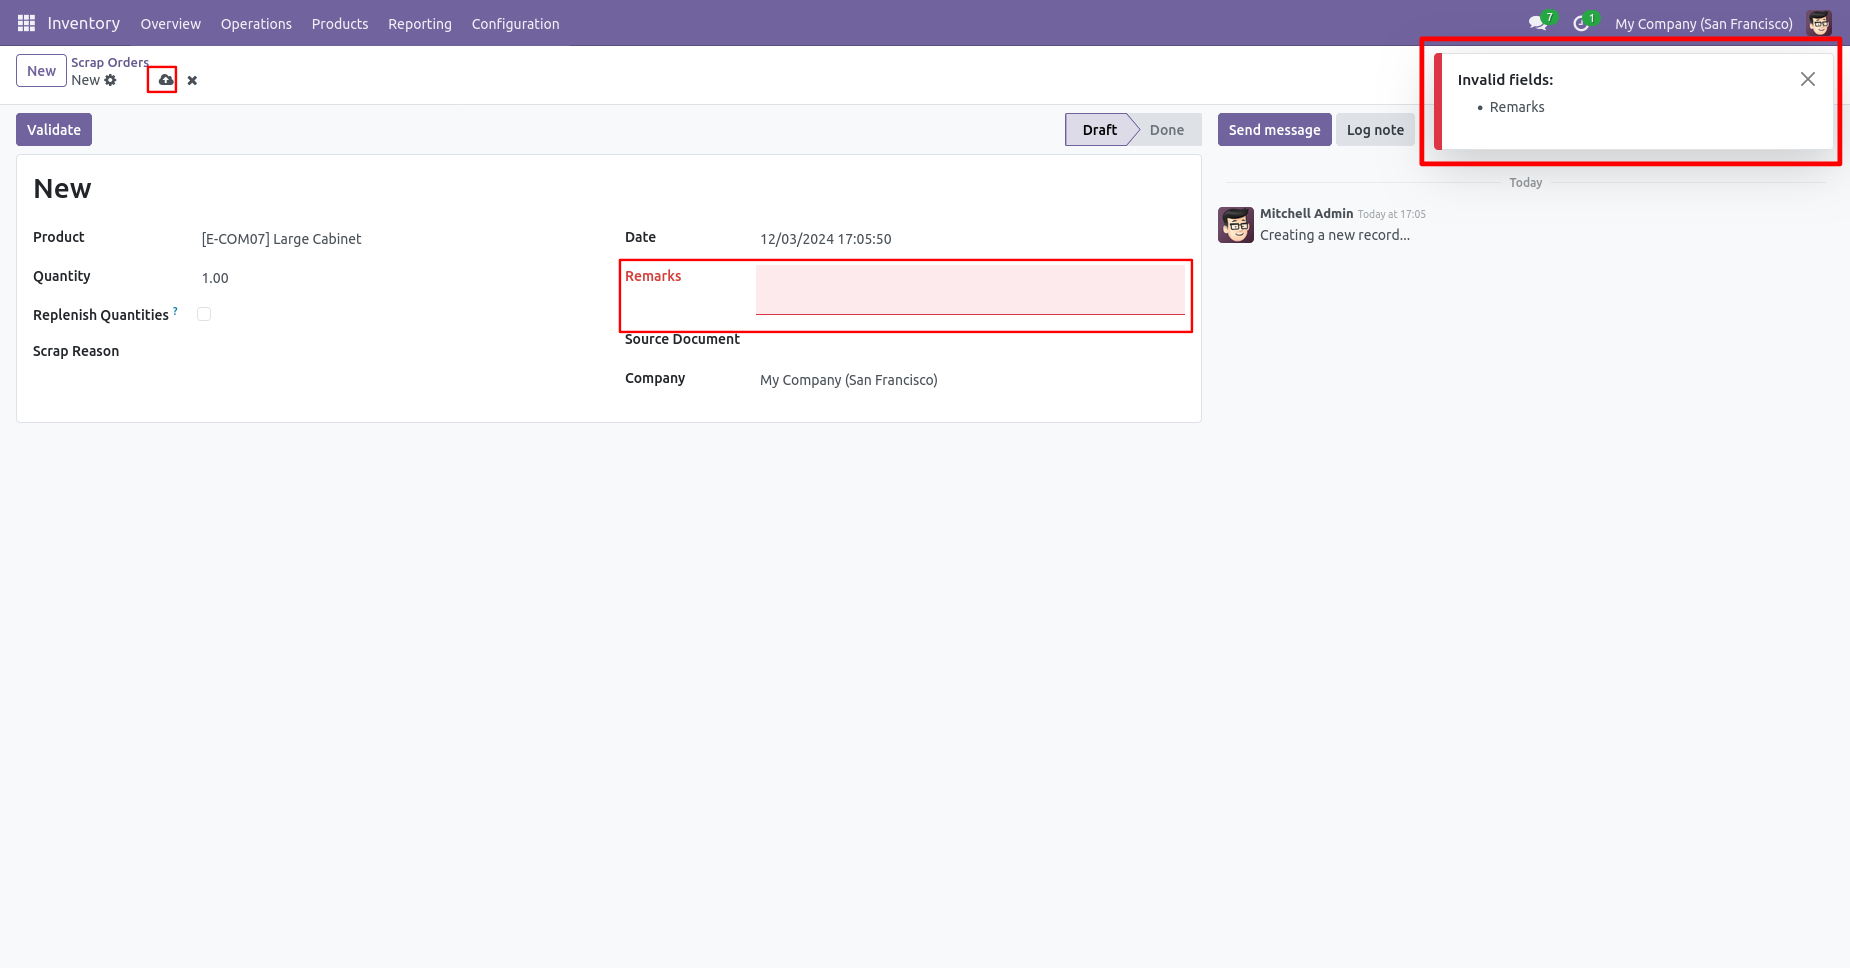
You can't save the Scrap Order without entering a remark.
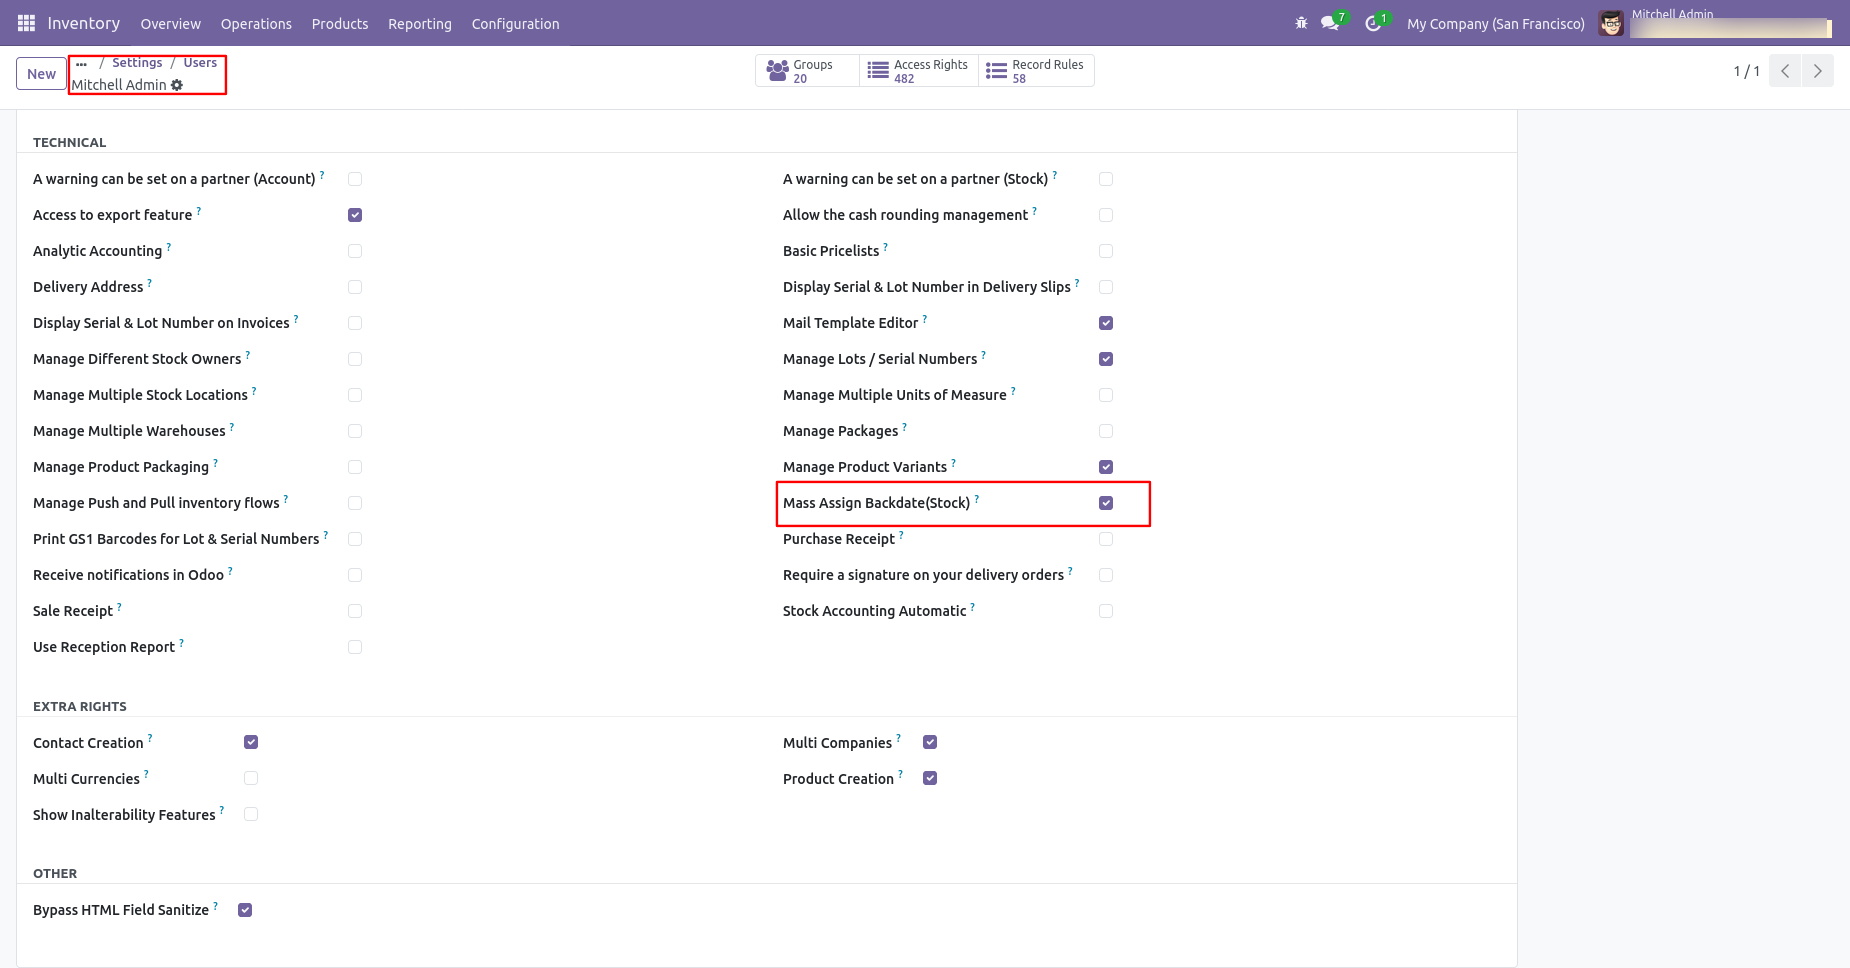
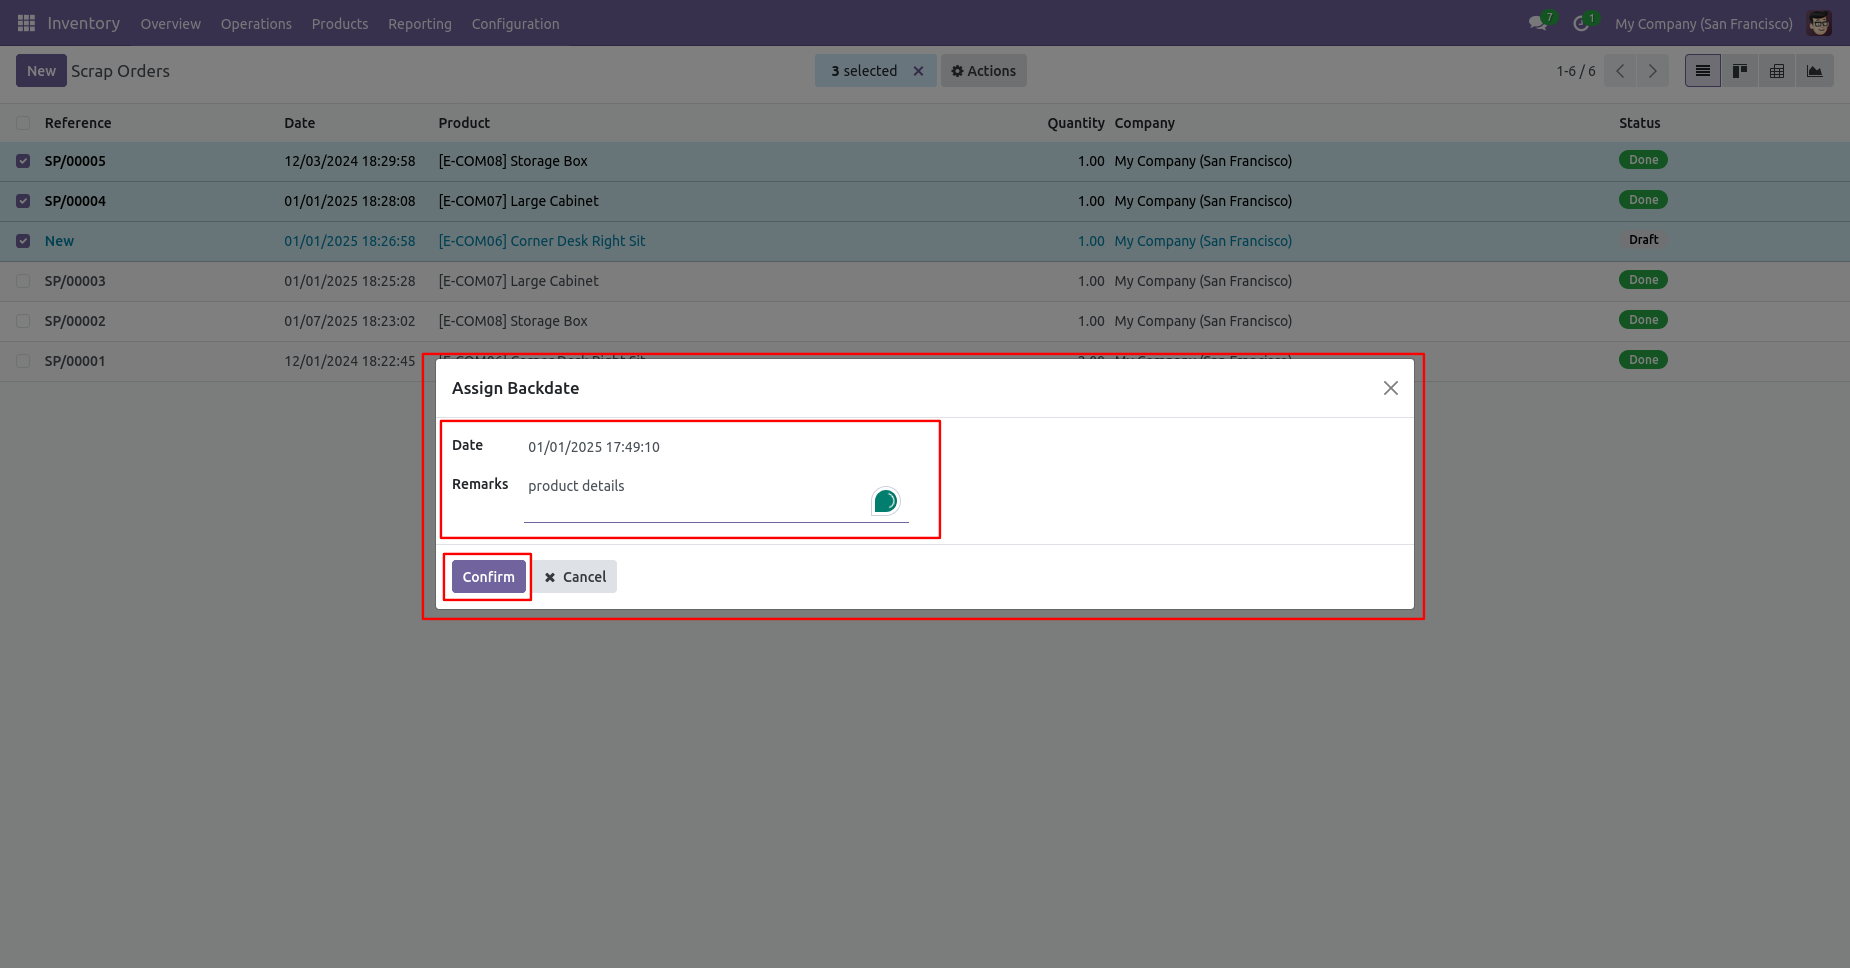
If you enable 'Mass Assign Backdate(Stock)' then you can mass assign backdate.
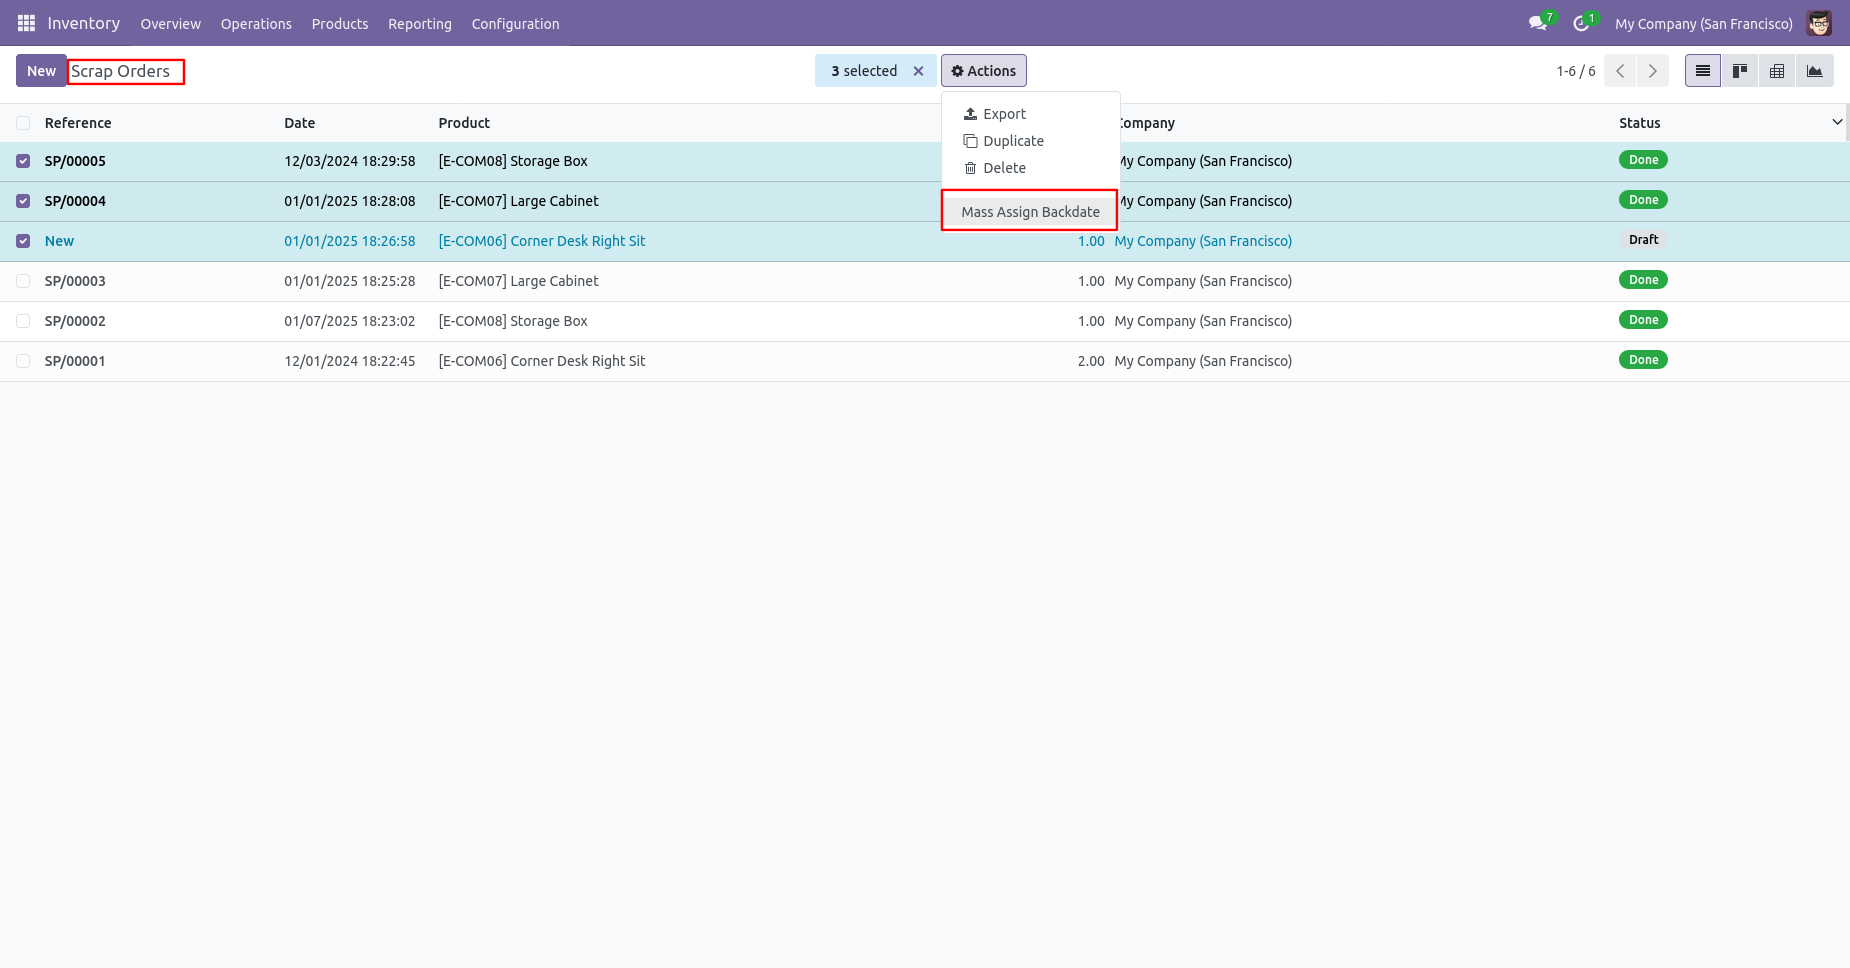
If you enable 'Mass Assign Backdate' then you can mass assign backdate, Select orders from the list view then click 'Mass Assign Backdate'.
After that, this wizard opens, enters the order date, and remarks. Here, remarks come if you have enabled that feature.
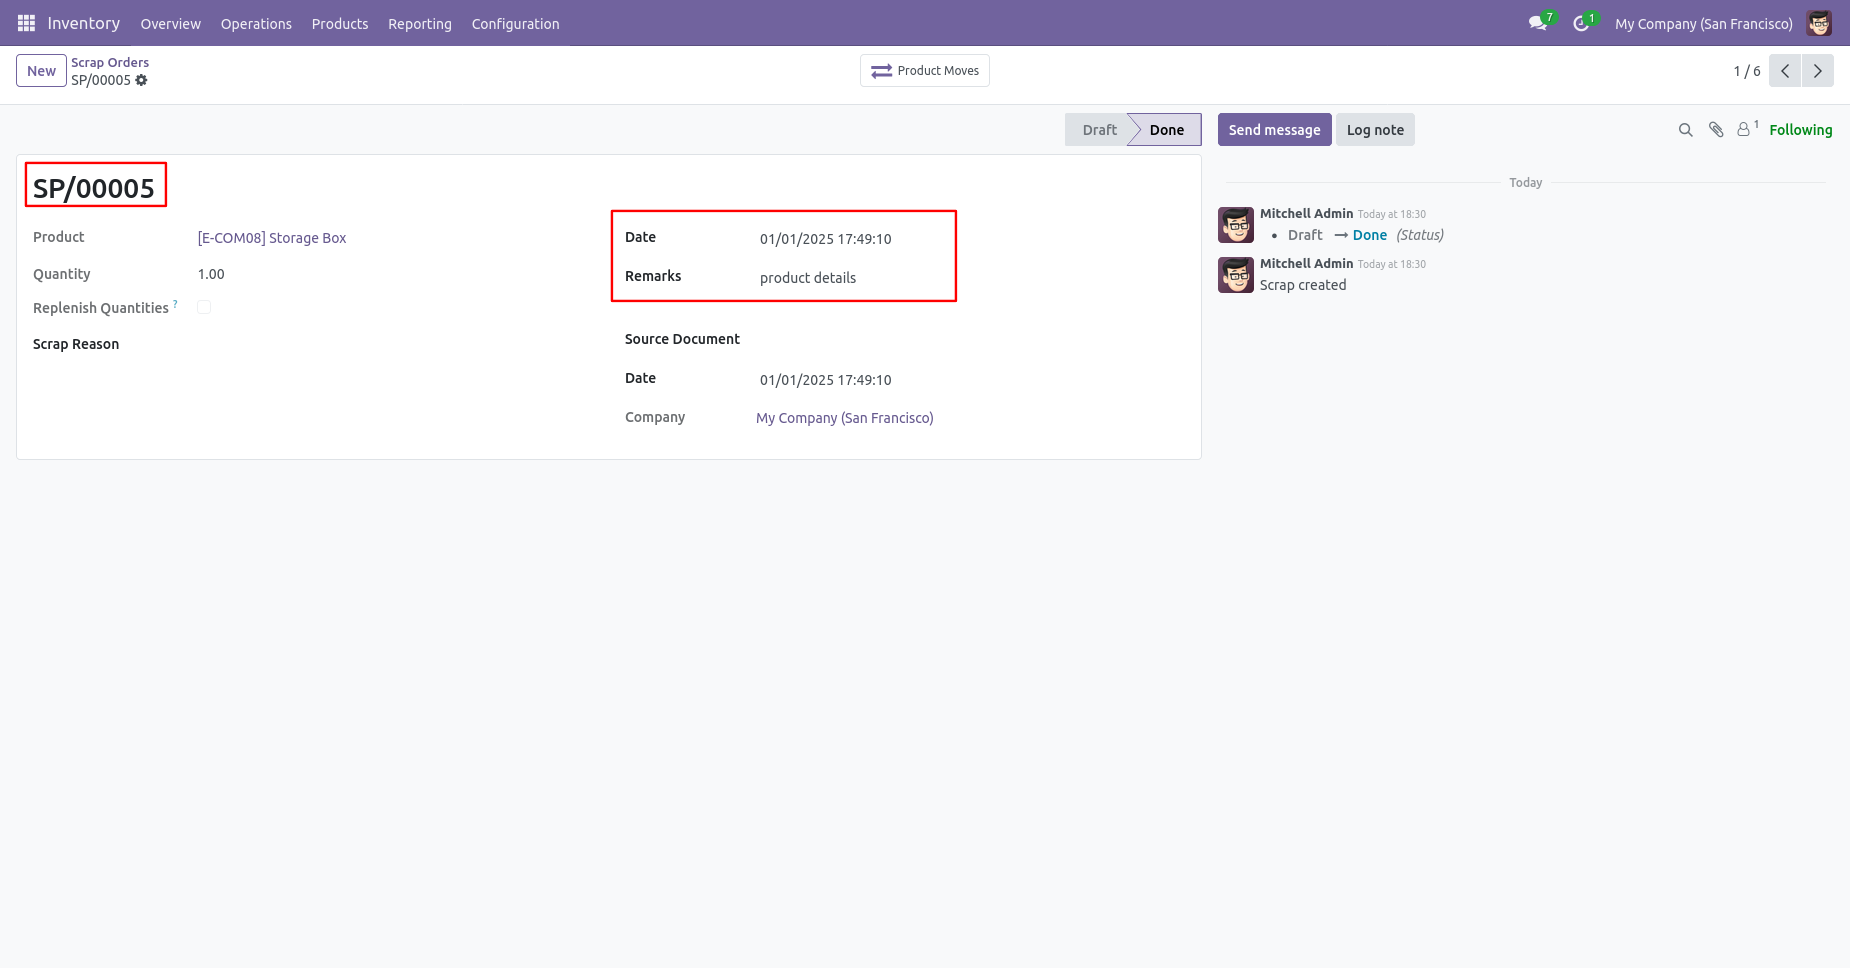
Scrap order form view with backdate and remarks.
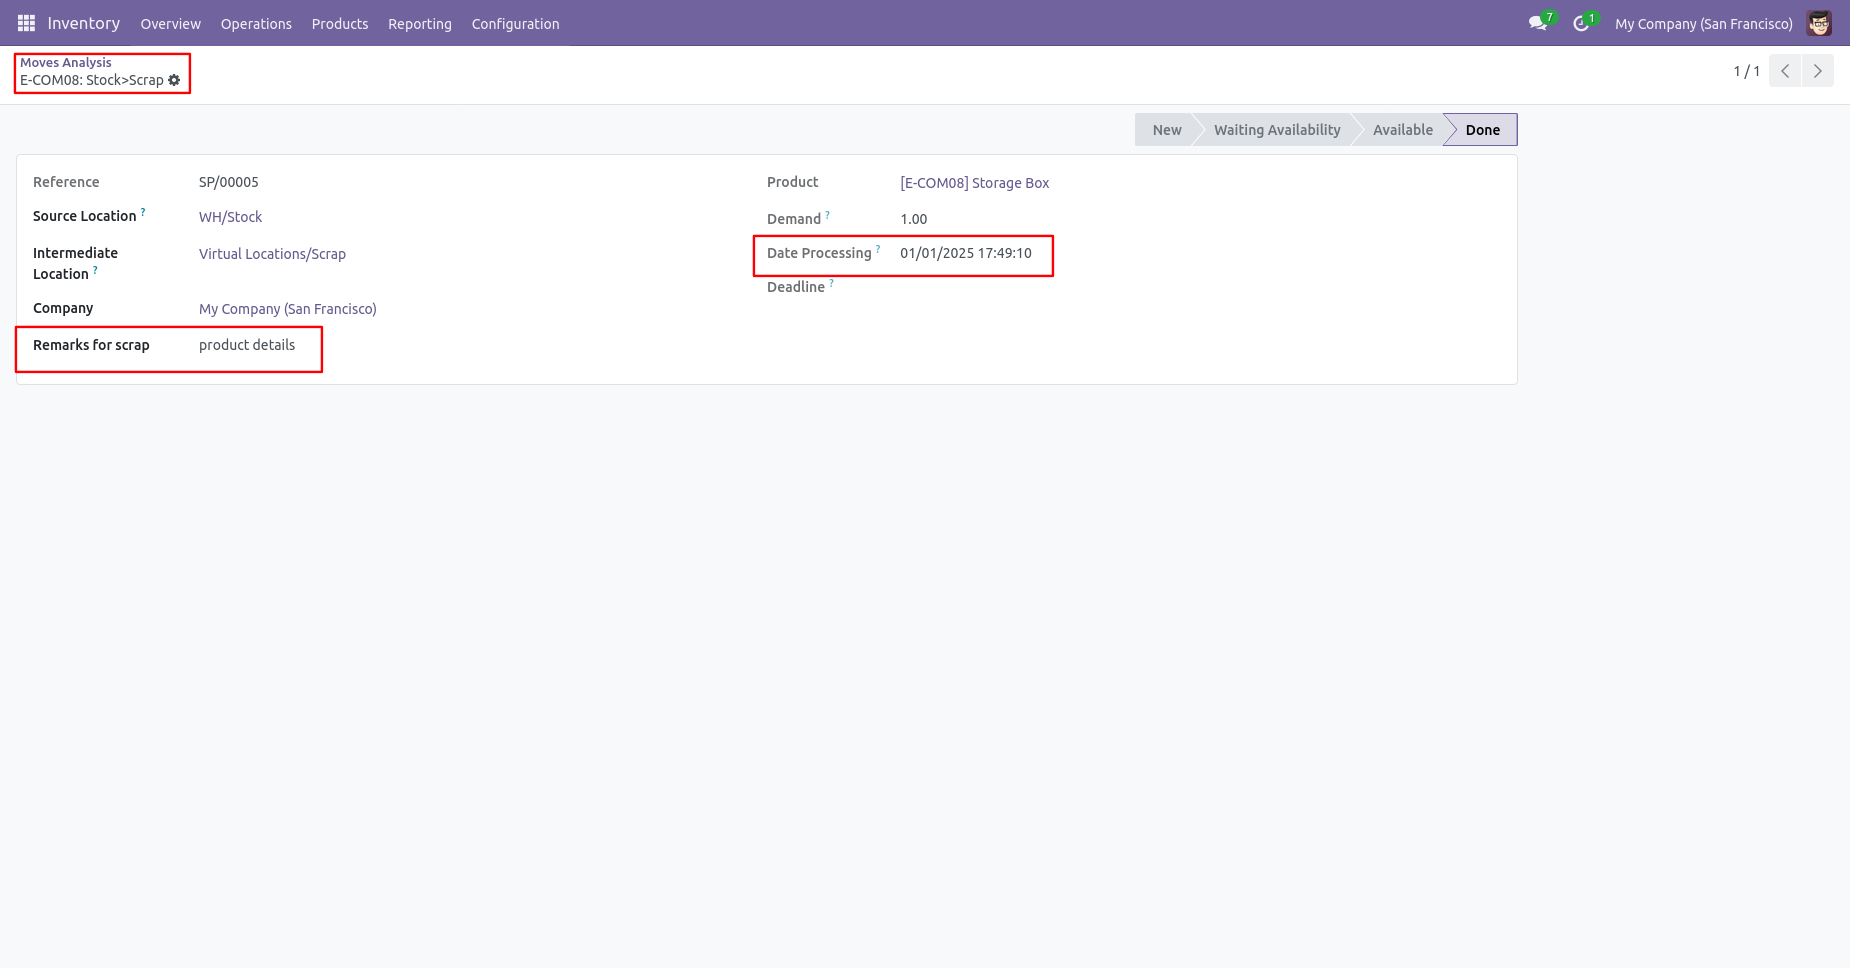
Moves analysis with backdate and remarks.
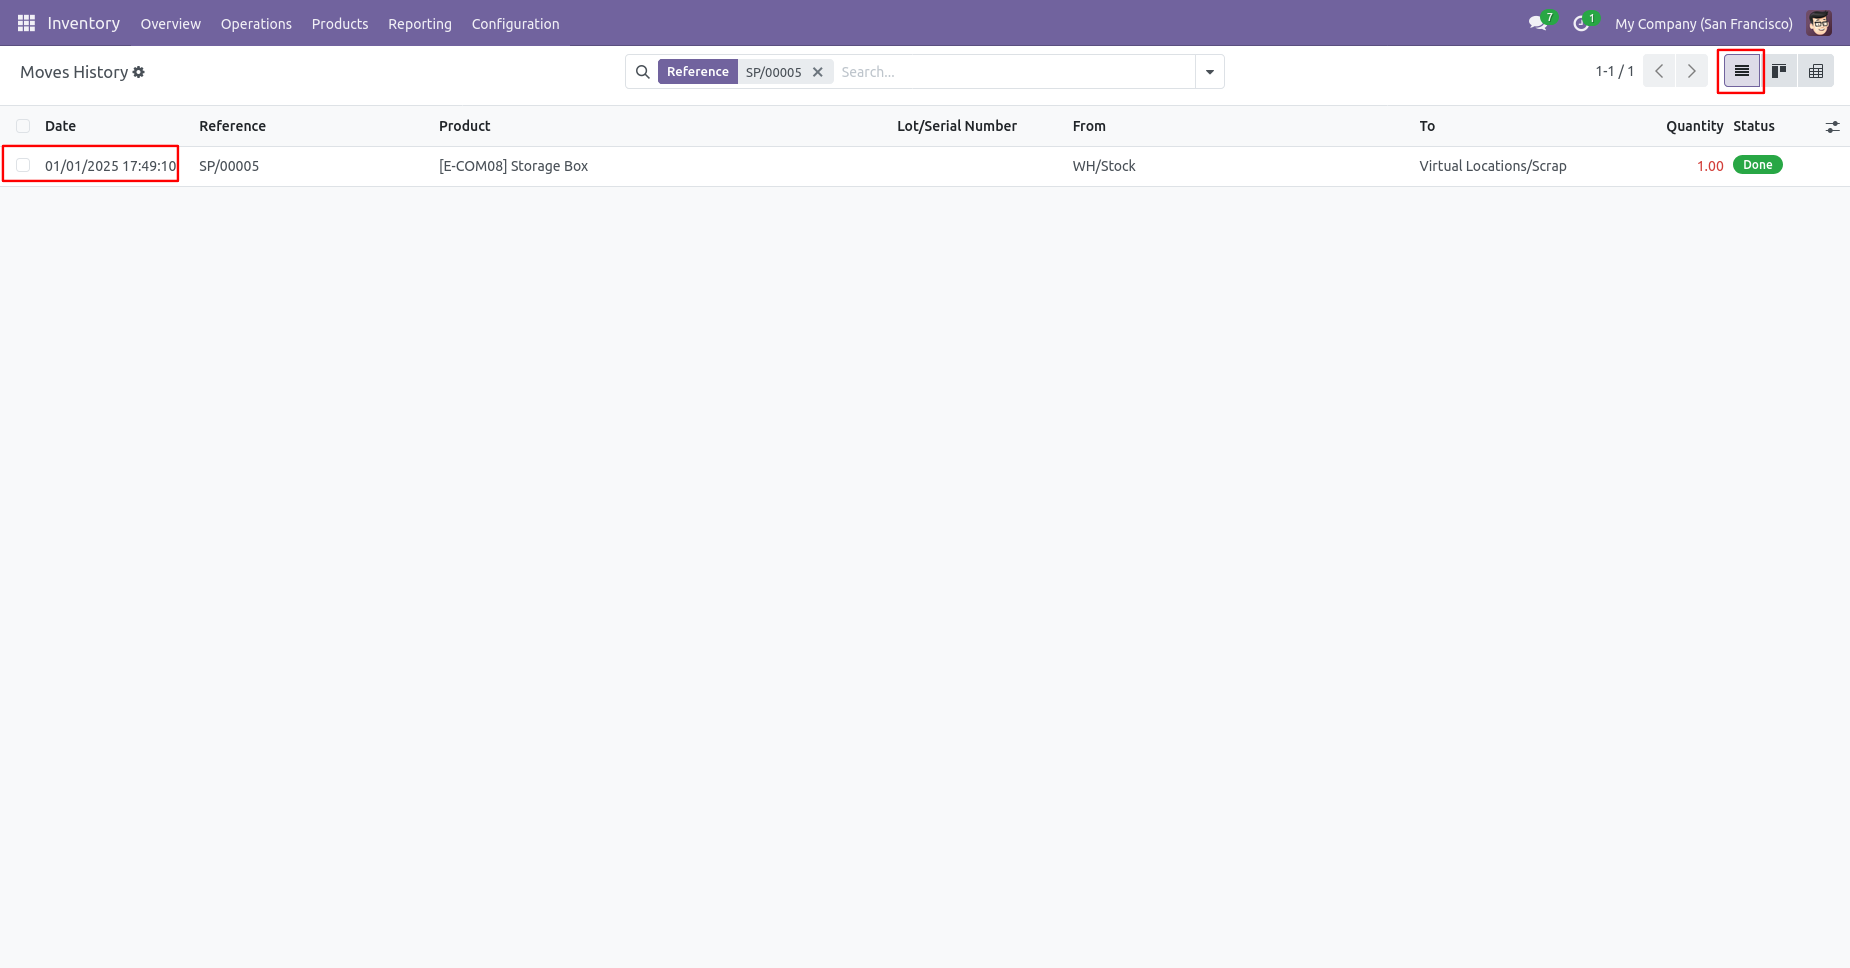
Moves history with backdate and remarks.
Version 18.0.10.0.0 | Released on : 07th August 2026
Version 18.0.9.0.0 | Released on : 19th November 2025
Version 18.0.8.0.0 | Released on : 16th October 2025
Version 18.0.7.0.0 | Released on : 15th October 2025
Version 18.0.6.0.0 | Released on : 4th September 2025
Version 18.0.5.0.0 | Released on : 3rd April 2025
Version 18.0.4.0.0 | Released on : 22th March 2025
Version 18.0.3.0.0 | Released on : 5th February 2025
Version 18.0.2.0.0 | Released on : 29th November 2024
Version 18.0.1.0.0 | Released on : 23rd September 2024
- Yes, this app works perfectly with Odoo Enterprise (Odoo.sh & Premise) as well as Community.
- No, this application is not compatible with odoo.com(odoo saas/Odoo Online)
- Yes, to test this module, please contact us at sales@softhealer.com.
- Please contact us at sales@softhealer.comto request customization.
- Yes, we provide free lifetime support for the version you purchased.
- Yes, you will receive lifetime free updates for the version of the module you purchased.
- No, there is no need to install any additional libraries.
- Yes, for version 12 and above, you need to purchase the module separately for each version you intend to use.
- No, exchanges or refunds are not allowed. Please make sure to select the correct version before purchasing.
- You can contact us at support@softhealer.com for language translation support. We use Google Translator tools to provide translations in multiple languages, so the accuracy may vary. We welcome your suggestions to help improve translations.
Discover Our Latest Apps